

Page 1

VBCollector
User’s Manual
E
ENGLISH
Page 2

Introduction
This manual describes the installation, configuration and operational procedures for VBCollector.
Please read this manual prior to use to ensure that you will be able to use the VBCollector effectively.
Exclusion of Liability
If the Product is connected to a recording device (for example a VCR), Canon Inc. accepts no
responsibility whatsoever for any financial losses that may be incurred as a result of the loss of
recorded information or images, regardless of the internal or external cause of the loss.
Copyright Information
Video or still pictures recorded using your Network Camera VB-C50i/VB-C50iR, VB-C10/VB-C10R
and Network Camera Server VB150 cannot be used in ways that infringe copyright laws or without
the consent of the owner, unless intended for personal use only.
Notes
1. The unauthorized transfer of all or any part of the contents of this Manual is forbidden.
2. The contents of this Manual are subject to change without notice.
3. Every effort has been made to ensure that this Manual is flawless. However, if you find any
oversights, please let us know.
4. Notwithstanding the above, Canon accepts no liability for any results arising from the operation
of this product.
Trademark Notices
● Canon and Canon logo are registered trademarks of Canon Inc.
● Microsoft and Windows are registered trademarks of Microsoft Corporation in the United States
and other countries.
● Windows is legally recognized as Microsoft Windows Operating System.
● Other brand or product names in this manual may be trademarks or registered trademarks of
their respective companies.
© Copyright 2004 CANON INC.
ALL RIGHTS RESERVED
1
Page 3

Contents
Introduction.................................................................. 1
Contents ....................................................................... 2
Overview of VBCollector ............................................. 3
Operating Environment and Installation .................... 4
Operating Environment .............................................................. 4
Installing VBCollector................................................................. 4
Configuring and Operating the VBCollector.............. 6
Starting Up VBCollector ............................................................. 6
Registering a Server ................................................................... 6
Registering Tasks ....................................................................... 9
Executing and Canceling Tasks .............................................. 11
Details Displayed on the Task View......................................... 13
Starting/Stopping the Service ................................................. 14
Automatic Downloading by Notification ................................ 14
Viewing Recorded Images ....................................................... 16
Viewing Logs ............................................................................. 20
Setting Download Capacity ..................................................... 23
2
Page 4
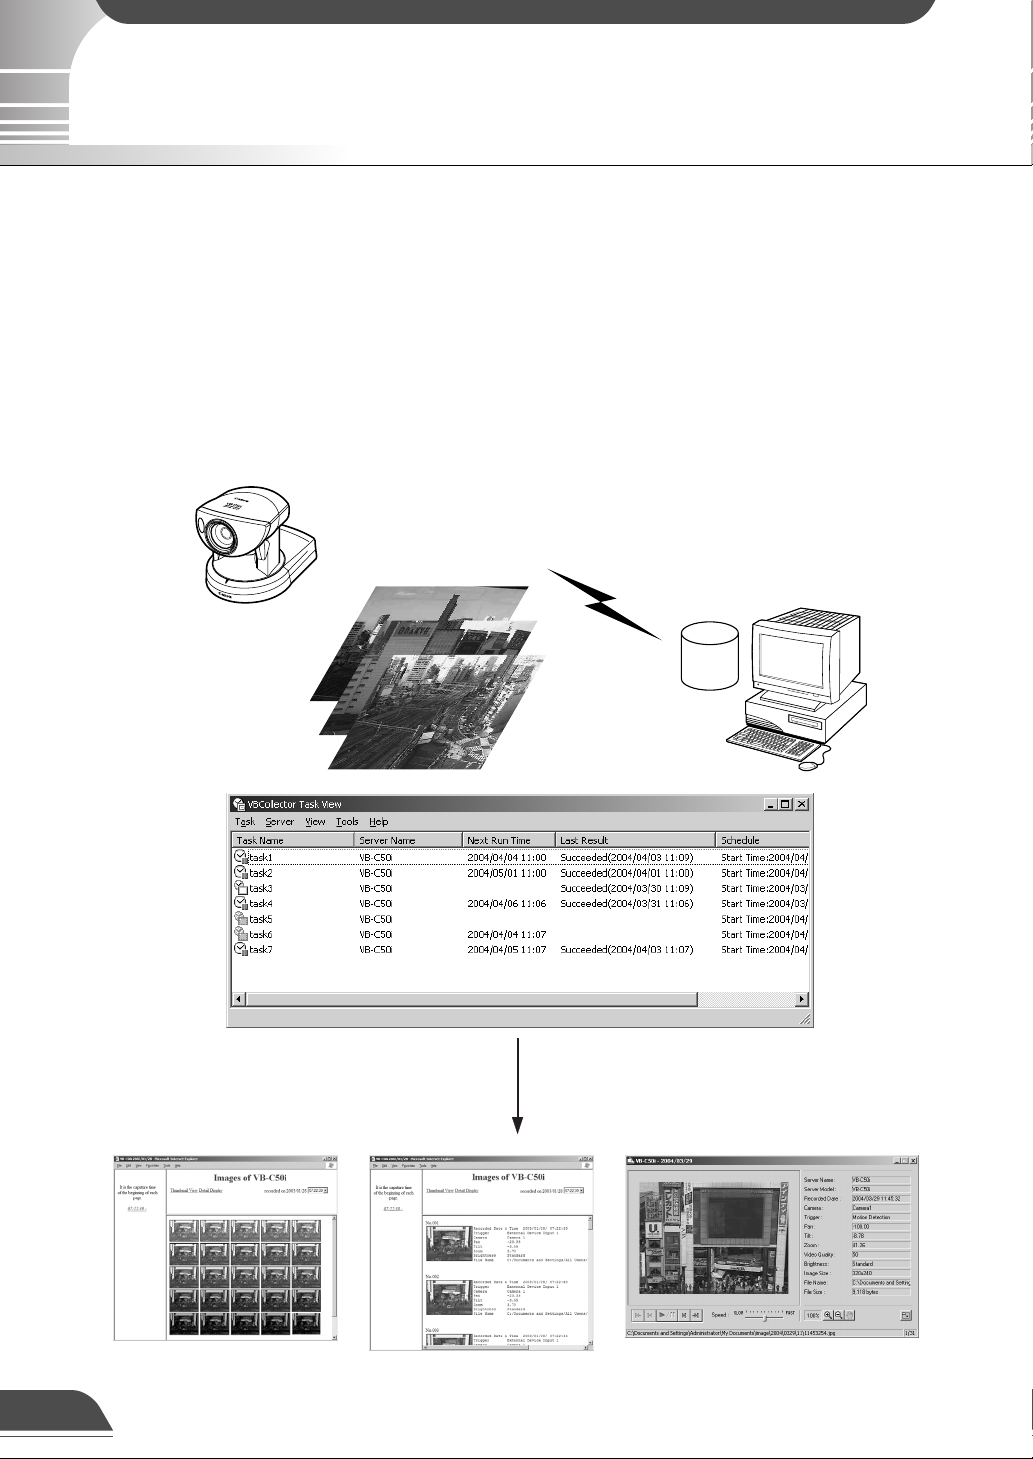
Overview of VBCollector
VBCollector is used to view pictures recorded by the Network Camera VB-C50i/VB-C50iR, VB-C10/VB-
C10R and Network Camera Server VB150 (hereinafter referred to as Server). With VBCollector, you can
collect and display still pictures recorded by the Sever based on inputs from an external device, motion
detection or schedules. VBCollector accesses the Sever at specific times expressed in units such as dates,
weeks, or months, and then downloads the recorded pictures. Since the recorded pictures are saved one
after another in the PC on which VBCollector is installed, pictures can still be securely saved when the
allowable limit on the number of pictures that the Server can record and save has been exceeded.
Downloaded images can also be easily viewed in the Web browser. Information related to task execution
can also be recorded in a log.
Pictures periodically collected
according to the task
Pictures recorded with
the Server’s picture
recording function
Downloaded image displays
3
Page 5
Operating Environment and Installation
Operating Environment
VBCollector Ver. 2.02
Operating System
Web Browser
Hard Disk
* If you configure your system to record pictures per second with servers and perform the maximum of 16 tasks (→ P.11)
at the same time, it is recommended that you use a desktop PC with Pentium 4 2.2 GHz and 512MB RAM or greater.
* It is recommended that you configure to collect up to 10,000 still pictures/day per a camera server. It the total
amount of still pictures exceeds this value, it may take several minutes to display all the pictures.
Windows 2000 (SP4 or later)/Windows XP (SP1a or later)
Microsoft Internet Explorer 6.0 (SP1 or later)
20GB HDD or greater (NTFS formatted)
Supported Camera Servers
• Network Camera VB-C50i/VB-C50iR
•Network Camera VB-C10/VB-C10R with Firmware Ver. 1.0 Rev. 25 or later
• Network Camera Server VB150 with Firmware Ver. 1.1 Rev. 30 or later
• Network Camera Server VB101 with Firmware Ver. 3.0 Rev. 68 or later
You should ensure the firmware version used is the latest one.
The latest firmware can be downloaded for free from the following WebView Product web page:
canon.com/webview
Installing VBCollector
VBCollector cannot be installed on a PC where MV Ver. 2.0 or later, optional
c
software sold separately, has already been installed.
Note
1
2
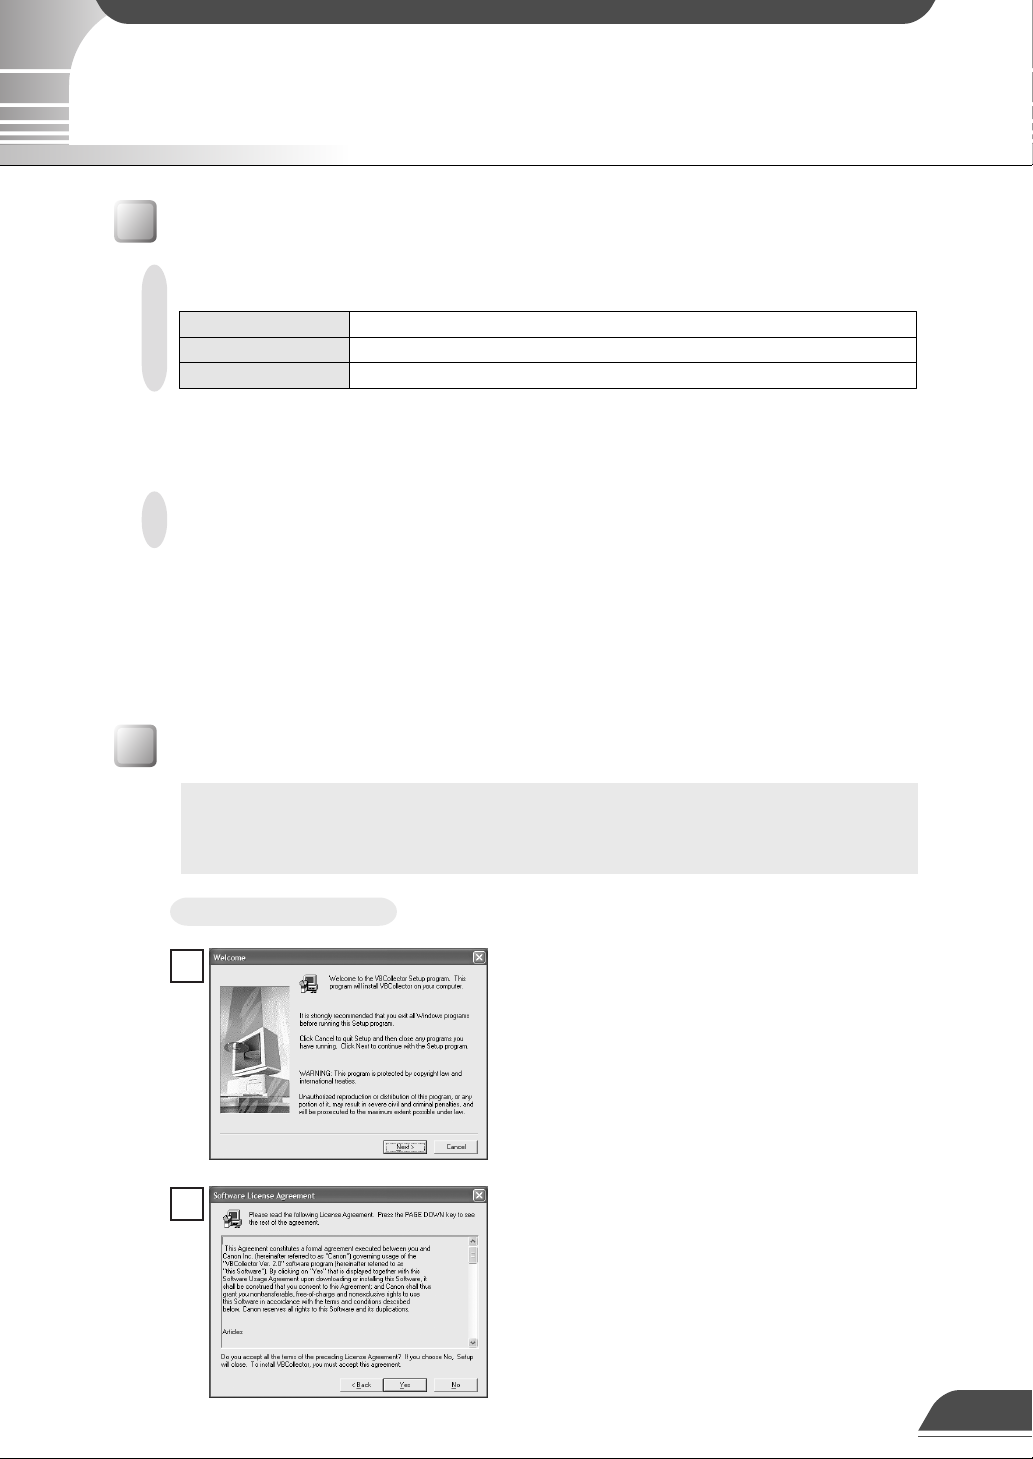
To Install...
If any other applications are running, please exit
them before installation. Please also be sure to
close the Windows Service Panel.
Double-click “CltSetup.exe” on the CD-ROM to start
up the installer. Click Next.
If you agree to the clauses in the licensing
agreement, click Yes.
4
Page 6
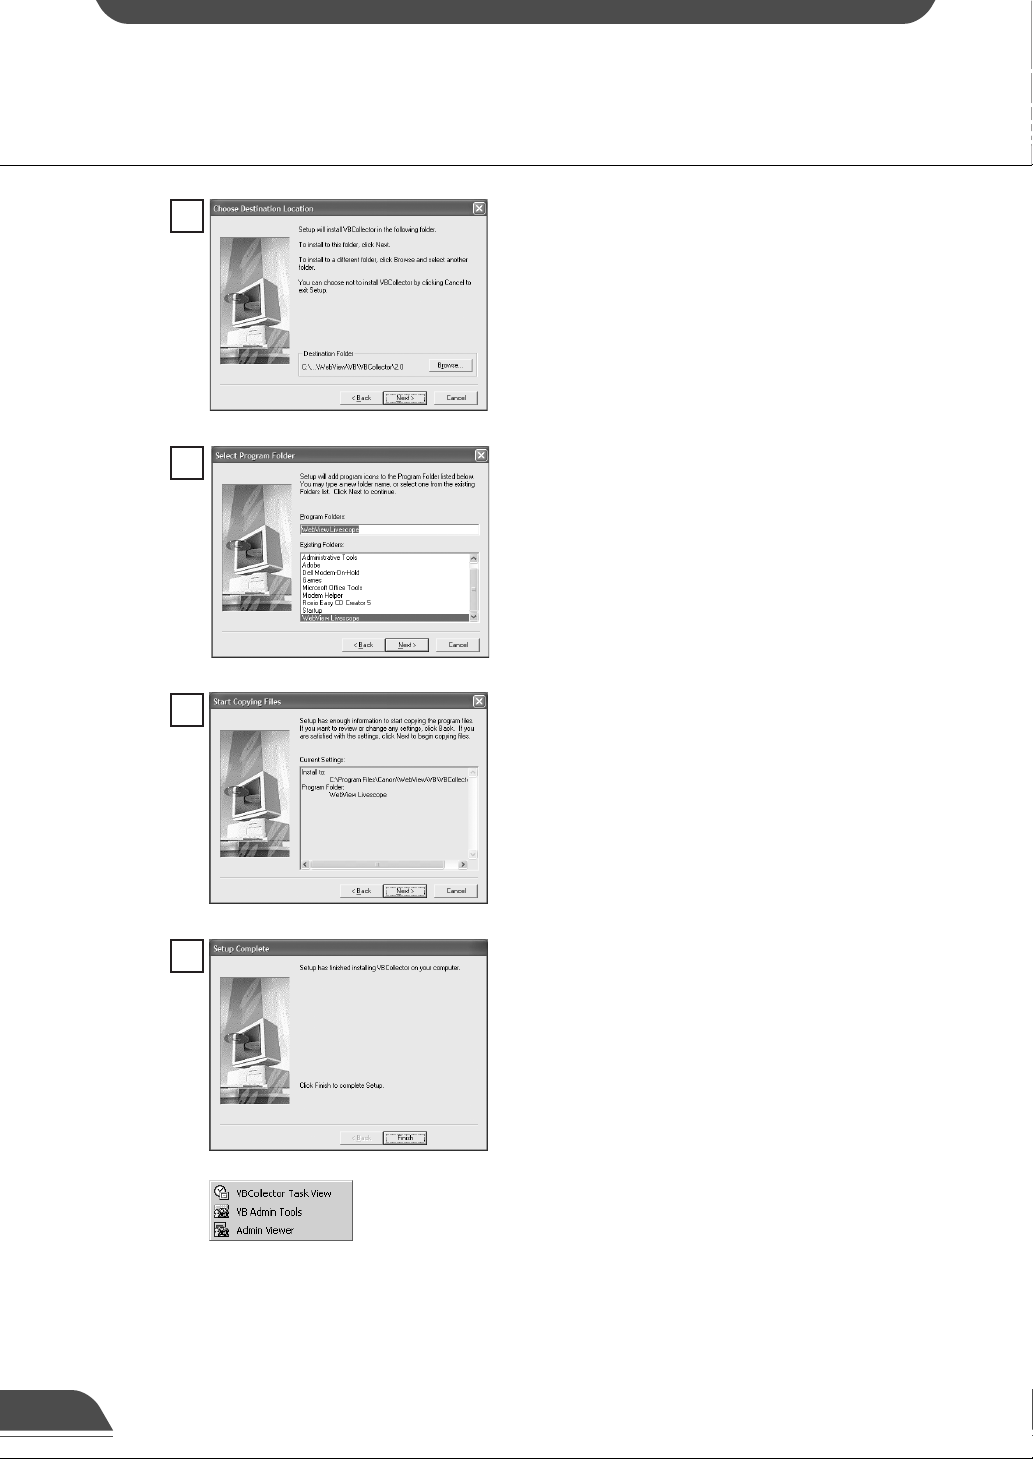
3
Specify the target directory for the installation and
click Next.
If you have no special directory preference, just click
Next.
4
5
6
Specify the menu name to be registered in the
Program menu of the Start button, then click Next.
Check the settings and items you have selected thus
far, and click Next to confirm. The installation will
proceed by copying files and making registry
settings, etc.
Click Finish to complete the installation.
When installation is complete, “VBCollector Task
View” is added to the Start menu.
5
Page 7
Configuring and Operating the VBCollector
Starting Up VBCollector
VBCollector is started up by choosing it from Start menu.
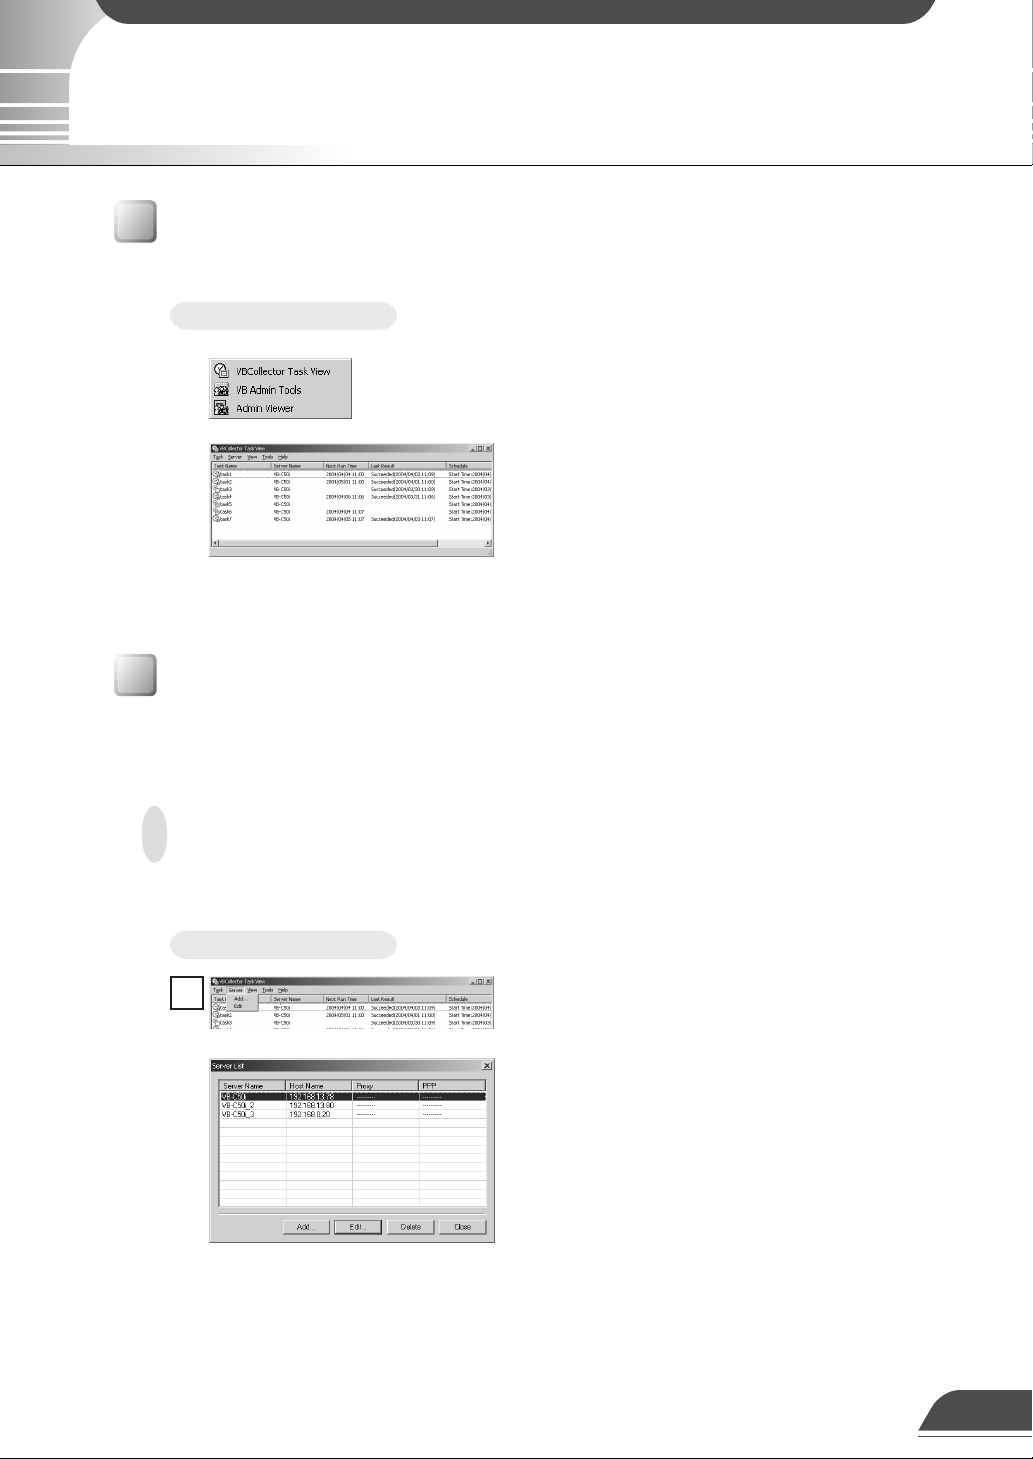
To Start Up VBCollector...
Choose [Program]-[WebView Livescope]-[VBCollector
Task View] from the Start menu to start up VBCollector.
Registering a Server
To use VBCollector, server from which the VBCollector downloads pictures must be registered.
Adding a server
Add a new server to which VBCollector will download pictures.
To Add a New Server...
1
To add a server, choose Add from the Server menu,
or click Add on the Server List dialog box that
appeared when Edit from the Server menu was
selected.
6
Page 8
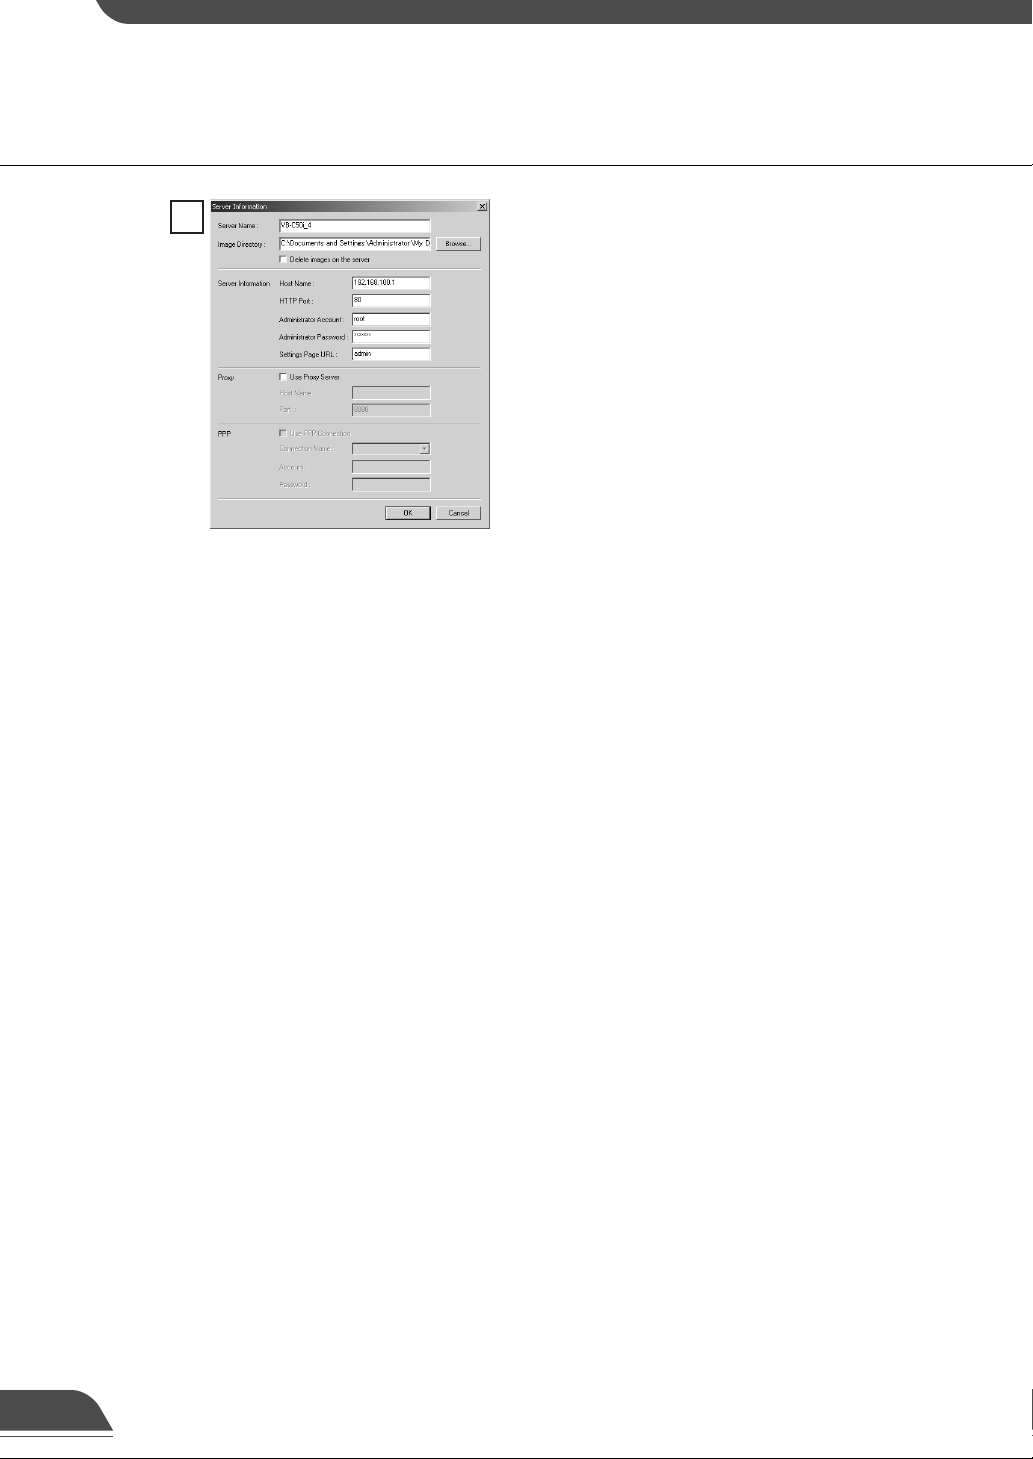
2
● Server Name
Assign a name for recognizing the Server (optional).
● Image Directory
Enter the name of the directory where downloaded images are to be saved, or click Browse to select a
directory folder. Refer to the next page for how to download images to a shared folder on the network.
Delete images on the server
When this check box is selected, pictures that VBCollector downloaded from the server will also be deleted
from the server.
● Server information
Host Name
Specify an IP address or a host name.
HTTP Port
Enter the HTTP port number set in the server. (The default setting is 80.)
Administrator Account
Enter an administrator account registered in the server (root).
Administrator Password
Enter the administrator password registered in the server. (The default setting is VB-C50i.)
Settings Page URL
Enter the “Path” to the setting title page set in the server (admin).
● Proxy
Use Proxy Server
Select if connecting through a proxy server.
Host Name
Specify a host name or IP address for the proxy server.
Port
Enter a port number for the proxy server. (The default setting is 8080.)
● PPP
Use PPP connection
Select if connection will be established by dialing up.
PPP Connection Name
Select a phone number from the phone book entry. A dialup network will need to have been installed and
the phone number will need to have been registered in the phone book.
Account
Enter the PPP account to be used for the dialup connection.
Password
Enter the PPP password to be used for the dialup connection.
Enter the various fields and click OK.
7
Page 9

Configuring and Operating the VBCollector
c
Note
e
Tip
● If using Windows 2000 or Windows XP, operate VBCollector with an
authority greater than PowerUser.
● NTFS is recommended for such file systems containing the installation
folder and the folder where images are saved.
● When using NTFS in the file system, set to permit reading and writing of
the installation folder and the folder where images are saved.
Functionality is limited if you do not have authority.
Downloading images to a shared folder on the network
● You cannot specify a path name that uses a network drive in the “Image
Directory” setting. Use UNC notation to specify the path name.
\\PC name\shared directory name[\path]
Eg) \\Server\Share\path
● Set the folder access privileges for the “Image Directory” folder so that read/
write operations can be performed from machines with VBCollector installed.
● In case of using VBCollector in Windows 2000/XP, make the logon account
setting for VBCollector task scheduler service in the following procedure
(→ P. 23).
1. Choose Options from Tools menu.
2. Select [Specify an account for downloading] under [Details] in the
option dialog.
3. Enter your user name and password.
4. Click OK.
* Specify an account from which you can log on to the download
destination machine.
* Set the folder access privileges so that read and write operations can
be performed from the download execution account to the folder in
which VBCollector is installed (the default setting is C:\ProgramFiles\
Canon\WebView\VB\VBCollector\2.0).
8
Page 10

Editing Server Information
Content of the registered server information can be edited.
To Edit Server Information...
1
2
Choose Edit from the Server menu, and when the
Server List dialog box appears, select the server
name to be edited and click Edit.
To delete a registered server, click Delete.
As with the procedure for adding servers, change all
desired items and click OK.
c
Note
Downloaded images are not deleted when a server is deleted. To delete
downloaded images, first follow the procedure in “Deleting Images” (→ P.
19) and then delete the server.
Registering Tasks
Adding a task
Add a new task for downloading images.
To Add a New Task...
1
9
To add a task, choose New Task from the Task
menu.
Page 11

Configuring and Operating the VBCollector
2
● Task Name
Assign a name to the task.
Enable this setting
Select “Enable this setting” if the task is to be performed according to the schedule. If not selected, the
added task will not be executed.
● Server Name
Select the server from which the VBCollector downloads recorded pictures. If there are no servers registered
in the list, you can register servers by selecting a blank column and clicking the “Server Settings”.
Server Settings
Any download server name can be registered (→ P. 7). After registration, it can be selected from the “Server
Name” column.
● Schedule
Start Date
Set the date which is to be the starting point of the schedule. The task will be executed after the specified
start date according to the criteria specified below.
Start Time
Set the time when the task is to start up (in 24-hour format).
Once
Select if the task is to be executed only once. The task will be executed only once at the start time on the
start date.
Daily
Select if the task is to be executed once every certain number of days. This number of days can be
specified between 1 and 31.
Weekly
Select if the task is to be executed every certain number of weeks on a certain day of the week. Set the
number of weeks between 1 and 53, and specify the day of the week.
Monthly
Select if the task is to be executed every month on a certain day of the month. Set this day between 1 and
31. Or a day of the week for a certain week of the month can also be specified.
● Details
Repeat task
Select this checkbox to repeat the task at set intervals. Images are downloaded repeatedly at the specified
intervals from the Start Time to the End Time specified in the schedule. If this checkbox is left unselected,
images are downloaded once at the Start Time specified in the schedule. Once the End Time is reached,
the task is not performed. Images can be downloaded at intervals of some minutes or by specifying a
number. Enter a value between 5 and 1439 as the number of minutes. Times up to the Start Time plus
23:59 can be specified as the End Time.
Retry when an error occurs
Select this item if a task is to be executed again in the event a download does not end normally after a task
is executed. The task will be executed again a specified number of times at specified time intervals. During
this time, if the download is completed normally, further tasks will not be repeated. Specify the number of
times and the time interval at which a task is to be re-executed. For the number of times, enter a value
between 1 and 10; for the interval, enter a value between 1 and 10.
Disconnect after finishing download (for access via dial-up connections)
If the connection with the server is a dialup connection and when this item is selected, it will automatically
be disconnected when the task ends.
Enter each item and click OK.
10
Page 12

● Up to 16 tasks can be executed by VBCollector simultaneously. Please be
c
Note
sure not to load a schedule with 17 or more tasks to be executed.
VBCollector is also not able to execute multiple tasks simultaneously to the
same server. Please take care to ensure that multiple tasks are not
executed to the same server by taking such measures as leaving a
sufficient time space between the “Start Time” of each task.
● If you execute a maximum of 16 tasks simultaneously, please confirm
performance of the PC on which VBCollector is installed (→ P. 4). When Log
S015 “The task was running longer than the execution interval.” or D040
“File saving time took 60 sec. or more.” is output, review the settings for
the schedules such as reducing the number of tasks to be performed at the
same time.
Editing Tasks
The details of a registered task can be edited.
To Edit a Task...
1
2
In the Task View, select the task to be edited by
clicking on its name, then choose Edit Task from the
Task menu. Or, double-click on the task to be edited.
To delete a registered task, choose Delete
from the Task menu.
As with procedure to add a new task, change all
desired items and click OK.
Executing and Canceling Tasks
Executing a task
Registered tasks are executed automatically according to pre-determined schedule when “Enable
this setting” is selected at Task Settings. If you want a task to be executed immediately, select the
desired task on the Task View and choose Execute now from the Task menu.
Task
11
Page 13

Configuring and Operating the VBCollector
Canceling a task
To disable a registered task, clear “Enable this setting” at Task Settings. To abort the execution of
a task, in the Task View, click on the task to be aborted, and choose Abort in the Task menu.
Display task status
During the execution of any task, the download status can be checked.
To View Task Status
1
During the execution of any task, choose Status from
Task menu. Alternatively, select and right-click the
task for which you want to display the status and
select Status in the pop-up menu.
2
Check the download status and click Close to close
the dialog box. If you want to cancel the download,
click Abort.
● Status
Shows the progress of download.
● Target Server
Shows the connection status with the server.
Host Name
Shows the host name of image download server set in the server information (→ P. 7).
Image Directory
Shows the name of the folder, set in the server information (→ P. 7), where any downloaded image is to be
saved.
Delete images on the server
When it is selected, any recorded image after download will be deleted from the server. In order to change
the checking status, change the setting in the server information (→ P. 7).
● Close this dialog automatically when downloading is complete
After download is finished, this dialog will automatically be closed. During download, it is always selected.
12
Page 14

Details Displayed on the Task View
The execution status can be checked on the Task View.
● Task Name
The names that were specified at Task Settings are displayed here. The status of each task
is displayed as an icon at the left of the name.
Running This task is currently being executed.
Waiting This task is currently standing by to be executed at the next
scheduled execution time.
Disabled “Enable this setting” for this task is not selected at Task Settings
and is currently not being executed.
Not scheduled This task is not currently scheduled for execution.
Settings damaged Inconsistencies have occurred in this task’s settings and the task
will not be executed.
● Server Name
The server names that were specified at Task Settings are displayed here.
● Next Run Time
The date and time when the task is to be executed next is displayed here.
● Last Result
The last results achieved by the task and the task end time are displayed here.
● Schedule
The start date, start time, and execution interval for each task are displayed here.
13
e
An automatic download is displayed as with the task name “Task by Notification”.
Tip
Refresh Task View Display Content
To refresh the Task View content to reflect the most recent information, choose Refresh from the
View menu.
Page 15

Starting/Stopping the Service
The task scheduler service can be started and stopped.
To Make Settings...
Configuring and Operating the VBCollector
1
2
Choose Start Service or Stop Service from the Tools
menu. If the service has started, Stop Service is
enabled in the menu; if the service is stopped, Start
Service is enabled.
When the Confirmation dialog box appears, click
OK.
Automatic Downloading by Notification
You will not be able to record images if there is insufficient space on the server. VBCollector can
receive a low server capacity notification sent from the server when available space on the server
falls below the value set, and automatically downloads images to a specified PC, thereby
increasing the available space on the server.
1
2
Choose Automatic Download by Notification in the
Tools menu.
Perform the settings relating to notification.
● Server List
Displays a list of the servers from which the images can be downloaded. The settings relating
to notification of each server registered with this tool (→ P. 6) are shown in this list.
● Server Name
Displays the names of the servers registered with this tool.
● Notification
Displays the setting for whether the server will send a low server warning message when
available space on the server reaches the value set (→ P. 15).
14
Page 16

● Free space (MB)
Displays the setting value for available space on the server. When available space has
fallen below this setting, the server sends a low server capacity warning message.
● Host
Displays the name of the host which will send the low server capacity warning message.
●Port
Displays the TCP port of the host.
● Server status display area
Displays the status of the selected server. Depending on the server conditions, you may or
may not be able to specify settings in Server Setting and Notification Settings.
“The Notification Function is available for the server”
Both Server Setting and Notification Settings are available.
“The server does not support the Notification Function” and “Failed to connect to the server”
The Server Setting is available but the Notification Settings is not.
“The server information is invalid”
The Server Setting is available but the Notification Settings is not.
“None”
Neither the Server Setting nor the Notification Settings is available.
● Reception Port No.
Specifies the TCP port number which will receive the low server capacity warning message
from the server. The default is 1906.
● [Apply] button
Saves a change to the reception port number in the registry. If you make a change, a dialog
box is displayed. Click Yes and the transmission port of each server is also changed.
● [Server Setting] button
Displays a dialog box with information about the selected server for editing (→ P. 7).
● [Notification Settings] button
For performing notification settings for the selected server.
15
3
Send notification when server space gets low
Select to send a low server capacity notification when available space on the server is
insufficient.
Available disk space of the server
Set a value for available space at which the server will send a low server capacity notification.
When available space on the server falls below the value set, a low server capacity notification
is sent.
Click the “Notification Settings” button to set a value
for available space for the server to give a low
server capacity notification.
Page 17

Configuring and Operating the VBCollector
● Where “Host” is displayed as “(Other)” or where the transmission port and the
e
Tip
reception port are different, you cannot receive a low server capacity notification.
● “--------” is displayed where server information such as the host name or the HTTP
port number has not been entered correctly, or in the case of servers other than
the VB-C50i(R) which support the low server capacity notification function.
● If “Host” is not “(Other)” or “Port” is not “Reception Port No.” in the selected
server, a message asking you to confirm whether it is okay to change the setting
values will be displayed. Click Yes and a dialog box appears.
● If the server that sends the notification is in the middle of a task, there is no
automatic downloading during normal tasks.
● If there is a setting value for the maximum number of downloaded images, only
the specified number will be downloaded.
● Images on the server are deleted regardless of the setting for deletion of the
images on the server.
● When large images are recorded each second, the server will run out of capacity
before it can send a notification, and picture recording may stop working.
● When the server capacity falls below the set value, a notification will be sent from
the server every 30 seconds.
Viewing Recorded Images
The images that were downloaded according to the task schedule are saved in the folder specified
at Server Information. You can view images easily by outputting these recorded images to a Web
browser.
Displaying Images
Downloaded images are selected by server name and date, and displayed in a Web browser.
To View Pictures...
1
2
Choose Display Images in the Tools menu.
The Image List dialog box appears. Select the
server name to be viewed, select the date of the list
to be displayed, and click the Display Image.
16
Page 18

3
When the confirmation dialog box appears, click OK.
4
5
Animate images
HTML for displaying the images is generated, the
Web browser starts up, and thumbnail images of the
selected date are displayed in 100-image units on
the page. Click on the image to be viewed; it is
displayed in the original saved dimensions.
When you click Detail Display in the above screen,
detailed information on the images in the thumbnail
screen is displayed. Click on the image to be
viewed; it is displayed in the original saved
dimensions.
17
Downloaded images can be selected using the server name and date to be animated
(consecutive display). The images can also be shown in detail or zoomed in/out.
To View Animation
1
Choose Display Images from Tools menu.
Page 19

Configuring and Operating the VBCollector
2
3
Image Display area
Shows any image of the selected
recording date. If the image size is
greater than the display area, the
image display position can be moved
with scroll bar.
Image List dialog will be displayed. Select the name
of the server where you want to browse and click to
select the date of any image to be animated. Then,
click Animation.
Animation dialog will be displayed. As dialog size,
large or normal size is available and is automatically
selected depending on the original image size.
Status bar
Shows the image file name and “Current image number/
total number of images”.
Image data display area
Shows the detail image data.
● Animation
Images can consecutively be displayed.
[Top] button Shows the original image.
[Prev] button Shows the previous image.
[Play/Pause] button Plays/pauses the animation.
[Next] button Shows the next image.
[Last] button Shows the final image.
[Speed] bar Adjust the speed for animation
playback.
During animation, [Top], [Prev], [Next] or [Last] button cannot be used. If you
e
want to use any, click [Play/Pause] button to stop the animation.
Tip
18
Page 20

● Zoom in/out
Images can be zoomed in/out.
[Magnification] Shows the current magnification (10~500%).
[Zoom in] button Enlarges images by 10%.
[Zoom out] button Reduces images by 10%.
[Move] button If any image size is greater than the display area, you
can move the image display position. Click Move to
position the mouse cursor on the image changes the
cursor into
button on the image. The image display position will
be moved.
● Change dialog size
As dialog size, large or normal size is available and is automatically selected depending on
the initial image size. However, you can also change it manually.
[Large size] button When it is clicked, the dialog will be displayed in large
size. It appears when normal dialog size is displayed.
[Normal size] button When it is clicked, the dialog will be displayed in
normal size. It appears when large dialog size is
displayed.
. Move while pressing the left mouse
19
Deleting Images
Downloaded images can be deleted.
To Delete Images...
Stop the task schedule of the tool. Choose Delete
Image from the Tools menu. In the Image List dialog
box, select the name of the server that the
VBCollector downloaded the images to be deleted,
select the date to be deleted by clicking on it, then
click Delete Image.
Page 21

Configuring and Operating the VBCollector
Viewing Logs
VBCollector outputs logs concerning the execution of tasks. To view a log, choose Display Log
from the Tools menu.
The following information about logs is displayed:
● Code
Identification codes are displayed here. Four types of icons representing the level are also
displayed with these codes.
Information level
Warning level
Error level
Unknown
● Date & Time
The date and time when the log was generated is displayed here.
● Task
The name of the task that output the log is displayed here.
● Server
The name of the server to which the task performs downloads is displayed here.
● Message
The log’s message is displayed here.
Displaying logs according to selection criteria
Logs can be filtered according to error type, code, or date and time so that only the required
information is displayed.
To Make Settings...
1
Choose Filter from the View menu.
20
Page 22

2
● Specify Task
Select if filtering by task name, then enter the task name.
● Specify Server
Select if filtering by server name, then enter the server name.
● Error Type
Specify the error type when filtering by error type.
Not Specified
Selecting this item disables priority and code settings.
Specify Priority
From Error, Warning, or Information, select the error level to be displayed.
Specify Code
Select if only logs with the corresponding identification code are to be displayed, then enter
the identification code.
● Date & Time
Filters logs by output date and time.
Specify Start Date & Time
When this item is selected and a date and time is entered, logs generated after the
specified start date and time are displayed.
Specify End Date & Time
When this item is selected and a date and time is entered, logs generated before the
specified end date and time are displayed.
The Filter dialog box appears. To display only the
logs that match the specified criteria, enter the
criteria below and click OK. If no changes are
required, click Cancel.
21
Search logs
Logs can be searched using character strings. This function is convenient in case of searching any
target log from among numbers of logs.
To Search Logs
1
Choose Search from Edit menu.
Page 23

Configuring and Operating the VBCollector
2
[Match case]
When it is selected, capital and small letters will be distinguished and only those
strings, which exactly coincide with the entered character string, will be searched.
3
Selecting log files
Search dialog will be displayed. Enter the character
string you want to search in Search for and click
Search. Searching begins from the top of the logs. If
you select any log, searching will be started from the
selected log. Click Cancel closes the search dialog.
A line containing the relevant character string will be
highlighted. Pressing “F3” on keyboard starts forward
search. Pressing “Shift+F3” makes backward search.
When searching is completed after taking a round,
the message “Searching complete.” will be displayed
to terminate searching. If the relevant string is not
found, the message “The search item was not found.”
will be displayed to quit searching.
The initial log file of VBCollector is saved as “vbrpd.log” file in the “SYSTEM” folder within the
VBCollector-installed directory. When the file exceeds the size of 10 MB, it will be renamed as
“vbrpd01.log”, creating a new “vbrpd.log” file within the same folder to save the log. Log files can be
created up to 11 (with names from “vbrpd.log” to “vbrpd10.log”): The newest log file is always
named as “vbrpd.log” and the older ones are renamed increasing their numbers whenever a new
one is created. VBCollector Log Viewer can selectively display any of created log files.
To Select Log Files...
1
2
Choose Open from File menu.
Choose the log file you want to display and click
Open. The selected log will be displayed.
22
Page 24

Setting Download Capacity
In order to perform downloads based on a task schedule, you can set the upper limit on the number
of pictures or specify the response to be made in the event the specified percentage on available
space on the drive where pictures are to be saved is exceeded.
To Make Settings...
1
2
Choose Options from the Tools menu.
Options dialog will be displayed. Enter the required
items and click OK.
● Disk Space on Image Directory
Min. amount of free space required on image directory
Set the ratio of minimum free space to 1~50% for a drive containing the folder where you want to save any
image (→ P. 7).
What to do when min. is reached
When the free space of destination drive reaches the ratio set in [Min. amount of free space required on
image directory], decide how to deal with it.
● Abort task
Cancels download.
● Delete old image [s]
Sequentially deletes downloaded images being recorded on the server from the image of the oldest
shooting date until the specified free space ratio can be recovered.
● Details
Set max. number of pictures per download
When it is checked, the maximum number of images to be downloaded from the server at a time can be set
to 1~30,000.
Specify an account for downloading
When it is checked, the execution account of download can be specified. Set it when you want to download
any image on the shared folder on the network from the server (→ P. 8). (Windows 2000/XP only)
Once selected, enter you user name and password.
23
● When the available capacity of the driver where the images are saved
c
Note
approaches the value specified, Log D031“Additional free space is going to
be required on the disk to save images.” is output. Review disk capacity
such as by backing up old files and then deleting them.
● If you are making a setting to delete old images, please be careful as the
images you downloaded the previous time may also be deleted.
Page 25

24
Page 26

CANON INC. 30-2, Shimomaruko 3-chome, Ohta-ku, Tokyo 146-8501, Japan
U.S.A. CANON U.S.A.,INC. NEW JERSEY OFFICE
100 Jamesburg Road, Jamesburg, NJ 08831 USA
CANON U.S.A.,INC. CHICAGO OFFICE
100 Park Blvd., Itasca, IL 60143 USA
CANON U.S.A.,INC. LOS ANGELES OFFICE
15955 Alton Parkway, Irvine, CA 92618 USA
CANON U.S.A.,INC. HONOLULU OFFICE
210 Ward Avenue, Suite 200 Honolulu, HI 96814 USA
● If you have any questions, call the Canon U.S.A. Information
Center toll-free at 1-800-OK-CANON (652-2666) (U.S.A.only)
CANADA CANON CANADA INC.NATIONAL HEADQUARTERS
6390 Dixie Road, Mississauga, Ontario L5T 1P7
CANON CANADA INC. CALGARY
2828, 16th Street, N.E, Calgary, Alberta T2E 7K7
CANON CANADA INC. MONTRÉAL
5990 Côte-de-Liesse, Montréal, Québec H4T 1V7
● If you have any questions, call the CANON CANADA Customer Information
Centre toll-free at 1-800-OK-CANON (652-2666) (Canada only)
MEXICO CANON MEXICANA, S. DE R.L.DE C.V.
Periferco Sur No. 4124, Col. Ex-Rancho de Anzaldo, C.P. 01900
México, D.F.,México
CENTRO Y
SURAMERICA CANON LATIN AMERICA, INC.
6505 Blue Lagoon Drive, Suite 325, Miami, FL 33126, USA
ASIA Canon Singapore Pte Ltd
1 HarbourFront Avenue #04-01 Keppel Bay Tower Singapore 098632
CANON HONGKONG CO., LTD.
9/F., The Hong Kong Club Building, 3A, Chater Road, Central, Hong Kong
OCEANIA CANON AUSTRALIA PTY.LTD.
1 Thomas Holt Drive, North Ryde, Sydney, N.S.W. 2113, Australia
EUROPE CANON EUROPA N.V.
P.O.Box 2262, 1180 EG Amstelveen, The Netherlands
CANON EUROPE LTD.
6 Roundwood Avenue, Stockley Park, Uxbridge Middlesex,
UB11 1JA, United Kingdom
PUB NO. YT1-1335-004
©CANON INC. 2004
IMPRIMÉ AU JAPON
PRINTED IN JAPAN
 Loading...