

Page 1
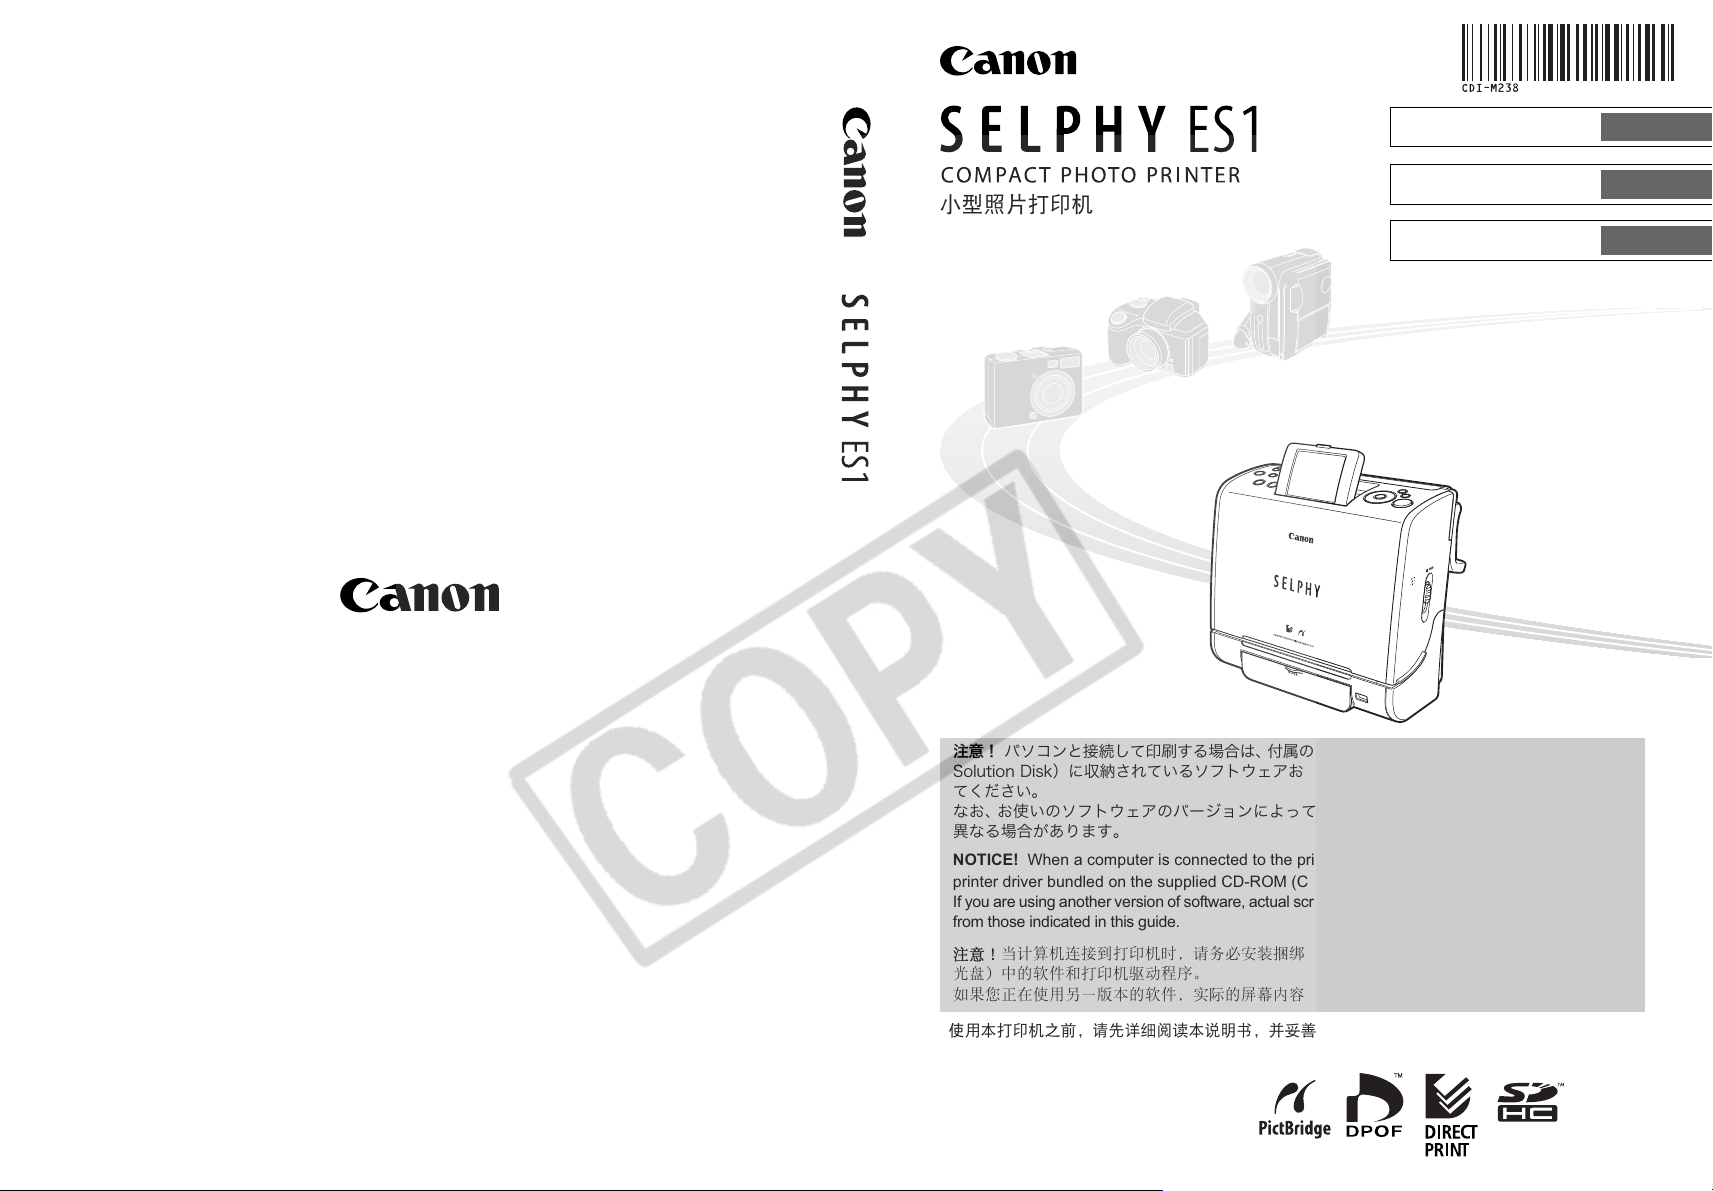
ʰ˂ʀ˂ɶɮʓ
᎙ሃʽ
ஓట
User Guide
ᄆᄲጐሠ
Έႊᐐԧ
าᴞʛʇɽʽȻፖȪȹԱҥȬɞکնɂǾࠖɁ ГДТПНᴥГбопоГпнрбгфРипфпРтйофет
ÓïìõôéïîÄéóëᴦȾՖጞȨɟȹȗɞʇʟʒɰɱɬȝɛɆʡʴʽʉ˂ʓʳɮʚɥȭɮʽʃʒ˂ʵȪ
ȹȢȳȨȗǿ
ȽȝǾȝΈȗɁʇʟʒɰɱɬɁʚ˂ʂʱʽȾɛȶȹɂǾͽᬲɗ႕ᬂȟյᝢంɁᜤᢐȻ۹ߵ
ႱȽɞکնȟȕɝɑȬǿ
NOTICE! When a computer is connected to the printer, be sure to install the software and the
printer driver bundled on the supplied CD-ROM (Canon ГпнрбгфРипфп Printer Solution Disk).
If you are using another version of software, actual screen contents and procedures may differ slightly
from those indicated in this guide.
ܬིஏܸሠˈขႚכᎧଫ֘ࡒཛྷ DE.SPN ˄ዊဳᾖ ሠિߴ՝
ࣕധ˅፩ܿሠดވڋᅗȃ
࣮ጸቂௐᇜׁܿˈৗܿൺಸ๒؞ᎁ૰ቪׁፑೌ፩ྈმܿວȃ!
ENGLISH
˹୫
CDI-M238-010 xxxxxxxx
ቂׁሠፇˈขჱႿኡޚׁངಖ༚ˈဢນ֦܃ངಖ༚Ꮾ๊دૣȃ
2006.05.01
© 2006 CANON INC. PRINTED IN JAPAN
Page 2
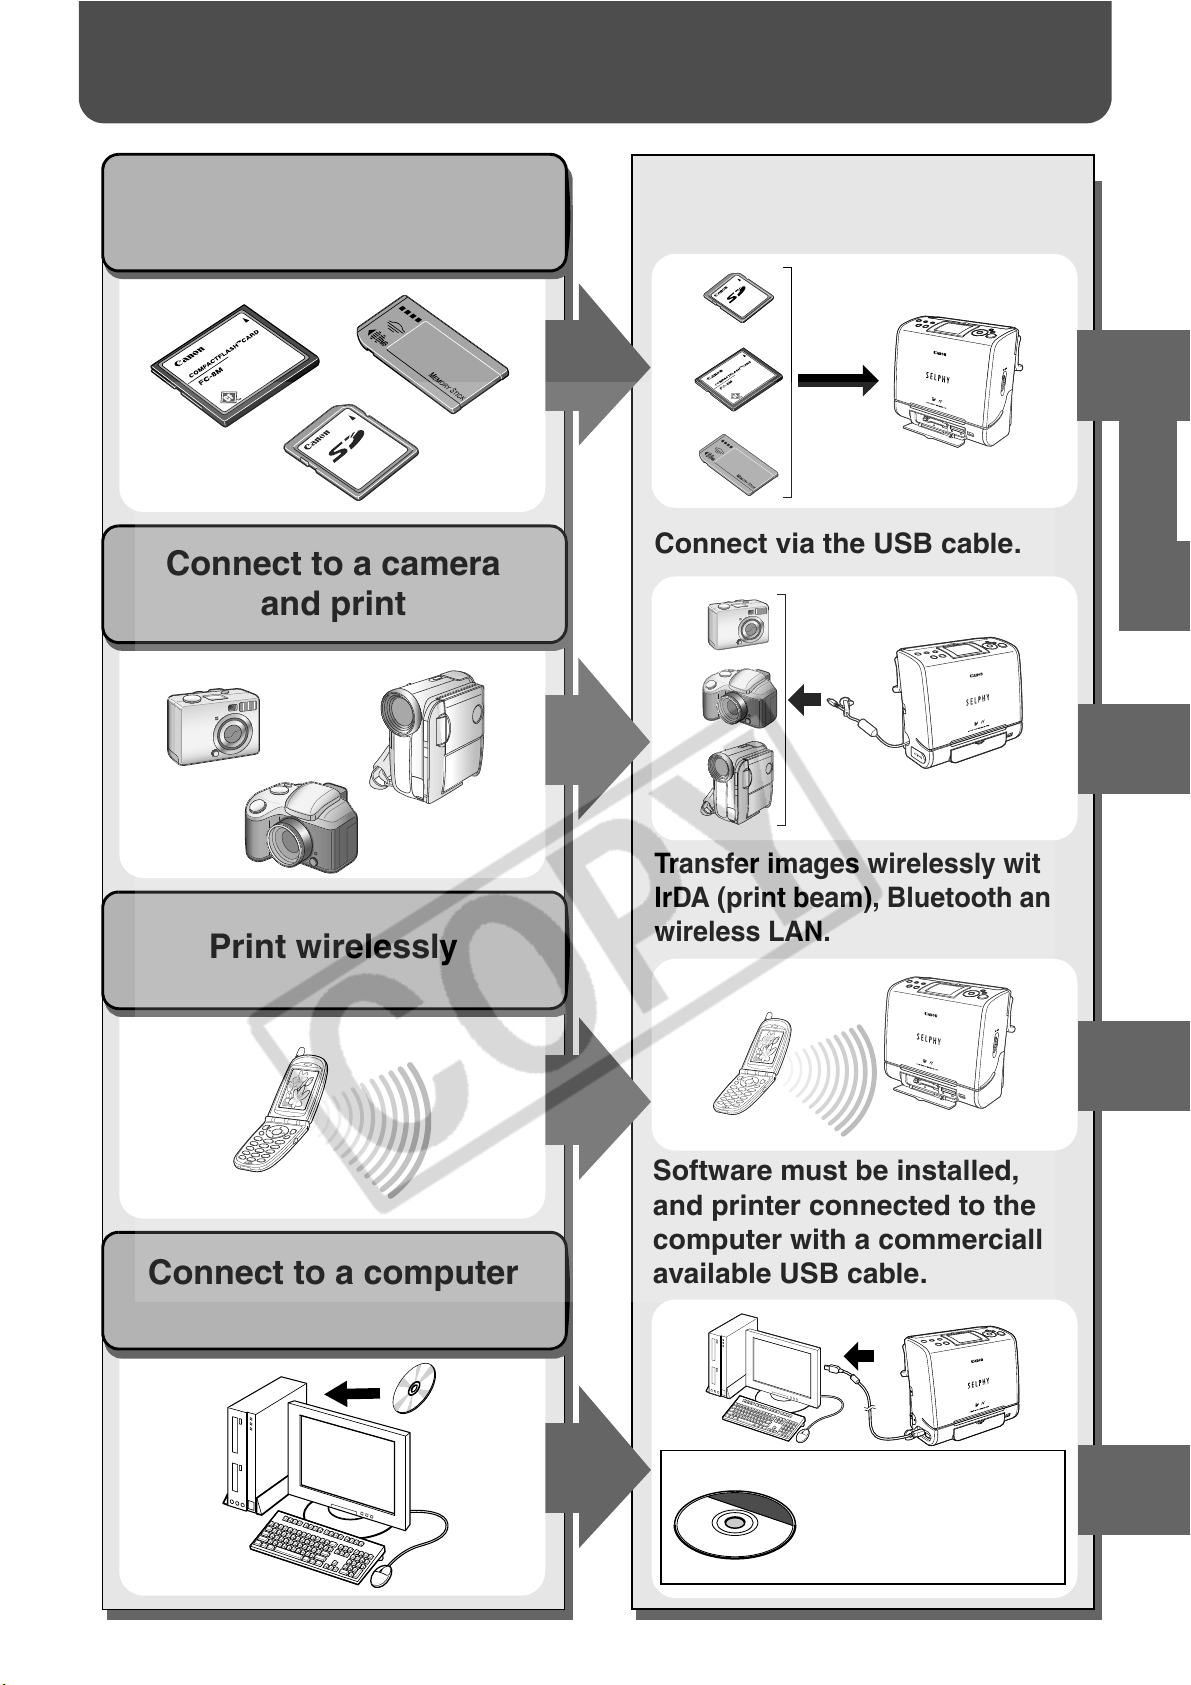
SELPHY ES1 Allows You to Do the Following
Insert the memory card into the
Print from a memory card
Connect to a camera
and print
appropriate memory card slot.
Connect via the USB cable.
Print wirelessly
Connect to a computer
and print
Transfer images wirelessly with
IrDA (print beam), Bluetooth and
wireless LAN.
Software must be installed,
and printer connected to the
computer with a commercially
available USB cable.
Before you connect the
printer to the computer,
be sure to install the
software following the
procedure on page 52.
Page 3
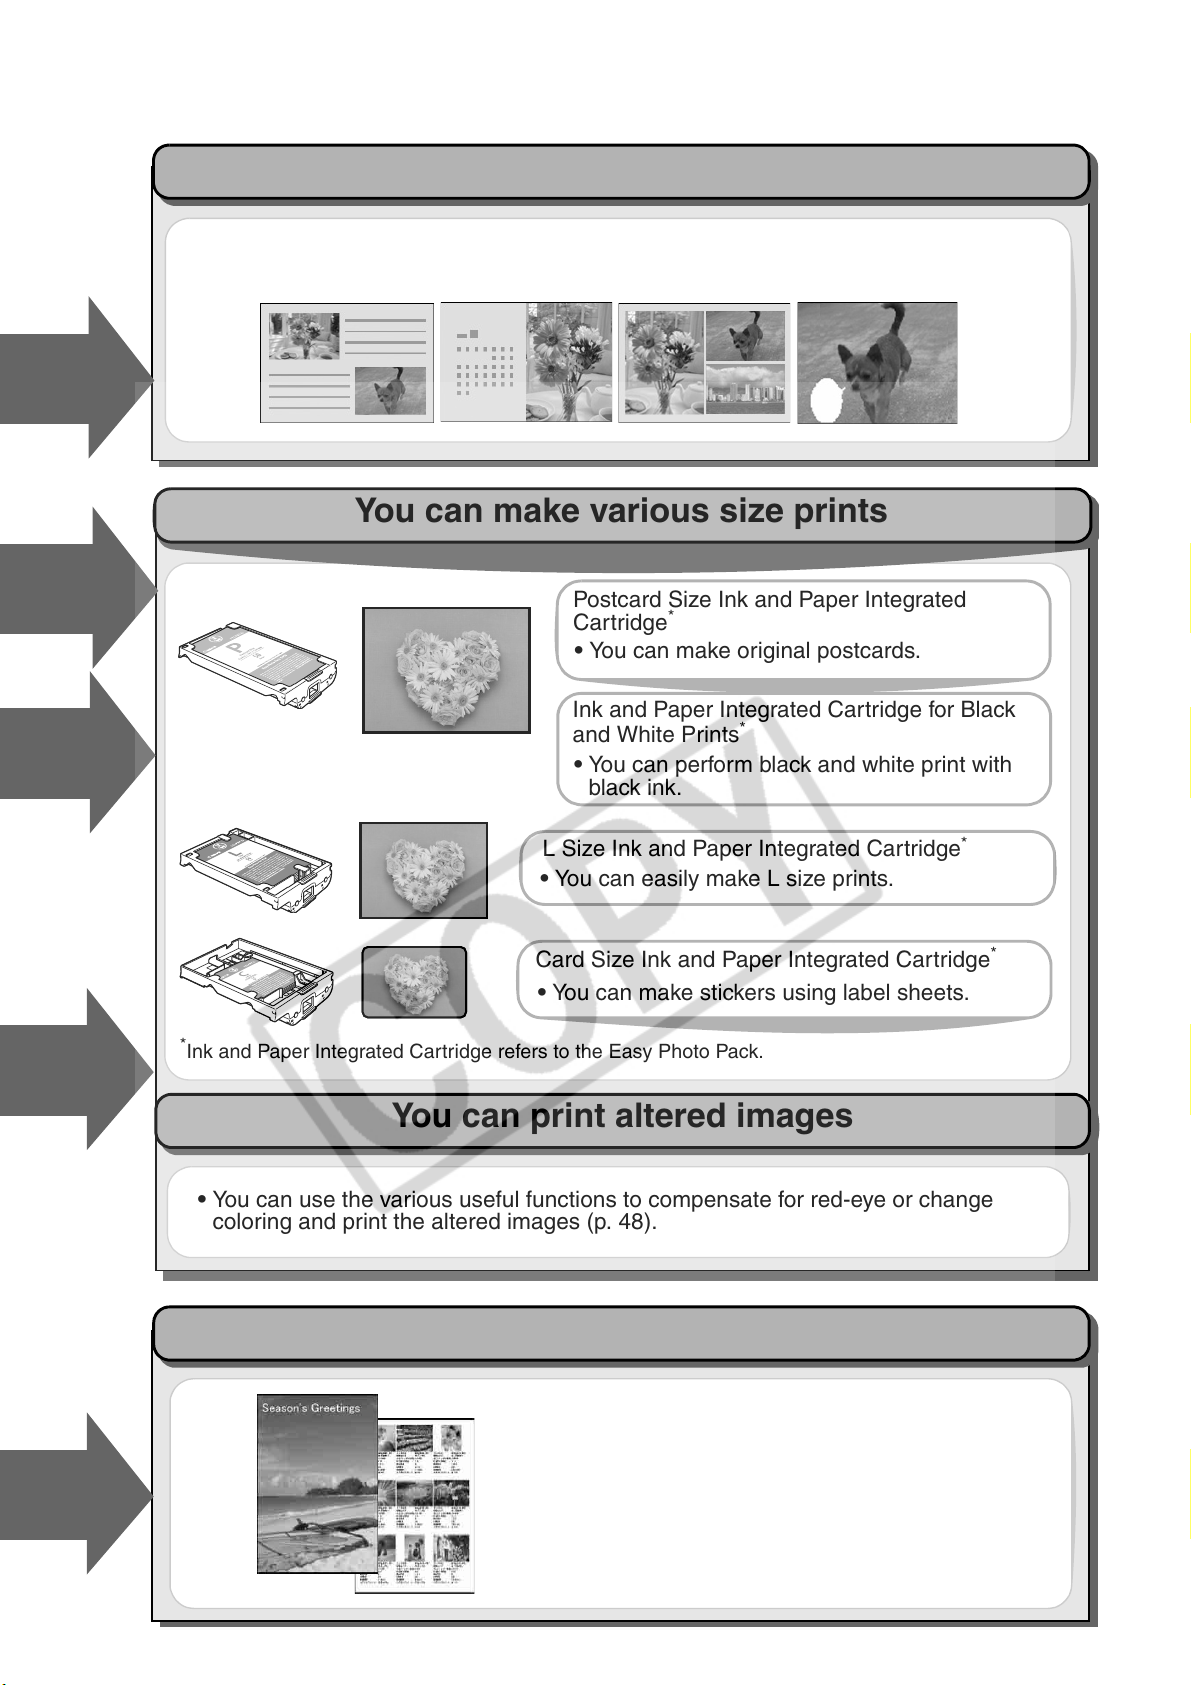
You can print in various designs and layouts
• You can use the Creative Print function to arrange the images in a more enjoyable
way (only when printing from an inserted memory card).
You can make various size prints
Postcard Size Ink and Paper Integrated
Cartridge
• You can make original postcards.
Ink and Paper Integrated Cartridge for Black
and White Prints
• You can perform black and white print with
black ink.
L Size Ink and Paper Integrated Cartridge
• You can easily make L size prints.
Card Size Ink and Paper Integrated Cartridge
• You can make stickers using label sheets.
*
Ink and Paper Integrated Cartridge refers to the Easy Photo Pack.
*
You can print altered images
*
*
*
• You can use the various useful functions to compensate for red-eye or change
coloring and print the altered images (p. 48).
You can easily print images saved on a computer
• You can use the software provided to correct and
trim images.
1
Page 4
Contents
SELPHY ES1 Allows You to Do the Following . . . . . . . . . . . . . . . . . . . . . . . . . . . . . . . . . 1
Quick Start . . . . . . . . . . . . . . . . . . . . . . . . . . . . . . . . . . . . . . . . . . . . . . . . . . . . . . . . . . . . . . 4
Before You Begin . . . . . . . . . . . . . . . . . . . . . . . . . . . . . . . . . . . . . . . . . . . . . . . . . . . . . . . . 7
About This Guide . . . . . . . . . . . . . . . . . . . . . . . . . . . . . . . 8
Safety Precautions . . . . . . . . . . . . . . . . . . . . . . . . . . . . . . . 9
Proper Usage and Handling . . . . . . . . . . . . . . . . . . . . . . . 13
Getting Started
Package Contents. . . . . . . . . . . . . . . . . . . . . . . . . . . . . . 16
Separately Sold Products . . . . . . . . . . . . . . . . . . . . . . . 16
Components Guide. . . . . . . . . . . . . . . . . . . . . . . . . . . . . 17
About LCD Monitor and Main Display Details . . . . . . . 19
Adjusting the Angle of the LCD Monitor and Switching the
Display . . . . . . . . . . . . . . . . . . . . . . . . . . . . . . . . . . . . . . . . 19
Main Display Details . . . . . . . . . . . . . . . . . . . . . . . . . . . . . . 19
Printing Procedure and Reference Guides . . . . . . . . . 20
Let’s Prepare . . . . . . . . . . . . . . . . . . . . . . . . . . . . . . . . . . 22
Preparing a Cartridge . . . . . . . . . . . . . . . . . . . . . . . . . . . . . 22
Loading the Cartridge . . . . . . . . . . . . . . . . . . . . . . . . . . . . . 23
Placing the Printer . . . . . . . . . . . . . . . . . . . . . . . . . . . . . . . 24
Setting the Display Language (when the printer is used for
the first time) . . . . . . . . . . . . . . . . . . . . . . . . . . . . . . . . . . . . 25
Printing from Memory Cards
Compatible Memory Cards . . . . . . . . . . . . . . . . . . . . . . 26
Inserting/Removing Memory Cards . . . . . . . . . . . . . . . 27
Removing Memory Cards . . . . . . . . . . . . . . . . . . . . . . . . . . 27
Single Photo Print. . . . . . . . . . . . . . . . . . . . . . . . . . . . . . 28
Multi Photo Print . . . . . . . . . . . . . . . . . . . . . . . . . . . . . . . 29
Print All Photos. . . . . . . . . . . . . . . . . . . . . . . . . . . . . . . . 31
Creative Print . . . . . . . . . . . . . . . . . . . . . . . . . . . . . . . . . 32
When [Album] is selected . . . . . . . . . . . . . . . . . . . . . . . . . . 32
When [Calendar] is selected. . . . . . . . . . . . . . . . . . . . . . . . 34
When [Multi Layout] is selected . . . . . . . . . . . . . . . . . . . . . 35
When [Speech Bubble] is selected . . . . . . . . . . . . . . . . . . . 36
Print Using Camera Specified Settings (DPOF Print)
Auto Play . . . . . . . . . . . . . . . . . . . . . . . . . . . . . . . . . . . . . 38
Connecting to a Camera for Printing
Connecting to a Canon Camera for Printing . . . . . . . . 39
Connecting to a Non-Canon Digital Camera
for Printing . . . . . . . . . . . . . . . . . . . . . . . . . . . . . . . . . . . 41
Disconnect the camera . . . . . . . . . . . . . . . . . . . . . . . . . . . . 41
. . 37
2
Page 5
English
Wireless Printing
Infrared (IrDA) Wireless Printing . . . . . . . . . . . . . . . . . . 42
Printing via a Wireless LAN. . . . . . . . . . . . . . . . . . . . . . 43
Printing via Bluetooth . . . . . . . . . . . . . . . . . . . . . . . . . . 44
Before Use . . . . . . . . . . . . . . . . . . . . . . . . . . . . . . . . . . . . . 44
Setting Bluetooth . . . . . . . . . . . . . . . . . . . . . . . . . . . . . . . . 45
Printing . . . . . . . . . . . . . . . . . . . . . . . . . . . . . . . . . . . . . . . . 46
Making Printer Settings (Various Useful Functions)
Using the Various Useful Functions . . . . . . . . . . . . . . . 48
Page Layout . . . . . . . . . . . . . . . . . . . . . . . . . . . . . . . . . . . . 49
My Colors . . . . . . . . . . . . . . . . . . . . . . . . . . . . . . . . . . . . . . 50
Connecting to a Computer for Printing
System Requirements . . . . . . . . . . . . . . . . . . . . . . . . . . 51
Installing the Printer Driver and the Software . . . . . . . 52
Windows . . . . . . . . . . . . . . . . . . . . . . . . . . . . . . . . . . . . . . . 52
Macintosh . . . . . . . . . . . . . . . . . . . . . . . . . . . . . . . . . . . . . . 55
Connecting the Printer to Your Computer . . . . . . . . . . 58
Software Manuals . . . . . . . . . . . . . . . . . . . . . . . . . . . . . . 60
Printer Software Guide . . . . . . . . . . . . . . . . . . . . . . . . . . . . 60
Uninstalling the Software. . . . . . . . . . . . . . . . . . . . . . . . 61
Windows . . . . . . . . . . . . . . . . . . . . . . . . . . . . . . . . . . . . . . . 61
Macintosh . . . . . . . . . . . . . . . . . . . . . . . . . . . . . . . . . . . . . . 61
Uninstalling the Printer Driver. . . . . . . . . . . . . . . . . . . . 61
Windows . . . . . . . . . . . . . . . . . . . . . . . . . . . . . . . . . . . . . . . 61
Macintosh . . . . . . . . . . . . . . . . . . . . . . . . . . . . . . . . . . . . . . 61
Using the Battery Pack (Sold Separately)
Installing and Charging the Battery Pack. . . . . . . . . . . 62
Battery Status . . . . . . . . . . . . . . . . . . . . . . . . . . . . . . . . . . . 63
Appendix
Handling of the Battery Pack (Sold Separately) . . . . . 64
Cleaning the Printer . . . . . . . . . . . . . . . . . . . . . . . . . . . . 66
Troubleshooting . . . . . . . . . . . . . . . . . . . . . . . . . . . . . . . 67
Error Messages. . . . . . . . . . . . . . . . . . . . . . . . . . . . . . . . 70
Specifications . . . . . . . . . . . . . . . . . . . . . . . . . . . . . . . . . 73
3
Page 6
Quick Start
This section explains the procedures required to print with the trial cartridge (Postcard
size (100 x 148 mm (4 x 6 in.)) paper) included with your printer from a memory card.
Things to Prepare
Printer (SELPHY ES1)
Ink and Paper Integrated Cartridge (Postcard size, 10 sheets)
Compact Power Adapter CA-ES100
Power Cord
Memory Card (containing the images you wish to print)
: Included with the printer
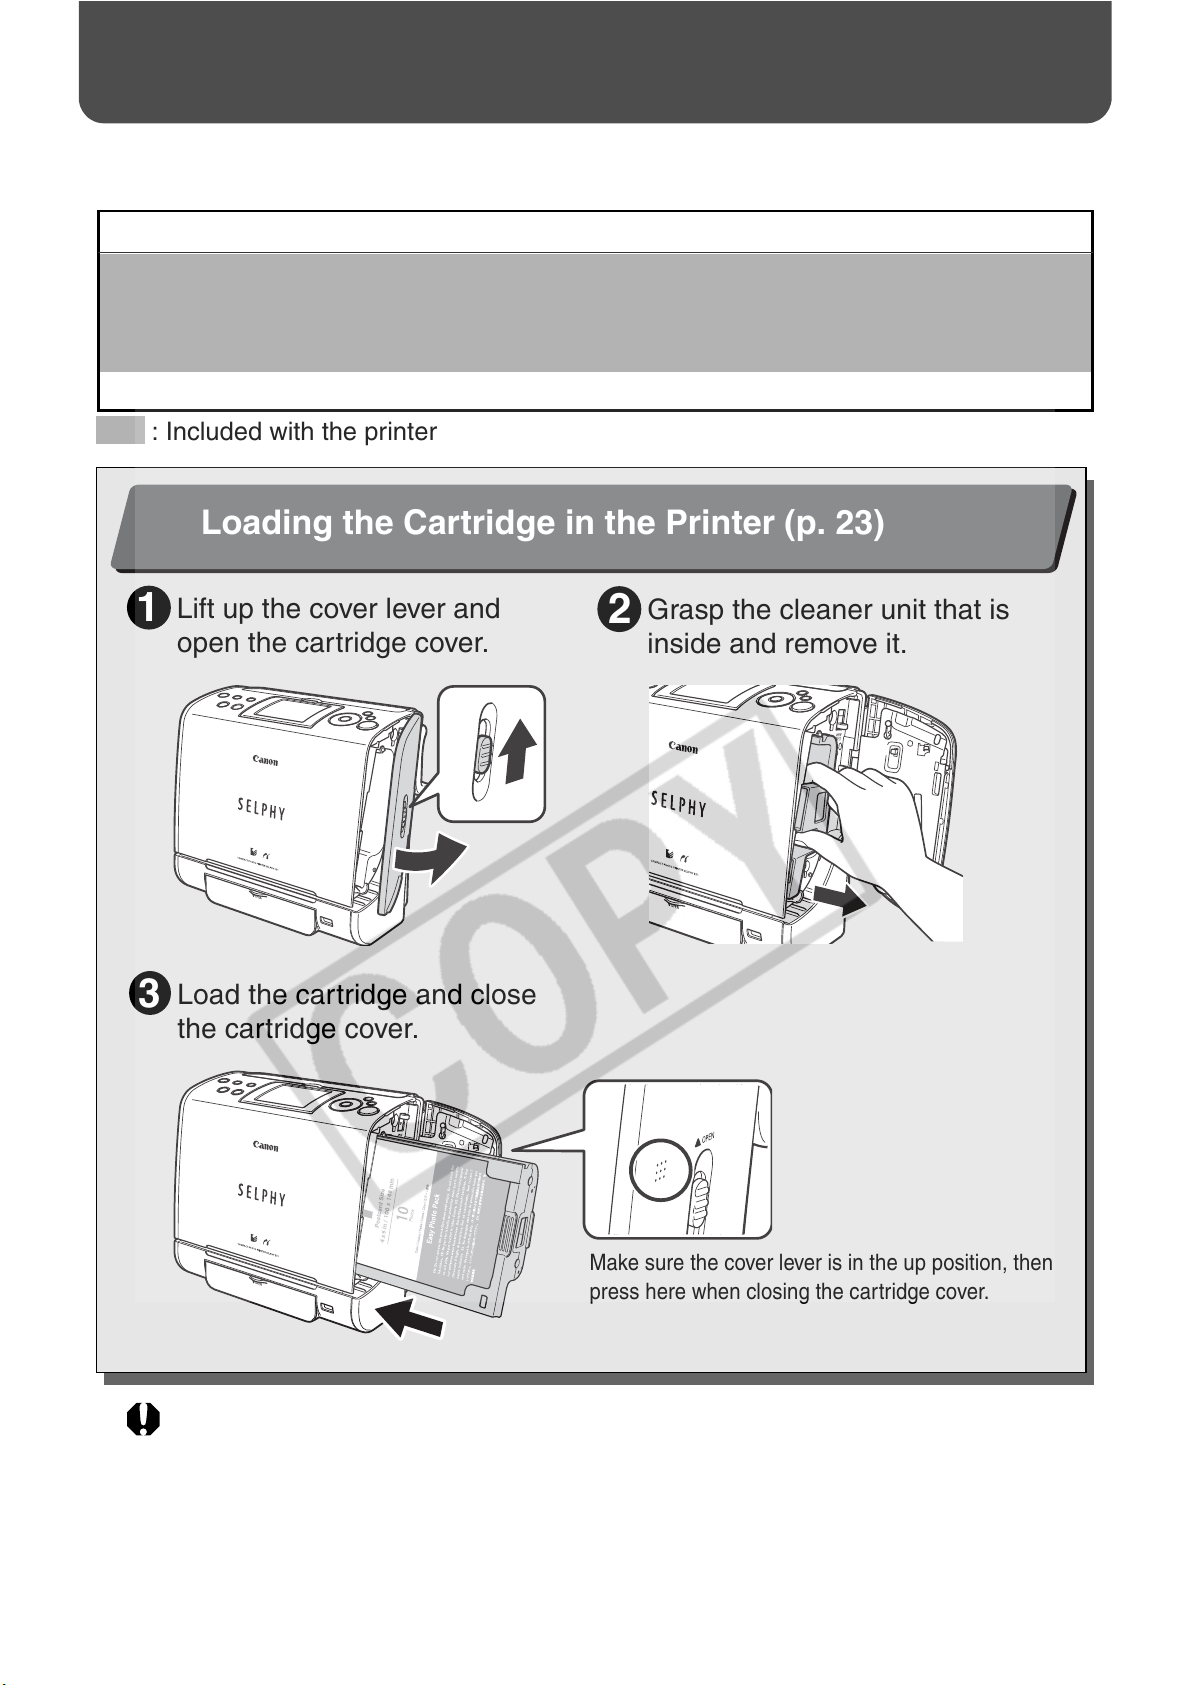
Loading the Cartridge in the Printer (p. 23)
1
Lift up the cover lever and
1
open the cartridge cover.
Load the cartridge and close
3
the cartridge cover.
Grasp the cleaner unit that is
2
inside and remove it.
Make sure the cover lever is in the up position, then
press here when closing the cartridge cover.
When closed, make sure the cover lever is pushed all
the way down.
The colored paper on the top side of the cartridge is the protective paper. Load the cartridge
with this paper still attached.
4
Page 7
Quick Start (Continued)
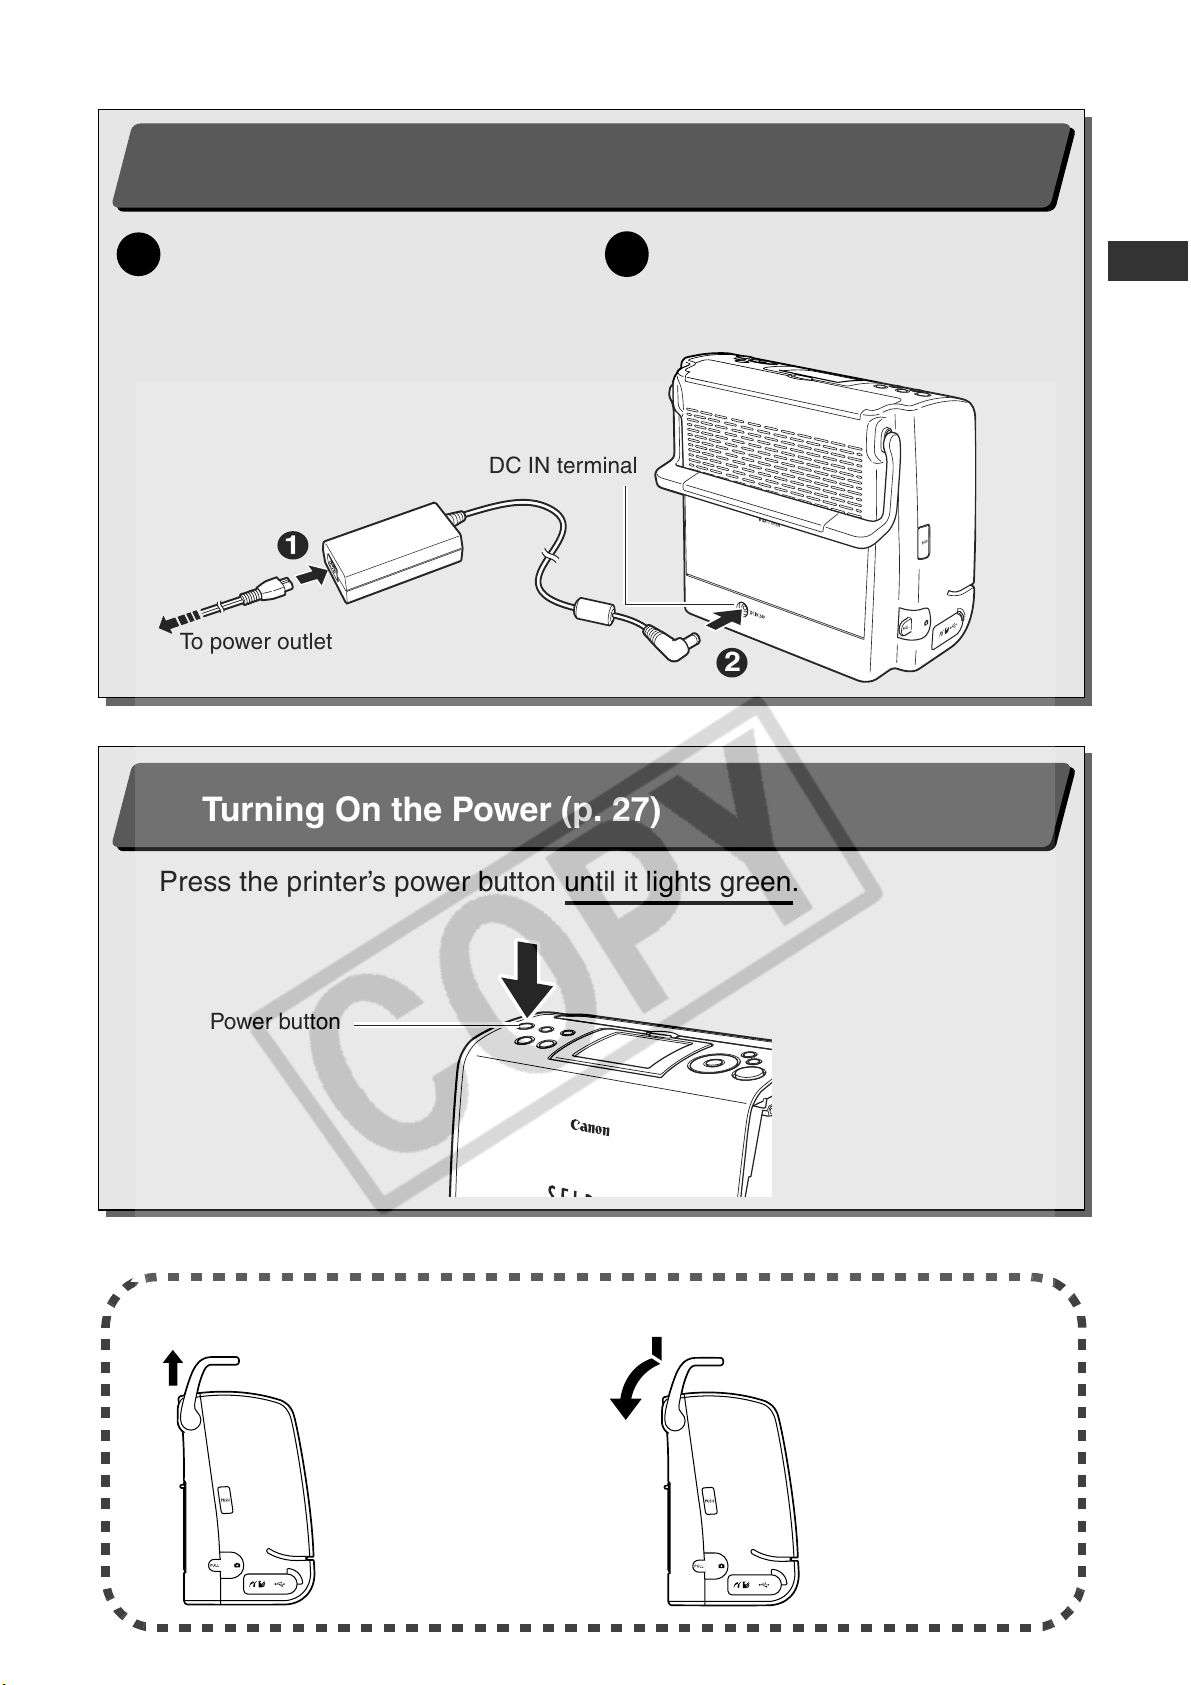
2
Connecting the Printer to a Power Source (p. 24)
Insert the power cord into the
1
compact power adapter and plug
the other end into a power outlet.
1
To power outlet
2
DC IN terminal
Connect the compact power
adapter to the printer’s DC IN
terminal.
2
3
Turning On the Power (p. 27)
Press the printer’s power button until it lights green.
Power button
About the Carrying Handle
When lifted vertically, the
handle locks, making it
convenient for carrying.
Before using the printer,
press down lightly on the
handle and rotate it
towards the back of the
printer.
5
Page 8
4
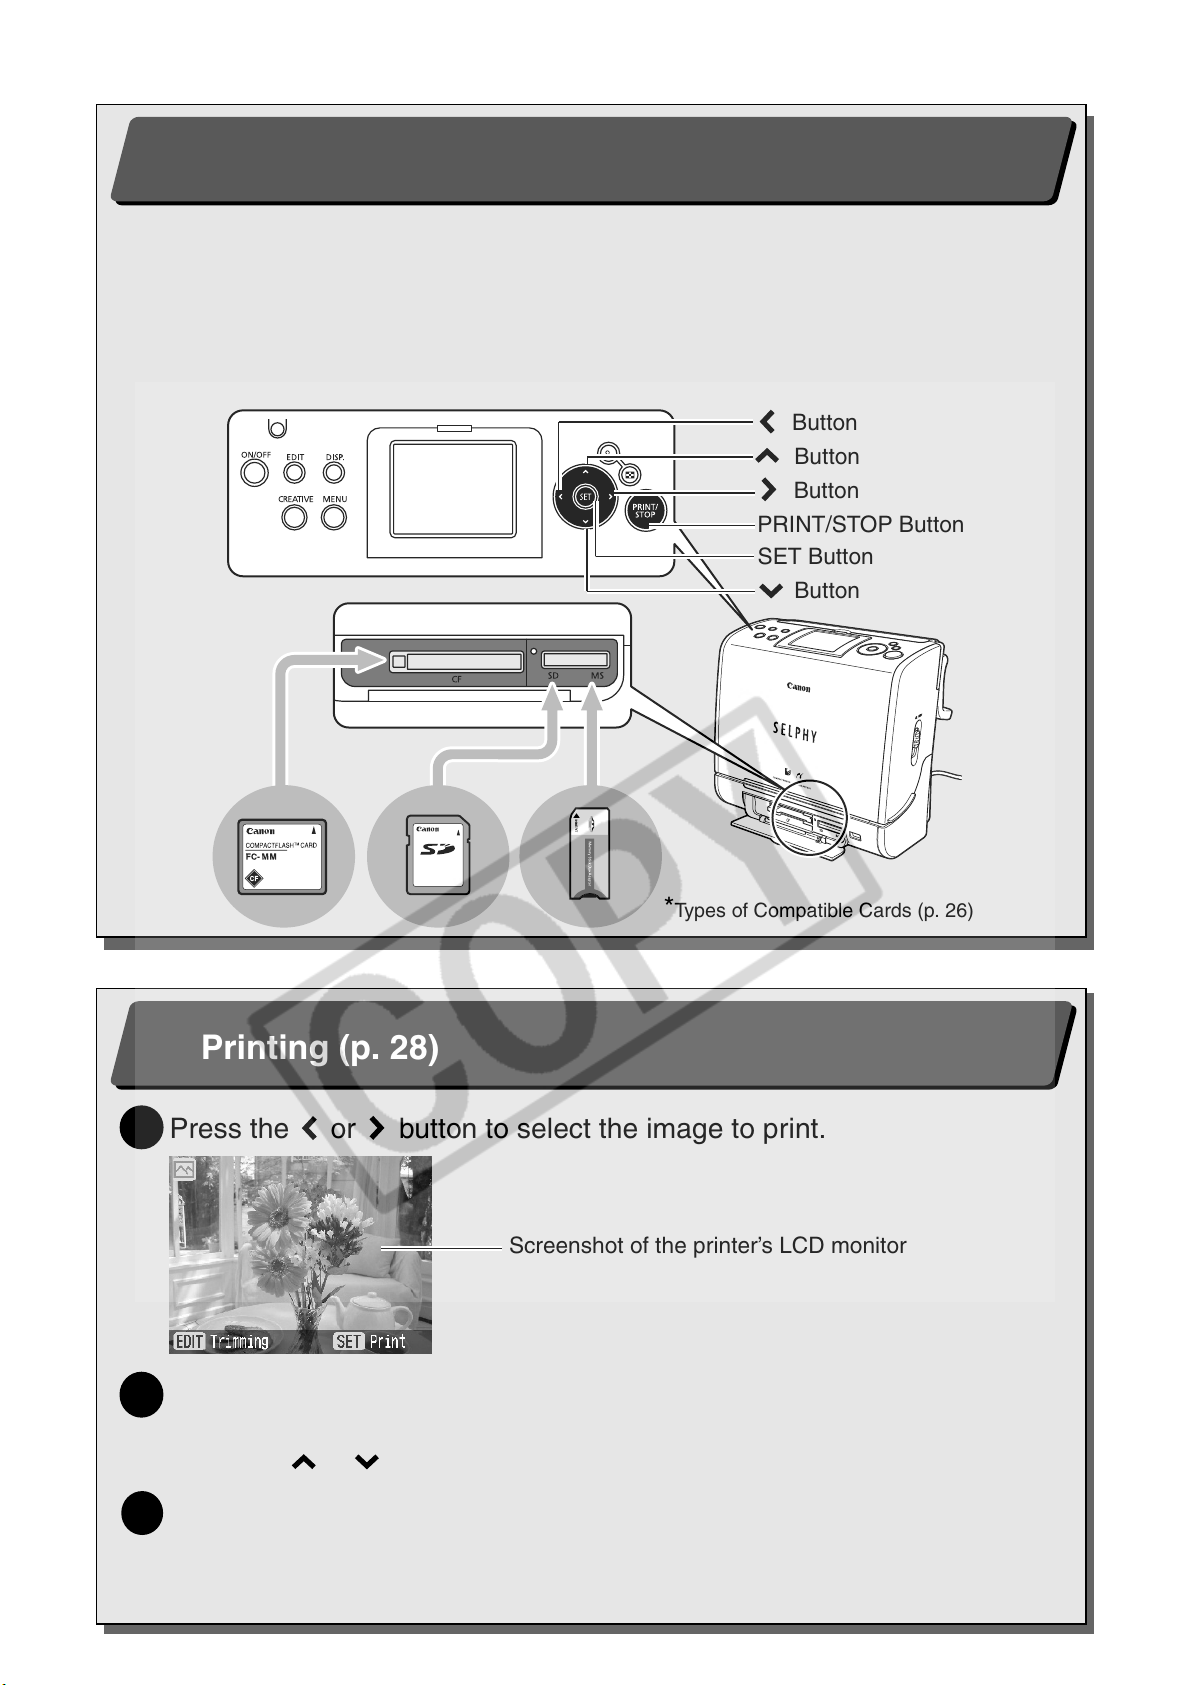
Inserting the Memory Card* into the Printer (p. 27)
Insert the memory card all the way into the appropriate card slot.
z
Insert the memory card with the top side up.
z
An image is displayed on the LCD monitor. If an image is not displayed, make sure
that there are images on the memory card and that the memory card is fully inserted.
Images cannot be displayed if a camera or wireless adapter is connected.
z
Push the SD memory card, Memory Stick or their variants in until it clicks.
Button
Button
Button
PRINT/STOP Button
SET Button
Button
*Types of Compatible Cards (p. 26)
Printing (p. 28)
5
Press the or button to select the image to print.
1
Screenshot of the printer’s LCD monitor
Press the SET or PRINT/STOP button, and check the setting on the
2
LCD monitor.
z
Press the or button to specify the number of prints.
Press the PRINT/STOP button.
3
z
The print receptacle cover opens automatically and printing starts. During printing, the
printer’s power button blinks green.
z
Press the PRINT/STOP button again to stop printing.
6
Page 9
Before You Begin
Thank you for your purchase of the Canon Compact Photo Printer SELPHY ES1. This guide
explains the printer’s general flow of operations, from camera print settings to printing and
computer connection operations to printing.
Before using your printer for the first time, please read through the
Warning against Copyright Infringement
Please respect all copyrights. Use of images produced by Canon Compact Photo Printer
SELPHY ES1
Warranty Limitations
This printer’s warranty is only effective in the country of sale. If a problem arises
while the printer is in use abroad, please convey it back to the country of sale before
proceeding with a warranty claim to a Canon Customer Support center.
For Canon Customer Support contacts, please see the customer support list
supplied with your printer.
for purposes other than personal entertainment may be prohibited by law.
Safety Precautions
(p. 9).
Use of genuine Canon accessories is recommended.
This product is designed to achieve excellent performance when used with genuine Canon
accessories. Canon shall not be liable for any damage to this product and/or accidents such
as fire, etc., caused by the malfunction of non-genuine Canon accessories (e.g., a leakage
and/or explosion of a battery pack). Please note that this warranty does not apply to repairs
arising out of the malfunction of non-genuine Canon accessories, although you may
request such repairs on a chargeable basis.
Communication Settings for Cameras
Depending on the model of the camera, it may be necessary to change the communication
settings prior to connecting the camera to the printer.
• For EOS 5D, EOS 10D, EOS 20D, EOS 30D, EOS 300D and EOS 350D cameras, set
[Communication] in the camera’s menu to [PTP], or [Print/PTP] or [Print/PC]. See the user
guide supplied with the camera for details.
• For non-Canon cameras, see the user guide supplied with the camera for details on
communication settings.
7
Page 10
About This Guide
Symbols Used
: This mark denotes issues that may affect the printer’s operation.
: This mark denotes additional topics that complement the basic operating
procedures.
About camera and accessory descriptions in this guide
General camera descriptions in this guide refer to digital cameras or digital camcorders
compatible with the compact photo printer (SELPHY ES1). However, in detailed
instructions, “camera” refers to “digital cameras”, and “power source” refers to “compact
power adapter” throughout this guide.
Also, “cartridge” refers to the “Ink and Paper Integrated Cartridge (Easy Photo Pack)”.
Disclaimer
z
While every effort has been made to ensure that the information contained in this guide is
accurate and complete, no liability can be accepted for any errors or omissions. Canon reserves
the right to change the specifications of the hardware and software described herein at any time
without prior notice.
z
No part of this guide may be reproduced, transmitted, transcribed, stored in a retrieval system,
or translated into any language in any form, by any means, without the prior written permission
of Canon.
z
Canon makes no warranties for damages resulting from corrupted or lost data due to a
mistaken operation or malfunction of the camera, the printer, the software, the memory cards,
personal computers, peripheral devices, or use of non-Canon memory cards.
z
Macintosh and Mac OS are trademarks of Apple Computer Inc., registered in the United
States and other countries.
z
Microsoft® and Windows® are either registered trademarks or trademarks of Microsoft
Corporation in the United States and/or other countries.
z
SDHC Logo is a trademark.
8
Page 11
Safety Precautions
z
Before using the printer, please ensure that you have read and understood the safety
precautions described below. Always ensure that the printer is operated correctly.
z
The safety precautions noted on the following pages are intended to instruct you in the safe
and correct operation of the printer to prevent injuries or damage to yourself and other
persons.
Devices: Printer, Compact power adapter
Battery: Battery pack (sold separately)
WARNINGS
Do not play the supplied CD-ROM(s) in any CD player that does not support data CDROMs. Playing the CD-ROM(s) in an audio CD player (music player) could damage the
speakers. It is also possible to suffer from hearing loss from listening with headphones
to the loud sounds of a CD-ROM played on a music CD player.
Equipment
z
Do not disassemble or modify the equipment.
z
If the equipment is dropped or the casing becomes damaged, do not continue operation.
z
If the equipment emits smoke or a burning odor, or shows other signs of significant
malfunction, immediately unplug the power cord from the power outlet.
z
Never rest liquid containers around the equipment. If the exterior comes into contact
with liquids or salt air, wipe it dry with a soft, absorbent cloth.
z
Do not drop or insert metallic or combustible objects into the equipment.
Continued use of the equipment may result in fire or electric shock.
Immediately turn the printer power off and remove the printer battery or unplug the power
cord from the power outlet. Please consult your camera distributor or the closest Canon
Customer Support center (see the customer support list supplied with your printer).
z
Do not touch metal parts of the equipment or the power plug during thunderstorms.
Lightning strikes may produce lethal voltages within the equipment. Keep clear of the
equipment during thunderstorms.
z
Do not use flammable solvents such as alcohol, benzine, or paint thinner to clean the
equipment.
Continued use of the equipment may result in fire or electric shock.
9
Page 12
Power
z
Do not exceed the cable and power outlet ratings when operating this product. Do not
operate this product outside of the specified voltage rating. Check that the voltage of the
outlet is compatible with the equipment before plugging it in.
z
If the power cord becomes damaged (if internal wiring is exposed, etc.), immediately
unplug it from the power outlet.
z
Be sure that the power cord is plugged all the way in.
z
Do not damage, modify, or rest heavy objects on the power cord.
z
Use only recommended power sources.
z
Remove the power cord on a regular periodic basis and wipe away the dust and dirt that
collects on the plug, the exterior of the power outlet and the surrounding area.
z
Do not handle the power cord if your hands are wet.
Continued use of the equipment may result in fire or electric shock.
z
After the battery pack is fully charged and when the compact power adapter is not being
used, disconnect the adapter from both the printer and the power outlet.
Heat will build up and could result in a fire.
z
The output terminal of the compact power adapter is designed for exclusive use with this
equipment. Do not use the output terminal for other batteries and products.
Heat will build up and could result in fire or electric shock.
Battery (Sold Separately)
z
Do not place the battery pack near a heat source or expose it to direct flame or heat.
z
The battery pack should not be immersed in water.
z
Do not attempt to disassemble, alter or apply heat to the battery pack.
z
Avoid dropping or subjecting the battery pack to severe impacts that could damage the
casing.
z
Use only recommended battery pack and accessories.
Use of a battery pack not expressly recommended for this equipment may cause explosions
or leaks, resulting in fire, injury and damage to the surroundings. In the event that a battery
leaks and the eyes, mouth, skin or clothing contact these leaked substances, immediately
flush with water.
z
Do not place anything, such as tablecloths, carpets, bedding or cushions, on top of the
battery charger while it is charging.
Heat will build up and could result in a fire.
z
When charging the battery pack, use only the printer. Do not use other equipment.
Heat will build up and could result in fire or electric shock.
z
Before you discard a battery, cover the terminals with tape or other insulators to prevent
direct contact with other objects.
Contact with the metallic components of other materials in waste containers may lead to fire
or explosions.
10
Page 13
Usage Location
z
Do not place the equipment on an unstable or tilted table or desk.
There is risk that the equipment may fall and cause injury.
CAUTIONS
Equipment
z
Do not block the air vents on the printer.
z
Do not rest objects on the equipment.
z
Do not reach into internal parts of the equipment except as specified in the operating
instructions.
Such conditions could lead to injury, fire, electric shock or other damage.
z
Unplug the equipment when you are not using it.
Leaving the equipment plugged in during prolonged periods of non-use poses risk of electric
shock or fire.
z
Do not open the cartridge cover during printing.
• If you do so, printing will stop.
• Paper moves back and forth in the printer during printing. Placing your hand in the way
of moving paper may result in injury.
Power
z
Do not move the equipment while it is plugged in.
z
Do not excessively bend or twist the power cord.
z
Do not pull on the power cord.
Doing so may damage the power cord. Continued use of a damaged cord poses risk of fire,
electric shock or equipment failure.
11
Page 14
Usage Location
z
Do not use the equipment in locations that are smoky, humid, dusty, or subject to strong
vibration.
z
Do not leave the equipment in places subject to strong sunlight or close to heating
equipment, such as the dashboard or trunk (boot) of a car.
The above-mentioned can cause leakage, overheating or explosion, resulting in fire, burns or
other injuries. High temperatures may also cause deformation of the casing.
z
Do not use the equipment near an open flame.
Sheets ejected from the print receptacle cover may fall into the flame, resulting in fire.
z
Do not use the equipment close to TV sets or AM radios.
Operation of the equipment may adversely affect TV and radio reception.
12
Page 15
Proper Usage and Handling
Usage Location
z
Leave about 15 cm (6 in.) of clearance at the front and back of the equipment and 10 cm
(4 in.) of clearance on both sides.
Be sure to leave clearance around the paper-handling slot (at the front) so that paper has
sufficient room to extend out from the slot during printing.
z
Do not use near strong magnets or near devices that produce strong electromagnetic
fields.
Electromagnetic radiation from devices such as TVs and game machines, and strong
magnetic fields from devices such as speakers and large motors, may cause distortion in
printed images.
When Not In Use
z
Be sure to close the print receptacle cover.
If dirt or foreign objects enter the printer, print quality may deteriorate.
z
Unplug the power cord from the outlet. If using the battery pack, remove it.
But please note that you should plug in and run the printer at least once every six months
to ensure that it remains functional.
When Planning Not to Use for an Extended Period
z
When the printer is not in use, please remove the cartridge from the printer and store it.
Return the cartridge to its original bag and package. Store the package horizontally.
Before Transporting
z
Close the print receptacle cover.
If dirt or foreign objects enter the printer, print quality may deteriorate.
Avoid Condensation Related Problems
z
You can avoid condensation by placing the equipment (printer, cartridge) in an airtight,
resealable plastic bag and letting the equipment adjust to temperature changes slowly
before removing the equipment from the bag.
Moving the equipment rapidly between hot and cold temperatures may cause
condensation (water droplets) to form on the external and internal surfaces of the
equipment.
If Condensation Forms Inside the Printer
z
Stop using the printer immediately.
Continued use may damage the equipment.
Wait until the water droplets have evaporated completely before resuming use.
13
Page 16
Printer
z
Please avoid turning the printer’s power on and off needlessly as the printer
initialization consumes ink.
There may not be enough ink left for the allotted sheets in the set.
z
Never use volatile compounds or insecticides on the printer, and do not allow rubber or
vinyl material to remain in prolonged contact with the printer.
These materials may cause deformation of the printer’s casing.
z
If the printer overheats, it will temporarily stop operating. This does not mean that the
printer has malfunctioned.
The printer will resume normal printing as soon as it cools down.
Temporary stoppages are most likely to occur in the following cases:
• When printing continuously.
• If the room is unusually warm.
• If the air vents on the back of the printer are blocked or if ventilation is inadequate.
z
Lower the carrying handle when printing. If the prints touch the carrying handle then
printing may not be done correctly.
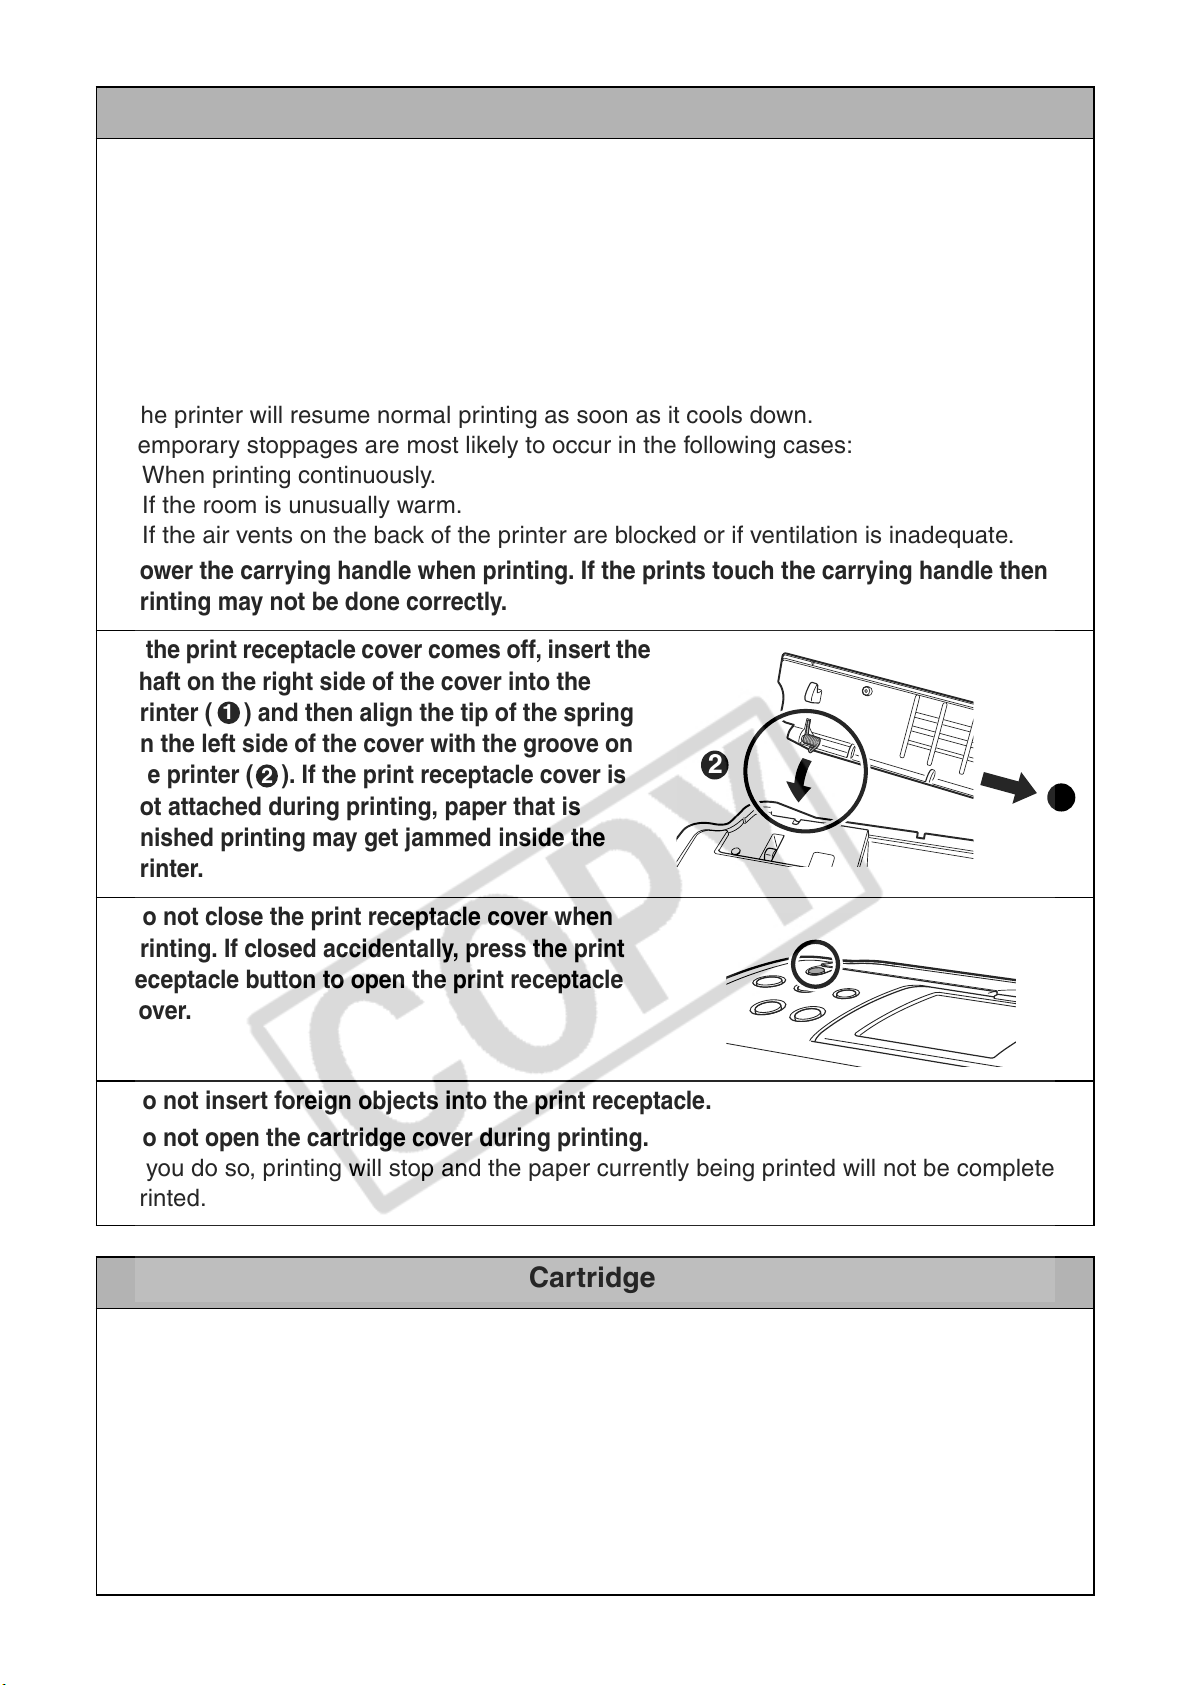
z
If the print receptacle cover comes off, insert the
shaft on the right side of the cover into the
printer ( ) and then align the tip of the spring
on the left side of the cover with the groove on
the printer ( ). If the print receptacle cover is
not attached during printing, paper that is
finished printing may get jammed inside the
printer.
1
2
2
1
z
Do not close the print receptacle cover when
printing. If closed accidentally, press the print
receptacle button to open the print receptacle
cover.
z
Do not insert foreign objects into the print receptacle.
z
Do not open the cartridge cover during printing.
If you do so, printing will stop and the paper currently being printed will not be completely
printed.
Cartridge
z
Please use only the cartridge type specified for use by Canon.
z
Do not touch or pull on the ink sheet.
There may not be enough ink left for the allotted sheets in the set.
z
Do not handle the cartridge with wet or sweaty hands.
z
Do not apply excessive force to the cartridge.
14
z
Do not remove the protective paper from the cartridge or do not press down hard on the
paper.
Force or impact on the paper may result in paper jams or equipment damage.
Page 17
Paper
z
Do not touch the paper while it is being printed.
During printing, the sheet repeatedly moves back and forth along the top of the print
receptacle and in and out through the paper-handling slot. Please do not touch the sheet
during this process as this could damage the printer.
z
Do not allow too many sheets to accumulate in the print receptacle during printing.
Do not allow more than 50 sheets to accumulate in the print receptacle.
Prints
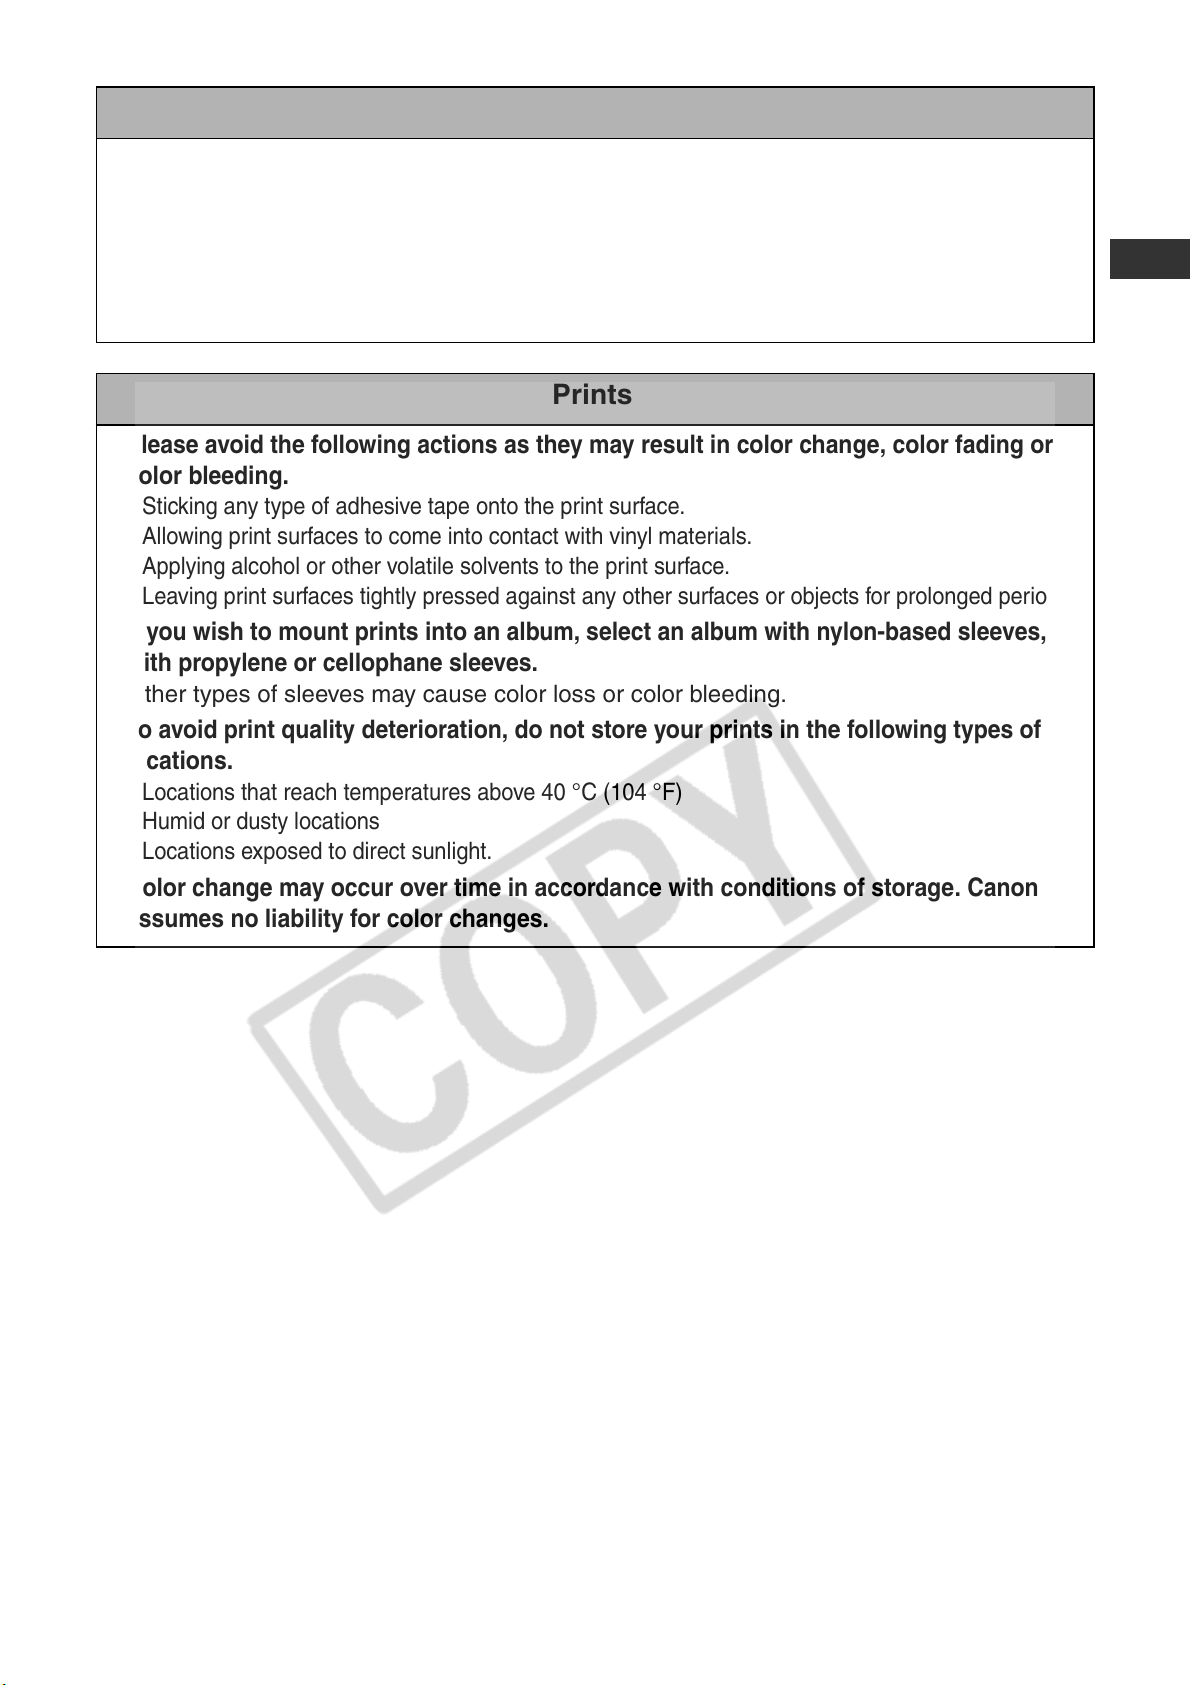
z
Please avoid the following actions as they may result in color change, color fading or
color bleeding.
• Sticking any type of adhesive tape onto the print surface.
• Allowing print surfaces to come into contact with vinyl materials.
• Applying alcohol or other volatile solvents to the print surface.
• Leaving print surfaces tightly pressed against any other surfaces or objects for prolonged periods.
z
If you wish to mount prints into an album, select an album with nylon-based sleeves, or
with propylene or cellophane sleeves.
Other types of sleeves may cause color loss or color bleeding.
z
To avoid print quality deterioration, do not store your prints in the following types of
locations.
• Locations that reach temperatures above 40 °C (104 °F)
• Humid or dusty locations
• Locations exposed to direct sunlight.
z
Color change may occur over time in accordance with conditions of storage. Canon
assumes no liability for color changes.
15
Page 18
Getting Started
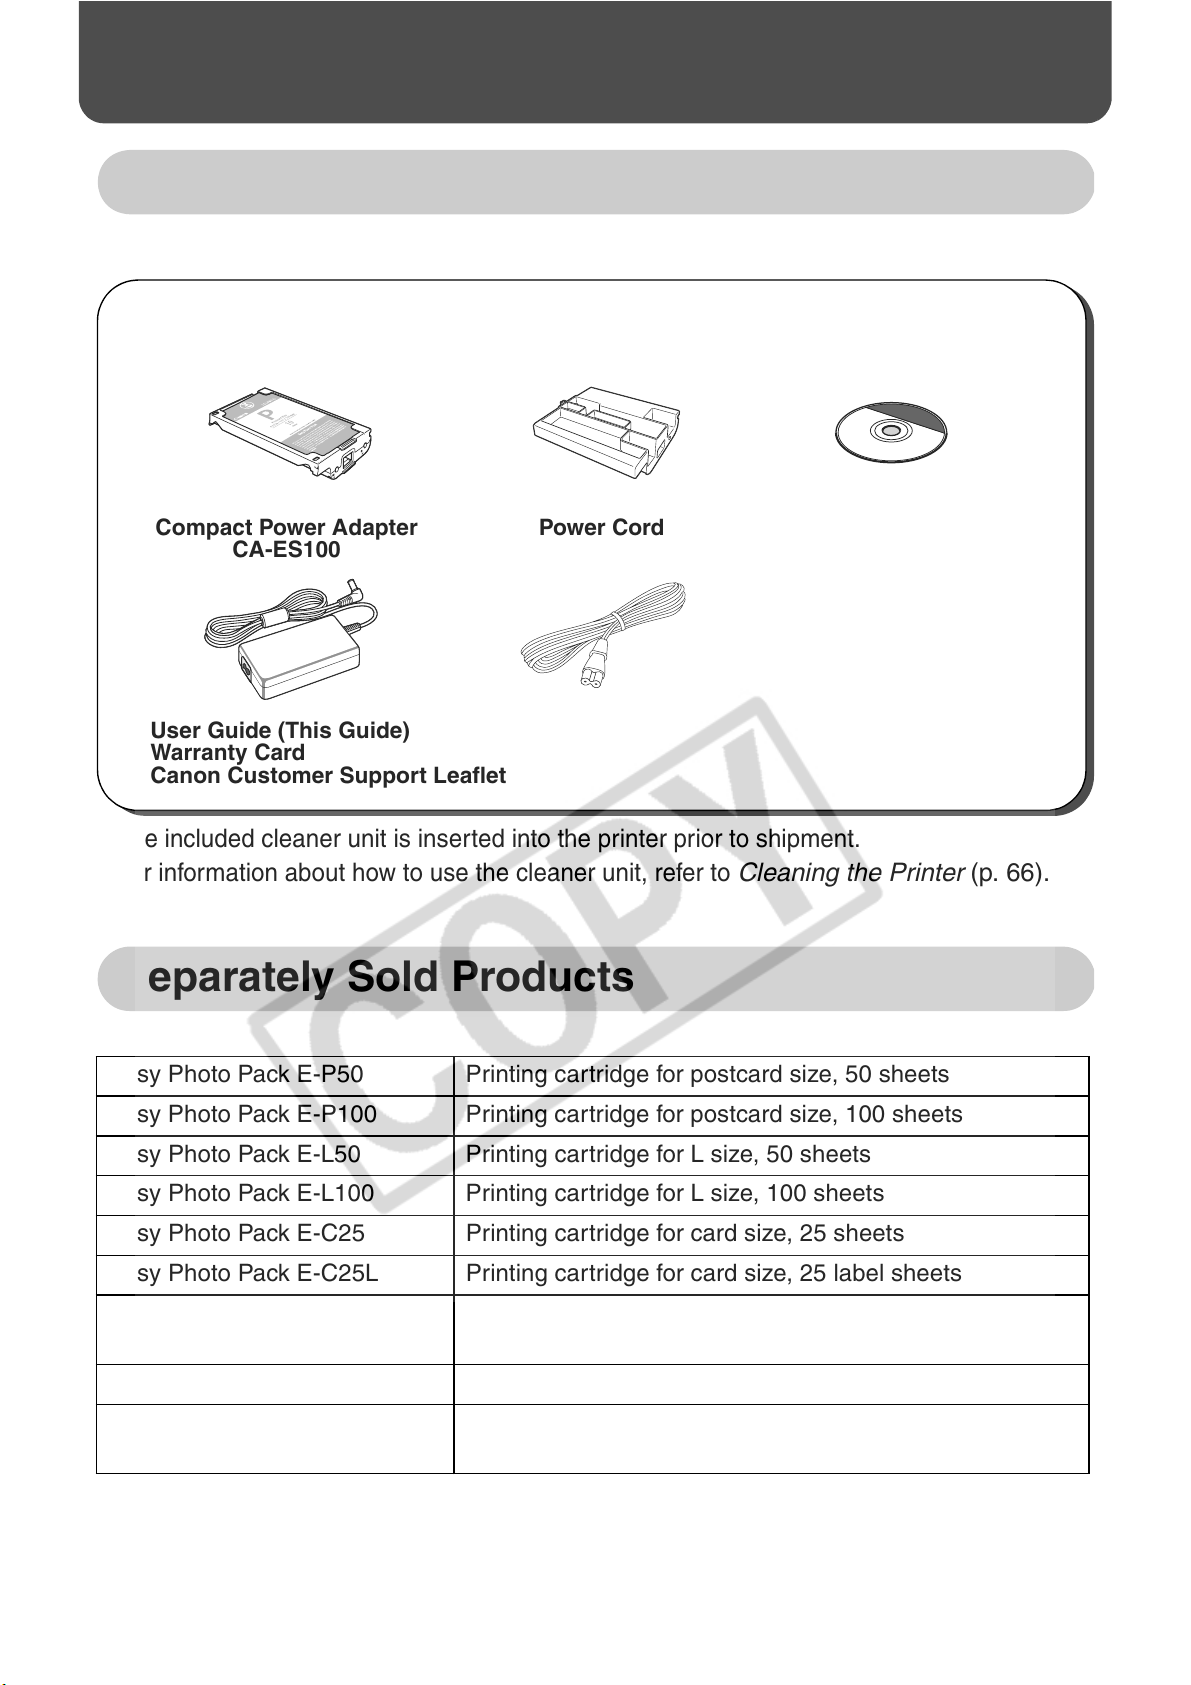
Package Contents
In addition to the printer, the package contains the following accessories.
Cartridge
(Postcard size, for 10
trial printouts)
Compact Power Adapter
CA-ES100
• User Guide (This Guide)
• Warranty Card
• Canon Customer Support Leaflet
*1
The included cleaner unit is inserted into the printer prior to shipment.
Cleaner Unit
Power Cord
*1
For information about how to use the cleaner unit, refer to
Compact Photo Printer
Cleaning the Printer (p. 66).
Solution Disk
Separately Sold Products
Easy Photo Pack E-P50 Printing cartridge for postcard size, 50 sheets
Easy Photo Pack E-P100 Printing cartridge for postcard size, 100 sheets
Easy Photo Pack E-L50 Printing cartridge for L size, 50 sheets
Easy Photo Pack E-L100 Printing cartridge for L size, 100 sheets
Easy Photo Pack E-C25 Printing cartridge for card size, 25 sheets
Easy Photo Pack E-C25L Printing cartridge for card size, 25 label sheets
Easy Photo Pack E-P25BW Printing cartridge for black and white postcard size, 25
sheets
Battery Pack NB-ES1L Battery pack
Bluetooth Unit BU-20 Enables wireless printing from devices that support the
Bluetooth standard.
16
Page 19
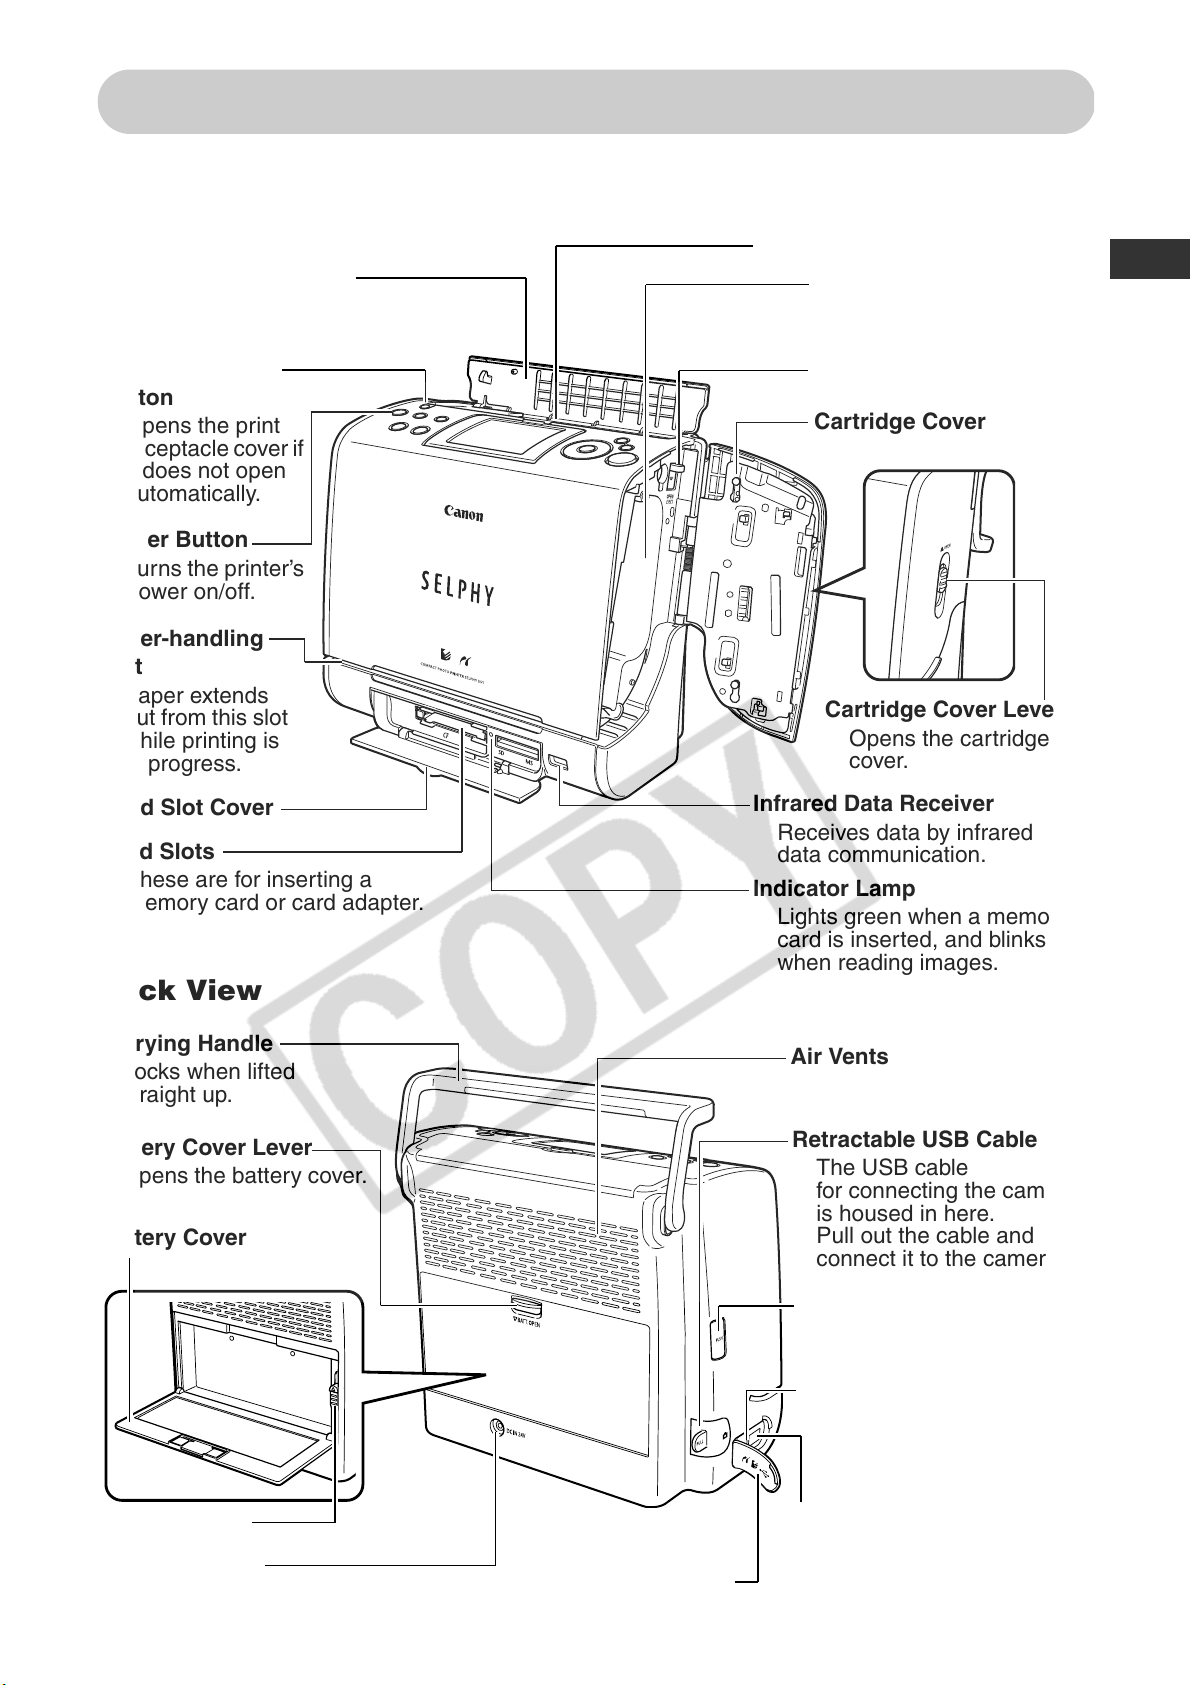
Components Guide
Compact Photo Printer SELPHY ES1
Front View
Print Receptacle Cover
Opens automatically
when printing starts.
Print Receptacle
Button
Opens the print
receptacle cover if
it does not open
automatically.
Power Button
Turns the printer’s
power on
Paper-handling
Slot
Paper extends
out from this slot
while printing is
in progress.
Card Slot Cover
Card Slots
These are for inserting a
memory card or card adapter.
/off.
Back View
Print Receptacle (Output Tray)
Cartridge Compartment
The cartridge is inserted
into this compartment.
Cartridge Lever
Cartridge Cover
Cartridge Cover Lever
Opens the cartridge
cover.
Infrared Data Receiver
Receives data by infrared
data communication.
Indicator Lamp
Lights green when a memory
card is inserted, and blinks
when reading images.
Carrying Handle
Locks when lifted
straight up.
Battery Cover Lever
Opens the battery cover.
Battery Cover
Battery Lever
DC IN Terminal
Connects to the compact power
adapter.
Terminal Cover
Air Vents
Retractable USB Cable
The USB cable
for connecting the camera
is housed in here.
Pull out the cable and
connect it to the camera.
USB Cable Retract
Button
USB Port
Connects commercially
available USB cables to a
computer.
Direct Print Port
Connects the interface
cable (included with the
camera) to the camera.
17
Page 20
Operation Panel
LCD Monitor
Displays images, operation mode
and error details.
DISP. (Display) Button
Displays the information
of the selected image.
EDIT Button
(pp. 28, 48)
Sets various
useful functions
to the image to
be printed.
Displays the creative print
menu.
Operation Buttons
Used for selecting images
and making print settings.
Button (p. 28)
Displays an enlarged
view of the image.
Button (p. 28)
Displays a reduced
view of the image.
PRINT/STOP
Button
Starts printing.
Printing is
canceled after this
button is pressed
during printing.
SET Button
Used for selecting and
setting images.
MENU ButtonCREATIVE Button
Displays the main menu.
Album
Print images in album format
(p. 32).
Calendar
Print your favorite images in
calendar format (p. 34).
Multi Layout
Print multiple images laid
out in the specified format.
(p. 35)
Speech Bubble
Print images with a speech
bubble attached (p. 36).
Single Photo Print
Printing one selected image
(p. 28).
Multi Photo Print
Print the required number of
specific images together
(p. 29).
Print All Photos
Print a single copy of all the
images on the memory card
at a time (p. 31).
Creative Print
Print images in a more
creative format (p. 32).
Power Button
DPOF Print
Print images according to
the DPOF setting (p. 37).
Auto Play
Play back images in file
number order (p. 38).
Printer Settings
Set the various useful
functions of the
(p. 48).
printer
18
The button’s surrounding area lights to indicate the printer status.
Green Lit Ready to print
Blinking Printing/Communicating
Orange Lit Charging the battery pack (sold separately)
Blinking Battery pack depleted (p. 62)
Red Lit Error (p. 70)
Blinking Error (p. 70)
Page 21
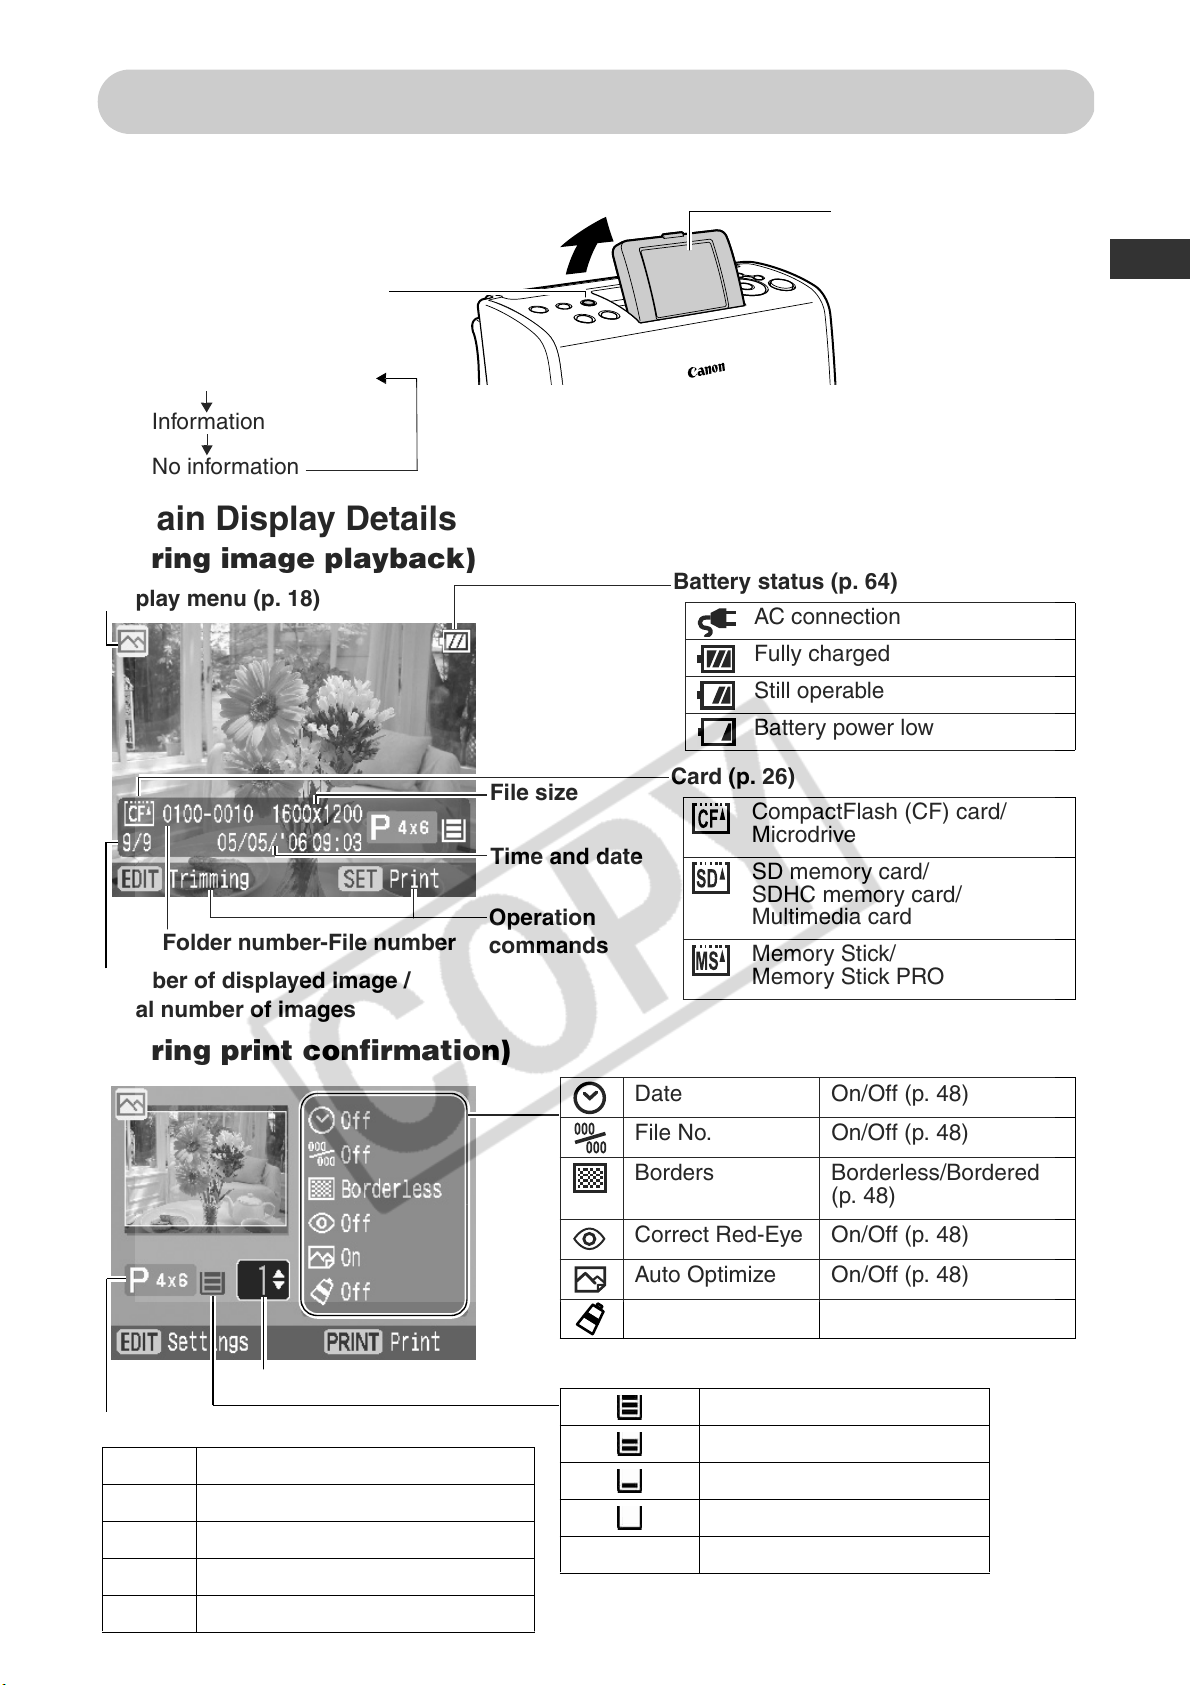
About LCD Monitor and Main Display Details
Adjusting the Angle of the LCD Monitor and Switching the Display
LCD Monitor
The angle of the LCD
monitor can be manually
DISP. (Display) Button
Each press of this button
switches the monitor display.
Operation commands
Information
No information
Main Display Details
(During image playback)
Display menu (p. 18)
Battery status (p. 64)
AC connection
Fully charged
adjusted to any angle.
File size
Time and date
Operation
Folder number-File number
Number of displayed image /
Total number of images
commands
(During print confirmation)
Still operable
Battery power low
Card (p. 26)
CompactFlash (CF) card/
Microdrive
SD memory card/
SDHC memory card/
Multimedia card
Memory Stick/
Memory Stick PRO
Date On/Off (p. 48)
File No. On/Off (p. 48)
Borders Borderless/Bordered
(p. 48)
Correct Red-Eye On/Off (p. 48)
Number of prints
Paper Size
P 4x6 Postcard size
LL size
C Card size
C Label Card size (full-sized label sheet)
BW Postcard size (black and white)
Auto Optimize On/Off (p. 48)
My Colors (p. 50)
Paper status (guideline)
*
No Display The status is not clear
*
The trial cartridge is different from the standard one
and is not shown in this table.
1/2 full or more
About 1/4 full or more
About 1/8 full or more
Empty
19
Page 22
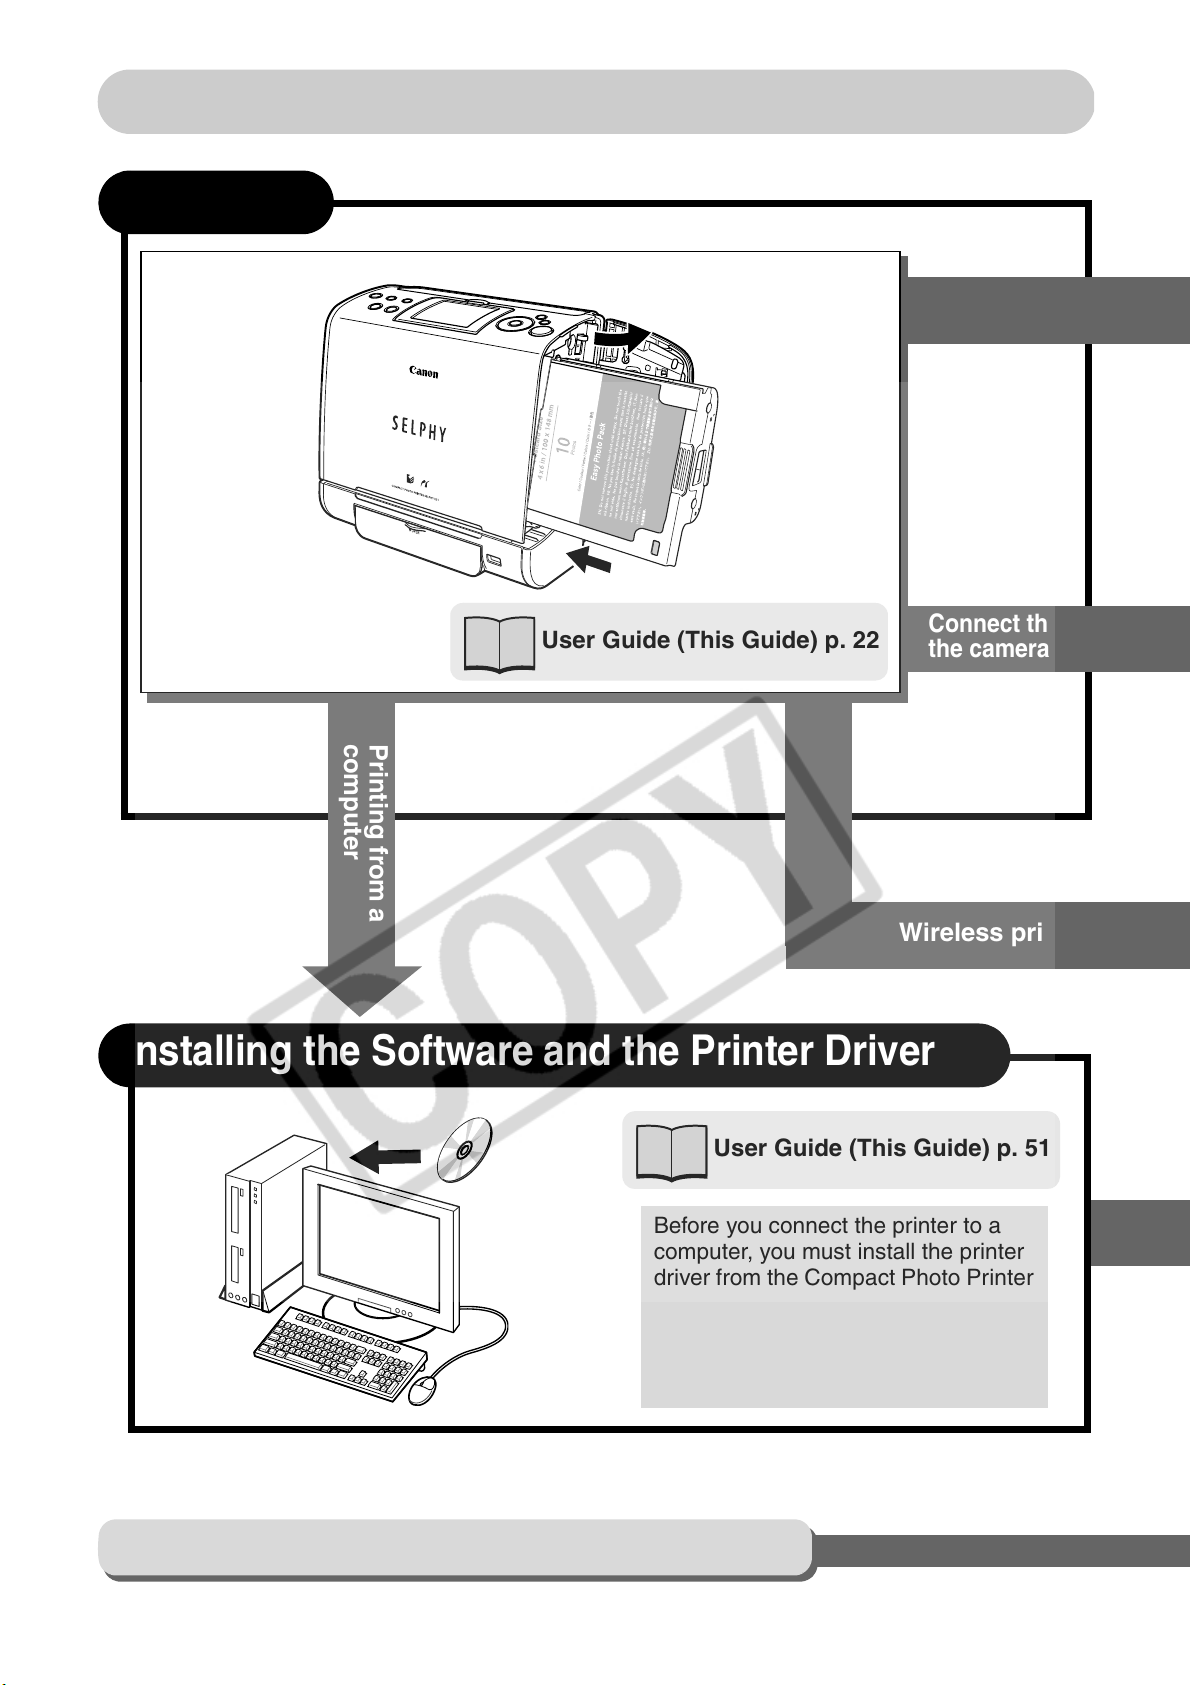
Printing Procedure and Reference Guides
Preparing
Printing from a
memory card
Connect the printer to
the camera for printing
Wireless printing
computer
User Guide (This Guide) p. 22
Printing from a
Installing the Software and the Printer Driver
User Guide (This Guide) p. 51
20
Before you connect the printer to a
computer, you must install the printer
driver from the Compact Photo Printer
Solution Disk. Be sure to install the
software before connecting the printer
to the computer using the procedure
on page 52.
When an Error Occurs and Troubleshooting
Page 23
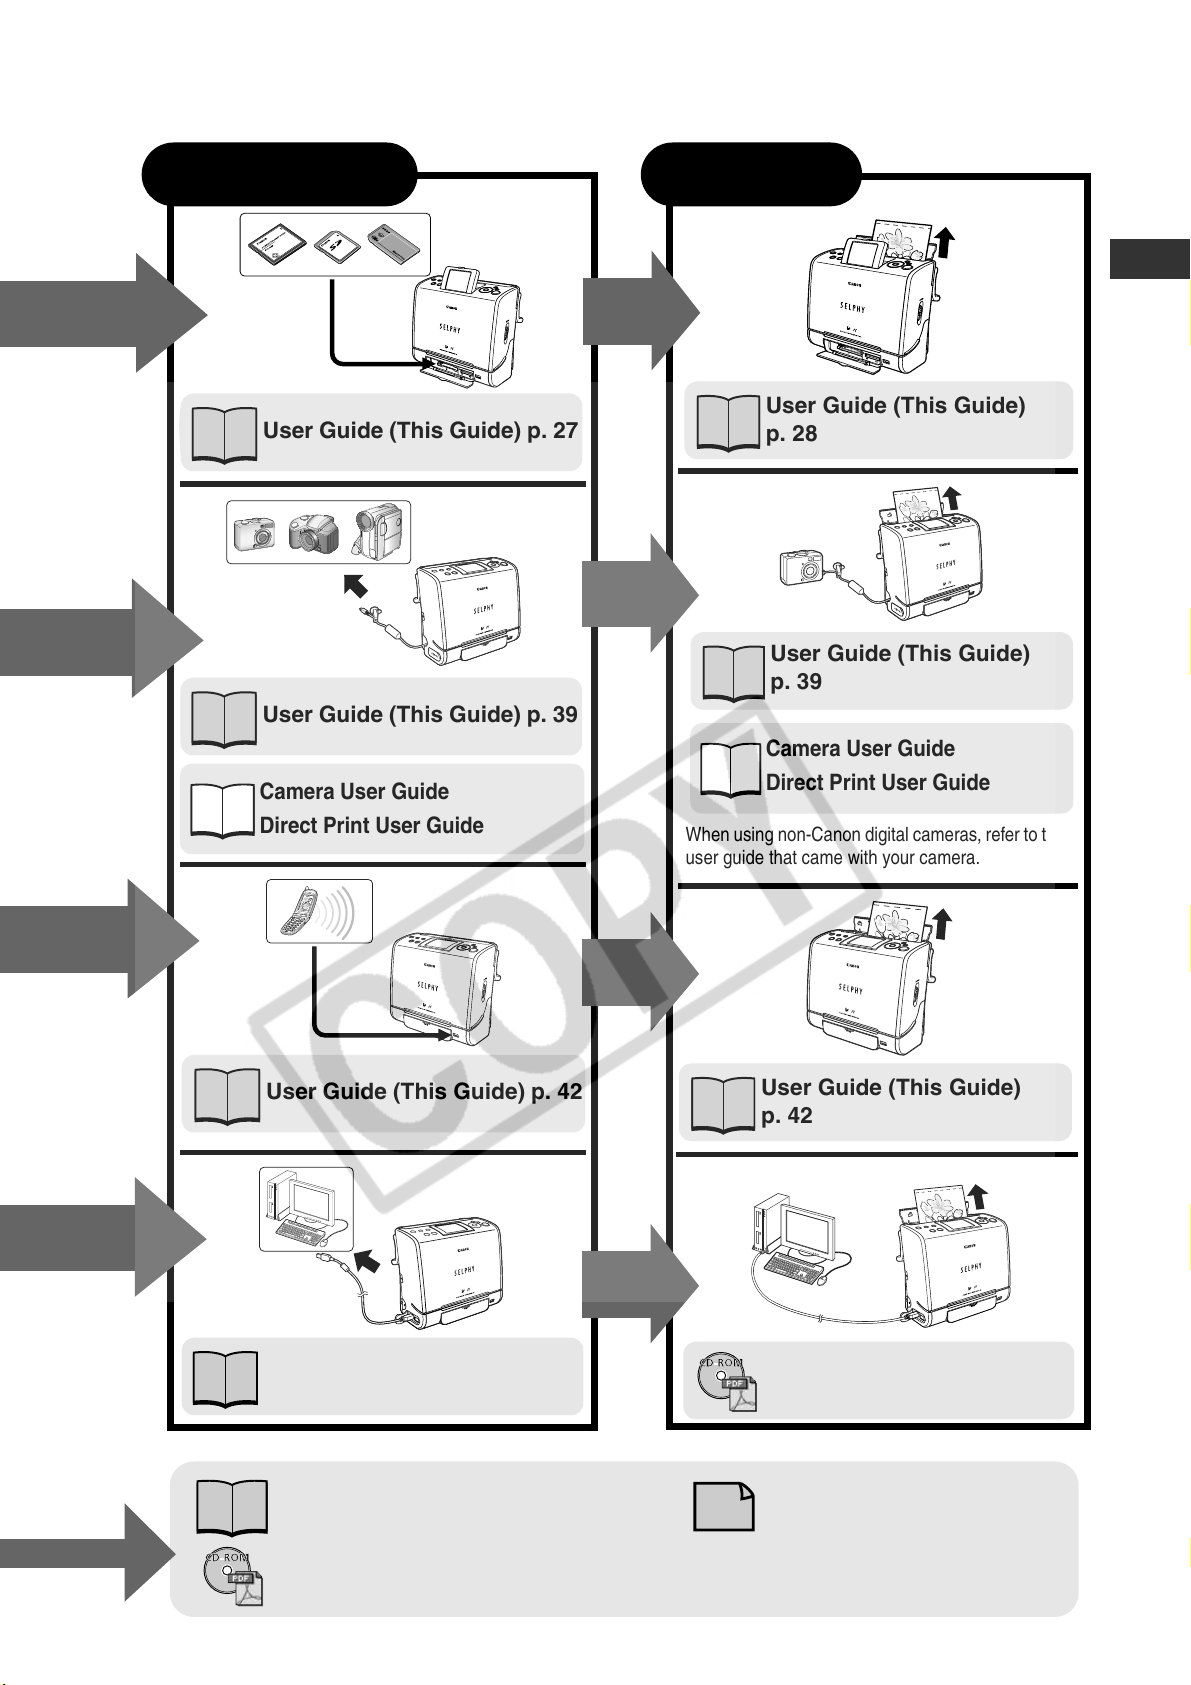
Connecting Printing
User Guide (This Guide)
User Guide (This Guide) p. 27
User Guide (This Guide) p. 39
p. 28
User Guide (This Guide)
p. 39
Camera User Guide
Camera User Guide
Direct Print User Guide
User Guide (This Guide) p. 42
Direct Print User Guide
When using non-Canon digital cameras, refer to the
user guide that came with your camera.
User Guide (This Guide)
p. 42
User Guide (This Guide) p. 58
Troubleshooting or Error Messages:
User Guide (This Guide) p. 67, 70
Printer Software Guide (
included with your printer
CD-ROM
)
Printer Software Guide (CDROM included with your printer)
Contacting us for repairs:
Canon Customer Support
Leaflet
21
Page 24
Let’s Prepare
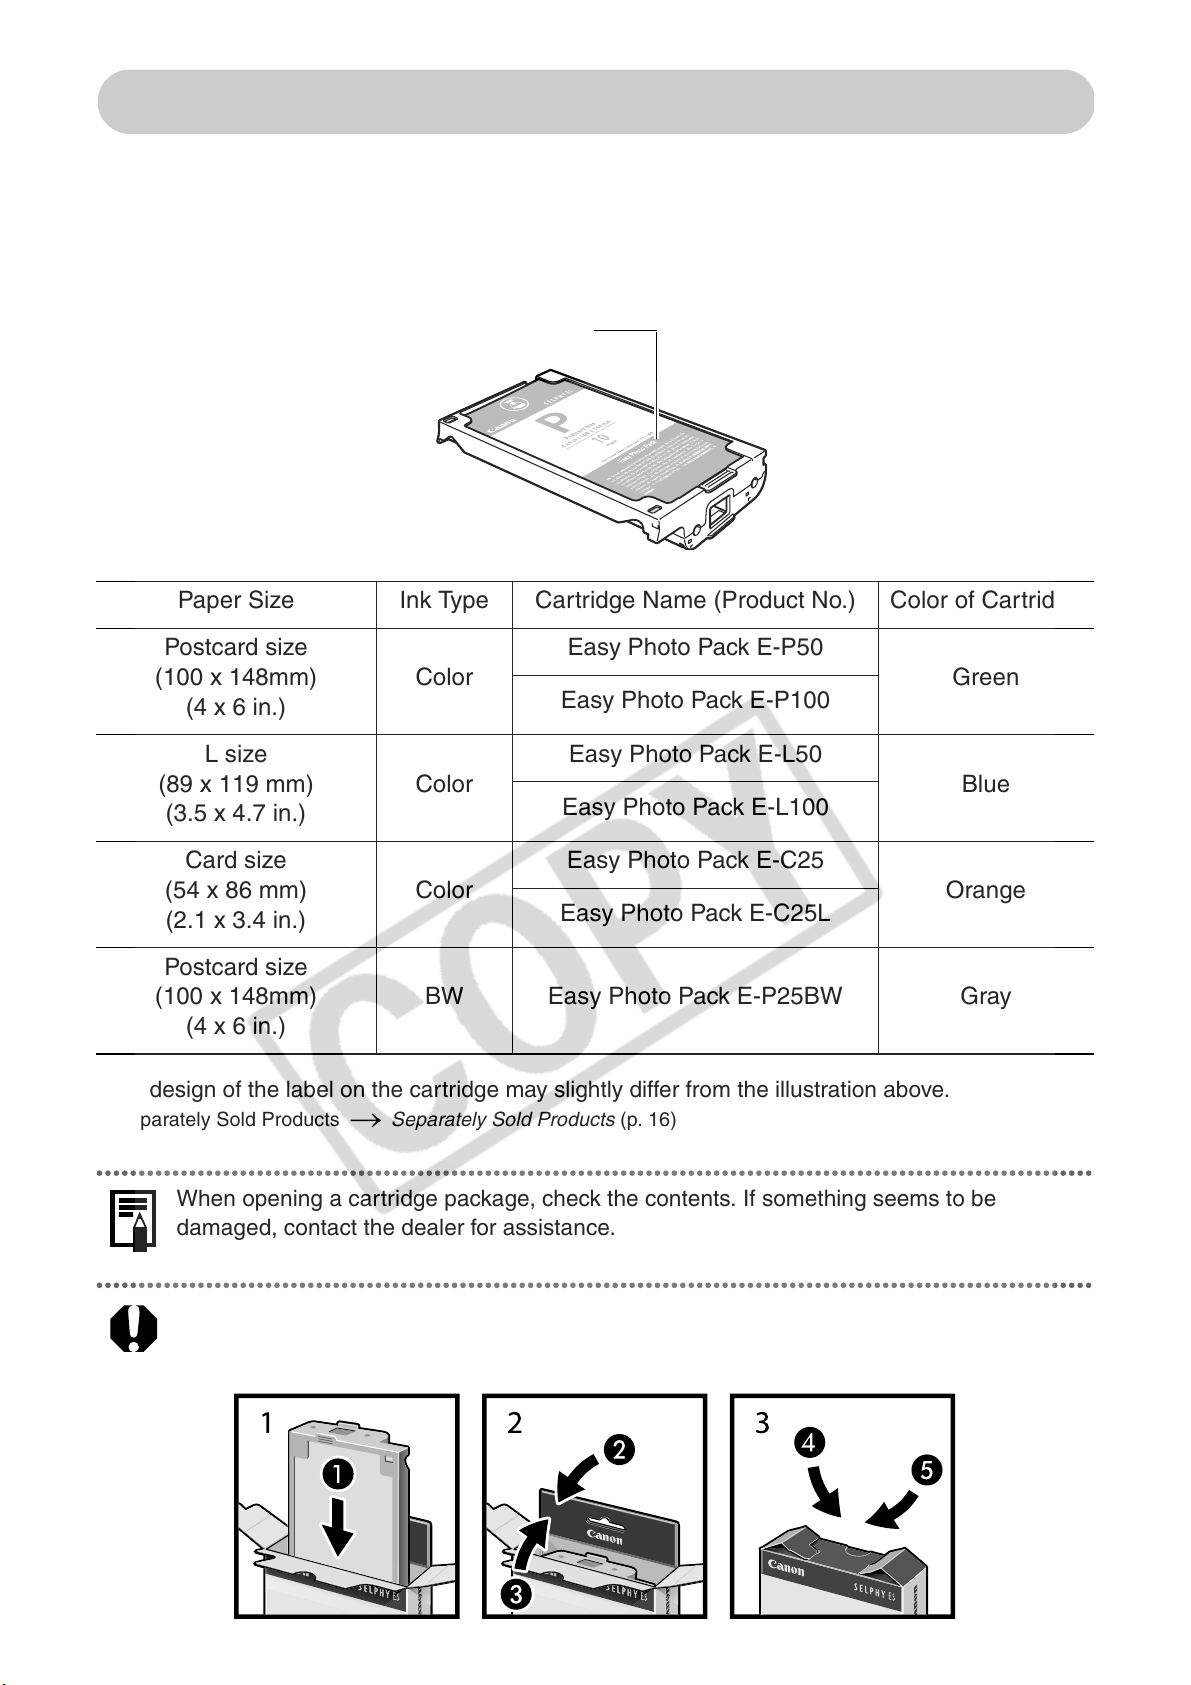
Preparing a Cartridge
An ink and paper integrated cartridge is used in this printer. Prepare a cartridge with the
size of the paper you will print.
The cartridge differs according to the paper size and ink type.
Cartridge Name
Paper Size Ink Type Cartridge Name (Product No.) Color of Cartridge
Postcard size
(100 x 148mm)
(4 x 6 in.)
L size
(89 x 119 mm)
(3.5 x 4.7 in.)
Card size
(54 x 86 mm)
(2.1 x 3.4 in.)
Color
Color
Color
*
Easy Photo Pack E-P50
Green
Easy Photo Pack E-P100
Easy Photo Pack E-L50
Blue
Easy Photo Pack E-L100
Easy Photo Pack E-C25
Orange
Easy Photo Pack E-C25L
Postcard size
(100 x 148mm)
(4 x 6 in.)
*
The design of the label on the cartridge may slightly differ from the illustration above.
Separately Sold Products Separately Sold Products (p. 16)
When opening a cartridge package, check the contents. If something seems to be
damaged, contact the dealer for assistance.
When storing cartridges, return the cartridge to its original package to prevent dust from
accumulating on the cartridge.
BW Easy Photo Pack E-P25BW Gray
22
Page 25

Loading the Cartridge
Proper Handling of Cartridges Cartridge (p. 14)
Check that the ink sheet is tight
1
and that the paper is correctly
loaded in the cartridge.
z
When inserting the cartridge into the printer, if the
ink sheet is so slack it catches, insert the cleaner
unit and turn it slowly to take up the slack.
z
If the paper is outside of the clips, push it
down with your finger so it is inside the clips.
•It will not be possible to use all the paper
for printing if you overwind the ink sheet.
•Do not touch or pull out the ink sheet.
Ink sheet
Clip
Cleaner unit
2
3
Lift up the cover lever to open the
Cartridge lever
cartridge cover, and insert the
cartridge all the way into the
compartment.
z
Push the cartridge all the way in, so that it
clicks into place.
z
When you are ready to remove the cartridge,
slide the lever down and pull the cartridge out.
•When replacing the cartridge, remove
all paper from the print receptacle
before printing.
•The colored paper on the top side of the cartridge is the protective paper. Load the
cartridge with this paper still attached.
Protective paper side facing front
Close the cartridge cover.
•You can check the type and the remaining
paper (ink) of the cartridge loaded in the
printer by the icons in the print confirmation
screen/printing screen or standby screen
(p. 19).
•After the power is turned on, or immediately
after the cartridge cover is opened/closed,
the status icon is not displayed.
This icon is displayed when at least one
sheet is printed.
Cover lever
When the cartridge cover is open, the cover
lever can become stuck in the lowered
position. When this happens, raise the lever to
close the cover.
Remaining paper (ink)
23
Page 26

z
Do not reuse empty cartridges. Attempting to reuse an empty cartridge may result in
malfunction or damage to the printer.
z
Do not remove the cartridge while feeding, printing, or ejection is in progress.
Placing the Printer
Usage Location Usage Location (p. 13)
Refer to the figure below when placing the printer. Numbers in the figure correspond to
the steps in the procedure below.
15 cm (6 in.) at the front and
1
back of the printer
and 10 cm (4 in.) on both
sides or more of open space
2
3
To power outlet
The battery pack (sold separately) also can be used (p. 62).
Place the printer on a flat area.
1
Connect the supplied power cord to the supplied Compact Power
2
Adapter.
Insert the plug into a power outlet.
3
Compact power
adapter
4
24
Connect the compact power adapter cord to the printer.
4
Page 27

Setting the Display Language (when the printer is used for
the first time)
Set the display language for menus and messages that appear on the LCD monitor.
Press the printer’s power button until it lights green.
1
z
The startup screen is displayed on the LCD monitor, followed shortly by the standby
screen.
Press and hold down the SET button, and then press the MENU
2
3
button.
Make sure that a memory card is not inserted into the printer and that a camera is not
connected to the printer.
Press the , , or button to select the language and press
the SET button.
z
The screen returns to the previous screen.
You can also set the display language using the following procedure.
Turn the printer on, and press the MENU
1
2
button, select [Printer Settings] with or
button, and then press the SET button.
Press the or button to select
[Language] and press the SET button.
z
Select the display language using the same procedure as
in step 3 above.
25
Page 28

Printing from Memory Cards
Insert the memory card into the printer to print images saved on the memory card.
z
Do not insert empty card adapters into the printer. The printer will not function
properly. Always insert a card into the adapter before inserting the adapter into the
printer. If an empty adapter has been inserted, remove the adapter, turn the power
off, and then turn it on again.
z
Make sure that a camera, computer or wireless adapter is not connected to the printer.
Compatible Memory Cards
*1
Icon
Memory cards that can be
directly inserted
z
SD memory card
z
SDHC memory card
z
MultiMedia Card
Memory cards that require
a dedicated adapter
z
miniSD memory card
z
miniSDHC memory
*2
card
*2
z
RS-MMC
*2 *3
26
z
CompactFlash Card
z
Microdrive
z
Memory Stick PRO
z
Memory Stick
*1
LCD monitor displays the icon of the memory card inserted in the printer.
*2
Use the specific adapter for the card.
*3
RS-MMC stands for Reduced-Size MultiMediaCard.
*4
TYPEI/TYPEII (Only 3.3 V cards are compatible.)
*5
Purchase the CompactFlash Card Adapter for xD-Picture Card separately.
z
SELPHY printer supports image data conforming to the Design rule for Camera File system
*4
*4
z
xD-Picture Card
z
Memory Stick PRO Duo
z
Memory Stick Duo
*5
*2
*2
(Exif compliant) and DPOF (Ver. 1.00) standards. This printer will recognize images saved in
folders and file structures not compliant with the Design rule for Camera File system (Exif
compliant). However, there is a possibility that images in deep file directories may not be
recognized.
z
Images saved on non-compatible memory cards might not be readable or data may be
corrupted. Use a memory card that is compatible with the camera. For details, refer to the
user guide included with the camera.
z
If formatting is necessary, format memory cards in the camera. Memory cards should not be
formatted on computers.
z
Images that have been edited on a computer might not be displayed or printed successfully.
z
Movies cannot be played back on this printer.
Page 29

Inserting/Removing Memory Cards
Do not load two or more memory cards at the same time.
Press the printer’s power button until it lights green.
1
2
z
The startup screen is displayed on the LCD monitor, followed shortly by the standby
screen.
Push the memory card all the way into the appropriate card slot.
z
The indicator lamp blinks green, and the
image is not displayed, make sure that there are images on the memory card and that
the memory card is fully inserted. Images cannot be displayed if a camera or wireless
adapter is connected.
•Insert memory cards with the top side up.
•Push the SD memory card, Memory Stick or their variants in until it clicks.
images
are displayed on the LCD monitor. If the
CF Card Slot
CF card /
Microdrive /
xD-Picture Card
*
A dedicated adapter is required (p. 26).
LCD monitor
Removing Memory Cards
SD memory card /
SDHC memory card /
*
Multimedia card /
miniSD memory card
miniSDHC memory card* /
RS-MMC
*
About LCD Monitor and Main Display Details (p. 19)
Memory Stick /
Memory Stick Duo
Memory Stick PRO /
*
/
Memory Stick PRO Duo
Indicator Lamp
SD Card Slot
*
/
*
z
CF card slot
Press the CF card eject
button.
Do not remove memory cards or turn the printer off while the indicator lamp is blinking.
z
SD card slot
Push the memory card with your finger until it clicks
and then release it.
27
Page 30

Buttons available for the following functions
DISP. (Display)
Button
EDIT Button
CREATIVE
Button
MENU Button
• Press the MENU button to
return to the previous screen.
Button
Button
Button
PRINT/STOP
Button
Button
SET Button
Button
Button
Single Photo Print
Display the image to be printed on LCD Monitor and print the image.
You can specify the number of prints of the displayed image to print. Images can also be
trimmed.
Turn the printer on, and insert the memory card into the
1
appropriate memory card slot (p. 27).
2
Press the or button to display the image
to print.
z
Pressing the DISP. (display) button cycles through the LCD
monitor display modes (p. 19).
z
If you press the button, nine images are displayed
together (index playback). During index playback, you can
select images with the or button. Pressing the
button ends index playback, and the display returns to the single image display. Printer
switches to index playback even if the or button is held down.
z
If you press the button during index playback, you can switch to jumping over nine
images at a time. The and button display the previous or the next nine images.
You can display the first nine images or the last nine images by pressing the or
button while holding down the SET button. Press the button to return to index
playback.
z
Each time you press the button, the display zooms in one level. During this enlarged
display, you can change the display position using the , , or button. Each
time you press the button during this enlarged display, the display zooms out one
level.
28
Page 31

3
4
To set the area to be printed (trimmed),
press the EDIT button and set the trimming
frame.
z
The following buttons can be used for the trimming frame:
Move: , , or buttons
Enlarge: button
Reduce: button
Rotate: DISP. (Display) button
z
To cancel the
z
Press the SET button to complete the setting.
When trimming is being set, cancel the enlarged display (p. 28).
Press the SET or PRINT/STOP button,
and check the settings on the LCD
trimming
setting, press the MENU button.
Trimming frame
monitor.
z
Press the or button to select the number of
prints.
z
Press the EDIT button to set the various useful
functions (p. 48).
Press the PRINT/STOP button.
Print preview
5
z
Printing starts. During printing, the printer’s power button blinks green.
z
You can also start printing by pressing the SET button.
During printer operation, paper is temporarily output from the printer. Do not touch the
paper until printing ends.
Multi Photo Print
Select a specific image in the LCD monitor and print that image.
The required number of specific images can be printed together.
1
2
Turn the printer on, and insert the memory card into the
appropriate memory card slot (p. 27).
Press the MENU button, select [Multi Photo
Print] with or button, and then press the
SET button.
29
Page 32

3
4
5
Press the or button to display the image
to print.
Selected image
z
You can switch the image display to index playback, and
enlarged display (see Single Photo Print step 2 on page
28).
Press the or button to specify the
number of prints.
Number of prints
When specifying the number of prints, cancel the enlarged
display (p. 28).
Repeat steps 3 and 4.
6
7
•Press the EDIT button and select [Select all] to print a single photo of each image.
Select [RESET] to cancel the print settings for all the images.
•To cancel the specified print setting, select the desired image, and press the
button to set the number of prints to “0”.
Press the SET or PRINT/STOP button, and
check the setting on the LCD monitor.
Print preview
(when 1-up is specified in Page Layout)
Number of sheets required for printing
z
Press the or button to change the page layout (p. 49).
z
Press the EDIT button to set various useful functions (p. 48).
Press the PRINT/STOP button.
30
z
Printing starts. During printing, the printer’s power button blinks green.
z
You can also start printing by pressing the SET button.
•You can specify a maximum of 998 images.
•After the images are printed all of their printing settings are cancelled.
Page 33

Print All Photos
Print a single copy of all the images on the memory card at one time.
Turn the printer on, and insert the memory card into the
1
2
appropriate memory card slot (p. 27).
Press the MENU button, select [Print All
Photos] with or button, and then press
the SET button.
Check the setting on the LCD monitor.
3
Print preview
(when 2-up is specified in Page Layout)
4
Layout
Number of sheets required for printing
z
Press the or button to change the page layout (p. 49).
z
Press the EDIT button to set various useful functions (p. 48).
Press the PRINT/STOP button.
z
Printing starts. During printing, the printer’s power button blinks green.
z
You can also start printing by pressing the SET button.
31
Page 34

Creative Print
The Creative Print function allows you to print more enjoyable images with ease. With
this function, Album, Calendar, Multi Layout and Speech Bubble printings are available.
Album Multiple images can be printed together like an album.
Calendar A one-month calendar and images are printed out in the desired
layout pattern.
Multi Layout Images are printed out in the desired layout pattern. Images can be
assigned as desired to individual frames.
Speech Bubble Images are printed out overlaid with the desired speech bubble
pattern.
Turn the printer on, and insert the memory card into the
1
appropriate memory card slot (p. 27).
Press the CREATIVE button.
2
z
The [Creative Print] menu can also be displayed by pressing the MENU button, selecting
[Creative Print] with or button and pressing the SET button.
To cancel operation during Creative Print settings, press the CREATIVE button. When
the print confirmation screen is displayed, select [OK] and press the SET button. The
settings are canceled, and the display returns to the [Creative Print] menu.
Press the or button to select the
3
function you want and press the SET button.
z
Operations from here on differ according to the selected
function. For details, refer to the corresponding page.
Album (p. 32)
Calendar (p. 34)
Multi Layout (p. 35)
Speech Bubble (p. 36)
If you press the MENU button during setting of each function, the screen returns to the
previous setting screen.
When [Album] is selected
32
4
Press the , , or button to select the
layout of the cover and press the SET button.
z
You can change the background color by pressing the
EDIT button. Press the
and press the MENU button.
or
button to select the color,
No cover
Page 35

5
6
7
Press the or button to select the image to
assign to the cover and press the SET button.
z
When “No cover” is selected in step 4, this operation is not
needed.
z
You can switch the image display to index playback,
enlarged display and other displays (see Single Photo Print
step 2 on page 28).
z
Press the EDIT button to trim the assigned image (see Single
Photo Print step 3 on page 29).
Press the , , or button to select the
page layout and press the SET button.
z
You can change the background color by pressing the EDIT
button. Press the
press the MENU button.
or
button to select the color, and
Press the or button to select the image
to print and press the or button to
Outline of the
printable area
8
assign the layout.
z
The image is automatically laid out. If there are fewer images than the selected layout,
blank spaces will be left. Write comments or the title of the album in the blank spaces with
an oil-based pen.
z
To select multiple images, repeat this step.
z
You can switch the image display to index playback, enlarged display and other displays
(see Single Photo Print step 2 on page 28).
•You can specify a maximum of 997 images.
•To cancel an assigned image, press the or button.
•You can select all images by pressing the EDIT button. When the Select all menu is
displayed, select [Select all] and press the SET button. Select [RESET] to cancel the
print settings for all the images.
Selected image
Selected page layout
Press the SET button and check the settings.
Print preview
9
z
Press the EDIT button to set various useful functions
(p. 48).
Press the PRINT/STOP button.
z
Printing starts. During printing, the printer’s power button blinks green.
z
You can also start printing by pressing the SET button.
33
Page 36

When [Calendar] is selected
First perform steps 1 to 3 on page 32, then proceed to step 4 below.
Press the , , or button to select the
4
layout of the calendar and press the SET
button.
z
You can change the background color by pressing the
EDIT button. Press the
and press the MENU button.
or
button to select the color,
Press the , , or button to select the
5
year and month of the calendar to print and
press the SET button.
z
If you press the EDIT button, you can specify the day of the
week to start the week ([Sunday]/[Monday]) and holidays
([No highlight]/[Sunday]/[Saturday]/[Sat. & Sun.]).
select setting items by pressing the
setting values by pressing the or button. When you have finished making setting,
press the MENU button.
or
You can
button, and
6
7
You can choose month and year until December, 2037.
The year/month display format can be changed in [Date Format] (p. 48).
Press the or button to select the image
to print.
z
You can switch the image display to index playback,
enlarged display and other displays (see Single Photo Print
step 2 on page 28).
z
The image can be trimmed (see Single Photo Print step 3
on page 29).
Press the SET button and check the
settings.
Print preview
z
Press the or button to select the number of
prints.
Outline of the
printable area
34
8
z
Press the EDIT button to set various useful functions
(p. 48).
Press the PRINT/STOP button.
z
Printing starts. During printing, the printer’s power button blinks green.
z
You can also start printing by pressing the SET button.
Page 37

When [Multi Layout] is selected
First perform steps 1 to 3 on page 32, then proceed to step 4 below.
Press the , , or button to select
4
the layout and press the SET button.
2 images per sheet
4 images per sheet
8 images per sheet
3 images per sheet
z
You can change the background color by pressing the EDIT button. Press the
button to select the color, and press the MENU button.
8 images per sheet layout can be specified only when printing on card size paper.
Press the or button to select the image
5
to assign to the initial frame and press the
or
6
or
z
z
button.
You can switch the image display to index playback,
enlarged display and other displays (see Single Photo Print
step 2 on page 28). Note that image information is not
displayed.
Press the EDIT button to trim images assigned to the
layout frame (see Single Photo Print step 3 on page 29).
Note that trimming is performed matching the aspect ratio of the assigned layout frame
(e.g., width-to-height ratio approximately 4:3 for 2-up and 4-up).
To cancel an assigned image, press the or
button again
Outline of the
printable area
.
Press the DISP. (Display) button to select the
next frame.
Outline of the
printable area
7
Layout frame already assigned an image
Currently selected layout frame
Repeat steps 5 and 6 to assign images to desired frames.
z
If you want to create a blank space, press the DISP. (Display) button to move the frame.
Write comments or the title in the blank spaces
with an oil-based pen
.
35
Page 38

Press the SET button and check the
8
9
First perform steps 1 to 3 on page 32, then proceed to step 4 below.
4
settings.
z
Press the or button to select the number of prints.
z
Press the EDIT button to set various useful functions
(p. 48).
Press the PRINT/STOP button.
z
Printing starts. During printing, the printer’s power button blinks green.
z
You can also start printing by pressing the SET button.
When [Speech Bubble] is selected
Press the or button to select the image to
print and press the SET button.
Print preview
5
6
z
You can switch the image display to index playback,
enlarged display and other displays (see Single Photo Print
step 2 on page 28).
Press the , , or button to select the
speech bubble and press the SET button.
Press the , , or button to adjust the
position of the speech bubble.
z
If you press the or button, you can rotate the
position of the “tail” of the speech bubble in a maximum of
eight steps.
z
You can change the color of the speech bubble by pressing
the EDIT button. Press the or button to select the
color, and press the MENU button.
36
7
Press the SET button and check the
settings.
z
Press the or button to select the number of prints.
z
Press the EDIT button to set various useful functions
(p. 48).
Print preview
Page 39

Press the PRINT/STOP button.
8
z
Printing starts. During printing, the printer’s power button blinks green.
z
You can also start printing by pressing the SET button.
To write a message in the speech bubble, use an oil-based pen.
Print Using Camera Specified Settings (DPOF Print)
You can make prints according to the DPOF (Digital Print Order Format) setting specified
on the camera.
z
The date and file number settings comply with the DPOF information. The date and file
number cannot be set in [Printer Settings]. For details on the DPOF settings, refer to the
documentation provided with your camera.
z
When Page Layout is set to Index, the page layout cannot be specified.
Turn the printer on, and insert the memory card into the
1
appropriate memory card slot (p. 27).
2
3
Press the MENU button, select [DPOF Print]
with or button, and then press the SET
button.
z
[DPOF Print] cannot be selected when a DPOF-specified
image is not found on the memory card.
Check the setting on the LCD monitor.
Layout
The “Print type” set on the camera is displayed.
Number of standard( ) prints
Number of index:( ) prints
Number of sheets required for printing
Displayed when the date is set on the camera.
4
Displayed when the file number is set on the camera.
z
Press the or button to change the page layout (p. 49).
z
Press the EDIT button to set various useful functions (p. 48).
Press the PRINT/STOP button.
z
Printing starts. During printing, the printer’s power button blinks green.
37
Page 40

Auto Play
All images on the memory card are automatically played back in file number order. Play
time is 3 seconds duration.
You can print the image after pausing the auto play.
Turn the printer on, and insert the memory card into the
1
2
appropriate memory card slot (p. 27).
Press the MENU button, select [Auto Play]
with or button and press the SET
button.
z
Images are automatically played after they have finished
being read. The following buttons can be used for
operations during automatic playback:
• Automatic playback pause/resume: SET button
• Previous image/Next image: and buttons
3
4
To cancel automatic playback, press the MENU button.
To printing an image that is being played
back, press the PRINT/STOP button and
check the settings.
Print preview
z
Press the or button to select the number of
prints.
z
Press the EDIT button to set various useful functions (p. 48).
z
Press the PRINT/STOP button to start printing. During printing, the printer’s power
button blinks green.
Press the MENU button.
z
The screen returns to the main menu.
38
Page 41

Connecting to a Camera for Printing
Connecting to a Canon Camera for Printing
Use the printer’s retractable USB cable to directly connect it to a camera and start
printing.
For more details, refer to your Camera User Guide or Direct Print User Guide.
Make sure that a memory card is not inserted into the printer and that the printer is not
connected to a computer.
z
We recommend that you use the camera’s compact power adapter (sold separately or
included with the camera) when connecting the camera to your printer. If you wish to run the
camera on battery power, be sure that the battery pack is fully charged or the batteries are
fresh.
z
Some camera models do not come with a compact power adapter. For details, please see the
System Map that came with your camera.
1
2
Pull out the retractable USB cable
from the printer, and connect the
cable to the camera.
z
You can also use the USB cable included
with your camera. In this case, connect the
DIGITAL terminal on the camera to the
direct print port or USB port (p. 17).
z
To retract the USB cable, press the USB
cable retract button.
z
The cable can be pulled out about 35 cm
(13.8 in.). Note that pulling the cable out
beyond this length may damage it.
USB Cable Retract Button
Press the printer’s power button until it lights green.
39
Page 42

3
Turn the camera’s power on and
display an image.
z
Check that the
Direct Print)
corner of the camera’s LCD monitor.
If no icon is displayed, see Troubleshooting (p. 67).
z
Some camera models automatically power up
when the cable is connected to the printer. The
icon then displays on the camera’s LCD monitor.
icon is displayed in the upper left
(PictBridge) or
(Canon
4
5
The black and white cartridge (Easy Photo Pack E-P25BW) cannot be used when
is displayed on the camera’s LCD monitor.
Display an image to be printed and press the SET or SELECT
button.
z
If your camera has a (Print/Share) or (direct print) button, printing starts
immediately after you press the or button (step 5 is not necessary).
Select [Print] and press the SET or
SELECT button.
z
The printer starts printing. During printing, the
printer’s power button blinks green.
z
The camera returns to the playback screen once
printing is successfully completed.
z
To cancel printing, use camera commands.
•If printing does not start, check the camera’s
LCD monitor for any messages (p. 70).
•Printing cannot be canceled by pressing the PRINT/STOP button when printing from
a camera.
The screen may differ depending
on the model of your camera.
40
Page 43

Connecting to a Non-Canon Digital Camera for Printing
Since the SELPHY ES1 printers support the direct print PictBridge* standard, you can
connect PictBridge compliant non-Canon digital cameras to easily print high quality
photos.
*PictBridge: PictBridge is an industry standard for direct printing that allows you to print images
without using a computer by directly connecting a digital camera or digital camcorder
(hereafter “camera”) to a printer, regardless of their brands and models.
Before Using the Printer
Please read carefully the user guide that came with your camera and make sure that:
z
The camera is PictBridge compliant.
z
You are using the retractable USB cable or the USB cable for the camera/computer connection
to connect the printer to the camera.
z
The camera’s communication settings are configured correctly.
z
You set the print settings with the camera.
*
For details, refer to the camera’s user guide.
*
*
Connecting the Camera
Connect the retractable USB cable to the camera’s terminal. If the connector on the
camera side does not match up, insert one end of the USB cable included with your
camera in the printer’s direct print port or USB port (p. 17) and insert the other end in the
camera’s terminal. For details, refer to the camera’s user guide.
z
The printer’s power button blinks green several times once the printer and camera are correctly
connected. The power button lights steadily green once it is ready to print.
z
If a problem occurs during a connection or during printing, the printer’s power button lights or
blinks red. If this happens, the error message that appears on the camera’s LCD monitor may
differ according to your camera model.
Printing speed may differ according to your camera model and the image’s number of
recorded pixels. (The value written on page 73 is a printing speed obtained when printing
with a Canon camera.)
Disconnect the camera
Before you disconnect the camera from the printer, turn off the printer by holding down
the power button until the green indicator goes out.
41
Page 44

Wireless Printing
Infrared (IrDA) Wireless Printing
You can transmit and easily print out the images shot by a camera equipped mobile
phone.
The mobile phone must have the following features.
z
JPEG image recording/saving capacity
z
Infrared data communication (with an IrDA compliant infrared data communication port)
Refer to your mobile phone’s manual when using infrared data communication.
Disconnect the camera or Bluetooth unit if it is connected to the
1
printer, or remove the memory card if it is inserted (p. 27).
z
The printer enlarges or reduces the size of the image according to the paper size
and sets the print direction to vertical or horizontal automatically. The upper, lower,
left or right portion(s) of the printed image may be trimmed depending on the
combination of the image size and paper size.
2
z
Printing is done according to the setting value specified in [Printer Settings] (p. 48).
Transmit an image from your
mobile phone to the printer.
z
Aim the mobile phone’s infrared port at
the printer
transmit the image data to the printer.
See the illustration to the right for the
transmittable distance. Note that the
distance differs depending on the
mobile phone model.
connection methods,
phone
z
During communications, the IrDA screen is
displayed on the printer’s LCD monitor and
the power button blinks green.
transmission is interrupted, the power
button stops blinking and lights green.
Check the message appearing on the
mobile phone display if an error occurs.
’s infrared data receiver and
For details on
refer to your mobile
’s manual.
If data
Within 20 cm
(Do not place objects
within this range.)
Effective range
Approx. 10 degrees (both
top/bottom and left/right)
42
3
z
If the data transmission fails, move the
mobile phone closer to the front of the
printer
repeat the procedure.
’s infrared data receiver and
IrDA screen
Printing starts after the data transmission is complete.
Printing cannot be canceled by pressing the PRINT/STOP button when printing
wirelessly.
Page 45

z
E-mail and phone directories cannot be printed.
z
Downloaded contents or image data, for example, downloaded from a URL attached to
mail cannot be printed due to the security settings made on the mobile phone.
z
Some mobile phones have limited memory capacity for infrared data transmission and you
may not be able to print the image at the best quality.
z
The images on the memory card (such as an SD memory card or Memory Stick) of some
mobile phones cannot be printed.
z
Movies cannot be printed.
z
Do not place any obstacle between the printer and the mobile phone.
z
Avoid direct sunlight on the infrared data receiver. Direct sunlight may interfere with
the communication with the mobile phone.
z
Do not place the printer near a plasma display. Placing it near a plasma display may
prevent the printer from communicating with the mobile phone.
z
During data transfer, do not interrupt the infrared data communication. If
communications are interrupted, do the procedure again.
z
Image quality may become coarser if you print on postcard size or L size paper. If this
happens, we recommend printing on card size paper.
z
If you transmit a large image, the transmission may take more than five minutes.
z
After the printer starts communicating with the mobile phone, do not do any printing
operations from the camera or computer until printing is complete.
z
The printer cannot communicate with the mobile phone until any printing jobs from a
computer are complete.
Printing via a Wireless LAN
If you attach a PictBridge compliant wireless print adapter to the printer, you can print
images taken with a camera that has wireless LAN support after transmitting the images
wirelessly to the printer.
z
For details, refer to the user guide included with the camera.
43
Page 46

Printing via Bluetooth
Before Use
When Bluetooth Unit BU-20 (sold separately) is installed on the printer, images can
be sent to the printer for printing wirelessly from a Bluetooth-compatible mobile
*1
phone
or PDA*2.
Wireless printing via Bluetooth from a computer is not possible.
*1 The mobile phone must have the following features.
• Built-in Bluetooth and support for OPP (Object Push Profile) or BIP (Basic Imaging Profile).
For details on supported profiles, refer to the user guide of the mobile phone you are using.
• Image data (JPEG images of maximum size 4MB) recording/saving capacity
*2 Conditions for PDA compatibility
• Compatible model
Runs Windows CE or Palm OS with built-in Bluetooth and support for OPP (Object Push Profile)
or BIP (Basic Imaging Profile).
For details on supported profiles, refer to the user guide of the PDA you are using.
• Supported print data
Image data (JPEG images of maximum size 4 MB) taken by a PDA or mobile phone camera.
44
Page 47

Setting Bluetooth
To use Bluetooth, the printer's model and security settings must be set in advance.
Disconnect the computer or camera if it is connected to the printer,
1
or remove the memory card if it is inserted.
z
Printing is done according to the setting value specified in [Printer Settings] (p. 48).
Install the Bluetooth Unit.
2
z
Insert Bluetooth Unit BU-20 into the USB port on
the printer.
Display the [Printer Settings] menu (see Making Printer Settings
3
(Various Useful Functions) steps 1 and 2 on page 49).
4
5
Press the or button to select [Bluetooth]
and press the SET button.
Press the or button to select the desired setting item, and
press the or button to set the item.
z
The following table summarizes the setting items and their functions.
Device name Select a name from Canon ES1-1* to ES1-9. This is the
name used when the target device (this device) is selected
from the mobile phone. This setting distinguishes this device
when there are two or more Bluetooth-compatible devices
capable of communications.
Security Select either [On] or [Off]
the printer and mobile phone must be entered when
connecting to the printer.
*
. When set to [On], the passkey for
Passkey The passkey refers to an identification number to be
determined. It is used to prevent incorrect access from other
Bluetooth devices. When [Security] is set to [On], press the
SET button and set the key (4-digit number) to enter on the
mobile phone to enable printing. The default passkey is
“0000”.
Deny Access Select either [On] or [Off]
searching and printing from Bluetooth devices.
Reset Returns Bluetooth settings to their defaults.
*
Default setting
*
. Selecting [On] will disable
45
Page 48

6
Printing
1
2
Press the MENU button.
z
The display returns to the [Printer Settings] menu. Pressing the MENU button again
returns the display to the main menu.
Disconnect the computer or camera if it is connected to the printer,
or remove the memory card if it is inserted.
z
Printing is done according to the setting value specified in [Printer Settings] (p. 48).
Install the Bluetooth Unit.
z
Insert Bluetooth Unit BU-20 into the USB
port on the printer.
3
4
Send the image to the printer from the
mobile phone or PDA.
z
For details on how to print or make Bluetooth
connections from a mobile phone or PDA, read the user
guide of the mobile phone or PDA you are using.
When selecting the model name, select “Canon ES1-
x” (x stands for the 1-digit number you set on page 45).
z
During communications, the Bluetooth screen is
displayed on the printer’s LCD monitor.
To be
Bluetooth screen
Printing starts after the data transmission is complete.
During transfer, Bluetooth Unit BU-20 blinks blue. During data transfer, do not
interrupt the
procedure again.
•Image quality may become coarser if you print on postcard size or L size paper. If this
happens, we recommend printing on card size paper.
•Printing cannot be canceled by pressing the PRINT/STOP button when printing
wirelessly.
Bluetooth communications. If communications are interrupted, do the
46
5
End printing.
z
Either remove the Bluetooth Unit from the printer, or turn the printer off.
Page 49

Communications distance
z
The maximum communications distance is approx.10 m (approx. 32.8 ft.). However, the
following conditions sometimes cause this distance or printing speed to change:
-Obstacles or radio wave conditions between communications devices
-Sites where magnetic fields, static electricity or radio wave interference is generated
-Reception sensitivity and antenna performance of communications devices
Image data that can be sent to the printer from the mobile phone or PDA
z
Downloaded contents or image data, for example, downloaded from a URL attached to
mail cannot be printed due to the security settings made on the mobile phone.
z
Image data saved after being edited on the PDA sometimes cannot be printed.
z
Movies cannot be printed.
z
It sometimes takes time for printing to start after image data is sent depending on the size
of the image data file.
z
Only image data files up to 4 MB in size can be sent.
z
Image data saved on memory cards sometimes cannot be printed depending on the
model you are using.
z
Print quality and orientation (portrait or landscape) are automatically set according to the
size of the image (recording pixels) when the image was taken.
z
The left and right, and top and bottom of images are sometimes trimmed depending on
the size of the image.
47
Page 50

Making Printer Settings (Various Useful Functions)
Using the Various Useful Functions
You can make various settings, such as printing of date and file number, selecting the
print layout and correcting images. The following table summarizes the settings items
and details for each of the functions. Items in the following table that are gray can also be
set in the printing confirmation screen (but borders cannot be set from Creative Print).
Item Description Settings
*2
Date
File No.
Borders
*2
*2
Page Layout
Correct Red-
*3
Eye
Prints the date. On, Off
Prints the file number. On, Off
Sets borders for 1-up or speech
bubble printing.
*2
Sets the number of images to print
on a single sheet of paper.
Corrects red-eye. On, Off
Borderless*6, Bordered
1-up
6 types Page Layout (p. 49)
*6
*6
*6
*6
Auto Optimize*2Automatically corrects the image
On*6, Off
so that it is optimized.
My Colors
*3 *7
Changes the color of the image
Off*6, 10 types My Colors (p. 50)
when it is printed.
Date Format
*1
Selects the date format used when
yy/mm/dd, mm/dd/yy, dd/mm/yy
printing out the date.
Auto Rotate Vertically displays images that are
On*6, Off
set to be rotated.
Auto Power
Down
*4
The printer automatically turns off
if no operations are performed for
On*6, Off
five minutes.
Bluetooth
*5
Setting Bluetooth (p. 45) Press the SET button and select the
desired item in the display screen.
Language Setting the Display Language
(when the printer is used for the
Press the SET button and select the
desired item in the display screen.
first time) (p. 25)
Reset All Returns all setting items to their
defaults.
*1
Enabled only when printing from a memory card
*2
The camera’s settings are given priority when printing from the camera
*3
Enabled when printing from a memory card, or via Bluetooth, IrDA or cameras that display
the
*4
Disabled when connected to a computer
*5
Enabled only when a Bluetooth unit is connected
*6
Default
*7
Does not display when using the black and white cartridge (Easy Photo Pack E-P25BW).
(PictBridge) in their LCD monitor
Press the SET button and select the
desired item in the display screen.
48
Page 51

1
2
3
Turn the printer’s power on, and press the MENU button (p. 27).
Press the or button to select [Printer
Settings] and press the SET button.
[Date]/[File No.]/[Borders]/[Correct Red-Eye]/[Auto
Optimize] can also be set by selecting settings in each of
the printing confirmation screens.
Press the or button to select the desired
setting item, and press the or button to
change the setting value.
z
When [Bluetooth], [Language] or [Reset All] are selected,
press the SET button to display the sub menu. Select the
desired
and press the SET button.
item to be set using the , , or button,
When [Reset All] is selected, all settings (except Date Format and Language) can be
returned to their defaults. In the Reset All confirmation screen, press the or
button to select [OK] and press the SET button.
Press the MENU button.
4
z
The screen returns to the main menu.
Page Layout
The following six layouts can be selected when printing by [Multi Photo Print], [Print All
Photos] or [DPOF Print]. The available layout differs according to the paper used. Check
which layouts are available in the table below.
1-up ([Borderless]/[Bordered] can be
selected in [Borders].)
2-up
4-up
8-up
Index
Fixed Size
(A white border is left on
the right side of the
printed image. So you
can write your message
with an oil-based pen.)
49
Page 52

Available layouts for each paper size
Paper Size 1-up 2-up 4-up 8-up Index
*
Fixed Size
Postcard size print { { {
L size { { {
Card size { { { { {
*
The file number is printed when both Date and File No. are set to [On].
When the print mode is set to [Print All Photos] and Page Layout is set to [Index], all of the
images in memory card can be printed out as an index.
My Colors
-
{
-
{
70.0 x 100.0 mm
(2.8 x 3.9 in.)
89.0 x 55.0 mm
(3.5 x 2.2 in.)
-
The My Colors function simply changes the color of images to any desired color before
the image is printed out. For example, it changes the red, green and blue color balance,
or lightens or darkens skin tone. Note, however, that images may get coarser or the color
may not be reproduced as intended depending on the photographic conditions.
Off The image is printed out without the My Colors function applied.
Vivid Contrast and color depth are enhanced to produce sharp hues.
Neutral Contrast and color depth are suppressed to produce a subdued hue.
Sepia Images are printed out in sepia tones.
B/W Images are printed out in black and white.
PositiveFilm This setting makes red, green or blue colors more intense like the
[Vivid Red], [Vivid Green] or [Vivid Blue] effects. It can produce
intense natural-appearing colors like those obtained with positive film.
Lighter Skin
Darker Skin
Vivid Blue The color blue is enhanced. This is good for printing subjects
Vivid Green The color green is enhanced. This is good for printing subjects
Vivid Red The color red is enhanced. This is good for printing subjects
*
If the image contains colors that are the same as human skin, those colors will also be
changed. Skin color effects sometimes are not produced depending on the color of the skin.
*
*
Skin tones are reproduced in a lighter tone.
Skin tones are reproduced in a darker tone.
containing lots of blue, such as the sky and the sea, more vividly.
containing lots of green such as mountains, new growth, flowering
plants and lawns, more vividly.
containing lots of red, such as red flowers and red cars, more vividly.
50
Page 53

Connecting to a Computer for Printing
System Requirements
Please install the software on a computer meeting the following minimum requirements.
Windows
OS Windows 2000 Service Pack 4
Windows XP (Including Service Pack 1 and Service Pack 2)
Computer Model The above OS should be pre-installed on computers with built-in USB
ports.
CPU Pentium 500 MHz or higher processor
RAM 256 MB or more
Interface USB
Free Hard Disk
Space
Display 1,024 x 768 pixels/High Color (16 bit) or better
Macintosh
OS Mac OS X (v10.2 - v10.4)
Computer Model The above OS should be pre-installed on computers with built-in USB
CPU PowerPC G3/G4/G5 or Intel processor*
RAM 256MB or more
Interface USB
Free Hard Disk
Space
• Canon Utilities
- Easy-PhotoPrint:
- ZoomBrowser EX:
• Canon SELPHY
4 MB or more (the amount of free space required for installation)
ports.
• Canon Utilities
- ImageBrowser: 200 MB or more
• Canon SELPHY
4 MB or more (the amount of free space required for installation)
65MB or more
200 MB or more
ES1 Printer Driver:
ES1 Printer Driver:
Display 1,024 x 768 pixels/32,000 colors or better
*
EOS Utility (an application for EOS DIGITAL cameras) supported on PowerPC only
z
A CD-ROM drive is required to install the software.
z
Even when system requirements are met, not all computer functions can be guaranteed.
z
Macintosh software cannot be used on disks formatted in the UFS (Unix File System)
format.
51
Page 54

Installing the Printer Driver and the Software
The Compact Photo Printer Solution Disk contains software that your computer will
require for printing. Install the printer driver and the software according to the following
steps.
The instructions in this section are intended for Windows XP and Mac OS X (v10.3). If you
are using another version of OS, actual screen contents and procedures may differ slightly
from those indicated here.
Windows
z
Be sure to install the software and the printer driver before connecting the printer to the
computer.
z
Be sure to log on with Administrator privileges (computer system administrator) when
installing the software.
Close any programs that are running.
1
Place the Compact Photo Printer Solution Disk in the CD-ROM drive.
2
Install the printer driver to your computer.
z
How to display the installer panel
If the installer panel does not automatically appear, use the following procedure to
display it.
1. Click the [start] button and select [My Computer].
For Windows 2000, double-click the [My Computer] icon on the desktop.
2. Right-click the CD-ROM icon and select [Open].
3. Double-click the SETUP.EXE
*
The “.EXE” extension may not display depending on the computer used.
Click the Printer Driver [Select printer] button.
3
*
icon ( ).
52
Installer panel
Click the printer you are using.
4
Page 55

5
6
Click [Yes] if you consent to all the conditions of the software
license agreement.
z
The installer starts.
When the screen below appears, connect the printer to the
computer with a commercially available USB cable and turn the
printer’s power on.
Refer to Connecting the Printer to Your Computer (p. 58) on how to connect.
z
Follow the onscreen instructions to proceed.
When a dialog box appears instructing that the installation is
7
Next, install the software to your computer.
complete, click [Finish].
z
Restart your computer when a dialog box appears instructing you to do so.
Click the Application Software [Easy Installation] button.
8
z
Select [Custom Installation] to select programs for individual installation.
z
If the installer panel does not appear, refer to How to display the installer panel (p. 52).
53
Page 56

9
10
Follow the onscreen instructions and click [Install] when the
screen for confirming the installation details appears.
Follow the onscreen instructions to proceed. When a dialog box
appears instructing that the installation is complete, click [Finish].
z
Restart your computer when a dialog box appears instructing you to do so.
11
When the computer desktop displays, remove the Solution Disk
from the CD-ROM drive.
54
Page 57

Macintosh
Be sure to install the software and the printer driver before connecting the printer to the
computer.
Close any programs that are running.
1
Place the Compact Photo Printer Solution Disk in the CD-ROM
2
drive, and double-click the icon in the CD-ROM window.
z
The installer panel appears.
Click the Printer Driver [Select printer] button.
3
4
5
Installer panel
Click the printer you are using.
Click [Agree] if you consent to all the conditions of the software
license agreement.
z
The installer starts.
55
Page 58

Select [Easy Install] and then click the [Install] button.
6
z
Follow the onscreen instructions to proceed.
z
Restart your computer when a dialog box appears instructing you to do so.
Next, register your printer in the Printer List.
7
8
9
Connect the printer to the computer with a commercially available
USB cable and turn the printer’s power on.
For directions on connecting the printer, see Connecting the Printer to Your Computer (p. 58).
Double-click the [Printer Setup Utility] or [Print Center] icon in
[Applications] [Utilities] folder.
z
The Printer List window appears.
Click the [Add] button.
56
Page 59

Select [USB], select the printer name, and then click the [Add]
10
button.
Close the window by clicking in the upper left-hand corner.
11
Next, install the software to your computer.
12
13
14
Click the Application Software [Install] button.
Select [Easy Installation] and then click [Next].
z
Select [Custom Installation] to select programs for individual installation.
Follow the onscreen instructions to proceed. When a dialog box
appears instructing that the installation is complete, click [OK].
57
Page 60

Connecting the Printer to Your Computer
Notes about connection
Before connecting the printer to a computer, make sure that a memory card is not
inserted into the printer and that the printer is not connected to a camera.
z
The printer may not function properly.
When using the USB cable, be sure to connect the printer directly to your
computer.
z
If you connect the USB cable to a USB hub, the printer may not function
properly.
Do not use other USB devices (with the exception of a USB mouse or USB
keyboard) at the same time as the printer. The printer may not function properly.
z
Disconnect the other USB devices from your computer and then reconnect the
printer.
Do not connect two or more compact photo printers to the same computer via the
USB interface at the same time.
z
The printers may not function properly.
For Windows, when connecting the printer to your computer, we recommend that
you connect it to the same USB port you used to install the printer driver.
z
If you connect the printer to a different USB port, Windows may create a copy
of the printer driver. This depends on your Windows version and the printer
driver, and does not affect the operation of the printer.
To delete a copy of the printer driver, proceed as follows:
1. Disconnect the USB cable from your computer.
2. Delete the copy of the printer driver as follows (do not use the uninstaller.)
(1) For Windows XP, click the [start] button and select [Control Panel] [Printers
and Other Hardware] [Printers and Faxes].
For Windows 2000, click the [Start] button and select [Settings] [Printers].
(2) Right-click the copy of the printer driver and then select [Delete] on the
shortcut menu.
3. Restart your computer. Connect the printer to the USB port you used to install
the printer driver.
z
Do not put your computer into the standby mode (or sleep mode) while the printer is
connected to a USB port.
z
If you accidentally do so, do not disconnect the USB cable from your computer while it is in
the standby mode; instead, leaving the USB cable connected, first return your computer to
its normal mode. If you remove the USB cable while your computer is in the standby
mode, your computer may not be able to return to its normal mode. For details on your
computer’s standby mode, refer to the documentation provided with your computer.
58
Page 61

1
Connect one end of a commercially available USB cable to the USB
port on the printer, and the other end to a USB port on your
computer.
z
There is no need to turn off the printer or your computer.
z
When connecting the printer to your computer, make sure the connectors on the ends of
the USB cable match the ports on the printer and your computer.
z
For the location and direction of your computer’s USB port, refer to the documentation
provided with your computer.
USB port on
computer
USB cable
When disconnecting the USB cable, you do not need to turn off the printer or your computer.
59
Page 62

Software Manuals
Adobe Reader or Adobe Acrobat Reader must be installed to view the PDF Manuals. If this
software is not already installed in your computer, access the following web site and
download the software.
http://www.adobe.com/products/acrobat/readstep2.html
Printer Software Guide
This guide describes how to print using the software installed on your computer.
Install the software from the Compact Photo Printer Solution Disk.
1
(Windows p. 52, Macintosh p. 55)
z
The Printer Software Guide is automatically installed.
Double-click the icon that appears on the desktop.
2
z
The Printer Software Guide will be displayed.
XXXX Printer Guide
The following manuals can be downloaded from the following web site if they are required:
http://web.canon.jp/Imaging/information-e.html
- ZoomBrowser EX Software User Guide
- ImageBrowser Software User Guide
60
Page 63

Uninstalling the Software
Windows
Click the [start] button and select [All Programs] [Canon Utilities] [ZoomBrowser EX]
[ZoomBrowser EX Uninstall].
z
You can use the same procedure to uninstall other software.
Macintosh
Drag the application’s folder (the folder in which it was installed) into the Trash, and
empty the Trash.
Uninstalling the Printer Driver
Windows
Click the [Start] button and select [All Programs] [Canon SELPHY XXXX]
[Uninstaller].
Macintosh
Double-click the icon in Solution Disk, select Printer Driver [Select printer] on the
installer panel, and follow the onscreen instructions that appear to uninstall the printer
driver.
Next, delete the printer from the Printer List.
61
Page 64

Using the Battery Pack (Sold Separately)
You can print outdoors or at locations without a power outlet by installing Battery Pack
NB-ES1L (sold separately).
Proper Usage and Handling of the Battery Pack Handling of the Battery Pack (Sold Separately) (p. 64)
Do not use the battery pack in products other than those recommended by Canon.
Installing and Charging the Battery Pack
To charge Battery Pack NB-ES1L, install it in the printer.
Remove the battery pack’s
1
terminal cover.
2
3
When the battery pack is not in use,
always store it with its terminal cover
on.
Press the battery cover lever
down and open the battery
cover.
Install the battery pack in the
printer.
z
Slide the battery pack into place, in the
direction of the arrow ( ), and push it
in until it clicks into place ( ).
To remove the battery pack, slide the
battery lever up and pull the battery
pack out.
1
2
Te rm in a l c ov er
1
1
2
Battery lever
2
62
Page 65

4
Close the battery cover.
5
6
Attach the power cord to
Compact Power Adapter
CA-ES100 and plug it into a
power outlet.
Connect the compact power
adapter cord to the printer.
z
The power button lights orange while
charging and turns off once the battery
pack is fully charged.
If the power button is pressed and the
printer’s power turns on while
charging the battery pack, charging
will stop. Pressing the power button
again will turn off the printer and
charging will resume.
Compact power
adapter
Compact power adapter cord
To power outlet
Power cord
Power button
Disconnect the compact power
7
If the battery power is low, the printer’s power button blinks orange.
Also, the camera’s LCD monitor or printer’s LCD monitor display an error message
(p. 70).
Change it with a fully charged battery pack or recharge the battery pack. You can also
use the printer’s compact power adapter.
adapter cord from the printer
once charging is complete.
z
The battery pack can be used to power
the printer.
Battery Status
63
Page 66

Appendix
Handling of the Battery Pack (Sold Separately)
Checking the Battery Status
z
The following icons and messages are displayed.
Indication Description
There is sufficient battery power.
To use the printer for a long time, either use fully charged batteries
or charge the battery as soon as possible.
Battery power is low. We recommend recharging the battery pack.
(Blinking red) Operations other than printing are possible.
Recharge the
printer battery
Change it with a fully charged battery pack or recharge the battery
pack immediately. You can also use the printer’s compact power
adapter.
The AC adapter is connected.
Proper Usage and Handling
z
If the battery power is low, the finished print may not be ejected into the print receptacle
completely.
If this happens, turn the power off then on again. Paper is automatically output to the print
receptacle.
z
At low temperatures, battery performance is sometimes reduced and the low battery
power icon ( , ) may be displayed earlier than usual.
Battery performance can be recovered by putting the battery pack in your pocket, for
example, to warm it up before use.
z
When warming up the battery pack, do not put key holders or other metal objects in your
pocket.
These may cause the battery pack to short-circuit.
64
z
Do not allow key holders or other metal
Figure A
Figure B
objects to contact (i.e. short-circuit) the “ ”
and “ ” terminals of the battery (Figure A).
When carrying the battery pack or when the
battery pack is not used, be sure to attach the
terminal cover (Figure B).
Otherwise, the battery pack might become
damaged.
z
When storing a battery pack, you are recommended to use it in the printer until it is
completely discharged and to store it in an indoor location with low relative humidity
-
and between the temperatures of 0
Storing a fully charged battery pack for long periods of time (about 1 year) can shorten its
lifecycle or affect performance. If you do not use the battery pack for long periods of time,
charge it fully and discharge it fully in the printer at least once a year before returning it to
storage.
30 °C (32 - 86 °F).
Page 67

Charging the Battery Pack
z
This is a lithium ion battery pack so there is no need to completely use or discharge it
before recharging.
It can be charged at any charge state.
z
It takes approximately 2 hours 55 minutes to bring a depleted battery pack to a full
charge state (based on standard Canon testing criteria).
• We recommend recharging the battery pack in a temperature of 5 - 40 °C (41 104 °
F
).
• The charging time varies according to the ambient temperature and charge state.
z
You are advised to charge the battery on the day of use, or one day before, to ensure a
full charge.
Even charged battery packs continue to discharge naturally.
z
If the usable time of a battery pack diminishes substantially even when fully charged, it
should be replaced.
65
Page 68

Cleaning the Printer
Cleaning Inside the Printer
If faint stripes appear in the printed image, a probable cause is that dust has
accumulated inside the printer. Remove any dust using the cleaner unit included with
your printer.
Remove the cartridge.
1
Insert the cleaner unit in the
2
direction of the arrow and with
the arrow on the cleaner unit
facing up. Push it in completely
and slide it in and out of the
printer 2 or 3 times.
Cleaning the Printer Casing
Wipe the casing with a soft dry cloth. If stronger cleaning is required, wipe first with a
cloth moistened with a diluted neutral solvent, then wipe again with a soft dry cloth. If you
use a chemical cleaning cloth, read the instructions that come with it and observe all
indicated precautions.
Never use benzine, paint thinner, or other volatile solvents to clean the printer. Volatile
solvents may cause deformation or peeling of the printer’s casing.
Cleaning the Back of the Printer
Keep the air vents clean and free of dust. Clean the vents as necessary. Dust that enters
the printer through the vents may land on the ink sheet, resulting in poor print quality.
If the ink sheet becomes dusty, remove the cartridge and replace it with a new one.
66
Page 69

Troubleshooting
If the printer does not seem to be working properly, run through the checks below to see
if you can identify and correct the problem. If you are not able to solve the problem,
please call your dealer or contact a Canon Customer Support center for assistance.
The printer has no power.
The compact power adapter
or power cord is not correctly
connected.
The printer’s power button is blinking red.
There is a malfunction in the
printer.
The (PictBridge) or
corner of the camera’s LCD monitor.
The cable is not correctly
connected.
The printer’s power is off.
Your camera’s firmware is
incompatible with this printer.
Printing from a memory card
is in progress or printing
connected to a computer is
in progress.
z
Be sure that the compact power adapter and power cord
are connected correctly. Be sure that the power cord is
plugged into a standard power outlet.
z
Turn the printer’s power off and turn it on again.
(Canon Direct Print) icon does not display in the upper left
z
Connect the cable correctly (p. 39).
z
Turn the printer’s power on (p. 39).
z
Please check the Canon BeBit website (http://
web.canon.jp/Imaging/BeBit-e.html), or your regional
Canon website, for information or to download compatible
firmware.
z
Wait until printing has completed.
The printer does not print.
The printer is not correctly
connected to the camera.
The camera’s battery pack or
batteries are depleted.
The cartridge is not loaded
correctly.
Too much slack in the
cartridge’s ink sheet.
The printer has overheated.
Printing stopped midway.
The printer is not correctly
connected to the camera.
z
Connect the cable correctly (p. 39). If the connection is
correct, the or icon will appear on the camera’s
LCD monitor.
z
Replace with a fully charged battery pack or fresh
batteries, or plug the camera into a power outlet (using the
camera’s optional compact power adapter).
z
Load the cartridge correctly (p. 23).
z
Take up the slack (p. 23).
z
Wait for the printer to cool down.
z
Connect the cable correctly (p. 39).
67
Page 70

Print is not ejected.
Paper has jammed inside the
printer.
The print receptacle cover
did not open.
The printer’s power button lights red without the camera’s LCD monitor displaying
any error message.
There is a malfunction in the
printer.
z
Remove the cover below
the paper-handling slot
(the cover can be opened
by laying the printer down,
placing your fingers on
both sides of the cover and
lifting up) and remove the
jammed paper.
Re-attach the cover.
z
If the print receptacle cover does not open automatically
and paper gets jammed, press the print receptacle button
on the left side of the operation panel to open the print
receptacle cover and remove the jammed paper.
z
Remove the paper from the paper-handling slot and take
up any slack in the ink sheet. Turn the printer’s power off
and turn it on again.
Print quality is not good.
The ink sheet or paper is
dirty.
Condensation has formed
inside the printer.
Faint stripes appear in the print.
Dust has accumulated inside
the printer.
Printed images are distorted.
The printer is too close to a
TV, video game machine, or
other electromagnetic
source.
The printer is too close to a
stereo speaker, large motor,
or other strong magnetic
source.
z
z
z
z
z
z
Use a clean cartridge.
Store the cartridge so that dust does not accumulate on it.
Wait for condensation to evaporate (p. 13).
Remove the dust inside the printer using the cleaner unit
(p. 66).
Move the printer so that it is at least 1 meter (3.3 ft.) away
from the electromagnetic source.
Move the printer away from the strong magnetic source.
There is not enough ink left for the allotted sheets in the set.
You turned the printer’s
power on and off repeatedly.
You pulled on the ink sheet.
z
Please avoid turning the printer’s power on and off
needlessly as the printer initialization consumes ink. There
may not be enough ink left for the allotted sheets in the
set.
z
Do not forcefully pull on the ink sheet.
68
Page 71

Nothing happens when the camera’s , or SET button is pressed.
The printer has overheated.
Printing is in progress.
Frequent paper jams.
The print receptacle is
overloaded.
The cartridge cover does not close all the way.
The cover lever is down.
“?” instead of the image is displayed on the LCD monitor.
“?” is sometimes displayed
depending on the image.
The image selected on the LCD monitor is not printed.
z
Wait for the printer to cool down.
z
Wait for the printer to finish printing.
z
Do not load more than 50 sheets of paper into the print
receptacle.
z
Lift the cover lever again and then close the cartridge
cover.
z
The image cannot be printed because it is corrupted.
z
The image has been altered with a computer or has had its
extension changed and may not print correctly.
When the list of images is printed, the index print contains an image displayed as a
white dropped out area.
You tried to print the
following images:
- An image taken with a
different camera or
recorded as a different type
- An image altered by a
computer
- An image with a data size
that is too big
- An image that is corrupted
z
Check the size of the image you are trying to print and the
number of recorded pixels on the camera, and convert the
image to JPEG compressed type that can be displayed on
the camera. Limit the size of image files to less than 8000
x 6000 pixels.
69
Page 72

Error Messages
The power button of the printer blinks or lights red and a message is displayed on the
LCD monitor if any error occurs during printing. If a problem occurs while the printer is
connected to the camera, the camera's LCD monitor may display an error message.
Power button
Button State Remedy
Blinks red
Blinks orange
Lights red
LCD monitor
Message Remedy
No paper/ink
Paper jam
z
An error (e.g. paper jam) that prevents printing from restarting has
occurred. Turn the printer off then back on again, and try printing
again.
z
Battery pack depleted. Change it with a fully charged battery pack or
recharge the battery pack. You can also use the printer’s compact
power adapter.
z
Check the error message on the LCD monitor.
z
Check that the cartridge is correctly installed.
z
Make sure that the cartridge contains paper/ink.
z
If paper is not feeding correctly, remove the cartridge, and manually
remove any paper remaining in the printer.
z
Press the PRINT/STOP button to eject the paper. If the paper is not
ejected, turn the power off and turn it on again. If the printer fails to
eject the paper, contact a Canon Customer Support center for
assistance.
Ink Error
Recharge the
printer battery
Cannot print!
z
Remove the cartridge from the printer, take up the slack in the ink
sheet, and then reload the cartridge. If the cartridge is stuck in the
printer, contact a Canon Customer Support center for assistance.
z
Change it with a fully charged battery pack or recharge the battery
pack. You can also use the printer’s compact power adapter.
z
You tried to print the following images:
-An image taken with a different camera or recorded in a different
type
-An image altered by a computer
-An image with a data size that is too big
-An image that is corrupted
Check whether the image’s size matches the camera’s pixel capacity.
If the size is not appropriate, resize the image and convert it as
necessary to a JPEG image that the camera can display. Limit the
size of image files to less than 8000 x 6000 pixels.
70
Page 73

Message Remedy
Could not print
XX images
No Image.
z
Yo u t r ied to print xx of the following images at the DPOF setting:
-An image taken with a different camera or recorded in a different
type
-An image altered by a computer
-An image with a data size that is too big
-An image that is corrupted
Check whether the image’s size matches the camera’s pixel capacity.
If the size is not appropriate, resize the image and convert it as
necessary to a JPEG image that the printer can display. Limit the size
of image files to less than 8000 x 6000 pixels.
z
The memory card does not contain any images. Insert a memory card
recorded with images.
z
The inserted memory card does not contain any images that can be
read.
z
The image file name (folder name) sometimes cannot be recognized if it
contains double-byte characters (Japanese, Chinese or Korean).
Change double-byte characters to single-byte alphanumeric characters.
z
Print data that has been edited or processed on a personal computer
from the personal computer.
Hardware Error
Cartridge cover
is open
This camera
cannot print B/W
Insert memory
card to print
Cartridge has
been changed
Cartridge not
compatible
Communication
error
z
Check whether or not an error other than a cartridge error has
occurred. Turn the printer and camera power off and turn it on again.
If the error message does not clear, contact a Canon Customer
Support center for assistance.
z
Close the cartridge cover, making sure the cartridge cover lever
slides down into its locked position.
z
Black and white printing is not possible when the camera is
connected (Except when the (PictBridge) is displayed on the
LCD monitor.). Insert a memory card to print.
z
The cartridge was changed after the print menu was displayed.
Change back to the original cartridge or change the print settings.
z
Use a cartridge that is compatible with this printer.
z
Turn the printer, camera and computer power off and turn it on again.
z
Check Communication Settings for Cameras (p. 7). If the error
message continues to display, contact a Canon Customer Support
center for assistance.
Disconnected
Print output tray
is full
z
Make sure that the printer and the sender are located within
communications distance of each other.
z
Check the sender’s power supply.
z
Remove accumulated paper from the print receptacle.
71
Page 74

Message Remedy
Cartridge
incorrectly
inserted or not
loaded
Image too large.
Corrupted data.
Incompatible
JPEG format.
Memory card
error
Unidentified
Image
Cannot magnify!
Too many marks.
z
Load the cartridge.
z
Remove the cartridge and load it again. Insert the cartridge all the
way, make sure that the cartridge lever is up and then close the
cartridge cover.
z
You are trying to play back a number of recorded pixels exceeding
8000 x 6000 or a large-sized file.
z
You are trying to play back or print an image that is corrupted.
z
You are trying to play back or print an incompatible JPEG
compressed image.
z
Memory card has experienced an anomaly.
z
You are trying to play back an image taken in a special format (e.g.
format unique to a other manufacturer's camera).
z
You are trying to enlarge an image taken on a different camera or in a
different format and loaded to the
z
Too many images have been marked with print settings. Cannot
process any more. Mark 998 or less images.
personal computer
.
Cannot complete!
Cannot trim
Image not
compatible
z
Could not completely save the print setting.
z
You are trying to trim an image that has a file size lower than 640 x
480 pixels or an image with a width-to-height ratio narrower than 2:1.
z
You are trying to put a speech bubble in an image that has a file size
lower than 640 x 480 pixels or an image with a width-to-height ratio
narrower than 2:1.
72
Page 75

Specifications
Compact Photo Printer SELPHY ES1
All data is based on standard Canon testing criteria. Details are subject to change without notice.
Print Method Dye-sublimation thermal transfer (with overcoating)
Resolution 300 x 600 dpi, 300 x 300 dpi
*
When a PC is connected and 4-up and higher or Creative Print (excluding
2-up Multi Layout) is selected
Gradation 128 gradations/color (300 x 600 dpi), 256 gradations/color (300 x 300 dpi)
Ink Dedicated cartridge (Y/M/C/overcoating, black and white/overcoating)
Paper Postcard size, L size, Card size (including full-sized label sheet)
Feeding System Automatic feed from cartridge
*
Paper-Eject System
Print Modes Single Photo Print/Multi Photo Print
Automatic paper ejection to print receptacle
**/Print All Photos
DPOF Print/ID Photo Print
Movie Print
*
When a Canon camera is connected
**
Layout Print is available (1-up/2-up/4-up/8-up/Index/Fixed Size)
***
Speech Bubble/Calendar/Multi Layout (2-up/3-up/4-up/8-up), Album
* (Borderless/Bordered can be selected)
*/
**/Creative Print
Image processing My Colors/Correct Red-Eye
Image Quality
Intelligent automatic dynamic-range correction
Adjustment
Print Sizes Borderless Bordered
Printing Speeds
(When using color
cartridge)
Postcard size
L size 89.0 x 119.0mm
Card size 54.0 x 86.0mm
When a camera is connected
or printing from memory card
100.0 x 148.0 mm
(3.9 x 5.8 in.)
91.4 x 121.9mm
(3.6 x 4.8 in.)
79.2 x 105.3mm
(3.5 x 4.7 in.)
(3.1 x 4.2 in.)
50.0 x 66.7mm
(2.1 x 3.4 in.)
(2.0 x 2.6 in.)
Postcard size Approx. 69 sec.
L size Approx. 61 sec.
Card size Approx. 53 sec.
***
/
Playback Modes Single/Index (9 thumbnail images)/
Magnified (approx. 10x max. in LCD Monitor)/
Image search (jumps over nine images at a time during Index playback)/
Auto play
Interface USB PictBridge and proprietary protocol for Canon cameras
Infra-red IrDA (print beam)
Wireless LAN
IEEE 802.11b
*
When connected via a PictBridge compatible wireless
*
LAN adapter
Bluetooth OPP
**
When connected via a Bluetooth Unit BU-20 (sold
**, BIP
**
separately)
73
Page 76

Connection
method
Camera connection Retractable USB Cable
Interface cable included with the camera
Computer connection USB compliant Type B connector
Wireless connection Infrared data (IrDA)
Wireless LAN Requires PowerShot SD430 Digital
ELPH Wireless/Digital IXUS WIRELESS
digital camera (sold separately) and
Wireless Print Adapter WA-1N/WA-1E
(included in camera kit)
Bluetooth Unit BU-20 (sold separately)
Memory card
Operating
Temperatures
Operating Humidity
Power Source AC 100 - 240 V (50/60 Hz)
Power Consumption
Dimensions 199.0 x 176.7 x 113.3 mm (7.8 x 7.0 x 4.5 in.) (excluding protrusions and
Weight Approx. 2055 g (72.5 oz.) (excluding cartridge)
Compact Power Adapter CA-ES100
Input Voltage AC 100 - 240 V (50/60 Hz)
Rated Output DC 24 V, 2.3 A
Operating
Temperatures
SD memory card, SDHC memory card, CompactFlash (CF) card, Microdrive,
Memory Stick, Memory Stick PRO, MultiMedia Card
Memory cards that require a specific adapter
miniSD memory card, miniSDHC memory card, RS-MMC, xD-Picture Card,
Memory Stick Duo, Memory Stick PRO Duo
5 - 40 °C (41 - 104 °F)
20 - 80%
70 W or less (4 W or less when idle)
carrying handle)
-
1.2 A (100 V)
0 - 40 °C (32 - 104 °F)
0.6 A (240 V)
Dimensions 134.0 x 67.5 x 34.0 mm (5.3 x 2.7 x 1.3 in.) (excluding cable)
Weight Approx. 295 g (10.4 oz.)
Battery Pack NB-ES1L (sold separately)
Ty pe Lithium ion battery
Nominal Voltage DC 22.2 V
Nominal Capacity 2000 mAh
Charge Cycles Approx. 300
*
Number of prints
Operating
Temperatures
Dimensions 140.0 x 60.0 x 22.0 mm (5.7 x 2.4 x 0.9 in.)
Weight Approx. 335 g (11.8 oz.)
Postcard size paper: Approx. 50 sheets
L size paper: Approx. 50 sheets
Card size paper: Approx. 72 sheets
5 - 40 °C (41 - 104 °F)
*Test Conditions: When using color cartridge, normal temperature (23 °C/73 °F),
Canon images, continuous print
The above data may vary according to the printing environment and the image to be printed.
74
Page 77

MEMO
75
 Loading...