

step 1
Unpack
p. 2
step 2
Prepare
step 3
Print
Connecting the
Printer to Your
Computer
Separately Sold
Items
Maintenance,
Storage and
Transport
Troubleshooting
p. 3
p. 5
p. 6
p. 8
p. 9
p. 10
Printing Guide
This guide describes the basic and advanced operations
of your SELPHY printer in easy to understand terms.
Basic operation is simple! Just three steps: 1. Unpack,
2. Prepare, 3. Print.
ENGLISH
Safety
Precautions
Specifications
p. 13
p. 15
step 1
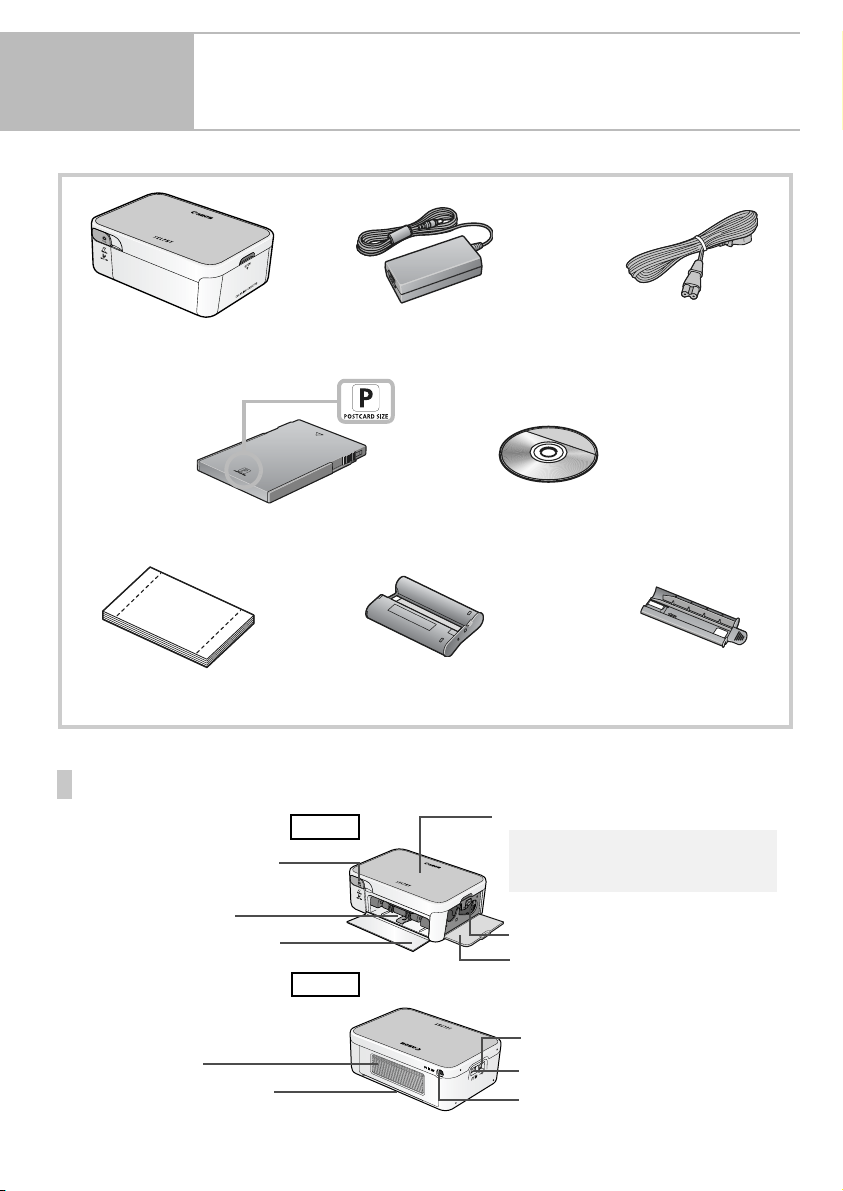
Check that the following items are supplied with your purchase.
Unpack
Main Printer Unit Compact Power
Paper Cassette
(Postcard Size)
Starter Paper Pack
(Postcard Size)
Adapter
Compact Photo
Printer Solution Disk
Starter Ink Cassette
(Postcard Size)
Component Names and Functions
Front
Retractable USB Cable for
Cameras
Paper Cassette Slot
Paper Cassette Slot Cover
Back
Power Cord
CD-ROM:
Cleaner
Indicator
Blue: (Power On) Standing By
Blinking Blue: Printing
Red/Blinking Red: Error
Ink Cassette Compartment
Ink Cassette Compartment Cover
USB Connector for Computers
Air Vents
Paper Ejection Slot
USB Connector for Cameras
DC IN Terminal (Power Connector)
2
step 2
Prepare
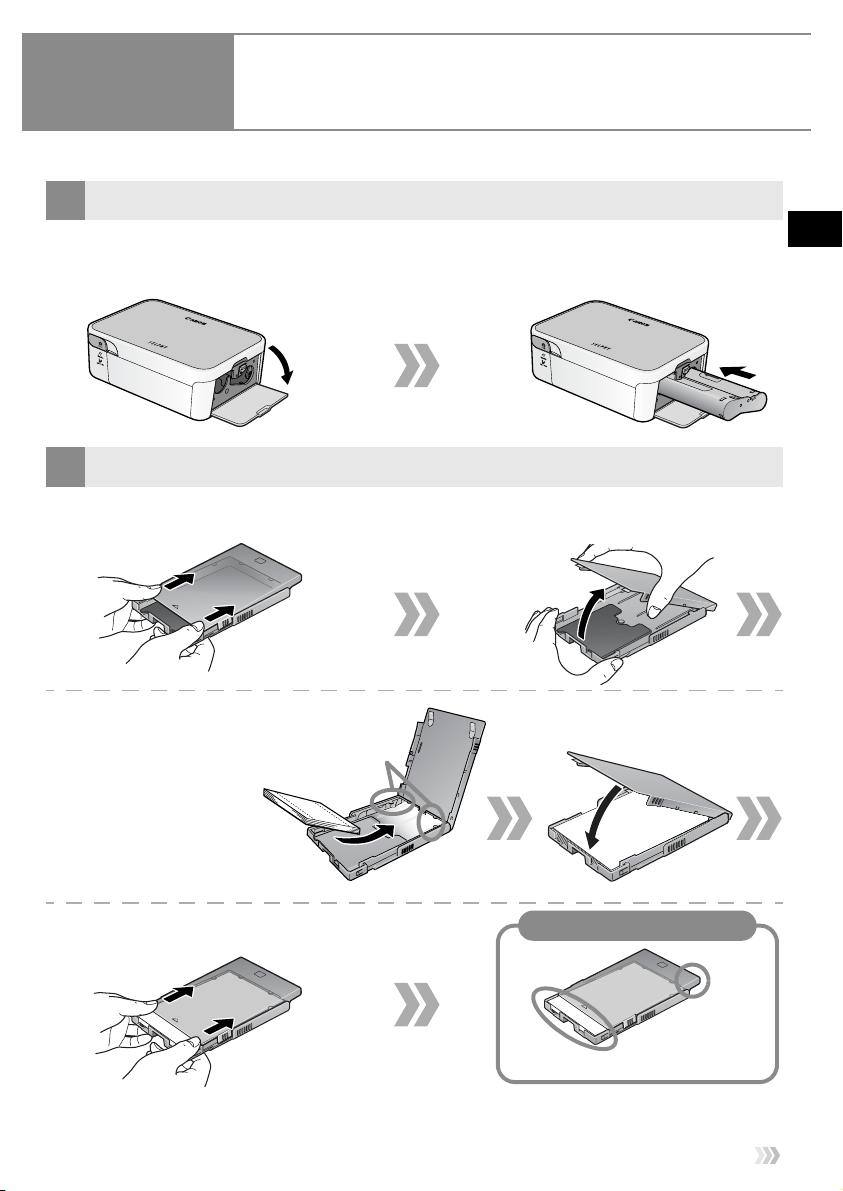
In this step you will insert the ink and paper cassette to prepare for printing.
Install the ink cassette.
1
Open the ink cassette compartment
cover on the printer.
Place paper into the paper cassette.
2
Slide the lid of the paper cassette back
until it comes to a stop.
Insert the starter ink cassette into the
printer until it clicks firmly into place and
close the cover.
While firmly holding the paper cassette,
lift the lid upward.
Insert the paper into the paper cassette
with the shiny side facing up.
Align the paper beneath the tabs.
For postcard size paper,
the address portion on the
bottom face should be
oriented toward the tabs.
Slide the lid of the paper cassette back
until it comes to a stop.
Close the lid until it clicks
shut.
Correct Position
Slightly open
Continued
The lid is
slanted.
3
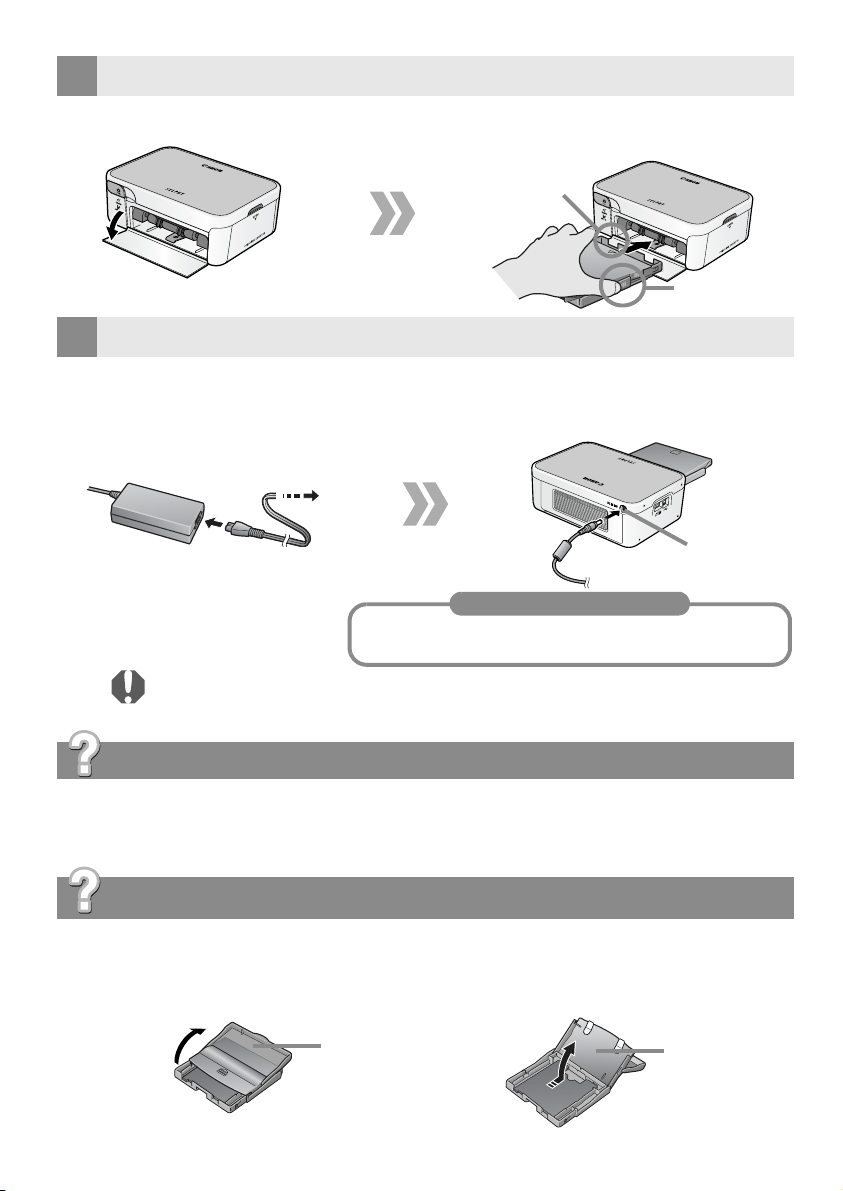
Install the paper cassette into the printer.
3
Open the paper cassette slot cover. Insert the paper cassette into the printer all
the way.
Paper visible
through opening
Hold here.
Attach the power cord.
4
Plug the power cord into the
compact power adapter, and then
the plug into a power outlet.
Attach the compact power adapter connector to
the printer’s DC IN terminal.
The printer turns on and the indicator lights blue.
DC IN terminal
Turning Off the Printer
Detach the compact power adapter connector of
the from the printer. The indicator will turn off.
Do not insert or remove the paper cassette just after turning on the
printer or while printing. This could cause problems with the printer.
Can I use general printer paper or postcards?
No. Always use paper specific to SELPHY CP series printers included in the
genuine Canon brand “Color Ink/Paper Sets”. Paper sets specific to SELPHY ES
series cannot be used.
How can I use Card Size or Wide Size paper cassettes?
Card Size and Wide Size paper cassettes are shaped a little differently from the
Postcard Size and
the paper into the cassette. Close only the inner lid and insert the paper cassette
into the printer.
L Size paper cassette. Open the outer lid and inner lid, and set
Outer lid
Inner lid
4
step 3
Print
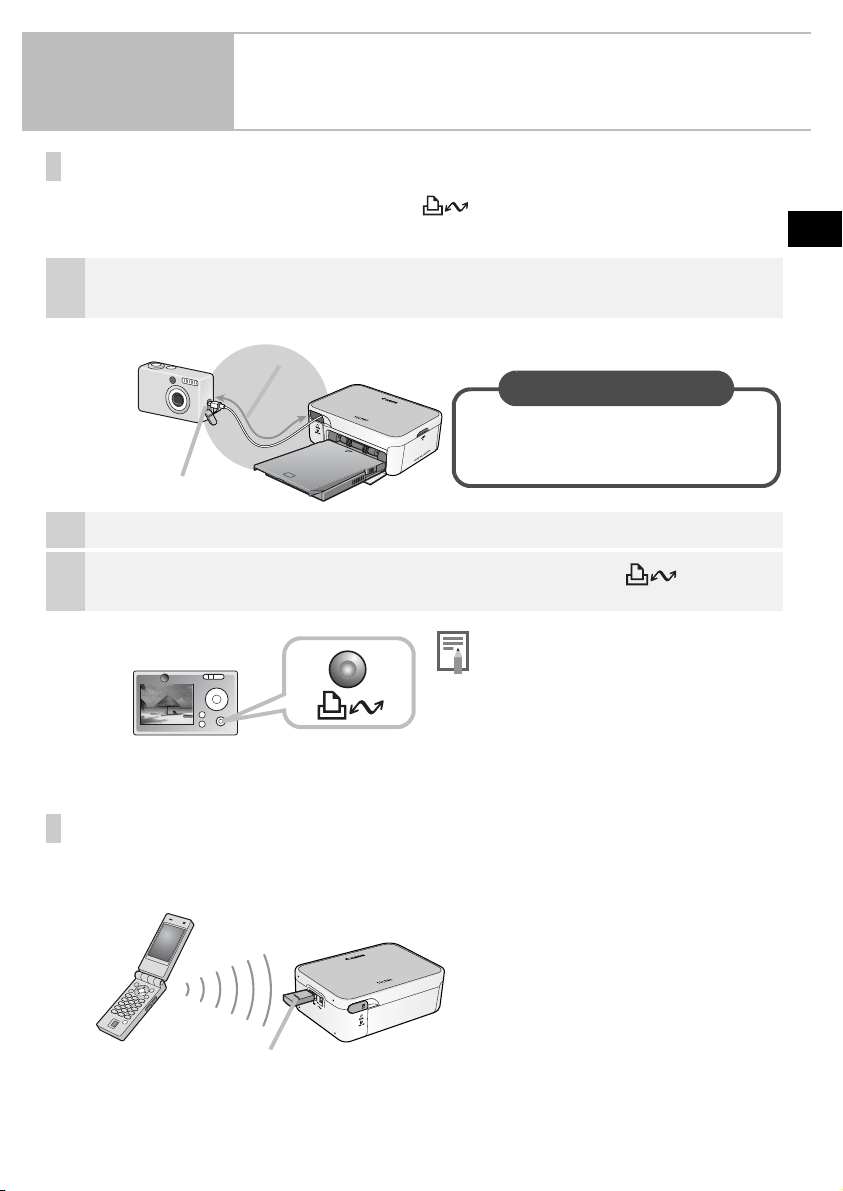
Printing by Connecting Your Camera
If your Canon digital camera has a (Print/Share) button, you can
connect the camera to the printer for easy printing.
Pull the cable out of the printer and attach it to the camera’s DIGITAL
1
terminal.
Extends up to 30 cm (12 in.)
Retracting the Cable
Lightly pull on the cable, then while
holding the cable let it retract into
the printer.
DIGITAL Terminal
Turn the camera on and prepare the camera to play back images.
2
Select an image on the camera’s LCD monitor and press the (Print/
3
Share) button.
Non-Canon brand cameras that are
compliant with PictBridge can also be
used. If the connector on the cable does
not fit your camera’s terminal, use the
USB cable supplied with your camera.
Refer to your camera’s operation
manual for further details.
Printing from Mobile Telephones
If you use a mobile telephone that supports the Bluetooth protocol, you
can print wirelessly with the separately sold Bluetooth Unit BU-20.
Up to approx. 10 m (32.8 ft.)
Bluetooth Unit (sold separately)
5
Wh
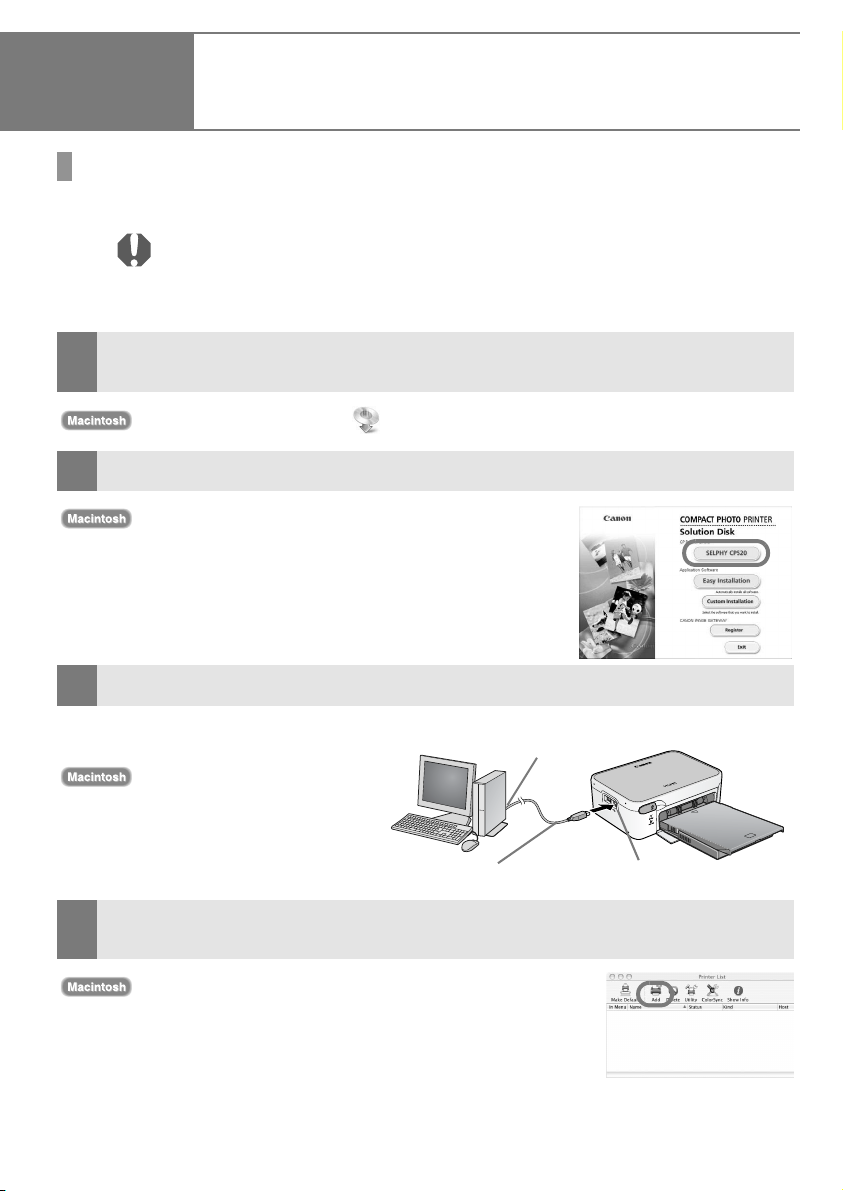
Connecting the Printer to Your Computer
Installing the Printer Driver
The following explains the installation procedure for Windows.
• Do not connect the printer to the computer yet.
• You must login to the computer as an administrator before
beginning installation.
Place the supplied Compact Photo Printer Solution Disk into the computer’s
1
CD-ROM drive.
In addition, double-click the (CPSD Installer) icon in the CD-ROM window.
Click [SELPHY CP520] in the printer driver window.
2
In addition, click [Agree], select [Easy Install], followed by
[Install].
Follow the onscreen instructions.
3
en you are prompted to attach the printer, attach the printer to the computer.
USB Terminal
Restart the computer when
prompted. After restarting the
computer, attach the printer to
the computer.
Commercially available USB Cable
Click the [Finished] or [Restart] button when it appears.
4
This completes the driver installation.
Open the [Utilities] folder on the start-up disk and doubleclick the [Printer Settings Utility] icon. Click [Add (Printer)]
and select [USB] followed by your printer. Finish by clicking
the [Add] button and closing the window. This completes the
driver installation.
6
USB Cable Connector
for Computers
 Loading...