

Page 1
1 ImageBrowser Software User Guide
Page 2

Table of Contents (1/2)
Chapter 1 Try It! ImageBrowser
Starting ImageBrowser ............................................................. 4
Downloading Images to Your Computer .................................. 8
Printing Images .......................................................................11
Supplementary Information .................................................... 13
Chapter 2 What is ImageBrowser ?
What Can ImageBrowser Do? .................................................14
Storing Images ........................................................................16
Understanding the Browser Window ...................................... 17
Changing the Browser Window Display ..................................18
Using Contextual Menus .........................................................20
Chapter 3 Managing Images
Moving and Copying Images ...................................................21
Deleting Images ...................................................................... 24
Rotating Images ...................................................................... 25
Duplicating Images..................................................................26
Chapter 4 Viewing Images
Selecting Folders .....................................................................32
Opening Images ...................................................................... 33
Changing the Magnification ................................................... 34
Editing Images ......................................................................... 35
Editing Images with Other Programs ......................................39
Chapter 5 Using the Camera Window
Opening the Camera Window ................................................ 40
Downloading Images .............................................................. 41
Deleting Images in the Camera ...............................................43
Rotating Images ...................................................................... 44
Copying Images to a Camera ...................................................45
Checking and Modifying the Camera Settings ........................47
Other Functions of the Camera Window .................................48
Renaming Images .................................................................... 27
Viewing Image Information ....................................................28
Creating Folders ......................................................................29
Renaming Folders .................................................................... 30
Deleting Folders ......................................................................31
2 ImageBrowser Software User Guide
Page 3
Table of Contents (2/2)
Chapter 6 Using Supplementary Features
Creating Images for E-mail ...................................................... 49
Running Slide Shows ...............................................................51
Adding Sounds to Images ........................................................ 54
Saving the “My Camera Settings” to the Camera .................... 56
Printing Images ....................................................................... 66
Printing Images over Multiple Pages ....................................... 74
Sorting Images by Date and Time—TimeTunnel ......................75
Stitching Panoramic Images with PhotoStitch .........................77
Operating the Shutter from a Computer—RemoteCapture ... 78
Converting RAW Images—File Viewer Utility ..........................80
Appendices
Supported File Formats ...........................................................82
Preventing ImageBrowser from Starting Automatically .........83
The ImageBrowser Automatic Wizard Feature at Startup .......84
Customizing Preferences .........................................................88
Playing Movies ........................................................................91
Setting up Slide Shows on the Camera .................................... 92
Print Settings ........................................................................... 93
Troubleshooting ......................................................................95
Index
Index .......................................................................................96
3 ImageBrowser Software User Guide
NOTE
○○○○○○○○○○○○○○○○○○○○○○○○○○○○○○○○○○○○○○○○○○
• This manual uses Mac OS 9.2 screen shots and procedures in the
explanations. The screen shots and procedures may appear
slightly different if you are using another version of the Mac OS.
• “Memory card” in this guide is used as the general term for CF
cards, PC cards, SD memory cards and multimedia cards.
Page 4

Chapter 1
Try It! ImageBrowser
Starting ImageBrowser (1/4)
This chapter covers the ImageBrowser basics, such as starting the
program, downloading images from the camera and printing images. It
begins with the procedures for starting ImageBrowser.
IMPORTANT
○○○○○○○○○○○○○○○○○○○○○○○○○○○○○○○○○○○○○○○○○○
• This guide assumes that all the relevant software programs and
drivers have been correctly installed on your computer. If you
have not yet installed the software, please read the guide
supplied with your product and install it.
Starting ImageBrowser with Mac OS 9.0 ~ 9.2
You can start ImageBrowser with Mac OS 9.0 ~ 9.2 using the
following procedure.
■ Starting ImageBrowser by connecting a camera to
your computer
This method starts ImageBrowser by connecting the camera to
the computer and preparing it to transfer data.
IMPORTANT
○○○○○○○○○○○○○○○○○○○○○○○○○○○○○○○○○○○○○○○○○○
• This method can only be used when the camera is connected to
the computer with a USB cable. (The program may not start
automatically with some camera models.)
• If you are using a camera or memory card reader, please refer to
the section Starting from the ImageBrowser icon in Starting
ImageBrowser (3/4).
REFERENCE
○○○○○○○○○○○○○○○○○○○○○○○○○○○○○○○○○○○○○○○○○○
•You can prevent ImageBrowser from starting automatically. For
setting details, see Preventing ImageBrowser from Starting
Automatically in the Appendices.
4 ImageBrowser Software User Guide
Page 5
Chapter 1
Try It! ImageBrowser
Starting ImageBrowser (2/4)
1.
Connect the camera to the computer using a USB
cable.
Read the guides that accompanied your camera for instructions
to connect the camera to the computer. Some models cannot
connect with the computer unless you set it to a particular
mode, such as the Replay mode. As described in the guides for
these models, set the camera to the correct mode to transfer
data.
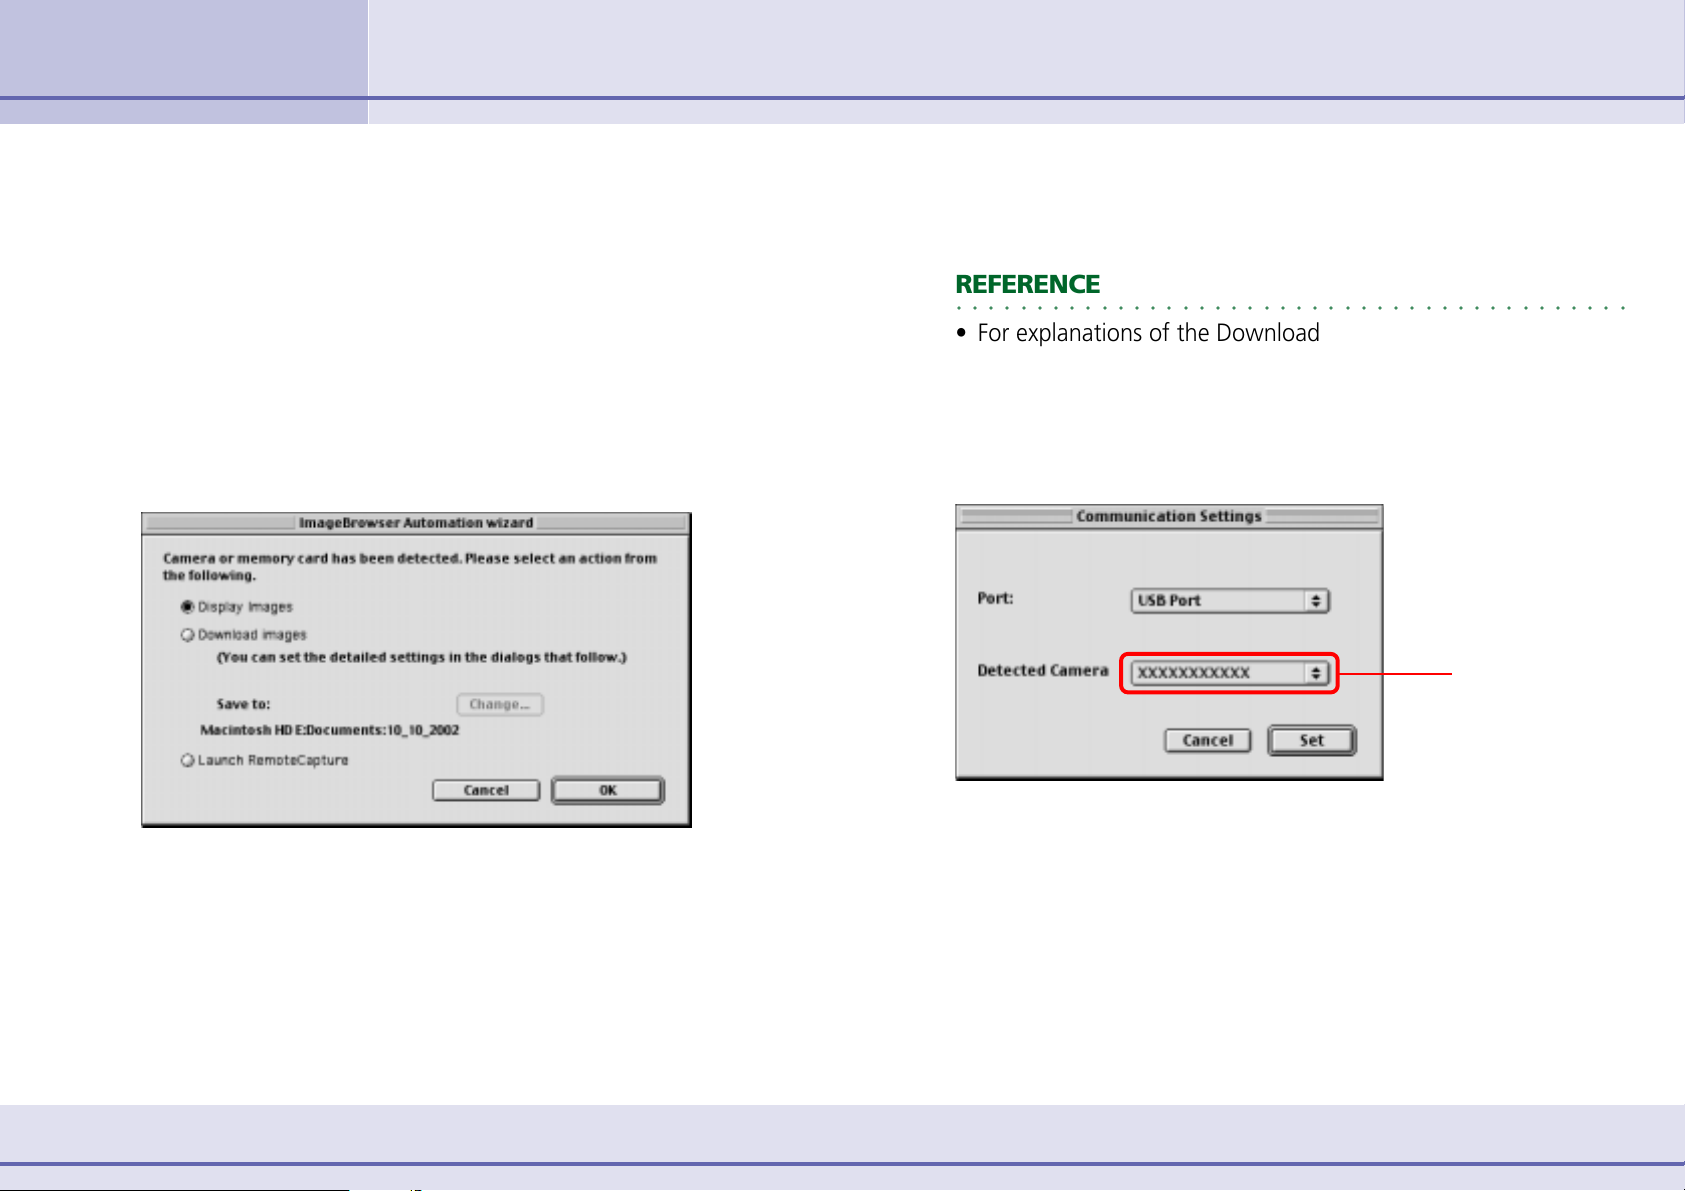
A dialog similar to the following one will appear the first time
you start ImageBrowser.
2.
For this example, leave the [Display Images] option
selected and click the [OK] button.
REFERENCE
○○○○○○○○○○○○○○○○○○○○○○○○○○○○○○○○○○○○○○○○○○
• For explanations of the Download Images and Launch
RemoteCapture options, see The ImageBrowser Automation
Wizard Feature at Startup section in the Appendices.
A dialog similar to the following one will appear. (This dialog
will only appear the first time the program is started.)
The model name
of the camera that
you are using
appears here.
This dialog allows you to select the next action for
ImageBrowser to automatically perform after it is started.
If the above dialog does not appear when ImageBrowser is first
started, see the Troubleshooting section in the Appendices.
5 ImageBrowser Software User Guide
3.
Click [Set].
The Camera window will open and display the
camera’s images.
Page 6

Chapter 1
Try It! ImageBrowser
Starting ImageBrowser (3/4)
REFERENCE
○○○○○○○○○○○○○○○○○○○○○○○○○○○○○○○○○○○○○○○○○○
•Procedures for Subsequent ImageBrowser Startups
When you start ImageBrowser again the next time, the
previously selected auto processing option will display in the
dialog box. To execute the command, click the [Start] button.
To do nothing, click the [Cancel] button and to change the
settings, click the [Settings Change] button.
The previously selected option will display.
• For instructions for changing the settings, see the
ImageBrowser Automation Wizard Feature at Startup section in
the Appendices.
Starting from the ImageBrowser icon
Use this method to start ImageBrowser if you are using a
memory card reader. It may also be used to start ImageBrowser
without connecting a camera or to restart it after exiting.
1.
Double-click the [Canon ImageBrowser] icon on the
desktop.
ImageBrowser starts.
REFERENCE
○○○○○○○○○○○○○○○○○○○○○○○○○○○○○○○○○○○○○○○○○○
• Depending on the selections you make during installation, the
Canon ImageBrowser icon may not appear on the desktop. In
this case, start ImageBrowser by double-clicking on the
application using the following sequence.
IMPORTANT
○○○○○○○○○○○○○○○○○○○○○○○○○○○○○○○○○○○○○○○○○○
• The ImageBrowser Automation Wizard only appears when the
camera and computer are connected via a USB cable to start
ImageBrowser. It will not appear when you start ImageBrowser
by using the icon as described on the right.
6 ImageBrowser Software User Guide
Locate and open the [Canon Utilities] folder, then open the
[ImageBrowser] folder and double-click on the [ImageBrowser]
icon.
Page 7
Chapter 1
Try It! ImageBrowser
Starting ImageBrowser (4/4)
Starting ImageBrowser with Mac OS X
With Mac OS X, you can start ImageBrowser using the
following procedure.
IMPORTANT
○○○○○○○○○○○○○○○○○○○○○○○○○○○○○○○○○○○○○○○○○○
•You can also use this procedure to start ImageBrowser in Mac
OS X when using a memory card reader.
1.
2.
Connect the camera to the computer using a USB
cable.
Read the guides that accompanied your camera for instructions
to connect the camera to the computer. Some models cannot
connect with the computer unless you set it to a particular
mode, such as the Replay mode. As described in the guides for
these models, set the camera to the correct mode to transfer
data.
Close iPhoto or Image Capture if either program starts up.
REFERENCE
○○○○○○○○○○○○○○○○○○○○○○○○○○○○○○○○○○○○○○○○○○
• Depending on the selections you make during installation, the
Canon ImageBrowser icon may not appear on the desktop. In
this case, start ImageBrowser by double-clicking on the
application using the following sequence.
Locate and open the [Canon Utilities] folder, then open the
[ImageBrowser] folder and double-click on the [ImageBrowser]
icon.
3.
Double-click the [Canon ImageBrowser] icon on the
desktop.
ImageBrowser starts.
7 ImageBrowser Software User Guide
Page 8

Chapter 1
Try It! ImageBrowser
Downloading Images to Your Computer (1/3)
This section explains how to download images from the camera to a
computer.
Camera Window
The Camera Window appears when you connect the camera to
the computer, start ImageBrowser and select [Display Images] or
[Download Images] in the ImageBrowser Automation Wizard.
The model name of the camera
that you are using and its images
appear here.
REFERENCE
○○○○○○○○○○○○○○○○○○○○○○○○○○○○○○○○○○○○○○○○○○
• The Camera Window does not appear when you start
ImageBrowser from the desktop. However, when you connect
the camera and make it ready for communication with your
computer, the Camera Window appears.
With Mac OS X, or if you ready the camera for
communication with your computer and the
Camera Window does not appear, click
[Canon Camera] at the lower left of the
Browser Window and select a port and a
camera model.
Images stored in the camera are
displayed in the order in which they
were taken.
If you are using a memory card reader, open the memory card
that appears in the Explorer View section and double-click the
[DCIM] folder.
Creating a destination folder
Let’s begin with how to create a new folder to use as the
destination folder for images imported from the camera.
1.
2.
Click the Browser Window to bring it to the front.
In the Explorer View Section, click the disk where you
want to create new folders, as shown in the figure
below.
New folders are created on the disk that you select here.
Browser Window
Explorer View Section
The disks available to your computer display in the Explorer View area.
Browser
Area
8 ImageBrowser Software User Guide
Page 9
Chapter 1
Try It! ImageBrowser
Downloading Images to Your Computer (2/3)
3.
4.
REFERENCE
○○○○○○○○○○○○○○○○○○○○○○○○○○○○○○○○○○○○○○○○○○
•With Mac OS X, it is recommended to create a new folder
within the [your name] subfolder of the [Users] folder in the
startup disk.
On the [File] menu, click [New Folder].
A new folder is created.
Input a new folder name and press the [return] key.
This provides the new folder with the specified name.
Importing Images to Your Computer
Use the following procedure to import (copy) images to the
newly created folder on your computer.
1.
2.
3.
Click the Camera Window to bring it to the front.
Click the image that you want to import.
A blue frame appears around the image.
REFERENCE
○○○○○○○○○○○○○○○○○○○○○○○○○○○○○○○○○○○○○○○○○○
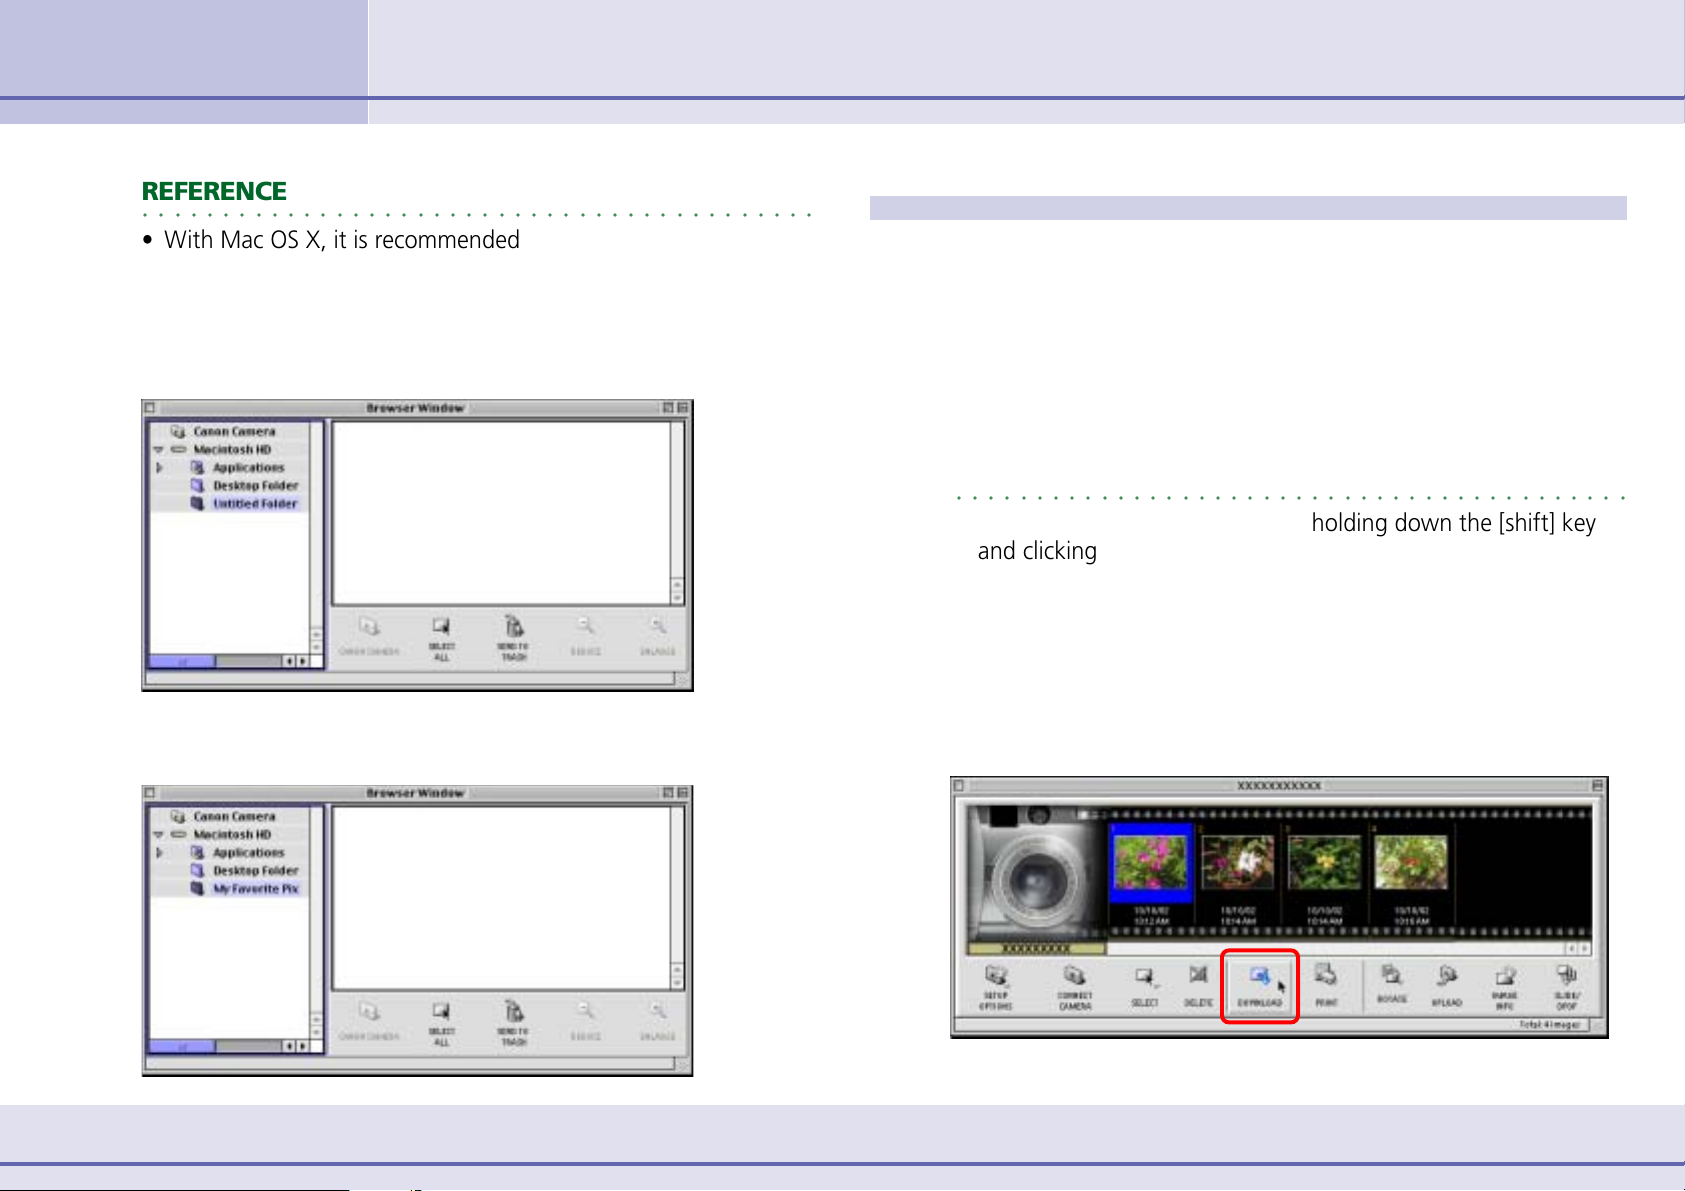
•You can select several images by holding down the [shift] key
and clicking the images that you want to copy. If you hold
down the [option] and [shift] keys together and click on two
images, you can select all the images between them.
•To download all images in the Camera Window, click [Select] in
the toolbar below the images, choose [Select All], then click
[Download].
Click [Download].
9 ImageBrowser Software User Guide
Page 10

Chapter 1
Try It! ImageBrowser
Downloading Images to Your Computer (3/3)
The selected images are copied into the folder you just created
and small versions (thumbnails) are displayed in the Browser
Area of the Browser Window.
Image imported from the camera
Try to import all the images that you want.
Next, let’s try printing.
REFERENCE
○○○○○○○○○○○○○○○○○○○○○○○○○○○○○○○○○○○○○○○○○○
• For detailed information on how to use the Camera Window,
see Chapter 5.
10 ImageBrowser Software User Guide
Page 11
Chapter 1
Try It! ImageBrowser
Printing Images (1/2)
This section explains how to print the images downloaded to the folder
on a printer.
1.
2.
Click the image you want to print.
A blue frame appears around the image.
REFERENCE
○○○○○○○○○○○○○○○○○○○○○○○○○○○○○○○○○○○○○○○○○○
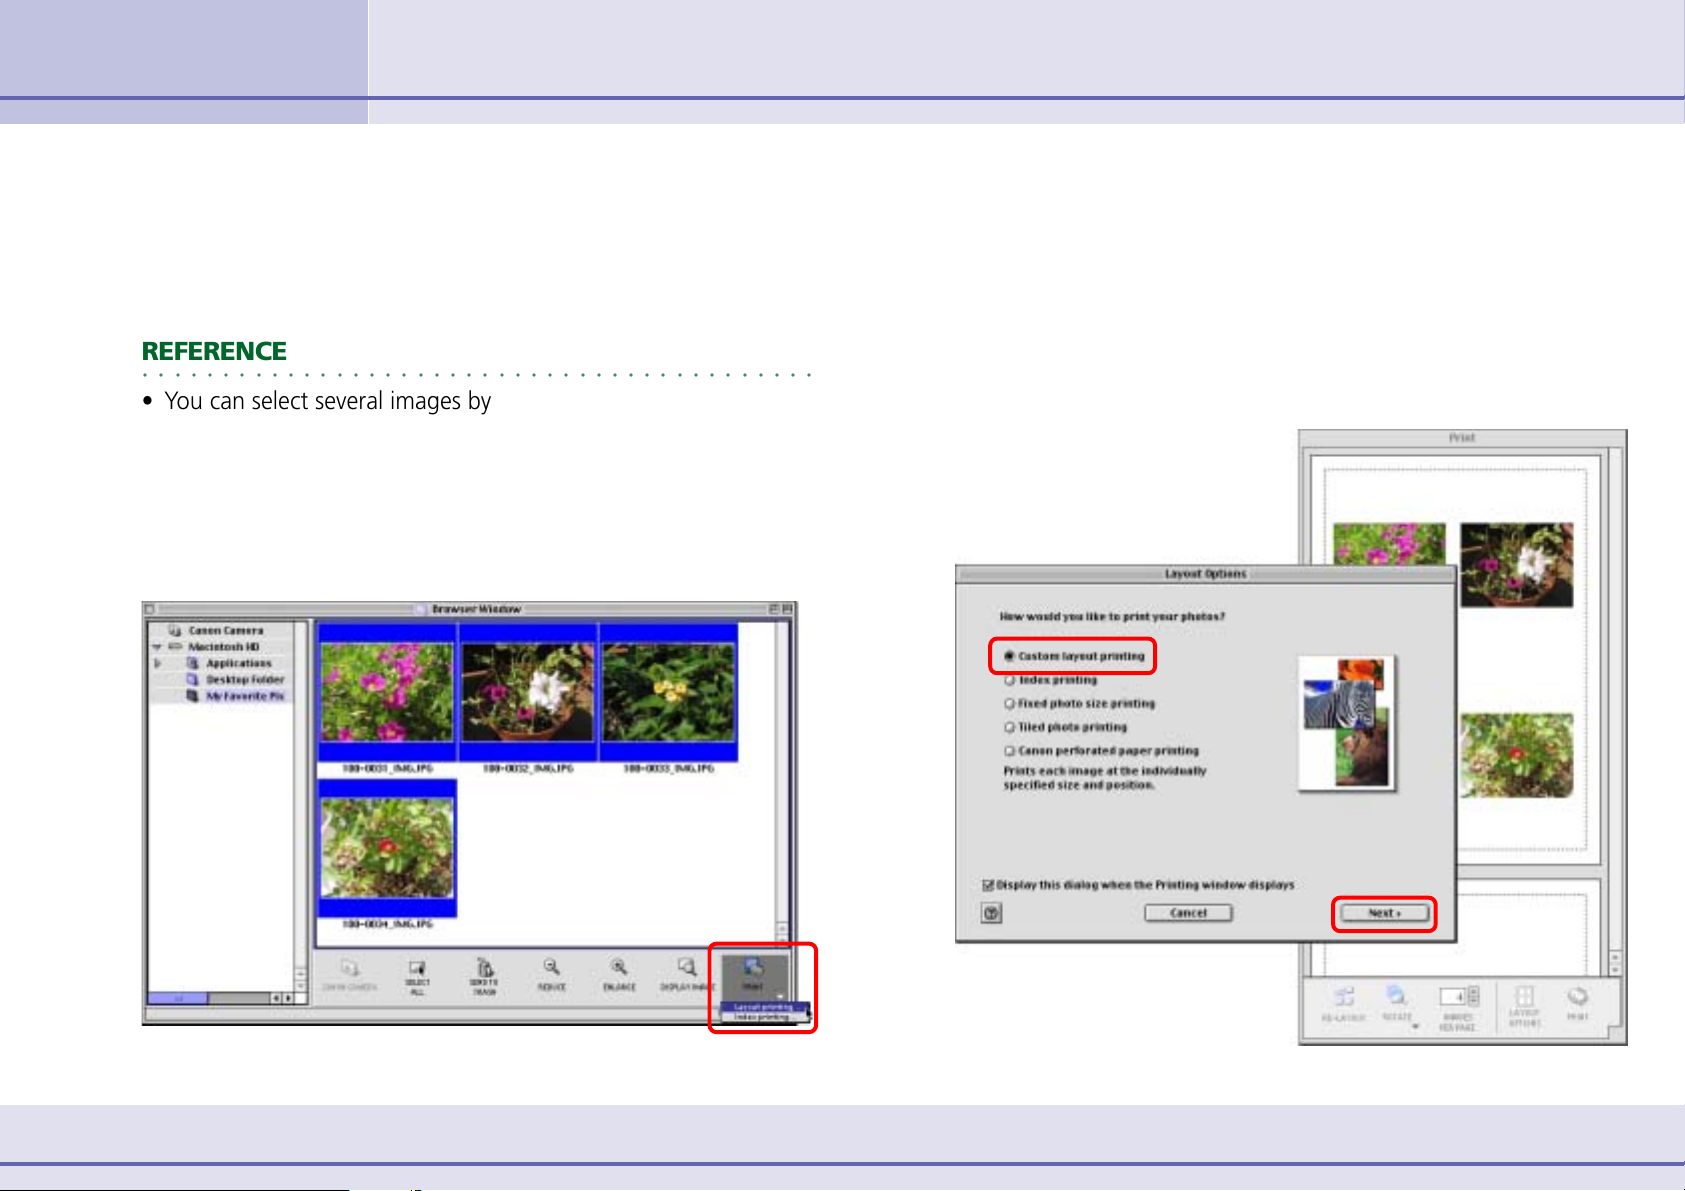
•You can select several images by holding down the [shift] key
and clicking the images that you want to print. If you hold
down the [option] and [shift] keys together and click on two
images, you can select all the images between them.
Click [Print] and select [Layout Printing] from the
displayed menu.
3.
The selected images are automatically laid out in the Print
Window. You can select a layout option in the Layout Options
dialog. For the moment, just print the images without making
any changes.
In the Layout Options dialog, leave the [Custom layout
printing] option selected and click [Next].
Print Window
Layout Options Dialog
The Layout Options dialog and Print Window open.
11 ImageBrowser Software User Guide
Page 12
Chapter 1
Try It! ImageBrowser
Printing Images (2/2)
4.
5.
When the Page Setup dialog box appears, click [OK].
The Layout Options dialog closes.
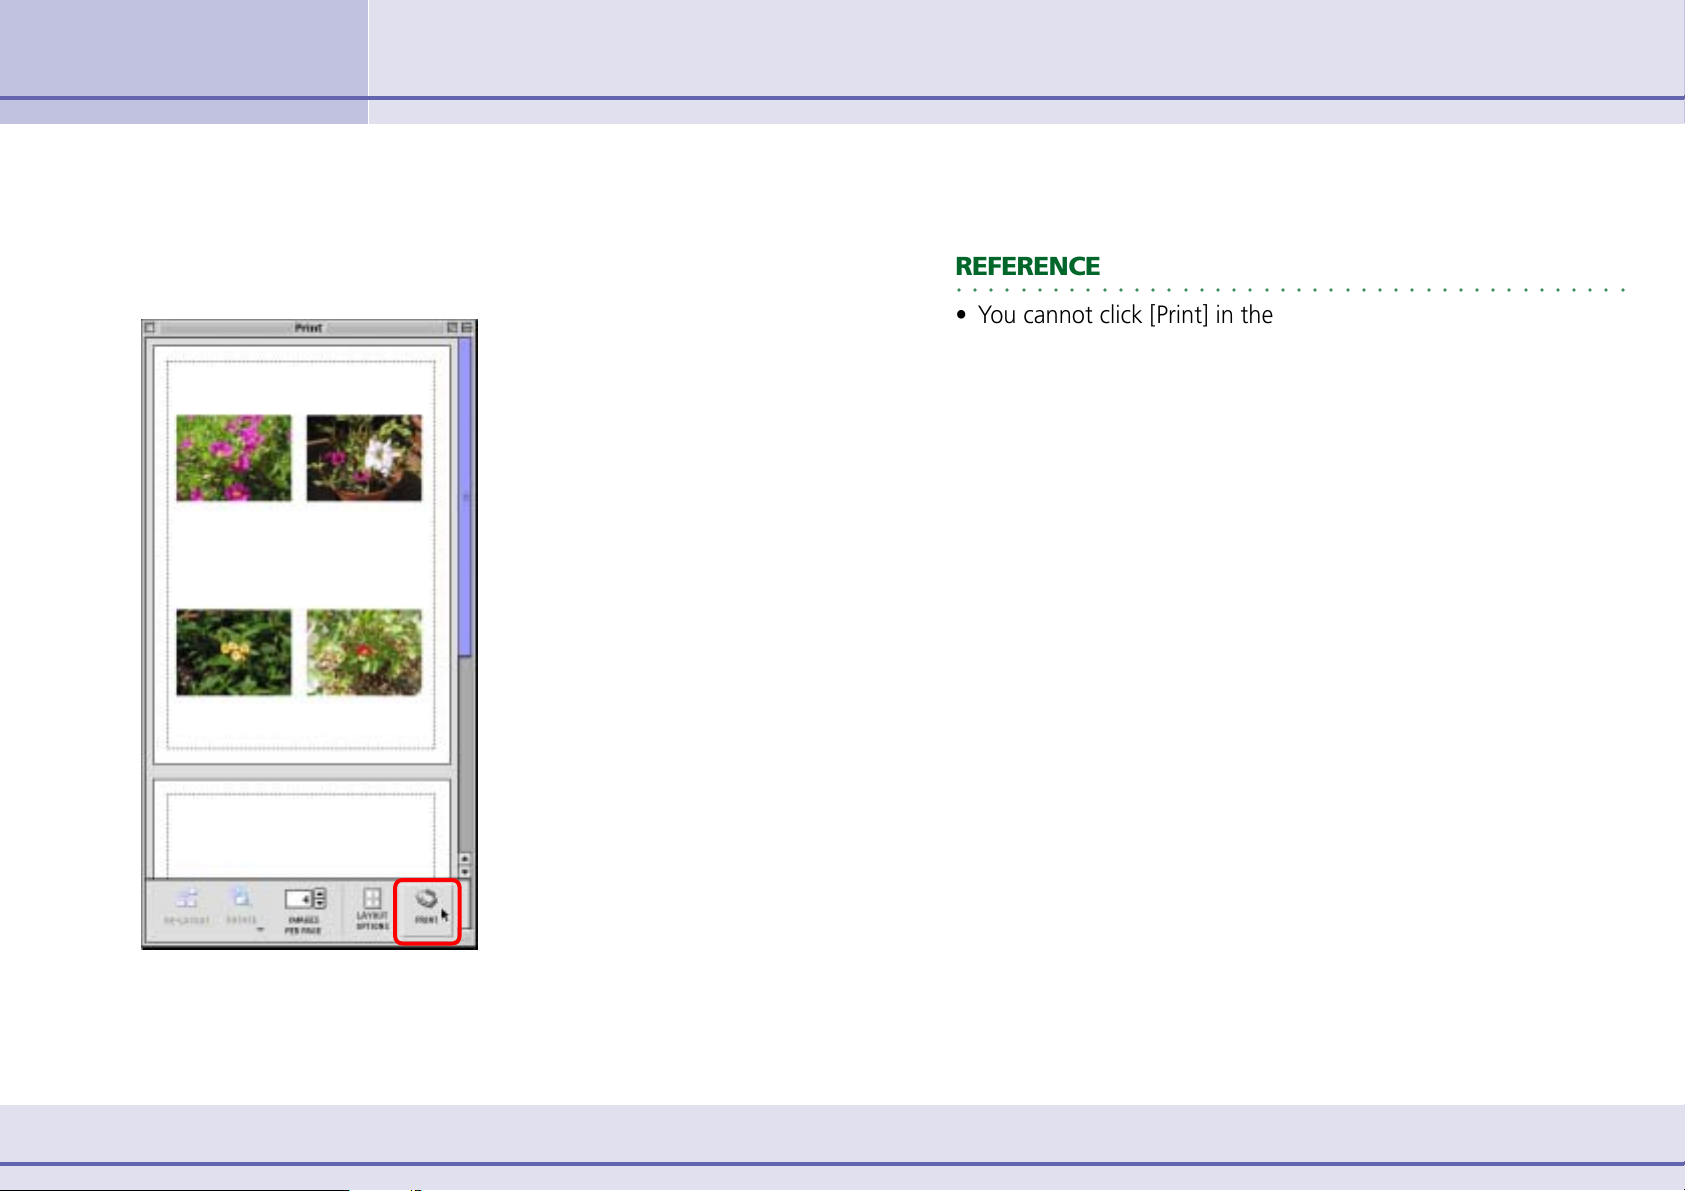
In the Print Window, click [Print].
The Print Settings dialog box appears. Select the print options
that you want and start printing.
REFERENCE
○○○○○○○○○○○○○○○○○○○○○○○○○○○○○○○○○○○○○○○○○○
•You cannot click [Print] in the Print Window while the Layout
Options dialog is open.
• For details on print operations, see the Printing Images section
in Chapter 6.
12 ImageBrowser Software User Guide
Page 13
Chapter 1
Try It! ImageBrowser
Supplementary Information
We recommend that you memorize the following information before
you begin using ImageBrowser.
If You Have a Problem
ImageBrowser comes with a Help file. Use it when you want to
learn how to do an operation, or when you want to know
about the features of the application.
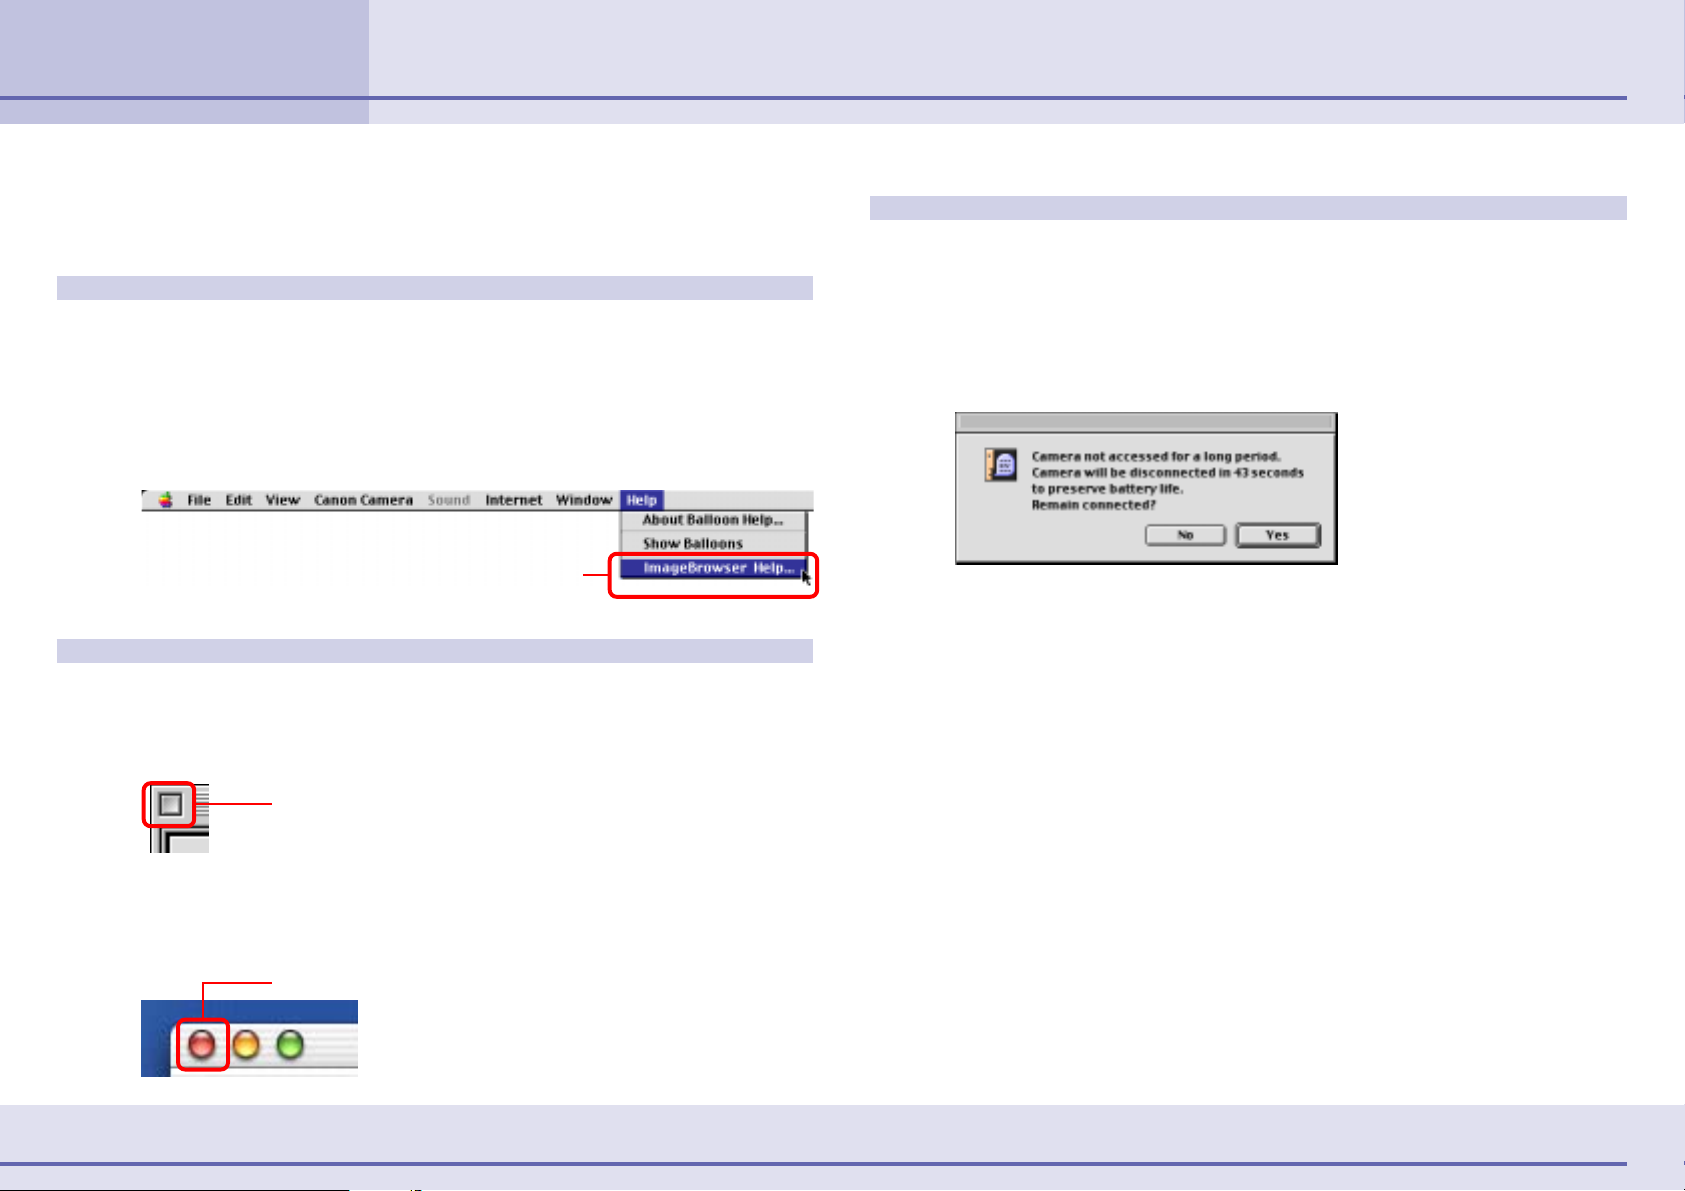
You can access Help by clicking [ImageBrowser Help] on the
[Help] menu.
Displays Help
Exiting ImageBrowser
With Mac OS 9.0 ~ 9.2, you can exit ImageBrowser by clicking
[Quit] on the [File] menu. Alternatively, click the Close Box in
the Browser Window.
Close Box
With Mac OS X, you can exit ImageBrowser by clicking [Quit
ImageBrowser] from the [ImageBrowser] menu. Alternatively,
click the red button in the Browser Window.
Close Box
When a connection message appears
With certain camera models, a message asking whether you
wish to remain connected may appear if the camera’s Auto
Power Down function is set to On, the connection between the
camera and computer is open and the camera is idle for a set
period of time (usually 5 minutes).
This feature is designed to help save the power of the camera
batteries. If you want to stay connected, click [Yes]. To cut the
connection, click [No]. If you do not respond to the message
within approximately one minute, the connection is
automatically cut.
After disconnecting the camera, use the following method
when you want to connect it again.
Prepare your camera to transfer data (set it to the Replay mode
on some models). This will open the Camera Window. If the
Camera Window does not open, click [Canon Camera] in the
Browser Window. However, if the Camera Window is already
open, click its [Connect Camera] button.
13 ImageBrowser Software User Guide
Page 14

Chapter 2
What is ImageBrowser?
What Can ImageBrowser Do? (1/2)
This chapter explains the various basic skills required to master
ImageBrowser. Let’s begin with an overview of the main features of
ImageBrowser.
Connect the camera to a computer to:
•View a list of images stored in the camera.
• Download images from the camera to the computer.
•View information about images stored in the camera, such as
the shooting date and camera settings.
• Use your computer to set up slide shows or DPOF print
settings (not available on some models).
• Save computer images onto your camera.
Use the file management features to:
• Categorize, sort and manage image files on your computer
with easy procedures.
• Move or copy images.
• Perform simple editing such as cropping images or adjusting
their colors.
• Run a slide show displaying the images in sequence in fullscreen mode.
• Use the TimeTunnel feature to display images in a tunnel-like
arrangement in the order of their shooting dates.
Use the My Camera Settings function to:
• Save the My Camera Settings in the computer to the camera
or vice versa (only on camera models supporting the My
Camera Settings function).
• Manage newly created image and sound files as My Camera
Settings.
REFERENCE
○○○○○○○○○○○○○○○○○○○○○○○○○○○○○○○○○○○○○○○○○○
• The start-up image, start-up sound, shutter sound, operation
sound and self-timer sound are collectively called the “My
Camera Settings.”
• The Canon CD-ROM supplied with your product contains
several prepared My Camera Settings files (only supported by
models compatible with the My Camera Settings function).
These files are automatically copied to your computer when you
install ImageBrowser.
14 ImageBrowser Software User Guide
Page 15

Chapter 2
What is ImageBrowser?
What Can ImageBrowser Do? (2/2)
By using other applications:
ImageBrowser gives you additional power when you use it
together with the following applications. (You can start these
applications from within ImageBrowser.)
■ PhotoStitch
•You can stitch multiple images (which were split and shot
individually using functions like the camera's Stitch Assist
mode) together to form a single, large size, panoramic
picture.
•You can stitch images horizontally or vertically or in a matrix
format.
• When you shoot the surroundings in 360 degrees, you can
later stitch the images to form a 360-degree cylindrical
shape. By saving this stitched image in QuickTime VR format,
you can then get a virtual view of the various parts of the
image.
■ RemoteCapture
■ File Viewer Utility
•You can convert RAW format images (some models may not
offer this format).
• Image quality and color adjustments can be made when
converting RAW images.
•You can use the computer to operate the shutter of a camera
connected to it via a USB cable.
•You can specify the shooting interval and number of images
to be shot, and then take images using interval shooting.
15 ImageBrowser Software User Guide
Page 16

Chapter 2
What is ImageBrowser?
What happens to the files you import, move or copy with ImageBrowser?
Storing Images
Where are images stored?
You can use the following procedure to locate images.
1.
2.
In the Finder, double-click the disk containing the
folder (My Favorite Pix) you created earlier.
Double-click the folder that you created.
Image files appear in the folder as shown below.
However, when you select [My Favorite Pix] from the Browser
Window, images are displayed as follows:
As you can see, they have exactly the same names.
Thus, the images displayed in the Browser Area of
ImageBrowser are actually the files in the folder that you
selected above. When you move or copy images using
ImageBrowser, files are moved or copied accordingly in the
Finder.
16 ImageBrowser Software User Guide
Page 17
Chapter 2
What is ImageBrowser?
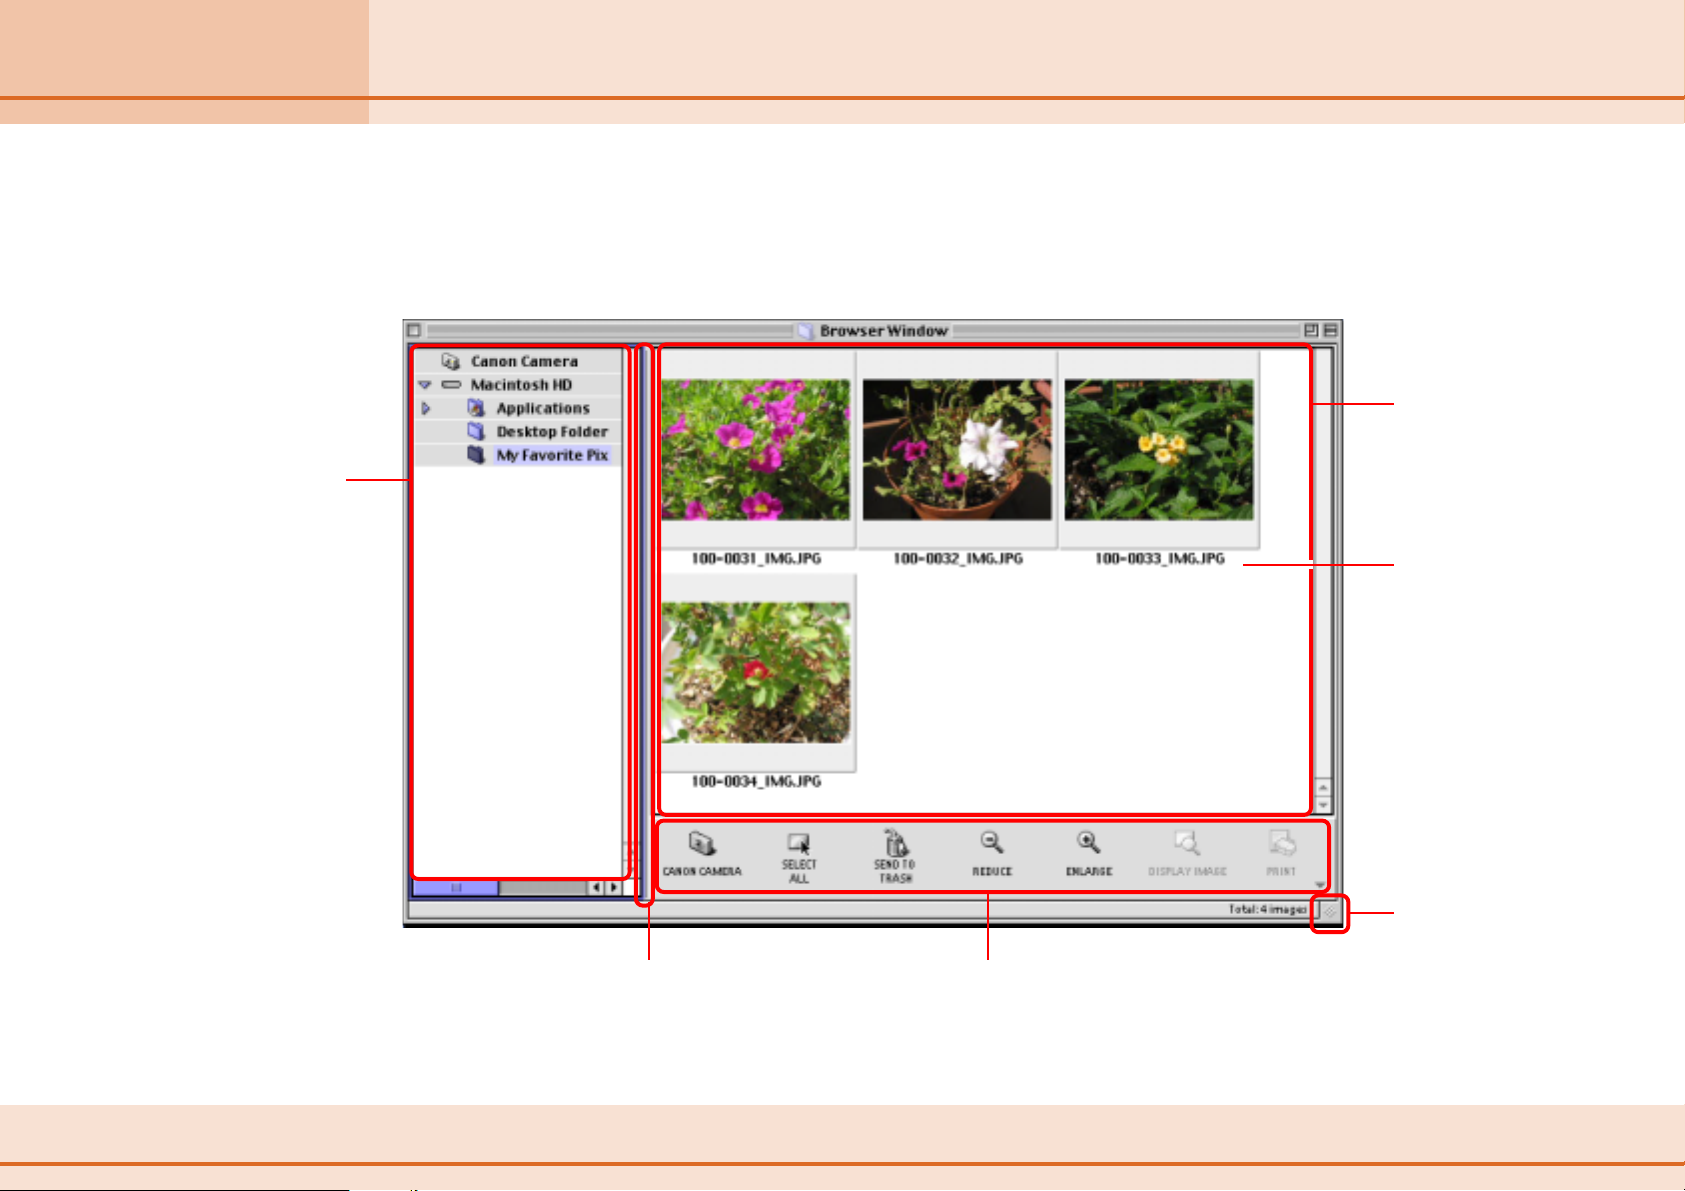
Understanding the Browser Window
This section describes the various parts of the Browser Window display.
Explorer View Section
Displays the disks and
folders that you can use
on your computer.
If you click the disclosure
triangle on the left edge
of the display, you can
switch between
collapsing and
expanding the contents
of that folder.
Browser Area
This is the area where
thumbnails of images in
the selected folder are
displayed.
Image Name
This is where the file
name of each individual
image is displayed.
You can drag this line to change the position
of the boundary between the Explorer View
Section and the Browser Area.
17 ImageBrowser Software User Guide
Control Panel
This area contains buttons that allow
you to perform a variety of functions.
You can drag this part of
the frame to change the
size of the Browser
Window.
Page 18
Chapter 2
What is ImageBrowser?
You can change the way the Browser Window displays information to
make it easier to use. This section describes how to do this.
Changing the Browser Window Display (1/2)
Changing the size of thumbnails
By clicking or you can change the size of the thumbnails
displayed in the Browser Area.
18 ImageBrowser Software User Guide
Page 19

Chapter 2
What is ImageBrowser?
Changing the Browser Window Display (2/2)
Using the View menu
You can use the View menu to fine-tune the Browser Window
display settings.
Allows you
to enlarge
and reduce
the size of
thumbnails.
Allows you
to select
the size of
thumbnails.
In addition, you can display a preview of an image above its
thumbnail by clicking the [View] menu, selecting [View Mode],
followed by [Preview]. To stop displaying the preview image, click
the [View] menu and select [View Mode], followed by [List].
Allows you
to specify the
information
displayed
under the
thumbnail.
Control Panel
Allows you to hide or display
the control panel in the lower
part of the Browser Area.
Sound Panel
Allows you to hide or display
the sound panel. This panel
allows you to record and play
back voice messages.
For example, you can display the Browser Window as follows:
Display Preview
Sound Panel
The shooting date is displayed as well as the file name.
Control Panel
19 ImageBrowser Software User Guide
Page 20

Chapter 2
What is ImageBrowser?
Using Contextual Menus
When you hold down the [control] key and click the mouse
button, a menu is displayed. This is a contextual menu.
In ImageBrowser, you can access many useful functions through
contextual menus.
For example, when you hold down the [control] key and click
an image, the following contextual menu appears.
A contextual menu is, as its name implies, a menu whose
options vary according to the context. It is a collection of the
most commonly used buttons and commands that apply to a
given situation.
Contextual menus allow you to use ImageBrowser more
efficiently. When you feel comfortable with ImageBrowser, try
using the contextual menus in different situations and you will
be impressed with their convenience.
Note that, in general, this manual does not cover operations
using contextual menus. (This is because explaining the many
menu variations would take too many pages.)
Nevertheless, a full explanation is provided on the
corresponding page when a contextual menu is used in a
procedure.
Click the mouse button anywhere in the window while holding
down the [control] key to display the contextual menu.
20 ImageBrowser Software User Guide
Page 21

Chapter 3
Managing Images
This section describes how to move and copy images between folders.
REFERENCE
○○○○○○○○○○○○○○○○○○○○○○○○○○○○○○○○○○○○○○○○○○
• Moving or copying images in ImageBrowser affects the actual
location in which those images are stored on your computer.
• When you use the Finder to modify files or folders while
ImageBrowser is open, those changes might not be reflected in
the ImageBrowser window. To remedy this, click [Refresh] on
the [View] menu.
Moving and Copying Images (1/3)
Moving or copying in the Explorer View Section
When you want to move an image, you first need to display it
in the Browser Area. Then, drag that image to the destination
folder in the Explorer View Section.
When you want to copy an image, proceed as above, but press
and hold the [option] key before releasing the mouse button to
drop the image.
A Drag the image that you want to move.
B Drop it at the desired location.
21 ImageBrowser Software User Guide
Page 22
Chapter 3
Managing Images
Moving and Copying Images (2/3)
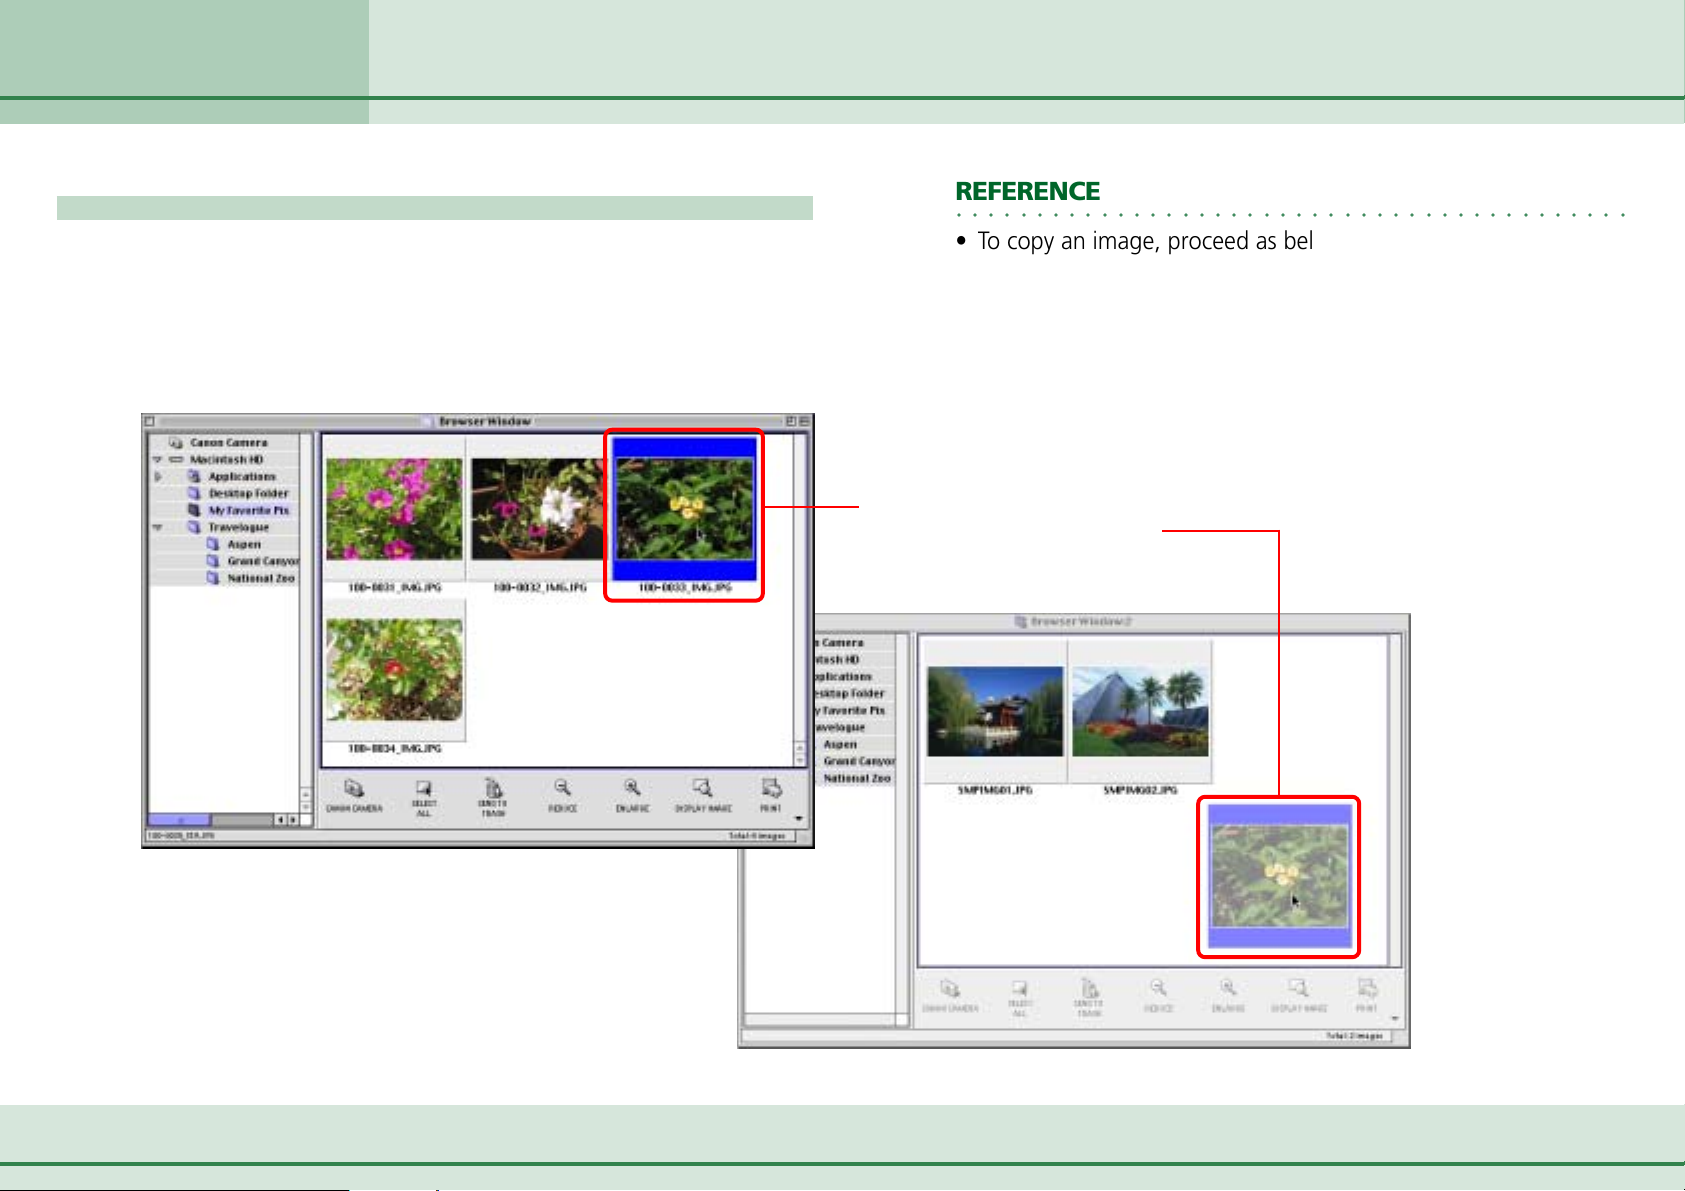
Moving or copying images using two Browser Windows
You can display a second Browser Window by clicking [New
Browser Window] on the [View] menu.
You can move or copy images between folders by displaying
different folders in two Browser Windows, then dragging
images from one Browser Window to another.
REFERENCE
○○○○○○○○○○○○○○○○○○○○○○○○○○○○○○○○○○○○○○○○○○
•To copy an image, proceed as below, but press and hold the
[option] key before releasing the mouse button to drop the
image.
• Up to two Browser Windows can be open simultaneously.
A Drag the image that you want to move.
B Drop it at the desired location.
The First Browser Window
22 ImageBrowser Software User Guide
The Second Browser Window
Page 23

Chapter 3
Managing Images
Moving and Copying Images (3/3)
More ways of moving and copying images
■ Moving or copying multiple images
You can select several images that you want to move or copy all
at once. While holding down the [shift] key, or the [option] +
[shift] keys, click the images you want to move or copy. After
selecting the images, you can move or copy all of them at the
same time using the same basic procedure as explained above.
■ Moving or copying a complete folder
Instead of selecting individual images, you can select an entire
folder for moving or copying. Drag the folder that you have
chosen in the Explorer View Section, and drop it into another
folder.
■ Copying to a camera
You can copy images to a camera. When you open the Camera
Window and drag an image from the Browser Area into the
Camera Window, the image is copied to the camera. For details
on this feature, see the Copying Images to a Camera section in
Chapter 5.
REFERENCE
○○○○○○○○○○○○○○○○○○○○○○○○○○○○○○○○○○○○○○○○○○
• By clicking (Select All) on the control panel, you can select all
the folders or images displayed in the Browser Area at once.
• By clicking [Deselect All] on the [Edit] menu, you can cancel
selection of all images that have been selected in the Browser
Area.
23 ImageBrowser Software User Guide
Page 24
Chapter 3
Managing Images
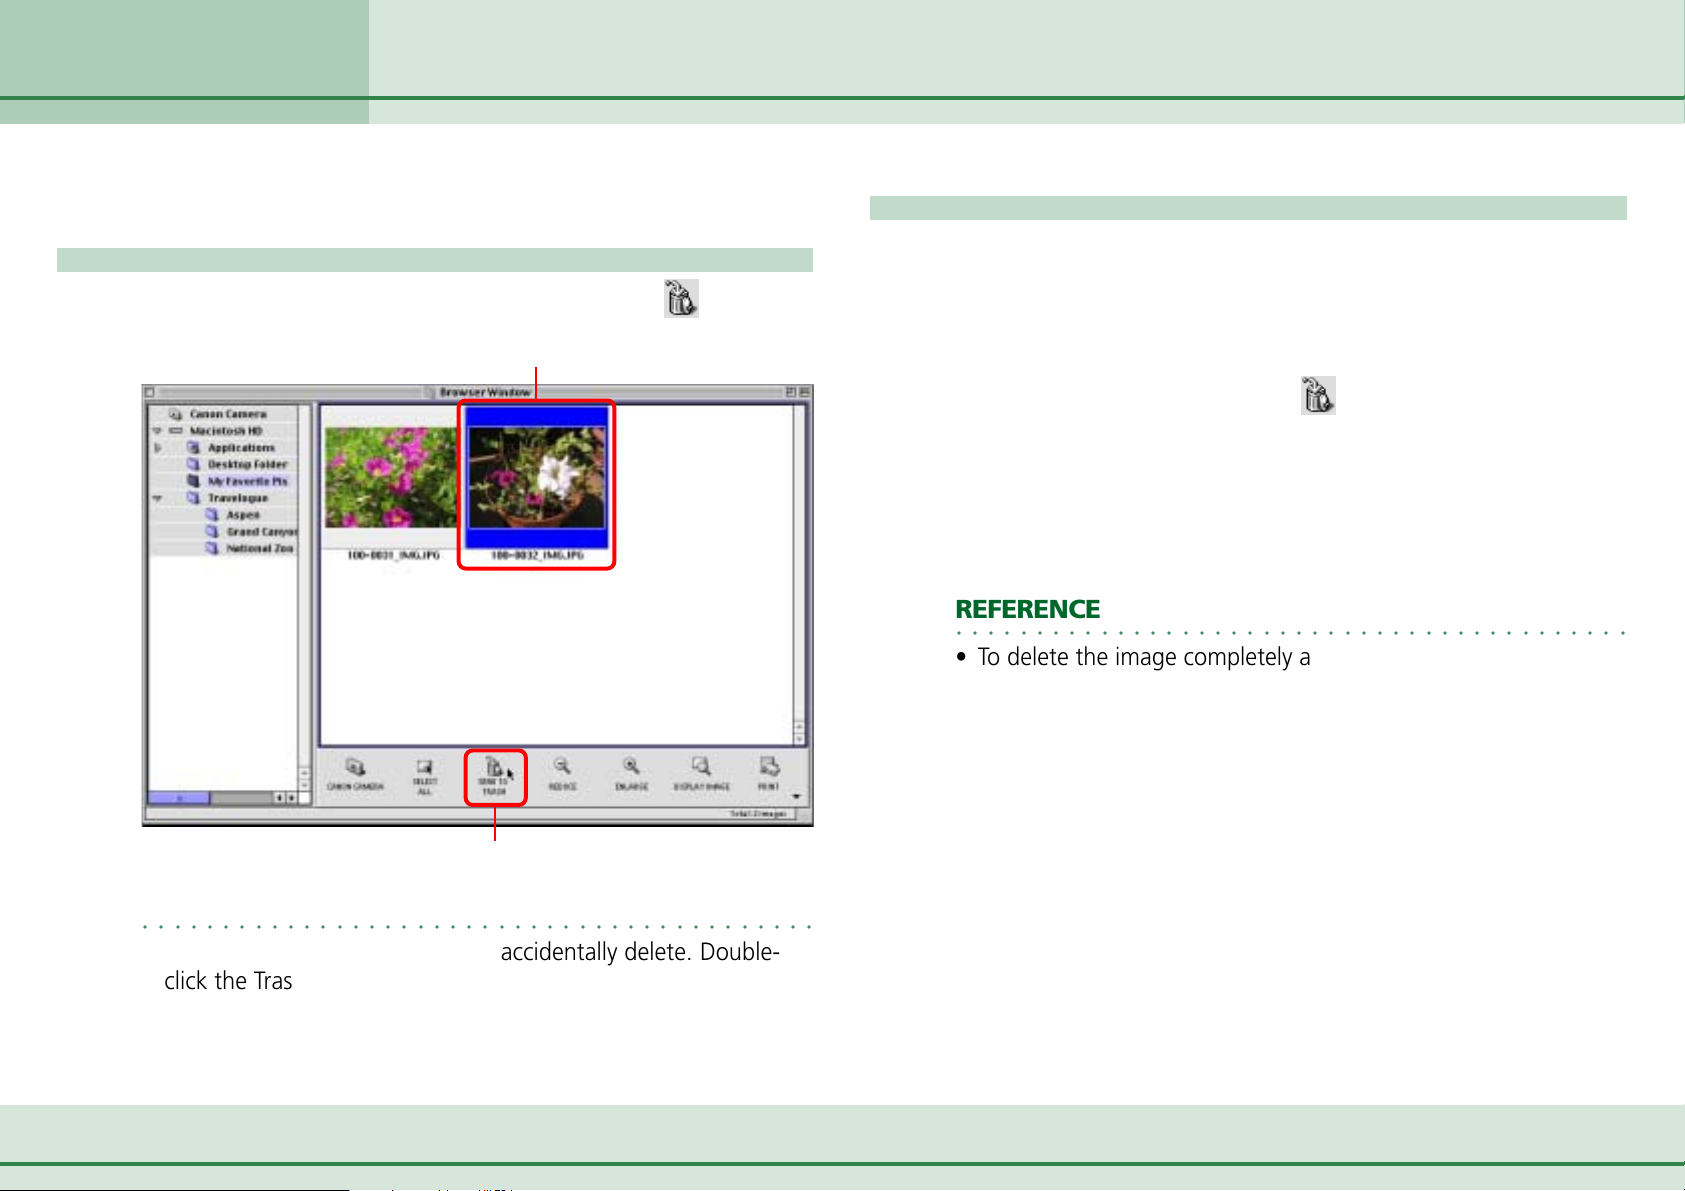
Deleting Images
This section describes how to delete images that you no longer need.
How to delete an image
Click the image that you want to delete and click (Send to
Trash).
A Click the image that you want to delete.
More ways of deleting images
■ Deleting multiple images
You can select several images at once by holding down the
[shift] key, or the [option] + [shift] keys, and clicking the images
you want to delete. When you have selected all the images
that you want to delete, clicking
the selected images at once.
■ Deleting images from the File menu
Click an image. Then, click [Send to Trash] on the [File] menu to
delete the image.
REFERENCE
○○○○○○○○○○○○○○○○○○○○○○○○○○○○○○○○○○○○○○○○○○
•To delete the image completely after performing these
operations, click [Empty Trash] on the [Special] menu. (In Mac
OS X, click the [Finder] menu and select [Empty Trash].)
(Send to Trash) deletes all
B Click here.
REFERENCE
○○○○○○○○○○○○○○○○○○○○○○○○○○○○○○○○○○○○○○○○○○
•You can recover images that you accidentally delete. Doubleclick the Trash icon to open it, and drag the image files from the
Trash to the original folder on the desktop (not the Explorer
View section).
24 ImageBrowser Software User Guide
Page 25

Chapter 3
Managing Images
Rotating Images
This section describes how to rotate images to the desired orientation.
This is useful for images taken by holding the camera sideways.
How to rotate an image
Click the image that you want to rotate. On the [Edit] menu,
point to [Rotate] and click the desired rotation angle.
IMPORTANT
○○○○○○○○○○○○○○○○○○○○○○○○○○○○○○○○○○○○○○○○○○
• When you rotate an image, the new rotated image appears in
the Browser Window. The image file is also created as a new
file on the disk.
A Click the image that you want to rotate.
REFERENCE
○○○○○○○○○○○○○○○○○○○○○○○○○○○○○○○○○○○○○○○○○○
• [90 degrees right] is a clockwise rotation and [90 degrees left] is a
counterclockwise rotation.
• There are 2 ways of rotating an image. As default, the original
image is left untouched, and a copied image is rotated, as
described on the left. These copied image files will contain "_1",
"_2", etc. within its file names.
• The original file will be overwritten and only the rotated file will
display if you click the [Edit] menu (in Mac OS X, click the
[ImageBrowser] menu), select [Preferences] and [Browser
Window], and remove the check mark from [Retain original
when rotating JPEG images].
• When you rotate an image in a format other than JPEG, only the
rotated image displays. The original image file is overwritten.
More ways of rotating images
■ Rotating multiple images
You can select several images at once by holding down the
[shift] key, or the [option] + [shift] keys, and clicking the images
you want to rotate. When you have selected all the images that
you want to rotate, perform the rotation operation and all the
selected images are rotated at the same time.
B Click a
rotation
angle.
25 ImageBrowser Software User Guide
A new rotated copy is created.The original image is retained.
Page 26
Chapter 3
Managing Images
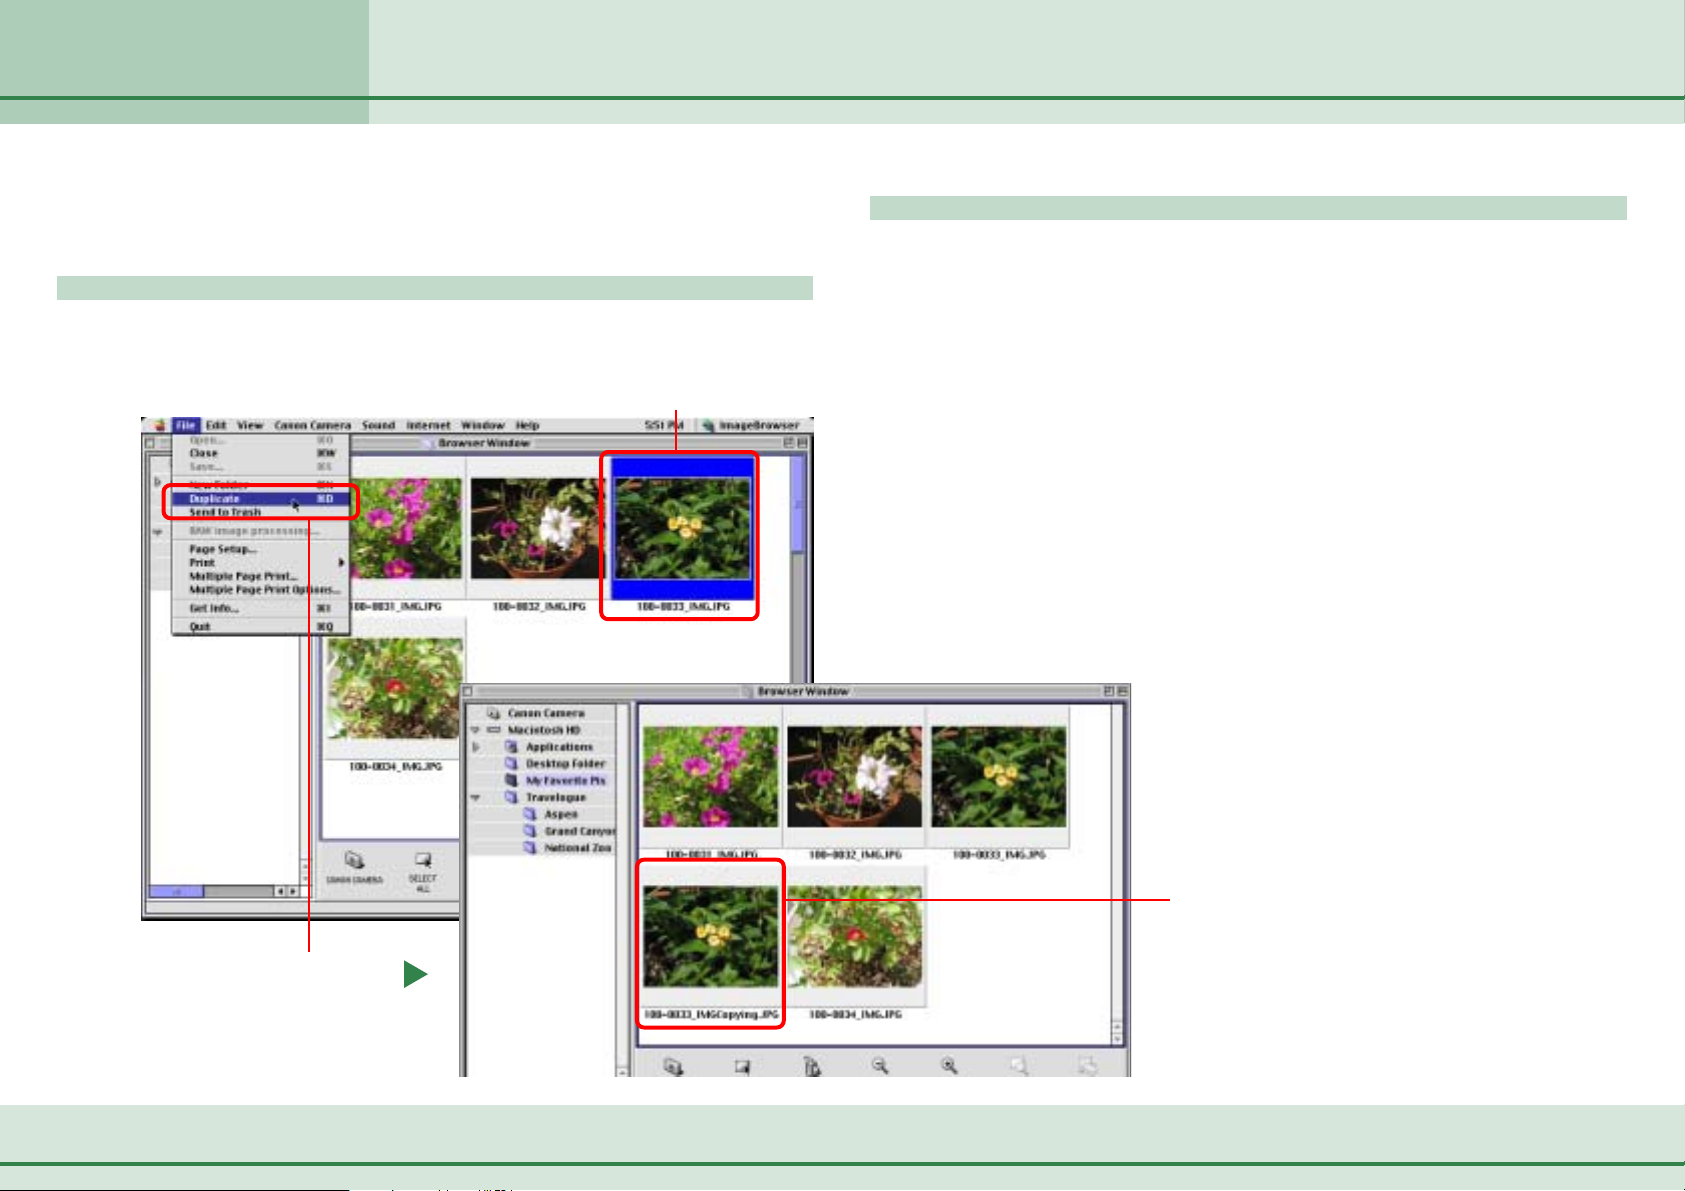
Duplicating Images
This section describes how to duplicate images (create an exact copy of
an image file).
How to duplicate an image
Click an image. On the [File] menu, click [Duplicate].
A Click the image that you want to duplicate.
More ways of duplicating images
■ Duplicating multiple images
You can select several images at once by holding down the
[shift] key, or the [option] + [shift] keys, and clicking the images
that you want to duplicate. When you have selected all the
images that you want to duplicate, perform the duplication
operation and all the selected images are duplicated at once.
■ Duplicating a complete folder
Instead of duplicating single images, you can select an entire
folder for duplication. Select the folder in the Explorer View
Section (make sure no images are selected in the Browser Area),
and on the [File] menu click [Duplicate]. The complete folder is
duplicated.
B Click here.
26 ImageBrowser Software User Guide
The duplicated image
Page 27
Chapter 3
Managing Images
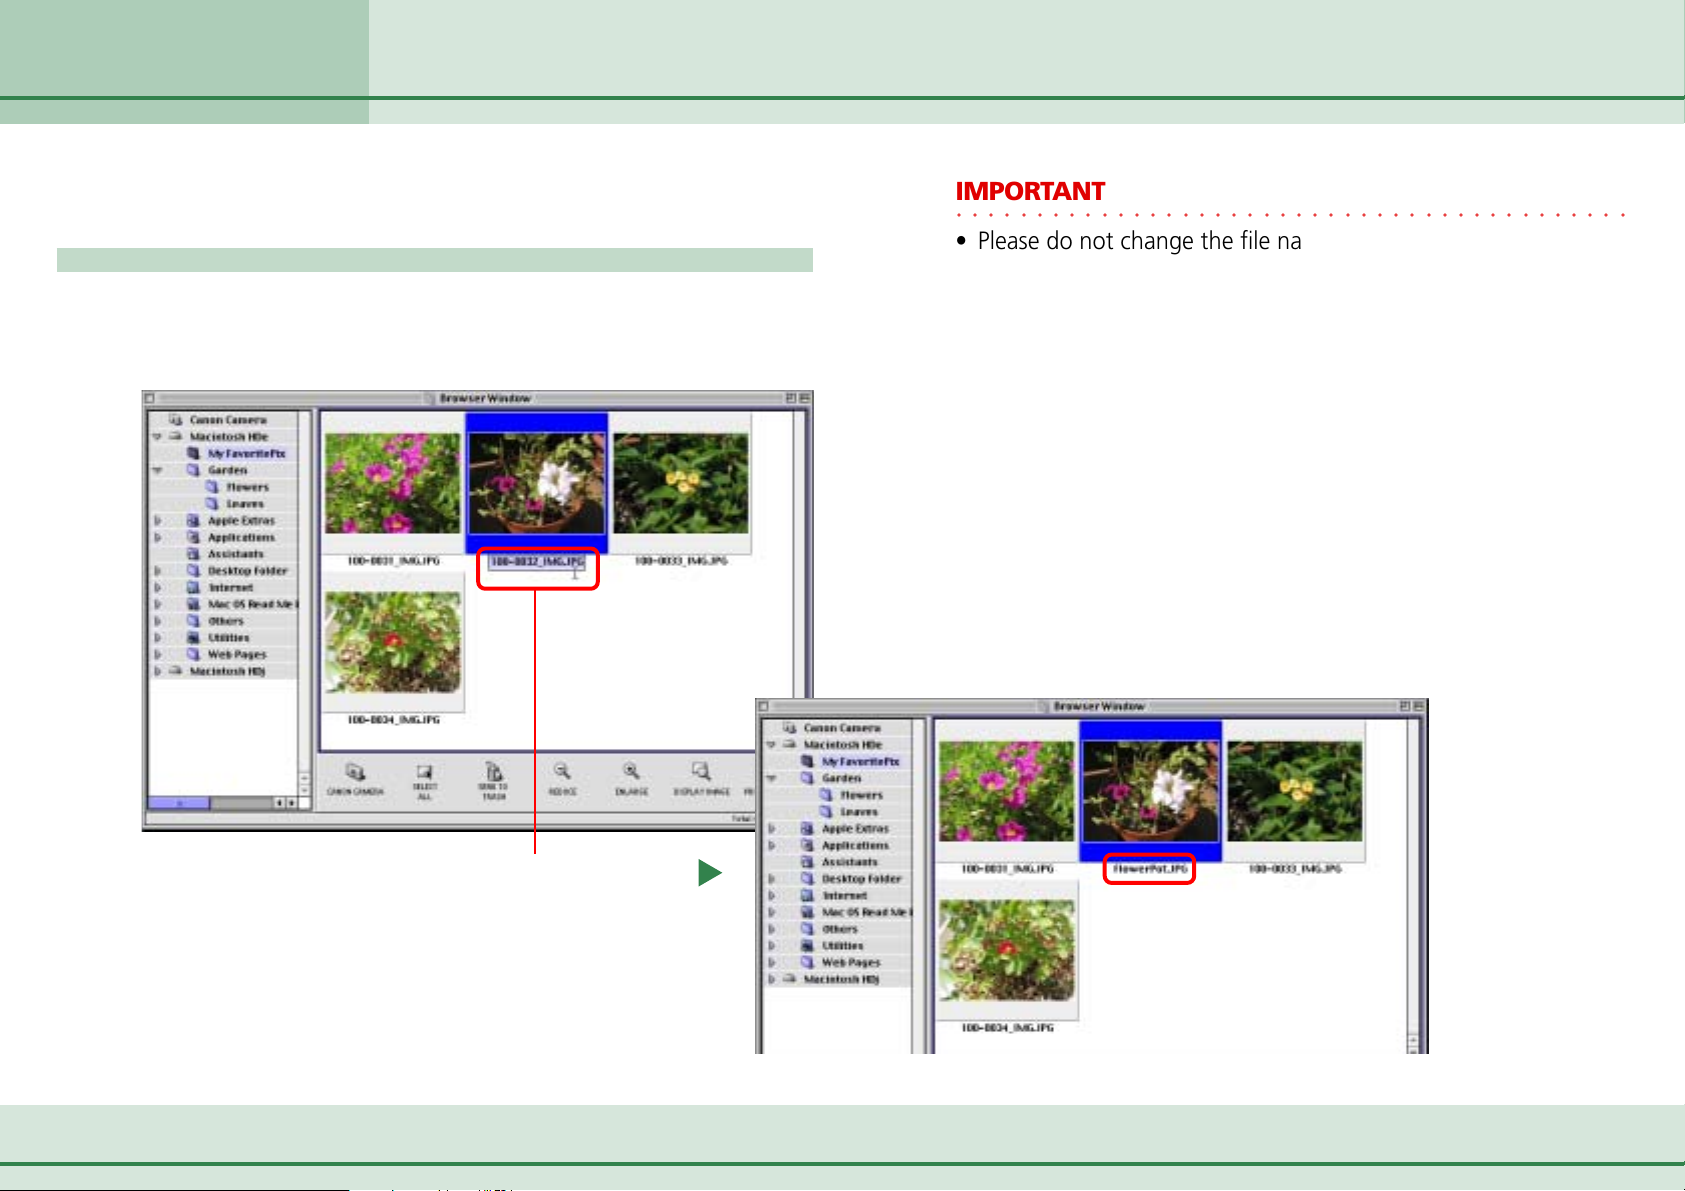
Renaming Images
This section describes how to rename images.
How to rename an image
Click the name of the image that you want to rename. After a
moment you can type the new name of the image. Type the
new name and press [return].
IMPORTANT
○○○○○○○○○○○○○○○○○○○○○○○○○○○○○○○○○○○○○○○○○○
• Please do not change the file name extension, which identifies
the file type. If you change this part of the name, the image
may cease to display in ImageBrowser. The file name extension,
such as [.JPG], is the last part of the file name and is preceded
by a period.
Click here, and wait a moment, then type
the new name and press [return].
27 ImageBrowser Software User Guide
Page 28
Chapter 3
Managing Images
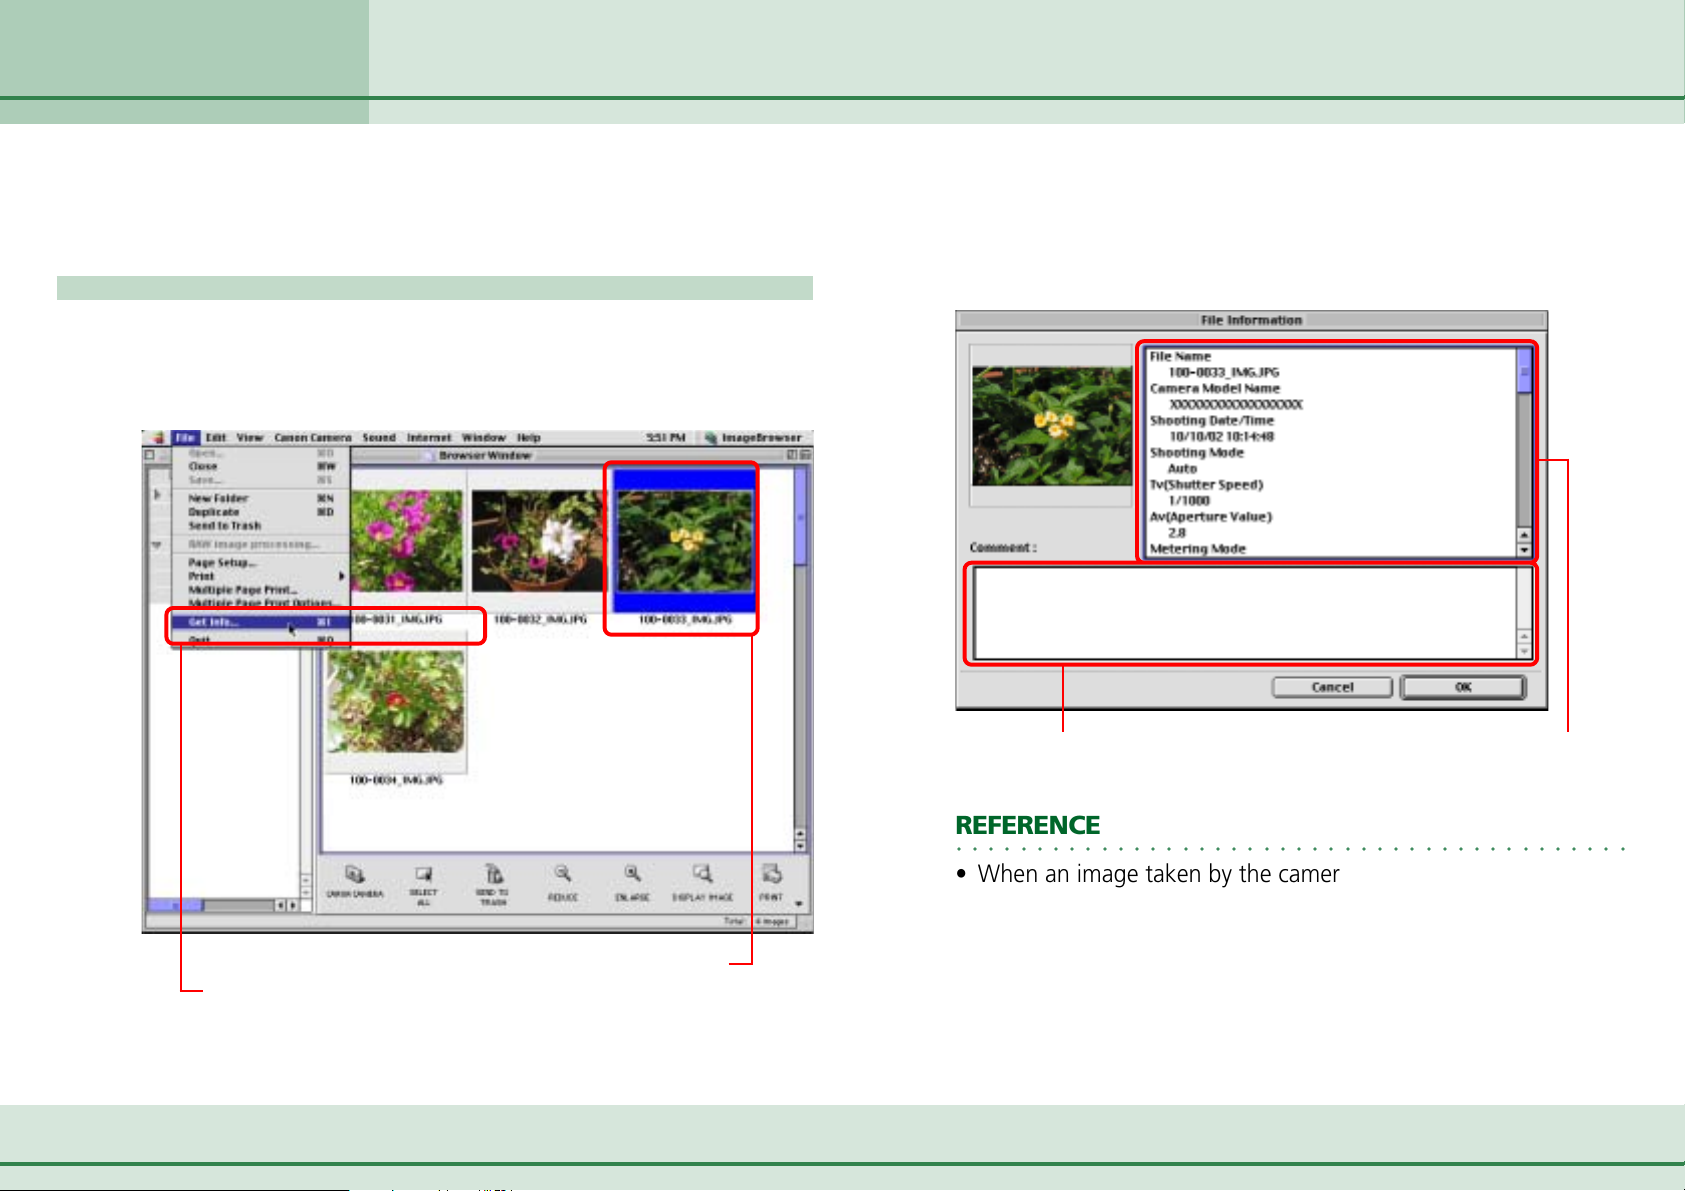
Viewing Image Information
You can click images and look at the various shooting information
about them.
How to view image information
In the Browser Area, click an image. Then, on the [File] menu,
click [Get Info] to open the File Information dialog box for that
image.
The File Information dialog box contains such information as
the camera model, the date the image was shot, and the
camera settings at the time of shooting. To close the File
Information dialog box, click [OK].
You can input a
comment here.
Information displayed here
depends on the camera used.
A Click the image for which you want to view information.
B Click here.
28 ImageBrowser Software User Guide
REFERENCE
○○○○○○○○○○○○○○○○○○○○○○○○○○○○○○○○○○○○○○○○○○
• When an image taken by the camera is modified and saved by
another program, information about the camera settings might
be lost.
Page 29

Chapter 3
Managing Images
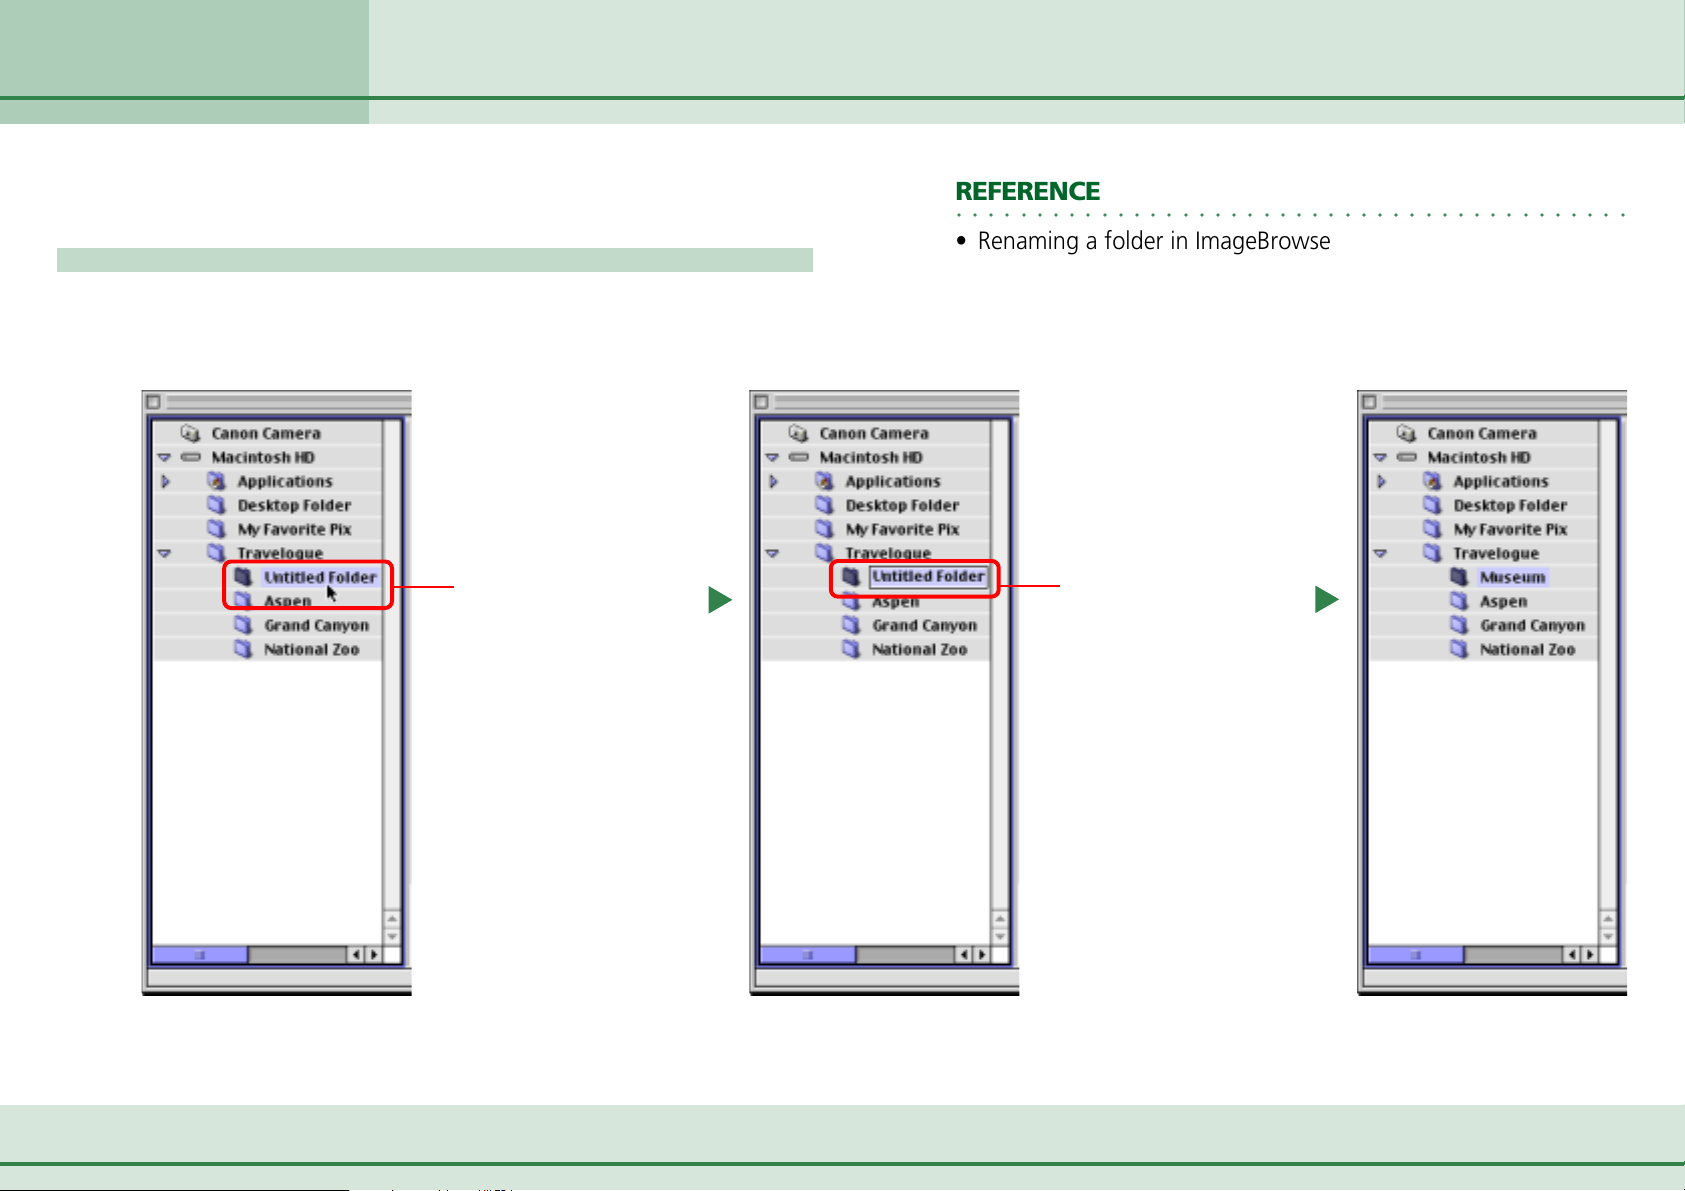
Creating Folders
This section describes how to create folders within disks or other folders.
How to create a folder
In the Explorer View Section, click the disk or folder in which
you wish to create the new folder. On the [File] menu, click
[New Folder] to create a new folder called [Untitled Folder].
Click the folder where you want to
create a new folder, then click
[New Folder] on the [File] menu.
REFERENCE
○○○○○○○○○○○○○○○○○○○○○○○○○○○○○○○○○○○○○○○○○○
• For details on how to change the folder name, see the next page.
• When you create a new folder in ImageBrowser, a new folder of
the same name appears in the Finder.
New folder
29 ImageBrowser Software User Guide
Page 30
Chapter 3
Managing Images
Renaming Folders
This section describes how to rename folders.
How to rename a folder
In the Explorer View Section, click the name of the folder that
you want to rename. After a moment, you can type the new
folder name. Type the new name and press [return].
Click the name of the
folder and wait a moment.
REFERENCE
○○○○○○○○○○○○○○○○○○○○○○○○○○○○○○○○○○○○○○○○○○
• Renaming a folder in ImageBrowser changes the name of the
folder itself on your computer.
Type the new name for the
folder and press [return].
30 ImageBrowser Software User Guide
Page 31

Chapter 3
Managing Images
Deleting Folders
This section describes how to delete unnecessary folders.
How to delete a folder
Click the folder that you want to delete and click (Send to
Trash).
Another way to delete folders
■ Deleting a folder from the [File] menu
You can delete folders using the File menu. Click the folder you
wish to delete. Click the [File] menu and select [Send to Trash].
REFERENCE
○○○○○○○○○○○○○○○○○○○○○○○○○○○○○○○○○○○○○○○○○○
•To delete the folder completely after performing these
operations, click [Empty Trash] on the [Special] menu. (In Mac
OS X, click the [Finder] menu and select [Empty Trash].)
A Click the folder to be deleted.
B Click here.
31 ImageBrowser Software User Guide
Page 32

Chapter 4
Viewing Images
Selecting Folders
This chapter describes how to view and edit images in ImageBrowser.
In this section, you will learn how to use the Explorer View Section to
choose a folder containing the images that you want to see.
How to select a folder
In the Explorer View Section, click the folder that you want to
open. The Browser Area displays a list of the images in the
selected folder.
Selected folder
The thumbnails of the images in the
folder that you selected appear here.
Collapsing and expanding a folder
You can use the and buttons to collapse or expand a disk
or a folder. Clicking the
hides its subfolders. On the other hand, clicking the
to expand the disk or folder displays its subfolders.
Click
a folder.
REFERENCE
○○○○○○○○○○○○○○○○○○○○○○○○○○○○○○○○○○○○○○○○○○
•You can display the Camera Window (assuming the camera is
to collapse
connected and ready to transfer data) by clicking [Canon
Camera] in the Explorer View section. If you are using a
memory card reader, open the memory card icon in the Explorer
View section and double-click the [DCIM] folder to open the
Camera Window.
button to collapse a disk or a folder
Click to expand
a folder.
button
32 ImageBrowser Software User Guide
Page 33

Chapter 4
Viewing Images
Opening Images
This section describes how to open images using the thumbnails
displayed in the Browser Area.
How to open an image
In the Browser Area, double-click the thumbnail of the image
that you want to open. The image appears in a new window.
Double-click
the thumbnail
of the image
that you want
to see.
REFERENCE
○○○○○○○○○○○○○○○○○○○○○○○○○○○○○○○○○○○○○○○○○○
• After selecting a thumbnail, you can also click (Display
Image) to open the image.
• After selecting a thumbnail, you can click [View Actual Image]
on the [View] menu to open the image.
Opening several images
When you want to open several images at the same time, you
can use the following method.
• In the Browser Area, hold down the [shift] key and click the
thumbnails of the images that you want to open. Then, click
(Display Image) to open all the selected images.
Closing an image
Click (Close button) on the image window to close the
image. With Mac OS X, click
You can also click [Close] on the [File] menu.
.
The size of the
image (vertical x
horizontal, in
pixels) appears
here.
33 ImageBrowser Software User Guide
Click here to display
or hide the toolbar
at the bottom of the
image window.
Page 34

Chapter 4
Viewing Images
Changing the Magnification
This section describes how to change the magnification of an image.
How to change the zoom ratio with the buttons in the image window
You can change the zoom ratio by clicking or directly in
the image window.
How to change the zoom ratio using the Display menu
You can change the zoom ratio by clicking one of the zoom
ratios on the [View] menu, or by clicking [Enlarge] or [Reduce].
REFERENCE
○○○○○○○○○○○○○○○○○○○○○○○○○○○○○○○○○○○○○○○○○○
•You can select a zoom ratio of [25%] to [200%].
34 ImageBrowser Software User Guide
Reduce Enlarge
Current zoom ratio
Page 35

Chapter 4
Viewing Images
Editing Images (1/4)
This section describes how to edit open images.
Editing functions
Using ImageBrowser, you can perform the following editing
operations.
■ Save
After you have modified an image, you can save it under a
different name with this function.
■ Crop
You can extract part of an image, leaving out parts that you
don’t need.
REFERENCE
○○○○○○○○○○○○○○○○○○○○○○○○○○○○○○○○○○○○○○○○○○
• After you edit an image, it is possible that the result might not
satisfy you. If you want to go back to the previous step, click
[Undo] on the [Edit] menu to cancel the operation and return to
the previous step. Keep clicking [Undo] to continue going back.
• If you feel that you have undone too many steps, you can
reverse it by clicking [Redo] on the [Edit] menu.
■ Adjust Color
You can change the appearance of an image by adjusting its
hue, saturation, and lightness.
Detailed explanations of these procedures start on the next
page.
35 ImageBrowser Software User Guide
Page 36

Chapter 4
Viewing Images
Editing Images (2/4)
Cropping
Use this function to extract only part of an image, leaving out
the parts that you do not want. Place the mouse pointer within
the image you want to crop. Drag the mouse to form a
rectangular frame. Then, click
within the frame.
(Crop) to extract the area
A Drag to frame the area that you want to crop.
B Click this button.
REFERENCE
○○○○○○○○○○○○○○○○○○○○○○○○○○○○○○○○○○○○○○○○○○
• When an area is selected for cropping, the following
information is displayed at the bottom of the window.
This is the size of the area that
you selected (horizontal x
vertical, in pixels).
These are the coordinates of
the mouse pointer in the
cropped area.
36 ImageBrowser Software User Guide
Page 37

Chapter 4
Viewing Images
Adjusting colors
You can change the appearance of an image by adjusting its
colors. Click
dialog box. In the dialog box, you can adjust the hue,
saturation and lightness, and click [OK].
Editing Images (3/4)
(Adjust Color) to display the Adjust Color
Click here.
Decrease Hue
Decrease
Saturation
Decrease
Lightness
Increase Hue
Increase
Saturation
Increase
Lightness
37 ImageBrowser Software User Guide
Page 38

Chapter 4
Viewing Images
Editing Images (4/4)
Saving images
After you have modified an image, you can save it under a
different name so that the original image remains intact. In this
case, click
and specify the file format you wish to use. Then, click [Save].
After you have modified an image file, you can save it under
the same file name (overwriting the original image). To do this,
type the original file name of the image under Save File in the
save dialog box, then click [Save].
Click this button.
(Save). In the save dialog box, type a new name
REFERENCE
○○○○○○○○○○○○○○○○○○○○○○○○○○○○○○○○○○○○○○○○○○
• After you have modified an image, if you try to close the image
window without saving your changes, a message appears to
prompt you to save the edited image.
To save the changes, click [Save]. In the save dialog box, type a
name and specify the file format that you want to use. Then,
click [Save].
If you do not want to save the changes, click [Don’t Save].
• The “Exif JPEG format” is a variety of JPEG file that contains
additional information, such as the shooting data. Files in this
format can be handled in the same fashion as conventional
JPEG files.
38 ImageBrowser Software User Guide
Page 39

Chapter 4
Viewing Images
Editing Images with Other Programs
It is possible to edit images that you have selected in ImageBrowser
using a different image editing program that you have registered. This
section describes how to perform this operation.
REFERENCE
○○○○○○○○○○○○○○○○○○○○○○○○○○○○○○○○○○○○○○○○○○
•You cannot select this function if the image editing software
supplied with your product has not been installed. Please install
the software to use this function. Also, if you wish to use other
image editing programs, you need to register them by clicking
the [Edit] menu ([ImageBrowser] menu in Mac OS X), selecting
[Preferences] and [Browser Window] in the list box, and adding
the program to the Register Application category.
• The image editing software shipped with the camera varies
according to the model. (Some models may not be shipped
with an image editing program.)
Editing Images with Other Programs
After selecting an image, click the [Edit] menu and select the
desired program from the [Start Application] submenu.
Select an image.
A
B Select your application from
this submenu (program
names vary according to the
camera model).
39 ImageBrowser Software User Guide
The image editing program starts and displays the selected
image.
Page 40

Chapter 5
Using the Camera Window
Opening the Camera Window
This chapter describes how to use the Camera Window of ImageBrowser.
Let’s begin by looking at the three ways of opening the Camera Window.
Opening it automatically
Connect the camera to the computer and prepare it to transfer
data to automatically start ImageBrowser, open the Browser
Window and the ImageBrowser Automation Wizard. The
Camera Window will display if you select [Display Images] or
[Download Images] in the ImageBrowser Automation Wizard
window.
You can open the Camera Window with the same operation
even if ImageBrowser is already running.
REFERENCE
○○○○○○○○○○○○○○○○○○○○○○○○○○○○○○○○○○○○○○○○○○
• The Camera Window will not open automatically with Mac OS
X, or if the check mark is removed from the [The application
program below will start] option in the [Canon ImageBrowser
Auto Launch] control panel in the Macintosh Control Panels
with Mac OS 9.0 ~ 9.2.
In addition, the Camera Window will not open automatically if
you are using a memory card reader.
Double-clicking Canon Camera in the Explorer View Section
In the Explorer View Section, double-click [Canon Camera] to
open the Camera Window.
Click here.
Using the Canon Camera button
Click (Canon Camera) to display the Camera Window.
Click here.
To open the Camera Window when you are using a memory
card reader, open the memory card icon in the Explorer View
section and double-click the [DCIM] folder.
REFERENCE
○○○○○○○○○○○○○○○○○○○○○○○○○○○○○○○○○○○○○○○○○○
• If the “No camera detected” message appears, refer to the
Troubleshooting section in the Appendices for information on
how to solve the problem.
40 ImageBrowser Software User Guide
Page 41

Chapter 5
Using the Camera Window
Downloading Images (1/2)
This section explains the procedures for downloading images from the
camera (memory card) to a computer disk.
How to import an image
Click the thumbnail of the image that you want to import from
the camera and click
(Download).
A Select an image.
B Click here.
REFERENCE
○○○○○○○○○○○○○○○○○○○○○○○○○○○○○○○○○○○○○○○○○○
• The image is imported into the folder currently selected in the
Browser Window.
•Your camera’s model name and picture displays in the Camera
Window. Consequently, it may appear slightly different from
that shown here. This should not be a cause for concern.
Representation of
your camera
Camera name
Camera name
Image imported from the camera
41 ImageBrowser Software User Guide
Other ways of importing images
■ Double-clicking
You can import images by double-clicking them in the Camera
Window.
Page 42

Chapter 5
Using the Camera Window
Downloading Images (2/2)
■ Drag-and-drop
Drag an image in the Camera Window and drop it into a folder
in the Browser Window. The image is then imported into
ImageBrowser. Further, you can import an image directly into a
recognized folder by dragging an image in the Camera
Window and dropping it into a folder in the Explorer View
Section.
■ Importing multiple images
You can select several images by holding down the [shift] key,
or the [option] + [shift] keys, and clicking the images you want
to import. When the images are selected, perform the
importation. All the images that you selected are imported.
■ Importing all the images
Click (Select) and click [Select All] on the menu. All the
images of the folder are selected and when you perform the
importation procedure, they are all imported at once.
REFERENCE
○○○○○○○○○○○○○○○○○○○○○○○○○○○○○○○○○○○○○○○○○○
• If an image is taken in the Stitch Assist mode (some camera
models do not come with this feature), it appears in the
Camera Window as follows:
• If an image is taken in the RAW mode (some camera models do
not come with this feature), it appears in the Camera Window
as follows:
This mark indicates that
the image was taken in
the RAW mode.
• If an image is taken in the Movie mode (some camera models
do not come with this feature), it appears in the Camera
Window as follows:
This is the mark that
indicates a movie.
• If an image has a sound memo attached (this feature is not
available on some models), it appears in the Camera Window
as follows:
42 ImageBrowser Software User Guide
This mark indicates that
the image was taken in
the Stitch Assist mode.
(You can click the wavy
line to start PhotoStitch.)
This is the mark that
indicates a sound memo.
Page 43

Chapter 5
Using the Camera Window
Deleting Images in the Camera
This section describes how to delete images from the camera (memory
card).
IMPORTANT
○○○○○○○○○○○○○○○○○○○○○○○○○○○○○○○○○○○○○○○○○○
• Please note that deleting an image in the Camera Window
deletes the actual image from the memory card. Since deleted
images cannot be recovered, be extremely careful when using
this function.
How to delete an image in the camera
Select the image that you want to delete and click (Delete)
to delete it.
A Select an image.
Other ways of deleting images
■ Deleting multiple images
You can select several images by holding down the [shift] key, or
the [option] + [shift] keys, and clicking the images you want to
delete. When you have selected all the images to be deleted,
perform the deletion. All the selected images are deleted.
■ Deleting all the images
Click (Select) and click [Select All] on the menu. When you
proceed with the deletion, all the images contained in the
folder are deleted at once.
A message appears. Click [OK]. The image is deleted.
43 ImageBrowser Software User Guide
B Click here.
Page 44

Chapter 5
Using the Camera Window
Rotating Images
This section describes how to rotate images (stored on the camera) to
the desired orientation.
How to rotate an image
In the Camera Window, select the image that you want to
rotate. Click
want to use on the menu.
(Rotate) and click the rotation angle that you
A Select an image.
B Click the [Rotate]
button and select
a rotation angle.
REFERENCE
○○○○○○○○○○○○○○○○○○○○○○○○○○○○○○○○○○○○○○○○○○
• 90 degrees left is a counterclockwise rotation and 90 degrees
right is a clockwise rotation.
• The Rotate function affects only the image displayed in the
Camera Window. The image stored on the camera is not
changed at all. However, when you download the image, two
files are sent to the computer, one version with the image
rotated and a second version with the original orientation.
• Only the rotated file will be downloaded (the original file will
not) if you click the [Edit] menu (in Mac OS X, click the
[ImageBrowser] menu), select [Preferences] and [Browser
Window] in the list box, and remove the check mark from
[Retain original when rotating JPEG images].
Another way to rotate images
■ Rotating multiple images
You can select several images at once by holding down the
[shift] key, or the [option] + [shift] keys, and clicking the images
that you want to rotate. When all the images are selected,
perform the rotation operation. All the selected images are
rotated at the same time at the same rotation angle.
44 ImageBrowser Software User Guide
Page 45

Chapter 5
Using the Camera Window
Copying Images to a Camera (1/2)
This section explains the procedures for copying images from your
computer disk to the camera (memory card).
IMPORTANT
○○○○○○○○○○○○○○○○○○○○○○○○○○○○○○○○○○○○○○○○○○
• Check that you have connected the camera to the computer
with the USB cable and prepared it to transfer data before
performing these procedures.
• If you are using a memory card reader, ensure that the card is
loaded into the reader before performing these procedures.
How to copy an image to the camera
Click (Upload).
REFERENCE
○○○○○○○○○○○○○○○○○○○○○○○○○○○○○○○○○○○○○○○○○○
•You can upload multiple images in the same operation.
When the “Save to Camera” dialog box appears, set up all the
necessary options. Then, click [Save to Camera]. The selected
image is copied to the camera.
Specify the size
of the image.
Specify how to
adjust the size
of the image.
A dialog box appears. In the dialog box, select an image you
want to copy to the camera and click [Open].
45 ImageBrowser Software User Guide
Click here.
Page 46

Chapter 5
Using the Camera Window
Copying Images to a Camera (2/2)
When you copy several images, the [Save subsequent images with
the same setting] button in the “Save to Camera” dialog box is
enabled. By using this button you save time because you do not
need to adjust the settings for each image.
Click this button to apply the current settings to subsequent images.
REFERENCE
○○○○○○○○○○○○○○○○○○○○○○○○○○○○○○○○○○○○○○○○○○
• If the “Adjust Height” check box and the “Adjust Width” check
box are not selected, then enlargement/reduction of the image
is not performed.
• If the “Adjust Height” check box and the “Adjust Width” check
box are both selected, then the vertical/horizontal ratio of the
image might change.
•You can copy images of the following formats to the camera:
JPEG, PICT, TIFF and Windows BMP. (However, files are saved in
the JPEG format when stored on the camera.)
For detailed information on file formats, see the Supported File
Formats section in the Appendices.
•RAW image files and Movie files (AVI format) cannot be copied
to the camera.
Other ways of copying images
■ Using the menu
You can copy images to a camera by clicking [Upload Images] on
the [Canon Camera] menu.
46 ImageBrowser Software User Guide
■ Drag-and-drop
In the Browser Area, drag an image that you want to copy into
the Camera Window.
Page 47

Chapter 5
Using the Camera Window
Checking and Modifying the Camera Settings
This section explains how you can check and modify the camera
settings from your computer.
How to check or modify the camera settings
Click (Setup Options) to display a menu. On the menu, click
[Camera Settings].
Click [Camera Settings] on
the [Setup Options] menu.
Type the name of
the owner of the
camera here.
Click this button
to synchronize
the camera’s
date and time
settings with the
computer.
Click this button
to format the
camera’s memory
card (not
supported by
some camera
You can set the date and time from here.
models).
After you have checked the camera settings and made the
necessary changes, click [OK].
The Camera Settings dialog box appears. Use it to change the
settings, as shown in the figure on the right.
47 ImageBrowser Software User Guide
Page 48

Chapter 5
Using the Camera Window
Other Functions of the Camera Window
This section describes the additional functions of the Camera Window
that you can use.
On the [Setup Options] menu,
click [Communication Settings]
to adjust the communications
settings for the port
connecting the camera.*
Click the [Setup Options]
button and select [My Camera
for Digital Cameras] to display
the My Camera Settings
dialog, which can be used to
change the start-up image,
shutter sound and other
camera settings (which are
explained in Saving the ‘My
Camera Settings’ to the
Camera section in Chapter 6). *
48 ImageBrowser Software User Guide
Click this button to
reconnect the camera and
computer after a
connection is broken.
Click this button to print the
selected image (For detailed
information on this
operation, see the Printing
Images section in Chapter 6).
Click this button to check the
various shooting information.
Click this button to run a camerabased slide show or set the DPOF
print settings (see the Setting Up
Slide Shows on the Camera and
Setting Up DPOF Prints sections in
the Appendices). *
* Some camera models do not support this button.
Page 49

Chapter 6
Using Supplementary Features
Creating Images for E-mail (1/2)
This chapter describes how you can use the images stored in
ImageBrowser in various situations. First, let’s begin with how you can
reduce image files so they can be attached to e-mail.
How to send an image by e-mail
1.
2.
3.
In the Browser Area, select the image that you want
to send.
You can select several images by holding down the [shift] key or
the [option] + [shift] keys.
On the [Internet] menu, select [Create Image for
Email].
Specify the compression method that you want to
apply to the image.
4.
5.
Click [Next].
The Create Image for Email dialog box appears. (However, if you
selected the “Send image(s) without compression” option, the
Send Email dialog box appears and you can proceed to step 7.)
Specify the reduction ratio and the image quality.
Specify the
reduction ratio
relative to the
original size of
the image (50%
means the size of
the image is
reduced by half
Specify the image quality.
(The lower the quality,
the rougher the image
becomes, but the size of
the file also becomes
smaller.)
Use it to check the file
size when you actually
compress the image.
(The file size appears
next to “Total Size after
compression.”)
both vertically
and horizontally.)
Use this option when you
do not want to reduce the
size of the image.
49 ImageBrowser Software User Guide
Normally, we recommend
that you select this option.
6.
Click [Next].
The last window appears.
Page 50

Chapter 6
Using Supplementary Features
Creating Images for E-mail (2/2)
7.
8.
Save the image and select whether you want to start
your e-mail program.
Save the image and place a checkmark here
if you want to start your e-mail program
A warning
message
displays when
the file size is
large.
To change the
file size, click
[Previous].
Click here to check an image
after changing it.
Click [Finish].
• If this is the first time you send an image in e-mail, the [Email
Images] folder appears in the Explorer View Section, and the
image is saved in that folder. If the [Email Images] folder
already exists, the image is saved in that folder.
• When you click [Finish], your e-mail program starts
automatically if you have selected “Start email application
after closing” in Step 7.
You can send the image you just created by opening a new email and attaching the image to the e-mail message.
•With Outlook Express or other types of e-mail programs, you
can attach images to e-mail messages simply by dragging
them from the Browser Area to the new message window.
REFERENCE
○○○○○○○○○○○○○○○○○○○○○○○○○○○○○○○○○○○○○○○○○○
•You can change the e-mail program so that this procedure
starts automatically. With Mac OS 9.0 ~ 9.2, click the [Internet]
icon in the Control Panels and change the program on the [Email] tab. With Mac OS X, click [Internet] in the System
Preferences and change the program on the [Email] tab.
However, please note that some e-mail programs cannot start
automatically.
•With Mac OS 9.0 ~ 9.2, images created with the [Create Image
for Email] feature are saved to the disk on which ImageBrowser
was installed or in the [Documents] folder on the hard disk.
Open the following folders to find them: [ImageBrowser] or
[Documents], [ImageBrowserUserData], and [Mail]. With Mac
OS X, open the following folders to find them: [Users], [User
login name], [Library], [Preferences], [ImageBrowserUserData],
and [Mail].
50 ImageBrowser Software User Guide
Page 51

Chapter 6
Using Supplementary Features
Running Slide Shows (1/3)
This section describes how to use slide shows that display multiple
selections of images in sequence at full screen size.
Setting up a slide show
First, you need to specify how to run the slide show, as follows:
On the [View] menu, click [Slide Show Options] to set up the
options.
Select this option if you want to continue
running the slide show when it ends.
Place a check here if you do not wish the
buttons to show while a slide show is in
progress.
Select the “Auto Play” option if you want
the slide show to proceed automatically
and go to the next slide after a
predetermined number of seconds.
Select the “Control with Mouse or
keypad” option if you want to control
the progress of the slide show manually.
Select the transition effect to be used
when moving from one slide to another.
(When you click an effect, you can get a
preview of how the effect looks in the
area to the right.)
If you want the transition effects to be
randomly assigned, select [Random].
51 ImageBrowser Software User Guide
When you have completed the slide show
settings, click [OK].
Page 52

Chapter 6
Using Supplementary Features
Running Slide Shows (2/3)
How to run a slide show
First, in the Browser Area, select images that you want to use in
the slide show.
Next, on the [View] menu, click [Slide Show]. The slide show
starts.
REFERENCE
○○○○○○○○○○○○○○○○○○○○○○○○○○○○○○○○○○○○○○○○○○
• If you want to view all the images contained in the folder, click
(Select All).
While a slide show is underway, you can use the buttons at the
bottom of the screen to do the following.
Click here to return to
the previous image.
Click here to return
to the first image.
Click here to pause
the slide show (click
again to resume).
Print Settings Button
Click this button during a slide show when you see an
image you would like to print (a check mark appears
beside the button to indicate marked images). After
the slide show finishes, a dialog for printing the
marked photos will automatically appear.
Image Selection Button
Click this button during a slide show to select/ deselect images (a
check mark on the button indicates a selected image). After the
slide show finishes, the deselected images are no longer selected in
the Browser Window. You can also use this function to select
images that require further magnification so that only the selected
photos are placed in a different folder.
Click here to move
to the next image.
Click here to jump
to the last image.
Click here to end
the slide show.
52 ImageBrowser Software User Guide
Page 53

Chapter 6
Using Supplementary Features
Running Slide Shows (3/3)
If you selected “Control with Mouse or keypad” in the Slide Show
Options dialog box, you can control the slide show as follows:
■ To move to the next image
Press the [return] or [ ] key.
Click the image.*
■ To return to the previous image
Press the [ ] key.
Hold the [shift] key and click the image.*
■ To end the show
Press the [esc] key.
REFERENCE
○○○○○○○○○○○○○○○○○○○○○○○○○○○○○○○○○○○○○○○○○○
• The operations marked with an asterisk can only be used when
[Hides buttons] has been selected in the Slide Show Options
dialog. (The mouse actions are disabled when the buttons are
displayed.)
If you selected [Hide buttons] in the Slide Show Options dialog,
you can display a contextual menu for controlling the slide
show by holding down the [control] key and clicking the
mouse. This feature is available even if you selected [Auto Play]
in the Slide Show Options dialog.
53 ImageBrowser Software User Guide
Page 54

Chapter 6
Using Supplementary Features
Adding Sounds to Images (1/2)
You can add sounds to your images and play them later.
REFERENCE
○○○○○○○○○○○○○○○○○○○○○○○○○○○○○○○○○○○○○○○○○○
•To add sound to images with ImageBrowser, you must use the
Mac OS recording function. Connect all the peripherals that you
need for your computer model, such as a microphone, and
confirm that the recording function is activated in the [Sound]
control panels.
How to add a sound to an image
In the Browser Area, select an image to which you want to add
sound. On the [Sound] menu, click [Record].
The following dialog box appears.
When you click , the [Save] button becomes enabled and
recording starts. When you click [Save], recording stops and the
sound is saved.
The sound is added to the image.
The following mark appears when an image is accompanied by
sound.
This mark indicates an image with sound.
How to play sound added to an image
Click here to
record.
54 ImageBrowser Software User Guide
■ Using the menu to replay sounds
Select the image for which you want to play the sound. On the
[Sound] menu, click [Play]. The sound is played.
Further, you can control playback by clicking [Pause] or [Stop]
on the [Sound] menu.
Recording starts when the
[Save] button is enabled.
To stop recording, click the
[Save] button.
Page 55

Chapter 6
Using Supplementary Features
Adding Sound to Images (2/2)
■ Using the Sound Panel to replay sounds
On the [View] menu, select [View Settings] followed by [Sound
Panel] from the displayed menu.
Select [Sound Panel].
After selecting an image with a sound attached, you can use
the sound panel to perform the following.
Click here to stop playing a sound
Click here to pause a sound
Click here to record a sound
Click here to replay a sound.
REFERENCE
○○○○○○○○○○○○○○○○○○○○○○○○○○○○○○○○○○○○○○○○○○
Move the tab to adjust
the sound volume.
•To remove sound from an image, select the image and on the
[Sound] menu, click [Record]. When a confirmation message
appears, click [OK]. Click [Cancel] on the recording window.
The sound is removed from the image.
• When you add a sound to an image, the sound file is created in
the same folder as the image file as an AIFF format file with the
[.AIF] file name extension.
The Sound Panel appears.
55 ImageBrowser Software User Guide
Page 56

Chapter 6
Using Supplementary Features
Saving the “My Camera Settings” to the Camera (1/10)
This section explains how to save the “My Camera Settings” on your
computer to the camera or vice versa. (These procedures only work on
models supporting the My Camera Settings.)
What are the My Camera Settings?
The start-up image for the camera and sounds such as the
start-up sound, the shutter sound, operation sound and the
self-timer sound are collectively referred to as the My Camera
Settings. You can add your favorite images and sounds from
your computer to the My Camera Settings in the camera.
Displaying the My Camera Settings dialog
ImageBrowser comes with some My Camera Settings already
prepared. Start by displaying the My Camera dialog.
1.
Connect the camera to the computer, prepare the
camera to transfer data and open the Camera
Window.
Try changing the settings type selected in the Type category.
The Computer list displays the image files and sounds that were
previously prepared.
Click [View Camera] to display the My Camera Settings in the
camera (only the editable settings are shown).
Switches between
settings types.
My Camera Settings that are already
on your computer display here.
My Camera Settings in
your camera display here.
2.
Click [Setup Options] and select [My Camera for
Digital Cameras] in the next menu.
Click here.
The My Camera dialog displays.
56 ImageBrowser Software User Guide
REFERENCE
○○○○○○○○○○○○○○○○○○○○○○○○○○○○○○○○○○○○○○○○○○
• The theme in the [Type] list box contains a start-up image, startup sound, shutter sound, operation sound, and self-timer
sound regrouped as a set. By selecting a theme, you can
change the start-up image, start-up sound, shutter sound,
operation sound, and self-timer sound in one easy step.
Page 57

Chapter 6
Using Supplementary Features
Saving the “My Camera Settings” to the Camera (2/10)
You can save the files that appear in this list as My Camera
Settings to your camera.
REFERENCE
○○○○○○○○○○○○○○○○○○○○○○○○○○○○○○○○○○○○○○○○○○
•You can also open the My Camera dialog by clicking the [Edit]
menu and selecting [My Camera for Digital Cameras].
• By selecting the desired theme in the [Type] list box and adding
it to the camera, you can change the start-up image, start-up
sound, shutter sound, operation sound, and self-timer sound in
one easy step.
•You can also add new files as My Camera Settings to the
Computer list (the procedure is explained later in this section).
• The My Camera Settings that come with ImageBrowser can be
found by opening the following sequence of folders on the
drive on which you installed ImageBrowser:
Mac OS 9.0 ~ 9.2: [Canon Utilities], [ImageBrowser],
[ImageBrowser.Info], and [My Camera Files]. However, if the
disk on which the OS is installed has a folder called
[Documents], then they will be found with the following
sequence: [Documents], [ImageBrowserUserData], and [My
Camera files].
Mac OS X: System Disk, [Users], [User login name], [Library],
[Preferences], [ImageBrowserUserData], and [MyCameraFiles].
Saving the My Camera Settings to the camera
This topic explains how to save the previously recorded My
Camera Settings files to the camera.
1.
Select a settings type.
Select a settings type.
57 ImageBrowser Software User Guide
Page 58

Chapter 6
Using Supplementary Features
Saving the “My Camera Settings” to the Camera (3/10)
2.
In the Computer list, select a setting you would like to
add to the camera.
When you select a start-up image, it will be displayed in the
preview area to the right.
When you select a sound file, it will automatically be played.
When you select a theme, it will be displayed in the preview
area to the right and the start-up sound, shutter sound,
operation sound and self-timer sound will be played in
succession.
3.
In the Camera list, select the settings file you would
like to replace and click .
The settings file in the Camera list will be replaced by the
settings file from the Computer list. If a settings file with the
same name has already been added, it will be overwritten.
Select the setting you want to replace
and click
Repeat steps 1-3 to replace all the settings files with those you
wish to save to the camera.
Up to this stage, only the settings in the Camera list change,
not those in the camera itself.
.
58 ImageBrowser Software User Guide
4.
Click the [Save to Camera] button.
The settings files in the Camera list are saved to the camera.
Page 59

Chapter 6
Using Supplementary Features
Saving the “My Camera Settings” to the Camera (4/10)
5.
Click the [Close] button to close the dialog.
This concludes the procedure for adding settings to the camera.
Next, change the settings on the camera itself to use the new
start-up image and sounds. See the guide supplied with your
camera for instructions for changing the settings.
IMPORTANT
○○○○○○○○○○○○○○○○○○○○○○○○○○○○○○○○○○○○○○○○○○
• Never detach the USB cable, turn off the camera power, or
disconnect the camera from the computer while the My
Camera Settings are being saved to the camera.
REFERENCE
○○○○○○○○○○○○○○○○○○○○○○○○○○○○○○○○○○○○○○○○○○
•To delete settings files in the Camera list, select the file and click
the [Delete] button.
•You can check the settings in the camera (sounds) by clicking
[Play].
Click here to delete a file
from the list.
Click here to check the
camera settings (sounds).
Displays the camera settings
when an image file is selected.
Adding new files to the My Camera Settings
Create a new image or sound file and save it to the computer
and then add that file as a My Camera Settings file to the My
Camera dialog.
Create new files before adding them
Start by creating the image or sound file that will become the
camera start-up image or sound setting and save it to the
computer.
IMPORTANT
○○○○○○○○○○○○○○○○○○○○○○○○○○○○○○○○○○○○○○○○○○
• Files that do not meet the conditions listed below cannot be
saved to the camera.
■ Creating a Start-Up Image File
Create an image file using an image editing program, such as
Adobe Photoshop LE, ArcSoft PhotoStudio or ArcSoft
PhotoImpression. The file should be in the JPEG format, 320 x
240 pixels, and less than 20KB.
REFERENCE
○○○○○○○○○○○○○○○○○○○○○○○○○○○○○○○○○○○○○○○○○○
• See the manual and help facility for the editing program for a
detailed explanation of how to use it.
59 ImageBrowser Software User Guide
Page 60

Chapter 6
Using Supplementary Features
Saving the “My Camera Settings” to the Camera (5/10)
■ Creating a Sound File
Record the sound as an 11.025 kHz or 8.000 kHz, 8 bit, Mono
sound and save it in the WAV file format.
Sound files that can be added to the camera should conform to
these guidelines.
Typ e
Start-Up Sound
Operation Sound
Self-Timer Sound
Shutter Sound
1.0 sec. or less
0.3 sec. or less
2.0 sec. or less
0.3 sec. or less
If you are using SimpleSound, which comes as a standard part
of the Mac OS, you cannot save a sound file directly as a WAV
file. First record and save the sound with SimpleSound, then
use a program such as ArcSoft VideoImpression to convert the
sound into a WAV file. See the right side of this page for
detailed instructions.
Duration in Seconds
11.025 kHz
8.000 kHz
1.3 sec. or less
0.4 sec. or less
2.0 sec. or less
0.4 sec. or less
This topic explains how to use SimpleSound to record and save a sound file
and ArcSoft VideoImpression to convert the file into a WAV format file.
IMPORTANT
○○○○○○○○○○○○○○○○○○○○○○○○○○○○○○○○○○○○○○○○○○
• SimpleSound is a software program that can be used with Mac
OS 9.0–9.2.
1.
2.
Start SimpleSound.
On the [File] menu, select [New].
The Recording Panel appears.
3.
Click [Record].
60 ImageBrowser Software User Guide
Page 61

Chapter 6
Using Supplementary Features
Saving the “My Camera Settings” to the Camera (6/10)
4.
5.
6.
7.
8.
Click [Stop] to halt the recording.
Click [Save].
The Save dialog appears.
Save the file.
Input a file name and click the [Save] button. This saves the
recorded sound.
REFERENCE
○○○○○○○○○○○○○○○○○○○○○○○○○○○○○○○○○○○○○○○○○○
• Save the sound file to the disk containing the System folder.
You cannot save it to any other disk.
On the [File] menu, select [Quit].
SimpleSound closes.
On the disk to which ArcSoft VideoImpression was
installed, double-click the [VideoImpression] folder,
followed by the [VideoImpression] icon.
ArcSoft VideoImpression starts.
10.
11.
Select [audio] from the list box and click [get].
Click [get]. Select [audio].
When the “Open” dialog appears, select the sound file you
created in SimpleSound and click [Open]. A new sound icon is
added.
Double-click the newly added sound icon.
The window will change to the sound editing window.
9.
61 ImageBrowser Software User Guide
Click [New].
Page 62

Chapter 6
Using Supplementary Features
Saving the “My Camera Settings” to the Camera (7/10)
12.
Edit the length of the sound file.
Adjust the start and end marks to change the length of the sound.
Displays the length
Plays the sound.
Adjust the length of the sound file
by moving the green start mark or
the red end mark left or right.
REFERENCE
○○○○○○○○○○○○○○○○○○○○○○○○○○○○○○○○○○○○○○○○○○
• The allowable length of sound files used as My Camera Settings
varies with the type of sound. See the previous page for details.
of the sound file.
13.
14.
15.
16.
Click [Play Movie].
The first window is restored.
Click [Save].
Click [QuickTime].
Set it to the following and click [Save].
Input a file name, select [Sound to Wave] in the Export
category, and select [8 kHz 8 bit Mono] or [11.025 kHz 8 bit
Mono] in the Use category.
62 ImageBrowser Software User Guide
Page 63

Chapter 6
Using Supplementary Features
Saving the “My Camera Settings” to the Camera (8/10)
17.
18.
When the [Add Album] dialog appears, click [OK].
This saves the file you created.
Select [Quit] in the [File] menu.
ArcSoft VideoImpression closes.
REFERENCE
○○○○○○○○○○○○○○○○○○○○○○○○○○○○○○○○○○○○○○○○○○
• For details of how to use ArcSoft VideoImpression, see its Help
file, which can be opened by clicking the [?] button at the top
right of its window.
■ Adding new files as My Camera Settings to the My
Camera dialog
1.
2.
Open the My Camera dialog and select the settings
type in the [Type] list box.
Click [Add].
63 ImageBrowser Software User Guide
Click [Add].
REFERENCE
○○○○○○○○○○○○○○○○○○○○○○○○○○○○○○○○○○○○○○○○○○
• The Add button is greyed out and disabled when the [Type] list
box is set to [Theme].
Page 64

Chapter 6
Using Supplementary Features
Saving the “My Camera Settings” to the Camera (9/10)
3.
Select the file you created in the Open dialog and
click [Open].
The selected file will appear in the Computer list.
The newly added settings will appear here.
You can save the newly created settings to the camera using
the procedures described in the Saving the My Camera Settings
to the Camera section.
REFERENCE
○○○○○○○○○○○○○○○○○○○○○○○○○○○○○○○○○○○○○○○○○○
•To delete a settings file, select it and click the [Send to Trash]
button beneath the Computer list.
•Previously created settings can also be added as My Camera
Settings to the My Camera dialog with the same procedures as
above, but have to comply with the specifications listed in the
Create the new files before adding them section.
64 ImageBrowser Software User Guide
Page 65

Chapter 6
Using Supplementary Features
Saving the “My Camera Settings” to the Camera (10/10)
■ Saving the Settings to the Computer
You can copy the My Camera Settings from the camera to the
computer.
1.
2.
Select an option from the [Type] list box.
Select the setting you would like to copy from the
Camera list.
If you selected the start-up image in the Type list box in Step 1,
the preview image will display in the area to the right. If you
selected a sound, it will automatically play. If you selected
Theme as the Type, the start-up image will preview in the area
to the right and the start-up sound, the shutter sound, the
operation sound and the self-timer sound will play in order.
3.
4.
5.
Click [ ].
Assign a name to the settings file and click [OK].
The settings file will copy to the computer disk. If there is a
settings file with the same name, it will be over-written.
Repeat steps 1-4 as required to save the settings files you wish
to copy to the computer.
Click [Close] to close the My Camera dialog.
This completes the copying process.
IMPORTANT
○○○○○○○○○○○○○○○○○○○○○○○○○○○○○○○○○○○○○○○○○○
• Do not detach the USB cable, shut off the camera’s power or
break the connection while the settings files are being copied.
65 ImageBrowser Software User Guide
Page 66

Chapter 6
Using Supplementary Features
Printing Images (1/8)
This section explains the procedures for printing.
Displaying the print layout
After you select the images you want to print in the Browser
Area, click
displayed menu.
The Layout Options dialog and Print Window will open.
The selected images will automatically be laid out in the Print
Window. You can select a layout option in the Layout Options
dialog.
REFERENCE
○○○○○○○○○○○○○○○○○○○○○○○○○○○○○○○○○○○○○○○○○○
•To select several images, hold down the [shift] key, or the
[option] and [shift] key, and click the images you want.
Further, you can select all of the images in a folder by clicking
the (Select All) button.
•You can also start printing by clicking the (Print) button in
the Camera Window.
• The shooting date and file name appear as captions under the
images in the Print Window when the respective options have
check marks in the Preferences dialog. Access it by clicking the
[Edit] menu (the [ImageBrowser] menu in Mac OS X), and
selecting [Preferences]. Select [Print] in the list box and place
check marks in the desired options in the [Items to Print in
Caption] category.
(Print) and select [Layout printing] from the
Select images
Click here
Print Window
Layout Options Dialog
66 ImageBrowser Software User Guide
Page 67

Chapter 6
Using Supplementary Features
Printing Images (2/8)
Selecting a layout
You can select from the following 5 layout types:
■ Custom layout printing
Allows you to specify the size and location of the images freely.
■ Index printing
Allows you to select between large, medium and small
thumbnails to print the index.
■ Fixed photo size printing
Allows you to squeeze images together to fit the specified
paper size.
■ Tiled photo printing
Allows you to have the program lay out and print the specified
number of images per page with no gaps between images on
the page.
When you finish selecting a layout, click [OK].
■ Canon perforated paper printing
You can only use Canon Perforated Paper in some Canon BJ
printers that support Canon Perforated Paper media. You can
obtain photo-like prints by simply separating images at the
perforations.
However, with Mac OS X, “Canon perforated paper
printing” does not display.
67 ImageBrowser Software User Guide
A print
preview
displays on
the right
after you
select a
layout.
Page 68

Chapter 6
Using Supplementary Features
Printing Images (3/8)
In the following dialog, you can select more detailed settings.
Set more detailed
settings here (the
available settings will
vary with the layout
option selected).
When you finish adjusting the settings, click [OK]. The Layout
Options dialog closes and you can now change the layout and
print settings in the Print Window.
REFERENCE
○○○○○○○○○○○○○○○○○○○○○○○○○○○○○○○○○○○○○○○○○○
• If you do not want the Layout Options dialog to appear while
the Print Window is open, remove the check mark beside the
[Display this dialog when the Print window displays] option.
REFERENCE
○○○○○○○○○○○○○○○○○○○○○○○○○○○○○○○○○○○○○○○○○○
•To open the Layout Options dialog again, click the (Layout
Options) button in the Print Window.
Adding/Clearing images
You can add images by dragging them from the Browser Area
or Camera Window and dropping them into the Print Window.
Conversely, you can clear images from the Print Window by
selecting them, clicking the [Edit] menu and selecting [Clear].
Click here.
Remove this check mark.
68 ImageBrowser Software User Guide
Page 69

Chapter 6
Using Supplementary Features
Printing Images (4/8)
Moving or changing the size of an image
When [Custom layout printing] is selected in the Layout
Options dialog, you can move or change the size of an image.
Drag the image that
you want to move.
Reorganizing and rotating images, and specifying the number of images per page
When [Custom layout printing] is selected in the Layout
Options dialog, you can use the following functions.
Click to reorganize
the images
according to their
file size.
Click here to change the
orientation of an image.
Select an image, click the
button and click a rotation
angle on the menu.
Specify the number of images that you want
to see on each page. If you change this
value, the images are reorganized.
69 ImageBrowser Software User Guide
Drag any side of the
frame of the image
to change its size.
REFERENCE
○○○○○○○○○○○○○○○○○○○○○○○○○○○○○○○○○○○○○○○○○○
•You can also select a rotation angle on the [Rotate] submenu
on the [Edit] menu.
Page 70

Chapter 6
Using Supplementary Features
Printing Images (5/8)
Typing a caption
You can type captions for individual images. Select an image
and on the [Edit] menu, click [Edit Caption]. The Edit Caption
window appears. Type your caption and specify the font and its
size, as well as any styles that you want. Click [OK].
Specify the font
(typeface).
Specify the size
of the font.
The location of the caption differs depending on what kind of
layout you have selected.
Custom Layout Example
Fixed Photo Size Example
Specify the alignment
of the text.
Specify the style
of the font.
Specify spacing
between
characters.
70 ImageBrowser Software User Guide
Specify the color of
the characters.
Page 71

Chapter 6
Using Supplementary Features
Printing Images (6/8)
Typing text
You can type text anywhere you want in the layout.
First, make sure that no images are selected and on the [Edit]
menu, click [Add Text]. A window where you can type text
appears. Type your text and specify the font and its size, as well
as any styles that you want. Click [OK].
The text appears in the center of the page.
Text surrounded by a frame is called a “text box.” You can
control text boxes as follows:
■ Moving text boxes
You can move text boxes by dragging them.
■ Changing the size of text boxes
You can change the size of a text box by dragging its left or right
edge. The number of lines in the text box changes automatically
according to its size.
■ Editing text boxes
First select a text box and on the [Edit] menu, click [Edit Text]. A
window where you can edit your text appears. Edit your text.
Another way to open this window is to double-click the text box.
71 ImageBrowser Software User Guide
Page 72

Chapter 6
Using Supplementary Features
Printing Images (7/8)
Typing a header
You can type a page header.
First, make sure that no images are selected and on the [Edit]
menu, click [Edit Header]. The Edit Header window appears.
Type your text and specify the font and its size, as well as any
styles that you want. Click [OK].
The header appears at the top of the page.
Duplicating images
You can duplicate images by selecting the image that you want,
and clicking [Copy Image] on the [Edit] menu. The image is
duplicated.
Clipping images
You can clip part of an image. Select an image, and click
[Clipping] on the [Edit] menu. When the image appears, specify
the area for clipping by dragging a box around it. Click
(Close for Mac OS 9.0 to 9.2) or (Close for Mac OS X).
72 ImageBrowser Software User Guide
Clipping area
Page 73

Chapter 6
Using Supplementary Features
Printing Images (8/8)
Initiating Printing
Once you have finished making all the adjustments you want in
the Print Window, click
When the Print dialog box appears, set the print settings and
start printing.
IMPORTANT
○○○○○○○○○○○○○○○○○○○○○○○○○○○○○○○○○○○○○○○○○○
• It may take relatively long to print if there are many images or
the images are large.
REFERENCE
○○○○○○○○○○○○○○○○○○○○○○○○○○○○○○○○○○○○○○○○○○
•Click (Print) in the Browser Window and select [Index
printing] from the displayed menu. The settings dialog for
index printing will appear. Adjust the settings, such as the
thumbnail size or paper size and click [Start Printing] to begin
printing the index immediately.
•You can also start printing by clicking the [File] menu, selecting
[Print] and choosing [Layout printing] or [Index printing] from
the submenu.
(Print).
Click here.
Printing for Better Results
ImageBrowser supports the Exif 2.2 (nicknamed Exif Print)
standard. This feature can generate better print results because
it automatically corrects images.
To use this feature, click the [Edit] menu (the [ImageBrowser]
menu in Mac OS X) and select [Preferences], followed by [Print]
in the list box. In the [Image Correction Settings] category, set
the Exif 2.2 settings. Then print the image using the procedures
in Printing Images (1/8). See Print Dialog in the Customizing
Preferences (3/3) topic of the Appendices for information about
Exif 2.2 settings.
REFERENCE
○○○○○○○○○○○○○○○○○○○○○○○○○○○○○○○○○○○○○○○○○○
• Images captured by cameras that support the Exif 2.2 standard
have the shooting settings data, such as the shooting
conditions and shooting mode, embedded in them. The Exif
Print function uses this data to more accurately reflect the
conditions at the time of shooting when it corrects the image.
• The image correction settings apply to all of the images printed
from ImageBrowser.
73 ImageBrowser Software User Guide
Page 74

Chapter 6
Using Supplementary Features
Printing Images over Multiple Pages
This function prints images, such as panoramic images created with
PhotoStitch, over several pages. You can paste the printed pages
together after printing to create one large print.
Multiple page printing
In the Browser Area, select an image and on the [File] menu,
click [Multiple Page Print].
Adjust the print settings in the dialog box illustrated below and
click [Print] to launch the print job.
Position setting
Setting the print size
Sets the overlap for binding
74 ImageBrowser Software User Guide
To set the print size, on the [File] menu click [Multiple Page Print
Options]. The Options dialog box appears. The smaller you
make the resolution, the larger the image is printed. Similarly,
the larger you make the print resolution, the smaller the image
is printed.
Page 75

Chapter 6
Using Supplementary Features
Sorting Images by Date and Time—TimeTunnel (1/2)
This section describes how to use TimeTunnel to sort images by date
and time, like arranging images in a time tunnel.
Displaying images in TimeTunnel
On the [View] menu, select [View Mode], followed by
[TimeTunnel] on the submenu. The Browser Area switches to
the TimeTunnel display. To close the TimeTunnel and restore
the standard display, on the [View Mode] submenu, select [List].
How to use TimeTunnel
You can perform the following operations in TimeTunnel display.
The date/time at which the images were
shot appears on the red line. You can
change this date/ time by double-clicking
it on the display. A window similar to the
one below appears. Specify the new
date/ time.
Point an image and
wait a moment.
The information
about the image is
displayed.
Double-click a thumbnail to
display it in another window.
Control Panel
Move the slider up or down to
move backward or forward
along the time line.
Click to display the control
panel menu (the menu is
explained on the next page).
If you select “Find and Show Item”
and no images with that date are
found, the closest match to the date
is displayed instead.
75 ImageBrowser Software User Guide
Page 76

Chapter 6
Using Supplementary Features
Sorting Images by Date and Time—TimeTunnel (2/2)
Using the Control Panel menu
The Control Panel menu allows you to control TimeTunnel.
Using the Tool Panel
Click to display the tool panel.
Enables or disables [Auto Cruise].
When [Auto Cruise] is active, the time
movement continues even after you
have moved and released the bar.
Click to play a sound attached to a
selected image.
Exit TimeTunnel, and return to the
previous screen.
Adjusting settings from the Display menu
On the [View] menu, you can also select the [View Settings]
submenu to adjust the settings.
To create a vanishing point, click a
position on the screen, then click
[Mouse Click Point] on this menu.
The point you clicked becomes the
vanishing point.
To display the following tool panel, click [Display Tool Panel] on
the Control Panel menu.
Allows you to
specify the date
for the images
displayed.
Select this option
to make the
TimeTunnel rings
octagonal.
76 ImageBrowser Software User Guide
Select this option
to make the
TimeTunnel look
curved.
Allows you to
change the
number of
TimeTunnel
rings.
Page 77

Chapter 6
Using Supplementary Features
Stitching Panoramic Images with PhotoStitch
The following sections describe how to open and use programs in
ImageBrowser. If you have several images of the same scene with only a
slight difference, you can use PhotoStitch to connect the images
together to make a panoramic image. This section describes how to use
this program to stitch images.
REFERENCE
○○○○○○○○○○○○○○○○○○○○○○○○○○○○○○○○○○○○○○○○○○
• For detailed information on how to use PhotoStitch, refer to the
PhotoStitch Help (accessible from the [Help] menu).
• If the camera has the Stitch Assist mode, you can use this mode
to take pictures that can later be stitched together more easily.
Opening PhotoStitch
In the Browser Area, select the images that you want to stitch
together. On the [Edit] menu, click [PhotoStitch].
REFERENCE
○○○○○○○○○○○○○○○○○○○○○○○○○○○○○○○○○○○○○○○○○○
•You can also start PhotoStitch by clicking the wavy line above
images shot in Stitch Assist mode in the Camera Window.
Then, follow the instructions on the upper part of the
PhotoStitch window, and stitch your images together.
Decide the order
in which the
images should be
stitched.
77 ImageBrowser Software User Guide
Perform stitching.
Save the image.
Page 78

Chapter 6
Using Supplementary Features
Operating the Shutter from a Computer—RemoteCapture (1/2)
This section introduces RemoteCapture, a program that enables you to
control a camera from a computer connected to it.
IMPORTANT
○○○○○○○○○○○○○○○○○○○○○○○○○○○○○○○○○○○○○○○○○○
•You can only use RemoteCapture if the lens cover or cap is
open, the camera is connected via the USB cable to the
computer and the camera is ready to transfer data. (Some
models may not support this program.)
• Close the Camera window before you start RemoteCapture.
REFERENCE
○○○○○○○○○○○○○○○○○○○○○○○○○○○○○○○○○○○○○○○○○○
• For detailed information on how to use RemoteCapture, read
the RemoteCapture Help (accessible from the [Help] menu).
Opening RemoteCapture
Check to make sure that the
camera is attached to the
computer and ready to transfer
data, then click the [Edit] menu
and select [RemoteCapture].
Using the RemoteCapture functions
The Save - RemoteCapture Window
Displays a list of pictures taken.
Click to display the image
in enlarged form.
Image information displays
here.
The image selected in the list
above displays here.
78 ImageBrowser Software User Guide
When a message appears
indicating that the connection
with the camera is ready, click
[Connect].
Page 79

Chapter 6
Using Supplementary Features
Operating the Shutter from a Computer—RemoteCapture (2/2)
The Save - RemoteCapture Window
Click the triangle to the left of [Detail setting] to
open the Detail setting window.
Click to release the
shutter (captured
image is
automatically saved
to the computer).
Click here to further
adjust the camera’s
settings in detail (not
supported by some
models).
REFERENCE
○○○○○○○○○○○○○○○○○○○○○○○○○○○○○○○○○○○○○○○○○○
•You can select whether or not to save the image to the camera
by clicking the [File] menu and selecting [Preferences]. (For Mac
OS X, click the [RemoteCapture] menu and select [Preferences].)
•You can select whether or not to display the viewfinder
contents in the camera’s LCD monitor by clicking the [File]
menu and selecting [Camera Display Settings].
The viewfinder contents will also
display in the camera’s LCD monitor
when you select [Camera’s LCD
monitor] here and Viewfinder On is
selected in the Shooting—
RemoteCapture window.
Click [Viewfinder On] to display the image seen through
the camera’s viewfinder (not supported by some models).
79 ImageBrowser Software User Guide
Page 80

Chapter 6
Using Supplementary Features
Converting RAW Images—File Viewer Utility (1/2)
If your camera supports RAW files, you can obtain high quality images.
However, most programs cannot open RAW files in their native format.
You must first convert them. This section explains that process. The File
Viewer Utility application must be opened to convert RAW images.
REFERENCE
○○○○○○○○○○○○○○○○○○○○○○○○○○○○○○○○○○○○○○○○○○
• The RAW format yields very high-quality images with no degradation during compression.
• See the help file (click the [Help] menu) for assistance with File
Viewer Utility operations.
Opening the File Viewer Utility
In the Browser Area, select a RAW image. On the file menu,
click [RAW Image Processing…]. This will start File Viewer
Utility.
80 ImageBrowser Software User Guide
Page 81

Chapter 6
Using Supplementary Features
Converting RAW Images—File Viewer Utility (2/2)
File Viewer Utility Features
Preferences Button
Sets the processing methods for RAW images and the
application programs to which converted images are sent.
Save Button
Converts and saves the image.
Select Button
Selects the image selection method.
Model Specific Processing Mode List Box
Selects the model of camera on which the
image was recorded.
Click the [File] menu and select [Save File], followed by [Convert
and save in file] to open the Save window. Adjust the settings
as required and click [OK] to start the conversion.
Select this to save the converted
image to the same folder as the
original.
Select this to choose a different
destination for the converted image.
If you selected [Save in following
specified folder], click [Browse]
to specify a destination folder.
Sets the format
and compression
ratio of the
converted file.
Sets the conditions for converting RAW images.
They display when a RAW image is selected and a camera model
is selected in the Model Specific Processing Mode List Box.
81 ImageBrowser Software User Guide
To change the name of the converted file, remove the check mark from [Do not
modify] and type a root name and/or specify the numbering settings.
List of RAW images
for conversion.
Page 82

Appendices
Supported File Formats
The following is a list of file formats supported by ImageBrowser.
Readable files
ImageBrowser can read the following file formats.
■ JPEG files
Most cameras use this file format. It compresses at very high
ratios, taking advantage of the characteristics of the human
eye. However, because it is an irreversible compression method
(part of the data is lost during compression), if you process and
save an image repeatedly using this method, the image may
become rougher.
The “Exif JPEG format” is a variety of JPEG file that contains
additional information, such as the shooting data.
■ RAW files
This format is a proprietary file format provided by Canon. It
allows the output of the image pixels from a digital camera
without any deterioration in the quality of the image. Some
cameras might not support this file format.
■ Windows Bitmap files
This format is standard on Windows. Most Windows programs
support it.
■ QuickTime files
This is a movie file format. The file appears as a movie mark in
the Browser Area of ImageBrowser. When you click the movie
mark or a thumbnail, QuickTime Player starts and plays the
movie. (You must install QuickTime Player before you can use it.)
■ PICT files
This is the standard file format for Macintosh. This file format is
supported by most Macintosh software.
■ TIFF files
This is a relatively popular format. It is widely supported by nonMacintosh programs (such as Windows).
82 ImageBrowser Software User Guide
Page 83

Appendices
Preventing ImageBrowser from Starting Automatically
This section explains how to set up ImageBrowser so that it does not
start automatically when you connect the camera to the computer.
IMPORTANT
○○○○○○○○○○○○○○○○○○○○○○○○○○○○○○○○○○○○○○○○○○
• This function is not available with Mac OS X.
Canceling the automatic start
On (Apple menu), select [Control Panels] followed by [Canon
ImageBrowser Auto Launch]. Clear the selection from “The
application program below will start.” in the dialog box.
Clear this selection.
When you have cleared the selection, click the Close box to
close the dialog box.
REFERENCE
○○○○○○○○○○○○○○○○○○○○○○○○○○○○○○○○○○○○○○○○○○
•You can set it so that programs other than ImageBrowser will
start automatically when you connect the camera to the
computer and prepare it to transfer data.
In the dialog box illustrated above, click the program that you
want to start automatically on the Program Name list.
However, if no other programs supported by the camera are
installed, the list only contains ImageBrowser.
83 ImageBrowser Software User Guide
Page 84

Appendices
The ImageBrowser Automation Wizard Feature at Startup (1/4)
This section explains how to set up ImageBrowser so that it performs an
action automatically after it starts automatically.
IMPORTANT
○○○○○○○○○○○○○○○○○○○○○○○○○○○○○○○○○○○○○○○○○○
• Ensure that the camera is ready to transfer data to the computer
before setting the ImageBrowser Automation Wizard features.
• This function is not available with Mac OS X.
How to set ImageBrowser to start automatically
In the following dialog, set the action to be performed at startup.
■ Display Images
Select this to have the Camera window open and display the
camera images after ImageBrowser starts.
■ Download images
Select this to have the Camera window open and automatically
download the camera images into ImageBrowser (the next
page discusses the detailed settings you can select when you
choose this option).
■ Launch RemoteCapture
Select this to launch RemoteCapture directly after ImageBrowser
starts.
Select the desired startup action
REFERENCE
○○○○○○○○○○○○○○○○○○○○○○○○○○○○○○○○○○○○○○○○○○
• The dialog above will not display when you access a memory
card reader. To adjust ImageBrowser Automation Wizard
settings, connect the camera to the computer and open the
above dialog.
84 ImageBrowser Software User Guide
Page 85

Appendices
The ImageBrowser Automation Wizard Feature at Startup (2/4)
Displaying the Auto Run Dialog
You can display the Auto Run dialog for selecting the startup
actions using the following procedures.
■ Starting ImageBrowser for the first time
The Auto Run dialog will appear automatically.
■ Subsequent ImageBrowser starts
Click the [Settings Change] button in the ImageBrowser
Automation Wizard dialog, which will appear automatically.
Selecting the detailed settings for the [Download images] option
If you select the [Download images] option in the
ImageBrowser Automation Wizard, you can specify the folder
to which they are saved, a downloading option and a postdownloading action.
1.
Click [Change].
A dialog similar to the one below will appear.
85 ImageBrowser Software User Guide
Click here.
2.
Select a folder for the imported images.
Double-click drive and folder icons to open them.
Page 86

Appendices
The ImageBrowser Automation Wizard Feature at Startup (3/4)
3.
Click [OK] when the following dialog appears.
REFERENCE
○○○○○○○○○○○○○○○○○○○○○○○○○○○○○○○○○○○○○○○○○○
•A folder named with the current date will be created in the
folder selected in Step 2. The images will be imported to this
folder.
The selected folder will display in the [Save to] category of the
previous dialog.
5.
Select an image download option.
Click a downloading
option.
■ Download all images
Select this to download all the images in the camera.
Click here to return to
the previous dialog.
4.
Click [Next].
86 ImageBrowser Software User Guide
■ Download images marked for printing
Select this to download only the images that have been marked
for printing.
■ Download images marked for transferring
Select this to download only the images that have been marked
for transferring.
Page 87

Appendices
The ImageBrowser Automation Wizard Feature at Startup (4/4)
6.
7.
REFERENCE
○○○○○○○○○○○○○○○○○○○○○○○○○○○○○○○○○○○○○○○○○○
• Setting the print settings adds information to the memory card
about the images selected for printing and the number of
copies to print.
•Transmission settings are made from the camera (some camera
models do not support this function).
• Please refer to the guide supplied with your camera for more
information regarding print settings and transmission settings.
Click [OK].
The Camera Window will appear and ImageBrowser will
download the camera images. When the downloading process
is complete, a dialog allowing you to select a post-downloading
action will appear.
Select an action.
■ Display slide show
Select this to start a slide show of the downloaded images.
■ Launch the Print window
Select this to display a dialog for printing layouts.
■ Print with index printing
Select this to display the Print Index dialog.
■ Create image for Email
Select this to display a dialog for creating email attachments.
8.
Click [OK].
The selected action will take place.
Click an option for
processing the
downloaded images.
87 ImageBrowser Software User Guide
Click here to continue without
processing the images.
Page 88

Appendices
Customizing Preferences (1/3)
ImageBrowser provides a variety of preference settings that you can
customize to make ImageBrowser work the way you like. This section
introduces some of the major preference settings that you can change.
Opening the Preferences dialog box
Use the following method to open the Preferences dialog box.
■ Mac OS 9.0 ~ 9.2
In the [Edit] menu, click [Preferences] to open the Preferences
dialog box and use the tabs to customize the preferences.
■ Mac OS X
Select [Preferences] from the [ImageBrowser] menu to open the
Preferences dialog box and use the tabs to customize the
preferences.
Browser Window Dialog
Allows you to set the background
color of the Preview window.
Change the category here.
Allows you to set the color of
each area in the Browser Area.
88 ImageBrowser Software User Guide
If you select this, when you display
images in ImageBrowser, a customized
icon is automatically attached to them.
Specifies the program(s) displayed on the [Start
Application] submenu on the [Edit] menu. You can
add programs using the [Add] button on the right.
Place a check mark here to retain the original image as well when a JPEG image
is rotated in the Browser Window. When an image rotated in the Camera
Window is downloaded to the Browser Window, both the original and rotated
copies are downloaded.
Page 89

Appendices
Customizing Preferences (2/3)
Thumbnail Cache Dialog
When you select a folder from a peripheral, such as a CD-ROM
or CD-R, in the Explorer View Section, ImageBrowser creates a
file in a predetermined folder for the thumbnail displayed in the
Browser Area.
However, when viewing a CD-ROM or a CD-R containing a
large number of files, the number of thumbnails also increases,
resulting in less free hard disk space on your computer. In this
case, you can use this dialog to delete unnecessary thumbnails
(thumbnails for files on a CD-ROM or a CD-R that you have
already looked at and probably will not look at again).
To delete the thumbnails mentioned above, click the
appropriate disk name in this dialog. The thumbnails for that
particular disk are deleted. (The thumbnails are not actually
deleted until the next time you start ImageBrowser.)
Camera Window Dialog
Allows you to set the color for the image frame
of images selected in the Camera Window.
Click a disk.
89 ImageBrowser Software User Guide
Page 90

Appendices
Customizing Preferences (3/3)
Print Dialog
Selects whether or not to activate image correction to enhance printing results
(even better results can be obtained with images recorded by an Exif 2.2
compliant camera).
Units Dialog
Select this to apply image correction to all images, not
just the images recorded by an Exif 2.2 compliant camera.
Select this to apply image correction just to
images recorded by an Exif 2.2 compliant camera.
Use this to set the units used for measuring the paper size in the Print window.
Web Browser Dialog
Use this to select how far the image is printed past the edge of
the paper when the Canon perforated paper option is selected.
(When using Mac OS X, this section will not be shown.)
Use this to set the information used in the caption when
the Print Window is open.
With some print modes, images that are wider than tall will be automatically rotated 90º
for display in the Print window. Use this setting to specify the direction of rotation.
90 ImageBrowser Software User Guide
Select the web browser program that you use to connect to the Internet.
IMPORTANT
○○○○○○○○○○○○○○○○○○○○○○○○○○○○○○○○○○○○○○○○○○
• When using Mac OS X, the [Web Browser] category can not be
selected. Click [System Preferences] from the Dock, [Internet],
and the [Web] tab to select the web browser program.
Page 91

Appendices
If your camera can shoot movies, you can use ImageBrowser to handle
the movie files.
When you connect a camera with movie files on it to the
computer and open the Camera Window, a thumbnail of the
first image of each movie file will display with a video camera
symbol on it.
You can import movie files in the Browser Area the same way
you do images. In this case, a thumbnail and a movie mark
appear in the Browser Area. When you double-click the
thumbnail, QuickTime Player starts and plays the movie.
Playing Movies
Thumbnail with movie mark.
QuickTime Player window
91 ImageBrowser Software User Guide
Use this button to play the movie.
Page 92

Appendices
Setting up Slide Shows on the Camera
If the camera comes with a slide show feature, you can use
ImageBrowser to edit slide shows.
REFERENCE
○○○○○○○○○○○○○○○○○○○○○○○○○○○○○○○○○○○○○○○○○○
• For detailed information on how to use a slide show and display
images, refer to the Camera User Guide that comes with your
camera.
How to set up a slide show
In the Camera Window, click (Slide/ DPOF).
Click here.
When the following window appears, select the [Slide Show]
option that appears on the top left part of the window. Then,
use the list below to select a slide show number.
From the image list on the left, drag images to the right area
and arrange their sequence for the slide show.
When you are done arranging the slide sequence, click [Save to
Camera] to save the slide show setup.
Select a slide show number.
92 ImageBrowser Software User Guide
Drag images from the image list on the left to the area on the
right and arrange their sequence for the slide show.
REFERENCE
○○○○○○○○○○○○○○○○○○○○○○○○○○○○○○○○○○○○○○○○○○
• If you want to change the sequence of some images, just drag
them to the right place in the area on the right.
• If you want to remove an image from the slide show, select the
image. On the [Edit] menu, click [Clear].
Page 93

Appendices
Print Settings (1/2)
If your camera supports the DPOF feature, you can use ImageBrowser
to add the print settings, such as the image selection and number of
copies, to a memory card (some models do not support this feature).
IMPORTANT
○○○○○○○○○○○○○○○○○○○○○○○○○○○○○○○○○○○○○○○○○○
• This feature does not directly work with RAW images. If you
want to print RAW images, you need to convert them first, then
copy them to the camera and perform this operation.
REFERENCE
○○○○○○○○○○○○○○○○○○○○○○○○○○○○○○○○○○○○○○○○○○
• DPOF is a standardized format for recording print settings, such
as the image selection and number of copies. After DPOF print
settings have been set, you can take a CF card or PC card to a
camera store or developing laboratory and have the images
printed according to the settings.
• For details on DPOF, refer to the documentation that comes
with your camera.
How to set the DPOF print settings
In the Camera Window, click (Slide/ DPOF).
When the following window appears, select the [Print Order
(DPOF)] option that appears on the upper left part of the
window. Then from the list below, select the print type.
Select the print type.
■ Standard Print
Prints the specified number of copies of the images that you
selected.
■ Index Print
Prints only thumbnails of the images that you selected.
■ Both (Standard/Index)
Prints the specified number of copies and thumbnails of the
images that you selected.
93 ImageBrowser Software User Guide
Click here.
REFERENCE
○○○○○○○○○○○○○○○○○○○○○○○○○○○○○○○○○○○○○○○○○○
•You can also click [Edit] and click [Include in index print] to
include the image date and file number in the prints.
Page 94

Appendices
Print Settings (2/2)
Standard printing
The number under each image indicates the number of copies
to print. Use the arrows to select the number of copies that
you want.
When you are done with your selections, click [Save to Camera]
to save the information.
Allows you to specify the number of copies
to print.
The standard print icon displays when a
number of copies is specified.
Index printing
To include images in an index print, select the check box under
the image.
Select the check box to include
the image in the index print.
The index print icon displays when a check mark is
added to the image.
When you are done with your selections, click [Save to Camera]
to save the information.
REFERENCE
○○○○○○○○○○○○○○○○○○○○○○○○○○○○○○○○○○○○○○○○○○
• The procedure described above also applies when the print
type is Both (Standard/Index).
94 ImageBrowser Software User Guide
Page 95

Appendices
Troubleshooting
This section describes how to troubleshoot problems.
Camera is not detected or recognized
The dialog below fails to appear even though the camera is
correctly connected to the computer via the USB cable and
ready to transfer data…
When ImageBrowser does not start even though you have
enabled communication, or when you try to import images
from the camera and the “No camera detected.” message
appears, check the following, in that order.
■ Check Your Computer
Automatic launching of ImageBrowser upon connection to the
camera via interface cable is only supported on Macintosh
computers that are equipped with a built-in USB port.
Automatic launching is not available through the computer’s
serial port, and it is not guaranteed when connecting through a
USB hub.
■ Check the Connection between the Camera and the
Computer
Confirm that the camera is correctly attached to the computer
with a USB cable. Please refer to the guide supplied with your
product for information regarding connecting.
■ Check the Camera
Confirm that the camera is on and in the correct mode to
transfer data. Because the procedures for preparing the camera
for communication differ among camera models, refer to the
documentation that accompanied your camera for more
information.
■ Check the Battery Charge
95 ImageBrowser Software User Guide
If the camera is running on batteries, make sure that they
have enough power left. You are recommended to use an AC
adapter when connecting the camera to a computer.
Page 96

Index
Index (1/2)
A
Auto Launch 83
B
Browser Window 8 , 17
Browser Area 8 , 17
Control Panel 17
Explorer View Section 8 , 17 , 21
View Menu 19
Buttons
Cancel 6
Canon Camera 40
Delete 43
Download 9 , 41
Select All 43
Settings Change 6
Start 6
C
Camera Settings 47
Camera Window 5 , 8 , 9 , 40 - 48
Connecting 48
Downloading Images 41
Opening 40
Opening it Automatically 40
Printing 48
Setup Options 48
Slide Show/DPOF Print Settings 48
Close Button 33
Connecting 4
Connection Message 13
Contextual Menus 20
Control Key 20
Control Panel 19
D
Date and Time 75 - 76
DPOF Print Settings 93 - 94
Deleting 24 , 43
Destination Folder 8
E
E-Mail 49 - 50
Exiting 13
Explorer View Section 8 , 21
F
File Formats 82
File Information Dialog 28
File Name Extension 27
Folders
Collapsing 32
Copying 23 , 26
Creating 8 , 29
Deleting 31
Duplicating 26
Expanding 32
Moving 23
Renaming 30
Selecting 32
Format 47
H
Help 13
I
Icon 6
ImageBrowser Automation Wizard
Images
Closing 33
Color 35 , 37
Copying 21 - 23 , 26 , 45 - 46
Cropping 35 - 36
Deleting 24 , 43
Downloading 8 - 10 , 41 - 42
Duplicating 26 , 72
Editing 35 - 39
Get Info 28
Information 28
JPEG 25 , 44
Magnification 34
Movies 42 , 91
Moving 21 - 23
Opening 33
Printing 11 - 12 , 66 - 74
RAW 42 , 80
Renaming 27
Rotating 25 , 44
Saving 35 , 38
Selecting 9 , 11 , 25 , 26 , 43 , 65
Slide Show 51 , 92
Sounds 54
Stitch Assist Mode 42
Stitching 77
Storing 16
Viewing Information 28
5 , 40 , 84 - 87
96 ImageBrowser Software User Guide
Page 97

Index
Index (2/2)
J
JPEG Images 25 , 44
M
Magnification 34
Movies 42 , 91
My Camera Settings 56 - 65
P
Panoramas 77
PhotoStitch 15 , 77
Starting 77
Preferences 88 - 90
Browser Window Dialog 88
Camera Window Dialog 89
Print Dialog 90
Thumbnail Cache Dialog 89
Units Dialog 90
Web Browser Dialog 90
Printing Images 11 - 12 , 66 - 74
Canon Perforated Paper Printing 67
Captions 70 - 71
Clipping Images 72
Custom Layout Printing 67
Fixed Photo Size Printing 67
Headers 72
Index Printing 67
Multiple Page Printing 74
Tiled Photo Printing 67
Print Window 12
Q
QuickTime Player 91
R
RAW Images 42 , 80
Converting 80
RemoteCapture 15 , 78
Starting 78
S
Selecting 9 , 11 , 25 , 26 , 32 , 43 , 66
Slide Show 51 - 53 , 92
Auto Play 51
Buttons 52
Transition Effects 51
Sounds 54 - 55
Adding 54
Sound Panel 55
Startup 4 - 7
Stitch Assist Mode 42
Stitching 77
Storing Images 16
T
Thumbnails 10 , 18
TimeTunnel 75 - 76
Control Panel 75, 76
Tool Panel 76
Troubleshooting 95
U
USB
Connection 4
ImageBrowser Automation Wizard
5 , 40 , 83 - 87
97 ImageBrowser Software User Guide
Z
Zoom Ratio 34
Page 98

ImageBrowser Software User Guide
Disclaimer
• While every effort has been made to ensure that the information contained in
this guide is accurate and complete, no liability can be accepted for any errors or
omissions. Canon reserves the right to change the specifications of the hardware
and software described herein at any time without prior notice.
• No part of this guide may be reproduced, transmitted, transcribed, stored in a
retrieval system, or translated into any language in any form, by any means,
without the prior written permission of Canon.
• Canon makes no warranties for damages resulting from corrupted or lost data
due to a mistaken operation or malfunction of the camera, the software, the
CompactFlash™ cards (CF cards), personal computers, peripheral devices, or use
of non-Canon CF cards.
Trademark Acknowledgments
• Canon and PowerShot are trademarks of Canon Inc.
• Adobe and Photoshop are trademarks of Adobe Systems Incorporated.
• ArcSoft, the ArcSoft logo, ArcSoft PhotoStudio, ArcSoft PhotoImpression and
ArcSoft VideoImpression are trademarks or registered trademarks of ArcSoft, Inc.
• CompactFlash is a trademark of SanDisk Corporation.
• Macintosh and Quick Time are trademarks of Apple Computer Inc., registered in
the United States and other countries.
• Microsoft, Windows and Windows NT are either registered trademarks or
trademarks of Microsoft Corporation in the United States and/ or other countries.
• Netscape and Netscape Navigator are trademarks or registered trademarks of
Netscape Communications Corporation in the United States and other countries.
Netscape Communicator is a trademark of Netscape Communications Corporation.
• Other names and products not mentioned above may be registered trademarks or
trademarks of their respective companies.
© 2003 CANON INC.CDP-E022-010
98 ImageBrowser Software User Guide
 Loading...