

Page 1

Canon Compact Photo Printer
User Guide
ENGLISH
Fotoimpresora compacta
Guía del usuario
Imprimante Photo Compacte
Guide d’utilisation
Connecting the Printer to Camera and Printing
Conexión de la impresora a la cámara e impresión
Connexion de l’imprimante à l’appareil photo
Connecting the Printer to a Computer and Printing
Conexión de la impresora a un ordenador e impresión
Connexion de l’imprimante à un ordinateur et impression
ESPAÑOL
FRANÇAIS
CDI-M142-010 xx04Nixx © 2004 CANON INC. PRINTED IN JAPAN
IMPRIMÉ AU JAPON
NOTICE! Please be careful when installing the printer driver. Do not install with-
out reading the Printer Driver User Guide included on the CD-ROM as a PDF file.
¡ATENCIÓN! Tenga cuidado al instalar el controlador de la impresora. No lo
instale sin leer el Manual del usuario del controlador de la impresora incluido en
el CD-ROM como un archivo PDF.
ATT EN TION! Avant l’installation du pilote de l’imprimante, il est impératif de lire
attentivement le Guide d’utilisation du pilote de l’imprimante au format pdf qui se
trouve sur le CD-ROM.
Page 2
English
Contents
Enjoy Various Kinds of Printing....................................................... 2
How to Use the Manuals.................................................................... 4
Symbols Used................................................................................... 4
Package Contents.............................................................................. 5
Quick Start.......................................................................................... 6
Before You Begin............................................................................. 10
What Can Be Accomplished with this Printer .............................. 11
Read This First................................................................................. 12
Safety Precautions.......................................................................... 12
Proper Usage and Handling ........................................................... 16
Components Guide......................................................................... 20
Let’s Print ......................................................................................... 22
Preparing Your Ink Cassette/Paper Sets and Paper Cassette....... 22
Loading the Ink Cassette................................................................ 24
Placing the Paper into the Paper Cassette .................................... 25
Loading the Paper Cassette ........................................................... 27
Connecting a Power Source and the Camera to the Printer........... 28
Printing............................................................................................ 30
Battery Usage................................................................................... 32
Using the Battery Pack (CP-330 Only) ........................................... 32
Using the Car Battery Adapter (CP-330/CP-220)........................... 36
Troubleshooting............................................................................... 37
Error Messages................................................................................ 39
Specifications................................................................................... 41
Connecting the Printer to a Computer and Printing..................... 43
Safety Precautions.......................................................................... 43
Read Carefully Before Using! ......................................................... 44
System Requirements .................................................................... 46
Printing Operations Overview......................................................... 47
Installing the Software from the CP Printer Solution Disk (Windows)
Installing the Software from the CP Printer Solution Disk (Macintosh)
Viewing the Printer Driver User Guide (Windows/Macintosh) ....... 52
Viewing the ZoomBrowser EX Software User Guide (Windows)/
ImageBrowser Software User Guide (Macintosh) PDF Manuals
Printing with Non-Canon Digital Cameras..................................... 54
....... 48
...... 51
.... 53
1
Page 3
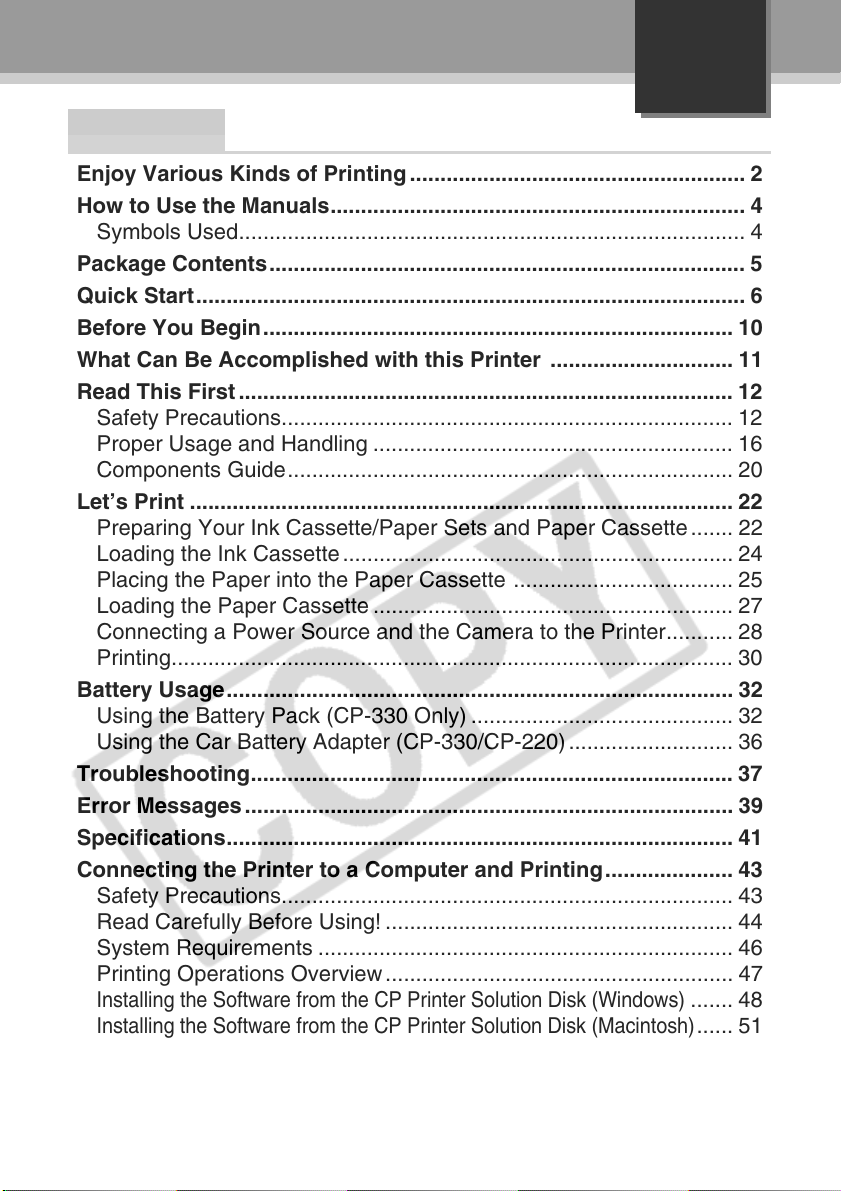
Enjoy Various Kinds of Printing
Enjoy Printing Images from Your Digital Camera or Digital
Camcorder
Connect to your
digital camera
L size paper
cassette
(sold separately)
Compact Photo Printer
CP-330/CP-220
Credit card size
paper cassette
(sold separately)
Postcard size
paper cassette
Connect to your
digital camcorder
Wide size paper cassette
(sold separately
with the CP-220)
Write your
message in the
blank portion.
Print easily at
home.
Make label
stickers
(8 per sheet)
Make original
large size
postcards.
Make original
greeting cards.
2
Page 4
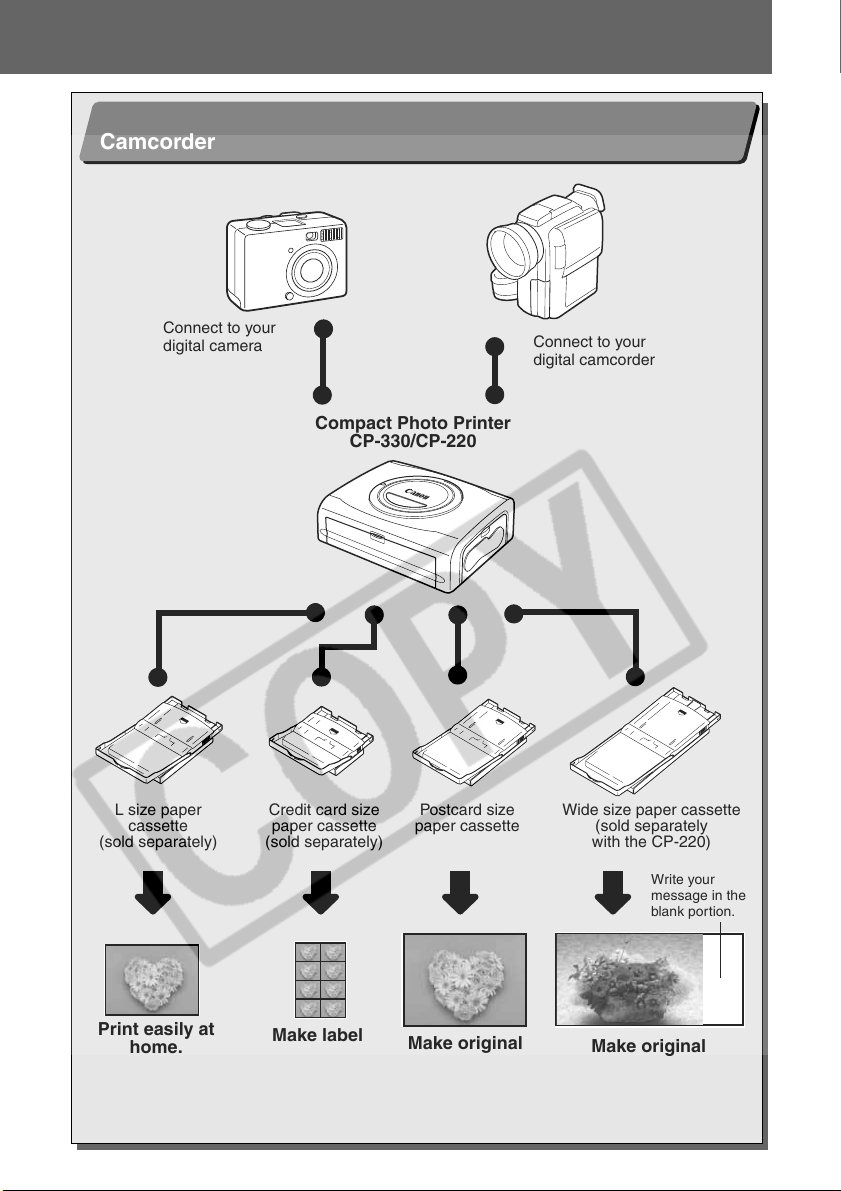
Printing Images from Your Computer
Be sure to read the Printer Driver User Guide (p. 52).
Software
CP Printer Solution Disk
Connect to your computer
Compact Photo Printer CP-330/CP-220
Various types of paper cassettes
You can design layouts as you like.
3
Page 5
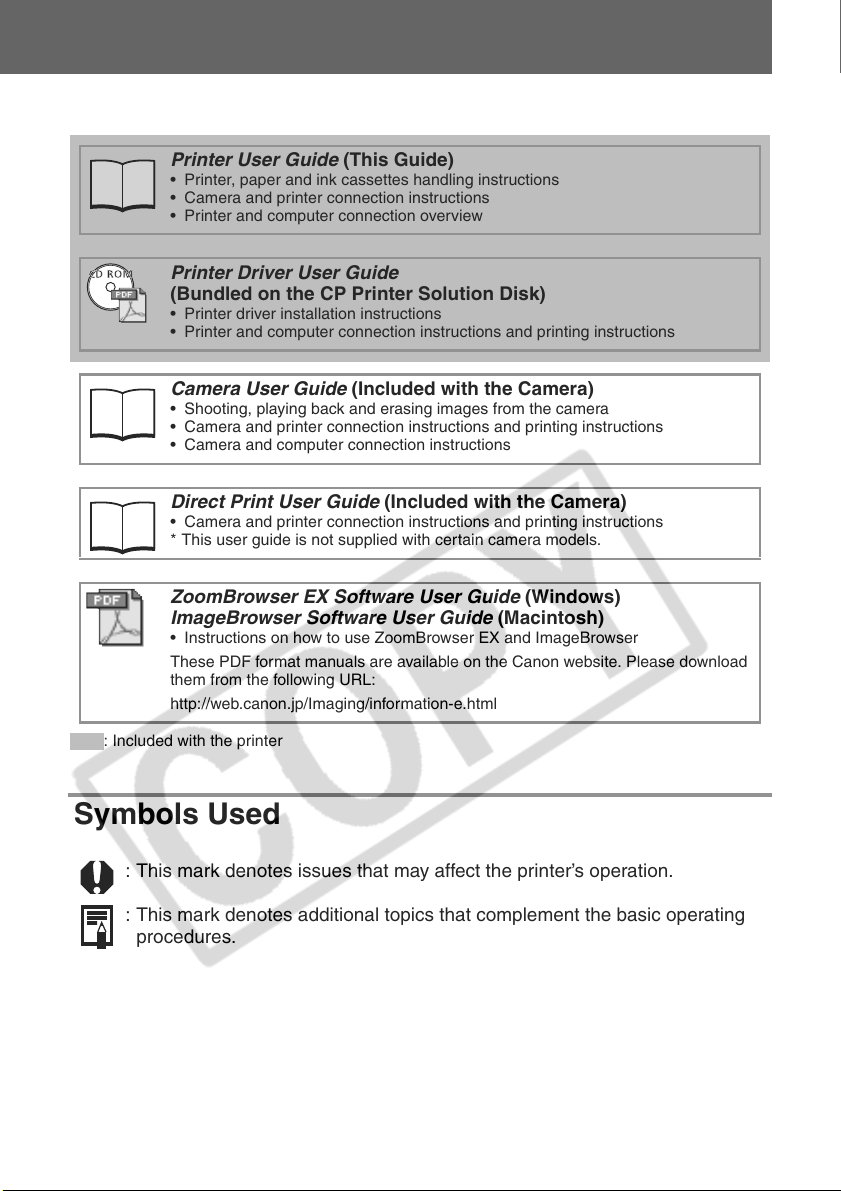
How to Use the Manuals
Please refer to the following manuals according to your purposes.
Printer User Guide (This Guide)
• Printer, paper and ink cassettes handling instructions
• Camera and printer connection instructions
• Printer and computer connection overview
Printer Driver User Guide
(Bundled on the CP Printer Solution Disk)
• Printer driver installation instructions
• Printer and computer connection instructions and printing instructions
Camera User Guide (Included with the Camera)
• Shooting, playing back and erasing images from the camera
• Camera and printer connection instructions and printing instructions
• Camera and computer connection instructions
Direct Print User Guide (Included with the Camera)
• Camera and printer connection instructions and printing instructions
* This user guide is not supplied with certain camera models.
ZoomBrowser EX Software User Guide (Windows)
ImageBrowser Software User Guide (Macintosh)
• Instructions on how to use ZoomBrowser EX and ImageBrowser
These PDF format manuals are available on the Canon website. Please download
them from the following URL:
http://web.canon.jp/Imaging/information-e.html
: Included with the printer
Symbols Used
: This mark denotes issues that may affect the printer’s operation.
: This mark denotes additional topics that complement the basic operating
procedures.
4
Page 6
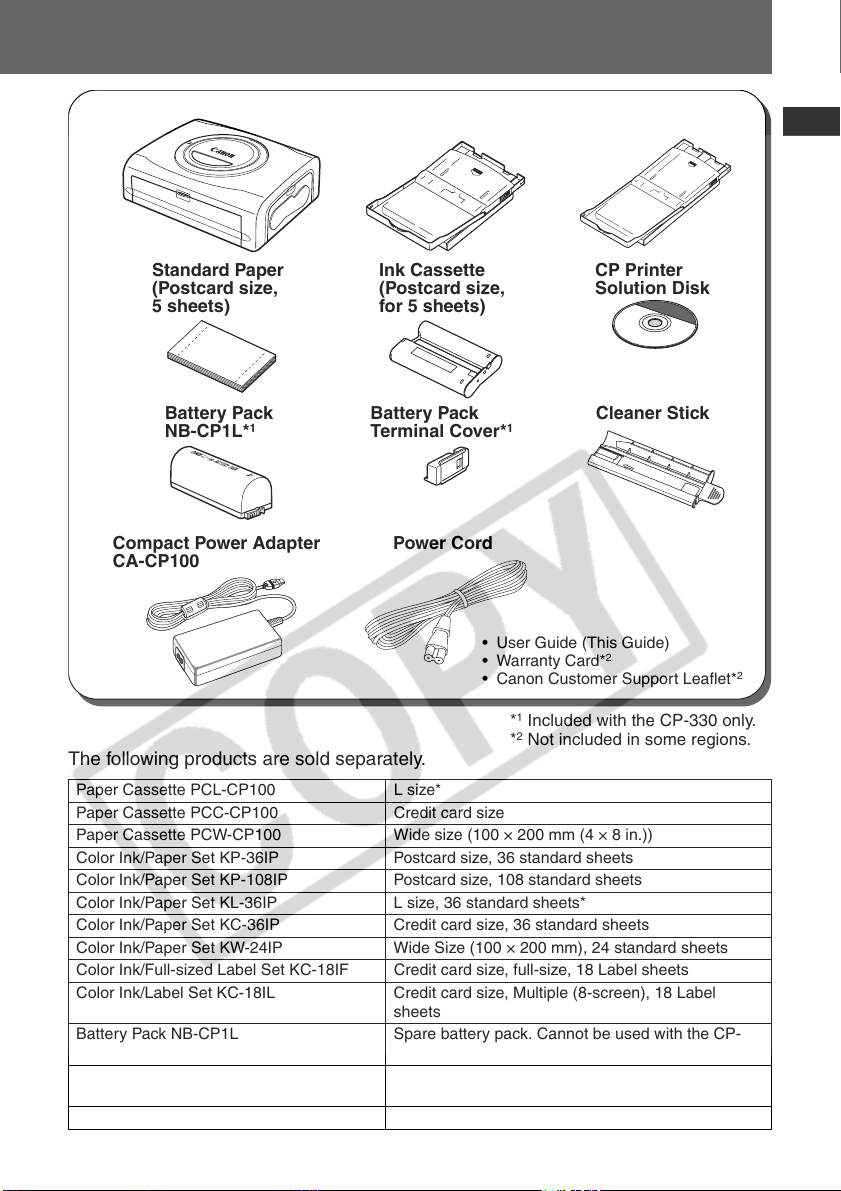
Package Contents
Compact Photo Printer Paper Cassette
(Postcard size)
Standard Paper
(Postcard size,
5 sheets)
Battery Pack
NB-CP1L*
1
Compact Power Adapter
Ink Cassette
(Postcard size,
for 5 sheets)
Battery Pack
Terminal Cover*
Power Cord
CA-CP100
• User Guide (This Guide)
• Warranty Card*
• Canon Customer Support Leaflet*
Paper Cassette
(Wide size)*
1
CP Printer
Solution Disk
1
Cleaner Stick
2
2
*1 Included with the CP-330 only.
2
Not included in some regions.
*
The following products are sold separately.
Paper Cassette PCL-CP100 L size*
Paper Cassette PCC-CP100 Credit card size
Paper Cassette PCW-CP100 Wide size (100 × 200 mm (4 × 8 in.))
Color Ink/Paper Set KP-36IP Postcard size, 36 standard sheets
Color Ink/Paper Set KP-108IP Postcard size, 108 standard sheets
Color Ink/Paper Set KL-36IP L size, 36 standard sheets*
Color Ink/Paper Set KC-36IP Credit card size, 36 standard sheets
Color Ink/Paper Set KW-24IP Wide Size (100 × 200 mm), 24 standard sheets
Color Ink/Full-sized Label Set KC-18IF Credit card size, full-size, 18 Label sheets
Color Ink/Label Set KC-18IL Credit card size, Multiple (8-screen), 18 Label
Battery Pack NB-CP1L Spare battery pack. Cannot be used with the CP-
Battery/Charge Adapter Kit BCA-CP100 Set including the Battery Pack NB-CP1L and a
Car Battery Adapter CBA-CP100 Powers the printer from a car’s battery.
* Not sold in some regions.
sheets
220.
battery charger. Cannot be used with the CP-220.
5
Page 7
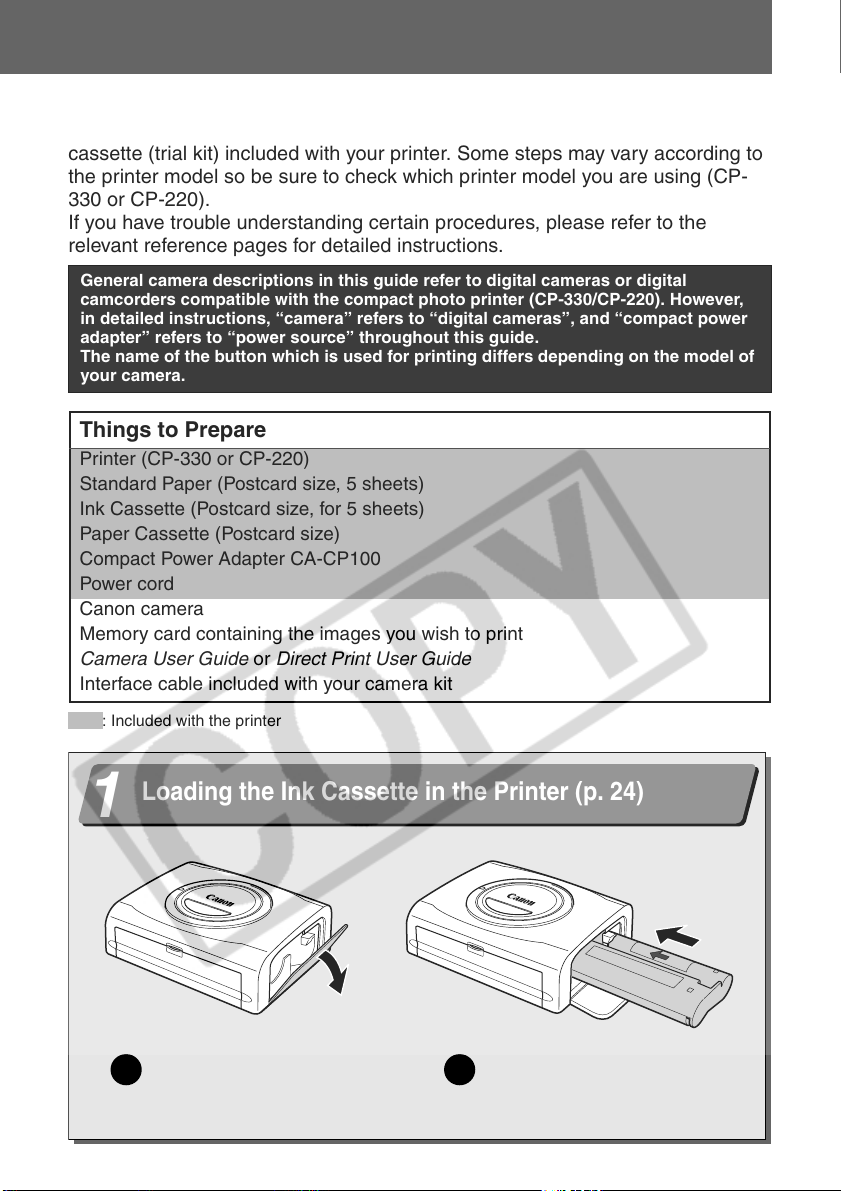
Quick Start
Let’s start by printing on postcard size paper.
This section explains the procedures required to print with the paper and the ink
cassette (trial kit) included with your printer. Some steps may vary according to
the printer model so be sure to check which printer model you are using (CP-
330 or CP-220).
If you have trouble understanding certain procedures, please refer to the
relevant reference pages for detailed instructions.
General camera descriptions in this guide refer to digital cameras or digital
camcorders compatible with the compact photo printer (CP-330/CP-220). However,
in detailed instructions, “camera” refers to “digital cameras”, and “compact power
adapter” refers to “power source” throughout this guide.
The name of the button which is used for printing differs depending on the model of
your camera.
Things to Prepare
Printer (CP-330 or CP-220)
Standard Paper (Postcard size, 5 sheets)
Ink Cassette (Postcard size, for 5 sheets)
Paper Cassette (Postcard size)
Compact Power Adapter CA-CP100
Power cord
Canon camera
Memory card containing the images you wish to print
Camera User Guide or Direct Print User Guide
Interface cable included with your camera kit
: Included with the printer
Loading the Ink Cassette in the Printer (p. 24)
1
Open the ink cassette
1
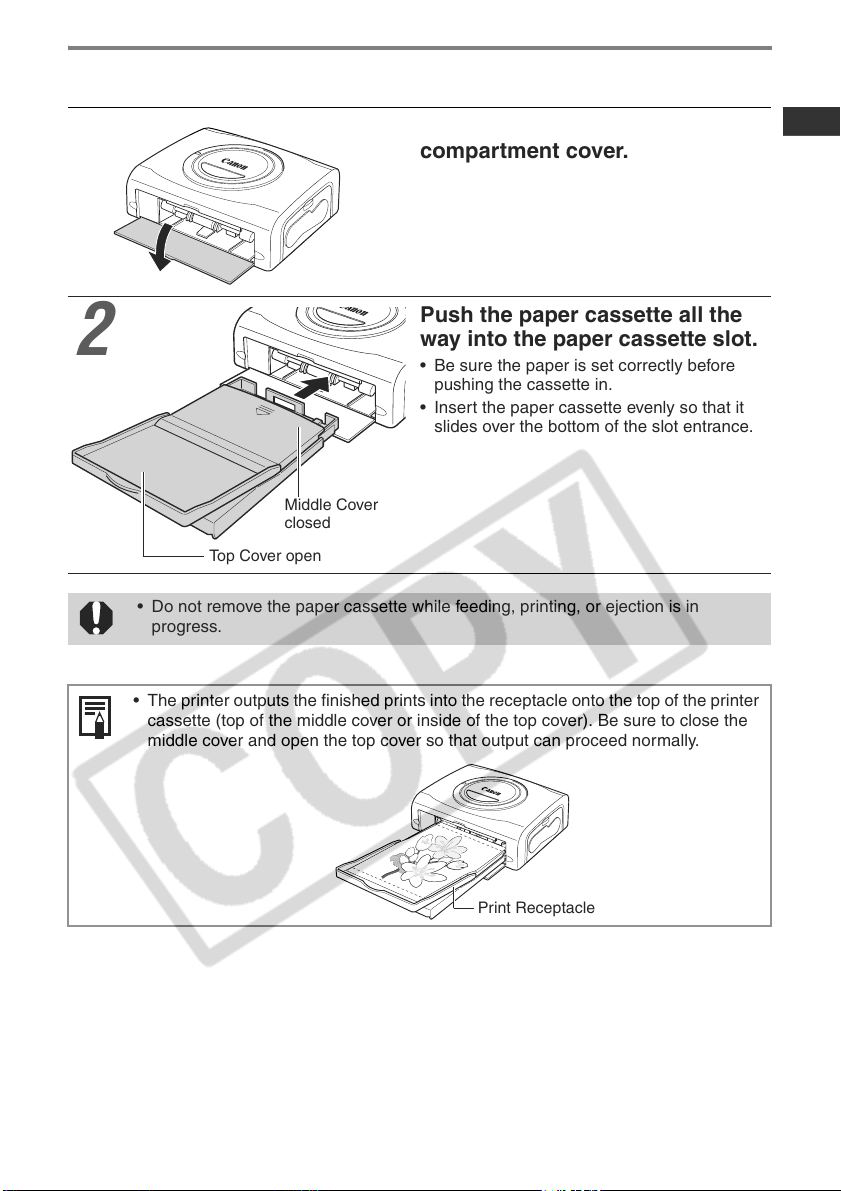
compartment cover.
6
Load the ink cassette and
2
close the ink cassette
compartment cover.
Page 8
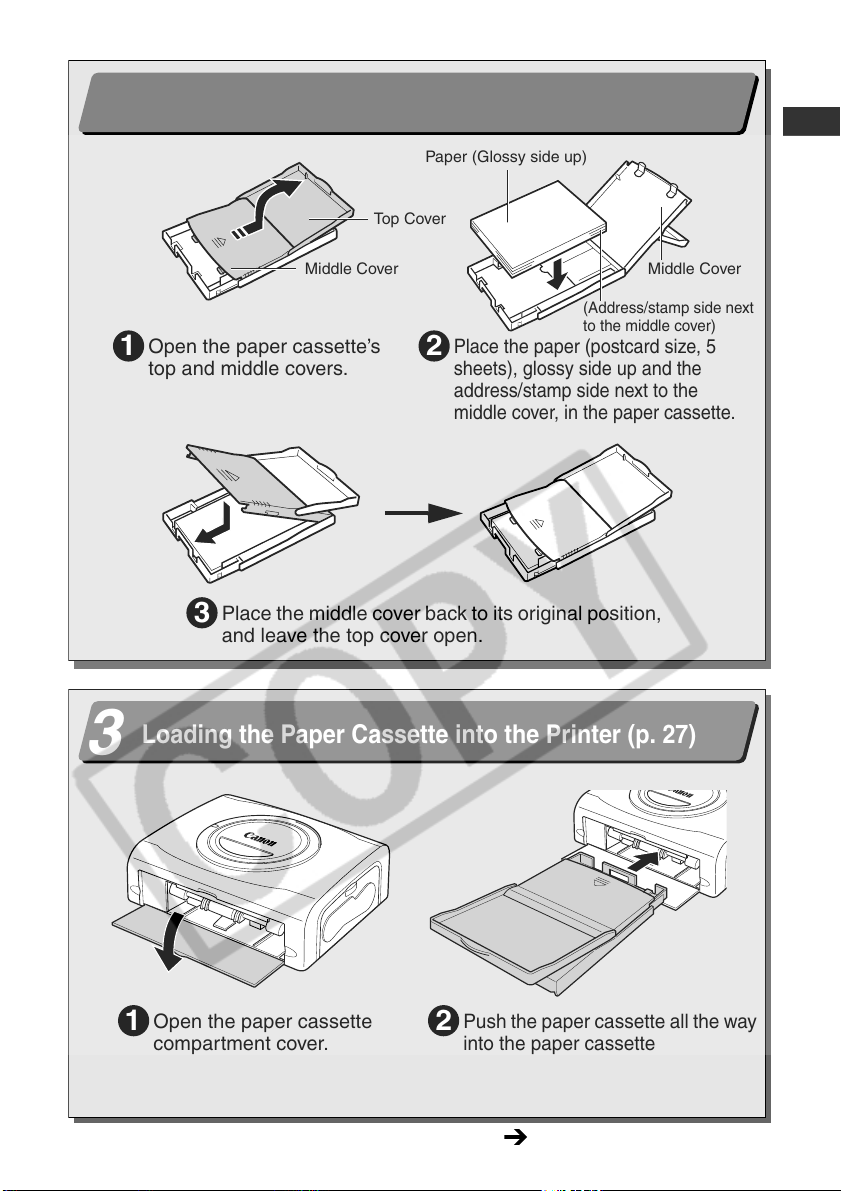
Placing the Paper into the Paper Cassette (p. 25)
2
Paper (Glossy side up)
Top Cover
Middle Cover
Open the paper cassette’s
1
top and middle covers.
Place the middle cover back to its original position,
3
and leave the top cover open.
Loading the Paper Cassette into the Printer (p. 27)
3
Place the paper (postcard size, 5
2
sheets), glossy side up and the
address/stamp side next to the
middle cover, in the paper cassette.
Middle Cover
(Address/stamp side next
to the middle cover)
Open the paper cassette
1
compartment cover.
Push the paper cassette all the way
2
into the paper cassette
compartment, with its top cover
open and its middle cover closed.
Continued on the next page.
7
Page 9
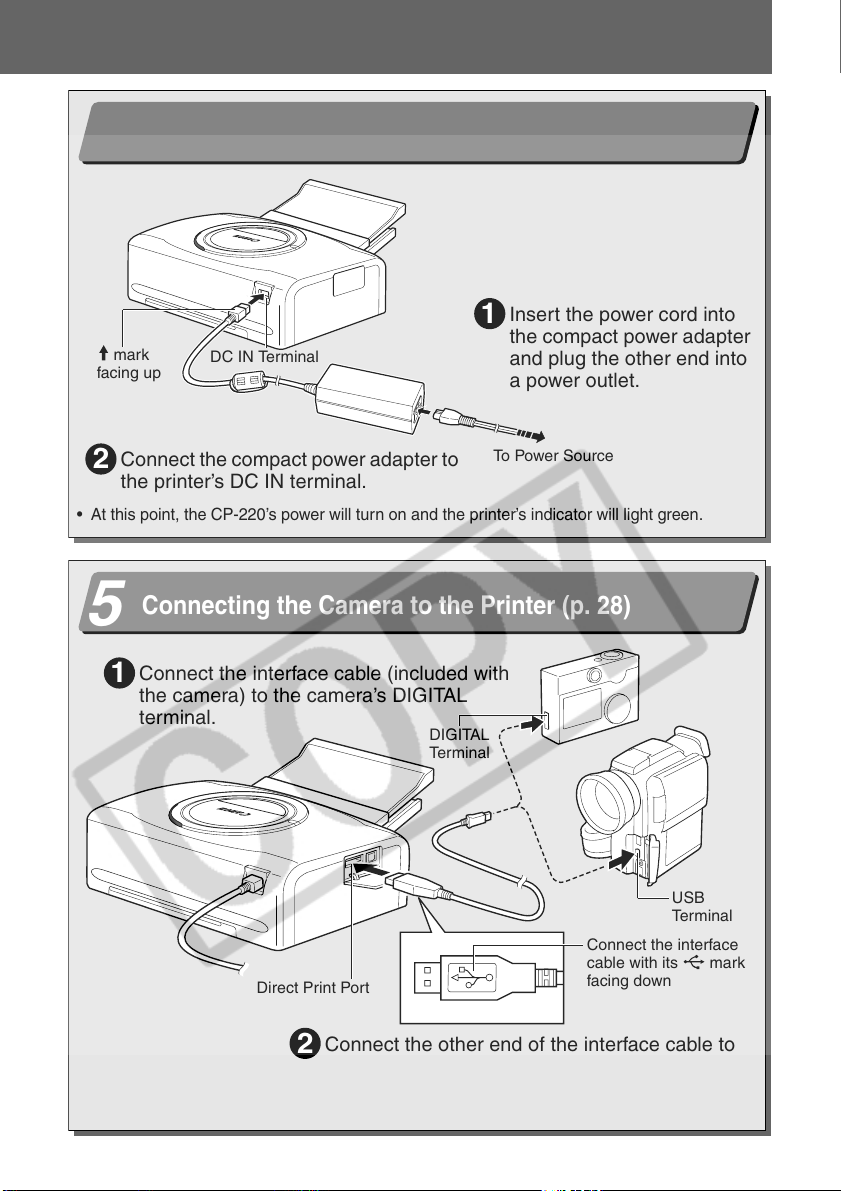
Quick Start (Continued)
Connecting the Printer to a Power Source (p. 28)
4
mark
facing up
DC IN Terminal
Insert the power cord into
1
the compact power adapter
and plug the other end into
a power outlet.
Connect the compact power adapter to
2
the printer’s DC IN terminal.
• At this point, the CP-220’s power will turn on and the printer’s indicator will light green.
Connecting the Camera to the Printer (p. 28)
5
Connect the interface cable (included with
1
the camera) to the camera’s DIGITAL
terminal.
Direct Print Port
DIGITAL
Terminal
To Powe r Sou r ce
USB
Terminal
Connect the interface
cable with its mark
facing down
• If you are using the CP-220, go to step 7.
8
Connect the other end of the interface cable to
2
the printer’s direct print port.
Page 10
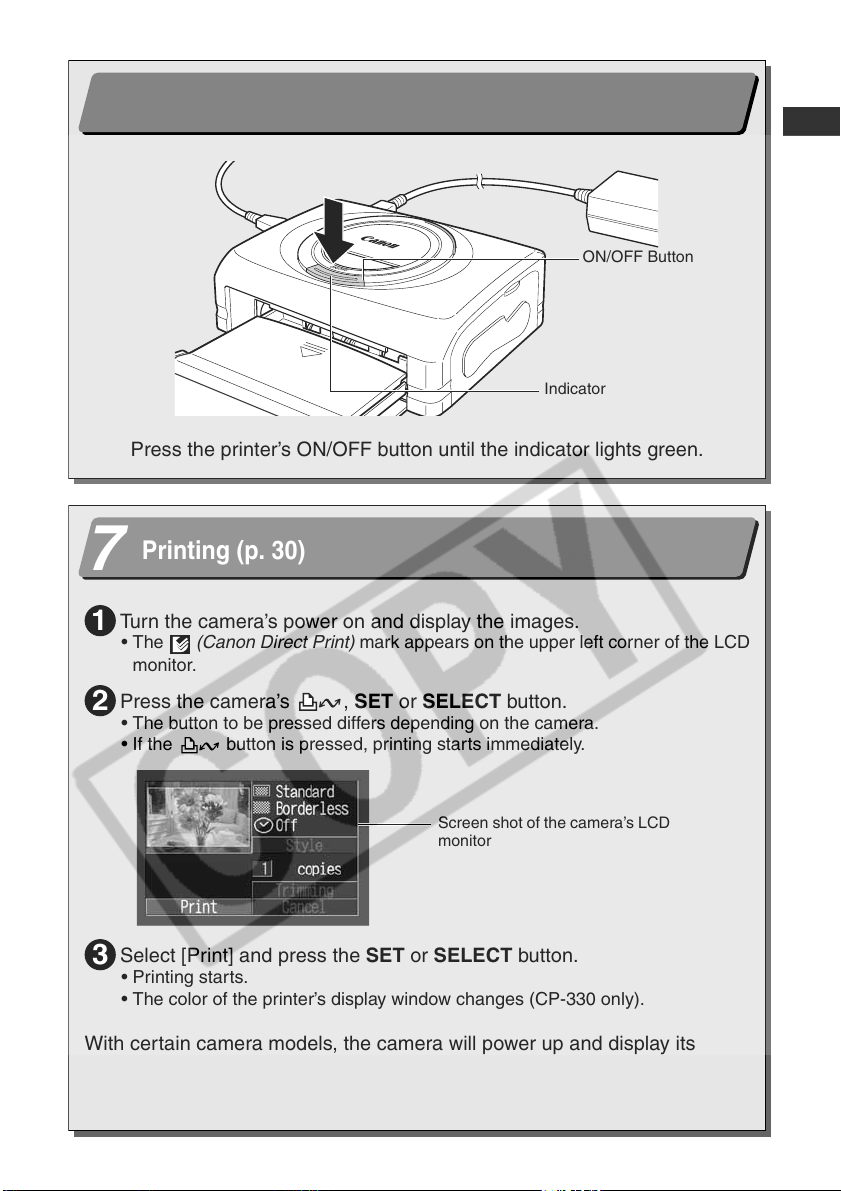
Turn On the Power (CP-330 Only) (p. 29)
6
ON/OFF Button
Indicator
Press the printer’s ON/OFF button until the indicator lights green.
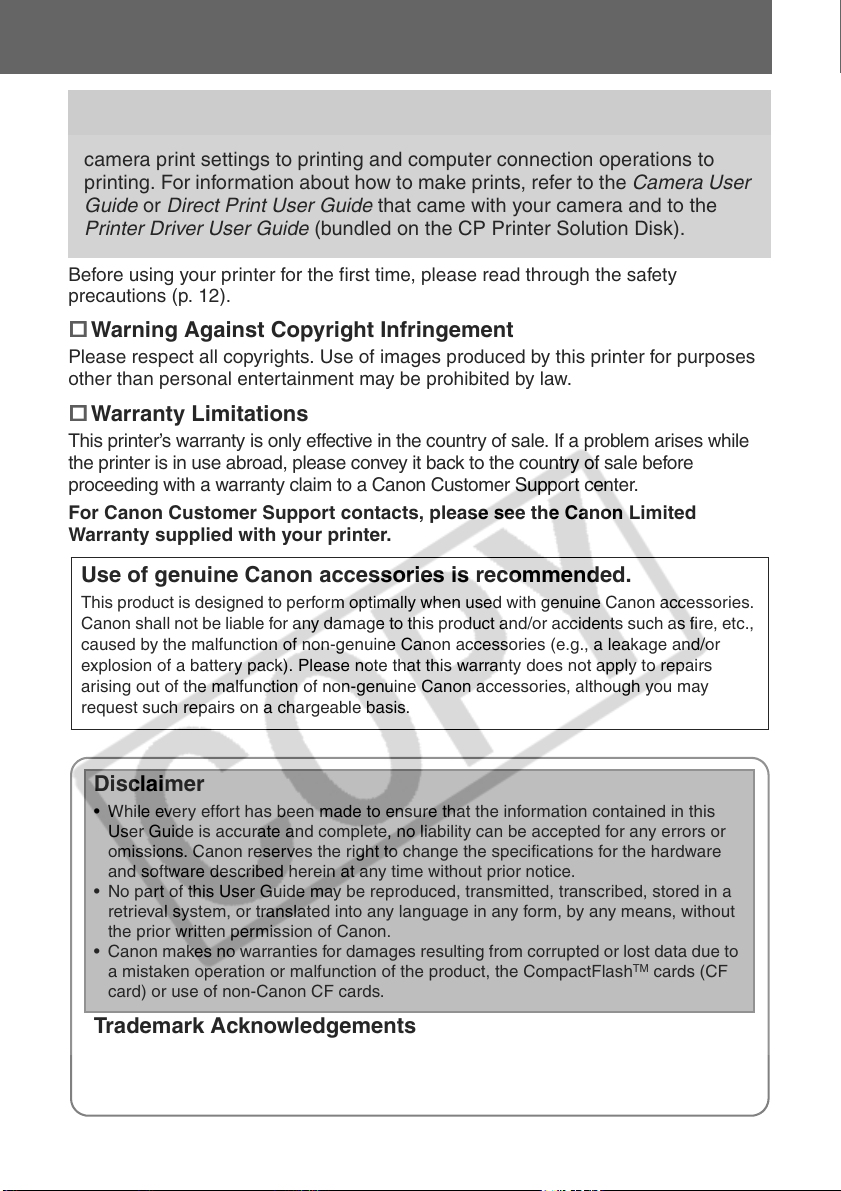
Printing (p. 30)
7
Turn the camera’s power on and display the images.
1
• The (Canon Direct Print) mark appears on the upper left corner of the LCD
monitor.
Press the camera’s , SET or SELECT button.
2
• The button to be pressed differs depending on the camera.
• If the button is pressed, printing starts immediately.
Screen shot of the camera’s LCD
monitor
Select [Print] and press the SET or SELECT button.
3
• Printing starts.
• The color of the printer’s display window changes (CP-330 only).
With certain camera models, the camera will power up and display its
images when it is connected to the printer with the interface cable. For
detailed instructions, please refer to the Camera User Guide or Direct Print
User Guide that came with your camera.
9
Page 11
Before You Begin
Thank you for your purchase of the Canon Compact Photo Printer CP-330/
CP-220. This guide explains the printer’s general flow of operations, from
camera print settings to printing and computer connection operations to
printing. For information about how to make prints, refer to the Camera User
Guide or Direct Print User Guide that came with your camera and to the
Printer Driver User Guide (bundled on the CP Printer Solution Disk).
Before using your printer for the first time, please read through the safety
precautions (p. 12).
Warning Against Copyright Infringement
Please respect all copyrights. Use of images produced by this printer for purposes
other than personal entertainment may be prohibited by law.
Warranty Limitations
This printer’s warranty is only effective in the country of sale. If a problem arises while
the printer is in use abroad, please convey it back to the country of sale before
proceeding with a warranty claim to a Canon Customer Support center.
For Canon Customer Support contacts, please see the Canon Limited
Warranty supplied with your printer.
Use of genuine Canon accessories is recommended.
This product is designed to perform optimally when used with genuine Canon accessories.
Canon shall not be liable for any damage to this product and/or accidents such as fire, etc.,
caused by the malfunction of non-genuine Canon accessories (e.g., a leakage and/or
explosion of a battery pack). Please note that this warranty does not apply to repairs
arising out of the malfunction of non-genuine Canon accessories, although you may
request such repairs on a chargeable basis.
Disclaimer
• While every effort has been made to ensure that the information contained in this
User Guide is accurate and complete, no liability can be accepted for any errors or
omissions. Canon reserves the right to change the specifications for the hardware
and software described herein at any time without prior notice.
• No part of this User Guide may be reproduced, transmitted, transcribed, stored in a
retrieval system, or translated into any language in any form, by any means, without
the prior written permission of Canon.
• Canon makes no warranties for damages resulting from corrupted or lost data due to
a mistaken operation or malfunction of the product, the CompactFlash
card) or use of non-Canon CF cards.
Trademark Acknowledgements
• Canon is a trademark of Canon Inc.
• Any other company and product names used herein may be trademarks of their
respective companies.
10
TM
cards (CF
Page 12
What Can Be Accomplished with this Printer
Connects directly to supporting Canon cameras
Allows easy printing from any Canon camera that supports direct printing with the compact
photo printer (CP-330/CP-220). Just connect the interface cable and you’re ready to go.
Connects directly to computers
Simply connect the printer to a computer with a commercially available USB cable to
perform the following operations.
• Print images shot with the camera
• Print part of an image (trimming)
• Print images with captions and artistic layout (Windows only)
• Make your own custom business cards
Four paper sizes and two types of labels
You can print on standard paper in postcard size, L size, credit-card size or wide size
(100 × 200 mm (4 × 8 in.)). In addition to the standard size paper, you can print full-sized
labels or 8-label stickers with the credit-card size paper.
High-quality prints, fast paper feeding
Offers photo-quality prints. Produces up to 18* prints without reloading.
* Up to 12 prints when using wide size paper (sold separately with the CP-220).
Fast printing
Postcard size images can be printed at the high speed of approximately 85 seconds per sheet.
Coated prints
Applies a protective coating to each print.
Borderless prints
Can produce borderless images that fill the paper completely.
Supports DPOF (Digital Print Order Format)
Supports DPOF settings for print selection, number of copies, and shooting date.
Easy outdoor printing
You can easily print outdoors by attaching the battery pack (CP-330 only). You can also print
images using the power from a car cigarette lighter socket. This requires the Car Battery
Adapter (sold separately).
• If mark does not display on the camera’s LCD monitor when you connect your
camera to this printer, your camera’s firmware may be incompatible with this
printer. Please check the Canon BeBit website (http://web.canon.jp/Imaging/BeBit-
e.html) or your regional Canon website, for information or to download compatible
firmware.
Since this printer complies with an industry standard for direct printing, you can print
with non-Canon cameras that are also compatible with this standard. For details, refer
to page 54.
11
Page 13
Read This First
Safety Precautions
• Before using the devices, please ensure that you have read and understood the safety
precautions described below. Always ensure that the devices are operated correctly.
• The safety precautions noted on the following pages are intended to instruct you in the safe
and correct operation of the devices to prevent injuries or damage to yourself and other
persons.
• “Devices” refers to the “printer, compact power adapter, battery pack (included with the CP-
330 or sold separately) or charge adapter (sold separately)” throughout this guide.
WARNINGS
Devices
If the devices emit smoke or a burning odor, or show other signs of significant
malfunction, immediately unplug the power cord from the power outlet. Continued
operation under these conditions poses risk of fire or electric shock. Be sure that smoke or
burning odor subsides, and then contact your dealer or the nearest Canon Customer Support
help desk.
If the devices are dropped or the casing becomes damaged, unplug the power cord
from the power outlet. Continued operation poses risk of fire or electric shock. Contact your
dealer or the nearest canon Customer Support help desk.
Never rest small metallic objects or liquid containers on top of the devices. If liquid
splashes onto the devices, wipe the devices dry using a soft absorbent cloth. If liquid spills
into the devices or an object falls into the devices, immediately unplug the power cord from
the power outlet. Continued operation poses risk of fire or electric shock. Contact your dealer
or the nearest Canon Customer Support help desk.
Do not use flammable solvents such as alcohol, benzene, or paint thinner to clean the
devices. Use of such solvents poses a fire risk.
Do not drop or insert metallic or combustible objects into the devices. Entry of foreign
objects into the devices may result in fire, electric shock, or equipment failure. Store the
devices out of the reach of children.
Do not disassemble or modify the devices. The devices contain high-voltage components,
and there is risk of electric shock. If your devices need internal adjustments or repair, contact
your dealer or a Canon Customer Support help desk.
Do not touch metal parts of the devices or the power plug during thunderstorms.
Lightning strikes may produce lethal voltages within the devices. Keep clear of the devices
while thunderstorms are in progress.
12
Page 14
Power
Do not exceed the cable and power outlet ratings when operating this product. Do not
operate this product outside of the specified voltage rating. Connecting too many devices to
the same outlet may result in fire. Check that the voltage of the outlet is compatible with the
devices before plugging them in.
If the power cord becomes damaged (if internal wiring is exposed, etc.), immediately
unplug it from the power outlet. Continued use poses risk of fire or electric shock.
Do not plug in or unplug the power cord while your hands are wet, as this may result in
electric shock. When unplugging the power cord, hold it firmly at the plug area. Do not pull
directly on the cord, as this may damage or expose the cord’s internal wiring, resulting in risk
of fire or electric shock.
Be sure that the power cord is plugged all the way in. A loose connection may result in
heat buildup, fire, or electric shock.
Do not damage, modify, or rest heavy objects on the power cord. Damage to the cord
may result in the exposure of live wires, fire, or electric shock.
Keep the power cord free of dust. The presence of dust or metallic debris on the plug
poses risk of fire or electric shock. If the plug area is not clean, unplug the power cord and
then wipe the plug area clean using a dry cloth. Check the plug periodically to make sure it is
clean.
Usage Location
Do not place the devices on an unstable or tilted table or desk, as there is risk that the
devices may fall and cause injury.
13
Page 15
CAUTIONS
Devices
Do not block the air vents on the printer. Blocking the vents may cause the inside of the
printer to overheat, resulting in damage to internal components and risk of equipment failure
or fire. Use the devices in a well-ventilated area.
Do not rest heavy objects on the devices. Objects may fall off the devices and cause
injury. Weight placed on the devices may deform the casing, resulting in damage to internal
parts and posing risk of fire.
Unplug the devices when you are not using them. If the devices remain plugged in, there
is risk that accidental contact with the device’s internal parts may cause electric shock.
Leaving the devices plugged in during prolonged periods of non-use poses risk of fire.
Do not remove the paper cassette from the printer while printing is in progress. Paper
moves back and forth in the cassette four times during printing. Placing your hand in the way
of moving paper may result in injury. Wait for printing to finish completely before removing the
cassette. Never place your hand into the paper cassette slot.
Do not reach into internal parts of the devices except as specified in the operating
instructions. Reaching into inappropriate parts of the devices may cause your hand to
become caught or injured.
Power
Do not move the devices while they are plugged in. Doing so may damage the power
cord. Continued use of a damaged power cord poses risk of fire or electric shock.
Do not excessively bend or twist the power cord. Doing so may damage the cord.
Continued use of a damaged cable poses risk of fire or equipment failure. Leave about 15 cm
(6 in.) of clearance at the front and back of the devices and 10 cm (4 in.) of clearance on both
sides to ensure adequate ventilation.
Do not pull on the power cord. Doing so may damage the cord. Continued use of a
damaged cord poses risk of fire or electric shock. Always hold the cord by the plug area when
unplugging it.
14
Page 16

Usage Location
Do not use the devices in locations that are smoky, humid, dusty, or subject to strong
vibration. Entry of water or dust into the devices, or internal damage caused by strong
vibration, may pose risk of fire or electric shock. Have the devices checked approximately
once a year (contact your dealer), preferably before the onset of your area’s humid season.
Do not leave the devices exposed to high temperatures. Do not leave in direct sunlight, or
close to heating equipment, or in a car with windows closed on a hot day. High temperatures
may cause deformation of the devices and pose risk of fire.
Do not use the devices near an open flame. Sheets ejected from the printer (onto the top
of the paper cassette) may fall into the flame, resulting in fire.
Do not use the devices close to TV sets or AM radios. Devices’ operation may adversely
affect TV and radio reception.
15
Page 17
Proper Usage and Handling
Usage Location
Do not use near strong magnets or near devices that produce strong electromagnetic
fields. Electromagnetic radiation from devices such as TVs and game machines, and strong
magnetic fields from devices such as speakers and large motors, may cause distortion in
printed images.
Use in a well-ventilated, level area.
Leave about 15 cm (6 in.) of clearance at the front and back of the devices and 10 cm
(4 in.) of clearance on both sides. Be sure to leave clearance around the paper-handling
slot (at the rear) so that paper has sufficient room to jut out from the slot during printing.
Peel off the protective seal on the top of the printer.
The air vents are covered by a protective seal. If you use the printer before removing the
protective seal, the printer may stop operating because of heat built-up inside the printer.
Handling Precautions
Please avoid turning the printer’s power on and off needlessly as the printer
initialization consumes ink: There may not be enough ink left for the allotted sheets in the
set.
When the printer is not in use, please remove the battery pack (CP-330 only).
Unplug the printer when you are not using it. But please note that you should plug in and
run the printer at least once every six months to ensure that it remains functional.
Before transporting the printer, remove the paper and ink cassettes and close the
paper cassette cover and the ink cassette cover. If dirt or foreign objects enter the printer,
print quality may deteriorate.
Pack the printer into an appropriate case for transport. If a case is not available, wrap it
with cloth or other protective material to protect against scratches.
Never use volatile compounds or insecticides on the printer, and do not allow rubber
or vinyl material to remain in prolonged contact with the printer. These materials may
cause deformation of the printer’s casing.
Overheating
If the printer overheats, it will temporarily stop operating. This does not mean that the
printer has malfunctioned. The printer will resume normal printing as soon as it cools
down.
Temporary stoppages are most likely to occur in the following cases:
• When printing continuously.
• If the room is unusually warm.
• If the air vents on the top of the printer are blocked or if ventilation is inadequate.
16
Page 18

To Prevent Damage from Condensation
Condensation may form in the printer if you suddenly move it from a cold location to a
warm location. To prevent damage that might be caused by condensation, place the printer
in a sealed plastic bag prior to moving it, and allow it to reach room temperature before using
it. Stop using the printer immediately if you detect condensation. Continued use may damage
the equipment. Wait until the moisture evaporates completely before resuming use.
Cleaning the Printer
Never use benzene, paint thinner, or other volatile solvents to clean the printer. Volatile
solvents may cause deformation or peeling of the printer’s casing. To clean the printer, wipe it
with a soft dry cloth. If stronger cleaning is required, wipe first with a cloth moistened with a
dilute neutral solvent, then wipe again with a soft dry cloth. If you use a chemical cleaning
cloth, read the instructions that come with it and observe all indicated precautions.
Keep the air vents clean and free of dust. Clean the vents as necessary. Dust that enters
the printer through the vents may land on the ink sheet, resulting in poor print quality and
possibly leading to printer breakdown. If the ink sheet becomes dusty, remove the ink
cassette and replace it with a new one.
Proper Handling of Ink Cassettes
Please use only the ink cassettes specified for use by Canon.
Do not open the ink cassette cover while printing is in progress, and do not pull the
ink cassette out. These actions may damage the printer.
Do not touch or pull on the ink sheet.
Do not handle the ink cassettes with wet or sweaty hands.
Allow ink cassettes to reach room temperature before installing and using them.
Condensation may form if you suddenly move ink cassettes from a cold location to a warm
location. If there is risk of condensation, leave the cassette in its packaging until it reaches
room temperature, and wipe away any moisture before loading it.
If you are not planning to use the printer for a while, remove and store the ink cassette.
17
Page 19
Proper Handling of Paper Cassettes
Do not apply excessive force to the paper cassette. Force or impact on the cassette may
result in paper jams or equipment damage.
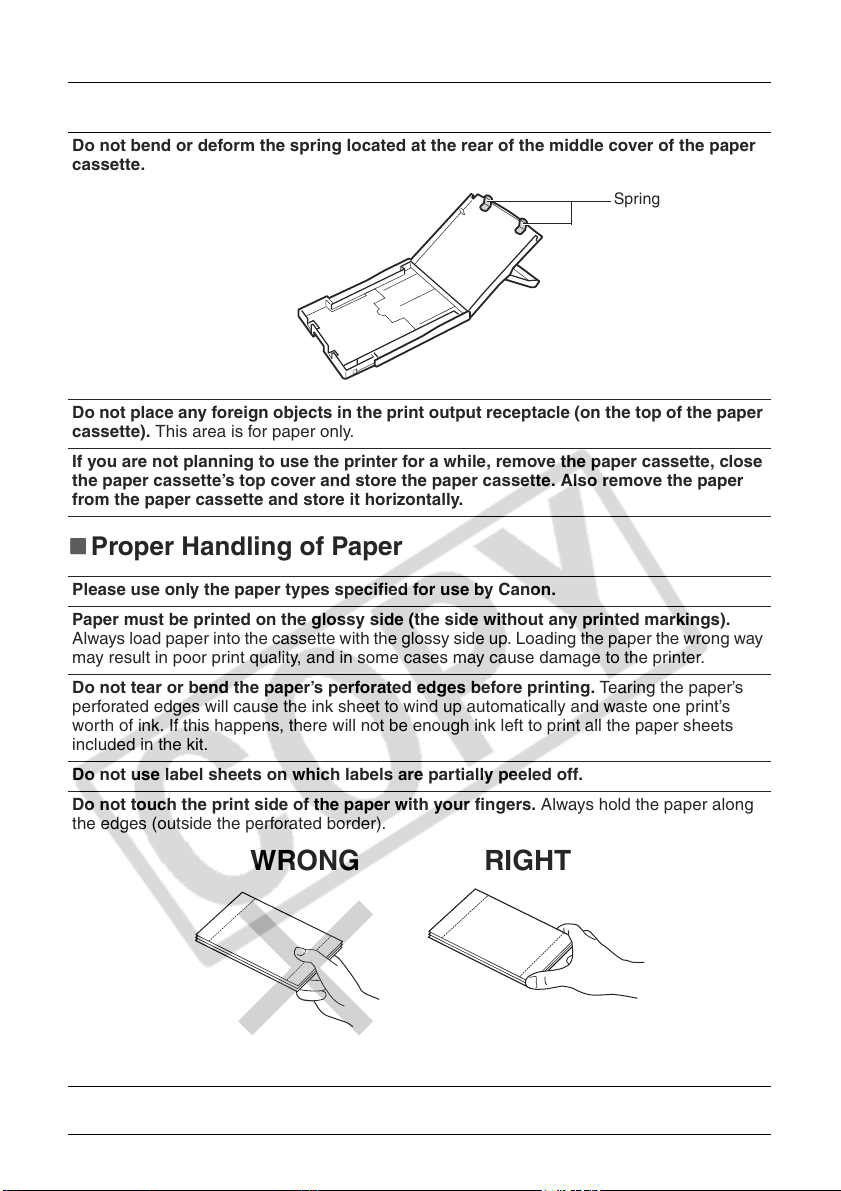
Do not bend or deform the spring located at the rear of the middle cover of the paper
cassette.
Spring
Do not place any foreign objects in the print output receptacle (on the top of the paper
cassette). This area is for paper only.
If you are not planning to use the printer for a while, remove the paper cassette, close
the paper cassette’s top cover and store the paper cassette. Also remove the paper
from the paper cassette and store it horizontally.
Proper Handling of Paper
Please use only the paper types specified for use by Canon.
Paper must be printed on the glossy side (the side without any printed markings).
Always load paper into the cassette with the glossy side up. Loading the paper the wrong way
may result in poor print quality, and in some cases may cause damage to the printer.
Do not tear or bend the paper’s perforated edges before printing. Tearing the paper’s
perforated edges will cause the ink sheet to wind up automatically and waste one print’s
worth of ink. If this happens, there will not be enough ink left to print all the paper sheets
included in the kit.
Do not use label sheets on which labels are partially peeled off.
Do not touch the print side of the paper with your fingers. Always hold the paper along
the edges (outside the perforated border).
WRONG RIGHT
Be sure that hands are dry before touching the paper. Sharp objects will scratch the paper
surface. Keep the paper surface free from fingerprints, dust, water droplets, etc.
Do not write on the paper before printing. Writing on paper before printing on it may result
in malfunction.
18
Page 20
Do not touch paper while it is being printed. During printing, the sheet repeatedly moves
back and forth along the top of the paper cassette and in and out through the paper-handling
slot. Please do not touch the sheet during this process.
Do not allow too many prints to accumulate in the print output receptacle. Do not allow
more than 9 sheets to accumulate in the print output receptacle.
You may write on the paper with an oil-based pen, but to avoid smudging please allow
ink time to dry before touching it.
Allow the paper to reach room temperature before installing and using it. Condensation
may form if you suddenly move the paper from a cold location to a warm location. If there is
risk of condensation, leave the paper in its packaging until it reaches room temperature, and
wipe away any moisture before loading it.
Please avoid the following actions as they may result in color change, color fading or
color bleeding.
• Sticking any type of adhesive tape onto the print surface.
• Allowing print surfaces to come into contact with vinyl materials.
• Applying alcohol or other volatile solvents to the print surface.
• Leaving print surfaces tightly pressed against any other surfaces or objects for prolonged
periods.
Paper Storage
If you wish to mount prints into an album, select an album with nylon-based sleeves,
or with propylene or cellophane sleeves. Other types of sleeves may cause color loss or
color bleeding.
Color change may occur over time in accordance with conditions of storage. Canon
assumes no liability for color changes.
To avoid print quality deterioration, do not store your prints in the following types of
locations.
• Locations that reach temperatures above 40 °C (104 °F)
• Humid or dusty locations
• Locations exposed to direct sunlight.
Remove unused paper from the paper cassette, return it to the bag and then into its
original package. Store the package horizontally.
Others
When opening a color ink/paper set (full-sized label set, label set), check the contents.
If something seems to be missing or appears to be damaged, contact the dealer for
assistance.
The battery pack can be charged while installed on the printer (CP-330 only), using the
printer.
• Charge the battery pack using the compact power adapter supplied with the printer.
• The battery pack can also be charged using the separately sold the Battery/Charge
Adapter Kit.
When using the battery pack (Included with the CP-330 in some regions or sold
separately), if the battery status is low, the finished print may not be ejected into the
print output receptacle completely. If this happens, please pull out the paper.
19
Page 21
Components Guide
Compact Photo Printer CP-330
<Front View>
Indicator
Indicates the printer’s status.
Orange: Charging the battery pack
Off: Charging complete
Green: Ready to print
Blinking green: Printing in progress
Blinking orange: Battery depleted
Red/Blinking red: Error
Paper Cassette Slot
The paper cassette loads into
this compartment.
Paper Cassette
Compartment Cover
ON/OFF Button
Turns the printer’s power ON and OFF.
Display Window
Ink Cassette Slot
The ink cassette is
inserted into this
compartment.
Ink Cassette
Compartment Cover
<Back View>
Battery Cover Lever
Used when the battery pack or
battery cover is removed.
Battery Cover
20
DC IN Terminal
Connects to the Compact Power Adapter.
Air Vents
Paper-handling Slot
Paper extends out from this slot
while printing is in progress.
USB Port
Connects commercially
available USB cables to a
computer.
Direct Print Port
Connects the interface cable
(included with the camera) to the
camera.
Page 22
Compact Photo Printer CP-220
<Front View>
Indicator
Indicates the printer’s status.
Green: Ready to print
Blinking green: Printing in progress
Red/Blinking red: Error
Display Window
Paper Cassette Slot
The paper cassette loads into
this compartment.
Paper Cassette
Compartment Cover
Ink Cassette Slot
The ink cassette is inserted
into this compartment.
Ink Cassette
Compartment Cover
<Back View>
Air Vents
Paper-handling Slot
Paper extends out from this slot
while printing is in progress.
DC IN Terminal
Connects to the Compact Power Adapter.
USB Port
Connects commercially available
USB cables to a computer.
Direct Print Port
Connects the interface cable
(included with the camera) to the
camera.
21
Page 23
Let’s Print
Preparing Your Ink Cassette/Paper Sets and
Paper Cassette
Since there are several kinds of paper set (including the separately sold sets),
please make sure you are using the right ink cassette and paper cassette for the
chosen paper. If the set is not correct, you will not be able to print.
Please check the sets and the names of their components in the table below.
Look here for the paper cassette name Look here for the ink cassette name
Checking Your Ink/Paper Sets
Printing on Postcard Size Paper (100 × 148 mm (4 × 6 in.))
Number
Paper
• Included in package
of
Sheets
5
36
Paper Cassette
Name
The design of the seal on your ink cassette may
Ink Cassette Name
slightly differ from the examples below.
Printing on L Size Paper (89 × 119 mm (3.5 × 4.7 in.))
Number
Paper
Sheets
36
• The paper cassette PCL-CP100 (sold separately) is required when printing on L size paper.
of
Paper Cassette
Name
The design of the seal on your ink cassette may
Ink Cassette Name
slightly differ from the example below.
22
Page 24
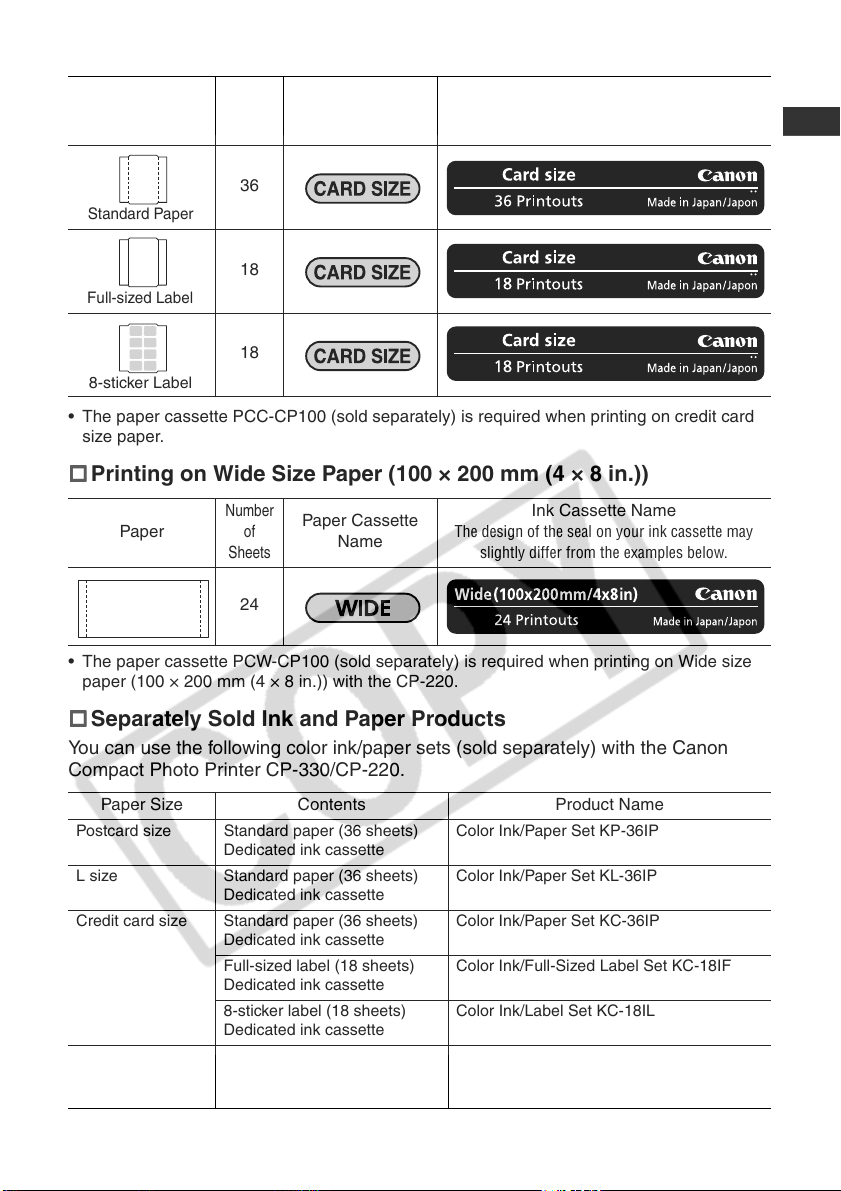
Printing on Credit Card Size Paper (54 × 86 mm (2.1 × 3.4 in.))
Ink Cassette Name
slightly differ from the examples below.
Paper
Number
of
Sheets
Paper Cassette
Name
The design of the seal on your ink cassette may
36
Standard Paper
18
Full-sized Label
18
8-sticker Label
• The paper cassette PCC-CP100 (sold separately) is required when printing on credit card
size paper.
Printing on Wide Size Paper (100 × 200 mm (4 × 8 in.))
Number
Paper
Sheets
of
Paper Cassette
Name
The design of the seal on your ink cassette may
24
• The paper cassette PCW-CP100 (sold separately) is required when printing on Wide size
paper (100 × 200 mm (4 × 8 in.)) with the CP-220.
Ink Cassette Name
slightly differ from the examples below.
Separately Sold Ink and Paper Products
You can use the following color ink/paper sets (sold separately) with the Canon
Compact Photo Printer CP-330/CP-220.
Paper Size Contents Product Name
Postcard size Standard paper (36 sheets)
L size Standard paper (36 sheets)
Credit card size Standard paper (36 sheets)
Wide size
(100 × 200 mm (4
× 8 in.))
Dedicated ink cassette
Dedicated ink cassette
Dedicated ink cassette
Full-sized label (18 sheets)
Dedicated ink cassette
8-sticker label (18 sheets)
Dedicated ink cassette
Standard paper (24 sheets)
Dedicated ink cassette
• One ink cassette can print to all of the paper included in the ink/paper set.
Color Ink/Paper Set KP-36IP
Color Ink/Paper Set KL-36IP
Color Ink/Paper Set KC-36IP
Color Ink/Full-Sized Label Set KC-18IF
Color Ink/Label Set KC-18IL
Color Ink/Paper Set KW-24IP
23
Page 25
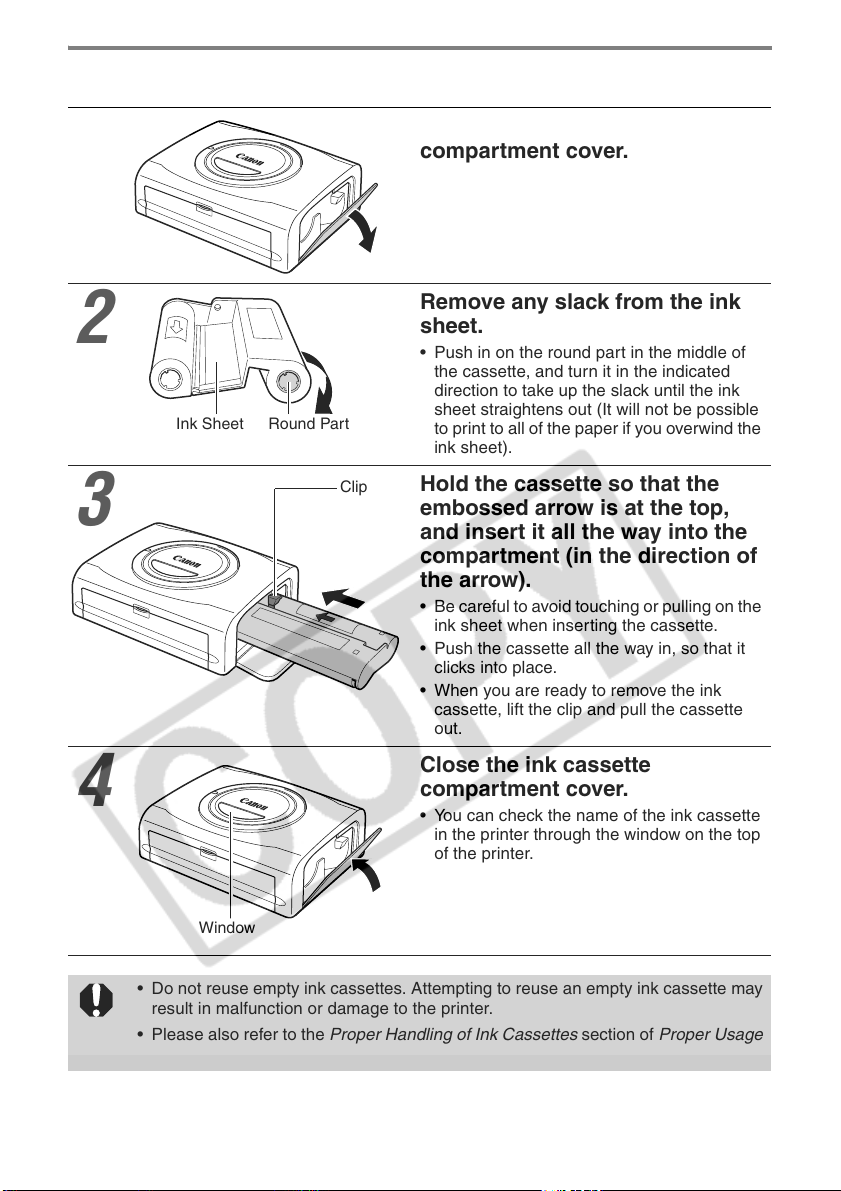
Loading the Ink Cassette
1
2
Ink Sheet
Round Part
Open the ink cassette
compartment cover.
Remove any slack from the ink
sheet.
• Push in on the round part in the middle of
the cassette, and turn it in the indicated
direction to take up the slack until the ink
sheet straightens out (It will not be possible
to print to all of the paper if you overwind the
ink sheet).
3
4
Clip
Window
• Do not reuse empty ink cassettes. Attempting to reuse an empty ink cassette may
result in malfunction or damage to the printer.
• Please also refer to the Proper Handling of Ink Cassettes section of Proper Usage
and Handling (p. 17).
Hold the cassette so that the
embossed arrow is at the top,
and insert it all the way into the
compartment (in the direction of
the arrow).
• Be careful to avoid touching or pulling on the
ink sheet when inserting the cassette.
• Push the cassette all the way in, so that it
clicks into place.
• When you are ready to remove the ink
cassette, lift the clip and pull the cassette
out.
Close the ink cassette
compartment cover.
• You can check the name of the ink cassette
in the printer through the window on the top
of the printer.
24
Page 26
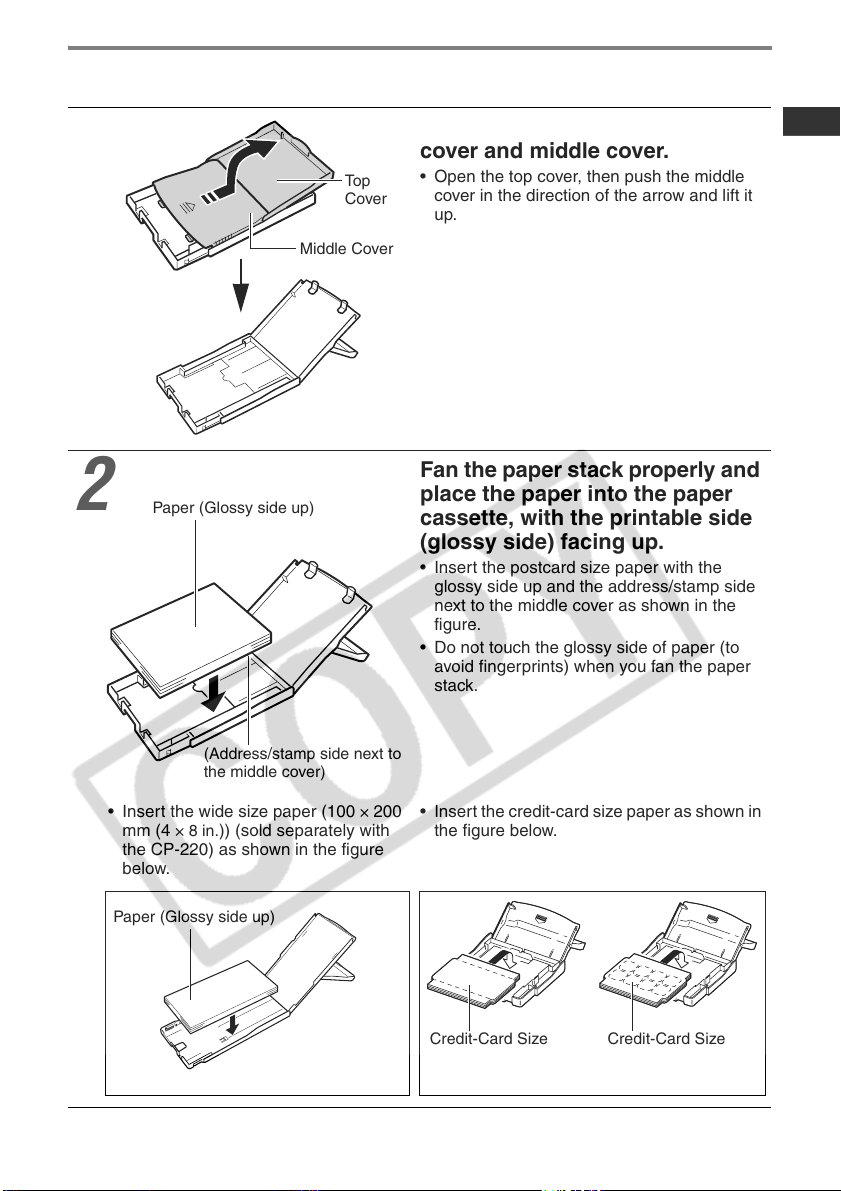
Placing the Paper into the Paper Cassette
Open the paper cassette’s top
1
2
Top
Cover
Middle Cover
Paper (Glossy side up)
cover and middle cover.
• Open the top cover, then push the middle
cover in the direction of the arrow and lift it
up.
Fan the paper stack properly and
place the paper into the paper
cassette, with the printable side
(glossy side) facing up.
• Insert the postcard size paper with the
glossy side up and the address/stamp side
next to the middle cover as shown in the
figure.
• Do not touch the glossy side of paper (to
avoid fingerprints) when you fan the paper
stack.
(Address/stamp side next to
the middle cover)
• Insert the wide size paper (100
× 8 in.)) (sold separately with
mm (4
the CP-220) as shown in the figure
below.
Paper (Glossy side up)
× 200
• Insert the credit-card size paper as shown in
the figure below.
Credit-Card Size
(Standard Paper/
Full-sized Label)
Credit-Card Size
(8-label Sticker)
25
Page 27
• Insert the L size paper (sold
separately) as shown in the figure
below
Paper (Glossy side up)
3
• Please use specified paper types only.
• Do not insert more than 18 sheets in the paper cassette.
• Do not insert more than 12 sheets wide size paper (100 × 200 mm (4 × 8 in.); sold
separately with the CP-220) in the paper cassette.
• Printed or fed paper is coated even when nothing is printed on the paper.
Therefore, never reuse the printed or fed paper for printing. Reused paper may
stick to the ink sheet, resulting in damage to the printer.
• Please also refer to the Proper Handling of Paper Cassettes and the Proper
Handling of Paper sections of Proper Usage and Handling (p. 18).
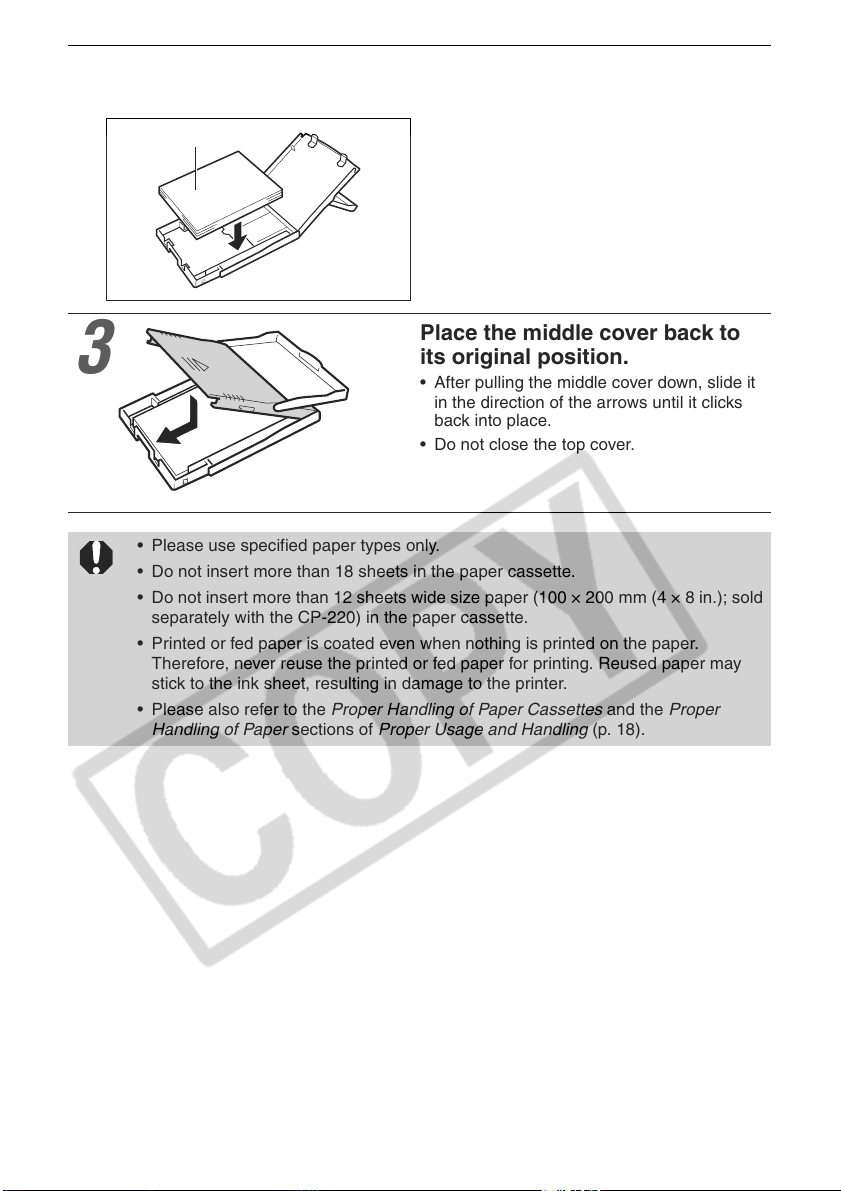
Place the middle cover back to
its original position.
• After pulling the middle cover down, slide it
in the direction of the arrows until it clicks
back into place.
• Do not close the top cover.
26
Page 28
Loading the Paper Cassette
Open the paper cassette
1
2
Middle Cover
closed
Top Cover open
• Do not remove the paper cassette while feeding, printing, or ejection is in
progress.
compartment cover.
Push the paper cassette all the
way into the paper cassette slot.
• Be sure the paper is set correctly before
pushing the cassette in.
• Insert the paper cassette evenly so that it
slides over the bottom of the slot entrance.
• The printer outputs the finished prints into the receptacle onto the top of the printer
cassette (top of the middle cover or inside of the top cover). Be sure to close the
middle cover and open the top cover so that output can proceed normally.
Print Receptacle
27
Page 29
Connecting a Power Source and the Camera to
the Printer
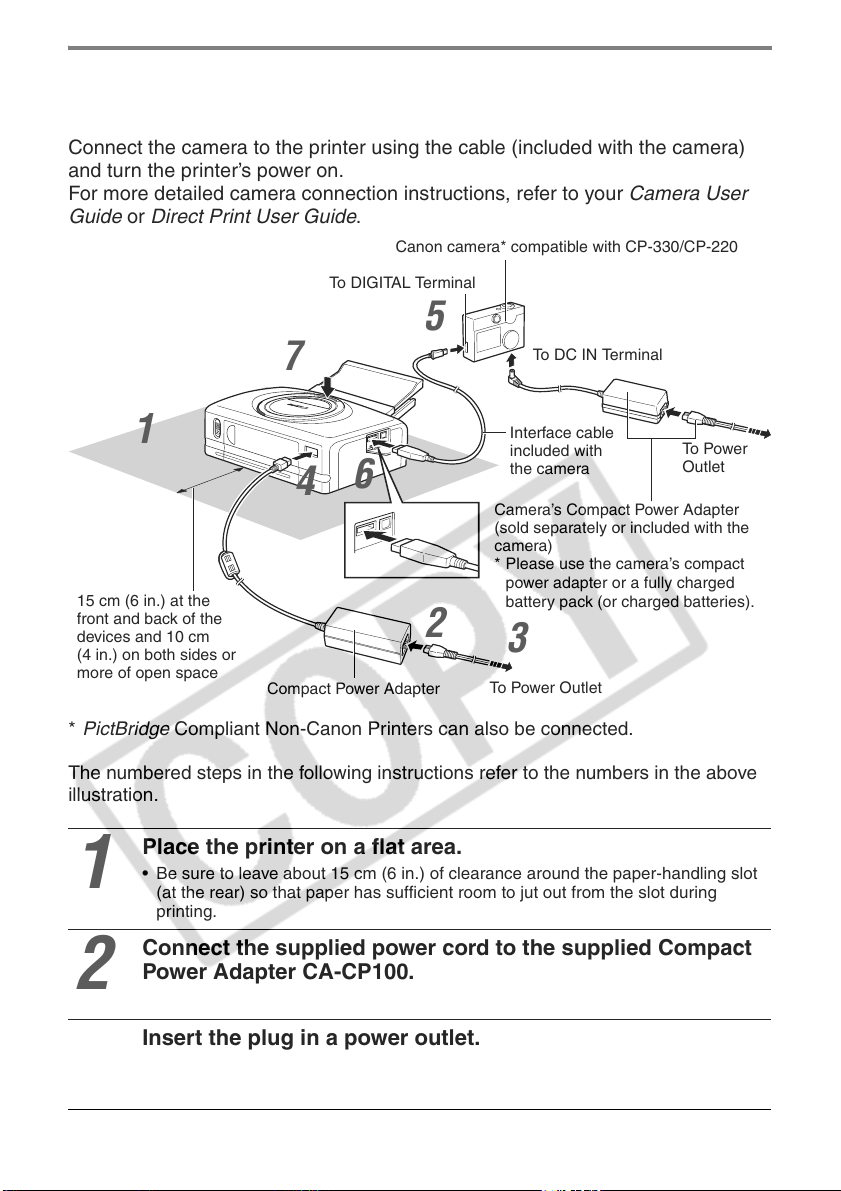
Connect the camera to the printer using the cable (included with the camera)
and turn the printer’s power on.
For more detailed camera connection instructions, refer to your Camera User
Guide or Direct Print User Guide.
Canon camera* compatible with CP-330/CP-220
To DIGITAL Terminal
5
7
To DC IN Terminal
1
6
4
15 cm (6 in.) at the
front and back of the
devices and 10 cm
(4 in.) on both sides or
more of open space
* PictBridge Compliant Non-Canon Printers can also be connected.
The numbered steps in the following instructions refer to the numbers in the above
illustration.
Place the printer on a flat area.
1
2
• Be sure to leave about 15 cm (6 in.) of clearance around the paper-handling slot
(at the rear) so that paper has sufficient room to jut out from the slot during
printing.
Connect the supplied power cord to the supplied Compact
Power Adapter CA-CP100.
Compact Power Adapter
2
Interface cable
included with
the camera
Camera’s Compact Power Adapter
(sold separately or included with the
camera)
* Please use the camera’s compact
power adapter or a fully charged
battery pack (or charged batteries).
To Pow e r
Outlet
3
To Power Outlet
28
Insert the plug in a power outlet.
3
Page 30
Connect the Compact Power Adapter cable to the printer.
4
5
6
7
• Insert the cable with its mark facing up.
• With the CP-220, the power turns on at this point and the indicator lights green.
Connect the interface cable to the camera.
• Use the interface cable that came with your camera.
Connect the interface cable to the printer.
• Insert the cable in the left port, with the mark on the cable facing down.
Press the ON/OFF button until the indicator goes on. (CP-
330 only)
• The indicator lights green once the printer powers up.
Turning the Printer’s Power Off
CP-330
Press the ON/OFF button until the indicator goes off.
CP-220
Unplug the cable of the compact power adapter from the printer. (The indicator will
go off)
• We recommend that you also connect the camera’s compact power adapter (sold
separately or included with the camera) when using the camera with your printer. If
you wish to run the camera on battery power, be sure that batteries are fresh (fully
charged).
• When connecting the cable, be sure that the connectors on the cable match up
correctly with the connectors on the camera and printer.
• Use an easily accessible power outlet for the printer’s power cord, so that you can
unplug the printer cable quickly in the event of a problem.
• Please also refer to the Usage Location section of Proper Usage and Handling for
information about printer usage location (p. 16).
• Some camera models do not come with a compact power adapter. For details,
please see the System Map that came with your camera.
29
Page 31

Printing
This section explains the flow of printing operations with Canon camera*.
For more details, refer to your Camera User Guide or Direct Print User Guide.
* In other cases, please refer to the Printing with Non-Canon Digital Cameras (p. 54).
Turn the camera’s power on and
1
2
3
Display the images to be printed and press the SET or
SELECT button.
• If your camera has the (Print/Share) button, printing starts immediately
after you press the button (Step 3 is not necessary).
display the images.
• Check that the (Canon Direct Print)/
(PictBridge) mark is displayed in the upper
left corner of the LCD monitor.
• Some camera models automatically power
up when the cable is connected to the
printer. The mark then displays on the LCD
monitor.
Select [Print] and press the SET
or SELECT button.
• Printing starts. The camera returns to the
playback screen once printing is
successfully completed.
• The display window lights as explained
below.
CP-330 : The color changes in the following
order: yellow Æ pink (magenta) Æ
light blue (cyan) Æ white Æ blue.
CP-220 : Lights in blue.
30
If does not display in step 1, check the following:
• Is the cable correctly connected? (p. 28)
• Is the printer’s power on? (p. 28)
• Is your camera’s firmware compatible with this printer? (p. 37)
If printing does not start, check the following:
• Does the camera’s LCD monitor display a message? (p. 39)
Page 32

Printing on the the Wide Size (100 × 200 mm (4 × 8 in.))
(Sold Separately with the CP-220) Paper
You can make your own message cards and greeting cards.
The cards are printed as explained below.
When the Camera is Connected
to the Printer
Printed on the 100 × 150 mm
(4 × 6 in.) portion of the card.
Nothing is printed on this portion so you can
write your message with an oil-based pen.
• If (PictBridge) mark appears on step 1 on page 30, select [Default] on the
paper size setting screen.
• When a computer is connected to the printer, you can lay out pictures and letters
as you wish. For details, refer to the Printer Driver User Guide.
When a Computer is Connected
to the Printer
Printed on the whole card.
31
Page 33

Battery Usage
Using the Battery Pack (CP-330 Only)
With the CP-330, you can use the rechargeable battery pack (Battery Pack NB-
CP1L) to print.
The battery pack can either be charged in the printer or with the separately sold
battery charger (included with the Battery/Charge Adapter Kit BCA-CP100).
Charging the Battery Pack in the Printer
Attach the battery pack NB-CP1L to the printer to charge it.
Remove the battery pack’s
1
Terminal Cover
2
terminal cover.
• When the battery pack is not in use, always
store it with its terminal cover on.
Press the battery cover lever
down and remove the battery
cover.
32
3
4
Compact Power Adapter
To Power Outlet
power cord
Install the battery pack.
• Slide the battery pack into place, in the
direction of the arrow, and push it in until it
clicks into place.
• To remove the battery pack, push the
battery cover lever down and pull the battery
pack out. Replace the battery cover
afterwards.
Attach the power cord to the
compact power adapter CA-
CP100 and plug it into a power
outlet.
Page 34

5
Connect the compact power
adapter cable to the printer.
• The indicator lights orange while charging
and turns off once the battery pack is fully
charged.
Indicator
6
Charging the Battery Pack with the Battery Charger
Use the separately sold battery charger (included with the Battery/Charge Adapter
Kit BCA-CP100) to charge the battery pack NB-CP1L before attaching it to the
printer.
Remove the battery pack’s terminal cover.
1
• Refer to step 1 of the Charging the Battery Pack in the Printer section (p. 32).
2
Compact Power
Adapter Cable
Disconnect the compact power
adapter cable from the printer
once charging is complete.
Attach the battery pack to the
charge adapter.
• Attach it firmly in the direction of the arrow.
Charge Adapter
3
Attach the power cord to the compact power adapter CA-
CP100 and plug it into a power outlet.
• Refer to step 4 of the Charging the Battery Pack in the Printer section (p. 32).
33
Page 35

4
Charge Indicator
Remove the battery cover and install the battery pack.
5
• Refer to step 2 and 3 of the Charging the Battery Pack in the Printer section
(
• If the ON/OFF button is pressed and the printer’s power turns on while charging
the battery pack, charging will stop. Pressing the ON/OFF button again will turn off
the printer and charging will resume.
• Do not charge this battery pack with charge adapters other than those
recommended by Canon.
• Do not use the battery pack in products other than those recommended by Canon.
• Do not charge battery packs other than the battery pack NB-CP1L.
• Do not carry or store the battery pack with metal objects with sharp edges, such as
paper clips and pins. Always put the terminal cover on the battery pack’s terminal
when carrying it or before storing it.
• Avoid dropping or subjecting the battery pack to severe impact.
• Do not apply heat or expose the battery pack to open flame.
• Do not cover the compact power adapter with anything, such as a tablecloth,
cushion or blanket, when it is charging. Heat will build up internally and possibly
lead to fire.
• Immediately flush water over parts of the body or clothing that come into contact
with the inner contents of a battery if the outer casing incurs damage. If any of
these substances should contact internal tissues, such as eyes or the mouth,
immediately flush with water and seek medical assistance.
p. 32).
Compact Power
Adapter Cable
Connect the compact power
adapter cable to the charge
adapter.
• The charge indicator lights orange while
charging and turns green once the battery
pack is fully charged.
• Disconnect the cable from the charge
adapter once charging is complete and
detach the battery pack from the charge
adapter.
34
Page 36

• When the battery pack is used to power the printer, the printer will automatically
turn off if it is idle for 5 minutes or more.
• This is a lithium ion battery pack so there is no need to completely use or
discharge it before recharging. It can be charged at any charge state.
• It takes approximately 150 minutes to bring a fully discharged battery pack to a full
charge state (based on standard Canon testing criteria).
o
• Charge it within a temperature range of 5 to 40
C (41 to 104oF).
• The charge adapter may emit noises while charging. This is not a malfunction.
• Do not charge the battery pack for more than 24 continuous hours to avoid
performance loss.
• When the printer is not in use, remove the battery pack, replace its terminal cover
and store it in a cool place (30
o
C/86oF or less).Charge it before using it again.
• Even charged battery packs continue to discharge naturally. You are advised to
charge the battery on the day of use, or one day before, to ensure a full charge.
• Since storing a fully charged battery pack for long periods of time (about 1 year)
can shorten its lifecycle or affect performance, you are recommended to discharge
the battery pack fully in the printer before storing it in a cool place (30
o
C/86oF or
less). If you do not use the battery pack for long periods of time, charge it fully and
discharge it fully in the printer at least once a year before returning it to storage.
• The printer consumes the battery charge when the power is on even when a
function is not being used. To conserve the battery charge, be particularly attentive
in turning the power off.
o
• Although the battery pack’s maximum operating range is 5 to 40
the optimal range is 10 to 30
o
C (50 to 86oF). At cold temperatures, such as those
C (41 to 104oF),
experienced on ski hills, performance will temporarily decline, reducing the usable
time.
• If the usable time of a battery pack diminishes substantially even when fully
charged, it should be replaced.
• Remove the battery pack when the printer is not in use. The battery pack
continues to discharge a small amount when left in the printer or charge adapter
even with the power turned off. This shortens the battery life.
35
Page 37

Battery Status
If battery status is running down and the indicator of the printer blinks orange while
the printer is connected to the camera, the camera’s LCD monitor may display the
following message.
Error Message Solution
Recharge the printer battery The battery pack’s power is too low to operate the printer.
Switch the battery pack for a fully charged one or recharge
the battery pack.
Battery Performance
Number of prints Postcard size paper: Approximately 36 sheets
L size paper: Approximately 36 sheets
Card size paper: Approximately 72 sheets
Wide size (100 × 200 mm (4 × 8 in.)) paper: Approximately 24 sheets
Test conditions: Normal temperature (23 °C/73 °F), Canon images, continuous print.
* The above data may vary according to the printing environment and the image to be printed.
* At low temperatures, the battery pack performance may diminish and the low battery icon
may appear very rapidly. In these circumstances, the performance can be improved by
warming the battery pack in a pocket before use.
Using the Car Battery Adapter
(CP-330/CP-220)
Car Battery Adapter CBA-CP100 (sold separately) can be used to power the printer
or charge the battery pack from a car’s cigarette lighter socket.
Please refer to the Car Battery Adapter User Guide for advice about proper
handling.
36
Page 38

Troubleshooting
If the printer does not seem to be working properly, run through the checks
below to see if you can identify and correct the problem. If you are not able to
solve the problem, please call your dealer or contact a Canon Customer
Support help desk for assistance.
Problem Cause Solution
The printer has no power. The compact power adapter or
power cord is not correctly
connected.
The printer’s indicator is blinking
red.
The (Canon Direct Print)/
(PictBridge) mark does not
display in the upper left corner of
the LCD monitor.
The printer does not print. The printer is not correctly
Printing stopped midway. The printer is not correctly
There is a malfunction in the
printer.
The cable is not correctly
connected.
The printer’s power is off. Turn the printer’s power on
Your camera’s firmware is
incompatible with this printer.
The printer is connected to a
computer and printing is in
progress.
connected to the camera.
The camera’s batteries are
depleted.
The printer’s battery pack is
depleted. (CP-330 only)
The ink cassette is not loaded
correctly.
Too much slack in the ink
cassette’s ink sheet.
The paper cassette is not pushed
all the way in.
The printer has overheated. Wait for the printer to cool down.
connected to the camera.
Be sure that the compact power
adapter and power cord are
connected correctly. Be sure that
the power cord is plugged into a
standard power outlet.
Turn the printer’s power off and
turn it on again.
Connect the cable correctly
(p. 28).
(p. 28).
Please check the Canon BeBit
website or your regional Canon
website.
Wait until the print outputted by
the computer is complete.
Connect the cable correctly
(p. 28). If the connection is
correct, the or mark will
appear on the camera’s LCD
monitor.
Replace with fully charged (fresh)
batteries, or plug the camera into
a power outlet (using the
camera’s optional compact power
adapter).
Use a fully charged battery pack
or use the printer’s compact
power adapter.
Load the ink cassette correctly.
(p. 24)
Take up the slack. (p. 24)
Load the paper cassette correctly.
(p. 27)
Connect the cable correctly.
(p. 28)
37
Page 39

Problem Cause Solution
The printer’s indicator lights red
without the camera’s LCD
monitor displaying any error
message.
Print quality is not good. You are not using the correct
Faint stripes appear in the print. Dust has accumulated inside the
Printed images are distorted. The printer is too close to a TV,
Nothing happens when the
camera’s or SET button is
pressed.
Frequent paper jams. The paper cassette is overloaded. Do not load more than 18 sheets
There is a malfunction in the
printer.
paper type.
Paper is loaded with the wrong
side up.
The ink sheet or paper is dirty. Use a clean ink sheet and clean
Condensation has formed inside
the printer.
printer.
video game machine, or other
electromagnetic source.
The printer is too close to a stereo
speaker, large motor, or other
strong magnetic source.
The printer has overheated. Wait for the printer to cool down.
Printing is in progress. Wait for the printer to finish
The print output receptacle is too
full.
Paper is creased or curled. Do not use paper that is creased
Figure A
Remove the paper from the
paper-handling slot and take up
any slack in the ink sheet. Turn
the printer’s power off and turn it
on again.
Use the designated paper type.
Load the paper correctly (p. 25).
paper.
Wait for condensation to
evaporate.
Remove the ink cassette and
insert the cleaner stick in the
direction of the arrow and with
the arrow on the cleaner stick
facing up.
Push it in completely as shown in
figure A and slide it in and out of
the printer 2 or 3 times.
Move the printer so that it is at
least one meter (3.3 ft.) away
from the electromagnetic source.
Move the printer away from the
strong magnetic source.
printing.
of paper into the cassette.
Do not insert more than 12 sheets
of wide size paper (100 ×
200 mm (4 × 8 in.); sold
separately) in the paper cassette.
Do not allow more than 9 sheets
to accumulate in the receptacle.
or curled.
38
Page 40

Error Messages
If a problem occurs while the printer is connected to the camera, the printer’s
indicator will light or blink red and the camera’s LCD monitor may display one of
the messages indicated below. (If the camera is connected to a TV, the
message will appear on the TV screen.)
Error Message Cause Solution
No paper Paper cassette is incorrectly
installed.
Paper is not loaded correctly in
the paper cassette.
No paper in the paper cassette. Load paper into the cassette.
Paper is not feeding correctly. Take out the paper cassette, and
No Ink No ink cassette in the printer. Load an ink cassette.
The ink cassette is out of ink. Load a new ink cassette.
Incompatible paper size Wrong paper size is loaded in the
printer.
Incompatible ink size Wrong ink cassette size is loaded
in the printer.
Ink Cassette Error The ink cassette is not working
correctly.
Paper and ink do not match The paper and ink are from
Paper Jam Paper jammed during printing. Turn the printer’s power off and
Paper has been changed. Paper was changed after the print
Recharge the printer battery
(CP-330 only)
different sets.
menu was displayed.
The printer’s battery pack is
depleted.
Load the paper cassette correctly.
Load paper into the cassette
correctly.
then manually remove any paper
remaining in the printer.
Use the designated paper size.
Use the designated ink cassette
size.
Remove the ink cassette from the
printer, take up the slack in the ink
sheet, and then reload the
cassette. If this does not solve the
problem, replace with a new ink
cassette. If the ink cassette is
stuck in the printer, contact a
Canon Customer Support help
desk for assistance.
Check the ink/paper sets.
turn it on again.
If the printer fails to eject the
paper, contact a Canon Customer
Support help desk for assistance.
Change back to the original paper
size or change the print settings.
Change it with a fully charged
battery pack or recharge the
battery pack. You can also use the
printer’s compact power adapter.
39
Page 41

Error Message Cause Solution
Communication Error Error in communication between
printer and camera.
Cannot Print! The image was taken with a
different camera, recorded in a
different format, or has been
altered by a computer.
Could not print xx images You have selected a number of
images for DPOF printing, but
some of these images cannot be
printed because they were taken
with a different camera, recorded
in a different format, or have been
altered by a computer. (Where xx
indicates the number of
unprintable images from among
those selected)
Turn the printer’s power off and
turn it on again.
If the error message does not
clear, contact a Canon Customer
Support help desk for assistance.
Check whether the image’s size
matches the camera’s pixel
capacity. If the size is not
appropriate, resize the image and
convert as necessary so that the
image is in a JPEG format that the
camera can display.
Check whether the image size
matches the camera’s pixel
capacity. If sizes are not
appropriate, resize the images
and convert as necessary so that
images are in a JPEG format that
the camera can display.
40
Page 42

Specifications
Compact Photo Printer CP-330/CP-220
General Specifications
Printer Type Full-color direct digital printer
Print Method Dye-sublimation thermal transfer (with overcoating)
Resolution Reproduction 300 × 300 dpi
Gradation 256 gradations/color
Ink Dedicated ink cassette for each paper size (Y/M/C/overcoating)
Paper Postcard size (standard sheets)
Paper-Feed Method Automatic feed from paper cassette
Paper-Eject Method Sheets eject onto top of paper cassette
Print Modes Standard (1-screen) print (bordered or borderless)
Print Sizes Postcard size print (borderless): 100 × 148 mm (4 × 6 in.)
Print Speeds* Postcard size print (bordered/borderless): Approx. 85 sec.
L size (standard sheets)
Credit card size (standard sheets, full-sized label and 8-label sticker)
Wide size (100 × 200 mm (4 × 8 in.)) (standard sheets)
Multiple (8-screen) print (for use with labels)
Postcard size print (bordered): 91.4 × 121.9 mm (3.6 × 4.8 in.)
L size print (borderless): 89 × 119 mm (3.5 × 4.7 in.)
L size print (bordered): 79.2 × 105.3 mm (3.1 × 4.2 in.)
Credit card size print (full-sized, borderless): 54 × 86 mm (2.1 × 3.4 in.)
Credit card size print (full-sized, bordered): 50 × 66.7 mm (2.0 × 2.6 in.)
Credit card size multiple print (8 stickers per label):17.3 × 22 mm (0.7 × 0.9 in.) (per sticker)
Wide size (100 × 200 mm (4 × 8 in.)) print (computer connection):100 × 200 mm (4 × 8 in.)
Wide size (100 × 200 mm (4 × 8 in.)) print (camera connection):100 × 150 mm (4 × 6 in.)
L size print (bordered/borderless): Approx. 70 sec.
Credit card size print (full-sized, bordered/borderless): Approx. 40 sec.
Credit card size multiple print (8 stickers): Approx. 40 sec.
Wide size (100 × 200 mm (4 × 8 in.)) print (
Wide size (100 × 200 mm (4 × 8 in.)) print (
computer connection
camera connection
): Approx. 106 sec.
): Approx. 85 sec.
Interface
Signal Transfer Proprietary protocol for Canon cameras, PictBridge
Connection Method Camera/Printer connection Interface cable included with the camera
Computer/Printer connection Commercially available USB cable
Recommended printer cable
Material:AWG 28 or better
Type: Twisted-pair, sealed cable
(compatible with high-speed mode)
Length: max. 5.0 m (16.4 ft.)
Device Specifications
Operating Environment 5 – 40 °C (41 – 104 °F), 20% to 80% RH (when running)
Power Source AC 100 – 240 V (50/60 Hz)
Power consumption AC 50 W or less (4 W or less when idle)
Dimensions CP-330: 170.0 (W) × 55.0 (H) × 123.0 (D) mm (6.70 × 2.17 × 4.84 in.)
CP-220: 170.0 (W) × 54.8 (H) × 119.0 (D) mm (6.70 × 2.16 × 4.69 in.)
Weight CP-330: Approx. 860 g (30.3 oz.) (excluding ink and paper cassettes)
CP-220: Approx. 820 g (28.9 oz.) (excluding ink and paper cassettes)
* Based on Canon’s standard testing conditions. Variations may occur depending on printing
conditions.
41
Page 43

Compact Power Adapter CA-CP100
Input voltage AC 100-240 V (50/60 Hz)
Rated output DC 24 V, 2 A
Operating temperatures 0 – 40 °C (32 – 104 °F)
Dimensions 100 × 50 × 24 mm (3.9 × 2.0 × 0.9 in.) (excluding cable)
Weight Approx. 200 g (7.1 oz.)
95 VA (100 V) – 120 VA (240 V)
Battery Pack NB-CP1L
Supplied with the CP-330, supplied with the separately sold Battery/Charge Adapter Kit BCA-
CP100, or sold separately.
Type Lithium ion battery
Nominal voltage DC 22.2 V
Nominal capacity 1200 mAh
Charge cycles Approx. 300
Operating temperatures 5 – 40 °C (41 – 104 °F)
Dimensions 110.0 × 40.7 × 37.5 mm (4.3 × 1.6 × 1.5 in.)
Weight Approx. 230 g (8.1 oz.)
Charge Adapter CG-CP100
Supplied with the separately sold Battery/charge Adapter Kit BCA-CP100
Input voltage DC 24 V, 2 A
Rated output DC 24 V, 0.7 A
Charging time 2.5 hours
Operating temperatures 0 – 40 °C (32 – 104 °F)
Dimensions 136.7 × 46.5 × 41.1 mm (5.4 × 1.8 × 1.6 in.)
Weight Approx. 120 g (4.2 oz.)
Car Battery Adapter CBA-CP100 (Sold Separately)
Input voltage DC 12 V, 90 W
Rated output DC 24 V, 3.2 A
Operating temperatures 0 – 40 °C (32 – 104 °F)
Dimensions 89.4 × 63.3 × 40.0 mm (3.5 × 2.5 × 1.6 in.) (excluding cable)
Weight Approx. 370 g (13.1 oz.) (including cable)
* The specifications and appearance are subject to change without notice.
42
Page 44

Connecting the Printer to a Computer and Printing
Safety Precautions
The precautions noted within this guide are intended to instruct you in the safe
and correct use of the products and to prevent injuries or damage to yourself,
other persons and property. Please read and ensure that you understand them
before proceeding to other sections of the guide.
Warning
This symbol indicates topics that could lead to death or serious injury if
ignored or handled incorrectly.
Warning
Do not play the supplied CD-ROM(s) in any CD player that does not support data CD-ROMs.
Playing the CD-ROM(s) in an audio CD player (music player) could damage the speakers. It is
also possible to suffer from hearing loss from listening with headphones to the loud sounds of a
CD-ROM played on a music CD player.
Disclaimer
• While every effort has been made to ensure that the information contained in this guide is
accurate and complete, no liability can be accepted for any errors or omissions. Canon reserves
the right to change the specifications of the hardware and software described herein at any time
without prior notice.
• No part of this guide may be reproduced, transmitted, transcribed, stored in a retrieval system,
or translated into any language in any form, by any means, without the prior written permission
of Canon.
• Canon makes no warranties for damages resulting from corrupted or lost data due to a
mistaken operation or malfunction of the camera, the software, the CompactFlash
cards), personal computers, peripheral devices, or use of non-Canon CF cards.
Trademark Acknowledgments
• Canon and PowerShot are trademarks of Canon Inc.
• Adobe is a trademark of Adobe Systems Incorporated.
• CompactFlash is a trademark of SanDisk Corporation.
• iBook and iMac are trademarks of Apple Computer, Inc.
• Macintosh, PowerBook, Power Macintosh and QuickTime are trademarks of Apple Computer
Inc., registered in the United States and other countries.
• Microsoft and Windows are either registered trademarks or trademarks of Microsoft Corporation
in the United States and/or other countries.
• Other names and products not mentioned above may be registered trademarks or trademarks
of their respective companies.
TM
cards (CF
43
Page 45

Read Carefully Before Using!
CANON SOFTWARE LICENSE AGREEMENT
IMPORTANT – READ THIS AGREEMENT BEFORE USING THE SOFTWARE ON THE CD-ROM IN
THIS BOX. BY USING THE SOFTWARE, YOU AGREE TO BE BOUND BY THE TERMS OF THIS
AGREEMENT.
This is a license agreement (the “Agreement”) between you and Canon Inc. (“Canon”).
IF YOU DO NOT AGREE TO THE TERMS AND CONDITIONS OF THIS AGREEMENT, DO NOT USE
THE SOFTWARE PROGRAM ON THE CD-ROM (INCLUDING ALL SOUND AND IMAGE DATA) AND
THE USER MANUAL IN THIS BOX (COLLECTIVELY, THE “SOFTWARE”) AND PROMPTLY RETURN
THE SOFTWARE TO YOUR POINT OF PURCHASE FOR A REFUND.
In consideration of the right to use the SOFTWARE, you agree to abide by the terms and conditions
of this Agreement.
1. LICENSE: Canon grants you the personal, non-exclusive right to use the SOFTWARE only on a single
computer. You may physically transfer the SOFTWARE from one computer to another provided that the
SOFTWARE is used on only one computer at a time. You shall not install or use the SOFTWARE on a
network, multiple CPU, multiple site arrangement, or any other hardware configuration where the
SOFTWARE is accessible to more than one CPU or to more than one user.
With respect to the sound and image data (“Data”) contained in the Software, which are to be
downloaded to the applicable Canon digital camera product, Canon grants you a personal, non-
exclusive license to use the Data on a single Canon digital camera product only.
YOU SHALL NOT ASSIGN, SUBLICENSE, RENT, LEASE, LOAN, CONVEY OR OTHERWISE USE,
TRANSFER, COPY, TRANSLATE, CONVERT TO ANOTHER PROGRAMMING LANGUAGE, ALTER,
MODIFY, DECOMPILE OR DISASSEMBLE THE SOFTWARE, IN WHOLE OR IN PART, EXCEPT AS
EXPRESSLY PROVIDED IN THIS AGREEMENT.
2. BACK-UP COPY: You may make one copy of the SOFTWARE solely for back-up purposes, or copy the
SOFTWARE onto the permanent storage device (e.g. a hard disk) of your computer and retain the
original for back-up purposes. Any other copying of the SOFTWARE is a violation of this Agreement.
You must reproduce and include the copyright notice on the back-up copy.
3. SUPPORT AND UPDATES: Neither Canon, nor its subsidiaries, dealers or distributors will be
responsible for providing maintenance or support for use of the SOFTWARE. No updates, fixes or
support will be made available for the SOFTWARE.
4. LIMITED WARRANTY AND LIMITATION OF LIABILITY: It is your responsibility to choose, maintain
and match the hardware and software components of your computer system. Thus Canon does not
guarantee uninterrupted service or correction of errors or that the functions or performance of the
SOFTWARE will meet your requirements. THE SOFTWARE IS LICENSED ON AN “AS IS” BASIS AND
WITHOUT WARRANTY OR CONDITION OF ANY KIND. The CD-ROM storing the SOFTWARE is
warranted only against defective material under normal use for a period of ninety (90) days after
purchase from an authorized Canon dealer as evidenced by your sales receipt. Your sole remedy for a
defective CD-ROM shall be replacement of the same without charge when returned by you at your
expense to your point of purchase and proven to be defective upon inspection. The Replacement CD-
ROM will be warranted for the remainder of the original ninety (90) day warranty period of the defective
CD-ROM. The limited warranty does not apply if the failure of the CD-ROM resulted from accident,
abuse or misapplication of the SOFTWARE and shall not extend to anyone other than the original user
of the SOFTWARE.
EXCEPT AS SPECIFICALLY SET FORTH IN THIS PARAGRAPH 4, CANON, CANON’S
SUBSIDIARIES, DISTRIBUTORS AND DEALERS DISCLAIM ALL WARRANTIES, OR
CONDITIONS, EXPRESS OR IMPLIED, INCLUDING ANY WARRANTY OR CONDITION OF
MERCHANTABILITY OR FITNESS FOR A PARTICULAR PURPOSE, WITH RESPECT TO THE
SOFTWARE.
NEITHER CANON NOR ANY OF CANON’S SUBSIDIARIES, DISTRIBUTORS OR DEALERS IS
LIABLE FOR ANY DAMAGES HOWSOEVER CAUSED, INCLUDING WITHOUT LIMITATION,
DIRECT, CONSEQUENTIAL OR INCIDENTAL LOSS OR DAMAGE INCLUDING LOSS OF PROFITS,
EXPENSE OR INCONVENIENCE HOWSOEVER CAUSED OR ARISING OUT OF THE SOFTWARE
OR THE USE THEREOF.
NEITHER CANON, NOR ANY OF CANON’S SUBSIDIARIES, DISTRIBUTORS OR DEALERS
SHALL HAVE ANY OBLIGATION TO INDEMNIFY YOU AGAINST ANY CLAIM OR SUIT BROUGHT
BY A THIRD PARTY ALLEGING THAT THE SOFTWARE OR THE USE THEREOF INFRINGES ANY
INTELLECTUAL PROPERTY OF SUCH THIRD PARTY.
44
Page 46

SOME STATES, PROVINCES OR LEGAL JURISDICTIONS DO NOT ALLOW THE EXCLUSION OF
IMPLIED WARRANTIES, OR THE LIMITATION OR EXCLUSION OF LIABILITY FOR INCIDENTAL
OR CONSEQUENTIAL DAMAGES, OR PERSONAL INJURY OR DEATH RESULTING FROM
NEGLIGENCE ON THE PART OF THE SELLER, SO THE ABOVE DISCLAIMERS AND
EXCLUSIONS MAY NOT APPLY TO YOU.
5. TERM: This Agreement is effective upon your using the SOFTWARE and remains in effect until
expiration of all copyright interests in the SOFTWARE unless earlier terminated. You may terminate this
Agreement by destroying the SOFTWARE. This Agreement will also terminate without notice to you if
you fail to comply with any of the terms of this Agreement and you must then promptly return the
SOFTWARE. In addition, Canon may enforce its other legal rights.
6. U.S. GOVERNMENT RESTRICTED RIGHTS NOTICE:
The SOFTWARE is a “commercial item,” as that term is defined at 48 C.F.R. 2.101 (Oct 1995),
consisting of “commercial computer software” and “commercial computer software documentation,” as
such terms are used in 48 C.F.R. 12.212 (Sept 1995). Consistent with 48 C.F.R. 12.212 and 48 C.F.R.
227.7202-1 through 227.72024 (June 1995), all U.S. Government End Users shall acquire the
SOFTWARE with only those rights set forth herein. Manufacturer is Canon Inc./30-2, Shimomaruko 3-
chome, Ohta-ku, Tokyo 146-8501, Japan.
7. EXPORT RESTRICTIONS: You agree to comply with all export laws and restrictions and regulations of
the country involved, and not to export or re-export, directly or indirectly, the SOFTWARE in violation of
any such laws and restrictions and regulations, or without all necessary approvals.
8. SEVERABILITY:
In the event that any provision of this Agreement is declared or found to be illegal by any court or
tribunal of competent jurisdiction, such provision shall be null and void with respect to the jurisdiction of
that court or tribunal and all the remaining provisions of this Agreement shall remain in full force and
effect.
9. CONTROLLING LAW: The terms of this Agreement as it relates to purchases of the Software in the
United States of America shall be governed and construed in all respects in accordance with the laws
and regulations of the State of New York, without reference to choice of law principles. The terms of this
Agreement as it relates to purchases of the Software in Canada shall be governed by the laws of the
province of Ontario.
10.OWNERSHIP: All rights, including but not limited to copyrights and trade secret rights, to the
SOFTWARE belong to Canon, its affiliated corporations and third party licensors. Your use of the
SOFTWARE is subject to the laws of the United States, and Canada, and other applicable copyright
and trademark laws, and nothing in this Agreement constitutes a waiver of the rights of Canon, its
affiliated corporations and third party licensors under such laws. You only own the CD-ROM media in
which the Software is stored. Except as expressly provided herein, no license or right, express or
implied, is hereby conveyed or granted by Canon to you for any intellectual property of Canon. Nothing
contained in Paragraph 1 shall be construed to give Canon any ownership rights in any images,
graphics or textual material that you save in connection with the Software.
You may not modify, remove or delete any or all copyright notices (i) which are contained in the
Software, including any copy thereof, and (ii) which are on the original CD-ROM and on the medium of
a back-up copy made pursuant to Section 2 above.
11.ACKNOWLEDGEMENT: BY USING THE SOFTWARE, YOU ACKNOWLEDGE THAT YOU HAVE
READ THIS AGREEMENT, UNDERSTOOD IT, AND AGREE TO BE BOUND BY ITS TERMS AND
CONDITIONS. YOU ALSO AGREE THAT THIS AGREEMENT IS THE COMPLETE AND EXCLUSIVE
STATEMENT OF AGREEMENT BETWEEN YOU AND CANON CONCERNING THE SUBJECT
MATTER HEREOF AND SUPERSEDES ALL PROPOSALS OR PRIOR AGREEMENTS, VERBAL
OR WRITTEN, AND ANY OTHER COMMUNICATIONS BETWEEN THE PARTIES RELATING TO
THE SUBJECT MATTER HEREOF. NO AMENDMENT TO THIS AGREEMENT SHALL BE
EFFECTIVE UNLESS SIGNED BY A DULY AUTHORIZED OFFICER OF CANON.
45
Page 47

System Requirements
Please install the software on a computer meeting the following minimum
requirements.
Windows
OS Windows 98 (First or Second Edition),
Computer Model The above OS should be pre-installed on computers with built-in USB ports.
CPU Windows 98/Windows Me/Windows 2000: Pentium 150 MHz or better
RAM Windows 98/Windows Me/Windows 2000: 64 MB or more
Interface USB
Free Hard Disk
Space
Display 800 × 600 pixels/High Color (16 bit) or better is required
Windows Me,
Windows 2000,
Windows XP (Home Edition, Professional)
Windows XP: Pentium 300 MHz or better
Windows XP: 128 MB or more
• Canon Utilities
- ZoomBrowser EX: 200 MB or more
(including the PhotoRecord printing program)
- PhotoStitch: 40 MB or more
• Canon CP-330/CP-220 Printer Driver: 1 MB or more
(the amount of free space required for installation)
1,024 × 768 pixels or better is recommended
Macintosh
OS Mac OS 9.0 – 9.2, Mac OS X (v10.1/v10.2/v10.3)
Computer Model The above OS should be pre-installed on computers with built-in USB ports.
CPU PowerPC
RAM Mac OS 9.0 – 9.2: 64 MB or more of application memory
Interface USB
Free Hard Disk
Space
Display 800 × 600 pixels/32,000 colors or better is required
Mac OS X (v10.1/v10.2/v10.3): 128 MB or more
• Canon Utilities
- ImageBrowser: 120 MB or more
- PhotoStitch: 30 MB or more
• Canon CP-330/CP-220 Printer Driver: 3.8 MB or more
(the amount of free space required for installation)
1,024 × 768 pixels or better is recommended
46
• A CD-ROM drive is required to install the software.
• All procedures performed with a connection to a USB 2.0 compliant board are not
guaranteed.
• The Macintosh version of the software is compatible with Mac OS X (v10.1/v10.2/
v10.3). However, it is not compatible with disks formatted with the Unix File
System (UFS).
Page 48

Printing Operations Overview
Follow the steps outlined below to prepare the printer and install the necessary
software to enable printing.
Install the software onto the computer.
Place the supplied Canon CP
Printer Solution Disk in the
computer’s CD-ROM drive and
install the necessary software and
the Printer Driver User Guide (PDF
format).
Read the Printer Driver User Guide.
Double-click the icon on the
desktop.
CP Printer Guide
Install the printer driver onto the computer.
See this guide.
Windows p. 48
Mactintosh p. 51
• Please be sure to install
the printer driver
according to the
procedures of the Printer
Driver User Guide. If the
printer driver is not
installed properly, you
may not be able to print.
See the Printer Driver User
Guide.
Connect the printer to the computer.
Load the paper and ink cassettes
in the printer, turn the printer’s
power on and connect it to the
computer using a commercially
available USB cable.
See the Printer Driver User Guide
and this guide (p.24 – 29).
Print the image.
See the Printer Driver User Guide.
• Please refer to the specifications on page 41 and to the Printer Driver User Guide
for detailed information about USB cables.
47
Page 49

Installing the Software from the CP Printer
Solution Disk (Windows)
Canon CP Printer Solution Disk contains software required for printing from your
computer.
• With Windows 2000 or Windows XP, be sure to log on with Administrator privileges
(computer system administrator) when installing the software.
Installing
• The explanations in this section are based on Windows XP. If you are using
another version of Windows, the actual screen contents and procedures may vary
slightly from those shown.
Close any programs that are running.
1
Place the Canon CP Printer Solution Disk in the CD-ROM
2
drive.
• The installer panel automatically appears.
48
3
Installer Panel
If the installer panel does not automatically appear, use the following procedure to
start it.
• For Windows 98/Me/2000, double-click the [My Computer] icon on the desktop,
and double-click the CD-ROM icon in the next window.
• For Windows XP, click the [Start] button and select [My Computer], double-click
the CD-ROM icon in the next window.
Click the Application Software [Install] button and click
[Next].
Page 50

Select [Easy Installation] as the setup type and click [Next].
4
5
6
7
8
• Select [Custom Installation] to select programs individually for installation.
Read the software license agreement and click [Yes] if you
consent to all conditions.
Review the installation settings and click [Next].
• Installation starts.
Follow the onscreen instructions to proceed.
When the installation is over, select [Yes, I want to restart
my computer now.] and click [Finish].
• Users of Windows 2000 and Windows XP must log in as an
Administrator (computer system administrator) after restarting to carry
out the subsequent procedures.
Remove the disk from the CD-ROM drive when your normal
desktop screen appears after restarting.
• This concludes the software installation.
• When you connect a computer to the printer for printing, you must also install the
printer driver. Refer to the Printer Driver User Guide on how to install the printer
driver (p. 52).
49
Page 51

Uninstalling
This section describes how to uninstall the software, using ZoomBrowser EX as
an example.
• Uninstall the software when it is no longer needed, or if a problem occurs and
uninstalling becomes necessary. Note that if you uninstall the software, you will not
be able to use it anymore.
Click the [Start] button and select [Programs] ([All
1
Programs] for Windows XP), [Canon Utilities],
[ZoomBrowser EX], and [ZoomBrowser EX Uninstall].
50
• Uninstallation begins and ZoomBrowser EX is removed.
• You can use the same procedure to uninstall PhotoStitch.
• To uninstall PhotoRecord, click the [Start] button and select [Programs] or [All
Programs], [Canon PhotoRecord], and [PhotoRecord Uninstall].
Page 52

Installing the Software from the CP Printer
Solution Disk (Macintosh)
Canon CP Printer Solution Disk contains software required for printing from your
computer.
Installing
Close any programs that are running.
1
Place the Canon CP Printer Solution Disk in the CD-ROM
2
3
drive.
Double-click the CD-ROM icon, followed by the [Mac OS X]
and [Canon Digital Camera Installer] icons.
• With Mac OS 9-9.2, double-click the CD-ROM icon, followed by the [Mac OS 9]
and [Canon Digital Camera Installer] icons.
4
5
6
Installer Panel
Click the Application Software [Install] button.
Select [Easy Installation] and click [Next].
• Select [Custom Installation] to select programs individually for installation.
Read the software license agreement and click [Agree] if
you consent to all the conditions.
51
Page 53

Review the installation settings and click [Next].
7
8
• Follow the onscreen instructions to proceed.
When the installation is over, click [OK] and remove the disk
from the CD-ROM drive.
• This concludes the software installation.
• When you connect a computer to the printer for printing, you must also install the
printer driver. Refer to the Printer Driver User Guide on how to install the printer
driver (p. 52).
Uninstalling
• Uninstall the software when it is no longer needed, or if a problem occurs and
uninstalling becomes necessary. Note that if you uninstall the software, you will not
be able to use it anymore.
Uninstall the programs by dragging the application’s folder (the folder in which it
was installed) into the Trash, and then empty the Trash.
• Please be careful not to accidentally delete any folders with downloaded images
that may be contained within the application folder.
Viewing the Printer Driver User Guide
(Windows/Macintosh)
When connecting to your computer for printing, be sure to read the Printer Driver
User Guide and install the printer driver following the steps. If the printer driver is
not installed properly, you may not be able to print.
• Adobe Reader or Adobe Acrobat Reader must be installed to view the Printer
Driver User Guide (Windows/Macintosh). If this software is not installed in your
computer, access the following web site and download the software.
http://www.adobe.com/products/acrobat/readstep2.html
Install the software from the CP Printer Solution Disk
1
52
(Windows p. 48, Macintosh p. 51)
• The Printer Driver User Guide is installed on your computer automatically at the
same time.
Page 54

Double-click [CP Printer Guide]
2
• Printer Driver User Guide will be displayed.
CP Printer Guide
CP Printer Guide
• If you need the Printer Driver User Guide in a different language:
Windows: Double-click the desired language folder in the [Readme] folder on the CD-
ROM, then double-click [CP Printer User Guide.pdf].
Macintosh: Double-click the following folders in order: the CD-ROM icon, [Mac OS X],
[Readme], then the desired language folder. Then double-click [CP Printer
User Guide.pdf].
Viewing the ZoomBrowser EX Software User
Guide (Windows)/ImageBrowser Software User
Guide (Macintosh) PDF Manuals
These PDF format manuals are available on the Canon Inc. website, from the
following URL address:
http://web.canon.jp/Imaging/information-e.html
• Adobe Reader or Adobe Acrobat Reader must be installed on your computer to
view the ZoomBrowser EX Software User Guide (Windows) or ImageBrowser
Software User Guide (Macintosh). If this software is not installed on your
computer, access to the followong site and download the software.
http:www.adobe.com/products/acrobat/readstep2.html
53
Page 55

Printing with Non-Canon Digital Cameras
Since the CP-330/CP-220 printers support the direct print PictBridge* standard,
you can connect PictBridge compliant non-Canon digital cameras to easily print
high image quality photos.
* PictBridge: PictBridge is an industry standard for direct printing that allows you to print
images without using a computer by directly connecting a digital camera or digital camcorder
(hereafter “camera”) to a printer, regardless of their brands and models.
Before Using the Printer
Please read carefully the user guide that came with your camera and make sure
that:
• The camera is PictBridge compliant.
• You are using the USB cable for the camera/computer connection to connect the printer to
the camera. (This cable may be included with the camera)
• You set the print settings with the camera. For details, refer to the camera’s user guide.
Connecting the Camera
Insert one end of the USB cable used for the camera/computer connection in the
printer’s direct print port (see p. 28) and insert the other end in the camera’s
terminal. (For details, refer to the camera’s user guide)
• The printer’s indicator blinks green several times once the printer and camera are correctly
connected. The indicator lights steadily green once it is ready to print.
• If a problem occurs during a connection or during printing, the printer’s indicator lights or
blinks red. If this happens, the error message that appears on the camera’s LCD monitor
may differ according to your camera model.
Printing Functions
When printing with non-Canon cameras, the following items differ from Canon-
camera printing operations.
Functions Available with Non-Canon Cameras
• Printing different selected images on an 8-label sheet.*
• If you connect a camera which has an automatic image enhancement function to the printer,
the image is automatically adjusted for even more beautiful prints.
* You can use this function if it is supported by your camera. Refer to the camera’s user
guide for details.
Functions Not Available with Non-Canon Cameras
• Printing indexes with the file name.
• Printing speed may differ according to your camera model and the image’s number
of recorded pixels. (The value written on page 41 is a printing speed obtained
when printing with a Canon camera.)
54
Page 56

Espa
ñol
Contenido
Para disfrutar de varios tipos de impresión ............................. 2
Cómo usar los manuales............................................................ 4
Símbolos empleados ............................................................ 4
Contenido del paquete................................................................ 5
Inicio rápido................................................................................. 6
Antes de empezar a imprimir ................................................... 10
Qué se puede conseguir con esta impresora.............................. 11
Léame primero........................................................................... 12
Precauciones de seguridad ................................................ 12
Uso y manejo adecuados ................................................... 16
Guía de los componentes................................................... 20
Comencemos a imprimir ..........................................................22
Preparación de los juegos de cassette de tinta/papel y del
cassette de papel ...........................................................22
Carga del cassette de tinta................................................. 24
Carga del papel en el cassette de papel ............................ 25
Carga del cassette de papel............................................... 27
Conexión de la impresora a una fuente de alimentación y a la cámara
Impresión............................................................................ 30
Utilización de las baterías ........................................................32
Utilización del paquete de baterías (sólo la CP-330)............... 32
Uso del adaptador de baterías para coches (CP-330/CP-220)
Solución de problemas............................................................. 37
Mensajes de error...................................................................... 39
Especificaciones ....................................................................... 41
Conexión de la impresora a un ordenador e impresión........ 43
Precauciones de seguridad ................................................ 43
Lea Minuciosamente Antes De Usar .................................. 44
Requisitos del sistema........................................................ 46
Resumen de operaciones de impresión ............................. 47
Instalación del software desde el disco
CP Printer Solution Disk (Windows)............................... 48
Instalación del software desde el disco CP Printer Solution
Disk (Macintosh)............................................................. 51
Consulta del Manual del usuario del controlador de la
impresora (Windows/Macintosh) .................................... 52
Visualización de los manuales en PDF ZoomBrowser EX
Software User Guide (Windows)/ImageBrowser Software
User Guide (Macintosh).................................................. 53
Impresión con cámaras digitales que no son de Canon....... 54
... 28
.... 36
1
Page 57

Para disfrutar de varios tipos de impresión
Para disfrutar imprimiendo imágenes de su cámara digital o
videocámara digital
Conecte a su
cámara digital
Cassette de papel
tamaño L (se vende
por separado)
Fotoimpresora compacta
CP-330/CP-220
Cassette de papel
tamaño tarjeta de crédito
(se vende por separado)
Cassette de papel
tamaño tarjeta postal
Conecte a su
videocámara digital
Cassette de papel tamaño
ancho (se vende por separado
con la CP-220)
Escriba su mensaje
en la parte que está
en blanco.
Puede imprimir
2
fácilmente en
casa.
Tamb ién
puede hacer
pegatinas con
8 etiquetas.
Puede hacer
tarjetas postales
originales de
tamaño grande.
Puede hacer tarjetas
de presentación
originales.
Page 58

Para disfrutar imprimiendo imágenes de su ordenador
Asegúrese de leer el Manual del usuario del controlador de la impresora. (p. 52).
Software
Disco CP Printer Solution Disk
Conecte a su ordenador
Fotoimpresora compacta CP-330/CP-220
Varios tipos de cassettes de papel
Puede diseñar la configuración que usted desee.
3
Page 59

Cómo usar los manuales
Por favor, consulte los siguientes manuales en función de la información que
necesite.
Guía de usuario de la impresora (esta guía)
• Instrucciones de manejo de la impresora, el papel y los cassettes de tinta
• Instrucciones de conexión de la cámara y la impresora
• Resumen de conexiones de la impresora y el ordenador
Manual del usuario del controlador de la impresora
(se suministra con el disco CP Printer Solution Disk)
• Instrucciones de instalación del controlador de impresora
• Instrucciones de conexión de la impresora y el ordenador e instrucciones de
impresión
Guía del usuario de la cámara (se suministra con la cámara)
• Filmación, reproducción y borrado de imágenes con la cámara
• Instrucciones de conexión de la cámara y la impresora e instrucciones de
impresión
• Instrucciones de conexión de la cámara y el ordenador
Guía del usuario de impresión directa (se suministra con la
cámara)
• Instrucciones de conexión de la cámara y la impresora e instrucciones de
impresión
* Esta guía del usuario no se suministra con ciertos modelos de cámara.
ZoomBrowser EX Software User Guide (Windows)
ImageBrowser Software User Guide (Macintosh)
• Instrucciones de uso de ZoomBrowser EX e ImageBrowser
Estos manuales en formato PDF están disponibles en el sitio web de Canon.
Puede descargarlos de la siguiente dirección:
http://web.canon.jp/Imaging/information-e.html
: Se suministra con la impresora
Símbolos empleados
: Este símbolo indica aspectos que pueden afectar al funcionamiento de la
impresora.
: Este símbolo indica aspectos adicionales que complementan a los
procedimientos básicos de funcionamiento.
4
Page 60

Contenido del paquete
Fotoimpresora
compacta
Papel estándar
(tamaño postal,
5 hojas)
Paquete de baterías
NB-CP1L*
1
Alimentador compacto
CA-CP100
Cassette de papel
(tamaño postal)
Cassette de tinta
(tamaño postal,
para 5 hojas)
Tapa del terminal
de la batería*
1
Cable de alimentación
• Guía del usuario (Esta guía)
• Tarjeta de garantía*
• Folleto “Canon Customer Support”*
Cassette de papel
(tamaño ancho)
1
*
CP Printer Solution Disk
Vara limpiadora
2
2
*1 Se suministra sólo con la CP-330.
2
No se incluye en algunos países.
*
Los siguientes productos se venden por separado.
Cassette de papel PCL-CP100 Tamaño L*
Cassette de papel PCC-CP100 Tamaño tarjeta de crédito
Cassette de papel PCW-CP100 Tamaño ancho (100 × 200 mm (4 × 8 pulg.))
Juego de papel/tinta color KP-36IP Tamaño postal, 36 hojas estándar
Juego de papel/tinta color KP-108IP Tamaño postal, 108 hojas estándar
Juego de papel/tinta color KL-36IP Tamaño L, 36 hojas estándar*
Juego de papel/tinta color KC-36IP Tamaño tarjeta de crédito, 36 hojas estándar
Juego de papel/tinta color KW-24IP Tamaño ancho (100 × 200 mm), 24 hojas estándar
Juego de etiqueta tamaño natural/tinta color KC-18IF
Juego de etiqueta/tinta color KC-18IL
Paquete de baterías NB-CP1L
Kit del adaptador de carga/baterías
BCA-CP100
Adaptador de baterías para coches
CBA-CP100
* No se vende en algunos países.
Tamaño tarjeta de crédito, tamaño natural, hojas de 18 etiquetas
Tamaño tarjeta de crédito, múltiple (de 8 pantallas), hojas de 18 etiquetas
Paquete de baterías de repuesto. No se pueden usar con la CP-220.
El juego incluye el paquete de baterías NB-CP1L y un
cargador de baterías. No se pueden usar con la CP-220.
Para alimentar a la impresora desde la batería de un automóvil.
5
Page 61

Inicio rápido
Empecemos imprimiendo sobre papel de tamaño tarjeta postal.
Esta sección explica los procedimientos requeridos para imprimir con el papel y
el cassette de tinta (juego de prueba) que se suministran con la impresora.
Algunos pasos de dicho procedimiento pueden variar dependiendo del modelo
de impresora. Por este motivo, conviene comprobar el modelo que está usando
(CP-330 o CP-220).
Si tiene problemas para entender algún procedimiento, por favor consulte las
páginas de referencia correspondientes para buscar instrucciones detalladas.
Las descripciones generales de cámaras de esta guía se refieren a cámaras
fotográficas o videocámaras digitales compatibles con la Fotoimpresora compacta
CP-330/CP-220. No obstante, en instrucciones detalladas, “cámara” hace referencia
a “cámaras fotográficas digitales” y “adaptador de alimentación compacto” se
refiere a “fuente de alimentación”.
El nombre del botón que se utiliza para imprimir es diferente dependiendo del
modelo de su cámara.
Cosas que debe preparar
Impresora (CP-330 o CP-220)
Papel estándar (tamaño postal, 5 hojas)
Cassette de tinta (tamaño postal, para 5 hojas)
Cassette de papel (tamaño postal)
Alimentador compacto CA-CP100
Cable de alimentación
Cámara Canon
Tarjeta de memoria que contenga las imágenes que desee imprimir
Guía del usuario de la cámara o Guía del usuario de impresión directa
Cable de interfaz incluido con el juego de su cámara
: Se suministra con la impresora
Carga del cassette de tinta en la impresora (p. 24)
1
Abra la cubierta del
1
compartimento del
cassette de tinta.
6
Cargue el cassette de tinta y cierre
2
la cubierta del compartimento del
cassette de tinta.
Page 62

Carga del papel en el cassette de papel (p. 25)
2
Papel
(con la cara brillante hacia arriba)
Tapa superior
Tapa intermedia
Abra las tapas superior e
1
intermedia del cassette del
papel.
Vuelva a colocar la tapa intermedia en su posición
3
original, dejando la tapa superior abierta.
Carga del cassette de papel en la impresora (p. 27)
3
Coloque el papel (tamaño tarjeta
2
postal, 5 hojas), con el lado satinado
hacia arriba y el lado de la dirección
o sello al lado de la tapa intermedia,
en el cassette del papel.
(Lado de la dirección/
sello al lado de la tapa
intermedia)
Tapa intermedia
Abra la cubierta del
1
compartimento del cassette
de papel.
Introduzca el cassette de papel en
2
el compartimento del cassette, con
la tapa superior abierta y la
intermedia cerrada.
Continúa en la siguiente página.
7
Page 63

Inicio rápido (continuación)
Conexión de la impresora a la fuente de alimentación eléctrica (p. 28)
4
Introduzca el cable de
1
alimentación en el adaptador
de alimentación compacto y
símbolo
hacia
abajo
Conecte el adaptador de alimentación
2
compacto al terminal DC IN de la impresora.
• En este punto, la impresora CP-220 se encenderá y el indicador de la impresora se
iluminará en color verde.
Terminal de entrada DC
enchufe el otro extremo a
una toma de corriente.
A la fuente de alimentación
Conexión de la cámara a la impresora (p. 28)
5
Conecte el cable de interfaz (suministrado con
1
la cámara) al terminal DIGITAL de la cámara.
Puerto de impresión
directa
• Si está usando la CP-220, vaya al paso 7.
8
Terminal
DIGITAL
Terminal
USB
Conecte el cable de
interfaz con su marca
hacia abajo.
Conecte el otro extremo del cable de interfaz al
2
puerto de impresión directa de la impresora.
Page 64

Encienda la unidad (sólo CP-330) (p. 29)
6
Botón ON/OFF
Indicador
Presione el botón ON/OFF de la impresora hasta que se encienda el
indicador verde.
Impresión (p. 30)
7
Encienda la cámara y visualice las imágenes.
1
• El simbolo (Impresión Directa de Canon) aparece en la esquina
superior izquierda del monitor de LCD.
Presione el botón , SET o SELECT de la cámara.
2
• El botón que debe pulsarse cambia dependiendo de la cámara.
• Si se pulsa el botón , la impresión empezará automáticamente.
Captura de pantalla del monitor LCD de la
cámara
Seleccione [Imprimir] y presione el botón SET o SELECT.
3
• La impresión comienza.
• El color de la ventana de visualización de la impresora cambia (CP-330 solamente).
En determinados modelos, la cámara se encenderá y mostrará sus imágenes
cuando esté conectada a la impresora a través del cable de interfaz. Para
obtener más información, consulte la Guía del usuario de la cámara o la Guía
del usuario de impresión directa suministrada con su cámara.
9
Page 65

Antes de empezar a imprimir
Gracias por la compra de la Fotoimpresora compacta Canon CP-330/CP-
220. Esta guía explica las operaciones generales de la impresora, desde los
ajustes de impresión de la cámara y las operaciones de conexión al
ordenador hasta la impresión. Si desea instrucciones sobre la impresión,
consulte la Gu
impresión directa suministrada con la cámara y el Manual del usuario del
controlador de la impresora (suministrada con el disco CP Printer Solution
Disk).
Antes de utilizar la impresora por primera vez, lea las precauciones de
seguridad.
Advertencia sobre la violación de las leyes de copyright
Respete las leyes de copyright. Queda legalmente prohibido el uso de las imágenes
producidas por esta impresora con otros fines que no sean los del disfrute personal.
Limitaciones de la garantía
La garantía de esta impresora sólo tiene validez en el país de venta. Si experimenta
algún problema con la impresora cuando esté utilizandola en el extranjero, llévela al
país de compra antes de realizar una reclamación de garantía en un Servicio de
asistencia al cliente de Canon.
Para ponerse en contacto con el Servicio de asistencia al cliente de Canon,
consulte la Tarjeta de garantía que se incluye con la impresora.
Se recomienda el uso de accesorios originales de Canon.
Este producto está diseñado para ofrecer un rendimiento óptimo si se utiliza con
accesorios originales de Canon. Canon no será responsable de ningún daño en el
producto ni accidentes como fuego, etc., provocados por un funcionamiento incorrecto de
accesorios que no sean originales de Canon (por ejemplo, fugas y/o explosiones de la
batería). Tenga en cuenta que esta garantía no se aplica a reparaciones como
consecuencia de un funcionamiento incorrecto de accesorios que no sean originales de
Canon. No obstante, podrá solicitar dichas reparaciones que estarán sujetas a un recargo.
ía del usuario de la cámara o la Guía del usuario de
(p. 12)
Denegación de responsabilidad
• Se ha hecho lo imposible por garantizar que la información contenida en la Guía del
usuario sea exacta y completa; no se aceptarán cargos por errores u omisiones. Canon
se reserva el derecho a modificar las especificaciones del hardware y del software
descritas en el presente documento en cualquier momento y sin previo aviso.
• Esta guía no puede ser reproducida, transmitida, transcripta, almacenada en sistemas de
recuperación ni traducida a ningún idioma, de ninguna forma ni por ningún medio, sin la
autorización previa por escrito de Canon.
• Canon no proporciona garantías por los daños resultantes de datos dañados o perdidos
debido a un manejo erróneo o al mal funcionamiento del producto, las tarjetas
CompactFlash™ (tarjetas CF) o el uso de tarjetas CF que no sean de Canon.
Reconocimiento de marcas registradas
• Canon es una marca registrada de Canon Inc.
• Los demás nombres de empresas y productos utilizados en el presente documento
son marcas registradas de sus respectivas empresas.
10
Page 66

Qué se puede conseguir con esta impresora
Se conecta directamente a las cámaras Canon compatibles
Permite imprimir de forma sencilla desde cualquier cámara Canon que admita la impresión con
la fotoimpresora compacta (CP-330/CP-220). Sólo es necesario conectar el cable de interfaz.
Se conecta directamente a ordenadores
Simplemente conecte la impresora a un ordenador con un cable USB (disponible
comercialmente) para realizar las siguientes operaciones.
• Imprimir imágenes tomadas con la cámara
• Imprimir parte de una imagen (recorte)
• Imprimir imágenes con texto y diseño artístico (sólo Windows)
• Hacer sus propias tarjetas de visita
Cuatro tamaños de papel y dos tipos de etiquetas
Puede imprimir sobre papel estándar en tamaño postal, tamaño L, tamaño tarjeta de crédito o
tamaño ancho (100 × 200 mm (4 × 8 pulg.)). Además del papel de tamaño estándar, puede
imprimir etiquetas a tamaño completo o 8 etiquetas autoadhesivas con el papel de tamaño
tarjeta de crédito.
Impresiones de alta calidad y rápida alimentación de papel
Ofrece impresiones de calidad fotográfica. Produce hasta 18* impresiones sin necesidad de
volver a cargar.
* Hasta 12 impresiones cuando utiliza papel de tamaño ancho (se vende por separado con
la CP-220).
Impresión rápida
Las imágenes en tamaño postal se pueden imprimir a alta velocidad, aproximadamente 85
segundos por página.
Impresiones con papel tratado
Aplica una capa protectora a cada impresión.
Impresiones sin borde
Puede producir imágenes sin borde que abarquen la totalidad del papel.
Es compatible con DPOF (Digital Print Order Format, formato de orden de
impresión digital)
Es compatible con los valores de DPOF que se aplican a las opciones de impresión, número
de copias y fecha de disparo.
Fácil impresión en el exterior
Puede imprimir en exteriores, gracias al paquete de baterías (sólo la CP-330). También puede
imprimir imágenes usando la toma de alimentación del encendedor de cigarrillos de un
automóvil. Para esto se necesita el adaptador de baterías para coches (se vende por
separado).
• Si la marca no se visualiza en el monitor LCD de la cámara cuando la conecta
a esta impresora, el firmware de su cámara puede que no sea compatible con
esta impresora. Para obtener información o descargar el firmware compatible,
consulte el sitio Web BeBit de Canon (http://web.canon.jp/Imaging/BeBit-e.html) o
el sitio Web de Canon que corresponda a su región.
Ya que esta impresora cumple con una norma industrial relacionada con la impresión
directa, usted podrá imprimir con cámaras que no sean de la marca Canon pero que sí
sean compatibles con esta norma. Para obtener más información, consulte la página 54.
11
Page 67

Léame primero
Precauciones de seguridad
• Antes de utilizar los dispositivos, asegúrese de haber leído y comprendido las precauciones
de seguridad descritas a continuación. Asegúrese también de utilizar dichos dispositivos
adecuadamente.
• Las precauciones de seguridad detalladas en las páginas a continuación son para
informarle sobre las medidas para el funcionamiento adecuado y seguro de los dispositivos,
a fin de evitar lesiones y daños a su persona o terceros.
• En esta guía “Dispositivos” hace referencia a “la impresora, el adaptador de alimentación
compacto, el paquete de baterías (suministrado con la CP-330 o vendido por separado) o el
adaptador de carga (se vende por separado)”.
ADVERTENCIAS
Dispositivos
Si los dispositivos emiten humo u olor a quemado, o muestran otros signos de mal
funcionamiento, desconecte inmediatamente el cable de alimentación de la toma de
corriente. Si continúa utilizándolos en estas condiciones, se corre riesgo de incendio o de
descarga eléctrica. Asegúrese de que el humo, o el olor a quemado, disminuye y, a
continuación, póngase en contacto con el distribuidor o Servicio de soporte de clientes
Canon más cercano a su domicilio.
Si los dispositivos se caen o sus carcasas resultan dañadas, desconecte el cable de
alimentación de la toma de corriente. Si continúa utilizándolos en estas condiciones, se
corre riesgo de incendio o de descarga eléctrica. Póngase en contacto con el distribuidor o
Servicio de soporte de clientes Canon más cercano a su domicilio.
Nunca apoye pequeños objetos metálicos ni recipientes con líquido sobre los
dispositivos. Si se producen salpicaduras de líquidos en los dispositivos, séquelos con un
trapo absorbente suave. Si se derraman líquidos sobre los dispositivos o si se cae algún
objeto sobre los mismos, desconecte inmediatamente el cable de alimentación de la toma de
corriente. El funcionamiento continuo supone riesgos de incendio o descarga eléctrica.
Contacte con su distribuidor o con el centro de soporte al cliente de Canon más cercano.
No utilice disolventes inflamables como alcohol, benceno o disolventes para limpiar
los dispositivos. El uso de tales solventes conlleva peligro de incendio.
Evite que caigan o entren objetos metálicos o combustibles en los dispositivos.
Dichos objetos podrían provocar fuego, descargas eléctricas o fallos en el equipo. Mantenga
los dispositivos fuera del alcance de los niños.
No desarme ni modifique los dispositivos. Contienen componentes de alto voltaje, por lo
que existe riesgo descarga eléctrica. Si alguno de los dispositivos requiere de ajustes o
reparaciones internas, póngase en contacto con el distribuidor o Servicio de soporte de
clientes Canon más cercano a su domicilio.
Evite el contacto con las partes metálicas de los dispositivos o la clavija del
enchufe. Los relámpagos pueden generar voltajes letales dentro de los dispositivos.
Manténgase alejado de ellos durante las tormentas.
12
Page 68

Alimentación eléctrica
No supere los valores para el cable y el enchufe de corriente al usar este producto.
Respete los parámetros de voltaje especificados. Si se conectan demasiados dispositivos a
la misma toma, se puede producir un incendio. Controle que el voltaje de la toma sea
compatible con los dispositivos antes de conectarlos.
Si el cable de alimentación resulta dañado (si los hilos internos quedan expuestos,
etc.) desconecte inmediatamente el cable de alimentación de la toma de corriente. Si
continúa utilizándolo en estas condiciones, se corre riesgo de incendio o de descarga
eléctrica.
No enchufe y desenchufe el cable de alimentación con las manos húmedas; podría
provocar una descarga eléctrica. Al desenchufar el cable, tómelo con firmeza de la parte
del enchufe en sí. No tire directamente del cable, ya que esto podría dejar expuesto el
cableado interno o bien dañarlo, causando riesgo de incendio o descarga eléctrica.
Asegúrese de que el cable de alimentación esté bien enchufado. Una conexión floja
puede generar acumulación de calor, incendio o descarga eléctrica.
No dañe, modifique ni coloque objetos pesados sobre el cable de alimentación. Si esto
ocurre, los hilos internos del cable pueden quedar expuestos, se puede provocar un incendio
o una descarga eléctrica.
Mantenga el cable de alimentación libre de polvo. La presencia de polvo o de residuos
metálicos en el enchufe puede ocasionar un incendio o una descarga eléctrica. Si el área del
enchufe no está limpia, desenchufe el cable de alimentación y limpie el enchufe utilizando un
paño seco. Compruebe periódicamente que el enchufe este limpio.
Ubicación para su uso
No coloque los dispositivos en una tabla o escritorio inestable o inclinado, ya que
pueden caerse provocando daños.
13
Page 69

PRECAUCIONES
Dispositivos
No bloquee las ventilaciones de aire de la impresora. De lo contrario, el interior de la
impresora se recalentará, provocando daños a los componentes internos y riesgo de
incendio o de fallos en el equipo. Utilice los dispositivos en un área bien ventilada.
No apoye objetos pesados sobre los dispositivos. Dichos objetos pueden caer y
provocar daños, a la vez que pueden deformar la cubierta de los dispositivos, dañando las
piezas internas y corriendo riesgo de incendio.
Desenchufe los dispositivos cuando no los esté utilizando. Si permanecen enchufados,
existe el riesgo de contacto accidental con las piezas internas del dispositivo, provocando
una descarga eléctrica. Al dejar enchufados y sin uso los dispositivos por períodos
prolongados, se corre riesgo de incendio.
No retire el cassette de papel de la impresora durante un trabajo de impresión. El papel
realiza un movimiento oscilante en cuatro tiempos dentro del cassette durante dicho período.
Si coloca la mano donde se mueve el papel, puede ocasionar daños. Espere a que el
proceso de impresión haya finalizado antes de retirar el cassette. Nunca coloque la mano en
la ranura del cassette de papel.
No manipule las piezas internas de los dispositivos, sin seguir las instrucciones de
operación especificadas. Al manipular piezas inadecuadas de los dispositivos, su mano
puede quedar atrapada o bien sufrir daños.
Alimentación eléctrica
No mueva los dispositivos mientras están enchufados. Al hacerlo puede dañar el cable
de alimentación. Si continúa utilizando el cable dañado, se corre riesgo de incendio o de
descarga eléctrica.
No doble ni tuerza el cable de alimentación en exceso. Al hacerlo, puede dañarlo. Si
continúa utilizando el cable dañado, se corre riesgo de incendio o de fallos en el equipo. Para
garantizar una ventilación adecuada, deje una separación de unos 15 cm (6 pulg.) por la
parte delantera y trasera de los dispositivos y unos 10 cm (4 pulg.) por ambos lados.
No tire del cable de alimentación. Al hacerlo, puede dañarlo. Si continúa utilizando el cable
dañado, se corre riesgo de incendio o de descarga eléctrica. Al desenchufar el cable, tómelo
siempre del enchufe.
14
Page 70

Ubicación para su uso
No utilice los dispositivos en lugares donde hay mucho humo, polvo, humedad o
vibración. Si se filtran agua o polvo dentro de los dispositivos o se producen daños internos
a causa de la vibración intensa, se puede producir un incendio o una descarga eléctrica.
Controle los dispositivos aproximadamente una vez por año (póngase en contacto con el
distribuidor), preferentemente antes del comienzo de una estación húmeda.
No deje los dispositivos expuestos a altas temperaturas. No los exponga a la luz directa
del sol ni cerca de un equipo de calefacción, tampoco dentro de un automóvil con las
ventanillas cerradas durante un día de calor. Las altas temperaturas pueden causar
deformaciones y se corre riesgo de incendio.
No utilice los dispositivos cerca de las llamas. Las hojas que expulsa la impresora (en la
parte superior del cassette de papel) pueden caer en las llamas y ocasionar un incendio.
No utilice los dispositivos cerca de aparatos de televisión o radio. El funcionamiento de
los dispositivos afecta la recepción de las ondas de radio y televisión.
15
Page 71

Uso y manejo adecuados
Ubicación para su uso
No utilice imanes poderosos cerca de los dispositivos ya que pueden producir potentes
campos electromagn
juegos electrónicos, así como los poderosos campos magnéticos de artefactos tales como
altavoces o grandes motores pueden causar distorsiones en las imágenes impresas.
Utilícese en áreas niveladas y bien ventiladas.
Deje una separación de unos 15 cm (6 pulg.) por la parte delantera y trasera de los
dispositivos y unos 10 cm (4 pulg.) por ambos lados. Asegúrese de hacer lo mismo
alrededor de la ranura de manejo de papel (en la parte posterior) para que el mismo tenga
suficiente espacio y sobresalga de la ranura durante la impresión.
Despegue el sello de protección de la parte superior de la impresora. Los orificios de
ventilación están tapados por un sello de protección. Si utiliza la impresora antes de quitar el
sello de protección, ésta podrá dejar de funcionar debido a la acumulación de calor en su
interior.
éti
cos.
La radiación electromagnética de aparatos como televisores o
Precauciones de manejo
Evite encender o apagar la impresora sin necesidad, ya que al encenderla consume
tinta. Quizás no quede suficiente tinta para las hojas que hay para imprimir.
Cuando la impresora no esté en uso, retire el paquete de baterías (sólo la CP-330).
Desenchufe la impresora cuando no esté en uso. Tenga en cuenta que es aconsejable
enchufar y poner en funcionamiento la impresora por lo menos una vez cada seis meses
para asegurarse de que su funcionamiento es óptimo.
Si va a mover la impresora, quite los cassettes de papel y de tinta y cierre la cubierta
de ambos cassettes. Antes de transportar la impresora, retire los cassettes de papel y
tinta y cierra la cubierta del cassette de tinta. Si entra suciedad u objetos extraños en la
impresora, la calidad de impresión podría verse deteriorada.
Empaquete la impresora en una caja adecuada para su transporte. Si no dispusiera de
una caja, envuélvala en paños u otro material que sirva de protección contra las raspaduras.
No utilice compuestos volátiles ni insecticidas sobre la impresora, no deje materiales
plásticos ni vinílicos en contacto prolongado con la impresora. Estos materiales
pueden provocar la deformación de la cubierta de la impresora.
Recalentamiento
Si la impresora se recalienta, dejará de funcionar temporalmente. Esto no significa
que la impresora funcione mal. Volverá a funcionar normalmente tan pronto como se
enfríe.
La impresora podrá dejar de funcionar temporalmente en los siguientes casos:
• Cuando ha estado imprimiendo ininterrumpidamente.
• Si la temperatura de la habitación es excepcionalmente alta.
• Si los orificios de ventilación de la parte superior de la impresora están tapados o si la
ventilación no es adecuada.
16
Page 72

Modo de evitar los daños provocados por la condensación
La condensación puede provocarse al transportar la impresora de un lugar frío a un
lugar cálido. Para evitar el daño que la condensación puede causar, antes de mover la
impresora colóquela en una bolsa de material vinílico sellada y espere a que alcance la
temperatura ambiente antes de utilizarla. Deje de usar la impresora inmediatamente si
detecta condensación. El uso continuado puede dañar el equipo. Espere a que se evapore la
humedad completamente antes de volver a usar la unidad.
Limpieza de la impresora
Nunca utilice benceno, disolvente ni ningún otro solvente volátil para limpiar la
impresora. Los solventes volátiles pueden causar deformación o descascarillado de la
cubierta de la impresora. Para limpiarla utilice un paño suave y seco. Si es necesario realizar
una limpieza más profunda, utilice un paño humedecido con un solvente neutro diluido y
vuelva a pasar el paño suave y seco. Si utiliza un paño químico, lea las instrucciones
adjuntas y preste atención a todas las precauciones detalladas.
Mantenga las ventilaciones de aire limpias y libres de polvo. Limpie las ventilaciones
toda vez que sea necesario. El polvo que se filtra en la impresora a través de las
ventilaciones puede depositarse en la plancha de tinta y hacer que el resultado de la
impresión sea de baja calidad, a la vez que puede dañar la impresora. Si la plancha de tinta
se cubre de polvo, retire el cassette de tinta y reemplácelo por uno nuevo.
Manejo correcto de los cassettes de tinta
Utilice sólo los cassettes de tinta especificados para Canon.
No abra la tapa del cassette de tinta ni tire de él durante el proceso de impresión ya
que se puede dañar la impresora.
No toque ni tire de la plancha de tinta.
No maneje los cassettes de tinta teniendo las manos húmedas o sudadas.
Deje que los cassettes de tinta alcancen la temperatura ambiente antes de instalarlos y
utilizarlos.
un lugar frío a uno caliente. Si hay riesgo de condensación, deje el cassette en su envoltorio hasta
que alcance la temperatura ambiente, y limpie la posible humedad formada antes de cargarlo.
Si no va a utilizar la impresora durante un periodo prolongado de tiempo, retire y
guarde el cassette de tinta.
Puede formarse condensación si traslada rápidamente los cassettes de tinta desde
17
Page 73

Manejo correcto de los cassettes de papel
No ejerza una fuerza extrema sobre el cassette de papel. Si se ejerce una fuerza
desmedida o se provoca un impacto sobre el cassette, se puede producir un atasco de papel
o daños en el equipo.
No doble ni deforme el resorte ubicado en la parte posterior de la tapa intermedia del
cassette de papel.
Resorte
No coloque objetos extraños en el receptáculo de salida de la impresora (en la parte
superior del cassette de papel). Esta área es únicamente para el papel.
Si no va a utilizar la impresora durante un periodo prolongado de tiempo, retire y
guarde el cassette de papel, cierre la cubierta superior del cassette de papel y guarde
el cassette de papel. Retire también el papel del cassette de papel y guárdelo en
posición horizontal.
Manejo correcto del papel
Utilice sólo los tipos de papel especificados para Canon.
La impresión debe realizarse sobre la cara brillante del papel (el lado que no tiene
marcas impresas). Cuando cargue papel en el cassette, hágalo con la cara brillante hacia
arriba. De lo contrario, la calidad de la impresión será deficiente y es posible que se dañe la
impresora.
No corte ni doble los bordes perforados del papel antes de imprimir. Si se rasgan los
bordes perforados del papel, la plancha de tinta pasará hacia delante, desperdiciándose la
tinta equivalente a una impresión. Si esto ocurre, no quedará suficiente tinta para imprimir
todas las hojas de papel incluidas en el juego.
No utilice hojas de etiquetas en las que las etiquetas estén parcialmente despegadas.
No toque el lado impreso del papel. Siempre debe tomar el papel por los lados (por fuera
del borde perforado).
Al hacerlo, asegúrese de tener las manos secas. Los objetos afilados pueden rayar la
superficie del papel. Mantenga la superficie del papel libre de huellas dactilares, polvo y
humedad, etc.
No escriba en el papel antes de imprimir. De lo contrario, el funcionamiento puede verse
afectado.
18
Page 74

No toque el papel durante la impresión, ya que la hoja se mueve constantemente en
forma oscilante sobre la superficie del cassette de papel y de adentro hacia afuera en la
ranura de manejo de papel.
No deje que se acumulen más de 9 hojas en el receptáculo de salida de impresión.
Puede escribir en el papel con un bolígrafo de base oleosa, pero para evitar borrones,
deje que la tinta se seque antes de tocarla.
Deje que el papel alcance la temperatura ambiente antes de instalarlo y utilizarlo.
Puede formarse condensación si traslada rápidamente el papel desde un lugar frío a uno
caliente. Si hay riesgo de condensación, deje el papel en su envoltorio hasta que alcance la
temperatura ambiente, y limpie la posible humedad formada antes de cargarlo.
Evite las siguientes acciones, que podrían provocar cambios de color, decoloración o
sangrado de la tinta.
• Pegar cualquier tipo de cinta adhesiva sobre la superficie impresa.
• Permitir que las superficies impresas entren en contacto con materiales de vinilo.
• Aplicar alcohol o cualquier otro disolvente volátil sobre la superficie impresa.
• Presionar las superficies impresas contra otras superficies u objetos durante periodos
prolongados.
Almacenamiento del papel
Si desea colocar las impresiones en un
basadas en nailon, propileno o celof
o borrones en el color.
Se pueden producir cambios de color con el paso del tiempo, dependiendo de las
condiciones en que tenga guardadas las impresiones. Canon no se hace responsable
por los cambios en el color.
Para evitar el deterioro de la calidad de impresi
en los siguientes lugares:
• Lugares en los que se alcancen temperaturas superiores a 40 °C (104 °F).
• Lugares húmedos o polvorientos
• Lugares expuestos a luz directa del sol
Saque el papel sin usar del cassette de papel y póngalo en la bolsa, y luego métalo en
el paquete original. Guarde el paquete horizontalmente.
álbum, seleccione un álbum cuyas hojas estén
án. Otro tipo de hojas pueden provocar decoloración
ón, no almacene las copias impresas
Otras recomendaciones
Al abrir el juego de papel/tinta color (juego de etiquetas tama
etiquetas), verifique el contenido. Si nota que falta alguna parte o que cierta pieza está
dañada, póngase en contacto con el distribuidor para que lo asista.
El paquete de bater
la CP-330) usando la impresora.
• Cargue el paquete de baterías usando el adaptador de alimentación compacto
suministrado con la impresora.
• El paquete de baterías también se puede cargar usando el adaptador de carga de batería
(se vende por separado).
Si al utilizar el paquete de bater
vendido por separado) nota que la carga de la bater
copia impresa no sea depositada adecuadamente en el recept
impresi
ón. En ese caso, tire del papel para extraerlo.
ías se puede cargar mientras está instalado en la impresora (sólo
ías (suministrado con la CP-330 en algunas regiones o
ía está baja, es posible que la
ño natural, juego de
áculo de salida de
19
Page 75

Guía de los componentes
Fotoimpresora compacta CP-330
<Vista frontal>
Indicador
Informa sobre el estado de la impresora.
Anaranjado:
Carga del paquete de baterías
Apagado: Carga completada
Verde: Lista para imprimir
Parpadeo verde: Imprimiendo
Parpadeo naranja: Batería agotada
Rojo/parpadeo rojo: Error
Ranura del cassette de papel
Es la ranura en la que se coloca el
cassette de papel.
Cassette de papel Tapa del compartimento
Botón ON/OFF (encendido y apagado)
Enciende y apaga la impresora.
Ventana de visualización
Ranura del cassette
de tinta
El cassette de tinta se
introduce en este
compartimiento.
Tapa del compartimento
del cassette de tinta
<Vista posterior>
Palanca de la tapa de bater
Se utiliza cuando se quita el
paquete de baterías o la tapa de las
baterías.
Orificios de
ventilación
Tapa de batería
Ranura de manejo de papel
El papel sobresale de esta ranura durante
el proceso de impresión.
20
ía
Terminal de entrada DC
Se conecta al alimentador compacto.
Puerto USB
Conecta cables USB disponibles
comercialmente a un ordenador.
Puerto de impresión
directa
Conecta el cable de interfaz
(suministrado con la cámara) a la
cámara.
Page 76

Fotoimpresora compacta CP-220
<Vista frontal>
Indicador
Informa sobre el estado de la impresora.
Verde: Lista para imprimir
Parpadeo verde: Imprimiendo
Rojo/parpadeo rojo: Error
Ventana de visualización
Ranura del cassette de
papel
Es la ranura en la que se coloca el
cassette de papel.
Cassette de papel Tapa del compartimento
<Vista posterior>
Ranura del cassette
de tinta
El cassette de tinta se
introduce en este
compartimiento.
Tapa del compartimento
del cassette de tinta
Orificios de
ventilación
Ranura de manejo de papel
El papel sobresale de esta ranura
durante el proceso de impresión.
Terminal de entrada DC
Se conecta al alimentador compacto.
Puerto USB
Conecta cables USB disponibles
comercialmente a un ordenador.
Puerto de impresión
directa
Conecta el cable de interfaz
(suministrado con la cámara) a la
cámara.
21
Page 77

Comencemos a imprimir
Preparación de los juegos de cassette de tinta/
papel y del cassette de papel
Como hay varios tipos de juegos (incluyendo los juegos que se venden por
separado), asegúrese de que está usando el cassette de tinta, el papel y el cassette
de papel correctos. Si el juego no es correcto, no podrá imprimir.
Compruebe los juegos y los nombres de sus componentes en la tabla de abajo.
Busque aquí el nombre del cassette
de papel
Busque aquí el nombre del cassette
de tinta
Control de la tinta y del papel
Impresión en papel de tamaño tarjeta postal
(100
×
148 mm (4 × 6 pulgadas))
Número
Papel
• Artículo incluido en el paquete
de
hojas
5
36
Nombre del
cassette de papel
Nombre del cassette de tinta
El diseño del sello del cassette de tinta puede ser
ligeramente distinto al de los ejemplos.
Impresión en papel tamaño L (89 × 119 mm (3,5 × 4,7 pulgadas))
Número
Papel
• Cuando se imprime en papel tamaño L se necesita el cassette de papel PCL-CP100 (se
vende por separado)
de
hojas
36
Nombre del
cassette de papel
Nombre del cassette de tinta
El diseño del sello del cassette de tinta puede ser
ligeramente distinto al del ejemplo.
22
Page 78

Impresión en papel tamaño tarjeta de crédito
×
86 mm (2,1 × 3,4 pulgadas))
(54
Número
Papel
Papel estándar
Etiqueta
tamaño natural
8 etiquetas
autoadhesivas
• El cassette de papel PCC-CP100 (vendido por separado) es necesario al imprimir en papel
tamaño tarjeta de crédito.
Impresión en papel de tamaño ancho (100 × 200 mm (4 × 8 pulgados))
Papel
de
hojas
36
18
18
Número
hojas
Nombre del
cassette de papel
de
Nombre del
cassette de papel
Nombre del cassette de tinta
El diseño del sello del cassette de tinta puede ser
ligeramente distinto al de los ejemplos.
Nombre del cassette de tinta
El diseño del sello del cassette de tinta puede ser
ligeramente distinto al de los ejemplos.
24
• Cuando se imprime en papel de tamaño ancho (100 × 200 mm (4 × 8 pulg.)) con la CP-220
se necesita el cassette de papel PCW-CP100 (se vende por separado).
Productos de tinta y papel que se venden por separado
Puede usar el siguiente juego de papel / tinta de color (vendidos por separado) con
la fotoimpresora compacta Canon CP-330/CP-220.
Tamaño del papel
Tamaño postal Papel estándar (36 hojas) Cassette
Tamaño L Papel estándar (36 hojas) Cassette
Tamaño tarjeta de crédito Papel estándar (36 hojas) Cassette
Tamaño ancho
(100× 200 mm) (4 × 8 pulgados)
• Un cassette de tinta puede imprimir todo el papel incluido en el juego de tinta y papel.
de tinta especial
de tinta especial
de tinta especial
Etiqueta tamaño natural (18 hojas)
Cassette de tinta especial
8 etiquetas autoadhesivas (18 hojas)
Cassette de tinta especial
Papel estándar (24 hojas) Cassette
de tinta especial
Contenido Nombre del producto
Juego de papel/tinta color
KP-36IP
Juego de papel/tinta color
KL-36IP
Juego de papel/tinta color
KC-36IP
Juego de etiqueta tamaño
natural/tinta color KC-18IF
Juego de etiqueta/tinta color
KC-18IL
Juego de papel/tinta color
KW-24IP
23
Page 79

Carga del cassette de tinta
Abra la tapa del compartimento
1
2
Plancha de tinta
Pieza redonda
del cassette de tinta.
Elimine la tensión de la plancha
de tinta.
• Empuje la pieza redonda en el centro del
cassette y gírela en la dirección indicada
para tensar la plancha de tinta (no podrá
imprimir todo el papel si sobrepasa el fin de
la carrera de la plancha de tinta).
3
4
Clip
Ventana
• No vuelva a utilizar cassettes de tinta vacíos. De lo contrario, puede ocasionar
daños o afectar el funcionamiento de la impresora.
• Consulte también la sección Manejo correcto de los cassettes de tinta de Uso y
manejo adecuados. (p. 17)
Sostenga el cassette para que la
flecha impresa quede hacia
arriba e ins
compartimento (en la direcci
que indica la flecha).
• Tenga cuidado de no tocar o tirar de la
plancha de tinta al insertar el cassette.
• Empuje el cassette hasta oír un chasquido
que le indique que quedó bien colocado.
• Cuando esté listo para retirar el cassette de
tinta, levante el clip y extraiga el cassette
tirando de él.
Cierre la tapa del compartimento
del cassette de tinta.
• Puede comprobar el nombre del cassette
de tinta en la impresora a través de la
ventana de la parte superior de la
impresora.
értelo en el
ón
24
Page 80

Carga del papel en el cassette de papel
Abra las tapas superior e
1
Tapa
superior
Tapa intermedia
intermedia del cassette de papel.
• Abra la tapa superior, empuje la tapa
intermedia en la dirección de la flecha y
levántela.
2
Papel
(con la cara brillante hacia arriba)
(Lado de la dirección/sello al lado de
la tapa intermedia)
• Introduzca el papel de tamaño ancho
× 200 mm (4 × 8 pulg.)] (vendido
[100
por separado con la CP-220) como se
muestra en la figura de abajo.
Papel (con la cara brillante
hacia arriba)
Avanique el panel
convenientemente y coloquelo
en el cassette de papel, con el
lado de impresi
ón (lado
satinado) hacia arriba.
• Introduzca el papel de tamaño tarjeta postal
con el lado satinado hacia arriba y el lado
de la dirección o sello al lado de la cubierta
central, como se muestra en la figura.
• No toque la cara brillante del papel (para
evitar mancharla con huellas dactilares)
cuando separe la pila de papel formando un
abanico.
• Introduzca el papel de tamaño tarjeta de
crédito como se muestra en la figura de
abajo.
Tamaño tarjeta de crédito
(etiqueta tamaño natural/papel
estándar)
Tamaño tarjeta de crédito
(8 etiquetas autoadhesivas)
25
Page 81

• Introduzca el papel de tamaño L
como se muestra en la figura de
abajo.
Papel (con la cara
brillante hacia arriba)
3
• Utilice sólo los tipos de papel especificados.
• No inserte más de 18 hojas en el cassette de papel.
• No introduzca más de 12 hojas de papel de tamaño ancho (100 × 200 mm (4 × 8
pulg.)) (vendido por separado con la CP-220) en el cassette de papel.
• El papel impreso o alimentado está esmaltado aunque no hay nada impreso en él.
Por lo tanto, no vuelva a usar nunca el papel impreso o alimentado para imprimir.
Al volver a utilizar un mismo papel es probable que se adhiera a la plancha de
tinta, dañando la impresora.
• Consulte también las secciones Manejo correcto de los cassettes de papel y
Manejo correcto del papel de Uso y manejo adecuados. (p. 18)
Vuelva a colocar la cubierta
central en su posici
• Después de tirar de la tapa intermedia,
deslícela en la dirección de las flechas
hasta que quede en su sitio, escuchándose
un “clic”.
• No cierre la tapa superior.
ón original.
26
Page 82

Carga del cassette de papel
Abra la tapa del compartimento
1
2
Tapa intermedia
cerrada
Tapa superior abierta
• No quite el cassette de papel al cargar papel, imprimir o cuando la impresora está
depositando las copias.
del cassette de papel.
Introduzca el cassette de papel
hasta que quede bien colocado
en la ranura correspondiente.
• Asegúrese de que el papel esté
correctamente colocado antes de insertar el
cassette.
• Inserte el cassette de papel de modo tal
que se pueda deslizar sobre la base de la
entrada de la ranura.
• La impresora deposita las copias impresas en el receptáculo que se encuentra en
la parte superior del cassette de la impresora (sobre la tapa intermedia o dentro
de la tapa superior). Asegúrese de cerrar la tapa intermedia y de abrir la superior
para que el proceso de impresión se realice correctamente.
Receptáculo de impresión
27
Page 83

Conexión de la impresora a una fuente de
alimentación y a la cámara
Conecte la cámara a la impresora usando el cable (suministrado con la cámara)
y encienda la impresora.
Para obtener más información acerca de la conexión, consulte la Guía del
usuario de la cámara o Guía del usuario de impresión directa.
Cámara* Canon compatible con CP-330/CP-220
Conectar a la terminal DIGITAL
5
7
1
Espacio abierto de 15 cm (6
pulg.) por la parte delantera
y trasera de los dispositivos y
de 10 cm (4 pulg.) por
ambos lados o más.
* También se pueden utilizar las impresoras que no sean de Canon pero que sean
compatibles con la norma PictBridge.
Los pasos numerados de las siguientes instrucciones hacen referencia a los
números de la ilustración de arriba.
Coloque la impresora sobre una superficie llana.
1
• Asegúrese de dejar aproximadamente 15 cm (6 pulg.) de espacio alrededor de la
ranura de manejo de papel (en la parte posterior) para que el papel tenga
suficiente espacio y sobresalga de la ranura durante la impresión.
Alimentador compacto
6
4
2
Conectar a la terminal de
entrada DC
Cable de
interfaz
suministrado
con la cámara
Alimentador compacto de la cámara
(suministrado con la cámara o
vendido por separado)
* Por favor, use el adaptador de
alimentación compacto de la cámara
o un paquete de baterías totalmente
cargado (o baterías cargadas).
Conectar a la
toma de energía
3
Conectar a la toma de energía
28
2
Conecte el cable de alimentación suministrado al adaptador
de alimentaci
ón compacto CA-CP100.
Page 84

Introduzca el enchufe a un toma de corriente.
3
Conecte el cable del adaptador de alimentación compacto a
4
5
6
7
Apagado de la impresora
CP-330
Presione el botón ON/OFF hasta que se apague el indicador.
CP-220
Desenchufe el cable del adaptador de alimentación compacto de la impresora (el
indicador se apagará)
la impresora.
• Introduzca el cable con el simbolo mirando hacia arriba.
• En el caso de la CP-220, ésta se enciende en este momento y el indicador se
ilumina de color verde.
Conecte el cable de interfaz a la cámara.
• Utilice el cable USB que se suministra con la cámara.
Conecte el cable de interfaz a la impresora.
• Introduzca el cable en el puerto izquierdo, con la marca del cable mirando
hacia abajo.
Presione el botón ON/OFF hasta que se encienda el
indicador. (s
• Cuando la impresora se enciende, el indicador se ilumina de color verde.
ólo la CP-330)
• Le recomendamos que también conecte el adaptador de alimentación compacto
de la cámara (vendido por separado o incluido con la cámara) cuando utilice la
cámara con la impresora. Si desea utilizar la cámara con alimentación de
baterías, asegúrese de que están completamente cargadas.
• Al conectar el cable, asegúrese de que los conectores del cable coinciden con los
conectores correspondientes de la cámara y la impresora.
• Escoja una toma de energía de fácil acceso para el cable de alimentación de la
impresora para poder desenchufar el cable de inmediato en caso de un problema.
• Consulte también la sección Ubicación para su uso de Uso y manejo adecuados
si desea información sobre los lugares en los que puede utilizarse la impresora.
(p. 16)
• Algunos modelos de cámara no incorporan un adaptador de alimentación
compacto. Si desea más detalles, consulte el Diagrama del sistema de su cámara.
29
Page 85

Impresión
Esta sección explica el flujo de las operaciones de impresión con Cámara
Canon*.
Para obtener más información, consulte la Guía del usuario de la cámara o
Guía del usuario de impresión directa.
* En otros casos, consulte Impresión con cámaras digitales que no son de Canon.
Encienda la cámara y visualice
1
2
3
las im
• Verifique que la marca (Impresión directa
• En determinados modelos, la cámara se
Visualice las imágenes a imprimir y pulse el botón SET
(Ajuste) o SELECT.
• Si su cámara tiene el botón (Imprimir / Compartir), la impresión empieza
inmediatamente después de pulsar el botón (el paso 3 no es necesario).
Seleccione [Imprimir] y presione
el bot
• La impresión comienza. La cámara vuelve a
• La ventana de visualización se enciende
ágenes.
de Canon) / (PictBridge) se visualice en
la esquina superior izquierda del monitor
LCD.
encenderá automáticamente cuando se
conecte el cable a la impresora. El simbolo
aparece en el monitor de LCD.
ón SET o SELECT.
la pantalla de repetición una vez
completada la impresión correctamente.
como se explica a continuación:
CP-330 : El color cambia en el orden siguiente:
amarillo Æ rosado (magenta) Æ
azul claro (cian) Æ blanco Æ azul.
CP-220 : Se enciende en azul.
30
Si no se visualiza en el paso 1, compruebe lo siguiente:
• ¿El cable está correctamente conectado? (p. 28)
• ¿La impresora está encendida? (p. 28)
• ¿El firmware de la cámara es compatible con esta impresora? (p. 37)
Si la impresora no comienza a funcionar, verifique lo siguiente:
• ¿El monitor LCD de la cámara muestra un mensaje? (p. 39)
Page 86

Impresión en papel de tamaño ancho
(100 × 200 mm (4 × 8 pulg.)) (vendido por separado con
la CP-220)
Puede hacer sus tarjetas con mensajes y tarjetas de presentación originales.
Las tarjetas se imprimen como se explica a continuación.
Cuando la cámara está
conectada a la impresora
Impresión en la parte de 100 × 150
mm (4 × 6 pulg.)
En esta parte no se imprime nada, y usted puede
escribir un mensaje con un bolígrafo de base oleosa.
• Si aparece la marca (PictBridge) en el paso 1 de la página 30, seleccione
[Defecto] en la pantalla de ajuste del tamaño del papel.
• Cuando se conecte un ordenador a la impresora, usted podrá poner las imágenes
y las letras como usted quiera. Para conocer más detalles, consulte del Manual
del usuario del controlador de la impresora.
Cuando un ordenador está
conectado a la impresora
Impresión en toda la tarjeta.
31
Page 87

Utilización de las baterías
Utilización del paquete de baterías (s
Con la CP-330 puede utilizar el paquete de baterías recargables (Paquete de
baterías NB-CP1L) para imprimir.
El paquete de baterías se puede cargar con la impresora encendida o usando
el adaptador de carga de batería (se vende por separado, junto con el juego de
batería y adaptador de carga BCA-CP100).
Carga del paquete de baterías en la impresora
Para cargar el paquete de baterías NB-CP1L, introdúzcalo en la impresora.
Retire la tapa del terminal del
1
Tapa del terminal
de la batería
2
paquete de baterías.
• Cuando el paquete de baterías no se esté
utilizando, guárdelo con la cubierta terminal
puesta.
Presione la palanca de la tapa de
la bater
ía y quite la tapa.
ólo
la CP-330)
32
3
4
Alimentador compacto
Conectar a la
toma de energía
Cable de
alimentación
Instale el paquete de baterías.
• Coloque el paquete de baterías en su sitio,
deslizándolo en la dirección de la flecha, y
empújelo hasta que se escuche un “clic”.
• Para retirar el paquete de baterías, baje la
palanca de la tapa de la batería y tire del
paquete de baterías. A continuación, vuelva
a colocar la tapa de la batería.
Conecte el cable de alimentación
al alimentador compacto CA-
CP100 y ench
ía.
energ
úfelo a la toma de
Page 88

Conecte el cable del adaptador
5
Indicador
Cable del alimentador
compacto
6
Carga del paquete de baterías con el cargador de
bater
El paquete de baterías NB-CP1L se puede cargar con el adaptador de carga de
batería (se vende por separado, junto con el juego de batería y adaptador de
carga BCA-CP100) antes de introducirlo en la impresora.
1
ías
Retire la tapa del terminal del paquete de baterías.
• Consulte el paso 1 de la sección Carga del paquete de baterías en la impresora.
(p. 32)
de alimentaci
impresora.
• El indicador se ilumina de color naranja
cuando está cargando y se apaga cuando
el paquete de baterías está totalmente
cargado.
Una vez terminada la carga,
desenchufe el cable del
adaptador de alimentaci
compacto de la impresora.
ón compacto a la
ón
2
Adaptador de carga
Conecte el cable de alimentacion al alimentador compacto
3
CA-CP100 y ench
• Consulte el paso 4 de la sección Carga del paquete de baterías en la impresora.
(p. 32)
Conecte el paquete de baterías
al adaptador de carga.
• Hágalo en la dirección que indica la flecha.
úfelo a la toma de energía.
33
Page 89

4
Indicador de carga
Retire la cubierta terminal e instale el paquete de baterías.
5
• Consulte el pasos 2 y 3 de la sección Carga del paquete de baterías en la
impresora. (p. 32)
• Si se presiona el botón ON/OFF y la impresora se enciende mientras se está
cargando el paquete de baterías, la carga se detendrá. Si se vuelve a presionar el
botón ON/OFF, la impresora se apagará y se reanudará la carga.
• No cargue este paquete de baterías mediante adaptadores de carga que no sean
los recomendados por Canon.
• No utilice este paquete de baterías con productos que no sean los recomendados
por Canon.
• No cargue paquetes de baterías que no sean el paquete de baterías NB-CP1L.
• No transporte ni guarde el paquete de baterías con objetos metálicos que tengan
bordes cortantes, como clips de papel y alfileres. Antes de guardar o transportar
el paquete de baterías, tape el terminal.
• Evite que el paquete de baterías se caiga o reciba impactos serios.
• No exponga el paquete de baterías al calor ni a las llamas.
• No cubra el alimentador compacto con manteles, almohadones ni cobertores
durante la carga. Al generarse calor internamente puede provocar un incendio.
• En caso de daños o contacto con las partes internas de una batería debe lavar de
inmediato con agua. Si cualquiera de estas substancias entrara en contacto con
los tejidos internos, como los ojos o la boca, lave con agua y consulte a un
médico.
Cable del
alimentador
compacto
Conecte el cable del alimentador
compacto al adaptador de carga.
• El indicador de carga se ilumina de color
naranja cuando está cargando y se ilumina
en color verde cuando el paquete de
baterías está totalmente cargado.
• Una vez terminada la carga, desenchufe el
cable del adaptador de carga y saque el
paquete de baterías del adaptador de
carga.
34
Page 90

• Cuando se emplee el paquete de baterías para alimentar la impresora, ésta se
apagará si está inactiva durante 5 minutos o más.
• Como éste es un paquete de baterías de litio-ion, no hay necesidad de utilizar
toda la carga ni de descargar las baterías antes de volverlas a cargar; puede
hacerlo en cualquier momento.
• Para que un paquete de baterías sin carga alcance el nivel de carga plena tarda
aproximadamente 150 minutos (según el criterio de control estándar de Canon).
o
• La carga debe realizarse a temperaturas que oscilen entre los 5 y los 40
41 y 104
o
F).
C (entre
• El adaptador de carga emite sonidos durante la carga; no es signo de desperfecto.
• No cargue el paquete de baterías durante más de 24 horas seguidas para evitar
afectar su rendimiento.
• Cuando no se esté utilizando la impresora, retire el paquete de baterías, vuelva a
colocarle su cubierta terminal y guárdelo en un lugar fresco (30
o
C/86 oF o
menos). Cárguelo antes de volver a utilizarlo.
• Aun cuando el paquete de baterías esté cargado, se descargan naturalmente. Se
recomienda cargar la batería durante el día en que se va a utilizar, o bien con un
día de antelación, para asegurarse de que la carga esté completa.
• El almacenamiento prolongado (más de un año) de un paquete de baterías
totalmente cargado puede acortar su ciclo de vida o afectar a su rendimiento. Se
recomienda descargar completamente el paquete de baterías antes de guardarlo
en un lugar fresco y seco (30
o
C/86 oF o menos). Si no utiliza el paquete de
baterías por períodos prolongados, cárguelo completamente y descárguelo en la
impresora por lo menos una vez al año antes de volver a guardarlo.
• La impresora consume carga de la batería cuando está encendida, aun cuando
no se está utilizando ninguna función. Para conservar la carga de la batería,
recuerde siempre apagar el equipo.
• Si bien el rango de operación máximo del paquete de baterías oscila entre los 5 y
o
C (entre 41 y 104 oF), la temperatura óptima se encuentra entre los 10 y
los 40
o
C (entre 50 y 86 oF). En condiciones climáticas frías, como en los centros
los 30
de esquí, el rendimiento puede disminuir temporalmente, reduciendo así el tiempo
de vida útil.
• Si el ciclo de vida útil se viera afectado sustancialmente, aun cuando la carga
fuera plena, será necesario cambiar el paquete de baterías.
• Cuando la impresora no esté en uso retire el paquete de baterías. El paquete de
baterías sufre una leve descarga cuando se deja dentro de la impresora o del
adaptador de carga, aun cuando esté apagado. Esto acorta la vida útil de la
batería.
35
Page 91

Estado de la batería
Si la batería se está agotando y el indicador de la impresora parpadea en
anaranjado mientras la impresora está conectada a la cámara, el monitor LCD de la
cámara puede que muestre el mensaje siguiente.
Mensaje de error Solución
Recargar la batería de la
impresora
Rendimiento de la batería
La carga del paquete de baterías es demasiado
baja para el funcionamiento de la impresora.
Cambie el paquete de baterías por otro cuya carga
esté completa o vuelva a cargar el que está
utilizando.
Número de
impresiones
Condiciones de la prueba: Temperatura normal (23 oC/73oF), imágenes Canon, impresión
continua.
* Los datos anteriores pueden variar dependiendo del medio ambiente de la impresión de
impresión y de la imagen a imprimir.
* A temperaturas bajas, el rendimiento del paquete de baterías puede disminuir. Es
probable que el icono de batería baja aparezca de inmediato. En casos como éste, es
posible mejorar el rendimiento calentando el paquete de baterías dentro del bolsillo antes
de utilizarlo.
Papel tamaño postal: aproximadamente 36 hojas
Papel de tamaño L: aproximadamente 36 hojas
Papel tamaño tarjeta de crédito: aproximadamente 72 hojas
Papel tamaño ancho (100 × 200 mm (4 × 8 pulg.)):
aproximadamente 24 hojas
Uso del adaptador de baterías para coches
(CP-330/CP-220)
El adaptador de baterías para coches CBA-CP100 (se vende por separado) se
puede usar para alimentar la impresora o para cargar el paquete de baterías desde
la toma del encendedor de cigarrillo de un automóvil.
Para obtener más información sobre el manejo adecuado del equipo, consulte la
Guía del usuario del adaptador de baterías para coches.
36
Page 92

Solución de problemas
Si la impresora no parece estar funcionando correctamente, haga los controles
detallados a continuación para ver si puede identificar y corregir el problema. Si
no lo logra, póngase en contacto con el distribuidor de su zona o con el Servicio
de soporte de clientes Canon para que lo asistan.
Problema Causa Solución
La impresora no tiene energía. El alimentador compacto y el
cable de alimentación no están
correctamente conectados.
El indicador luminoso de la
impresora está en rojo intermitente.
La marca (Impresión directa
de Canon)/(PictBridge) no se
visualiza en la esquina superior
izquierda del monitor LCD.
La impresora no imprime. La impresora no está
Se interrumpió el proceso de
impresión.
La impresora no está
funcionando correctamente.
El cable no está conectado
correctamente.
La impresora está apagada. Encienda la impresora (p. 28).
El firmware de su cámara es
incompatible con esta impresora.
Apague la impresora y vuelva a
encenderla.
correctamente conectada a la
cámara.
Las baterías de la cámara están
descargadas.
El paquete de baterías de la
impresora está descargado. (Sólo
la CP-330)
El cassette de tinta no está
cargado correctamente.
La tensión de la plancha de tinta del
cassette de tinta es muy alta.
El cassette de papel no está bien
colocado.
La impresora está recalentada. Espere que la impresora se enfríe.
La impresora no está correctamente
conectada a la cámara.
Asegúrese de que el alimentador
compacto y el cable de
alimentación están conectados
correctamente y de que este
último esté enchufado a una toma
de energía doméstica estándar.
La impresora está conectada a un
ordenador y está imprimiendo.
Conecte el cable correctamente
(p. 28).
Consulte el sitio Web BeBit de
Canon o el sitio Web de Canon
que corresponda a su región.
Espere hasta que se termine la
impresión enviada por el
ordenador.
Conecte el cable correctamente
(p. 28). Si la conexión es correcta,
aparecerá el símbolo o en el
monitor LCD de la cámara.
Sustitúyalo por baterías totalmente
cargadas o enchufe la cámara a una
toma de corriente (usando el
adaptador de alimentación
compacto opcional de la cámara).
Utilice un paquete de baterías
totalmente cargado o el
adaptador de alimentación
compacto de la impresora.
Cargue el cassette de tinta
correctamente. (p. 24)
Disminuya la tensión. (p. 24)
Cargue el cassette de papel.
(p. 27)
Conecte el cable de interfaz
directa correctamente (p. 28).
37
Page 93

Problema Causa Solución
El indicador de la impresora se
ilumina de color rojo sin que el
monitor de LCD de la cámara
muestre ningún mensaje de error.
La calidad de impresión no es
buena.
La impresión presenta vetas. Se ha acumulado polvo dentro de
Las imágenes impresas están
distorsionadas.
Al pulsar el botón o SET de
ajuste no sucede nada.
Atascos de papel frecuentes. El cassette de papel está
La impresora no está
funcionando correctamente.
No está utilizando el tipo de papel
adecuado.
El papel está cargado del lado
equivocado.
El papel o la plancha de tinta
están sucios.
Se ha formado condensación
dentro de la impresora.
la impresora.
La impresora está demasiado cerca
de un televisor, un juego electrónico u
otro campo electromagnético.
La impresora está demasiado cerca
de un altavoz estéreo, un motor
grande u otro campo magnético
intenso.
La impresora está recalentada.
Imprimiendo. Espere a que la impresora
sobrecargado.
El receptáculo de salida de
impresión está demasiado lleno.
El papel está arrugado o ajado.
A
Retire el papel de la ranura de
manejo de papel y disminuya la
tensión en la plancha de tinta. La
impresora está conectada a un
ordenador y está imprimiendo.
Utilice el tipo de papel indicado.
Cargue el papel correctamente.
(p. 25)
Utilice un papel y una plancha de
tinta limpios.
Espere a que la condensación se
evapore.
Retire el cassette de tinta e
inserte la vara limpiadora en la
dirección que indica la flecha, con
la flecha de la vara limpiadora
apuntando hacia arriba.
Insértelo como se muestra en la figura
A y deslícelo hacia adentro y hacia
afuera de la impresora 2 o 3 veces.
Aleje la impresora por lo menos
un metro (3,3 pies) de distancia
del campo electromagnético.
Aleje la impresora del campo
magnético.
Espere a que la impresora se enfríe.
termine de imprimir.
No cargue más de 18 hojas de
papel en el cassette.
No introduzca más de 12 hojas de papel
de tamaño ancho (100 × 200 mm (4 ×
8 pulg.)) (vendido por separado) en el
cassette de papel.
No deje que se acumulen más de
9 hojas en el receptáculo.
No utilice papel arrugado ni ajado.
38
Page 94

Mensajes de error
Si se produce un problema mientras la impresora está conectada a la cámara,
el indicador de la impresora se iluminará o parpadeará en color rojo y el monitor
de LCD podrá mostrar alguno de los siguientes mensajes. (Si la cámara está
conectada a un televisor, el mensaje aparecerá en la pantalla de dicho aparato.)
Mensaje de error Causa Solución
No hay papel Cassette de papel mal instalado. Cargue el cassette de papel
correctamente.
El papel no está cargado
correctamente en el cassette de
papel.
No hay papel en el cassette de
papel.
La alimentación de papel es
inadecuada.
No hay tinta No hay cassette de tinta en la
impresora.
El cassette de tinta está agotado. Cargue un nuevo cassette de
Tamaño papel incompatible El papel cargado en la impresora
no es del tamaño adecuado.
Tamaño cartucho incompatible El cassette de tinta cargado en la
impresora no es del tamaño
adecuado.
Error de cassette de tinta El cassette de tinta no está
funcionando correctamente.
Papel y tinta incompatibles El papel y la tinta corresponden a
juegos diferentes.
Atasco de papel Atasco de papel durante la
impresión.
Cargue el papel en el cassette
correctamente.
Cargue el papel en el cassette.
Quite el cassette de papel y, a
continuación, retire manualmente
el papel restante de la impresora.
Cargue un cassette de tinta.
tinta.
Utilice el tamaño de papel
indicado.
Utilice el tamaño de cassette de
tinta indicado.
Retire el cassette de tinta de la
impresora, disminuya la tensión
en la plancha de tinta y vuelva a
colocar el cassette. Si esto no
soluciona el problema, coloque
un cassette de tinta nuevo. Si el
cassette de tinta está atascado en
la impresora, póngase en
contacto con el Servicio de
soporte de clientes Canon para
que lo asistan.
Compruebe los juegos de tinta/
papel.
La impresora está conectada a un
ordenador y está imprimiendo.
De lo contrario debe ponerse en
contacto con el Servicio de
soporte de clientes Canon para
que lo asistan.
39
Page 95

Mensaje de error Causa Solución
Cambio papel El papel se cambió después de
que apareció el menú de
impresión.
Recarga batería impresora
(sólo la CP-330)
Error de comunicación Error de comunicación entre la
No se puede imprimir La imagen se tomó con una
No se puede imprimir xx Ha seleccionado un cierto
El paquete de baterías de la
impresora está descargado.
impresora y la cámara.
cámara diferente, se guardó en un
formato diferente o se alteró con
la ayuda de un ordenador.
número de imágenes para
impresión DPOF, pero algunas de
ellas no se pueden imprimir
porque se tomaron con una
cámara diferente o se guardaron
en un formato diferente, o bien
fueron modificadas con la ayuda
de un ordenador. (Donde xx
indica el número de imágenes
seleccionadas que no es posible
imprimir.)
Utilice el tamaño de papel original
o cambie los valores de la
configuración de impresión.
Cambie el paquete de baterías por
otro cuya carga esté completa o
vuelva a cargar el que está
utilizando.
La impresora está conectada a un
ordenador y está imprimiendo.
Si el mensaje de error no
desaparece, póngase en contacto
con el Servicio de soporte de
clientes Canon para que lo
asistan.
Compruebe que el tamaño de la
imagen coincide con la capacidad
de pixels de la cámara. Si el
tamaño no es el adecuado,
modifique el tamaño de la imagen
según sea necesario para que la
imagen esté en un formato JPEG
que sea compatible con la
cámara.
Compruebe que el tamaño de la
imagen coincide con la capacidad
de pixels de la cámara. Si el
tamaño no es el adecuado,
modifique el tamaño de la imagen
según sea necesario para que la
imagen esté en un formato JPEG
que sea compatible con la
cámara.
40
Page 96

Especificaciones
Fotoimpresora compacta CP-330/CP-220
Especificaciones generales
Tipo de impresora: Impresora digital de impresión directa a todo color
Método de impresión: Transferencia térmica para sublimación del color (con recubrimiento)
Reproducción de la
resolución:
Matices: 256 matices/color
Tinta:
Papel: Tamaño postal (hojas estándar)
Método de alimentación
del papel:
Método de expulsión del
papel:
Modos de impresión: Impresión (con o sin bordes) estándar (de 1 pantalla)
Tamaños de impresión: Postal (sin borde): 100 × 148 mm (4 × 6 pulg.)
Velocidades de
impresión*:
300 × 300 ppp
Cassette de tinta especial para cada tamaño de papel (recubrimiento amarillo/magenta/cian)
Tamaño L (hojas estándar)
Tamaño tarjeta de crédito (hojas estándar, etiqueta tamaño natural y 8 etiquetas
autoadhesivas)
Tamaño ancho (100
Alimentación automática desde el cassette de papel
Las hojas son depositadas en la parte superior del cassette de papel
Impresión (para utilizar con etiquetas) múltiple (de 8 pantallas)
Tamaño postal (con borde): 91,4 × 121,9 mm (3,6 × 4,8 pulg.)
Tamaño L (sin borde): 89 × 119 mm (3,5 × 4,7 pulg.)
Tamaño L (con borde): 79,2 × 105,3 mm (3,1 × 4,2 pulg.)
Tamaño tarjeta de crédito (tamaño natural, sin borde)
Tamaño tarjeta de crédito (tamaño natural, con borde)
Impresión múltiple en tamaño tarjeta de crédito (8 pegatinas por etiqueta):
Tamaño ancho (100
Tamaño ancho (100
Tamaño postal (con o sin borde): Aprox. 85 segundos
Tamaño L (con o sin borde): Aprox. 70 segundos
Tamaño tarjeta de crédito (tamaño natural, con o sin borde):
Impresión múltiple en tamaño tarjeta de crédito (8 pegatinas):
Tamaño ancho (100 × 200 mm) (
Tamaño ancho (100 × 200 mm) (
×
200 mm (4 × 8 pulg.)) (hojas estándar)
: 54 × 86 mm (2,1 × 3,4 pulg.)
: 50 × 66,7 mm (2,0 × 2,6 pulg.)
×
200 mm (4 × 8 pulg.)) (conexión del ordenador): 100 × 200 mm (4 × 8 pulg.)
×
200 mm (4 × 8 pulg.)) (conexión de la cámara): 100 × 150 mm (4 × 6 pulg.)
conexión del ordenador
conexión de la cámara
17,3 × 22 mm (0,7 × 0,9 pulg.) (por etiqueta)
Aprox. 40 segundos
Aprox. 40 segundos
): Aprox. 106 segundos
): Aprox. 85 segundos
Interfaz
Transferencia de señal: Protocolo de propiedad para las cámaras Canon, PictBridge
Método de conexión: Conexión cámara-impresora Cable de interfaz suministrado con la cámara
Conexión ordenador-impresora Cable de interfaz disponible comercialmente
Cable de impresora recomendado Material: AWG 28 o mejor
Tipo: Cable de par trenzado, estanco
(compatible con el modo de alta velocidad)
Longitud: máx. 5,0 m (16,4 pies)
Especificaciones para el dispositivo
Entorno de operación: 5 - 40 oC (41 - 104 oF), entre 20% y 80% de humedad relativa del ambiente (en
funcionamiento)
Alimentación eléctrica: CA 100 - 240 V (50/60 Hz)
Consumo de energía: CA 50 W o menos (4 W o menos cuando está inactiva)
41
Page 97

Dimensiones:
Peso: CP-330: Aprox. 860 g (30,3 oz.) (sin contar los cassettes de tinta y de papel)
* Basadas en condiciones de pruebas estándar de Canon. Pueden ocurrir variaciones dependiendo
de las condiciones de impresión.
CP-330: 170,0 (ancho) × 55,0 (altura) × 123,0 mm (profundidad) (6,70 × 2,17 × 4,84 pulg.)
CP-220: 170,0 (ancho) × 54,8 (altura) × 119,0 mm (profundidad) (6,70 × 2,16 × 4,69 pulg.)
CP-220: Aprox. 820 g (28,9 oz.) (sin contar los cassettes de tinta y de papel)
Alimentador compacto CA-CP100
Voltaje de entrada: AC de 100-240 V (50/60 Hz)
Potencia de salida: CC 24 V, 2 A
Temperaturas de operación: 0 - 40
Dimensiones: 100 × 50 × 24 mm (3,9 × 2,0 × 0,9 pulg.) (sin contar el cable)
Peso: Aprox. 200 g (7,1 oz.)
Paquete de bater
Suministrado con la CP-330, vendido por separado junto con el juego de batería y adaptador
de carga BCA-CP100 o vendido por separado.
Tipo: Batería de litio-ion
Voltaje nominal: CC 22,2 V
Capacidad nominal: 1200 mAh
Ciclos de carga: Aprox. 300
Temperaturas de operación: 5 - 40
Dimensiones: 110,0 × 40,7 × 37,5 mm (4,3 × 1,.6 × 1,5 pulg.)
Peso: Aprox. 230 g (8,1 oz.)
95 VA (100 V) - 120 VA (240 V)
o
C (32 - 104 oF)
ías NB-CP1L
o
C (41 - 104 oF)
Adaptador de carga CG-CP100
Suministrado junto con el juego de batería y adaptador de carga BCA-CP100 (vendido por separado).
Voltaje de entrada: CC 24 V, 2 A
Potencia de salida: CC 24 V, 0,7 A
Tiempo de carga: 2,5 horas
Temperaturas de operación: 0 - 40
Dimensiones: 136,7 × 46,5 × 41,1 mm (5,4 × 1,8 × 1,6 pulg.)
Peso: Aprox. 120 g (4,2 oz.)
o
C (32 - 104 oF)
Adaptador de baterías para coches CBA-CP100
(vendido por separado)
Voltaje de entrada: DC de 12 V, 90 W
Potencia de salida: CC 24 V, 3,2 A
Temperaturas de operación: 0 - 40
Dimensiones: 89,4 × 63,3 × 40,0 mm (3,5 × 2,5 × 1,6 pulg.) (sin contar el cable)
Peso: Aprox. 370 g (13,1 oz.) (con el cable)
* Las especificaciones y la apariencia quedan sujetos a cambios sin previo aviso.
42
o
C (32 - 104 oF)
Page 98

Conexión de la impresora a un ordenador e impresión
Precauciones de seguridad
Las instrucciones de seguridad que contiene este manual indican cómo utilizar
de forma correcta y segura los productos y cómo prevenir lesiones o daños
personales al propio usuario, terceras personas o propiedades. Lea
atentamente estas instrucciones antes de pasar a otras secciones de este
manual.
Este símbolo indica aspectos que pueden ocasionar la muerte o
Advertencia
No reproduzca los CD-ROM suministrados en ningún reproductor de CD que no admita CD-ROM
de datos. La reproducción de los CD-ROM en un reproductor de CD de audio (música) puede
dañar los altavoces. Asimismo, el uso de auriculares con un CD-ROM a gran volumen en un
equipo de CD de música puede ocasionar pérdidas de la capacidad auditiva.
Denegación de responsabilidad
• Si bien se han realizado todos los esfuerzos posibles para garantizar que la información de
este manual es precisa y completa, no se acepta responsabilidad alguna por errores u
omisiones. Canon se reserva el derecho a modificar las especificaciones del hardware y el
software descritas en el presente manual, en cualquier momento y sin previo aviso.
• Se prohíbe la reproducción, transmisión, transcripción, almacenamiento en sistemas de
recuperación o traducción a cualquier idioma de cualquier modo y por cualquier medio de
cualquier parte de este manual sin el permiso previo y por escrito de Canon.
• Canon no ofrece garantías por daños y perjuicios asociados a la pérdida o alteración de datos
debido al uso o funcionamiento incorrecto de la cámara, el software, las tarjetas
CompactFlash™ (tarjetas CF), ordenadores personales, dispositivos periféricos o el uso de
tarjetas CF de marcas que no sean Canon.
lesiones graves si no se manipulan correctamente o no se respetan las
normas.
Advertencia
Marcas comerciales
• Canon y PowerShot son marcas comerciales de Canon Inc.
• Adobe es una marca comercial de Adobe Systems Incorporated.
• CompactFlash es una marca comercial de SanDisk Corporation.
• iBook e iMac son marcas comerciales de Apple Computer, Inc.
• Macintosh, PowerBook, Power Macintosh y QuickTime son marcas comerciales de Apple
Computer Inc. registradas en Estados Unidos y otros países.
• Microsoft y Windows son marcas comerciales registradas o marcas comerciales de Microsoft
Corporation en Estados Unidos y/u otros países.
• Otros nombres y productos no mencionados aquí pueden ser marcas comerciales registradas
o marcas comerciales de sus respectivas compañías.
43
Page 99

Lea Minuciosamente Antes De Usar
CONTRATO DE LICENCIA DE SOFTWARE DE CANON
IMPORTANTE: LEA ESTE CONTRATO ANTES DE USAR EL SOFTWARE QUE VIENE EN EL CD-ROM
DE ESTA CAJA. AL USAR EL SOFTWARE, SE COMPROMETE A REGIRSE POR LOS TÉRMINOS DE
ESTE CONTRATO.
El presente es un contrato de licencia (el “Contrato”) celebrado entre usted y Canon Inc. (“Canon”).
SI NO ESTÁ DE ACUERDO CON LOS TÉRMINOS Y CONDICIONES DEL PRESENTE CONTRATO, NO
USE EL PROGRAMA DE SOFTWARE QUE VIENE EN EL CD-ROM (INCLUIDOS TODOS LOS DATOS
DE SONIDOS E IMÁGENES) Y EL MANUAL DEL USUARIO QUE TIENE ESTA CAJA (EN CONJUNTO,
EL “SOFTWARE”) Y DEVUELVA ENSEGUIDA EL SOFTWARE AL ESTABLECIMIENTO DONDE LO
COMPRÓ PARA OBTENER EL CORRESPONDIENTE REEMBOLSO.
En atención al derecho de usar el SOFTWARE, se compromete a regirse por los términos y
condiciones del presente Contrato.
1. LICENCIA: Canon le otorga el derecho personal pero no exclusivo de usar el SOFTWARE en una sola
computadora únicamente. Podrá transferir físicamente el SOFTWARE de una computadora a otra
siempre que use el SOFTWARE en una sola computadora por vez. No instalará ni usará el
SOFTWARE en una red, varias CPU, varios sitios conectados ni en ninguna otra configuración de
hardware en que el SOFTWARE esté accesible para más de una CPU o más de un usuario.
Con respecto a los datos de sonidos e imágenes (los “Datos”) que tiene el Software, y que se
descargarán al correspondiente producto de cámara digital de Canon, Canon le otorga una licencia
personal, pero no exclusiva, para usar los Datos en una sola cámara digital de Canon únicamente.
NO CEDERÁ, OTORGARÁ UNA SUBLICENCIA, ALQUILARÁ, ARRENDARÁ, ENTREGARÁ EN
PRÉSTAMO, TRANSFERIRÁ NI USARÁ DE NINGUNA OTRA MANERA O TRANSFERIRÁ,
COPIARÁ, TRADUCIRÁ, CONVERTIRÁ A OTRO LENGUAJE DE PROGRAMACIÓN, ALTERARÁ,
MODIFICARÁ, DESCOMPILARÁ O DESARMARÁ EL SOFTWARE, TANTO EN FORMA
COMPLETA COMO PARCIAL, SALVO POR LO EXPRESAMENTE DISPUESTO EN EL PRESENTE
CONTRATO.
2. COPIA DE SEGURIDAD O RESERVA: Podrá efectuar una copia del SOFTWARE solamente con
fines de seguridad o reserva, o bien copiar el SOFTWARE en algún mecanismo de
almacenamiento permanente (por ejemplo, un disco duro) de su computadora y guardará el
original con fines de seguridad. Cualquier otra copia del SOFTWARE constituye una violación
del presente Contrato. Deberá reproducir e incluir la declaración de derechos de autor
(copyright) en la copia de seguridad.
3. ASISTENCIA TÉCNICA Y ACTUALIZACIONES: Ni Canon ni sus subsidiarias, representantes o
distribuidores tendrán la responsabilidad de prestar servicios de mantenimiento o asistencia
técnica para el uso del SOFTWARE. No habrá actualizaciones, correcciones ni asistencia
técnica disponible para el SOFTWARE.
4. GARANTÍA LIMITADA Y LIMITACIÓN DE RESPONSABILIDAD: Usted tiene la responsabilidad de
elegir, mantener y combinar los componentes del hardware y software de su sistema de
computación. Por lo tanto, Canon no garantiza el servicio ininterrumpido ni la corrección de
errores, ni que las funciones o el funcionamiento del SOFTWARE responderán a sus
necesidades. LA LICENCIA DEL SOFTWARE SE OTORGA “TAL CUAL” Y SIN GARANTÍA O
CONDICIÓN DE NINGÚN TIPO. El CD-ROM que contiene el SOFTWARE está garantizado
solamente contra materiales defectuosos, en condiciones de uso normal, durante un periodo de
noventa (90) días después de la compra efectuada a un representante autorizado de Canon,
según conste en su recibo de compra. El único remedio para un CD-ROM defectuoso será su
reemplazo, sin cargo alguno, cuando usted lo devuelva por cuenta propia al establecimiento
donde lo compró y se compruebe que está defectuoso mediante una inspección. El nuevo CD-
ROM estará garantizado durante el resto del periodo de garantía original de noventa (90) días
del CD-ROM defectuoso. La garantía limitada no corresponde si la falla del CD-ROM es
consecuencia de algún accidente, abuso o aplicación errónea del SOFTWARE y no se
extenderá a persona alguna que no sea el usuario original del SOFTWARE.
SALVO POR LO ESPECÍFICAMENTE ESTIPULADO EN EL PRESENTE PÁRRAFO 4, CANON, LAS
SUBSIDIARIAS DE CANON, LOS DISTRIBUIDORES Y REPRESENTANTES RECHAZAN TODA
GARANTÍA O CONDICIÓN, TANTO EXPRESA COMO IMPLÍCITA, LO CUAL INCLUYE TODA
GARANTÍA O CONDICIÓN DE COMERCIABILIDAD O APTITUD PARA ALGÚN FIN ESPECÍFICO,
CON RESPECTO AL SOFTWARE.
NI CANON NI NINGUNA DE SUS SUBSIDIARIAS, DISTRIBUIDORES O REPRESENTANTES
TIENEN RESPONSABILIDAD ALGUNA POR DAÑOS Y PERJUICIOS DE CUALQUIER TIPO Y
OCASIONADOS DE CUALQUIERA MANERA, INCLUIDOS, ENTRE OTROS, LAS PÉRDIDAS O
DAÑOS DIRECTOS, INDIRECTOS O INCIDENTALES, INCLUIDO EL LUCRO CESANTE, LOS
GASTOS O INCONVENIENTES DE CUALQUIER TIPO QUE FUERAN OCASIONADOS POR EL
SOFTWARE Y EL USO DEL MISMO, O QUE SE DERIVARAN DE ELLO.
44
Page 100

NI CANON NI NINGUNA DE SUS SUBSIDIARIAS, DISTRIBUIDORES O REPRESENTANTES
TENDRÁN OBLIGACIÓN ALGUNA DE INDEMNIZARLE POR ALGUNA DEMANDA O JUICIO
ENTABLADO POR TERCEROS, EN EL QUE SE ALEGUE QUE EL SOFTWARE O EL USO DEL
MISMO INFRINGE CUALQUIER PROPIEDAD INTELECTUAL DE DICHOS TERCEROS.
ALGUNOS ESTADOS, PROVINCIAS O JURISDICCIONES LEGALES NO PERMITEN LA
EXCLUSIÓN DE GARANTÍAS IMPLÍCITAS NI LA LIMITACIÓN O EXCLUSIÓN DE
RESPONSABILIDADES POR DAÑOS O PERJUICIOS INCIDENTALES O INDIRECTOS, O BIEN
POR LESIONES PERSONALES O MUERTE QUE SEAN CONSECUENCIA DE LA NEGLIGENCIA
DEL VENDEDOR; POR LO TANTO, ES PROBABLE QUE LOS DESCARGOS DE
RESPONSABILIDADES Y EXCLUSIONES PRECEDENTES NO CORRESPONDAN EN SU CASO.
5. VIGENCIA: El presente Contrato entrará en vigencia en el momento en que use el SOFTWARE y
seguirá vigente hasta el vencimiento de todos los derechos de autor (copyright) en el
SOFTWARE, salvo que se los dé por terminados en forma anticipada. Podrá dar por terminado
el presente Contrato mediante la destrucción del SOFTWARE. El presente Contrato terminará
también, sin previo aviso, si no cumple con cualquiera de los términos del presente Contrato y
deberá devolver enseguida el SOFTWARE. Además, Canon podrá hacer cumplir otros derechos
legales que tenga.
6. NOTIFICACIÓN DE DERECHOS RESTRINGIDOS DEL GOBIERNO DE LOS EE.UU.:
El SOFTWARE es un “elemento comercial”, según la definición que tal término tiene en 48
C.F.R. 2.101 (octubre de 1995), que consiste en “software comercial para computadoras” y
“documentación del software comercial para computadoras”, según la definición que tales
términos tienen en 48 C.F.R. 12.212 (septiembre de 1995). En congruencia con lo dispuesto en
48 C.F.R. 12.212 y 48 C.F.R. 227.7202-1 a 227.72024 (junio de 1995), todos los Usuarios Finales
del Gobierno de los EE.UU. adquirirán el SOFTWARE con aquellos derechos que se indican en
el presente únicamente. El fabricante es Canon Inc./30-2, Shimomaruko 3-chome, Ohta-ku,
Tokio 146-8501, Japón.
7. RESTRICCIONES DE EXPORTACIÓN: Se compromete a cumplir todas las leyes de exportación,
así como las restricciones y reglamentaciones del país que corresponda, y a no exportar ni
volver a exportar, ya sea directa o indirectamente, el SOFTWARE en violación de cualquiera de
dichas leyes y restricciones y reglamentaciones, o sin todas las aprobaciones necesarias.
8. DIVISIBILIDAD:
En el caso de que alguna disposición del presente Contrato fuera declarada ilegal por algún
tribunal o juzgado de jurisdicción competente, dicha disposición será nula con respecto a la
jurisdicción de dicho tribunal o juzgado y todas las demás disposiciones del presente Contrato
seguirán teniendo plena vigencia.
9. LEY DE APLICACIÓN: Los términos del presente Contrato, en la medida de lo relativo a
compras del Software en los Estados Unidos de América, se regirán e interpretarán en todos
sus aspectos de acuerdo con las leyes y reglamentaciones del Estado de Nueva York, sin
referencia alguna a los principios de elección del derecho aplicable. Los términos del presente
Contrato, en lo relativo a las compras del Software en Canadá, se regirán por las leyes de la
Provincia de Ontario.
10.DERECHOS DE PROPIEDAD: Todos los derechos sobre el SOFTWARE, incluidos, entre otros,
los derechos de autor (copyright) y derechos de secreto comercial, pertenecen a Canon, sus
empresas afiliadas y terceros otorgantes de licencias. El uso del SOFTWARE está sujeto a las
leyes de los Estados Unidos, Canadá y demás leyes aplicables de copyright y marcas
registradas, y ninguna parte del presente Contrato constituye una renuncia de los derechos de
Canon, sus empresas afiliadas y terceros otorgantes de licencias en virtud de tales leyes. Usted
solamente posee el CD-ROM en que está almacenado el Software. Salvo que se disponga
expresamente en el presente, Canon no le transfiere ni otorga por el presente licencia o derecho
alguno, ya sea expresa o implícitamente, por cualquier propiedad intelectual de Canon. Lo
expresado en el Párrafo 1 no será interpretado como una concesión de derechos de propiedad
que se otorga a Canon con respecto a las imágenes, los gráficos o el texto que usted guarde en
relación con el Software.
No podrá modificar, quitar o suprimir ninguna o todas las declaraciones de copyright (i) que se encuentren
en el Software, incluida cualquier copia del mismo, y (ii) que se encuentren en el CD-ROM original y en el
medio que corresponda a la copia de seguridad realizada según lo indicado en la Sección 2 anterior.
11.RECONOCIMIENTO: AL USAR EL SOFTWARE RECONOCE HABER LEÍDO Y ENTENDIDO EL
PRESENTE CONTRATO Y QUE SE COMPROMETE A REGIRSE POR SUS TÉRMINOS Y
CONDICIONES. ADEMÁS ESTÁ DE ACUERDO CON QUE EL PRESENTE CONTRATO ES LA
DECLARACIÓN COMPLETA Y EXCLUSIVA DE LO ACORDADO ENTRE USTED Y CANON EN
RELACIÓN CON EL OBJETO DEL PRESENTE Y QUE REEMPLAZA A TODAS LAS PROPUESTAS
O ACUERDOS PREVIOS, YA SEAN VERBALES O ESCRITOS, Y A CUALQUIER OTRA
COMUNICACIÓN ENTRE LAS PARTES EN RELACIÓN CON EL OBJETO DEL PRESENTE.
NINGUNA MODIFICACIÓN DEL PRESENTE CONTRATO SERÁ EFECTIVA A MENOS QUE ESTÉ
FIRMADA POR ALGÚN DIRECTIVO DEBIDAMENTE AUTORIZADO DE CANON.
45
 Loading...