

Page 1
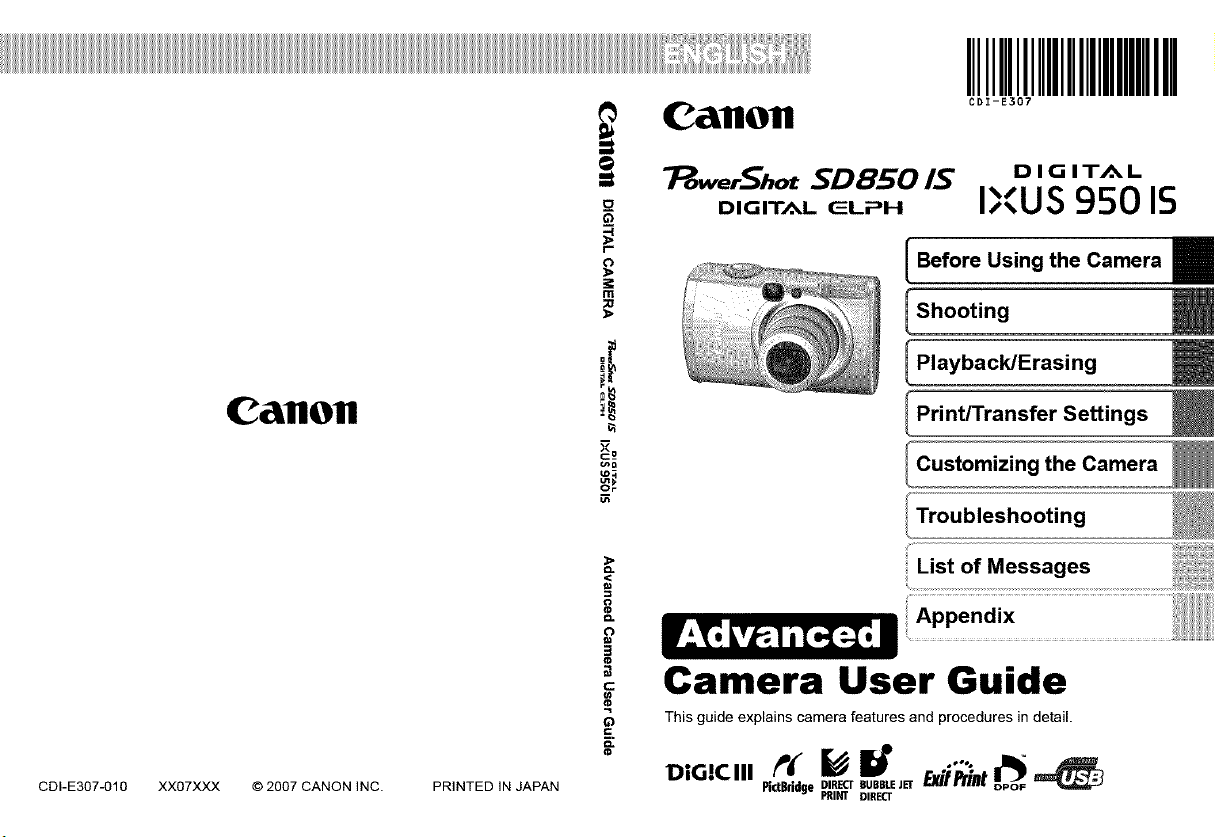
_ "_wer_hotSDBSO/S IXUS 95015
Before Using the Camera
Shooting
Playback/Erasing
CallOfl
CDI-E307-010XX07XXX
© 2007 CANON INC. PRINTED IN JAPAN
Print/Transfer Settings
Customizing the Camera
<
List of Messages
8
8
3
c
!
Q
E.
o.
Camera User Guide
This guide explains camera features and procedures in detail.
Pi.Blidge DIpRR_ BIURBBLEcTE JET
Page 2
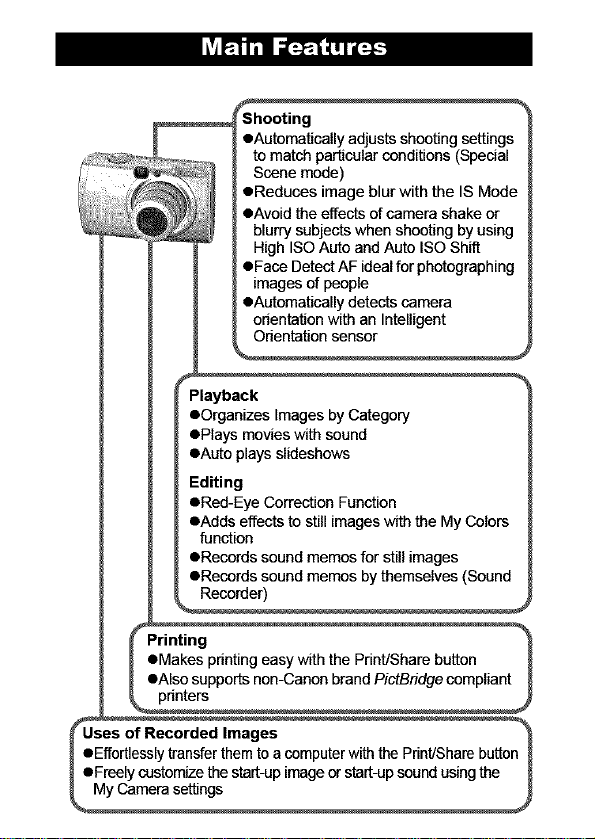
Shooting
oAutomatically adjusts shooting settings
to match particular conditions (Special
Scene mode)
OReduces image blur with the IS Mode
oAvoid the effects of camera shake or
blurry subjects when shooting by using
High ISO Auto and Auto ISO Shift
OFace Detect AF ideal for photographing
images of people
oAutomatically detects camera
orientation with an Intelligent
Orientation sensor
Playback
OOrganizes Images by Category
OPlays movies with sound
oAuto plays slideshows
Editing
ORed-Eye Correction Function
oAdds effects to still images with the My Colors
function
ORecords sound memos for still images
ORecords sound memos by themselves (Sound
Recorder)
Page 3
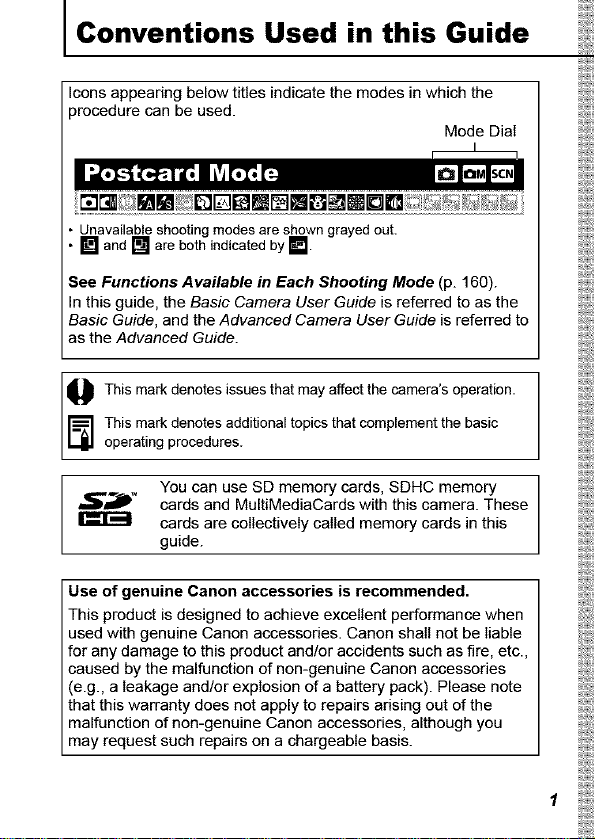
I Conventions Used in this Guide
Icons appearing below titles indicate the modes in which the
procedure can be used.
• Unavailableshootingmodesareshowngrayedout.
• [] and [] are both indicated by [].
See Functions Available in Each Shooting Mode (p. 160).
In this guide, the Basic Camera User Guide is referred to as the
Basic Guide, and the Advanced Camera User Guide isreferred to
as the Advanced Guide.
Mode Dial
This mark denotes issues that affectthe camera's operation.
_] his mark denotes additional topics that complement the basic
operating procedures.
_'JP* cards and MultiMediaCards with this camera. These
Use of genuine Canon accessories is recommended.
This product is designed to achieve excellent performance when
used with genuine Canon accessories. Canon shall not be liable
for any damage to this product and/or accidents such as fire, etc.,
caused by the malfunction of non-genuine Canon accessories
(e.g., a leakage and/or explosion of a battery pack). Please note
that this warranty does not apply to repairs arising out of the
malfunction of non-genuine Canon accessories, although you
may request such repairs on a chargeable basis.
You can use SD memory cards, SDHC memory
cards are collectively called memory cards in this
guide.
may
Page 4

I Table of Contents
Items marked with a_j_ are lists or charts that summarize camera
functions or procedures.
Please Read ...................................... 5
Safety Precautions ................................. 6
Preventing Malfunctions ............................ 11
Using the LCD Monitor ............................. 12
LCD Monitor Brightness ............................ 14
Information Displayed on the LCD Monitor ............. 15
Using the Viewfinder .............................. 18
Power Saving Function ............................ 19
Setting the World Clock ............................ 20
Menus and Settings ............................... 22
I#
Menu List ....................................... 24
Resetting Settings to Their Default Values .............. 28
Formatting Memory Cards .......................... 29
Changing the Recording Pixels and Compression (Still Images) 30
How to Use the tS Mode ........................... 32
Using the Digital Zoom/Digital Tele-Converter ........... 33
Magnified Close-Up Shooting (Digital Macro) ........... 35
Red-Eye Reduction Function ........................ 36
Setting the Slow Synchro Function ................... 36
I_ Continuous Shooting ........................... 37
Creative Light Effect Mode .......................... 38
Postcard Mode ................................... 40
Embedding the Date in the Image Data .............. 40
Setting the Display Overlay ......................... 41
,m Movie Shooting ................................ 42
Shooting Panoramic Images (Stitch Assist) ............. 47
Switching between Focusing Modes .................. 49
Page 5
ShootingHard-to-FocusSubjects(FocusLock.AFLock).. 51
Locking the Exposure Setting (AE Lock) ................ 53
Locking the Flash Exposure Setting (FE Lock) ........... 54
Switching between Metering Modes ................... 55
Adjusting the Exposure Compensation ................. 56
Setting the Shutter Speed (Long Shutter Mode) .......... 57
Adjusting the Tone (White Balance) .................... 59
Shooting in a My Colors Mode ........................ 62
Changing Colors .................................. 64
IS0 Adjusting the ISO Speed ......................... 69
_.,_.,Changing the ISO Speed with One Touch (Auto ISO Shift) 70
Registering Functions with the _,_, button .............. 71
Setting the Auto Rotate Function ....................... 73
Checking for Focus Right After Shooting ............... 74
Creating an Image Destination (Folder) ................ 76
Resetting the File Number ........................... 78
O, Magnifying Images .............................. 80
[] Viewing Images in Sets of Nine (Index Playback) ...... 81
Organizing Images by Category (My Category) .......... 82
Jumping to Images ............................. 83
Viewing Movies ................................... 84
Editing Movies .................................... 86
Rotating Images in the Display ....................... 87
Playback with Transition Effects ...................... 88
Red-Eye Correction Function ........................ 89
Adding Effects with the My Colors Function ............. 92
Attaching Sound Memos to Images ................... 94
Sound-Only Recording (Sound Recorder) ................. 95
Automated Playback (Slide Shows) ................... 97
Protecting Images ................................ 102
Viewing Images on a TV set ........................ 104
Erasing Images .................................. 105
Setting the DPOF Print Settings ..................... 107
Setting the DPOF Transfer Settings .................. 111
Page 6
ChangingMyCameraSettings....................... 113
RegisteringMyCameraSettings..................... 114
Camera........................................ 116
Whenthepoweristurnedon....................... 116
LCDmonitor.................................... 117
Shooting....................................... 118
ShootingMovies................................. 122
Playback....................................... 123
Battery/BatteryCharger........................... 124
TVmonitoroutput................................ 124
PrintingonDirectPrintCompatiblePrinters............ 125
BatteryHandling................................. 130
HandlingtheMemoryCard........................ 132
UsinganACAdapterKit(SoldSeparately)............ 134
UsinganExternallyMountedFlash(SoldSeparately).... 135
CameraCareandMaintenance..................... 137
Specifications................................... 138
4
Page 7
I Handling Precautions
I_I_ I_I_':_II
Test Shots
Before you try to photograph important subjects, we highly
recommend that you shoot several trial images to confirm that the
camera is operating and being operated correctly.
Please note that Canon Inc., its subsidiaries and affiliates, and its
distributors are not liable for any consequential damages arising
from any malfunction of a camera or accessory, including memory
cards, that results in the failure of an image to be recorded or to be
recorded in a way that is machine readable.
Warning Against Copyright Infringement
Please note that Canon digital cameras are intended for personal
use and should never be used in a manner that infringes upon or
contravenes international or domestic copyright laws and
regulations. Please be advised that in certain cases the copying of
images from performances, exhibitions, or commercial properties
by means of a camera or other device may contravene copyright or
other legal rights even if the image was shot for personal use.
Warranty Limitations
This camera's warranty is only effective in the country of sate. If a
problem arises while the camera is in use abroad, please convey it
back to the country of sale before proceeding with a warranty claim
to a Canon Customer Support Help Desk.
For Canon Customer Support contacts, please see the customer
support list supplied with your camera.
Page 8
VideoFormat
Please set the camera's video signal format to the one used in your
region before using it with a TV monitor (p. 104).
Language Setting
Please see the Basic Guide (p. 9) to change the language setting.
OBefore using the camera, please ensure that you read the safety
precautions described below and in the "Safety Precautions"
section of the Basic Camera User Guide. Always ensure that the
camera is operated correctly.
OThe safety precautions noted on the following pages are intended
to instruct you in the safe and correct operation of the camera and
its accessories to prevent injuries or damage to yourself, other
persons and equipment. Be sure you fully understand them before
reading the rest of the manual.
OEquipment refers to the camera, battery charger or separately
sold compact power adapter.
OBattery refers to the battery pack.
Page 9

_,,,,__,_, ,,_ ,_,,,,,,_,,,_,,__,, __,, __,, __,, __,, ,_,__,,,__,_ _,, __i i ¸,___,_,__ ____ ,,_,_,__,__,_,__, _,__, _,__, _,__, _,__,_,__, _,__
• Do not point the camera directly at the sun or bright light
sources.
• Doing so could damage the camera's CCD or your eyesight.
• Store this equipment out of the reach of children and infants.
• Wrist strap: Placement of the strap around the child's neck could
result in asphyxiation.
• Memory card: Dangerous if accidentally swallowed. If this
occurs, contact a doctor immediately.
• Do not attempt to disassemble or alter any part of the
equipment that is not expressly described in this guide.
• To avoid the risk of high-voltage electrical shock, do not
touch the flash portion of the camera if it has been damaged.
• Stop operating the equipment immediately if it emits smoke
or noxious fumes.
• Do not allow the equipment to come into contact with, or
become immersed in, water or other liquids. If the exterior
comes into contact with liquids or salt air, wipe it dry with a
soft, absorbent cloth.
Continued use of the equipment may result in fire or electrical
shock. Immediately turn the camera power off and remove the
camera battery or unplug the battery charger or compact power
adapter from the power outlet. Please consult your camera
distributor or the closest Canon Customer Support Help Desk.
• Do not use substances containing alcohol, benzine,
thinners or other flammable substances to clean or
maintain the equipment.
• Do not cut, damage, alter or place heavy items on the power cord.
• Use only recommended power accessories.
• Remove the power cord on a regular periodic basis and
wipe away the dust and dirt that collects on the plug, the
exterior of the power outlet and the surrounding area.
• Do not handle the power cord if your hands are wet.
Continued use of the equipment may result in fire or electrical
shock.
Page 10
• Do not place the battery near a heat source or expose it to
direct flame or heat.
• The battery should not be immersed in water or sea water.
• Do not attempt to disassemble, alter or apply heat to the
battery.
• Avoid dropping or subjecting the battery to severe impacts
that could damage the casing.
• Use only recommended battery and accessories.
Use of battery not expressly recommended for this equipment
may cause explosions or leaks, resulting in fire, injury and
damage to the surroundings. In the event that a battery leaks and
the eyes, mouth, skin or clothing contact these substances,
immediately flush with water and seek medical assistance.
Disconnect the battery charger and compact power adapter
from both the camera and the power outlet after recharging
or when they are not in use to avoid fire and other hazards.
Do not place anything, such as tablecloths, carpets,
bedding or cushions, on top of the battery charger while it
is charging.
_eaving the units plugged in for a long period of time may cause
them to overheat and distort, resulting in fire.
• Use only the specified battery charger to charge the battery.
• The battery charger and compact power adapter are
designed for exclusive use with your camera. Do not use it
with other products or batteries.
There is a risk of overheating and distortion which could result in
fire or electrical shock.
Before you discard a battery, cover the terminals with tape
or other insulators to prevent direct contact with other
objects.
_ontact with the metallic components of other materials in waste
containers may lead to fire or explosions.
Page 11
• Do not trigger the flash in close proximity to human or
animal eyes. Exposure to the intense light produced by the
flash may damage eyesight.
In particular, remain at least one meter (39 inches) away from
infants when using the flash.
• Keep objects that are sensitive to magnetic fields (such as
credit cards) away from the speaker of the camera.
Such items may lose data or stop working.
• Be careful not to bang the camera or subject it to strong
impacts or shocks when wearing or holding it by the strap.
• Be careful not to bump or strongly push the end of the lens.
The above-mentioned could lead to injury or damage the
equipment.
• Do not store the equipment in humid or dusty areas.
• Do not allow metal objects (such as pins or keys) or dirt to
contact the charger terminals or plug.
Such conditions could lead to fire, electrical shock or other
damage.
• Avoid using, placing or storing the equipment in places
subject to strong sunlight or high temperatures, such as the
dashboard or trunk (boot) of a car.
• Do not use the equipment in a manner that exceeds the
rated capacity of the electrical outlet or wiring accessories.
Do not use if the power cord or plug are damaged, or if not
fully plugged into the outlet.
• Do not use in locations with poor ventilation.
The above-mentioned can cause leakage, overheating or
explosion, resulting in fire, burns or other injuries. High
temperatures may also cause deformation of the casing.
• When not using the camera for extended periods of time,
remove the battery from the camera or battery charger and
store the equipment in a safe place.
The battery can run down.
Page 12
chargers to devices such as electrical transformers for
foreign travel because it may lead to malfunctions,
• Do not connect compact power adapters or battery
excessive heat generation, fire, electric shock or injury.
• Do not operate the flash with dirt, dust or other items stuck
to the surface of the flash.
• Be careful not to cover the flash with your fingers or
clothing when shooting.
The flash may be damaged and emit smoke or noise. The
resulting heat build-up could damage the flash.
Do not touch the surface of the flash after taking several
pictures in rapid succession.
_)oing so could result in burns.
lO
Page 13
• Never place the camera in close proximity to electric motors
or other equipment generating strong electromagnetic
fields.
Exposure to strong magnetic fields may cause malfunctions or
corrupt image data.
• When moving the equipment rapidly from a cold place to a
hot place, you can avoid condensation by placing the
equipment in an airtight, resealable plastic bag and letting it
adjust to temperature changes slowly before removing it
from the bag.
Moving the equipment rapidly from a cold place to a hot place may
cause condensation (water droplets) to form on its external and
internal surfaces.
• Stop using the camera immediately.
Continued use may damage the equipment. Remove the memory
card and battery or compact power adapter from the camera and
wait until the moisture evaporates completely before resuming
use.
11
Page 14
I BeforeUsingtheCamera--BasicOperations
_/_IZ -- _i_%_i_ ¸ _i_ii_/_iz i_i,_i_, _i_i_. _i_ _ i
• The LCD monitor on or off setting is retained even after the
camera power is turned off.
• The LCD monitor does not shut off in the [] or _,_, mode.
• The LCD monitor is set to the detailed display (Information
View) in the _, _, _, [_, [] or [] mode.
• The LCD monitor will not switch to detailed display in
magnified display (p. 80), or index playback mode (p. 81).
12.
Page 15
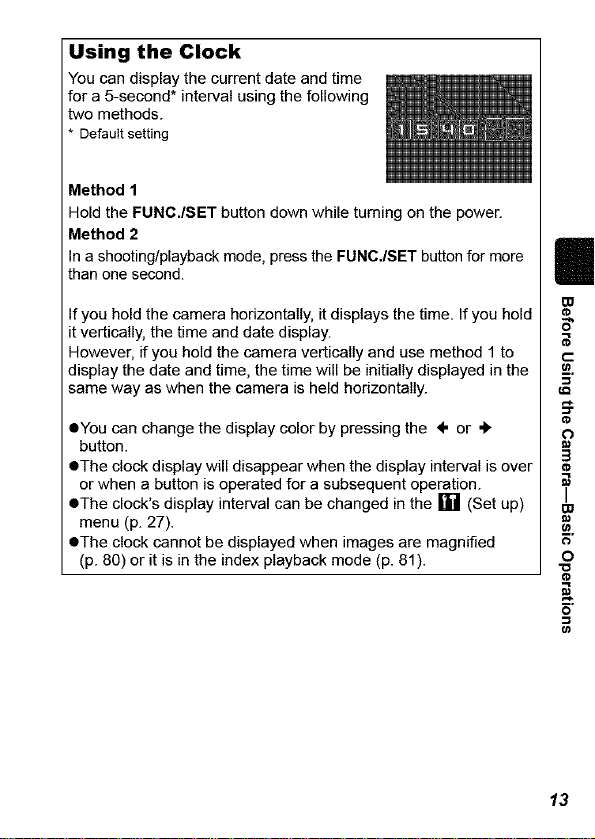
Using the Clock
You can display the current date and time
for a 5-second* interval using the following
two methods.
* Defaultsetting
Method 1
Hold the FUNC./SET button down while turning on the power.
Method 2
In a shooting/playback mode, press the FUNC,/SET button for more
than one second.
If you hold the camera horizontally, it displays the time. If you hold
it vertically, the time and date display.
However, if you hold the camera vertically and use method 1 to
display the date and time, the time will be initially displayed in the
same way as when the camera is held horizontally.
• You can change the display color by pressing the ÷ or +
button.
eThe clock display will disappear when the display interval is over
or when a button is operated for a subsequent operation.
eThe clock's display interval can be changed in the [] (Set up)
menu (p. 27).
eThe clock cannot be displayed when images are magnified
(p. 80) or it is in the index playback mode (p. 81).
5"
13
Page 16

LCD Monitor Brightness Settings
The brightness of the LCD monitor can be changed in the following
two ways.
eChanging Settings Using the Set up Menu (p. 26)
eChanging Settings Using the DISP. Button (Quick-bright LeD
Function)
You can set the LCD monitor to the brightest setting regardless of
the option selected in the Set up menu by pressing the DISP.
button for more than one second.*
- To restore the previous brightness setting, press the DISP.
button for more than one second again.
- The next time you turn on the camera, the LCD monitor will be at
the brightness setting selected in the Set up menu.
* You cannot change the brightness ofthe LCD monitor withthisfunction if
you have alreadyset itto itshighest setting inthe Set upmenu.
Night Display
When shooting in dark conditions, the camera automatically
brightens the LCD monitor to suit the brightness of the subject*,
making it easier to frame the subject.
* Although noise mayappear and the movement of the subject shown onthe
LCD monitor may appear somewhat jagged,there is no effect on the
recorded image. The brightness of the image displayed inthe monitor, and
the brightness of the actual imagerecordedwill be different.
14
Page 17
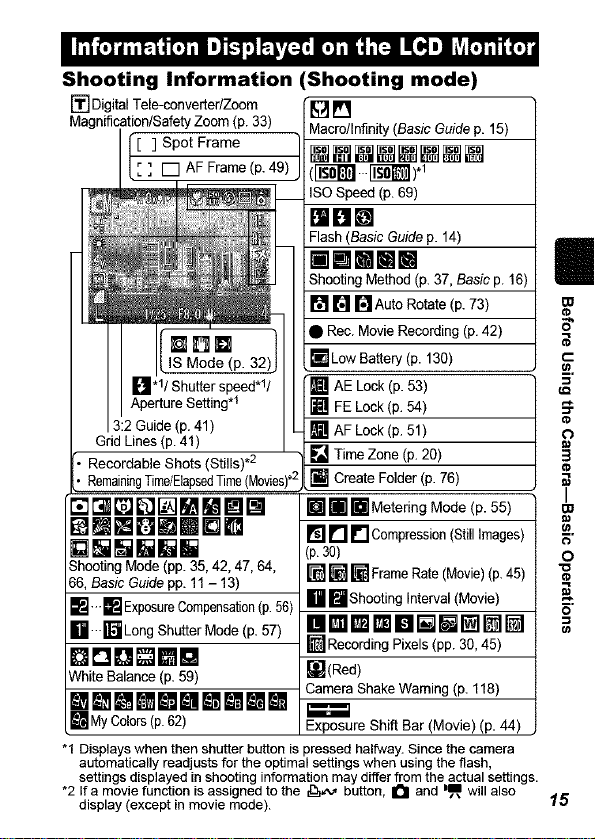
Shooting information
[] Digital Tele-converter/Zoom
Magnification/Safety Zoom (p. 33)
] Spot Frame
] [] AF Frame (p. 49)
(Shooting mode)
Macro/Infinity (Basic Guide p. 15)
[]l_[][]_t[][][]
(ITfd_I..li_).1
ISO Speed (p. 69)
81BIE!
Flash (Basic Guide p. 14)
ilWMMllill
Shooting Method (p. 37, Basic p. 16)
[] [] I'_ Auto Rotate (p. 73)
Rec. Movie Recording (p. 42)
il_"lLow Battery (p. 130)
ApertureSetting.!
3:2Guide (p. 41)
Grid Lines(p.41)
Recordable Shots (Stills) .2 .
RemainingTime/ElapsedTime (Movies)*"
_D_MMmll
mmHmmDm
Shooting Mode (pp. 35, 42, 47, 64,
66, Basic Guide pp. 11 - 13)
_;J---[] ExposureCompensation (p.56)
lli--i]_ Long Shutter Mode (p. 57)
DDO mn
White Balance (p. 59)
_[]_lmE_!jl_l_[][][] CameraShakeWaming(p. 118)
[] My Colors (p. 62)
"1 Displays when then shutter button is pressed halfway. Since the camera
automatically readjusts for the optimal settings when using the flash,
settings displayed in shooting information may differ from the actual settings.
*2 If a movie function is assigned to the _,_ button, IPI and ill will also
display (except in movie mode).
AE Look (p. 53)
[] FE Lock (p. 54)
[] AF Lock (p. 51)
[] Time Zone (p. 20)
[] Create Folder (p. 76)
[] [] [] Metering Mode (p. 55)
[] [] [] Compression (Still Images)
(p. 30)
[] [] [] Frame Rate (Movie) (p. 45)
[] []Shooting Interval (Movie)
__r_Recerding Pixels (pp. 30, 45)
[](Red)
Exposure Shift Bar (Movie) (p. 44)
15
Page 18
J_z_,z _y -: _m_i_i_m_,?_ ....... i - _i_i_¸ • :_,,••t_,y_,z _i_•?_,y_,•_
If the indicator blinks orange and the camera shake icon []
displays, it indicates there is insufficient illumination and a
slow shutter speed will be selected. Shoot using the following
methods.
- Set the IS mode to a setting other than [Off] (p. 32).
- Raise the ISO speed (p. 69).
- Set the Auto tSO Shift to [Oo_ (p. 70).
Select a setting other than [O] (flash off)
(Basic Guide p. 14).
- Attach the camera to a tripod or other device.
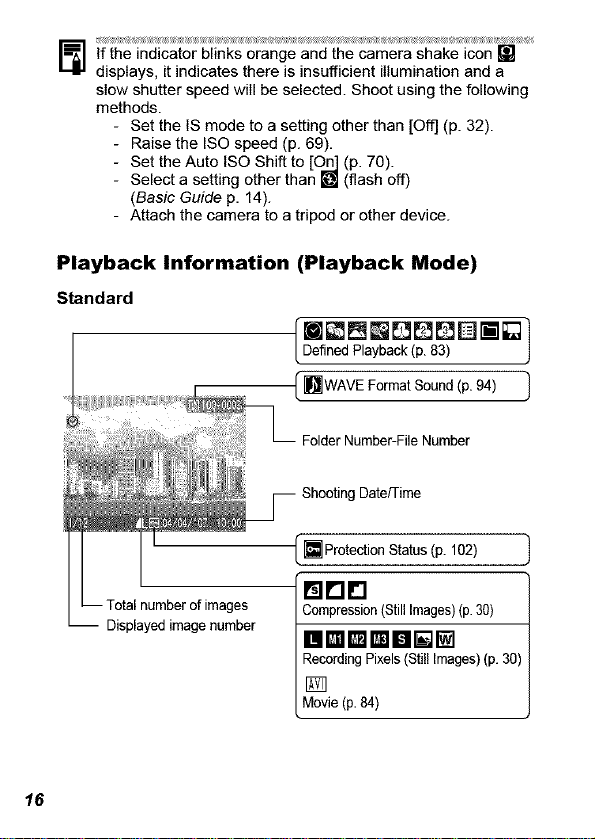
Playback Information
Standard
Displayedimagenumber
16
(Playback Mode)
[I_LgLg_DI;_ }
DefinedPlayback(p. 83) j
(HwAwFormatSound/P.94/ "]
FolderNumber-FileNumber
ShootingDate/Time
[] ProtectionStatus(p. 102)
mrlr'l
Compression(StillImages)(p.30)
RecordingPixels(Still Images)(p. 30)
[]
Movie(p.84)
Page 19
Detailed
My Category(p. 82)
ExposureCompensation(p.56)
Flash (BasicGuidep. 14)
Histogram(p. 18)
Macre/Infinity(Basic Guidep. 15)
[_1_lm[ml[_.l[][
i mmDm[Dl l[]
ShootingMode (pp.35, 42, 47, 64,
66,Basic Guidepp. 11- 13)
[ [ mlMetering Mode (p. 55)
_---_ ISOSpeed (p.69)
mMm[t [
RecordingPixels/FrameRate
(Movies)(p.45)
Sh_ter speed
[]Time Lapse(p.46)
Aperture Setting
The following information may also be displayed with some images.
Asound file ina formatother thantheWAVE formatis attachedor the
[ fileformat isnotrecognized.
JPEGimage notconformingto Designrulefor CameraFile System
_' Standards
[] RAW image
UnrecognizeddatatypeInformation for images shot on other cameras may not display
correctly.
_l_My Colors(Shooting)(p.62),
[] [] ColorAccent/Color Swap(p. 64)
m Immlmmm lm l
My Colors(Playback)(p. 92)
[] Imagewith Red-EyeCorrection
(p. 89)/MyColors effect(p. 92)
oDomm[
WhiteBalance(p. 59)
File Size
W Red-EyeCorrection(Playback)(p.89)
RecordingPixels (StillImages)(p.30)
MovieLength(Movies) (p. 42)
17
Page 20
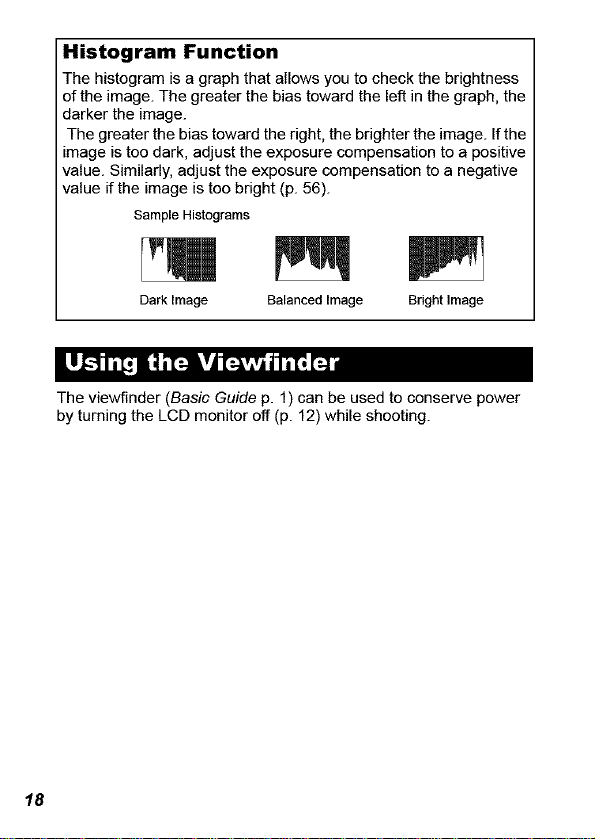
Histogram Function
The histogram is a graph that allows you to check the brightness
of the image. The greater the bias toward the left in the graph, the
darker the image.
The greater the bias toward the right, the brighter the image. If the
image is too dark, adjust the exposure compensation to a positive
value. Similarly, adjust the exposure compensation to a negative
value if the image is too bright (p. 56).
SampleHistograms
Dark Image Balanced Image Bright Image
The viewfinder (Basic Guide p. 1) can be used to conserve power
by turning the LCD monitor off (p. 12) while shooting.
18
Page 21
Thiscameraisequippedwithapowersavingfunction.Thepower
willshutoffinthefollowingcircumstances.Pressthepowerbutton
againtorestorepower.
Shooting Mode Powers down approximately 3 minutes after the last
Playback Mode Powers down approximately 5 minutes after the last
Connected to a Printer control is accessed on the camera.
* This time canbe changed.
• The power saving function will not activate during a slide
show or while the camera is connected to a computer.
• The power saving function settings can be changed (p. 26).
control is accessed on the camera. The LCD monitor
automatically turns off 1 minute* after the last control
is accessed even if [Auto Power Down] is set to [Off].
Press any button other than the power button or
change the camera orientation to turn the LCD
monitor back on.
i
5"
t-"
f.Q
t_
3
I
O
"o
19
Page 22

When traveling abroad, you can record images with local dates and
times simply by switching the time zone setting if you pre-register
the destination time zones. You can enjoy the convenience of not
having to switch the Date/Time settings.
Setting the Home/World Time Zones
20
Page 23
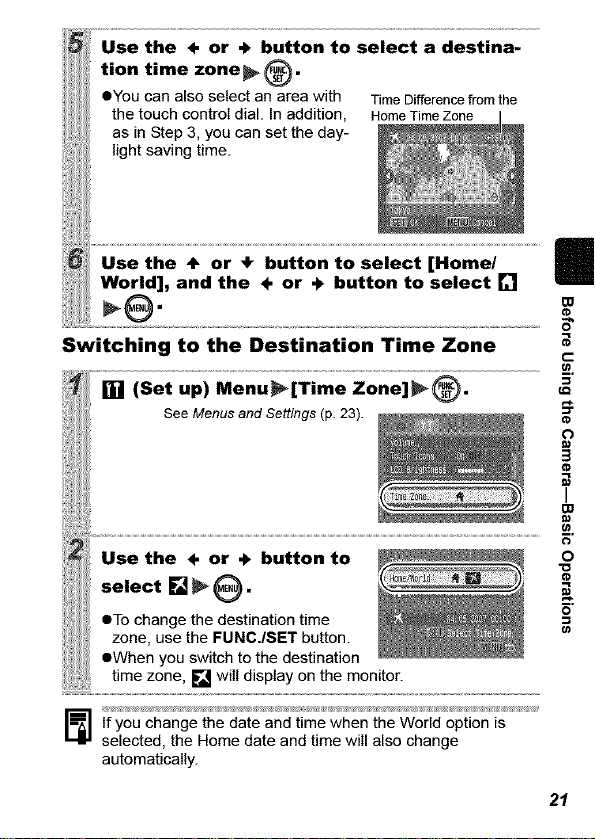
Use the ÷ or ÷ button to select a destina-
tion time zone_ .
eYou can also select an area with TimeDifferencefromthe
the touch control dial. In addition, HomeT meZone I
as in Step 3, you can set the day- __
,ghtsavingtime.
Use the 4_ or 4" button to select [Home/ []
World], and the ÷ or + button to select []
_@.
Switching to the Destination Time Zone
.... ...............
t-
B,
l See Menusand Settings (p.23).
.sethe÷or÷buttonto
select [] _ 0"
eTo change the destination time
zone, use the FUNC./SET button.
eWhen you switch to the destination
If you change the date and time when the World option is
selected, the Home date and time will also change
automatically.
T
(#
o
21
Page 24
Menus are used to set the shooting, playback and print settings as
well as such camera settings as the date/time and electronic beep.
The following menus are available.
eFUNC. Menu
eRec., Play, Print, Set up and My Camera Menus
FUNC. Menu
This menu sets many of the common shooting functions.
J
This example shows the FUNC. menu in 0 (Auto) mode.
® Turnthe modedialto O, OM, SCN or',==,.
® Press the FUNC./SET button.
_) Use the 4= or @ button to select a menu item.
• Some items may not be selectabte in some shooting modes.
(_ Use the ÷ or @ button to select an option for the menu
item.
• You can also use the touch control dial to make a selection.
• You can select further options with the MENU button for some
options.
• After selecting an option, you can press the shutter button to
shoot immediately. After shooting, this menu will appear again,
allowing you to adjust the settings easily.
® Press the FUNO./SET button.
22
Page 25

Rec., Play, Print, Set up and My Camera
Menus
Convenient settingsfor shooting, playback or printing can be set
with these menus.
[] (Rec.)Menu --
(Setup) Menu
(MyCamera)Menu
Q
(_ You canswitch
betweenmenus with
the ÷ or 4" button
whenthis part is
selected.
•This example shows the Rec. menu in O (Auto) mode.
• In playback mode, the Play, Print, Set up and My Camera
menus display.
® Press the MENU button.
Use the 4, or 4" button to switch between menus.
• You can also use the zoom lever to switch between menus.
® Use the ÷ or _1, button to select menu items.
• You can also use the touch control dial to make a selection.
• Some items may not be setectabte in some shooting modes.
® Use the 4" or 4" button to select an option.
• Menu items followed by an ellipsis (...) can only be set after
pressing the FUNC./SET button to display the next menu.
Press the FUNCJSET button again to confirm the setting.
® Press the MENU button.
®
m
0
"o
O_
23
Page 26
See Functions Available in Each Shooting Mode (p. 160).
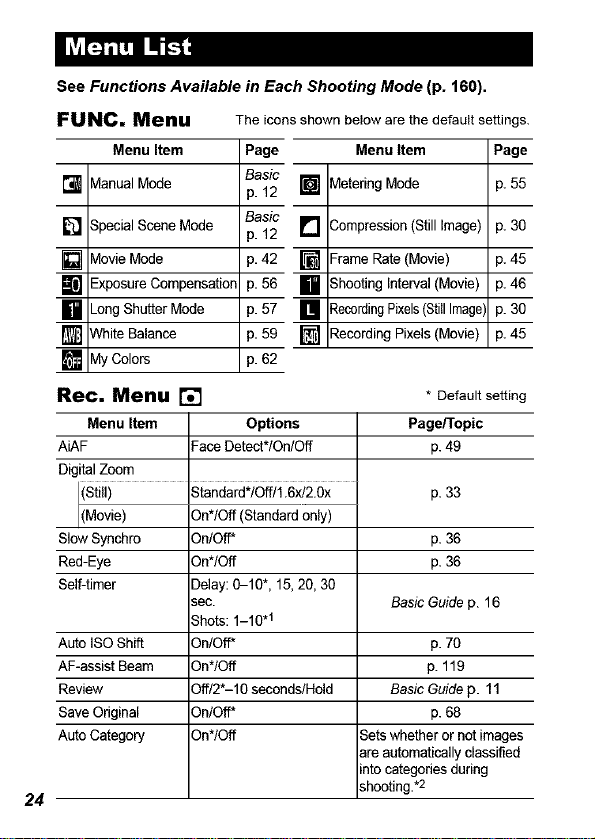
FUNC. Menu
Menu Item
[] VtanualMode
3pecialSceneMode
[] p.t2 []
VlovieMode
[]
-xposure Compensation
_ongShutterMode
Nhite Balance
[]
VlyColors
[]
Rec. Menu [] * Defaultsetting
Menu Item Options PageFl'opic
AiAF FaceDetect*IOn/Off p.49
DigitalZoom
(Still) Standard*/Off/1.6x/2.0x p.33
(Movie) On*lOft (Standardonly)
SlowSynchro On/Off* p.36
Red-Eye On*/Off p.36
Self-timer Delay:0-10", 15,20, 30
Auto ISOShift On/Off* p. 70
AF-assistBeam On*lOft p. 119
Review Off/2"-10 seconds/Hold Basic Guidep. 11
SaveOriginal OnlOff* p.68
AutoCategory On*lOft Setswhether or notimages
24
The icons shown below are the default settings.
Page Menu Item Page
Basic
p. 12 []
Basic
p.42 []
p.56
p.57
p.59 []
). 62
sec. BasicGuidep. 16
Shots:1-10.1
VleteringMode p. 55
3ompression(StillImage) p. 30
--rameRate (Movie) p.45
3hootingInterval(Movie) p.46
_ecordingPixels(StillImage',p. 30
:_ecerdingPixels (Movie) p.45
are automaticallyclassified
into categoriesduring
shooting.*2
Page 27
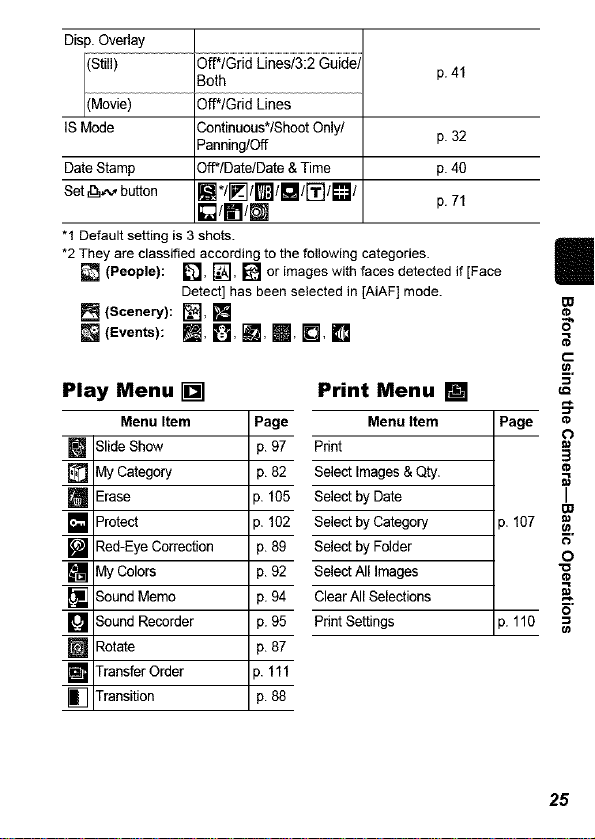
Disp.Overlay
p.41
r_es
ISMode 3ontinuous*/ShootOnly/ p. 32
DateStamp 3ff*/Date/Date &Time p.40
Set _,'_ button []*/_]lml[]/["_l[]l p.71
"1 Default setting is 3 shots.
*2They are classified according to the following categories.
(People): L_, [_&'],[] or images with faces detectedif [Face
(Scenery): _, []
[] (Events): _[_, B, I_, m, I_, []
Play Menu []
Menu Item Page
m SlideShow 3.97
MyCategory 3.82
[] Erase p. 105
[] Protect p. 102
[] Red-EyeCorrection 3.89
[] MyColors 3.92
[] SoundMemo 3.94
[] SoundRecorder 3.95
[] Rotate 3.87
[] TransferOrder p. 111
[] Transition 3.88
Panning/Off
[]/ITI/m
Detect]has been selected in [AiAF] mode.
Print Menu []
Menu Item
Print
SelectImages &Qty.
Select byDate
Select byCategory
Select byFolder
Select All Images
ClearAll Selections
PrintSettings
Page
p. 107
p. 110
I
m
5"
t-
f.Q
o
3
I
m
O
"o
25
Page 28
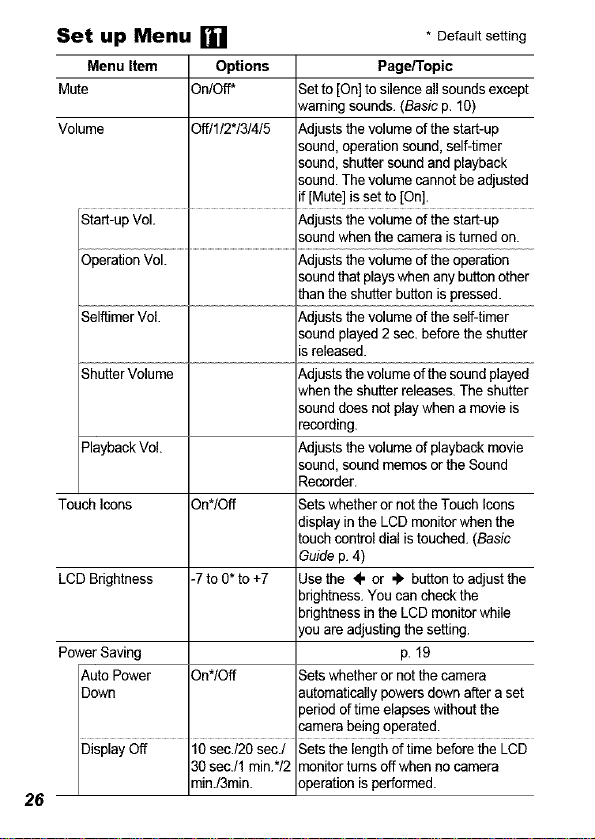
Set up Menu []
Menu Item Options
Mute On/Off*
Volume Off/1/2"/3/4/5
Setto [On]tosilence allsounds except
_vamingsounds.(Basic p. 10)
_,djuststhe volumeofthe start-up
sound,operationsound,self-timer
sound,shuttersoundand playback
sound.The volumecannot beadjusted
f [Mute]is set to [On].
* Default setting
Page/Topic
................I...........................................................................................
. _,djuststhe volumeof the operation
SelftimerVoL t_djuststhe volumeof the self-timer
ShutterVolume t_djuststhevolumeofthe soundplayed
_laybackVoL _,djuststhe volumeof playbackmovie
Touch Icons On*/Off Setswhetheror notthe Touch Icons
LCDBrightness -7 to0* to +7 Usethe ÷ or _ button toadjust the
PowerSaving p.19
Auto Power On*/Off Setswhether or notthe camera
Down _utomaticallypowersdown after aset
Display Off 10sec./2Osec./ Setsthe lengthof time beforethe LCD
26
3gsecJ1 min.*/2 _nitor tums offwhen nocamera
min./3min. _perationisperformed.
soundthatplayswhen anybuttonother
Lhanthe shutterbuttonispressed.
soundplayed2 sec.before theshutter
s released.
,vhenthe shutterreleases.The shutter
sounddoesnotplaywhena movieis
oecording
sound,soundmemosorthe Sound
Recorder.
Jisplayinthe LCDmonitorwhen the
Louchcontroldialis touched.(Basic
Guidep.4)
Ddghtness.You can checkthe
brightnessinthe LCDmonitorwhile
_,ouare adjustingthe setting.
periodof time elapseswithoutthe
_mera_ ngopera!e_:
Page 29

Time Zone Home*/World p. 20
Date/Time Basic Guide p. 9
Clock Display 3-10 .1 eec./20
Format You can also set itto perform a low
File Numbering Sontinuous*/
Create Folder p. 76
Create New Folder Sheck mark Creates a folder for the next shooting
sec./30 secJ1
"nin./2 min./3 p. 13
"nin.
level format (p. 29).
_uto Reset p. 78
[On)l session.
No check mark
:off)
Auto Create _ff*IDailyl You can also set the Auto Create time.
Auto Rotate 9n*lOff p. 73
Lens Retract min.*IO sec. Sets the timing of the lens retraction
Language Basic Guide p. 9
Video System NTSCIPAL p. 104
Print Method t_uto*/_i] See below. *2
Reset All p. 28
"1 Default setting is 5 seconds.
*2 You can change the printer connection method. There is usually no need
to change the settings, but select [] when you print an image recorded in
the [] (Widescreen) mode at the full page setting for wide paper using a
Canon SELPHY CP730/CP720/CP710/CP510 Compact Photo Printer.
Since this setting is saved even when the power is turned off, ensure that
you return the setting to [Auto] to print other image sizes. (However, it
cannot be changed while the printer is connected.)
Vlonday-Sundayl
Monthly
when you switch from the shooting to
the playback mode.
I!
m
a-
t-.
I,Q
O
3
I
m
O
27
Page 30
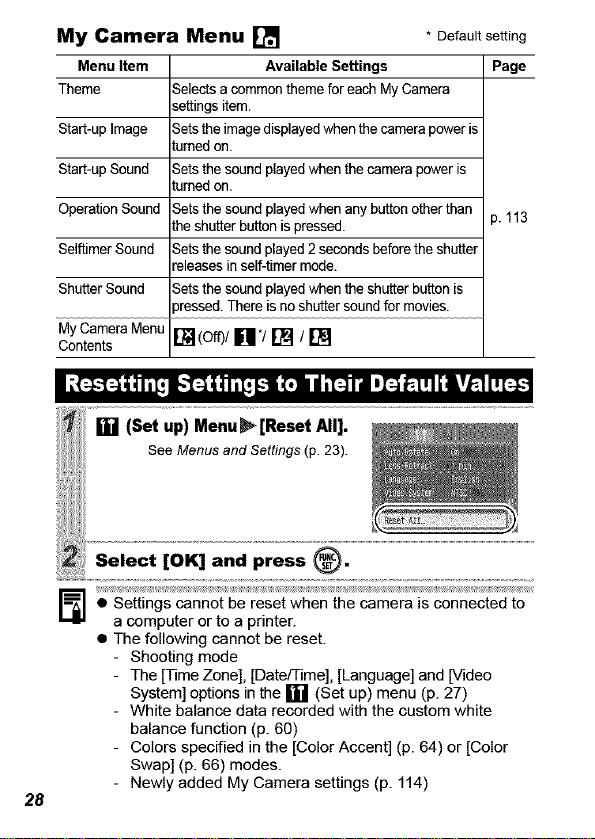
My Camera Menu []
Menu Item Available Settings
Theme Selectsa commonthemefor eachMyCamera
Start-upImage
Start-upSound
OperationSound ). 113
SelftimerSound
ShutterSound
My CameraMenu
Contents
settings item.
Setsthe imagedisplayedwhen thecamerapoweris
turnedon.
Sets the soundplayed when thecamerapower is
turnedon.
Setsthe soundplayed when any buttonotherthan
the shutterbutton ispressed.
Setsthe soundplayed2 seconds beforethe shutter
releasesin self-timer mode.
Setsthe soundplayed when theshutter buttonis
)ressed.There isno shuttersoundfor movies.
[] (of0/[]*/[] / []
* Default setting
= A"]:
®:
• Settings cannot be reset when the camera is connected to
a computer or to a printer.
• The following cannot be reset.
- Shooting mode
- The [Time Zone], [Date/Time], [Language] and [Video
System] options in the [] (Set up) menu (p. 27)
- White balance data recorded with the custom white
balance function (p. 60)
- Colors specified in the [Color Accent] (p. 64) or [Color
Swap] (p. 66) modes.
28
- Newly added My Camera settings (p. 114)
Page
Page 31

Youshouldalwaysformatanewmemorycardoronefromwhich
youwishtoeraseallimagesandotherdata.
oToperformaoweveformat,use
the+ button to select [Low Level
Format] and the 4" or .l, button to __
add a check mark. _1
• You can stop formatting a card _j
when [Low Level Format] is Displayswhensound
selected by pressing the FUNC./ data recordedwiththe
SET button. You can still use a card soundrecorderispresent
without problem when formatting is (P 95).
halted, but its data will be erased.
B,
O
• Low Level Format
We recommend you select [Low Level Format] when you
think that the recording/reading speed of a memory card
has dropped. A low level format may require 2 to 3 minutes
with some memory cards.
29
Page 32

I Shooting
You can also use the touch control dial to select shooting
modes or FUNC. menu opt ons. See the Basic Guide, p. 4.
Approximate Values for Recording Pixels
Recording Pixels
[] (Large) 3264 x 2448
[] (Medium 1) 2592x 1944
[] (Medium 2) 2048x 1536
[] (Medium3) 1600x120(3
[] (Small) 640 x 480
[] *2 or [] *2 1600 X 120(3
(Postcard) pixels
pixels
pixels
pixels
pixels
pixels
High Printing to about A3-size
,h, 297 x 420 mm (11.7 x 16.5 in.)
Printing to about A4-size
219 x 297 mm (8.3x 11.7in.)
Printing to about Letter-size
216 x 279 mm (8.5 x 11in.)
Printing to about A5-size
148 x 210 mm (6 x 8.3 in.)
Print postcard-size prints
148 x 190 mm (6 x4 in.)
Print L-size prints
'r 119x 89 mm (4.7 x 3.5 in.)
Low Sendimages as e-mail
attachments or shoot more images
When printing to postcards (p. 40).
You can also imprint the date on images.
Purpose.1
3O
Page 33
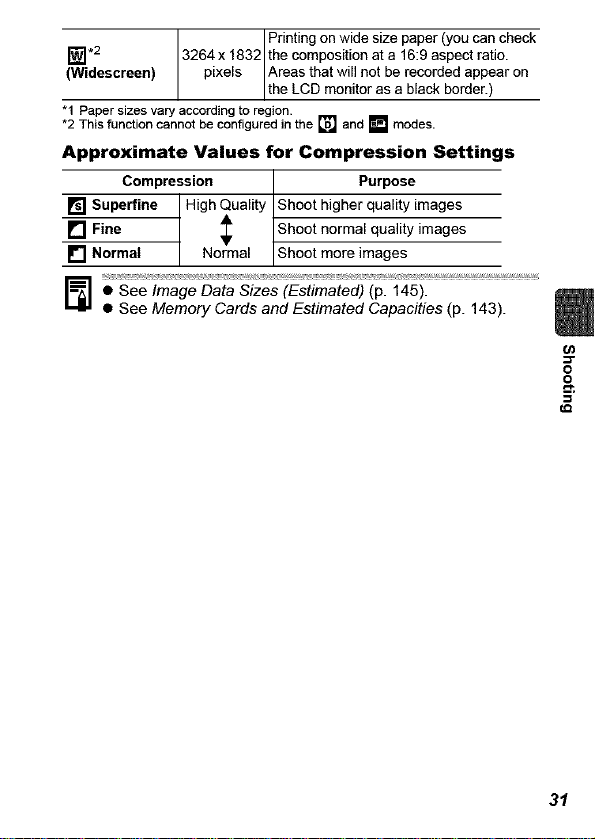
_].2 3264x 1832 the composition at a 16:9aspect ratio.
(Widescreen) pixels Areas that will not be recorded appear on
"1 Paper sizes vary according to region.
*2 This function cannot be configured in the [] and [] modes.
Approximate Values for Compression Settings
Compression Purpose
[] Superfine High Quality Shoot higher quality images
[] Fine _ Shoot normal quality images
[] Normal Normal Shoot more images
• See Image Data Sizes (Estimated) (p. 145).
• See Memory Cards and Estimated Capacities (p. 143).
Printingonwidesizepaper(youcancheck
the LCD montor as a back border.)
o
o
31
Page 34

By using the tS mode, you can reduce image blur when magnifying
a distant subject or shooting in low-light situations.
You can checkthe effect of the IS mode on image blur
[] Continuous
[] Shoot Only blur even if their movements displayed on the LCD
[] Panning recommendedfor shootingobjectsmoving horizontally.
on the LCD monitor since the ISmode runs
continually. This makes it easier to compose images
and focus on subjects.
IS mode is only activated when the shutter button is
pressed, so subjects will be captured with reduced
monitor are not smooth. This option is notavailable in
the _ mode.
This optiononlystabilizesthe effectof upand down
camera motionson the image.This optionis
This optionis not availablein the _lmmode.
32
Page 35

You can shoot zoomed images using the combined digital and
optical zooms. The focal lengths (35mm film equivalent) and
characteristics are as follows.
Option Focal Length
Characteristics
You can shoot at a maximum zoom
Standard 35 - 560 mm
factor of approximately 16x using a
combination of the optical and digital
zoom features.
Off 35 - 140 mm
1.6x 56 - 224 mm
Shoots without using the digital zoom.
The digital zoom locks at the selected
factor and the focal length shifts to the
telephoto setting.
2.0x 70 - 280 mm
Compared with the [Standard] and [Off]
options at a similar angle of view, this
option uses a higher shutter speed to
reduce the potential for camera shake.
(/)
o
&
33
Page 36

Using the Digital Zoom
Using the Digital Tele-Converter
Adjust the angle of view with the zoom lever
and shoot.
e[¥] and the zoom factor will display
on the LCD monitor.
OThe image may appear coarse
depending upon the selected
recording pixels (the [] icon and
the zoom factor appear in blue).
About the Digital Tele-Converter
A digital tele-converter is a function that reproduces the effect of a
tele-converter lens (supplemental lens that extends the zoom
factor of a ens) when the d g ta zoom s used.
34
Page 37

You can shoot a subject 2 - 50 cm (0.8 in. - 1.6 ft.) from the end of
the lens at the maximum wide angle setting. With the digital zoom,
the image area is 7.5 x 5.5 mm (0.3 x 0.2 in.) at maximum zoom
(approximately 4.0x).
35
Page 38

You can set whether or not the red-eye reduction* lamp automatically
fires with the flash.
*This function reduces the effect of light reflecting back from the eyes and making
them appear red.
(Rec,) Menu _ [Red-Eye] _ [On]*/[Off],
See Menus and Settings (p. 23).
*Default setting.
You can shoot with the flash at slow shutter speeds. This is handy
for shootin 9 at night or under artificial Iightin 9 indoors.
36
Please note that camera shake becomes a factor when [Slow
Synchro] is set to [On]. If this occurs, you are recommended
to fix the camera to a tripod to shoot in this mode.
Page 39

In this mode, the camera shoots continuously while the shutter
button is held down.
If you use the recommended memory card*, you can shoot
continuously at a set shooting interval until the memory card is full
(smooth continuous shooting) (p. 143).
*Recommended Memory Card
Super high speed SDC-512MSH memory card (sold separately)
newly formatted with low level formatting (p. 29).
• This ret]ectsstandard shooting criteria established by Canon.Actual results
may vary according tothe subject and shooting conditions.
• Evenif continuousshooting suddenly stops, the memory cardmay not be
full.
¸
ton to display J_l.
• The camera will continue to record successive images while
the shutter button is fully pressed. Recording will cease
when the shutter button is released.
To Cancel Continuous Shooting
Select [] in Step 1.
• The interval between shots lengthens when the built-in
memory of the camera fills.
• If the flash is used, the interval between shots lengthens
because the flash must charge.
37
Page 40

i'_E_ IIt_l,_:lI_|_ Lv_L'__ Isc.1
This mode is for recording people against a nightscape or points of
light, such as holiday lighting. You can depict the point source of
light in specific shapes to produce a fantastical image. Always use
the flash in this mode (flash is on by default).
Image shot with _ selected.
Special Effect Options
I m I _ I D I [] I _ I m I
Shooting Tips
eYou are advised to record a trial image before shooting to confirm
the effect before taking the actual picture.
eUse this mode in as dark a place as possible where there are
points of light, such as holiday lighting.
eShoot within range of the flash (p. 139) to ensure the subject is
illuminated by the flash. The subject must only be illuminated by
the flash and the point source.
eAfter shooting, check the image to see if it turns out as expected.
38
Page 41

FUNC. Menu_ El* (Portrait) _ [] (Creative
Light Effect).
See Menus and Settings(p. 22).
*Default setting.
Press O"
_i_y I¸_i _ _iiii_/iiilii_i_i>5_iii:_i_ _ _,,___i_,_2_,_i_ _ _Ii_¸_+;_ __iii__:_,Ji_ii__ _,_______________ ,_ _i_ ____ii____________i________
• The image stabilization function may not be as effective in
this mode as in others.
• The shape may not appear as expected if there is too much
camera shake or you are shooting a moving light source.
• The relative positions of the subject and the light source will
determine whether the shape overlaps the subject in the
image.
• Shooting conditions may cause unexpected results in terms
of image brightness and how well the shape is maintained
in the image.
(n
=F
o
(Q
39
Page 42

You can shoot images with the optimal settings for postcards by
composing them inside the print area (width-to-height ratio of
approximately 3:2) shown in the LCD monitor.
For printing instructions, refer to the Direct Print User Guide.
Embedding the Date in the Image Data
You can embed the date in image data when [] (Postcard)
is selected.
4O
Page 43

You can check a composition's horizontal and vertical alignment as
well as a 3:2 aspect ratio print range on the LCD monitor by using a
shooting guide while shooting.
Displays grid lines dividing the monitor into 9 areas,
Grid Lines allowing you to check the subject's horizontal and vertical
alignment.
You can check what can be printed in a composition using
3:2 Guide a 3:2 aspect ratio*. The portion that will not print displays
in gray.
Both
*Images are recorded at the same aspect ratio of 4:3 as shown in the normal view-
ing mode.
You can display both the grid lines and 3:2 guide at the
same time.
• The grid lines and 3:2 guide do not appear on recorded
images.
• Only [Grid Lines] can be used when [] or [] is selected,
or in _,_,mode.
O
o
41
Page 44

I_'R'_ [-_1[_tT_ I'w]
The following movie modes are available.
For information on the recording pixets and frame rate in each
mode, refer to Changing Recording Pixels and Frame Rates (p. 45).
If you register the [] function with the _,,_ button, you can start
shooting a movie simply by pressing the _,_, button regardless of
the mode dial setting (p. 71).
You can select the recording pixels and frame rate and record until the
memory card is full (when a super high-speed memory card is used,
such as the recommended SDC-512MSH). The digital zoom can be
used while shooting in this mode. (p. 33)
Maximum Size: 4 GB*/movie
Use this mode to record fast moving subjects, such as in sports
photography.
Maximum Clip Length: 1 minute
Since there are few recording pixels and also the data size is small, this
mode is convenient for sending movies as e-mail attachments or when
the memory card capacity is low.
Maximum Clip Length: 3 minutes
You can have only the specified color remain and change all others into
black and white, or change a specified color into a different color
(pp. 64, 66). As with the Standard mode, you can also select the
recording pixels and frame rate and record until the memory card is full
(when a super high-speed memory card is used, such as the
recommended SDC-512MSH).
Maximum Size: 4 GB*/movie
42
Select a shooting interval (1 or 2 sec.) to have a single frame shot at
that interval. When played back, two hours worth of recorded frames is
compressed to 8 minutes (1-sec. interval) or 4 minutes (2-sec.
interval). You can record events from a fixed perspective, such as the
spectacle of a flower budding over time, or view changing elements in
a short period. Sound cannot be recorded in this mode.
Maximum recording session: 2 hours.
Page 45

• The recording time will vary according to the capacity of the memory card
you use (p. 143).
* Recording will stop after one hour of continuous recording even if the
recorded data volume has not reached 4 GB. Depending on the volume and
data writing speed of the memory card, recording may stop after one hour
of continuous recording even if the recorded data volume has not reached
4GB.
O
2-.
43
Page 46

44
• Before recording, you can set the AE lock (p. 53) and
exposure shift.
1. Press the ISO button.
The exposure will lock (AE lock) and the exposure shift
bar will appear in the LCD monitor.
2. Use the _. or _ button to adjust the exposure.
Press the ISO button again to release the setting. Also,
the setting will be canceled if you press the MENU button
or change the white balance, My Colors or shooting
mode settings.
• In [] mode, the selected power saving option (p. 26)
determines if the LCD monitor turns off or not. You can turn
the LCD monitor on by pressing any button other than the
power button or shutter button.
• QuickTime is required to play back movies (Data type: AVI/
Compression method: Motion JPEG) on a computer (for
Windows 2000 only).
Page 47

Changing Recording Pixels and Frame
Rates
You can change the recording pixels and frame rate when
the movie mode is set to [] (Standard), [] (Color Accent)
or [] (Color Swap).
Recording Pixels and Frame Rates
Frame rates indicate the number of frames recorded or
played back each second. The higher the frame rate, the
smoother the appearance of motion.
FrameRate
Recording Pixels (frames/sec.)
[] W m
[] Standard
[] Color Accent
[] Color Swap
[] FastFrame Rate.2
[] Compact.2
[] Time Lapse
"1 Default setting
*2 The recording pixels and frame rate are fixed.
*3 Frame rate when the shooting interval is [] : 1 frame/sec.,
[]: 0.5 frame/sec.
Frame rate when playing back ([] or []): 15 frames/sec.
[] 640 x 480 pixels
[] 320 x 240 pixels
[] 320 x 240 pixels
[] 160 x 120 pixels
[] 640 x 480 pixels
- O O
O -
0*3
O
• See Image Data Sizes (Estimated) (p. 145).
See Memory Cards and Estimated Capacities (p. 143).
45
Page 48

Changing the Shooting Interval
([] (Time Lapse))
46
Page 49

Stitch Assist can be used to shoot overlapping images that can later be
merged (stitched) to create one panoramic image on a computer.
seams of several
The overlapping
adjacent images
can be joined into a
single panoramic
_mage. _t_
FUN6. I_len,,_l_*(l_lan-,al)_m/l_($titch Assist). o
*Default setting. _._
j two shooting directions.
• The exposure and white balance
See Menus and Settings(p. 22). _
You can select from the following
- [] Left to right horizontally
- [] Right to left horizontally _ _[______]
are set and locked with the first
,ma0e
O
47
Page 50

Compose the second image so that it over-
laps a portion of the first and shoot.
eYou can retake a shot by pressing the ÷ or ,I_ button and return-
ing to the previously recorded image screen.
eMinor discrepancies in the overlapping portions can be cor-
rected when the images are stitched together.
Repeat the procedure for additional images,
ePress the FUNCJSET button after the last shot.
eA sequence may contain up to 26 images.
Use PhotoStitch, a supplied software program, to merge the
images on a computer.
48
Page 51

.... J _m mDm s Dm ......
The autofocus frame (AF frame) indicates the area used to set the
focus. Select from among the following three focusing methods.
You can have the camera automatically detect
the position of a face and use this data to set the
focus and exposure* while shooting. In addition,
rl
LJ
Face
the camera will meter the subject so that the face
Detect
is correctly illuminated when the flash fires. If a
face is not detected, shooting will take place with
.... .. I
[on].
*Only in evaluative metering mode (p. 55).
The camera detects the subject and highlights
(No frame)
[]
• The AF frame appears as follows (when the LCD monitor is
On
the AF frames, from 9 available points, that itwill
use to determine the focus.
The camera focuses using the center AF frame.
OFF This is convenient for focusing on a specific part
of a subject with greater certainty.
on) when the shutter button is pressed halfway.
- Green: Shooting preparations complete
- Yellow: Focusing difficulty (AiAF set to [Off])
- No Display: Focusing difficulty (AiAF set to [On])
C/)
o
o
49
Page 52

• The following occurs when [Face Detect] is selected.
- The camera displays up to three frames where it has
detected a face. At this point, the frame the camera
judges to be the main subject appears in white while the
others appear in gray. Pressing the shutter button
halfway displays up to 9 green AF frames.
- If no white frame displays and all the frames appear in
gray, images will be shot using the [On] option rather
than [Face Detect].
- The camera may mistakenly identify non-human subjects
as a face. If this occurs, switch to the [On] or [Off] option.
- Faces may not be detected in the following instances.
Examples:
• Faces near the screen edges or faces that appear
extremely small, large, dark or bright in relation to the
overall image.
• Faces turned to the side or at a diagonal, or faces with
a portion hidden.
5O
Page 53

mmED m mDm@Dm WE WW
It may be difficult to focus on the following types of subjects.
eSubjects with extremely low contrast to the surroundings
eScenes with a mixture of near and far subjects.
eSubjects with extremely bright objects at the center of the composition
eSubjects that are moving quickly
eSubjects through glass: Try to shoot as close to the glass as
possible to reduce the chances of light reflecting back off the glass.
Shooting with the Focus Lock
same focal distance as the main subject is
centered in the viewfinder or in the AF
frame displayed on the LCD monitor.
wa e..............
focus.
Keep
to compose the shot as desired and press
the shutter button fully,
Shooting with the AF Lock
The AF lock can be used in the ["_, ['_, F_] [_ [] or [] mode.
2
51
Page 54

To Release the AF Lock
Press the _/all, button.
• When shooting with the focus lock or AF lock using the LCD
monitor, setting [AiAF] to [Off] (p. 49) makes shooting easier
since the camera focuses using the center AF frame only.
• The AF lock is convenient because you can let go of the
shutter button to compose the image. Moreover, the AF
lock isstill effective after the picture is taken, allowing you
to capture a second image with the same focus.
• In _m mode the AF frame does not display.
52
Page 55

You can set the exposure and focus separately. This is effective
when the contrast is too strong between the subject and
background or when a subject is backlit.
Turn on the LCD monitor.
Focus on ;he par; of the subiec; on wh;ch
you wish to lock the exposure setting.
the ISO button.
• The [] icon will display.
_ Re:aim the camera to compose the shot as
_[ desired and press the shutter button fully.
To Release the AE Lock
Press the IS0 button.
• In Dm mode, AE lock can also be set/canceled (p. 44).
• You can use the FE lock (p. 54) when using the flash.
53
Page 56

You can locktheflashexposure so thattheexposure settingsare
correctlysetregardlessofthecompositionofyour subject.
To Release the FE Lock
Press the ISObutton.
54
Page 57

Metering Methods
Appropriate for standard shooting conditions,
including backlit scenes. The camera divides
[] Evaluative complex lighting conditions, such as the position of
Center Averages the light metered from the entire frame,
[] Weighted but gives greater weight to the subject matter at the
Average center.
[] Spot center of the LCD monitor. Use this setting when
The metering method is fixed to [Evaluative] in the Long
Shutter mode (p. 57).
images into several zones for metering. It evaluates
the subject, the brightness, the direct light, and the
backlighting, and adjusts the settings to the correct
exposure for the main subject.
Meters the area within the spot AE point at the
you want to set the exposure on the subject inthe
center of the monitor.
oo
55
Page 58

Adjust the exposure compensation to a positive value to avoid
making the subject too dark when it is backlit or shot against a
bright background. Adjust the exposure compensation to a negative
value to avoid making the subject too bright in night shots or when
shot against a dark background.
To Cancel the Exposure Compensation
Restore the compensation value to [0].
In =,It mode, the exposure shift can be set/canceled (p. 44).
56
Page 59

You can set the shutter speed to a slow setting to make dark
subjects appear brighter.
FUNC Menu_ _i]* (Exposure Compensation)
• 0"
See Menus and Settings(p. 22). _..
Use the 4" or 4" button to select the shutter
speed_@.
eThe higher the value, the brighter
the image and the lower the value,
the darker the image.
• f you press the MENU button at
this point, you will return to the
Exposure Compensation setting
screen.
2
57
Page 60

• Use the LCD monitor to confirm that the image was
recorded at the desired brightness.
Please note that camera shake becomes a factor at low
shutter speeds. Set IS mode to a setting other than [Off], or
shoot with the camera attached to a tripod.
Use of the flash may result in an over-exposed image. If
this occurs, shoot with the flash set to _'i_.
The following are unavailable:
Exposure Compensation
Metering
AE Lock
FE Lock
ISO speed: Auto, High ISO Auto
Auto ISO Shift
Flash: Auto
Slow Synchro
58
Page 61

lET;i[r_ i li[_m4,TJli[.],[_a |YI,_;FJI :Fl_l,[.(4 lo.l,W m
Normally, the [] (Auto) white balance setting selects an optimal
white balance. When the [] setting cannot produce natural looking
colors, change the white balance using a setting appropriate for the
light source.
White Balance Settings
[] Auto Settings are automatically set by the camera
[] Day Light For recording outdoors on a bright day
[] Cloudy For recording under overcast, shady or twilight skies
[] Tungsten wavelength fluorescent lighting
[] Fluorescent warm-white (3-wavelength) fluorescent lighting
[] FluorescentH daylightfluorescent-type 3-wavelength fluorescent
[] Custom retained in the camera from awhite-colored object,
For recording under tungsten and bulb-type 3-
For recording under warm-white, cool-white or
For recording under daylight fluorescent, or
lighting
For recording with the optimal white balance data
such as white paper or cloth
(/)
o
59
Page 62

Using the Custom White Balance
You can set a custom white balance to obtain the optimal
setting for the shooting conditions by having the camera
evaluate an object, such as a piece of white paper or cloth,
or a photo-quality gray card that you wish to establish as the
standard white color.
In particular, take a custom white balance reading for the
following situations that are difficult for the [] (Auto) setting
to detect correctly.
eShooting close-ups
eShooting subjects of monotone color (such as sky, sea or
forest)
eShooting with a peculiar source of light (such as a
mercury-vapor lamp)
FUNC. Menu_[]* (Auto)_[] (Custom).
See Menus and Settings (p. 22).
* Default setting.
Aim the camera at a piece of white
paper or cloth and press _.
elf you are viewing it with the LCD monitor, ensure that
the center frame is completely filled with the white
image, tf you are using the optical viewfinder, ensure
that the entire field is filled. However, the center frame
will not display when using the digital zoom.
6O
Page 63

[] and the exposure compensation setting to [+0]
before setting a custom white balance.
The correct white balance may not be obtained when
the exposure setting is incorrect (image appears
completely black or white).
• Shoot with the same settings as when reading the
white balance data. If the settings differ, the optimal
white balance may not be set.
In particular, the following should not be changed.
- ISO Speed
- Flash
Setting the flash to on or off is recommended, tf the
flash fires when reading the white balance data with
the flash set to [] (Auto), make sure that you also
use the flash when you shoot.
• Since the white balance data cannot be read in Stitch
Assist mode, preset the white balance in another
shooting mode beforehand.
• If you register the [] (Custom White Balance)
function with the _._ button (p. 71), obtain the white
balance data each time you press the ,13,_._button.
61
Page 64

You can change the look and feel of the pictures you take.
My Colors Settings
[] My Colors Off Records normally with this setting.
Vivid -mphasizes the contrast and color saturation to
[] Neutral
[] Sepia Records in sepia tones.
[] B/W Records in black and white.
[] Positive Film _/ividBlue effects. It can produce intense natural-
Lighter Skin Jse this option to make skin tones lighter.
Tone*
I_1 Darker Skin Jse this option to make skin tones darker.
Tone*
[] Vivid Blue 31uesubjects, such as the sky or ocean, more
[] Vivid Green ]reen subjects, such as mountains, new growth,
Vivid Red
Custom Color
I1_ be used to make subtle adjustments, such as
* Ifthe image contains colorsthat are the same as human skin, those colors
will also bechanged. You may not obtain the expected results depending
on the skin color.
62
"ecord bold colors.
Tonesdown the contrast and color saturation to
"ecordneutral hues.
Jse this option to make red, green or blue colors
"nore intense like the Vivid Red, Vivid Green or
appearing colors like those obtained with positive
Jse this option to emphasize blue tints. It makes
_ivid.
Jse this option to emphasize green tints. It makes
:lowersand lawns, more vivid.
Jse this option to emphasize red tints. It makes
"ed subjects, such as flowers or cars, more vivid.
Jse this option to adjust the contrast, sharpness
or saturation settings or the color balance
between red, green, blue and skin tones*. It can
making blue colors more vivid or face colors
brighter.
Page 65

Setting the Camera to a Custom Color Mode
Thismodeallowsyoutoadjustthecontrast,sharpnessand
saturationandthecolorbalancefor red,green,blueandskintones.
FUNC. Menu_[]* (My
Colors Off)_[] (Cus-
tom Color) _ 0"
See Menus and Settings (p. 22).
*Default setting.
Use the ÷ or _, button
to select [Contrast],
[Sharpness], [Satura-
tion], [Red], [Green],
[Blue] or [Skin Tone]
and the 4. or • button
to adjust the setting.
eThe altered color will display.
Select a Adjust it
category
@.
• This completes the setting.
If you press the MENU button at this point, you will retum
to the screen where you can select a My Colors mode.
Page 66

_JF__'__ UI_1£_;_I__'_'__ _"_'__ _'_i;4__ _ _ _;;__;3_]I1__ _]
Youcanshootimageswiththeoriginalcolorstransformed.Thiscan
beperformedonmoviesaswetlasstillimages,allowingyouto
enjoyphotographingwithimageormovieeffects.
However,dependingontheshootingconditions,theimagesmay
appearroughoryoumaynotgettheexpectedcolor.Beforeyoutry
tophotographimportantsubjects,wehighlyrecommendthatyou
shoottrialimagesandchecktheresults.
Ifyouset[SaveOriginal](p.68)to[On]whenshootingastillimage,
you can record the original image as well the transformed one.
[] Color Accent the LCD monitor remain and to transform all
[] others to black and white.
[] Color Swap the LCD monitor into another. The specified color
[] can only be swapped into one other color, and
The ISO speed wilI rise depending on the shooting conditions,
which may increase the "noise" in the image.
Shooting in the Color Accent Mode
Use this option to have only the color specified in
Use this option to transform a color specified in
mu t pe coors cannot be chosen.
64
Page 67

.
eThe Color Accent mode will take effect.
@.
eThe camera will switch to color input
mode and the display will alternate
between the original image and the
color accent image (using the previ-
ously set color).
Aim the camera so that the color you wish
to retain appears at the center of the LCD
monitor and press the ÷ button.
eOnly one color can be specified.
eYou can use the 4, or _1,button to specify the range of cot-
ors that are retained.
• -5: Only takes the color that you want to retain
• +5: Also takes colors close to the one that you want to
retain
Press 0 to complete the setting, then
shoot.
• The default color accent is green.
• You may not obtain the expected results if you use the flash.
• The specified color accent and color range is retained even
if the camera's power is turned off.
o
65
Page 68

Shooting in the Color Swap Mode
#,
Original Color Desired Color
(Before Swapping) (After Swapping)
Stills: FUNC. Menu_r_* (Manual)_l (Color
Swap).
Movies: FUNC. Menu _ I_* (Standard)_ []
(Color Swap),
See Menus and
Settings (p. 22). (
*Default setting.
Stills Movies
,
eThe Color Swap mode will take effect.
66
,
eThe camera will switch to color input
mode and the display will alternate
between the original image and the
color swap image (using the previ-
ously set color).
Page 69

ii_i Aimii;e_ame_a;_ihaiii';_-o_.inai"_i_...........................
appears at the center of the LCD monitor
and press the ÷ button,
eOnly one color can be specified.
eYou can use the * or 4, button to specify the range of cot-
ors that are swapped.
• -5: Only takes the color that you want to swap
• +5: Also takes colors close to the one that you want to
swap
Aim the camera so t'ilat thedes ired c'oior
: appears at the center of the LCD monitor
and press the + button,
• Only one color can be specified.
o
&
The default setting for color swap mode changes green into
white.
You may not obtain the expected results if you use the
flash.
The colors specified in the color swap mode and the color
range are retained even if the camera's power is turned off.
67
Page 70

Changing the Save Method for the
Original Image
When shooting still images in the Color Accent or Color
Swap mode, you can set whether or not to save the original
image as well asthe transformed one.
• When [Save Original] is Set to [On]
- Only the transformed image displays in the LCD
monitor while shooting in the Color Accent or Color
Swap mode.
- The transformed image is reviewed in the LCD
monitor after shooting in the Color Accent or Color
Swap mode. If you erase the image at this point,
the original image is erased along with the
transformed image. Exercise adequate caution
before deleting a file.
- Since two images are recorded with each shot, the
number of shots remaining is approximately half
the number displayed when this function is set to
[Off].
68
Page 71

Raise the ISO speed to use a fast shutter speed when you wish to
reduce the effects of camera shake or avoid blurry subjects, or to
turn the flash off when shooting in a dark area.
• The camera automatically applies noise reduction
processin.q when you shoot at a high ISO speed.
• If [] or [] is selected, the tSO speed automatically
selected by the camera displays when you press the
shutter button halfway and in the image information during
playback.
g
69
Page 72

If the camera shake waming icon ([]) displays while shooting, you
can raise the tSO speed simply by pressing the _,,v button to
record at a shutter speed that avoids the effects of camera shake.
[] (Rec.) Menu_[Auto ISO
Shift] _ [On]/[Off]*.
See Menus and Settings (p. 23).
*Default setting.
Press the shutter button
halfway.
etf [] appears, the _,._ button will
blink blue.
Press the _ button while holding the shut-
ter button down halfway. When the _ but-
ton lights up, press the shutter button all
the way.
eWith the shutter button pressed half-
way, pressing the _,_ button again
returns the ISO speed to the original
setting.
elf you set the AE Lock (p. 53) after
raising the ISO speed, the _,,M but-
ton will continue to light blue until you
release the AE Lock, even ifyou release the shutter button.
7O
Page 73

You can register a function that you often use with the _,,_ button.
The following functions can be registered.
Menu Item Page Menu Item Page
NotAssigned.1 - Disp.Overlay p. 41
_[_] +/- (Exp.) p.56 _'1 Rec. Movie p.42
White Balance p.59
_ CustomWhiteBalance p.60 _]
Display
Pay Sound Effect.2 p. 28
p.
Off
[] Dg ta Te e-converter p. 33
"1 Defaultsetting.
*2Sets the sound registeredto _], found in the [Shutter Sound] section of
the My Camera menu.
[] (Rec.) Menu_[Set_button].
See Menus and Settings(p. 23).
Use the 4=, ÷, ÷ or + button to selecta
function to register and press @
m
• _) icon appearing at the bottom
right of an icon means that the
function can be registered, but it is
disabled in the current shooting
mode even if you press the _,,_,
button.
26
o
o
To Cancel Registration of a Function
Select [] in Step 2.
71
Page 74

Using the _ Button
• The setting value of the registered function switches each
time the ,B,N button is pressed thereafter.
- Aconfguraton screen w appear for the [] and [] func-
tions.
- With the [] function registered, the white balance data is
captured each time you press the _,,_ button. Since a
guidance frame does not show in the LCD monitor in this
case, please have the white target object or cloth centered
in the LCD monitor before pressing the _,,v button.
- With the [] function registered, the movie recording starts
with the recording pixels and frame rate settings selected
in the Standard mode when you press the _ button
even if the mode dial is set to a OM or SCN.
- The _J function is useful for directing your subject's atten-
tion to the camera right before taking a shot because it
plays a sound when you press the ,B.,v button.
elf a function that cannot be used in the currently selected
shooting mode is selected, nothing will happen when you
press the ,B,,_ button.
72.
Page 75

[][][]mME[][][]m[]mDWmD[][][][][][][]
Your camera is equipped with an Intelligent Orientation sensor that
detects the orientation of an image shot with the camera held
vertically and automatically rotates it to the correct orientation when
viewing it in the LCD monitor.
iset Upi Menu ...........
[off].
"Defaultsetting.
eWhen shoot ng and the Auto Rotate
function is set to [On] and the LCD _
monitor is set to the detailed display
mode, [] (normal), [] (right end is
down) or [] (left end is down) will
appear in the display. 2
_i_i _iiii_ _i/_ _,_ _x_l_i_/_+/_,______ _ __________ii__ii_iiii__!iii_i_ _ _!ii_,_,_ii__ii _,_,_,_ _ _ _ _iiii__ _i__i_ _ii_/____,¸_i
When the camera is held vertically to shoot, the IntelIigent
Orientation sensor judges the upper end to be "up" and the
lower end to be "down". It then regulates the optimal white
balance, exposure and focus for vertical photography. This
function operates regardless of the on/off status of the Auto
Rotate function.
73
Page 76

You can check whether the image is in focus right after it is recorded.
eThe recorded image displays for about 2 seconds (or the
interval set with the Review function p. 24).
Press O (or @)while ,.e Recorded Image
image is displayed. /__
The number of times the DISP but- ,__
ton is pressed depends upon the ,_
display settings for the LCD monitor
(See below). Press the DISP. button ___
repeatedly until the screen at the ..........
right appears. Orange frame contents
eDisplays as follows.
- Camera is focused: the AF frames are displayed in the
recorded image in white and the frame that is in focus has
an orange frame within it.
- Camera is not focused: an orange frame appears at the
centre of the recorded image.
- Contents of the orange frame can be confirmed at the bot-
tom right. You can change the display magnification of the
area within the orange frame with the zoom lever.
eYou can switch between orange frames and change the dis-
play position (p. 75)using the MENU button or the FUNCJ
SET button.
To Cancel Checking the Focus
Press the shutter button halfway.
• You can delete an image by pressing the ,_ button while
the image is displayed, except in the display position
change mode (See Basic Guide, p. 19).
• Pressing the DISP. button will change the display on the
LCD monitor as follows.
Focus Confirmation -) Detailed ._ No Information
74
Page 77

Switching between AF Frames/
Changing the Display Position
75
Page 78

You can create a new folder at any time and the recorded images
will be automatically saved to that folder.
Creates a new folder the next time you shoot
Create New Folder images. To create an additional folder, insert
another check mark.
Auto Create to create a new folder using a shooting time after
Creates a folder the next time you shoot.
[] (Set up) Menu _ [Create Folder].
Use the + or + button to add a check mark
beside [Create New Folder] _ 0"
el'_ displays when shooting. The
symbol will cease to display after the
new folder is created.
You can also specify a date and time if you wish
the specified date and time.
See Menus and Settings (p. 23).
76
Page 79

Setting the Day or Time for Automatic Folder Creation
a time in the [Time] option_ ,
iiiii_iiiiiiiiiii/iiii O
er_ displays when the specified time
arrives. The symbol will cease to
display after the new folder is cre-
ated.
Up to 2000 images can be saved into one folder. A new folder
will automatically be created when you record more than that
number even if you are not creating new folders.
g
5"
77
Page 80

W
The images you shoo{ are au{omatically assigned {ile numbers. You
can select how the file number is assigned.
File Number Reset Function
A number one higher than the last one recorded is
assigned to the next image. This is convenient for
managing all your images together on a computer
Continuous
Auto reset
because you avoid file name duplication when changing
folders or memory cards.*
*When a blank memory card is used. If a memory card with
recorded data is used, the 7-digit number for the last recorded
folder and image is compared with the last one on the card, and
the larger of the two is utilized as the basis for new images.
The folder and image number are reset to the starting
value (100-0001).* This is convenient for managing
images on a folder-by-folder basis.
*When a blank memory card is used. If a memory card with
recorded data is used, the number following the 7-digit number
for the last recorded folder and image on the card is utilized as
the basis for new images.
78
Page 81

File and Folder Numbers
Recorded images are assigned consecutive file numbers starting
with 0001 and ranging up to 9999, while folders are assigned
numbers starting with 100 and ranging up to 999. Up to 2,000
images can be saved into a single folder.
New Folder Created
Memory Card 1
Continuous
MemoryCardExchangedforAnother
Memory Card 1 Memory Card 2
Memory Card 1
Auto Reset
• Images may be saved to a new folder when there is insufficient
free space even if the total number of images in a folder is less
than 2,000 because the following types of image are always
saved together into the same folder.
- Images from continuous shooting
- Self-timer images (custom)
- Stitch Assist mode images
- Still images shot in Color Accent/Color Swap mode with the
[Save Original] category set to [On]
Olmages cannot be played back when the folder numbers are
duplicated or image numbers are duplicated within folders.
OPlease refer to the Software Starter Guide for information
regarding folder structures or image types.
Memory Card 1 Memory Card 2
(/)
o
&
79
Page 82

I Playback/Erasing
You can also use the touch control dial to select images and
perform var ous operat ons. See the Basic Guide, pp. 4, 18.
Press the zoom lever toward (3,.
• _ will display and a magnified
portion of the image will display.
• Images can be magnified up to a
factor of approximately 10x.
Use the 4-, +, ÷ or 4r button to move
around the image.
• if you press the FUNCJSET button while in magnified
display, the camera switches to image advance mode and
_[-+ will display. You can use the ÷ or ÷ button to
advance to the next or previous image at the same level of
magnification. Pressing the FUNC./SET button again
cancels the image advance mode.
eYou can change the magnification level with the zoom lever.
To Cancel the Magnified Display
Press the zoom lever toward .-"_. (You can also cancel it
immediately by pressing the MENU button.)
m
8O
the Displayed Area
of
Page 83

Switching between Sets of Nine Images
The jump bar will display if you press the
zoom lever toward [] while in index
playback and you can switch the display
between sets of nine images.
eUse the ÷ or ,k button to move to the
previous or next set of nine images.
eHold the FUNC.ISET button down and
press the ÷ or ,_ button to jump to the Jum[
first or last set.
To Return to Single Image Playback
Press the zoom lever toward 0,.
81
Page 84

You can organize images into prepared categories (People,
Scenery, Events, Category 1-3, To Do). At the category level, you
can perform the following.
Olmage searches (p. 83)
oSlide Show (p. 97)
OProtect (p. 102)
OErase (p. 105)
OConfigure print settings (p. 107)
82.
When working with images (for example, compiling a slide
show, erasing or printing), it is convenient to categorize
images in the [To Do] category.
Page 85

When you have many images recorded onto a memory card, it is
handy to use the six search keys below to jump over images to find
the object of your search.
[] Shot Date Jumps to the first image of each shooting date.
[] My Category Jumps to the first image in each category.
[] Folder Jumps to the first image in each folder.
[] Movie Jumps to a movie.
[] By 10 images Jumps over 10 images at a time.
[] By 100 images Jumps over 100 images at a time.
o-
83
Page 86

Ol_/[]/[]/[]: usethe ÷ or 4* Select the search key
button to select date, category,
folder or movie for playback and
press the FUNO.I$ET button.
- The camera will switch to defined
playback mode and display a blue
frame. You can limit playback to
the images corresponding to the
search key.
- When a category is selected by the ÷ or 4, button, the
first image corresponding to each category displays in the
LCD monitor.
- After a search key is selected, you can turn the touch
control dial to move between images corresponding to the
selected search key, such as a date, category or folder.
- Press the _ button to cancel defined playback mode.
The defined playback mode will be canceled under the
following circumstances.
- When classifying categories
- When newly saving images that have effects added
using the My Colors function, images edited with the Red
Eye Correction function, or movies that have been
edited.
- When images are deleted using [Erase] from the []
(Play) menu
84
Page 87

eThe movie will pause if you press
the FUNC./SET button during I
playback, tt will resume when you
Se'ect°'"a"an'--
press the button again.
eWhen playback ends, the movie
stops at the last frame displayed.
Press the FUNC./SET button to
display the movie control panel.
eYou can switch between showing/
hiding the playback progress bar
with the DISP. button while playing a
movie.
elf playback was halted partway PlaybackProgress Bar
through in the prior viewing session, Time movie was shot
playback will resume from the last
frame displayed.
Operating the Movie Control Panel
[] Ends playback and returns to single image playback
Print (An icon will display when a printer is connected. See the
m
Direct Print User Guide for details.)
Play
[]
Slow Motion Playback (You can use the ÷ button to slow
[]
down orthe ,l, button to speed up playback.)
[]
Displays the first frame
Previous Frame (Rewinds if the FUNC./SET button is held down)
[]
[]
Next Frame (Fast Forwards if the FUNC./SET button is held down)
Displays the last frame
[]
[]
Edit (Switches to movie editing mode) (p. 86)
o"
II1
• Use the television's controls to adjust the volume when
playing a movie on a TV set (p. 104).
• The sound cannot be played in slow motion playback.
85
Page 88

You can delete portions of recorded movies.
* When the shooting interval is 1 sec.
**When the shooting interval is 2 sec.
Select [] (Edit) in the
movie control panel and
press @.
eThe movie editing panel and the
movie editing bar will display.
Use the ÷ or _ button to select [] (Cut
Beginning) or [] (Cut End) and the _ or
button to specify the cut point( I ).
eTo check a temporarily edited movie, select [] (Play) and
press the FUNC./$ET button.
eSetecting [] (Exit) cancels the edit and restores the movie
control panel.
Select [] (Save) and press _.
Select [New File] or [Overwrite] and press _.
e[New File] saves the edited movie
under a new file name. The pre-edit
data is left unchanged.
Note, if you press the FUNC.ISET
button while saving the movie,
saving is canceled.
e[Overwrite] saves the edited movie
with its original name. The pre-edit data is lost.
eWhen there is not enough space left on the memory card,
86
only [Overwrite] can be selected.
Movie Editing Panel
Movie Editing Bar
Page 89

Dependingonthemovie'sfilesize,itmaytakesometimeto
saveaneditedmovie.Ifthebatteryrunsoutofcharge
partwaythrough,editedmovieclipscannotbesaved.When
editingmovies,itisrecommendedtouseafullycharged
batteryortheseparatelysoldACAdapterKitACK-DC30
(p.134).
Imagescanberotatedclockwise90°or270°inthedisplay.
Original 90 ° 270 °
[] (,,ay)Me.u ". ....
iiiiii]liiiiiii!iii
Use the ÷ or + button to select an image to
rotate and press _ to rotate it.
• Cycle through the 90°/270°/original orientations with each
press of the FUNC./SET button.
i[ ,This also can be set in the index playback mode.
o=
87
Page 90

You can select the transition effect displayed when switching
between images.
[] No transition effect.
[] IThe displayed image darkens and the next image gradually
brightens until it is displayed.
IPress the ÷ button to have the previous image display from the
[] left and the _ button to have the next image display from the
r ght.
88
Page 91

You can correct red eyes in recorded images. However, red eyes
may not be automatically detected in some images or the results
may not turn out as you intended.
Examples:
OFaces near the screen edges or faces that appear extremely
small, large, dark or bright in relation to the overall image.
OFaces turned to the side or at a diagonal, or faces with a portion
hidden.
o"
o
:x"
89
Page 92

Select [New File] or [Overwrite] and press _.
O[New File]: saves the image under /_t
a new file name. The original file
remains as is. The newly saved
image file is saved as the last image
of the photographed images.
e[Overwrite]: saves the new image
under the original file name. The
original image is overwritten.
otf you selected the [New File] image, proceed to Step 5.
Press _ and select [Yes] or
[No], then press _.
eSeiecting [Yes] displays the
corrected image, while [No] returns
you to the Play menu.
• When there is not enough space left on the memory card,
red-eye correction cannot be performed.
• Although you can apply red eye correction any number of
times to an image, the image quality will gradually
deteriorate with each application.
• Since the correction frame will not appear automatically on
images that have already been corrected once with the []
(Red-Eye Correction) function, use the [Add Frame] option
to correct them.
9O
Page 93

Adding Correction Frames
You can add upto a maximum of 35 correction frames.
Ill
91
Page 94

You can add effects to recorded images (stills only) using the My
Colors function. The following selection of My Colors effects is
available. For details, see p. 62.
92
[] IVivid
[]lNeutral
[]lSep ia
[] B_N
[] Positive
Film
[] (Play) Menu_[].
See Menus and Settings (p. 23).
Use the 4. or ÷ button to
select an image and press
[]1 Lighter Skin Tone
[]1 Darker Skin Tone
[] IVivid Blue
[] Vivid Green
[] Vivid Red
®.
Use the 4. or _ button to select the My
Colors type and press _.
eThe displayed image will reflect the
My Colors effect.
eYou can press the zoom lever
toward CL to check the image at a
higher magnification. While the
image is zoomed, you can press the
FUNC./SET button to switch
between the image transformed with the My Colors effect
and the original non-transformed image.
Page 95

• When there is not enough space left on the memory card, _"
the My Colors effects cannot be added, o
• Although My Colors effects can be added any number of
times to an image, the image quality will gradually
deteriorate with each application and the intended colors =
may not be achieved.
• Color in images taken using My Colors (p. 62) in shooting
mode and images edited with the My Colors function in
playback mode may differ slightly.
93
__.
Page 96

In playback mode (including single image playback and index
playback), you can attach sound memos (up to one minute) to an
image. The sound data is saved in the WAVE format.
[] (Play) Menu_[].
See Menus and Settings (p. 23).
Use the ÷ or + button to select an image to
attach a sound memo to and press @
m
eThe sound memo panel will display.
Select [] (Record) and press @.
eThe elapsed time and the remaining
time display.
ePressing the FUNC./SET button
pauses the recording. Pressing it
again resumes recording.
eUp to one minute of recordings can
be added to any one image.
Sound Memo Panel
Elapsed Time/
Remaining Time
Volume --
(Adjustwith the "1_ or
4!, button)
Sound Memo Panel
I[L'_IExit
r11Reoord
[] Pause
[] Play
94
Page 97

IErase
[] Select[Erase]intheconfirmationscreenandpressthe FUNC.ISET
button.
You can record a continuous sound memo for up to approximately
2 hours without taking a picture.
[] (Play) Menu_ 1_.
See Menus and Settings(p. 23).
OThe elapsed recording time _
displays.
eYou can use the ÷ or 41, button to
change the sampling rate.
The recording quality rises
progressively as you select [11.025
kHz] [22.050 kHz] or [44.100 kHz]*
but the recorded file sizes increase S_u_Rec°rdTerPanel _
correspondingly. Rerna,n,ngT,me
*Default setting.
OPress the FUNC.ISET button to stop the recording session.
Pressing the button again starts a new recording session.
o=
2
95
Page 98

Sound Recorder Panel
Use the ÷ or "I, button to select an option and press FUNC./SET.
[] Exit
[] Record
[] Stop
Play
[] (Use the ÷ or @ button to select a sound memo and then press
the FUNC./SET button.)
Rewind
[] (Holding down the FMNC./SET button rewinds. The sound memo
cannot be heard while rewinding.)
Fast Forward
[] (Holding down the FUNC./SET button fast forwards. The sound
memo cannot be heard while fast forwarding.)
Erase
[] Select [Erase] or [Erase all] in the confirmation screen and press
the FUNC./SET button.
Protect
[] (Protectsthe sound memo so that it cannotbe mistakenlyerased.
Use the FUNC./SET buttonto set/cancel protection.)
Volume
[] (You can use the "IF or @ button toadjust the volume.)
• Sound Recorder Data Rates and Recording Durations
(Estimated).
• Recording will automatically stop when the memory card is
full.
96
Page 99

Automated playback of memory card images.
Image settings for slide shows are based on the Digital Print Order
Format (DPOF) standard.
[] All Images Plays all images on a memory card in order.
[] Date order.
Plays images bearing a specified date in
[] My Category Plays the images in the selected category in
[] Folder Plays images in a specified folder in order.
[] Movies Plays movie files only, in order.
[] Stills Plays still images only, in order.
_11-_'_ Custom '1-3 show, Custom 1, Custom 2 or Custom 3, in
order.
Plays the images selected for each slide
order (p. 100).
i
,.@
97
Page 100

Select
eThe following functions are
[Start] and press _.
available during slide shows.
- Pausing/resuming the slide show:
press the FUNC./SET button
- Fast forwarding/rewinding the slide
show: press the ÷ or "I_ button
(continue to hold the button to
switch between images more rapidly)
- Stopping the slide show: press the MENU button.
Transition Effects
You can select the transition effect used when one image is
replaced by another.
[] No transition effect.
The new image gradually brightens as it moves upward from the
bottom.
_rI The new image first appears in a cross shape and gradually
=L=
expands to display the full image.
Portions of the new image move horizontally, then the image
expands to display the full image.
In single image playback mode, you can start a slide show
from the current image displayed by holding the FUNC./SET
button while you press the _,_ button. Please note that if
you do this while the last image shot is displayed, the slide
show will start from the first image using the same date.
98
 Loading...