


ScanGear CS-U 6.0
for CanoScan D646U Color Scanner
User’s Guide

2
Top Page
Glossary
Contents
Index
Copyright Notice
Copyright ©2000 Canon Inc.
This manual is copyrighted with all rights reserved. Under the copyright
laws, this manual may not be copied, in whole or in part, without
written consent of Canon Inc. Under the law, copying includes
translating into another language or format.
Microsoft and Windows are registered trademarks or trademarks of the
Microsoft Corporation in the United States and other countries.
Canon, and CanoScan are registered trademarks of Canon, Inc.
ColorGear and ImageTrust are registered trademarks of Canon Inc.
All other names are trademarks of their respective companies.
In this manual, screen shots are taken with Windows Millennium Edition
(Me). When you use Windows 98 or Windows 2000 Professional,
different screens may appear from this manual.

3
Top Page
Glossary
Contents
Index
Chapter 1 Before You Begin................................ 5
Welcome to ScanGear CS-U ...................................................... 6
System Requirements................................................................ 8
Hardware ............................................................................ 8
Software ............................................................................. 9
Getting Help in ScanGear CS-U............................................... 10
Chapter 2 Installing ScanGear CS-U.................. 11
Installing ScanGear CS-U......................................................... 12
Installing ScanGear CS-U ................................................... 13
Uninstalling ScanGear CS-U .................................................... 19
Chapter 3 Simple Mode and Advanced Mode. 20
What are the Simple Mode and Advanced Mode?............... 21
Switching Between the Simple and Advanced Modes ........ 22
Simple Mode Main Window................................................... 23
Advanced Mode Main Window.............................................. 24
Chapter 4 What is on the screen?..................... 26
Main Window.......................................................................... 27
Toolbar ..................................................................................... 28
Scanning Buttons..................................................................... 31
Simple Mode Main Window................................................... 32
Advanced Mode Main Window.............................................. 37
The Main Sheet ................................................................. 37
The Tone Sheet.................................................................. 41
Contrast/Brightness Sheet ......................................... 44
Gamma Sheet........................................................... 45
Histogram Sheet ....................................................... 47
Special Tone Curves Sheet ......................................... 49
Editing a Special Tone Curve Directly ......................... 50
The Halftone Sheet............................................................ 52
The Scanner Sheet............................................................. 53
Table of contents

4
Top Page
Glossary
Contents
Index
Chapter 5 Scanning an Original........................ 55
Preparing for the Scanning Job.............................................. 56
Quick Start ............................................................................... 57
Previewing and Scanning an Original.................................... 59
Scanning in the Simple Mode ............................................ 59
Scanning in the Advanced Mode ....................................... 64
Chapter 6
Settings in the Windows Control Panel .....
68
Opening Scanners and Cameras Properties........................... 69
General Settings ...................................................................... 71
Preferences Settings................................................................ 72
Color Management Settings................................................... 74
Chapter 7 Troubleshooting................................ 75
Pre-Scan Checklist.................................................................... 76
How to Avoid Problems .......................................................... 77
Troubleshooting Checklist ...................................................... 79
Glossary ........................................................... 85
Index ........................................................... 99
Customer Support Help Desk ........................... 104
Table of contents

5
Top Page
Glossary
Contents
Index
chapter
1
Before You Begin
Welcome to ScanGear CS-U
System Requirements
Getting Help in ScanGear CS-U

6
chapter 1
Before Y ou Begin
Top Page
Glossary
Contents
Index
Welcome to ScanGear CS-U
Welcome to Canon ScanGear CS-U 6.0 software for Windows.
ScanGear CS-U 6.0 (hereafter referred to as ScanGear CS-U) will provide
flexible, efficient image enhancement tools for scanning with your
CanoScan D646U Scanner by providing an interface with a variety of
TWAIN-compliant softwar e applications. (TWAIN ☞p.97)
ScanGear CS-U has a number of powerful features that help you achieve
peak performance with your scanner. Using ScanGear CS-U, you can
preview and adjust an image before the image is scanned and acquired
by the parent software application.
Here is a quick summary of the important features of ScanGear CS-U:
• Two operation modes: Simple mode, which allows you to select all
optimum settings with one selection, and Advanced mode, which
allows you to create professional color and other enhancements for
artistic effects.
• Flexible, fully automatic image acquisition, and pre-scan image
manipulation prior to passing data to the image application
• TWAIN 1.6 compliant
• Text Enhanced mode for OCR applications
• Canon ColorGear (color matching software technology)
• Automatic preview or preview image cache
• ScanGear CS-U can run with or without its main window,
depending on the acquiring application.

7
chapter 1
Before Y ou Begin
Top Page
Glossary
Contents
Index
Normally when you start a scanning job, you will see the ScanGear CS-U
main window with its toolbar, Preview Area, and tabs.
However, some software applications may not open the ScanGear CS-U
main window. When this occurs you cannot use the settings described in
this user’s guide because the host software application will provide the
settings so you can change the image after it is acquired. When a
software application uses ScanGear CS-U without opening the ScanGear
CS-U main window, this is called the windowless mode.
8
chapter 1
Before Y ou Begin
Top Page
Glossary
Contents
Index
System Requirements
The hardware and software listed below is required to use ScanGear
CS-U.
Hardware
• You can use following scanner with ScanGear CS-U: CanoScan
D646U.
• IBM PC or its compatible on which Windows Me, Windows 98 or
Windows 2000 Professional can run
• Memory (RAM) required is determined by your system:
32 MB (64 MB or more recommended)
• 10 MB of free disk space for ScanGear installation
• Free disk space, at least 50 MB. The amount of space required
depends on the scanning area and the Color Mode or Resolution
settings (color images scanned at higher resolution require more
storage space).
Note
Before you scan an image, check the file size in the
status bar. You should have at least twice that amount
of free space available on the hard disk.
• Minimum requirement for monitor: 800 x 600 resolution
(minimum), High Color (16 bit) or greater.

9
chapter 1
Before Y ou Begin
Top Page
Glossary
Contents
Index
Software
• Microsoft® Windows® Me, Microsoft® Windows® 98 or Microsoft
®
Windows® 2000 Professional
• TWAIN-compliant parent software application

10
chapter 1
Before Y ou Begin
Top Page
Glossary
Contents
Index
Getting Help in ScanGear CS-U
For information about using ScanGear CS-U, open the on-line Help by
clicking the Help button on the toolbar or in the dialog boxes.
Click the Contents or Index tab to see if the topic you are looking for is
covered elsewhere in on-line Help.

11
Top Page
Glossary
Contents
Index
chapter
2
Installing ScanGear
CS-U
Installing ScanGear CS-U
Uninstalling ScanGear CS-U
12
chapter 2
Installing
ScanGear CS-U
Top Page
Glossary
Contents
Index
Installing ScanGear CS-U
Before you install ScanGear CS-U, make sure that you have accomplished
the following tasks:
• Make sure that the computer is equipped with an enabled USB
port. In My Computer - Control Panel - System icon, click the
Device Manager tab and double-click “Universal serial bus
controler”. If you can see the names of the Host Controller and
USB Root Hub displayed, the computer is equipped with an
enabled USB port. Some computers may require enabling the USB
function with a BIOS setting. For details about enabling the USB
port with the BIOS setting, see your computer manual.
• Make sure the scanner is connected to a computer.
• If a previous version of ScanGear CS is installed on your computer,
uninstall it before you install ScanGear CS-U 6.0.
Note
• With Windows 2000 Professional, ensure that you log on
as an Administrator to install/uninstall the software.
• If ScanGear CS-U has already been installed according to
the instructions in the Getting Started guide that came
with the scanner, there is no need to perform the
installation procedures described on the following pages.
13
chapter 2
Installing
ScanGear CS-U
Top Page
Glossary
Contents
Index
Installing ScanGear CS-U
After you have attached the scanner to the computer, have the
CanoScan Setup CD-ROM at hand and follow the procedures
below to install the driver software (ScanGear CS-U).
If you use the English version (uni-language) CanoScan
Setup Utility CD-ROM;
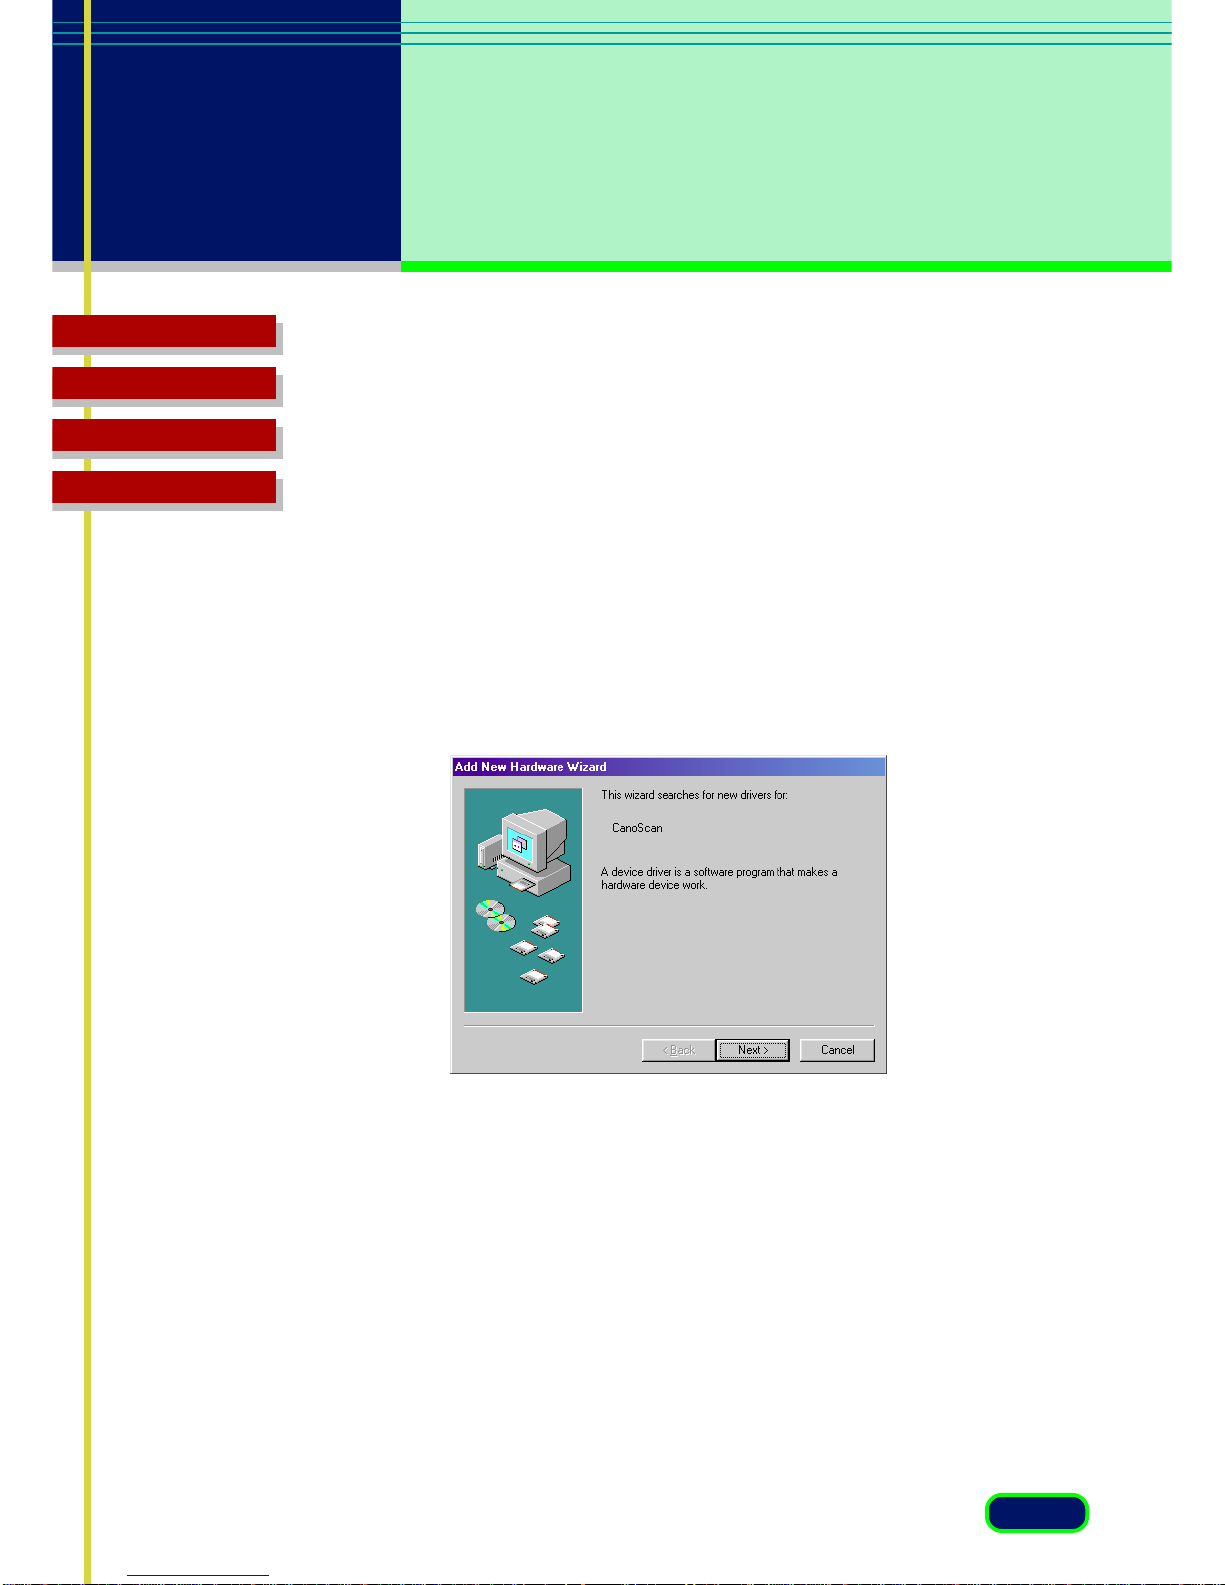
1. Turn the computer on.
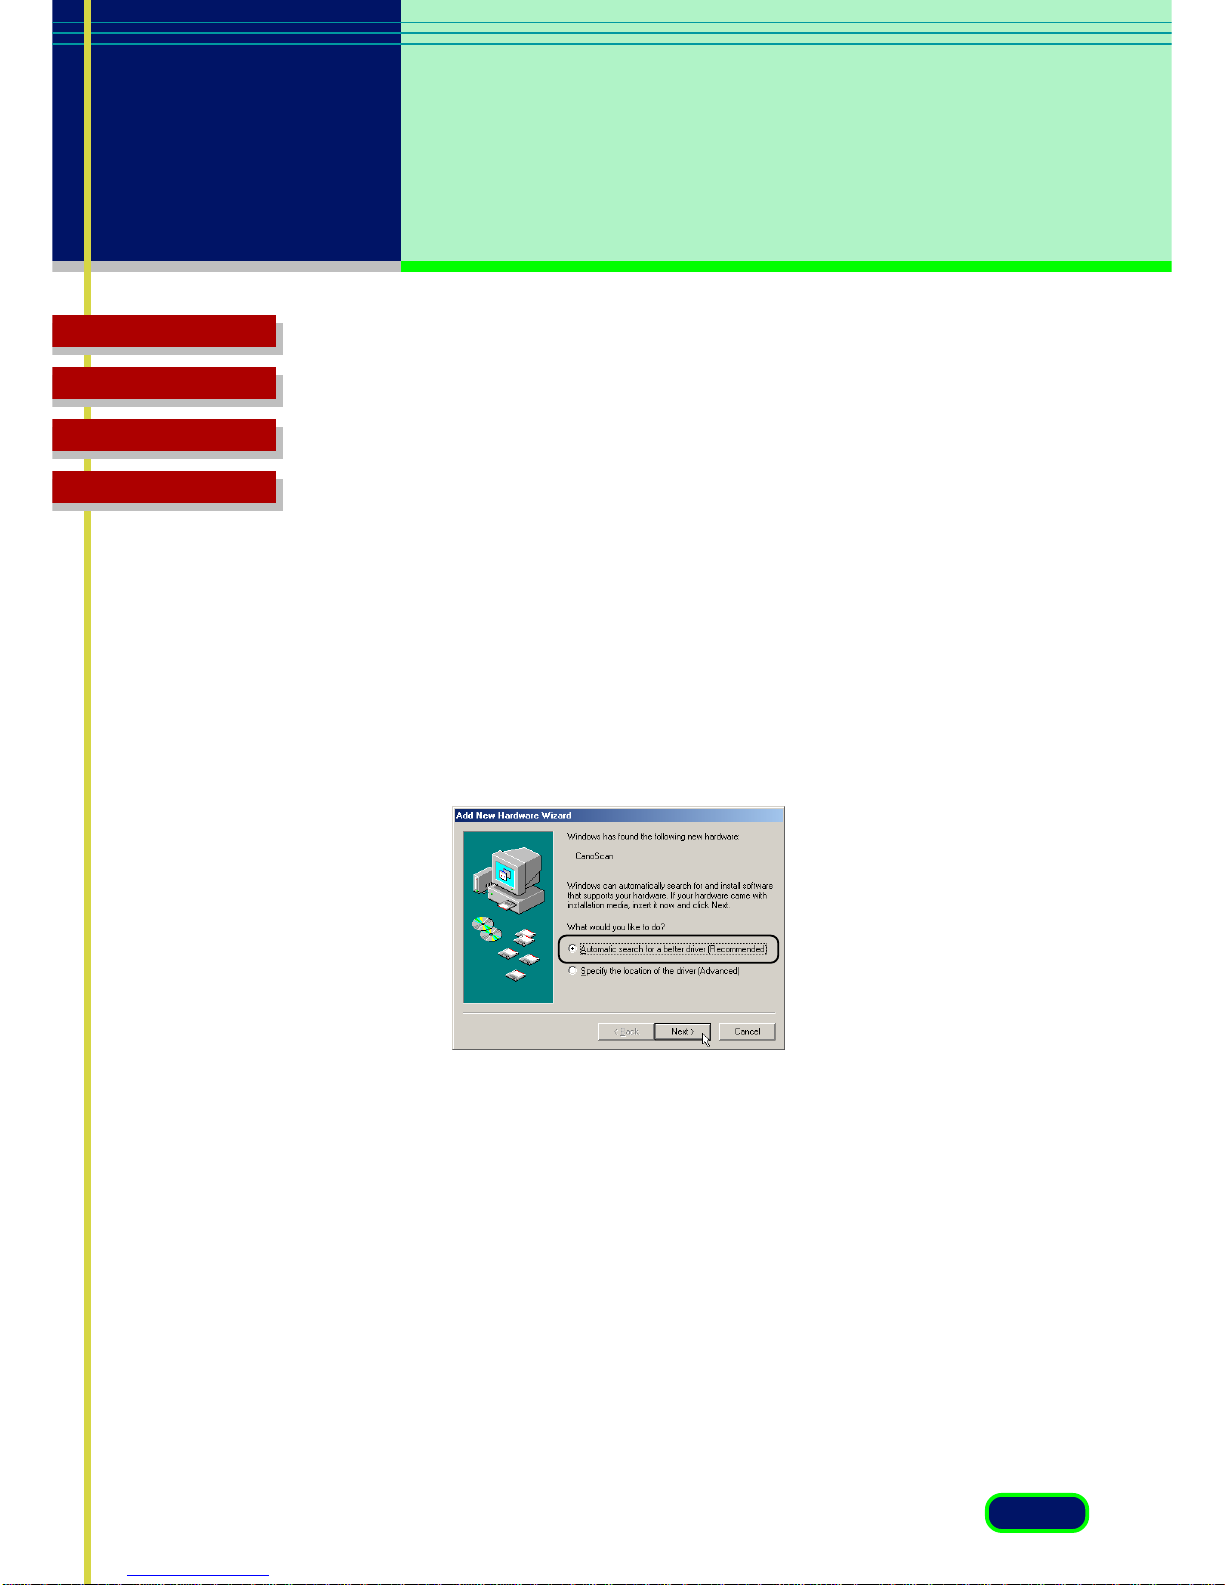
2. When the [Add New Hardware Wizard] displays, confirm that
[Automatic search for a better driver (Recommended)] is selected.
If you selected [Specify the location of the driver] in Step 2 and
then clicked the [Next] button, click the [Back] button and redo the
procedures starting from Step 2.
3. Place the CanoScan Setup CD-ROM in the drive.
4. Wait for approximately 10 seconds, then click the [Next] button.
The driver will begin to install.
If the [Windows was unable to locate the software for this device]
message appears after the [Next] button is clicked, click the [Back]
button and redo the procedures starting from Step 3.
• Windows Millennium Edition (Me)
14
chapter 2
Installing
ScanGear CS-U
Top Page
Glossary
Contents
Index
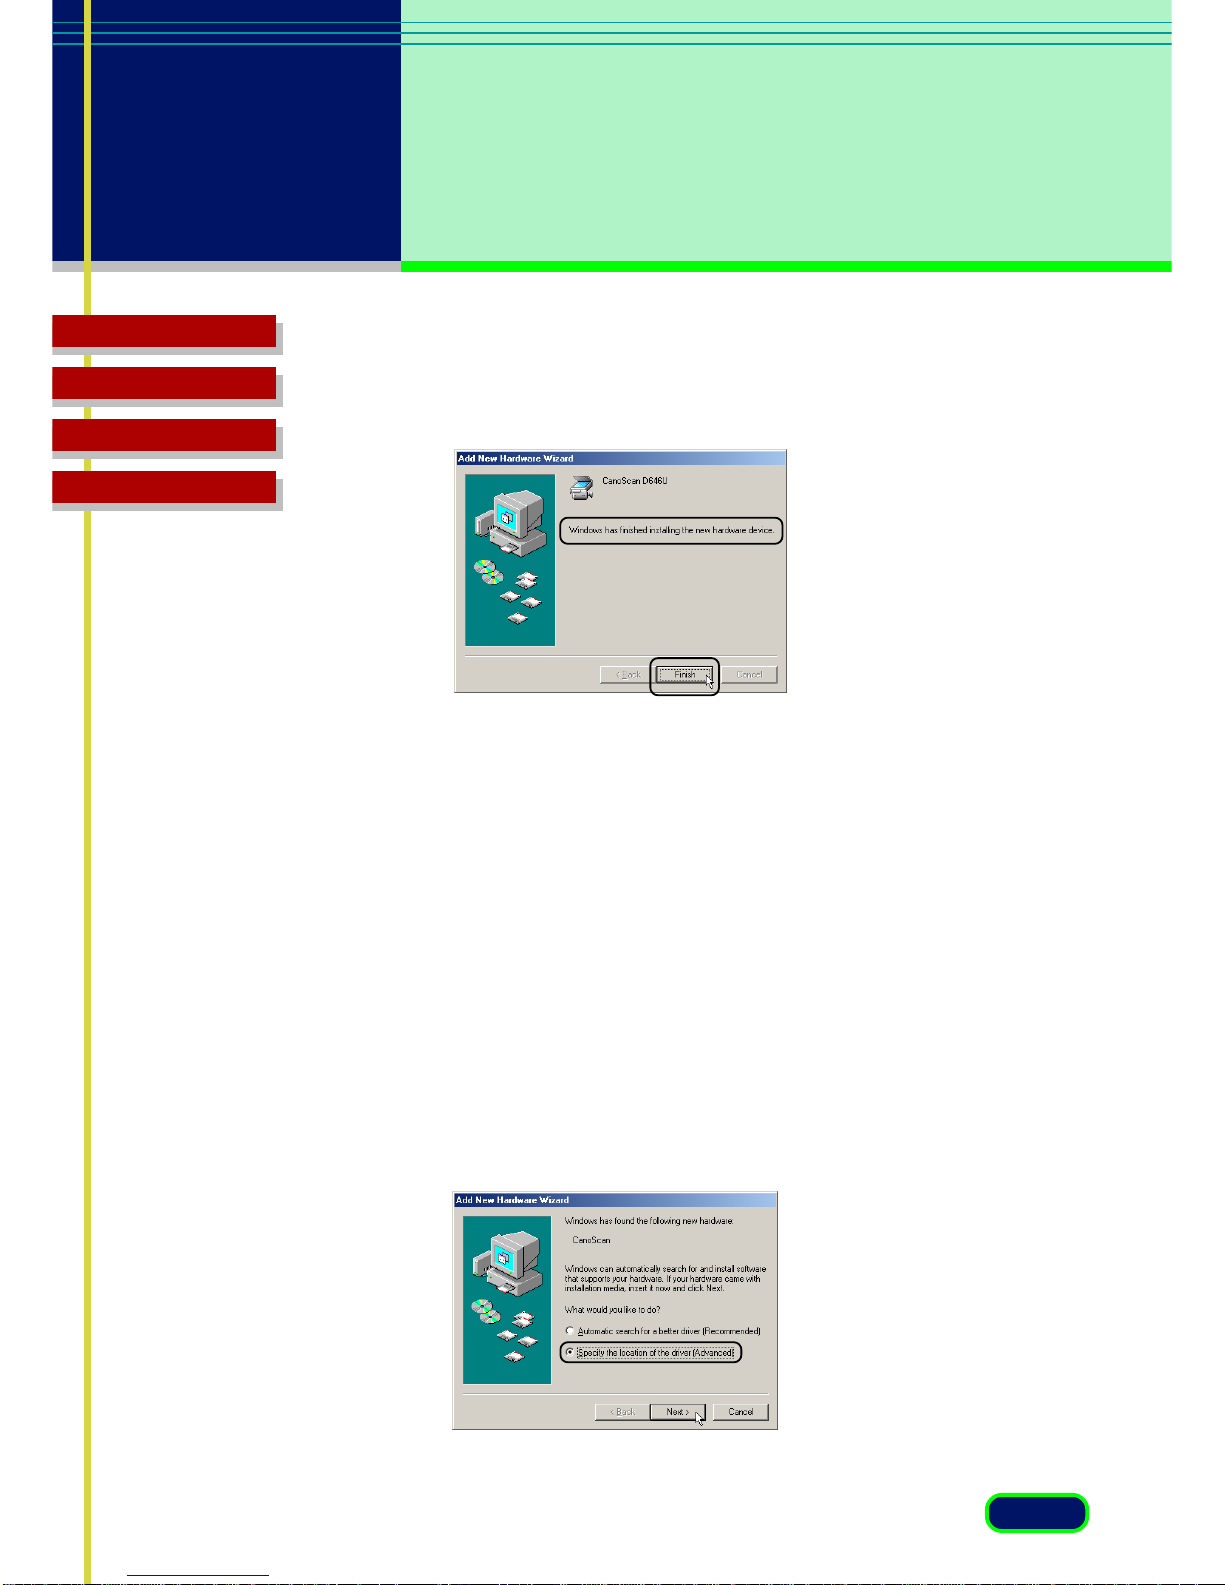
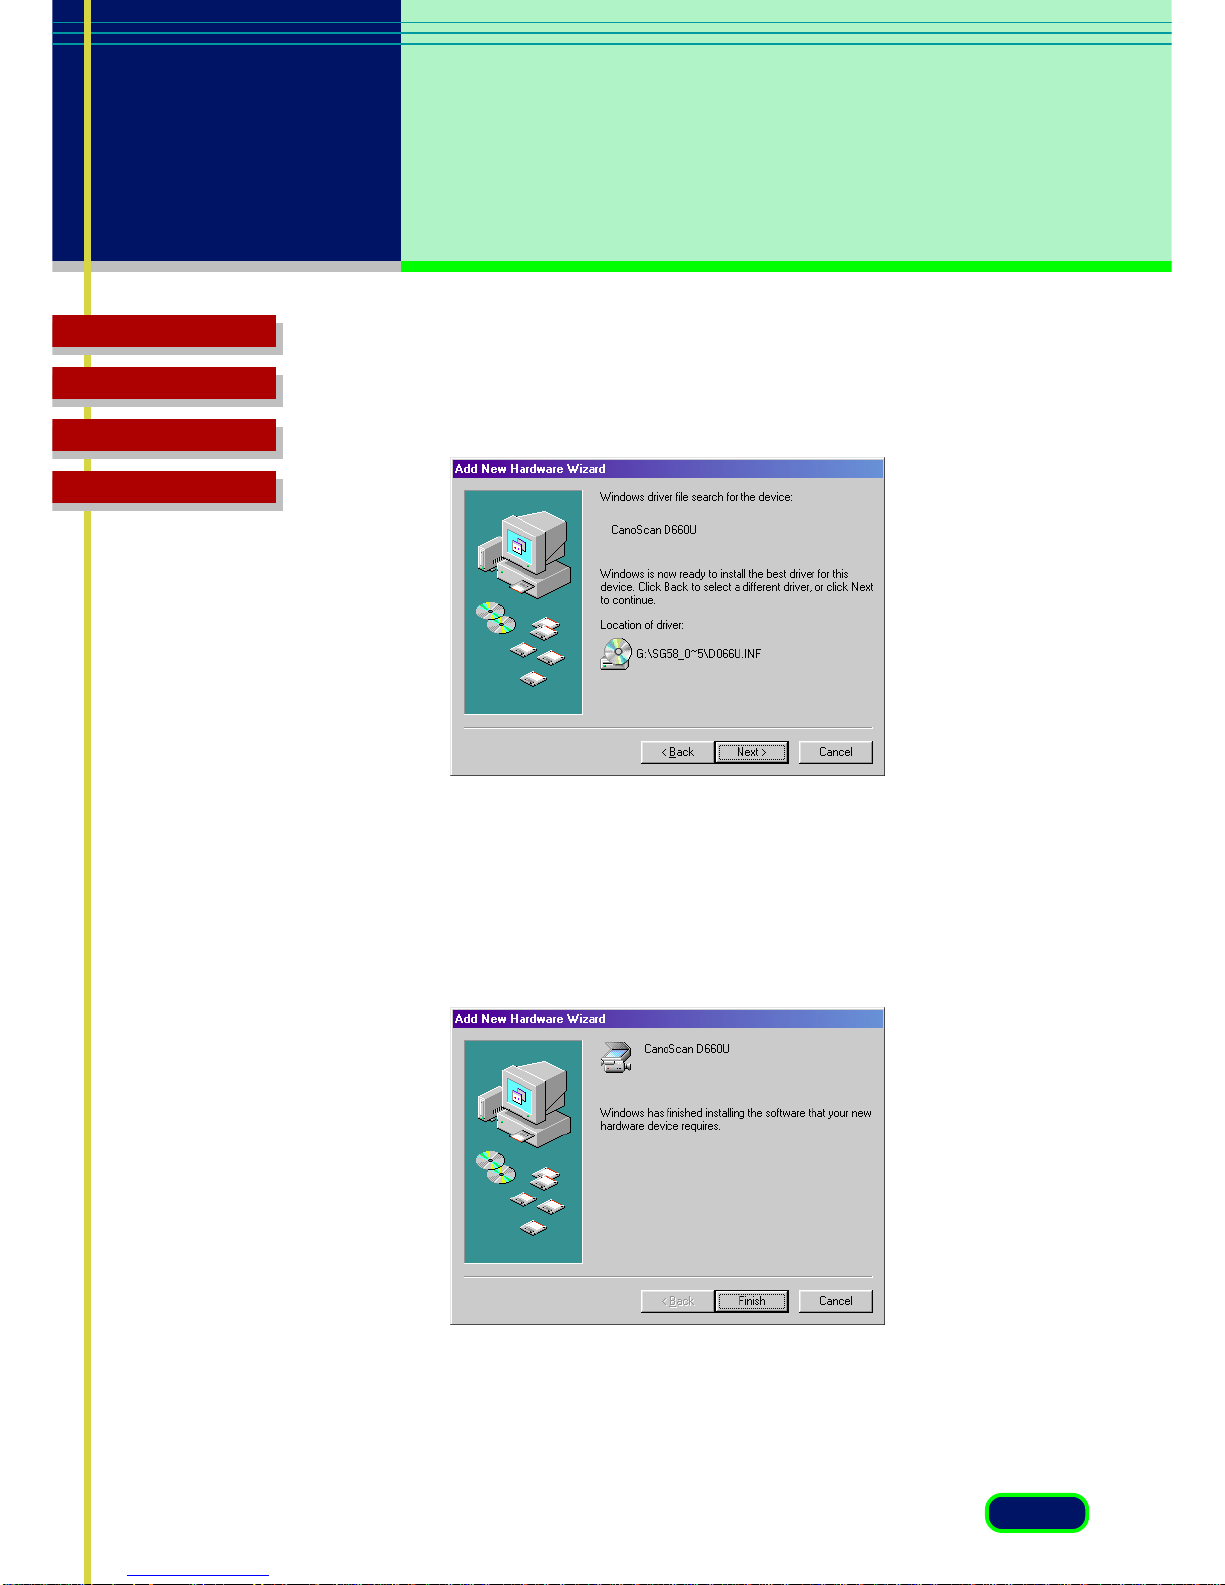
5. When the [Windows has finished installing the new hardware
device.] message appears, click the [Finish] button.
If the window in Step 2 does not appear, ScanGear CS-U may not
have been completely uninstalled and a portion of it may still be
resident on the drive. Follow the instructions in the [Uninstall the
Software] option on the CanoScan Setup Utility to uninstall
ScanGear CS-U.
If you use the multi language CanoScan Setup Utility CDROM.
After you have attached the scanner to the computer, have the
CanoScan Setup CD-ROM at hand and follow the procedures
below to install the driver software (ScanGear CS-U).
1. Turn the computer on.
2. When the [Add New Hardware Wizard] displays, select [Specify the
location of the driver (advanced)] and click the [Next] button.

15
chapter 2
Installing
ScanGear CS-U
Top Page
Glossary
Contents
Index
3. Place the CanoScan Setup Utility CD-ROM in the drive.
4. Wait for approximately 10 seconds. Click the [Removable Media...]
option so that it is unchecked, and click the [Specify a location]
option so that it is checked. Then click the [Browse] button.
5. From the [CANOSCAN] CD-ROM, select the [SCANGEAR] folder
followed by the appropriate language folder, and click the [OK]
button.
6. Confirm that the correct folder and path appear beside the Specify
a Location option and click the [Next] button.
7. When the name of the scanner appears, click the [Next] button.
The driver will begin to install.
8. When the [Windows has finished installing the new hardware
device.] message appears, click the [Finish] button.
16
chapter 2
Installing
ScanGear CS-U
Top Page
Glossary
Contents
Index
Follow this procedure to install ScanGear CS-U. To perform this
procedure you need CanoScan Setup Utility CD-ROM.
1.
Connect the scanner and computer with the USB cable. Then turn
on the computer.
A brief message will tell you that an unknown device has been
detected, then the Add New Hardware Wizard dialog box opens.
2.
Click the [Next] button.
• Windows 98 / Windows 2000 Professional

17
chapter 2
Installing
ScanGear CS-U
Top Page
Glossary
Contents
Index
3.
Confirm that the first button is selected (Search for the best driver
for your device) and click the [Next] button.
4.
Insert the CanoScan Setup Utility CD-ROM into the CD-ROM drive.
5.
If you use the English version (uni-language) CanoScan Setup Utility
CD-ROM, select the “CD-ROM drive” then click the [Next] button.
If you use the multi-language CanoScan Setup Utility CD-ROM,
select the “Specify a location:” and click the [Browse] button. In
the Browse for Folders dialog, navigate in the CD-ROM drive to
find the Scangear folder and select the English folder then click the
[OK] button. Finally click the [Next] button.
18
chapter 2
Installing
ScanGear CS-U
Top Page
Glossary
Contents
Index
6.
Confirm the name of the scanner is displayed, and click the [Next]
button to start copying the files.
7.
When you are prompted to insert the Windows 98 CD-ROM, after
clicking the [OK] button, click the [Browse] button . Specify the
CanoScan Setup Utility CD-ROM drive as the file source, then click
the [OK] button.
8.
Click the [Finish] button to complete the installation procedure.

19
chapter 2
Installing
ScanGear CS-U
Top Page
Glossary
Contents
Index
Uninstalling ScanGear CS-U
Always uninstall ScanGear CS-U with this procedure using
the CanoScan Setup Utility CD-ROM
1.
Place the CanoScan Setup Utility CD-ROM in the drive.
2.
Click the [Uninstall the Software] button in the CD-ROM’s menu
window.
3. Click the [Uninstall ScanGear CS-U] button in the Uninstall menu
window.
4. with Windows Me / 98 : Uninstallation procedure continues.
with Windows 2000 : Scanners and Cameras’ property dialog is
displayed. Select D646U and click [Remove]. Then uninstallation
procedure continues.
Note

20
Top Page
Glossary
Contents
Index
chapter
3
Simple Mode and
Advanced Mode
What are the Simple Mode and Advanced
Mode?
Simple Mode Main Window
Advanced Mode Main Window

21
chapter 3
Simple Mode
and Advanced
Mode
Top Page
Glossary
Contents
Index
What are the Simple Mode
and Advanced Mode?
You can run ScanGear CS-U in either of two modes: the Simple Mode
and Advanced Mode.
Simple Mode
The Simple Mode, as its name implies, is easy to use and fast. You can
set up a scanning job quickly just by selecting from the name that best
describes the job you want to execute: Color Photo, Color Photo Fine,
B&W Photo, and so on. All you have to do is select one Image Type
setting which sets up the scanning job for you automatically. You can
accept the settings and start the scanning job, or you can make small
adjustments to the settings before you begin. For routine scanning jobs
you can create your own Image Types and save them under a name that
will listed among the pre-defined selections.
Advanced Mode
The Advanced Mode presents more options which allow you to set up
professional quality scanning jobs. You can use precise settings to select
the scanning area in the Preview Area, adjust Color Mode and
Resolution, and take advantage of the wide selection of Tone options
(adjusting Contrast/Brightness, Gamma, Histogram, Special Tone Curve,
and Threshold).
22
chapter 3
Simple Mode
and Advanced
Mode
Top Page
Glossary
Contents
Index
Switching Between the Simple and Advanced
Modes
You can switch between the Simple and Advanced Modes simply by
clicking a button.
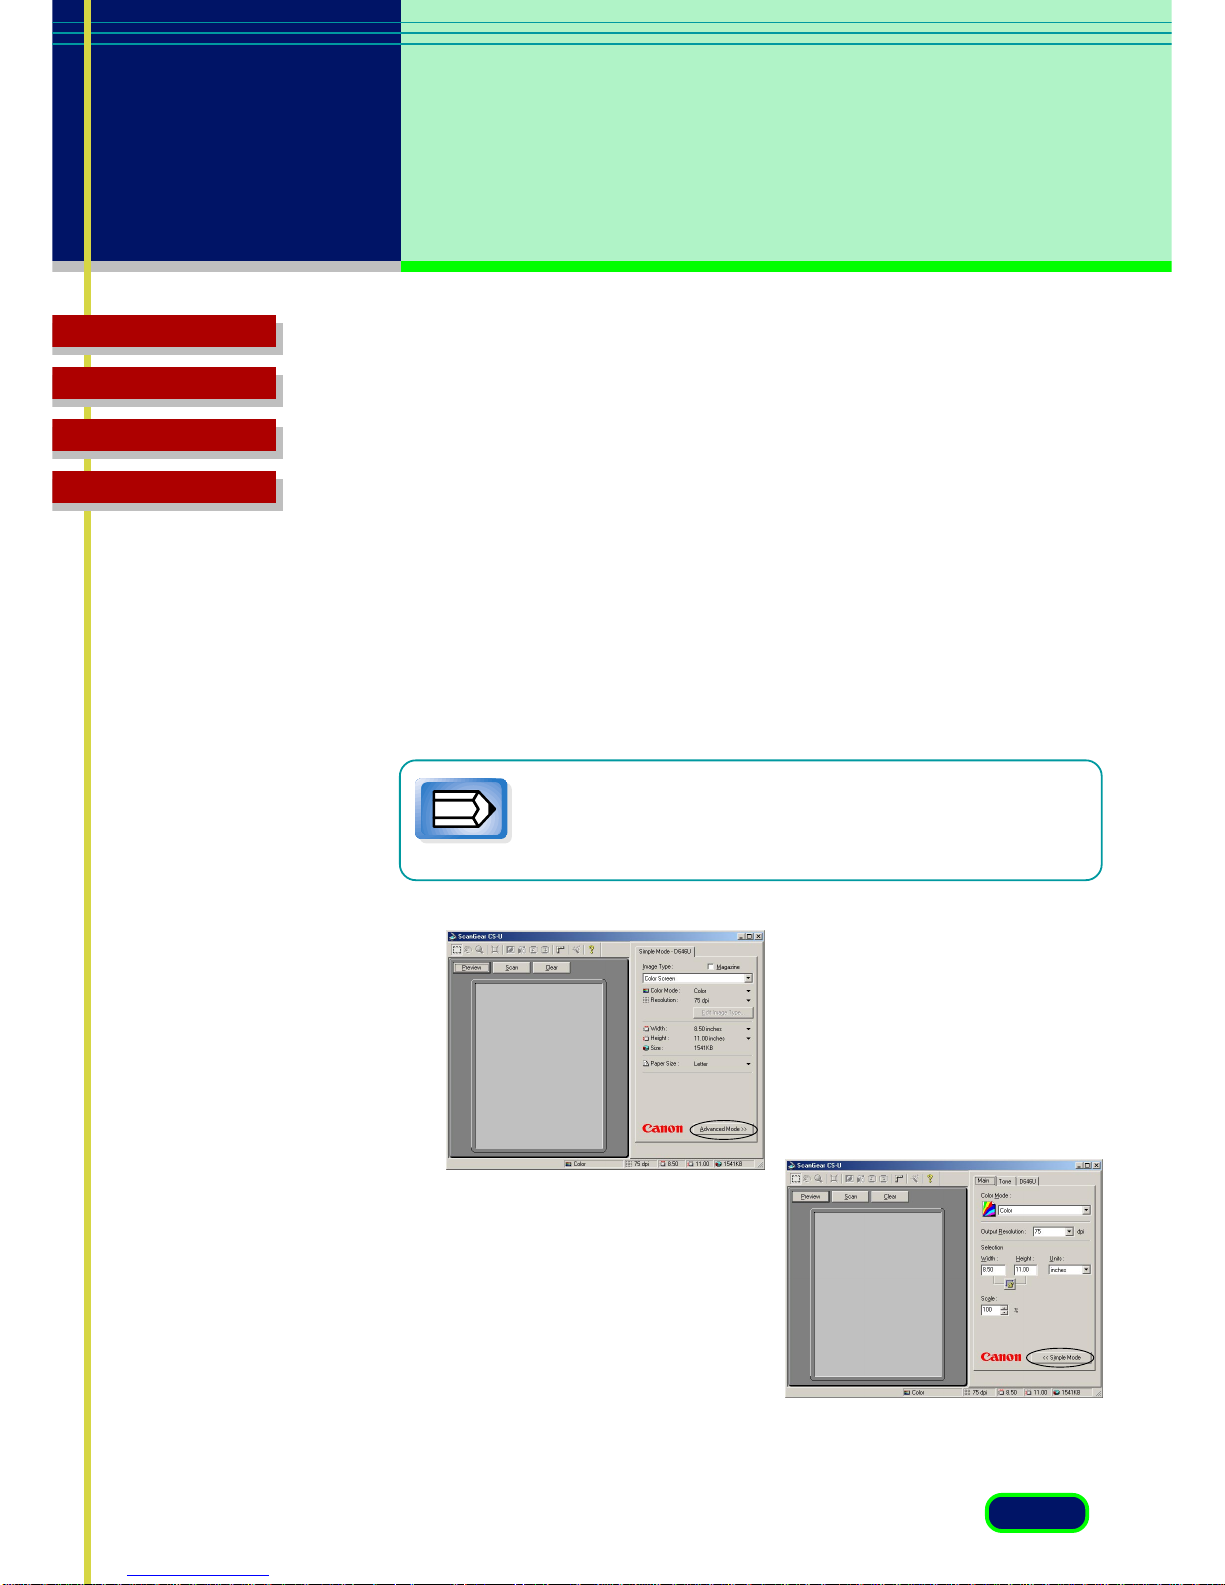
• In the Simple Mode main window, click the Advanced Mode
button to open the Advanced Mode main window.
• In the Advanced Mode main window, click the Simple Mode
button to open the Simple Mode main window.
Note
If you change the settings in either the Simple Mode or
Advanced Mode, the changes will be reflected in the
settings of the other mode.
Advanced Mode
Simple Mode
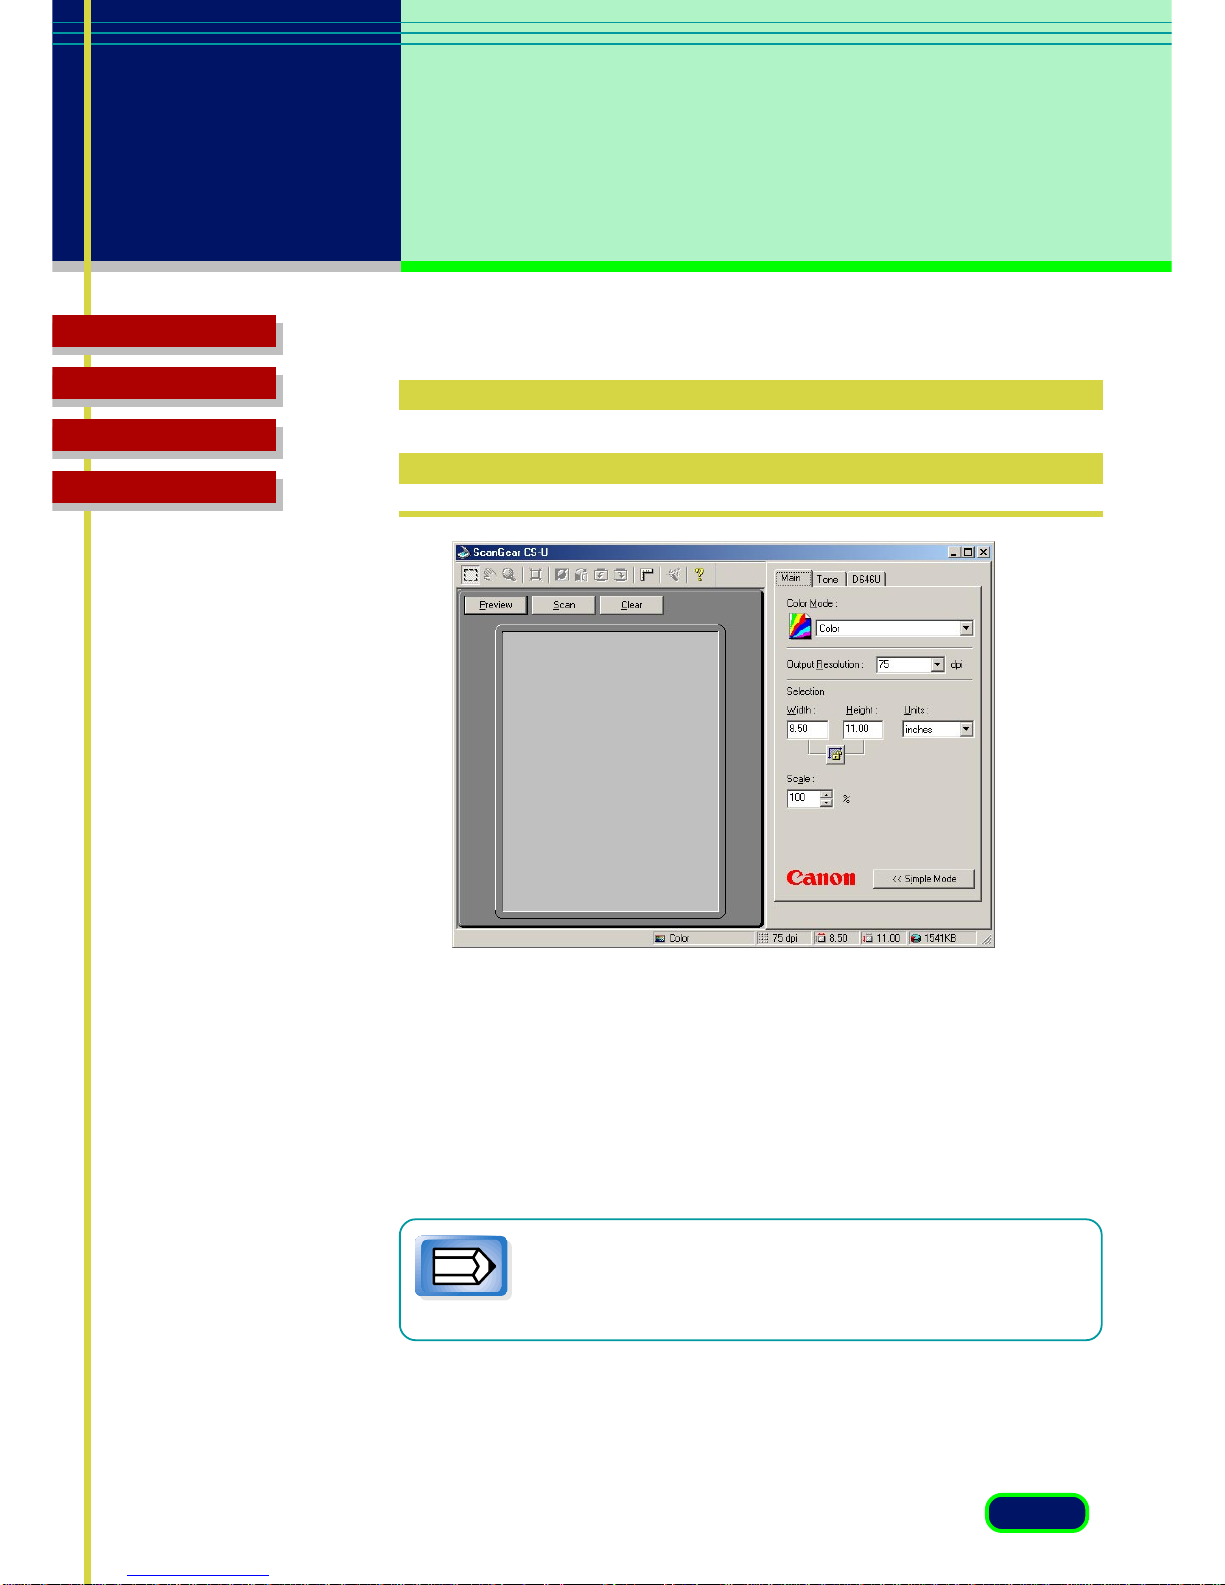
23
chapter 3
Simple Mode
and Advanced
Mode
Top Page
Glossary
Contents
Index
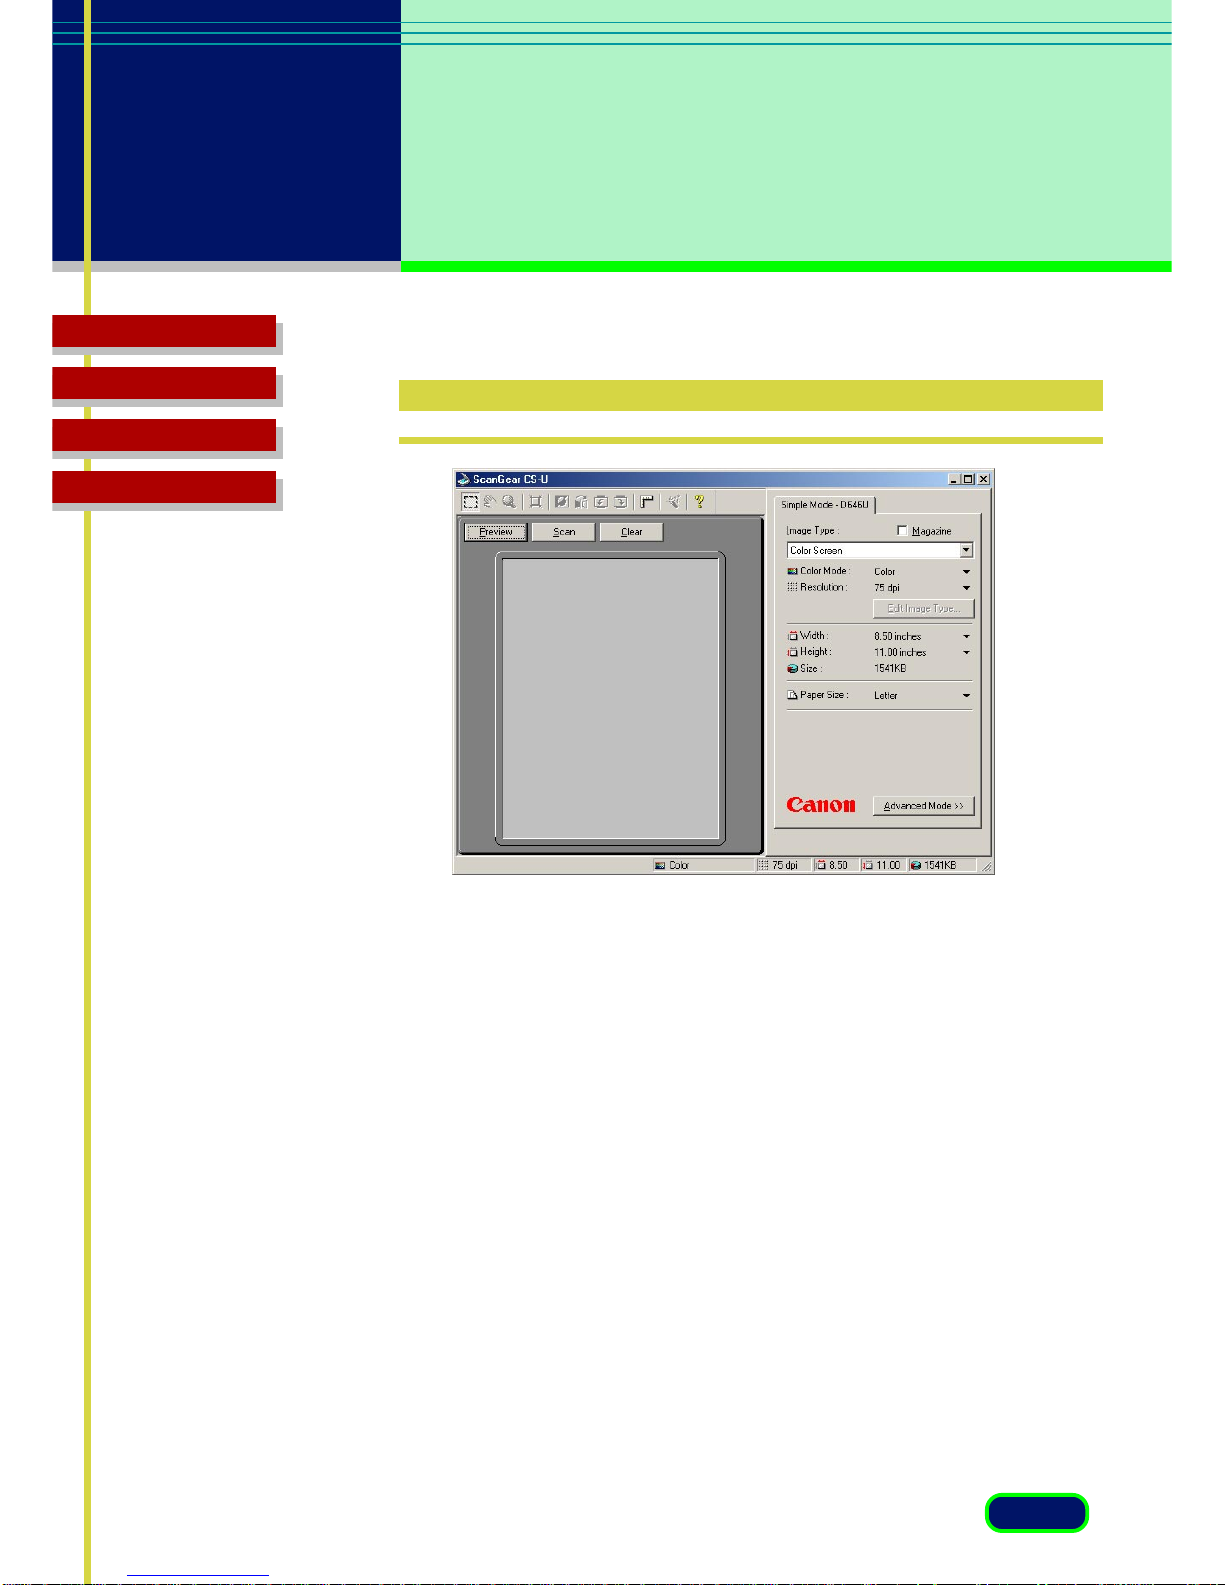
Simple Mode Main Window
The ScanGear CS-U main window in the Simple Mode has only one
sheet, named “Simple Mode” followed by the name of your scanner.
Use the Simple Mode sheet settings to select the settings for a scanning
job.
24
chapter 3
Simple Mode
and Advanced
Mode
Top Page
Glossary
Contents
Index
Advanced Mode Main
Window
The ScanGear CS-U main window in the Advanced Mode has more
sheets to perform the settings for scanning.
In the Advanced Mode click the Main tab , Tone tab (or Halftone tab), or
the Scanner tab to open the Main sheet, Tone sheet (or Halftone sheet)
or Scanner sheet. Use the settings on each sheet to perform important
settings for scanning.
Note
In the Advanced Mode, the name of your scanner (D646U)
is displayed on the tab of the Scanner sheet.
25
chapter 3
Simple Mode
and Advanced
Mode
Top Page
Glossary
Contents
Index
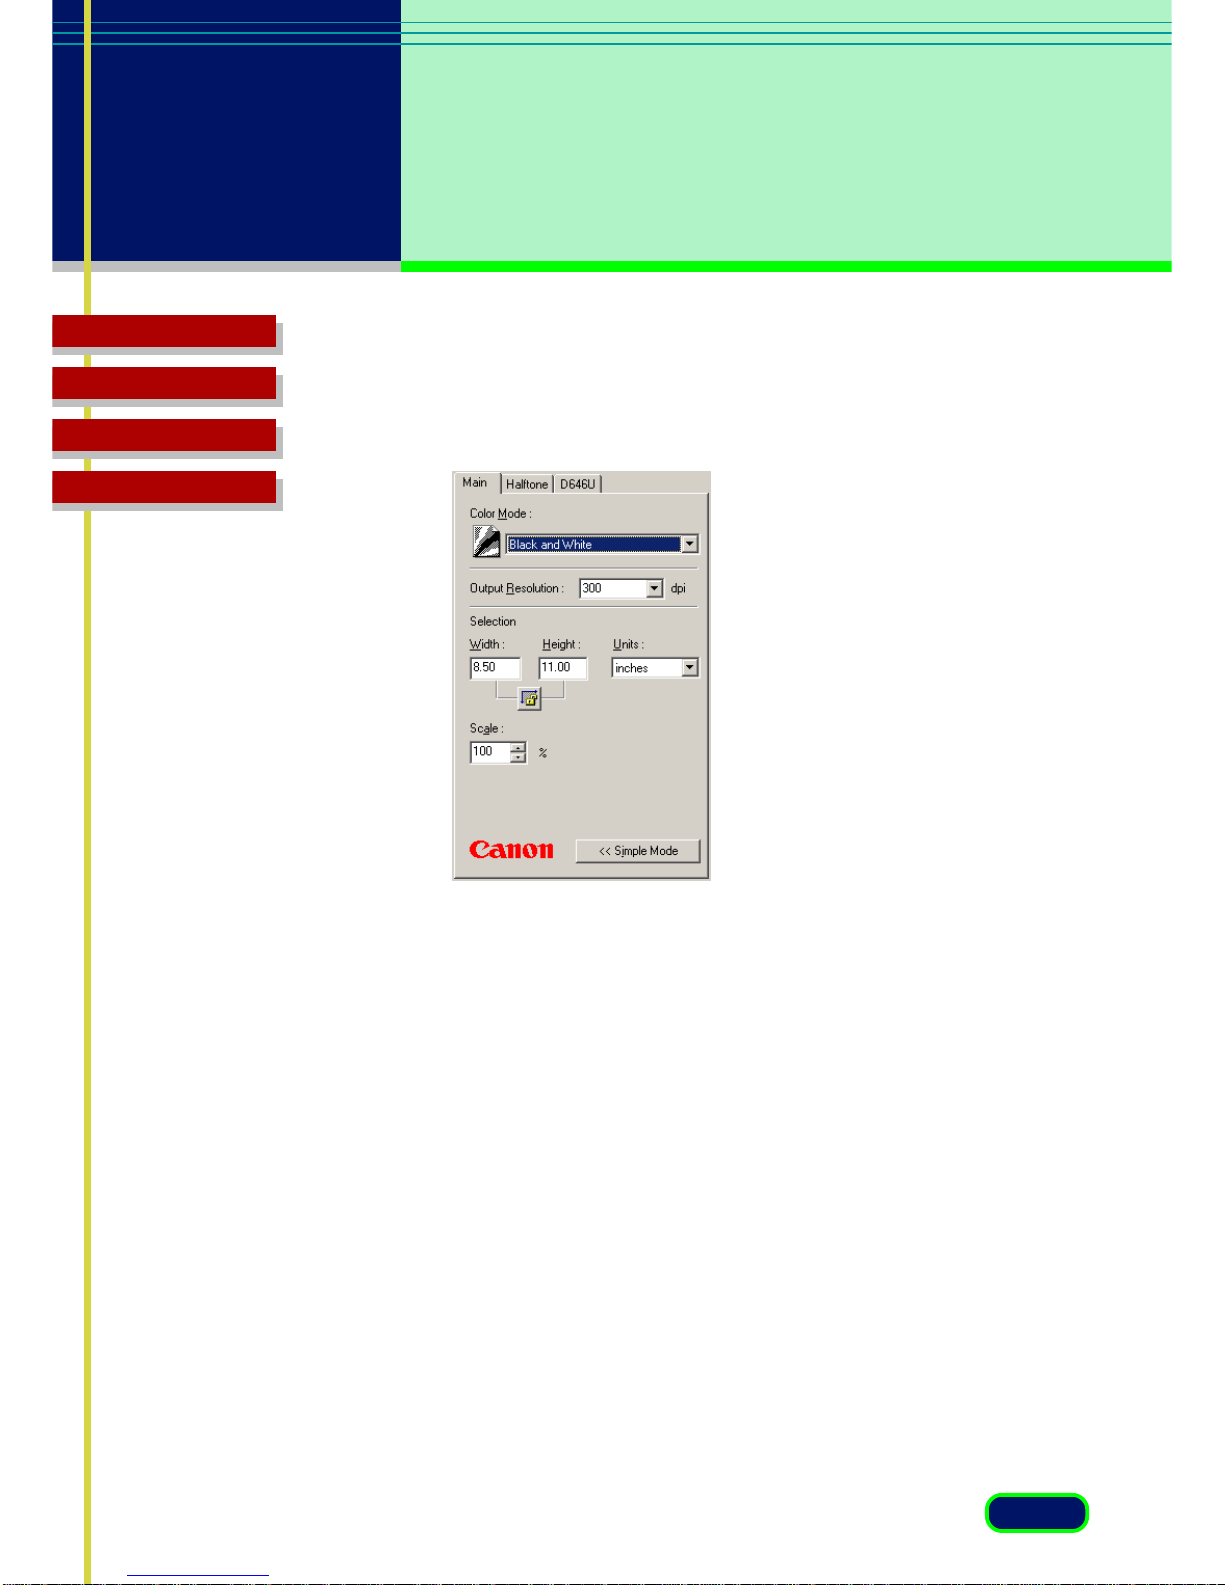
If you select Black and White or Text Enhanced(OCR) for the Color Mode
on the Main sheet, the Tone tab is replaced with the Halftone tab.

26
Top Page
Glossary
Contents
Index
4
What is on the
screen?
Main Window
Toolbar
Scanning Buttons
Simple Mode Main Window
Advanced Mode Main Window
chapter
27
chapter 4
What is on the
Screen?
Top Page
Glossary
Contents
Index
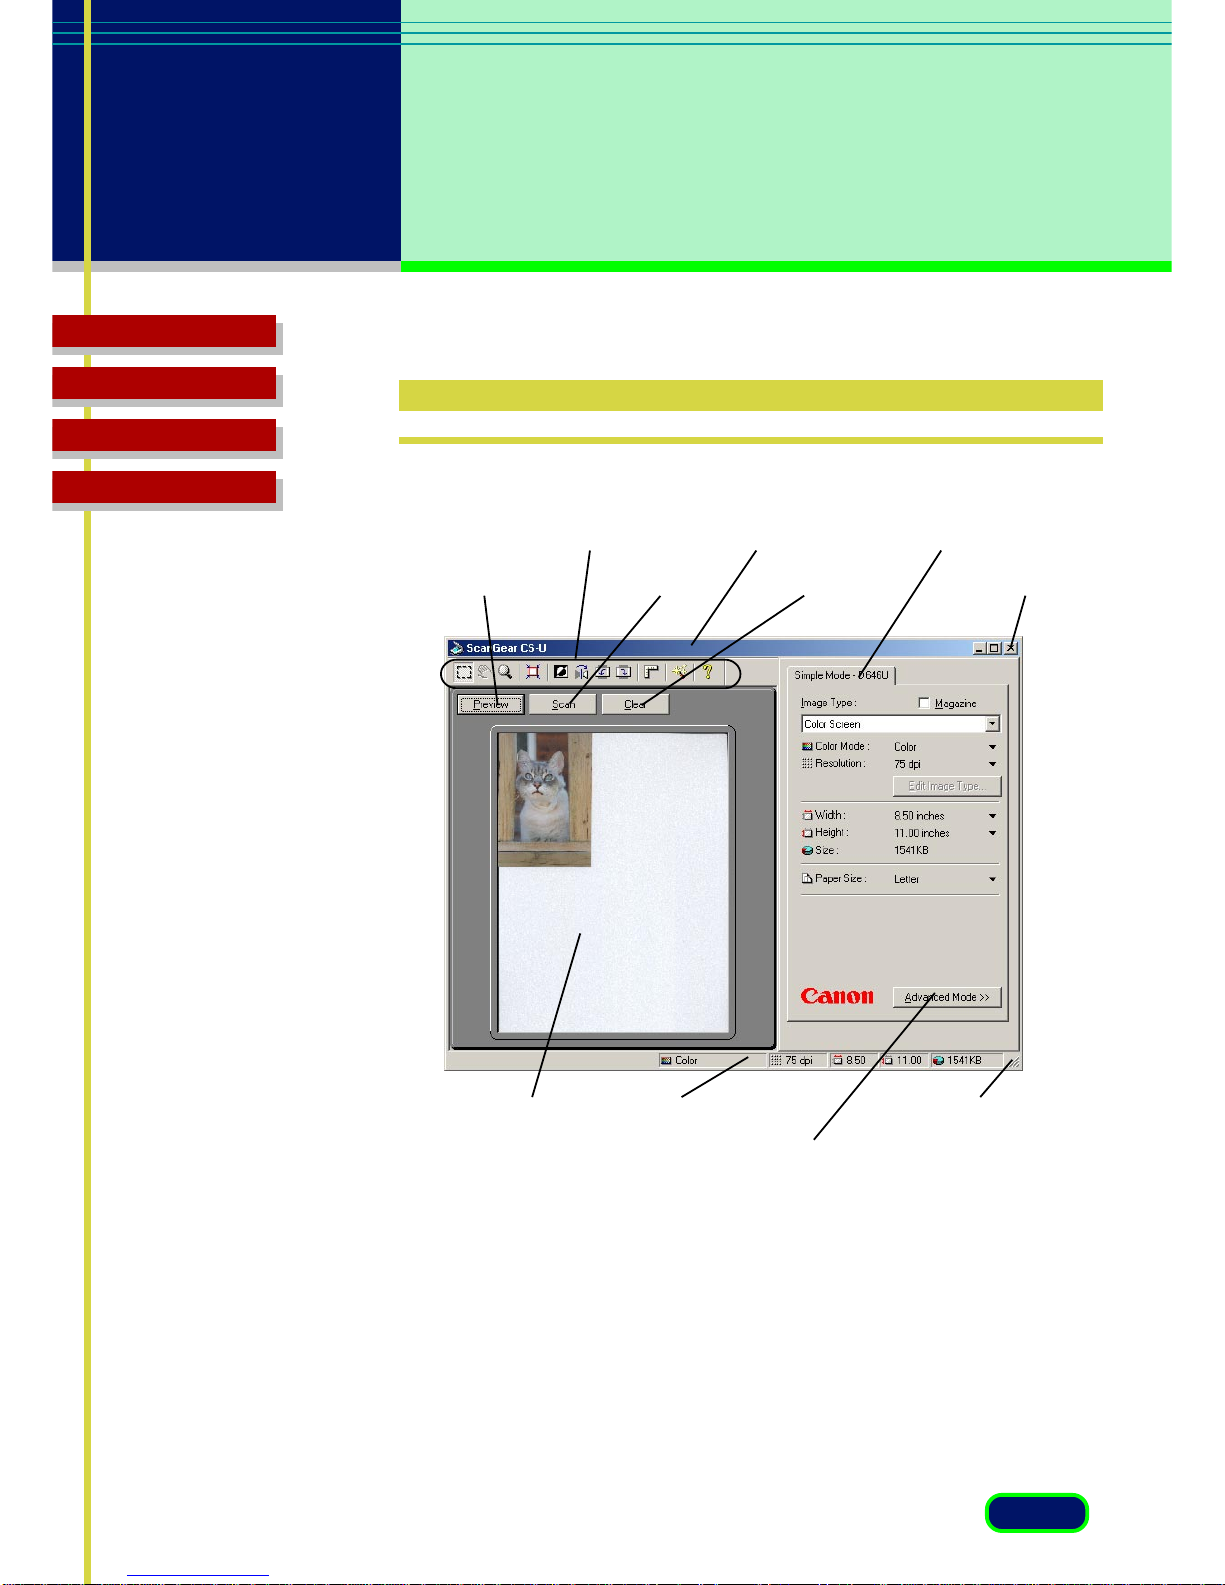
Preview Button Scan Button Clear Button
Preview Area
Tool Bar Title Bar
Window Resize Corner
Close Box
Setting Tab
Mode Switching Button
Status Area
Main Window
28
chapter 4
What is on the
Screen?
Top Page
Glossary
Contents
Index
Toolbar
Buttons on the toolbar help you to perform important tasks like,
cropping images, moving images, zooming, and so on.
Crop Button
Click the Crop button and drag the pointer in any direction to draw a
rectangle around the area you want to select for scanning. This reduces
the time it takes to scan an image because you are pre-scanning or
scanning only the necessary section of the image, not the whole area. To
un-crop the image simply click outside the cropped area.
Move Image Button
Use the Move Image button to scroll the image up/down or left/right
when the previewed image has been enlarged with the Zoom Tool
button and is too large to be viewed all at once. Click the Move Image
button and drag the image with the hand image pointer.
Note
The Move Image button is not available when the previewed
image has not been enlarged and is displayed entirely in the
Preview Area.

29
chapter 4
What is on the
Screen?
Top Page
Glossary
Contents
Index
Zoom Tool Button
Click the Zoom Tool button and then click the left or right mouse button
to change the size of the Preview image.
• To increase the magnification of the image, click the Zoom Tool
button then click the left mouse button on the area of the
previewed image to view. You can repeat this procedure to
magnify the image up to 4 times its previewed size.
• To decrease the magnification of the image, click the Zoom Tool
button then click the right mouse on the magnified image.
Auto Crop Button
After clicking the Crop button and drawing a rectangle around the part
of the image that you want to scan, click the Auto Crop button to size
the rectangle for the best fit around the object enclosed by the
rectangle.
Negative/Positive Button
Click the Negative/Positive button to invert the colors and create a
negative of the image.
Mirror Button
Click the Mirror button to flip the image horizontally like a mirror image.
Rotate Left Button
Click the Rotate Left button to rotate a scanned image left 90 degrees
(counterclockwise). Click this button repeatedly to continue rotating the
image left.

30
chapter 4
What is on the
Screen?
Top Page
Glossary
Contents
Index
Rotate Right Button
Click the Rotate Right button to rotate a scanned image right 90 degrees
(clockwise). Click this button repeatedly to continue rotating the image
right.
Rulers Button
Click the Rulers button to display a ruler in the Preview Area to help with
sizing and cropping the image. To select the gradations for rulers, click
the down-arrow for Units on the Main sheet and then select the units of
measure from the drop-down list.
Auto Tone Button
Click the Auto Tone button to have ScanGear CS-U automatically adjust
the tone of a pre-scanned color image within the cropped area. The
Auto Tone feature is on when the button on the toolbar is depressed.
The Auto Tone button is available only when Color has been selected for
Color Mode on the Main sheet and when ColorGear Color Matching is
not selected for Color Adjustment in the Preferences settings.
To reset to its default settings, click the All Reset button on the Tone
sheet.
Help Button
Click the Help button to display the ScanGear CS-U on-line Help.
 Loading...