

Canon PIXMA Pro9000 Series, 9995A001 - Pixma Pro9000 Professional Large Format Inkjet Printer Setup Instructions
Page 1
Start Here
Easy Setup Instructions
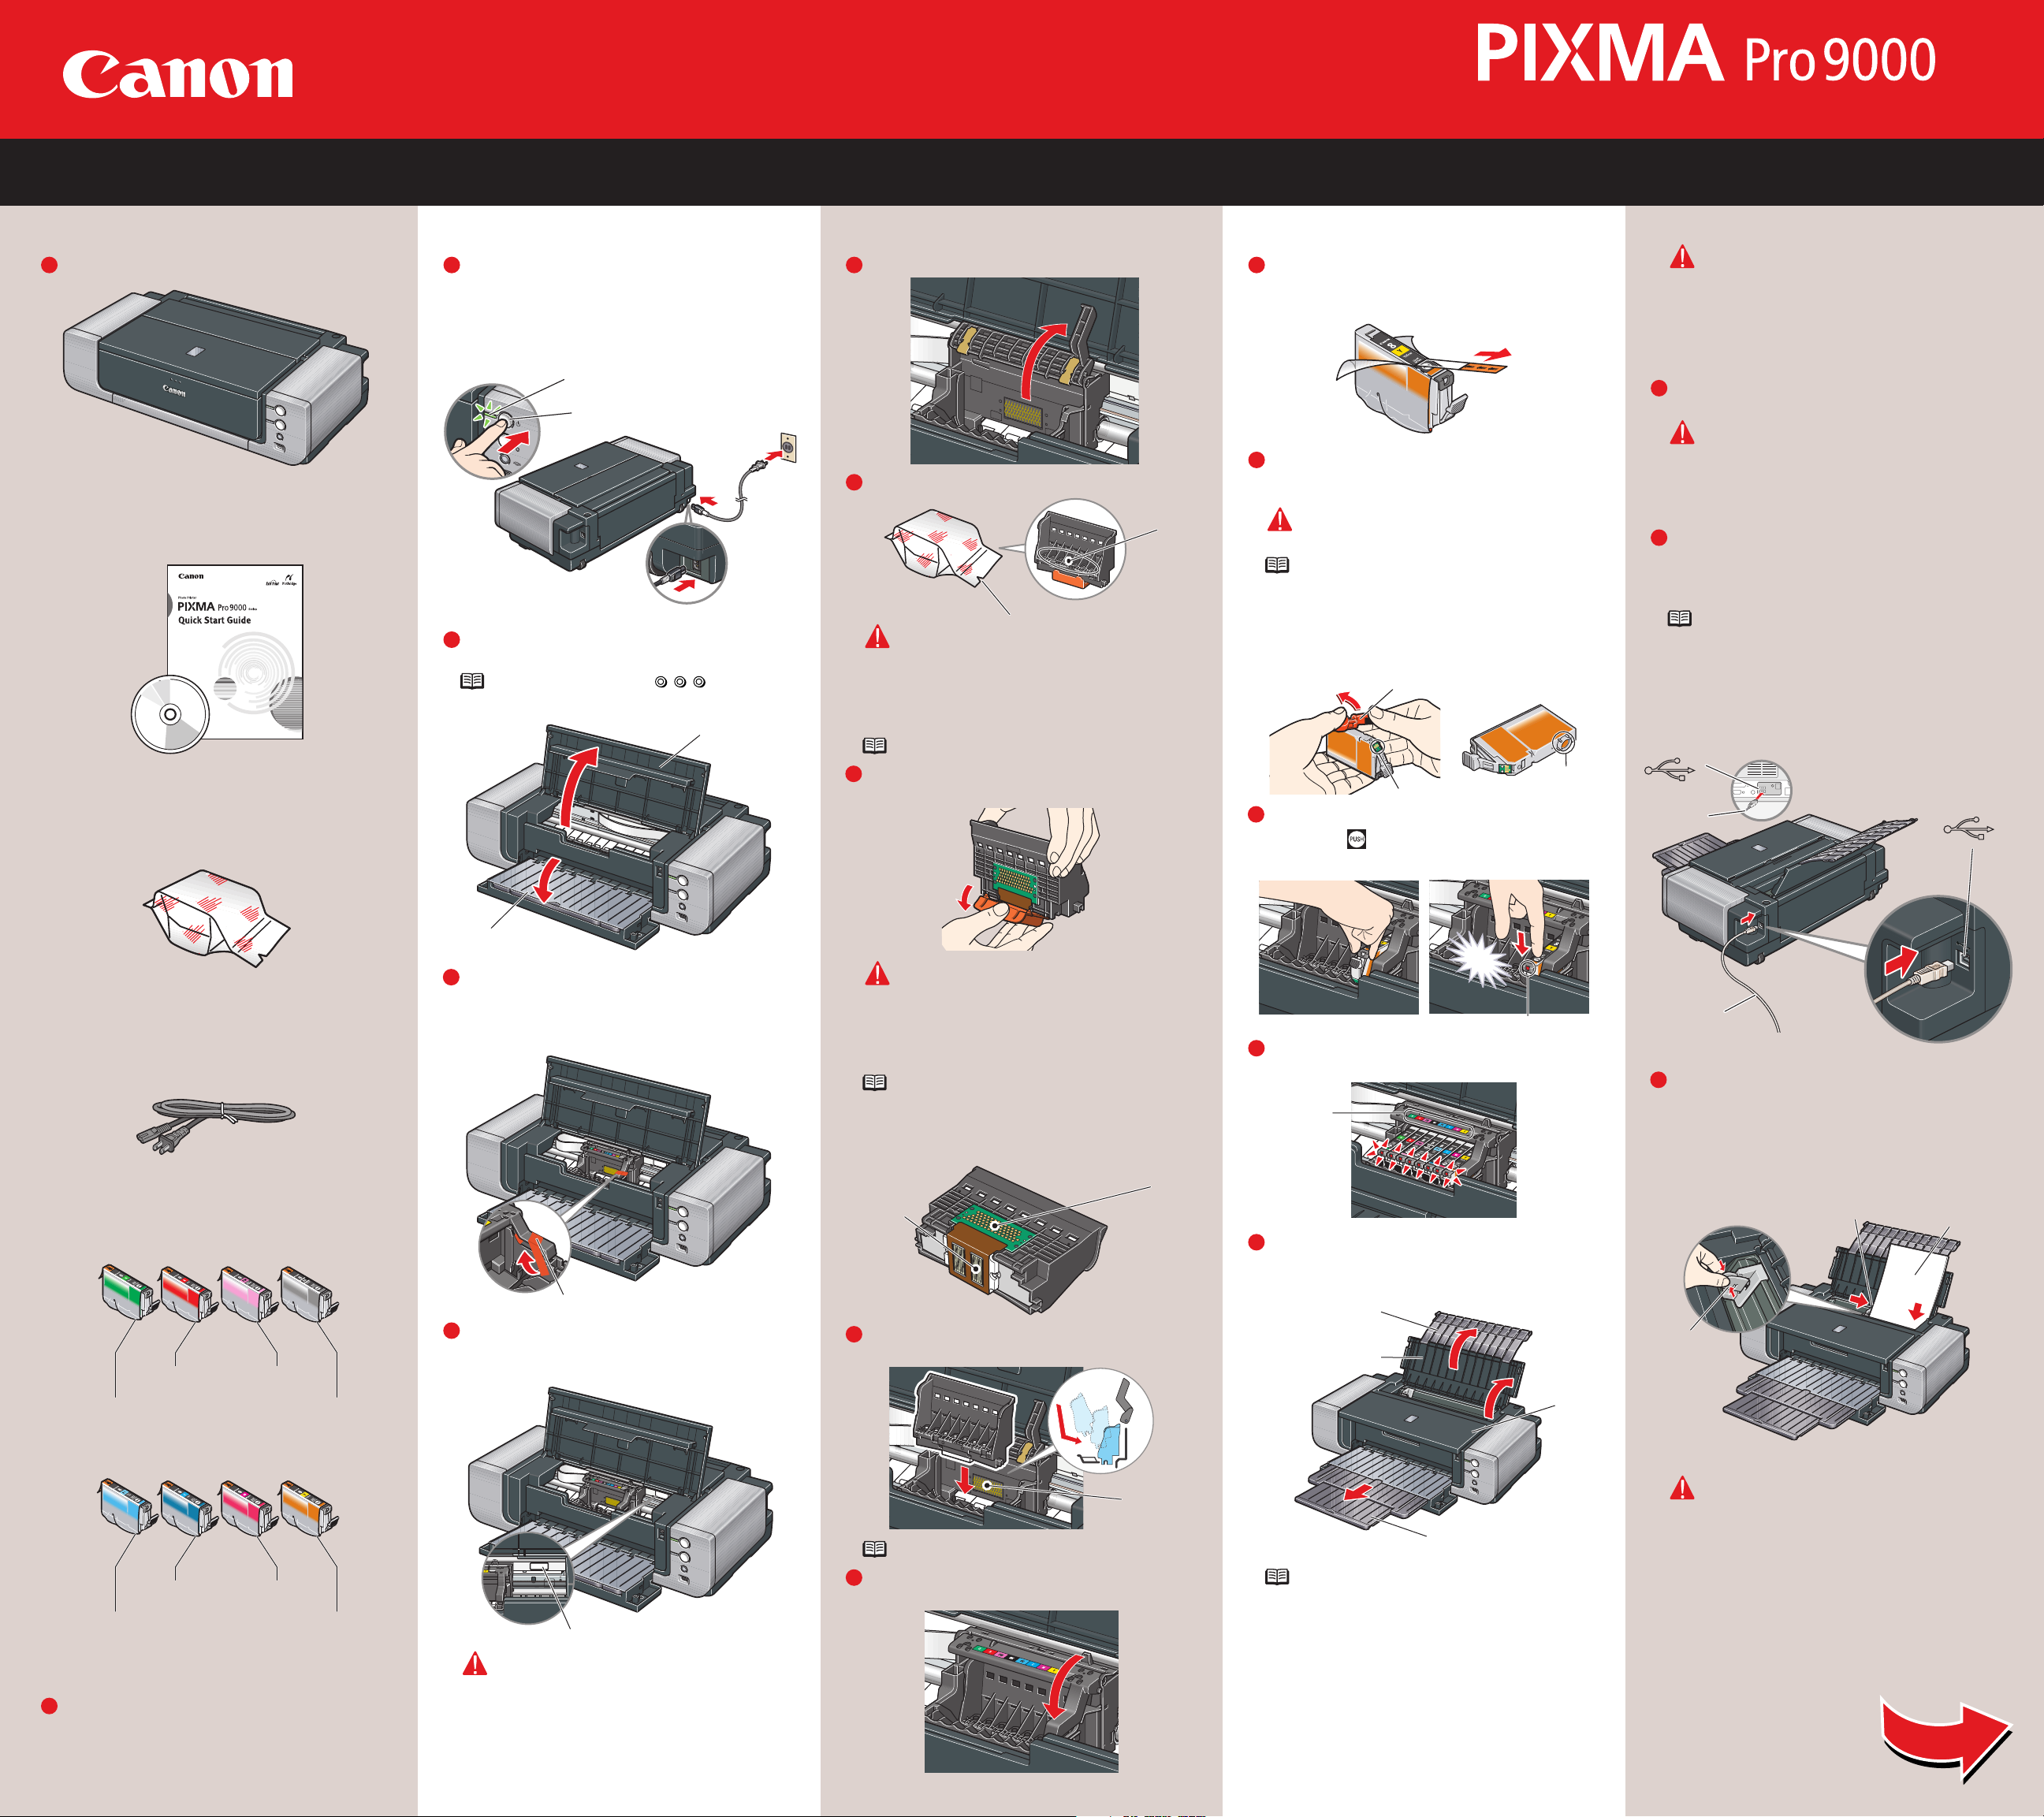
1 Unpack the Printer
Carefully remove all items from the box.
Remove the tapes from the printer.
2
Power Cord
PIXMA Pro9000
Print Head
Documentation and
Software Kit
PIXMA Pro9000
Photo Printer
1
2 Prepare the Printer
Plug the power cord into the back of the printer
and connect the other end to a power outlet.
Press the POWER button. The printer will
initialize. Wait until the POWER lamp displays a
steady green light.
Open the Front Tray. Raise the Top Cover.
NOTE: Gently press the mark on the
Front Tray. The Front Tray automatically opens.
The Print Head Holder automatically moves to
the center. Remove the protective tape from
the Print Head Holder. The tape position is
subject to change.
Write down the serial number located inside
the printer. You will need this to register your
products.
IMPORTANT: If the Top Cover is left open for
more than 10 minutes, the Print Head Holder
moves to the right. Close and reopen the Top
Cover to return the holder to the center.
4
3
3 Install the Print Head
Firmly raise the print head lock lever.
Remove the Print Head from its package.
CAUTION: There might be some transparent or
light blue ink on the inside of the bag the Print
Head comes in - this has no effect on print
quality. Be careful not to get ink on yourself
when handling these items.
NOTE: Do not touch the nozzles.
Remove and discard the orange protective cap
from the Print Head.
CAUTION: There might be some transparent or
light blue ink on the inside of the protective cap
- this has no effect on print quality. Be careful
not to get ink on yourself when handling these
items.
NOTE:
· Do not touch the print head nozzles and the
electrical contacts.
· Do not attempt to reattach the protective cap once
it has been removed.
Slide the Print Head into the holder.
The Print Head will rest at a slight angle.
NOTE: Do not touch the electrical contacts.
Lower the print head lock lever carefully and
press it down.
5
4
3
2
1
4 Install the Ink Tanks
Peel back the orange tab completely and
remove the plastic wrapper from the Yellow Ink
Tank (CLI-8Y).
Twist off and discard the orange protective cap
located on the bottom of the ink tank.
IMPORTANT: Do not touch the electrical
contacts.
NOTE:
·To avoid spilling ink, never press on the sides of
an ink tank.
· Do not touch the open ink port once the protective
cap is removed, as this may prevent the ink from
being ejected properly.
Insert the ink tank into the rightmost slot.
Press the mark on the ink tank until it clicks
into place and then its lamp lights red.
Insert the remaining seven ink tanks into their
assigned slots. Ensure that ink lamps light red.
Close the Top Cover. Lift open the Paper
Support and the Paper Support Extension, then
pull out the Front Tray Extension.
NOTE: If the ALARM lamp on the printer flashes
orange after you have closed the Top Cover, an
ink tank may not be installed properly. Open the
Top Cover and make sure that the ink tanks are
installed in the correct order directed on the
label.
5
4
5
Connect the Printer
and Load Paper
IMPORTANT: Once you have installed the ink
tanks, the POWER lamp will flash green. Wait for
about 2 minutes 30 seconds until the POWER
lamp displays a steady green light and the
printer has stopped making operating noises
before proceeding.
TURN THE PRINTER OFF.
IMPORTANT: Be sure the printer is off before
continuing, or the computer will attempt to
install the printer driver before the printer is
ready.
Connect one end of the USB cable to the
computer, the other to the appropriate USB
port on the printer.
NOTE: The Pro9000 Photo Printer is equipped
with USB 2.0 Hi-Speed port. If your PC does not
support USB 2.0 Hi-Speed, or if any noncertified USB 2.0 cable or driver is used for the
connection, the printer will operate at a lower
speed provided under USB 1.1.
Pinch the Paper Guide and slide it to the left.
Load two sheets of plain paper into the Auto
Sheet Feeder, align the paper with the right
edge of the Auto Sheet Feeder, then slide the
Paper Guide toward the left edge of the paper.
IMPORTANT: Print Head Alignment (Step 6)
requires that letter size paper is loaded in the
Auto Sheet Feeder (top paper feeder).
3
2
1
Top Cover
Tear at notch to open
Print Head
Nozzles
Electrical
Contacts
Electrical
Contacts
USB Cable
USB Cable
USB Port
Protective Cap
Nozzles
click
Auto Sheet
Feeder
Paper
Guide
Continue with Step 6
on side two.
Front Tray Extension
Paper Support
Extension
Paper Support
Top Cover
POWER Button
POWER Lamp
USB Port
Protective Tape
Serial Number Location
Ink Tanks
CLI-8G Green CLI-8BK Black
CLI-8R Red CLI-8PM
Photo Magenta
CLI-8PC
Photo Cyan
CLI-8C Cyan
CLI-8Y Yellow
CLI-8M Magenta
Electrical Contacts
Ink Lamp
Print Side
Refer to the color
guide on the print
head lock lever.
Front Tray
Ink Port
Series
Photo Printer
1
2
1
2
3
Page 2
Windows
Macintosh
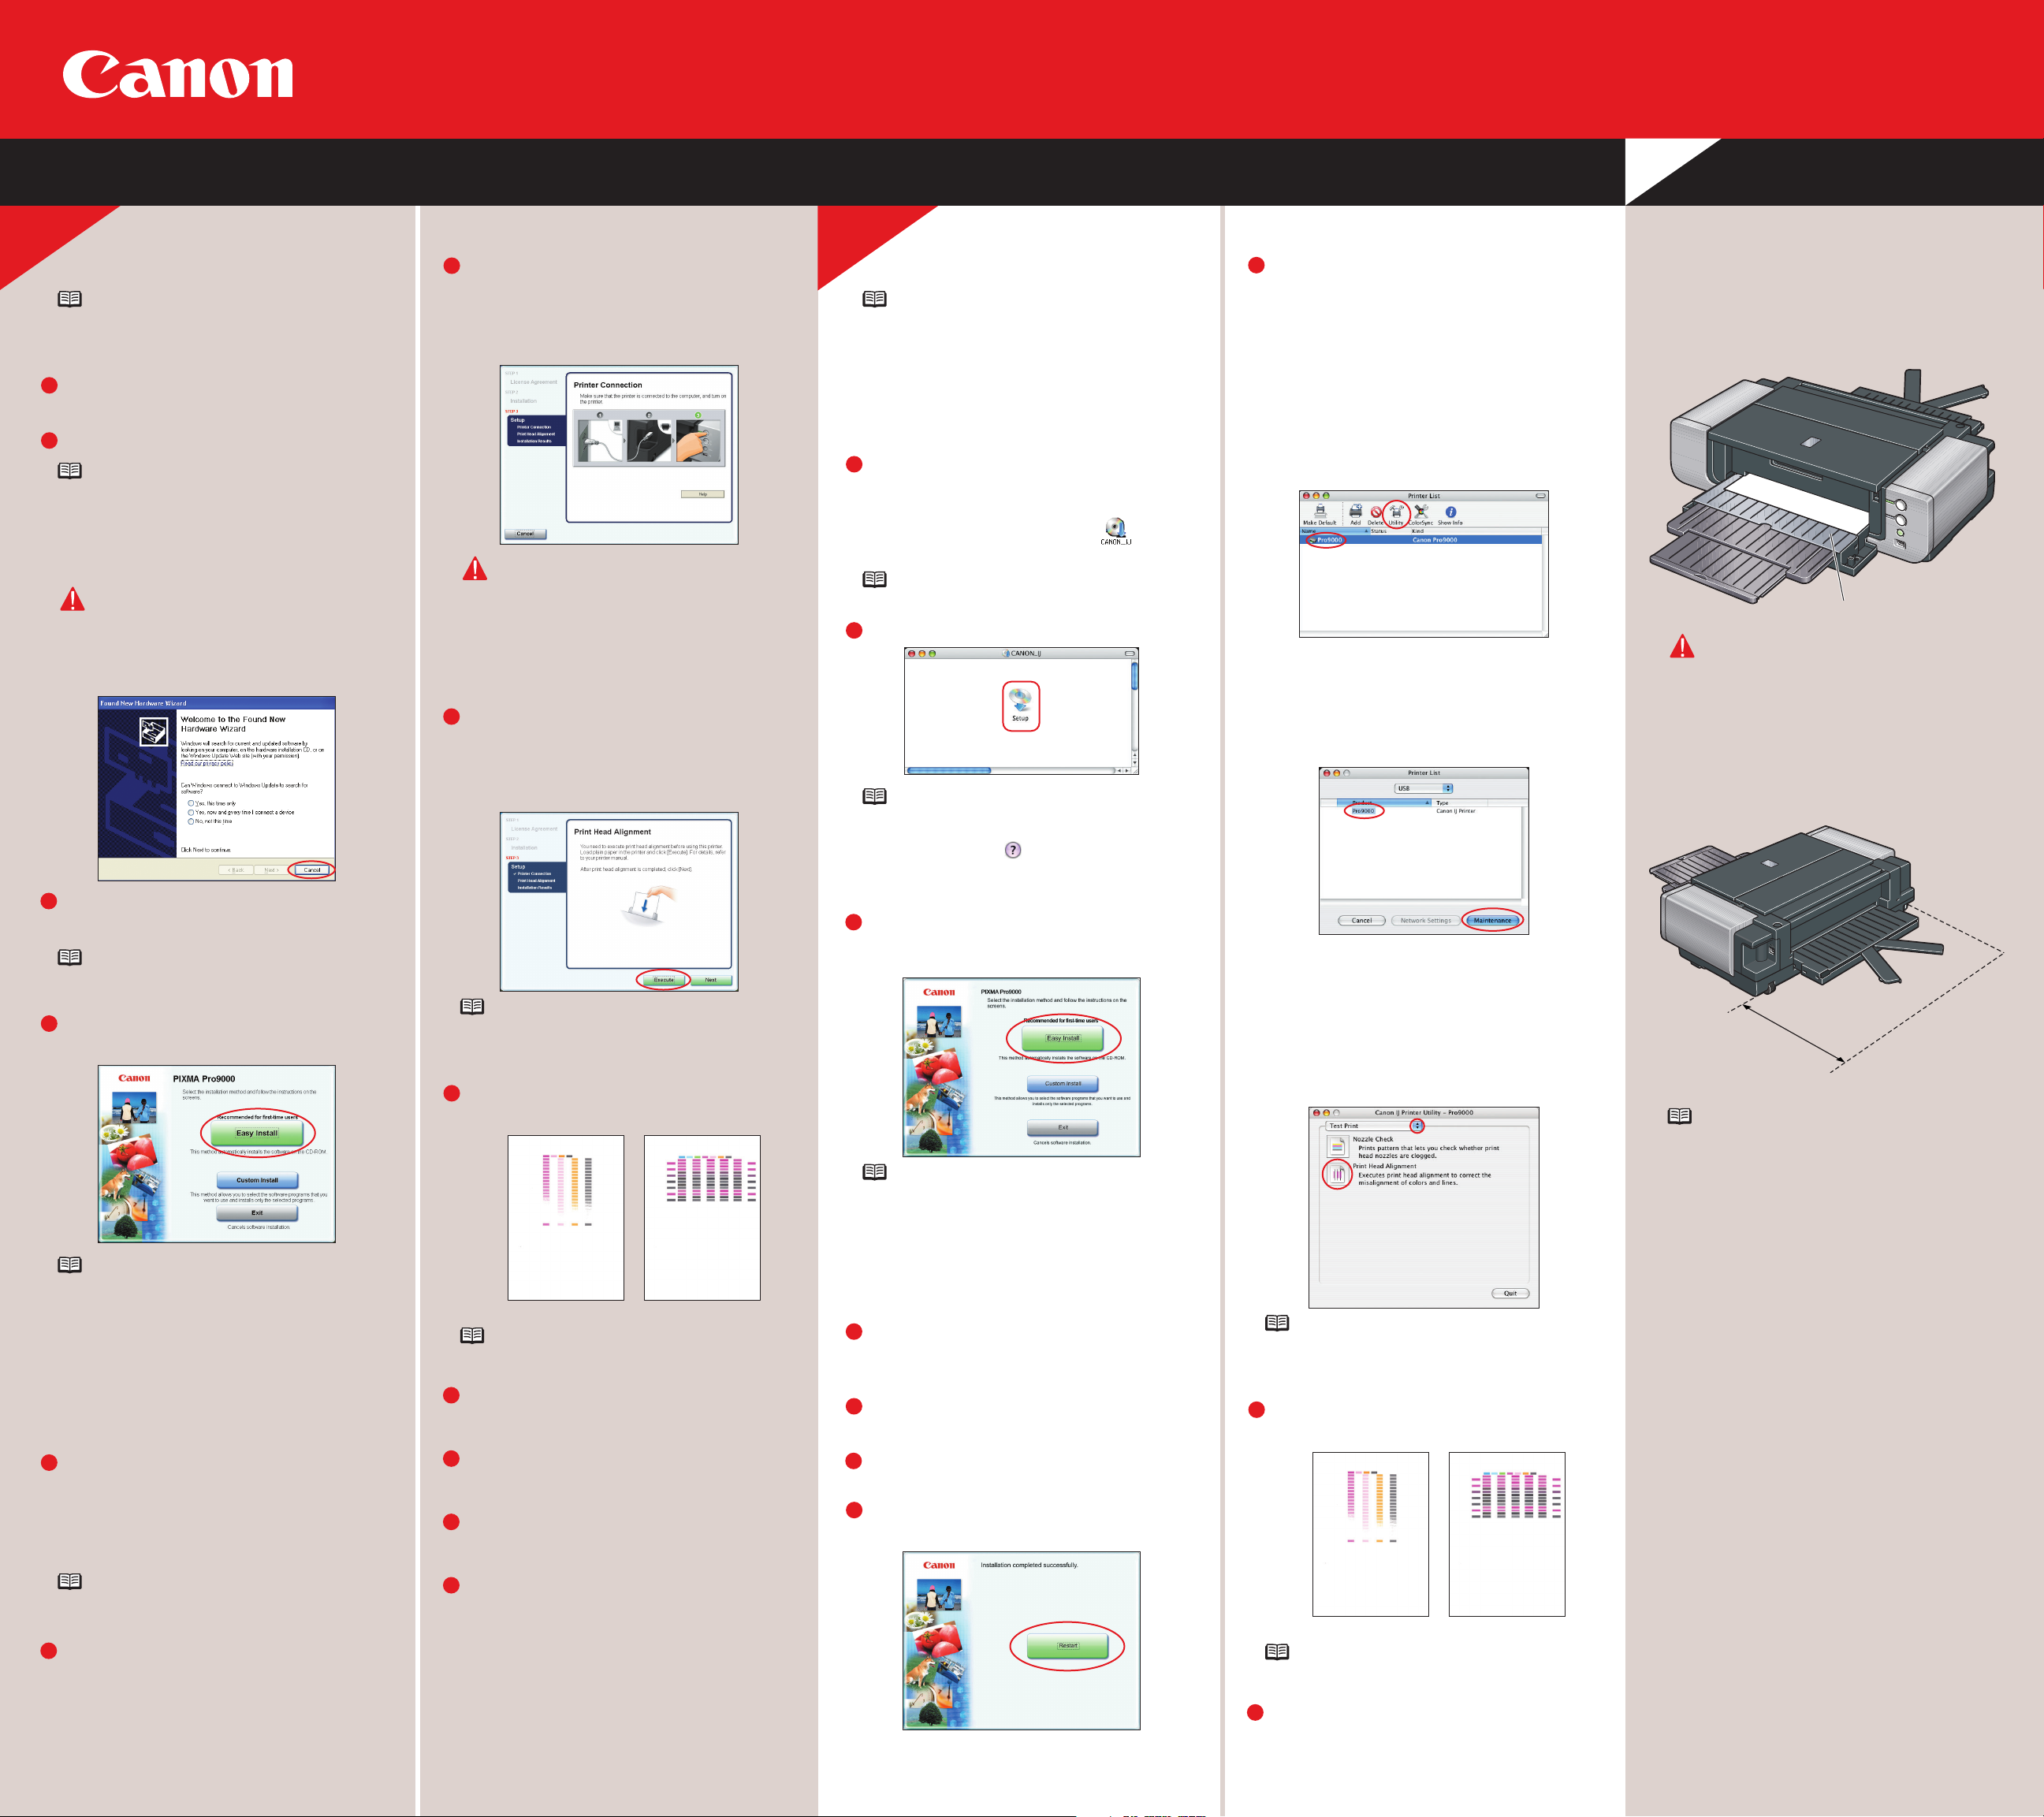
NOTE: The screens below refer to Windows XP
Service Pack 2 installation. Screens may differ
depending on the operating system you are
using.
Be sure to TURN THE PRINTER OFF before
continuing.
Turn on the computer and start Windows.
NOTE:
·For Windows XP or Windows 2000, log on to
Windows as a member of the Administrators group
before continuing.
·Before installing the driver, disable all anti-virus
programs and automatically loading programs.
IMPORTANT: If you see the Found New
Hardware Wizard, click Cancel, and turn off the
printer. Next, remove the USB cable connected
to your computer. Then proceed from step 3 to
install the printer driver.
Insert the
Setup CD-ROM
. The setup program
should run automatically.
NOTE: If the setup program does not run, click
Start, then Run, then type D:\Msetup4.exe,
where D is your CD-ROM drive.
When the main menu appears, click Easy
Install.
NOTE:
· Select Easy Install in order to install the application
software, on-screen manuals and printer driver.
Select Custom Install in order to choose the options
you would like to install.
·To install PhotoRecord, click Custom Install and
follow the instruction on the screen.
·Adobe
®
Photoshop®CS, Adobe Photoshop CS2, or
Digital Photo Professional must be installed to use
Easy-PhotoPrint Pro.
When the list of applications to install appears,
verify the contents, click Install, then follow the
instructions on the screen.
Move the cursor over items to display
explanations of each application below.
NOTE: Easy-PhotoPrint Pro and Adobe RGB
(1998) cannot be installed in Windows Me and
Windows 98.
Read the License Agreement and click Yes .
Follow the on-screen instructions to install the
software.
If a message asking for your confirmation to
restart your computer appears, click OK.
The system is restarted automatically.
6
5
4
3
2
1
When the Printer Connection screen appears,
ensure that the printer is connected to the
computer with the USB cable, then TURN THE
PRINTER ON. The software will begin
identifying the printer port being used.
IMPORTANT: If your computer cannot detect a
printer port, click Help and refer to the online
instructions.
If a message asking for your confirmation to
restart your computer appears, click OK.
The system is restarted automatically.
When the Print Head Alignment screen
appears, ensure that two sheets of letter size
paper are loaded in the Auto Sheet Feeder (top
paper feeder). Click Execute, read the message
and click Print Head Alignment.
NOTE:
· Print head alignment will take about five minutes
to complete. Do not start another operation here.
· Do not open the Top Cover while printing.
Print head alignment is automatically adjusted
by printing the patterns below.
NOTE: Some parts of the first pattern that is
printed will be faint.
After print head alignment is completed, click
Next.
When the Installation Results screen appears,
click Next.
Follow the on-screen instructions to register
your product.
When the Installation completed successfully
screen appears, click Exit.
If Restart is displayed, ensure the Restart the
system now (recommended) check box is
selected, then click Restart.
131211
10
NOTE:
·Use Mac
®
OS Xv.10.2.8 to 10.4.x.
· The screens below refer to Mac OS X v.10.4.x
installation. Screens may differ depending on the
operating system you are using.
·Before installing the driver, disable all anti-virus
programs and automatically loading programs.
Turn on your Mac and your printer and insert
the
Setup CD-ROM
.
If the CD-ROM folder does not open
automatically, double-click the on the
desktop.
NOTE: Log on as an Administrator before
continuing.
Double-click the
SSeettuupp
icon.
NOTE: When the Authenticate screen appears,
enter your administrator name and password.
If you do not know your administrator name or
password, click on the lower-left corner of
the screen, then follow the on-screen
instructions.
When the main menu appears, click Easy
Install and then Install, then follow the onscreen instructions.
NOTE:
· Select Easy Install in order to install the
application software, on-screen manuals and
printer driver. Select Custom Install in order to
choose the options you would like to install.
· Adobe Photoshop CS, Adobe Photoshop CS2, or
Digital Photo Professional must be installed to use
Easy-PhotoPrint Pro.
Read the License Agreement and click Yes .
Follow the on-screen instructions to install the
software.
Follow the on-screen instructions to register
your product.
When the Print Head Alignment Recommended
screen appears, click Next.
When the Installation completed successfully
screen appears, click Restart.
The system is restarted automatically.
7
6
5
4
3
2
1
Start the print head alignment procedure.
a. After restarting the computer, select
Applications from the Go menu. Double-
click the Utilities folder, then the Printer
Setup Utility (Print Center when using Mac
OS Xv.10.2.x) icon.
b. When the Printer List screen appears, select
Pro9000, then click Utility (Configure when
using Mac OS X v.10.2.x) icon.
If the printer is not displayed on the Printer
List, click Add to add the printer.
For details, follow the instructions in Mac
Help.
c. Select Pro9000 and click Maintenance.
d. Ensure that two sheets of letter size paper
are loaded in the Auto Sheet Feeder (top
paper feeder).
e. Click the down-arrow to select Test Print.
Click the Print Head Alignment icon and
follow the on-screen instructions.
NOTE:
· Print head alignment will take about five minutes
to complete. Do not start another operation here.
· Do not open the Top Cover while printing.
Print head alignment is automatically adjusted
by printing the patterns below.
NOTE: Some parts of the first pattern that is
printed will be faint.
Click Quit to exit the Canon IJ Printer Utility.
10
6 Windows
®
Printer Driver Installation and Print Head Alignment 6 Macintosh
®
Printer Driver Installation and Print Head Alignment
Introduction to the Front
Paper Feeding
You can load paper in both the Auto Sheet Feeder
and the Front Tray.
Loading paper in the Front Tray to print on large
size paper or to print on thick paper such as art
paper.
IMPORTANT:
· When loading paper in the Front Tray, the paper
sticks out from the back of the printer. Keep a
space of 40 cm / 15.7 inches for this purpose
behind the printer.
· There are wheels on the back corners of the
printer. Lift up the front of the printer to move it
back and forth.
NOTE: For details, refer to “Loading Paper in the
Front Tray” in “Loading Paper” in the
Quick
Start Guide
.
Front Tray
40 cm / 15.7 inches
behind the Printer
Part no. QT5-0114-V01 © 2006 Canon Inc. "Windows" is a trademark of Microsoft Corporation, registered in the United States and other countries. "Macintosh" and "Mac" are trademarks of Apple Computer, Inc., registered in the U.S. and other countries.
"Adobe", "Adobe Photoshop" and "Adobe RGB (1998)" are either registered trademarks or trademarks of Adobe Systems Incorporated in the United States and / or other countries. Specifications subject to change without notice. Printed in Japan.
Column
7
8
9
8
9
 Loading...