

Page 1
Getting Started
Démarrage
Inbetriebnahme
Guida Rapida
ENGLISH
FRANÇAIS
DEUTSCH
ITALIANO
Make sure to read this manual before using the machine. Please keep it in hand for future reference.
Veillez à lire ce manuel avant d’utiliser la machine. Conservez-le à portée de main an de pouvoir vous y reporter ultérieurement.
Bitte lesen Sie dieses Handbuch vor der Verwendung des Geräts. Bewahren Sie es so auf, dass Sie es bei Bedarf zur Hand haben.
Leggere questo manuale prima di utilizzare la stampante. Tenerlo a portato di mano per consultarlo all'occorrenza.
Page 2

Symbols Used in This
■
Document
Prohibited actions.
Symboles utilisés dans ce
■
document
Actions interdites.
In diesem Dokument
■
verwendete Symbole
Unzulässige Aktionen.
Simboli utilizzati in questo
■
documento
Azioni proibite.
Instructions including important
information.
In this guide, Windows 7 operating system is
•
referred to as Windows 7 and Windows Vista
operating system as Windows Vista.
In this guide, the screens are based on
•
Windows 7 Home Premium and Mac OS X
v.10.6.x. (Unless noted otherwise, the screens
are those of Windows 7.)
Microsoft is a registered trademark of Microsoft
•
Corporation.
•
Windows is a trademark or registered trademark
of Microsoft Corporation in the U.S. and/or other
countries.
Windows Vista is a trademark or registered
•
trademark of Microsoft Corporation in the U.S.
and/or other countries.
Internet Explorer is a trademark or registered
•
trademark of Microsoft Corporation in the U.S.
and/or other countries.
Macintosh, Mac, and AirPort are trademarks
•
of Apple Inc., registered in the U.S. and other
countries.
Safari is a trademark of Apple Inc., registered in
•
the U.S. and other countries.
Bonjour is a trademark of Apple Inc., registered
•
in the U.S. and other countries.
Instructions comportant des
informations importantes.
Dans ce guide, le système d’exploitation
•
Windows 7 est appelé Windows 7 et le système
d’exploitation Windows Vista est appelé
Windows Vista.
Dans ce guide, les captures d’écran ont été
•
prises sous Windows 7 Édition Familiale
Premium et Mac OS X v.10.6.x. (Sauf mention
contraire, les écrans sont ceux de Windows 7.)
Microsoft est une marque déposée de Microsoft
•
Corporation.
•
Windows est une marque ou une marque
déposée de Microsoft Corporation aux États-
Unis et/ou dans d’autres pays.
Windows Vista est une marque ou une marque
•
déposée de Microsoft Corporation aux États-
Unis et/ou dans d’autres pays.
Internet Explorer est une marque ou une
•
marque déposée de Microsoft Corporation aux
États-Unis et/ou dans d’autres pays.
Macintosh, Mac et AirPort sont des marques
•
d’Apple Inc., déposées aux États-Unis et/ou
dans d’autres pays.
Safari est une marque d’Apple Inc., déposée
•
aux États-Unis et/ou dans d’autres pays.
Bonjour est une marque d’Apple Inc., déposée
•
aux États-Unis et/ou dans d’autres pays.
Anweisungen, die wichtige
Informationen beinhalten.
In diesem Handbuch wird das Betriebssystem
•
Windows 7 als Windows 7 bezeichnet, das
Betriebssystem Windows Vista als Windows
Vista.
Die Bildschirme in diesem Handbuch beziehen
•
sich auf das Betriebssystem Windows 7 Home
Premium und Mac OS X 10.6.x. (Sofern
nicht anders angegeben beziehen sich die
Bildschirme auf Windows 7.)
Microsoft ist eine eingetragene Marke der
•
Microsoft Corporation.
•
Windows ist eine Marke oder eingetragene
Marke der Microsoft Corporation in den
Vereinigten Staaten und/oder anderen Ländern.
Windows Vista ist eine Marke oder eingetragene
•
Marke der Microsoft Corporation in den
Vereinigten Staaten und/oder anderen Ländern.
Internet Explorer ist eine Marke oder
•
eingetragene Marke der Microsoft Corporation
in den Vereinigten Staaten und/oder anderen
Ländern.
Macintosh, Mac und AirPort sind Marken von
•
Apple Inc., eingetragen in den Vereinigten
Staaten und anderen Ländern.
Safari ist eine Marke von Apple Inc.,
•
eingetragen in den Vereinigten Staaten und
anderen Ländern
Bonjour ist eine Marke von Apple Inc.,
•
eingetragen in den Vereinigten Staaten und
anderen Ländern.
Istruzioni che includono
informazioni importanti.
In questo manuale, il sistema operativo
•
Windows 7 viene denominato Windows 7
e il sistema operativo Windows Vista viene
denominato Windows Vista.
In questo manuale, le schermate si basano
•
su Windows 7 Home Premium e Mac OS
X v.10.6.x. (Se non specicato altrimenti, le
schermate si riferiscono a Windows 7.)
Microsoft è un marchio registrato di Microsoft
•
Corporation.
•
Windows è un marchio o un marchio registrato
di Microsoft Corporation negli Stati Uniti e/o in
altri paesi.
Windows Vista è un marchio o un marchio
•
registrato di Microsoft Corporation negli Stati
Uniti e/o in altri paesi.
Internet Explorer è un marchio o un marchio
•
registrato di Microsoft Corporation negli Stati
Uniti e/o in altri paesi.
Macintosh, Mac e AirPort sono marchi di Apple
•
Inc., registrati negli Stati Uniti e in altri paesi.
Safari è un marchio di Apple Inc., registrato
•
negli Stati Uniti e in altri paesi.
Bonjour è un marchio di Apple Inc., registrato
•
negli Stati Uniti e in altri paesi.
Model Number: K10363 (MX885)
Référence du modèle : K10363 (MX885)
Modellnummer: K10363 (MX885)
Modello numero: K10363 (MX885)
Page 3
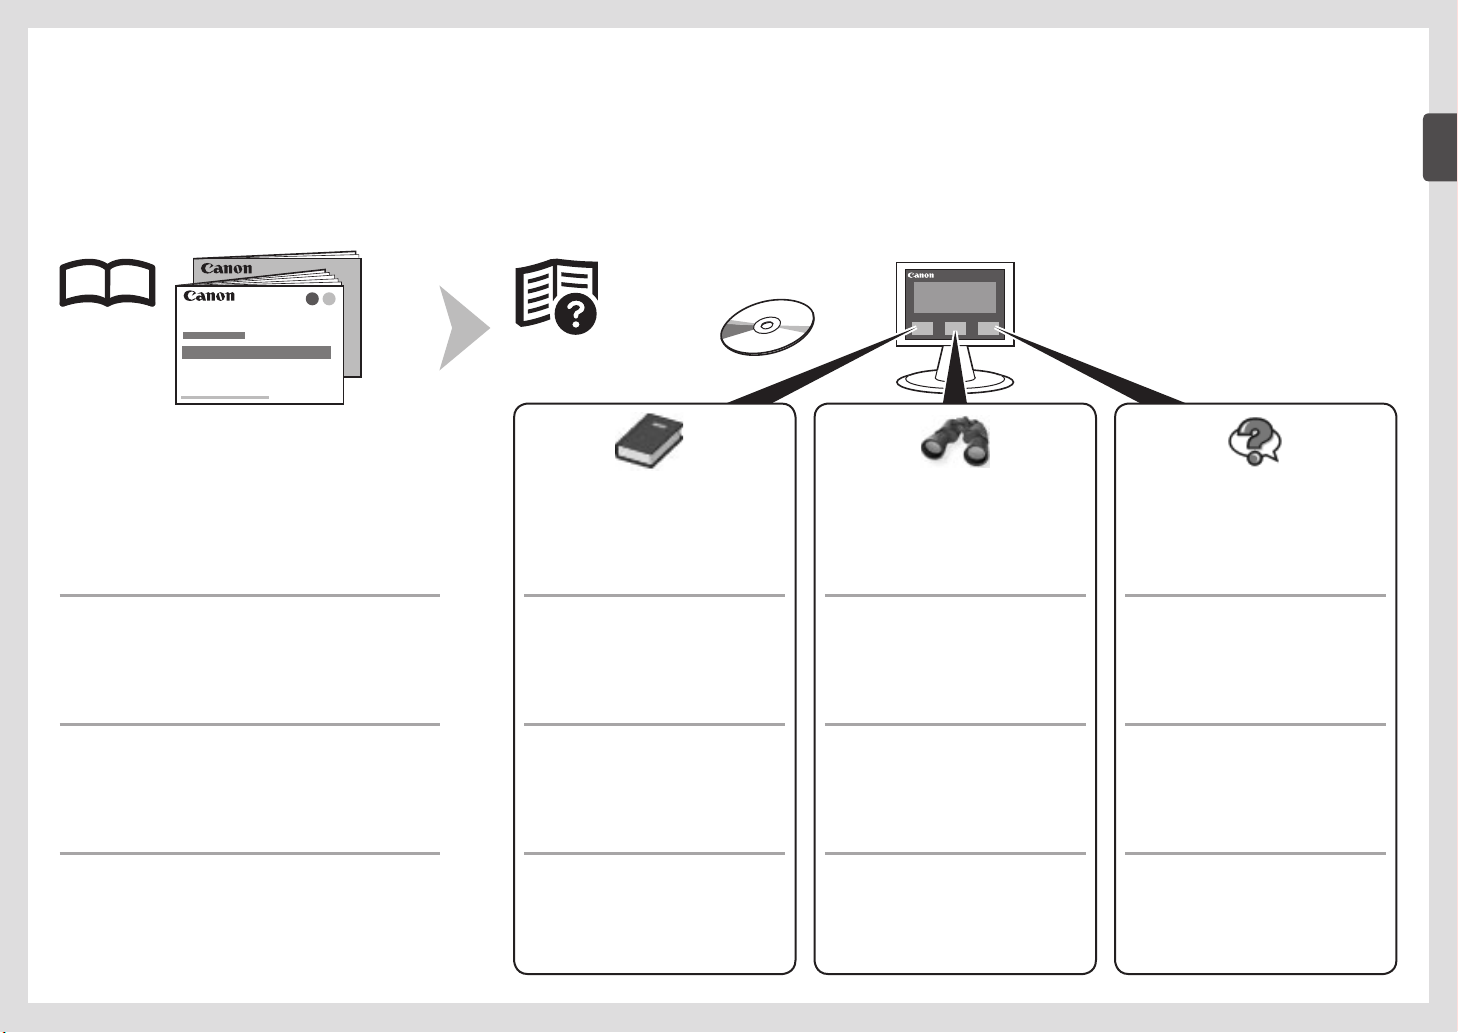
On-screen manuals can be viewed on a computer. They are included on the Setup CD-ROM and are installed during the software installation. Some parts of the manual may be displayed in English. For
details on opening the on-screen manuals, refer to page 70.
Les manuels en ligne peuvent être visualisés sur un ordinateur. Ils figurent sur le CD-ROM d’installation et sont installés en même temps que le logiciel. Il est possible que certaines parties du manuel
s’affichent en anglais. Pour plus d’informations sur l’ouverture des manuels en ligne, reportez-vous à la page 70.
Die Online-Handbücher können auf einem Computer angezeigt werden. Sie sind auf der Installations-CD-ROM (Setup CD-ROM) enthalten und werden zusammen mit der Software installiert. Einige Teile
des Handbuchs werden möglicherweise in Englisch angezeigt. Weitere Informationen zum Öffnen der Online-Handbücher finden Sie auf Seite 70.
I manuali a video possono essere visualizzati su un computer. Tali manuali sono inclusi nel CD-ROM di installazione (Setup CD-ROM) e vengono installati durante l'installazione del software. È possibile
che parti del manuale vengano visualizzate in lingua inglese. Per informazioni sull'apertura dei manuali a video, consultare la pagina 70.
Getting Started
•
(this manual)
Network Setup Tr o u b l e s h o o t i n g •
Describes how to set up and use your machine.
Démarrage
•
(ce manuel)
Guide de dépannage réseau•
Explique comment installer et utiliser la machine.
Describes basic operations and media,
and gives an introduction to other
functions available.
Explique le fonctionnement de base et les
supports, et présente les autres fonctions
disponibles.
Advanced Guide Tr o u b l e s h o o t i n gBasic Guide
Describes various operating procedures
to make full use of machine.
Describes troubleshooting tips for
problems you may encounter when using
the machine.
Guide d’utilisation avancéeGuide d’utilisation de base Dépannage
Présente diverses procédures permettant
d’exploiter au mieux la machine.
Fournit des solutions de dépannage
face aux problèmes que vous pouvez
rencontrer en utilisant la machine.
Inbetriebnahme
•
(dieses Handbuch)
Netzwerk-
•
Fehlerbehebungshandbuch
Beschreibt, wie das Gerät eingerichtet und verwendet wird.
Guida Rapida
•
(questo manuale)
Guida alla risoluzione dei
•
problemi di rete
Vengono descritti l'impostazione e l'utilizzo del dispositivo.
Beschreibt die grundlegende Bedienung
sowie Medien und stellt weitere
verfügbare Funktionen vor.
Descrive le operazioni di base e i supporti
e offre un'introduzione delle altre funzioni
disponibili.
Erweitertes Handbuch FehlersucheBasishandbuch
Beschreibt verschiedene Verfahren zur
Bedienung des Geräts, damit Sie dessen
Funktionalität vollständig nutzen können.
Erläutert Fehlerbehebungstipps für
Probleme, die beim Umgang mit dem
Gerät auftreten können.
Guida AvanzataGuida Base Risoluzione dei problemi
Descrive le diverse procedure operative
che consentono di utilizzare la stampante
in modo efcace.
Vengono forniti suggerimenti per la
risoluzione dei problemi che possono
vericarsi durante l'utilizzo della
stampante.
1
Page 4

Contents■
1 Preparation P.5
2 Install the Print Head P.12
3 Install the Ink Tanks P.16
4 Align the Print Head P.20
5 Load Paper P.22
6 Set Up for Fax Reception P.26
7 Select Connection Method P.30
8 Install the Software (USB Connection)
P.32
9 Wireless Setup P.41
Wireless Setup Using Easy Setup P.43
10 Wired Setup P.48
11 Install the Software (Network
Connection) P.52
Install the Software P.53
Registration (Macintosh) P.60
Information P.64
12 Use from Additional Computers P.68
13 Change from USB to Wireless
Connection P.69
14 Application Software P.70
15 Try Using the Machine P.72
Print Photos from a Computer P.72
Try Copying P.75
Send Faxes P.77
16 Wireless Setup Using WPS (Wi-Fi
Protected Setup) P.80
17 Wireless Setup Using WCN (Windows
Connect Now) P.83
18 Specications P.85
Sommaire■
1 Préparation P.5
2 Installation de la tête d’impression P.12
3 Installation des réservoirs d’encre P.16
4 Alignement de la tête d’impression P.20
5 Chargement du papier P.22
6 Conguration pour la réception de fax
P.26
7 Sélection de la méthode de connexion
P.30
8 Installation du logiciel (connexion USB)
P.32
9 Conguration sans l P.41
Conguration sans l à l’aide de Conguration
facile P.43
10 Conguration laire P.48
11 Installation du logiciel (connexion
réseau) P.52
Installation du logiciel P.53
Enregistrement (Macintosh) P.60
Informations P.64
12 Utilisation de la machine sur d’autres
ordinateurs P.68
13 Passage d’une connexion USB à une
connexion sans l P.69
14 Logiciel d’application P.70
15 Essai d’utilisation de la machine P.72
Impression de photos depuis un ordinateur
P.72
Première copie P.75
Envoi de fax P.77
16 Conguration sans l à l’aide de WPS
(Wi-Fi Protected Setup) P.80
17 Conguration sans l à l’aide de WCN
(Windows Connect Now) P.83
18 Spécications P.86
Inhalt■
1 Vorbereitung S.5
2 Einbauen des Druckkopfs S.12
3 Einsetzen der Tintenpatronen S.16
4 Ausrichten des Druckkopfs S.20
5 Einlegen von Papier S.22
6 Einrichtung für den Faxempfang S.26
7 Auswählen der Verbindungsmethode
S.30
8 Installieren der Software (USB-
Verbindung) S.32
9 Drahtlose Einstellungen S.41
Drahtlose Einstellungen mit Einfache
Einrichtung (Easy Setup) S.43
10 Kabeleinstellungen S.48
11 Installieren der Software
(Netzwerkverbindung) S.52
Installieren der Software S.53
Registrierung (Macintosh) S.60
Informationen S.64
12 Nutzung mit zusätzlichen Computern
S.68
13 Wechseln von einer USB-Verbindung zu
einer WLAN-Verbindung S.69
14 Anwendungssoftware S.70
15 Testen Sie das Gerät S.72
Drucken von Fotos von einem Computer S.72
Kopieren S.75
Senden von Faxen S.77
16 Drahtlose Einstellungen mit WPS (Wi-Fi
Protected Setup) S.80
17 Drahtlose Einstellungen mit WCN
(Windows Connect Now) S.83
18 Technische Daten S.87
Sommario■
1 Preparazione P.5
2 Installazione della testina di stampa
P.12
3 Installazione dei serbatoi d'inchiostro
P.16
4 Allineamento della testina di stampa P.20
5 Caricamento della carta P.22
6 Congurazione per la ricezione di fax
P.26
7 Selezione del metodo di connessione
P.30
8 Installazione del software (Connessione
USB) P.32
9 Impostazione wireless P.41
Impostazione wireless con Impost. facile
(Easy Setup) P.43
10 Impostazione cablata P.48
11 Installazione del software (Connessione
di rete) P.52
Installazione del software P.53
Registrazione (Macintosh) P.60
Informazioni P.64
12 Utilizzo della stampante da altri
computer P.68
13 Passaggio dalla connessione USB
alla connessione wireless P.69
14 Applicazioni software P.70
15 Utilizzo della stampante P.72
Stampa di foto da un computer P.72
Esecuzione di una copia P.75
Invio di fax P.77
16 Impostazione wireless con WPS (Wi-Fi
Protected Setup) P.80
17 Impostazione wireless con WCN
(Windows Connect Now) P.83
18 Speciche P.89
2
Page 5
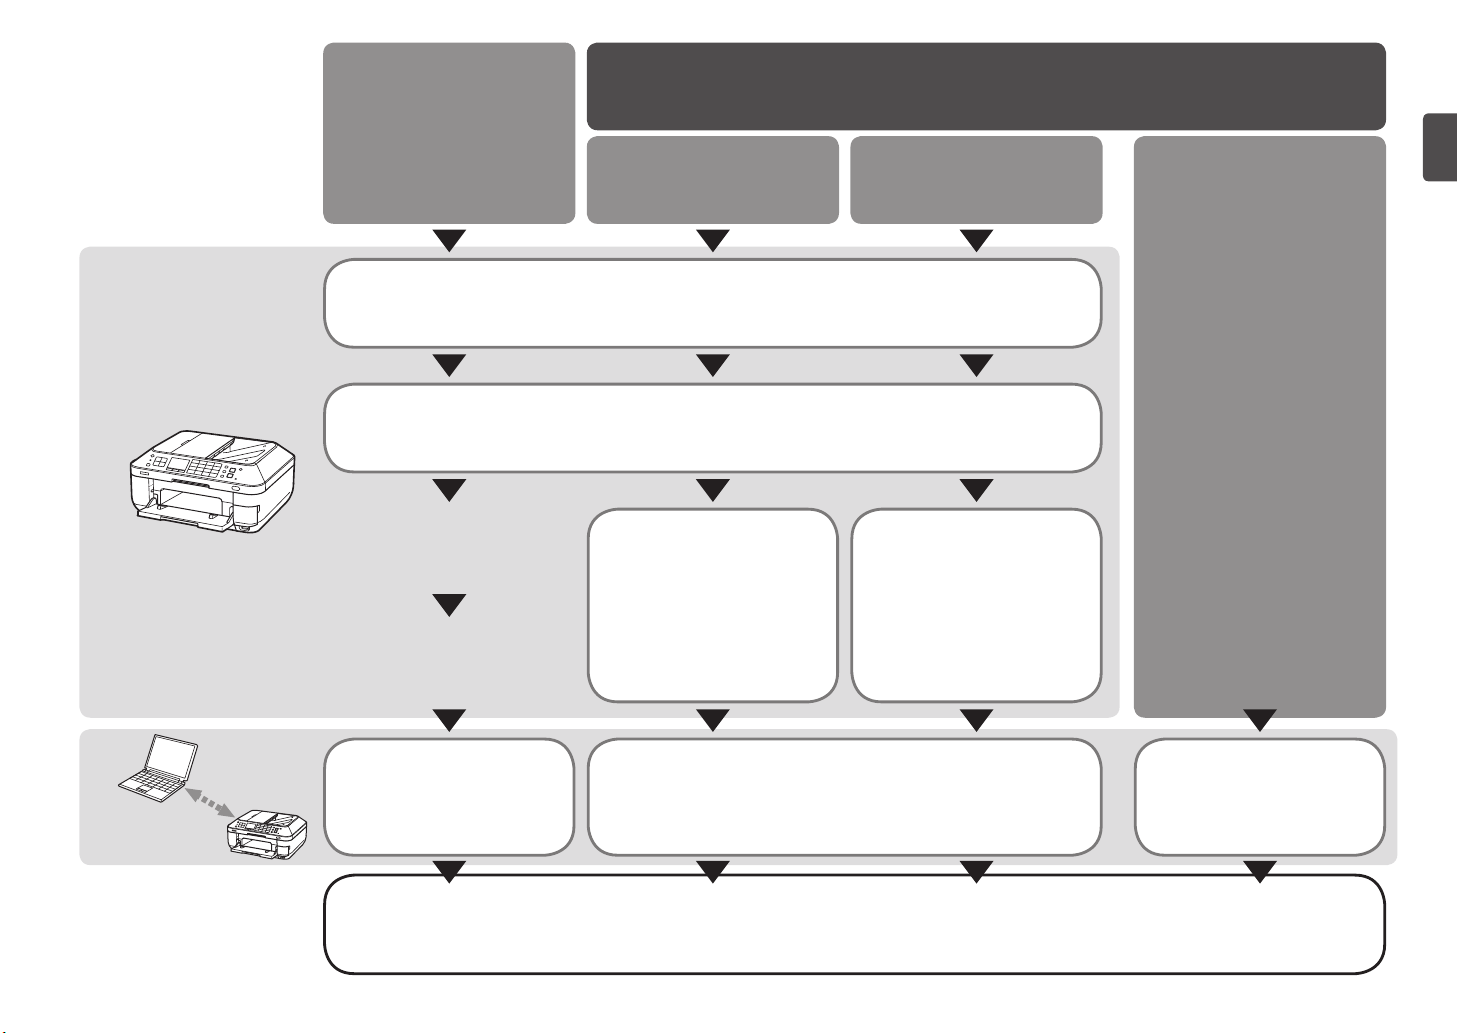
Machine Installation
■
Flow
Procédure d’installation
■
de la machine
Ablauf der Installation
■
des Geräts
Procedimento di installazione
■
della stampante
USB Connection
Connexion USB
USB-Verbindung
Connessione USB
Wireless Connection
Connexion sans l
Drahtlose Verbindung
Connessione wireless
Network Connection
Connexion réseau
Netzwerkverbindung
Connessione di rete
Wired Connection
Connexion laire
Kabelverbindung
Connessione cablata
Using from Additional
Computers
(when the machine is already
connected to the network and you
want to add computers from which
to use the machine)
Machine Preparation
Préparation de la machine
Vorbereitung des Geräts
Preparazione della stampante
Fax Reception Setup
Conguration pour la réception de fax
Einrichtung für den Faxempfang
Congurazione ricezione fax
Machine Wireless Setup
Conguration sans l de la
machine
Drahtlose Einstellungen
Impostazione wireless della
stampante
Software Installation
Installation du logiciel
Softwareinstallation Softwareinstallation Softwareinstallation
Installazione del software Installazione del software Installazione del software
P.30 - 40 P.52 - 67
Software Installation Software Installation
Installation du logiciel Installation du logiciel
P.30 - 31, 41 - 47
Machine Wired Setup
Conguration laire de la
machine
Einrichtung für Kabelverbindung
Impostazione cablata della
stampante
P.5 - 25
P.26 - 29
P.30 - 31, 48 - 51
Utilisation de la machine sur
d’autres ordinateurs
(si la machine est déjà connectée
au réseau et que vous voulez
ajouter des ordinateurs à partir
desquels utiliser la machine)
Nutzung mit zusätzlichen
Computern
(falls das Gerät bereits mit dem
Netzwerk verbunden ist und
weitere Computer zur Nutzung des
Geräts hinzugefügt werden sollen)
Utilizzo della stampante da
altri computer
(quando la stampante è già
connessa alla rete e si desidera
aggiungere computer dai quali
utilizzarla)
P.68, 52 - 67
Installation Complete
Fin de l’installation
Installation abgeschlossen
Installazione completata
3
Page 6
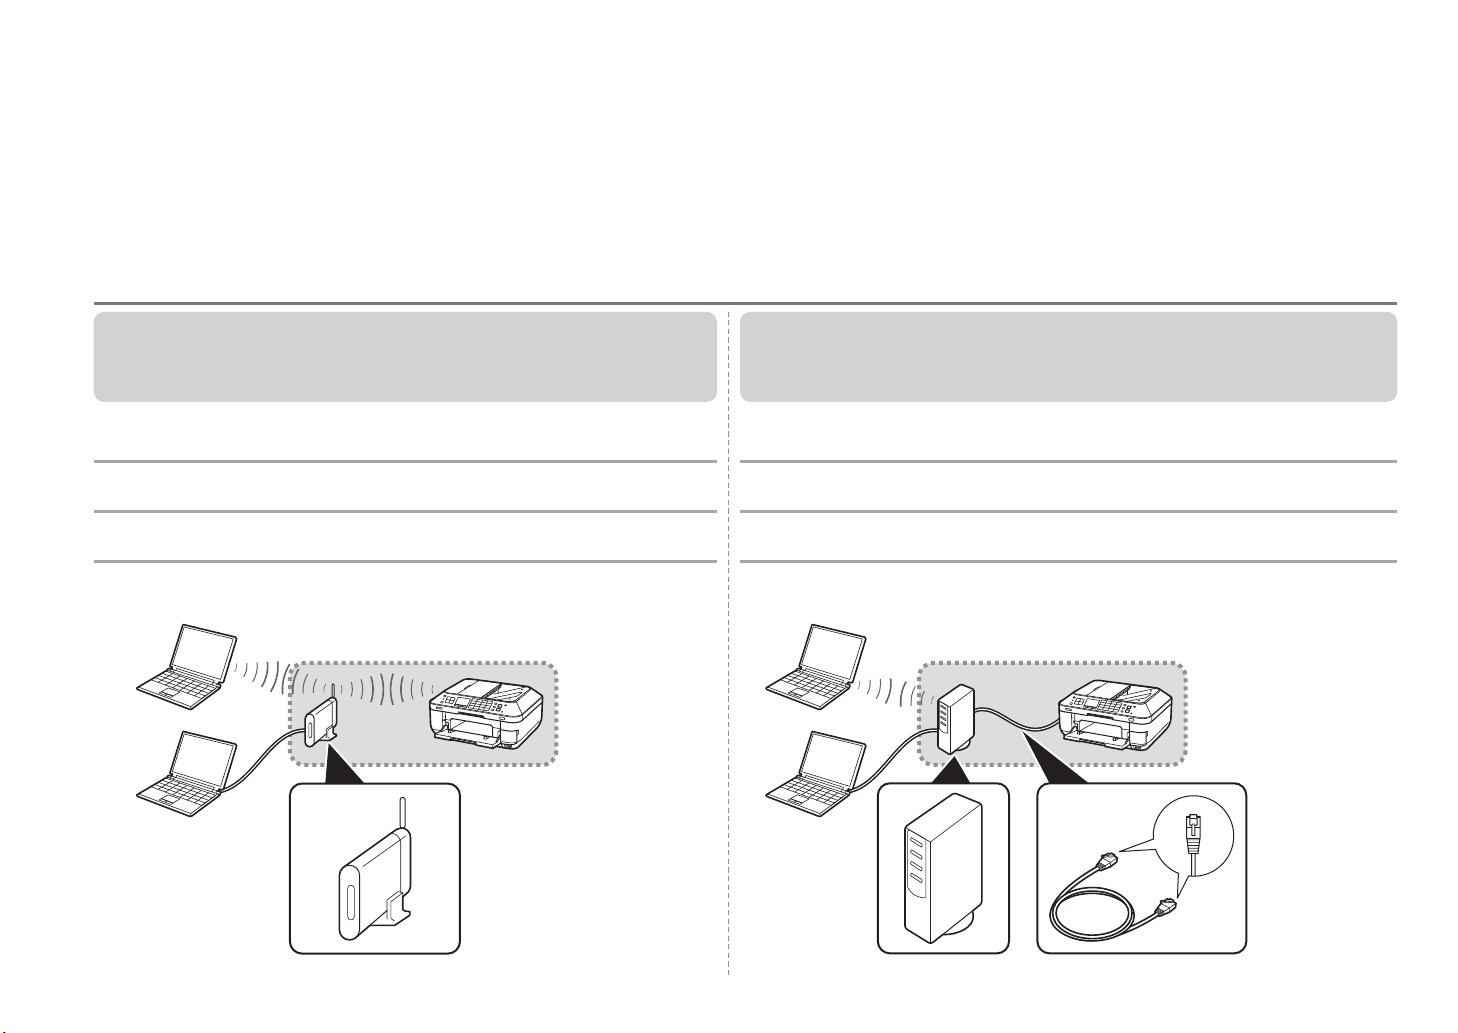
Devices Required for Wireless/Wired Connection■
Périphériques requis pour une connexion sans l/laire■
Erforderliche Geräte für drahtlose/Kabelverbindung■
Dispositivi necessari per la connessione wireless/cablata■
When using the machine over a wireless/wired connection, the following devices are required depending on the connection method.
Lorsque vous utilisez la machine via une connexion sans l/laire, les dispositifs suivants sont requis selon la méthode de connexion.
Wird das Gerät über eine drahtlose/Kabelverbindung verwendet, sind je nach Verbindungsmethode folgende Geräte erforderlich.
Quando si utilizza la stampante su una connessione wireless/cablata, è necessario disporre dei seguenti dispositivi a seconda del metodo di connessione.
Wireless Connection
Connexion sans l Connexion laire
Drahtlose Verbindung Kabelverbindung
Connessione wireless Connessione cablata
A commercial access point or router that supports IEEE802.11n/g/b is required.
Un point d’accès ou un routeur vendu dans le commerce prenant en charge
IEEE802.11n/g/b est requis.
Es wird ein im Handel erhältlicher Zugriffspunkt oder Router benötigt, der
IEEE802.11n/g/b unterstützt.
È necessario un punto di accesso commerciale o un router che supporti
IEEE802.11n/g/b.
Point d’accès ou routeur
sans l
Zugriffspunkt oder WLANRouter
Punto di accesso e router
wireless
4
Wired Connection
A commercial network device (router, etc.) and Ethernet cable are required.
Un périphérique réseau (routeur, etc.) et un câble Ethernet vendus dans le commerce
sont requis.
Ein handelsübliches Netzwerkgerät (Router usw.) und Ethernet-Kabel werden benötigt.
È necessario utilizzare una periferica di rete commerciale (Router, ecc.) e un cavo
Ethernet.
Ethernet cable Access point or wireless router
Router, etc.
Routeur, etc.
Router usw.
Router, ecc.
Câble Ethernet
Ethernet-Kabel
Cavo Ethernet
Page 7
1
1
A
Preparation
Préparation
Vorbereitung
Preparazione
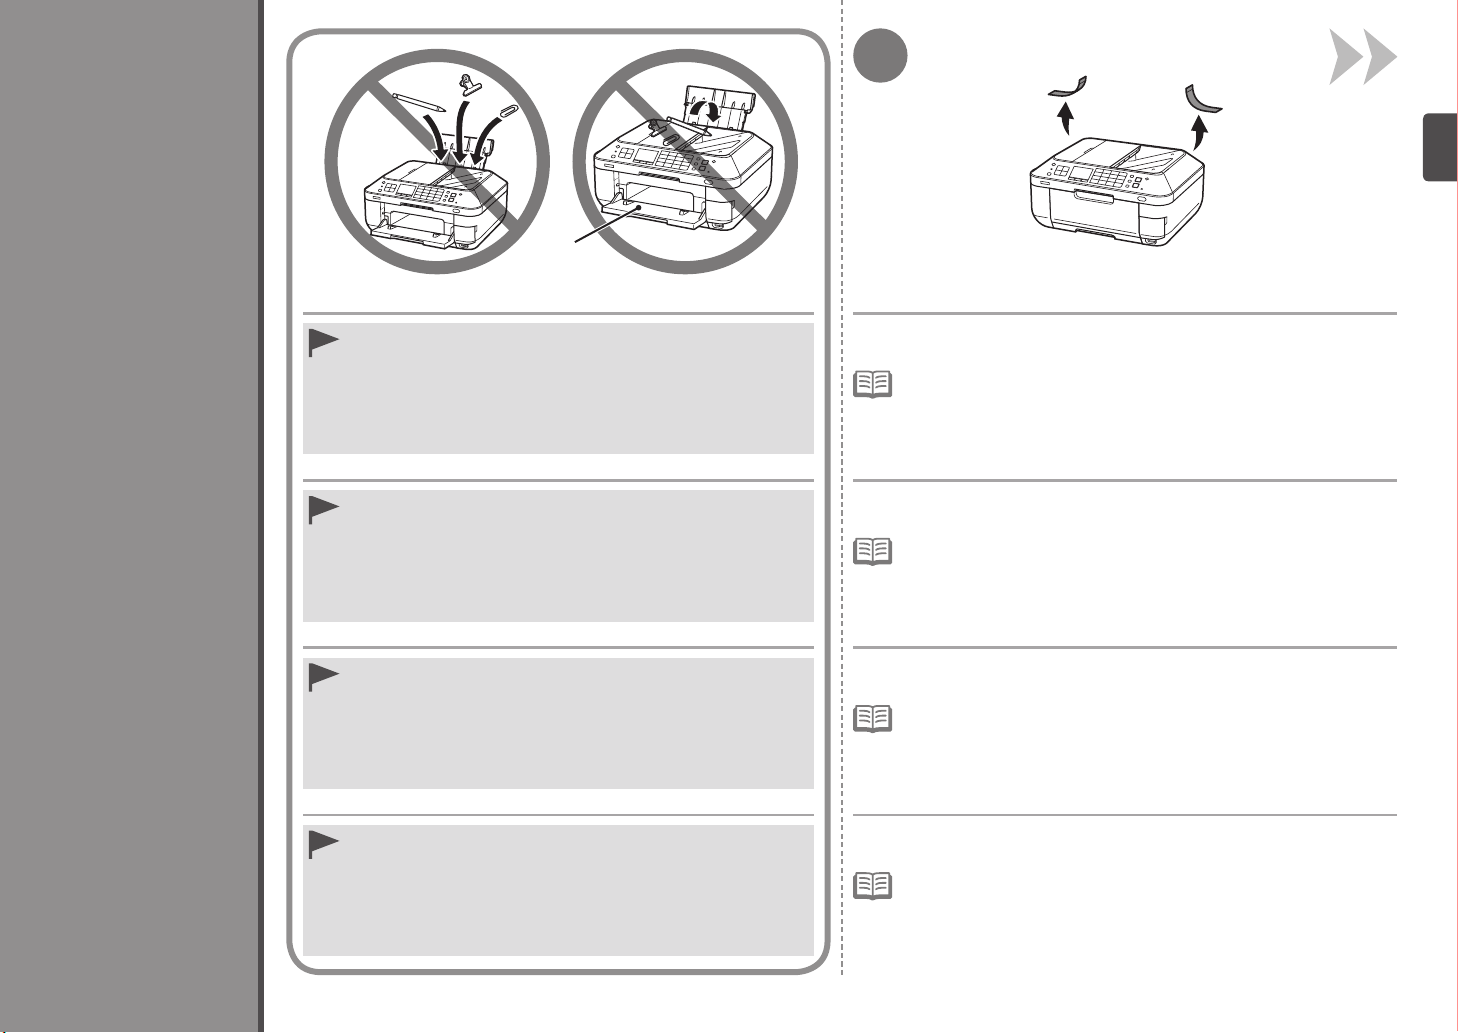
Do not install the machine where an object may fall on it. In addition,
•
do not place any object on the top of the machine. It may fall into the
machine when opening covers, resulting in malfunction.
Paper Output Tray (A) automatically opens when printing starts. Do not
•
place anything in front of the Paper Output Tray.
N’installez pas la machine dans un endroit présentant un risque de
•
chute d’objet sur la machine. En outre, ne placez aucun objet sur le
dessus de la machine. L’objet risquerait de tomber dans la machine à
l’ouverture du capot et de provoquer un dysfonctionnement.
Le bac de sortie papier (A) s’ouvre automatiquement au démarrage de
•
l’impression. Ne posez rien devant le bac de sortie papier.
Stellen Sie das Gerät nicht an Standorten auf, an denen Gegenstände
•
darauf fallen können. Legen Sie keine Gegenstände auf das Gerät. Sie
können in das Gerät fallen, wenn Sie die Abdeckungen öffnen, was zu
einer Fehlfunktion führen würde.
Das Papierausgabefach (A) wird automatisch geöffnet, wenn der
•
Druckvorgang beginnt. Legen Sie keine Gegenstände vor das
Papierausgabefach.
Non installare la stampante in una posizione su cui potrebbero
•
cadere degli oggetti. Inoltre, non collocare oggetti sopra la macchina.
Potrebbero cadere all'interno della macchina durante l'apertura dei
coperchi, con conseguente malfunzionamento.
Il vassoio di uscita della carta (A) si apre automaticamente all'avvio
•
della stampa. Non collocare nessun oggetto davanti al vassoio di
uscita della carta.
Remove all orange tape and protective materials from the inside and
outside of the machine.
The tape and protective materials may differ in shape and position from
•
those shown here.
Retirez l’intégralité du ruban orange et du plastique de protection
présents à l’intérieur et sur l’extérieur de la machine.
La forme et la position réelles du ruban et du plastique de protection peuvent
•
différer de celles montrées ici.
Entfernen Sie alle orangefarbenen Klebebänder und das
Schutzmaterial innen und außen am Gerät.
Klebebänder und Schutzmaterial können in Form und Position von der hier
•
dargestellten Anwendung abweichen.
Rimuovere il nastro arancione e tutti i materiali protettivi dalla parte
interna ed esterna della stampante.
La forma e la posizione del nastro e dei materiali protettivi potrebbero essere
•
diverse da quelle illustrate qui.
5
Page 8
2
A
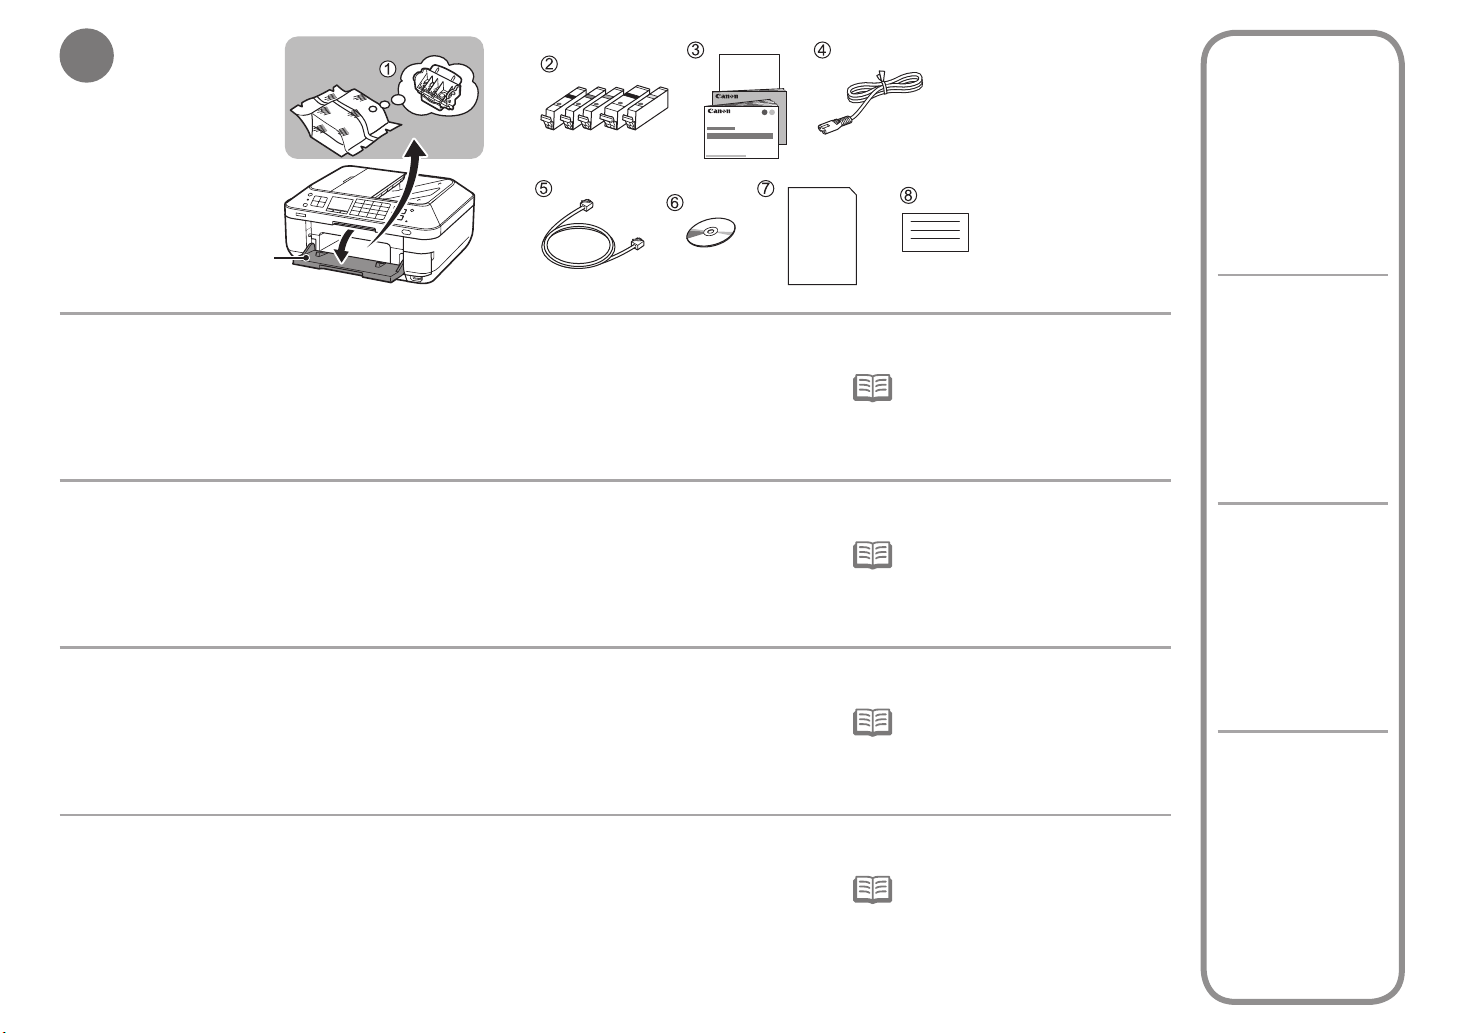
Make sure all the following items are supplied.
Some accessories (1) are stored within the Paper Output Tray (A). Open the Paper Output Tray to remove them.
1. Print Head
2. Ink tanks (5: BK, M, C, PGBK, Y)
3. Manuals
4. Power cord
5. Telephone line cable
Vérifiez que vous avez bien reçu tous les éléments suivants.
Certains accessoires (1) sont stockés dans le bac de sortie papier (A). Ouvrez le bac de sortie papier pour les enlever.
1. Tête d’impression
2. Cartouches d’encre (5 : BK, M, C, PGBK, Y)
3. Manuels
4. Cordon d’alimentation
5. Câble de ligne téléphonique
6. Setup CD-ROM (containing the drivers, applications and onscreen manuals)
7. Matte Photo Paper MP-101 (for Automatic Print Head
Alignment)
8. Other documents
6. CD-ROM d’installation (contient les pilotes, les applications et
les manuels en ligne)
7. Papier Photo mat MP-101 (pour l’alignement automatique de la
tête d’impression)
8. Autres documents
A USB cable is necessary to connect
•
the machine with your computer (USB
connection only).
Un câble USB est nécessaire pour
•
brancher la machine à votre ordinateur
(connexion USB uniquement).
Do not connect
the power cord
yet.
Ne branchez
pas encore
le cordon
d’alimentation.
Schließen Sie
das Netzkabel
noch nicht an.
Vergewissern Sie sich, dass alle unten gezeigten Gegenstände in der Verpackung enthalten sind.
Einige der Zubehörkomponenten (1) befinden sich im Papierausgabefach (A). Öffnen Sie das Papierausgabefach, und nehmen Sie sie heraus.
1. Druckkopf
2. Tintenpatronen (5: BK, M, C, PGBK, Y)
3. Handbücher
4. Netzkabel
5. Telefonkabel
6. Installations-CD-ROM (Setup CD-ROM) (mit Treibern,
Anwendungen und Online-Handbüchern)
7. Fotopapier Matt (Matte Photo Paper) MP-101
(für die automatische Druckkopfausrichtung)
8. Weitere Dokumente
Um das Gerät mit Ihrem Computer zu
•
verbinden, benötigen Sie ein USBKabel (nur USB-Verbindung).
Assicurarsi che siano presenti i seguenti elementi.
Alcuni accessori (1) si trovano all'interno del vassoio di uscita della carta (A). Aprire il vassoio di uscita della carta per rimuoverli.
1. Testina di stampa
2. Serbatoi d'inchiostro (5: BK, M, C, PGBK, Y)
3. Manuali
4. Cavo di alimentazione
5. Cavo della linea telefonica
6. CD-ROM di installazione (Setup CD-ROM) (contenente driver,
applicazioni e manuali a video)
7. Carta Fotografica Opaca (Matte Photo Paper) MP-101
(per l'allineamento automatico della testina di stampa)
8. Altri documenti
Per collegare la stampante al computer,
•
è necessario un cavo USB (solo
connessioni USB).
6
Non collegare
ancora il
cavo di
alimentazione.
Page 9
3
B
C
Use FAX features?
Yes
No
Utiliser les fonctions de télécopie ?
Oui
Non
Möchten Sie die Faxfunktionen verwenden?
Ja
Nein
Si utilizzano le funzioni FAX?
Sì
No
Go to .
Go to on
page 8.
Allez à l’étape
.
Allez à l’étape
à la page 8.
Fahren Sie mit
fort.
Fahren Sie mit
auf Seite
8 fort.
Vedere .
Vedere a
pagina 8.
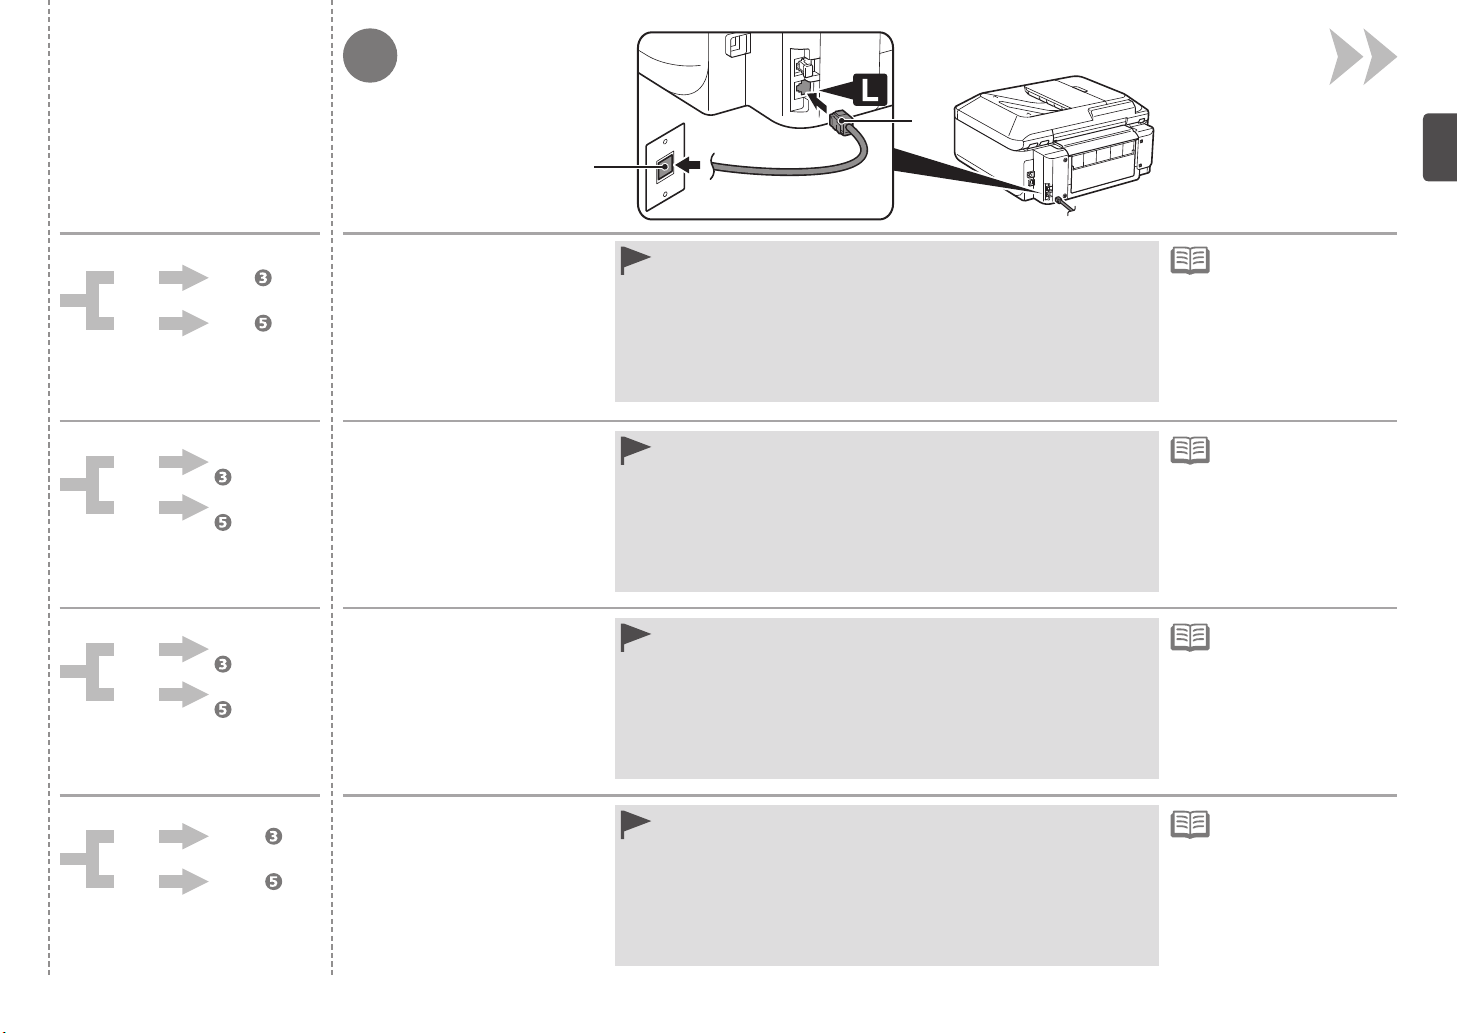
Connect one end of supplied
telephone line cable (B) to the
lower connector labeled "L" on
the machine, and then connect
the other end to the telephone
jack on the wall (C).
Branchez une extrémité du
câble téléphonique fourni (B) au
connecteur inférieur « L » sur la
machine, puis connectez l’autre
extrémité à la prise téléphonique
murale (C).
Schließen Sie ein Ende des
im Lieferumfang enthaltenen
Telefonkabels (B) an den
unteren Geräteanschluss mit der
Beschriftung „L“ und das andere
Ende an die Telefonbuchse in
der Wand (C) an.
Collegare un'estremità del
cavo della linea telefonica
(B) al connettore inferiore
contrassegnato da "L" sulla
macchina, quindi collegare l'altra
estremità alla presa telefonica a
muro (C).
If you cannot send faxes after installing the machine, check the following:
•
1. The telephone line cable is connected to connector labeled "L" on the
machine.
2. The dial tone at the telephone jack on the wall.
3. The telephone line type. For details, refer to "Conrming the Telephone
Line Connection" in the on-screen manual: Basic Guide after installation is
complete.
Users in Europe: If you prepare your own telephone line cable, be sure it is a
•
6-wire telephone line cable.
Si vous ne pouvez pas envoyer de télécopies après avoir installé la
•
machine, vériez les points suivants :
1. Le câble téléphonique est branché au connecteur « L » de la machine.
2. La prise téléphonique murale produit une tonalité.
3. Le type de ligne téléphonique. Pour plus de détails, reportez-vous à la
section « Vérication de la connexion à la ligne téléphonique » du manuel en
ligne :
Guide d’utilisation de base à la n de l’installation.
•
Pour les utilisateurs en Europe : si vous utilisez votre propre câble
téléphonique, assurez-vous que celui-ci comporte 6 ls.
Falls Sie nach dem Aufstellen des Geräts keine Faxe senden können,
•
überprüfen Sie Folgendes:
1. Das Telefonkabel ist an den Geräteanschluss mit der Kennzeichnung „L“
angeschlossen.
2. Den Wählton an der Telefonbuchse in der Wand.
3. Den Telefonleitungstyp. Weitere Informationen nden Sie im Online-
Handbuch Basishandbuch unter „Überprüfen des Telefonanschlusses“.
Benutzer in Europa: Falls Sie ein eigenes Telefonkabel verwenden möchten,
•
achten Sie darauf, dass es sich um ein 6-adriges Telefonkabel handelt.
Se non è possibile inviare fax dopo l'installazione della macchina, vericare
•
quanto segue:
1. Il cavo della linea telefonica è collegato al connettore contrassegnato da
"L" sulla macchina.
2. La presenza del segnale di linea sulla presa telefonica a muro.
3. Il tipo di linea telefonica. Per ulteriori informazioni, vedere "Conferma
della connessione alla linea telefonica" nel manuale a video: Guida Base al
termine dell'installazione.
Utenti residenti in Europa: se si predispone autonomamente un cavo
•
telefonico, assicurarsi che sia a 6 conduttori.
The basic connection
•
method is described
here. For other
connection methods,
refer to the on-screen
manual: Basic Guide
after installation is
complete.
La méthode de
•
connexion de base est
décrite ici. Pour d’autres
méthodes de connexion,
reportez-vous au
manuel en ligne Guide
d’utilisation de base
lorsque l’installation est
terminée.
Im Folgenden
•
wird die StandardVerbindungsmethode
erklärt. Weitere
Verbindungsmethoden
nden Sie im
Online-Handbuch:
Basishandbuch,
nachdem die Installation
abgeschlossen ist.
In questa sezione viene
•
descritto il metodo di
collegamento di base.
Per altri metodi di
collegamento, consultare
il manuale a video
Guida Base al termine
dell'installazione.
7
Page 10
2
1
Only when connecting a
telephone or an answering
machine
Connexion d’un téléphone ou
d’un répondeur uniquement
Nur bei Anschluss an ein Telefon
oder einen Anrufbeantworter
Solo se si collega un telefono o
una segreteria telefonica
D
54
E
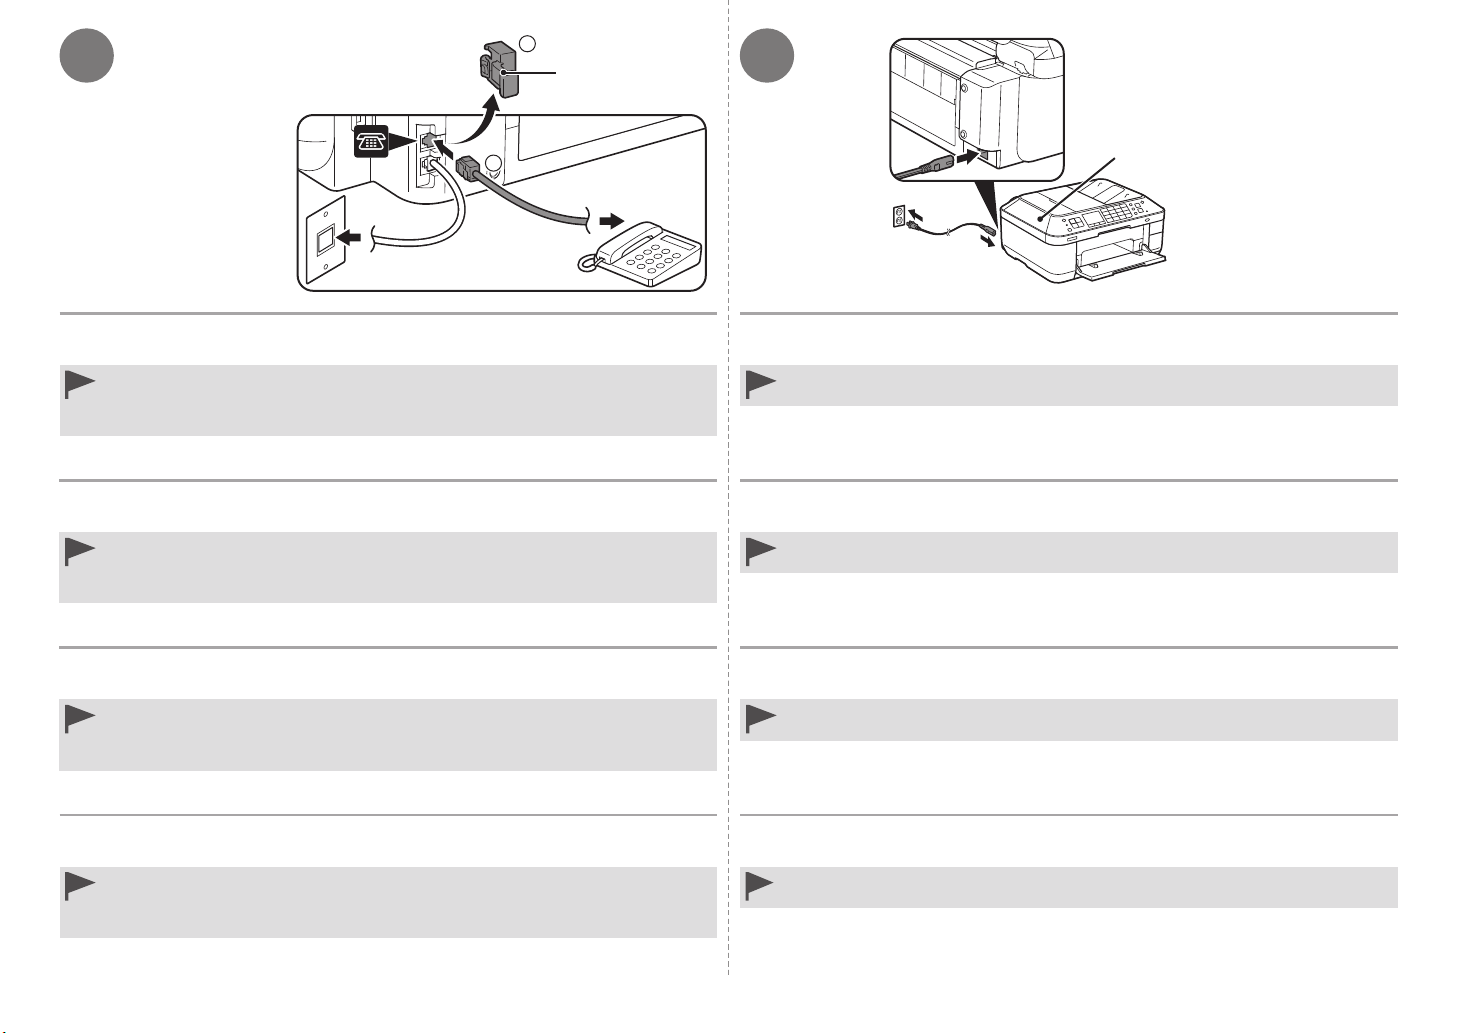
Remove the Cap (D) (1), then connect a telephone or an answering machine with
the telephone line cable (2).
Do not use a telephone jack line duplexer to connect the machine and a telephone in parallel.
•
The machine may not operate properly.
Users in the UK: Use a B.T. adapter for connection as required.
•
Retirez le capuchon (D) (1), puis connectez un téléphone ou un répondeur avec le
câble téléphonique (2).
N’utilisez pas de duplexeur de prise téléphonique pour connecter la machine et un téléphone
•
en parallèle. La machine risque de ne pas fonctionner correctement.
Pour les utilisateurs du Royaume-Uni : utilisez un adaptateur B.T. pour la connexion si
•
nécessaire.
Entfernen Sie die Kappe (D) (1), und schließen Sie über das Telefonkabel ein
Telefon oder einen Anrufbeantworter an (2).
Schließen Sie das Gerät und ein Telefon nicht über Parallelschaltung mit einer Weiche an der
•
Telefonbuchse an. Das Gerät funktioniert in diesem Fall möglicherweise nicht ordnungsgemäß.
Benutzer in GB: Verwenden Sie für den Anschluss je nach Bedarf einen BT-Adapter.
•
Rimuovere il coperchietto (D) (1), quindi collegare un telefono o una segreteria
telefonica mediante un cavo della linea telefonica (2).
Non utilizzare un duplexer della linea della presa telefonica per collegare la stampante e il
•
telefono in parallelo. In caso contrario, la stampante potrebbe non funzionare correttamente.
Utenti nel Regno Unito: utilizzare un adattatore B.T. per il collegamento.
•
Insert the power cord into the connector on the left side at the back of the machine
and into the wall outlet firmly.
Do NOT connect the USB cable or Ethernet cable at this stage.
•
Make sure that the Document Cover (E) is closed.
•
Insérez fermement le cordon d’alimentation dans le connecteur à l’arrière de la
machine, sur le côté gauche, et dans la prise secteur.
Ne branchez PAS le câble USB ou Ethernet à ce stade.
•
Vériez que le couvercle du scanner (E) est fermé.
•
Schließen Sie das Netzkabel am Netzkabelanschluss links auf der Rückseite des
Geräts an, und stecken Sie das andere Ende in die Steckdose.
Schließen Sie das USB- oder Ethernet-Kabel noch nicht an.
•
Der Vorlagendeckel (E) muss geschlossen sein.
•
Inserire il cavo di alimentazione nel connettore sulla parte posteriore sinistra della
macchina e nella presa a muro.
•
NON collegare il cavo USB o Ethernet in questa fase.
Assicurarsi che il coperchio dei documenti (E) sia chiuso.
•
8
Page 11
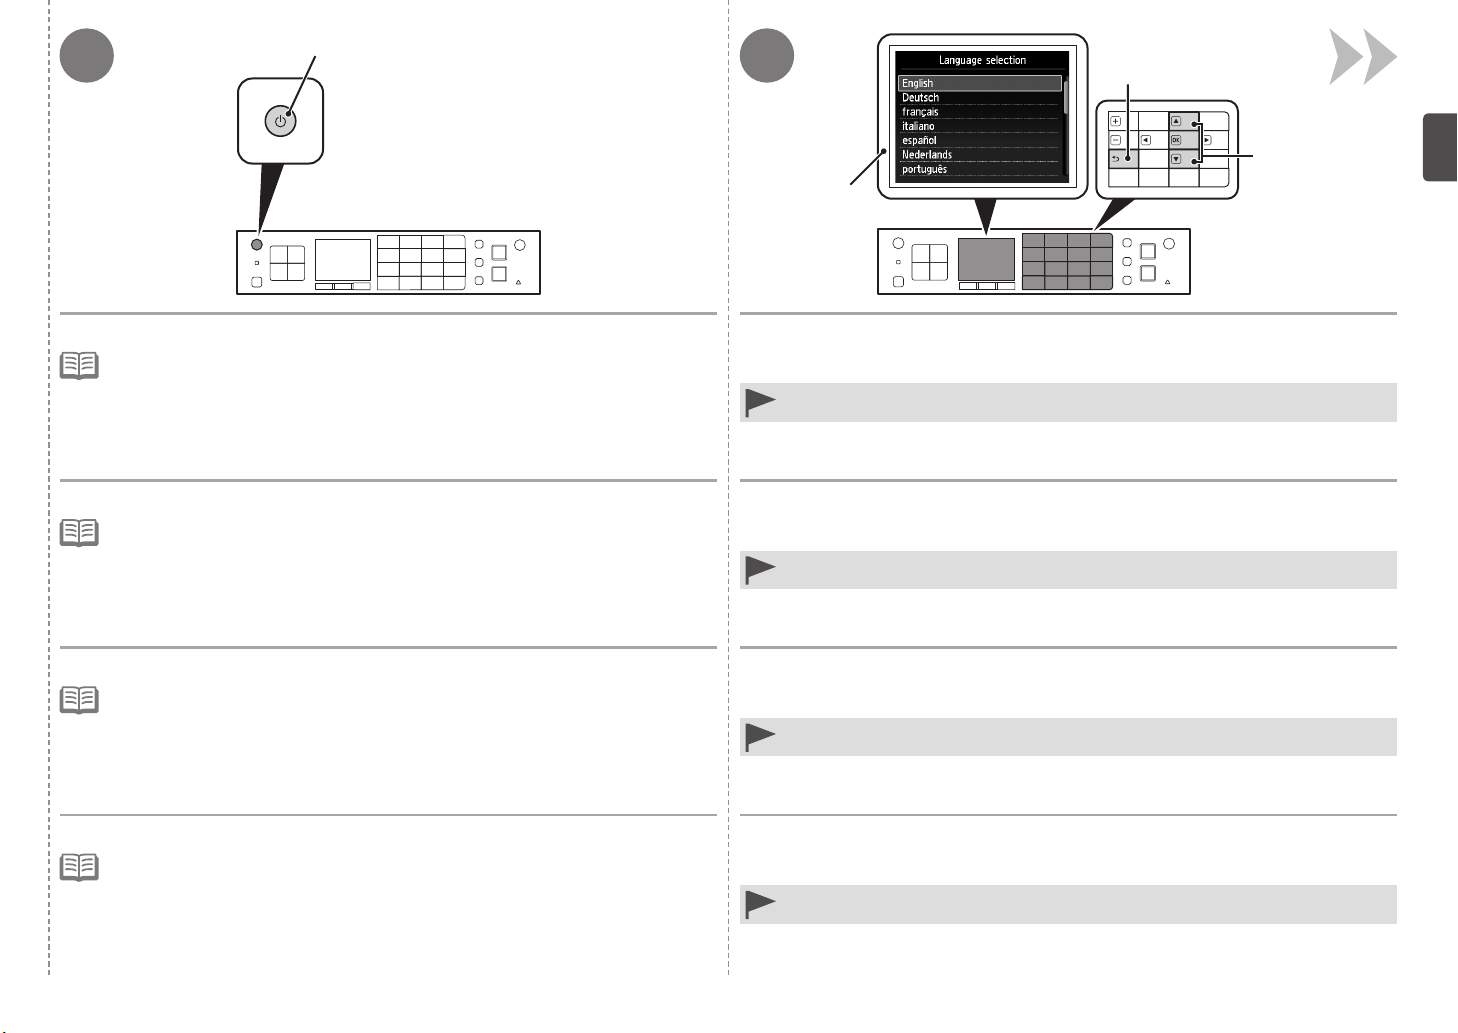
6
F
7
I
G
H
Press the ON button (F).
The machine may make some operating noises. This is normal operation.
•
It takes about 5 seconds for the ON button to work after the power cord is plugged in.
•
Appuyez sur le bouton MARCHE (ON) (F).
L’appareil émet des bruits de fonctionnement. Ceci est normal.
•
•
Il faut environ 5 secondes pour que le bouton
du cordon d’alimentation.
Drücken Sie die Taste EIN (ON) (F).
Das Gerät gibt unter Umständen Betriebsgeräusche aus. Dies ist völlig normal.
•
Es dauert ca. 5 Sekunden, bis die Taste EIN (ON) nach Anschluss des Netzkabels funktioniert.
•
Premere il pulsante ON (F).
La stampante potrebbe emettere rumori durante il funzionamento. Tali rumori fanno parte del
•
normale funzionamento.
Il pulsante ON si accende circa 5 secondi dopo il collegamento del cavo di alimentazione.
•
MARCHE (ON) réagisse après le branchement
Use the { or } button (G) on the Operation Panel to select the language for the
LCD (Liquid Crystal Display) (H), then press the OK button.
If you want to change the language shown on the LCD, press the Back button (I) to return to
•
the Language selection screen.
Utilisez le bouton { ou } (G) du Panneau de contrôle pour choisir la langue de
l’écran LCD (Liquid Crystal Display) (H), puis appuyez sur le bouton OK.
Si vous voulez changer la langue d’afchage de l’écran LCD, appuyez sur le bouton
•
Précédent (Back) (I) pour revenir à l’écran Sélection de langue (Language selection).
Wählen Sie mit der Taste { oder } (G) auf dem Bedienfeld die Sprache für die
LCD-Anzeige (Liquid Crystal Display, Flüssigkristallanzeige) (H) aus. Drücken Sie
anschließend die Taste OK.
Wenn Sie die auf der LCD-Anzeige angezeigte Sprache ändern möchten, drücken Sie die Taste
•
Zurück (Back) (I), um zum Bildschirm Sprachenauswahl (Language selection) zurückzukehren.
Premere il pulsante { o } (G) sul pannello dei comandi per selezionare la lingua
per il display LCD (Liquid Crystal Display) (H), quindi premere il pulsante OK.
Se si desidera modicare la lingua visualizzata sul display LCD, premere il pulsante Indietro
•
(Back) (I) per tornare alla schermata Selezione lingua (Language selection).
9
Page 12
8 9
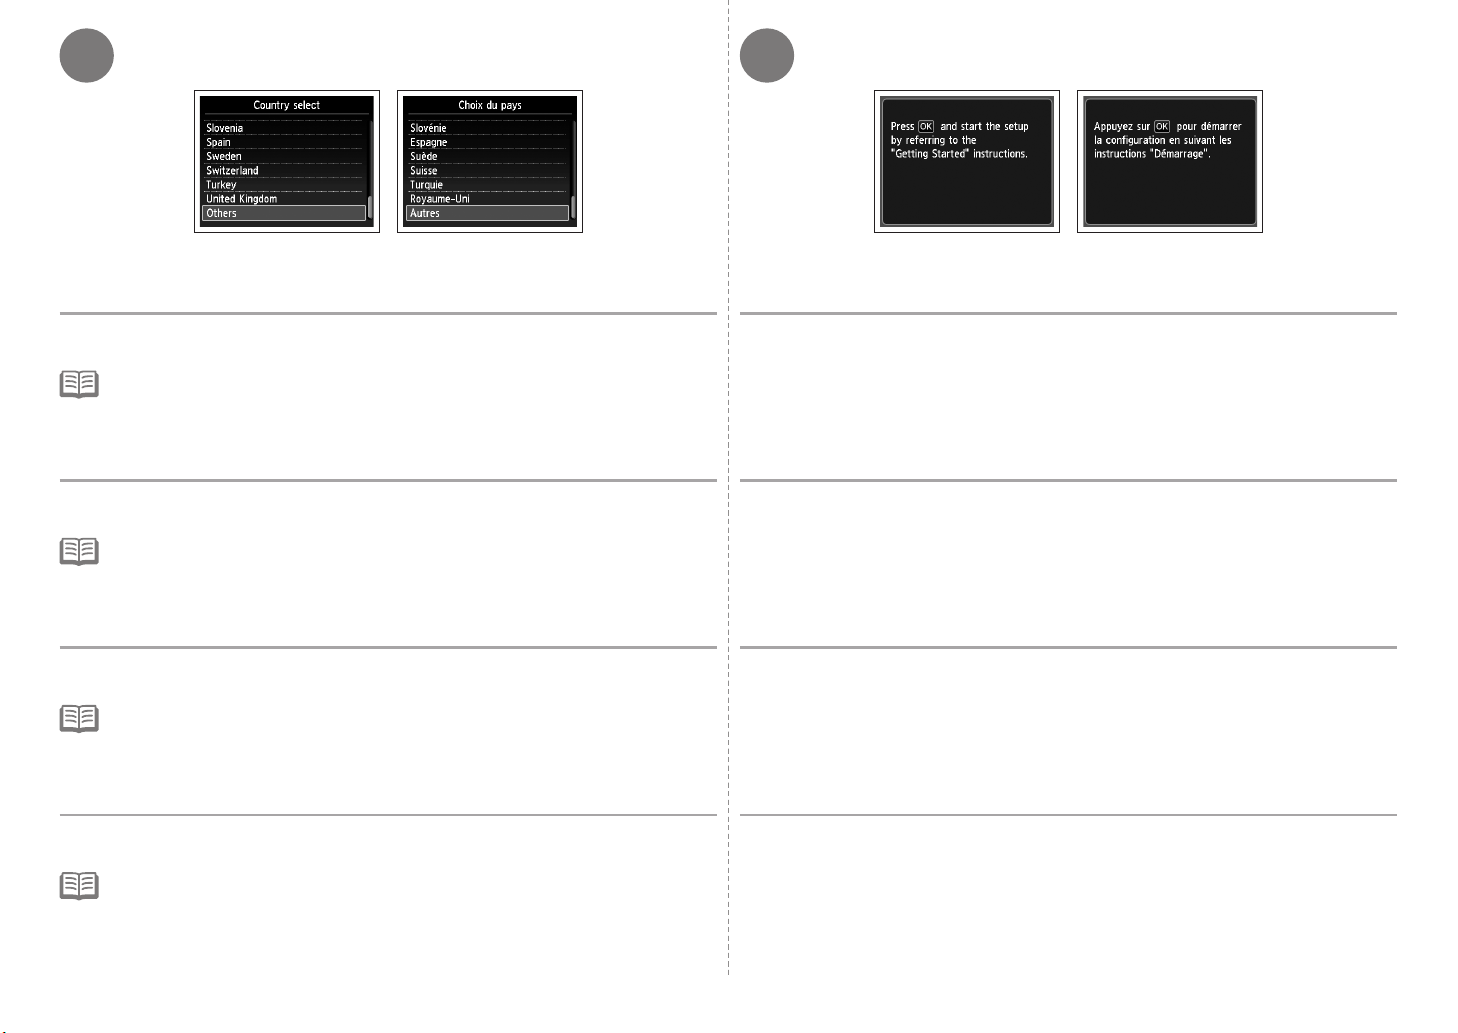
When this screen is displayed, press the OK button, then proceed to the next step.Select the country or region of use, then press the OK button.
The Country select screen may not be displayed depending on the country or region of
•
purchase.
Sélectionnez le pays ou la région d’utilisation, puis appuyez sur le bouton OK.
Selon le pays ou la région où vous avez effectué votre achat, l’écran Choix du pays (Country
•
Select) peut ne pas s’afcher.
Wählen Sie das Land oder die Region aus, in dem/der das Gerät verwendet wird.
Drücken Sie anschließend die Taste OK.
Die Anzeige Land auswählen (Country select) wird je nach Land oder Region, in der das
•
Gerät verwendet wird, möglicherweise nicht angezeigt.
Selezionare il paese o la regione in cui la stampante viene utilizzata, quindi
premere il pulsante OK.
La schermata Selezione paese (Country select) potrebbe non essere visualizzata a seconda
•
del paese o della regione in cui è stato acquistato il prodotto.
10
Lorsque cet écran est affiché, appuyez sur le bouton OK, puis passez à l’étape
suivante.
Wenn dieser Bildschirm angezeigt wird, drücken Sie die Taste OK und fahren Sie
mit dem nächsten Schritt fort.
Quando viene visualizzata questa schermata, premere il pulsante OK e andare al
passaggio successivo.
Page 13
1 2
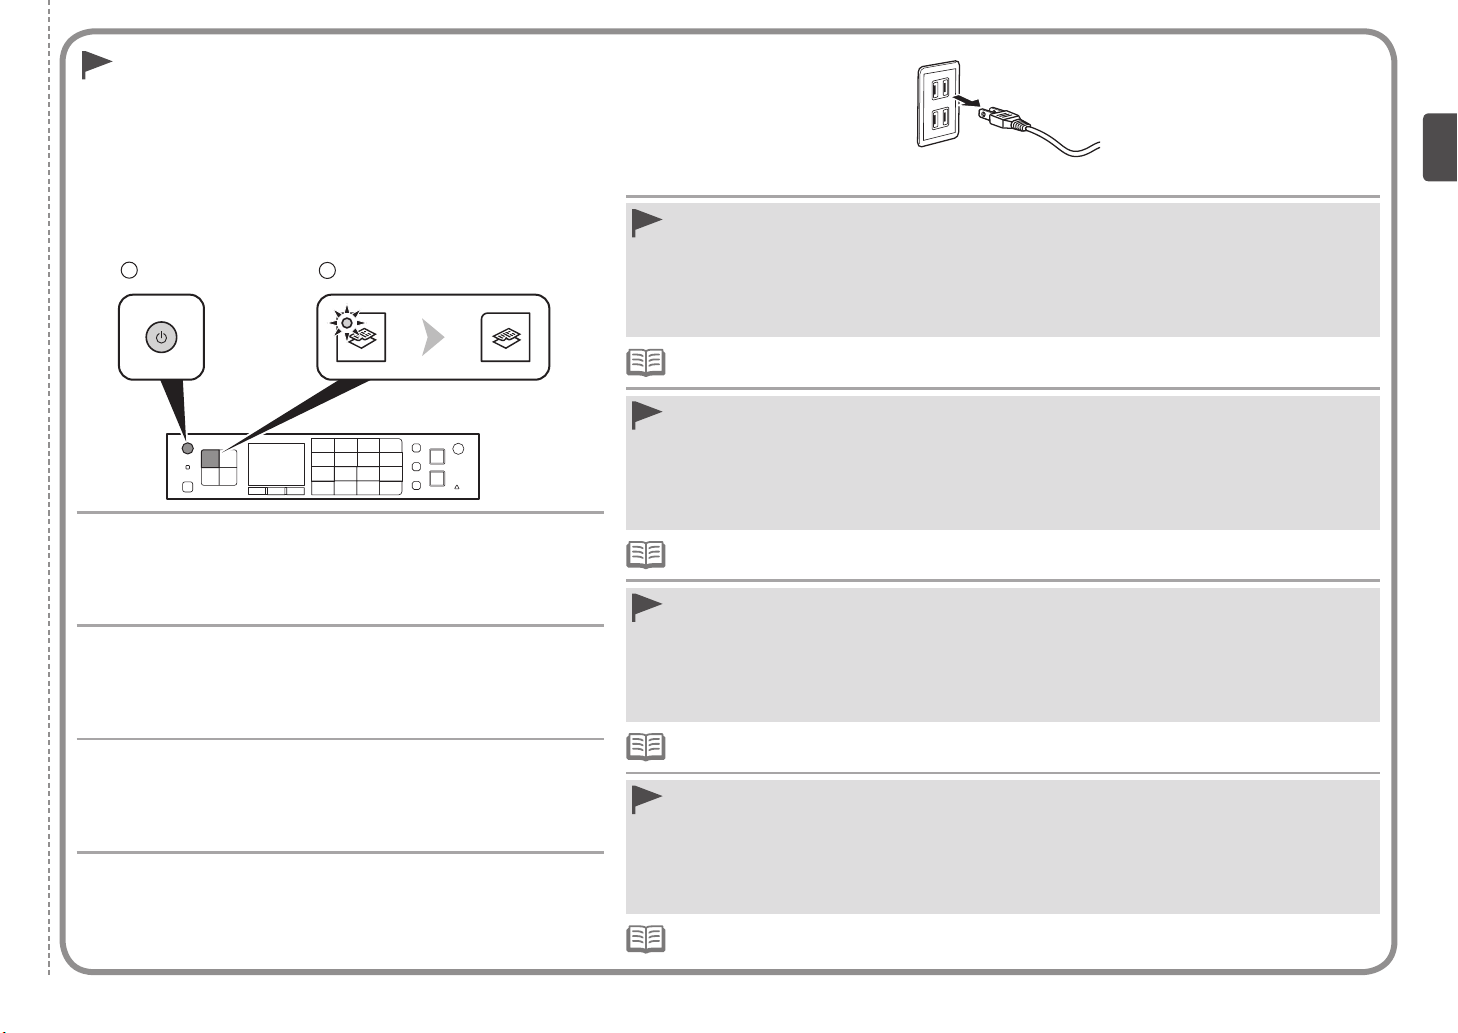
When it is necessary to turn off the machine
Lorsqu’il est nécessaire de mettre la machine
hors tension
Wenn das Gerät ausgeschaltet werden muss
Se è necessario spegnere la stampante
Be sure to follow the procedure below.
1. Press the
2. Make sure that all the lamps on the Operation Panel are not lit.
Operating noise may continue for up to 1 minute until the machine turns off.
Veillez à suivre la procédure ci-dessous.
1. Appuyez sur le bouton
2. Vériez que tous les voyants du Panneau de contrôle sont éteints.
Le bruit de fonctionnement peut rester audible jusqu’à 1 minute, jusqu’à ce que
la machine soit hors tension.
Gehen Sie bitte wie nachfolgend beschrieben vor.
1. Drücken Sie die Taste
2. Achten Sie darauf, dass die Anzeigen des Bedienfelds nicht leuchten.
Die Betriebsgeräusche können bis zu 1 Minute andauern, bis sich das Gerät
ausschaltet.
Attenersi alla procedura illustrata di seguito.
1. Premere il pulsante
2. Assicurarsi che tutte le spie sul pannello dei comandi siano spente.
La macchina potrebbe continuare a emettere i rumori di funzionamento per
1 minuto, fino allo spegnimento.
ON button to turn off the machine.
MARCHE (ON) pour mettre la machine hors tension.
EIN (ON), um das Gerät auszuschalten.
ON per spegnere la stampante.
Before removing the power plug, make sure that all the lamps on the Operation Panel are not lit. Removing the
•
power plug while any of the lamps on the Operation Panel is lit or ashing may cause drying and clogging of
the Print Head, resulting in poor printing.
When using the fax features
Removing the power plug deletes all faxes stored in memory. Before removing the power plug, send faxes,
•
print them, or save them to USB ash drive as necessary.
The specication of the power cord differs for each country or region. •
Avant de retirer la che d’alimentation, vériez que tous les voyants du Panneau de contrôle sont éteints. Si
•
vous retirez la che d’alimentation alors que l’un des voyants du Panneau de contrôle est allumé ou clignote,
la tête d’impression risque de sécher et de se boucher, ce qui donnera une impression de mauvaise qualité.
Lors de l’utilisation des fonctions de télécopie
Le retrait de la che d’alimentation entraîne la suppression de toutes les télécopies stockées dans la mémoire.
•
Avant de retirer la che d’alimentation, envoyez les télécopies, imprimez-les ou enregistrez-les sur un lecteur
ash USB au besoin.
Les caractéristiques techniques du cordon d’alimentation varient suivant le pays ou la région.•
Vergewissern Sie sich, dass keine der Anzeigen auf dem Bedienfeld leuchtet, bevor Sie den Netzstecker
•
ziehen. Wenn der Netzstecker gezogen wird, während eine Anzeige auf dem Bedienfeld leuchtet oder blinkt,
kann der Druckkopf austrocknen und verstopfen, wodurch sich die Druckqualität verschlechtert.
Wenn die Faxfunktionen verwendet werden
Durch Entfernen des Netzsteckers werden alle im Speicher bendlichen Faxe gelöscht. Bevor Sie den
•
Netzstecker ziehen, senden oder drucken Sie Ihre Faxe gegebenenfalls oder speichern Sie sie auf ein USBFlashlaufwerk.
Die Spezikationen des Netzkabels fallen je nach Land oder Region unterschiedlich aus.•
Prima di rimuovere la presa di alimentazione, vericare che tutte le spie sul pannello dei comandi siano
•
spente. La rimozione della presa di alimentazione mentre una qualsiasi delle spie sul pannello dei comandi è
accesa o lampeggiante può provocare l'essiccazione e l'otturazione delle testina di stampa, con conseguente
riduzione della qualità di stampa.
Se si utilizzano le funzioni fax
Scollegando la presa di alimentazione si eliminano tutti i fax archiviati in memoria. Prima di rimuovere la presa
•
di alimentazione, inviare, stampare o salvare i fax nell'unità ash USB in base alle necessità.
La specica del cavo di alimentazione varia in base al paese o alla regione.•
11
Page 14
2
1
E
A
B
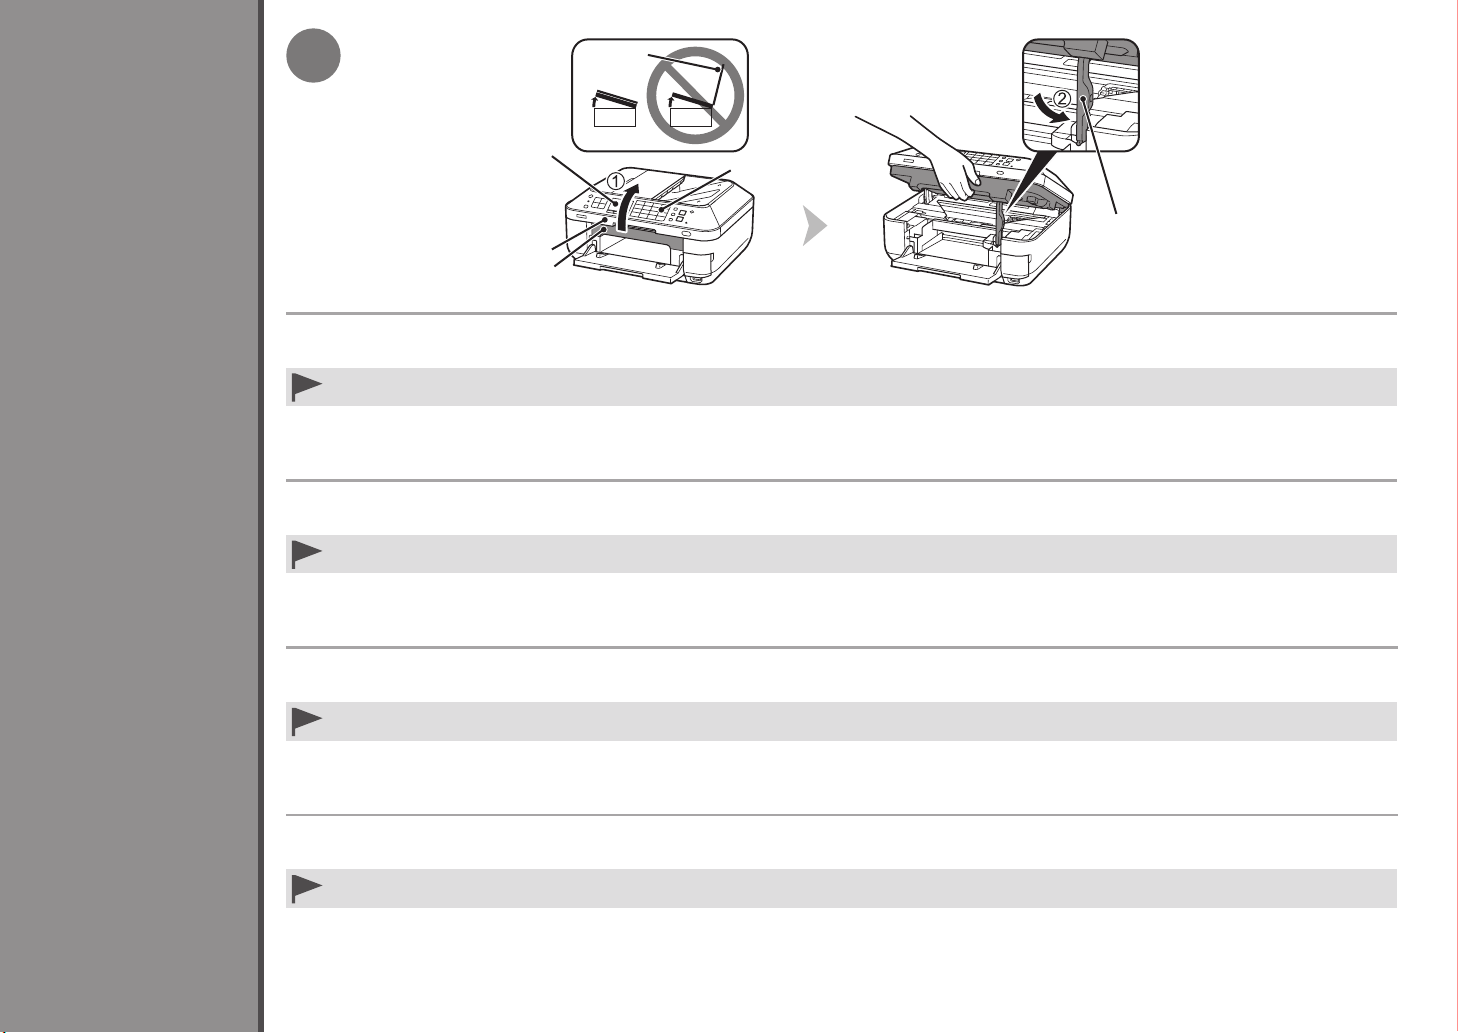
1. Make sure the Document Cover (A) is closed, then lift to open the Scanning Unit (Cover) (B).
2. Fix it with the Scanning Unit Support (C).
When you lift the Scanning Unit (Cover), do not touch the buttons on the Operation Panel (D) or the LCD (E). May result in unintended operation.•
A
D
C
12
Install the Print Head
Installation de la tête d’impression
Einbauen des Druckkopfs
Installazione della testina di stampa
1. Vérifiez que le couvercle du scanner (A) est fermé, puis soulevez l’unité de numérisation (capot) (B) pour l’ouvrir.
2. Fixez-la à l’aide du support de l’unité de numérisation (C).
Lorsque vous soulevez l’unité de numérisation (capot), ne touchez pas aux boutons du Panneau de contrôle (D) ni à l’écran LCD (E). Vous risquez de perturber le
•
fonctionnement de la machine.
1. Stellen Sie sicher, dass der Vorlagendeckel (A) geschlossen ist. Heben Sie dann das Scan-Modul (Abdeckung) (B) an, um es zu öffnen.
2. Fixieren Sie das Scan-Modul mit der Scan-Modul-Stütze (C).
Achten Sie darauf, beim Anheben des Scan-Moduls (Abdeckung) nicht die Tasten auf dem Bedienfeld (D) oder die LCD-Anzeige (E) zu berühren. Dadurch können
•
unbeabsichtigt Funktionen ausgelöst werden.
1. Assicurarsi che il coperchio dei documenti (A) sia chiuso, quindi sollevarlo per aprire l'unità di scansione (coperchio) (B).
2. Fissarla utilizzando il supporto dell'unità di scansione (C).
Quando si solleva l'unità di scansione (coperchio), non toccare i pulsanti sul pannello dei comandi (D) o il display LCD (E). Tale operazione potrebbe provocare un
•
funzionamento diverso da quello desiderato.
Page 15
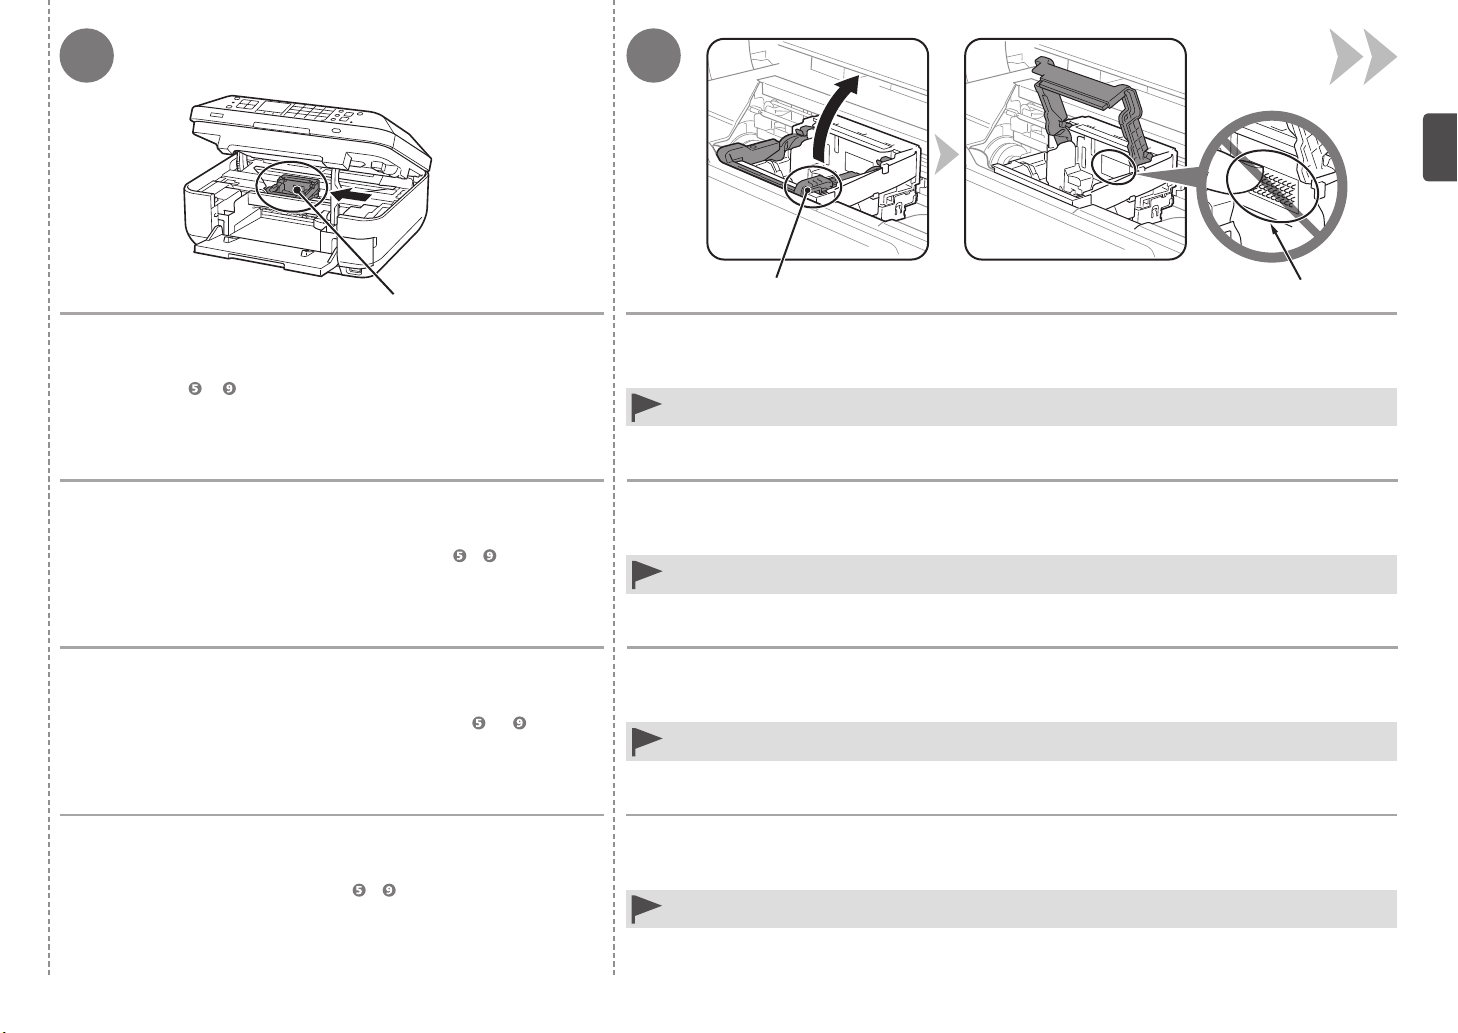
32
F
G
H
The Print Head Holder (F) moves to the installation position. Firmly lift the part (G) of the Print Head Lock Lever in the Print Head Holder until it stops.
If the Print Head Holder does not move, make sure that the machine is turned on.
For details, refer to to on page 8 in “1 Preparation.”
Le Support de tête d’impression (F) se place en position
d’installation.
Si le porte-tête d'impression ne bouge pas, vérifiez que la machine est sous
tension. Pour plus d’informations, reportez-vous aux étapes à à la page 8 de
la section « 1 Préparation ».
Der Druckkopfhalter (F) wird in die Installationsposition gefahren.
The Print Head Lock Lever may feel heavy.
Do not touch the inside of the Print Head Holder (H). The machine may not print properly if you touch it. •
Soulevez fermement la partie (G) du levier de verrouillage de tête d’impression du support de
tête d’impression jusqu’à ce qu’il s’arrête.
Le levier de verrouillage de tête d’impression peut paraître lourd.
Ne touchez pas l’intérieur du support de tête d'impression (H). La machine risque de ne pas imprimer
•
correctement si vous y touchez.
Drücken Sie den Sperrhebel für den Druckkopf des Druckkopfhalters am Teil (G) bis zum
Anschlag nach oben.
Falls sich die Druckkopfhalterung nicht verstellen lässt, überprüfen Sie, ob das
Gerät eingeschaltet ist. Weitere Informationen finden Sie unter bis auf Seite 8
im Abschnitt „1 Vorbereitung“.
Il supporto della testina di stampa (F) si sposta nella posizione di
installazione.
Se il supporto della testina di stampa non si sposta, verificare che la stampante sia
accesa. Per ulteriori informazioni, vedere da a a pagina 8 in "1 Preparazione".
Der Sperrhebel für den Druckkopf kann schwergängig sein.
Vermeiden Sie jede Berührung der Komponenten im Inneren des Druckkopfhalters (H). Nach einer Berührung
•
druckt das Gerät unter Umständen nicht mehr einwandfrei.
Sollevare la parte (G) della leva di bloccaggio della testina di stampa nel supporto della testina di
stampa fino all'arresto.
La leva di bloccaggio della testina di stampa potrebbe sembrare dura.
Non toccare la parte interna del supporto della testina di stampa (H). In caso contrario, la stampante potrebbe
•
non stampare correttamente.
13
Page 16
4
5
I
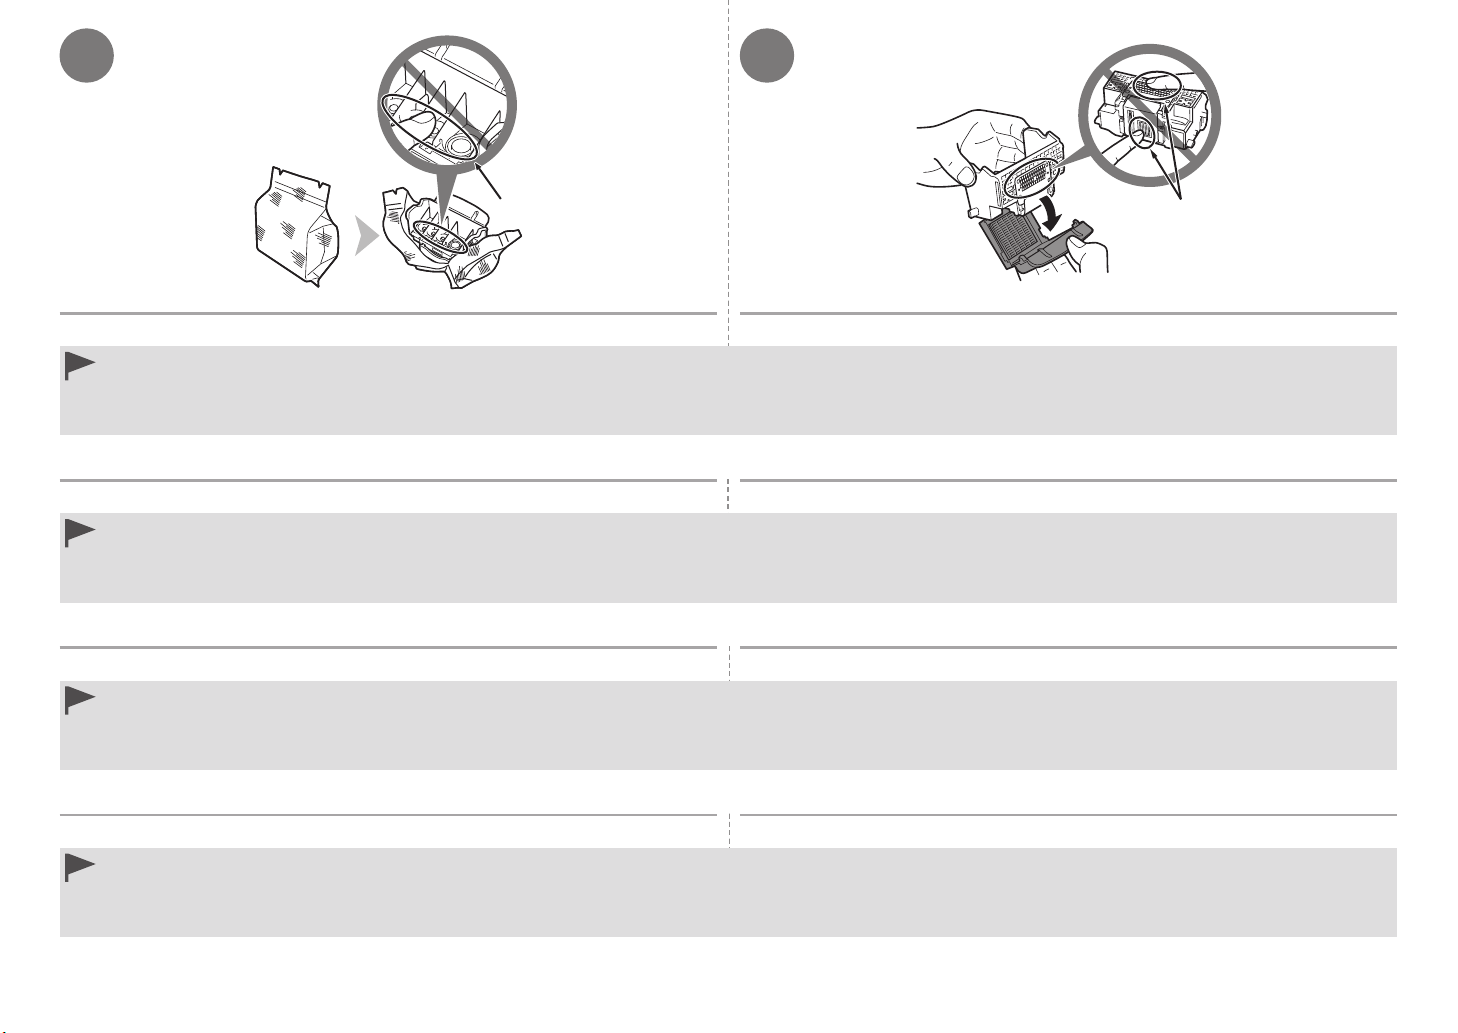
Remove the Print Head from the silver package. Remove the orange protective cap.
Handle the Print Head carefully. Do not drop or apply excessive pressure to it.
•
Do not touch the inside (I) or metal parts (J) of the Print Head. The machine may not print properly if you touch them.
•
There may be some transparent or light blue ink on the inside of the bag the Print Head comes in, or the inside of the protective cap - this has no effect on print quality. Be careful not to get ink on yourself
•
when handling these items.
Retirez la tête d’impression de l’emballage argenté. Retirez la capsule de protection orange.
Manipulez la tête d’impression avec précaution. Ne la faites pas tomber et n’exercez pas une trop grande pression dessus.
•
Ne touchez pas l’intérieur (I) ni les parties métalliques (J) de la tête d’impression. La machine risque de ne pas imprimer correctement.
•
Il peut y avoir de l’encre transparente ou bleu clair à l’intérieur du sachet de la tête d’impression ou dans la capsule de protection. Cela n’affecte pas la qualité d’impression. Veillez à ne pas mettre d’encre
•
sur vous lors de la manipulation de ces éléments.
Nehmen Sie den Druckkopf aus der Silberfolie. Ziehen Sie die orangefarbene Schutzkappe ab.
Behandeln Sie den Druckkopf vorsichtig. Lassen Sie ihn nicht fallen, und üben Sie keinen übermäßigen Druck auf ihn aus.
•
Vermeiden Sie jede Berührung der Komponenten im Inneren (I) oder der Metallteile (J) des Druckkopfs. Nach einer Berührung druckt das Gerät unter Umständen nicht mehr einwandfrei.
•
Auf der Innenseite der Umverpackung, in der der Druckkopf geliefert wird, oder auf der Innenseite der Schutzkappe ist unter Umständen ein transparenter oder hellblauer Tintenlm zu sehen. Auf die
•
Druckqualität hat das aber keinen Einuss. Achten Sie beim Umgang mit Teilen der Tintenversorgung darauf, dass keine Tinte auf Ihre Kleidung gelangt.
J
Rimuovere la testina di stampa dalla confezione di colore argento. Rimuovere il cappuccio protettivo arancione.
Maneggiare con cura la testina di stampa. Evitare di farla cadere o di applicarvi una pressione eccessiva.
•
Non toccare la parte interna (I) o le parti in metallo (J) della testina di stampa. In caso contrario, la stampante potrebbe non stampare correttamente.
•
All'interno della confezione della testina di stampa o del cappuccio protettivo è possibile che siano presenti tracce di inchiostro trasparente o blu chiaro. Ciò non inuisce sulla qualità di stampa. Fare
•
attenzione a non sporcarsi quando si maneggiano tali elementi.
14
Page 17
76
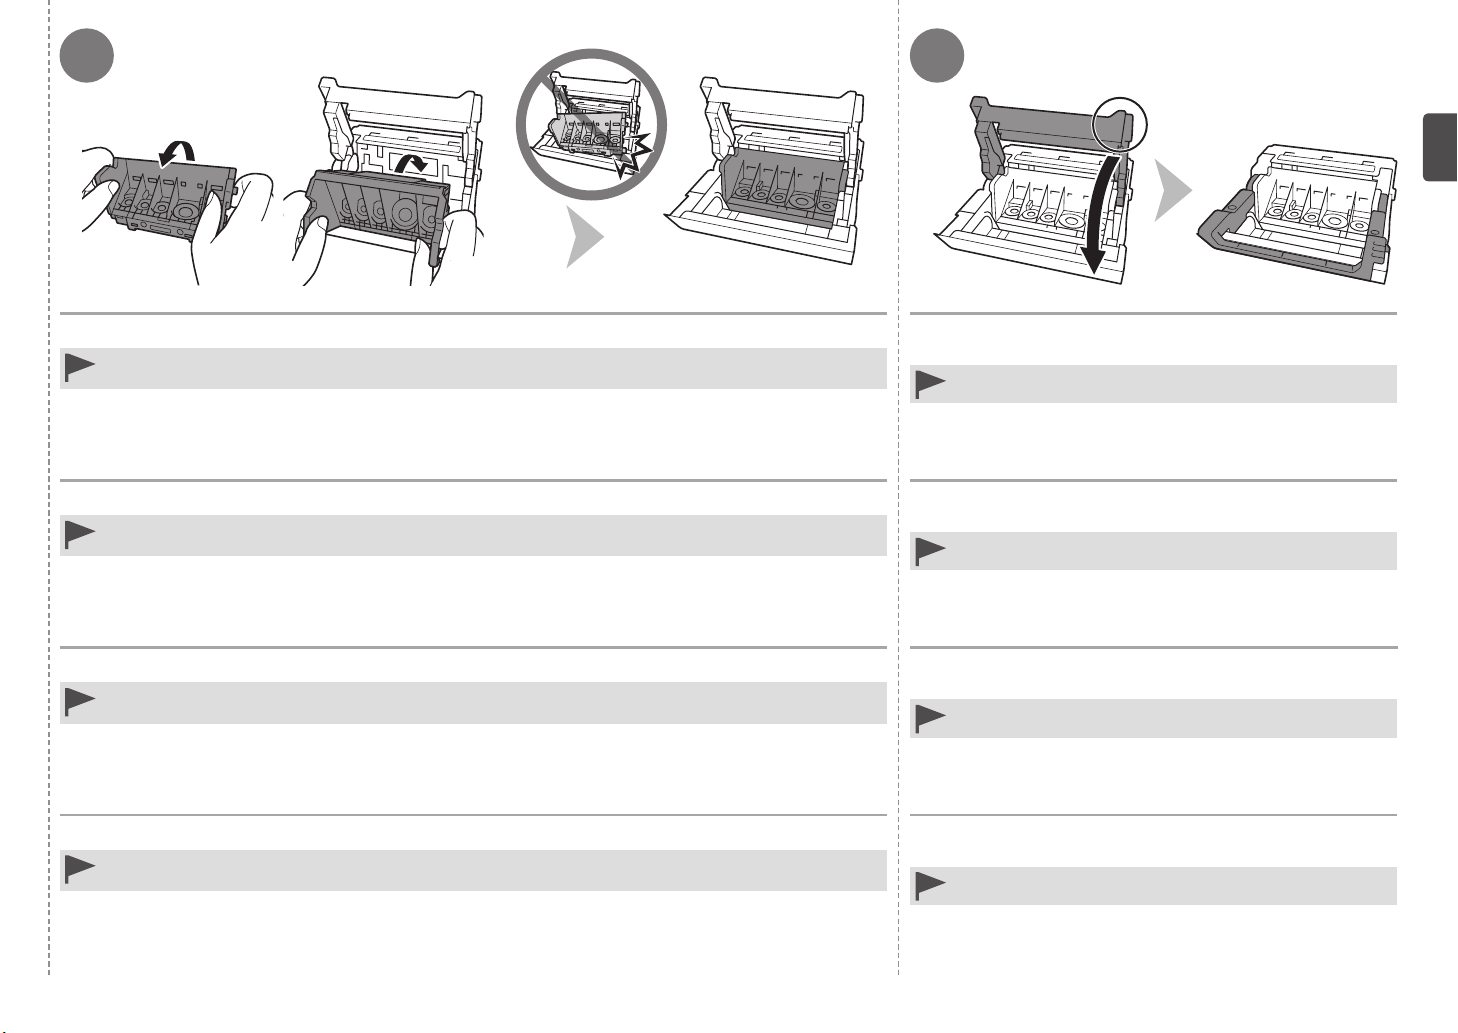
Tilt the Print Head forward and set it in place as shown.
Do not knock the Print Head against the sides of the holder.
•
Install in a well-lit environment.
•
Inclinez la tête d’impression vers l’avant et mettez-la en place comme illustré.
Ne cognez pas la tête d’impression contre les bords du support.
•
Installez-la dans de bonnes conditions d’éclairage.
•
Halten Sie den Druckkopf nach vorne geneigt fest, und setzen Sie ihn ein, wie in der Abbildung gezeigt.
Stoßen Sie mit dem Druckkopf nicht seitlich an den Halter.
•
Achten Sie beim Einsetzen auf eine gute Beleuchtung.
•
Inclinare in avanti la testina di stampa e posizionarla come illustrato.
Evitare che la testina di stampa urti i lati del supporto.
•
Eseguire l'installazione della cartuccia in un ambiente adeguatamente illuminato.
•
Hold the Print Head Lock Lever firmly and lower it
completely.
Once you have installed the Print Head, do not remove it
•
unnecessarily.
Tenez fermement le levier de verrouillage de tête
d’impression et abaissez-le complètement.
Une fois la tête d'impression installée, ne la retirez que lorsque
•
c'est absolument nécessaire.
Halten Sie den Sperrhebel für den Druckkopf fest, und
klappen Sie ihn vollständig nach unten.
Nach dem Einsetzen sollte der Druckkopf nicht unnötig wieder
•
ausgebaut werden.
Afferrare saldamente la leva di bloccaggio della testina di
stampa e abbassarla completamente.
Una volta installata la testina di stampa, non rimuoverla se non in
•
caso di effettiva necessità.
15
Page 18
3
1 2
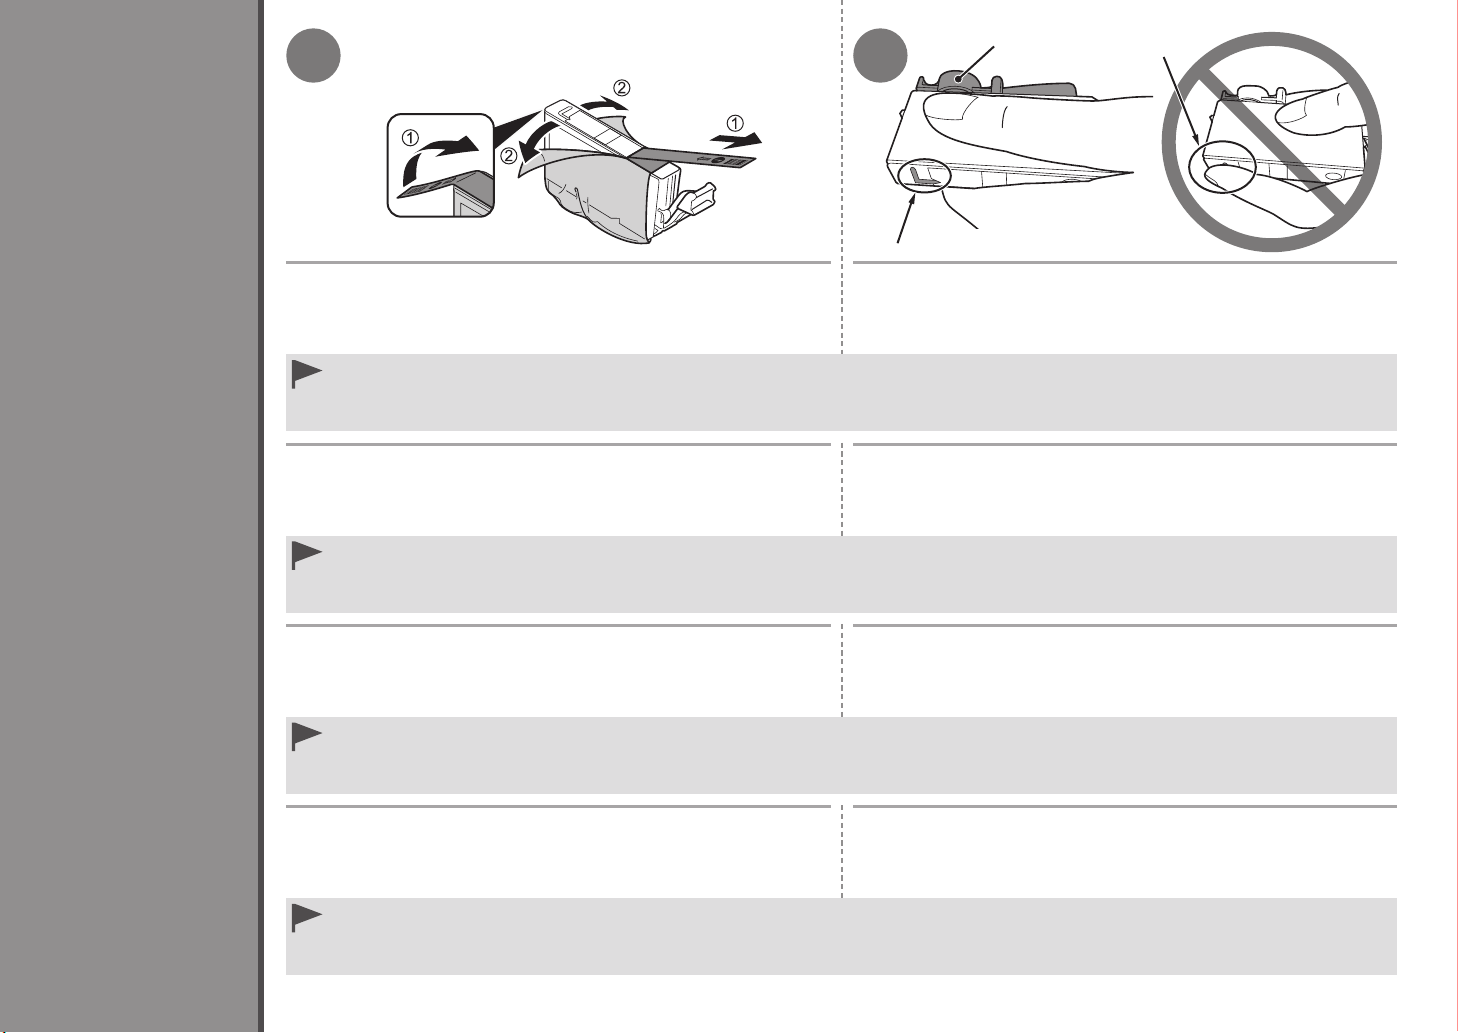
1. Remove the orange tape completely.
2. Remove the protective film completely.
Handle the ink tanks carefully. Do not drop or apply excessive pressure to them.
•
Be sure to use the supplied ink tanks.
•
If the orange tape remains on the L-shape air hole, ink may splash or the machine may not print properly.
•
If you push the sides of the ink tank with the L-shape air hole blocked, ink may splash.
•
A
B
1. Hold the ink tank with the orange protective cap (A) pointing up.
2. Hold the ink tank being careful not to cover the area (B) including
the L-shape air hole.
B
16
Install the Ink Tanks
Installation des réservoirs d’encre
Einsetzen der Tintenpatronen
Installazione dei serbatoi d'inchiostro
1. Retirez complètement le ruban orange.
2. Retirez complètement le film protecteur.
Manipulez les réservoirs d’encre avec précaution. Ne les faites pas tomber et n’exercez pas une trop grande pression dessus.
•
Prenez soin d’utiliser les cartouches d’encre fournies.
•
Si vous laissez le ruban orange sur le trou d’arrivée d’air en forme de L, l’encre risque de faire des éclaboussures ou la machine de ne pas imprimer correctement.
•
Si vous appuyez sur les côtés de la cartouche d’encre alors que le trou d’arrivée d’air en forme de L est obstrué, l’encre risque de faire des éclaboussures.
•
1. Ziehen Sie das orangefarbene Klebeband vollständig ab.
2. Ziehen Sie die Schutzfolie vollständig ab.
Behandeln Sie die Tintenpatrone vorsichtig. Lassen Sie sie nicht fallen, und üben Sie keinen übermäßigen Druck auf sie aus.
•
Verwenden Sie nur die mitgelieferten Tintenpatronen.
•
Wenn das orangefarbene Klebeband nicht von der L-förmigen Belüftungsöffnung entfernt wird, kann Tinte austreten, oder das Gerät druckt unter Umständen nicht einwandfrei.
•
Wenn Sie Druck auf die Seiten der Tintenpatrone ausüben und die L-förmige Belüftungsöffnung blockiert ist, kann Tinte austreten.
•
1. Rimuovere completamente il nastro arancione.
2. Rimuovere completamente la pellicola protettiva.
Maneggiare con cura i serbatoi d'inchiostro. Non farli cadere né premerli con eccessiva forza.
•
Assicurarsi di utilizzare i serbatoi d'inchiostro forniti.
•
Se sul foro di areazione a forma di L resta del nastro arancione, l'inchiostro potrebbe fuoriuscire oppure la stampante potrebbe non stampare correttamente.
•
Se il serbatoio d'inchiostro viene premuto dai lati mentre il foro di areazione a forma di L è bloccato, l'inchiostro potrebbe fuoriuscire.
•
1. Tenez la cartouche d’encre en orientant la capsule de protection orange
(A) vers le haut.
2. Tenez la cartouche d’encre tout en prenant garde de ne pas obstruer la
zone (B), y compris le trou d’arrivée d’air en forme de L.
1. Halten Sie die Tintenpatrone mit der orangefarbenen
Schutzkappe (A) nach oben.
2. Achten Sie beim Halten der Tintenpatrone darauf, dass die
L-förmige Belüftungsöffnung (B) nicht blockiert ist.
1. Tenere il serbatoio d'inchiostro con il cappuccio protettivo (A)
arancione rivolto verso l'alto.
2. Tenere il serbatoio d'inchiostro in modo tale da non coprire l'area
(B) con il foro di areazione a forma di L.
Page 19
3 4
C
D
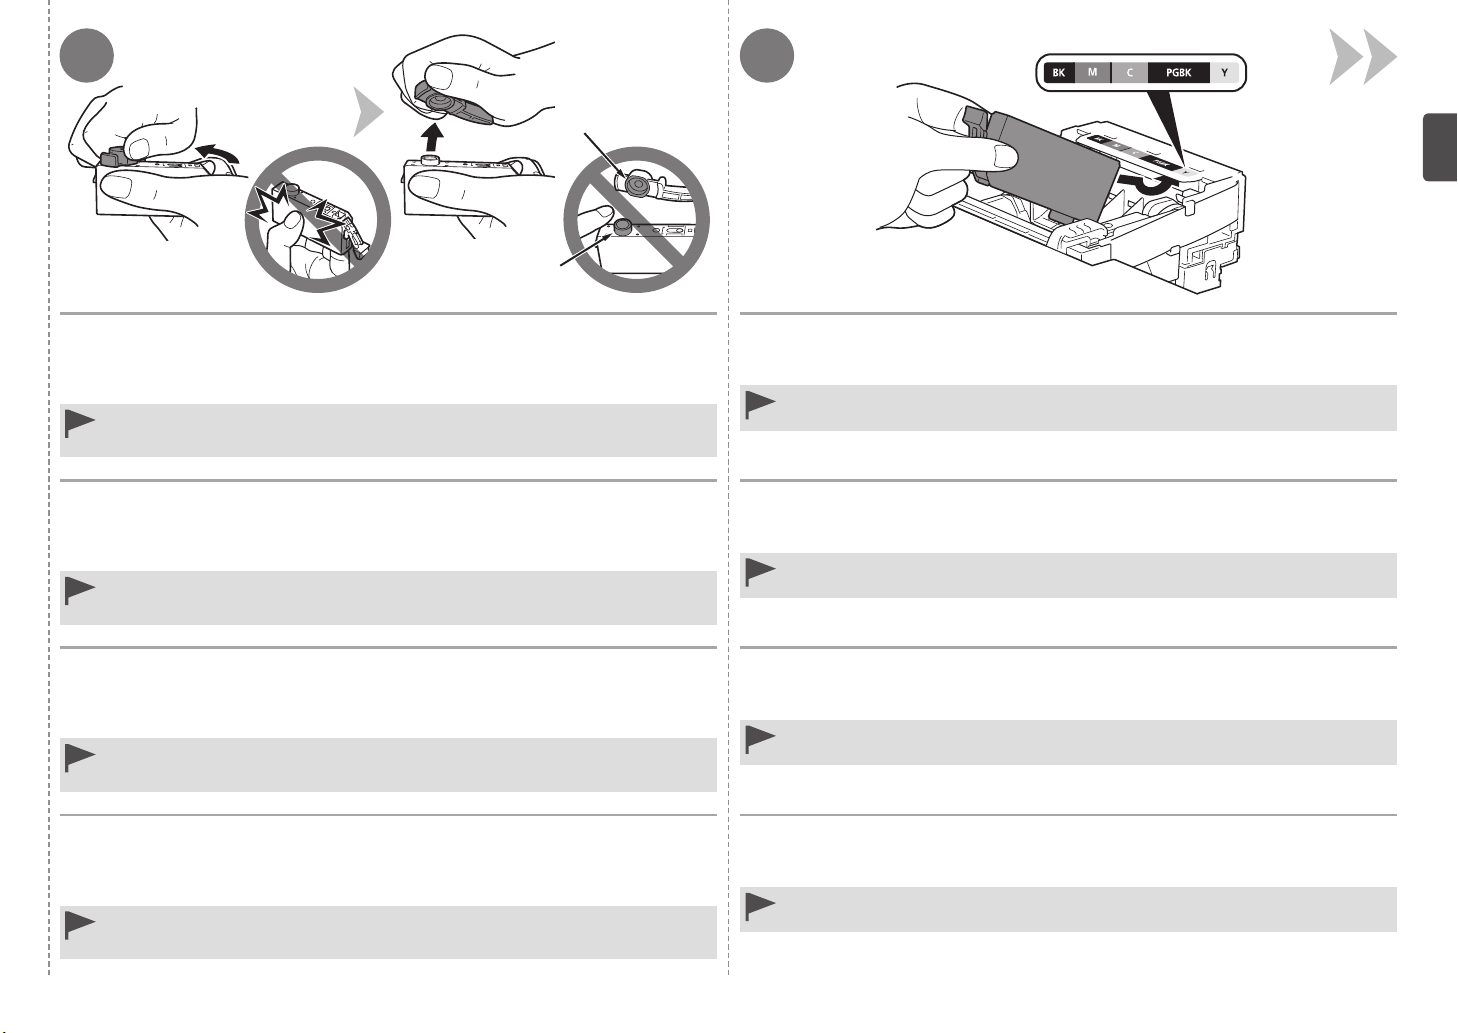
Hold the ink tank by its sides and slowly twist the orange protective cap 90
degrees horizontally to remove it off.
Do not push the sides of the ink tank.
Do not touch the inside (C) of the orange protective cap or the open ink port (D). The ink may
•
stain your hands if you touch them.
Tenez la cartouche d’encre par les bords et faites pivoter lentement la capsule de
protection orange de 90 degrés à l’horizontale pour la retirer.
N’appuyez pas sur les côtés de la cartouche d’encre.
Ne touchez pas l’intérieur (C) de la capsule de protection orange ou le port d’encre ouvert (D).
•
L’encre risque de tacher vos mains si vous les toucher.
Halten Sie die Tintenpatrone an beiden Seiten fest, drehen Sie die orangefarbene
Schutzkappe langsam horizontal um 90 Grad, und nehmen Sie sie ab.
Drücken Sie nicht seitlich auf den Tintenbehälter.
Vermeiden Sie jede Berührung der Innenseite (C) der orangefarbenen Schutzkappe und des
•
geöffneten Tintendurchlasses (D). Andernfalls kann Tinte an Ihre Hände gelangen.
Afferrare il serbatoio d'inchiostro dai lati e ruotare lentamente il cappuccio
protettivo di 90 gradi in senso orizzontale per rimuoverlo.
Non spingere il serbatoio d'inchiostro dai lati.
Non toccare la parte interna (C) del cappuccio protettivo arancione né la porta dell'inchiostro
•
aperta (D). Se toccati possono macchiare le mani.
Tilt the ink tank, then insert it under the label and against the back end of the slot.
Make sure that the color of the label matches the ink tank.
Install in a well-lit environment.•
Inclinez le réservoir d’encre, puis insérez-le sous l’étiquette, adossé contre
l’arrière de l’emplacement dédié.
Vérifiez que la couleur de l’étiquette correspond à celle du réservoir d’encre.
Procédez à l’installation dans un environnement bien éclairé.•
Halten Sie den Tintenbehälter nach vorne geneigt, führen Sie ihn unterhalb des
Aufklebers in den Schacht ein, und drücken Sie ihn nach hinten.
Die Farbe des Aufklebers muss mit der des Tintenbehälters übereinstimmen.
Achten Sie beim Einsetzen auf eine gut beleuchtete Umgebung.•
Inclinare il serbatoio d'inchiostro, quindi inserirlo sotto l'etichetta contro la parte
posteriore dello slot.
Assicurarsi che il colore del serbatoio di inchiostro corrisponda all'etichetta.
Eseguire l'installazione della cartuccia in un ambiente adeguatamente illuminato.•
17
Page 20
5 6
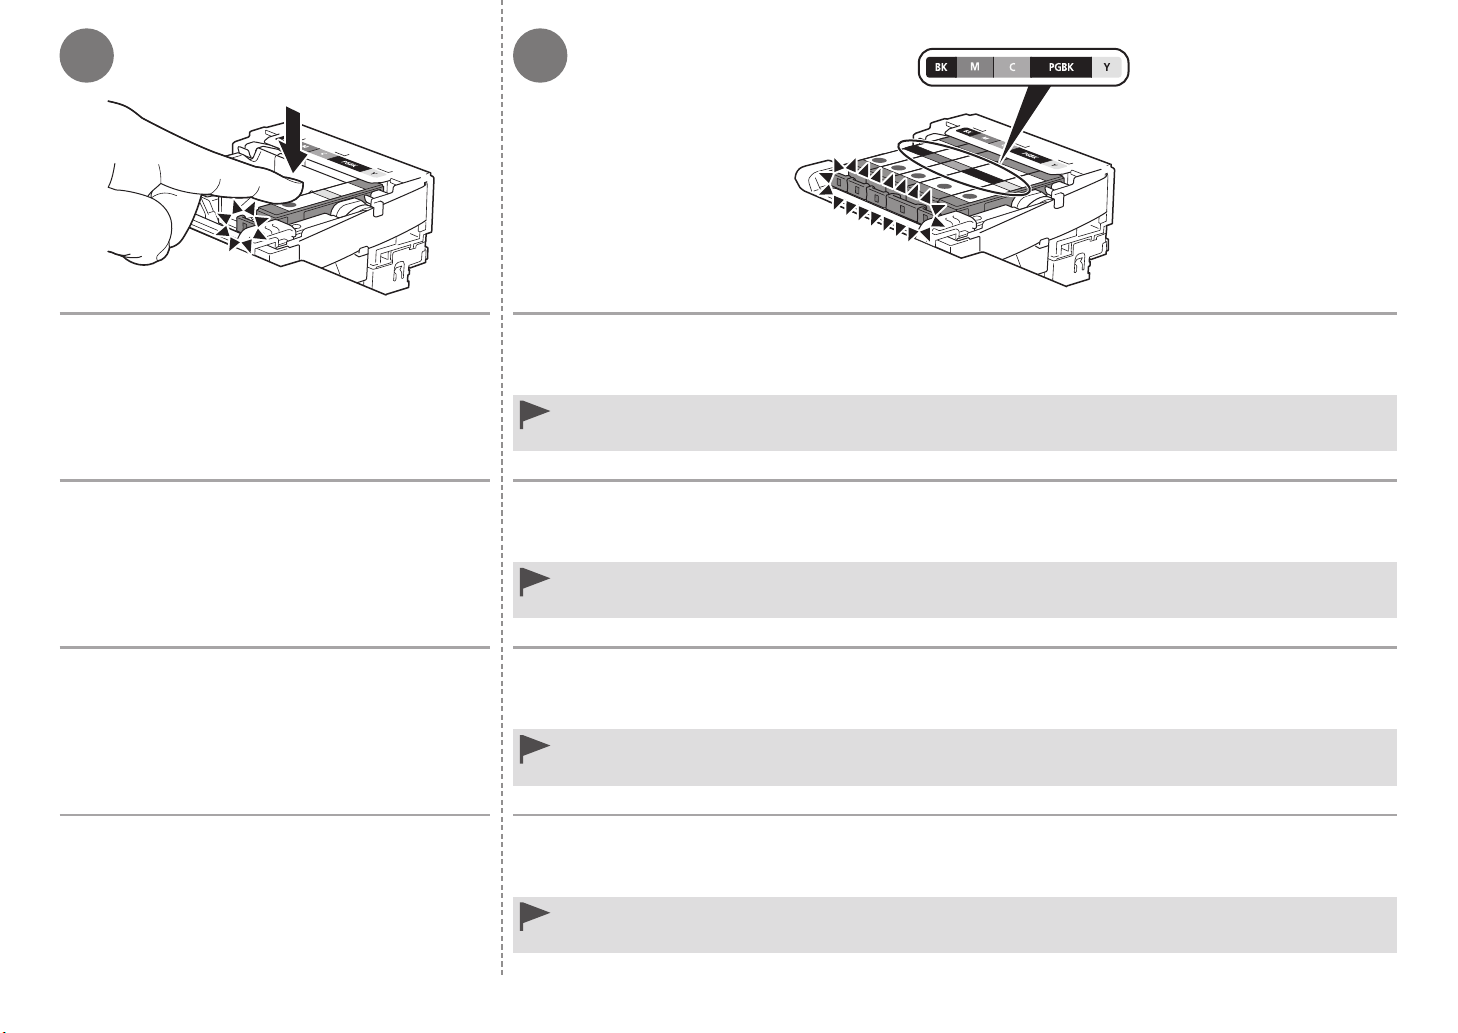
Press the PUSH mark on the ink tank firmly until it
clicks.
When the installation is completed properly, the Ink lamp lights
red.
Appuyez fortement sur le repère PUSH du réservoir
d’encre jusqu’à ce qu’il se mette en place.
Lorsque l’installation est correctement effectuée, le voyant
d’encre (Ink) s’allume en rouge.
Drücken Sie fest auf die Markierung PUSH auf dem
Tintenbehälter, bis dieser hörbar einrastet.
Wenn der Tintenbehälter richtig eingesetzt wurde, leuchtet die
Anzeige für Tintenbehälter (Ink) rot.
Premere sul segno PUSH sul serbatoio di inchiostro no a
quando il serbatoio d'inchiostro non scatta in posizione.
Se l'installazione è stata eseguita correttamente, l'indicatore
luminoso dell'inchiostro (Ink) emetterà una luce rossa.
Install all the other ink tanks in the same way according to the color order indicated on the label.
Make sure all the Ink lamps light red.
Once you have installed the ink tanks, do not remove them unnecessarily.
•
If the Print Head Holder moves to the right, close and reopen the Scanning Unit (Cover).
•
Installez toutes les autres cartouches d’encre de la même manière, en respectant l’ordre des couleurs indiqué
sur l’étiquette.
Vérifiez que tous les témoins d’encre (Ink) sont allumés en rouge.
Après avoir installé les cartouches d’encre, ne les retirez pas inutilement.
•
Si le support de tête d’impression se déplace vers la droite, fermez, puis rouvrez l’unité de numérisation (capot).
•
Setzen Sie die übrigen Tintenbehälter auf dieselbe Weise ein. Beachten Sie dabei die Farbreihenfolge auf den
Aufklebern.
Stellen Sie sicher, dass alle Anzeige für Tintenbehälter (Ink) rot leuchten.
Nehmen Sie die Tintenpatronenpatronen nach dem Einsetzen nur dann heraus, wenn es unbedingt erforderlich ist.
•
Falls sich die Druckkopfhalterung nach rechts bewegt, schließen Sie das Scan-Modul (Abdeckung), und öffnen Sie es anschließend
•
wieder.
Installare tutti gli altri serbatoi d'inchiostro con la stessa procedura in base all'ordine di colore indicato
sull'etichetta.
Assicurarsi che tutte le spie dell'inchiostro (Ink) si accendano e diventino rosse.
Una volta installati, non rimuovere i serbatoi d'inchiostro, se non strettamente necessario.
•
Se il supporto della testina di stampa si sposta verso destra, chiudere e riaprire l'unità di scansione (coperchio).
•
18
Page 21

7 8
E
F
1. Lift the Scanning Unit (Cover) (E) slightly.
2. Fold the Scanning Unit Support (F) towards the left.
3. Close the Scanning Unit (Cover) gently.
1. Soulevez légèrement l’unité de numérisation (capot) (E).
2. Repliez le support de l’unité de numérisation (F) vers la gauche.
3. Refermez doucement l’unité de numérisation (capot).
1. Heben Sie das Scan-Modul (Abdeckung) (E) leicht an.
2. Klappen Sie die Scan-Modul-Stütze (F) nach links ein.
3. Schließen Sie vorsichtig das Scan-Modul (Abdeckung).
1. Sollevare leggermente l'unità di scansione (coperchio) (E).
2. Ripiegare il supporto dell'unità di scansione (F) verso sinistra.
3. Chiudere con delicatezza l'unità di scansione (coperchio).
Wait for about 4 minutes until the LCD changes as shown in the illustration, then
proceed to the next step.
Do not press the OK button yet.
The machine may make some operating noises when preparing to print. This is normal operation.
If an error message is displayed on the LCD, make sure that the Print Head and the ink tanks
•
are correctly installed.
Attendez environ 4 minutes que l’écran LCD change comme indiqué sur
l’illustration, puis passez à l’étape suivante.
N’appuyez pas encore sur le bouton OK.
La machine peut émettre des bruits de fonctionnement pendant la préparation de l’impression. Ceci
est normal.
Si un message d’erreur s’afche sur l’écran LCD, vériez que la tête d’impression et les
•
réservoirs d’encre sont installés correctement.
Warten Sie etwa 4 Minuten, bis sich die LCD-Anzeige wie in der Abbildung
dargestellt ändert, und fahren Sie dann mit dem nächsten Schritt fort.
Betätigen Sie noch nicht die OK-Taste.
Bei der Druckvorbereitung gibt das Gerät unter Umständen Betriebsgeräusche von sich. Dies ist
vollkommen normal.
Falls im LCD-Display eine Fehlermeldung angezeigt wird, überprüfen Sie, ob Druckkopf und
•
Tintenbehälter ordnungsgemäß eingebaut sind.
Attendere almeno 4 minuti finché il display LCD non diventa come mostrato nella
figura, quindi procedere al passaggio successivo.
Non premere ancora il pulsante OK.
La stampante potrebbe emettere rumori durante la preparazione alla stampa. Tali rumori fanno parte
del normale funzionamento della stampante.
Se sul display LCD viene visualizzato un messaggio di errore, vericare che la testina di
•
stampa e i serbatoi di inchiostro siano stati installati correttamente.
19
Page 22
4
1 32
A
B
D
C
20
Align the Print Head
Alignement de la tête d’impression
Ausrichten des Druckkopfs
Allineamento della testina di stampa
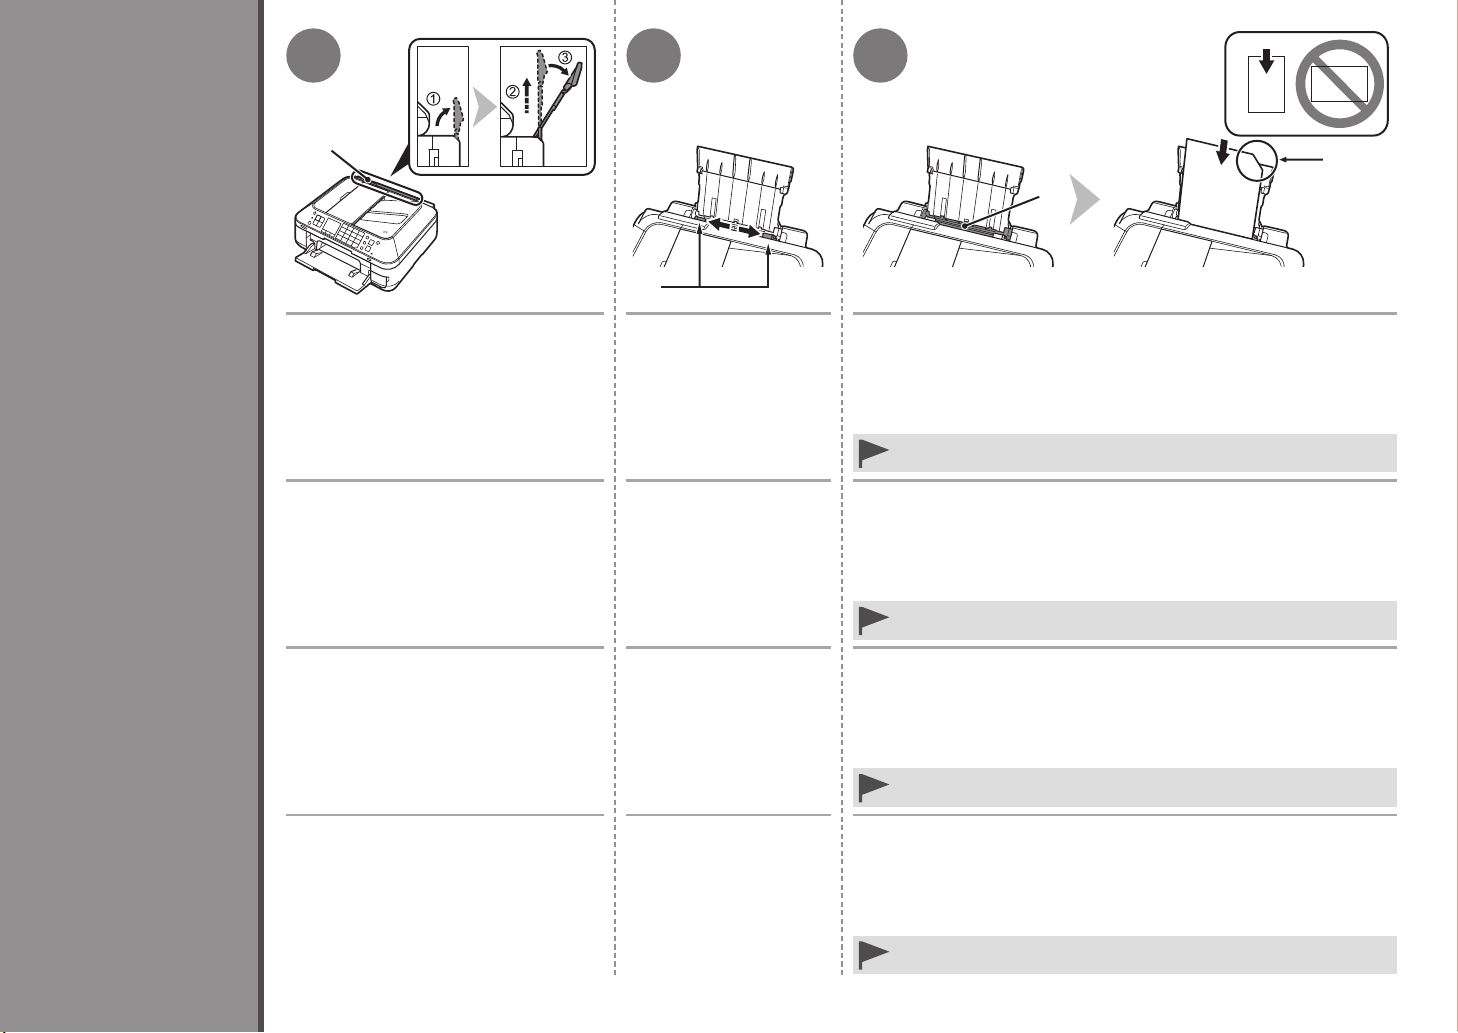
Extend the Paper Support (A).
1. Open the cover.
2. Lift it upwards.
3. Tilt it back to set in place.
Déployez le support papier (A).
1. Ouvrez le capot.
2. Tirez-le vers le haut.
3. Inclinez-le vers l’arrière pour le
mettre en place.
Klappen Sie die Papierstütze (A) aus.
1. Öffnen Sie die Abdeckung.
2. Heben Sie sie nach oben.
3. Kippen Sie sie nach hinten, um sie
zu arretieren.
Estendere il supporto per la carta (A).
1. Aprire il coperchio.
2. Sollevarlo verso l'alto.
3. Inclinarlo indietro per riposizionarlo.
Move the Paper Guides
(B) to both edges.
Ajustez les guides papier
(B) le long des deux
bords.
Schieben Sie die
Papierführungen (B) ganz
nach außen.
Spostare le guide della
carta (B) alle estremità di
entrambi i lati.
Load a sheet of supplied specialty paper (Matte Photo Paper MP-
101) in the Rear Tray (C).
Load paper in portrait orientation so that the cut corner (D) is at the top right.
Be sure to use the supplied MP-101 for Print Head Alignment.•
Chargez une feuille du papier spécial fourni (Papier Photo Mat MP-
101) dans le réceptacle arrière (C).
Chargez le papier en orientation Portrait de manière à ce que le coin coupé (D) soit
en haut à droite.
Veillez à utiliser le papier MP-101 fourni pour l’alignement de la tête
•
d’impression.
Legen Sie ein Blatt des mitgelieferten Spezialpapiers (Fotopapier
Matt (Matte Photo Paper) MP-101) in das hintere Fach (C) ein.
Legen Sie das Papier im Hochformat so ein, dass sich die angeschnittene Ecke (D)
rechts oben befindet.
Verwenden Sie unbedingt das mitgelieferte MP-101 für die Ausrichtung des
•
Druckkopfs.
Caricare un foglio della carta speciale in dotazione (Carta
Fotografica Opaca (Matte Photo Paper) MP-101) nel vassoio
posteriore (C).
Caricare la carta con orientamento verticale in modo che l'angolo smussato (D) sia
in alto a destra.
Assicurarsi di utilizzare la carta MP-101 in dotazione per l'allineamento della
•
testina di stampa.
Page 23
4 65 7 8
E
Slide the left and right
Paper Guides against
both edges of the paper.
Faites glissez les guides
papier gauche et droit
contre les deux bords du
papier.
Schieben Sie die linke
und rechte Papierführung
bis zum Anschlag an die
beiden Papierkanten.
Fare scorrere le guide
della carta destra e
sinistra fino a quando
non toccano entrambi i
bordi del foglio.
Make sure the Paper
Output Tray (E) is open.
If printing starts while the
Paper Output Tray is closed, it
will automatically open.
Vérifiez que le bac de
sortie papier (E) est
ouvert.
Si l’impression démarre alors
que le bac de sortie papier
est fermé, celui-ci s’ouvre
automatiquement.
Öffnen Sie das
Papierausgabefach (E).
Das Papierausgabefach wird
automatisch geöffnet, wenn
der Druckvorgang beginnt.
Assicurarsi che il vassoio
di uscita della carta (E)
sia aperto.
Se la stampa ha inizio con
il vassoio di uscita della
carta chiuso, questo si aprirà
automaticamente.
Press the OK button.
Print Head Alignment
takes about 5 minutes to
complete.
Appuyez sur le bouton
OK. L’alignement de la
tête d’impression requiert
5 minutes environ.
Drücken Sie die Taste
OK. Die Ausrichtung des
Druckkopfs nimmt etwa 5
Minuten in Anspruch.
Premere il pulsante OK.
L'allineamento della
testina di stampa richiede
circa 5 minuti.
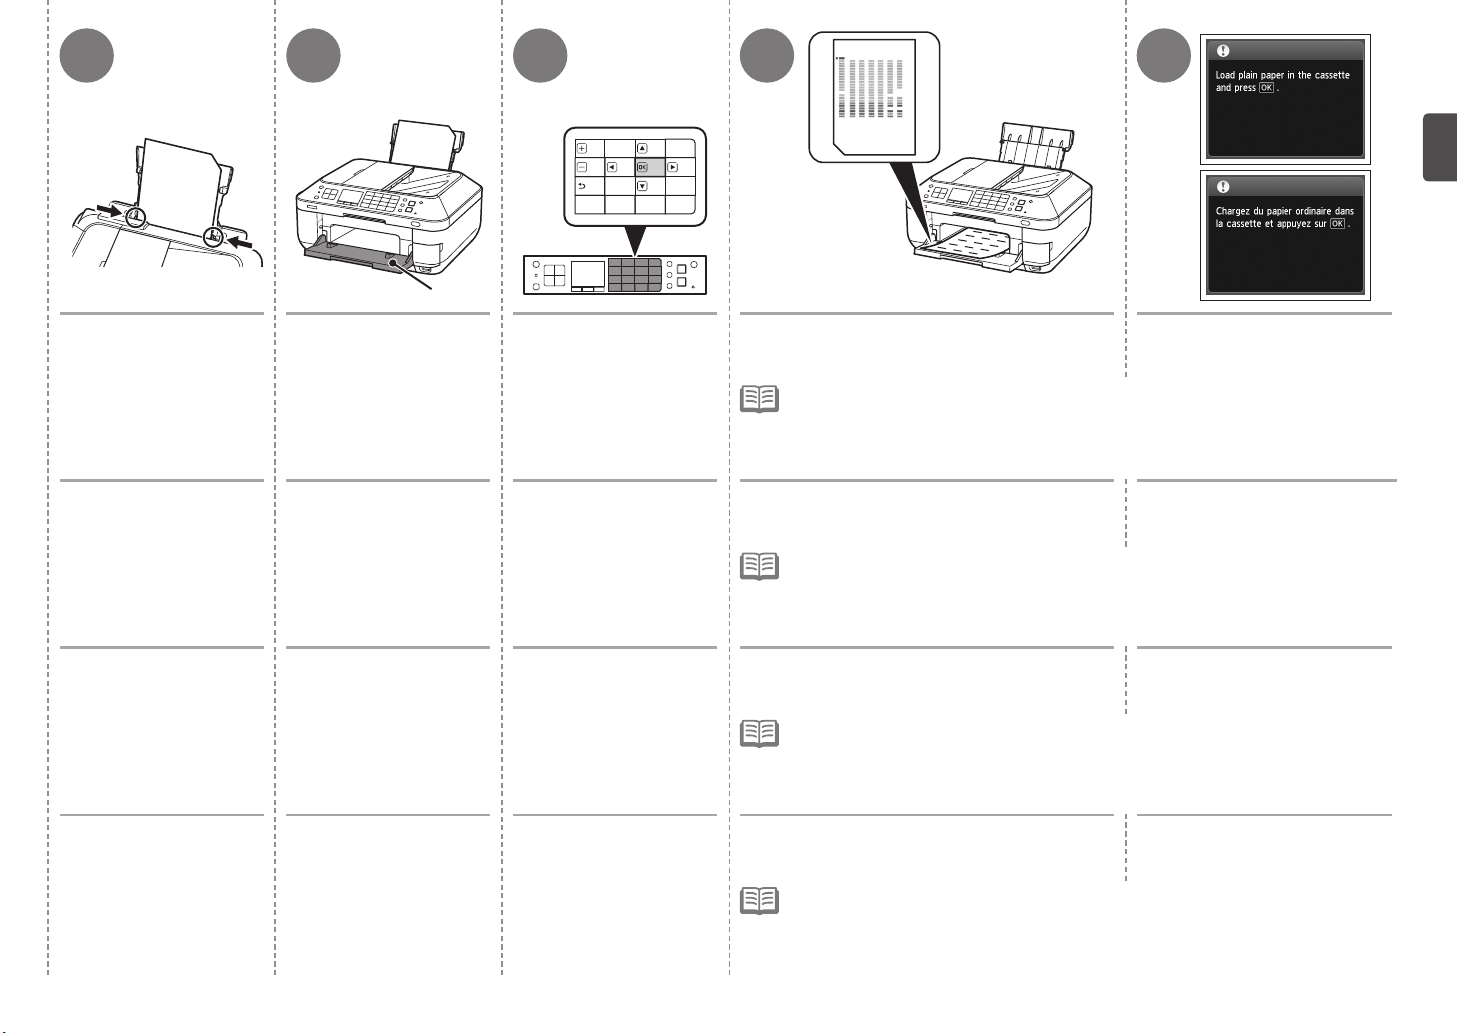
When the pattern is printed, remove the paper. Confirm the above message,
then proceed to the next step.
Print Head Alignment is now complete.
When an error message is displayed on the LCD, press the OK button to clear the error, then
•
proceed to the next step. After the installation is complete, perform Print Head Alignment by
referring to “When Printing Becomes Faint or Colors Are Incorrect” in the on-screen manual:
Basic Guide.
The pattern is printed in black and blue.
•
Une fois le motif imprimé, retirez le papier. Vérifiez le message ci-dessus,
puis passez à l’étape suivante.
L’alignement de la tête d’impression est terminé.
•
Lorsqu’un message d’erreur est afché sur l’écran LCD, appuyez sur le bouton OK pour
effacer l’erreur, puis passez à l’étape suivante. Une fois l’installation terminée, effectuez
l’alignement de la tête d’impression conformément aux instructions de la section « L’impression
devient pâle ou les couleurs ne s'impriment plus correctement » du manuel en ligne
d’utilisation de base.
Le motif est imprimé en noir et bleu.
•
Wenn das Muster gedruckt ist, entnehmen Sie
das Papier.
Die Ausrichtung des Druckkopfs ist nun abgeschlossen.
Wenn im LCD-Display eine Fehlermeldung angezeigt wird, drücken Sie die Taste OK, um den
•
Fehler zu löschen, und fahren Sie mit dem nächsten Schritt fort. Richten Sie den Druckkopf
nach Abschluss der Installation aus. Informationen hierzu nden Sie unter „Druck wird blasser
oder Farben sind falsch“ im Online-Handbuch Basishandbuch.
Das Muster wird in den Farben Schwarz und Blau gedruckt.
•
Quando viene stampato il motivo, rimuovere la
carta.
L'allineamento della testina di stampa è stato completato.
Se sul display LCD viene visualizzato un messaggio di errore, premere il pulsante OK per
•
risolvere il problema e andare al passaggio successivo. Al termine dell'installazione, eseguire
l'allineamento della testina di stampa facendo riferimento a "Stampe sbiadite o con colori non
corretti" nel manuale a video: Guida Base.
Il motivo viene stampato in nero e blu.
•
Bestätigen Sie die Meldung, und
fahren Sie mit dem nächsten
Schritt fort.
Verificare il messaggio
precedente, quindi andare al
passaggio successivo.
Guide
21
Page 24
5
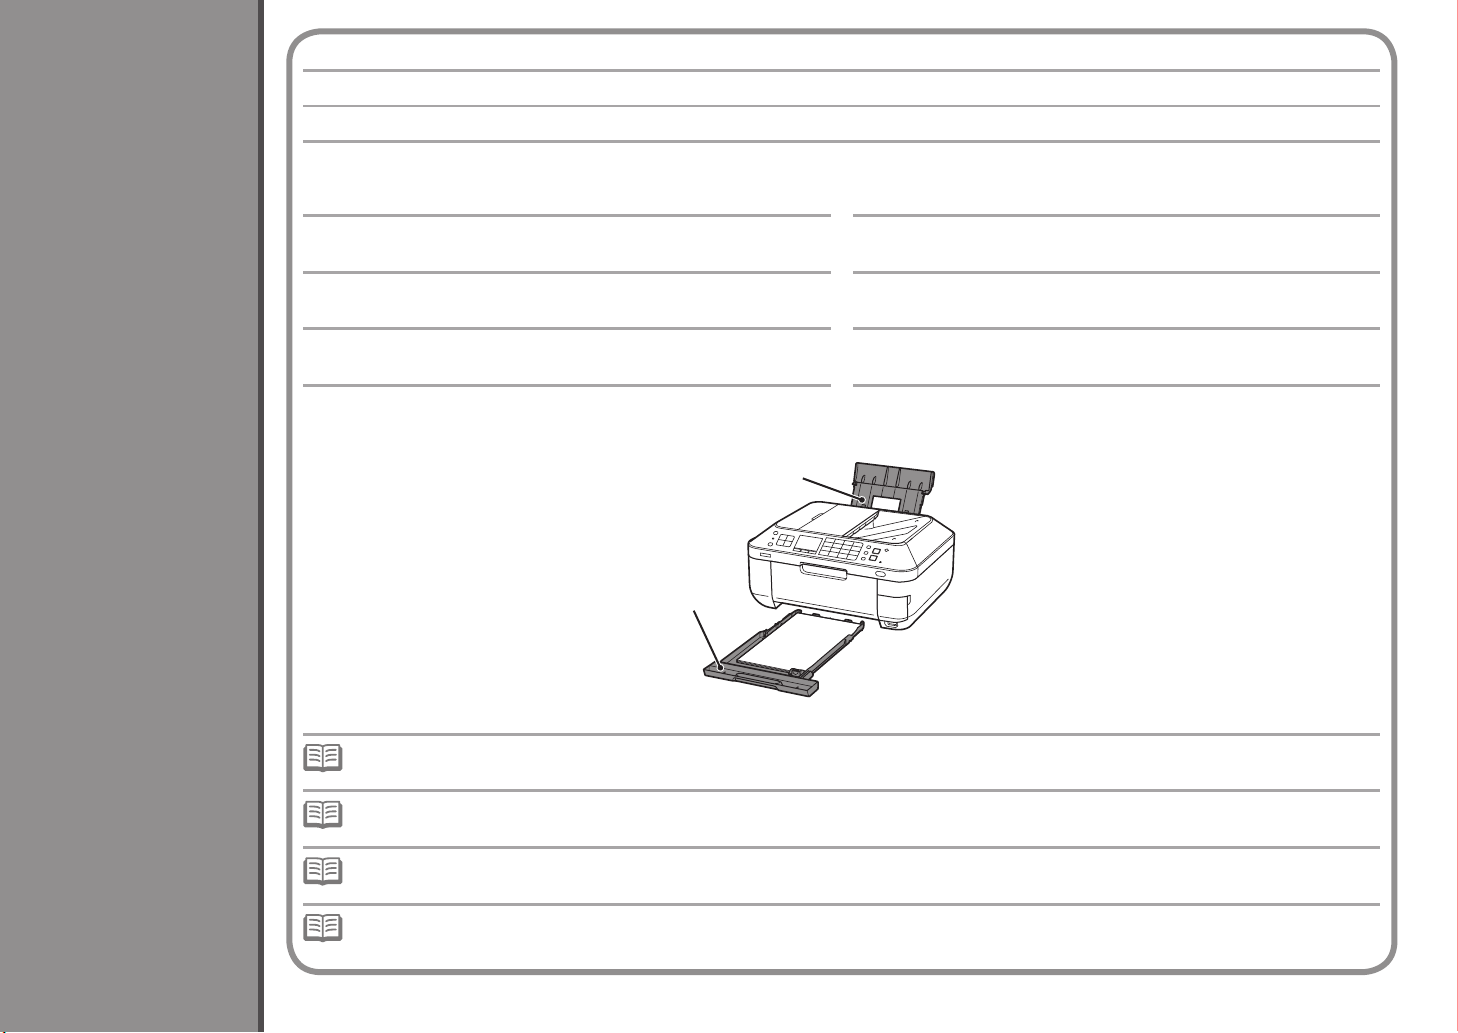
With the machine, the paper source varies depending on the media type.
Avec la machine, la source du papier varie en fonction du type de support.
Die Papierquelle des Geräts richtet sich nach dem verwendeten Medientyp.
Con la stampante, l'alimentazione della carta varia in base al tipo di supporto.
Specialty paper including photo paper
Load paper in the Rear Tray (A).
Papier spécial y compris le papier photo
Chargez du papier dans le réceptacle arrière (A).
Load Paper
Spezialpapier einschließlich Fotopapier
Legen Sie das Papier in das hintere Fach (A) ein.
Carta speciale, inclusa la carta fotograca
Caricare la carta nel vassoio posteriore (A).
A
Plain paper
Load paper in the Cassette (B).
Papier ordinaire
Chargez du papier dans la cassette (B).
Normalpapier
Legen Sie das Papier in die Kassette (B) ein.
Carta comune
Caricare la carta nel cassetto (B).
Einlegen von Papier
Chargement du papier
Caricamento della carta
B
For details on how to handle paper, refer to “Loading Paper” in the on-screen manual: Basic Guide after installation is complete. •
Pour plus d’informations sur la manipulation du papier, reportez-vous à la section « Chargement du papier » dans le manuel en ligne Guide d’utilisation de base
•
lorsque l’installation est terminée.
22
Details zum Umgang mit Papier können Sie unter „Einlegen von Papier“ im Online-Handbuch: Basishandbuch nachlesen, nachdem die Installation
•
abgeschlossen ist.
Per informazioni su come maneggiare la carta, consultare "Caricamento della carta" nel manuale a video: Guida Base al termine dell'installazione.•
Page 25
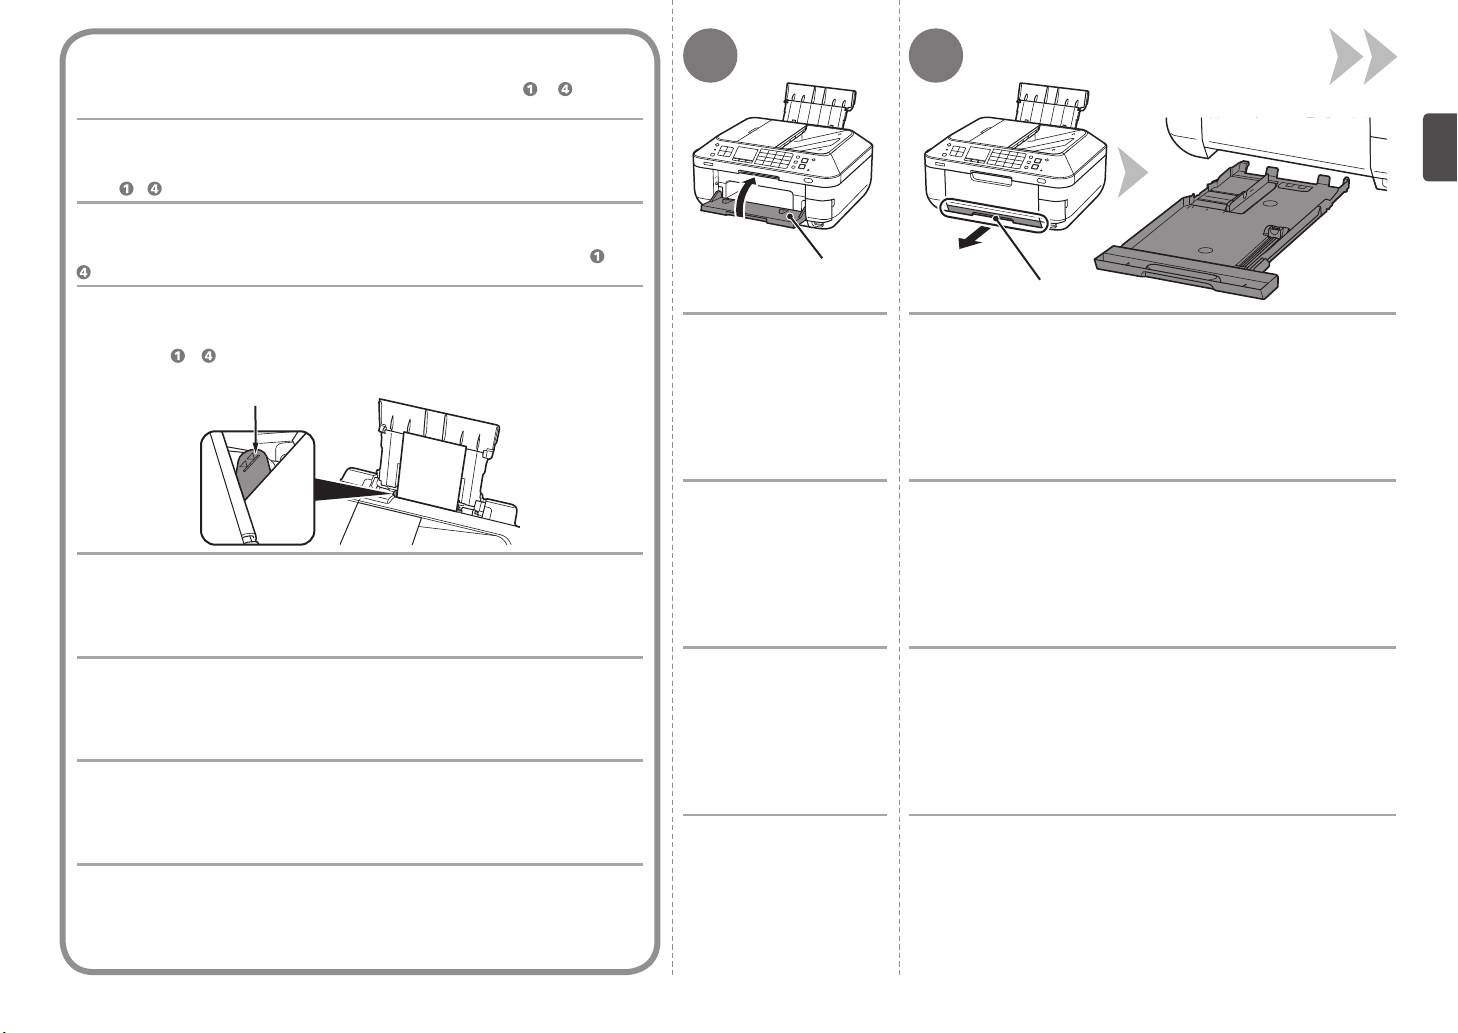
This section describes how to load plain paper in the Cassette.
For details on how to load specialty paper in the Rear Tray, refer to to in “4 Align
the Print Head” on page 20.
Cette section explique comment charger du papier ordinaire dans la cassette.
1
2
Pour plus d’informations sur le chargement de papier spécial dans le
étapes à
In diesem Abschnitt wird das Einlegen von Normalpapier in die Kassette beschrieben.
Details zum Einlegen von Spezialpapier in das hintere Fach nden Sie unter bis
im Abschnitt „4 Ausrichten des Druckkopfs“ auf Seite 20.
In questa sezione viene descritto come caricare la carta comune nel cassetto.
Per ulteriori informazioni sul caricamento della carta speciale nel vassoio posteriore,
consultare da a in "4 Allineamento della testina di stampa" a pagina 20.
de la section « 4 Alignement de la tête d’impression » à la page 20.
C
réceptacle arrière, reportez-vous aux
Loading specialty paper
Load paper in portrait orientation with the printing side facing up.
•
Make sure that the height of the paper stack does not exceed the line (C).
•
Chargement du papier spécial
Chargez du papier dans le sens de la hauteur (orientation Portrait), face à imprimer vers
•
le haut.
Vériez que la hauteur du papier chargé ne dépasse pas la ligne (C).
•
D
Close the Paper Output
Tray (D).
papier (D).
Papierausgabefach (D).
E
Pull out the Cassette (E).
Retirez la cassette (E).Fermez le bac de sortie
Ziehen Sie die Kassette (E) heraus.Schließen Sie das
Einlegen von Spezialpapier
Legen Sie das Papier im Hochformat mit der zu bedruckenden Seite nach oben ein.
•
Vergewissern Sie sich, dass die Höhe des Papierstapels nicht die Linie (C) übersteigt.
•
Caricamento della carta speciale
Caricare la carta con orientamento verticale con il lato di stampa rivolto verso l'alto.
•
Vericare che l'altezza della pila di carta non superi la linea (C).
•
uscita della carta (D).
Estrarre il cassetto (E).Chiudere il vassoio di
23
Page 26
3
F
4 5
G
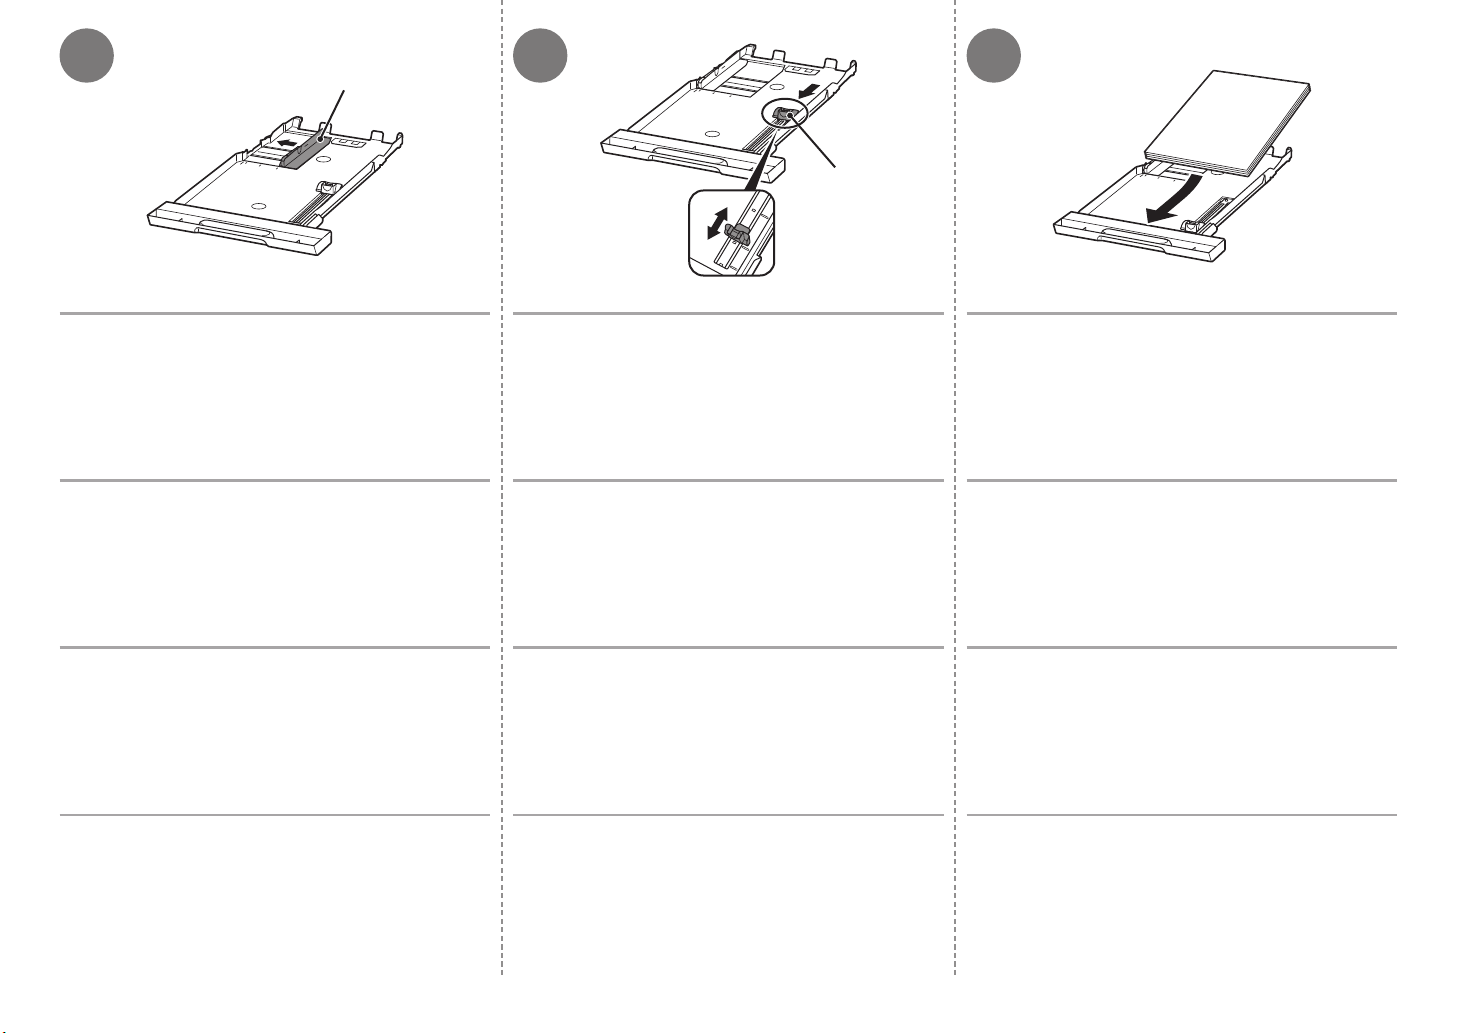
Move the left Paper Guide (F) to the edge. Slide the front Paper Guide (G) to align with the size
Ajustez le guide papier (F) gauche sur le bord. Faites glisser le guide papier (G) avant pour l’aligner
Schieben Sie die linke Papierführung (F) ganz nach
außen.
Spostare la guida della carta (F) sinistra fino al bordo. Fare scorrere la guida della carta (G) anteriore per
of the paper.
The front Paper Guide will click and stop when it aligns with the
corresponding mark of paper size.
sur le format réel du papier.
Le guide papier avant émet un bruit de déclic et s’arrête lorsqu’il
est aligné avec le repère de taille du papier correspondant.
Stellen Sie die vordere Papierführung (G) auf das
verwendete Papierformat ein.
Die vordere Papierführung rastet an der jeweiligen
Papierformatmarkierung ein.
allinearla al formato della carta.
La guida della carta anteriore scatta in posizione quando risulta
allineata con il simbolo del formato carta corrispondente.
Load plain paper.
Load paper with the printing side facing down.
Chargez le papier ordinaire.
Chargez le papier face d’impression vers le bas.
Legen Sie Normalpapier ein.
Die zu bedruckende Seite muss dabei nach unten zeigen.
Caricare carta comune.
Caricare la carta con il lato di stampa rivolto verso il basso.
24
Page 27
1
2
H
876
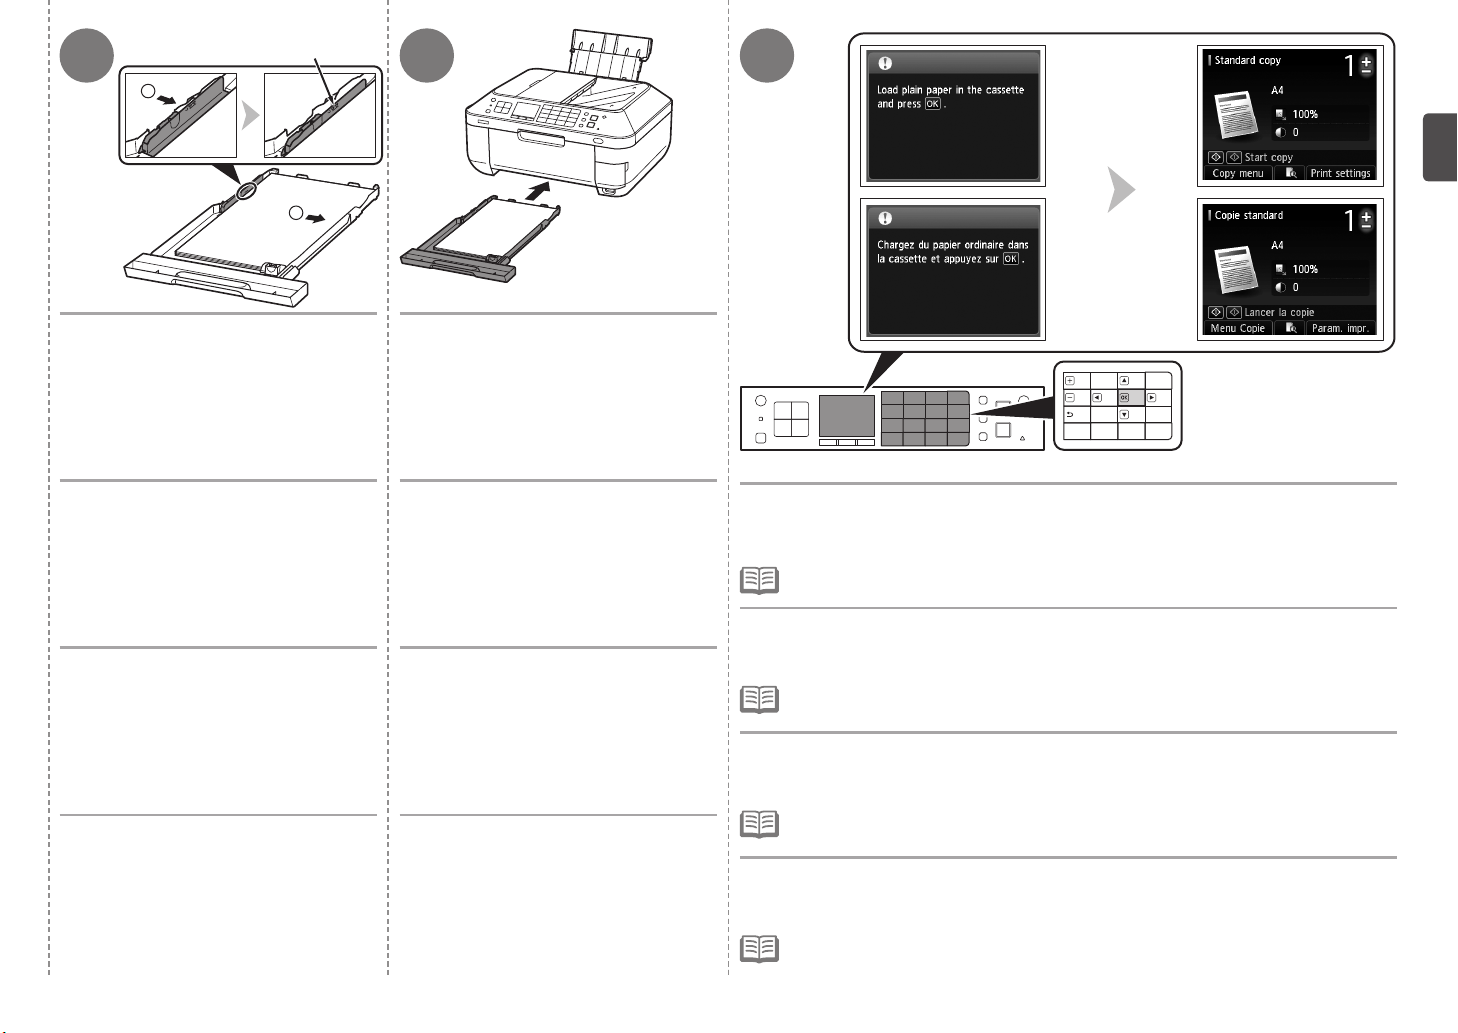
Align the paper to the right side of the
Cassette (1), and slide the left Paper
Guide completely against the left edge
of the paper (2).
Make sure that the height of the paper stack
does not exceed the line (H).
Alignez le papier sur le côté droit de la
cassette (1) et faites glisser le guide
papier gauche à fond le long du bord
gauche du papier (2).
Vérifiez que la hauteur du papier chargé ne
dépasse pas la ligne (H).
Legen Sie das Papier an der rechten
Seite der Kassette (1) an, und schieben
Sie die linke Papierführung vollständig
an die linke Kante des Papiers (2).
Achten Sie darauf, dass der Papierstapel nicht
höher ist als die Linie (H).
Allineare la carta sul lato destro del
cassetto (1), quindi fare scorrere
completamente la guida della carta
sinistra fino a toccare il bordo sinistro
della carta (2).
Verificare che l'altezza della pila di carta non
superi la linea (H).
Insert the Cassette slowly into the
machine until it clicks into place.
Insérez lentement la cassette dans la
machine jusqu’à ce qu’elle s’enclenche.
Setzen Sie die Kassette langsam in das
Gerät ein, bis sie einrastet.
Inserire lentamente il cassetto nella
stampante finché non scatta in
posizione.
Confirm the message on the LCD, then press the OK button.
The copy standby screen is displayed.
The LCD will turn off if the machine is not operated for about 5 minutes. Pressing any button
•
other than the ON button will restore the display.
Vérifiez le message affiché sur l’écran LCD, puis appuyez sur le bouton OK.
L’écran d’attente de copie s’affiche.
L’écran LCD s’éteint si la machine n’est pas utilisée pendant environ 5 minutes. Appuyez sur
•
n’importe quel bouton autre que MARCHE (ON) pour restaurer l’afchage.
Bestätigen Sie die Meldung im LCD-Display, und drücken Sie die Taste OK.
Der Kopie-Standby-Bildschirm wird angezeigt.
Die LCD-Anzeige schaltet sich ab, wenn das Gerät etwa 5 Minuten lang nicht bedient
•
wird. Durch Drücken einer beliebigen Taste außer der Taste EIN (ON) wird die Anzeige
wiederhergestellt.
Verificare il messaggio visualizzato nel display LCD, quindi premere il pulsante OK.
Viene visualizzata la schermata di standby copia.
Se la stampante non viene messa in funzione per circa 5 minuti, il display LCD si spegnerà. Se
•
si preme qualsiasi pulsante tranne il pulsante ON, il display verrà ripristinato.
25
Page 28
6
Read this section only when using
the fax features.
If not using the fax features, go to
"7 Select Connection Method" on
page 30.
Depending on your needs, select one of the following three modes for receiving faxes. You can
change the receive mode after installation is complete. For details, refer to "Setting the Receive
Mode" in the on-screen manual: Basic Guide.
A call ring pattern detective service (DRPD/Network Switch) may not be available depending on the country or
•
region of use.
Even when a telephone is connected to the machine, the telephone's ringtone may not sound for an incoming call
•
depending on the telephone type or settings.
Set Up for Fax Reception
Configuration pour la réception de fax
Einrichtung für den Faxempfang
Configurazione per la ricezione di fax
Lisez cette section seulement
si vous utilisez les fonctions de
télécopieur.
Sinon, allez à la section
« 7 Sélection de la méthode de
connexion » à la page 30.
Lesen Sie diesen Abschnitt nur,
wenn Sie die Faxfunktionen
verwenden.
Wenn Sie die Faxfunktionen
nicht verwenden, fahren
Sie mit „7 Auswählen der
Verbindungsmethode“ auf Seite 30
fort.
Leggere questa sezione solo
quando si utilizzano le funzioni fax.
Se non si utilizzano le funzioni fax,
vedere "7 Selezione del metodo di
connessione" a pagina 30.
Suivant vos besoins, sélectionnez l’un des trois modes suivants pour recevoir des fax. Vous
pouvez changer de mode de réception une fois l’installation terminée. Pour plus d’informations,
reportez-vous à la section « Dénition du mode de réception » du manuel en ligne
d’utilisation de base.
Selon le pays ou région d’utilisation, il est possible qu’aucun service de détecteur de codes de sonnerie (DRPD/
•
Commutation réseau) ne soit disponible.
Même si un téléphone est connecté à la machine, il peut ne pas sonner pour un appel entrant selon son type ou
•
son paramétrage.
Wählen Sie Ihren Bedürfnissen entsprechend einen der folgenden drei Modi für den Faxempfang
aus. Sie können den Empfangsmodus ändern, nachdem die Installation abgeschlossen ist.
Weitere Informationen nden Sie unter „Einrichten des Empfangsmodus“ im Online-Handbuch:
Basishandbuch.
Ein Erkennungsservice für Ruftonmuster (DRPD/Netzwerk-Switch) ist je nach Land oder Region, in dem/der das
•
Gerät verwendet wird, möglicherweise nicht verfügbar.
Auch wenn ein Telefon an das Gerät angeschlossen ist, ertönt je nach Typ oder Einstellungen des Telefons der
•
Rufton des Telefons bei eingehenden Anrufen nicht.
In base alle esigenze, selezionare una delle tre seguenti modalità per la ricezione di fax.
La modalità di ricezione può essere modicata al termine dell'installazione. Per ulteriori
informazioni, consultare la sezione "Impostazione della modalità di ricezione" nel manuale a
video: Guida Base.
Un servizio di rilevamento del motivo suoneria (DRPD/Commutatore di rete) potrebbe non essere disponibile nel
•
paese o nella regione in cui il dispositivo viene utilizzato.
Guide
26
Anche se alla stampante è collegato un telefono, la possibilità che la suoneria del telefono venga attivata per una
•
chiamata in entrata dipende dal tipo o dalle impostazioni del telefono.
Page 29
Intended Use Receive Mode
Utilisation prévue
Verwendungszweck Empfangsmodus
Utilizzo desiderato
Use a single telephone line for both voice and fax calls.
•
Prioritize voice calls over fax reception.
•
Connect an answering machine.
•
Utiliser une même ligne téléphonique pour les appels vocaux et les fax.
•
Donner la priorité à la réception des appels vocaux par rapport à la réception des télécopies.
•
Connecter un répondeur.
•
Es soll eine Telefonleitung für Telefonanrufe und Faxe genutzt werden.
•
Der Faxempfang soll Priorität vor der Annahme von Telefonanrufen haben.
•
Es soll ein Anrufbeantworter angeschlossen werden.
•
Utilizzare una linea telefonica per chiamate vocali e fax.
•
Dare priorità alle chiamate vocali rispetto alla ricezione di fax.
•
Collegare una segreteria telefonica.
•
Use a dedicated fax line.
•
Receive only faxes.
•
Utiliser une ligne de télécopieur dédiée.
•
Ne recevoir que des fax.
•
Es soll eine eigene Faxleitung verwendet werden.
•
Nur Faxempfang.
•
Utilizzare una linea fax dedicata.
•
Ricevere solo fax.
•
Mode Réception
Modalità di ricezione
TEL priority mode
Mode priorité tél
Telefon-Prioritätsmodus
Modo priorità tel.
Voice calls cannot be received unless a telephone is
connected.
Les appels vocaux ne peuvent pas être reçus si aucun
téléphone n’est connecté.
Telefonanrufe können nur angenommen werden, wenn ein
Telefon angeschlossen ist.
È possibile ricevere chiamate vocali solo se un telefono è
collegato.
FAX only mode
Mode Fax seulement
Nur Fax-Modus
Solo modo fax
Use a call ring pattern detection service (DRPD/Network Switch).•
Utiliser un service de détection de codes de sonneries (DRPD/Commutation réseau).•
DRPD/Network Switch
DRPD/Commutation réseau
Es soll ein Erkennungsservice für Ruftonmuster (DRPD/Netzwerk-Switch) verwendet werden.•
Utilizzare un servizio di rilevamento del motivo suoneria (DRPD/Commutatore di rete).•
DRPD/Netzwerk-Switch
DRPD/Commutatore di rete
27
Page 30
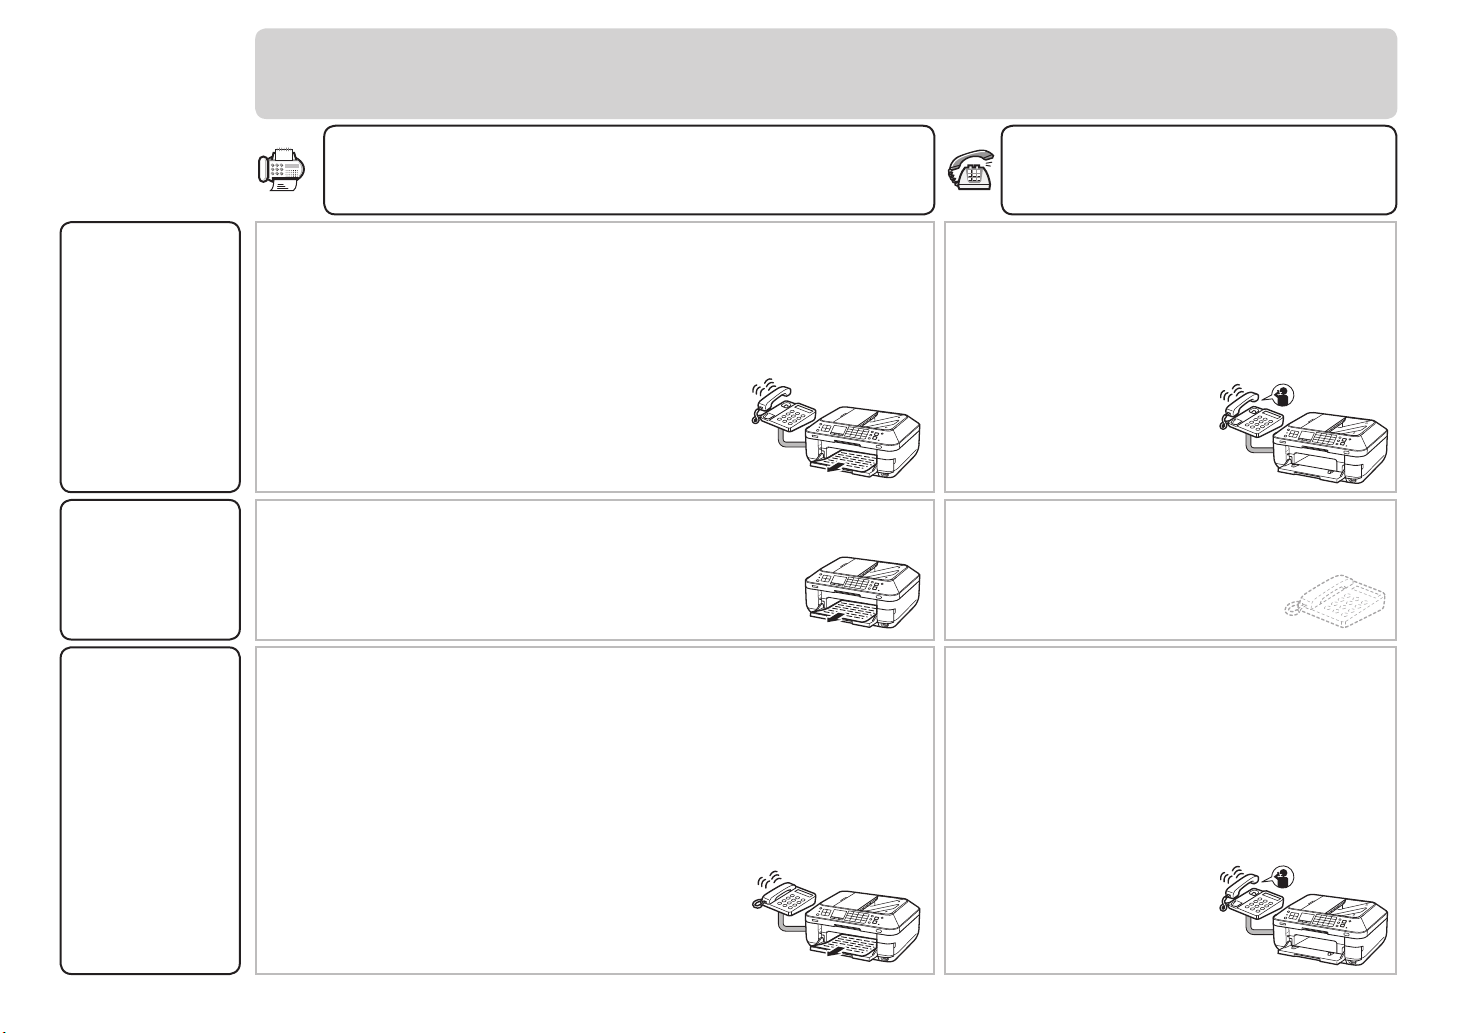
Responses to Calls in Each Mode
Réponses aux appels dans chaque mode
Anrufannahme im jeweiligen Modus
Risponde alle chiamate in ogni modalità
When a voice call arrivesWhen a fax call arrives
Lorsqu’un appel vocal arriveLorsqu’un appel de télécopie arrive
Wenn ein Telefonanruf eingehtWenn ein Faxanruf eingeht
Quando si riceve una chiamata vocaleQuando si riceve una chiamata fax
Modo priorità tel.
Telefon-Prioritätsmodus
Mode priorité tél
TEL priority mode
Solo modo fax
Nur Fax-
Modus
Mode Fax
seulement
FAX only
mode
DRPD/Commutatore di rete
DRPD/Netzwerk-Switch
DRPD/Commutation réseau
DRPD/Network Switch
While the telephone's ringtone sounds, pick up the handset. When the
fax reception starts, replace the handset. If an answering machine is
connected, the fax is received automatically.
Lorsque le téléphone sonne, décrochez le combiné. Lorsque la réception
du fax démarre, replacez le combiné. Si un répondeur est connecté, le fax
est reçu automatiquement.
Nehmen Sie den Hörer ab, während das Rufzeichen des Telefons ertönt.
Wenn der Faxempfang beginnt, legen Sie den Hörer wieder auf. Ist ein
Anrufbeantworter angeschlossen, wird das Fax automatisch empfangen.
Sollevare il ricevitore mentre il telefono squilla. Quando la ricezione fax
viene avviata, riposizionare il ricevitore. Se è collegata una segreteria
telefonica, la ricezione del fax avviene automaticamente.
The fax is received automatically.
Le fax est reçu automatiquement.
Das Fax wird automatisch empfangen.
La ricezione del fax avviene automaticamente.
The telephone’s ringtone sounds. The fax is received automatically when
the machine detects the fax ring pattern.
DRPD/Network Switch must be supported by your telephone service
provider. Please contact them for service details.
Le téléphone sonne. Le fax est reçu automatiquement lorsque la machine
détecte le code de sonnerie du fax.
DRPD/Commutation réseau doit être pris en charge par votre fournisseur
de service téléphonique. Veuillez le contacter pour les détails du service.
Das Rufzeichen des Telefons ertönt. Das Fax wird automatisch empfangen,
wenn das Gerät das Faxruftonmuster erkennt.
Der Telefonanbieter muss DRPD/Netzwerk-Switch unterstützen. Wenden
Sie sich an den Anbieter, um Informationen zum Dienst zu erhalten.
Il telefono squilla. Il fax viene ricevuto automaticamente quando la
macchina rileva il motivo suoneria del fax.
DRPD/Commutatore di rete deve essere supportato dal gestore dei servizi
telefonici. Per ulteriori informazioni sui servizi offerti, contattare il gestore.
While the telephone's ringtone sounds,
pick up the handset to answer the call.
Lorsque le téléphone sonne, décrochez
le combiné pour répondre à l’appel.
Nehmen Sie den Hörer ab, während
das Rufzeichen des Telefons ertönt, um
den Anruf entgegenzunehmen.
Per rispondere alla chiamata, sollevare
il ricevitore mentre il telefono squilla.
The call cannot be answered.
Il est impossible de répondre à l’appel.
Der Anruf kann nicht angenommen werden.
Non è possibile rispondere alla chiamata.
The telephone continues to ring.
Pick up the handset to answer the call.
Le téléphone continue de sonner.
Décrochez le combiné pour répondre
à l’appel.
Das Telefon klingelt weiter.
Nehmen Sie den Hörer ab, um den
Anruf entgegenzunehmen.
Il telefono continua a squillare.
Sollevare il ricevitore per rispondere alla
chiamata.
28
Page 31
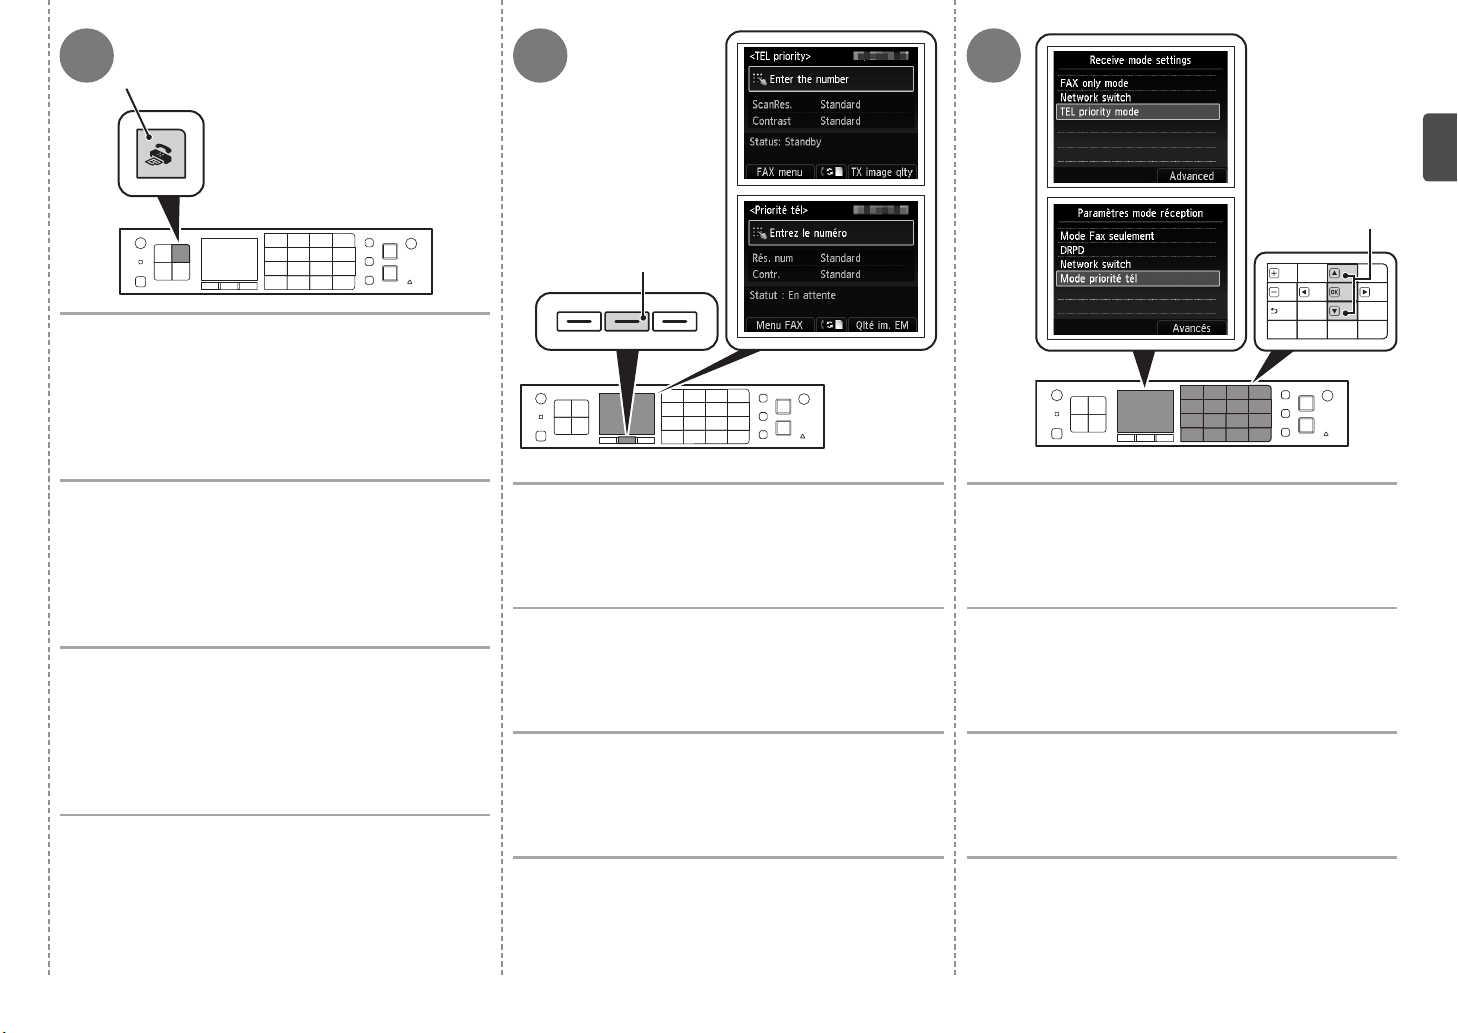
A
Press the FAX button (A).
Button layout on the Operation Panel changes automatically
depending on use. When the display changes, check the button
positions.
321
C
B
Appuyez sur le bouton FAX (A).
La disposition des boutons sur le panneau de contrôle change
automatiquement selon l’utilisation. Lorsque l’affichage change,
vérifiez les positions des boutons.
Drücken Sie die Taste FAX (A).
Die Tastenbelegung auf dem Bedienfeld ändert sich automatisch
abhängig von der Verwendung. Wenn sich die Anzeige ändert,
überprüfen Sie die Tastenanordnung.
Premere il pulsante FAX (A).
Il layout dei pulsanti sul pannello dei comandi cambia
automaticamente in base all'uso. Quando il display cambia,
verificare la posizione dei pulsanti.
Press the center FUNCTION button (B).
Appuyez sur le bouton FONCTION (FUNCTION) (B)
central.
Drücken Sie die mittlere Taste FUNKTION
(FUNCTION) (B).
Premere il pulsante FUNZIONE (FUNCTION) centrale
(B).
Use the { or } button (C) to select a receive mode,
then press the OK button.
The fax standby screen returns.
Utilisez le bouton { ou } (C) pour sélectionner un
mode de réception, puis appuyez sur le bouton OK.
L’écran d’attente de fax réapparaît.
Wählen Sie mit der Taste { oder } (C) einen
Empfangsmodus aus, und drücken Sie die Taste OK.
Der Standby-Bildschirm für das Faxen wird wieder angezeigt.
Premere il pulsante { o } (C) per selezionare una
modalità di ricezione, quindi premere il pulsante OK.
Viene nuovamente visualizzata la schermata di standby fax.
29
Page 32
7
Intended Use Connection Method
Utilisation prévue
Verwendungszweck
Utilizzo desiderato
Connect to a computer with a USB cable.•
Connexion à un ordinateur avec un câble
•
USB.
Das Gerät wird mit einem USB-Kabel an einen
•
Computer angeschlossen.
Méthode de connexion
Verbindungsmethode
Metodo di connessione
USB Connection
Connexion USB
USB-Verbindung
Go to "8 Install the Software (USB Connection)" on
page 32.
Passez à la section « 8 Installation du logiciel
(connexion USB) » à la page 32.
Fahren Sie mit „8 Installieren der Software (USBVerbindung)“ auf Seite 32 fort.
Select Connection Method
Sélection de la méthode de connexion
Auswählen der Verbindungsmethode
Selezione del metodo di connessione
Collegamento a un computer con un cavo
•
USB.
Connect to computers without using cables.
•
Use from multiple computers.
•
Connexion à des ordinateurs sans utiliser de
•
câbles.
Utilisation à partir de plusieurs ordinateurs.
•
Das Gerät wird ohne Kabel mit Computern
•
verbunden.
Das Gerät wird mit mehreren Computern verwendet.
•
Collegamento ai computer senza l'utilizzo di
•
cavi.
Utilizzo da più computer.
•
Connect to a computer with an Ethernet cable.
•
Use from multiple computers.
•
Connexion à un ordinateur avec un câble
•
Ethernet.
Utilisation à partir de plusieurs ordinateurs.
•
Das Gerät wird mit einem Ethernet-Kabel an einen
•
Computer angeschlossen.
Das Gerät wird mit mehreren Computern verwendet.
•
Collegamento a un computer con un cavo
•
Ethernet.
Utilizzo da più computer.
•
Connessione USB
Vedere "8 Installazione del software (Connessione
USB)" a pagina 32.
Wireless Connection
Go to "9 Wireless Setup" on page 41.
Also refer to the information on page 31.
Connexion sans l
Passez à la section « 9 Conguration sans l » à la page 41.
Reportez-vous également aux informations de la page
Drahtlose
Verbindung
Connessione
wireless
Fahren Sie mit „9 Drahtlose Einstellungen“ auf Seite 41 fort.
Beachten Sie außerdem die Informationen auf Seite 31.
Vedere "9 Impostazione wireless" a pagina 41.
Consultare inoltre le informazioni a pagina 31.
Wired Connection Go to "10 Wired Setup" on page 48.
Also refer to the information on page 31.
Connexion laire
Passez à la section « 10 Conguration laire » à la page 48.
Reportez-vous également aux informations de la page
Kabelverbindung
Fahren Sie mit „10 Kabeleinstellungen“ auf Seite 48 fort.
Beachten Sie außerdem die Informationen auf Seite 31.
Connessione cablata
Vedere "10 Impostazione cablata" a pagina 48.
Consultare inoltre le informazioni a pagina 31.
31.
31.
30
Page 33

What is Network?
A system to exchange information between computers by connecting them to each other with
cables or via wireless communication. The Internet and LAN are types of networks.
What is LAN (Local Area Network)?
A type of network that connects computers to each other within a limited area (room, building,
etc.).
If you are not certain whether your device (access point, router, etc.) supports wireless connection or
wired connection, refer to the manual supplied with the device, or contact its manufacturer.
If Your Device Supports Wireless Connection
Check if it supports IEEE802.11n/g/b.
If Your Device Supports Wired Connection
Check if it supports simultaneous connection of multiple computers and network devices.
Qu’est-ce qu’un réseau ?
Un système permettant d’échanger des informations entre des ordinateurs en les connectant
entre eux avec des câbles ou via un système de communication sans l. Citons, par exemple, les
réseaux Internet et LAN.
Qu’est-ce qu’un réseau LAN (Local Area Network) ?
Un type de réseau qui connecte des ordinateurs entre eux dans une zone restreinte (pièce,
bâtiment, etc.).
Was ist ein Netzwerk?
Ein System zum Informationsaustausch zwischen Computern, die mit Kabeln oder drahtlos
miteinander verbunden sind. Das Internet und LAN sind Arten von Netzwerken.
Was ist ein LAN (Local Area Network)?
Ein Netzwerktyp, der Computer in einem begrenzten Umkreis (Raum, Gebäude usw.) miteinander
verbindet.
Denizione di rete
Un sistema per lo scambio di informazioni tra computer collegati uno all'altro con cavi o tramite
comunicazione wireless. Internet e LAN sono tipi di reti.
Denizione di LAN (Local Area Network)
Un tipo di rete che collega i computer uno all'altro entro un'area limitata (stanza, edicio e così
via).
Si vous n’êtes pas sûr de savoir si votre périphérique (point d’accès, routeur, etc.) prend en charge
la connexion sans l ou laire, reportez-vous au manuel fourni avec celui-ci ou contactez son
fabricant.
Si votre périphérique prend en charge la connexion sans l
Vériez s’il prend en charge le protocole IEEE802.11n/g/b.
Si votre périphérique prend en charge la connexion laire
Vériez s’il prend en charge la connexion simultanée de plusieurs ordinateurs et périphériques
réseau.
Wenn Sie nicht wissen, ob Ihr Gerät (Zugriffspunkt, Router usw.) drahtlose oder Kabelverbindungen
unterstützt, sehen Sie im Handbuch des Geräts nach, oder wenden Sie sich an den Hersteller.
Wenn Ihr Gerät drahtlose Verbindungen unterstützt
Überprüfen Sie, ob es den Standard IEEE802.11n/g/b unterstützt.
Wenn Ihr Gerät Kabelverbindungen unterstützt
Überprüfen Sie, ob es eine gleichzeitige Verbindung mit mehreren Computern und Netzwerkgeräten
unterstützt.
Se non si è certi che la periferica in uso (punto di accesso, router e così via) supporti la connessione
wireless o la connessione cablata, consultare il manuale fornito con la periferica o contattare il
produttore.
Se il dispositivo in uso supporta la connessione wireless
vericare che supporti IEEE802.11n/g/b.
Se il dispositivo in uso supporta la connessione cablata
vericare che supporti la connessione simultanea di più computer e di dispositivi di rete.
31
Page 34
8
Do not connect the USB cable yet.
Ne branchez pas encore le câble USB.
Schließen Sie das USB-Kabel noch nicht an.
Non collegare ancora il cavo USB.
To use the machine by connecting it to a computer, software
including the drivers needs to be copied (installed) to the
computer’s hard disk. The installation process takes about 20
minutes. (The installation time varies depending on the computer
environment or the number of application software to be installed.)
Pour pouvoir utiliser la machine à partir d’un ordinateur, vous
devez copier (installer) le logiciel, de même que les pilotes,
sur le disque dur. Le processus d’installation prend environ 20
minutes. (La durée de l’installation varie selon l’environnement
informatique et le nombre d’applications à installer.)
Quittez toutes les applications en cours d’exécution avant l’installation.
Quit all running applications before installation.
•
Log on as the administrator (or a member of the Administrators group).
•
Do not switch users during the installation process.
•
Internet connection may be required during the installation. Connection
•
fees may apply. Consult the internet service provider.
It may be necessary to restart your computer during the installation
•
process. Follow the on-screen instructions and do not remove the
Setup CD-ROM
The installation resumes once your computer has restarted.
For the system requirements, refer to “18 Specications.”
•
during restart.
Um das Gerät in Verbindung mit einem Computer verwenden
zu können, müssen Software und Treiber auf die Festplatte
des Computers kopiert bzw. installiert werden. Der
Installationsvorgang nimmt ca. 20 Minuten in Anspruch.
(Die Installationsdauer hängt von der Computerumgebung
sowie der Anzahl der zu installierenden Anwendungen ab.)
Schließen Sie vor der Installation alle offenen Anwendungen.
•
Melden Sie sich als Administrator (oder Mitglied der Administratorgruppe)
•
an.
Wechseln Sie während des Installationsvorgangs nicht den Benutzer.
•
Während der Installation ist möglicherweise eine Internetverbindung
Install the Software (USB Connection)
Installation du logiciel (connexion USB)
Installazione del software (Connessione USB)
Installieren der Software (USB-Verbindung)
•
erforderlich. Möglicherweise fallen Verbindungsgebühren an. Wenden Sie
sich hierzu an Ihren Internetprovider.
Möglicherweise muss während des Installationsvorgangs der Computer
•
neu gestartet werden. Folgen Sie in diesem Fall den Anweisungen auf
dem Bildschirm. Nehmen Sie die Installations-CD-ROM (Setup CD-
ROM) während des Neustarts nicht heraus.
Die Installation wird nach dem Neustart des Computers fortgesetzt.
Informationen zu den Systemanforderungen nden Sie unter „18
•
Technische Daten“.
•
Connectez-vous en tant qu’administrateur (ou membre du groupe
•
Administrateurs).
Ne changez pas d’utilisateur au cours du processus d’installation.
•
Une connexion Internet peut s’avérer nécessaire lors de l’installation.
•
Des frais de connexion peuvent vous être facturés. Consultez votre
fournisseur d’accès Internet.
Vous devrez peut-être redémarrer votre ordinateur durant le processus
•
d’installation. Suivez les instructions à l’écran et ne retirez pas le CD-
ROM d’installation pendant le redémarrage.
Une fois l'ordinateur redémarré, le processus d’installation reprend là où il
s’était interrompu.
Pour connaître la conguration système requise, reportez-vous à la
•
section « 18 Spécications ».
Per utilizzare la stampante collegandola a un computer, nel
software sono disponibili i driver da copiare (installare) sul
disco rigido del computer. Il processo di installazione richiede
circa 20 minuti. La durata dell'installazione varia a seconda
dell'ambiente del computer o del numero di applicazioni da
installare.
Prima di eseguire l'installazione, chiudere tutte le applicazioni in
•
esecuzione.
Accedere al computer come amministratore (o membro del gruppo
•
Administrators).
Non alternare account utente diversi durante il processo di installazione.
•
Durante l'installazione potrebbe essere necessaria la connessione a
•
Internet. È possibile che siano presenti costi di connessione a carico del
cliente. Consultare il provider Internet.
Durante la procedura di installazione potrebbe essere necessario
•
riavviare il computer. Attenersi alle istruzioni visualizzate e non rimuovere
il CD-ROM di installazione (Setup CD-ROM) durante il riavvio.
L'installazione riprende dopo il riavvio del computer.
Per i requisiti di sistema, vedere "18 Speciche".
•
32
Page 35
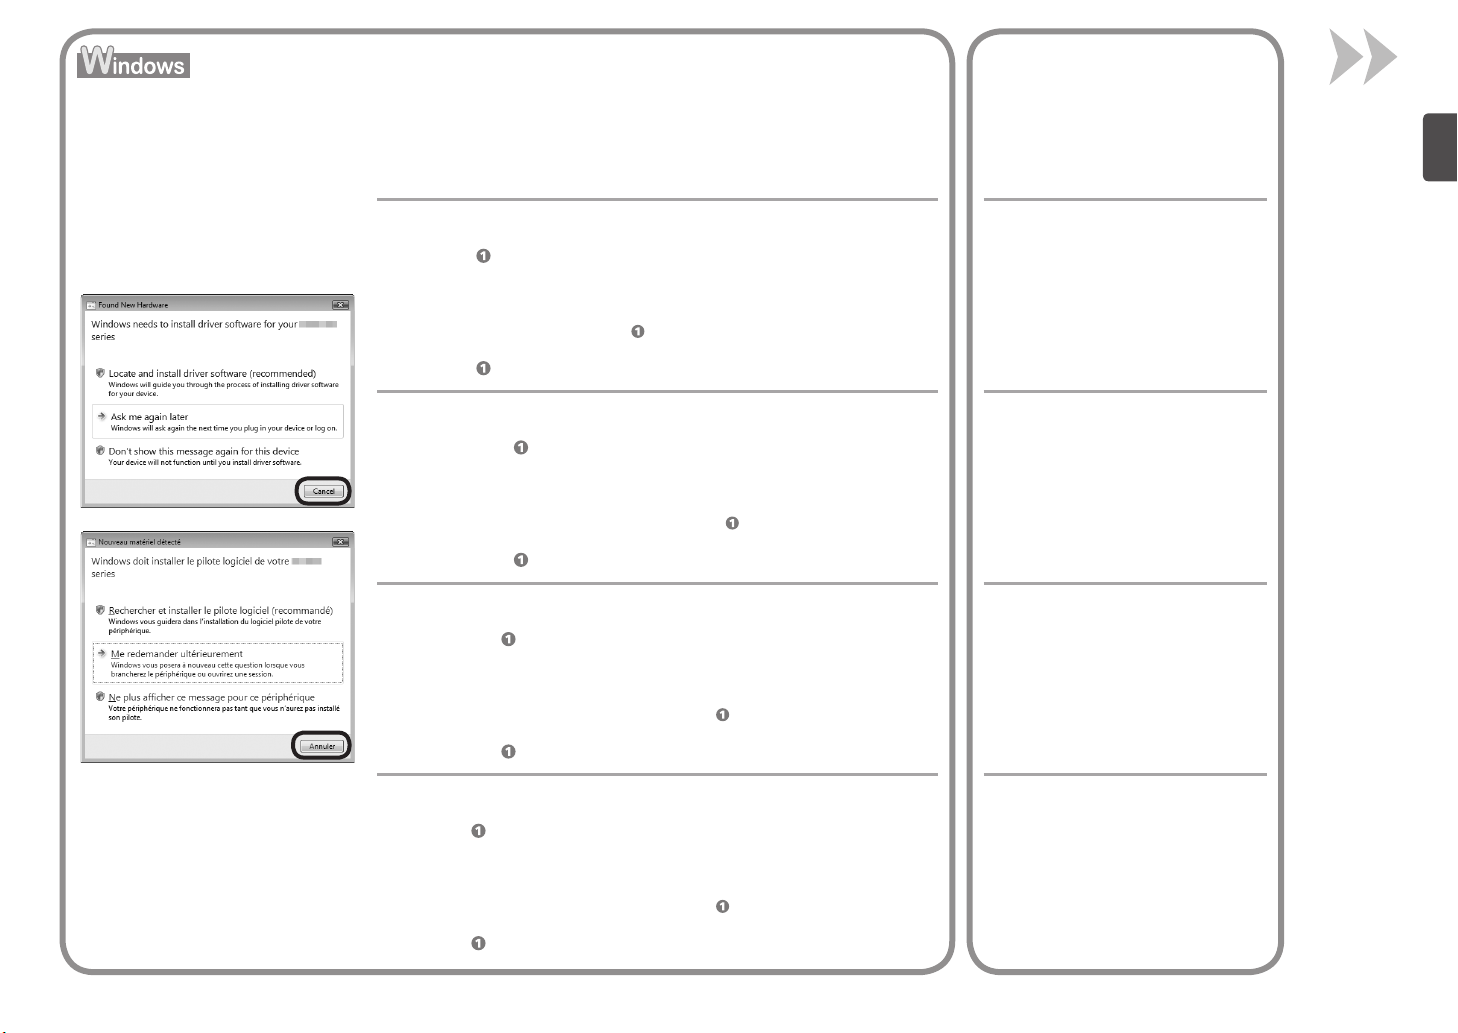
If the USB cable is connected before the software is installed
Si le câble USB est connecté avant que le logiciel ne soit installé
Wenn das USB-Kabel angeschlossen wird, bevor die Software installiert ist
Se si collega il cavo USB prima dell'installazione del software
Easy-WebPrint EX
Easy-WebPrint EX
Easy-WebPrint EX
Easy-WebPrint EX
For Windows 7
1. Remove the USB cable connected to your computer.
2. Proceed to
on page 34.
For Windows Vista/Windows XP
This dialog box may appear.
1. Remove the USB cable connected to your computer.
If the dialog box closes, proceed to on page 34.
2. Click Cancel.
3. Proceed to
on page 34.
Sous Windows 7
1. Débranchez le câble USB connecté à votre ordinateur.
2. Passez à l’étape
à la page 34.
Pour Windows Vista/Windows XP
Il se peut que cette boîte de dialogue apparaisse.
1. Débranchez le câble USB de l'ordinateur.
Si la boîte de dialogue se ferme, passez à l’étape de la page 34.
2. Cliquez sur Annuler (Cancel).
3. Passez à l’étape
à la page 34.
Für Windows 7
1. Ziehen Sie das USB-Kabel vom Computer ab.
2. Fahren Sie mit
auf Seite 34 fort.
Für Windows Vista/Windows XP
Dieses Dialogfeld wird möglicherweise angezeigt.
1. Ziehen Sie das USB-Kabel vom Computer ab.
Wird das Dialogfeld geschlossen, fahren Sie mit auf Seite 34 fort.
2. Klicken Sie auf Abbrechen (Cancel).
3. Fahren Sie mit
auf Seite 34 fort.
Per Windows 7
1. Rimuovere il cavo USB collegato al computer.
2. Passare a
a pagina 34.
Per Windows Vista/Windows XP
Potrebbe essere visualizzata questa finestra di dialogo.
1. Rimuovere il cavo USB collegato al computer.
Se la finestra di dialogo viene chiusa, passare a a pagina 34.
2. Fare clic su Annulla (Cancel).
3. Passare a
a pagina 34.
Easy-WebPrint EX is Web print software that
is installed on the computer when installing
the supplied software. Internet Explorer 7
or later (Windows) or Safari 4 or later (Mac
OS X v.10.5 or later) is required to use this
software. An Internet connection is required
for installation.
Easy-WebPrint EX est un logiciel
d’impression Web qui est installé sur
l’ordinateur en même temps que le logiciel
fourni. Internet Explorer 7 ou une version
ultérieure (Windows) ou Safari 4 ou une
version ultérieure (Mac OS X v.10.5 ou une
version ultérieure) est requis pour utiliser
ce logiciel. Vous devrez vous connecter à
Internet pour l’installation.
Bei Easy-WebPrint EX handelt es sich um
die Webdrucksoftware, die bei der Installation
der mitgelieferten Software auf Ihrem
Computer installiert wird. Zur Verwendung
dieser Software ist Internet Explorer 7 oder
höher (Windows) oder Safari 4 oder höher
(Mac OS X v.10.5 oder höher) erforderlich.
Für die Installation ist eine Internetverbindung
erforderlich.
Easy-WebPrint EX è un software di stampa
Web che viene installato nel computer
insieme al software fornito. Per utilizzare
questo software è necessario disporre di
Internet Explorer 7 o versione successiva
(Windows) o Safari 4 o versione successiva
(Mac OS X v.10.5 o versione successiva).
Per eseguire l'installazione, è necessario
disporre di una connessione a Internet.
33
Page 36
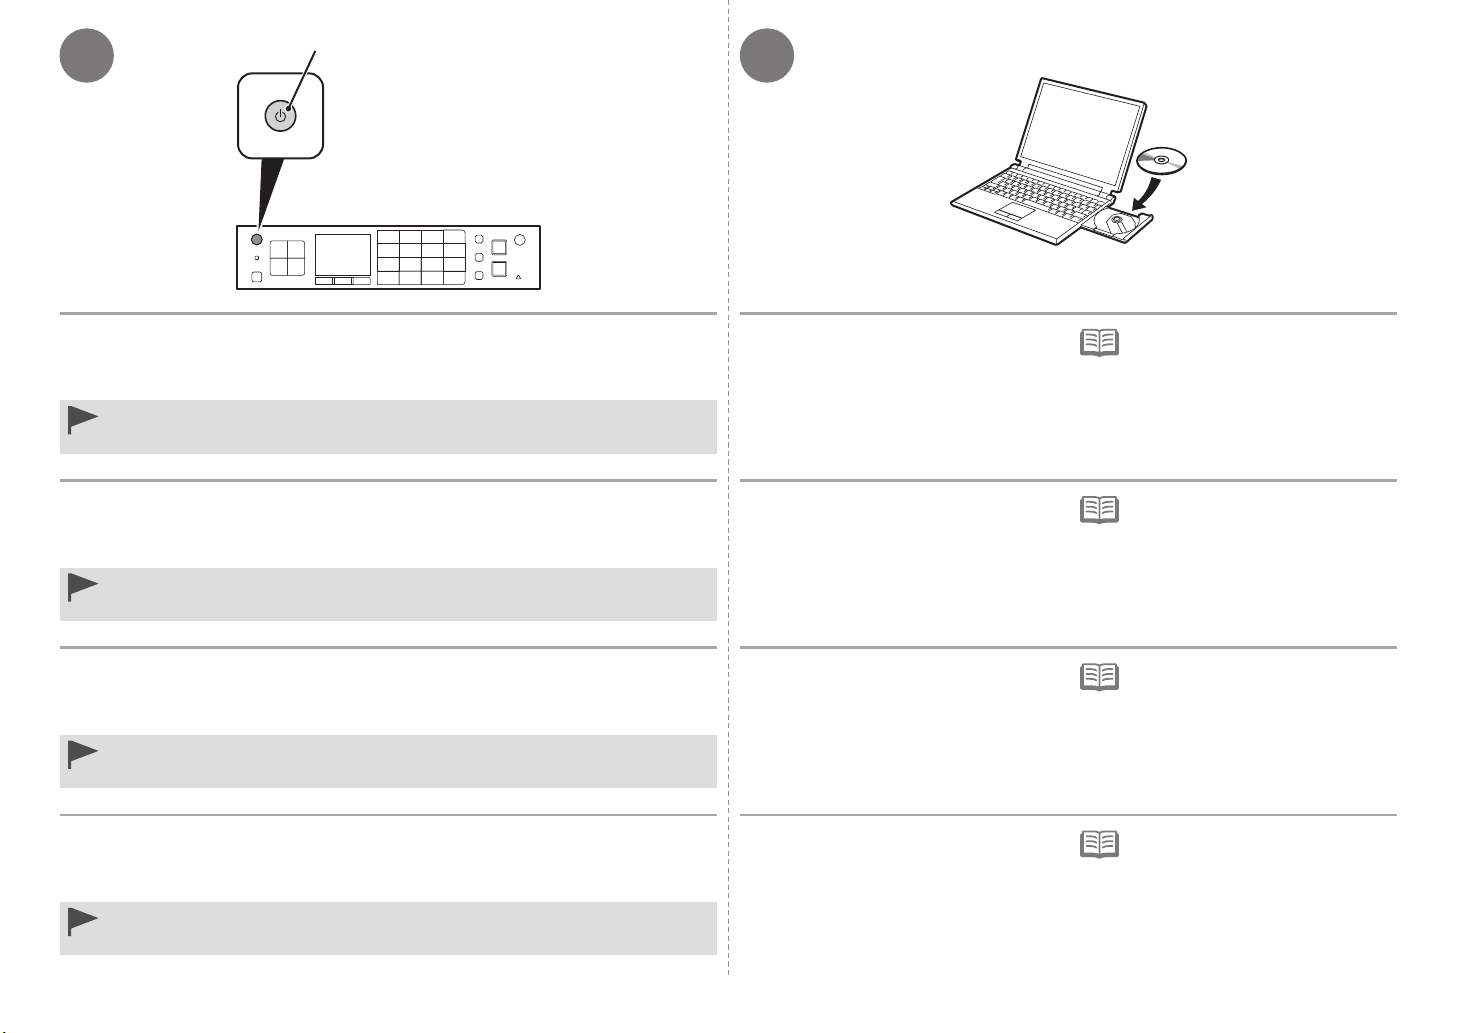
A
1 2
Press the ON button (A) to TURN OFF THE MACHINE.
Operating noise may continue for up to 1 minute until the machine turns off.
Do not connect the machine to the computer with the USB cable yet. If it is already connected,
•
disconnect the USB cable from the computer.
Appuyez sur le bouton MARCHE (ON) (A) pour METTRE LA MACHINE HORS
TENSION.
Le bruit de fonctionnement peut rester audible jusqu’à 1 minute, jusqu’à ce que la machine soit hors
tension.
Ne branchez pas encore la machine à l’ordinateur à l’aide du câble USB. S’il est déjà branché,
•
déconnectez le câble USB de l’ordinateur.
Drücken Sie die Taste EIN (ON) (A), um DAS GERÄT AUSZUSCHALTEN.
Die Betriebsgeräusche können bis zu 1 Minute andauern, bis sich das Gerät ausschaltet.
Schließen Sie das Gerät noch nicht mit dem USB-Kabel an den Computer an. Wenn Sie es
•
bereits angeschlossen haben, ziehen Sie das USB-Kabel vom Computer ab.
Premere il pulsante ON (A) per SPEGNERE LA STAMPANTE.
La macchina potrebbe continuare a emettere i rumori di funzionamento per 1 minuto, fino allo
spegnimento.
Non collegare ancora la macchina al computer con il cavo USB. Se è già collegato, scollegare
•
il cavo USB dal computer.
34
1. Make sure that the machine has
turned off.
2. Turn on the computer.
3. Insert the Setup CD-ROM into the
CD-ROM drive.
If you are using Windows, the setup program
starts automatically.
1. Vérifiez que la machine est hors
tension.
2. Allumez l’ordinateur.
3. Insérez le
CD-ROM d’installation
dans le lecteur de CD-ROM.
Si vous utilisez Windows, le programme
d’installation démarre automatiquement.
1. Stellen Sie sicher, dass das Gerät
ausgeschaltet ist.
2. Schalten Sie den Computer ein.
3. Legen Sie die
Installations-CD-
ROM (Setup CD-ROM) in das CD-
ROM-Laufwerk ein.
Wenn Sie Windows verwenden, startet das
Setup-Programm automatisch.
1. Assicurarsi che la macchina sia
spenta.
2. Accendere il computer.
3. Inserire il
CD-ROM di installazione
(Setup CD-ROM) nell'unità CD-ROM.
Se si utilizza Windows, il programma di
installazione verrà avviato automaticamente.
For Windows
If the program does not start
•
automatically, double-click the CD-ROM
icon in Computer or My Computer.
When the CD-ROM contents appear,
double-click MSETUP4.EXE.
Sous Windows
Si le programme d’installation ne se
•
lance pas automatiquement, doublecliquez sur l’icône de CD-ROM dans
Ordinateur (Computer) ou Poste de
travail (My Computer). Une fois le
contenu du CD-ROM afché, double-
cliquez sur MSETUP4.EXE.
Für Windows
Wenn das Programm nicht automatisch
•
startet, doppelklicken Sie auf das CD-
ROM-Symbol unter Computer oder
Arbeitsplatz (My Computer). Wenn
der Inhalt der CD-ROM angezeigt wird,
doppelklicken Sie auf MSETUP4.EXE.
Per Windows
Se il programma non viene avviato
•
automaticamente, fare doppio clic
sull'icona del CD-ROM in Computer o
Risorse del computer (My Computer).
Quando viene visualizzato il contenuto
del CD-ROM, fare doppio clic sul le
MSETUP4.EXE.
Page 37
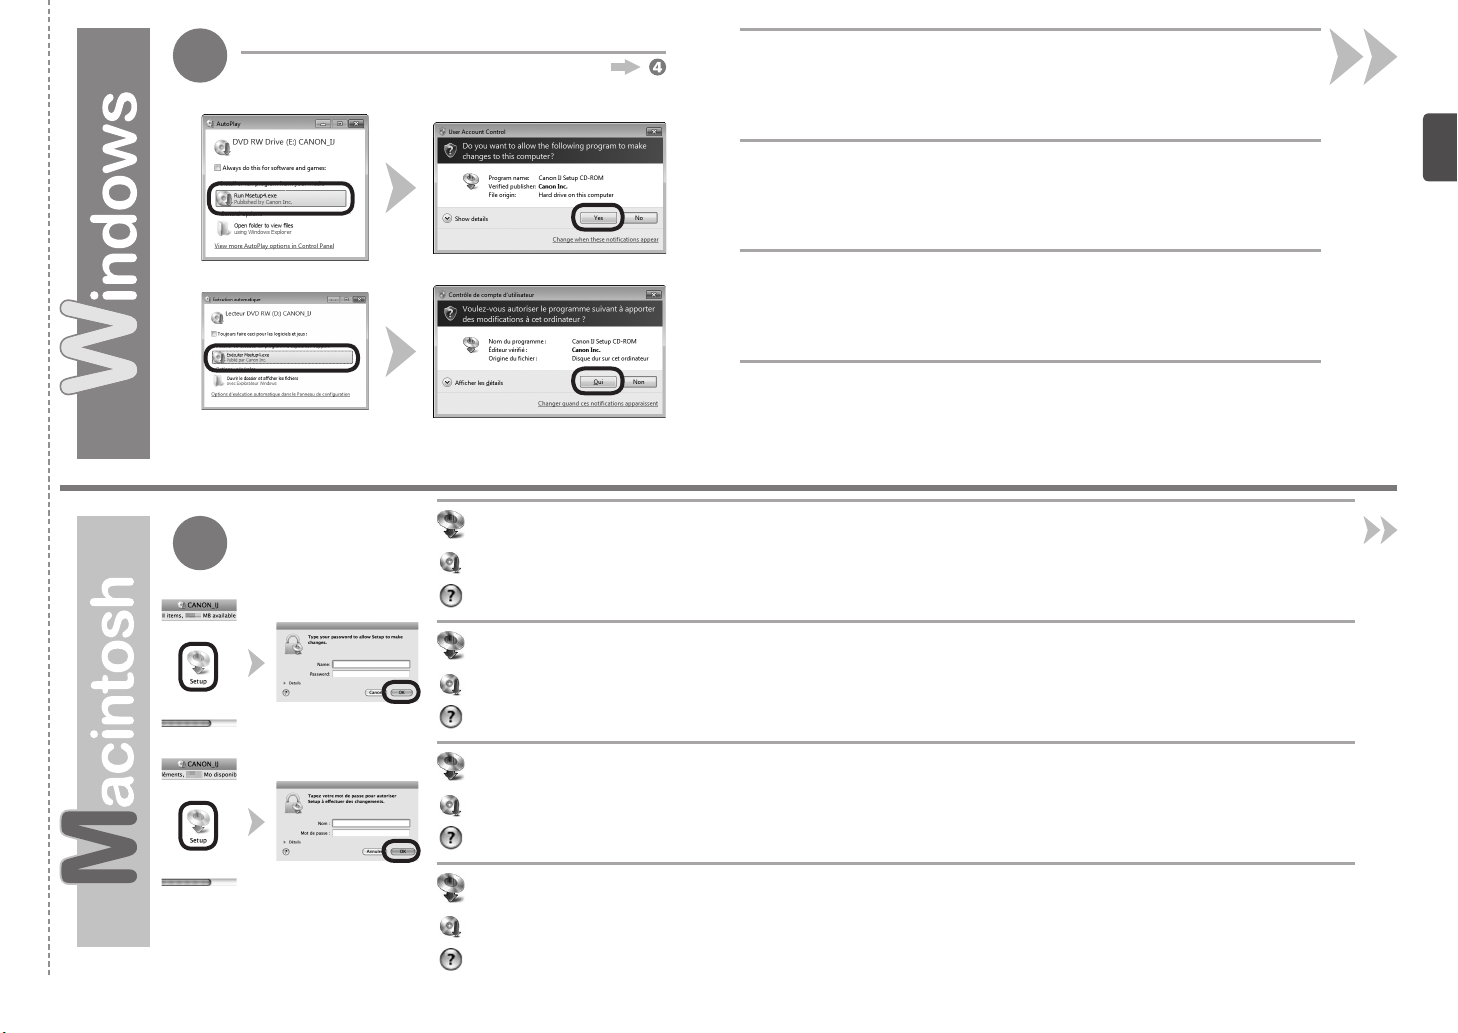
Windows 7/Windows Vista
3
3
Click Run Msetup4.exe on the AutoPlay screen, then click Yes or
Windows XP
Continue on the User Account Control dialog box.
If the User Account Control dialog box reappears in following steps, click Yes or
Continue.
Cliquez sur Exécuter Msetup4.exe (Run Msetup4.exe) dans l’écran Exécution
automatique (AutoPlay), puis cliquez sur Oui (Yes) ou Continuer (Continue) dans la
boîte de dialogue Contrôle de compte d’utilisateur (User Account Control).
Si la boîte de dialogue Contrôle de compte d’utilisateur (User Account Control)
réapparaît au cours des étapes suivantes, cliquez sur Oui (Yes) ou Continuer (Continue).
Klicken Sie im Fenster Automatische Wiedergabe (AutoPlay) auf Msetup4.exe
ausführen (Run Msetup4.exe) und anschließend im Dialogfeld Benutzerkontensteuerung
(User Account Control) auf Fortfahren (Continue) oder auf Ja (Yes).
Wenn das Dialogfeld Benutzerkontensteuerung (User Account Control) in folgenden
Schritten erneut angezeigt wird, klicken Sie auf Fortfahren (Continue) oder auf Ja (Yes).
Fare clic su Esegui Msetup4.exe (Run Msetup4.exe) nella schermata Riprod.
automatica (AutoPlay), quindi fare clic su Sì (Yes) o su Continua (Continue)
nella nestra di dialogo Controllo account utente (User Account Control).
Se la finestra di dialogo Controllo account utente (User Account Control) viene di
nuovo visualizzata nelle fasi successive, fare clic su Sì (Yes) o su Continua (Continue).
Double-click the Setup icon of the CD-ROM folder to proceed to the following screen. Enter your administrator
name and password, then click OK.
If the CD-ROM folder does not open automatically, double-click the CD-ROM icon on the desktop.
If you do not know your administrator name or password, click the help button, then follow the on-screen instructions.
Double-cliquez sur l’icône Setup dans le dossier du CD-ROM pour passer à l’écran suivant. Entrez votre nom
et votre mot de passe d’administrateur, puis cliquez sur OK.
Si le dossier du CD-ROM ne s’ouvre pas automatiquement, double-cliquez sur l’icône du CD-ROM sur le bureau.
Si vous ne connaissez pas votre nom ou votre mot de passe d’administrateur, cliquez sur le bouton d’aide, puis suivez les instructions
à l’écran.
Doppelklicken Sie auf das Symbol Setup des CD-ROM-Ordners, um zum folgenden Fenster zu wechseln.
Geben Sie Ihren Administratornamen und Ihr Kennwort ein, und klicken Sie auf OK.
Wenn sich der CD-ROM-Ordner nicht automatisch öffnet, doppelklicken Sie auf dem Desktop auf das CD-ROM-Symbol.
Wenn Sie Ihren Administratornamen oder das Kennwort vergessen haben, klicken Sie auf Hilfe, und folgen Sie dann den Anweisungen
auf dem Bildschirm.
Fare doppio clic sull'icona Setup nella cartella del CD-ROM per passare alla schermata seguente. Immettere il
nome e la password dell'amministratore, quindi fare clic su OK.
Se la cartella del CD-ROM non si apre automaticamente, fare doppio clic sull'icona del CD-ROM nel desktop.
Se non si conoscono il nome o la password dell'amministratore, fare clic sul pulsante ? (Help), quindi seguire le istruzioni a video.
35
Page 38
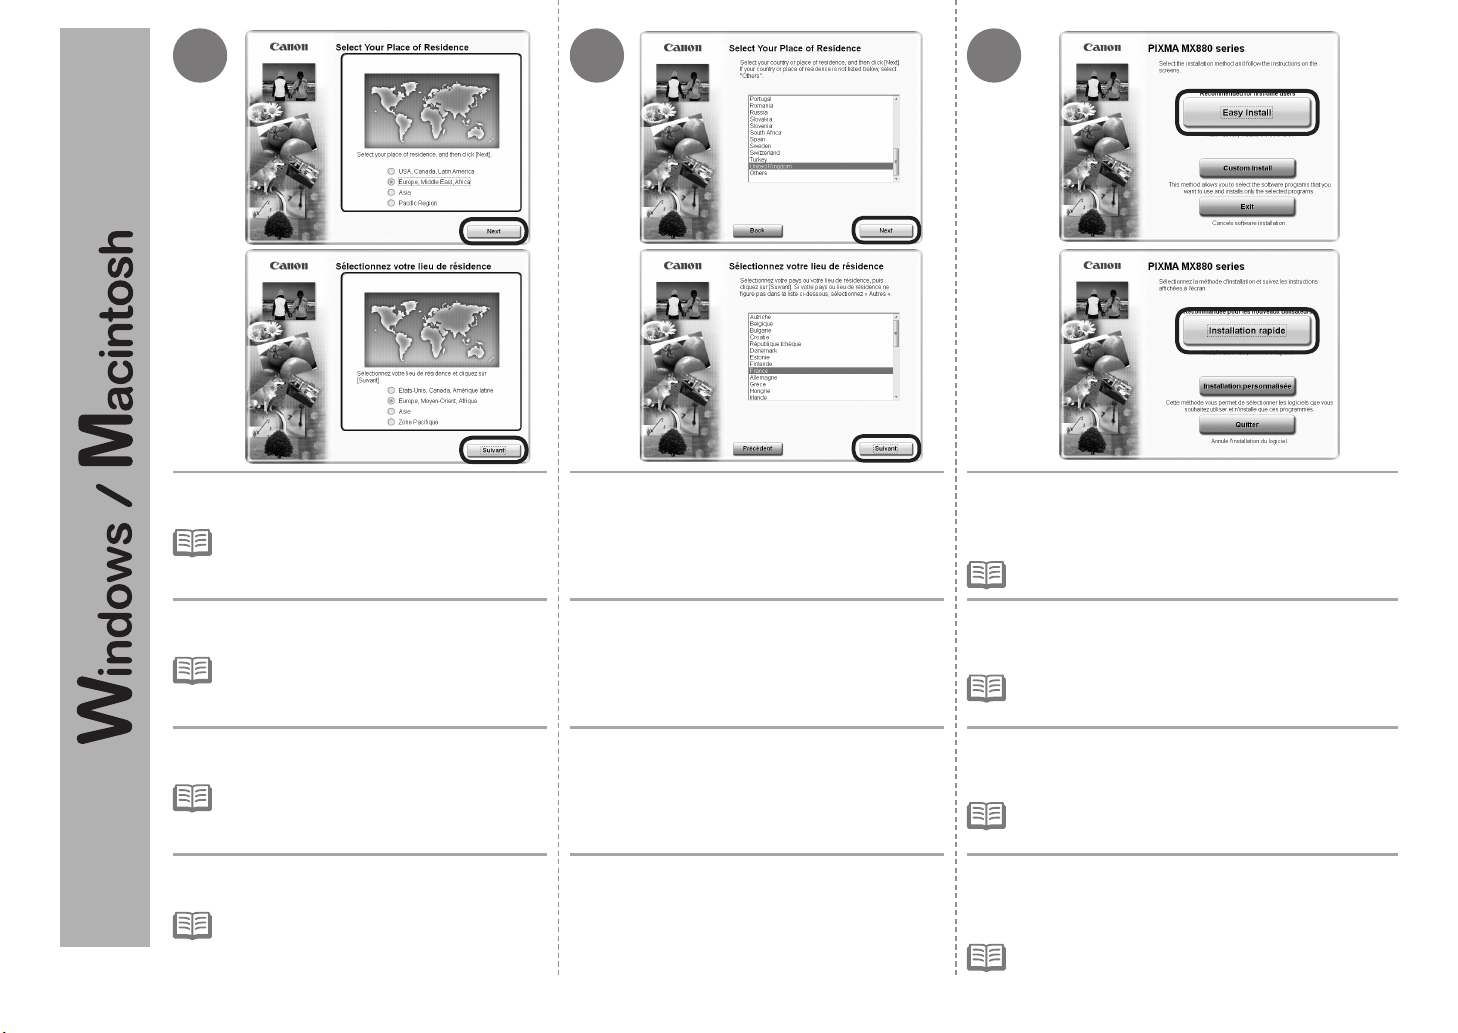
4 5 6
36
If the Select Language screen appears, select a
•
language, then click Next.
Sélectionnez votre lieu de résidence et cliquez
sur Suivant (Next).
Si l’écran Sélectionner une langue (Select
•
Language) s’afche, sélectionnez une langue,
puis cliquez sur Suivant (Next).
Wählen Sie Ihren Wohnsitz aus, und klicken
Sie auf Weiter (Next).
Wenn das Fenster Sprache wählen (Select
•
Language) angezeigt wird, wählen Sie eine
Sprache aus, und klicken Sie auf Weiter (Next).
Selezionare il paese di residenza, quindi fare
clic su Avanti (Next).
Se viene visualizzata la nestra di dialogo
•
Selezione lingua (Select Language), selezionare
una lingua, quindi fare clic su Avanti (Next).
Select a country or region, then click Next. Select your place of residence, then click Next.
Sélectionnez un pays ou une région, puis
cliquez sur Suivant (Next).
Wählen Sie ein Land oder eine Region aus,
und klicken Sie auf Weiter (Next).
Scegliere un paese, quindi fare clic su Avanti
(Next).
Click Easy Install.
The drivers, application software, and on-screen manuals are
installed.
If you want to select particular items to install, click
•
Custom Install.
Cliquez sur Installation rapide (Easy Install).
Les pilotes, l’application et les manuels en ligne sont installés.
Si vous souhaitez n’installer que certains éléments
•
spéciques, cliquez sur Installation personnalisée
(Custom Install).
Klicken Sie auf Einfache Installation (Easy Install).
Die Treiber, Anwendungssoftware und Online-Handbücher
werden installiert.
Wenn Sie bestimmte Elemente zur Installation auswählen
•
möchten, klicken Sie auf Benutzerdenierte Installation
(Custom Install).
Fare clic su Installazione standard (Easy Install).
Vengono installati i driver, le applicazioni software e i manuali a
video.
Se si desidera selezionare determinati elementi per
•
l'installazione, fare clic su Installaz. personalizzata
(Custom Install).
Page 39
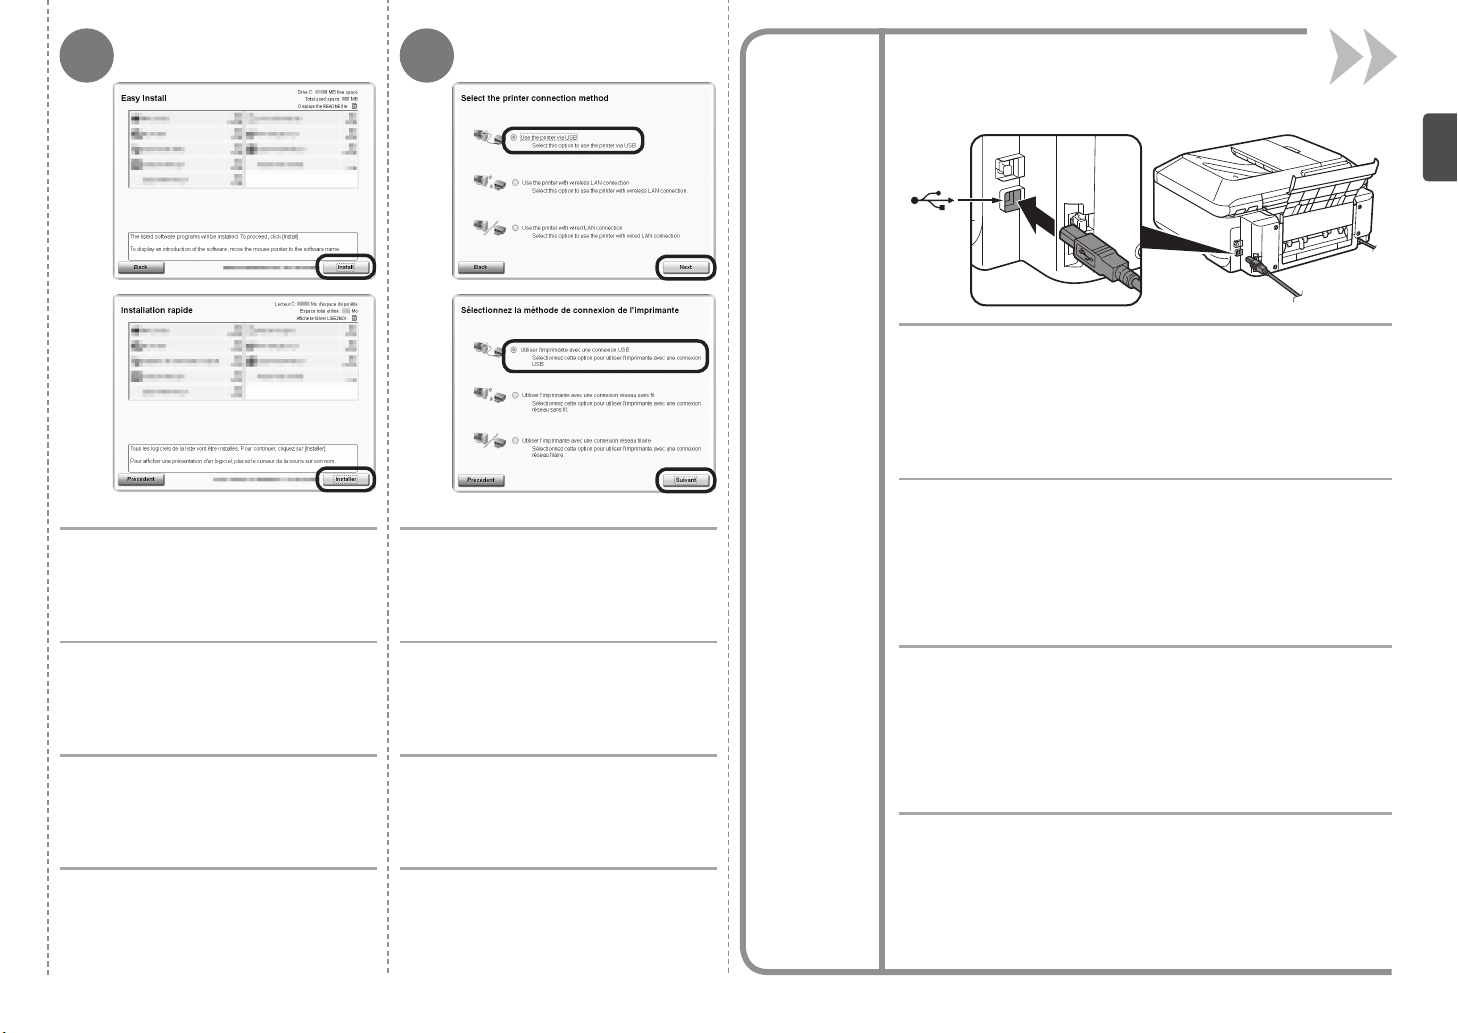
7 8
Click Install.
Select Use the printer via USB, then
click Next.
Follow any on-screen instructions to proceed
with the software installation.
USB Port
Port USB
USB-Anschluss
Porta USB
When the Printer Connection screen appears, connect the machine to the
computer with a USB cable.
After connecting the cable, TURN ON THE MACHINE.
The USB Port is located on the right side at the back of the machine. The
lower port is for USB.
Important Information for the Installation
Informazioni importanti per l'installazione
Wichtige Informationen für die Installation
Informations importantes concernant l’installation
Lorsque l’écran Connexion de l’imprimante (Printer Connection)
s’affiche, connectez la machine à l’ordinateur à l’aide d’un câble USB.
Après avoir connecté le câble, METTEZ LA MACHINE SOUS TENSION.
Le port USB se trouve à l’arrière de la machine, sur le côté droit. Le port
inférieur est destiné à la connexion USB.
Cliquez sur Installer (Install).
Klicken Sie auf Installieren (Install).
Fare clic su Installa (Install).
Sélectionnez Utiliser l’imprimante avec
une connexion USB (Use the printer via
USB), puis cliquez sur Suivant (Next).
Pour poursuivre l’installation du logiciel, suivez
les instructions à l’écran.
Wählen Sie Drucker über USB
verwenden (Use the printer via USB),
und klicken Sie auf Weiter (Next).
Befolgen Sie sämtliche Anweisungen auf dem
Bildschirm, um mit der Softwareinstallation fortzufahren.
Selezionare Utilizzare la stampante
tramite USB (Use the printer via
USB), quindi fare clic su Avanti (Next).
Per procedere con l'installazione del software,
seguire le istruzioni visualizzate.
Wird der Bildschirm Druckeranschluss (Printer Connection) angezeigt,
schließen Sie das Gerät mit einem USB-Kabel an den Computer an.
Schalten Sie das Gerät ein, nachdem Sie das Kabel angeschlossen haben.
Der USB-Anschluss befindet sich rechts auf der Rückseite des Geräts. Der
untere Anschluss ist für USB.
Quando viene visualizzata la schermata Connessione stampante (Printer
Connection), collegare la stampante al computer con un cavo USB.
Dopo avere collegato il cavo, ACCENDERE LA MACCHINA.
La porta USB si trova sul lato posteriore destro della stampante. La porta
inferiore è riservata al cavo USB.
37
Page 40
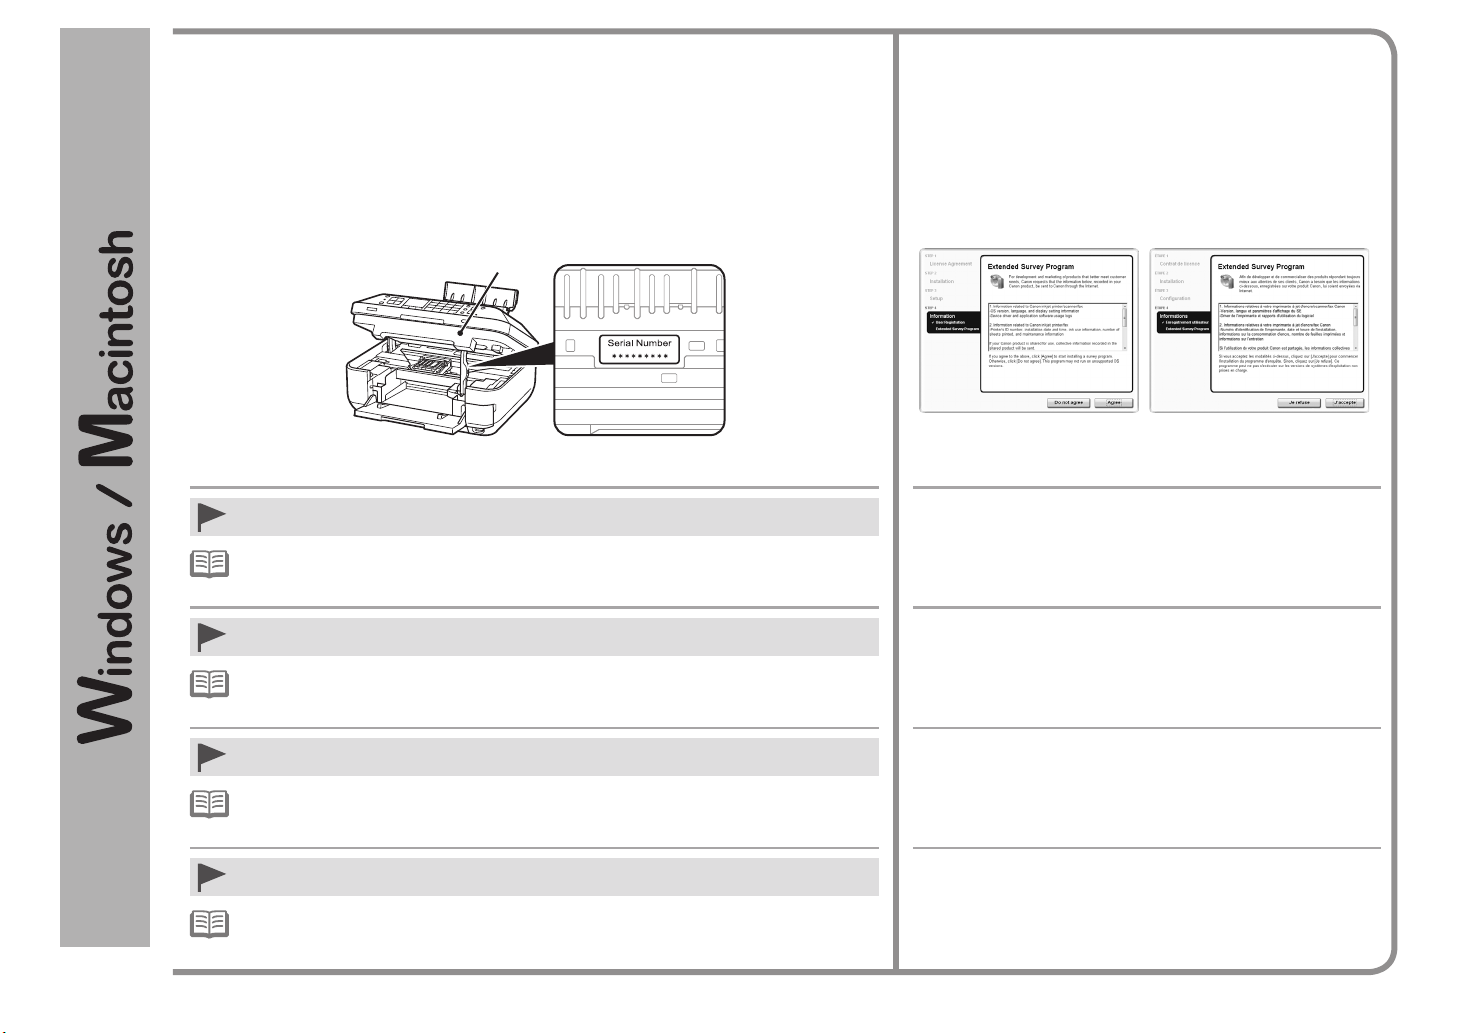
If the serial number is not displayed on the registration screen, input the number found inside the machine.
Si le numéro de série n’apparaît pas à l’écran d’enregistrement, saisissez le numéro de série qui se trouve à
l’intérieur de la machine.
Wenn die Seriennummer nicht im Registrierungsbildschirm angezeigt wird, geben Sie die Nummer ein, die im
Geräteinneren angegeben ist.
Se il numero di serie non viene visualizzato nella schermata di registrazione, immettere il numero che si trova
all'interno della macchina.
B
If the Extended Survey Program screen appears
Si l’écran Extended Survey Program apparaît
Wenn das Fenster für das Extended Survey Program
angezeigt wird
Se viene visualizzata la schermata Extended Survey
Program
38
If the power is on, the Print Head Holder will move when the Scanning Unit (Cover) (B) is opened. •
The User Registration screen will only be displayed when Europe, Middle East, Africa is selected
•
on the Select Your Place of Residence screen.
Si la machine est sous tension, le support de tête d’impression se déplace lorsque l’unité de
•
numérisation (capot) (B) est ouverte.
L’écran Enregistrement utilisateur (user Registration) ne s’afche que si vous avez choisi
•
Europe, Moyen-Orient, Afrique (Europe, Middle East, Africa) sur l’écran Sélectionnez votre lieu
de résidence (Select Your Place of Residence).
Ist das Gerät eingeschaltet, bewegt sich der Druckkopfhalter, wenn das Scan-Modul (Abdeckung)
•
(B) geöffnet wird.
Der Bildschirm Benutzerregistrierung (User Registration) wird nur dann angezeigt, wenn Sie
•
auf dem Bildschirm Wohnsitz wählen (Select Your Place of Residence) Europa, Naher Osten,
Afrika (Europe, Middle East, Africa) ausgewählt haben.
Se la stampante è accesa, il supporto della testina di stampa si sposterà all'apertura dell'unità di
•
scansione (coperchio) (B).
La schermata Registrazione utente (User Registration) verrà visualizzata solo se è stata
•
selezionata l'opzione Europa, Medio Oriente, Africa (Europe, Middle East, Africa) nella
schermata Scegliere l'area di residenza (Select Your Place of Residence).
If you can agree to Extended Survey Program, click Agree.
If you click Do not agree, the Extended Survey Program will not be
installed. (This has no effect on the machine’s functionality.)
Si vous acceptez l’application Extended Survey Program, cliquez sur
J’accepte (Agree).
Si vous cliquez sur Je refuse (Do not agree), l’application Extended
Survey Program ne sera pas installée. (Cela n’a aucun impact sur le
fonctionnement de la machine.)
Wenn Sie das Extended Survey Program akzeptieren, klicken Sie auf
Akzeptieren (Agree).
Wenn Sie auf Nicht akzeptieren (Do not agree) klicken, wird das
Extended Survey Program nicht installiert. (Ihre Auswahl hat keine
Auswirkungen auf die Funktionalität des Geräts.)
Per accettare i termini di Extended Survey Program, fare clic su
Accetto (Agree).
Se si fa clic su Non accetto (Do not agree), Extended Survey Program
non verrà installato. Ciò non pregiudica la funzionalità della stampante.
Page 41
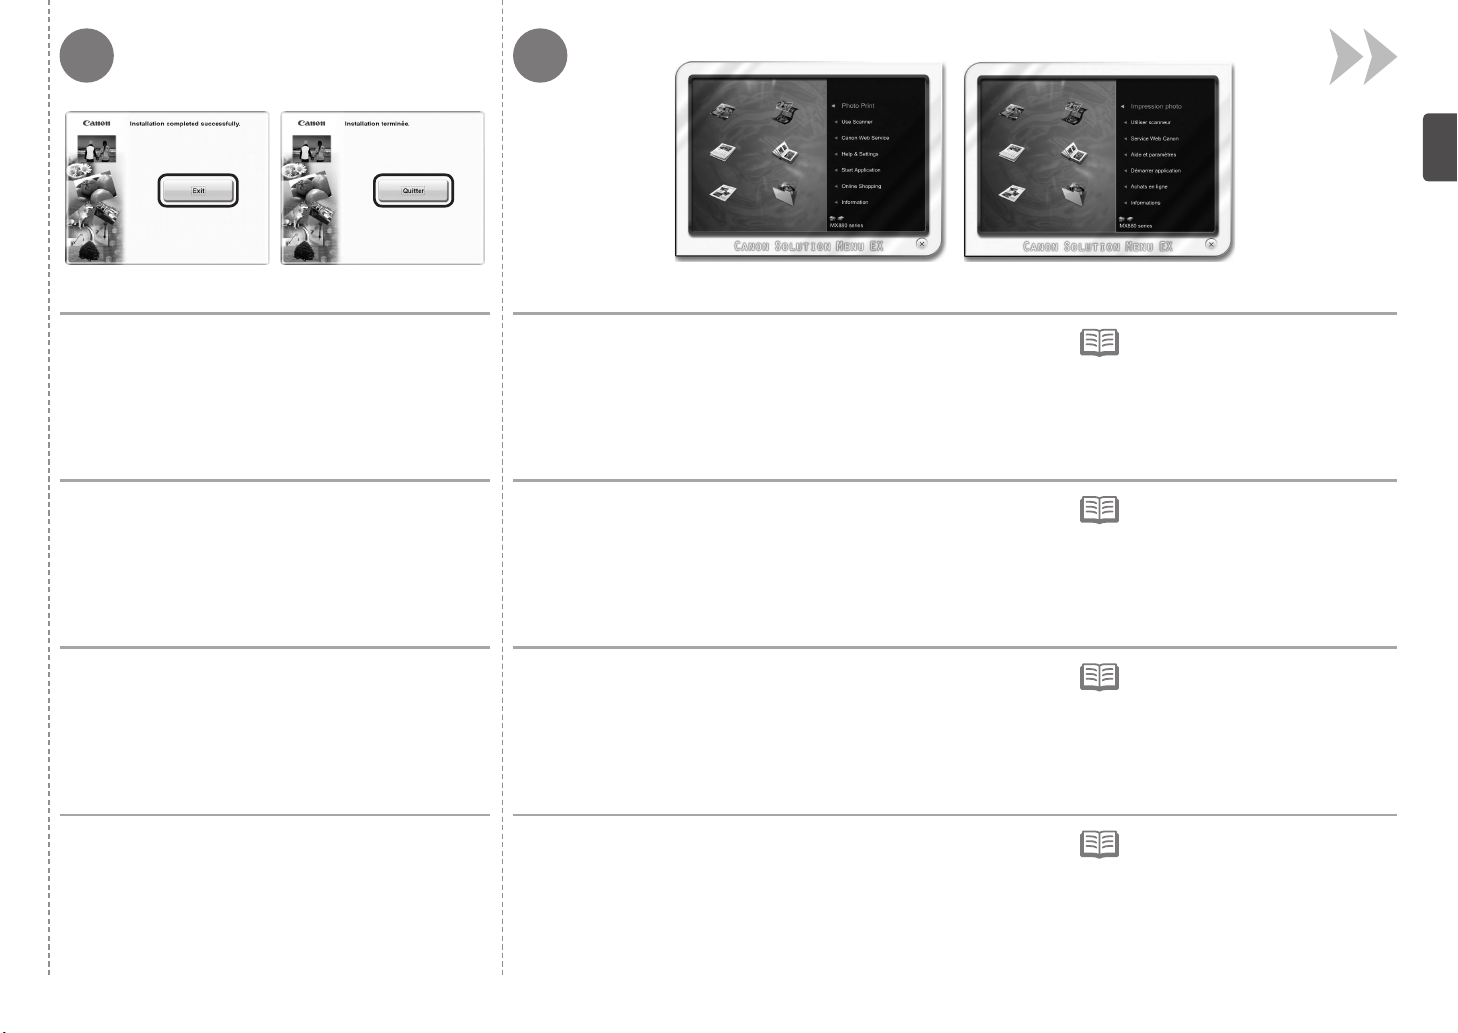
9 10
Click Exit to complete the installation.
For Macintosh
It is necessary to restart the computer before scanning using the
Operation Panel on the machine for the first time.
Cliquez sur Quitter (Exit) pour terminer l’installation.
Sous Macintosh
Vous devez redémarrer l’ordinateur avant d’effectuer pour la
première fois une numérisation à l’aide du panneau de contrôle
de la machine.
Klicken Sie auf Beenden (Exit), um die Installation
abzuschließen.
Für Macintosh
Vor dem erstmaligen Scannen über das Bedienfeld am Gerät ist
ein Neustart des Computers erforderlich.
Fare clic su Esci (Exit) per completare l'installazione.
Per Macintosh
Prima di eseguire scansioni tramite il pannello dei comandi della
stampante per la prima volta, è necessario riavviare il computer.
For Windows
Solution Menu EX starts.
For Macintosh
Solution Menu EX starts when clicking OK in the Canon Solution
Menu EX dialog.
Remove the Setup CD-ROM and keep it in a safe place.
Sous Windows
Solution Menu EX démarre.
Sous Macintosh
Solution Menu EX démarre en cliquant sur OK dans la boîte de
dialogue Canon Solution Menu EX.
Retirez le CD-ROM d’installation et conservez-le en lieu sûr.
Für Windows
Solution Menu EX wird gestartet.
Für Macintosh
Solution Menu EX wird gestartet, wenn Sie im Dialog Canon
Solution Menu EX auf OK klicken.
Nehmen Sie die Installations-CD-ROM (Setup CD-ROM) heraus, und bewahren
Sie sie an einem sicheren Ort auf.
Per Windows
Solution Menu EX viene avviato.
Per Macintosh
Solution Menu EX viene avviato quando si fa clic su OK nella
finestra di dialogo Canon Solution Menu EX.
Estrarre il CD-ROM di installazione (Setup CD-ROM) e conservarlo in un luogo
sicuro.
The buttons displayed on Solution Menu
•
EX may vary depending on the country
or region of purchase.
Les boutons afchés dans Solution
•
Menu EX peuvent varier selon le pays
ou la région d’achat.
Die in Solution Menu EX angezeigten
•
Schaltächen variieren je nach Land
oder Region, in dem bzw. in der das
Gerät erworben wurde.
I pulsanti visualizzati in Solution Menu
•
EX possono variare in base al paese o
alla regione di acquisto.
39
Page 42
Congratulations! Setup is complete.
To learn more about the Solution
Menu EX and on-screen manual,
proceed to page 70. To start using
the machine, proceed to page 72.
Installing the XPS Printer Driver
In Windows 7 and Windows Vista SP1 or later, the XPS
Printer Driver can be installed additionally. To install,
perform from on page 34 in “8 Install the Software (USB
Connection).” Click Custom Install in , then select XPS
Printer Driver in the Custom Install screen.
For details on useful functions of the XPS Printer Driver,
refer to the on-screen manual: Advanced Guide.
Félicitations ! L’installation est
terminée. Pour en savoir plus sur
Solution Menu EX et le manuel
en ligne, allez à la page 70. Pour
commencer à utiliser la machine,
allez à la page 72.
Glückwunsch! Die Installation
ist abgeschlossen. Weitere
Informationen über Solution
Menu EX und das Online-
Handbuch nden Sie auf Seite 70.
Informationen zur Inbetriebnahme
des Geräts nden Sie auf Seite 72.
Congratulazioni. L'installazione
è completata. Per ulteriori
informazioni relative a Solution
Menu EX e al manuale a video,
andare alla pagina 70. Per iniziare
a utilizzare la macchina, andare a
pagina 72.
Installation du Pilote d’imprimante XPS (XPS Printer Driver)
Sous Windows 7 et Windows Vista SP1 ou une version
ultérieure, le Pilote d’imprimante XPS (XPS Printer
Driver) peut être installé en complément. Pour procéder à
l'installation, exécutez la procédure décrite à partir de l'étape
à la page 34 dans la section « 8 Installation du logiciel
(connexion USB) ». Cliquez sur
(Custom Install) à l'étape , puis sélectionnez Pilote
d’imprimante XPS (XPS Printer Driver) dans l’écran
Installation personnalisée (Custom Install).
Pour plus d’informations sur les fonctions pratiques du Pilote
d’imprimante XPS (XPS Printer Driver), reportez-vous au
manuel en ligne Guide d’utilisation avancée.
Installation personnalisée
Installieren des XPS-Druckertreibers (XPS Printer Driver)
Unter Windows 7 und ab Windows Vista SP1 kann der
XPS-Druckertreiber (XPS Printer Driver) zusätzlich installiert
werden. Führen Sie zur Installation den Schritt unter
„8 Installieren der Software (USB-Verbindung)“ auf Seite
34 aus. Klicken Sie in Schritt auf Benutzerdefinierte
Installation (Custom Install), und wählen Sie im Bildschirm
Benutzerdefinierte Installation (Custom Install) die
Option XPS-Druckertreiber (XPS Printer Driver) aus.
Weitere Informationen über nützliche Funktionen des XPS-
Druckertreibers (XPS Printer Driver) finden Sie im OnlineHandbuch Erweitertes Handbuch.
Installazione del Driver stampante XPS (XPS Printer Driver)
In Windows 7 e Windows Vista SP1 o versione successiva
è possibile installare anche il Driver stampante XPS (XPS
Printer Driver). Per effettuare l'installazione, eseguire
a pagina 34 in "8 Installazione del software (Connessione
USB)". Fare clic su Installazione personalizzata (Custom
Install) in , quindi selezionare Driver stampante XPS
(XPS Printer Driver) nella schermata Installazione
personalizzata (Custom Install).
Per ulteriori informazioni sulle funzioni utili del Driver
stampante XPS (XPS Printer Driver), consultare il manuale a
video: Guida Avanzata.
40
Page 43
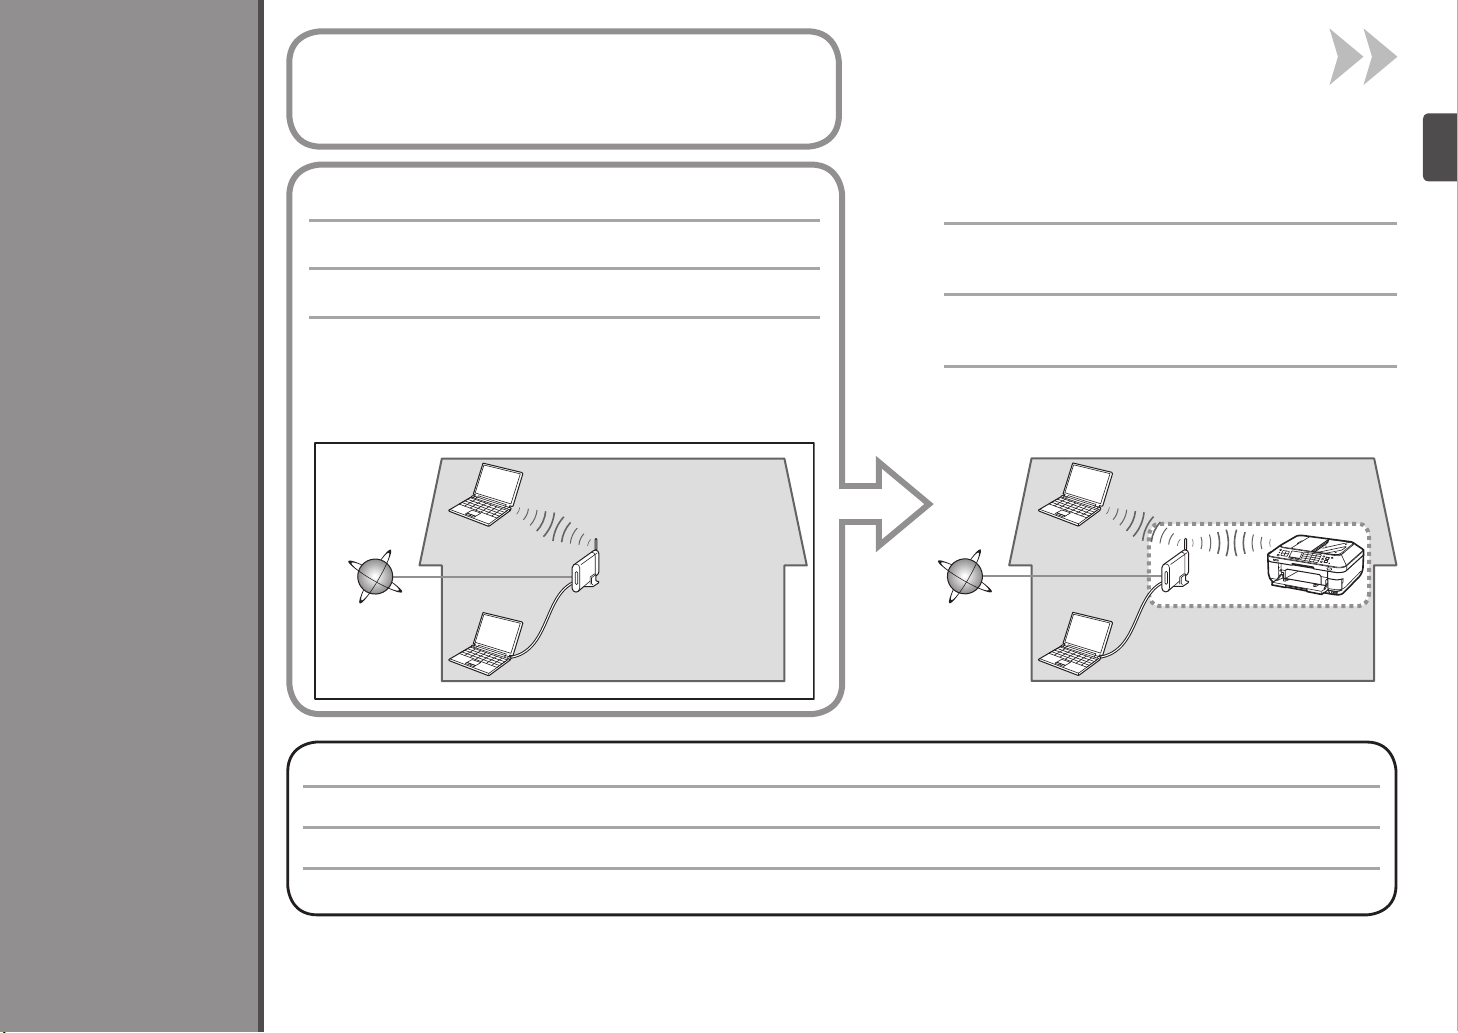
9
Before Conguring Wireless Settings
Avant de congurer les paramètres sans l
Vor Konguration der Drahtloseinstellungen
Prima di congurare le impostazioni wireless
Wireless Setup
Make sure that the computer and access point or router are
connected.
Vériez que l’ordinateur et le point d’accès ou le routeur
sont connectés.
Achten Sie darauf, dass eine Verbindung zwischen dem
Computer und dem Zugriffspunkt oder Router besteht.
Assicurarsi che il computer e il punto di accesso o il router
siano collegati.
Access point or wireless
router, etc.
Configuration sans fil
Impostazione wireless
Drahtlose Einstellungen
Internet
Internet
Internet
Internet
Point d’accès ou routeur
sans l, etc.
Zugriffspunkt oder
WLAN-Router usw.
Punto di accesso o router
wireless, ecc.
After confirming the connection, perform the following
instructions to add (connect) the machine to the network.
Après avoir confirmé la connexion, suivez les
instructions suivantes pour ajouter (connecter) la
machine au réseau.
Führen Sie nach der Bestätigung der Verbindung
folgende Anweisungen aus, um das Gerät zum Netzwerk
hinzuzufügen (damit zu verbinden).
Una volta verificato il collegamento, eseguire le istruzioni
riportate di seguito per aggiungere (collegare) la
macchina alla rete.
An “Ad-hoc connection,” which establishes a direct connection to the computer over a wireless connection without using an access point, is not supported.
La « connexion ad-hoc », qui établit une connexion directe à l’ordinateur via une connexion sans l sans utiliser de point d’accès, n’est pas prise en charge.
Eine „Ad-hoc-Verbindung“, bei der über eine drahtlose Verbindung ohne Zugriffspunkt eine direkte Verbindung zum Computer aufgebaut wird, wird nicht unterstützt.
Non sono supportate le "connessioni ad-hoc", che consentono di stabilire una connessione wireless al computer senza utilizzare un punto di accesso.
41
Page 44

Notes on Wireless Connection■
Remarques relatives à la connexion sans l■
Hinweise zu drahtlosen Verbindungen■
Note sulla connessione wireless■
The conguration, router functions, setup procedures and security settings of the network device vary depending on your system environment. For details, refer to your device’s instruction manual or contact its
•
manufacturer.
Check if your device supports IEEE802.11n/g/b.
•
In an ofce setup, consult your network administrator.
•
If you connect to a network that is not protected with security measures, there is a risk of disclosing data such as your personal information to a third party.
•
The machine cannot be used over a wireless and wired connection at the same time.
•
If an error message appears or if you have trouble with the network connection, refer to the printed manual: Network Setup Troubleshooting.
•
When using a router, connect the machine and computer to the LAN side (same network segment).
•
To set up using WPS (Wi-Fi Protected Setup), go to page 80. To set up using WCN (Windows Connect Now), go to page 83.
•
Go to page 43.
La conguration, les fonctions du routeur, les procédures de conguration et les paramètres de sécurité du périphérique réseau varient selon votre environnement système. Pour plus d’informations, reportez-vous
•
au manuel d’instructions de votre périphérique ou contactez son fabricant.
Vériez si votre appareil prend en charge le protocole IEEE802.11n/g/b.
•
Dans le cadre de la conguration d’un site, consultez votre administrateur réseau.
•
Si vous vous connectez à un réseau non protégé par des mesures de sécurité, il existe un risque de divulgation de données, par exemple vos coordonnées personnelles, à une tierce partie.
•
La machine ne peut pas être utilisée simultanément sur un réseau sans l et avec une connexion câblée.
•
Si un message d’erreur apparaît ou que vous rencontrez des problèmes avec la connexion réseau, reportez-vous au manuel imprimé Guide de dépannage réseau.
•
Lorsque vous utilisez un routeur, connectez la machine et l’ordinateur côté LAN (même segment de réseau).
•
Pour une conguration avec WPS (Wi-Fi Protected Setup), accédez à la page 80. Pour congurer avec WCN (Windows Connect Now), allez à la page 83.
•
Allez à la page 43.
Die Konguration, Routerfunktionen, Einrichtungsvorgänge und Sicherheitseinstellungen des Netzwerkgeräts variieren je nach Systemumgebung. Um weitere Informationen zu erhalten, lesen Sie im Handbuch des
•
Geräts nach oder wenden Sie sich an den Hersteller.
Überprüfen Sie, ob das Gerät IEEE802.11n/g/b unterstützt.
•
Wenden Sie sich bei einer Büroeinrichtung an den Netzwerkadministrator.
•
Falls Sie eine Verbindung zu einem Netzwerk herstellen, das nicht durch Sicherheitsmaßnahmen geschützt ist, besteht das Risiko, dass beispielsweise persönliche Daten an Dritte weitergegeben werden.
•
Das Gerät kann nicht gleichzeitig über eine drahtlose und eine Kabelverbindung verwendet werden.
•
Wenn eine Fehlermeldung angezeigt wird oder Sie Probleme mit der Netzwerkverbindung haben, nden Sie weitere Informationen im gedruckten Handbuch: Netzwerk-Fehlerbehebungshandbuch.
•
Verbinden Sie bei Verwendung eines Routers das Gerät und den Computer mit dem LAN (selbes Netzwerksegment).
•
Informationen zur Einrichtung mit WPS (Wi-Fi-Protected Setup) nden Sie auf Seite 80. Informationen zur Einrichtung mit WCN (Windows Connect Now) nden Sie auf Seite 83.
•
Fahren Sie auf Seite 43 fort.
La congurazione, le funzioni del router, le procedure di installazione e le impostazione di protezione dei dispositivi di rete variano in base all'ambiente di sistema. Per ulteriori informazioni, vedere il manuale di
•
istruzioni della periferica o rivolgersi al produttore della stessa.
Vericare che la periferica supporti lo standard IEEE802.11n/g/b.
•
Nella congurazione all'interno di un ufcio, rivolgersi all'amministratore di rete.
•
Se si effettua una connessione a una rete non protetta con misure di sicurezza, vi è il rischio di divulgare a terzi i dati riservati, ad esempio le informazioni personali.
•
La macchina non può essere utilizzata contemporaneamente con una connessione wireless e una cablata.
•
Se viene visualizzato un messaggio di errore o si vericano problemi con la connessione alla rete, consultare il manuale stampato: Guida alla risoluzione dei problemi di rete.
•
Se si utilizza un router, collegare la stampante e il computer al lato LAN (stesso segmento di rete).
•
Per l'impostazione con WPS (Wi-Fi Protected Setup), andare a pagina 80. Per l'impostazione con WCN (Windows Connect Now), andare a pagina 83.
•
Andare a pagina 43.
42
Page 45
Check the Information for Wireless Connection■
Vérication des informations requises pour la connexion sans l■
Überprüfen der Informationen für die drahtlose Verbindung■
Verica delle informazioni per la connessione wireless■
In most cases, “Easy Setup” will be used to connect the machine to your access point or router. Before you continue, you must gather the following
information which will be required during the installation. For your convenience, you may record the information in the provided spaces on the next
page and then proceed to page 45.
Dans la plupart des cas, « Conguration facile » sera utilisé pour connecter la machine à votre point d’accès ou routeur. Avant de continuer,
vous devez réunir les informations suivantes qui seront nécessaires lors de l’installation. Par souci de commodité, vous pouvez enregistrer les
informations dans les espaces fournis à la page suivante, puis passer à la page 45.
In den meisten Fällen wird „Einfache Einrichtung (Easy Setup)“ verwendet, um das Gerät mit dem Zugriffspunkt oder Router zu verbinden. Bevor
Sie fortfahren, müssen Sie die folgenden Informationen sammeln, die während der Installation benötigt werden. Sie können die Informationen bei
Wireless Setup Using Easy Setup
Bedarf in die vorgesehenen Felder auf der nächsten Seite eintragen. Fahren Sie dann mit Seite 45 fort.
Nella maggior parte dei casi, "Impost. facile (Easy Setup)" verrà utilizzata per collegare la stampante al punto di accesso o al router. Prima di
continuare, è necessario ottenere le seguenti informazioni, richieste durante l'installazione. Per comodità, è possibile annotare le informazioni negli
spazi forniti nella pagina successiva e quindi passare a pagina 45.
Conguration sans l à l’aide de Conguration facile
Impostazione wireless con Impost. facile (Easy Setup)
Drahtlose Einstellungen mit Einfache Einrichtung (Easy Setup)
43
Page 46
For details on how to check the following information, refer to the manual of your access point or router, or contact its manufacturer.
Pour plus de détails sur la vérication des informations suivantes, reportez-vous manuel de votre point d’accès ou routeur, ou contactez le fabricant.
Weitere Einzelheiten zum Überprüfen der folgenden Informationen nden Sie im Handbuch des Zugriffspunkts oder Routers, oder wenden Sie sich an den Hersteller.
Per ulteriori informazioni su come vericare le seguenti informazioni, consultare il manuale del punto di accesso o del router oppure contattare il produttore.
Access Point Name/Network Name
Nom du point d’accès/nom du réseau
Zugriffspunktname/Netzwerkname
* Also referred to as SSID.
An identier to identify the specic access point.
* Également appelé SSID.
Identicateur identiant le point d'accès spécique.
* Auch als SSID bezeichnet.
Ein Bezeichner zur Identizierung des spezischen Zugriffspunkts.
* Denito anche SSID.
L'identicativo univoco del punto di accesso specico.
Network Key
Clé réseau
Netzwerkschlüssel
Chiave di reteNome punto di accesso/Nome rete
* Also referred to as encryption key, WEP key or WPA/WPA2 passphrase, Pre-Shared key.
A password to prevent unauthorized access to the network.
* Également appelée clé de cryptage, clé WEP ou phrase de passe WPA/WPA2, clé pré-partagée.
Mot de passe empêchant tout accès non autorisé au réseau.
* Auch als Verschlüsselungsschlüssel, WEP-Schlüssel, WPA/WPA2-Passphrase oder vorinstallierter
Schlüssel bezeichnet.
Es muss ein Kennwort eingerichtet werden, um nicht autorisierten Zugriff auf das Netzwerk zu verhindern.
* Denita anche chiave di crittograa, chiave WEP o passphrase WPA/WPA2, chiave già condivisa.
Una password per impedire l'accesso non autorizzato alla rete.
44
Page 47
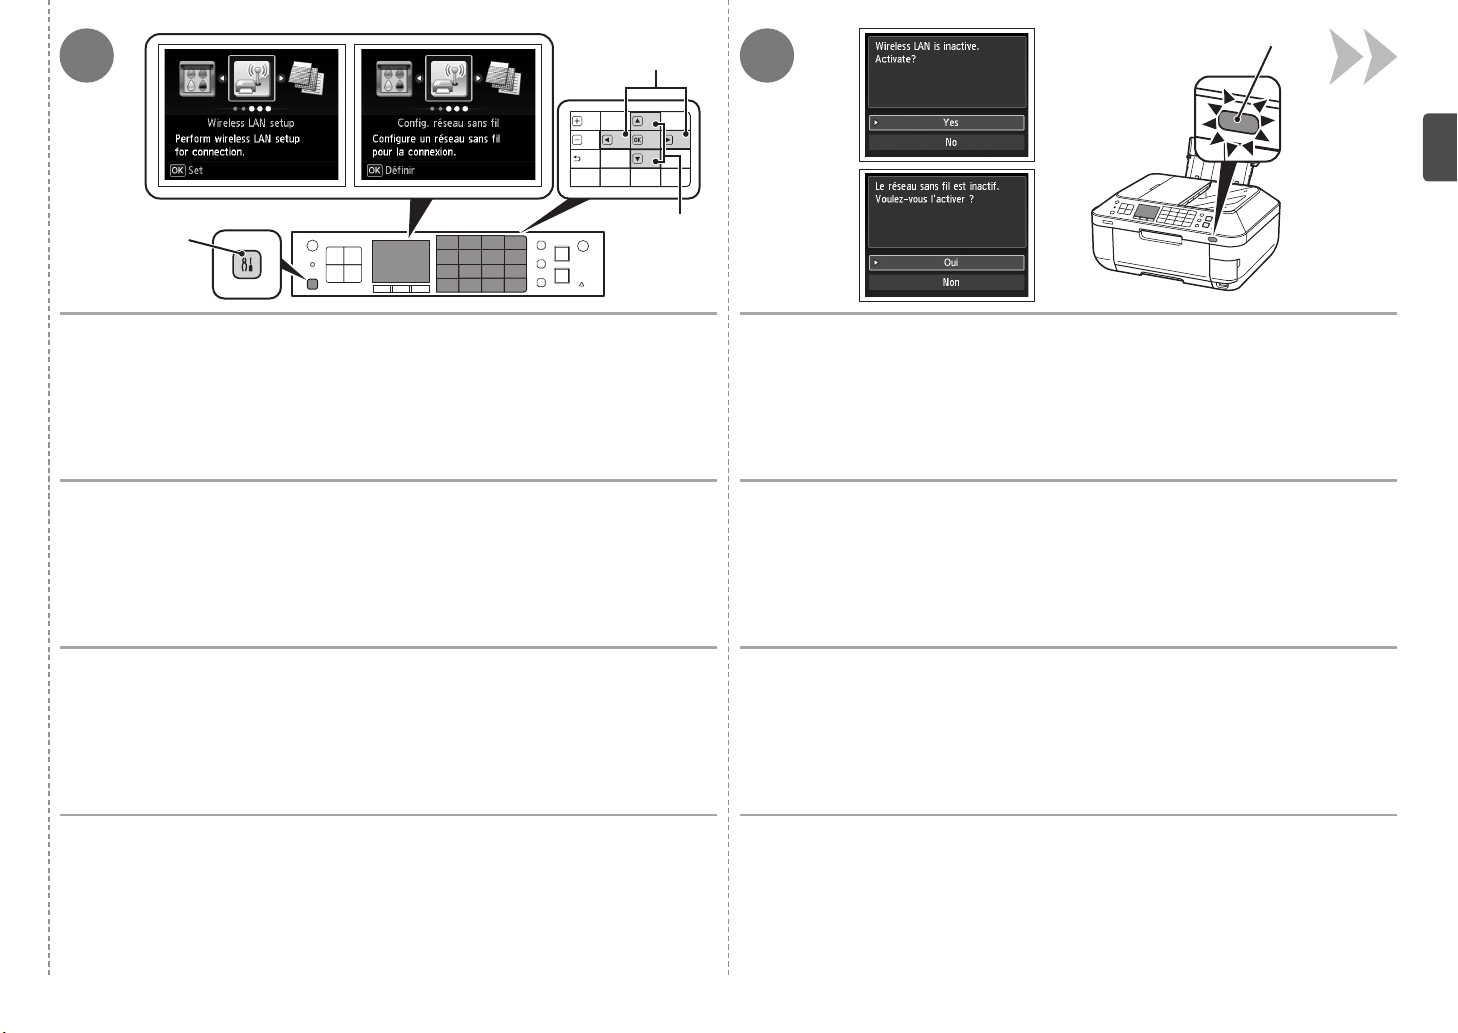
D
B
21
A
1. Press the Setup button (A).
2. Use the [ or ] button (B) to select Wireless LAN setup.
3. Press the OK button.
1. Appuyez sur le bouton Configuration (Setup)(A).
2. Utilisez le bouton [ ou ] (B) pour sélectionner Config. réseau sans fil
(Wireless LAN setup).
3. Appuyez sur le bouton OK.
1. Drücken Sie die Taste Einrichten (Setup) (A).
2. Wählen Sie mit der Taste [ oder ] (B) die Option WLAN-Einrichtung
(Wireless LAN setup) aus.
3. Drücken Sie die Taste OK.
C
Use the { or } button (C) to select Yes, then press the OK button.
When wireless connection is enabled, the Wi-Fi lamp (D) lights blue.
Utilisez le bouton { ou } (C) pour sélectionner Oui (Yes), puis appuyez sur le
bouton OK.
Lorsque la connexion sans fil est activée, le voyant Wi-Fi (D) s’allume en bleu.
Verwenden Sie die Taste { oder } (C), um Ja (Yes) auszuwählen, und drücken
Sie die Taste OK.
Wenn die drahtlose Verbindung aktiviert ist, leuchtet die Wi-Fi-Anzeige (D) blau.
1. Premere il pulsante Impostazione (Setup) (A).
2. Premere il pulsante [ o ] (B) per selezionare Impost. LAN wireless
(Wireless LAN setup),
3. Premere il pulsante OK.
Premere il pulsante { o } (C) per selezionare Sì (Yes), quindi premere il pulsante OK.
Una volta attivata la connessione wireless, la spia Wi-Fi (D) si accende in blu.
45
Page 48
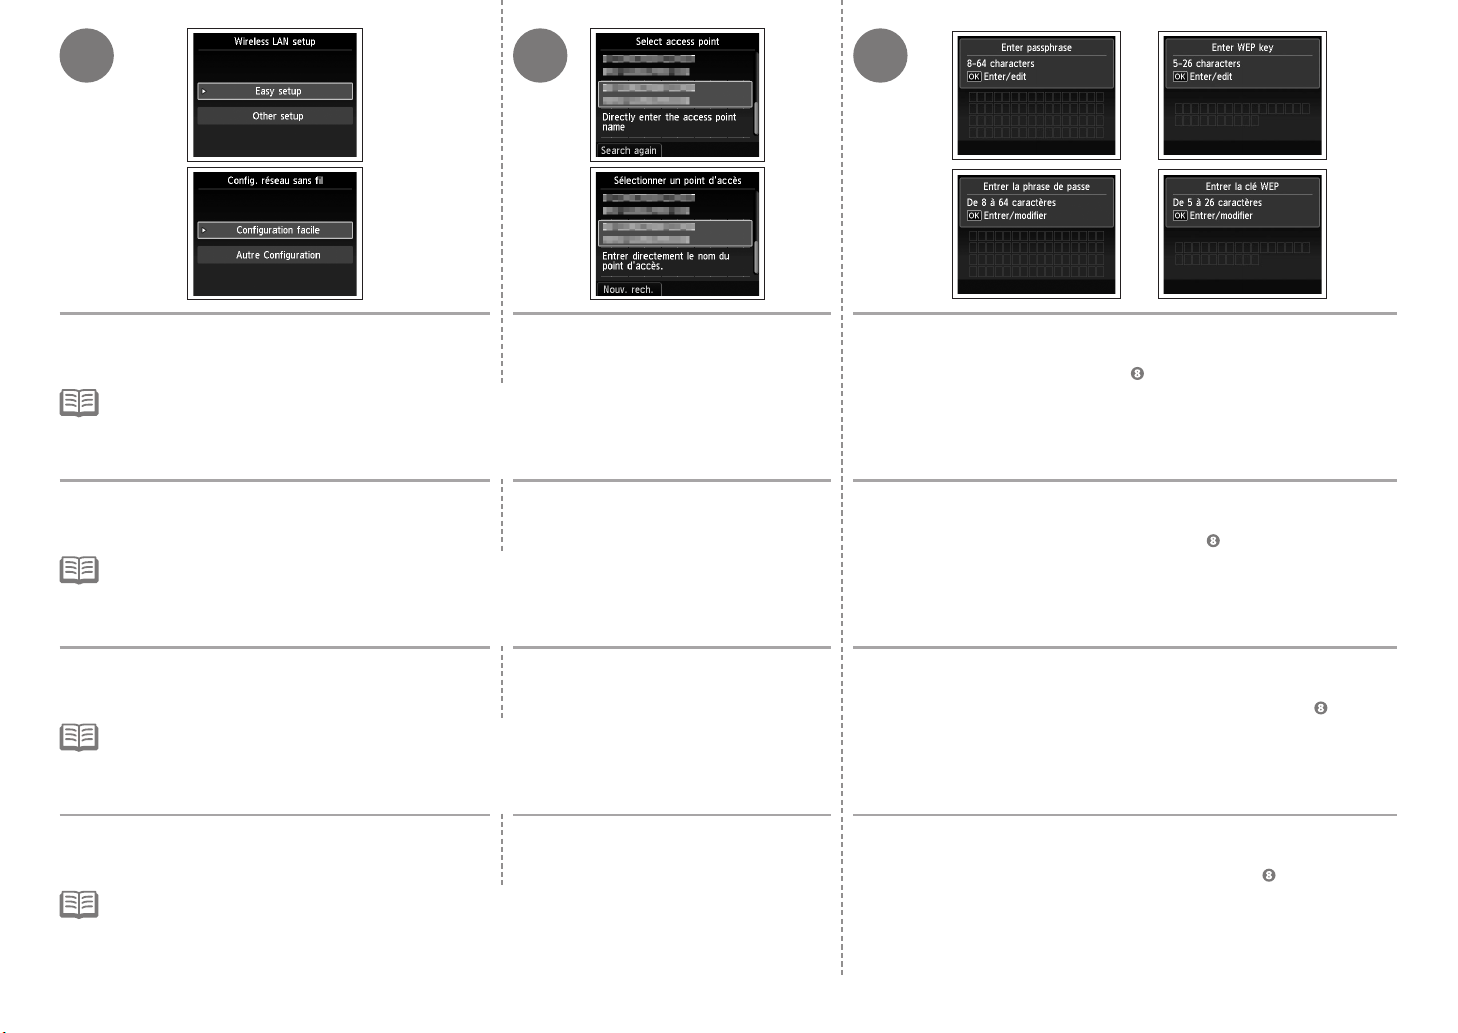
4 53
Select Easy setup, then press the OK button.
If you are living in an apartment, access points in use nearby may also be detected.
•
The access point names with 2-byte characters are not displayed properly, however, can be selected.
•
Sélectionnez Configuration facile (Easy setup), puis
appuyez sur le bouton OK.
Si vous vivez dans un appartement, les points d’accès situés à proximité peuvent également être détectés.
•
•
Les noms des points d’accès comportant des caractères à 2 octets ne s’afchent pas correctement, mais
peuvent néanmoins être sélectionnés.
Wählen Sie Einfache Einrichtung (Easy setup), und
drücken Sie anschließend die Taste OK.
Wenn sich das Gerät in einer Privatwohnung bendet, werden möglicherweise auch in der Nähe verwendete
•
Zugriffspunkte erkannt.
Zugriffspunktnamen mit zwei 2-Byte-Zeichen werden zwar nicht richtig angezeigt, können aber ausgewählt
•
werden.
Selezionare Impost. facile (Easy setup), quindi
premere il pulsante OK.
Se si abita in un appartamento, è possibile che vengano rilevati anche eventuali punti di accesso circostanti in uso.
•
I nomi dei punti di accesso con caratteri a 2 byte non vengono visualizzati correttamente, tuttavia è possibile
•
selezionarli.
Select the access point name you wrote
down on page 44, then press the OK
button.
Sélectionnez le nom du point d’accès
que vous avez noté à la page 44, puis
appuyez sur le bouton OK.
Wählen Sie den auf Seite 44 notierten
Zugriffspunktnamen aus, und drücken
Sie anschließend die Taste OK.
Selezionare il nome del punto di
accesso annotato a pagina 44 e
premere il pulsante OK.
Make sure that one of the above screens is displayed, then press
the OK button.
If the above screen is not displayed, go to on page 47.
Assurez-vous que l’un des écrans ci-dessus est affiché, puis
appuyez sur le bouton OK.
Si l’écran ci-dessus ne s’affiche pas, passez à l'étape à la page 47.
Vergewissern Sie sich, dass einer der oben dargestellten
Bildschirme angezeigt wird, und drücken Sie die Taste OK.
Wenn der obige Bildschirm nicht angezeigt wird, fahren Sie mit Schritt auf Seite
47 fort.
Assicurarsi che venga visualizzata una delle schermate sopra
indicate, quindi premere il pulsante OK.
Se la schermata sopra indicata non viene visualizzata, vedere a pagina 47.
46
Page 49
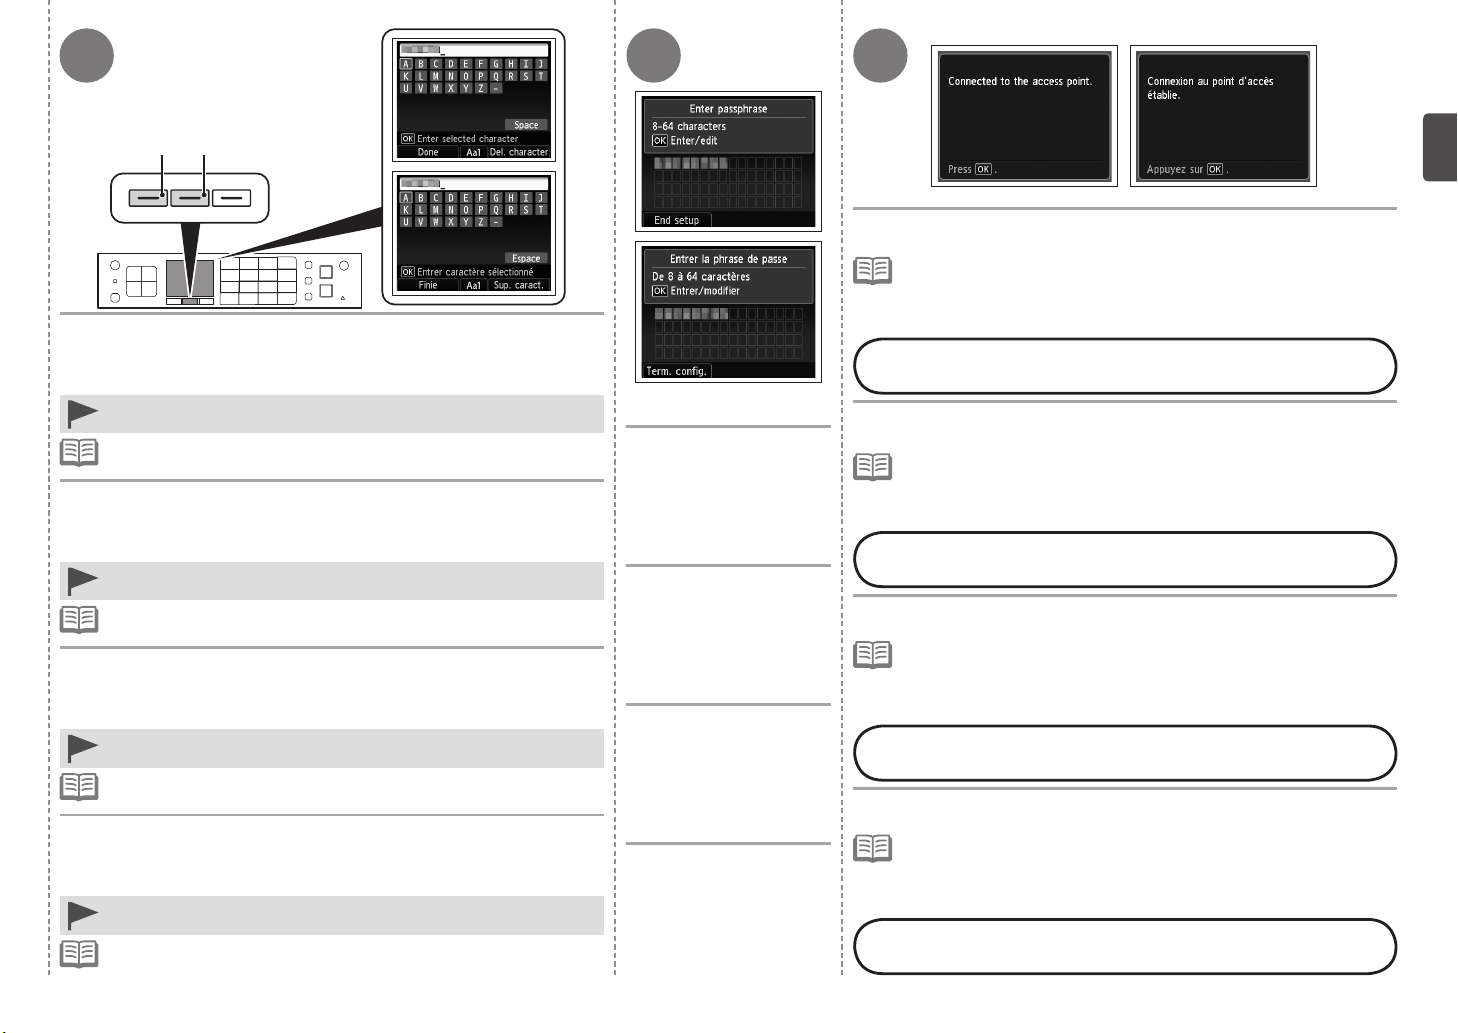
E F
Enter the network key you wrote down on page 44, then press the
left FUNCTION button (E).
Press the center FUNCTION button (F) to switch character entry modes.
Network key entry is case-sensitive. Be sure to enter upper and lower case
•
letters correctly.
For details on character entry, refer to the printed manual: Network Setup
•
Troubleshooting.
Entrez la clé réseau que vous avez notée à la page 44, puis
appuyez sur le bouton FONCTION (FUNCTION) de gauche (E).
Appuyez sur le bouton FONCTION (FUNCTION) du centre (F) pour changer de
mode de saisie des caractères.
L’entrée de la clé réseau est sensible à la casse. Veillez à entrer
•
correctement les lettres minuscules et majuscules.
Pour plus d’informations sur la saisie de caractères, reportez-vous au
•
manuel imprimé Guide de dépannage réseau.
Geben Sie den auf Seite 44 notierten Zugriffspunktnamen ein, und
drücken Sie die linke Taste FUNKTION (FUNCTION) (E).
Drücken Sie die mittlere Taste FUNKTION (FUNCTION) (F), um zwischen den
Eingabemodi zu wechseln.
Bei der Eingabe des Netzwerkschlüssels wird zwischen Groß-/Kleinschreibung
•
unterschieden. Geben Sie Groß- und Kleinbuchstaben korrekt ein.
Weitere Informationen über den Eingabemodus nden Sie im gedruckten
•
Handbuch Netzwerk-Fehlerbehebungshandbuch.
Immettere la chiave di rete annotata a pagina 44 e premere il
pulsante FUNZIONE (FUNCTION) sinistro (E).
Premere il pulsante FUNZIONE (FUNCTION) centrale (F) per alternare le modalità
di immissione dei caratteri.
Per l'immissione della chiave di rete viene rilevata la distinzione tra maiuscole e
•
minuscole. Assicurarsi di immettere correttamente le lettere maiuscole e minuscole.
Per informazioni sull'immissione di caratteri, consultare il manuale: Guida
•
alla risoluzione dei problemi di rete.
Make sure that the
network key is correct,
then press the left
FUNCTION button.
Assurez-vous que la clé
réseau est correcte, puis
appuyez sur le bouton
FONCTION (FUNCTION)
de gauche.
Stellen Sie sicher, dass
der Netzwerkschlüssel
korrekt ist, und drücken
Sie die linke Taste
FUNCTION (FUNKTION).
Accertarsi che la chiave
di rete sia corretta, quindi
premere il pulsante
FUNZIONE (FUNCTION)
sinistro.
86 7
When the above screen appears, press the OK button.
If Failed to connect to the access point. appears, press the OK button,
•
make sure that the network key is correct, then enter it again. If a connection
still cannot be established, refer to the printed manual: Network Setup
Troubleshooting.
Next, read “11 Install the Software (Network Connection)” on
page 52!
Lorsque l’écran ci-dessus apparaît, appuyez sur le bouton OK.
Si le message Échec de la connexion au point d’accès. (Failed to
•
connect to the access point.) apparaît, appuyez sur le bouton OK, vériez
que la clé réseau est correcte, puis entrez-la de nouveau. Si la connexion
ne s’établit toujours pas, reportez-vous au manuel imprimé : Guide de
dépannage réseau.
Lisez ensuite la section « 11 Installation du logiciel (connexion
réseau) » à la page 52.
Wenn der obige Bildschirm angezeigt wird, drücken Sie die Taste
OK.
Quando viene visualizzata la schermata sopra indicata, premere il
pulsante OK.
Wenn Herstellen der Verbindung zum Zugriffspunkt fehlgeschlagen. (Failed
•
to connect to the access point.) angezeigt wird, drücken Sie die Taste OK,
vergewissern Sie sich, dass der Netzwerkschlüssel stimmt, und geben Sie ihn erneut
ein. Wenn noch immer keine Verbindung hergestellt werden kann, nden Sie weitere
Informationen im gedruckten Handbuch Netzwerk-Fehlerbehebungshandbuch.
Lesen Sie jetzt den Abschnitt „11 Installieren der Software
(Netzwerkverbindung)“ auf Seite 52.
Se viene visualizzato il messaggio Impossibile connettersi al punto di
•
accesso. (Failed to connect to the access point.), premere il pulsante
OK, assicurarsi che la chiave di rete sia corretta, quindi immetterla
nuovamente. Se il problema persiste, consultare il manuale: Guida alla
risoluzione dei problemi di rete.
Leggere quindi "11 Installazione del software (Connessione di
rete)" a pagina 52.
47
Page 50
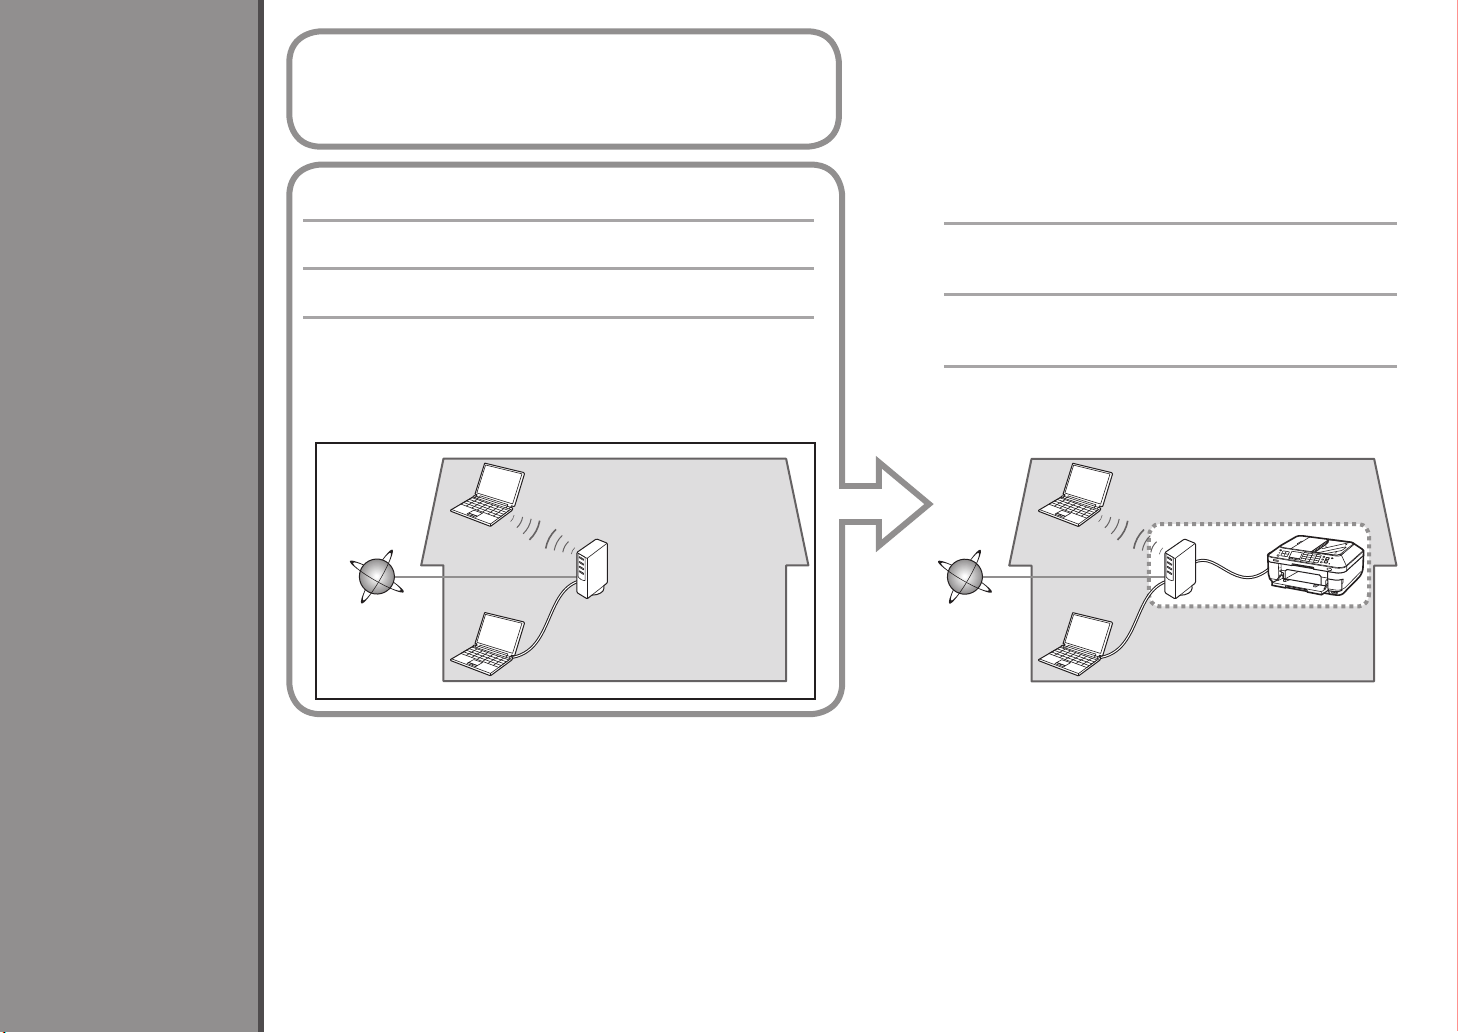
10
Before Conguring Wired Settings
Avant de congurer les paramètres laires
Vor Konguration der LAN-Einstellungen
Prima di congurare le impostazioni cablate
Wired Setup
Configuration filaire
Kabeleinstellungen
Impostazione cablata
Make sure that the computer and router are connected.
Vériez que l’ordinateur et le routeur sont connectés.
Achten Sie darauf, dass eine Verbindung zwischen dem
Computer und dem Router besteht.
Assicurarsi che il computer e il router siano collegati.
Router, etc.
Routeur, etc.
Router usw.
Internet
Internet
Internet
Internet
Router, ecc.
After confirming the connection, perform the following
instructions to add (connect) the machine to the network.
Après avoir confirmé la connexion, suivez les
instructions suivantes pour ajouter (connecter) la
machine au réseau.
Führen Sie nach der Bestätigung der Verbindung
folgende Anweisungen aus, um das Gerät zum Netzwerk
hinzuzufügen (damit zu verbinden).
Una volta verificato il collegamento, eseguire le istruzioni
riportate di seguito per aggiungere (collegare) la
macchina alla rete.
48
Page 51

Notes on Wired Connection■
Remarques relatives à la connexion laire■
Hinweise zu Kabelverbindungen■
Note sulla connessione cablata■
The conguration, router functions, setup procedures and security settings of the network device vary depending on your system environment. For details, refer to your device's instruction manual or contact its
•
manufacturer.
In an ofce setup, consult your network administrator.
•
If you connect to a network that is not protected with security measures, there is a risk of disclosing data such as your personal information to a third party.
•
The machine cannot be used over a wireless and wired connection at the same time.
•
If an error message appears or if you have trouble with the network connection, refer to the printed manual: Network Setup Troubleshooting.
•
Go to page 50.
La conguration, les fonctions du routeur, les procédures de conguration et les paramètres de sécurité du périphérique réseau varient selon votre environnement système. Pour plus d’informations, reportez-vous
•
au manuel d’instructions de votre périphérique ou contactez son fabricant.
Dans le cadre de la conguration d’un site, consultez votre administrateur réseau.
•
Si vous vous connectez à un réseau non protégé par des mesures de sécurité, il existe un risque de divulgation de données (vos coordonnées personnelles, par exemple) à une tierce partie.
•
La machine ne peut pas être utilisée simultanément sur un réseau sans l et avec une connexion câblée.
•
Si un message d’erreur apparaît ou que vous rencontrez des problèmes avec la connexion réseau, reportez-vous au manuel imprimé Guide de dépannage réseau.
•
Allez à la page 50.
Die Konguration, Routerfunktionen, Einrichtungsvorgänge und Sicherheitseinstellungen des Netzwerkgeräts variieren je nach Systemumgebung. Um weitere Informationen zu erhalten, lesen Sie im Handbuch des
•
Geräts nach, oder wenden Sie sich an den Hersteller.
Wenden Sie sich bei einer Büroeinrichtung an den Netzwerkadministrator.
•
Wenn Sie eine Verbindung zu einem Netzwerk herstellen, das nicht durch Sicherheitsmaßnahmen geschützt ist, besteht das Risiko, dass beispielsweise persönliche Daten an Dritte weitergegeben werden.
•
Das Gerät kann nicht gleichzeitig über eine drahtlose und eine Kabelverbindung verwendet werden.
•
Wenn eine Fehlermeldung angezeigt wird oder Sie Probleme mit der Netzwerkverbindung haben, nden Sie weitere Informationen im gedruckten Handbuch Netzwerk-Fehlerbehebungshandbuch.
•
Fahren Sie auf Seite 50
fort.
La congurazione, le funzioni del router, le procedure di installazione e le impostazione di protezione dei dispositivi di rete variano in base all'ambiente di sistema. Per informazioni, consultare il manuale di istruzioni
•
del dispositivo o contattare il produttore.
In caso di installazione all'interno di ufci, consultare l'amministratore della rete.
•
Se ci si connette a una rete non protetta, alcuni dati, ad esempio i dati personali, potrebbero essere divulgati a terzi.
•
La stampante non può essere utilizzata contemporaneamente in una connessione wireless e una cablata.
•
Se viene visualizzato un messaggio di errore o se si riscontrano problemi di connessione in rete, consultare il manuale cartaceo: Guida alla risoluzione dei problemi di rete.
•
Andare a pagina 50.
49
Page 52
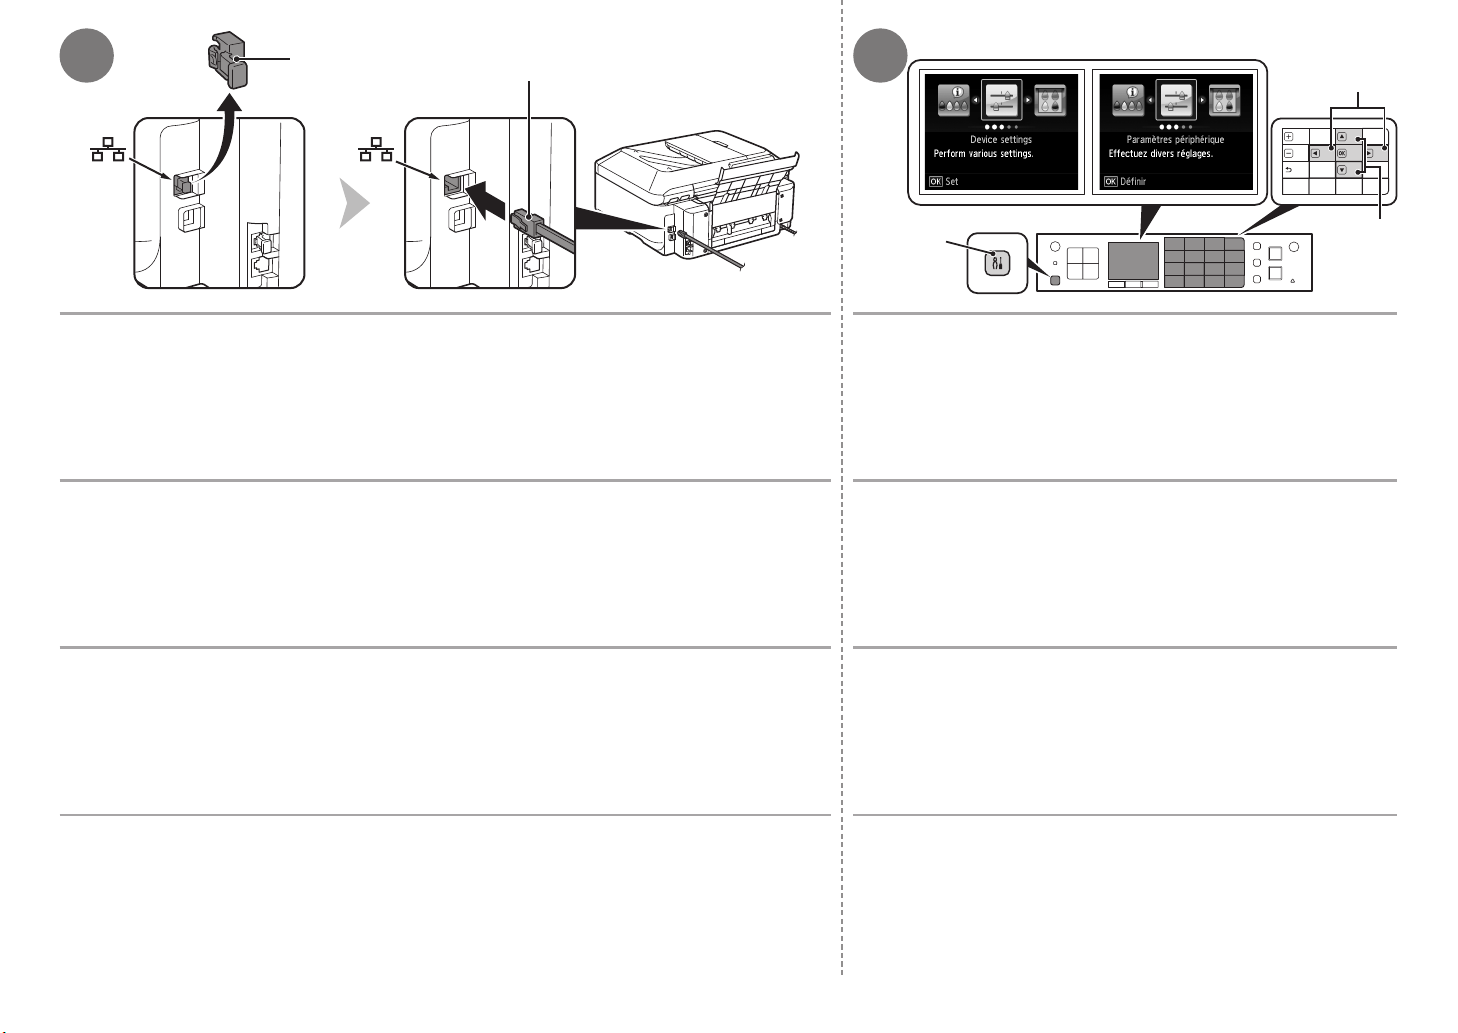
1 2
A
B
D
C
Remove the Cap (A), then connect a network device (router, etc.) with an Ethernet cable (B). 1. Press the Setup button (C).
The Wired LAN Connector is located on the right side at the back of the machine. The upper port is for an Ethernet
cable.
Retirez le capuchon (A), puis connectez un périphérique réseau (routeur, etc.) à l’aide d’un câble
Ethernet (B).
Le connecteur de réseau câblé se trouve à l’arrière de la machine, du côté droit. Le port supérieur est destiné au
câble Ethernet.
Nehmen Sie die Kappe (A) ab, und schließen Sie ein Netzwerkgerät (Router usw.) mit einem
Ethernet-Kabel an (B).
Der LAN-Anschluss befindet sich an der rechten Seite der Geräterückseite. Der obere Anschluss ist für ein EthernetKabel vorgesehen.
2. Use the
3. Press the
1. Appuyez sur le bouton Configuration (Setup) (C).
2. Utilisez le bouton
périphérique (Device settings).
3. Appuyez sur le bouton
1. Drücken Sie die Taste Einrichten (Setup) (C).
2. Wählen Sie mit der Taste
Geräteeinstellungen (Device settings) aus.
3. Drücken Sie die Taste
[ or ] button (D) to select Device settings.
OK button.
[ ou ] (D) pour sélectionner Paramètres
OK.
OK.
E
[ oder ] (D) die Option
Rimuovere il cappuccio (A), quindi effettuare la connessione a una periferica di rete (router e
così via) tramite un cavo Ethernet (B).
Il connettore della rete LAN cablata si trova a destra sul lato posteriore della macchina. La porta superiore è riservata
al cavo Ethernet.
50
1. Premere il pulsante Impostazione (Setup) (C).
2. Premere il pulsante
periferica (Device settings).
3. Premere il pulsante
[ o ] (D) per selezionare Impostazioni
OK.
Page 53
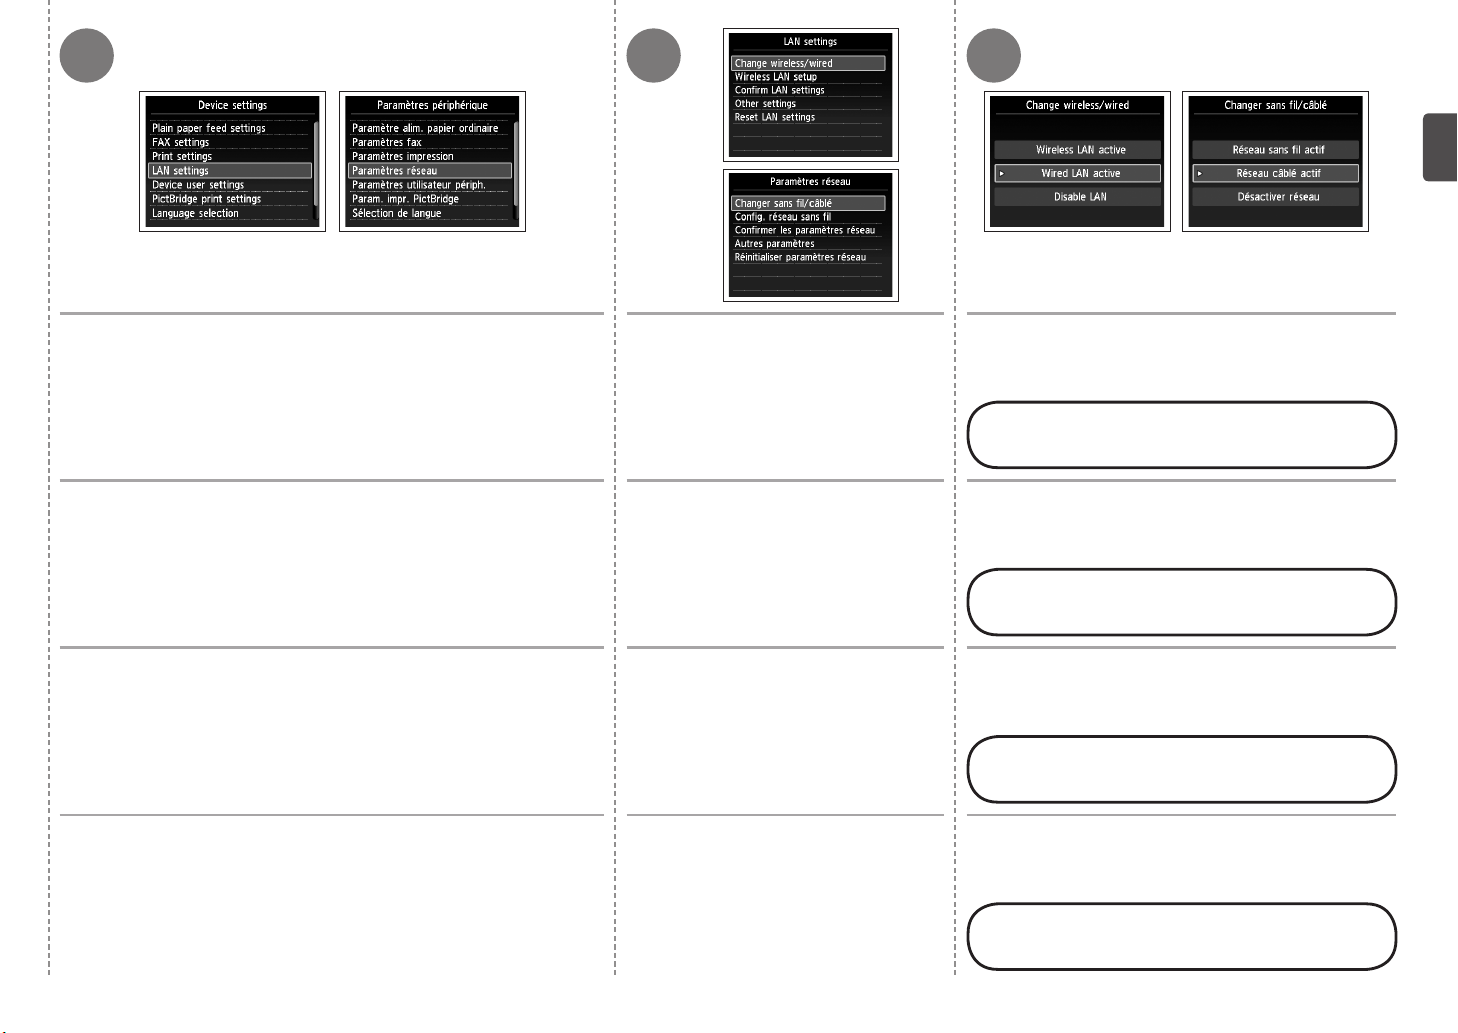
543
Use the { or } button (E) to select LAN settings, then press the
OK button.
Utilisez le bouton { ou } (E) pour sélectionner Paramètres réseau
(LAN settings), puis appuyez sur le bouton OK.
Verwenden Sie die Taste { oder } (E), um LAN-Einstellungen
(LAN settings) auszuwählen, und drücken Sie die Taste OK.
Utilizzare il pulsante { o } (E) per selezionare Impostazioni LAN
(LAN settings), quindi premere il pulsante OK.
Select Change wireless/wired, then
press the OK button.
Sélectionnez Changer sans fil/câblé
(Change wireless/wired), puis
appuyez sur le bouton OK.
Wählen Sie WLAN/LAN umschalten
(Change wireless/wired) aus, und
drücken Sie die Taste OK.
Selezionare Modifica wireless/wired
(Change wireless/wired), quindi
premere il pulsante OK.
Select Wired LAN active, press the OK button.
Next, read "11 Install the Software (Network
Connection)" on page 52!
Sélectionnez Réseau câblé actif (Wired LAN
active), puis appuyez sur le bouton OK.
Lisez ensuite la section « 11 Installation du
logiciel (connexion réseau) » à la page 52.
Wählen Sie LAN aktiv (Wired LAN active) aus, und
drücken Sie die Taste OK.
Lesen Sie jetzt den Abschnitt „11 Installieren der
Software (Netzwerkverbindung)“ auf Seite 52.
Selezionare LAN wired attiva (Wired LAN active),
quindi premere il pulsante OK.
Leggere quindi "11 Installazione del software
(Connessione di rete)" a pagina 52.
51
Page 54
11
To use the machine by connecting it to a computer, software
including the drivers needs to be copied (installed) to the
computer’s hard disk. The installation process takes about 20
minutes. (The installation time varies depending on the computer
environment or the number of application software to be installed.)
Pour pouvoir utiliser la machine à partir d’un ordinateur, vous
devez copier (installer) le logiciel, de même que les pilotes,
sur le disque dur. Le processus d’installation prend environ
20 minutes. (La durée de l’installation varie selon l’environnement
informatique et le nombre d’applications à installer.)
•
Quit all running applications before installation.
Log on as the administrator (or a member of the Administrators group).
•
Do not switch users during the installation process.
•
Internet connection may be required during the installation. Connection
•
fees may apply. Consult the internet service provider.
It may be necessary to restart your computer during the installation
•
process. Follow the on-screen instructions and do not remove the Setup
CD-ROM during restart.
The installation resumes once your computer has restarted.
If the rewall function of your security software is turned on, a warning
•
message may appear that Canon software is attempting to access the
network. If such a warning message appears, set the security software to
always allow access.
For the system requirements, refer to “18 Specications.”
•
Um das Gerät in Verbindung mit einem Computer verwenden
zu können, müssen Software und Treiber auf die Festplatte
des Computers kopiert bzw. installiert werden. Der
Installationsvorgang nimmt ca. 20 Minuten in Anspruch. (Die
Installationsdauer hängt von der Computerumgebung sowie der
Anzahl der zu installierenden Anwendungen ab.)
Schließen Sie vor der Installation alle offenen Anwendungen.
•
Melden Sie sich als Administrator (oder Mitglied der Administratorgruppe) an.
•
Wechseln Sie während des Installationsvorgangs nicht den Benutzer.
•
Während der Installation ist möglicherweise eine Internetverbindung
•
erforderlich. Möglicherweise fallen Verbindungsgebühren an. Wenden Sie
sich hierzu an Ihren Internetprovider.
Möglicherweise muss während des Installationsvorgangs der Computer
•
neu gestartet werden. Folgen Sie in diesem Fall den Anweisungen auf
dem Bildschirm. Nehmen Sie die Installations-CD-ROM (Setup CD-
ROM) während des Neustarts nicht heraus.
Die Installation wird nach dem Neustart des Computers fortgesetzt.
Falls die Firewall-Funktionen der Sicherheitssoftware aktiviert sind, wird
•
möglicherweise die Warnmeldung angezeigt, dass die Canon-Software
auf das Netzwerk zugreifen möchte. Falls eine solche Warnmeldung
Install the Software (Network Connection)
Installation du logiciel (connexion réseau)
Installieren der Software (Netzwerkverbindung)
Installazione del software (Connessione di rete)
angezeigt wird, kongurieren Sie die Sicherheitssoftware so, dass der
Zugriff immer erlaubt wird.
Eine Beschreibung der Systemvoraussetzungen nden Sie unter
•
„18 Technische Daten“.
•
Quittez toutes les applications en cours d’exécution avant l’installation.
Connectez-vous en tant qu’administrateur (ou membre du groupe
•
Administrateurs).
Ne changez pas d’utilisateur au cours du processus d’installation.
•
Une connexion Internet peut s’avérer nécessaire lors de l’installation.
•
Des frais de connexion peuvent vous être facturés. Consultez votre
fournisseur d’accès Internet.
Vous devrez peut-être redémarrer votre ordinateur durant le processus
•
d’installation. Suivez les instructions à l’écran et ne retirez pas le CD-
ROM d’installation pendant le redémarrage.
L’installation reprend après le redémarrage de votre ordinateur.
Si la fonction de pare-feu de votre logiciel de sécurité est activée, un
•
message d’avertissement peut apparaître indiquant que le logiciel Canon
tente d’accéder au réseau. Si un message de ce type apparaît, congurez
le logiciel de sécurité pour toujours autoriser l’accès.
Pour connaître la conguration système requise, reportez-vous à la
•
section « 18 Spécications ».
Per utilizzare la stampante collegandola a un computer, nel
software sono disponibili i driver da copiare (installare) sul
disco rigido del computer. Il processo di installazione richiede
circa 20 minuti. La durata dell'installazione varia a seconda
dell'ambiente del computer o del numero di applicazioni da
installare.
Prima di eseguire l'installazione, chiudere tutte le applicazioni in
•
esecuzione.
Accedere al computer come amministratore (o membro del gruppo
•
Administrators).
Non alternare account utente diversi durante il processo di installazione.
•
Durante l'installazione potrebbe essere necessaria la connessione a
•
Internet. È possibile che siano presenti costi di connessione a carico del
cliente. Consultare il provider Internet.
Durante la procedura di installazione potrebbe essere necessario
•
riavviare il computer. Attenersi alle istruzioni visualizzate e non rimuovere
il CD-ROM di installazione (Setup CD-ROM) durante il riavvio.
L'installazione riprenderà dopo il riavvio del computer.
Se la funzione rewall del software di protezione è attivata, potrebbe
•
venire visualizzato un messaggio che avvisa che il software Canon sta
tentando di accedere alla rete. In questo caso, impostare il software di
protezione in modo da consentire sempre l'accesso.
Per i requisiti di sistema, vedere "18 Speciche".
•
52
Page 55
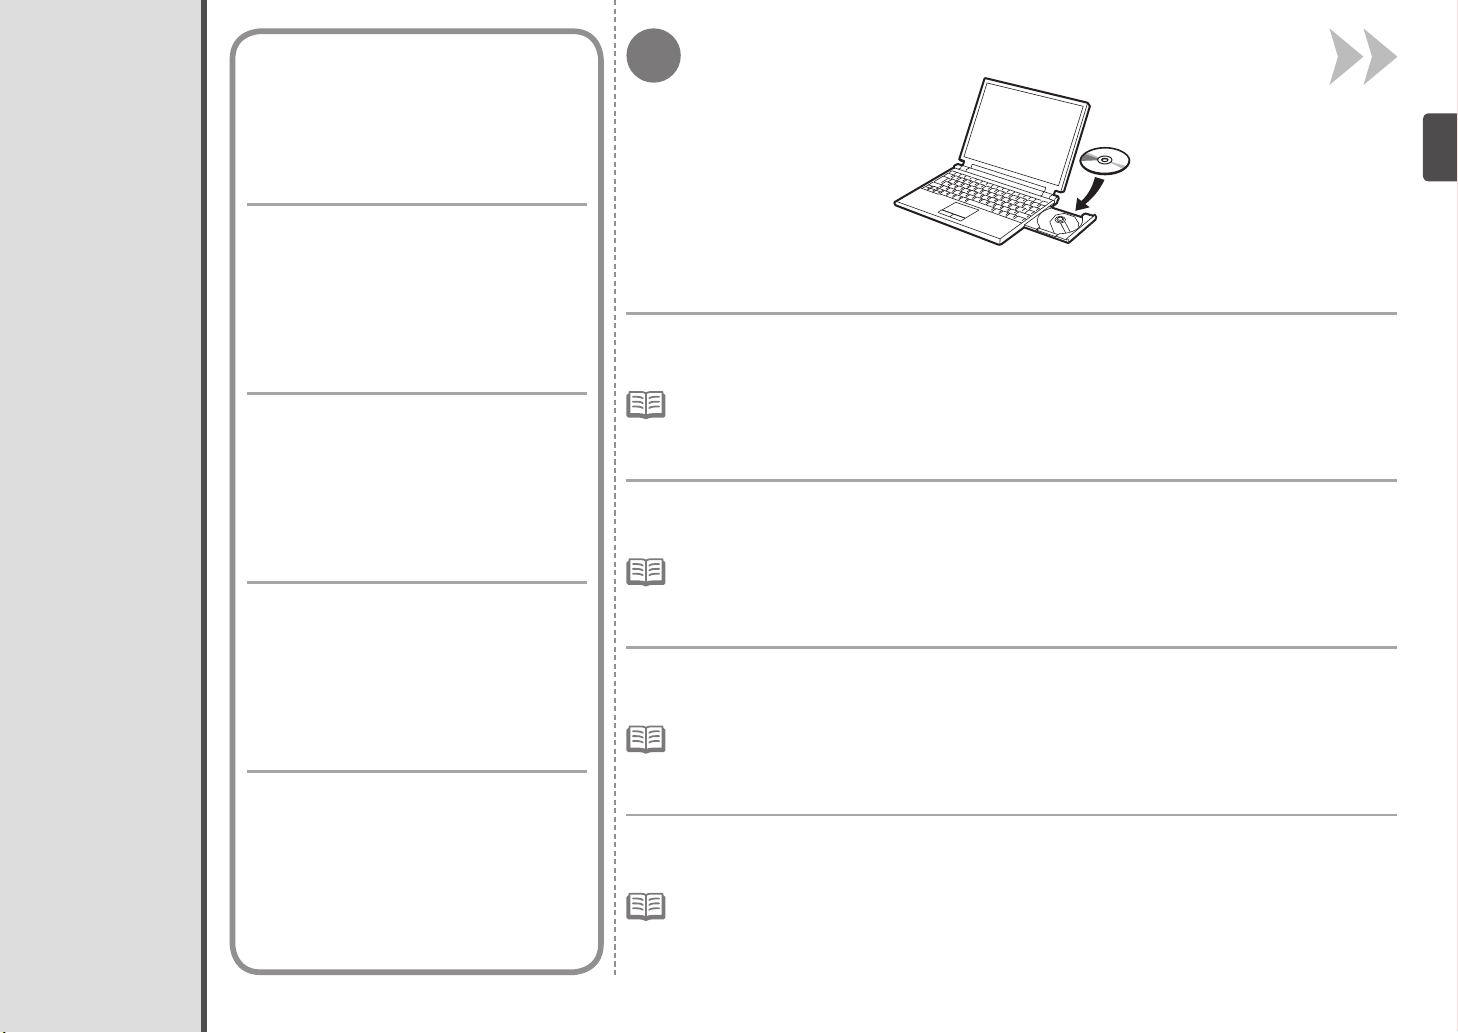
Easy-WebPrint EX
Easy-WebPrint EX
Easy-WebPrint EX
Easy-WebPrint EX
Easy-WebPrint EX is Web print software that is
installed on the computer when installing the supplied
software. Internet Explorer 7 or later (Windows) or
Safari 4 or later (Mac OS X v.10.5 or later) is required
to use this software. An Internet connection is required
for installation.
1
Install the Software
Installation du logiciel
Installieren der Software
Installazione del software
Easy-WebPrint EX est un logiciel d’impression Web
qui est installé sur l’ordinateur en même temps que
le logiciel fourni. Internet Explorer 7 ou une version
ultérieure (Windows) ou Safari 4 ou une version
ultérieure (Mac OS X v.10.5 ou une version ultérieure)
est requis pour utiliser ce logiciel. Vous devrez vous
connecter à Internet pour l’installation.
Bei Easy-WebPrint EX handelt es sich um die
Webdrucksoftware, die bei der Installation der
mitgelieferten Software auf Ihrem Computer installiert
wird. Zur Verwendung dieser Software ist Internet
Explorer 7 oder höher (Windows) oder Safari 4 oder
höher (Mac OS X v.10.5 oder höher) erforderlich. Für
die Installation ist eine Internetverbindung erforderlich.
Easy-WebPrint EX è un software di stampa Web che
viene installato nel computer insieme al software
fornito. Per utilizzare questo software è necessario
disporre di Internet Explorer 7 o versione successiva
(Windows) o Safari 4 o versione successiva (Mac
OS X v.10.5 o versione successiva). Per eseguire
l'installazione, è necessario disporre di una
connessione a Internet.
Turn on the computer, then insert the Setup CD-ROM into the CD-ROM drive.
If you are using Windows, the setup program starts automatically.
For Windows
If the program does not start automatically, double-click the CD-ROM icon in Computer or My Computer. When
•
the CD-ROM contents appear, double-click MSETUP4.EXE.
Allumez l’ordinateur et insérez le CD-ROM d’installation dans le lecteur de CD-ROM.
Si vous utilisez Windows, le programme d’installation démarre automatiquement.
Sous Windows
Si le programme d’installation ne se lance pas automatiquement, double-cliquez sur l’icône de CD-ROM dans
•
Ordinateur (Computer) ou Poste de travail (My Computer). Une fois le contenu du CD-ROM afché, double-
cliquez sur MSETUP4.EXE.
Schalten Sie den Computer ein, und legen Sie die Installations-CD-ROM (Setup CD-ROM) in
das CD-ROM-Laufwerk ein.
Wenn Sie Windows verwenden, startet das Setup-Programm automatisch.
Für Windows
Wenn das Programm nicht automatisch startet, doppelklicken Sie auf das CD-ROM-Symbol unter Computer
•
oder Arbeitsplatz (My Computer). Wenn der Inhalt der CD-ROM angezeigt wird, doppelklicken Sie auf
MSETUP4.EXE.
Accendere il computer, quindi inserire il CD-ROM di installazione (Setup CD-ROM) nell'unità
CD-ROM.
Se si utilizza Windows, il programma di installazione verrà avviato automaticamente.
Per Windows
Se il programma non viene avviato automaticamente, fare doppio clic sull'icona del CD-ROM in Computer o
•
Risorse del computer (My Computer). Quando viene visualizzato il contenuto del CD-ROM, fare doppio clic sul
le MSETUP4.EXE.
53
Page 56
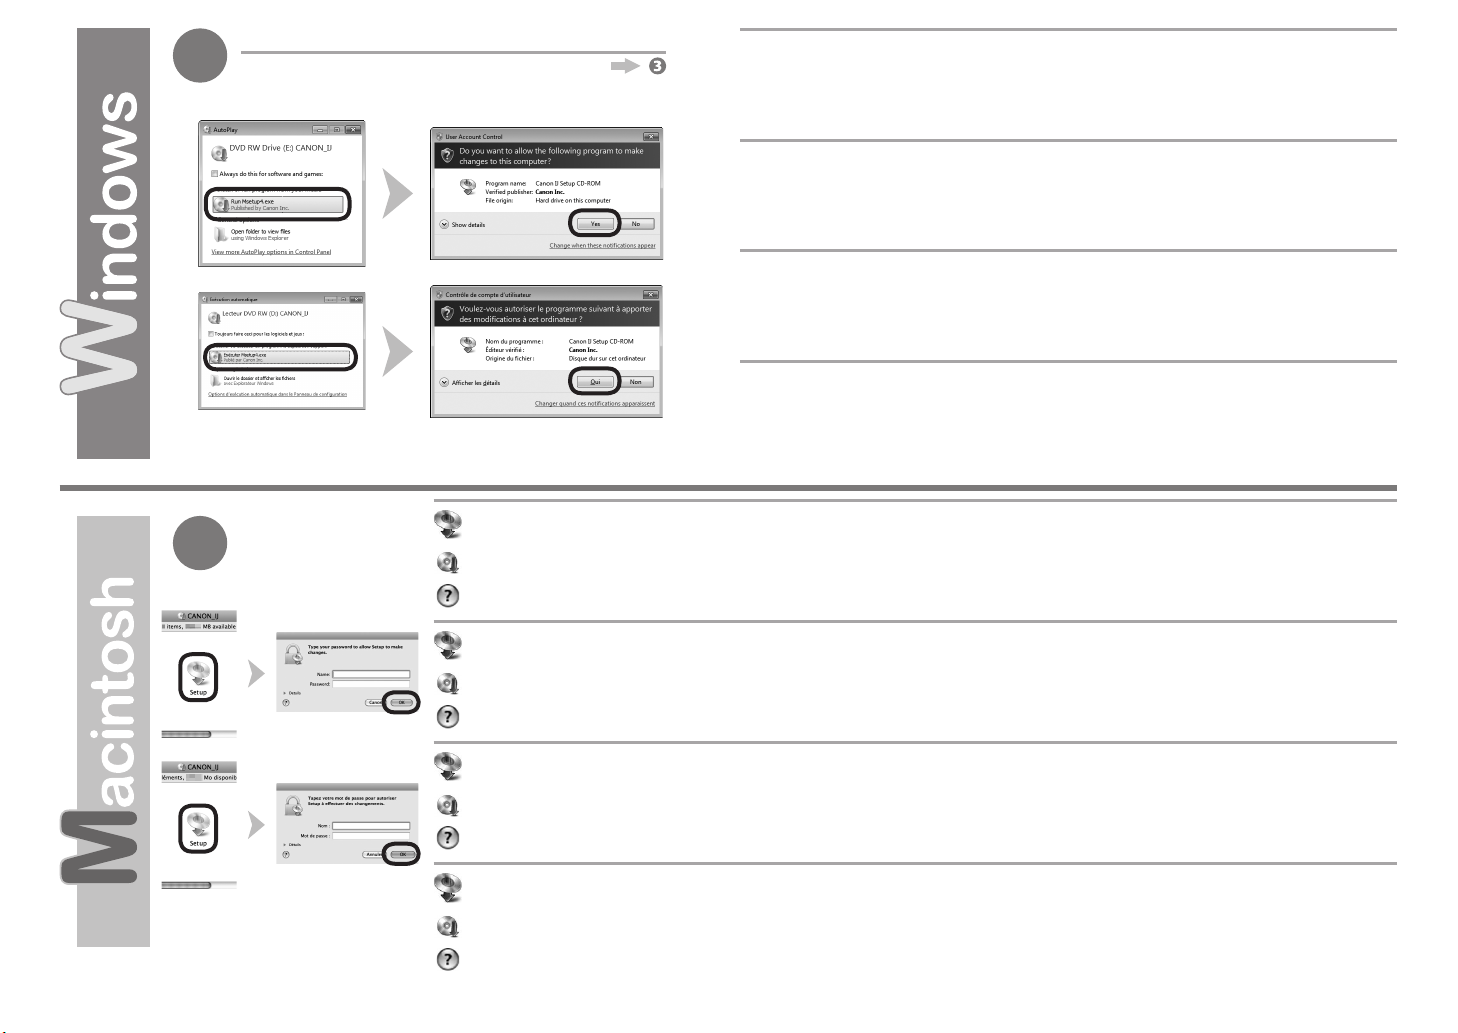
Windows 7/Windows Vista
2
2
Windows XP
Double-click the Setup icon of the CD-ROM folder to proceed to the following screen. Enter your administrator name
and password, then click OK.
If the CD-ROM folder does not open automatically, double-click the CD-ROM icon on the desktop.
If you do not know your administrator name or password, click the help button, then follow the on-screen instructions.
Click Run Msetup4.exe on the AutoPlay screen, then click Yes or Continue on
the User Account Control dialog box.
If the User Account Control dialog box reappears in following steps, click Yes or Continue.
Cliquez sur Exécuter Msetup4.exe (Run Msetup4.exe) dans l’écran Exécution
automatique (AutoPlay), puis cliquez sur Oui (Yes) ou Continuer (Continue) dans la
boîte de dialogue Contrôle de compte d’utilisateur (User Account Control).
Si la boîte de dialogue Contrôle de compte d’utilisateur (User Account Control) réapparaît au
cours des étapes suivantes, cliquez sur Oui (Yes) ou Continuer (Continue).
Klicken Sie im Fenster Automatische Wiedergabe (AutoPlay) auf Msetup4.exe ausführen
(Run Msetup4.exe) und anschließend im Dialogfeld Benutzerkontensteuerung (User
Account Control) auf Fortfahren (Continue) oder auf Ja (Yes).
Wenn das Dialogfeld Benutzerkontensteuerung (User Account Control) in folgenden Schritten
erneut angezeigt wird, klicken Sie auf Fortfahren (Continue) oder auf Ja (Yes).
Fare clic su Esegui Msetup4.exe (Run Msetup4.exe) nella schermata Riprod.
automatica (AutoPlay), quindi fare clic su Sì (Yes) o su Continua (Continue)
nella finestra di dialogo Controllo account utente (User Account Control).
Se la finestra di dialogo Controllo account utente (User Account Control) viene di nuovo
visualizzata nelle fasi successive, fare clic su Sì (Yes) o su Continua (Continue).
54
Double-cliquez sur l’icône Setup dans le dossier du CD-ROM pour passer à l’écran suivant. Entrez votre nom et
votre mot de passe d’administrateur, puis cliquez sur OK.
Si le dossier du CD-ROM ne s’ouvre pas automatiquement, double-cliquez sur l’icône du CD-ROM sur le bureau.
Si vous ne connaissez pas votre nom ou votre mot de passe d’administrateur, cliquez sur le bouton d’aide, puis suivez les instructions à
l’écran.
Doppelklicken Sie auf das Symbol Setup des CD-ROM-Ordners, um zum folgenden Fenster zu wechseln. Geben Sie
Ihren Administratornamen und Ihr Kennwort ein, und klicken Sie auf OK.
Wenn sich der CD-ROM-Ordner nicht automatisch öffnet, doppelklicken Sie auf dem Desktop auf das CD-ROM-Symbol.
Wenn Sie Ihren Administratornamen oder das Kennwort vergessen haben, klicken Sie auf Hilfe, und folgen Sie dann den Anweisungen auf
dem Bildschirm.
Fare doppio clic sull'icona Setup nella cartella del CD-ROM per passare alla schermata seguente. Immettere il nome
e la password dell'amministratore, quindi fare clic su OK.
Se la cartella del CD-ROM non si apre automaticamente, fare doppio clic sull'icona del CD-ROM nel desktop.
Se non si conoscono il nome o la password dell'amministratore, fare clic sul pulsante ? (Help), quindi seguire le istruzioni a video.
Page 57
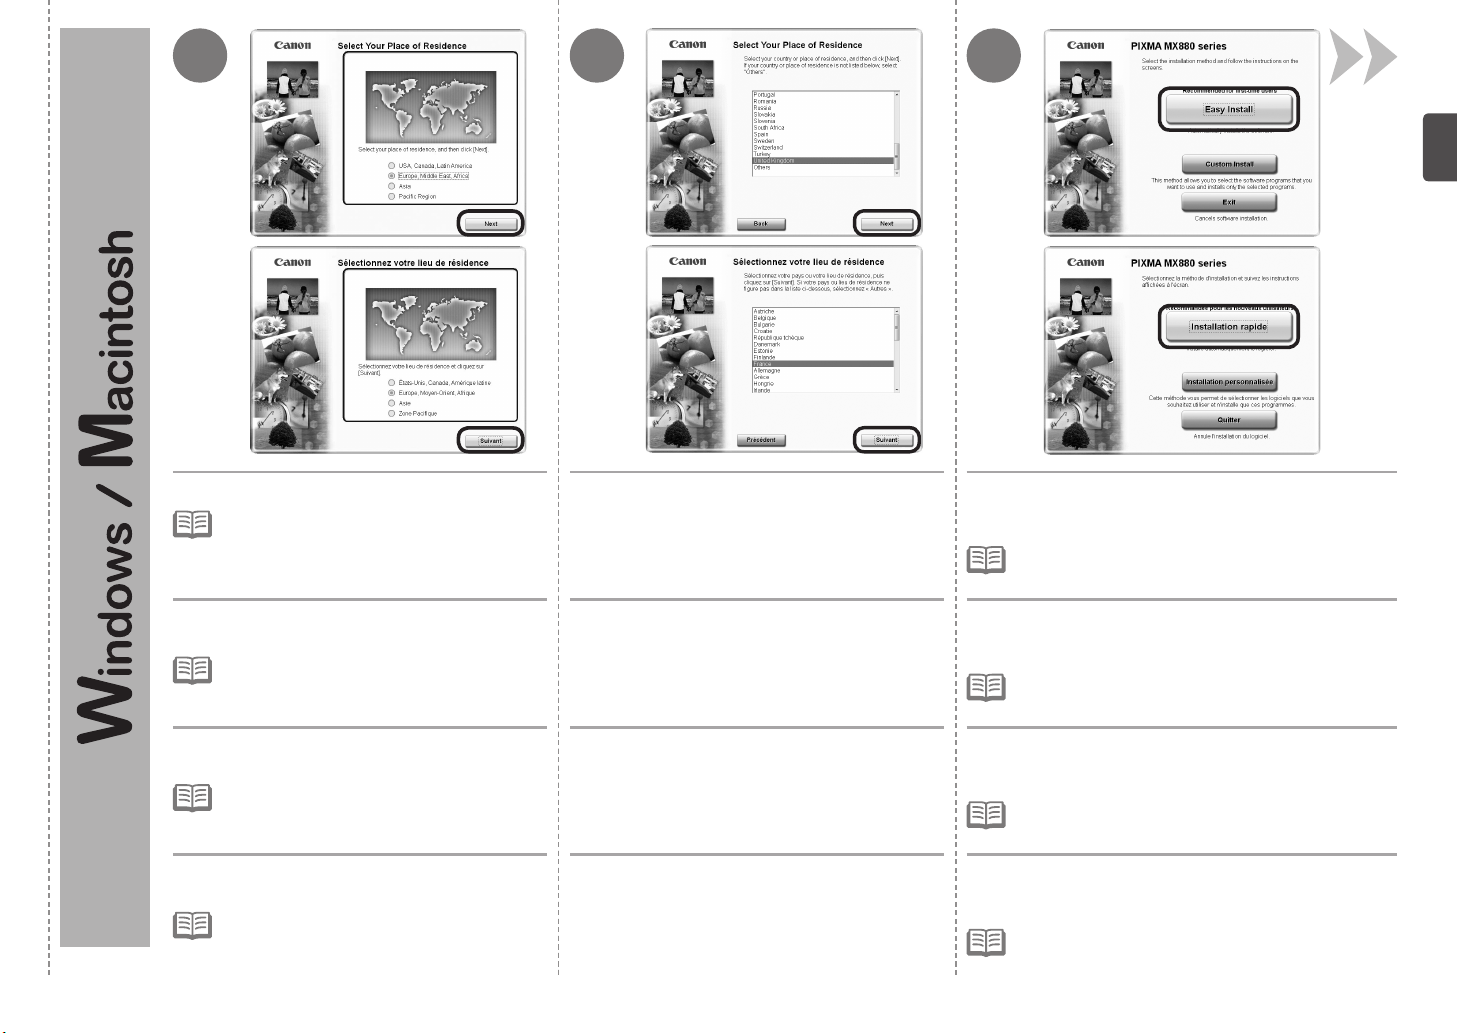
If the Select Language screen appears, select a
•
language, then click Next.
43 5
Select a country or region, then click Next.Select your place of residence, then click Next. Click Easy Install.
The drivers, application software, and on-screen manuals are
installed.
If you want to select particular items to install, click
•
Custom Install.
Sélectionnez votre lieu de résidence et cliquez
sur Suivant (Next).
Si l’écran Sélectionner une langue (Select
•
Language) s’afche, sélectionnez une langue,
puis cliquez sur Suivant (Next).
Wählen Sie Ihren Wohnsitz aus, und klicken
Sie auf Weiter (Next).
Wenn das Fenster Sprache wählen (Select
•
Language) angezeigt wird, wählen Sie eine
Sprache aus, und klicken Sie auf Weiter (Next).
Selezionare il paese di residenza, quindi fare clic su
Avanti (Next).
Se viene visualizzata la nestra di dialogo Selezione
•
lingua (Select Language), selezionare una lingua,
quindi fare clic su Avanti (Next).
Sélectionnez un pays ou une région, puis
cliquez sur Suivant (Next).
Wählen Sie ein Land oder eine Region aus,
und klicken Sie auf Weiter (Next).
Scegliere un paese, quindi fare clic su Avanti
(Next).
Cliquez sur Installation rapide (Easy Install).
Les pilotes, l’application et les manuels en ligne sont installés.
Si vous souhaitez n’installer que certains éléments
•
spéciques, cliquez sur Installation personnalisée
(Custom Install).
Klicken Sie auf Einfache Installation (Easy Install).
Die Treiber, Anwendungssoftware und Online-Handbücher
werden installiert.
Wenn Sie bestimmte Elemente zur Installation auswählen
•
möchten, klicken Sie auf Benutzerdenierte Installation
(Custom Install).
Fare clic su Installazione standard (Easy Install).
Vengono installati i driver, le applicazioni software e i manuali a
video.
Se si desidera selezionare determinati elementi per l'installazione,
•
fare clic su Installaz. personalizzata (Custom Install).
55
Page 58
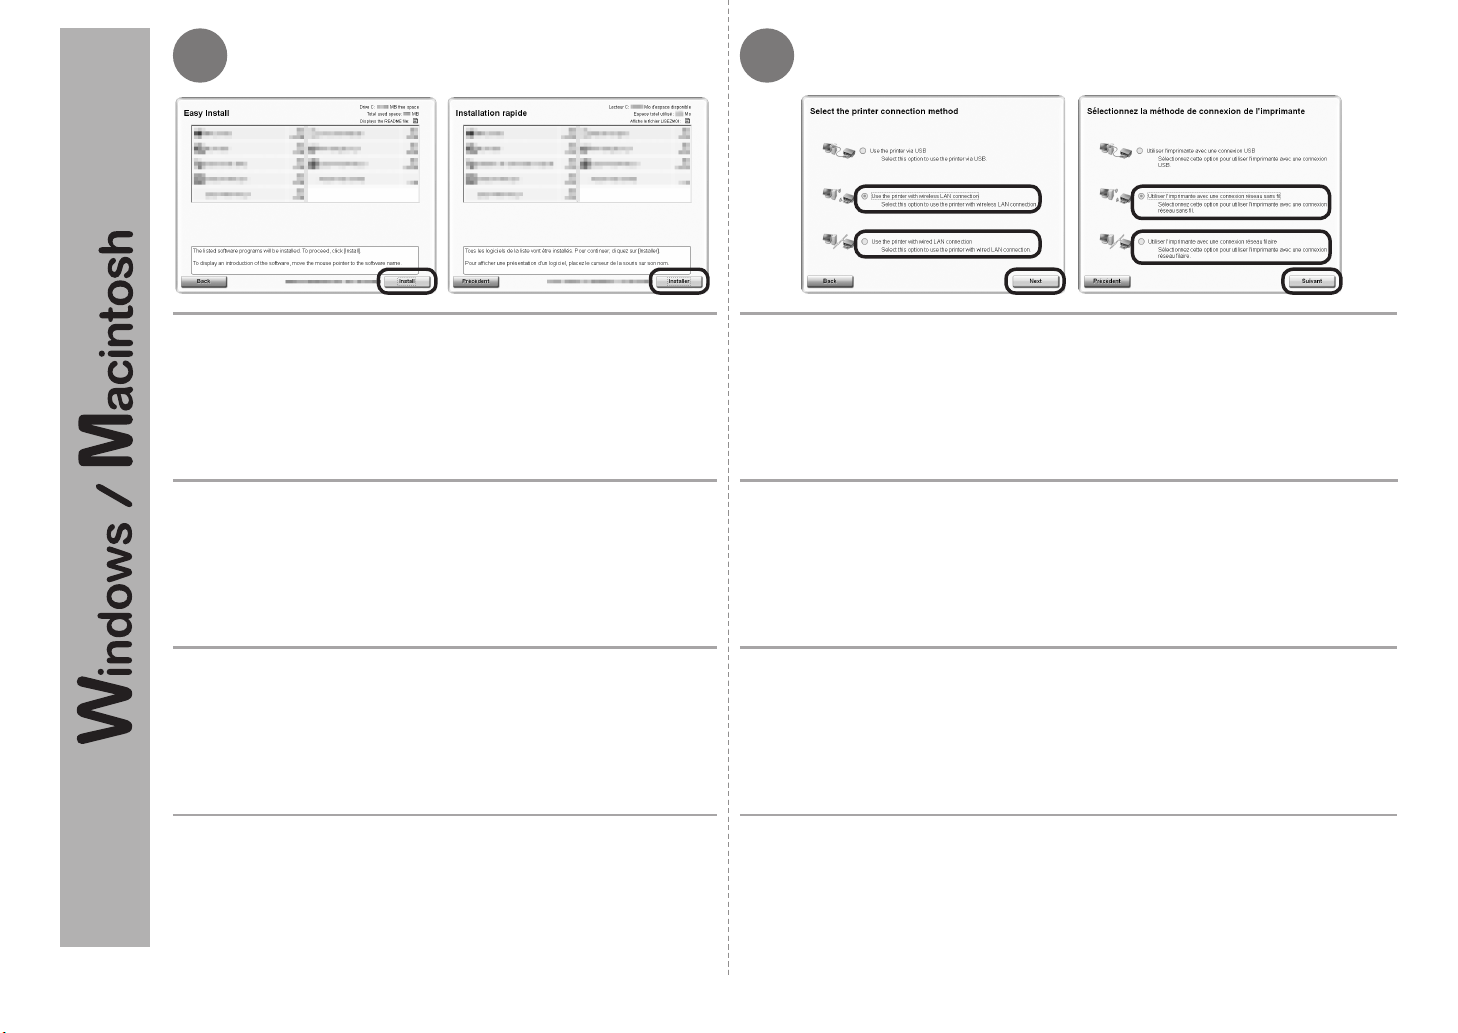
6 7
Click Install.
Cliquez sur Installer (Install).
Klicken Sie auf Installieren (Install).
Fare clic su Installa (Install).
If you select wireless connection on page 30
Select Use the printer with wireless LAN connection, then click Next.
If you select wired connection on page 30
Select Use the printer with wired LAN connection, then click Next.
Follow any on-screen instructions to proceed with the software installation.
Si vous sélectionnez une connexion sans l à la page 30
Sélectionnez Utiliser l’imprimante avec une connexion réseau sans fil (Use
the printer with wireless LAN connection), puis cliquez sur Suivant (Next).
Si vous sélectionnez une connexion laire à la page 30
Sélectionnez Utiliser l’imprimante avec une connexion réseau filaire (Use the
printer with wired LAN connection), puis cliquez sur Suivant (Next).
Pour poursuivre l’installation du logiciel, suivez les instructions à l’écran.
Bei Auswahl der drahtlosen Verbindung auf Seite 30
Wählen Sie Drucker mit drahtloser LAN-Verbindung verwenden (Use the
printer with wireless LAN connection) aus, und klicken Sie auf Weiter (Next).
Bei Auswahl der LAN-Verbindung auf Seite 30
Wählen Sie Drucker mit drahtgebundener LAN-Verbindung verwenden (Use
the printer with wired LAN connection) aus, und klicken Sie auf Weiter (Next).
Befolgen Sie sämtliche Anweisungen auf dem Bildschirm, um mit der Softwareinstallation
fortzufahren.
Se si è selezionata la connessione wireless a pagina 30
Selezionare Utilizzare la stampante con connessione LAN wireless (Use the
printer with wireless LAN connection), quindi fare clic su Avanti (Next).
Se si è selezionata la connessione cablata a pagina 30
Selezionare Utilizzare la stampante con connessione LAN cablata (Use the
printer with wired LAN connection), quindi fare clic su Avanti (Next).
Per procedere con l'installazione del software, seguire le istruzioni visualizzate.
56
Page 59
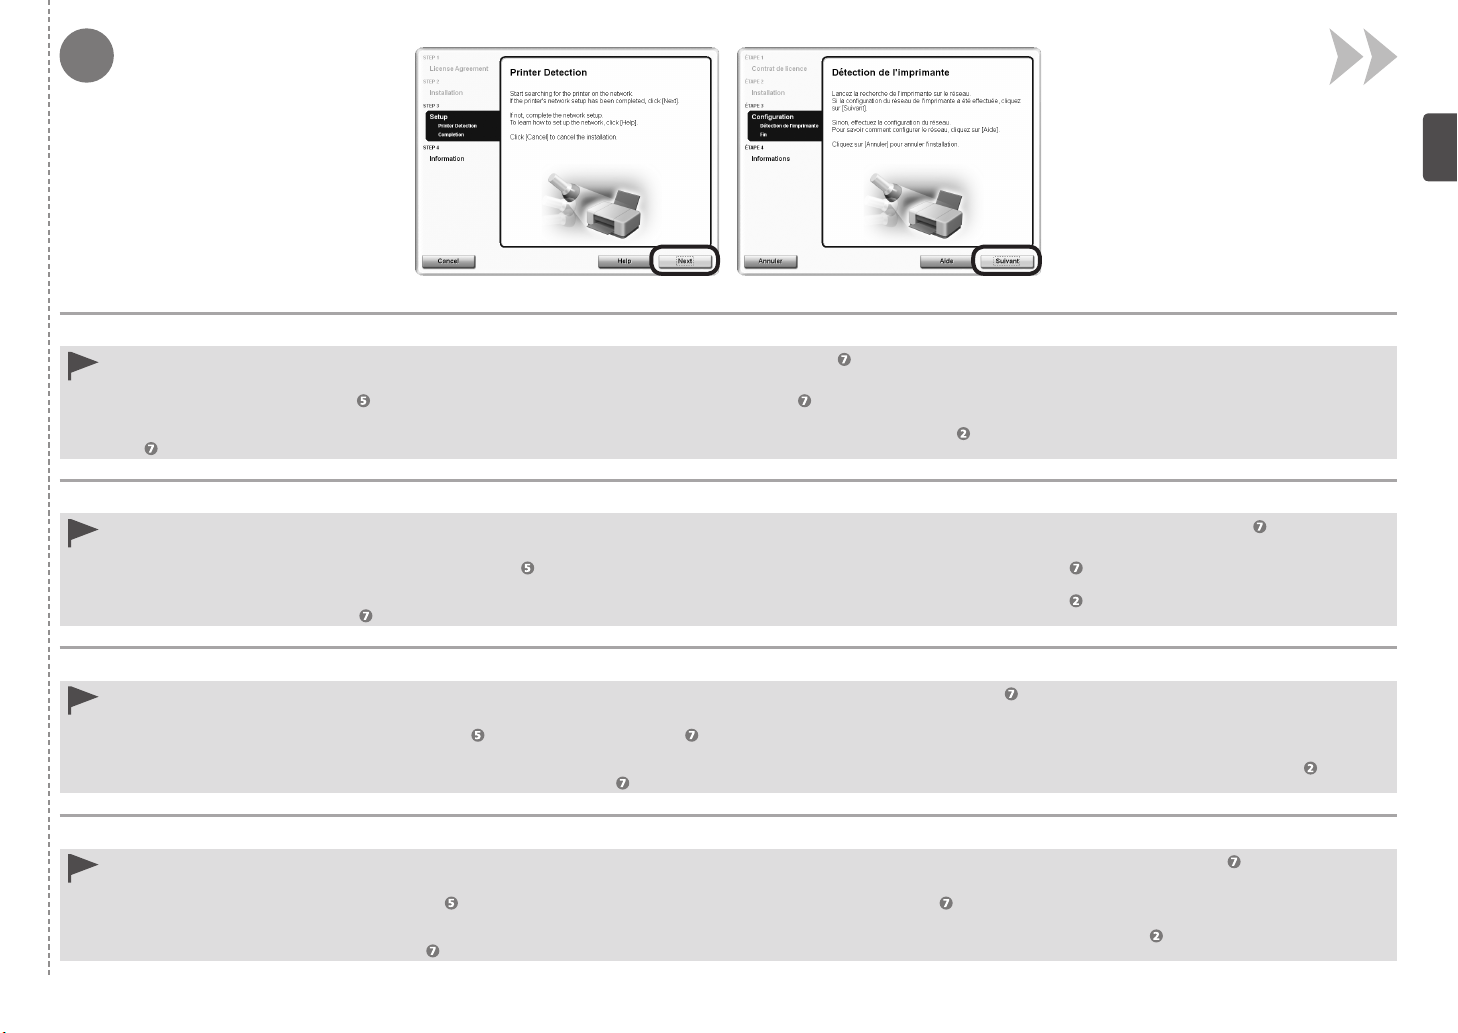
8
When the Printer Detection screen appears, click Next.
If the Printer Connection screen appears instead of this screen, the connection method is not correctly selected in .•
For Windows
−
Click Cancel and start again from , then select the connection method, which you select on page 30, in .
For Macintosh
−
Follow on-screen instructions and proceed with the installation. Click Exit on the installation complete screen, then start again from and select the connection method, which you select on page 56, in
.
Lorsque l’écran Détection de l’imprimante (Printer Detection) apparaît, cliquez sur Suivant (Next).
Si l’écran Connexion de l’imprimante (Printer Connection) s’afche au lieu de cet écran, cela signie que la méthode de connexion n’a pas été correctement sélectionnée à l’étape .•
Sous Windows
−
Cliquez sur Annuler (Cancel) et reprenez à partir de l’étape , puis sélectionnez le mode de connexion que vous avez choisi à la page 30, à l’étape .
Sous Macintosh
−
Suivez les instructions à l’écran et effectuez l’installation. Cliquez sur Quitter (Exit) sur l’écran de n de l’installation, puis reprenez à partir de l’étape et sélectionnez le mode de connexion que vous
avez choisi à la page 56, à l’étape .
Wenn der Bildschirm Druckererkennung (Printer Detection) angezeigt wird, klicken Sie auf Weiter (Next).
Wenn der Bildschirm Druckeranschluss (Printer Connection) anstelle dieses Bildschirms angezeigt wird, wurde die Verbindungsmethode in nicht richtig ausgewählt.•
Für Windows
−
Klicken Sie auf Abbrechen (Cancel), starten Sie ab erneut, und wählen Sie dann in die Verbindungsmethode aus, für die Sie sich auf Seite 30 entschieden haben.
Für Macintosh
−
Befolgen Sie die Anweisungen auf dem Bildschirm, und fahren Sie mit der Installation fort. Klicken Sie im Abschlussbildschirm der Installation auf Beenden (Exit), beginnen Sie wieder mit , und
wählen Sie die Verbindungsmethode aus, für die Sie sich auf Seite 56 unter entschieden haben.
Quando viene visualizzata la schermata Rilevamento stampante (Printer Detection), fare clic su Avanti (Next).
Se anziché questa schermata viene visualizzata la schermata Connessione stampante (Printer Connection), il metodo di connessione non è stato selezionato correttamente in .•
Per Windows
−
Fare clic su Annulla (Cancel) e ricominciare da , quindi selezionare il metodo di collegamento, come descritto a pagina 30, in .
Per Macintosh
−
Attenersi alle istruzioni visualizzate e continuare l'installazione. Fare clic su Esci (Exit) nella schermata di completamento dell'installazione, quindi ricominciare da e selezionare il metodo di
collegamento, come descritto a pagina 56, in .
57
Page 60
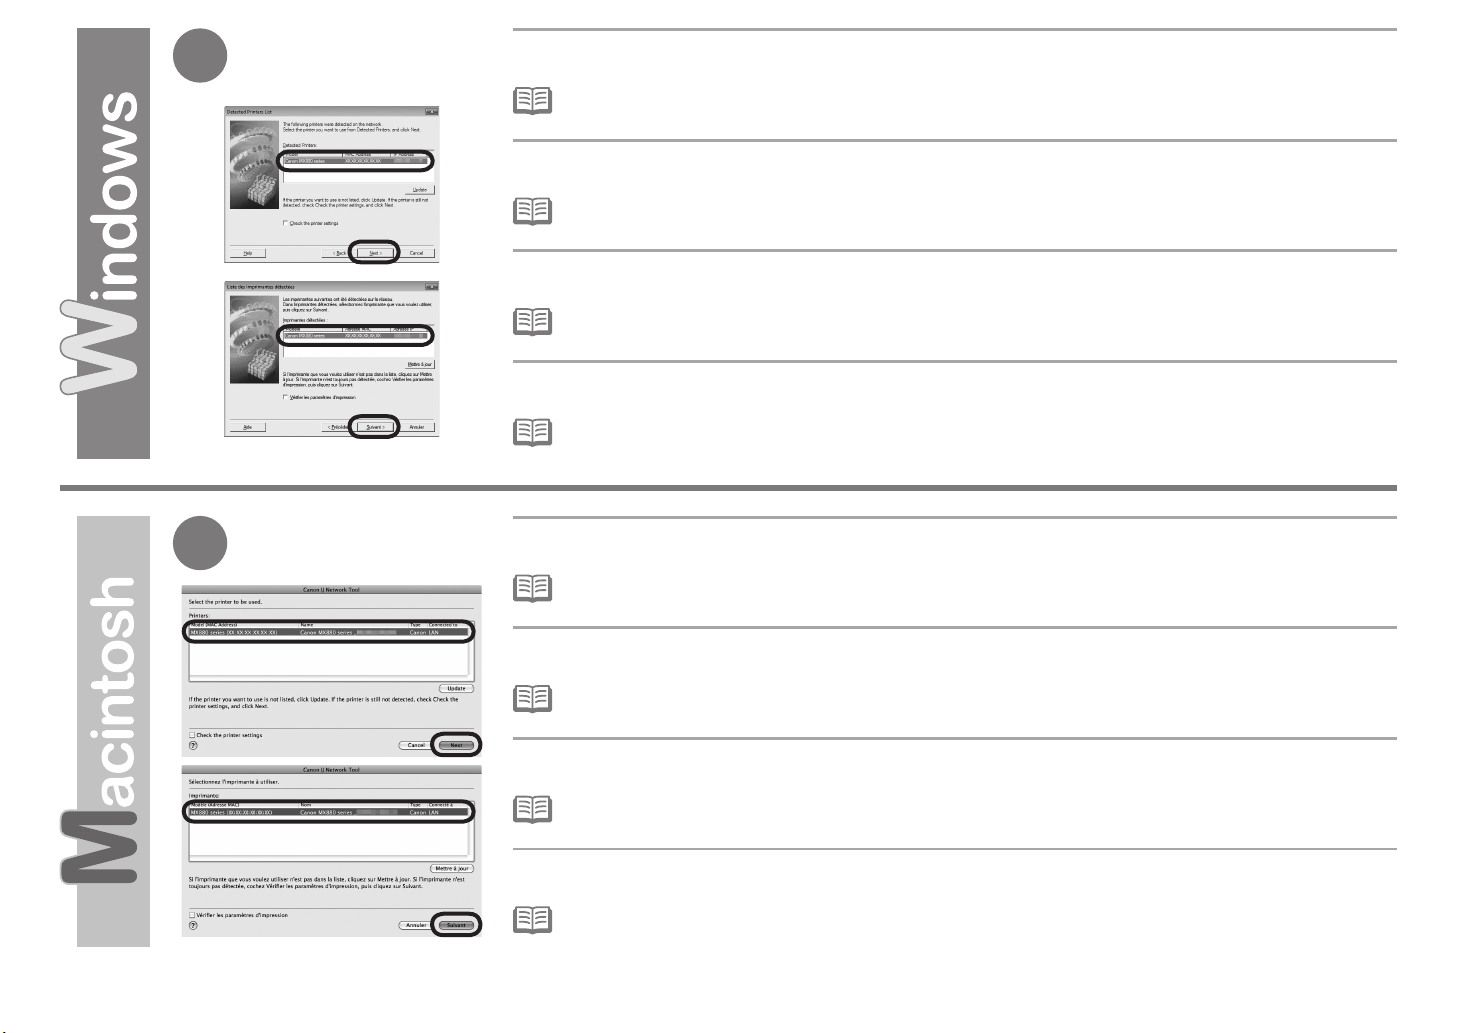
9
When the Detected Printers List dialog box appears, select Canon MX880 series, then click Next.
If the Check Printer Settings dialog box is displayed or the machine is not displayed in the Detected Printers List dialog box,
•
refer to the printed manual: Network Setup Troubleshooting.
Lorsque la boîte de dialogue Liste des imprimantes détectées (Detected Printers List) apparaît,
sélectionnez Canon MX880 series, puis cliquez sur Suivant (Next).
Si la boîte de dialogue Vérier paramètres d’impression (Check Printer Settings) s’afche ou que la machine n’apparaît pas
•
dans la boîte de dialogue Liste des imprimantes détectées (Detected Printers List), reportez-vous au manuel imprimé Guide de
dépannage réseau.
Wenn das Dialogfeld Liste der gefundenen Drucker (Detected Printers List) angezeigt wird, wählen Sie
Canon MX880 series aus, und klicken Sie anschließend auf Weiter (Next).
Wenn das Dialogfeld Druckereinstellungen prüfen (Check Printer Settings) angezeigt wird oder das Gerät nicht im Dialogfeld
•
Liste der gefundenen Drucker (Detected Printers List) aufgeführt wird, nden Sie weitere Informationen im gedruckten
Handbuch Netzwerk-Fehlerbehebungshandbuch.
Quando viene visualizzata la finestra di dialogo Elenco stampanti rilevate (Detected Printers List),
selezionare Canon MX880 series, quindi fare clic su Avanti (Next).
Se viene visualizzata la nestra di dialogo Verica impostazioni stampante (Check Printer Settings) o se la macchina non viene
•
visualizzata nella nestra di dialogo Elenco stampanti rilevate (Detected Printers List), consultare il manuale stampato: Guida
alla risoluzione dei problemi di rete.
58
9
On the Canon IJ Network Tool screen, select MX880 series in Printers, then click Next.
If the Check Printer Settings dialog box is displayed or the machine is not displayed in the Canon IJ Network Tool screen, refer
•
to the printed manual: Network Setup Troubleshooting.
Dans l’écran Canon IJ Network Tool, sélectionnez MX880 series dans la zone Imprimante (Printers), puis
cliquez sur Suivant (Next).
Si la boîte de dialogue Vérier paramètres d’impression (Check Printer Settings) s’afche ou que la machine n’apparaît pas à
•
l’écran Canon IJ Network Tool, reportez-vous au manuel imprimé Guide de dépannage réseau.
Wählen Sie im Bildschirm Canon IJ Network Tool unter Drucker (Printers) die Option MX880 series aus, und
klicken Sie auf Weiter (Next).
Wenn das Dialogfeld Druckereinstellungen prüfen (Check Printer Settings) angezeigt wird oder das Gerät nicht im
•
Bildschirm Canon IJ Network Tool aufgeführt wird, nden Sie weitere Informationen im gedruckten Handbuch Netzwerk-
Fehlerbehebungshandbuch.
Nella schermata Canon IJ Network Tool, selezionare MX880 series in Stampanti (Printers), quindi fare clic
su Avanti (Next).
Se viene visualizzata la nestra di dialogo Verica impostazioni stampante (Check Printer Settings) o se la macchina non viene
•
visualizzata nella schermata Canon IJ Network Tool, consultare il manuale stampato: Guida alla risoluzione dei problemi di rete.
Page 61
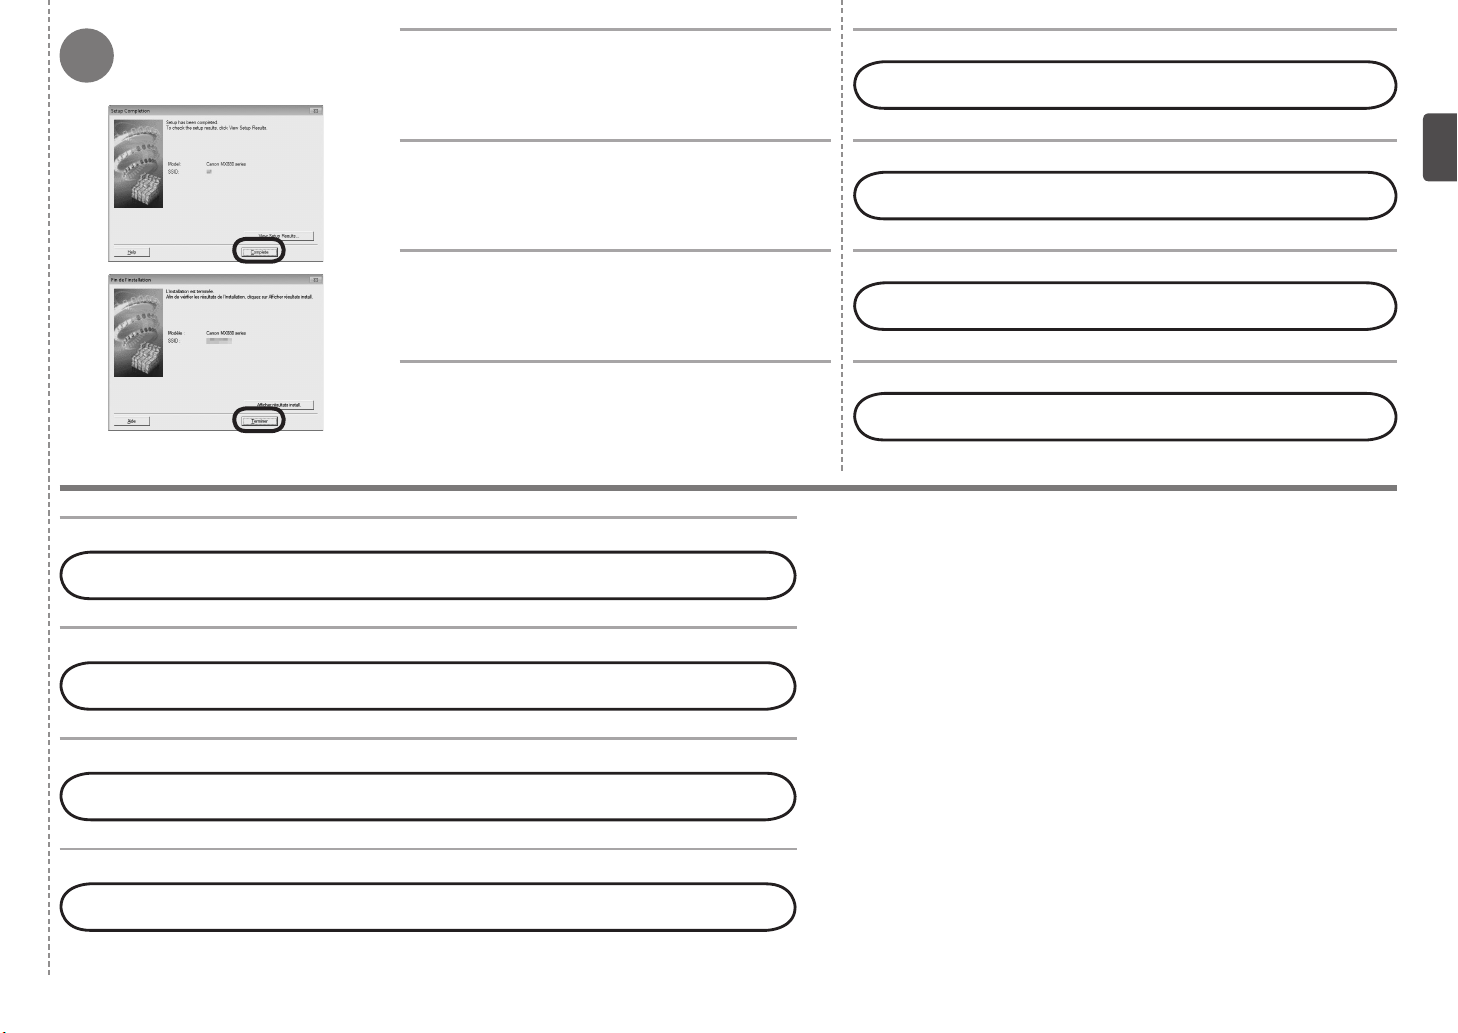
10
Next, read “Registration (Macintosh)” on page 60!
When the Setup Completion dialog box appears,
click Complete.
Lorsque la boîte de dialogue Fin de l’installation
(Setup Completion) apparaît, cliquez sur Terminer
(Complete).
Wenn das Dialogfeld Setup abgeschlossen
(Setup Completion) angezeigt wird, klicken Sie auf
Abgeschlossen (Complete).
Quando viene visualizzata la finestra di dialogo
Completamento dell'impostazione (Setup
Completion), fare clic su Completato (Complete).
Next, read “Information” on page 64!
Lisez ensuite la section « Informations » à la page 64.
Lesen Sie jetzt den Abschnitt „Informationen“ auf Seite 64.
Leggere quindi "Informazioni" a pagina 64.
Lisez ensuite la section « Enregistrement (Macintosh) » à la page 60.
Lesen Sie jetzt den Abschnitt „Registrierung (Macintosh)“ auf Seite 60.
Leggere quindi "Registrazione (Macintosh)" a pagina 60.
59
Page 62
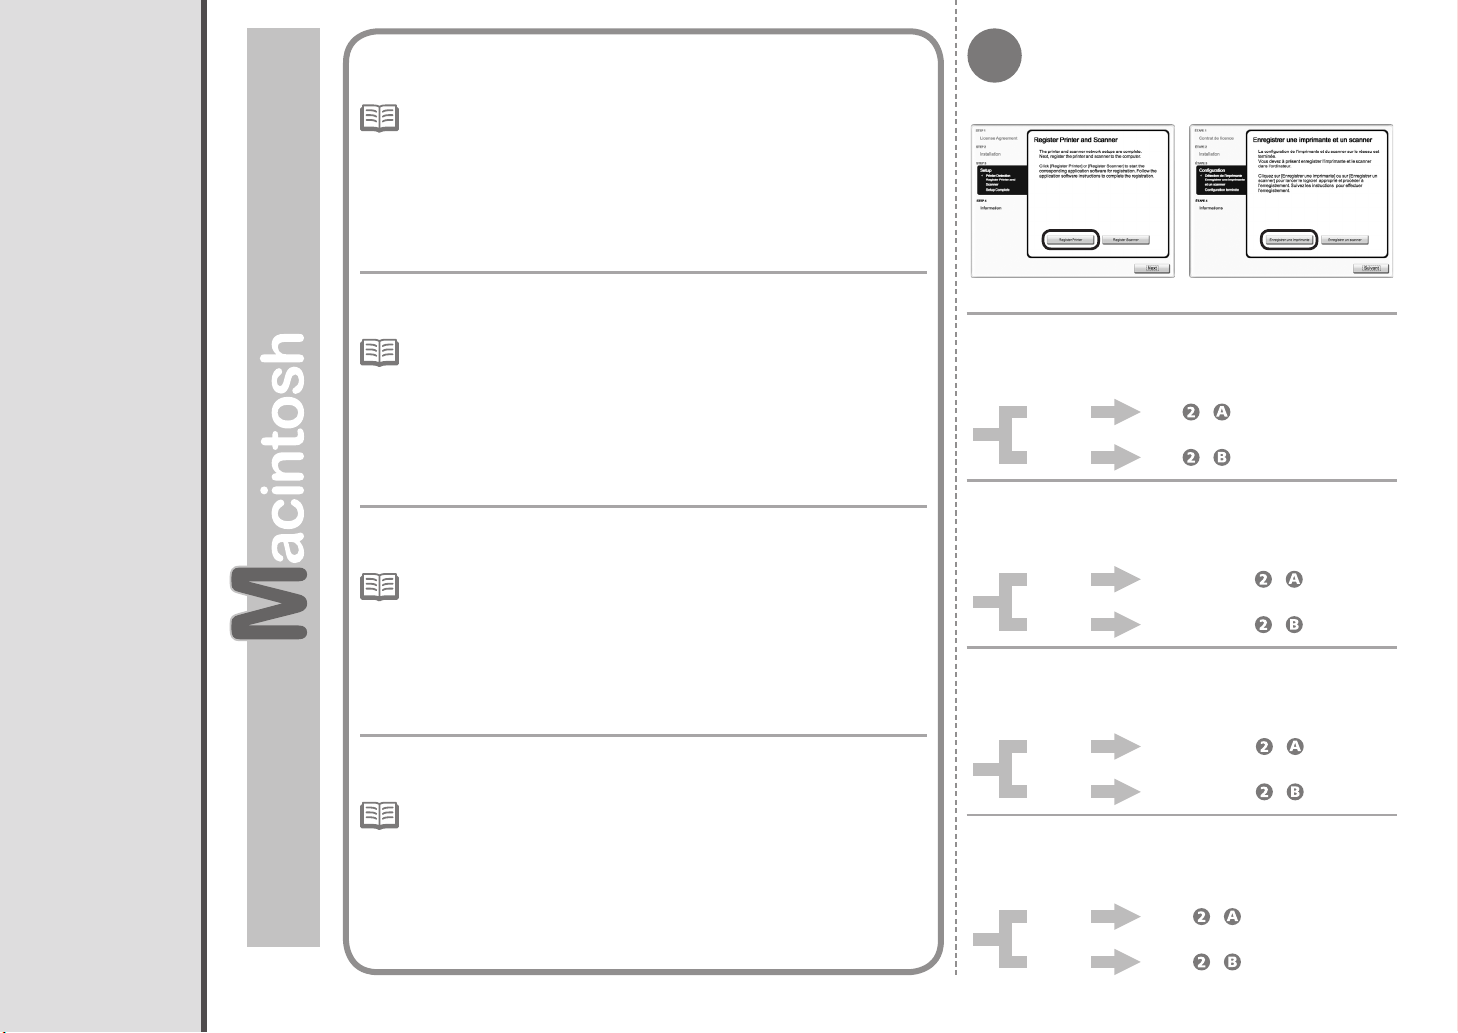
Registration (Macintosh)
Registrierung (Macintosh)
Enregistrement (Macintosh)
Registrazione (Macintosh)
60
This section describes how to register the machine on a Macintosh
computer. Windows users: read “Information” on page 64.
The alphanumeric characters after Canon MX880 series is the machine’s
•
Bonjour service name or MAC address.
If the machine is not detected, make sure of the following.
•
The machine is turned on.
−
The rewall function of any security software is turned off.
−
Wireless Connection: The computer is connected to the access point.
−
Wired Connection: The machine is connected to the network device with the
−
Ethernet cable.
Cette section explique comment enregistrer la machine sur un ordinateur
Macintosh. Utilisateurs Windows : lisez « Informations » à la page 64.
Les caractères alphanumériques après Canon MX880 series correspondent au
•
nom de service Bonjour ou à l’adresse MAC de la machine.
Si la machine n’est pas détectée, vériez les points ci-après.
•
La machine est sous tension.
−
La fonction de pare-feu des logiciels de sécurité est désactivée.
−
Connexion sans l : l’ordinateur est connecté au point d’accès.
−
Connexion câblée : la machine est connectée au périphérique réseau à
−
l’aide du câble Ethernet.
In diesem Abschnitt wird beschrieben, wie das Gerät auf einem
Macintosh-Computer registriert wird. Windows-Benutzer: Lesen Sie
den Abschnitt „Informationen“ auf Seite 64.
Die alphanumerischen Zeichen nach Canon MX880 series sind der Bonjour-
•
Dienstname oder die MAC-Adresse des Geräts.
Falls das Gerät nicht erkannt wird, überprüfen Sie Folgendes.
•
Das Gerät ist eingeschaltet.
−
Die Firewall-Funktion jeglicher Sicherheitssoftware ist deaktiviert.
−
Drahtlose Verbindung: Der Computer ist mit dem Zugriffspunkt verbunden.
−
Kabelverbindung: Das Gerät ist über ein Ethernet-Kabel mit dem
−
Netzwerkgerät verbunden.
In questa sezione viene descritto come registrare la stampante in un
computer Macintosh. Utenti Windows: leggere "Informazioni" a pagina 64.
I caratteri alfanumerici dopo Canon MX880 series rappresentano il nome di
•
servizio Bonjour o l'indirizzo MAC della macchina.
Se la macchina non viene rilevata, vericare quanto segue.
•
La stampante è accesa.
−
La funzione rewall di qualsiasi software di protezione è disattivata.
−
Connessione wireless: il computer è connesso al punto di accesso.
−
Connessione cablata: la stampante è connessa alla periferica di rete
−
mediante un cavo Ethernet.
1
When the Register Printer and Scanner screen
appears, click Register Printer.
Mac OS X
v.10.6.x
v.10.5.x
v.10.4.11
Lorsque l’écran Enregistrer une imprimante et un
scanner (Register Printer and Scanner) apparaît, cliquez
sur Enregistrer une imprimante (Register Printer).
Mac OS X
v.10.6.x
v.10.5.x
v.10.4.11
Wenn der Bildschirm Drucker und Scanner registrieren
(Register Printer and Scanner) erscheint, klicken Sie auf
Drucker registrieren (Register Printer).
Mac OS X
v.10.6.x
v.10.5.x
v.10.4.11
Quando viene visualizzata la nestra di dialogo Registra
stampante e scanner (Register Printer and Scanner),
fare clic su Registra stampante (Register Printer).
Mac OS X
v.10.6.x
v.10.5.x
v.10.4.11
Go to - on page 61.
Go to - on page 61.
Passez à l’étape - à la page 61.
Passez à l’étape - à la page 61.
Wechseln Sie zu - auf Seite 61.
Wechseln Sie zu - auf Seite 61.
Vedere - a pagina 61.
Vedere - a pagina 61.
Page 63
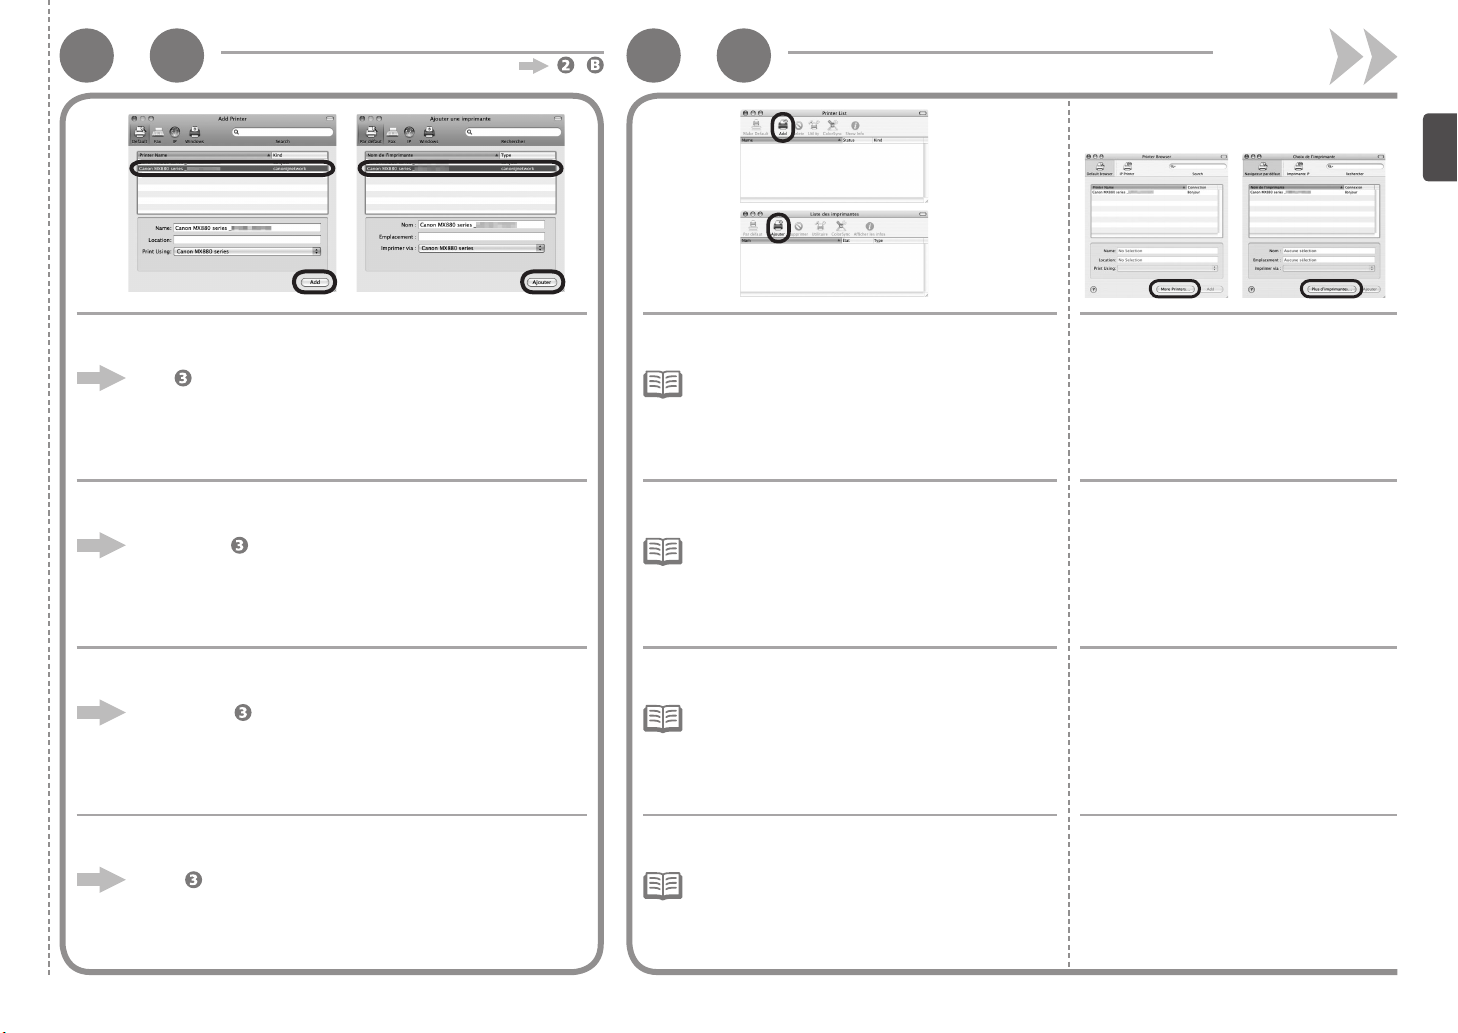
-
A
Mac OS X v.10.4.11
-
2
-
2 B
Mac OS X v.10.4.11Mac OS X v.10.6.x/v.10.5.x
1 1
Select Canon MX880 series canonijnetwork and click Add.
Go to on page 62.
Sélectionnez Canon MX880 series canonijnetwork et cliquez
sur Ajouter (Add).
Allez à l’étape à la page 62.
Wählen Sie Canon MX880 series canonijnetwork aus, und
klicken Sie auf Hinzufügen (Add).
Fahren Sie mit auf Seite 62 fort.
When the Printer List window appears, click Add. Click More Printers in the Printer
Lorsque la fenêtre Liste des imprimantes (Printer
List) apparaît, cliquez sur Ajouter (Add).
Klicken Sie bei Anzeige des Fensters Druckerliste
(Printer List) auf Hinzufügen (Add).
When the You have no printers available. screen
•
appears, click Add.
Lorsque l’écran Aucune imprimante disponible
•
(You have no printers available.)
Ajouter (Add).
Wenn der Bildschirm Keine Drucker vorhanden. (You
•
have no printers available.) erscheint, klicken Sie auf
Hinzufügen (Add).
apparaît, cliquez sur
2
Browser window.
Cliquez sur Plus d’imprimantes (More
Printers) dans la fenêtre Choix de
l’imprimante (Printer Browser).
Klicken Sie im Fenster
Druckerübersicht (Printer Browser)
auf Weitere Drucker (More Printers).
Selezionare Canon MX880 series canonijnetwork e fare clic
su Aggiungi (Add).
Vedere a pagina 62.
Quando viene visualizzata la schermata Elenco
Stampanti (Printer List), fare clic su Aggiungi (Add).
Quando viene visualizzata la schermata Nessuna
•
stampante disponibile. (You have no printers
available.), fare clic su Aggiungi (Add).
Fare clic su Altre stampanti (More
Printers) nella schermata Browser
stampante (Printer Browser).
61
Page 64
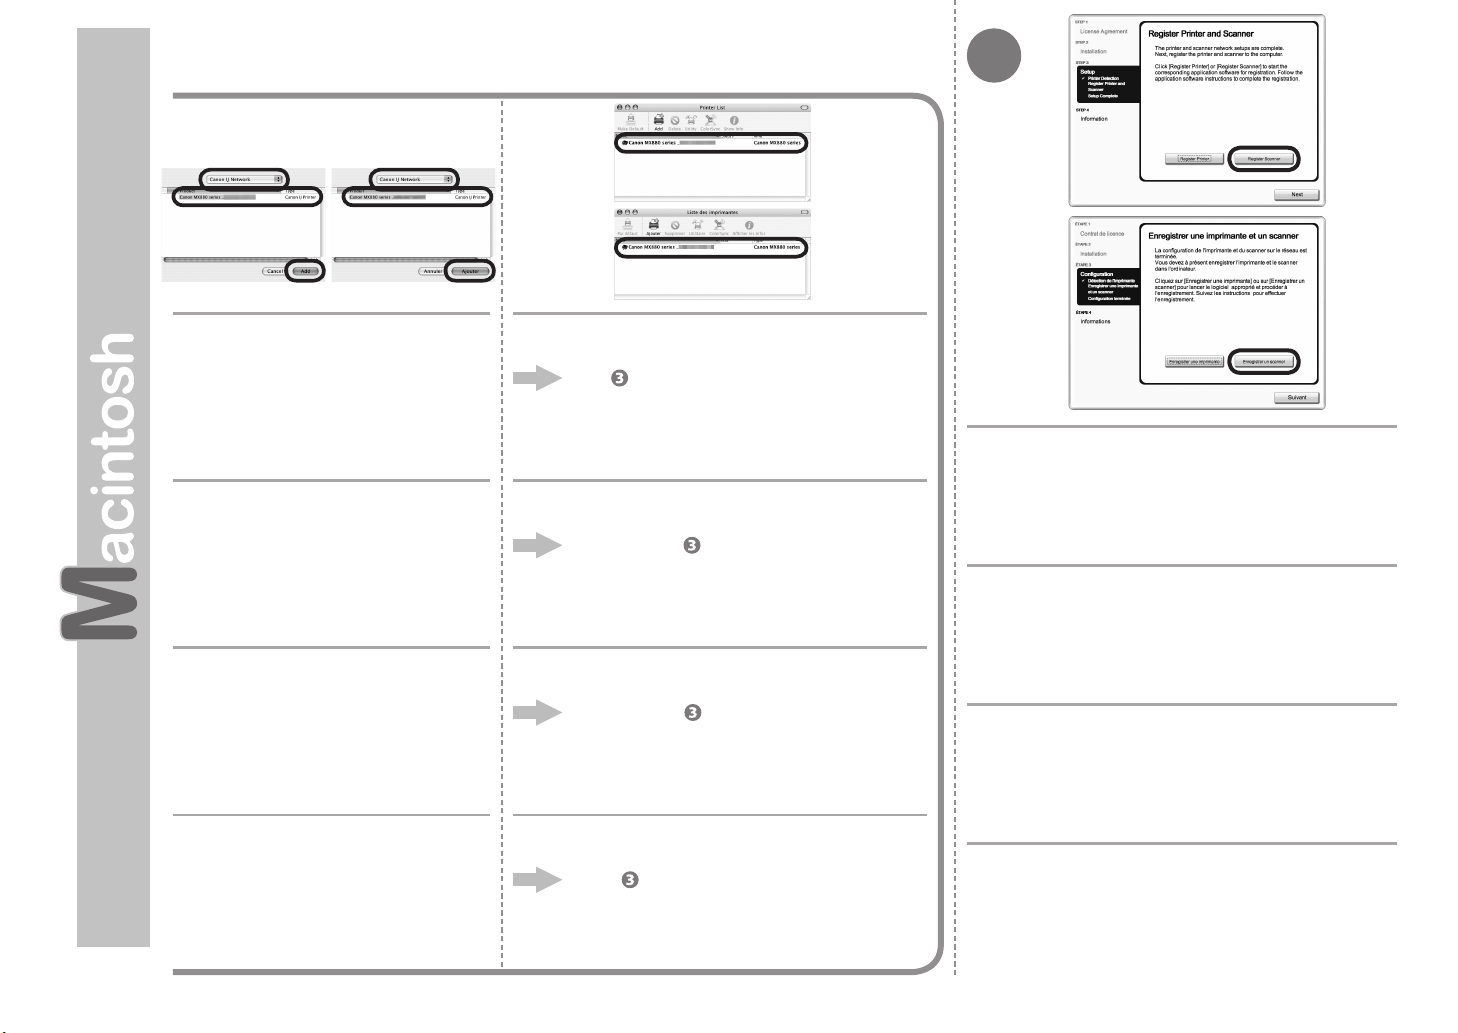
3
3
Select Canon IJ Network in the pop-up
menu, select Canon MX880 series in
the list of printers, then click Add.
Sélectionnez Canon IJ Network dans
le menu contextuel, puis Canon MX880
series dans la liste des imprimantes et
cliquez sur Ajouter (Add).
Wählen Sie im Popup-Menü die Option
Canon IJ Network aus, wählen Sie in
der Druckerliste Canon MX880 series
aus, und klicken Sie anschließend auf
Hinzufügen (Add).
4
Make sure that Canon MX880 series is added to
the list of printers.
Go to .
Vérifiez que Canon MX880 series figure dans la
liste des imprimantes.
Passez à l’étape .
Stellen Sie sicher, dass Canon MX880 series der
Druckerliste hinzugefügt wurde.
Wechseln Sie zu .
When the Register Printer and Scanner screen
appears, click Register Scanner.
Lorsque l’écran Enregistrer une imprimante et un
scanner (Register Printer and Scanner) apparaît,
cliquez sur Enregistrer un scanner (Register
Scanner).
Wenn der Bildschirm Drucker und Scanner
registrieren (Register Printer and Scanner)
angezeigt wird, klicken Sie auf Scanner registrieren
(Register Scanner).
62
Nel menu a comparsa, selezionare
Canon IJ Network, quindi Canon
MX880 series nell'elenco delle
stampanti, quindi fare clic su
Aggiungi (Add)
.
Verificare che Canon MX880 series venga aggiunta
all'elenco delle stampanti.
Vedere .
Quando viene visualizzata la nestra di dialogo Registra
stampante e scanner (Register Printer and Scanner),
fare clic su Registra scanner (Register Scanner).
Page 65
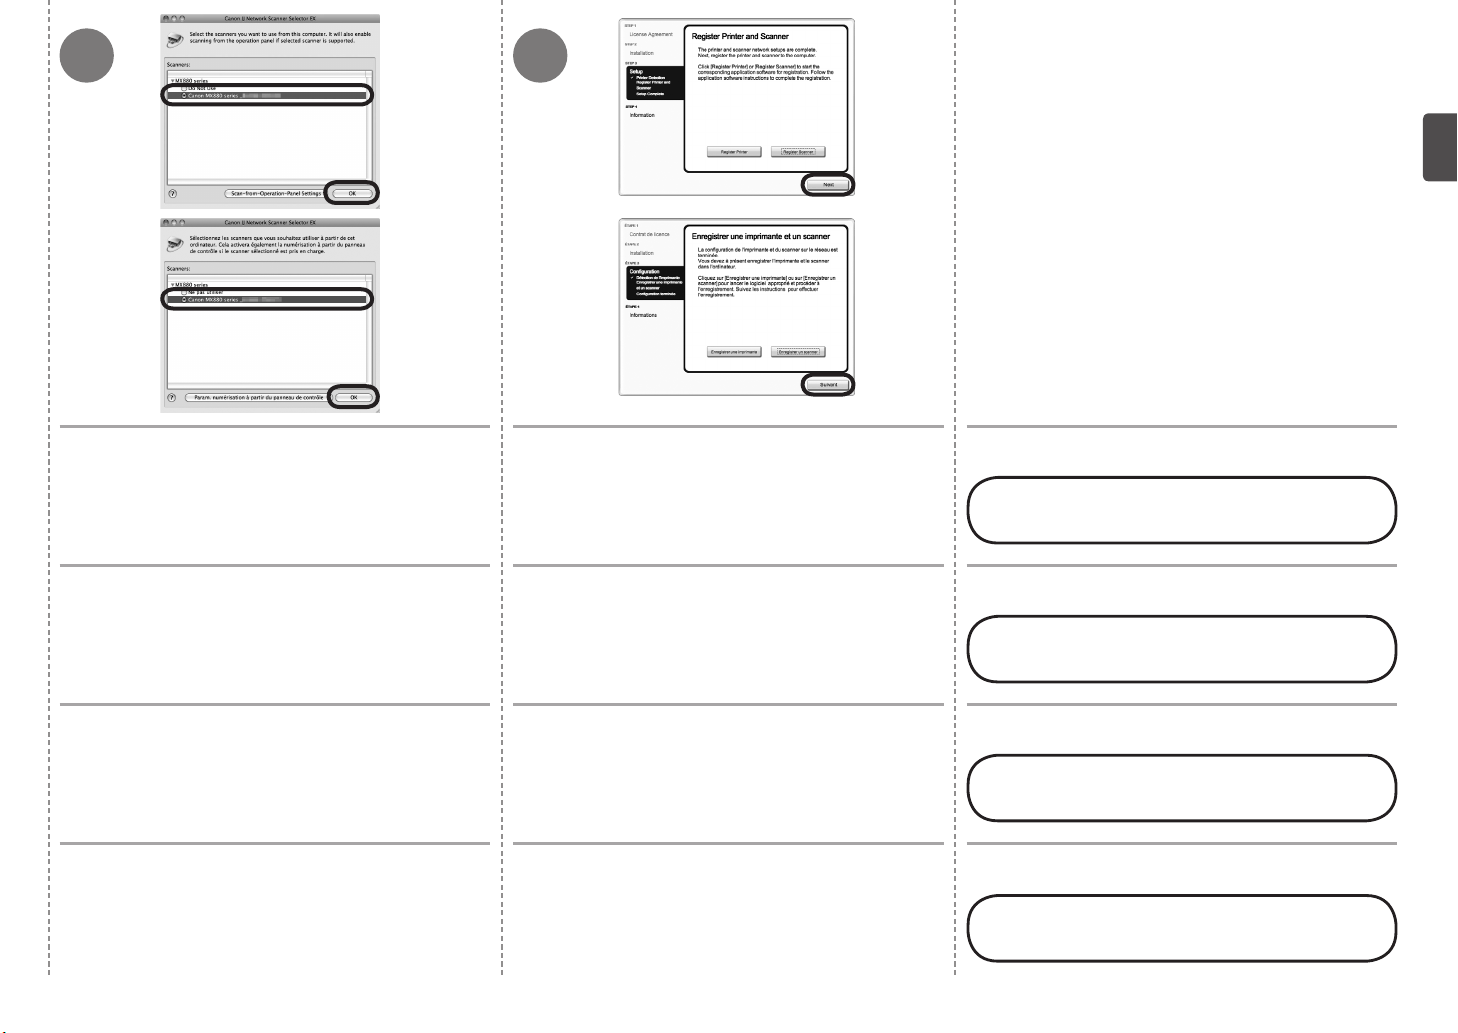
4 5
Select Canon MX880 series on the Canon IJ
Network Scanner Selector EX screen, then click OK.
Dans l’écran Canon IJ Network Scanner Selector
EX, sélectionnez Canon MX880 series, puis cliquez
sur OK.
Wählen Sie im Bildschirm Canon IJ Network
Scanner Selector EX die Option Canon MX880
series aus, und klicken Sie auf OK.
Selezionare Canon MX880 series nella schermata
Canon IJ Network Scanner Selector EX, quindi fare
clic su OK.
Click Next on the Register Printer and Scanner
screen.
Next, read “Information” on page 64!
Cliquez sur Suivant (Next) sur l’écran Enregistrer
une imprimante et un scanner (Register Printer
and Scanner).
Lisez ensuite la section « Informations » à la
page 64.
Klicken Sie im Bildschirm Drucker und Scanner
registrieren (Register Printer and Scanner) auf
Weiter (Next).
Lesen Sie jetzt den Abschnitt „Informationen“ auf
Seite 64.
Fare clic su Avanti (Next) nella schermata Registra
stampante e scanner (Register Printer and
Scanner).
Leggere quindi "Informazioni" a pagina 64.
63
Page 66
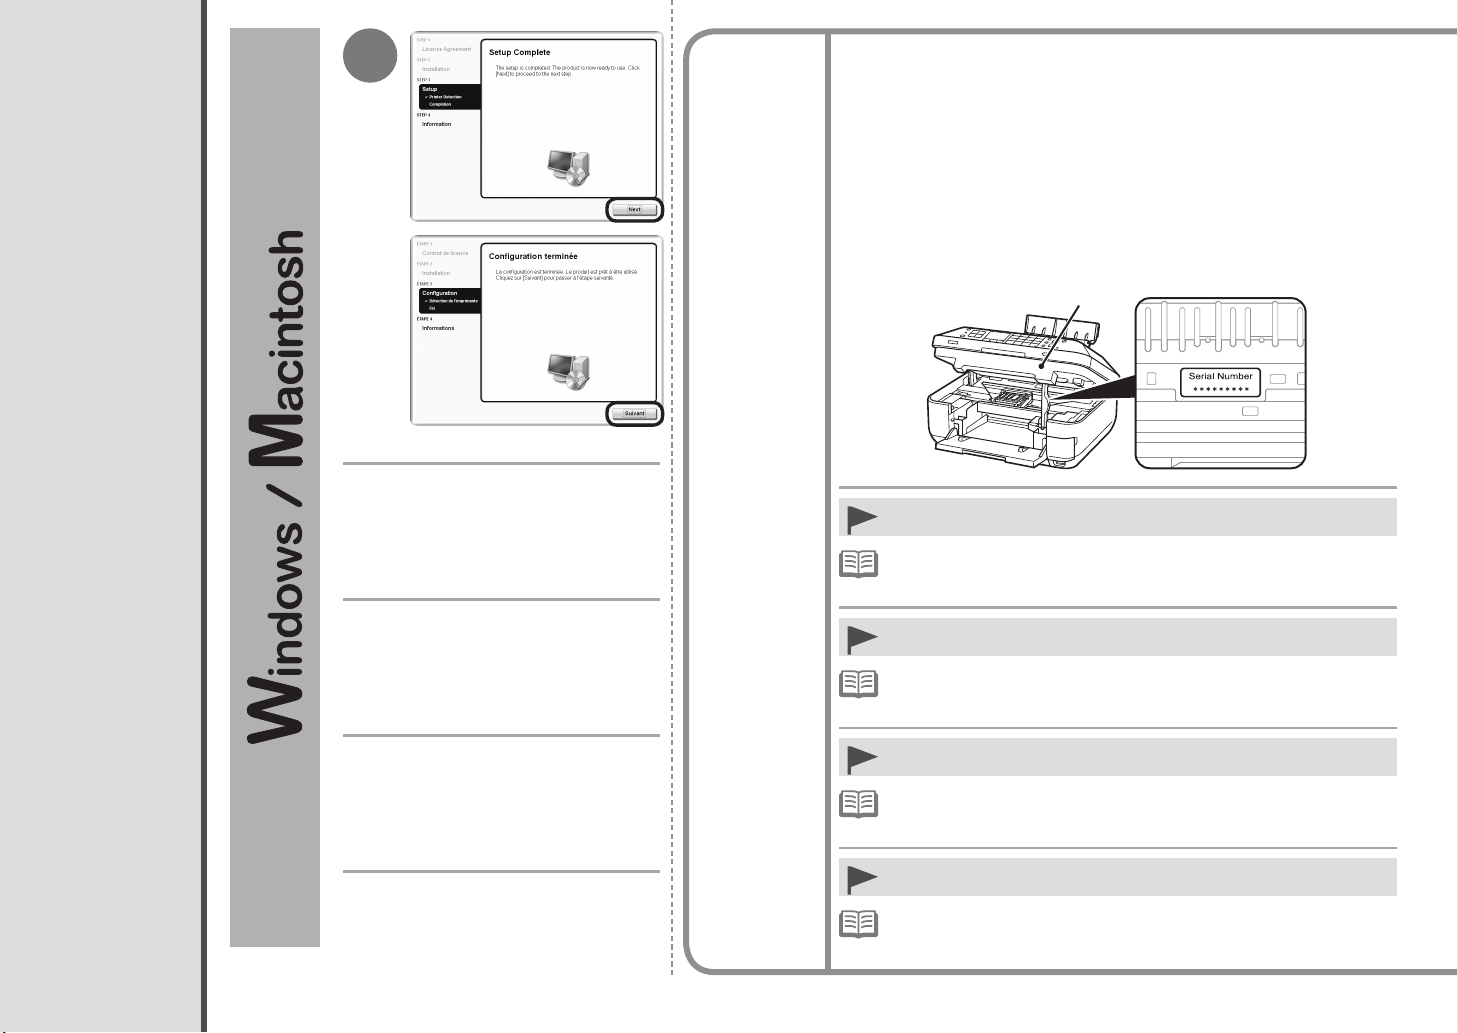
1
If the serial number is not displayed on the registration screen, input the number found
inside the machine.
Si le numéro de série n’apparaît pas à l’écran d’enregistrement, saisissez le numéro de
série qui se trouve à l’intérieur de la machine.
Wenn die Seriennummer nicht im Registrierungsbildschirm angezeigt wird, geben Sie die
Nummer ein, die im Geräteinneren angegeben ist.
Se il numero di serie non viene visualizzato nella schermata di registrazione, immettere il
numero che si trova all'interno della macchina.
Information
Informations
Informazioni
Informationen
Click Next.
Follow any on-screen instructions to proceed
with the software installation.
Cliquez sur Suivant (Next).
Pour poursuivre l’installation du logiciel, suivez
les instructions à l’écran.
Klicken Sie auf Weiter (Next).
Befolgen Sie sämtliche Anweisungen auf dem
Bildschirm, um mit der Softwareinstallation
fortzufahren.
A
Important Information for the Installation
Informazioni importanti per l'installazione
Wichtige Informationen für die Installation
If the power is on, the Print Head Holder will move when the Scanning Unit
•
(Cover) (A) is opened.
The User Registration screen will only be displayed when Europe, Middle
Informations importantes concernant l’installation
•
East, Africa is selected on the Select Your Place of Residence screen.
Si la machine est sous tension, le support de tête d’impression se déplace
•
lorsque l’unité de numérisation (capot) (A) est ouverte.
L’écran Enregistrement utilisateur (user Registration) ne s’afche que si vous
•
avez choisi Europe, Moyen-Orient, Afrique (Europe, Middle East, Africa) sur
l’écran Sélectionnez votre lieu de résidence (Select Your Place of Residence).
Ist das Gerät eingeschaltet, bewegt sich der Druckkopfhalter, wenn das Scan-
•
Modul (Abdeckung) (A) geöffnet wird.
Der Bildschirm Benutzerregistrierung (User Registration) wird nur dann angezeigt,
•
wenn Sie auf dem Bildschirm Wohnsitz wählen (Select Your Place of Residence)
Europa, Naher Osten, Afrika (Europe, Middle East, Africa) ausgewählt haben.
64
Fare clic su Avanti (Next).
Per procedere con l'installazione del software,
seguire le istruzioni visualizzate.
Se la stampante è accesa, il supporto della testina di stampa si sposterà
•
all'apertura dell'unità di scansione (coperchio) (A).
La schermata Registrazione utente (User Registration) verrà visualizzata solo se è stata
•
selezionata l'opzione Europa, Medio Oriente, Africa (Europe, Middle East, Africa) nella
schermata Scegliere l'area di residenza (Select Your Place of Residence).
Page 67
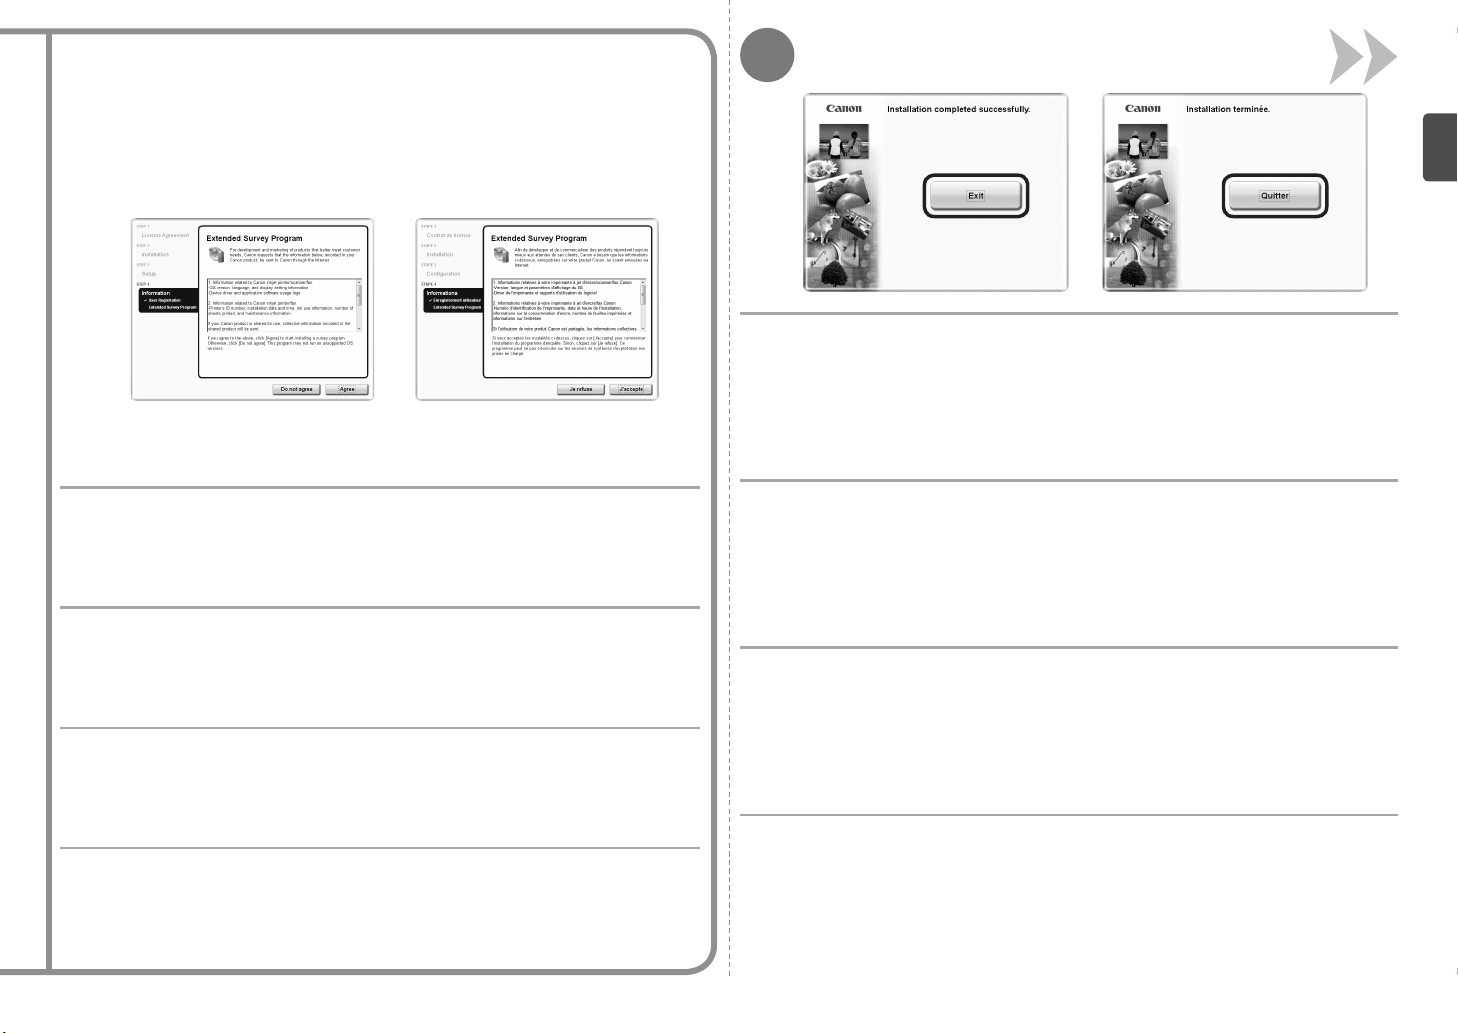
If the Extended Survey Program screen appears
Si l’écran Extended Survey Program apparaît
Wenn das Fenster für das Extended Survey Program angezeigt wird
Se viene visualizzata la schermata Extended Survey Program
2
Click Exit to complete the installation.
For Macintosh
It is necessary to restart the computer before scanning using the Operation Panel on the machine
for the first time.
If you can agree to Extended Survey Program, click Agree.
If you click Do not agree, the Extended Survey Program will not be installed. (This has no effect
on the machine’s functionality.)
Si vous acceptez l’application Extended Survey Program, cliquez sur J’accepte (Agree).
Si vous cliquez sur Je refuse (Do not agree), l’application Extended Survey Program ne sera pas
installée. (Cela n’a aucun impact sur le fonctionnement de la machine.)
Wenn Sie das Extended Survey Program akzeptieren, klicken Sie auf Akzeptieren (Agree).
Wenn Sie auf Nicht akzeptieren (Do not agree) klicken, wird das Extended Survey Program
nicht installiert. (Ihre Auswahl hat keine Auswirkungen auf die Funktionalität des Geräts.)
Per accettare i termini di Extended Survey Program, fare clic su Accetto (Agree).
Se si fa clic su Non accetto (Do not agree), Extended Survey Program non verrà installato. Ciò
non pregiudica la funzionalità della stampante.
Cliquez sur Quitter (Exit) pour terminer l’installation.
Sous Macintosh
Vous devez redémarrer l’ordinateur avant d’effectuer pour la première fois une numérisation à l’aide
du panneau de contrôle de la machine.
Klicken Sie auf Beenden (Exit), um die Installation abzuschließen.
Für Macintosh
Vor dem erstmaligen Scannen über das Bedienfeld am Gerät ist ein Neustart des Computers
erforderlich.
Fare clic su Esci (Exit) per completare l'installazione.
Per Macintosh
Prima di eseguire scansioni tramite il pannello dei comandi della stampante per la prima volta, è
necessario riavviare il computer.
65
Page 68
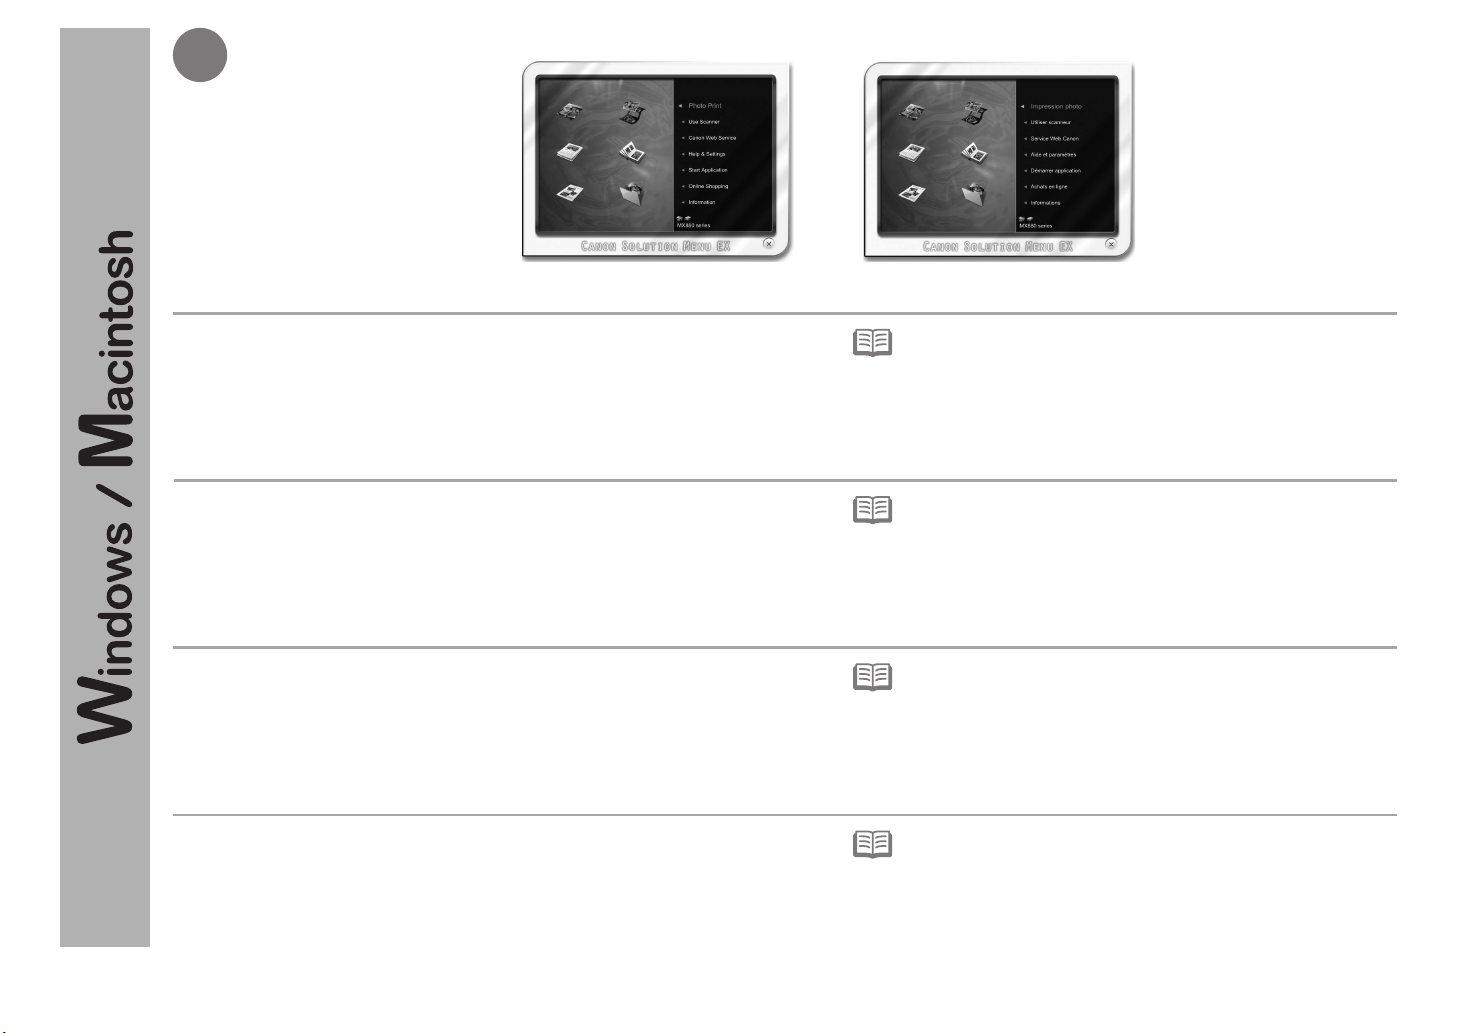
3
For Windows
Solution Menu EX starts.
For Macintosh
Solution Menu EX starts when clicking OK in the Canon Solution Menu EX
dialog.
Remove the Setup CD-ROM and keep it in a safe place.
Sous Windows
Solution Menu EX démarre.
Sous Macintosh
Solution Menu EX démarre lorsque vous cliquez sur OK dans la boîte de dialogue
Canon Solution Menu EX.
Retirez le CD-ROM d’installation et conservez-le en lieu sûr.
Für Windows
Solution Menu EX wird gestartet.
Für Macintosh
Solution Menu EX wird gestartet, wenn Sie im Dialog Canon Solution Menu EX
auf OK klicken.
Nehmen Sie die Installations-CD-ROM (Setup CD-ROM) heraus, und bewahren Sie sie an einem
sicheren Ort auf.
Per Windows
Solution Menu EX viene avviato.
Per Macintosh
Solution Menu EX viene avviato quando si fa clic su OK nella finestra di dialogo
Canon Solution Menu EX.
Estrarre il CD-ROM di installazione (Setup CD-ROM) e conservarlo in un luogo sicuro.
The buttons displayed on Solution Menu EX may vary depending on the
•
country or region of purchase.
Les boutons afchés dans Solution Menu EX peuvent varier selon le pays ou
•
la région d’achat.
Die in Solution Menu EX angezeigten Schaltächen variieren je nach Land
•
oder Region, in dem bzw. in der das Gerät erworben wurde.
I pulsanti visualizzati in Solution Menu EX possono variare in base al paese
•
o alla regione di acquisto.
66
Page 69
Congratulations! Setup is complete.
To learn more about the Solution
Menu EX and on-screen manual,
proceed to page 70. To start using
the machine, proceed to page 72.
Félicitations ! L’installation est
terminée.
Pour en savoir plus sur Solution
Menu EX et le manuel en
ligne, allez à la page 70. Pour
commencer à utiliser la machine,
allez à la page 72.
Glückwunsch! Die Installation ist
abgeschlossen.
Weitere Informationen über
Solution Menu EX und das Online-
Handbuch nden Sie auf Seite 70.
Informationen zur Inbetriebnahme
des Geräts nden Sie auf Seite 72.
Congratulazioni. L'installazione è
completata.
Per ulteriori informazioni relative
a Solution Menu EX e al manuale
a video, procedere alla pagina
70. Per iniziare a utilizzare la
macchina, andare a pagina 72.
Using the Machine from Additional Computers
Now that the machine is setup on your wireless/wired connection, you can install the software and drivers on additional computers on the same
network. Additional settings are not required.
To add computers from which to use the machine, go to “12 Use from Additional Computers” on page 68.
Utilisation de la machine sur d’autres ordinateurs
Une fois que la machine est configurée sur votre connexion sans fil/filaire, vous pouvez installer le logiciel et les pilotes sur d’autres ordinateurs du
même réseau. D’éventuels paramètres supplémentaires ne sont pas obligatoires.
Pour ajouter des ordinateurs à partir desquels utiliser la machine, reportez-vous à la section « 12 Utilisation de la machine sur d’autres
ordinateurs » à la page 68.
Verwenden des Geräts mit weiteren Computern
Nachdem die Einrichtung der drahtlosen/drahtgebundenen Verbindung für das Gerät abgeschlossen ist, können Sie die Software und Treiber auf
zusätzlichen Computern im selben Netzwerk installieren. Weitere Einstellungen sind nicht erforderlich.
Wenn Sie weitere Computer zur Nutzung des Geräts hinzufügen möchten, siehe „12 Nutzung mit zusätzlichen Computern“ auf Seite 68.
Utilizzo della stampante da altri computer
Nella macchina è stata impostata la connessione wireless/cablata. A questo punto, è possibile installare il software e i driver su altri computer della
stessa rete. Non sono richieste impostazioni aggiuntive.
Per aggiungere i computer da cui utilizzare la macchina, vedere "12 Utilizzo della stampante da altri computer" a pagina 68.
Installing the XPS Printer Driver
In Windows 7 and Windows Vista SP1 or later, the XPS Printer Driver can be installed additionally. To install, perform from on page 53 in “11
Install the Software (Network Connection).” Click Custom Install in , then select XPS Printer Driver in the Custom Install screen.
For details on useful functions of the XPS Printer Driver, refer to the on-screen manual: Advanced Guide.
Installation du Pilote d’imprimante XPS (XPS Printer Driver)
Sous Windows 7 et Windows Vista SP1 ou une version ultérieure, le Pilote d’imprimante XPS (XPS Printer Driver) peut être installé en complément. Pour procéder à
l'installation, exécutez la procédure décrite à partir de l'étape à la page 53 dans la section « 11 Installation du logiciel (connexion réseau) ». Cliquez sur Installation
personnalisée (Custom Install) à l'étape , puis sélectionnez Pilote d’imprimante XPS dans l’écran Installation personnalisée (Custom Install).
Pour plus d’informations sur les fonctions pratiques du Pilote d’imprimante XPS (XPS Printer Driver), reportez-vous au manuel en ligne Guide d’utilisation avancée.
Installieren des XPS-Druckertreibers (XPS Printer Driver)
Unter Windows 7 und ab Windows Vista SP1 kann der XPS-Druckertreiber (XPS Printer Driver) zusätzlich installiert werden. Führen Sie zur Installation den
Schritt unter „11 Installieren der Software (Netzwerkverbindung)“ auf Seite 53 aus. Klicken Sie in Schritt auf Benutzerdenierte Installation (Custom
Install), und wählen Sie im Bildschirm Benutzerdenierte Installation (Custom Install) die Option XPS-Druckertreiber (XPS Printer Driver) aus.
Weitere Informationen über nützliche Funktionen des XPS-Druckertreibers (XPS Printer Driver) nden Sie im Online-Handbuch Erweitertes Handbuch.
Installazione del Driver stampante XPS (XPS Printer Driver)
In Windows 7 e Windows Vista SP1 o versione successiva è possibile installare anche il Driver stampante XPS (XPS Printer Driver). Per effettuare
l'installazione, eseguire a pagina 53 in "11 Installazione del software (Connessione di rete)". Fare clic su Installazione personalizzata (Custom
Install) in , quindi selezionare Driver stampante XPS (XPS Printer Driver) nella schermata Installazione personalizzata (Custom Install).
Per ulteriori informazioni sulle funzioni utili del Driver stampante XPS (XPS Printer Driver), consultare il manuale a video: Guida Avanzata.
67
Page 70
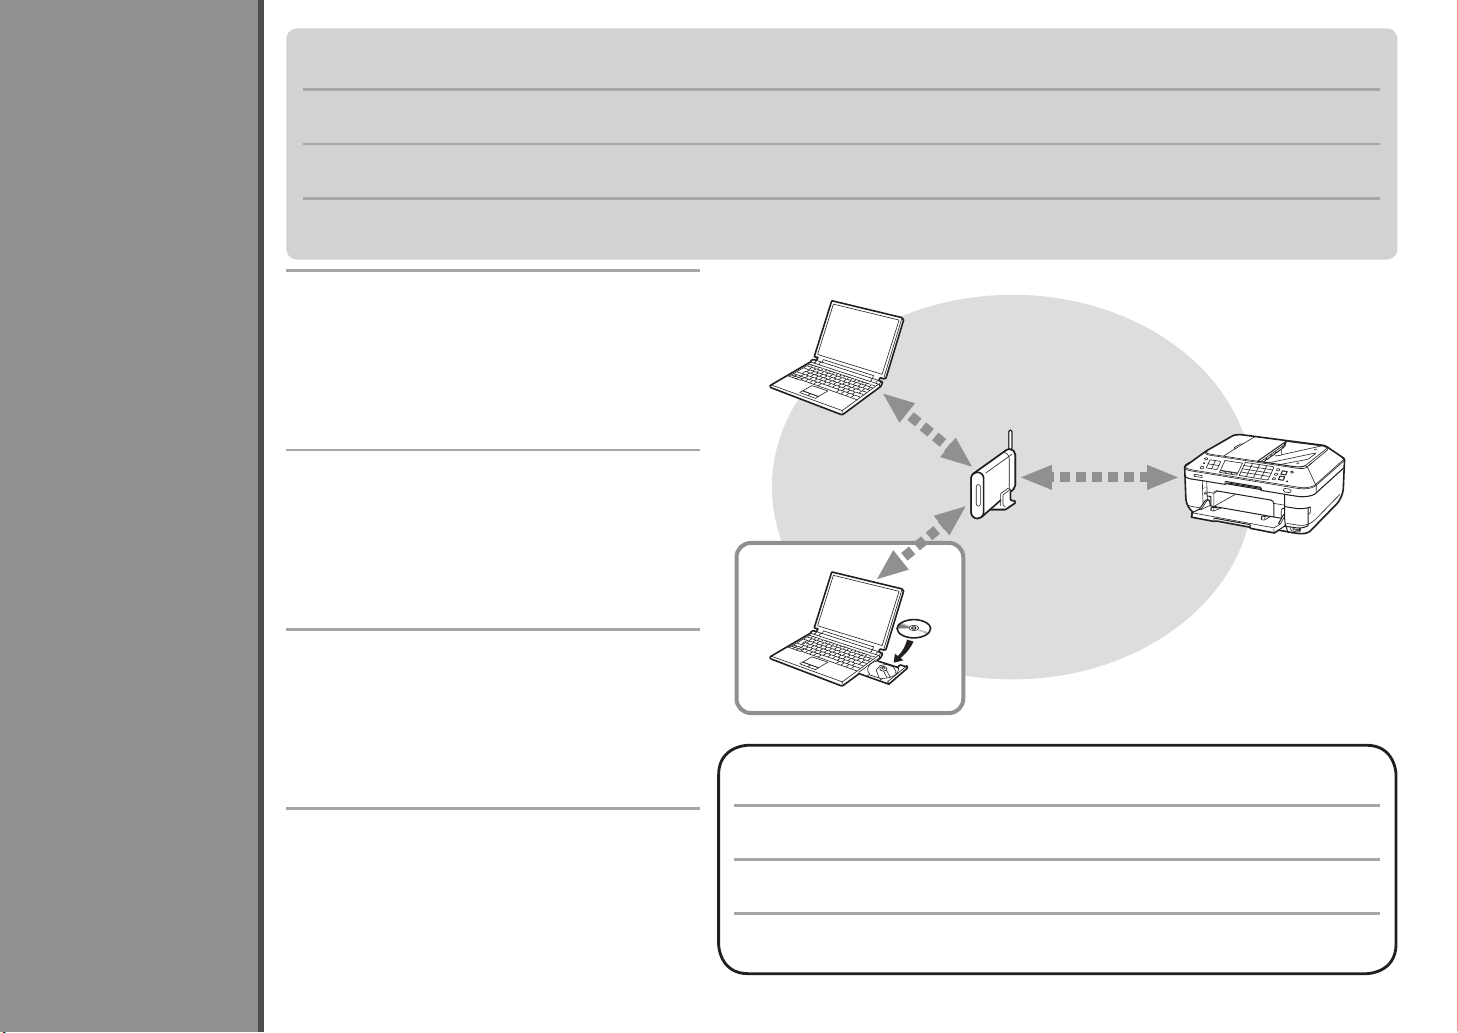
If the machine is already connected to a wireless/wired connection, it can be used from additional computers on the same network.
12
Use from Additional Computers
Nutzung mit zusätzlichen Computern
Utilisation de la machine sur d’autres ordinateurs
68
Si la machine est déjà reliée à une connexion sans l/laire, vous pourrez l’utiliser sur d’autres ordinateurs du même réseau.
Ist das Gerät bereits mit einem drahtlosen/drahtgebundenen Netzwerk verbunden, kann es von weiteren Computern im selben
Netzwerk genutzt werden.
Se la stampante dispone già di una connessione wireless/cablata, è possibile utilizzarla da altri computer sulla stessa rete.
To use from additional computers
Insert the Setup CD-ROM into the computer from which
1
you want to use the machine.
Follow the on-screen instructions to install the software.
2
Other settings are not required.
Pour utiliser la machine sur d’autres ordinateurs
Insérez le CD-ROM d’installation dans l’ordinateur sur
1
lequel vous souhaitez utiliser la machine.
Suivez les instructions à l’écran pour installer le logiciel.
2
Les autres paramètres ne sont pas obligatoires.
Nutzung mit zusätzlichen Computern
Legen Sie die Installations-CD-ROM (Setup CD-
1
ROM) in den Computer ein, mit dem Sie dieses Gerät
verwenden möchten.
Befolgen Sie die Anweisungen auf dem Bildschirm, um
2
die Software zu installieren.
Weitere Einstellungen sind nicht erforderlich.
Per utilizzare la stampante da altri computer
Inserire il CD-ROM di installazione (Setup CD-ROM)
1
Utilizzo della stampante da altri computer
nel computer da cui si desidera utilizzare la stampante.
Seguire le istruzioni a video per installare il software.
2
Non sono necessarie altre impostazioni.
For details on the software installation procedure, refer to "11 Install the Software
(Network Connection)" on page 52.
Pour plus d’informations sur la procédure d’installation du logiciel, reportez-vous
à la section « 11 Installation du logiciel (connexion réseau) » à la page 52.
Weitere Informationen über die Vorgehensweise zur Software-Installation nden
Sie unter „11 Installieren der Software (Netzwerkverbindung)“ auf Seite 52.
Per ulteriori informazioni sulla procedura di installazione del software, fare
riferimento a "11 Installazione del software (Connessione di rete)" a pagina 52.
Computer from which the machine can be used currently
Ordinateur sur lequel la machine peut être utilisée actuellement
Computer, von dem aus das Gerät derzeit verwendet werden kann
Computer da cui è attualmente possibile utilizzare la stampante
Additional computers on the same network
It enables the computer to use the machine.
Autres ordinateurs du même réseau
L'ordinateur peut alors utiliser la machine.
Weitere Computer im selben Netzwerk
Dadurch kann der Computer das Gerät verwenden.
Altri computer sulla stessa rete
Questo consente al computer di utilizzare la stampante.
Page 71
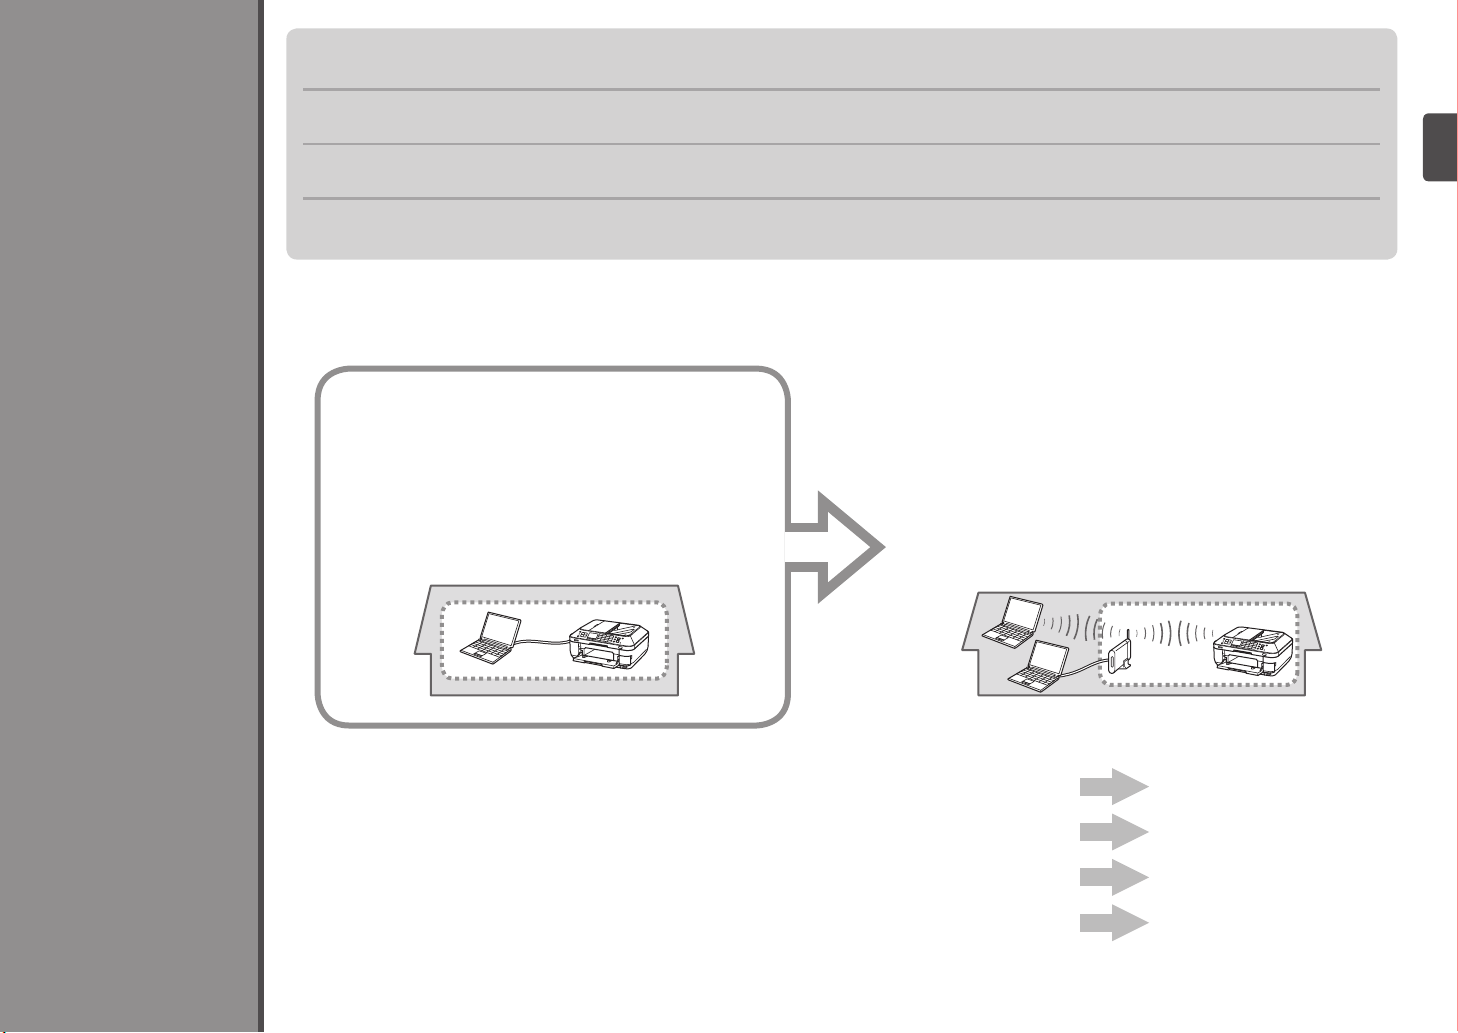
To change to a wireless connection from a USB connection, start over from “9 Wireless Setup” on page 41 to set up a wireless
connection.
13
Pour passer d’une connexion USB à une connexion sans l, reportez-vous à la section « 9 Conguration sans l » à la page 41 pour
congurer une connexion sans l.
Um von einer USB-Verbindung zu einer drahtlosen Verbindung zu wechseln, beginnen Sie mit „9 Drahtlose Einstellungen“ auf Seite 41
zur Einrichtung der drahtlosen Verbindung.
Per passare da una connessione USB a una connessione wireless, ricominciare da "9 Impostazione wireless" a pagina 41 per
impostare una connessione wireless.
USB Connection Wireless Connection
Connexion USB Connexion sans l
USB-Verbindung Drahtlose Verbindung
Connessione USB Connessione wireless
Change from USB to Wireless Connection
Go to page 41.
Allez à la page 41.
Fahren Sie auf Seite
41 fort.
Passage d’une connexion USB à une connexion sans l
Wechseln von einer USB-Verbindung zu einer WLAN-Verbindung
Passaggio dalla connessione USB alla connessione wireless
Andare a pagina 41.
69
Page 72
14
Various application software are installed on
the computer along with the drivers. You can
print creative items by correcting/enhancing
photos using the application software.
For details on how to use the application
software and the machine, refer to the onscreen manual.
Différentes applications sont installées sur
l’ordinateur en même temps que les pilotes.
Vous pouvez réaliser des impressions
créatives en corrigeant/améliorant vos photos
à l’aide de l’application.
Pour plus d’informations sur l’utilisation de
l’application et de la machine, reportez-vous
au manuel en ligne.
Solution Menu EX
Solution Menu EX is a gateway to functions and information that allow you to make full
use of the machine! For example,
Open the on-screen manual.
•
Open various application software.
•
Solution Menu EX est une passerelle donnant accès à des fonctions et informations vous
permettant d’utiliser la machine au maximum de ses capacités. Par exemple,
Ouvrez le manuel en ligne.
•
Ouvrez plusieurs applications.
•
Solution Menu EX ermöglicht den Zugriff auf Funktionen und Informationen, mit denen
Sie den vollen Funktionsumfang des Geräts nutzen können. Beispiel:
Öffnen Sie das Online-Handbuch.
•
Öffnen Sie verschiedene Anwendungen.
•
Solution Menu EX consente di accedere con facilità alle funzioni e alle informazioni utili
per sfruttare al meglio la stampante. Ad esempio,
Aprire il manuale a video.
•
Aprire le varie applicazioni software.
•
70
Application Software
Logiciel d’application
Anwendungssoftware
Applicazioni software
Auf dem Computer werden zusammen mit
den Treibern verschiedene Anwendungen
installiert. Sie können kreative Objekte
drucken, indem Sie Fotos mithilfe der
Anwendungssoftware korrigieren/optimieren.
Details zur Verwendung der
Anwendungssoftware und des Geräts nden
Sie im Online-Handbuch.
Insieme ai driver vengono installate nel
computer diverse applicazioni software. Tali
applicazioni consentono di stampare materiali
creativi con correzione/ottimizzazione delle foto.
Per informazioni sull'utilizzo delle applicazioni
software e della stampante, consultare il
manuale a video.
How to open the on-screen manual
Click Help & Settings, then click this icon to
open the on-screen manual.
Procédure d’ouverture du manuel
en ligne
Cliquez sur Aide et paramètres (Help &
Settings), puis cliquez sur cette icône pour
ouvrir le manuel en ligne.
Öffnen des Online-Handbuchs
Klicken Sie auf Hilfe und Einstellungen (Help
& Settings) und dann auf dieses Symbol, um
das Online-Handbuch zu öffnen.
Modalità di apertura del manuale a
video
Fare clic su Guida e impostazioni (Help &
Settings), quindi fare clic su questa icona per
aprire il manuale a video.
How to start Solution Menu EX
Click this icon on the desktop (Windows) or on
the Dock (Macintosh) to start Solution Menu EX.
Procédure de démarrage de Solution
Menu EX
Pour démarrer Solution Menu EX, cliquez sur
cette icône sur le bureau (Windows) ou dans le
Dock (Macintosh).
Starten von Solution Menu EX
Klicken Sie auf dieses Symbol auf dem Desktop
(Windows) oder im Dock (Macintosh), um
Solution Menu EX zu starten.
Come avviare Solution Menu EX
Fare clic su questa icona nel desktop
(Windows) o nel Dock (Macintosh) per avviare
Solution Menu EX.
Page 73
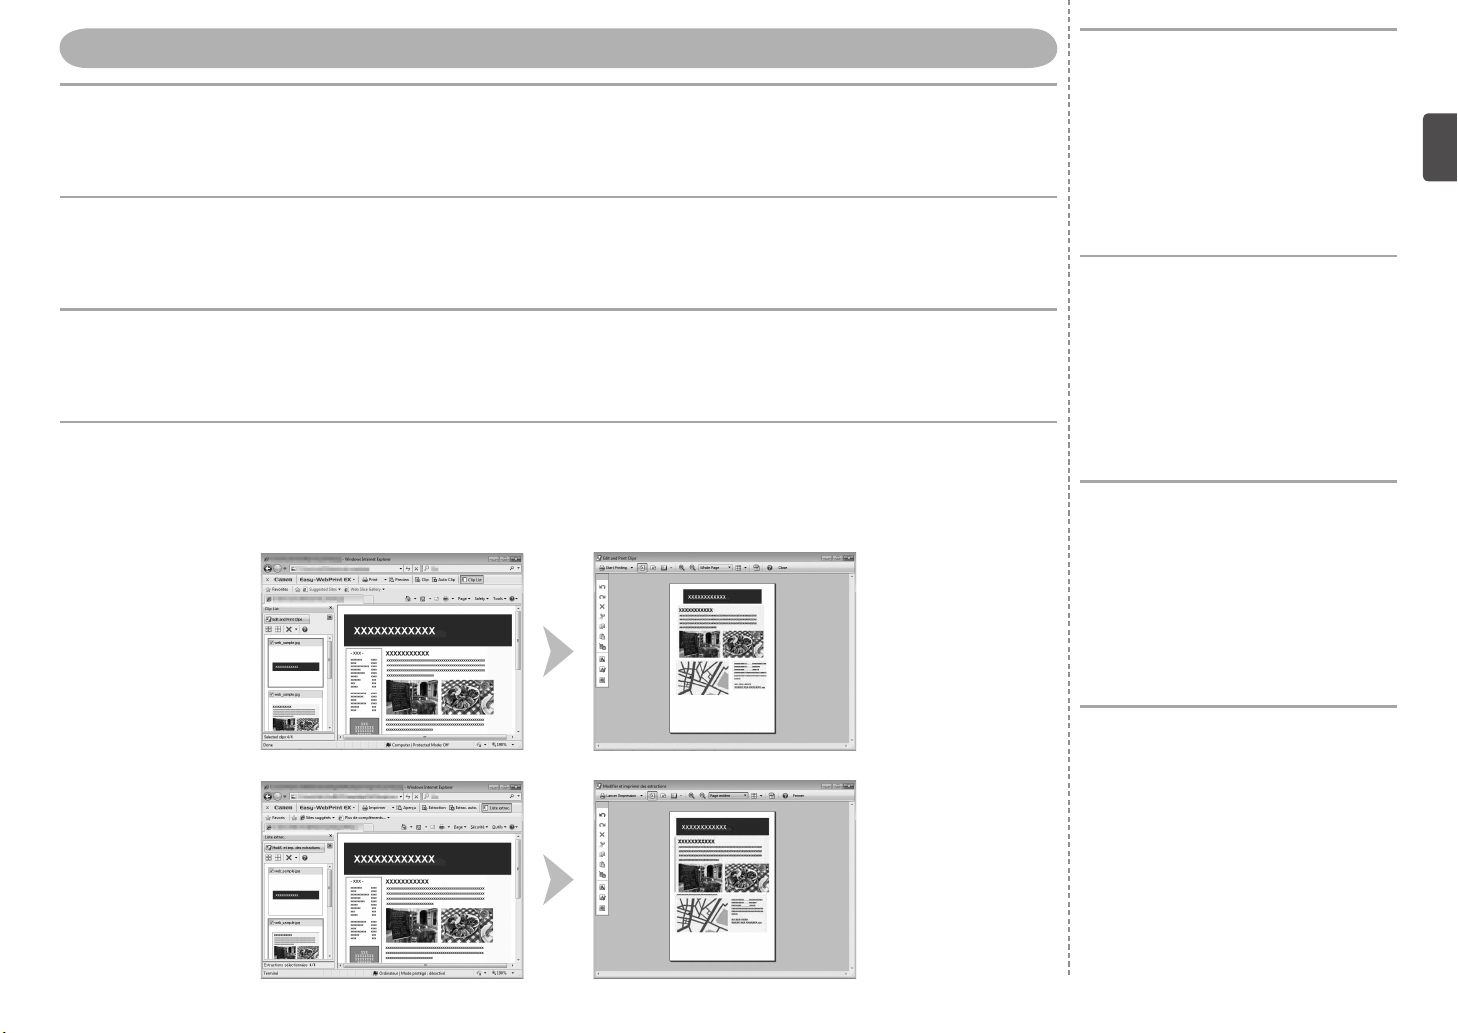
Easy-WebPrint EX
Use Easy-WebPrint EX to easily print web pages in Internet Explorer (Windows) or Safari (Macintosh). Some of its features
include:
Printing a web page by reducing its size to fit the paper width automatically without cropping edges.
•
Printing only the pages you want by selecting them from preview.
•
Printing selected portions of various pages after editing them.
•
Utilisez Easy-WebPrint EX pour imprimer facilement des pages Web dans Internet Explorer (Windows) ou Safari (Macintosh).
Parmi ses fonctions, citons :
Impression d’une page Web avec réduction automatique de sa taille en fonction de la largeur du papier sans rogner les bords.
•
Impression limitée aux pages souhaitées que vous sélectionnez à partir de l’aperçu.
•
Impression de certaines parties de plusieurs pages après modification.
•
Mit Easy-WebPrint EX können Sie in Internet Explorer (Windows) oder Safari (Macintosh) ganz einfach Webseiten drucken.
Zu den Funktionen zählen beispielsweise:
Drucken einer Webseite und automatisches Verkleinern, so dass der Inhalt auf die gewünschte Seite passt.
•
Drucken bestimmter Webseiten, die in der Vorschau ausgewählt wurden.
•
Drucken bestimmter Inhalte aus verschiedenen Seiten, die auf einer Seite zusammengefasst werden.
•
Utilizzare Easy-WebPrint EX per stampare con facilità pagine Web in Internet Explorer (Windows) o Safari (Macintosh).
Di seguito sono riportate alcune funzioni:
Stampa di una pagina Web riducendone le dimensioni in modo da adattarle alla larghezza della pagina automaticamente senza tagliare i bordi.
•
Stampa delle sole pagine desiderate selezionandole dall'anteprima.
•
Stampa delle porzioni selezionati delle varie pagine dopo averle modificate.
•
For details on Solution Menu EX and
Easy-WebPrint EX, refer to the on-
screen manual: Basic Guide.
Pour plus d’informations sur Solution
Menu EX et Easy-WebPrint EX,
reportez-vous au manuel en ligne
Guide d’utilisation de base.
Details zu Solution Menu EX und EasyWebPrint EX nden Sie im Online-
Handbuch Basishandbuch.
Per informazioni dettagliate su Solution
Menu EX e Easy-WebPrint EX,
consultare il manuale a video: Guida
Base.
71
Page 74
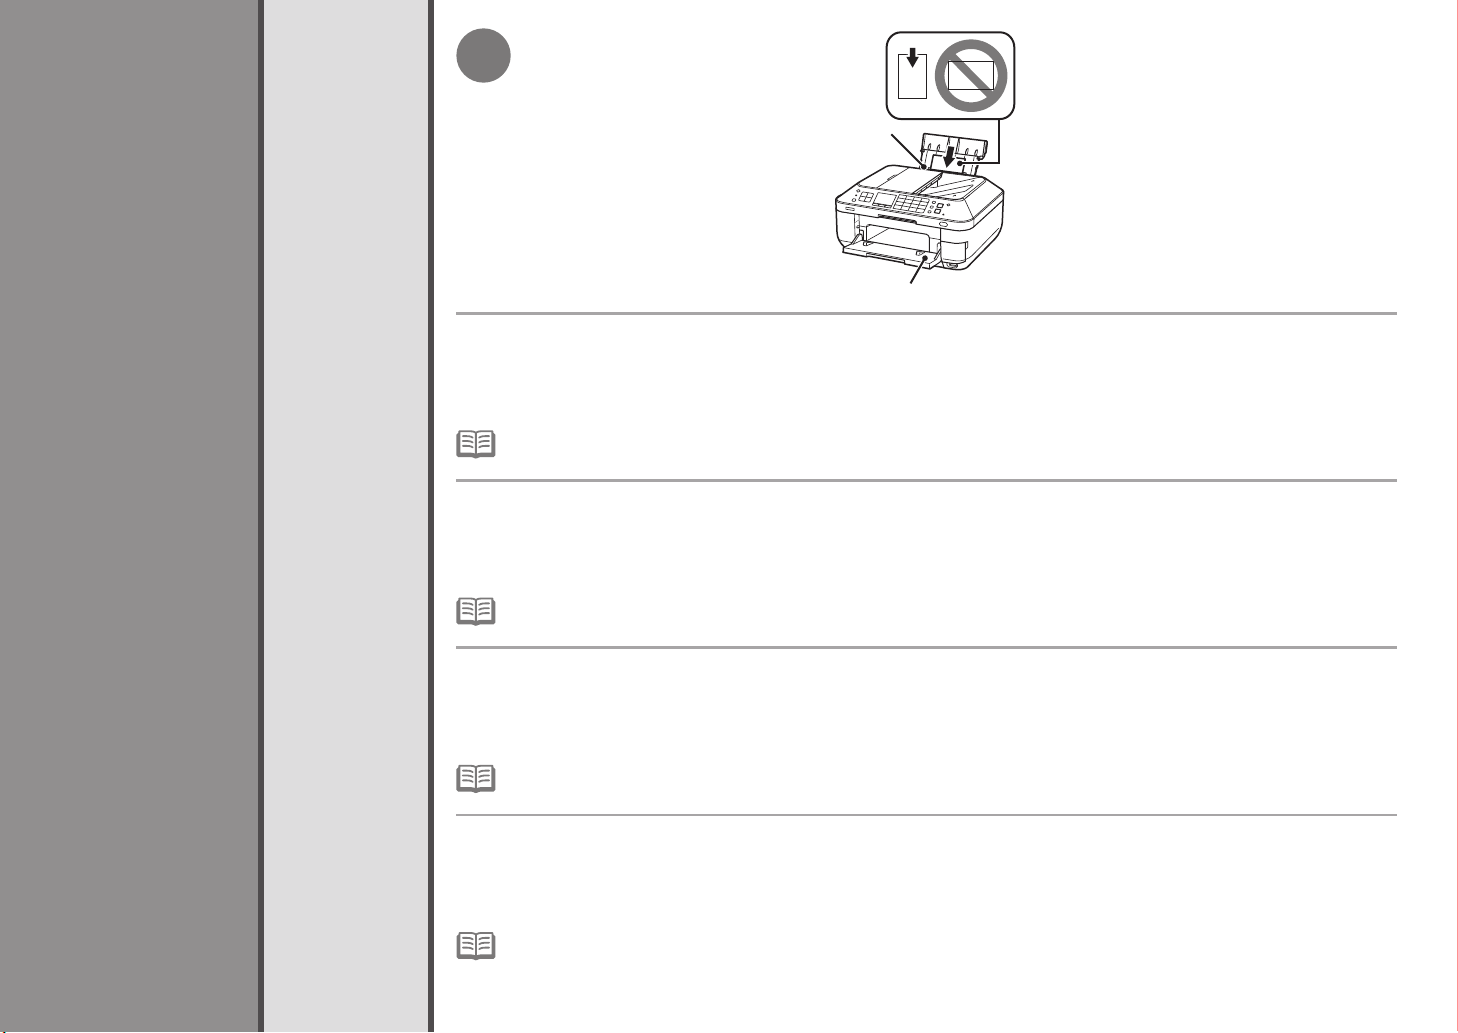
1
15
Testen Sie das Gerät
Try Using the Machine
Utilizzo della stampante
Load paper in the Rear Tray (A) in portrait orientation with the printing side facing up.
Make sure that the Paper Output Tray (B) is open.
If printing starts while the Paper Output Tray is closed, it will automatically open.
This section explains how to print images stored on the computer.
Print Photos from a Computer
Stampa di foto da un computer
Disposez le papier dans le réceptacle arrière (A) en orientation Portrait, face à imprimer vers le haut.
Vérifiez que le bac de sortie papier(B) est ouvert.
Drucken von Fotos von einem Computer
Si l’impression commence alors que le bac de sortie papier est fermé, il s’ouvre automatiquement.
Cette section explique comment imprimer des images stockées sur l’ordinateur.
Impression de photos depuis un ordinateur
Legen Sie Papier im Hochformat und mit der zu bedruckenden Seite nach oben in das hintere Fach (A) ein.
For details, refer to "5 Load Paper" on page 22.•
Pour plus d’informations, reportez-vous à la section « 5 Chargement du papier » à la page 22.
•
A
B
72
Essai d’utilisation de la machine
Achten Sie darauf, dass das Papierausgabefach (B) geöffnet ist.
Wenn der Druckvorgang beginnt, während das Papierausgabefach geschlossen ist, wird es automatisch geöffnet.
In diesem Abschnitt wird beschrieben, wie Sie auf einem Computer gespeicherte Bilder ausdrucken.
Weitere Informationen nden Sie unter „5 Einlegen von Papier“ auf Seite 22.•
Caricare la carta nel vassoio posteriore (A) in senso verticale con il lato di stampa rivolto verso l'alto.
Verificare che il vassoio di uscita della carta (B) sia aperto.
Se la stampa viene avviata con il vassoio di uscita della carta chiuso, questo viene aperto automaticamente.
In questa sezione viene descritto come stampare immagini memorizzate nel computer.
Per ulteriori informazioni, vedere "5 Caricamento della carta" a pagina 22.•
Page 75
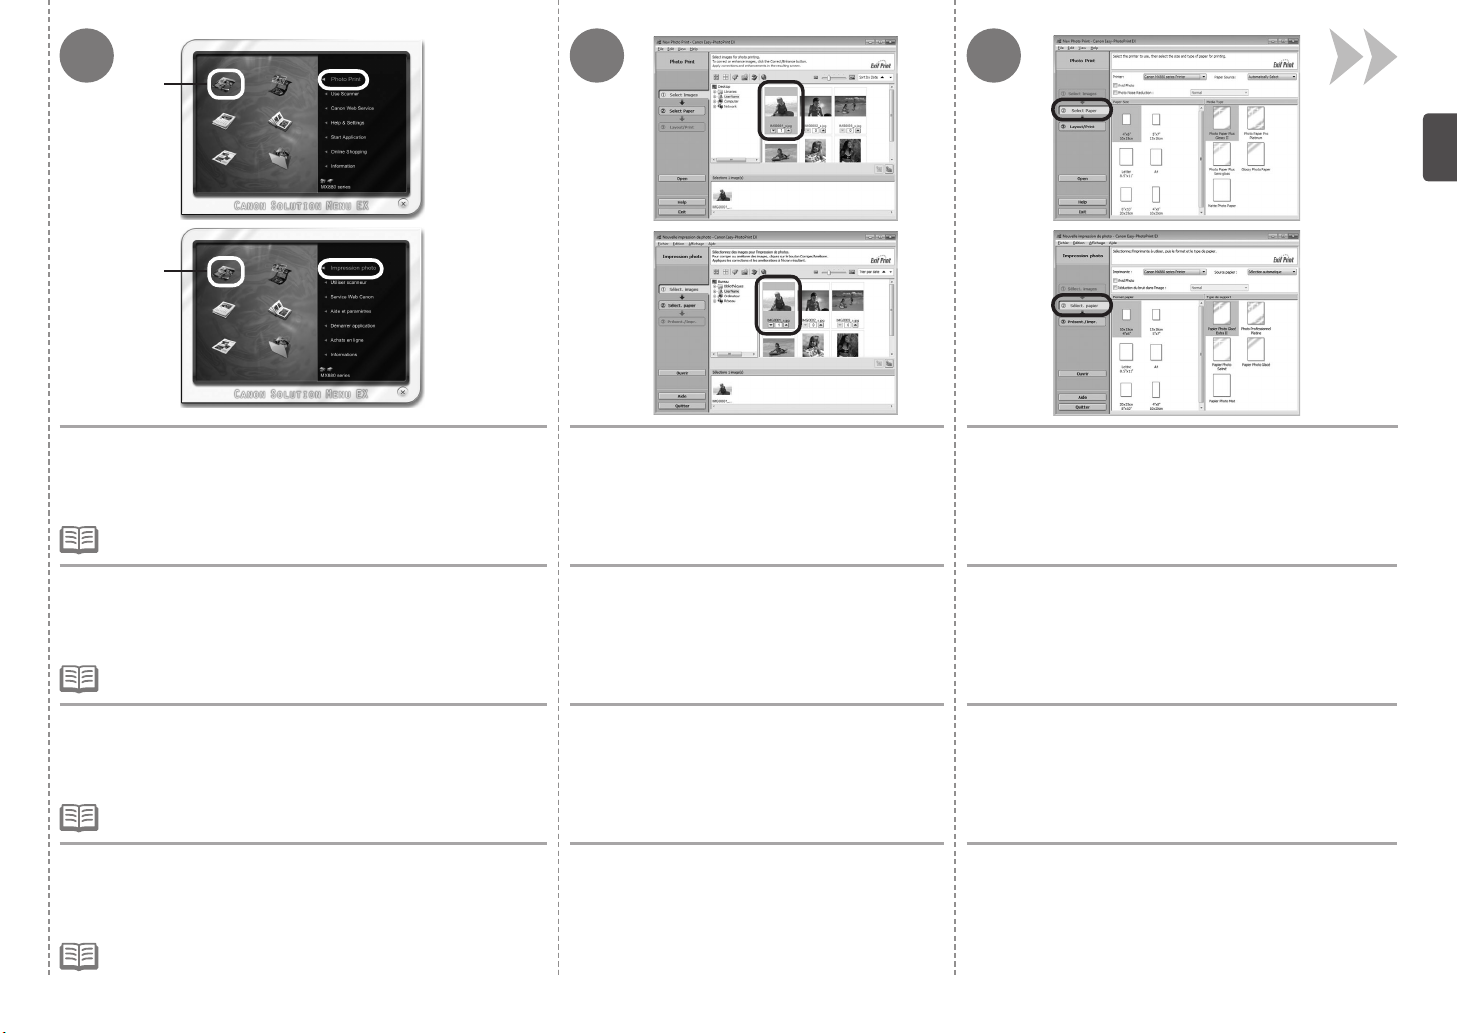
C
3 42
C
Start Solution Menu EX from the Canon Solution Menu EX
icon on the desktop (Windows) or on the Dock (Macintosh),
click Photo Print, then click Photo Print (C).
Easy-PhotoPrint EX starts.
For details on starting Solution Menu EX, refer to "14 Application
•
Software" on page 70.
Démarrez Solution Menu EX en cliquant sur l’icône Canon Solution Menu EX
sur le bureau (Windows) ou dans le Dock (Macintosh), cliquez sur Impression
photo (Photo Print), puis cliquez sur Impression photo (Photo Print) (C).
Easy-PhotoPrint EX démarre.
Pour plus d’informations sur le démarrage de Solution Menu EX,
•
reportez-vous à la section « 14 Logiciel d’application » à la page 70.
Starten Sie Solution Menu EX über das Symbol Canon Solution Menu
EX auf dem Desktop (Windows) bzw. im Dock (Macintosh), klicken Sie auf
Fotodruck (Photo Print) und dann auf Fotodruck (Photo Print) (C).
Easy-PhotoPrint EX wird gestartet.
Ausführliche Informationen zum Starten von Solution Menu EX
•
nden Sie unter „14 Anwendungssoftware“ auf Seite 70.
Avviare Solution Menu EX dall'icona Canon Solution Menu EX sul
desktop (Windows) o sul Dock (Macintosh), fare clic su Stampa foto
(Photo Print), quindi fare clic su Stampa foto (Photo Print) (C).
Easy-PhotoPrint EX viene avviato.
Per ulteriori informazioni sull'avvio di Solution Menu EX, vedere "14
•
Applicazioni software" a pagina 70.
Select a folder containing images, then select
an image you want to print.
When an image is selected, the number of copies is set
to "1."
Sélectionnez un dossier contenant des
images, puis sélectionnez celle que vous
souhaitez imprimer.
Lorsque vous sélectionnez une image, le nombre de
copies est défini sur «
1 ».
Wählen Sie einen Ordner mit Bildern und
danach ein Bild aus, das Sie drucken möchten.
Wenn ein Bild ausgewählt ist, steht die Anzahl der
Kopien auf „1“.
Selezionare una cartella contenente immagini,
quindi selezionare un'immagine da stampare.
Quando si seleziona un'immagine, il numero di copie
viene impostato su "1".
Click Select Paper, then select the Paper Size and
Media Type settings that match the loaded paper.
Cliquez sur Sélection du papier (Select Paper), puis
sélectionnez les options Format papier (Paper Size)
et Type de support (Media Type) en fonction du
papier que vous chargez.
Klicken Sie auf Papier auswählen (Select
Paper), und wählen Sie danach die Einstellungen
Papierformat (Paper Size) und Medientyp (Media
Type) entsprechend dem verwendeten Papier aus.
Fare clic su Seleziona carta (Select Paper), quindi
selezionare le impostazioni di Formato (Paper Size)
e Tipo di supporto (Media Type) corrispondenti alla
carta caricata.
73
Page 76
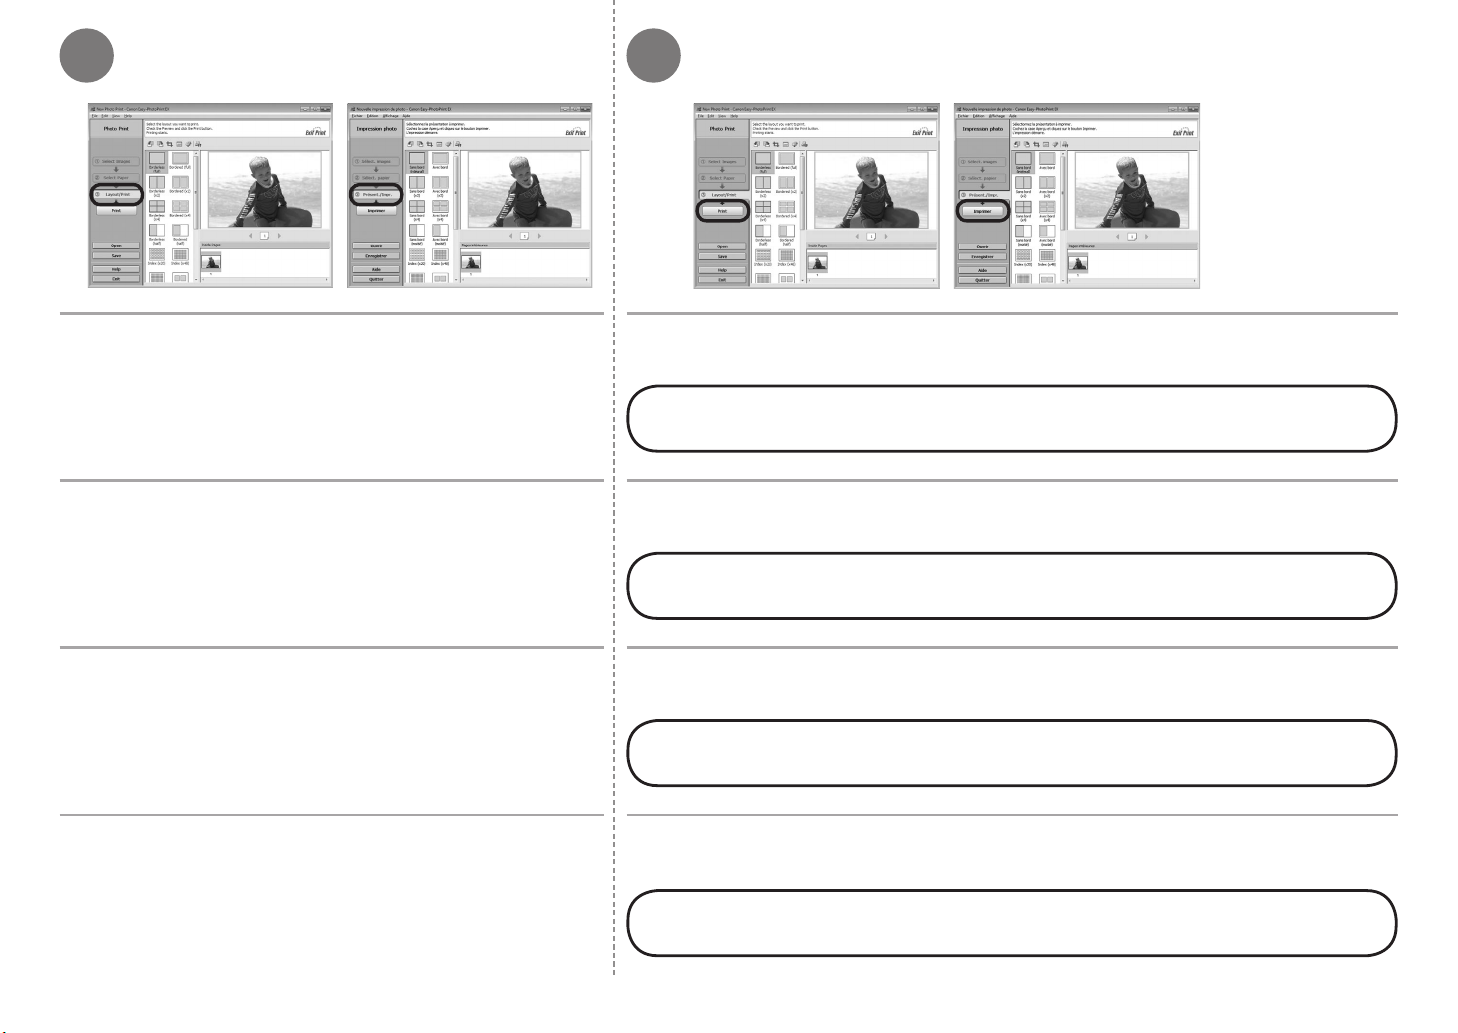
65
Click Layout/Print, then select a layout for the image.
Cliquez sur Présentation/Impression (Layout/Print), puis
sélectionnez une présentation pour l’image.
Klicken Sie auf Layout/Druck (Layout/Print), und wählen Sie ein
Layout für das Bild aus.
Fare clic su Layout/Stampa (Layout/Print), quindi selezionare un
layout per l'immagine.
Click Print.
If you are using Windows, printing will start.
If you are using Macintosh, click Print on the Print dialog box to start printing.
For more information, refer to the on-screen manual: Advanced Guide.
Cliquez sur Imprimer (Print).
Si vous utilisez Windows, l’impression démarre.
Si vous utilisez Macintosh, cliquez sur Imprimer (Print) dans la boîte de dialogue Imprimer (Print) pour démarrer l’impression.
Pour plus d’informations, reportez-vous au manuel en ligne : Guide d’utilisation avancée.
Klicken Sie auf Drucken (Print).
Wenn Sie Windows verwenden, wird der Druckvorgang gestartet.
Wenn Sie Macintosh verwenden, klicken Sie im Dialogfeld Drucken (Print) auf Drucken (Print), um den Druckvorgang zu starten.
Weitere Informationen nden Sie im Online-Handbuch: Erweitertes Handbuch.
Fare clic su Stampa (Print).
Se si utilizza Windows, la stampa verrà avviata.
Se si utilizza Macintosh, fare clic su Stampa (Print) sulla finestra di dialogo Stampa (Print) per avviare la stampa.
74
Per ulteriori informazioni, consultare il manuale a video Guida Avanzata.
Page 77
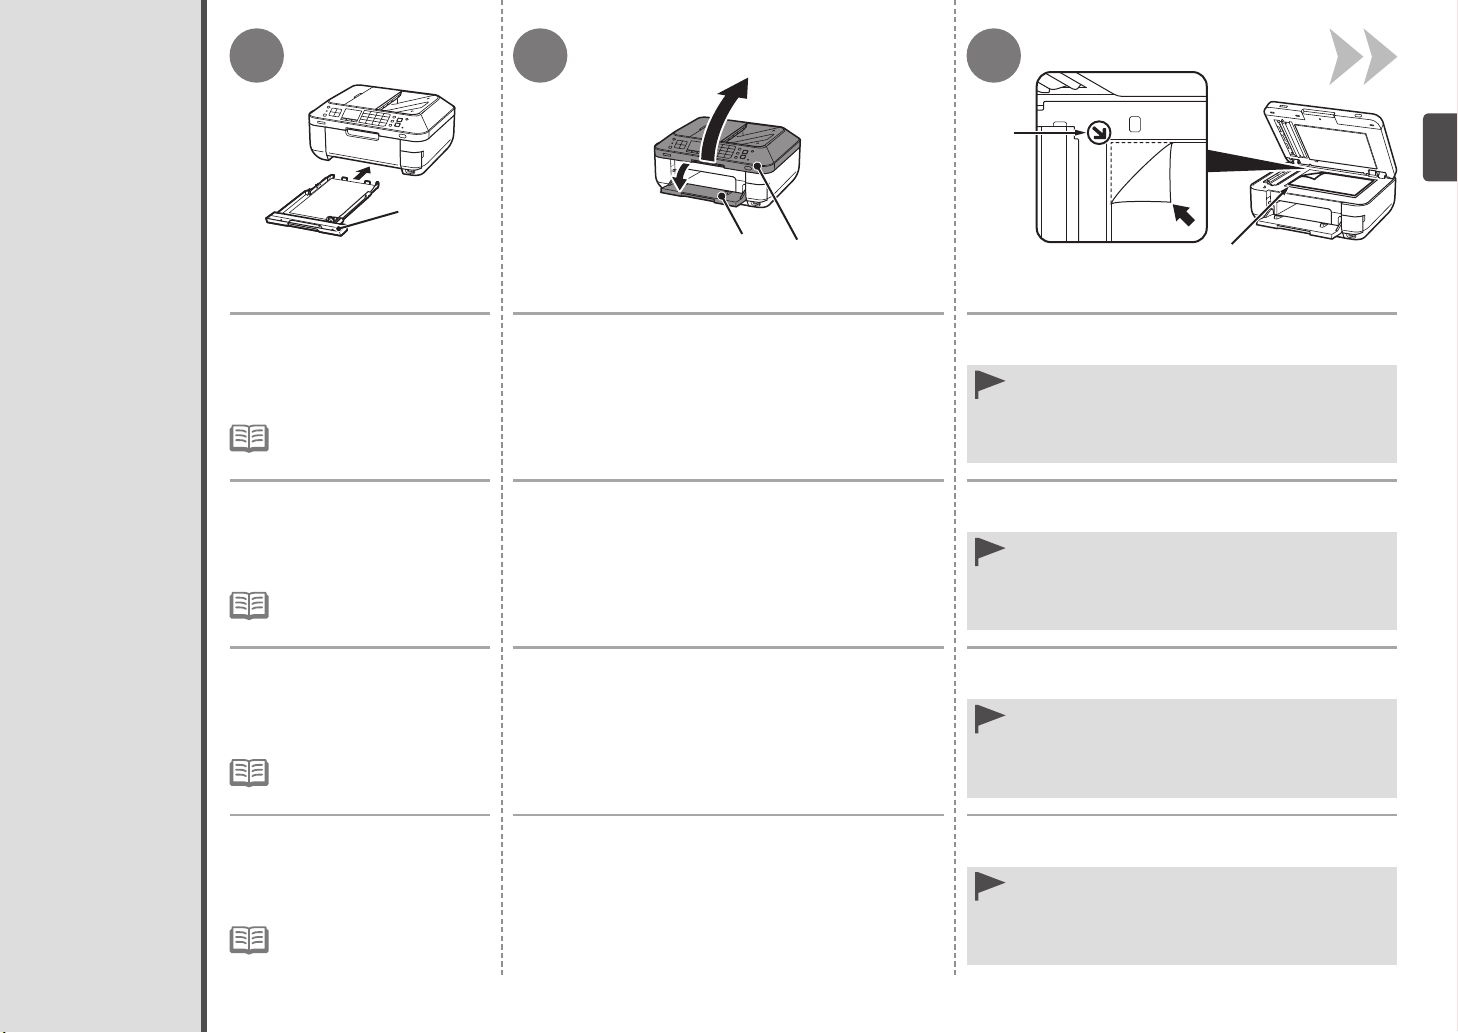
Kopieren
Try Copying
Première copie
1 2
A
3
D
B
C
E
Load A4 or Letter-sized plain
paper into the Cassette (A).
This section describes how to perform a
Esecuzione di una copia
standard copy.
For details, refer to "5 Load
•
Paper" on page 22.
Chargez du papier ordinaire
au format A4 ou Letter dans la
cassette (A).
Cette section explique comment
effectuer une copie standard.
Pour plus d’informations, reportez-
•
vous à la section « 5 Chargement
du papier » à la page 22.
Legen Sie Normalpapier im
Format A4 oder Letter in die
Kassette (A) ein.
In diesem Abschnitt wird beschrieben, wie
Sie eine Standardkopie durchführen.
Weitere Informationen nden
•
Sie unter „5 Einlegen von
Papier“ auf Seite 22.
Caricare la carta comune in
formato A4 o Letter nel cassetto
(A).
In questa sezione viene descritto come
eseguire una copia standard.
Per ulteriori informazioni,
•
vedere "5 Caricamento della
carta" a pagina 22.
Open the Paper Output Tray (B), then open the
Document Cover (C).
If printing starts while the Paper Output Tray is closed, it will
automatically open.
Ouvrez le bac de sortie papier (B), puis ouvrez le
couvercle du scanner (C).
Si l’impression démarre alors que le bac de sortie papier est
fermé, celui-ci s’ouvre automatiquement.
Öffnen Sie das Papierausgabefach (B) und dann den
Vorlagendeckel (C).
Das Papierausgabefach wird automatisch geöffnet, wenn der
Druckvorgang beginnt.
Aprire il vassoio di uscita della carta (B) quindi aprire
il coperchio dei documenti (C).
Se la stampa ha inizio con il vassoio di uscita della carta chiuso,
questo si aprirà automaticamente.
Place the document face-down and align it with the
Alignment Mark (D).
Do not place objects weighing 4.4 lb / 2.0 kg or more
•
on the Platen Glass (E), or do not apply pressure to the
document by pressing on it with a force exceeding 4.4 lb
/ 2.0 kg. The scanner may malfunction or the glass may
break.
Placez le document face vers le bas et alignez-le sur
le repère d’alignement (D).
Ne placez pas d’objets pesant plus de 4,4 lb/2,0 kg sur la
•
vitre d’exposition (E), ou n’appuyez pas sur l’original en
exerçant une pression supérieure à 4,4 lb/2,0 kg. Vous
risqueriez de provoquer un dysfonctionnement du scanner
ou de briser la vitre.
Legen Sie das Dokument mit der bedruckten Seite nach unten
auf, und richten Sie es an der Ausrichungsmarkierung (D) aus.
Achten Sie darauf, dass die Glasauageäche (E) durch
•
Gegenstände oder Druck nicht mit mehr als 2,0 kg (4,4 lb)
belastet wird, andernfalls entstehen Fehlfunktionen am
Scanner, oder das Glas könnte brechen.
Posizionare il documento con il lato di stampa rivolto verso il
basso, allineandolo al segno di allineamento (D).
Non collocare oggetti di peso pari o superiore a
•
4,4 libbre/2,0 kg sul piano di lettura in vetro (E) e non
applicare sul documento una pressione superiore a
4,4 libbre/2,0 kg. Così facendo, infatti, si potrebbero
provocare malfunzionamenti dello scanner o rompere il
piano in vetro.
75
Page 78
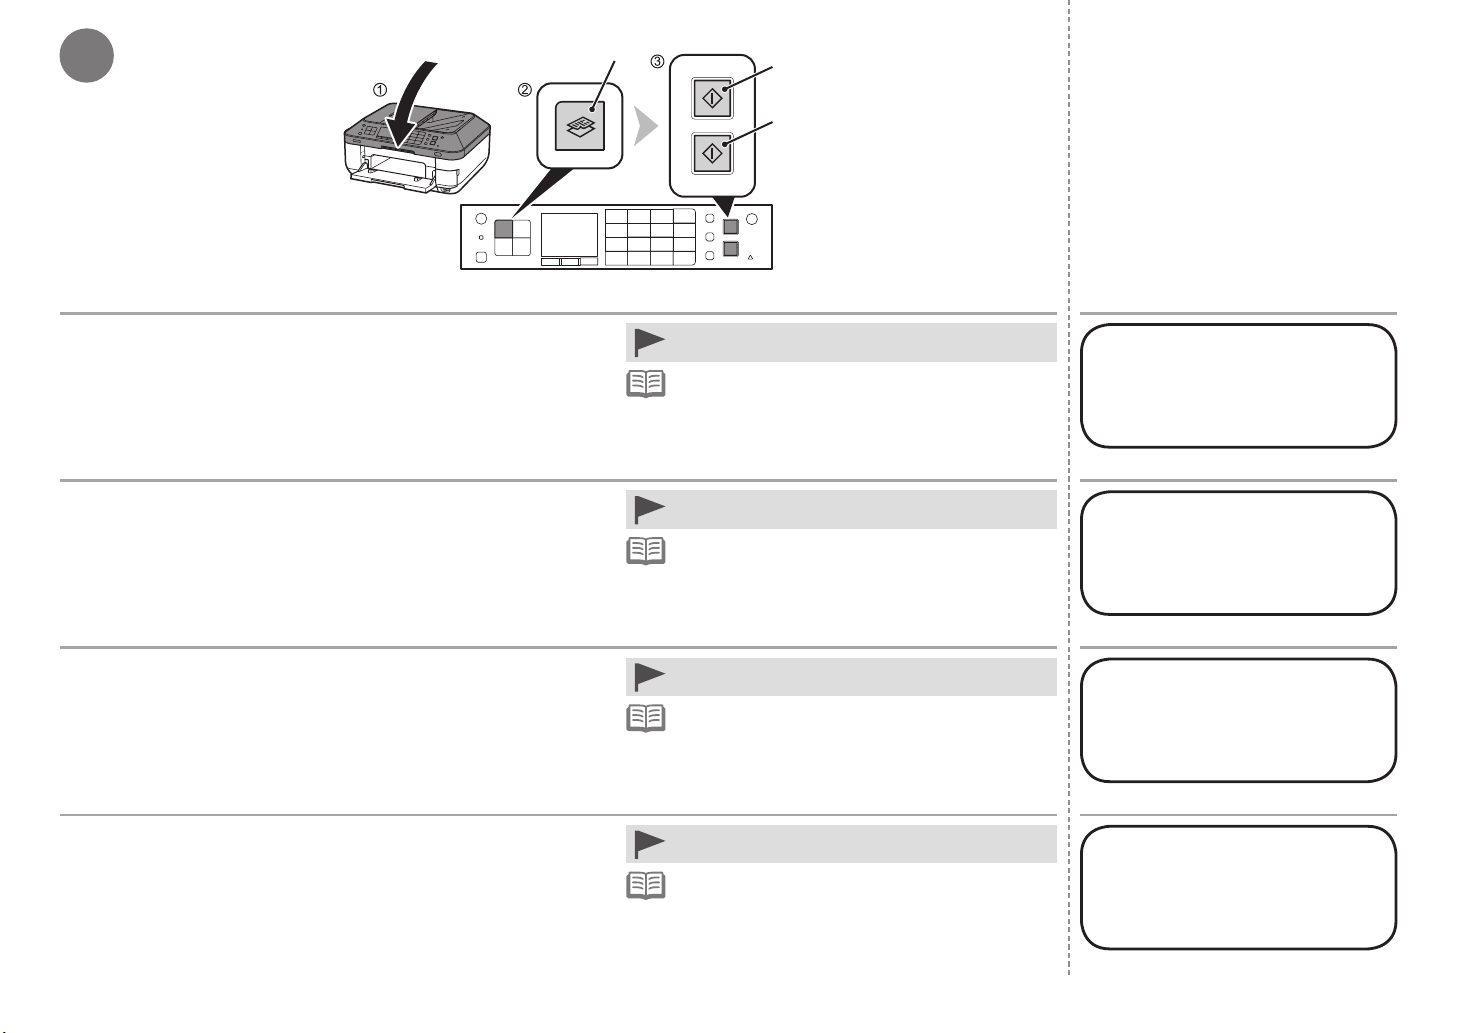
4
F
H
G
1. Close the Document Cover.
2. Press the
The copy standby screen is displayed.
COPY button (F).
3. Press the Color button (G) to make color copies or the Black
button (H) to make black-and-white copies.
Copying will start. Do not open the Document Cover until copying is complete.
Remove the document after printing.
1. Fermez le couvercle du scanner.
2. Appuyez sur le bouton
L’écran d’attente de copie s’affiche.
COPIE (COPY) (F).
3. Appuyez sur le bouton Couleur (Color)(G) pour faire des copies
couleur ou sur le bouton Noir (Black)(H) pour faire des copies en
noir et blanc.
La copie démarre. N'ouvrez le capot de document qu'une fois la copie terminée.
Retirez le document après l'impression.
1. Schließen Sie den Vorlagendeckel.
2. Drücken Sie die Taste
Der Kopie-Standby-Bildschirm wird angezeigt.
KOPIE (COPY) (F).
3. Drücken Sie die Taste Farbe (Color) (G) für Farbkopien oder die
Taste Schwarz (Black) (H) für Schwarzweißkopien.
Der Kopiervorgang wird gestartet. Öffnen Sie den Vorlagendeckel erst,
nachdem der Kopiervorgang vollständig abgeschlossen ist. Nehmen Sie das
Dokument nach dem Drucken heraus.
1. Chiudere il coperchio dei documenti.
2. Premere il pulsante
Viene visualizzata la schermata di standby copia.
COPIA (COPY) (F).
3. Premere il pulsante Colore (Color) (G) per eseguire copie a
colori o il pulsante Nero (Black) (H) per eseguire copie in bianco
e nero.
La copia verrà avviata. Non aprire il coperchio documenti fino al termine
del processo di copia. Al termine della stampa, rimuovere il documento.
Close the Document Cover gently, holding it rmly,
•
because it is heavy.
When the machine is ready for copying, the Black button
•
and Color button light up.
Fermez doucement le couvercle du scanner, en le tenant
•
fermement, car il est lourd.
Lorsque la machine est prête pour la copie, le bouton Noir
•
(Black) et le bouton Couleur (Color) s’allument.
Schließen Sie den Vorlagendeckel vorsichtig. Halten Sie
•
ihn dabei gut fest, da er schwer ist.
Wenn das Gerät bereit zum Kopieren ist, leuchten die
•
Tasten Schwarz (Black) und Farbe (Color).
Chiudere delicatamente il coperchio del documenti
•
tenendolo saldamente poiché è pesante.
Quando la macchina è pronta per la copia, i pulsanti Nero
•
(Black) e Colore (Color) si accendono.
For the procedure to copy on paper
other than plain paper, refer to
"Copying" in the on-screen manual:
Advanced Guide.
Pour plus d’informations sur la
procédure de copie sur du papier autre
que du papier ordinaire, reportez-vous
à la section « Copie » du manuel en
ligne Guide d’utilisation avancée.
Informationen über das Kopieren
auf anderem Papier als
Normalpapier nden Sie unter
„Kopieren“ im Online-Handbuch:
Erweitertes Handbuch.
Per la procedura di copia su
carta diversa dalla carta comune,
consultare "Copia" nel manuale a
video: Guida Avanzata.
76
Page 79
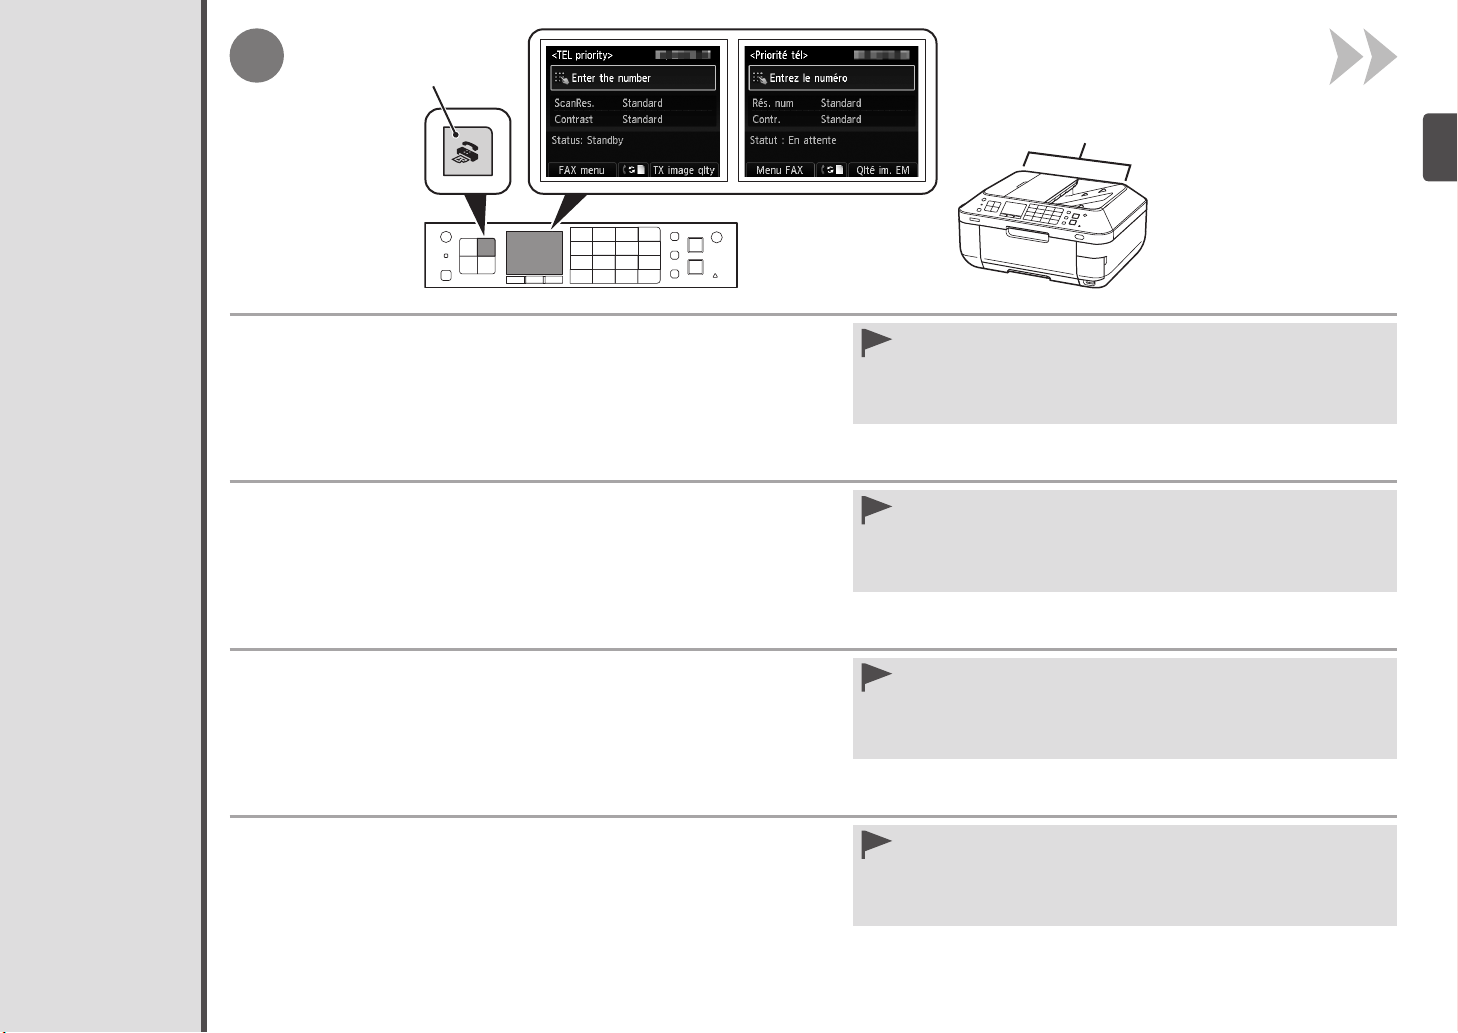
1
A
B
Send Faxes
Envoi de fax
Invio di fax
Senden von Faxen
Press the FAX button (A).
This section explains how to send a fax in black and white from the ADF (Auto Document
Feeder) (B).
Appuyez sur le bouton FAX (A).
Cette section explique comment envoyer un fax en noir et blanc à partir du CAD (chargeur
automatique de documents) (B).
Drücken Sie die Taste FAX (A).
In diesem Abschnitt wird das Senden eines Fax in Schwarzweiß über den ADF
(automatischen Dokumenteneinzug) (B) erklärt.
Make sure that the telephone line type is set correctly. For the setting
•
procedure, refer to "Preparing for Faxing" in the on-screen manual: Basic
Guide.
The setting may not be available depending on the country or region of your
•
residence.
Assurez-vous que le type de ligne téléphonique est déni correctement.
•
Pour connaître la procédure de conguration, reportez-vous à la section
« Opérations préalables à la télécopie » du manuel en ligne Guide
d’utilisation de base.
Selon votre pays ou région de résidence, ce paramètre peut ne pas être
•
disponible.
Der Telefonleitungstyp muss ordnungsgemäß festgelegt sein. Informationen
•
zur Vorgehensweise bei der Einrichtung nden Sie unter „Vorbereitungen für
Faxübertragungen“ im Online-Handbuch: Basishandbuch.
Diese Einstellung ist je nach Land oder Region, in dem/der das Gerät
•
verwendet wird, möglicherweise nicht verfügbar.
Premere il pulsante FAX (A).
In questa sezione viene descritto come inviare un fax in bianco e nero dall'ADF
(Alimentatore automatico documenti) (B).
Assicurarsi che l'impostazione del tipo di linea telefonica sia corretta. Per la
•
procedura di impostazione, consultare "Preparazione dell'invio di un fax" nel
manuale a video: Guida Base.
Questa impostazione potrebbe non essere disponibile nel paese o nella
•
regione di residenza.
77
Page 80
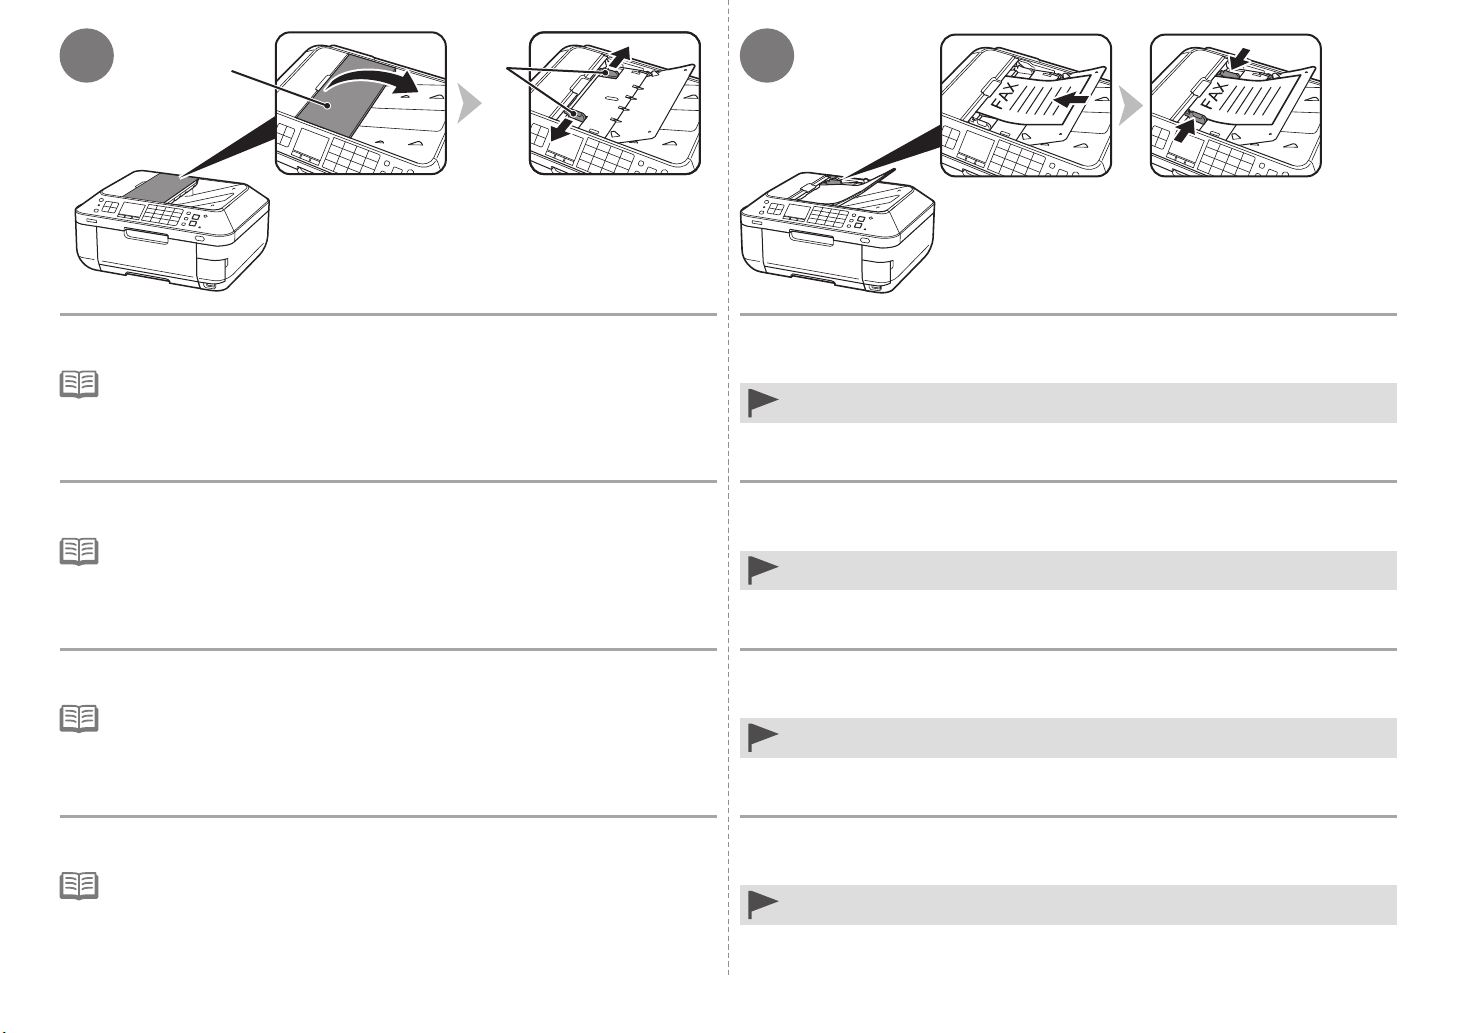
C
D
32
Open the Document Tray (C), then move the Document Guides (D) to both edges.
For details on supported documents and settings for image quality, density (brightness), etc.,
•
refer to the on-screen manual: Basic Guide.
Ouvrez le plateau destiné aux documents (C) et ajustez les guides du document
(D) le long des deux bords.
Pour plus d’informations sur les documents pris en charge et les paramètres de qualité d’image, de
•
densité (luminosité), etc., reportez-vous au manuel en ligne : Guide d’utilisation de base.
Öffnen Sie das Vorlagenfach (C), und verschieben Sie die Vorlagenhalter (D) an
beiden Seiten nach außen.
Informationen zu unterstützten Dokumenten und Einstellungen zur Bildqualität, Dichte
•
(Helligkeit) usw. nden Sie im Online-Handbuch: Basishandbuch.
Aprire il vassoio dei documenti (C), quindi spostare le guide dei documenti (D) alle
estremità di entrambi i lati.
Per informazioni sui documenti supportati e sulle impostazioni di qualità dell'immagine, densità
•
(luminosità) e così via, consultare il manuale a video Guida Base.
Insert the document until a beep sounds, then slide the left and right Document
Guides against both ends of the document.
Place the document face-up.•
Insérez le document jusqu’à ce qu’un bip sonore se déclenche, puis faites glisser
les guides du document gauche et droit contre les bords du document.
Placez le document face vers le haut.•
Legen Sie das Dokument ein, bis ein akustisches Signal ertönt, und verschieben
Sie den linken und rechten Vorlagenhalter an die Kanten des Dokuments.
Legen Sie das Dokument mit der zu bedruckenden Seite nach oben ein.•
Inserire il documento fino all'emissione di un segnale acustico, quindi spostare le
guide dei documenti destra e sinistra fino a quando non toccano i rispettivi bordi
del documento.
Posizionare il documento con il lato di stampa rivolto verso l'alto.•
78
Page 81
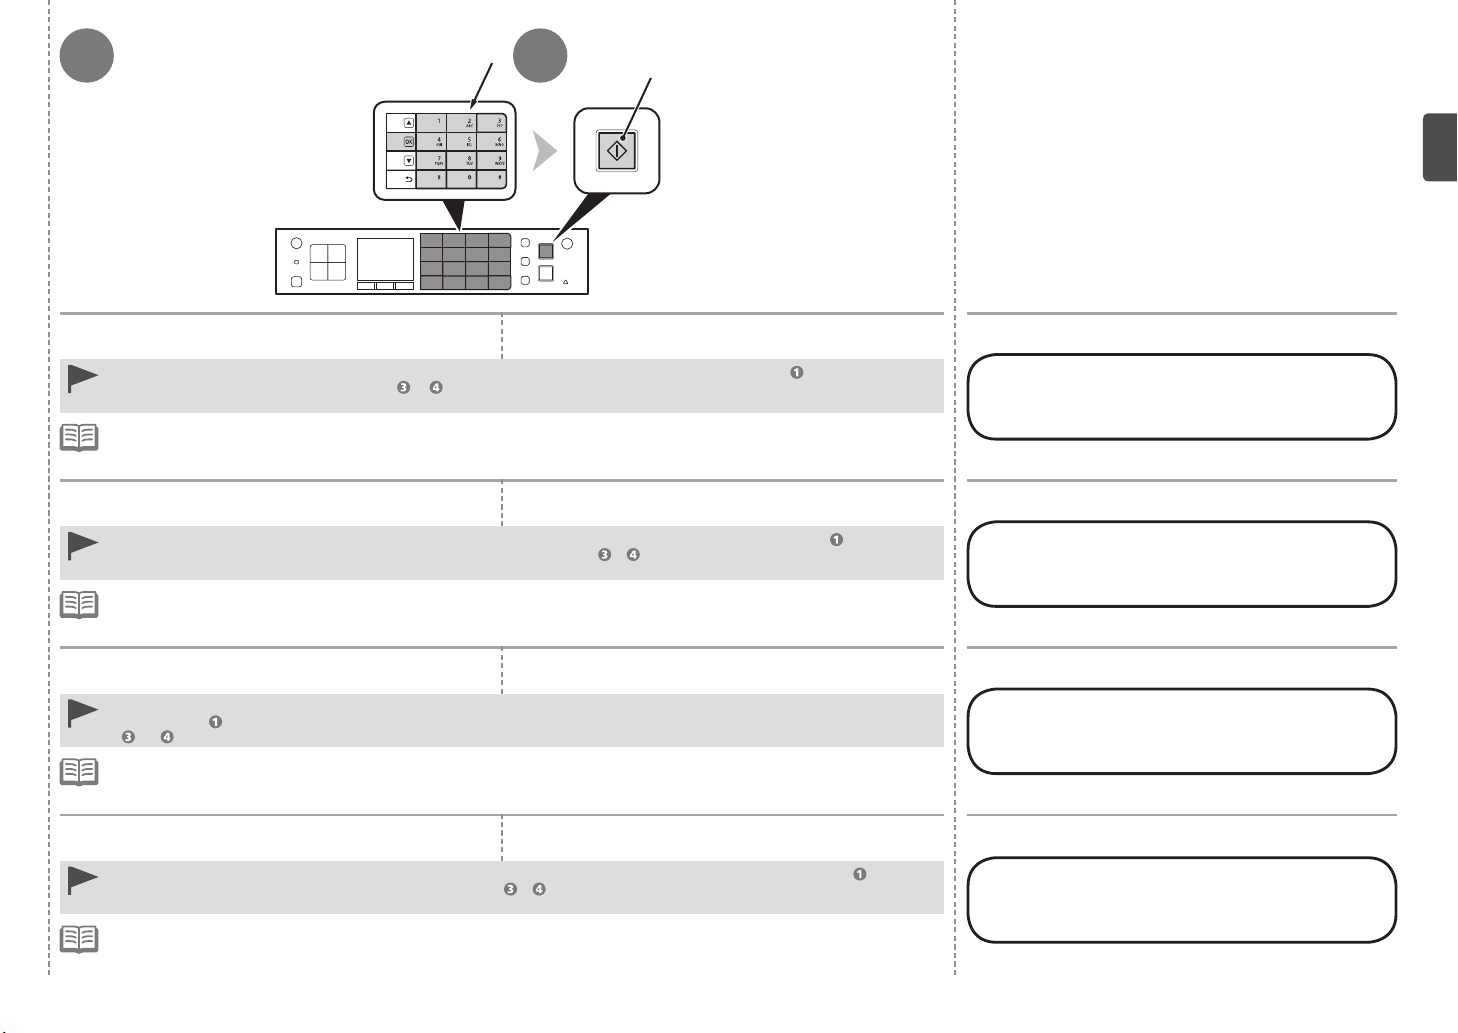
4
E
5
F
Use the Numeric buttons (E) to enter the fax number. Press the Black button (F).
The fax is sent.
If fax sending is unsuccessful, make sure that the telephone line is connected correctly and start again from on page 77. To
•
connect the telephone line correctly, refer to to on page 7 in "1 Preparation."
For details on sender information, refer to "Specifying the Basic Settings for Faxing" in the on-screen manual: Basic Guide.
•
When the machine is ready for faxing, the Black button and Color button light up.
•
Utilisez les touches numériques (E) pour saisir le
numéro de fax.
Si l’envoi de fax échoue, vériez que la ligne téléphonique est branchée correctement et recommencez à partir de à la page 77.
•
Pour brancher correctement la ligne téléphonique, reportez-vous aux étapes à à la page 7 dans « 1 Préparation ».
Pour en savoir plus sur les informations expéditeur, reportez-vous à la section « Spécication des paramètres de base du
•
télécopieur » du manuel en ligne
Lorsque la machine est prête à télécopier, le bouton Noir (Black) et le bouton Couleur (Color) s’allument.
•
Guide d’utilisation de base.
Geben Sie mit den Zifferntasten (E) die Faxnummer
ein.
Wenn das Senden eines Fax nicht erfolgreich ist, stellen Sie sicher, dass der Telefonanschluss richtig verbunden ist, und beginnen
•
Sie erneut ab auf Seite 77. Weitere Informationen zum ordnungsgemäßen Anschließen des Telefonanschlusses nden Sie unter
bis auf Seite 7 in „1 Vorbereitung“.
Details zu den Absenderinformationen nden Sie unter „Festlegen der Grundeinstellungen für das Faxen“ im Online-Handbuch:
•
Basishandbuch.
Wenn das Gerät bereit zum Faxen ist, leuchten die Tasten Schwarz (Black) und Farbe (Color).
•
Utilizzare i tasti numerici (E) per inserire il numero di
fax.
Se non è possibile inviare fax, assicurarsi che la linea telefonica sia collegata correttamente e iniziare nuovamente da a pagina
•
77. Per collegare la linea telefonica correttamente, vedere da a a pagina 7 in "1 Preparazione".
Per informazioni sui dati del mittente, vedere "Scelta delle impostazioni di base per l'utilizzo del fax" nel manuale a video: Guida
•
Base.
Quando la macchina è pronta per inviare fax, i pulsanti Nero (Black) e Colore (Color) si accendono.
•
Appuyez sur le bouton Noir (Black) (F).
Le fax est envoyé.
Drücken Sie die Taste Schwarz (Black) (F).
Das Fax wird gesendet.
Premere il pulsante Nero (Black) (F).
Il fax viene inviato.
For other procedures to send faxes, refer to
"Faxing" in the on-screen manual: Basic Guide.
Pour connaître les autres procédures d’envoi de fax,
reportez-vous à la section « Envoi de fax » du manuel
en ligne : Guide d’utilisation de base.
Andere Vorgehensweisen zum Senden von
Faxen nden Sie unter „Fax“ im Online-
Handbuch: Basishandbuch.
Per informazioni su altre procedure di invio di
fax, consultare "Fax" nel manuale a video Guida
Base.
79
Page 82
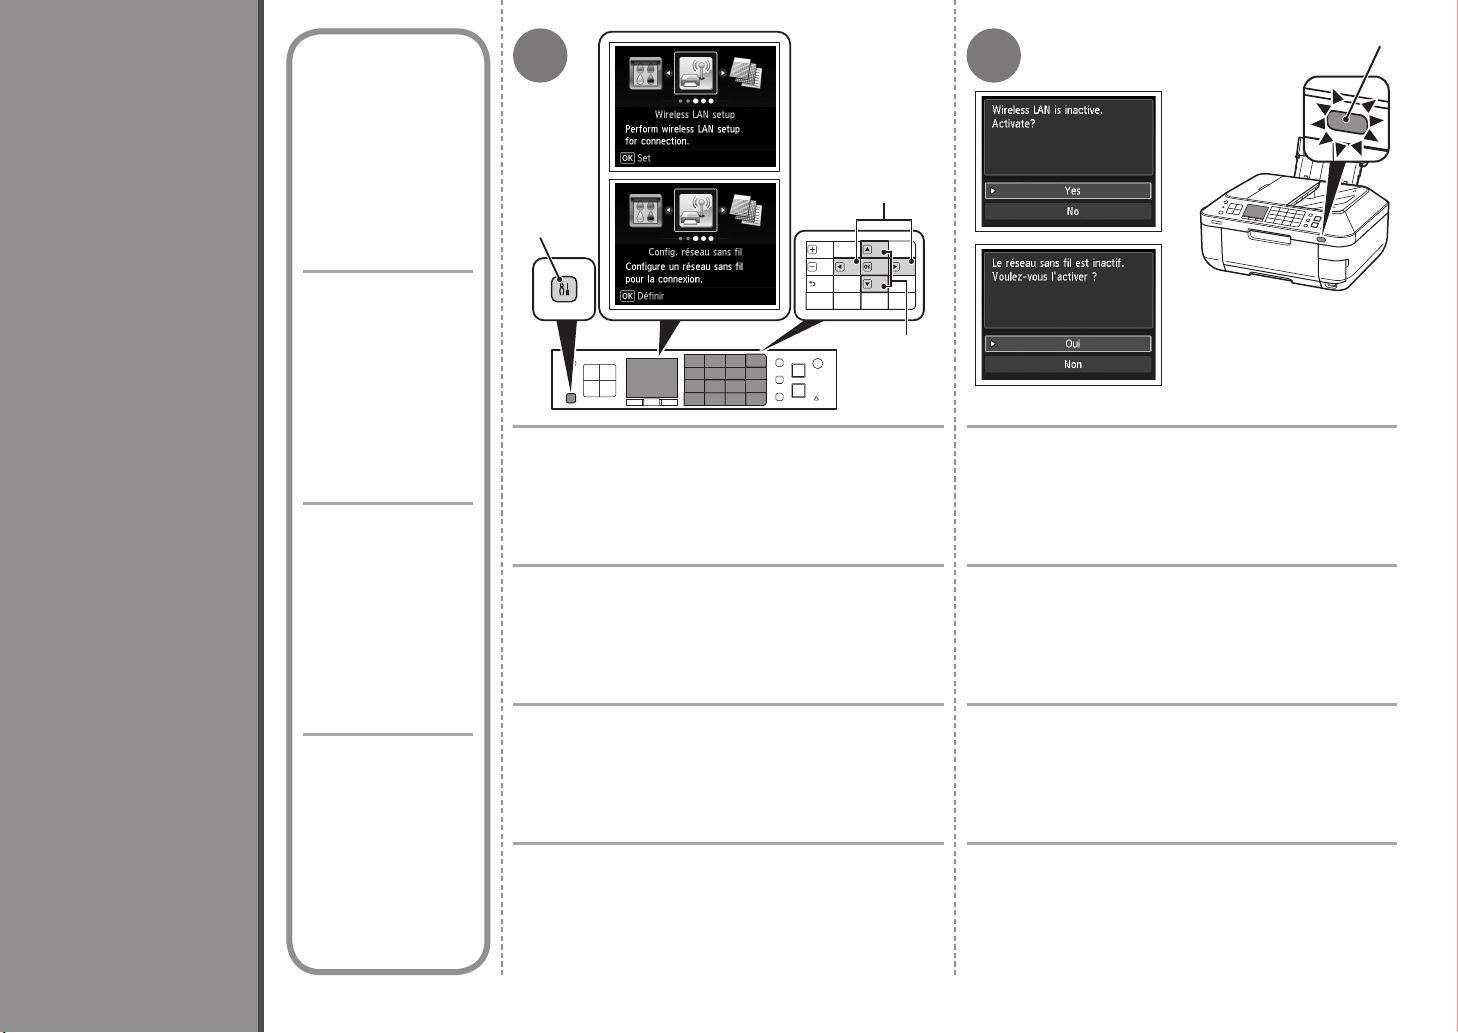
16
Read this section
only when setting
up a wireless
connection by using
the WPS (Wi-Fi
Protected Setup).
Lisez cette section
uniquement si vous
souhaitez congurer
une connexion sans
l à l’aide de WPS
(Wi-Fi Protected
Setup).
D
1 2
B
A
C
80
1. Press the Setup button (A).
2. Use the [ or ] button (B) to select Wireless LAN
setup.
Lesen Sie diesen
Abschnitt nur durch,
wenn Sie eine
drahtlose Verbindung
über WPS (Wi-Fi
Protected Setup)
einrichten.
Wireless Setup Using WPS (Wi-Fi Protected Setup)
Impostazione wireless con WPS (Wi-Fi Protected Setup)
Drahtlose Einstellungen mit WPS (Wi-Fi Protected Setup)
Leggere questa
sezione solo quando
si imposta una
connessione wireless
tramite WPS (Wi-Fi
Protected Setup).
Configuration sans fil à l’aide de WPS (Wi-Fi Protected Setup)
3. Press the OK button.
1. Appuyez sur le bouton Configuration (Setup) (A).
2. Utilisez le bouton [ ou ] (B) pour sélectionner
Config. réseau sans fil (Wireless LAN setup).
3. Appuyez sur le bouton OK.
1. Drücken Sie die Taste Einrichten (Setup) (A).
2. Wählen Sie mit der Taste [ oder ] (B) die Option
WLAN-Einrichtung (Wireless LAN setup) aus.
3. Drücken Sie die Taste OK.
1. Premere il pulsante Impostazione (Setup) (A).
2. Premere il pulsante [ o ] (B) per selezionare
Impost. LAN wireless (Wireless LAN setup),
3. Premere il pulsante OK.
Use the { or } button (C) to select Yes, then press
the OK button.
When wireless connection is enabled, the Wi-Fi lamp (D) lights
blue.
Utilisez le bouton { ou } (C) pour sélectionner Oui
(Yes), puis appuyez sur le bouton OK.
Lorsque la connexion sans fil est activée, le voyant Wi-Fi (D)
s’allume en bleu.
Verwenden Sie die Taste { oder } (C), um Ja (Yes)
auszuwählen, und drücken Sie die Taste OK.
Wenn die drahtlose Verbindung aktiviert ist, leuchtet die Wi-FiAnzeige (D) blau.
Premere il pulsante { o } (C) per selezionare Sì
(Yes), quindi premere il pulsante OK.
Una volta attivata la connessione wireless, la spia Wi-Fi (D) si
accende in blu.
Page 83
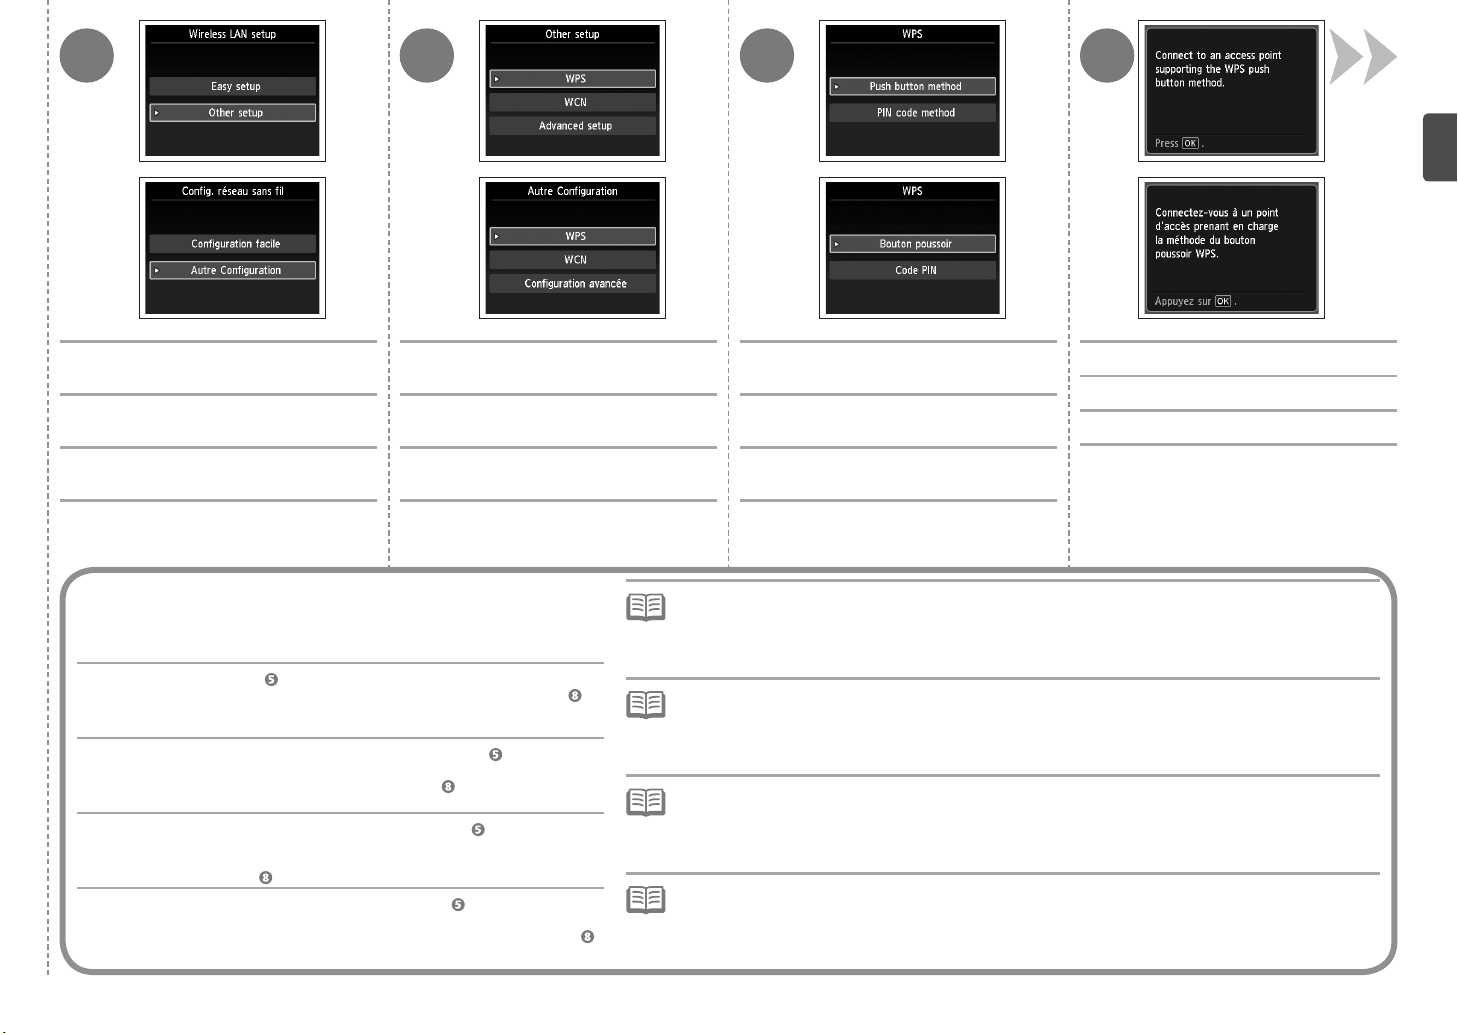
3 4 5 6
Select Other setup, then press the OK
Select WPS, then press the OK button. Select Push button method, then
button.
Sélectionnez Autre Conguration (Other
setup), puis appuyez sur le bouton OK.
Wählen Sie Andere Einrichtung (Other setup),
und drücken Sie anschließend die Taste OK.
Selezionare Altre impostazioni (Other
setup), quindi premere il pulsante OK.
To use the PIN code method for setup
Pour congurer à l’aide du code PIN
So verwenden Sie die PIN-Code-Methode zur Einrichtung
Per utilizzare il metodo del codice PIN per l'impostazione
Select PIN code method in , then press the OK button. Follow the on-screen
instructions to operate the machine and access point. When the screen in
appears, press the OK button.
Sélectionnez la méthode Code PIN (PIN code method) dans , puis appuyez
sur le bouton OK. Suivez les instructions à l’écran pour faire fonctionner la
machine et le point d’accès. Lorsque l’écran de l’étape apparaît, appuyez
sur le bouton OK.
Wählen Sie PIN-Code-Methode (PIN code method) unter aus, und
drücken Sie anschließend die Taste OK. Gehen Sie den Anweisungen auf dem
Bildschirm entsprechend vor, um das Gerät und den Zugriffspunkt zu bedienen.
Erscheint der Bildschirm in , drücken Sie die Taste OK.
Selezionare Metodo codice PIN (PIN code method) in , quindi premere il
pulsante OK. Seguire le istruzioni visualizzate sullo schermo per attivare la
stampante e il punto di accesso. Quando viene visualizzata la schermata in ,
premere il pulsante OK.
Sélectionnez WPS, puis appuyez sur le
bouton OK.
Wählen Sie WPS, und drücken Sie
anschließend die Taste OK.
Selezionare WPS, quindi premere il
pulsante OK.
press the OK button.
Sélectionnez Bouton poussoir (Push button
method), puis appuyez sur le bouton OK.
Wählen Sie Tastendrückmethode (Push button
Appuyez sur le bouton OK.
Drücken Sie die Taste OK.
Premere il pulsante OK.
method), und drücken Sie anschließend die Taste OK.
Selezionare Metodo pulsante (Push button
method), quindi premere il pulsante OK.
If the setup is not completed within 10 minutes and the timeout error screen appears, press the OK button to
•
perform the setup again and set the new PIN code displayed on the screen to the access point. If another error
is displayed, refer to the printed manual: Network Setup Troubleshooting.
Si la conguration n’est pas terminée dans un délai de 10 minutes et si une erreur de délai d’attente se produit,
•
appuyez sur le bouton OK pour recommencer la conguration et dénir le nouveau code PIN afché à l’écran
pour le point d’accès. Si une autre erreur s’afche, reportez-vous au manuel imprimé: Guide de dépannage
réseau.
Falls die Einrichtung nicht innerhalb von 10 Minuten abgeschlossen und ein Zeitüberschreitungsfehler
•
gemeldet wird, drücken Sie die Taste OK, führen Sie die Einrichtung erneut aus, und stellen Sie den auf dem
Bildschirm angezeigten neuen PIN-Code auf den Zugriffspunkt ein. Wenn ein anderer Fehler angezeigt wird,
nden Sie weitere Informationen im gedruckten Handbuch Netzwerk-Fehlerbehebungshandbuch.
Se la congurazione non viene completata entro 10 minuti e viene visualizzata la schermata di errore di
•
timeout, premere il pulsante OK per eseguire nuovamente la congurazione e impostare il nuovo codice PIN
visualizzato nella schermata del punto di accesso. Se viene visualizzato un altro errore, consultare il manuale:
Guida alla risoluzione dei problemi di rete.
Press the OK button.
81
Page 84
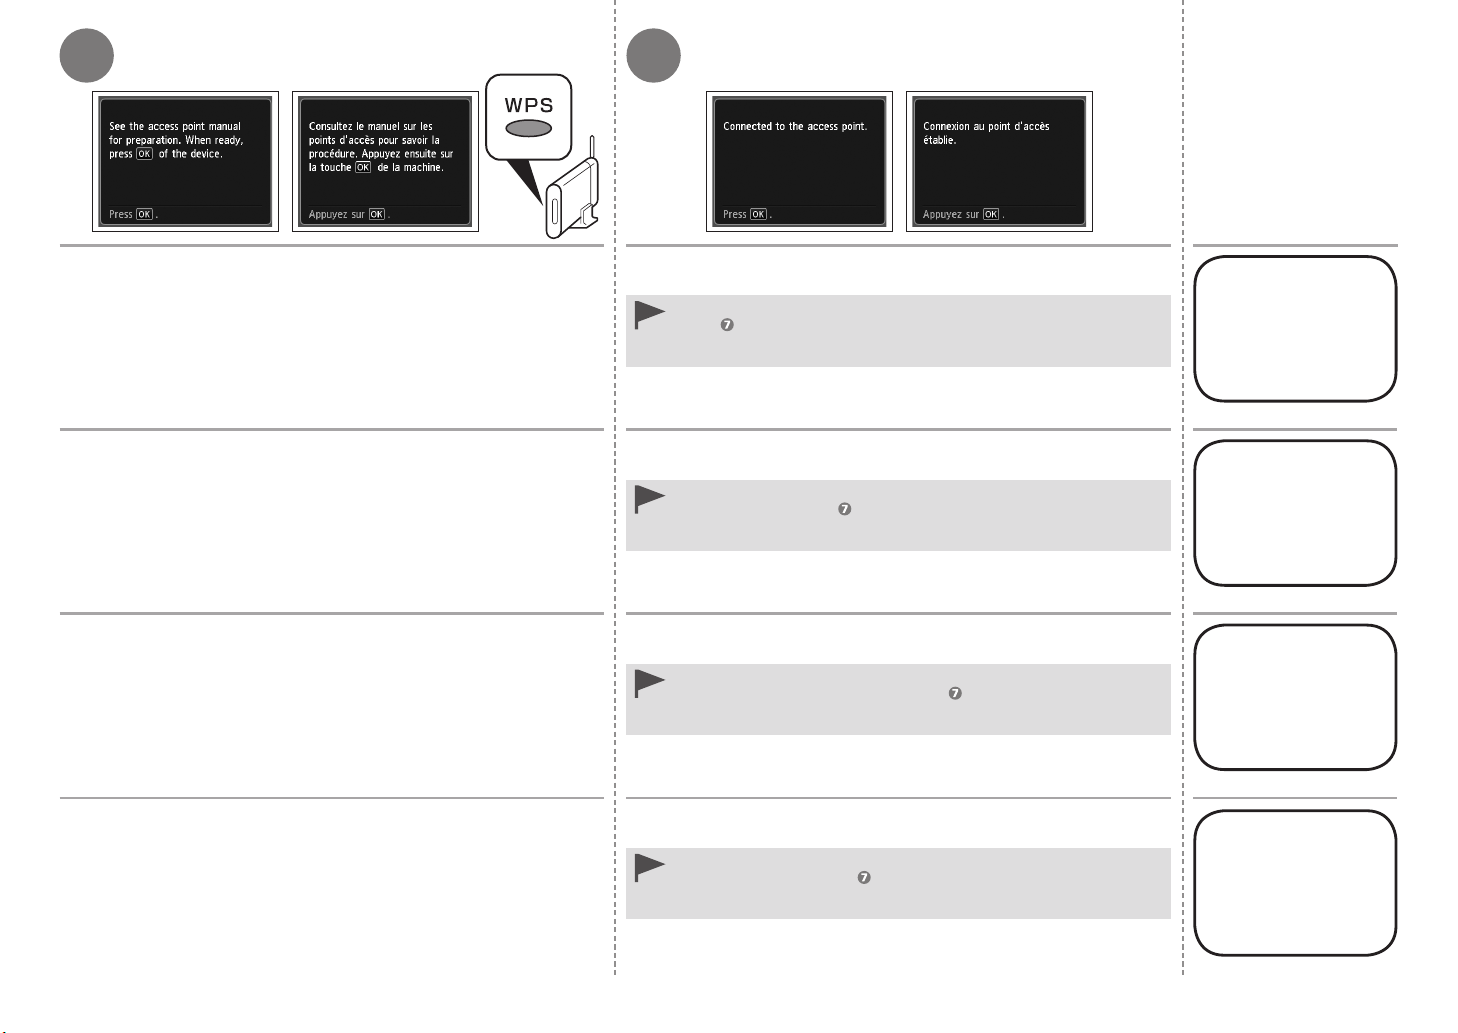
87
Press and hold the WPS button on the access point (for about
5 seconds), then press the OK button on the machine within
2 minutes.
For details on the WPS button pressing, refer to the manual of your access point.
The Wi-Fi lamp (blue) on the machine flashes while searching for or connecting to
an access point.
Appuyez sur le bouton WPS sur le point d’accès et maintenez-le
enfoncé pendant environ 5 secondes, puis appuyez sur le bouton
OK de la machine dans un délai de 2 minutes.
Pour plus d’informations sur l’utilisation du bouton WPS, reportez-vous au manuel
de votre point d’accès.
Le voyant Wi-Fi (bleu) sur la machine clignote pendant la recherche d’un point
d’accès ou la connexion à celui-ci.
Halten Sie die WPS-Taste auf dem Zugriffspunkt gedrückt (etwa
5 Sekunden lang), und drücken Sie dann innerhalb von 2 Minuten
auf dem Gerät die Taste OK.
Einzelheiten zum Drücken der WPS-Taste nden Sie im Handbuch Ihres Zugriffspunkts.
Die Wi-Fi-Anzeige (blau) am Gerät blinkt während der Suche nach oder Verbindung mit
einem Zugriffspunkt.
Tenere premuto il pulsante WPS sul punto di accesso (per circa
5 secondi), quindi premere il pulsante
OK sulla stampante entro
2 minuti.
Per ulteriori informazioni sull'utilizzo del pulsante WPS, consultare il manuale del
punto di accesso.
La spia Wi-Fi (blu) sulla stampante lampeggia durante la ricerca o la connessione
a un punto di accesso.
When the above screen appears, press the OK button.
If the timeout error screen appears, press the OK button, then start over
•
from .
If another error appears, refer to the printed manual: Network Setup
•
Troubleshooting.
Lorsque l’écran ci-dessus apparaît, appuyez sur le bouton OK.
Si l’écran d’erreur de temporisation apparaît, appuyez sur le bouton OK et
•
reprenez depuis l’étape .
Si une autre erreur apparaît, reportez-vous au manuel imprimé Guide de
•
dépannage réseau.
Wenn der obige Bildschirm angezeigt wird, drücken Sie die Taste
OK.
Wenn ein Zeitüberschreitungsfehler angezeigt wird, drücken Sie die Taste
•
OK, und beginnen noch einmal ab Schritt .
Tritt ein anderer Fehler auf, nden Sie weitere Informationen im gedruckten
•
Handbuch Netzwerk-Fehlerbehebungshandbuch.
Quando viene visualizzata la schermata sopra indicata, premere il
pulsante OK.
Se viene visualizzata la schermata di errore di timeout, premere il pulsante
•
OK, quindi ricominciare da .
Se viene visualizzato un altro errore, consultare il manuale stampato: Guida
•
alla risoluzione dei problemi di rete.
Next, read “11 Install
the Software (Network
Connection)” on page
52!
Lisez ensuite
la section « 11
Installation du logiciel
(connexion réseau) »
à la page 52.
Lesen Sie jetzt
den Abschnitt
„11 Installieren
der Software
(Netzwerkverbindung)“
auf Seite 52.
Leggere quindi
"11 Installazione
del software
(Connessione di rete)"
a pagina 52.
82
Page 85
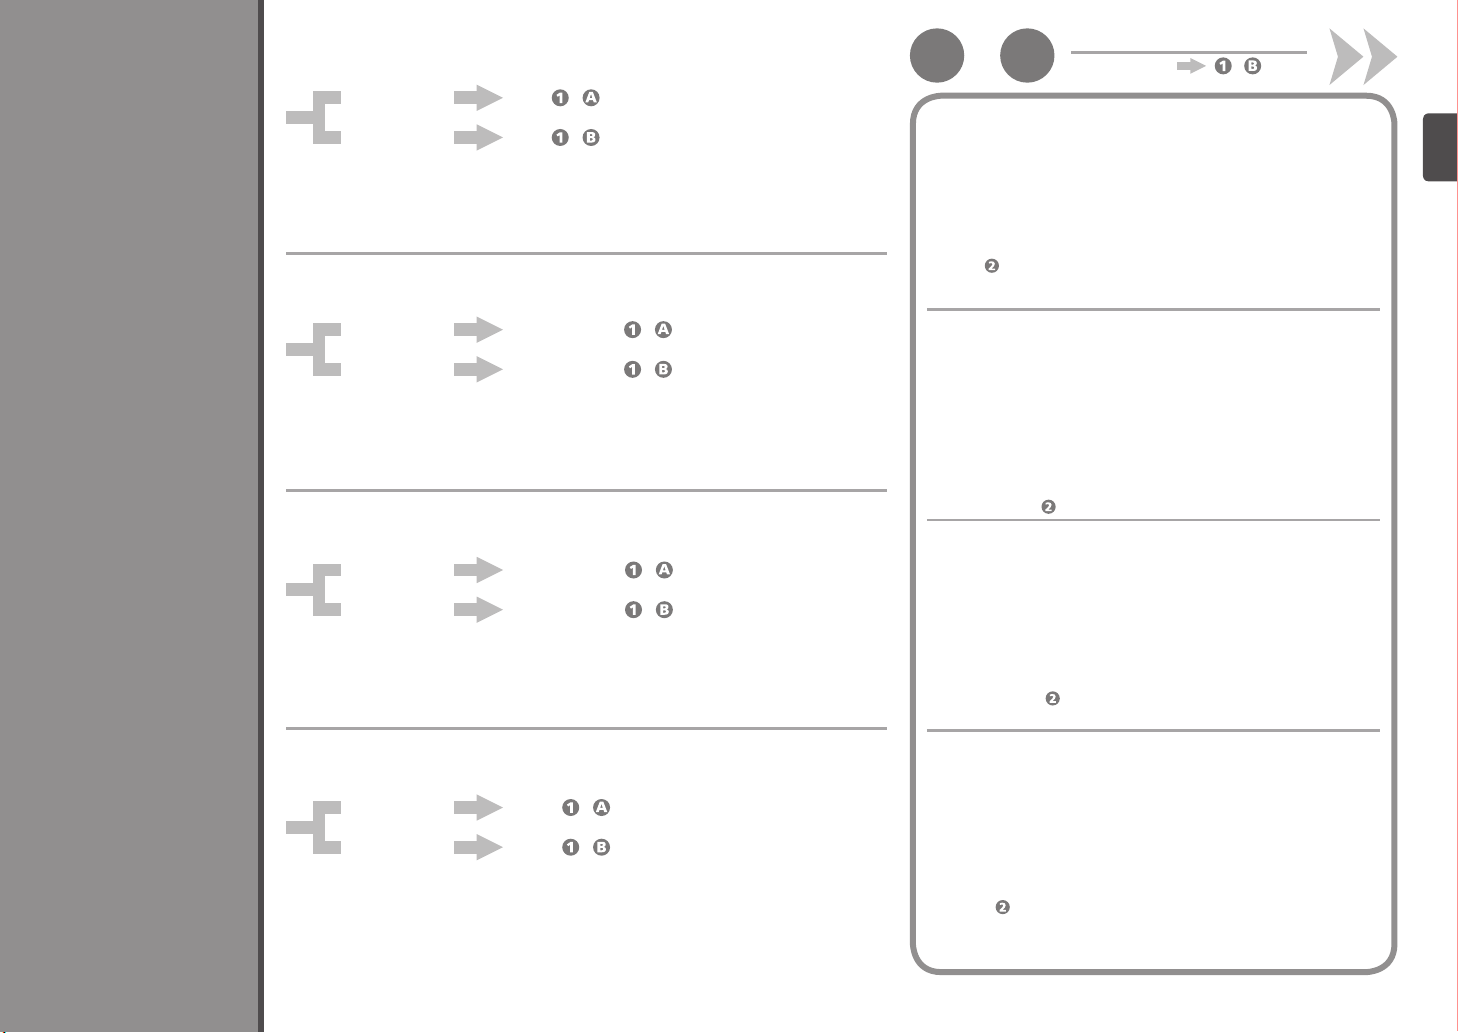
17
Wireless Setup Using WCN (Windows Connect Now)
Drahtlose Einstellungen mit WCN (Windows Connect Now)
Configuration sans fil à l’aide de WCN (Windows Connect Now)
A
Windows 7
Windows Vista
(P.84)
-
Read this section only when setting up a wireless connection by using the
WCN (Windows Connect Now) function of Windows 7/Windows Vista.
Windows 7
Windows Vista Go to - on page 84.
The machine supports “WCN-UFD.”
Canon assumes no responsibility for any damage or loss of data stored on your USB ash
•
drive regardless of the cause even within the warranty period.
Operation may not be guaranteed depending on your USB ash drive. USB ash drives with
•
security enabled may not be used.
Go to - .
Lisez cette section uniquement lorsque vous congurez une connexion
1
-
1. Click Start > Control Panel > View network status and tasks >
Manage wireless networks.
2. Select the network name (SSID) and right-click it, then select
Properties.
3. Select
Follow the on-screen instructions to complete the settings on the
computer.
4. Go to on page 84.
Copy this network prole to a USB ash drive.
sans l à l’aide de la fonction WCN (Windows Connect Now) de Windows
7/Windows Vista.
Windows 7
Windows Vista Passez à l’étape -
La machine prend en charge « WCN-UFD ».
Canon ne saurait être tenu responsable en cas d’altération ou de perte de données stockées
•
sur votre clé USB ash quelle qu’en soit la cause, même durant la période de garantie.
Selon la clé USB ash utilisée, le fonctionnement peut ne pas être garanti. Les clés USB ash
•
avec sécurité activée ne peuvent pas être utilisées.
Passez à l’étape - .
à la page 84.
Lesen Sie diesen Abschnitt nur, wenn Sie eine drahtlose Verbindung mit
der WCN (Windows Connect Now)-Funktion von Windows 7/Windows
Vista einrichten.
Windows 7
Windows Vista Wechseln Sie zu - auf Seite 84.
Das Gerät unterstützt „WCN-UFD“.
Canon übernimmt keine Verantwortung für etwaige Schäden oder Verlust von Daten, die auf Ihrem
•
USB-Flash-Laufwerk gespeichert sind. Dies gilt auch in der Garantiezeit und unabhängig von der
Ursache.
Die ordnungsgemäße Funktion kann nicht bei allen USB-Flash-Laufwerken gewährleistet werden.
•
USB-Flash-Laufwerke mit aktivierter Sicherheitsfunktion dürfen nicht verwendet werden.
Wechseln Sie zu - .
Leggere questa sezione solo quando si imposta una connessione wireless
tramite la funzione WCN (Windows Connect Now) di Windows 7/Windows
Vista.
Impostazione wireless con WCN (Windows Connect Now)
La macchina supporta "WCN-UFD".
•
•
Windows 7
Windows Vista Vedere - a pagina 84.
Canon declina qualsiasi responsabilità per eventuali danni o perdite dei dati memorizzati
sull'unità ash USB, a prescindere dalla causa, anche se ciò dovesse accadere durante il
periodo coperto dalla garanzia.
Il funzionamento potrebbe non essere garantito in base all'unità ash USB. Le unità ash USB
con protezione attivata potrebbero non essere utilizzate.
Vedere - .
1. Cliquez sur Démarrer (Start) > Panneau de conguration
(Control Panel) > Afcher l’état et la gestion du réseau
(View network status and tasks) > Gérer les réseaux sans l
(Manage wireless networks).
2. Sélectionnez le nom du réseau (SSID), puis cliquez dessus avec
le bouton droit et sélectionnez Propriétés (Properties).
3. Sélectionnez
USB (Copy this network prole to a USB ash drive).
Suivez les instructions à l’écran pour poursuivre le paramétrage de
l’ordinateur.
4. Allez à l’étape à la page 84.
1. Klicken Sie auf Start > Systemsteuerung (Control Panel) >
Netzwerkstatus und -aufgaben anzeigen (View network status and
tasks) > Drahtlosnetzwerke verwalten (Manage wireless networks).
2. Wählen Sie den Netzwerknamen (SSID) aus, klicken Sie mit der rechten
Maustaste darauf, und klicken Sie auf Eigenschaften (Properties).
3. Wählen Sie
kopieren (Copy this network prole to a USB ash drive).
Folgen Sie der Anleitung auf dem Bildschirm, und schließen Sie die
Einrichtung des Computers ab.
4. Fahren Sie mit auf Seite 84 fort.
1. Fare clic su Avvio (Start) > Pannello di controllo (Control Panel) >
Visualizza stato della rete e attività (View network status and tasks) >
Gestisci reti wireless (Manage wireless networks).
2. Selezionare il nome della rete (SSID) dall'elenco e fare clic con il pulsante
destro su di esso, quindi selezionare Proprietà (Properties).
3. Selezionare
USB (Copy this network prole to a USB ash drive).
Seguire le istruzioni a video per completare le impostazioni sul
computer.
4. Vedere a pagina 84.
Copier ce prol réseau vers un lecteur ash
Dieses Netzwerkprol auf ein USB-Flash-Laufwerk
Copia questo prolo di rete in un'unità memoria ash
83
Page 86
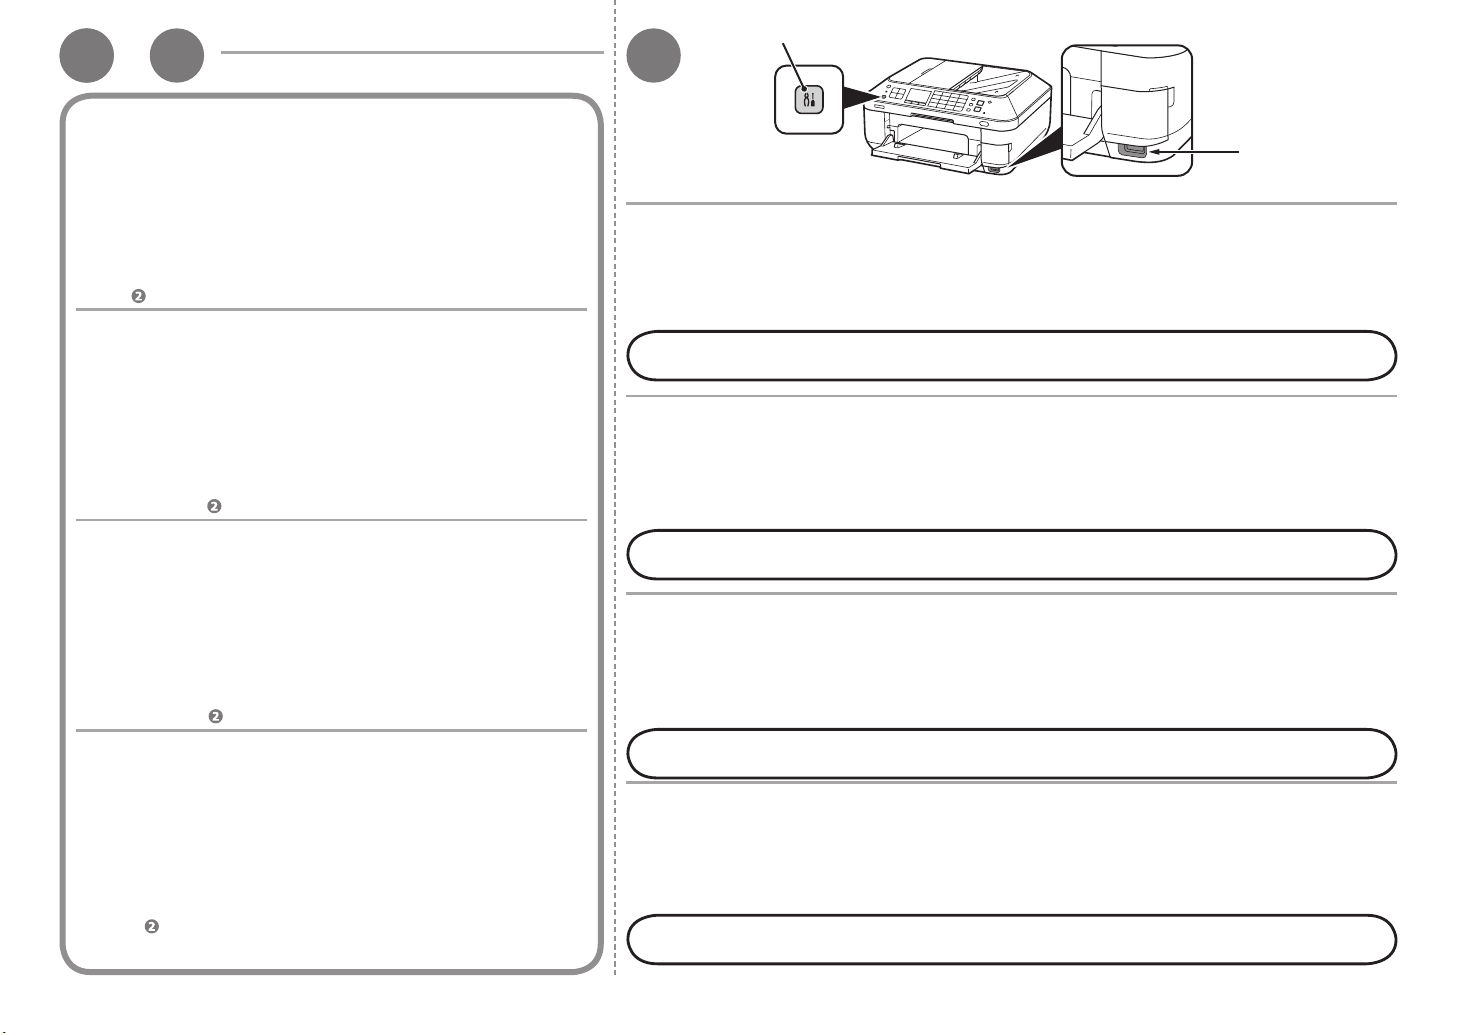
Windows Vista
1-1 B 2
1. From the Start menu of the Windows side, select Network, then click Add
a wireless device on the menu.
I want to add a wireless device or computer that is not on the
2. Click
list, using a USB ash drive.
Add the device or computer using a USB ash drive.
3. Click
4. Select the network name (SSID), then click
Follow the on-screen instructions to complete the settings on the computer.
5. Go to .
1. Dans le menu Démarrer (Start) de Windows, sélectionnez Réseau
(Network), puis cliquez sur Ajouter un périphérique sans l (Add a
wireless device) dans le menu.
2. Cliquez sur
ne gure pas dans la liste à l’aide d’un lecteur ash USB (I want to add a
wireless device or computer that is not on the list, using a USB ash drive).
3. Cliquez sur
ash USB (Add the device or computer using a USB ash drive).
4. Sélectionnez le nom du réseau (SSID), puis cliquez sur
Suivez les instructions à l’écran pour poursuivre le paramétrage de l’ordinateur.
5. Passez à l’étape .
1. Zeigen Sie in Windows im Menü Start auf Netzwerk (Network), und klicken Sie
auf Ein Drahtlosgerät hinzufügen (Add a wireless device).
2. Klicken Sie auf
hinzufügen, das bzw. der nicht in der Liste aufgeführt ist (I want to add a
wireless device or computer that is not on the list, using a USB ash drive).
3. Klicken Sie auf
hinzufügen (Add the device or computer using a USB ash drive).
4. Wählen Sie den Netzwerknamen (SSID) aus, und klicken Sie auf
Folgen Sie der Anleitung auf dem Bildschirm, und schließen Sie die
Einrichtung des Computers ab.
5. Wechseln Sie zu .
1. Dal menu Avvio (Start) del lato Windows, selezionare Rete (Network), quindi fare
clic su Aggiungi un dispositivo wireless (Add a wireless device) nel menu.
2. Fare clic su
incluso nell'elenco, tramite un'unità memoria ash USB (I want to add a
wireless device or computer that is not on the list, using a USB ash drive).
3. Fare clic su
ash USB (Add the device or computer using a USB ash drive).
4. Selezionare dall'elenco il nome della rete (SSID), quindi fare clic su
Seguire le istruzioni a video per completare le impostazioni sul computer.
5. Vedere .
Je veux ajouter un périphérique sans l ou un ordinateur qui
Ajouter le périphérique ou l’ordinateur à l’aide d’un lecteur
Mit einem USB-Flashlaufwerk ein Drahtlosgerät oder -computer
Das Gerät oder den Computer mit einem USB-Flashlaufwerk
Desidero aggiungere un computer o dispositivo wireless non
Aggiungi il dispositivo o computer utilizzando un'unità memoria
Next.
Suivant (Next).
Weiter (Next).
Avanti (Next).
1. Press the
setup, then press the OK button.
2. Select
3. Select
Next, read “11 Install the Software (Network Connection)” on page 52!
1. Appuyez sur le bouton Conguration (Setup) (A),
sélectionnez Cong. réseau sans l (Wireless LAN
setup), puis appuyez sur le bouton OK.
2. Sélectionnez
appuyez sur le bouton OK.
3. Sélectionnez
Lisez ensuite la section « 11 Installation du logiciel (connexion réseau) » à la page 52.
1. Drücken Sie die Taste Einrichten (Setup) (A), wählen Sie
WLAN-Einrichtung (Wireless LAN setup) aus, und drücken
Sie die Taste OK.
2. Wählen Sie die Option
aus, und drücken Sie die Taste OK.
3. Wählen Sie
Lesen Sie jetzt den Abschnitt „11 Installieren der Software (Netzwerkverbindung)“ auf Seite 52.
1. Premere il pulsante Impostazione (Setup) (A),
selezionare Impost. LAN wireless (Wireless LAN setup),
quindi premere il pulsante OK.
2. Selezionare
premere il pulsante OK.
3. Selezionare
Leggere quindi "11 Installazione del software (Connessione di rete)" a pagina 52.
A
Setup button (A), select Wireless LAN
Other setup, then press the OK button.
WCN, then press the OK button.
Autre conguration (Other setup), puis
WCN, puis appuyez sur le bouton OK.
Andere Einrichtung (Other setup)
WCN, und drücken Sie anschließend die Taste OK.
Altre impostazioni (Other setup), quindi
WCN, quindi premere il pulsante OK.
B
4. Connect the USB ash drive to the Direct Print Port
(USB connector) (B) on the front right of the machine,
then press the OK button.
5. When
4. Connectez la clé USB ash au port d’impression
5. Lorsque l’écran Paramétrage du réseau sans l effectué.
4. Setzen Sie das USB-Flash-Laufwerk vorne rechts am Gerät in
5. Wenn der Bildschirm
4. Collegare l'unità ash USB alla porta di stampa diretta
5. Quando viene visualizzata la schermata
Wireless LAN settings completed. screen is
displayed, press the OK button and eject the USB ash
drive.
directe (connecteur USB) (B) situé à droite, sur l'avant
de la machine, puis appuyez sur le bouton OK.
(Wireless LAN settings completed.) est afché, appuyez
sur le bouton OK et éjectez la clé USB ash.
den Anschluss für den Direktdruck (USB-Anschluss) (B) ein, und
drücken Sie die Taste OK.
WLAN-Einstellungen sind abgeschlossen.
(Wireless LAN settings completed.) angezeigt wird, drücken Sie
die Taste OK, und nehmen Sie das USB-Flash-Laufwerk heraus.
(connettore USB) (B) sulla parte anteriore destra della
macchina, quindi premere il pulsante OK.
Impostazioni LAN
wireless completate. (Wireless LAN settings completed.),
premere il pulsante OK ed espellere l'unità ash USB.
84
Page 87
18
General Specications
Printing resolution (dpi)
9600* (horizontal) X 2400 (vertical)
* Ink droplets can be placed with a pitch of 1/9600 inch at minimum.
Interface
USB Port:
Hi-Speed USB *1
Direct Print Port:
PictBridge
Bluetooth v2.0 (Option) *2 *3 *4
USB ash drive
LAN Port:
Wired LAN: 100BASE-TX/10BASE-T
Wireless LAN: IEEE802.11n/IEEE802.11g/IEEE802.11b *5
*1 A computer that complies with Hi-Speed USB standard is required.
Since the Hi-Speed USB interface is fully upwardly compatible with
USB 1.1, it can be used at USB 1.1.
*2 Maximum speed: 1.44 Mbps
*3 JPEG/PNG only
*4 Bluetooth connection is for printing only.
*5 Setup possible through Easy setup, WPS (Wi-Fi Protected Setup) or
Specifications
WCN (Windows Connect Now).
Print width
203.2 mm/8 inches
(for Borderless Printing: 216 mm/8.5 inches)
Operating environment
Temperature: 5 to 35°C (41 to 95°F)
Humidity: 10 to 90% RH (no condensation)
Storage environment
Temperature: 0 to 40°C (32 to 104°F)
Humidity: 5 to 95% RH (no condensation)
Power supply
AC 100-240 V, 50/60 Hz
Power consumption
Printing (Copy): Approx. 23 W
Standby (minimum): Approx. 2.5 W *1 *2
OFF: Approx. 0.4 W *1
*1 USB connection to PC
*2 The wait time for standby cannot be changed.
External dimensions
Approx. 491 (W) X 448 (D) X 218 (H) mm
Approx. 19.4 (W) X 17.7 (D) X 8.6 (H) inches
* With the Paper Support and Paper Output Tray retracted.
Weight
Approx. 11.7 kg (Approx. 25.7 lb)
* With the Print Head and ink tanks installed.
Print Head/Ink
Total 4,608 nozzles (PgBK 512 nozzles, Y/DyeBK each 512 nozzles, C/M
each 1536 nozzles)
ADF capacity
A4 or Letter size: max. 35 sheets (20 lb/75 gsm paper), up to 5 mm/0.20
inches in height
Legal size: max. 30 sheets (20 lb/75 gsm paper), up to 4 mm/0.16 inches
in height
Other sizes: 1 sheet
Copy Specications
Multiple copy
max. 99 pages
Intensity adjustment
9 positions, Auto intensity (AE copy)
Reduction/Enlargement
25 % - 400 % (1 % unit)
Scan Specications
Scanner driver
TWAIN/WIA (for Windows 7/Windows Vista/Windows XP)
Maximum scanning size
A4/Letter, 216 X 297 mm/8.5" X 11.7" (Platen Glass) /216 X 356 mm/8.5"
X 14.0" (ADF)
Scanning resolution
Optical resolution (horizontal X vertical) max: 2400 X 4800 dpi
Interpolated resolution max: 19200 X 19200 dpi
Gradation (Input/Output)
Gray: 16 bit/8 bit
Color: 48 bit/24 bit (RGB each 16 bit/8 bit)
Network Specications
Communication protocol
TCP/IP
Wired LAN
Supported Standards: IEEE802.3u (100BASE-TX)/IEEE802.3 (10BASE-T)
Transfer speed: 10 M/100 Mbps (auto switching)
Wireless LAN
Supported Standards: IEEE802.11n/IEEE802.11g/IEEE802.11b
Frequency bandwidth: 2.4 GHz
Channel: 1-11 or 1-13
* Frequency bandwidth and available channels differ depending on
country or region.
Transfer speed (Standard value):
IEEE802.11n: max. 150 Mbps
IEEE802.11g: max. 54 Mbps
IEEE802.11b: max. 11 Mbps
Communication distance: Indoors 164 feet/50 m
* Effective range varies depending on the installation environment and
location.
Security:
WEP (64/128 bits)
WPA-PSK (TKIP/AES)
WPA2-PSK (TKIP/AES)
Setup:
WCN (WCN-UFD/WCN-NET)
WPS (Push button conguration/PIN code method)
Other Features: Administration password
Fax Specications
Applicable line
Public Switched Telephone Network (PSTN)
Communication mode
Super G3, G3
Data compressing system
Black: MH, MR, MMR
Color: JPEG
Modem speed
Max. 33.6 kbps
(Automatic fallback)
Transmission speed
Black: Approx. 3 seconds/page at 33.6 kbps
(Based on ITU-T No.1 chart for US specications and Canon FAX
Standard chart No.1 for others, both in standard mode or Canon FAX
Standard chart No.1, standard mode.)
Color: Approx. 1 minute/page at 33.6 kbps
(Based on Canon COLOR FAX TEST SHEET.)
Gradation
Black: 256 levels
Color: 24 bit Full Color (RGB each 8 bit)
Density adjustment
3 levels
Memory
Transmission/reception: approx. 250 pages
(Based on ITU-T No.1 chart for US specications and Canon FAX
Standard chart No.1 for others, both in standard mode.)
Fax resolution
Black Standard: 8 pels/mm X 3.85 lines/mm (203 pels/inch X 98
lines/inch)
Black Fine, Photo: 8 pels/mm X 7.70 lines/mm (203 pels/inch X 196
lines/inch)
Black Extra Fine: 300 X 300 dpi
Color: 200 X 200 dpi
Dialing
Automatic dialing
Coded speed dial (max. 100 destinations)
Group dial (max. 99 destinations)
Regular dialing (with Numeric buttons)
Automatic redialing
Manual redialing (with the Redial/Pause button: max. 10 destinations)
Others
Activity report (after every 20 transactions)
Sequential broadcasting (max. 101 destinations)
Rejected numbers (max 10 destinations)
85
Page 88
Conform to the operating system’s requirements when higher than those
Minimum System Requirements
given here.
Operating System/Processor/RAM
Windows 7
1 GHz or faster 32-bit (x86) or 64-bit
(x64) processor
1 GB (32-bit)/2 GB (64-bit)
Windows Vista, Vista SP1, Vista SP2
1 GHz processor
512 MB
Windows XP SP2, SP3
300 MHz processor
128 MB
Browser
Internet Explorer 6 or later Safari 3 or later
Hard Disk Space
1.5 GB
Note: For bundled software
installation.
The necessary amount of hard disk
space may be changed without
notice.
CD-ROM Drive
Required Required
Display
SVGA 800 x 600 XGA 1024 x 768
Windows: Operation can only be guaranteed on a PC with Windows 7,
•
Windows Vista or Windows XP pre-installed.
Windows: Uninstall software bundled with the Canon inkjet printer before
•
upgrading from Windows Vista to Windows 7, then, install the bundled
software again.
Some functions may not be available with Windows Media Center.
•
Macintosh: Hard Disk must be formatted as Mac OS Extended (Journaled)
•
or Mac OS Extended.
Macintosh: After upgrading from Mac OS X v.10.5 or lower to Mac OS X
•
v.10.6, install software bundled with the Canon inkjet printer.
Internet Explorer 7 or later (Windows), or Safari 4 or later (for Mac OS X
•
v.10.5 or later) is required to install Easy-WebPrint EX.
Specications are subject to change without notice.
About Consumables
Consumables (ink tanks / FINE Cartridges) are available for 5 years
after production has stopped.
Mac OS X v.10.6
Intel processor
1 GB
Mac OS X v.10.5
Intel processor, PowerPC G5,
PowerPC G4
(867 MHz or faster)
512 MB
Mac OS X v.10.4.11
Intel processor, PowerPC G5,
PowerPC G4, PowerPC G3
256 MB
1.5 GB
Note: For bundled software
installation.
The necessary amount of hard disk
space may be changed without notice.
18
Spécications générales
Résolution d’impression (ppp)
9600* (horizontale) X 2400 (verticale)
* Les gouttelettes d’encre peuvent être positionnées à un pas
d’impression de 1/9 600 pouce au minimum.
Interface
Port USB :
Hi-Speed USB *1
Port d’impression directe :
PictBridge
Bluetooth v2.0 (Option) *2 *3 *4
Clé USB ash
Port réseau :
Réseau câblé : 100BASE-TX/10BASE-T
Réseau sans l : IEEE802.11n/IEEE802.11g/IEEE802.11b *5
*1 Un ordinateur compatible avec la norme Hi-Speed USB est
nécessaire. L’interface Hi-Speed USB étant totalement compatible
avec l’USB 1.1, elle peut être utilisée pour l’USB 1.1.
*2 Débit maximal : 1,44 Mbit/s
*3 JPEG/PNG uniquement
*4 La connexion Bluetooth est réservée à l’impression.
Spécifications
*5 Conguration possible à l’aide des paramètres Conguration facile,
WPS (Wi-Fi Protected Setup) ou WCN (Windows Connect Now).
Largeur d’impression
203,2 mm/8 pouces
(pour l’impression sans bordure : 216 mm/8,5 pouces)
Environnement de fonctionnement
Température : 5 à 35 °C (41 à 95 °F)
Humidité : 10 à 90 % d’humidité relative (sans condensation)
Environnement de stockage
Température : 0 à 40 °C (32 à 104 °F)
Humidité : 5 à 95 % d’humidité relative (sans condensation)
Alimentation
100-240 VCA, 50/60 Hz
Consommation
Impression (copie) : environ 23 W
En mode veille (minimum) : environ 2,5 W *1*2
Éteint : environ 0,4 W *1
*1 Connexion USB à PC
*2 Le temps d'attente du mode veille ne peut pas être modié.
Dimensions externes
Environ 491 (L) x 448 (P) x 218 (H) mm
Environ 19,4 (L) x 17,7 (P) x 8,6 (H) pouces
* Support papier et bac de sortie papier rentrés.
Poids
Environ 11,7 kg (environ 25,7 lb)
* Avec tête d’impression et cartouches d’encre installées.
Tête d’impression/encre
4608 buses au total (PgBK : 512 buses, Y/DyeBK : 512 buses pour
chaque couleur, C/M : 1536 buses pour chaque couleur)
Capacité du CAD
Format A4 ou Lettre : 35 feuilles (20 lb/75 g/m²) max., jusqu’à 5 mm/
0,20 pouce en hauteur
Format Légal : 30 feuilles (20 lb/75 g/m²) max., jusqu’à 4 mm/0,16 pouce
en hauteur
Autres formats : 1 feuille
Spécications du copieur
Copies multiples
99 pages max.
Réglage d’intensité
9 positions, intensité auto (copie AE)
Réduction/Agrandissement
25 à 400 % (unité 1 %)
Spécications du scanner
Pilote du scanner
TWAIN/WIA (sous Windows 7/Windows Vista/Windows XP)
Taille maximale de numérisation
A4/Lettre, 216 x 297 mm/8,5" x 11,7" (vitre d’exposition) /216 x 356 mm/
8,5'' x 14,0'' (CAD)
Résolution
Résolution optique (horizontal X vertical) max : 2400 ppp x 4800 ppp
Résolution interpolée max : 19200 ppp x 19200 ppp
Gradation (Entrée/Sortie)
Gris : 16 bits/8 bits
Couleur : 48 bits/24 bits (RVB chacun 16 bits/8 bits)
Spécications réseau
Protocole de communication
TCP/IP
Réseau câblé
Normes prises en charge : IEEE802.3u (100BASE-TX)/IEEE802.3
Vitesse de transfert : 10 M/100 Mbits/s (commutation automatique)
Réseau sans l
Normes prises en charge : IEEE802.11n/IEEE802.11g/IEEE802.11b
Largeur de la bande passante : 2,4 GHz
Canal : 1-11 ou 1-13
* La largeur de la bande passante et les canaux disponibles varient en
fonction du pays ou de la région.
Vitesse de transmission (valeur standard) :
IEEE802.11n : 150 Mbits/s max.
IEEE802.11g : 54 Mbits/s max.
IEEE802.11b : 11 Mbits/s max.
Distance de communication : à l'intérieur : 164 pieds/50 m
* La plage effective varie en fonction de l’environnement et de
l’emplacement d’installation.
Sécurité :
WEP (64/128 bits)
WPA-PSK (TKIP/AES)
WPA2-PSK (TKIP/AES)
Conguration :
WCN (WCN-UFD/WCN-NET)
WPS (conguration du bouton poussoir/code PIN)
Autres fonctions : mot de passe d'administrateur
(10BASE-T)
86
Page 89
Spécications du télécopieur
Type de ligne
RTPC (Réseau téléphonique public commuté)
Mode de communication
Super G3, G3
Système de compression des données
Noir : MH, MR, MMR
Couleur : JPEG
Vitesse de modem
Max. 33,6 kbits/s
(Fallback automatique)
Vitesse de transmission
Noir et blanc : environ 3 secondes/page à 33,6 kbits/s
(selon la mire UIT-T N° 1 pour les États-Unis et la mire standard Canon
FAX N° 1 pour les autres pays, en mode standard, ou la mire standard
Canon FAX N° 1, en mode standard.)
Couleur : environ 1 minute/page à 33,6 kbits/s
(selon la FEUILLE DE TEST DES FAX COULEUR Canon.)
Gradation
Noir : 256 niveaux
Couleur : 24 bits, couleur pleine (RVB chacun 8 bits)
Réglage de la densité
3 niveaux
Mémoire
Transmission/réception : environ 250 pages
(selon la mire UIT-T N° 1 pour les États-Unis et la mire standard Canon
FAX N° 1 pour les autres pays, en mode standard.)
Résolution
Noir et blanc Standard : 8 pts/mm x 3,85 lignes/mm (203 pts/pouce x 98
lignes/pouce)
Noir et blanc Fin, Photo : 8 pts/mm x 7,70 lignes/mm (203 pts/pouce x
196 lignes/pouce)
Noir et blanc Extra Fin : 300 x 300 ppp
Couleur : 200 x 200 ppp
Numérotation
Composition automatique
Composition codée (100 destinations max.)
Composition groupe (99 destinations max.)
Composition normale (à l’aide des touches numériques)
Recomposition automatique
Recomposition manuelle (à l’aide de la touche Bis/Pause : 10
destinations max.)
Autres
Rapport d’activité (toutes les 20 transactions)
Diffusion séquentielle (101 destinations max.)
Numéros refusés (10 destinations max.)
Conformez-vous à la conguration de système d’exploitation requise
Conguration minimale requise
lorsque celle-ci est supérieure à celle indiquée ici.
Système d’exploitation/Processeur/RAM
Windows 7
Processeur de 1 GHz ou supérieur 32
bits (x86) ou 64 bits (x64)
1 Go (32 bits)/2 Go (64 bits)
Windows Vista, Vista SP1, Vista SP2
Processeur de 1 GHz
512 Mo
Windows XP SP2, SP3
Processeur de 300 MHz
128 Mo
Navigateur
Internet Explorer 6 ou supérieur Safari 3 ou une version ultérieure
Espace disque dur
1,5 Go
Remarque : pour l’installation des
logiciels fournis.
La quantité d’espace disque
nécessaire peut être modiée sans
avis préalable.
Lecteur de CD-ROM
Nécessaire Nécessaire
Afchage
SVGA 800 x 600 XGA 1024 x 768
•
Windows : le fonctionnement peut être garanti uniquement sur un PC sur
lequel Windows 7, Windows Vista ou Windows XP sont déjà installés.
•
Windows : désinstallez les logiciels fournis avec l’imprimante à jet d’encre
Canon avant de mettre à niveau Windows Vista vers Windows 7, puis
réinstallez les logiciels fournis.
Certaines fonctions peuvent ne pas être disponibles avec Windows Media
•
Center.
•
Macintosh : le disque dur doit être formaté en tant que Mac OS Extended
(Journalisé) ou Mac OS Extended.
•
Macintosh : après avoir mis à niveau Mac OS X v.10.5 ou antérieur vers
Mac OS X v.10.6, installez les logiciels fournis avec l'imprimante à jet
d'encre Canon.
Internet Explorer 7 ou ultérieur (Windows), ou Safari 4 ou ultérieur (Mac
•
OS X v.10.5 ou supérieur) est requis pour l'installation du logiciel Easy-
WebPrint EX.
Les spécications pourront faire l’objet de modications sans
préavis.
À propos des consommables
Les consommables (cartouches d’encre/cartouches FINE) sont
disponibles pendant 5 ans après l’arrêt de la production.
Mac OS X v.10.6
Processeur Intel
1 Go
Mac OS X v.10.5
Processeur Intel, PowerPC G5,
PowerPC G4
(867 MHz ou supérieur)
512 Mo
Mac OS X v.10.4.11
Processeur Intel, PowerPC G5,
PowerPC G4, PowerPC G3
256 Mo
1,5 Go
Remarque : pour l’installation des
logiciels fournis.
La quantité d’espace disque
nécessaire peut être modiée sans
avis préalable.
18
Allgemeine technische Daten
Druckauösung (dpi)
9600* (horizontal) x 2400 (vertikal)
* Tintentropfen können mit einem minimalen Abstand von 1/9600 Zoll
aufgetragen werden.
Schnittstelle
USB-Anschluss:
Hi-Speed USB *1
Anschluss für den Direktdruck:
PictBridge
Bluetooth 2.0 (Option) *2 *3 *4
USB-Flash-Laufwerk
LAN-Port:
Drahtgebundenes LAN: 100BASE-TX/10BASE-T
Drahtloses LAN: IEEE802.11n/IEEE802.11g/IEEE802.11b *5
*1 Der Computer muss dem USB-Hi-Speed-Standard entsprechen. Die
USB Hi-Speed-Schnittstelle ist vollständig abwärtskompatibel mit USB
1.1, sodass auch eine Verbindung über USB 1.1 möglich ist.
*2 Maximale Geschwindigkeit: 1,44 MBit/s
*3 Nur JPEG/PNG
*4 Die Bluetooth-Verbindung wird nur zum Drucken verwendet.
*5 Einrichtung möglich über die Einfache Einrichtung (Easy setup) oder
über WPS (Wi-Fi Protected Setup) bzw. WCN (Windows Connect Now).
Druckbreite
203,2 mm/8 Zoll
Technische Daten
(für randlosen Druck: 216 mm/8,5 Zoll)
Betriebsbedingungen
Temperatur: 5 bis 35 °C (41 bis 95 °F)
Feuchtigkeit: 10 bis 90 % rel. F. (ohne Kondenswasserbildung)
Lagerbedingungen
Temperatur: 0 bis 40 °C (32 bis 104 °F)
Feuchtigkeit: 5 bis 95 % rel. F. (ohne Kondenswasserbildung)
Stromversorgung
100 bis 240 V Wechselstrom, 50/60 Hz
Leistungsaufnahme
Drucken (Kopie): ca. 23 W
Standby (Minimum): ca. 2,5 W *1 *2
AUS: ca. 0,4 W *1
* USB-Verbindung mit PC
*2 Die Wartezeit für das Standby kann nicht geändert werden.
Außenabmessungen
Ca. 491 (B) x 448 (T) x 218 (H) mm
Ca. 19,4 (B) x 17,7 (T) x 8,6 (H) Zoll
* Bei geschlossener Papierstütze und geschlossenem Papierausgabefach.
Gewicht
Etwa 11,7 kg (etwa 25,7 lb)
* Mit installiertem Druckkopf und eingesetzten Tintenpatronen.
Druckkopf/Tinte
Insgesamt 4608 Düsen (PgBK: 512 Düsen, Y/DyeBK: jeweils 512 Düsen,
C/M: jeweils 1536 Düsen)
ADF-Kapazität
Format A4 oder Letter: max. 35 Blatt (Papier mit 20 lb/m² / 75 g/m²),
bis zu 5 mm/0,20 Zoll hoch
Format Legal: max. 30 Blatt (20 lb/m² / 75 g/m² Papier), bis zu 4 mm/
0,16 Zoll hoch
Andere Formate: 1 Blatt
87
Page 90
Technische Daten für Kopiervorgänge
Mehrfachkopie
Maximal 99 Seiten
Intensitätseinstellung
9 Positionen, Autom. Intensität (Kopie mit automatischer Belichtung)
Zoomen
25 – 400 % (in 1 %-Schritten)
Technische Daten für Scanvorgänge
Scanner-Treiber
TWAIN/WIA (für Windows 7/Windows Vista/Windows XP)
Maximales Scanformat
A4/Letter, 216 x 297 mm / 8,5" x 11,7" (Auageäche)/216 x 356 mm /
8,5" x 14,0" (ADF)
Scanauösung
Max. optische Auösung (horizontal X vertikal): 2400 X 4800 dpi
Max. interpolierte Auösung: 19200 X 19200 dpi
Gradation (Eingabe/Ausgabe)
Grau: 16 Bit/8 Bit
Farbe: 48 Bit/24 Bit (RGB jeweils 16 Bit/8 Bit)
Netzwerkspezikationen
Kommunikationsprotokoll
TCP/IP
LAN
Unterstützte Standards: IEEE802.3u (100BASE-TX)/IEEE802.3
Übertragungsgeschwindigkeit: 10/100 MBit/s (automatischer Wechsel)
WLAN
Unterstützte Standards: IEEE802.11n/IEEE802.11g/IEEE802.11b
Frequenzbandbreite: 2,4 GHz
Kanal: 1 – 11 oder 1 – 13
* Frequenzbandbreite und verfügbare Kanäle abhängig von Land oder
Region.
Übertragungsgeschwindigkeit (Standardwert):
IEEE802.11n: max. 150 MBit/s
IEEE802.11g: max. 54 MBit/s
IEEE802.11b: max. 11 MBit/s
Reichweite in Innenräumen: 164 feet/50 m
* Effektive Reichweite abhängig von der Installationsumgebung und den
räumlichen Gegebenheiten.
Sicherheit:
WEP (64/128 Bit)
WPA-PSK (TKIP/AES)
WPA2-PSK (TKIP/AES)
Einrichtung:
WCN (WCN-UFD/WCN-NET)
WPS (Drucktastenkonguration/PIN-Code-Methode)
Sonstiges: Administrationskennwort
(10BASE-T)
Angaben zum Faxen
Geeignete Verbindung
Öffentliches Telefonnetz (PSTN)
Kommunikationsmodus
Super G3, G3
Datenkomprimierungssystem
Schwarzweiß: MH, MR, MMR
Farbe: JPEG
Modemgeschwindigkeit
Max. 33,6 KBit/s
(Automatische Reduzierung)
Übertragungsgeschwindigkeit
Schwarzweiß: Etwa 3 Sekunden/Seite bei 33,6 KBit/s
(Basierend auf ITU-T No.1 chart für US-Daten und Canon FAX Standard
chart No.1 für andere Länder, beide im Standardmodus oder Canon FAX
Standard chart No.1, Standardmodus.)
Farbe: Etwa 1 Minute/Seite bei 33,6 KBit/s
(Basierend auf Canon FARBFAXTEST-BLATT.)
Gradation
Schwarzweiß: 256 Stufen
Farbe: 24 Bit Full Color (RGB jeweils 8 Bit)
Dichteeinstellung
3 Stufen
Arbeitsspeicher
Übertragung/Empfang: Etwa 250 Seiten
(Basierend auf ITU-T No.1 chart für US-Daten und Canon FAX Standard
chart No.1 für andere Länder, beide im Standardmodus.)
Faxauösung
Schwarzweiß Standard: 8 Pixelelemente/mm x 3,85 Zeilen/mm (203
Pixelelemente/Zoll x 98 Zeilen/Zoll)
Schwarzweiß Fein, Foto: 8 Pixelelemente/mm x 7,70 Zeilen/mm (203
Pixelelemente/Zoll x 196 Zeilen/Zoll)
Schwarzweiß Extrafein: 300 × 300 dpi
Farbe: 200 x 200 dpi
Wählen
Automatisches Wählen
Code-Wahl (max. 100 Empfänger)
Gruppenwahl (max. 99 Empfänger)
Normales Wählen (über Zifferntasten)
Automatische Wahlwiederholung
Manuelle Wahlwiederholung (über die Taste Wahlwiederholung/Pause:
max. 10 Empfänger)
Sonstiges
Aktivitätenbericht (nach jeweils 20 Transaktionen)
Sequentielles Rundsenden (max. 101 Empfänger)
Zurückgewiesene Nummern (max. 10 Empfänger)
Entspricht bei höheren Werten den Voraussetzungen für das
Mindestsystemanforderungen
Betriebssystem.
Betriebssystem/Prozessor/RAM
Windows 7
1-GHz-Prozessor 32 Bit (x86) oder 64
Bit (x64) oder schneller
1 GB (32 Bit)/2 GB (64 Bit)
Windows Vista, Vista SP1, Vista SP2
1-GHz-Prozessor
512 MB
Windows XP SP2, SP3
300-MHz-Prozessor
128 MB
Browser
Internet Explorer 6 oder höher Safari 3 oder höher
Verfügbarer Festplattenspeicher
1,5 GB
Hinweis: Für die Installation der im
Lieferumfang enthaltenen Software.
Der erforderliche Festplattenspeicher
kann sich jederzeit ohne vorherige
Ankündigung ändern.
CD-ROM-Laufwerk
Erforderlich Erforderlich
Bildschirm
SVGA 800 x 600 XGA 1024 x 768
Windows: Der Betrieb kann nur auf einem PC mit installiertem Windows 7,
•
Windows Vista oder Windows XP garantiert werden.
Windows: Deinstallieren Sie erst das Softwarepaket des Canon-
•
Tintenstrahldruckers, bevor Sie ein Upgrade von Windows Vista auf
Windows 7 durchführen, und installieren Sie das Softwarepaket erneut.
Einige Funktionen sind bei Windows Media Center möglicherweise nicht
•
verfügbar.
Macintosh: Die Festplatte muss mit dem Dateisystem Mac OS Extended
•
(Journaled) oder Mac OS Extended formatiert werden.
Macintosh: Nach einem Upgrade von Mac OS X 10.5 oder niedriger auf
•
Mac OS X 10.6 muss das Softwarepaket des Canon-Tintenstrahldruckers
installiert werden.
Internet Explorer 7 oder höher (Windows) oder Safari 4 oder höher (für
•
Mac OS X v.10.5 oder höher) ist für die Installation von Easy-WebPrint EX
erforderlich.
Die Angaben können sich jederzeit ohne vorherige Ankündigung
ändern.
Informationen zu Verbrauchsmaterialien
Verbrauchsmaterialien (Tintenpatronen/FINE-Patronen (FINE
Cartridges)) sind noch 5 Jahre nach Produktionsstopp erhältlich.
Mac OS X 10.6
Intel-Prozessor
1 GB
Mac OS X 10.5
Intel-Prozessor, PowerPC G5,
PowerPC G4
(867 MHz oder schneller)
512 MB
Mac OS X 10.4.11
Intel-Prozessor, PowerPC G5,
PowerPC G4, PowerPC G3
256 MB
1,5 GB
Hinweis: Für die Installation der im
Lieferumfang enthaltenen Software.
Der erforderliche Festplattenspeicher
kann sich jederzeit ohne vorherige
Ankündigung ändern.
88
Page 91
18
Speciche generali
Risoluzione di stampa (dpi)
9600* (orizzontale) X 2400 (verticale)
* Passo minimo per le gocce di inchiostro 1/9600 di pollice.
Interfaccia
Porta USB:
Hi-Speed USB *1
Porta di stampa diretta:
PictBridge
Bluetooth v2.0 (opzionale) *2 *3 *4
Unità ash USB
Porta LAN:
LAN cablata: 100BASE-TX/10BASE-T
LAN wireless: IEEE802.11n/IEEE802.11g/IEEE802.11b *5
*1 È necessario utilizzare un computer conforme allo standard Hi-Speed
Specifiche
USB. Poiché l'interfaccia Hi-Speed USB è compatibile con la versione
USB 1.1, è possibile utilizzarla con USB 1.1.
*2 Velocità massima: 1,44 Mbps
*3 Solo JPEG/PNG
*4 La connessione Bluetooth è disponibile solo per la stampa.
*5 Impostazione possibile tramite Impost. facile (Easy setup), WPS (Wi-Fi
Protected Setup) o WCN (Windows Connect Now).
Larghezza di stampa
203,2 mm/8 pollici
(stampa senza bordo: 216 mm/8,5 pollici)
Ambiente operativo
Temperatura: tra 5°C e 35°C (tra 41°F e 95°F)
Umidità: 10 - 90% UR (senza condensa)
Ambiente di immagazzinaggio
Temperatura: tra 0°C e 40°C (tra 32°F e 104°F)
Umidità: 5 - 95% UR (senza condensa)
Alimentazione
CA 100-240 V, 50/60 Hz
Consumo energetico
Stampa (copia): circa 23 W
Standby (minimo): circa 2,5 W *1*2
Spenta: circa. 0,4 W *1
*1 Connessione USB al PC
*2 Non è possibile modicare il tempo di attesa per l'entrata in standby.
Dimensioni esterne
Circa 491 (L) X 448 (P) X 218 (H) mm
Circa 19,4 (L) X 17,7 (P) X 8,6 (H) pollici
* Con il supporto per la carta e il vassoio di uscita carta retratti.
Peso
Circa 11,7 kg (circa 25,7 lb)
* Con la testina di stampa e i serbatoi d'inchiostro installati.
Testina di stampa/Inchiostro
In totale 4.608 ugelli (PgBK 512 ugelli, Y/DyeBK 512 ugelli ciascuno, C/M
1536 ugelli ciascuno)
Capacità ADF
Formato A4 o Letter: max. 35 fogli (carta da 20 lb/75 g/m²), no a
5 mm/0,20 pollici di altezza
Formato Legal: max. 30 fogli (carta da 20 lb/75 g/m²), no a 4 mm/
0,16 pollici di altezza
Altri formati: 1 foglio
Speciche copia
Copia multipla
Max. 99 pagine
Regolazione di intensità
9 posizioni, Intensità automatica (copia AE)
Riduzione/ingrandimento
25% - 400% (unità di 1%)
Speciche scansione
Driver dello scanner
TWAIN/WIA (per Windows 7/Windows Vista/Windows XP)
Formato di scansione massimo
A4/Letter, 216 X 297 mm/8,5'' X 11,7'' (piano di lettura in vetro)/216 X 356
mm/8,5'' X 14,0'' (ADF)
Risoluzione di scansione
Risoluzione ottica (orizzontale X verticale) max: 2400 X 4800 dpi
Risoluzione di interpolazione max: 19200 X 19200 dpi
Gradazione (input/output)
Grigio: 16 bit/8 bit
Colore: 48 bit/24 bit (16 bit/8 bit ognuno per RGB)
Speciche di rete
Protocollo di comunicazione
TCP/IP
LAN cablata
Standard supportati: IEEE802.3u (100BASE-TX)/IEEE802.3 (10BASE-T)
Velocità di trasferimento: 10 M/100 Mbps (commutazione automatica)
LAN wireless
Standard supportati: IEEE802.11n/IEEE802.11g/IEEE802.11b
Ampiezza di banda di frequenza: 2,4 GHz
Canale: 1-11 o 1-13
* L'ampiezza di banda della frequenza e i canali disponibili variano in
base al paese o alla regione.
Velocità di trasferimento (valore standard):
IEEE802.11n: max. 150 Mbps
IEEE802.11g: max. 54 Mbps
IEEE802.11b: max. 11 Mbps
Distanza di comunicazione: 164 piedi/50 m in interni
* L'ampiezza effettiva varia in base all'ambiente di installazione e alla
posizione.
Protezione:
WEP (64/128 bit)
WPA-PSK (TKIP/AES)
WPA2-PSK (TKIP/AES)
Impostazione:
WCN (WCN-UFD/WCN-NET)
WPS (metodo congurazione pulsante/codice PIN)
Altre funzionalità: password di amministrazione
Speciche fax
Linea applicabile
Rete telefonica analogica (PSTN)
Modalità di comunicazione
Super G3, G3
Sistemi di compressione dei dati
Nero: MH, MR, MMR
Colore: JPEG
Velocità modem
Massimo 33,6 kbps
(fallback automatico)
Velocità di trasmissione
Nero: circa 3 secondi/pagina a 33,6 kbps
(Basata sul graco ITU-T N.1 per le speciche degli Stati Uniti e sul
graco N.1 Canon FAX Standard per gli altri paesi, entrambi in modalità
standard o modalità standard, graco N.1 Canon FAX Standard).
Colore: circa 1 minuto/pagina a 33,6 kbps
(Basata sul FOGLIO TEST FAX A COLORI Canon).
Gradazione
Nero: 256 livelli
Colore: tutti i colori a 24 bit (RGB ogni 8 bit)
Regolazione di densità
3 livelli
Memoria
Trasmissione/ricezione: circa 250 pagine
(Basata sul graco ITU-T N.1 per le speciche degli Stati Uniti e sul
graco N.1 Canon FAX Standard per gli altri paesi, entrambi in modalità
standard).
Risoluzione fax
Nero Standard: 8 pels/mm X 3,85 linee/mm (203 pels/pollice X
98 linee/pollice)
Nero Fine, Foto: 8 pels/mm X 7,70 linee/mm (203 pels/pollice X
196 linee/pollice)
Nero Molto elevata: 300 X 300 dpi
Colore: 200 X 200 dpi
Selezione
Selezione automatica
Selezione codicata (100 destinazioni massimo)
Selezione gruppo (max. 99 destinazioni)
Selezione normale (tramite pulsanti numerici)
Riselezione automatica
Riselezione manuale (tramite il pulsante Riselezione/Pausa (Redial/
Pause): max. 10 destinazioni)
Altri
Rapporto attività (ogni 20 transazioni)
Broadcast sequenziale (max. 101 destinazioni)
Numeri riutati (max. 10 destinazioni)
89
Page 92
Conforme ai requisiti del sistema operativo se superiori a quelli indicati.
Requisiti minimi di sistema
Sistema operativo/Processore/RAM
Windows 7
Processore a 32 bit (x86) o a 64 bit
(x64) da 1 GHz o superiore
1 GB (32 bit)/2 GB (64 bit)
Windows Vista, Vista SP1, Vista SP2
Processore da 1 GHz
512 MB
Windows XP SP2, SP3
Processore da 300 MHz
128 MB
Browser
Internet Explorer 6 o versione
successiva
Spazio su disco rigido
1,5 GB
Nota: per l'installazione del software
fornito.
Il requisito di spazio minimo su disco
rigido può venire modicato senza
preavviso.
Unità CD-ROM
Necessaria Necessaria
Schermo
SVGA 800 x 600 XGA 1024 x 768
Windows: il funzionamento è garantito solo sui PC in cui è installato
•
Windows 7, Windows Vista o Windows XP.
Windows: disinstallare il software fornito con la stampante a getto di
•
inchiostro Canon prima di eseguire l'aggiornamento da Windows Vista a
Windows 7, quindi installare nuovamente il software fornito.
Alcune funzioni potrebbero non essere disponibili con Windows Media
•
Center.
Macintosh: il disco rigido deve essere formattato come Mac OS Extended
•
(Journaled) o Mac OS Extended.
Macintosh: dopo l'aggiornamento da Mac OS X v.10.5 o versioni precedenti
•
a Mac OS X v.10.6, installare il software fornito con la stampante a getto di
inchiostro Canon.
Per installare Easy-WebPrint EX è necessario Internet Explorer 7 o
•
versione successiva (Windows) oppure Safari 4 o versione successiva (per
Mac OS X v.10.5 o versione successiva).
Mac OS X v.10.6
Processore Intel
1 GB
Mac OS X v.10.5
Processore Intel, PowerPC G5,
PowerPC G4
(867 MHz o superiore)
512 MB
Mac OS X v.10.4.11
Processore Intel, PowerPC G5,
PowerPC G4, PowerPC G3
256 MB
Safari 3 o versione successiva
1,5 GB
Nota: per l'installazione del software
fornito.
Il requisito di spazio minimo su disco
rigido può venire modicato senza
preavviso.
Le speciche sono soggette a modica senza preavviso.
Informazioni sui materiali di consumo
I materiali di consumo (serbatoi d'inchiostro/cartucce FINE (FINE
Cartridges)) sono disponibili per 5 anni dopo la cessazione della
produzione.
90
Page 93
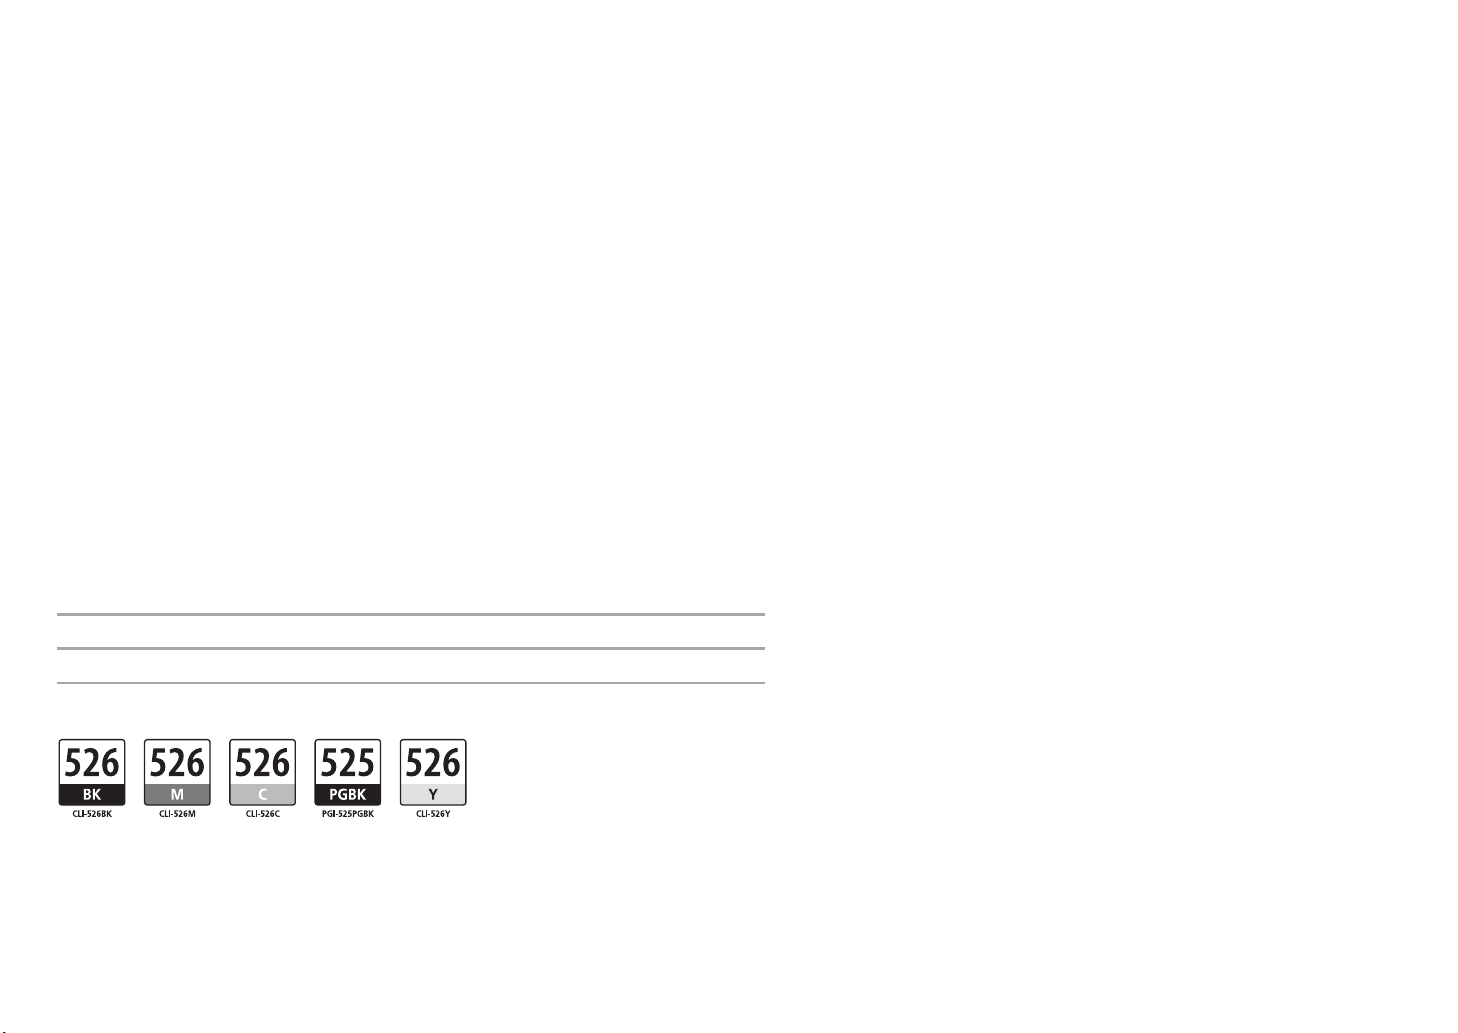
The following ink tanks are compatible with this machine.
Les cartouches d’encre suivantes sont compatibles avec cette machine.
Die folgenden Tintenpatronen sind mit diesem Gerät kompatibel.
CANON AUSTRALIA PTY LTD
1 Thomas Holt Drive, North Ryde, Sydney N.S.W. 2113, Australia
canon.com.au
CANON NEW ZEALAND LIMITED
Akoranga Business Park, Akoranga Drive, Northcote, Auckland,
New Zealand
canon.co.nzI serbatoi d'inchiostro seguenti sono compatibili con questa stampante.
QT5-3557-V01 XXXXXXXX ©CANON INC.2011
PRINTED IN XXXXXXXX
IMPRIME XX XXXXXXXX
 Loading...