

Canon oce 31x5e Daily Maintenance

Océ 31x5E
Copy jobs & daily
maintenance

Océ-Technologies B.V.
This manual, which can be kept at the inside of the copiers paper compartment
door, contains a description of the Océ 31x5E and the copying and printing that
can be done with it. The introduction (chapter 1) contains general instructions
for using the printer. We recommend that you read at least this chapter.
Overview
To assist you in quickly finding the various parts of the copier and the functions
on the operator panel, an illustration of the Océ 31x5E is presented on the
inside front cover and an illustration of the operator panel on the inside back
cover, both of which can be folded out.
Safety information
This manual contains the following safety information:
■ Appendix B lists ‘Instructions for safe use’. You are advised to read this
information before you start to actually use the copier. Tech n ical s afety
information such as safety data sheets can also be found in appendix B.
■ Where applicable, cautions and warnings are used throughout this manual to
draw your attention to safety precautions to be taken.
Copyright
© 2002 Océ-Technologies B.V. Venlo, The Netherlands
All rights reserved. No part of this work may be reproduced, copied, adapted,
or transmitted in any form or by any means without written permission from
Océ.
Océ-Technologies B.V. makes no representation or warranties with respect to
the contents hereof and specifically disclaims any implied warranties of
merchantability or fitness for any particular purpose.
Further, Océ-Technologies B.V. reserves the right to revise this publication and
to make changes from time to time in the content hereof without obligation to
notify any person of such revision or changes.
Code number 7218970
Edition 5.0
US

Trademarks
All trademarks mentioned in this manual are the exclusive property of the
respective parties and are hereby acknowledged by Océ-Technologies B.V.
Licenses
The following products and technologies that are used in the Océ 31x5E are
owned by third parties and used by Océ-Technologies B.V. under license from
their respective owners:
■ FIVE-E Printer Language Emulation
© Copyright 1988-1995 Xionics Document Technologies, Inc.
All rights reserved.
■ Novell, NEST Networking Software
© Copyright 1996 Novell, Inc.
All rights reserved
■ AppleTalk-compatible networking software
© Copyright 1993-1996 Quiotix Corporation (Menlo Park, CA USA).
All rights reserved
■ Windows Print Drivers:
© Copyright 1997 Software 2000
■ LZW Algorithm licensed under U.S. Patent No. 4,558,302 and foreign
counterparts
■ The PostScript option is based in part on work of the Independent JPEG
Group.
■ Adobe and the Adobe logo are trademarks of Adobe Systems Inc.
© 1996 Adobe Inc.
All rights reserved
3

4 Océ 31x5E Copy jobs & daily maintenance

Table of Contents
Trademarks 3
Licenses 3
Table of Contents 5
Chapter 1
Introduction
The Océ 31x5E 10
Overview of the Océ 31x5E 11
Types of users 13
The operating panel 14
Graphical overview of copy jobs 20
Turning the Océ 31x5E on and off 24
Gaining access to the Océ 31x5E 26
Copying using a coin or card 26
Copying using a PIN code 27
Accessing the Océ 31x5E Network Copier 29
Stopping a job 31
Chapter 2
Basic copy jobs
Copying sets of letter-size (8.5 x 11”) originals 34
Stapling copies 36
Copying standard original sizes 38
Copying special originals 41
Chapter 3
Extended copy jobs
Introduction 46
Making finished reports 47
Using covers 48
Using separation sheets 50
Copying appendices 52
Specifying blank pages 53
Defining the location and size of the binding edge 54
Copying calendar originals 57
Table of Contents 5

Chapter 4
Chapter 5
Altering the margin (image shift) 59
Copying onto special material (overhead sheets etc.) 62
Copying onto special material from the paper trays 62
Copying onto special material via the special feeder 64
Copying two originals onto one page side 66
Improving the copy quality 68
Make a booklet copy 69
Other settings when booklet is selected 69
Combine copyjob parts 72
Settings of the jobs 73
The selection of the size 73
Maintenance
Loading paper 76
Refilling staples 80
Cleaning the glass platen 86
Problem solving
Introduction 88
Clearing paper jams 89
Appendix A
Overview and tables
Product specifications 92
Originals that can be used 94
Copy materials that can be used 95
Considerations 97
Functional overview copy mode 98
Appendix B
Safety information
General safety information 100
Radio interference 100
Symbols 100
Instructions for safe use 101
Safety data sheets for the Océ 31x5E 103
6Océ 31x5E Copy jobs & daily maintenance

Appendix C
Safety data sheet Océ 3145 Digital Copier 104
Safety data sheet Océ 3145 Network Copier 105
Safety data sheet Océ 3145 Digital Copier 106
Safety data sheet Océ 3145 Network Copier 107
Safety data sheet Océ 3145E Digital Copier 108
Safety data sheet Océ 3145E Network Copier 109
Safety data sheet Océ 3145E Digital Copier 110
Safety data sheet Océ 3145E Network Copier 111
Safety data sheet Océ 3155 Digital Copier 112
Safety data sheet Océ 3155 Network Copier 113
Safety data sheet Océ 3155 Digital Copier 114
Safety data sheet Océ 3155 Network Copier 115
Safety data sheet Océ 3155E Digital Copier 116
Safety data sheet Océ 3155E Network Copier 117
Safety data sheet Océ 3165 Digital Copier 118
Safety data sheet Océ 3165 Network Copier 119
Safety data sheet Océ 3165 Digital Copier 120
Safety data sheet Océ 3165 Network Copier 121
Safety data sheet Océ 3165E Digital Copier 122
Safety data sheet Océ 3165E Network Copier 123
Safety data sheet Océ 3165E Digital Copier 124
Safety data sheet Océ 3165E Network Copier 125
EPA ENERGY STAR® 126
Miscellaneous
How to read this manual 130
User survey 131
Addresses of local Océ organizations 133
Index 135
Table of Contents 7

8Océ 31x5E Copy jobs & daily maintenance

Océ 31x5E
Copy jobs & daily maintenance
Chapter 1 Introduction
This chapter contains a general description of the Océ
31x5E and the basic functioning of the operating panel.
This chapter also provides a graphical overview of the most
common copy jobs and where to find them in this manual.
Finally, it explains how to access the Océ 31x5E and how
to stop and interrupt jobs.
9

The Océ 31x5E
The Océ 3145E, Océ 3155 and Océ 3165E are available in two configurations,
the Digital Copier and the Network Copier.
Digital Copier The Digital Copier uses digital techniques to reproduce an
original. After the image is scanned from the original, each page is read into
the memory. The Océ 3145E scans at the rate of 45 pages per minute, the Océ
3155 at the rate of 52 pages, and the Océ 3165E at the rate of 56 pages. The
desired number of copies can then be reproduced from memory at a rate of 46
pages per minute for the Océ 3145E, 52 pages for the Océ 3155, and 62 pages
for the Océ 3165E. This means that the originals need only need be fed in once
in order to produce any number of copies. The users can then take the originals
with them, leaving the Océ 31x5E to produce the required number of copies.
The Océ 31x5E is a particularly productive machine, because it attains full
speed when processing double-sided jobs.
Network Copier When the Océ 31x5E is equipped with the optional DAC
(Digital Access Controller), it is possible to connect the copier to a Novell,
LAN manager, Appletalk, or TCP/IP network. We refer to this configuration
as a Network Copier.
The Network Copier handles 2 different kinds of originals: a paper original
(hard copy) and an electronic original (print file). Users who are connected to
the network can print directly to the Network Copier. This allows them to use
specific functions such as double-sided printing, various paper sizes and
stapled copies. The Network Copier offers very high print quality, as it prints
at a resolution of 600x600 dpi. The manual “Print jobs and job management”
describes how jobs are printed.
The Network Copier can also be optionally configured to scan paper originals
and send them as a multipage TIFF file or PDF file to a file server in your
network. Refer to the ’Scan jobs’ manual for details.
Copy quality Image Logic technology, developed by Océ, is employed in the
Océ 31x5E. This technology distinguishes any light sections of text, thin lines
and even photographs in the original. The scanned image is then automatically
processed in order to produce optimum results. This is the most advanced
system available today for scanning and converting analog information into
digital data. While the technology behind Image Logic is quite advanced, its
benefits are very simple: perfect copies, automatically, even from originals
with mixed text and photos. Océ Image Logic intelligently identifies all
10 Océ 31x5E Copy jobs & daily maintenance

information on an original for faultless reproduction. As a result, in most cases
it is not necessary to manually select the photo or text mode or adjust the
shading for lighter/darker copying.
Quality control of print jobs is done via the printer driver (see ‘Improving print
quality of solid gray areas’ in the Print jobs and job management manual).
Memory size The precise number of originals you can store in memory
depends on the amount of memory available. The memory is at least 32 Mb,
which stores about 140 letter-size (8.5 x 11”) pages. The exact number of
pages depends on the type of information on the original (graphics require
more memory than text). The memory capacity can be expanded in steps of 16
Mb to a maximum of 128 Mb (about 560 8.5 x 11” pages).
Note: When the scan option is available, the size of the set memory (also
available for copying) is 128 Mb.
Overview of the Océ 31x5E
The Océ 31x5E is simple to operate. The available functions are displayed
comprehensively on the Océ 31x5Eoperating panel. This makes it easy to
choose the right settings for your copy job.
In order to help you quickly find copier parts and functions on the operating
panel, an illustration of the Océ 31x5E is presented on the inside of the front
cover. An illustration of the operating panel appears on the inside back cover.
Both illustrations can be folded out.
Automatic feeder Using the automatic document feeder, you can copy or scan
single- and double-sided originals in 11 x 17”, 8.5 x 11”, or 5.5 x 8.5” format.
This feature is especially useful for sets of originals such as reports. The
physical limit of the feeder is 50 sheets of 20 lb. bond paper, but the maximum
number of originals in a set is determined by the size of the set memory. When
copying, originals can be added while scanning is in progress.
Glass platen Books and magazines, as well as originals smaller than 5.5 x
8.5”, cannot be copied by means of the automatic document feeder. This also
applies to damaged originals, bent or wrinkled originals, certain paste-up
originals (originals with pasted sections) and valuable originals. You should
use the glass platen for these types of originals.
Introduction 11

Paper trays The trays in the paper compartment are equipped to handle many
sizes of copy material: the lower tray (tray 4), for instance, holds up to 1,750
or 2,250 sheets, depending on your configuration. Trays 1 through 3 can each
hold a maximum of 500 sheets of 20 lb. bond paper. Tray 1 can be adapted to
accommodate any paper size, whereas the sizes to be used in trays 2 and 3 are
determined by the customer and set by the service technician. The paper can
be of different weights, orientation ( or ) and/or colors.
Original tray Scanned originals are deposited into the original tray to the right
of the automatic feeder.
Output trays The Océ 31x5E is equipped with three output trays: a finisher
tray, an upper output tray and a lower output tray. Printed 8.5 x 11” portrait
pages are usually delivered into the finisher tray. The finisher tray also contains
a stapler and a batch tray into which printed pages are collected in order to be
stapled. The Océ 3165E comes standard with a 1000-sheet finisher, whereas
this finisher is optional on the Océ 3145E and Océ 3155. Other sizes are
delivered into the upper output tray. Error pages are delivered into the lower
output tray (on top of the paper compartment).
11 x 17” paper rest When printing onto A3 paper, the copies are delivered into
the upper output tray. In order to support long paper, pull out the 11 x 17” paper
rest, which is located at the end of the upper output tray.
Staple slot The finisher is equipped with a stapler which can be used for
automatic and manual stapling of copies. The Océ 3145E and Océ 3155 staple
up to 50 sheets of 20 lb. bond, while the Océ 3165E staples either 35 or 50
sheets, depending on the type of stapler.
The staple slot allows you to insert copies for manual stapling, provided that
the Océ 31x5E is not copying at the same time.
Special feeder The special feeder is used to copy onto special materials such
as overhead sheets, very thin and very thick paper. It also handles all paper
sizes, including standard DIN A sizes, USA paper sizes and folio. Copies from
the special feeder are always 1-sided and delivered face-up into the upper
output tray.
12 Océ 31x5E Copy jobs & daily maintenance

Types of users
Two types of Océ 31x5E users are mentioned in this manual. The purpose of
this section is to describe briefly what type of user is meant when a specific
term is used.
End users use the Océ 31x5E for their copy jobs.
The key operator is the person responsible for configuring and maintaining
the Océ 31x5E. This person also assists users with their copy jobs. The key
operator system is used for the configuration of the most frequently-used
standard settings. Maintenance of the Océ 31x5E includes replenishing toner
and staples.
Should something occur which requires the attention of the key operator, a
message will appear on the display requesting the user to alert the key operator.
Introduction 13

The operating panel
The Océ 31x5E operating panel is designed in such a way that it performs
simple as well as complex copy and print jobs in a user-friendly manner.
Note: An illustration of the Océ 31x5E operating panel appears on the inside
back cover, which can be folded out.
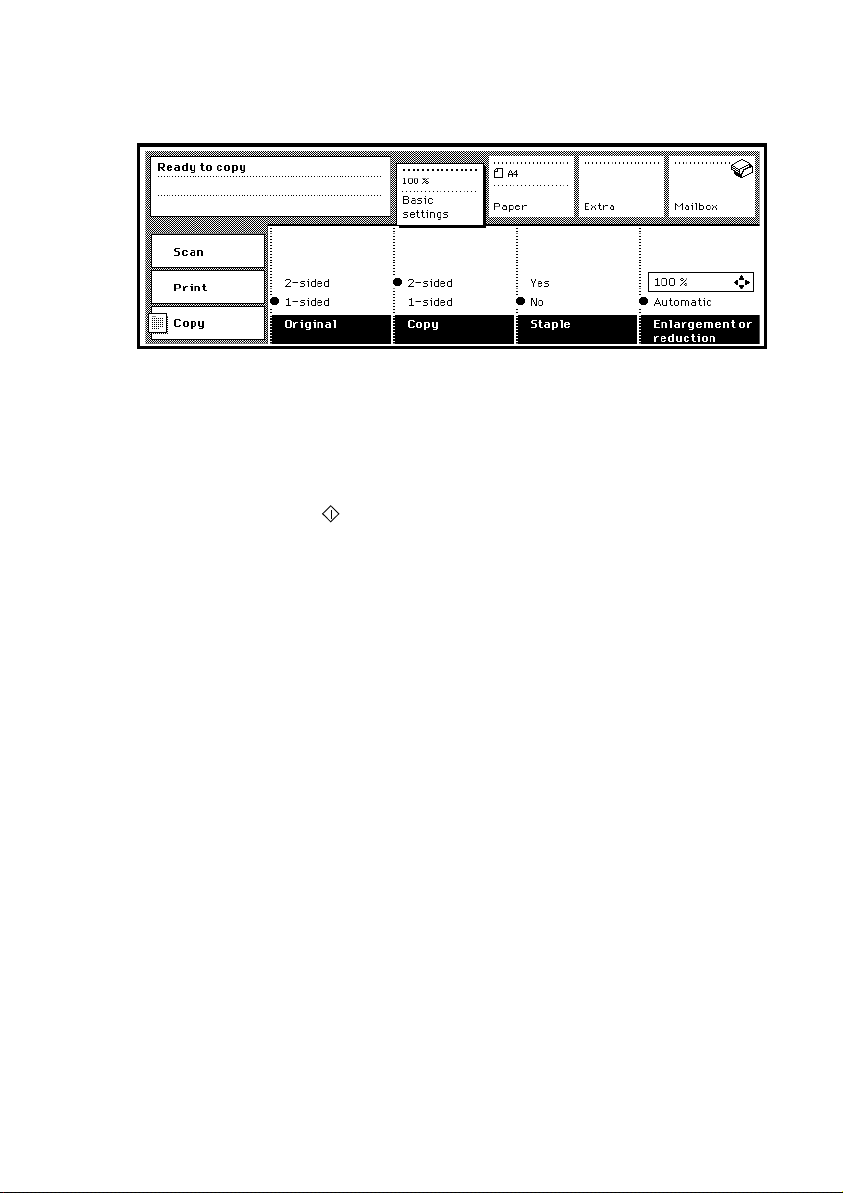
Standard settings After warming up, the Océ 31x5E is in initial mode. When
using the Digital Copier, you will see the basic copy jobs settings (see
figure 1). If you have the Network Copier, the initial mode may display
■ the basic copy job settings (see figure 2)
■ a list of users that use the Océ 31x5E for printing (see figure 3 on page 15), or
■ a list of available profiles for scanning (see figure 4 on page 15).
The key operator may define what initial mode is used.
[1] Initial mode of the Océ 31x5E Digital Copier
[2] Initial mode of the Océ 31x5E Network Copier when set to copying
14 Océ 31x5E Copy jobs & daily maintenance
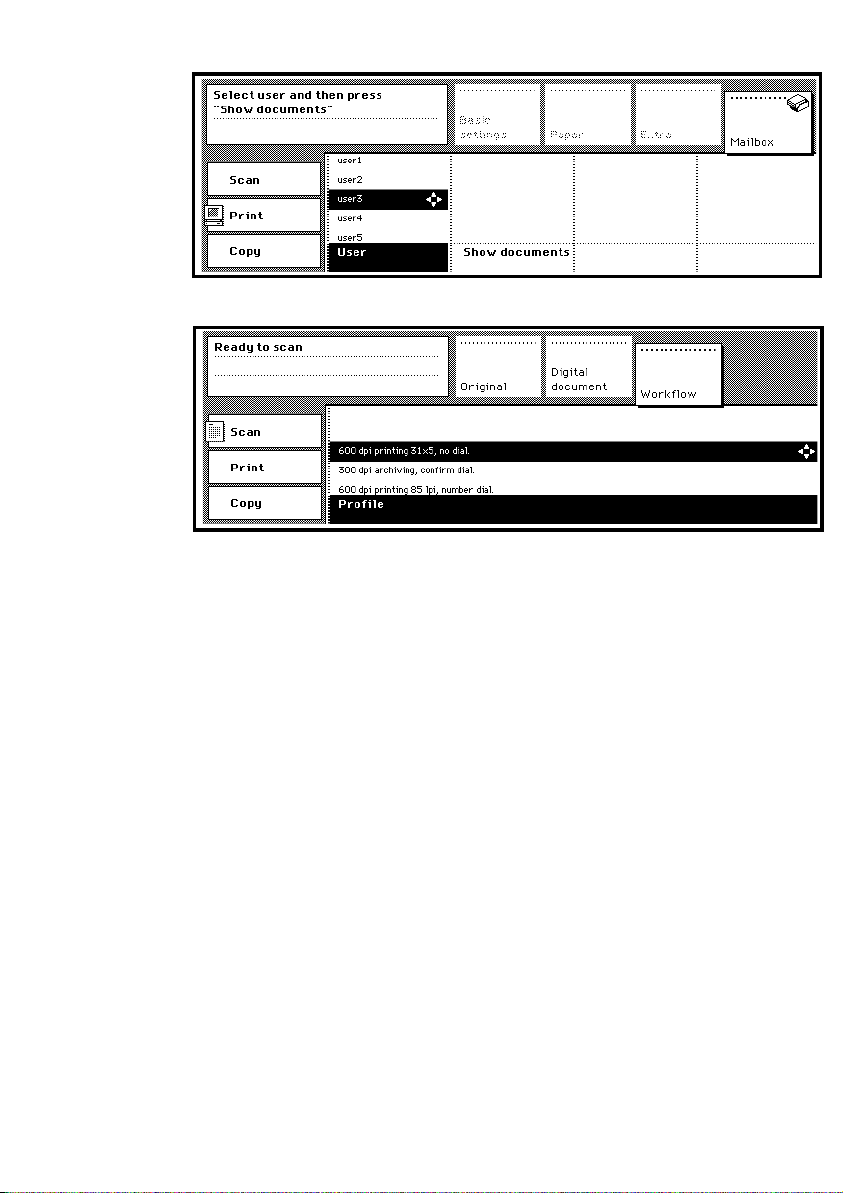
[3] Initial mode of the Océ 31x5E Network Copier when set to printing
[4] Initial mode of the Océ 31x5E Network Copier when set to scanning
Note: Scanning is an optional feature. From this point until the end of the
manual, the display will be shown without a scanning mode.
By factory default, the initial mode displays the basic copy job settings. These
settings are usually defined for making double-sided copies from single-sided
originals on 8.5 x 11” paper from tray 4, with no reduction or enlargement (set
at 100%).
When originals are placed in the automatic document feeder, their size is
detected automatically and the matching paper tray (if available) is selected. If
the size of the original does not match any available paper size, the copier will
select the required reduction or enlargement factor automatically.
This means that the only action required to make a double-sided copy is
pressing the green start button.
The key operator can change any setting to a specific custom value. These
customized settings then become the standard copy settings.
All settings can be changed as required for each new job. Once a job is
completed and a certain number of seconds (pre-set by the key operator) have
passed, the Océ 31x5E returns to initial mode.
Introduction 15
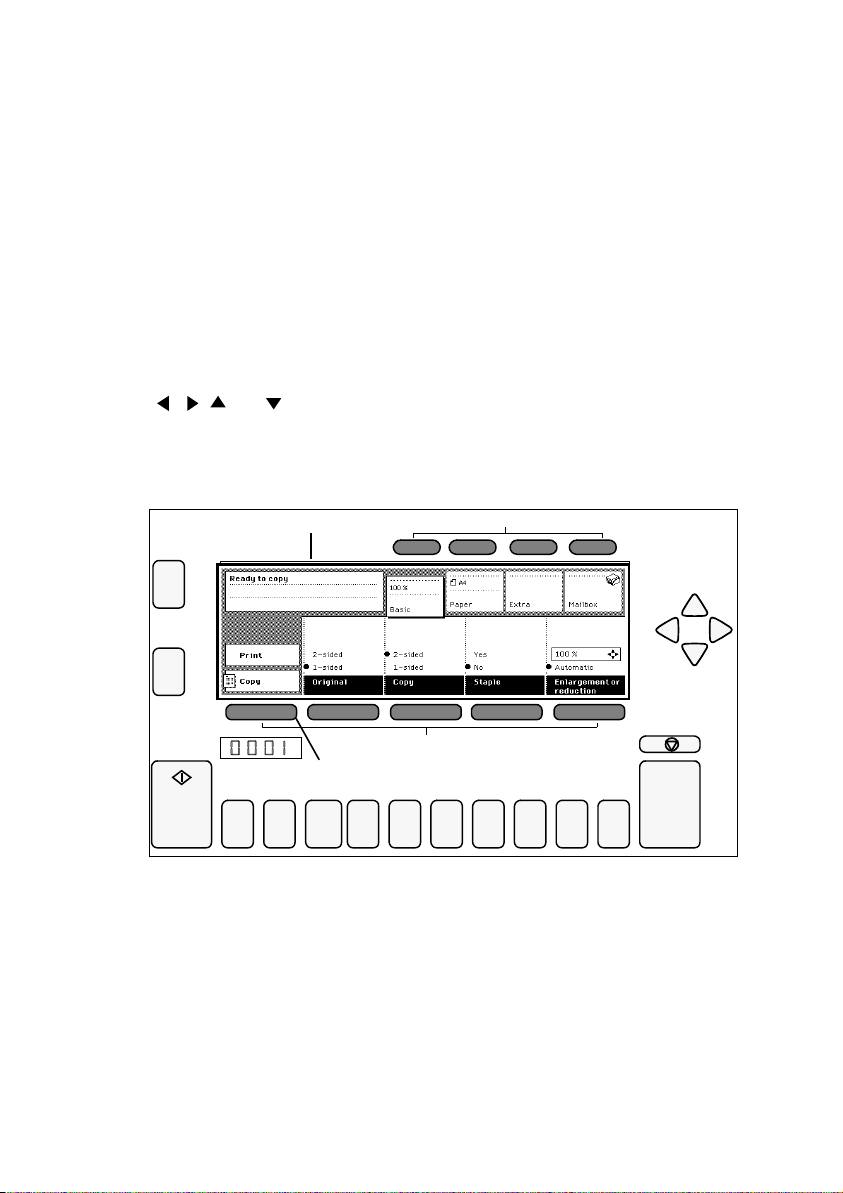
Section and function buttons Pressing a section button gives you access to a
s
field in which related settings are grouped. The Digital Copier presents the
‘Basic’, ‘Paper’ and ‘Extra’ sections, while the Network copier also offers a
‘Mailbox’ section. The section buttons are located above the display. The
settings used for simple jobs are grouped in the ‘Basic’ section.
Use the function buttons to choose specific functions within a section. The
function buttons are located below the display (see figure 5 on page 16). The
function name belonging to each button is shown on the display.
Each function offers two or more options for a setting. The current setting is
indicated by a black dot next to the name of the selection. Pressing the function
button moves the dot to the following selection (or group of selections). For
some settings you must use the arrow buttons in order to define the selection
(, , and ).
Functions which cannot be chosen or changed in a specific situation are
marked by a lock symbol.
display
function buttons
(application button with Océ 31x5E )
5674312
[5] Section and function buttons of the Océ 31x5E
When a specific section contains many functions, these will be described on
section buttons
8
arrow button
C
9
0
several cards. In this case, one of the function buttons acts as a card selection
button. In the case of the Digital Copier, this is the left function button. In the
case of the Network Copier, it is the second function button from the left.
By pressing this button or one of the arrow buttons you can move from one card
to another (see figure 6 on page 17).
16 Océ 31x5E Copy jobs & daily maintenance
On the Network Copier, the left-most function button is reserved for choosing
an application within the Océ 31x5E, such as printing, copying or scanning
(see ‘Accessing the Océ 31x5E Network Copier’ on page 29).
[6] Card selection
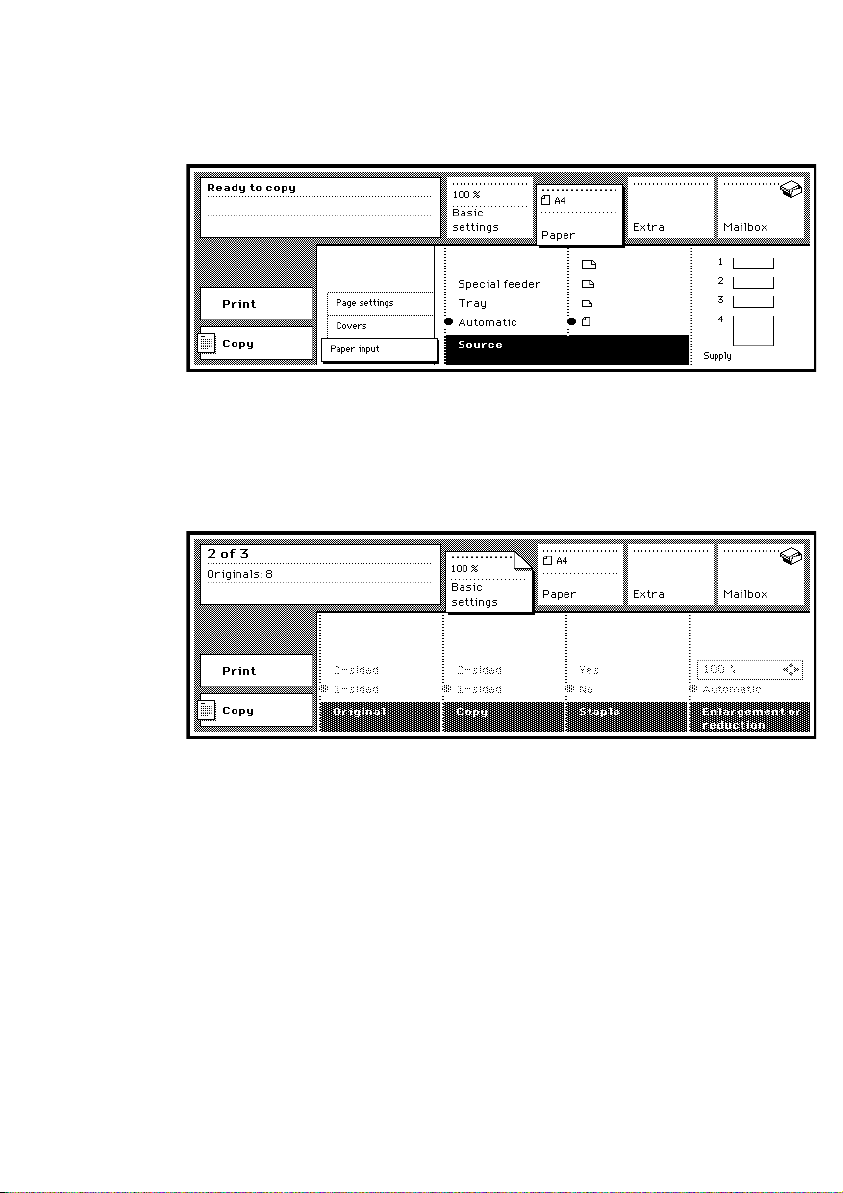
Dog ear When standard settings are changed for a new job, the affected
section is marked with a ‘dog-ear’ (see figure 7). This ‘dog-ear’ in a section
label or a subsection label indicates to the user that at least one setting in that
section (or any of its subsections) does not reflect the default value.
[7] Indication of a changed setting
The automatically selected paper size and reduction/enlargement setting also
appear in the corresponding section labels.
Original counter During copying or printing, you can see the progress of the
job in the display.
Introduction 17
The copy job counter shows the following information about the running copy
job (see figure 8):
■ the first line shows which sets have been finished and the total number of sets
■ the second line contains the total number of scanned originals of one set.
[8] Copy job counter
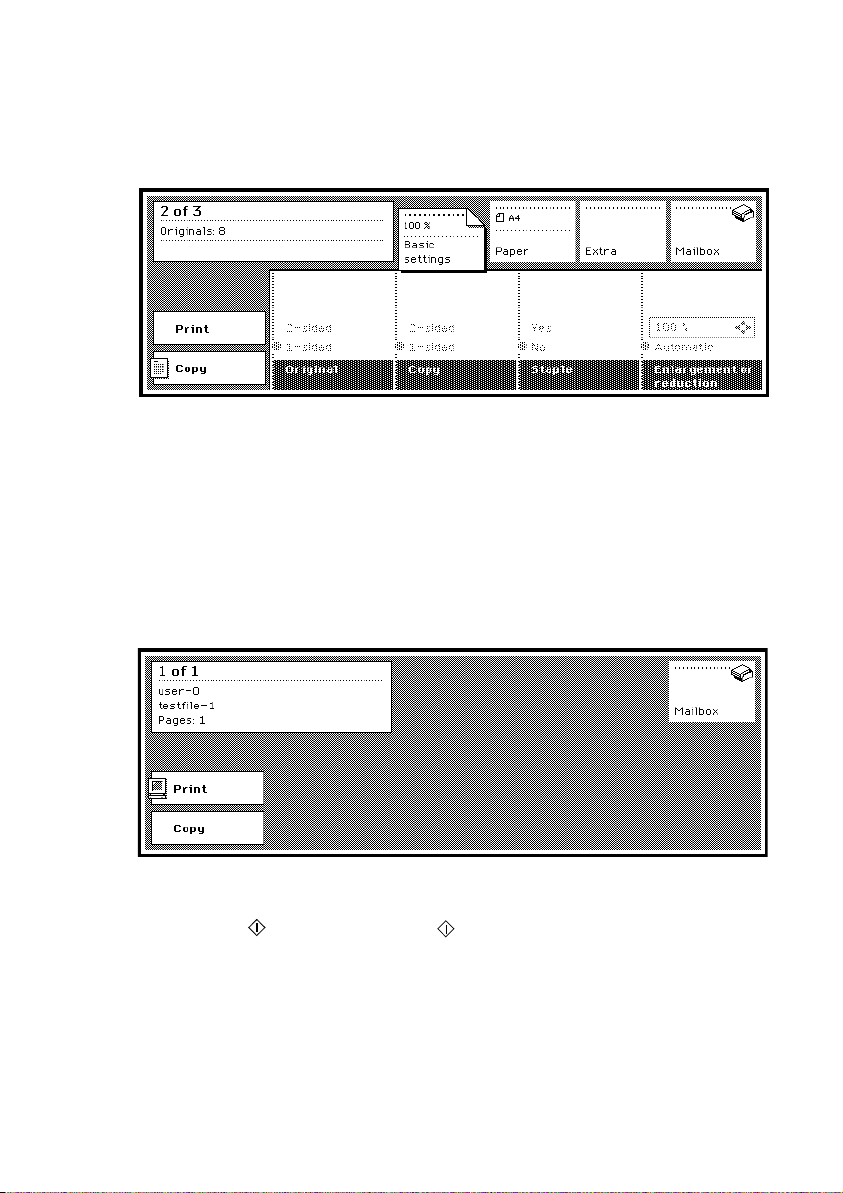
When operating the Network Copier, you will also be informed on the running
print job in the print job counter. The following information is shown (see
figure 9).
■ the first line contains the current set from the total number of sets
■ the second line contains the user of the print job
■ the third line contains the file name of the print job
■ the fourth line contains the total number of pages of the print job.
[9] Print job counter
Start button The button with the ‘’ symbol under the display, is used to
start copy or print jobs and to confirm settings. If you choose contradictory
settings, the machine will suggest automatic adjustments. In this case the start
button is used to confirm this suggestion and start the job.
18 Océ 31x5E Copy jobs & daily maintenance

Correction button ‘C’ You can use the correction button to reset defined
settings. The correction button can also be used to stop scanning a job. The
correction button actually affects the preparation phase of a job: choosing
settings and scanning originals.
Press the correction button once to reset the number of copies to ‘1’. When you
press the button a second time, all settings will be reset to their standard values.
If the copy counter has already been set to ‘1’, pressing the correction button
will return all settings to their standard values. We recommend that you press
this button twice before copying in order to make sure that the standard values
are active.
When operating the Network Copier, the key operator can also define whether
the machine is mainly used for printing or for copying. If you press the
correction button a third time, the machine switches to its initial mode, which
can be ‘Print’ or ‘Copy’.
The correction button can also be used to delay a print job if you want to copy
during a job (see ‘Accessing the Océ 31x5E Network Copier’ on page 29).
Stop button The red button above the correction button with the symbol
‘’ is used to stop a job that is being printed. You can indicate whether to stop
after the current set is finished (by pressing the stop button once) or to stop
immediately (by pressing the stop button twice). Before the job is canceled
definitively and the data is erased, the copier will ask for confirmation. The
stop button thus affects the execution phase of a copy job or print job.
When the printing of pages stops, the scanning of originals does not stop. If the
job being printed is a copy job, and the stopping of the job is confirmed by
pressing the start button, the scanning will also stop and all scanned pages will
be deleted.
Arrow buttons The arrow buttons , , and , which are grouped in the
form of a star to the right of the display, are used to choose settings. The display
indicates whether these buttons can be used.
Note: The two buttons to the left of the display are not used at this time. These
buttons will be used in a later release.
Introduction 19
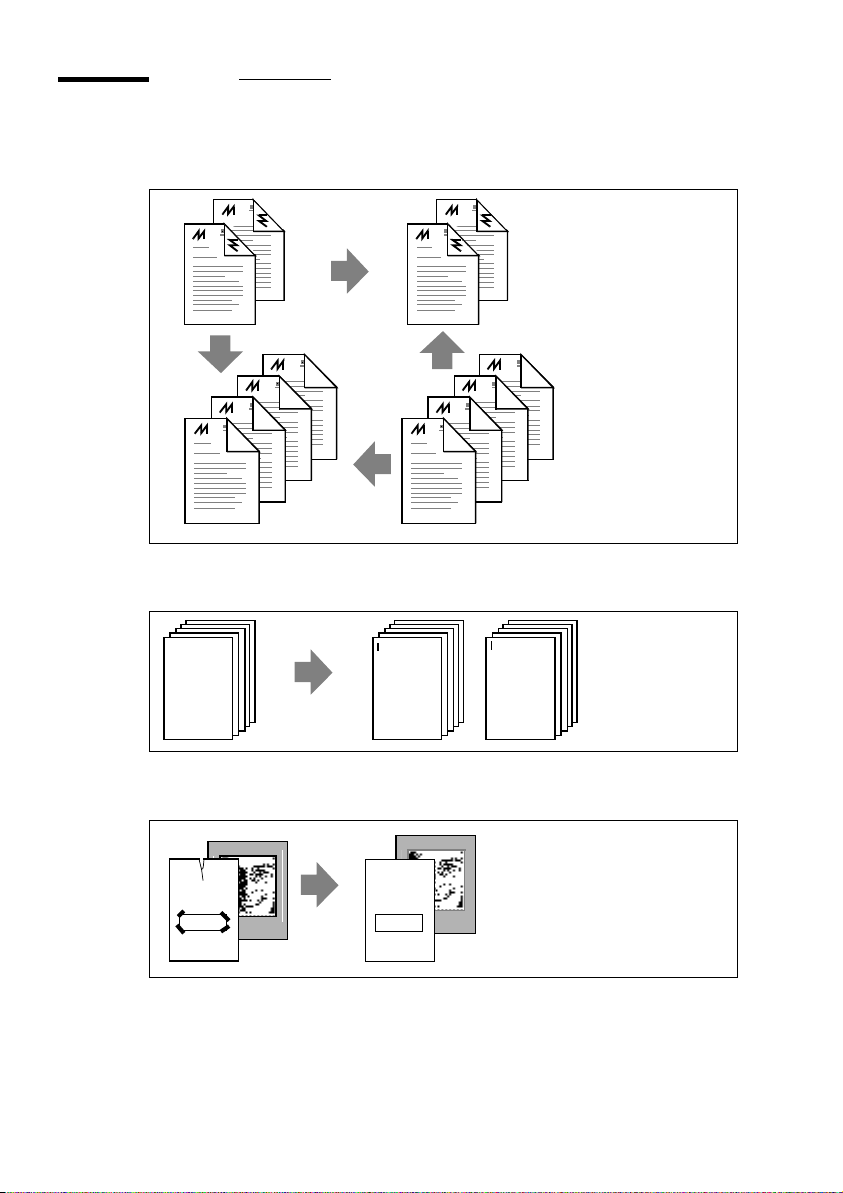
Graphical overview of copy jobs
■ 1-sided or 2-sided copies from 1-sided or 2-sided originals (see page 34).
2-sided originals
1-sided copies
2-sided copies
1-sided originals
■ Copy multiple sets (with or without staples) from a set of originals (see
page 36).
..................
................................ ................
................................ ..................
................................ .................
................................ ..................
................................ .................
................................ ..................
..............................
................................ ..................
................................ .................
................................ ..................
................................ ...............
................................ ...........
■ Copying damaged or otherwise special originals from the glass platen (see
.
page 41)
.................................... ..............
............................... .................
............................... ...................
............................... ..................
............................... ...................
............................... ..................
............................... ...................
............................... ................
............................... ............
..................
................................ .................
................................ ..................
................................ .................
................................ ..................
................................ .................
................................ ..................
..............................
................................ ..................
................................ .................
................................ ..................
................................ ...............
................................ ...........
................................ ..................
................................. ...............
................................. .................
................................. ................
................................. .................
................................. ................
................................. .................
................................. ..............
................................. ..........
..................
.................................... .............
.................................... ..............
.................................... .............
.................................... ..............
.................................... .............
.................................... ..............
..............................
.................................... ..............
.................................... .............
.................................... ..............
.................................... ...........
.................................... .......
20 Océ 31x5E Copy jobs & daily maintenance
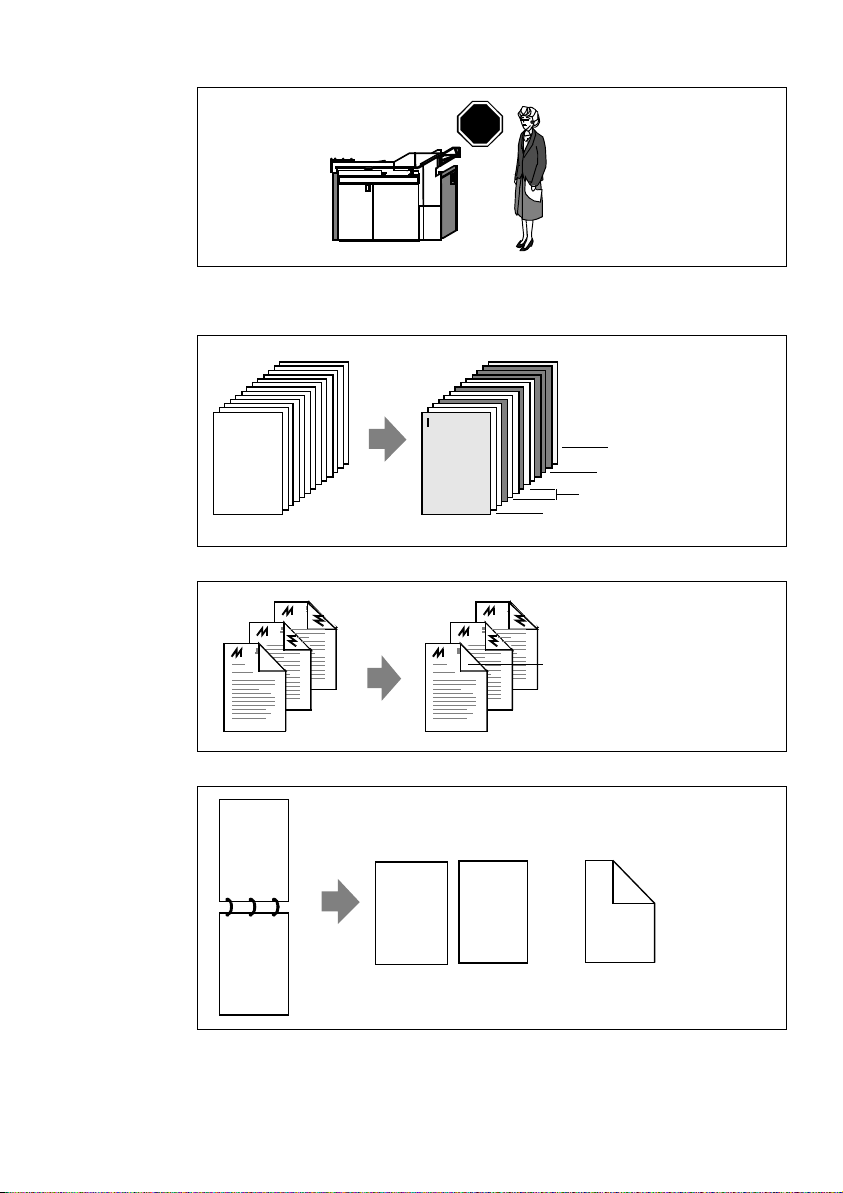
■ Stopping a job (see page 31).
STOP
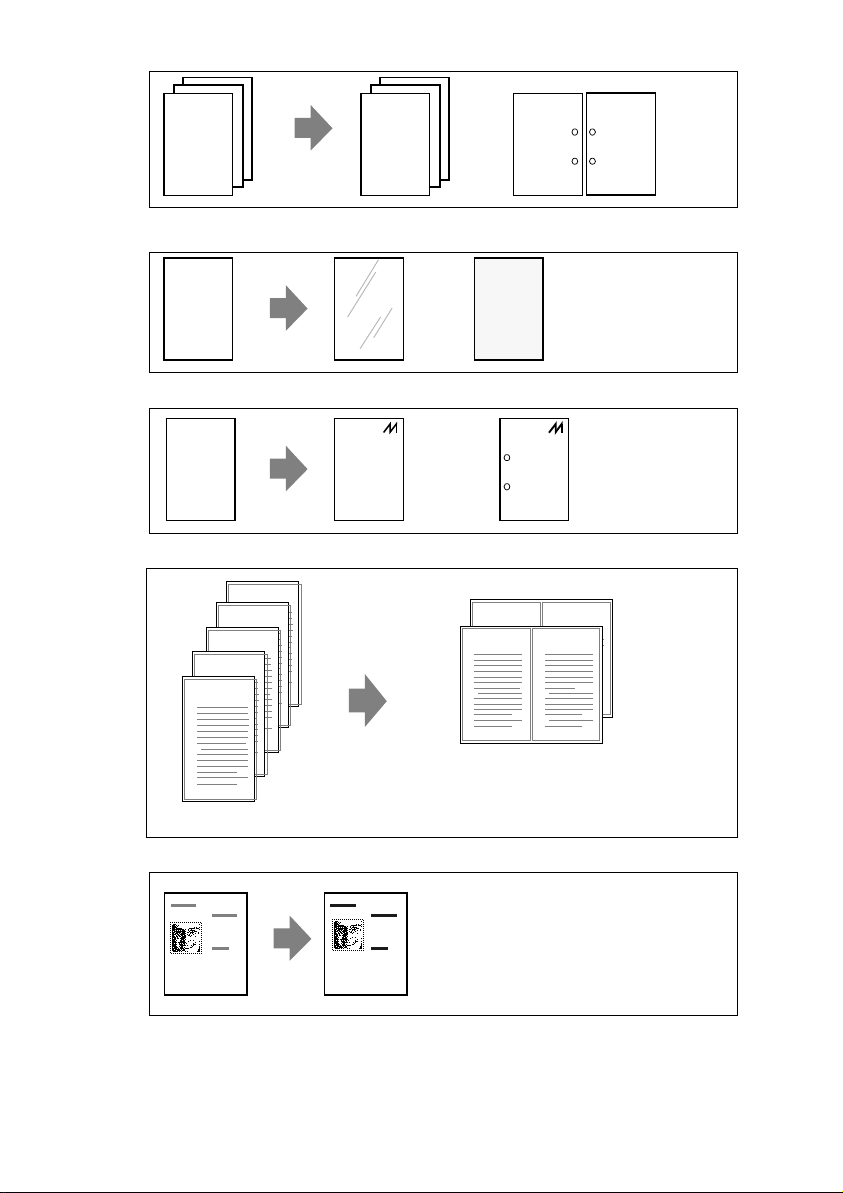
■ Finished reports with covers, separation sheets and/or appendices on
different paper, with or without staples (see page 47).
International
Conference on
International
Safety
Regulations
Safety
Regulations
Conference on
International
Conference on
Safety
Regulations
■ Blank (uncopied) pages (see page 53).
■ Copying calendar originals (see page 57).
Conference on
International
Conference on
International
Safety
Conference on
Regulations
Safety
Regulations
International
Safety
Regulations
A
A B
front cover
uncopied side
or
back cover
appendix
separation sheets
B
A
B
■ Copies with extra margin (see page 59).
Introduction 21
................................. .................
................................... .............
................................... ...............
................................... ..............
................................... ...............
................................... ..............
................................... ...............
..............................
................................... ...............
................................... ..............
................................... ...............
................................... ............
................................... ........
................................. .................
.................................. ..............
.................................. ................
.................................. ...............
.................................. ................
.................................. ...............
.................................. ................
..............................
.................................. ................
.................................. ...............
.................................. ................
.................................. .............
.................................. .........
■ Copies on special material (see page 62).
............................... .........
................................. ...............
................................. .................
or
................................. ................
................................. .................
................................. ................
................................. .................
................................. ......
................................. .................
................................. ................
................................. .................
................................. .................
................................. ................
...............................
................................... ................
................................... ................
.................................... ............
.................................... ..............
...............................
.................................... ..............
.................................... .............
.................................... ..............
.................................... ............
.................................... ..............
........................
.................................... ..............
.................................... ..............
.................................... .............
International
Conference on
Safety
Regulations
International
Conference on
Safety
Regulations
International
Conference on
or
Safety
Regulations
■ Copying on preprinted/punched material (see page 62).
..................
..........................
...................
.....................
................................ ..................
................................ ..................
................................ ..................
................................ ..................
................................ ..................
................................ ..................
................................ ..................
................................ ...........
..................
..........................
...................
.....................
............................... ...................
............................... ...................
............................... ...................
............................... ...................
............................... ...................
............................... ...................
............................... ...................
............................... ............
..............................
and/or
..................
..........................
...................
.....................
................................. .................
................................. .................
................................. .................
................................. .................
................................. .................
................................. .................
................................. .................
................................. ..........
..............................
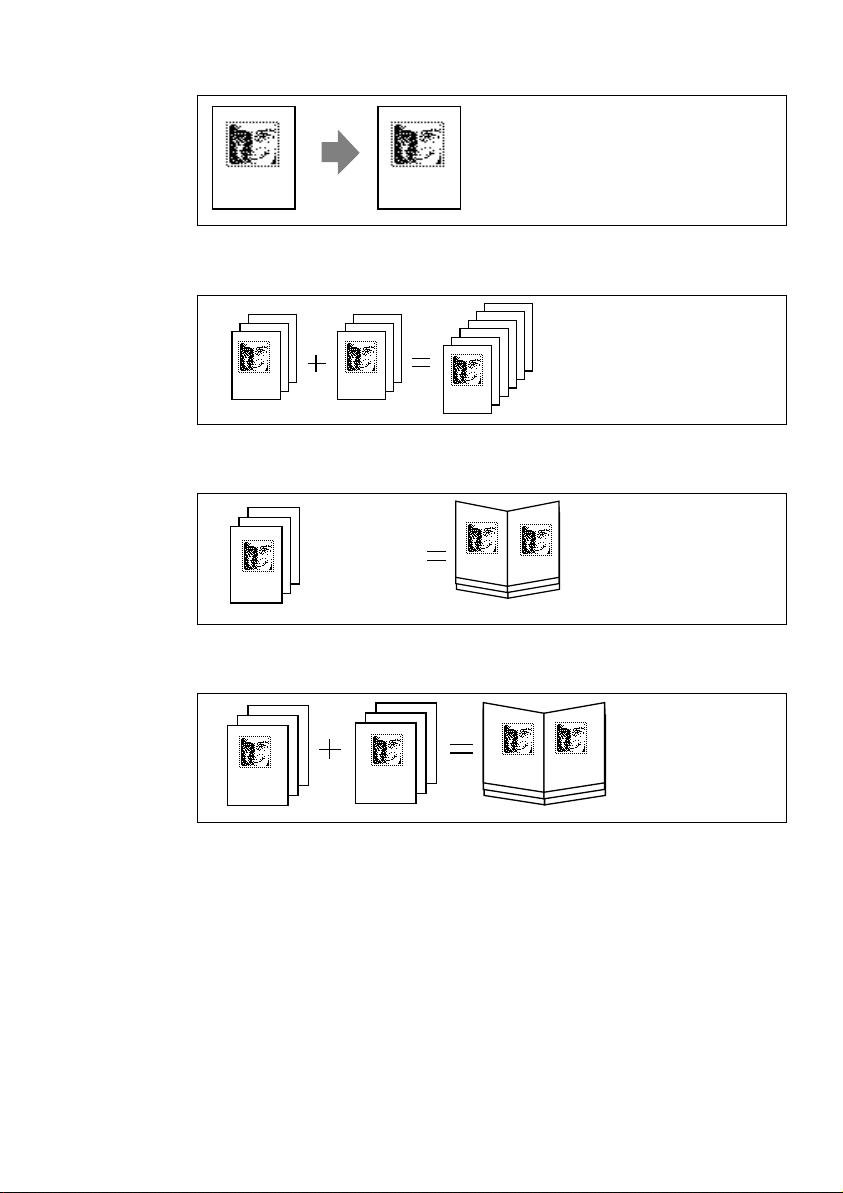
■ Copying multiple pages onto one page (see page 66).
multi-page 8.5 x 11” document
4
3
34
12
2
1
two pages
on one side of the page
■ Improving quality of copies with text and/or photographs (see page 68).
................................
................................
................................
................................
................................
................................
................................
................................
................................
................................
................................
................................
................................
................................
................................
................................
........
................................
................................
................................
................................
................................
................................
................................
................................
................................
................................
................................
................................
................................
................................
................................
................................
................................
................................
................................
................................
................................
................................
................................
................................
................................
................................
................................
................................
................................
................................
................................
................................
22 Océ 31x5E Copy jobs & daily maintenance
■ Copies of originals with photographs (see page 68).
........
.....
........
........
.....
........
■ Different parts of a job combined into one job
■ Booklet copy
■ Different parts of a job combined in a booklet copy
Introduction 23
Turning the Océ 31x5E on and off
Normally, the key operator should make sure that the Océ 31x5E is turned on
in the morning and turned off at the end of the day. However, circumstances
may arise in which you may have to turn the copier on or off yourself (e.g. for
use outside normal working hours or after the Océ 31x5E has been turned off
(Classic) or has gone into sleep mode (Eco).
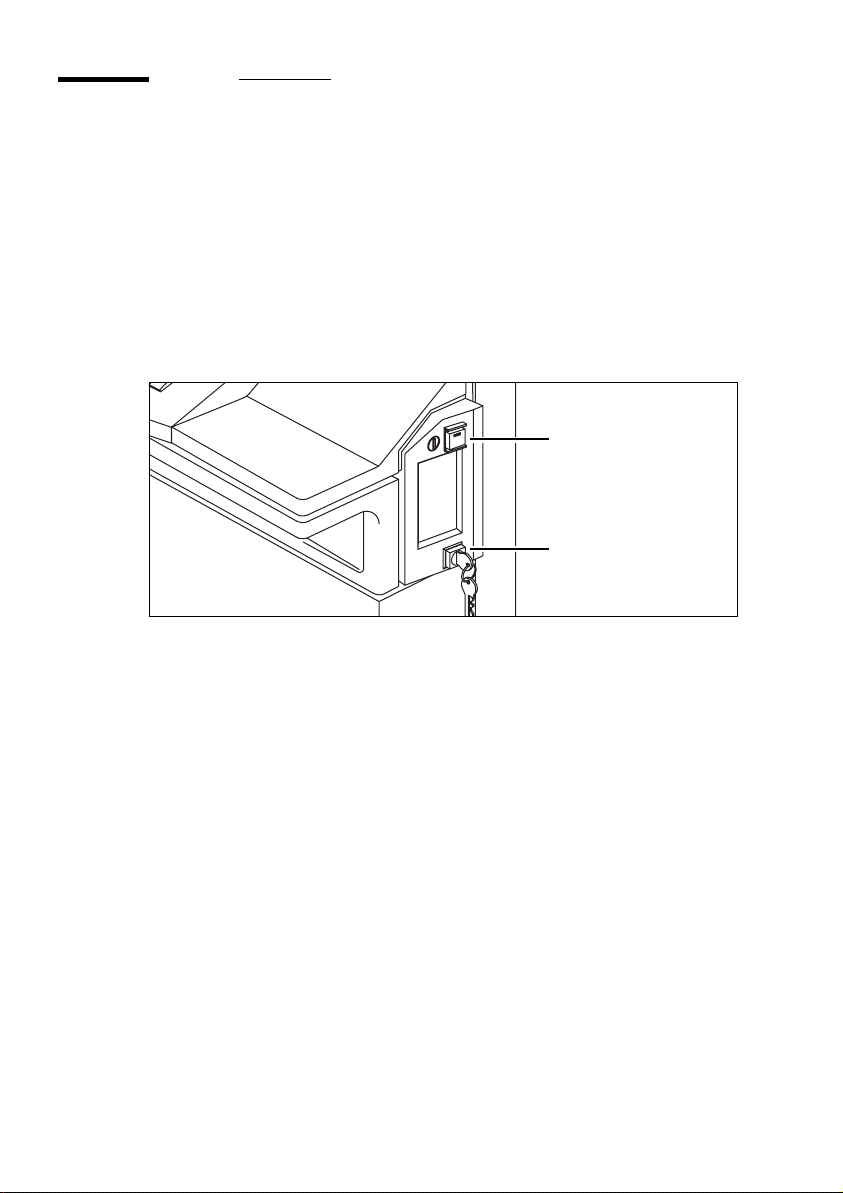
If the Océ 31x5E is equipped with the optional key switch (see figure 10), the
copier can only be turned on or off if the key is in the switch.
on/off button
key switch
[10] On/off button on the copier
▼ Turning on
1
Insert the key (if available) into the key switch and turn it to the right, into a
horizontal position (see figure 10).
Note: Call the key operator if the copier does not turn on.
2 Press the green on/off button, which will light up.
3 If available, remove the key.
The copier takes about 8 minutes to warm up. During this time, you can check
the paper stock and, if necessary, refill the paper tray(s).
As soon as the copier has warmed up, the message ‘Ready to copy’, ‘Ready to
print’ or ‘Ready to scan’ (depending on your standard configuration) will
appear in the display. The copier is now in initial mode, and all settings have
been assigned their standard values.
The copier is configured to turn off or to sleep automatically when it has not
been used for a certain period of time (the automatic switch off time or sleep
24 Océ 31x5E Copy jobs & daily maintenance

time can be defined by the key operator; see Configuration and Special
Maintenance Manual).
Note: The Digital Access Controller, which is part of the Network Copier,
should remain on.
▼ Turning off
1
Make sure that there are no jobs in progress.
2 If available, insert the key into the key switch and turn it to the left.
3 Press the green on/off button.
4 If available, remove the key.
Introduction 25
Gaining access to the Océ 31x5E
The Océ 31x5E is optionally equipped with an accounting system which
makes it possible to control access and to register copies and prints made by
individual persons or departments.
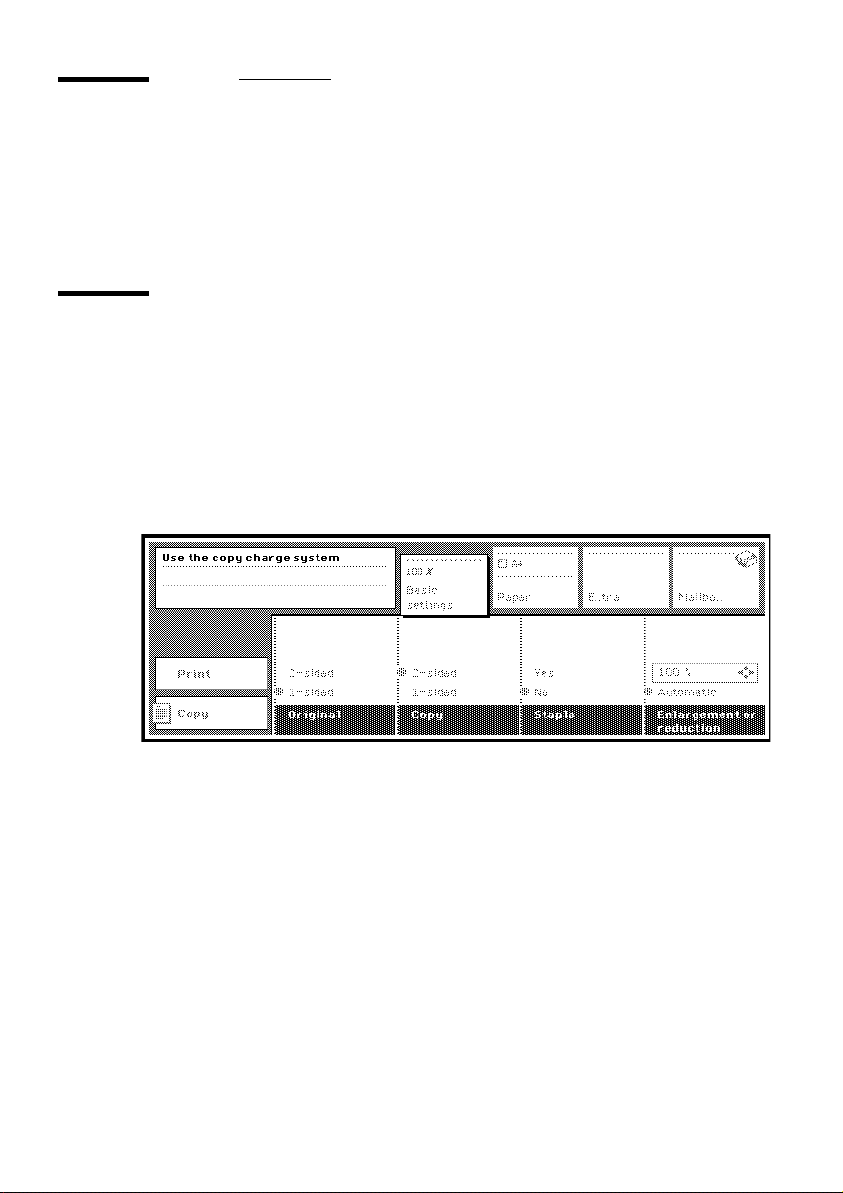
Copying using a coin or card
The Océ 31x5E may be equipped with a copy control device to which a coin
box and/or credit card unit may be connected.
If such a unit is installed, the message ‘Use the copy charge system’ will
appear in the display (see figure 11), and the labels on the display will be
dimmed. Depending on the type of device installed, you will need to insert
coins or a copy credit card in order to pay for the copies and prints you make.
[11] Basic display when copy charge system is in use
▼ Copying using a coin or credit card
Insert the credit card or coin into the slot.
1
The copy charge device is activated, the machine switches to its default settings
and is ready to copy.
2 You can now make copies and prints.
3 Once you have finished, remove the credit card (if appropriate) from the slot.
The machine is deactivated.
26 Océ 31x5E Copy jobs & daily maintenance
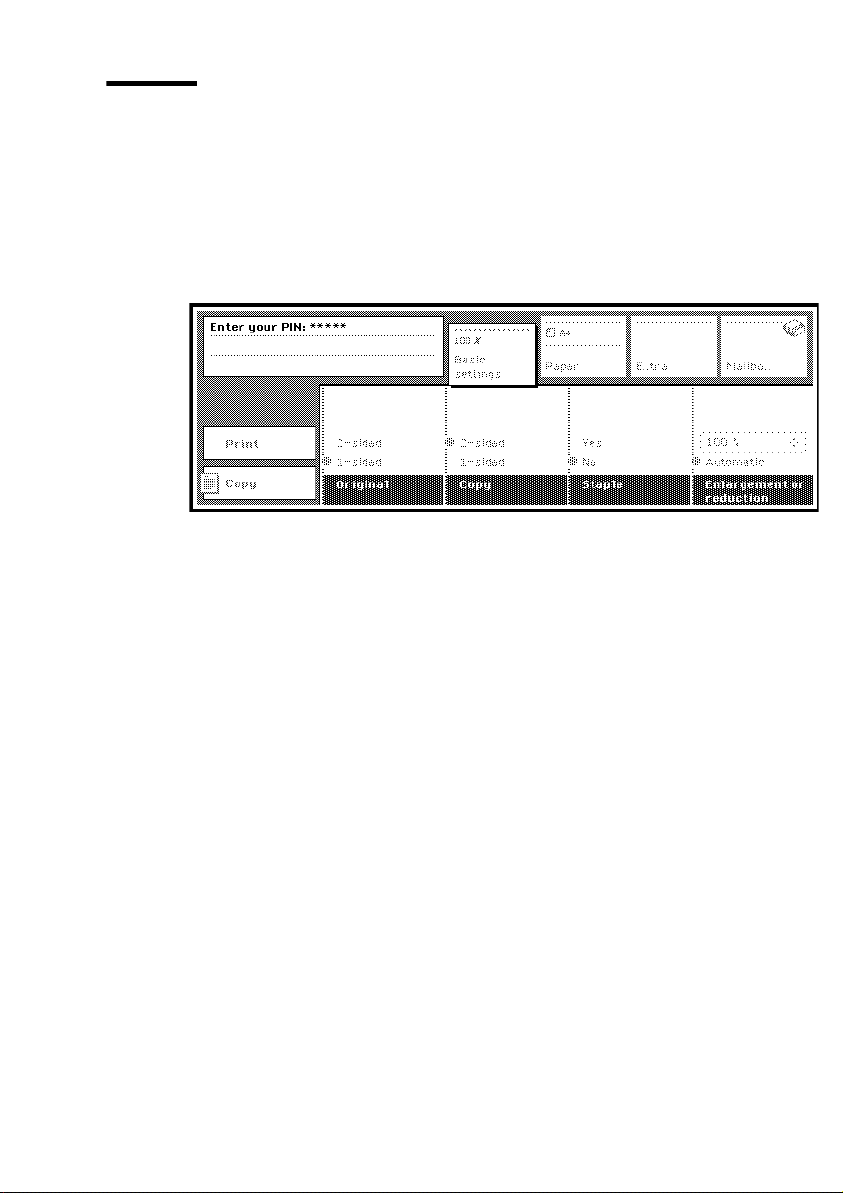
Copying using a PIN code
If access control for copying has been activated by the key operator, the copier
will be accessible only to those users who have been assigned a PIN code. This
PIN code gives access to a specific account, to which each copied and printed
page made by the owner of the account will be charged. If access control is
active, the display shows the message: ‘Enter your PIN code’, and the labels
on the display will be dimmed (see figure 12).
[12] Basic display when accounting system is in use
The key operator assigns a 5-digit PIN code to users that gives them access to
the Océ 31x5E. Each PIN code is unique and the key operator is the only
person authorized to change it. Each account has its own copy counter, which
keeps track of the number of copies made. The key operator has certain
privileges relating to account management, including limiting the number of
copies to be made on a specific account (see Configuration and special
maintenance manual).
If you produce copies and prints for various departments, you will have a PIN
code for each department. After having produced copies on one account, you
can switch to another account for the next job(s). When a selected account is
not accessible, a message appears with an explanation (copy limit exceeded, or
selected account closed or frozen).
Note: If the limit for a particular account has been reached, this is indicated
by a message. When the limit is reached during a job, the current job finishes,
but you are not able to start a new job. Contact the key operator for more
information.
Introduction 27

▼ Copying using a PIN code
1
Enter your PIN code using the copy quantity buttons. Each time you enter a
number, one bullet will be filled (to show how many digits have been entered).
Your PIN code will be not displayed.
Note: If you make a mistake while entering your PIN code, press the
‘Correction’ button (C) and enter your PIN code again.
2 If the PIN code you have entered corresponds to an existing account, the
message ‘Ready to copy’ will appear on the display, as well as the selected
account number. You can now make your copies, which will be charged to this
account.
Note: If you select an inaccessible account, a message appears indicating
that the selected account is locked. Contact the key operator for more
information.
3 Once the job is completed, press the correction button to restore the standard
settings.
4 Then press the correction button once more to deselect the account.
The message ‘Enter your PIN code’ appears again and the Océ 31x5E is no
longer available for use.
28 Océ 31x5E Copy jobs & daily maintenance

Accessing the Océ 31x5E Network Copier
You can use the Network Copier for copying, printing and scanning. When
using the Network Copier for copying, you must access the ‘Copy’ mode of
the machine, in which you can define settings for copy jobs. The ‘Print’ mode
is used for defining settings which apply to print jobs, whereas the ’Scan
mode’is used for scanning documents.
After starting up, the copier will be in initial mode, which by factory default is
the ‘Copy’ mode (see ‘Standard settings’ on page 14). If the Océ 31x5E is to
be used mainly for printing jobs, the key operator can change the initial mode
to ‘Print’ mode. The operator can also set the initial mode to ’Scan’ if scanning
is to be the main activity.
You can switch from one mode to another by pressing the left-most function
button, which is called the application button (see figure 5 on page 16). The
machine will always finish the current job before you can start a new job.
When you send an automatic print job, the machine will automatically switch
to printing, provided that the machine is not busy with another type of job.
For stopping or interrupting a copy or print job, see ‘Stopping a job’ on
page 31.
Introduction 29
▼ Accessing the Océ 31x5E Network Copier for copying while another mode
is active
Press the application button once or twice to switch to the ‘Copy’ mode.
1
[13] Copy Mode
2 If necessary, enter your PIN code or use the copy charge device.
3 Define settings for your copy job.
Note: Settings for a copy job which are selected when a print job starts will
still be selected when the print job is finished. These settings do not have
any effect on the print job.
4 Press the start button ( )to start copying.
If the copy control device is active, the prints will be deducted from your credit
in the device.
30 Océ 31x5E Copy jobs & daily maintenance
 Loading...