

Canon OC210 Instruction Manual
Canon
PUB.DIM-797
DVD
Camcorder
I I
Instruction Manual English
OC210
Camescope
Manuel d'instruction
Camara DVD I I
DVD I I
Fran~ais
Manual de Instrucciones Espafiol
Important
WARNING!
1iA
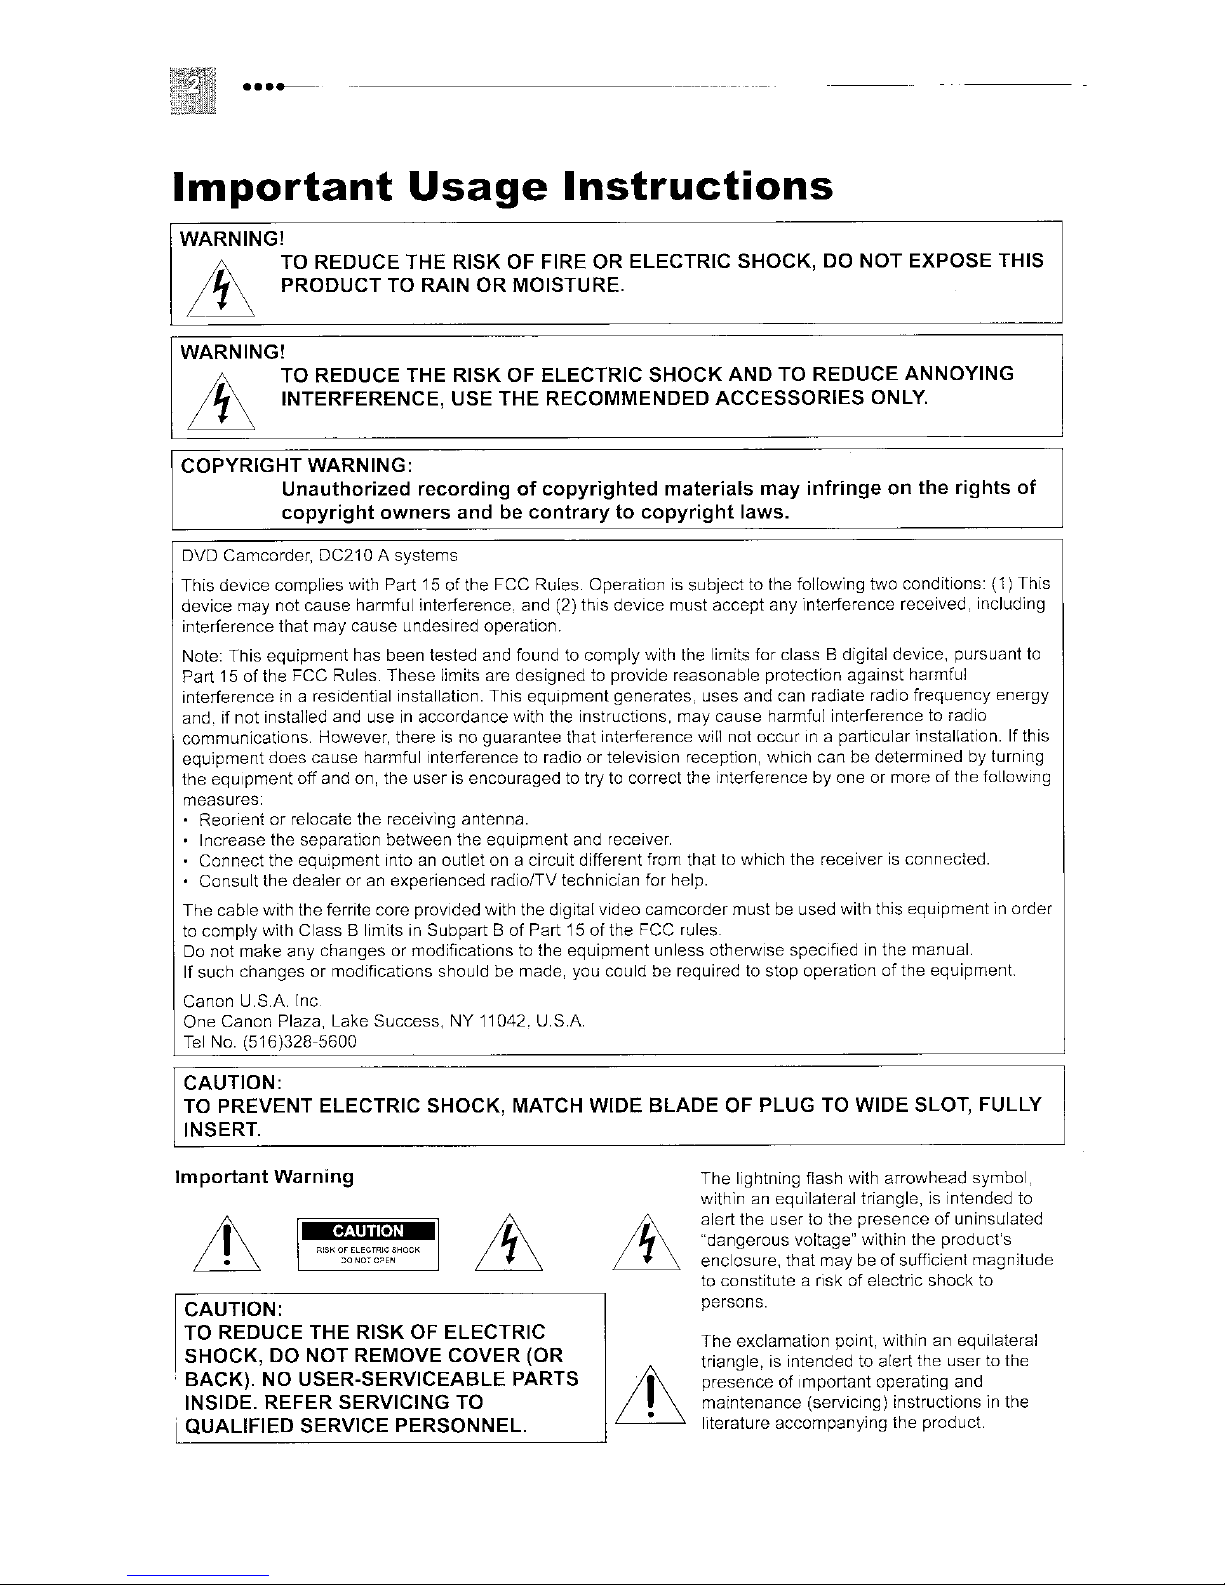
L TO REDUCE THE RISK OF FIRE OR ELECTRIC SHOCK, DO
in
PRODUCT TO RAIN
Usage
OR
MOISTURE.
Instructions
_
WARNING!
~
~
TO REDUCE THE RISK OF ELECTRIC
INTERFERENCE, USE THE RECOMMENDED
SHOCK
AND TO REDUCE ANNOYING
ACCESSORIES
NOT
EXPOSE THIS
ONLY.
COPYRIGHT
DVD Camcorder, DC210 A systems
This device complies with Part
device may not cause harmful interference, and (2) this device
interference that
Note: This equipment has been tested and found to
Part15of
Interference
and. if not installed and useinaccordance with the instructions, may cause harmful interference to radio
communications. However, there is no guarantee that interference will not occur
equipment does cause harmful interference to radio or television reception, which can be determinedbyturning
the
equipment off and on, the
measures:
Reorient or relocate the receiving antenna .
• Increase the separation between the equipment and receiver.
Connect the equipment into
• Consult the dealer
The cable with the ferrite core prOVided with the digital video camcorder must be used with this equipment
to
comply
Do not make any changes or modifications to the equipment unless otherwise speCified in the manual.
If such changes or modifications should be made, you could be required to stop operation
Canon U.S.A. Inc
One
Canon Plaza, Lake Success, NY 11042. U.S.A.
Tel
No. (516)328-5600
WARNING:
of
Unauthorized recording
copyright owners and
15ofthe FCC Rules. Operation is subject to the following two conditions: (1) This
may
cause undesired operation
the FCC Rules.
in
a residential installation. This equipment generates uses and can radiate radio frequency energy
with Class B limits in Subpart BofPart 15ofthe FCC rules
These
limits are designed to provide reasonable protection against harmful
user
is encouraged to try to correct the Interferencebyone or moreofthe following
an
outlet on a circuit different from that to which the receiver is connected.
or
an experienced radiolTV technician for help.
copyrighted materials may infringe on the rights of
be
contrary to copyright laws.
must
accept any interference received. including
comply
with the limits for class B digital device, pursuant
In
a particular installation. If this
of
the equipment.
in
order
to
CAUTION:
TO PREVENT ELECTRIC SHOCK, MATCH WIDE BLADE OF PLUG TO WIDE SLOT, FULLY
INSERT.
Important Warning
1-
....
uw.P-1
•
&
CAUTION:
TO REDUCE THE RISK OF ELECTRIC
SHOCK, DO NOT REMOVE
BACK). NO USER-SERVICEABLE PARTS
INSIDE. REFER SERVICING TO
, QUALIFIED SERVICE PERSONNEL.
RiSKOFELE:CTmCSHOCK
:JOND:-CiJEN
it
COVER
(OR
The
lightning flash with arrowhead symbol
an
within
alert
"dangerous voltage" within the product's
enclosure, that
to constitute a risk
persons.
The
triangle,
presence
maintenance (serviCing) instructions in the
literature accompanying the prodUCt.
equilateral triangle, is intended to
the
user to the presenceofuninsulated
maybeof
exclamation point, withinanequilateral
IS Intended to alert the user to the
of
Important operating and
sufficient magnitude
of
electric shock to
In
these safety instructions the word "product"
refers
to
the Canon DVD Camcorder DC21 0 A
and all its accessories.
1 Read Instructions - All the safety and
be
operating instructions should
is
before the product
operated.
read
2 Retain Instructions - The safety and
be
operating instructions should
for future reference.
retained
3 Heed Warnings - All warnings on the
product and
should
4 Follow Instructions - All operating and
maintenance instructions should
followed.
be
adhered
in
the operating instructions
to.
be
5 Cleaning - Unplug this product from the
wall outlet before cleaning. Do not use
liquid or aerosol cleaners. The product
should be cleaned only
in
this manual.
6 Accessories -
recommended
be
hazardous.
Do
in
as
recommended
not use accessories not
this manual as they may
7 Avoid magnetic or electric fields - Do not
use the camera close to TV transmitters,
portable communication devices or other
sources of electric or magnetic radiation.
They may cause picture interference, or
permanently damage the camera.
8 Water and Moisture - Hazard of electric
shock - Do not use this product near
water or
9 Placing or Moving -
unstable cart, stand, tripod, bracket or
table. The product may fall, causing
serious injury to a child or adult, and
serious damage to the
product.
A product and cart
combination should be
moved with care. Quick
stops, excessive force, •
and uneven surfaces may
cause the product and cart
combination to overturn.
in
rainy/moist situations.
Do
not placeonan
til
~
~
~
••
'iiiIJ'
~
•
10 Power Sources - The CA-570 Compact
Power Adapter should be operated only
from the type
the marking label. If you are not sure
type
of
your product dealer or local power
company. Regarding other power sources
such as battery power, refer to instructions
in
this manual.
11
Polarization - The CA-570 Compact
Power Adapter is equipped with a
polarized 2-prong plug (a plug having one
blade wider than the other).
The 2-prong polarized plug will fit into the
power outlet only one way. This is a safety
feature. Ifyou are unable
fully into the outlet, try reversing the plug. If
the plug still fails to fit, contact your
electrician
Do not defeat the safety purpose
polarized plug.
12 Power Cord Protection - Power cords
should be routed so that they are not likely
to
be
walkedonor
upon or against them. Pay particular
attention to plugs and the point from which
the cords exit the product.
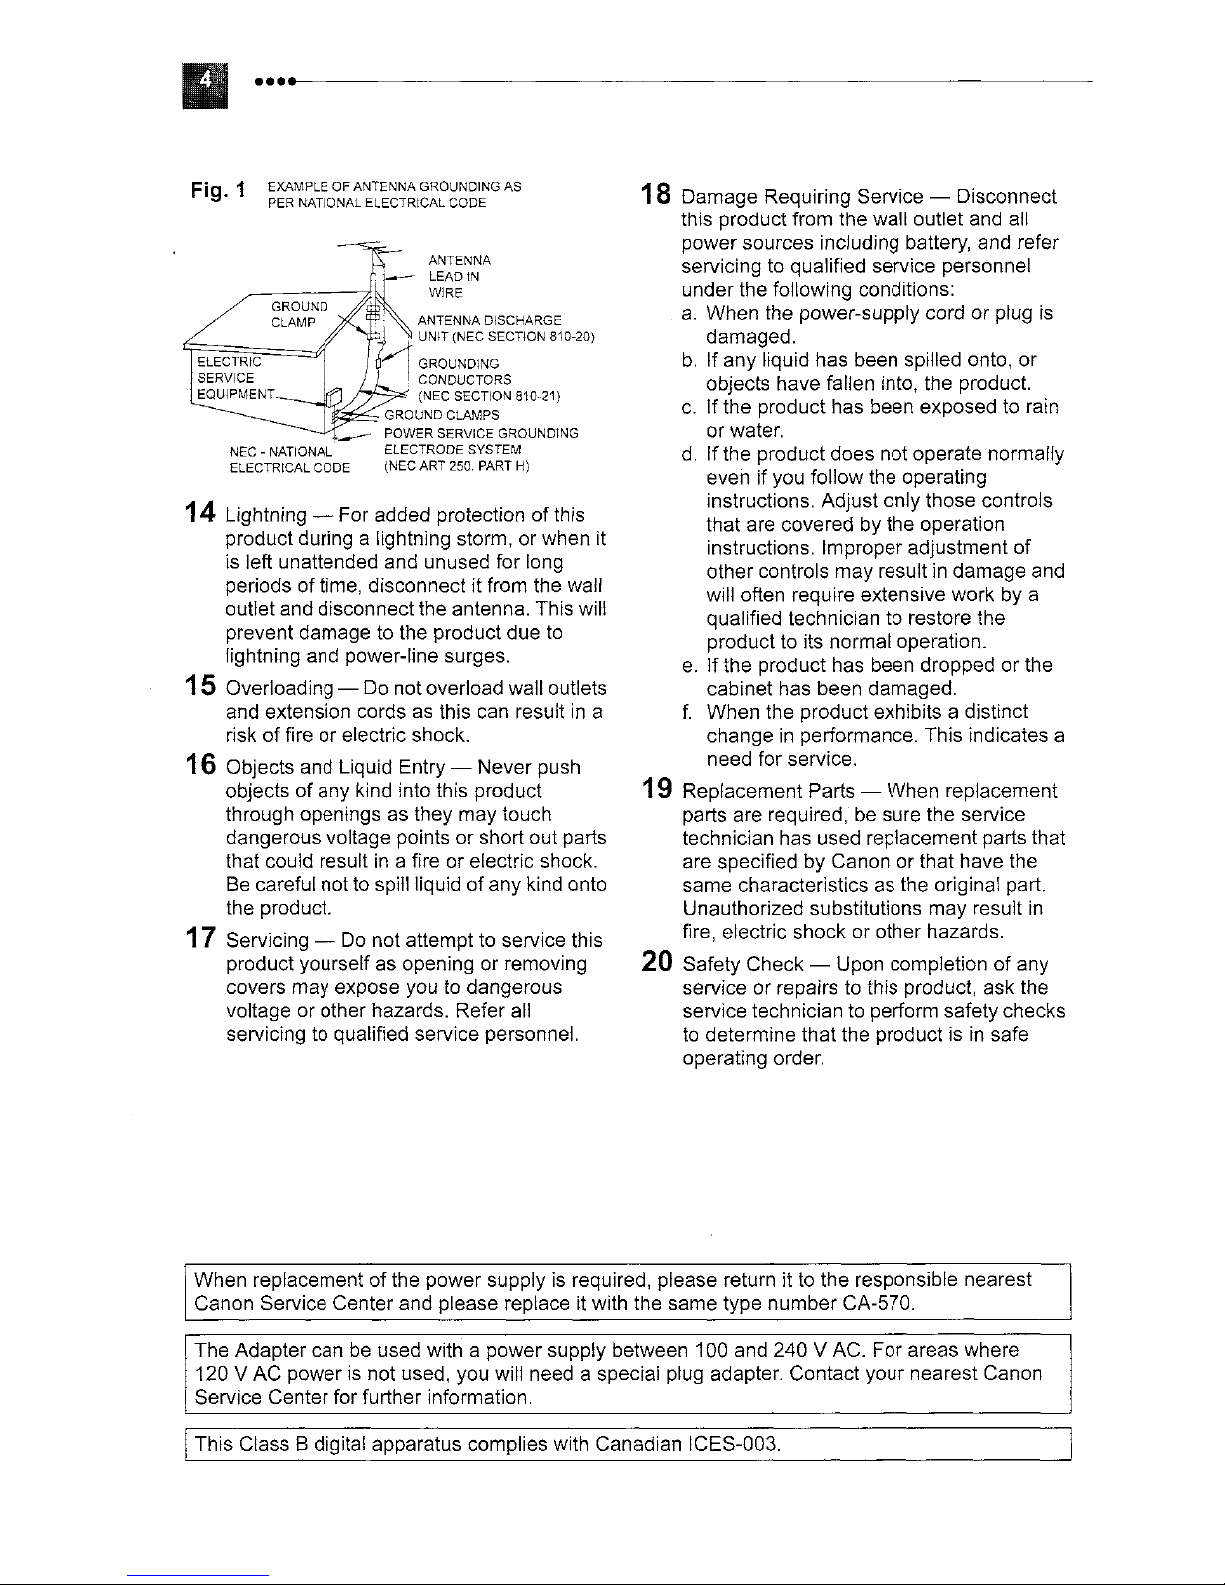
13 Outdoor Antenna Grounding - If
outside antenna is connected to the
product,
so as to provide some protection against
voltage surges and bUilt-up static charges.
Section 810
Code, ANSI / NFPA
provides information with respect to proper
grounding of the mast and supporting
structure, grounding
an antenna discharge unit, size
grounding conductors, locationofantenna
discharge unit, connection to grounding
electrodes, and requirements for the
grounding electrode. See figure
of
power source indicated on
of
power supply to your home, consult
to
insert the plug
to
replace your obsolete outlet.
of
the
pinched by items placed
an
be
sure the antenna is grounded
of
the National Electrical
No.
70-1984,
of
the lead-in wire to
of
1.
•
the
-
·
....
---------------------------------
Fig. 1
14
EXAMPLE OF ANTENNA GROUNDING
PER NATIONAL ELECTRICAL CODE
ANTENNA
LEAOtN
WIRE
ANTENNA DISCHARGE
~
UNIT (NEC SECTION 810-20}
6,1
GROUNDING
. I CONDUCTORS
(NEC SECTION 810-21)
GROUND CLAMPS
POWER SERVICE GROUNDING
NEC - NATIONAL
ELECTRICAL CODE
Lightning - For added protection of this
product during a lightning storm, or when it
is
left unattended and unused for long
periods oftime, disconnect it from the wall
outlet and disconnect the antenna. This will
prevent damage
lightning and power-line surges.
ELECTRODE SYSTEM
--
(NEG ART 250 PART H)
to
the product due to
AS
15 Overloading - Do not overload wall outlets
and extension cords
of
fire or electric shock.
risk
as
this can resultina
16 Objects and Liquid Entry - Never push
of
objects
through openings
dangerous voltage points or short out parts
that could result
Be careful not to spl1lliquid of any kind onto
the product.
any kind into this product
as
they may touch
in
a fire or electric shock.
17 Servicing - Do not attempt to service this
as
product yourself
covers may expose you to dangerous
voltage or other hazards. Refer all
servicing to qualified service personnel.
opening or removing
18 Damage Requiring Service - Disconnect
this product from the wall outlet and all
power sources including battery, and refer
servicing to qualified service personnel
under the following conditions:
a.
When the power-supply cord or plug is
damaged.
b.
If any liquid has been spilled onto, or
objects have fallen into, the product.
c.
Ifthe product has been exposed to rain
or water.
d.
Ifthe product does not operate normally
even if you follow the operating
instructions. Adjust only those controls
that are covered by the operation
instructions. Improper adjustment
other controls may resultindamage and
will often require extensive work by a
qualified technician to restore the
to
product
e.
Ifthe product has been dropped or the
cabinet has been damaged.
When the product exhibits a distinct
change
need for service.
its normal operation.
in
performance. This indicates a
19 Replacement Parts - When replacement
be
parts are required,
technician has used replacement parts that
are specified by Canon or that have the
same characteristics as the original part.
Unauthorized substitutions may result
fire, electric shock or other hazards.
sure the service
20 Safety Check - Upon completion of any
to
service or repairs
service technician
to
determine that the productisin
operating order.
this product, ask the
to
perform safety checks
of
in
safe
of
When replacement
Canon Service Center and please replace it with the same type number CA-570.
The Adapter can
120 V AC power
Service Center for further information.
the power supplyisrequired, please return ittothe responsible nearest
be
used with a power supply between 100 and 240 V AC. For areas where
is
not used, you will need a special plug adapter. Contact your nearest Canon
IThis Class 8 digital apparatus complies with Canadian ICES-003.
How
to
selectaDVD
disc
There are many typesofDVD discs but this camcorder uses only the following three
types
can do with a disc depends on the type
your purpose.
of8em
DVD·R
DVD-Rs can be recorded only once - you cannot edit or delete the recordings.
other hand, these discs are comparatively cheaper and they can be played back in
most common DVD players.
DVD·R
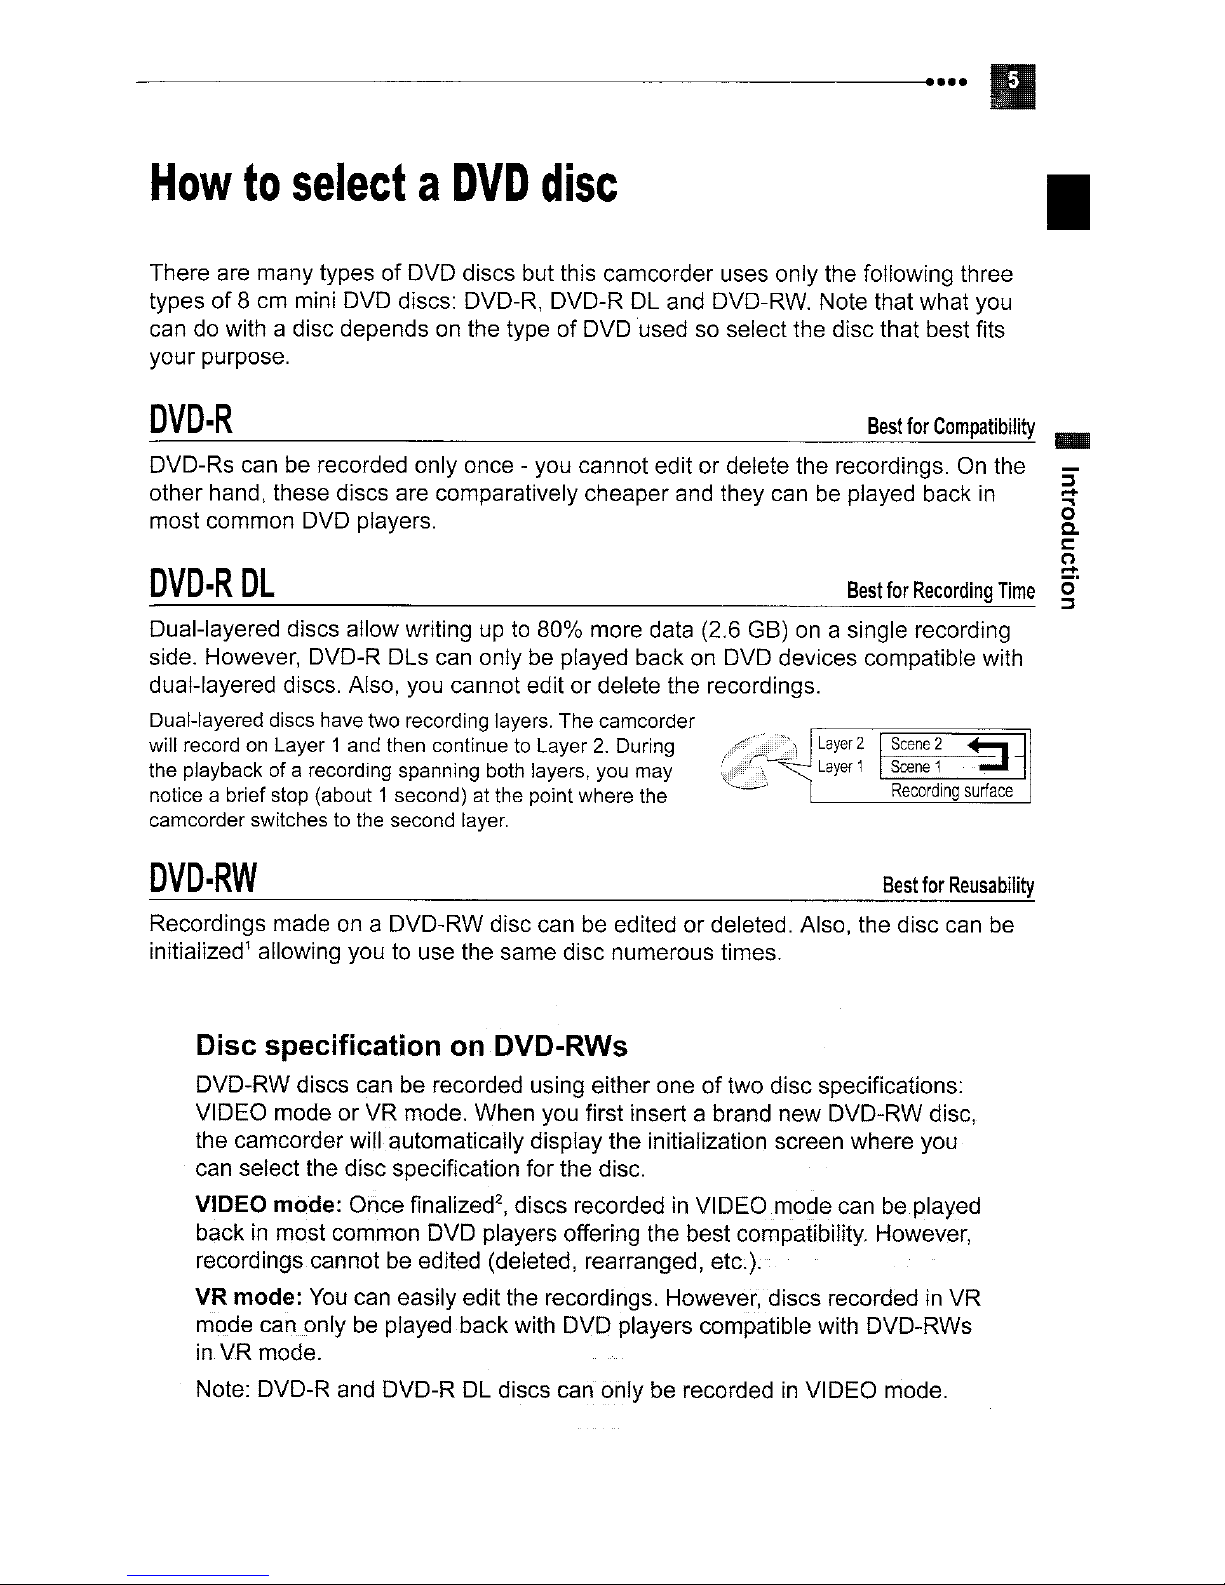
Dual-layered discs allow writing up to 80% more data (2.6 GB) on a single recording
side. However, DVD-R DLs can only be played back on DVD devices compatible with
dual-layered discs. Also, you cannot edit or delete the recordings.
Dual-layered discs havetwo recording layers. The camcorder
will record
the playback of a recording spanning both layers, you may
notice a brief stop (about 1 second) at the point where the
camcorder switches to the second layer.
mini DVD discs: DVD-R, DVD-R DL and DVD-RW. Note that what you
of
DVD used so select the disc that best fits
Best
DL
on
Layer 1 and then continuetoLayer2.During
Best
~:~:;~
I
for
Compatibility
On
the
for
Recording
Time
~:~:~~j
Recording
surface
•
_
3-
.,
o
a.
l:
~
O·
~
DVD·RW
Recordings made on a DVD-RW disc can be edited or deleted. Also, the disc can be
initialized
1
allowing you to use the same disc numerous times.
Disc specification
DVD-RW discs can be recorded using either oneoftwo disc specifications:
VIDEO mode or VR mode. When you first insert a brand new DVD-RW disc,
the camcorder willautomatically display the initialization screen where you
can select the disc specification for the disc.
VIDEO
back in most common DVD players offering the best compatibility. However,
recordings cannot
VR
mode
in
Note: DVD-R and DVD-R DL discs can ohly be recorded
mode: Once finalized
be
mode:
VR
You
can easily edit the recordings. However,discs recorded in VR
canonrybeplayed back with DVD players compatible with DVD-RWs
mode.
on
DVD-RWs
2
,
discs recorded in VIDEO mode can be played
edited (deleted, rearranged, etc.).
in
VIDEO mode.
Best
for
Reusability
Great
Why
I
No need to worry about recording over a tape.
When you use a DVD, the camcorder witl automatically record on the empty space
the disc. So you don't have to worry about mistakenly recording over a precious
memory.
Just select a scene from the index screen.
You
want to play back. Simply select a scene from the index screen and start the playback
in
a breeze.
Easy Playback on a DVD player
After you finalize the disc you recorded, all you have to do
player and start the playback. If you record your disc in
to play back your disc
AdvantagesofDVDs
DVDs
don't need to bother running a tape forwards and backwards to find the scene you
are
better
on
than
tapes
is
just pop it into a DVD
VI
DEO mode, you will be able
most tabletop DVD players and DVD devices.
of
Recommended Discs
The camcorder's performance was tested with single-layered discs using
Hitachi-Maxell HG series DVD discs; and with dual-layered discs using
Canon DVD-R DL54 discs and Verbatim DVD-R
contact directly the manufacturer's customer'support center. Note that
attempting to record orplay with this camcorder DVD discs thatwere
recorded, initialized
permanently losing the recordings.
Forthe
using the VIDEO mode.
highest compatibility with external DVD devices we recommend
or
finalized with other digital devices can result
DL
discs. For further details,
in
-------------------------------
....
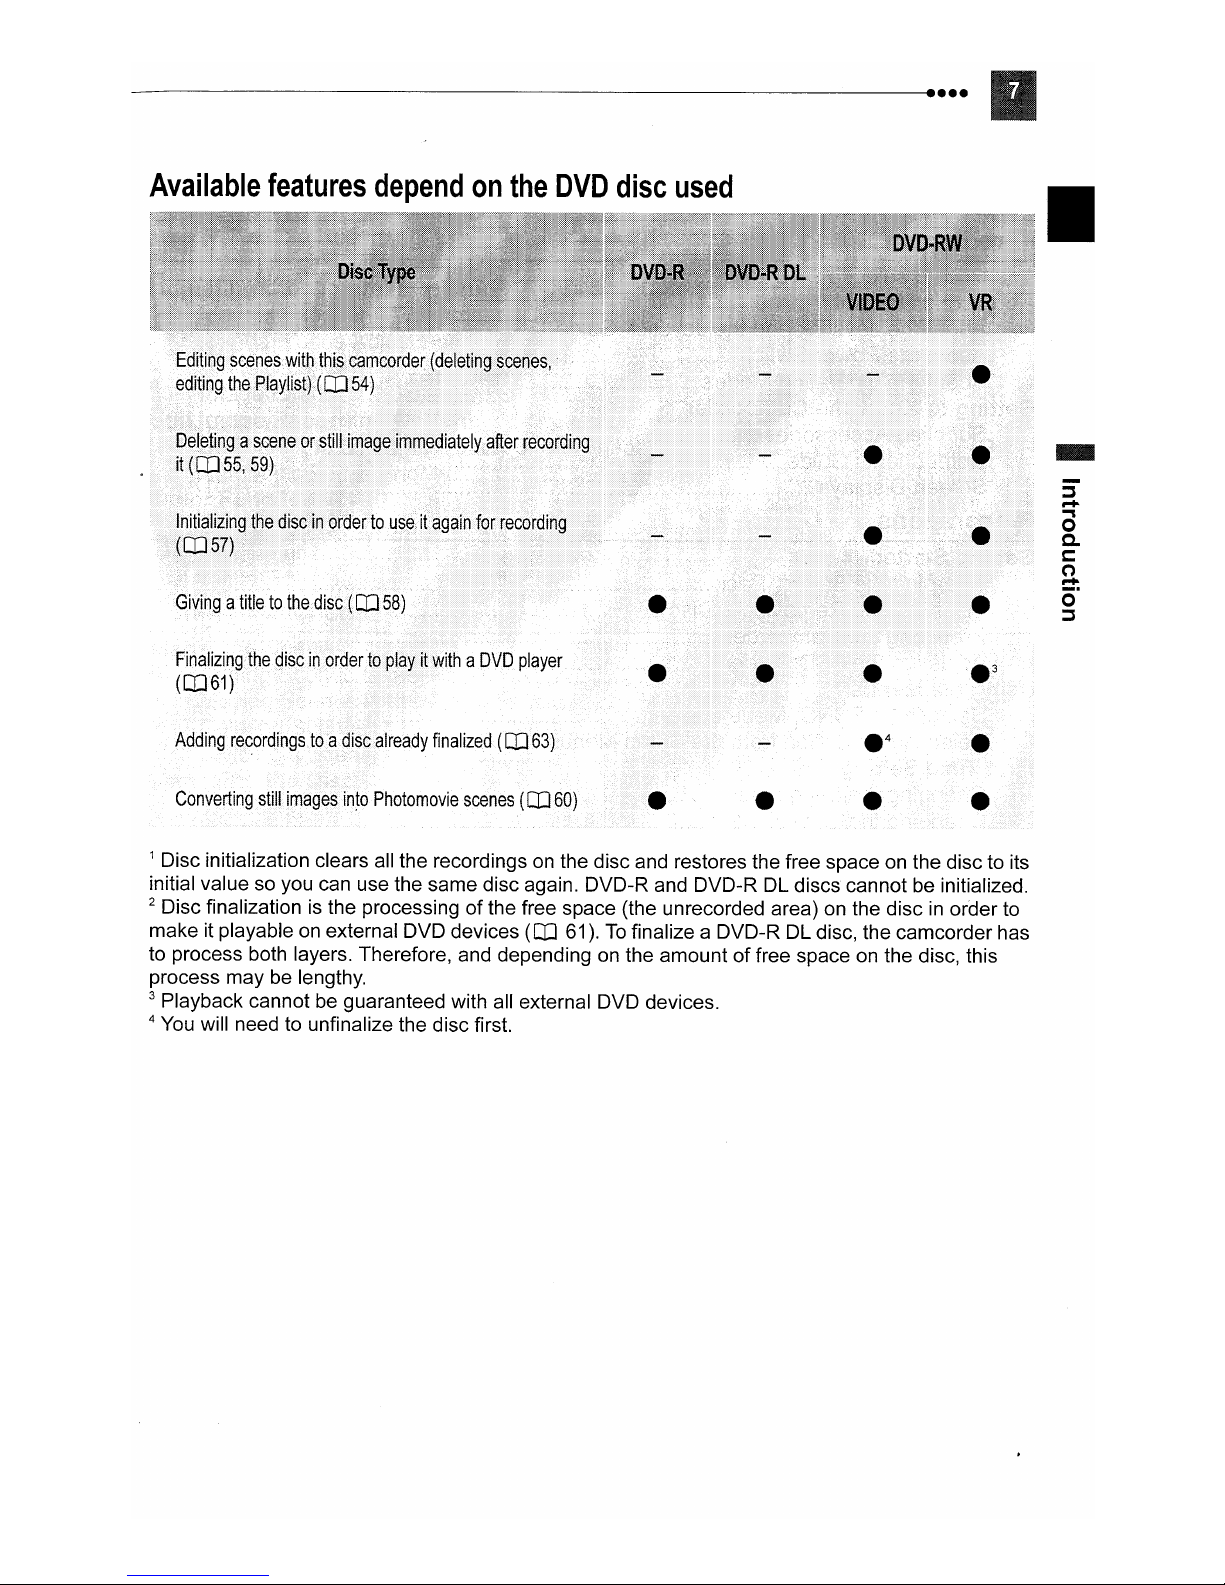
Available
Finalizing
(CD61)
Adding
the
recordings.
features
discinordertoplayitwithaDVD
toadisc
dependonthe
already
finalized
(CD
player
63)
DVD
disc
used
.3
•
II
5'
-
r+
..,
o
0-
s::::::
(")
r+
o·
::s
Converting
1 Disc initialization clears all the recordings
initial value so you can use the same disc again. DVD-R and DVD-R DL discs cannot be initialized.
2 Disc finalization
make it playable
to process both layers. Therefore, and depending
process may
3 Playback cannot
4
You
still
images
in~o
Photomovie
is
the processing ofthe free space (the unrecorded area) on the discinorder to
on
external DVD devices
be
lengthy.
be
guaranteed with all external DVD devices.
will need to unfinalize the disc first.
scenes
(CD
60)
• •
on
the disc and restores the free space on the disc to its
(CD
61).Tofinalize a DVD-R DL disc, the camcorder has
on
the amount of free space on the disc, this
•
•
.....
---------------------------
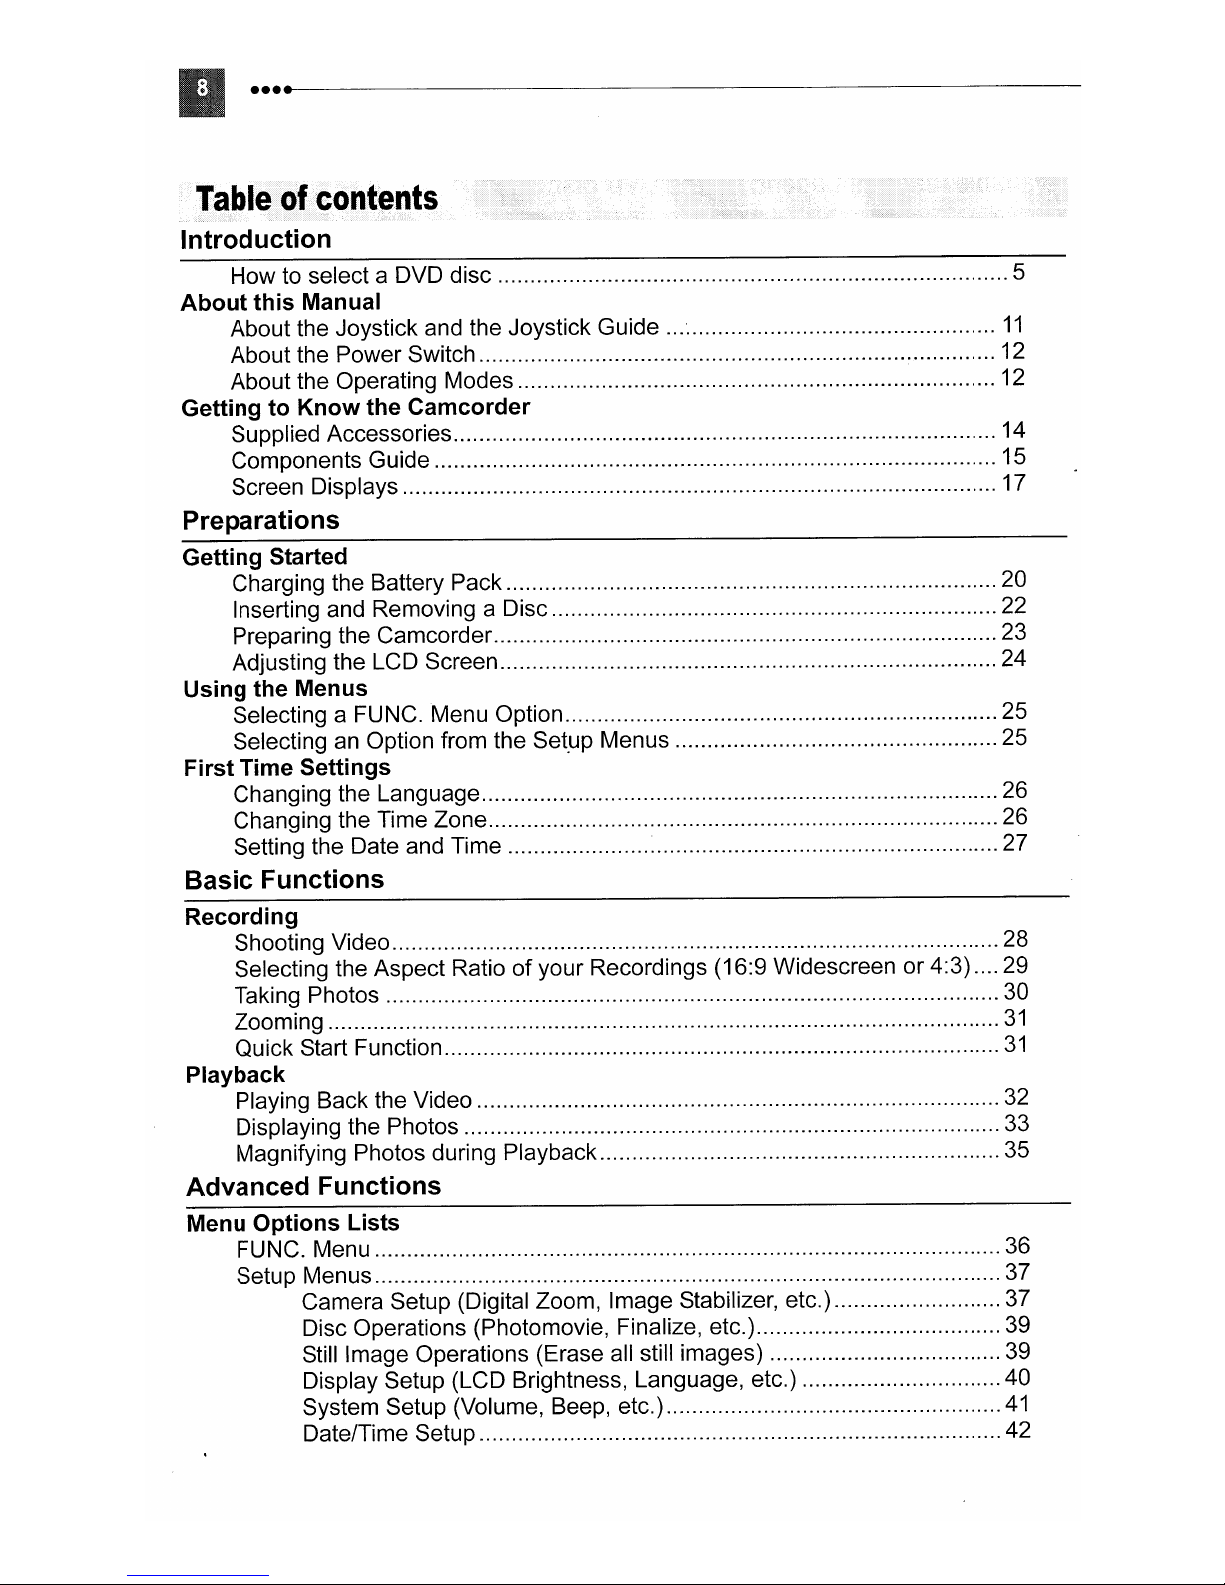
Tableofcontents
Introduction
How to select a DVD disc 5
About this Manual
About the Joystick and the Joystick Guide
About the Power Switch 12
About the Operating Modes 12
Getting to Know the Camcorder
Supplied Accessories 14
Components Guide 15
Screen Displays 17
Preparations
Getting Started
Charging the Battery Pack 20
Inserting and Removing a Disc 22
Preparing the Camcorder 23
Adjusting the LCD Screen 24
Using the Menus
Selecting a FUNC. Menu Option 25
Selecting an Option from the
First Time Settings
Changing the Language 26
Changing the Time Zone 26
Setting the Date and Time 27
Basic Functions
Set,up
Menus 25
11
Recording
Shooting Video 28
Selecting the Aspect Ratio
Taking Photos 30
Zooming
Quick Start Function
Playback
Playing Back the Video 32
Displaying the Photos 33
Magnifying Photos during Playback 35
of
your Recordings (16:9 Widescreen or 4:3) 29
Advanced Functions
Menu Options Lists
FUNC. Menu 36
Setup Menus 37
Camera Setup (Digital Zoom, Image Stabilizer, etc.) 37
Disc Operations (Photomovie, Finalize, etc.) 39
Still Image Operations (Erase all still images) 39
Display Setup (LCD Brightness, Language, etc.) 40
System Setup (Volume, Beep, etc.)
Date/Time Setup 42
31
31
41
---------------------------e
Recording Programs
Using the Recording Programs 43
P Flexible Recording: Changing the Aperture and Shutter Speed 44
Special Scene: Recording Programs to Match Special Conditions 45
Adjusting the Picture: Exposure, Focus and Color
Manual Exposure Adjustment.
Manual Focus Adjustment 46
White Balance 47
Image Effects 48
Still Image Recording Options
Selecting the Size and Quality
Automatic Focus Priority 50
Other Functions
On-Screen Displays 50
Self Timer 52
Digital Effects 52
of
Still Images 49
Editing Functions
Managing Scenes
Adding Scenes to the Playlist 54
Moving Scenesinthe Playlist 55
Deleting Scenes 55
Dividing a Scene 56
Managing the Disc
Protecting the Disc 57
Initializing the Disc 57
Changing the Disc Title 58
Managing Photos
Erasing Photos 59
Converting Photos into Photomovie Scenes 60
~
••••
46
II
..
5"
r+
""'l
o
0-
s:::::
(')
r+
o·
~
Playing Back the Disc
Finalizing the Disc
Playing Back your Disc on a DVD Player or a Computer's DVD Drive 62
Unfinalizing the Disc - Additional Recordings on a Finalized Disc 63
on
an External Device
External Connections
Connecting to a TV or VCR
Connection Diagrams 64
Playback on a
Recording to a VCR or Digital Video Recorder 65
TV
Screen 65
Additional Information
Trouble?
Troubleshooting 66
List
of
Messages 70
Do's and Don'ts
Handling Precautions 72
Maintenance/Others 74
Using the Camcorder Abroad 75
61

..•..
----------------------------
General Information
System Diagram 76
Optional Accessories 77
Product Codes 78
Specifications 79
Index :
81
---------------------------e
••••
About this Manual
(iiiii
Thank you for purchasing the Canon DC210. Please read this manual carefully before
you use the camcorder and retain it for future reference. Should your camcorder fail to
operate correctly, refer to the
Conventions
.0
•
IMPORTANT: Precautions related to the camcorder's operation.
CD
NOTES: Additional topics that complement the basic operating procedures.
Usedinthe
Troubleshooting table (OJ 66).
Manual
i<1
•e POINTS TO CHECK: Restrictions that apply if the function described is not
in
available
set, the type
•
OJ:
• The following terms are used
"Screen" refers to the LCD and the viewfinder screen.
"Scene" refers to one movie unit from the point you press the start/stop button to
start recording until you press again to pause the recording.
The terms "Photo" and "Still image" are used interchangeably with the same
meaning.
• The photos included
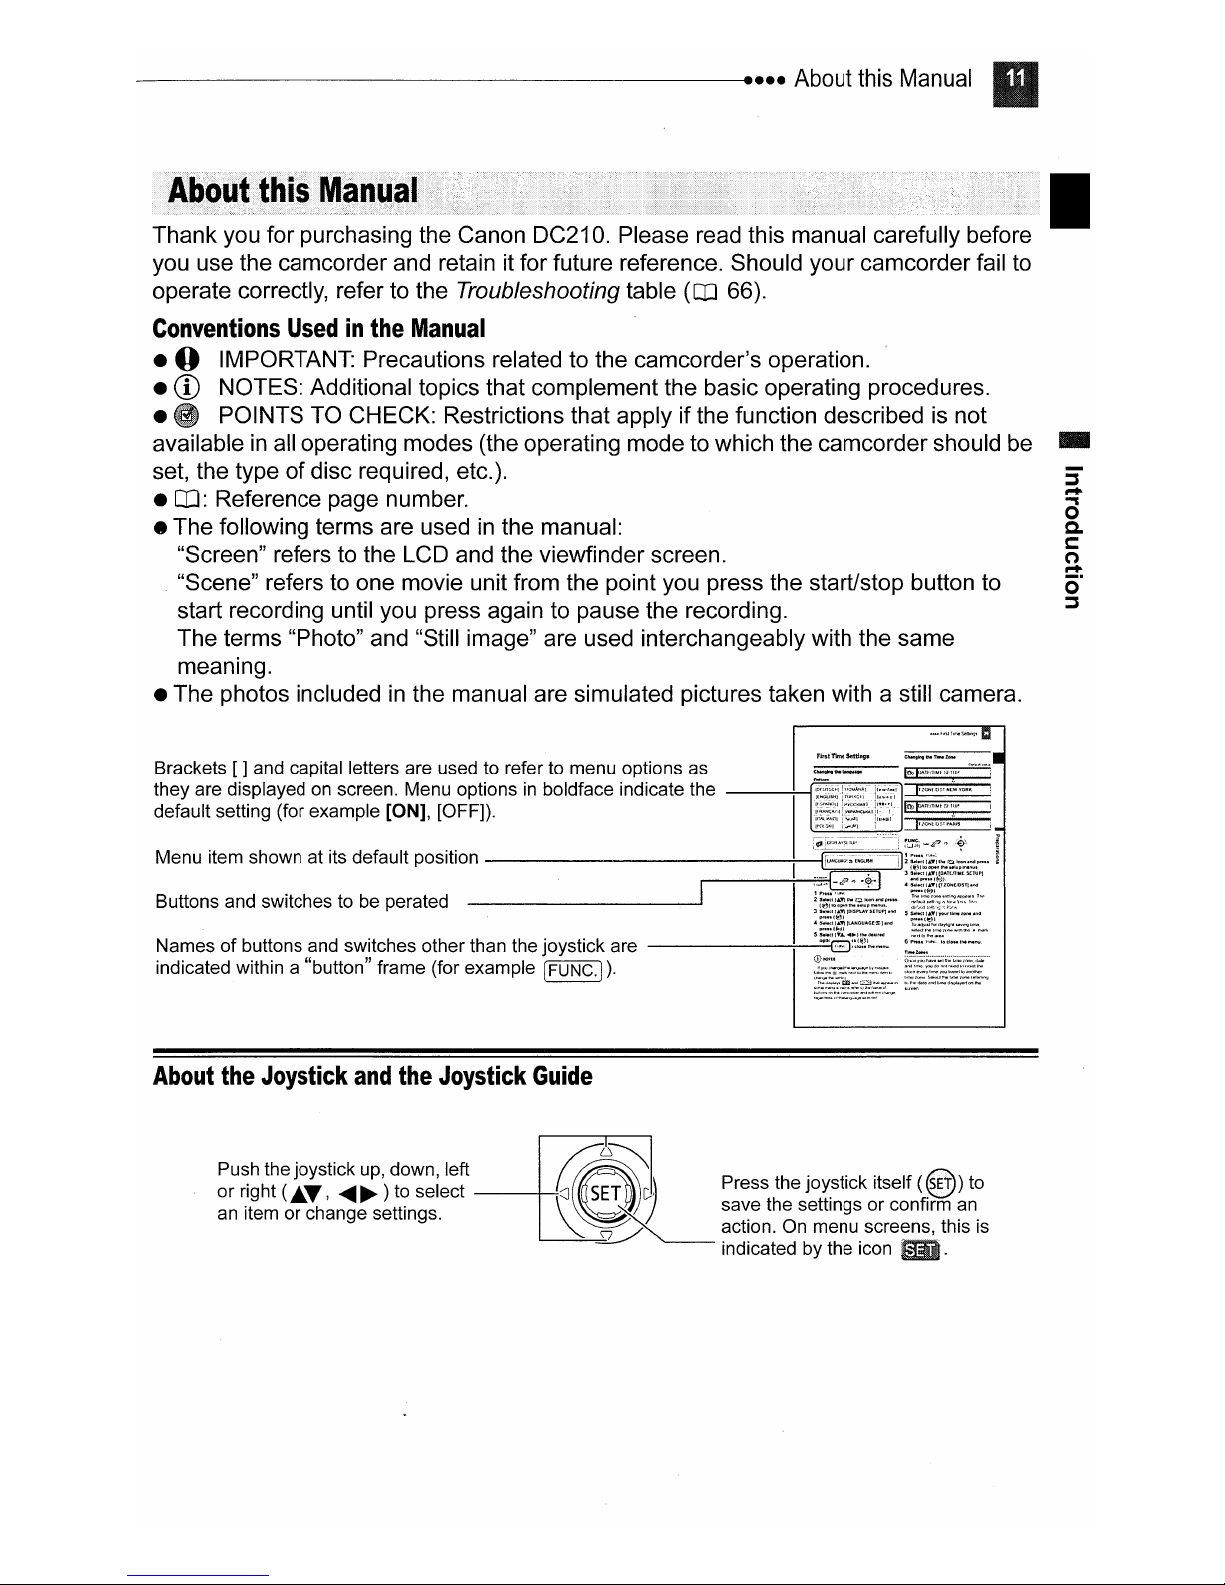
Brackets [ ] and capital letters are used to refer to menu options as
they
are
default
all operating modes (the operating mode to which the camcorder should be
of
disc required, etc.).
Reference page number.
in
the manual:
in
the manual are simulated pictures taken with a still camera.
~
displayedonscreen.
setting
(for
example
Menu
[ON]
[OFF]).
optionsinboldface
indicate
the
------+i.:.:~t~~;.:.I:.:.:.:.:.::.'c:11!::
Ilf~"i=d:-i'
...
:::';.II]
.~
~
~
,-",,--
,
-
:::::::-:U::::h:::::~:::::::::::han
indicated within a "button" frame (for example IFUNC·I)·
About
the
Joystick
Push the joystick
or
right
(.~,
an
item or change settings.
and
up,
......~)to select
the
Joystick
down, left
the
joystick
Guide
are
~~~
~er«:r~
\"~J
~
d)
JL/~
i
Iji~l
~~i~~;;~_~g;:::"
Press the joy.stick itself
save the settings or confirm
action. On menu screens,this is
indicated by the icon
(~)
an
•.
to
About this Manual
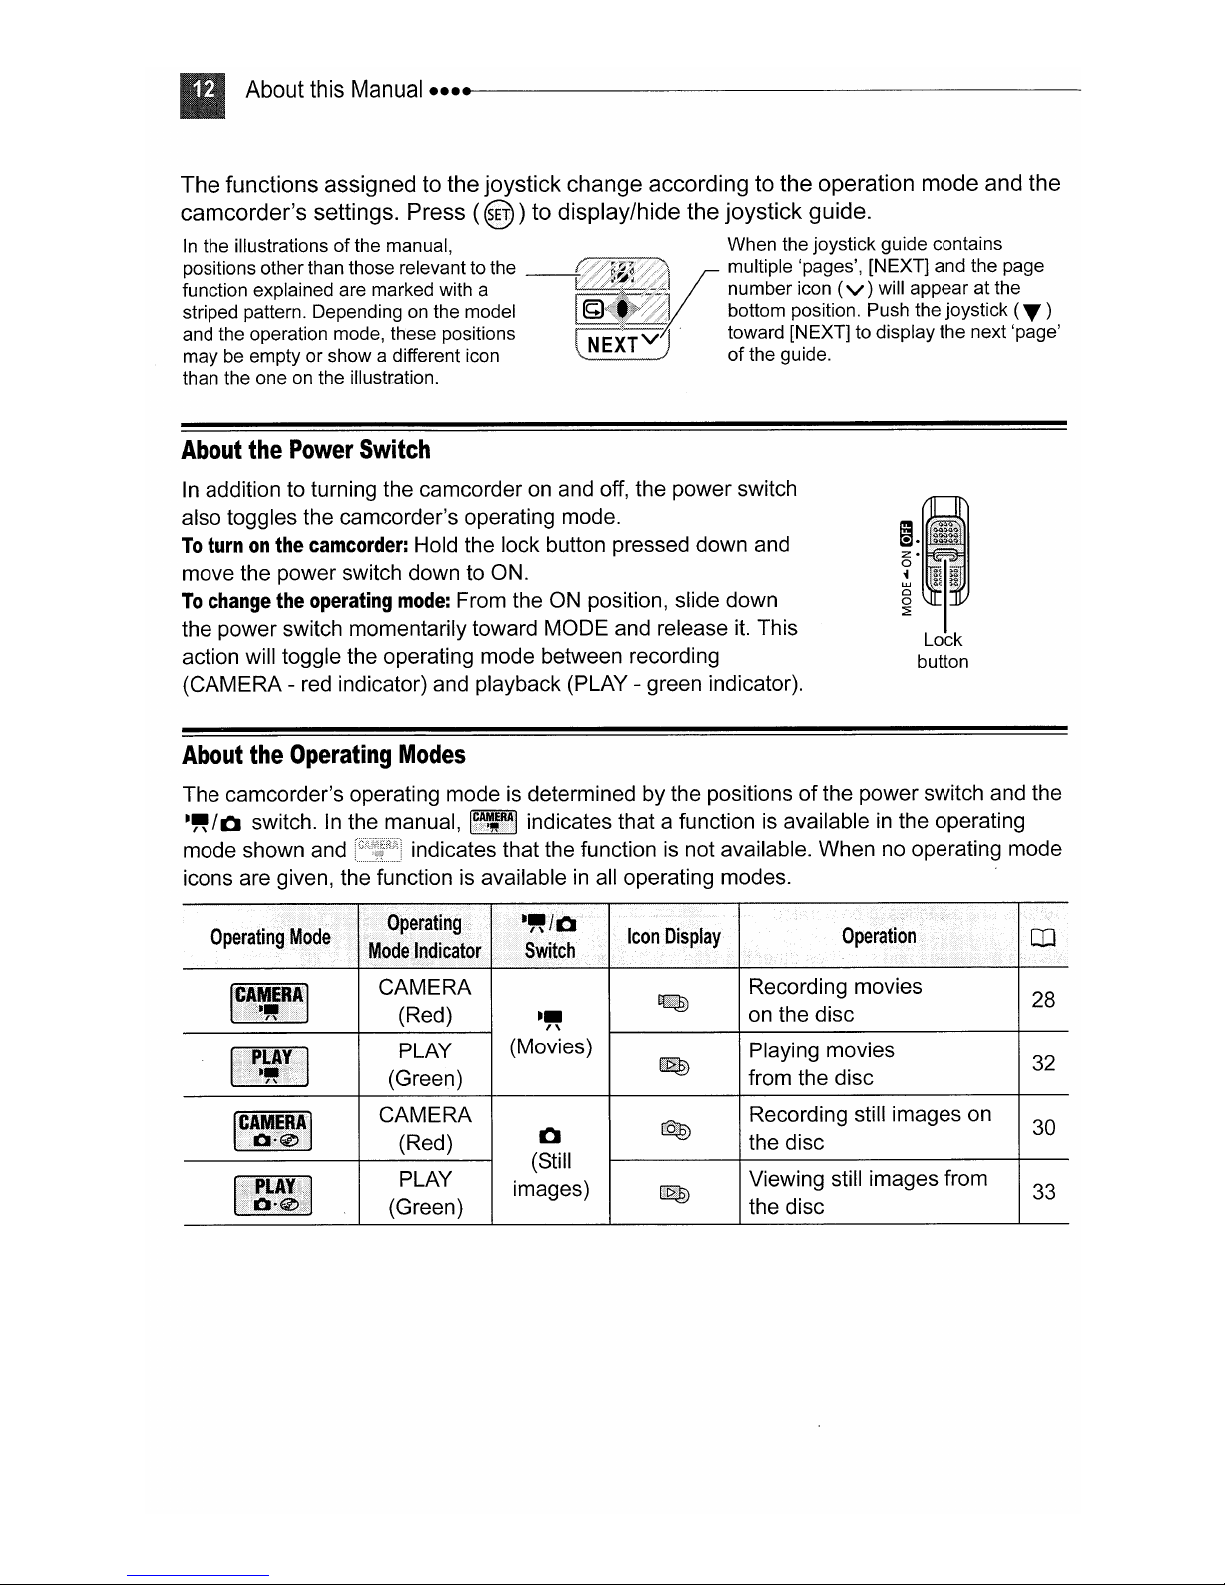
The functions assigned to the joystick change according to the operation mode and the
camcorder's settings. Press
In
the illustrations of the manual, When the joystick guide contains
positions other than those relevant to the multiple 'pages', [NEXT] and the page
function explained are marked with a number icon
striped pattern. Depending
and the operation mode, these positions toward [NEXT] to display the next 'page'
maybeempty or show a different icon ofthe guide.
than the oneonthe illustration.
•••••
-----------------------
(~)
to display/hide the joystick guide.
(v)
will appear at the
on
the model bottom position. Push the joystick (..)
About
In
also toggles the camcorder's operating mode.
To
move the power switch down to ON.
To
the power switch momentarily toward MODE and release
action will toggle the operating mode between recording
(CAMERA - red indicator) and playback (PLAY - green indicator).
About
The camcorder's operating modeisdetermined by the positionsofthe power switch and the
.~/Q
mode shown and indicates that the function is not available. When no operating mode
icons are given, the function is available
the
Power
addition to turning the camcorderonand off, the power switch
turnonthe
change
the
the
Operating
switch.Inthe manual,
[
..•...£·...•.......•.....•...
1
..•.•.•.......•...•......•......••..
•·M
..............•.
'E
...•.....•....
8
...................•..................•..
I..·
..•.......•......•.
-'Ii
·
....
Switch
camcorder:
operating
•••••.
]
CAMERA
(Green) from the disc
Hold the lock button pressed down and
mode:
From the ON position, slide down
it.
Modes
1~~1l1
indicates that a functionisavailableinthe operating
in
all operating modes.
(Red)
PLAY
.~
(Movies)
l'lZ@)
~
This
Recording movies
on the disc
Playing movies
t:'
Lock
button
28
32
I
CA.
M~RAI
10-0
CAMERA
(Red)
PLAY
(Green)
CJ
(Still
images)
~
Qe)
Recording still images on
the disc
Viewing still images from
the disc
30
33
-~~~~~~~~~~~~~~~~~~~~
........
About
this
Manual
Trademark
•
~
• Manufactured under license from Dolby Laboratories.
"Dolby" and the double-D symbol are trademarks of Dolby
Laboratories.
• Other names and products not mentioned above may be trademarks
or registered trademarks of their respective companies.
• ANY USE OF THIS PRODUCT OTHER THAN CONSUMER PERSONAL USE
MANNER THAT COMPLIES WITH THE MPEG-2 STANDARD FOR ENCODING VIDEO
INFORMATION FOR PACKAGED MEDIA IS EXPRESSLY PROHIBITED WITHOUT A
LICENSE UNDER APPLICABLE PATENTS
WHICH LICENSE
300, DENVER, COLORADO 80206.
Acknowledgements
is a trademarkofDVD Format/Logo Licensing Corporation.
IN
THE MPEG-2 PATENT PORTFOLIO,
IS
AVAILABLE FROM MPEG LA, L.L.C., 250 STEELE STREET, SUITE
STEREO CREATOR
IN
ANY
•
-
GettingtoKnow
the
Camcorder
•••••
-----------------
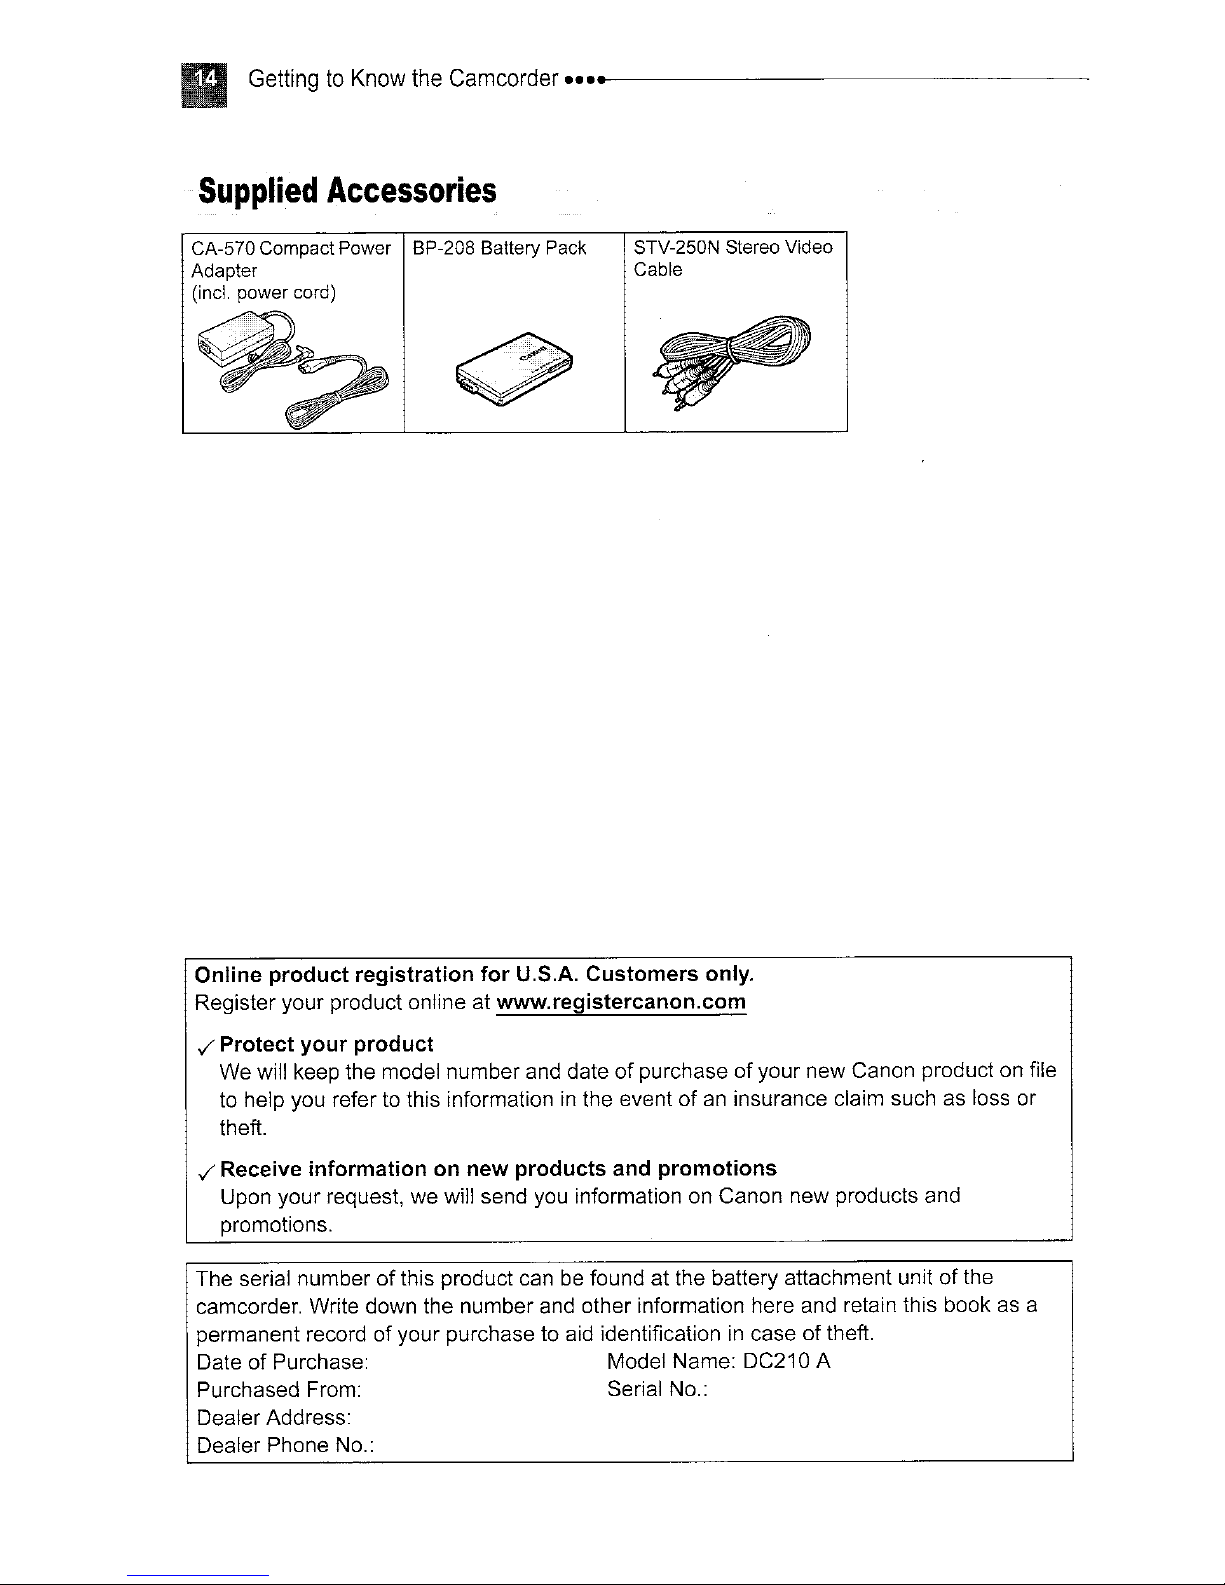
Supplied
CA-570 Compact Power BP-208 Battery Pack
Adapter
(inc!. power cord)
Accessories
STV-250N Stereo Video
Cable
Online product registration for U.S.A. Customers only.
Register your product online at www.registercanon.com
,/
Protect your product
of
We will keep the model number and date
to help you refer to this information
theft.
,/
Receive informationonnew products and promotions
Upon your request, we will send
promotions.
The serial number
camcorder. Write down the number and other information here and retain this book
permanent record of your purchase to aid identification
Date of Purchase: Model Name: DC210 A
Purchased From: Serial No.:
Dealer Address:
Dealer Phone No.:
of
this product can
in
you
information on Canon new products and
be
purchaseofyour new Canon product on file
the event ofaninsurance claim such as loss or
found at the battery attachment unitofthe
in
case of theft.
as
a
_----------------____e
••••
GettingtoKnow
the
Camcorder
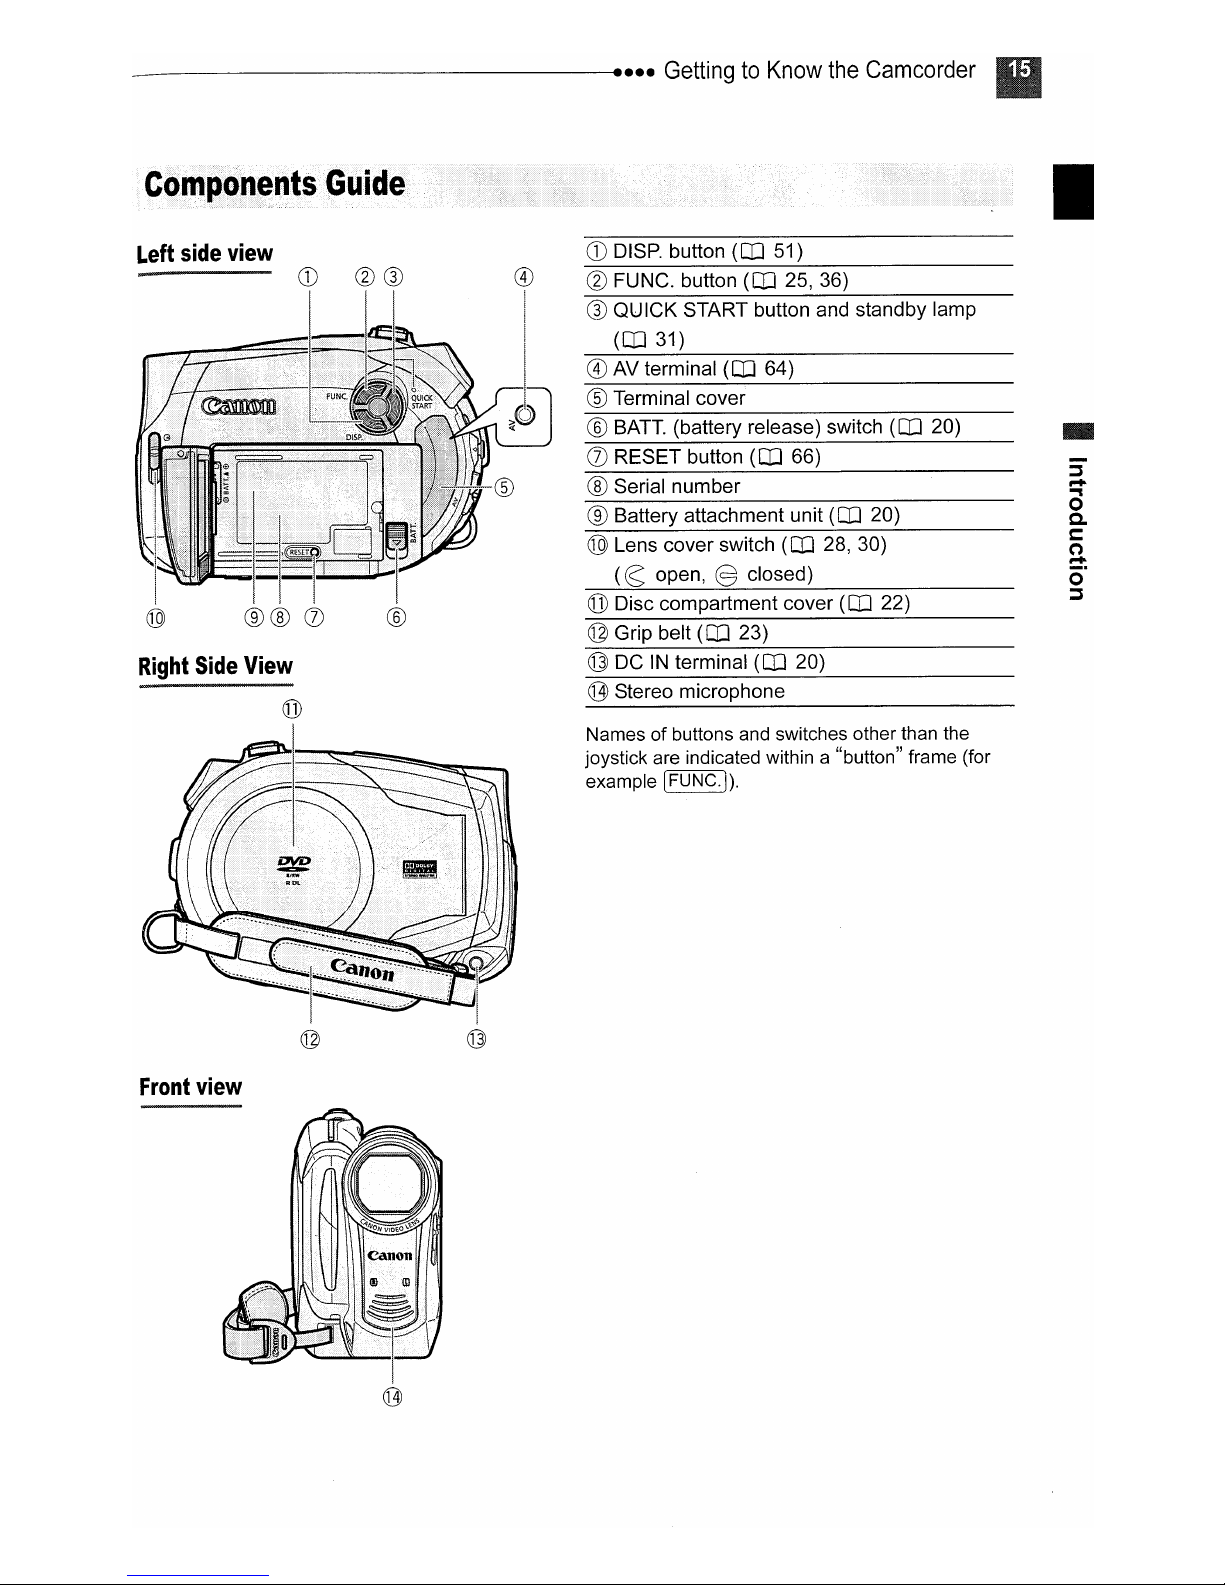
Components
Left
side
view
Right
Side
View
Guide
CD
DISP. button (OJ 51)
@ FUNC. button (OJ
®
au
ICK START button and standby lamp
(OJ 31)
@ AV terminal (OJ 64)
25,36)
® Terminal cover
®
BATT.
(battery release) switch (OJ 20)
(J)
RESET button (OJ 66)
® Serial number
® Battery attachment unit (OJ 20)
@ Lens cover switch (OJ
(e
open, @ closed)
@ Disc compartment cover (OJ 22)
@ Grip belt (OJ 23)
@ DC
(jJl
Namesofbuttons and switches other than the
joystick are indicated within a "button" frame (for
example [FUNC·I).
IN
terminal (OJ 20)
Stereo microphone
28,30)
I
5'
-
r+
..,
o
a.
t:
(')
r+
o'
~
Front
view
GettingtoKnow
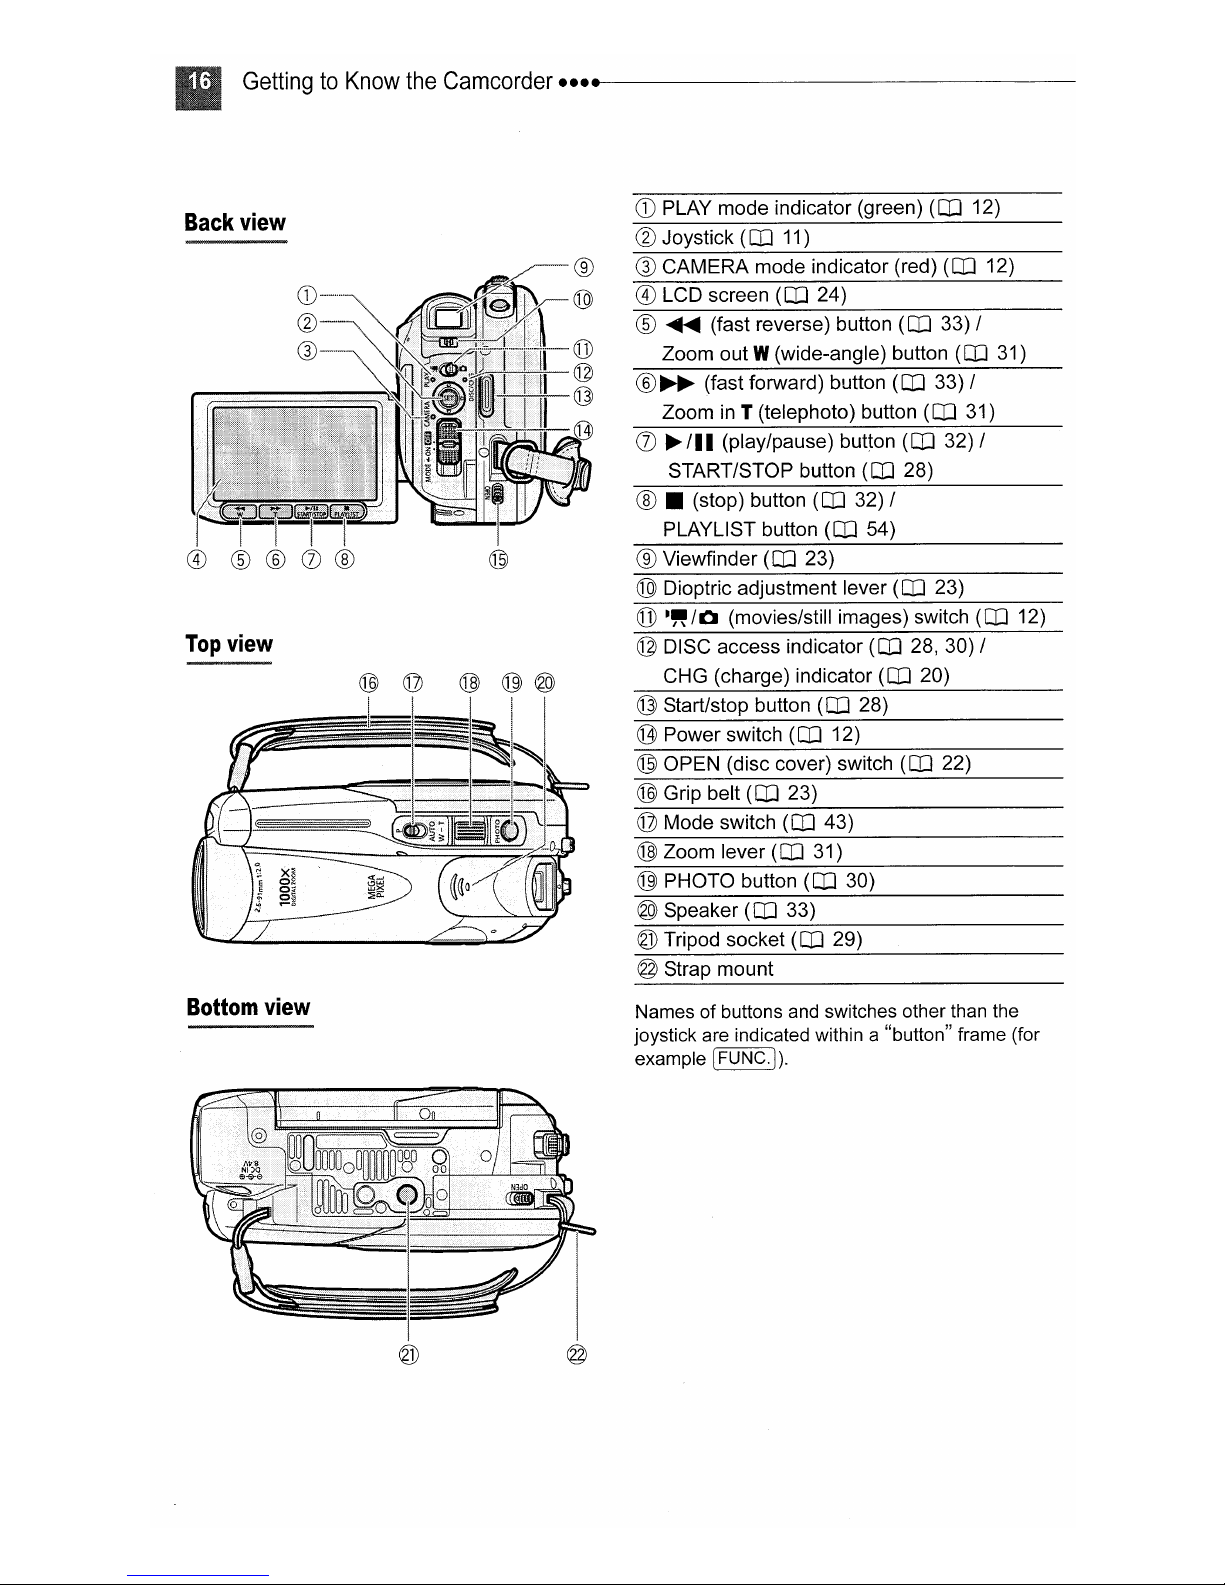
Back
view
Top
view
the
Camcorder
.......
-----------------
CD
® Joystick (OJ 11)
®
® CAMERA mode indicator (red) (OJ 12)
@ LCD screen (OJ 24)
® ..... (fast reverse) button (OJ 33) /
®~
(J)
® • (stop) button (OJ 32) /
® Viewfinder (OJ 23)
® Dioptric adjustment lever (OJ 23)
(jJ)
@ DISC access indicator (OJ 28, 30) /
@ Start/stop button (OJ 28)
@ Power switch (OJ 12)
® OPEN (disc cover) switch (OJ 22)
® Grip belt (OJ 23)
@ Mode switch (OJ 43)
@ Zoom lever (OJ 31)
@ PHOTO button (OJ 30)
@ Speaker (OJ 33)
@ Tripod socket (OJ 29)
@ Strap mount
PLAY mode indicator (green) (OJ 12)
Zoom out W(wide-angle) button (OJ 31)
(fast forward) button (OJ 33) /
Zoom
in
T (telephoto) button (OJ 31)
~
/11
(play/pause) button (OJ 32) /
START/STOP button (OJ 28)
PLAYLIST button (OJ 54)
-"'/0
CHG (charge) indicator (OJ 20)
(movies/still images) switch (OJ 12)
Bottom
view
Names of buttons and switches other than the
joystick are indicated within a "button" frame (for
example
I
FUNC.
I).
------------------e
••••
GettingtoKnow
the
Camcorder
I
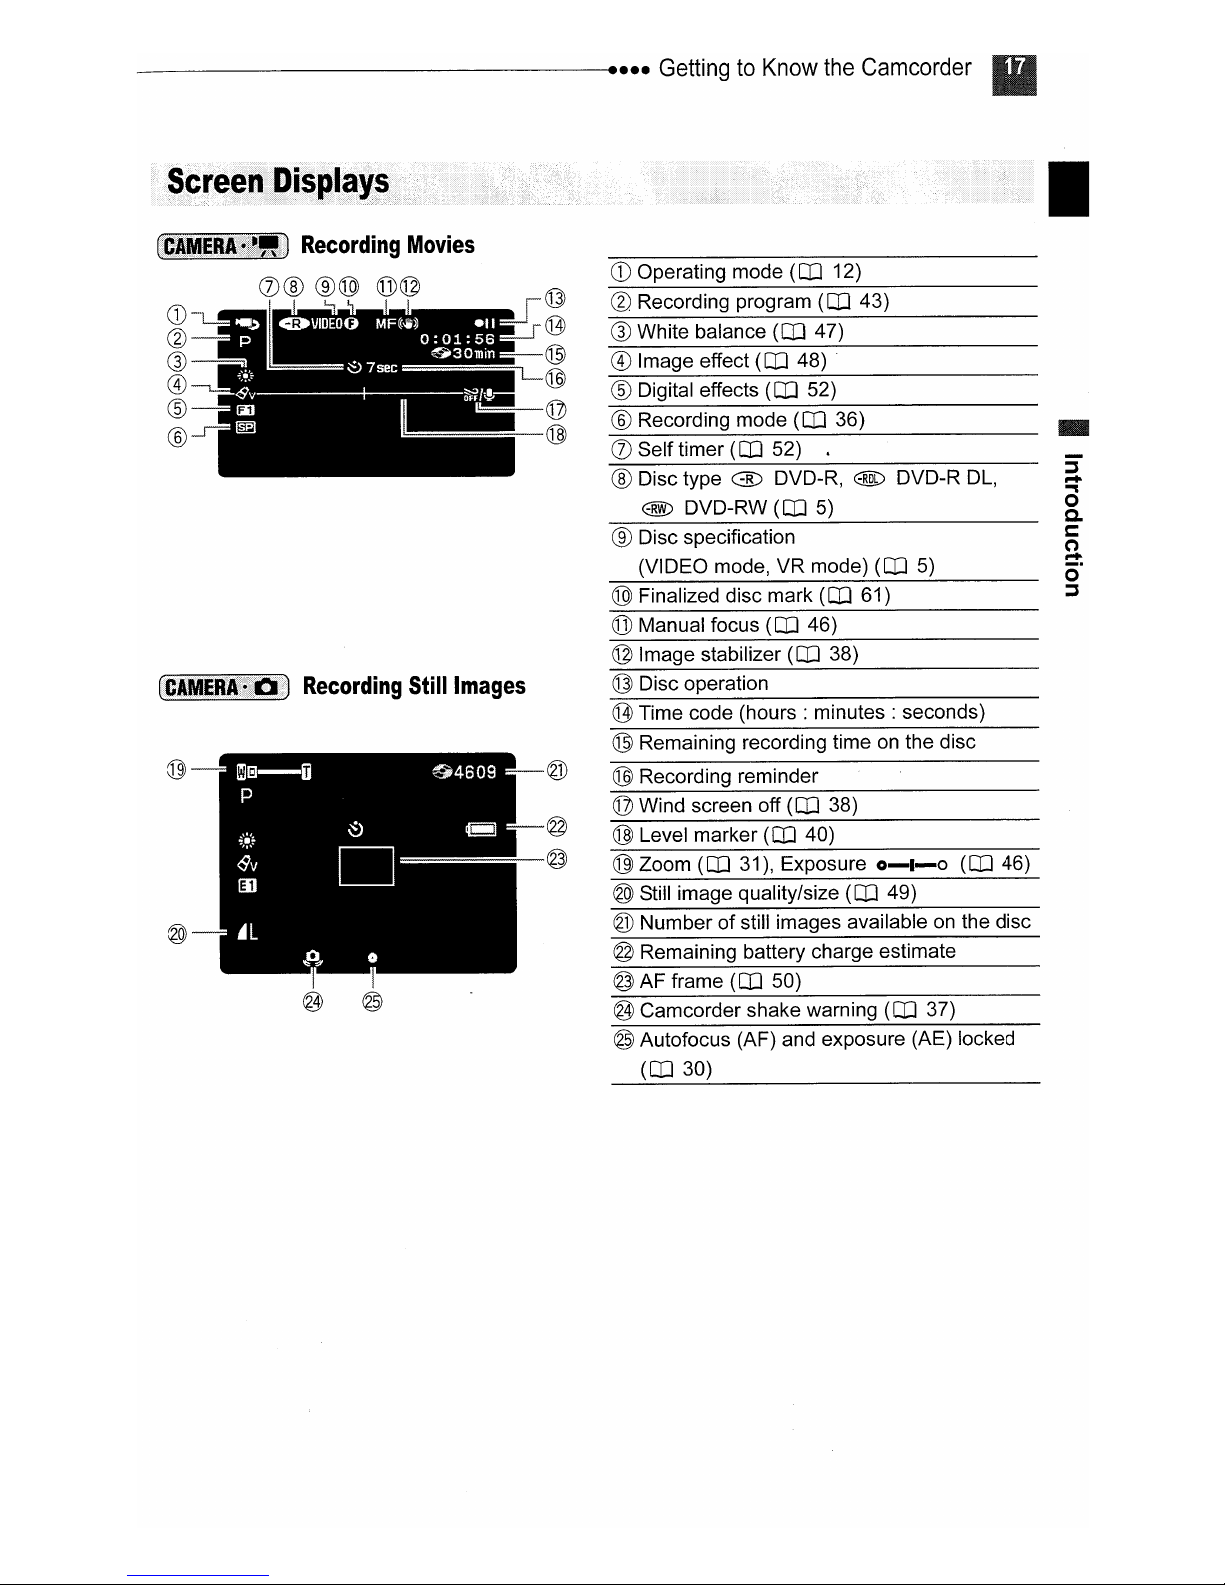
~~••II.~~!!~
Recording
cv®
®®
Movies
@@
CD-"
@
®
®
®
®
~1
••
III.mI)J
@ @
lIDs-ii
P
~;~:::
Sv
()J
~L
Recording
~
D
A
I]
0
~
Still
~4609
Images
-
~
~
CD
Operating mode (OJ 12)
® Recording program (OJ 43)
® White balance (OJ 47)
® Image effect
(OJ
48)
® Digital effects (OJ 52)
® Recording mode (OJ 36)
CV
Selftimer (OJ 52) .
® Disc type
@ DVD-RW (OJ 5)
@)
DVD-R, @ DVD-R DL,
® Disc specification
(VIDEO mode,
VR
mode) (OJ 5)
® Finalized disc mark (OJ 61)
@ Manual focus (OJ 46)
@ Image stabilizer (OJ 38)
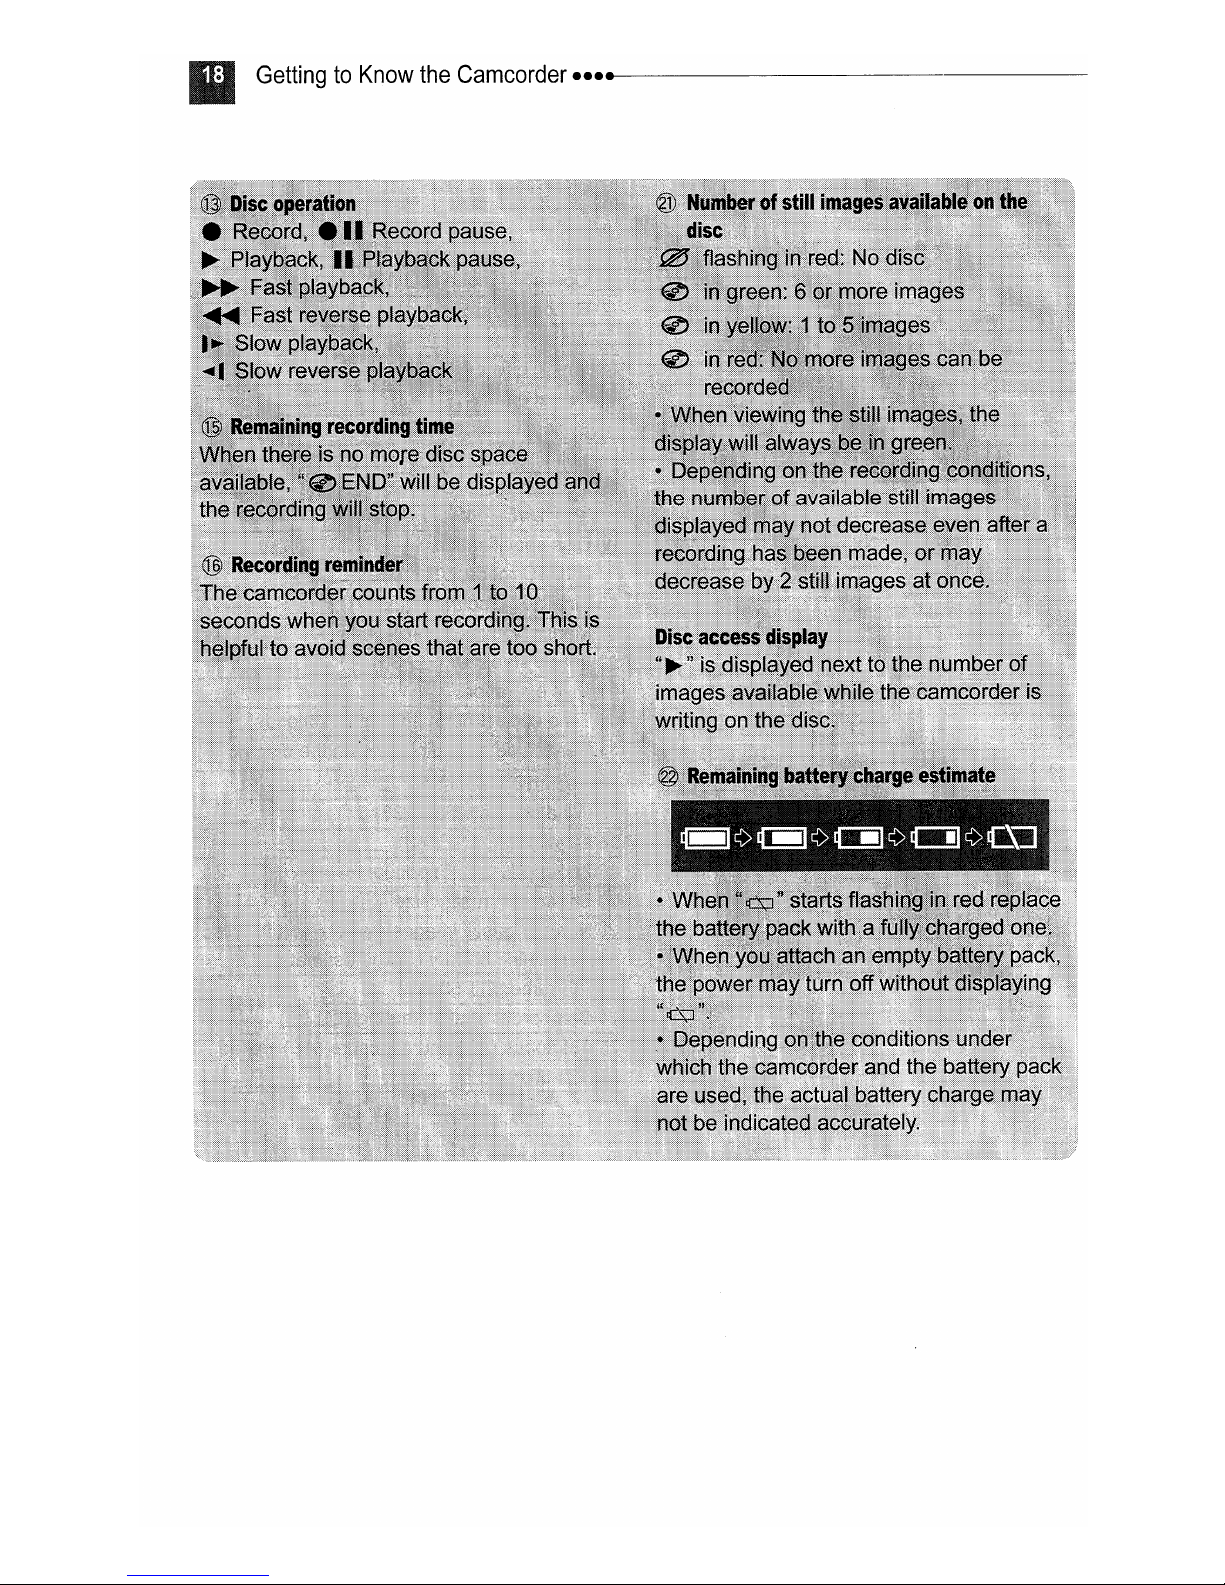
@ Disc operation
@ Time code
(hours:
minutes:
seconds)
® Remaining recording time on the disc
® Recording reminder
@ Wind screen off (OJ 38)
@ Level marker (OJ 40)
@Zoom
@ Still image quality/size (OJ 49)
@ Number
@ Remaining battery charge estimate
@AF
@ Camcorder shake warning (OJ 37)
@ Autofocus (AF) and exposure (AE) locked
(OJ 31), Exposure
of
frame (OJ 50)
(OJ 30)
0-1-0
still images available on the disc
(OJ 46)
:r
-
....
..,
o
0-
c::
(")
....
ci"
~
GettingtoKnow
the
Camcorder
•••••
-----------------

-----------------
.........
GettingtoKnow
the
Camcorder
Playing
Movies
(During
Playback)
CD
@ @ Playback time (hours: minutes: seconds)
® ® Scene number
-----®
Viewing
OCT.
@)
Still
Images
101-0107
!H!tiMMIL
~~~L
a
P 1024x768
MF
SV
':~f
®
O.44MB
F
[s]
~±O.OO
1, 200 9:20
2.0
1/30
AM
...
.......
CD
@
@
-CD
D-isc
o-pera-tion----
® Data code (OJ 51)
CD
Image number (OJ 41)
@ Current image / Total number
® Histogram (OJ 51)
® Still image quality/size (OJ 49)
® Date and time of recording
of
images
I
iii
P lU,qX/tits
fj
MF
iii
m
f!±O.
...-------@
R&ffi~(jJ)
;ev
0.44MB
i:~::
00
F2.0
1/30
........._..
@
@
............
@
® Recording program (OJ 43)
(J)
Manual focus (OJ 46)
® White balance (OJ 47)
® Manual exposure (OJ 46)
® Image effect
@ Image size (OJ 49)
(llJ
48)
© File size
@ Aperture value
@ Shutter speed (OJ 44)
Getting Started
Charging
the
Battery
•••••
-----------------------
Pack
The camcorder can be powered with a
battery pack or directly using the compact
power adapter. Charge the battery pack
before use.
switch
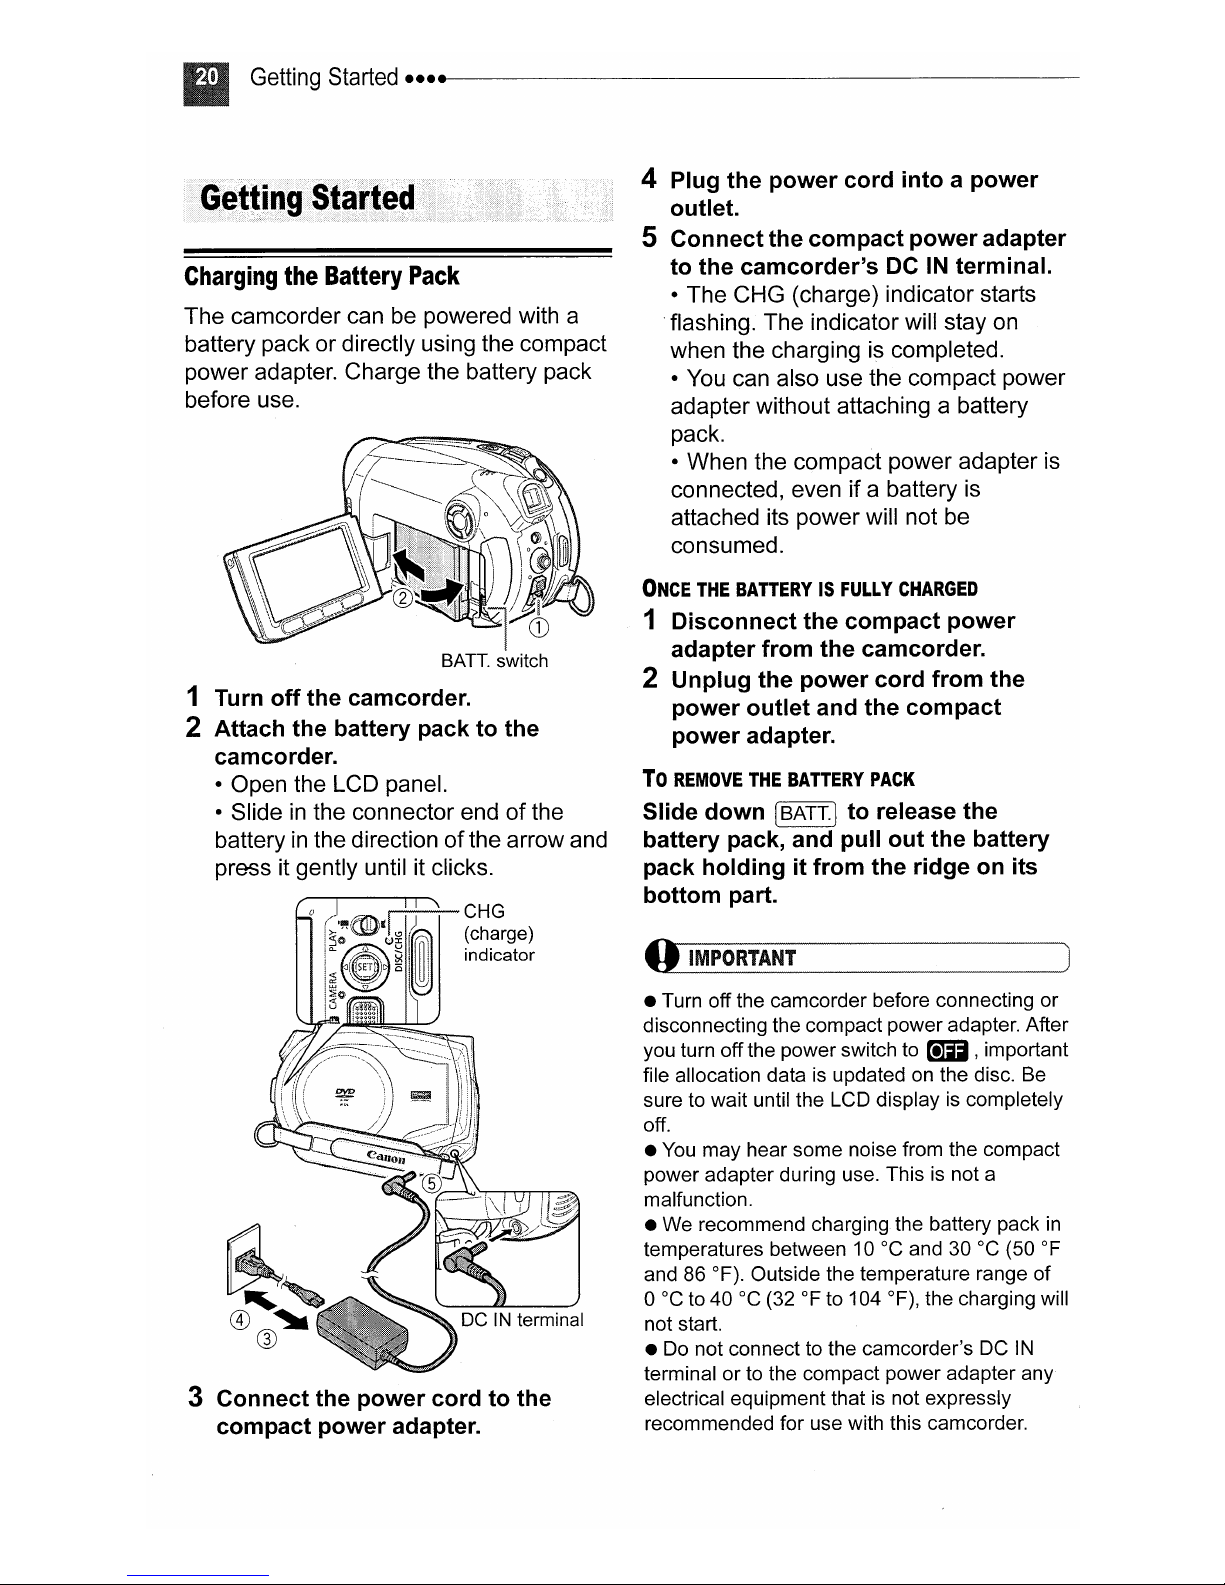
1 Turn off the camcorder.
2 Attach the battery pack to the
camcorder.
• Open the LCD panel.
• Slide
battery
press it gently until it clicks.
in
the connector endofthe
in
the directionofthe arrow and
4 Plug the power cord into a power
outlet.
S Connect the compact power adapter
to the camcorder's DC
• The CHG (charge) indicator starts
.flashing. The indicator will stay on
when the charging is completed.
You
•
can also use the compact power
adapter without attaching a battery
pack.
• When the compact power adapter is
connected, even ifa battery is
attached its power will not be
consumed.
ONCE
THE
BATTERYISFULLY
1 Disconnect the compact power
adapter from the camcorder.
IN
terminal.
CHARGED
2 Unplug the power cord from the
power outlet and the compact
power adapter.
To
REMOVE
Slide down
battery pack, and pull out the battery
pack holding it from the ridge on its
bottom part.
THE
[BATT.]
BATTERY
to release the
PACK
3 Connect the power cord to the
compact power adapter.
o
IMPORTANT
• Turn off the camcorder before connecting or
disconnecting the compact power adapter. After
you turn offthe power switch to _ , important
file allocation data
sure to wait until the LCD displayiscompletely
off.
You
may hear some noise from the compact
•
power adapter during use. Thisisnot a
malfunction.
• We recommend charging the battery pack
temperatures between
and 86
o
not start.
•
terminal orto the compact power adapter any
electrical equipment that
recommended for use with this camcorder.
OF).
Outside the temperature range of
°Cto40°C
Do
not connect to the camcorder's DC
is
updated on the disc.
10°C
(32OFto 104
and 30 °C (50
OF),
the charging will
is
not expressly
Be
in
OF
IN
_-----------------------e
••••
Getting Started
•Toprevent equipment breakdowns and
excessive heating, do not connect the supplied
compact power adapterto voltage converters for
overseas travels or special power sources such
on
as those
etc.
• The CHG (charge) indicator also serves as a
rough estimate ofthe battery charge status.
Continuously on: Battery fully charged.
Flashes approx. twice per second: Battery over
50% charged.
aircraft and ships, DC-AC inverters,
Flashes approx. once per second: Battery less
than 50% charged.
• The charging time will vary depending
surrounding temperature and the battery pack's
In
initial charge condition.
effective usage time
decrease.
• We recommend that you prepare battery
packs 2 to 3 times longer than you think you
might need.
•
U.S.A.
and
Canada
ion/polymer battery that powers this
product
1-800-8-BATTERY for information
on how to recycle this battery.
is
recyclable. Please call
only:
cold places, the
of
the battery will
The lithium
on
the
CD
.~,
~N.:.
I
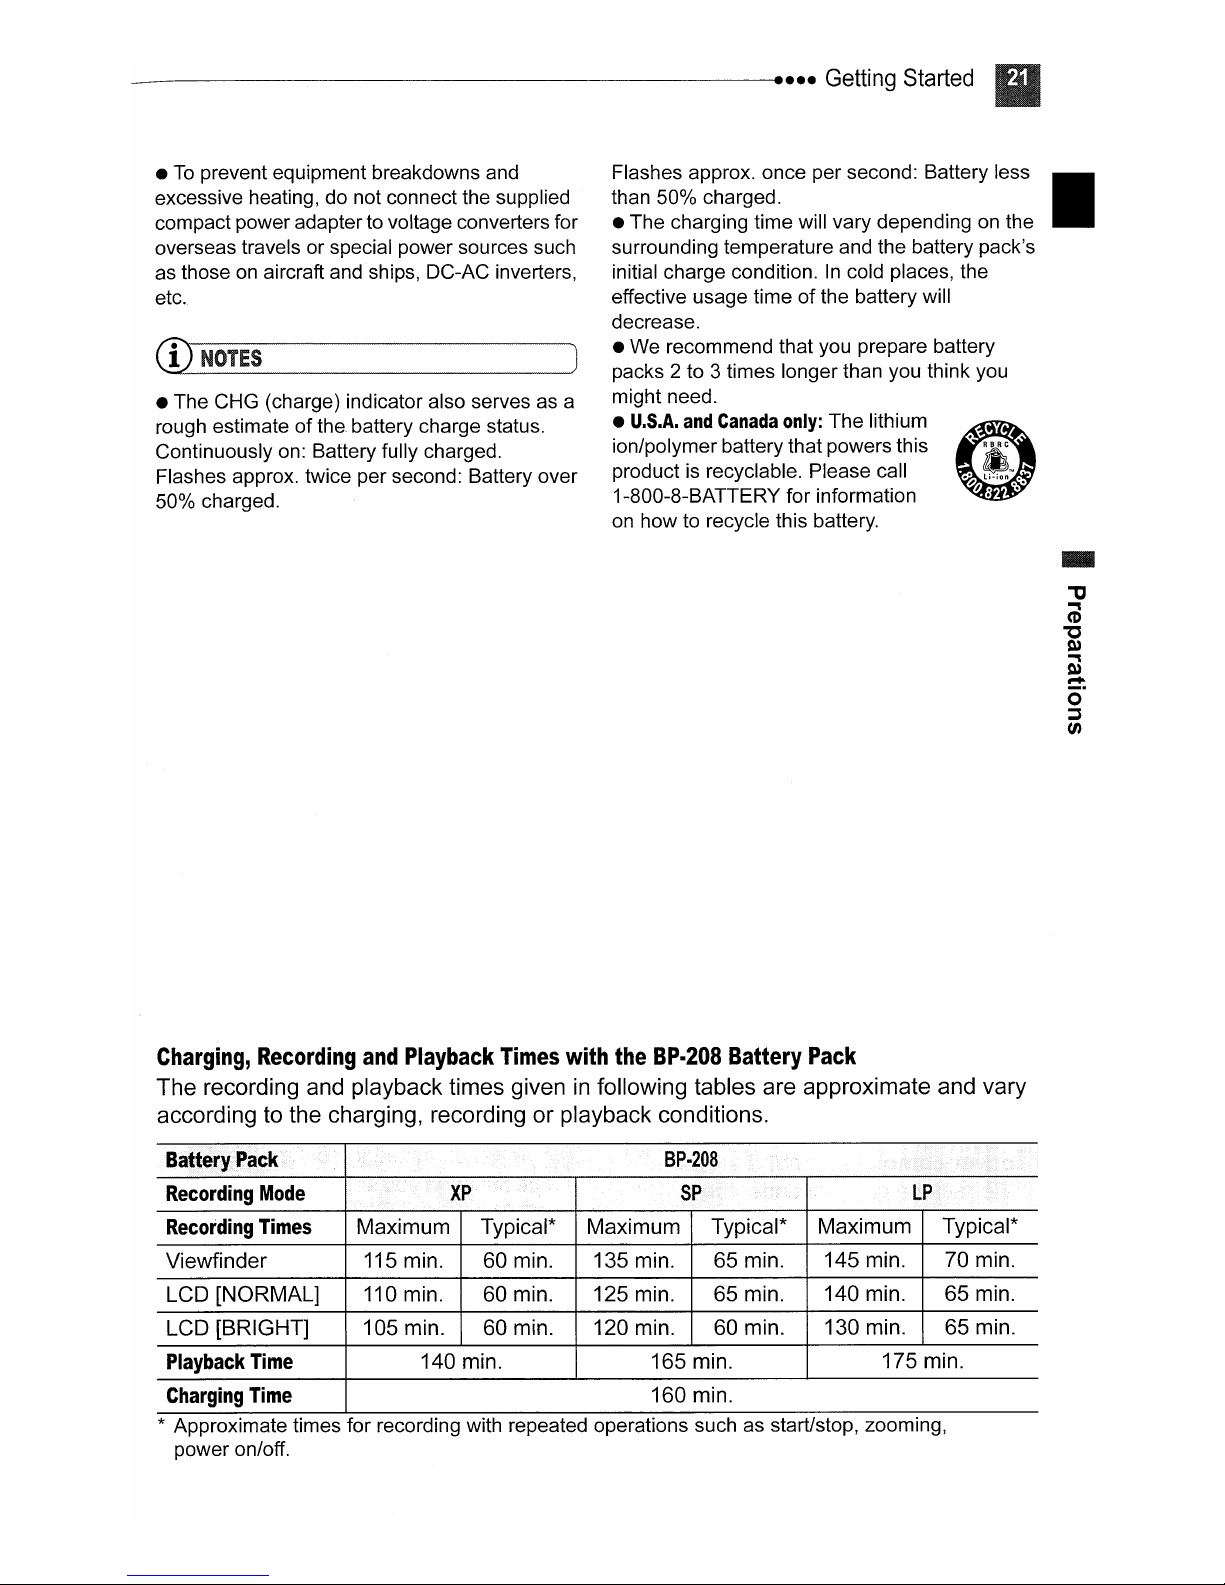
Charging,
The recording and playback times giveninfollowing tables are approximate and vary
according to the charging, recording or playback conditions.
-
Recording
Recording
Viewfinder
LCD [NORMAL]
LCD [BRIGHT]
Playback
Charging
* ApproXimate times for recording with repeated operations such as start/stop, zooming,
power on/off.
Recording
........
......
Mode
Times
Time
Time
and
Playback
Maximum Typical* Maximum
115 min. 60 min. 135 min.
110 min. 60 min. 125 min. 65 min.
105 min. 60 min. 120 min.
Times
140 min. 165 min.
with
the
Bp·208
Typical*
65 min. 145 min.
60 min. 130 min.
160 min.
Battery
Pack
Maximum Typical*
70 min.
140 min. 65 min.
65 min.
175 min.
Getting
Started
•••••
----------------------
Inserting
Use only 8
marked with the DVD-R
(including DVD-R
~
Discs
Before inserting the discbesuretocheck
that the recording surface
necessary, use asoft lens-cleaning cloth to
remove any fingerprints, dirt buildup or
smudges from the disc surface.
Inserting
and
RemovingaDisc
cm(3in.) mini
DL)
logo. Refer also to Recommended
(OJ
6).
the
Disc
DVD
discs
~
logo
or the DVD-RW
is
clean. If
(OJ
12)
~
(-))
OPEN
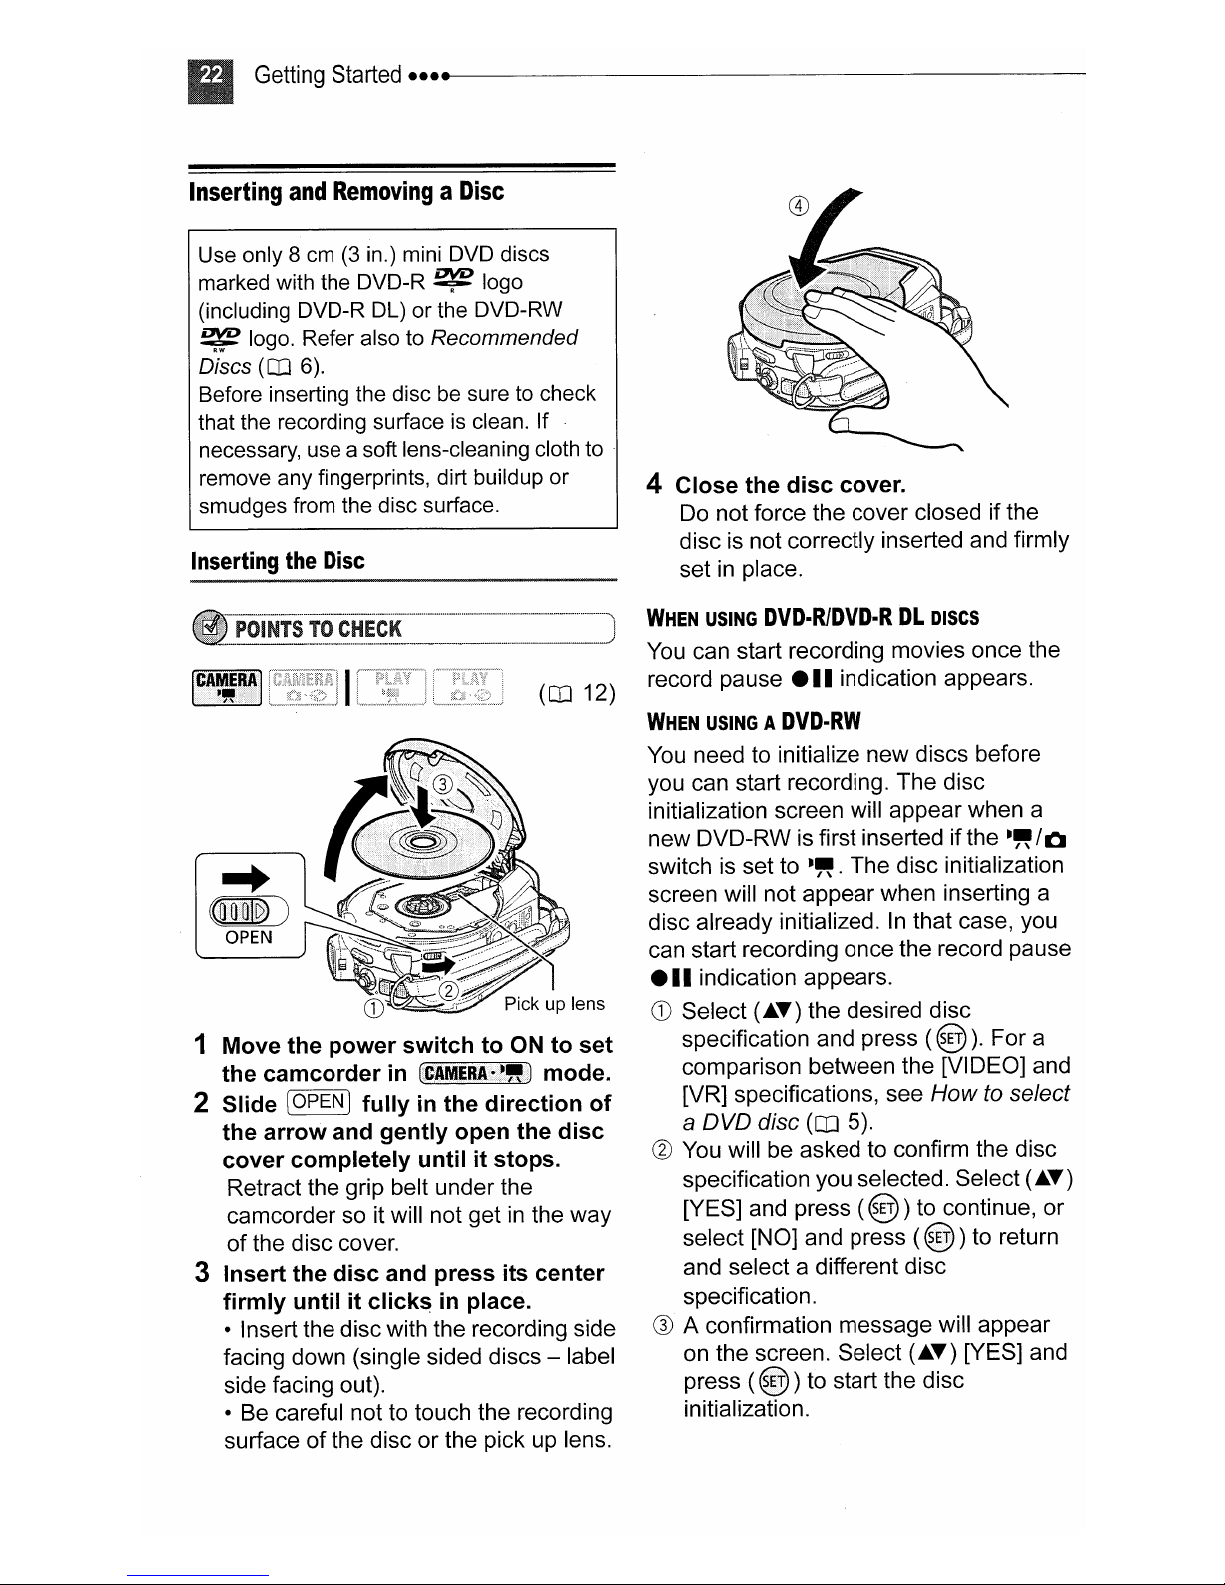
1 Move the power switch to ON to set
the camcorder
2 Slide [OPEN I fully
the arrow and gently open the disc
cover completely until it stops.
Retract the grip belt under the
camcorder so it will not get
of
the disc cover.
in
(CAMERA·II!!)
in
the direction
in
mode.
the
of
way
3 Insert the disc and press its center
firmly until it
• Insert the discwith the recording side
facing down (single sided discs
side facing out).
• Be careful not to touch the recording
surface
of
click~
the discorthe pick up lens.
in
place.
-label
4 Close the disc cover.
Do not force the cover closed if the
disc is not correctly inserted and firmly
set
in
place.
WHEN
USING
DVD·R1DVD·RDLDISCS
You can start recording movies once the
record pause
WHEN
USINGADVD·RW
You need to initialize
you can start recording.
initialization screen will appear when a
new DVD-RW is first inserted ifthe
switch is set to
screen will not
disc already initialized.
can start recording once the record pause
e
••
indication appears.
CD
Select (JiT) the desired disc
specification and press
comparison between the [VIDEO] and
[VR] specifications, see
a DVD disc
@ You will be asked to confirm the disc
specification you selected. Select
[YES] and press
select [NO] and press
and select a different disc
specification.
e
••
indication appears.
new
discs before
The
II".
The disc initialization
appear
when inserting a
In
that case, you
(@).
How
(OJ
5).
(@)
to continue, or
(@)
disc
to select
to return
."
For a
(JiT)
/0
® A confirmation message will appear
on the screen. Select
press
initialization.
(@)
to start the disc
(JiT) [YES] and
_-----------------------a
••••
Getting Started
• The disc initialization will take
approximately one minute. Avoid
moving the camcorder while the
operation is
You
•
the record pause
appears.
The process of recognizing a disc may take a
moment. The
disc
finishes recognizing the disc before you start
recording.
can start recording movies once
is
being read. Wait until the camcorder
Removing
in
progress.
e
••
indication
® display will move while the
the
Disc
o
IMPORTANT
When you slide
recording, important file allocation data
updated on the disc before the disc cover
opens. While the DISC access indicator
flashing do not subject the camcorder to shocks
such as forcefully laying it on a table.
Preparing
[OPEN
the
Camcorder
I after making a
is
isonor
...
~OOgl~
OPEN
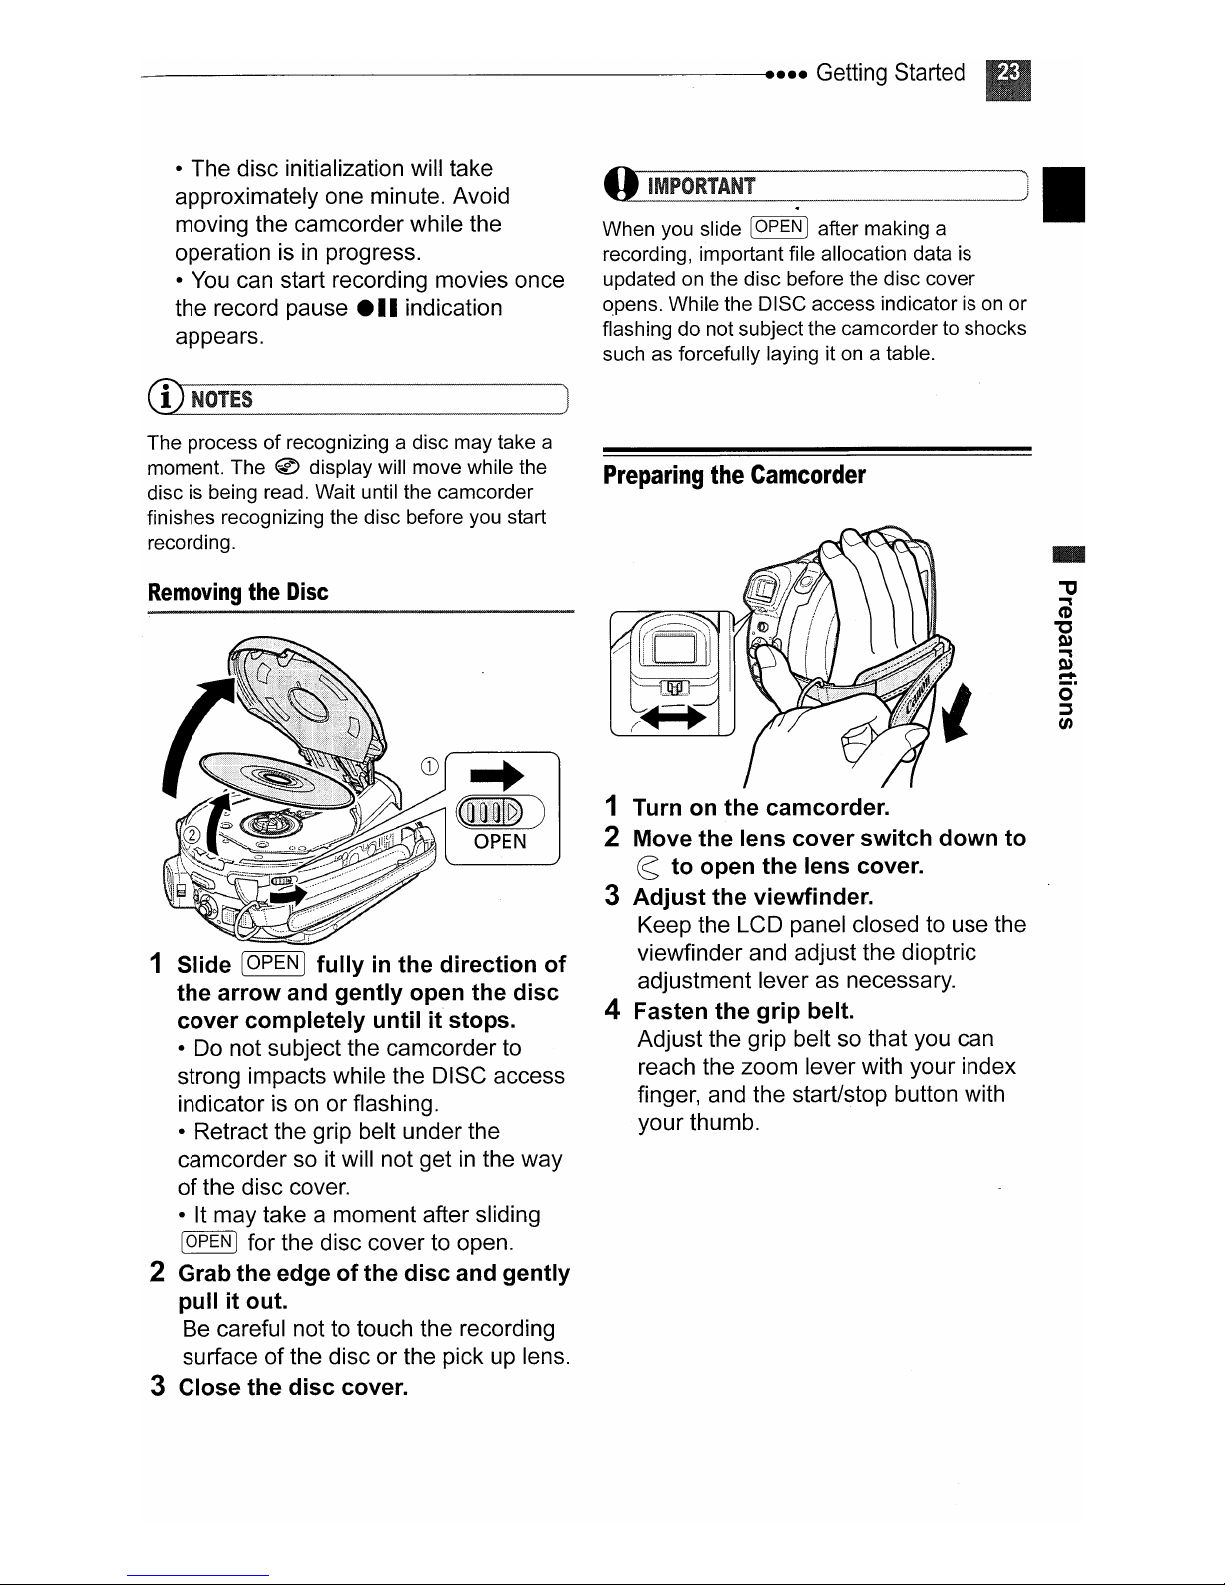
1 Slide [OPEN I
the
arrow
cover
• Do not subject the camcorder to
strong impacts while the DISC access
indicator is on or flashing.
• Retract the grip belt under the
camcorder so it will not get
of
• It may take a moment after sliding
[OPEN] for the disc cover to open.
2 Grab
pullitout.
Be careful not to touch the recording
surface
3 Close
completely
the disc cover.
the
the
fullyinthe
and
gently
untilitstops.
edgeofthe
of
the disc or the pickuplens.
disc
cover.
direction
open
disc
the
in
the way
and
)
of
disc
gently
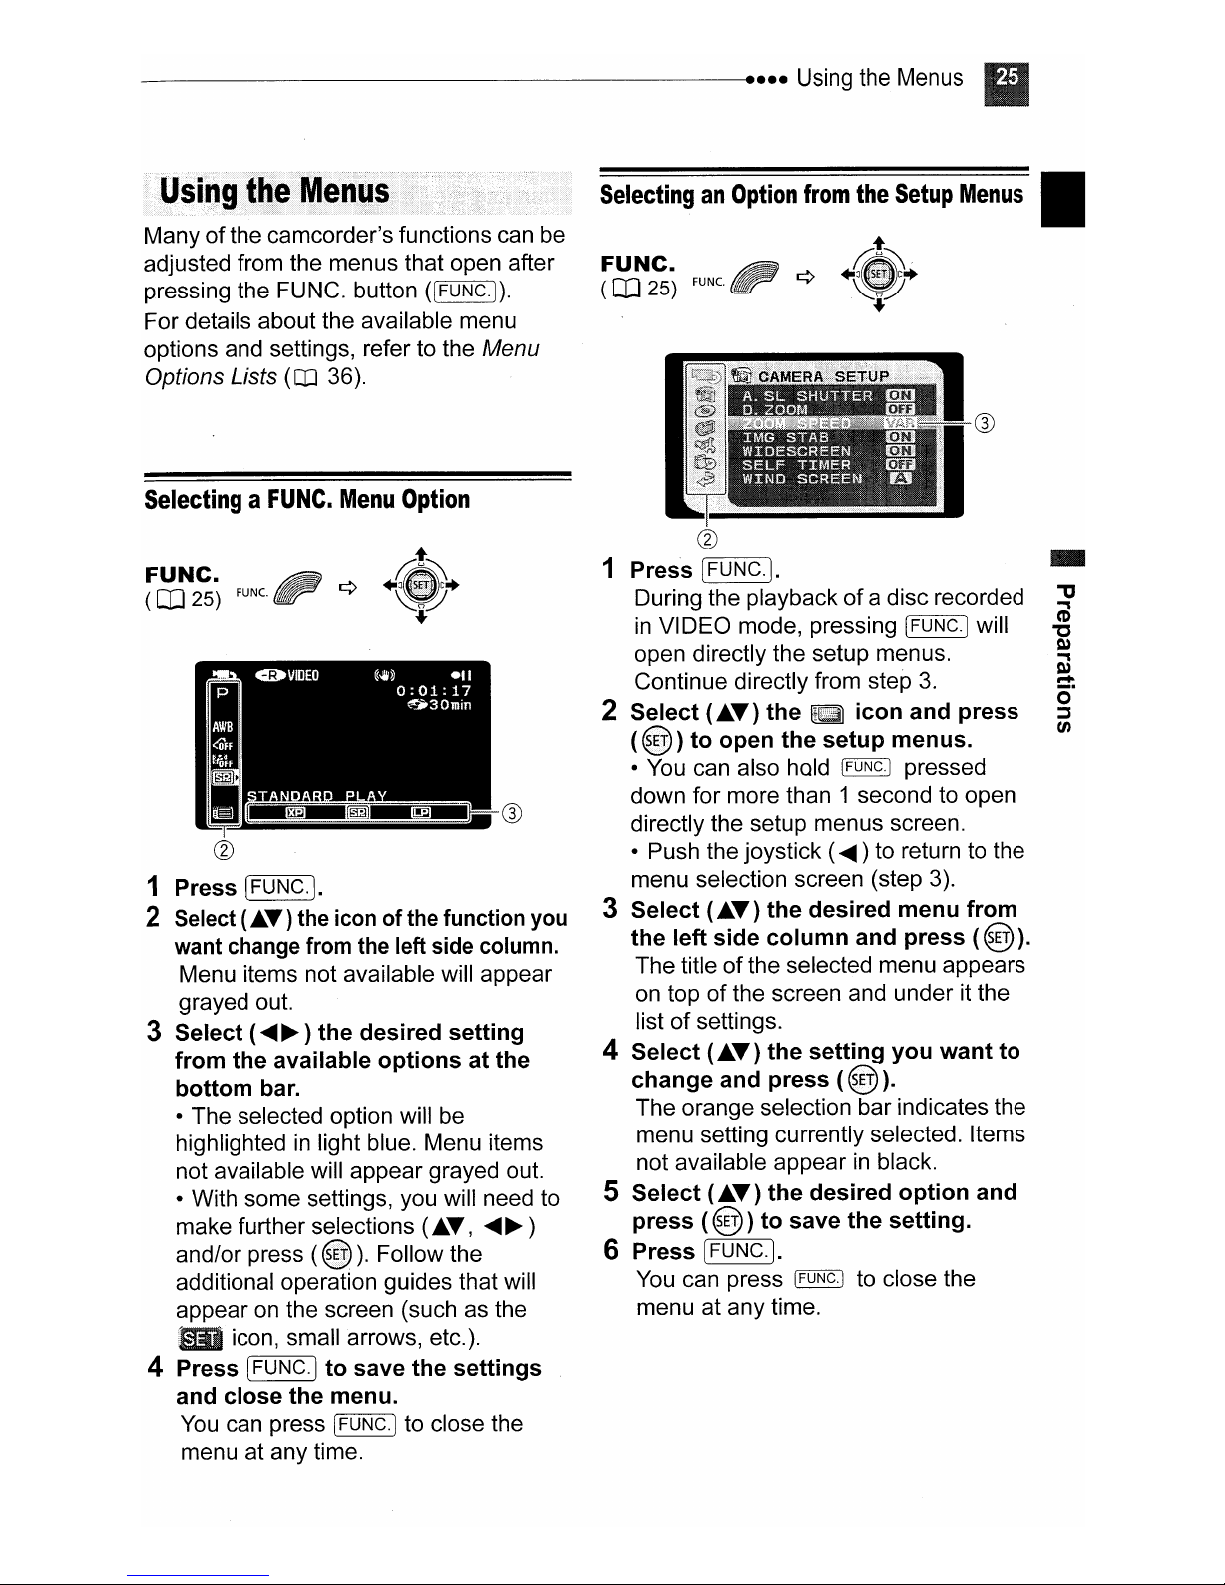
1 Turn on
2
Move
~
3
Adjust
Keep the LCD panel closed to use the
viewfinder and adjust the dioptric
adjustment lever as necessary.
4 Fasten
Adjust the grip belt so that you can
reach the zoom lever with your index
finger, and the start/stop button with
your thumb.
to
the
the
open
the
the
lens
camcorder.
cover
the
lens cover.
viewfinder.
grip
belt.
switch
down
to

Getting Started ........
Adjusting
Rotating
the
the
LCD
LCD
Screen
Panel
----------------------
LCD
Backlight
You
can adjust the brightnessofthe LCD
screen to one
of
two levels.
Open the
•
You
LC'O
panel 90 degrees.
can rotate the panel 90 degrees
downward.
• You can rotate the panel 180 degrees
toward the lens (allowing the subject to
monitorthe LCD screen while you use the
viewfinder). Rotating the panel 180
degrees is also useful if you wish to
include yourself when recording with the
selftimer. This is the only case where you
can use the viewfinder and the LCD
screen simultaneously.
Keep IDISP.j pressed down for more
than 2 seconds.
Repeat this action to toggle between the
normal and bright settings.
• This setting
the
recordingorthe
• Using
effective
does
not affect the brightness
viewfinder
the
bright setting will shorten the
usage
timeofthe battery.
screen .
of
Subject
can
monitor the LCD screen
---------------------
••••
Using the Menus
Manyofthe camcorder's functions can be
adjusted from the menus that open after
pressing the FUNC. button
For details about the available menu
options and settings, refer to the
Options Lists
SelectingaFUNe.
FUNC.
([025)
@
FUNC.
(CO
36).
Menu
([FUNG.]).
Menu
Option
1 Press IFUNC.J.
2 Select (
want change from the left side column.
Menu items not available will appear
grayed out.
3 Select
from
bottom
• The selected option will be
highlighted
not available will appear grayed out.
• With some settings, you will need to
make further selections (
and/or press
additional operation guides that will
appear on the screen (such as the
_ icon, small arrows, etc.).
4 Press IFUNC·I
and
You can press IFUNG.j to close the
menu at any time.
....
(~~
the
bar.
close
)the iconofthe function you
)
the
desired
available
in
(~).
the
optionsatthe
light blue. Menu items
Follow the
to
save
menu.
....
the
setting
,
~
~ )
settings
SelectinganOption
FUNC.
([025)
FUNC.
@
from
the
Setup
1 Press [FUNC·I.
During the playbackofa disc recorded
in
VIDEO mode, pressing (FUNG.j will
open directly the setup menus.
Continue directly from step
2
Select(....)the
(@J)
• You can also hold IFUNC·I pressed
down for more than 1 second to open
directly the setup menus screen.
• Push the joystick (
menu selection screen (step 3).
3
Select(....)the
the
4
Select(....)the
change
S
Select
to
open
left
side
The titleofthe selected menu appears
on top
list
The orange selection bar indicates the
menu setting currently selected. Items
not available appear
press
of
of
settings.
C
(@J)
the screen and under it the
and
....
the
column
press
)
the
to
save
g
icon
setup
~
desired
and
setting
(@J).
in
desired
the
3.
and
menus.
) to return to the
menu
press
you
want
black.
option
setting.
6 Press [FUNC·I.
You can press IFUNC·I to close the
menu at any time.
Menus
I
press
from
(@J).
to
and
Changing
the
Time
Zone
Changing
.
Options
[DEUTSCH]
[ENGLISH]·
[ESPANOL]
[FRANc;AIS]
[ITALIANO]
[POLSKI]
~
FUNC.
(OJ25)
the
Language
[ROMANA]
[TORKc;E]
[PYCCKV1C1]
[YKPAiHCbKA]
[~yJ\]
[~.J1j]
DISPLAY
I
LANGUAGE@ENGLISH'
FUNC.~¢+~~J+
SETUP
~
~•./~~
[.fI1M'1"lVH..I ]
[fal1t$x]
[~!I~x]
[E!~Ol]
[B*~fi]
• Default
:t
+
1 Press (FUNG.j.
2 Select
(~)
3 Select
press
4 Select
press
S Select
option and press
(J..T)
to open the setup menus.
CJ..T)
the g icon and press
[DISPLAY SETUP] and
(~).
CJ..T)
[LANGUAGE®]
(~).
(TJ..,
......
~)
the desired
(~).
6 Press IFUNG.J to close the menu.
and
value
• Default
~
FUNC.
(OJ
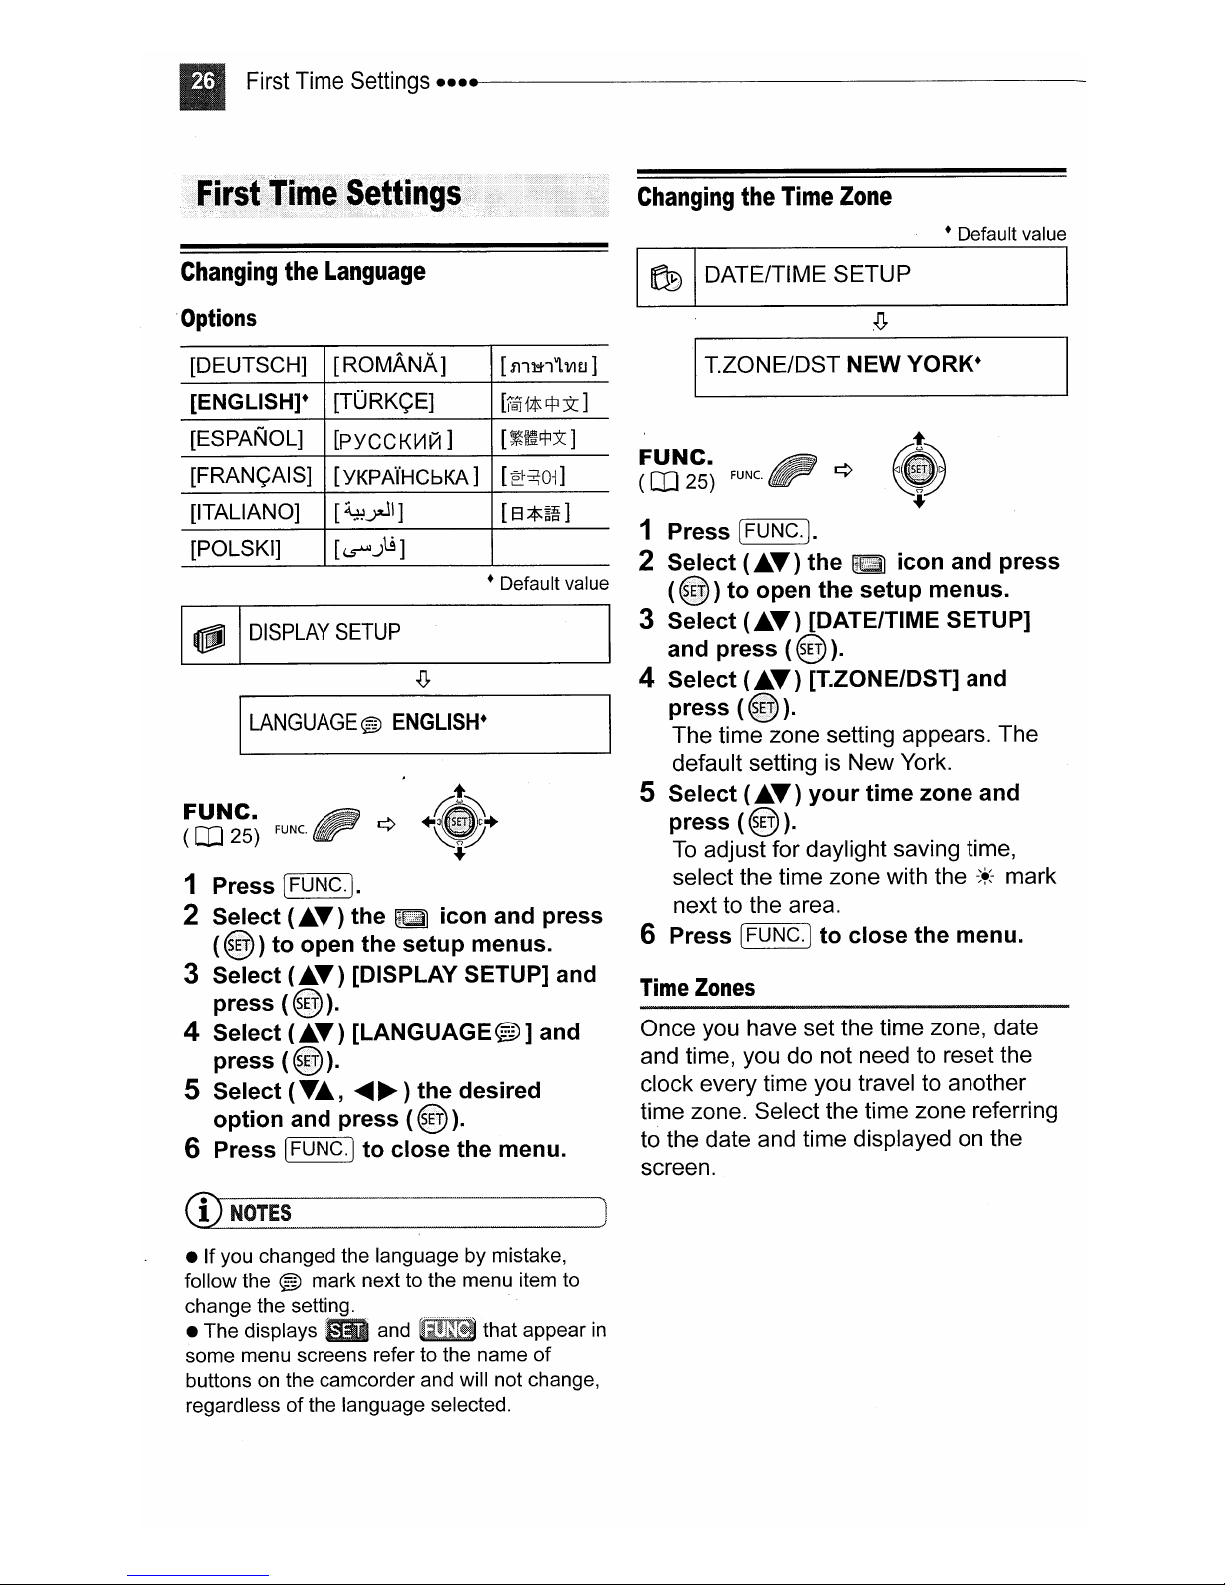
1 Press I
2 Select
3 Select
4 Select
S Select
DATE/TIME SETUP I
~
IL....-T_,Z_O_N_E_/D_S_T_N_EW_Y_O_R_K_·
FUNC.
25)
FUNG.j.
(J..T)
(~)
to open the setup menus.
(J..T)
and press
CJ..T)
press
The time zone setting appears. The
default setting is New York.
(~).
CJ..T)
press
To
select the time zone with the
next to the area.
(~).
adjust for daylight saving time,
the g icon and press
[DATE/TIME SETUP]
(~).
[T.ZONE/DST] and
your time zone and
-:+;
value
mark
6 Press [FUNG.] to close the menu.
Time
Zones
Once you have set the time zone, date
and time, you do not need to reset the
clock every time you travel to another
time zone. Select the time zone referring
to the date and time displayed on the
screen.
I
• Ifyou changed the language by mistake,
follow the
change the setting.
• The displays • and
some menu screens refer to the name
buttonsonthe camcorder and will not change,
regardless ofthe language selected.
® mark next to the menu item to
~i!Rti
that appear
in
of
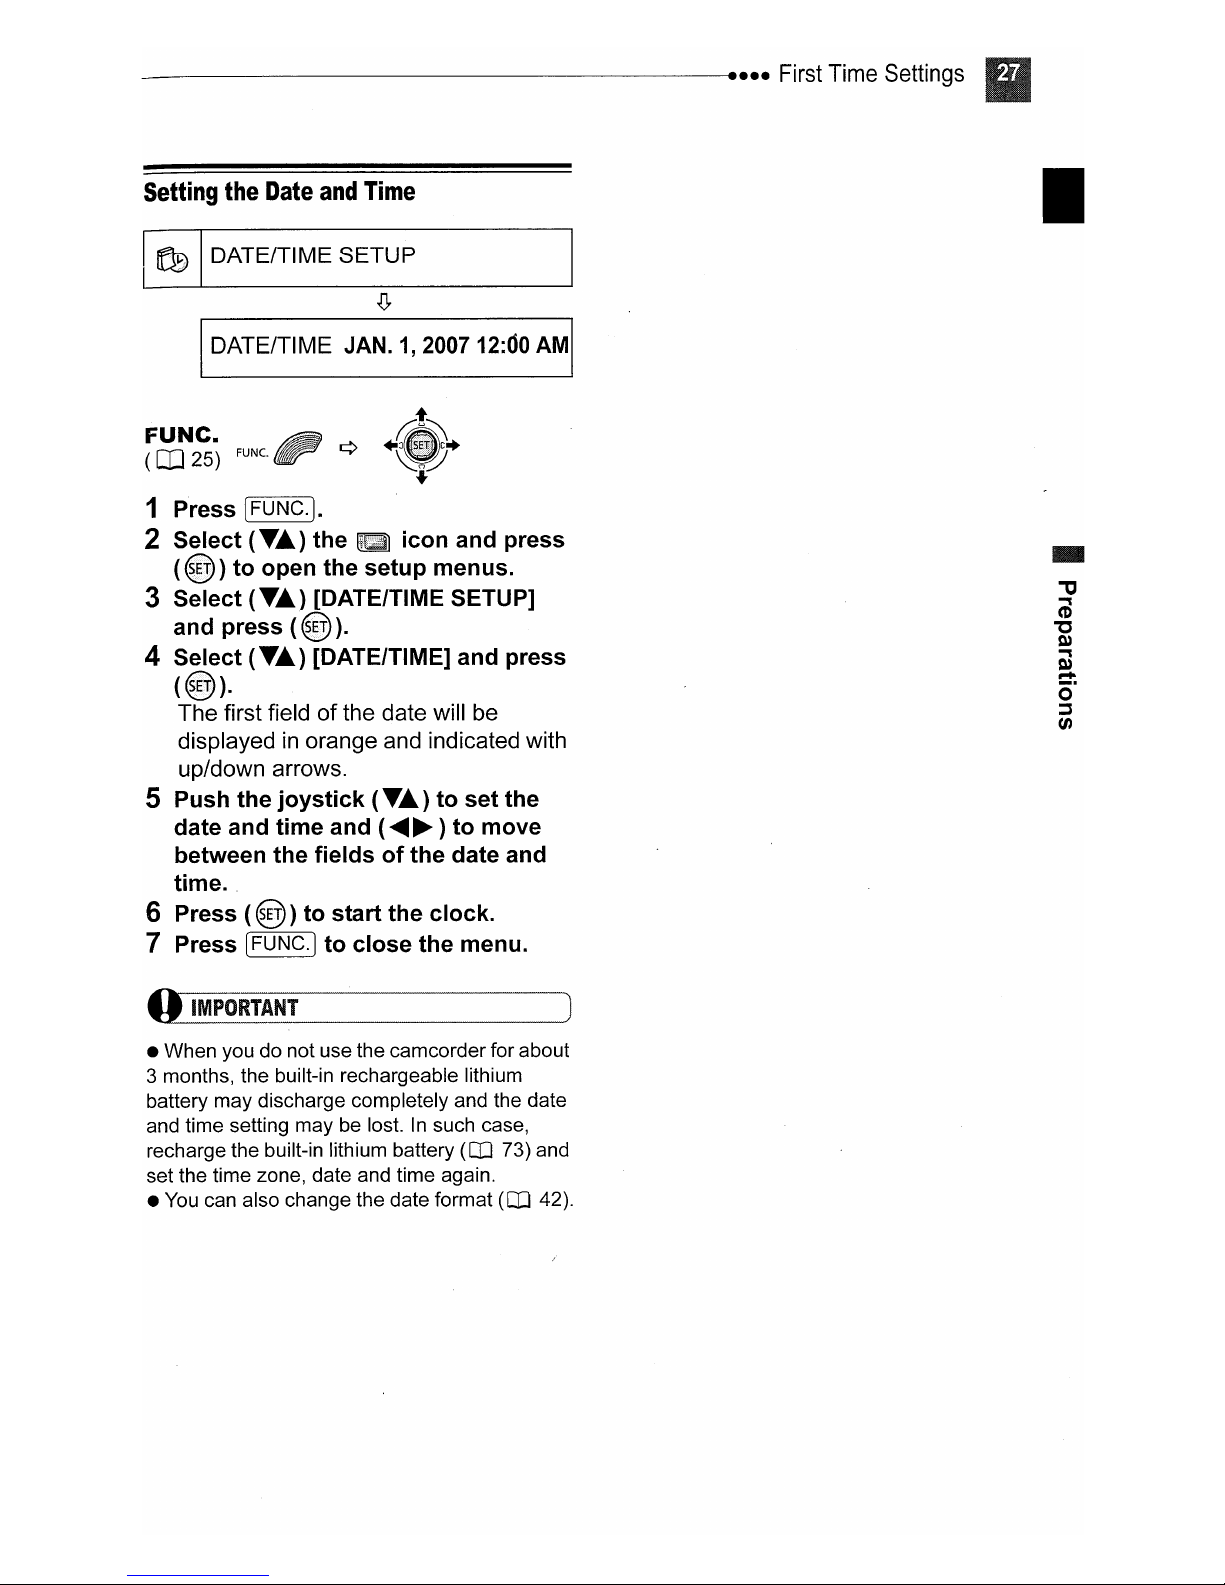
Setting
the
Date
and
Time
I
~
FUNC.
(CD25)
DATEITIME SETUP
.Q,
IDATEITIME JAN.
FUNC.
1,
200712:do
AMI
1 Press (FUNC.J.
2 Select (T") the g icon and press
(~)
to open the setup menus.
3 Select
and press
4 Select
(~).
The first fieldofthe date will be
displayedinorange and indicated with
up/down arrows.
5 Push the joystick
date and time and (
between the fields
time.
6 Press
7 Press I
(T")
(T")
(~)
FUNC.J
[DATE/TIME SETUP]
(~).
[DATE/TIME] and press
to start the clock.
to close the menu.
(T")
to set the
......~) to move
of
the date and
o
IMPORTANT
• When you do not use the camcorder for about
3 months, the built-in rechargeable lithium
battery may discharge completely and the date
and time setting may be lost.
recharge the built-in lithium battery (OJ 73) and
set the time zone, date and time again .
• You can also change the date format (OJ 42).
In
such case,
 Loading...