Canon NP6621 Service Handbook

SERVICE
HANDBOOK
REVISION 0
FEB. 1998
COPYRIGHT © 1998 CANON INC. CANON NP6621 REV.0 FEB. 1998 PRINTED IN JAPAN (IMPRIME AU JAPON)
FY8-23AT-000

IMPORTANT
THE INFORMATION CONTAINED HEREIN IS PUBLISHED BY CANON, INC., JAPAN, AND IS
FOR REFERENCE USE ONLY. SPECIFICATIONS AND OTHER INFORMATION CONTAINED
HEREIN MAY VARY SLIGHTLY FROM ACTUAL MACHINE VALUES OR THOSE FOUND IN
ADVERTISING AND OTHER PRINTED MATTER.
ANY QUESTIONS REGARDING INFORMATION CONTAINED HEREIN SHOULD BE DIRECTED
TO THE COPIER SERVICE DEPARTMENT OF THE SALES COMPANY.
COPYRIGHT © 1998 CANON INC.
Printed in Japan
Imprimé au Japon
Use of this manual should be
strictly supervised to avoid
disclosure of confidential
information.
Prepared by
OFFICE IMAGING PRODUCTS TECHNICAL SUPPORT DEPARTMENT 1
OFFICE IMAGING PRODUCTS TECHNICAL SUPPORT DIVISION
CANON INC.
5-1, Hakusan 7-chome, Toride-shi Ibaraki, 302-0023 Japan
COPYRIGHT © 1998 CANON INC. CANON NP6621 REV.0 FEB. 1998 PRINTED IN JAPAN (IMPRIME AU JAPON)
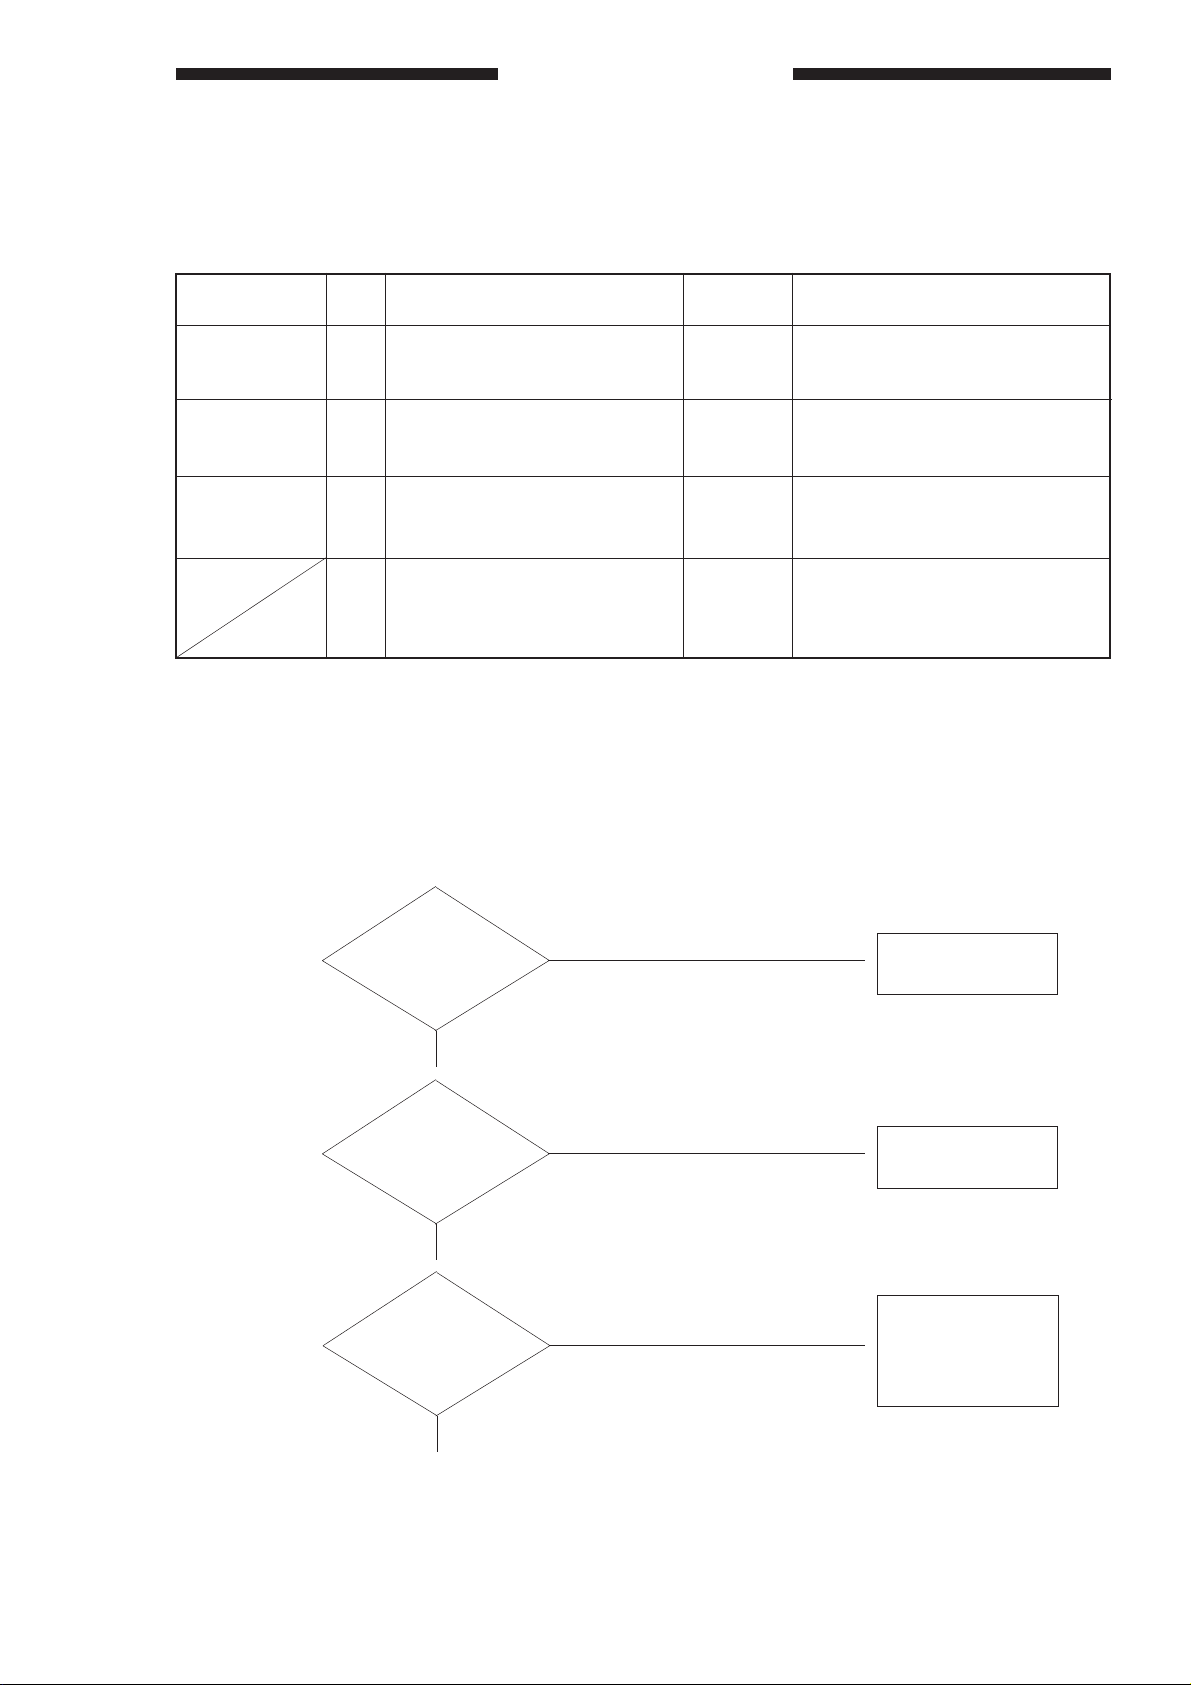
Guide To Tables
In this Handbook, work procedures are given in the form of tables instead of flow charts used generally.
Familiarize yourself by studying the example below.
EX. AC power is absent.
Cause
Power plug
Step
1
Checks
Is the power plug connected to
Yes/No
NO
Connect the power plug.
Remedy
the power outlet?
Covers
2
Are the front door and delivery
NO
Close the door or the cover.
cover closed properly?
Power source
3
Is the rated voltage present at
the power outlet?
4
Is the rated voltage present
NO
YES
The problem is not of the copier.
Advise the customer as such.
Go to step 6.
between J1-1 and -2 (near
cord plate)?
■ To find out the cause (problem part) of a single problem, refer to the item under “Cause.” For “AC power
is absent,” the cause may be the power plug, covers, power source, or others.
■ To find out the checks to make or remedies to provide for a single problem, refer to the “Checks” and
“Remedy”; make checks, answer to the questions YES or NO, and provide remedies accordingly. If the
answer is otherwise, proceed to the next step.
<Step>
<Checks>
<Yes/No>
<Remedy>
Is the power plug
1
2
3
connected to the
power outlet?
YES
▼
Are the front door
and delivery cover
closed properly?
YES
▼
Is the rated voltage
present at the power
outlet?
YES
▼
NO
NO
NO
Connect the power
▼
plug.
Close the door or
▼
the cover.
The problem is not
of the copier. Advise
▼
the customer as
such.
■ Checks on the voltage using a meter call for special note; the description “Check the voltage between
J109-1 (+) and J109-2 (–) on the DC controller PCB” means that the positive probe of the meter should
be placed on J109-1 (+) and the negative probe, on J109-2 (–).
i

ii

CONTENTS
CHAPTER 1 MAINTENANCE AND INSPECTION
1
2
I. SERVICING CHART .................................1-1
II. PERIODICALLY REPLACED PARTS....... 1-2
A. Periodically Replaced Parts ................1-2
III. DURABLES ...............................................1-3
A. Copier ..................................................1-3
B. Cassette Feeding Module-B2/
Cassette Feeding Module-A2/
Cassette Feeding Unit-K1 ...................1-4
C. Paper Deck Pedestal-K1.....................1-4
IV. MAINTENANCE AND INSPECTION ........1-5
A. Image Adjustment Procedure..............1-5
B. Points to Note for Servicing Work .......1-6
CHAPTER 2 STANDARDS AND ADJUSTMENTS
A. Mechanical................................................. 2-1
1. Adjusting the Image Leading
Edge Margin ([3], No.305;
registration ON timing).........................2-1
2. Adjusting the Leading Edge
Non-Image Width ([3], No.306;
blank shutter ON timing)...................... 2-1
3. Adjusting the Image Trailing
Edge Non-Image Width ([3], No.309;
blanking shutter timing) .......................2-2
4. Adjusting the Left/Right
Registration ......................................... 2-2
5. Adjusting the Left/Right Margin
(No.311 left/right margin
adjustment)..........................................2-3
6. Routing the Scanner Drive Cable........2-4
7. Adjusting the Mirror Position
(optical length between No.1mirror
and No.2/3 mirror) ...............................2-5
8. Adjusting the Scanner Cable
Tension................................................2-5
9. Orienting the Pick-Up Roller................2-5
10. Orienting the Multifeeder
Pick-Up Roller......................................2-6
11. Positioning the Multifeeder Assembly
Paper Guide Plate Cam ......................2-6
12. Positioning the Blanking
Shutter Solenoid .................................. 2-7
13. Positioning the Change Solenoid ........2-7
14. Routing the Blanking Shutter Cable ....2-8
15. Adjusting the Lower Fixing Roller
Nip ....................................................... 2-8
16. Points to Note After Replacing
the Upper Fixing Unit...........................2-9
17. Mounting the Oil Application Solenoid ..2-9
18. Routing the Drive Belt .......................2-10
19. Positioning the Primary Charging
Roller Cleaning Solenoid...................2-11
20. After Replacing the Drum Unit...........2-12
21. Installing the Drum Heater.................2-12
22. Assembling the Mirror Positioning
Tool....................................................2-13
23. Positioning the Paper Deflecting
Plate Solenoid (SL8) ......................... 2-13
24. Setting the Deck Size ........................ 2-13
25. Adjusting the Deck Registration ........2-14
B. Electrical .................................................. 2-15
1. Adjustment after Replacing PCBs.....2-15
2. Adjusting the Scanning Lamp
Intensity ............................................. 2-15
3. AE Adjustment...................................2-15
4. Multifeeder Paper Width Sensor
Adjustment.........................................2-19
5. Setting the Paper Size for the
Universal Cassette ............................2-20
6. Initializing the Back-Up RAM.............2-21
7. Checking the Photointerrupters.........2-21
3
4
5
6
7
8
iii

CHAPTER 3 IMAGE FAULTS
A. Initial Checks .............................................3-1
B. Samples of Image Faults...........................3-4
C.
Troubleshooting Image Faults ......................
1. The copy is too light (half-tone
areas only)...........................................3-5
2. The copy is too light (including
solid black)........................................... 3-6
3. The copy is too light (overall,
extremely)............................................3-6
4. The copy has uneven density
(darker at front)....................................3-7
5. The copy has uneven density
(lighter at front). ................................... 3-7
6. The copy is foggy (overall). ................. 3-8
7. The copy has vertical fogging.............. 3-9
8. The copy has black lines
(vertical, fuzzy, thick). .......................... 3-9
9. The copy has black lines
(vertical, fine). ....................................3-10
3-5
10. The copy has white spots (vertical). ..3-11
11. The copy has white lines (vertical). ...3-11
12. The copy has white spots
(horizontal)......................................... 3-12
13. The back of the copy is soiled. .......... 3-13
14. The copy has a fixing fault.................3-14
15. The leading edge of the copy
is displaced........................................3-15
16. The leading edge of the copy
is displaced........................................3-15
17. The leading edge of the copy
is displaced........................................3-15
18. The copy has blurred images. ...........3-16
19. The copy has horizontal fogging. ......3-16
20. The copy has poor sharpness. ..........3-17
21. The copy is blank...............................3-18
22. The copy is solid black. ..................... 3-18
CHAPTER 4 TROUBLESHOOTING MALFUNCTIONS
1. E000 .......................................................... 4-1
2. E001 .......................................................... 4-2
3. E002, E003 ................................................ 4-2
4. E004 .......................................................... 4-3
5. E010 .......................................................... 4-4
6. E064 .......................................................... 4-5
7. E202 (The keys on the control panel are
locked.) ...................................................... 4-5
8. E210 .......................................................... 4-6
9. E220 .......................................................... 4-6
10. E240 ..........................................................4-6
11. E260 ..........................................................4-7
12. E261 ..........................................................4-7
13. E710, E711, E712, E717 ........................... 4-8
14. E802 ..........................................................4-8
15. AC power is absent. ..................................4-9
16. DC power is absent. ................................ 4-10
17. The blanking shutter fails to operate. ......4-10
18. The photosensitive drum fails to rorate. .. 4-11
19. Pick-up operation fails (from cassette). ...4-11
20. Pick-up operation fails (multifeeder). .......4-12
21. The scanner fails to move forward/
in reverse. ................................................4-12
22. The registration roller fails to operate. ..... 4-13
23. The scanning lamp fails to turn ON. ........4-13
24. The lens fails to move. ............................. 4-14
25. The fixing heater fails to operate. ............4-14
26. The pre-exposure lamp fails to turn ON. . 4-15
27. The ADD PAPER message fails to turn
OFF.......................................................... 4-15
28. The JAM message fails to turn OFF........4-15
CHAPTER 5 TROUBLESHOOTING FEEDING
FAULTS
A. Copy Paper Jams ......................................5-1
1. Pick-Up Assembly ............................... 5-2
2. Separation/Feeding Assembly ............5-3
3. Fixing/Delivery Assembly .................... 5-3
4. Duplexing Unit (during stacking
operation) ............................................ 5-4
5. Duplexing Unit (during re-pick
up operation) ....................................... 5-4
iv

B. Feeding Faults............................................5-5
1. Double Feeding ...................................5-5
2. Wrinkles...............................................5-5
C. Paper Deck................................................5-6
1. Pick-up fails (from deck). ..................... 5-6
2. Paper jams when pick-up is from the
paper deck...........................................5-7
3. Double feeding (paper deck). ..............5-8
4. Wrinkling (paper deck).........................5-8
5. The ‘ADD PAPER’ message fails to
turn off (paper deck). ...........................5-9
6. The lifter fails to rise (paper deck). ....5-10
CHAPTER 6 ARRANGEMENT AND FUNCTIONS OF
THE ELECTRICAL PARTS
A. Sensors...................................................... 6-2
B. Clutches, Solenoids,
and Switches .............................................6-4
C. Motors, Heaters, and Lamps ..................... 6-6
D. PCBs..........................................................6-8
CHAPTER 7 SERVICE MODE
A. Outline ....................................................... 7-1
B. Using Service Mode .................................. 7-1
C. Control Display Mode (‘1’) .........................7-3
D. I/O Mode (‘2’).............................................7-6
CHAPTER 8 SELF DIAGNOSIS
A. Copier Self Diagnosis ................................8-1
B. Self Diagnosis on the Cassette Feeding
Unit ............................................................ 8-4
E. Cassette Feeding Module-A2 .................. 6-10
F. Cassette Feeding Unit-K1 .......................6-12
G. Paper Deck Pedestal-K1 .........................6-14
H. Variable Resistors (VR) and
Check Pins by PCB. ................................ 6-16
E. Adjustment Mode (‘3’).............................. 7-10
F. Operation/Inspection Mode (‘4’) ..............7-13
G. Machine Settings Mode (‘5’) ....................7-14
H. Counter Mode (‘6’)................................... 7-16
C. RDF/ADF Self Diagnosis...........................8-5
D. Sorter Self Diagnosis................................. 8-6
APPENDIX
A. GENERAL TIMING CHART ..................... A-1
B. SIGNALS AND ABBREVIATIONS ........... A-2
C. GENERAL CIRCUIT DIAGRAM............... A-5
D. SPECIFICATIONS .................................... A-7
I. Copier.................................................. A-7
II. Cassette Feeding Module-B2/
Cassette Feeding Module-A2/
Cassette Feeding Unit-K1 ................ A-11
III. Paper Deck Pedestal-K1 .................. A-11
E. SPECIAL TOOLS ................................... A-12
F. SOLVENTS/OILS ................................... A-13
v

vi
MAINTENANCE AND INSPECTION
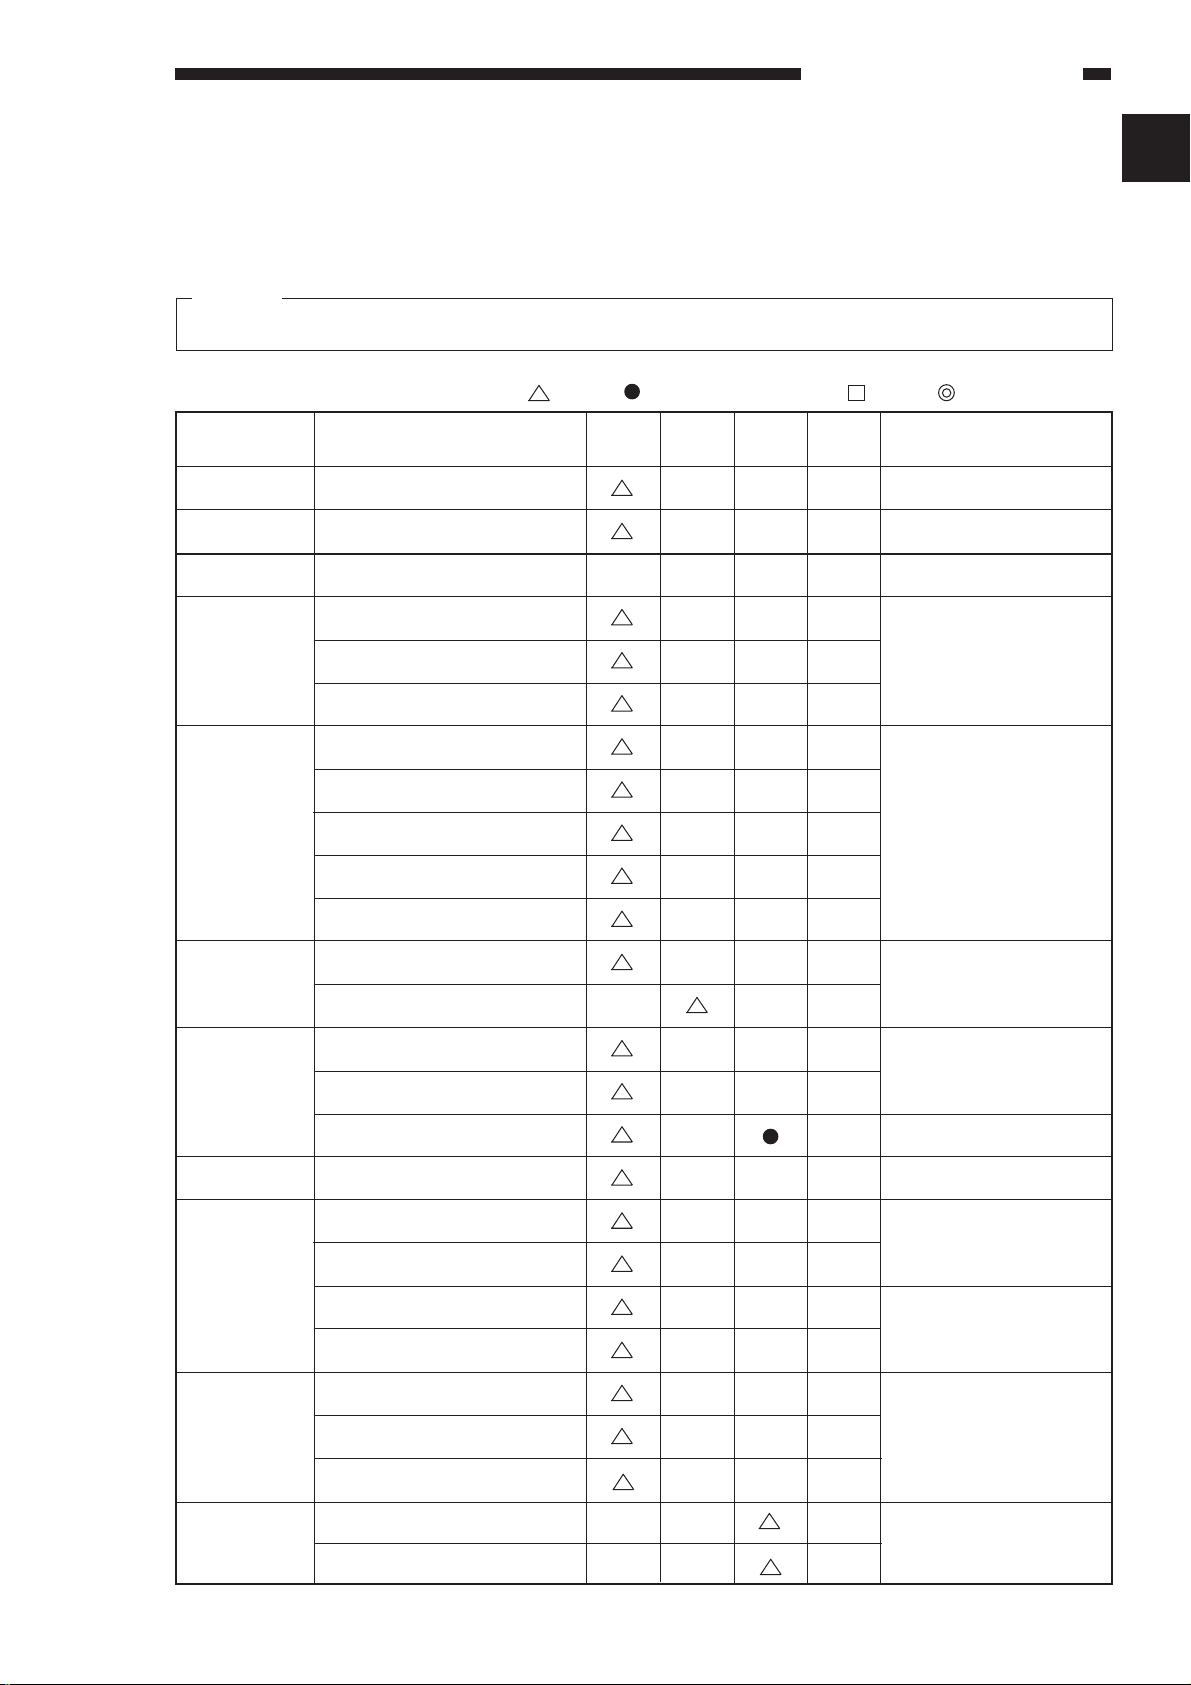
CHAPTER 1 MAINTENANCE AND INSPECTION
I. SERVICING CHART
Caution:
Do not use solvents or oils other than those specified.
: clean : replace ✩ : lubricate : adjust : inspect or clean
Unit
External
Pick-up
assembly
Scanner drive
assembly
Feeding
assembly
Parts
Copyboard glass
Pick-up roller
Scanner rail
Transfer guide assembly
Feeding belt
Feeding assembly mount
every
20,000
every
60,000
✩
every
100,000
every
year
Remarks
Use alcohol.
Use alcohol solution;
then, apply lubricant.
Use a moist cloth.
1
Optical
assembly
Drum kit
Charging
assembly
Developing
assembly
Fixing
assembly
Reflecting plate for original exposure
Side reflecting plate for
original exposure
No. 1 through No. 6 mirrors
Lens
Dust-proofing glass
Clearner base
Drum support shaft
Charging roller
Charging roller cleaner
Static eliminator
Developing spacer
Upper fixing roller
Lower fixing roller
Separation claw (lower, upper)
Fixing inlet guide
Use a blower brush; if
the soiling is excessive,
use alcohol.
Actual use of the drum
kit.
Use a cotton wad.
Use cleaning oil.
Use solvent.
Delivery
assembly
Duplexing
Delivery guide/ tray
Fixing feeding spacer
Delivery spacer
Set-back roller
Re-pick-up roller
Use alcohol.
Use alcohol.
1–1

MAINTENANCE AND INSPECTION
II. PERIODICALLY REPLACED PARTS
Some parts of the copier must be replaced on a periodical basis to ensure a specific level of performance;
replace them as indicated regardless of the presence of visible damage.
Plan the replacement to coincide with a scheduled visit.
A. Periodically Replaced Parts
No.
1
Static eliminator
Note:
The above values are estimates only and subject to change based on the future data.
Parts name
Parts No.
FG5-2912-020
Q’ty
1
Life (copies)
100,000
as of FEB. 1998
Remarks
1–2

MAINTENANCE AND INSPECTION
III. DURABLES
The parts shown in the table may require replacement because of deterioration or damage over the period
of warranty; replace them when they fail using the table as a guide.
A. Copier
No.
1
Pick-up roller
2
Pick-up separation pad
3
Multifeeder pick-up roller
4
Multifeeder separation pad
5
Halogen lamp
6
Fixing cleaning roller
7
Oil-applying roller
8
Transfer roller
9
Upper fixing unit
10
Lower fixing roller
Parts name
Parts No.
FB3-8771-00P
FG5-6792-020
FB1-8581-000
FB2-2167-000
FH7-3271-000
FB3-4494-00P
FA0-0353-00P
FB2-2223-000
FG5-2928-140
FB2-2316-000
Q’ty
2
2
1
1
1
1
1
1
1
1
as of FEB. 1998
Life (copies)
100,000
100,000
100,000
100,000
100,000
100,000
60,000
100,000
200,000
200,000
Remarks
See Note 1.
See Note 1.
See Note 1.
See Note 1.
11
12
13
14
14-1
14-2
14-4
15
Note:
1. The life represents the number of copies actually made using the part.
2. The above values are estimates only and subject to change based on future data.
Upper fixing separation claw
Lower fixing separation claw
Pre-exposure lamp
Developing assembly
Developing cylinder
Side seal
Developing blade unit
Scanner cooling fan filter
FB1-0301-000
FB1-7275-000
FG5-2891-000
FG5-3275-04P
FB2-3834-000
FB2-3825-00P
FG5-7012-00P
FC2-8902-00P
4
4
1
1
1
2
1
1
200,000
200,000
200,000
100,000
100,000
100,000
100,000
100,000
Replace with
item 12 or
12-1 through
12-4.
1–3

MAINTENANCE AND INSPECTION
B. Cassette Feeding Module-B2/Cassette Feeding Module-A2/
Cassette Feeding Unit-K1
as of FEB. 1998
No.
1
Pick-up roller
2
Pick-up separation pad
Note:
The above values are estimates only and subject to change based on future data.
Parts name
Parts No.
FB2-2251-000
FG5-3614-000
Q’ty
1 through 3
1 through 3
Life (copies)
100,000
100,000
C. Paper Deck Pedestal-K1
No.
1
2
Parts name
Pick-up roller
Feeding roller
Parts No.
FF5-1220-000
FF5-1221-000
FB1-7061-000
Q’ty
1
1
1
Life (copies)
100,000
100,000
100,000
Remarks
Actual usage
Actual usage
as of FEB. 1998
Remarks
Rear
Front
Separation roller
3
Note:
The above values are estimates only and subject to change based on future data.
FB1-7060-020
1
100,000
1–4

MAINTENANCE AND INSPECTION
IV. MAINTENANCE AND INSPECTION
A. Image Adjustment Procedure
Pre-Checks
Clean the static eliminator.
NO
Is the density correction volume (VR850) on the service
switch PCB centered on the
black dot?
▼
Adjust pointer to
black dot on
panel.
Make sure that all input
values of service mode [3]
are as indicated on the
label attached to the front
door; if different, correct
them.
▼
▼
▼
YES
Optimum Density Adjustment
Is the density of gray scale
▼
No. 8 optimum?
Is the density of gray scale
too high (dark)?
NO
▼
Turn the copy density
correction volume
(VR850) clockwise so
that No. 8 darkens.
(Note 2).
Make one copy.
YES
End the
▼
adjustment.
NO
▼
YES
▼
Turn the copy density
correction volume
(VR850) counterclockwise so that No. 8
lightens. (Note 2)
▼
▼
▼
Make two to three copies
in non-AE and at copy
density 5. (NA-3)
▼
Check the following:
1. density of gray scale
No. 8
2. presence/absence of
fogging in white background
▼
Note 1:
For NA-3 (Test Charts), make sure that No. 8 on
the copy is of the same density as No. 4 through
No. 7 of the charts.
Note 2:
A shift is made in the control of the developing
bias (DC component).
1–5
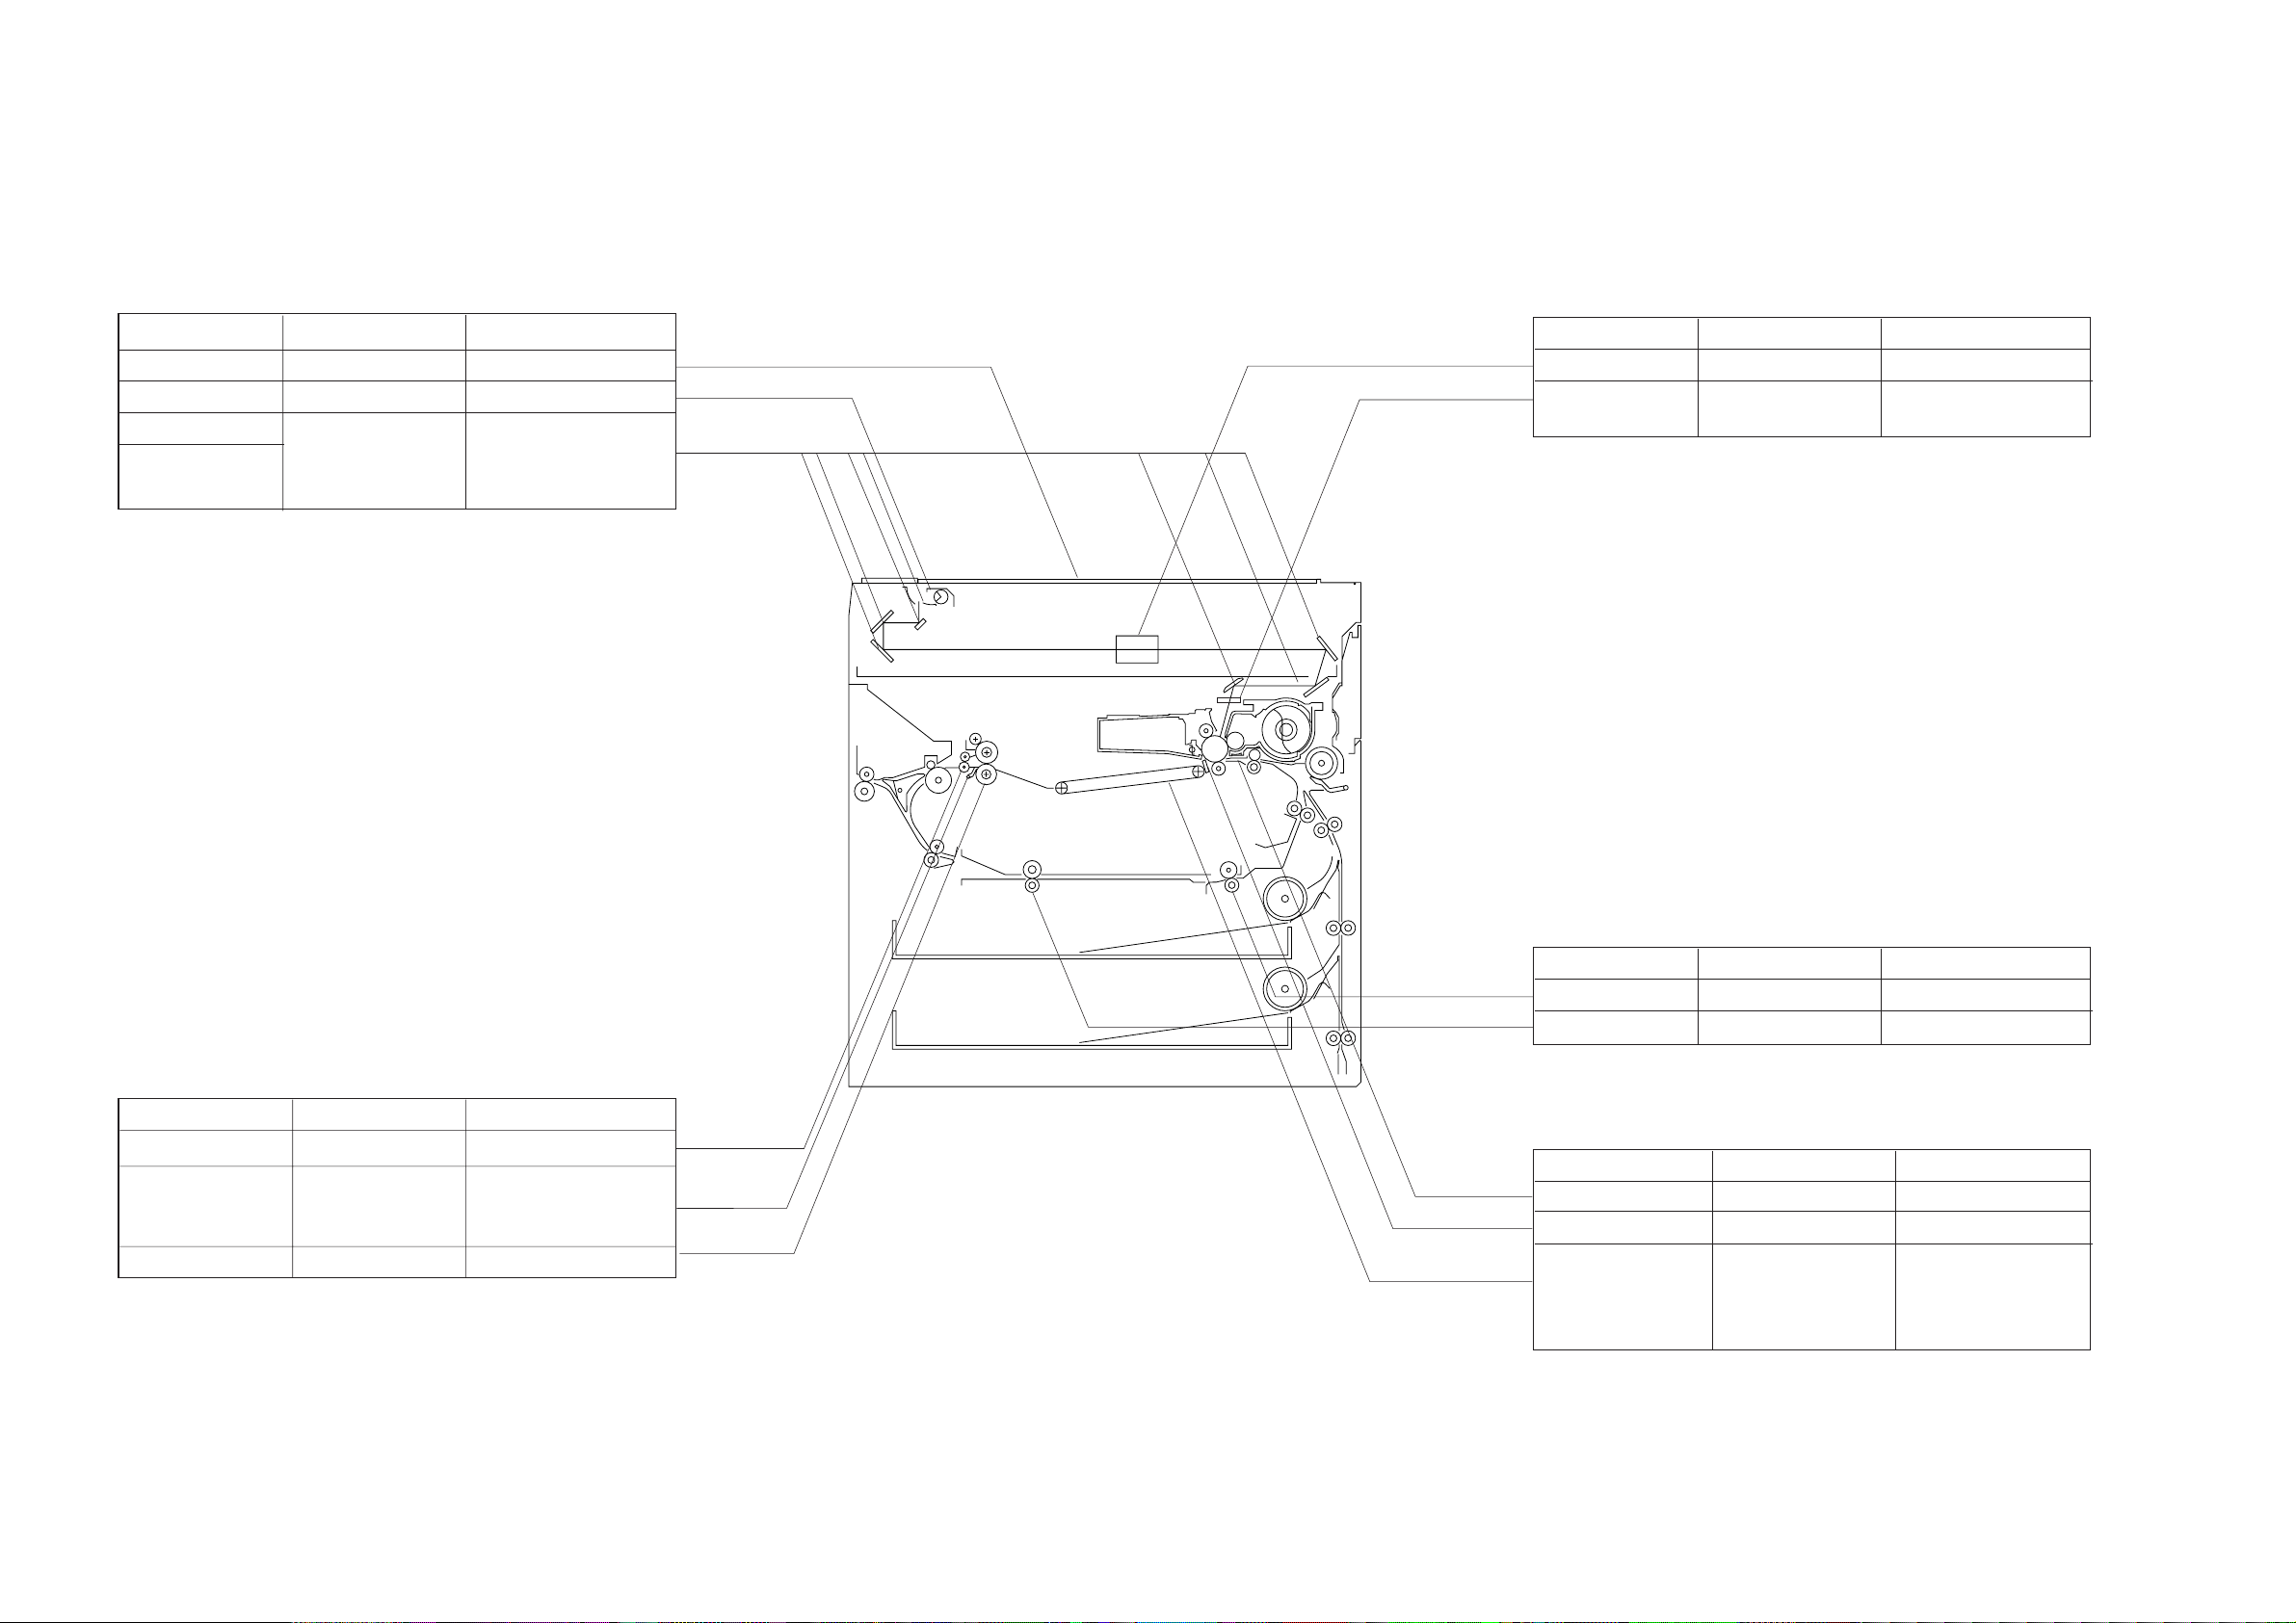
B. Points to Note for Servicing Work
MAINTENANCE AND INSPECTION
Copyboard, Scanner
Item Tool/Solvent Work/Remarks
Copyboard glass
Scanning lamp
Reflecting plate
No. 1 though
6 mirrors
Alcohol
Lint-free paper
Blower brush
Cleaning
Dry wiping
If excessive, dry wiping
with lint-free paper
Optical path
Item
Lens
Dust-proofing
glass
Tool/Solvent Work/Remarks
Blower brush
Blower brush
Cleaning
Cleaning
Fixing/Delivery assembly
Item
Separation claws
Upper fixing
roller,lower
fixing roller
Paper guide plate
Tool/Solvent
MEK
Cleaning oil
(TKN-0464 )
MEK
Work/Remarks
Cleaning
Cleaning
Cleaning
Duplexing unit
Item
Re-pick up roller
Set-back roller
Feeding assembly, Static eliminator
Item
Transfer guide
Static eliminator
Feeding belt,
Feeding assembly
mount, Transfer
charging assembly,
Rail
Note:
Make sure no droplets of water remain; if any,
do not turn on the power.
Tool/Solvent Work/Remarks
Alcohol
Alcohol
Tool/Solvent Work/Remarks
Moist cloth (Note)
Special brush
Moist cloth (Note)
Cleaning
Cleaning
Cleaning
Cleaning
Cleaning
1–6
STANDARDS AND ADJUSTMENTS
CHAPTER 2 STANDARDS AND ADJUSTMENTS
A. Mechanical
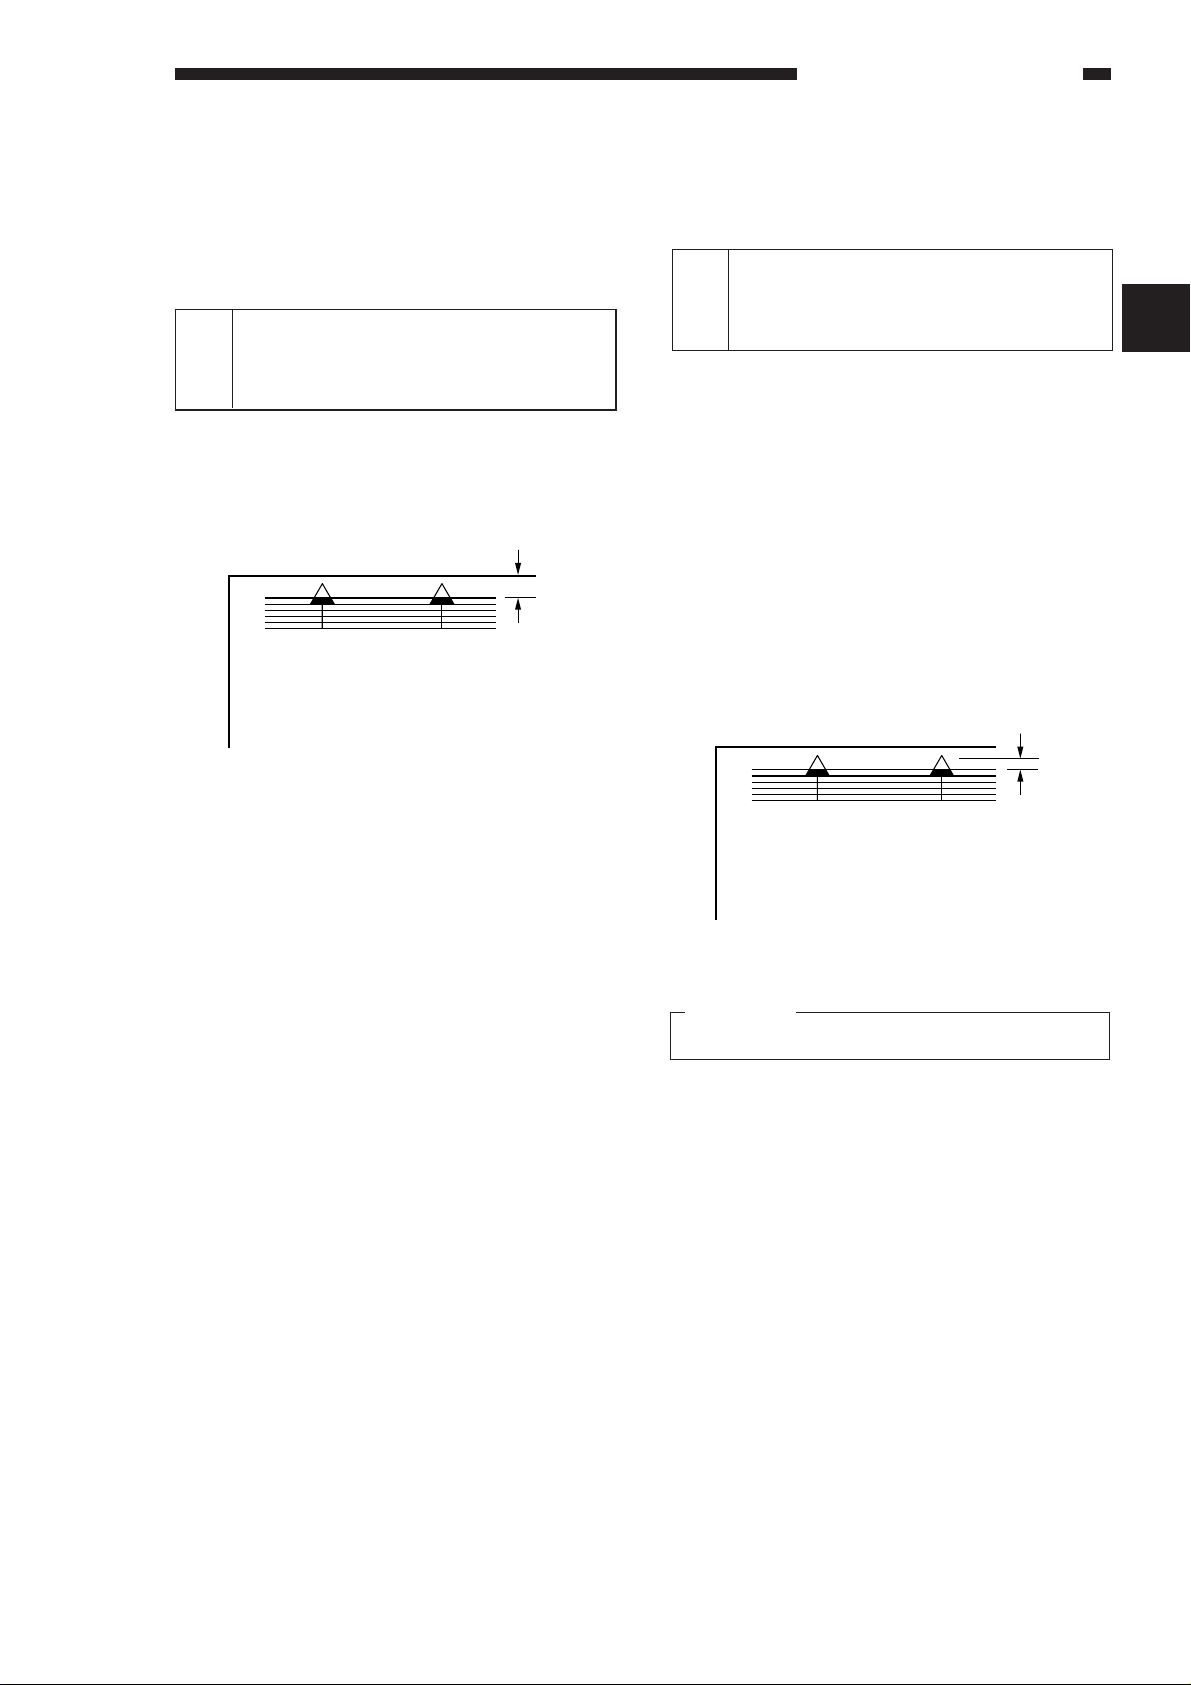
1 Adjusting the Image Leading
Edge Margin ([3], No. 305;
registration ON timing)
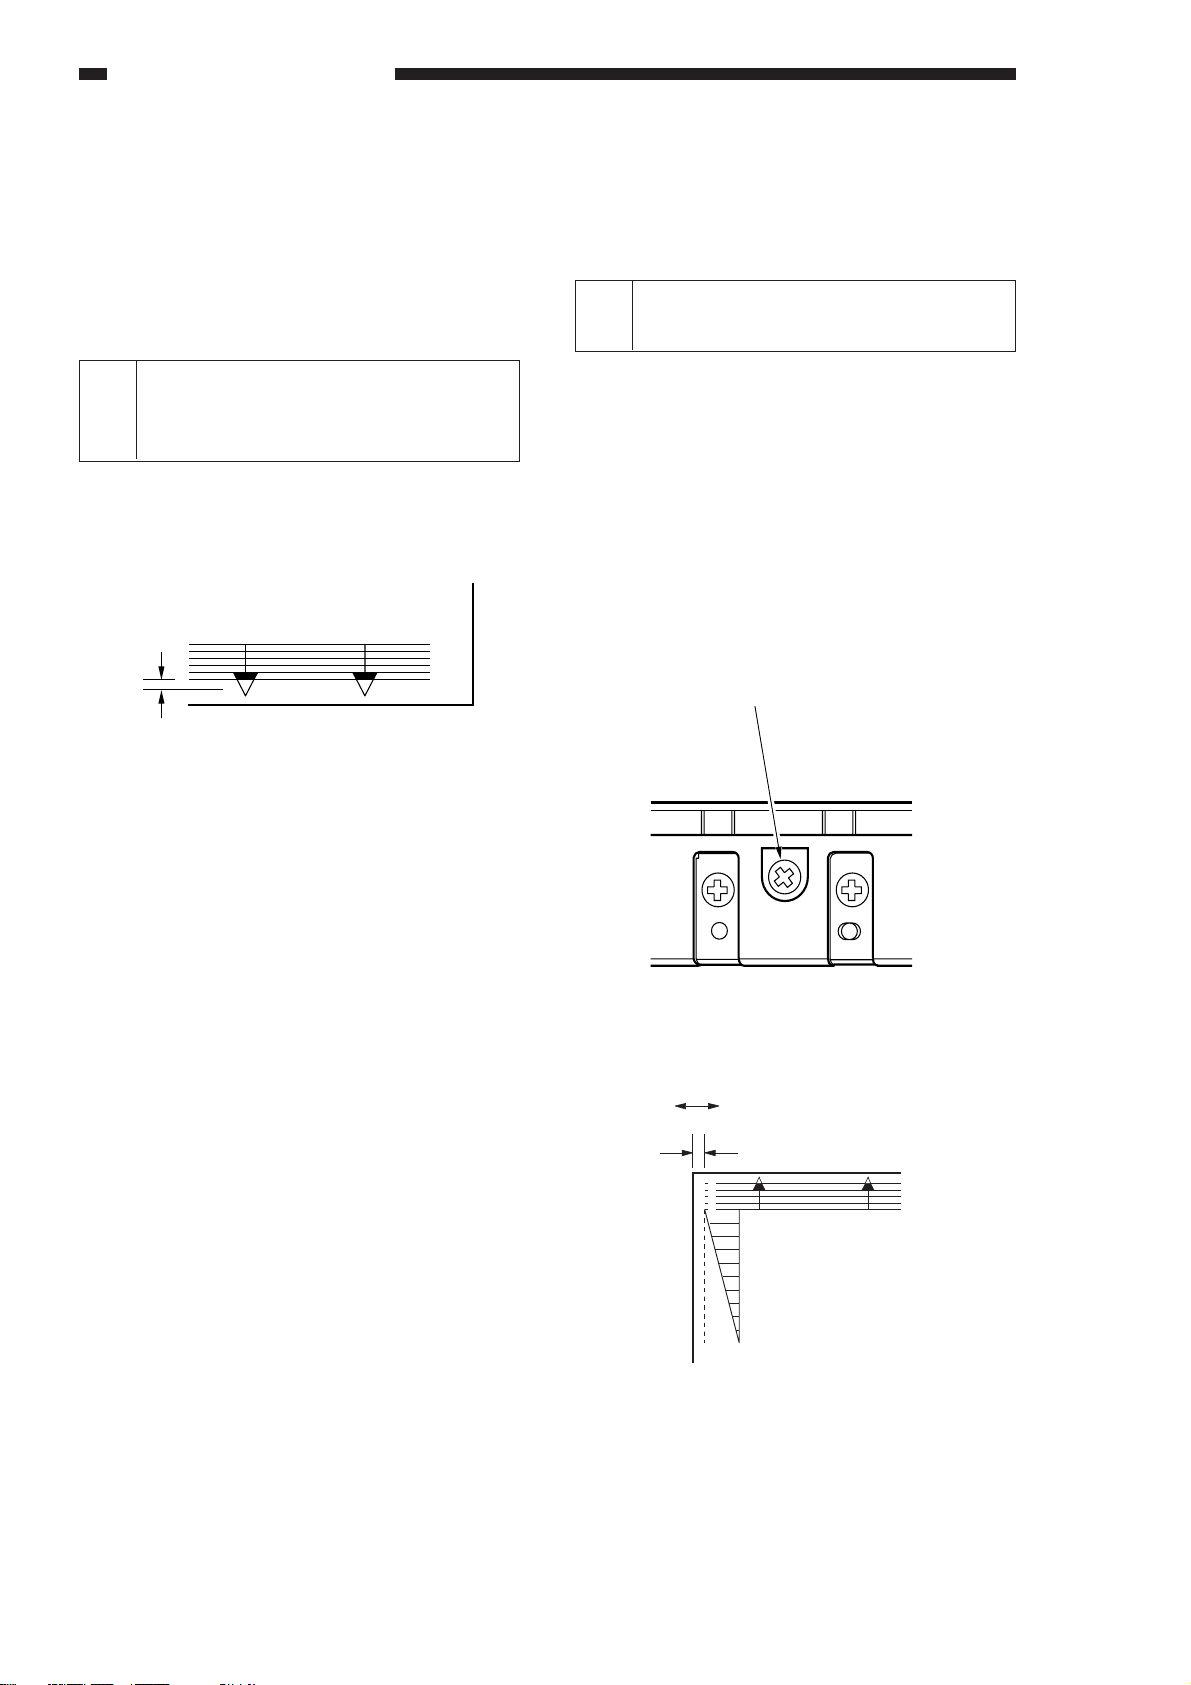
Select service mode ([3] No. 305; leading edge
margin adjustment). Make adjustments so that the
image position is as indicated in Figure 2-200 when
the Test Chart is copied in DIRECT.
2.5±1.5mm
Figure 2-200
Making Adjustments
1) Choose service mode [3], and select No. 305
using the numeric keypad.
• The copy count display flashes ‘No. 305’.
2) Press the Start key.
• The display flashes the present value.
• If the value is negative, ‘%’ is flashed.
To enter a negative value, press the % key,
and then enter the value using the numeric
keypad.
4) Press the AE key.
• The value is stored and the display remains
ON.
• Copying starts when the start key is pressed.
5) To enter a value once again, repeat steps 1)
and 4).
6) Press the Clear key to return to item selection.
The following is the relationship between the
settings and the image positions:
• For each ‘1’, the image position changes by
about 0.27 mm.
• For a ‘+’, the image position advances.
2 Adjusting the Leading Edge Non-
Image Width ([3], No. 306; blank
shutter ON timing)
Select service mode ([3] No. 306; leading edge
non-image width), and make adjustments so that
the leading edge non-image width is as indicated in
Figure 2-201 when the Test Sheet is copied in
DIRECT.
The machine adjusts the leading edge nonimage width taking advantage of the timing at which
the blanking shutter closes.
You must make this adjustment whenever you
have replaced the blanking shutter solenoid or the
blank exposure assembly.
Leading Edge Non-Image Width
2.5±1.5mm
Figure 2-201
Reference:
In enlargement/reduction mode, 6 mm or less.
Making Adjustments
1) Select service mode ([3] No. 306).
• The copy count display flashes ‘No. 306’.
2) Press the Start key.
3) Change the setting using the numeric keypad.
• The display flashes the present value.
• If the value is negative, ‘%’ is flashed.
To enter a negative value, press the % key,
and then enter the value using the numeric
keypad.
4) Press the AE key.
• The value is stored and the display remains
ON.
• Copying starts when the start key is pressed.
5) To enter a value once again, repeat steps 1) and
2).
2
2–1
STANDARDS AND ADJUSTMENTS
6) Press the Clear key to return to item selection.
The following is the relationship between the
settings and the image positions:
• For each ‘1’, the image position changes by
about 0.27 mm.
• For a ‘+’, the leading edge non-image width
increases.
3 Adjusting the Image Trailing
Edge Non-Image Width ([3] No.
309; blanking shutter timing)
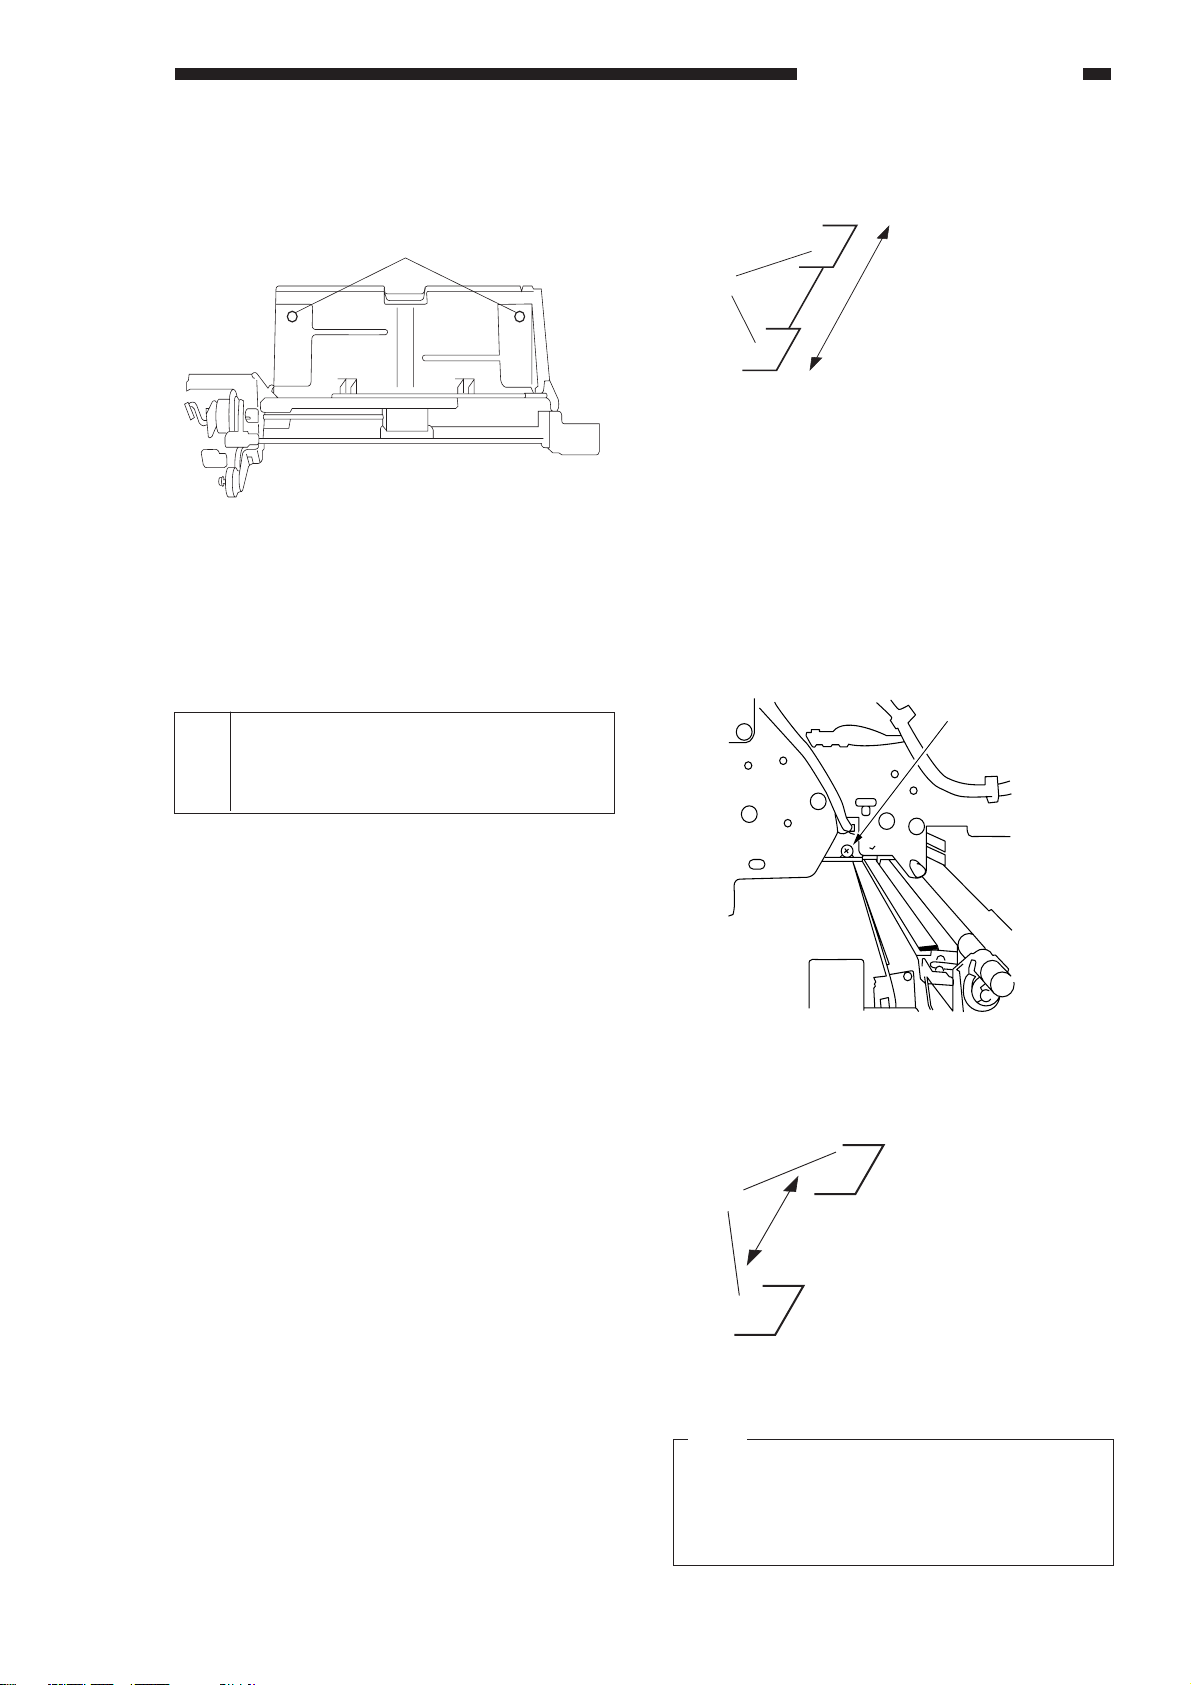
Trailing Edge Non-Image Width
2.5±
1.5mm
• For each ‘1’, the image position changes by
about 0.27 mm.
• For a ‘+’, the trailing edge non-image width
decreases.
4 Adjusting the Left/Right Regis-
tration
Make adjustments so that the image position is
as indicated in Figure 2-204 when the Test Sheet is
copied in DIRECT.
a. Pick-Up from the Cassette
Turn the screw q shown in Figure 2-203 to
adjust the position of the cassette hook.
standard: 0 ±1.5 mm
CW turn: moves the paper in the direction of
(–) shown in Figure 2-204.
CCW turn: moves the paper in the direction of
(+) indicated in Figure 2-204.
q
Figure 2-202
Select service mode ([3] No. 309; leading edge
non-image width adjustment), and make adjustments so that the image trailing edge non-image
width is as indicated in Figure 2-202 when the Test
Sheet is copied in DIRECT.
The machine adjusts the image trailing edge
non-image width by taking advantage of the timing
at which the blanking shutter opens.
Making Adjustments
1) Select service mode ([3] No. 309).
• The copy count display flashes ‘No. 309’.
2) Press the Start key.
3) Change the setting using the numeric keypad.
• The display flashes the value.
• If the value is negative, ‘%’ is flashed.
To enter a negative value, press the % key,
and then enter the value using the numeric
keypad.
4) Press the AE key.
• The value is stored and the display remains
ON.
• Copying starts when the start key is pressed.
5) To enter a value once again, repeat steps 1)
and 2).
6) Press the Clear key to return to item selection.
The following is the relationship between the
settings and the image positions:
(-)
Figure 2-203
(+)
0±1.5mm
0
2
4
6
8
10
Figure 2-204
2–2
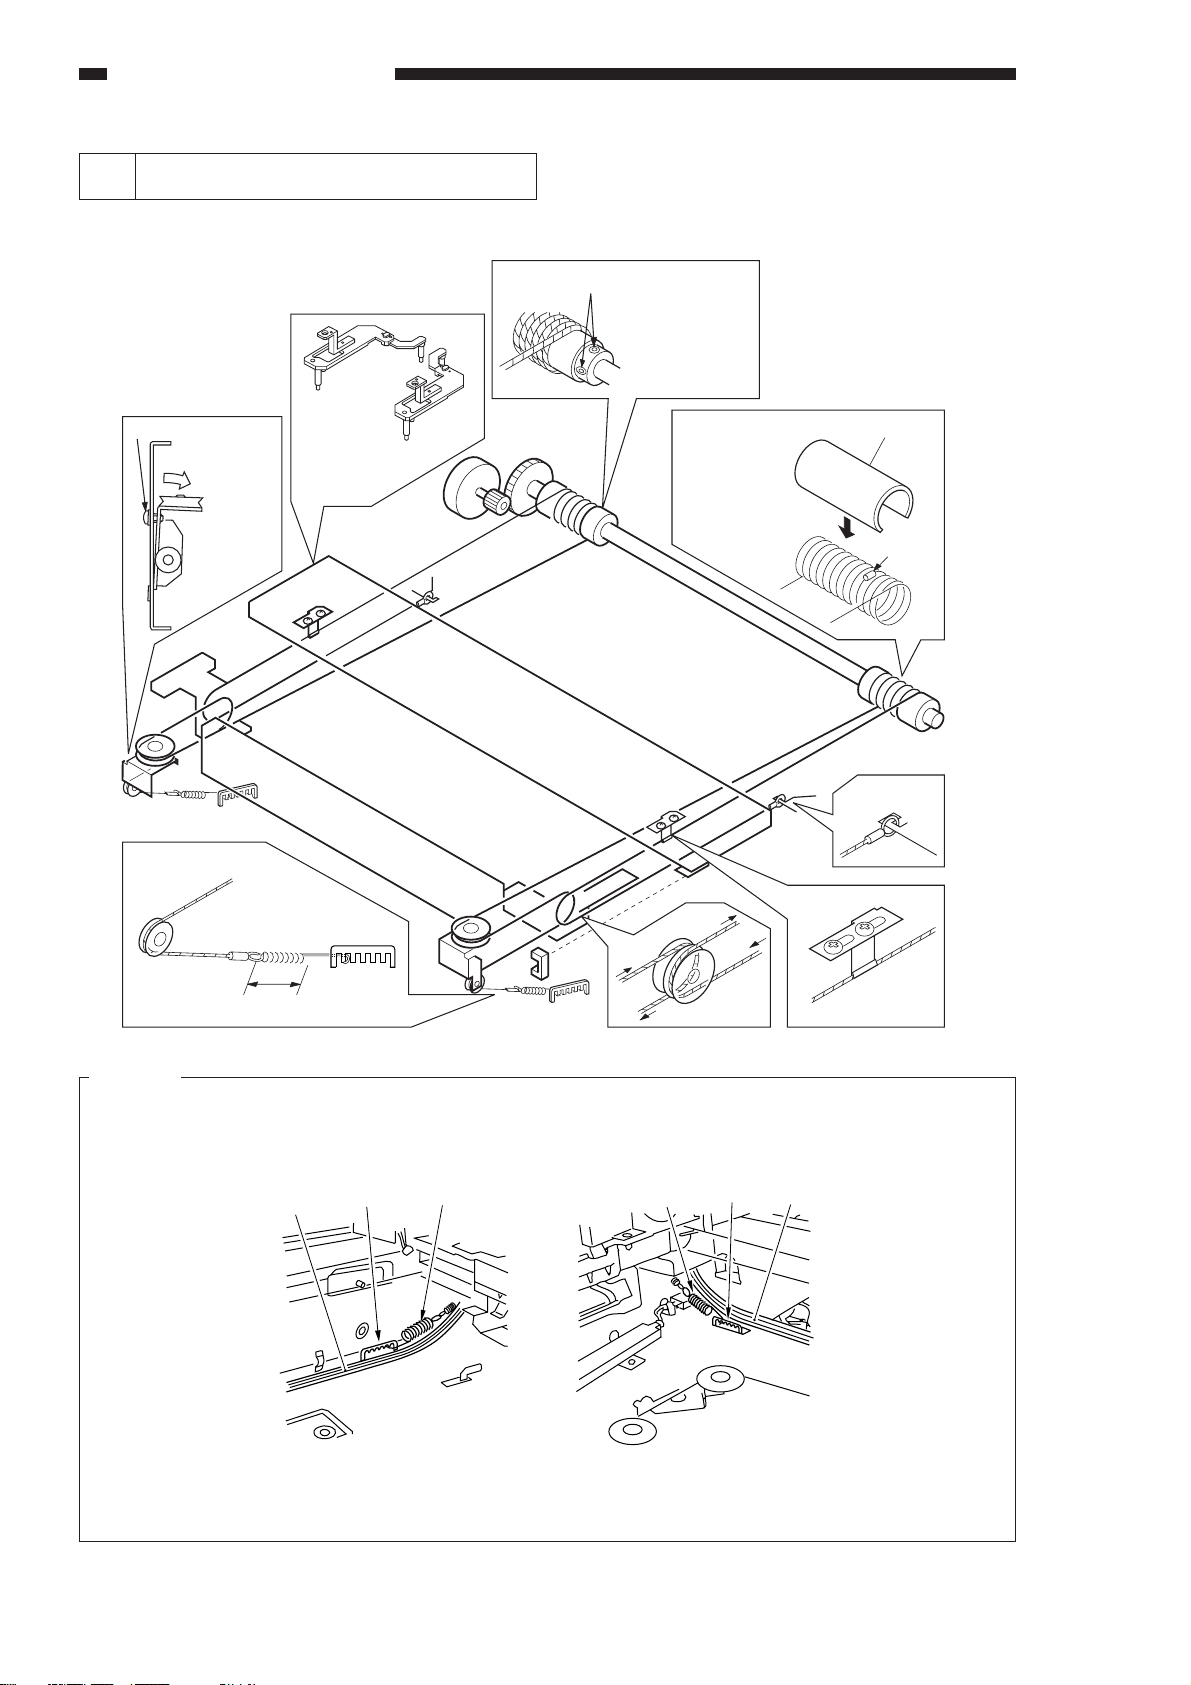
b. Pick-Up from the Multifeeder
Shutter
Adjust the distance between the
two shutters in the blanking
assembly.
Shutter
The entire shutters are
shifted.
Loosen the screw q, and move the position of
the tray so that the measurement is 0 ±1.5 mm.
q
Figure 2-205
c. Duplexing Pick-up
Start service mode (No. 329), and make adjustments so that the measurement (Figure 2-204) is 0
±1.5 mm.
Unit: 0.27 mm
STANDARDS AND ADJUSTMENTS
Figure 2-206
b. Adjusting the Position of the Left/Right
Margin
Turn the blanking adjusting screw on the machine front side plate shown in Figure 2-207 so that
the dimension is as specified:
CW: moves the margin to the front.
CCW: moves the margin to the rear.
full turn: moves the margin by about 1 mm.
5 Adjusting the Left/Right Margin
(No. 311 left/right margin adjustment)
Select service mode (No. 311 left/right margin
adjustment), and make adjustments so that the left/
right margin is 2.5 ±1.5 mm when the Test Sheet is
copied in DIRECT.
You must first adjust the “left/right registration”
before making this adjustment.
Making Adjustments
a. Margin (adjusting the width)
1) Select service mode ([3] No. 311).
2) Press the Start key.
3) Enter the new setting using the numeric key-
pad.
• If the value is negative, ‘%’ is flashed.
To enter a negative value, press the % key,
and then enter the value using the numeric
keypad.
The following describes the relationship between the settings and the margin:
• For each ‘1’ in the setting, the margin changes
to the side by about 0.37 mm.
• The settings may be between 0 and 15 mm.
• ‘+’ increases the margin.
• ‘-’ decreases the margin.
q
Figure 2-207
Figure 2-208
Note:
For both a. and b., turn ON and OFF the power
switch after making the adjustments or try a
different reproduction ratio to move the home
position of the blank exposure assembly.
2–3
STANDARDS AND ADJUSTMENTS
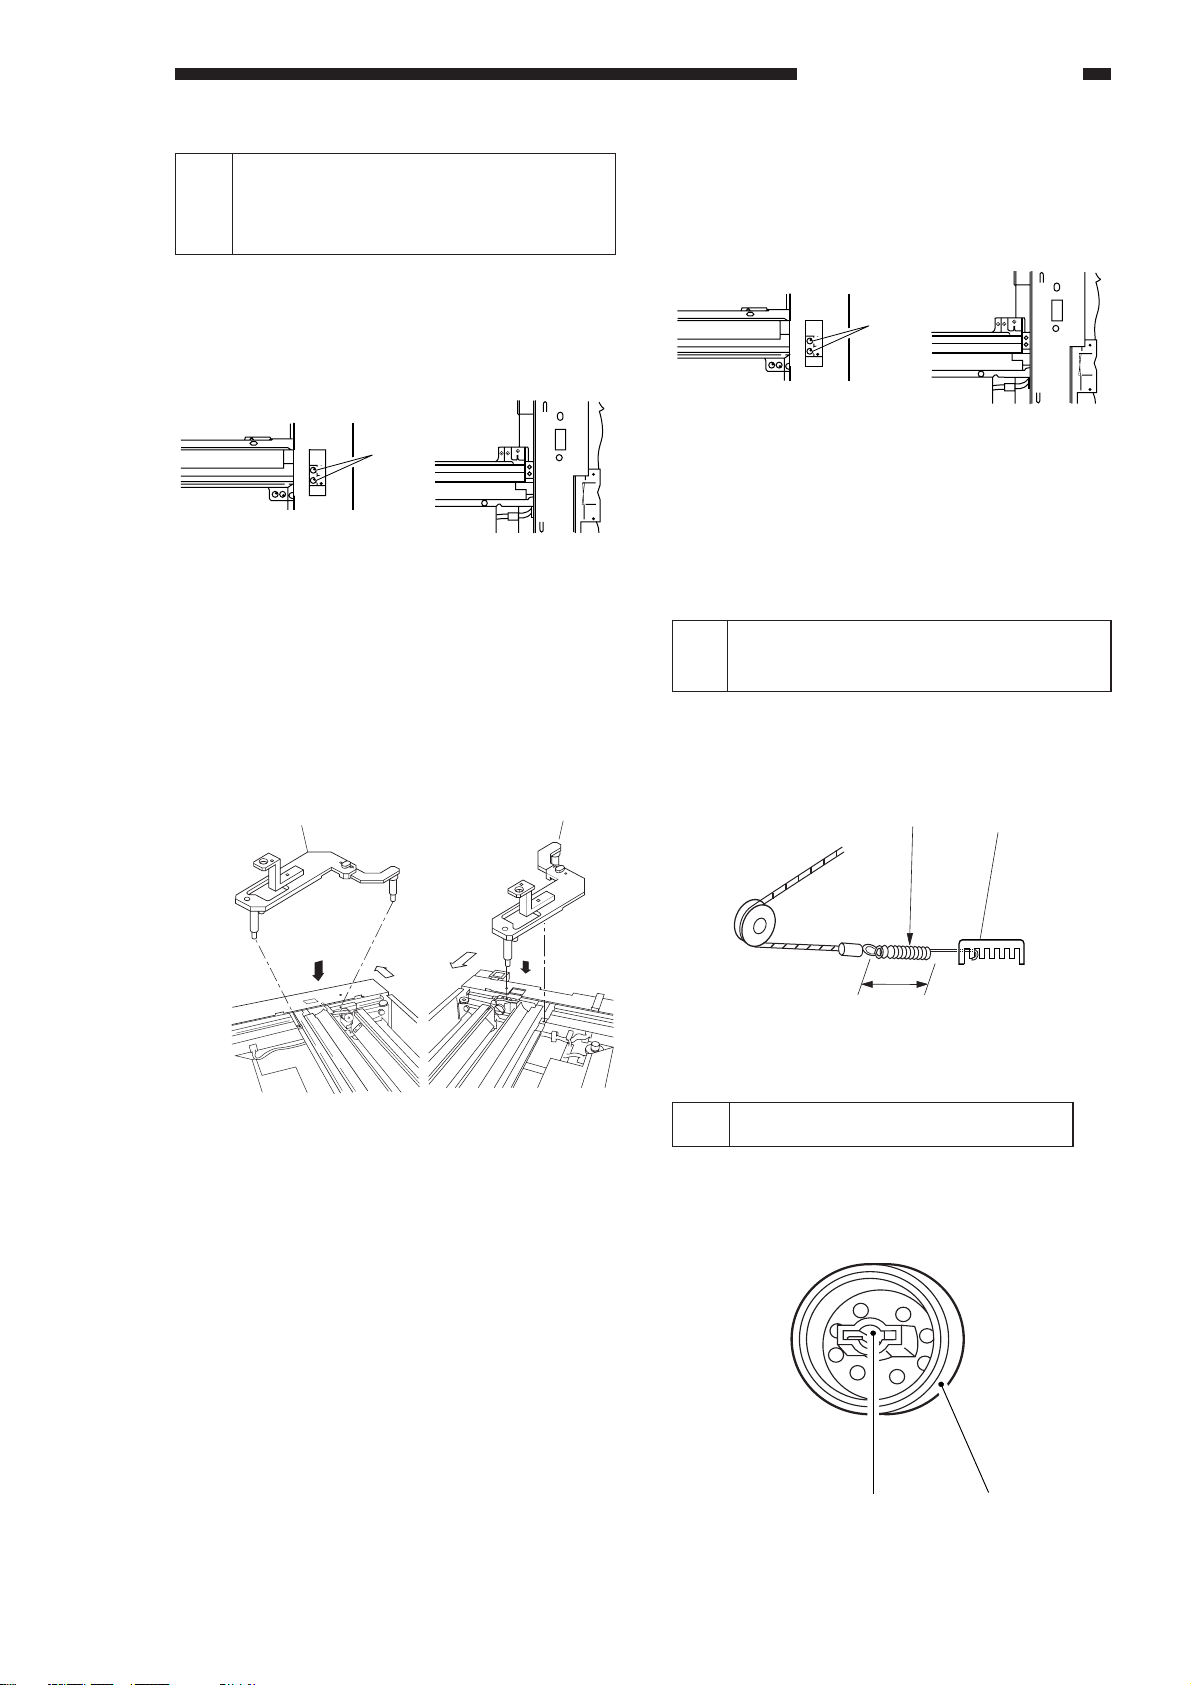
6 Routing the Scanner Drive Cable
Route the cable as indicated by the numbers q through !1, and perform “Adjusting the Cable tension”
and “Adjusting the Mirror Position” as described.
Screw
e
Loosen the
screw,and shift
it down.
i
Re-tighten
the screw.
Attach the mirror
positioning tool.
w
Set screws
Loosen the set
screws to enable
free rotation.
Put the steel ball
into the hole in
the pulley; wind
the cable nine
times toward the
inside, and four
times toward the
outside; then, snap
on the pulley clip.
!0
Pulley clip
Steel ball
q
t
o
y
r
34±1mm
u
Figure 2-209
Caution:
Pay attention to the direction of the wire spring when installing the cable spring. (Follow the illustrations
given below.) Installing the spring in the wrong direction can cause the hook tip of the spring to interfere
with the cable.
Cable
Hook
Cable spring Cable spring
Hook
Cable
!1
2–4
(front) (rear)
Figure 2-210
STANDARDS AND ADJUSTMENTS
7 Adjusting the Mirror Position (op-
tical length between No. 1 mirror
and No. 2/3 mirror)
1) Keep the mirror positioning tool at hand.
2) Move the No. 1 mirror mount in the forward
direction, and match the angular hole in the
front side plate and the cable fixing screw q.
q
(front) (rear)
Figure 2-211
3) Loosen the set screw on the pulley.
4) Attach the mirror positioning tool w to the No. 1
mirror mount and the No. 2 mirror mount (both
front and rear).
5) Install the metal fixing of the scanner cable to
the No. 1 mirror mount using two screws e
(both front and rear).
e
(front) (rear)
Figure 2-213
6) Tighten the set screw of the pulley.
7) Remove the tool (FY9-3009).
8 Adjusting the Scanner Cable
Tension
Pull the tension spring so that both ends of the
cable spring q is 34 ±1 mm, and tighten the screw
w.
Mirror positioning tool (front)
(front) (rear)
Figure 2-212
Mirror positioning tool (rear)
(front)
(front)
q
34±1mm
Figure 2-214
w
9 Orienting the Pick-Up Roller
When installing the pick-up roller q, make sure
that the face indicated in Figure 2-215 is toward the
rear.
w
Figure 2-215
q
2–5
STANDARDS AND ADJUSTMENTS
130.5±0.5mm
Paper guide
plate cam
Hole
10 Orienting the Multifeeder Pick-
Up Roller
When installing the multifeeder pick-up roller q,
make sure that the side with a cross w on its collar
is toward the rear.
w
q
(front)
Figure 2-216
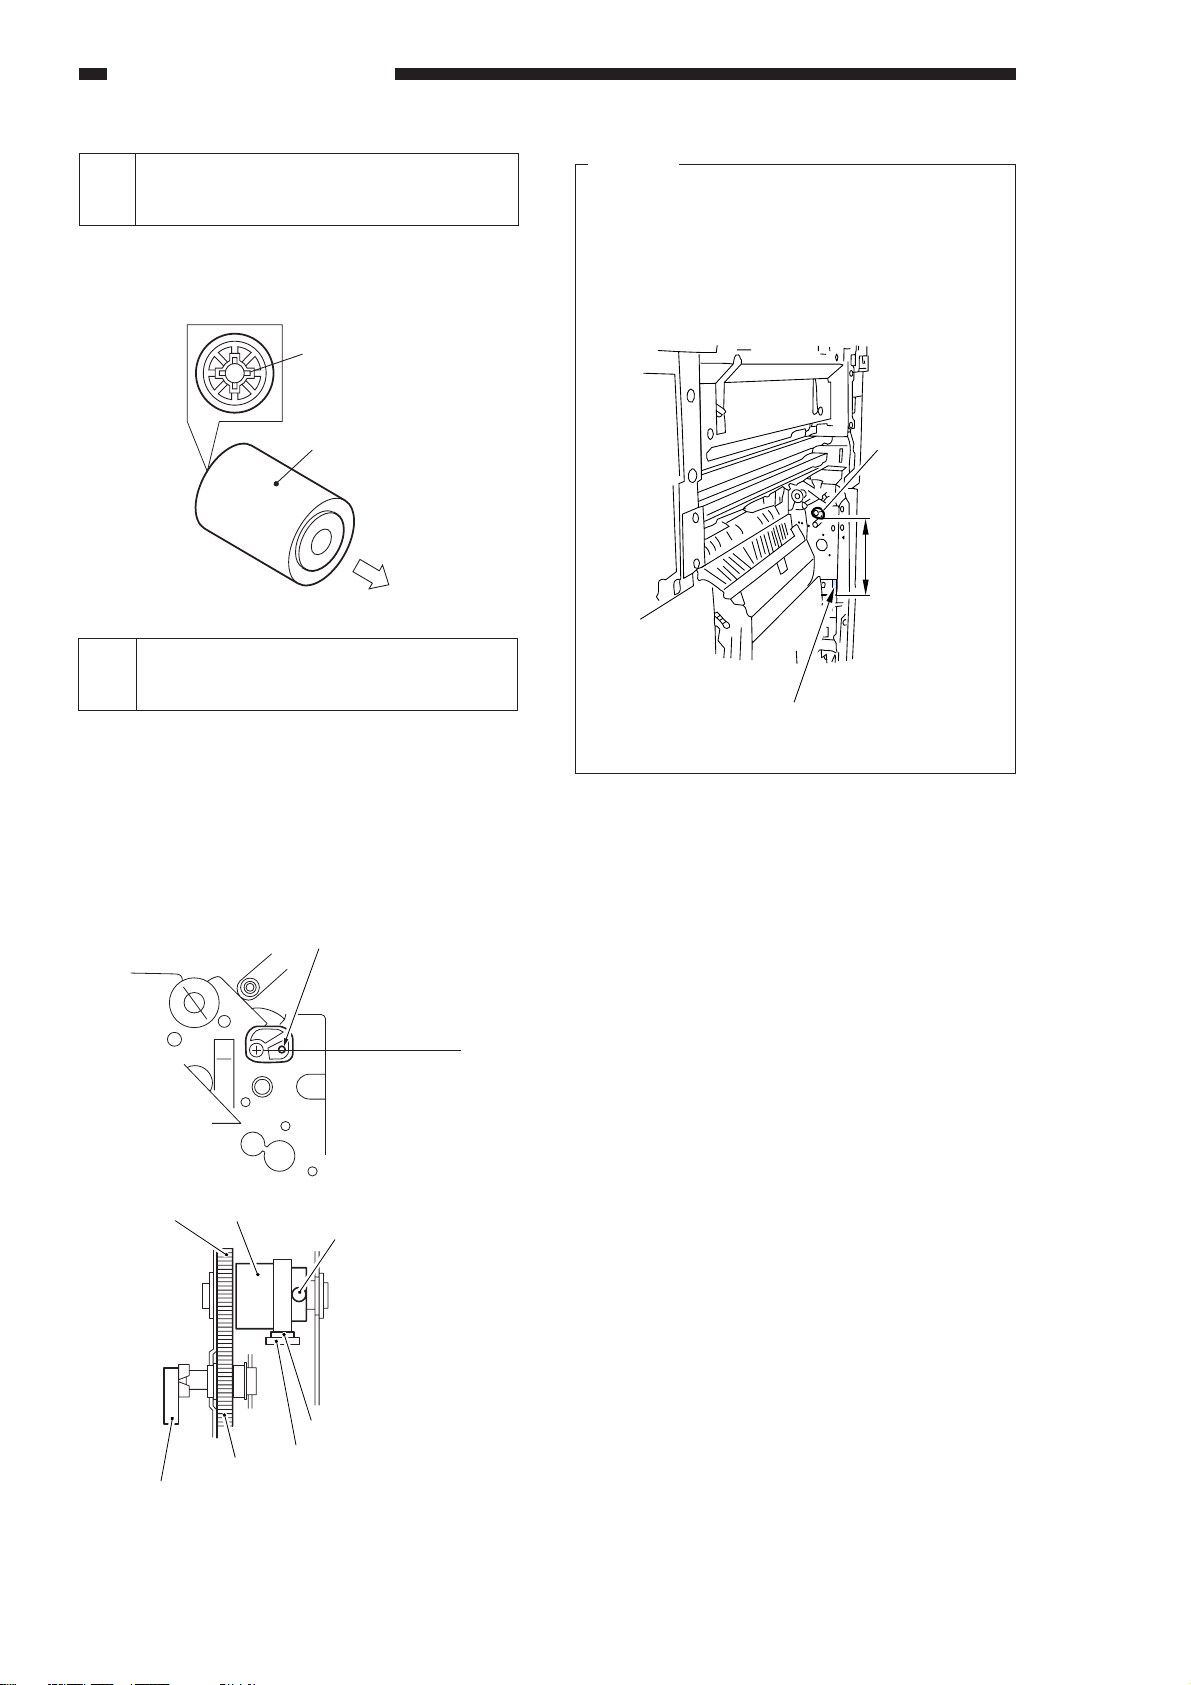
11 Positioning the Multifeeder As-
sembly Paper Guide Plate Cam
Temporarily fix the screw with a hex nut of the
spring clutch assembly in place, and rotate the
control ring. At this time, i.e., while the claw of the
control ring is engaged with the solenoid plate,
make adjustments so that the hole (or black dot) in
the cam and the hole in the multifeeder drive unit
match; then, tighten the part in place.
Caution:
If the adjusting hole is not furnished with a black
dot for reference, make adjustments as
instructed while making sure that the paper
guide plate cam of the multifeeder assembly is
located as shown.
Figure 2-218
Holes (or hole and black dot) matched
Horizontal line
Gear
Control ring
Screw w/hex nut
Gear
Paper guide plate cam
Claw
Solenoid plate
Figure 2-217
2–6
STANDARDS AND ADJUSTMENTS
A
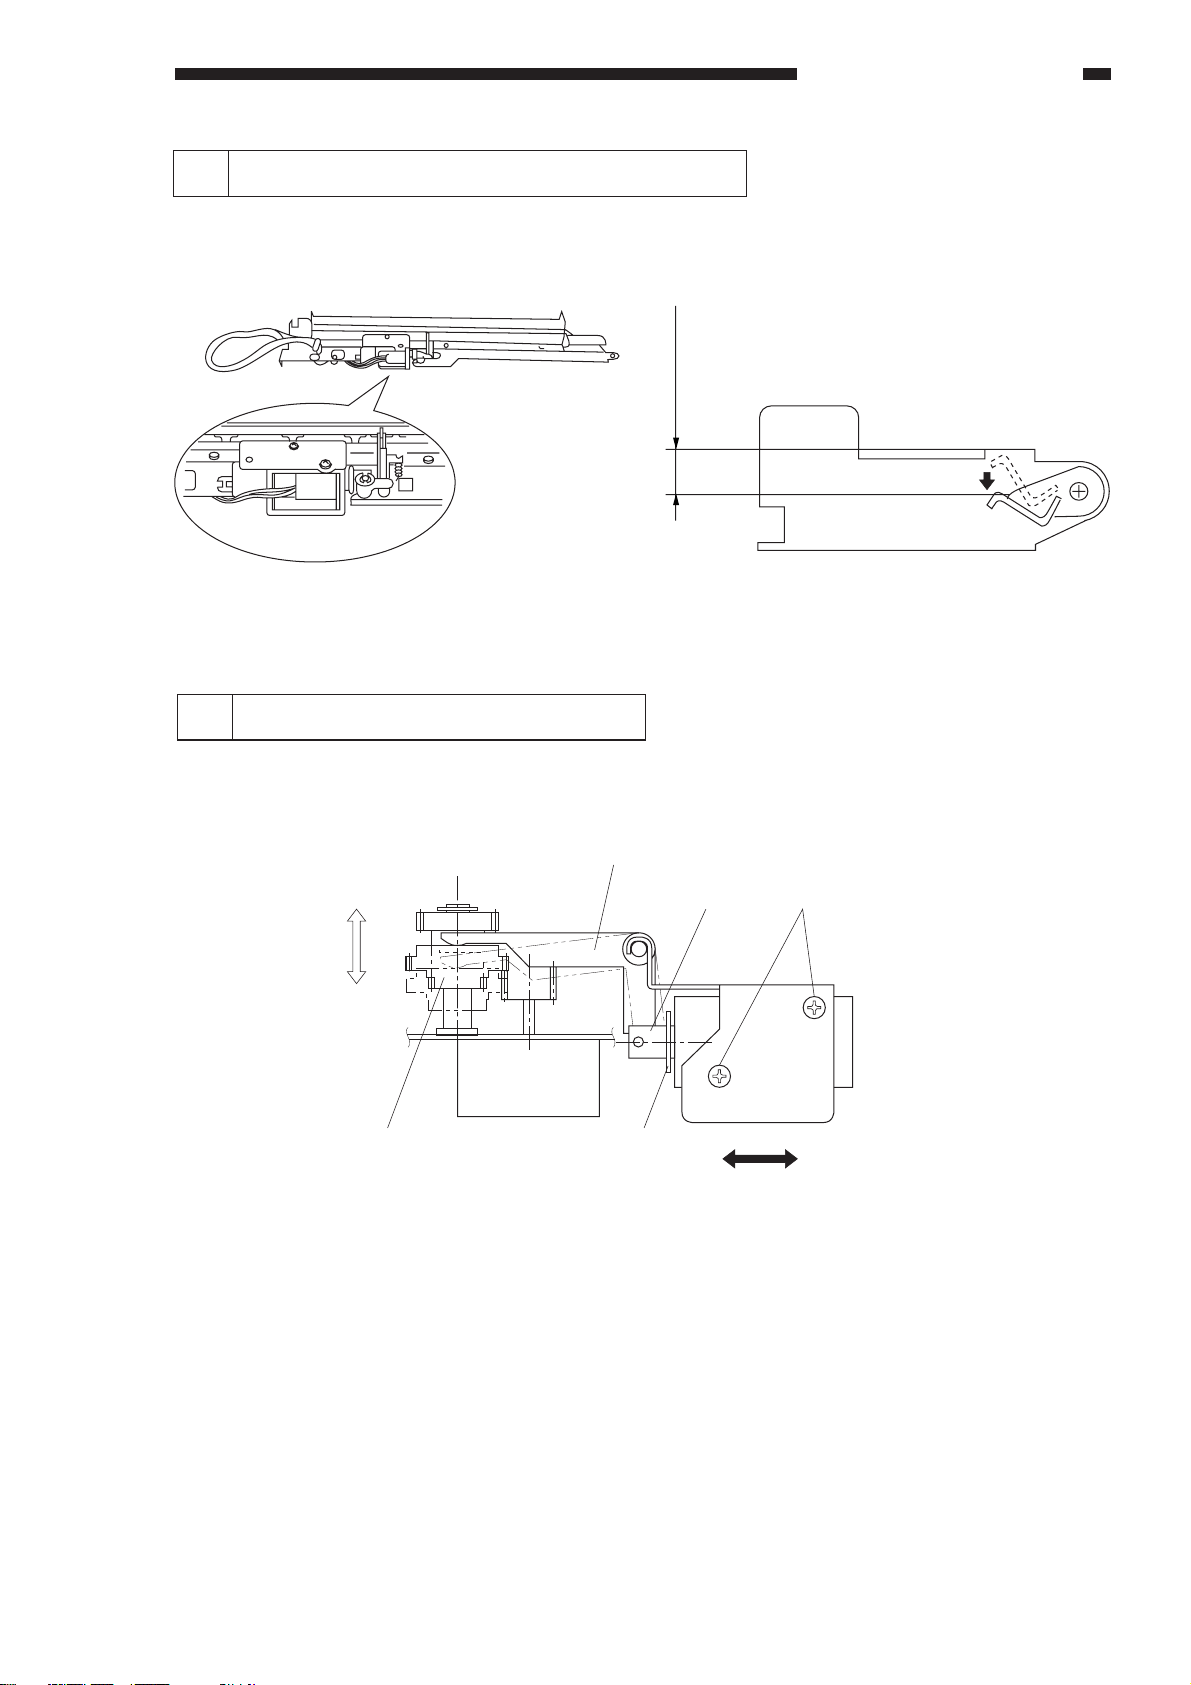
12 Positioning the Blanking Shutter Solenoid
Adjust the position of the solenoid so that bottom A is 9.5 ±0.5 mm for both sides of the shutter when the
solenoid is moved to the ON direction. Avoid forcing the shutter down when taking measurements.
After adjustment, make sure that the solenoid moves smoothly.
Figure 2-219
Figure 2-220
13 Positioning the Change Solenoid
Loosen the two screws t, and make adjustments so that the gear r moves until it stops in the direction
of b along the arm e when the steel core q of the solenoid is fully pushed in the direction of B, i.e., when the
E-ring w comes into contact with the solenoid.
e
a
b
r
w
q
AB
t
Figure 2-221
2–7
STANDARDS AND ADJUSTMENTS
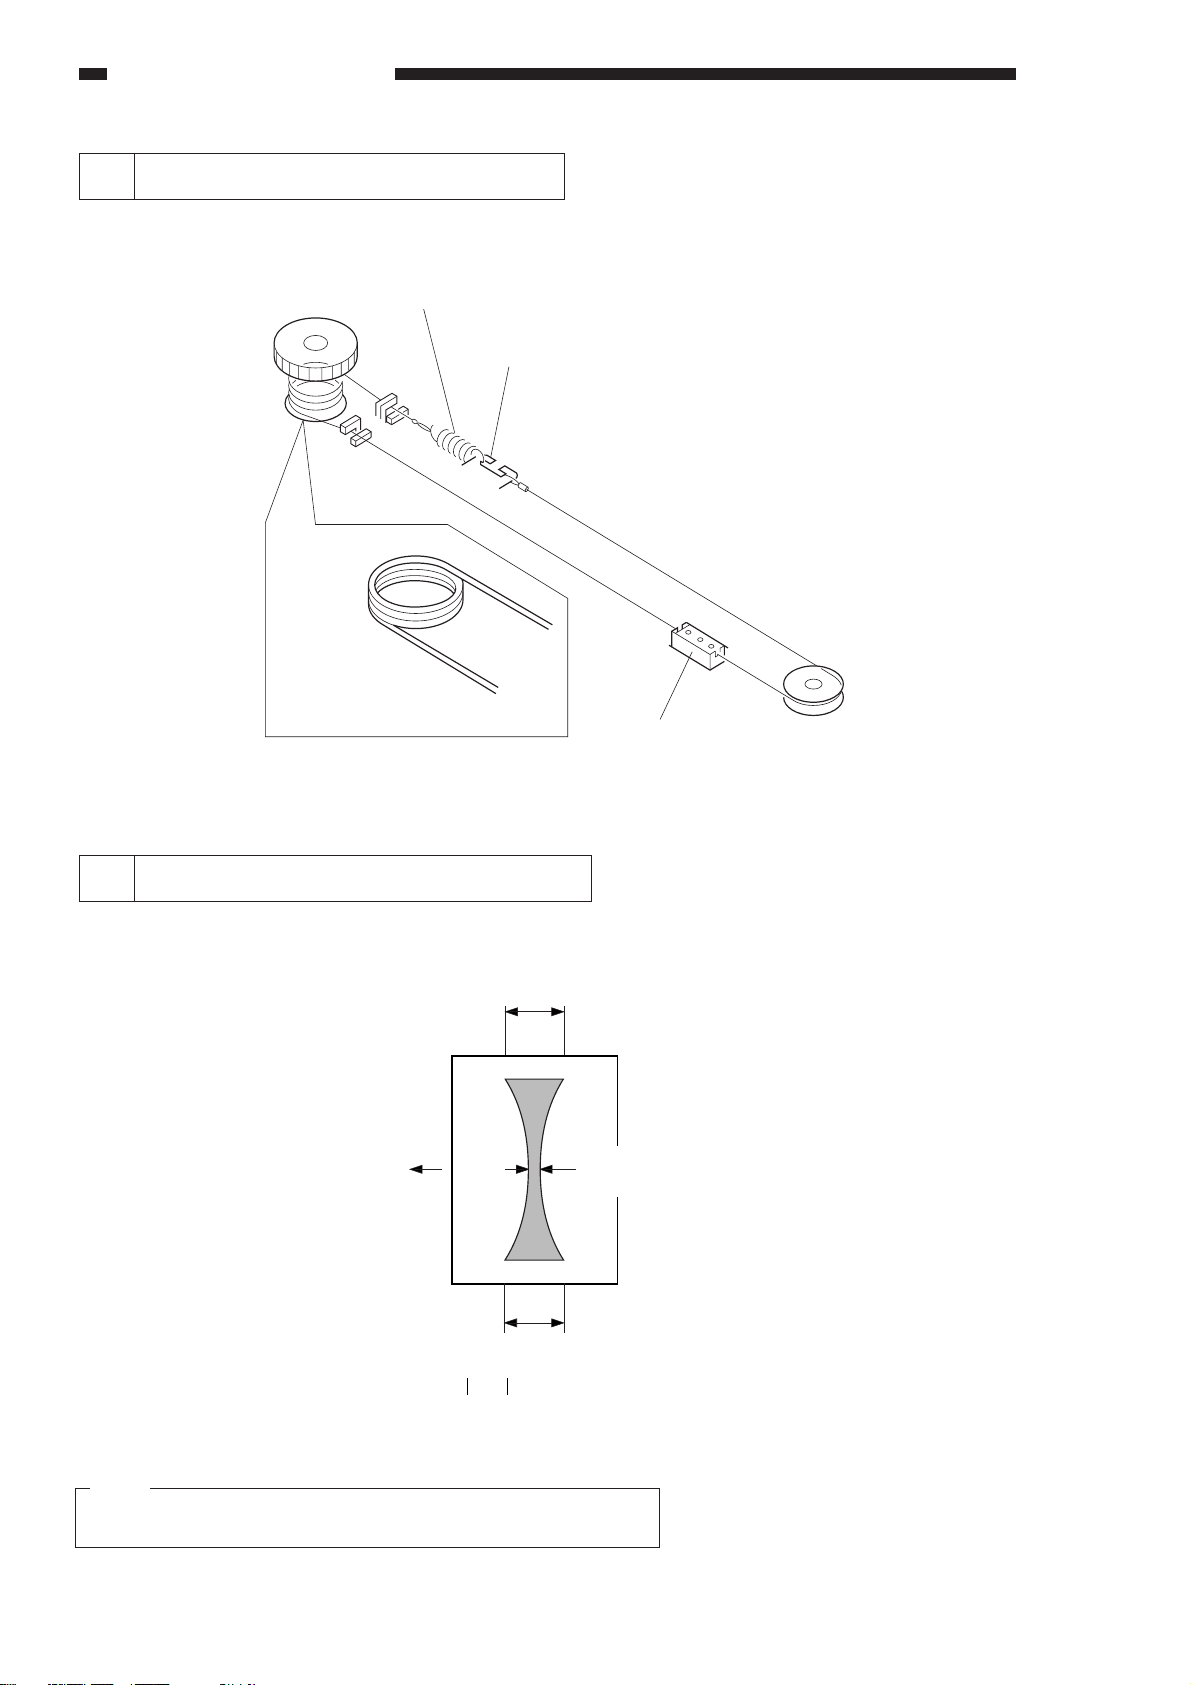
14 Routing the Blanking Shutter Cable
Attach the spring to
the outside of the
sides shutter.
Slide shutter (rear)
Wind 3.5 times.
Slide shutter (front)
Figure 2-222
15 Adjusting the Lower Fixing Roller Nip
If fixing faults occur, make the following adjustments:
The nip is correct if it is as indicated in Figure 2-223; otherwise, turn the bolt to adjust.
c
A4
paper
Feeding
direction
Center of copy
b
paper
a
b : 4.5±0.5mm
a-c : 0.5mm or less
Figure 2-223
Note:
a and c represent points 10 mm from either edge of the paper.
2–8
STANDARDS AND ADJUSTMENTS
Oil application
Solenoid
Screw
Screw
Lever
Contact
Support
a. Measuring the Nip
Measure the nip when the machine is turned on
for the first time in the morning.
1) Open the copyboard cover, and make an A4
(SM0-1) solid black copy.
2) Place the copy in the cassette tray face down
(solid black facing downward).
3) Press the service mode switch (SW850) with a
hex key.
• The machine starts service mode and indi-
cates ‘1’.
4) Press ‘4’ on the numeric keypad.
• The display indicates ‘4’.
5) Press the AE key.
• The machine enters operation/inspection
mode and indicates ‘401’.
6) Press ‘6’ on the numeric keypad.
• The display indicates ‘406’.
7) Press the Start key.
• The paper will be fed from the cassette, and
the machine will be ready to accept new
settings as in Figure 2-223. (The paper will be
discharged.)
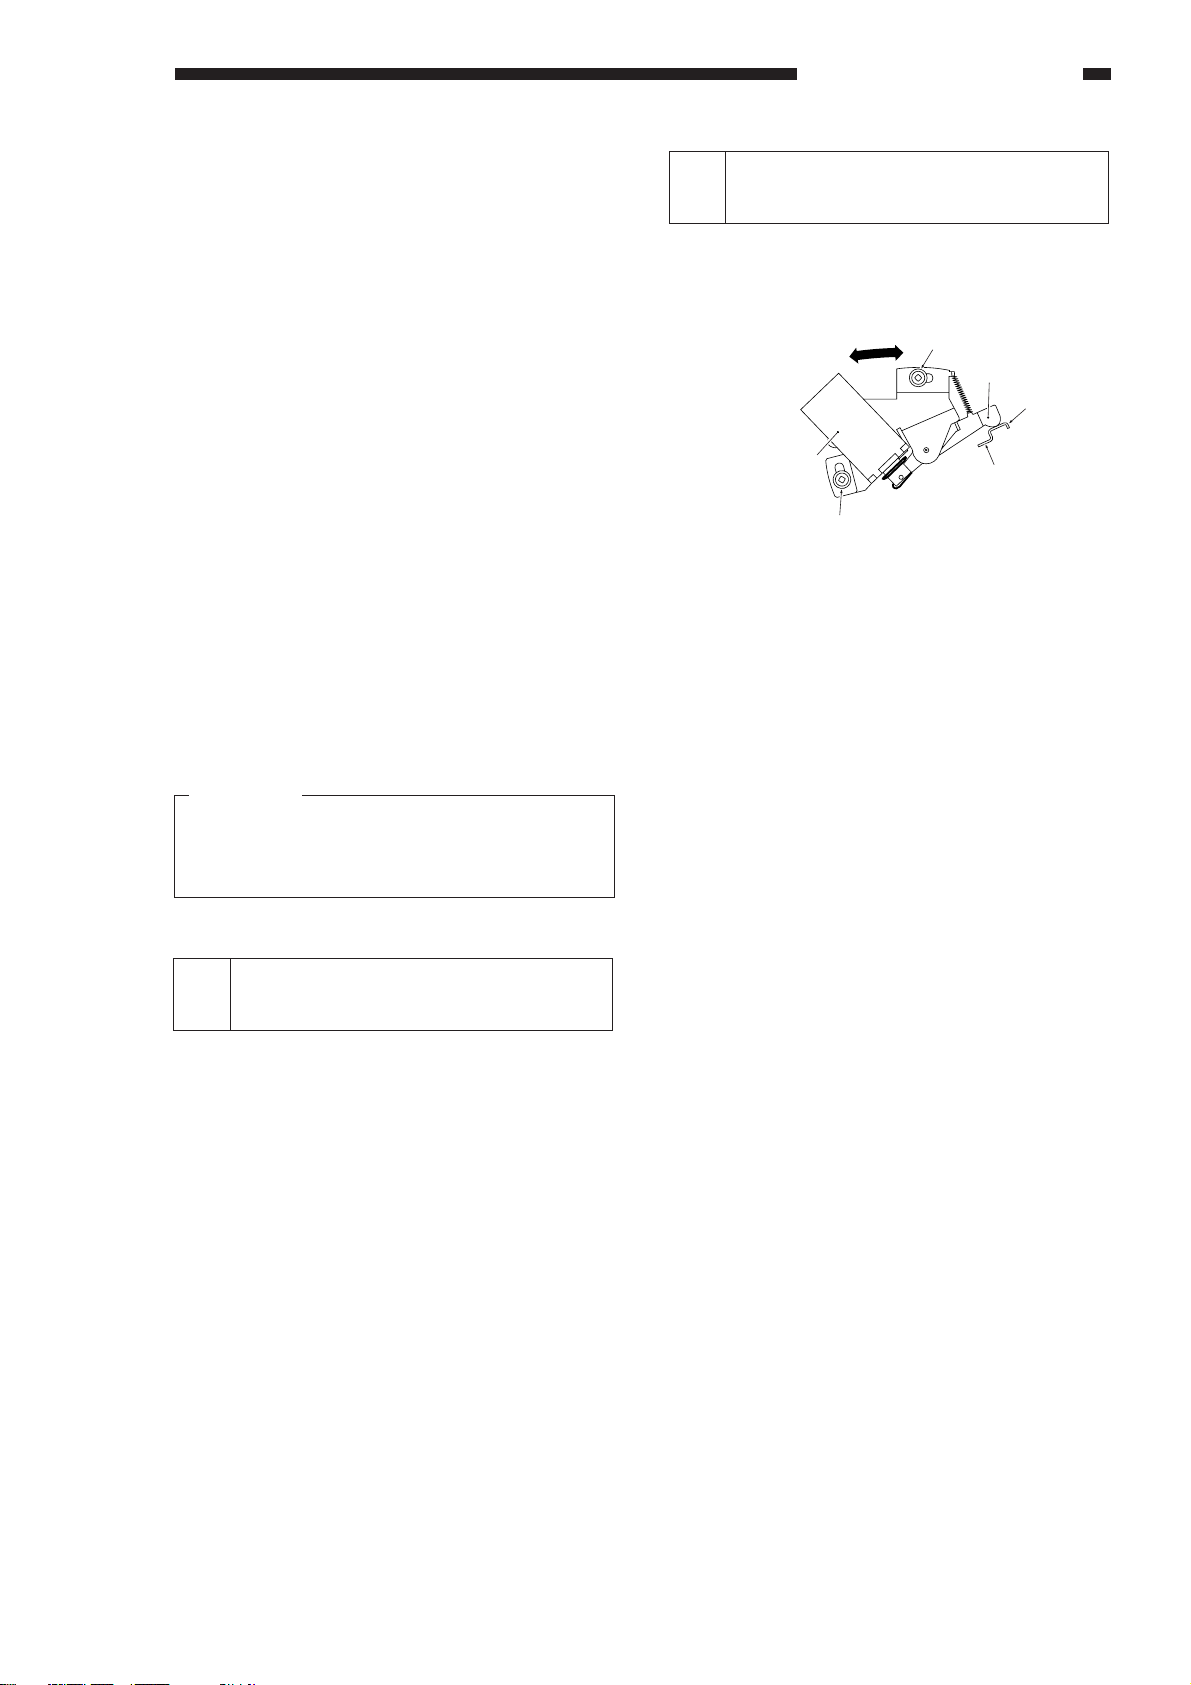
17 Mounting the Oil Application
Solenoid
Screw the oil application solenoid in place where
its lever is lightly in contact with the support of the oil
application roller.
Figure 2-224
Reference:
The paper stops while half of it is held between
the fixing rollers; it will then be discharged fully
about 10 sec later.
8) Measure the nip.
16 Points to Note After Replacing
the Upper Fixing Unit
If you replaced the upper fixing unit, you must
enter the temperature offset value of the heater
using service mode No. 304. (See p. 7-10)
2–9
STANDARDS AND ADJUSTMENTS
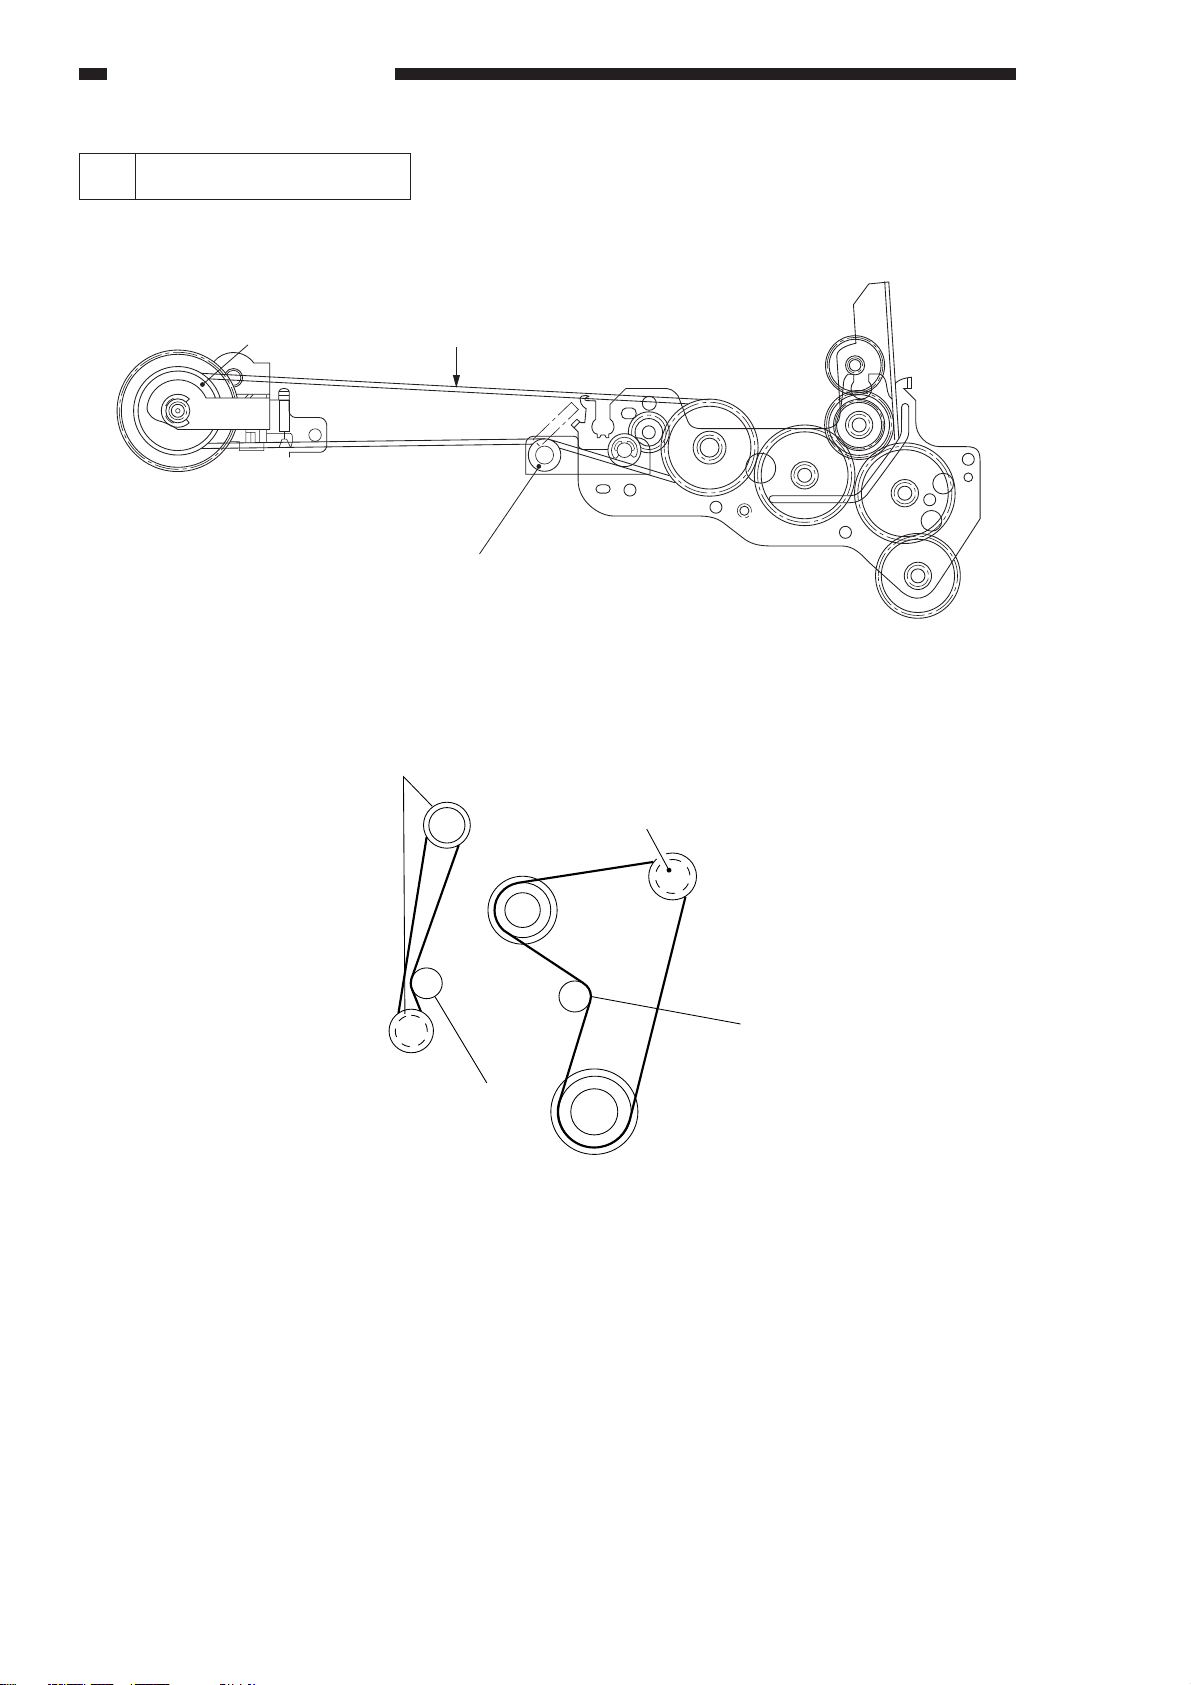
18 Routing the Drive Belt
Be sure to attach the drive belt on the pulley and the tensioner as indicated in Figures 2-225 and 2-226.
Pulley
Vertical path roller gear
Drive belt
Tensioner
Figure 2-225
Main motor
2–10
Tensioner
Vertical path roller
clutch (CL7)
Figure 2-226
STANDARDS AND ADJUSTMENTS
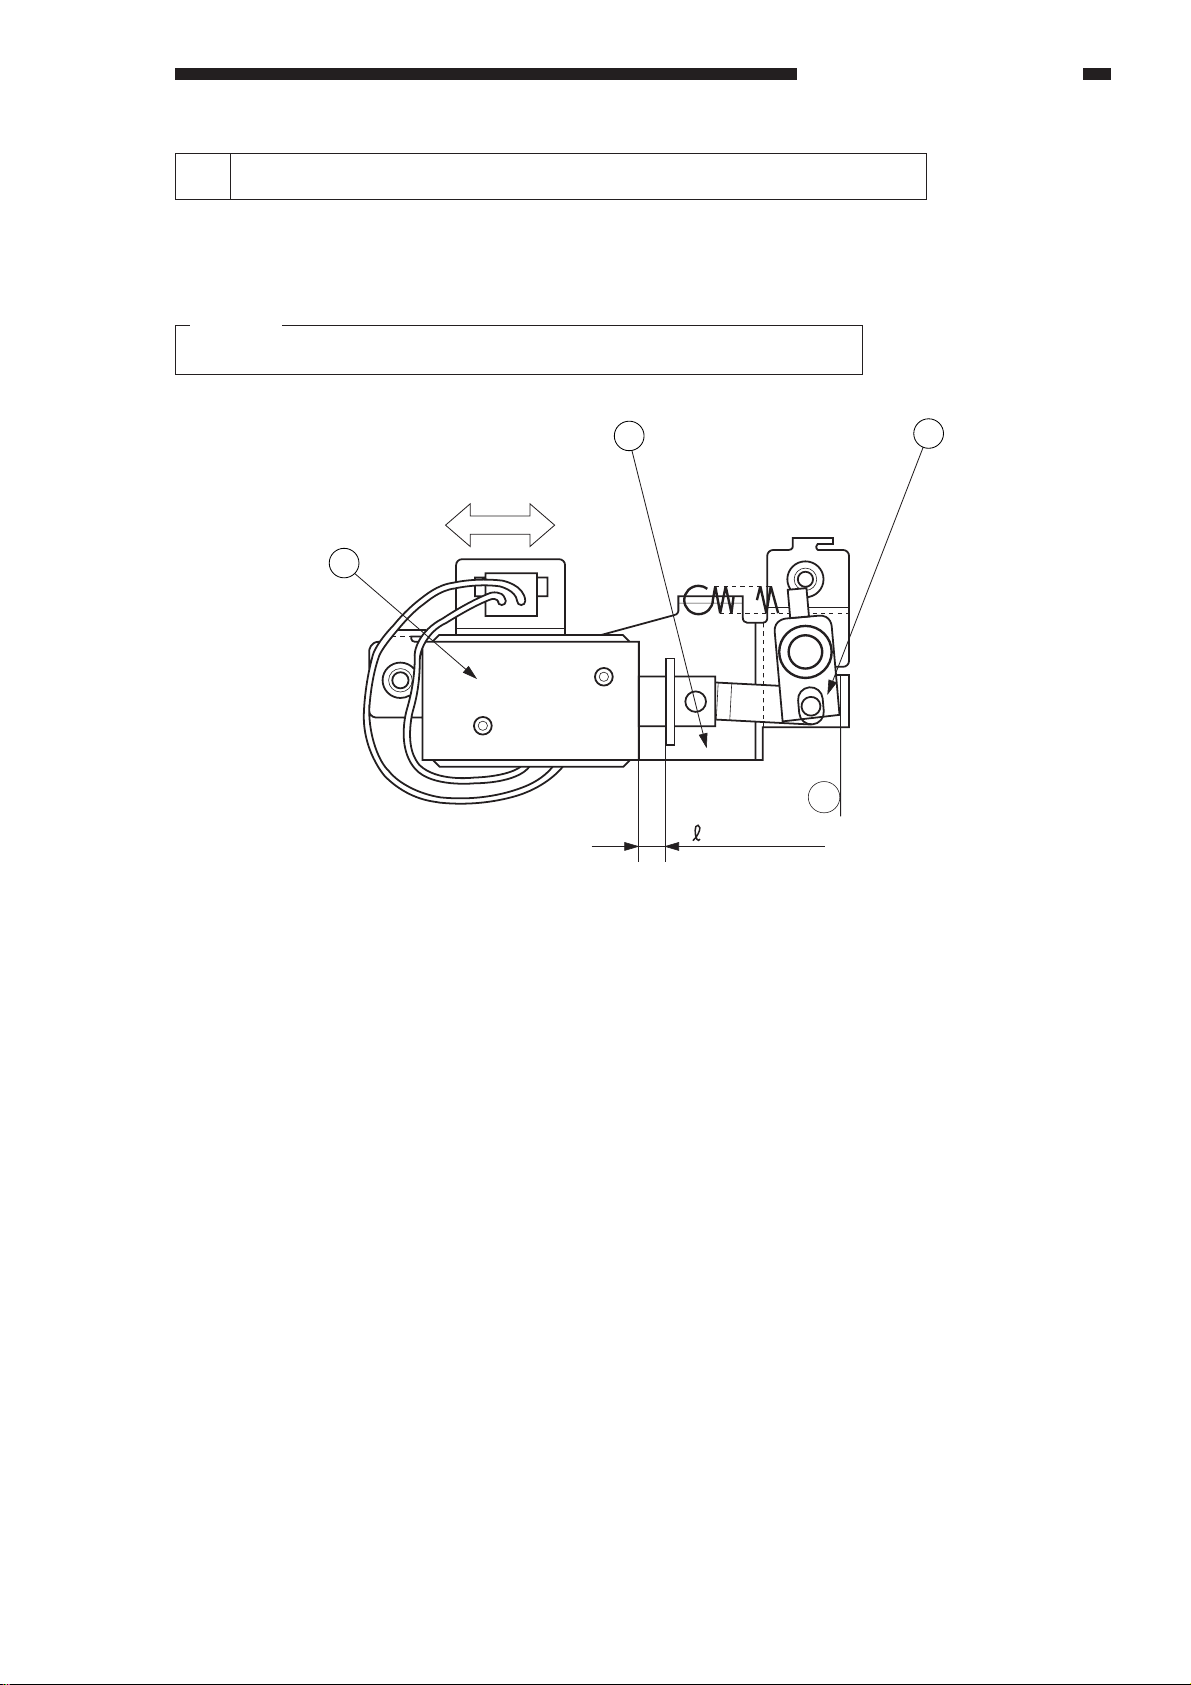
19 Positioning the Primary Charging Roller Cleaning Solenoid
Loosen the two screws used to fix the solenoid e in place, and move the solenoid in the direction of the
arrow B so that the l in Figure 2-227 is 5.5 ±0.2 mm when the joint q is forced against the a section of the
solenoid support plate w.
Caution:
You must make this adjustment whenever you have replaced the solenoid.
2
1
B
3
a
= 5.5 ± 0.2
Figure 2-227
2–11
STANDARDS AND ADJUSTMENTS
7
20 After Replacing the Drum Unit
Whenever you have replaced the drum unit,
record the date and the counter reading on the label
that comes with the drum unit; attach the label to the
front cover of the new drum unit, and perform the
Image Adjustment Basic Procedure.
Figure 2-228
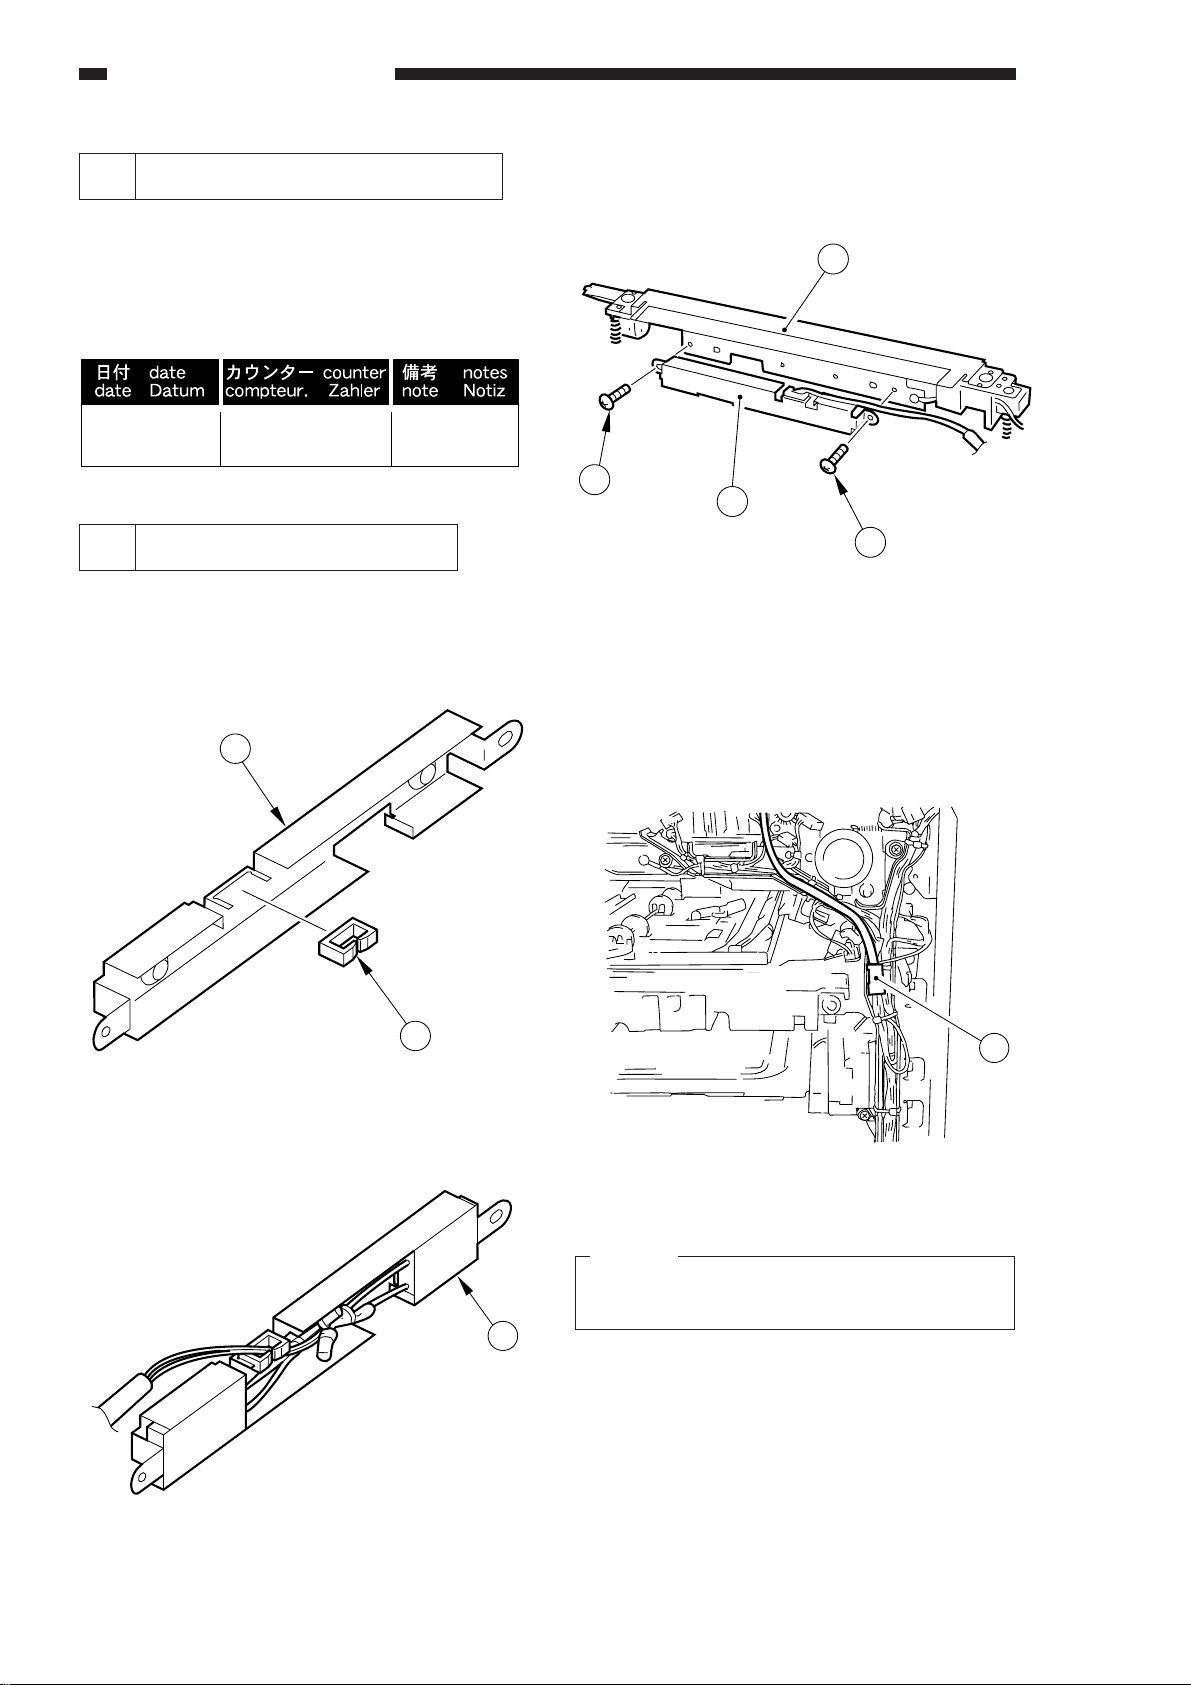
21 Installing the Drum Heater*
*This may not be available for sale in some areas.
1) Remove the transfer guide from the copier.
2) Install the cord clamp w to the heater holder q.
1
4) Install the heater holder t to the transfer guide
y with two screws r.
6
4
5
4
Figure 2-231
5) Install the transfer guide to the copier.
6) Connect the connector u of the heater to the
copier’s connector.
2
Figure 2-229
3) Remove the transfer roller and the static eliminator.
3
Figure 2-230
2–12
Figure 2-232
Caution:
As necessary, keep the heater harness in place
on the cord guide using tie-wraps.
STANDARDS AND ADJUSTMENTS
2 1
3
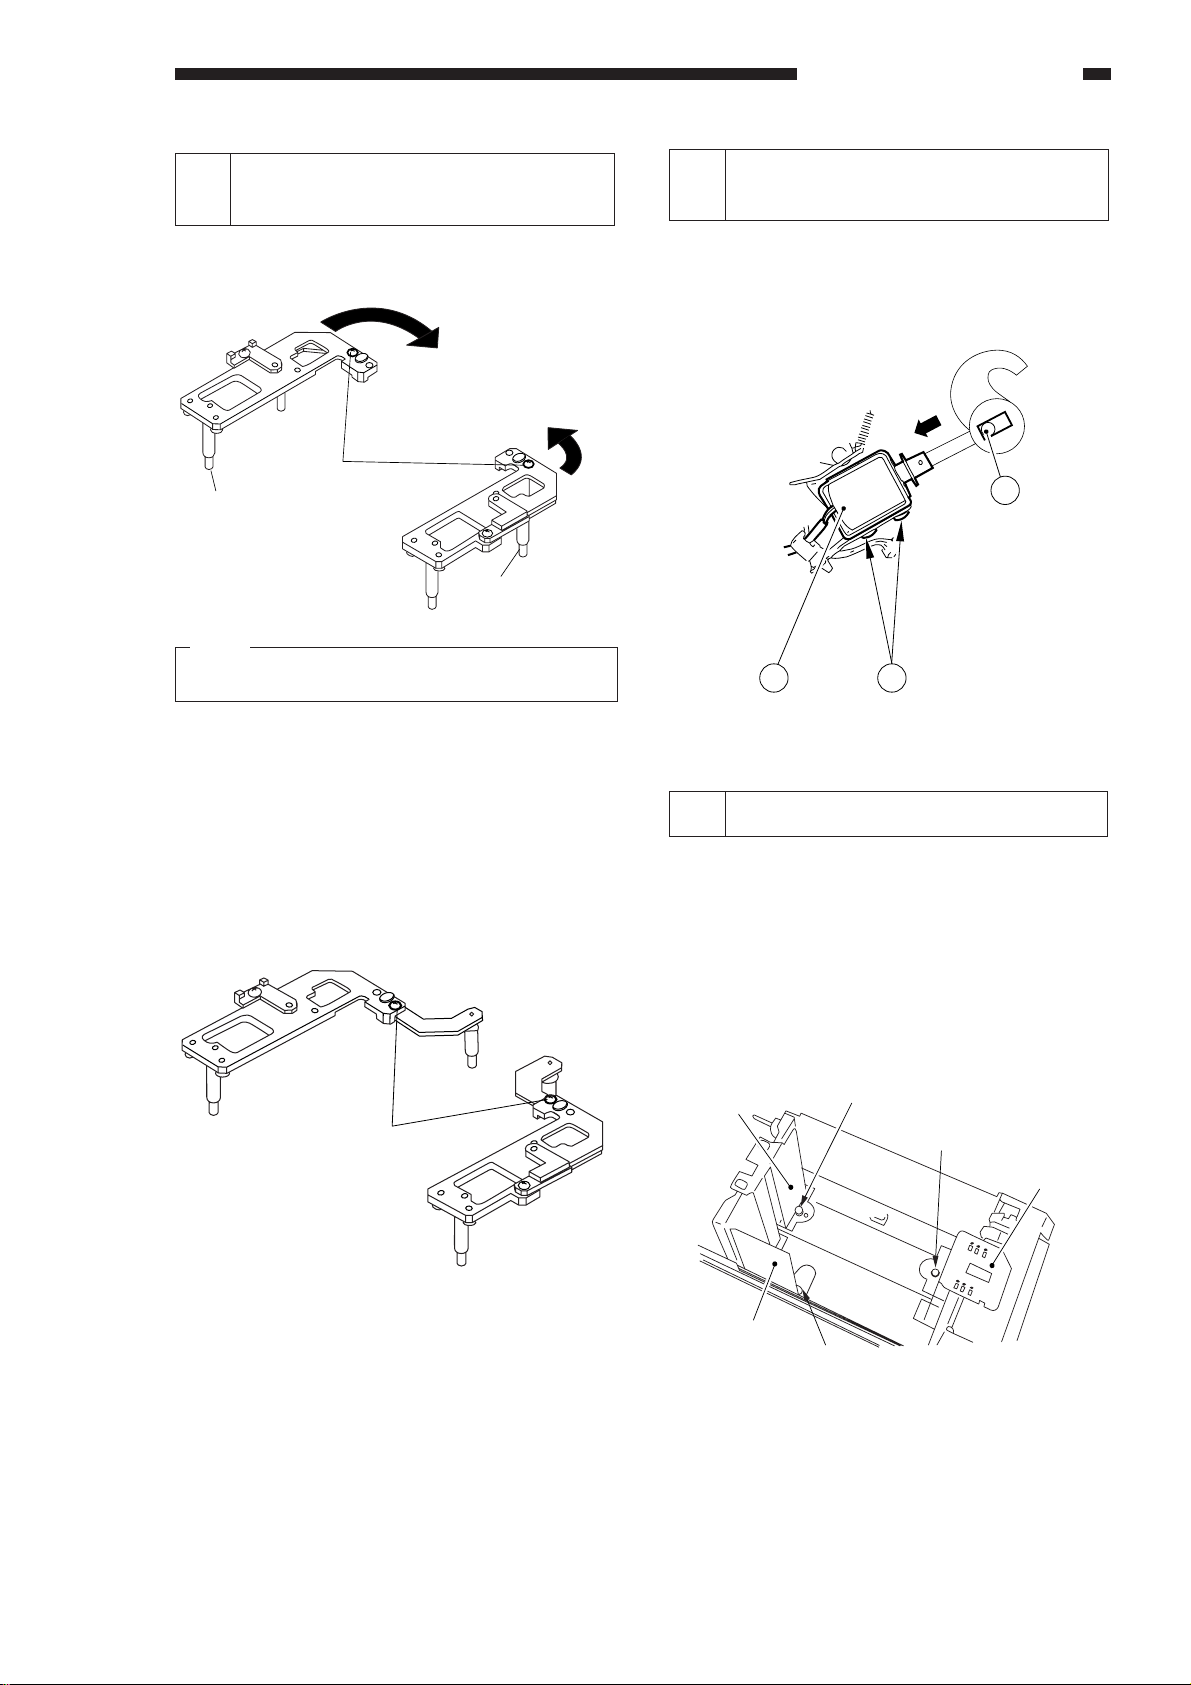
22 Assembling the Mirror Position-
ing Tool
1) Remove the screw from position B indicated in
Figure 2-233.
B
A
A
Position B
Longest pin
Note:
Shortest pin not used.
Figure 2-233
B
Medium-Length pin
23 Positioning the Paper Deflecting
Plate Solenoid (SL8)
Loosen the two screws q, push the solenoid
plunger to the arrow until the pin e reach to the
bottom of slot, and fix the screw.
Figure 2-235
2) Fit the screw removed in step 1) in position A;
then, tighten it slightly.
3) Spread the arm out of the main frame until it
comes into contact with the stopper as indicated in Figure 2-234.
4) Fix the screw in place.
B
A
A
B
Position A
Figure 2-234
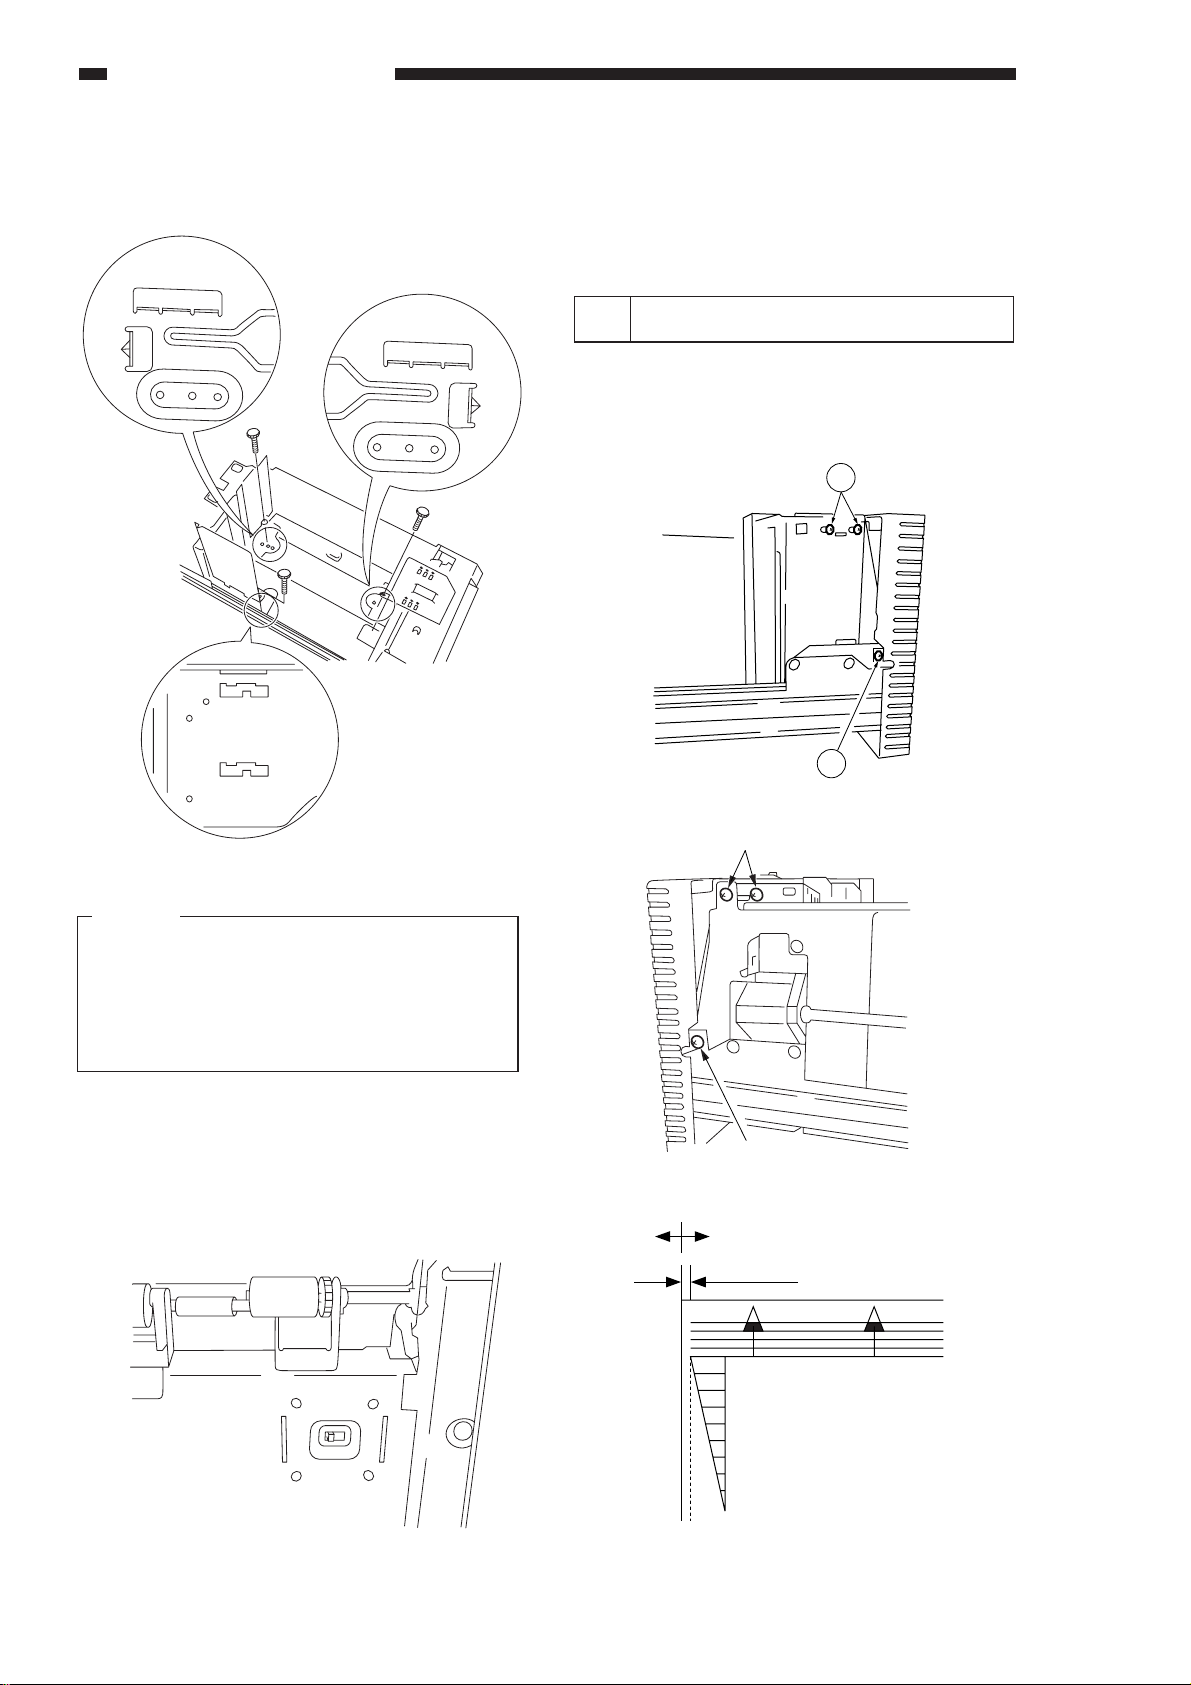
24 Setting the Deck Size
To change the paper deck size, change the
position of the guide plate at the front, rear, and rear
left.
1) Slide out the deck toward the front until it stops.
2) Remove the mounting screw from the guide
plate at the front, rear, and rear left; then, detach
the guide plates.
Guide plate (rear)
Guide plate (left)
Screw
Screw
Guide plate (front)
Screw
Figure 2-236
2–13
STANDARDS AND ADJUSTMENTS
3) Fix each guide plate in position referring to the
size indexes on the base plate, front side plate,
and guide plates.
A4
LTR
B5
B5
LTR
A4
LTR
A4
8) Install the switch cover.
9) Attach the size seal to the front cover of the
deck.
10) Switch on the copier, and check that the new
deck size is indicated in the message display.
25 Adjusting the Deck Registration
Detach the deck front cover, and loosen the
mounting screws on both left and right of the deck
(6 in total); then, move the latch assembly to the
front and rear until the standards shown in Figure 2239 are met.
3
B5
Figure 2-237
Caution:
Make sure that the front and rear guide plates
are attached as follows:
• Perpendicular to the base plate of the deck.
• Parallel to the metal plates at the front and the
rear.
4) Place paper in the deck, and slide the deck into
the pedestal.
5) Open the right door of the deck.
6) Remove the switch cover.
7) Set the deck size switch to reflect the new paper
size.
3
Figure 2-239 (left)
Screws
Screw
Figure 2-239 (right)
(-) (+)
0±1.5mm
2–14
Figure 2-238
0
2
4
6
8
10
Figure 2-240

STANDARDS AND ADJUSTMENTS
B. Electrical
1 Adjustment after Replacing
PCBs
You must perform the following adjustments
whenever you have replaced the following PCBs:
a. DC Controller PCB
1) Start service mode (adjustment mode [3]), and
enter the settings indicated on the Service
Mode label attached behind the front door.
2) Perform the multifeeder paper width sensor
adjustment.
3) Perform scanning lamp intensity adjustment.
4) Perform AE adjustment.
As necessary, change the settings of service
mode and user mode.
Caution:
If you changed any of the settings indicated in
the Service Mode label, be sure to record the
new settings on the label.
b. Composite Power Supply PCB
1) Select service mode No. 315 through No. 318
(adjustment mode [3]), and enter the settings
indicated on the label attached to the composite
power supply PCB.
Be sure to record any new settings in the Ser-
vice Mode label.
2 Adjusting the Scanning Lamp
Intensity
Select service mode No. 407.
1) Place the Test Sheet NA3 on the copyboard,
and close the copyboard cover.
2) Turn OFF AE, and make copies in continuous
mode at copy density 5 and VR850 (DC bias) is
at center.
3) Press the zoom + key or zoom - key so that the
optimum image is obtained.
• If the image is too light, press the zoom + key.
• If the image is too dark, press the zoom - key.
Reference:
1. What is referred to as optimum image is an
image in which gray scale No. 8 on the copy
corresponds to gray scale No. 4 through
No. 7 on the Test sheet whtile the copy is
free of fogging.
2. Turning the VR excessively can cause E220
to be displayed. If this is the case, turn the
VR 301 to the center position, turn OFF/ON
the power, and make adjustments once
again.
Caution:
After making the adjustment, be sure to perform
AE adjustment.
3 AE Adjustment
c. AE Sensor PCB
1) Perform AE adjustment.
Caution:
If you changed any of the settings indicated in
the Service Mode label, be sure to record the
new settings on the label.
d. Light Adjustment Sensor PCB
1) Perform scanning lamp intensity adjustment.
2) Perform AE adjustment.
Caution:
If you changed any of the settings indicated on
the Service Mode label, be sure to record the
new settings on the label.
Perform AE adjustment using the following three
service modes:
q AE Basic Adjustment
No. 410 scanner forward stop
No. 408 scanning lamp ON check
No. 208 AE sensor voltage display
No. 301 AE scan lamp intensity automatic ad-
justment
w No. 302 AE mode copy density (developing
bias) reference adjustment
e No. 303 AE mode copy density (developing
bias) slope adjustment
If the copy density is not optimum after performing AE basic adjustment q No. 410, No. 408, No.
208, and No. 301, try w No. 302 and e No. 303 in
sequence.
2–15

STANDARDS AND ADJUSTMENTS
If you have replaced the AE sensor, scanning
lamp, or DC controller or if you performed scanning
lamp intensity adjustment (VR301), you must perform
• AE basic adjustment,
• No. 410 scanning forward stop,
• No. 408 scanning lamp ON check,
• No. 208 AE sensor voltage indication, and
• No. 301 AE scanning lamp intensity automatic
adjustment.
Go through the steps that follow when making
these adjustments. Table 2-201 gives a list of three
service modes excluding No. 408 scanning lamp
ON check and No. 208 AE sensor voltage indication.
a. AE Basic Adjustment (No. 410, No. 408,
No. 208, No. 301)
In this adjustment, the intensity of the scanning
lamp is read by the lamp intensity sensor, and the
voltage of the AE sensor unit is adjusted using
VR860/851 on the service switch PCB.
After making the adjustment, you must perform
AE scan lamp intensity automatic adjustment.
1) Place the Test Sheet NA-3 on the copyboard,
and close the copyboard.
Press the service mode switch (SW850) to start
service mode.
2) Press ‘4’ on the numeric keypad, and press the
AE key.
• The display indicates ‘401’.
3) Press ‘410’ on the numeric keypad.
• The machine indicates ‘410’.
4) Press the Start key once.
• The scanner moves forward.
Caution:
Each press on the Start key causes the scanner
to move forward. Be sure not to press it more
than once.
9) Press the Start key.
• The display indicates ‘0’ through ‘255’.
10) Adjust VR860/851 on the Service switch PCB
so that the display indicates ‘100’ through ‘105’.
11) Turn OFF/ON the power switch.
• This turns OFF the scanning lamp and turns
ON the power once again.
12) Press the service mode switch.
• The machine start service mode and indi-
cates ‘1’.
13) Press ‘3’ on the numeric keypad, and press the
AE key.
• The display indicates ‘301’.
14) Press the Start key.
Caution:
Wait until initial rotation ends.
• After initial rotation, the AE indicator starts to
flash.
15) Press the AE key so that the following takes
place to perform automatic adjustment.
• The AE indicator stops flashing and remains
ON.
• The scanner moves to the AE measurement
point.
• When the intensity has stabilized, the reading
of the AE sensor is stored.
• The lamp turns OFF, and the scanner returns.
16) After the above ends, press the Clear key twice.
• The display indicates ‘3’.
17) Press ‘1’ on the numeric keypad, and press the
AE key.
• The display indicates ‘1’.
18) Press ‘116’ on the numeric keypad, and press
the Start key.
• Make sure that the display indicates ‘68’
through ‘72’. If not, start with step 2) of operation/inspection mode and make adjustments
once again.
5) Press ‘408’ on the numeric keypad, and press
the Start key.
• The display indicates ‘ON’, and the scanning
lamp turns ON about 1.5 sec later.
6) Press the Clear key twice.
• The display indicates ‘4’.
7) Press ‘2’ on the numeric keypad, and press the
AE key.
• The display indicates ‘201’.
8) Press ‘208’ on the numeric keypad.
• The machine indicates ‘208’.
2–16
b. AE Mode Copy Density (developing bias)
Reference Point Adjustment (No. 302)
1) If the display does not indicate ‘300’s’, start
adjustment mode of service mode as you would
for No. 301.
2) Press ‘2’ on the numeric keypad.
• The display indicates ‘302’.
3) Press the Start key.
• The display indicates the current setting.
4) Change the setting using the numeric keypad,
and press the AE key.
• To increase the setting, press the AE key.
 Loading...