Canon NP6512 Service Handbook

REVISION 0
A UG. 1999
COPYRIGHT © 1999 CANON INC. CANON NP6512/6612/7120/7130/7130F REV.0 AUG. 1999 PRINTED IN JAPAN (IMPRIME AU JAPON)
FY8-23B7-000

IMPORTANT
THIS DOCUMENTATION IS PUBLISHED BY CANON INC., JAPAN, TO SERVE AS A SOURCE
OF REFERENCE FOR WORK IN THE FIELD .
SPECIFICATIONS AND OTHER INFORMATION CONTAINED HEREIN MAY VARY SLIGHTLY
FROM ACTUAL MACHINE VALUES OR THOSE FOUND IN ADVERTISING AND OTHER
PRINTED MATTER.
ANY QUESTIONS REGARDING INFORMA TION CONTAINED HEREIN SHOULD BE DIRECTED
TO THE COPIER SERVICE DEPARTMENT OF THE SALES COMPANY.
THIS DOCUMENT ATION IS INTENDED FOR ALL SALES AREAS, AND MA Y CONTAIN INFORMATION NOT APPLICABLE T O CERTAIN AREAS.
COPYRIGHT © 1999 CANON INC.
Printed in Japan
Imprimé au Japon
Use of this manual should be strictly supervised to avoid disclosure of confidential
information.
Prepared by
OFFICE IMAGING PRODUCTS TECHNICAL SUPPORT DIVISION
CANON INC.
5-1, Hakusan 7-chome, Toride-shi, Ibaraki 302-8501 Japan
COPYRIGHT © 1999 CANON INC. CANON NP6512/6612/7120/7130/7130F REV.0 AUG. 1999 PRINTED IN JAPAN (IMPRIME AU JAPON)

• This service handbook covers the models shown in the following table. Be sure to have
a good understanding of the difference from model to model before referring to this
handbook.
Model
NP6512
NP6612
NP7120
NP7120
NP7130
NP7130
NP7130F
Type
code
TWA
TXA
PUB
PUC
NVF
PTZ
NVH
Default
ratio
2R2E
2R2E
2R2E
2R2E
3R1E
2R2E
3R1E
ADF as
standard
√
√
The notation “√” indicates that the item in question is available.
Cassette
250 sheets
250 sheets
Universal
Universal
500 sheets
500 sheets
500 sheets
i


CONTENTS
CHAPTER 1 MAINTENANCE AND INSPECTION
1
2
A. Periodically Replaced Parts .........1-1
B. Durables and Consumables .........1-1
C. Scheduled Servicing .................... 1-1
D. Image Adjustment Basic
Procedure..................................... 1-3
E. Points to Note for Servicing .........1-4
CHAPTER 2 STANDARDS AND ADJUSTMENTS
A. Mechanical................................... 2-1
B. ADF ........................................... 2-26
C. Electrical ................................... 2-37
CHAPTER 3 ARRANGEMENT AND FUNCTIONS OF
ELECTRICAL PARTS
A. Sensors and Solenoids................ 3-1
B. Switches.......................................3-2
C. Lamp, Heater, Motor, Etc. ............3-3
D. PCBs ............................................3-4
E. ADF ..............................................3-5
F. Variable Resistors (VR) and
Check Pins by PCB......................3-6
3
4
5
CHAPTER 4 SERVICE MODE
A. Outline..........................................4-1
B. Using Service Mode.....................4-1
C. Adjustment Mode (30) .................4-4
CHAPTER 5 SELF DIAGNOSIS
A. Self Diagnosis ..............................5-1
APPENDIX
A. General Timing Chart.................. A-1
B. Signals and Abbreviations .......... A-3
C. General Circuit Diagram ............. A-5
D. Operation/Inspection Mode (40) ..4-5
E. Machine Settings Mode (50)........4-6
F. Counter Mode (60).......................4-6
D . Special T ools ............................... A-7
E. Solvents/Oils ............................... A-8
F. Specifications.............................. A-9
iii


CHAPTER 1 MAINTENANCE AND INSPECTION
CHAPTER 1 MAINTENANCE AND INSPECTION
A. Periodically Replaced Parts
The machine does not have parts which must be replaced on a periodical basis.
B. Durables and Consumables
The machine does not have items designated as durables or consumables.
C. Scheduled Servicing
The machine does not have any parts which require scheduled servicing.
1
1-1

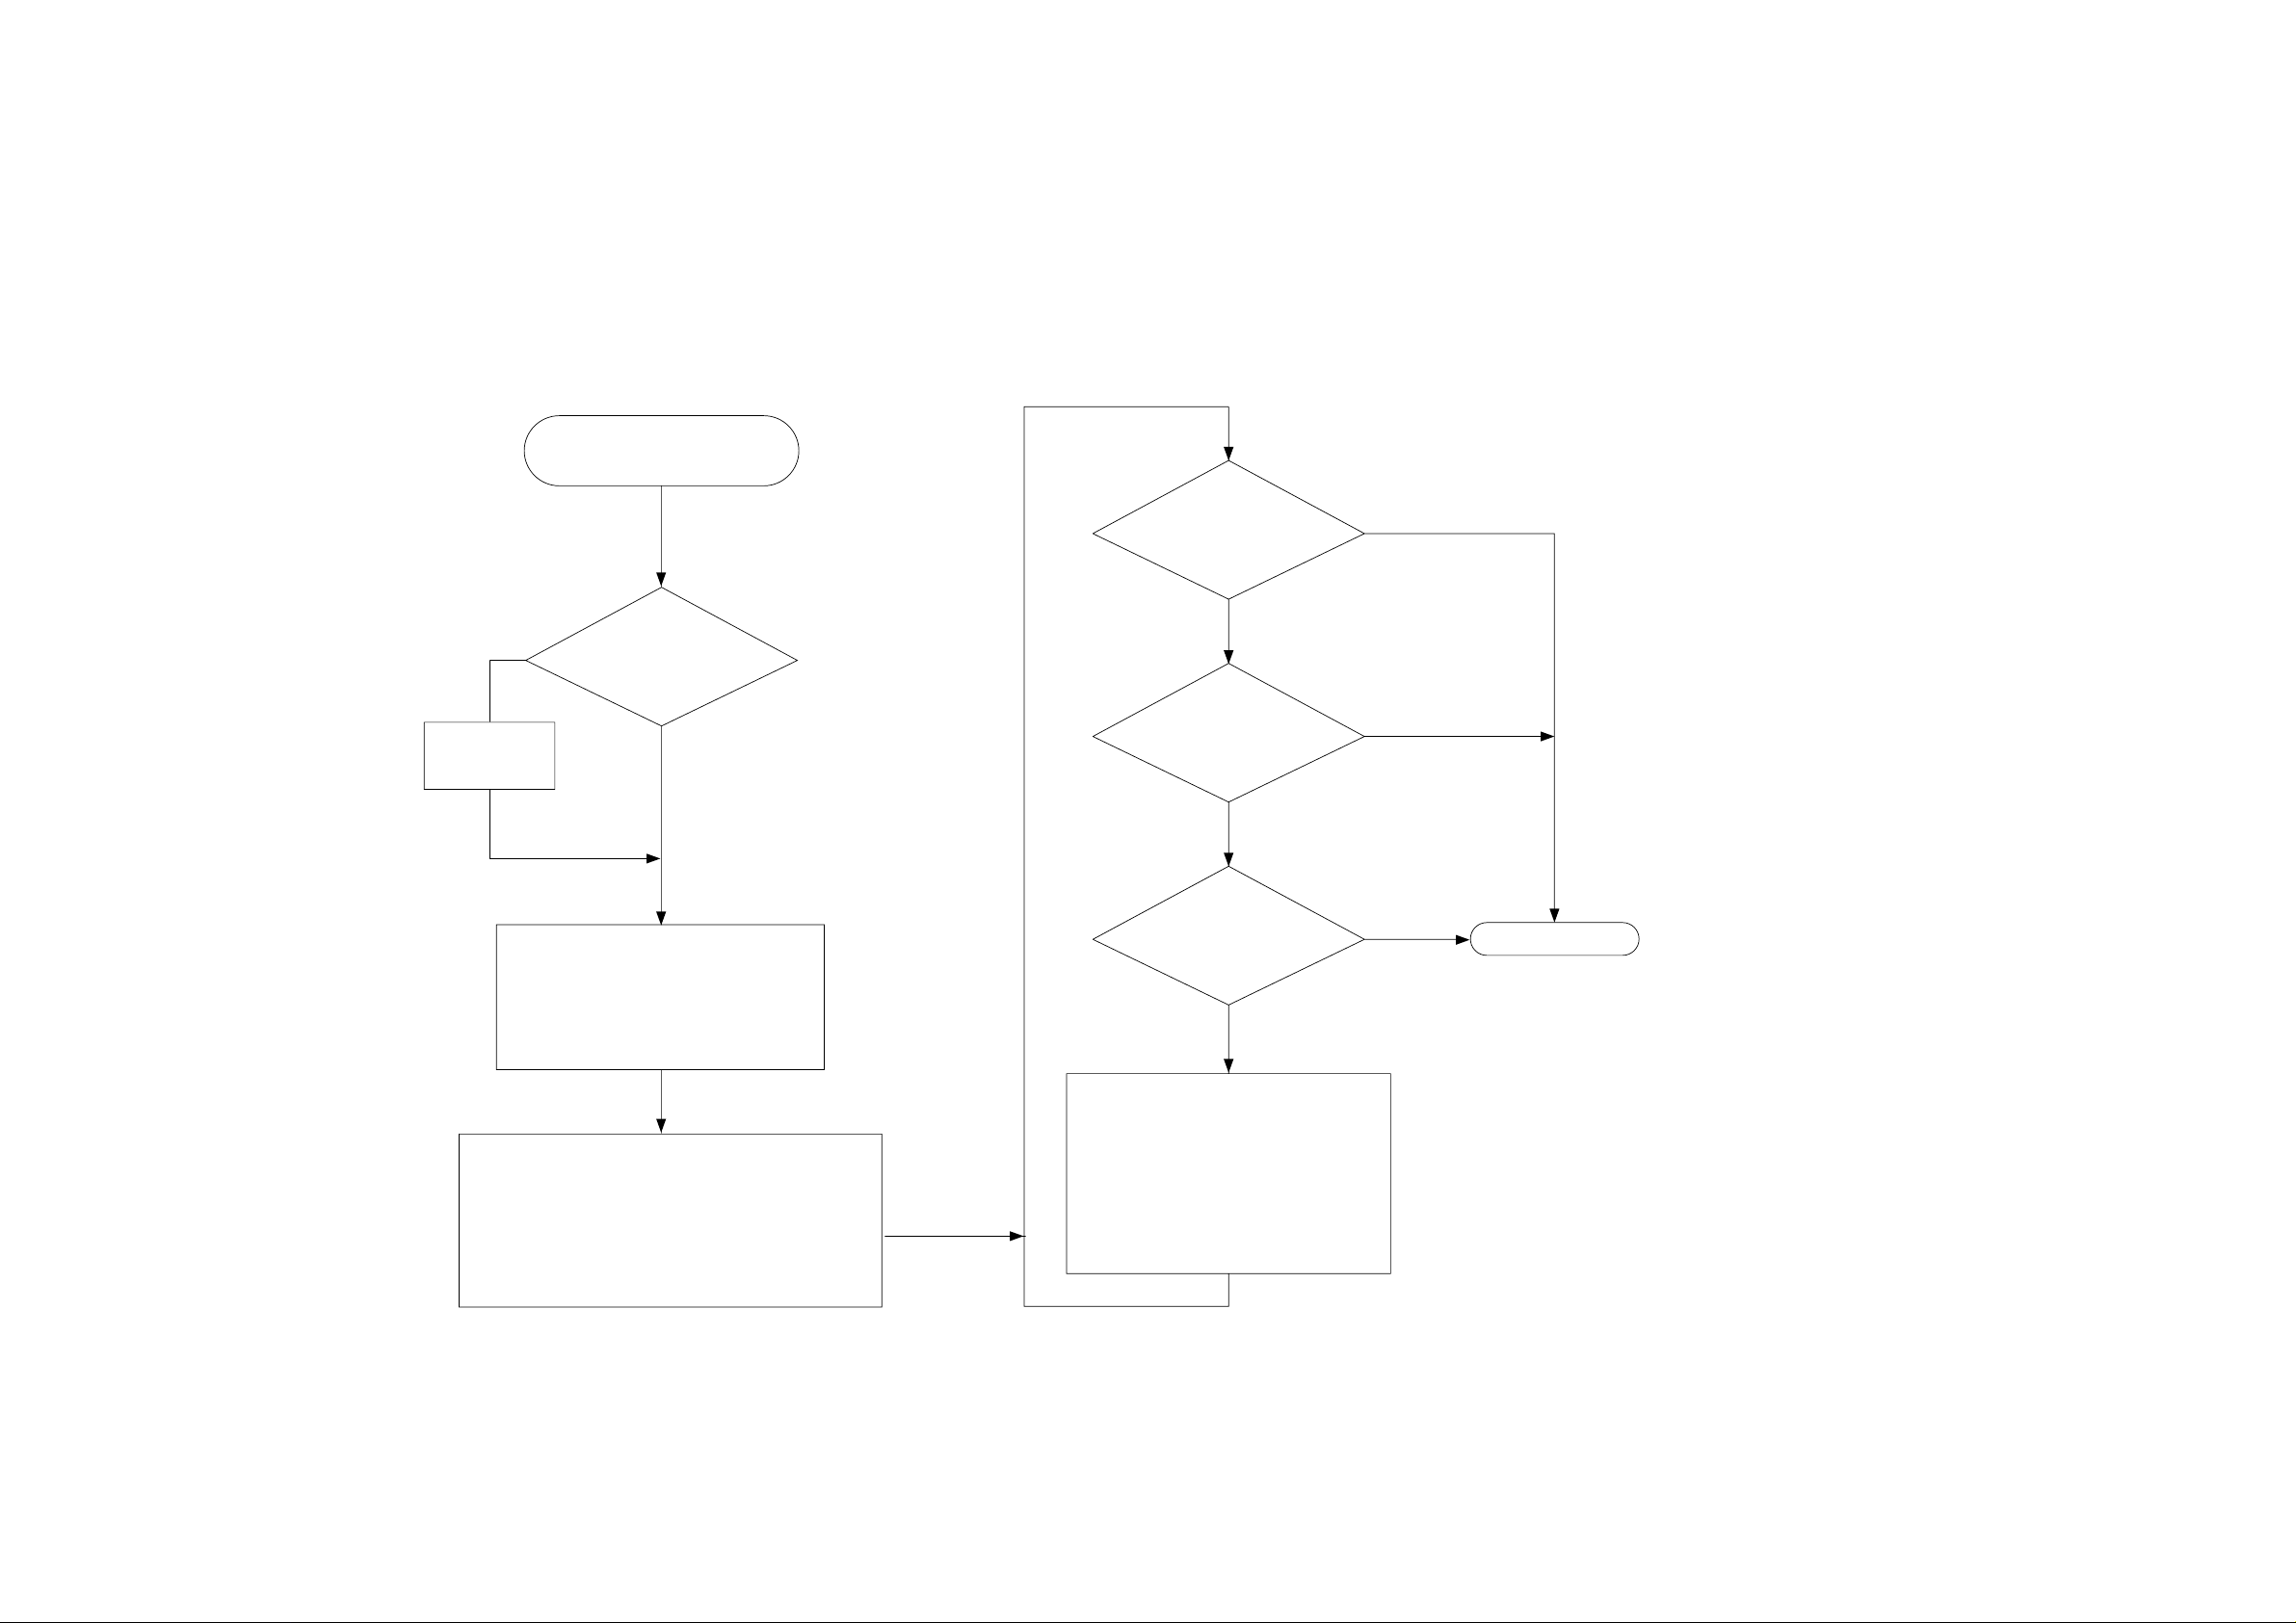
Making Pre-Checks Adjusting the Optimum Density
Clean the parts.
D. Image Adjustment Basic Procedure
NO
Set it at
the center.
Select non-AE, and set the copy density
adjusting lever to the middle index; then,
make two to three copies of the Test
Sheet (NA-3).
Scanning system,
pickup/feeding system,
delivery assembly
Is the copy density
correction dial (VR107)
centered?
YES
Is gray scale No. 9
barely visible?
NO
Can the
deviation be corrected
using the copy density correction
dial (VR107)?
NO
Is the optimum
density obtained by intensity
adjustment?
(Note 2)
NO
YES
YES
YES
END
Check the following:
1. Density of gray scale No. 9
2. Presence/absence of difference between front
and rear (Note 1)
3. Density of gray scale No. 1 (good or bad; Note 1)
4. Fogging of background (Note 1)
Check the following:
1. Drum unit
2. Scanning lamp
3. AE sensor PCB
4. DC controller PCB
5. Composite power supply PCB
(See the appropriate troubleshooting
procedure.)
Note:
1. The machine is not equipped with a function to
correct image faults. See the appropriate
troubleshooting procedure.
2. See p. 2-38.
1-3
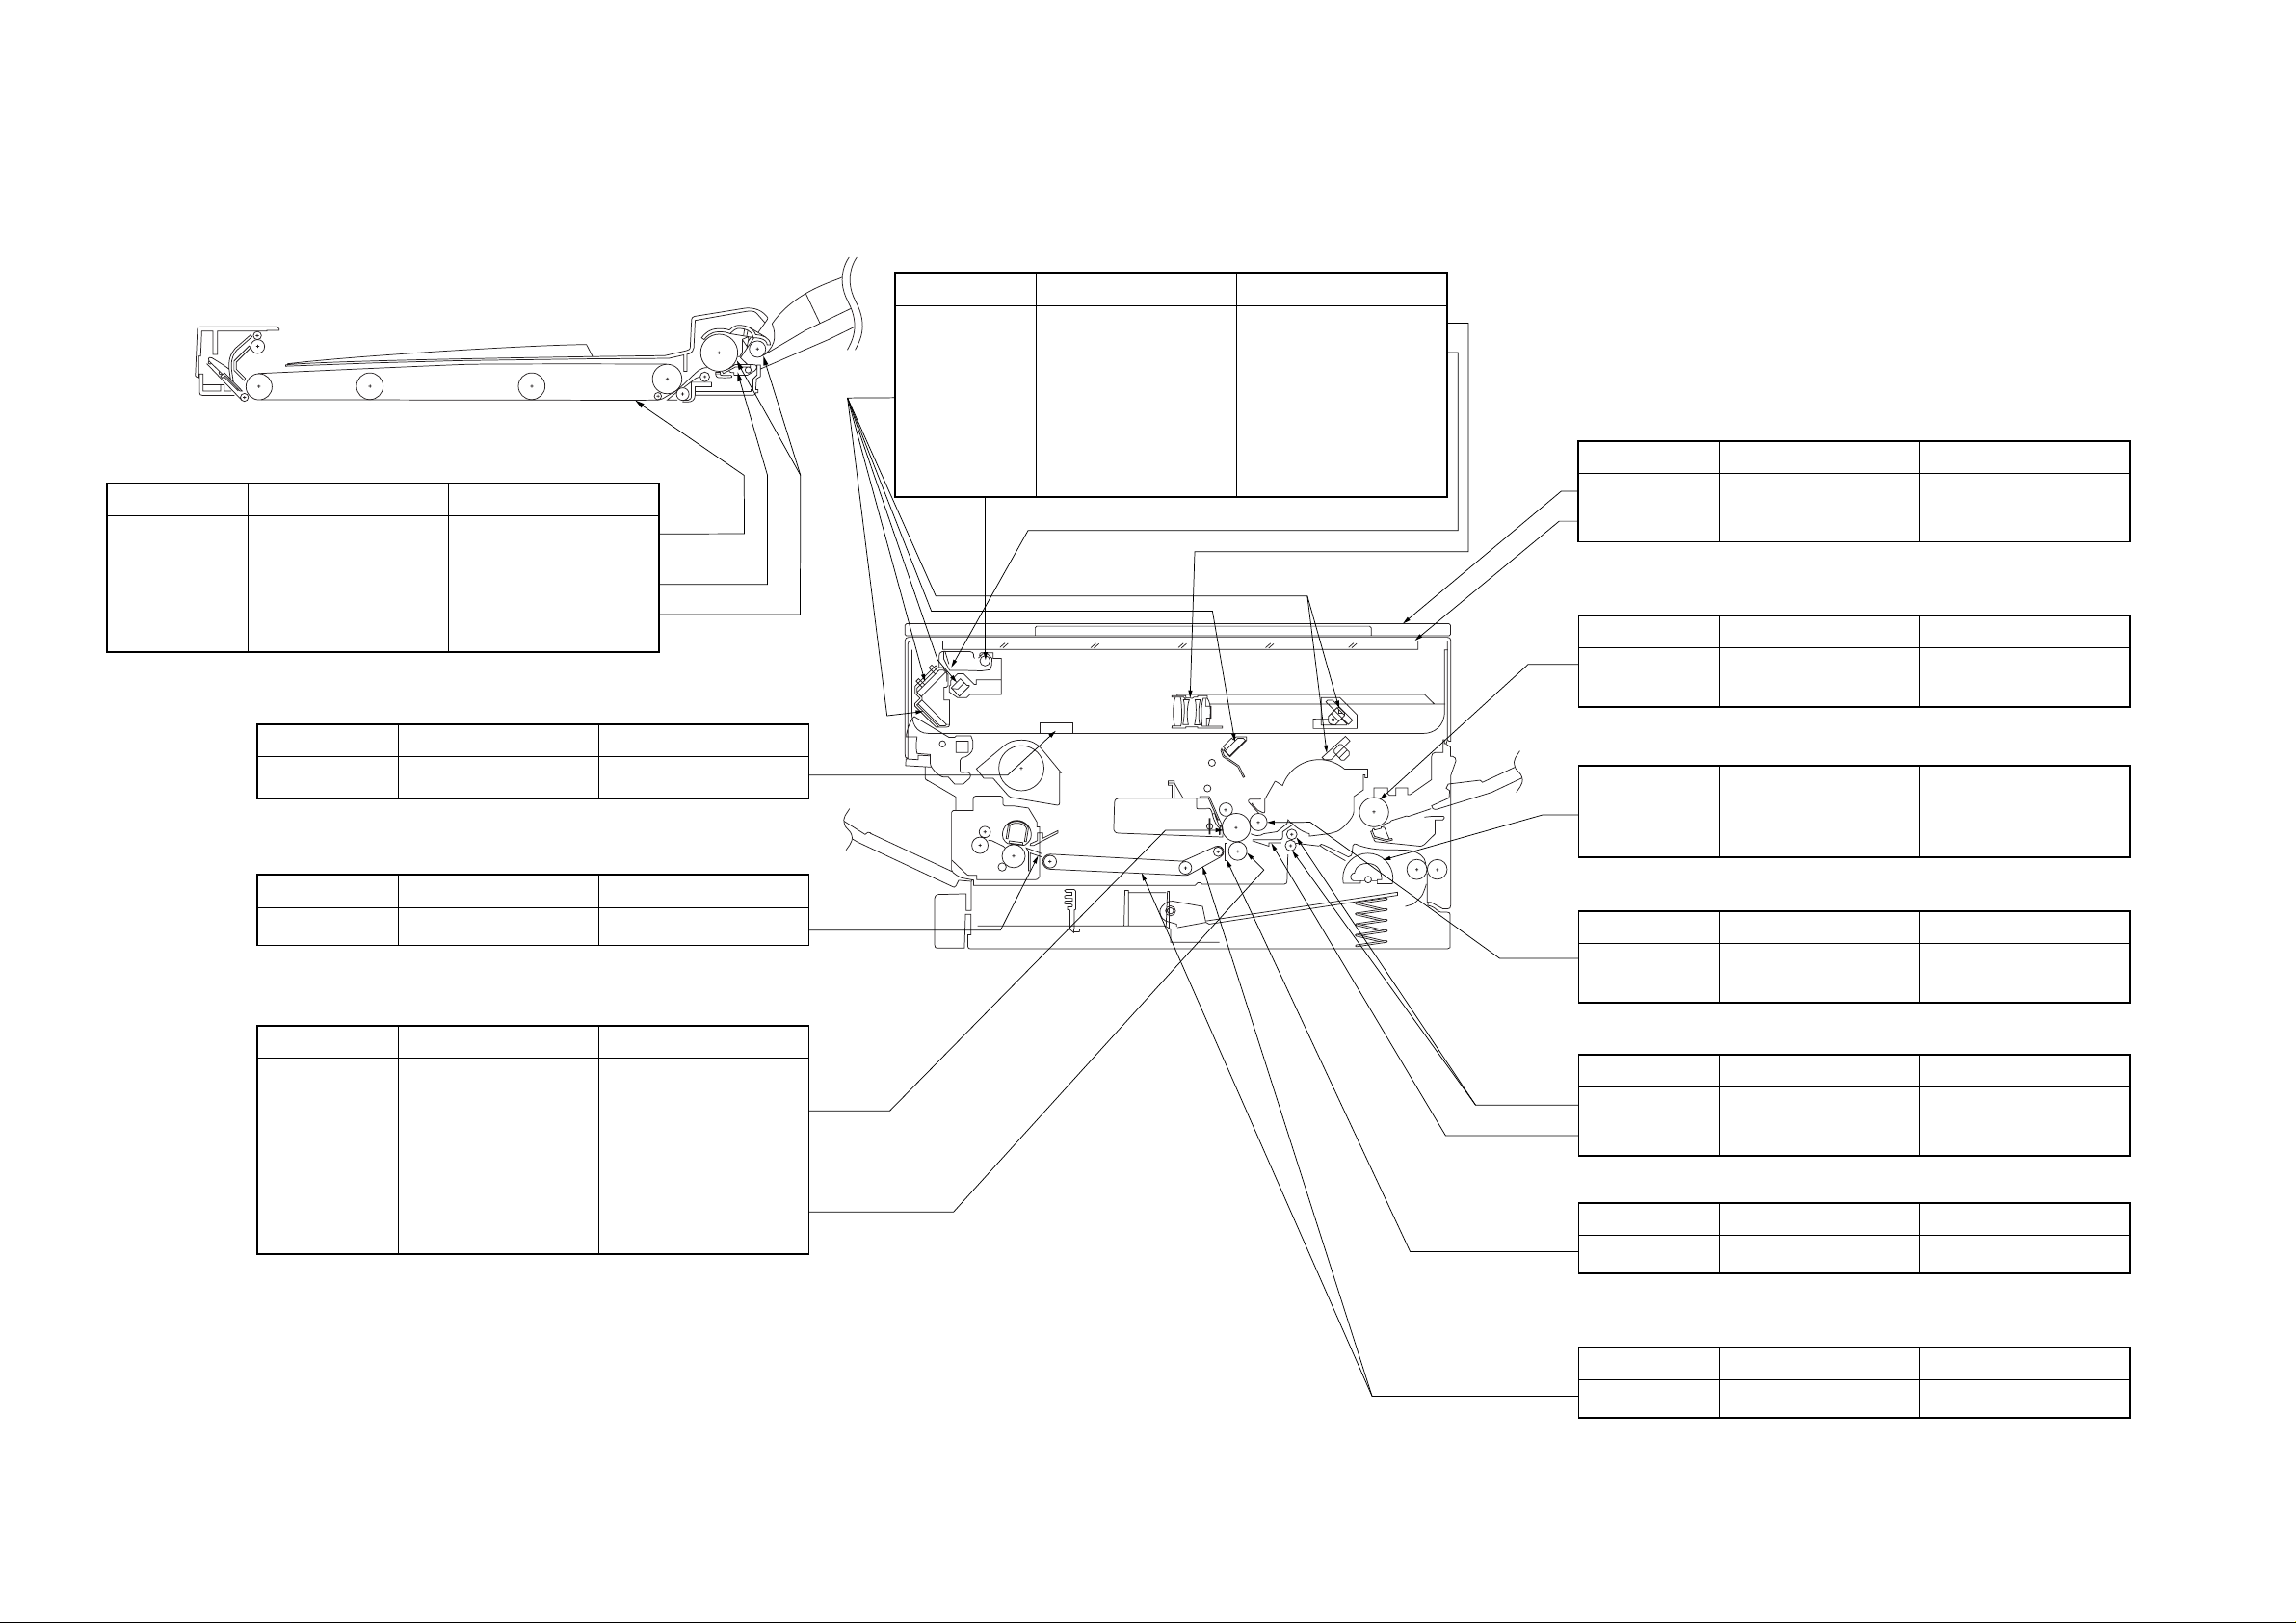
E. Points to Note for Servicing
Optical path
Part Tools/sovents Work/remarks
ADF
Item Tool/solvent
Feeding belt
Separation pad
Pickup roller Cloth moistened with
*Be sure to wring it well.
Cloth moistened with
water*
Cloth
water* or alcohol
Electrical unit
Part
AE sensor
Fixing assembly
Part
Inlet guide
Dry-wiping.
Cleaning.
Cleaning.
Tools/sovents
Blower brush
Tools/sovents
Solvent
Work/remarks
Work/remarks
Cleaning.
Work/remarks
Cleaning.
Lens
Reflecting plate
No. 1/No. 6 mirror
Scanning lamp
Blower brush
Blower brush
Blower brush or alcohol
and lint-free paper
Moist cloth
Cleaning.
Cleaning.
Cleaning with a blower
blush; if dirt cannot be
removed, use alcohol and
lint-free paper.
Cleaning.
Part Tools/sovents Work/remarks
Copyboard cover
Copyboard glass
Multifeeder assembly
Part Tools/sovents Work/remarks
Multifeeder
pickup roller
Cassette pickup assembly
Part Tools/sovents Work/remarks
Cassette pickup
roller
Developing assembly
Part Tools/sovents Work/remarks
Alcohol
Alcohol
Moist cloth (well-wrung)
or alcohol
Moist cloth (well-wrung)
or alcohol
Cleaning.
Cleaning.
Cleaning.
Cleaning.
Drum unit/Transfer charging roller
Part
Photosensitive
drum
Transfer charging
roller
Tools/sovents
Toner
Lint-free paper
Work/remarks
Do not use solvent; in
principle, do not touch or
clean. Never expose to
light.
Cleaning; do not use
water or solvent. Do not
touch, and take care not
to soil with solvent and oil.
Developing
cylinder
Transfer guide assembly
Part Tools/sovents Work/remarks
Registration roller
Transfer guide
Static eliminator
Part Tools/sovents Work/remarks
Static eliminator
Feeding assembly
Part Tools/sovents Work/remarks
Feed belt
Alcohol Cleaning.
Moist cloth
Moist cloth
Special brush Cleaning.
Moist cloth Cleaning.
Cleaning.
Cleaning.
1-4
CHAPTER 2 STANDARDS AND ADJUSTMENTS
CHAPTER 2 STANDARDS AND ADJUSTMENTS
A. Mechanical
1. Copier
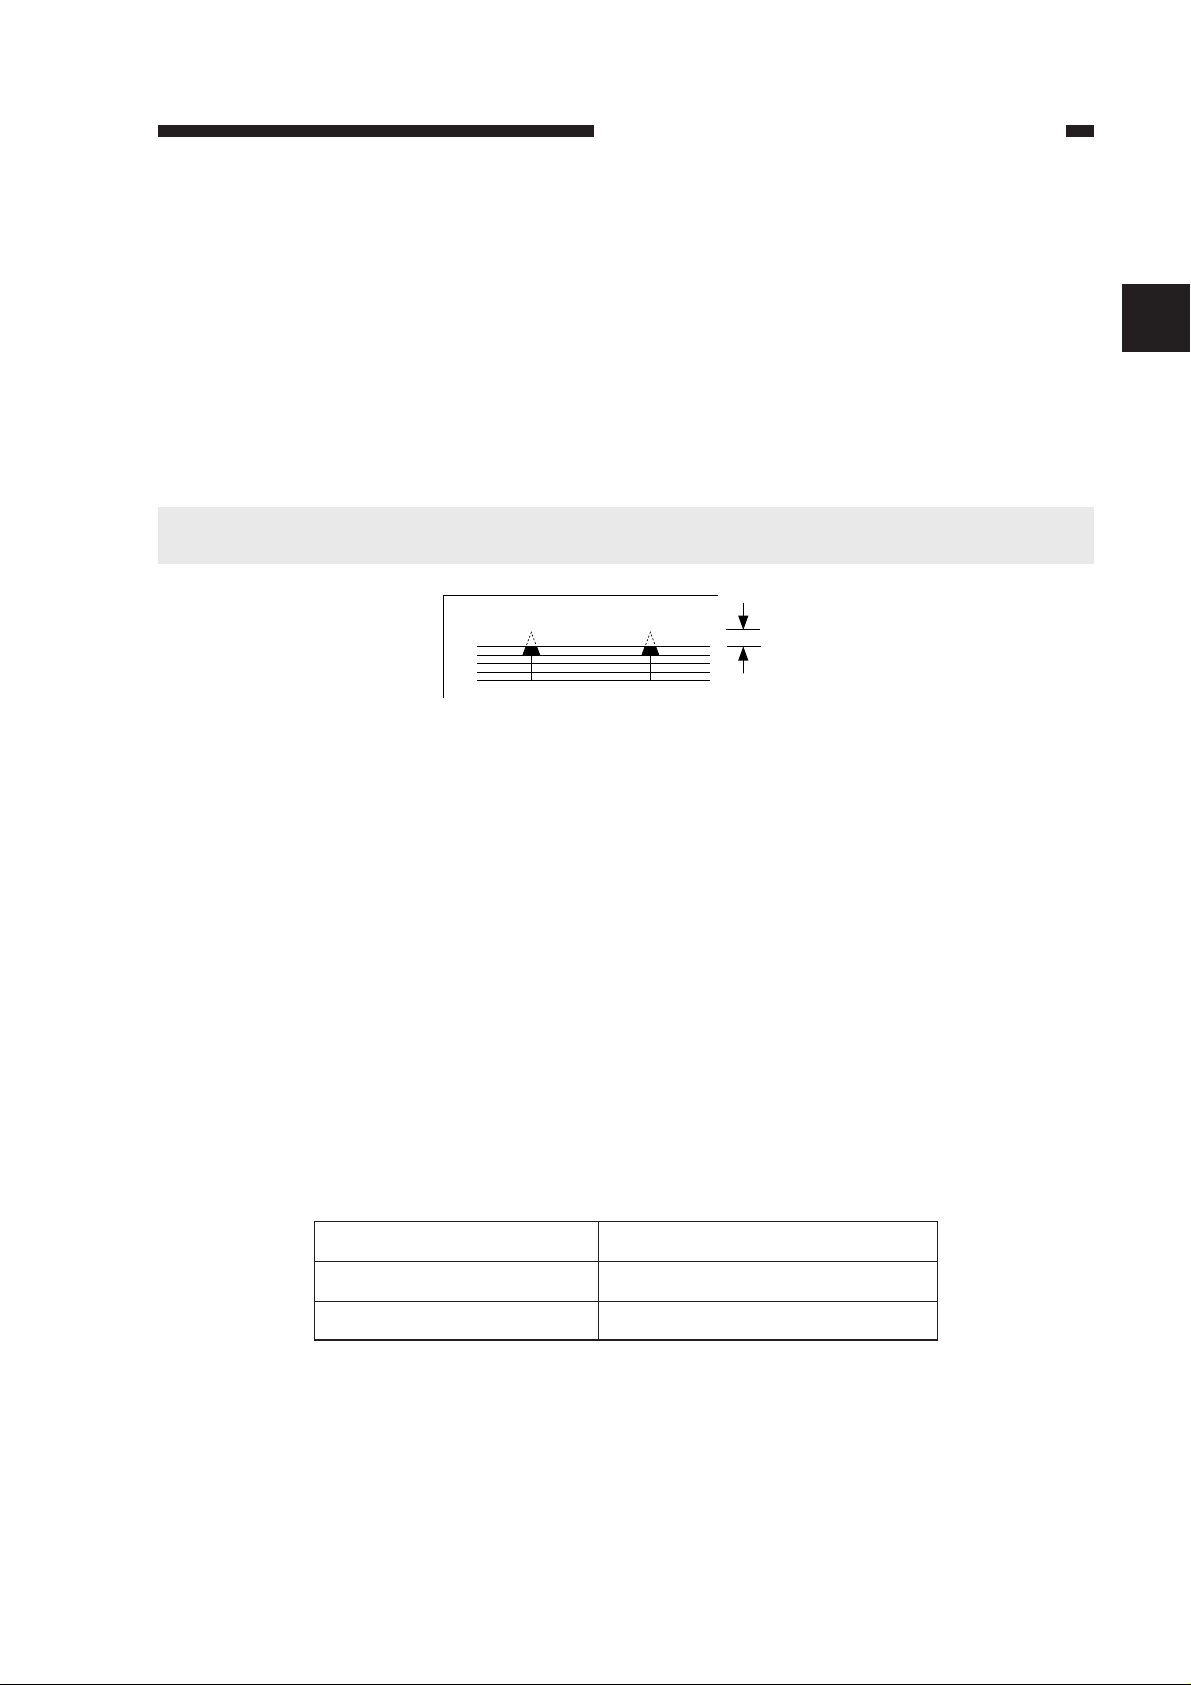
a. Leading Edge Non-Image Width
Make adjustments so that the leading edge non-image width is 2.0 ±1.5 mm when the Test
Sheet is copied in Direct.
Caution:
If you have performed this adjustment, be sure to adjust the image leading edge margin.
2.0±1.5mm
2
Figure 2-1
Making Adjustments
1) Select '31' in service mode.
• The display will indicate '31'.
2) Press the Copy Start key.
• The existing setting will flash.
3) Change the setting by the +/- key.
• The setting may be between 0 and 99.
• For each '1', the non-image width will change by 0.24 mm.
4) Press the AE key.
• The setting will stop flashing and will remain on, indicating that it has been stored in
memory.
5) As necessary, press the Clear/Stop key once to return to item selection; or, press it once again
to end service mode.
Relationship between Setting and Leading Edge Non-Image Width
Setting
Higher
Leading edge non-image width
Increases
Lower
Decreases
Table 2-1
2-1

CHAPTER 2 STANDARDS AND ADJUSTMENTS
b. Image Leading Edge Margin (registration activation timing)
Make adjustments so that the leading edge margin is 2.5 ±1.5 mm when the Test Sheet is
copied.
Caution:
Be sure to check that the leading edge non-image width is as indicated before performing this
adjustment.
2.5±1.5mm
Figure 2-2
Making Adjustments
1) Select '30' in service mode.
• The display will indicate '30'.
2) Press the Copy Start key.
• The existing setting will flash.
3) Change the setting using the +/- key.
• The setting may be between 0 and 99.
• The setting will change by 0.24 mm in terms of margin for each '1'.
4) Press the AE key.
• The setting will stop flashing and will remain on, indicating it has been stored in memory.
5) As necessary, press the Clear/Stop key once to return to item selection; or, press it once again
to end service mode.
Relationship between Settings and Image Leading Edge Margin
Setting
Higher
Lower
Image leading edge margin
Decreases
Increases
Table 2-2
2-2
CHAPTER 2 STANDARDS AND ADJUSTMENTS
c. Adjusting the Mirror Position (optical length between No. 1 mirror and No. 2 mirror)
If you have replaced the scanner drive cable, you must adjust the mirror position, by changing
the position of the cable retainer of the No. 1 mirror mount.
Reference:
1. As more and more copies are made, the cable tends to become slack, requiring adjustment.
2. If the optical length between the No. 1 mirror and the No. 2 mirror is not correct, the horizontal
reproduction ratio will be wrong, causing poor sharpness or blurred images.
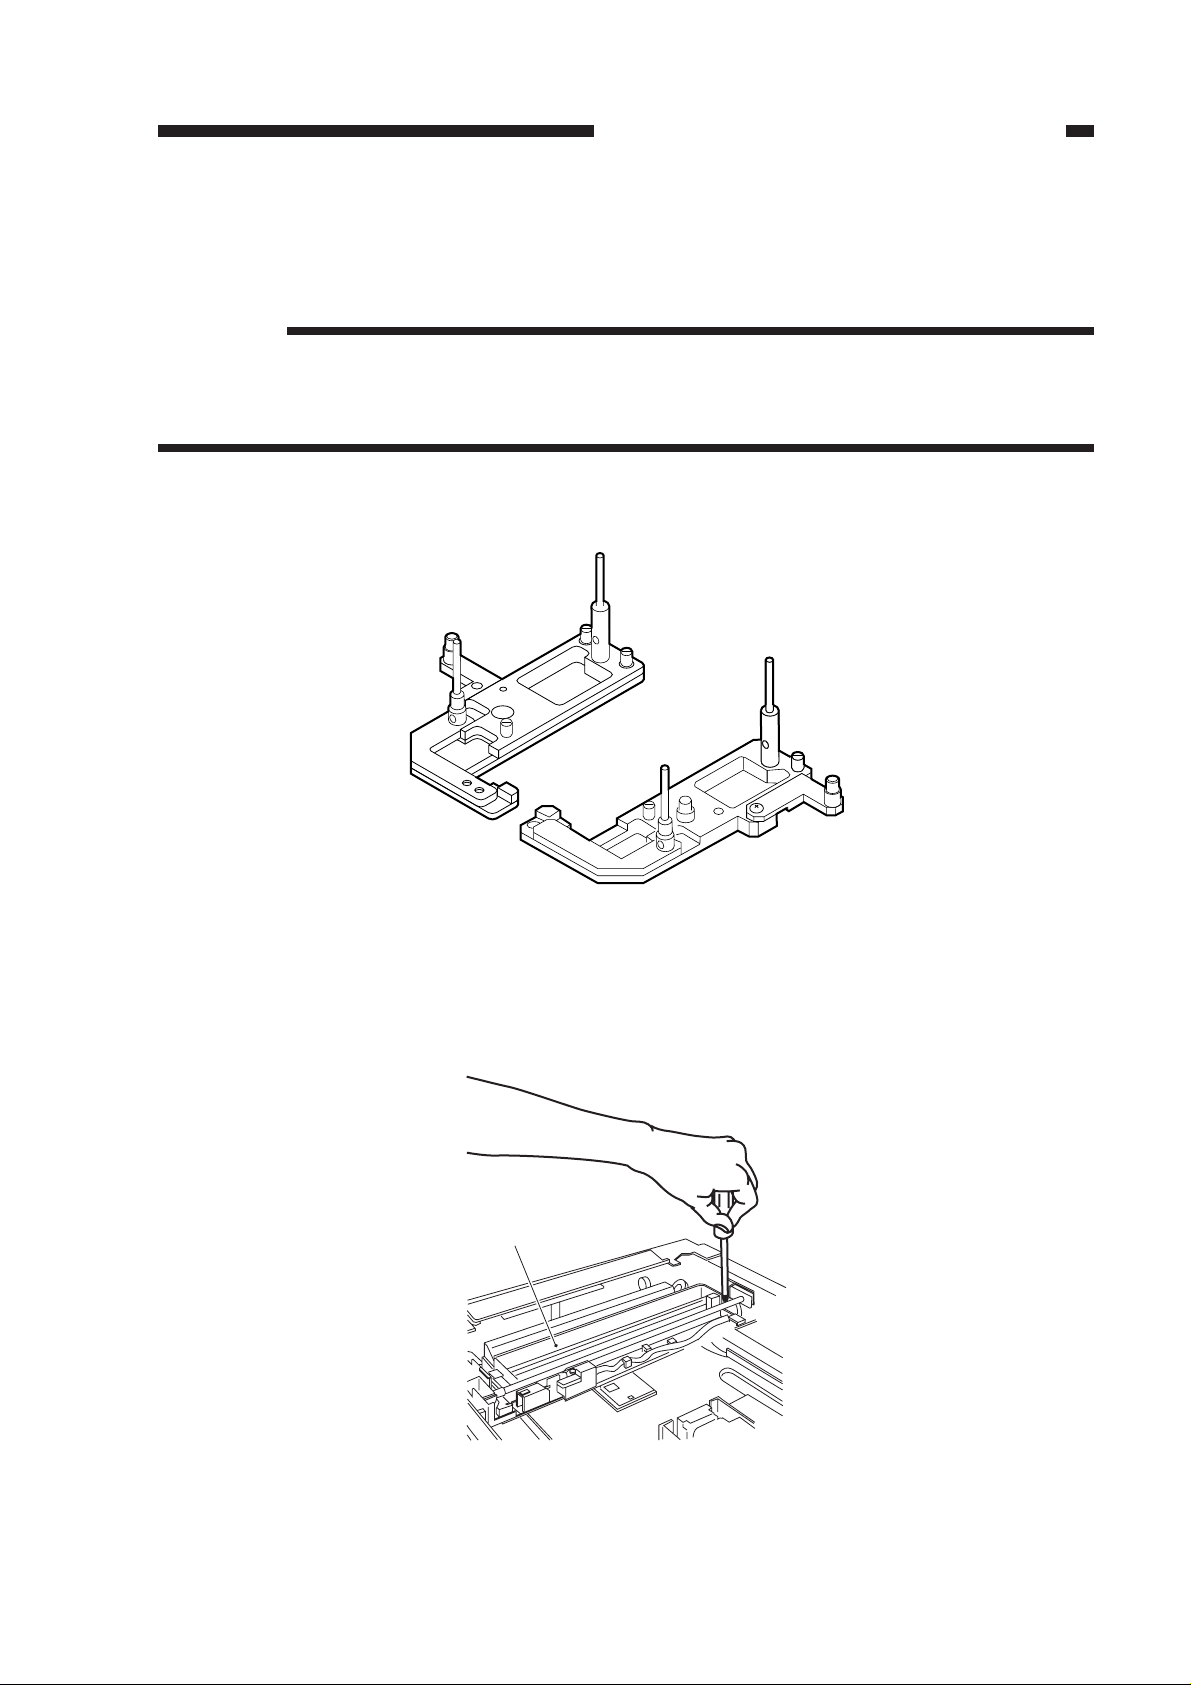
1) Fit the mirror positioning tool (FY9-3009) as shown.
Figure 2-3
2) Remove the copyboard glass.
3) Loosen the screws used to secure the cable retainer at the rear and the front of the No. 1 mirror
mount [1].
[1]
Figure 2-4
2-3
CHAPTER 2 STANDARDS AND ADJUSTMENTS
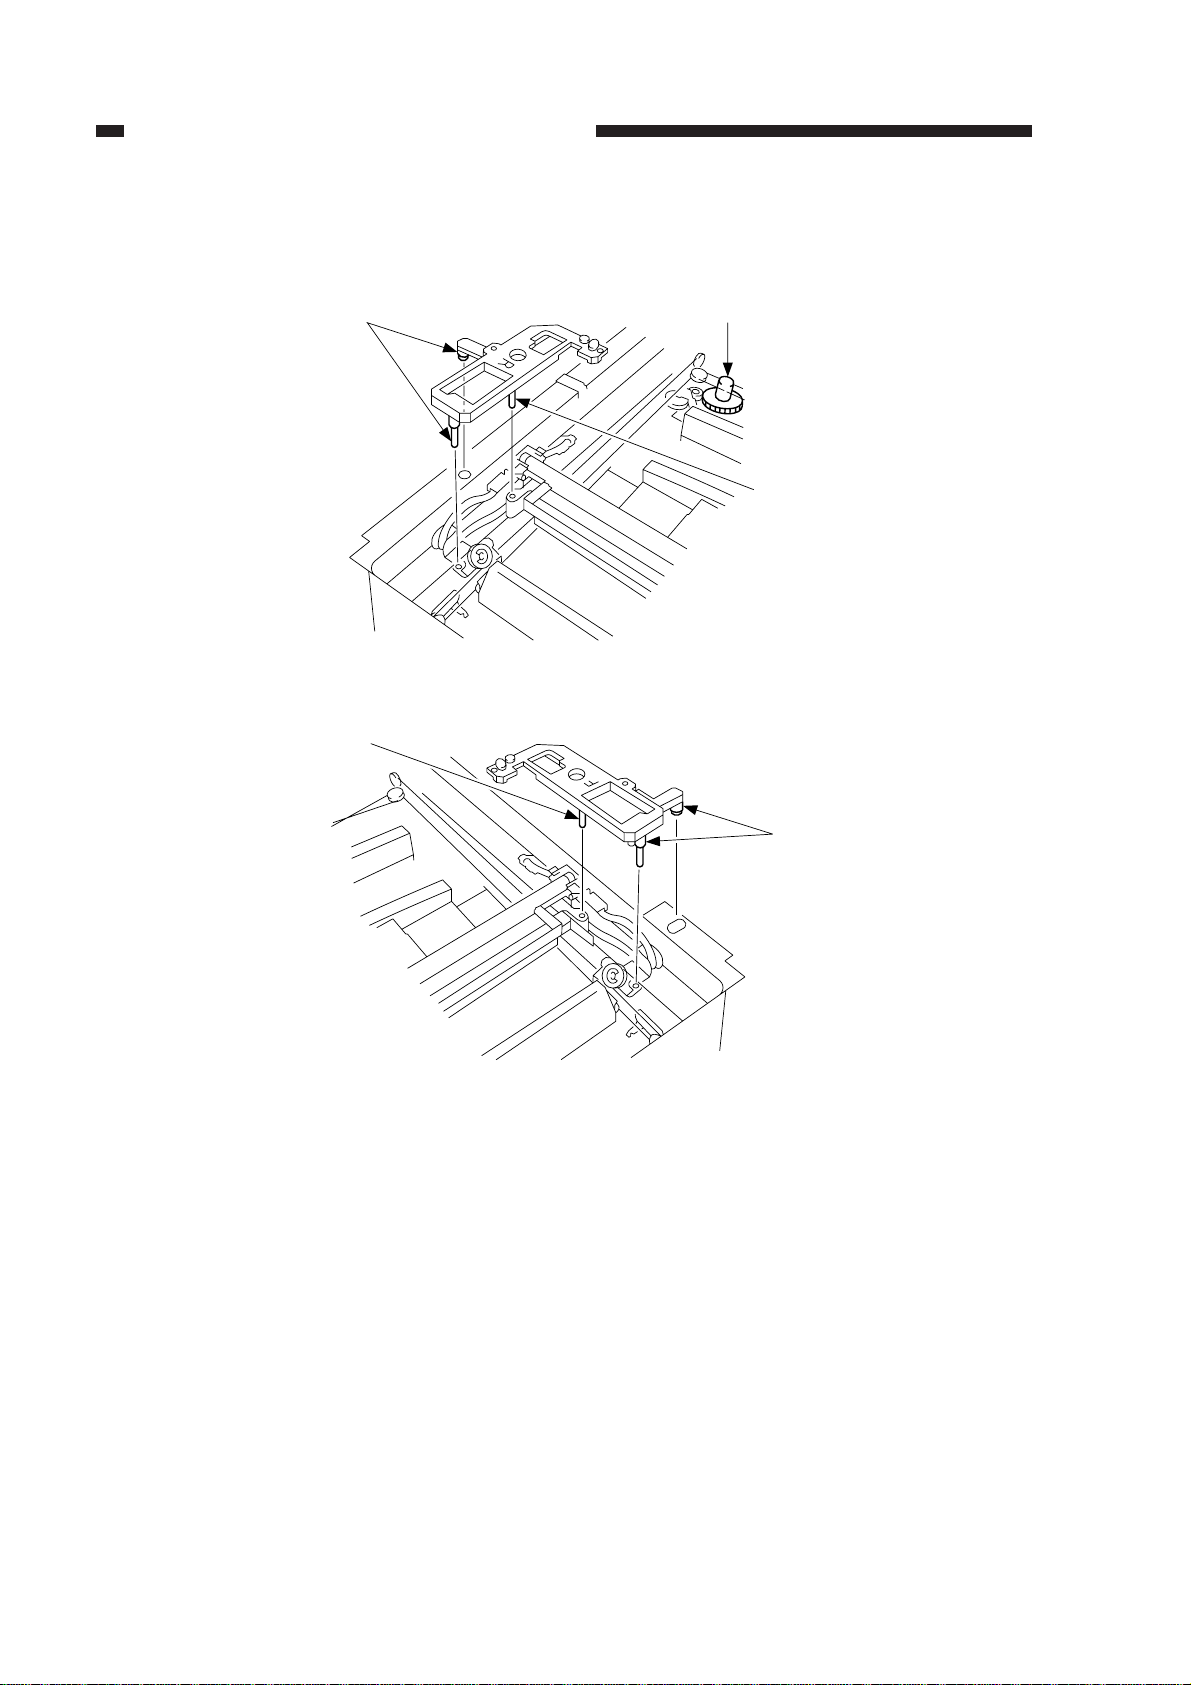
4) Turn the cable drive pulley [3] so that the three shafts [2] of the mirror positioning tool for the
front and the rear may be arranged as shown.
[3][2]
[2]
Figure 2-5 (rear)
[2]
[2]
Figure 2-6 (front)
2-4
CHAPTER 2 STANDARDS AND ADJUSTMENTS
[1]
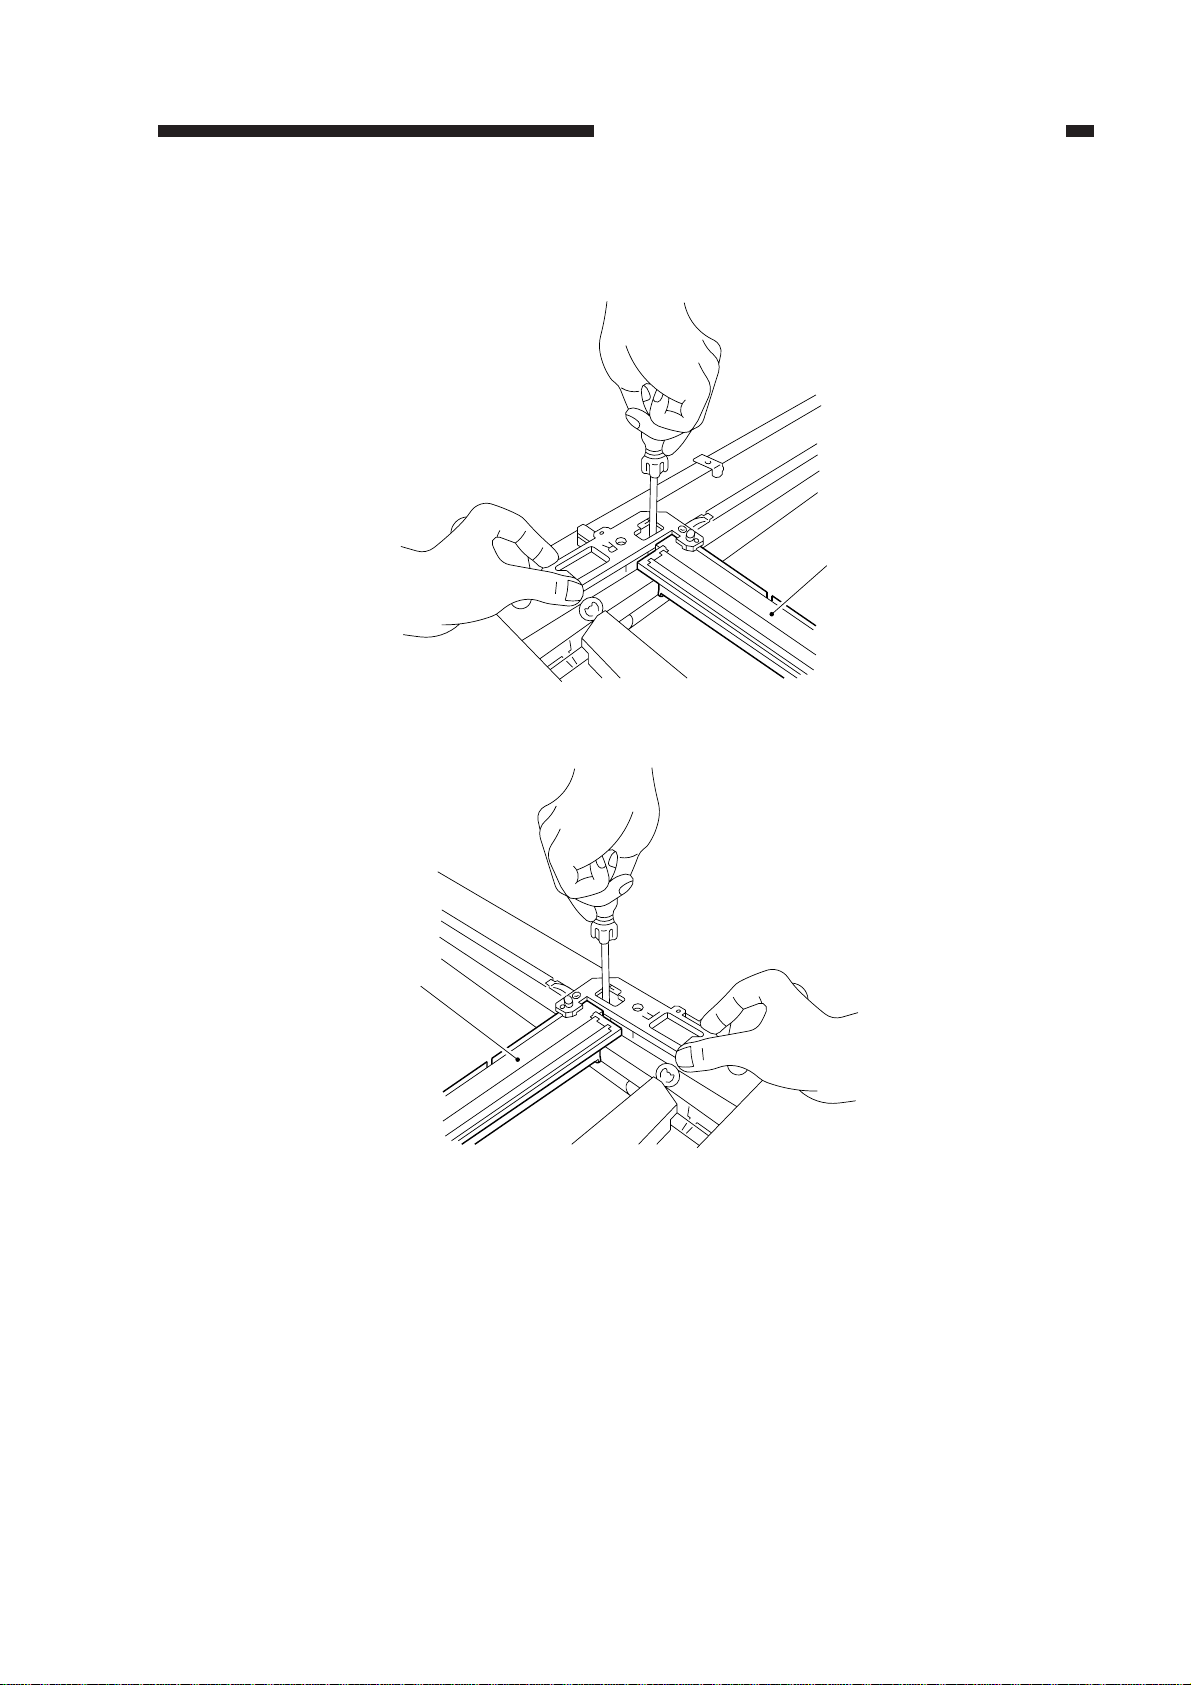
5) While keeping the condition of 4), tighten the positioning screw at the rear and the front of the
No. 1 mirror mount [1].
[1]
Figure 2-7 (rear)
Figure 2-8 (front)
2-5
CHAPTER 2 STANDARDS AND ADJUSTMENTS
d. Checking the Force of the Cassette Spring
If the force of the spring used to hold up the holding plate of the cassette is not correct, pickup
faults or the like can occur.
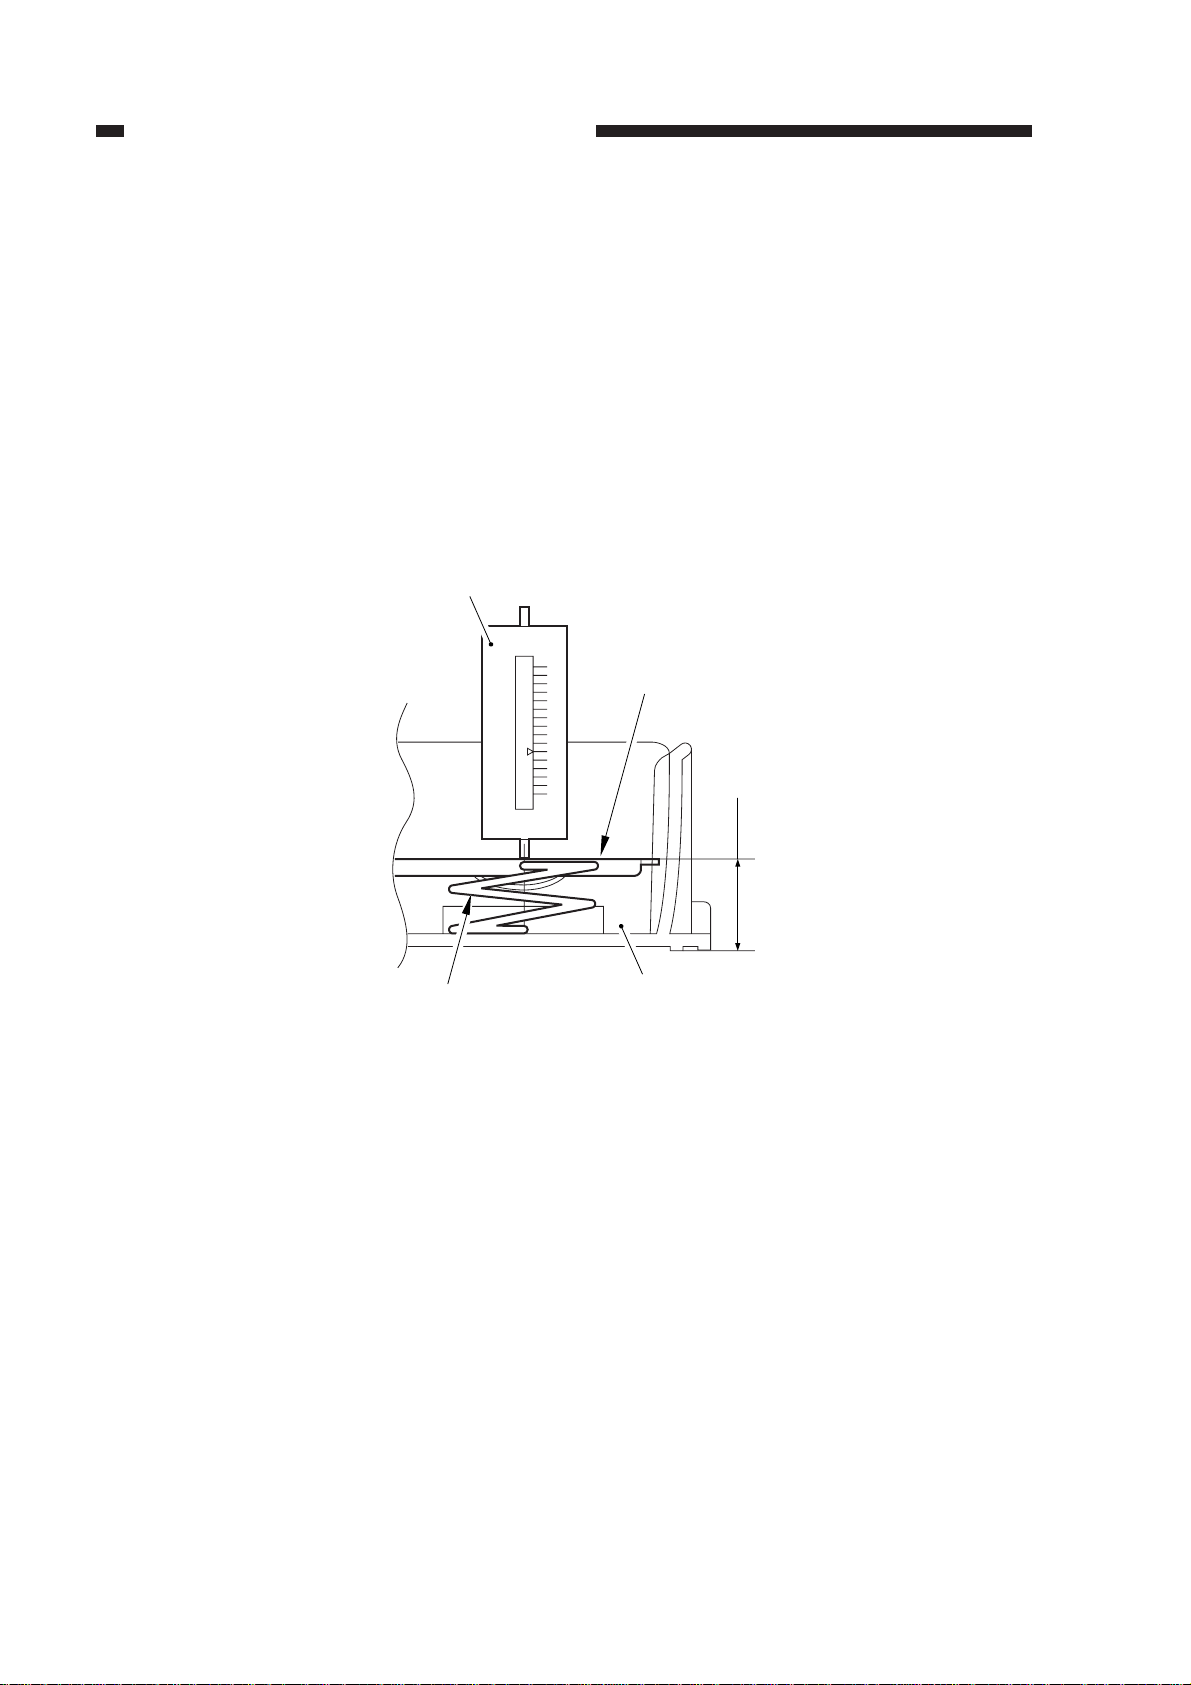
If a fault is suspected, check the force of the spring using a spring gauge (CK-0054), and
replace the spring if it is not as indicated:
Standard: 970 ±150 g
Making Measurements
Push the spring gauge against the middle of the spring as shown, and check to make sure that
the reading of the spring gauge is 970 ±150 g when the holding plate is 18 mm away from the
bottom of the cassette.
Spring gauge
(CK-0054)
Holding plate
Cassette spring
18mm
Cassette
Figure 2-9
2-6
e-1. Routing the Scanner Drive Cable
CHAPTER 2 STANDARDS AND ADJUSTMENTS
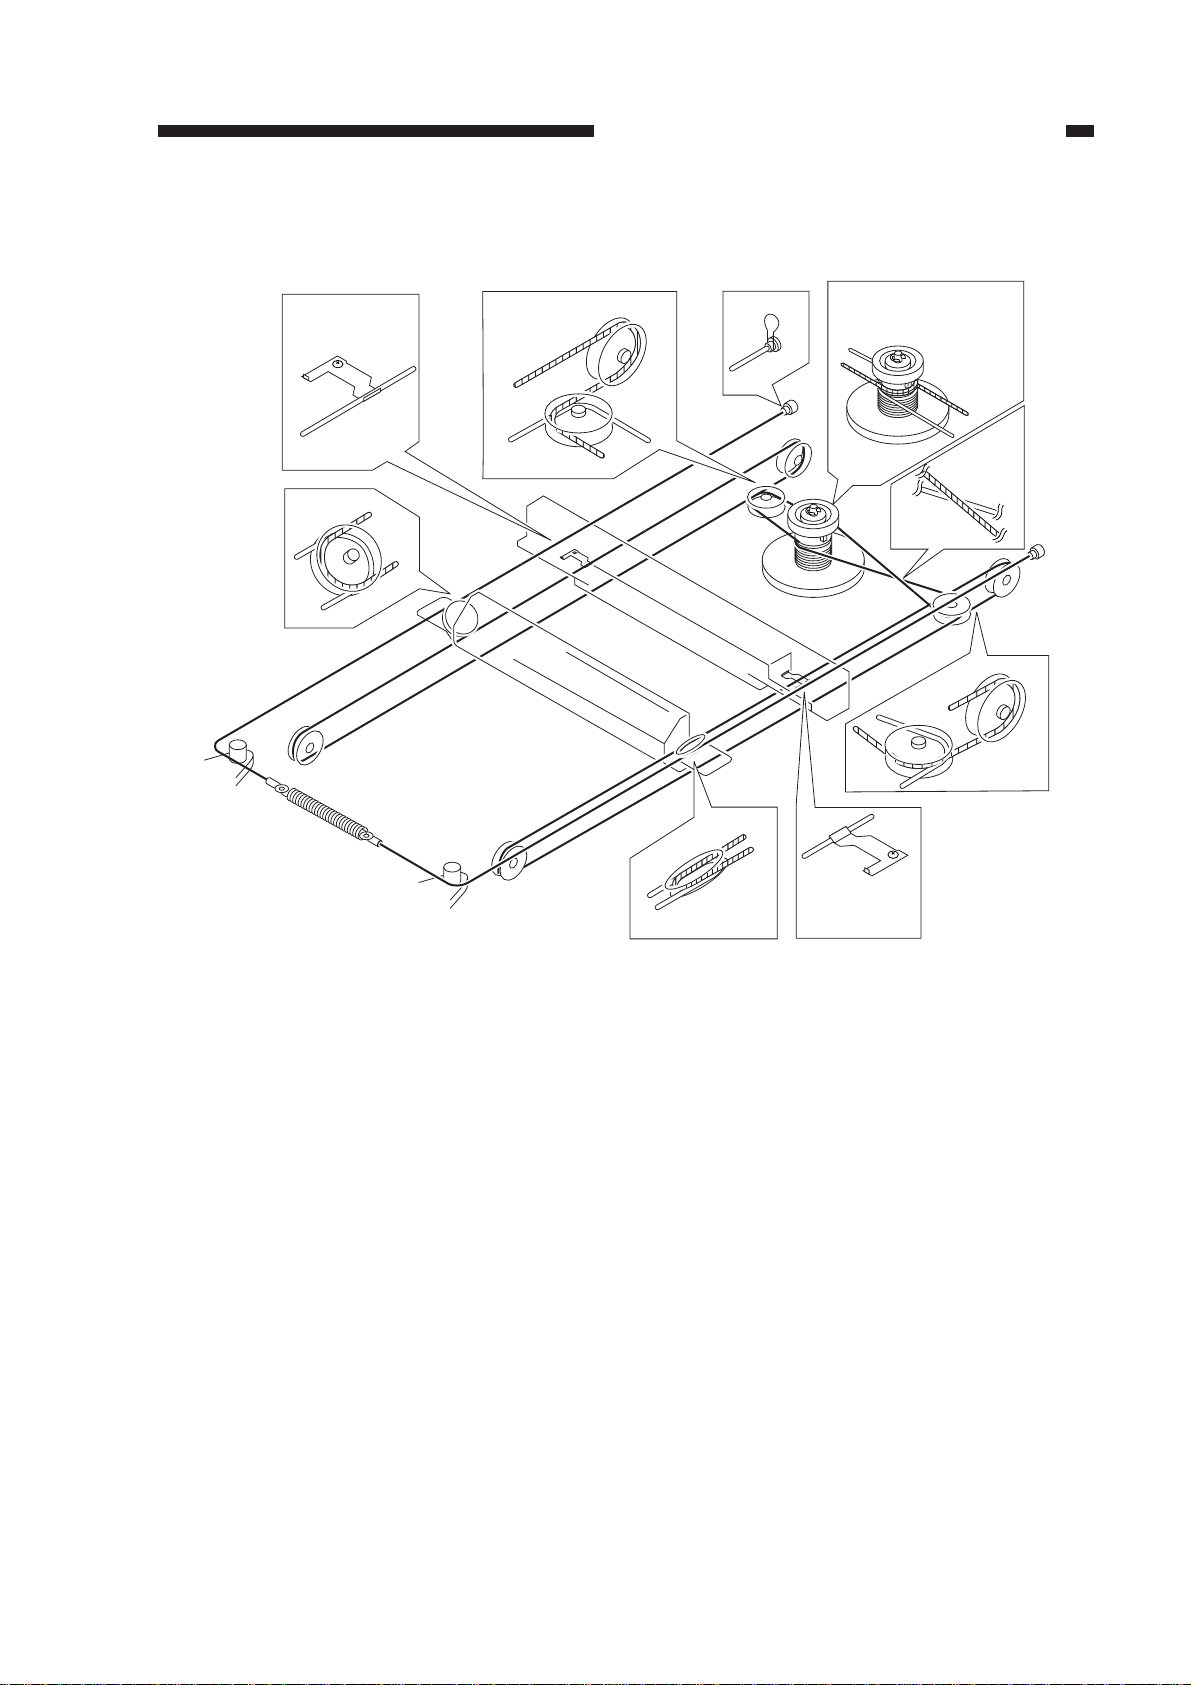
Wind 1.5 times. (black
cable)
Wind 7.5 times. (silvercolored cable)
Figure 2-10
2-7
CHAPTER 2 STANDARDS AND ADJUSTMENTS
e-2. Routing the Scanner Drive Cable
1. Before Starting the Work
Prepare the following:
• Mirror positioning tool (FY9-3009)
• Cable clip (FY9-3017)
• Adhesive tape
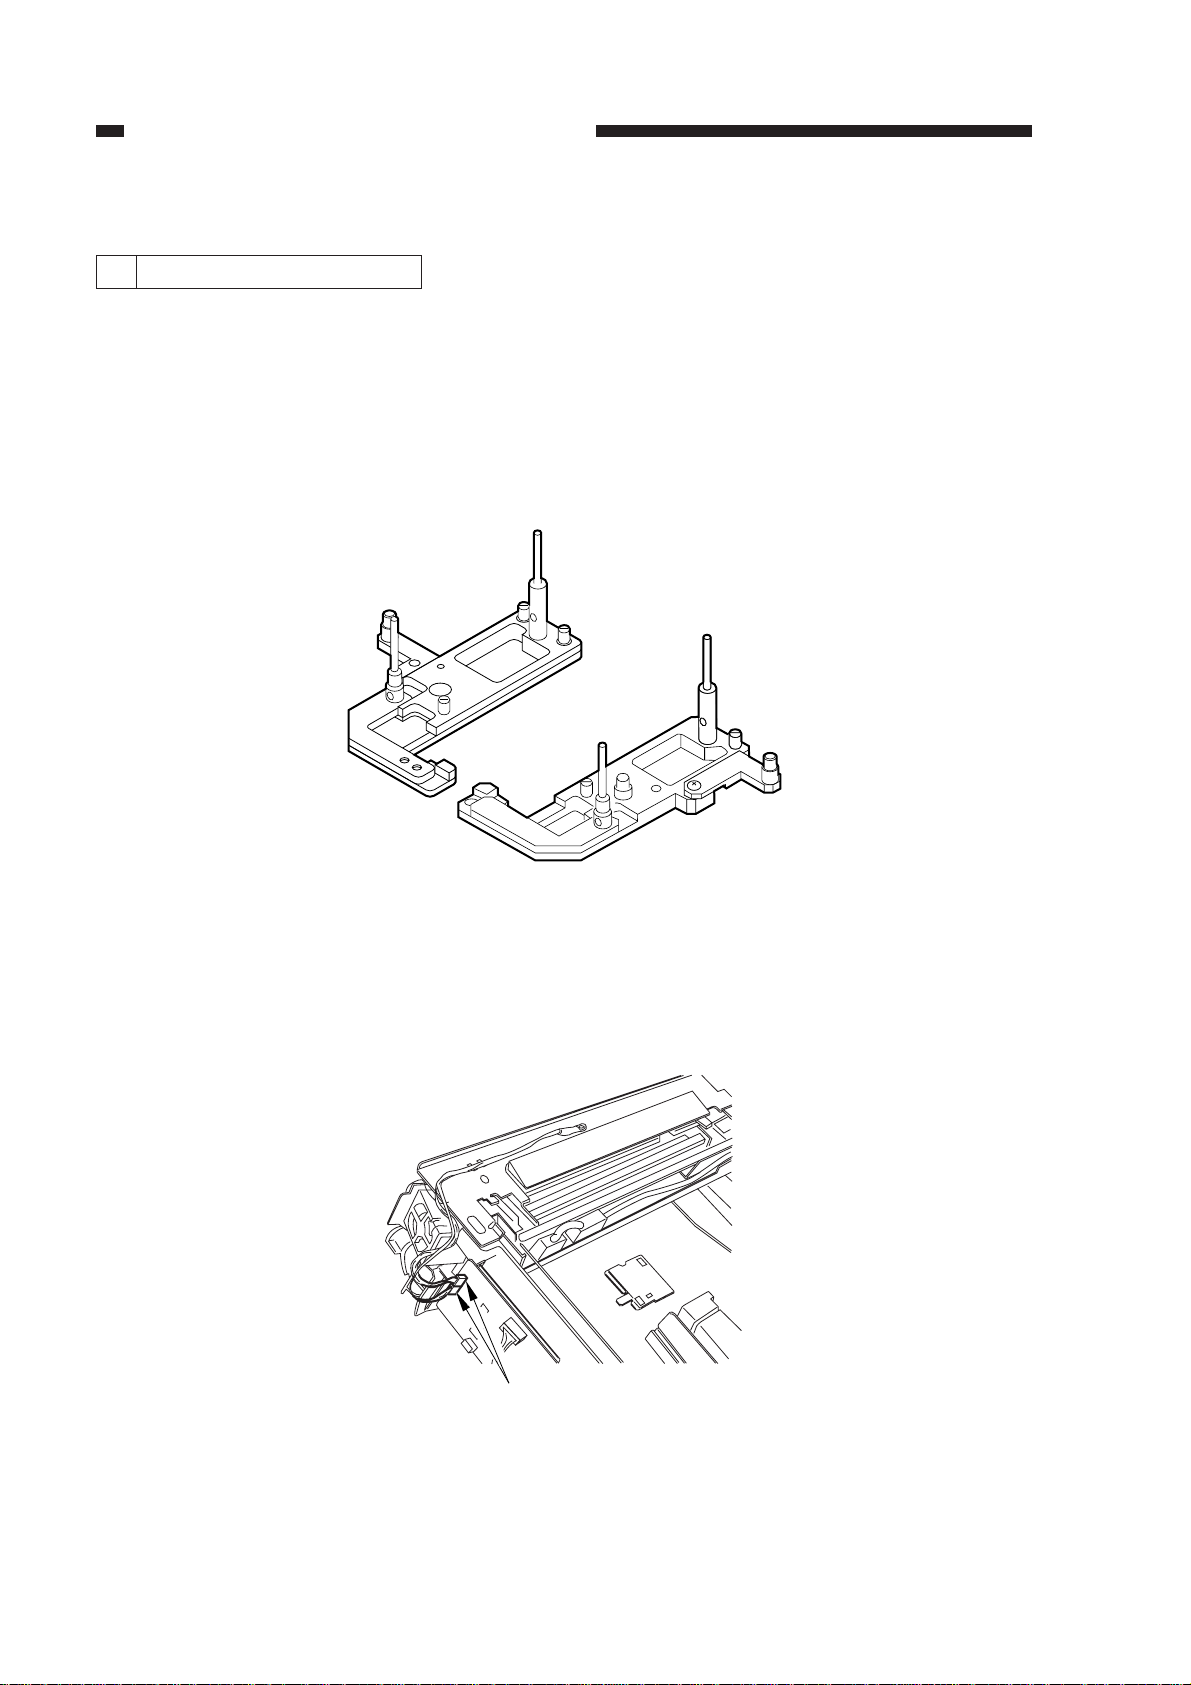
1) Set the mirror positioning tool as shown.
Figure 2-11
2) Prepare about five strips of adhesive tape (each one about 20 x 50 mm).
3) Remove the copyboard glass.
4) Disconnect the connectors (J101, J131) [1] from the DC controller PCB.
[1]
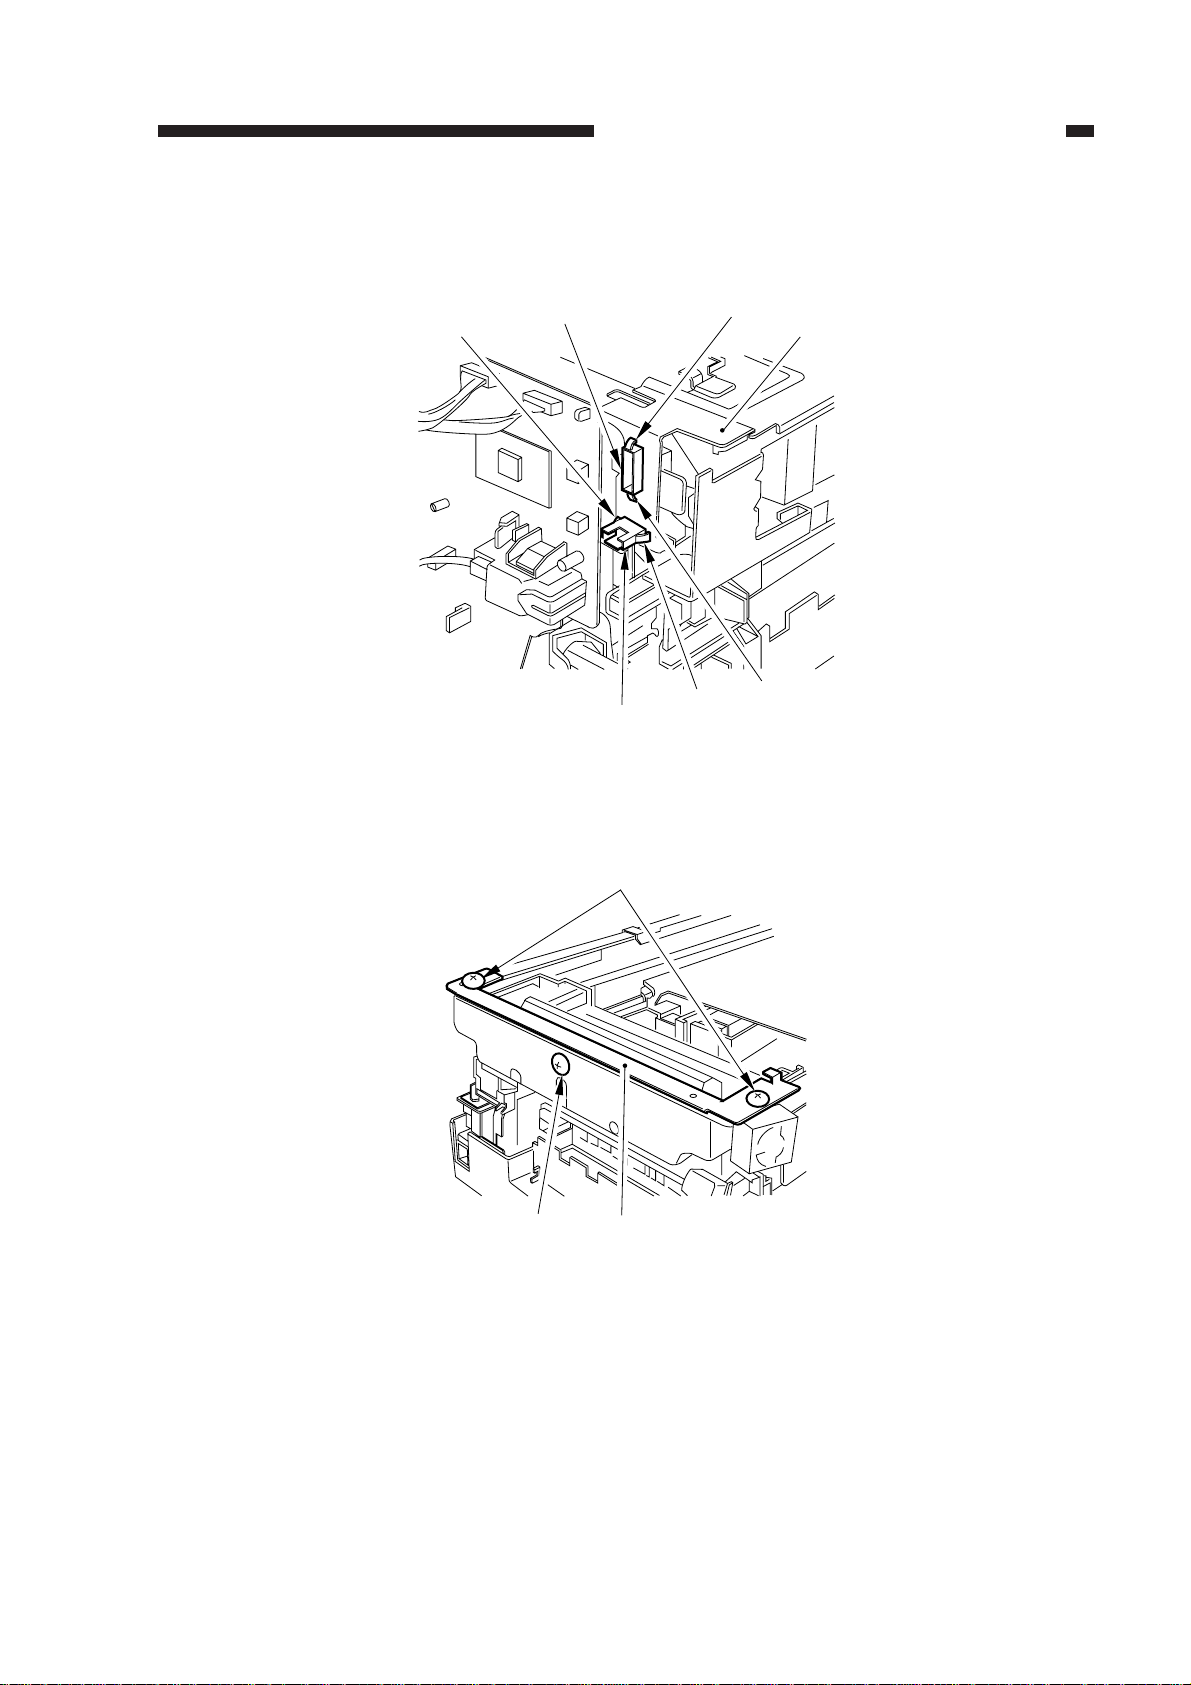
Figure 2-12
2-8
CHAPTER 2 STANDARDS AND ADJUSTMENTS
5) If the machine is equipped with an ADF, free the hook [2], and disconnect the two relay connectors [3] from the left upper stay [4].
[2]
[2]
[2]
[2]
[3]
[3]
Figure 2-13
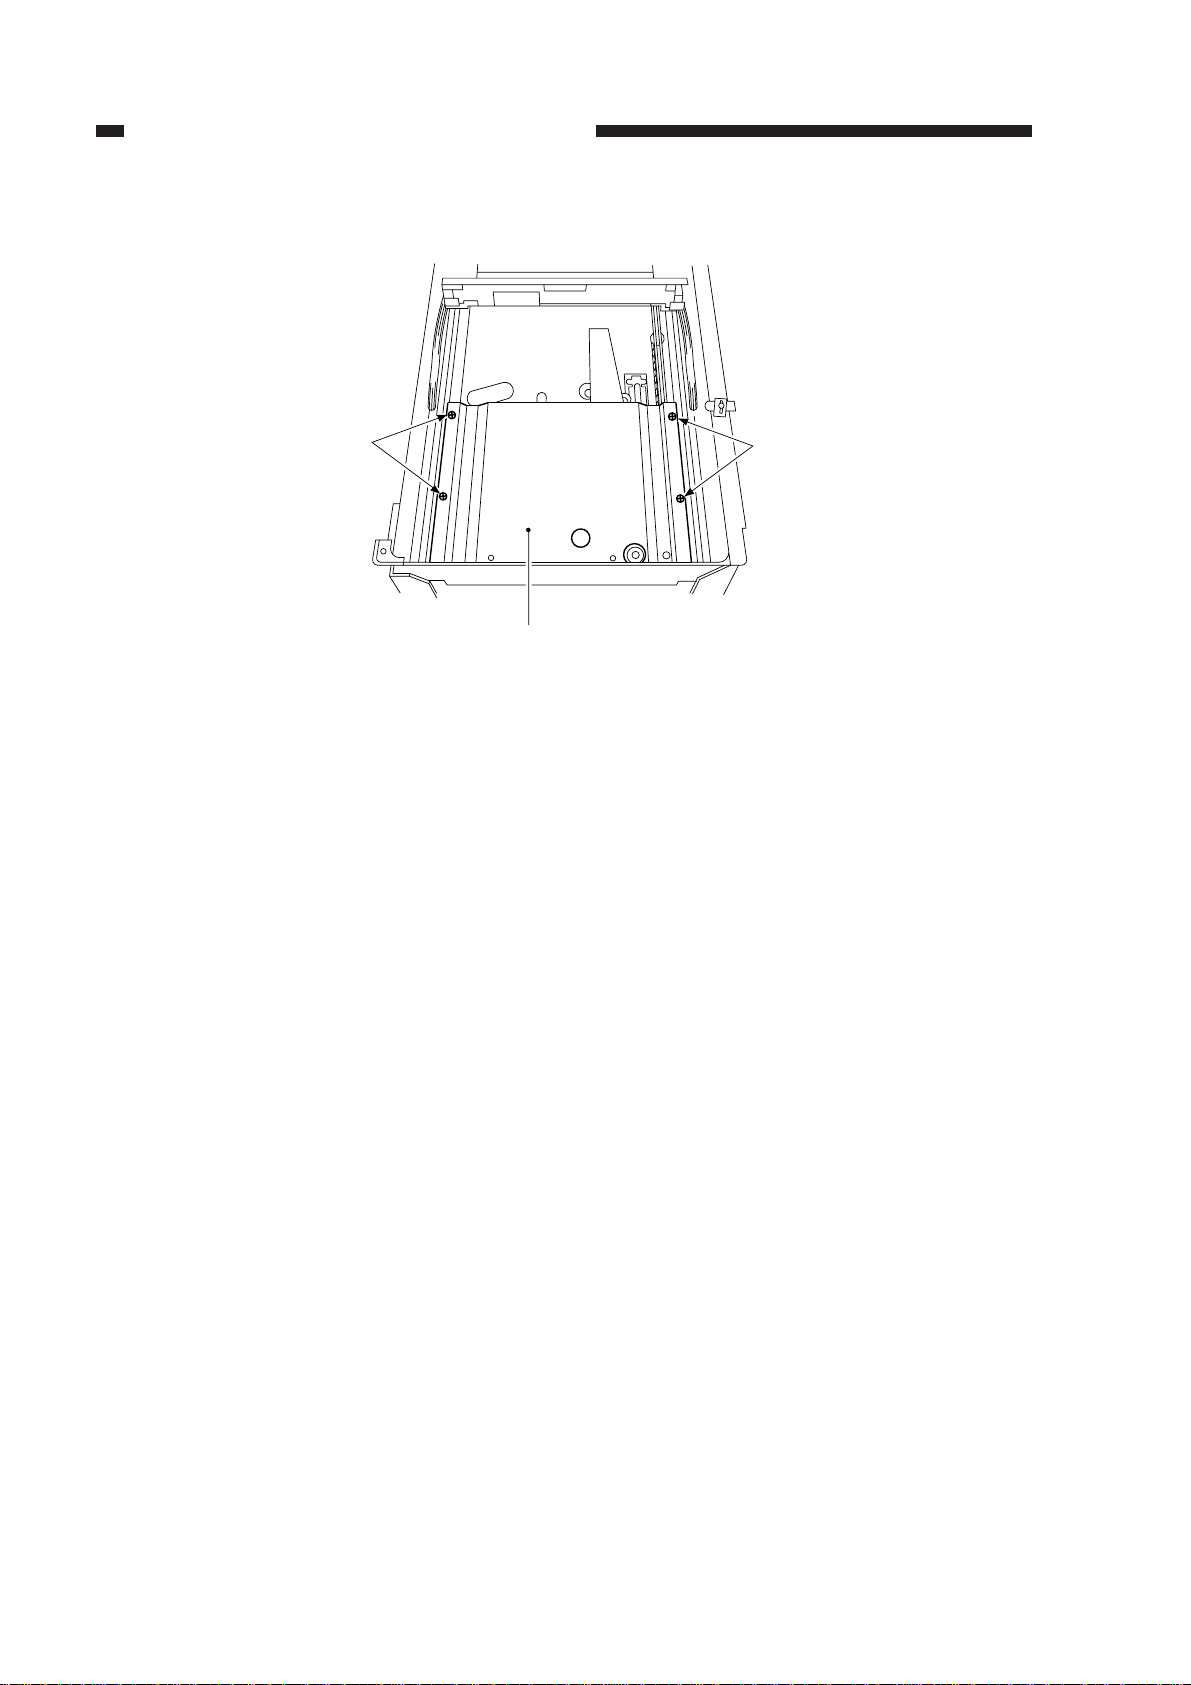
6) Remove the three screws [5], and detach the left upper stay [4].
[5]
[4]
[4][5]
Figure 2-14
2-9
CHAPTER 2 STANDARDS AND ADJUSTMENTS
7) Remove the four screws [7], and detach the lens cover [8].
[7]
[7]
[8]
Figure 2-15
2-10
CHAPTER 2 STANDARDS AND ADJUSTMENTS
[1]
[3]
Top view
[3]
2. Routing the Reversing Cable
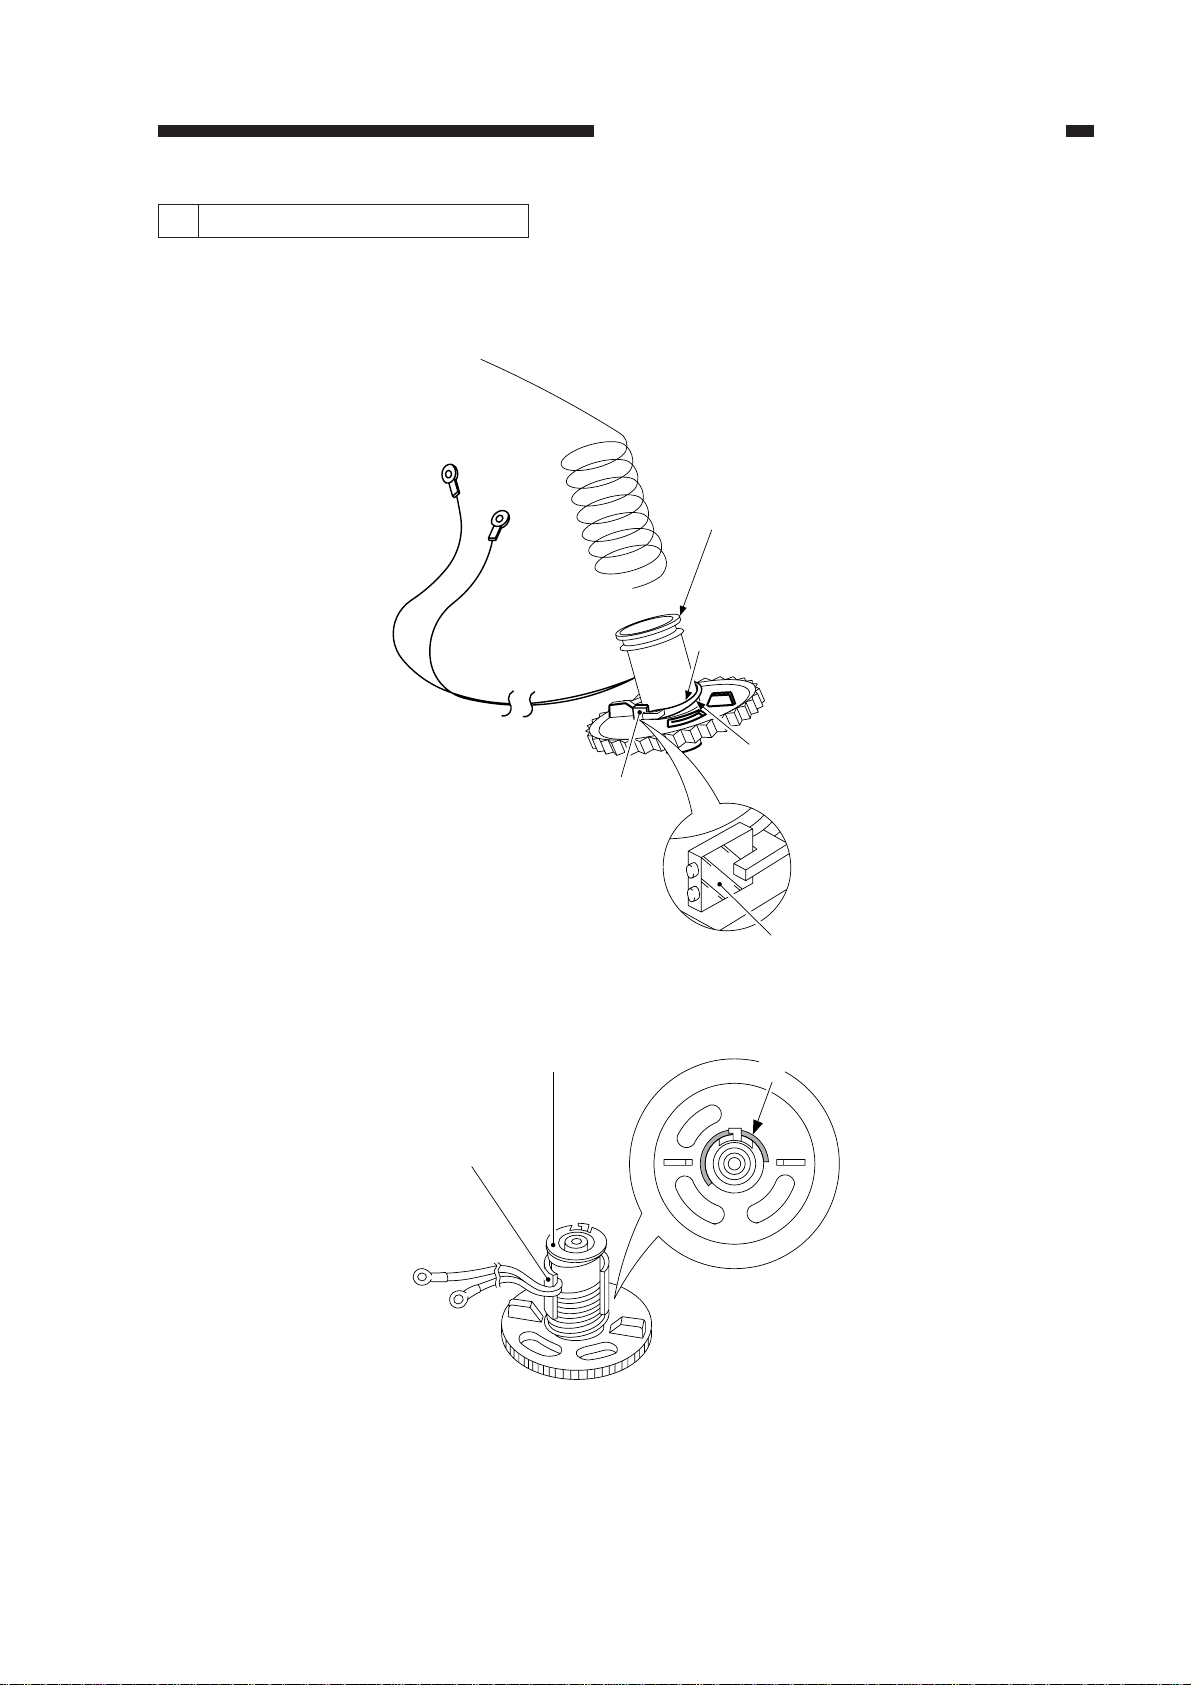
1) Wind the reversing cables (silver-colored) [2] on the cable drive pulley [1] 7.5 times with the
longer of the two on top; then, secure it in position with a cable clip [3].
[1]
Longer end
[2]
Figure 2-16
Shorter end
Face with a marking
Figure 2-17
2-11
CHAPTER 2 STANDARDS AND ADJUSTMENTS
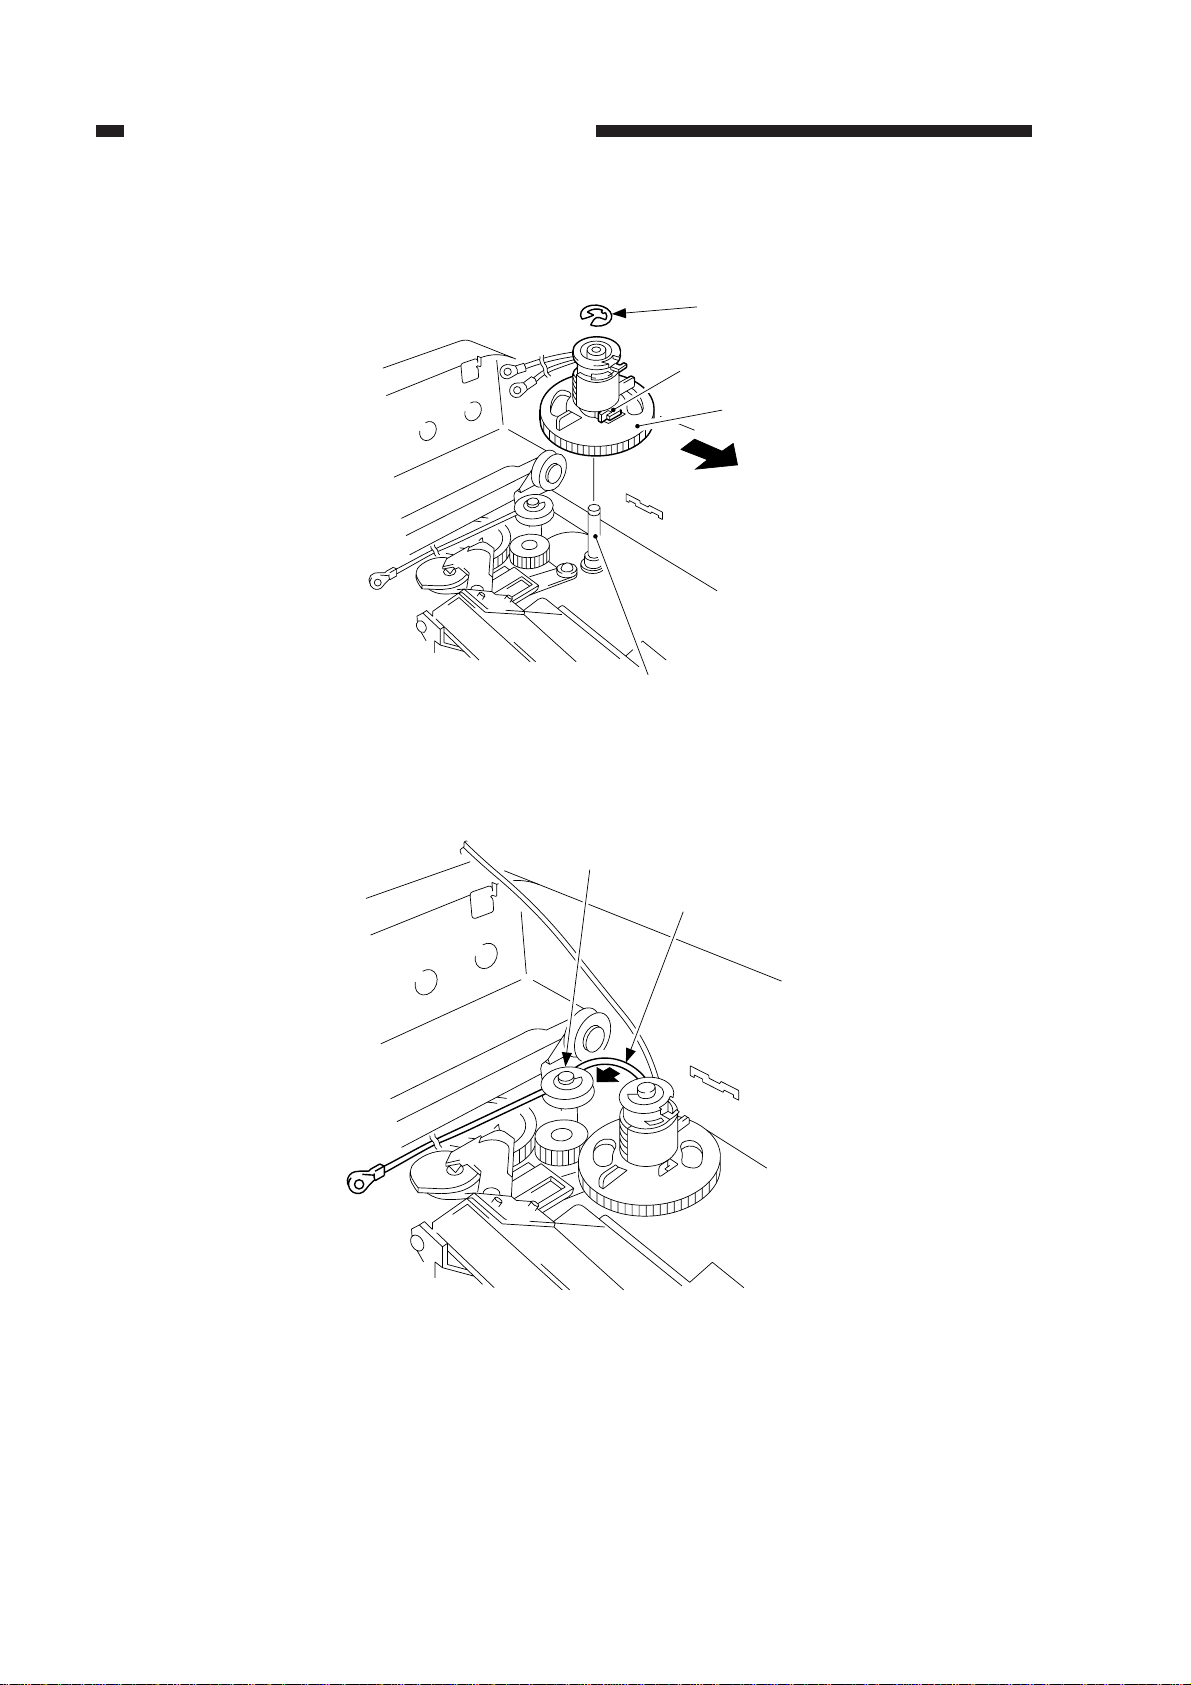
2) Put the cable drive pulley [1] into the shaft [4], and secure it in position with an E-ring [5].
When putting the cable drive pulley into the shaft, be sure that the hook is at the front.
[5]
Hook
[1]
(front)
[4]
Figure 2-18
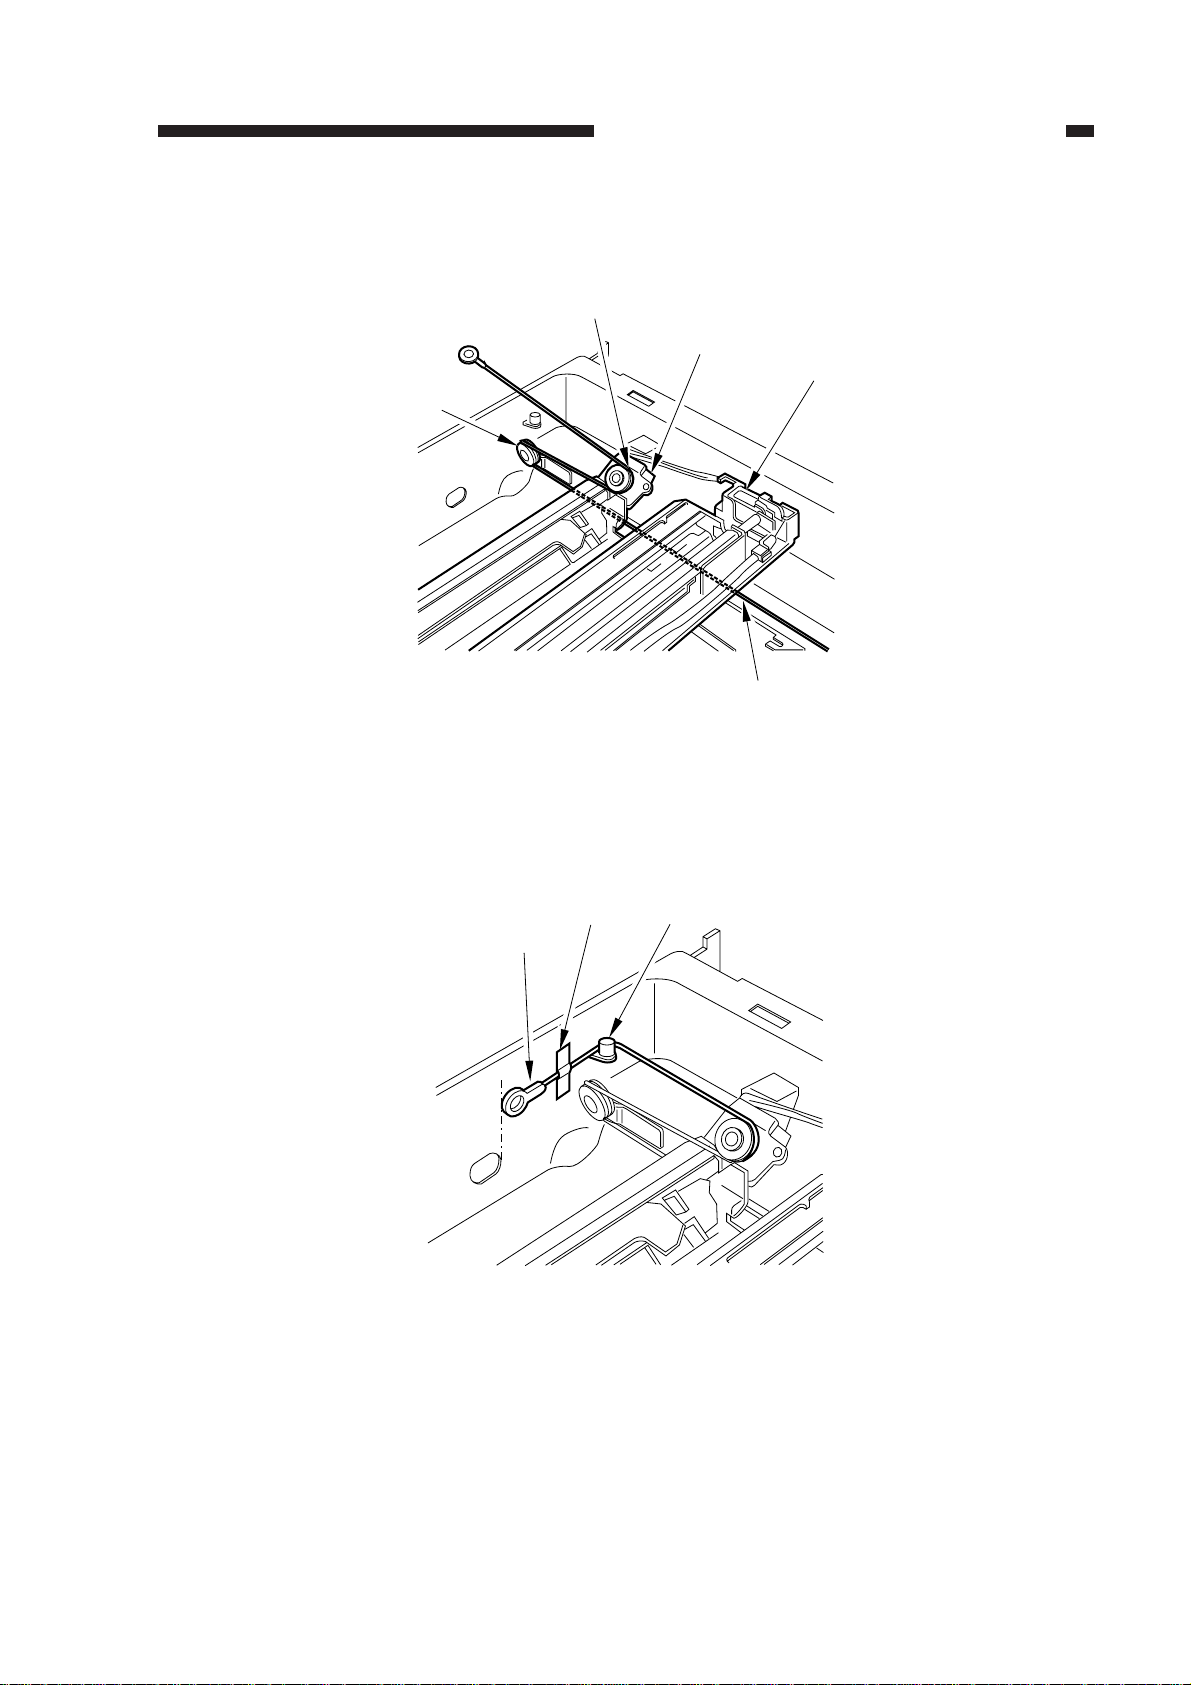
3) Hook the shorter end [6] on the pulley [7].
[7]
[6]
2-12
Figure 2-19
CHAPTER 2 STANDARDS AND ADJUSTMENTS
4) Lead the shorter end [6] under the No. 1 mirror mount [8] and the No. 2/3 mirror mount [9];
then, hook it on the left rear pulley [10] and the pulley [11] of the No. 2/3 mirror mount.
[11]
[9]
[8]
[10]
[6]
Figure 2-20
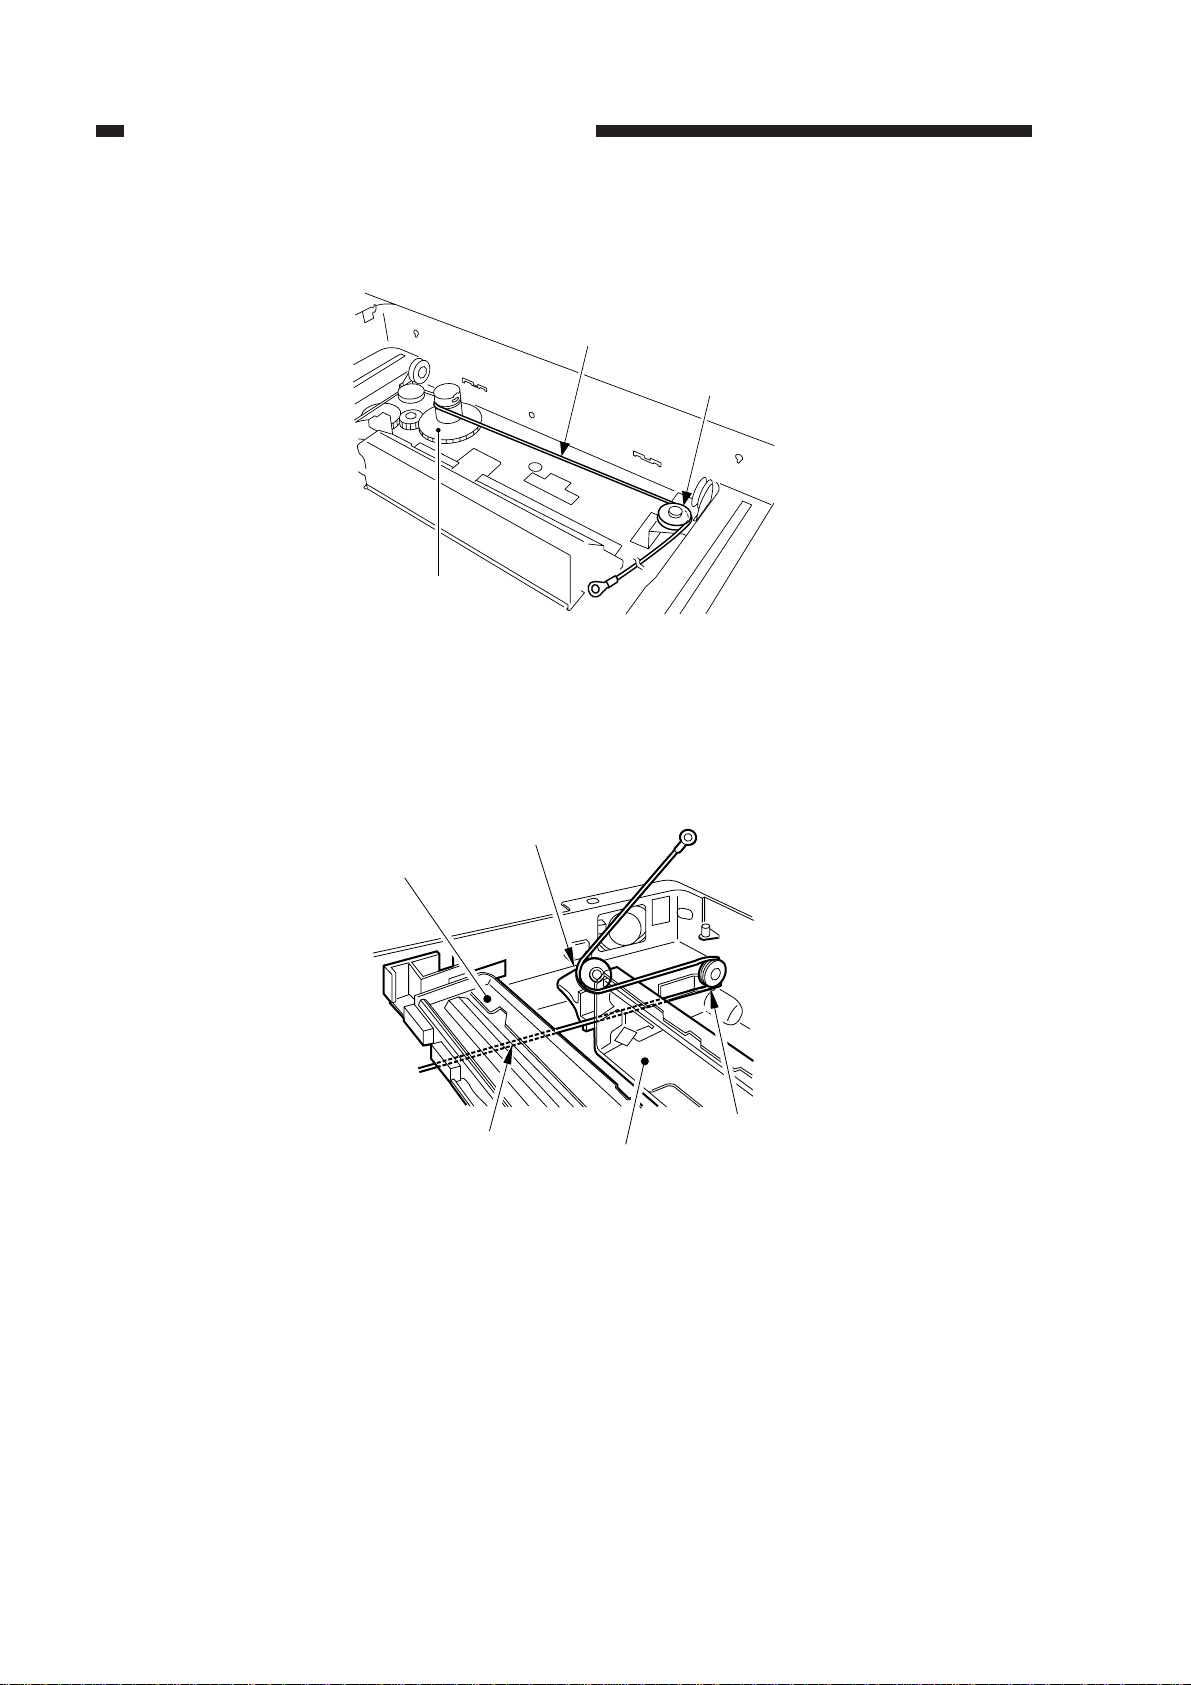
5) After fitting the shorter end [6] on the cable hook [12], secure its end with adhesive tape [13].
Be sure that the secured end of the cable is found where the hole in the left side plate and the tip
of the cable matches.
[12][13]
[6]
Figure 2-21
2-13
CHAPTER 2 STANDARDS AND ADJUSTMENTS
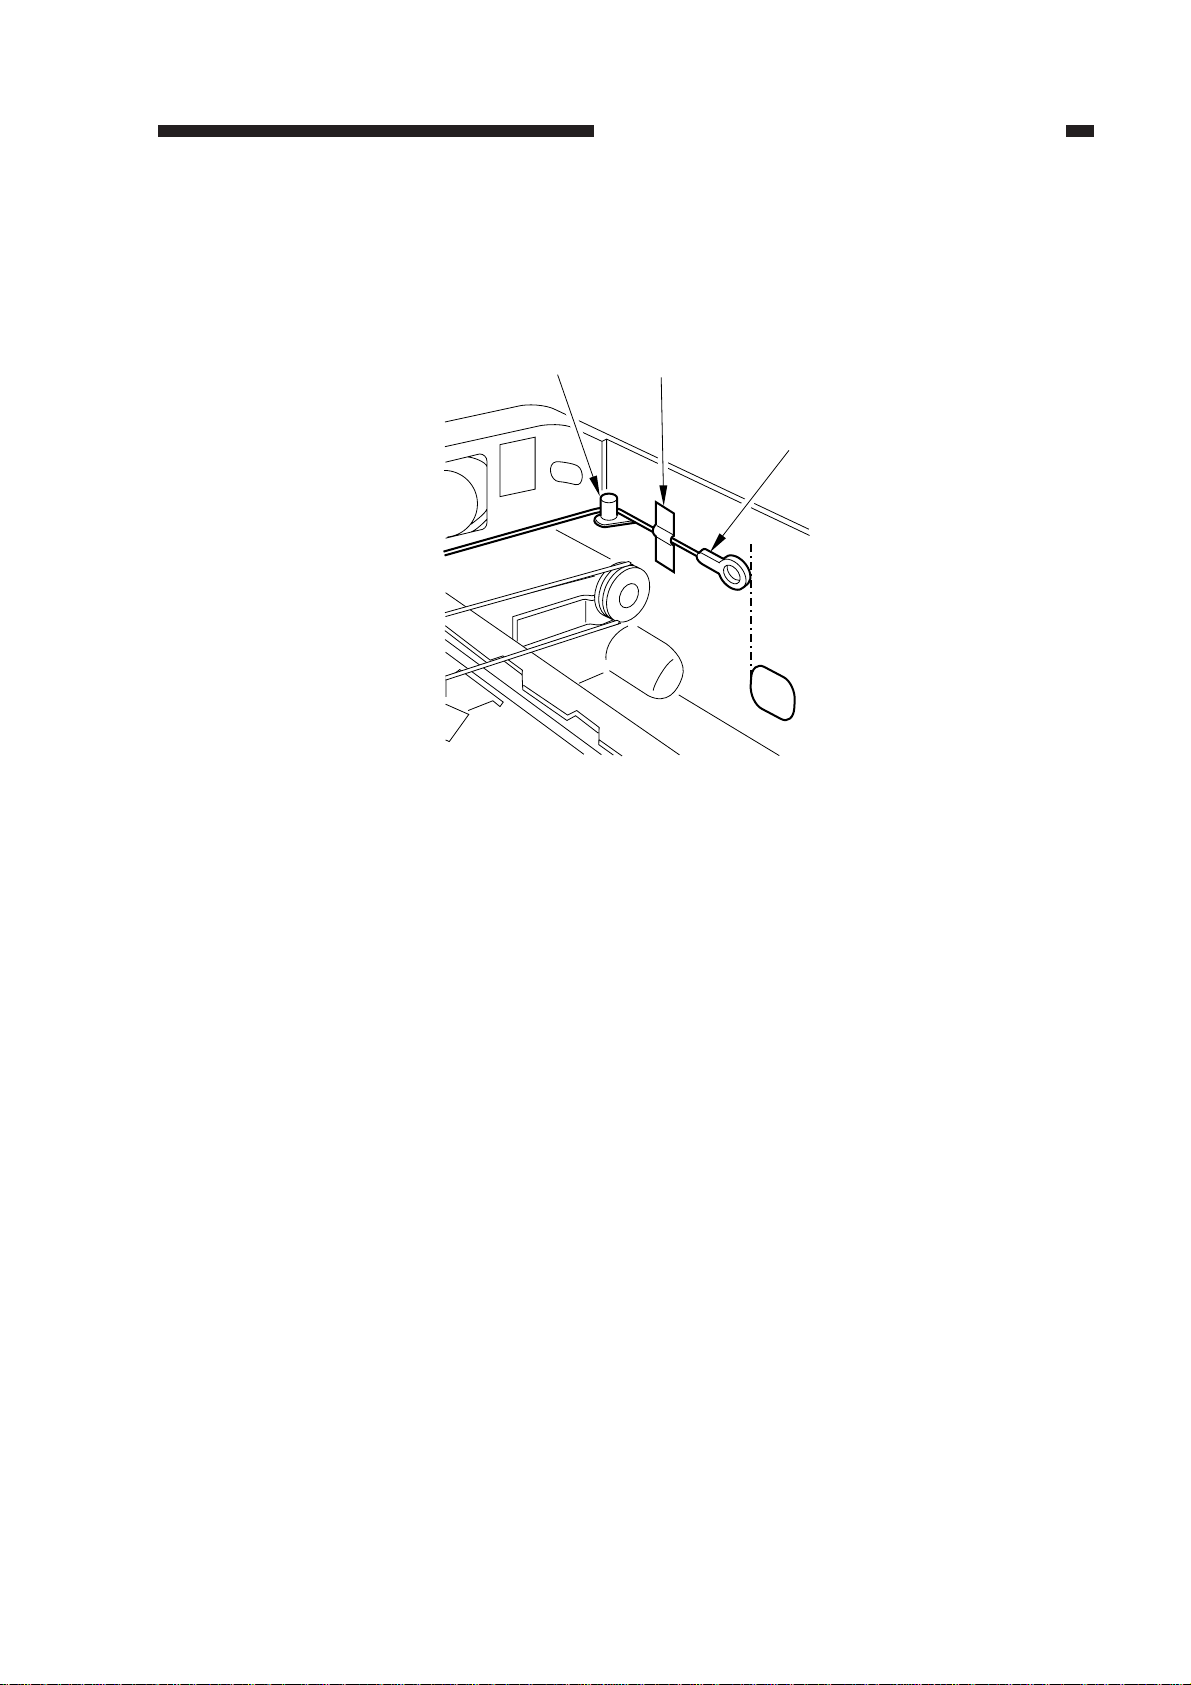
6) Lead the longer end [14] along the cable drive pulley [1], and hook it on the pulley [15] on the
right front side.
[14]
[15]
[1]
Figure 2-22
7) Lead the longer end [14] under the No. 1 mirror mount [8] and the No. 2/3 mirror mount [9];
then, hook it on the pulley [16] on the left front side and the pulley [17] of the No. 2/3 mirror
mount.
[17]
[8]
[14]
[9]
[16]
Figure 2-23
2-14
CHAPTER 2 STANDARDS AND ADJUSTMENTS
8) Hook the longer cable [14] on the cable hook [18]; then, secure its end to the left side with
adhesive tape [19].
Be sure that the secured end of the cable is found where the hole in the left side plate and the tip
of the cable matches.
[18]
Figure 2-24
[19]
[14]
2-15
CHAPTER 2 STANDARDS AND ADJUSTMENTS
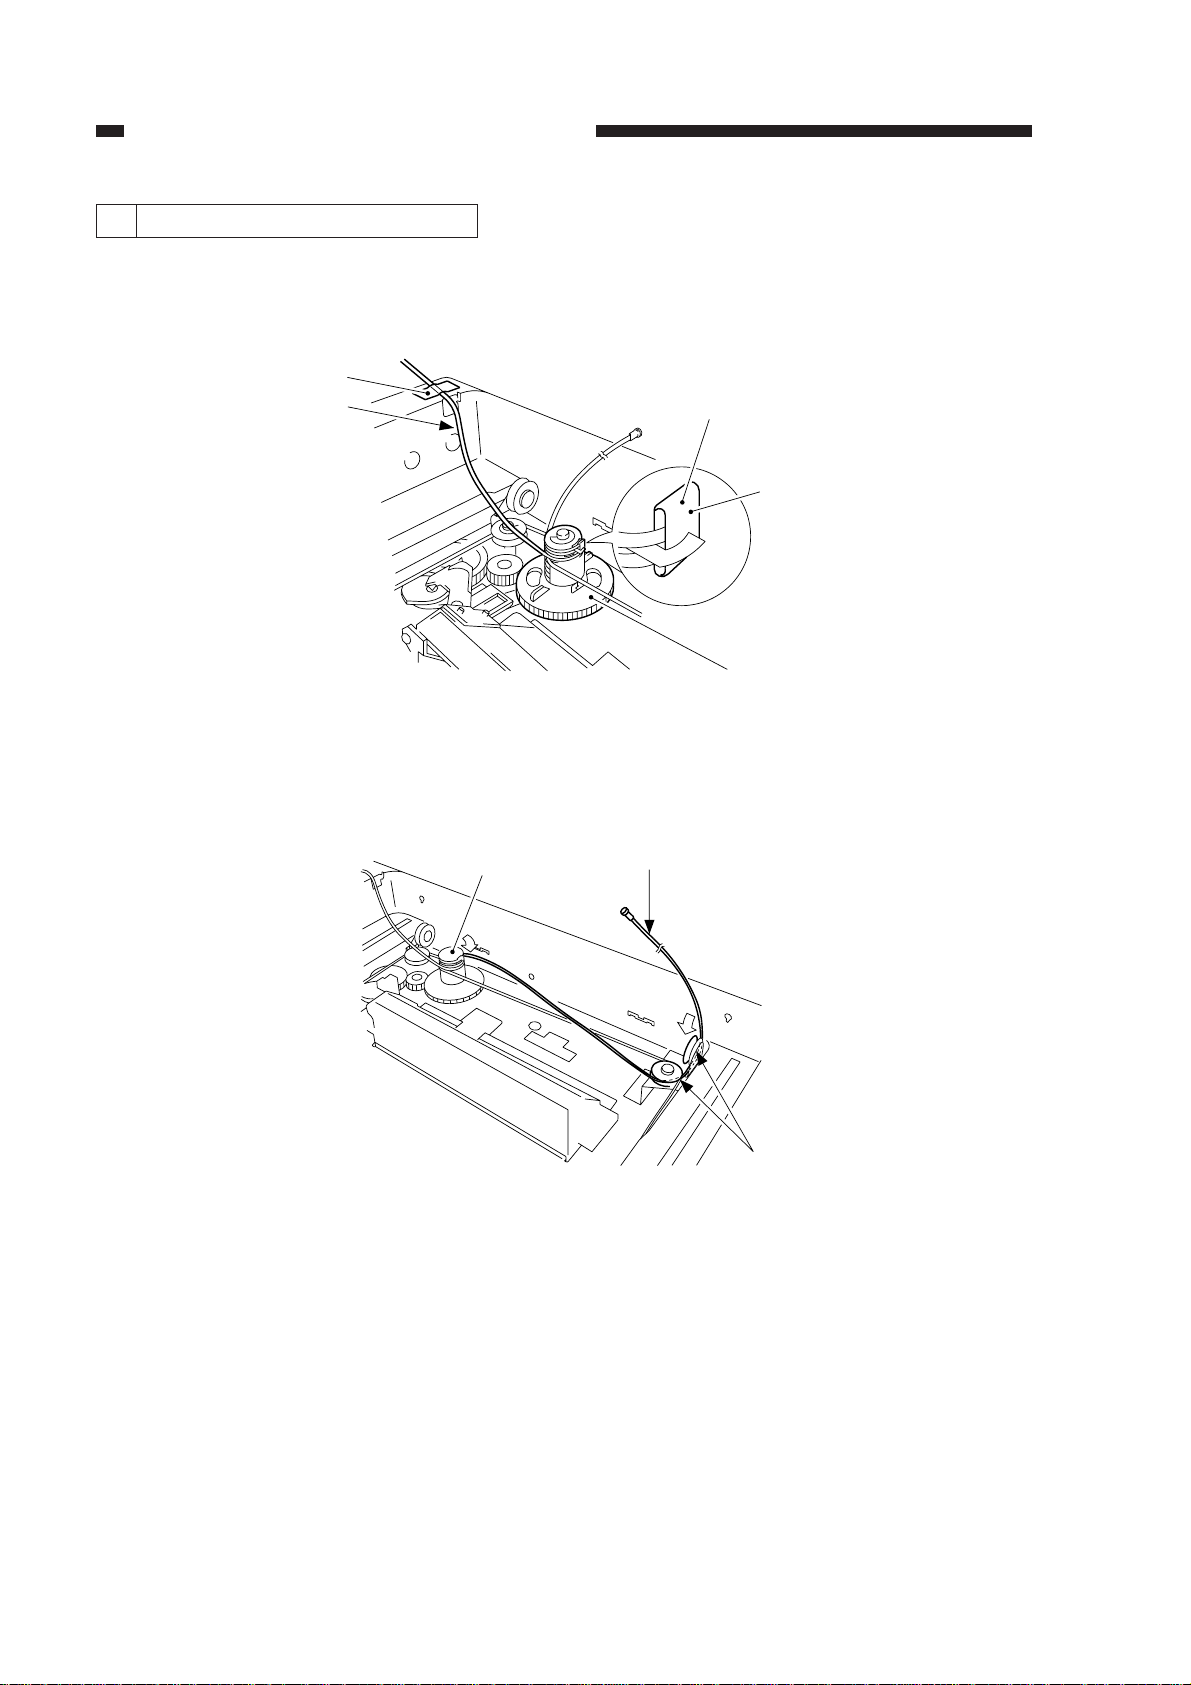
3. Routing the Forwarding Cable
1) Fit the longer end forwarding cable (black) [2] on the top hook of the cable drive pulley [1], and
wind it 1.5 times. Then, secure the shorter end [3] as shown with adhesive tape [4].
[4]
[3]
Face without a marking
[2]
[1]
Figure 2-25
2) Lead the longer end [5] along the cable drive pulley [1] as shown, and hook it on the pulley [6]
on the right front side.
[1]
[5]
[6]
Figure 2-26
2-16
CHAPTER 2 STANDARDS AND ADJUSTMENTS
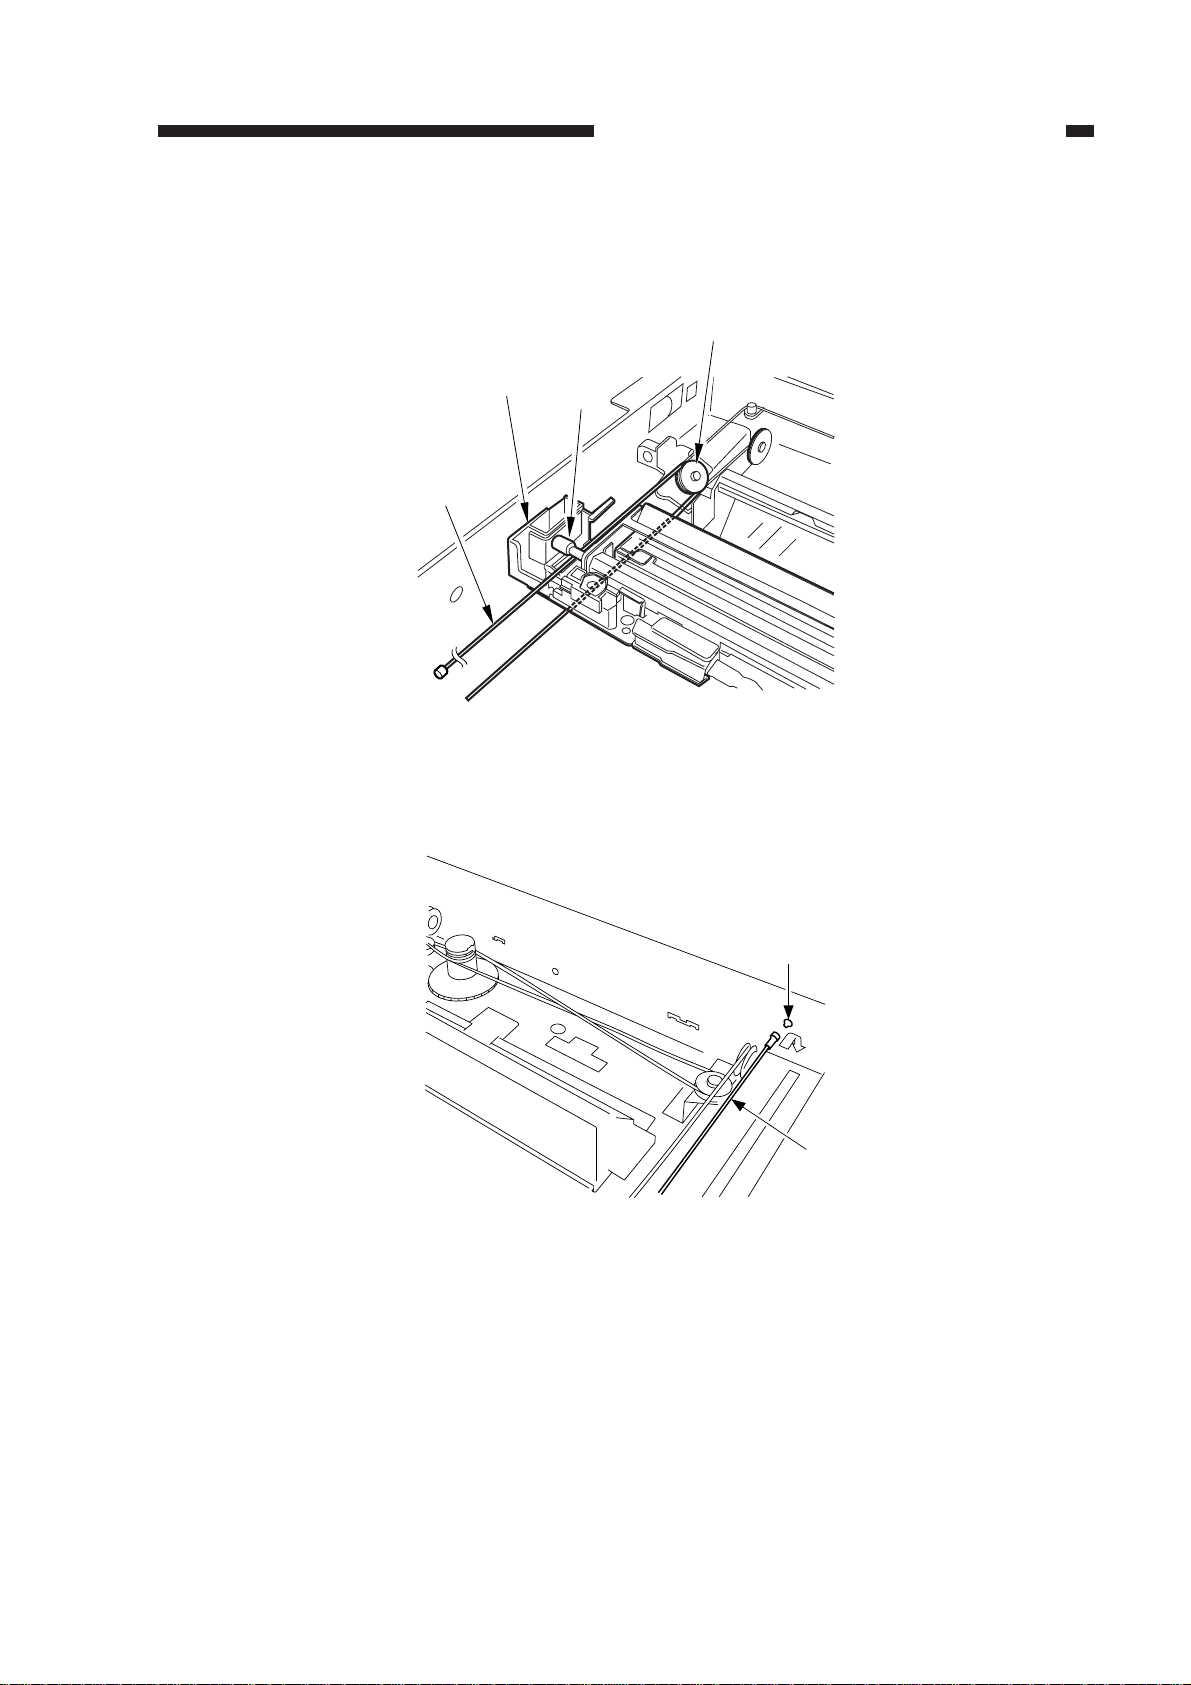
3) Lead the longer end [5] under the No. 1 mirror mount [7]; then, hook it on the pulley [8] of the
No. 2/3 mirror mount, and lead it between the No. 1 mirror mount [7] and the scanning lamp
[9].
[8]
[7]
[5]
[9]
Figure 2-27
4) Hook the end of the longer end [5] on the hole [10] on the right side.
[10]
Figure 2-28
[5]
2-17
CHAPTER 2 STANDARDS AND ADJUSTMENTS
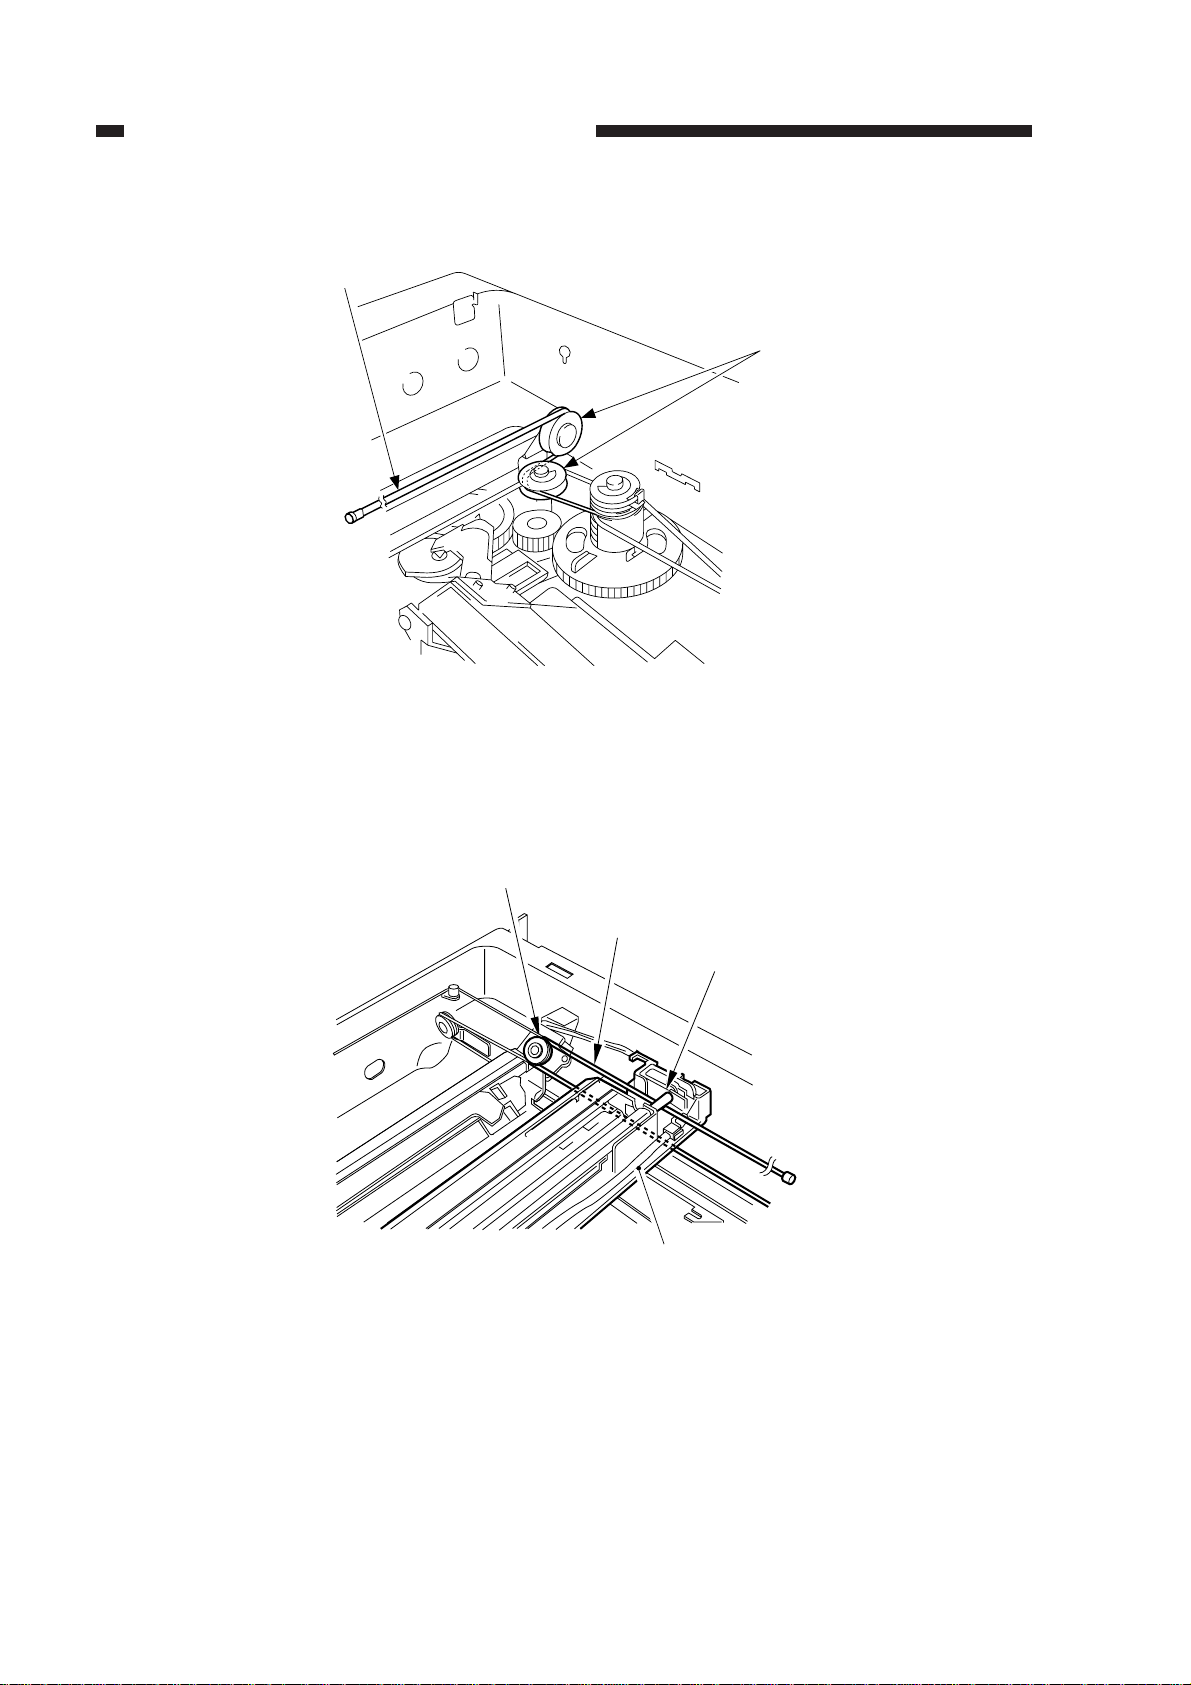
5) Free the shorter end [3], and hook it on the pulley [11] on the right rear side.
[3]
[11]
Figure 2-29
6) Lead the shorter end [3] under the No. 1 mirror mount [7], and hook it on the pulley [12] of the
No. 2/3 mirror mount as shown; then, lead it between the No. 1 mirror mount [7] and the
scanning lamp [9].
[12]
[3]
[9]
[7]
Figure 2-30
2-18
 Loading...