REVISION 0
COPYRIGHT © 1997 CANON INC. CANON NP6350/NP6251 REV.0 JULY 1997 PRINTED IN JAPAN (IMPRIME AU JAPON)
JULY 1997
FY8-23AR-000

COPYRIGHT © 1997 CANON INC.
Printed in Japan
Imprimé au Japon
Use of this manual should be strictly
supervised to avoid disclosure of
confidential information.
IMPORTANT
THIS DOCUMENTATION IS PUBLISHED BY CANON INC., JAPAN, TO SERVE AS A SOURCE OF
REFERENCE FOR WORK IN THE FIELD.
SPECIFICATIONS AND OTHER INFORMATION CONTAINED HEREIN MAY VARY SLIGHTLY FROM
ACTUAL MACHINE VALUES OR THOSE FOUND IN ADVERTISING AND OTHER PRINTED
MATTER.
ANY QUESTIONS REGARDING INFORMATION CONTAINED HEREIN SHOULD BE DIRECTED TO
THE COPIER SERVICE DEPARTMENT OF THE SALES COMPANY.
THIS DOCUMENTATION IS INTENDED FOR ALL SALES AREAS, AND MAY CONTAIN
INFORMATION NOT APPLICABLE TO CERTAIN AREAS.
Prepared by
OFFICE IMAGING PRODUCTS TECHNICAL SUPPORT DEPARTMENT 1
OFFICE IMAGING PRODUCTS TECHNICAL SUPPORT DIVISION
CANON INC.
5-1, Hakusan 7-chome, Toride-shi, Ibaraki 302 Japan
COPYRIGHT © 1997 CANON INC. CANON NP6350/NP6251 REV.0 JULY 1997 PRINTED IN JAPAN (IMPRIME AU JAPON)

i
CONTENTS
CHAPTER 1 MAINTENANCE AND INSPECTION
A. Scheduled Servicing Chart...........1-1
1. Copier......................................1-1
2. Paper Deck-A1 ........................1-3
B. Periodically Replaced Parts.........1-4
C. Consumables and Durables.........1-5
1. Copier......................................1-5
2. Paper Deck-A1 ........................1-6
D. Image Adjustment Basic
Procedure .....................................1-7
E. Points to Note for
Scheduled Servicing ....................1-8
CHAPTER 2 STANDARDS AND ADJUSTMENTS
A. Image Adjustment ........................2-1
1. Adjusting the Image Leading
Edge Margin ............................2-1
2. Adjusting the Image Leading
Edge Non-Image Width
(registration)............................2-1
3. Adjusting the Left/Right
Registration (left/right front
deck paper deck, cassette).....2-2
3-1. Adjusting the Left/Right
Registration (paper deck-A1)...2-3
4. Adjusting the Left/Right
Registration (holding tray
position; 2nd side of two-
sided/overlay copies) ..............2-4
5. Adjusting the Left/Right
Margin .....................................2-4
6. Executing AE Automatic
Adjustment ..............................2-5
7. Adjusting the AE Slope...........2-6
B. Exposure System.........................2-7
1. Adjusting the Scanner Home
Position ...................................2-7
2. Routing the Scanner Drive
Cable.......................................2-8
3. Orientation of the Heat
Absorbing Glass ......................2-9
4. Adjusting the Tension of the
Scanning Lamp Cable.............2-9
5. Adjusting the Position of the
Mirror.....................................2-10
6. Cleaning the Mirror (No. 5
mirror)....................................2-11
7. Routing the Light-Blocking
Belt ........................................2-11
8. Routing the Lens X Direction
Drive Belt...............................2-12
9. Adjusting the Position of the
Scanner Locking Solenoid
(SL1) .....................................2-12
C. Image Formation System...........2-13
1. Grid Wire of the Primary
Charging Assembly...............2-13
2. Adjusting the Height of the
Charging Wire.......................2-15
3. Adjusting the Position of the
Blanking Exposure Lamp......2-16
4. Position of the Roller
Electrode...............................2-17
5. Adjusting the Position of the
Cleaning Assembly Side
Seal.......................................2-17
6. Cleaning the Cleaner Side
Scraper..................................2-18
D. Pick-Up/Feeding System............2-20
1. Orientation of the Cassette/
Front Paper Deck Pick-Up
Roller.....................................2-20
2. Orientation of the Cassette/
Front Paper Deck Separation
Roller.....................................2-21
3. Orientation of the Feeding
Roller (cassette/ front paper
deck) .....................................2-21
4. Orientation of the Multifeeder
Pick-Up Roller.......................2-22
1
2
3
4
5

4-1. Orientation of the Paper
]4]
; cassette/
multifeeder) ...........................2-59
A. Sensors........................................3-2
B. Switches and Solenoids...............3-6
C. Motors and Fans........................3-10
D. Clutches .....................................3-12
E. Lamps, Heaters, and
Photosensors .............................3-14
F. PCBs ..........................................3-16
G. Paper Deck-A1...........................3-18
1. Sensors and Switches ..........3-18
2. Motors, Clutches, Solenoids,
and PCBs..............................3-20
H. Variable Resistors (VR),
Light-Emitting Diodes (LED),
and Check Pins by PCB.............3-22
1. DC Controller PCB................3-22
2. AC Driver PCB......................3-25
3. DC Power Supply PCB.........3-25
4. Control CPU PCB .................3-26
5. Holding Tray Driver PCB.......3-27
6. Potential Measurement
PCB.......................................3-28
7. HVT1 PCB.............................3-29
Deck-A1 Pick-Up Roller ........2-22
5. Rotation of the Multifeeder
Feeding Roller .......................2-23
5-1. Orientation of the Paper
Deck-A1 Feeding Roller........2-23
6. Adjusting the Separation
Roller Pressure of the
Cassette/Front Paper Deck...2-24
7. Adjusting the Separation
Roller Pressure of the
Holding Tray ..........................2-25
8. Pick-Up/Feeding Roller of
the Multifeeder ......................2-25
9. Adjusting the Position of the
Pick-Up Roller Releasing
Solenoid (cassette) ...............2-26
9-1. Adjusting the Position of the
Pick-Up Roller Releasing
Solenoid (front paper deck)...2-27
9-2. Adjusting the Position of the
Pick-Up Roller Releasing
Solenoid (paper deck-A1) .....2-27
10.Adjusting the Position of the
Pick-Up Roller Releasing
Solenoid (multifeeder)...........2-28
11.Routing the Timing Belt of the
Side Guide (multifeeder
assembly)..............................2-29
12.Adjusting the Position of the
Solenoid (delivery paper
deflecting plate solenoid) ......2-29
13.Adjusting the Position of the
Holding Tray Paper Deflecting
Plate Drive Solenoid .............2-30
14.Adjusting the Position of the
Holding Tray Assembly Side
Guide Plate ...........................2-30
15.Adjusting the Position of the
Holding Tray Paper Jogging
Plate......................................2-31
16.Adjusting the Timing Belt of
the Holding Tray Paper
Jogging Guide Plate..............2-31
17.Adjusting the Position of the
Holding Tray Paper Jogging
Plate Solenoid.......................2-32
18.Drive Belt...............................2-32
E. Fixing System.............................2-34
1. Points to Note When Installing
the Fixing Heater...................2-34
2. Adjusting the Position of the
Fixing Assembly Inlet
Guide.....................................2-34
3. Adjusting the Lower Roller
Pressure (nip)........................2-36
4. Adjusting the Fixing Clutch ...2-37
F. Electrical System........................2-38
1. When Replacing the DC
Controller PCB......................2-38
2. Checking the Surface
Potential Control System ......2-38
3. Checking the Potential
System ..................................2-43
4. Potential Control System
Conversion Table ..................2-45
5. Checking the Environment
Sensor...................................2-50
6. Checking the
Photointerrupters...................2-51
7. Registering the Paper Width
Basic Value (
CHAPTER 3 ARRANGEMENT AND FUNCTIONS OF THE ELECTRICAL PARTS
ii

8. HVT2 PCB.............................3-30
9. Inverter PCB..........................3-30
10.Lamp Regulator PCB............3-31
CHAPTER 4 SERVICE MODE
11.Counter PCB.........................3-31
12.Side Deck Driver
(paper deck-A1) ....................3-32
A. Outline..........................................4-1
B. Using Service Mode.....................4-2
C. Using Adjustment Mode and
Options Mode...............................4-2
D. Display Mode ( )..................4-4
1
]
]
CHAPTER 5 SELF DIAGNOSIS
A. Copier...........................................5-1
B. RDF-D1........................................5-6
APPENDIX
A. GENERAL TIMING CHART.........A-1
B.
SIGNALS AND ABBREVIATIONS
1. Signals....................................A-3
2. Abbreviations..........................A-4
C. GENERAL CIRCUIT DIAGRAM..A-5
D. PAPER DECK-A1 GENERAL
CIRCUIT DIAGRAM ....................A-7
..A-3
E. I/O Display Mode ( )..........4-17
F. Adjustment Mode ( )..........4-53
G. Function Mode ( )..............4-62
H. Options Mode ( ) ...............4-66
I. Counter Mode ( )...............4-71
2
]
]
3
]
]
4
]
]
5
]
]
6
]
]
C. Sorter............................................5-8
E. SPECIFICATIONS.......................A-9
A.Copier ..........................................A-9
1. Type........................................A-9
2. Mechanisms............................A-9
3. Performance .........................A-10
4. Others...................................A-13
B.Paper Deck-A1 ..........................A-16
iii

CHAPTER 1 MAINTENANCE AND INSPECTION
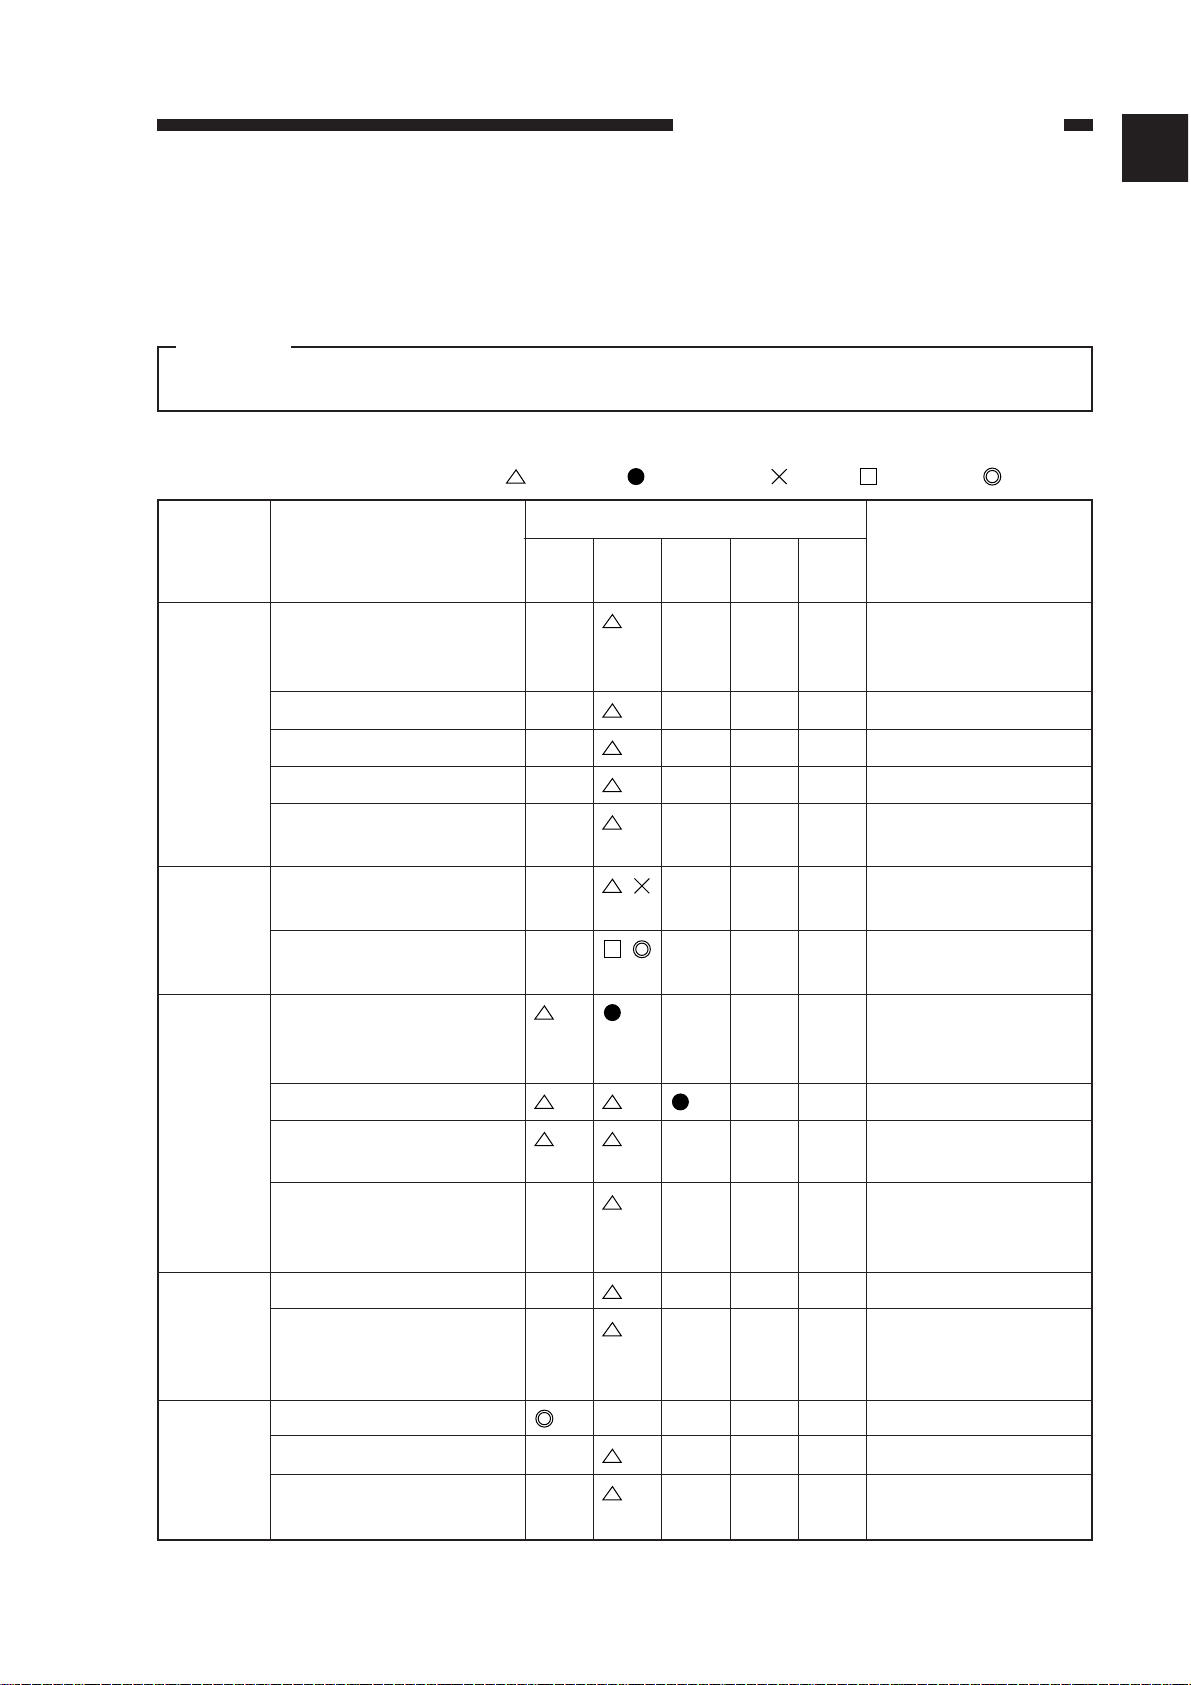
A. Scheduled Servicing Chart
Do not use solvents or oils other than those specified.
1. Copier
: Clean : Replace : Oil : Adjust : Inspect
Note 1: Take care not to touch the mirrors or the lenses.
CHAPTER 1 MAINTENANCE AND INSPECTION
1-1
Caution:
Unit
Optical
path
Use alcohol; then,
apply oil.
Charging
assembly
Photosen
sitive
drum
Developing
assembly
Part
No. 1/No. 6 mirror
Dust-proofing glass
Heat absorbing glass
Standard white plate
Reflecting shade
(scanning lamp)
Scanner rail
Scanner cable
Charging wire (primary,
pre-transfer, transfer,
separation)
Grid wire (primary)
Shielding plate (each
charging assembly)
Roller electrode waste
toner case (pre-transfer
charging assembly)
Photosensitive rum
Anti-stray toner sheet
(primary charging
assembly)
Developing cylinder
Developing roller
Anti-stray toner sheet
(developing assembly)
Remarks
Use blower brush; for
No. 5 mirror, use
mirror cleaning tool.
Use alcohol; then,
apply lubricant.
Check and adjust if
for initial 250,000.
Use solvent.
at instal-
lation
every
250,000
every
500,000
every
750,000
every
1,000,000
Intervals
1
CHAPTER 1 MAINTENANCE AND INSPECTION
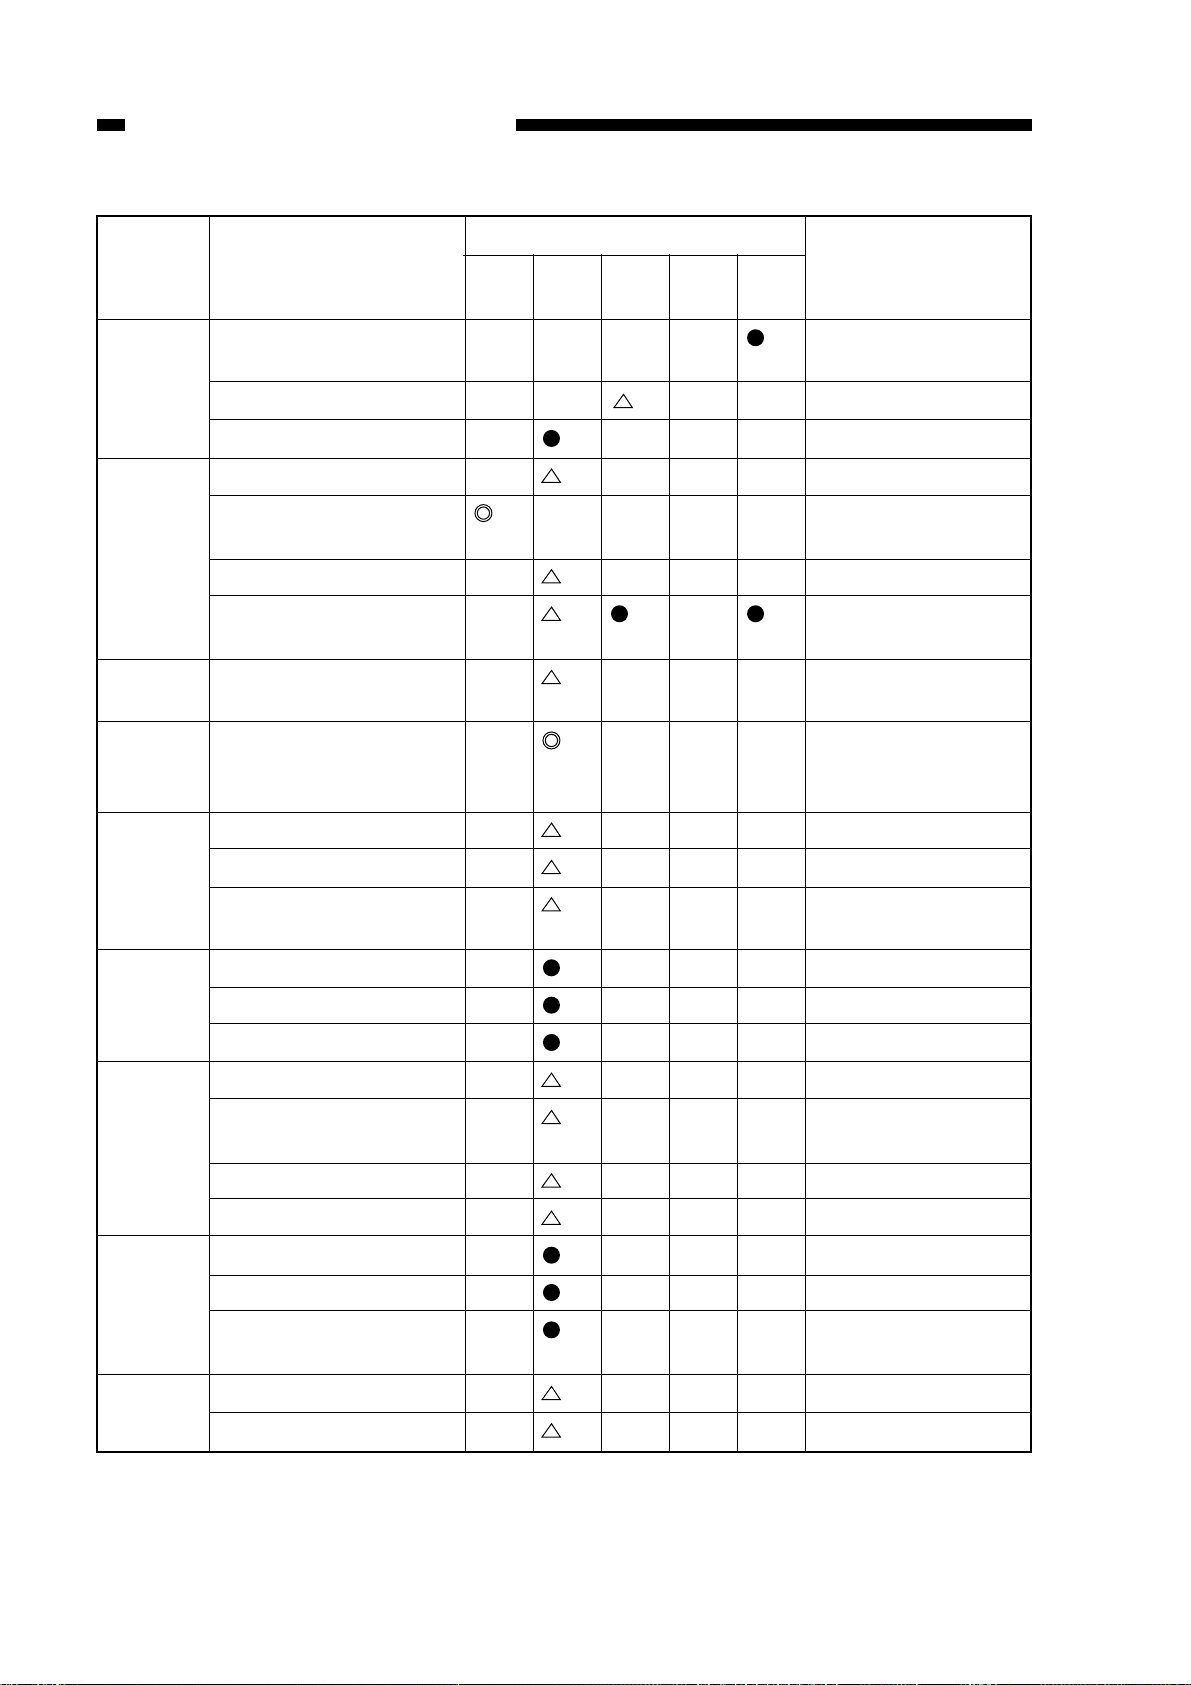
Unit
Part
at instal-
lation
Intervals
every
250,000
every
500,000
every
750,000
every
1,000,000
Remarks
Cleaner
Fixing
assembly
Delivery
assembly
Waste toner
collection
assembly
Externals
Blade
Side scraper assembly
Separation claw
Inlet guide
Fixing web
Thermistor
Oil receptacle
Separation claw
(upper/lower)
Waste toner
Copyboard glass
Ozone filter
Air filter (scanner
cooling fan)
*
(upper)
*Replace edge.
Apply toner.
Remove paper lint.
Take up during
installation.
(lower)
Remove as
necessary.
Pick-up
assembly
Feeding
assembly
Holding
tray
Hopper
Pick-up roller
Feeding roller
Separation roller
Transfer guide/roll
Registration roller
(upper/lower)
Feeding belt
Feeding roller
Pick-up roller (crescent)
Upper separation belt
Separation lower
feeding roller
Toner supply mouth
Toner receptacle
1-2
2. Paper Deck-A1
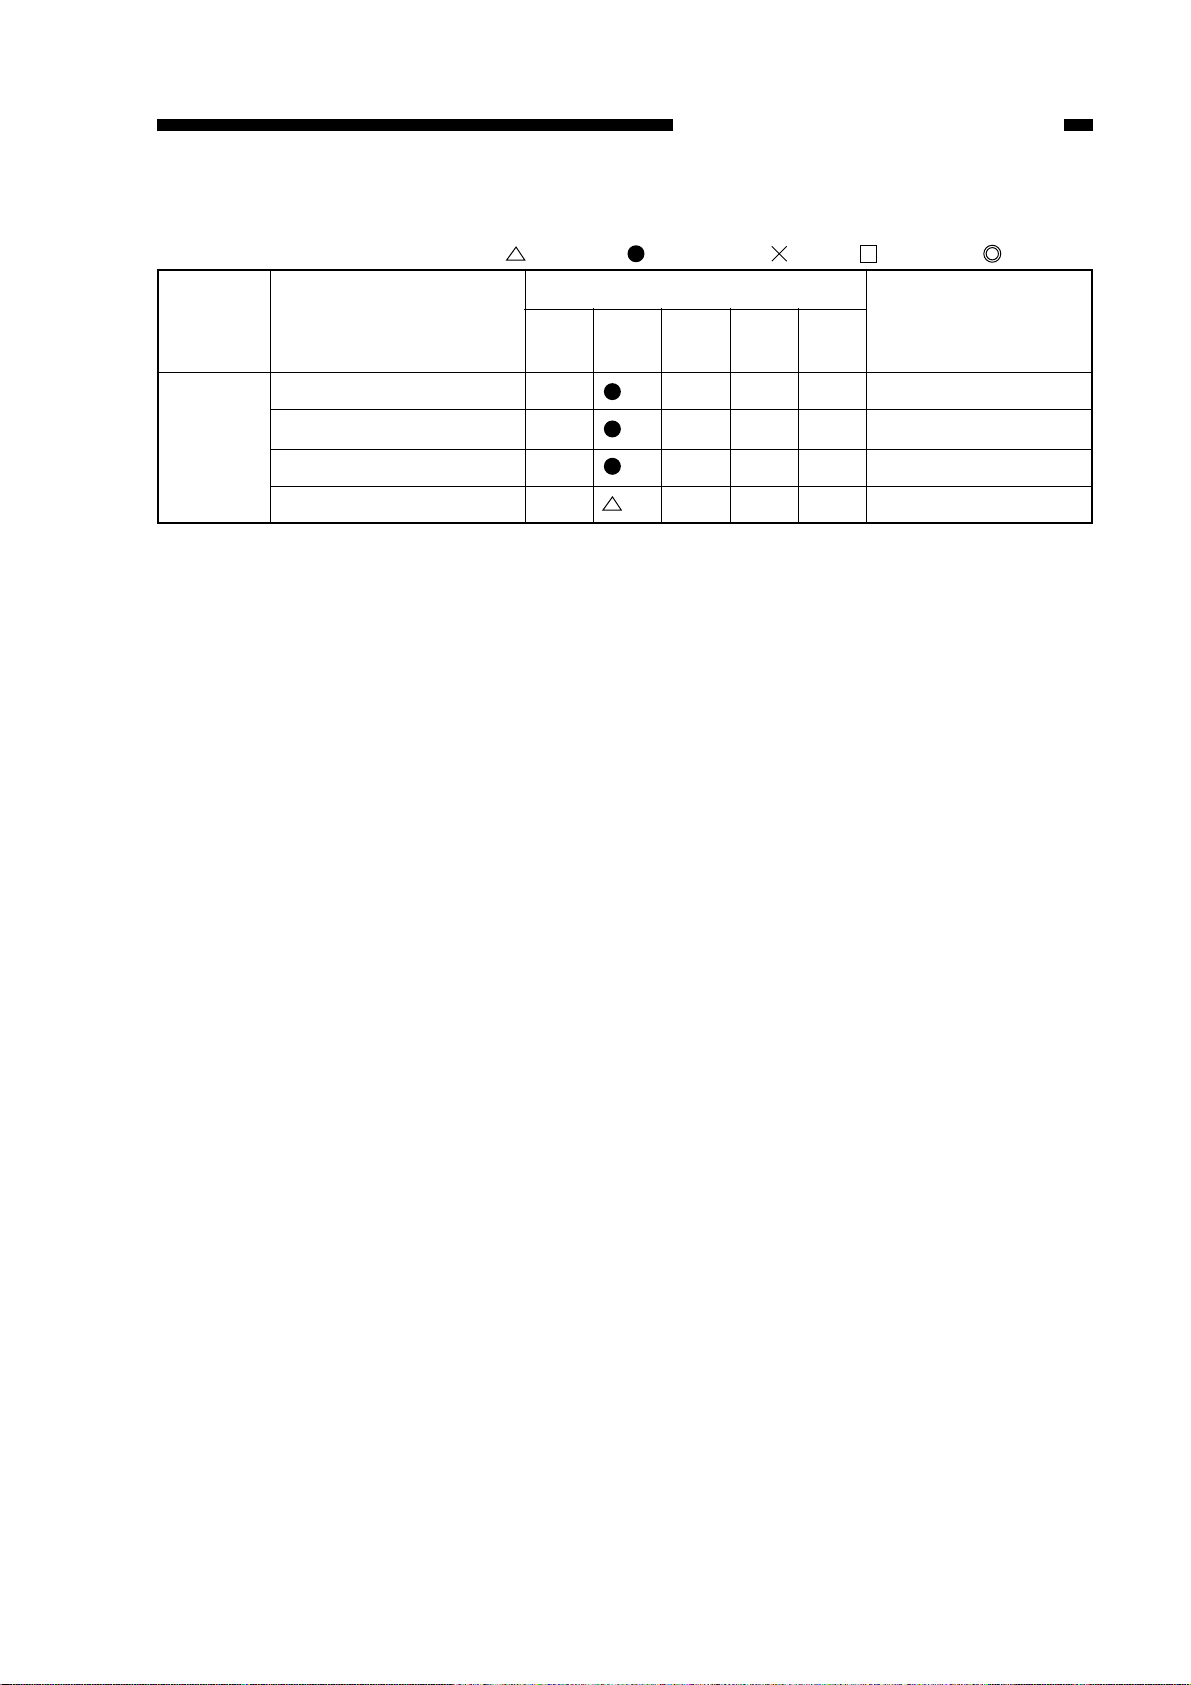
Unit
Pick-up roller
Part
CHAPTER 1 MAINTENANCE AND INSPECTION
: Clean : Replace : Oil : Adjust : Inspect
Intervals
at instal-
lation
every
250,000
every
500,000
every
750,000
every
1,000,000
Remarks
Pick-up
assembly
Feeding roller
Separation roller
Vertical path, roll
1-3

CHAPTER 1 MAINTENANCE AND INSPECTION
B. Periodically Replaced Parts
Some parts of the machine must be replaced on a periodical basis to maintain the
performance of the machine at a specific level regardless of the presence/absence of
damage (when they fail, they will affect the performance to a significant degree).
Schedule the replacement so that it coincide with a scheduled service visit.
as of July 1997
No.
1
2
Primary/pre-transfer/transfer/
separation charging wire
Primary charging assembly grid
wire
Parts name
Part number
FY3-0030-000
FY3-0040-000
FY1-0883-000
Q’ty
AR
AR
AR
Life (copies)
250,000
250,000
500,000
Remarks
100V
120/230V
Note: The above values are all estimates and are subject to change based on future
data.
Table 1-1
1-4

CHAPTER 1 MAINTENANCE AND INSPECTION
C. Consumables and Durables
Some parts of the machine may need replacement once or more because of wear or
damage. Use the table as a reference, and replace them as needed.
1. Copier
as of July 1997
No.
1
2
3
4
5
6
7
8
9
10
11
12
Parts name
Multifeeder pick-up roller
Multifeeder feeding roller
Multifeeder separation roller
Scanning lamp
Scanning lamp
Cleaner separation claw
Fixing cleaning belt
Delivery upper separation claw
Pick-up roller (paper deck,
cassette)
Feeding roller (paper deck, cassette)
Separation roller (paper deck,
cassette)
Duplexing pick-up crescent roller
FF5-1220-000
FF5-1221-000
FB2-7522-000
FB2-7545-000
FH7-3280-000
FH7-3282-000
FB2-6899-000
FA3-8908-000
FC1-0391-030
FF5-1220-000
FF5-1221-000
FB2-7695-000
FB2-7777-000
FC2-1532-000
Parts number
Q’ty
1
1
2
1
1
1
3
1
6
4
4
8
4
2
Life (copies)
120,000
120,000
120,000
120,000
250,000
250,000
250,000
250,000
500,000
250,000
250,000
250,000
250,000
250,000
Remarks
Front
Rear
100V/120V
220V/240V
Rear
Front
Duplex upper separation belt
13
14
Duplexing feeding roller
15
Primary charging wire cleaner 1
16
Primary charging cleaner 2
17
Transfer charging wire cleaner
18
Separation charging wire cleaner
19
Pre-transfer charging wire cleaner
20
Pre-transfer charging assembly
scraperr
21
Upper fixing roller
22
Lower fixing roller
FA5-5427-000
FC2-1533-000
FF2-3552-000
FF2-3551-000
FF2-3551-000
FF2-3552-000
FF5-3090-000
FF5-3090-000
FA4-1867-000
FB2-7200-000
FB2-7121-000
Table 1-2a
8
1
2
2
1
1
2
1
1
1
1
250,000
250,000
500,000
500,000
500,000
500,000
500,000
500,000
500,000
500,000
500,000
1-5
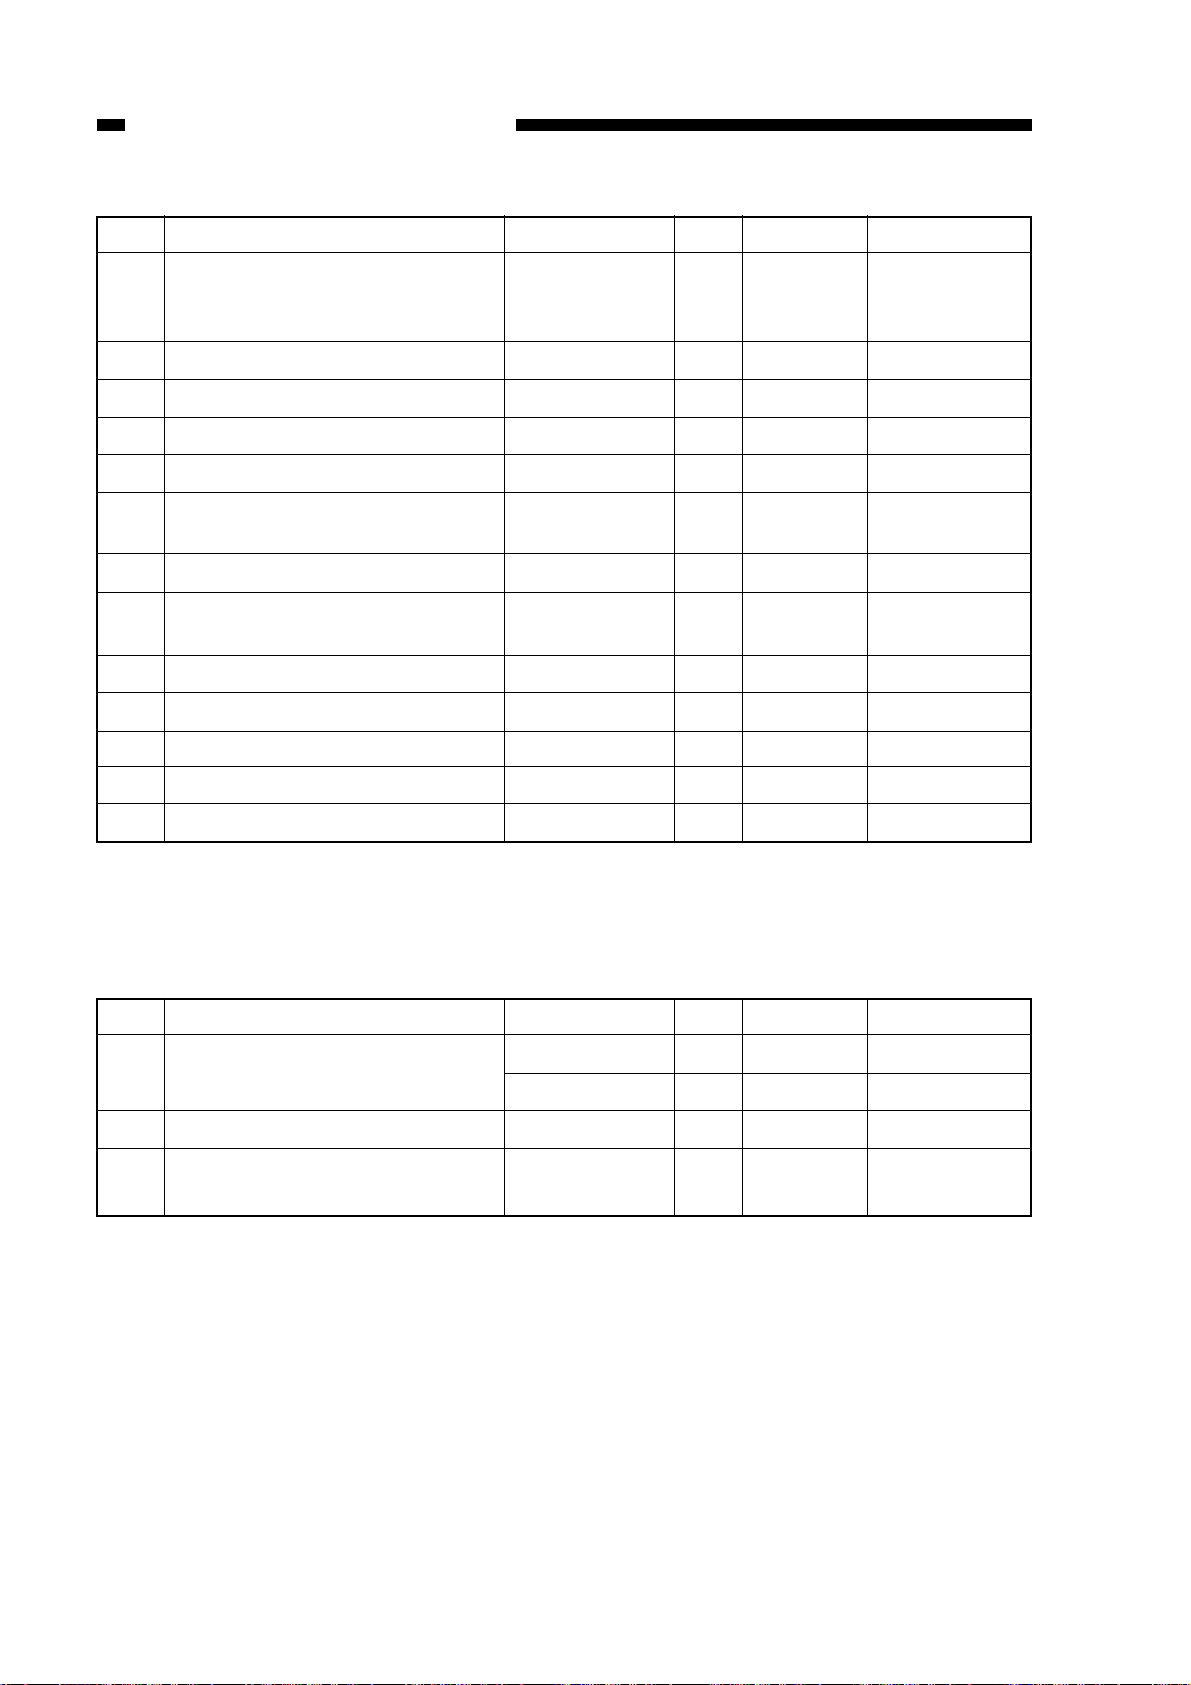
CHAPTER 1 MAINTENANCE AND INSPECTION
No.
23
24
25
26
27
28
29
30
31
32
33
34
Parts name
Heat insulating bush (front,
rear)
Fixing main thermistor (TH1)
Fixing sub thermistor (TH2)
Pick-up clutch (left deck, cassette)
Pick-up clutch (right deck, cassette 1)
Cleaning blade
Primary charging assembly
Transfer/separation charging
assembly
Pre-transfer charging assembly
Fixing thermal switch
Delivery lower separation claw
Developing cylinder
Parts number
FB2-7239-000
FH7-7349-000
FG5-8812-000
FH7-5726-000
FH7-5729-000
FA4-1827-000
FG5-4378-030
FG5-4550-090
FG5-4377-050
FH7-7154-000
FA2-9037-000
FF5-3086-000
Q’ty
2
1
1
3
1
1
1
1
1
1
2
1
Life (copies)
500,000
500,000
500,000
1,000,000
1,000,000
1,000,000
1,000,000
1,000,000
1,000,000
1,000,000
1,000,000
1,000,000
Remarks
Simultaneously
w/ upper fixing
roller.
Use both edges;
500,000 for each
.
35
Developing assembly roll
2. Paper Deck-A1
No.
1
2
3
Side paper deck pick-up roller*
Side paper deck feeding roller
Side paper deck separation
roller
Parts name
* Exercise care during replacement; the pick-up roller of the side paper deck and
the pick-up roller of the machine must be oriented differently.
FB2-6933-000
Table 1-2b
Parts number
FF5-1220-000
FF5-1221-000
FB2-7695-000
FB2-7777-000
Table 1-2c
2
Q’ty
1
1
2
1
1,000,000
Life (copies)
250,000
250,000
250,000
250,000
as of July 1997
Remarks
Front
Rear
1-6
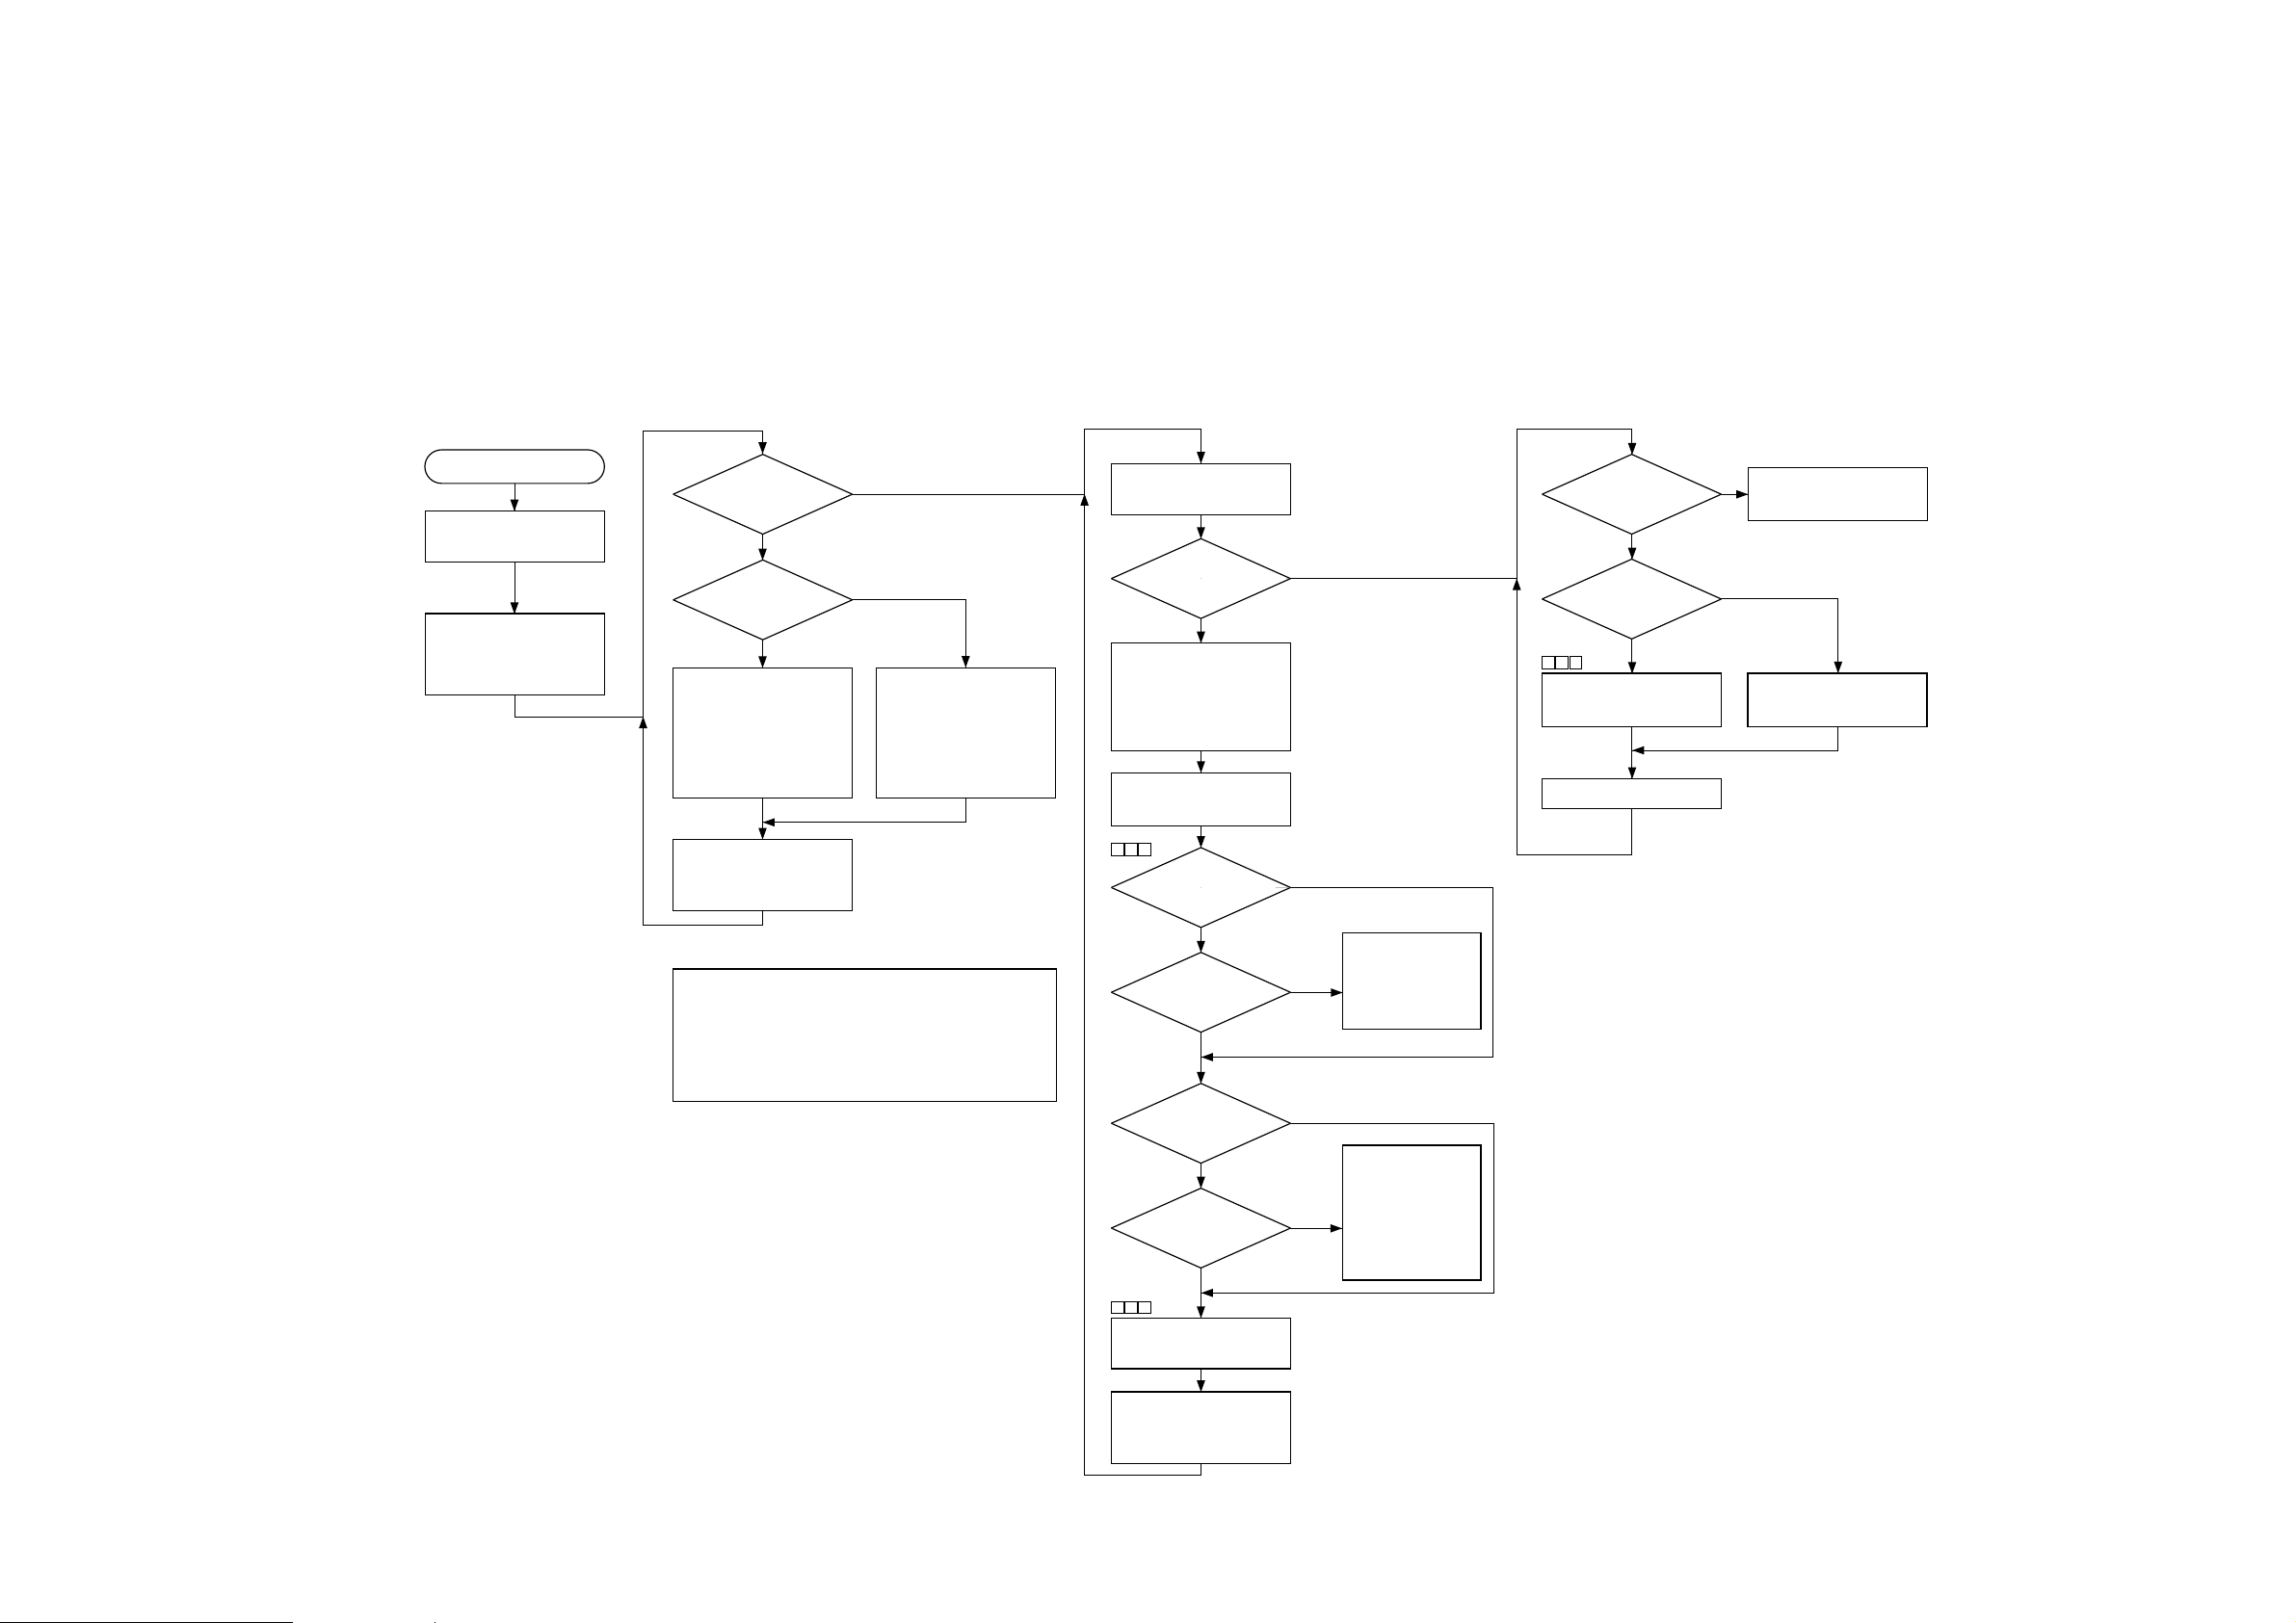
D. Image Adjustment Basic Procedure
n Non-AE, Copy Density at 5
1-7
Is there a
difference in density
between front
and rear?
Is it low (light)
at the rear?
Turn the adjusting screw
at the rear of the primary
charging assembly
clockwise, and turn the
adjusting screw at the
front counterclockwise
the same degree (1.5 mm
max. each).
Make two to three
copies of the Test
Sheet.
Check the height of the
charging wire.
Turn the adjusting screw
at the rear of the primary
charging assembly
counterclockwise, and
turn the adjusting screw
at the front clockwise the
same degree (1.5 mm
max. each).
Turn off and then on the
machine, and make a
copy.
Note 1: If the difference still exists after turning the screw
1. 5 mm (each; a full turn causes a 0.7mm
difference), check the charging assemblies,
scanning lamp, and scanner for dirt.
Note 2: When turning the screw counterclockwise, take
care so that the wire is not 7.5mm or less in
height.
Check the copy paper
and the transfer system.
Is the density
of gray scale No. 1
too low (light)?
Clean the standard white
plate, mirror, lens, dustroofing glass, scanning
lamp, reflecting plate, and
heat absorbing glass.
Turn off and then on the
machine, and make a
copy.
Is 'VDM' 'VDT'
±10 V?
Is 'PLMT' '1'?
Is 'VL1M' 'VL1T'
±10 V?
Is 'VL1M" 'VL1T'
±10V?
Check the potential
control system; if
normal, replace the
photosensitive
drum.
Check the scanning
lamp and the
potential control
system; if normal,
replace the
photosensitive
drum.
Increase the value of
'VDT-SW'.
Turn off and on the
machine, and make a
copy.
Increase the value of
'LIGHT_5'.
Decrease the value of
'LIGHT_5'.
Is the density
of gray scale No. 10
proper?
Is the density
of gray scale No. 10
too high (dark)?
Execute AE adjustment.
(See p. 11-36.)
<Pre-Checks>
<Density slope>
<
Solid black>
NO
YES
YES
NO
YES
NO
YES
NO
YES
NO
YES
NO
YES
NO
YES
NO
NO
YES
*1*
*3*
*5*
Clean the charging wire.
Make a copy.
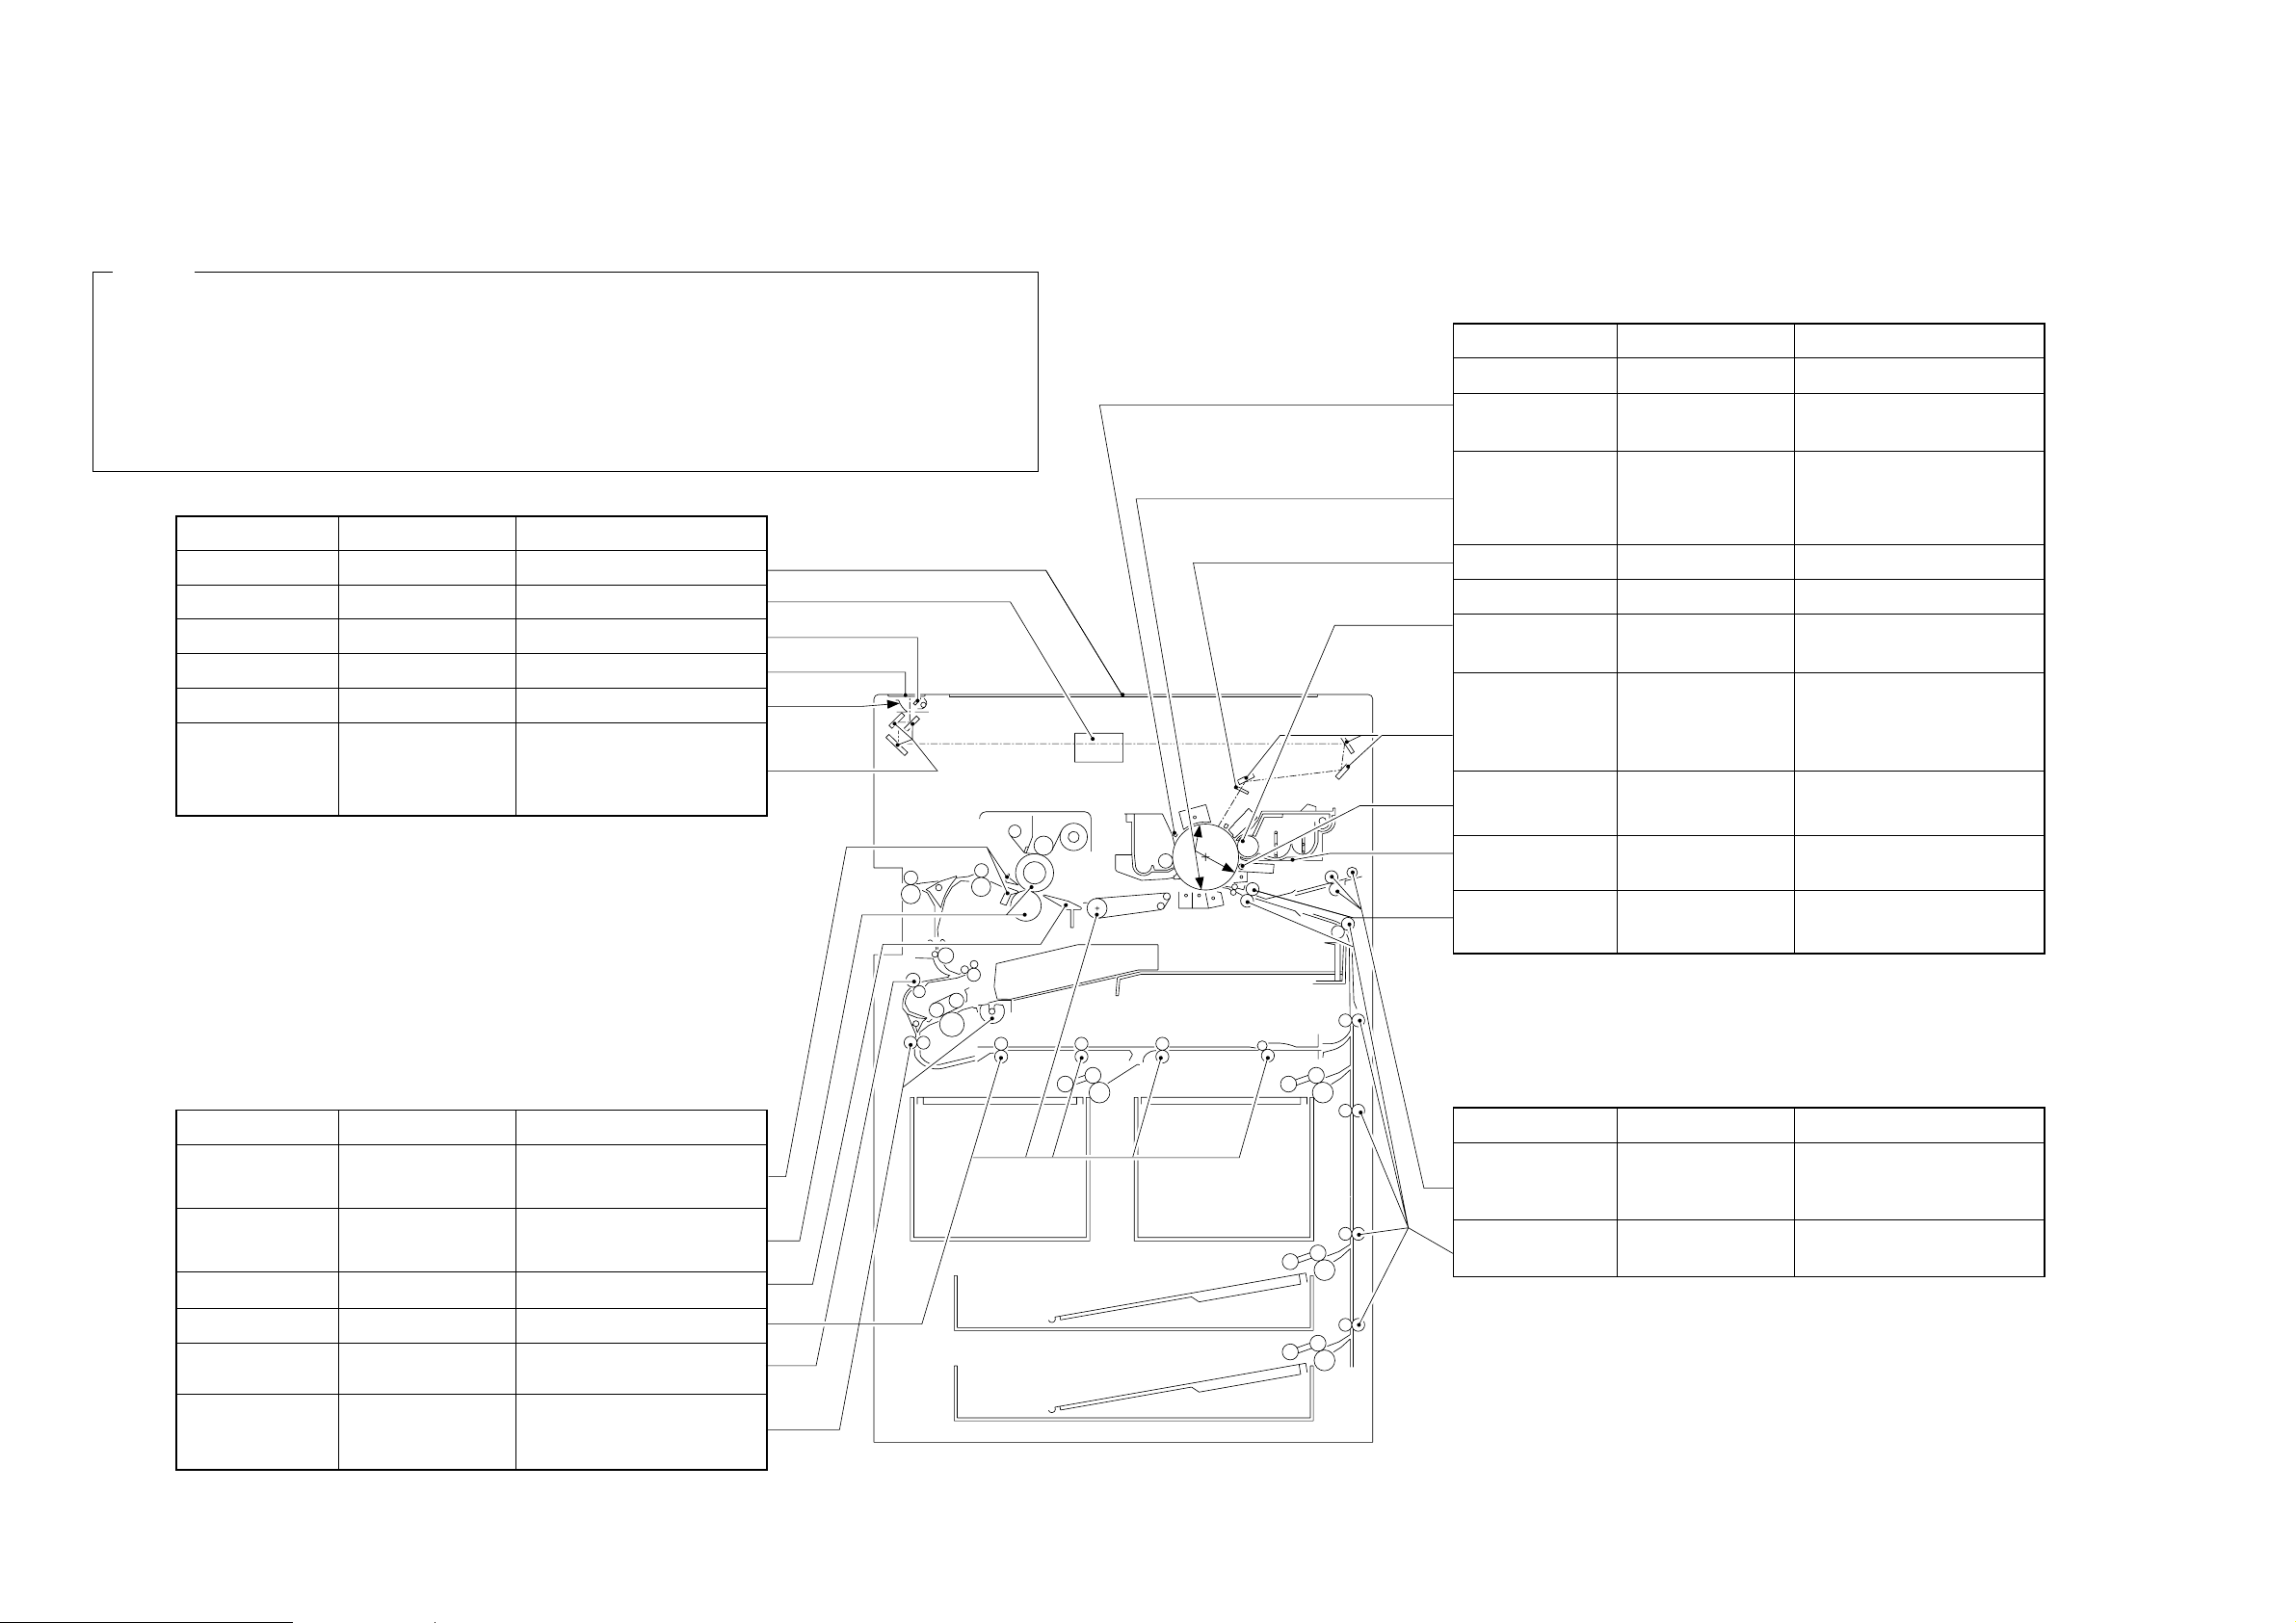
E. Points to Note for Scheduled Servicing
Cleaning
Parts Tools/chemicals
Remarks
Multifeeder tray,
pick-up roller,
feeding roller
Vertical path roller
Alcohol, lint-free
paper
Alcohol, lint-free
paper
Cleaning
Cleaning
Parts Tools/chemicals
Remarks
Pre-exposure lamp
Primary charging
assembly,
transfer/separation
charging assembly, pretransfer charging assembly
Dust-proofing glass
Blanking exposure lamp
No. 4 through No. 6
mirrors
Roller electrode
Developing
assembly mount
Registration roller
Moist cloth (Note)
Alcohol, lint-free
paper
Lint-free paper
Blower brush or lintfree paper
Alcohol, lint-free
paper
Cleaning
Dry wiping; then, using lintfree paper moistened with
alcohol
Cleaning
Cleaning with blower brush; if
necessary, using lint-free
paper. For No. 5 mirror, use
mirror cleaning tool
Dispose of toner collecting on
roller electrode
Cleaning
Cleaning
Note: Make sure no droplets of water remain.
Parts
Copyboard glass
Tools/chemicals
Remarks
Cleaning
Alcohol
Lens
Heat absorbing glass
Standard white plate
Reflecting plate
Blower brush
Lint-free paper
Lint-free paper
Blower brush
Cleaning
Dry wiping
Dry wiping
Cleaning
No. 1 through No. 3
mirrors
Blower brush or lint-
free paper
Cleaning with blower brush; if
necessary, lint-free paper
Parts Tools/chemicals
Remarks
Separation claw
Upper roller,
lower roller
Feeding assembly
Re-pick up assembly,
refreshing roller
Re-pick up assembly,
pick-up roller,
registration roller
Solvent and lint-free
paper
Cleaning oil, lint-free
paper
Moist cloth (Note)
Alcohol, lint-free paper
Paper guide
Solvent, lint-free paper
Alcohol, lint-free paper
Cleaning
Cleaning
Cleaning
Cleaning
Cleaning
Cleaning
Anti-stray toner
(primary charging
assembly)
Cleaning
Anti-stray toner
sheet (developing
assembly)
Cleaning
Caution:
• Make thorough checks of the block (front, rear) for melting by leakage, deformation by heat, tears, and
yellowing. If any fault is found, replace it.
• Be sure to check and clean the inner side as well as the outer side of the block (front, rear).
• Do NOT use a cloth coated with metal powder for cleaning.
• Do NOT use a moist cloth for cleaning. Use lint-free paper, and clean. (Be sure that the part is fully dry
before putting it back into the machine.
• Try to finish all work (scheduled servicing/maintenance) within a specific period of time.
1-8
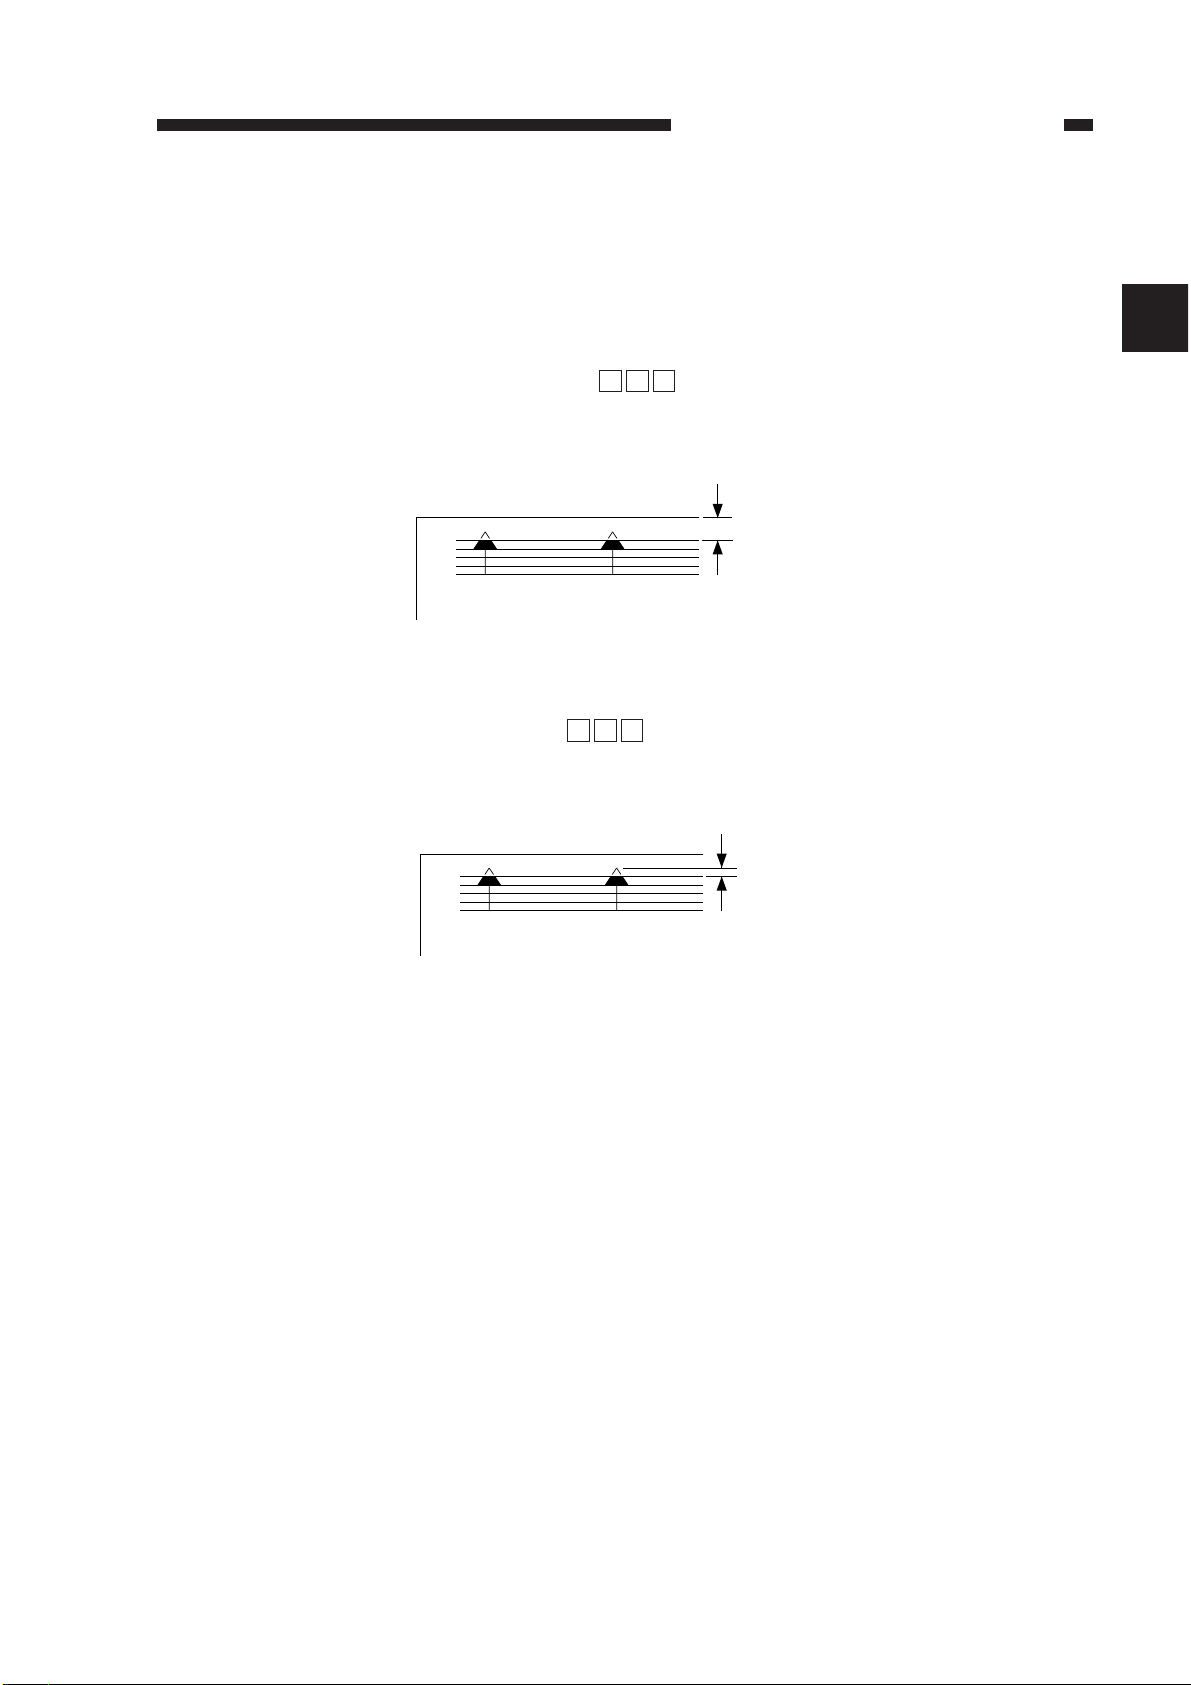
CHAPTER 2 STANDARDS AND ADJUSTMENTS
A. Image Adjustment
1. Adjusting the Image Leading Edge Margin
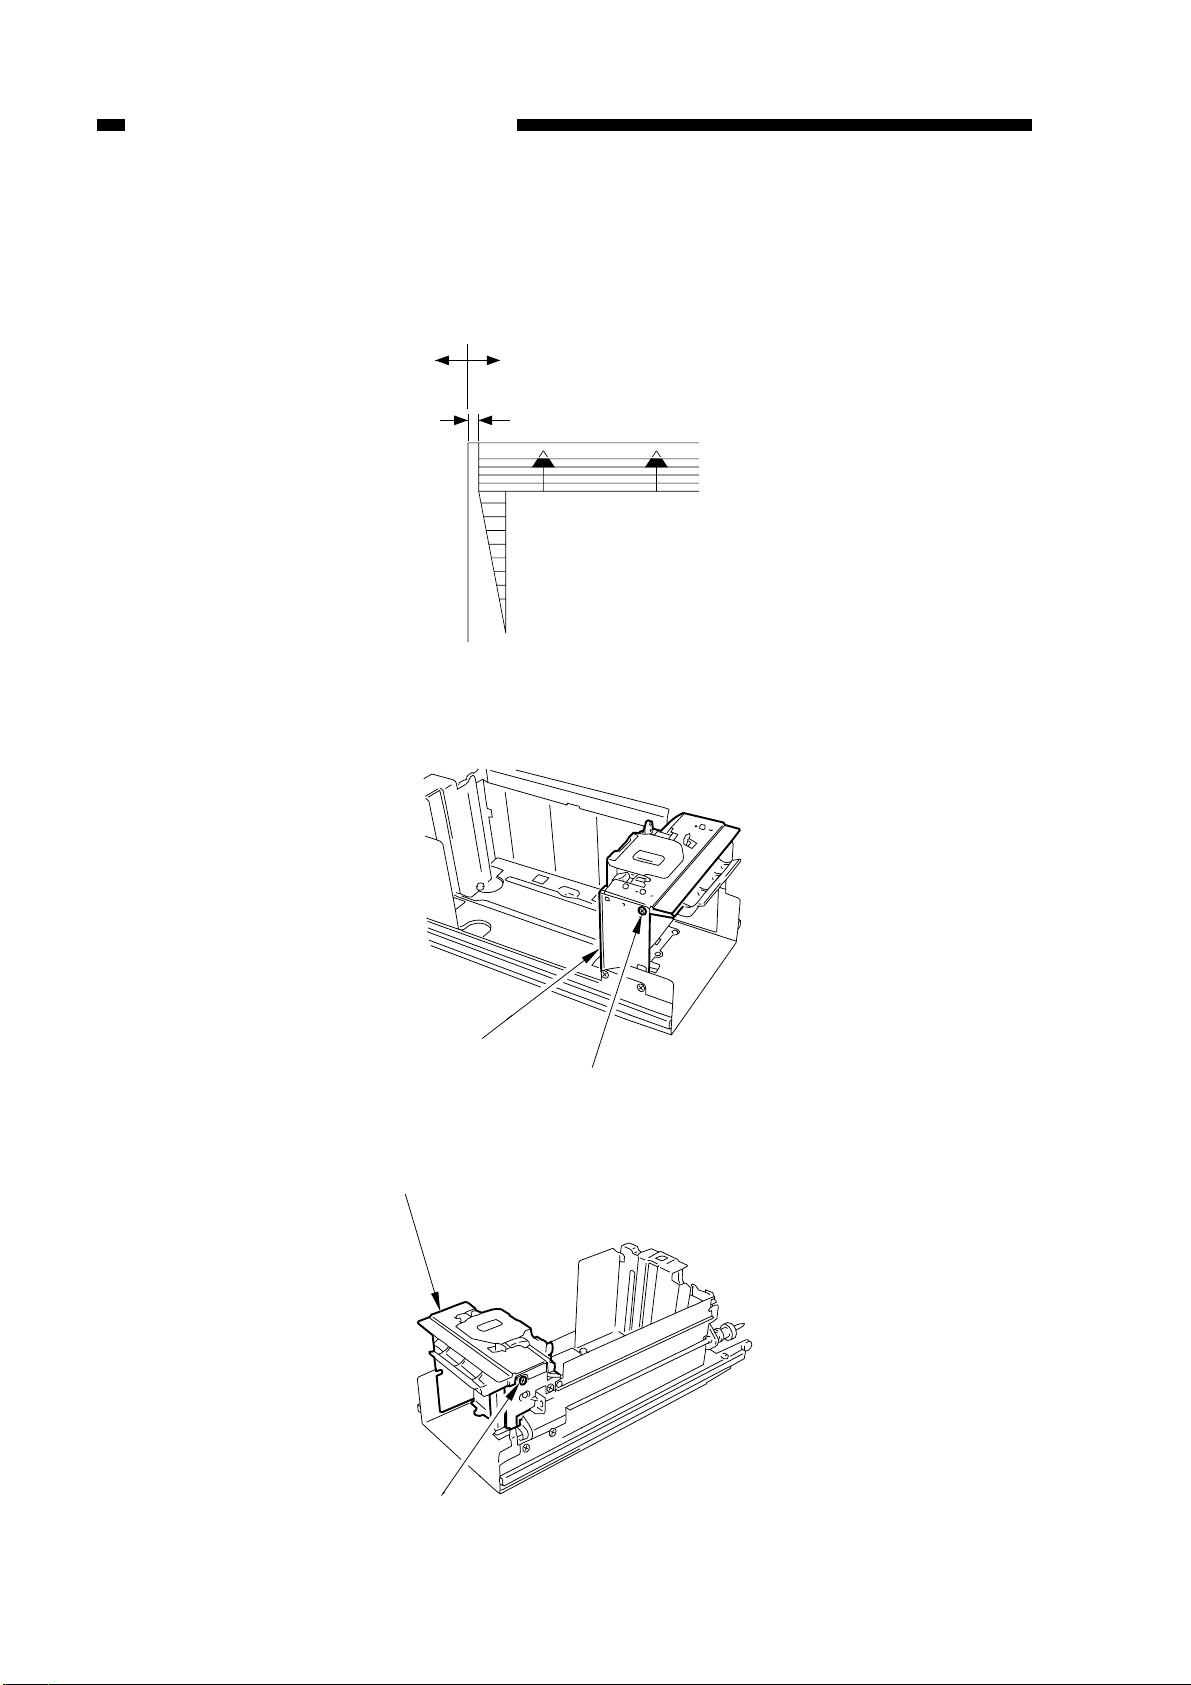
Select ‘LE_BLANK’ in service mode ( ).
Make adjustments so that the image leading edge margin is 4.5 ±1.5 mm when the
Test Sheet is copied in Direct.
(unit: 0.1 mm)
Figure 2-1
2. Adjusting the Image Leading Edge Non-Image Width (registration)
Select ‘REGIST’ in service mode ( ).
Make adjustments so that the image leading edge margin is 4.5 ±1.5 mm when the
Test Sheet is copied in Direct.
(unit: REGIST:0.1 mm)
Figure 2-2
4.5±1.5mm
]
3
]
]
3
]
CHAPTER 2 STANDARDS AND ADJUSTMENTS
2-1
2
4.5±1.5mm
Adjusting plate
Screw
Adjusting plate
Screw
0±1.5mm
0
2
4
6
8
10
(+)(-)
CHAPTER 2 STANDARDS AND ADJUSTMENTS
3. Adjusting the Left/Right Registration (left/right front deck paper deck, cassette)
Make adjustments by moving the horizontal registration adjusting plate of each
left/right paper deck/cassette so that the edge-to-edge distance between the copy image
and the copy paper is 0 ±1.5 mm.
Figure 2-3
a. Left/Right Front Paper Deck
Figure 2-4a
2-2
Figure 2-4b
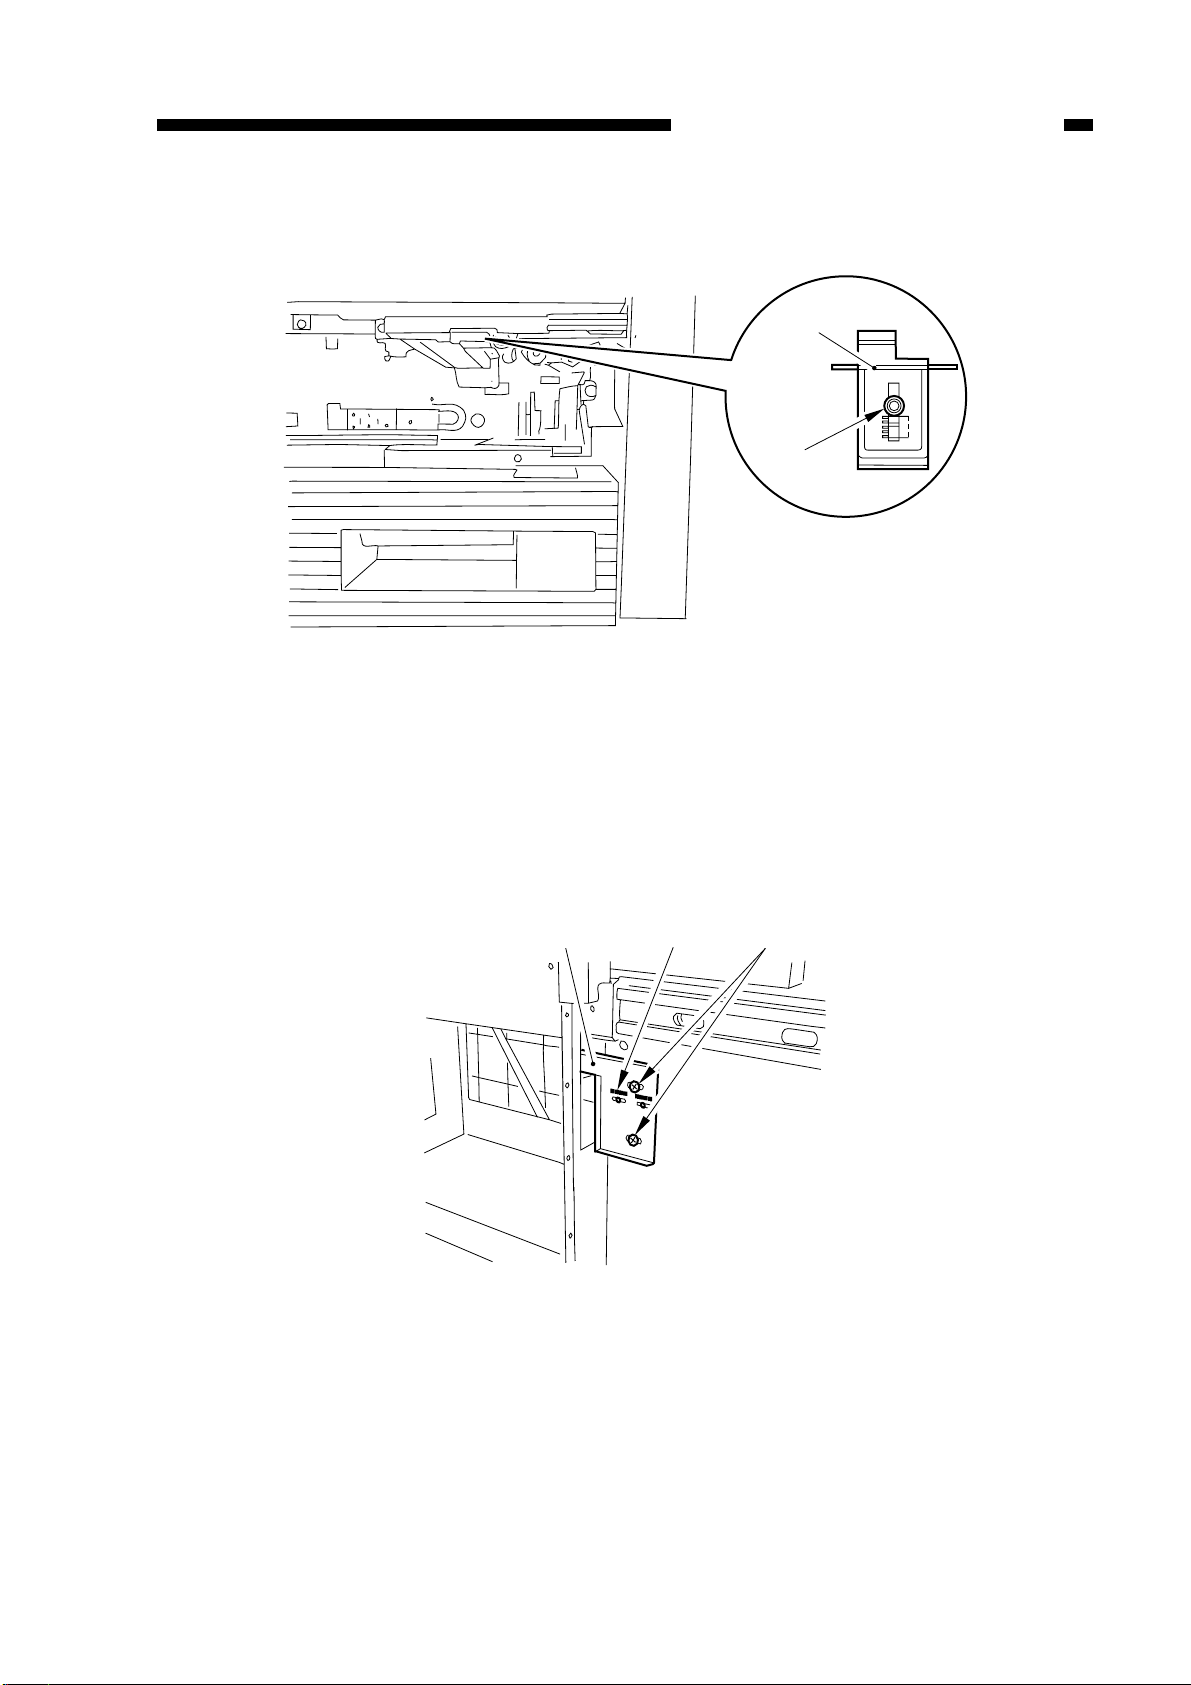
b. Cassette
Screws
Latch plate
Scale
Screw
Adjusting
Plate
CHAPTER 2 STANDARDS AND ADJUSTMENTS
Figure 2-5
3-1.Adjusting the Left/Right Registration (paper deck-A1)
1) Make a copy of the Test Sheet, and check to make sure that the left/right registration
between copy image and paper deck is 0 ±1.5 mm or less.
2) If the left/right registration is not as specified, adjust the position of the latch plate of
the deck opening solenoid by turning the two adjusting screws. (At this time, use the
scale on the latch plate as a reference.)
Figure 2-5a (rear left of compartment)
2-3
CHAPTER 2 STANDARDS AND ADJUSTMENTS
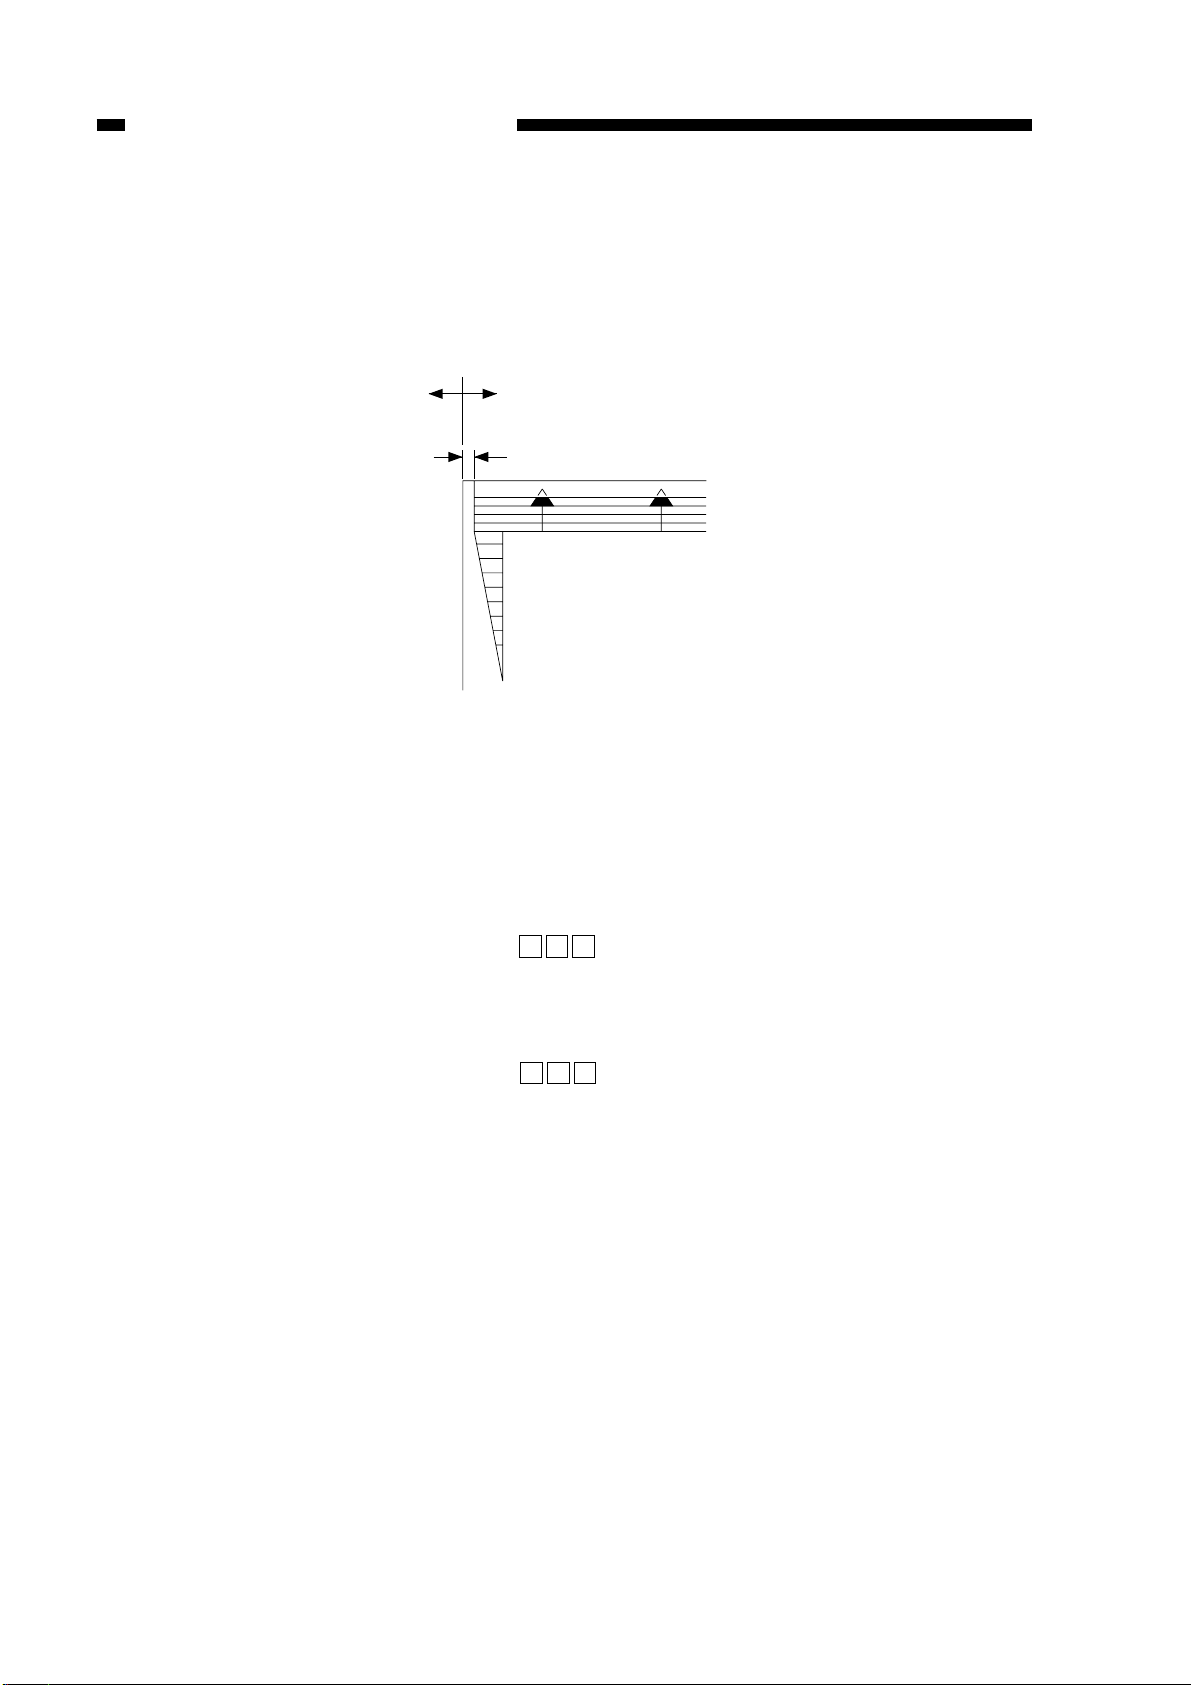
4. Adjusting the Left/Right Registration (holding tray position; 2nd side of twosided/overlay copies)
Loosen the two screws, and move the guide plate of the holding tray assembly so
that the edge-to-edge distance between the copy image and the copy paper is 0 ±2.0
mm in Direct.
(+)(-)
0±2.0mm
0
2
4
6
8
10
Figure 2-6
5. Adjusting the Left/Right Margin
Make adjustments so that the image left/right margin is 2.75 ±2.5 mm when the Test
Sheet is copied in Direct.
Be sure to adjust the left/right registration before making this adjustment.
a. Front Margin Adjustment (left margin)
Select ‘F-BLANK’ in service mode ( ), and change the setting. Increasing the
3
]
]
setting increases the front margin.
(unit: 0.1 mm)
b. Adjusting the Rear Margin (right margin)
Select ‘R-BLANK’ in service mode ( ), and change the setting. Increasing the
3
]
]
setting increases the rear margin.
(unit: 0.1 mm)
2-4
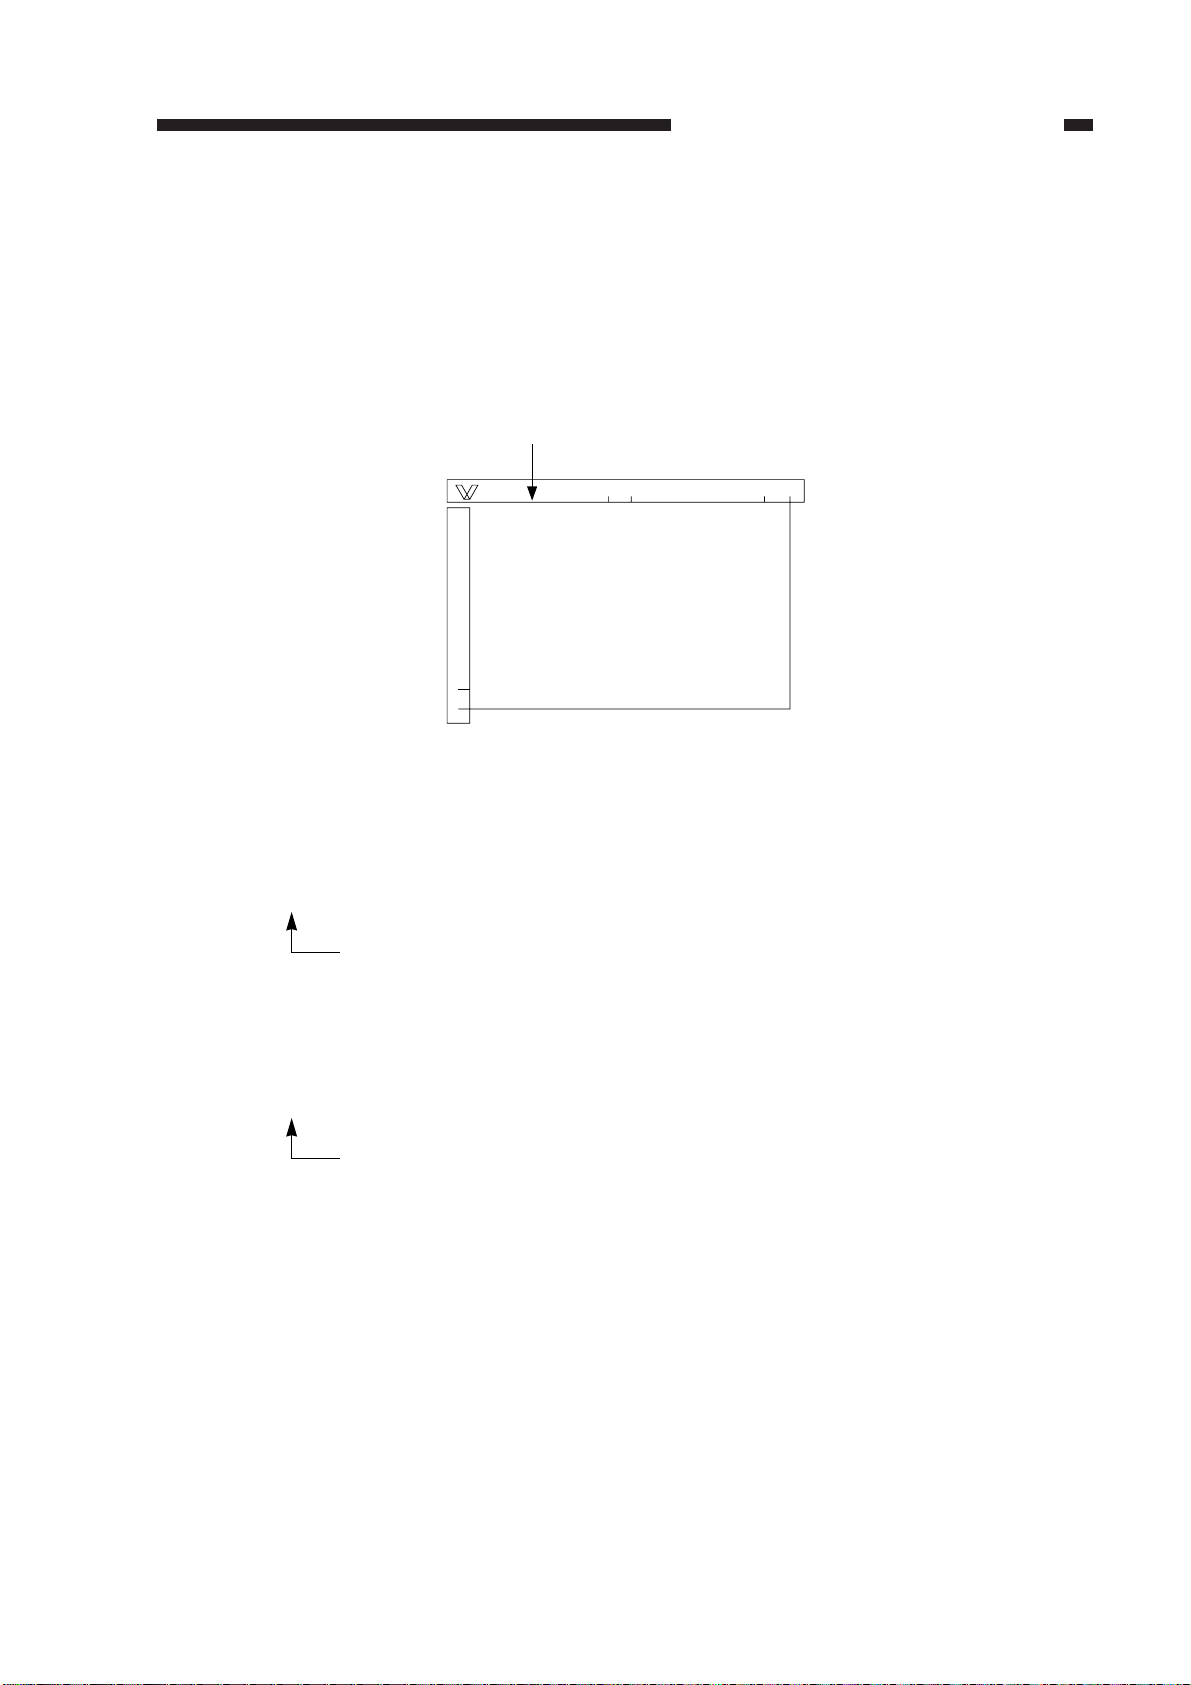
← (]: START)
(0: F5, 1:F9).
4) Place the Test Sheet on the copyboard, and close the copyboard cover.
Figure 2-7
5) Press the user mode key
] once.
•The scanning lamp turns on, and auto adjustment is executed.
AE_ADJ: 1 ← (]: START)
Changes to ‘1’.
6) Place a newspaper on the copyboard, and close the copyboard cover.
7) Press the user mode key
] once.
•The scanning lamp turns on, and automatic adjustment is executed.
AE_ADJ: 0 ← (]: START)
Changes to ‘0’.
8) Press the Reset key twice to end service mode.
NA-3
Test Sheet
Butted.
CHAPTER 2 STANDARDS AND ADJUSTMENTS
2-5
6. Executing AE Automatic Adjustment
1) Open the front door, and insert the door switch actuator into the door switch actuator.
2) Push the service mode switch over the cover.
3) Select the following in service mode:
AE_ADJ:0

CHAPTER 2 STANDARDS AND ADJUSTMENTS
q If you decrease the setting in adjustment mode,
→Copies of a newspaper will be lighter.
w If you increase the setting in adjustment mode,
→Copies of a newspaper will be darker.
Note:
You may press the Copy Start key to make copies.
6) Press the Reset key twice to end service mode.
]
3
]
7. Adjusting the AE Slope
After executing AE auto adjustment, make a copy of a newspaper (or a rather dark
original). If the copy is foggy or too light, perform the following:
1) Open the front door, and insert the door switch actuator into the door switch
assembly.
2) Press the service mode switch over the cover with a clip.
3) Select ‘AE_SLOP’ in service mode ( ).
4) Place a newspaper (or a relatively dark original) on the copyboard.
5) Change the setting using the numeric keypad, and press the user mode key (
]).
2-6
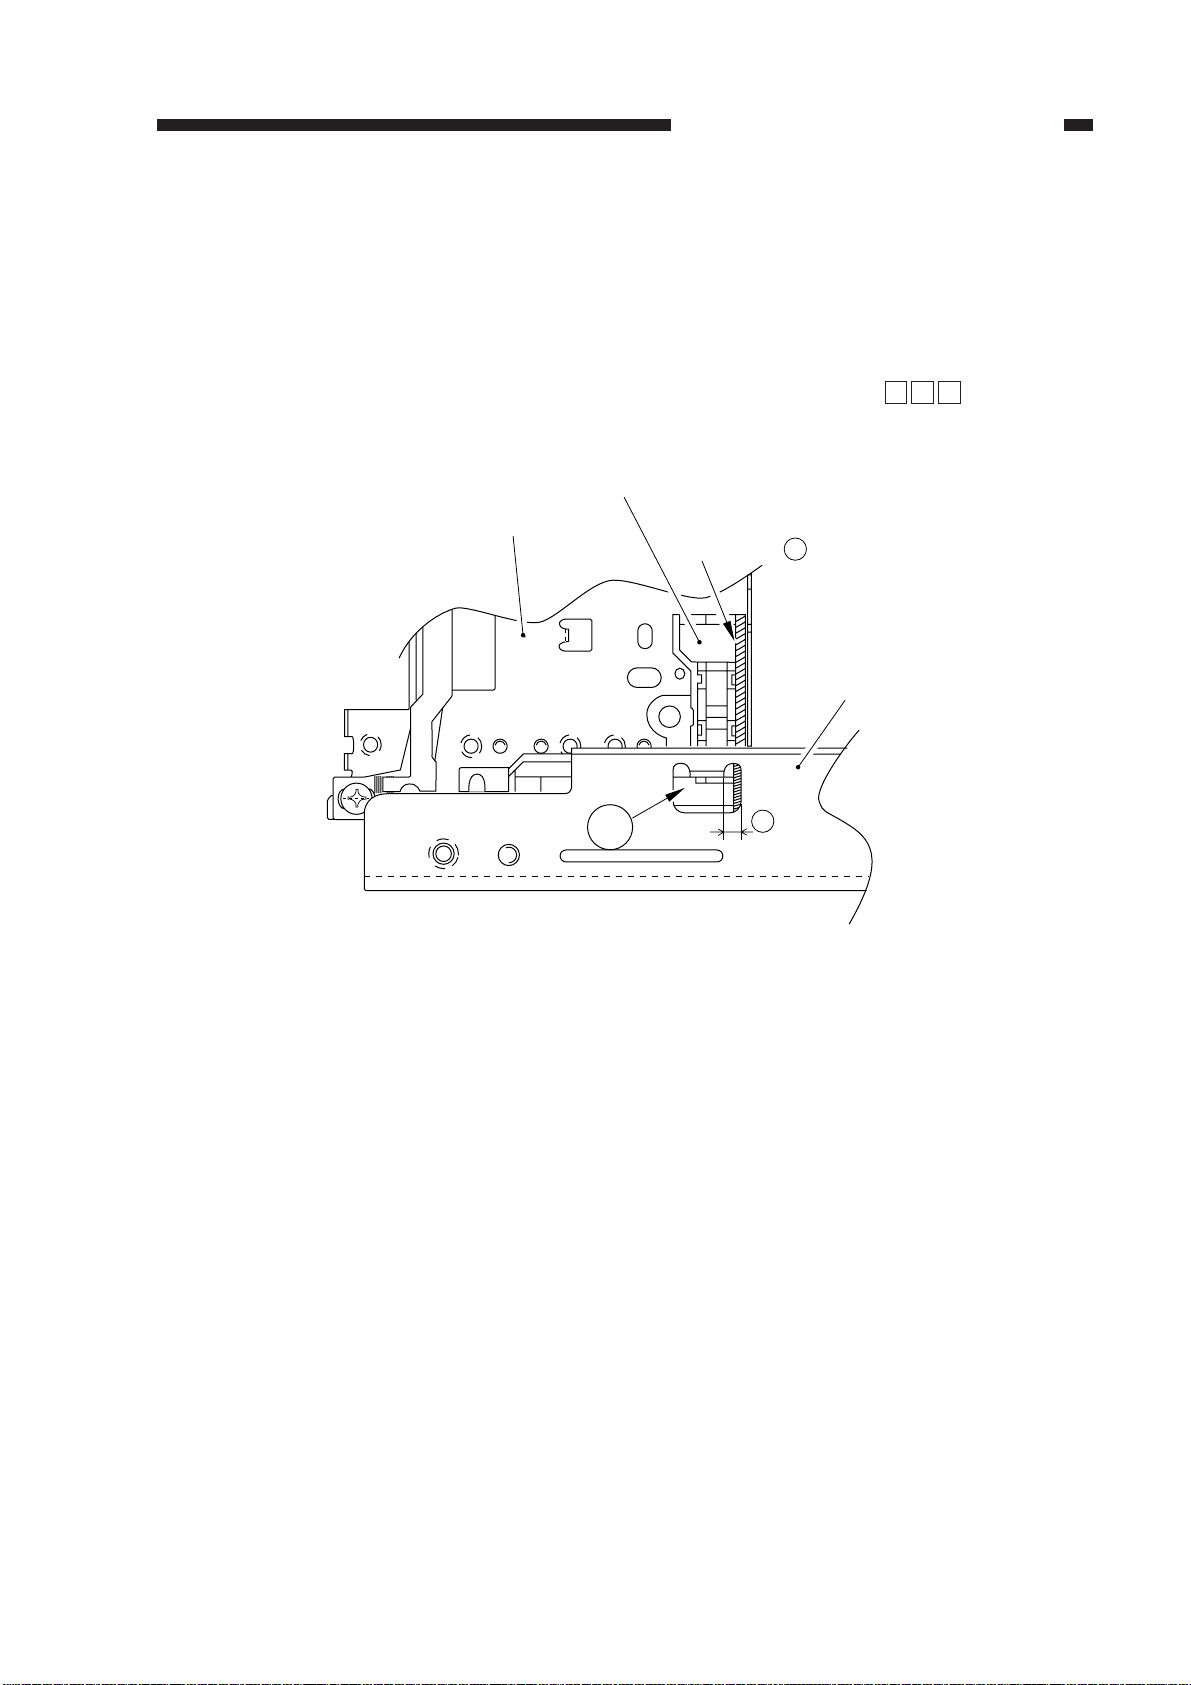
A is within section B.
Figure 2-8
B
No. 1 mirror mount
Electrode (front)
Section A of left of wall
Glass support
(front)
Hole
]
3
]
CHAPTER 2 STANDARDS AND ADJUSTMENTS
2-7
B. Exposure System
1. Adjusting the Scanner Home Position
After making copies, remove the control panel, and check to make sure that the line
in section A on the electrode mount (front) of the No. 1 mirror mount is in section B of
the hole of the glass support (front).
Otherwise, change the setting of ‘BRAKE_SC’ in service mode ( ) so that the
line in section
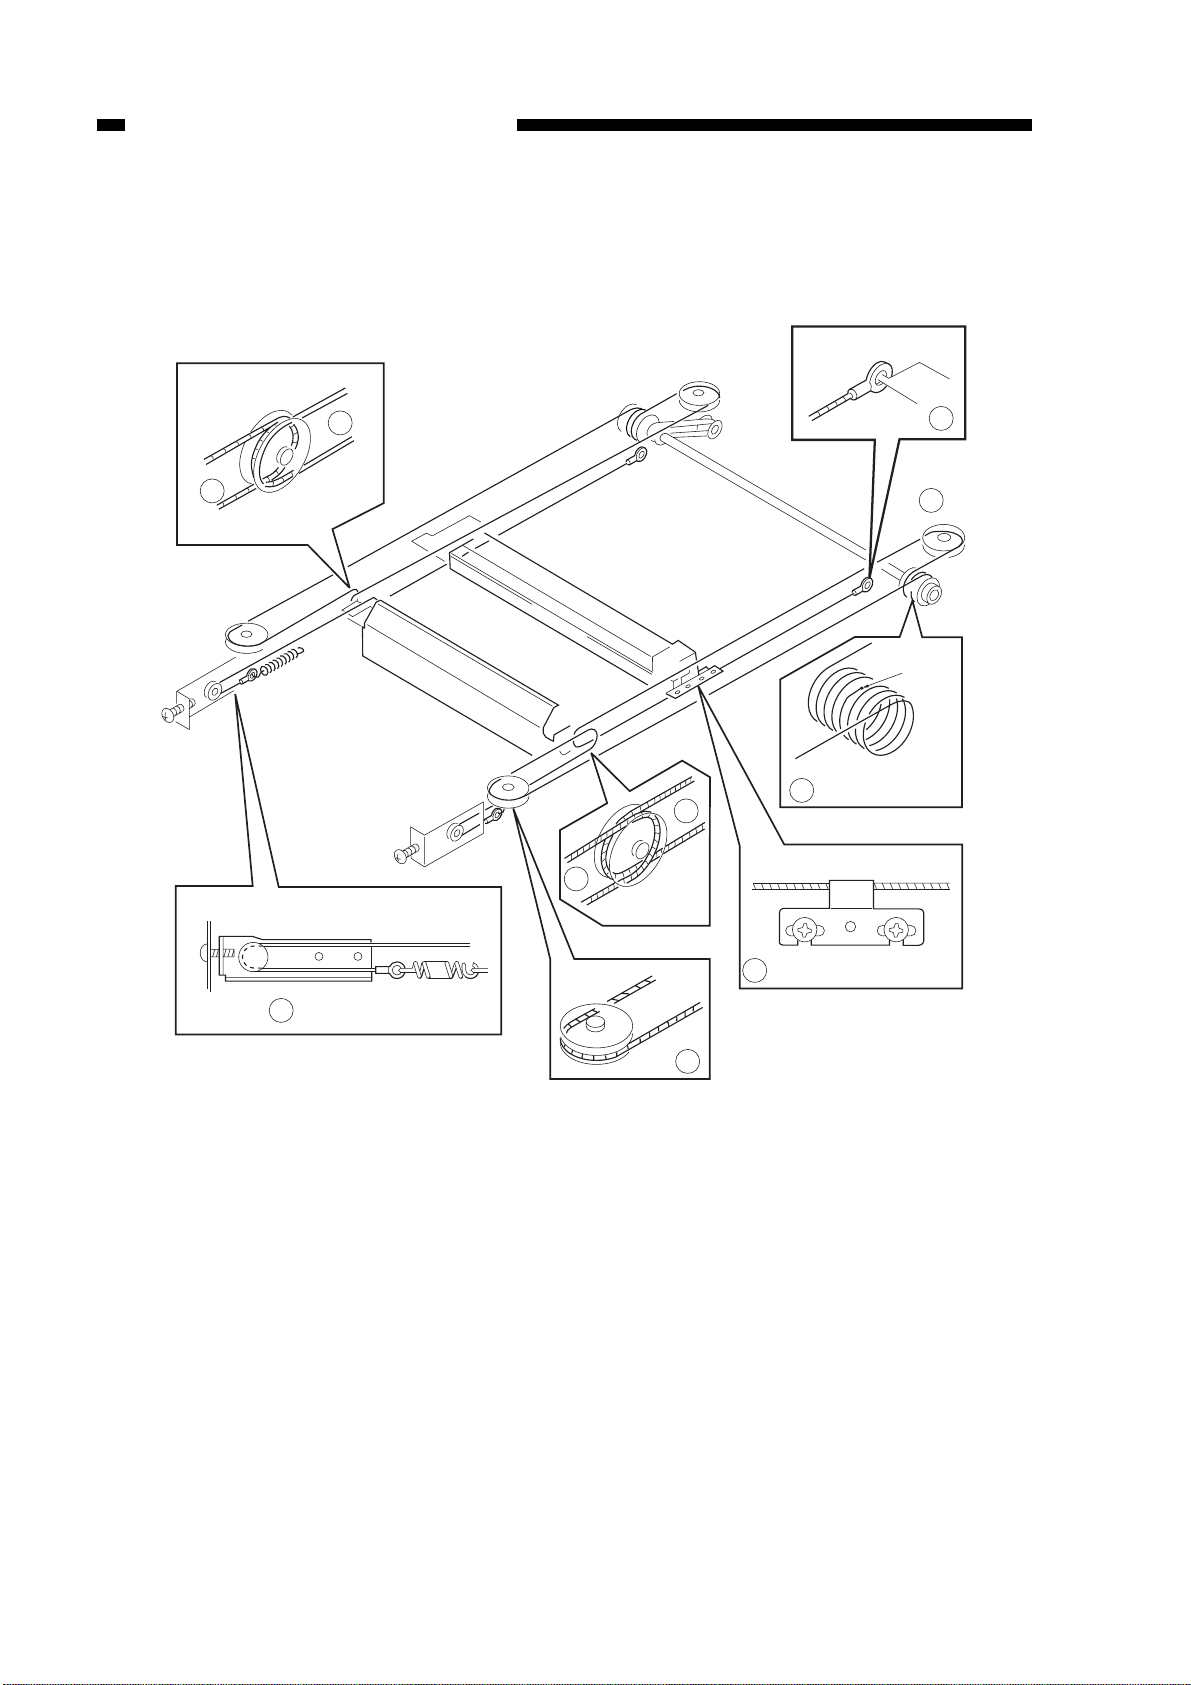
Steel ball
Wind eight times.
Fix in place temporaily.
1
3
4
8
5
6
2
7
6
2
CHAPTER 2 STANDARDS AND ADJUSTMENTS
2. Routing the Scanner Drive Cable
Route the cable as indicated (q through i), and adjust the tension of the cable and
the position of the mirror.
Figure 2-9
2-8
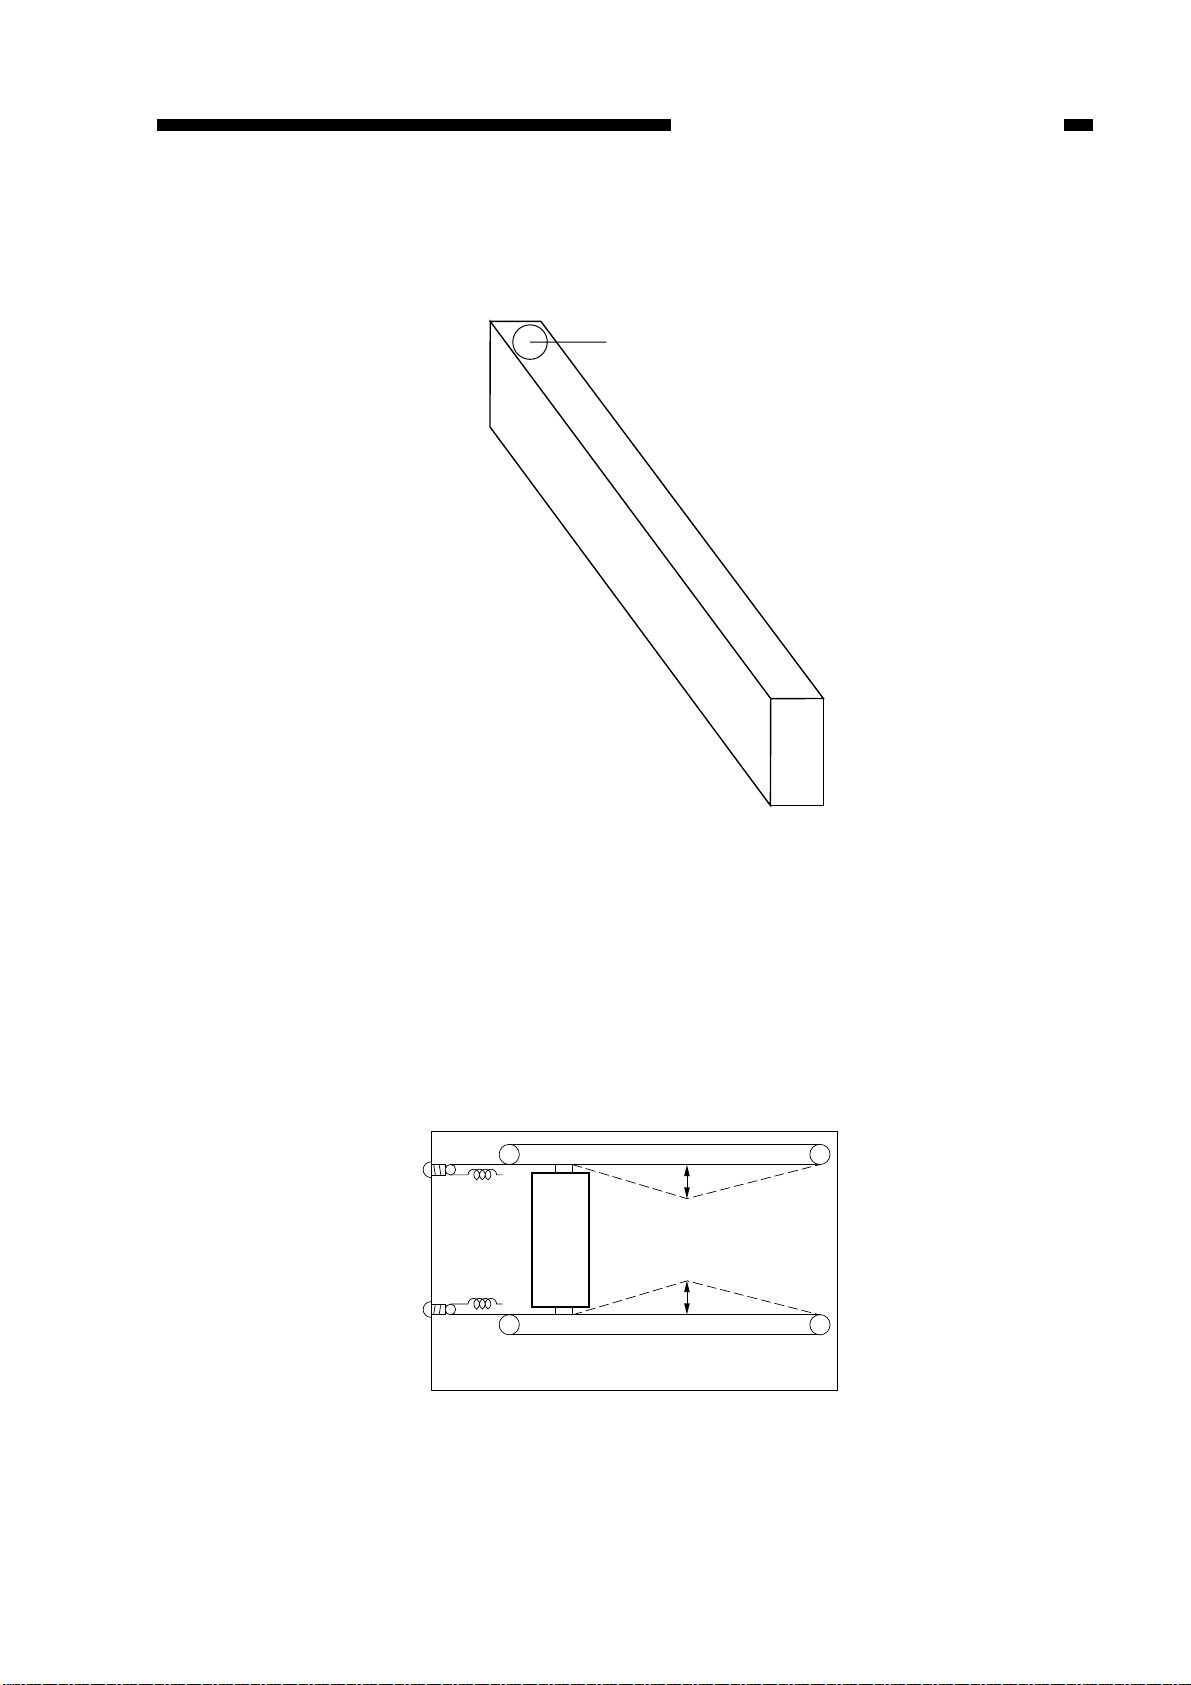
A
A
10 mm
10 mm
(rear)
(front)
Mirror mount
White paint
(rear)
(front)
CHAPTER 2 STANDARDS AND ADJUSTMENTS
3. Orientation of the Heat Absorbing Glass
When replacing the heat absorbing glass, make sure that the white paint marking is
toward the rear of the machine.
Figure 2-10
4. Adjusting the Tension of the Scanning Lamp Cable
1) Remove the two mounting screws, and remove the left cover.
2) Loosen the fixing screw on the tension spring bracket.
3) Turn the tension adjusting screw so that the reading is as indicated.
• Turn the tension adjusting screw A so that the reading of the spring gauge is 200
±50 g when the center of the scanner cable is pulled about 10 mm.
Figure 2-11
2-9
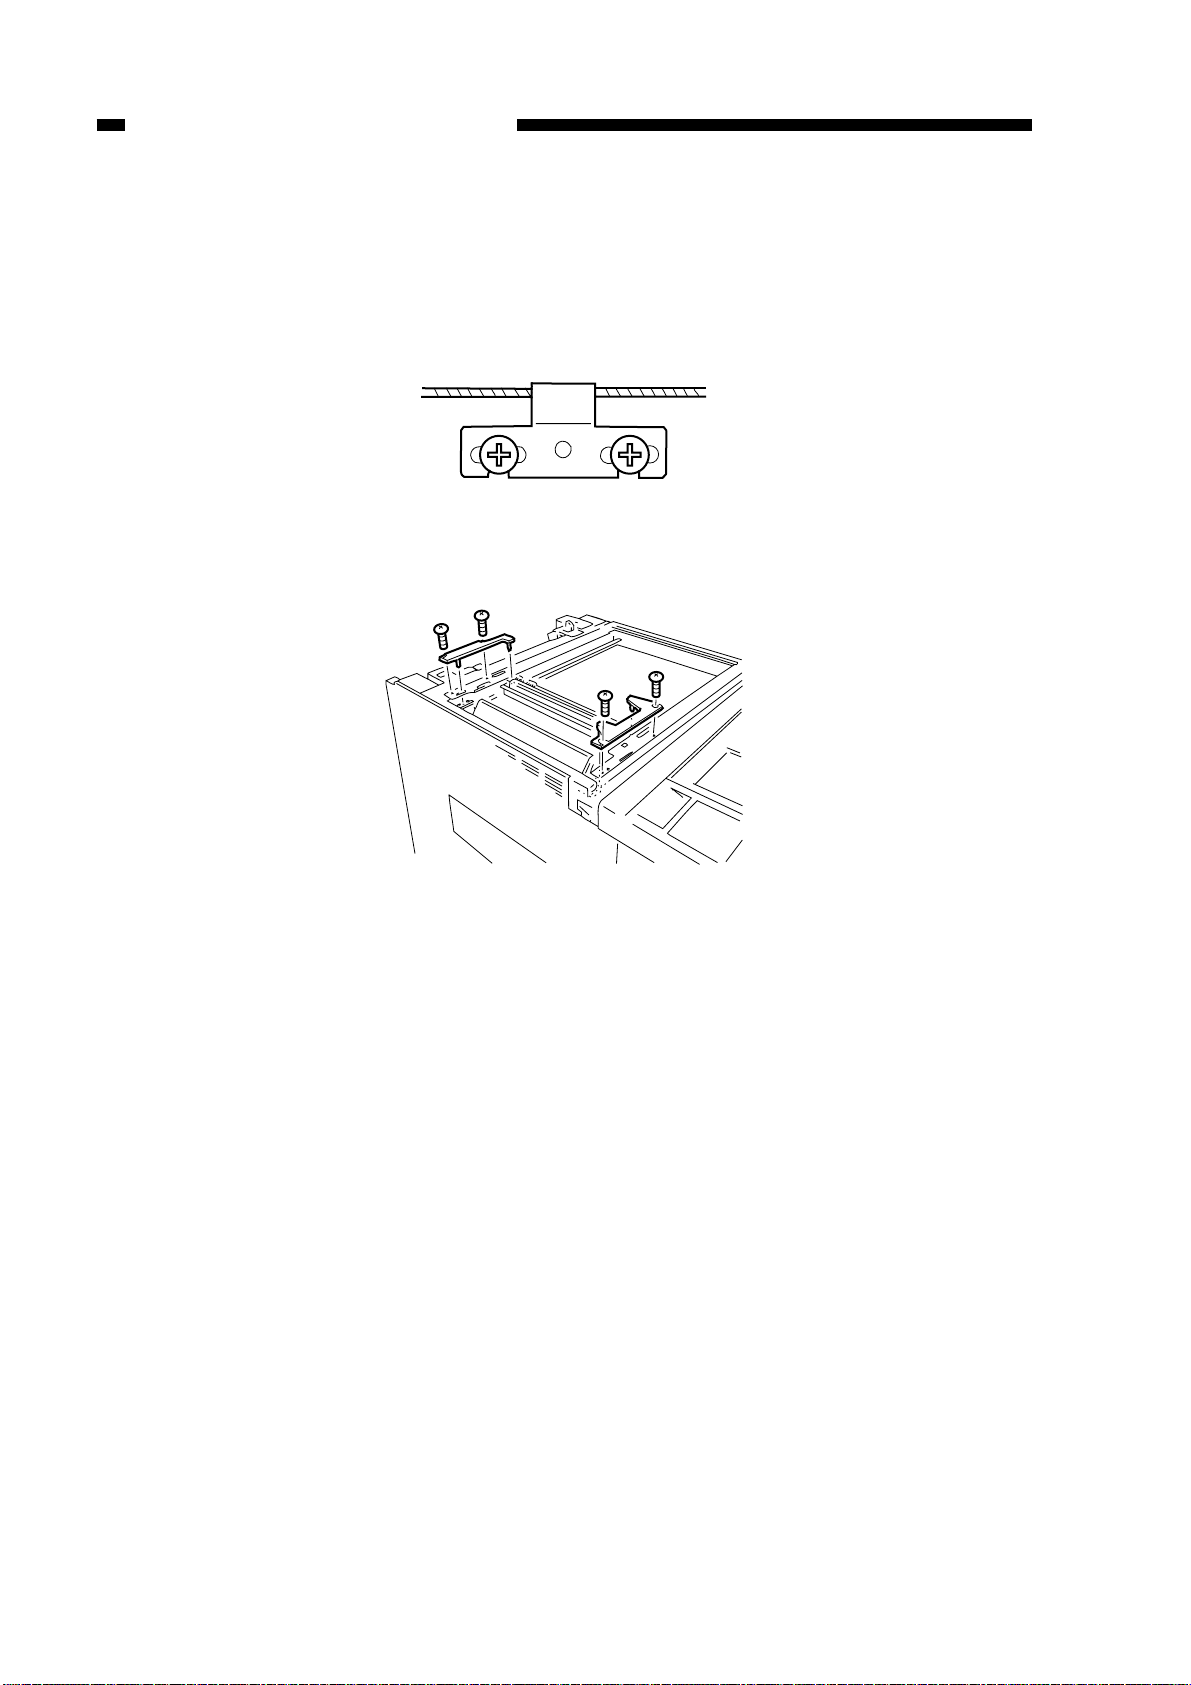
CHAPTER 2 STANDARDS AND ADJUSTMENTS
5. Adjusting the Position of the Mirror
You must always adjust the position of the mirror whenever you have installed the
scanner drive cable.
1) Move the No. 1 mirror mount and the No. 2/No. 3 mirror to the left.
2) Set the mirror positioning tool (front, rear; FY9-3011) as shown.
Figure 2-12
Figure 2-13
2-10
q
w
e
r
q
CHAPTER 2 STANDARDS AND ADJUSTMENTS
6. Cleaning the Mirror (No. 5 mirror)
1) Remove the copyboard glass.
2) Remove the lens hood.
3) Remove the mirror guide plate.
4) Move the lens stage in the direction of Enlarge.
5) Remove the screw, and remove the mirror cleaning tool.
6) While butting the mirror cleaning tool q against the No. 5 mirror as shown, clean the
mirror by moving the tool in the direction of the arrow.
At this time, be sure that your finger or the cleaning tool will not touch the No. 4
mirror.
7. Routing the Light-Blocking Belt
Figure 2-14
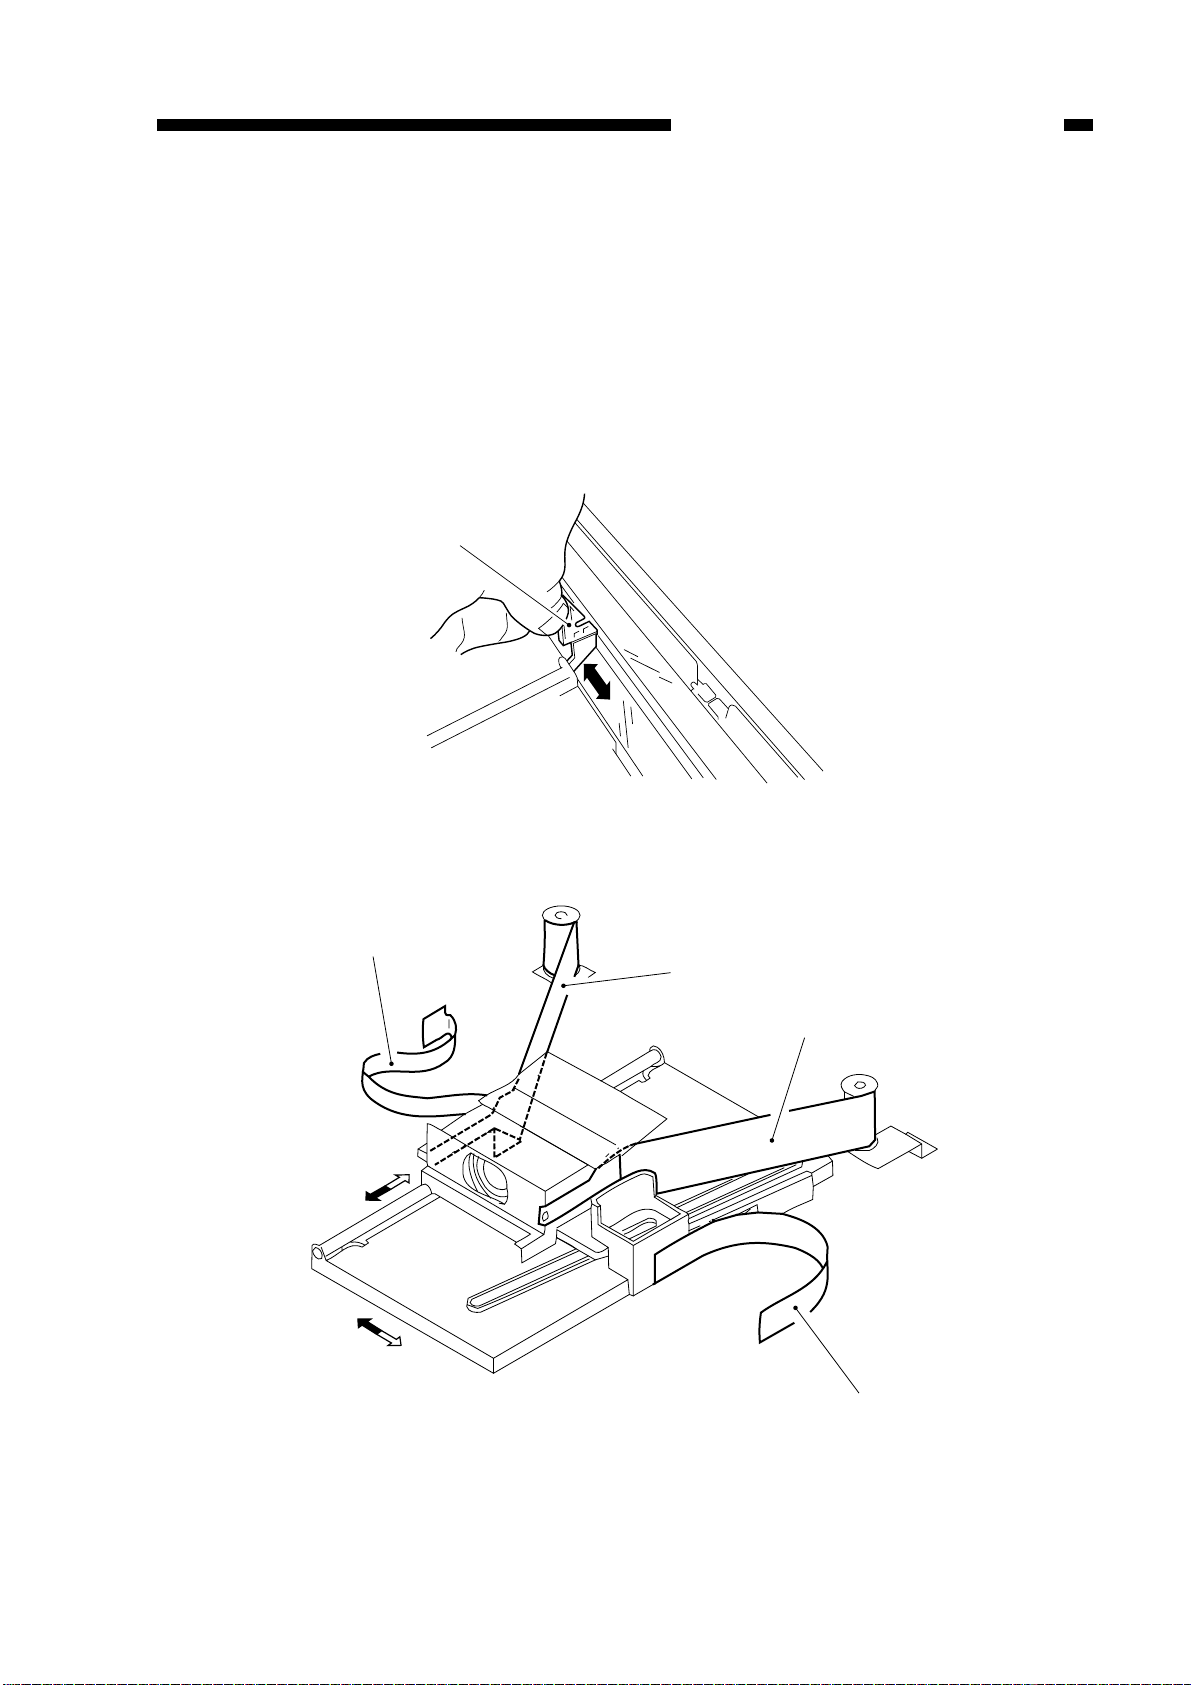
q Light-blocking belt 1 e Light-blocking belt 3
w Light-blocking belt 2 r Light-blocking belt 4
Figure 2-15
2-11
E-ring
Standards
(10.5 ±0.5 mm;
from bottom of
clamp to top of
solenoid)
Scanner locking
solenoid
Loosen these
two screws to
adjust.
q
w
Own weight
CHAPTER 2 STANDARDS AND ADJUSTMENTS
8. Routing the Lens X Direction Drive Belt
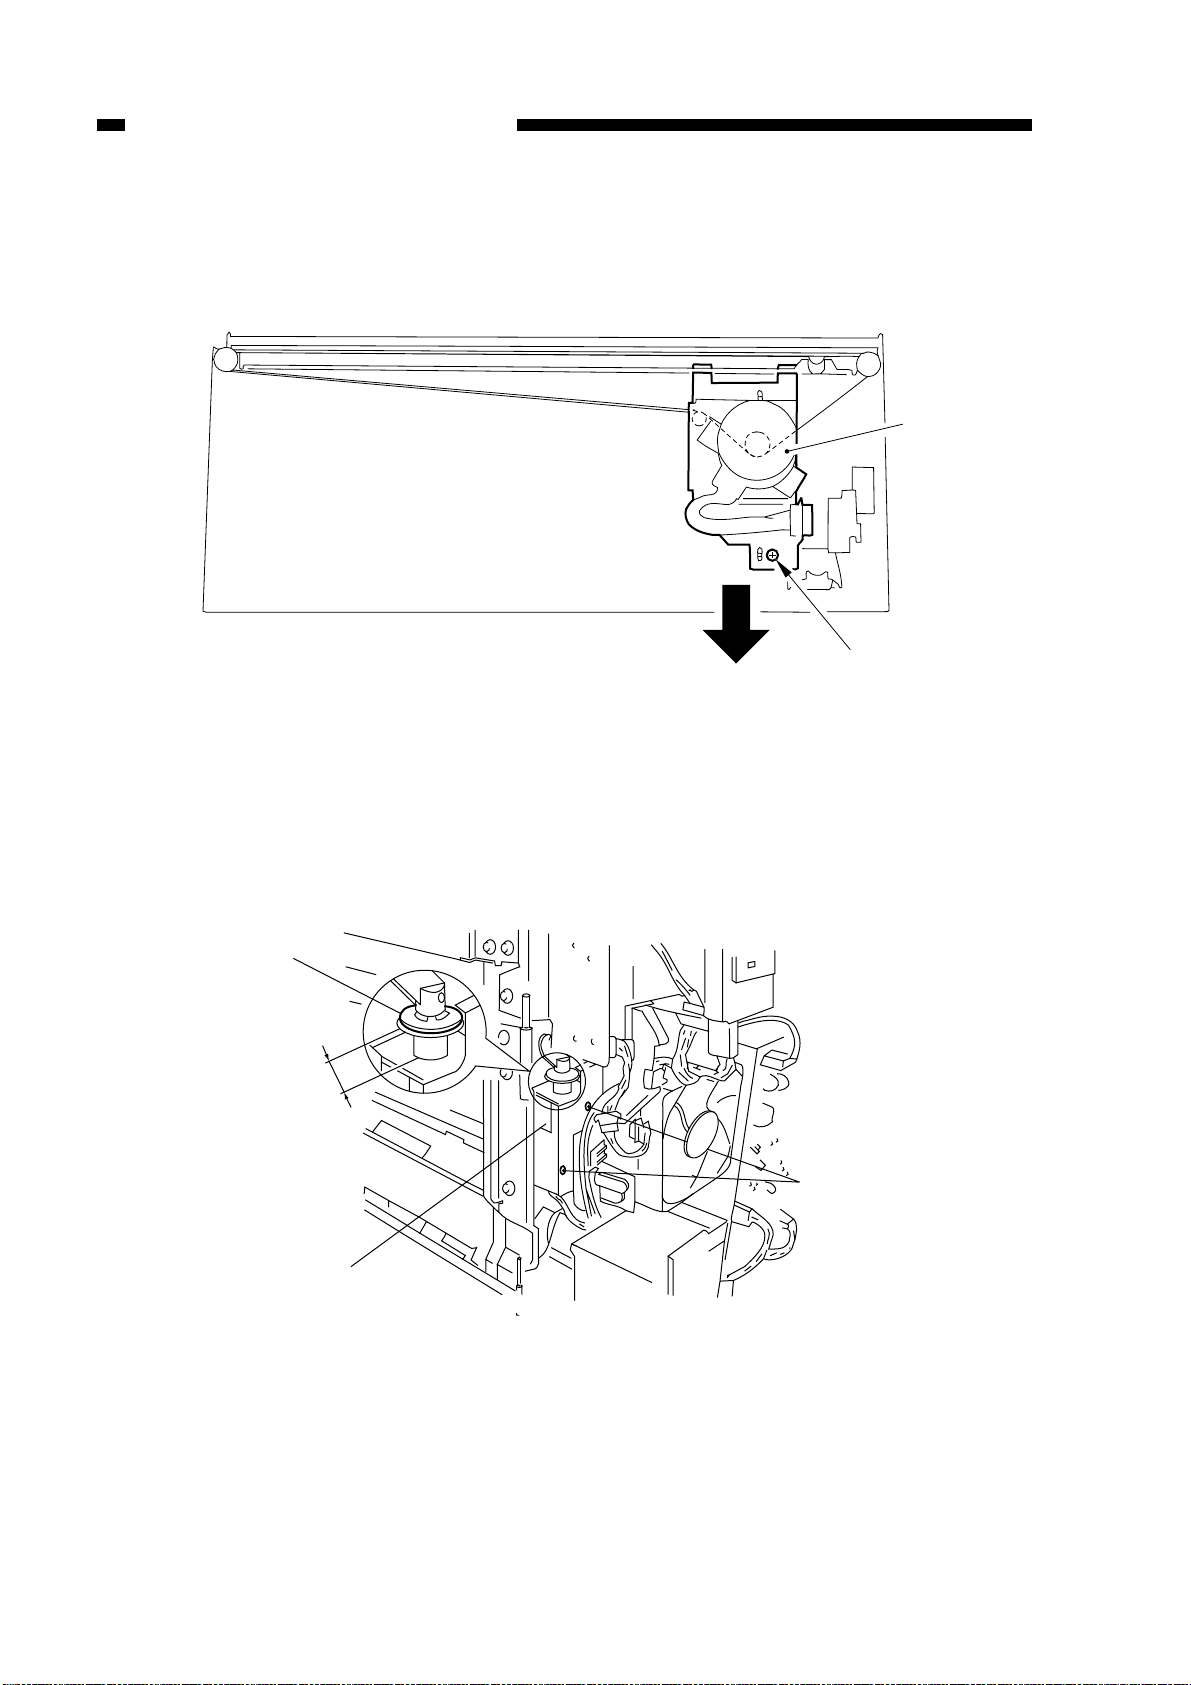
Fix the lens X direction drive motor q with the mounting screw w where the motor
has lowered on its own weight.
Figure 2-16
9. Adjusting the Position of the Scanner Locking Solenoid (SL1)
1) Remove the rear cover.
2) Remove the multifeeder assembly. (See Service Manual Chapter 5.)
3) Adjust the stroke of the scanner locking solenoid as indicated.
2-12
Figure 2-17
CHAPTER 2 STANDARDS AND ADJUSTMENTS
Screw
Screws
C. Image Formation System
1. Grid Wire of the Primary Charging Assembly
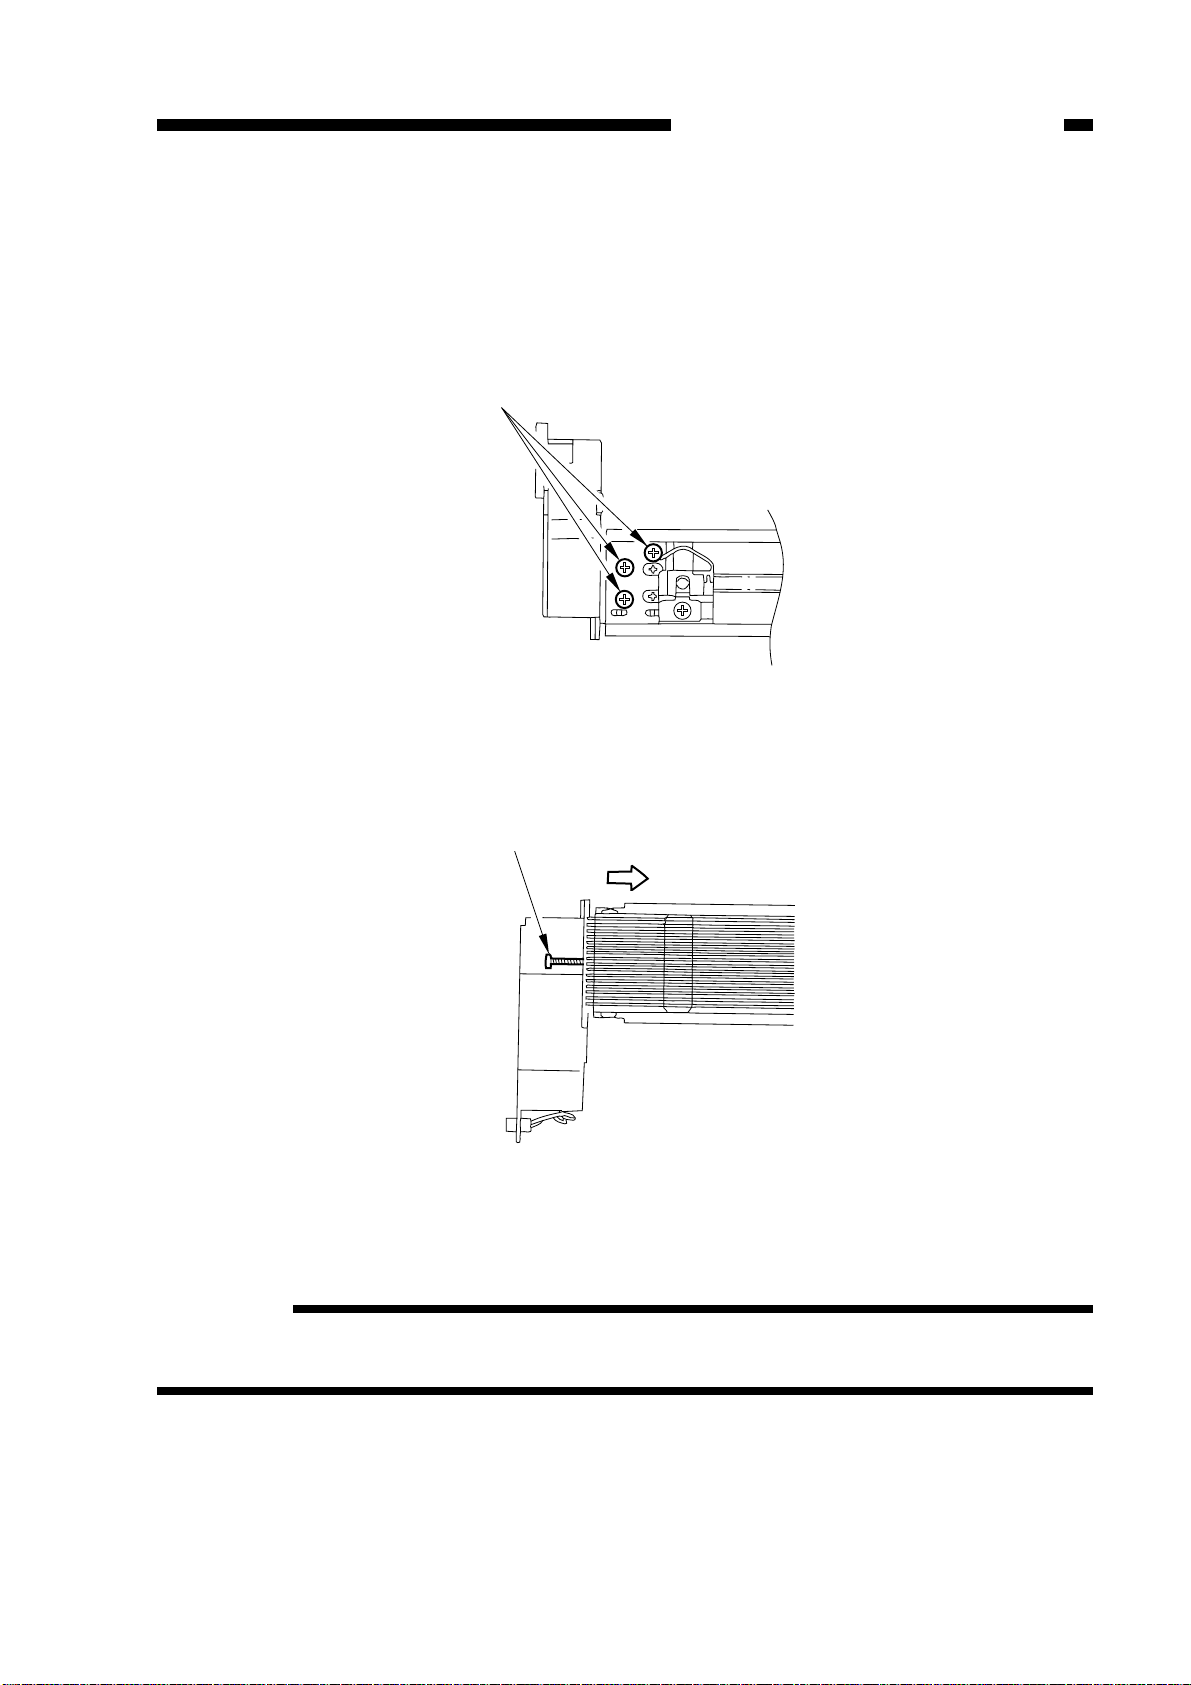
1) Loosen the two mounting screws used to fix the left/right shielding plate in place.
2) Loosen the three mounting screws used to fix the motor unit in place at the front.
Figure 2-18
3) Loosen the mounting screw, and move the assembly in the direction indicated in
Figure 2-19; then, fix it in place temporarily.
Figure 2-19
4) Free a length of charging wire (about 5 cm) from the charging wire reel (0.1mm dia.);
then, form a loop at its end (2mm dia.)
Reference:
To form a loop, wind the charging wire around a hex key three to four times, and
twist the charging wire.
5) Cut the twisted charging wire (excess) with a nipper.
2-13
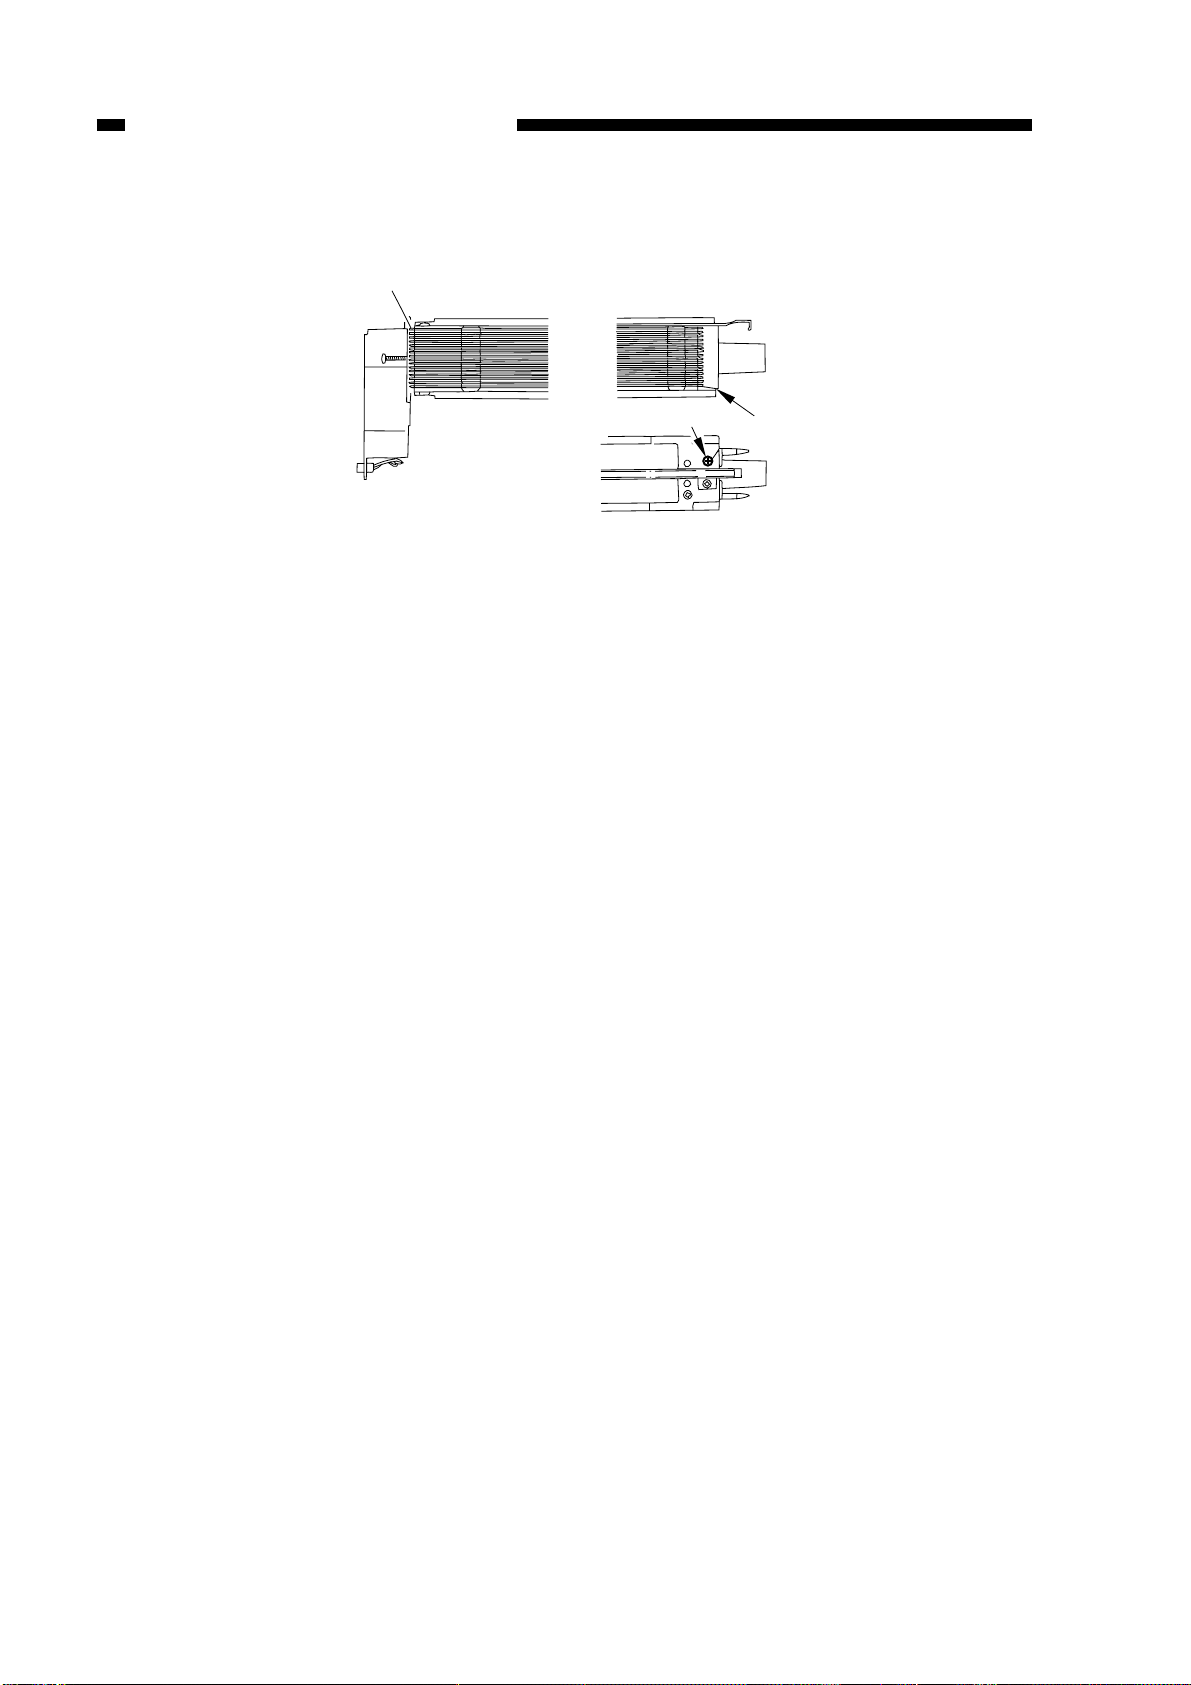
Stud A
Screw
B
CHAPTER 2 STANDARDS AND ADJUSTMENTS
6) Hook the loop on the stud A shown in Figure 2-20.
Figure 2-20
7) After routing the wire for 31 runs, lead it through section B, give it a 1/2 turn, lead it
between washer and motor unit, wind it once around the mounting screw clockwise,
and fix it in place with the mounting screw.
8) Cut the excess charging wire with a nipper.
9) Tighten the mounting screw loosened in step 8).
Take care to avoid deformation (slack) of the charging assembly. Try to tighten the
mounting screw (front) on the shielding plate (left, right) earlier.
2-14
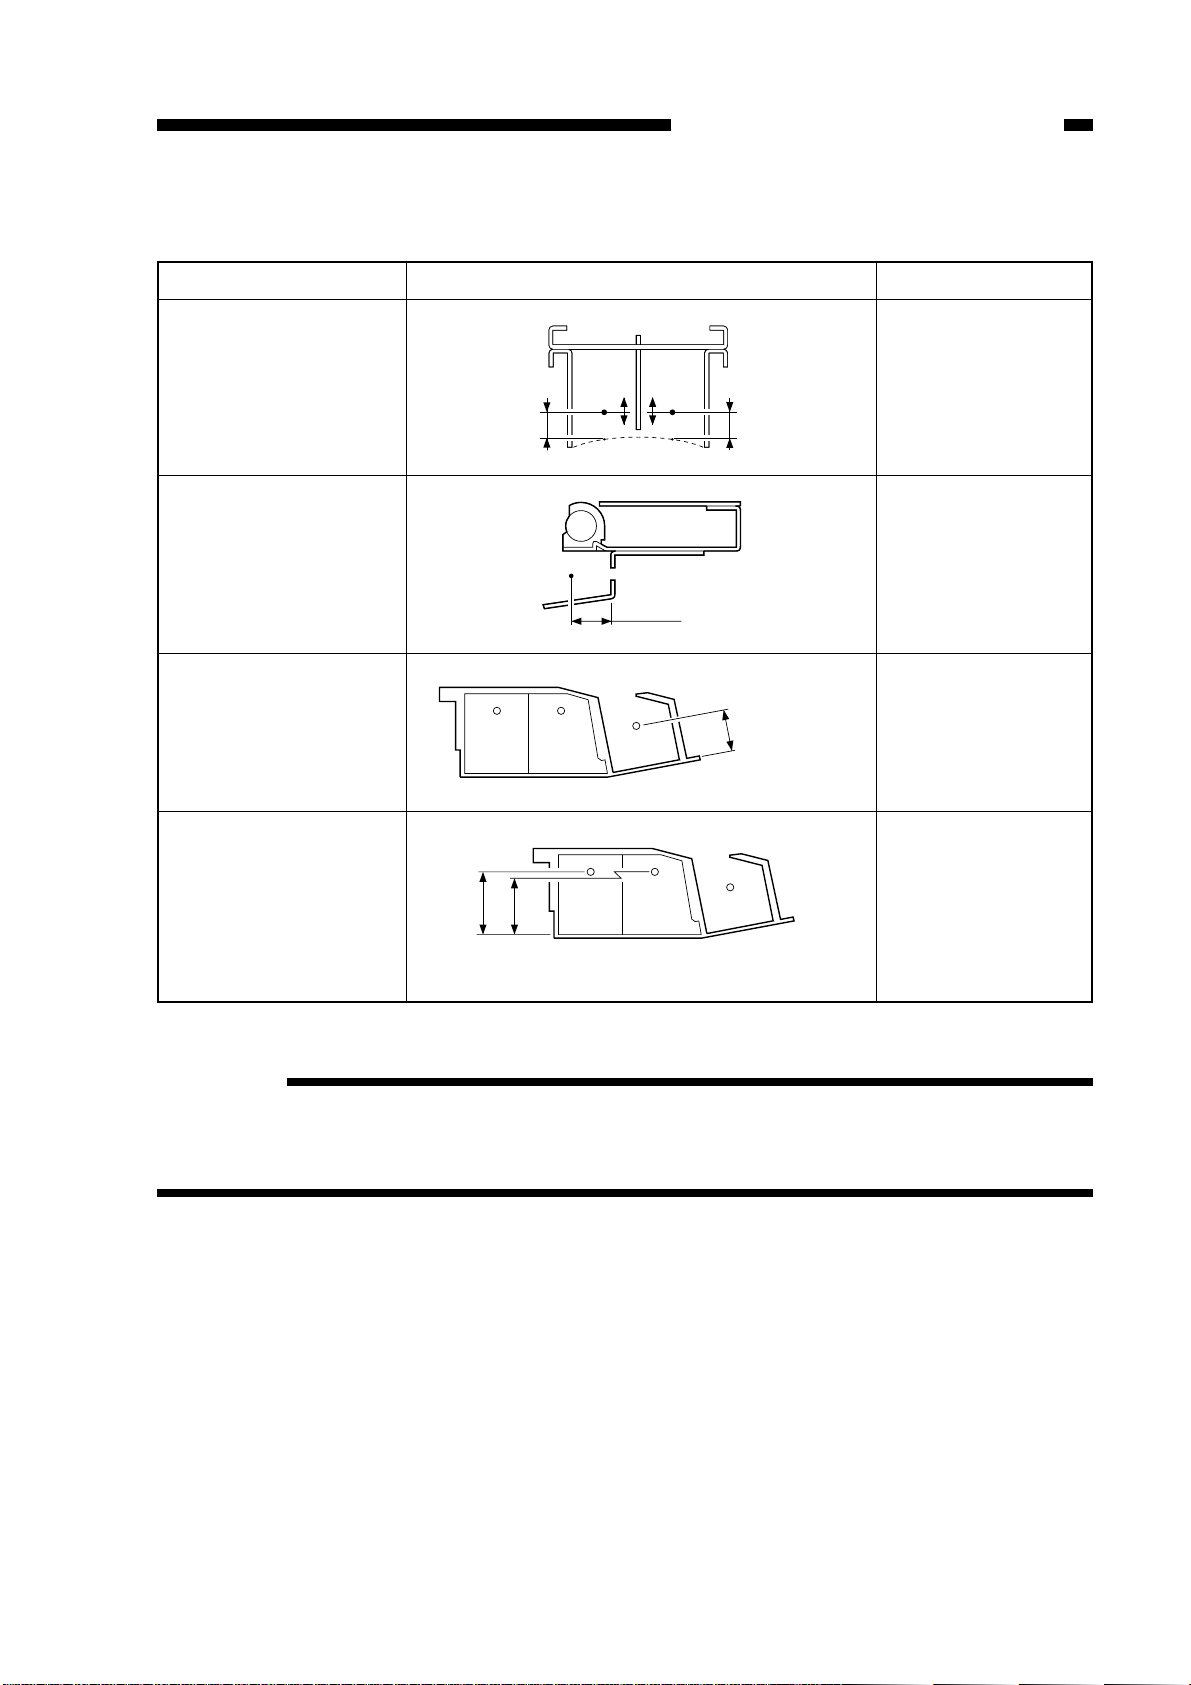
2. Adjusting the Height of the Charging Wire
7.5+1.5
-0mm
7.5+1.5
-0mm
9.5+1.0
-0mm
10.2±0.5mm
A:16.2±0.5mm B:14.9±0.5mm
AB
CHAPTER 2 STANDARDS AND ADJUSTMENTS
Charging assembly
Primary
Pre-transfer
Transfer
Separation
Height of charging wire
Tolerance
±1mm
No adjusting
mechanism
±2mm
±2mm
Table 2-1
Reference:
Y ou can adjust the height (position) of the primary, transfer/separation charging wire
by turning the screw behind the charging assembly. A full turn changes the position
of the charging wire by about 0.7 mm.
2-15
Adjusting screw
0
2
4
6
8
12
10
0
2
3
6
8
12
10
W
1 W1
CHAPTER 2 STANDARDS AND ADJUSTMENTS
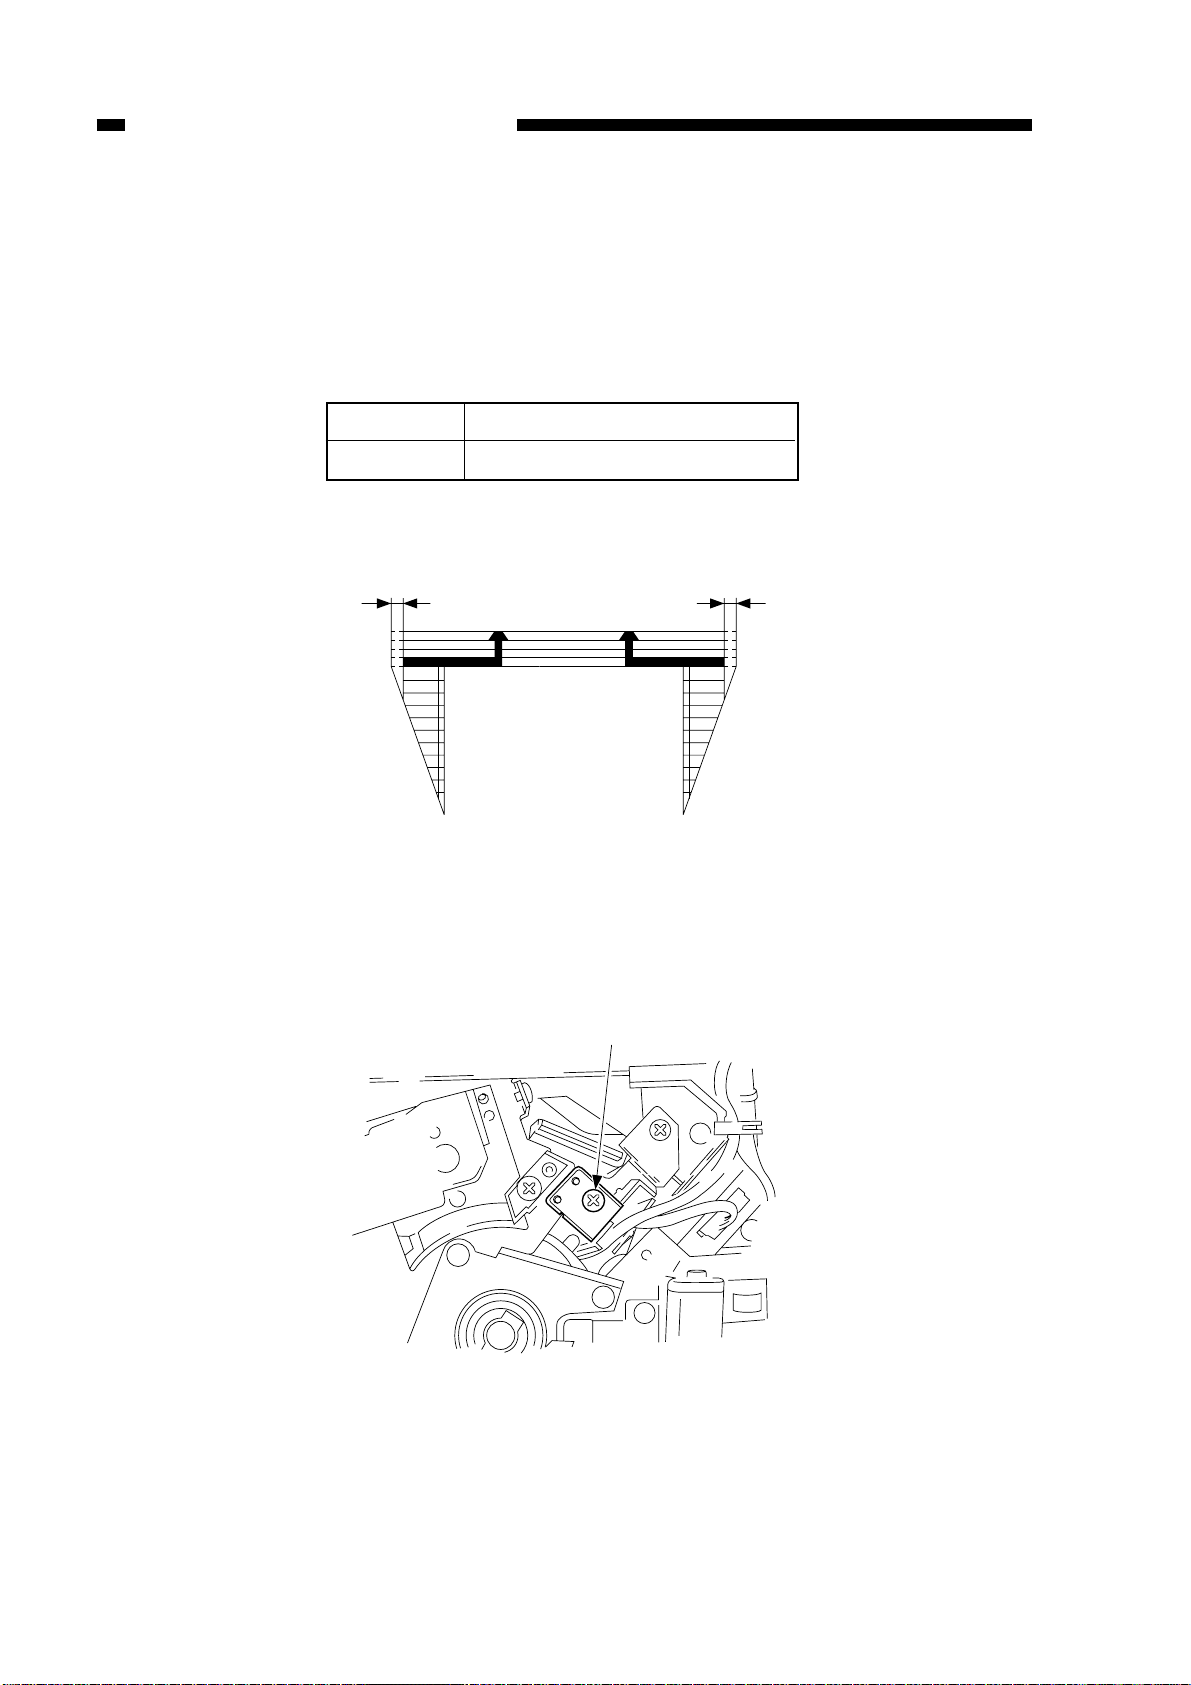
3. Adjusting the Position of the Blanking Exposure Lamp
1) Place the Test Sheet on the copyboard.
2) Select A4 copy paper.
3) Make a copy, and check that the left/right registration is correct.
4) Make a copy in Direct.
5) Check the image, and measure the non-image width shown in Figure 2-21.
Standard
Paper
All sizes
Left/right non-image width (W1)
2.75 ± 2.5mm
(w/ standard frame erasing)
Table 2-2
Figure 2-21
6) If the non-image width is not as specified, turn the adjusting screw to adjust the
position of the blanking exposure lamp assembly.
2-16
Figure 2-22
 Loading...