
REVISION 0
DEC. 1999
COPYRIGHT © 1999 CANON INC. CANON NP6320 REV.0 DEC. 1999 PRINTED IN JAPAN (IMPRIME AU JAPON)
FY8-23B8-000

IMPORTANT
THIS DOCUMENTATION IS PUBLISHED BY CANON INC., JAPAN, TO SERVE AS A SOURCE
OF REFERENCE FOR WORK IN THE FIELD.
SPECIFICATIONS AND OTHER INFORMATION CONTAINED HEREIN MAY VARY SLIGHTLY
FROM ACTUAL MACHINE VALUES OR THOSE FOUND IN ADVERTISING AND OTHER
PRINTED MATTER.
ANY QUESTIONS REGARDING INFORMA TION CONTAINED HEREIN SHOULD BE DIRECTED
TO THE COPIER SERVICE DEPARTMENT OF THE SALES COMPANY.
THIS DOCUMENT ATION IS INTENDED FOR ALL SALES AREAS, AND MA Y CONTAIN INFORMATION NOT APPLICABLE TO CERTAIN AREAS.
COPYRIGHT © 1999 CANON INC.
Printed in Japan
Imprimé au Japon
Use of this manual should be strictly supervised to avoid disclosure of confidential
information.
Prepared by
OFFICE IMAGING PR ODUCTS TECHNICAL SUPPORT DIVISION
OFFICE IMAGING PR ODUCTS QUALITY ASSURANCE CENTER
CANON INC.
5-1, Hakusan 7-chome, Toride-shi, Ibaraki 302-8501 Japan
COPYRIGHT © 1999 CANON INC. CANON NP6320 REV.0 DEC. 1999 PRINTED IN JAPAN (IMPRIME AU JAPON)
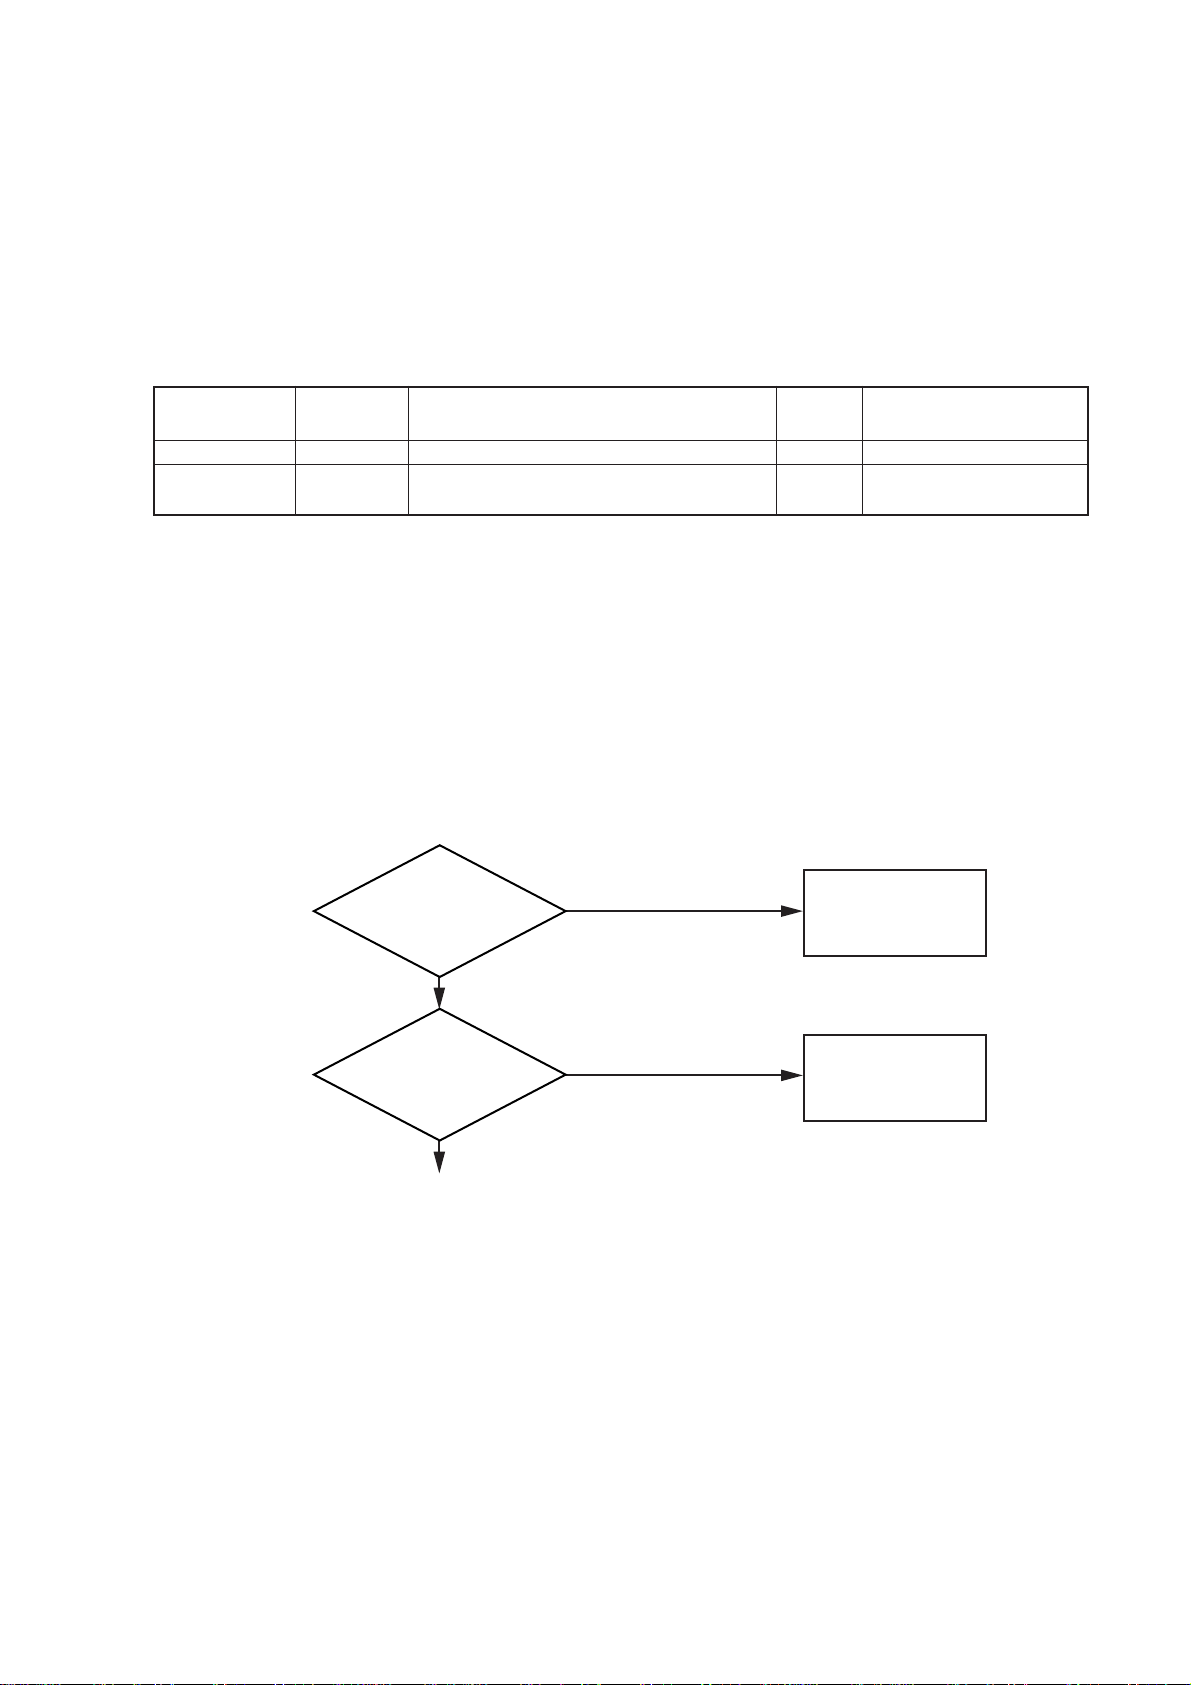
Reading the Troubleshooting Tables
The troubleshooting tables used in this chapter are modifications of the general servicing
flowchart. The example below shows how to read the tables.
Example: AC power is not supplied.
Cause
Power cord
Doors
Step
1
2
Checks
Is the power cord plugged in?
Are the front door and copy delivery door
closed properly?
YES/
NO
NO
NO
Plug the copier in.
Make sure the doors are
closed properly.
Action
• To find possible causes of trouble, refer to the “Cause” column in the table.
For example, for “AC power is not supplied,” shown above, the possible causes include
the following: power cord, power cord, and door switches.
• To find the repair or check procedure for a certain type of problem, go through the table
step by step.
Depending on the answer to the “Check” question, perform the action described in the
“Action” column, or continue to the next step.
Step Check Result Action
1
Is the power cord
plugged in?
NO
Plug the copier in.
YES
2
Are the doors
closed properly?
YES
NO
Make sure the
doors are closed
properly.
• Included among the voltage checks to be performed using a meter is “Measure the
voltage between J109-1 (+) and J109-2 (-) on the DC controller PCB.” Here, the (+) and
(-) signs after the connector number indicate the polarity of the meter leads that are to be
connected to the connectors.
Example: J109- 1(+) Positive lead
J109- 2(-) Negative lead
i

ii

CONTENTS
CHAPTER 1 MAINTENANCE AND INSPECTION
1
2
A. Periodic Servicing Inspection.......1-1
B. Per iodically Replaced Par ts .........1-2
C. Durable Parts ............................... 1-3
CHAPTER 2 STANDARDS AND ADJUSTMENTS
A. Mechanical................................... 2-1
CHAPTER 3 FUNCTION AND ARRANGEMENT OF
THE ELECTRICAL PARTS
A. Sensors, Fuses and Lamps ......... 3-1
B. Clutches, Solenoids, Fans,
Motors and Heaters .....................3-2
D. Basic Image Adjustment
Procedure .....................................1-5
E. Per iodic Maintenance
Check points ................................1-6
B. Electrical ................................... 2-15
C. Switches, Cricuit Breakers,
Counters, Etc. ..............................3-3
D. PCBs ............................................ 3-4
3
4
5
CHAPTER 4 IMAGE TROUBLESHOOTING
A. Initial Check..................................4-1
B. Sampels of Image Faults .............4-4
CHAPTER 5 OPERATION TROUBLESHOOTING
A. Troubleshooting of Malfunction ....5-1
CHAPTER 6 TROUBLESHOOTING THE FEEDING
PROBLEMS
A. Paper Jams .................................. 6-1 B. Incorrect Paper Feed Operation ..6-5
C. Troubleshooting of Image Faults..4-5
6
7
8
iii

CHAPTER 7 SERVICE MODE
A. Outline..........................................7-1
B. Using the Service Mode..............7-1
CHAPTER 8 SELF DIAGNOSIS
A. Self Diagnosis ..............................8-1
APPENDIX
A. General Timing Chart.................. A-1
B. List of Signals/Commands .......... A-3
C. Guide to Service Mode ................7-2
C. General Circuit Diagram .............A-5
D. Specifications.............................. A-7
iv

CHAPTER 1 MAINTENANCE AND INSPECTION
CHAPTER 1 MAINTENANCE AND INSPECTION
A. Periodic Servicing Inspection
Note:
Do not use solvents or oils other than those specified.
∆: Clean l: Replace ×: Lubricate o: Adjust : Check
Periodic servicing
Unit
External
Scanner
drive unit
Feeder
Optical path
Corona
assemblies
Developing
assembly
Fixing
assembly
Drum unit
Description
Copyboard glass
Ozone filter
Dustproofing filter
Scanner rails
Transfer guide
Feeder belt
Feeder frame
Scanning lamp reflector
Scanning lamp side
reflector
Mirrors 1 to 6
Lens
Dustproofing glass
Primary corona assembly
Primary corona wire
Transfer corona
assembly
Transfer corona wire
Static charge eliminator
Developing rollers
(front and rear)
Upper fixing roller
Lower fixing roller
Paper guide plate
Separation claws
(upper and lower)
Lower face of drum unit
Coupling pin
Every
15,000
copies*
∆
∆
∆
∆
∆
∆
∆
∆
∆
∆
∆
∆
∆
∆
∆
∆
Every
30,000
copies
×
∆
∆
∆
∆
∆
Every
60,000
copies
l
l
l
l
Every
90,000
copies
Clean with alcohol.
or 1 year
or 1 year
Clean with alcohol;
then apply high-viscosity lubricating oil
(TKN-0451).
Damp cloth
Clean with a blower
brush. If excessively
solid, clean with
alcohol. Clean mirrors
5 and 6 with the mirror
cleaning tool.
Dry wipe using lint-free
paper; then clean using
alcohol.
Clean with a brush.
Clean with alcohol.
Clean with cleaning oil.
Clean with solvent.
1
Remarks
* Items to be cleaned every 15,000 copies or every 6 months, whichever comes first.
Table 1-1
1-1

CHAPTER 1 MAINTENANCE AND INSPECTION
B. Periodically Replaced Parts
To maintain the copier at its peak performance, the parts listed in the following chart must be
replaced periodically. Although the deterioration of a part may not be visible, it can seriously
hamper the performance of the copier if not replaced on schedule.
Parts should be replaced during the regular service visit that is closest to the end of the service
life of the part.
as of Dec. 1999
No.
1
2
3
4
Description
Ozone filter
Dustproofing filter
Static charge eliminator
Transfer corona wire
Part No.
FF2-5595-00P
FA0-0339-00P
FF1-9438-070
FY3-0040-000
Quantity
1
1
1
AR
Replacement
60,000
60,000
60,000
60,000
Table 1-2
Note:
The above values are estimates and are subject to change based on future data.
Remarks
or 1 year
or 1 year
1-2

CHAPTER 1 MAINTENANCE AND INSPECTION
C. Durable Parts
The values shown in the table below indicate the expected average life (number of copies) of
parts which may require replacement at least once during the warranty period due to deterioration
or damage but which can be simply replaced to restore the performance of the copier.
as of Dec. 1999
Service life
No.
1
2
3
4
5
6
7
8
9
10
11
13
14
15
Description
Paper pick-up roller
(pick-up assembly)
Multi-feeder roller
Pad (multi feeder)
Scanner drive cable
Scanning lamp (scanner)
Pre-exposure lamp
Upper fixing roller (fixing
assembly)
Upper separation claw
(fixing assembly)
Lower separation claw
(fixing assembly)
Lower fixing roller
(fixing assembly)
Thermistor assembly
Fixing roller bushing
Developing assembly
Oil applying roller
Part No.
FA0-0241-00P
FC1-0741-00P
FC1-0736-00P
FF0-0041-00P
FH7-3114-000
FG2-4048-00P
FC2-9961-00P
FB1-0301-000
FA2-9037-000
FC2-8962-00P
FF3-2855-00P
FS1-1240-00
FG3-0351-00P
FA0-0711-00P
Quantity
12
1
1
1
1
1
1
5
5
1
1
2
1
1
(number of
copies)
100,000
100,000
100,000
120,000
100,000
200,000
200,000
200,000
200,000
200,000
100,000
200,000
300,000
60,000
Remarks
Must be replaced at the
same time
Table 1-3
Note:
The above values are estimates and are subject to change based on future data.
1-3

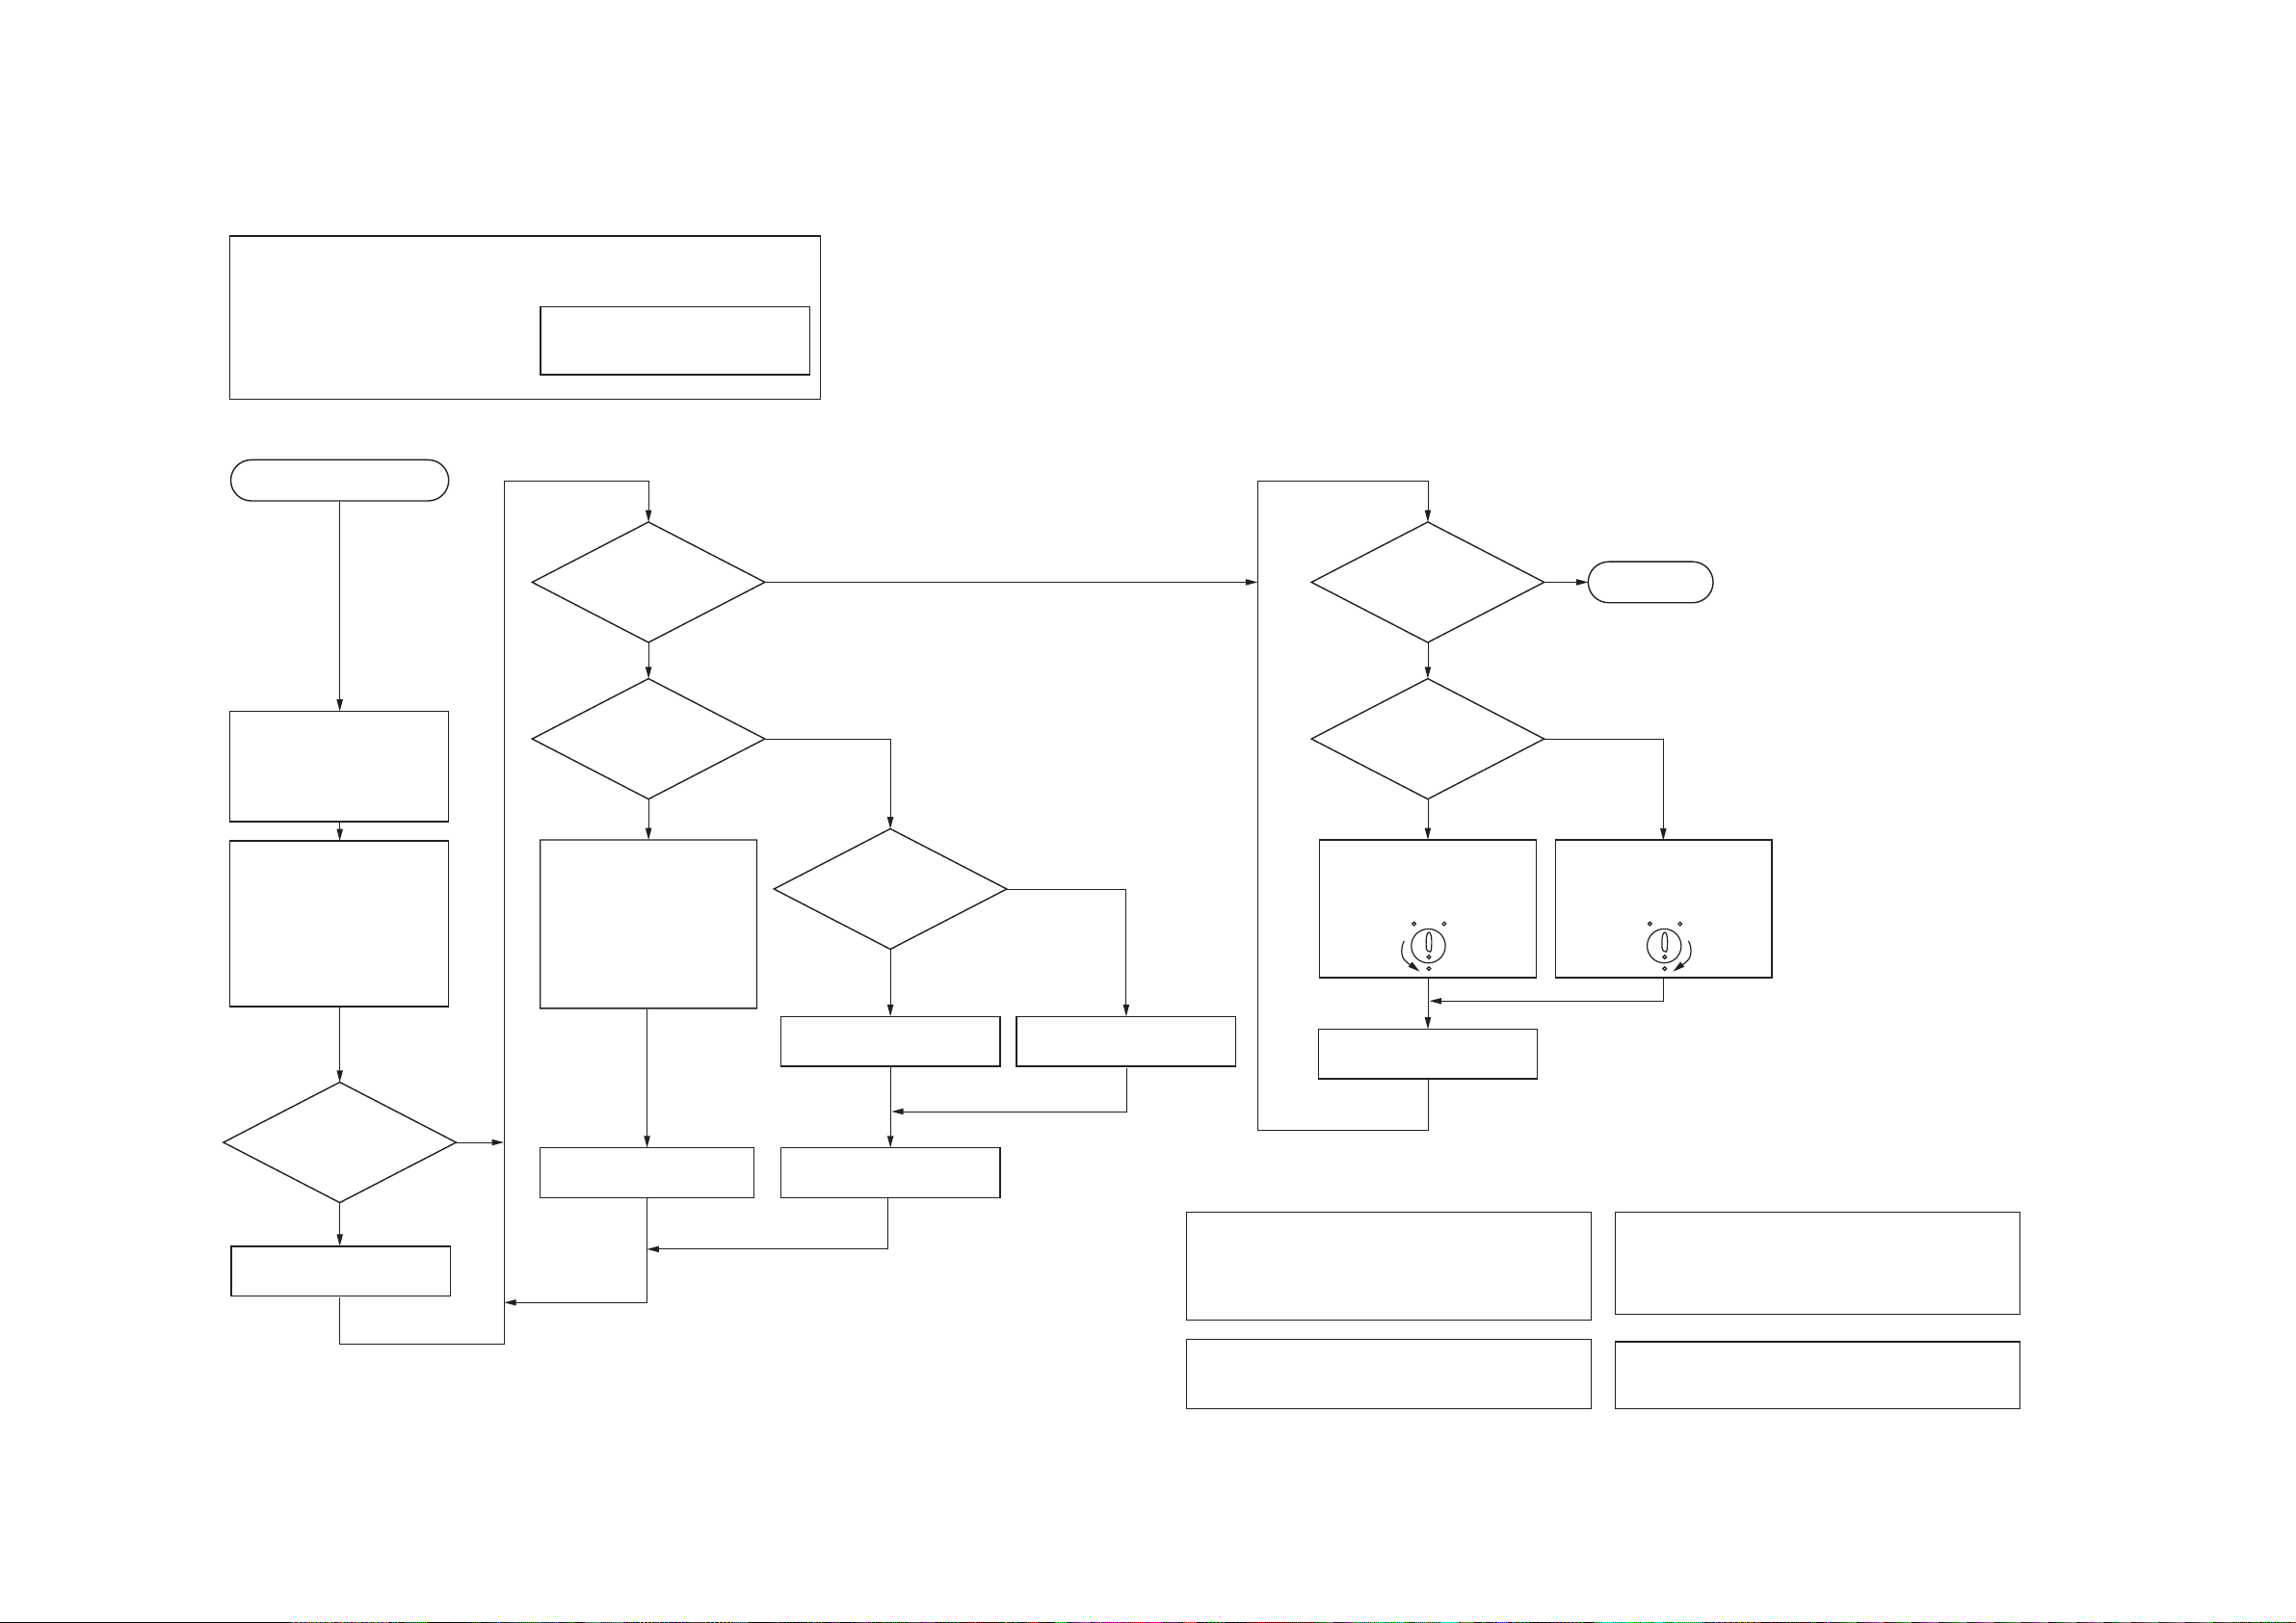
D. Basic Image Adjustment Procedure
Image adjustment should be performed using the following settings:
1. Manual (non AE) exposure
2. Density cursor setting : 5
3. Direct reproduction ratio
Making pre-Checks
Clean the corona wires.
Make the following copies
(using test sheet NA-2 or
NA-3):
Copy density 5: 2 copies
Copy density 1: 1 copy
Check the following :
1. Differences in density
between the near and
far sides of the copies.
2. Density of gray scale
No. 10. (No. 9, if NA-3)
3. Fogging in blank areas.
Adjust the image by the following
procedure when the photosensitive drum has been replaced.
Make this adjustment with the
upper front panel and front door
installed.
Adjusting Side-to-Side
Density
Is there a
difference in density
on the near and far sides
of the copies?
YES
Is there a
difference in density
in the image area of a
reduced copy?
YES
Check for stains on the
scanning lamp, reflector
plate, and mirror; clean
them if necessary.
NO
NO
Is the
distance be-
tween the primary
corona grid and the photo-
sensitive drum
correct?
(Note 1)
NO
YES
Adjusting the Density
Is the
density of gray
scale No. 10 correct?
(See Note 3.)
Is the
density of gray
scale No. 10 too dark?
(See Note 3.)
Turn the copy density knob
counterclockwise. (Note 2)
(The image will become
darker.)
NO
NO
YES
YES
Turn the copy density knob
clockwise. (Note 3)
(The image will become
lighter.)
End.
(See Note 4.)
Is the top
margin of the copy
at copy density 1 within
the standard?
NO
Adjust Service mode (C03).
(See p. 10-3.)
Return copy density
to 5.
YES
Make one copy.
Replace the grid plate and
grid mounting panel.
Mount the drum unit
and make one copy.
Replace the drum unit.
Note 1 : The distance between the grid and
Note 2 :
Figure 1-1
Make one copy.
photosensitive drum is determined by
the spacer mounted on the grid.
Check for deterioration or damage to
the spacer.
This changes the developing bias, but
not the intensity of the scanning
lamp.
Note 3 :
Note 4 :
No. 10 (No. 9, if NA-3) on the gray
scale of a copy should have the
density of No. 8 on the gray scale
of the test sheet.
Turning the copy density knob clockwise too far past the proper position
will result in fogging in blank areas.
1-5
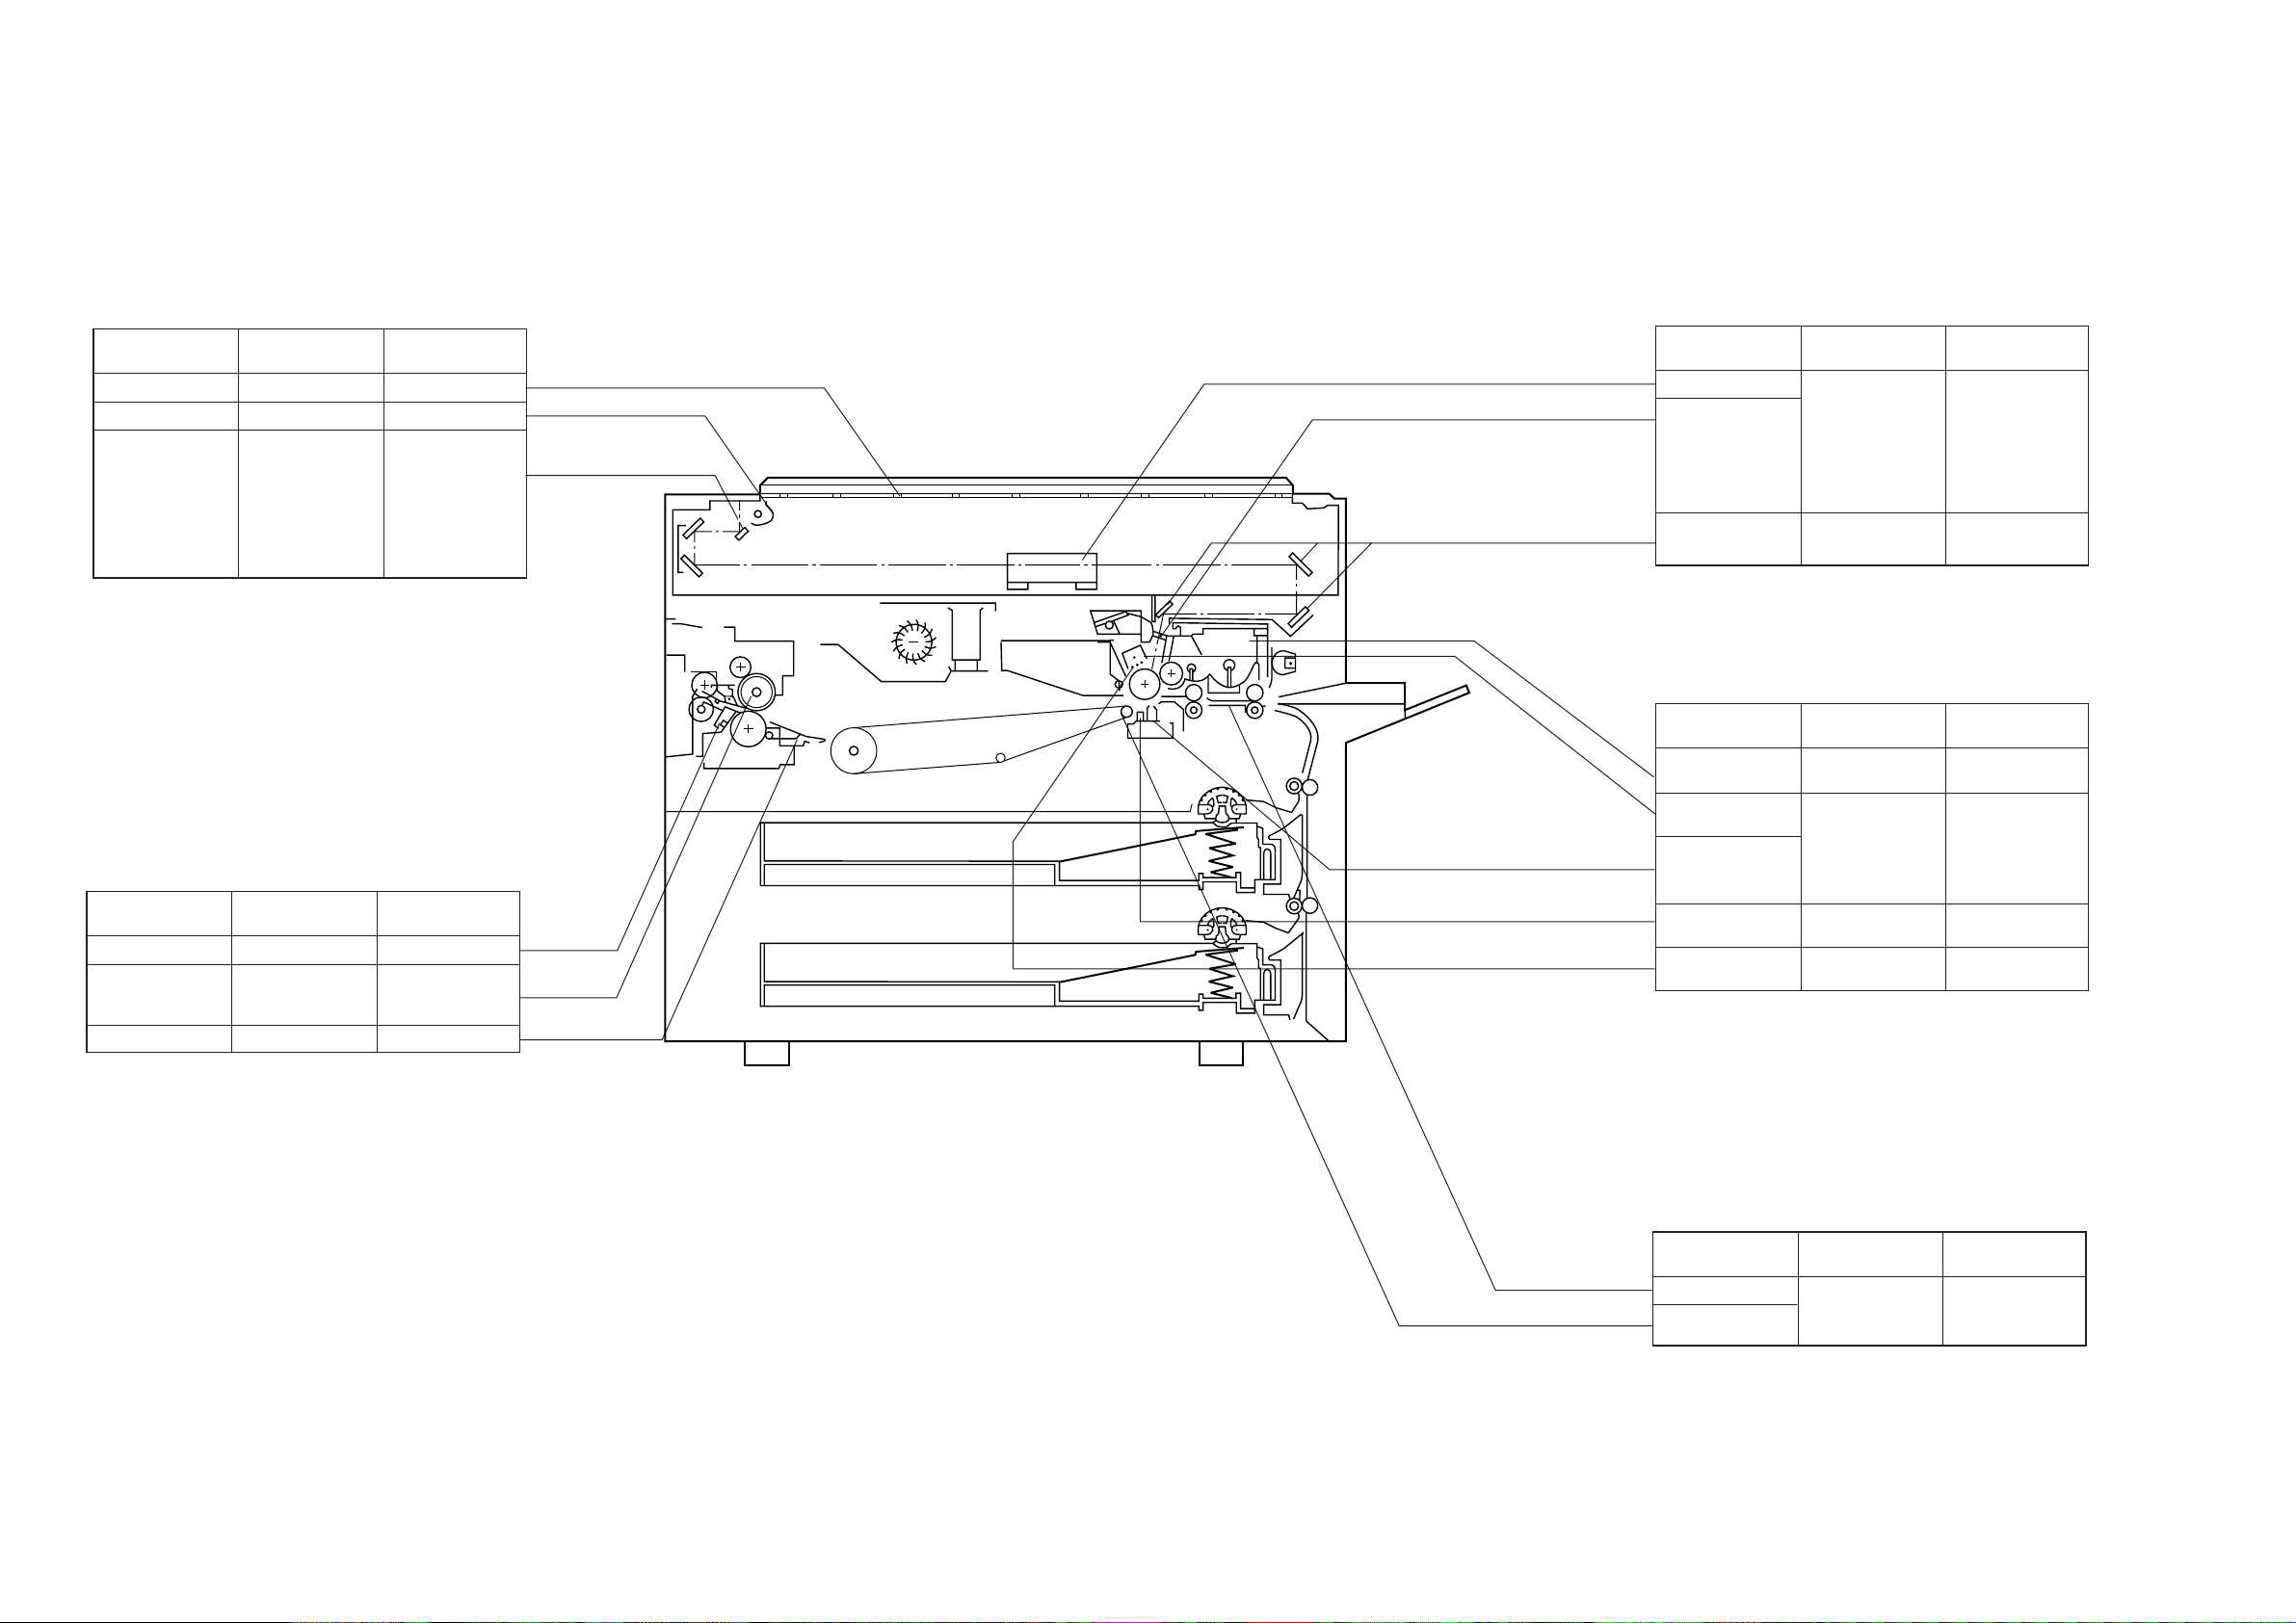
E. Periodic Maintenance Check points
Copyboard/Scanner
Location
Copyboard glass
Reflectors
Mirrors 1, 2 and
3
Tool/Cleaner
Alcohol
Blower brush
Blower brush or
alcohol and
lint-free paper
Action/Remarks
Cleaning
Cleaning
Clean with a
blower brush.
If dirt cannot be
removed with a
blower brush,
clean with
alcohol.
Fixing assembly and Paper pick-up assembly
Optical path
Location
Lens
Dust-proofing
glass
Mirror 4, 5 and 6
Blower brush or
alcohol and
lint-free paper
Mirror
cleaning tool
Corona assemblies
Location
Developing
rolls
Primary corona
assembly
Transfer corona
assembly
Alcohol
Alcohol and
lint-free paper
Tool/Cleaner
Tool/Cleaner
Action/Remarks
Clean with a
blower brush.
If dirt cannot be
removed with a
blower brush,
clean with
alcohol.
Cleaning
Action/Remarks
Cleaning
Wipe with a dry
cloth; then, clean
with lint-free
paper moistened
with alcohol.
Location
Separation claws
Upper fixing
roller, lower
fixing roller
Paper guide plate
Tool/Cleaner
MEK
Cleaning oil
(TKN-0464)
MEK Cleaning
Action/Remarks
Cleaning
Cleaning
Static charge
ellminator
Primary corona
grid
Blower brush
Blower brush
Cleaning
Separation and Transfer assemblies
Location
Transter guide
Feeder belt,
Feeder assembly
Tool/Cleaner
Damp cloth
Action/Remarks
Cleaning
1-6
Figure 1-2

CHAPTER 2 STANDARDS AND ADJUSTMENTS
CHAPTER 2 STANDARDS AND ADJUSTMENTS
A. Mechanical
1. Leading Edge Non-Reproduced Area
There is a white strip on the bottom of the copyboard glass in the position shown in the figure
below. If bias is being applied to the grid of the primary corona while the scanner is passing the
white strip, the leading edge of the copy will be reproduced blank. If the leading edge non-image
width is outside the standards, adjust the timing at which the grid bias goes from OFF to ON in the
service mode (C03).
White strip
Surface of copyboard glass
2
Approx. 10 mm
Figure 2-1
The standard leading edge nonreproduced area on a Direct copy of the test sheet is 2.0 ±1.5
mm.
2.0 ±1.5 mm
Figure 2-2
A higher setting (C03) increases the leading edge non-image width; in units of 0.25 mm.
2-1

CHAPTER 2 STANDARDS AND ADJUSTMENTS
2. Leading Edge Registration
Make adjustments in the service mode (C02) so that the distance shown is 10.0 ±1.5 mm when
the test sheet is copied in Direct.
Note:
Adjust the leading edge non-reproduced area before making this adjustment.
10.0 ±1.5 mm
Figure 2-3
A higher setting in the service mode (C02) increases the leading edge margin.
3. Side-to-Side Registration
The standard near side registration on a Direct copy of the test sheet is 10.0 ±2 mm.
0
2
4
6
8
10 ±2 mm
10
Figure 2-4
Loosen the two screws, and adjust the latch assembly for the cassette found on the back of the
bottom plate by sliding it.
Screws
Feeder release
lever
2-2
Cover
Figure 2-5
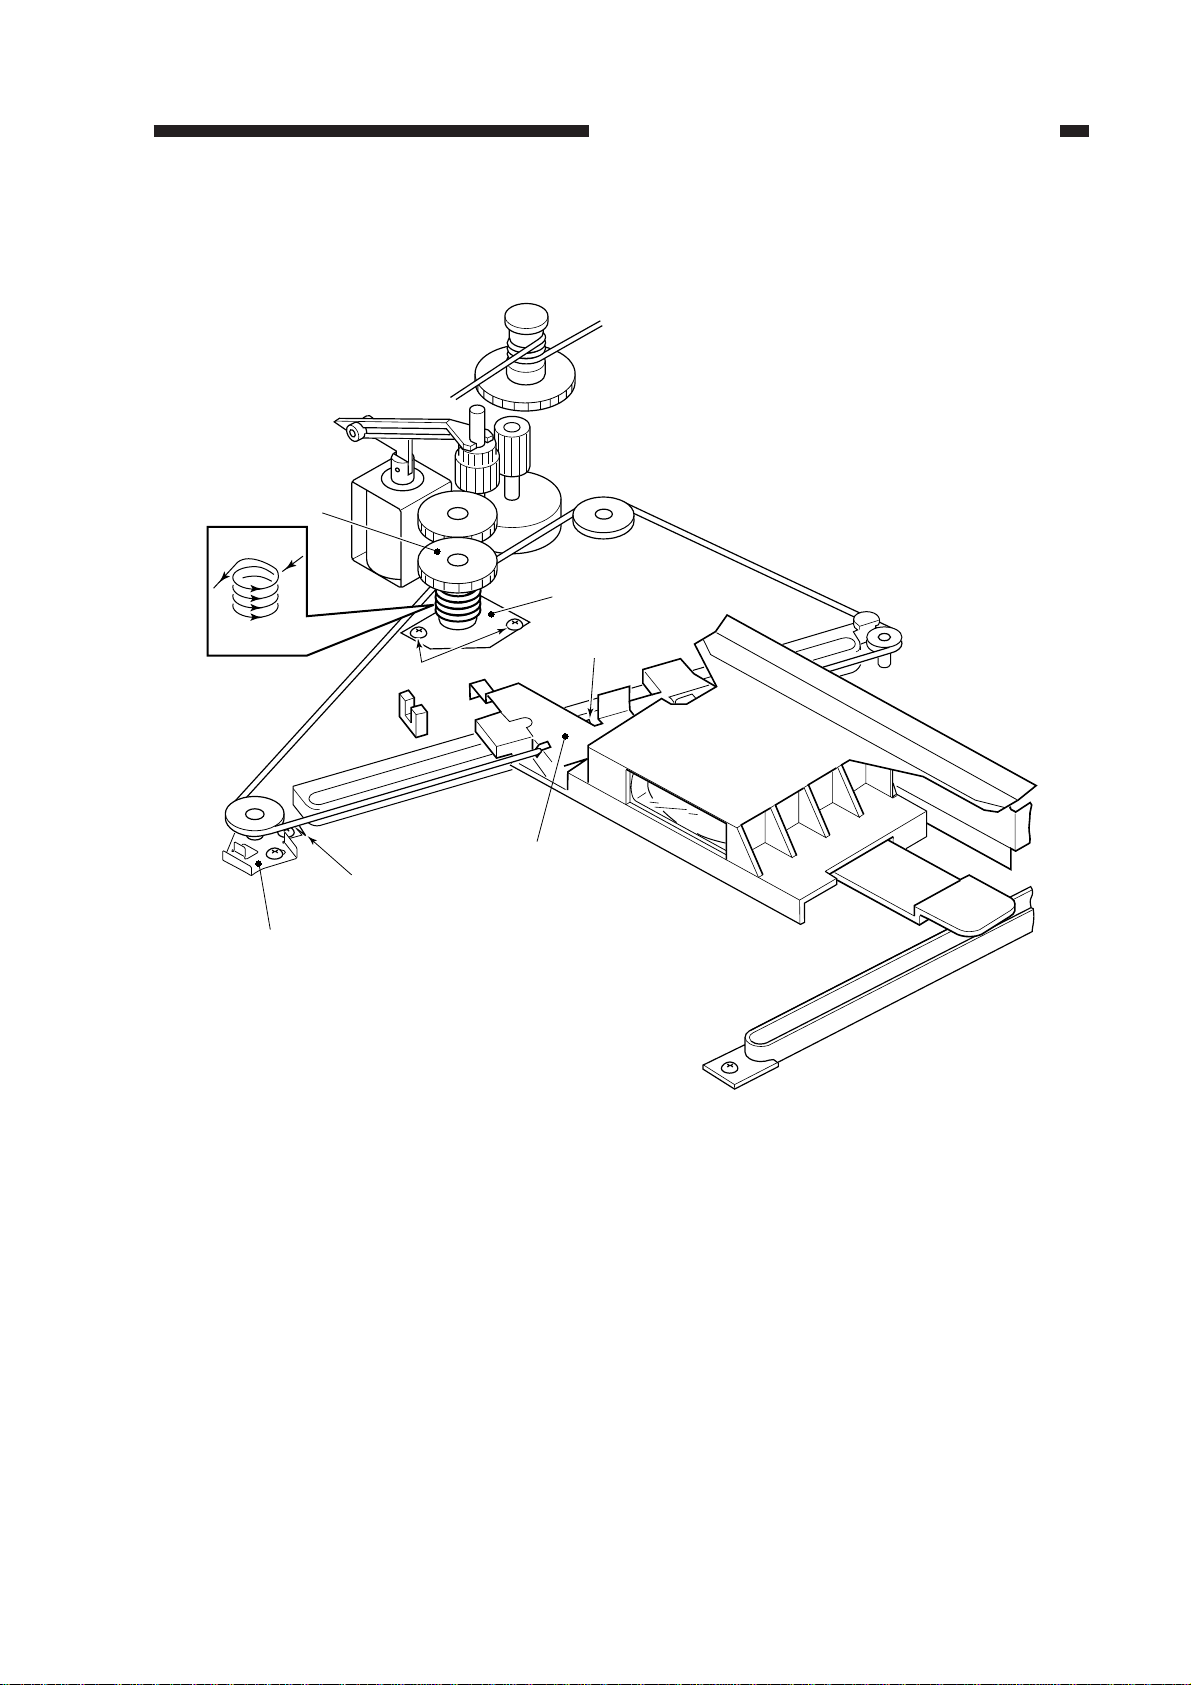
CHAPTER 2 STANDARDS AND ADJUSTMENTS
4. Installing the Lens Drive Cable
This unit has been accurately adjusted at the factory with special gauges. Do not remove parts
other than those shown below, nor loosen any other screws.
[2]
Lens pulley
[3]
Lens pulley fixing plate
4 turns
[4]
Pulley mount
Mark with scriber.
Mounting screws
[5]
Cable mount
Mark with scriber
[1]
Figure 2-6
a. Removing the Lens Wire
1) Unscrew the three screws; then remove the upper frame.
2) Mark the positions of the pulley fixing base and the wire fixing with a scriber.
3) Unscrew the two screws used to hold the pulley fixing base.
4) Remove the wire.
b. Attaching the Lens Wire
1) Unscrew the two screws used to hold the lens pulley fixing plate, and remove the lens pulley.
(See Figure 2-6.)
2) Wind the lens wire around the lens pulley as shown in Figure 2-6, and fix it with the two fixing
screws.
3) Shift the pulley fixing base to the position of the scriber mark; then fix it with the two fixing
screws.
2-3
CHAPTER 2 STANDARDS AND ADJUSTMENTS
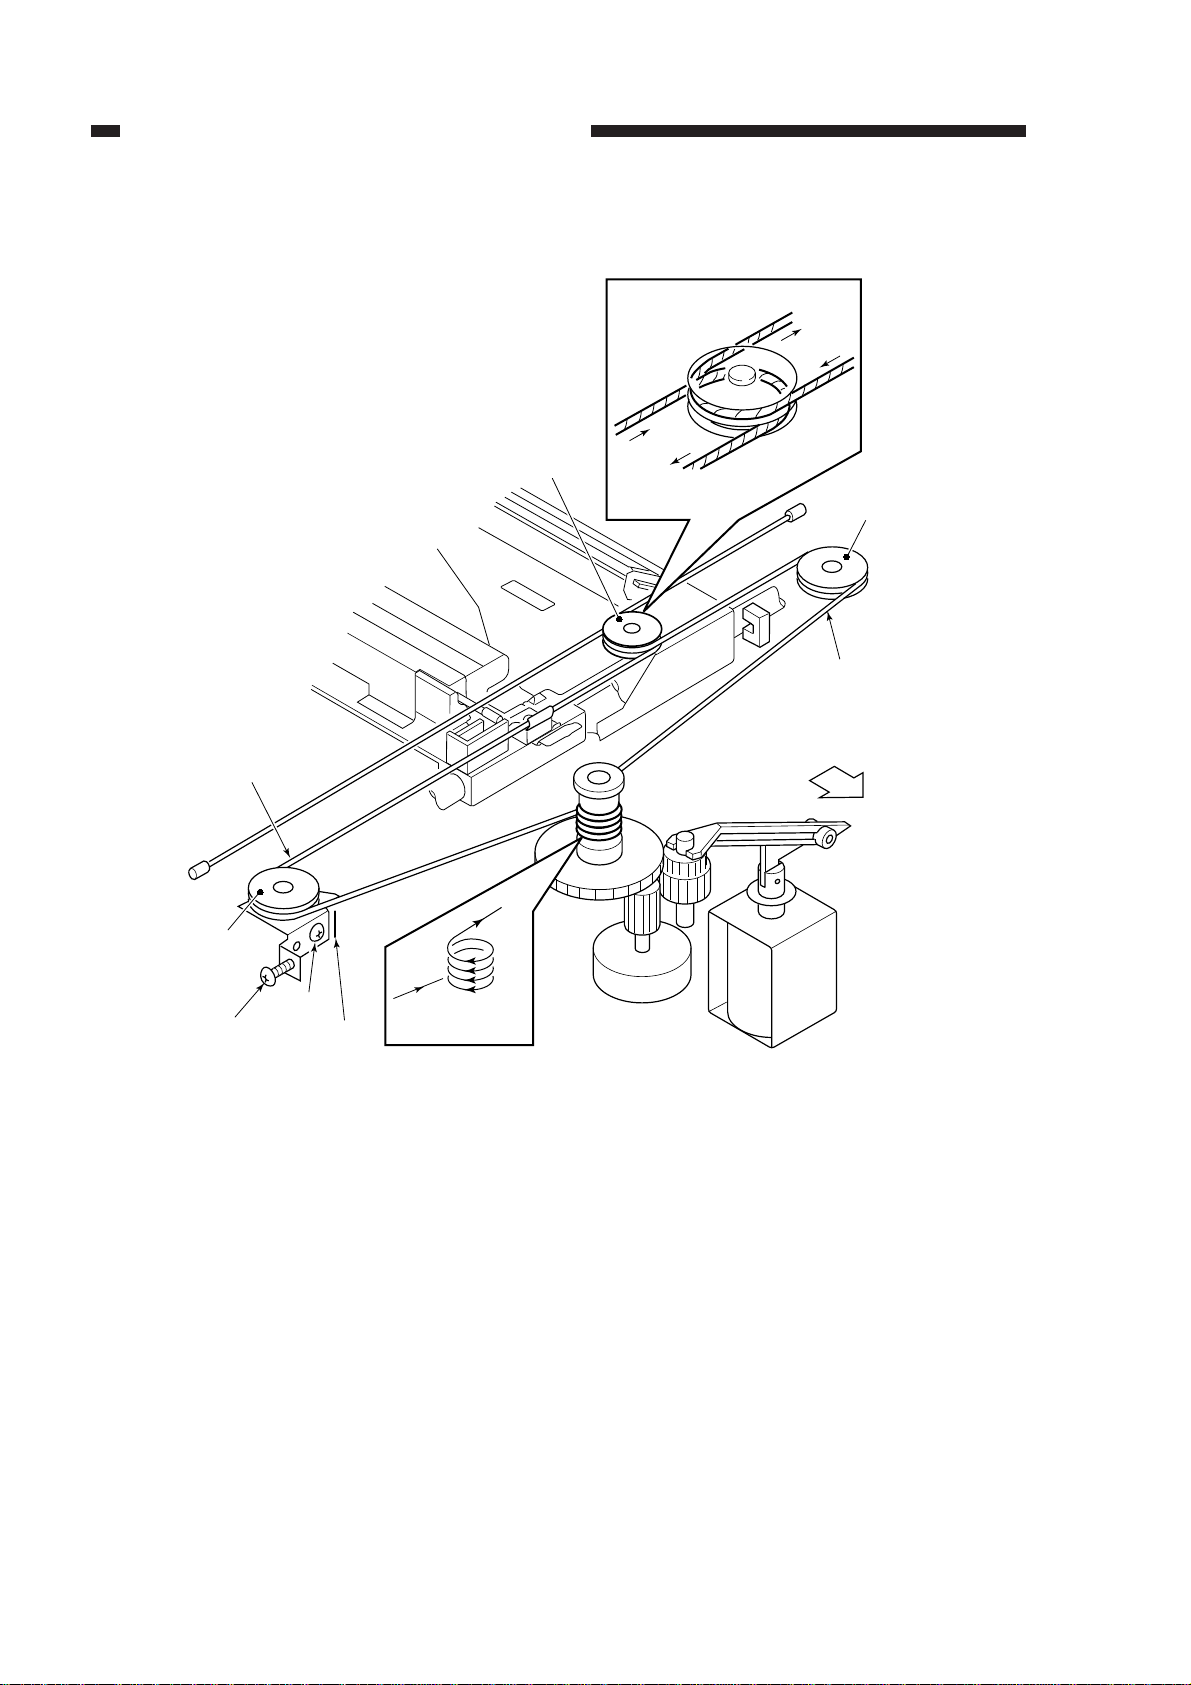
5. Installing the Scanner Drive Cable
Top groove of the pulley
[6]
Under groove of the pulley
[1]
Pulley 2
Screw B
Screw A
[3]
Mark the
position
4 turns
pulley 1
[2]
Under groove of
the pulley
Scanner pulley
[4]
pulley 3
[5]
Top groove of the pulley
(rear)
2-4
Figure 2-7
CHAPTER 2 STANDARDS AND ADJUSTMENTS
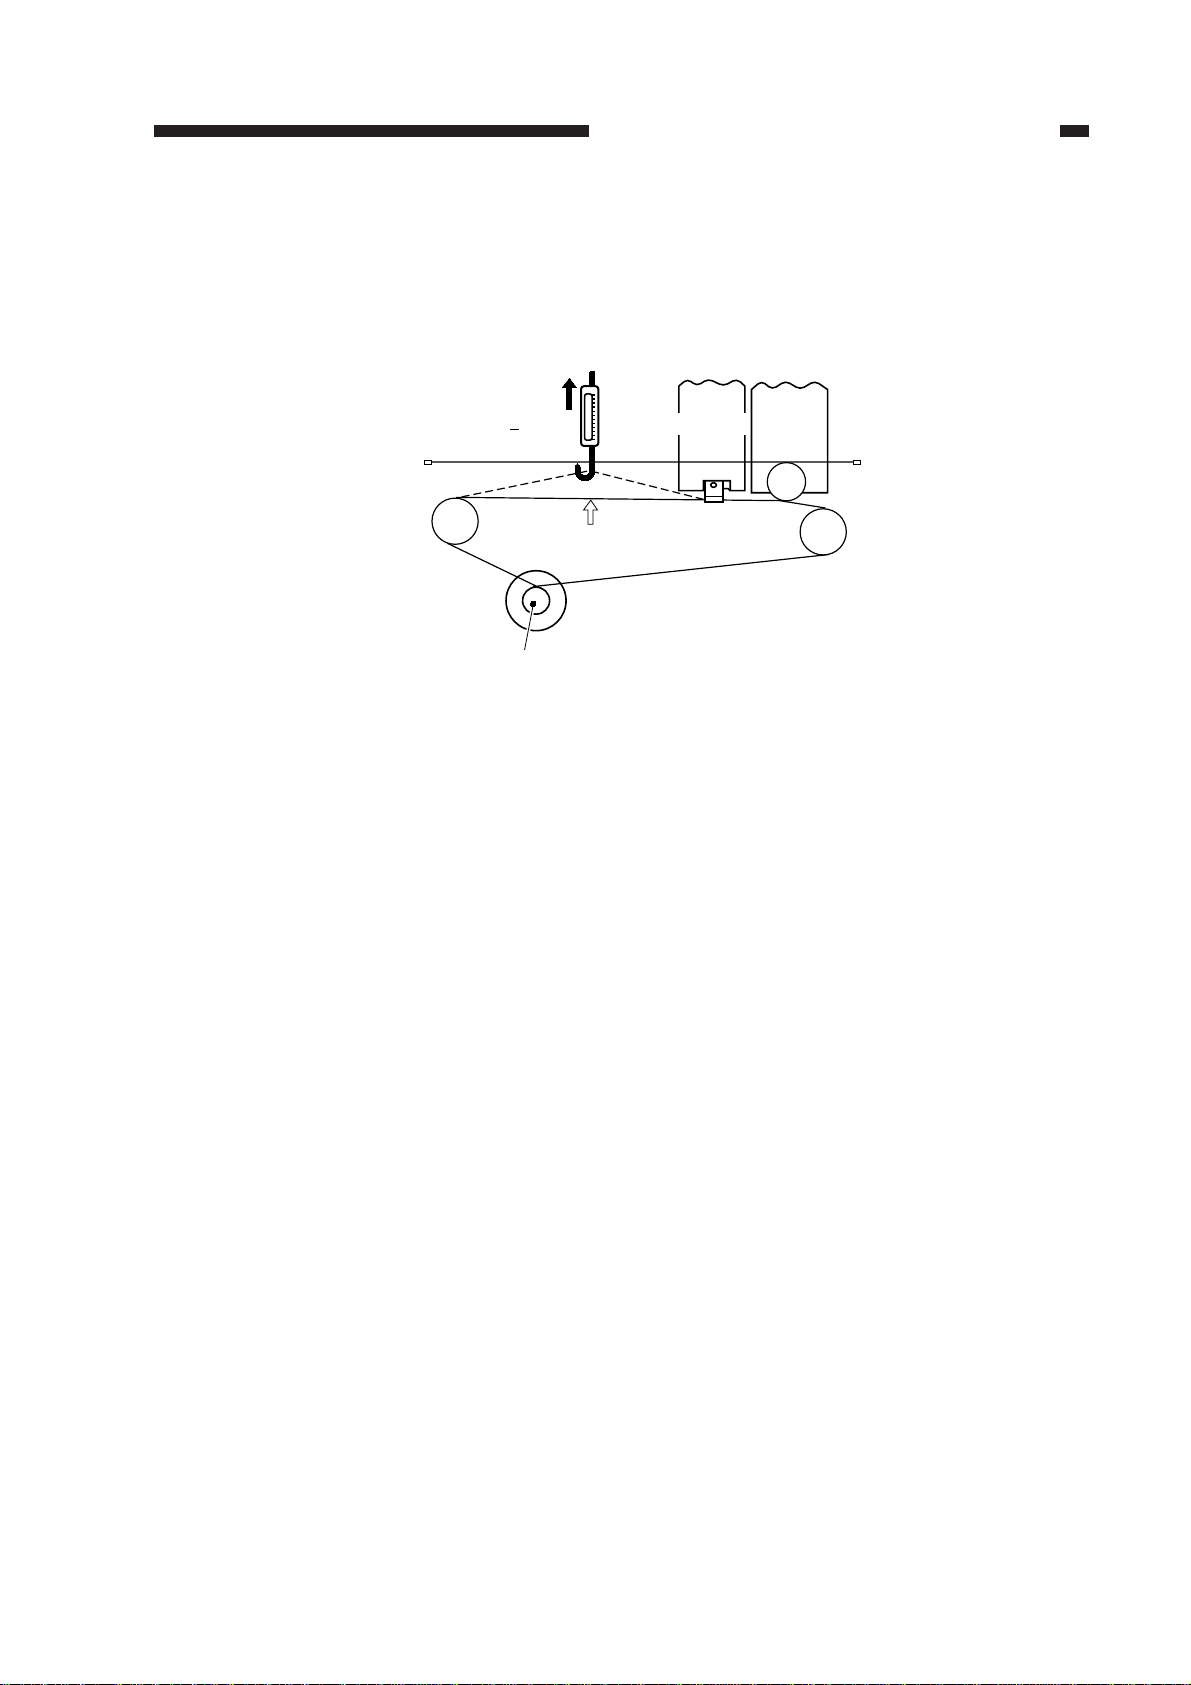
6. Adjusting the Tension of the Scanner Drive Cable
Move the mirror 1 mount to the home position (start position). As shown in Figure 2-8, pull at
point [A] (approximate center) of the free cable with a spring gauge so that the wires touch each
other. If the reading on the spring balance is not about 1.0±0.5 kg, turn screw A of Figure 2-7 to
achieve this reading.
1.0+0.5 kg
Pulley 2
Scanner drive capstan
Figure 2-8 Top View
[A]
Scanner
Mirror
2 and 3
mount
Pulley1
Pulley3
2-5
CHAPTER 2 STANDARDS AND ADJUSTMENTS
7. Adjusting the Position of the Mirrors (length of optical path between mirrors 1
and 2)
Adjust the tension of the scanner drive cable before making this adjustment. Adjust the position of the scanner (mirror 1) by altering the tension of the scanner drive cable. (Loosen the cap
screws.)
Reference:
1. The cable will stretch after a large number of copies have been made, making readjustment
necessary.
2. An incorrect distance between mirror 1 and mirror 2 will cause an incorrect side-to-side repro-
duction ratio and poor focus, resulting in poor sharpness and fuzziness in the copy image.
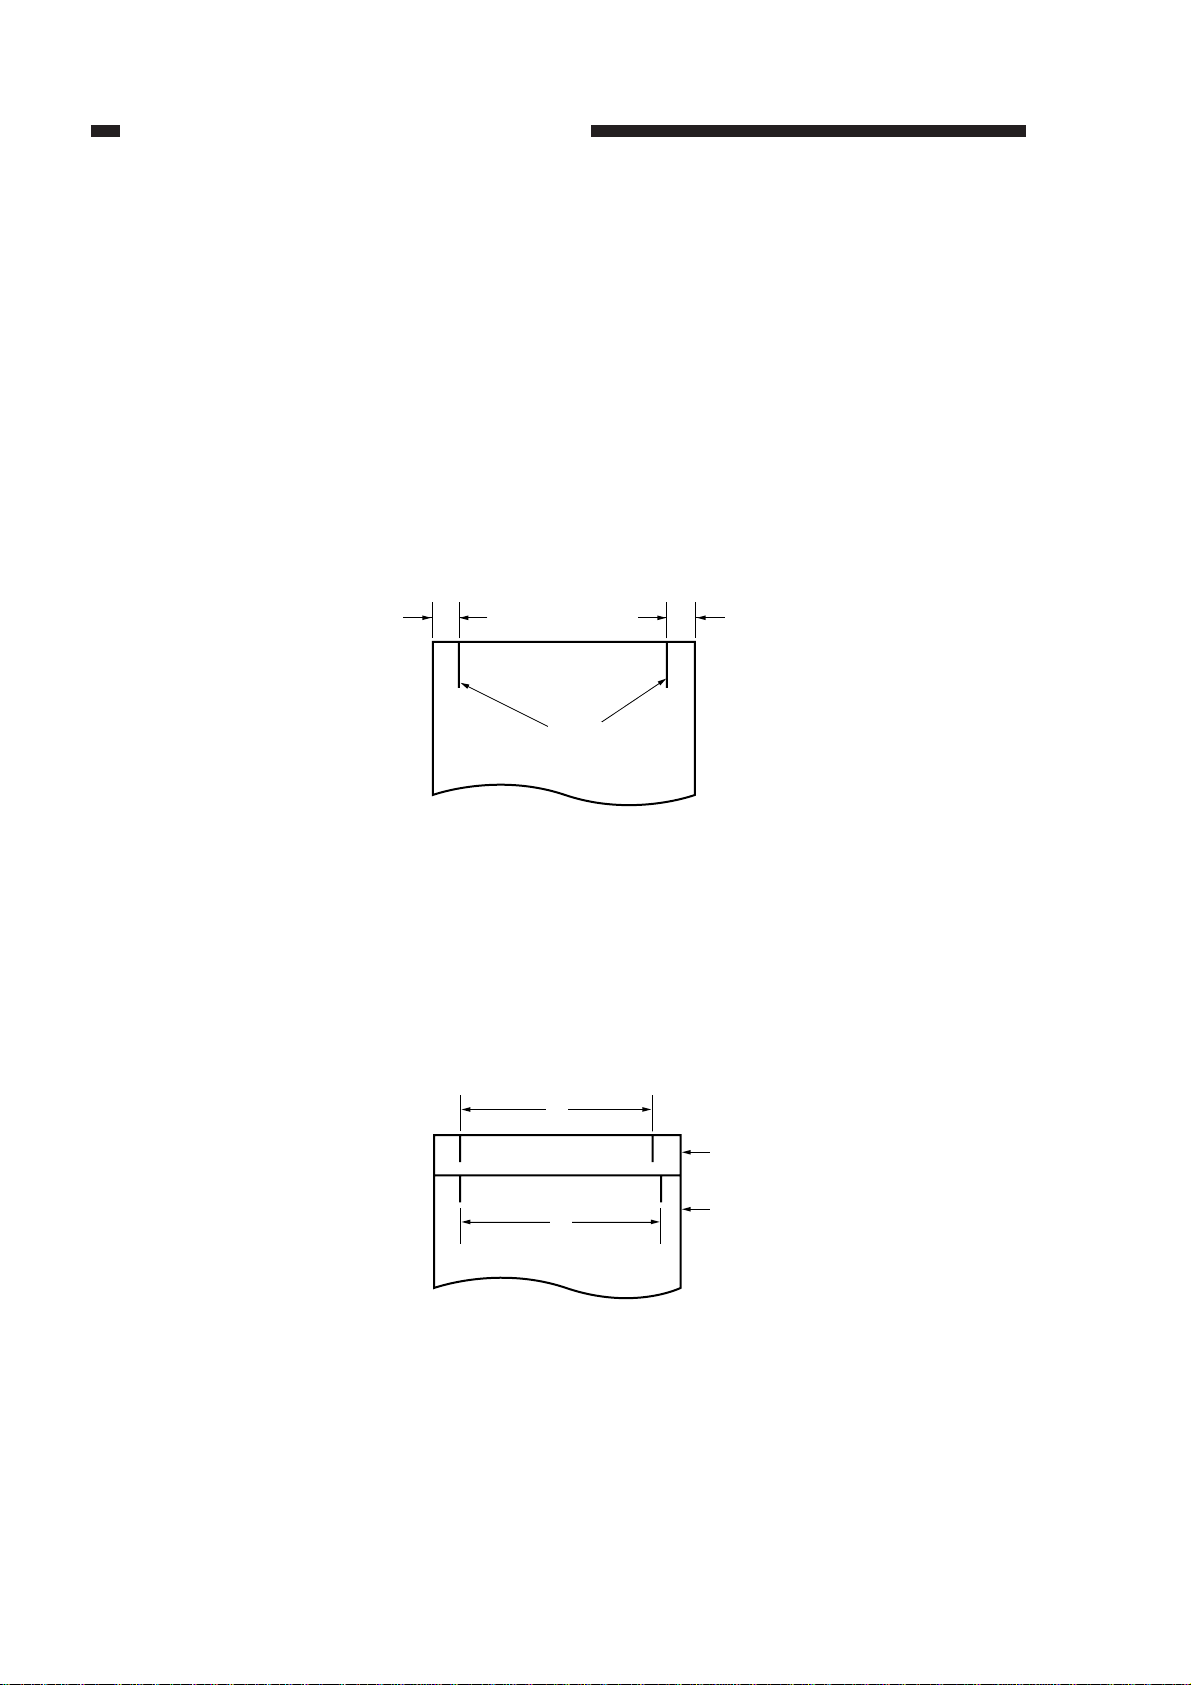
1) Mark a line 10 mm from each edge of a piece of copy paper (B4), as shown in Figure 2-9.
10 mm 10 mm
Lines
Figure 2-9
2) Make a copy of the paper with the lines marked on it. (A)
3) Place a blank sheet of paper on the copyboard and feed the marked sheet of paper into the
copier. (Use manual feed.) (B)
• Passing the sheet through the copier indicates the amount of shrinkage caused by heat.
4) Align the lines on the left side of the copy sheet (A) and the sheet passed through the copier (B).
If the lines on the right are not in line, adjust the position of the scanner so that dimensions x
and y are equal.
x
Sheet A
y
Sheet B
Figure 2-10
x=y Correct
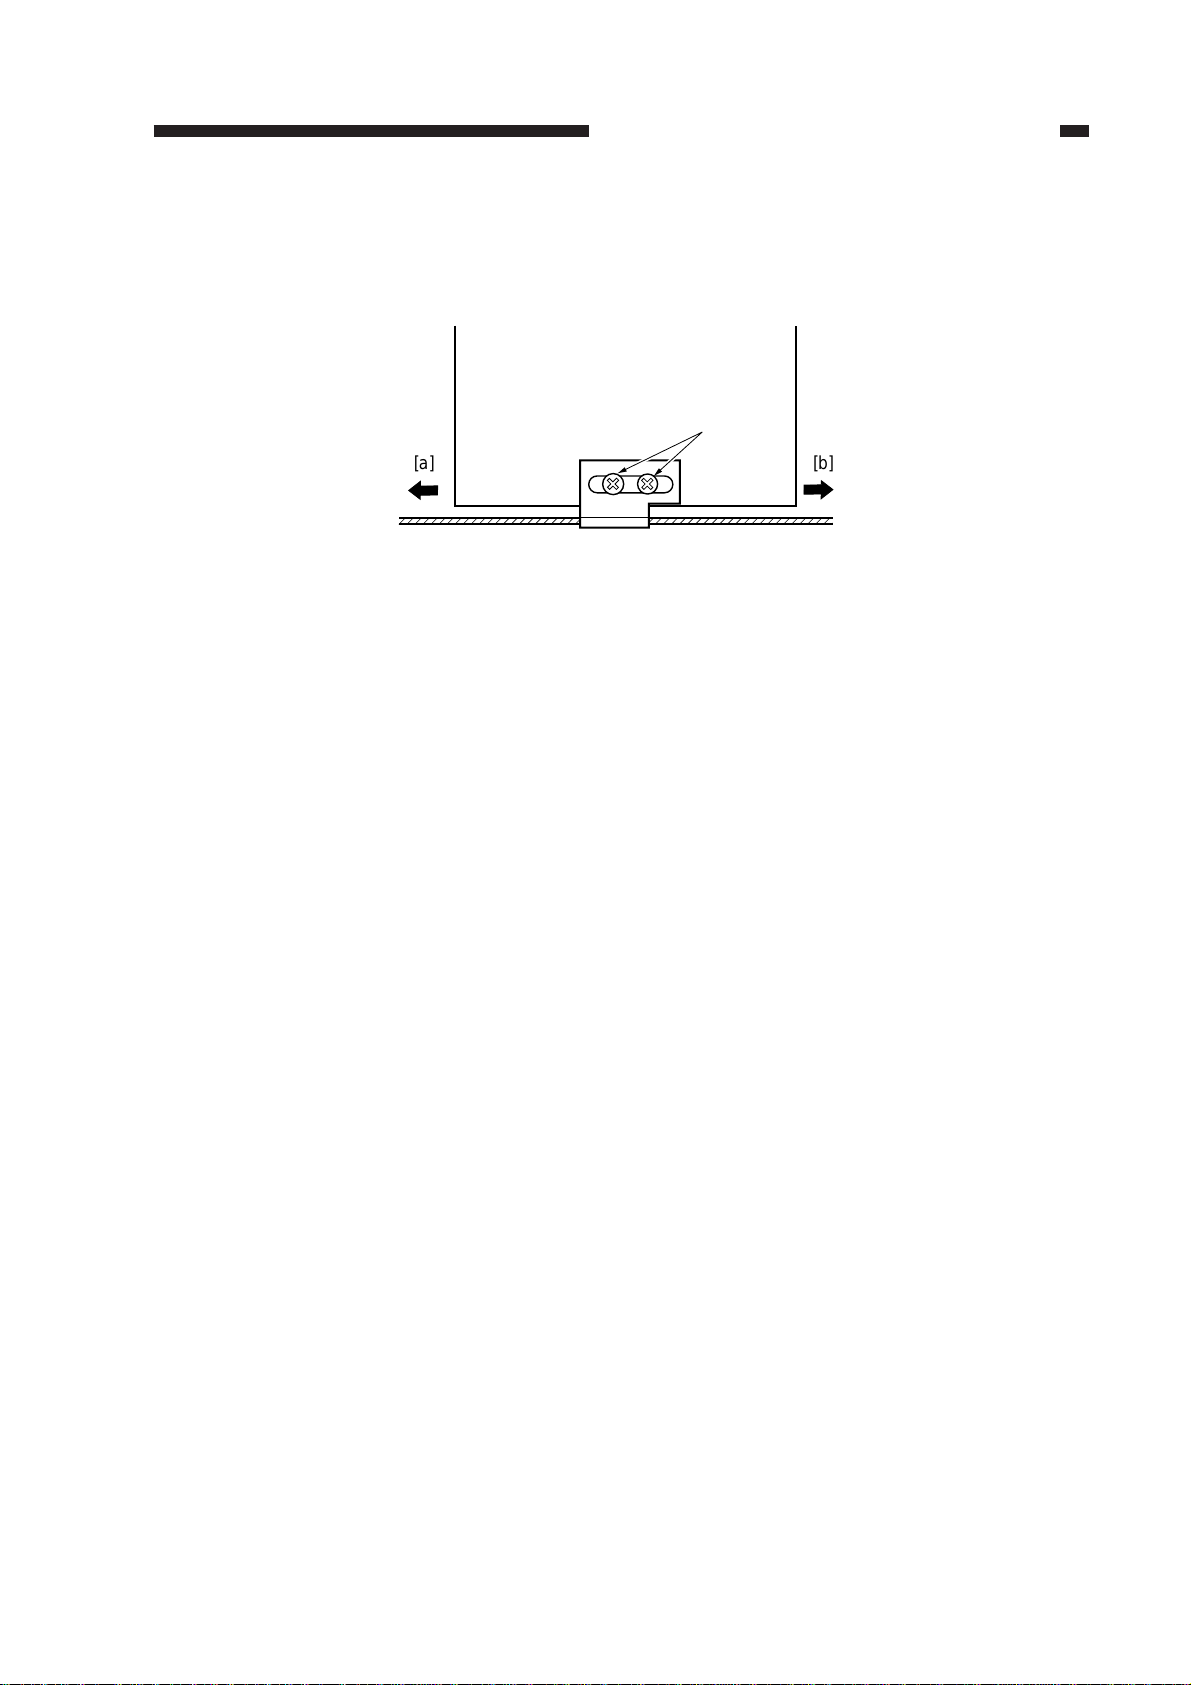
x>y Move the scanner in direction [a] (Figure 2-11).
x<y Move the scanner in direction [b] (Figure 2-11).
2-6
CHAPTER 2 STANDARDS AND ADJUSTMENTS
Reference:
If the distance between the mirrors is short, the image will be enlarged. If the distance is long,
the image will be reduced.
No.1 mirror mount
[a] [b]
Mirror drive cable
(front)
(rear)
Fixing screws
Figure 2-11 Top View
2-7
CHAPTER 2 STANDARDS AND ADJUSTMENTS
8. Mounting the Main Motor
The drive of the main motor is used to drive the drum and execute pick-up operations by way of
timing belts.
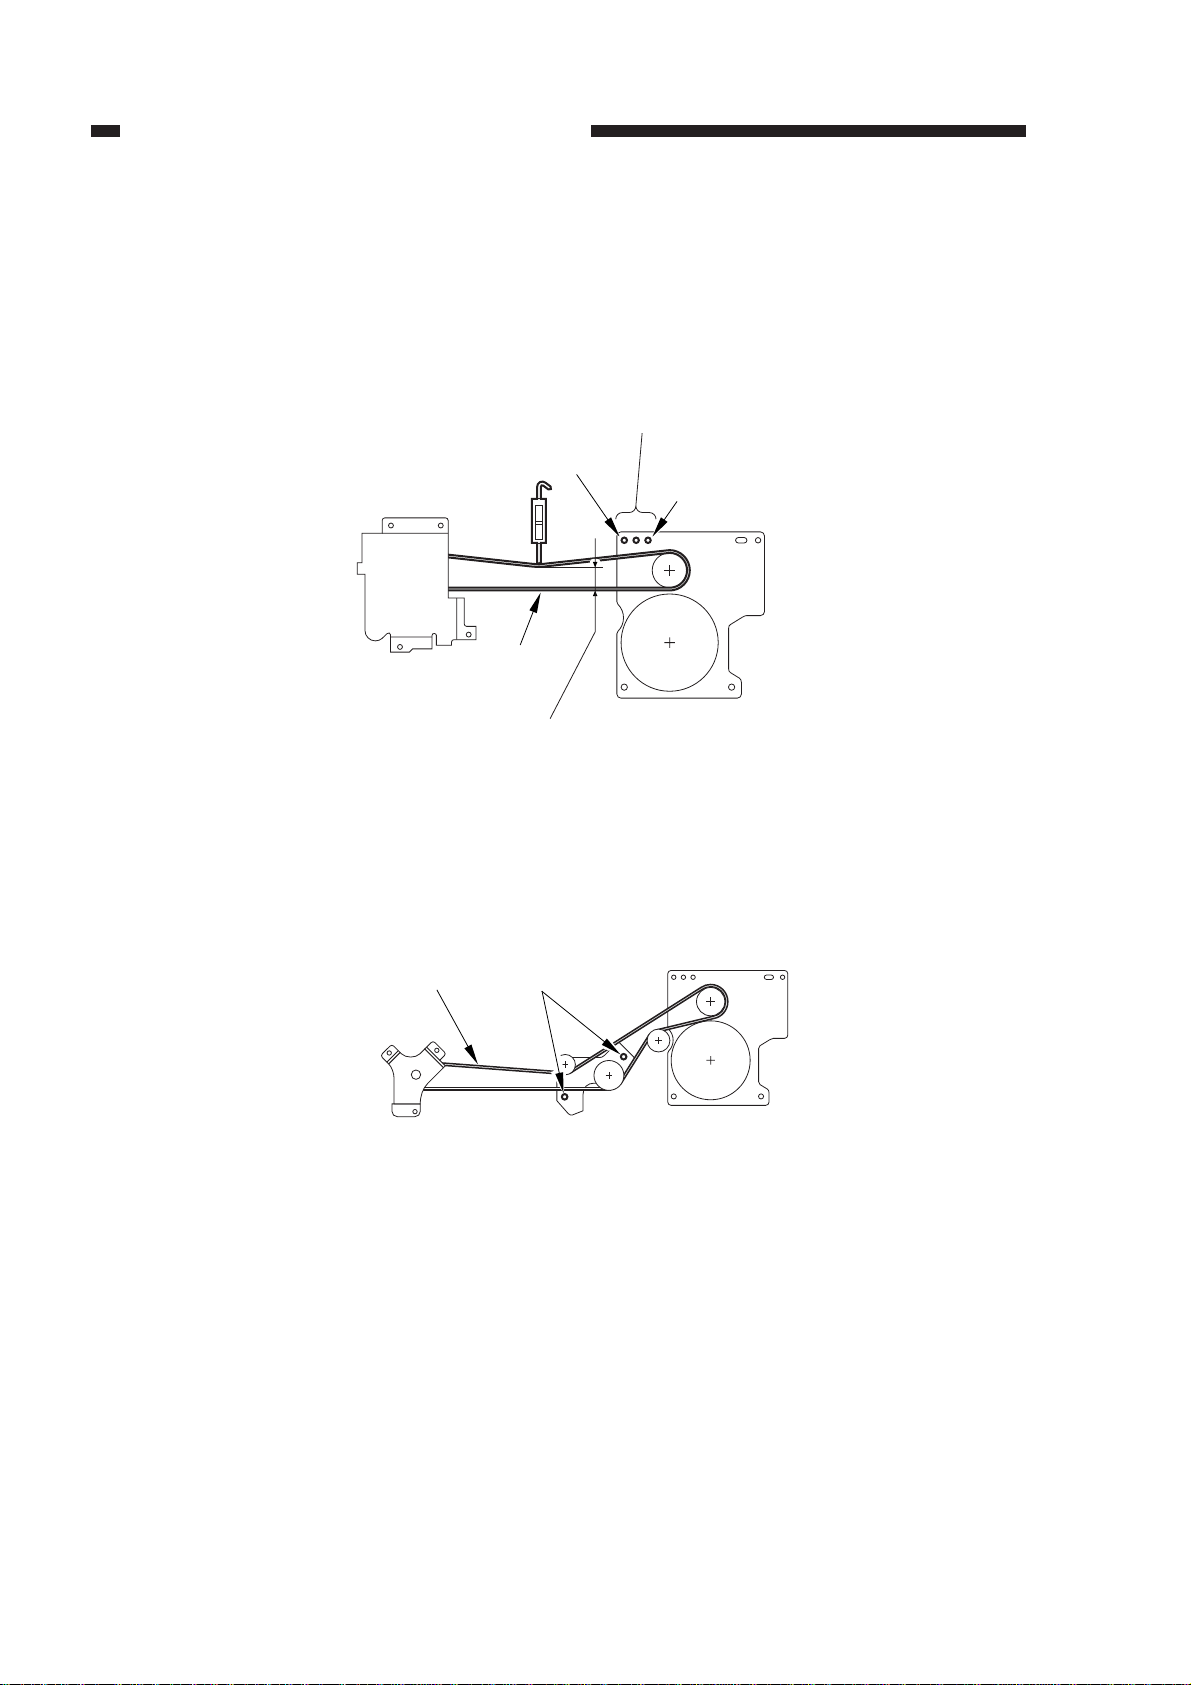
Adjust the tension of the belt by selecting the mounting hole of the main motor so that when the
center of the timing belt is pushed down with a force of 500 g, the distance between the two runs of
the belt is between 20 and 25 mm.
Main motor
mounting holes
Tension
increases
500 g
Tension
decreases
Drum
drive unit
Belt 1
Dimension
20 to 25 mm
Main motor
Figure 2-12
To adjust the timing belt used to execute pick-up operations, on the other hand, push the pulley
support plate with a force of 2.4 kg, and fix it in place when it stops; see Figure 2-13.
Belt 2
Pick-up
drive unit
Adjusting
screws
Pulley
support plate
2.4 kg
Main motor
2-8
Figure 2-13

CHAPTER 2 STANDARDS AND ADJUSTMENTS
9. Installation Position of the Transfer Guide
When installing the transfer guide, ensure that the clearance between the transfer assembly
roller and the photosensitive drum is about 1.8 ± 0.2 mm, as shown in Figure 2-14.
Photosensitive drum
Lower transfer guide
1.8 ± 0.2 mm
Transfer assembly roller
Figure 2-14
10. Installation Position of the Scanner Drive Assembly
Loosen the four screws of the scanner drive assembly; then while pushing the scanner drive
assembly against the rear plate (direction of arrow [1]) move it in the direction of the manual feed
tray (direction of arrow [2]) so that it touches the pulley base and the lens gear. In this condition,
tighten the screws; then, confirm that there is play between the lens gear and the gear of the lens
drive capstan.
Pulley base
[1]
Pulley gear
[2]
Lens base
Lens gear
Shaft
Scanner drive
assembly
Figure 2-15
2-9
CHAPTER 2 STANDARDS AND ADJUSTMENTS
11. Installing the Corona Wires in the Primary and Transfer Corona Assemblies
Primary corona assembly
(about 2 mm)
Transfer corona assembly
(about 5 mm)
Figure 2-16
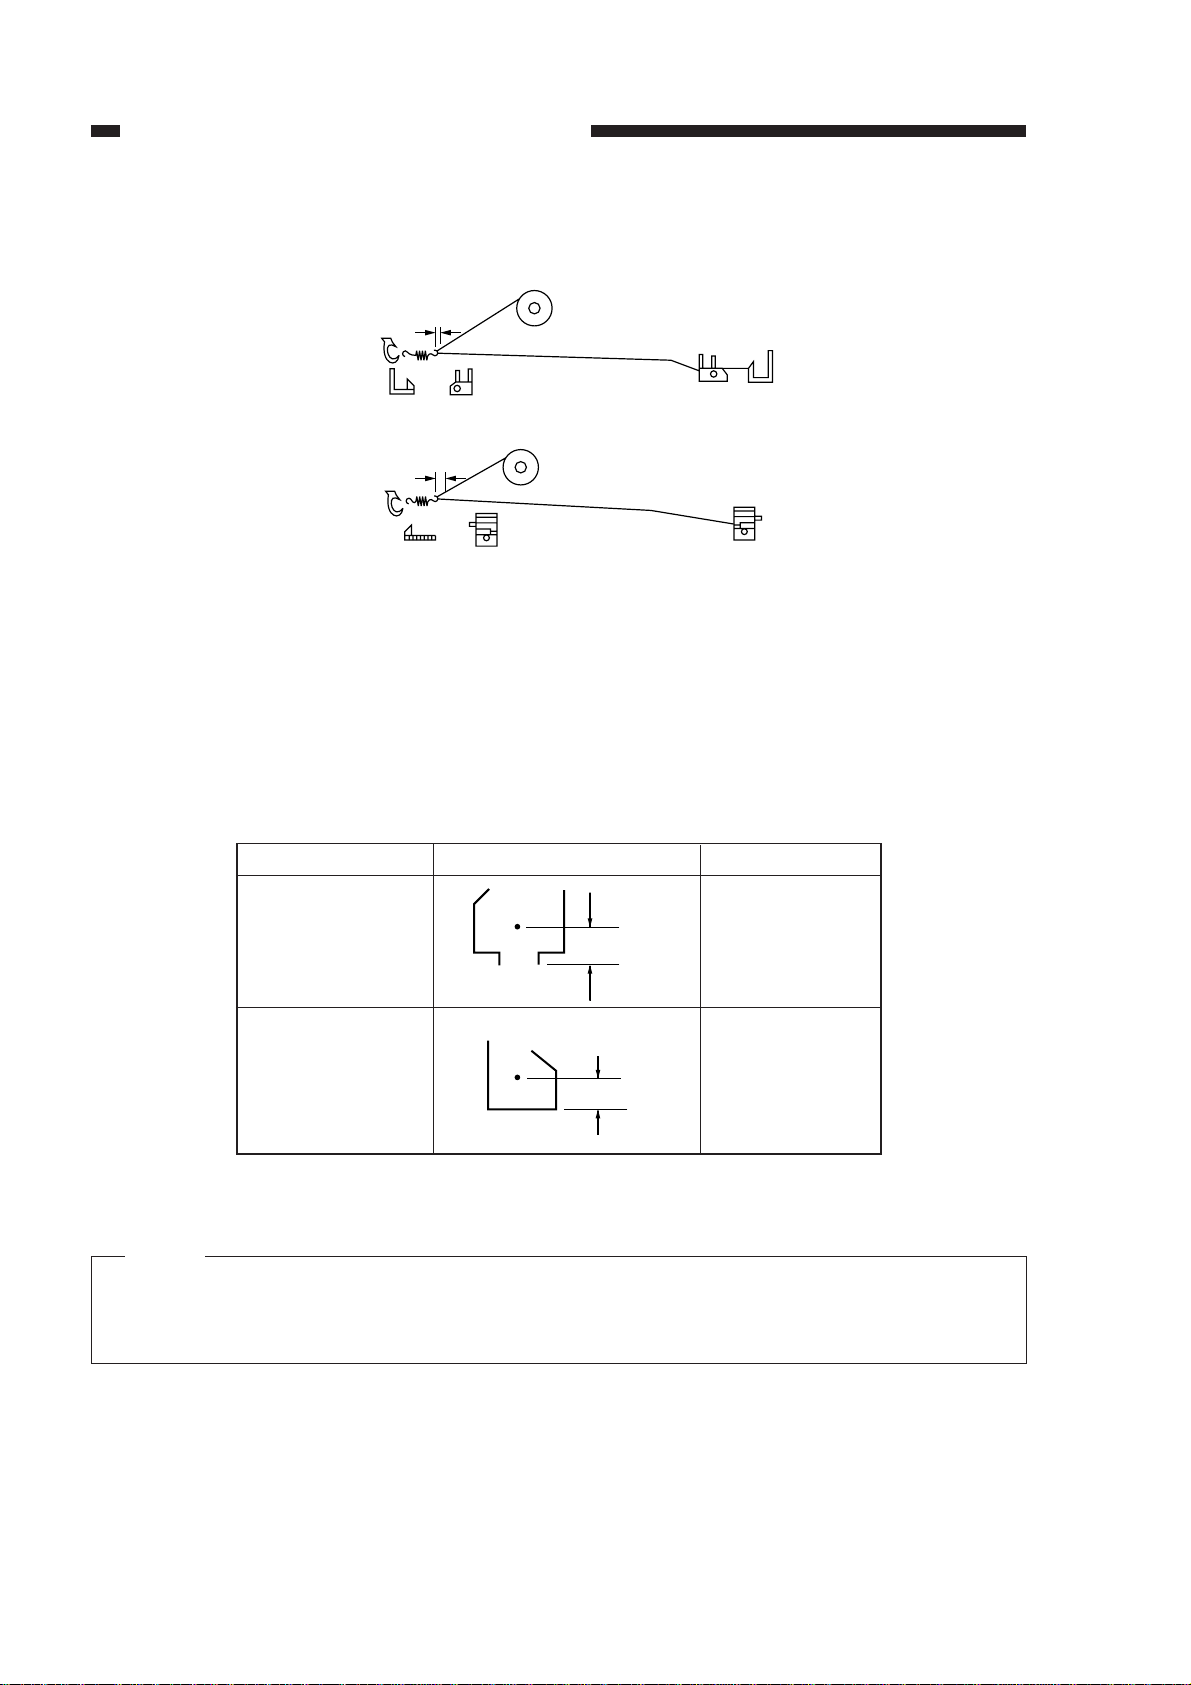
• The corona wire must not be bent or twisted, and the gold plating must not be peeling off.
• The corona wire must not be slack. (The length of the corona wire tension spring should be
about 12 mm.)
• The corona wire must be in the V groove of the height adjusting piece.
12. Adjusting the Height of the Corona Wires
Corona assembly
Primary corona
assembly
Transfer corona
assembly
Standard position
Approx. 10.5 mm
Approx. 10 mm
Allowable range
±2 mm
±2 mm
Figure 2-17
Note:
The height (position) of the corona wire of the primary and transfer corona assemblies can be
adjusted by turning the screw at the back of the corona wire. Turning the screw once causes
the height of the corona wire to change by about 0.7 mm.
2-10
CHAPTER 2 STANDARDS AND ADJUSTMENTS
13. Installation Position of Side Seals
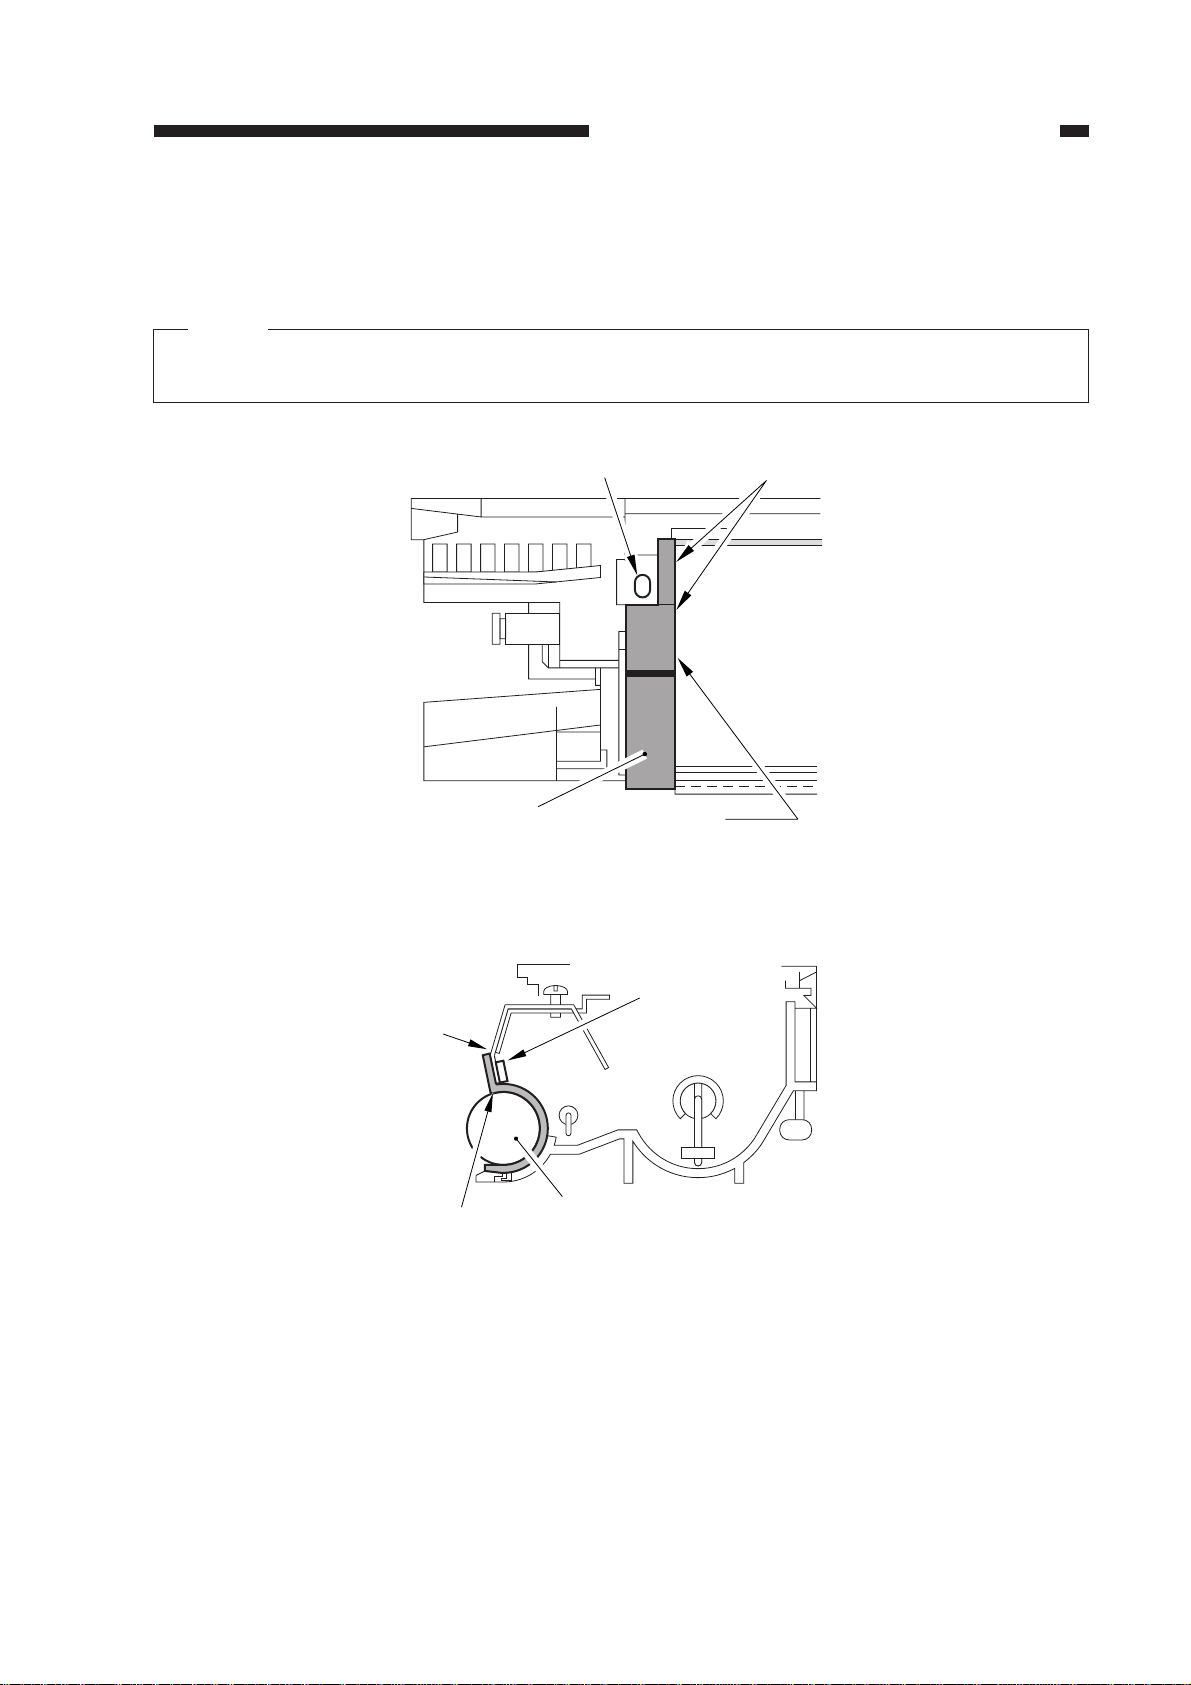
1) Clean the surface on which the side magnetic seal will be hooked using alcohol.
2) Fix the side magnetic seal at the position shown in Figure 2-19.
Note:
Put the hook of the magnetic side seal on its side on the plastic marking so that the magnetic
side seals is firmly in the correct position.
Blade
Magnetic
side seal
Screw hole
Figure 2-18
Sponge
Sponge
Butted.
Magnetic
side seal
Magnetic cylinder
Figure 2-19
2-11
CHAPTER 2 STANDARDS AND ADJUSTMENTS
14. Adjusting the Fixing Assembly Roller Pressure (adjusting the nip width)
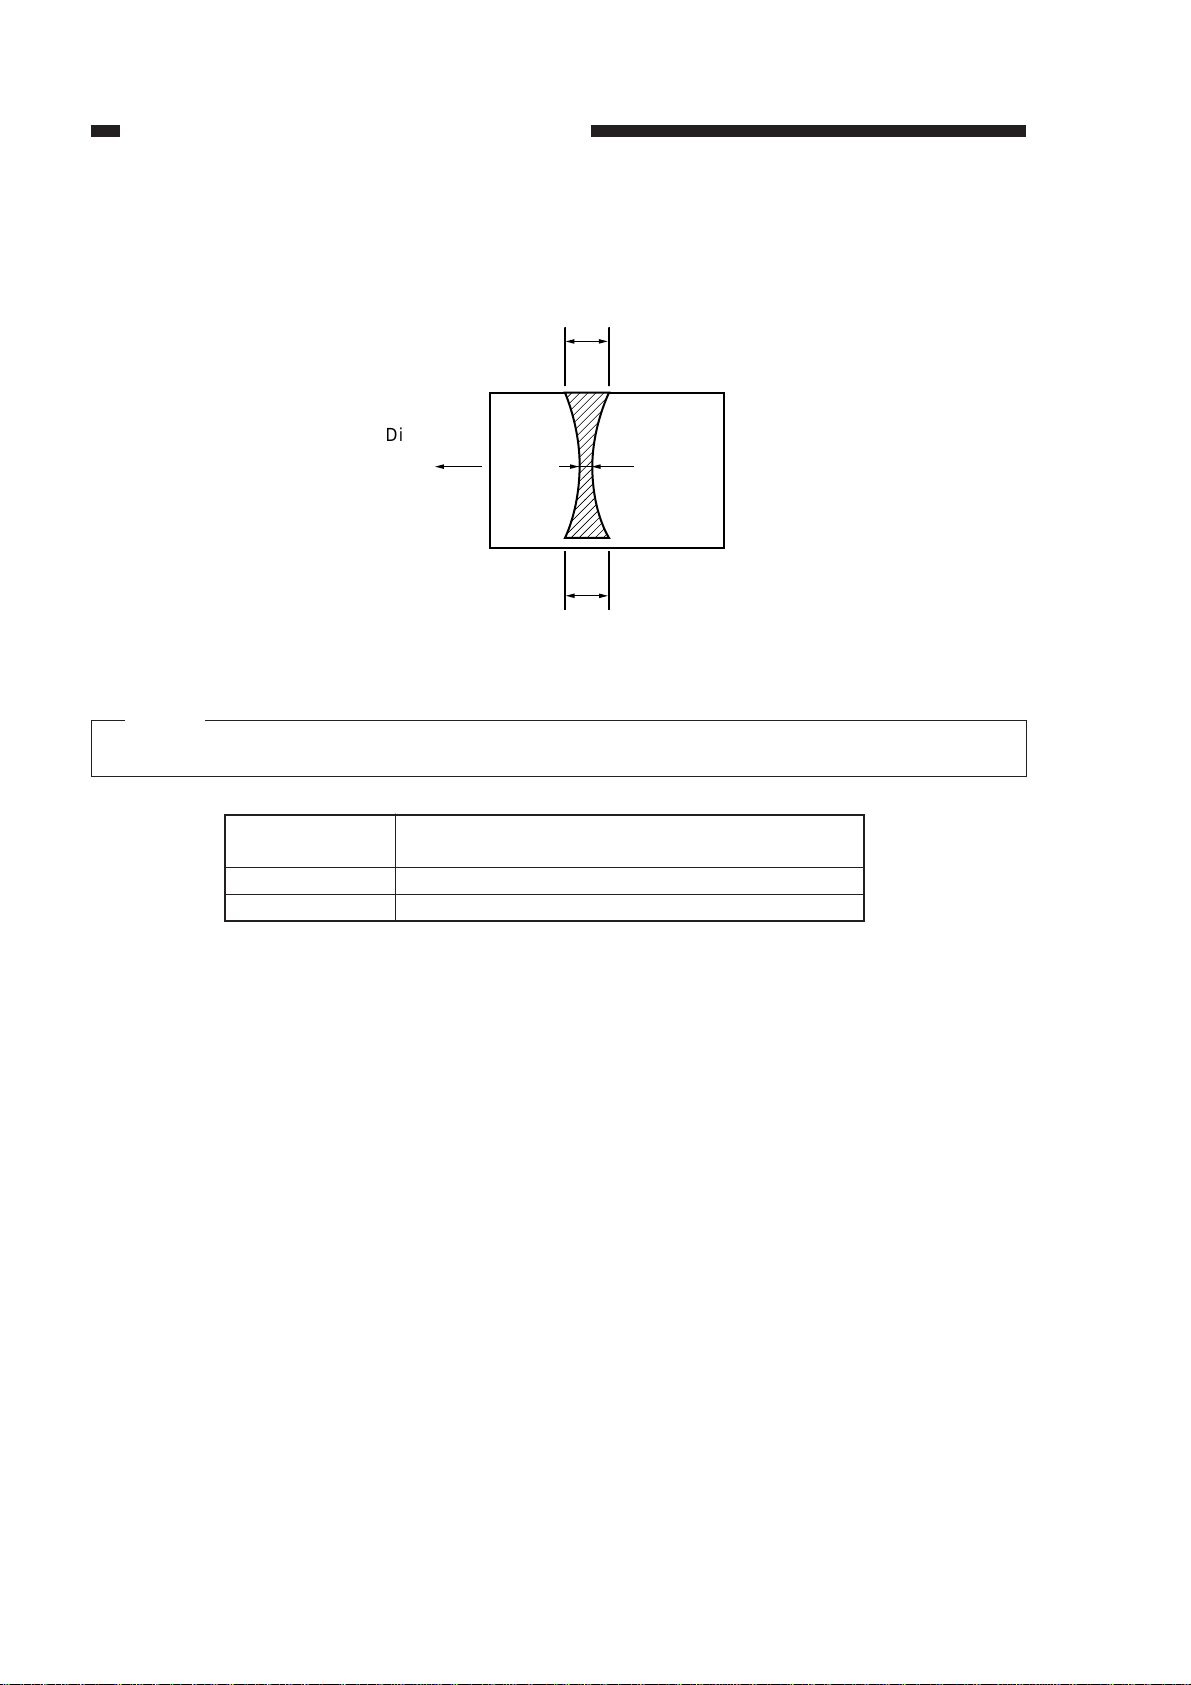
The nip width should conform to the dimension shown in Table 2-1. Adjust the nip width with
the bolt when it is out of standard.
c
Direction of
feed
A3 size
baCenter of
copy paper
Figure 2-20
Note:
a and c are the dimensions of the 10 mm position at both edges of the copy paper.
Dimension
b
|a-c|
Measure after the upper and lower rollers have
been adequately heated.
4.0 ±0.5 mm
0.5 mm or less
Table 2-1
• Measuring the Nip Width
If the rollers are cool, leave the copier ON, keep the Wait indicator ON for 15 minutes; make 20
copies, and then measure the nip width.
Measuring Procedure
1) Open the copyboard cover and make an A3 size solid black copy.
2) Set the solid black copy to the multifeeder.
3) Select the service mode C13.
3-1) Detach the VR cover from the rear of the left cover.
3-2) Press the service switch (SW300) on the DC controller PCB.
3-3) Select the service mode C13 using the 10-key or the zoom key.
4) Press the Sort/Group key.
• The solid black paper is automatically picked up from the multifeeder.
• Then the solid black paper is stopped at the fixing roller and, after a specific period, is delivered.
5) Measure the width of the toner portion which has a glossy surface, as shown in Figure 2-20.
6) Press the service switch (SW300) to exit from the service mode.
2-12
CHAPTER 2 STANDARDS AND ADJUSTMENTS
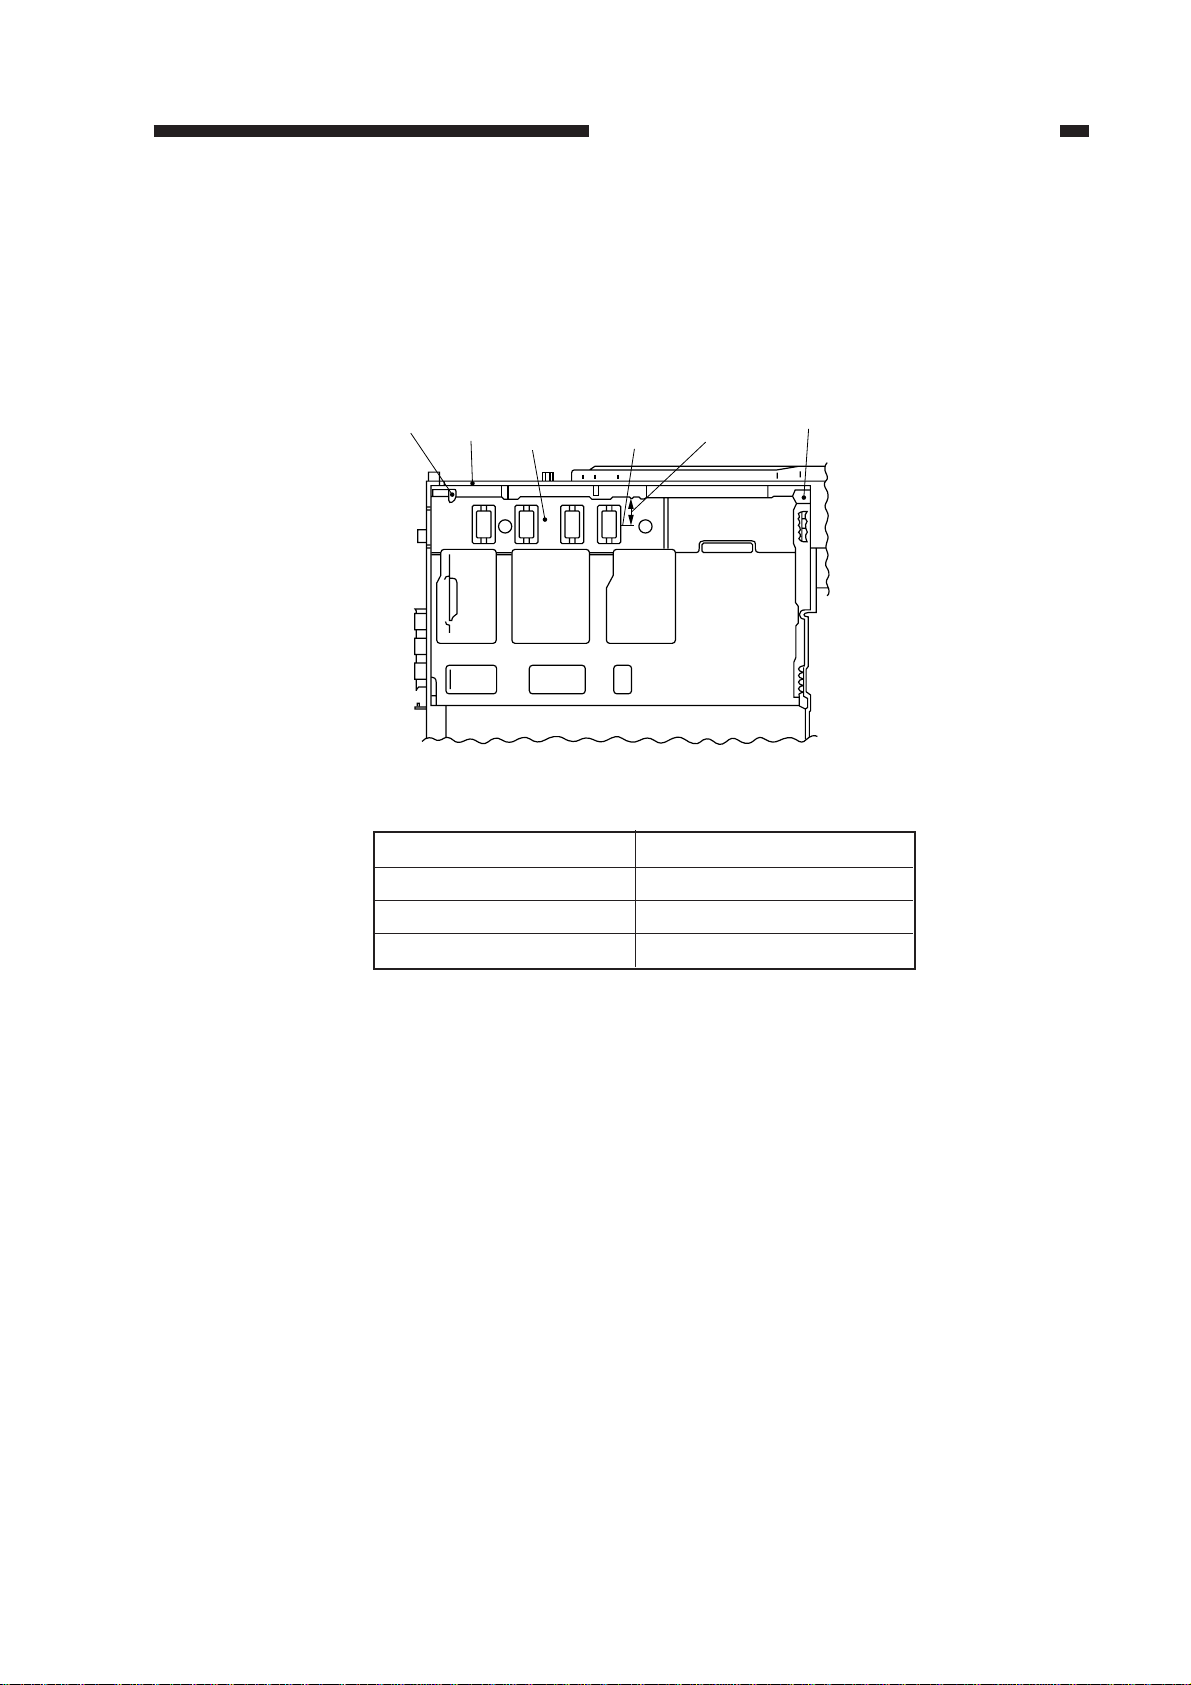
15. Cassette Spring Strength
If the strength of the springs in the cassette that raise the paper-lifting plate is not correct,
improper paper pick-up or other problem will result.
If such a problem occurs, check the spring strength with a compression spring scale.
Press the scale at point A shown in Figure 2-21 to push the plate down 3 mm and read the scale.
If the indication is outside the range shown in Table 2-2, replace both springs. (The springs cannot
be adjusted.)
Hook
Cassette
Center
plate
25 mm
A
Hook
Figure 2-21
Cassette size Indication on spring scale
A3 and LGR cassette 390 ±30g
A4R and LTR-R cassette 350 ±20g
STMT 330 ±40g
Table 2-2
2-13
CHAPTER 2 STANDARDS AND ADJUSTMENTS
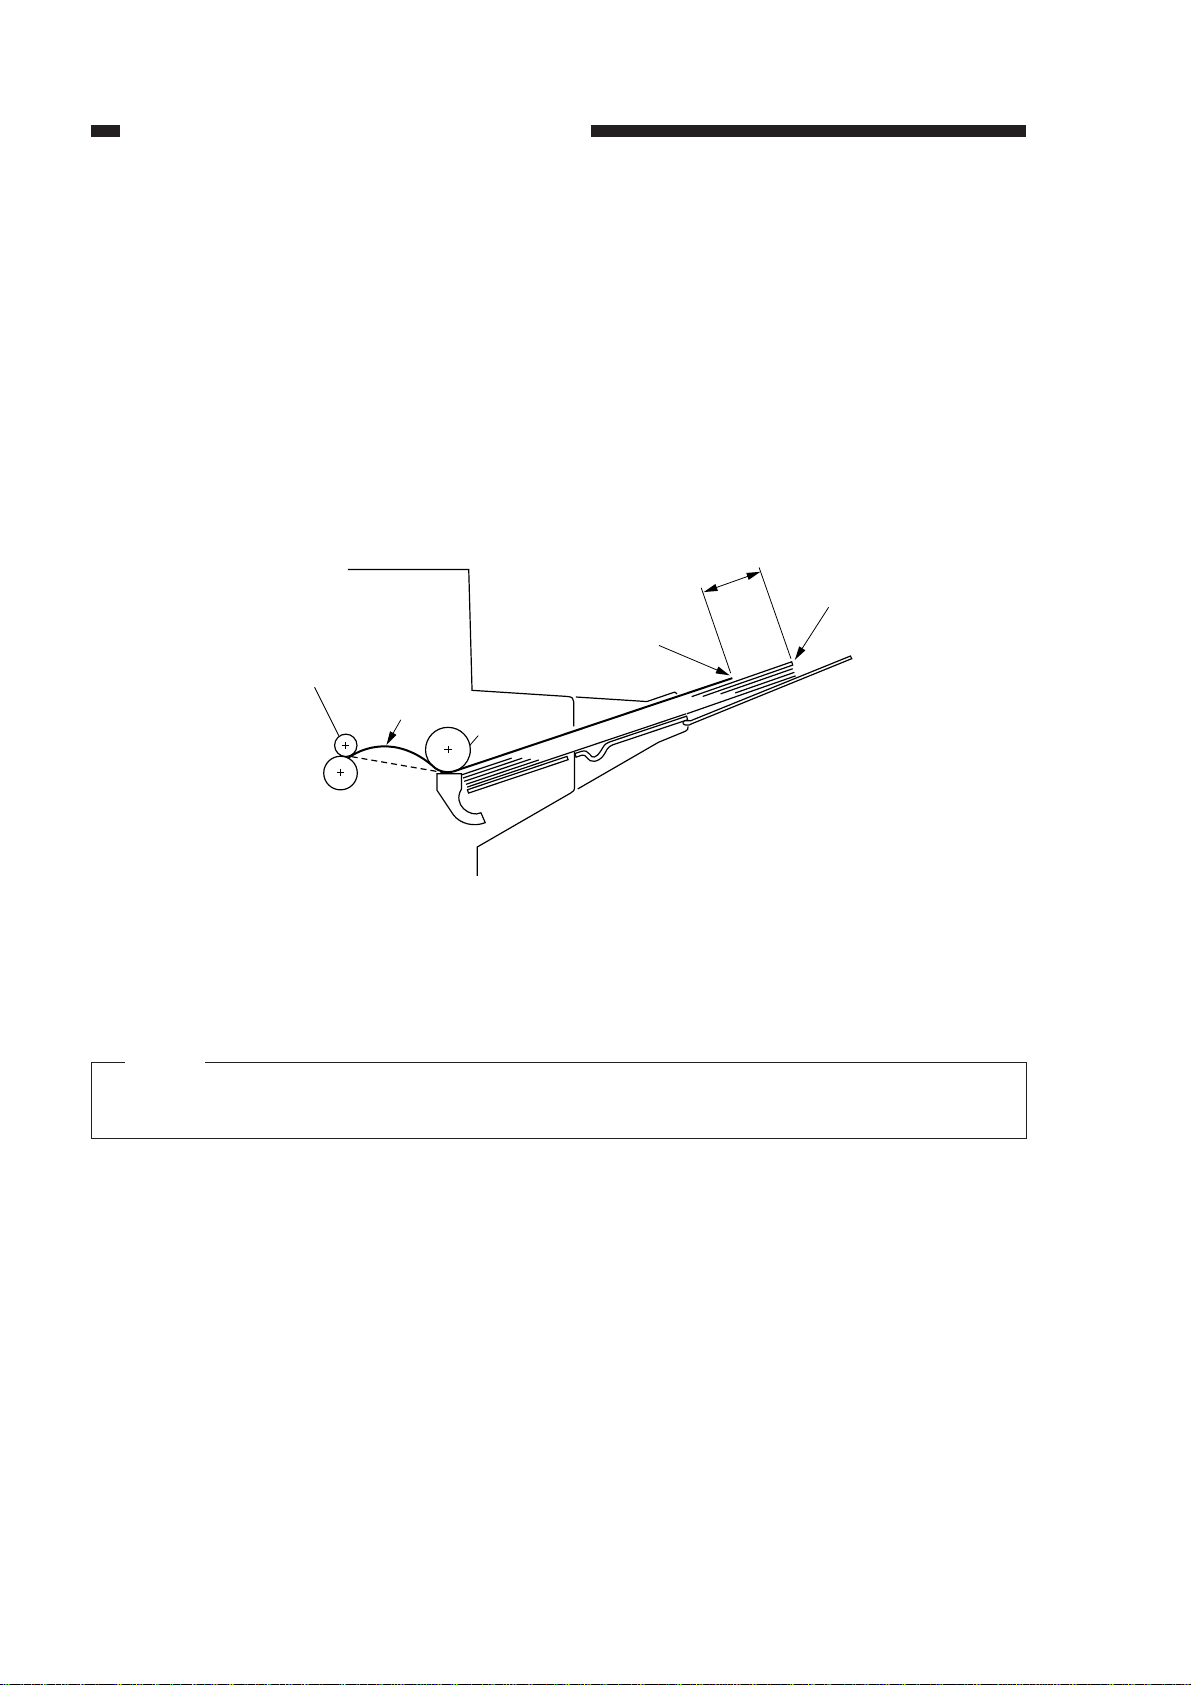
16. Degree of Arching (multifeeder)
Make the following adjustments if the copy paper picked up from the multifeeder moves askew
or wrinkles are noted on the leading edge of the copy paper; the adjustments are made by changing
the degree of arching of the copy paper between the multifeeder pick-up roller and the registration
roller.
1) Set 50 sheets of A4 paper (80 g/m2) on the multifeeder tray.
2) Press the Paper Select key on the control panel to select the multifeeder.
3) Press the Copy Start key.
4) Check that the leading edge of the copy paper butts against the registration roller and arches; at
the time, turn the copier OFF.
5) Measure the distance between [A] (trailing edge of the second sheet) and [B] (trailing edge of
the first sheet).
Registration roller
Arching
70 to 75 mm
[B]
Multifeeder
roller
[A]
Figure 2-22
6) Turn the copier ON, and select C04 in the service mode.
7) Enter a setting so that the measurement between [A] and [B] (step 5)) is between 70 and 75
mm.
Note:
A higher setting increases the measurement, i.e., the multifeeder clutch OFF timing is delayed (in units of 0.25 mm).
2-14
CHAPTER 2 STANDARDS AND ADJUSTMENTS
B. Electrical
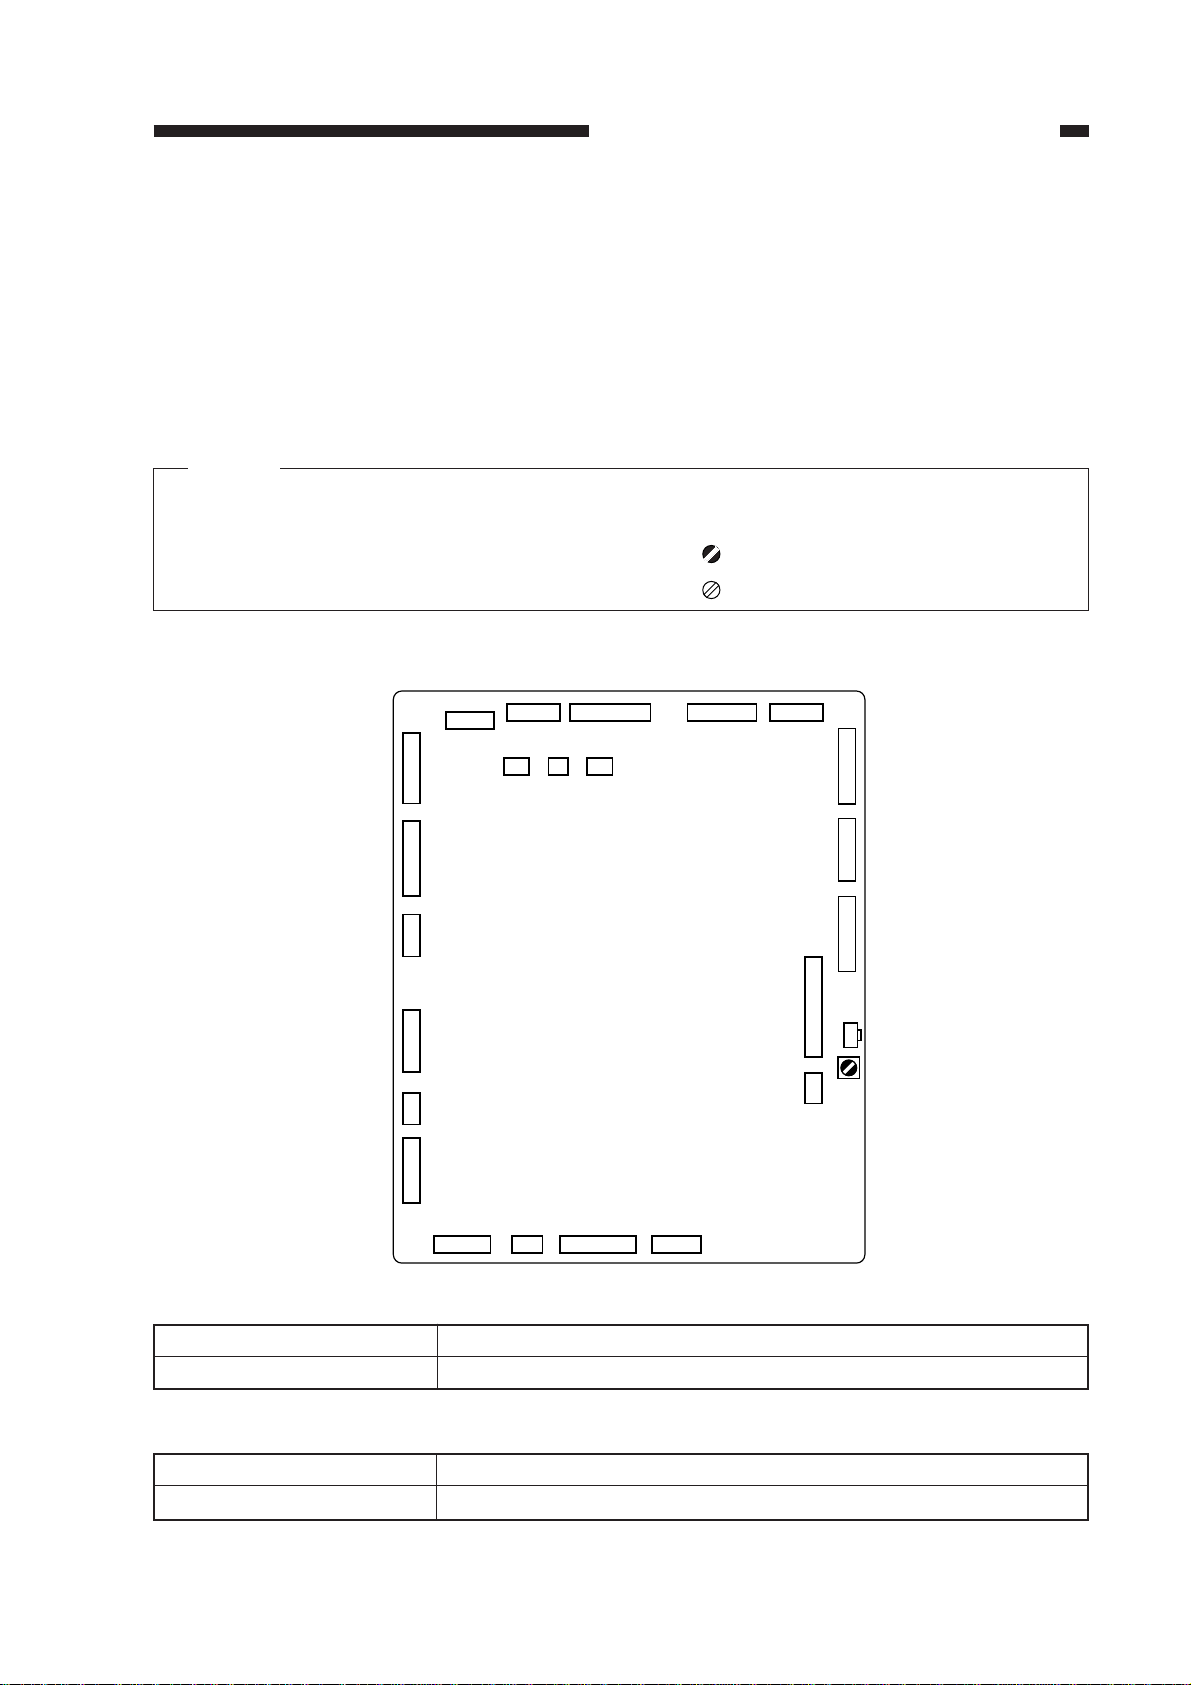
1. List of PCBs/VRs/LEDs/Check Pins
Variable resistors, LEDs and check pins which are used for adjustments in the field are listed
below.
VRs and check pins not listed here are used only for factory adjustments which require special
tools and measuring instruments, as well as great care and precision. Do not attempt to adjust such
parts.
Notes:
1. Leakage current may flow through some LEDs and cause them to glow dimly even though
they are supposed to be OFF.
2. VRs which can be adjusted in the field .................
VRs which should not be adjusted in the field......
a. DC Controller PCB
J306
J305
J304
J303
J324
J302
J301
J307
J308
J323J309 J310
J312 J311 J313
J314
J315
J316
J317
SW300
VR301
J318
J320J321 J319
Figure 2-23
VR No
VR301
SW No
SW300
Purpose
Adjusting AE reference point
Table 2-3
Purpose
Press to enter or leave the SERVICE mode.
Table 2-4
2-15
CHAPTER 2 STANDARDS AND ADJUSTMENTS
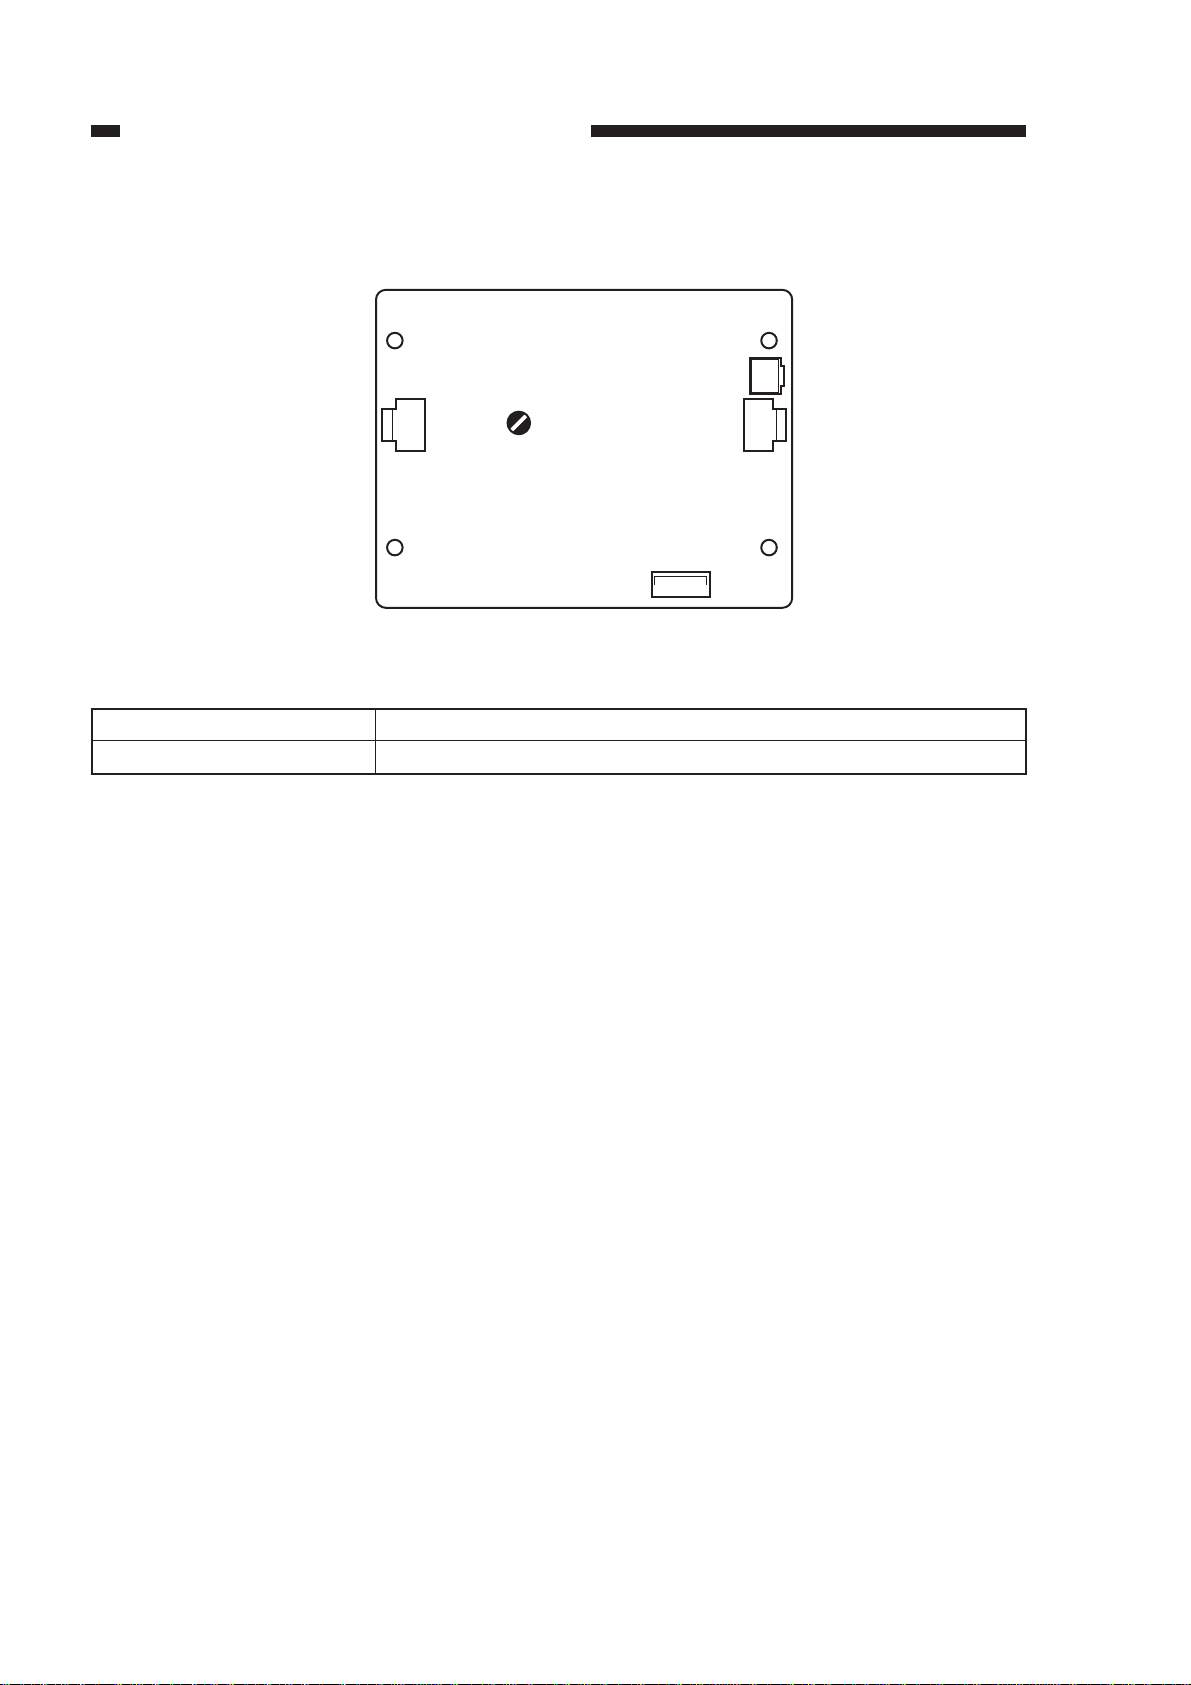
b. Lamp driver PCB
J204
VR No
VR202
J201
VR202
Figure 2-24
Lamp intensity adjustment
Table 2-5
J202
J203
Purpose
2-16

CHAPTER 2 STANDARDS AND ADJUSTMENTS
2. AE Adjustment
Make the following adjustments when the AE sensor or the DC controller PCB has been re-
placed.
1) Remove the VR cover at the back of the left cover.
2) Set the power switch ON.
• Wait until the wait period has ended.
3) Place an NB-3 or NA-2, NA-3 test sheet on the copyboard, and lower the copyboard cover.
4) Press switch SW300 on the DC controller PCB.
• ‘C00’ will appear on the Copy Count/Ratio indicator on the control panel.
• If ‘C00’ does not appear, press the “0” number key on the control panel so that ‘C00’ appears.
5) Press the Sort/Group key on the control panel.
• The scanner will move forward to the AE measuring position; then, the scanning lamp will go
ON. (Note)
6) Adjust VR301 on the DC controller so that “20” appears on the Copy Count/Ratio indicator.
For reference:
7.7
Copy density
5
VR301
Test sheet Sheet of newspaper
Document density
Figure 2-25
7) Press the Sort/Group key.
• The scanning lamp will go OFF, and the scanner will return to the home position.
8) Remove the test sheet, place a sheet of newspaper on the copyboard, and lower the copyboard
cover.
9) Press the Sort/Group key.
• The copier will perform the same operations as described in step 5).
10) Make a note of the numerical value displayed on the Copy Count/Ratio indicator.
11) Press the Sort/Group key.
• ‘C00’ will appear on the Copy Count/Ratio indicator.
12) Press the “1” number key.
• ‘C01’ will appear on the Copy Count/Ratio indicator.
13) Enter the value recorded in step 10) using the numeric keypad.
7.7
Copy density
5
Test sheet Sheet of newspaper
Document density
When the setting is lowered.
When the setting is raised.
Figure 2-26
2-17
 Loading...