Canon NP6218 Service Handbook

REVISION 0
COPYRIGHT © 1996 CANON INC. CANON NP6218 REV.0 MAY 1997 PRINTED IN JAPAN (IMPRIME AU JAPON)
MAY 1997
FY8-23AP-000

COPYRIGHT © 1997 CANON INC.
Printed in Japan
Imprimé au Japon
Use of this manual should be strictly
supervised to avoid disclosure of
confidential information.
IMPORTANT
THE DOCUMENTATION IS PUBLISHED BY CANON INC., JAPAN, TO SERVE AS A SOURCE OF
REFERENCE FOR WORK IN THE FIELD.
SPECIFICATIONS AND OTHER INFORMATION CONTAINED HEREIN MAY VARY SLIGHTLY FROM
ACTU AL MA CHINE VALUES OR THOSE FOUND IN AD VER TISING AND O THER PRINTED MATTER.
ANY QUESTIONS REGARDING INFORMATION CONTAINED HEREIN SHOULD BE DIRECTED TO
THE COPIER SERVICE DEPARTMENT OF THE SALES COMPANY.
THIS DOCUMENTATION IS INTENDED FOR ALL SALES AREAS, AND MAY CONTAIN
INFORMATION NOT APPLICABLE TO CERTAIN AREAS.
Prepared by
OFFICE IMAGING PRODUCTS TECHNICAL SUPPORT DEPT.1.
OFFICE IMAGING PRODUCTS TECHNICAL SUPPORT DIVISION
CANON INC.
5-1, Hakusan 7-chome, Toride-shi, Ibaraki 302 Japan
COPYRIGHT © 1997 CANON INC. CANON NP6218 REV.0 MAY 1997 PRINTED IN JAPAN (IMPRIME AU JAPON)

i
CONTENTS
CHAPTER 1 MAINTENANCE AND INSPECTION
A. Image Adjustment Basic
Procedure....................................1-1
B. Periodical Servicing......................1-2
CHAPTER 2 STANDARDS AND ADJUSTMENTS
A. Image Adjustment ........................2-1
1. Adjusting the Image Leading
Edge Margin ([3], No.305;
registration ON timing)............2-1
2. Adjusting the Leading Edge
Non-Image Width ([3], No.306;
blank shutter ON timing)........2-2
3. Adjusting the Image Trailling
Edge Non-Image Width
([3], No.309;blank shutter
timing) .....................................2-3
4. Adjusting the Left/Right
Registration.............................2-4
5. Adjusting the Left/Right Margin
(No.311;left/right margin)........2-5
6. Adjusting the Scanning Lamp
Intensity...................................2-6
7. AE Adjustment ........................2-7
B. Exposure System.......................2-11
1. Routing the Scanner Drive
Cable.....................................2-11
2.
Adjusting the Mirror Position
optical distance between No.1
mirror and No.2/No.3 mirror)
...2-12
3. Adjusting the Scanner Cable
Tension..................................2-13
4.
Assembling the Mirror Positioning
Tool
........................................2-13
5. Points to Note When Attaching
the Fluorescent Lamp Heater/
Scanning Lamp.....................2-14
6. Positioning the Change
Solenoid ................................2-16
C.
Image Formation System
.............2-17
1. Positioning the Blank Shutter
Solenoid ................................2-17
2. Routing the Blank Shutter
Cable.....................................2-18
3. Positioning the Solenoid for the
Primary Charging Roller ........2-18
4. After Replacing the Drum
Unit........................................2-19
5. Attaching the Drum Heater ...2-19
D. Pick-Up/Feeding System ............2-21
1. Orientation of the Pick-Up
Roller.....................................2-21
2. Orientation of the Multifeeder
Pick-up Roller........................2-21
3. Positioning the paper Guide
Plate Cam (multifeeder)........2-22
E. Fixing System.............................2-23
1. Points to Note when Attaching
the Fixing Film.......................2-23
2. Points to Note when Attaching
the Heater Connector............2-23
3. Adjusting the Fixing Film Drive
Roller Pressure .....................2-24
4. Points to Note after Replacing
the Fixing Upper Unit............2-25
5. Adjusting the Nip...................2-26
6. Routing the Drive Belt...........2-27
7. Storing the Fixing Heater
Registance ............................2-27
8. Setting the Fixing Heater
Temperature Control Value....2-28
F. Electrical .....................................2-31
1. After Replacing the PCB.......2-31
2. Clearing the Back-Up RAM...2-31
3. Checking the
Photointerrupters...................2-32
4. Adjusting the Multifeeder
Paper width Sensor...............2-39
5. Setting the Paper Size for the
Universal Cassette................2-40
1
2
3
4
5

CHAPTER 3 ARRANGEMENT AND FUNCTIONS OF THE ELECTRICAL PARTS
A. Sensors........................................3-2
B. Clutches, Solenoids, and
Switches.......................................3-4
C. Motors, Heaters, and Lamps ........3-6
D. PCBs ............................................3-8
E. Cassette Feeding Module-A2.....3-10
CHAPTER 4 SERVICE MODE
A. Outline..........................................4-1
B. Using Service Mode.....................4-1
1. Activating Service Mode .........4-1
2. Selecting a Service Mode.......4-2
3. Selecting Items........................4-2
4. Using Adjustment Mode [3]
and Specification Mode [5]......4-2
5. Using Operation/Inspection
Mode [4]..................................4-2
F. Variable Registors (VR) and check
Pins by PCB...............................3-12
1. DC controller PCB.................3-12
2. Composite power supply
PCB.......................................3-13
6. Clearing Stored Error..............4-2
7. Recording on the Service
Mode Label .............................4-3
C. Control Display Mode [1] ..............4-4
D. I/O Mode [2] .................................4-6
E. Adjustment Mode [3]....................4-9
F. Operation/Inspection Mode [4]...4-12
G. Specification Settings Mode [5]..4-14
H. Counter Mode [6].......................4-15
CHAPTER 5 SELF DIAGNOSIS
A. Copier...........................................5-1
B. Self Diagnosis (ADF)....................5-5
APPENDIX
A. GENERAL TIMING CHART.........A-1
B.
SIGNALS AND ABBREVIATIONS
C. GENERAL CIRCUIT DIAGRAM ..A-3
D. SPECIFICATIONS .......................A-5
A. Copier .....................................A-5
1. Type ....................................A-5
..A-2
C. Self Diagnosis (Sorter).................5-6
2. System...............................A-5
3. Features.............................A-6
4. Others ................................A-7
B.
Cassette Feeding Module-B2/
Cassette Feeding Module-A2
....A-8
ii
1-1
1
CHAPTER 1 MAINTENANCE AND INSPECTION
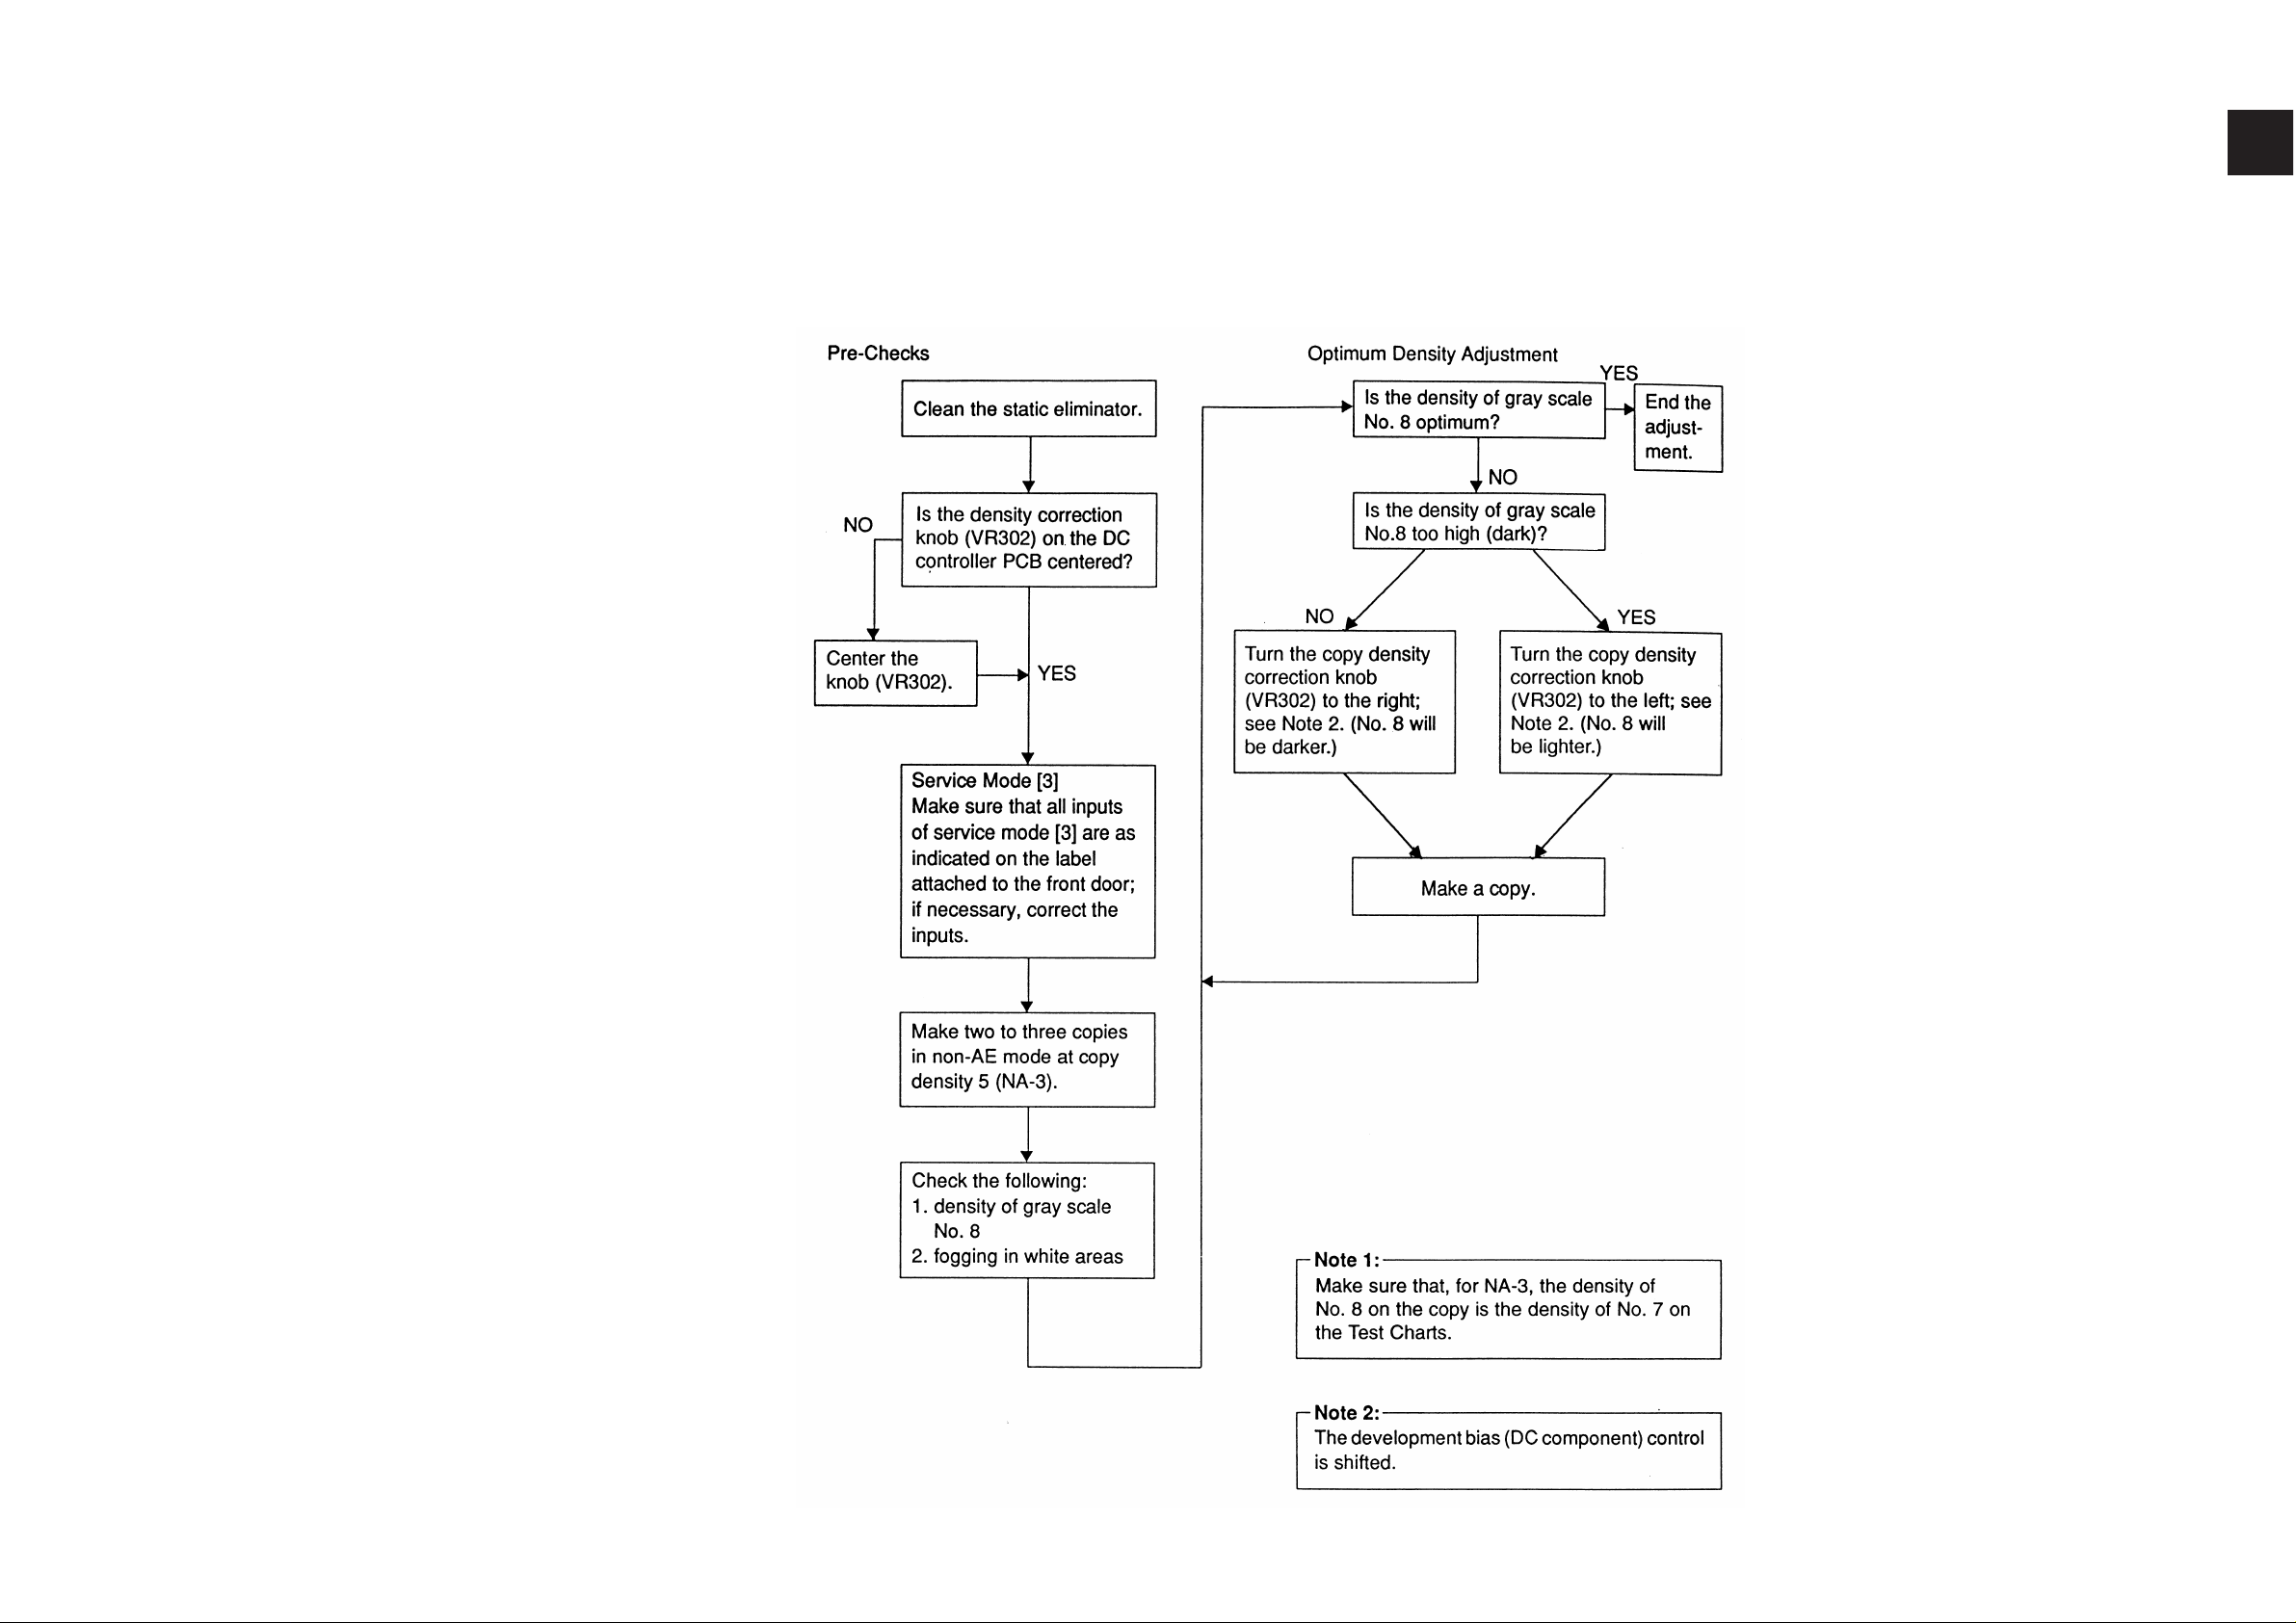
A. Image Adjustment Basic Procedure
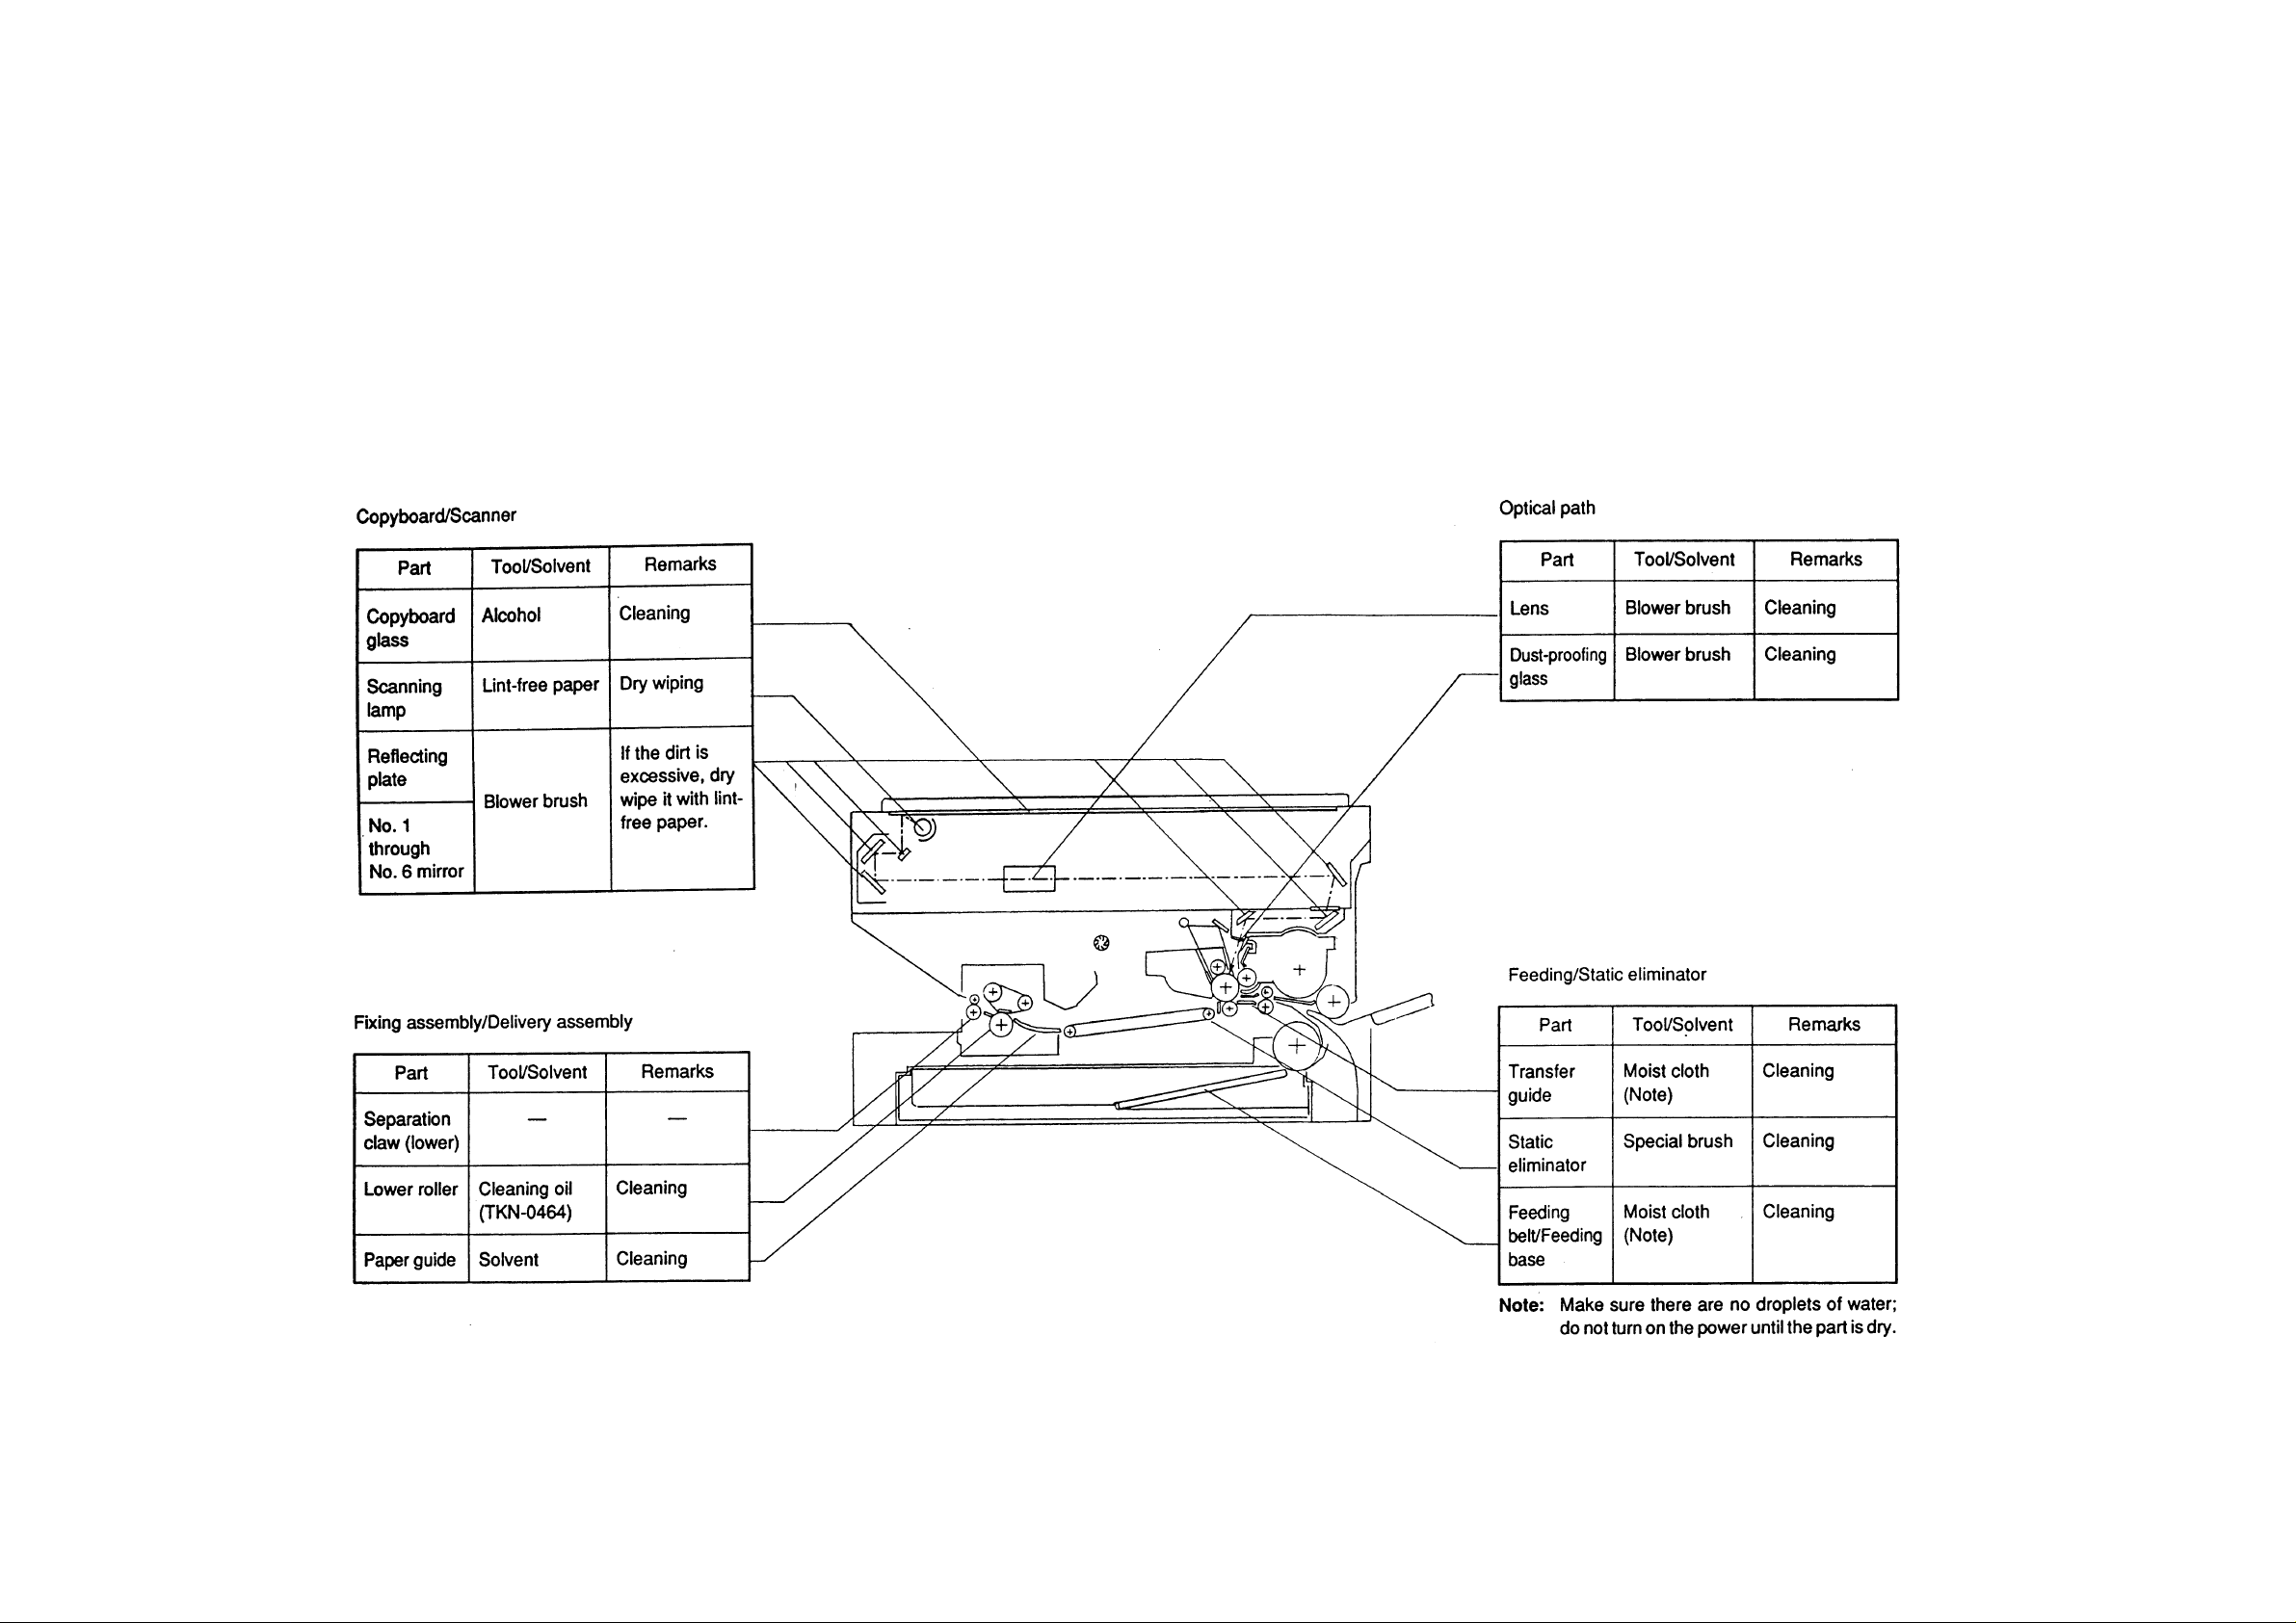
B. Periodical Servicing
1-2

CHAPTER 2 STANDARDS AND ADJUSTMENTS
A. Image Adjustment
1. Adjusting the Image Leading Edge Margin ([3], No. 305; registration ON timing)
Activate [3] in service mode, and select ‘No. 305’ (leading edge margin adjustment),
and make adjustments so that the image position is as indicated in Figure 2-1 when the
Test Sheet is copied in Direct.
Figure 2-1
Making Adjustments
1) Activate [3] in service mode, and select ‘No. 305’ using the keypad.
• The copy count indicator flashes ‘No. 305’.
2) Press the Start key.
3) Change the value using the keypad.
• The value flashes.
• If the value is negative, ‘%’ turns on. To enter a negative value, press the % key,
then enter the value using the keypad.
4) Press the AE key.
• The value flashes as soon as it is entered.
• Press the Start key to start copying operation.
5) To change a value continuously, repeat steps 1) through 4).
6) Press the Clear key to return to selecting items.
The relationship between the setting and the image position is as follows:
• For each ‘1’ in the setting, the position shifts about 0.27 mm.
• ‘+’ shifts the image forward.
CHAPTER 2 STANDARDS AND ADJUSTMENTS
2-1
2
2.5±1.5mm
CHAPTER 2 STANDARDS AND ADJUSTMENTS
2.0±1.0mm
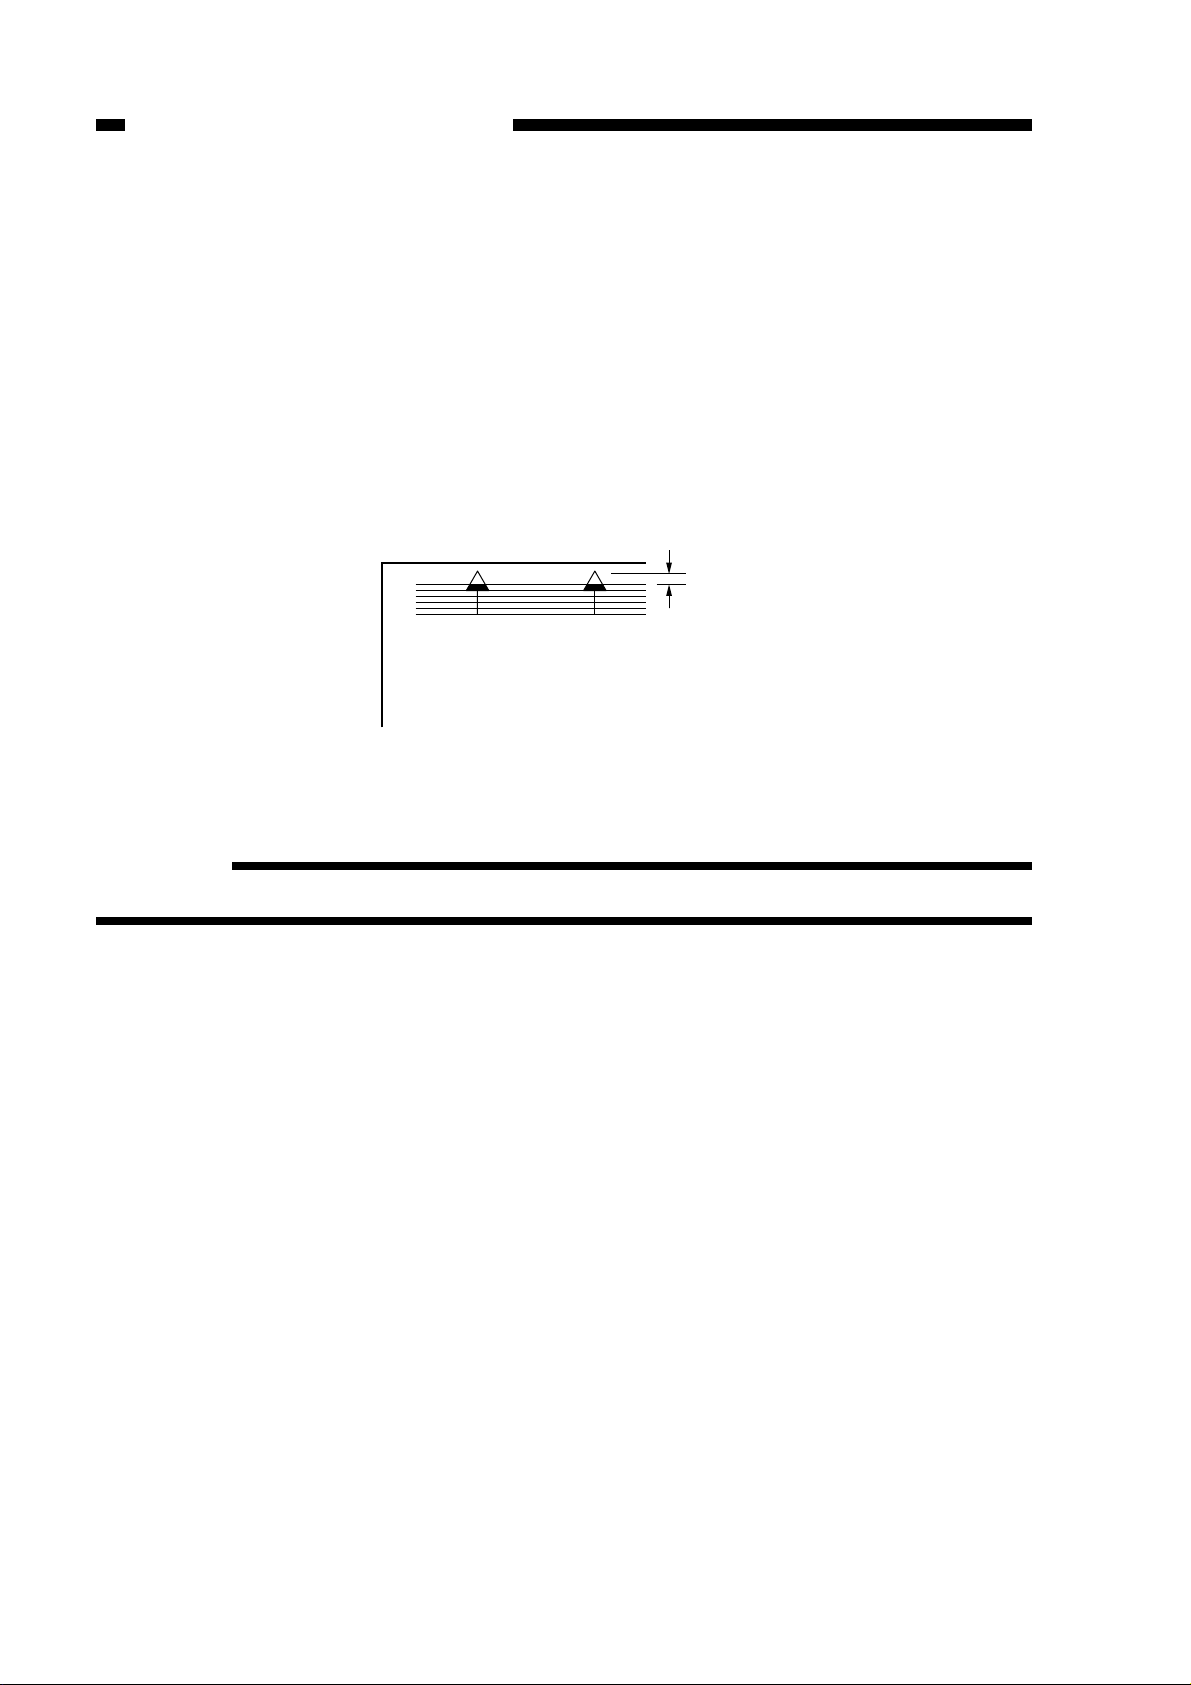
2. Adjusting the Leading Edge Non-Image Width ([3], No. 306; blank shutter ON
timing)
Activate [3] in service mode, select ‘No. 306’ (leading edge non-image width
adjustment), and make adjustments so that the image leading edge non-image width is
as indicated in Figure 2-2 when the Test Sheet is copied in Direct.
The copier varies the image leading edge non-image width by varying the timing at
which the blank shutter is closed.
You must make this adjustment whenever you have replaced the blank shutter
solenoid or the blank exposure assembly.
Leading Edge Non-Image Width
Figure 2-2
Reference:
6 mm or less in Reduce/Enlarge mode.
Making Adjustments
1) Activate [3] in service mode, and select ‘No. 306’ using the keypad.
• The copy count indicator flashes ‘No. 306’.
2) Press the Start key.
3) Change the value using the keypad.
• The value flashes.
• If the value is negative, ‘%’ turns on. To enter a negative value, press the % key,
then enter the value using the keypad.
4) Press the AE key.
• The value flashes as soon as it is entered.
• Press the Start key to start copying operation.
5) To change a value continuously, repeat steps 1) through 4).
6) Press the Clear key to return to selecting items.
The relationship between the setting and the image position is as follows:
• For each ‘1’ in the setting, the position shifts about 0.27 mm.
• ‘+’ increases the non-image width.
2-2

CHAPTER 2 STANDARDS AND ADJUSTMENTS
2.5±
1.5mm
3. Adjusting the Image Trailing Edge Non-Image Width ([3], No. 309; blank shutter
timing)
Trailing Edge Non-Image Width
Figure 2-3
Activate [3] in service mode, and select ‘No. 309’ (leading edge non-image width
adjustment); make adjustments so that the image trailing edge non-image width is as
indicated in Figure 2-3 when the Test Sheet is copied in Direct.
The copier varies the image trailing edge non-image width by varying the timing at
which the blank shutter is opened.
Making Adjustments
1) Activate [3] in service mode, and select ‘No. 309’ using the keypad.
• The copy count indicator flashes ‘No. 309’.
2) Press the Start key.
3) Change the value using the keypad.
• The value flashes.
• If the value is negative, ‘%’ turns on. To enter a negative value, press the % key,
then enter the value using the keypad.
4) Press the AE key.
• The value flashes as soon as it is entered.
• Press the Start key to start copying operation.
5) To change a value continuously, repeat steps 1) through 2).
6) Press the Clear key to return to selecting items.
The relationship between the setting and the image position is as follows:
• For each ‘1’ in the setting, the position shifts about 0.27 mm.
• ‘+’ decreases the trailing edge non-image width.
2-3
CHAPTER 2 STANDARDS AND ADJUSTMENTS
q
(-)
(+)
0±1.5mm
0
2
4
6
8
10
q
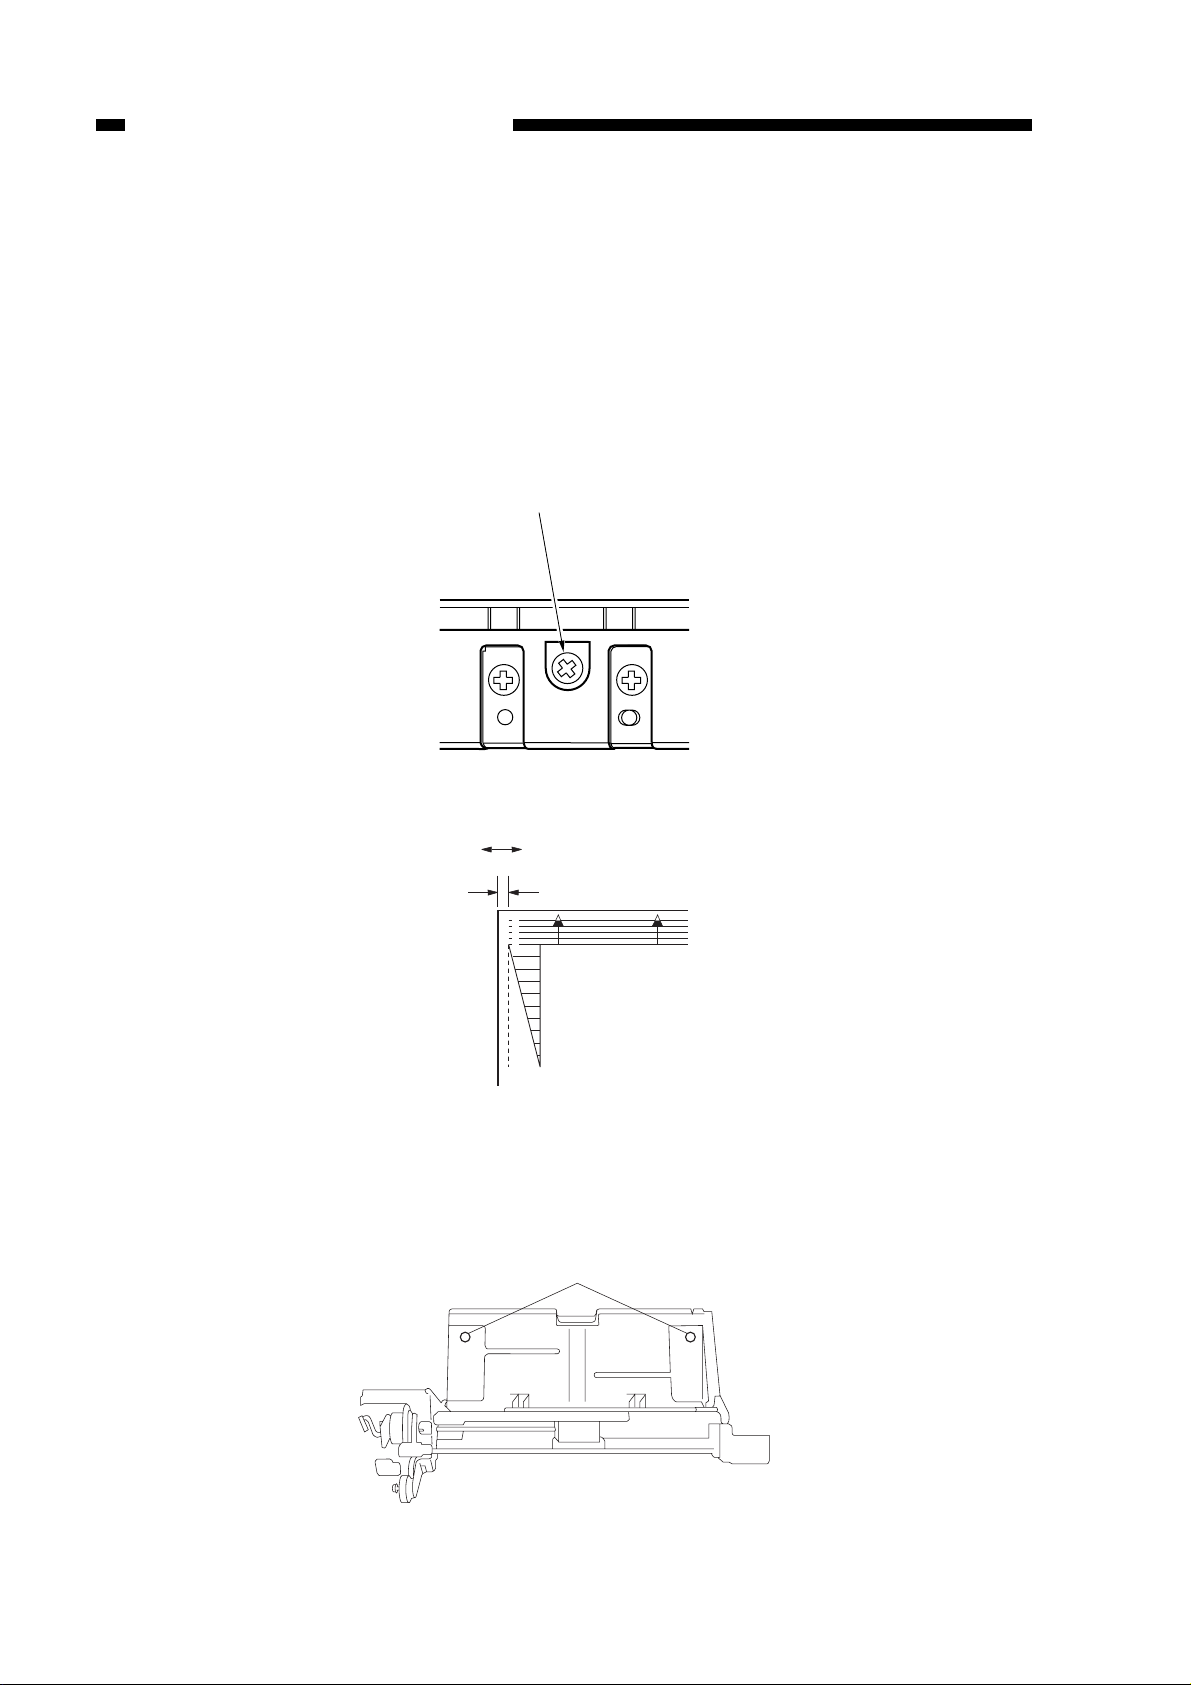
4. Adjusting the Left/Right Registration
Make adjustments so that the position of the image is as indicated in Figure 2-5 when
the Test Sheet is copied in Direct.
a. Pick-Up from the Cassette
Turn the screw 1 sho wn in Figure 2-4 to adjust the position of the cassette hook plate.
standard: 0.±1.5 mm
clockwise turn: paper moves in the direction of – shown in Figure 2-5.
counterclockwise turn: paper moves in the direction of + in Figure 2-5.
Figure 2-4
Figure 2-5
b. Pick-Up from the Multifeeder
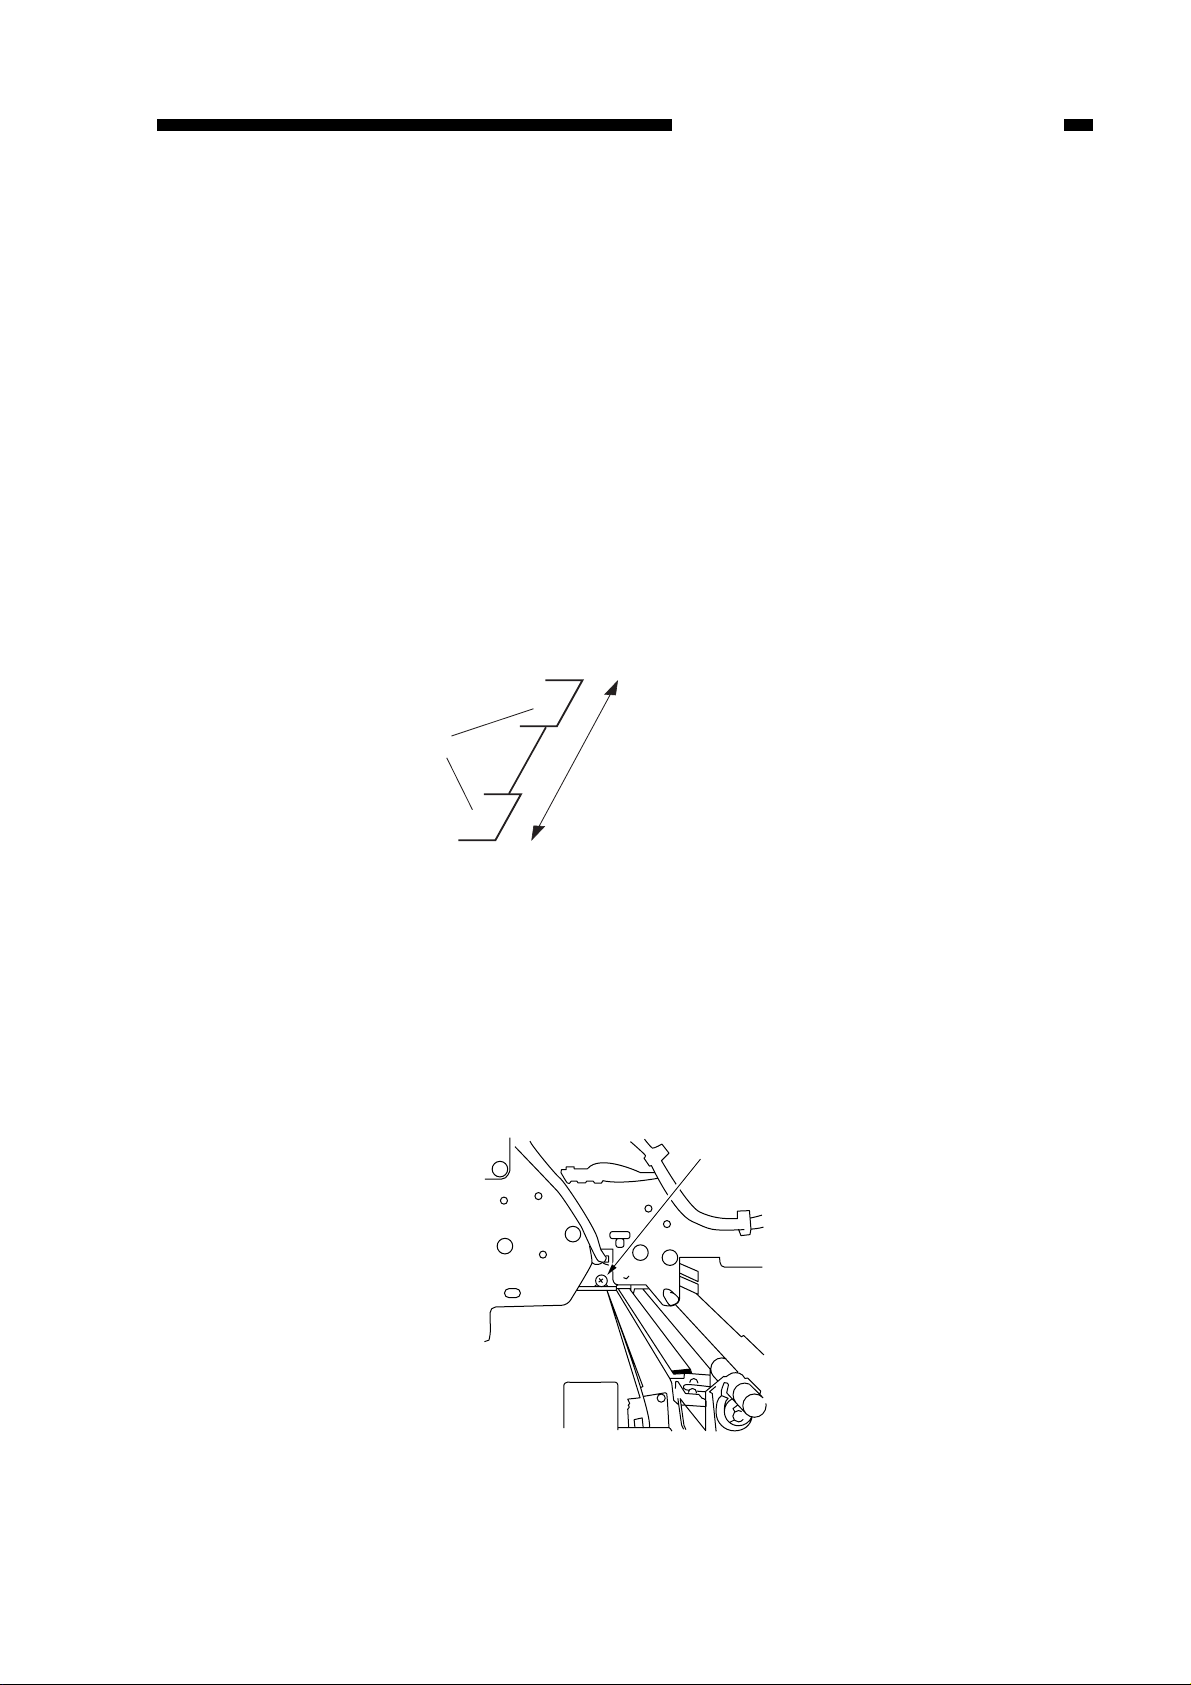
Loosen the screw 1, and move the position of the tray so that it is 0 ±1.5 mm.
2-4
Figure 2-6
CHAPTER 2 STANDARDS AND ADJUSTMENTS
Shutter
Adjust the distance between the
two shutters in the blanking
assembly.
q
5. Adjusting the Left/Right Margin (No. 311; left/right margin)
Select ‘No. 311’ (left/right margin adjustment); make adjustments so that the left/right
margin is 2.5 ±1.5 mm when the Test Sheet is copied in Direct.
You must adjust the left/right registration before making this adjustment.
Making Adjustments
a. Margin (adjusting the width)
1) Activate [3] in service mode, and select ‘No. 311’ using the keypad.
2) Press the Start key.
3) Enter a value using the keypad.
• If the value is negative, ‘%’ turns on. To enter a negative value, press the % key,
then enter the value using the keypad.
The relationship between the setting and the image position is as follows:
• For each ‘1’ in the setting, the margin (one side) shifts about 0.37 mm.
• range: 0 to 15 mm
• ‘+’ increases the margin.
• ‘–’ decreases the margin.
Figure 2-7
b. Left/Right Margin
Turn the blank shutter adjustment screw located on the front side plate shown in
Figure 2-8 so that the value is as specified.
clockwise turn:moves the margin toward the front.
counterclockwise turn:moves the margin toward the rear.
a full turn: shifts the margin by about 1 mm.
Figure 2-8
2-5

❋ Without this adjustment, exposure value becomes invalid.
3) Tur n VR301 on the DC controller so that the image is optimum.
• If the image is too light, turn the VR slightly clockwise.
• If the image is too dark, turn the VR slightly counterclockwise.
Reference:
1. The term optimum image refers to a copy whose gray scale No. 8 corresponds to
gray scale No. 4 through 7 of the Test Sheet without fogging.
2. An excessive turn on the VR could put out the lamp. If that is the case, turn it
clockwise until it stops, and turn off and then on the power for re-adjustment.
Caution:
Be sure to execute AE adjustment after these adjustments.
CHAPTER 2 STANDARDS AND ADJUSTMENTS
2-6
Shutter
The entire shutters are
shifted.
Figure 2-9
Caution:
After the adjustments (both a and b), turn on and off the power switch or change
the reproduction ratio so that the blank exposure assembly performs home
positioning.
6. Adjusting the Scanning Lamp Intensity
Turn VR301 on the DC controller as follows whenever you have replaced the
scanning lamp, intensity sensor, or DC controller.
1) Set Test Sheet NA3 on the copyboard, and close the copyboard cover.
2) Adjust the copy density (AE off) to electrical central position (service mode 1/0 mode
[2] No. 212 Value = 153~159).

CHAPTER 2 STANDARDS AND ADJUSTMENTS
7. AE Adjustment
Adjust the AE mechanism using the following three service modes:
q AE Basic Adjustment
No. 410.............scanner forward stop
No. 408........scanning lamp on check
No. 208.....AE sensor voltage display
No. 301lamp intensity automatic adjustment at time of AE scan
w Copy Density in AE Mode (No. 302)
(developing bias) reference adjustment
e Copy Density in AE Mode
(developing bias) slope adjustment
If the copy density is not optimum after executing AE basic adjustment q (No. 410,
No. 408, No. 208, No. 301), execute w and then , if necessary, e, i.e., No. 302 and No.
303.
If you have replaced the AE sensor, scanning lamp, or DC controller, adjust the
scanning lamp intensity (VR 301); then, execute AE basic adjustment q, scanner
forward stop (No. 410), scanning lamp on check (No. 408), AE sensor voltage display
(No. 208), and lamp intensity automatic adjustment (No. 301).
Go through the following when making adjustments; Table 2-1 is a list of service
modes excluding scanner forward stop (No. 410), list of service modes excluding
scanner forward stop (No. 410), scanning lamp on check (No. 408), and AE sensor
voltage display (No. 208).
a. AE Basic Adjustment (No. 410, No. 408, No. 208, No. 301)
In this adjustment, the intensity of the scanning lamp is read by the lamp intensity
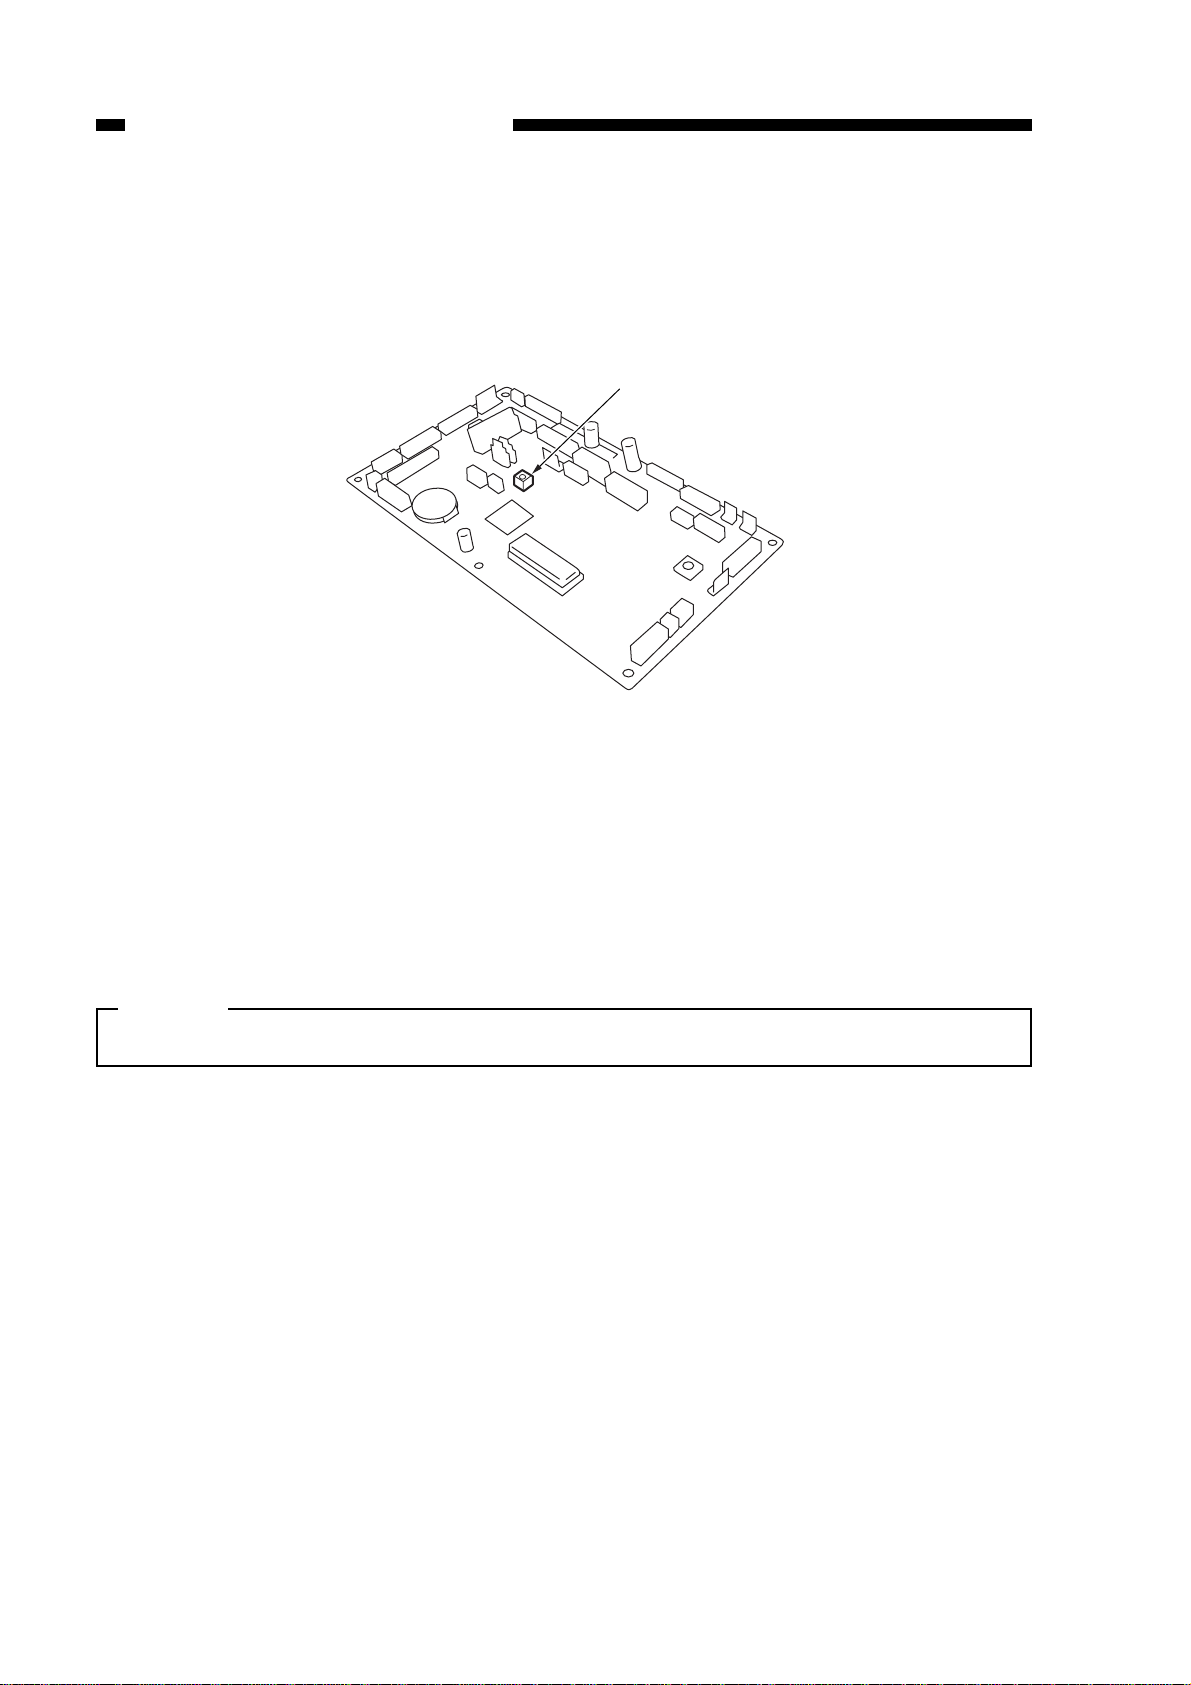
sensor and the voltage of the AE sensor unit is adjusted by VR 391 on the DC controller.
After the adjustment, execute the lamp intensity automatic adjustment for AE scans.
1) Place the Test Sheet NA-3 on the copyboard, and close the copyboard.
Adjust to the appropriate copy density in non-AE mode (settings) by suing bias
adjustment knob “VR302”. Then press the service mode switch (SW302) to activate
service mode.
2) Enter ‘4’ using the keypad, and press the AE key.
• The display indicates ‘401’.
3) Enter ‘410’ using the keypad.
• The display indicates ‘410’.
4) Press the Start key once.
• The scanner moves forward.
Caution:
Each press moves the scanner forward; do not press more than once.
5) Enter ‘408’ using the keypad, and press the Start key.
• The display indicates ‘ON’, and turns off after about 1.5 sec.
6) Press the Clear key twice.
• The display indicates ‘4’.
7) Press ‘2’ on the keypad, and press the AE key.
• The display indicates ‘201’.
2-7
CHAPTER 2 STANDARDS AND ADJUSTMENTS
VR391
8) Enter ‘208’ using the keypad, and press the start button.
• The display indicates ‘208’.
9) Press the Start key.
• The display indicates ‘0–255’.
10)Turn VR391 on the DC controller so that the reading on the display is ‘100~105’.
Figure 2-10 DC Controller PCB
11)Turn off and on the power switch.
• This turns off and on the scanning lamp.
12)Press the ser vice mode switch.
• The copier enters service mode, and the display indicates ‘1’.
13)Enter ‘3’ using the keypad, and press the AE key.
• The display indicates ‘301’.
14)Press the Start key.
Caution:
Wait until initial rotation is over.
• After initial rotation is over, the AE indicators starts to flash.
15)Press the AE key; the following take place to indicate that the optimum intensity is
adjusted automatically:
• The AE indicator stops flashing and remains on.
• The scanner moves to the AE measurement position.
• When the intensity has stabilized, the reading taken b y the AE sensor is stored in
memory.
• The lamp is turned off, and the scanner is returned to its original position.
16)When the above has ended, press the clear key twice.
• The display indicated ‘3’.
17)Enter ‘1’ using the keypad, and press the AE key.
• The display indicates ‘101’.
18)Enter ‘116’ using the keypad, and press the Start key.
• Make sure that the display indicates ‘68–72’; otherwise, start with step 2) of
operation/inspection mode for re-adjustment.
2-8

CHAPTER 2 STANDARDS AND ADJUSTMENTS
b. Copy Density (development bias) Reference Point Adjustment for AE Mode (No.
302)
1) If the indication is not in the 300’s , activ ate adjustment mode (service mode) as in the
case of ‘No. 301’.
2) Press [2] on the keypad.
• The copier indicates ‘302’.
3) Press the Start key.
• The copier indicates the current setting.
4) Change the setting using the keypad, and press the AE key.
• A higher setting causes the AE copies to be darker.
• default: 0
range: –26 to +26
• If the setting is negative, the ‘%’ is indicated. To enter a negative value, press the
‘%’ key, and enter a setting.
• When the copier has read the setting, the indication stops flashing and remains
on.
5) Record the new setting on the service mode label.
6) To end, press the Clear key.
• The copier returns to selection mode, and indicates ‘302’.
• As necessary, execute ‘No. 303’.
c. Copy Density (development bias) Slope Adjustment for AE Mode (No. 303)
1) If the indication is not in the 300’s , activ ate adjustment mode (service mode) as in the
case of No. 301.
2) Press [3] on the keypad.
• The copier indicates ‘303’.
3) Press the Start key.
• The copier indicates the current setting.
4) Change the setting with the keypad, and press the AE key.
• A larger setting causes the AE copies to be darker.
• default:.........................................0
range:...........................–26 to +26
• If the setting is negative, ‘%’ is indicated. To enter a negative value, press the ‘%’
key, and enter a setting.
• When the copier has read the setting, the indication stops flashing and remains
on.
5) Record the new settings on the service mode label.
6) Press the Reset key.
• The copier de-activates service mode.
2-9
CHAPTER 2 STANDARDS AND ADJUSTMENTS
Lighter
Copy
density 5
Darker
Test Chart Density of
original
9
Test Chart
Density of
original
Lighter
Copy
density 5
Darker
9
q
w
Test Chart
Density of
original
Lighter
Copy
density 5
Darker
9
Newspaper
w
q
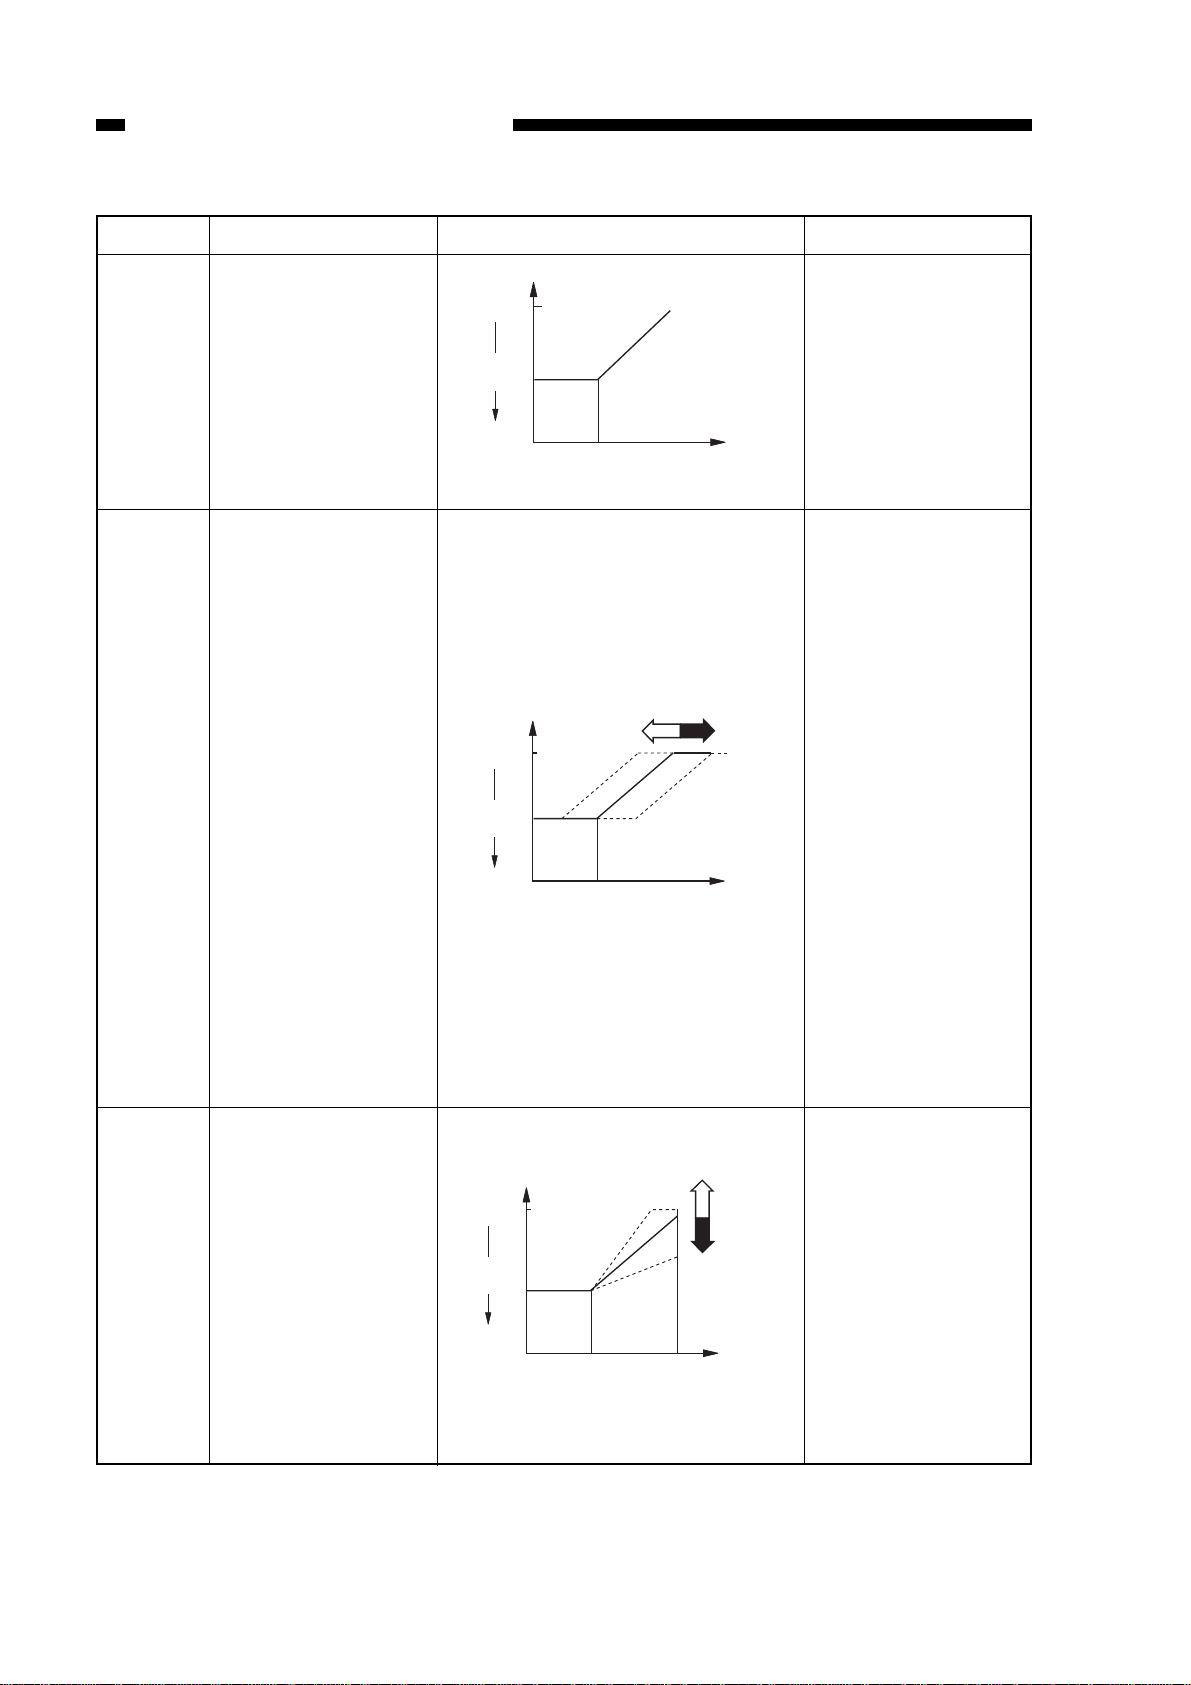
Item
No. 301
No. 302
Function
Automatic lamp
intensity adjustment
for AE scans
Copy density
(development bias)
reference point
adjustment for AE
mode
Description
Remarks\
The lamp intensity
is automatically
adjusted so that the
copies of the Test
Chart will be made
at density 5.
q A lower setting in
service mode causes
the AE copies to be
darker.
w A higher settings
in service mode
causes the AE copies
to be lighter.
default: 0
range: –26 to +26
No. 303
Copy density
(development bias)
slope adjustment for
AE mode
2-10
Table 2-1
After adjustment with
the test sheet NA-3,
using AE mode,
density adjustment
should show ‘5
’.
In non-AE mode,
density ‘5’ must also
be apprppriate
(adjusted with knob
VR302).
q A higher setting
in service mode
causes copies of a
newspaper to be
lighter.
w A lower setting
in service mode
causes copies of a
newspaper to be
darker.
default: 0
range: –26 to +26
CHAPTER 2 STANDARDS AND ADJUSTMENTS
Screw
Loosen the
screw,and shift
it down.
Re-tighten
the screw.
Attach the mirror
positioning tool.
Set screws
Loosen the set
screws to enable
free rotation.
Put the steel ball
into the hole in
the pulley; wind
the cable nine
times toward the
inside, and four
times toward the
outside; then, snap
on the pulley clip.
Pulley clip
Steel ball
34±1mm
o
y
u
r
!1
t
q
!0
w
e
i
Wire spring
Wire spring
Hook
Hook
Cable
Cable
B. Exposure System
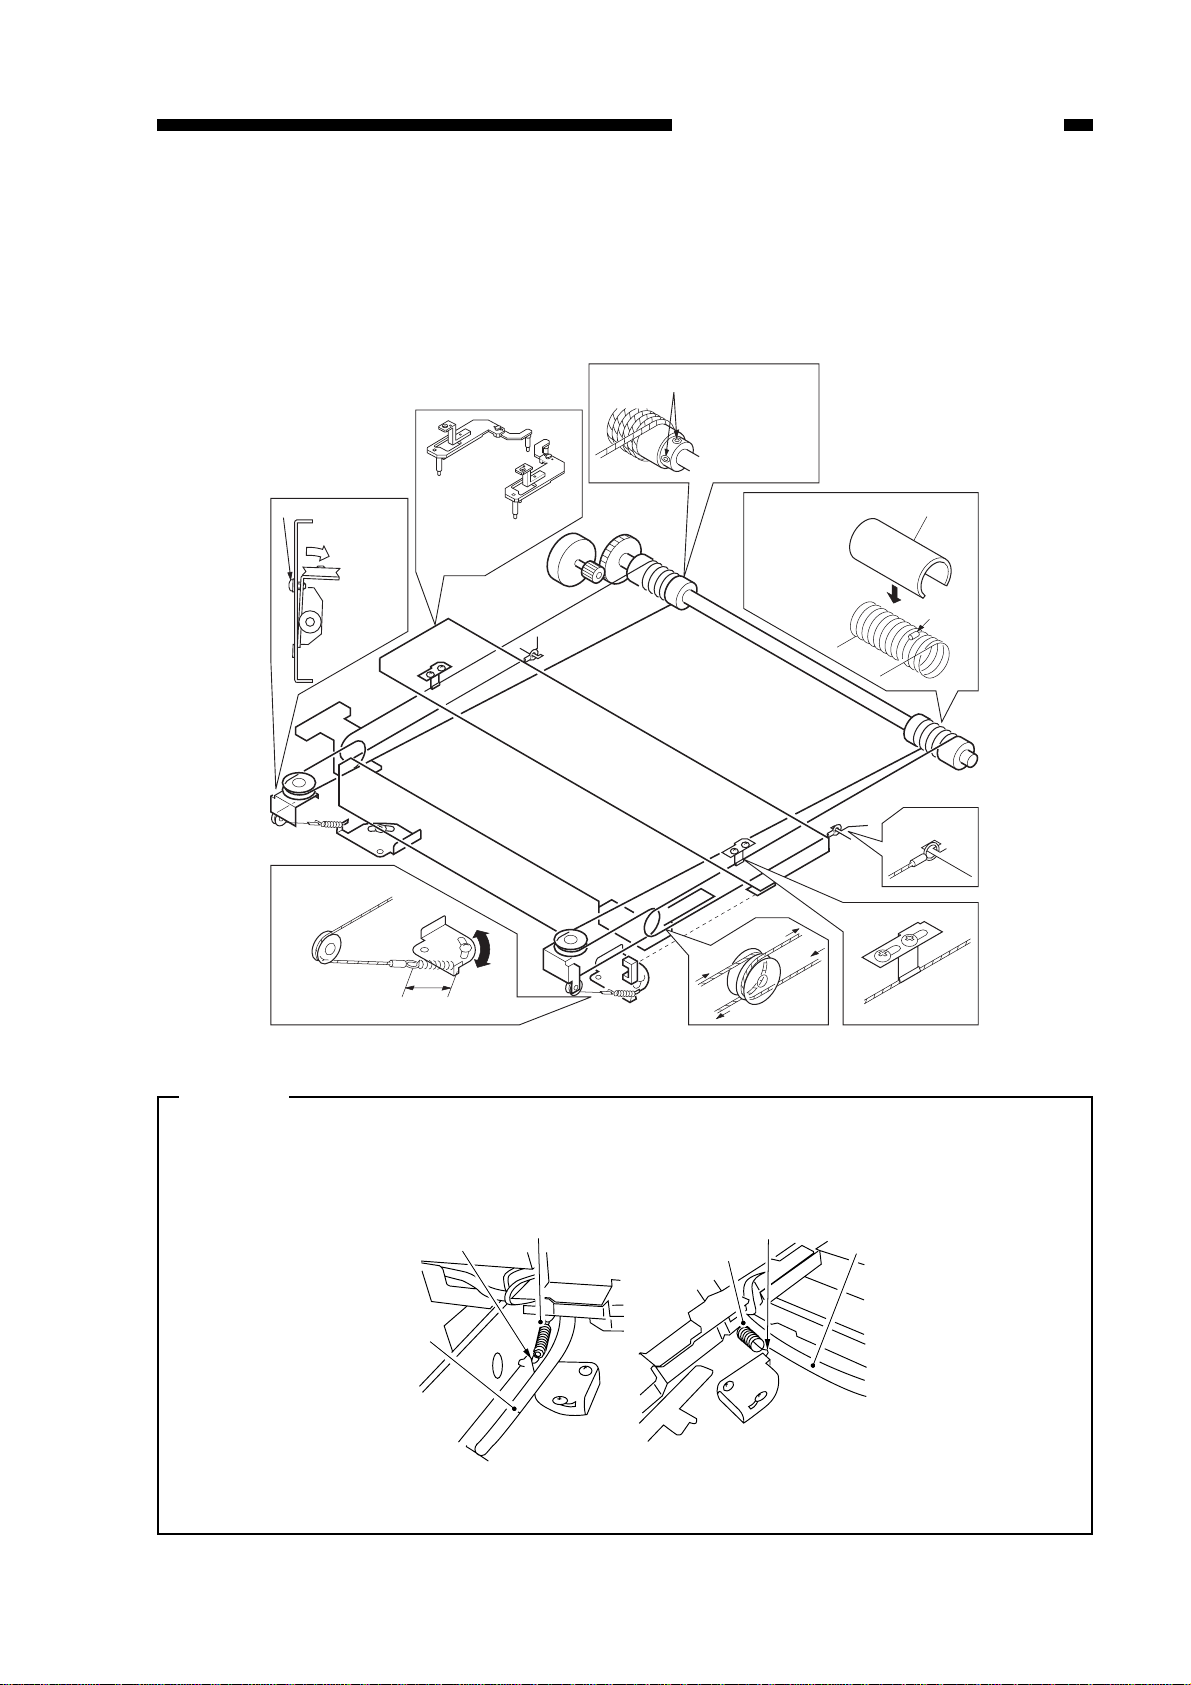
1. Routing the Scanner Drive Cable
Route the cable as shown by q through !0; then, adjust the cable tension and mirror
position as described.
Caution:
Figure 2-11
When attaching the wire spring, pay attention to the orientation of the spring; see
the diagrams below. If not attached correctly, its hook tip could interfere with the
cable.
Figure 2-12
2-11
CHAPTER 2 STANDARDS AND ADJUSTMENTS
q
(front) (rear)
(front)
Mirror positioning tool (front) Mirror positioning tool (rear)
(front)
w
e
(front) (rear)
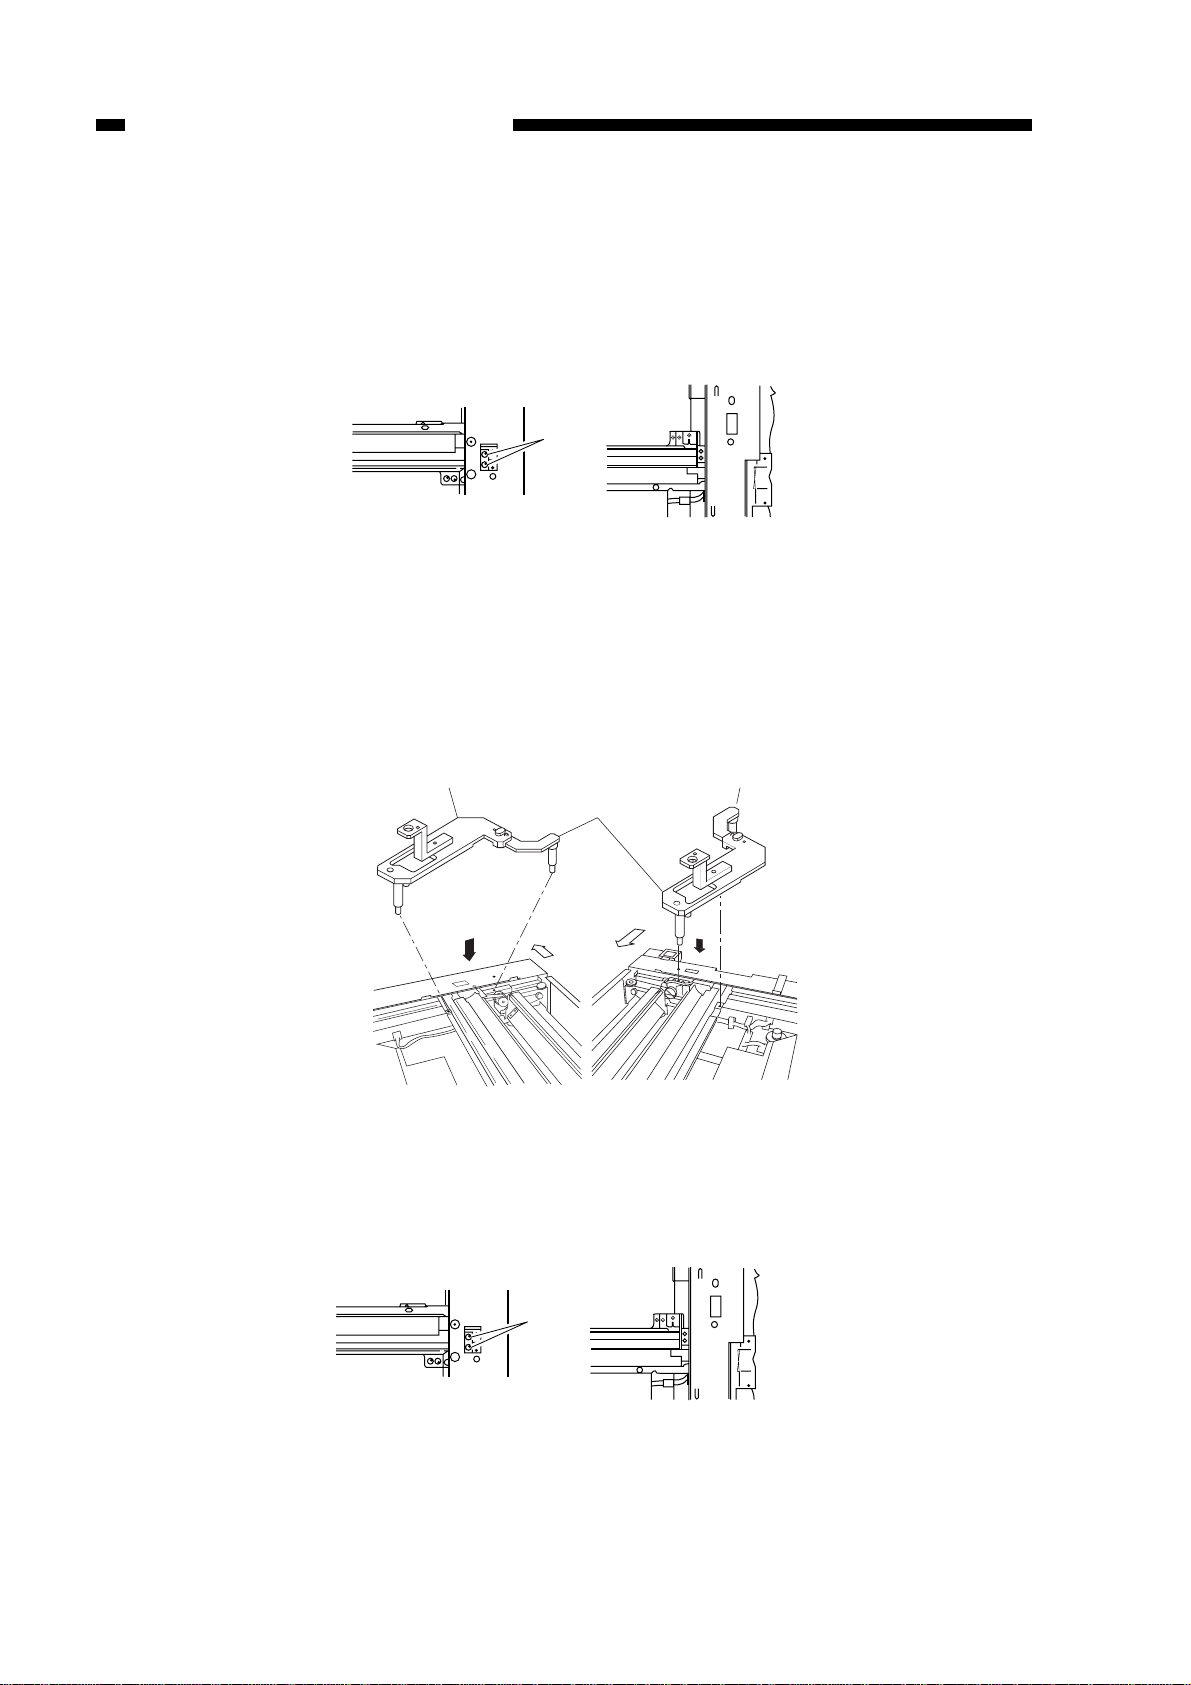
2. Adjusting the Mirror Position (optical distance between No. 1 mirror and No.
2/No. 3 mirror)
1) Keep the mirror positioning tool handy.
(See “4 Assembling the Mirror Positioning Tool on P. 2-13.”)
2) Move the No. 1 mirror mount forward, and match the long hole in the front side plate
and the cable fixing screw q.
Figure 2-13
3) Loosen the set screw on the pulley.
4) Set the mirror positioning tool w to the No. 1 mirror mount and the No . 2 mirror mount
(both front and rear).
Figure 2-14
5) Attach the scanner cable fixing to the No. 1 mirror mount using two screws e (both
front and rear).
Figure 2-15
2-12
CHAPTER 2 STANDARDS AND ADJUSTMENTS
q
w
34±1mm
A
A
B
B
Position B
Longest pin
Medium-Length pin
6) Tighten the screw on the pulley.
7) Detach the positioning tool (FY9-3009).
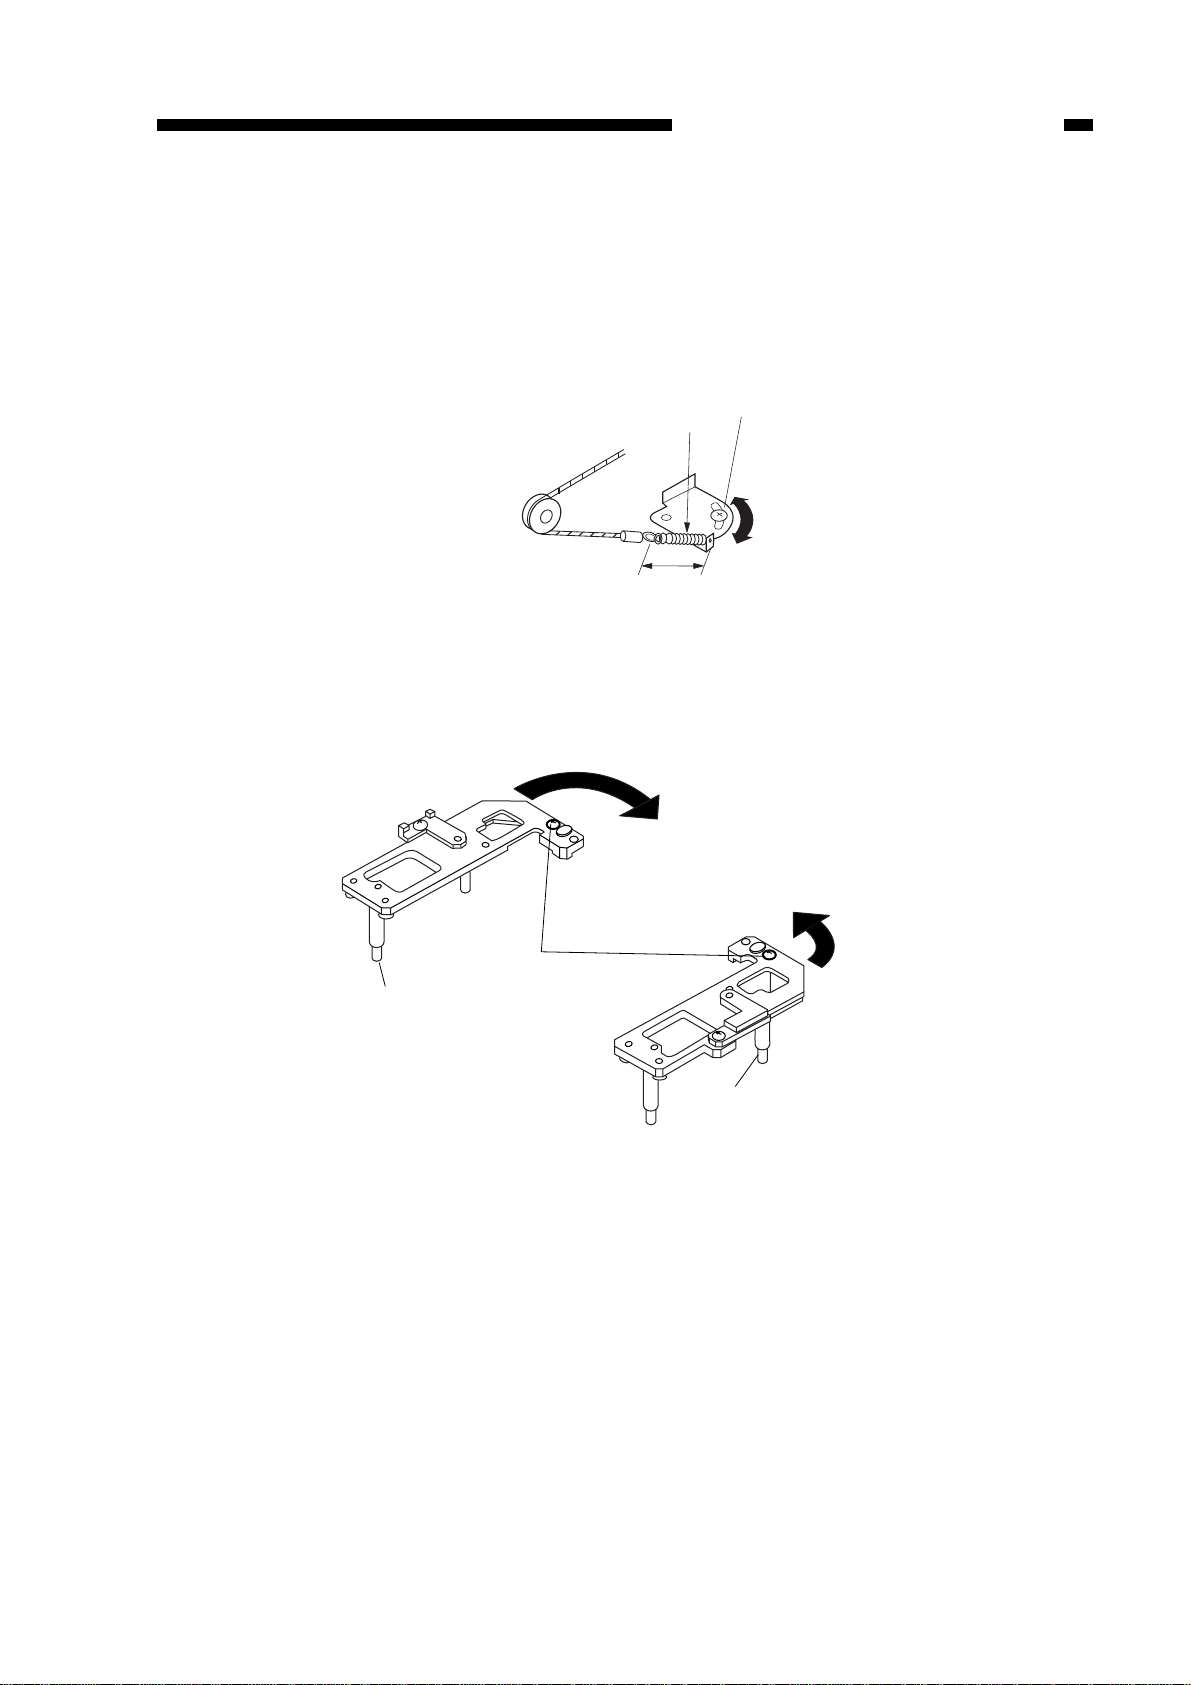
3. Adjusting the Scanner Cable Tension
Move the tension plate and tighten the scre w w so that the distance across the ends
of the cable spring q is 34 ±1 mm as indicated in Figure 2-16.
Figure 2-16
4. Assembling the Mirror Positioning Tool
1) Remove the screw found in position B.
Figure 2-17
2) Fit the screw removed in step 1) in position A, and tighten it slightly.
3) Extend the arm accommodated by the main frame unit it butts against the stopper as
in Figure 2-18.
2-13
CHAPTER 2 STANDARDS AND ADJUSTMENTS
A
A
B
B
Position A
Lightemitting
portion
Fluorescent
heater
1~5mm
60mm
60mm
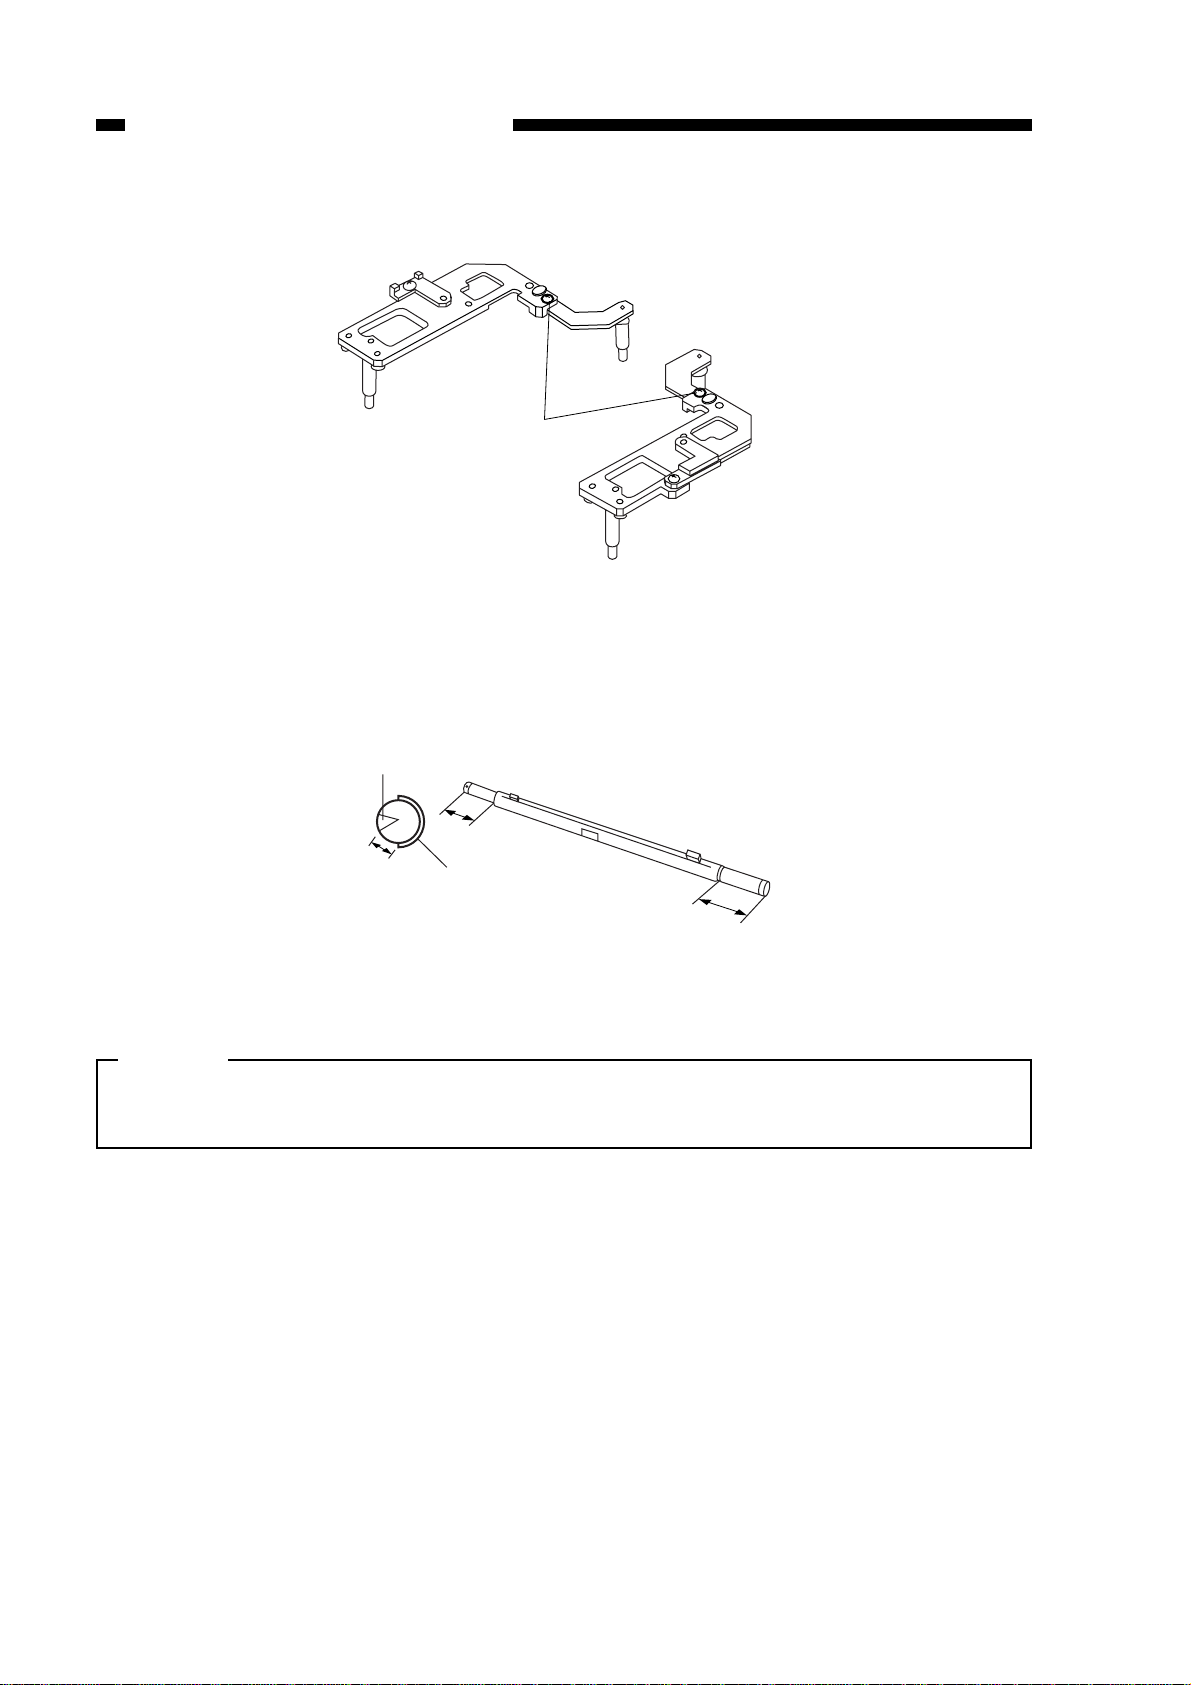
4) Tighten the screw.
Figure 2-18
5. Points to Note When Attaching the Fluorescent Lamp Heater/Scanning Lamp
• Attach the heater to the lamp as follows:
Figure 2-19
Caution:
Do not touch the fluorescent lamp. (Use lint-free paper.)
Do not block the light-emitting portion by the fluorescent lamp heater.
2-14
CHAPTER 2 STANDARDS AND ADJUSTMENTS
Light-emitting portion
Light adjustment sensor
Fluorescent lamp heater
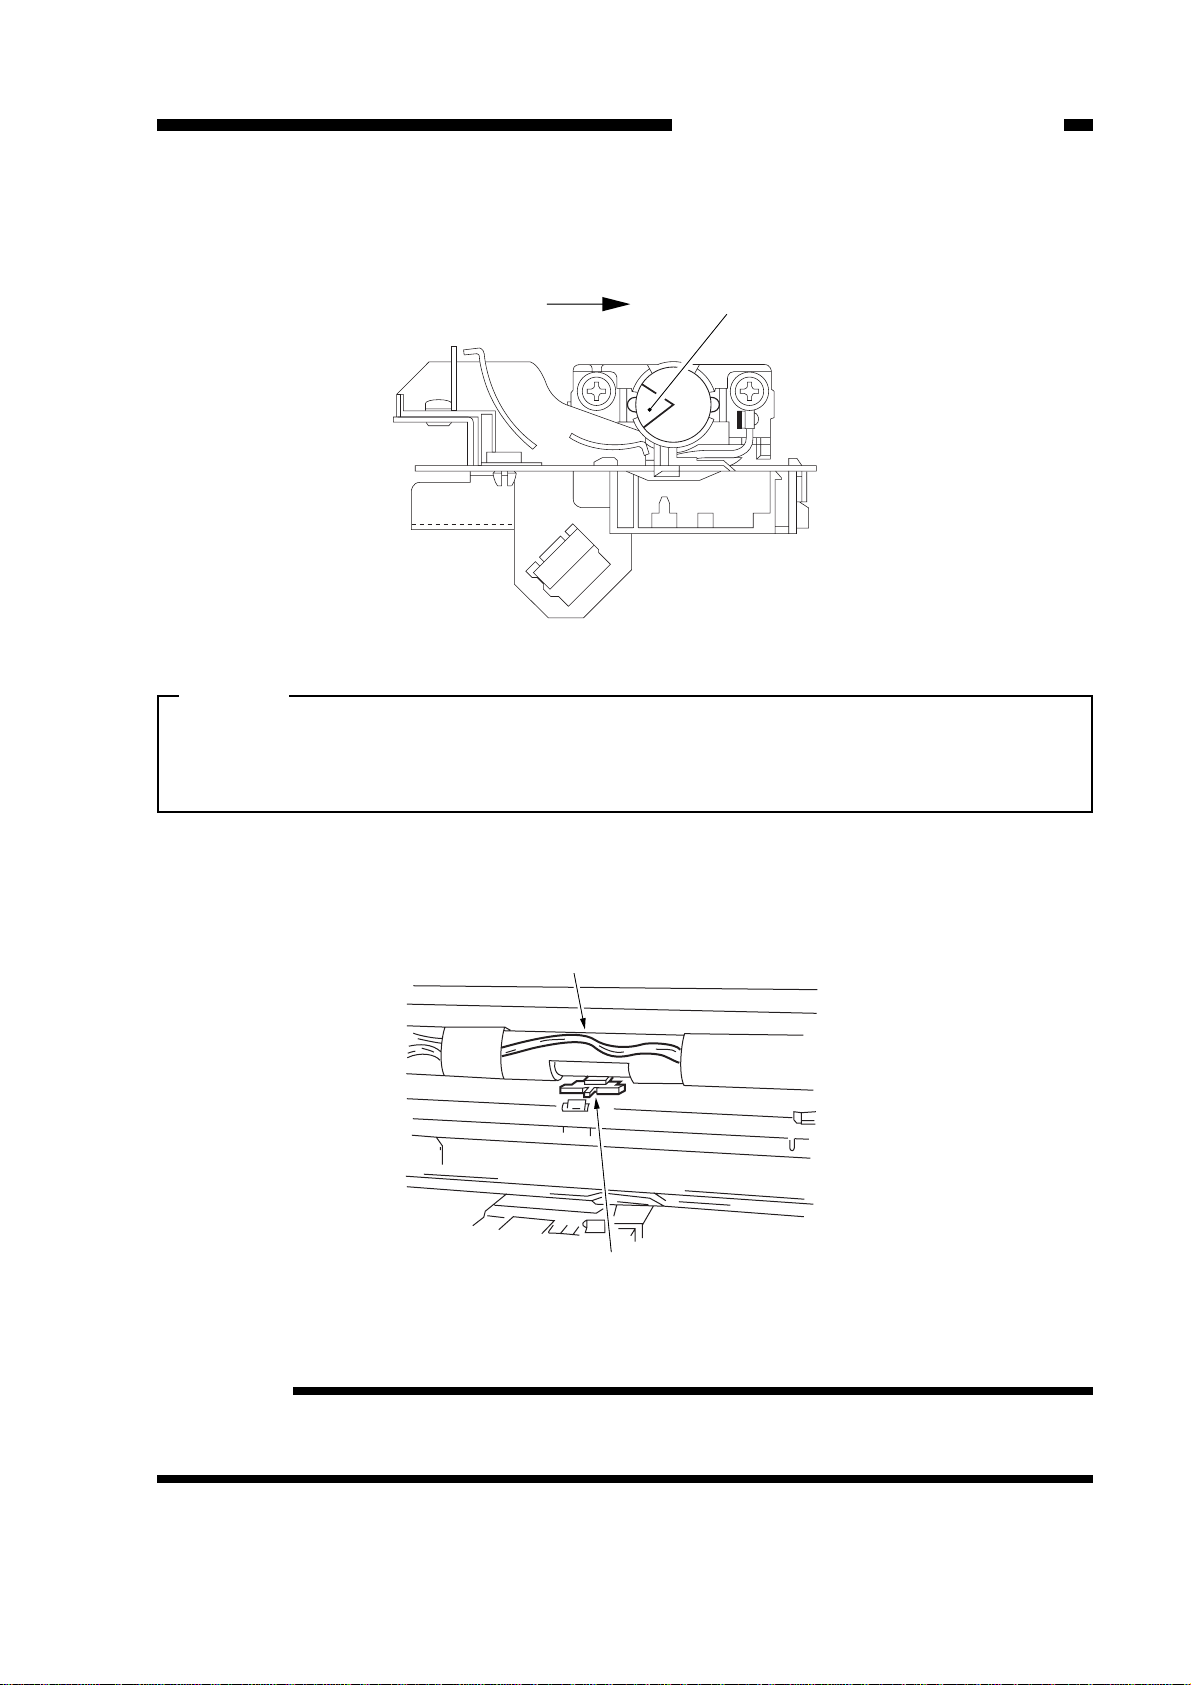
Attach the scanning lamp so that its light-emitting portion (open side) is to the left
when viewed from the front of the copier as shown in Figure 2-20.
Figure 2-20 (front view)
Caution:
Do not touch the fluorescent lamp. (Use rint-free paper)
Be sure to adjust the gain and AE whenever you have replaced the fluorescent
lamp. (See P. 2-7.)
• Make sure that the cut-off of the fluorescent heater is correctly oriented in relation
to the intensity adjustment sensor.
Figure 2-21
Reference:
The fluorescent lamp heater will not operate unless the copier’s heater switch is
turned on.
2-15
CHAPTER 2 STANDARDS AND ADJUSTMENTS
t
q
w
e
r
AB
a
b
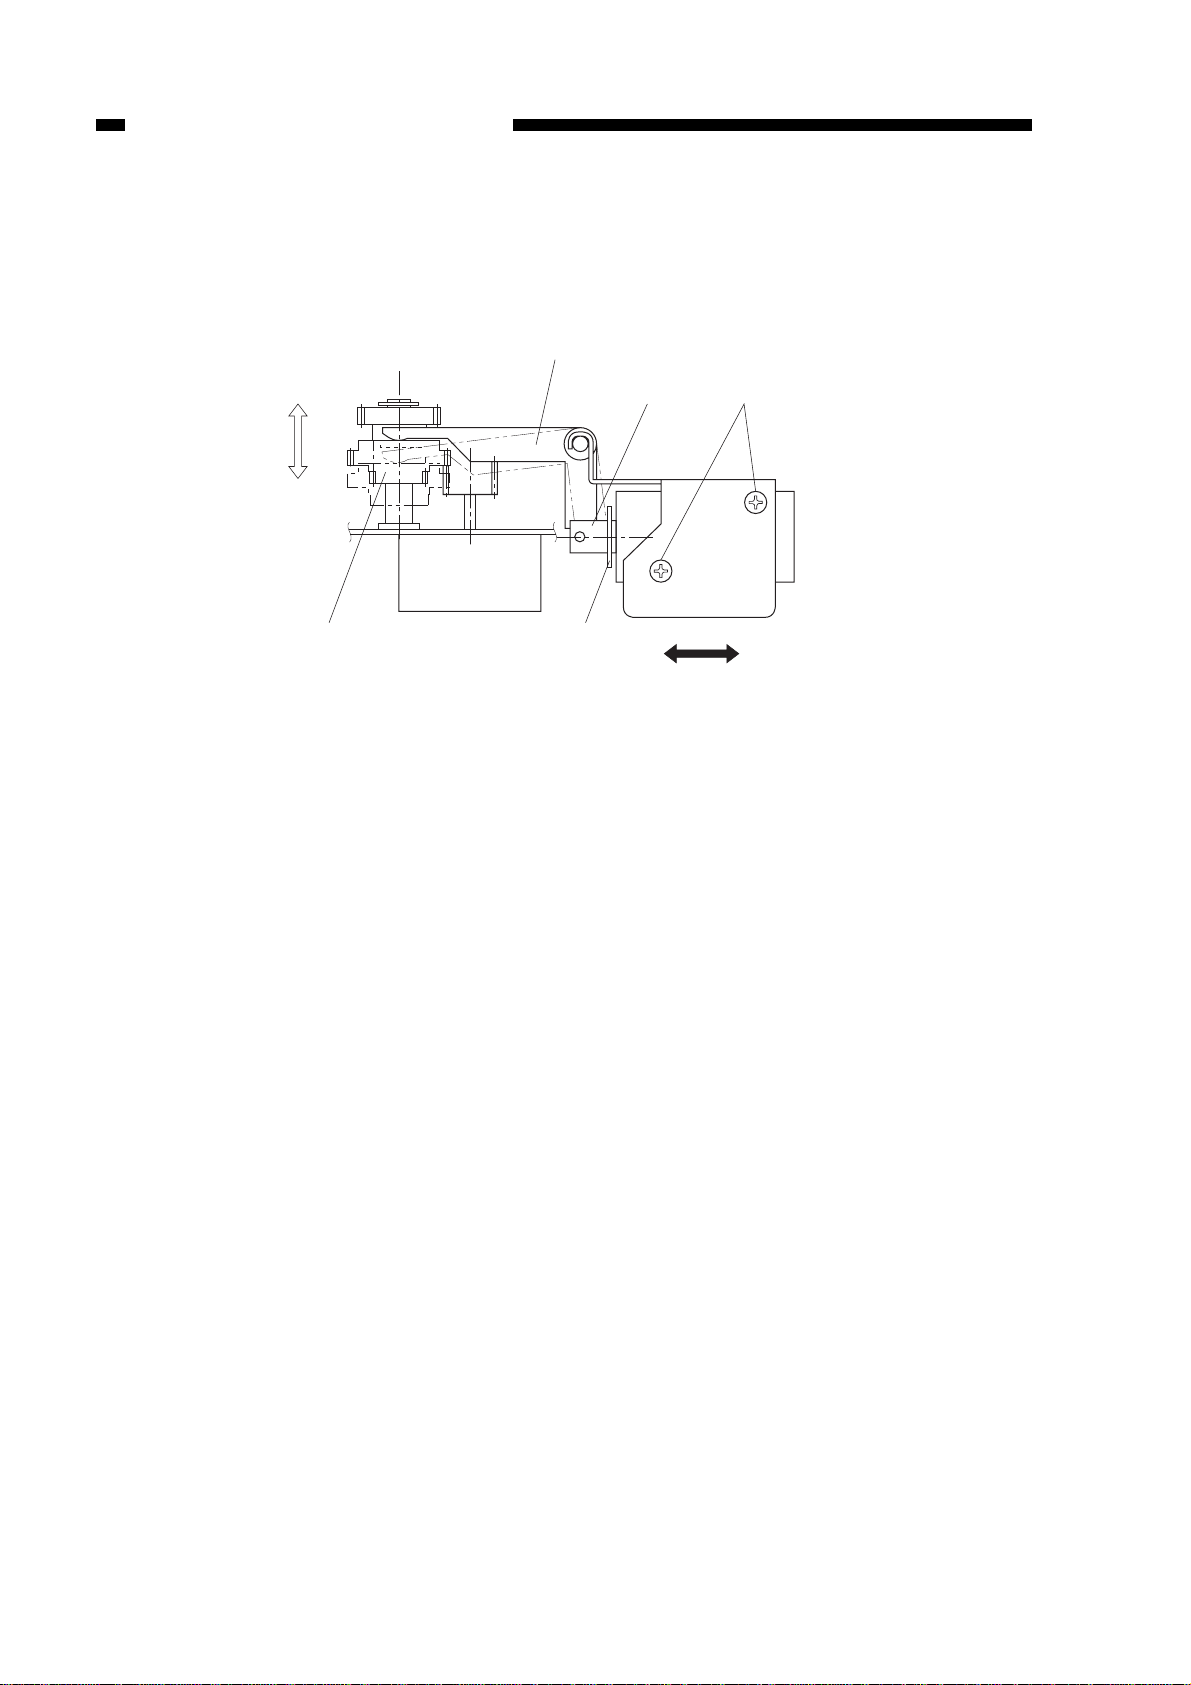
6. Positioning the Change Solenoid
Make adjustments by loosening the two screws t so that the gear r butts against
the direction of b by the arm e when the steel core q of the solenoid is fully pushed in
the direction of B, i.e., when the E-ring comes into contact with the solenoid.
Figure 2-22
2-16
CHAPTER 2 STANDARDS AND ADJUSTMENTS
A
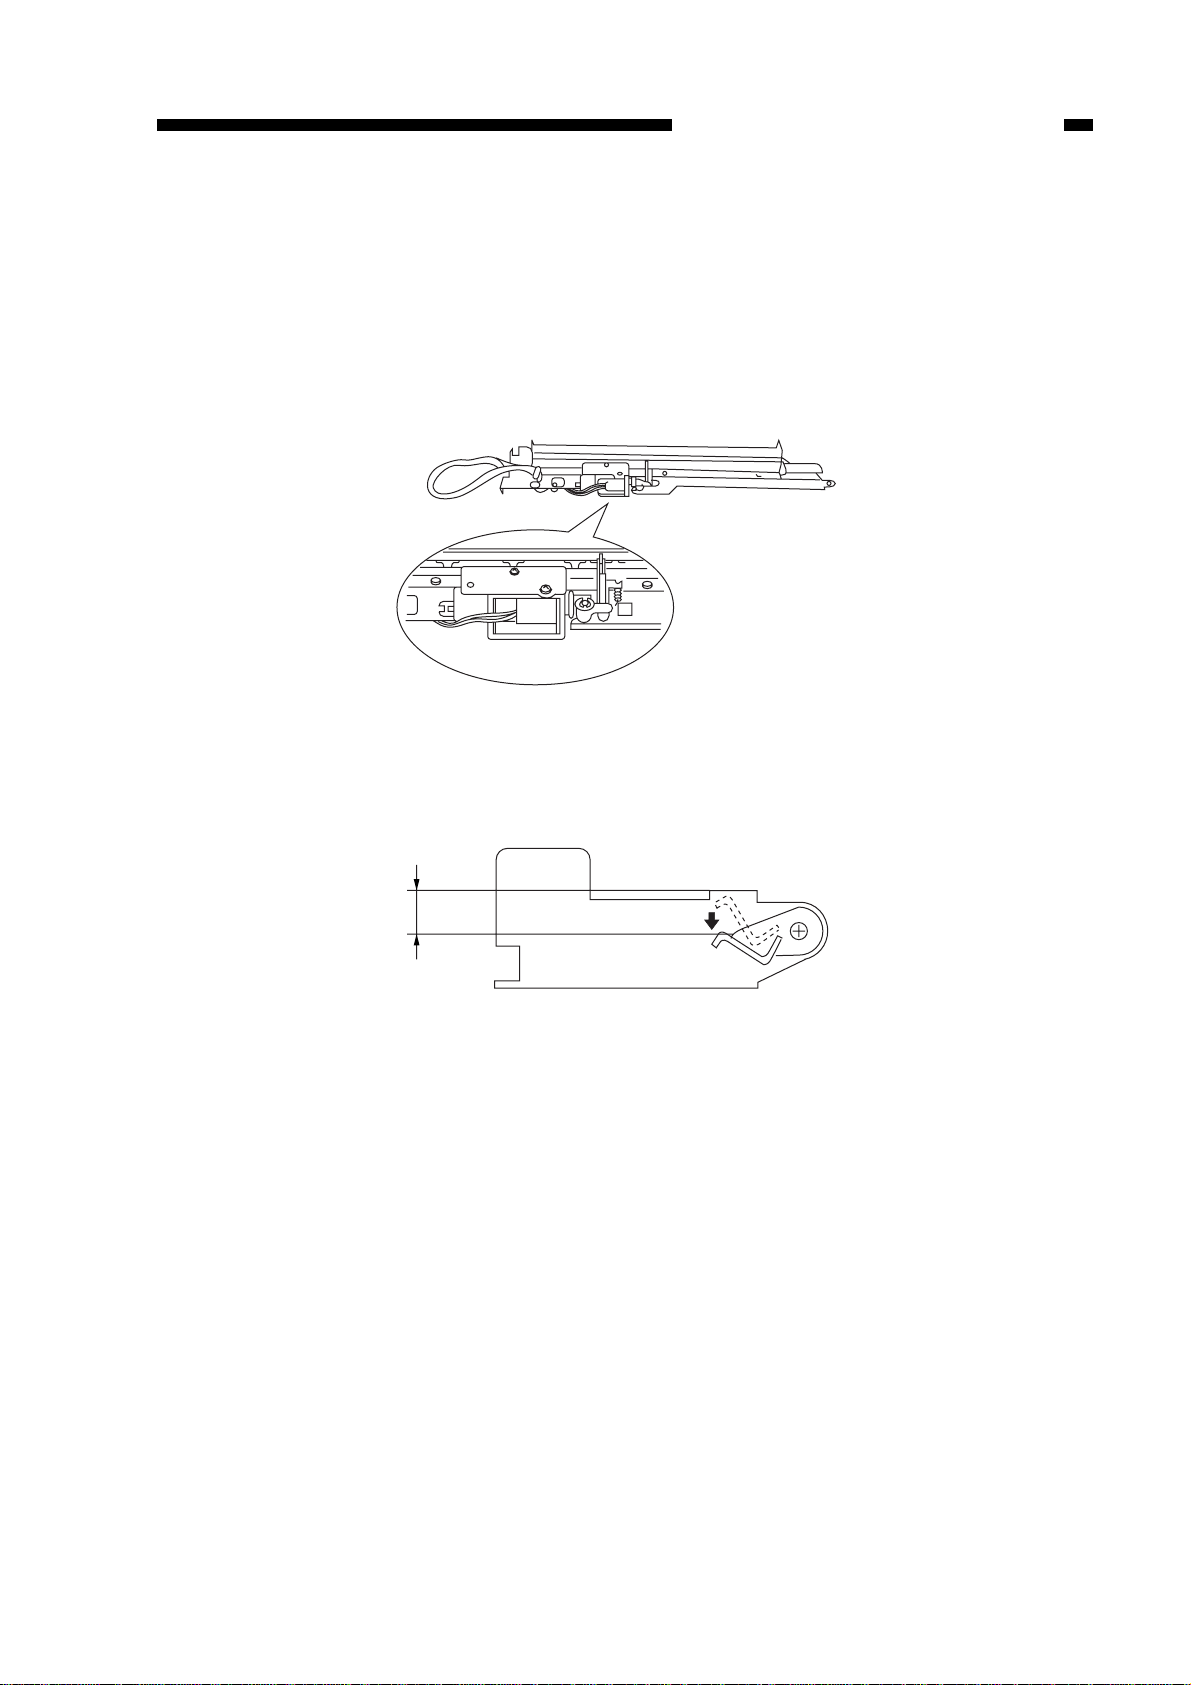
C. Image Formation System
1. Positioning the Blank Shutter Solenoid
Adjust the position of the blank shutter solenoid so that the bottom A is 9.5 ±0.5 mm
on both sides when the solenoid is moved in the direction of ON; try not to force down
the shutter.
After adjustments, make sure that the solenoid moves smoothly.
Figure 2-23a
Figure 2-23b
2-17
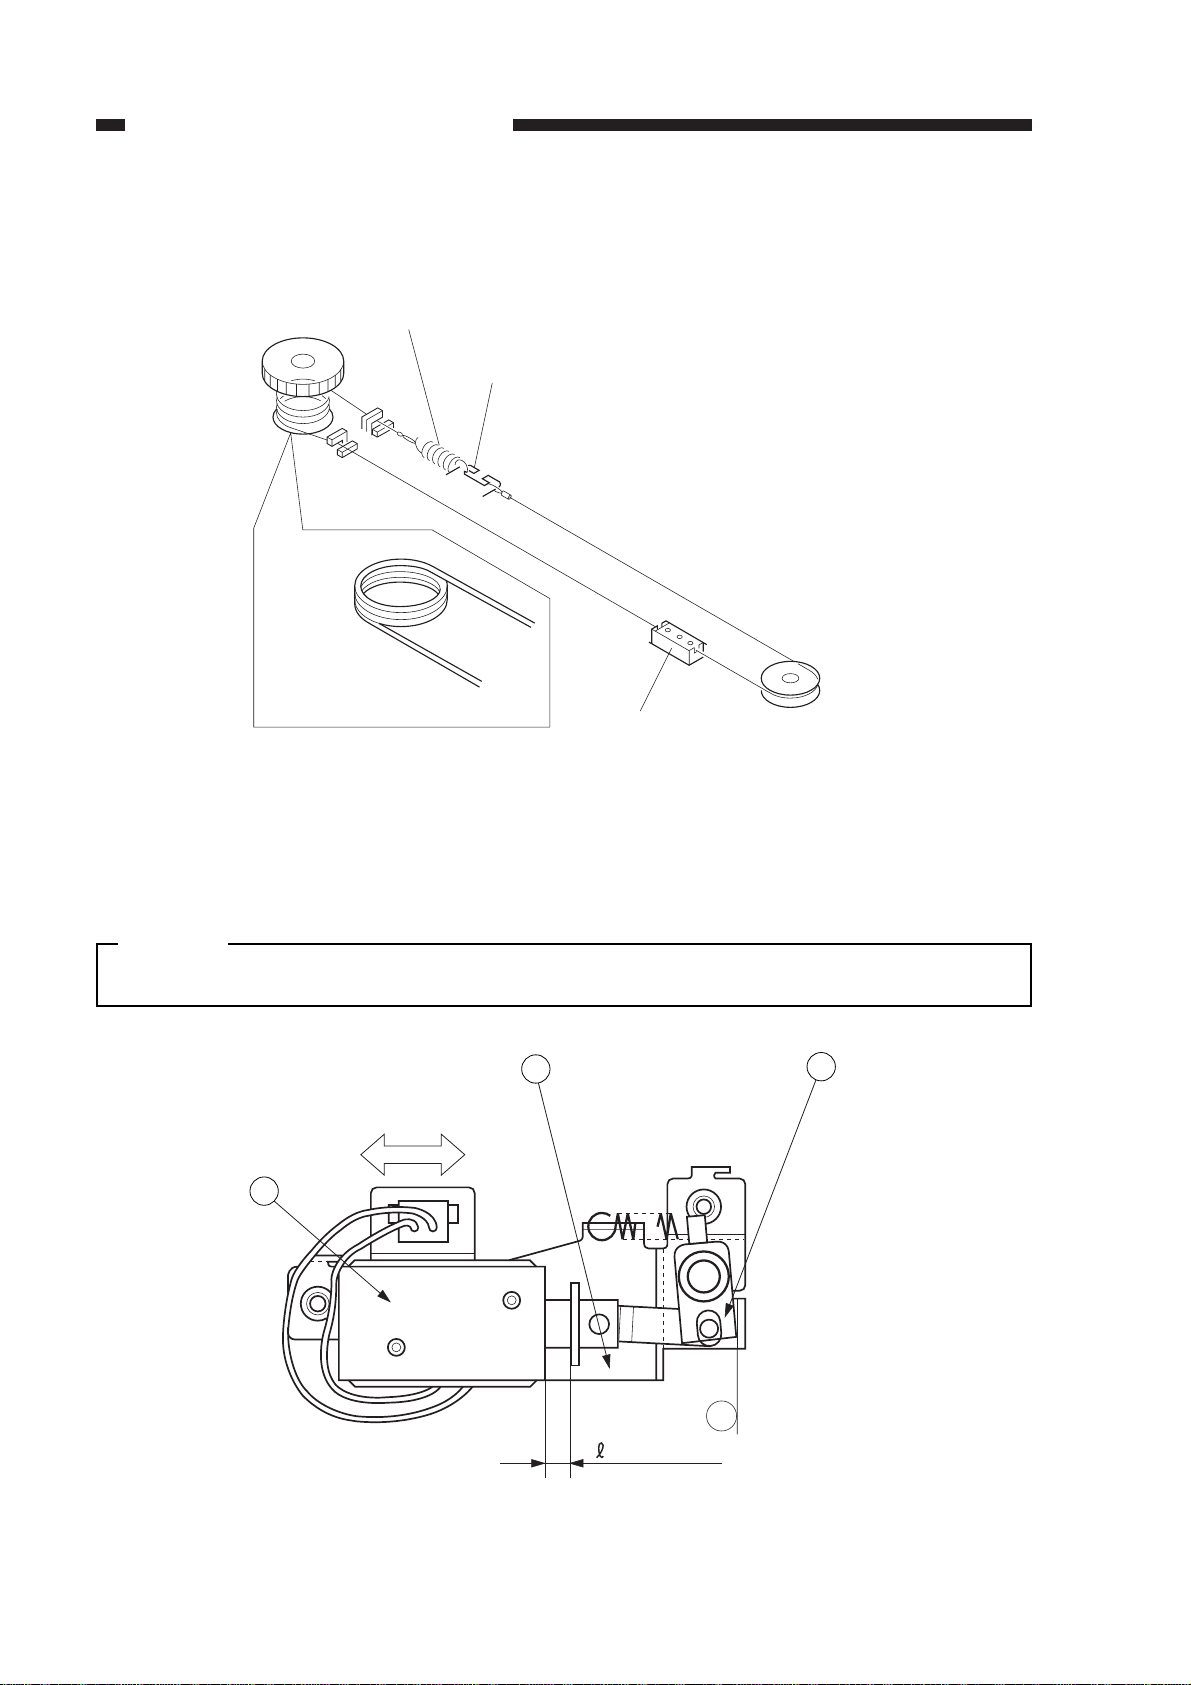
R in Figure 2-25 is 5.5 ±0.2 mm when the joint q is butted
against a of the solenoid support plate w.
Caution:
Be sure to make the adjustment whenever you have replaced the solenoid.
Figure 2-25
CHAPTER 2 STANDARDS AND ADJUSTMENTS
2-18
Attach the spring to
the outside of the
sides shutter.
Slide shutter (rear)
Wind 3.5 times.
Slide shutter (front)
a
= 5.5 ± 0.2
2
1
3
2. Routing the Blank Shutter Cable
Figure 2-24
3. Positioning the Solenoid for the Primary Charging Roller
Loosen the two screws used to fix the solenoid e in place, and move the solenoid in
the direction of B so that the
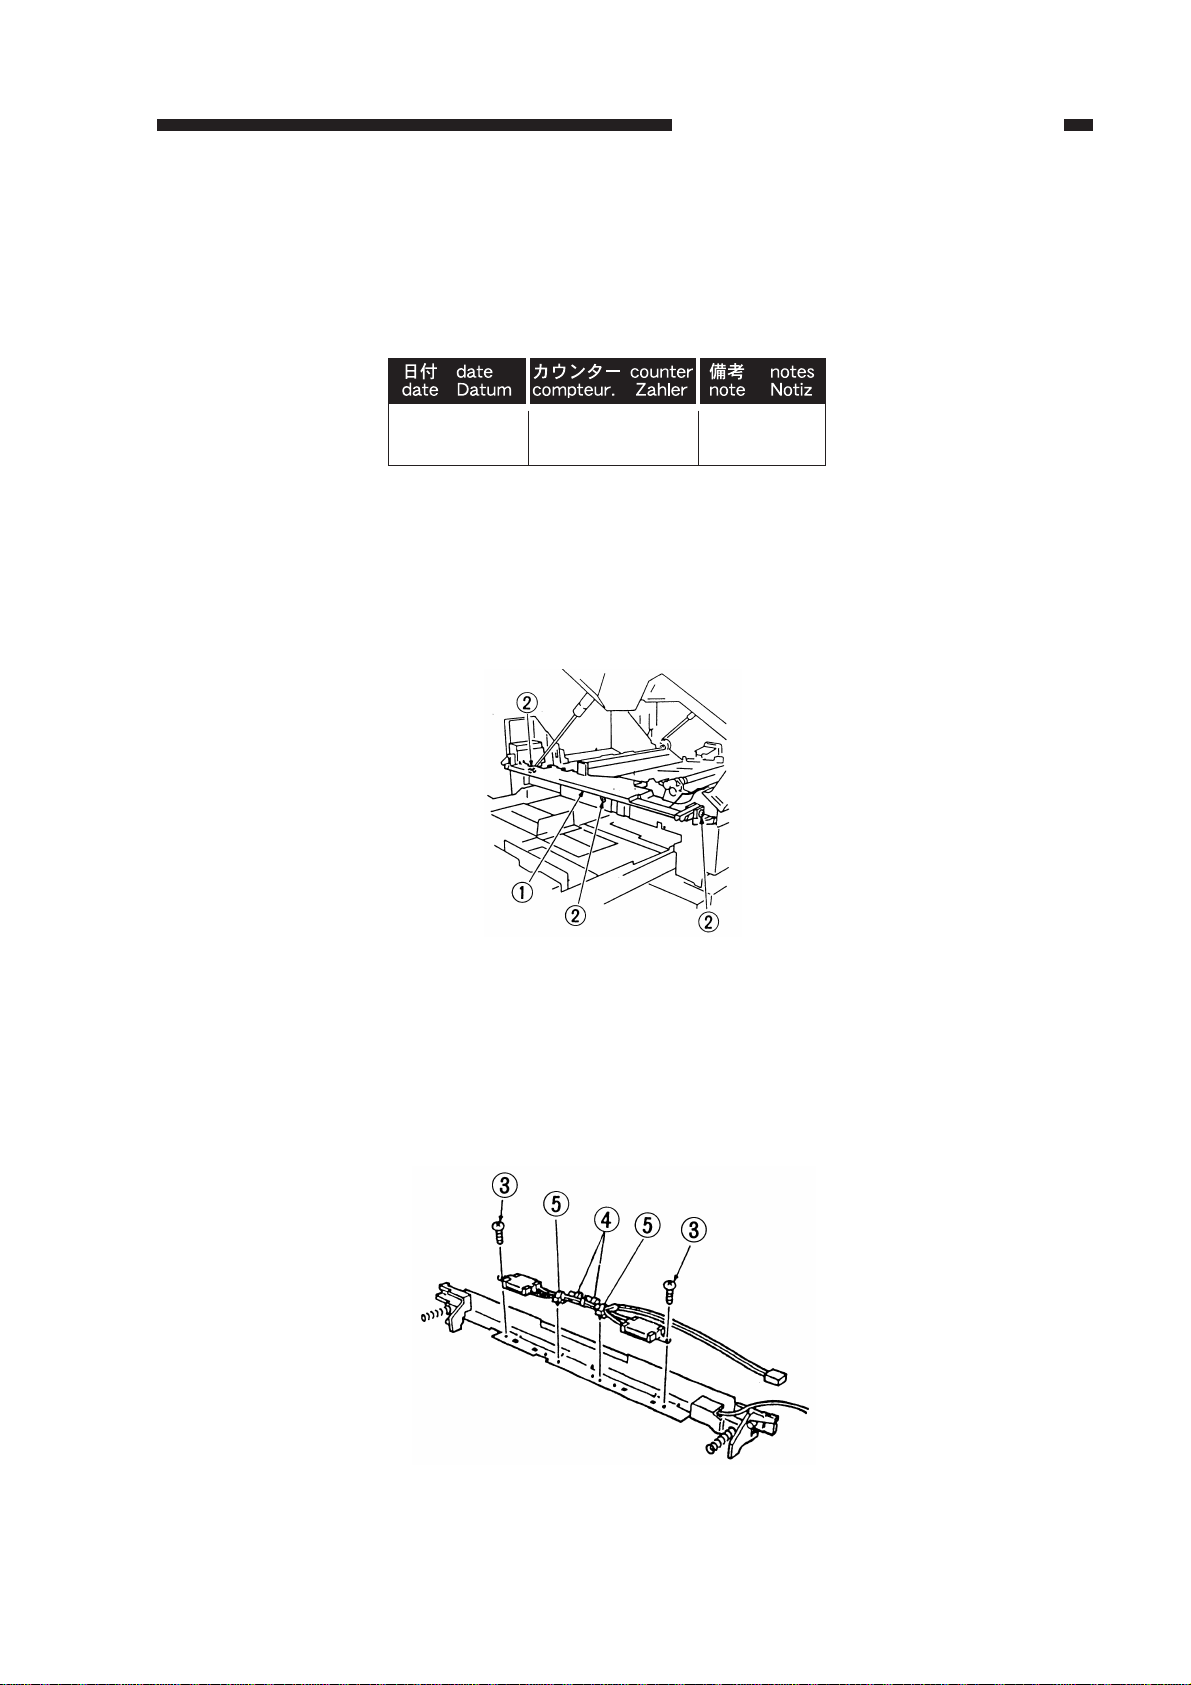
4. After Replacing the Drum Unit
Whenever you have replaced the drum unit, enter the date of replacement and the
current counter reading on the label (Figure 2-26) that came with the drum unit; attach
the label to the front cover of the ne w drum unit, and perform the image basic adjustment
procedure.
Figure 2-26
5. Attaching the Drum Heater
1) Detach the front cover.
2) Open the copier’s top body by operating the copier open/close lever.
3) Remove the two fixing screws
w, and detach the harness cover q.
Figure 2-27
4) Detach the transfer roller and the static eliminator.
5) Detach the transfer guide.
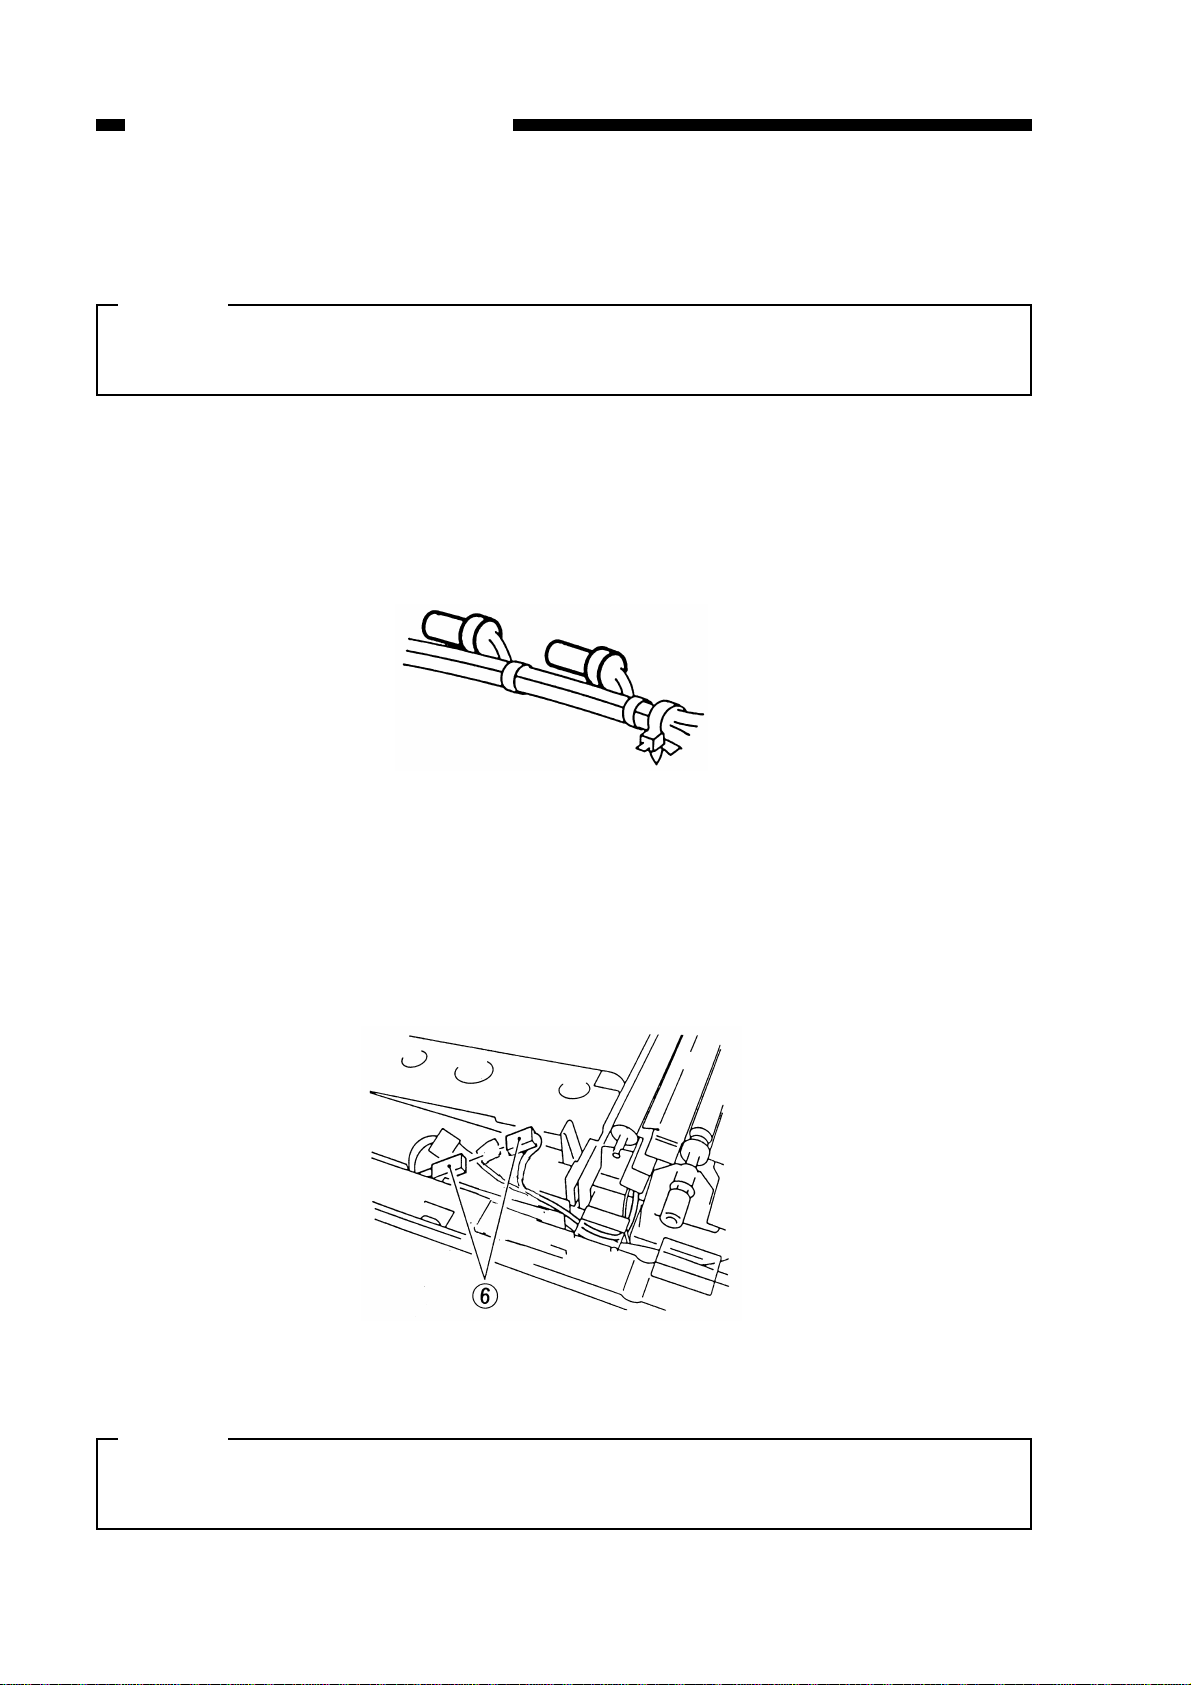
6) Butt the two heaters against the transfer guide as shown in Figure 2-28, and fix the
two mounts with two screws e; further, fix the harness in place using two harness
bands r (front, rear).
Figure 2-28
CHAPTER 2 STANDARDS AND ADJUSTMENTS
2-19
CHAPTER 2 STANDARDS AND ADJUSTMENTS
7) Fix the harness in place using two SK binders (WT2-5145; front, rear) t; then, insert
it into the transfer guide.
Caution:
When fixing the harness in place, make sure that the cap portions of the terminals
alternate; keeping them in parallel will bring them in contact with the transfer roller.
8) Fix the harness with two SK binder t (front, rear) in place, and insert it into the
transfer guide.
Figure 2-29
9) Connect the connector y as shown in Figure 2-30.
Figure 2-30
Caution:
When attaching the transfer guide to the copier after attaching the drum heater,
make sure that the spring at the rear is firmly in the groove.
2-20
CHAPTER 2 STANDARDS AND ADJUSTMENTS
w
q
(front)
q
w
D. Pick-Up/Feeding System
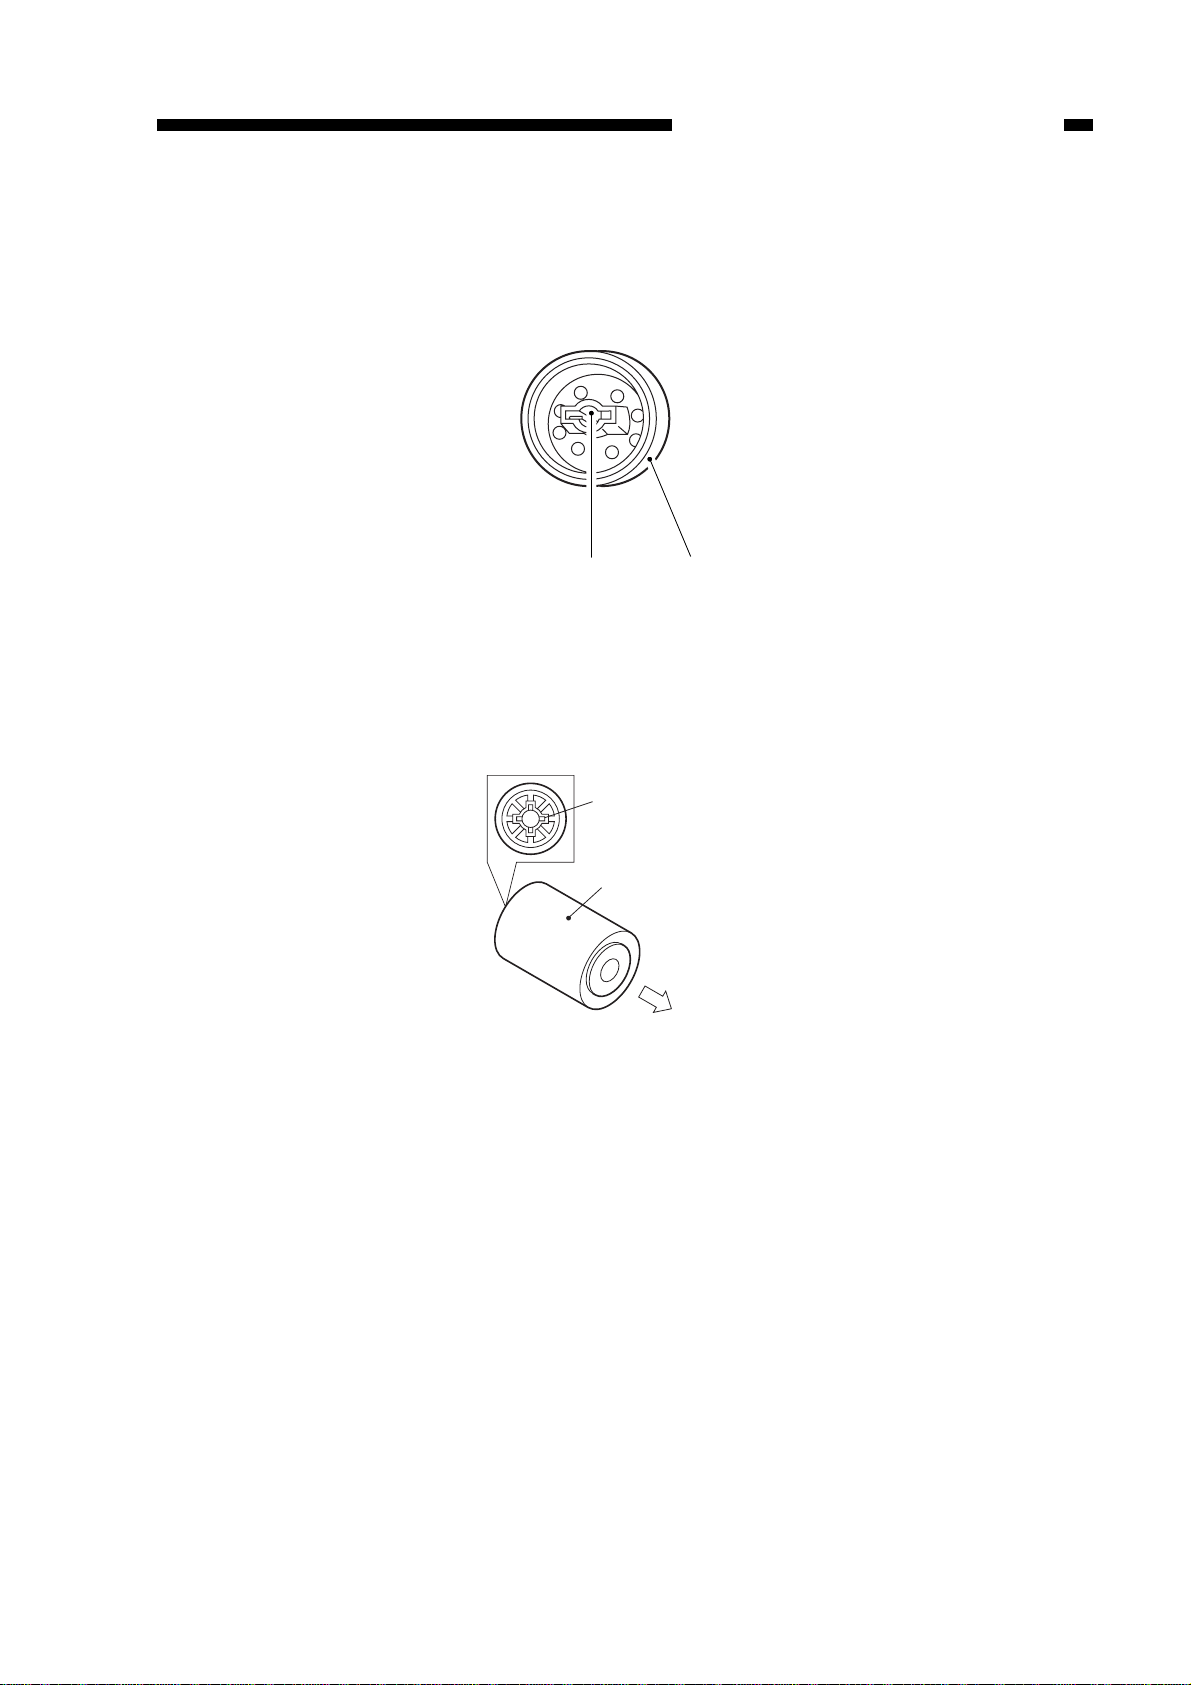
1. Orientation of the Pick-Up Roller
Attach the pick-up roll q so that the side w shown in Figure 2-31 is toward the rear.
Figure 2-31
2. Orientation of the Multifeeder Pick-Up Roller
Attach the multifeeder pic k-up roller q so that the side with the collar with a cross w
is toward the rear.
Figure 2-32
2-21
CHAPTER 2 STANDARDS AND ADJUSTMENTS
3. Positioning the Paper Guide Plate Cam (multifeeder)
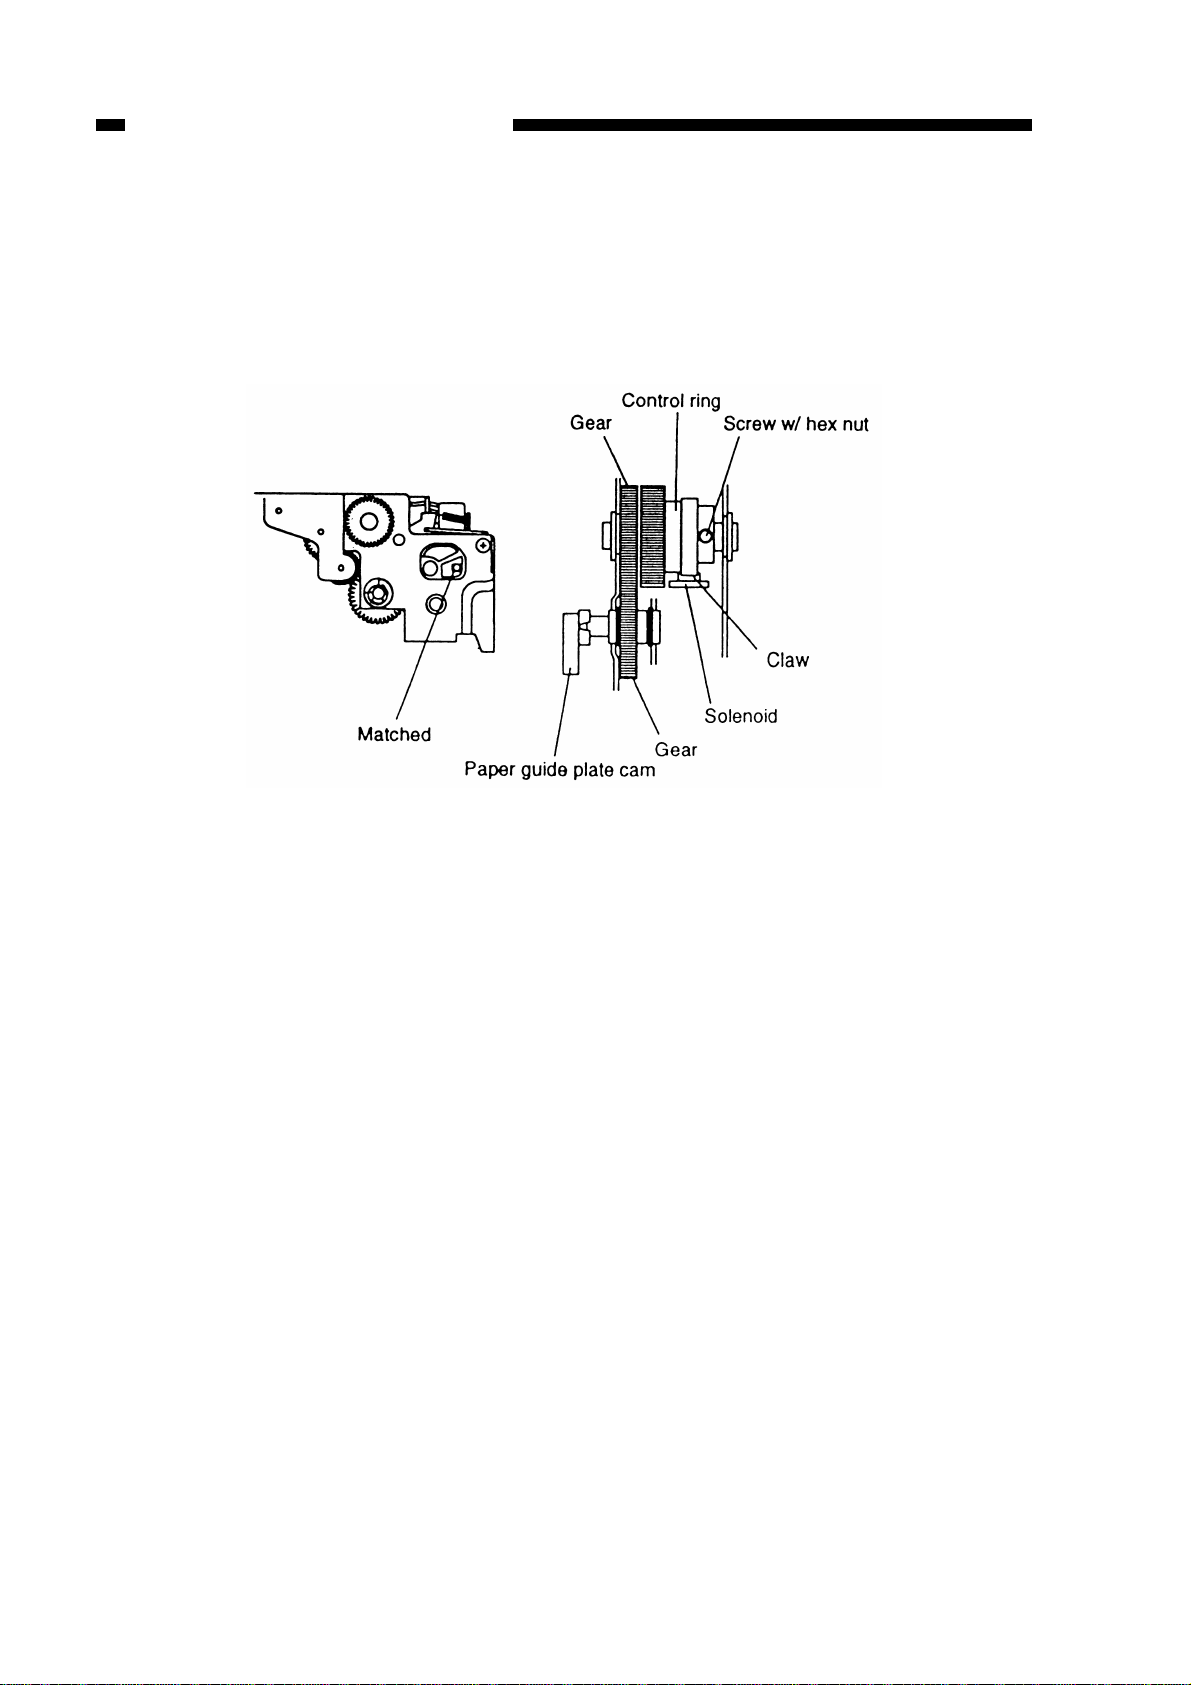
Temporarily fix the screw with a hex nut of the spring clutch assembly in place; turn
the control ring. Make adjustments so that the hole in the cam and the hole in the
multifeeder drive unit match as indicated in Figure 2-33 when the claw of the control ring
is engaged with the solenoid; then, fix in place.
Figure 2-33
2-22
CHAPTER 2 STANDARDS AND ADJUSTMENTS
Film end aligned.
Screw
Heater connector
E. Fixing System
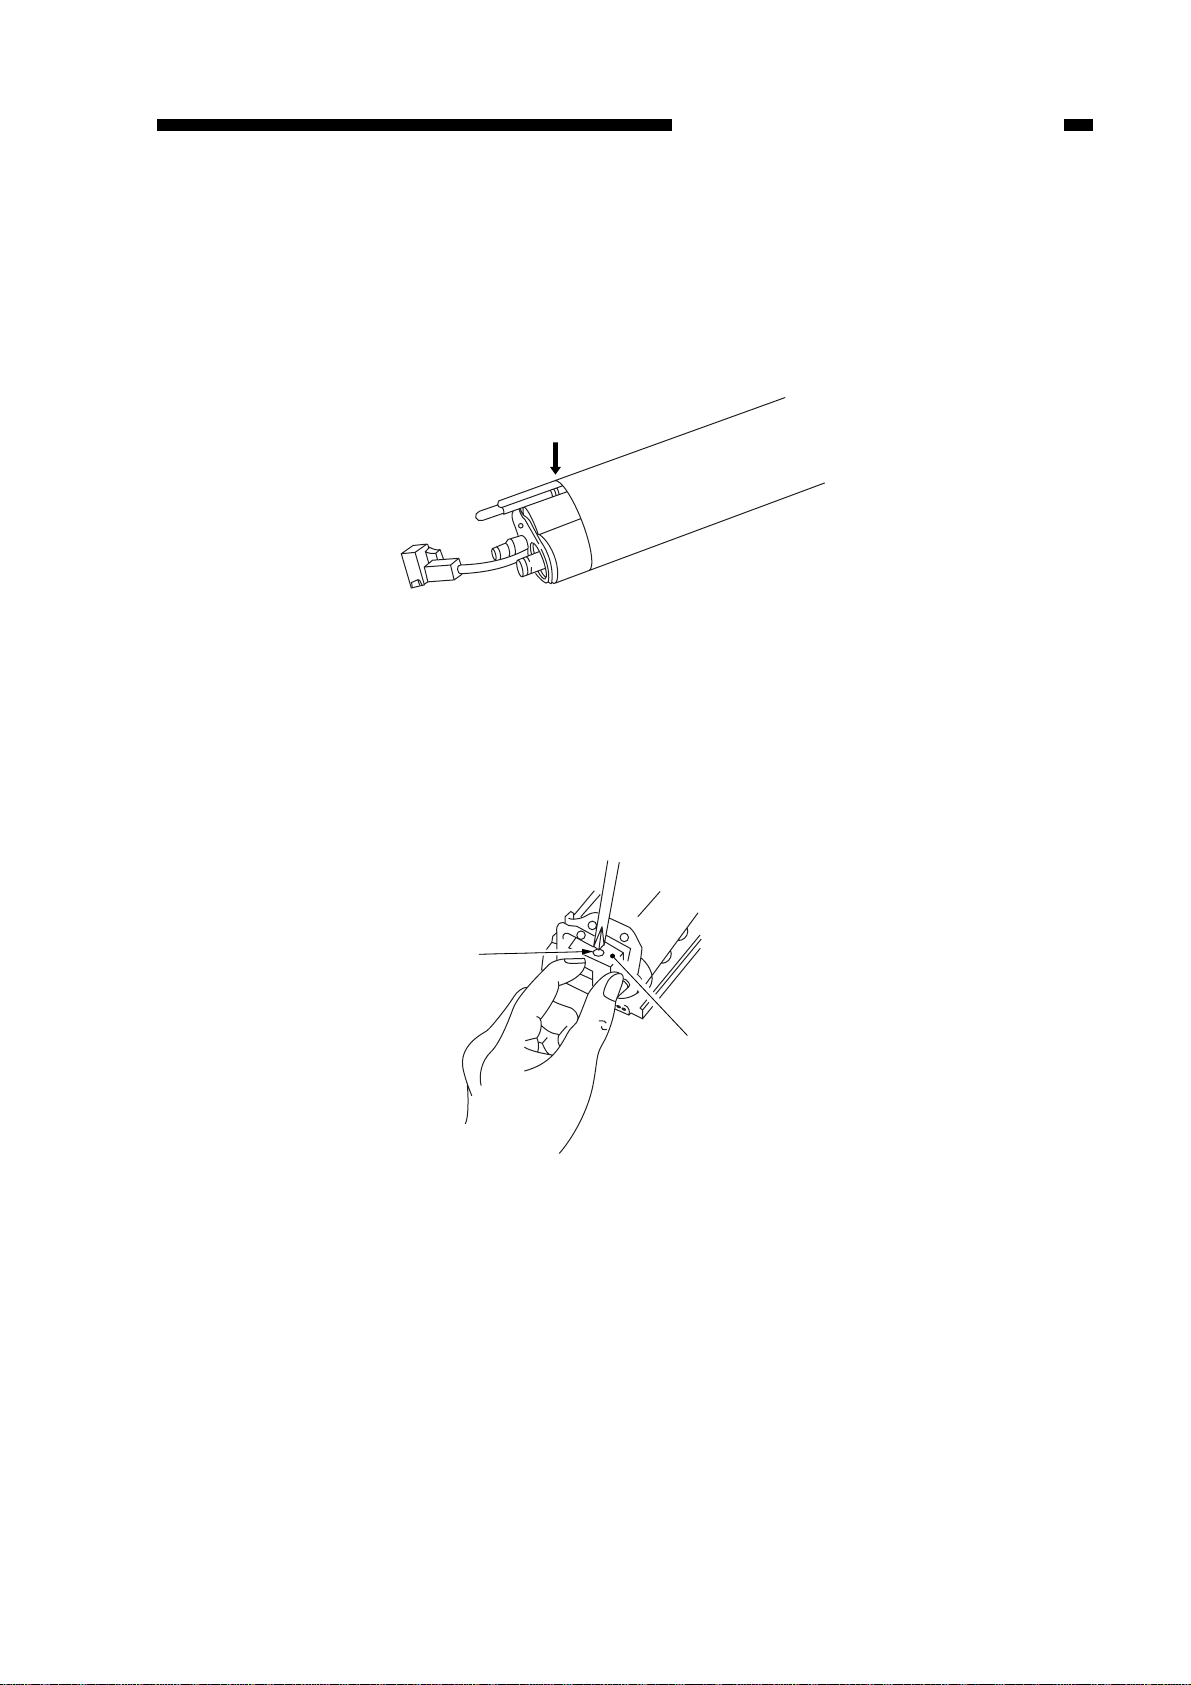
1. Points to Note When Attaching the Fixing Film
Orient it so that the cut-off is toward the rear.
Make sure that the end toward the front is along the middle groove.
Figure 2-34
2. Points to Note When Attaching the Heater Connector
• When attaching the heater connector to the fixing heater, tak e care not to damage
the heater.
• When tightening the screw, hold the connector making sure that both its top and
bottom are free of pressure; do not tighten the screw excessively.
Figure 2-35
2-23
 Loading...