

Page 1

1
5
6
1
3
4
2
7
1
2
8
1
2
213
2
1
55
66
11
33
44
Preparazione
Elementi
inclusi
22
77
88
55
66
11
33
44
Vorbereitung
Im Lieferumfang
enthalten
22
77
88
55
66
11
33
44
Préparation
Éléments
fournis
22
77
88
55
66
ENGLISH
11
33
44
Preparation
Included Items
22
77
88
Getting Started
FRANÇAIS
DEUTSCH
ITALIANO
Read me rst!
Keep me handy for future reference.
Open the Paper Output Cover.
Ouvrez le couvercle de sortie
papier.
Öffnen Sie die Abdeckung der
Papierausgabe (Paper Output Cover).
Aprire il coperchio di uscita della
carta (Paper Output Cover).
Démarrage
Inbetriebnahme
Guida Rapida
Windows ist eine Marke oder
Windows est une marque ou une
Windows is a trademark or registered
•
trademark of Microsoft Corporation in the
U.S. and/or other countries.
Windows Vista is a trademark or
•
registered trademark of Microsoft
Corporation in the U.S. and/or other
countries.
Macintosh, Mac and Mac OS are
•
trademarks of Apple Inc., registered in
the U.S. and other countries.
Model Number: K10374 (MX375)
•
marque déposée de Microsoft
Corporation aux États-Unis et/ou dans
d'autres pays.
Windows Vista est une marque ou
•
une marque déposée de Microsoft
Corporation aux États-Unis et/ou dans
d'autres pays.
Macintosh, Mac et Mac OS sont des
•
marques d'Apple Inc., déposées aux
États-Unis et dans d'autres pays.
Référence du modèle : K10374 (MX375)
To perform setup, place the machine near the computer.
•
eingetragene Marke der Microsoft
Corporation in den Vereinigten Staaten
und/oder anderen Ländern.
Windows Vista ist eine Marke oder
•
eingetragene Marke der Microsoft
Corporation in den Vereinigten Staaten
und/oder anderen Ländern.
Macintosh, Mac und Mac OS sind
•
Marken von Apple Inc., eingetragen in
den Vereinigten Staaten und anderen
Ländern.
Modellnummer: K10374 (MX375)
À lire en premier !
Conservez ce document à portée de main an
de pouvoir vous y reporter ultérieurement.
Bitte zuerst lesen!
Bewahren Sie die Anleitung
griffbereit auf.
Da leggersi preventivamente.
Da conservare per riferimento futuro.
Windows è un marchio o un marchio
•
registrato di Microsoft Corporation negli
Stati Uniti e/o in altri paesi.
Windows Vista è un marchio o
•
un marchio registrato di Microsoft
Corporation negli Stati Uniti e/o in altri
paesi.
Macintosh, Mac e Mac OS sono marchi
•
di Apple Inc., registrati negli Stati Uniti e
in altri paesi.
Modello numero: K10374 (MX375)
Remove the orange tape and plastic bag.
Retirez la bande orange ainsi que l'emballage en plastique.
Entfernen Sie das orangefarbene Klebeband (orange tape) und die Kunststoffhülle.
Rimuovere il nastro arancione (orange tape) e il sacchetto di plastica.
Close the Paper Output Cover and
the Document Cover.
Pour procéder à l'installation, placez la machine à proximité de l'ordinateur.
Zur Einrichtung stellen Sie das Gerät in die Nähe des Computers.
Per eseguire l'impostazione, posizionare la macchina in prossimità del computer.
Check the included items.
Vériez les éléments fournis avec l'imprimante.
Überprüfen Sie den Lieferumfang.
Controllare gli elementi inclusi.
Fermez le couvercle de sortie
papier et le couvercle du scanner.
Schließen Sie die Abdeckung der
Papierausgabe (Paper Output Cover) und
den Vorlagendeckel (Document Cover).
Chiudere il coperchio di uscita della carta
(Paper Output Cover) e il coperchio dei
documenti (Document Cover).
Connect the power cord.
Do not connect the USB cable yet.
Branchez le cordon d'alimentation.
Ne branchez pas encore le câble USB.
Schließen Sie das Netzkabel an.
Schließen Sie das USB-Kabel noch
nicht an.
Collegare il cavo di alimentazione.
Non collegare ancora il cavo USB.
A USB cable is required.
Un câble USB est nécessaire.
Ein USB-Kabel ist
erforderlich.
Remove the protective sheets and tape.
Retirez les feuilles de protection ainsi que la bande.
Entfernen Sie die Schutzabdeckungen (protective sheets) und das
Klebeband (tape).
Rimuovere i fogli di protezione (protective sheets) e il nastro (tape).
È necessario un cavo USB.
Back button
Bouton Précédent (Back)
Taste Zurück (Back)
Pulsante Indietro (Back)
To change the language
setting, press the Back
button.
Pour modier le paramètre
de langue, appuyez sur le
bouton Précédent (Back).
Press the ON button.
Appuyez sur le bouton MARCHE
(ON).
Drücken Sie die Taste EIN (ON).
Premere il pulsante ON.
Select your language, then press
the OK button.
Sélectionnez votre langue, puis
appuyez sur le bouton OK.
Wählen Sie Ihre Sprache aus,
und drücken Sie anschließend die
Taste OK.
Selezionare la lingua, quindi
premere il pulsante OK.
Um die Spracheinstellung
zu ändern, drücken Sie die
Taste Zurück (Back).
Per modicare
l'impostazione della
lingua, premere il pulsante
Indietro (Back).
QT5-4670-V02
XXXXXXXX ©CANON INC.2012
Open the Front Cover, the Paper
Output Tray, and the Document
Cover.
Ouvrez le panneau avant, le bac
de sortie papier et le couvercle du
scanner.
Öffnen Sie die vordere Abdeckung
(Front Cover), das Papierausgabefach
(Paper Output Tray) und den
Vorlagendeckel (Document Cover).
Aprire il coperchio anteriore (Front
Cover), il vassoio di uscita della carta
(Paper Output Tray) e il coperchio
dei documenti (Document Cover).
PRINTED IN XXXXXXXX
IMPRIME XX XXXXXXXX
Depending on the country
or region of purchase, the
Country select screen
may not be displayed.
Selon le pays ou la région
où vous avez effectué
votre achat, l'écran Choix
du pays peut ne pas
s'afcher.
Select the country of use, then
press the OK button.
Sélectionnez le pays d'utilisation,
puis appuyez sur le bouton OK.
Wählen Sie das Land aus, in dem
das Gerät verwendet wird. Drücken
Sie anschließend die Taste OK.
Selezionare il paese di utilizzo,
quindi premere il pulsante OK.
Der Bildschirm Land
auswählen (Country
select) wird je nach Land
oder Region, in dem bzw.
der das Gerät erworben
wurde, möglicherweise
nicht angezeigt.
In base al paese o alla
regione di acquisto, la
schermata Selezione
paese (Country select)
potrebbe non essere
visualizzata.
Page 2

2
1
2
1
752
4
9
6
3
44
77
33
11
22
55
Sostituzione
delle cartucce
FINE (FINE
Cartridges)
99
66
44
77
33
11
22
55
Austauschen
der FINEPatronen (FINE
Cartridges)
99
66
44
77
33
11
22
55
Remplacement
des
cartouches
FINE
99
66
44
77
33
Replacing
the FINE
Cartridges
11
22
55
Check that this screen is displayed.
99
66
Vériez que cet écran s'afche.
Insert the FINE Cartridge until it
stops.
Do not knock it against the sides!
Check that the Head Cover has
opened automatically.
Überprüfen Sie, ob der Bildschirm
angezeigt wird.
Vericare che venga visualizzata
questa schermata.
Open the Paper Output Tray and
the Paper Output Cover.
Ouvrez le bac de sortie papier et le
couvercle de sortie papier.
Öffnen Sie das Papierausgabefach
(Paper Output Tray) und die Abdeckung
der Papierausgabe (Paper Output Cover).
Aprire il vassoio di uscita della carta
(Paper Output Tray) e il coperchio di
uscita della carta (Paper Output Cover).
If the Head Cover is closed, close the
Paper Output Cover and open it again
to open the Head Cover.
Insert it straight until it stops.
Insérez-la sans la faire pencher jusqu'à ce qu'elle soit correctement installée.
Setzen Sie sie gerade ein, bis sie einrastet.
Inserirla in modo rettilineo nché non si ferma.
Insérez la cartouche FINE jusqu'à ce
qu'elle soit correctement installée.
Ne cognez pas la cartouche contre
les bords !
Setzen Sie die FINE-Patrone (FINE
Cartridge) ein, bis sie einrastet.
Stoßen Sie mit der Patrone nicht
gegen die Seiten der Halterung!
Inserire la cartuccia FINE (FINE
Cartridge) nché non si ferma.
Non farla urtare contro i bordi.
Lift the Ink Cartridge Lock Lever.
Soulevez le levier de verrouillage
de cartouche d'encre.
Heben Sie den TintenpatronenSperrhebel (Ink Cartridge Lock
Lever) an.
Sollevare la leva di bloccaggio
della cartuccia di inchiostro (Ink
Cartridge Lock Lever).
Vériez que le capot des têtes
s'est ouvert automatiquement.
Überprüfen Sie, ob sich die
Abdeckung für Kopf (Head
Cover) automatisch geöffnet hat.
Controllare che il coperchio
della testina (Head Cover) si
sia aperto automaticamente.
Si le capot des têtes est fermé, fermez
le couvercle de sortie papier, puis
ouvrez-le de nouveau pour ouvrir le
capot des têtes.
Wenn die Abdeckung für Kopf (Head
Cover) geschlossen ist, schließen Sie die
Abdeckung der Papierausgabe (Paper
Output Cover) und öffnen sie erneut, um die
Abdeckung für Kopf (Head Cover) zu öffnen.
Se il coperchio della testina (Head
Cover) è chiuso, chiudere il coperchio
di uscita della carta (Paper Output
Cover), quindi riaprirlo per aprire il
coperchio della testina (Head Cover).
Repeat to to install the other
FINE Cartridge.
Répétez les étapes à pour
installer l'autre cartouche FINE.
Wiederholen Sie bis , um
die andere FINE-Patrone (FINE
Cartridge) einzusetzen.
Ripetere la procedura dal punto
al punto per installare l'altra
cartuccia FINE (FINE Cartridge).
Close the Paper Output Cover.
Wait for about 1 to 2 minutes until this
screen is displayed, then proceed.
Lower the Ink Cartridge Lock Lever.
The left is where the Color FINE Cartridge is to be installed and the right is where the Black FINE Cartridge is to be
installed.
Rabaissez le levier de verrouillage de cartouche d'encre.
La cartouche FINE couleur doit être installée à gauche et la cartouche FINE noire doit être installée à droite.
Senken Sie den Tintenpatronen-Sperrhebel (Ink Cartridge Lock Lever) ab.
Auf der linken Seite muss die farbige FINE-Patrone (FINE Cartridge) und auf der rechten Seite die schwarze FINEPatrone (FINE Cartridge) eingesetzt werden.
Abbassare la leva di bloccaggio della cartuccia di inchiostro (Ink Cartridge Lock Lever).
La cartuccia FINE (FINE Cartridge) Colore viene installata sulla sinistra, mentre la cartuccia FINE (FINE Cartridge)
Nero viene installata a destra.
Unpack the FINE Cartridge, then
remove the protective tape.
Be careful of ink on the protective tape.
If an error message
appears, check that the
FINE Cartridge is installed
correctly.
The LCD turns off if the
machine is not operated
for about 5 minutes. To
restore the display, press
any button (except the ON
button) on the Operation
Panel.
Si un message d'erreur
apparaît, vériez que
la cartouche FINE est
correctement installée.
L'écran LCD s'éteint si
la machine n'est pas
utilisée pendant environ
5 minutes. Pour restaurer
l'afchage de l'écran,
appuyez sur n'importe
quel bouton (à l'exception
du bouton MARCHE (ON))
du panneau de contrôle.
Fermez le couvercle de sortie
papier.
Attendez environ 1 à 2 minutes que cet
écran s'afche, puis passez à l'étape
suivante.
Schließen Sie die Abdeckung der
Papierausgabe (Paper Output Cover).
Warten Sie etwa 1 bis 2 Minuten, bis
dieser Bildschirm angezeigt wird, und
fahren Sie dann fort.
Chiudere il coperchio di uscita
della carta (Paper Output Cover).
Attendere circa 1 - 2 minuti, nché non
viene visualizzata la schermata, quindi
procedere.
Wenn eine Fehlermeldung
angezeigt wird, überprüfen Sie,
ob die FINE-Patrone (FINE
Cartridge) ordnungsgemäß
eingesetzt ist.
Die LCD-Anzeige schaltet
sich aus, wenn das
Gerät etwa 5 Minuten
lang nicht bedient
wird. Um die Anzeige
wiederherzustellen,
drücken Sie eine beliebige
Taste am Bedienfeld
(Operation Panel) (außer
der Taste EIN (ON)).
Se viene visualizzato
un messaggio di errore,
vericare che la cartuccia
FINE (FINE Cartridge) sia
installata correttamente.
Il display LCD si spegne
se la stampante non
viene utilizzata per circa
5 minuti. Per ripristinare il
display, premere qualsiasi
pulsante (tranne il
pulsante ON) sul pannello
dei comandi (Operation
Panel).
Do not touch!
Ne pas toucher !
Nicht berühren!
Non toccare.
Enlevez la cartouche FINE de
son emballage, puis le ruban
protecteur.
Faites attention à l'encre se trouvant
sur le ruban protecteur.
Packen Sie die FINE-Patrone
(FINE Cartridge) aus, und
entfernen Sie das Schutzband.
Achten Sie auf Tintenspuren auf dem
Schutzband.
Rimuovere dalla confezione la
cartuccia FINE (FINE Cartridge),
quindi rimuovere il nastro protettivo.
Prestare attenzione all'inchiostro sul
nastro protettivo.
The following FINE Cartridges are compatible with this machine.
Les cartouches FINE suivantes sont compatibles avec cette machine.
Folgende FINE-Patronen (FINE Cartridges) sind mit diesem Gerät kompatibel.
Le seguenti cartucce FINE (FINE Cartridges) sono compatibili con questa stampante.
Color: CL-541XL
Color: CL-541
Black: PG-540XL
Black: PG-540
Page 3
3
1
2
1
2
4
5
1
2
3
Impostazione della
carta comune
Caricamento di
carta fotografica
11
22
33
44
55
Einlegen von
Normalpapier
Einlegen von
Fotopapier
11
22
33
44
55
Configuration du
papier ordinaire
Chargement de
papier photo
11
22
33
44
55
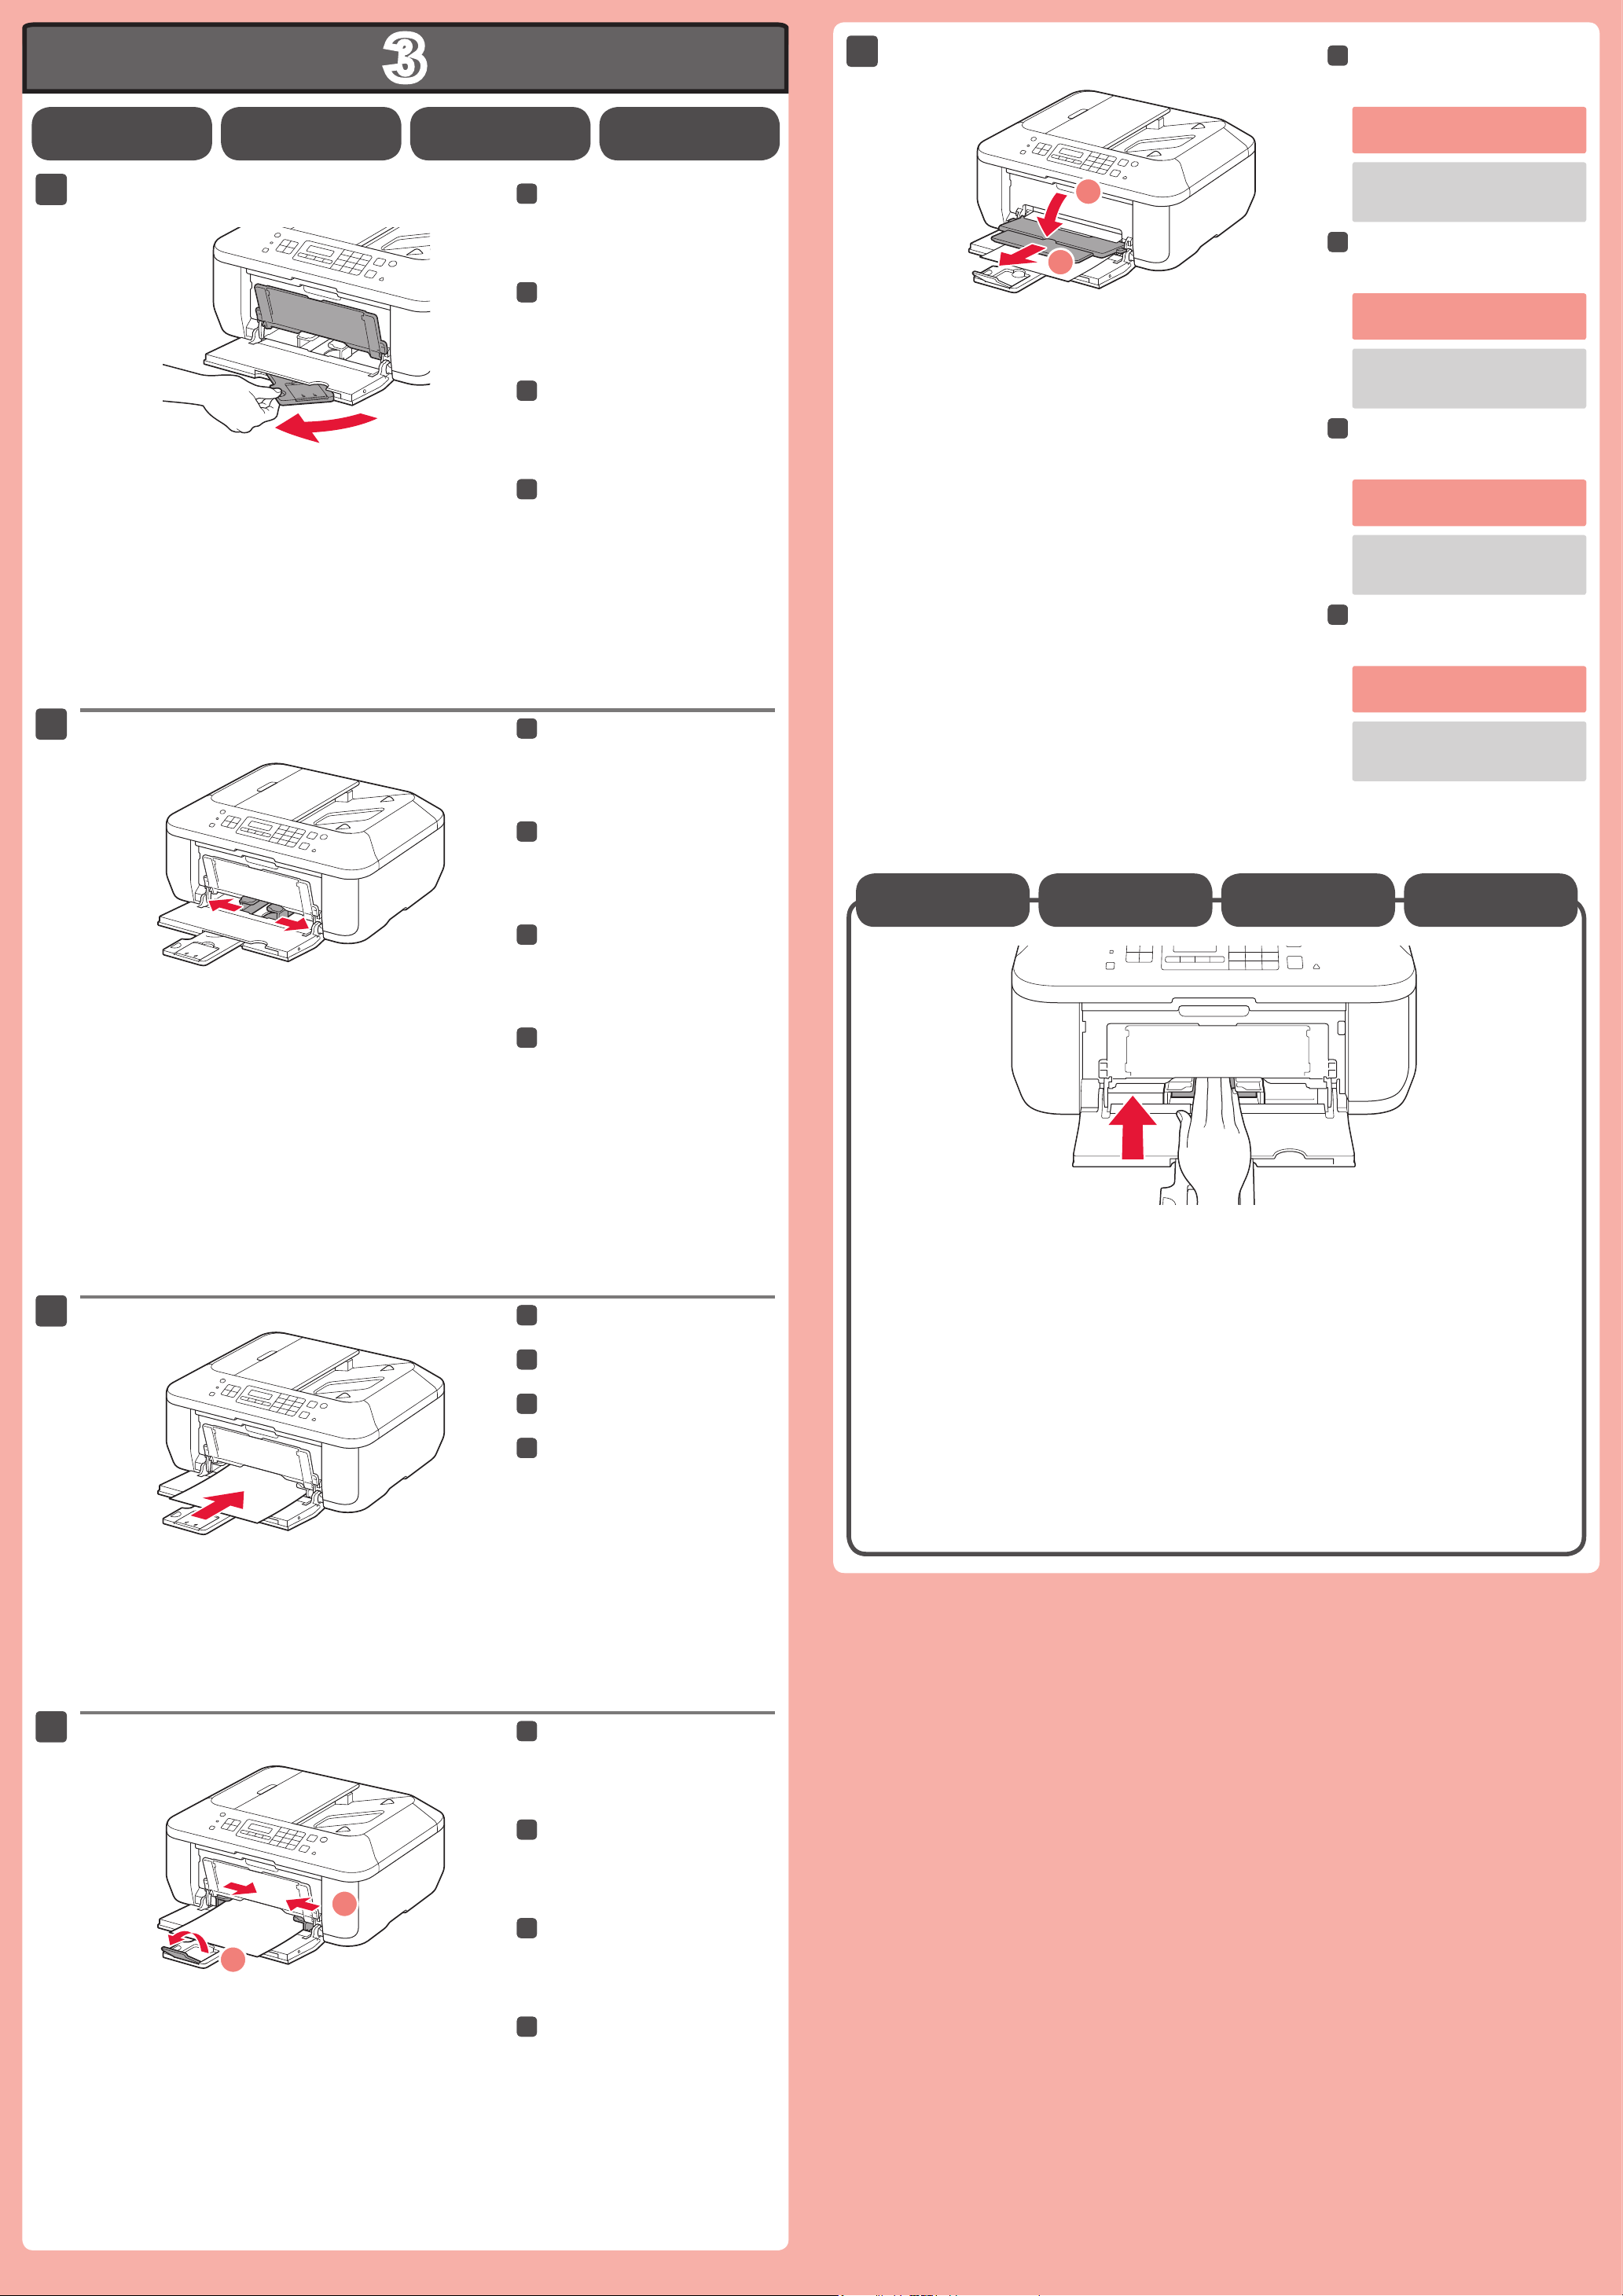
Check that the Paper Output Tray
11
22
33
44
Setting Plain
Paper
Loading Photo
Paper
55
is closed, then pull out the Paper
Support.
Open the Paper Output Tray and
the Paper Output Support.
Printing without opening the Paper
Output Tray causes an error.
For information about paper, refer to
the On-screen Manual which will be
installed later.
Ouvrez le bac de sortie papier et le
support de sortie papier.
Vériez que le bac de sortie papier
est fermé, puis retirez le support
papier.
Überprüfen Sie, dass das
Papierausgabefach (Paper Output
Tray) geschlossen ist, und ziehen
Sie dann die Papierstütze (Paper
Support) heraus.
Controllare che il vassoio di uscita
della carta (Paper Output Tray) sia
chiuso, quindi estrarre il supporto
per la carta (Paper Support).
Slide the right Paper Guide to the
end.
The left Paper Guide moves
simultaneously with the right guide.
L'impression sans ouvrir le bac de
sortie papier provoque une erreur.
Pour plus d'informations sur le papier,
reportez-vous au Manuel en ligne, qui
sera installé ultérieurement.
Öffnen Sie das Papierausgabefach (Paper
Output Tray) und die Papierausgabestütze
(Paper Output Support).
Wenn der Druckvorgang bei geschlossenem
Papierausgabefach (Paper Output Tray)
ausgeführt wird, tritt ein Fehler auf.
Weitere Informationen zum Papier
nden Sie im Online-Handbuch, das
zu einem späteren Zeitpunkt installiert
wird.
Aprire il vassoio di uscita della carta
(Paper Output Tray) e il supporto di
uscita della carta (Paper Output Support).
Se si stampa senza aprire il vassoio di
uscita della carta (Paper Output Tray)
si verica un errore.
Per informazioni sulla carta, consultare
il Manuale a video che verrà installato
in seguito.
Faites glisser le guide papier de
droite vers l'extrémité.
Le guide papier de gauche se déplace
simultanément avec le guide de droite.
Schieben Sie die rechte
Papierführung (Paper Guide) an
das Ende.
Die linke Papierführung (Paper Guide)
bewegt sich parallel zur rechten Führung.
Fare scorrere la guida della
carta (Paper Guide) destra no
all'estremità.
La guida della carta (Paper Guide)
sinistra si sposta contemporaneamente
con la guida destra.
Insert paper with the printable side down until it stops. When using photo paper, machine settings for
media type and size should be adjusted. For details, refer to the On-screen Manual which will be installed
later.
Insert paper until it stops.
Insérez le papier jusqu'à ce qu'il
soit correctement en place.
Legen Sie Papier bis zum
Anschlag ein.
Inserire la carta nché non si
ferma.
Adjust the Paper Guide to t the
paper size used, then open the
Output Tray Extension.
Insérez le papier, face à imprimer vers le bas, jusqu'à ce qu'il soit correctement en place. Lorsque vous
utilisez ce type de papier, il vous faut modier les paramètres de la machine relatifs au type et au format de
support. Pour plus d'informations, reportez-vous au Manuel en ligne, qui sera installé ultérieurement.
Legen Sie das Papier mit der bedruckbaren Seite nach unten bis zum Anschlag ein. Passen Sie
die Geräteeinstellungen für Medientyp und Format bei der Verwendung von Fotopapier an. Weitere
Informationen nden Sie im Online-Handbuch, das zu einem späteren Zeitpunkt installiert wird.
Inserire la carta con il lato stampabile rivolto verso il basso nché non si ferma. Quando si utilizza la
carta fotograca, è necessario modicare le impostazioni della macchina relative al tipo e al formato del
supporto. Per ulteriori informazioni, consultare il Manuale a video che verrà installato in seguito.
Réglez le guide papier en fonction
du format de papier utilisé, puis
ouvrez l'extension du bac de sortie
papier.
Richten Sie die Papierführung
(Paper Guide) auf das Papierformat
aus, und öffnen Sie dann die
Verlängerung des Ausgabefachs
(Output Tray Extension).
Regolare la guida della carta
(Paper Guide) in base al formato
dei fogli utilizzato, quindi aprire
l'estensione del vassoio di uscita
(Output Tray Extension).
Page 4
4
2
1
1
2
2
1
22
11
22
11
22
11
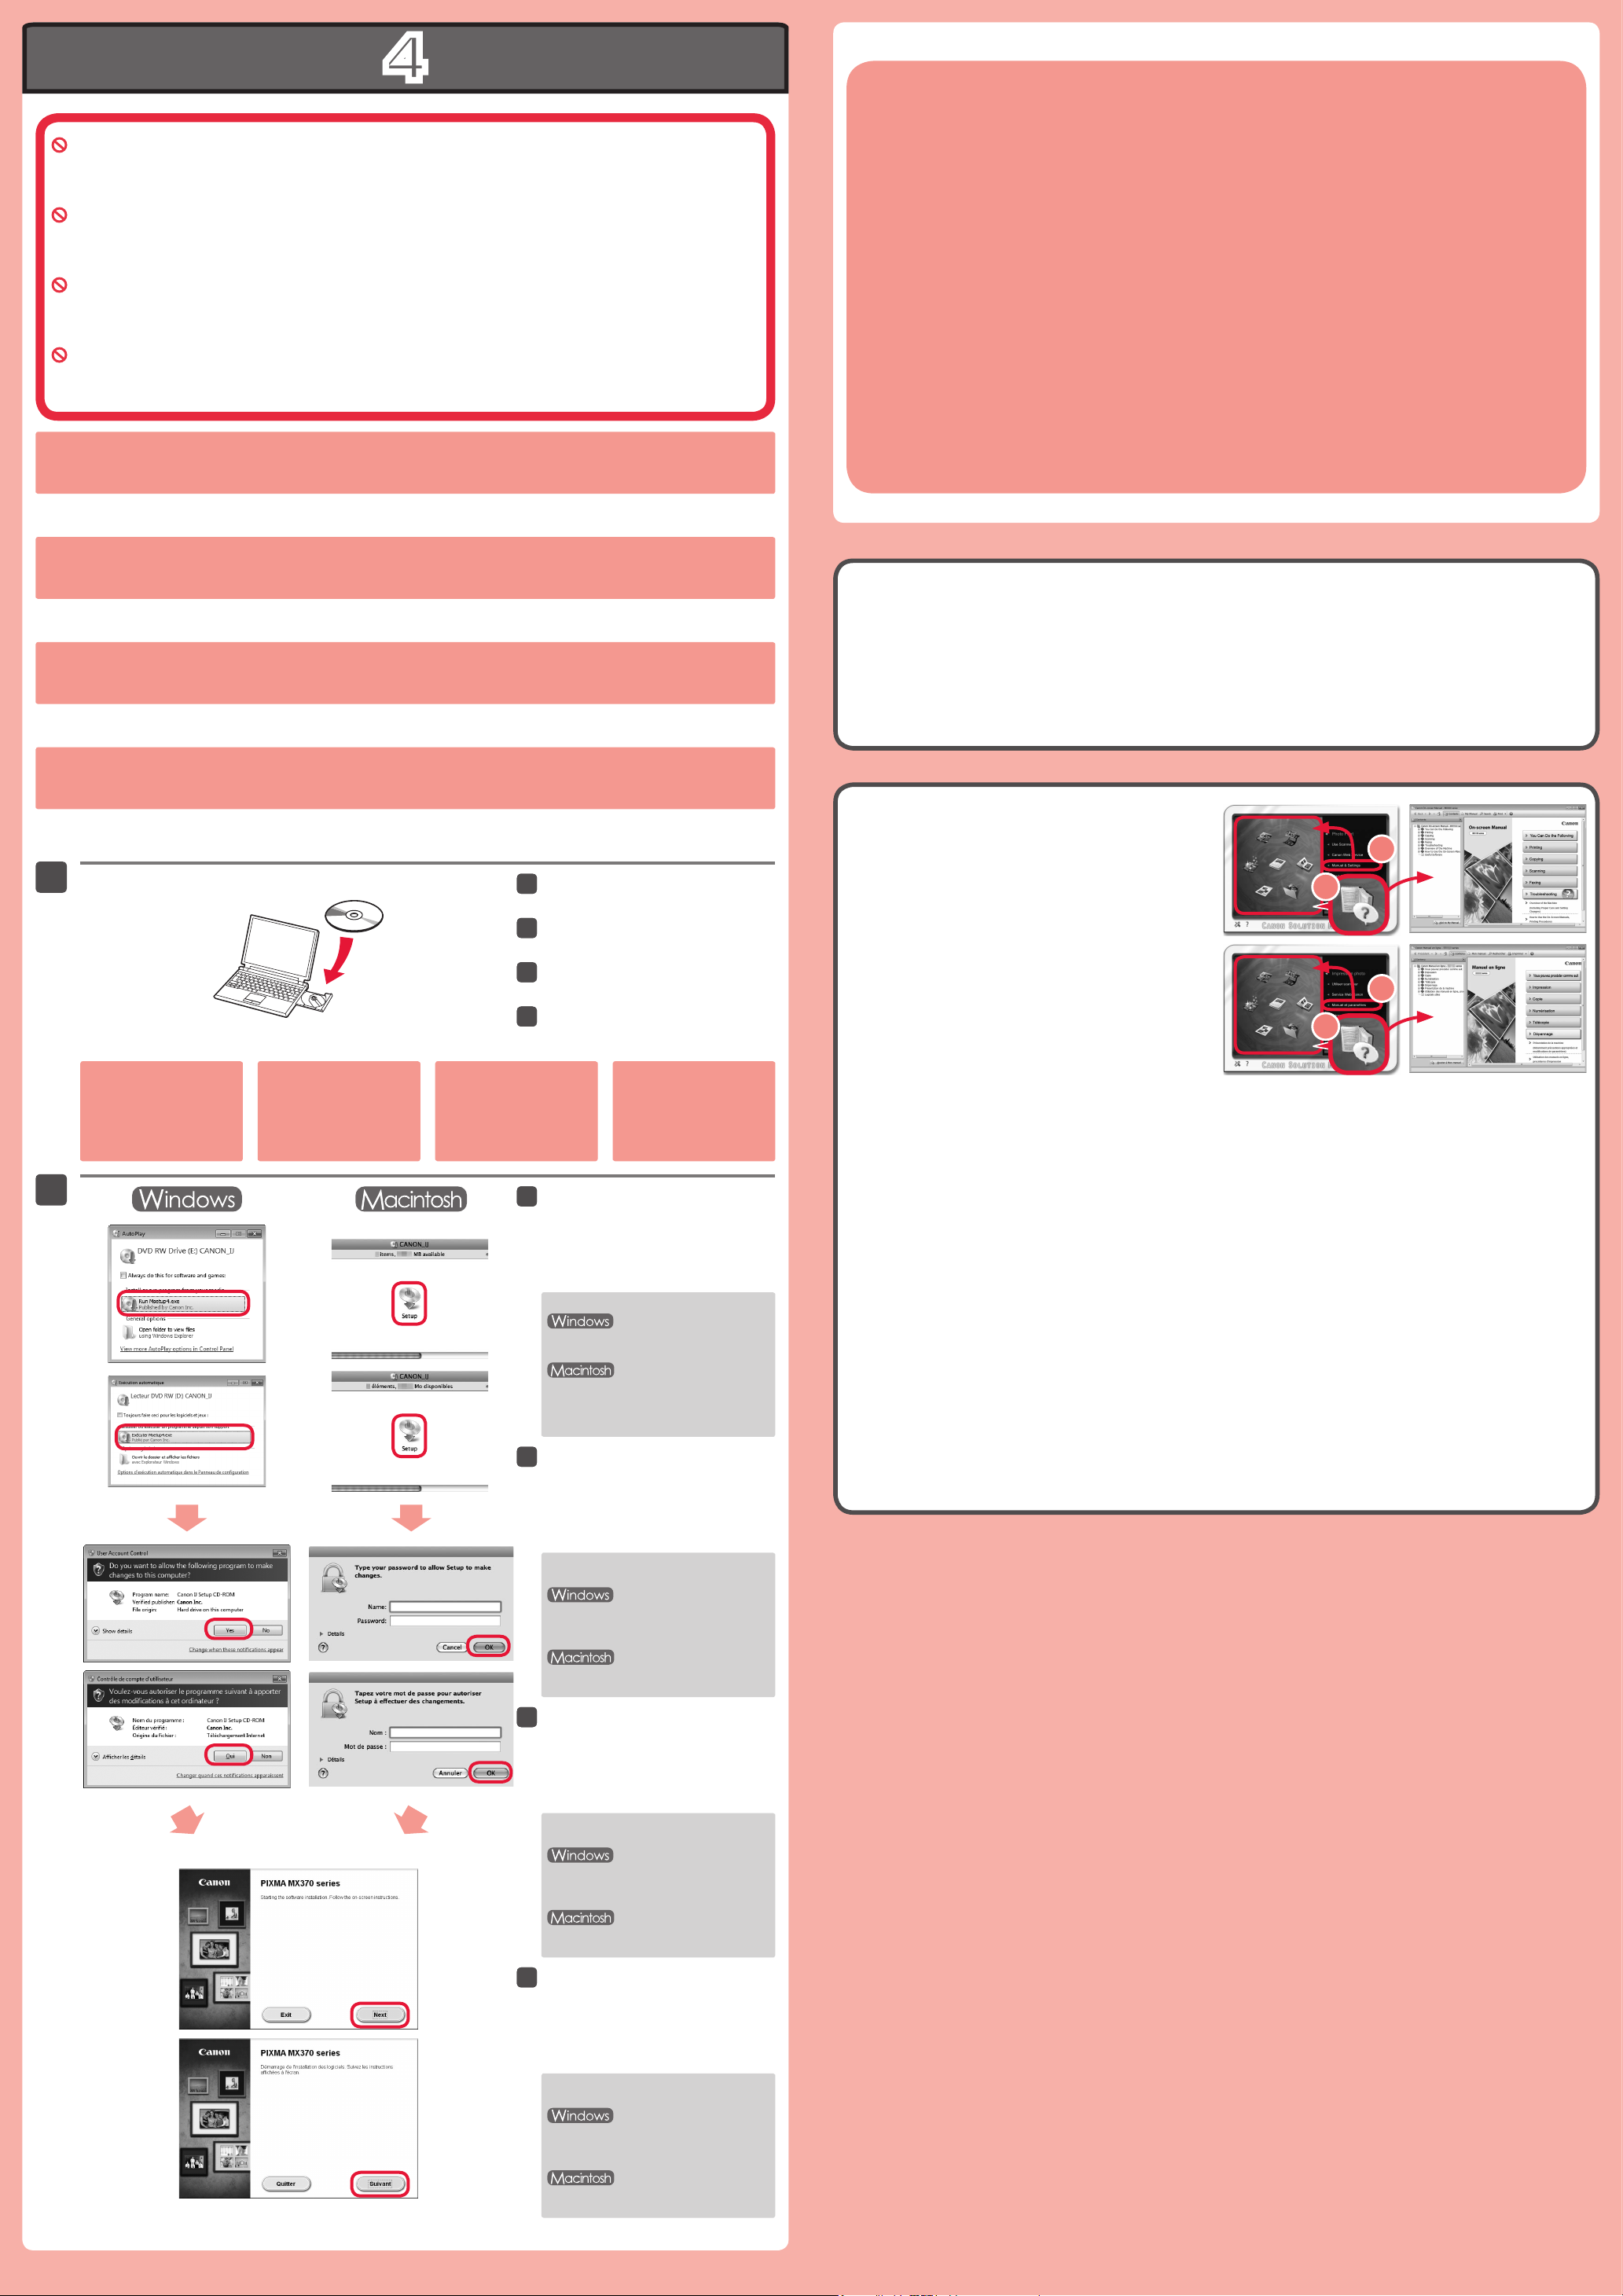
Do not connect the USB cable yet.
22
11
You will be prompted to connect it during the installation using the Setup CD-ROM.
Ne branchez pas encore le câble USB.
Il vous sera demandé de le brancher plus tard au cours de l'installation réalisée à l'aide du CD-ROM
d'installation.
Schließen Sie das USB-Kabel noch nicht an.
Sie werden während der Installation mithilfe der Installations-CD-ROM (Setup CD-ROM) zum
Anschließen des Kabels angewiesen.
Non collegare ancora il cavo USB.
Verrà richiesto di collegarlo durante l'installazione tramite il CD-ROM di installazione (Setup CD-ROM).
Quit all applications before installation.
•
Log on using an administrator account.
•
Internet connection may be required during the installation. Connection fees apply.
•
Screens are based on Windows 7 operating system Home Premium and Mac OS X 10.6.x. Actual screens may
differ depending on the OS version.
•
Quittez toutes les applications avant l'installation.
•
Connectez-vous en utilisant un compte administrateur.
Une connexion Internet peut être requise lors de l'installation. Des frais de connexion sont facturés.
•
Les captures d'écran ont été prises sous Windows 7 operating system Home Premium et Mac OS X 10.6.x.
Les écrans peuvent varier en fonction du système d'exploitation utilisé.
Schließen Sie vor der Installation alle Anwendungen.
•
Melden Sie sich über ein Administratorkonto an.
•
Während der Installation ist möglicherweise eine Internetverbindung erforderlich. Es fallen Verbindungsgebühren an.
•
Die Bildschirme beziehen sich auf Windows 7 operating system Home Premium und Mac OS X 10.6.x.
Die tatsächlichen Bildschirme weichen möglicherweise je nach verwendeter Betriebssystemversion ab.
Chiudere tutte le applicazioni prima di effettuare l'installazione.
•
Effettuare l'accesso mediante un account amministratore.
•
Durante l'installazione potrebbe essere necessaria la connessione a Internet. I costi di connessione sono a carico del cliente.
•
Le schermate si basano su Windows 7 operating system Home Premium e Mac OS X 10.6.x. Le schermate
effettive potrebbero variare in base alla versione del sistema operativo.
To complete the installation, follow the on-screen instructions
on the computer.
Pour terminer l'installation, suivez les instructions qui
apparaissent sur l'écran de l'ordinateur.
Befolgen Sie die Anweisungen auf dem Computerbildschirm,
um die Installation abzuschließen.
Per completare l'installazione, seguire le istruzioni visualizzate
sul computer.
You may setup the fax features of the machine later. For the setup instructions, refer to Setting Up the FAX.
Vous pouvez congurer les fonctions de télécopie de la machine plus tard. Pour obtenir les instructions de
conguration, reportez-vous à la section Conguration du FAX.
Sie können die Faxfunktionen des Geräts zu einem späteren Zeitpunkt einrichten. Anweisungen zur Einrichtung
nden Sie unter Einrichten des FAX.
È possibile impostare le funzioni fax della macchina in un secondo momento. Per istruzioni sull'impostazione,
consultare Impostazione del FAX.
Read the On-screen Manual on
the Computer
If the USB cable is already
connected, unplug it. If a
message appears on the
computer, click Cancel.
Si le câble USB est déjà
branché, débranchez-le.
Si un message apparaît
sur l'écran de l'ordinateur,
cliquez sur Annuler.
Insert the CD-ROM into the
computer.
Insérez le CD-ROM dans
l'ordinateur.
Legen Sie die CD-ROM in den
Computer ein.
Inserire il CD-ROM nel computer.
Wenn das USB-Kabel
bereits angeschlossen ist,
ziehen Sie es ab. Falls auf
dem Computerbildschirm
eine Meldung angezeigt
wird, klicken Sie auf
Abbrechen (Cancel).
Follow the on-screen instructions
to proceed.
If the Select Language screen appears,
select a language.
If the CD-ROM does not autorun:
Double-click (My) Computer > CDROM icon > MSETUP4.EXE.
Double-click the CD-ROM icon on the
desktop.
Suivez les instructions à l'écran
pour continuer.
Si l'écran Sélectionner la langue
s'afche, sélectionnez une langue.
Se è già collegato,
scollegare il cavo
USB. Se sul computer
viene visualizzato un
messaggio, fare clic su
Annulla (Cancel).
Consultez le Manuel en ligne sur
l'ordinateur
Lesen des Online-Handbuch auf
dem Computer
Leggere il Manuale a video sul
computer
After the installation, “Solution Menu EX” starts.
To open the On-screen Manual, click Manual & Settings > On-screen Manual. Refer to it for details on the functions, operations,
and troubleshooting tips.
Solution Menu EX and the On-screen Manual need to be selected for installation.
Une fois l'installation terminée, « Solution Menu EX » démarre.
Pour ouvrir le Manuel en ligne, cliquez sur Manuel et paramètres > Manuel en ligne. Vous y trouverez des informations détaillées
concernant les fonctions et le fonctionnement de votre imprimante, ainsi que des solutions de dépannage.
Pour effectuer l'installation, vous devez sélectionner Solution Menu EX ainsi que le Manuel en ligne.
Nach der Installation wird „Solution Menu EX“ gestartet.
Klicken Sie zum Öffnen des Online-Handbuch auf Handb. u. Einstell. (Manual & Settings) > Online-Handbuch (On-screen
Manual). Hier nden Sie Informationen zu Funktionen, Vorgehensweisen und Tipps zur Fehlersuche.
Solution Menu EX und das Online-Handbuch müssen zur Installation ausgewählt werden.
Dopo l'installazione, viene avviato "Solution Menu EX".
Per aprire il Manuale a video, fare clic su Manuale e impostazioni (Manual & Settings) > Manuale a video (On-screen Manual).
Consultarlo per ulteriori informazioni sulle funzioni, operazioni e suggerimenti per la risoluzione dei problemi.
Selezionare Solution Menu EX e il Manuale a video per l'installazione.
Si le CD-ROM ne s'exécute pas
automatiquement :
Double-cliquez sur Poste de travail
/ Ordinateur > icône CD-ROM >
MSETUP4.EXE.
Double-cliquez sur l'icône CD-ROM
située sur le bureau.
Befolgen Sie die Anweisungen auf
dem Bildschirm, um fortzufahren.
Wenn der Bildschirm Sprache wählen
(Select Language) angezeigt wird,
wählen Sie eine Sprache aus.
Falls die CD-ROM nicht automatisch
gestartet wird:
Doppelklicken Sie auf Computer bzw.
Arbeitsplatz ((My) Computer) > CD-
ROM-Symbol > MSETUP4.EXE.
Doppelklicken Sie auf das CD-ROMSymbol auf dem Desktop.
Seguire le istruzioni a video per
continuare.
Se viene visualizzata la schermata
Scegliere una lingua (Select
Language), selezionare una lingua.
Se il CD-ROM non viene eseguito
automaticamente:
Fare doppio clic su Risorse del
computer ((My) Computer) > Icona
del CD-ROM > MSETUP4.EXE.
Fare doppio clic sull'icona del CD-ROM
sul desktop.
 Loading...