

Page 1
1
5
6
134
2
7
1
2
213
2
1
55
66
11
33
44
Preparativos
Elementos
suministrados
22
77
55
66
11
33
44
Preparation
Included Items
22
77
ENGLISH
ESPAÑOL
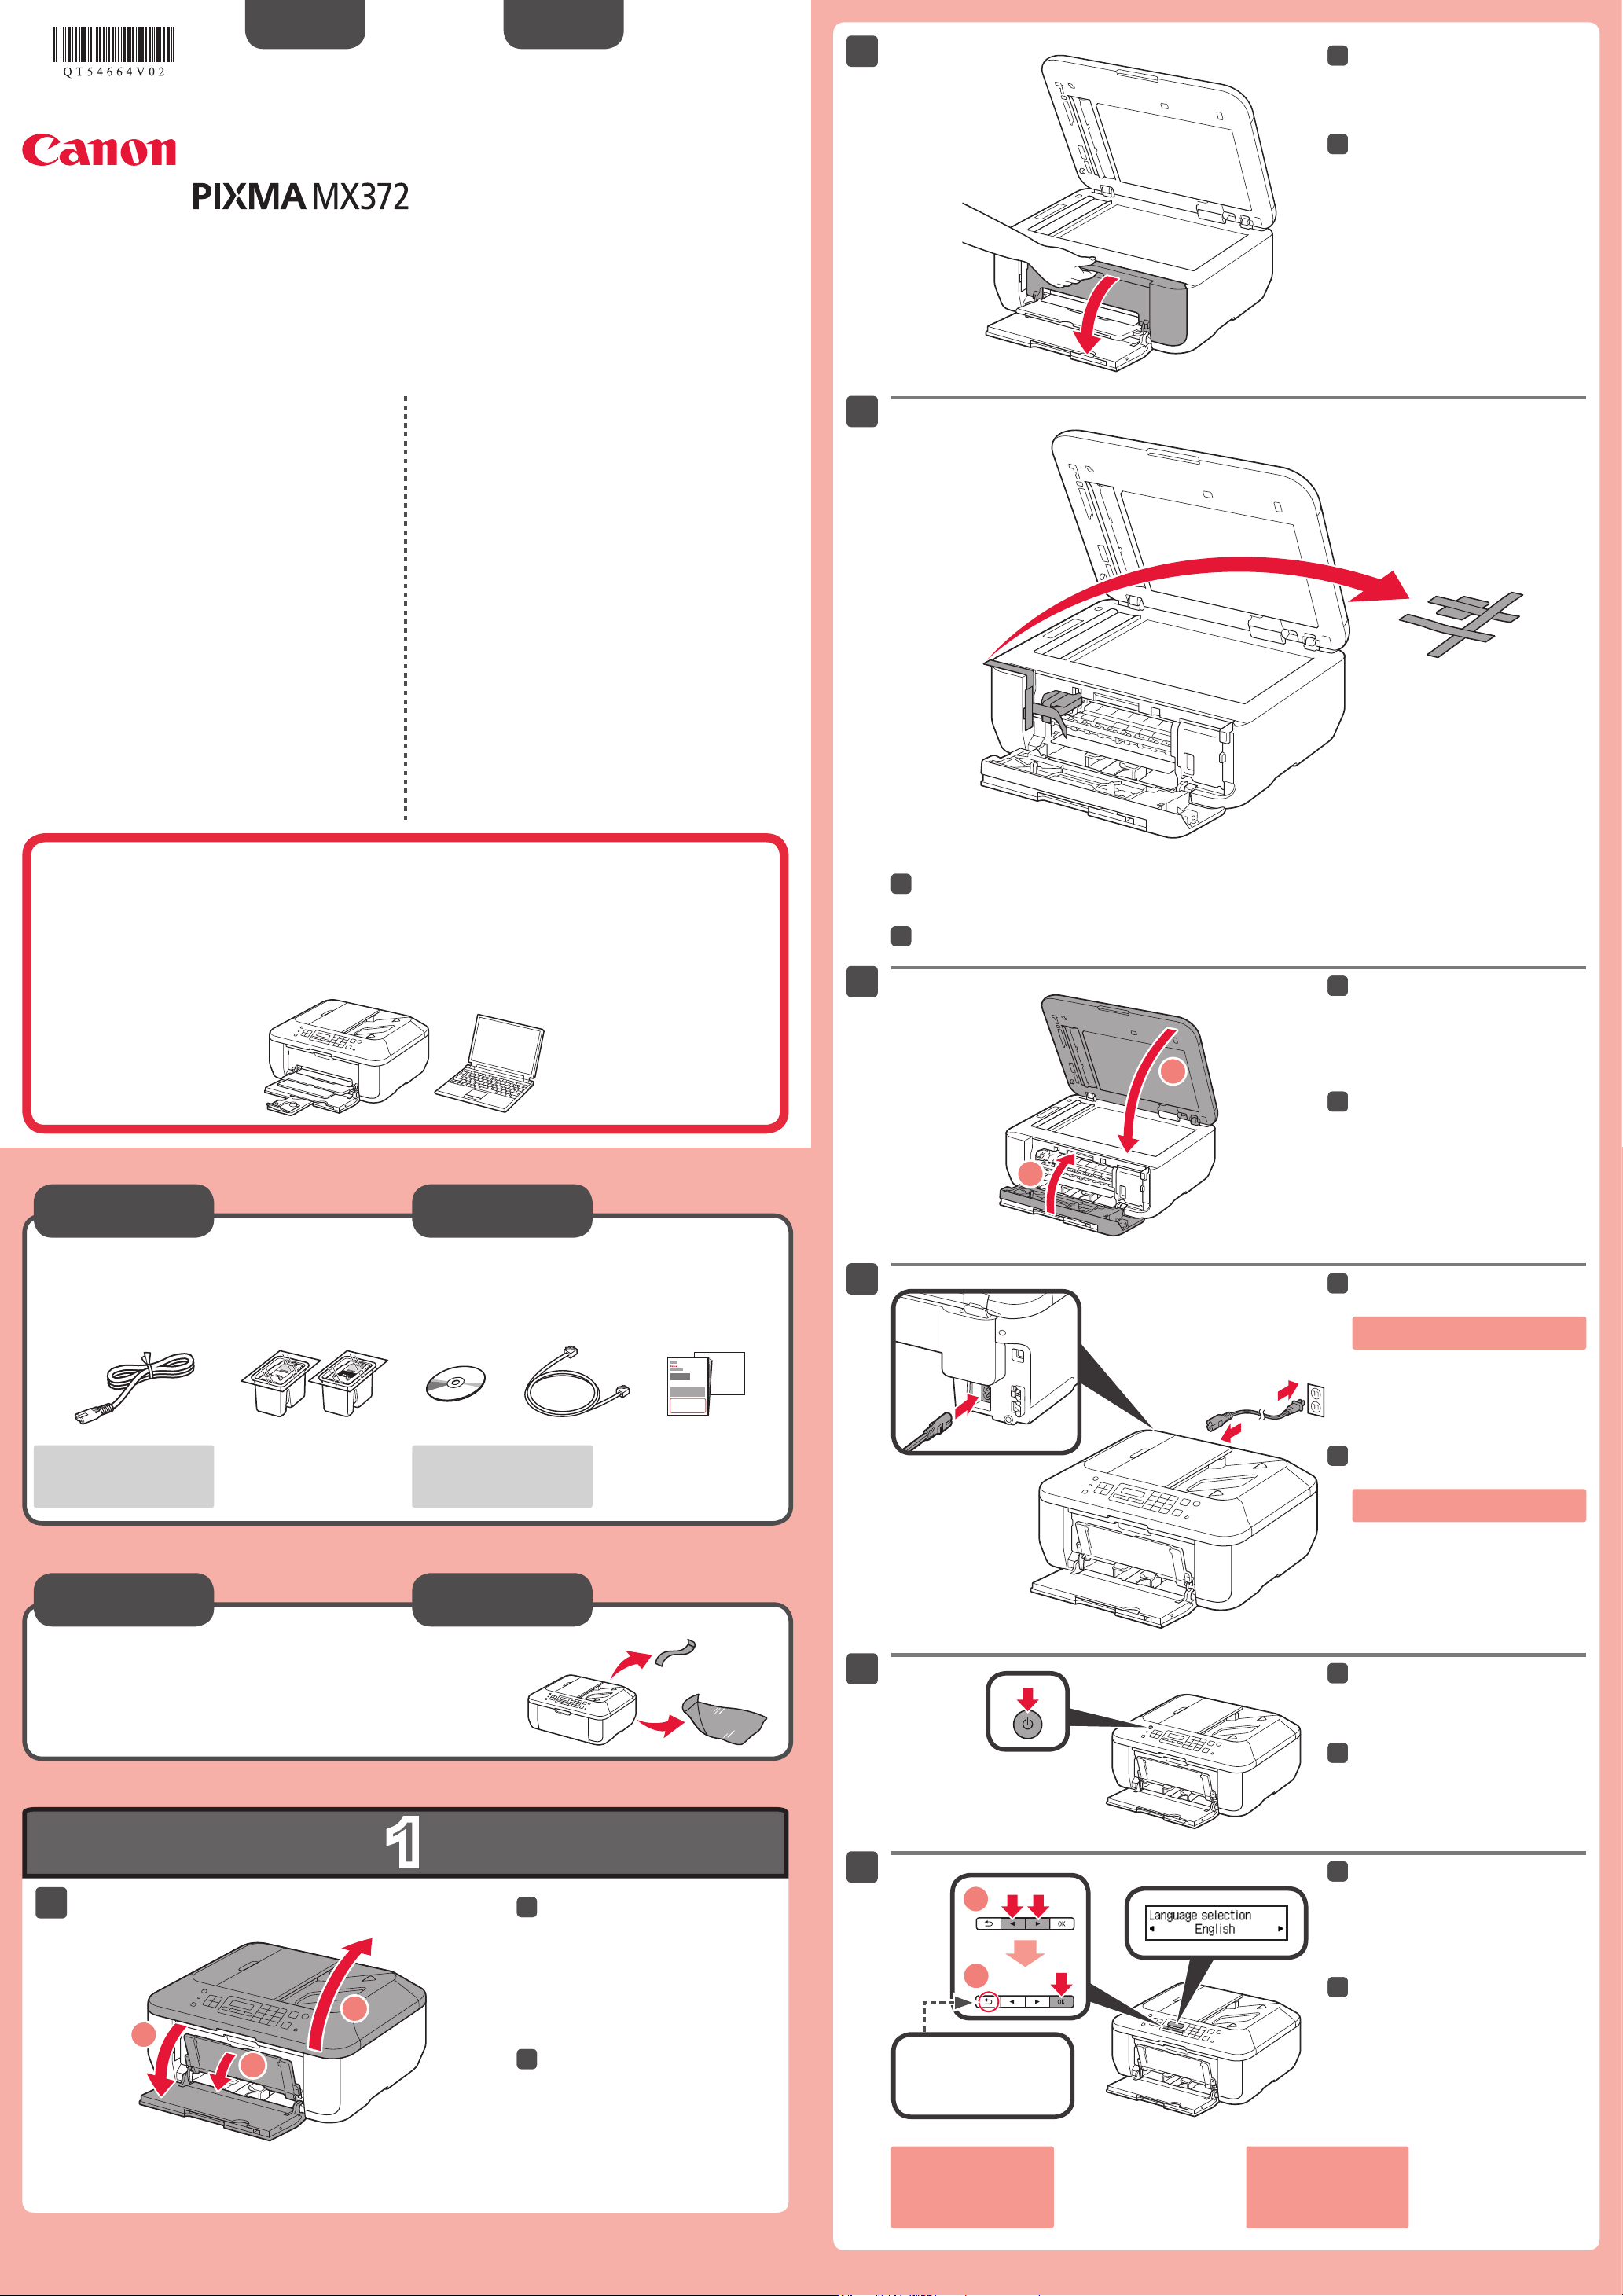
Open the Paper Output Cover.
Canon Inkjet Ofce All-In-One
Equipo multifunción para ocina Canon Inkjet
Getting Started
Guía de inicio
Getting Help from Canon
Email Tech Support — www.usa.canon.com/support
Toll-Free Tech Support — 1-800-OK-CANON
This option provides live telephone technical support, free of
service charges, Monday-Friday (excluding holidays), during the
warranty period.
Telephone Device for the Deaf (TDD) support is available at
1-866-251-3752.
Abra la tapa de salida del papel
(Paper Output Cover).
series
Read me rst!
Keep me handy for future reference.
¡Léame en primer lugar!
Consérvelo a mano para utilizarlo
como referencia en el futuro.
Ayuda de Canon
Asistencia técnica por correo electrónico:
www.usa.canon.com/support
Asistencia técnica gratuita: 1-800-OK-CANON
Esta opción proporciona asistencia telefónica técnica personal,
sin cargo por servicio, de lunes a viernes (excepto festivos),
durante el periodo de garantía.
Se dispone de un dispositivo telefónico auxiliar para sordos (TDD) en
1-866-251-3752.
Windows es una marca comercial o una marca comercial registrada de Microsoft
Windows is a trademark or registered trademark of Microsoft Corporation in the U.S.
•
and/or other countries.
Windows Vista is a trademark or registered trademark of Microsoft Corporation in the
•
U.S. and/or other countries.
Macintosh, Mac and Mac OS are trademarks of Apple Inc., registered in the U.S. and
•
other countries.
Model Number: K10374 (MX372)
•
Corporation en EE. UU. y/u otros países.
Windows Vista es una marca comercial o una marca comercial registrada de Microsoft
•
Corporation en EE. UU. y/u otros países.
Macintosh, Mac y Mac OS son marcas registradas de Apple Inc., registradas en EE.
•
UU. y otros países.
To perform setup, place the machine near the computer.
Para llevar a cabo la instalación, coloque el equipo cerca del ordenador.
Número de modelo: K10374 (MX372)
Remove the orange tape and plastic bag.
Retire la cinta naranja (orange tape) y la bolsa de plástico.
Close the Paper Output Cover and
the Document Cover.
Cierre la tapa de salida del papel
(Paper Output Cover) y la cubierta
de documentos (Document Cover).
Check the included items.
Compruebe que se le han suministrado los siguientes elementos.
A USB cable (not included) is
required.
Remove the protective sheets and tape.
Retire las hojas protectoras (protective sheets) y la cinta (tape).
Es necesario un cable USB
(no suministrado).
Connect the power cord.
Do not connect the USB cable yet.
Conecte el cable de alimentación.
No conecte aún el cable USB.
Press the ON button.
Open the Front Cover, the Paper
Output Tray, and the Document
Cover.
Abra la cubierta delantera (Front
Cover), la bandeja de salida
del papel (Paper Output Tray)
y la cubierta de documentos
(Document Cover).
Back button
Botón Atrás (Back)
To change the language
setting, press the Back
button.
Pulse el botón ACTIVADO (ON).
Select your language, then press
the OK button.
Seleccione su idioma y, a
continuación, pulse el botón OK.
Para cambiar el ajuste
de idioma, pulse el botón
Atrás (Back).
QT5-4664-V02
XXXXXXXX ©CANON INC.2012
PRINTED IN XXXXXXXX
Page 2
2
1
2
1
752
4
8
6
3
44
77
33
11
22
55
88
66
Información
para pedidos
44
77
33
11
22
55
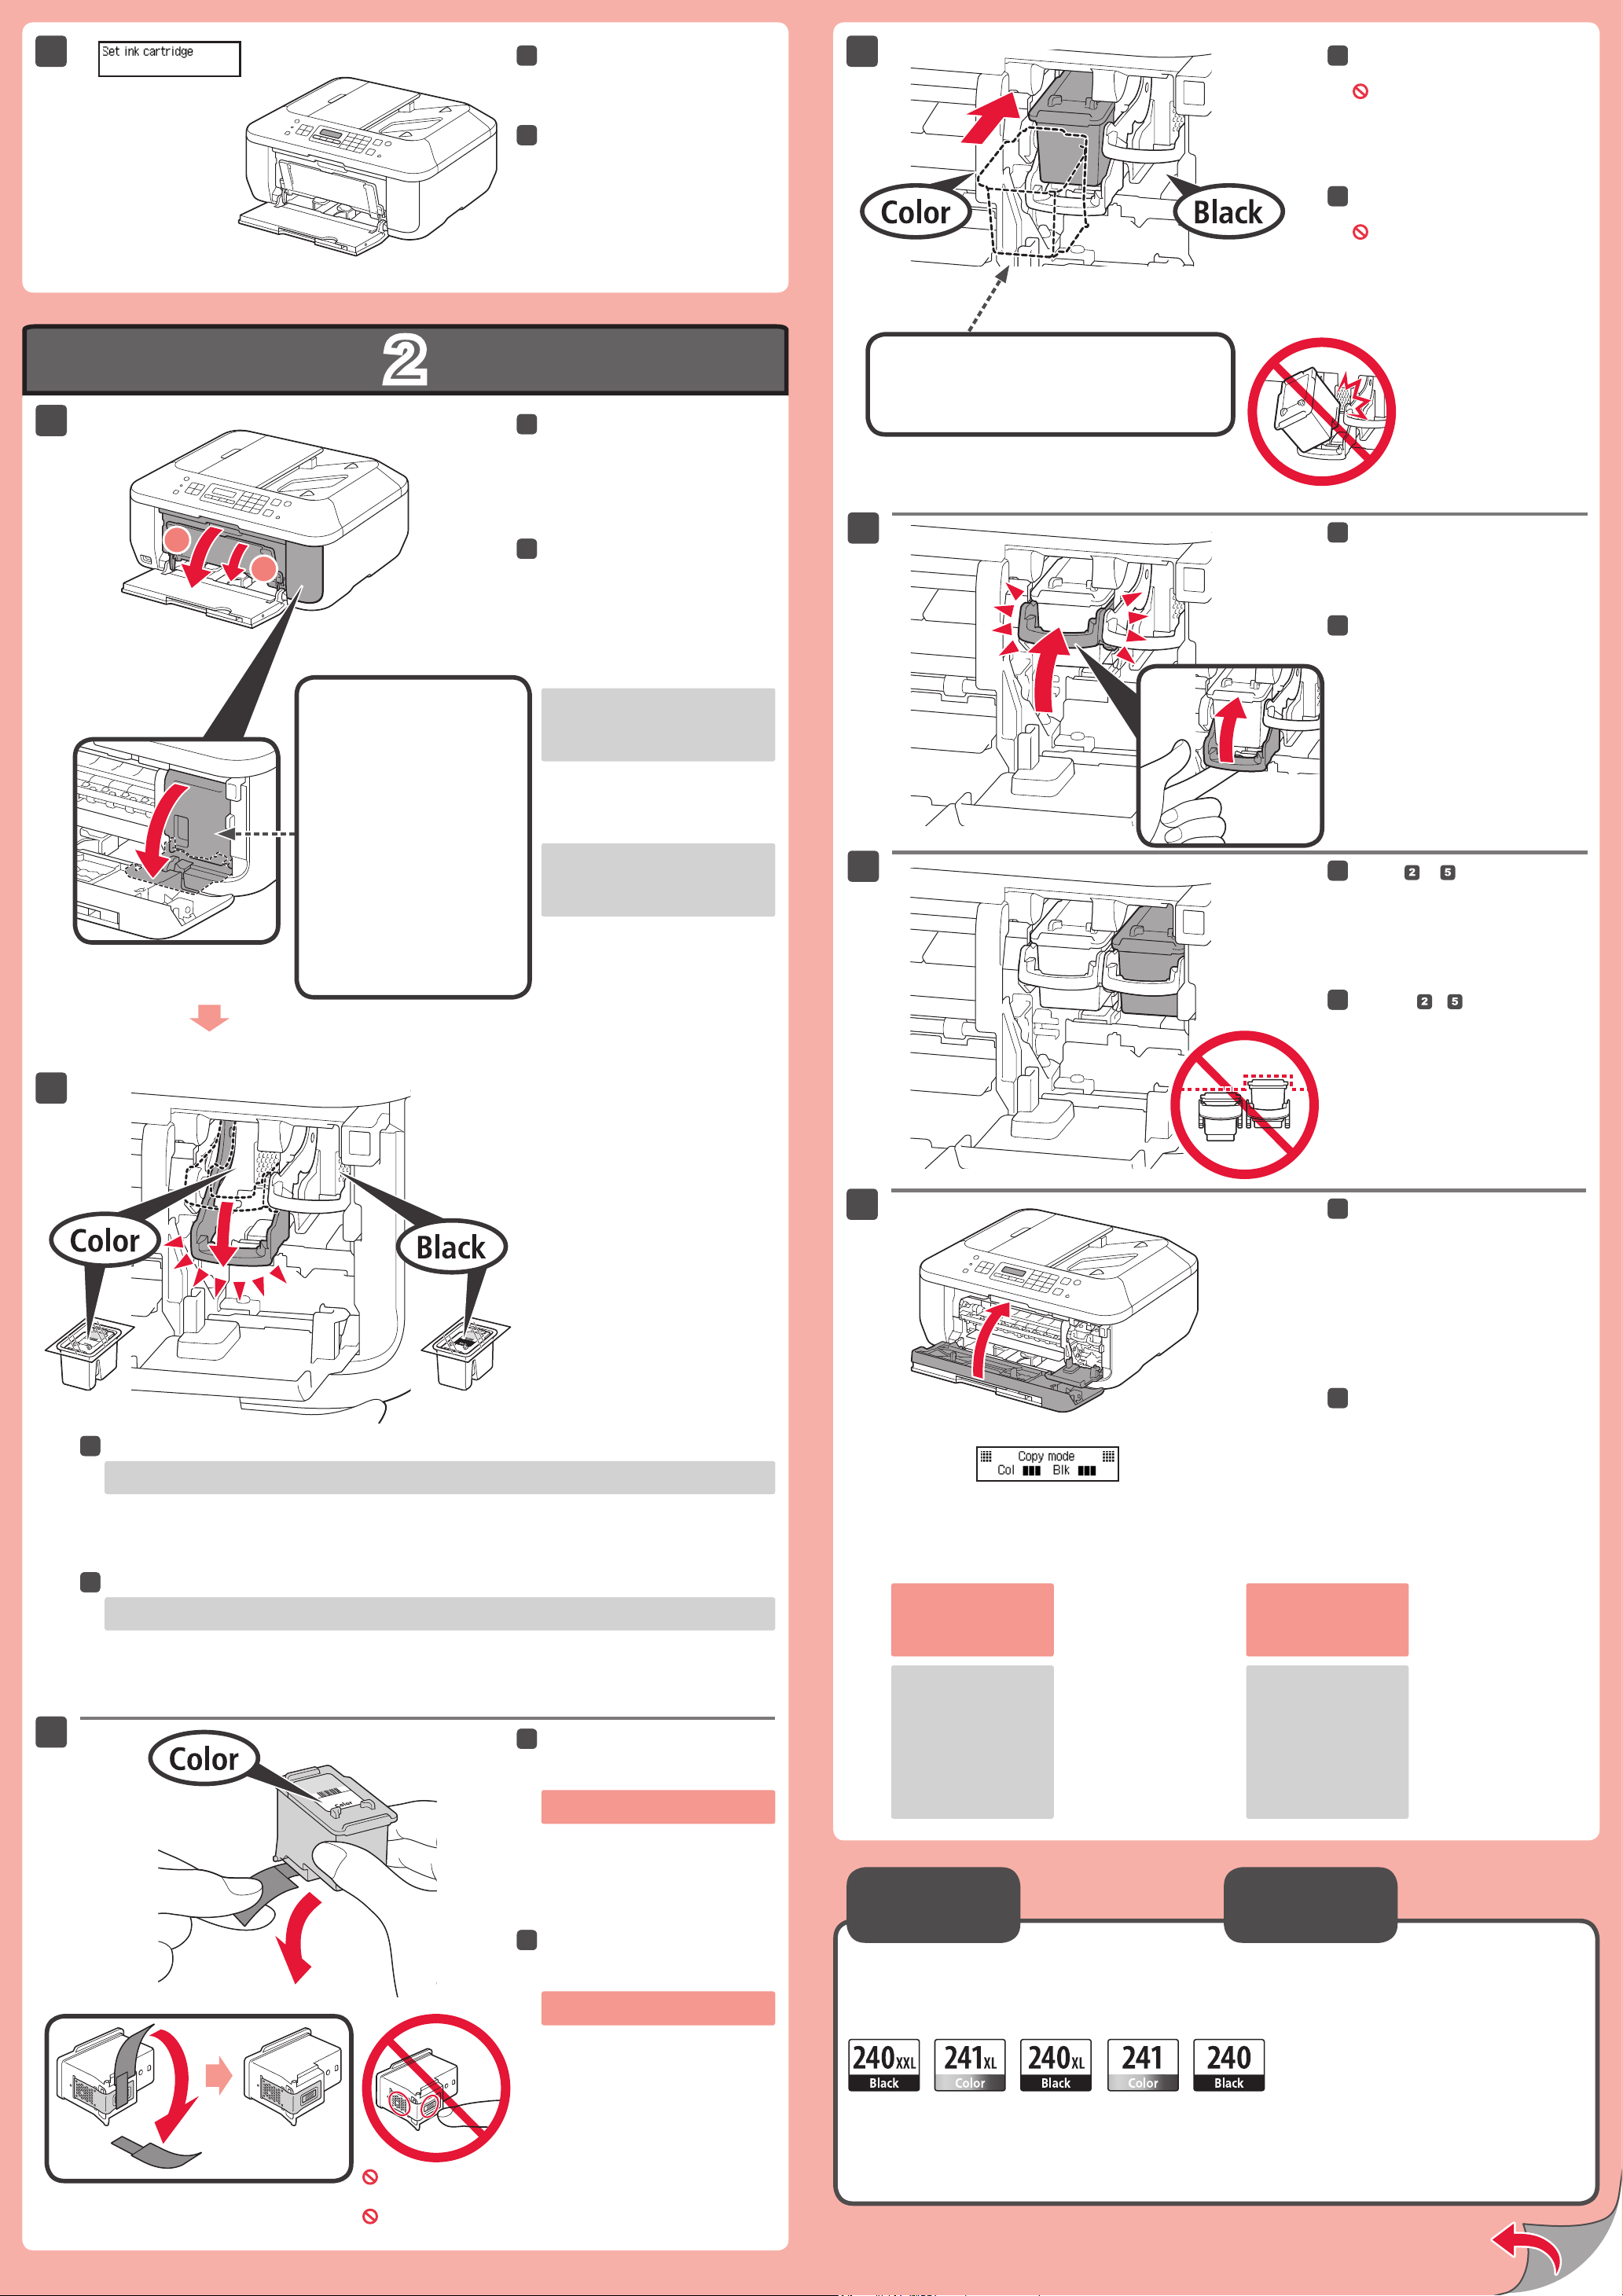
Check that this screen is displayed.
88
66
Ordering
Information
Compruebe si aparece esta pantalla.
Open the Paper Output Tray and
the Paper Output Cover.
Insert it straight until it stops.
Insértelo recto hasta que se detenga.
Insert the FINE Cartridge until it
stops.
Do not knock it against the sides!
Inserte el cartucho FINE (FINE
Cartridge) hasta que se detenga.
¡No lo golpee contra los lados!
Check that the Head Cover has
opened automatically.
Asegúrese de que la cubierta
del cabezal (Head Cover) se
ha abierto automáticamente.
Abra la bandeja de salida del papel
(Paper Output Tray) y la tapa de
salida del papel (Paper Output
Cover).
If the Head Cover is closed, close the
Paper Output Cover and open it again
to open the Head Cover.
Si la cubierta del cabezal (Head Cover)
está cerrada, cierre la tapa de salida
del papel (Paper Output Cover) y
vuelva a abrirla para abrir la cubierta
del cabezal (Head Cover).
Lift the Ink Cartridge Lock Lever.
Levante la palanca de bloqueo del
cartucho de tinta (Ink Cartridge
Lock Lever).
Repeat to to install the other
FINE Cartridge.
Lower the Ink Cartridge Lock Lever.
The left is where the Color FINE Cartridge is to be installed and the right is where the Black FINE Cartridge is to be
installed.
Repita de a para instalar el
otro cartucho FINE (FINE Cartridge).
Close the Paper Output Cover.
Wait for about 1 to 2 minutes until this
screen is displayed, then proceed.
Cierre la tapa de salida del papel
(Paper Output Cover).
Espere aproximadamente de 1 a 2 minutos
hasta que aparezca esta pantalla y continúe.
Baje la palanca de bloqueo del cartucho de tinta (Ink Cartridge Lock Lever).
A la izquierda debe instalarse el cartucho FINE (FINE Cartridge) de color y a la derecha debe instalarse el cartucho
FINE (FINE Cartridge) negro.
Unpack the FINE Cartridge, then
remove the protective tape.
Be careful of ink on the protective tape.
Desembale el cartucho FINE
(FINE Cartridge) y retire la cinta
protectora.
Tenga cuidado con la tinta de la cinta
protectora.
If an error message
appears, check that the
FINE Cartridge is installed
correctly.
The LCD turns off if the
machine is not operated
for about 5 minutes. To
restore the display, press
any button (except the ON
button) on the Operation
Panel.
The following FINE Cartridges are compatible with this
machine.
Los cartuchos FINE (FINE Cartridges) siguientes son
compatibles con este equipo.
Si aparece un mensaje
de error, compruebe que
el cartucho FINE (FINE
Cartridge) está instalado
correctamente.
Cuando el equipo no
se utiliza durante unos
5 minutos, la pantalla
LCD se desconecta.
Para reactivarla, pulse
cualquier botón (excepto
el botón ACTIVADO (ON))
en el panel de control
(Operation Panel).
Order #
Número para pedidos
Black: PG-240XXL 5204B001
Color: CL-241XL 5208B001
Black: PG-240XL 5206B001
Color: CL-241 5209B001
Black: PG-240 5207B001
Call 1-800-OK-CANON to locate a dealer near you, or visit the Canon online store at
www.shop.usa.canon.com
Do not touch!
¡No tocar!
Llame al 1-800-OK-CANON para buscar un distribuidor cerca de usted o visite la tienda
en línea de Canon en www.shop.usa.canon.com
Page 3
3
1
2
1
2
4
5
1
2
3
Conguración
para papel normal
Cargar papel
fotográfico
11
22
33
44
55
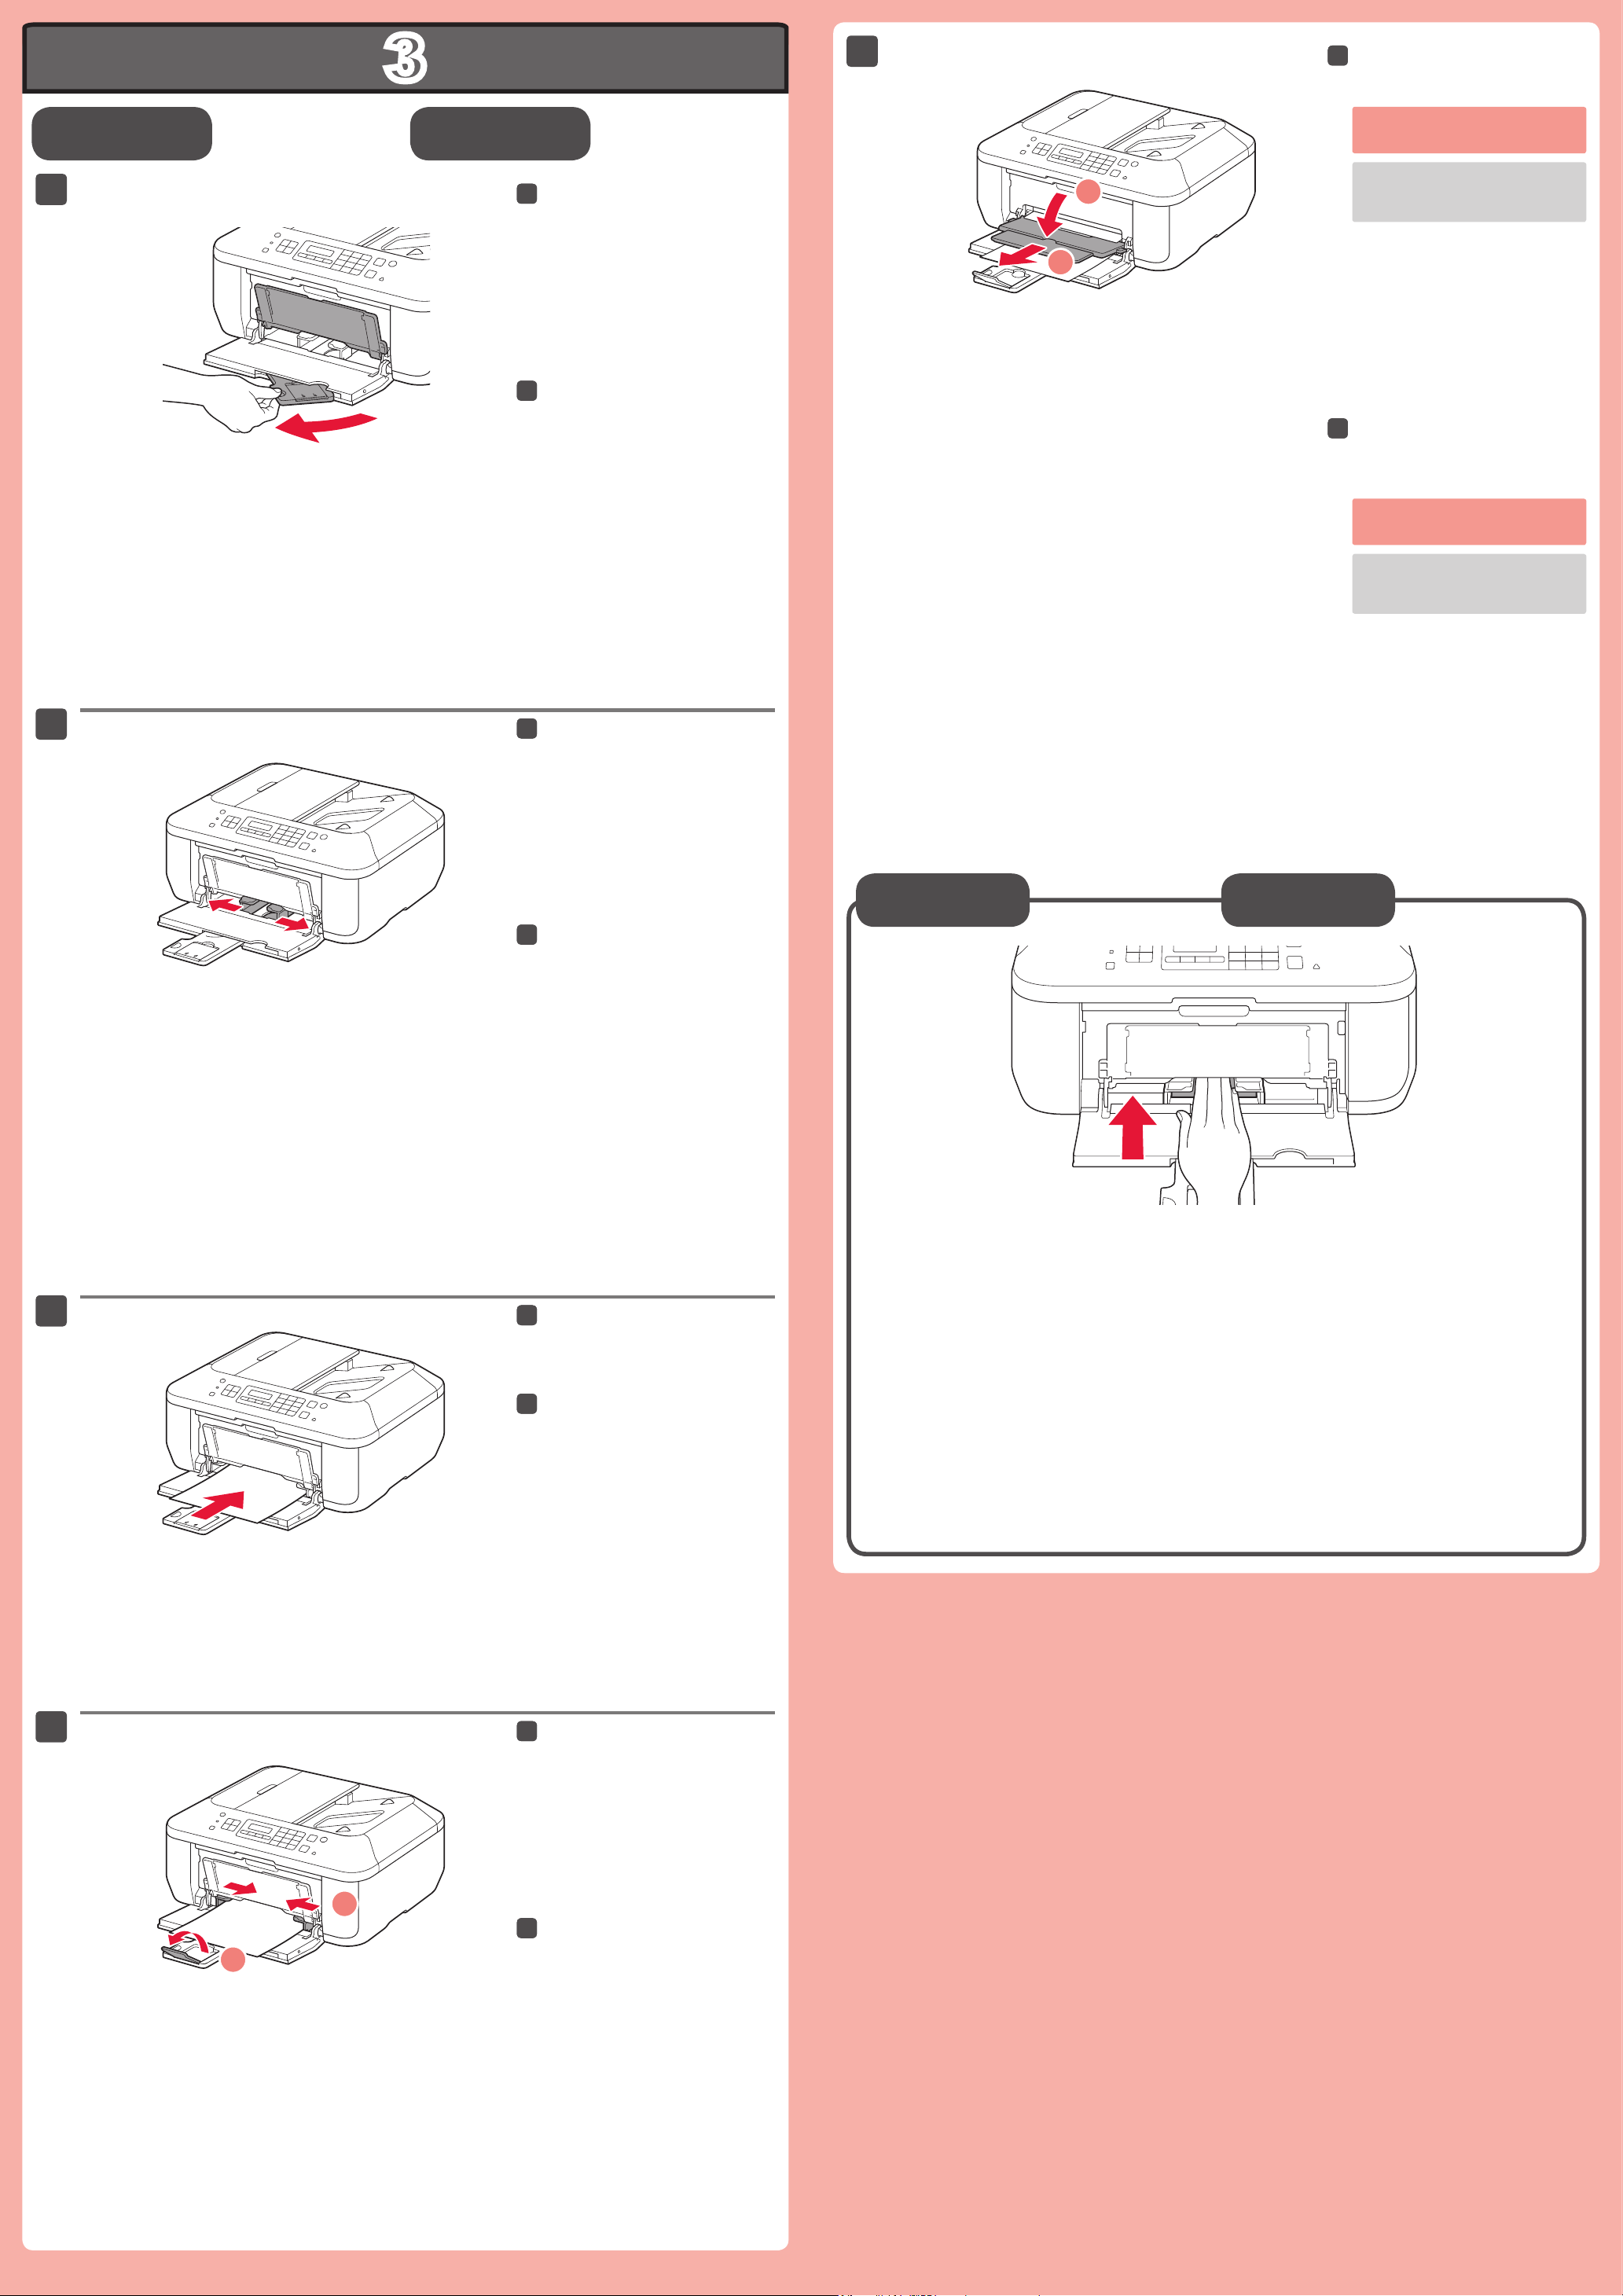
Check that the Paper Output Tray
11
22
33
44
Setting Plain
Paper
Loading Photo
Paper
55
is closed, then pull out the Paper
Support.
Asegúrese de que la bandeja de
salida del papel (Paper Output
Tray) está cerrada y extraiga el
soporte del papel (Paper Support).
Open the Paper Output Tray and
the Paper Output Support.
Printing without opening the Paper
Output Tray causes an error.
For information about paper, refer to
the On-screen Manual which will be
installed later.
Abra la bandeja de salida del papel
(Paper Output Tray) y el soporte de
la salida del papel (Paper Output
Support).
Si imprime sin abrir la bandeja de
salida del papel (Paper Output Tray),
provocará un error.
Slide the right Paper Guide to the
end.
The left Paper Guide moves
simultaneously with the right guide.
Deslice la guía del papel (Paper
Guide) derecha hacia el lado.
La guía del papel (Paper Guide) izquierda
se mueve al mismo tiempo que la derecha.
Para obtener más información sobre el
papel, consulte el Manual en pantalla
que se instalará posteriormente.
Insert paper until it stops.
Inserte el papel hasta que se
detenga.
Insert paper with the printable side down until it stops. When using photo paper, machine settings for
media type and size should be adjusted. For details, refer to the On-screen Manual which will be installed
later.
Inserte el papel con la cara imprimible hacia abajo hasta que se detenga. Cuando use papel fotográco,
deberá ajustar la conguración del equipo al tipo y al tamaño del soporte. Para obtener más detalles,
consulte el Manual en pantalla que se instalará posteriormente.
Adjust the Paper Guide to t the
paper size used, then open the
Output Tray Extension.
Ajuste la guía del papel (Paper
Guide) al tamaño del papel utilizado
y abra la extensión de la bandeja
de salida (Output Tray Extension).
Page 4
4
2
1
1
2
22
11
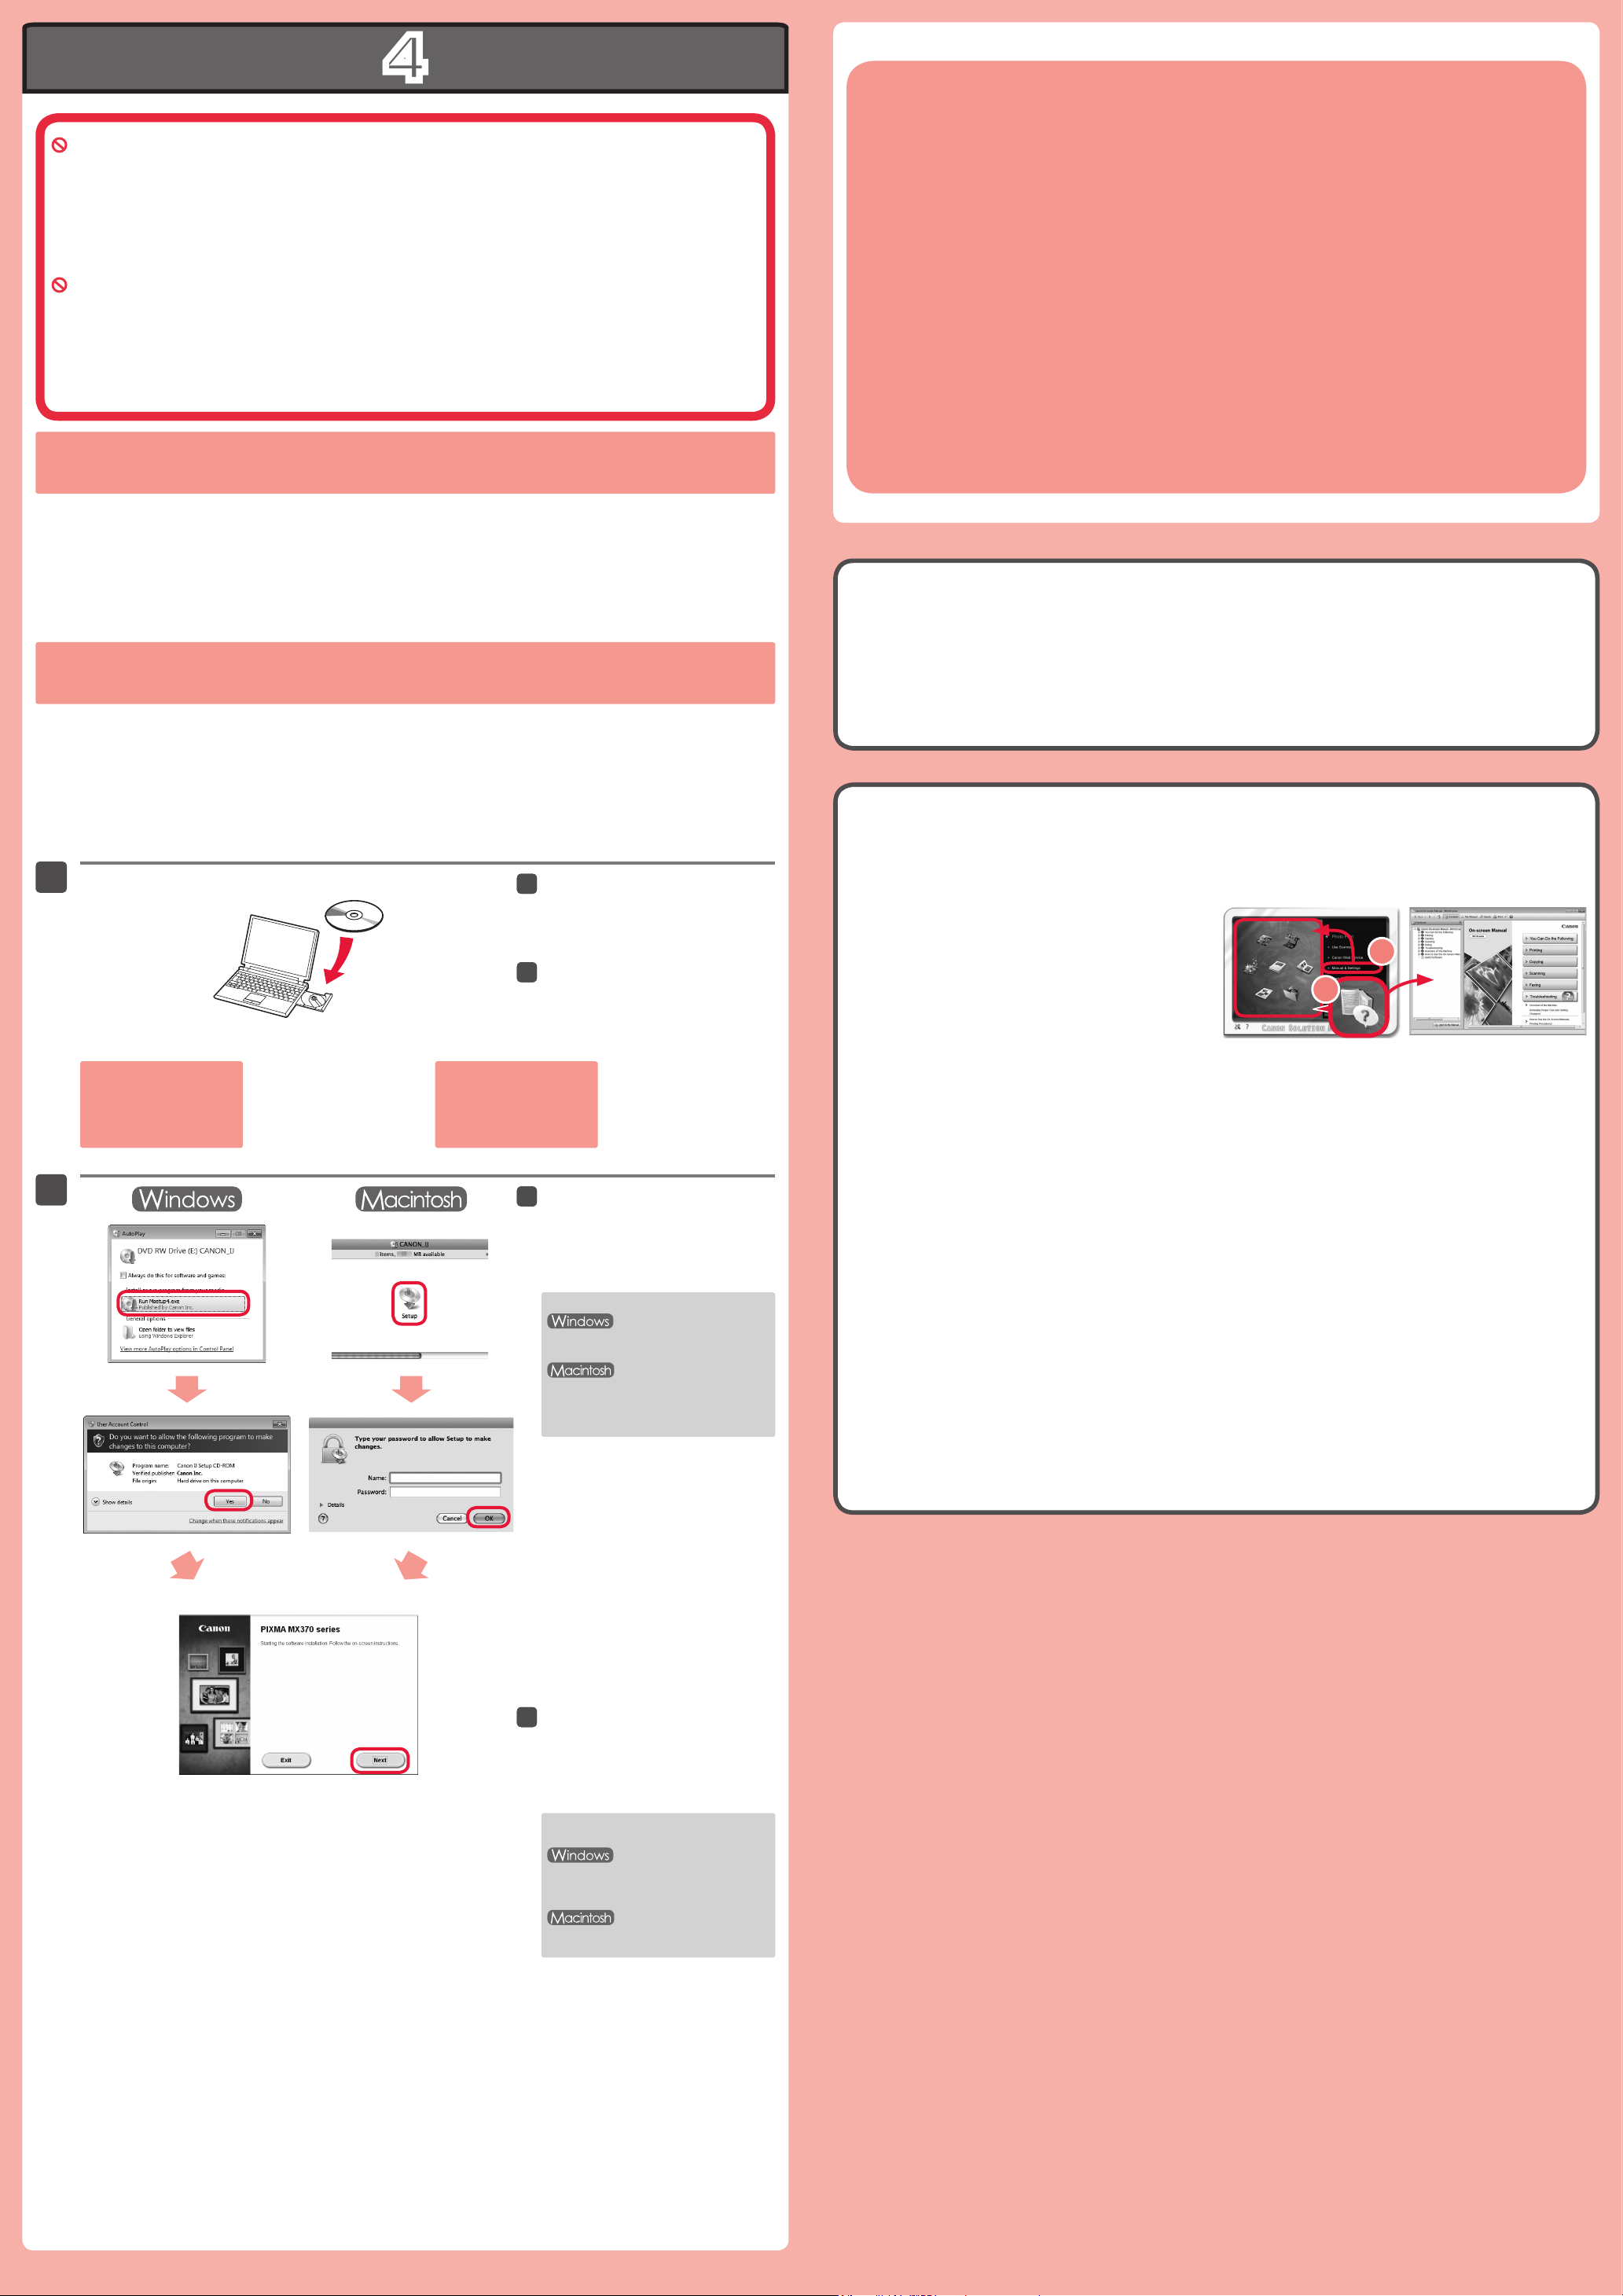
Do not connect the USB cable yet.
22
11
You will be prompted to connect it during the installation using the Setup CD-ROM.
No conecte aún el cable USB.
El sistema le solicitará que lo conecte durante la instalación utilizando el CD-ROM de instalación (Setup
CD-ROM).
Quit all applications before installation.
•
Log on using an administrator account.
•
Internet connection may be required during the installation. Connection fees apply.
•
Screens are based on Windows 7 operating system Home Premium and Mac OS X 10.6.x. Actual screens may
differ depending on the OS version.
To complete the installation, follow the on-screen instructions
on the computer.
Para finalizar la instalación, siga las instrucciones que
aparezcan en la pantalla del ordenador.
Cierre todas las aplicaciones antes de la instalación.
•
Inicie una sesión con una cuenta de administrador.
•
Durante la instalación, es posible que se tenga que conectar a Internet. Esto puede implicar gastos de conexión.
•
Las pantallas se basan en Windows 7 operating system Home Premium y Mac OS X 10.6.x. Las pantallas
reales pueden diferir en función de la versión del sistema operativo.
Insert the CD-ROM into the
computer.
Introduzca el CD-ROM en el
ordenador.
You may setup the fax features of the machine later. For the setup instructions, refer to Setting Up the FAX.
Puede congurar las funciones de fax del equipo más tarde. Para obtener instrucciones de conguración,
consulte Conguración del FAX.
Read the On-screen Manual on
the Computer
Lea el Manual en pantalla en el
ordenador
If the USB cable is already
connected, unplug it. If a
message appears on the
computer, click Cancel.
Si el cable USB ya está
conectado, desconéctelo.
Si aparece un mensaje en
el ordenador, haga clic en
Cancelar (Cancel).
Follow the on-screen instructions
to proceed.
If the Select Language screen appears,
select a language.
If the CD-ROM does not autorun:
Double-click (My) Computer > CD-
ROM icon > MSETUP4.EXE.
Double-click the CD-ROM icon on the
desktop.
After the installation, “Solution Menu EX” starts.
To open the On-screen Manual, click Manual & Settings > On-screen Manual. Refer to it for details on the functions, operations,
and troubleshooting tips.
Solution Menu EX and the On-screen Manual need to be selected for installation.
Después de la instalación, se inicia “Solution Menu EX”.
Para abrir el Manual en pantalla, haga clic en Manual y conguración (Manual & Settings) > Manual en pantalla (On-screen
Manual). Consúltelo para detalles sobre las funciones, las operaciones y la resolución de problemas.
Para la instalación deben estar seleccionados Solution Menu EX y el Manual en pantalla.
Siga las instrucciones que aparezcan
en pantalla para continuar.
Si aparece la pantalla Seleccionar
idioma (Select Language), elija uno.
Si el CD-ROM no se ejecuta
automáticamente:
Haga doble clic en (Mi) PC ((My)
Computer) > icono de CD-ROM >
MSETUP4.EXE.
Haga doble clic en el icono de CD-ROM
del escritorio.
 Loading...