

Page 1

Canon MultiP ASS™ C80
Canon MultiP ASS™ C70
MultiPASS
™
Suite
V ersion 3.10
Software User's Guide
Page 2

Copyright
© 1999 by Canon, Inc. All rights reserved.
This manual may not be reproduced in any form, in whole or part,
without the prior written consent of Canon, Inc.
Trademark Acknowledgements
Adobe PageMaker® and Adobe Photoshop® are registered trademarks,
and Adobe Photo Deluxe™ is a trademark, of Adobe Systems
Corporation.
Canon and BJ are registered trademarks, and MultiPASS, Bubble Jet, and
ScanGear are trademarks of Canon, Inc.
Exchange®, Outlook®, and Outlook Express®, are registered trademarks of
Microsoft Corporation.
Microsoft® and Windows® are registered trademarks of Microsoft
Corporation.
Netscape Mail™ is a trademark and Netscape Messenger® is a registered
trademark of Netscape Communications Corporation.
Pentium® is a registered trademark of Intel Corporation.
PhotoFinish™ is a trademark of Zsoft Corporation.
TextBridge® is a registered trademark of ScanSoft, Inc.
All other trademarks identified herein are the property of their respective
owners.
ii Preface
Page 3

Contents
Chapter 1 Introduction ....................................................................................................1-1
Desktop Manager Features: an Overview ...................................................1-2
Desktop Manager Software Package ........................................................... 1-3
System Requirements.....................................................................................1-5
About This Guide ........................................................................................... 1-5
Conventions Used in This Guide .......................................................... 1-6
Other User Assistance ....................................................................................1-6
Chapter 2 Installing the Desktop Manager Software................................................2-1
Installing the Software ...................................................................................2-2
Preparing for the Installation .................................................................2-3
Installing the Software ............................................................................2-4
Overwriting the MultiPASS Printer Options .......................................2-6
Setting the Default Printer .............................................................................2-7
Sharing the Printer Installation .....................................................................2-8
Setting Up Your MultiPASS Printer for Sharing..................................2-8
Installing the Printer Driver on a Client System ...............................2-10
Chapter 3 Printing with the MultiPASS Printer.........................................................3-1
Printing a Document ......................................................................................3-2
Printing Envelopes ..................................................................................3-2
Working with Print Options (Windows 95/98) ..........................................3-5
Changing the Printer Settings: a Summary .........................................3-5
Choosing a Print Mode ...........................................................................3-6
Changing the Print Mode Settings ........................................................3-9
Editing a Custom Print Mode ..............................................................3-15
Deleting a Custom Print Mode ............................................................3-16
Saving a Custom Print Mode as a File ................................................3-17
Setting Paper Options ........................................................................... 3-18
Setting Other Print Features .................................................................3-21
Creating or Changing a Stamp ............................................................3-24
Setting Default Printer Options ...........................................................3-30
Displaying Printer Driver Information............................................... 3-31
Contents iii
Page 4

Working with Print Options (Windows NT).............................................3-31
Changing the Printer Settings: a Summary .......................................3-31
Choosing a Print Mode .........................................................................3-32
Changing the Print Mode Settings ......................................................3-34
Editing a Custom Print Mode ..............................................................3-40
Deleting a Custom Print Mode ............................................................3-41
Saving a Custom Print Mode as a File ................................................3-42
Setting Paper Options ........................................................................... 3-43
Setting Default Printing Options .........................................................3-47
Displaying Printer Driver Information............................................... 3-49
Chapter 4 Using the Desktop Manager.........................................................................4-1
Desktop Manager: an Overview .................................................................... 4-2
Features of the Desktop Manager Window ........................................... 4-3
Understanding Desktop Manager Folders ............................................4-6
System-Defined Folders ...........................................................................4-6
User-Defined Folders ...............................................................................4-8
Viewing Documents in the Desktop Manager ...................................... 4-8
Chapter 5 PC Faxing .........................................................................................................5-1
Faxing with Your Computer ...........................................................................5-2
Sending a Fax from Your Computer (PC Faxing) ................................. 5-2
Specifying a Fax Recipient ...................................................................... 5-5
Defining Send Fax Options .....................................................................5-7
Processing the Fax.................................................................................... 5-9
Creating a Fax Memo ............................................................................. 5-11
Receiving a Fax ...................................................................................... 5-12
Using the Fax Log ................................................................................. 5-14
Working with Jobs in the Send Fax Manager ..................................... 5-15
Setting Up the Address Book ...................................................................... 5-20
Working with Address Book Entries................................................... 5-21
Printing the Address Book ................................................................... 5-26
Importing the Address Book ................................................................ 5-27
Exporting the Address Book ................................................................ 5-29
Designing a Fax Cover Page ........................................................................ 5-31
Using the Cover Page Designer ........................................................... 5-32
Creating a New Cover Page ................................................................. 5-34
Making Image Adjustments ................................................................. 5-48
Adding Annotations to Your Cover Page ........................................... 5-61
Opening and Modifying a Fax Cover Page ........................................ 5-63
Reverting to the Last Saved Version .................................................... 5-64
iv Contents
Page 5

Printing a Cover Page ........................................................................... 5-64
Renaming a Cover Page ........................................................................ 5-64
Deleting a Cover Page ........................................................................... 5-66
Faxing with Your Email Application ......................................................... 5-66
Setting Up MultiPASS Fax in Your Email Application..................... 5-67
Sending an Email Message as a Fax ................................................... 5-67
Receiving a Fax ...................................................................................... 5-68
Chapter 6 Scanning ..........................................................................................................6-1
Scanning Overview ......................................................................................... 6-2
Features of the ScanGear Window .........................................................6-2
Scanning with the Desktop Manager............................................................ 6-4
Scanning from a Windows Application .......................................................6-5
Setting the Preview Scan Options ..................................................................6-6
Setting the Scan Mode ..............................................................................6-6
Setting the Scan Resolution .....................................................................6-8
Setting Preferences ................................................................................ 6-10
Setting Paper Size .................................................................................. 6-12
Setting Black and White Options ........................................................ 6-14
Adjusting the Preview Image for Final Scan ............................................. 6-15
Clearing the Preview Area ................................................................... 6-15
Adjusting the Preview Image View ..................................................... 6-15
Adjusting the Selection Size ................................................................. 6-16
Moving an Image ................................................................................... 6-17
Reversing the Image Tone ..................................................................... 6-17
Mirroring an Image ............................................................................... 6-18
Rotating an Image ................................................................................. 6-18
Scaling the Image Output Size ............................................................. 6-18
Adjusting the Preview Image Tone ............................................................. 6-19
Features of the Tone Tab ....................................................................... 6-19
Correcting the Image Tone Automatically .......................................... 6-20
Adjusting Contrast and Brightness .................................................... 6-21
Changing Gamma Curve Values ......................................................... 6-22
Adjusting Histogram Tone Levels ....................................................... 6-24
Using Tone Curves ................................................................................ 6-26
Adjusting Contrast/Brightness for Black and White Scan Mode ... 6-27
Increasing the Speed of the Scan Process ........................................... 6-29
Scanning with the MultiPASS Toolbar ...................................................... 6-29
Changing the Options for the Scan Buttons on the Toolbar ............. 6-32
Changing Toolbar Settings ................................................................... 6-36
Performing Other Toolbar Tasks .......................................................... 6-39
Contents v
Page 6

Chapter 7 W orking with Documents in the Desktop Manager .................................7-1
Managing Your Documents in the Desktop Manager ................................. 7-3
Selecting Documents in the Desktop Manager ..................................... 7-3
Printing a Document in the Desktop Manager ..................................... 7-4
Creating a Folder ...................................................................................... 7-4
Moving a Document .................................................................................7-5
Copying a Document ............................................................................... 7-6
Renaming a Document or Folder............................................................ 7-6
Deleting a Document or Folder ............................................................... 7-7
Restoring a Deleted Folder or Document ...............................................7-8
Emptying the Trash Folder ...................................................................... 7-9
Importing a Document .............................................................................7-9
Exporting a Document .......................................................................... 7-10
Attaching a Document to Electronic Mail (Email) .............................. 7-11
Manipulating a Document in Document View.................................. 7-12
Arranging Documents in Document View ......................................... 7-12
Scrolling Through a Multi-page Document ....................................... 7-13
Removing a Page from a Document .................................................... 7-13
Splitting a Document ............................................................................ 7-14
Merging a Document ............................................................................ 7-14
Indexing and Searching for Documents ............................................. 7-15
Setting Up the Search Index ................................................................. 7-16
Assigning Index Criteria to Documents ............................................. 7-21
Searching Your Documents.................................................................. 7-25
Redisplaying the Result of Your Last Search ..................................... 7-30
Modifying a Document ................................................................................ 7-30
Features of the MultiPASS Viewer Window ....................................... 7-32
Adjusting the Document Image ........................................................... 7-35
Making Image Adjustments ................................................................. 7-40
Adding Annotations to Your Document ............................................ 7-53
Revising Your Annotations .................................................................. 7-60
Reverting to the Last Saved Version .................................................... 7-62
Printing the Document ......................................................................... 7-62
Adjusting the MultiPASS Viewer Default Options ............................ 7-64
Chapter 8 MultiP ASS Printer Setup and Other Utilities in the
Desktop Manager ..........................................................................................8-1
Setting Up Fax Options in the Desktop Manager....................................... 8-2
Setting Up Fax Preferences.....................................................................8-3
Setting Up Send Fax Options .................................................................8-4
vi Contents
Page 7

Setting Up Advanced Send Fax Options ............................................... 8-6
Setting Up Receive Fax Options ............................................................. 8-9
Setting Up Advanced Receive Fax Options ........................................ 8-11
Setting Up Speed Dial Assignments ................................................... 8-15
Setting Up System Options .......................................................................... 8-17
Using the Launcher ...................................................................................... 8-19
Making a Phone Call from the Desktop Manager .................................... 8-23
Using the MultiPASS Status Monitor ......................................................... 8-24
Using the Minimised Status Monitor .................................................. 8-25
Using the Status Monitor Window ...................................................... 8-26
Status Messages .................................................................................... 8-27
Disconnecting the MultiPASS Printer ........................................................ 8-28
Restarting the MultiPASS Connection ................................................ 8-29
Removing the Desktop Manager ................................................................ 8-29
Reinstalling the Desktop Manager ...................................................... 8-31
Chapter 9 Frequently Asked Questions ........................................................................9-1
MultiPASS Printer Cannot Be Initialised. .....................................................9-2
MultiPASS Service Cannot Be Restarted (Windows NT only). .................. 9-2
Faxes Are Not Being Sent Correctly. .............................................................. 9-3
Faxes Are Not Being Received Correctly. ...................................................... 9-4
Images Are Not Scanning Properly. ..............................................................9-6
Documents Are Not Being Copied. ...............................................................9-6
Documents Are Not Printing Correctly. ........................................................ 9-7
Paper Is Not Loading Correctly. .....................................................................9-9
The Print Quality Is Not Satisfactory. ......................................................... 9-10
Appendix A Fax/Phone Characters ...................................................................................A-1
Appendix B Sharing Y our Printer Cross-Platform in W indows NT............................. B-1
Preparing to Share Your Printer Cross-Platform ......................................... B-1
Setting Up the MultiPASS Printer for Sharing ............................................ B-2
Glossary ......................................................................................................................... G-1
Index ........................................................................................................................... I-1
Contents vii
Page 8

viii Contents
Page 9

Chapter 1
Introduction
Welcome and congratulations on your purchase of the Canon MultiPASS
C80/70 and its accompanying MultiPASS Desktop Manager for Windows
software (hereafter referred to as the MultiPASS printer and Desktop
Manager, respectively).
With your MultiPASS printer, the Desktop Manager software package
enables you to perform a variety of tasks, meeting all your printing,
faxing, and scanning needs.
❑ Desktop Manager Features: an Overview ............................................1-2
❑ Desktop Manager Software Package.....................................................1-3
❑ System Requirements ..............................................................................1-5
❑ About This Guide .....................................................................................1-5
z Conventions Used in This Guide ...................................................1-6
❑ Other User Assistance.............................................................................. 1-6
Introduction
Chapter 1 Introduction 1-1
Page 10

Desktop Manager Features: an Overview
This section reviews some of the features of the Desktop Manager. For
detailed information and instructions, refer to later chapters in this guide.
❏❏
❏ Print a Document
❏❏
The MultiPASS printer can be configured as the Windows default
printer, allowing you to print a document in any Windows
application.
You can also define and customise print options that affect the output
of your printed documents.
❏❏
❏ Fax a Document
❏❏
You can fax a black and white document from your computer, from
within a Windows application, or from the Desktop Manager. You
can attach a fax cover page and even schedule the transmission time
that the fax should be sent. Predefined fax cover pages are available
for you to use, or you can design your own.
For associates to whom you repeatedly send faxes or email, you can
set up an Address Book, containing predefined fax and email
information for each recipient (such as the fax number or email
address). When you send a fax or an email message from your
computer, the recipient information is then readily available in the
Address Book.
You can also receive colour and black and white faxes from your
business and personal contacts directly into your PC.
❏❏
❏ Scan an Image
❏❏
The TWAIN-compliant scan driver enables you to use the MultiPASS
printer to scan black and white, and colour documents, photographs,
and other images directly into the Desktop Manager or into another
Windows application.
❏❏
❏ Import or Export a Document
❏❏
You can import, export, store, and manage documents and images in
a variety of formats directly in the Desktop Manager, such as .BMP
and .TIF.
1-2 Introduction Chapter 1
Page 11

❏❏
❏ Manipulate or Annotate a Document
❏❏
You can manipulate or annotate any document placed in the Desktop
Manager — which occurs by sending or receiving a fax, scanning an
image, or importing a file. You manipulate a document by scrolling
through and viewing its contents; removing a page; splitting or
merging it with another document; editing it by cropping, rotating or
flipping; adjusting the document brightness, contrast, size, or image
type; or by printing the document. You annotate a document by
adding a text annotation, graphic or text stamp, sticky note,
highlighting, or by creating a simple drawn graphic.
❏❏
❏ Set MultiPASS Printer Options
❏❏
Options that affect certain operations of your MultiPASS printer can
be set manually on the MultiPASS printer itself or in the Desktop
Manager. These options include parameters that affect sending and
receiving faxes, and the assignment of speed dial numbers. Option
settings defined in the Desktop Manager override any corresponding
option setting you previously set up on the MultiPASS printer.
Desktop Manager Software Package
The Desktop Manager software package includes drivers and a set of
utility programs which are automatically installed on your system when
you install the software package. The drivers allow the MultiPASS
printer to communicate with the software on your computer.
Introduction
The following drivers and application programs are installed:
❏❏
❏ MultiPASS Desktop Manager for Windows
❏❏
The MultiPASS Desktop Manager for Windows coordinates sending
faxes directly from your computer (PC faxes), receiving faxes into
your computer, and scanning images. The Desktop Manager enables
you to store and manage the resulting documents.
❏❏
❏ MultiPASS Printer Driver
❏❏
The MultiPASS printer driver enables you to use the MultiPASS
printer as the default printer in any Windows application that
supports printing.
Chapter 1 Introduction 1-3
Page 12

❏❏
❏ MultiP ASS Fax Driver
❏❏
The MultiPASS fax driver enables you to send a PC fax from any
Windows application that allows faxing.
❏❏
❏ Scan Driver (ScanGear for MultiPASS)
❏❏
The scan driver enables you to scan an image into the Desktop
Manager or most Windows applications that support TWAIN-
compliant scanning.
❏❏
❏ MultiPASS Service (Windows NT only)
❏❏
The MultiPASS Service (MPService) enables and controls all the
communication between your computer and the MultiPASS printer.
MPService must be running for jobs to be processed with the
Desktop Manager and the MultiPASS printer (such as receiving faxes
in the Desktop Manager, scheduling faxes, scanning, and printing).
MPService starts automatically when you start your computer, even
if you have not yet logged into Windows. If you log off Windows and
leave the computer on, MPService continues to run, to receive and
send any faxes to and from the Desktop Manager.
❏❏
❏ MultiPASS Status Monitor
❏❏
The MultiPASS Status Monitor controls and tracks the activity
occurring through the bi-directional parallel port to which the
MultiPASS printer is connected. The Status Monitor must be running
to enable the MultiPASS system to function successfully. The Status
Monitor displays status messages about the current activity with
your MultiPASS system. With the installation of the software, the
Status Monitor is set up to automatically start when you start
Windows.
❏❏
❏ Send Fax Manager
❏❏
The Send Fax Manager displays an ordered queue of fax jobs and
their status.
❏❏
❏ MultiPASS Toolbar
❏❏
The MultiPASS Toolbar enables you to scan an image from the
Windows desktop without opening an imaging application (such as
Photoshop) or the Desktop Manager. The scanned image is delivered
directly to a destination, such as a fax or to the desired application
(such as your email application or a graphic application).
1-4 Introduction Chapter 1
Page 13

System Requirements
To successfully install and operate the Desktop Manager with the
MultiPASS printer, your system must meet the following minimum
requirements:
❏ An IBM or compatible computer with a Pentium 90 processor or
higher
❏ Microsoft Windows 95, Windows 98, or Windows NT 4.0
❏ For Microsoft Windows NT 4.0, Service Pack 3 or later
❏ 32 megabytes (MB) of RAM. 64 MB of RAM is recommended.
❏ 60 MB of available hard disk space. 150 MB of available hard disk
space is recommended.
❏ CD-ROM drive, or access to one over a network connection
❏ 256-colour SVGA monitor or greater
❏ A shielded, bi-directional, IEEE-1284-compatible parallel cable 6.6 feet
(2 meters) in length or shorter. For help in purchasing the correct
cable, consult your dealer or retailer.
Introduction
About This Guide
This guide assumes you have a basic understanding of Windows. This
includes how to start your system and navigate within the Windows
environment. You should be familiar with common Windows terms such
as window, dialog box, button, icon, menu, application, select, open,
close, click, double-click, drag, and list box.
For assistance in familiarising yourself with Windows, refer to your
Microsoft Windows user documentation.
Chapter 1 Introduction 1-5
Page 14

Conventions Used in This Guide
The following types of formatting identify specific types of information
provided in this guide.
Italicised text Used to stress the importance of a word
or phrase, or to refer to the title of
another guide. For example:
You cannot access the dialog box ....
—or—
...the Microsoft Windows User’s Guide....
Text in quotation marks Used to refer to the title of a section
within the guide. For example:
...the “Installing the Software” section....
Click, double-click Use of the word click or double-click
provides instructions for selecting or
choosing a command or option,
generally with a mouse.
Monospaced text Used for commands you might type
when installing the software, or system
messages that may display on your
screen. For example:
A:\SETUP
Other User Assistance
In addition to this guide, the following information and instructions on
using the MultiPASS printer and Desktop Manager software are
available.
1-6 Introduction Chapter 1
Page 15

❏❏
❏ MultiP ASS Desktop Manager Online Help
❏❏
The online help includes context-sensitive help about a window or
dialog box and step-by-step instructions for performing Desktop
Manager tasks.
❏❏
❏ Canon MultiPASS User’s Guide
❏❏
This guide offers detailed information on how to set up and operate
your MultiPASS printer. It includes initial setup procedures, fax
operations, daily maintenance, and troubleshooting.
❏❏
❏ Quick Start Guide
❏❏
This guide summarises the steps for setting up your MultiPASS
system.
Introduction
Chapter 1 Introduction 1-7
Page 16

1-8 Introduction Chapter 1
Page 17

Chapter 2
Installing the Desktop Manager
Software
This chapter provides information and instructions for installing the
Desktop Manager software and setting the default printer.
❑ Installing the Software.............................................................................2-2
z Preparing for the Installation ..........................................................2-3
z Installing the Software .....................................................................2-4
z Overwriting the MultiPASS Printer Options ................................2-6
❑ Setting the Default Printer ...................................................................... 2-7
❑ Sharing the Printer Installation ..............................................................2-8
z Setting Up Your MultiPASS Printer for Sharing........................... 2-8
z Installing the Printer Driver on a Client System ........................2-10
Software
Installing the
Desktop Manager
Chapter 2 Installing the Desktop Manager Software 2-1
Page 18

Installing the Software
Your MultiPASS software comes with a Master Installer that makes
installing the MultiPASS software fast and easy. The Master Installer
starts up and loads the software in this order:
❏ MultiPASS Desktop Manager (including the printer and fax drivers)
❏ MultiPASS ODBC (Open DataBase Connectivity) Interface
❏ ScanGear for MultiPASS.
By default, the Desktop Manager software is installed on your C: drive in
a folder named MultiPASS (C:\Program Files\Canon\MultiPASS\),
unless you specify another drive or folder during installation. The
installation process also changes some of your system files to allow all
the Desktop Manager components to work properly.
During installation, you are prompted to enter certain fax setup
information. This information can later be changed in the Desktop
Manager, as described in a later chapter.
The fax setup information you enter during installation adjusts
corresponding settings in your MultiPASS printer. Therefore, any fax
n
information you may have manually set on the MultiPASS printer is
replaced by the information you enter when installing the Desktop
Manager.
During installation, the MultiPASS Status Monitor is set to automatically
start each time you start Windows.
When installation is complete, the Master Installer determines whether or
not your computer needs to be restarted.
If you are using Windows NT, you may have formatted the partitions on
your hard drive with NTFS (New Technology File System). In this case,
n
2-2 Installing the Desktop Manager Software Chapter 2
you can operate the MultiPASS Desktop Manager only if you log in as the
Administrator or with Administrator privileges.
Page 19

Preparing for the Installation
Before you begin installing the software, take some time to prepare your
system and fax setup information required for installation.
❏ Connect the MultiPASS printer to the parallel port on your computer.
The MultiPASS printer must be connected to your computer to install
the Desktop Manager software.
The selected parallel port must be a dedicated port. The MultiPASS
printer does not operate with a redirected or virtual parallel port.
❏ Prepare the following fax setup information, which is entered during
installation:
z Your preferred mode for receiving faxes with the MultiPASS
printer: automatically switching between a telephone and fax
call; automatically receiving fax calls only; requiring you to
manually receive fax calls; or handling incoming calls with an
answering machine connected directly to the MultiPASS printer.
z Fax Heading/Unit Name
The name you want to appear in the fax header (usually your
name or company name), which appears in the top margin of
each page of a fax transmission.
z Fax Number
The number for the fax line connected to your MultiPASS printer.
This information is printed in the fax header, displaying in the
top margin of each page of a fax transmission.
z Company Name (for Cover Page)
Name of your company. Once entered, this information is
available to print on a fax cover page.
Software
Installing the
Desktop Manager
z Outside Dialling Prefix
If applicable, the number for accessing an outside line through
your office phone system (usually 9).
Chapter 2 Installing the Desktop Manager Software 2-3
Page 20

z Fax Receive Mode
The method by which you want the MultiPASS printer to handle
incoming faxes when your PC is on: upload the fax directly to the
Desktop Manager or print the fax from the MultiPASS printer.
❏ Start Windows. If any Windows applications are open, close the
applications. With the applications closed, you ensure that the
Desktop Manager software installs properly.
If you are attempting to reinstall the Desktop Manager software, you
must first remove the current installation. For instructions on removing
n
the software, refer to Chapter 8, “MultiPASS Printer Setup and Other
Utilities in the Desktop Manager.”
Installing the Software
Once you have prepared your system and the required fax information,
you are ready to install the Desktop Manager software.
If you are using Windows NT, you must log on as Administrator or have
Administrator privileges before installing the Desktop Manager software.
n
If you do not have Administrator privileges for Windows NT, ask your
system administrator to install the MultiPASS Desktop Manager software
on your PC.
To install the Desktop Manager software:
1. Insert the installation disk into your disk drive.
2-4 Installing the Desktop Manager Software Chapter 2
Page 21
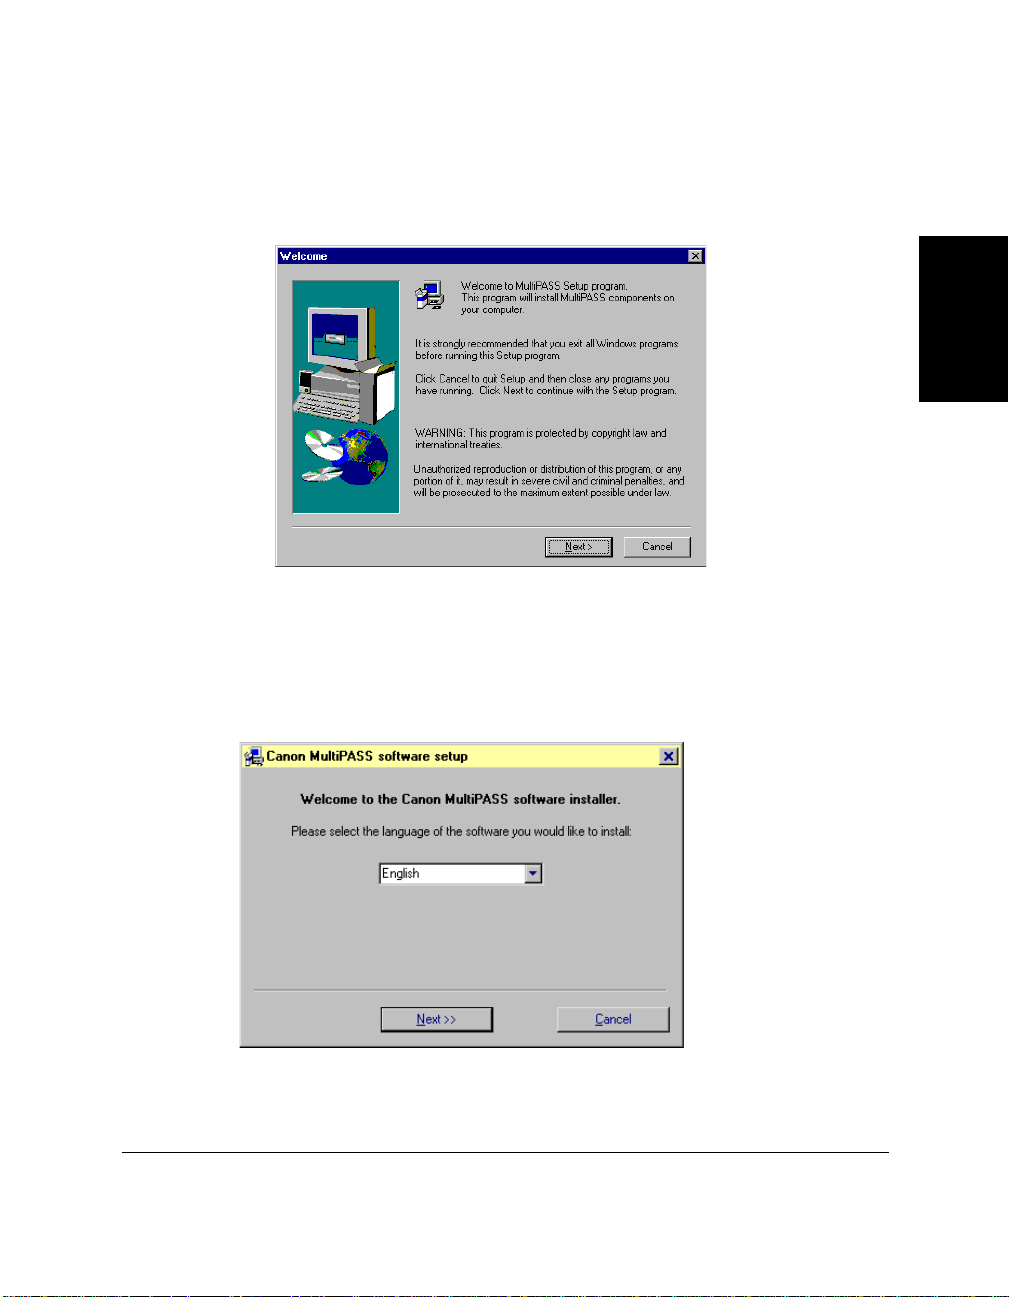
2. The Desktop Manager software will be supplied on either a single
language CD, or a multilingual CD. If you have a single language CD
the following dialog will be displayed:
If you have a multilingual CD the following dialog will be displayed:
Software
Installing the
Desktop Manager
Chapter 2 Installing the Desktop Manager Software 2-5
Page 22

3. If installation does not start automatically:
z On the Windows taskbar, click Start, and then click Run.
z If you received your software on a multilingual CD, in the Run
dialog box, type the following command and click OK (where D:
is your disk drive).
D:\SETUP.EXE
zIf you received your software on a single language CD, in the
Run dialog box, type the following command and click OK
(where D: is your disk drive).
D:\SETUP\SETUP.EXE
4. Follow the on-screen instructions to complete the installation
process.
During installation, follow these guidelines:
z Click Next to move from one dialog box to the next.
z Make sure you click Next or OK on the current dialog box.
z Be sure to wait for Windows to complete each setup step. If you
hear the computer working, wait until it is done.
For information about allowing the Desktop Manager software to
overwrite the MultiPASS printer setup options, refer to the “Overwriting
the MultiPASS Printer Options” section.
Overwriting the MultiPASS Printer Options
If you set options on the operation panel of your MultiPASS printer (such
as a phone line type), they are overwritten by the Desktop Manager
software under the following conditions:
❏ When the installation of the Desktop Manager software is completed
2-6 Installing the Desktop Manager Software Chapter 2
Page 23

❏ After installation, when you open the MultiPASS Status Monitor
(which occurs automatically when you start Windows)
❏ After installation, when you save a change to the setup options in the
Desktop Manager (as described in Chapter 8, “MultiPASS Printer
Setup and Other Utilities in the Desktop Manager”).
When setting options, a message appears to remind you that the
MultiPASS printer options set on the operation panel will be
overwritten if set in the Desktop Manager.
You can choose to proceed with the update, overwriting the settings
in the MultiPASS printer, or you can cancel the action. When
cancelling, you can first record your settings on the MultiPASS
printer. This enables you to re-enter them in the Desktop Manager
when you resume operations.
Setting the Default Printer
When you install the printer driver software, the system automatically
sets the MultiPASS printer as the default printer. If necessary, however,
follow these instructions to set the default printer.
Software
Installing the
Desktop Manager
To set the default printer:
1. On the Windows desktop, click Start, and then point to Settings.
2. On the Settings menu, click Printers.
3. In the Printers window, click the MultiPASS printer icon.
4. On the File menu, click Set As Default.
Chapter 2 Installing the Desktop Manager Software 2-7
Page 24

Sharing the Printer Installation
You may be using your computer and the MultiPASS printer connected
to your computer in an environment where multiple computers are
connected by a network. In this case, you can share the use of your
MultiPASS printer with the other computers on the network.
If you choose to share the use of your MultiPASS printer, your computer
acts as the host system or server to the other computers (also referred to
as remote or client systems).
To use your MultiPASS printer, the client systems must install the
MultiPASS printer driver onto their systems. They can do so directly
from your system. Based on which Windows operating system you are
using, the following client system can share your MultiPASS printer:
If your system (server) is: Install on client system:
Windows 95 or Windows 98 Windows 95 or Windows 98
Windows NT Windows 95, Windows 98, or
Windows NT
When a document is printed by the client system on a shared MultiPASS
printer, any printing messages (status or error messages) display on the
server system.
If you are using Windows NT for sharing your MultiPASS printer, it is
recommended that Service Pack 4 or later is installed on your system.
n
This ensures that the client systems can successfully connect to your
MultiPASS printer on the network.
Setting Up Your MultiPASS Printer for Sharing
Before the client systems can install and use the MultiPASS printer driver,
you must set up the MultiPASS printer for sharing.
2-8 Installing the Desktop Manager Software Chapter 2
Page 25

To set up the MultiPASS printer for sharing:
1. On the MultiPASS server system, on the Windows taskbar, click Start.
2. On the Start menu, point to Settings. Then click Printers.
3. In the Printers window, click the MultiPASS printer icon.
4. On the File menu, click Sharing.
n
n
5. In the Properties dialog box, on the Sharing tab, click Shared or
Shared As.
6. In Share Name box, type a name you want to assign to the shared
MultiPASS printer.
If available, you may also want to assign a password, which would
then be required by the client systems when using the MultiPASS
printer.
7. Click OK.
If the Sharing command is not available (see Step 4), you need to set up
printer sharing in Windows. For details, see your Windows user
documentation.
If you are using Windows NT and expect Windows 95/98 client systems
to use your shared MultiPASS printer, you need to set up an alternate
driver for Windows 95/98. With this procedure, you may need to have
the following installation disks available: Windows NT, Windows 95/98,
and MultiPASS Desktop Manager.
Software
Installing the
Desktop Manager
To set up an alternate driver: On the Sharing tab, under Alternate
Drivers, click Windows 95. Then click OK. Follow the on-screen
instructions. For details, see Appendix B, and your Windows NT
documentation.
Chapter 2 Installing the Desktop Manager Software 2-9
Page 26

Installing the Printer Driver on a Client System
Once the MultiPASS printer has been set up for sharing, the printer
driver can be installed from the MultiPASS server system to the
appropriate client systems.
To install the printer driver on a client system:
1. On the client system, on the Windows taskbar, click Start.
2. On the Start menu, point to Settings. Then click Printers.
3. In the Printers window, double-click Add Printer.
4. Follow the on-screen instructions.
Install the printer driver as a network printer, based on the name
assigned to the shared printer.
You cannot install the MultiPASS printer driver on a client system that
has a previous version of a MultiPASS printer.
n
2-10 Installing the Desktop Manager Software Chapter 2
Page 27

Chapter 3
Printing with the MultiPASS Printer
This chapter provides instructions for printing a document from a
Windows application with your MultiPASS printer and for changing the
printer settings.
❑ Printing a Document ................................................................................3-2
z Printing Envelopes ............................................................................3-2
❑ Working with Print Options (Windows 95/98) .................................... 3-5
z Changing the Printer Settings: a Summary ....................................3-5
z Choosing a Print Mode .....................................................................3-6
z Changing the Print Mode Settings ..................................................3-9
z Editing a Custom Print Mode ....................................................... 3-15
z Deleting a Custom Print Mode ...................................................... 3-16
z Saving a Custom Print Mode as a File ......................................... 3-17
z Setting Paper Options .................................................................... 3-18
z Setting Other Print Features .......................................................... 3-21
z Creating or Changing a Stamp ..................................................... 3-24
z Setting Default Printer Options .................................................... 3-30
z Displaying Printer Driver Information ........................................ 3-31
❑ Working with Print Options (Windows NT) ...................................... 3-31
z Changing the Printer Settings: a Summary ................................. 3-31
z Choosing a Print Mode .................................................................. 3-32
z Changing the Print Mode Settings ............................................... 3-34
z Editing a Custom Print Mode ....................................................... 3-40
z Deleting a Custom Print Mode ...................................................... 3-41
z Saving a Custom Print Mode as a File ......................................... 3-42
z Setting Paper Options .................................................................... 3-43
z Setting Default Printing Options .................................................. 3-47
z Displaying Printer Driver Information ........................................ 3-49
Printer
MultiPASS
Printing with the
Chapter 3 Printing with the MultiPASS Printer 3-1
Page 28

Printing a Document
Once you have installed the software, you are ready to print a document —
from any Windows application that supports printing, such as Word for
Windows — using the MultiPASS printer.
Printer options are initially installed using default settings, enabling you
to print immediately. These options determine what your documents look
like when printed. For example, they define such settings as the paper size
and page orientation. For more information on printer settings, see the
“Working with Print Options (Windows 95/98)” and “Working with Print
Options (Windows NT)” sections presented later in this chapter.
Instructions for printing a document can vary somewhat for different
Windows applications. Therefore, for detailed instructions, see the user
documentation for the specific application from which you are printing.
The following instructions summarise the general procedures for printing
a document.
To print a document:
1. With your document open, click the print command. (In most
Windows applications, the print command is on the File menu or
toolbar.)
2. In the Print dialog box, make sure the MultiPASS printer is selected in
the Printer box.
The MultiPASS printer appears as the selected printer if you specified
it as the default printer when you installed the printer driver and
Desktop Manager software, as described in the previous chapter.
3. Click the command to print your document (usually OK or Print).
The document is printed to your MultiPASS printer.
Printing Envelopes
When printing envelopes, use the following guidelines for the best results.
3-2 Printing with the MultiPASS Printer Chapter 3
Page 29

❏ Use the appropriate size envelope: US commercial size number 10 or
European size DL.
Although other envelope sizes might fit in the paper tray, using them
may not provide consistent printing results.
❏ Avoid using the following types of envelopes. They may cause jams or
smears, or may damage your printer:
z With windows, holes, perforations, cutouts, and double flaps
z Made with special coated or deeply embossed paper
z With peel-off sealing strips
z With letters enclosed in the envelope.
❏ Be sure to place envelopes face-up when printing.
❏ Stack up to 10 envelopes in the multipurpose tray to feed the envelopes
automatically for printing.
To load envelopes:
1. On the MultiPASS printer, make sure the paper thickness lever is set to
the right.
Printer
MultiPASS
Printing with the
Chapter 3 Printing with the MultiPASS Printer 3-3
Page 30

C
I
a
n
B
rt
k
r
C
i
d
C
g
l-
e
o
2
lo
1
M
a
r
d
J
a
e
p
i
a
n
n
C
In
a
BCl-21
r
k
tr
id
Black
g
e
M
a
J
d
a
e
p
a
i
n
n
2. Prepare the envelopes.
Arrange the stack of envelopes on a firm surface and press down
firmly on the edges to make the folds crisp.
Press all the way around the envelopes to remove any curls and expel
any excess air. Make sure any curls are removed from the flap of each
envelope.
3-4 Printing with the MultiPASS Printer Chapter 3
Page 31

3. Insert the stack of envelopes into the multipurpose tray until it stops.
Align the edge of the paper guide with the left edge of the stack of
envelopes.
You are now ready to begin printing the envelopes.
Working with Print Options (Windows 95/98)
This section provides information on setting and changing your printing
options if you are using Windows 95/98. If you are using Windows NT,
see the “Working with Print Options (Windows NT)” section presented
later in this chapter.
Changing the Printer Settings: a Summary
Print options are the settings that determine how your document looks
when it is printed. Print options are initially installed using default
settings, allowing you to print documents immediately. However, you may
want to change these settings for certain documents.
Printer
MultiPASS
Printing with the
Chapter 3 Printing with the MultiPASS Printer 3-5
Page 32

The following instructions summarise the general procedures for changing
printer settings. For detailed information on specific printer options, refer
to later sections in this chapter.
To change print options:
1. With your document open, click the Print command. (In most
Windows applications, this command is on the File menu or toolbar.)
2. In the Print dialog box, click Properties.
3. In the Printer Properties dialog box, on the Main, Paper, and Features
tabs, specify the desired printer options.
4. If you are dissatisfied with your changes on a particular tab and want
to revert to the default settings, click Defaults.
5. To save the changes and close the Printer Properties dialog box, click
OK.
To save the changes and leave the dialog box open, click Apply.
To close the dialog box without saving any changes, click Cancel.
Choosing a Print Mode
When printing a document, you choose a print mode. A print mode
specifies print quality and colour settings. Initially when you first install
the MultiPASS software, there are a number of factory-defined print modes.
You can temporarily change the settings for a predefined print mode when
printing a particular document. You can also save your changed settings
as a new print mode to use when printing future documents.
To choose a print mode:
1. In the Printer Properties dialog box, click the Main tab.
3-6 Printing with the MultiPASS Printer Chapter 3
Page 33

2. Under Choose Print Mode, click the predefined print mode that best
suits your document.
With the initial installation of the software, the following factorydefined print modes are available:
z Text
Click if the majority of your document consists of text.
z Auto
Click to have the system check the contents of the document. The
appropriate colour processing is automatically selected, and the
document is printed at a higher quality than Text mode.
Printer
MultiPASS
Printing with the
Chapter 3 Printing with the MultiPASS Printer 3-7
Page 34

z Graphics
Click if you desire crisp and sharp border distinctions between the
colours of your illustrations.
z Photo
Click if you want your images to appear smoother and lifelike in
colour. Because the Photo print mode provides a high print
quality, expect your print job to take longer to complete.
z Super Photo
Click when you want to make an exact replica of an original photo
image. Super Photo is most effective when used in conjunction
with the Photo BJ cartridge and high resolution or glossy photo
paper.
z Draft
Click if you would like to print your document quickly but with a
lower print quality. The Draft print mode is ideal for longer
documents and proofreading purposes.
z Camera
Click to print images taken with a digital camera.
The quality and colour settings for the mode you select are displayed
in the corresponding boxes and illustration area below the Choose
Print Mode option.
3. If you want to temporarily change the following settings for the
predefined mode you selected:
z In the BJ Cartridge box, click the type of BJ cartridge you want to
use for printing your document (such as black or colour).
z Select Greyscale Print if you want colour data in your document
converted to greyscale (monochrome) values.
z In the Media Type box, click the medium on which you want to
print your document (such as plain paper or envelope).
3-8 Printing with the MultiPASS Printer Chapter 3
Page 35

Changing the Print Mode Settings
You can temporarily change the settings for a factory-defined print mode,
to print your current document. You can also define and save a custom
print mode to fit the needs of a particular print job. Once saved, a custom
print mode can be changed and resaved. If you do not save a custom print
mode, it is available only for the current print job.
The following instructions summarise the procedures for changing print
mode settings.
To change print mode settings:
1. In the Printer Properties dialog box, on the Main tab, click the print
mode you want to change. Then click Advanced.
2. In the Properties dialog box, specify your desired print mode settings
on the Quality and Colour tabs.
3. If you want to save your settings to print future documents, click the
Save tab and save the settings as a custom print mode. For detailed
instructions, see the “Saving a Custom Print Mode” section in this
chapter.
4. When you have completed your entries on the Quality and Colour tabs
( and optionally Save tab), click OK or Cancel to close the dialog box.
If you did not save your settings as a print mode on the Save tab: Click
OK to save your settings temporarily to print only the current
document; click Cancel to close the dialog box without saving your
changes.
Setting Quality Print Mode Options
You define the following options on the Quality tab in the Properties
dialog box. The setting of one quality option may affect the settings
available for another quality option. For example, if you set the BJ cartridge
as Photo, the Halftoning option is automatically set to Diffusion.
Printer
MultiPASS
Printing with the
Chapter 3 Printing with the MultiPASS Printer 3-9
Page 36

❏❏
❏ BJ Cartridge
❏❏
Select the type of cartridge you want to use for printing (such as black,
colour, or photo).
❏❏
❏ Greyscale Print
❏❏
Select if you want colour data in your document converted to greyscale
monochrome values.
❏❏
❏ Media Type
❏❏
Click the medium on which you want to print your document (such as
plain paper or envelope).
❏❏
❏ Paper Feed
❏❏
If available, select the desired method for feeding paper into the
printer.
3-10 Printing with the MultiPASS Printer Chapter 3
Page 37

❏❏
❏ Print Quality
❏❏
Move the slider to set the desired balance between print speed and
print quality. Generally, the higher (or finer) the print quality, the
slower the print speed.
❏❏
❏ Halftoning
❏❏
Click the desired halftoning method:
z Auto
Select to have the system automatically use the most appropriate
halftoning method based on the different types of image data in
your document.
z Fine (Fast)
Click to simplify the halftoning process, and print text and tables
at a higher speed.
z Fine
Click to use a small pattern of dots that creates a smooth
appearance with an average range of greyscales. This setting
offers a faster printing speed and is best for printing business
graphics.
z Diffusion
Click to place individual dots randomly to achieve subtle
greyscale gradations. This setting is best suited for documents
with finely-detailed graphics or photographic images. The setting
takes longer to print, but offers a higher quality of printed output.
Printer
MultiPASS
Printing with the
❏❏
❏ Image Optimiser
❏❏
Select to smooth the jagged appearance of an image when printing.
This option is particularly useful for low-resolution images such as
Web pages. Optimisation may not work well with some applications,
or with certain image resolutions. Selecting this option may increase
the print time.
❏❏
❏ Photo Optimiser
❏❏
Select to adjust a digital camera image when printing. This option
adjusts the colour balance if the printed image is unsatisfactory.
Chapter 3 Printing with the MultiPASS Printer 3-11
Page 38

❏❏
❏ Whole Page
❏❏
If you selected Photo Optimiser, select this option to adjust multiple
graphic images appearing on a single page.
Setting Colour Print Mode Options
To ensure colours are printed accurately, you set the following options on
the Colour tab in the Properties dialog box.
❏❏
❏ Colour Adjustment
❏❏
Select to adjust the differences between display colours and printed
colours.
3-12 Printing with the MultiPASS Printer Chapter 3
Page 39

❏❏
❏ ICM
❏❏
If available, select this option if you want to use the image colour
management (ICM) system used by Windows.
❏❏
❏ Colour Balance
❏❏
Move the scroll box to adjust the balance for the listed colours. Move to
the right for a darker shade of colour, to the left for a lighter shade of
colour.
The overall coloration is modified when you change the balance of the
colour inks. Since colour is generally adjusted from within your
software application, use this option for fine adjustments only.
❏❏
❏ Output Style
❏❏
Select your desired output emphasis:
z Accurate
Click to emphasise accurate, natural-looking intermediate colours
(such as skin tones, or sky or natural green colours).
z Vivid
Click to emphasise vivid, brilliant primary colours (for example,
for computer graphics and illustrations).
z Auto
Click to have the system automatically use the appropriate style,
based on your type of image.
❏❏
❏ Brightness
❏❏
Adjust the overall darkness of the intermediate colours without
changing the coloration for pure white and pure black:
z Light
Click Light if you do not want to adjust the brightness.
z Normal, Dark, or Very Dark
Click for an overall darker appearance. The contrast of the bright
areas is higher, and the contrast of the dark areas is lower.
❏❏
❏ Intensity
❏❏
Move the slider to increase or decrease the level of darkness or
lightness of your document.
Printer
MultiPASS
Printing with the
Chapter 3 Printing with the MultiPASS Printer 3-13
Page 40

Saving a Custom Print Mode
After you change the settings on the Quality and Colour tabs, you can save
the print mode for future use. For example, one print mode may be
appropriate when printing a Word document, and another when printing
a Photoshop graphic. To quickly set options for printing your next
document, you can select your saved print mode.
To save the custom print mode:
1. On the Save tab, enter a name for the new print mode in the Title box.
2. In the Icon Selection box, click an icon to illustrate your new print
mode. The icon you select for your custom print mode will then appear
in the Choose Print Mode box on the Main tab.
3-14 Printing with the MultiPASS Printer Chapter 3
Page 41

3. In the Description box, type an internal description of the print mode.
4. Click Save.
Adjusting the Order of Displayed Print Modes
The factory-defined and custom print mode icons display on the Main tab
in a predefined order. If the current order is not convenient for you, you can
move the icons, thereby adjusting the display order.
To adjust the display order of the print mode icons:
1. On the Save tab, in the Saved Settings box, click the print mode icon
you want to move in its display order.
Printer
MultiPASS
Printing with the
Move Left
Move Right
2. Click Move Right or Move Left to move the icon as desired. Or, drag the
selected icon to the desired position.
The print mode icons display in the order you assign.
Editing a Custom Print Mode
You can change the settings of any saved custom print mode. For example,
you may want to define a different cartridge for a custom print mode you
created earlier.
Chapter 3 Printing with the MultiPASS Printer 3-15
Page 42

You cannot permanently change and save the settings for a factory-defined
print mode.
To edit a custom print mode:
1. In the Printer Properties dialog box, on the Main tab, click the custom
print mode that you want to edit.
2. Click Advanced.
3. In the Properties dialog box, on the Quality and Colour tabs, make
your desired changes.
4. On the Save tab, make sure that the print mode that you specified in
Step 1 is selected in the Saved Settings list. Then click Save.
Your setting is saved with your new changes.
Deleting a Custom Print Mode
When you decide that you no longer need one of your saved custom print
modes, you can delete it.
You cannot delete a factory-defined print mode.
To delete a custom print mode:
1. In the Printer Properties dialog box, on the Main tab, click the custom
print mode that you want to delete.
2. Click Advanced.
3. In the Properties dialog box, on the Save tab, make sure the print mode
you clicked in Step 1 is selected in the Saved Settings box. Then click
Delete.
4. When prompted, confirm that you want to delete the print mode.
Your custom print mode no longer appears.
3-16 Printing with the MultiPASS Printer Chapter 3
Page 43

Saving a Custom Print Mode as a File
To keep the number of custom print modes stored on the Main tab to a
minimum, you can save a print mode as a file. Once a custom print mode is
saved, you can delete the print mode from the list of your saved settings.
Anytime you need the print mode, however, you can retrieve the file.
To save a custom print mode as a file:
1. In the Printer Properties dialog box, on the Main tab, click Advanced.
2. In the Properties dialog box, click the Save tab.
3. In the Saved Settings list, click the print mode that you want to save as
a file.
4. Click Save As.
5. In the Save File dialog box, click the folder where you want to save the
file. Then type a name for the file.
6. Click OK.
Your custom print mode is saved in the folder and with the file name you
specified.
Retrieving a Custom Print Mode File
When you need to print a document using a print mode you previously
saved as a file, you can retrieve the print mode file.
To retrieve a custom print mode file:
1. In the Printer Properties dialog box, on the Main tab, click Advanced.
2. In the Properties dialog box, click the Save tab and then click Open.
3. In the Open File dialog box, click the following: the folder where you
saved your print mode; the name of the file for your saved print mode
that you want to retrieve; and the corresponding icon for the saved
print mode.
Printer
MultiPASS
Printing with the
4. Click OK.
Chapter 3 Printing with the MultiPASS Printer 3-17
Page 44

Your retrieved print mode appears in the Saved Settings box on the Save
tab and in the Choose Print Mode box on the Main tab.
Setting Paper Options
In addition to choosing the print mode and changing any print quality
and colour settings, you can set the following options on the Paper tab in
the Printer Properties dialog box.
❏❏
❏ Page Size
❏❏
Select the size of the page you want to use for your document.
Often, the page size specified here is the page size you specified when
you created your document in your Windows application.
3-18 Printing with the MultiPASS Printer Chapter 3
Page 45

If you want to define your own page size, select Custom. Then, in the
Custom Paper Size dialog box, specify the width, height, and unit
measure for the size.
❏❏
❏ Normal-size Printing
❏❏
Click if you want to print your document in its actual size, not
reducing or enlarging the size of the printing.
❏❏
❏ Scaled Printing
❏❏
Click if you want to reduce or enlarge the printing of your document.
❏❏
❏ Scaling
❏❏
If you selected Scaled Printing, select the percentage of reduction or
enlargement.
Printer
MultiPASS
Printing with the
❏❏
❏ Page Layout Printing
❏❏
Click if you want to print more than one page on a single sheet of
paper. Then, on the Features tab, you can specify the desired page
layout options. For more details, see the “Setting Other Print Features”
section.
❏❏
❏ Banner Printing
❏❏
Click if you want to print a banner. For details, see the “Printing a
Banner” section.
❏❏
❏ Printer Paper Size
❏❏
If you selected Scaled Printing or Page Layout Printing, select the size
of the paper in your printer on which you are printing.
Chapter 3 Printing with the MultiPASS Printer 3-19
Page 46

If you want to define your own paper size, select Custom. Then, in the
Custom Paper Size dialog box, specify the width, height, and unit
measure for the size.
❏❏
❏ Orientation
❏❏
Click the orientation to determine how your document is printed on
the page: Portrait to print the contents of your document vertically on
the page, or Landscape to print the contents of your document
horizontally on the page.
Printing a Banner
Although your MultiPASS printer is capable of printing a banner, there are
some limitations to the banner printing feature. These limitations are as
follows:
❏ The MultiPASS printer cannot print on the first sheet of banner paper.
As a result, when printing, you must always allocate one sheet more
than the length of your actual banner.
❏ The banner can be a maximum of five actual printed pages (for a total
of six pages, including the first sheet on which the banner cannot be
printed).
T o prepare your MultiPASS printer for banner printing:
1. Make sure the paper rest is extended.
2. Make sure the paper thickness lever is set to the left.
3. Insert the banner paper into the printer. Make sure that you insert the
first page so that the fold between the first and second pages is facing
up.
4. Verify that the side of the paper that is facing up is the side on which
you want the banner to appear.
5. Raise both paper output guides to a vertical position.
3-20 Printing with the MultiPASS Printer Chapter 3
Page 47

To set your banner printing options and print your banner:
1. From within the application that you used to create the banner, click
the Print command.
2. In the Print dialog box, under Print Range, specify the range of the
pages to print.
Remember that you cannot print on the first page of your banner
paper. Thus, if you want to print a banner that is the maximum length,
under Print Range, specify printing from page 2 to page 6 for a total of
five actual printed pages.
3. Click Properties.
4. In the Printer Properties dialog box, on the Main tab, select the print
mode.
5. Click Advanced.
6. In the Properties dialog box, on the Quality tab, select Plain Paper in
the Media Type box. Then click OK.
7. In the Printer Properties dialog box, on the Paper tab, select your
banner paper size in the Page Size box. Then select Banner Printing.
Printer
MultiPASS
Printing with the
8. In the MultiPASS printer message box, click OK. Then in the Printer
Properties dialog box, click OK.
9. In the Print dialog box, click the print command (usually OK or Print).
Your banner is printed by your MultiPASS printer.
Setting Other Print Features
You set the following options on the Features tab in the Printer Properties
dialog box.
Chapter 3 Printing with the MultiPASS Printer 3-21
Page 48

❏❏
❏ Background Printing
❏❏
Click if you want to continue working in your application while your
document is printing.
❏❏
❏ Copies
❏❏
Specify the number of copies of the document you want to print.
❏❏
❏ Reverse Order
❏❏
If you are printing a multi-page document, click if you want to print
the last page first.
3-22 Printing with the MultiPASS Printer Chapter 3
Page 49

❏❏
❏ Collate
❏❏
If you are printing multiple copies of a multi-page document, click to
have all pages of the document print before the next copy of the
document is printed. If this option is not selected, each page in turn is
printed the number of times needed for the number of copies you
specified.
❏❏
❏ Page Layout
❏❏
Select if you want to print more than one page of your multiple page
document on a single sheet of paper. If you had selected Page Layout
on the Paper tab, the option is automatically selected on the Features
tab.
If you select this option, you then choose the order in which the pages
print on the sheet of paper. You can also indicate whether you want a
frame placed around each page, to visually separate each page from
one another.
The page graphic on the left illustrates your selected page layout.
❏❏
❏ Pages
❏❏
If you selected Page Layout, click the number of pages you want to
print on a single sheet of paper.
❏❏
❏ Page Order
❏❏
If you selected Page Layout, click the order in which you want the
pages of your document to print on the single sheet of paper. The icons
illustrate the available choices, based on the number of pages you
chose to print on a sheet of paper.
Printer
MultiPASS
Printing with the
❏❏
❏ Frame Border
❏❏
If you selected Page Layout, select if you want each page outlined with
a border (a solid-line frame around each page). The border helps to
distinguish the different pages from one another on the sheet of paper.
Chapter 3 Printing with the MultiPASS Printer 3-23
Page 50

❏❏
❏ Stamp
❏❏
If you want your document printed with a watermark stamp, click a
predefined stamp. You may want to print your document with a
watermark stamp that designates the status of the document. For
example, you want to print your document with a stamp that marks
the document as confidential or a draft version. When you have
selected a particular stamp, you then select how you want the stamp
to print:
z Stamp First Page Only
Select if you prefer to print the stamp only on the first page of your
printed document, rather than all the pages.
z Place Stamp Over Text
Select if you prefer to print the stamp over the text within your
document. This setting, however, may interfere with the
readability of your printed document. Instead, clear this option to
print the stamp in back of the text within your document. In this
case, the text of your document prints over the stamp which may
preserve the readability of your printed document.
The page graphic on the left illustrates your selected stamp.
If you want to define a custom stamp, see the “Creating or Changing a
Stamp” section.
Creating or Changing a Stamp
When first installed, the software provides certain factory-defined stamps.
You can change the settings of a predefined stamp or create one of your
own.
In creating or changing a stamp, you define its various characteristics,
such as the text, font, font size, colour, and placement on the page.
To create or change an existing stamp:
1. On the Features tab, in the Stamp box, click one of the following:
z The existing stamp you want to change
3-24 Printing with the MultiPASS Printer Chapter 3
Page 51

z None to create a new stamp.
2. Click Stamp Settings.
Printer
MultiPASS
Printing with the
3. In the Stamp Settings Properties dialog box, specify the features of your
stamp on the Text, Colour, and Placement tabs.
The graphic on the left illustrates your selected stamp settings.
4. To save your stamp settings, click Save. When prompted, confirm that
you want to save your stamp.
To cancel your settings, click Cancel.
Chapter 3 Printing with the MultiPASS Printer 3-25
Page 52

Specifying the T ext of a Stamp
You define the following stamp options on the Text tab in the Stamp
Settings Properties dialog box.
❏❏
❏ Stamp Text
❏❏
Type characters for your stamp.
❏❏
❏ Outline
❏❏
Click the type of border you want around the stamp text, if any.
❏❏
❏ True T ype Font
❏❏
Click the type of font you want for your stamp text.
3-26 Printing with the MultiPASS Printer Chapter 3
Page 53

❏❏
❏ Size
❏❏
Click the point size of the font you want for the stamp text.
❏❏
❏ Bold
❏❏
Select if you want to make the stamp text boldfaced.
❏❏
❏ Italic
❏❏
Select if you want to make the stamp text italicised.
Setting the Colour of a Stamp
You can select a predefined colour from the colour palette, or customise a
colour and optionally add it to the palette. You specify the following
options on the Colour tab in the Stamp Settings Properties dialog box.
Printer
MultiPASS
Printing with the
Chapter 3 Printing with the MultiPASS Printer 3-27
Page 54

To set the colour of the stamp text:
Under Palette, click an available colour shown in the colour palette. The
selected colour is used for the text of your stamp.
To customise a colour:
1. Under Palette, click the colour that is closest to your desired custom
colour.
2. Under Colour, move the scroll box for each of the listed colours until
you’ve reached the desired colour mix for your custom colour.
3. If you want to save your custom colour in the palette, click Add to
Palette. The newly created colour is added to the last row on the colour
palette. If the last row has been filled with custom colours you created
previously, you can choose to replace the oldest existing custom
colour.
Setting the Placement of a Stamp
You can indicate the position on the page where and how you want the
stamp to appear. You set the following options on the Placement tab in the
Stamp Settings Properties dialog box.
3-28 Printing with the MultiPASS Printer Chapter 3
Page 55

❏❏
❏ Position
❏❏
Click the desired placement on the page. If you want to define your
own placement, click Custom. Then in the X-Position and Y-Position
boxes, select the X-axis and Y-axis coordinates for the position of the
stamp.
You can also click the stamp in the page illustration on the left and
drag the stamp to the desired position on the page.
❏❏
❏ Orientation
❏❏
Click the number of degrees to specify the angle of rotation of your
stamp. A negative number of degrees rotates the stamp clockwise.
Printer
MultiPASS
Printing with the
Chapter 3 Printing with the MultiPASS Printer 3-29
Page 56

Deleting a Stamp
If you decide you no longer use a particular stamp, you can delete it.
To delete a stamp:
1. In the Printer Properties dialog box, click the Features tab.
2. In the Stamp box, click the stamp you want to delete. Then click Stamp
Settings.
3. In the Stamp Settings Properties dialog box, click Delete.
4. When prompted, confirm that you want to delete the selected stamp.
Setting Default Printer Options
You can access printer driver options directly from the Windows desktop,
before actually printing a document, to change the default settings.
To set the default printer options:
1. On the Windows desktop, click Start, point to Settings, and then click
Printers.
2. In the Printers window, click the MultiPASS printer icon.
3. On the File menu, click Properties.
4. In the Properties dialog box, specify your changes on the appropriate
tabs and click OK.
The following tabs provide standard Windows options for your printer
driver: General, Details, and Sharing tabs in Windows 95/98, and Colour
n
3-30 Printing with the MultiPASS Printer Chapter 3
Management tab in Windows 98. For details about these options, see your
Windows user documentation.
Page 57

Displaying Printer Driver Information
You can review information about your printer driver, such as the version
and copyright.
To do so, on the Main tab in the Printer Properties dialog box, click About.
Working with Print Options (Windows NT)
This section provides information on setting and changing your printing
options if you are using Windows NT. If you are using Windows 95/98,
see the “Working with Print Options (Windows 95/98)” section presented
earlier in this chapter.
Changing the Printer Settings: a Summary
Print options are the settings that determine how your document looks
when it is printed. Print options are initially installed using default
settings, allowing you to print documents immediately. However, you may
want to change these settings for certain documents.
Printer
MultiPASS
Printing with the
The following instructions summarise the general procedures for changing
printer settings. For detailed information on specific printer options, refer
to later sections in this chapter.
To change print options:
1. With your document open, click the Print command. (In most
Windows applications, this command is on the File menu or toolbar.)
2. In the Print dialog box, click Properties.
3. In the Printer Properties dialog box, on the Main and Paper tabs,
specify the desired printer options.
4. If you are dissatisfied with your changes on a particular tab and want
to revert to the default settings, click Defaults.
Chapter 3 Printing with the MultiPASS Printer 3-31
Page 58

5. To save the changes and close the Printer Properties dialog box, click
OK.
To close the dialog box without saving any changes, click Cancel.
Choosing a Print Mode
When printing a document, you choose a print mode. A print mode
specifies print quality and colour settings. Initially when you first install
the MultiPASS software, there are a number of factory-defined print modes.
You can temporarily change the settings for a predefined print mode when
printing a particular document. You can also save your changed settings
as a new print mode to use when printing future documents.
To choose a print mode:
1. In the Printer Properties dialog box, click the Main tab.
3-32 Printing with the MultiPASS Printer Chapter 3
Page 59

2. Under Choose Print Mode, click the predefined print mode that best
suits your document. With the initial installation of the software, the
following factory-defined print modes are available:
z Text
Click Text if the majority of your document consists of text.
z Graphics
Click Graphics if you desire crisp and sharp border distinctions
between the colours of your illustrations.
z Photo
Click Photo if you want your images to appear smoother and
lifelike in colour. Because the Photo print mode provides a high
print quality, expect your print job to take longer to complete.
Printer
MultiPASS
Printing with the
Chapter 3 Printing with the MultiPASS Printer 3-33
Page 60

z Super Photo
Click Super Photo when you want to make an exact replica of an
original photo image. Super Photo is most effective when used in
conjunction with the Photo BJ cartridge and high resolution paper.
z OHP
Click OHP if you want to print on transparencies.
z Draft
Click Draft if you would like to print your document quickly but
with a lower print quality. The Draft print mode is ideal for longer
documents and proofreading purposes.
The Printer Illustration area shows the settings for the current print
mode.
The Description box displays a simple explanation or note about the
selected print mode.
Changing the Print Mode Settings
You can temporarily change the settings of a factory-defined print mode, to
print your current document. You can also define and save a custom print
mode to fit the needs of a particular print job. Once saved, a custom print
mode can be changed and resaved. If you do not save a custom print mode,
it is available only for the current print job.
The following instructions summarise the procedures for changing print
mode settings.
To change print mode settings:
1. In the Printer Properties dialog box, on the Main tab, click the print
mode you want to change. Then click Change.
2. In the Properties dialog box, specify your desired print mode settings
on the Quality and Colour tabs.
3. If you want to save your settings to print future documents, click the
Save tab and save your settings as a custom print mode.
3-34 Printing with the MultiPASS Printer Chapter 3
Page 61

4. When you have completed your entries on the Quality and Colour tabs
(and optionally the Save tab), click OK or Cancel to close the dialog
box.
If you did not save your settings on the Save tab: Click OK to save your
settings temporarily to print only the current document; click Cancel to
close the dialog box without saving your changes.
Setting Quality Print Mode Options
You define the following options on the Quality tab in the Properties
dialog box.
Printer
MultiPASS
Printing with the
Chapter 3 Printing with the MultiPASS Printer 3-35
Page 62

❏❏
❏ BJ Cartridge
❏❏
Click the type of cartridge you want to use for printing:
z Colour/Black
Click when you are using the colour or black BJ cartridge.
z Photo Colour
Click when you are using the Photo BJ cartridge.
❏❏
❏ Print Quality
❏❏
Move the slider to set the desired print quality between Fast and Fine
to choose the best balance between print speed and print quality.
❏❏
❏ Halftoning
❏❏
Click the desired halftoning method:
z Fine
Click to use a small pattern of dots that creates a smooth
appearance with an average range of greyscales. This setting
offers a faster printing speed and is best for printing business
graphics.
z Diffusion
Click to place individual dots randomly to achieve subtle
greyscale gradations. This setting is best suited for documents
with finely-detailed graphics or photographic images. The setting
takes longer to print, but offers a higher quality of printed output.
❏❏
❏ Media Type
❏❏
Click the type of printing medium (such as plain paper or envelopes).
Setting Colour Print Mode Options
To ensure colours are printed accurately, you set the following options on
the Colour tab in the Properties dialog box.
3-36 Printing with the MultiPASS Printer Chapter 3
Page 63

❏❏
❏ Colour Adjustment
❏❏
Select to adjust the differences between display colours and printed
colours.
❏❏
❏ Colour Balance
❏❏
Move the slider to adjust the balance for the listed colours. Move the
slider to the right for a darker shade of colour, to the left for a lighter
shade of colour.
The overall coloration is modified when you change the balance of the
four colour inks. Since colour is generally adjusted from within your
software application, use this option for fine adjustments only.
Printer
MultiPASS
Printing with the
Chapter 3 Printing with the MultiPASS Printer 3-37
Page 64

❏❏
❏ Output Style
❏❏
Click whether to print accurate, natural-looking intermediate colours,
or vivid, brilliant primary colours.
❏❏
❏ Brightness
❏❏
Adjust the overall darkness of the intermediate colours without
changing the coloration for pure white and pure black:
z Light
Click if you do not want to adjust the brightness.
z Normal, Dark, or Very Dark
Click for an overall darker appearance. The contrast of the bright
areas is higher, and the contrast of the dark areas is lower.
❏❏
❏ Matching
❏❏
Select the matching process to print colours as closely and as
accurately as possible to the original colours.
z None
Prints colours based on the CMYK percentage, or a colour
specified in a colour sample.
z Scanner/Camera
Prints a scanned image as closely and accurately as possible to the
original colours.
z Screen
Prints images taken with a video camera, or images appearing on
a monitor as closely and accurately as possible to the original
colours. Also select Screen when you want to print scanned
images, which have been processed with a software application.
❏❏
❏ Intensity
❏❏
Move the slider to increase or decrease the level of darkness or
lightness of your document.
3-38 Printing with the MultiPASS Printer Chapter 3
Page 65

Saving a Custom Print Mode
After you change the settings on the Quality and Colour tabs, you can save
the print mode for future use. For example, one print mode may be
appropriate when printing a Word document, and another when printing
a Photoshop graphic. To quickly set print options for your next document,
you can select a saved mode.
Printer
MultiPASS
Printing with the
To save the custom print mode:
1. In the Properties dialog box, on the Save tab, enter a name for the new
print mode in the Title box.
2. In the Icon Selection box, click an icon to illustrate your new print
mode. The icon you select for your custom print mode will then appear
in the Choose Print Mode box on the Main tab.
Chapter 3 Printing with the MultiPASS Printer 3-39
Page 66

3. In the Description box, type a description of the print mode. This
description appears on the Main tab when your print mode is selected.
4. Click Save.
Adjusting the Order of Displayed Print Modes
The factory-defined and custom print mode icons display on the Main tab
in a predefined order. If the current order is not convenient for you, you can
move the icons, thereby adjusting the display order.
To adjust the display order of the print mode icons:
1. On the Save tab, in the Saved Settings box, click the print mode icon
you want to move in its display order.
Move Left
2. Click Move Right or Move Left to move the icon as desired.
The print mode icons display in the order you assign.
Move Right
Editing a Custom Print Mode
You can change the settings of any saved custom print mode. For example,
you may want to define a different cartridge for a custom print mode you
created previously.
3-40 Printing with the MultiPASS Printer Chapter 3
Page 67

You cannot permanently change and save the settings of a factory-defined
print mode.
To edit a custom print mode:
1. In the Printer Properties dialog box, on the Main tab, click the custom
print mode you want to edit.
2. Click Change.
3. In the Properties dialog box, on the Quality and Colour tabs, make
your desired changes.
4. On the Save tab, make sure that the print mode that you specified in
Step 1 is selected in the Saved Settings list.
5. Click Save.
Your setting is saved with your new changes.
Deleting a Custom Print Mode
When you decide that you no longer need one of your saved custom print
modes, you can delete it.
Printer
MultiPASS
Printing with the
You cannot delete a factory-defined print mode.
To delete a custom print mode:
1. In the Printer Properties dialog box, on the Main tab, select the custom
print mode that you want to delete.
2. Click Change.
3. In the Properties dialog box, on the Save tab, make sure the setting that
you specified in Step 1 is selected.
4. Click Delete.
Your custom print mode no longer appears.
Chapter 3 Printing with the MultiPASS Printer 3-41
Page 68

Saving a Custom Print Mode as a File
To keep the number of custom print modes stored on the Main tab to a
minimum, you can save a print mode as a file. Once a custom print mode is
saved, you can delete the print mode from the list of your saved settings.
Anytime you need the print mode, however, you can retrieve the file.
To save a custom print mode as a file:
1. In the Printer Properties dialog box, on the Main tab, click Change.
2. In the Properties dialog box, click the Save tab.
3. On the Save tab, in the Saved Settings list, click the print mode that you
want to save as a file.
4. Click Save As.
5. In the Save File dialog box, click the folder where you want to save the
file. Then type a name for the file.
6. Click OK.
Your custom print mode is saved in the folder and with the file name you
specified.
Retrieving a Custom Print Mode File
When you need to print a document using a print mode you previously
saved as a file, you can retrieve the print mode file.
To retrieve a custom print mode file:
1. In the Printer Properties dialog box, on the Main tab, click Change.
2. In the Properties dialog box, click the Save tab.
3. On the Save tab, click Open.
4. In the Open File dialog box, click the following: the folder where you
saved your print mode; the name of the file for your saved print mode
that you want to retrieve; and the corresponding icon for the saved
print mode.
3-42 Printing with the MultiPASS Printer Chapter 3
Page 69

5. Click OK.
Your retrieved print mode appears in the Saved Settings list on the Save tab
and in the Choose Print Mode box on the Main tab.
Setting Paper Options
In addition to choosing the print mode and changing any print quality
and colour settings, you can set the following options on the Paper tab in
the Printer Properties dialog box.
Printer
MultiPASS
Printing with the
❏❏
❏ Paper Size
❏❏
Click the size of the paper or envelop you want to use.
Chapter 3 Printing with the MultiPASS Printer 3-43
Page 70

The selected paper should be identical to the paper size specified
within the Windows NT application from which you want to print.
❏❏
❏ Enlarge/Reduce
❏❏
Click to enlarge your document’s printing size by up to 400 percent or
reduce it to as low as 10 percent of the original document size.
For detailed information, see the “Using the Enlarge/Reduce Option”
section.
❏❏
❏ Printer Paper Size
❏❏
Click a paper size for the enlarging and reducing option.
When the Printer Paper Size option is selected instead of the Paper
Size option, the size of the document is automatically enlarged or
reduced to fit the printer paper size you selected.
❏❏
❏ Orientation
❏❏
Click the type of orientation to determine how your document is
printed on the page: Portrait to print the contents of your document
vertically on the page, or Landscape to print the contents of your
document horizontally on the page.
❏❏
❏ Colour/Monochrome
❏❏
Click whether you want to print in colour or monochrome. You can
also select to have this setting automatically determined.
❏❏
❏ Copies
❏❏
Click the number of copies you want to print.
❏❏
❏ Banner Printing
❏❏
Select to activate the banner printing feature. For details, see the
“Printing a Banner” section.
Using the Enlarge/Reduce Option
You can use the Enlarge/Reduce option to increase your document
printing size by up to 400 percent or reduce it to as low as 10 percent of the
original document size. When you change the enlarge or reduce rates,
however, you also change the printable area of your document, which may
result in only a partial printing of your document.
3-44 Printing with the MultiPASS Printer Chapter 3
Page 71

There are two ways to enlarge or reduce your document. You can either
specify a different paper size from the one specified in the software
application, or you can specify the rate of enlargement or reduction of the
document size.
To enlarge or reduce by changing the printing paper size:
1. In the Paper Size list, click the paper size specified in the software
application (you can usually find this by looking at the Page Setup
option in the software application).
2. Select Enlarge/Reduce.
3. In the Printer Paper Size list, select the actual paper size that is in the
printer. The percent by which your document is enlarged or reduced
automatically adjusts to the printer paper size you specified.
n
4. Click OK.
To enlarge or reduce by specifying the rate of enlargement or reduction:
1. In the Paper Size list, select the paper size specified in the software
application (you can usually find this by looking at the Page Setup
option in the software application).
2. Select Enlarge/Reduce.
3. In the Enlarge Reduce list, select the desired rate of enlargement or
reduction.
4. Click OK.
When you change the paper size in your software application, the rate of
enlargement or reduction automatically adjusts to reflect your change.
Printing a Banner
Although your MultiPASS printer is capable of printing a banner, there are
some limitations to the banner printing feature. These limitations are as
follows:
Printer
MultiPASS
Printing with the
Chapter 3 Printing with the MultiPASS Printer 3-45
Page 72

❏ The MultiPASS printer cannot print on the first sheet of banner paper.
As a result, when printing, you must always allocate one sheet more
than the length of your actual banner.
❏ The banner can be a maximum of five actual printed pages (for a total
of six pages, including the first sheet on which the banner cannot be
printed).
T o prepare your MultiPASS printer for banner printing:
1. Make sure the paper rest is extended.
2. Make sure the paper thickness lever is set to the left.
3. Insert the banner paper into the printer. Make sure that you insert the
first page so that the fold between the first and second pages is facing
up.
4. Verify that the side of the paper that is facing up is the side on which
you want the banner to appear.
5. Raise both paper output guides to a vertical position.
To set your banner printing options and print your banner:
1. From within the application that you used to create the banner, click
the Print command.
2. In the Print dialog box, under Print Range, specify the range of the
pages to print.
Remember that you cannot print on the first page of your banner
paper. Thus, if you want to print a banner that is the maximum length,
under Print Range, specify printing from page 2 to page 6 for a total of
five actual printed pages.
3. Click Properties.
4. In the Printer Properties dialog box, on the Main tab, select the print
mode.
5. Click Change.
3-46 Printing with the MultiPASS Printer Chapter 3
Page 73

6. In the Properties dialog box, on the Quality tab, select Plain Paper in
the Media Type list. Then click OK.
7. In the Printer Properties or Printer Default dialog box, on the Paper tab,
select your banner paper size in the Paper Size list. Then select Banner
Printing.
8. In the MultiPASS printer message box, click OK. Then in the Printer
Properties or Printer Default dialog box, click OK.
9. In the Print dialog box, click the print command (usually OK or Print).
Your banner is printed by your MultiPASS printer.
Setting Default Printing Options
You can access printer driver options directly from the Windows desktop,
before actually printing a document, to change the default settings.
To set default print options:
1. On the Windows desktop, click Start, point to Settings, and then click
Printers.
2. In the Printers window, click the MultiPASS printer icon.
3. On the File menu, click Document Defaults.
4. In the Document Defaults dialog box, on the appropriate tabs, specify
your changes and click OK.
To set the paper size associated with a paper tray:
1. On your Windows desktop, click Start, point to Settings, and then click
Printers.
2. In the Printers window, select the MultiPASS printer icon.
3. On the File menu, click Properties.
4. In the Printer Properties dialog box, click the Device Settings tab.
Printer
MultiPASS
Printing with the
Chapter 3 Printing with the MultiPASS Printer 3-47
Page 74

5. Under Change “Auto Feeder” Setting, click the paper size you want to
assign.
6. To save your changes and close the dialog box, click OK.
To close the dialog box without saving your changes, click Cancel.
The General, Ports, Scheduling, Sharing, and Security tabs provide
standard Windows options for your printer driver. For details on these
n
3-48 Printing with the MultiPASS Printer Chapter 3
options, see your Windows user documentation.
Page 75

Displaying Printer Driver Information
You can review information about your printer driver, such as the version
and copyright.
To do so, on the Main tab in the Printer Properties dialog box, click About.
Printer
MultiPASS
Printing with the
Chapter 3 Printing with the MultiPASS Printer 3-49
Page 76

3-50 Printing with the MultiPASS Printer Chapter 3
Page 77

Chapter 4
Using the Desktop Manager
This chapter provides an overview of the basic features of the Desktop
Manager.
For detailed information and instructions on Desktop Manager tasks,
refer to later chapters in this guide.
❑ Desktop Manager: an Overview ............................................................4-2
z Features of the Desktop Manager Window .................................. 4-3
z Understanding Desktop Manager Folders.................................... 4-6
z System-Defined Folders................................................................... 4-6
z User-Defined Folders ....................................................................... 4-8
z Viewing Documents in the Desktop Manager.............................. 4-8
Using the
Desktop Manager
Chapter 4 Using the Desktop Manager 4-1
Page 78

Desktop Manager: an Overview
The MultiPASS Desktop Manager is a full-featured Windows application
that enables you to use your MultiPASS printer from your computer.
With the Desktop Manager, you can:
❏ Send and receive faxes from and to your computer
❏ Scan images into your computer
❏ Store faxes and scanned images in folders on your computer
❏ Import or export a document
❏ Manipulate stored documents by removing a page; splitting or
merging it with another document; editing it by cropping, rotating or
flipping; adjusting the document brightness, contrast, size, or image
type; or by printing the document
❏ Annotate a stored document
❏ Set up an address book for individuals or groups to whom you
repeatedly send faxes
❏ Design your own fax cover page
❏ Define system options for the MultiPASS printer
❏ Complete other tasks such as phoning an individual with an
extension telephone connected to your MultiPASS printer and
monitoring the status of your Desktop Manager jobs.
To start the MultiPASS Desktop Manager:
1. On the Windows desktop, click Start, and then point to Programs.
2. In the Programs menu, point to Canon MultiPASS Suite, and then
click MultiPASS Desktop Manager.
4-2 Using the Desktop Manager Chapter 4
Page 79

To close the Desktop Manager:
On the File menu, click Exit.
When you exit the Desktop Manager, you close only the Desktop
Manager window. Any documents you have set up to PC fax or print
remain active. The MultiPASS Status Monitor and the Send Fax Manager,
which track the progress of your active jobs, also remain open and active.
Features of the Desktop Manager Window
This section provides an overview on the basic use of the MultiPASS
Desktop Manager window. Detailed instructions for using its commands
and components are provided in later sections of this chapter.
Menu Bar
Document T oolbar
Action T oolbar
Folders List
Work Area
Using the
Desktop Manager
Command Bar
Status Bar
❏❏
❏ Menu Bar
❏❏
The menu bar contains the commands that enable you to perform the
various Desktop Manager tasks. Many of the commands can also be
accessed using their corresponding button on the toolbar.
Chapter 4 Using the Desktop Manager 4-3
Page 80

Some of the menu commands are also available on shortcut menus,
which are displayed by clicking the right mouse button in the
Desktop Manager window.
❏❏
❏ Document Toolbar
❏❏
The Document toolbar provides quick access for performing
manipulation tasks with a selected document. In circumstances
where a task is not possible, the toolbar button is unavailable,
appearing dimmed.
Select All
Arrange
Split
Document
View
Search
Manual
Indexing
Duplicate
❏❏
❏ Action Toolbar
❏❏
Remove
Page
Merge
List View
Edit
Keywords
Show Search
Results
The Action toolbar provides quick access for performing certain
Desktop Manager tasks. In circumstances where a task is not
possible, the toolbar button is unavailable, appearing dimmed.
Scan
Import
Fax Log
Manage Cover
Pages
Fax Setup
Help
Contents
Fax Memo
Address
Book
Cover Page
Designer
Send Fax
Manager
Delete
You can move the action or document toolbar anywhere on the
Desktop Manager workspace to better suit your own working habits.
ToolTips are also available, providing descriptions of the toolbar
buttons. To display a ToolTip, pause the mouse pointer when it is
directly over a button.
4-4 Using the Desktop Manager Chapter 4
Page 81

Export
❏❏
❏ Folders List
❏❏
The folders list contains folders that store your documents. The list
contains both system-defined folders, which were automatically
created when you installed the software, and user-defined folders,
which you create as you need them.
❏❏
❏ Work Area
❏❏
The work area appears to the right of the folders list and displays the
documents contained in the open folder. The documents are
displayed either as a graphic thumbnail of each document, or a list of
the documents.
The width of the work area can be adjusted by dragging the border
(the split bar) between the work area and folders list.
❏❏
❏ Command Bar
❏❏
The Command bar is located at the bottom of the work area and
contains buttons that perform key processing tasks. You can also
launch other Windows applications such as your email program,
Paint or WordPad.
Open
Document
Send Email
Launcher Application
Print
Send Fax Phone
A Phone button displays if an extension telephone is connected to
your MultiPASS printer and you set the telephone option in the
Desktop Manager Setup Options dialog box. This is described in
detail in Chapter 8, “MultiPASS Printer Setup and Other Utilities in
the Desktop Manager.”
You use command bar buttons as follows:
z Drag a document to the button.
For example, you can drag a document from a folder to the Print
button in order to print the document.
Chapter 4 Using the Desktop Manager 4-5
Using the
Desktop Manager
Page 82

If a document is dragged to a button that cannot perform the task,
the mouse pointer displays as a No icon (a circle with a diagonal
bar drawn through it).
z Select a document in a folder, and then click a button.
This method activates the command for the selected document, as
though the document had been dragged to the button.
z Click a launching icon. This starts the application as if it were
started from the Windows desktop.
❏❏
❏ Status Bar
❏❏
The status bar displays information about the selected document or
folder, or a description of the currently selected menu or toolbar
command. It also displays the current date and time. The information
is for display only, and cannot be edited.
Understanding Desktop Manager Folders
The Desktop Manager stores and organises documents in folders. Only
one folder can be open at a time. When you open another folder, the
current folder closes.
You can organise your documents in any manner you want, placing
documents in folders, or folders within folders as may be desirable.
System-Defined Folders
When you installed the Desktop Manager, a number of system-defined
folders were automatically created — In Box, Sent Fax, Scan, Trash, and
Cabinet (which contains the folders you create). You can tell which folder
is open by the folder icon.
You cannot add new folders or documents to the system-defined folders.
They are reserved for use by the Desktop Manager in the following ways:
4-6 Using the Desktop Manager Chapter 4
Page 83

❏ With the exception of the Trash folder, only the Desktop Manager can
place documents in system-defined folders, based on faxes sent or
received, or images scanned. You can rename, copy, move, delete, or
manipulate documents in these folders.
❏ The system-defined folders, including the Trash folder, cannot be
deleted or renamed.
A document remains in a system-defined folder until you move it to a
user-defined folder, or delete it.
In Box Folder
The In Box folder is automatically opened each time you start the
Desktop Manager (even if is empty). It stores all incoming faxes that were
sent to you by other fax machines, received by your MultiPASS printer,
and then uploaded to your PC.
Each received fax is displayed using a system-assigned name. You can
change the name to something more descriptive.
Sent Fax Folder
The Sent Fax folder contains all documents which have been successfully
sent as PC faxes and which you requested not to be deleted after sending.
Each sent fax displays with a system-assigned name, which can be
changed as desired.
Scan Folder
The Scan folder stores all images you scan with the MultiPASS printer
from the Desktop Manager. Each document displays with a systemassigned name, which can be changed as desired.
Chapter 4 Using the Desktop Manager 4-7
Using the
Desktop Manager
Page 84

Trash Folder
The Trash folder stores all the documents you remove from the other
folders. Once a document is moved to the Trash folder, it remains there
until you delete it.
You can fax, print, or open documents in the Trash folder.
User-Defined Folders
You can create an unlimited number of folders for your own use in the
Cabinet. You cannot place documents directly into the Cabinet; you must
place them in folders within the Cabinet.
Viewing Documents in the Desktop Manager
When you open a folder, you can view the documents which are
contained in that folder in Document View or List View.
If the number of documents within a folder exceeds the available work
area, horizontal and/or vertical scroll bars display. You can use them to
scroll through the work area to view all the documents.
To open a folder:
In the folders list, click the desired folder.
Document View
Document View displays each individual document as a thumbnail titled
with the document name. For multiple page documents, the thumbnail
also displays the page count, as well as scroll arrows at the bottom, and a
scroll box at the right side. The scroll arrows and scroll box enable you to
page through a multi-page document, displaying each page in turn or
moving to a particular page in the document.
4-8 Using the Desktop Manager Chapter 4
Page 85

Document View allows you to work with an individual document at the
page level: scrolling pages, removing a page, splitting a document, or
merging two or more documents into a single document. You can
rearrange the document thumbnails within the work area as needed by
simply dragging them to the desired location.
To view documents in a folder as thumbnails:
With the folder open, click Document View on the View menu or toolbar.
List View
List View displays documents within the open folder as a list. Each
document in the list displays an icon representing the document type,
along with other pertinent information about the document (such as its
name, page count, disk storage size, date and time of creation, and its
origin).
Using the
Desktop Manager
Chapter 4 Using the Desktop Manager 4-9
Page 86

The icon designates the document type as fax, scan, or modified. A
modified document is a document where the fax cover page has been
removed, a scanned document that has been annotated, or a multi-page
document that has been split into multiple documents.
Documents displayed in List View cannot be manipulated as in
Document View, such as by splitting a document or merging two or more
documents.
To view documents in a folder as a list:
With the folder open, click List View on the View menu or toolbar.
Sorting Documents in the List
You can change the order of listed documents in both system-defined and
user-defined folders using any of the column label criteria displayed at
the top of the list. Sorting by page, size, or date and time displays the
largest or most current document last. The list displays in the selected
order until you change the sort option.
To change the order of the list:
Click the title of the appropriate column at the top of the list.
4-10 Using the Desktop Manager Chapter 4
Page 87

n
With the installation of the MultiPASS Desktop Manager, the MultiPASS
Toolbar displays on the Windows desktop. For information and
instructions, see the “Scanning with the MultiPASS Toolbar” section in
Chapter 6, “Scanning.”
Using the
Desktop Manager
Chapter 4 Using the Desktop Manager 4-11
Page 88

4-12 Using the Desktop Manager Chapter 4
Page 89

Chapter 5
PC Faxing
This chapter provides information and instructions for sending and
receiving a fax, setting up the Address Book, and designing your own fax
cover page.
❑ Faxing with Your Computer ....................................................................5-2
l Sending a Fax from Your Computer (PC Faxing) ...........................5-2
l Specifying a Fax Recipient ...............................................................5-5
l Defining Send Fax Options .............................................................. 5-7
l Processing the Fax .............................................................................5-9
l Creating a Fax Memo ...................................................................... 5-11
l Receiving a Fax ............................................................................... 5-12
l Using the Fax Log ........................................................................... 5-14
l Working with Jobs in the Send Fax Manager .............................. 5-15
❑ Setting Up the Address Book ................................................................ 5-20
l Working with Address Book Entries............................................ 5-21
l Printing the Address Book ............................................................ 5-26
l Importing the Address Book ......................................................... 5-27
l Exporting the Address Book ......................................................... 5-29
❑ Designing a Fax Cover Page ................................................................. 5-31
l Using the Cover Page Designer .................................................... 5-32
l Creating a New Cover Page .......................................................... 5-34
l Making Image Adjustments .......................................................... 5-48
l Adding Annotations to Your Cover Page .................................... 5-61
l Opening and Modifying a Fax Cover Page ................................. 5-63
l Reverting to the Last Saved Version ............................................. 5-64
l Printing a Cover Page .................................................................... 5-64
l Renaming a Cover Page ................................................................. 5-64
l Deleting a Cover Page .................................................................... 5-66
❑ Faxing with Your Email Application .................................................. 5-66
l Setting Up MultiPASS Fax in Your Email Application .............. 5-67
l Sending an Email Message as a Fax ............................................ 5-67
l Receiving a Fax ............................................................................... 5-68
PC Faxing
Chapter 5 PC Faxing 5-1
Page 90

Faxing with Your Computer
You can use the Desktop Manager, with your MultiPASS printer, to send
and receive faxes. You can also set up an Address Book, containing fax
and email information for people to whom you often send faxes, and
design your own fax cover page. To assist you in managing your faxes, a
Fax Log maintains a record of every fax you send or receive.
You can also customise your MultiPASS printer by changing the factory
default user settings. The settings include the date format that displays on
your faxed documents, or how many times the MultiPASS printer calls
another fax unit if the other party’s line is initially busy. You can also
register one-touch/coded speed dial and group numbers using the
Desktop Manager and then download them to the MultiPASS printer. For
details on changing setup options, refer to Chapter 8, “MultiPASS Printer
Setup and Other Utilities in the Desktop Manager.”
Sending a Fax from Your Computer (PC Faxing)
You can send a PC fax from any Windows application that supports
document printing using the MultiPASS fax driver.
The MultiPASS Desktop Manager sends the PC fax to the Send Fax
Manager, where its progress is tracked until it is actually transmitted. If
you specified multiple recipients, an individual fax job for each recipient is
sent to the Send Fax Manager. Once transmitted, the fax is placed in your
Sent Fax folder (unless you specified that it be deleted after transmission).
A record of the sent fax is also recorded in the Fax Log. If a fax fails (for
example, because of an incorrect fax number), it remains in the Send Fax
Manager until you attempt to resend it or delete it.
When you send a PC fax, you provide fax information about each
recipient, such as the recipient’s name and fax number. If, as part of the
recipient’s information, you provide the recipient’s email address, the
document can be transmitted as an email message. The email feature is
possible if you have an email application installed on your system that is
Messaging Application Program Interface (MAPI)-compliant (such as
Microsoft Exchange). Your email application must be set up as the system
default MAPI client. For details, see your email application documentation.
5-2 PC Faxing Chapter 5
Page 91

n
Before sending a PC fax, make sure that the date and time in your
computer is correct. The system date and time displays on all PC faxes that
you send. If you need to change the date and time, refer to your Windows
user documentation.
The following instructions summarise the overall procedures for sending a
PC fax.
To send a PC fax:
1. With the document you want to fax open in a Windows application
(such as Word), click the Print command. (In most Windows
applications, the command is on the File menu or toolbar.)
2. In the Print dialog box, select Canon MultiPASS Fax as your printer in
the Printer list, and then click OK.
3. In the Send Fax dialog box, enter the recipient for your fax.
Chapter 5 PC Faxing 5-3
PC Faxing
Page 92

l For a onetime recipient, enter the name and fax number or email
address in the First Name, Last Name, Fax, and Email Address
boxes.
l For an entry listed in your address book, click the applicable name
in the To list box, and then click Add.
4. For a onetime recipient, select Use Outside Dialling Prefix if you need
to use a prefix (for example, 9) to access an outside line in dialling the
fax number.
5. Optionally, select and enter any of the following send fax options:
l Enter the name of your recipients company in the Company box.
l Enter the fax subject in the Subject box.
l To attach a cover page to your fax, select it in the Template list. If
you do not want to use a fax cover page, select None.
l Enter your name and telephone number (the Sender) in the From
and Phone boxes.
l Enter any desired comments or notes, which display on the cover
page, in the Memo box.
l To delete the fax after it is sent, click Delete After Sending.
l To include any annotations that were added to the fax using the
MultiPASS Viewer, click Include Annotations.
6. After completing your fax entries, process the fax as follows:
l To send the fax or email immediately, click Send Now.
l To send the fax at a specified later time, click Send Later. This
option is not available for sending email.
5-4 PC Faxing Chapter 5
Page 93

l To hold the fax indefinitely, preserving all fax options, click Hold.
This option is not available for sending email.
l To close the dialog box without sending the fax, cancelling the
specified fax options, click Cancel.
Specifying a Fax Recipient
To send a fax, you must insert the required recipient information in the
Send Fax dialog box. The required information is your recipient’s first and
last name and your recipient’s fax number or email address.
You can insert the required information into the Send Fax dialog box by
using one of three methods: you can specify a onetime fax recipient, select
entries from your Address Book, or a combination of both.
Specifying a Onetime Recipient
A onetime recipient is specified by entering the name and fax number or
email address in the First Name, Last Name, Fax, and Email Address
boxes.
Entering a Fax Number
In the Fax box, when you enter a fax number, use the actual numbers plus
any valid characters that separate the different segments of the fax number.
For example, you can use 0 through 9, dash (-), or parentheses (). For a
complete list of the characters that are valid in the Desktop Manager, refer
to Appendix A.
Entering an Email Address
If you enter an email address instead of a fax number, you cannot hold the
email or schedule it for sending later.
Chapter 5 PC Faxing 5-5
PC Faxing
Page 94

Including a Fax Recipient from the Address Book
The To list box displays all recipients which have been set up in the
Address Book. You can include one or more recipients by selecting the
name and clicking Add. Selected names display in the Recipients list box
and appear disabled in the To list box. This is to prevent the same recipient
from being selected twice.
Removing a Fax Recipient
You can remove a name included in the Recipients list box by clicking the
name, and then clicking Remove. If the recipient was previously added to
the Address Book, the name again becomes available in the To list box.
Adding a New Recipient to the Address Book
If you want to add a new fax recipient to your Address Book, you can do so
as follows:
1. Enter the recipient information in the First Name, Last Name,
Company, Prefix, Fax, and Email Address boxes.
2. Click New Individual Entry.
3. Complete the fields in the New Recipient dialog box as necessary and
click Add.
You can also click the New Individual Entry button without first entering
the recipient information in the Send Fax dialog box. In this case, a blank
n
New Recipient dialog box displays. Complete the appropriate information
and click Add.
For detailed instructions on using the New Recipient dialog box to add a
new individual to the Address Book, refer to the “Working with Address
Book Entries” section in this chapter.
Specifying a Dialling Prefix
In some office environments, you may need to enter a prefix for the fax
number, which is the number required to connect you to an outside phone
line (usually 9).
5-6 PC Faxing Chapter 5
Page 95

For a onetime recipient, you must select the Use Outside Dialling Prefix
option in the Send Fax dialog box if you need to use a prefix (such as 9) to
access an outside line.
For a recipient from the Address Book, if you selected the Use Outside
Dialling Prefix option in the New Entry or New Recipient dialog box used
to create their entry, you do not need to select Use Outside Dialling Prefix.
Defining Send Fax Options
The following sections provide additional information on defining options
in the Send Fax dialog box.
Chapter 5 PC Faxing 5-7
PC Faxing
Page 96

Attaching a Cover Page
As desired, you can attach a cover page to your fax. The Desktop Manager
contains a library of predefined fax cover pages, each providing a different
style for both business and personal use. In addition, you can design your
own cover page using the MultiPASS Cover Page Designer and add it to
the library.
For instructions on designing your own cover page, refer to the “Designing
a Fax Cover Page” section in this chapter.
Previewing the Cover Page
To view a selected cover page before sending the fax, click Preview. The
cover page displays the specified recipients and other fax information,
including memo text. This display is read only, and cannot be edited.
To print the cover sheet, click Print on the File menu or toolbar. In the Print
dialog box, select your printing options and click OK.
To close the Preview window, click Exit on the File menu. For instructions
on editing a cover page, refer to the “Designing a Fax Cover Page” section
in this chapter.
Entering Fax Sender Information
To identify yourself as the sender of the PC fax, enter your name and
telephone number in the From and Phone boxes. Once you send your first
PC fax, this information is automatically displayed the next time you send
a PC fax. You can then change the fax sender information as desired.
Entering a Memo
You can include a memo on the fax cover page if the cover page has been
designed to accept memo text. The font, style, and size of the memo text are
determined by the particular design of the selected cover page. You can
change these attributes using the MultiPASS Cover Page Designer. For
instructions on editing a cover page, refer to the “Designing a Fax Cover
Page” section in this chapter.
5-8 PC Faxing Chapter 5
Page 97

Deleting the Fax After Sending
If the Delete After Sending option is selected, the fax is automatically
deleted after it has been successfully transmitted. This option makes it easy
to keep your computer free of unneeded documents, thereby maximising
your available disk space.
If this option is not selected, the fax is automatically moved from the Send
Fax Manager to the Sent Fax folder after transmission.
Including Annotations
Using the editing capabilities of the MultiPASS Viewer (described in
Chapter 7, “Working with Documents in the Desktop Manager”), you may
have modified your document — for example, by adding text annotations,
graphic or text stamps, or highlighting. In this case, you can select to
include these modifications by clicking the Include Annotation option.
If this option is not selected, the original version of the document is faxed,
without any added annotations.
Processing the Fax
You can send your fax — either now or later — only when at least one
recipient and fax number has been specified. As necessary, you can also
place a fax on hold and return to it later. The following sections provide
additional information on these processing options.
Sending the Fax Now
When you click Send Now, the fax document is sent to the Send Fax
Manager until it is transmitted. Once transmission is complete, the fax is
either moved to the Sent Fax folder or deleted, based on whether you
enabled or disabled the Delete After Sending option.
If you entered both an email address and a fax number, when you click
Send Now, the Select Send Preference dialog box appears.
Chapter 5 PC Faxing 5-9
PC Faxing
Page 98

n
In the Select Send Preference dialog box, specify your desired sending
mode, and then click OK.
Sending the Fax Later
If you prefer to send the fax later, you can specify the date and time to send
it by clicking Send Later. In the Send Later dialog box, select the desired
transmission date and time from their respective lists, and click OK.
The Send Later option only applies to faxes; it does not apply to email
messages. If you specified both a fax number and an email address in the
Send Fax dialog box, when you click Send Later, the fax is scheduled for
the designated fax recipients, and the email message is sent to the
designated email recipients.
The fax is sent to the Send Fax Manager for processing at the specified date
and time.
5-10 PC Faxing Chapter 5
Page 99

n
Holding the Fax
You can place a fax document on hold at any time prior to sending it. The
held fax is sent to the Send Fax Manager with no specified transmission
time. Any fax information you entered — such as recipients or cover page
information — is preserved. You can decide later whether to send the fax
— revising the send information as needed — or to delete it.
If you specified both a fax number and an email address in the Send Fax
dialog box, in the Select Send Preference dialog box that appears, click
Email or Fax. Then click OK.
The Hold option only applies to faxes; it does not apply to email. If you
specified both a fax number and an email address in the Send Fax dialog
box, when you click Hold, the fax is held for the designated fax recipients,
and the email message is sent to the designated email recipients.
Cancelling the Fax
If you cancel the fax while working in the Send Fax dialog box, you are
returned to the application where you originally initiated the Send Fax (or
Print using the MultiPASS Fax driver) command.
Creating a Fax Memo
A fax memo is generally a brief, one-page fax sent directly from the Desktop
Manager, without using another Windows application to create it.
Operating directly from the Desktop Manager, you specify the same fax
options as described in the previous sections of this chapter.
To create a fax memo:
1. In the Desktop Manager, click Fax Memo on the File menu or toolbar.
2. In the Send Fax dialog box, specify your fax options, as described in
the previous section:
l Select a cover page from the Template list, then enter the message
of your fax in the Memo box.
Chapter 5 PC Faxing 5-11
PC Faxing
Page 100

l Revise the Sender name and phone number as necessary.
l Click Delete After Sending to delete the fax after it is successfully
transmitted.
3. After completing the entries in the Send Fax dialog box, process the
fax:
l To send the fax immediately, click Send Now.
l To send the fax at a later time and date, click Send Later.
l To hold the fax indefinitely, click Hold.
l To close the dialog box without sending the fax or an email, click
Cancel.
Because the fax memo is not originating from a document created in
another Windows application, be sure to enter the memo message in the
Memo box. Also, since your fax memo does not originate from a document
that may have been annotated in the MultiPASS Viewer, the Include
Annotation option will not be available for selection.
Receiving a Fax
All incoming faxes are received by your MultiPASS printer and can be
uploaded to the Desktop Manager for viewing, printing, or replying.
Uploaded faxes are stored in your In Box folder. A flashing icon in the
taskbar indicates that you have received a new incoming fax. Once you
open the folder to review the newly received fax, the flashing icon no
longer displays until another fax is received.
A received fax displays in the In Box folder with a system-assigned name.
The fax remains in the In Box folder until you move or delete it.
You can receive faxes regardless of whether your computer is turned on or
off.
5-12 PC Faxing Chapter 5
 Loading...