

Page 1
What Can I Do with This Machine?
Before Using the Machine
Document and Paper
Copying
Sending Documents (MF4690PL Only)
Receiving Documents (MF4690PL Only)
Printing
Scanning
PC Faxing (MF4690PL Only)
Remote UI
Maintenance
Troubleshooting
Machine Settings
Appendix
Basic Operation Guide
Please read this guide before operating this product.
After you finish reading this guide, store it in a safe place for future reference.
Page 2
i
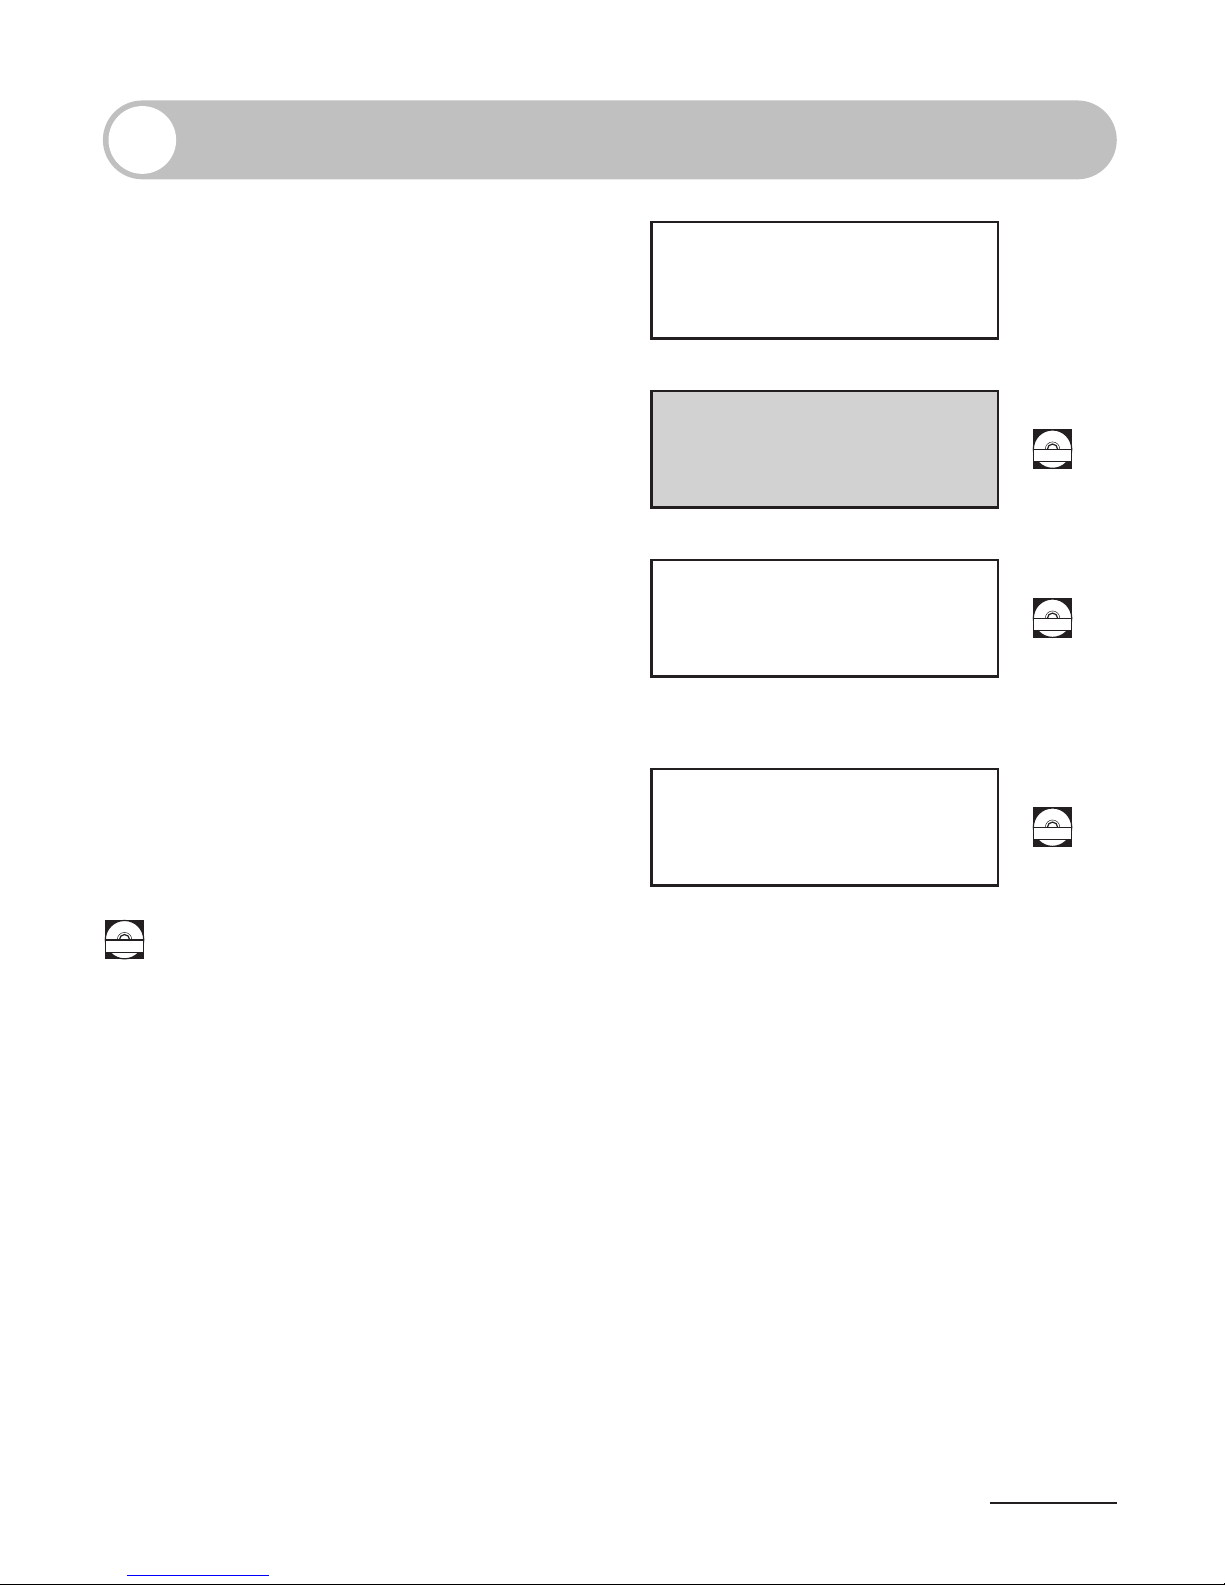
Manuals for the Machine
Machine Set-Up
Software Installation
Basic Features
Maintenance
●
●
●
●
Starter Guide
Basic Features
Maintenance
Trouble Shooting
Specifications
●
●
●
●
Basic Operation Guide
(This Document)
CD-ROM
Total Operation Features
Network and Remote User Interface
System Manager Settings
Reports and Lists
Trouble Shooting
●
●
●
●
●
Reference Guide
CD-ROM
Scanning Features●
Scanner Driver Guide
CD-ROM
CD-ROM
Indicates the manual is supplied in PDF format in the accompanying CD-ROM.
To view the manual in PDF format, Adobe Reader/Adobe Acrobat Reader is required. If Adobe Reader/Adobe
Acrobat Reader is not installed on your system, please download it from the Adobe Systems Incorporated
website.
Considerable effort has been made to make sure that the manuals for the machine are free of inaccuracies
and omissions. However, as we are constantly improving our products if you need an exact specification,
please contact Canon.
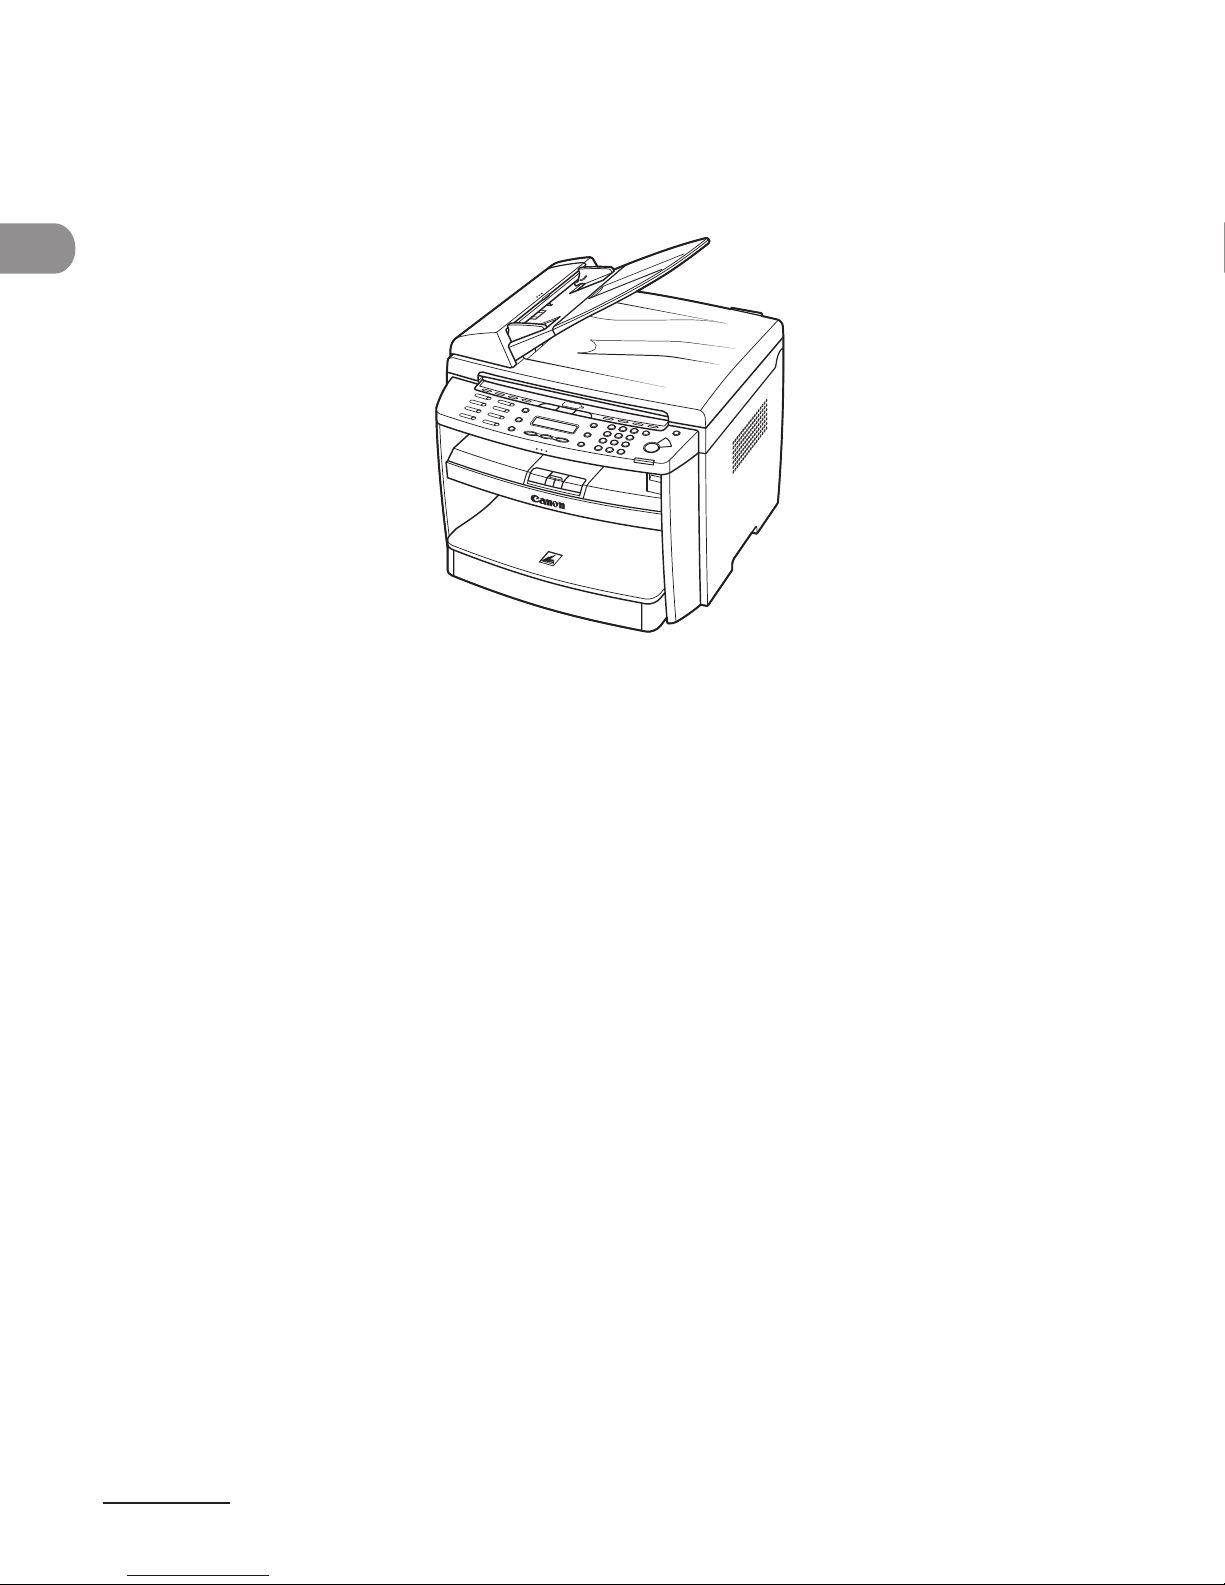
The machine illustration on the cover may differ slightly from your machine.
●
●
●
Page 3
What Can I Do with This Machine?
ii
What Can I Do with This
Machine?
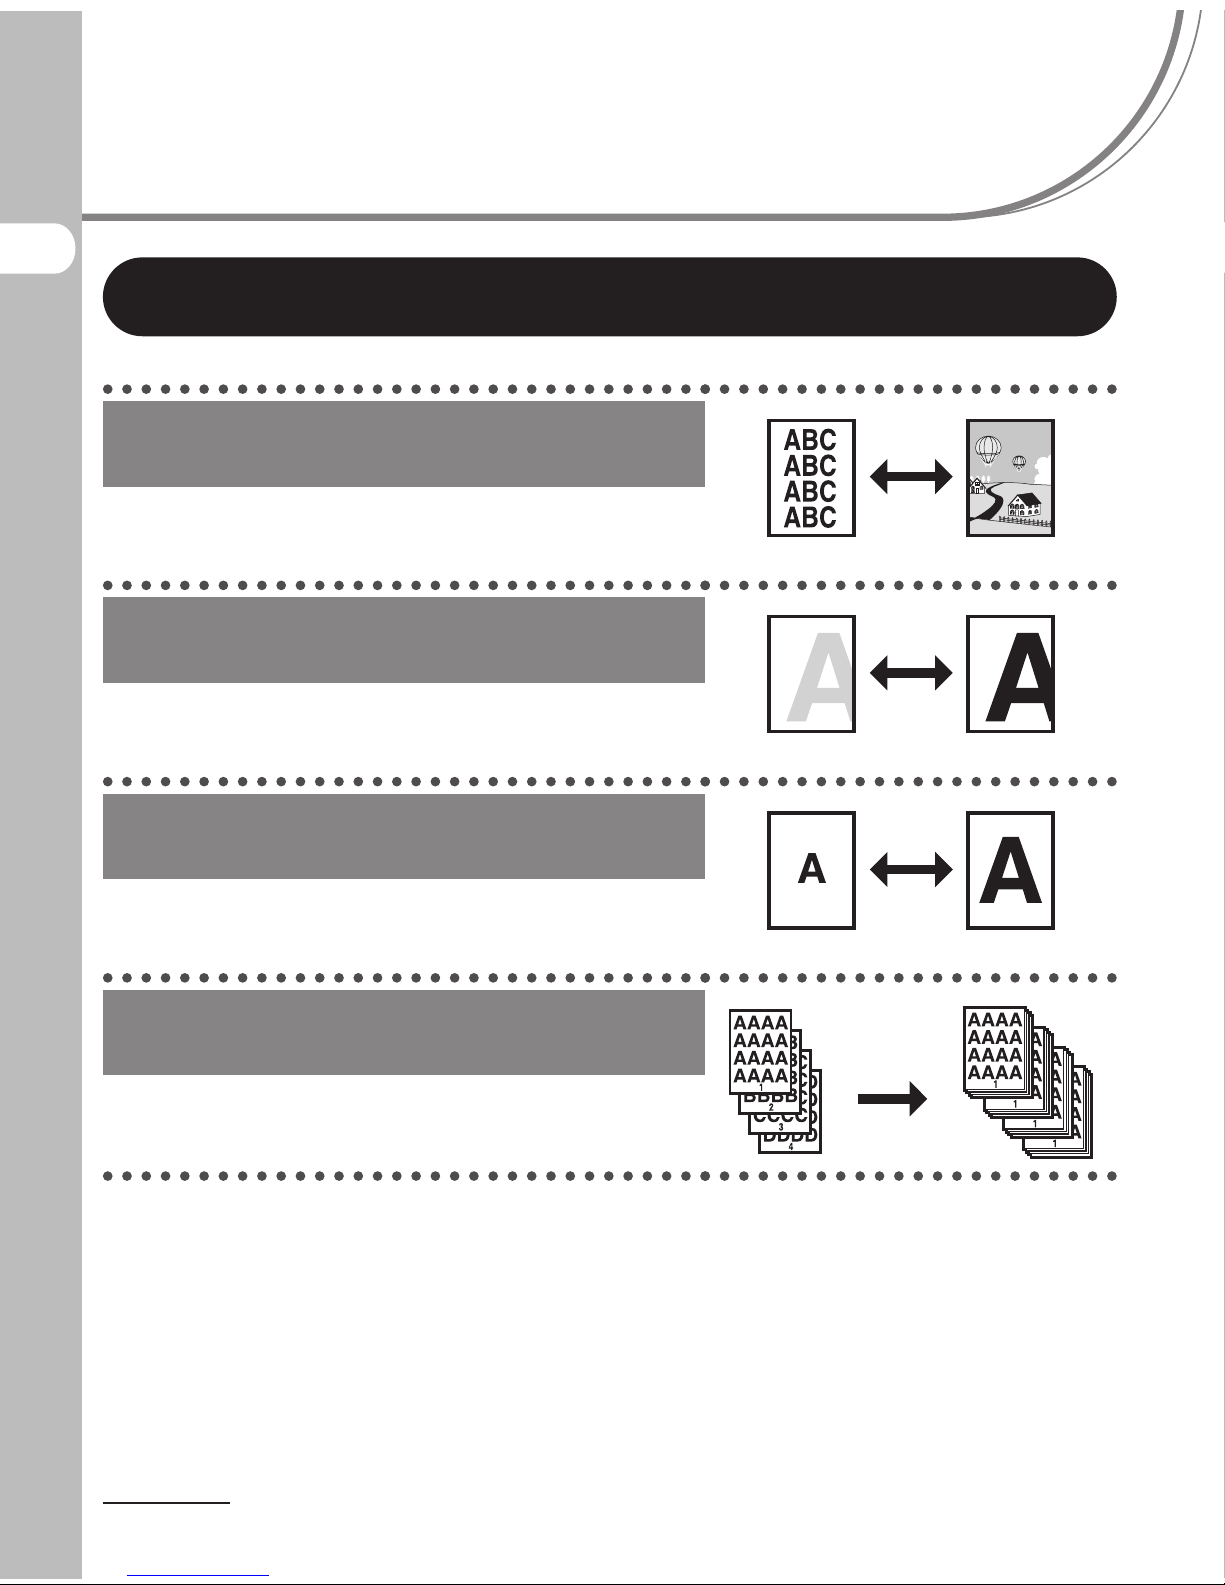
Copy Features
Select a scan mode depending on the
type of image
Image Quality
p. 3-4
Adjust the density level of scanned
images
Density
p. 3-5
Enlarge or reduce copied images
Zoom Ratio
p. 3-7
Sort copies by page order
Collate Copying
p. 3-10
Page 4
What Can I Do with This Machine?
iii
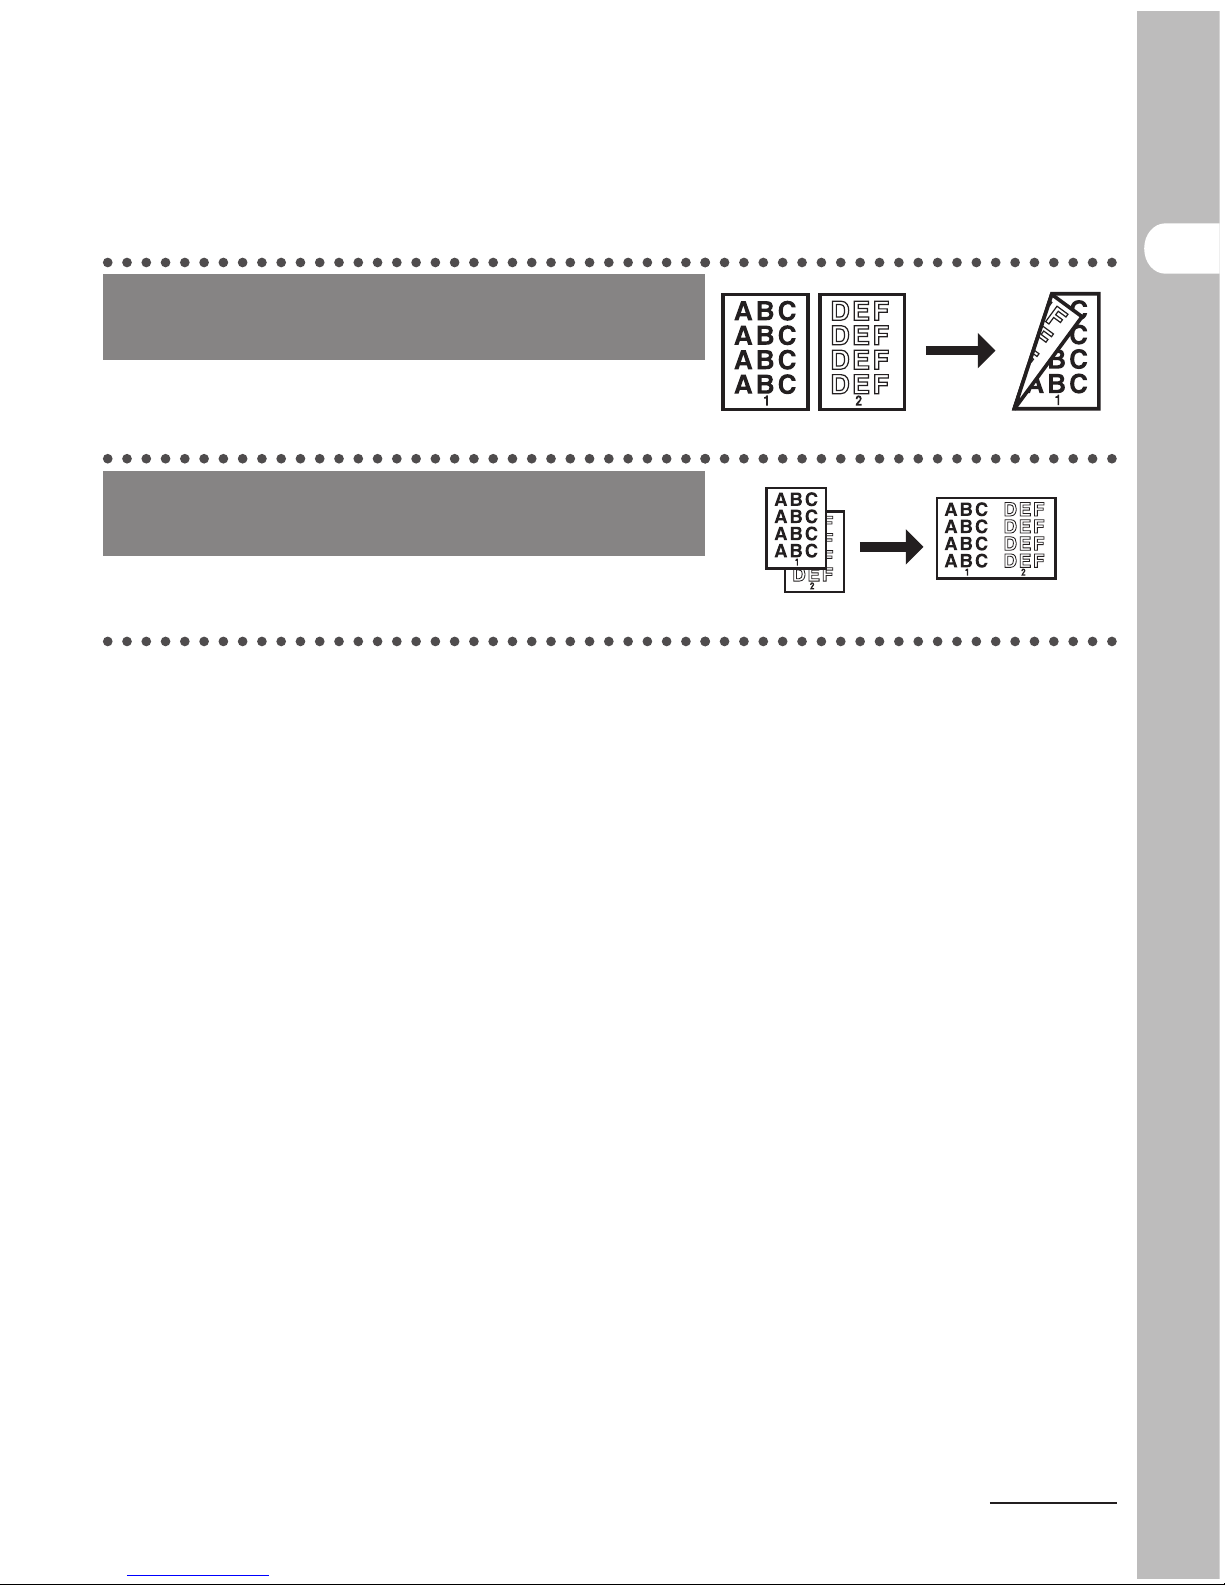
Make two-sided copies
Two-Sided Copy
p. 3-14
Copy two documents on one sheet
2 on 1 Combination
p. 3-12
Page 5
What Can I Do with This Machine?
iv
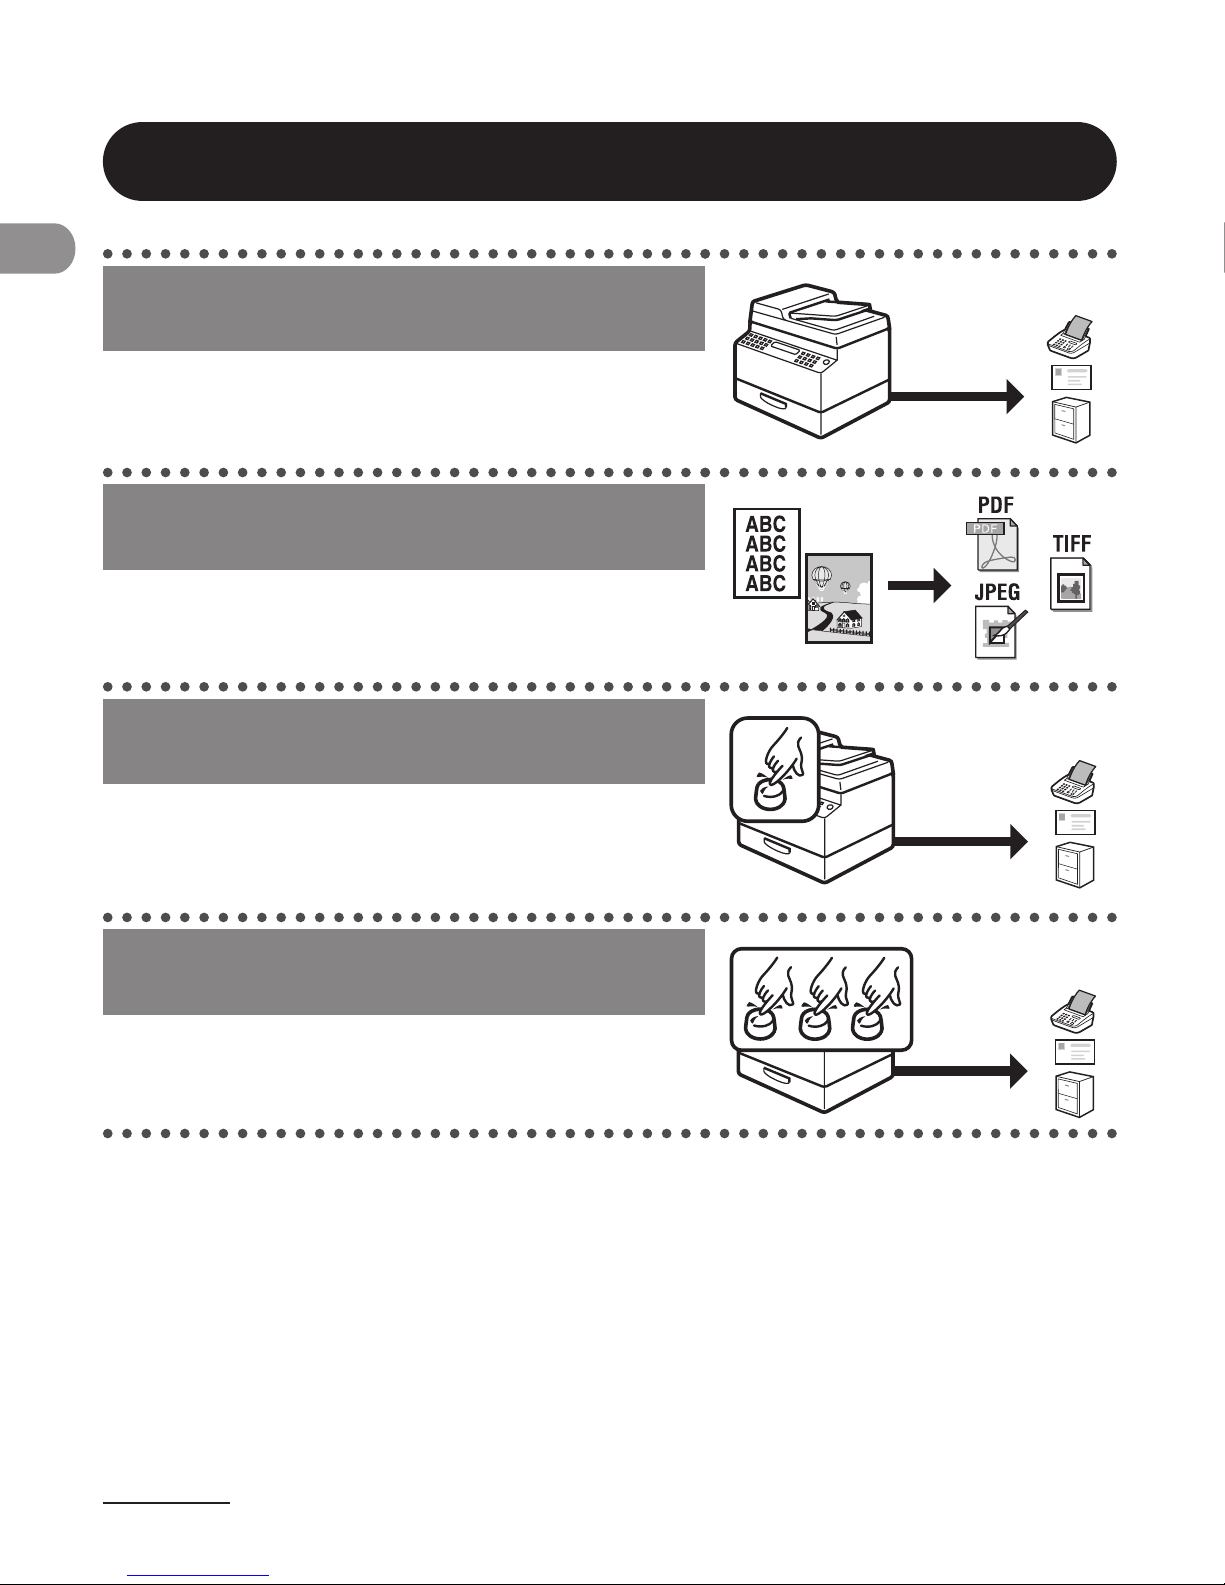
Sending/Receiving Features (MF4690PL Only)
Send documents with diverse sending
methods
Fax, E-Mail, and File Server
Chapter 4
Send documents in a variety of file
formats
Send Settings
p. 4-7
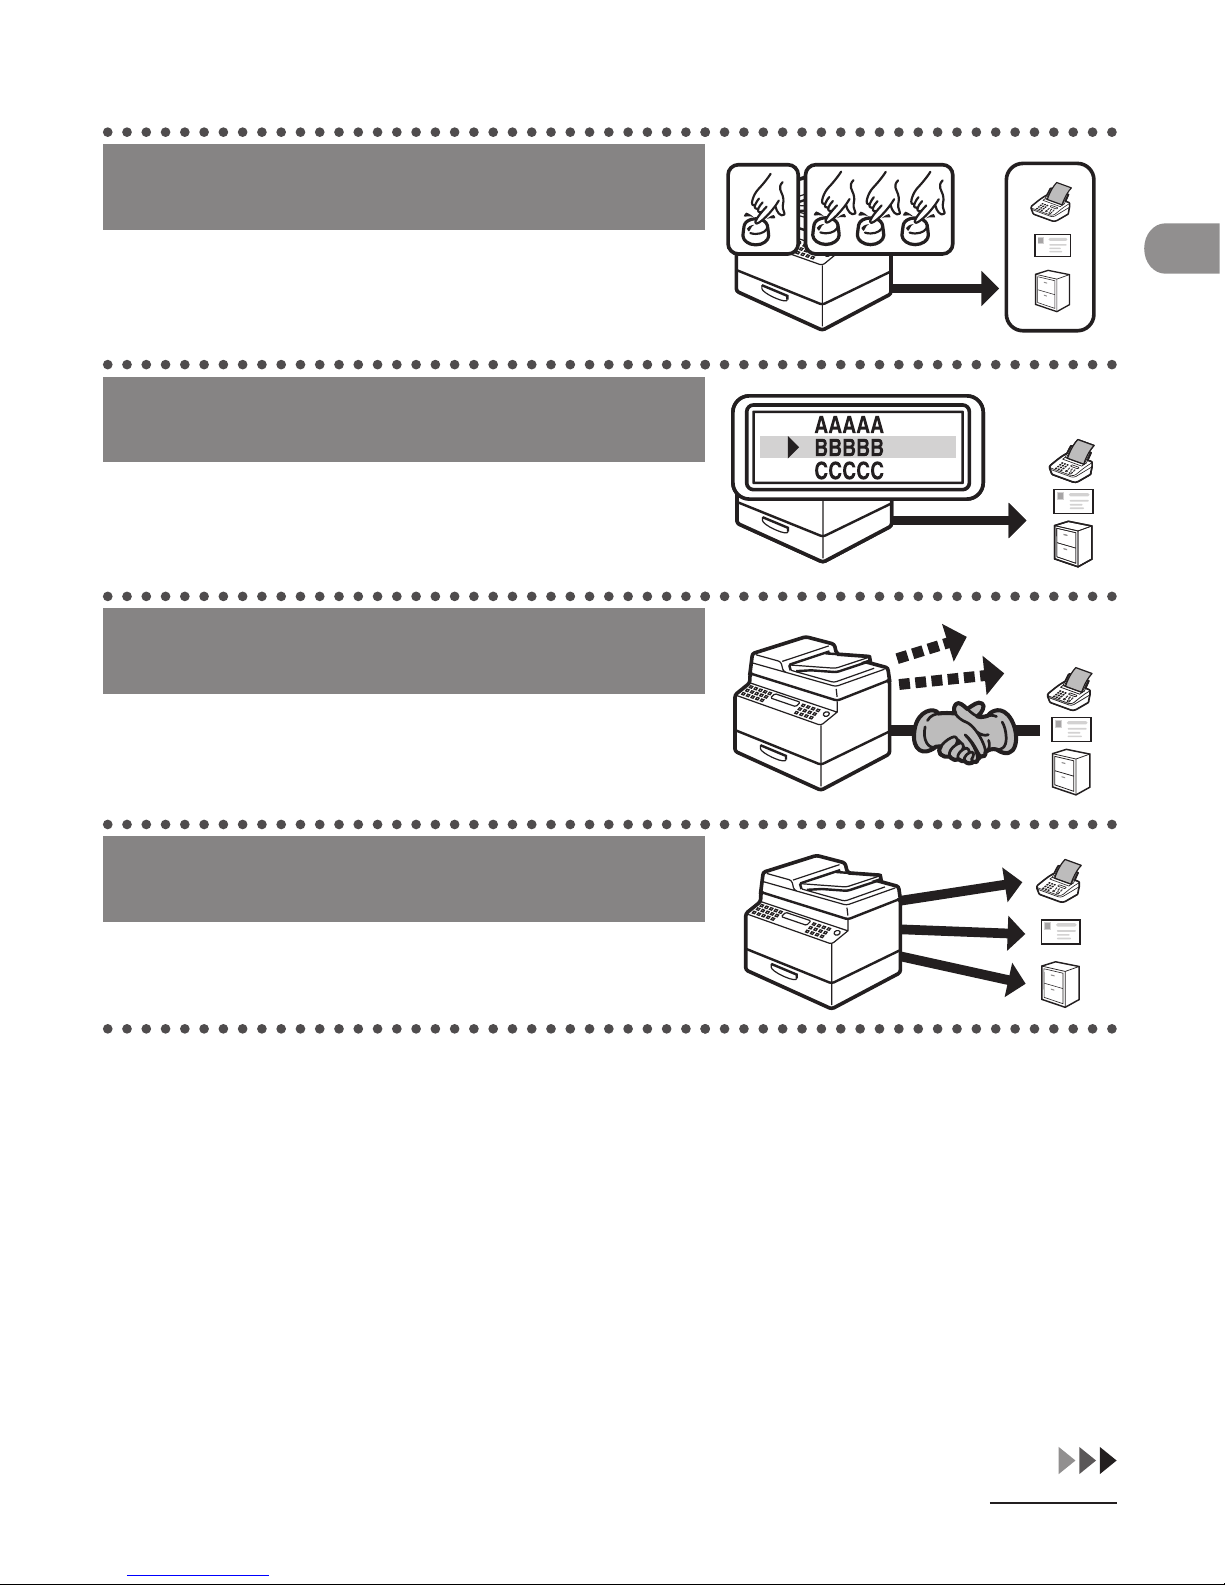
Specify a recipient with a single key
Sending with One-Touch Keys
p. 4-40
Specify a recipient with a three-digit
code
Sending with Coded Dial Codes
p. 4-42
Page 6
v
What Can I Do with This Machine?
Specify multiple recipients as a group
Sending to Group Addresses
p. 4-44
Look up a particular recipient
Address Book Search
p. 4-46
Retry sending documents
automatically
Auto Retry
Reference Guide
Send documents to multiple
recipients
Broadcasting
Reference Guide
Page 7
What Can I Do with This Machine?
vi
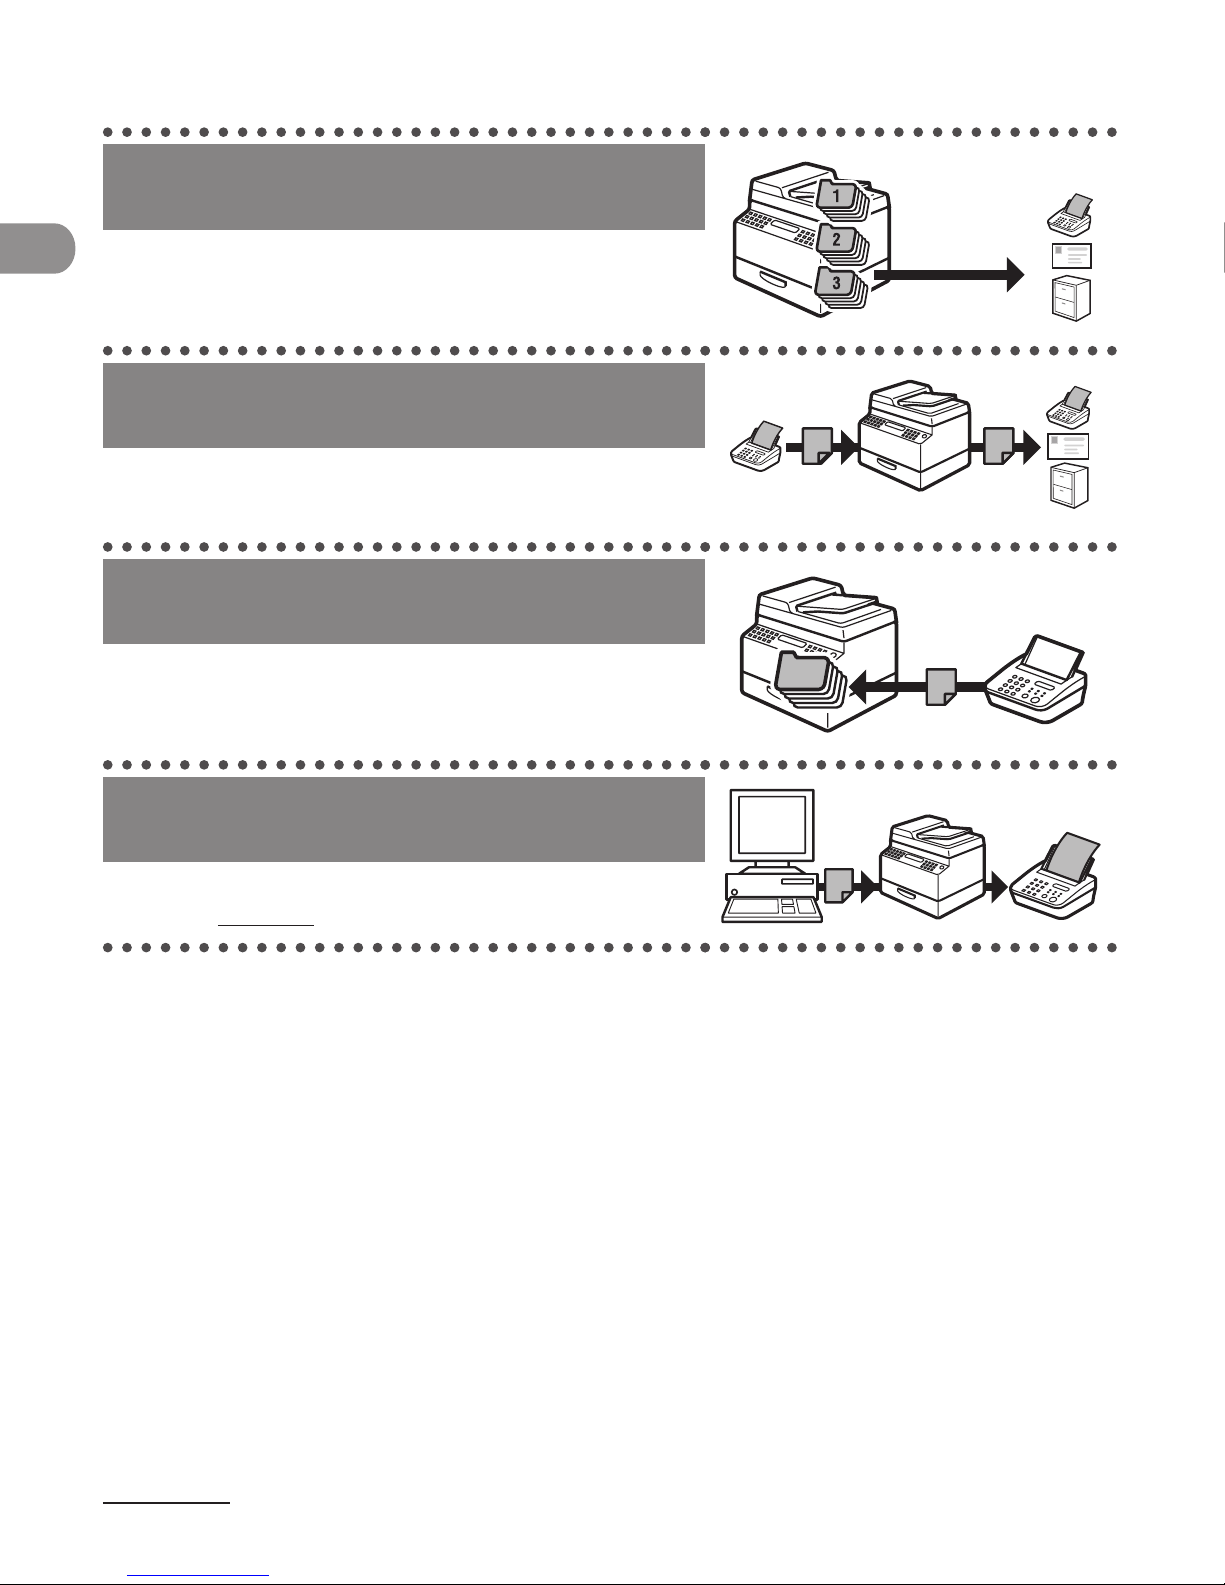
Recall the last three sending jobs
Job Recall
Reference Guide
Forward received documents
Forwarding Documents
Reference Guide
Receive faxes in memory without
printing out
Memory Reception
Reference Guide
Send a fax from a PC
PC Faxing
Online Help
Page 8

vii
What Can I Do with This Machine?
Printer Feature
Print a document from a PC
Printing
Online Help
Scanner Feature
Specify detailed scanning options to
suit various images
Scanning
Scanner Driver Guide
Page 9
What Can I Do with This Machine?
viii
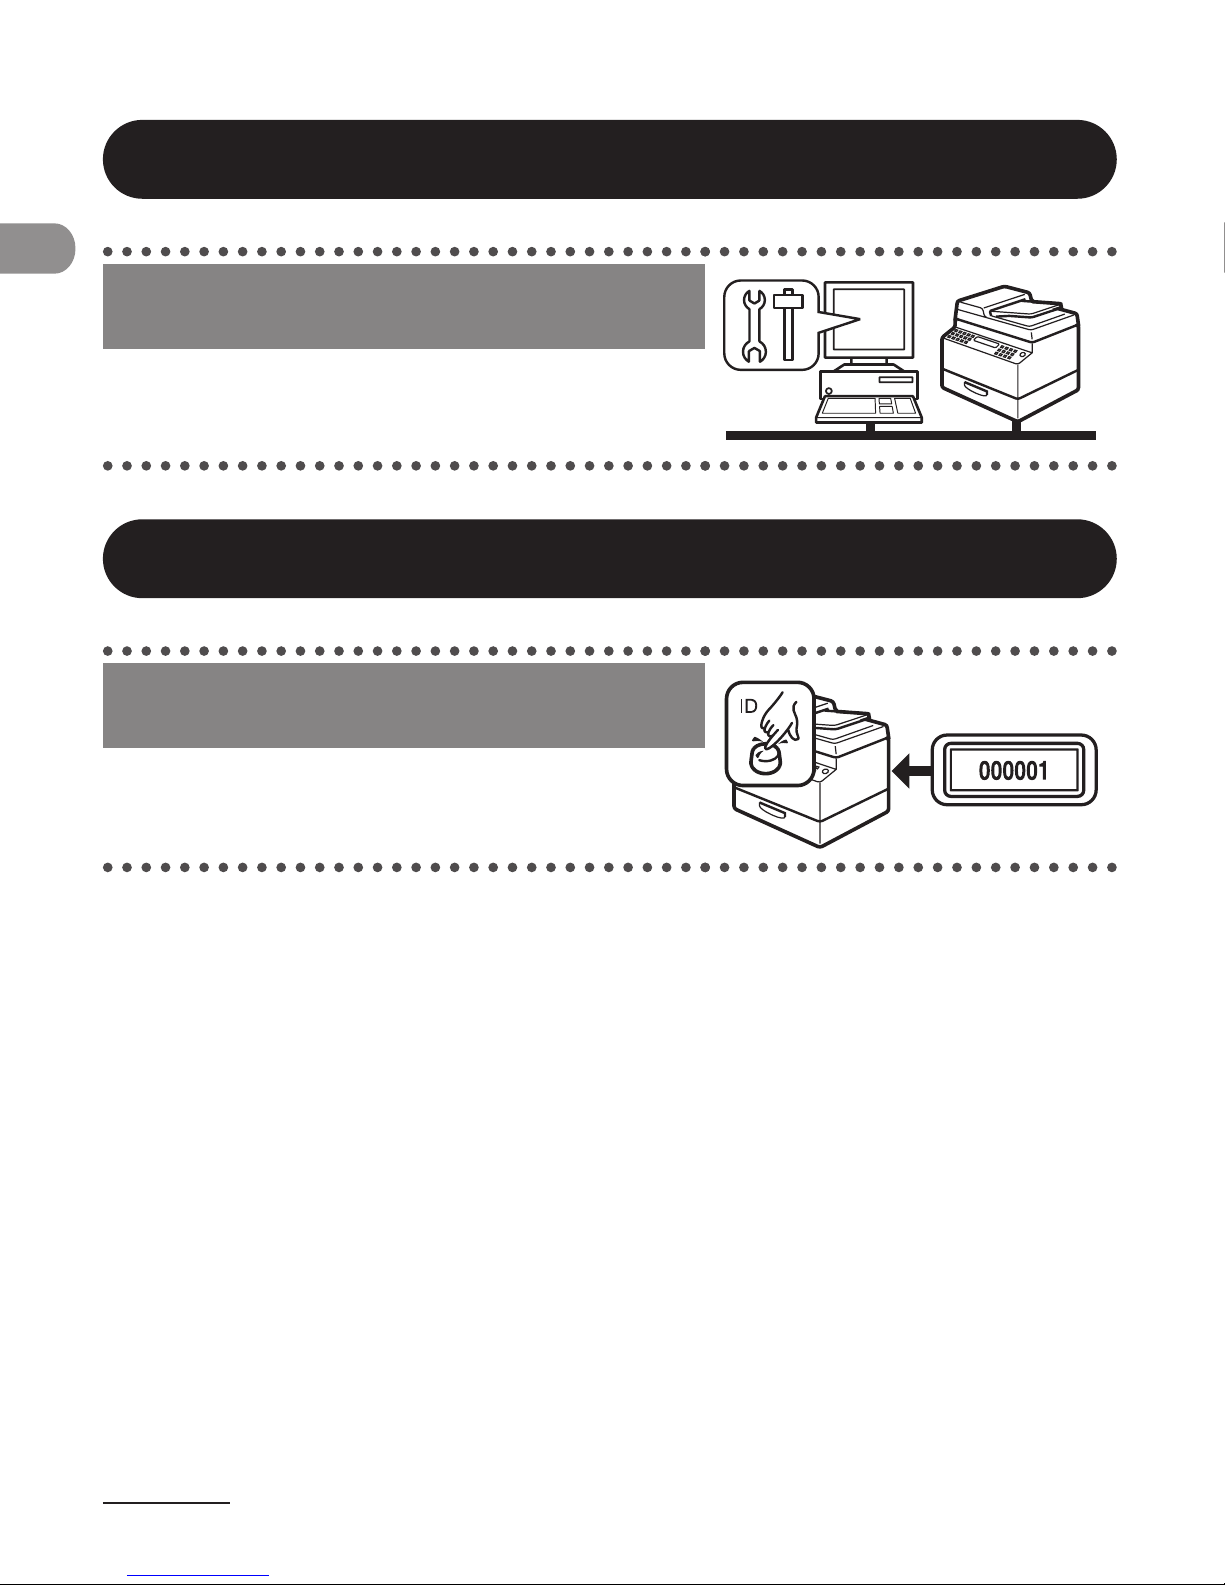
Remote UI Feature
Access and manage the machine from
a PC
Remote UI
Reference Guide
System Manager Settings
Restrict the use of the machine with
department IDs
Department ID Management
Reference Guide
Page 10

ix
What Can I Do with This Machine?
Contents
Manuals for the Machine ........................................................................i
What Can I Do with This Machine? ........................................................ii
Copy Features ...........................................................................................ii
Sending/Receiving Features (MF4690PL Only) ............................iv
Printer Feature ........................................................................................vii
Scanner Feature .....................................................................................vii
Remote UI Feature ................................................................................viii
System Manager Settings ..................................................................viii
Contents .................................................................................................ix
How to Use This Guide .......................................................................xvii
Symbols Used in This Manual ......................................................... xvii
Illustrations Used in This Manual .................................................xviii
Legal Notices ........................................................................................xix
Trademarks ..............................................................................................xix
Copyright .................................................................................................xix
Disclaimers ..............................................................................................xix
1 Before Using the Machine ..............................................................1-1
Machine Components ........................................................................ 1-2
Page 11

What Can I Do with This Machine?
x
Operation Panel .................................................................................. 1-5
Main Operation Panel ........................................................................1-5
Send/Fax Operation Panel (MF4690PL Only) ..............................1-9
LCD (Standby Mode) ........................................................................ 1-10
Copy Mode ..........................................................................................1-10
Scan Mode ........................................................................................... 1-10
Send/Fax Mode (MF4690PL Only) .............................................. 1-10
Log In Mode ........................................................................................1-10
Department/User ID Management ................................................. 1-11
Procedure before Using the Machine ........................................ 1-11
Procedure after Using the Machine ...........................................1-12
Optional Handset (MF4690PL Only) ............................................... 1-13
Maintaining the Handset ............................................................... 1-13
Toner Cartridge ................................................................................ 1-14
Maintaining the Toner Cartridge ................................................. 1-15
Checking the toner level ................................................................ 1-17
Timer Settings................................................................................... 1-18
Setting the Sleep Mode .................................................................. 1-18
Setting Auto Clear Time ................................................................. 1-20
Setting Time Zone (MF4690PL Only) ......................................... 1-22
Setting Daylight Saving Time ....................................................... 1-23
2 Document and Paper ...................................................................... 2-1
Document Requirements ................................................................... 2-2
Page 12

xi
What Can I Do with This Machine?
Scanning Area ..................................................................................... 2-4
Loading Documents ........................................................................... 2-5
On the Platen Glass .............................................................................2-5
In the ADF ...............................................................................................2-7
Paper Requirements ........................................................................... 2-9
Printable Area ................................................................................... 2-11
Loading Paper ................................................................................... 2-12
Into the Multi-Purpose Tray........................................................... 2-12
Setting Paper Size and Type ............................................................ 2-15
3 Copying ........................................................................................... 3-1
Basic Copying Method ....................................................................... 3-2
Scan Settings ...................................................................................... 3-4
Image Quality ........................................................................................3-4
Density ..................................................................................................... 3-5
Zoom Ratio .............................................................................................3-7
Collate Copy ...................................................................................... 3-10
2 on 1 Combination .......................................................................... 3-12
Two-Sided Copying ..........................................................................3-14
Printing a Sample Page .................................................................... 3-16
Page 13

What Can I Do with This Machine?
xii
Canceling Copy Jobs ........................................................................ 3-17
Checking and Deleting Jobs ............................................................3-19
Checking and Deleting Copy Jobs ............................................. 3-19
4 Sending Documents (MF4690PL Only) ......................................... 4-1
Basic Sending Method ....................................................................... 4-2
Scan Settings ...................................................................................... 4-4
Image Quality (Fax) .............................................................................4-4
Density ..................................................................................................... 4-6
Send Settings (E-Mail/File Server) ..................................................4-7
Storing/Editing Address Book ......................................................... 4-11
Storing/Editing One-Touch Keys/Coded Dial Codes ............ 4-12
Storing/Editing Group Addresses ............................................... 4-29
Specifying Destinations ................................................................... 4-40
Using One-Touch Keys .................................................................... 4-40
Using Coded Dial Codes ................................................................. 4-42
Using Group Addresses .................................................................. 4-44
Using Address Book Key ................................................................. 4-46
Manual Sending (Fax) ...................................................................... 4-50
Canceling TX Jobs ............................................................................. 4-53
Checking and Deleting Jobs ............................................................4-55
Checking Transmission Results .................................................... 4-55
Checking and Deleting Sending Documents
Stored in Memory ............................................................................. 4-56
Page 14

xiii
What Can I Do with This Machine?
5 Receiving Documents (MF4690PL Only) ....................................... 5-1
Basic Receiving Method ..................................................................... 5-2
Forwarding Received Documents ..................................................... 5-4
Forwarding Documents Received in Memory ..........................5-4
Forwarding Documents with Forwarding Errors .....................5-6
Printing or Erasing Documents with Forwarding Errors ........5-8
Canceling RX Jobs ............................................................................ 5-10
Checking and Deleting Jobs ............................................................5-11
Checking Reception Results ......................................................... 5-11
Checking and Deleting Receiving Documents
Stored in Memory ............................................................................. 5-13
6 Printing ............................................................................................ 6-1
Printing Documents ........................................................................... 6-2
Checking and Deleting Jobs .............................................................. 6-4
Checking and Deleting Print Jobs .................................................6-4
7 Scanning ..........................................................................................7-1
Scanning to a Computer .................................................................... 7-2
Scanning to a USB Memory (MF4690PL Only) ................................. 7-4
Scanning to a USB memory .............................................................7-5
Scan Settings .........................................................................................7-8
Page 15

What Can I Do with This Machine?
xiv
Canceling Scan Jobs .........................................................................7-14
Canceling Scan Jobs to a Computer .......................................... 7-14
Canceling Scan Jobs to a USB Memory
(MF4690PL Only) ...............................................................................7-15
8 PC Faxing (MF4690PL Only) ........................................................... 8-1
PC Faxing ............................................................................................. 8-2
9 Remote UI ........................................................................................ 9-1
Remote UI ............................................................................................ 9-2
10 Maintenance ...............................................................................10-1
Cleaning the Machine ...................................................................... 10-2
Exterior ................................................................................................. 10-2
Interior .................................................................................................. 10-3
Fuser Roller .......................................................................................... 10-6
Scanning area .................................................................................... 10-7
Replacing the Toner Cartridge ...................................................... 10-10
Redistributing Toner ......................................................................10-10
Replacing the Toner Cartridge with a New One ..................10-13
Transporting the Machine .............................................................10-16
11 Troubleshooting .........................................................................11-1
Clearing Jams ....................................................................................11-2
Document Jams ................................................................................11-3
Paper Jams ..........................................................................................11-4
Page 16

xv
What Can I Do with This Machine?
LCD Messages .................................................................................11-12
Error Codes (MF4690PL Only) ....................................................... 11-22
If <LOAD CORRECT PAPER> is displayed ......................................11-29
Re-Loading the Paper....................................................................11-29
Changing the Paper Size Setting ..............................................11-30
If a Power Failure Occurs ................................................................ 11-32
If You Cannot Solve a Problem ......................................................11-33
12 Machine Settings ........................................................................ 12-1
Machine Settings .............................................................................. 12-2
Printing USER'S DATA LIST ............................................................. 12-2
Accessing the Setting Menu ......................................................... 12-4
Setting Menu .................................................................................... 12-6
PAPER SETTINGS ................................................................................ 12-6
VOLUME CONTROL (MF4690PL Only) ....................................... 12-6
COMMON SETTINGS ........................................................................ 12-8
COPY SETTINGS .................................................................................12-9
TX/RX SETTINGS (MF4690PL Only) ...........................................12-11
ADDRESS BOOK SET. (MF4690PL Only) ...................................12-19
PRINTER SETTINGS .........................................................................12-22
TIMER SETTINGS ..............................................................................12-27
ADJUST./CLEANING ........................................................................12-29
REPORT SETTINGS ..........................................................................12-31
SYSTEM SETTINGS ..........................................................................12-33
Page 17

What Can I Do with This Machine?
xvi
13 Appendix .....................................................................................13-1
Specifications ................................................................................... 13-2
General ................................................................................................. 13-2
Copier .................................................................................................... 13-3
Printer ................................................................................................... 13-4
Facsimile (MF4690PL Only) ........................................................... 13-4
Telephone (MF4690PL Only) ........................................................ 13-6
Send (MF4690PL Only) ................................................................... 13-6
Index .................................................................................................. 13-8
Page 18
xvii
What Can I Do with This Machine?
How to Use This Guide
Symbols Used in This Manual
The following symbols are used throughout the manuals for the machine and indicate the
warnings, cautions and notes you should keep in mind when using the machine.
Indicates a warning that may lead to death or serious injury if not observed.
Explains how to avoid actions that could injure you or damage your
machine.
Explains operating restrictions and how to avoid minor difficulties.
In addition, this guide uses distinctive notations to identify keys and information in the LCD:
The keys you press appear in square brackets: [Stop/Reset].
Information in the LCD appears in angle brackets: <LOAD PAPER>.
The numbers that point to the keys on the operation panel diagram correspond to the
order of steps to take in the procedure.
–
–
Page 19
What Can I Do with This Machine?
xviii
Illustrations Used in This Manual
Unless otherwise mentioned, illustrations used in this manual are those taken when no
optional equipment is attached to the MF4690PL.
The model MF4690PL is used for illustration purposes in this manual.
When there is any difference between MF4660PL and MF4690PL, it is clearly indicated in
the text, e.g., “MF4690PL Only”.
Page 20

xix
What Can I Do with This Machine?
Legal Notices
Trademarks
Canon and the Canon logo are trademarks of Canon Inc.
Microsoft, Windows and Windows Server are registered trademarks of Microsoft
Corporation in the United States and other countries.
Windows Vista is a trademark of Microsoft Corporation in the United States and other
countries.
All other product and brand names are registered trademarks, trademarks or service marks
of their respective owners.
Copyright
Copyright © 2007 by Canon Inc. All rights reserved. No part of this publication may be
reproduced, transmitted, transcribed, stored in a retrieval system, or translated into any
language or computer language in any form or by any means, electronic, mechanical,
magnetic, optical, chemical, manual, or otherwise, without the prior written permission of
Canon Inc.
Disclaimers
The information in this document is subject to change without notice.
CANON INC. MAKES NO WARRANTY OF ANY KIND WITH REGARD TO THIS MATERIAL, EITHER
EXPRESS OR IMPLIED, EXCEPT AS PROVIDED HEREIN, INCLUDING WITHOUT LIMITATION,
THEREOF, WARRANTIES AS TO MARKETABILITY, MERCHANTABILITY, FITNESS FOR A
PARTICULAR PURPOSE OF USE OR NON-INFRINGEMENT. CANON INC. SHALL NOT BE LIABLE
FOR ANY DIRECT, INCIDENTAL, OR CONSEQUENTIAL DAMAGES OF ANY NATURE, OR LOSSES
OR EXPENSES RESULTING FROM THE USE OF THIS MATERIAL.
Page 21

Before Using the Machine
1
Before Using the
Machine
Machine Components ∙∙∙∙∙∙∙∙∙∙∙∙∙∙∙∙∙∙∙∙∙∙∙∙∙∙∙∙∙∙∙∙∙∙∙∙∙∙∙∙∙∙∙∙∙∙∙∙∙∙∙∙∙∙∙∙∙∙∙∙∙∙∙∙∙1-2
Operation Panel ∙∙∙∙∙∙∙∙∙∙∙∙∙∙∙∙∙∙∙∙∙∙∙∙∙∙∙∙∙∙∙∙∙∙∙∙∙∙∙∙∙∙∙∙∙∙∙∙∙∙∙∙∙∙∙∙∙∙∙∙∙∙∙∙∙∙∙∙∙∙∙∙∙∙∙1-5
Main Operation Panel ∙∙∙∙∙∙∙∙∙∙∙∙∙∙∙∙∙∙∙∙∙∙∙∙∙∙∙∙∙∙∙∙∙∙∙∙∙∙∙∙∙∙∙∙∙∙∙∙∙∙∙∙∙∙∙∙∙∙∙∙∙∙∙∙∙∙∙∙∙∙∙∙∙ 1-5
Send/Fax Operation Panel (MF4690PL Only) ∙∙∙∙∙∙∙∙∙∙∙∙∙∙∙∙∙∙∙∙∙∙∙∙∙∙∙∙∙ 1-9
LCD (Standby Mode) ∙∙∙∙∙∙∙∙∙∙∙∙∙∙∙∙∙∙∙∙∙∙∙∙∙∙∙∙∙∙∙∙∙∙∙∙∙∙∙∙∙∙∙∙∙∙∙∙∙∙∙∙∙∙∙∙∙∙∙∙∙∙∙∙∙ 1-10
Copy Mode ∙∙∙∙∙∙∙∙∙∙∙∙∙∙∙∙∙∙∙∙∙∙∙∙∙∙∙∙∙∙∙∙∙∙∙∙∙∙∙∙∙∙∙∙∙∙∙∙∙∙∙∙∙∙∙∙∙∙∙∙∙∙∙∙∙∙∙∙∙∙∙∙∙∙∙∙∙∙∙∙∙∙∙∙∙∙∙∙∙∙∙1-10
Scan Mode ∙∙∙∙∙∙∙∙∙∙∙∙∙∙∙∙∙∙∙∙∙∙∙∙∙∙∙∙∙∙∙∙∙∙∙∙∙∙∙∙∙∙∙∙∙∙∙∙∙∙∙∙∙∙∙∙∙∙∙∙∙∙∙∙∙∙∙∙∙∙∙∙∙∙∙∙∙∙∙∙∙∙∙∙∙∙∙∙∙∙∙∙1-10
Send/Fax Mode (MF4690PL Only) ∙∙∙∙∙∙∙∙∙∙∙∙∙∙∙∙∙∙∙∙∙∙∙∙∙∙∙∙∙∙∙∙∙∙∙∙∙∙∙∙∙∙∙∙∙∙∙∙1-10
Log In Mode ∙∙∙∙∙∙∙∙∙∙∙∙∙∙∙∙∙∙∙∙∙∙∙∙∙∙∙∙∙∙∙∙∙∙∙∙∙∙∙∙∙∙∙∙∙∙∙∙∙∙∙∙∙∙∙∙∙∙∙∙∙∙∙∙∙∙∙∙∙∙∙∙∙∙∙∙∙∙∙∙∙∙∙∙∙∙∙∙∙1-10
Department/User ID Management ∙∙∙∙∙∙∙∙∙∙∙∙∙∙∙∙∙∙∙∙∙∙∙∙∙∙∙∙∙∙∙∙∙∙∙∙∙∙∙∙∙ 1-11
Procedure before Using the Machine ∙∙∙∙∙∙∙∙∙∙∙∙∙∙∙∙∙∙∙∙∙∙∙∙∙∙∙∙∙∙∙∙∙∙∙∙∙∙∙∙∙1-11
Procedure after Using the Machine ∙∙∙∙∙∙∙∙∙∙∙∙∙∙∙∙∙∙∙∙∙∙∙∙∙∙∙∙∙∙∙∙∙∙∙∙∙∙∙∙∙∙∙∙∙1-12
Optional Handset (MF4690PL Only) ∙∙∙∙∙∙∙∙∙∙∙∙∙∙∙∙∙∙∙∙∙∙∙∙∙∙∙∙∙∙∙∙∙∙∙∙∙∙∙ 1-13
Maintaining the Handset ∙∙∙∙∙∙∙∙∙∙∙∙∙∙∙∙∙∙∙∙∙∙∙∙∙∙∙∙∙∙∙∙∙∙∙∙∙∙∙∙∙∙∙∙∙∙∙∙∙∙∙∙∙∙∙∙∙∙∙∙∙∙∙∙∙1-13
Toner Cartridge ∙∙∙∙∙∙∙∙∙∙∙∙∙∙∙∙∙∙∙∙∙∙∙∙∙∙∙∙∙∙∙∙∙∙∙∙∙∙∙∙∙∙∙∙∙∙∙∙∙∙∙∙∙∙∙∙∙∙∙∙∙∙∙∙∙∙∙∙∙∙∙∙∙ 1-14
Maintaining the Toner Cartridge ∙∙∙∙∙∙∙∙∙∙∙∙∙∙∙∙∙∙∙∙∙∙∙∙∙∙∙∙∙∙∙∙∙∙∙∙∙∙∙∙∙∙∙∙∙∙∙∙∙∙1-15
Checking the toner level ∙∙∙∙∙∙∙∙∙∙∙∙∙∙∙∙∙∙∙∙∙∙∙∙∙∙∙∙∙∙∙∙∙∙∙∙∙∙∙∙∙∙∙∙∙∙∙∙∙∙∙∙∙∙∙∙∙∙∙∙∙∙∙∙∙1-17
Timer Settings ∙∙∙∙∙∙∙∙∙∙∙∙∙∙∙∙∙∙∙∙∙∙∙∙∙∙∙∙∙∙∙∙∙∙∙∙∙∙∙∙∙∙∙∙∙∙∙∙∙∙∙∙∙∙∙∙∙∙∙∙∙∙∙∙∙∙∙∙∙∙∙∙∙∙∙ 1-18
Setting the Sleep Mode ∙∙∙∙∙∙∙∙∙∙∙∙∙∙∙∙∙∙∙∙∙∙∙∙∙∙∙∙∙∙∙∙∙∙∙∙∙∙∙∙∙∙∙∙∙∙∙∙∙∙∙∙∙∙∙∙∙∙∙∙∙∙∙∙∙∙∙1-18
Setting Auto Clear Time ∙∙∙∙∙∙∙∙∙∙∙∙∙∙∙∙∙∙∙∙∙∙∙∙∙∙∙∙∙∙∙∙∙∙∙∙∙∙∙∙∙∙∙∙∙∙∙∙∙∙∙∙∙∙∙∙∙∙∙∙∙∙∙∙∙∙∙1-20
Setting Time Zone (MF4690PL Only) ∙∙∙∙∙∙∙∙∙∙∙∙∙∙∙∙∙∙∙∙∙∙∙∙∙∙∙∙∙∙∙∙∙∙∙∙∙∙∙∙∙∙∙1-22
Setting Daylight Saving Time ∙∙∙∙∙∙∙∙∙∙∙∙∙∙∙∙∙∙∙∙∙∙∙∙∙∙∙∙∙∙∙∙∙∙∙∙∙∙∙∙∙∙∙∙∙∙∙∙∙∙∙∙∙∙∙∙∙1-23
Page 22
Before Using the Machine
1-2
Machine Components
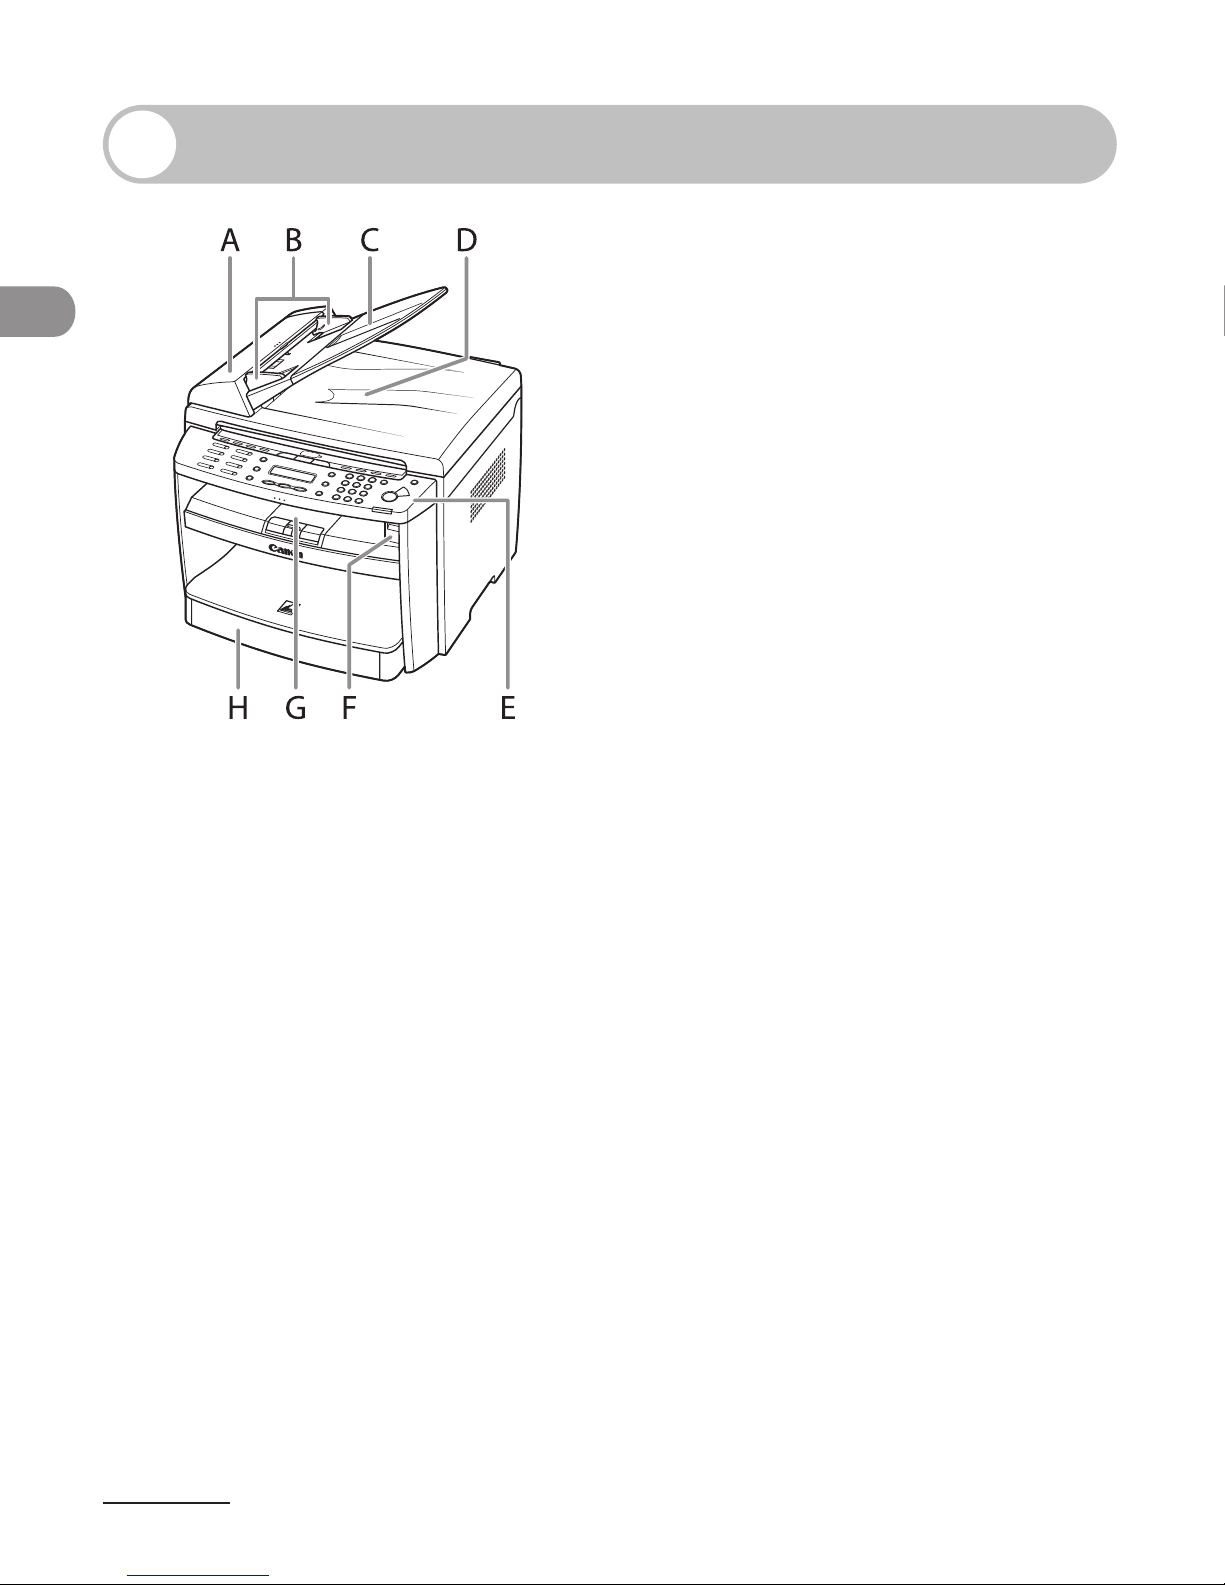
A ADF (Automatic Document Feeder)
Holds documents and feeds them automatically
into the scanning area.
B Slide guides
Adjust to the width of the document.
C Document feeder tray
Holds documents.
D Document delivery tray
Receives documents.
E Operation panel
Controls the machine.
F USB memory port
Insert the USB memory when using scanning to
USB memory option.
G Output tray
Receives copies, prints and faxes.
H Paper cassette
Loads the paper supply.
Page 23
1-3
Before Using the Machine
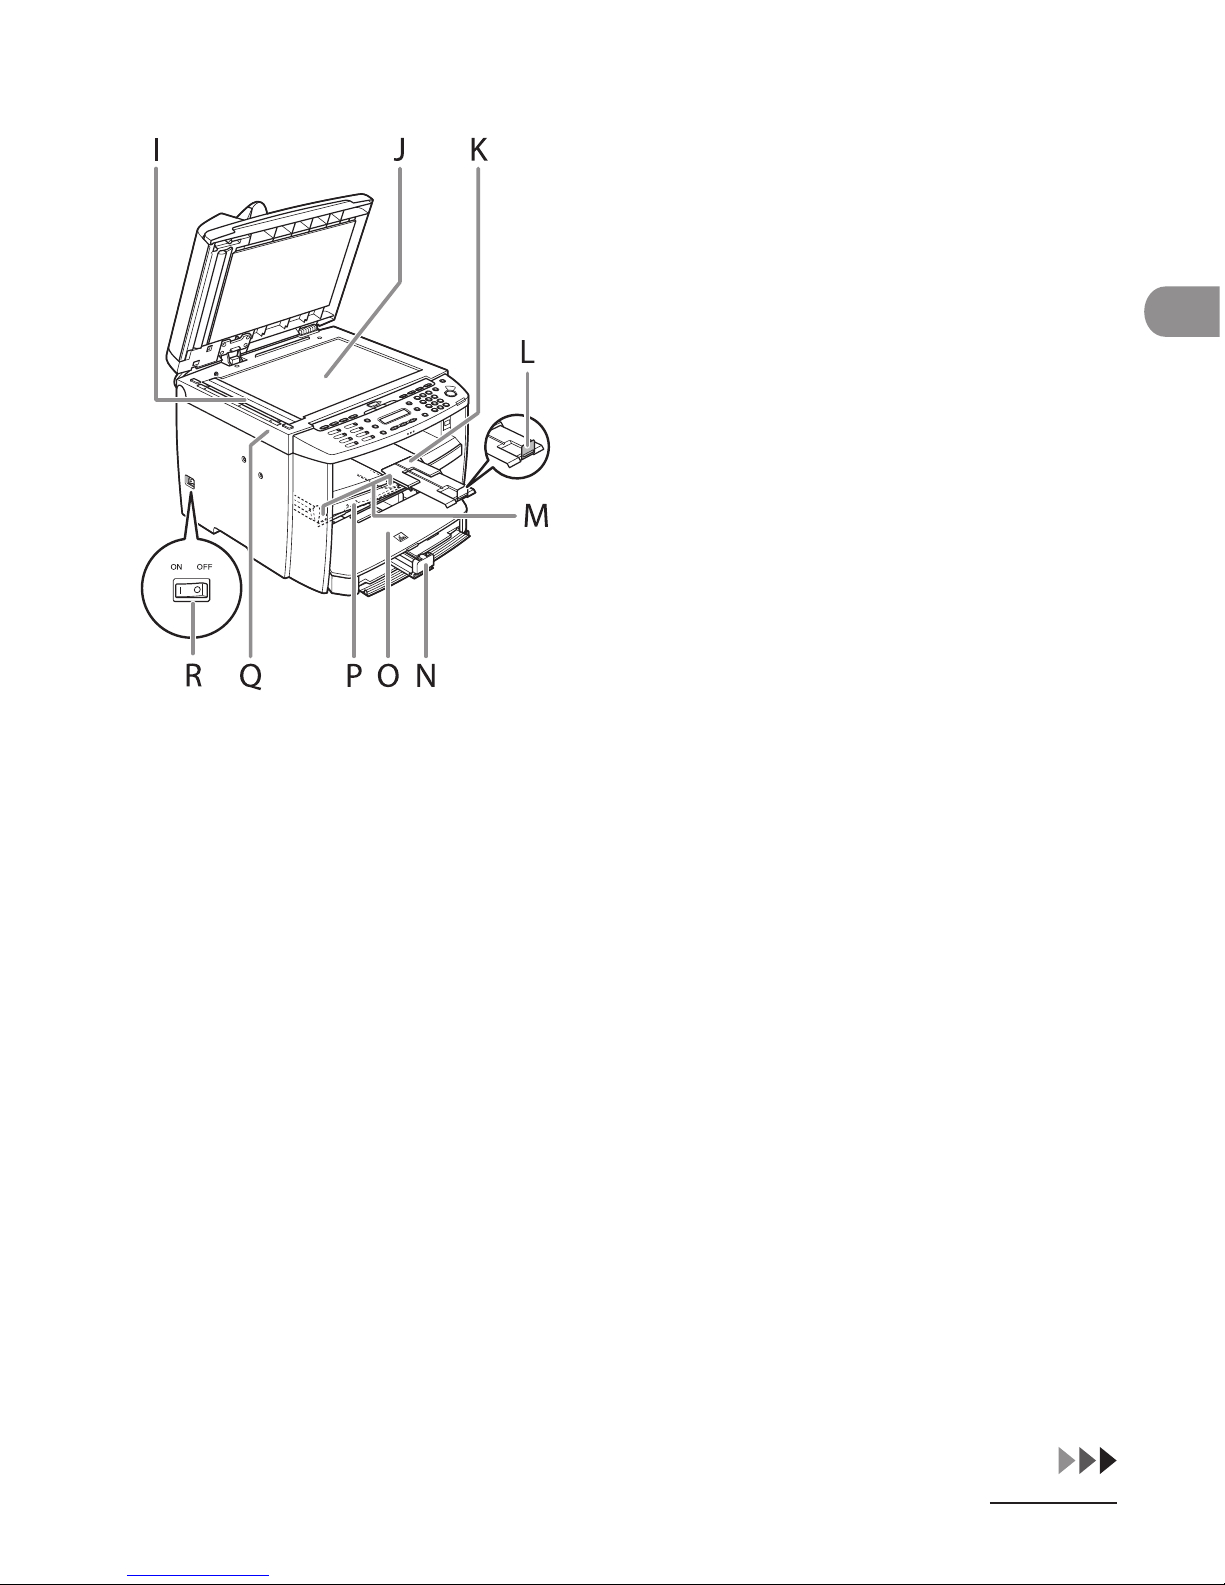
I Scanning area
Scans documents from the ADF.
J Platen glass
Place documents.
K Output tray extension
Extends the output tray.
L Paper stopper
Prevents the paper from falling off the output
tray.
Open the paper stopper from its original
position for A4 paper.
M Slide guides for multi-purpose tray
Adjusts to the width of the paper.
N Paper guide rail
Holds the paper supply.
O Dust cover
Protects the paper supply in the paper cassette
from the dirt and dust.
P Multi-purpose tray
Feeds paper when you insert one by one
manually.
Q Scanning platform
Open this platform when replacing the toner
cartridge or clearing paper jams.
R Main power switch
Turns the power on or off.
Page 24
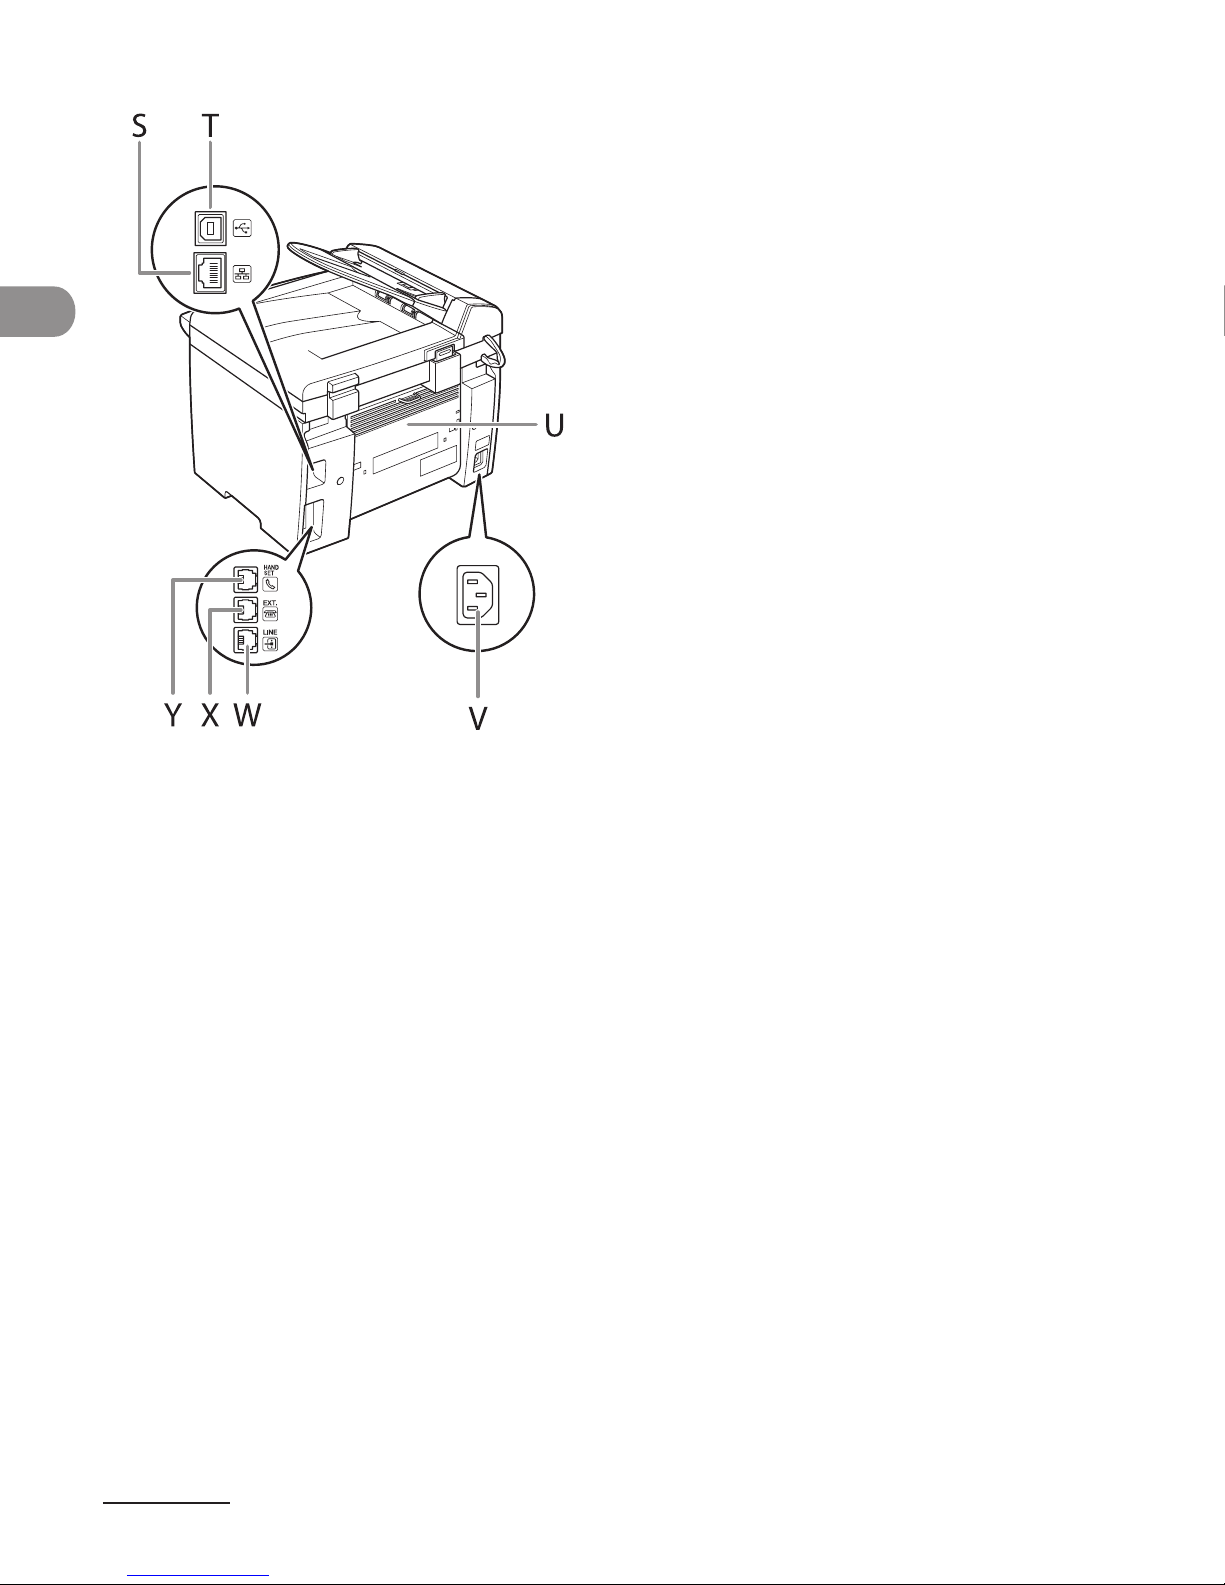
Before Using the Machine
1-4
S Ethernet port
Connect the network cable.
T USB port*
Connect the USB (Universal Serial Bus) cable.
U Rear cover
Open this cover when clearing paper jams.
V Power socket
Connect the power cord.
W Telephone line jack*
Connect the external telephone cable.
X External device jack*
Connect an external device.
Y Handset jack*
Connect the optional handset cable.
*MF4690PL Only
Page 25
1-5
Before Using the Machine
Operation Panel
Main Operation Panel
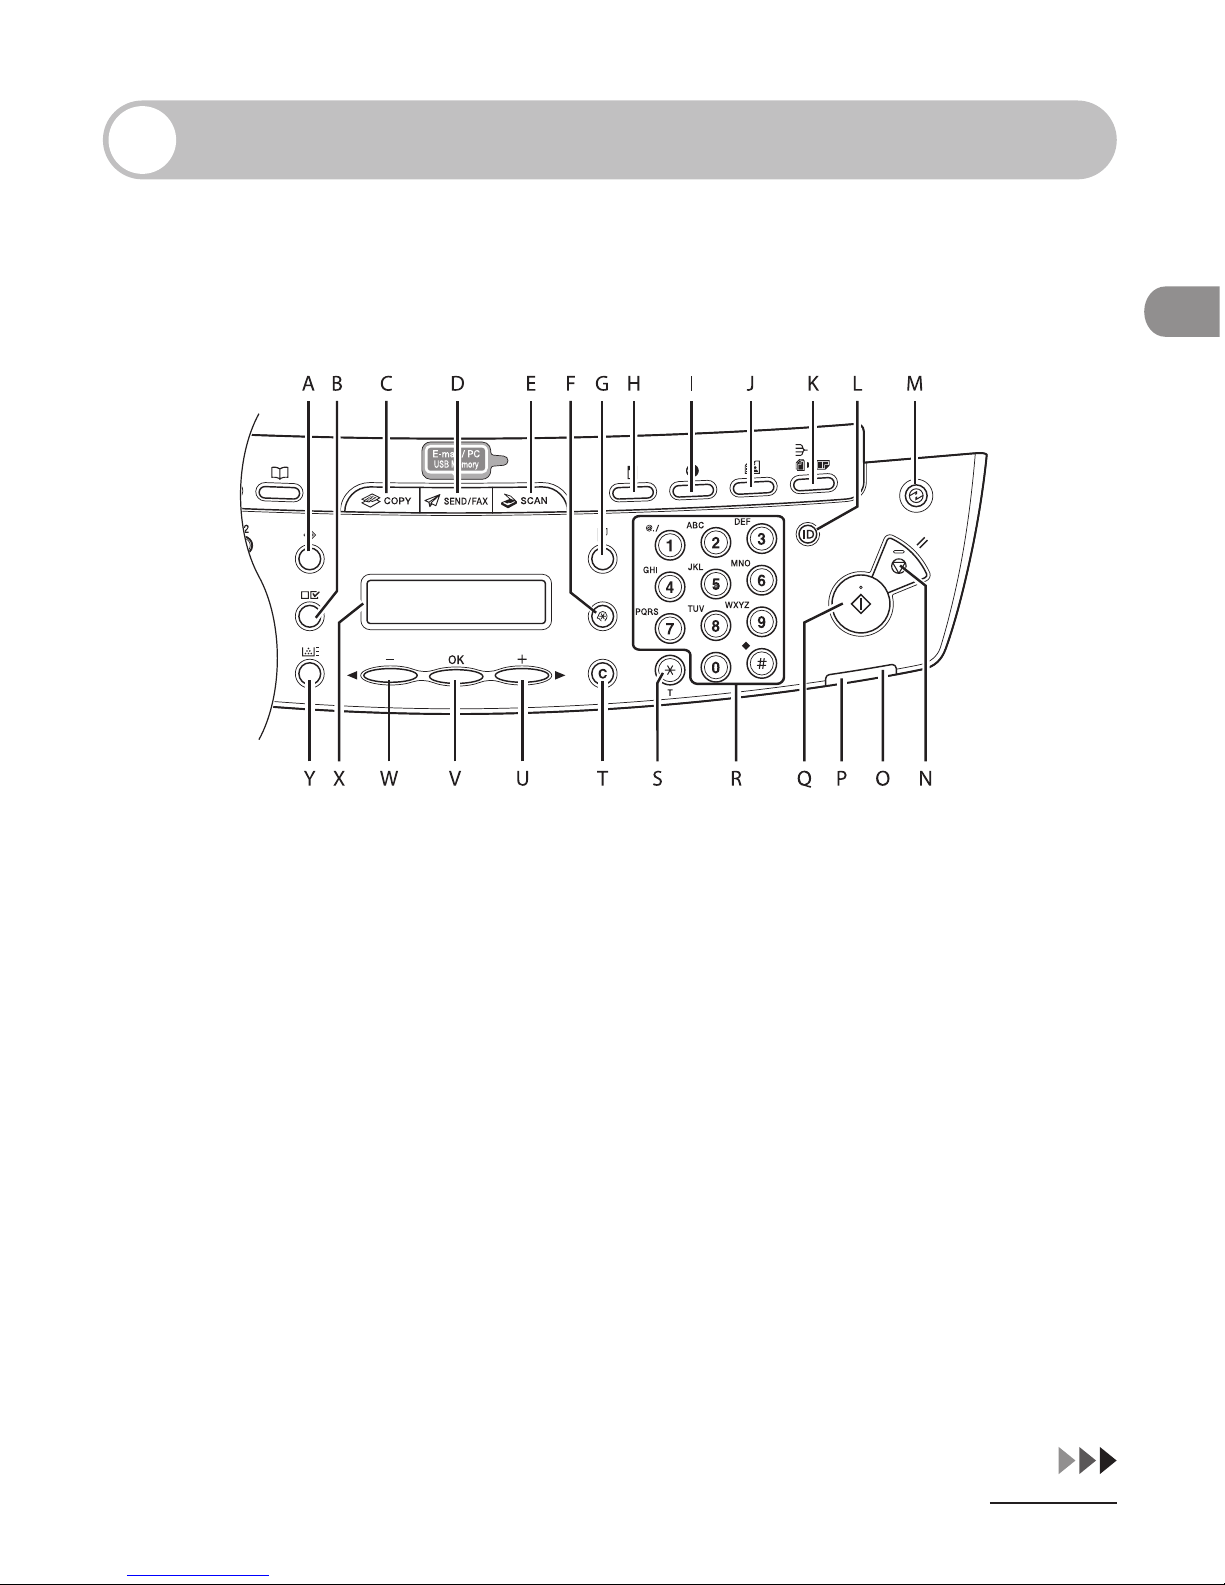
MF4690PL
A [System Monitor] key
Press to check fax transmission, print, copy, or
report output status.
B [View Settings] key
Press to confirm settings of the copy function.
C [COPY] key
Press to switch to the Copy mode.
D [SEND/FAX] key
Press to switch to the Send/Fax mode.
●
E [SCAN] key
Press to switch to the Scan mode.
F [Additional Functions] key
Press to select or cancel the modes in
Additional Functions.
G [2-Sided] key
Press to set two-sided copying.
H [Enlarge/Reduce] key
Press to enlarge or reduce copy ratio.
I [Density] key
Press to adjust the density for copy or
documents you send.
Page 26

Before Using the Machine
1-6
J [Image Quality] key
Press to select image quality for copy or fax.
K [Collate/2 on 1] key
Press to collate copies, or press to set 2 on 1
copying.
L Log In/Out key (ID key)
Press to operate the machine when the ID
management is activated. Also press to enable
the ID management when you finished using
the machine.
M [Energy Saver] key
Press to set or cancel the Sleep mode manually.
The key lights green when the Sleep mode is
set, and goes off when the mode is canceled.
N [Stop/Reset] key
Press to stop a current job. Also, press to return
the machine to the standby mode.
O Error indicator
Flashes when an error has occurred.
P Processing/Data indicator
Flashes while sending or receiving faxes. Lights
when the machine has waiting jobs and stores
the data in memory.
Q [Start] key
Press to start copying, scanning and sending
faxes.
R Numeric keys
Enter letters and numbers.
S [Tone] key
Press to switch from rotary pulse to tone dialing.
T [Clear] key
Press to clear entered alphanumeric characters.
U [ ] key
Press to increase the value for various settings.
Also press to see the next item in the menu.
V [OK] key
Press to accept a set function or mode.
Also press and hold to print a sample page
when you are in the copy mode. For details, see
“Printing a Sample Page,” on p. 3-16.
W [ ] key
Press to decrease the value for various settings.
Also press to see the previous item in the menu.
X LCD display
Displays messages and prompts during
operation. Displays selection, text, and numbers
when adjusting the settings.
Y [Toner Gauge] key
Press to check the toner remaining in the toner
cartridge.
Page 27
1-7
Before Using the Machine
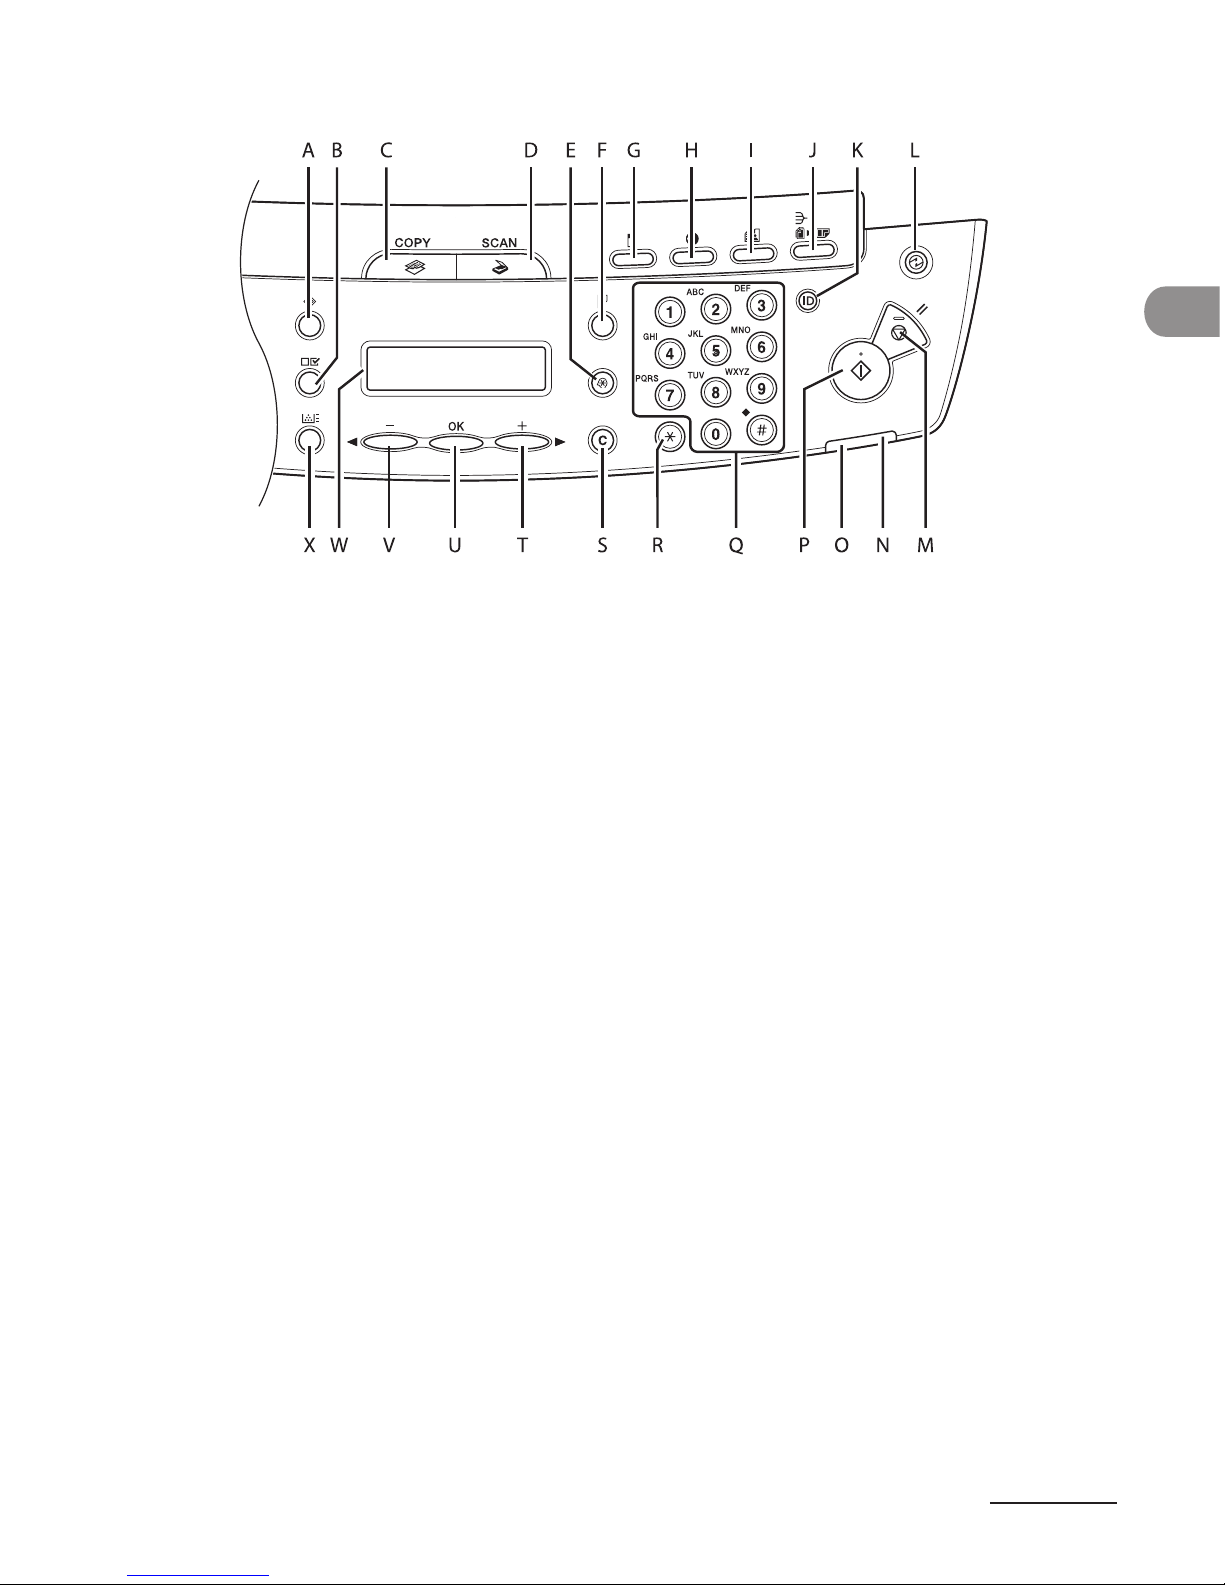
MF4660PL
A [System Monitor] key
Press to check print, copy, or report output
status.
B [View Settings] key
Press to confirm settings of the copy function.
C [COPY] key
Press to switch to the Copy mode.
D [SCAN] key
Press to switch to the Scan mode.
E [Additional Functions] key
Press to select or cancel the modes in
Additional Functions.
●
F [2-Sided] key
Press to set two-sided copying.
G [Enlarge/Reduce] key
Press to enlarge or reduce copy ratio.
H [Density] key
Press to adjust the density for copy.
I [Image Quality] key
Press to select image quality for copy.
J [Collate/2 on 1] key
Press to collate copies, or press to set 2 on 1
copying.
Page 28

Before Using the Machine
1-8
K Log In/Out key (ID key)
Press to operate the machine when the ID
management is activated.
Also press to
enable the ID management when you
finished using the machine.
L [Energy Saver] key
Press to set or cancel the Sleep mode manually.
The key lights green when the Sleep mode
is set, and goes off when the mode is
canceled.
M [Stop/Reset] key
Press to stop a current job. Also, press to return
the machine to the standby mode.
N Error indicator
Flashes when an error has occurred.
O Processing/Data indicator
Flashes during sending or receiving faxes.
Lights when the machine has waiting jobs
and stores the data in memory.
P [Start] key
Press to start copying and scanning.
Q Numeric keys
Enter letters and numbers.
R [Tone] key
Press to switch from rotary pulse to tone dialing.
S [Clear] key
Press to clear entered alphanumeric characters.
T [ ] key
Press to increase the value for various settings.
Also press to see the next item in the
menu.
U [OK] key
Press to accept a set function or mode. Also
press and hold to print a sample page
when you are in the copy mode. For
details, see ”Printing a Sample Page,“ on
p. 3-16.
V [ ] key
Press to decrease the value for various settings.
Also press to see the previous item in the
menu.
W LCD display
Displays messages and prompts during
operation. Displays selection, text, and numbers
when adjusting the settings.
X [Toner Gauge] key
Press to check the toner remaining in the toner
cartridge.
Page 29
1-9
Before Using the Machine
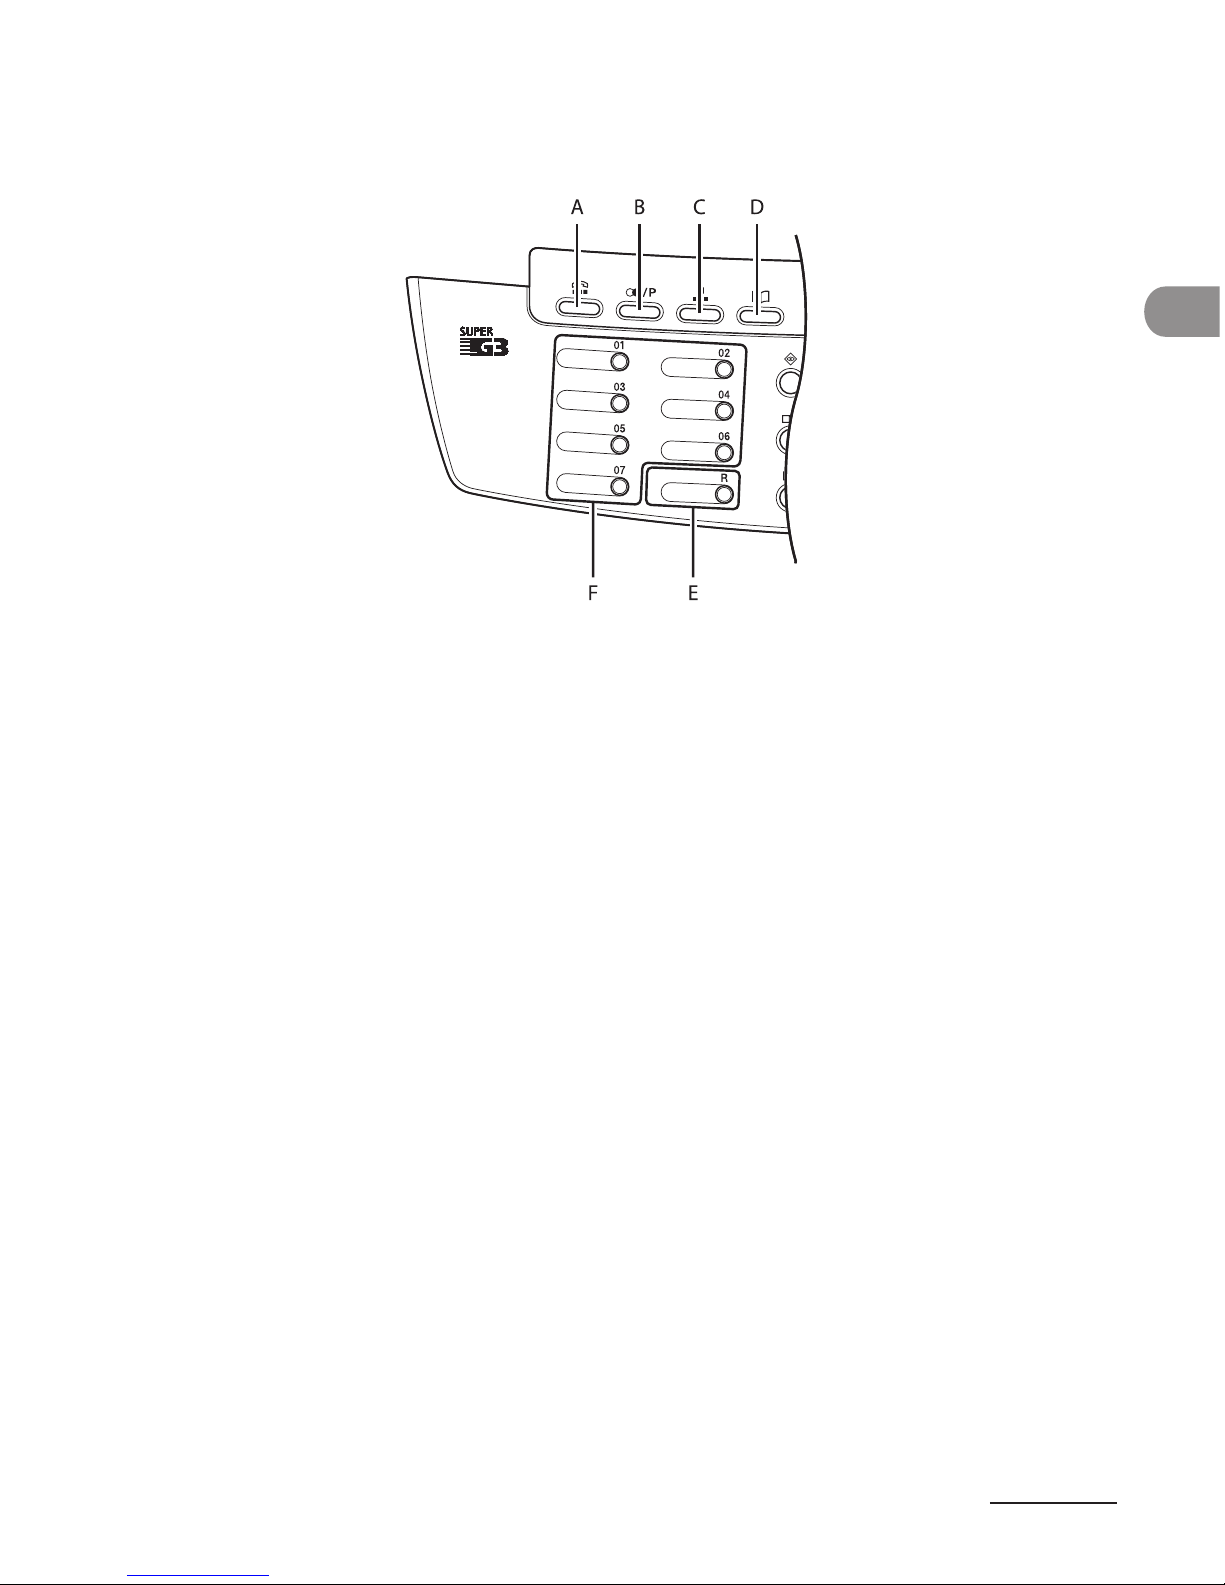
Send/Fax Operation Panel
(MF4690PL Only)
A [Hook] key
Press when you want to dial without lifting
up the optional handset or the handset of the
external telephone.
B [Recall/Pause] key
Press to recall previously set send jobs,
including the destinations, scan settings, and
send settings.
Press to enter a pause between or after
the telephone/fax number when dialing or
registering numbers.
C [Coded Dial] key
Press to specify destinations registered under
coded dial codes.
D [Address Book] key
Press to search pre-registered destinations
under one-touch keys or coded dial codes by
name, number, or address.
E [R] key
Press to dial an outside line access number
or an extension number when the unit is
connected through a switchboard (PBX).
F One-Touch keys
Press to specify destinations registered under
one-touch keys.
Page 30
Before Using the Machine
1-10
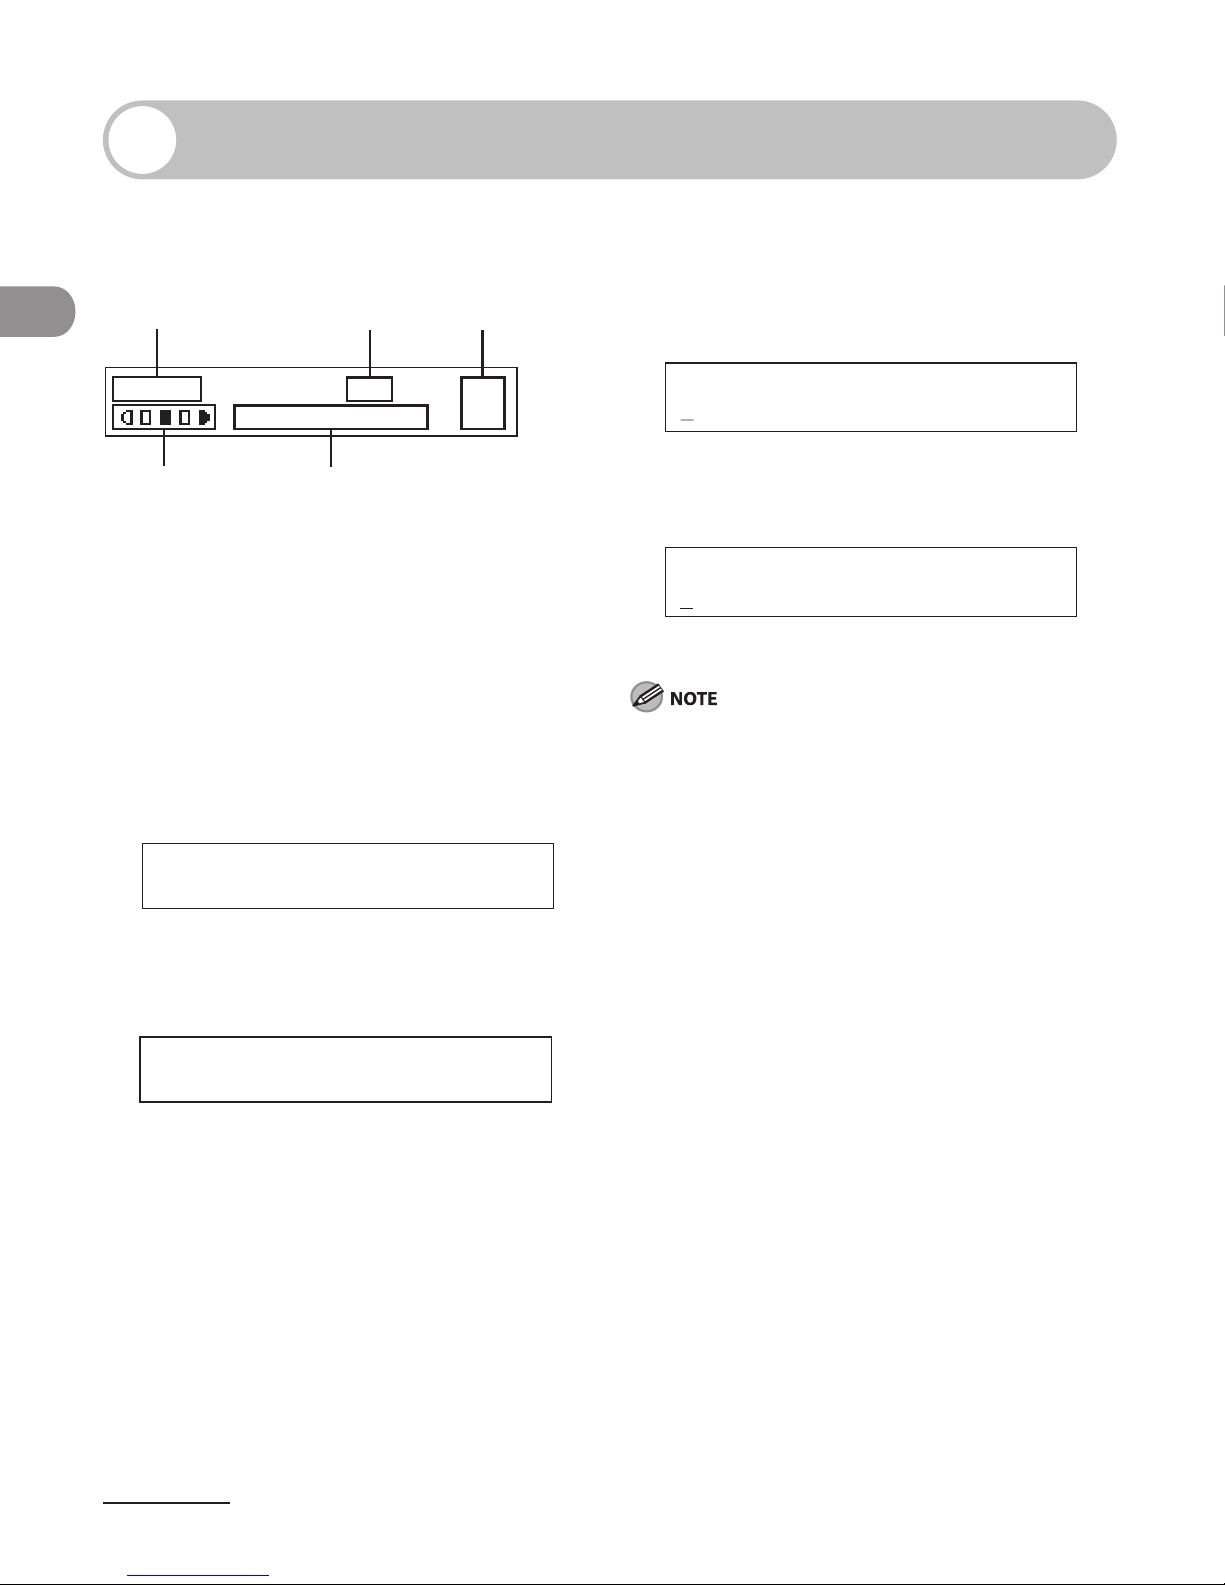
LCD (Standby Mode)
Copy Mode
DE
CBA
O1
A4100%
TEXT/PHOTO
A Zoom ratio
B Paper size
C Quantity
D Density
E Image quality
Scan Mode
SCANNING MODE
Send/Fax Mode (MF4690PL Only)
FAX
Log In Mode
For Department ID Management
ENTER DEPT.ID
For User ID Management
ENTER USER ID :a
Depending on your needs, you can change the
standby display which appears when the main
power switch is turned on. For details, see “Setting
Menu,” on p. 12-6.
When the main power switch is turned on, the LCD
displays <PLEASE WAIT> first, and then displays
<INITIALIZING...> until the standby display appears.
It is also possible to see the standby display without
having <INITIALIZING...> shown.
If the Auto Clear function is activated, the display
returns to the standby mode.
Log in mode is displayed only when Department/
User ID Management is set to <ON> in <SYSTEM
SETTINGS>. To log in or out, see “Department/User
ID Management,” on p. 1-11.
●
●
–
–
–
–
Page 31
1-11
Before Using the Machine
Department/User ID Management
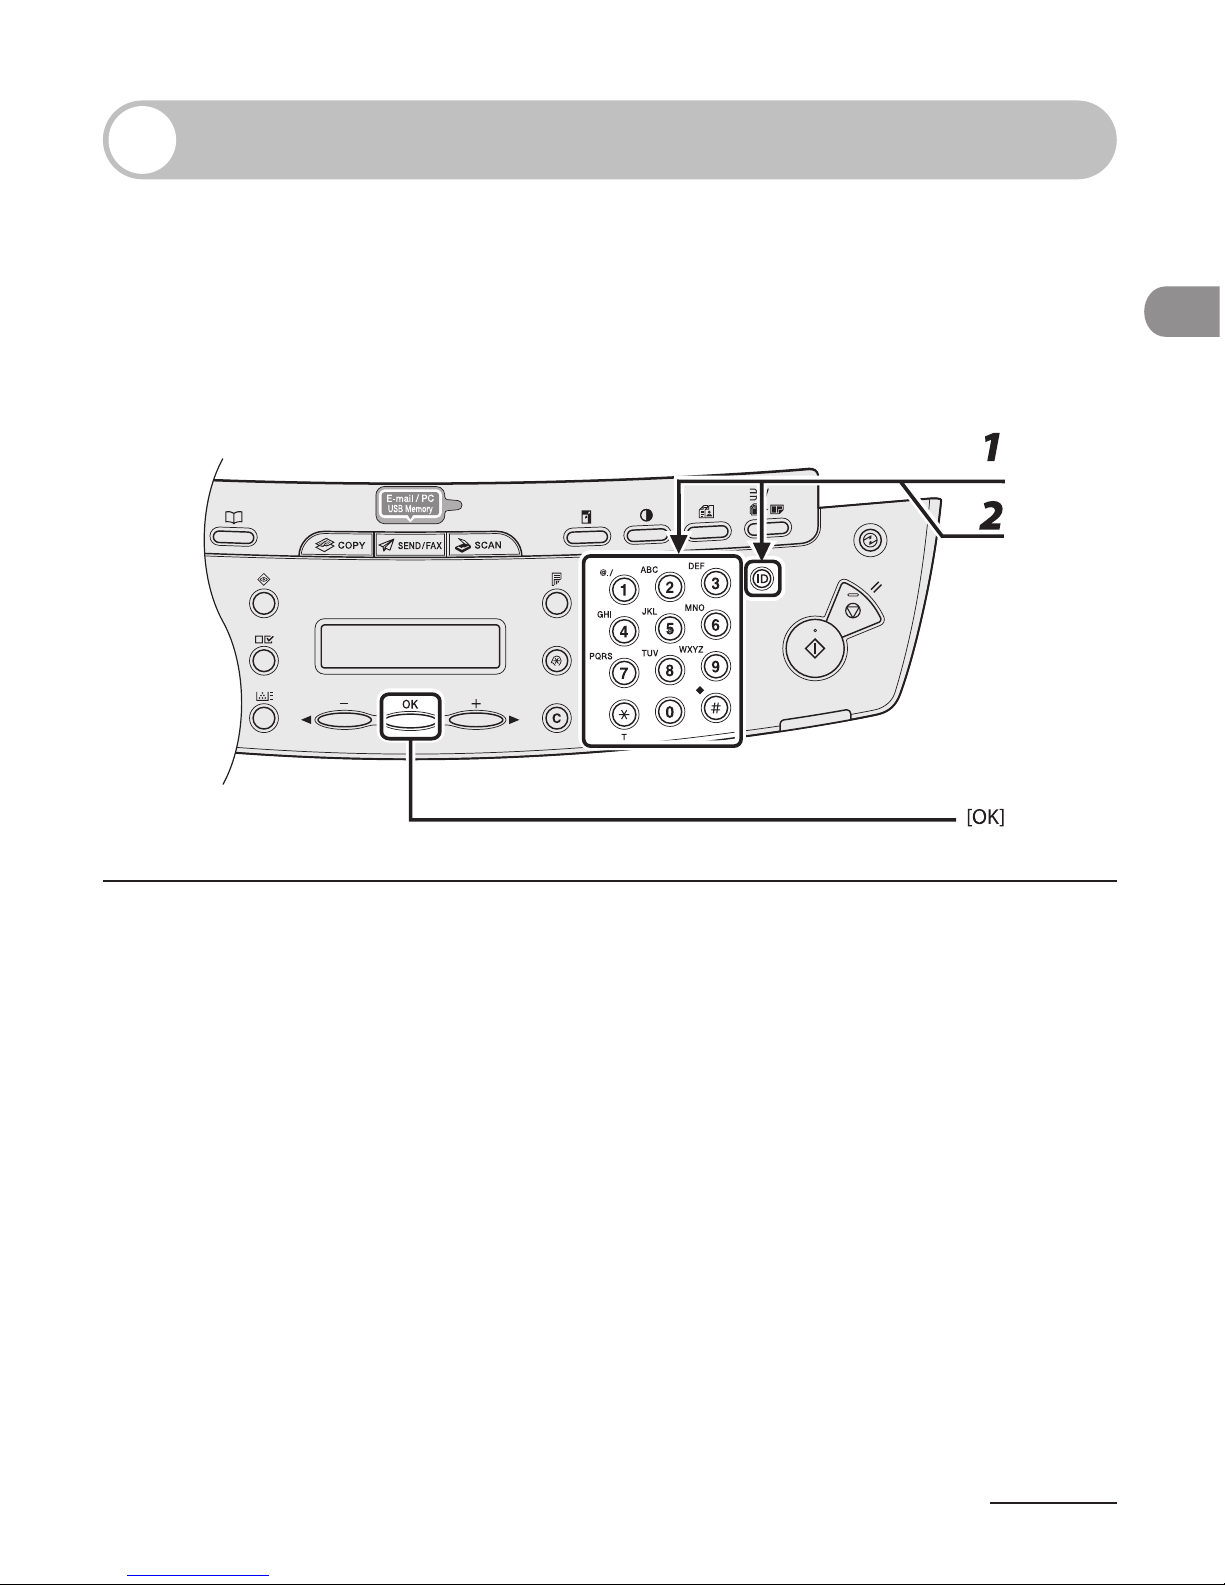
If Department ID Management or User ID Management is set to <ON> in <SYSTEM
SETTINGS>, you must enter your ID and password to be able to operate the machine.
For details, see Chapter 8, “System Manager Settings,” in the Reference Guide.
Procedure before Using the Machine
1 Enter the department ID or the user ID with the numeric keys, then press [OK]
or [Log In/Out (ID)].
2 If the password is set, enter the password with the numeric keys, then press
[OK] or [Log In/Out (ID)].
The standby display appears.
Page 32
Before Using the Machine
1-12
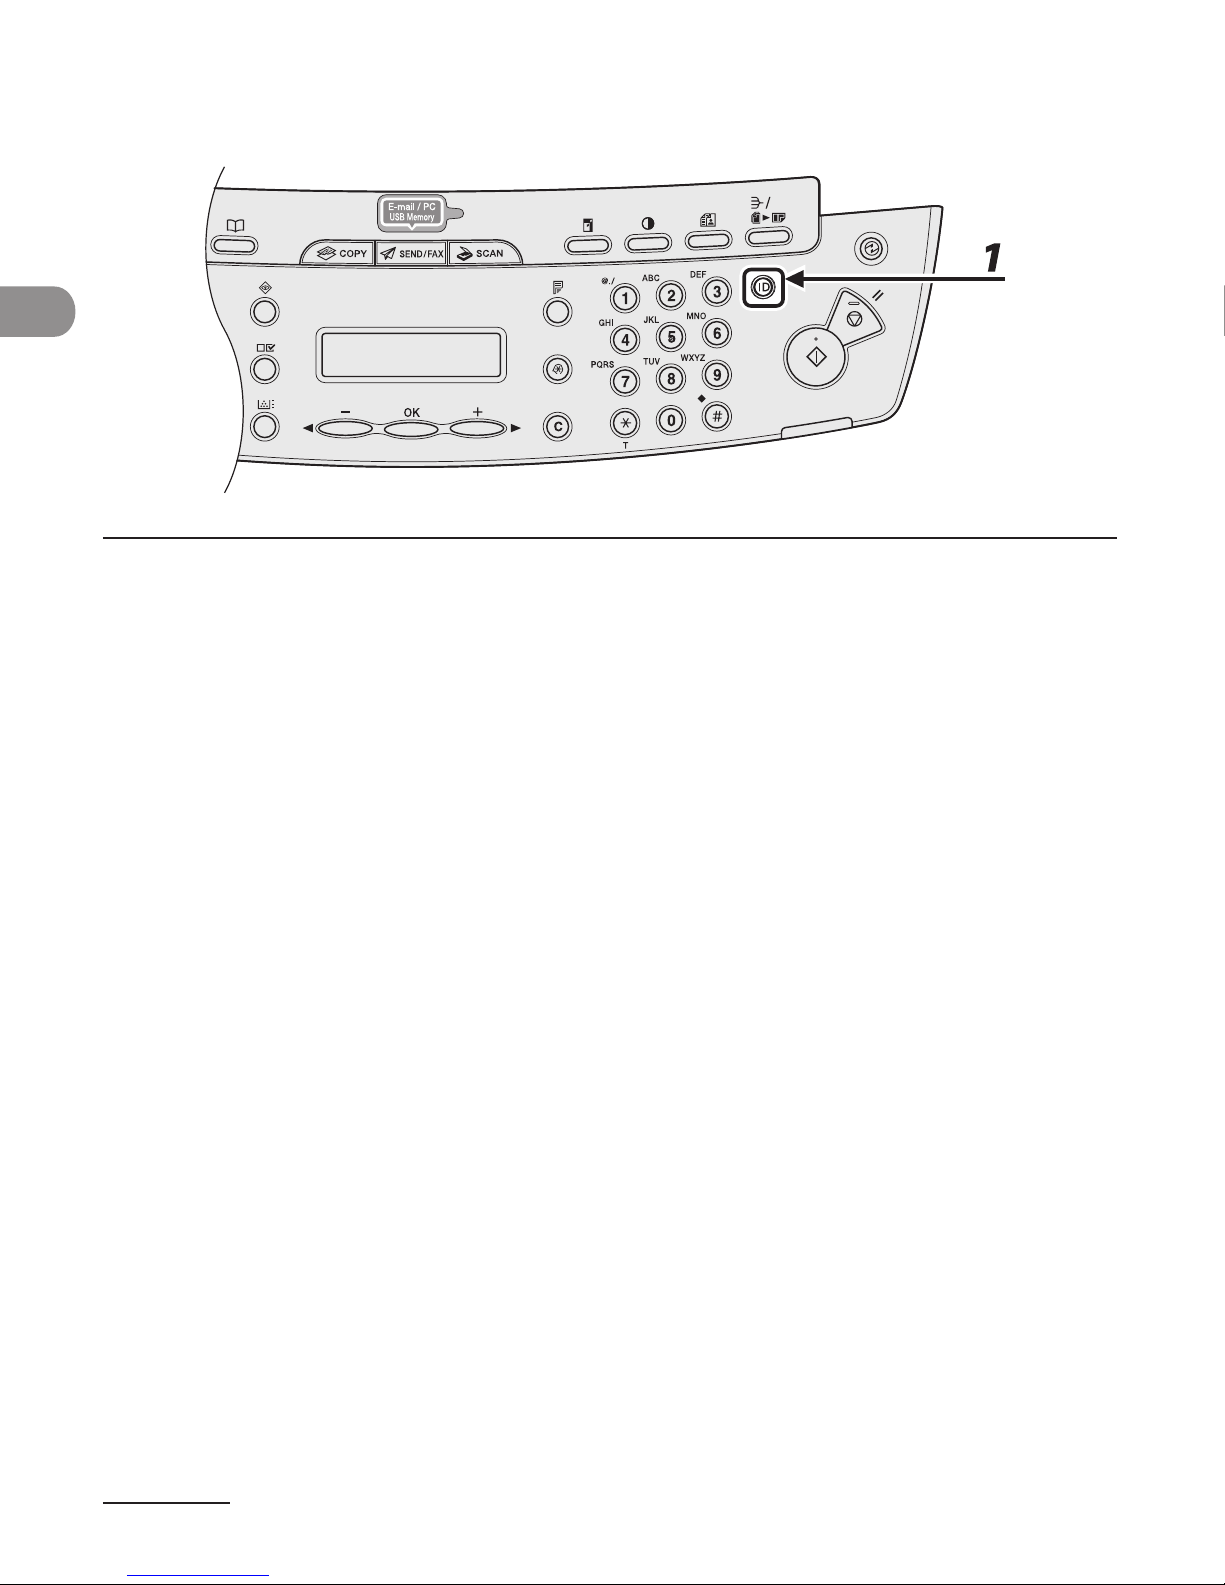
Procedure after Using the Machine
1 Be sure to press [Log In/Out (ID)].
Page 33
1-13
Before Using the Machine
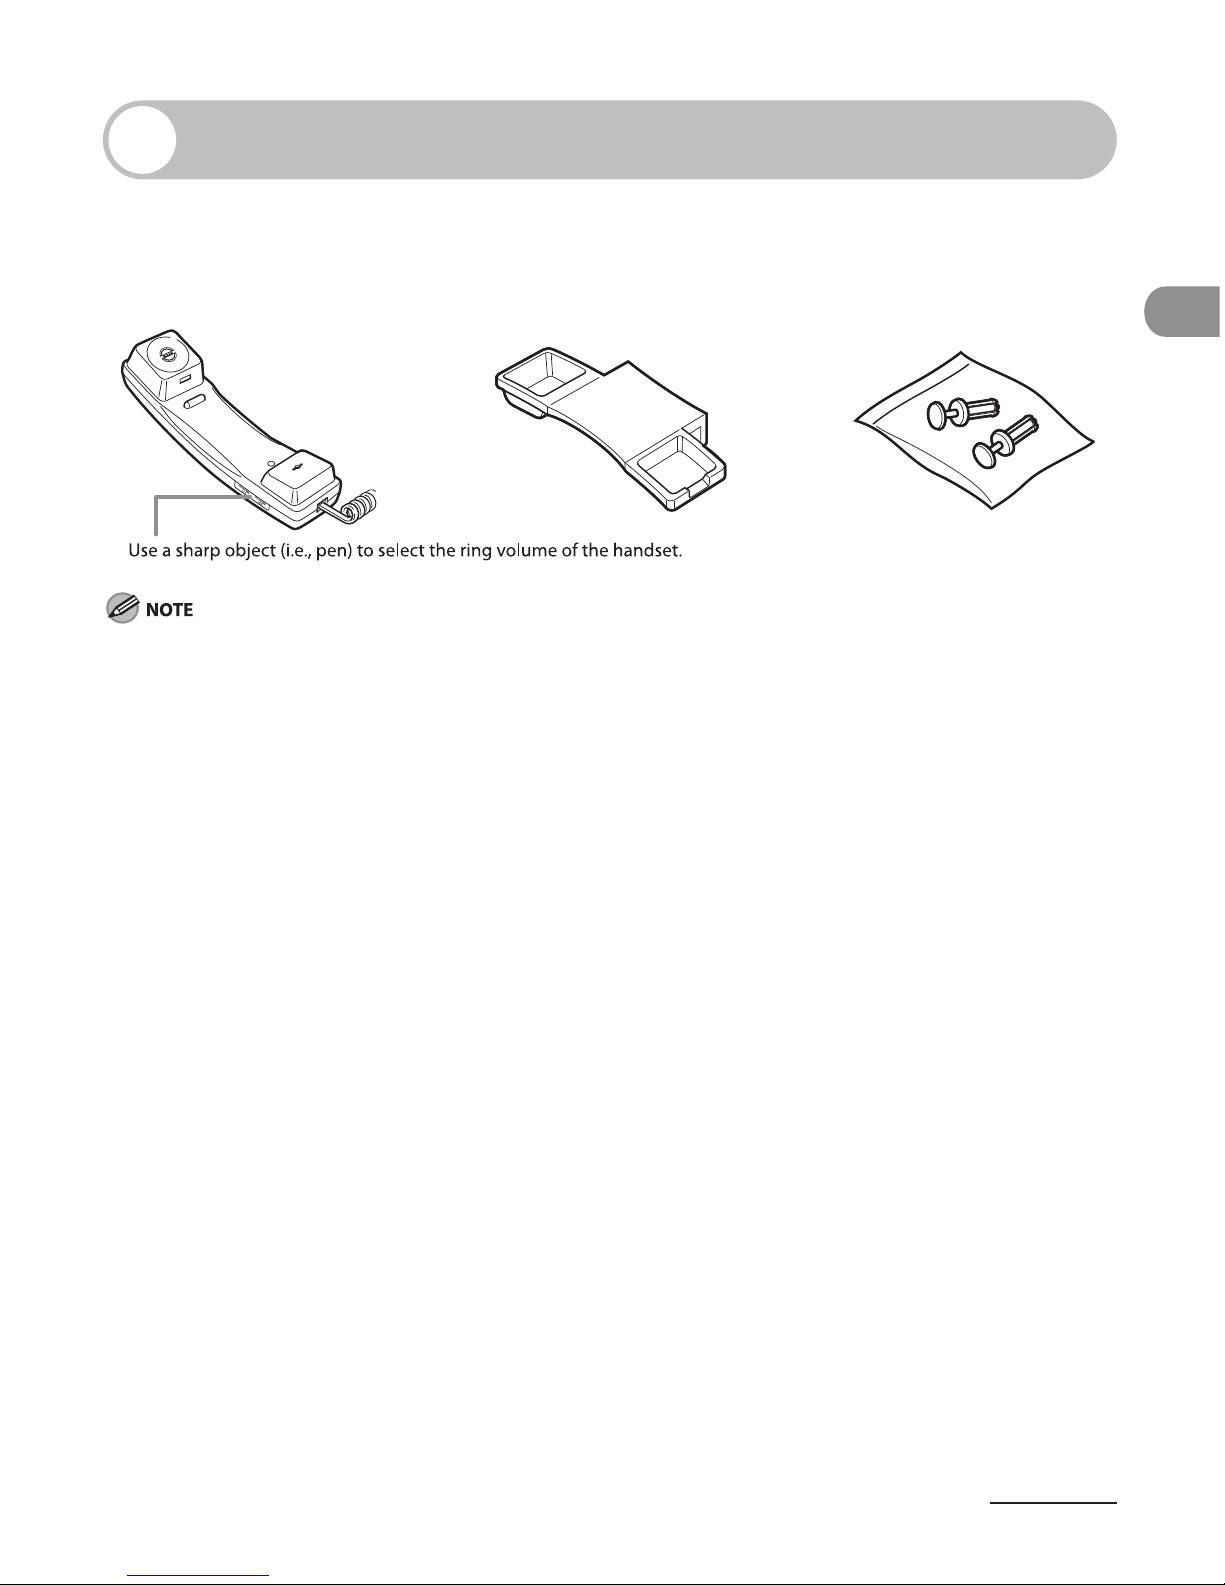
Optional Handset (MF4690PL Only)
If you want to use the machine as a telephone and a fax machine, or if you want
to receive faxes manually, install the optional handset available from your local
authorized Canon dealer or the Canon help line.
For how to install the handset, see “Set Up the Machine,” in the Starter Guide.
Maintaining the Handset
Do not leave the handset exposed to direct sunlight.
Do not install the handset in hot or humid conditions.
Do not spray aerosol polish on the handset as it may cause damage.
Use a damp cloth to wipe clean the handset.
–
–
–
–
Page 34
Before Using the Machine
1-14
Toner Cartridge
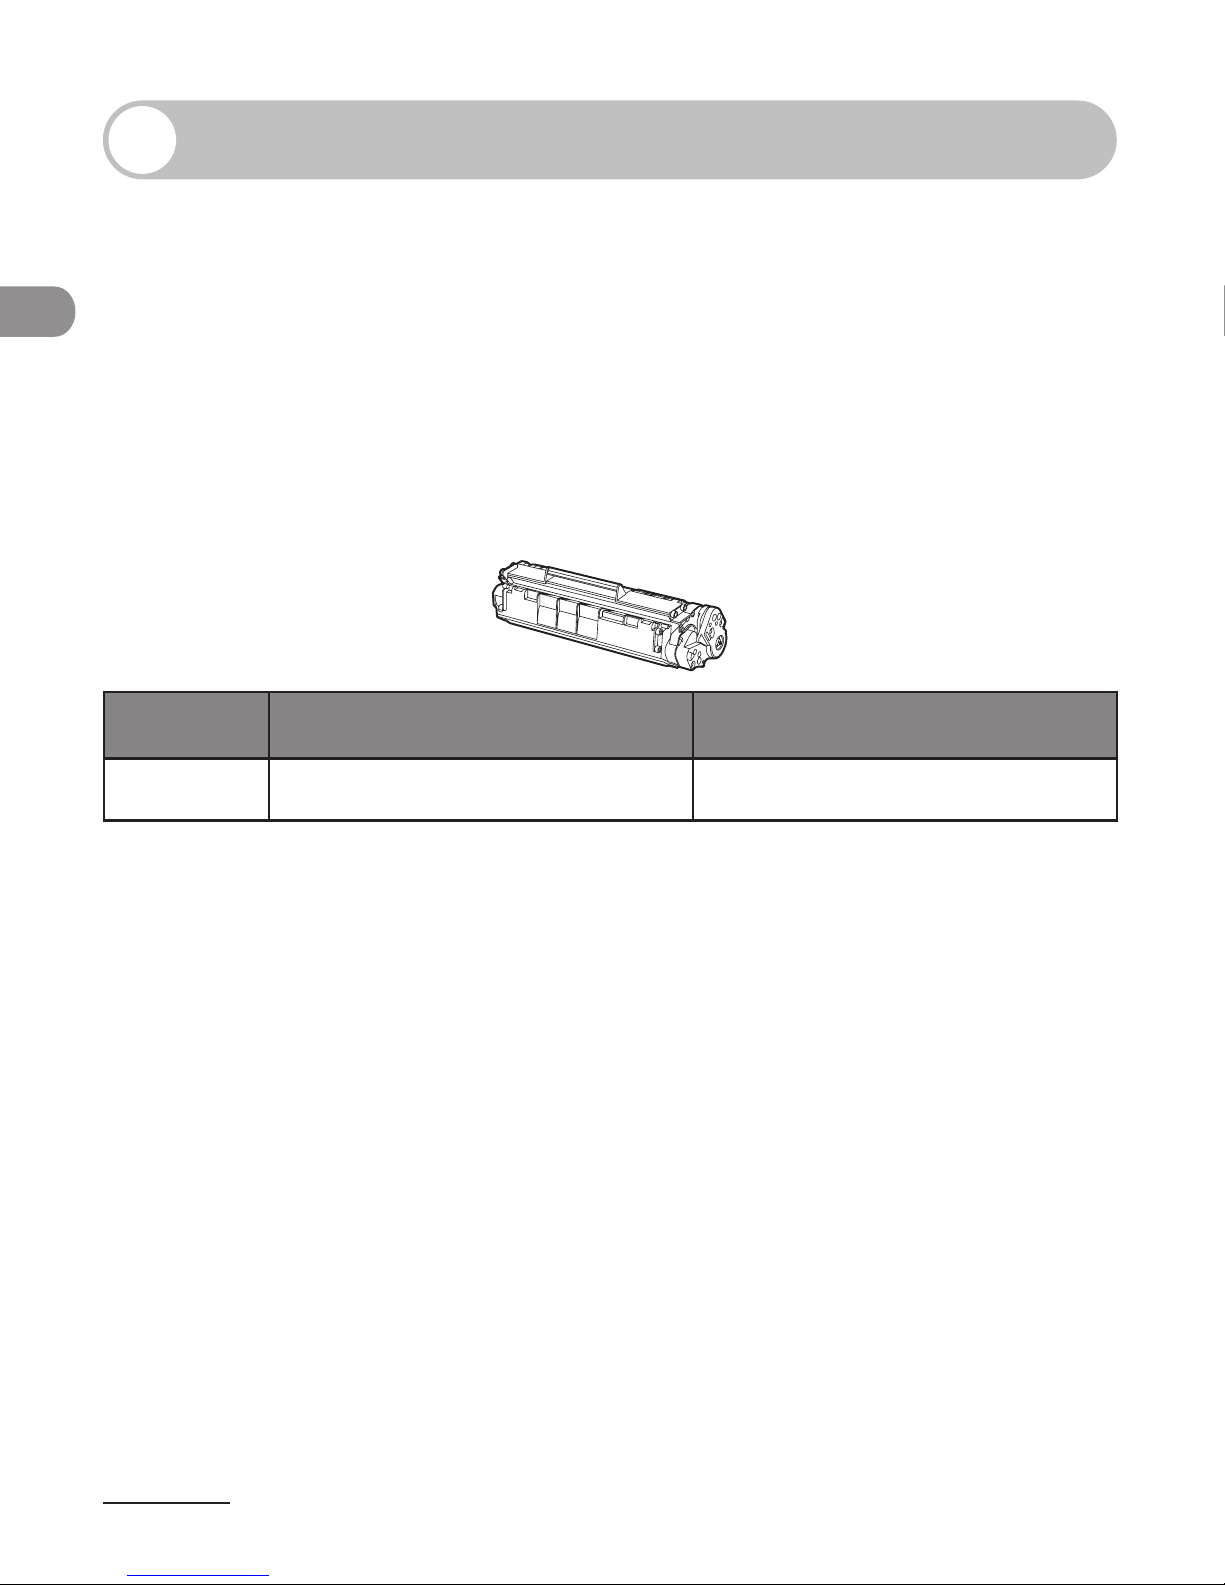
The lifetime of the Canon Genuine toner cartridge used in this machine is
approximately 2,000 pages. The page counts are on the basis of ISO/IEC 19752*
when printing A4 size paper with the default print density setting. The level of toner
consumption varies depending on the type of documents printed. If your average
document contains a lot of graphics, tables, or charts, the life of the toner cartridge
will be shorter as they consume more toner. To purchase a new Canon genuine toner
cartridge, contact your local authorized Canon dealer or Canon help line.
* “ISO/IEC 19752” is the global standard related to “Method for the determination of toner cartridge yield
for monochromatic electrophotographic printers and multi-function devices that may contain printer
components” issued by ISO (International Organization for Standardization).
Toner Cartridge name:
Canon FX10 Cartridge
Model Name
Supported Canon
Genuine Cartridge
Print Yield
MF4660PL
MF4690PL
Canon FX10 Cartridge Approx. 2,000 pages
Page 35

1-15
Before Using the Machine
Maintaining the Toner Cartridge
Keep the toner cartridge away from computer screens, disk drives, and floppy disks. The
magnet inside the toner cartridge may harm these items.
Avoid locations subject to high temperature, high humidity, or rapid changes in
temperature.
Do not expose the toner cartridge to direct sunlight or bright light for more than five
minutes.
Store the toner cartridge in its protective bag. Do not open the bag until you are ready to
install the toner cartridge in the machine.
Save the toner cartridge’s protective bag in case you need to repack and transport the
toner cartridge at a later date.
Do not store the toner cartridge in a salty atmosphere or where there are corrosive gases
such as from aerosol sprays.
Do not remove the toner cartridge from the machine unnecessarily.
Do not open the drum protective shutter on the toner cartridge. Print quality may
deteriorate if the drum surface is exposed to light or is damaged.
Always hold the toner cartridge by its handle to avoid touching the drum protective
shutter.
Do not stand the toner cartridge on end, and do not turn it upside down. If toner
becomes caked in the toner cartridge, it may become impossible to free it even by
shaking the toner cartridge.
●
●
●
●
●
●
●
●
●
●
Page 36

Before Using the Machine
1-16
If there is a toner powder leakage, make sure not to inhale or touch the toner powder. If it
comes in contact with your skin, rinse with cold water using soap. If you feel an irritation
on your skin or inhale the powder, consult a doctor immediately.
When removing the toner cartridge from the machine, make sure to remove it carefully. If
not removed with care, the toner powder may scatter and come in contact with your eyes
and mouth. If this happens, rinse with water and consult a doctor immediately.
Keep the toner cartridge away from small children. If they ingest the toner powder,
consult a doctor immediately.
Do not disassemble the toner cartridge. The toner powder may scatter and come in
contact with your eyes and mouth. If this happens, rinse with water and consult a doctor
immediately.
Do not place the toner cartridge in fire. Toner powder is flammable.
●
●
●
●
Page 37
1-17
Before Using the Machine
Checking the toner level
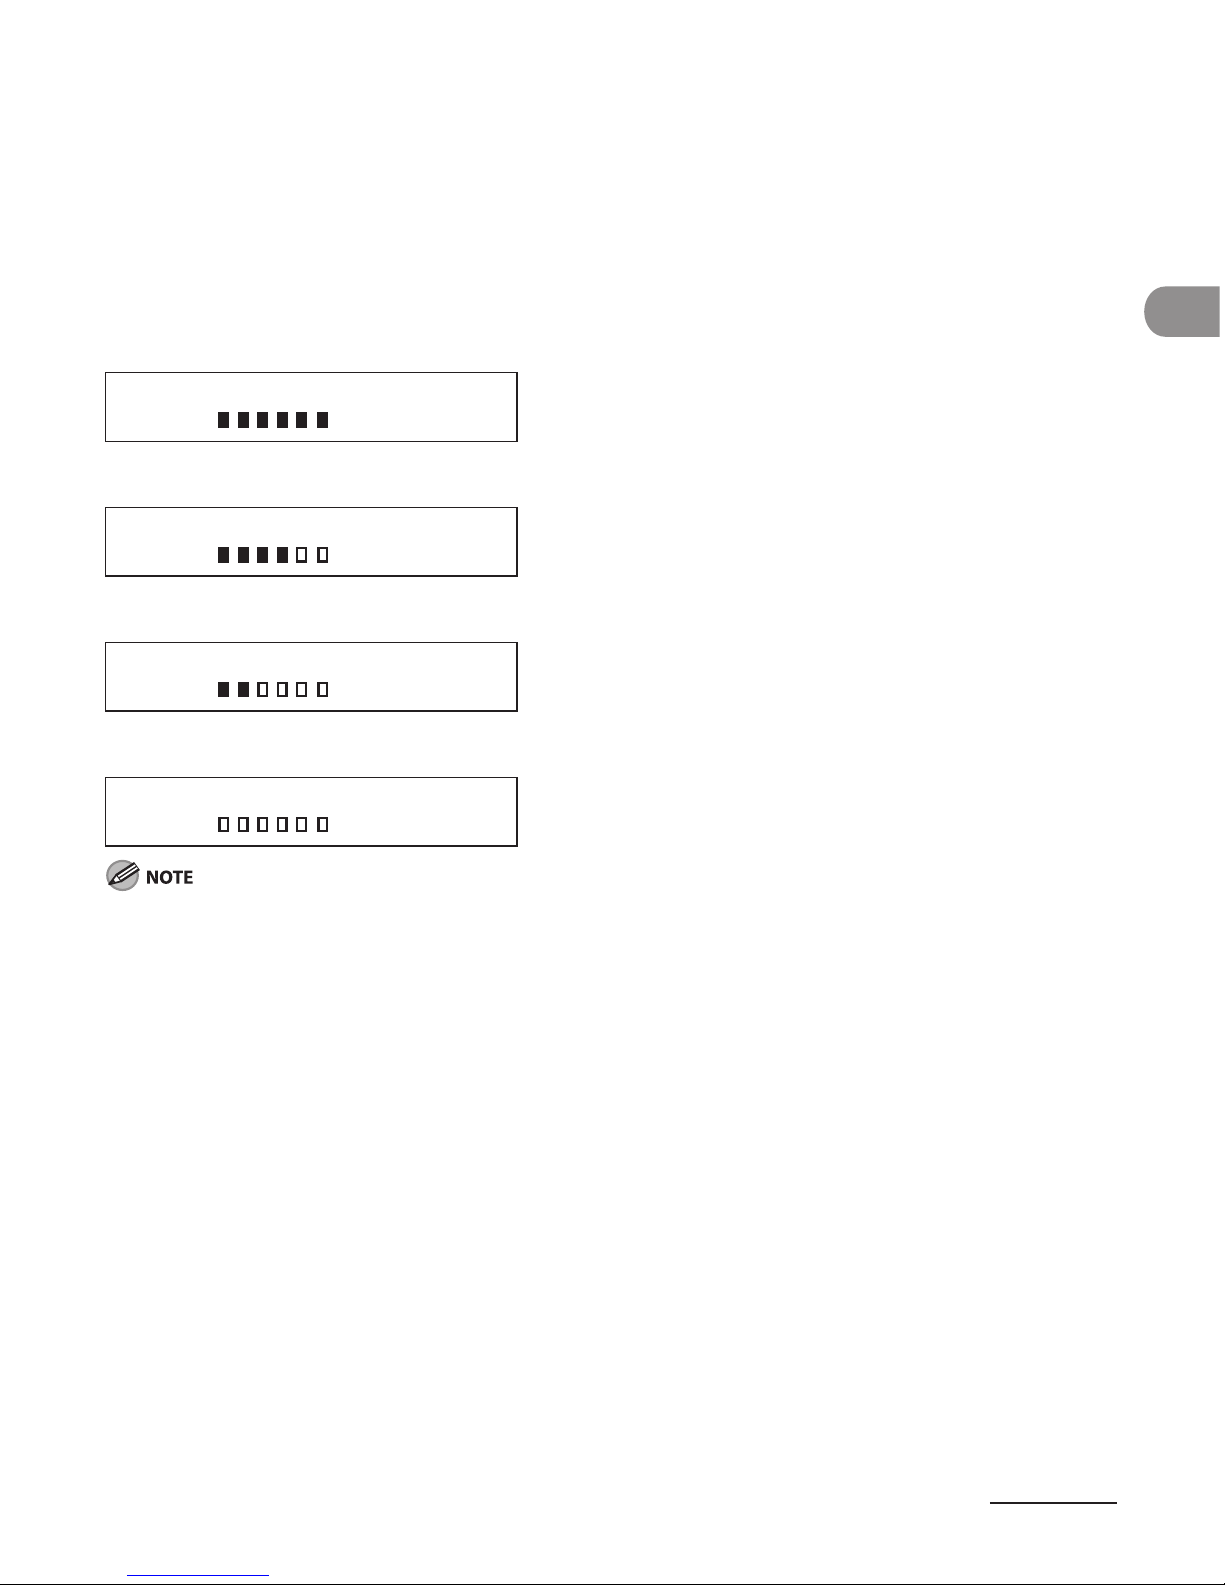
You can check the amount of toner remaining in the toner cartridge by pressing the [Toner
Gauge] key. The toner level is displayed in the LCD at four levels.
If the toner gauge indicates that the toner is empty, it is recommended that the toner
cartridge be replaced. (See “Replacing the Toner Cartridge,” on p. 10-10.)
Toner full
0% 100%
TONER GAUGE
Toner high
0% 100%
TONER GAUGE
Toner low
0% 100%
TONER GAUGE
Toner empty
0% 100%
TONER GAUGE
To return to the standby mode, press [Stop/Reset].
Page 38
Before Using the Machine
1-18
Timer Settings
Setting the Sleep Mode
When the machine remains idle for a certain period of time, it automatically enters the
Sleep mode.
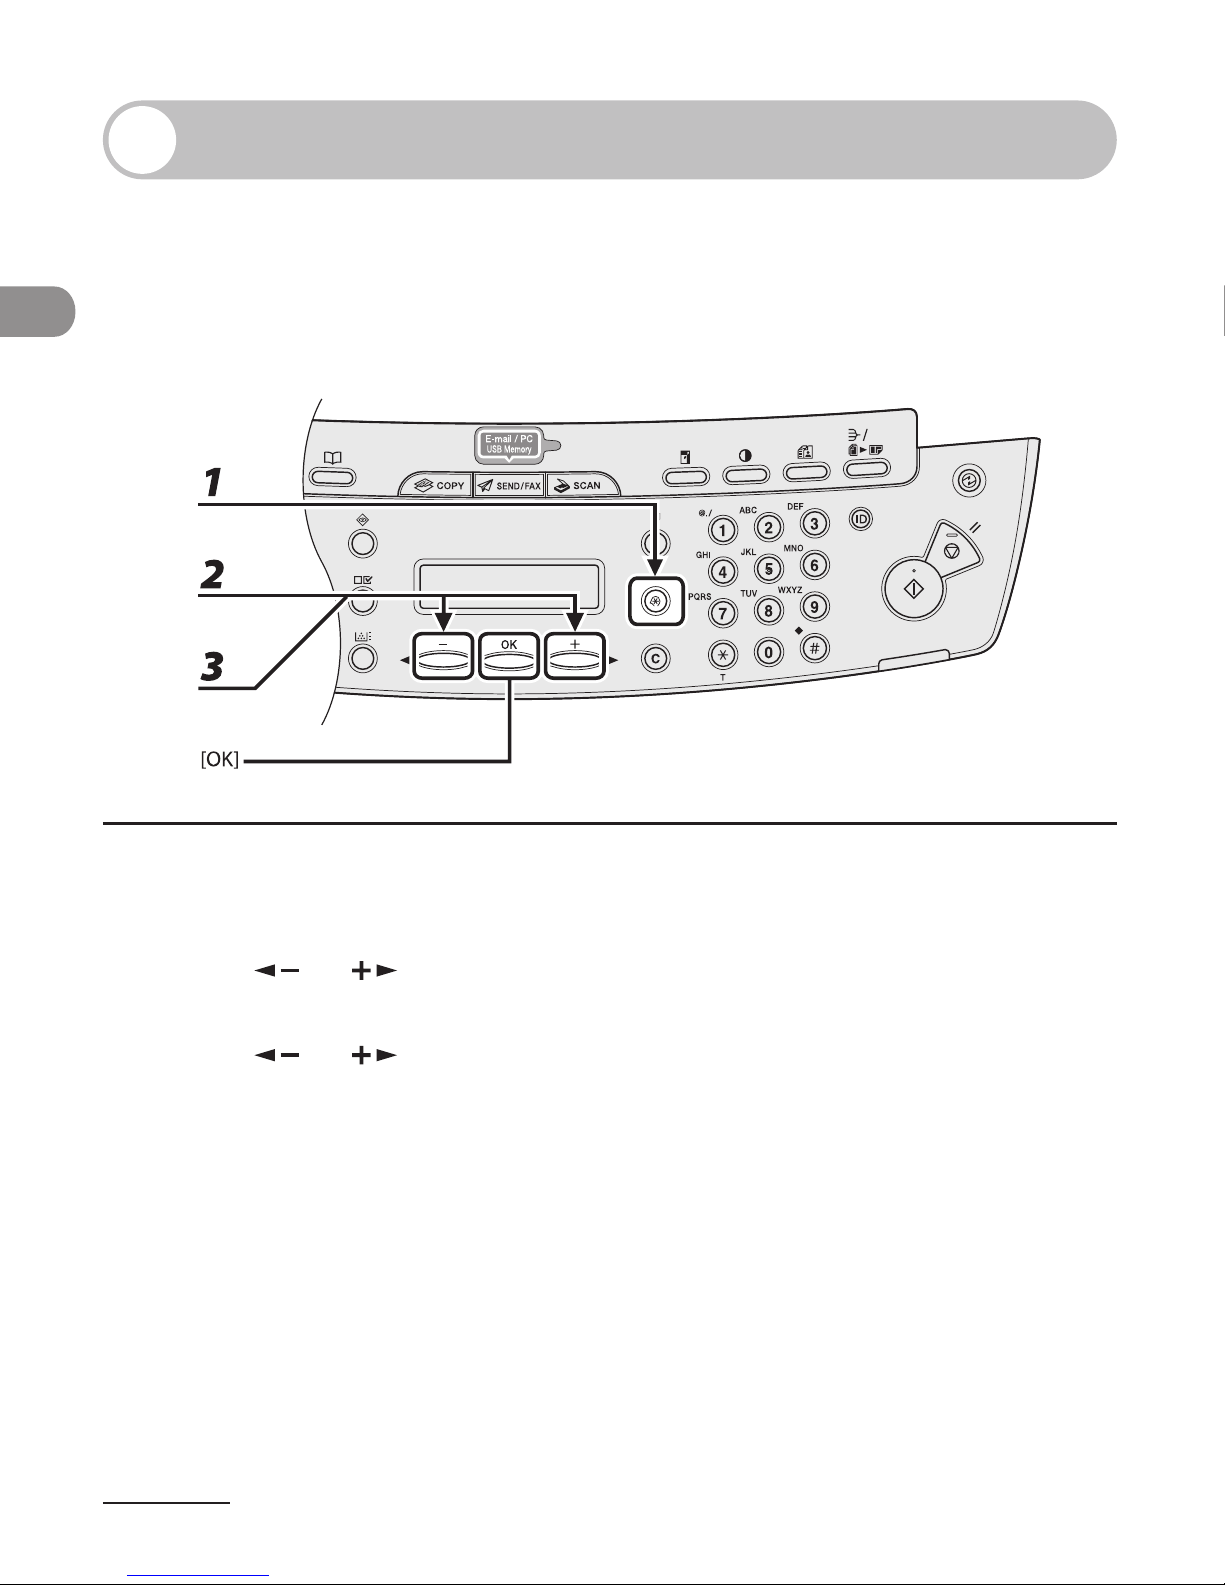
1 Press [Additional Functions].
2 Press [ ] or [ ] to select <TIMER SETTINGS>, then press [OK].
3 Press [ ] or [ ] to select <AUTO SLEEP TIME>, then press [OK].
Page 39
1-19
Before Using the Machine
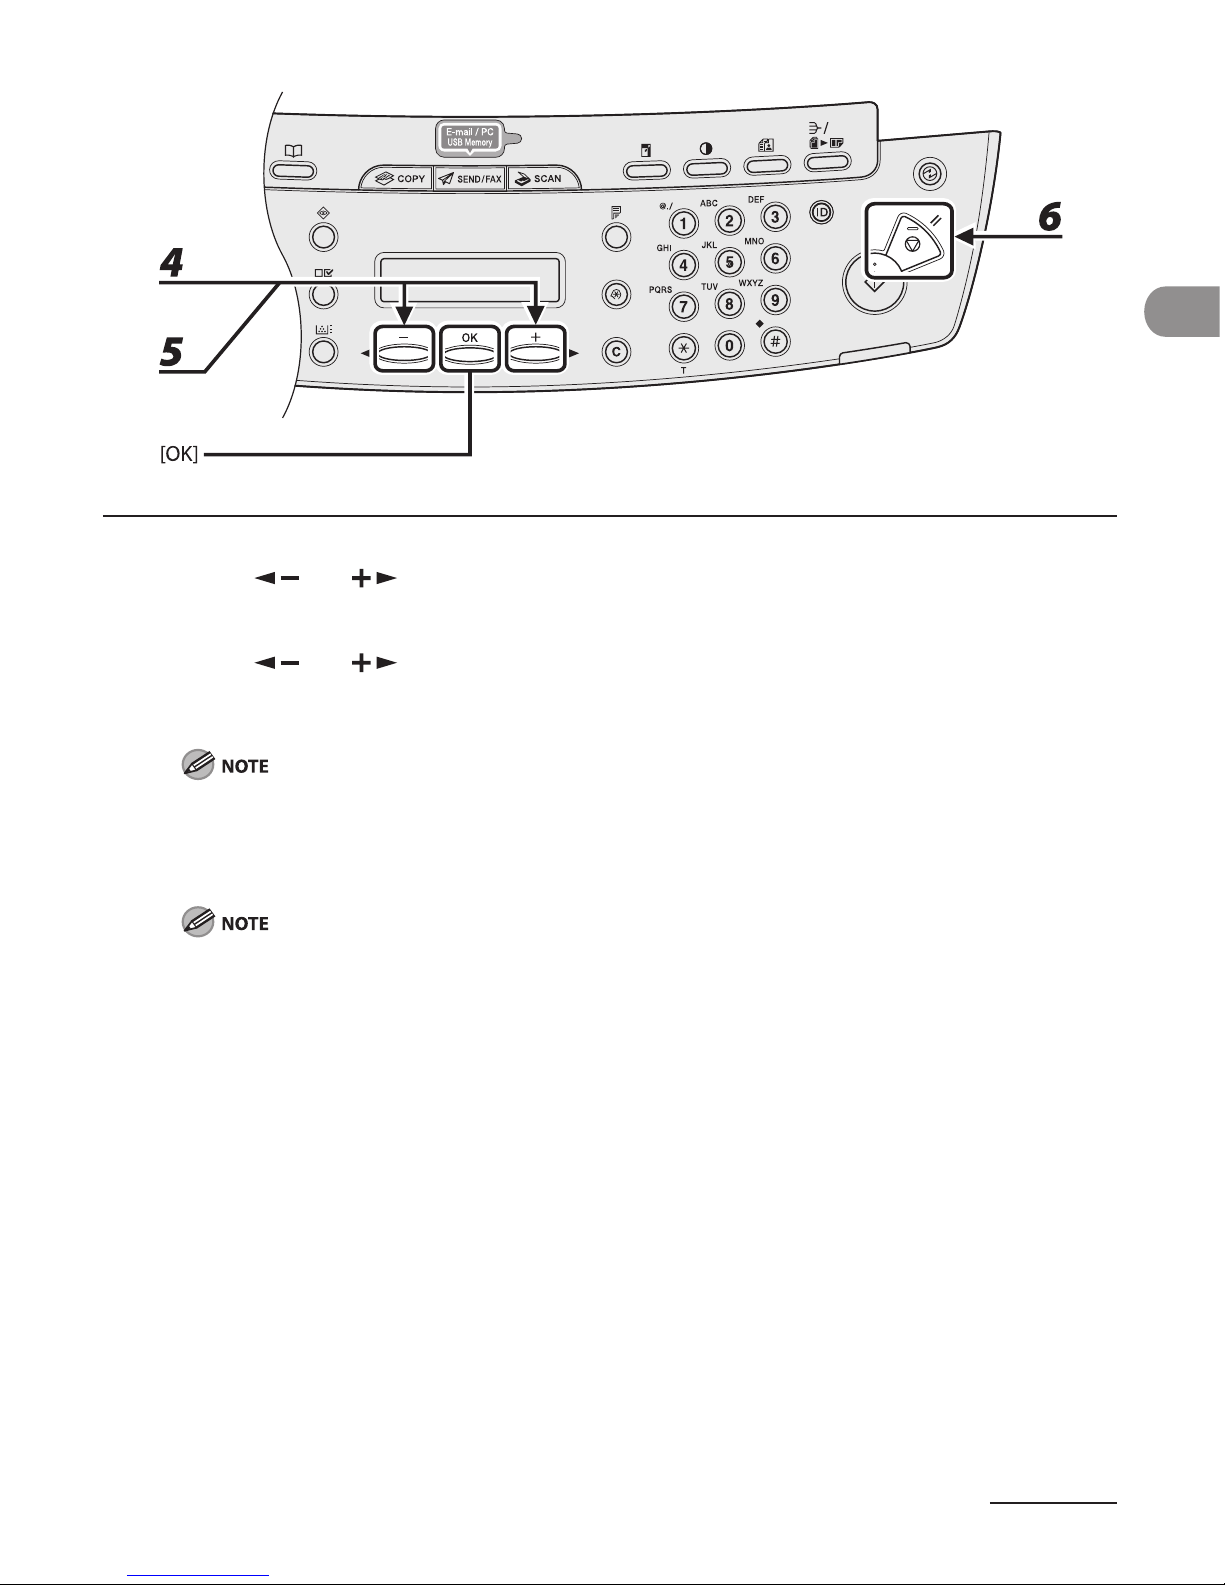
4 Press [ ] or [ ] to select <ON>, then press [OK].
5 Press [ ] or [ ] to select the desired interval, then press [OK].
You can set the interval from 3 to 30 minutes (in one-minute increments).
You can also enter values using numeric keys.
The default setting is 5 minutes.
6 Press [Stop/Reset] to return to standby mode.
[Energy Saver] lights green when the machine enters the Sleep mode.
To resume normal mode from the Sleep mode, press [Energy Saver] on the operation panel.
To enter the Sleep mode manually, press [Energy Saver] on the operation panel.
The machine will not enter the Sleep mode when:
the machine is in operation
the Processing/Data indicator lights or flashes
a message appears on the display and the Error indicator flashes
paper is loaded in the multi-purpose tray
a paper jam occurs in the machine
the optional handset or the handset of the external telephone is off the hook*
The machine will leave the Sleep mode when:
you press [Energy Saver] on the operation panel
a fax is received*
the optional handset or the handset of the external telephone is off the hook*
a print job is sent from a computer, and the print is started
* MF4690PL Only
–
–
–
–
•
•
•
•
•
•
–
•
•
•
•
Page 40
Before Using the Machine
1-20
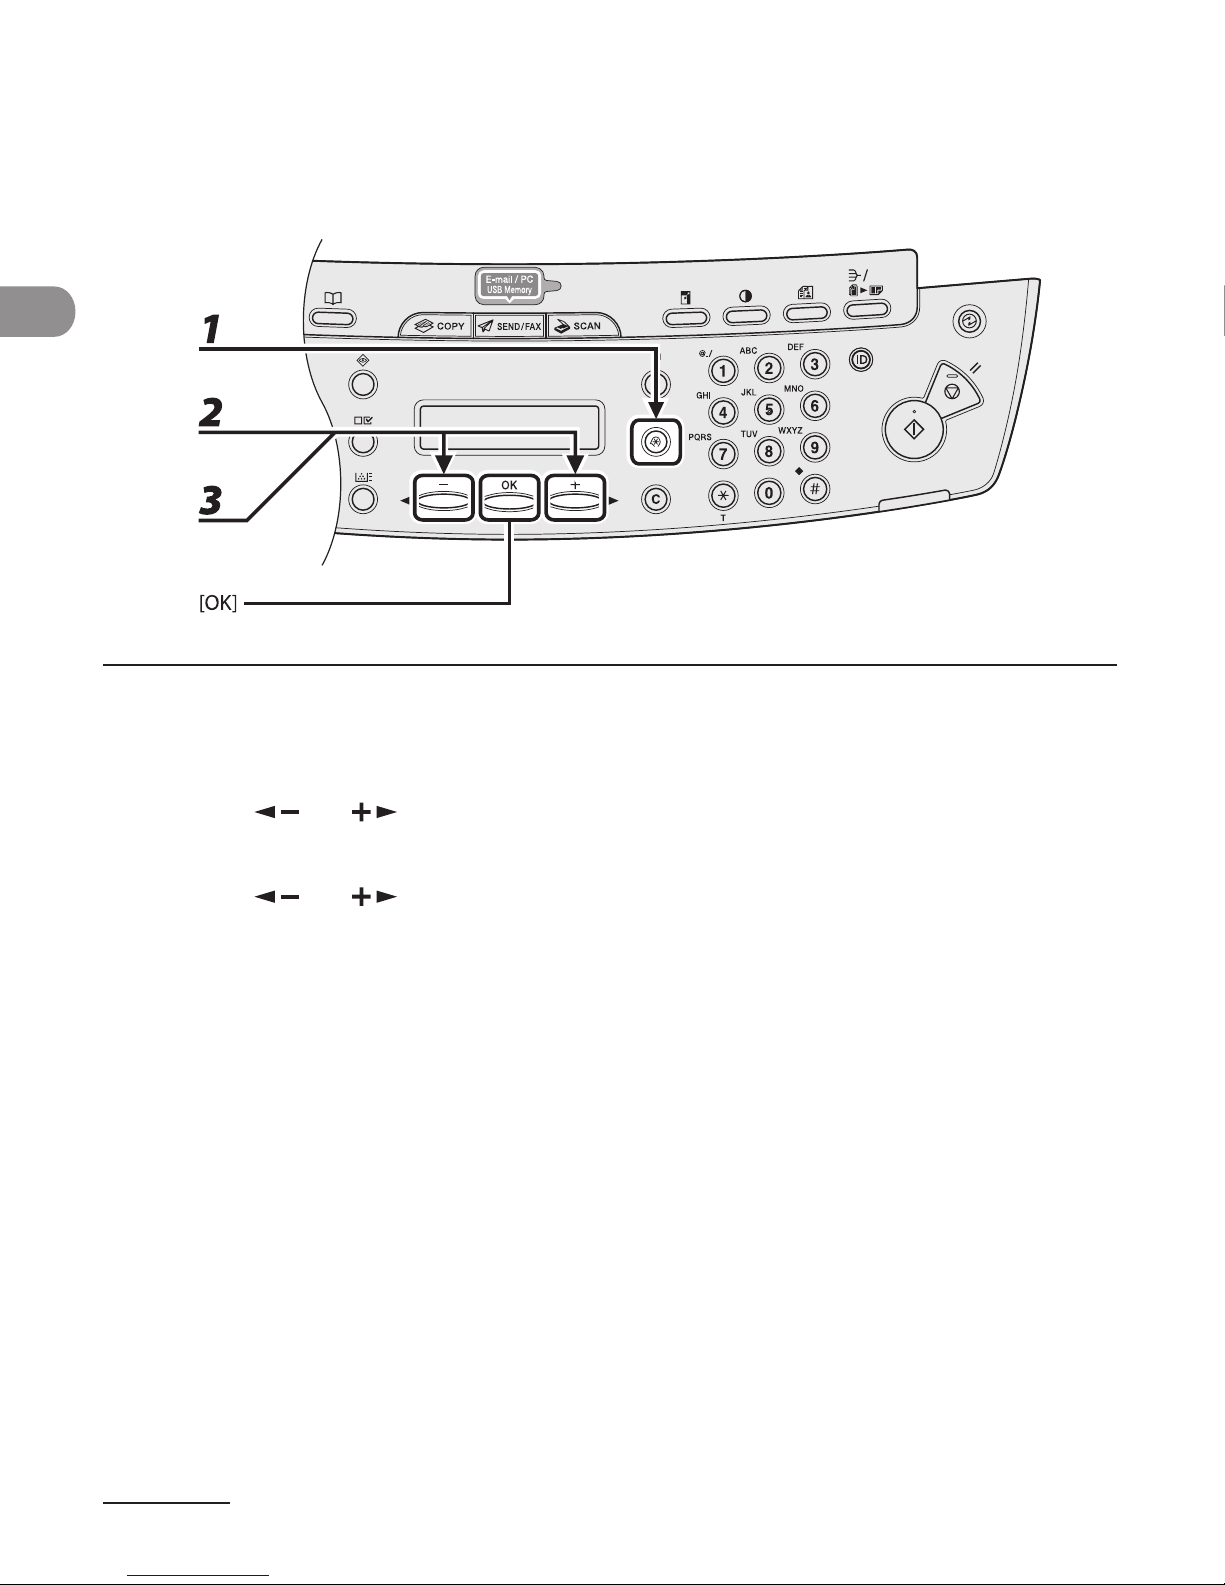
Setting Auto Clear Time
If the machine remains idle for a certain period of time, the display returns to the standby
mode (Auto Clear function).
1 Press [Additional Functions].
2 Press [ ] or [ ] to select <TIMER SETTINGS>, then press [OK].
3 Press [ ] or [ ] to select <AUTO CLEAR TIME>, then press [OK].
Page 41
1-21
Before Using the Machine
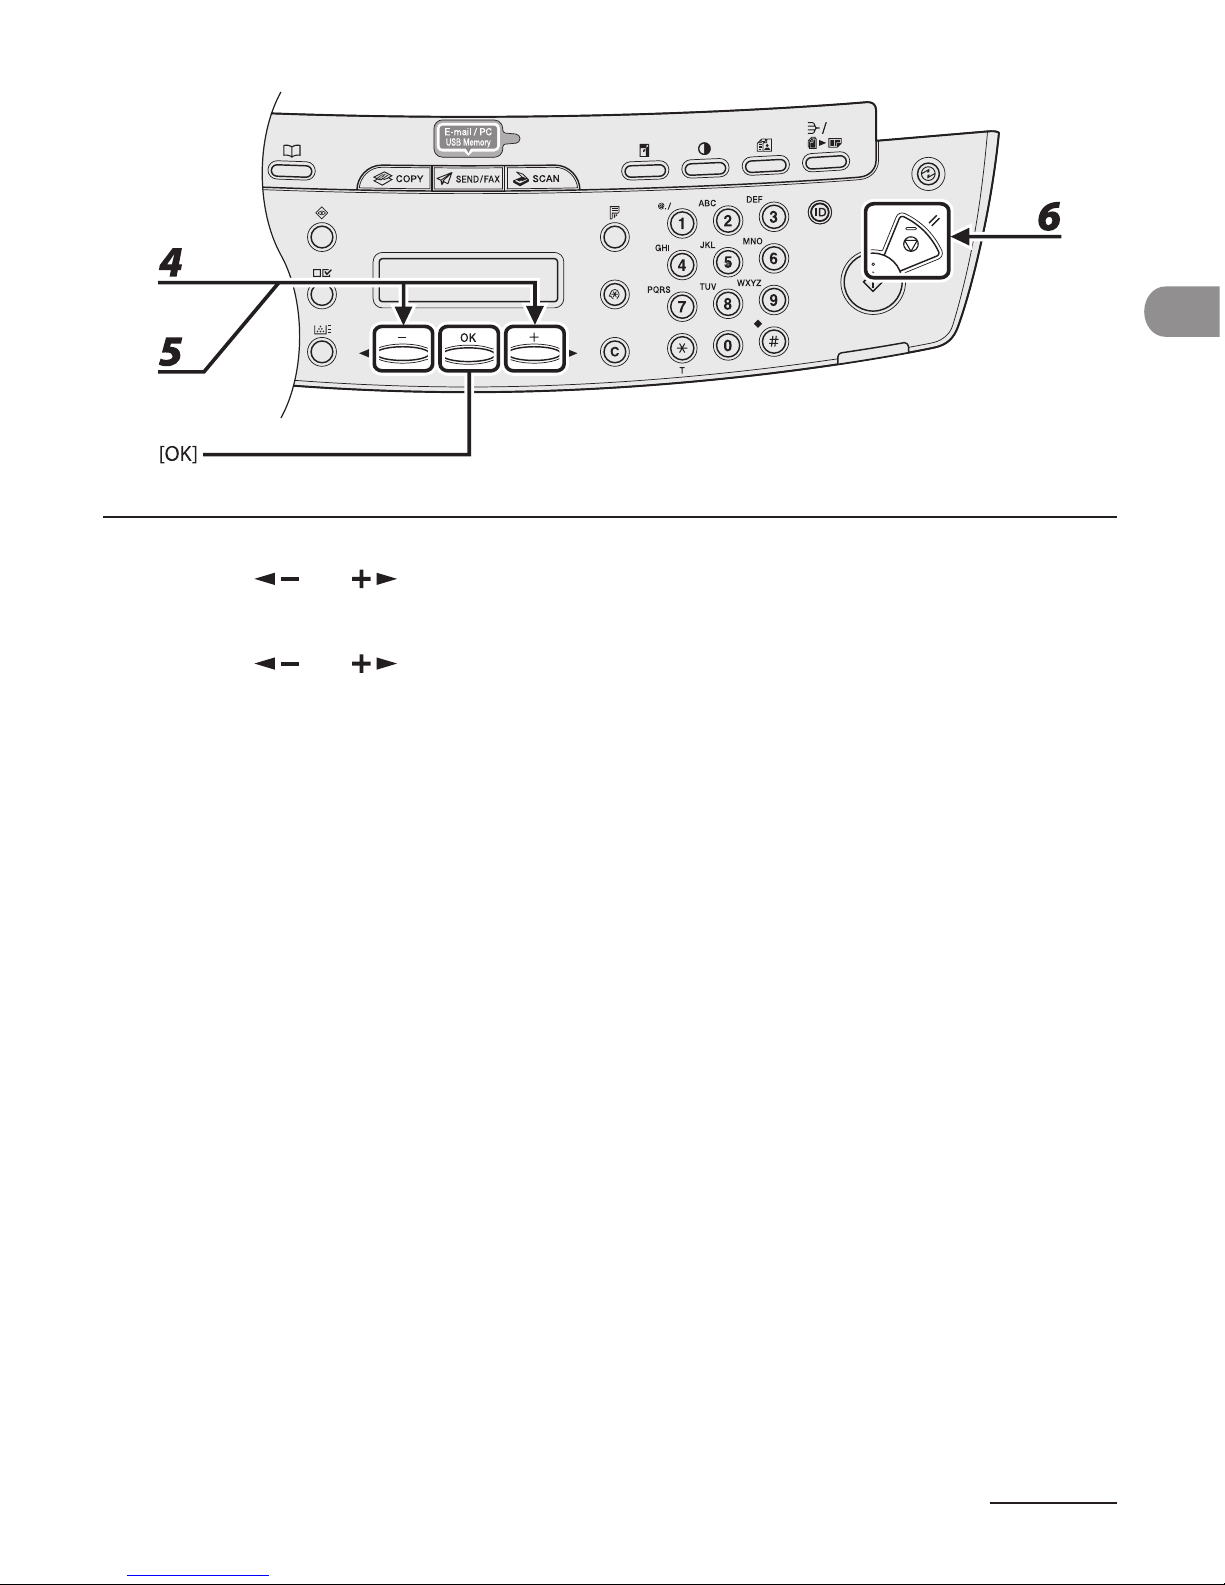
4 Press [ ] or [ ] to select <ON>, then press [OK].
5 Press [ ] or [ ] to select the desired interval, then press [OK].
You can set the interval from 1 to 9 minutes (in one-minute increments).
You can also enter values using numeric keys.
6 Press [Stop/Reset] to return to standby mode.
Page 42
Before Using the Machine
1-22
Setting Time Zone (MF4690PL Only)
The standard time zones of the world are expressed globally in terms of the difference in
hours (± up to 12 hours) from GMT (0 hours). A time zone is a region throughout which this
time difference is the same.
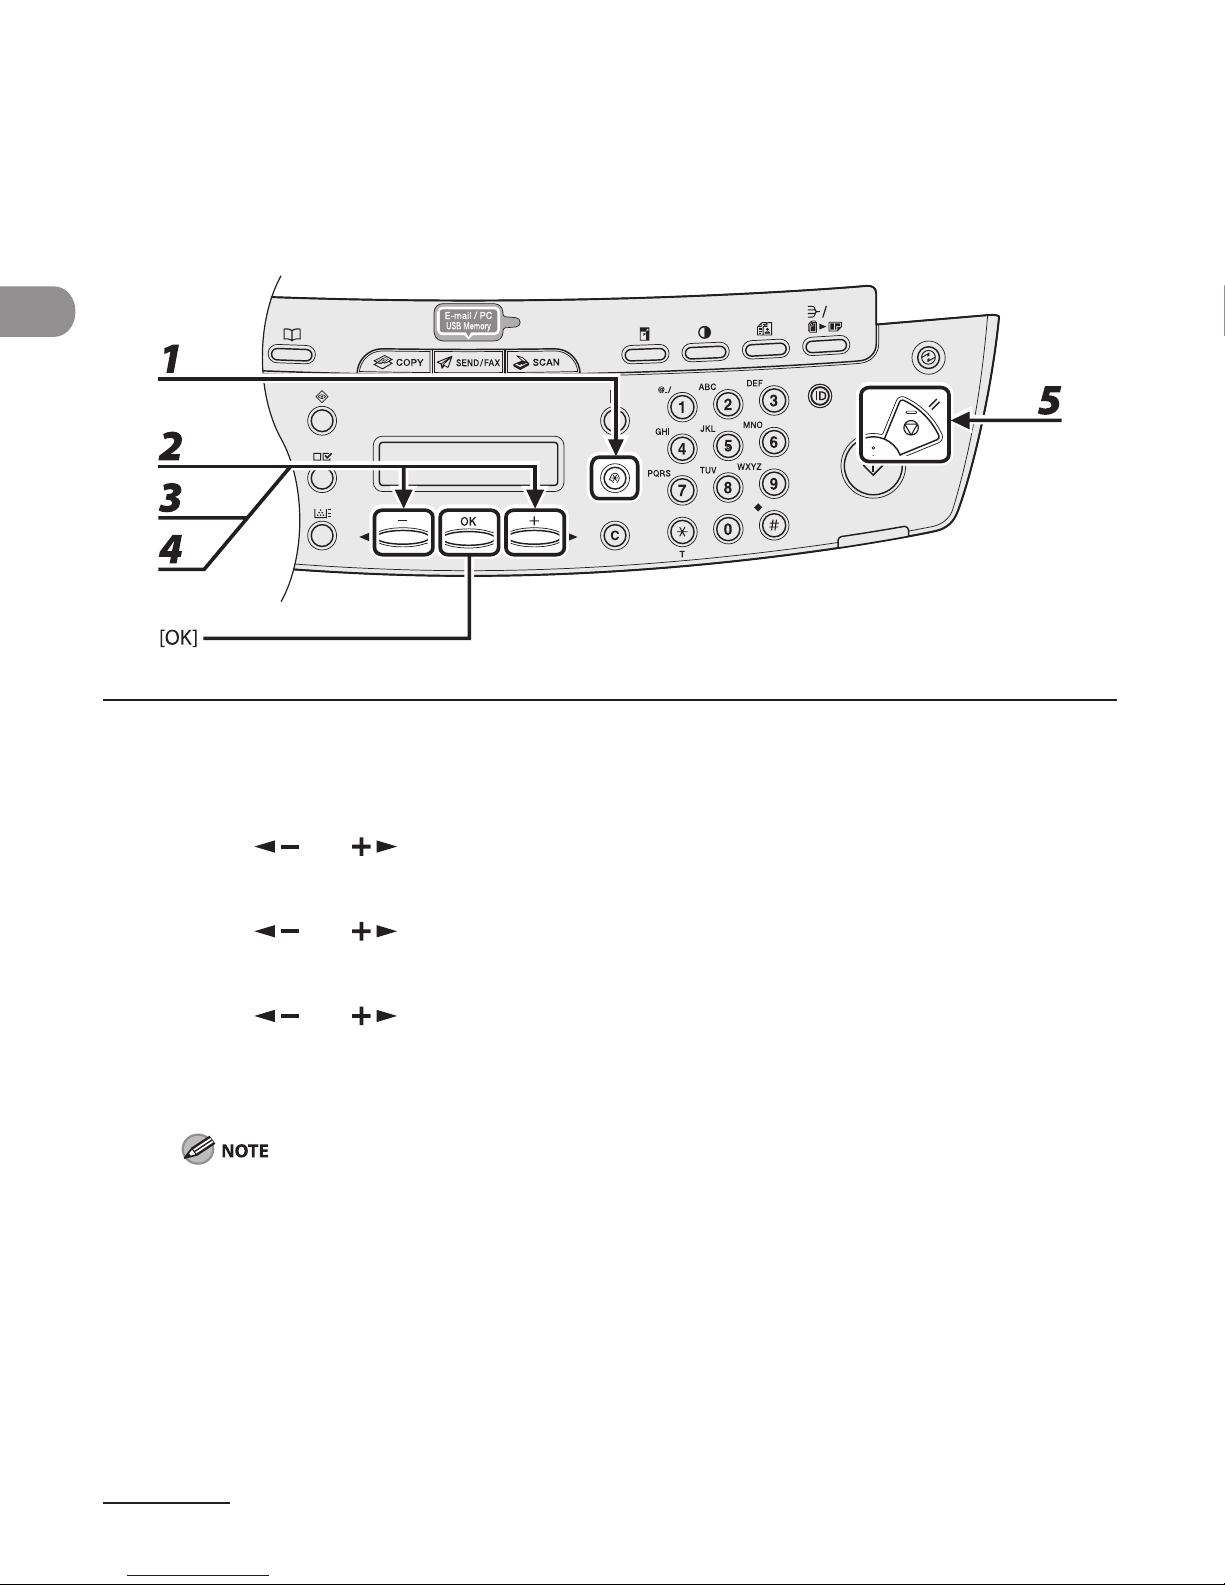
1 Press [Additional Functions].
2 Press [ ] or [ ] to select <TIMER SETTINGS>, then press [OK].
3 Press [ ] or [ ] to select <TIME ZONE SETTING>, then press [OK].
4 Press [ ] or [ ] to select the time zone, then press [OK].
5 Press [Stop/Reset] to return to the standby mode.
The specified time zone setting becomes effective after the machine is restarted.
Page 43
1-23
Before Using the Machine
Setting Daylight Saving Time
In some countries or areas, time is advanced throughout the summer season. This is called
“Daylight Saving Time.”
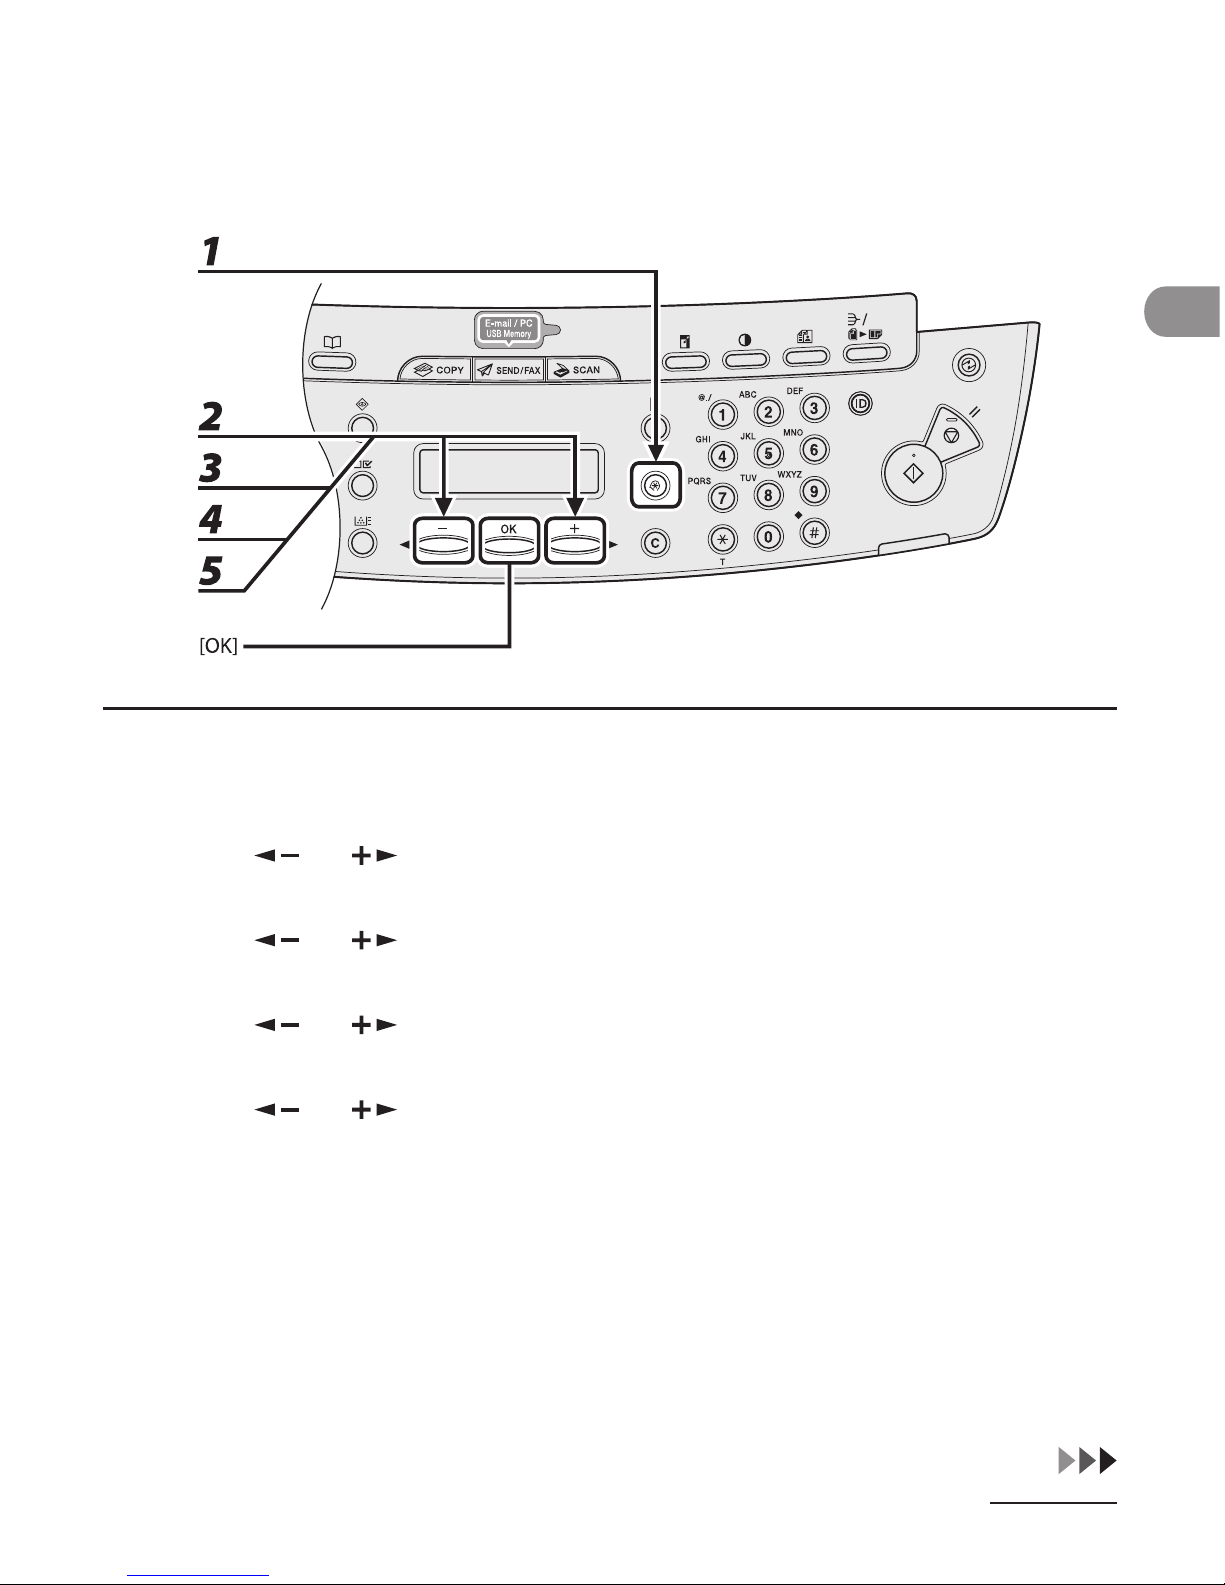
1 Press [Additional Functions].
2 Press [ ] or [ ] to select <TIMER SETTINGS>, then press [OK].
3 Press [ ] or [ ] to select <DAYLIGHT SV.TIME>, then press [OK].
4 Press [ ] or [ ] to select <ON>, then press [OK].
5 Press [ ] or [ ] to select <BEGIN DATE/TIME>, then press [OK].
Page 44
Before Using the Machine
1-24
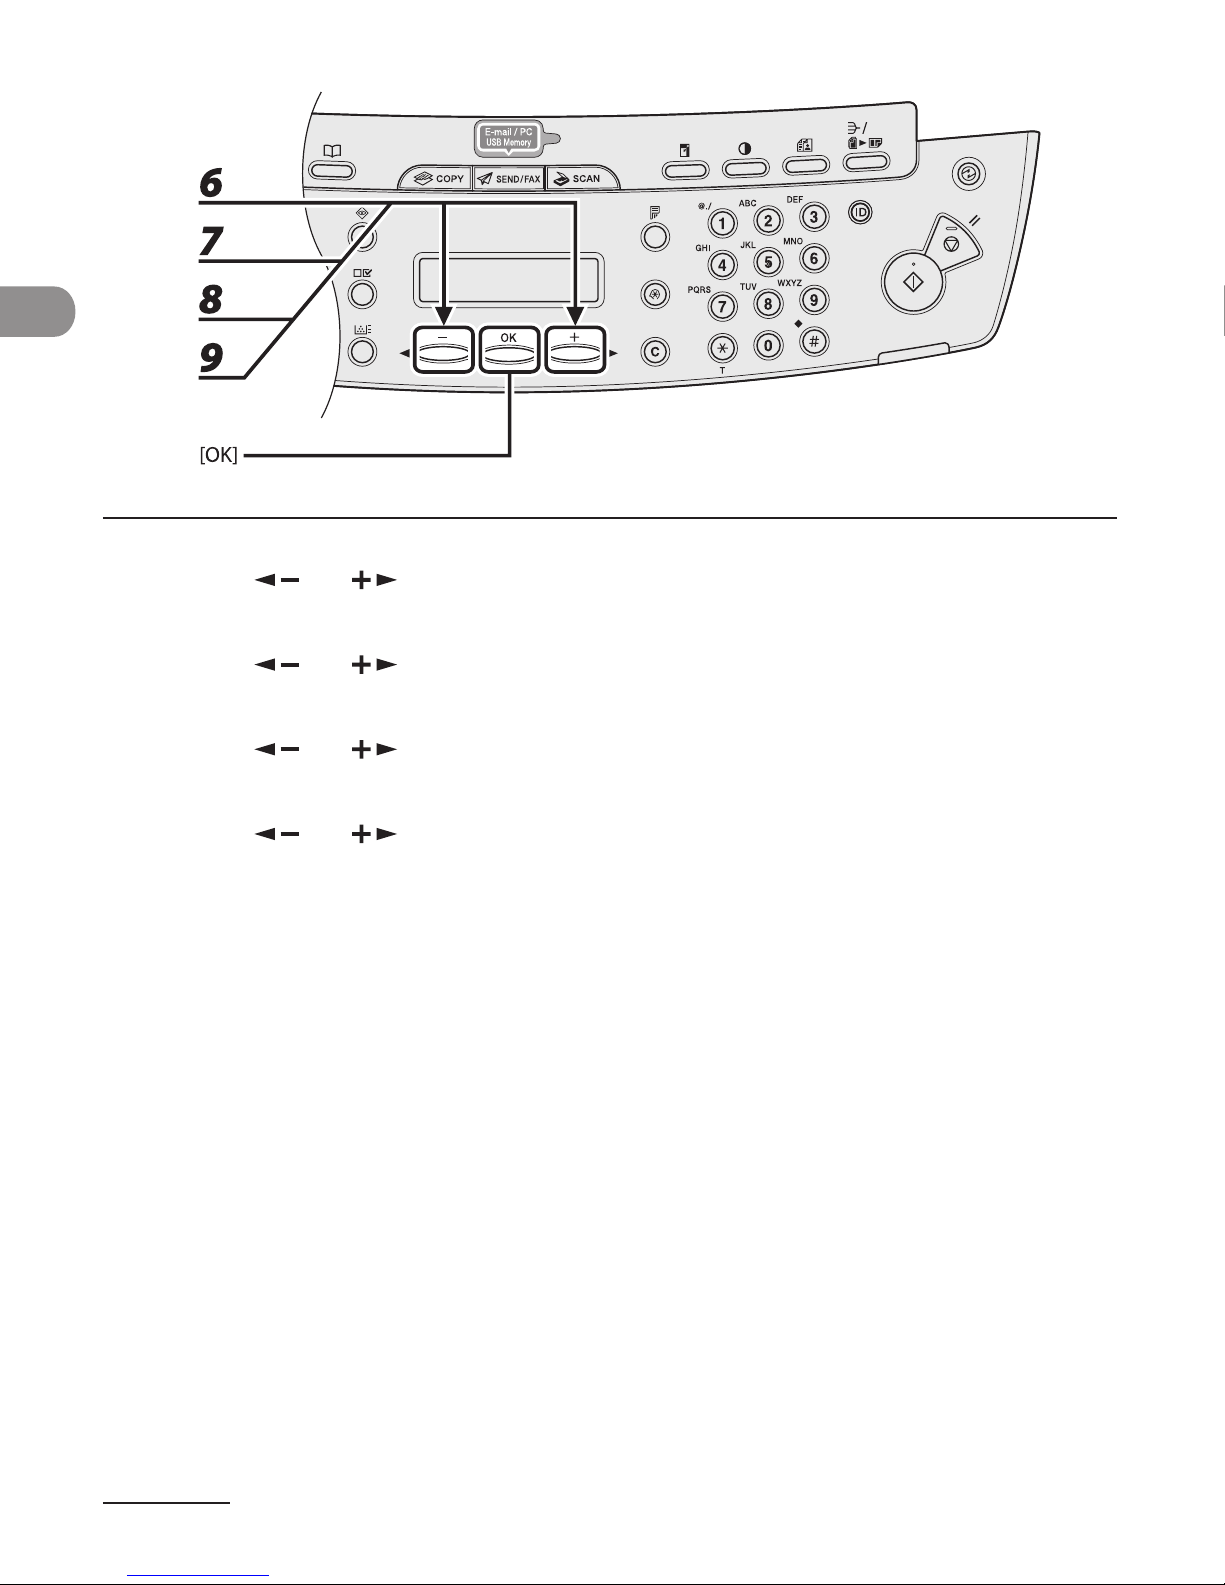
6 Press [ ] or [ ] to select <MONTH>, then press [OK].
7 Press [ ] or [ ] to select the month, then press [OK].
8 Press [ ] or [ ] to select <WEEK>, then press [OK].
9 Press [ ] or [ ] to select the week, then press [OK].
Page 45
1-25
Before Using the Machine
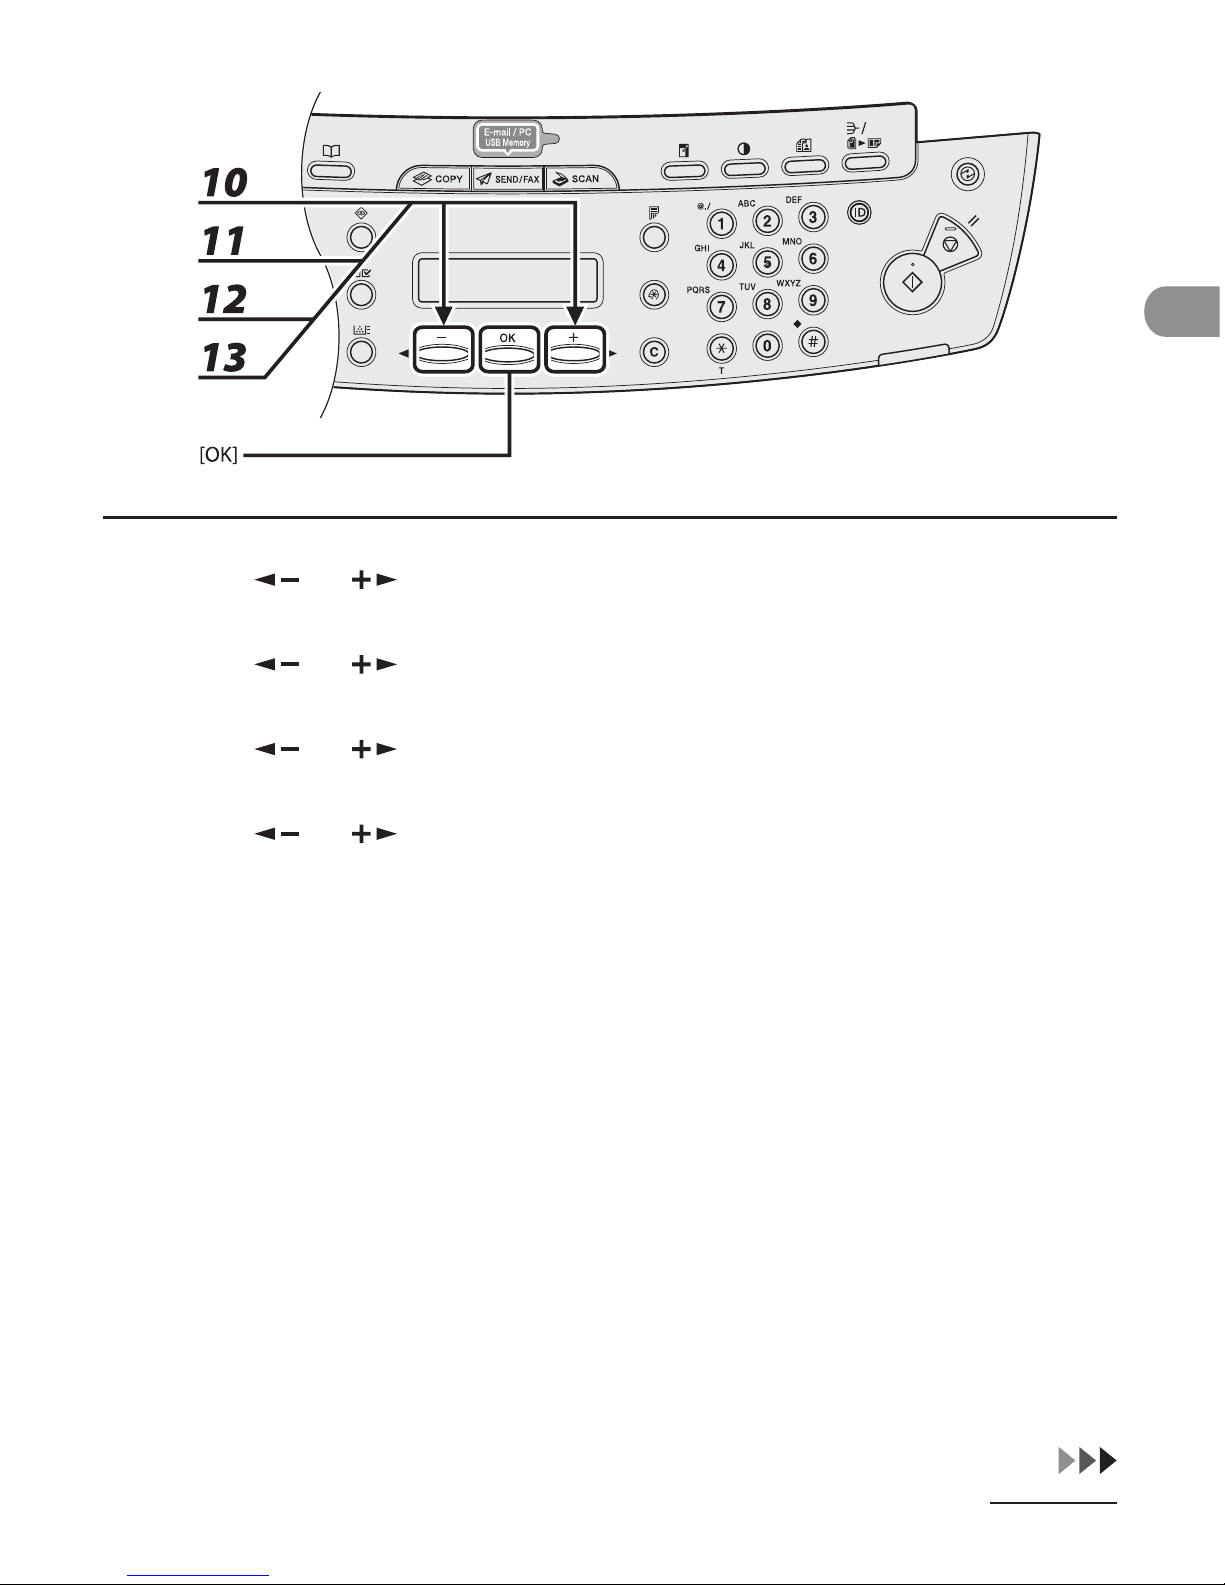
10 Press [ ] or [ ] to select <DAY>, then press [OK].
11 Press [ ] or [ ] to select the day, then press [OK].
12 Press [ ] or [ ] to select <END DATE/TIME>, then press [OK].
13 Press [ ] or [ ] to select <MONTH>, then press [OK].
Page 46
Before Using the Machine
1-26
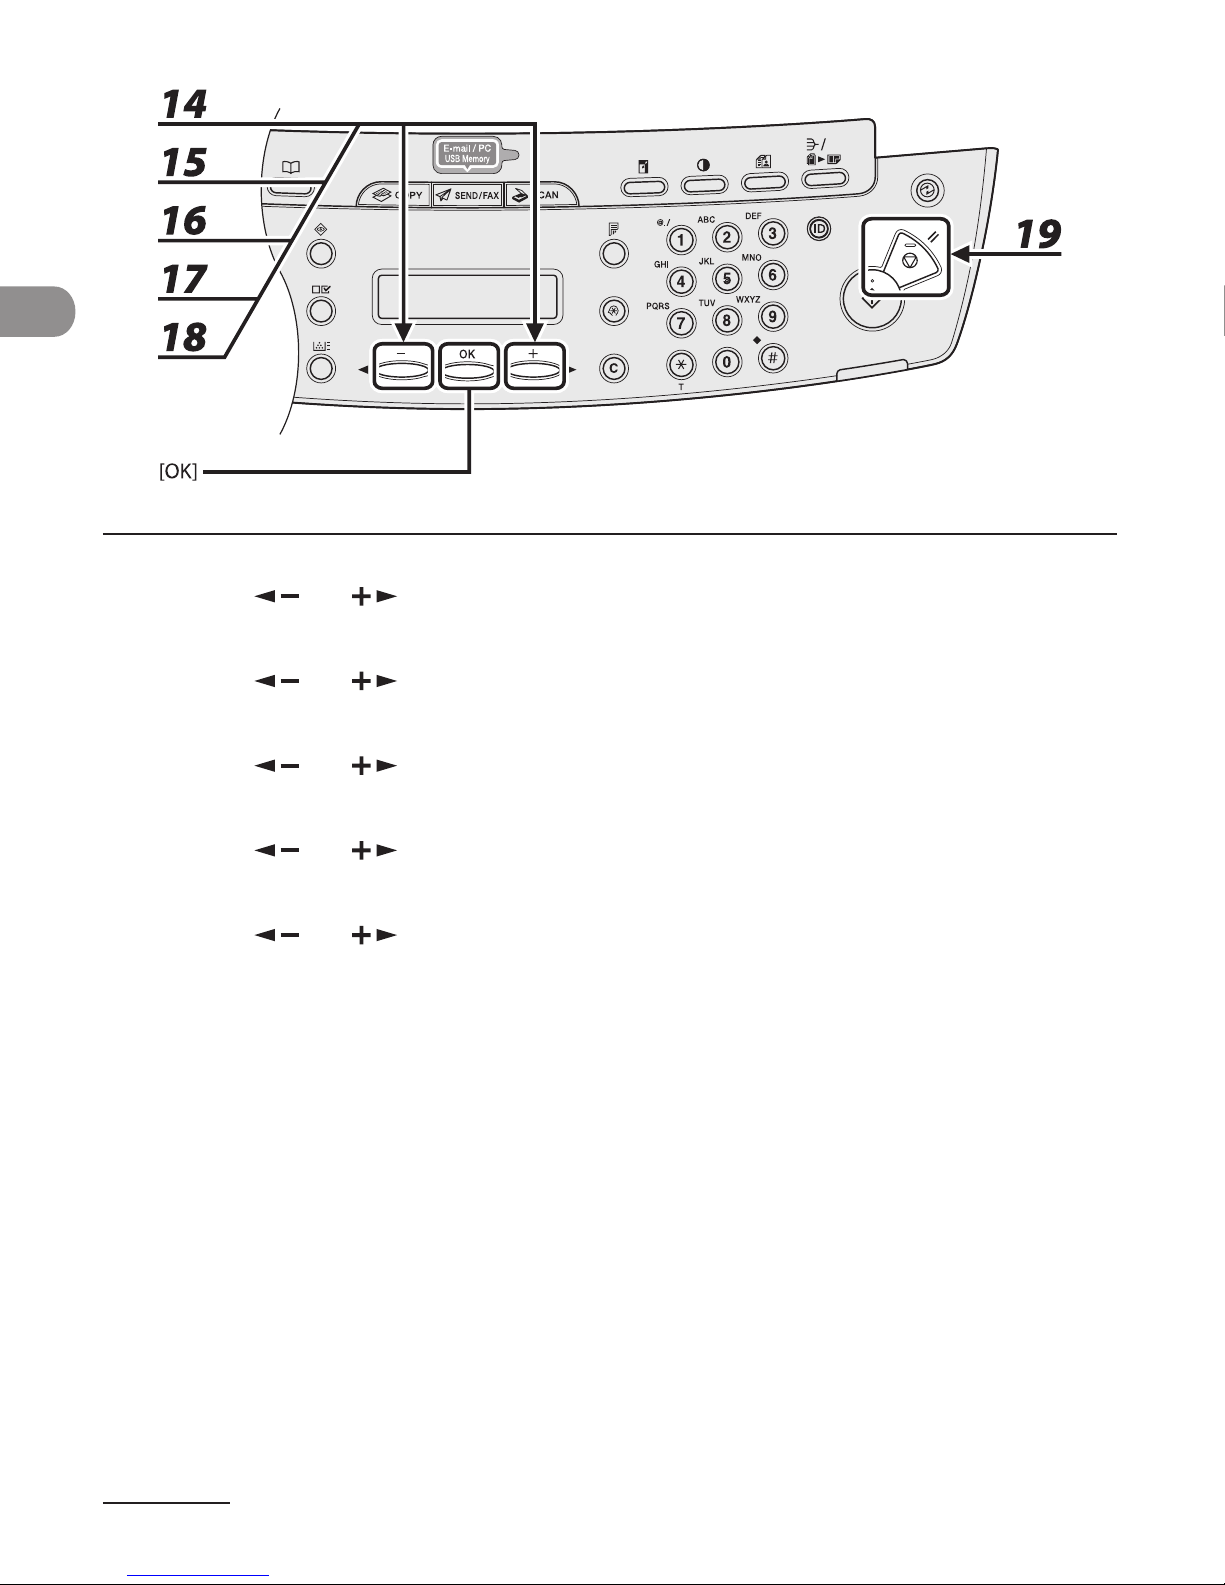
14 Press [ ] or [ ] to select the month, then press [OK].
15 Press [ ] or [ ] to select <WEEK>, then press [OK].
16 Press [ ] or [ ] to select the week, then press [OK].
17 Press [ ] or [ ] to select <DAY>, then press [OK].
18 Press [ ] or [ ] to select the day, then press [OK].
19 Press [Stop/Reset] to return to standby mode.
Page 47

Document and Paper
2
Document and
Paper
Document Requirements ∙∙∙∙∙∙∙∙∙∙∙∙∙∙∙∙∙∙∙∙∙∙∙∙∙∙∙∙∙∙∙∙∙∙∙∙∙∙∙∙∙∙∙∙∙∙∙∙∙∙∙∙∙∙∙∙∙∙∙∙2-2
Scanning Area ∙∙∙∙∙∙∙∙∙∙∙∙∙∙∙∙∙∙∙∙∙∙∙∙∙∙∙∙∙∙∙∙∙∙∙∙∙∙∙∙∙∙∙∙∙∙∙∙∙∙∙∙∙∙∙∙∙∙∙∙∙∙∙∙∙∙∙∙∙∙∙∙∙∙∙∙∙∙2-4
Loading Documents ∙∙∙∙∙∙∙∙∙∙∙∙∙∙∙∙∙∙∙∙∙∙∙∙∙∙∙∙∙∙∙∙∙∙∙∙∙∙∙∙∙∙∙∙∙∙∙∙∙∙∙∙∙∙∙∙∙∙∙∙∙∙∙∙∙∙∙∙2-5
On the Platen Glass ∙∙∙∙∙∙∙∙∙∙∙∙∙∙∙∙∙∙∙∙∙∙∙∙∙∙∙∙∙∙∙∙∙∙∙∙∙∙∙∙∙∙∙∙∙∙∙∙∙∙∙∙∙∙∙∙∙∙∙∙∙∙∙∙∙∙∙∙∙∙∙∙∙∙∙∙∙∙ 2-5
In the ADF ∙∙∙∙∙∙∙∙∙∙∙∙∙∙∙∙∙∙∙∙∙∙∙∙∙∙∙∙∙∙∙∙∙∙∙∙∙∙∙∙∙∙∙∙∙∙∙∙∙∙∙∙∙∙∙∙∙∙∙∙∙∙∙∙∙∙∙∙∙∙∙∙∙∙∙∙∙∙∙∙∙∙∙∙∙∙∙∙∙∙∙∙∙∙∙ 2-7
Paper Requirements ∙∙∙∙∙∙∙∙∙∙∙∙∙∙∙∙∙∙∙∙∙∙∙∙∙∙∙∙∙∙∙∙∙∙∙∙∙∙∙∙∙∙∙∙∙∙∙∙∙∙∙∙∙∙∙∙∙∙∙∙∙∙∙∙∙∙∙∙2-9
Printable Area ∙∙∙∙∙∙∙∙∙∙∙∙∙∙∙∙∙∙∙∙∙∙∙∙∙∙∙∙∙∙∙∙∙∙∙∙∙∙∙∙∙∙∙∙∙∙∙∙∙∙∙∙∙∙∙∙∙∙∙∙∙∙∙∙∙∙∙∙∙∙∙∙∙∙∙ 2-11
Loading Paper ∙∙∙∙∙∙∙∙∙∙∙∙∙∙∙∙∙∙∙∙∙∙∙∙∙∙∙∙∙∙∙∙∙∙∙∙∙∙∙∙∙∙∙∙∙∙∙∙∙∙∙∙∙∙∙∙∙∙∙∙∙∙∙∙∙∙∙∙∙∙∙∙∙∙∙ 2-12
Into the Multi-Purpose Tray ∙∙∙∙∙∙∙∙∙∙∙∙∙∙∙∙∙∙∙∙∙∙∙∙∙∙∙∙∙∙∙∙∙∙∙∙∙∙∙∙∙∙∙∙∙∙∙∙∙∙∙∙∙∙∙∙∙∙∙∙2-12
Setting Paper Size and Type ∙∙∙∙∙∙∙∙∙∙∙∙∙∙∙∙∙∙∙∙∙∙∙∙∙∙∙∙∙∙∙∙∙∙∙∙∙∙∙∙∙∙∙∙∙∙∙∙∙∙∙∙ 2-15
Page 48
Document and Paper
2-2
Document Requirements
Platen Glass ADF
Type Plain paper
Thick documents
Photographs
Small documents (e.g., index cards)
Special types of paper (e.g., tracing
paper*
1
, transparencies*1, etc.)
Book (Height: max. 24 mm)
–
–
–
–
–
–
Plain paper (Multipage documents of
the same size, thickness and weight or
one page documents.)
Size (W x L) Max. 216 x 297 mm Max. 216 x 356 mm
Min. 105 x 148.5 mm
Weight Max. 2 kg 40 to 105 g/ m
2
Quantity 1 sheet Max. 35 sheets*
2
*1 When copying a transparent document such as tracing paper or transparencies, use a piece of plain white
paper to cover the document after placing it face-down on the platen glass.
*
2
80 g/m2 paper
Page 49

2-3
Document and Paper
Do not place the document on the platen glass or in the ADF until the glue, ink or
correction fluid on the document is completely dry.
To prevent document jams in the ADF, do not use any of the following:
Wrinkled or creased paper
Carbon paper or carbon-backed paper
Curled or rolled paper
Coated paper
Torn paper
Onion skin or thin paper
Documents with staples or paper clips attached
Paper printed with a thermal transfer printer
Transparencies
●
●
–
–
–
–
–
–
–
–
–
Page 50
Document and Paper
2-4
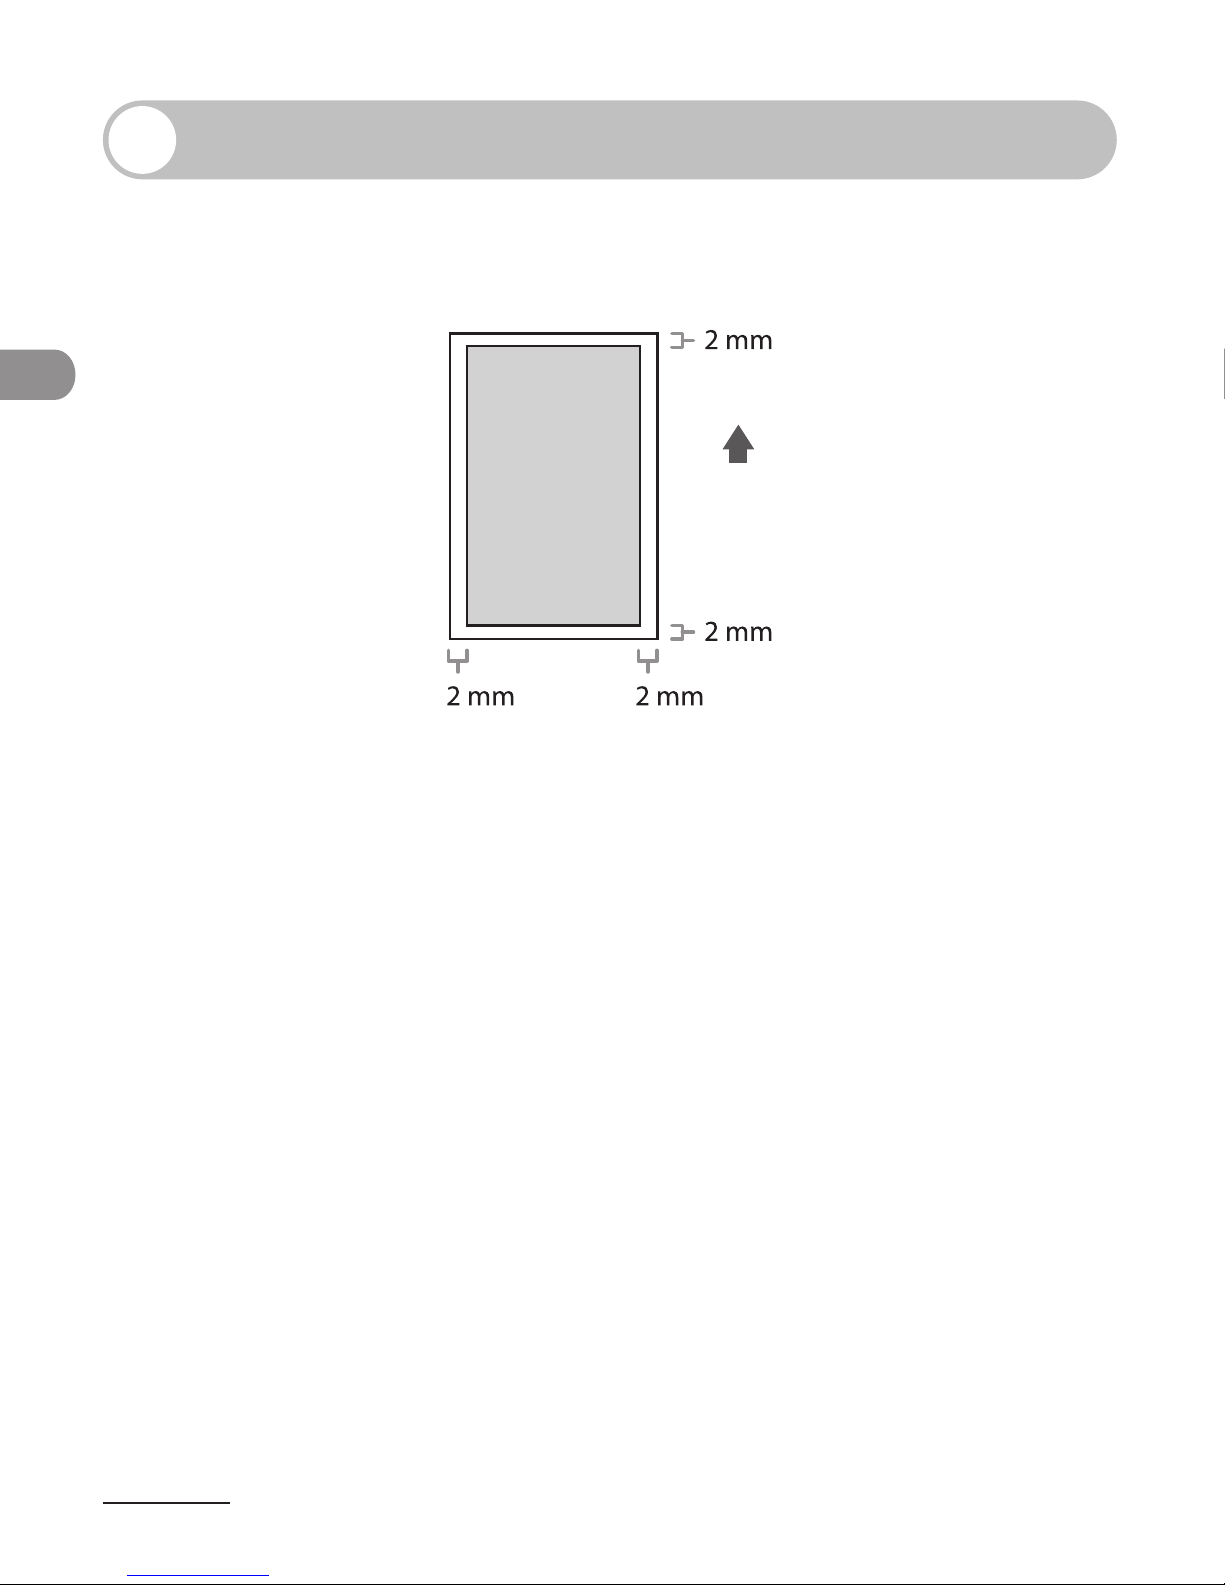
Scanning Area
Make sure your document's text and graphics fall within the shaded area in the
following diagram. Note that the margin widths listed are approximate and there may
be slight variations in actual use.
Page 51
2-5
Document and Paper
Loading Documents
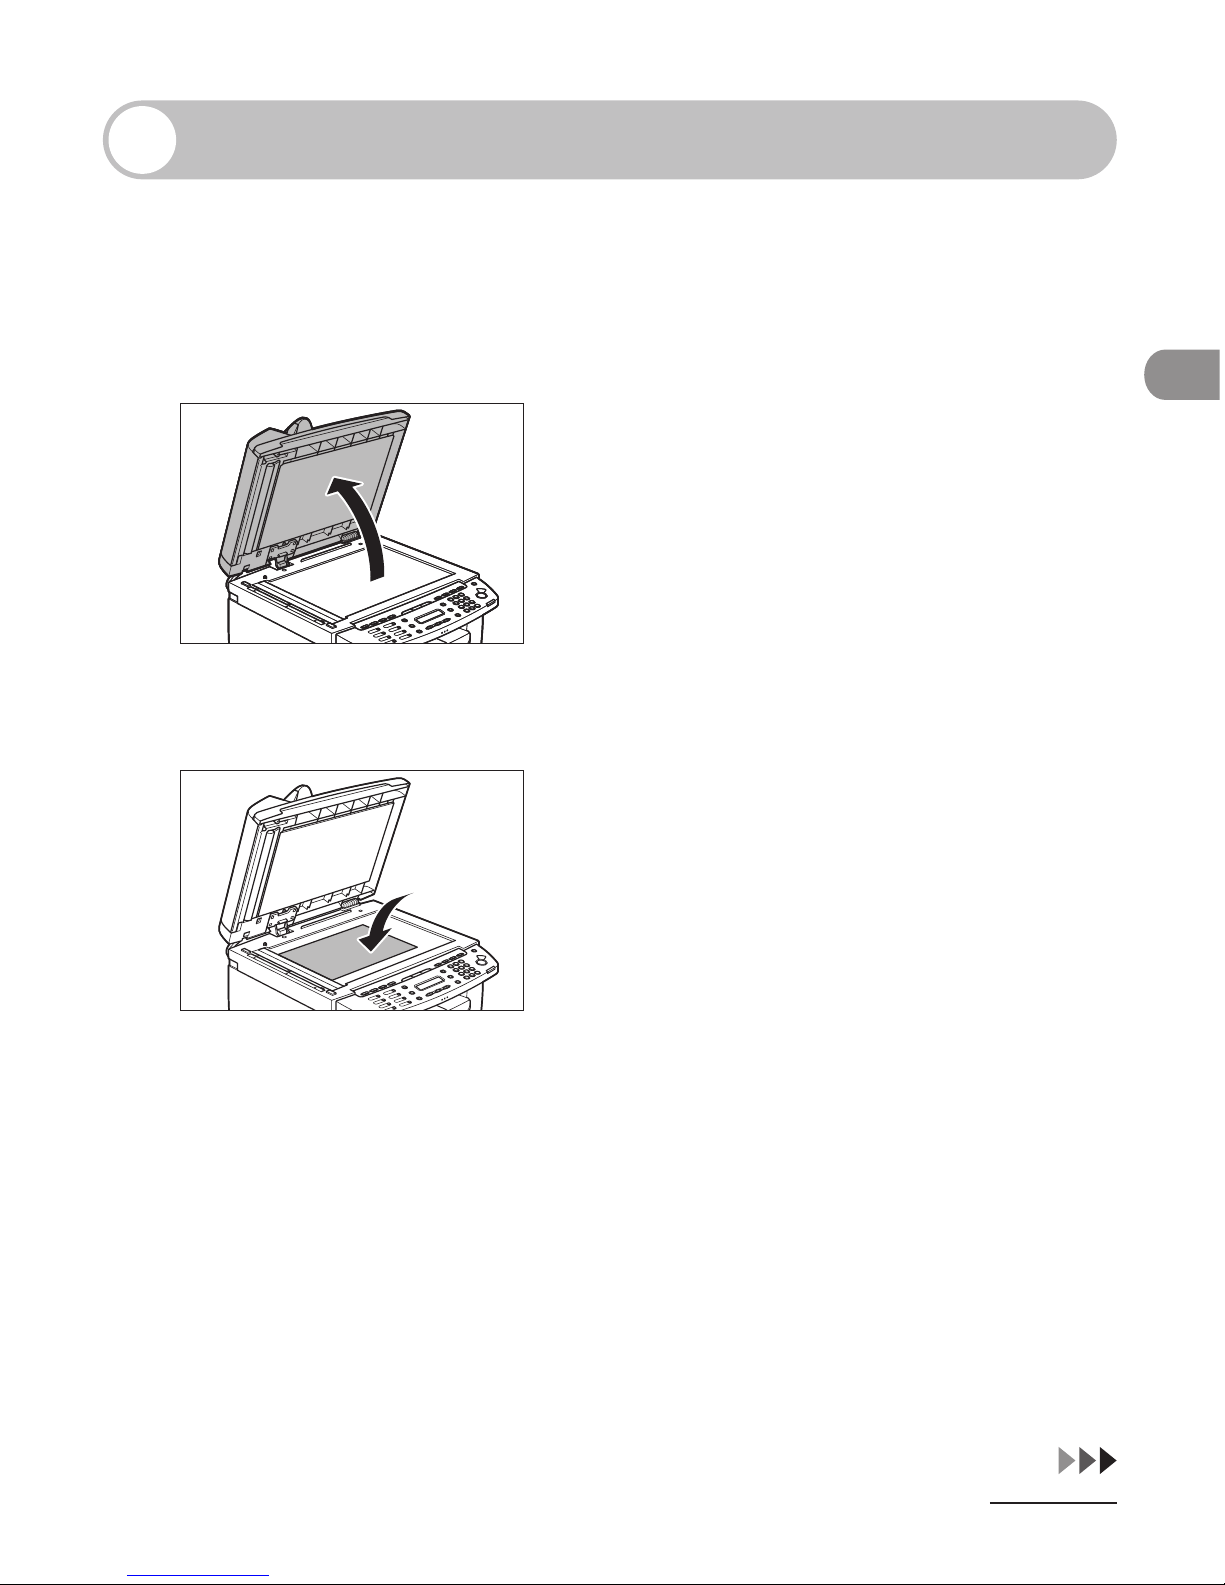
On the Platen Glass
1 Lift up the platen glass cover.
2 Place your document face down.
Page 52
Document and Paper
2-6
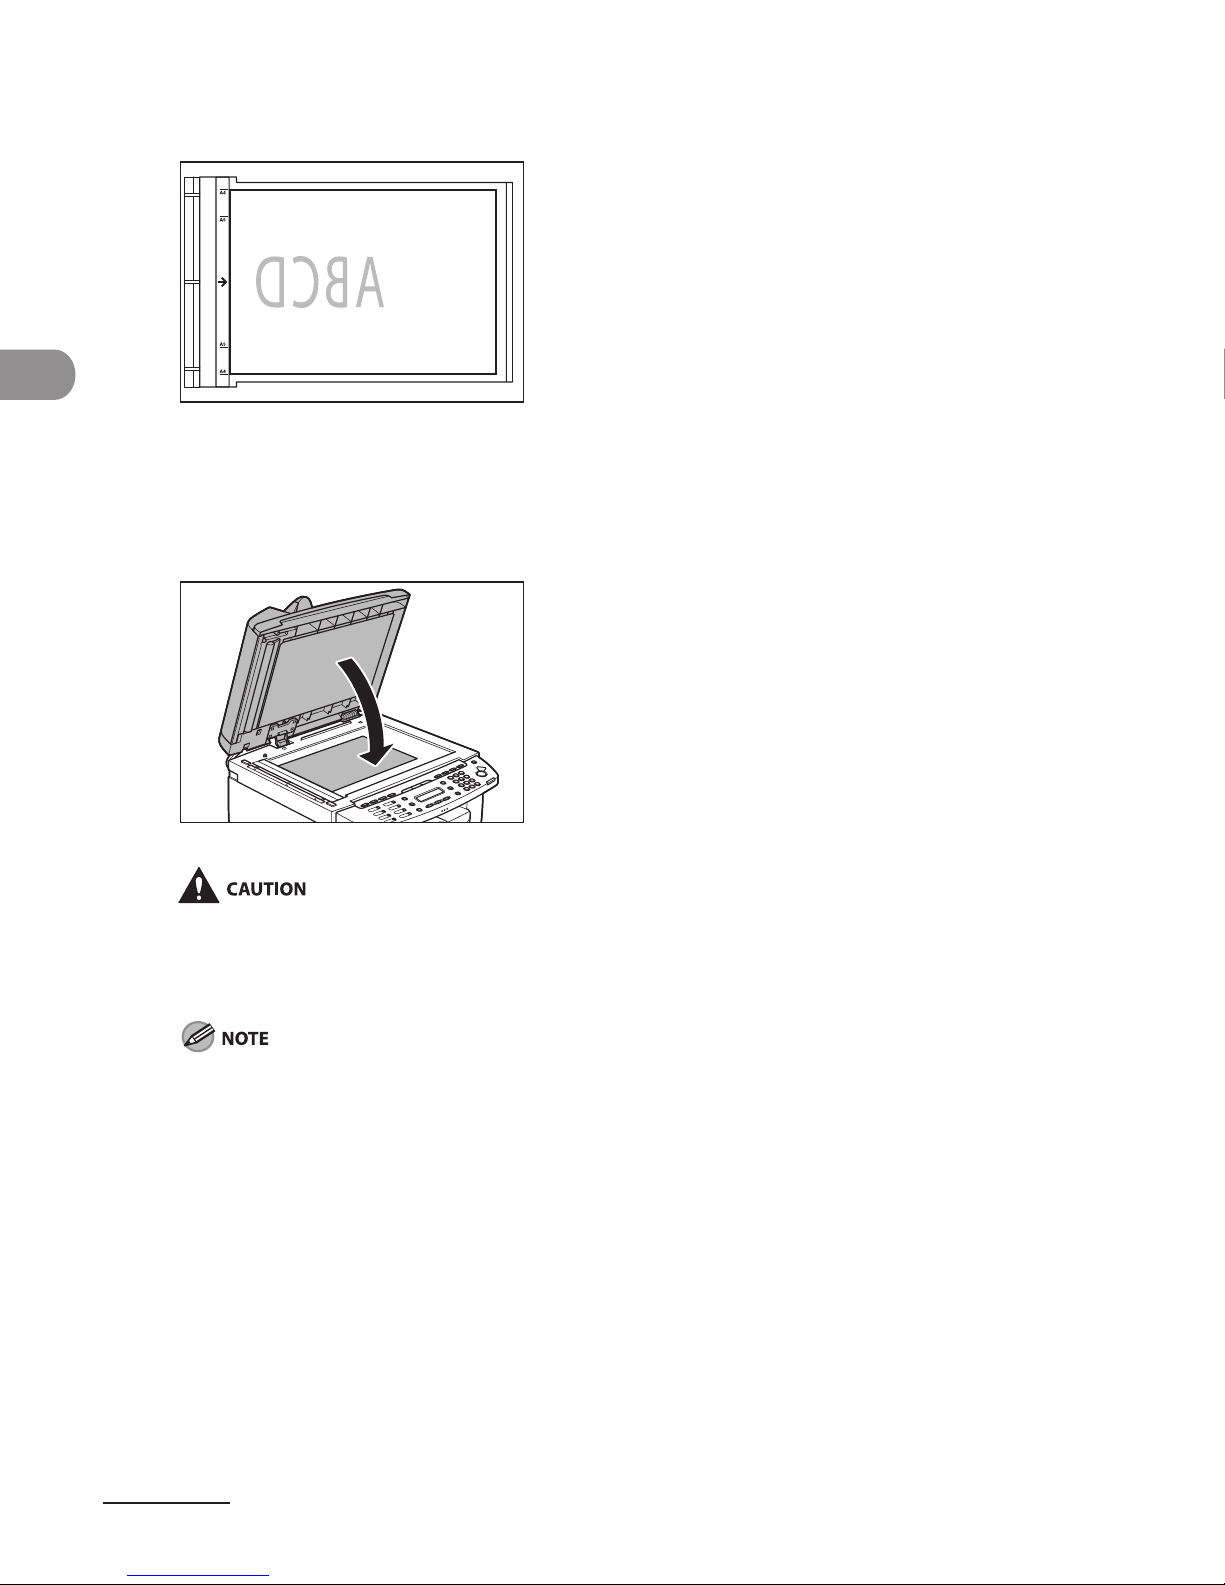
3 Align the document with the appropriate paper size marks.
If your document does not match any of the paper size marks, align the center of your document with
the arrow mark.
4 Gently lower the platen glass cover.
The document is ready for scanning.
When closing the platen glass cover, be careful not to get your fingers caught, as this may result in
personal injury.
Do not press down the platen glass cover forcefully, as this may damage the platen glass and cause
personal injury.
Remove the document from the platen glass when scanning is complete.
–
–
Page 53
2-7
Document and Paper
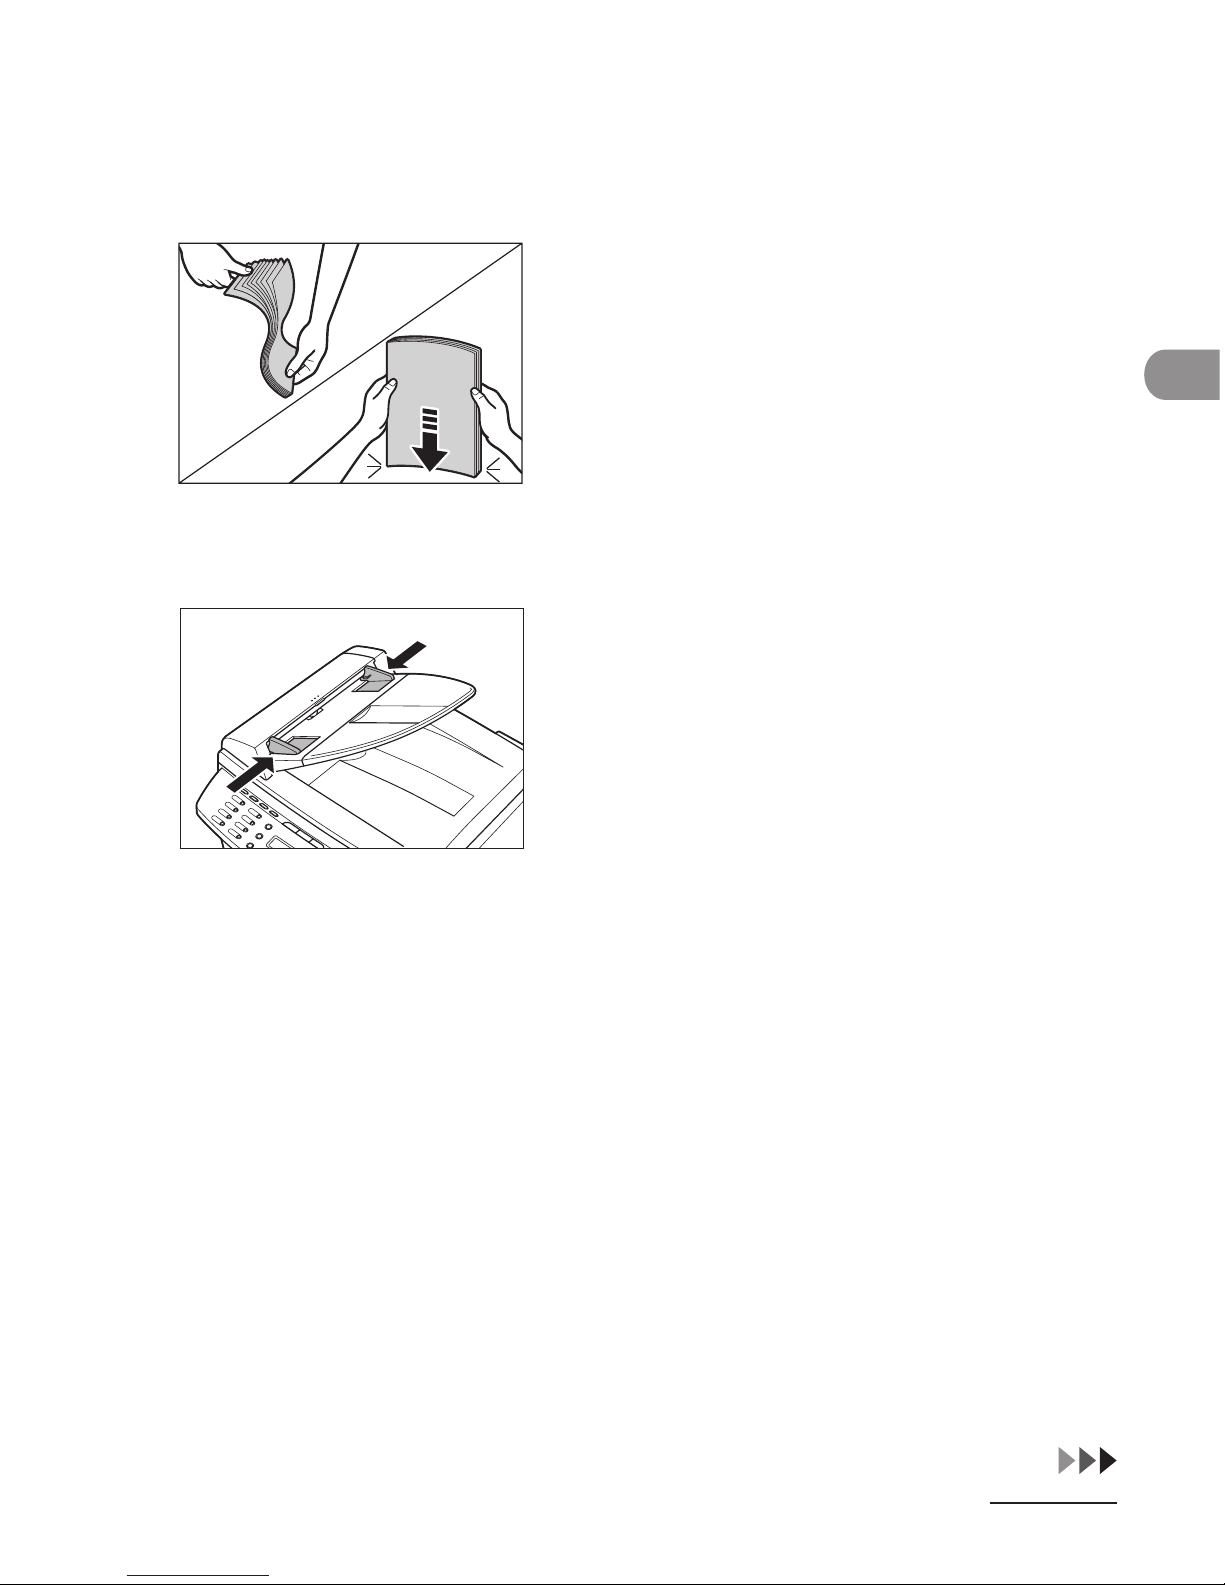
In the ADF
1 Fan the document stack and even the edges.
2 Adjust the slide guides to the width of the documents.
Page 54
Document and Paper
2-8
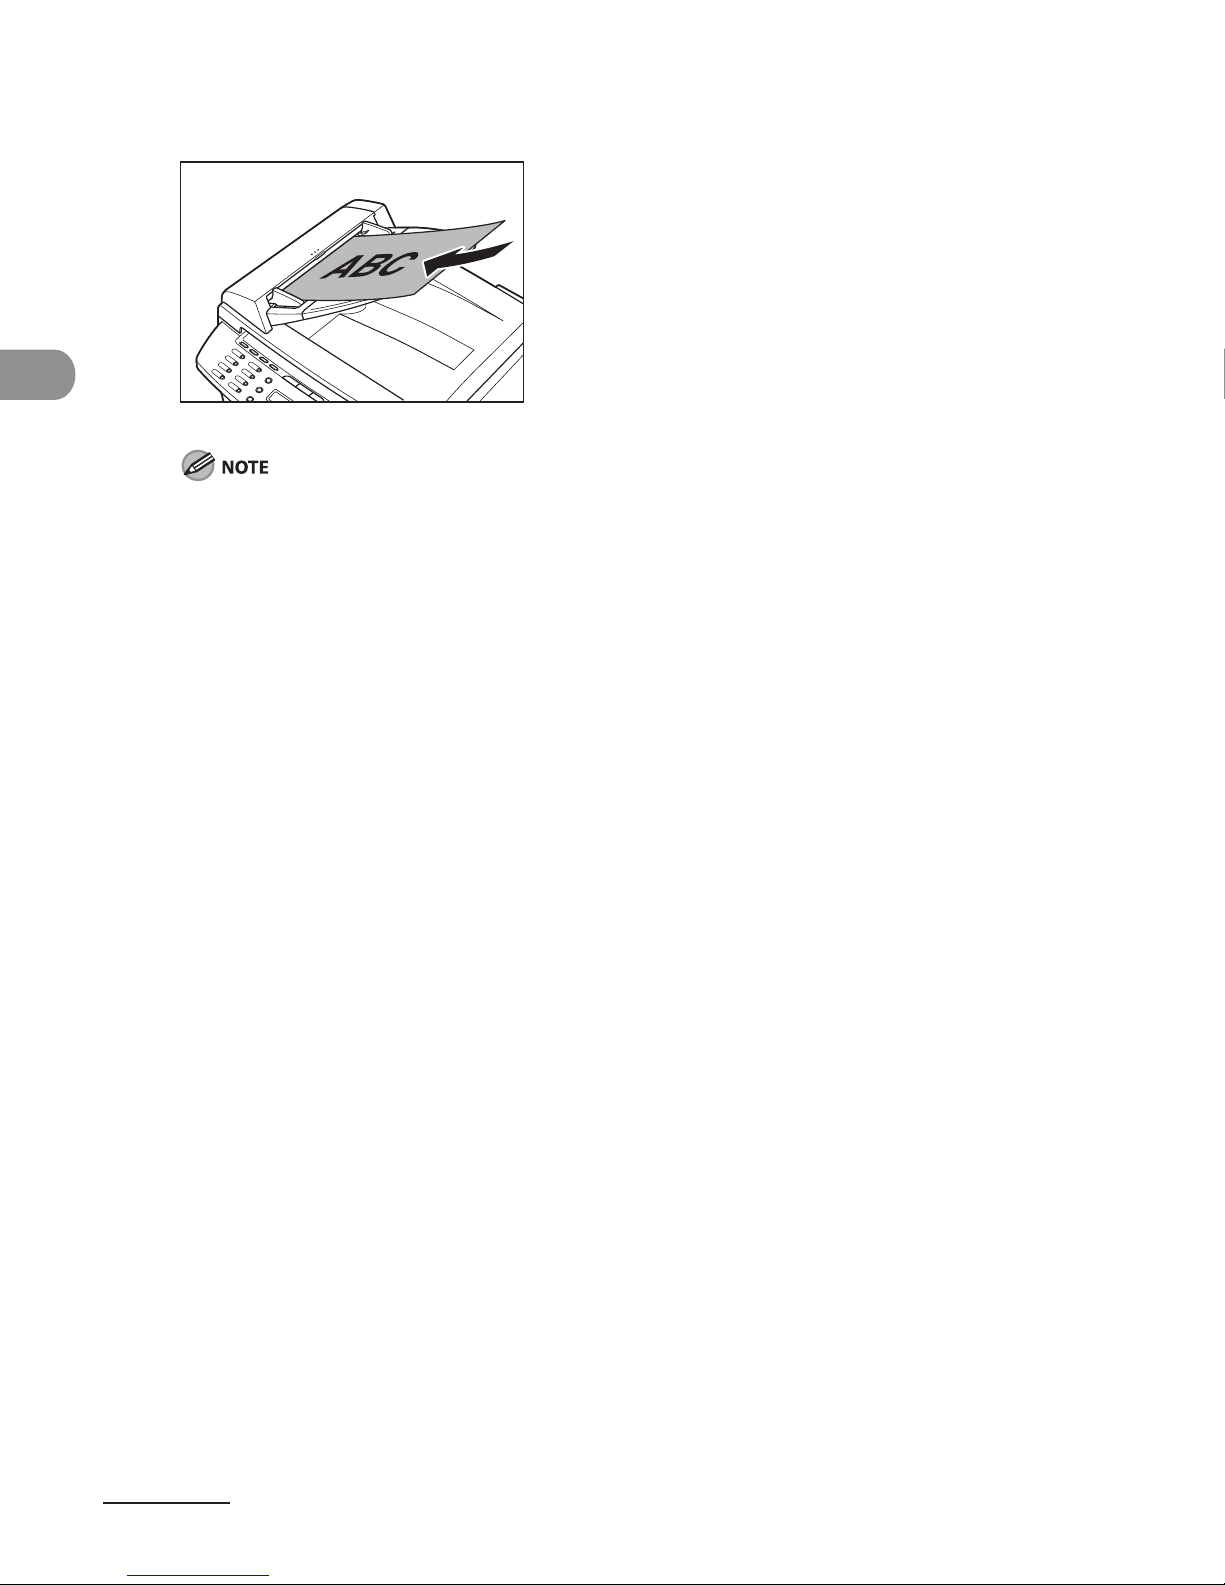
3 Neatly place the documents face up in the document feeder tray.
The document is ready for scanning.
Do not add or remove documents while they are being scanned.
When scanning is complete, remove the documents from the document delivery tray to avoid paper
jams.
Avoid using ADF to scan the same document more than 30 times. When scanned repeatedly,
documents can become folded or torn, which may cause paper jams.
If the feeder rollers are soiled from scanning a document written in pencil, clean them. (See “Cleaning
the Machine,” on p. 10-2.)
–
–
–
–
Page 55
2-9
Document and Paper
Paper Requirements
Paper cassette Multi-purpose tray
Size (W x L) A4, B5, A5, Executive, Envelope (COM10, Monarch, DL, ISO-C5 (162 x 229 mm)),
Oficio, Brazil-Oficio, Mexico-Oficio, Folio, Government-LTR, Government-LGL,
Foolscap, LTR, LGL (76 x 127 to 216 x 356 mm)
Weight 60 to 163 g/m
2
Quantity Max. 250 sheets
(Height: max. 25 mm)
Max. 1 sheet
Type Plain Paper, Plain Paper L, Heavy Paper, Heavy Paper H, Transparency
The default paper size is A4. If you use a different paper size, you must change the paper size settings. (See
“Setting Paper Size and Type,” on p. 2-15.)
Page 56

Document and Paper
2-10
To prevent paper jams, do not use any of the following:
Wrinkled or creased paper
Curled or rolled paper
Coated paper
Torn paper
Damp paper
Very thin paper
Paper which has been printed on using a thermal transfer printer (Do not copy on the
reverse side.)
The following types of paper do not print well:
Highly textured paper
Very smooth paper
Shiny paper
Make sure the paper is free from dust, lint, and oil stains.
Be sure to test paper before purchasing large quantities.
Store all paper wrapped and on a flat surface until ready for use. Keep opened packs in
their original packaging in a cool, dry location.
Store paper at 18°C–24°C, 40%–60% relative humidity.
Use only the transparencies designed for laser printers. Canon recommends you to use
Canon type transparencies with this machine.
●
–
–
–
–
–
–
–
●
–
–
–
●
●
●
●
●
Page 57
2-11
Document and Paper
Printable Area
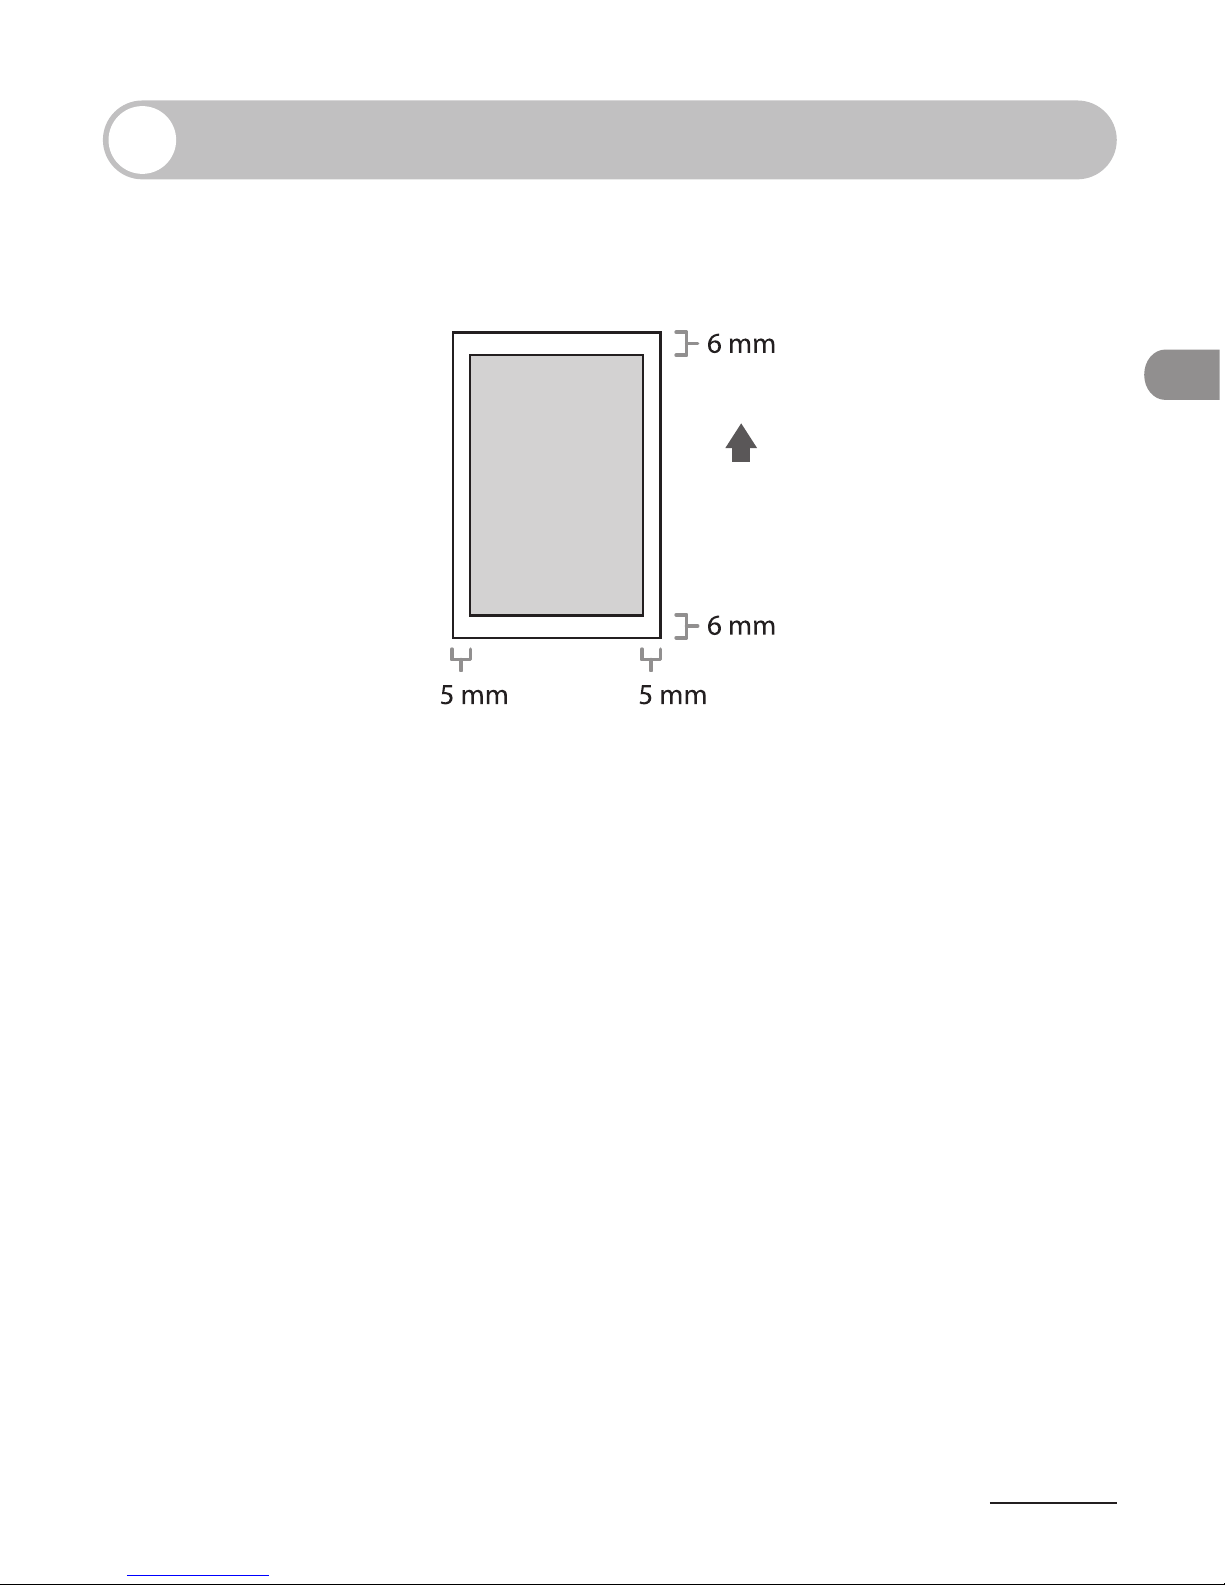
The shaded area indicates the approximate printable area of A4 paper and envelope.
Note that the margin widths listed are approximate and there may be slight variations
in actual use.
b
Page 58
Document and Paper
2-12
Loading Paper
To load paper in the paper cassette, see “Set Up the Machine,” in the Starter Guide.
Into the Multi-Purpose Tray
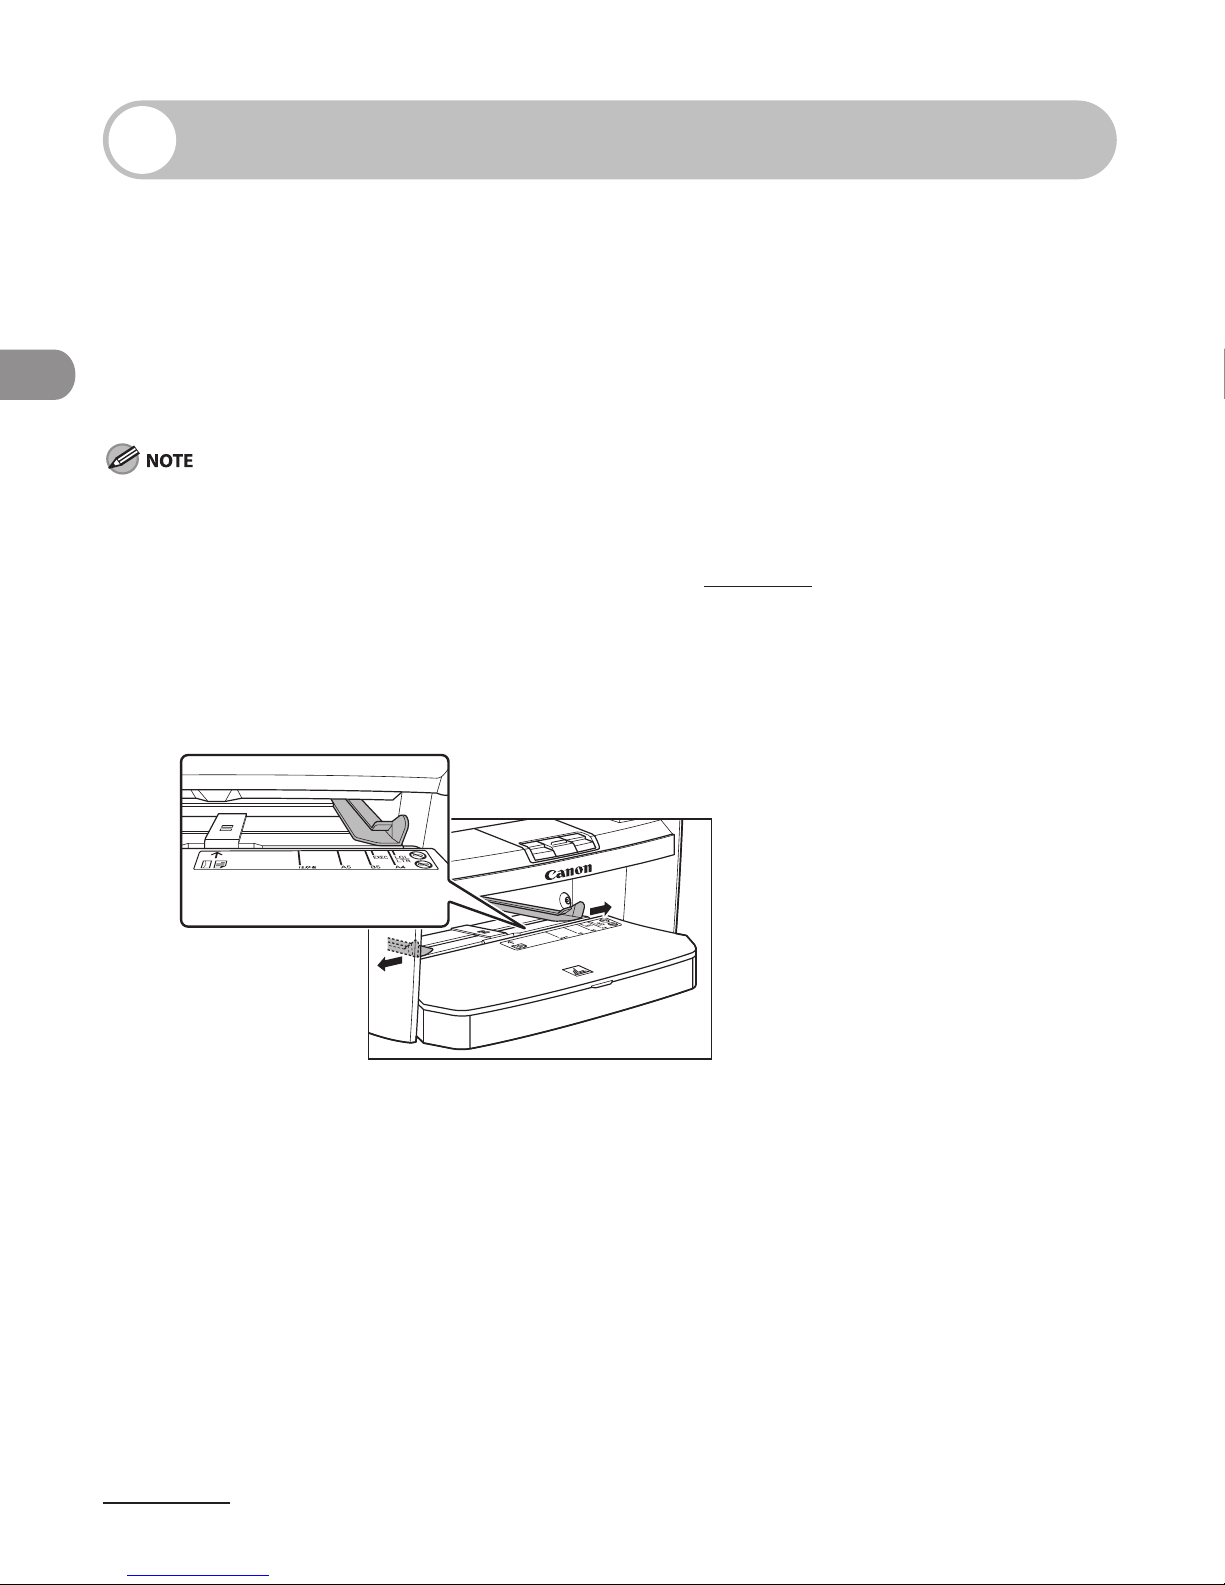
Use the multi-purpose tray when you want to copy or print on the different paper which is
in the paper cassette. Load paper one by one in the multi-purpose tray.
The paper in the multi-purpose tray is fed prior to the paper in the paper cassette.
The recommended envelopes are COM10, MONARCH, DL, and ISO-C5. Using other envelopes may affect the
quality of the printout.
Make sure to set the correct paper size in the printer driver. (See Online Help.)
When printing received documents, it is possible to feed paper only from the paper cassette. If paper is
loaded into the multi-purpose tray, <PAPER IN MP TRAY/REMOVE PAPER> appears.
1 Spread the paper guides a little wider than the actual paper width.
–
–
–
–
Page 59
2-13
Document and Paper
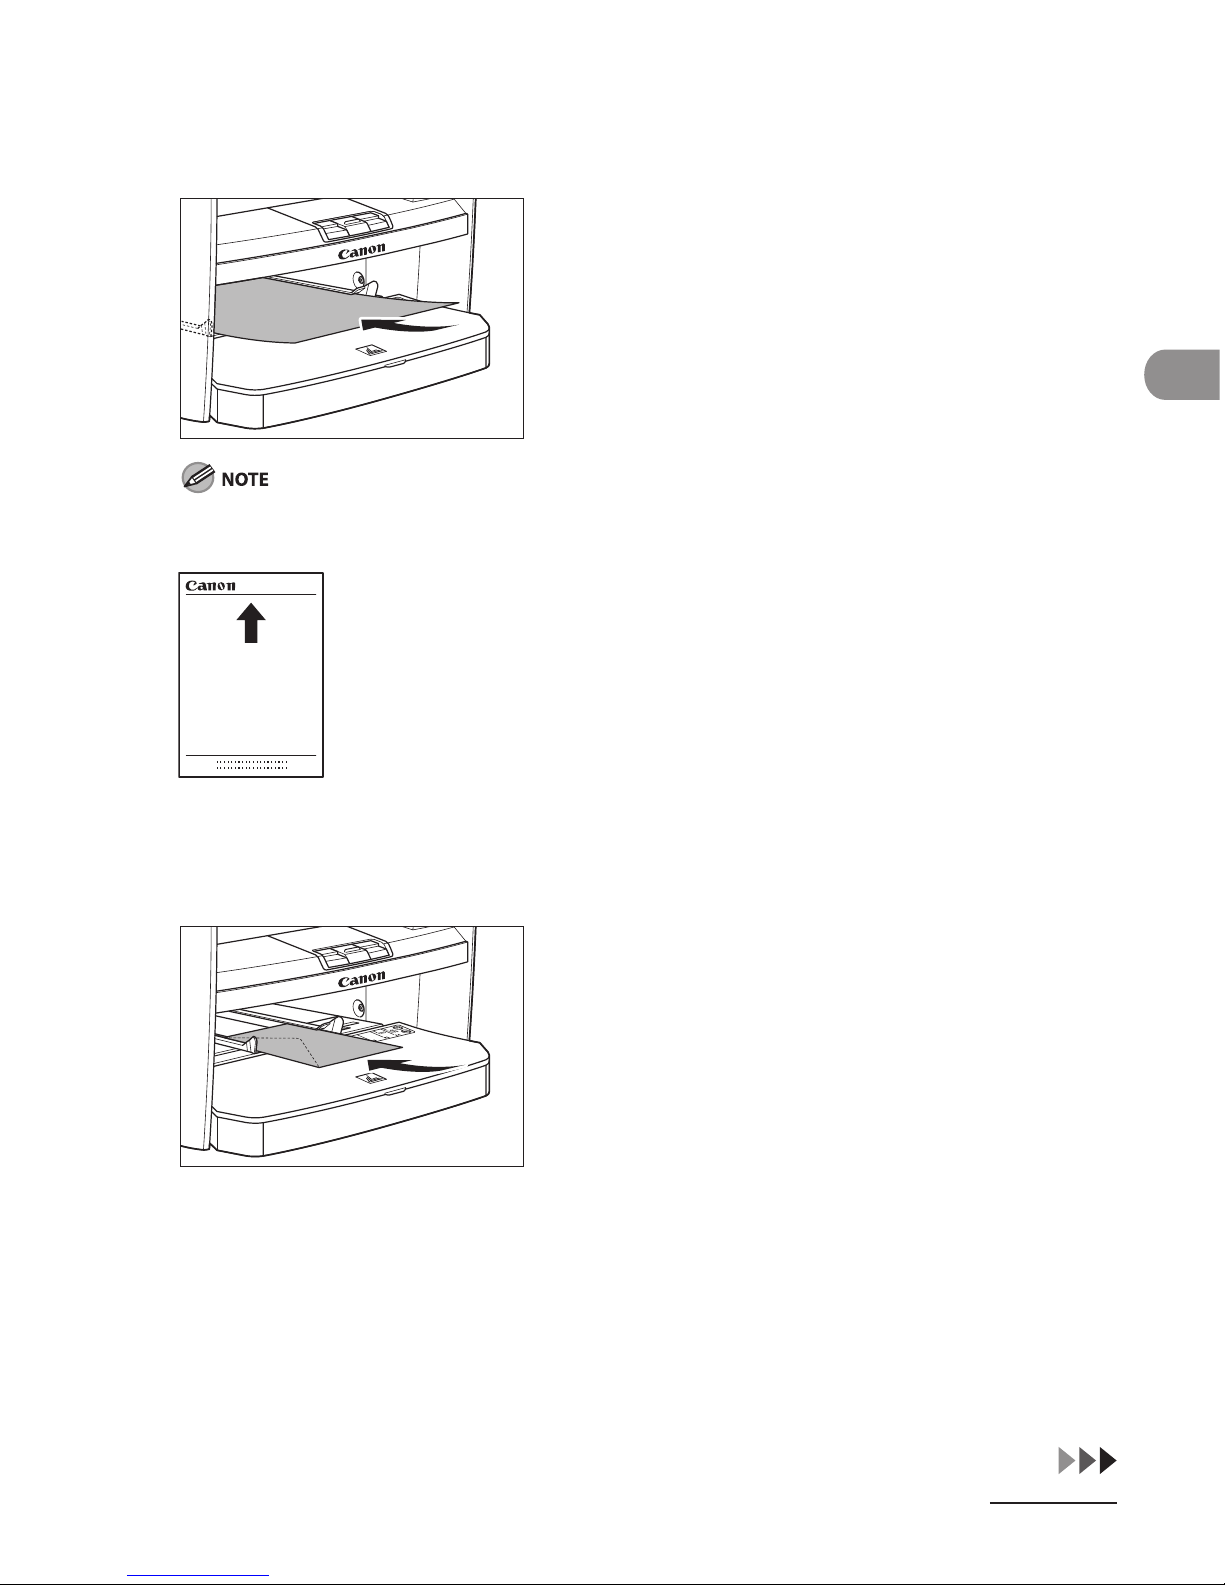
2 When setting paper, gently insert the paper into the multi-purpose tray with
the print side up.
When you load paper with a logo on, position the paper with the print side up (logo side) and insert it
so that the top of the paper feeds first in the multi-purpose tray.
When setting an envelope, gently insert the envelope into the multi-purpose
tray with the print side up and the right edge (i.e., closer to the stamp) first.
Page 60
Document and Paper
2-14
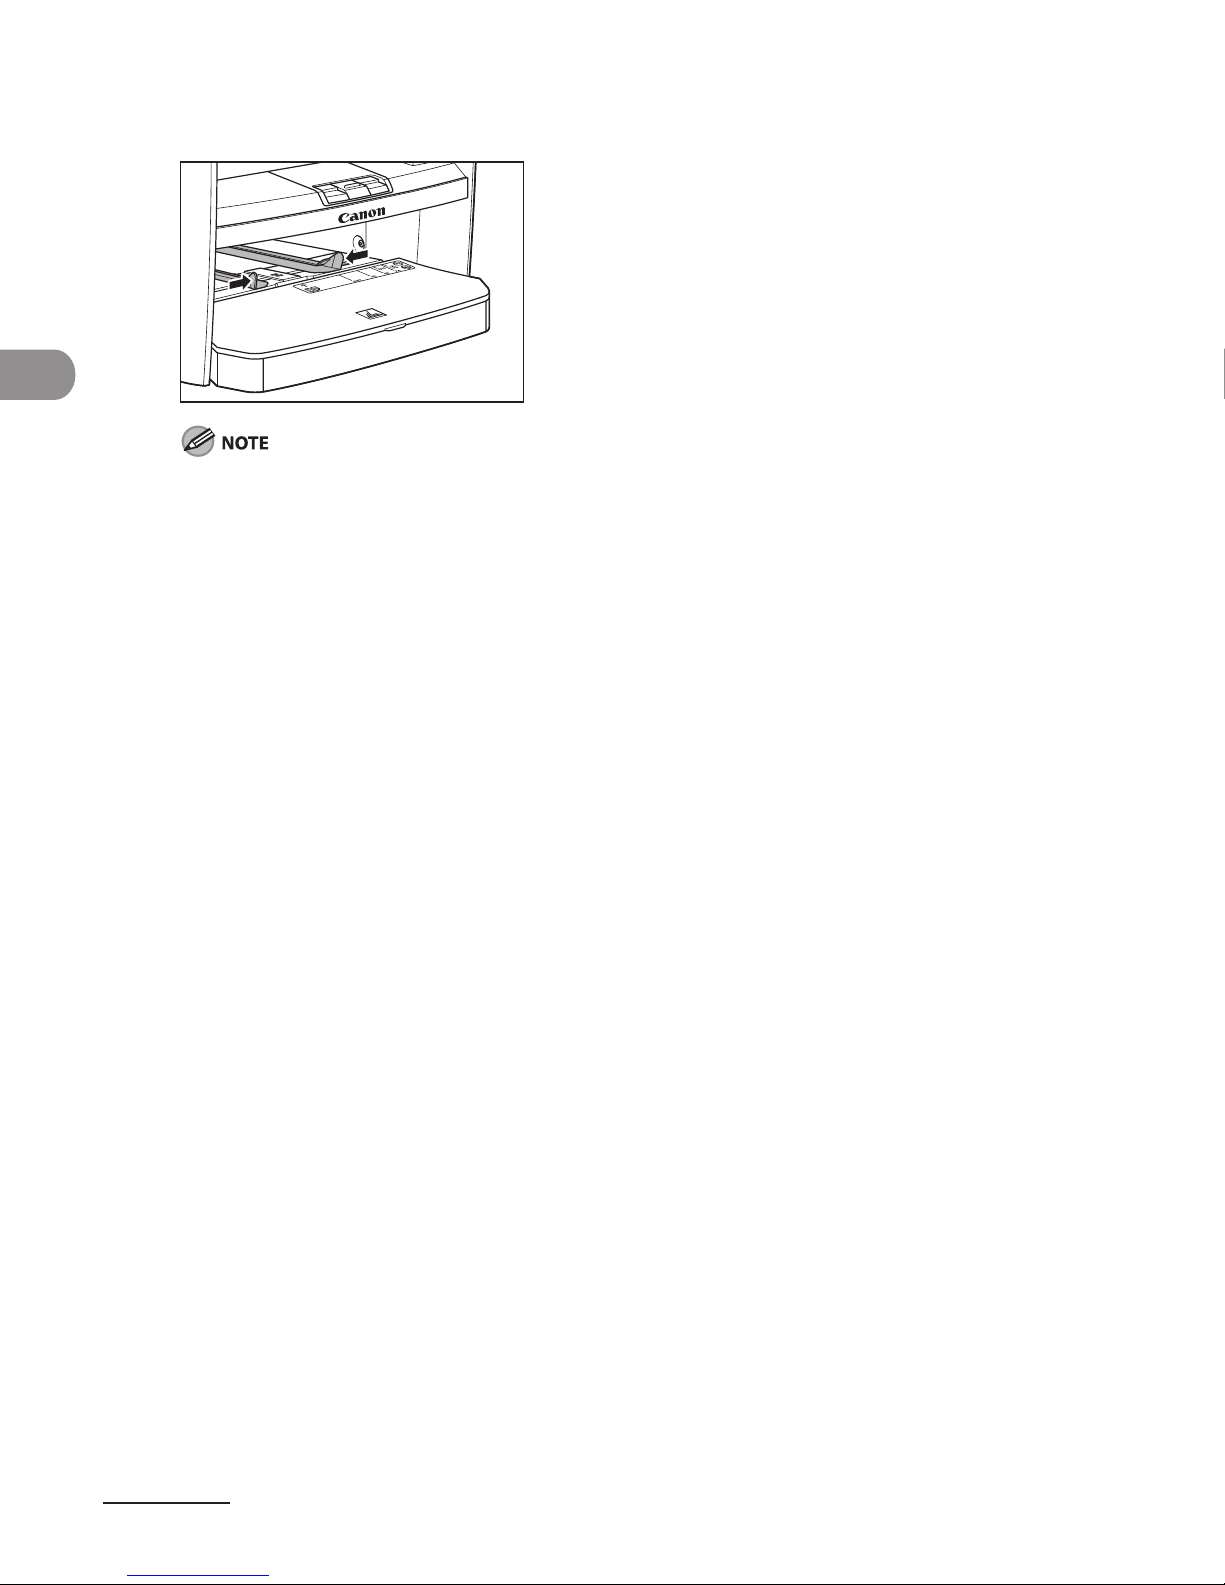
3 Slide the paper guides so that they fit to both sides of the paper.
If the paper guides are not adjusted correctly for the size of the paper, the quality of your printouts may
be adversely affected.
4 Specify the size and the type of the paper you load.
For details on how to specify the paper size and type, see “Setting Paper Size and Type,” on p. 2-15.
Page 61
2-15
Document and Paper
Setting Paper Size and Type
The default setting is <A4> and <PLAIN PAPER>. When you place other sizes and/or
types of paper, follow this procedure to change the settings.
The procedure is same for the paper cassette and multi-purpose tray except for
selecting the paper cassette or multi-purpose tray in step 3 and 6.
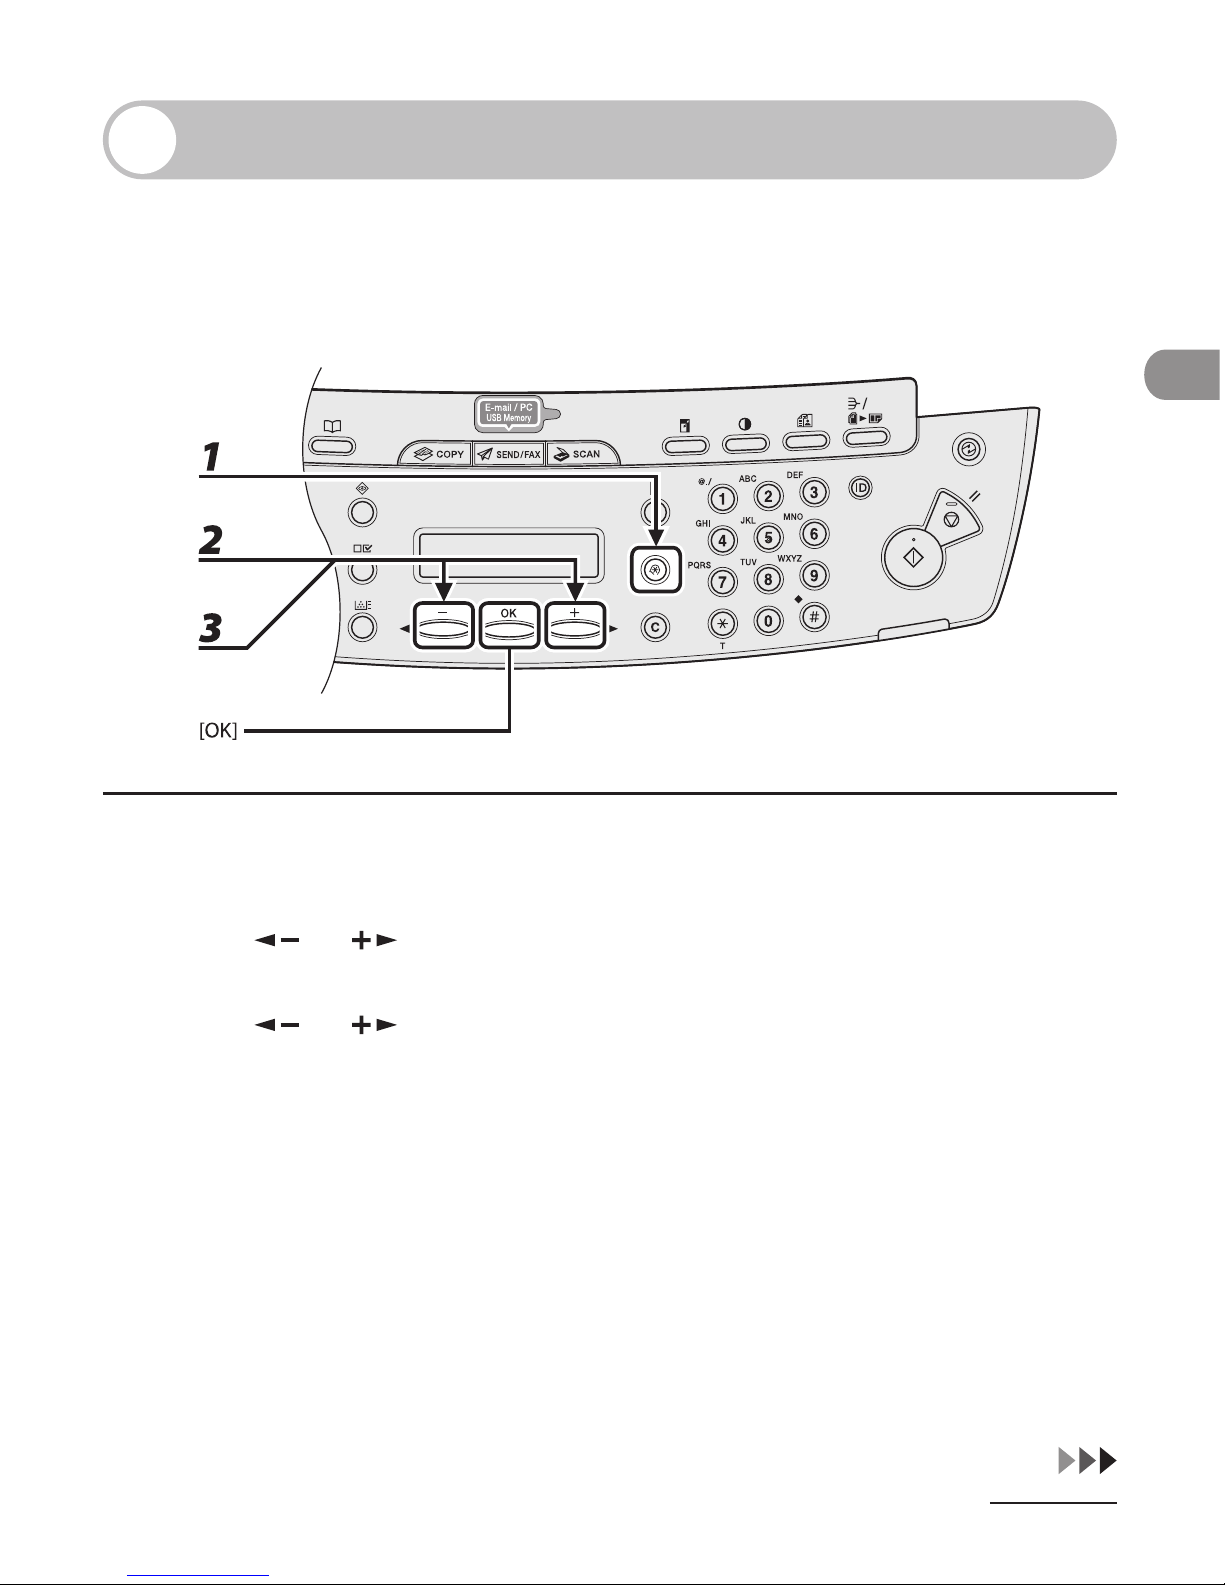
1 Press [Additional Functions].
2 Press [ ] or [ ] to select <PAPER SETTINGS>, then press [OK].
3 Press [ ] or [ ] to select <CASSETTE> or <MP TRAY>, then press [OK].
Page 62
Document and Paper
2-16
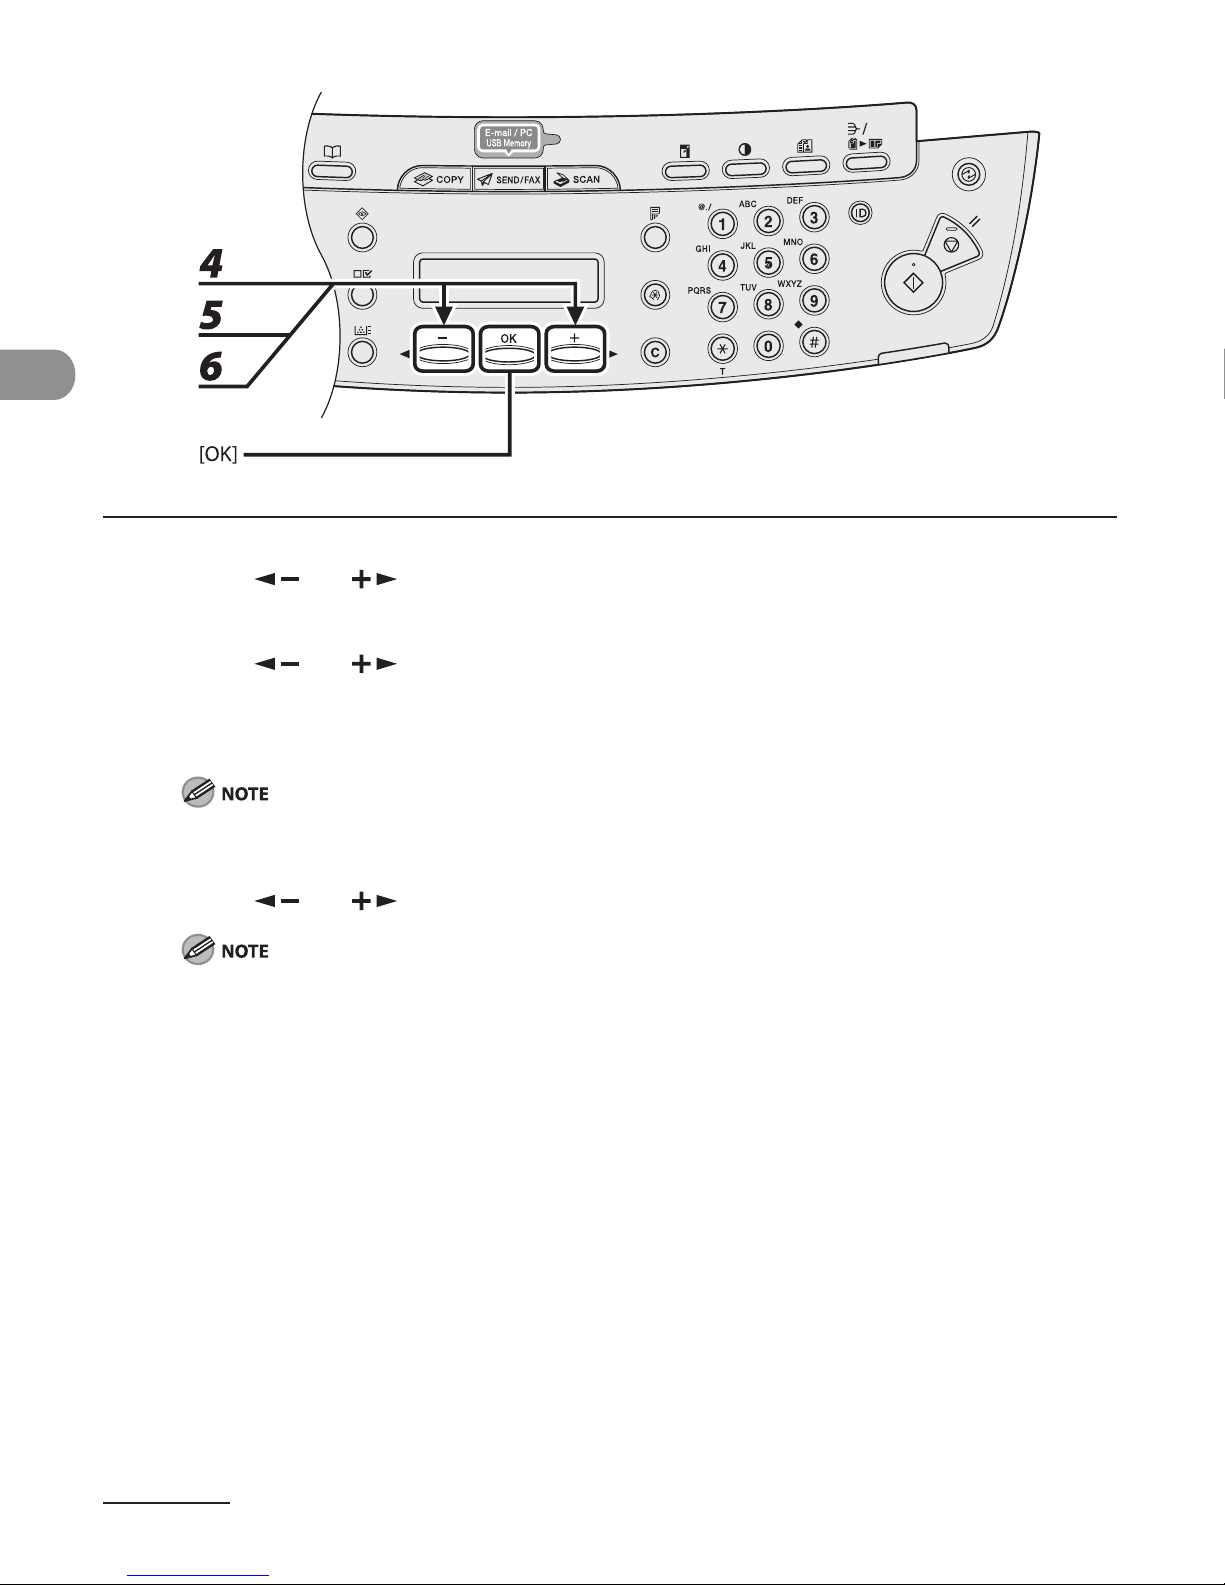
4 Press [ ] or [ ] to select <PAPER SIZE>, then press [OK].
5 Press [ ] or [ ] to select the paper size, then press [OK].
You can select from the following paper sizes:
<A4>, <B5>, <A5>, <EXECUTIV>, <COM10>, <MONARCH>, <DL>, <ISO-C5>, <OFICIO>, <B-OFI>, <MOFI>, <FOLIO>, <G-LTR>, <G-LGL>, <FLSP>, <LTR>, <LGL>
The paper sizes available will vary depending on the country where the unit was purchased.
6 Press [ ] or [ ] to select <SELECT PAPER TYPE>, then press [OK].
If you have selected <B5>, <A5>, <EXECUTIV>, <COM10>, <MONARCH>, <DL> or <ISO-C5> for the
paper size in step 5, <SELECT PAPER TYPE> is not displayed. Skip to step 8.
Page 63
2-17
Document and Paper
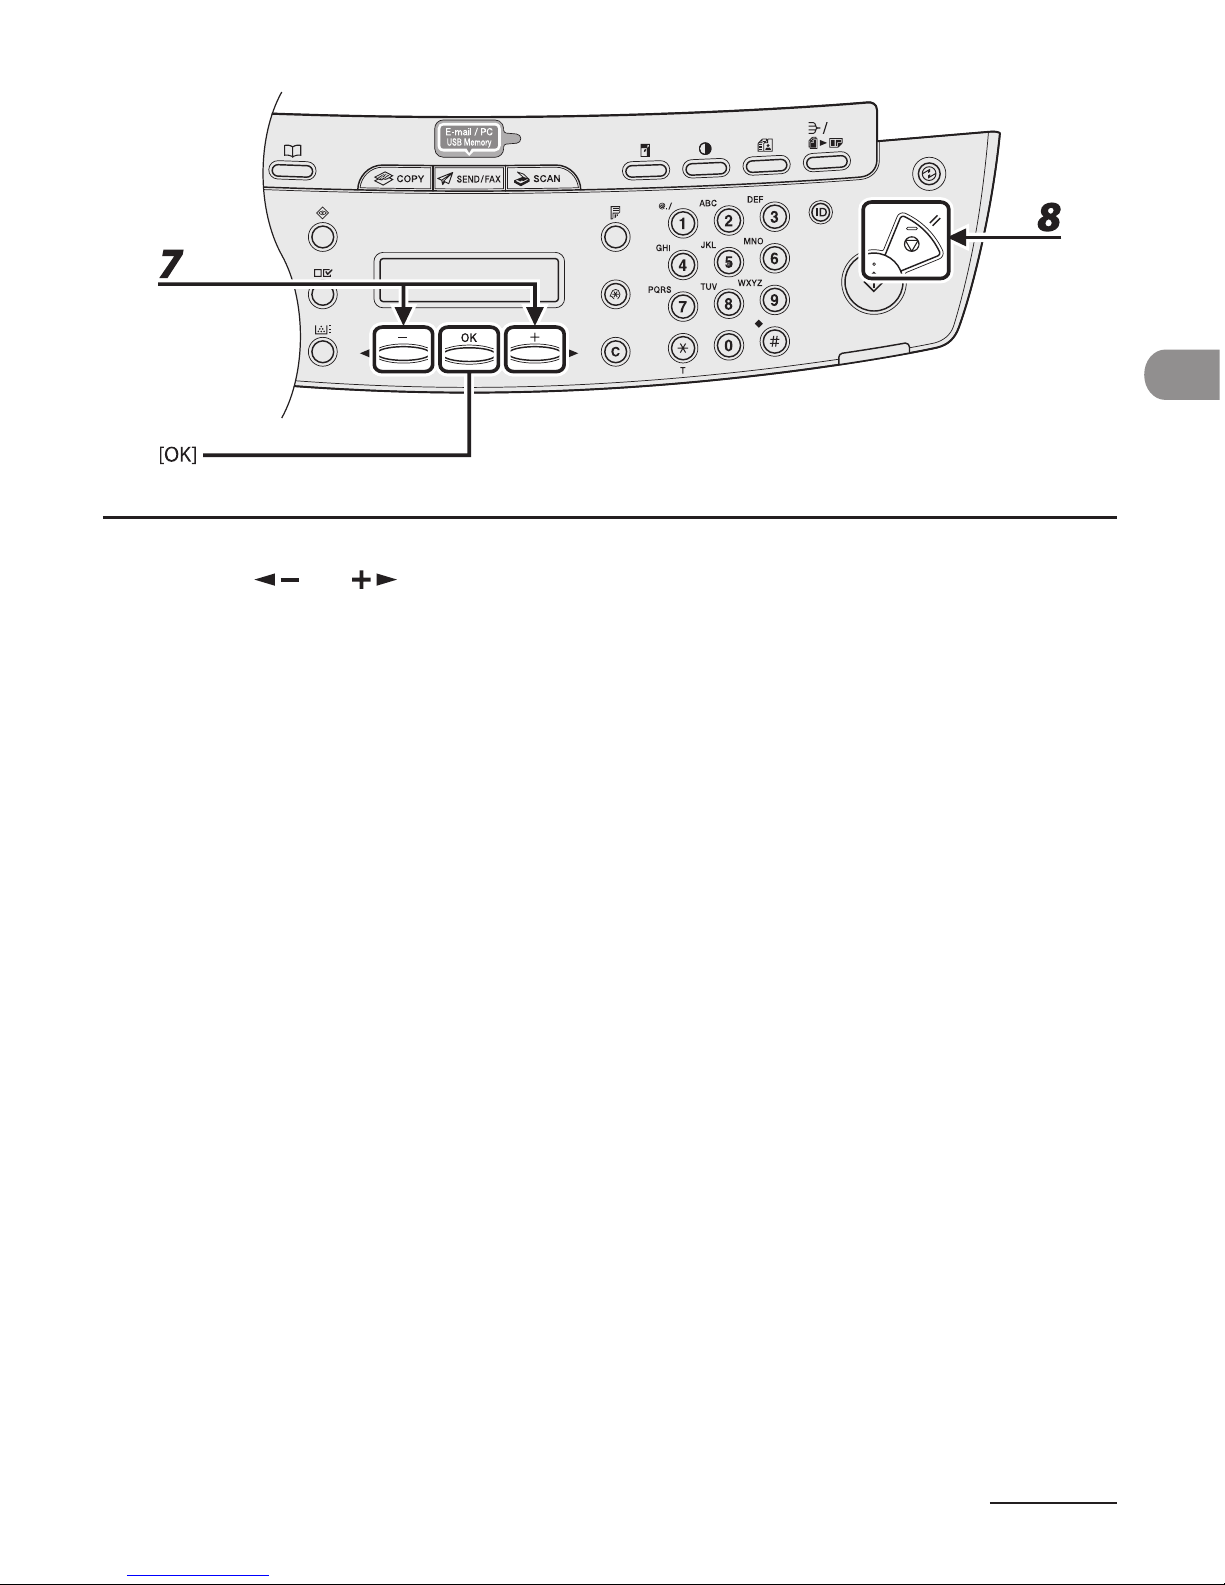
7 Press [ ] or [ ] to select the paper type, then press [OK].
You can select from the following paper types:
<PLAIN PAPER> or <PLAIN PAPER L>*
1
for Plain paper (64 g/m2 to 90 g/m2)
<HEAVY PAPER> or <HEAVY PAPER H>*
2
for Heavy paper (Paper cassette: 105 g/m2 to 128 g/m2, Multi-
purpose tray: 105 g/m
2
to 163 g/m2) or Envelope
<TRANSPARENCY> for Transparency
*
1
If paper curls excessively when printed with <PLAIN PAPER> selected, select <PLAIN PAPER L>.
*
2
If print fixing is not sufficient when printed with <HEAVY PAPER> selected, select <HEAVY PAPER H>.
8 Press [Stop/Reset] to return to the standby mode.
Page 64

Copying
3
Copying
Basic Copying Method ∙∙∙∙∙∙∙∙∙∙∙∙∙∙∙∙∙∙∙∙∙∙∙∙∙∙∙∙∙∙∙∙∙∙∙∙∙∙∙∙∙∙∙∙∙∙∙∙∙∙∙∙∙∙∙∙∙∙∙∙∙∙∙∙3-2
Scan Settings ∙∙∙∙∙∙∙∙∙∙∙∙∙∙∙∙∙∙∙∙∙∙∙∙∙∙∙∙∙∙∙∙∙∙∙∙∙∙∙∙∙∙∙∙∙∙∙∙∙∙∙∙∙∙∙∙∙∙∙∙∙∙∙∙∙∙∙∙∙∙∙∙∙∙∙∙∙∙∙3-4
Image Quality ∙∙∙∙∙∙∙∙∙∙∙∙∙∙∙∙∙∙∙∙∙∙∙∙∙∙∙∙∙∙∙∙∙∙∙∙∙∙∙∙∙∙∙∙∙∙∙∙∙∙∙∙∙∙∙∙∙∙∙∙∙∙∙∙∙∙∙∙∙∙∙∙∙∙∙∙∙∙∙∙∙∙∙∙∙∙∙∙ 3-4
Density ∙∙∙∙∙∙∙∙∙∙∙∙∙∙∙∙∙∙∙∙∙∙∙∙∙∙∙∙∙∙∙∙∙∙∙∙∙∙∙∙∙∙∙∙∙∙∙∙∙∙∙∙∙∙∙∙∙∙∙∙∙∙∙∙∙∙∙∙∙∙∙∙∙∙∙∙∙∙∙∙∙∙∙∙∙∙∙∙∙∙∙∙∙∙∙∙∙∙∙∙∙ 3-5
Zoom Ratio ∙∙∙∙∙∙∙∙∙∙∙∙∙∙∙∙∙∙∙∙∙∙∙∙∙∙∙∙∙∙∙∙∙∙∙∙∙∙∙∙∙∙∙∙∙∙∙∙∙∙∙∙∙∙∙∙∙∙∙∙∙∙∙∙∙∙∙∙∙∙∙∙∙∙∙∙∙∙∙∙∙∙∙∙∙∙∙∙∙∙∙∙∙ 3-7
Collate Copy ∙∙∙∙∙∙∙∙∙∙∙∙∙∙∙∙∙∙∙∙∙∙∙∙∙∙∙∙∙∙∙∙∙∙∙∙∙∙∙∙∙∙∙∙∙∙∙∙∙∙∙∙∙∙∙∙∙∙∙∙∙∙∙∙∙∙∙∙∙∙∙∙∙∙∙∙∙∙ 3-10
2 on 1 Combination ∙∙∙∙∙∙∙∙∙∙∙∙∙∙∙∙∙∙∙∙∙∙∙∙∙∙∙∙∙∙∙∙∙∙∙∙∙∙∙∙∙∙∙∙∙∙∙∙∙∙∙∙∙∙∙∙∙∙∙∙∙∙∙∙∙∙ 3-12
Two-Sided Copying ∙∙∙∙∙∙∙∙∙∙∙∙∙∙∙∙∙∙∙∙∙∙∙∙∙∙∙∙∙∙∙∙∙∙∙∙∙∙∙∙∙∙∙∙∙∙∙∙∙∙∙∙∙∙∙∙∙∙∙∙∙∙∙∙∙∙ 3-14
Printing a Sample Page ∙∙∙∙∙∙∙∙∙∙∙∙∙∙∙∙∙∙∙∙∙∙∙∙∙∙∙∙∙∙∙∙∙∙∙∙∙∙∙∙∙∙∙∙∙∙∙∙∙∙∙∙∙∙∙∙∙∙∙∙ 3-16
Canceling Copy Jobs ∙∙∙∙∙∙∙∙∙∙∙∙∙∙∙∙∙∙∙∙∙∙∙∙∙∙∙∙∙∙∙∙∙∙∙∙∙∙∙∙∙∙∙∙∙∙∙∙∙∙∙∙∙∙∙∙∙∙∙∙∙∙∙∙∙ 3-17
Checking and Deleting Jobs ∙∙∙∙∙∙∙∙∙∙∙∙∙∙∙∙∙∙∙∙∙∙∙∙∙∙∙∙∙∙∙∙∙∙∙∙∙∙∙∙∙∙∙∙∙∙∙∙∙∙∙∙ 3-19
Checking and Deleting Copy Jobs ∙∙∙∙∙∙∙∙∙∙∙∙∙∙∙∙∙∙∙∙∙∙∙∙∙∙∙∙∙∙∙∙∙∙∙∙∙∙∙∙∙∙∙∙∙∙∙3-19
Page 65
Copying
3-2
Basic Copying Method
Follow this procedure to make a copy.
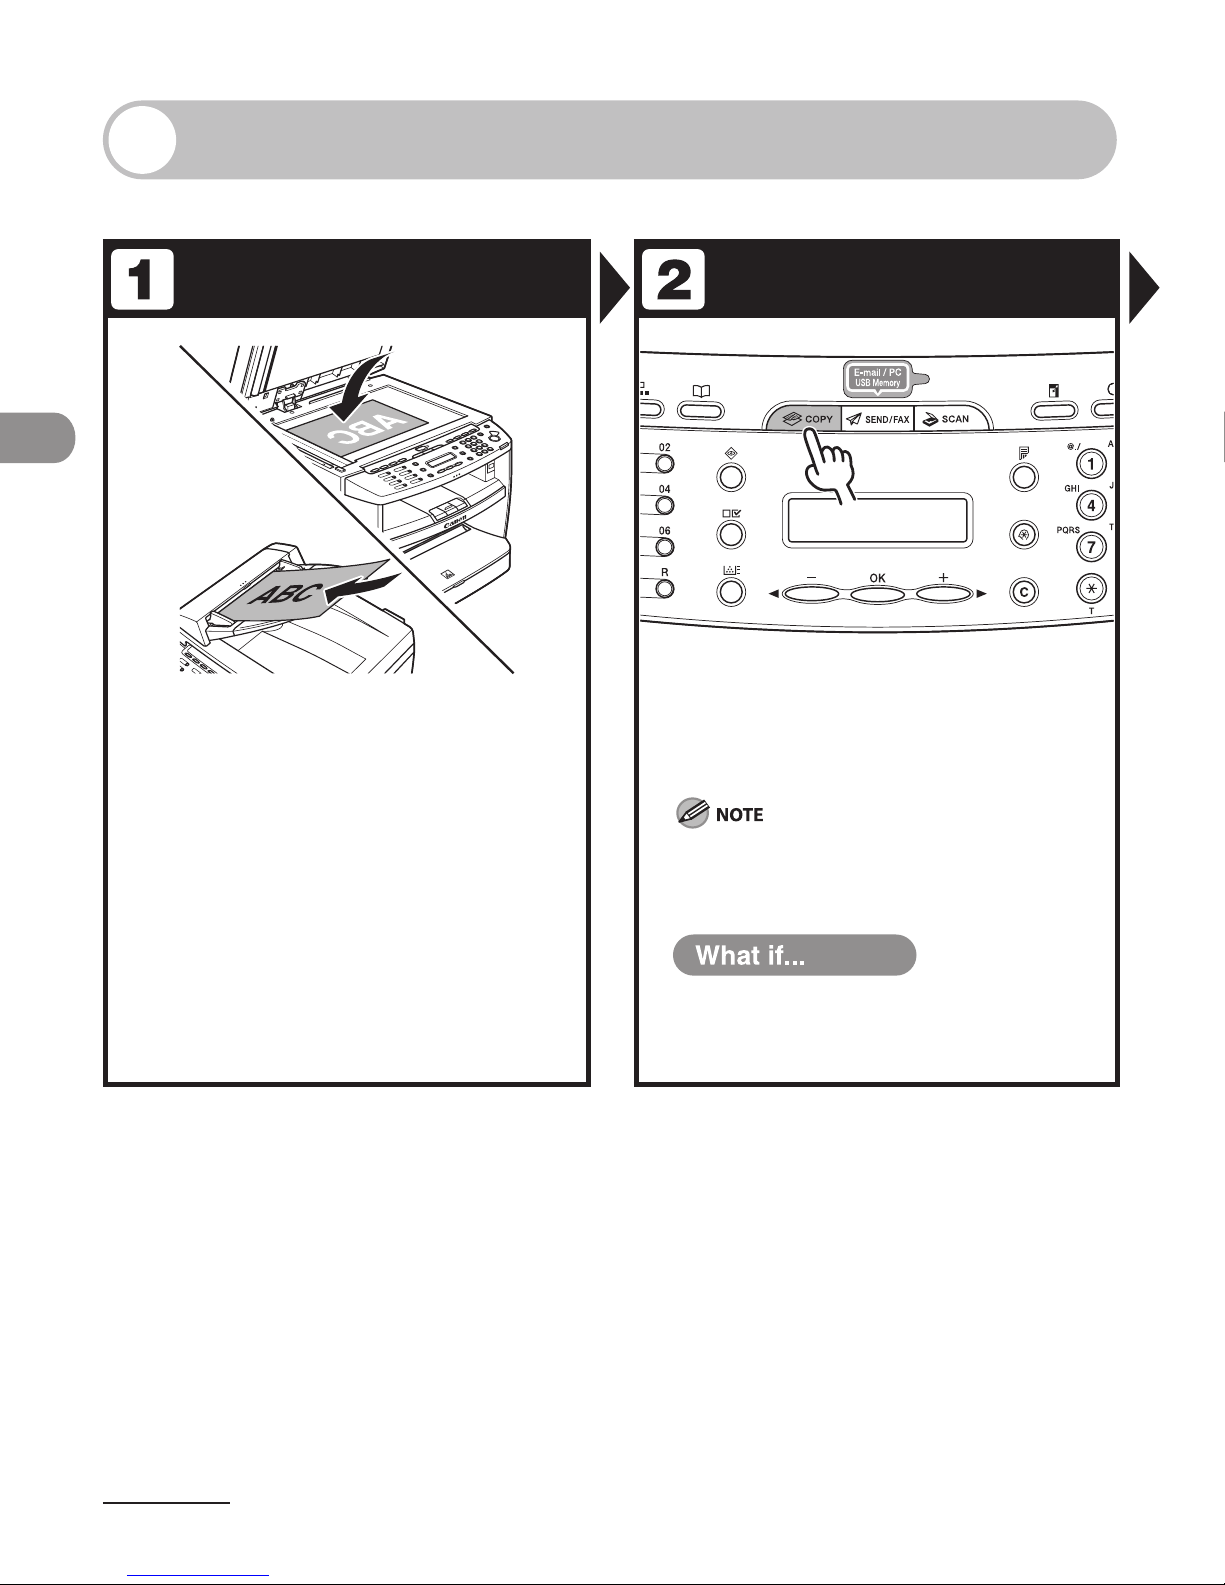
Set a Document Enter the Copy Mode
Place the document on the platen
glass or load it in the ADF.
For documents you can copy, see “Document
Requirements,” on p. 2-2.
Press [COPY]
The COPY indicator lights up and the machine enters the
copy standby mode.
When you are in the copy mode and press and hold
[OK], a sample page will be printed. For details, see
“Printing a Sample Page,” on p. 3-16.
You want to adjust the image quality,
density and zoom ratio:
See “Scan Settings,” on p. 3-4.
●
Page 66
3-3
Copying
Enter the Copy Quantity Start Copying
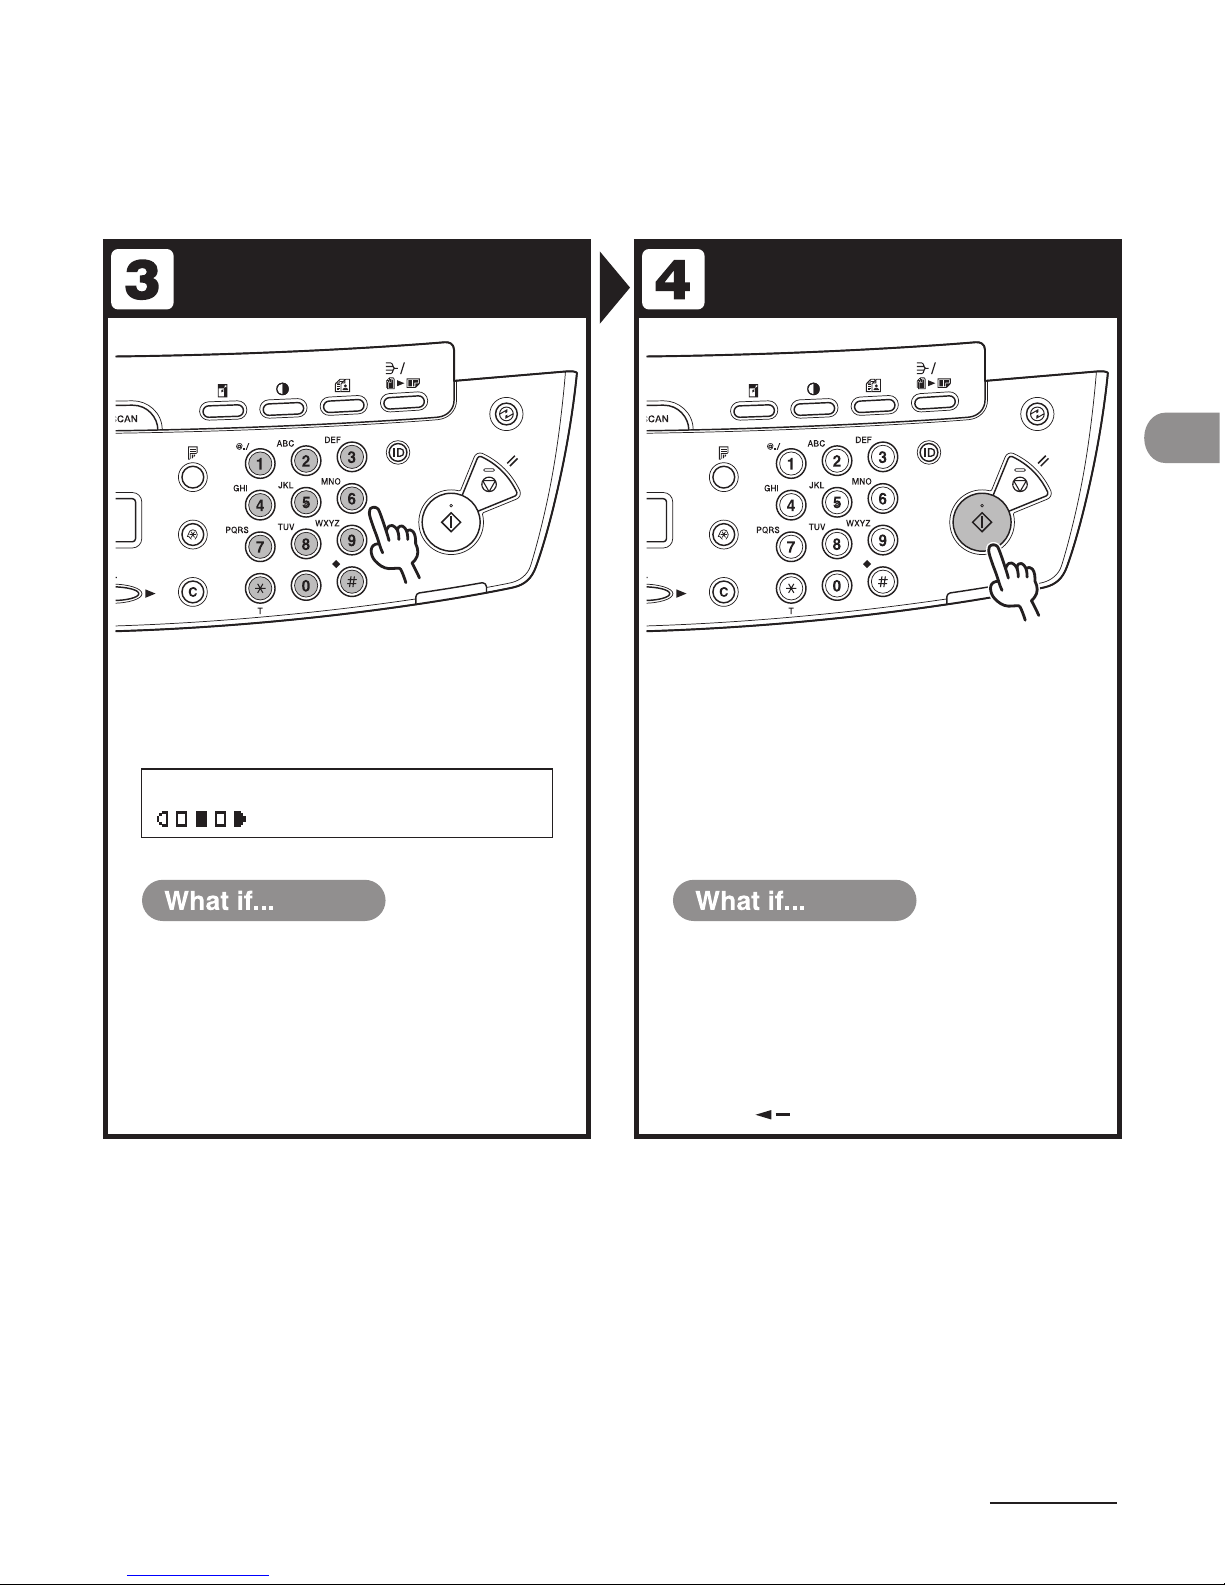
Use the numeric keys to enter the
desired copy quantity (1 to 99).
O3
A4100%
TEXT/PHOTO
Ex.
Press [Start].
You enter a wrong number:
Press [Clear], and enter a new number.
● You want to cancel copying:
Press [Stop/Reset] on the operation panel.
When the <STOP KEY PRESSED> message
appears, press [OK].
When the <CANCEL?> message appears,
press [
] to select <YES>.
●
Page 67
Copying
3-4
Scan Settings
Before pressing [Start] to begin copying, you can adjust the settings to better suit the
document to be scanned. These settings return to the default values if the Auto Clear
function is activated or if you press [Stop/Reset].
Image Quality
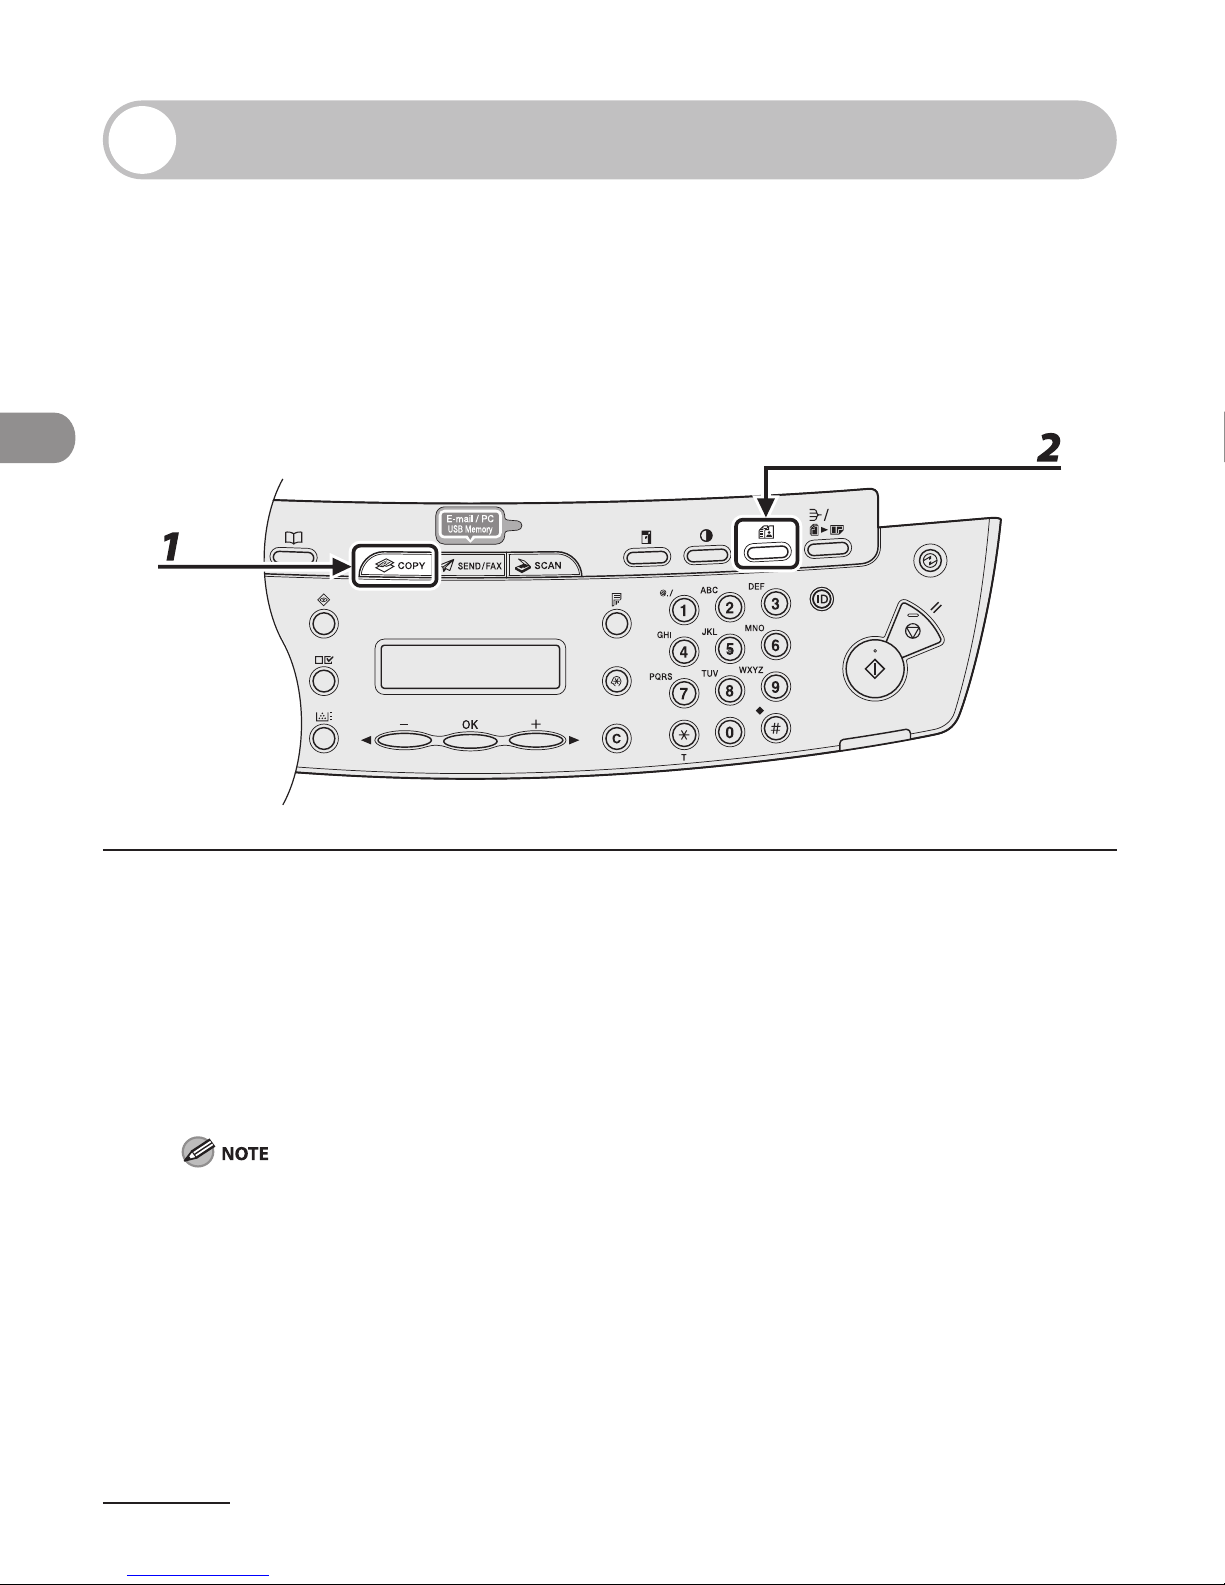
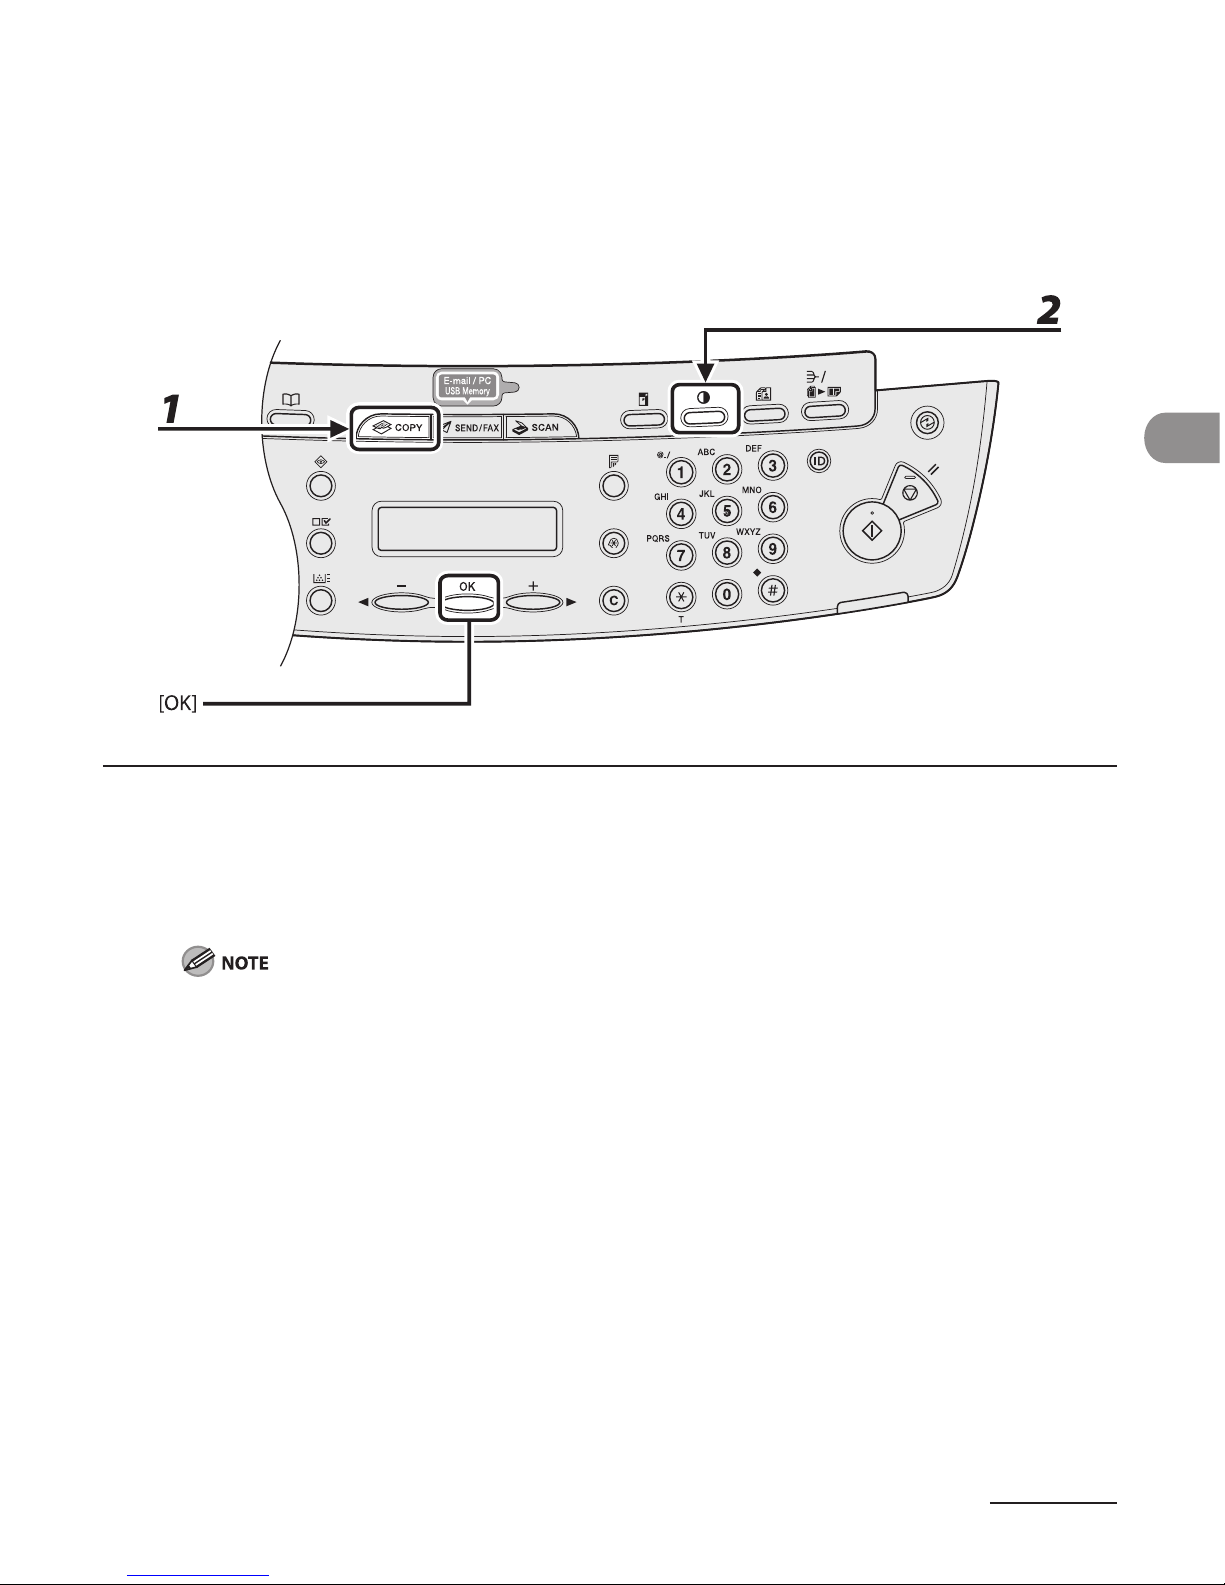
1 Press [COPY].
2 Press [Image Quality] repeatedly to select the document type.
<TEXT/PHOTO>: For documents that contain text and photos.
<TEXT/PHOTO+>: For documents that contain fine text and photos.
<TEXT>: For text documents.
<PHOTO>: For documents that contain fine text or photos.
Copy density automatically changes to the manual mode when <TEXT/PHOTO>, <PHOTO> or <TEXT/
PHOTO+> is set.
Page 68
3-5
Copying
Density
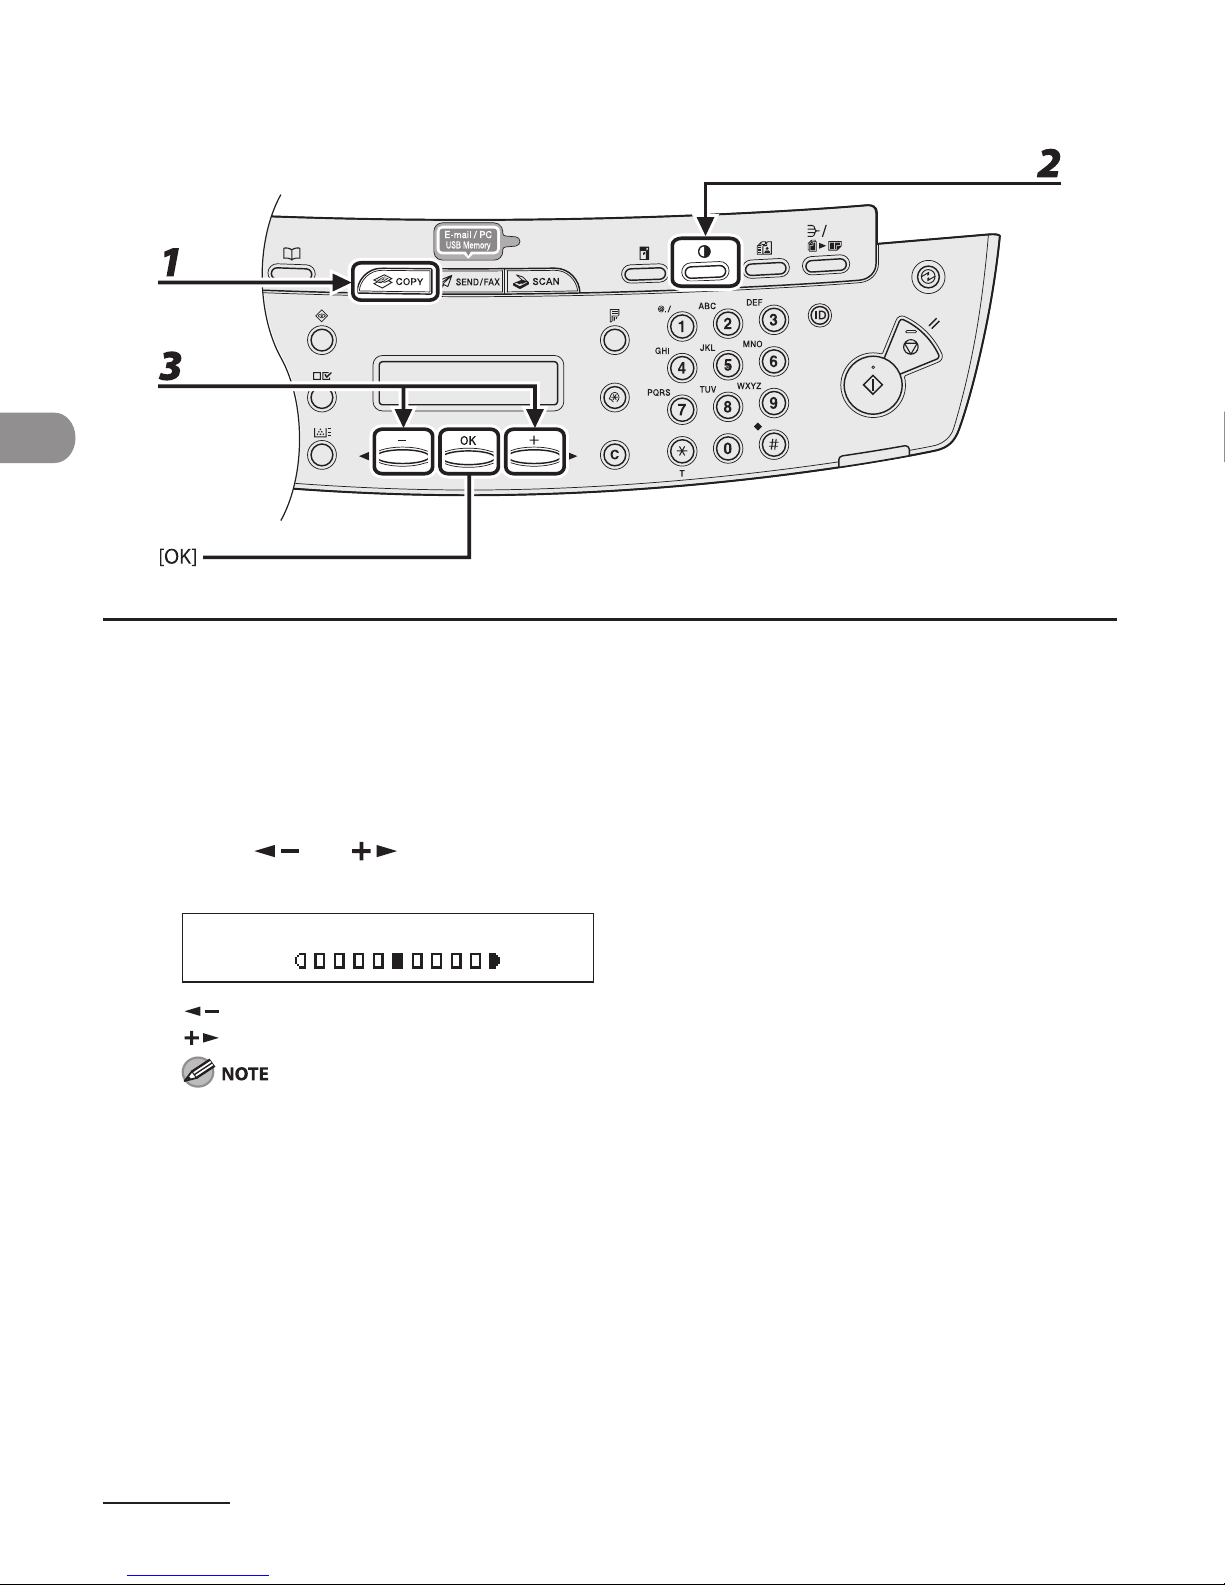
You can adjust the density to the most appropriate level for the document either
automatically or manually.
Adjusting Automatically
1 Press [COPY].
2 Press [Density] repeatedly to select <AUTO DENSITY>, then press [OK].
The image quality is automatically set to <TEXT>.
●
Page 69
Copying
3-6
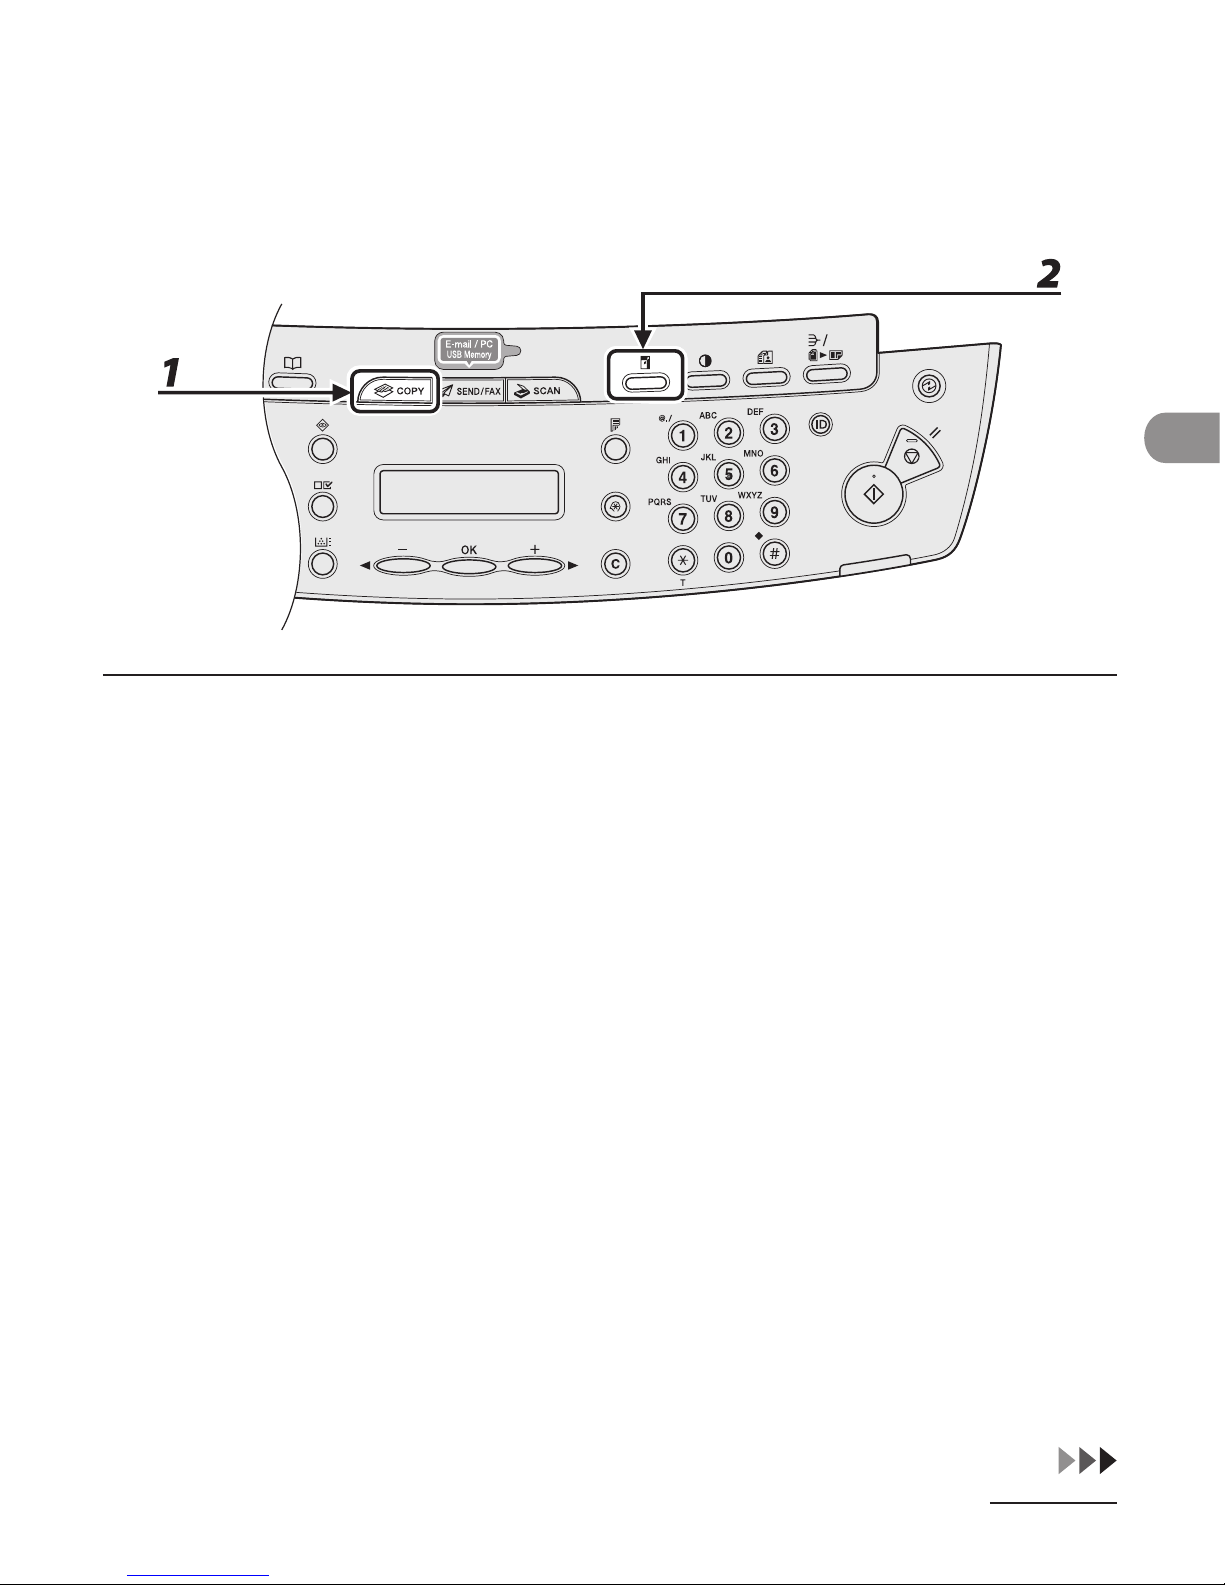
Adjusting Manually
1 Press [COPY].
2 Press [Density] repeatedly to select the manual mode.
3 Press [ ] or [ ] to adjust the copy density, then press [OK].
Ex.
DENSITY
-LT DK+
[ ]: to make dark documents lighter
[
]: to make light documents darker
To cancel all settings, press [Stop/Reset].
When you switch the mode by pressing the mode keys such as [SEND/FAX], all settings will be also
canceled. If you want to keep the settings, set the density as following;
[Additional Functions] <COPY SETTINGS> <STANDARD SETTINGS> <DENSITY> <MANUAL>
(See “Setting Menu,” on p. 12-6.)
●
–
–
Page 70
3-7
Copying
Zoom Ratio
Preset Zoom
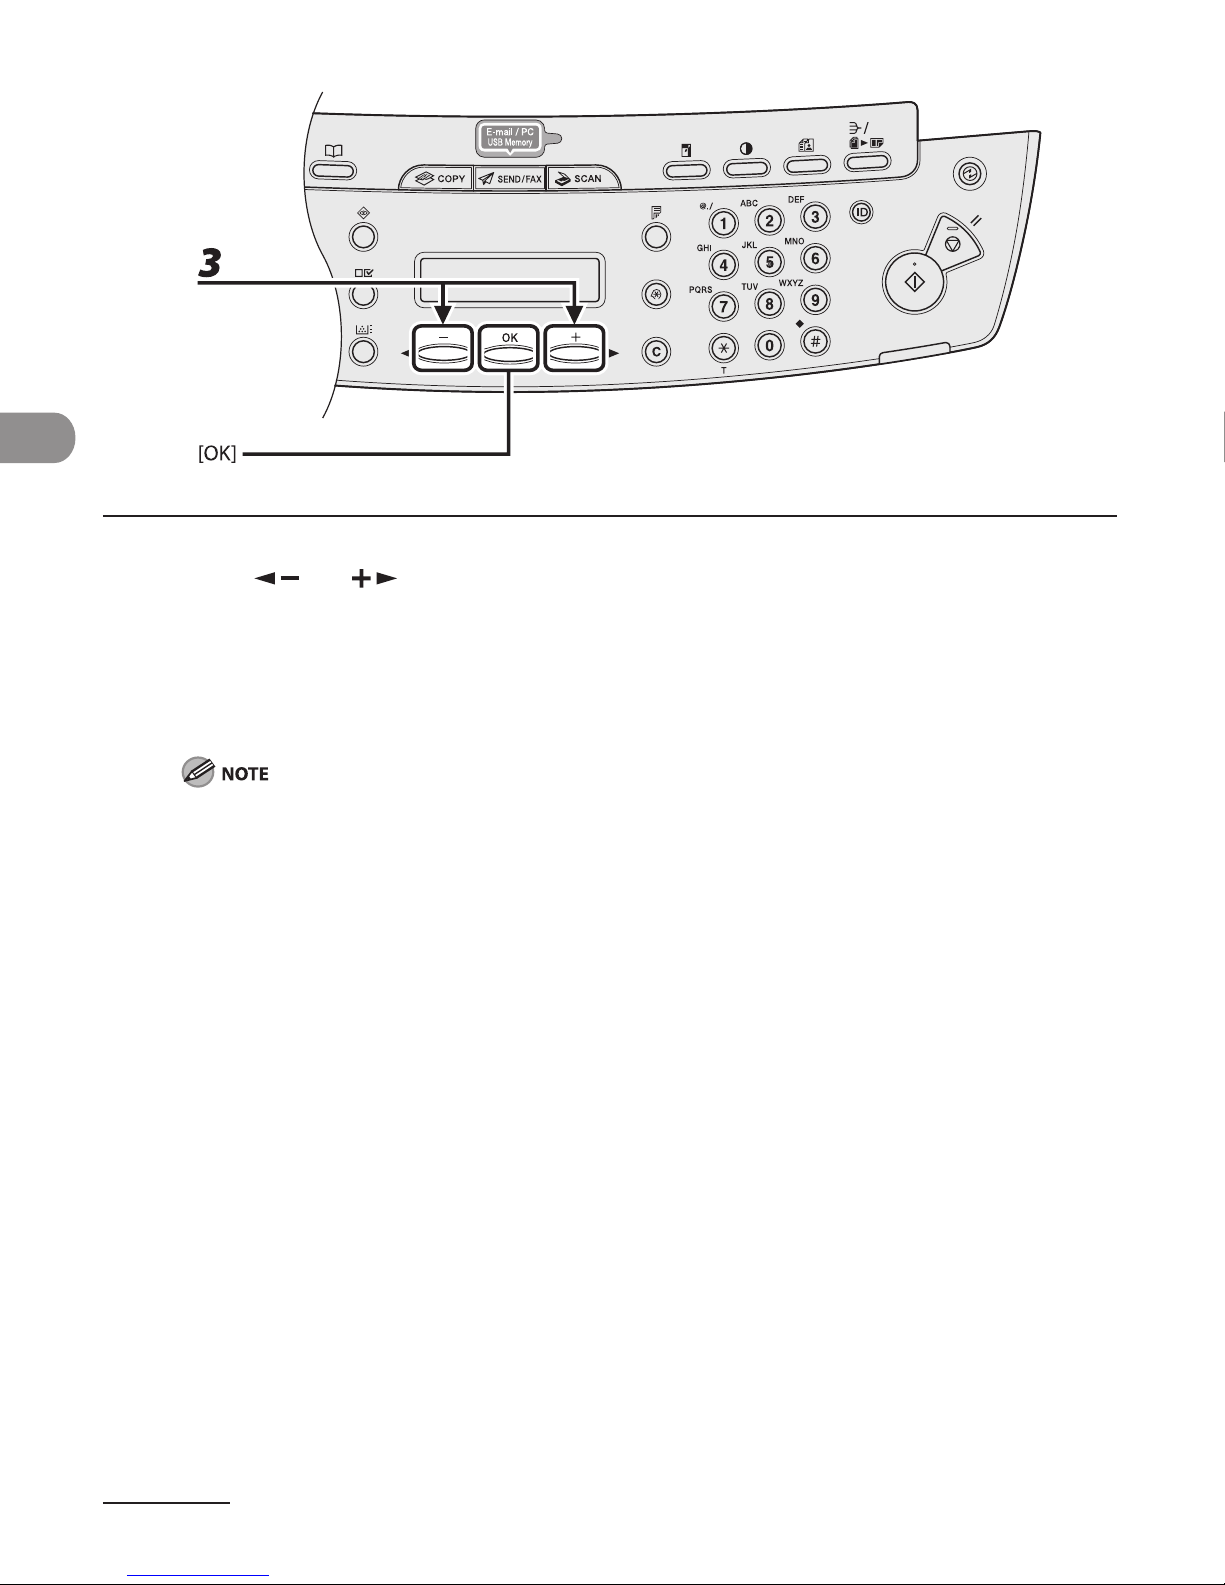
You can enlarge or reduce documents from one standard paper size to another.
1 Press [COPY].
2 Press [Enlarge/Reduce].
●
Page 71
Copying
3-8
3 Press [ ] or [ ] to adjust the copy density, then press [OK].
200% MAX.
141% A5 A4
100%
70% A4 A5
50% MIN.
When <PAPER SIZE GROUP> in the <COPY SETTINGS> menu is set to <INCHES> or <AB>, the preset
copy ratios change as follows:
INCHES: 50%, 64%, 78%, 100%, 129%, 200%
AB: 50%, 70%, 81%, 86%, 100%, 115%, 122%, 141%, 200%
–
–
–
–
–
Page 72
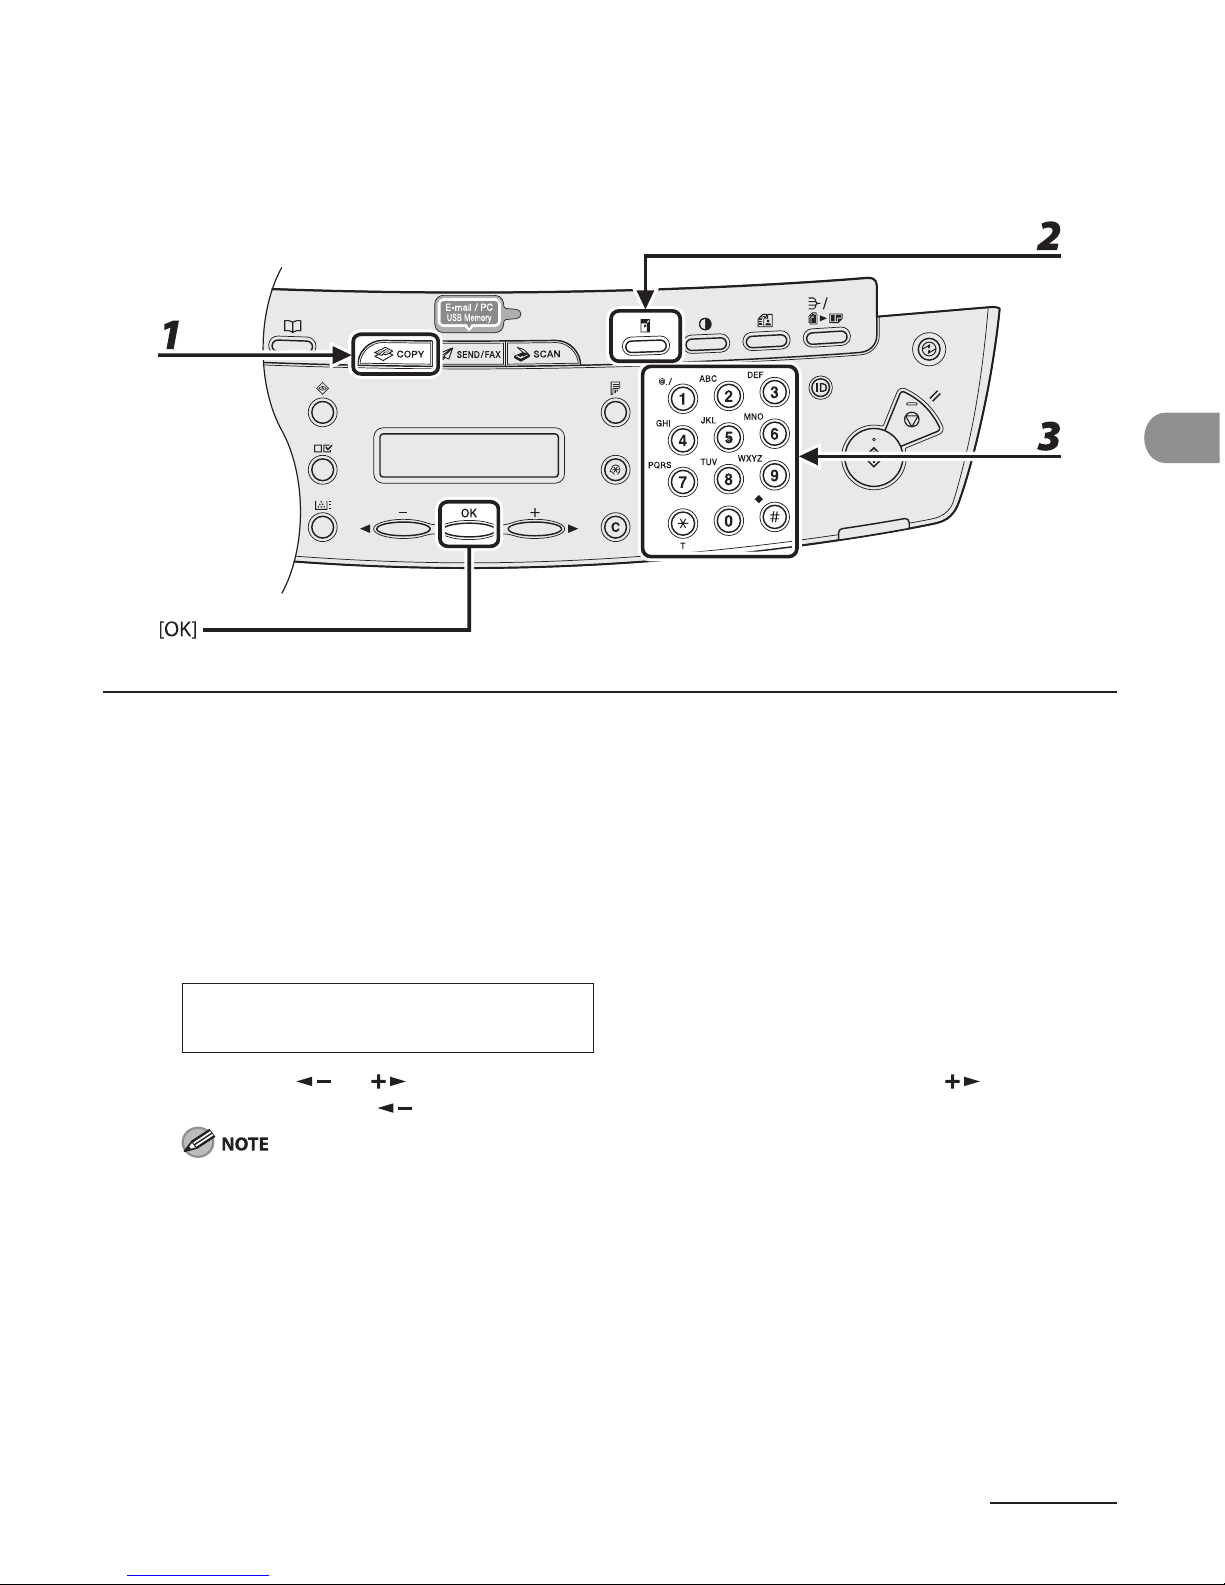
3-9
Copying
Zoom Designation
You can reduce or enlarge images by any copy ratio, in 1% increments. The available copy
ratios are from 50% to 200%.
1 Press [COPY].
2 Press [Enlarge/Reduce] twice.
3 Enter the copy ratio with the numeric keys, then press [OK].
- 100% +
ZOOM 50-200%
Ex.
You can use [ ] or [ ] to adjust the zoom ratio. To increase the zoom ratio, press [ ]. To decrease
the zoom ratio, press [
].
To return the copy ratio to 100%, press [Enlarge/Reduce] repeatedly to display <100%>, then press [OK].
●
Page 73
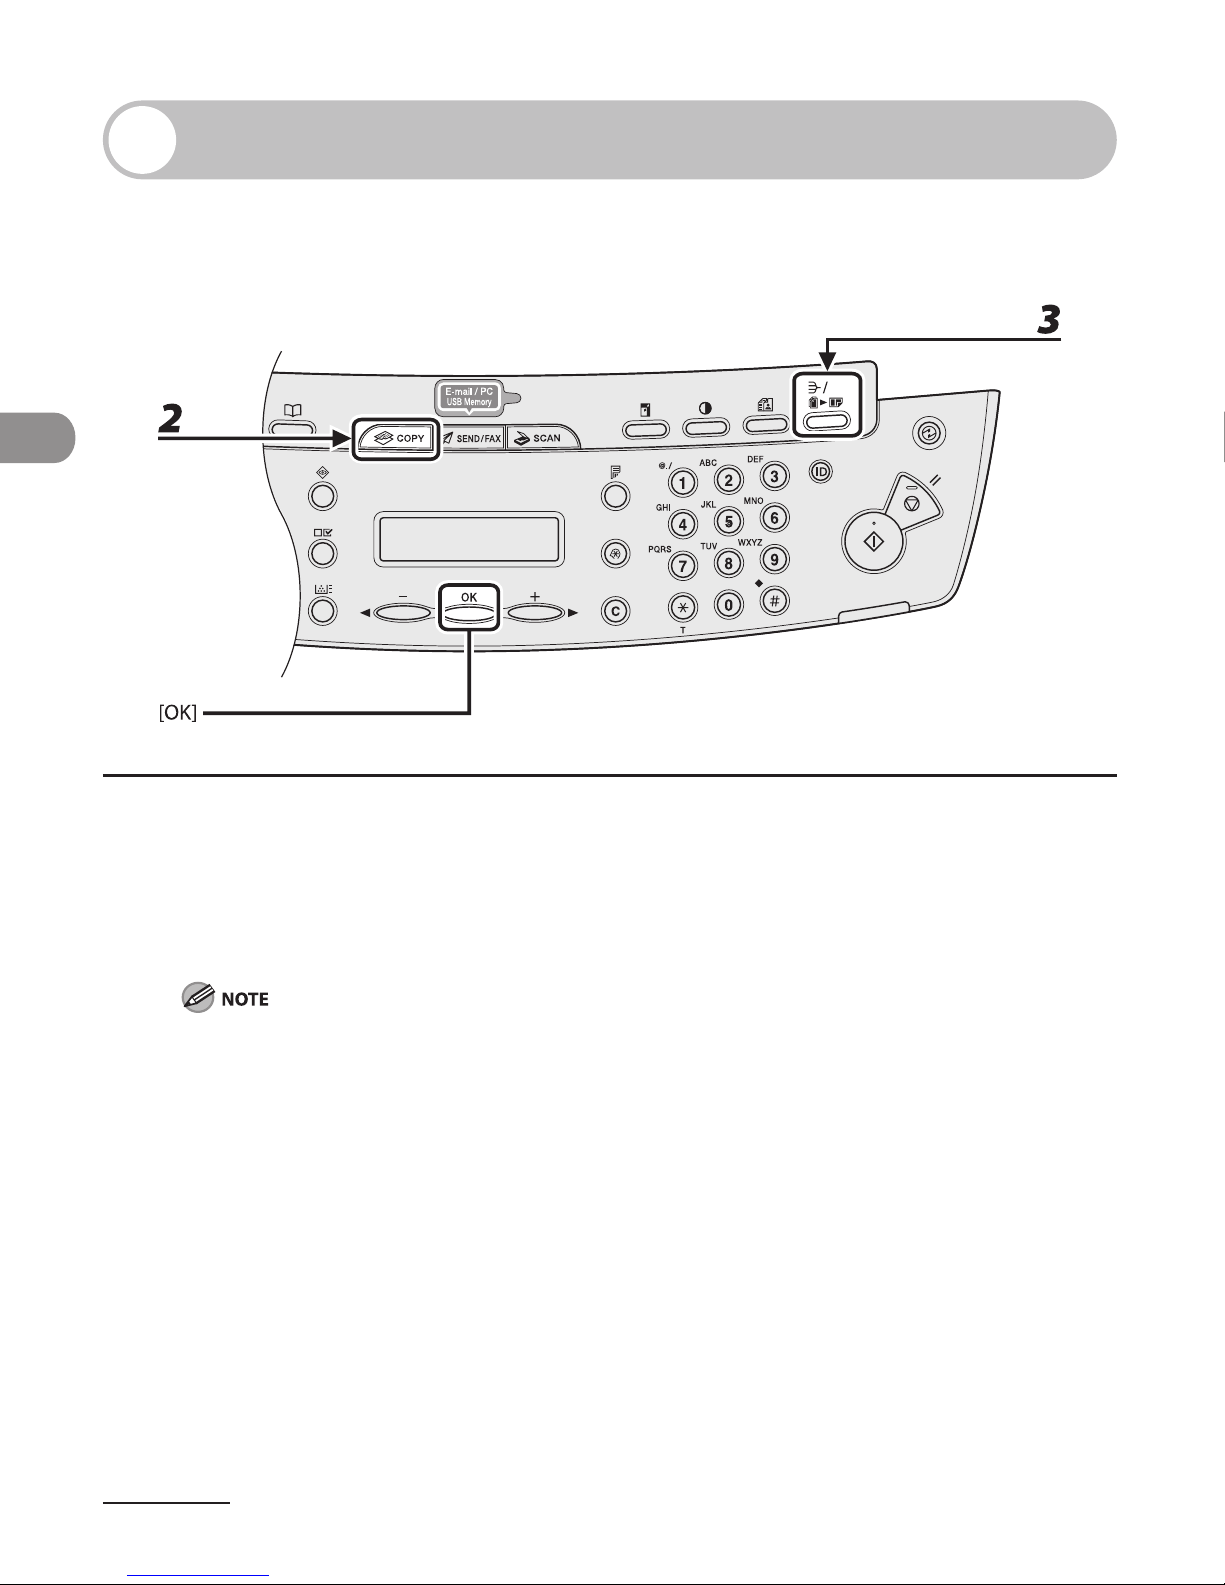
Copying
3-10
Collate Copy
You can copy documents collated into sets arranged in page order. This feature can be
used together with both “Two-Sided Copying” (see p. 3-14) and “2 on 1 Combination”
(see p. 3-12).
1 Set documents.
Place the first page on the platen glass if you are not using the ADF.
2 Press [COPY].
If <COLLATE> is set to <ON> in <STANDARD SETTINGS> in <COPY SETTINGS>, skip step 3.
3 Press [Collate/2 on 1] repeatedly to select <COLLATE> , then press [OK].
If you want to use <COLLATE> with “2 on 1 Combination” (see p. 3-12) at the same time, select
<COLLATE+2 ON 1>, then press [OK].
If you want to use with “Two-Sided Copying” at the same time, go to step 3 on p. 3-14.
Page 74
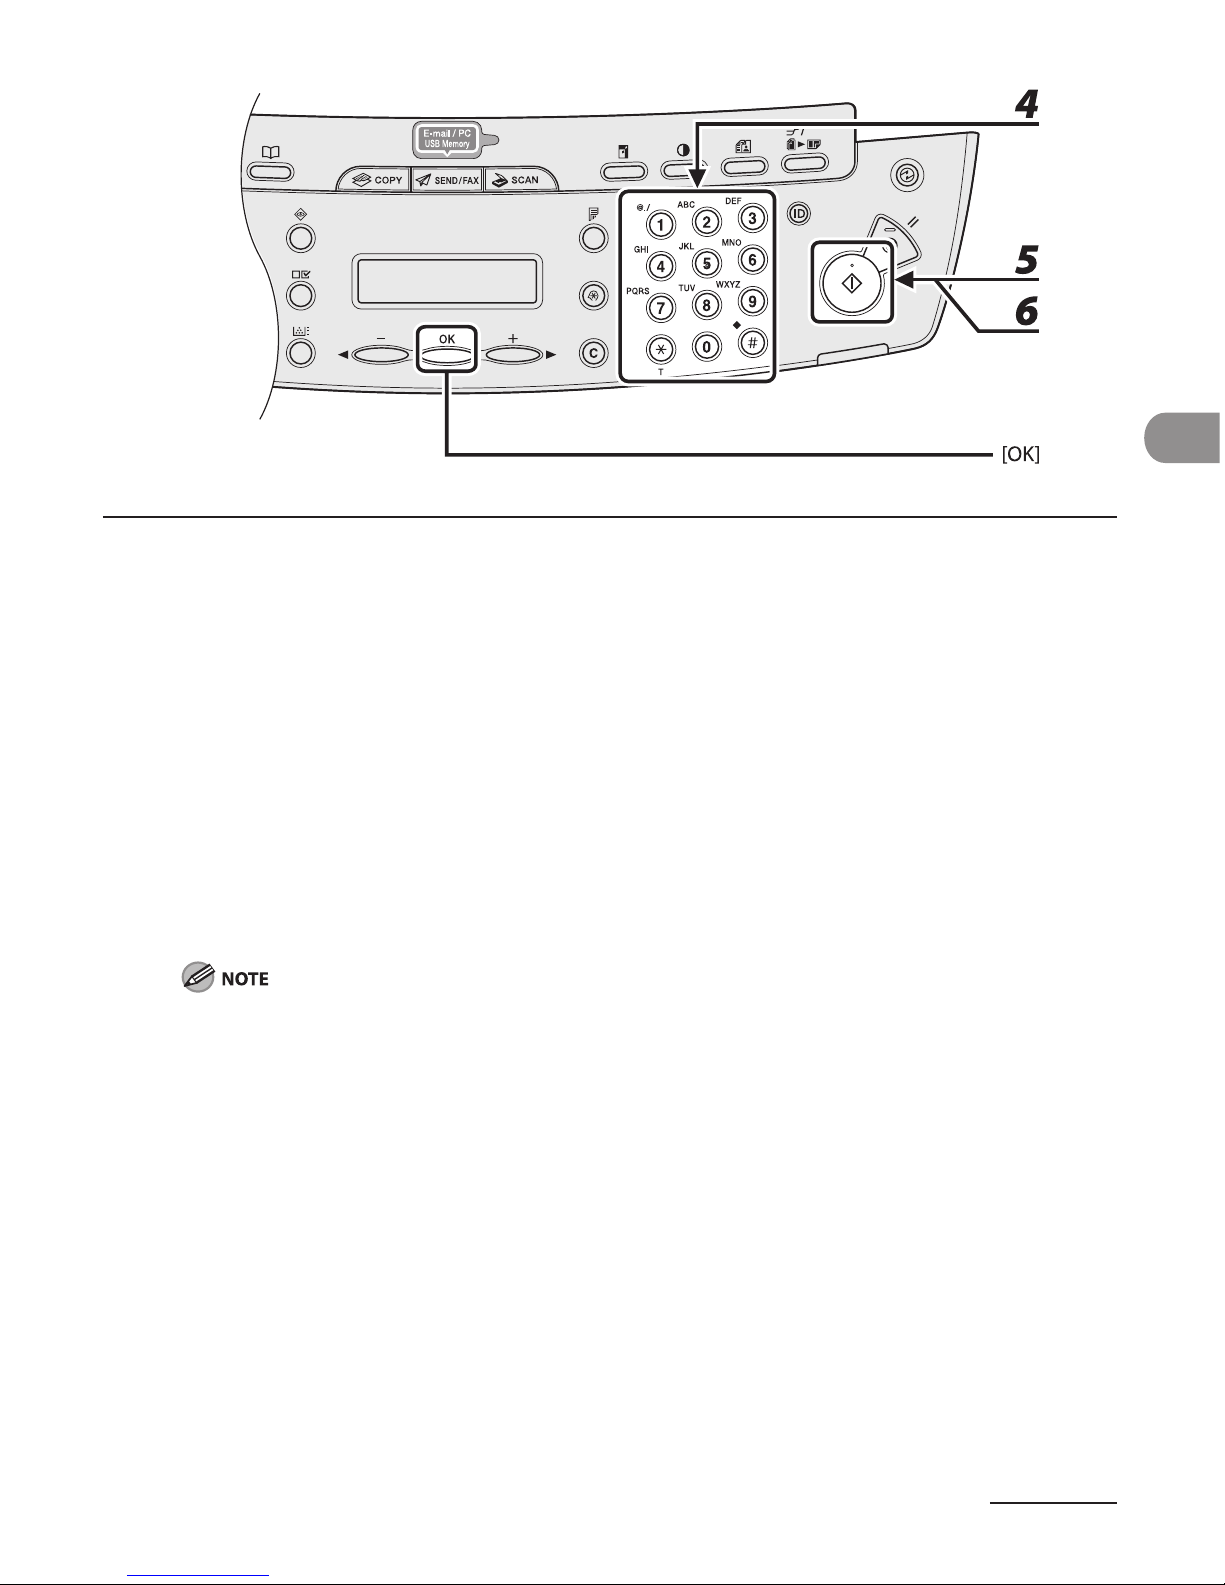
3-11
Copying
4 Use the numeric keys to enter the desired copy quantity (1 to 99).
5 Press [Start].
When the documents are loaded in the ADF, collate copying starts and no further operation is required.
6 Place the next page of the document on the platen glass, then press [Start].
Repeat this step to scan all pages.
7 Press [OK].
The machine prints the remaining sets of copies.
To cancel all settings, press [Stop/Reset].
When you switch the mode by pressing the mode keys such as [SEND/FAX], all settings will be also
canceled. If you want to keep the settings as the default, see “Setting Menu,” on p. 12-6.
When scanning multiple page documents, <MEMORY FULL> may appear in the LCD and scanning
may be canceled. If this happens, press [OK] to return to the standby mode, and print, send, or delete
any documents stored in memory.
–
–
–
Page 75
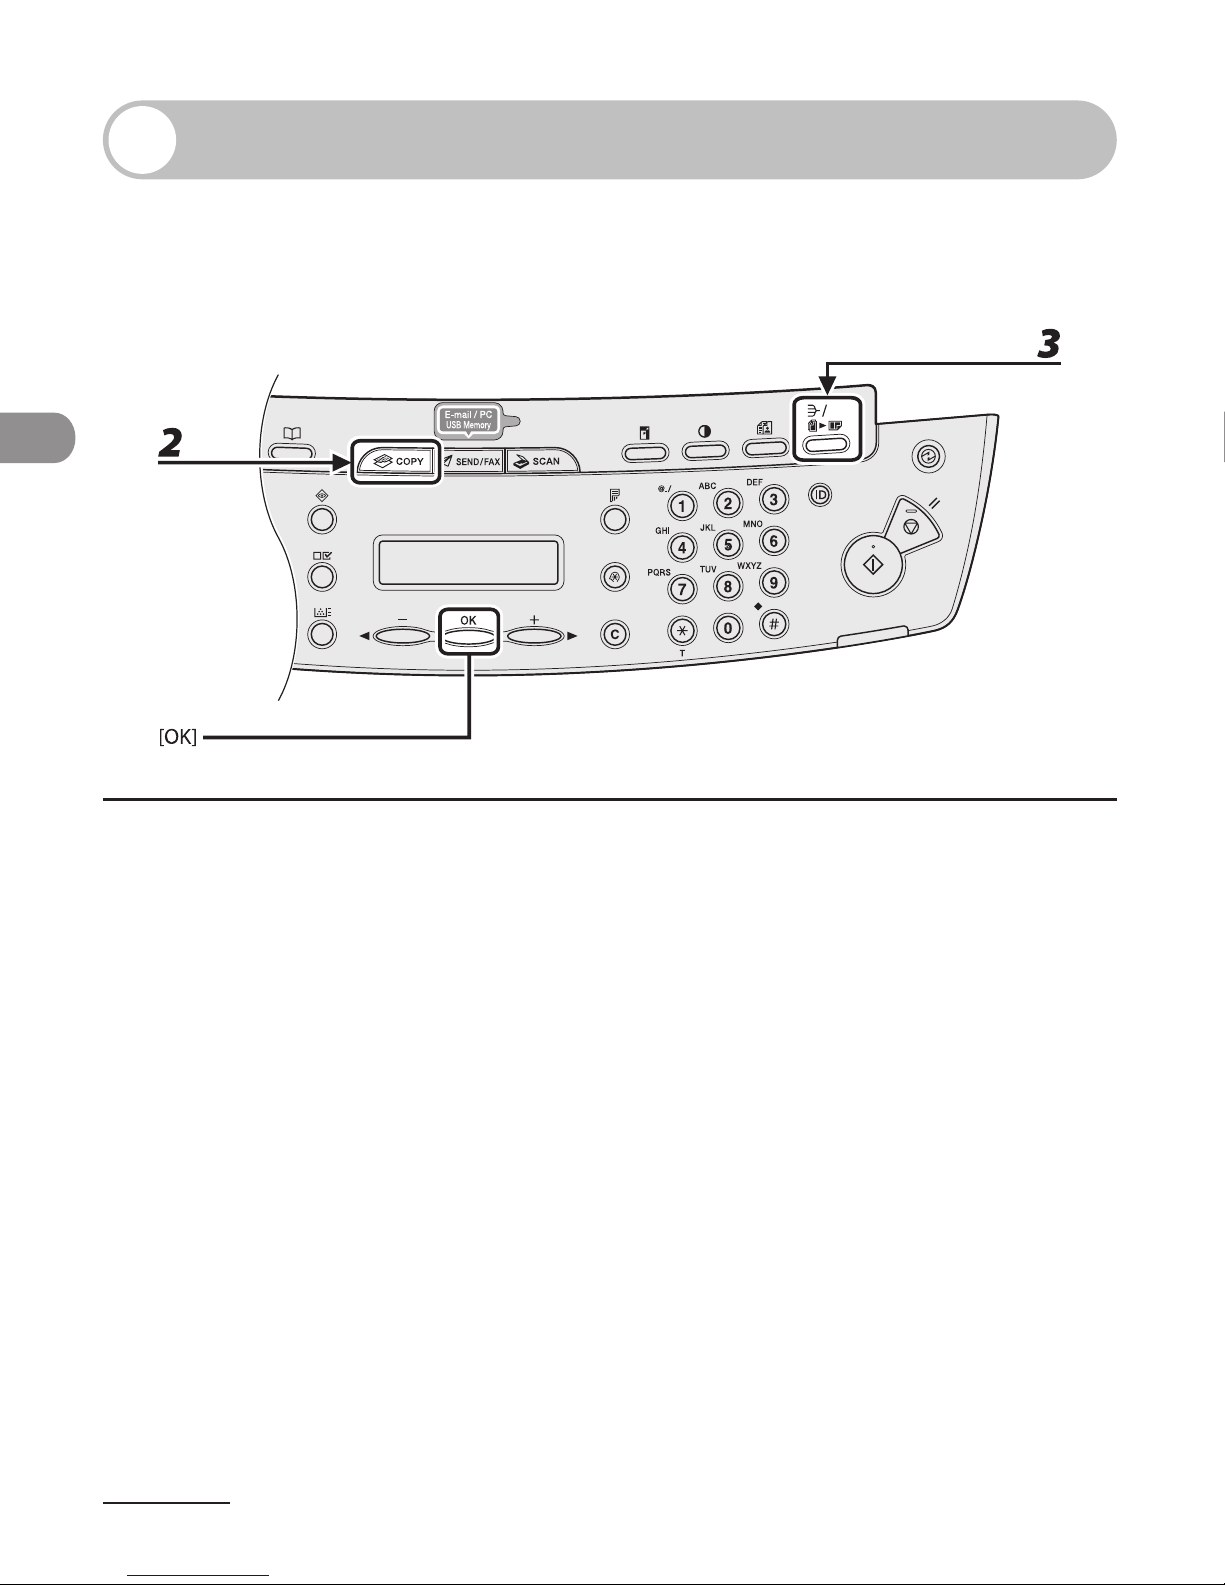
Copying
3-12
2 on 1 Combination
2 on 1 combination automatically reduces two documents to fit on the selected paper
size. This feature can be used together with both “Collate Copy” (see p. 3-10) and
“Two-Sided Copying” (see p. 3-14).
1 Set documents.
Place the first page on the platen glass if you are not using the ADF.
2 Press [COPY].
3 Press [Collate/2 on 1] repeatedly to select <2 ON 1>, then press [OK].
If you want to use <2 ON 1> with “Collate Copy” (see p. 3-10) at the same time, select <COLLATE+2 ON
1>, then press [OK].
If you want to use with “Two-Sided Copying” at the same time, go to step 3 on p. 3-14.
Page 76
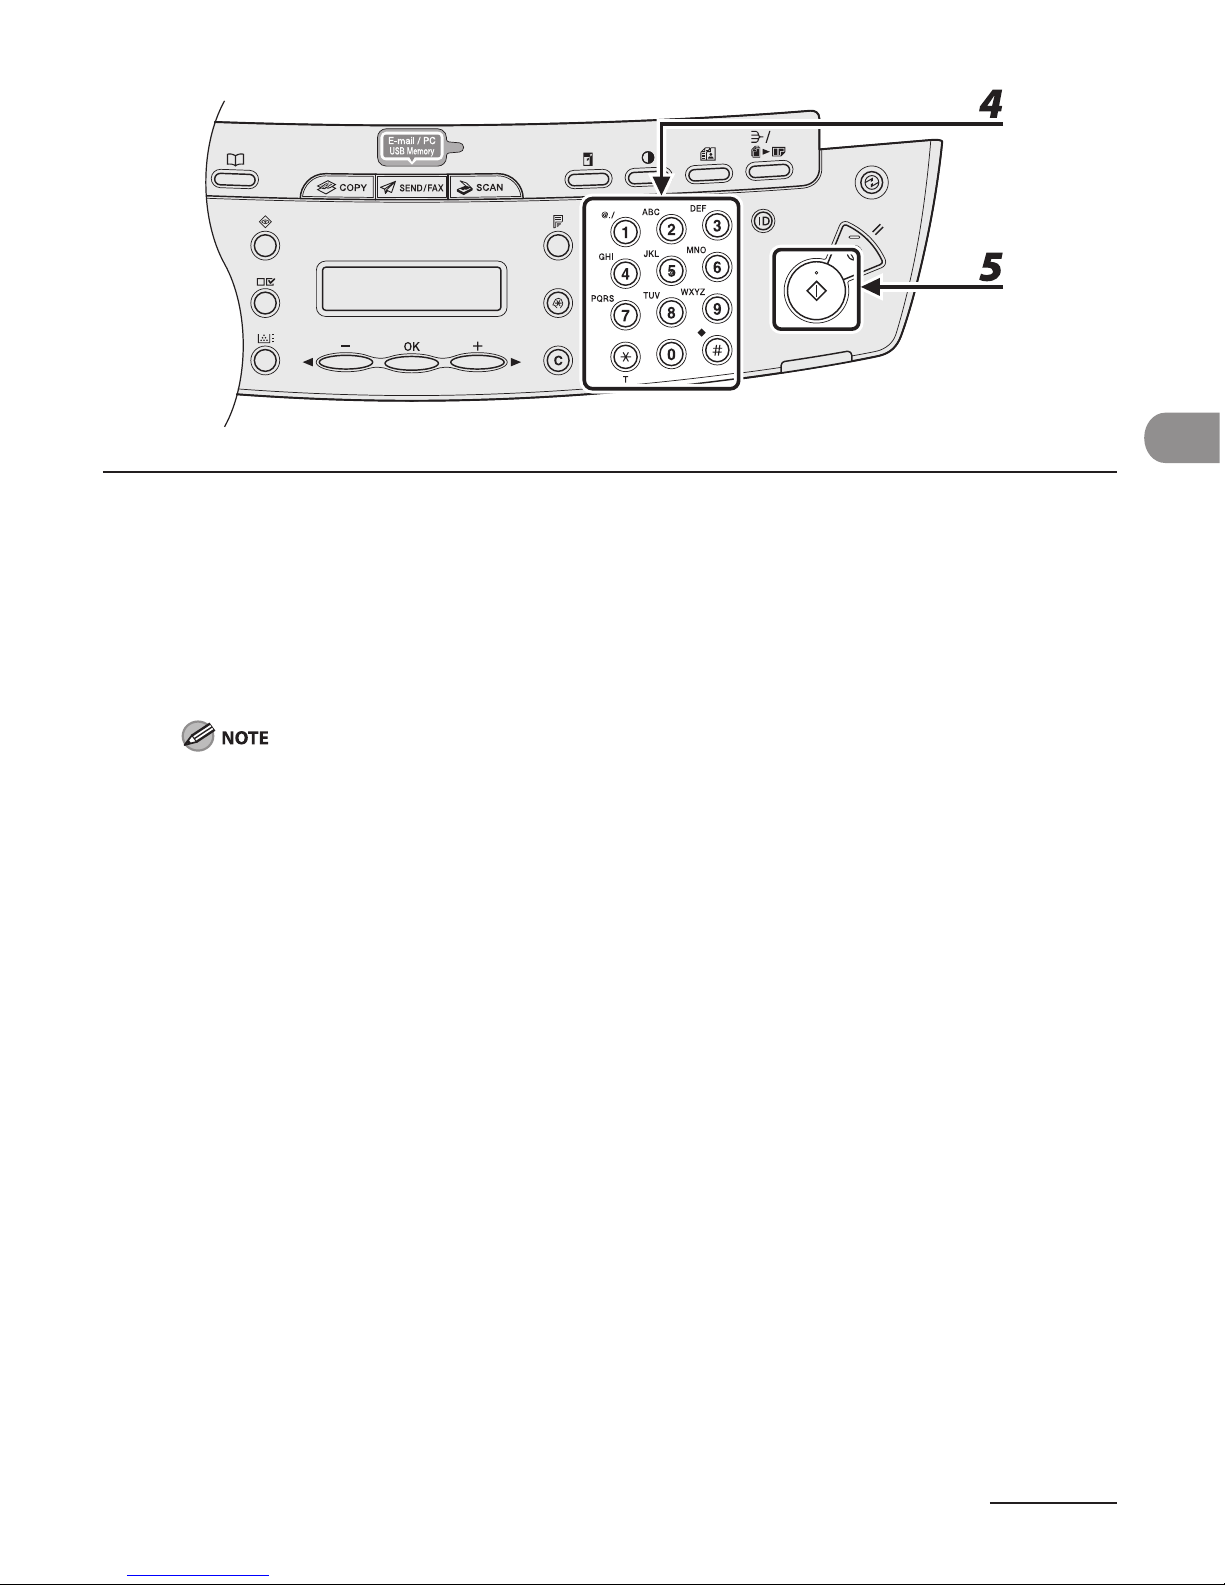
3-13
Copying
4 Use the numeric keys to enter the desired copy quantity (1 to 99).
5 Press [Start].
When you set the document on the platen glass, press [Start] for each document. When scanning is
complete, press [OK].
If you press [OK] without scanning the second document, only the first document will be printed on
the left side of the paper.
A maximum of 4 mm margin will be produced between the two reduced documents in 2 on 1
combination copying.
To cancel all settings, press [Stop/Reset].
When you switch the mode by pressing the mode keys such as [SEND/FAX], all settings will be also
canceled. If you want to keep the settings as the default, see “Setting Menu,” on p. 12-6.
–
–
–
–
Page 77
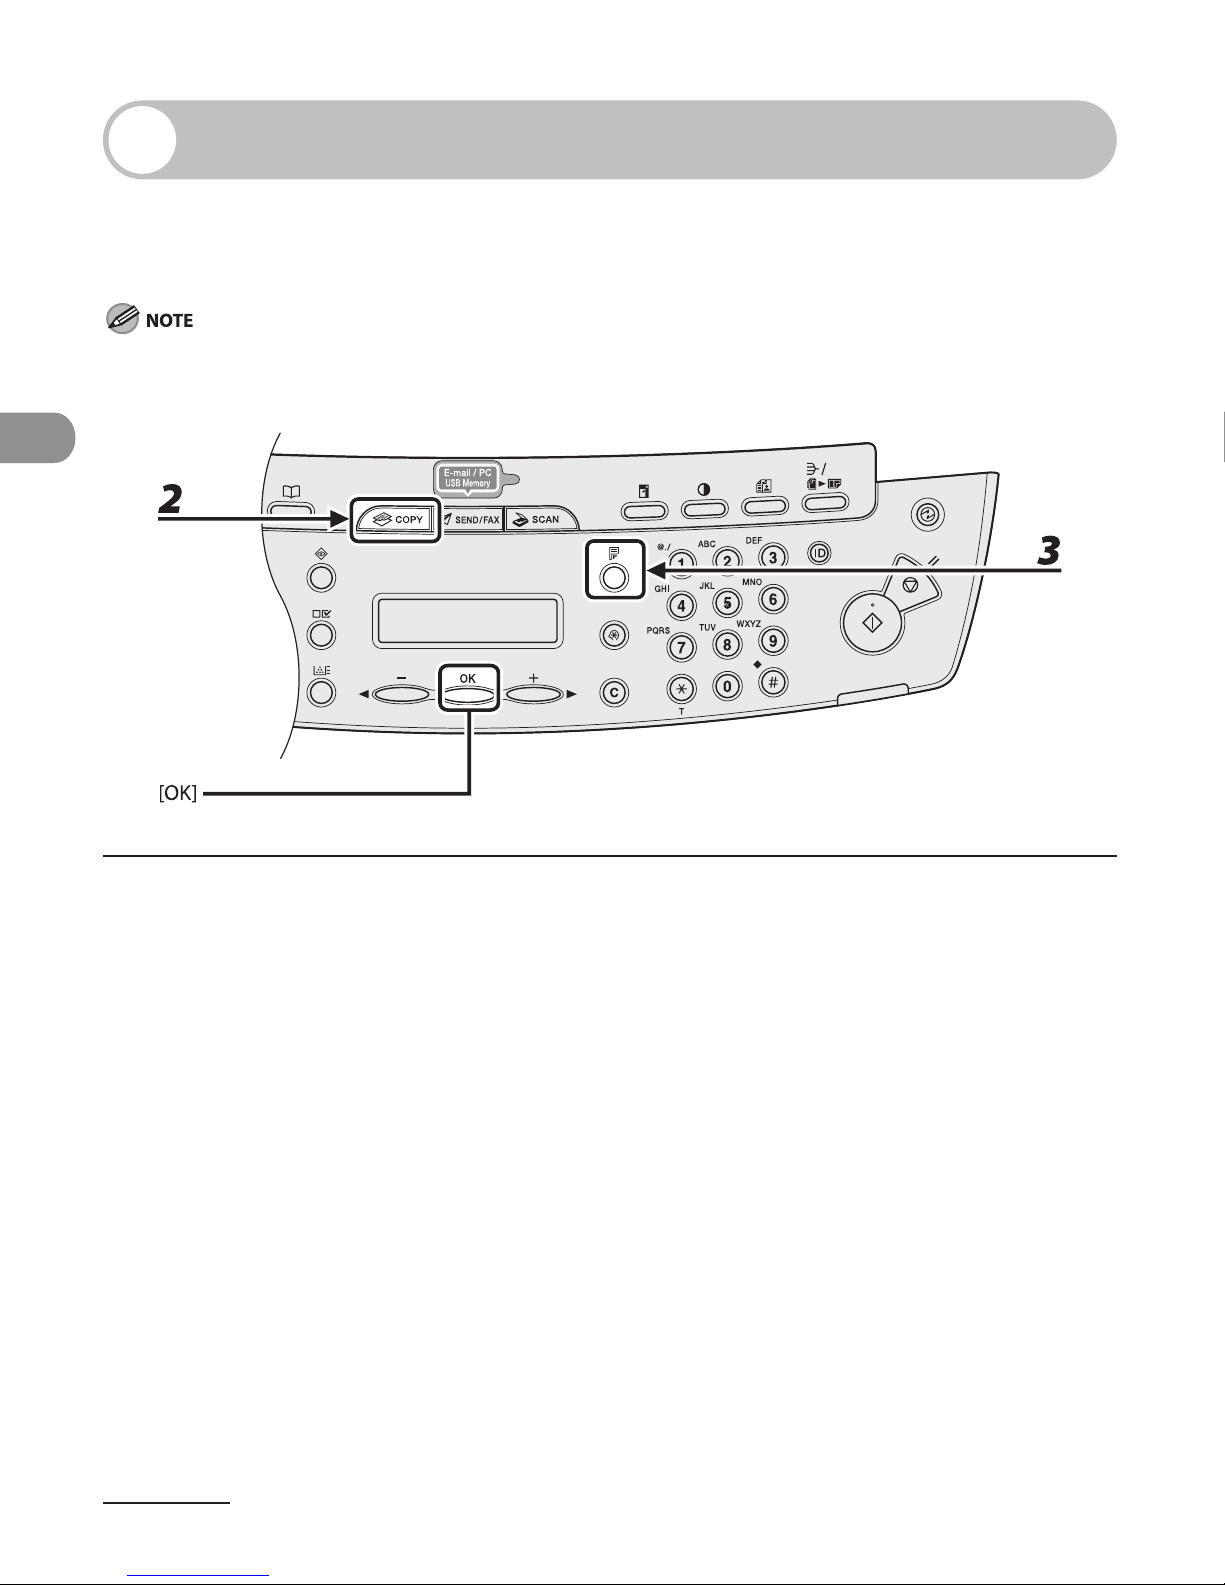
Copying
3-14
Two-Sided Copying
Two-sided copying enables you to make two-sided copies from one-sided documents.
This feature can be used together with both “Collate Copy” (see p. 3-10) and “2 on 1
Combination” (see p. 3-12).
Paper used to make two-sided copies must conform to the following specifications:
Paper size: A4 and LTR
Paper weight: 64 to 80 g/m
2
1 Set documents.
Place the first page on the platen glass if you are not using the ADF.
2 Press [COPY].
3 Press [2-Sided] repeatedly to select <1 > 2-SIDED>, then press [OK].
–
–
Page 78
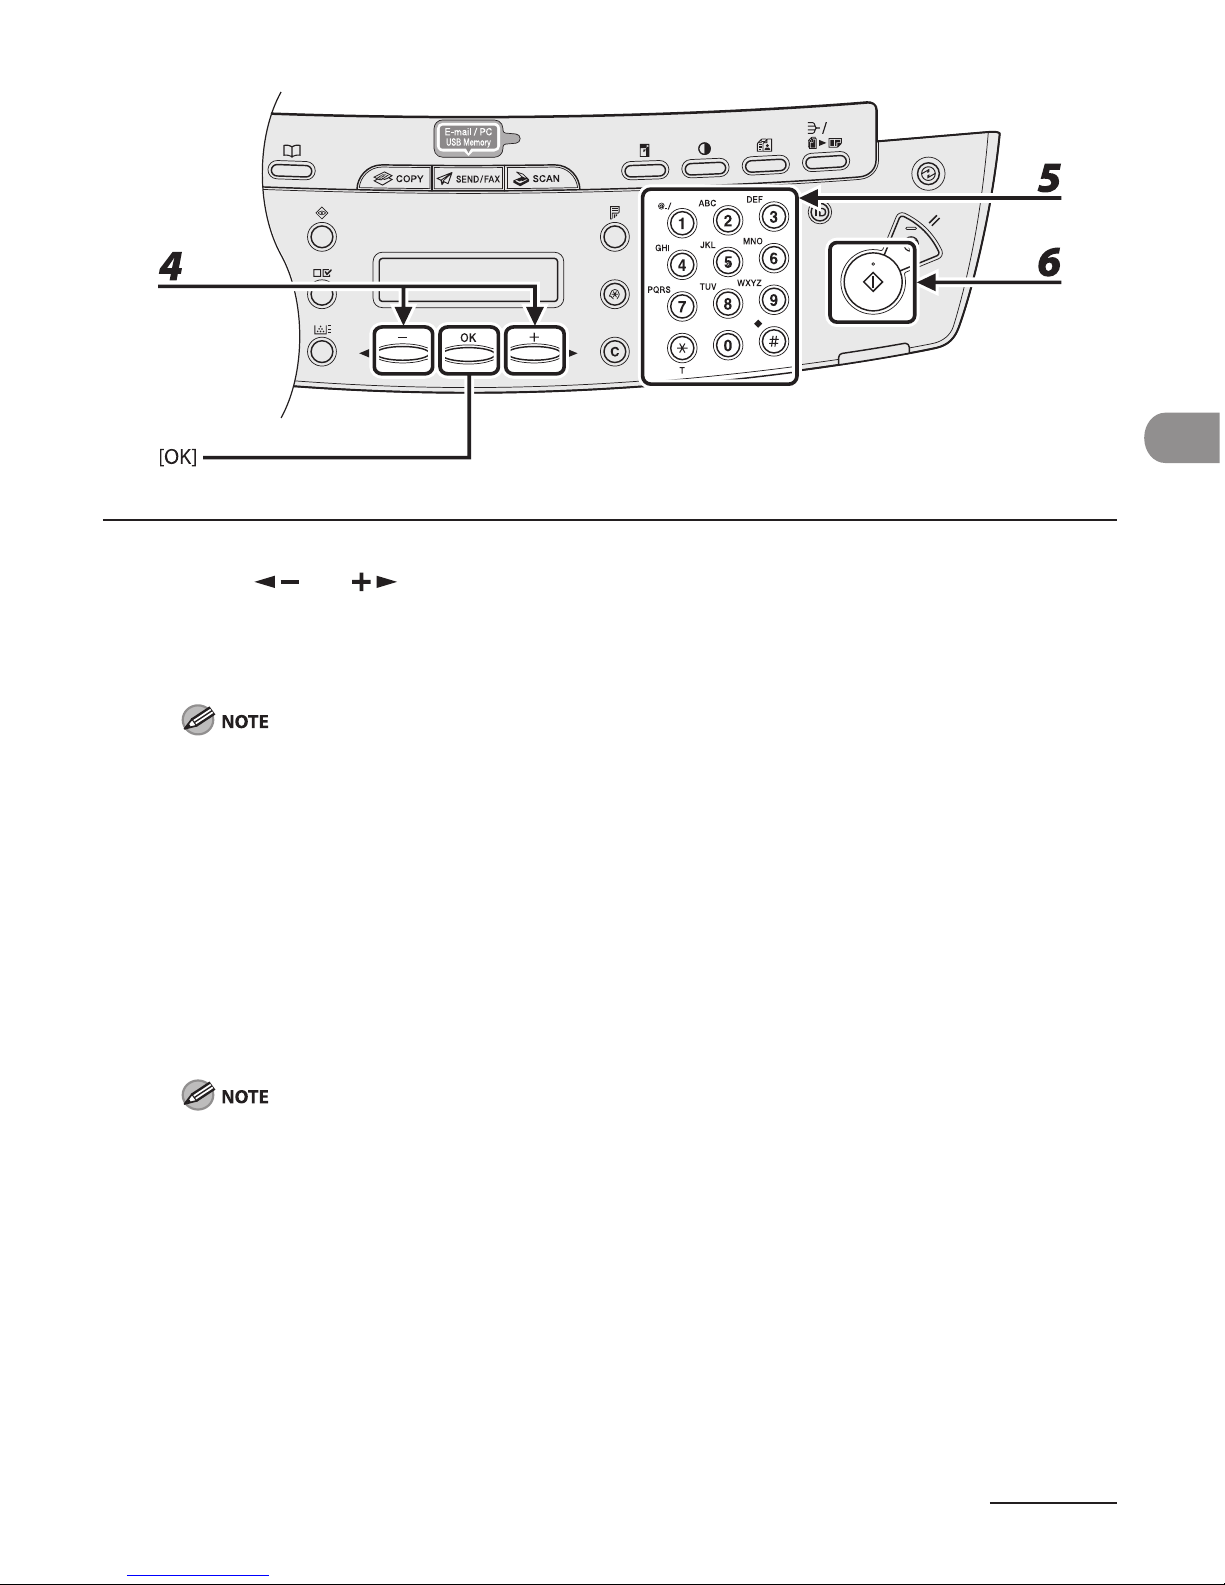
3-15
Copying
4 Press [ ] or [ ] to select <BOOK TYPE> or <CALENDAR TYPE>, then press
[OK].
<BOOK TYPE>: The front and back sides of the copy will have the same top-bottom orientation.
<CALENDAR TYPE>: The front and back sides of the copy will have opposite top-bottom orientations.
For the landscape oriented documents, the front and back sides of the copy will have the opposite topbottom orientation when <BOOK TYPE> is selected.
When <CALENDAR TYPE> is selected, the front and back sides of the copy will have the same topbottom orientation.
5 Use the numeric keys to enter the desired copy quantity (1 to 99).
6 Press [Start].
When you set the document on the platen glass, press [Start] for each document. When scanning is
complete, press [OK].
To cancel all settings, press [Stop/Reset].
When you switch the mode by pressing the mode keys such as [SEND/FAX], all settings will be also
canceled. If you want to keep the settings as the default, see “Setting Menu,” on p. 12-6.
Instead of performing step 4, you can just press [OK]. In this case, the machine makes <BOOK TYPE>
copies.
–
–
–
Page 79
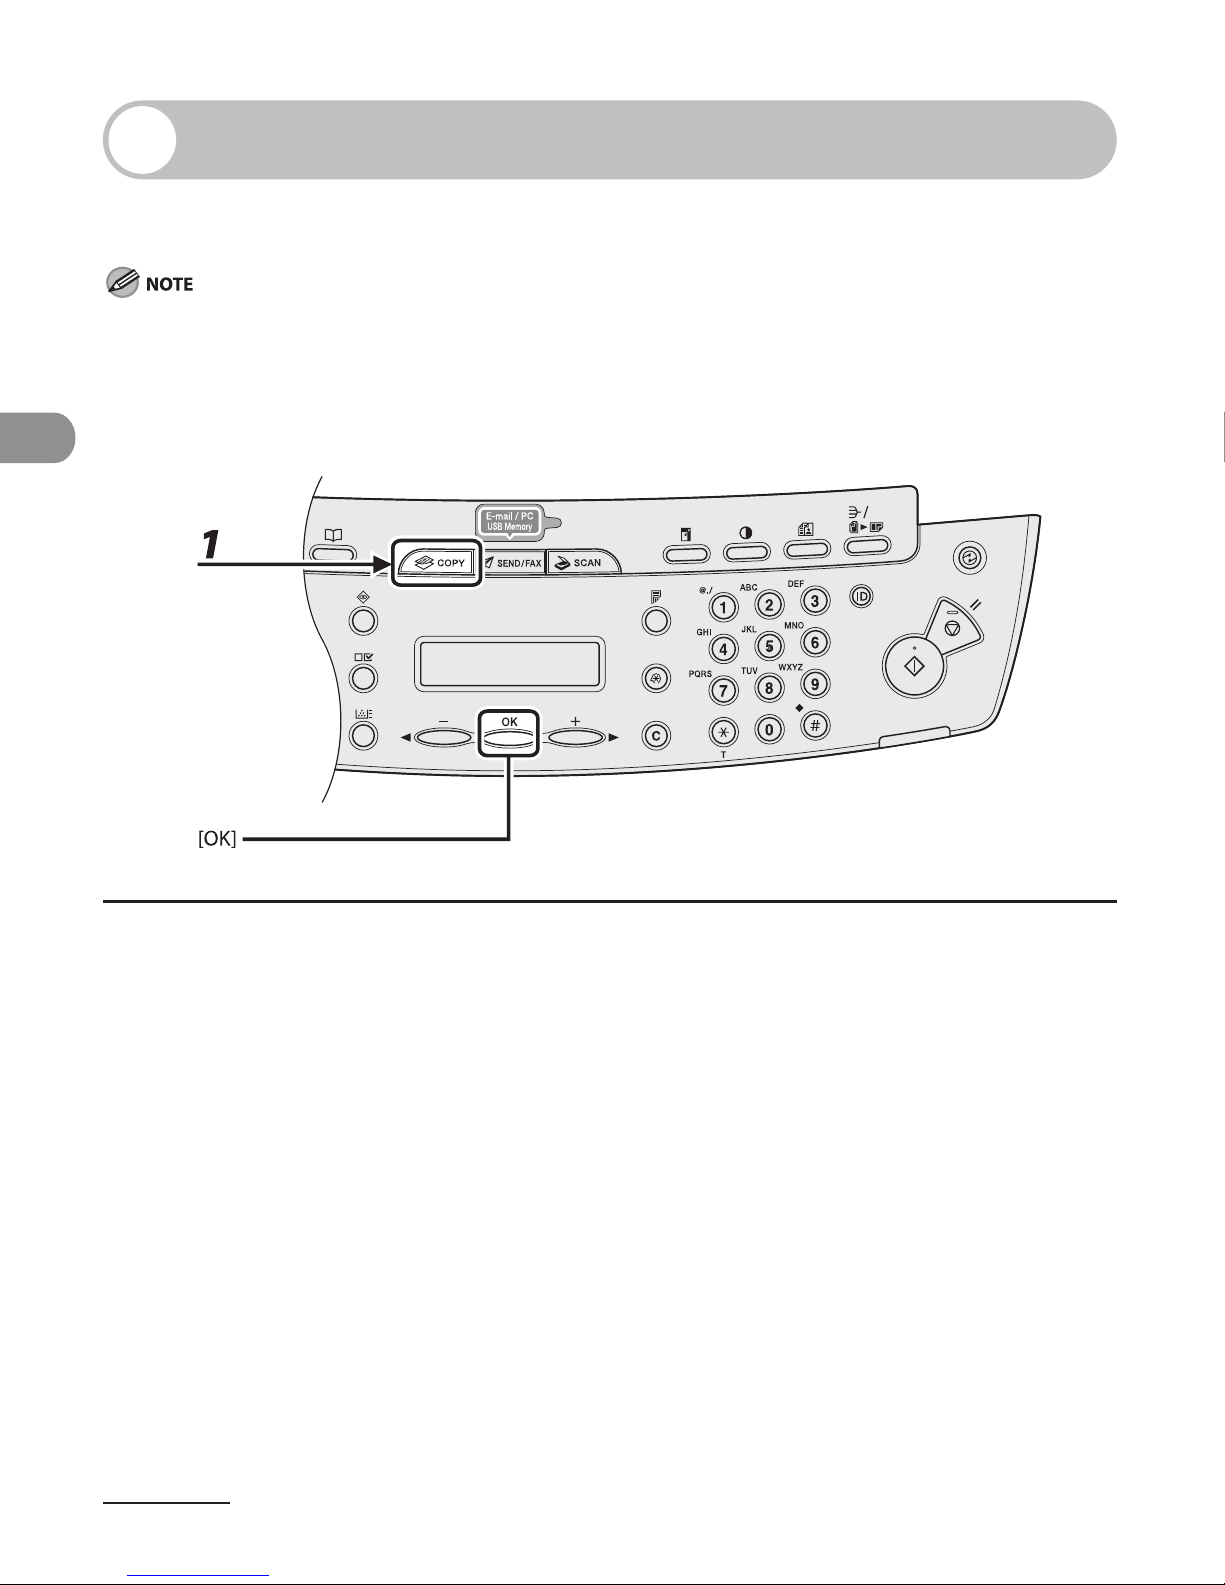
Copying
3-16
Printing a Sample Page
This machine provides you to print a sample page. You can use this function to test
how the printouts will look with current settings.
The paper size must be A4 or LTR.
The paper type must be Plain Paper (64 to 80 g/m
2
).
If the paper setting is not appropriate or the paper is not loaded correctly, printing does not start without any
error massages.
You cannot cancel printing a sample page once printing has started.
You cannot use this function while making copies, scanning documents, or printing reports or lists.
1 Press [COPY].
2 Press and hold [OK].
The sample page will be printed on the both sides of the paper.
–
–
–
–
–
Page 80
3-17
Copying
Canceling Copy Jobs
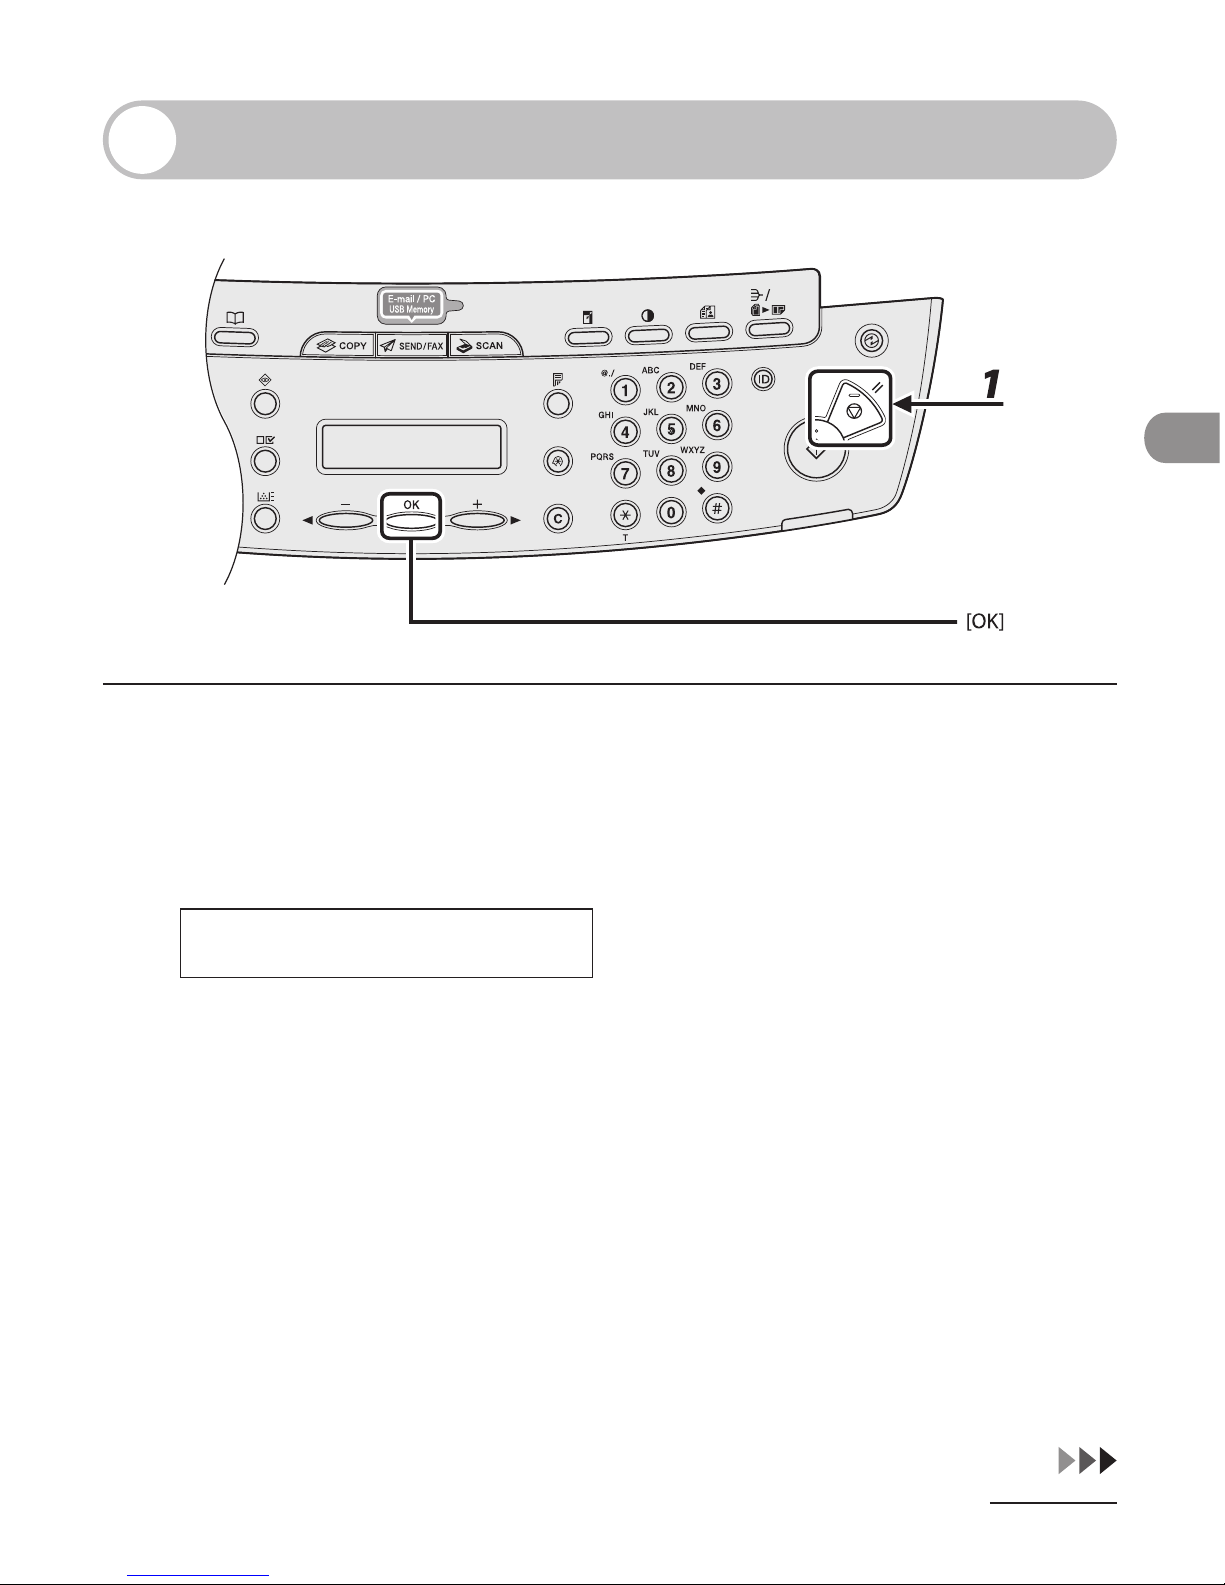
Cancel an ongoing job as follows.
1 Press [Stop/Reset].
2 When the <STOP KEY PRESSED> message appears, press [OK].
When scanning using the ADF:
STOP KEY PRESSED
PRESS OK KEY
●
Page 81
Copying
3-18
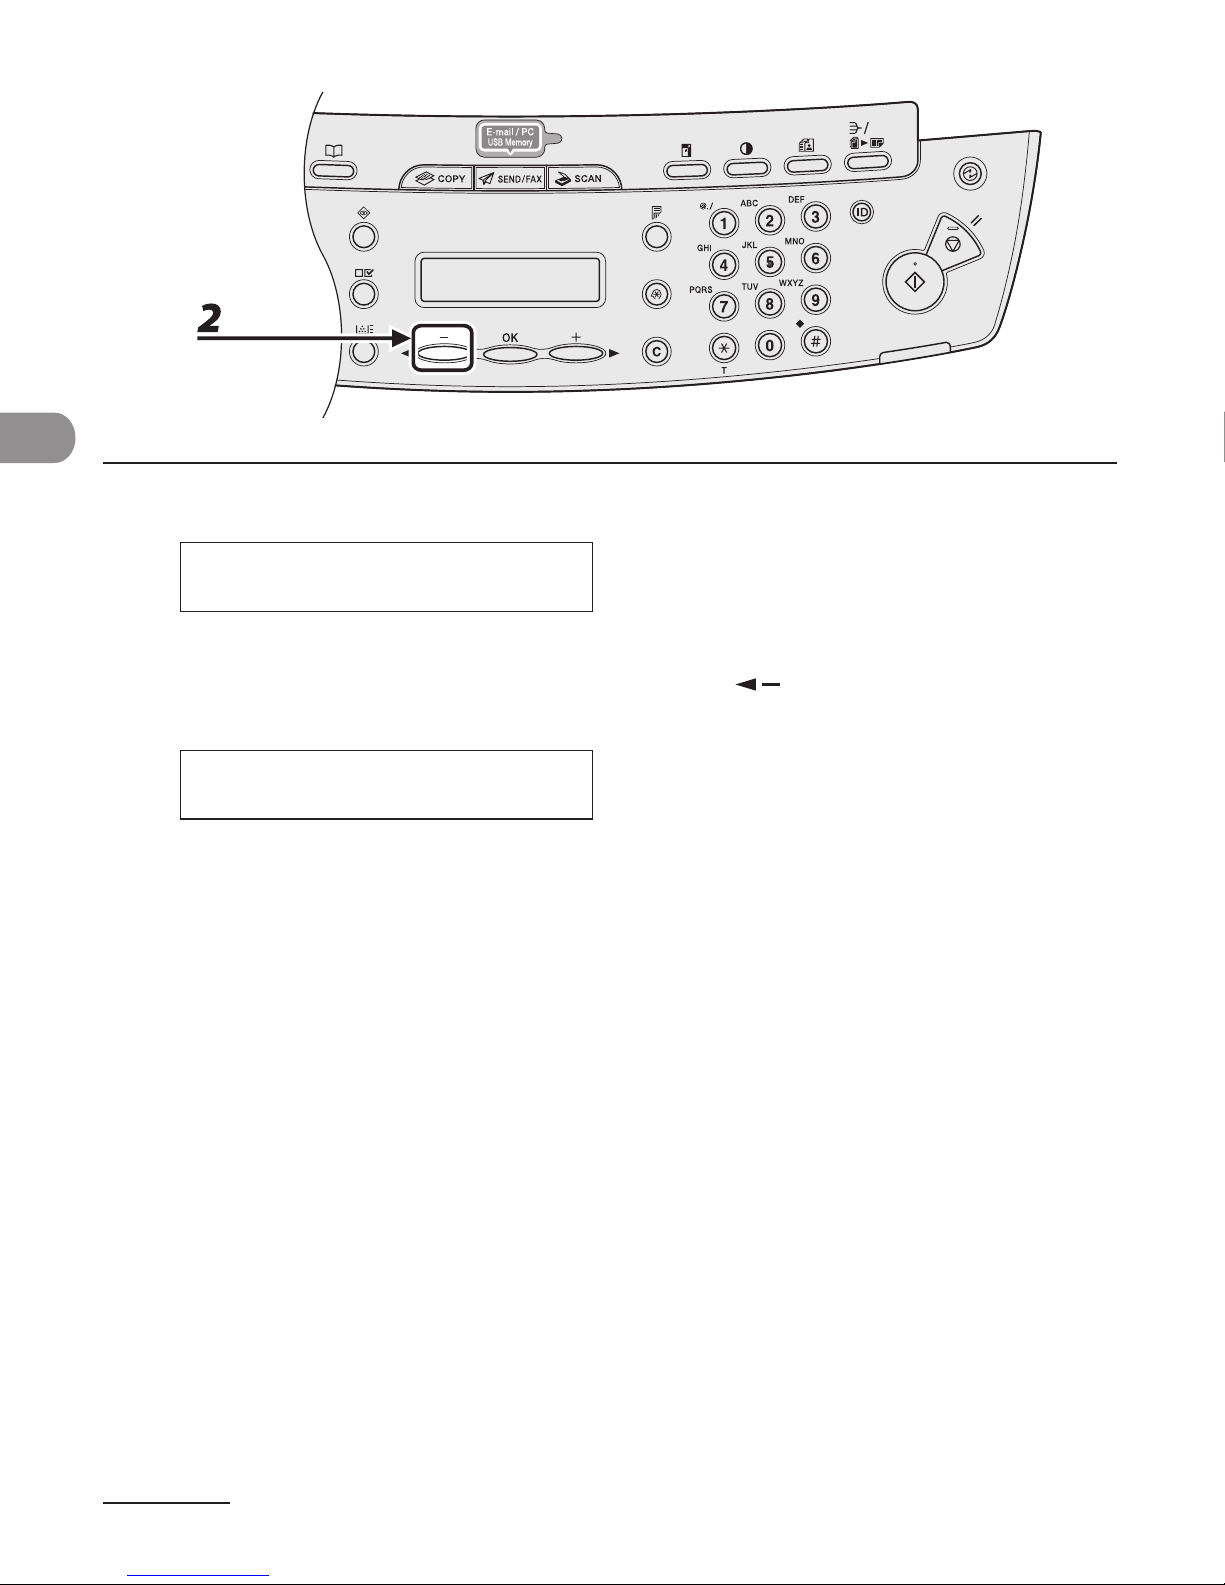
When scanning using the platen glass:
STOP KEY PRESSED
When the <CANCEL?> message appears, press [ ] to select <YES>.
< YES NO >
CANCEL?
●
Page 82
3-19
Copying
Checking and Deleting Jobs
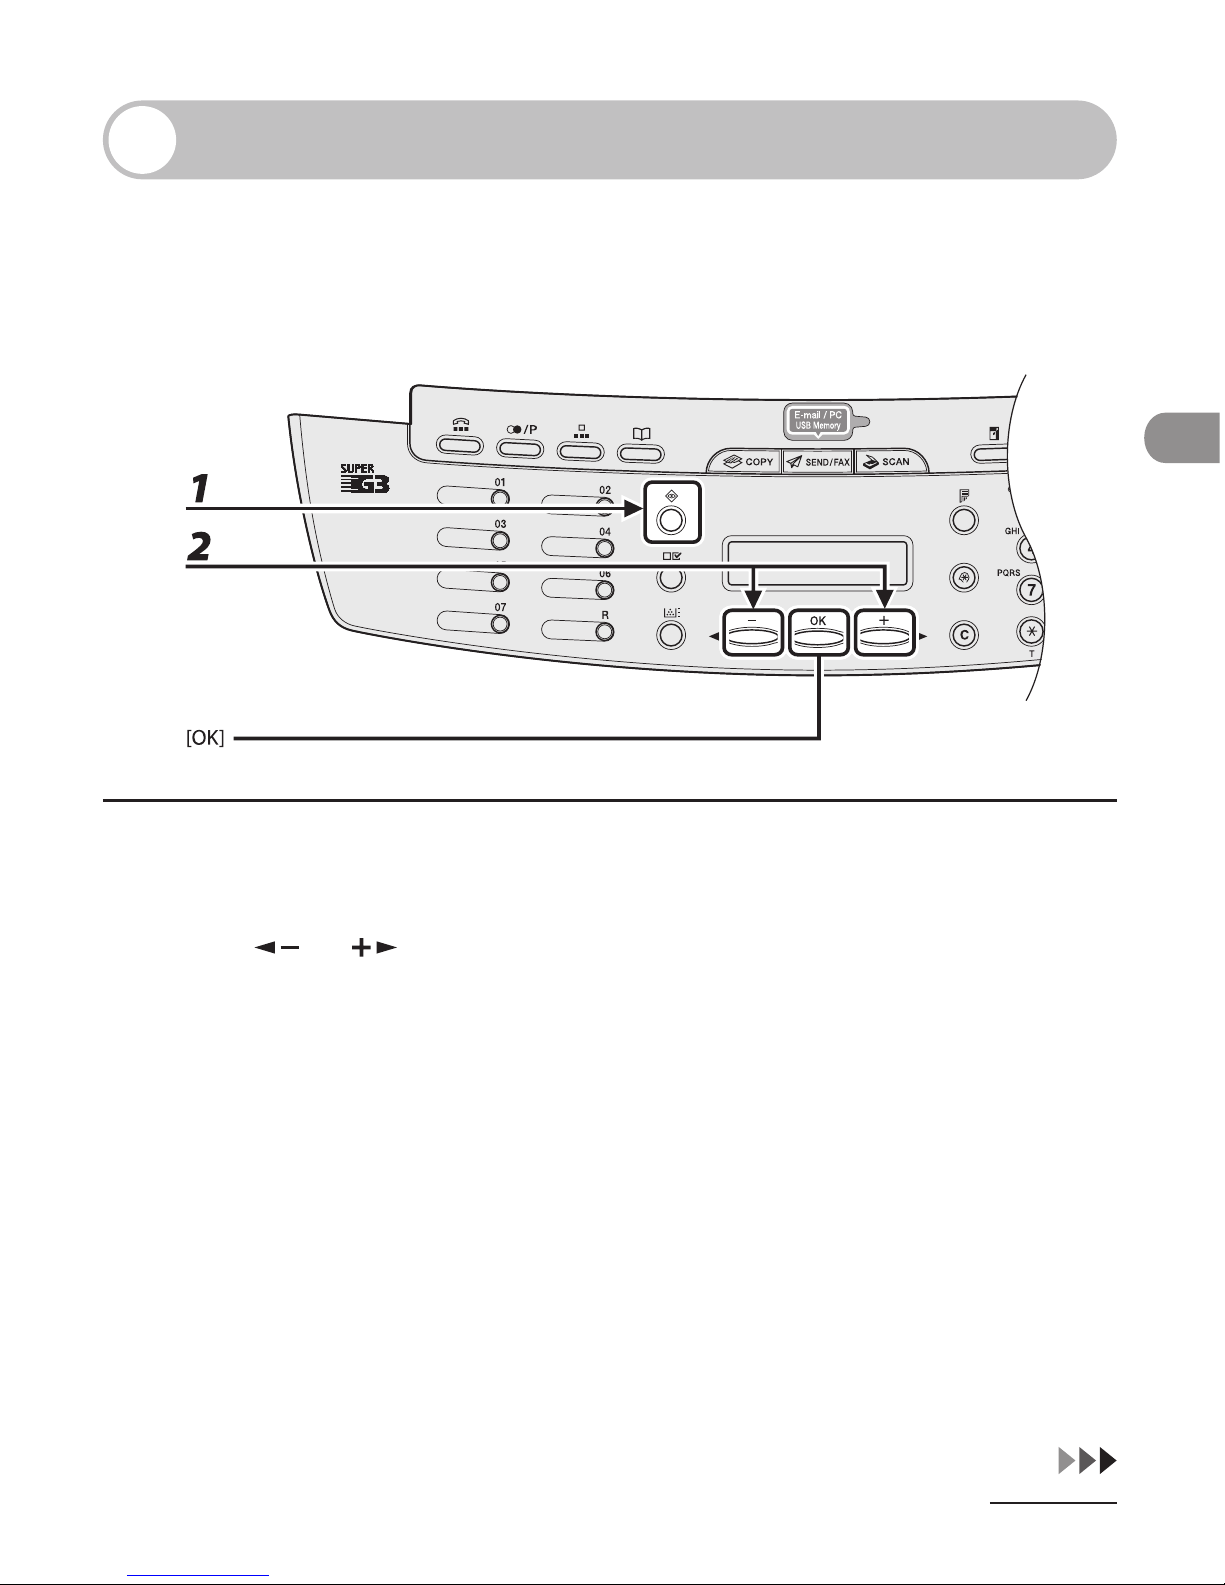
System monitor enables you to monitor the status of the copy jobs currently being
processed.
Checking and Deleting Copy Jobs
1 Press [System Monitor] repeatedly to select <COPY STATUS>, then press [OK].
2 Press [ ] or [ ] to scroll through the job list, and check the status of the
copy jobs.
If you want to delete the job, go to step 3. Otherwise, press [Stop/Reset] to return to the standby mode.
Page 83
Copying
3-20
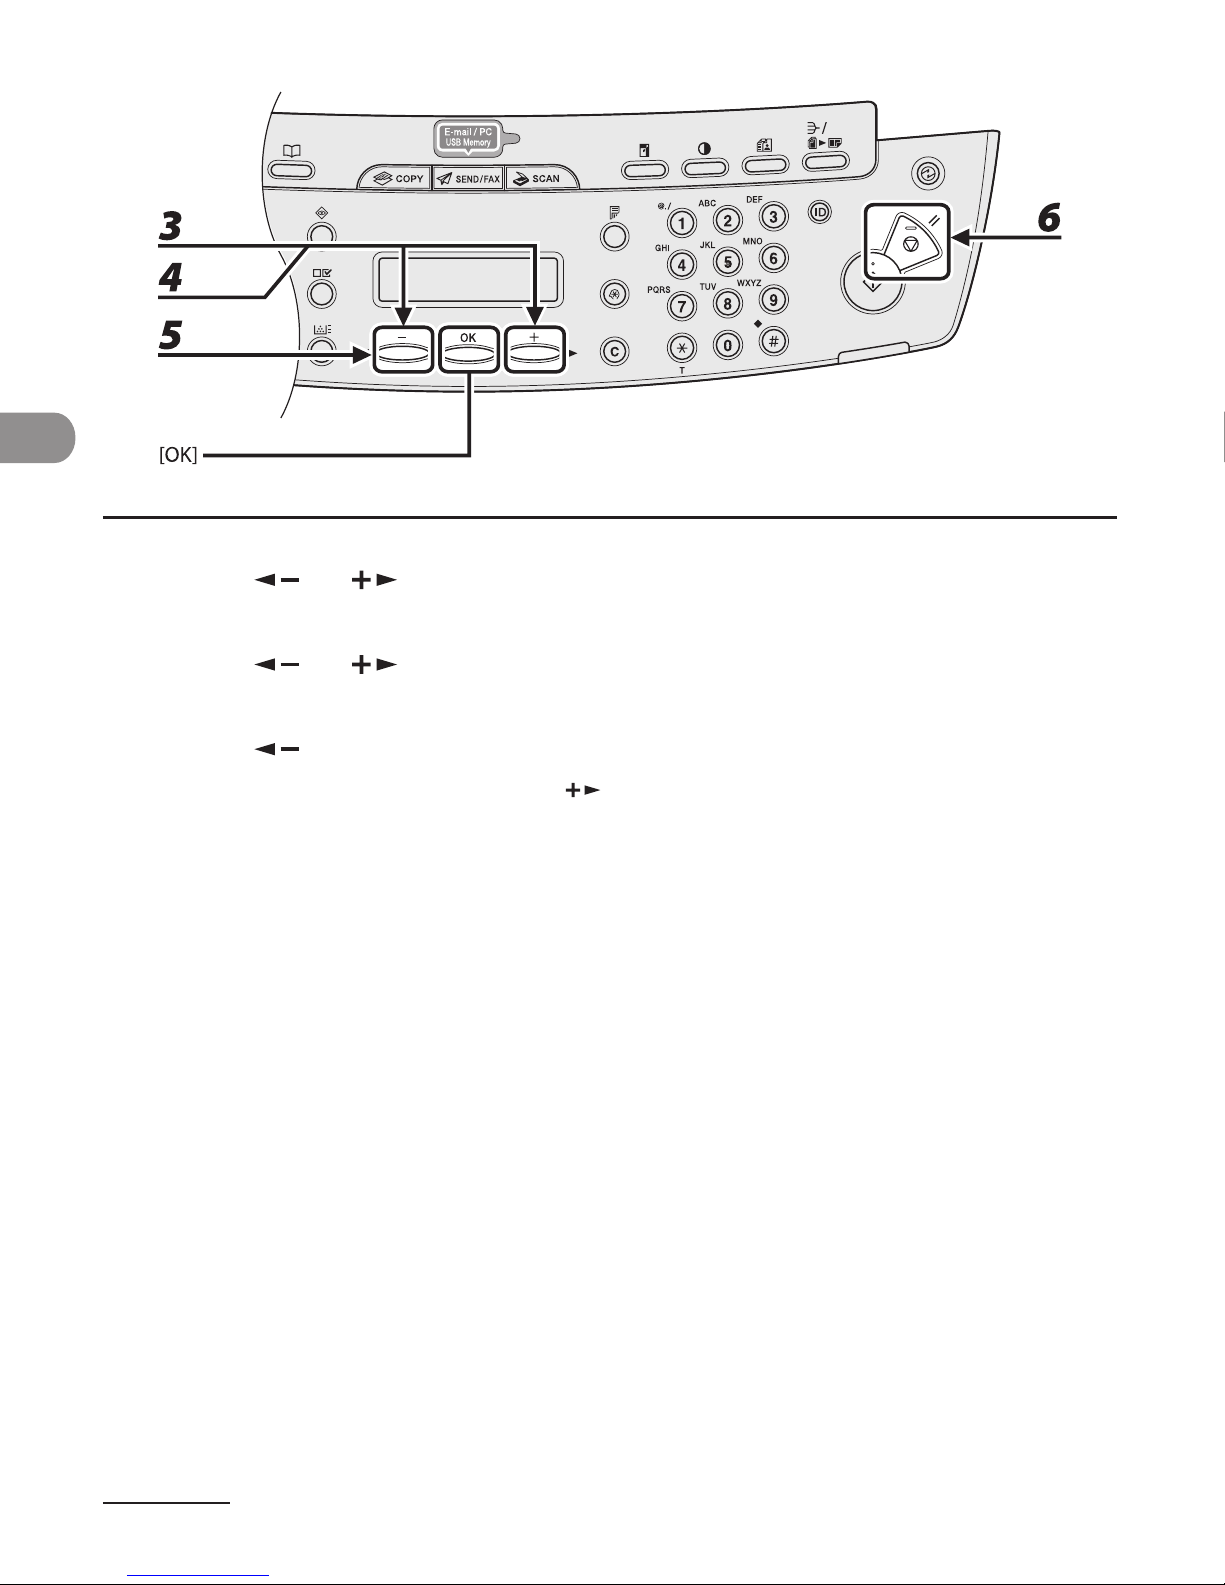
3 Press [ ] or [ ] to select the desired job, then press [OK].
4 Press [ ] or [ ] to select <CANCEL>, then press [OK].
5 Press [ ] to select <YES>.
If you do not want to cancel the job, press [ ] to select <NO>.
6 Press [Stop/Reset] to return to the standby mode.
Page 84

Sending Documents (MF4690PL Only)
4
Sending Documents
(MF4690PL Only)
Basic Sending Method ∙∙∙∙∙∙∙∙∙∙∙∙∙∙∙∙∙∙∙∙∙∙∙∙∙∙∙∙∙∙∙∙∙∙∙∙∙∙∙∙∙∙∙∙∙∙∙∙∙∙∙∙∙∙∙∙∙∙∙∙∙∙∙∙4-2
Scan Settings ∙∙∙∙∙∙∙∙∙∙∙∙∙∙∙∙∙∙∙∙∙∙∙∙∙∙∙∙∙∙∙∙∙∙∙∙∙∙∙∙∙∙∙∙∙∙∙∙∙∙∙∙∙∙∙∙∙∙∙∙∙∙∙∙∙∙∙∙∙∙∙∙∙∙∙∙∙∙∙4-4
Image Quality (Fax) ∙∙∙∙∙∙∙∙∙∙∙∙∙∙∙∙∙∙∙∙∙∙∙∙∙∙∙∙∙∙∙∙∙∙∙∙∙∙∙∙∙∙∙∙∙∙∙∙∙∙∙∙∙∙∙∙∙∙∙∙∙∙∙∙∙∙∙∙∙∙∙∙∙∙∙∙∙∙ 4-4
Density ∙∙∙∙∙∙∙∙∙∙∙∙∙∙∙∙∙∙∙∙∙∙∙∙∙∙∙∙∙∙∙∙∙∙∙∙∙∙∙∙∙∙∙∙∙∙∙∙∙∙∙∙∙∙∙∙∙∙∙∙∙∙∙∙∙∙∙∙∙∙∙∙∙∙∙∙∙∙∙∙∙∙∙∙∙∙∙∙∙∙∙∙∙∙∙∙∙∙∙∙∙ 4-6
Send Settings (E-Mail/File Server) ∙∙∙∙∙∙∙∙∙∙∙∙∙∙∙∙∙∙∙∙∙∙∙∙∙∙∙∙∙∙∙∙∙∙∙∙∙∙∙∙∙∙∙∙∙∙∙∙∙∙ 4-7
Storing/Editing Address Book ∙∙∙∙∙∙∙∙∙∙∙∙∙∙∙∙∙∙∙∙∙∙∙∙∙∙∙∙∙∙∙∙∙∙∙∙∙∙∙∙∙∙∙∙∙∙∙∙∙ 4-11
Storing/Editing One-Touch Keys/Coded Dial Codes ∙∙∙∙∙∙∙∙∙∙∙∙∙4-12
Storing/Editing Group Addresses ∙∙∙∙∙∙∙∙∙∙∙∙∙∙∙∙∙∙∙∙∙∙∙∙∙∙∙∙∙∙∙∙∙∙∙∙∙∙∙∙∙∙∙∙∙∙∙∙∙4-29
Specifying Destinations ∙∙∙∙∙∙∙∙∙∙∙∙∙∙∙∙∙∙∙∙∙∙∙∙∙∙∙∙∙∙∙∙∙∙∙∙∙∙∙∙∙∙∙∙∙∙∙∙∙∙∙∙∙∙∙∙∙∙∙ 4-40
Using One-Touch Keys ∙∙∙∙∙∙∙∙∙∙∙∙∙∙∙∙∙∙∙∙∙∙∙∙∙∙∙∙∙∙∙∙∙∙∙∙∙∙∙∙∙∙∙∙∙∙∙∙∙∙∙∙∙∙∙∙∙∙∙∙∙∙∙∙∙∙∙∙∙∙4-40
Using Coded Dial Codes ∙∙∙∙∙∙∙∙∙∙∙∙∙∙∙∙∙∙∙∙∙∙∙∙∙∙∙∙∙∙∙∙∙∙∙∙∙∙∙∙∙∙∙∙∙∙∙∙∙∙∙∙∙∙∙∙∙∙∙∙∙∙∙∙∙∙4-42
Using Group Addresses ∙∙∙∙∙∙∙∙∙∙∙∙∙∙∙∙∙∙∙∙∙∙∙∙∙∙∙∙∙∙∙∙∙∙∙∙∙∙∙∙∙∙∙∙∙∙∙∙∙∙∙∙∙∙∙∙∙∙∙∙∙∙∙∙∙∙∙∙4-44
Using Address Book Key ∙∙∙∙∙∙∙∙∙∙∙∙∙∙∙∙∙∙∙∙∙∙∙∙∙∙∙∙∙∙∙∙∙∙∙∙∙∙∙∙∙∙∙∙∙∙∙∙∙∙∙∙∙∙∙∙∙∙∙∙∙∙∙∙∙∙4-46
Manual Sending (Fax) ∙∙∙∙∙∙∙∙∙∙∙∙∙∙∙∙∙∙∙∙∙∙∙∙∙∙∙∙∙∙∙∙∙∙∙∙∙∙∙∙∙∙∙∙∙∙∙∙∙∙∙∙∙∙∙∙∙∙∙∙∙∙∙ 4-50
Canceling TX Jobs ∙∙∙∙∙∙∙∙∙∙∙∙∙∙∙∙∙∙∙∙∙∙∙∙∙∙∙∙∙∙∙∙∙∙∙∙∙∙∙∙∙∙∙∙∙∙∙∙∙∙∙∙∙∙∙∙∙∙∙∙∙∙∙∙∙∙∙∙∙ 4-53
Checking and Deleting Jobs ∙∙∙∙∙∙∙∙∙∙∙∙∙∙∙∙∙∙∙∙∙∙∙∙∙∙∙∙∙∙∙∙∙∙∙∙∙∙∙∙∙∙∙∙∙∙∙∙∙∙∙∙ 4-55
Checking Transmission Results ∙∙∙∙∙∙∙∙∙∙∙∙∙∙∙∙∙∙∙∙∙∙∙∙∙∙∙∙∙∙∙∙∙∙∙∙∙∙∙∙∙∙∙∙∙∙∙∙∙∙∙∙∙4-55
Checking and Deleting Sending Documents
Stored in Memory ∙∙∙∙∙∙∙∙∙∙∙∙∙∙∙∙∙∙∙∙∙∙∙∙∙∙∙∙∙∙∙∙∙∙∙∙∙∙∙∙∙∙∙∙∙∙∙∙∙∙∙∙∙∙∙∙∙∙∙∙∙∙∙∙∙∙∙∙∙∙∙∙∙∙∙∙∙∙4-56
Page 85
Sending Documents (MF4690PL Only)
4-2
Basic Sending Method
Follow this procedure to send faxes and e-mails, or to send documents to a file server.
For network connection, see “Set the Machine for Network Usage,” in the Starter
Guide.
For advanced sending features, see Chapter 4, “Sending and Receiving (MF4690PL
Only),” in the Reference Guide.
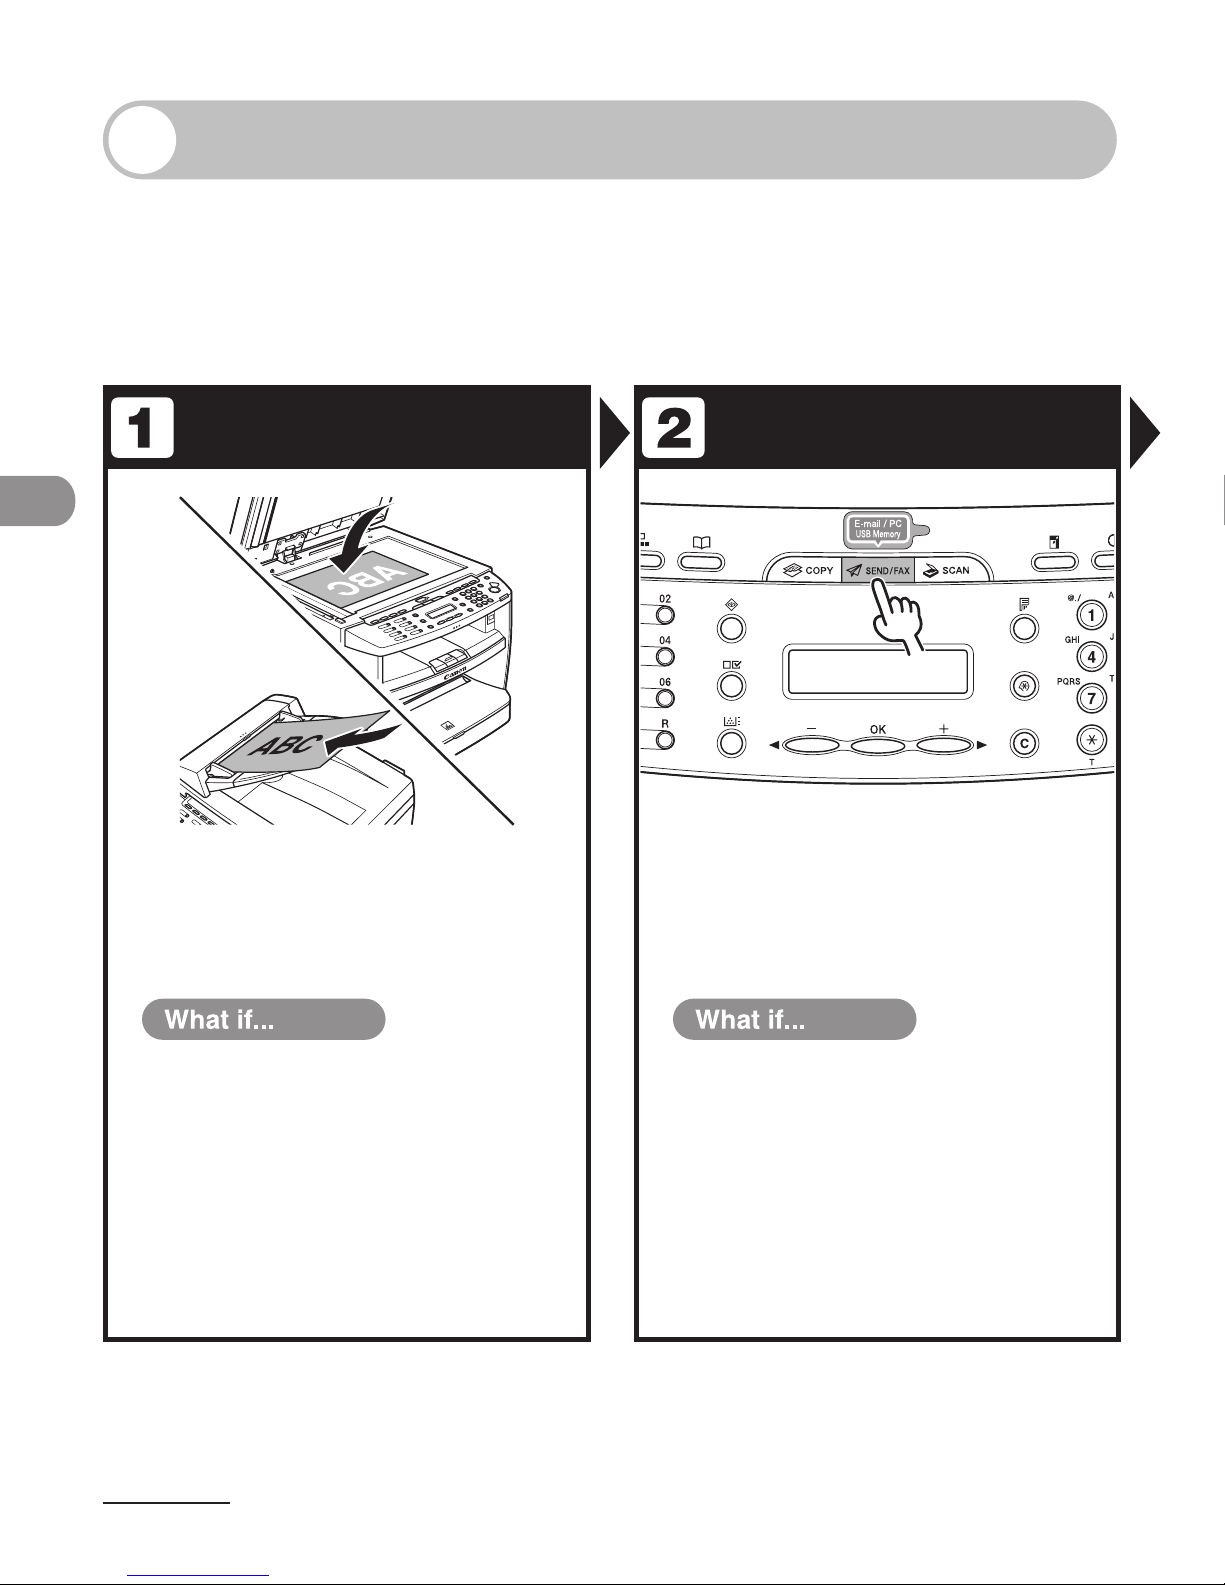
Set a Document
Select the Sending
Method
Place the document on the platen
glass or load it in the ADF.
For documents you can send, see “Document
Requirements,” on p. 2-2.
You want to send multipage documents
as E-mail (Color):
Scan the documents by the ADF. You can
only send one page by the platen glass.
●
Press [SEND/FAX] repeatedly to select
the sending method, then press [OK].
The SEND/FAX indicator lights up and the machine enters
the send/fax standby mode.
You want to send document to a file
server:
You can specify the file server addresses
only with one-touch keys, coded dial
codes, or [Address Book] key. See
“Specifying Destinations,” on p. 4-40.
You want to adjust the image quality
and density :
See “Scan Settings,” on p. 4-4.
●
●
Page 86
4-3
Sending Documents (MF4690PL Only)
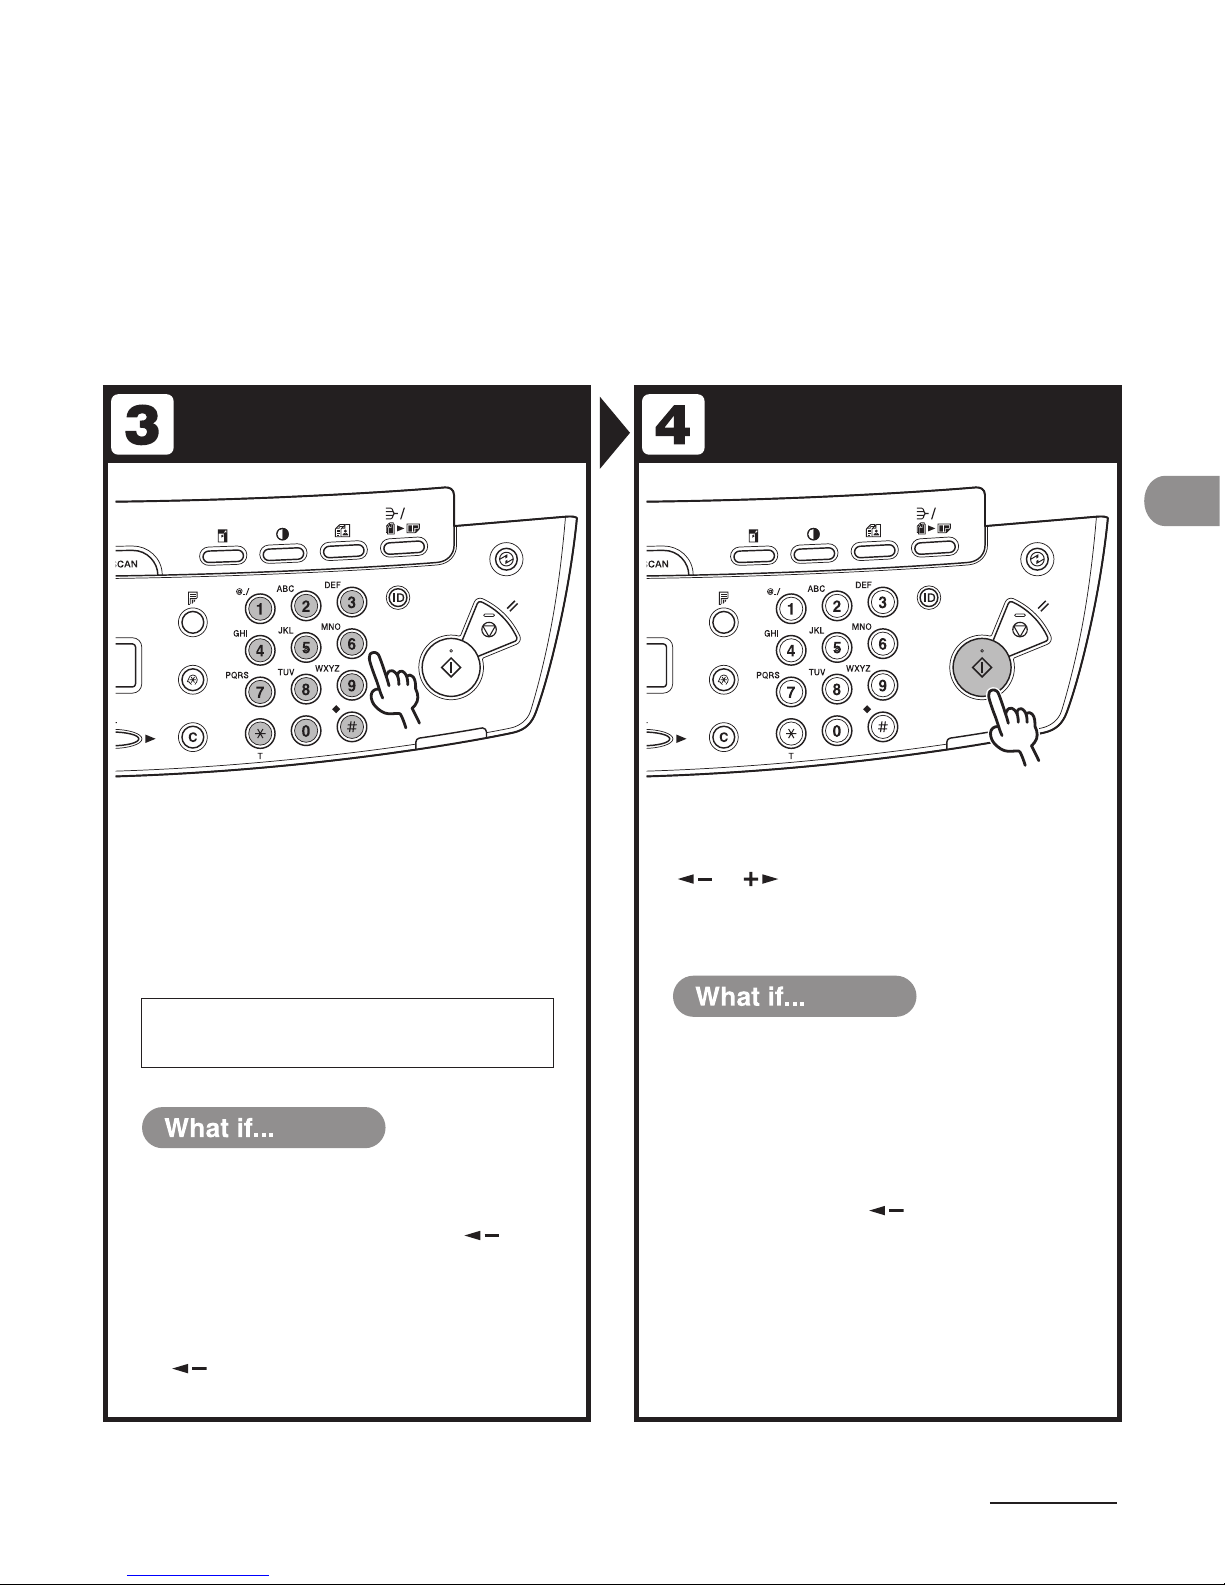
Specify the Destination Send the Document
Specify the fax number or e-mail
address with the numeric keys.
You can also specify the fax number or e-mail addresses
with one-touch keys, coded dial codes, or [Address Book]
key. (See “Specifying Destinations,” on p. 4-40.)
Press [Start].
When you set the documents on the platen glass, press
[
] or [ ] to select the document size, then press
[Start] for each document. When scanning is complete,
press [OK] to start dialing.
TEL=123
Ex.
FAX NUMBER
You enter a wrong number when
specifying a fax number:
Go back to the wrong digit with [
].
You enter a wrong character when
specifying an e-mail address:
Go back to the wrong character with
[
], then press [Clear]. Or press and hold
[Clear] to delete the entire entry.
●
●
You want to cancel sending:
Press [Stop/Reset] on the operation panel.
When the <STOP KEY PRESSED> message
appears, press [OK].
When the <CANCEL?> message appears,
select <YES> with [
].
●
Page 87
Sending Documents (MF4690PL Only)
4-4
Scan Settings
You can adjust the image quality (Fax) and density of the document you send.
The higher image quality you set, the better the output will be, but the longer the
transmission will take.
When you send e-mail or send documents to a file server, you can optionally set the
file format, if multiple images are sent as separate files or a single file, resolution, and
original type according to the type of document you are sending. (See “Send Settings
(E-Mail/File Server),” on p. 4-7.)
Image Quality (Fax)
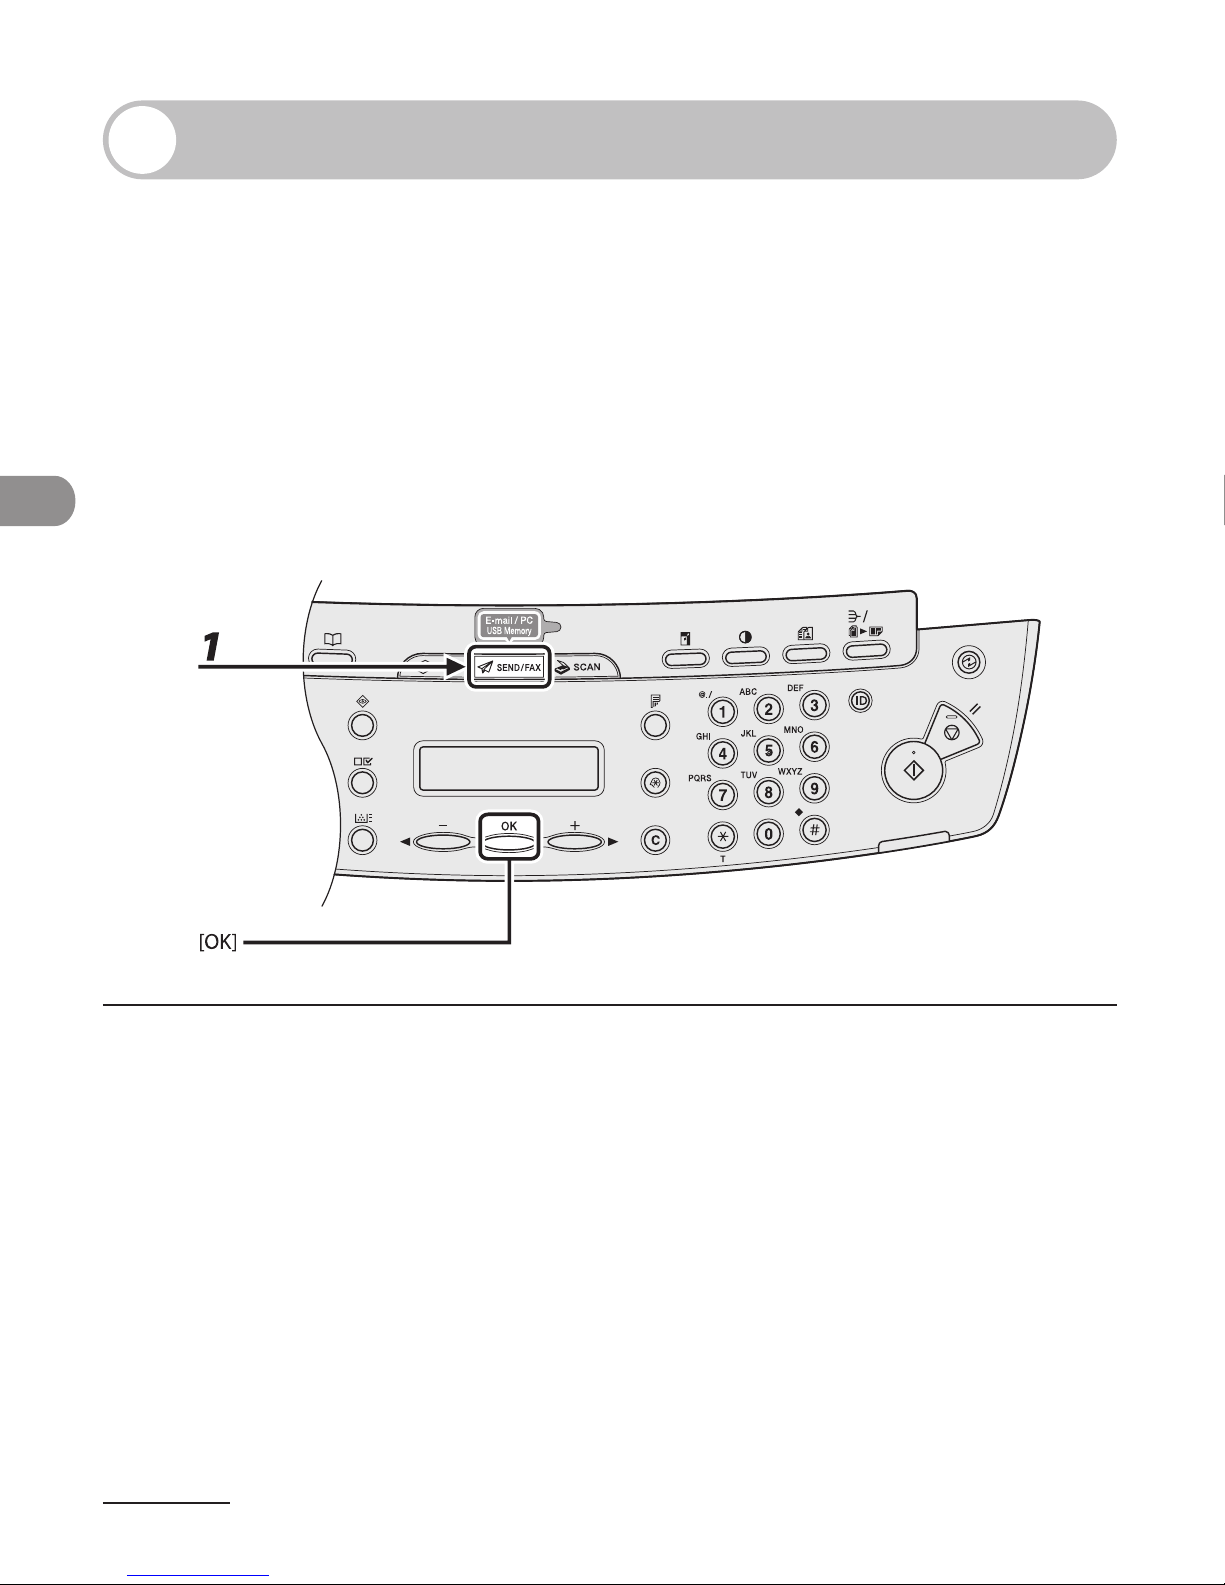
1 Press [SEND/FAX] to select <FAX>, then press [OK].
Page 88
4-5
Sending Documents (MF4690PL Only)
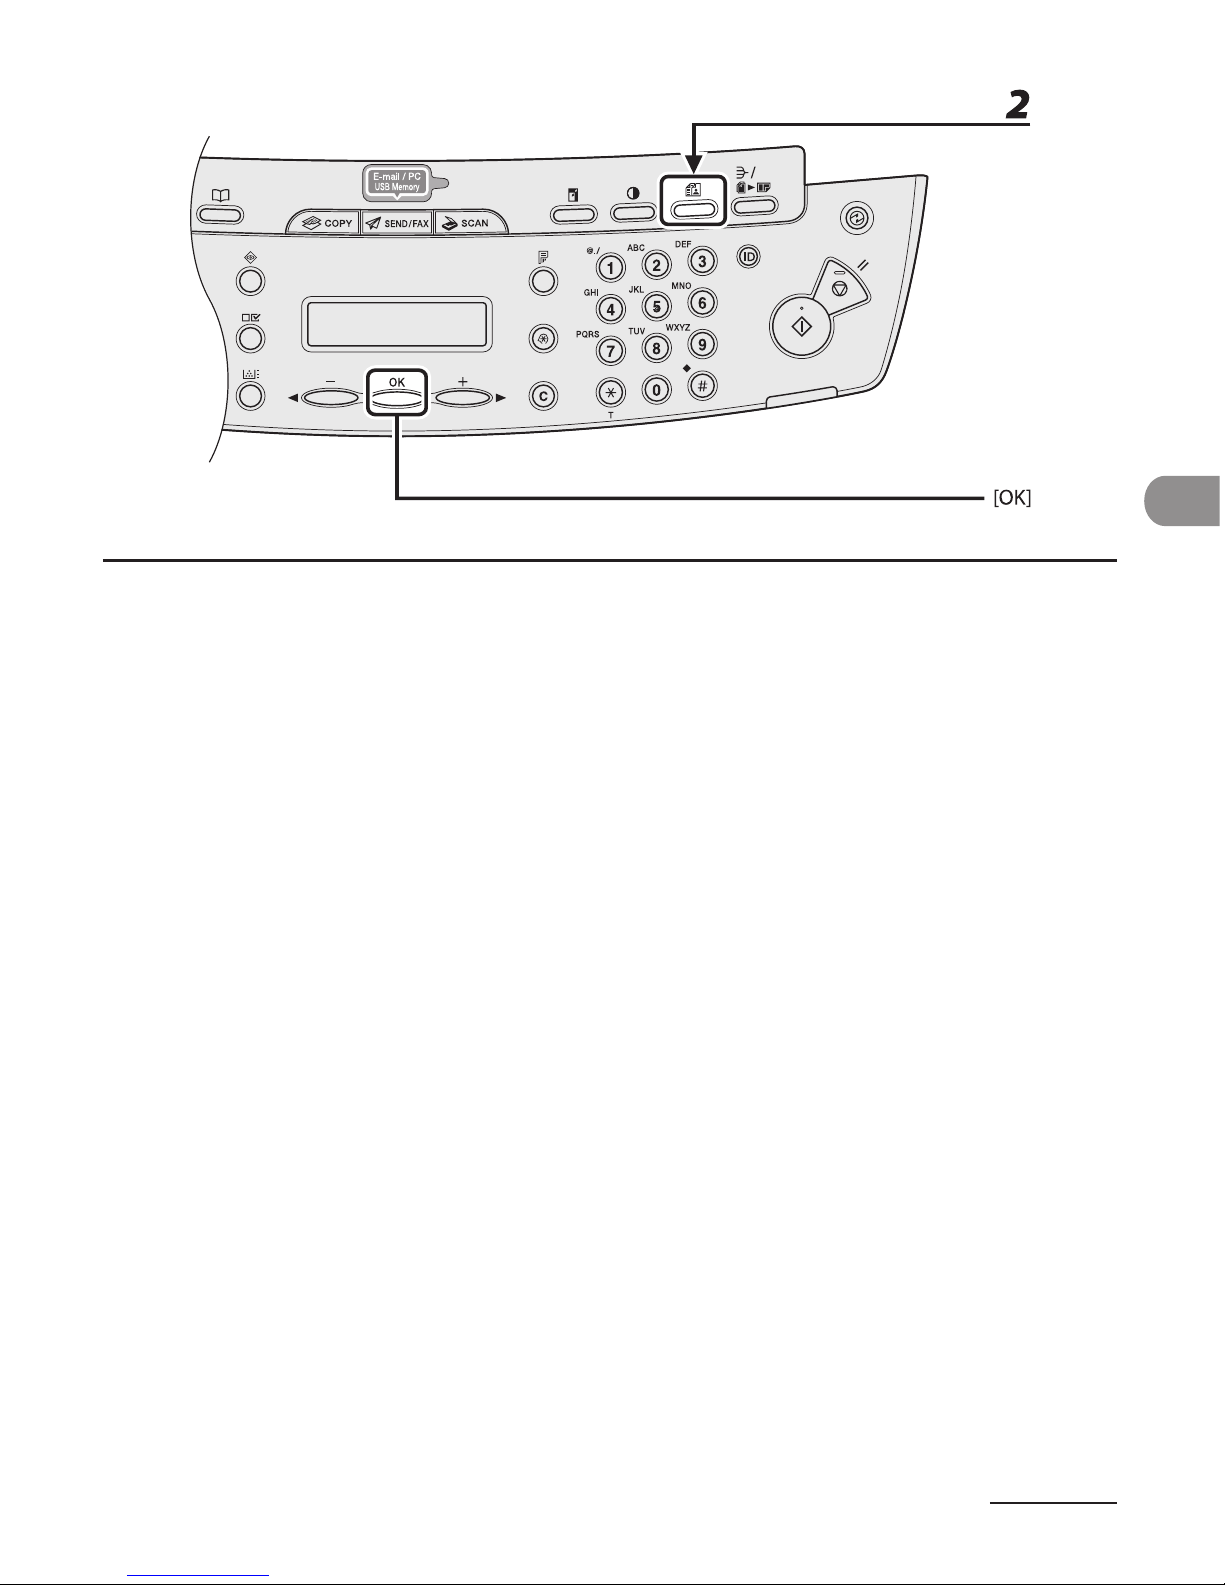
2 Press [Image Quality] repeatedly to select the resolution, then press [OK].
<FINE>: for fine-print documents (the resolution is twice that of <STANDARD>). (200 x 200 dpi)
<PHOTO>: for documents that contain photographs (the resolution is twice that of <STANDARD>). (200
x 200 dpi)
<SUPER FINE>: for documents that contain fine print and images (the resolution is four times that of
<STANDARD>). (200 x 400 dpi)
<ULTRA FINE> for documents that contain fine print and images (the resolution is eight times that of
<STANDARD>). (400 x 400 dpi)
<STANDARD>: for most text-only documents. (200 x 100 dpi)
Page 89
Sending Documents (MF4690PL Only)
4-6
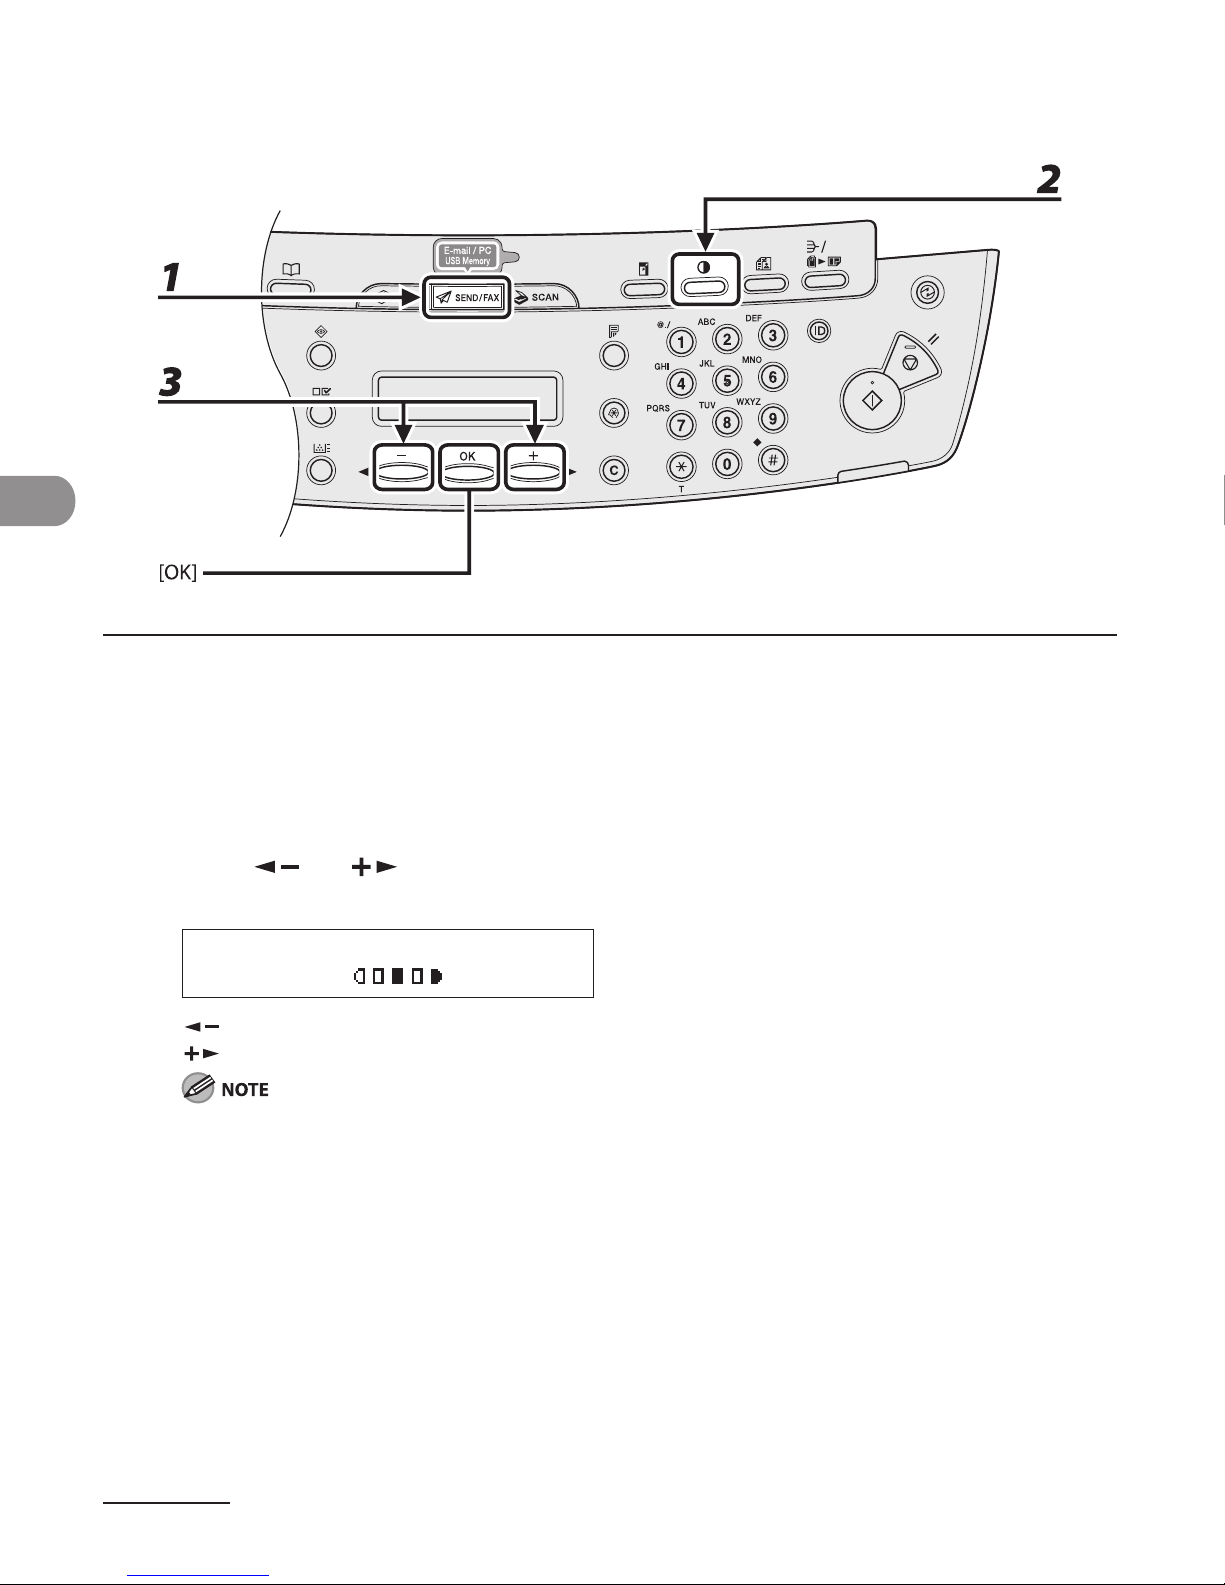
Density
1 Press [SEND/FAX] repeatedly to select the sending method, then press [OK].
2 Press [Density].
3 Press [ ] or [ ] to adjust the density, then press [OK].
Ex.
DENSITY
-LT DK+
[ ]: to make dark documents lighter.
[
]: to make light documents darker.
These settings return to the default values after all documents are scanned. If you want to keep the
settings, set the density as following;
[Additional Functions] <TX/RX SETTINGS> <TX/RX COMMON SET.> <TX SETTINGS>
<SCANNING DENSITY> (See “Setting Menu,” on p. 12-6.)
Page 90
4-7
Sending Documents (MF4690PL Only)
Send Settings (E-Mail/File Server)
You can optionally set the file format, if multiple images are sent as separate files or a single
file, resolution, and original type after specifying the e-mail or file server address.
1 Set documents.
Place the first page on the platen glass if you are not using the ADF.
When you scan documents for E-mail (Color) using the platen glass, you can only send one page for
each job. If you want to send multipage documents as E-mail (Color), scan the documents by the ADF.
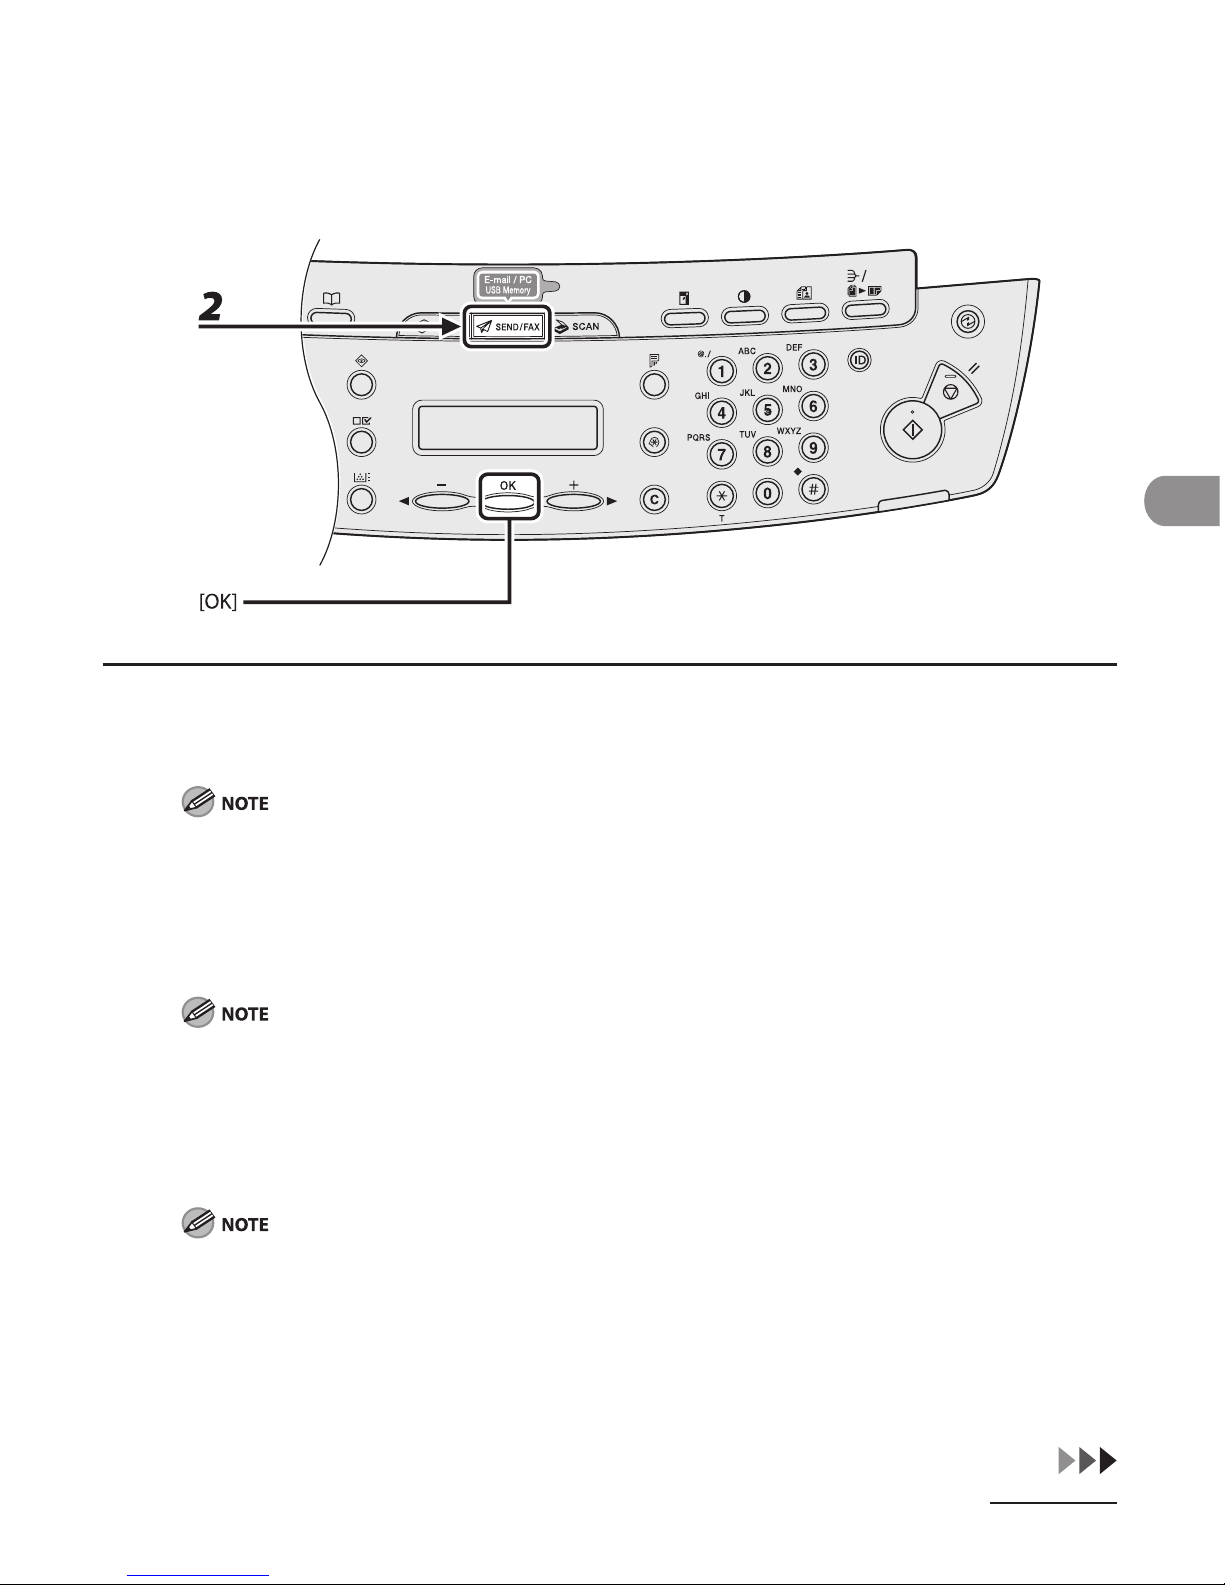
2 Press [SEND/FAX] repeatedly to select the sending method, then press [OK].
To send documents to a file server, select any sending method.
If you want to send color images to a file server or attached to an e-mail message, select <E-MAIL:
COLOR> as a sending method.
3 Specify the destination.
For instructions on specifying destinations, see “Specifying Destinations,” on p. 4-40.
You can specify the file server addresses only with one-touch keys, coded dial codes, or [Address Book].
Page 91
Sending Documents (MF4690PL Only)
4-8
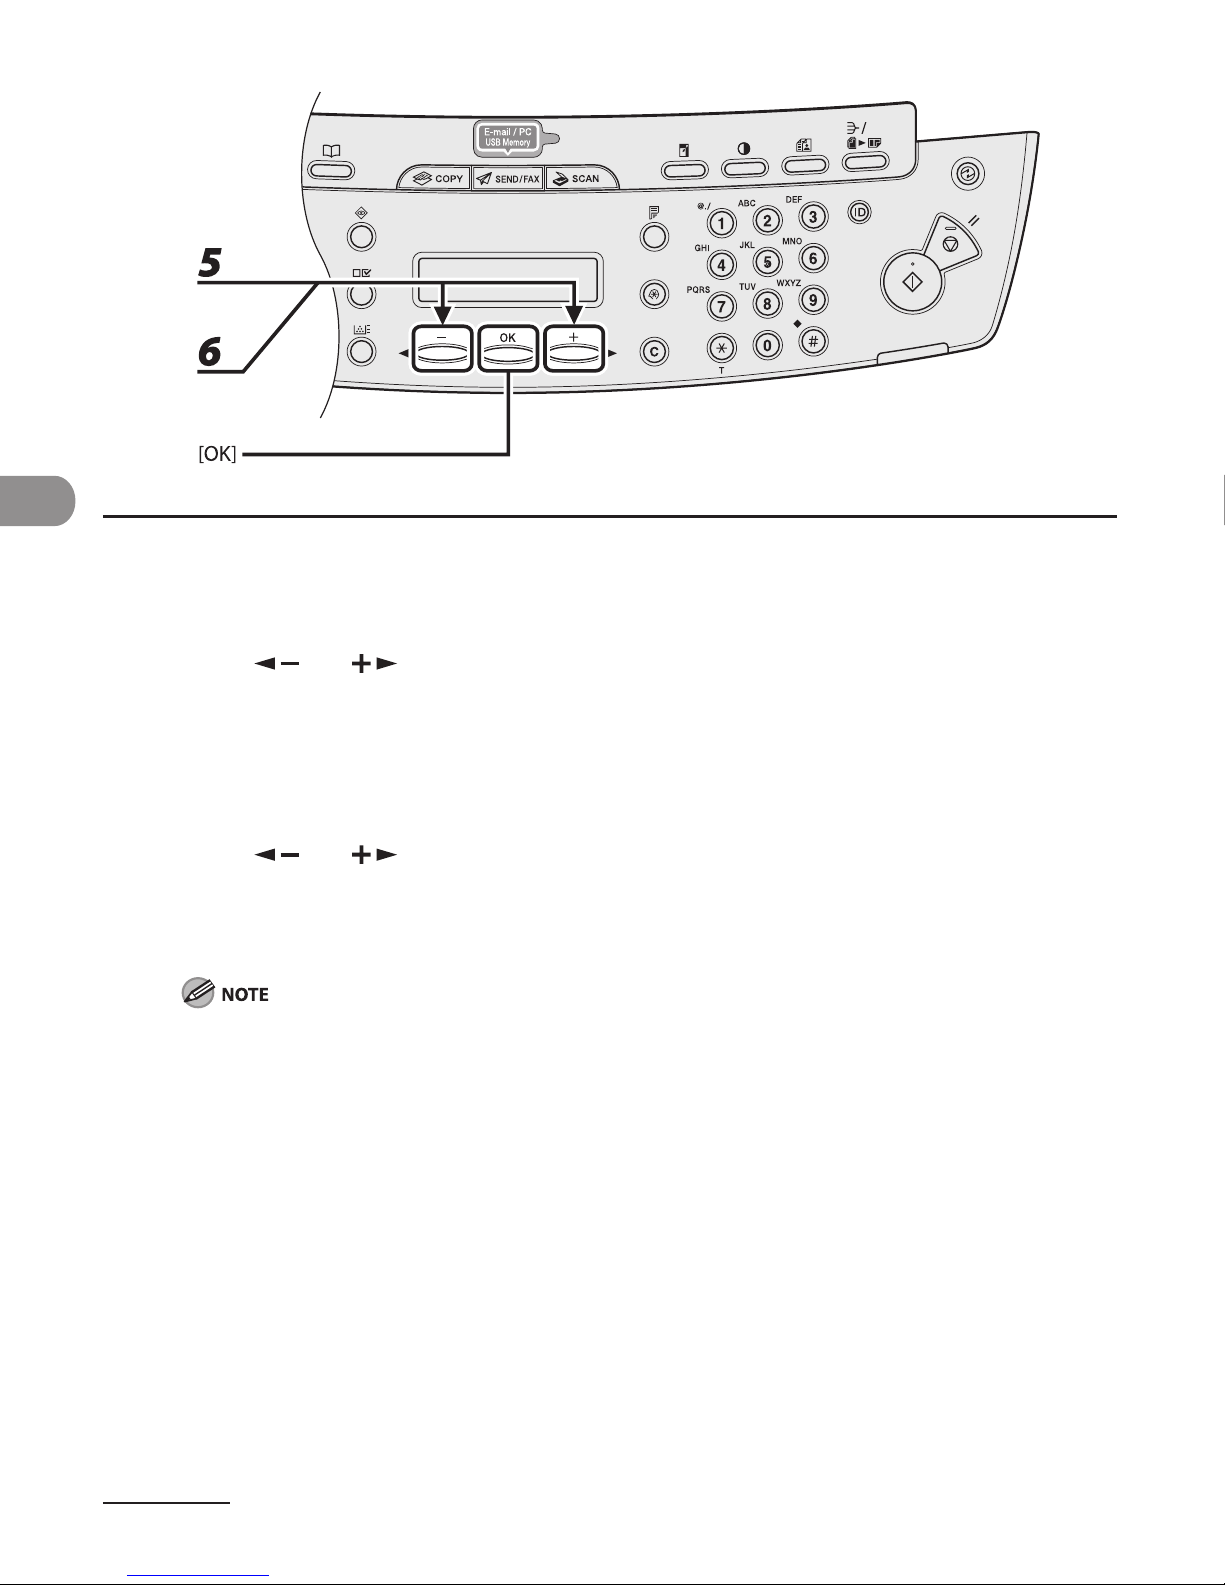
4 Press [OK] repeatedly until <FILE FORMAT> is displayed.
5 Press [ ] or [ ] to select the file format, then press [OK].
E-mail (B&W): <PDF>, <TIFF (B&W)>
E-mail (Color): <JPEG>, <PDF (COMPACT)>
File server (B&W): <PDF>, <TIFF (B&W)>
File server (Color): <JPEG>, <PDF (COMPACT)>
6 Press [ ] or [ ] to select <ON> or <OFF> for <DIVIDE INTO PAGES>, then
press [OK].
<OFF>: Sends multiple images as a single file without dividing them.
<ON>: Separates multiple images and sends them as separate files
If you have selected <JPEG> in step 5, this setting is not available.
<DIVIDE INTO PAGES> is automatically set to <ON> when sending documents in JPEG format.
Page 92
4-9
Sending Documents (MF4690PL Only)
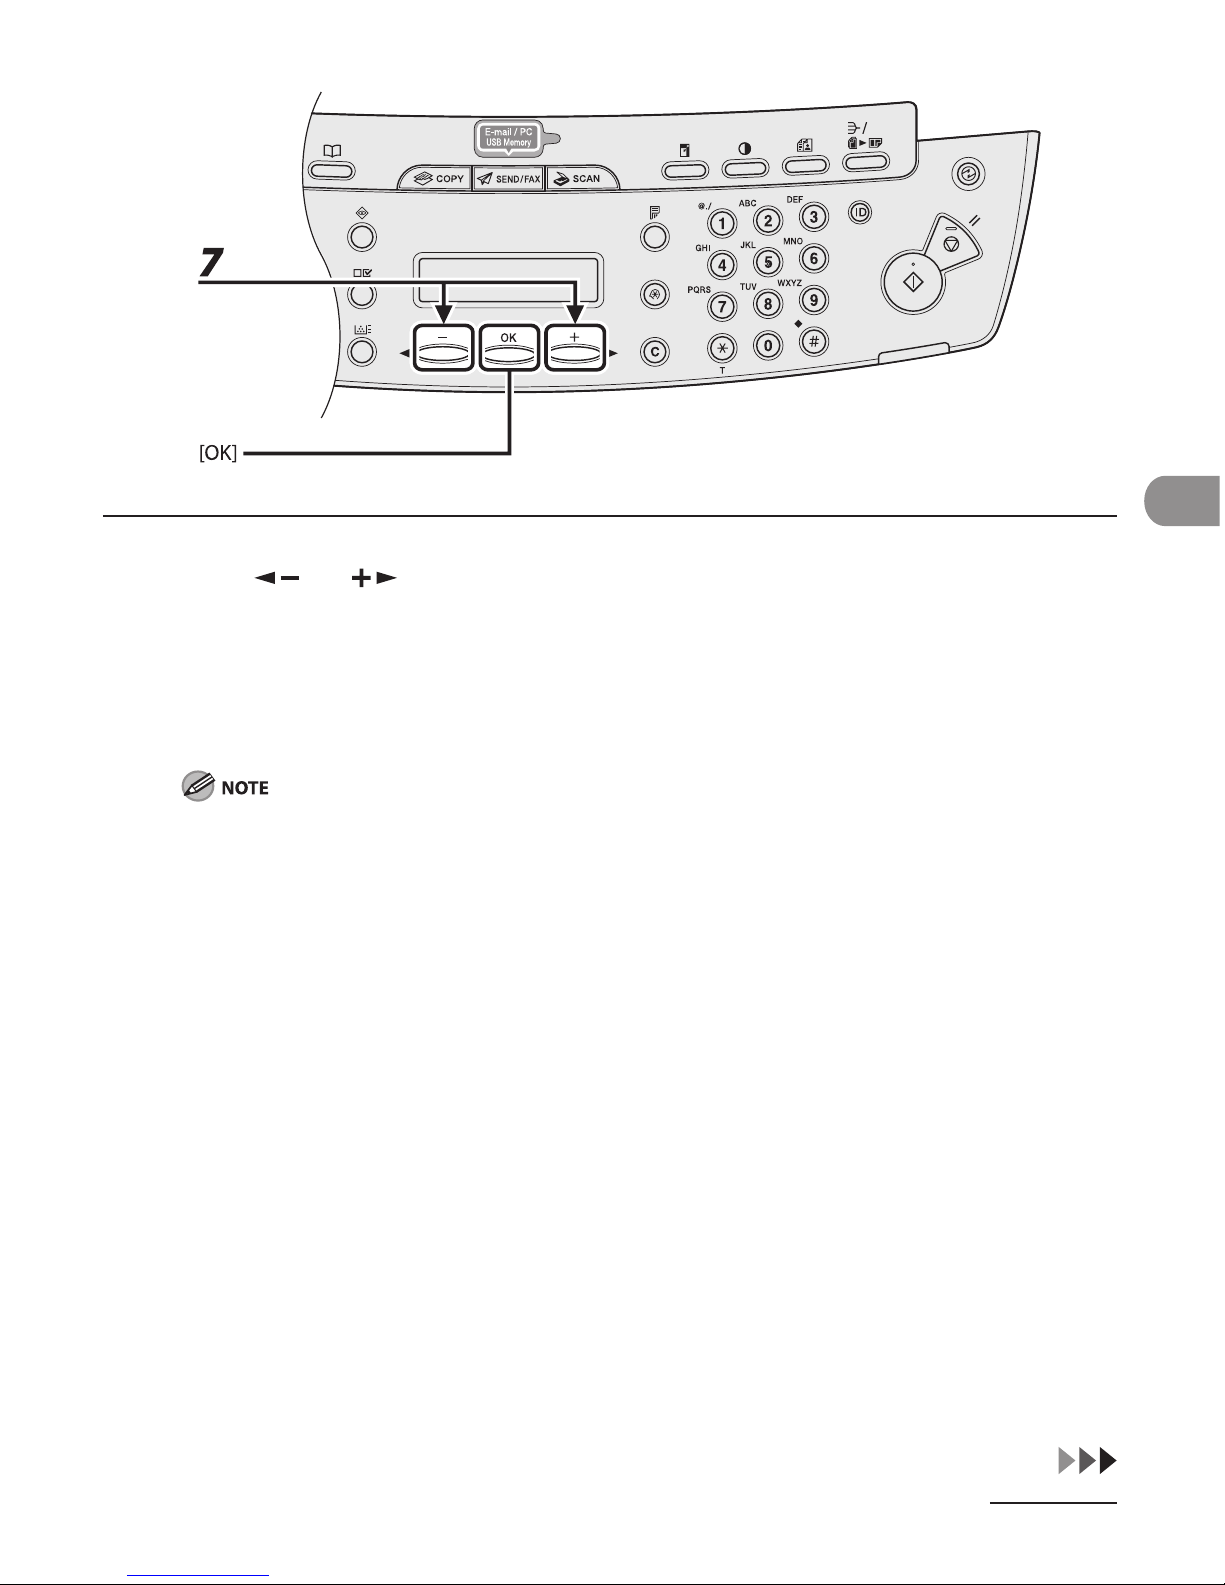
7 Press [ ] or [ ] to select the resolution, then press [OK].
E-mail (B&W): <200X200dpi>, <300X300dpi>, <400X400dpi>, <600X600dpi>, <150X150dpi>,
<200X100dpi>
E-mail (Color): <200X200dpi>, <300X300dpi>, <100X100dpi>, <150X150dpi>
File server (B&W): <200X200dpi>, <300X300dpi>, <400X400dpi>, <600X600dpi>, <150X150dpi>,
<200X100dpi>
File server (Color): <200X200dpi>, <300X300dpi>, <100X100dpi>, <150X150dpi>
If <PDF (COMPACT)> is selected as the file format, only <300X300dpi> can be selected for sending color
images attached to an e-mail message.
Page 93
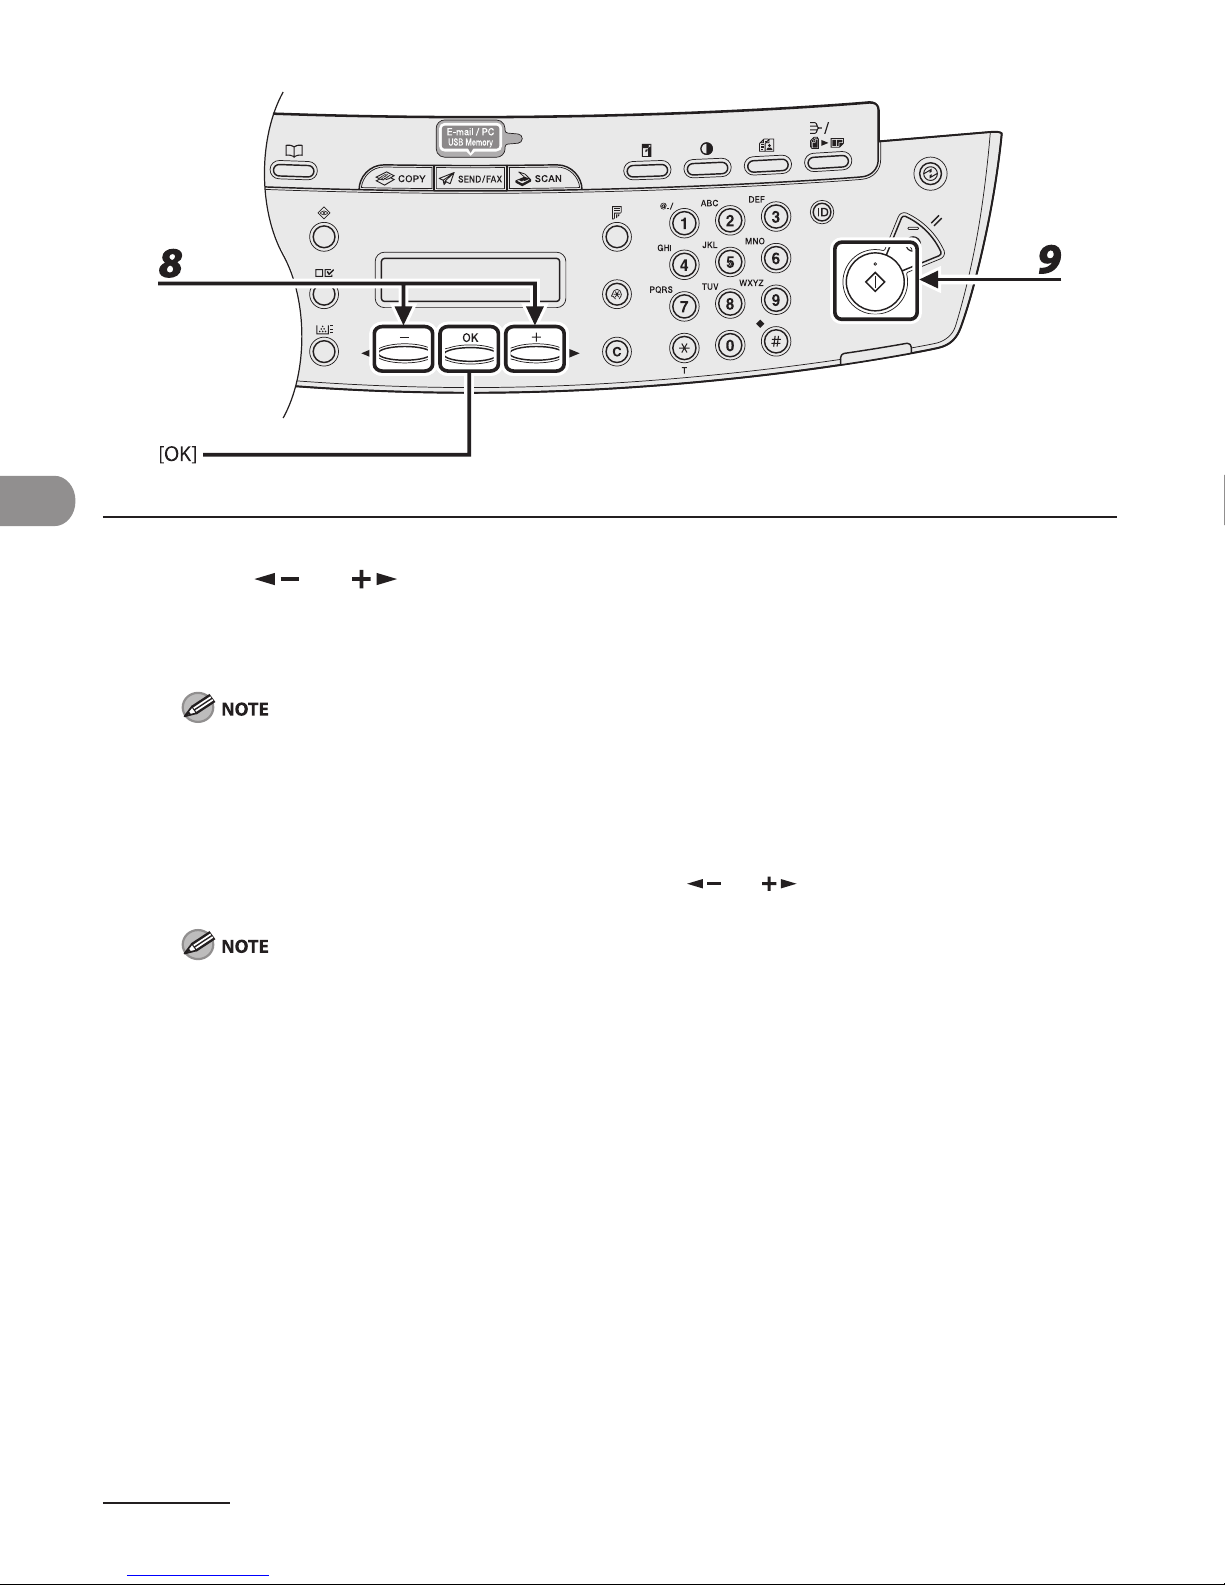
Sending Documents (MF4690PL Only)
4-10
8 Press [ ] or [ ] to select the original type, then press [OK].
<TEXT/PHOTO>: For documents that contain text and photos.
<TEXT>: For text documents.
<PHOTO>: For documents that contain fine text or photos.
If you have selected <PDF (COMPACT)> as the file format in step 5, the original type is automatically set
to <TEXT/PHOTO>. Skip to step 9.
9 Press [Start].
When you set the documents on the platen glass, press [ ] or [ ] to select the document size, then
press [Start] for each document. When scanning is complete, press [OK] to start sending.
When <TIME OUT> is set to <ON> in <TX SETTINGS> in <FAX SETTINGS> in <TX/RX SETTINGS>, and if
you have specified the destination by any other method than using numeric keys, the machine starts
scanning automatically without pressing [Start], after the preset time for this setting is elapsed.
You can set the document’s name, a subject line, message body text, and reply-to address, and
e-mail priority common to all sending jobs. For instructions, see Chapter 4, “Sending and Receiving
(MF4690PL Only),” in the Reference Guide.
–
–
Page 94
4-11
Sending Documents (MF4690PL Only)
Storing/Editing Address Book
This machine provides you with various ways to specify the destination besides using
the numeric keys. You can register fax numbers, e-mail addresses and file server
addressed to the Address Book. Once you have registered destinations using these
functions, you can specify the destinations by simply pressing one or a combination
of keys:
Using One-Touch Keys (p. 4-40)
You can specify destinations by pressing one-touch keys. You can register up to 7 onetouch keys, including group addresses.
Using Coded Dial Codes (p. 4-42)
You can specify destinations by pressing [Coded Dial] followed by three-digit code. You
can register up to 192 coded dial codes, including group addresses.
Using Group Addresses (p. 4-44)
You can specify groups of destinations registered in one-touch keys and coded dial
codes. You can register up to 198 destinations in a group.
Using Address Book Key (p. 4-46)
You can specify destinations by pressing [Address Book] and searching a destination from
Address Book.
If <ADD. BOOK PASSWORD> is set in <SYSTEM SETTINGS>, you must enter your password to enter <ADDRESS
BOOK SET.> menu. Enter the password with the numeric keys, then press [OK].
To send documents to a file server, the file server addresses must be registered in one-touch keys or coded
dial codes.
Destinations stored in the Address Book can be exported to your computer as a file, which can be imported
into the machine. For information on exporting the Address Book, see Chapter 7, “Remote UI,” in the
Reference Guide.
For easy reference, print out the list of recipients registered in one-touch keys or coded dial codes. (See
“REPORT SETTINGS,” on p. 12-31.)
●
●
●
●
–
–
–
–
Page 95
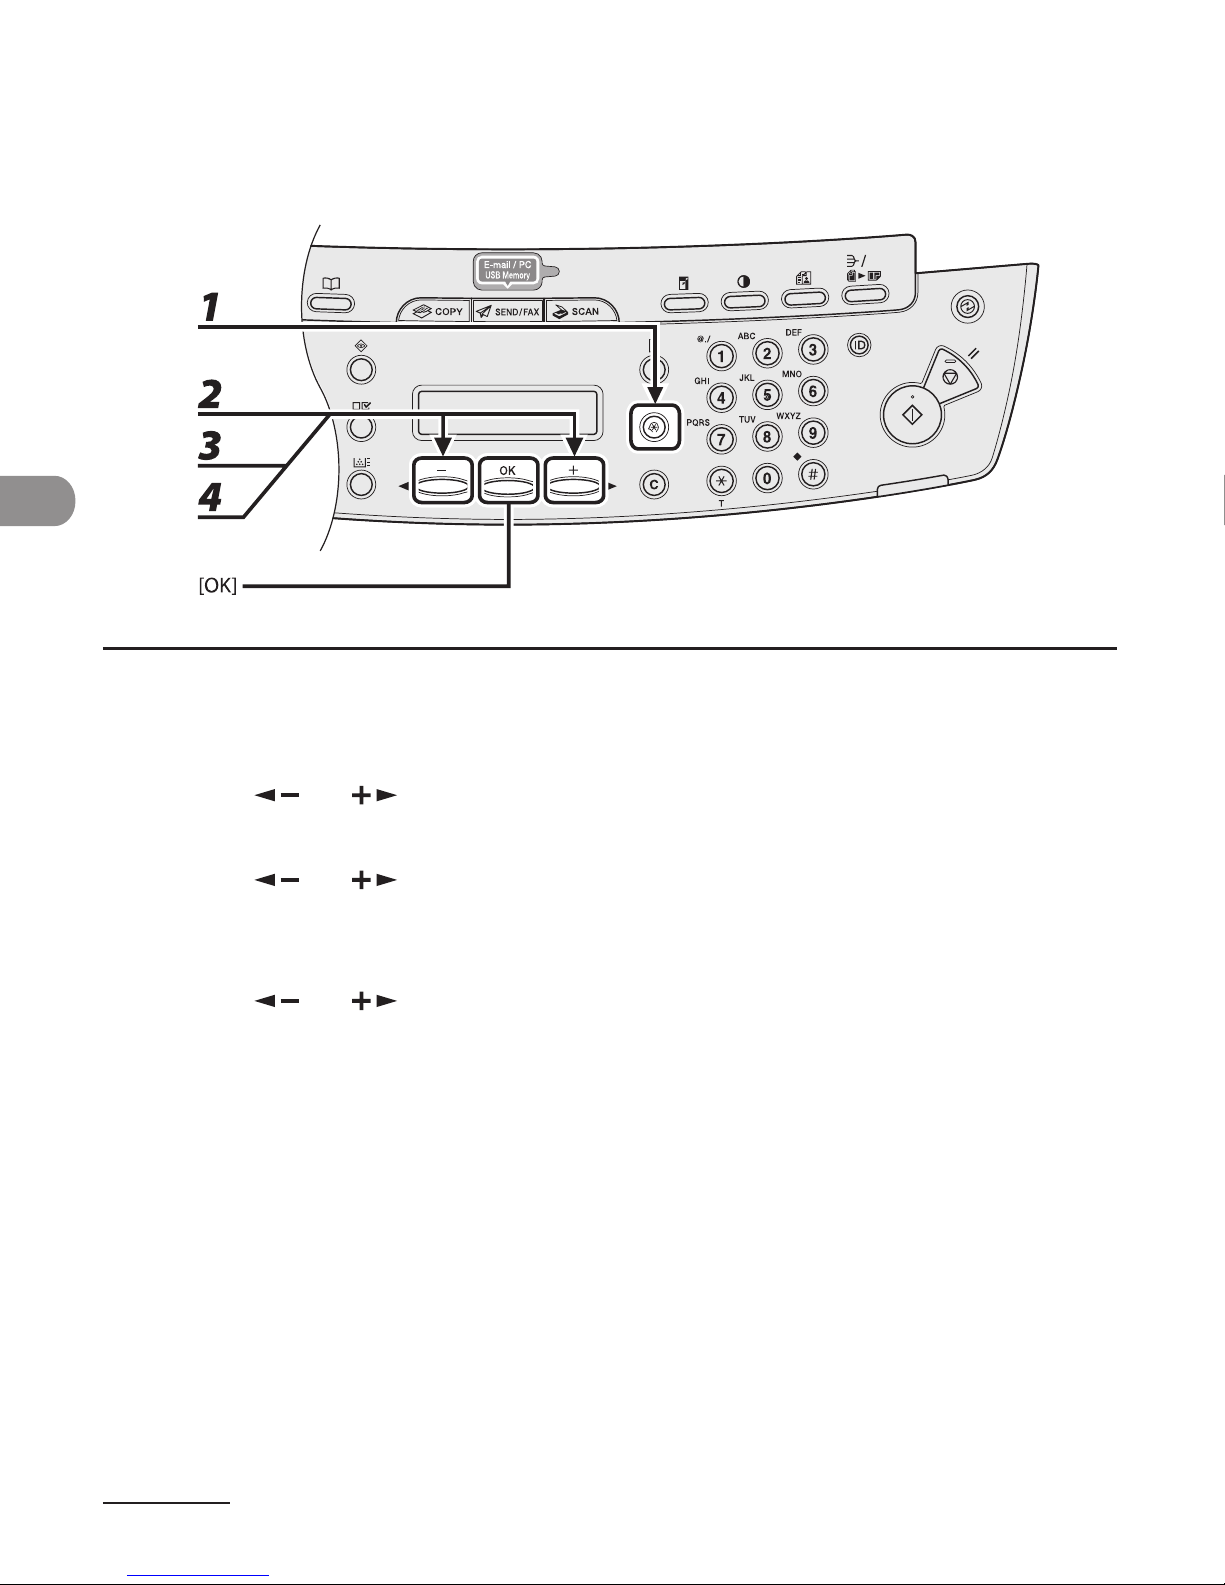
Sending Documents (MF4690PL Only)
4-12
Storing/Editing One-Touch Keys/ Coded Dial Codes
Registering Fax Numbers
1 Press [Additional Functions].
2 Press [ ] or [ ] to select <ADDRESS BOOK SET.>, then press [OK].
3 Press [ ] or [ ] to select <1-TOUCH SPD DIAL> or <CODED SPD DIAL>, then
press [OK].
4 Press [ ] or [ ] to select a one-touch key (01 to 07) or coded dial code (000
to 191) for which you want to register the fax number, then press [OK].
You can also select a one-touch key or coded dial code by pressing the corresponding one-touch key, or
[Coded Dial] followed by the desired three-digit code.
●
Page 96
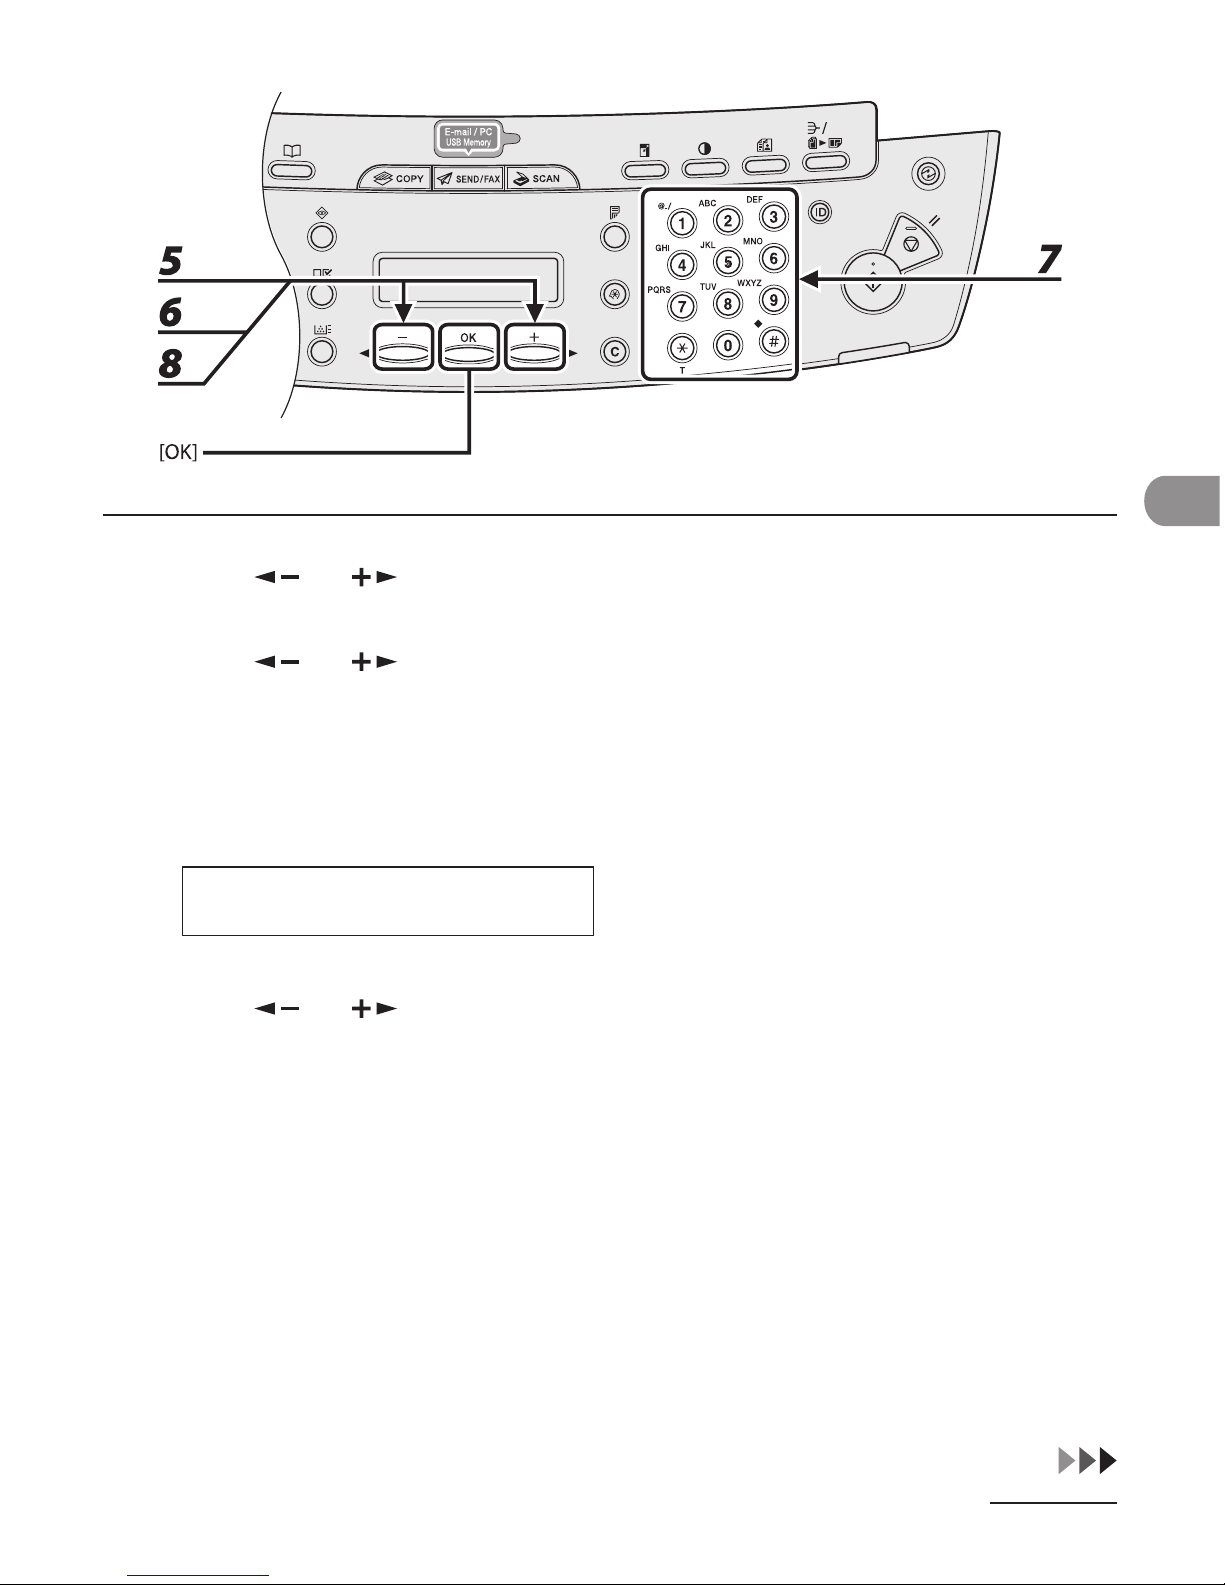
4-13
Sending Documents (MF4690PL Only)
5 Press [ ] or [ ] to select <FAX>, then press [OK].
6 Press [ ] or [ ] to select <TEL NUMBER ENTRY>, then press [OK].
7 Enter the fax number you register (max. 120 digits, including spaces and
pauses) with the numeric keys, then press [OK].
012XXXXXXX_
TEL NUMBER ENTRY
Ex.
8 Press [ ] or [ ] to select <NAME>, then press [OK].
Page 97
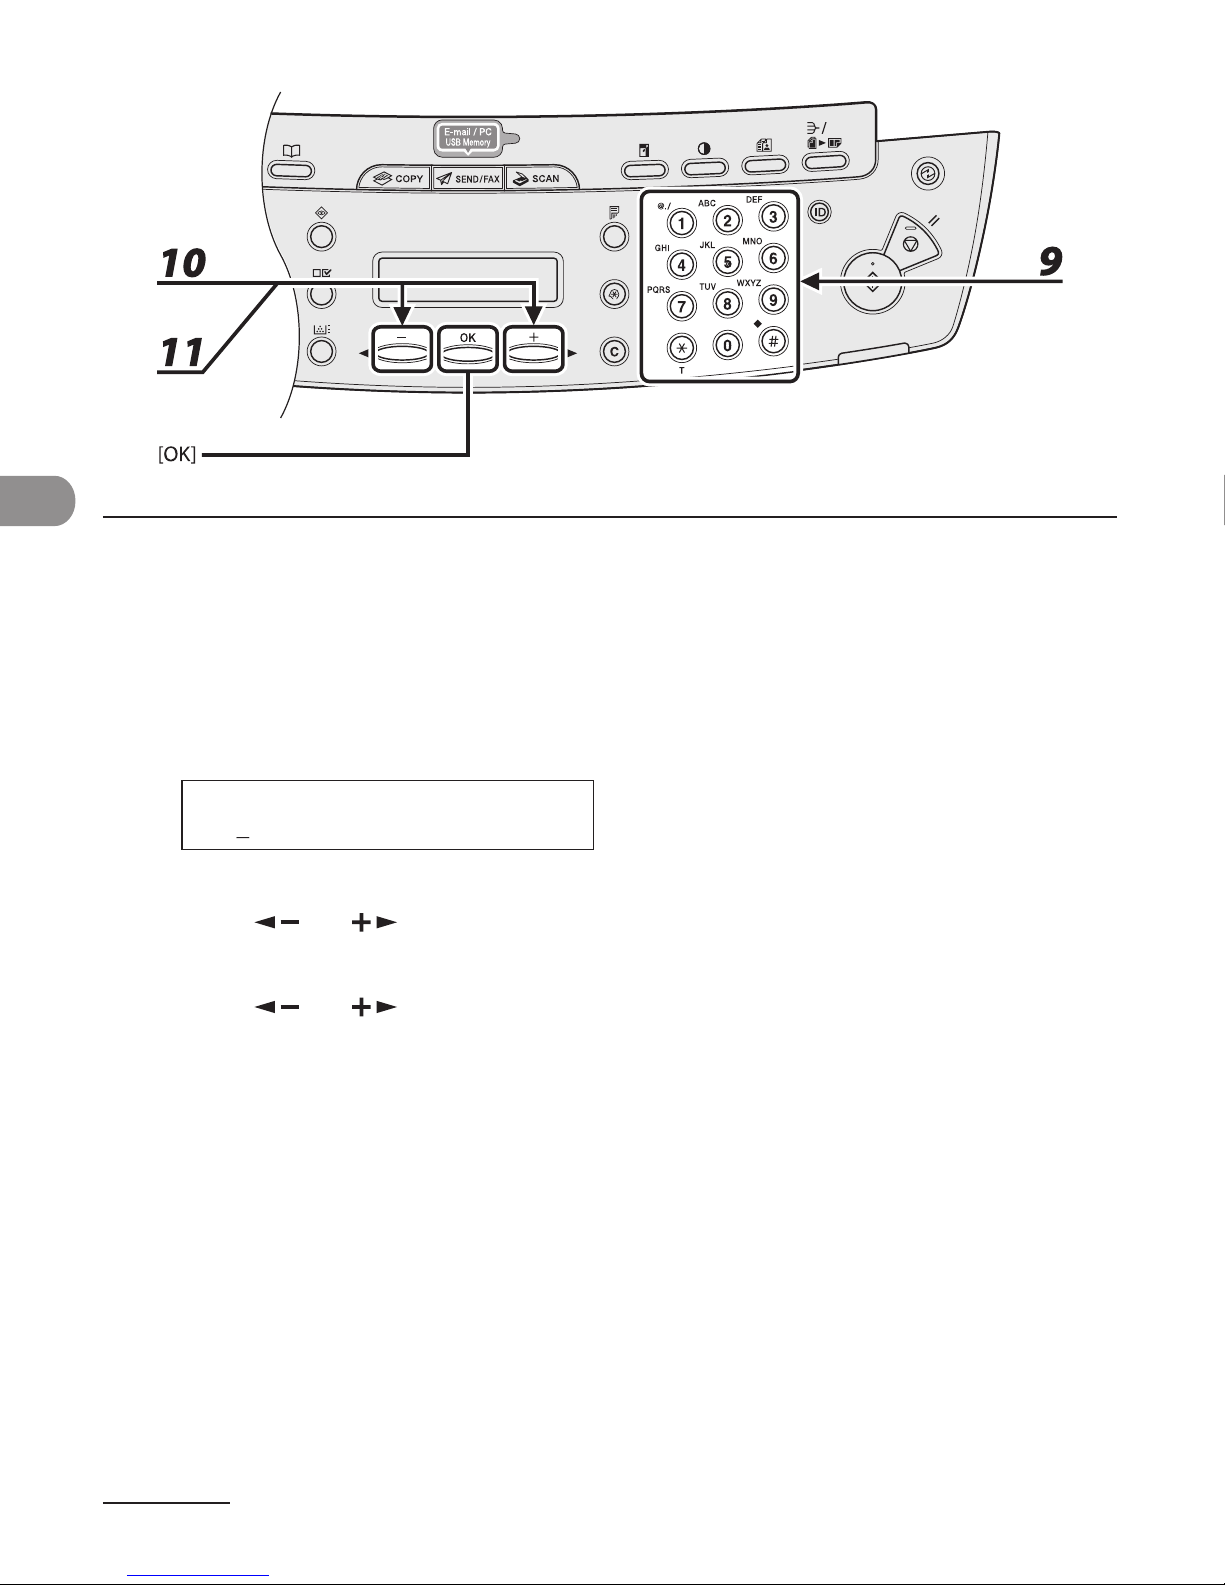
Sending Documents (MF4690PL Only)
4-14
9 Enter the destination name (max. 16 letters, including spaces) with the numeric
keys, then press [OK].
If you want to specify the following optional settings (<LONG DISTANCE>, <TX SPEED>, and <ECM>) for
the fax number you are registering, proceed to the next step.
If you do not need to set these options, skip to step 18.
NAME :a
Can
Ex.
10 Press [ ] or [ ] to select <OPTIONAL SETTING>, then press [OK].
11 Press [ ] or [ ] to select <ON>, then press [OK].
Page 98
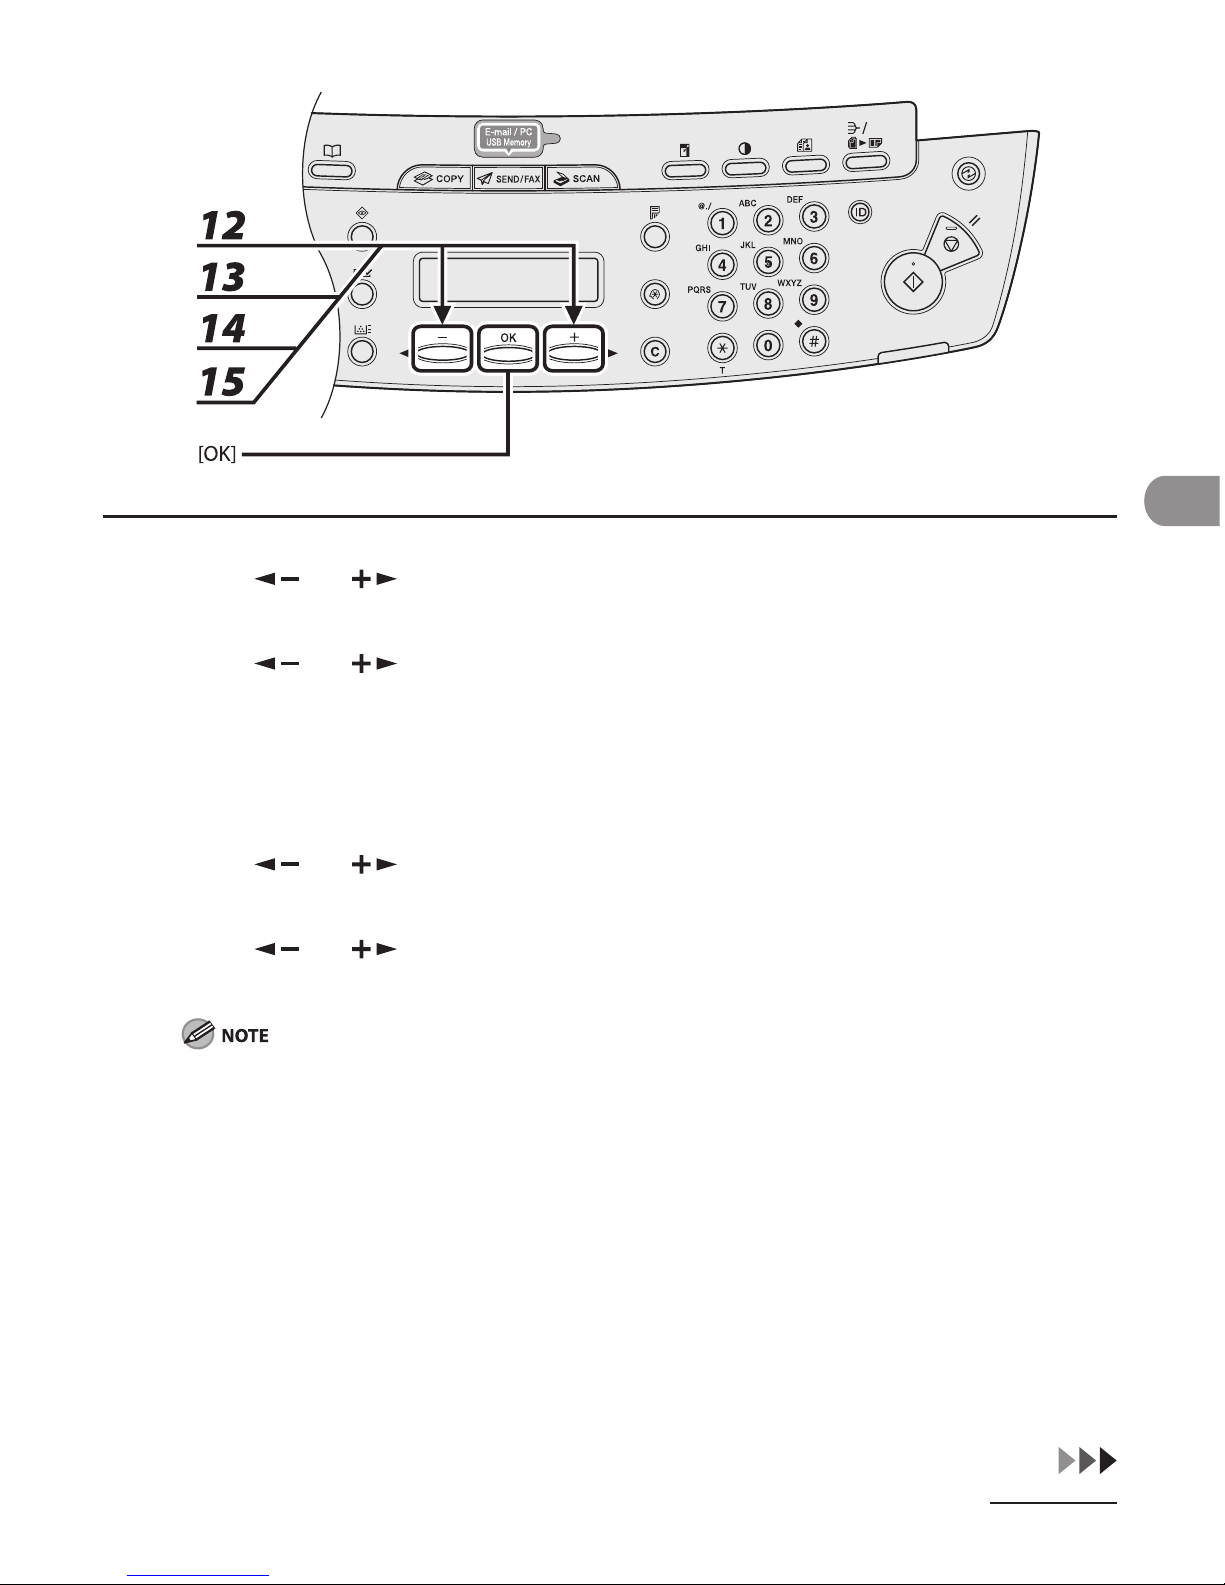
4-15
Sending Documents (MF4690PL Only)
12 Press [ ] or [ ] to select <LONG DISTANCE>, then press [OK].
13 Press [ ] or [ ] to select the most effective transmission option, then press
[OK].
<DOMESTIC>: Normally select this option.
<LONG DISTANCE 1-3>: Select one of these options when you make an international call. If errors occur
during fax transmissions, try the setting from <LONG DISTANCE 1> through <LONG DISTANCE 3>.
14 Press [ ] or [ ] to select <TX SPEED>, then press [OK].
15 Press [ ] or [ ] to select the sending speed (33600 bps, 14400 bps, 9600
bps, or 4800 bps), then press [OK].
If transmission errors occur frequently, lower the speed.
Page 99
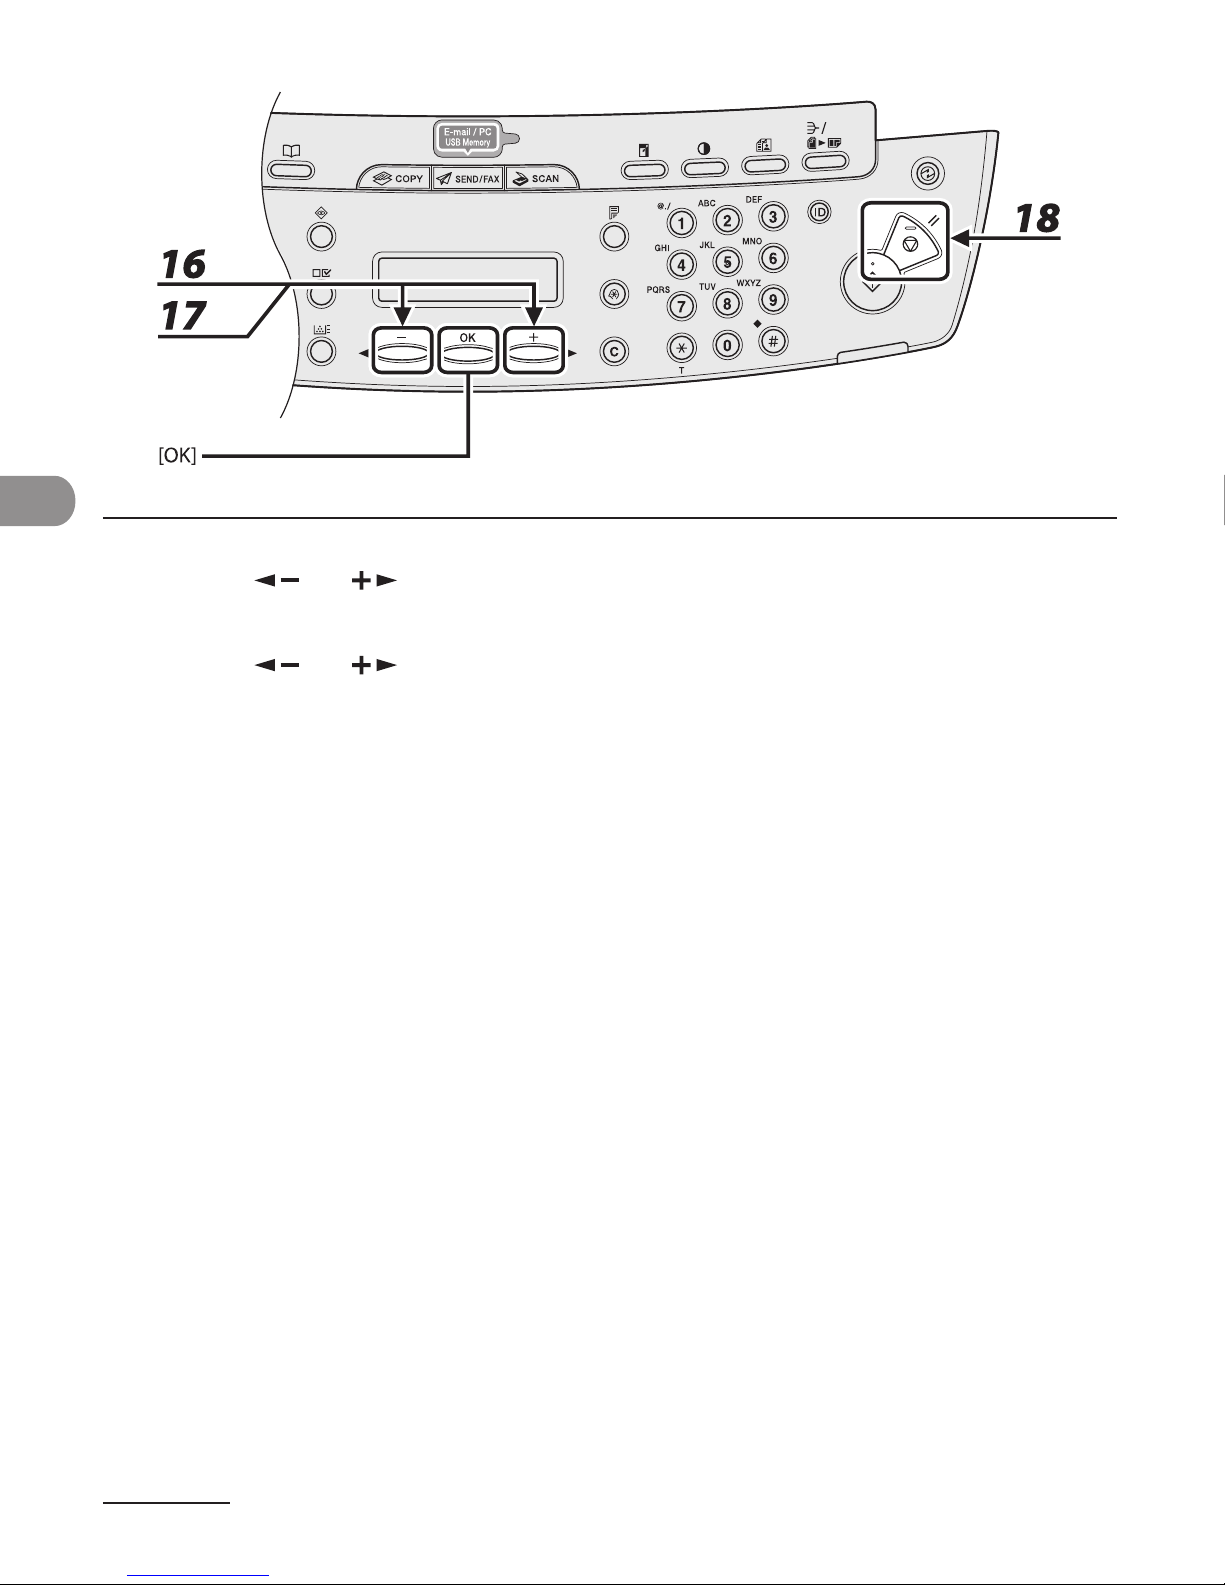
Sending Documents (MF4690PL Only)
4-16
16 Press [ ] or [ ] to select <ECM>, then press [OK].
17 Press [ ] or [ ] to select <ON> to reduce system and line errors while
sending to or receiving from other machines that support ECM, then press [OK].
To register another one-touch key or coded dial code, repeat the procedure from step 4.
18 Press [Stop/Reset] to return to the standby mode.
Page 100
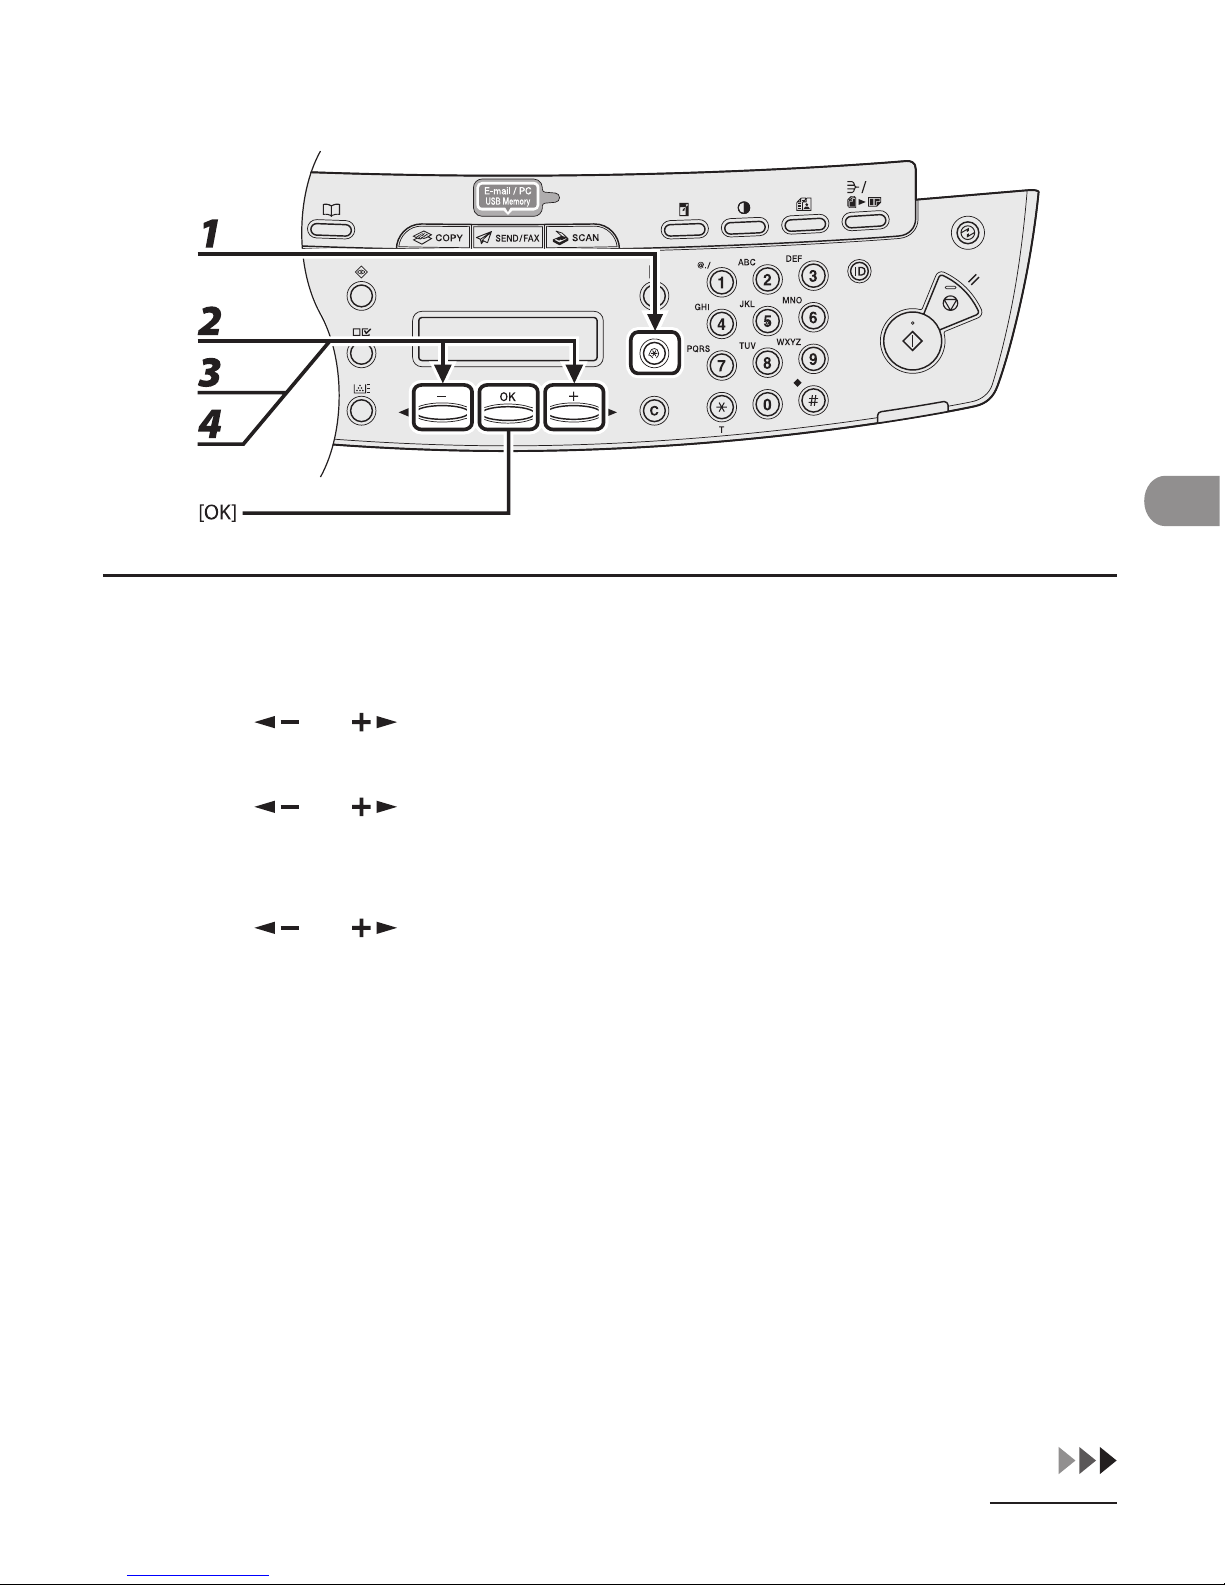
4-17
Sending Documents (MF4690PL Only)
Registering E-Mail Addresses
1 Press [Additional Functions].
2 Press [ ] or [ ] to select <ADDRESS BOOK SET.>, then press [OK].
3 Press [ ] or [ ] to select <1-TOUCH SPD DIAL> or <CODED SPD DIAL>, then
press [OK].
4 Press [ ] or [ ] to select a one-touch key (01 to 07) or coded dial code (000
to 191) for which you want to register the address, then press [OK].
You can also select a one-touch key or coded dial code by pressing the corresponding one-touch key, or
[Coded Dial] followed by the desired three-digit code.
●
 Loading...