


HT1-2147-000-V.3.1
CANON INC.
30-2, Shimomaruko 3-chome, Ohta-ku, Tokyo 146-8501, Japan
CANON U.S.A., INC.
One Canon Plaza, Lake Success, NY 11042, U.S.A.
CANON CANADA INC.
6390 Dixie Road Mississauga, Ontario L5T 1P7, Canada
CANON EUROPA N.V.
Bovenker kerweg 59-61 P.O. Box 2262, 1180 EG Amstelveen, The Netherlands
CANON FRANCE S.A.
17, quai du President Paul Doumer, 92414 Courbevoie, Cedex, France
CANON (U.K.) LTD.
Woodhatch, Reigate, Surrey, RH2 8BF, United Kingdom
CANON DEUTSCHLAND GmbH
P.O. Box 100364, Europark Fichtenhain A10 47807 Krefeld, Germany
CANON LATIN AMERICA, INC.
6505 Blue Lagoon Drive Suite 325 Miami, Florida 33126, U.S.A.
CANON AUSTRALIA PTY. LTD.
1 Thomas Holt Drive, North Ryde, Sydney, N.S.W. 2113, Australia
CANON SINGAPORE PTE. LTD.
79 Anson Road #09-01/06, Singapore 079906
CANON HONG KONG CO., LTD.
9/F., The Hong Kong Club Building, 3A Chater Road, Central, Hong Kong
© CHINA

Copyright
Copyright © 1999 by Canon, Inc. All rights reserved. No part of this
publication may be reproduced, transmitted, transcribed, stored in a
retrieval system, or translated into any language or computer language in
any form or by any means, electronic, mechanical, magnetic, optical,
chemical, manual, or otherwise, without the prior written permission of
Canon, Inc.
ii
Preface

Trademarks
Canon and LASER CLASS are registered trademarks, and UHQ™ is a
trademark of Canon Inc.
Other brand and product names may be trademarks or registered
trademarks of their respective companies.
As an ENERGY STAR
®
Partner, Canon has
determined that the LASER CLASS 2060 meets the
Energy Star guidelines for energy efficiency.
Super G3 is a phrase used to describe the new
generation of fax machines that use ITU-T V.34
standard 33.6Kbps* modems. Super G3 High Speed
Fax machines allow transmis sion time of
approximately 3 seconds* per page which results in
reduced telephone line charges.
*Approximately 3 seconds per page fax
transmission time based on ITU-T No.1 Chart,
(JBIG, Standard Mode) at 33.6Kbps modem speed.
The Public Switched Telephone Network (PSTN)
currently supports 28.8Kbps modem speeds or
lower, depen di ng o n telephone line conditions.
Preface
iii

USERS IN U.S.A.
PRE-INSTALLATION REQUIREMENTS FOR CANON
FACSIMILE E QUI PMENT
A. Location
Supply a suitable table, cabinet, or desk. See Appendix for the unit’s
dimensions and weight.
B. Order Information
1. Only a single line, touch tone, or rotary telephone set is to be
used.
2. Order an RJ11-C modular jack (USOC code), which should be
installed by the phone company. If the RJ11-C jack is not present,
installation cannot occur.
3. Order a normal business line from your telephone company’s
business representative. The line should be a regular voice grade
line or equivalent. Use one line per unit.
DDD (DIRECT DISTANCE DIAL) LINE
N
or
IDDD (INTERNATIONAL DIRECT DISTANCE DIAL) LINE IF
YOU COMMUNICATE OVERSEAS
Canon recommends an individ u al line following industry standards
[e.g., the 2500 (Touch Tone) or 500 (Rotary/Pulse Dial) telephones]. A
dedicated extension of a PBX unit without “Call Waiting” can be used
with your unit. Key telephone systems are not recommended because
they send non-standard signals to individual telephones for ringing and
special codes, which may cause a fax error.
C. Power Requirements
This equipment should be connected to a standar d 120 volt AC, thr eewire grounded outlet only. Do not connect this un it to an outlet or
power line shared with other appliances that cause “electrical noise.”
Air conditioners, electric typewriters, copiers, and machines of this
sort generate noise which often interferes with communications
equipment and the sending and receiving of documents.
iv
Preface

CONNECTION OF THE EQUIPMENT
This equipment complies with Part 68 of the FCC rules. On the rear panel
of this equipment is a label that contains, among other information, the
FCC Registration Number and Ringer Equivalence Number (REN) for
this equipment. If requested, this information must be given to the
telephone company. This equipment may not be used on coin service
provided by the telephone company. Connection to party lines is subject
to state tariffs.
An FCC compliant telephone cord and modular jack is provided with this
equipment. This equipment is designed to be connected to the telephone
network or premises wiring using a compatible modular jack which is
Part 68 compliant. See Inst allation Instructions for details.
This REN is used to determine the quantity of devices which ma y be
connected to the telephone line. Excessive REN’s on the telephone line
may result in the devices not ringing in response to an incoming call. In
most, but all areas, the sum of the REN’s should not exceed five(5.0). To
be certain of the number of devices that may be connected to the line, as
determined by the total REN’s, contact the telephone company to
determine the maximum REN for the calling area.
IN CASE OF EQUIPMENT MALFUNCTION
Should any malfunctio n occur which cannot be corrected by the
procedures described in this User’s Guide, disconnect the equipment
from the telephone line or unplug the power cord. The telephone line
should not be reconnected nor the power cord plugged in until the
problem is completely resolved. Users should contact their local
authorized Canon Facsimile Dealer for servicing of equipment.
RIGHTS OF THE TELEPHONE COMPANY
Should the equipment cause harm to the telephone network, the
telephone company may temporarily disconnect service. The telephone
company also retains the right to make chan ges in facilities and services
which may affect the operation of this equipment. When such changes are
necessary, the telephone company is required to give adequate prior
notice to the user.
Preface
v

WARNING
Do not make any changes or modificatio ns to the equipment unless
otherwise specified in the user’s guide. If such changes or modifications
should be made, you could be required to stop operation of the
equipment.
This equipment has been tested and found to comply with the limits for
Class B digital device, pursuant to Part 15 of the FCC Rules. These limits
N
are designed to provide reasonable protection against harmful
interference in a residential installation. This equipment generates, uses
and can radiate radio frequency energy and, if not installed and used in
accordance with the instructions, may cause harmful interference to radio
communications.
However, there is no guarantee that interference will not occur in a
particular installation. If this equipment does cause harmful interference
to radio or television reception, which can be determined by turning the
equipment off and on, the user is encouraged to try to correct the
interference by one or more of the following measures:
• Reorient or relocate the receiving antenna.
• Increase the separation between the equipment and receiver.
• Connect the equipment into an outlet on a circuit differen t from that to
which the receiver connected.
• Consult the dealer or an experienced radio/TV technician for help.
vi
Preface

Use of shielded cable is required to comply with class B limit in Subpart B
of Part 15 of FCC Rules. Do not make any changes or modifications to the
equipment unless otherwise specified in the manual. If such changes or
modifications should be made, you could be required to stop operation of
the equipment.
The Telephone Consumer Protection Act of 1991 makes it unlawful for
any person to use a computer or other electronic device to send any
message via a telephone fax machine unles s such message clearly
contains in a margin at the top or bottom of each transmitted page or on
the first page of the transmission, the date and time it is sent and an
identification of the business or other entity, or other individua l sending
the message and the telephone number of the sending machine or such
business, other entity, or ind ivid ual.
In order to program this information into your unit, you should complete
registering your number and name. See Chapter 3, Registering Information
in the LASER CLASS 2060, for details.
Preface
vii

USERS IN CANADA
PRE-INSTALLATION REQUIREMENTS FOR CANON
FACSIMILE E QUI PMENT
A. Location
Supply a suitable table, cabinet, or desk. See Appendix for the unit’s
dimensions and weight.
B. Order Information
1. Provide only a single-line to touch-tone or rotary telephone set
terminated with a standard 4-pin modular phone plug.
(Touch-tone is recommended if available in your area.)
2. Order an CA11A modular jack (USOC code), which should be
installed by the phone company. If the CA11A j ack is not pr esent,
installation cannot occur.
3. Order a normal business line from your telephone company’s
business representative. The line should be a regular voice grade
line or equivalent. Use one line per unit.
n
DDD (DIRECT DISTANCE DIAL) LINE
or
IDDD (INTERNATIONAL DIRECT DISTANCE DIAL) LINE IF
YOU COMMUNICATE OVERSEAS
Canon recommends an individ u al line following industry standards
[e.g., the 2500 (Touch Tone) or 500 (Rotary/Pulse Dial) telephones]. A
dedicated extension of a PBX unit without “C amp On” signals is also
permissible with a fax unit. Key telephone systems are not recommended
because they send non-standard signals to individual telephones for
ringing and special codes, which may cause a fax error.
C. Power Requirements
The power outlet should be a three-prong grounded receptacle
(Single or Duplex). It should be independent f rom copiers, he aters,
air conditioners, or any electric equipment that is thermostatic ally
controlled. The rated value is 120 volts and 15 amperes. The CA11A
modular jack should be relatively close to the power outlet to
facilitate installation.
viii
Preface

NOTICE
The Industry Canada label identifies certified equipment. This
certification means that the equipment meets certain telecommunications
networks protective, operational and safety requirements. The
Department does not guarantee the equipment will operate to the user’s
satisfaction.
Before installing this equipment, users should ensure that it is permissible
to be connected to the facilities of the local telecommunications company.
The equipment must also be installed using an acceptable method of
connect i on . In some cases, t h e co mp any’s insi d e wiring ass ociated wit h a
single line individual service may be extended by means of a certified
connector assembly (telephone extension cord). The customer should be
aware that compliance with the above conditions may not prevent
degradation of service in some situations.
The Load Number (LN) assigned to each terminal device denotes the
percentage of the total load to be connected to a telephone loop which is
used by the device, to prevent overloading. The termination on a loop
may consist of any combination of devices subject only to the
requirements that the total of the Load Numbers of all the devices does
not exceed 100.
C
Repairs to certified equipment should be made by an authorized
Canadian maintenance facility designated by the supplier. Any repairs or
alterations made by the user to this equipment, or equipment
malfunctions, may give the telecommunications compan y cause to
request the user to disconnect the equipment.
Users should ensure for their own protection that the electrical ground
connections power utility, telephone lines and internal metallic water
pipe system, if present, are connected together. This precaution may be
particularly important in rural a reas.
Users should not attempt to make such connections themselves, but
should contact the appropriate electric inspection authority, or electrician,
as appropriate.
Preface
ix

N
This Class B digital apparatus meets all requirements of the Canadian
Interference-Causing Equipment Regulations.
Ce appareil numerique de la class B respecte toutes les exgences du
Reglement sur le materiel brouilleur du Canada.
The Ringer Equivalence Number (REN) assigned to each terminal device
provides an indication of the maximum number of terminals allowed to
be connected to a telephone interface. The termination on an interface
may consist of any combination of devices subject only to the requirement
that the sum of the Ringer Equivalence Numbers of all the devices does
not exceed 5. The REN of this product is 0.3.
CANON CANADA INC.
1-800-263-1121
24 HOURS A DAY, SEVEN DAYS A WEEK
x
Preface
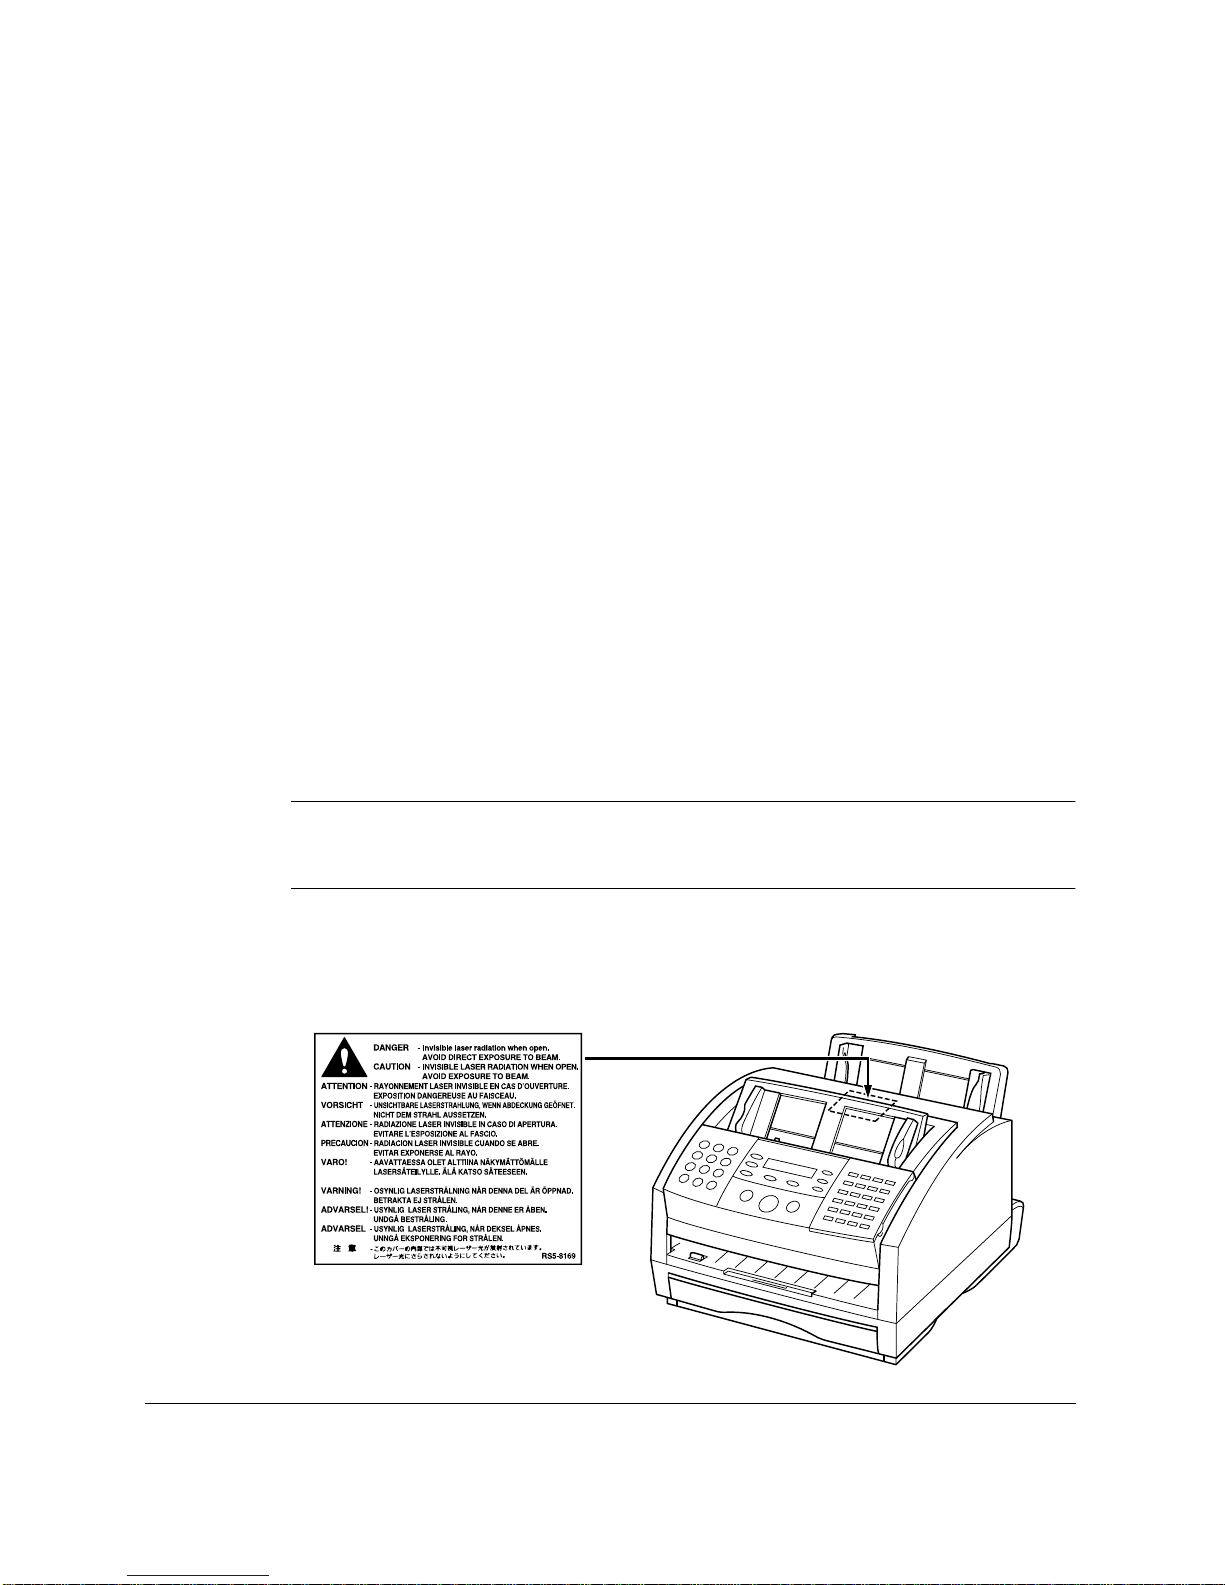
Safety Information
Laser Safety
The LASER CLASS 2060 compl ies w i th 21 CFR Chapter 1 Subchapter J as
a Class 1 laser product under the U.S. Depar t ment of Healt h and Human
Services (DHHS) Radiation Performance Standard according to the
Radiation Control for Health and Safety Act of 1968. This means that the
LASER CLASS 2060 does not produce hazardous laser radiation.
Since radiation emitted inside the LASER CLASS 2060 is completely
confined within protective housings, and external covers, the laser beam
cannot escape from the machine during any phase of user operation.
CDRH Regulations
The Center for Devices and Radiological Health ( CDRH) of the U.S. Food
and Drug Administration implemented regulations for laser products on
August 2, 1976. These regulations apply to laser products manufactured
from August 1, 1976. Compliance is mandatory for products marketed in
the United States.
C
Use of controls, adjustments or performance of procedures other than
those specified in this user’s guide may result in hazardous radiation
exposure.
This label is attached to the laser scanner unit inside the LA SER CLASS
2060 and is not in a user access area.
Preface
xi

xii
Preface

Contents
Chapter 1 Introducing the LASER CLASS 2060 .........................................................1-1
Welcome...........................................................................................................1 -2
The Main Features of the LASER CLASS 2060...........................................1-3
The LASER CLASS 2060 Includes the Following Features:................1-3
Plain Paper Fax Features..........................................................................1-4
Copier Features............................................ ..............................................1-5
Telephone Features...................................................................................1-5
How to Use This User’s Guide......................................................................1-7
Type Conventions Used in This User’s Guide......................................1-8
Customer Support...........................................................................................1-9
Safety Instructions ........................................................................................1-10
Chapter 2 Setting Up Your LASER CLASS 2060.........................................................2-1
Choosing a Location for Your LASER CLASS 2060...................................2-3
Dimensions.................................................................................................2 -4
Unpacking Your LASER CLASS 2060..........................................................2-5
Do You Have Everything?.......................................................................2-5
Lifting the LASER CLASS 2060...............................................................2-7
Handset.......................................................................................................2-8
Adjusting the Ringer Volume Switch and the Speaker Volume
Switch..........................................................................................................2-9
Removing Shipping Materials.................................... ...... .....................2-10
Replaceable Parts.....................................................................................2-12
Assembling the LASER CLASS 2060..........................................................2-13
Attaching Components........................................................................... 2-13
Attaching the Paper Loading Label................................................2-13
Attaching the Extension Tray ..........................................................2-14
Straightening the Multi-Purpose Tray............................................2-14
Attaching the Support Trays............................................................2-15
Attaching the Handset to Your Unit.......................... ..... ................2-16
Making Connections............................................... ..... ...... ...........................2-19
Connecting the Telephone Line ............................................................2-19
Connecting an Extension Phone or Answering Machine..................2-20
Connecting the Power Cord ..................................................................2-21
Contents
xiii

Getting Acquainted With Your LASER CLASS 2060 ..............................2-23
Front View ..............................................................................................2-23
Inside View ..............................................................................................2-24
Rear View ...............................................................................................2-25
The Operation Panel ..............................................................................2-26
Special Function Buttons (One-Touch Speed Dial panel open)..2-29
The Toner Cartridge.....................................................................................2-31
Handling and Storing Cartridges .........................................................2-31
Installing/Replacing the Toner Cartridge...........................................2-33
Loading Recording Paper............................................................................2-39
Loading Paper in the Cassette .........................................................2-41
Loading Paper in the Multi-Purpose Tray..................................... 2-44
Testing the LASER CLASS 2060 .................................................................2-46
Chapter 3 Registering Information in the LASER CLASS 2060..............................3-1
Guidelines for Entering Information............................................................3-2
Entering Numbers, Letters, and Symbols..............................................3-3
Editing Information.............................................................................3-4
Using the One-Touch Speed Dial button/
One-Touch Speed Dial Panel ...............................................................3-5
Using the Special Function buttons........................................................3-5
Using the Menu System............................................................................3-6
Personalizing Your LASER CLASS 2060.....................................................3-8
Identifying Your Documents...................................................................3 -8
Entering the Date and Time......................................................... ............3-9
Registering Your Fax Number and Name...........................................3-10
Setting the Telephone Line Type ..........................................................3-12
Chapter 4 Paper Hand ling ..............................................................................................4-1
Guidelines for Selecting Print Media...........................................................4-2
Plain Paper .................................................................................................4-4
Labels ..........................................................................................................4-4
The Paper Path ................................................................................................4-5
Selecting Paper Delivery................................................................................4-7
Face-Down Delivery .................................................................................4-8
Face-Up Delivery.......................................................................................4-9
Loading Paper ...............................................................................................4-11
The Paper Cassette..................................................................................4-11
The Multi-Purpose Tray.........................................................................4-11
Changing a Paper Size from Letter- to A4-Size Paper in the
Paper Cassette............................................................................................4-12
xiv
Contents

Changing the Paper Size Setting.................................................................4-15
The Paper Cassette..................................................................................4-15
The Multi-Purpose Tray.........................................................................4-16
Chapter 5 Speed Dialing.................................................................................................5-1
Speed Dialing Methods..................................................................................5-2
One-Touch Speed Dialing................................................. .............................5-3
Storing Numbers for One-Touch Speed Dialing ..................................5-3
Changing a Number/Name Stored Under a One-Touch Speed Dialing
Button ......................................................................................................5-7
Using One-Touch Speed Dialing .......................................................... 5-10
Coded Speed Dialing....................................................................................5-12
Storing Numbers for Coded Speed Dialing ........................................5-12
Changing a Number/Name Stored Under a Coded Speed Dialing
Code....................................................................................................... 5-17
Using Coded Speed Dialing...................................................................5-21
Group Dialing................................................................................................5-23
Creating Groups for Group Dialing.....................................................5-23
Using Group Dialing...............................................................................5-28
Using Directory Dialing...............................................................................5-30
Chapter 6 Sending Faxes.................................................................................................6-1
Preparing to Send a Fax.................................................................................6-3
Document Requirements..........................................................................6-3
Scanning Area......................................................................................6-5
Selecting Automatic/Manual Document Feed.....................................6-6
Loading Documents for Automatic Feed.........................................6-7
Loading Documents for Manual Feed ............................................6-11
Setting the Resolution and Contrast.....................................................6-13
Setting the Scanning Resolution......................................................6-13
Setting the Scanning Contrast..........................................................6-14
Sending Methods.....................................................................................6-16
Manual Sending Via the Handset ...................................................6-16
Memory Sending ...............................................................................6-16
Dialing Methods............................... .......................................................6-17
Sending Documents......................................................................................6-18
Manual Sending Via the Handset.........................................................6-18
Memory Sending.....................................................................................6-20
Adding Pages to the Document in the Automatic Document Feeder
(ADF)...........................................................................................................6-22
Contents
xv

Canceling Sending........................................................................................6-23
Removing the Document From the Automatic Document Feeder
(ADF) .....................................................................................................6-24
Redialing ........................................................................................................6-26
Manual Redialing....................................................................................6-26
Automatic Redialing With Memory Sending ..................... ...... ...... ....6-26
Canceling Automatic Redialing.......................................................6-27
Setting Up Automatic Redialing .....................................................6-28
Sequential Broadcasting...............................................................................6-31
Sending a Document to More Than One Destination ........................6-31
Sending a Document Using Group Dialing ........................................6-33
Delayed Sending...........................................................................................6-34
Sending Other Documents While the LASER CLASS 2060 is Set for
Delayed Sending..................................................................................6-36
Chapter 7 Receiving Faxes..............................................................................................7-1
Different Ways to Receive a Fax...................................................................7-2
FAX/TEL AUTO SW ..........................................................................7-2
FAX ONLY MODE..............................................................................7-2
DRPD (Distinctive Ring Pattern Detection).....................................7-2
Setting the RX MODE...............................................................................7-3
Setting the Receive Mode.........................................................................7-4
Receiving Faxes and Phone Calls Automatically: Fax/Tel Mode......7-4
Setting Up Fax/Tel Mode...................................................................7-5
What Happens When Fax/Tel Mode is Selected...........................7-6
Receiving Faxes Manually: MANUAL MODE............................... ..... .7-9
Receiving Faxes Automatically: FAX ONLY MODE.........................7-10
Using an Answering Machine: ANS.MACHINE MODE..................7-10
Using the LASER CLASS 2060 With an Answering Machine.....7-11
Documents Received in Memory ...............................................................7-12
Messages Displayed When Documents are Rece ive d in Memory...7-12
Receiving While Registering or Copying ............................................7-13
Canceling an Incoming Fax.........................................................................7-14
Distinctive Ring Pattern Detection (DRPD) Feature................................7-15
Types of Ring Patterns............................................................ ................7-15
Setting Up DRPD Mode .........................................................................7-16
How DRPD Responds to Calls..............................................................7-21
LASER CLASS 2060 Set for Automati c Swit chi n g Betw een Fax and
Telephone Calls ..............................................................................7-21
xvi
Contents

Chapter 8 Using the Memory Features.........................................................................8-1
Documents Stored in Memory......................................................................8 -2
Printing a List of Documents Stored in Memory..................................8-2
Printing Documents Stored in Memory.................................................8-3
Method 1...............................................................................................8 -3
Method 2...............................................................................................8 -4
Sending Documents Stored in Memory.................................................8-5
Deleting a Document Stored in Memory...............................................8-7
Method 1...............................................................................................8 -7
Method 2...............................................................................................8 -8
Chapter 9 Setting Up and Using Polling ......................................................................9 -1
What’s Polling?................................................................................................9-2
Before You Use Polling Receiving ..........................................................9-2
Polling to Receive Faxes.................................................................................9-3
Requesting Another Fax to Send a Document......................................9-3
Canceling a Polling ...................................................................................9-5
Setting Up Polling Sending ...........................................................................9-6
Before You Can Be Polled to Send..........................................................9-6
Setting Up a Polling Box...........................................................................9-6
Scanning a Document into the Memory for Polling Sending.............9-9
Changing the Polling Box Setup ...........................................................9-10
Canceling a Polling Box..........................................................................9-12
Chapter 10 Special Features............................................................................................10-1
Special Dialing........................................ .......................................................10-2
Dialing Through a Switchboard............................................................10-2
Long Distance Dialing............................................................................10-2
How to Enter Pauses.........................................................................10-2
Using Tone Dialing On a Pulse Line ....................................................10-4
Chapter 11 Making Copies.............................................................................................11-1
Making Copies...............................................................................................11-2
Chapter 12 Reports and Lists..........................................................................................12-1
Activity Report..............................................................................................12-2
Transmission (TX) Reports.......................................................................... 12-4
Error TX Report.......................................................................................12-4
TX Report..................................... ...... .......................................................12-5
Multi TX/RX Report...............................................................................12-6
Reception (RX) Report................................................. ...... ...........................12-7
Memory Clear Report................................................................................... 12-8
Contents
xvii

Speed Dialing Lists.......................................................................................12-9
One-Touch Speed Dial List..................................................................12-10
Coded Speed Dial List..........................................................................12-12
Group Dial List......................................................................................12-13
User’s Data List ...........................................................................................12-14
Doc Memory List.........................................................................................12-15
Chapter 13 Frequently Asked Questions.....................................................................13-1
If You Cannot Solve the Problem ...............................................................13-2
Problems Index.................................................. .................................. ..........13-3
Paper Jams................................................................................................13-5
Jams in the Automatic Document Feeder (ADF)? ........................13-5
Jams in the Output Slots? .................................................................13-7
Jams in the Paper Cassette?..............................................................13-8
Jams Inside the Unit? ......................................................................13-10
Jams in the Front Area of the Unit?............................................... 13-15
Jams in the Rear Cover of the Unit?.............................................. 13-18
After Clearing a Paper Jam ........................ ..... ...............................13-20
Problems Feeding Paper into the LASER CLASS 2060....................13-21
Printing Problems..................................................................................13-23
Print Quality Problems.........................................................................13-25
Faxing Problems....................................................................................13-26
Sending Faxes...................................................................................13-26
Receiving Faxes................................................................................13-29
Telephone Problems .............................................................................13-33
Copying Problems.................................................................................13-34
General Problems.............................................. ....................................13-35
If the Power Goes Out................................................................................13-36
Error Codes, Messages, and Solutions.....................................................13-37
Chapter 14 Maintaining Your LASER CLASS 2060 ...................................................14-1
Cleaning the LASER CLASS 2060...............................................................14-2
Cleaning the LASER CLASS 2060 Exterior..........................................14-2
Cleaning the Inside of the LASER CLASS 2060..................................14-3
Cleaning the Scanner Components....................................... ...... ...... ....14-6
Replacing the Toner Cartridge....................................................................14-9
Transporting the LASER CLASS 2060.....................................................14-10
xviii
Contents

Chapter 15 The Menu System........................................................................................15-1
Understanding the Menu System...............................................................15-2
Accessing the USER SETTINGS Menu......................................................15-3
Accessing the REPORT SETTINGS Menu.................................................15-5
Accessing the TX SETTINGS Menu ...........................................................15-7
Accessing the RX SETTINGS Menu...........................................................15-9
Accessing the FAX’S PRINTER SET Menu.............................................15-12
Accessing the POLLING BOX Menu .......................................................15-14
Accessing the SYSTEM SETTINGS Menu...............................................15-16
Appendix Specifications.................................................................................................A-1
General.............................................................................................................A-2
Plain Paper Fax...............................................................................................A-4
Copier ..............................................................................................................A-7
Telephone........................................................................................................ A-8
Document Sizes.............................................................................................. A-9
Printing Area...........................................................................................A-10
Glossary ..........................................................................................................................G-1
Index ............................................................................................................................I-1
Contents
xix

xx
Contents

Chapter 1
Introducing the
LASER CLASS 2060
This chapter introduces you to the main features of the
LASER CLASS 2060. It also explains how to get the most out of the
documentation that comes with the unit, and gives important safety
instructions.
❏ Welcome................................................................................................ 1-2
❏ The Main Features of the LASER CLASS 2060................................ 1-3
• The LASER CLASS 2060 Includes the Following Features:...... 1-3
• Plain Paper Fax Features................................................................ 1-4
• Copier Features ............................................................................... 1-5
• Telephone Features ......................................................................... 1-5
❏ How to Use This User ’s Guide.......................................................... 1-7
• Type Conventions Used in This User’s Guide............................ 1-8
2060
LASER CLASS
Introducing the
❏ Customer Support ............................................................................... 1-9
❏ Safety Instructions............................................................................... 1-10
Chapter 1 Introducing the LASER CLASS 2060
1-1
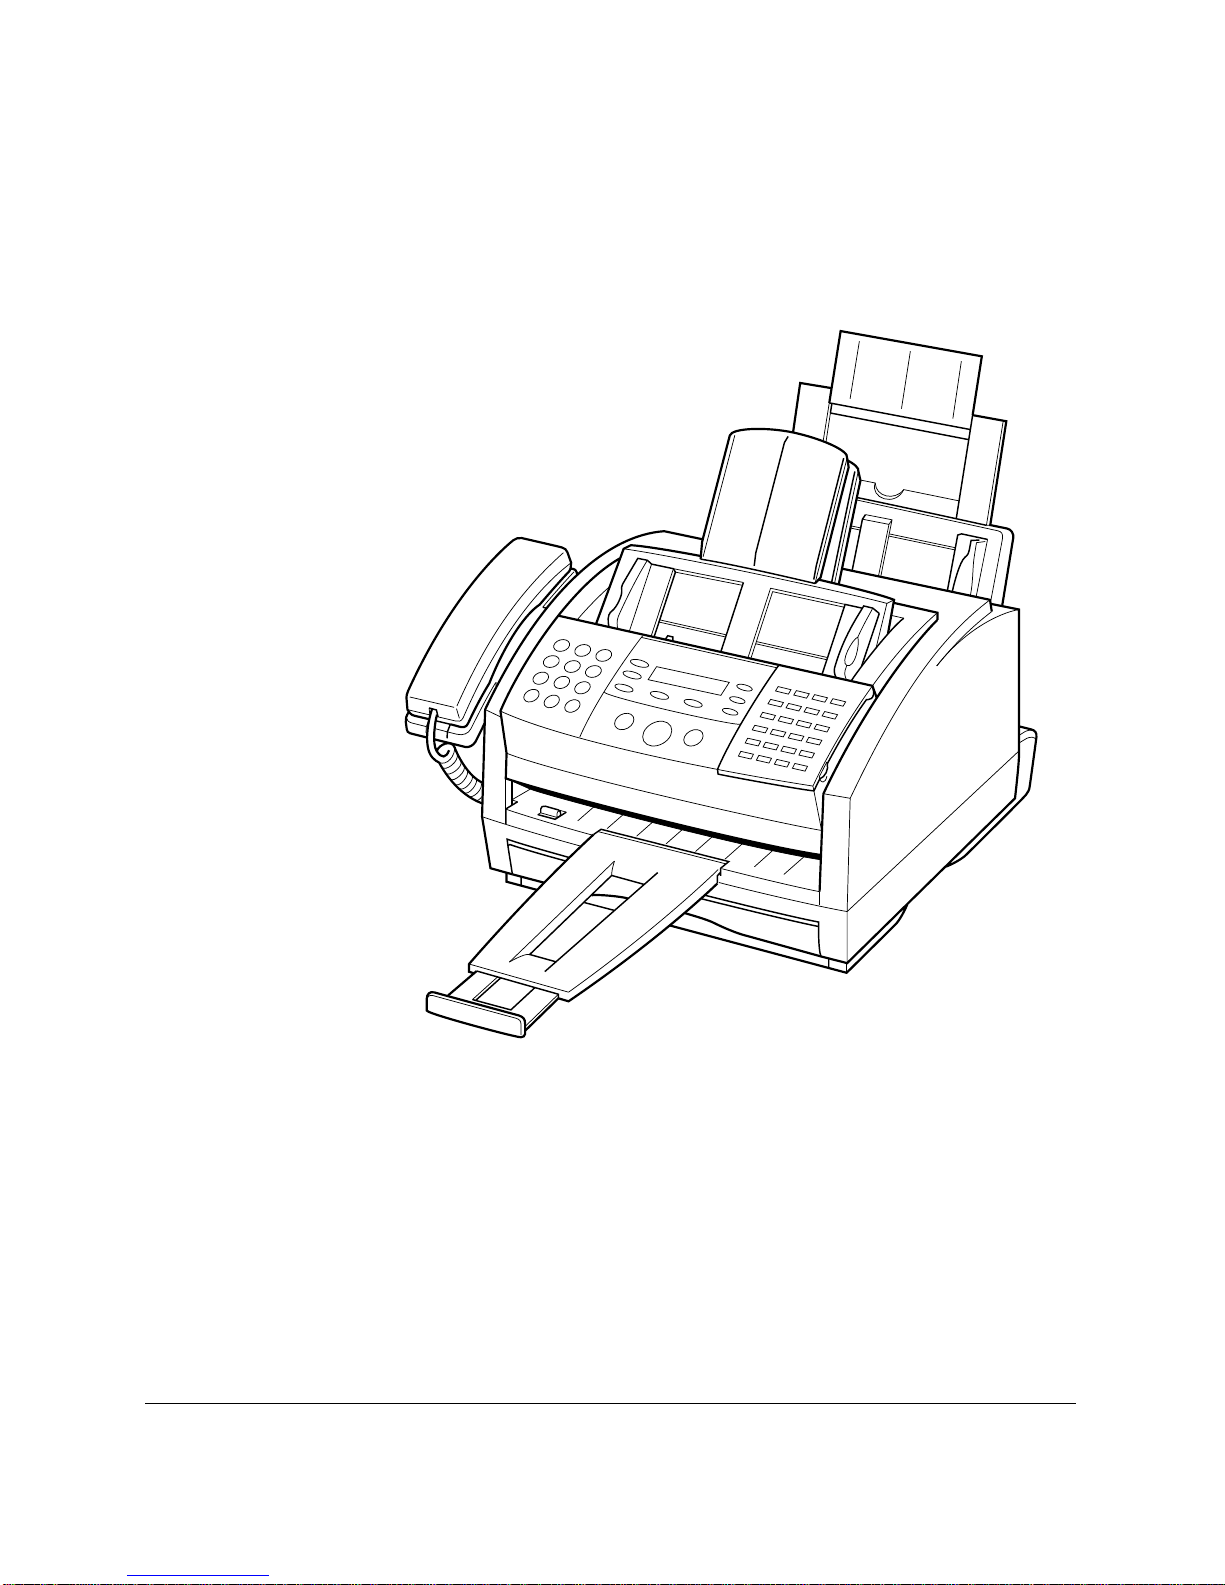
Welcome
Thank you for purchasing the new Canon LASER CLASS 2060. We are
sure that your LASER CLASS 2060 will meet your fax and phone
requirements easily and conveniently, as well as your copying n e eds.
1-2
Introducing the LASER CLASS 2060 Chapter 1
LASER CLASS 2060

The Main Features of the LASER CLASS
2060
The LASER CLASS 2060 is a multifunction system for your home or small
office. The LASER CLASS 2060 combines a plain paper fax machine, a
copier, and a teleph one into a single, convenient desktop unit.
The LASER CLASS 2060’s multitasking ability enables you to perform a
number of operations simultaneously. For example, you can make copies
at the same time you are sending a fax or receiving a fax into memory.
The compact size of the LASER CLASS 2060 makes it ideal for desktop
use, and allows you to use it in places where other machines may not fit.
The LASER CLASS 2060 Includes the Following Features:
Excellent print quality and speed
The LASER CLASS 2060 offers 600 × 600 dpi laser beam printing,
providing you with high resolution text and graphics. The exceptional
printing speed of 6 pages per minute of plain A4-size paper allows you to
work more efficiently.
Simple maintenance
The FX-3 toner cartridge for the LASER CLASS 2060 contains both the
toner and drum, making installation and replacement simple.
2060
LASER CLASS
Introducing the
Convenient paper handling
The paper cassette holds up to approximately 250 sheets* of plain A4- or
letter-size paper, and the multi-purpose tray holds up to approximately
100 sheets* of plain A4-, letter-, legal-, custom1**-, or custom2**-size
paper.
Economy toner-saving printi ng
The LASER CLASS 2060 includes a n economy printing mode that uses up
to approximately 30-40% less toner, resulting in longer cartridge life.
*20 lb (75 g/m2) paper
**The LASER CLASS 2060 allows you to prin t dif fer en t size paper. See “Accessing
the FAX’S PRINTER SET Menu” on page 15-12, for details.
Chapter 1 Introducing the LASER CLASS 2060
1-3

Plain Paper Fax Features
UHQ™ Image Processing System
The LASER CLASS 2060 uses Canon’s Ultra High Quality Image
Processing System to provide enhanced definition in faxed photos.
Error Correction Mode (ECM)
Using the LASER CLASS 2060’s Error Correction Mode (ECM) reduces
transmission errors when sending faxes to or receiving faxes from other
fax machines that also have ECM capability.
Automatic switching between fax and voice calls
The LASER CLASS 2060 can automa tically distinguish between fax calls
and normal telephone calls, so tha t you can receive both through a single
phone line.
Answering machine connection
You can connect an answering machine to the LASER CLASS 2060 to let it
receive telephone messages and faxes while you are away from your
desk.
Transmission speed
The LASER CLASS 2060 uses G3 data encoding methods that increase
transmission speed to approximately 3 se conds* per page.
Memory sending/receiving
The LASER CLASS 2060 can stor e up to 340* fax pages (eit her r eceived or
to be sent) in its built-in memory, and can receive faxes while printing.
Flexible document feeding
The LASER CLASS 2060 includes an Automatic Document Feeder (ADF)
that can be set for automatic document feed or manual document feed,
according to your needs. This allows you to fax a va riety of documents,
from multipage documents (up to 30 A4- or letter-size pages, or 20
legal-size pages at a time), to a single photo or business card.
* Based on ITU-T No.1 Chart, standard mode
1-4
Introducing the LASER CLASS 2060 Chapter 1

Reduced-size printing
The LASER CLASS 2060 automa tica lly scales received faxes t o fit the size
of the paper loaded in the paper cassette or the multi-purpose tray. So if
your client is sending you a fax on A4-size paper and you have letter-size
paper in the multi-purpose tray, the fax will be scaled down and printed
on letter-size paper.
Automatic dialing and broadcasting
To make faxing even easier, the LASER CLASS 2060 provides several
automatic dialing methods: One-Touch Speed Dialing, Coded Speed
Dialing, and Group Dialing. The LASER CLASS 2060 also enables you to
broadcast faxes or send faxes at a preset time to as many as 133 locations
at once.
Copier Features
Up to 99 copies
The LASER CLASS 2060 can make up to 99 copies of a document at a
time, at a rate of up to six copies per minute.
600 × 600 dpi resolution
The LASER CLASS 2060 copies documents at 600 × 600 dpi when using
direct copying and 300 × 600 dpi when using memory copying.
2060
LASER CLASS
Introducing the
Copy reduction
The LASER CLASS 2060 can reduce copies to 90%, 80% or 70% of their
original size. This allows you to copy legal-size docume nts onto
letter-size paper, for example.
Telephone Features
Automatic dialing
The LASER CLASS 2060’s three automatic dialing methods (One-Touch
Speed Dialing, Coded Speed Dialing, and Group Dialing) can be used to
store phone numbers and fax numbers for easy and efficient calling.
Connection for the handset, an answering machine, or a telephone
Connecting the handset or a telephone to the LASER CLASS 2060 allows
you to use it to make and receive normal telephone calls. In addition,
connecting an answering machine allows you to receive faxes and phone
messages while you are away from your desk.
Chapter 1 Introducing the LASER CLASS 2060
1-5

Distinctive Ring Pattern Detection capability (DRPD)
The DRPD feature of your LASER CLASS 206 0 allow s you to have two o r
more telephone/fax numbers assigned to your LASER CLASS 2060 using
only one telephone line. Yo u can use this feature when you subscribe to a
DRP service offered by some telephone companies.
1-6
Introducing the LASER CLASS 2060 Chapter 1

How to Use This User’s Guide
To make the best use of this user’s guide in learnin g how to set up and
operate your LASER CLASS 2060, be sure to do the following:
❏ Read this chapter to learn about the LASER CLASS 2060’s main
features and for guidelines on using the unit s afe ly.
❏ Carefully follow the instructions in Chapter 2, “Setting Up Your
LASER CLASS 2060” to get your unit unpacked and assembled
properly.
❏ Read Chapter 3 to learn how to enter information in the LAS E R
CLASS 2060 and to register your user information.
❏ Read Chapter 4 to learn about the types of print media you can use
with your LASER CLASS 2060, and for instructions on selecting
paper delivery and loading paper.
❏ Read Chapter 5 to learn how to register numbers for speed dialing,
how to change them, and how to use speed dialing to send faxes.
❏ Read Chapter 6 through 11 to master the LASER CLASS 2060
operating procedures (such as sending faxes, receiving faxes, and
making copies) and to learn more about its special features (such as
special dialing features).
2060
LASER CLASS
Introducing the
❏ Refer to Chapter 12 to learn about the reports and lists that can be
automatically or ma nually printed from your LASER CLASS 2060.
❏ If your LASER CLASS 2060 begins operating impr operly, use Chapter
13, “Frequently Asked Questions,” to try to solve the problem.
❏ Look over Chapter 14, “Maintaining Your LASER CLASS 2060” to
become familiar with procedu res for cleaning your LASER CLASS
2060 and replacing the toner cartridge.
❏ Refer to Chapter 15, “The Menu System” to learn how to change the
settings of the LASER CLASS 2060.
❏ Refer to Appendix for the LASER CLASS 2060 technical
specifications.
If you still have questions about how to use your LASER CLASS 2060,
please contact your local authorized Canon Facsimile Dealer . They will be
happy to answer your questions.
Chapter 1 Introducing the LASER CLASS 2060
1-7

You must register your fax number, your name or company name, and
the date and time in the LASER CLASS 2060 before using it. This is
N
required by the FCC rules governing the use of fax equipment. For details
on registering this information, refer to Chapter 3, “Registering
Information in the LASER CLASS 2060.”
Type Conventions Used in This User’s Guide
This user’s guide follows the conventions below to emph asize certain
information that w ill help yo u use your LA SER CLASS 20 60 corr ectly an d
safely:
Cautions tell you how to avoid actions that could injure you or damage
your LASER CLASS 2060.
C
Notes provide ad vice for using your LASER CLASS 2060 mor e ef fectivel y,
describe operating restrictions, and tell how to avoid minor operating
N
difficulties.
1-8
In addition, this user’s guide uses bold letters to show the names of
buttons and switches on the LASER CLASS 2060, such as Stop, Set, and
Start/Copy. Text that appears in the unit’s display is shown in plain
capital letters, such as: RECEPTION OK.
Introducing the LASER CLASS 2060 Chapter 1

Customer Support
Your LASER CLASS 2060 is designed with the latest technology to
provide trouble-free operation. The warranty information at the back of
this user’s guide describes Canon’s limited warranty for its products. Be
sure to read this warranty information.
If you have a problem with the unit’s operation, try to solve it by referring
to the information in Chapter 13, “Frequently Asked Questions.” If you
cannot solve the problem or if you think your LASER CL ASS 2060 needs
service, contact your local authorized Canon Facsimile Dealer. If you
think your LASER CLASS 2060 n e eds service, only an authorized Cano n
Facsimile Dealer will do warranty service.
You must have your sales receipt for warranty service.
N
2060
LASER CLASS
Introducing the
Chapter 1 Introducing the LASER CLASS 2060
1-9

Safety Instructions
Read these safety instructions thoroughly bef ore using your
LASER CLASS 2060, and keep them handy in case you need to refer to
them later.
Except as specifically described in this user’s guide, do not attempt to
service the LASER CLASS 2060 yourself. Never attempt to disassemble
C
the unit: opening and removing its interior covers will expose you to
dangerous voltages and other risks. For all service, contact y our local
authorized Canon Facsimile Dealer.
❏ Always follow all warnings and i nstructions marked on the
LASER CLASS 206 0.
❏ Use the LASER CLASS 2060 only on a sturdy, stable, level surface. If
the unit falls, it could be seriously dama ged .
❏ Do not use the LASER CLASS 2060 near water. If you spill liquid on
or into the unit, unplug it immediately and call your local authorized
Canon Facsimile Dealer.
❏ The back of the LASER CLASS 2060 includes slots and openings for
ventilation. To keep the LASER CLASS 2060 from overheating (which
can cause it to operate abnormally and create a fire risk), take care not
to block or cover these openings. Do not operate the unit on a bed,
sofa, rug, or other similar soft surface, or near a radiator or other heat
source. Do not place the LASER CLASS 2060 in a closet or cabinet or
on shelves unless adequate ventilation is available. See “Choo sing a
Location for Your LASER CLASS 2060” on page 2-3 for guidelines on
how much space the unit needs for ventilation.
❏ Operate the LASER CLASS 2060 only from the type of power source
indicated on the unit’s label. If you are unsure of the type of power
available from your wall outlets, contac t your local power company.
❏ Make sure the total amperage used by all devices plugged into the
wall outlet does not exceed the ampere rating of the outlet's circuit
breaker.
❏ Do not allow anything to rest on the power cord and do not place the
LASER CLASS 2060 where the cord will be walked on. Make sure the
cord is not knotted or kinked.
1-10
Introducing the LASER CLASS 2060 Chapter 1
 Loading...