


Canon FAXPHONE L75
Canon FAXPHONE L75
Printer Driver
for Windows
Software User’s Guide

Copyright
© 2002 by Canon, Inc. All rights reserved.
This manual may not be reproduced in any form, in whole or part,
without the prior written consent of Canon, Inc.
Trademark Acknowledgments
Canon is a registered trademark of Canon, Inc.
Microsoft and Windows are registered trademarks of Microsoft
Corporation.
Pentium is a registered trademark of Intel Corporation.
All other trademarks identified herein are the property of their respective
owners.
ii Preface

Contents
Chapter 1 Introduction.....................................................................................................1-1
Printer Driver: an Overview..........................................................................1-2
System Requirements .....................................................................................1-2
About This Guide............................................................................................1-4
Conventions Used in This Guide........................................................... 1-4
Other User Assistance.....................................................................................1-5
Chapter 2 Installing the Printer Driver.........................................................................2-1
Before You Begin the Installation: a Checklist.............................................2-2
Installing the Software.................................................................................... 2-3
Setting the Default Printer .............................................................................2-6
Sharing the Printer Installation .....................................................................2-6
Setting Up Your Printer for Sharing ......................................................2-7
Installing the Printer Driver on a Client System .................................2-8
Removing the Printer Driver.........................................................................2-9
Changing the Port Connection......................................................................2-9
Chapter 3 Printing.............................................................................................................3-1
Printing a Document....................................................................................... 3-2
Defining Print Settings: an Overview...........................................................3-2
Viewing a Summary of Print Settings................................................... 3-5
Defining Page Settings....................................................................................3-6
Defining a Custom Paper Size................................................................3-7
Defining a Print Overlay.......................................................................3-13
Defining Quality Print Settings...................................................................3-15
Conserving Toner When Printing........................................................3-16
Adding a Print Profile...................................................................................3-17
Using a Print Profile...............................................................................3-18
Editing a Print Profile ...................................................................................3-19
Changing Information About a Print Profile ..................................... 3-20
Adjusting the Display Order................................................................3-20
Exporting a Print Profile .......................................................................3-21
Importing a Print Profile.......................................................................3-22
Deleting a Print Profile..........................................................................3-23
Displaying Printer Driver Information ...................................................... 3-23
Defining Default Print Settings ...................................................................3-23
Contents iii

Chapter 4 Frequently Asked Questions........................................................................4-1
Printer Cannot Be Initialized. ........................................................................ 4-2
Installation Is Displaying Unexpected Behavior. ....................................... 4-2
Documents Are Not Printing Correctly........................................................4-4
Paper Is Not Loading Correctly..................................................................... 4-6
The Print Quality Is Not Satisfactory............................................................4-6
Appendix A Sharing Your Printer Cross-Platform in Windows 2000/XP ..................A-1
Appendix B Installing from a Local or Network Drive ................................................ B-1
Installing the Software................................................................................... B-1
Glossary ..................................................................................................................................G-1
Index ......................................................................................................................................... I-1
iv Contents

Chapter 1
1Introduction
Welcome and congratulations on your purchase of the Canon
FAXPHONE L75 (also referred to in this guide as the printer) and its
accompanying printer driver software.
Contents of this chapter:
❏
Printer Driver: an Overview ..................................................................1-2
❏
System Requirements .............................................................................1-2
❏
About This Guide ....................................................................................1-4
• Conventions Used in This Guide...................................................1-4
❏
Other User Assistance.............................................................................1-5
Introduction
Chapter 1 Introduction 1-1

Printer Driver: an Overview 1
The printer driver is software that enables the printer to communicate
with your computer. You can use the printer as the default printer in any
Windows application that supports printing.
The printer driver includes features that enable you to define the results
of your printed output (documents or images), such as:
❏
Custom paper sizes
❏
Graphic image as an overlay on documents
(for example, to print your company logo on each page)
❏
Multiple pages (up to nine) printed on one sheet of paper
❏
User-defined print profiles for storing and using print preferences.
System Requirements 1
To successfully install and operate your printer and printer driver, your
system must meet the following minimum requirements:
❏
Windows Operating System
Microsoft Windows 98, Windows Me, Windows 2000, or Windows
XP.
❏
USB port
❏
Computer Processor
•Windows 98: A 90-megahertz (MHz) Pentium processor or higher
•Windows Me: A 150-MHz Pentium processor or higher
•Windows 2000: A 133-MHz Pentium processor or higher
•Windows XP: A 233-MHz Pentium processor or higher
1-2 Introduction Chapter 1

❏
Memory
•Windows 98/Me: 32 megabytes (MB) of RAM. 64 MB of RAM or
more is recommended.
•Windows 2000/XP: 64 MB of RAM. 128 MB of RAM or more is
recommended.
❏
Hard Disk Space
15 MB of available hard disk space
❏
Disk Drive
CD-ROM drive, or access to one over a network connection
❏
Monitor
256-color SVGA monitor or greater
❏
Printer Cable
A USB cable 5 meters (16.4 feet) in length or shorter.
If you upgraded your system to Windows 98/Me or Windows 2000/XP
from Windows 95 or Windows NT, the USB port on your computer
not
operate successfully. Successful operation of the port is ensured when
may
using a system installed with Windows 98/Me or Windows 2000/XP by
the computer manufacturer. For assistance in resolving the support of a
USB port on your system, contact the technical support department with
your PC manufacturer, for a possible change of setting or an upgrade to
the BIOS residing on your system.
Introduction
Chapter 1 Introduction 1-3

About This Guide 1
This guide assumes you have a basic understanding of Windows. This
includes how to start your system and navigate within the Windows
environment. You should be familiar with common Windows terms such
as window, dialog box, button, icon, menu, application, select, open,
close, click, double-click, drag, and list box.
For assistance in familiarizing yourself with Windows, refer to your
Microsoft Windows user documentation.
Screen illustrations were prepared using a Windows 98 system, or a
Windows 2000 system (for instructions specified for Windows 2000).
Conventions Used in This Guide 1
The following types of formatting identify specific types of information
provided in this guide.
Italicized text Used to stress the importance of a word
or phrase, or to refer to the title of
another guide. For example:
You
cannot
access the dialog box....
-or...the
Microsoft Windows User’s Guide
Text in quotation marks Used to refer to the title of a section
within the guide. For example:
...the “Installing the Software” section....
Click, double-click Use of the word click or double-click
provides instructions for selecting or
choosing a command or option,
generally with a mouse. For example:
Click OK to continue.
1-4 Introduction Chapter 1
....

Monospaced text Used for commands you might type
when installing the software, or system
messages that may display on your
screen. For example:
A:\SETUP
Capitalization Used for all the key words in the name
or title of an option on the screen. For
example:
In the dialog box, click Image Type to
set....
Other User Assistance 1
In addition to this guide, the following online information and
instructions are available.
❏
Printer Driver Online Help
The online help includes context-sensitive help about a window or
dialog box and step-by-step instructions for performing tasks.
Introduction
❏
Canon FAXPHONE L75 User’s Guide
This guide offers detailed information on how to set up and operate
your printer. It includes initial setup procedures, daily maintenance,
and troubleshooting.
Chapter 1 Introduction 1-5

1-6 Introduction Chapter 1

2Installing the Printer Driver
Contents of this chapter:
Chapter 2
❏
Before You Begin the Installation: a Checklist ....................................2-2
❏
Installing the Software............................................................................2-3
❏
Setting the Default Printer......................................................................2-6
❏
Sharing the Printer Installation .............................................................2-6
• Setting Up Your Printer for Sharing..............................................2-7
• Installing the Printer Driver on a Client System..........................2-8
❏
Removing the Printer Driver .................................................................2-9
❏
Changing the Port Connection ..............................................................2-9
Driver
Installing the Printer
Chapter 2 Installing the Printer Driver 2-1

Before You Begin the Installation: a Checklist 2
To ensure a smooth and successful installation, take some time before you
begin to plan and prepare for the installation process.
❏
Do not connect.
Do not connect
time. When you begin the installation of the software, the installation
program will prompt you when it is appropriate to connect the
printer to your computer.
Use the procedures in the “Installing the Software” section to install
the software with the installation disk.
❏
Cancel new hardware detection.
As a reminder: If your system displays a found new hardware dialog
box, click Cancel, and then disconnect the printer cable from the USB
port on your computer.
❏
Turn on computer. Start Windows.
If you have not already done so, turn on your computer and start
Windows.
the printer cable to the port on your computer at this
❏
Close applications.
If any Windows applications (including any virus checkers) are open,
close the applications. With the applications closed, you ensure that
the software installs properly.
To install the printer driver if you are using Windows 2000/XP, you must
log on as Administrator or have Administrator privileges. If you do not
have Administrator privileges, ask your system administrator to install
the printer driver software on your PC.
2-2 Installing the Printer Driver Chapter 2

If your current printer purchase is replacing a MultiPASS printer, you
must remove
installing
software, see the software user’s guide that came with your MultiPASS
software.
the MultiPASS software installed on your system
the new printer. For instructions on removing the MultiPASS
before
Installing the Software 2
You are ready to install the software once you have prepared your
system, as described in the “Before You Begin the Installation: a
Checklist” section. In particular, and as a reminder, make sure you do not
connect the printer cable.
If the software has been placed on a local or network drive, you can install
the software on your system from that drive, rather than using the
installation disk. For instructions, see Appendix B.
To install the software:
1. Insert the installation disk into your disk drive.
2. If AutoRun is enabled, the installation starts automatically.
3. Click Install Printer Driver to start installation.
Driver
Installing the Printer
Chapter 2 Installing the Printer Driver 2-3

If installation does not start automatically:
• On the Windows desktop, click Start, and then click Run.
• In the Run dialog box, type the following command and click OK
(where D: is your disk drive containing the installation disk).
D:\SETUP.EXE
4. Follow the on-screen instructions to complete the installation process.
During installation, follow these guidelines:
• Click Next to move from one dialog box to the next.
•Make sure you click Next or OK on the current dialog box.
• Be sure to wait for Windows to complete each setup step. If you
hear the computer working, wait until it is done.
5. When prompted, connect your printer cable to the port on your
computer.
2-4 Installing the Printer Driver Chapter 2
6. The system displays messages indicating that the driver for your
printer is being installed.
For Windows 98/Me: Wait for the system to complete the installation
of the printer driver.
For Windows 2000/XP: See Step 7.
7. For Windows 2000/XP:
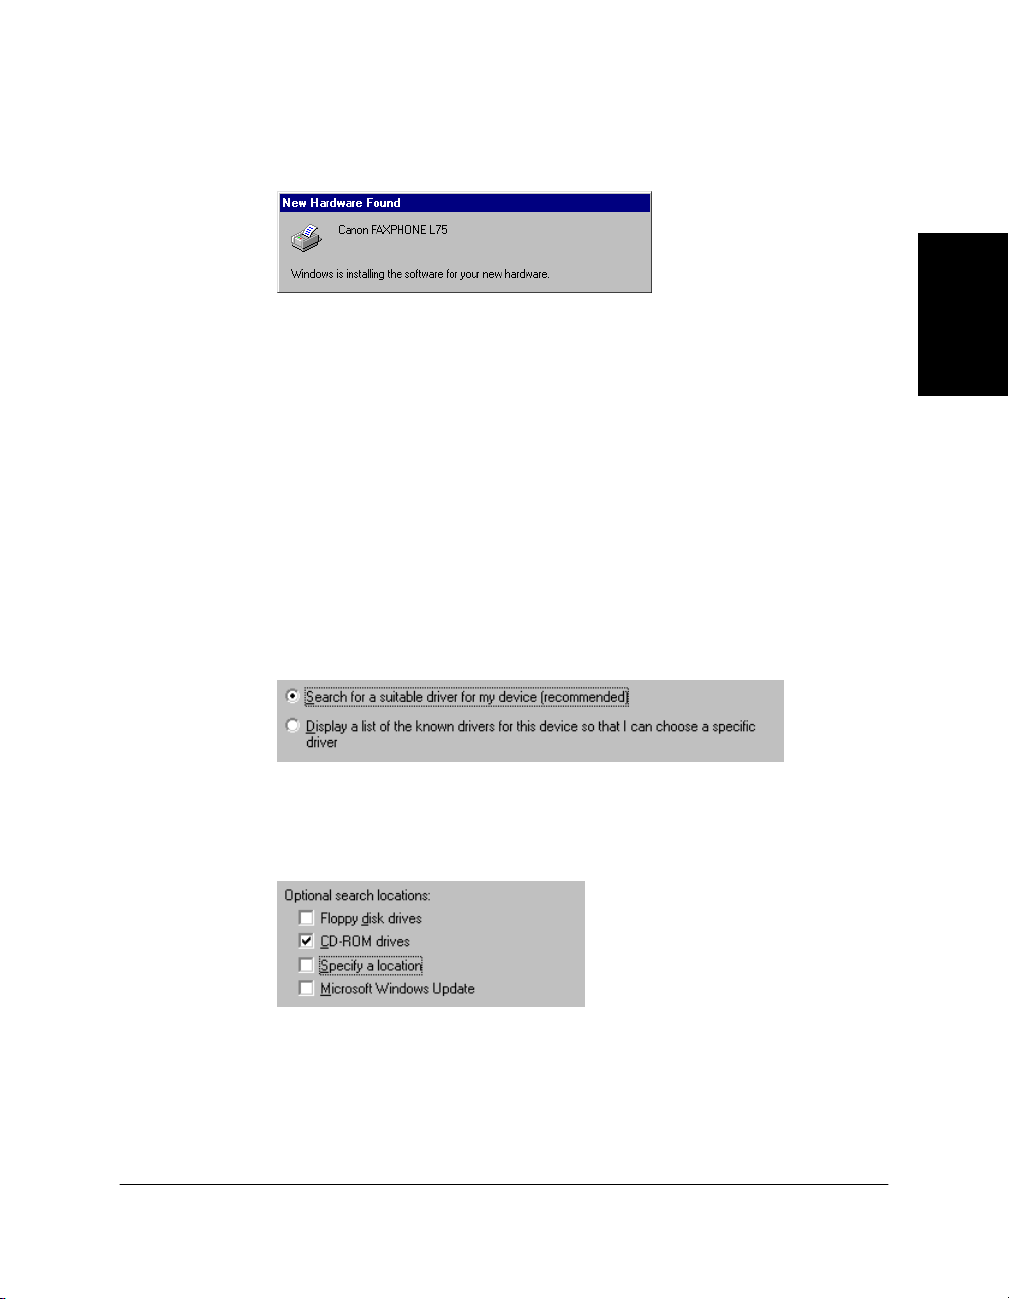
When the Found New Hardware Wizard appears during the setup,
and prompts you for additional information, conduct the following:
For Windows 2000
• Search for a suitable driver for the printer.
(Do not display a list of drivers.)
• Search only on the installation disk.
(Click CD-ROM drives only, and clear the other options.)
Driver
Installing the Printer
Chapter 2 Installing the Printer Driver 2-5

For Windows XP
• Select Install the software automatically (Recommended).
8. When the setup is finished, if prompted, restart Windows.
The installation program determines whether Windows needs to be
restarted on your system.
Setting the Default Printer 2
When you install the printer driver software, the system automatically
sets the printer as the default printer. If necessary, however, follow these
instructions to set the default printer.
To set the default printer:
1. On the Windows desktop, click Start, point to Settings, and then click
Printers (in Windows XP, click Start, and then click Printers and
Faxes).
2. In the Printers window (in Windows XP, the Printers and Faxes
window), click the printer icon.
3. On the File menu, click Set As Default (Windows 98/Me) or Set as
Default Printer (Windows 2000/XP).
Sharing the Printer Installation 2
You may be using your computer and the printer connected to your
computer in an environment where multiple computers are connected by
a network. In this case, you can share the use of your printer with the
other computers on the network.
2-6 Installing the Printer Driver Chapter 2

If you choose to share the use of your printer, your computer acts as the
host system or server to the other computers (also referred to as remote or
client systems).
To use your printer, the client systems must have the printer driver
software installed on them. The software can be installed on the client
systems directly from your system. Based on which Windows operating
system you are using, the following client systems can share your printer:
If your system (server) is: Install on client system:
Windows 98/Me Windows 98/Me
Windows 2000/XP Windows 98/Me or Windows 2000/XP
When a document is printed by the client system on a shared printer, any
printing messages (status or error messages) display on the server
system.
Setting Up Your Printer for Sharing 2
Before the client systems can be installed with the printer driver software,
you must set up the printer for sharing on the server system.
To set up the printer for sharing:
1. On the server system, on the Windows desktop, click Start, point to
Settings, and then click Printers (in Windows XP, click Start, and then
click Printers and Faxes).
2. In the Printers window (in Windows XP, the Printers and Faxes
window), click the printer icon.
3. On the File menu, click Sharing.
Driver
Installing the Printer
If the Sharing command is not available, you need to set up printer
sharing in Windows. For details, see your Windows user
documentation.
4. In the Properties dialog box, on the Sharing tab, click Shared As (in
Windows XP, Share this Printer).
Chapter 2 Installing the Printer Driver 2-7

5. In the Share Name box (Windows 98/Me/XP) or Shared As box
(Windows 2000), type a name you want to assign to the shared
printer.
If available, you may also want to assign a password, which would
then be required by the client system when using the printer.
6. If your situation matches the following, set up an alternate driver:
•Windows 2000/XP server system sharing with Windows 98/Me
client systems.
For detailed instructions, see Appendix A in this guide.
7. In the Properties dialog box, click OK.
Installing the Printer Driver on a Client System 2
Once the printer has been set up for sharing, the printer driver can be
installed from the server system to the appropriate client systems.
To install the printer driver on a client system:
1. On the client system, on the Windows desktop, click Start, point to
Settings, and then click Printers (in Windows XP, click Start, and then
click Printers and Faxes).
2. In the Printers window, double-click Add Printer (in Windows XP, in
the Printers and Faxes window, click Add a printer).
3. Follow the on-screen instructions.
Install the printer driver as a network printer, based on the name
assigned to the shared printer.
You cannot install the printer driver on a client system that has
MultiPASS software installed on it.
2-8 Installing the Printer Driver Chapter 2

Removing the Printer Driver 2
As needed, you can remove the printer driver from your system.
To remove the printer driver:
1. On the Windows desktop, click Start, point to Settings, and then click
Control Panel (in Windows XP, click Start, and then click Control
Panel).
2. In Control Panel, double-click Add/Remove Programs (in Windows
XP, double-click Add or Remove Programs).
3. In the Add/Remove Programs Properties dialog box (in Windows
XP, the Add or Remove Programs dialog box), click Canon
FAXPHONE L75, and then click the Add/Remove button (Windows
98/Me) or the Change/Remove button (Windows 2000/XP).
4. Follow the on-screen instructions.
5. After the printer driver has been removed, restart your computer.
Changing the Port Connection 2
Driver
Installing the Printer
To change the port, disconnect the printer cable from the USB port on
your computer, and reconnect the printer cable to another USB port or
hub.
When changing the port connection, it is not necessary to uninstall and
reinstall the printer driver software.
Chapter 2 Installing the Printer Driver 2-9

2-10 Installing the Printer Driver Chapter 2
 Loading...