


FAX-L280/L200
Getting Started Guide
Please Read
This First!
The following pages have been copied from the FAX-L280/L200 User’s Guide to
get you started. Please use the FAX-L280/L200 User’s Guide for full details.
ENGLISH

Contents
Unpacking the FAX ........................................................................ 1
Removing Shipping Materials ......................................................... 1
Assembling the FAX ....................................................................... 2
Connecting the Telephone Line Cord and External Devices .......... 3
Connecting the Power Cord ............................................................ 3
Installing the Toner Cartridge ........................................................ 4
Loading Paper ................................................................................. 6
Operation Panel .............................................................................. 7
Entering the Date and Time ........................................................... 8
Registering Your FAX Number and Name ................................... 8
Sending Methods ............................................................................. 10
Memory Sending ............................................................................. 10
Manual Sending Via the Handset ................................................... 11
Registering One-Touch Speed Dialling ........................................... 12
Sending a Document With Speed Dialling ..................................... 13
Receiving Faxes Automatically: FAX ONLY MODE ................... 14
Receiving Both Faxes and Telephone Calls Automatically:
Receiving Faxes Manually: MANUAL MODE ............................. 16
Making a Quick Single Copy .......................................................... 17
Notes ............................................................................................... 18
Special Function Buttons ......................................................... 7
Setting FAX ONLY MODE .................................................... 14
Fax/Tel Mode ........................................................................... 15
Setting Up Fax/Tel Mode ......................................................... 15
Setting MANUAL MODE ....................................................... 16
Receiving a Fax Manually ........................................................ 16
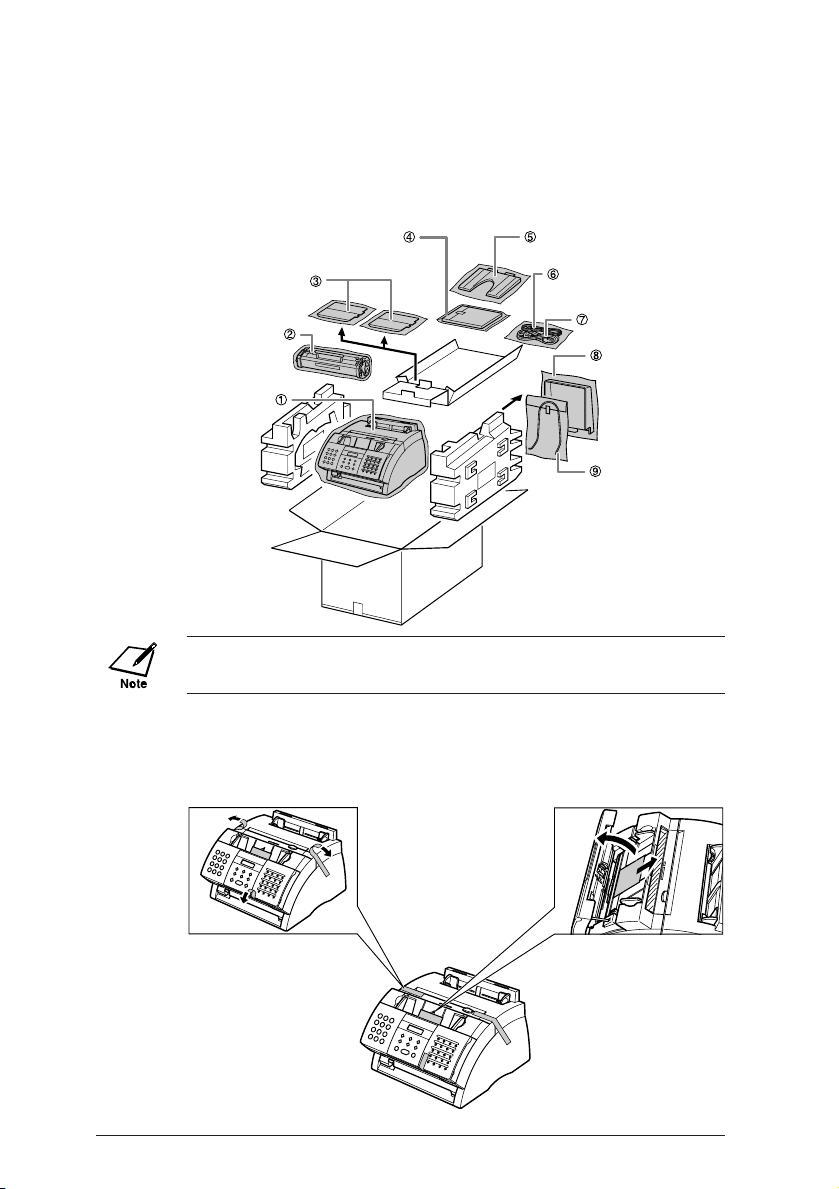
Unpacking the FAX (2-2)
Before unpacking your FAX, be sure to choose a suitable location for it
(→ p. 1-5).
Make sure you have the following items:
DOCUMENTATION
PAPER REST
SUPPORT TRAYS
FX-3 TONER
CARTRIDGE
MAIN UNIT
❏ If you have purchased the optional handset, see Appendix B for the
items included.
Removing Shipping Materials (2-4)
Follow this procedure to remove the shipping materials. Keep them in case
you need to transport the unit in the future.
TELEPHONE LINE CORD
POWER CORD
MULTI-PURPOSE TRAY
COVER
DOCUMENT SUPPORT
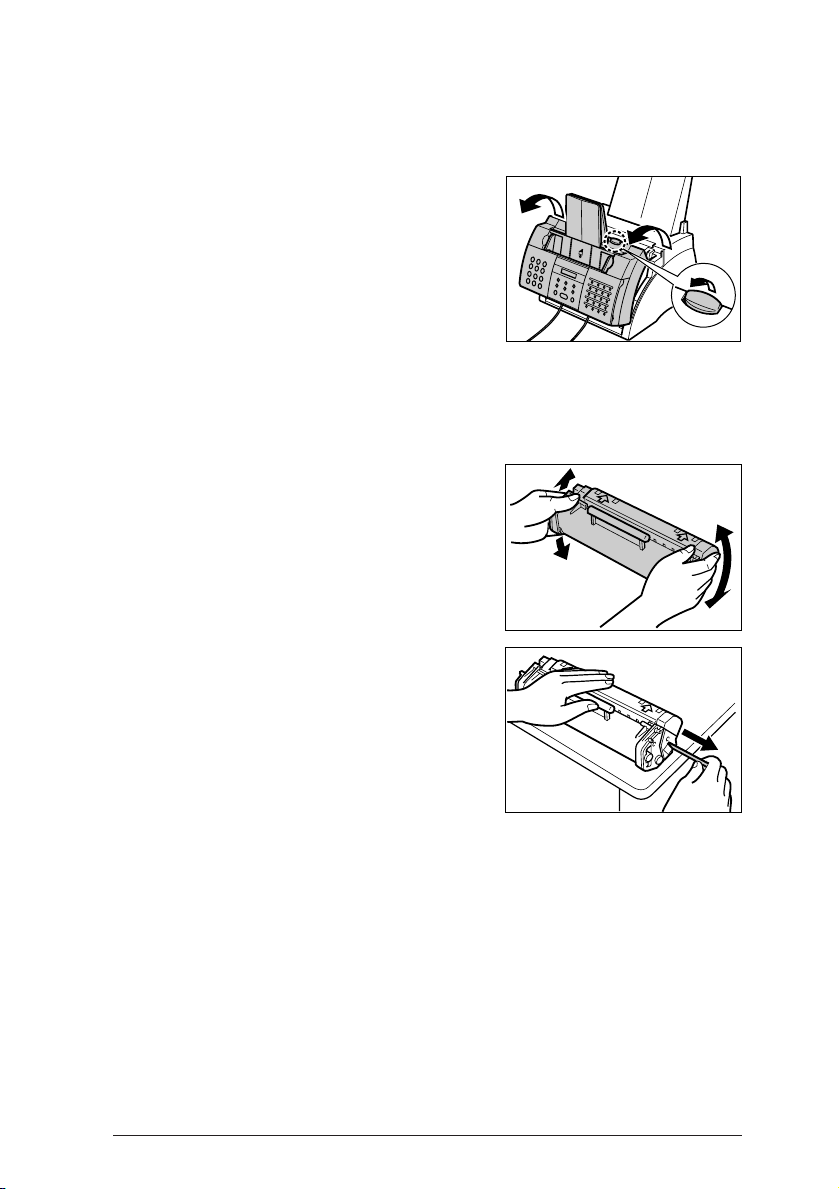
1 Remove all shipping
detailed information.
tapes from the FAX.
2 Use both hands to gently
open the operation panel
(it only opens partially).
Then remove the
protective sheet from the
ADF. Close the
operation panel by
pressing it down from
the centre until it locks
into place.
1The numbers in parentheses indicate the pages in the FAX-L280/L200 User’s Guide on which you can find
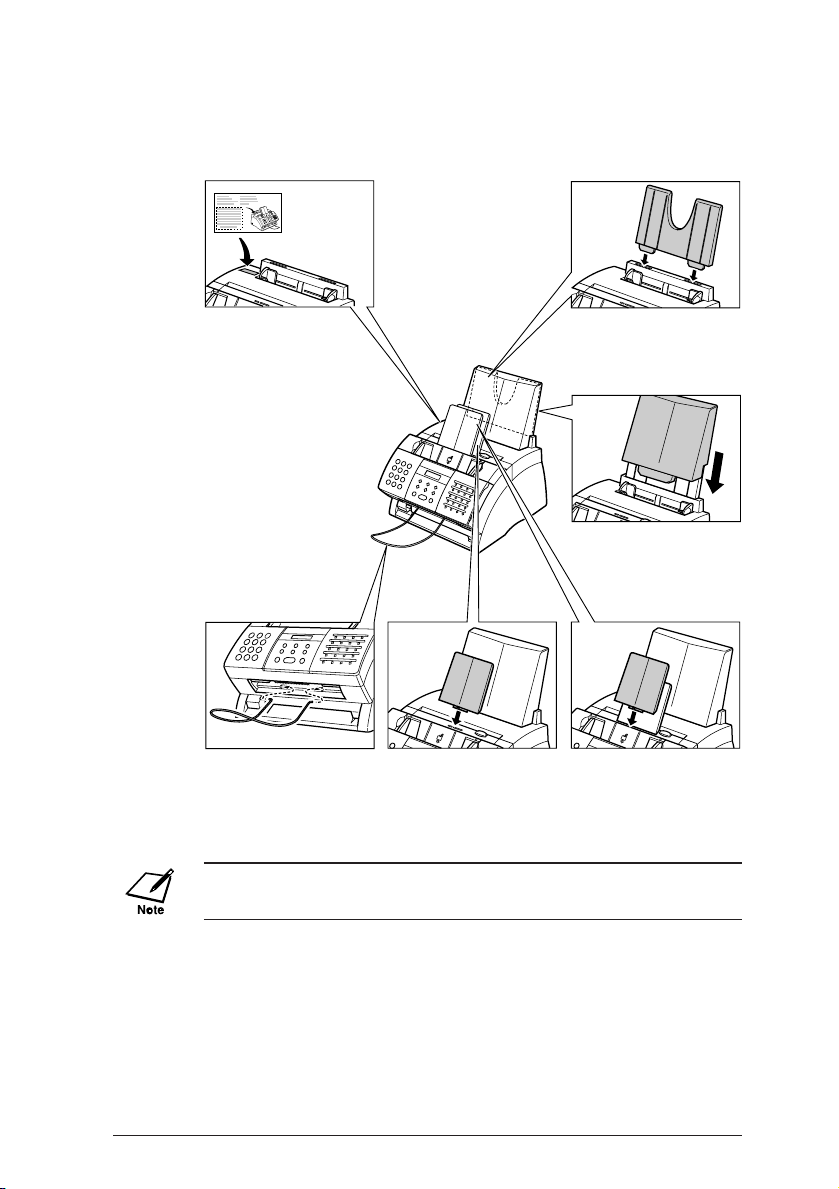
Assembling the FAX (2-5)
Follow this procedure to assemble your FAX:
1 Attach the paper
loading warning label
to the left of the
multi-purpose tray.
4 Insert the ends of the
document support into
the slots on the unit.
5 Insert the tabs on one of
the support trays into the
corresponding slots above
the face-down delivery
slot.
2 Insert the tabs on the
paper rest into the slots
on the unit.
3 Slide the multi-purpose
tray cover over the paper
rest.
6 Insert the tabs on the
other support tray into the
corresponding slots above
the ADF.
❏ For details on attaching the optional handset to your FAX, see
Appendix B.
2 The numbers in parentheses indicate the pages in the FAX-L280/L200 User’s Guide on which you can find
detailed information.
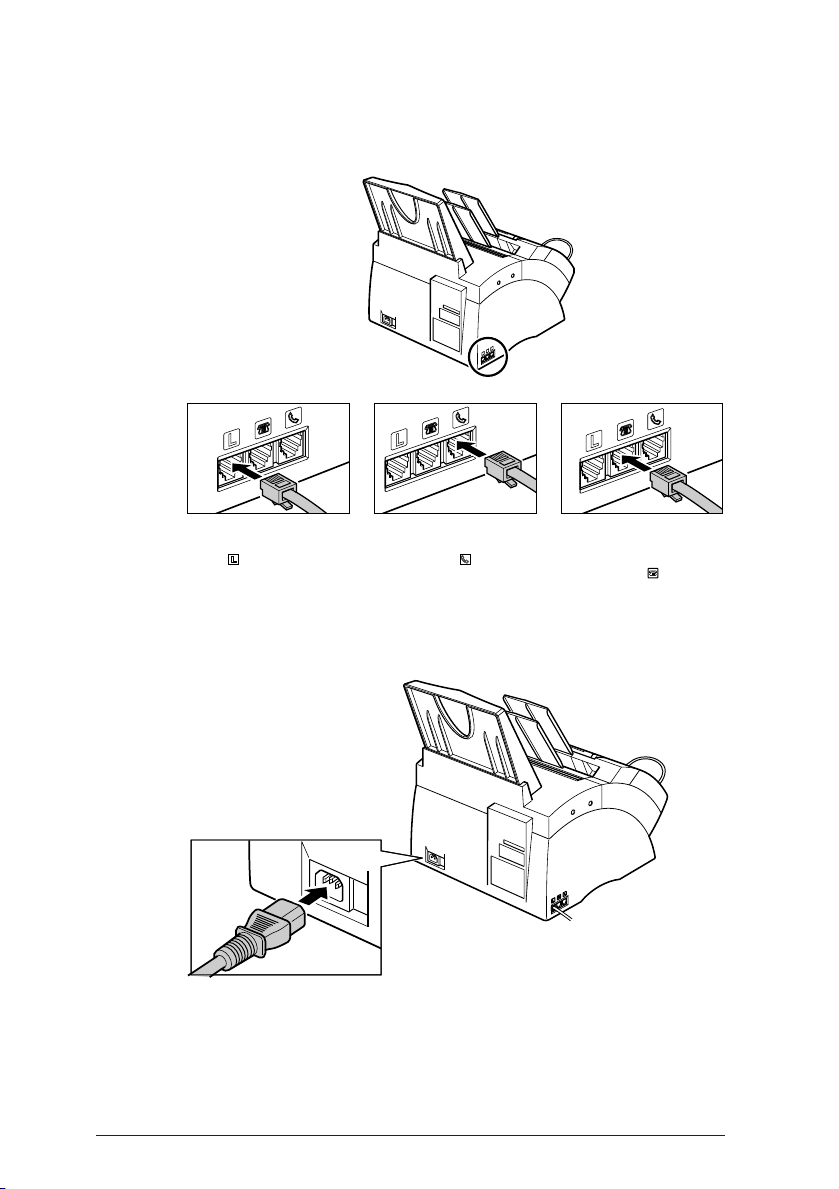
Connecting the Telephone Line Cord and External Devices
(2-6)
1 Connect the supplied
telephone line cord to
the
. jack, then the
other end to the
telephone line jack on
your wall.
2 Connect the optional
handset or telephone
cord to the
users, see the following
page.)
Connecting the Power Cord (2-8)
Connect the supplied power cord to the
power cord connector. Then connect the
other end into a properly grounded
200–240 V AC three-prong outlet.*
* The shape of the plug and outlet vary depending on the country of purchase.
. jack. (UK
3 Connect the additional
telephone, answering
machine, or data modem
cord to the
users, see the following
page.)
. jack. (UK
detailed information.
3The numbers in parentheses indicate the pages in the FAX-L280/L200 User’s Guide on which you can find
Installing the Toner Cartridge (2-11)
Make sure the FAX is plugged in.
1
2 Lift the latch and open the front
cover.
3 Remove the new FX-3 toner cartridge
from its protective bag.
❏ Save the protective bag in case
you need to repack the toner
cartridge at a later date.
4 Gently rock the toner cartridge
from side to side a few times to
distribute the toner evenly inside
it.
❏ Poor print quality may result
if the toner is unequally
distributed.
5 Place and support the toner
cartridge on a flat, clean surface,
then gently pull on the plastic tab
to remove the plastic seal.
❏ Use a firm, even pull to avoid
breaking the seal.
4 The numbers in parentheses indicate the pages in the FAX-L280/L200 User’s Guide on which you can find
detailed information.
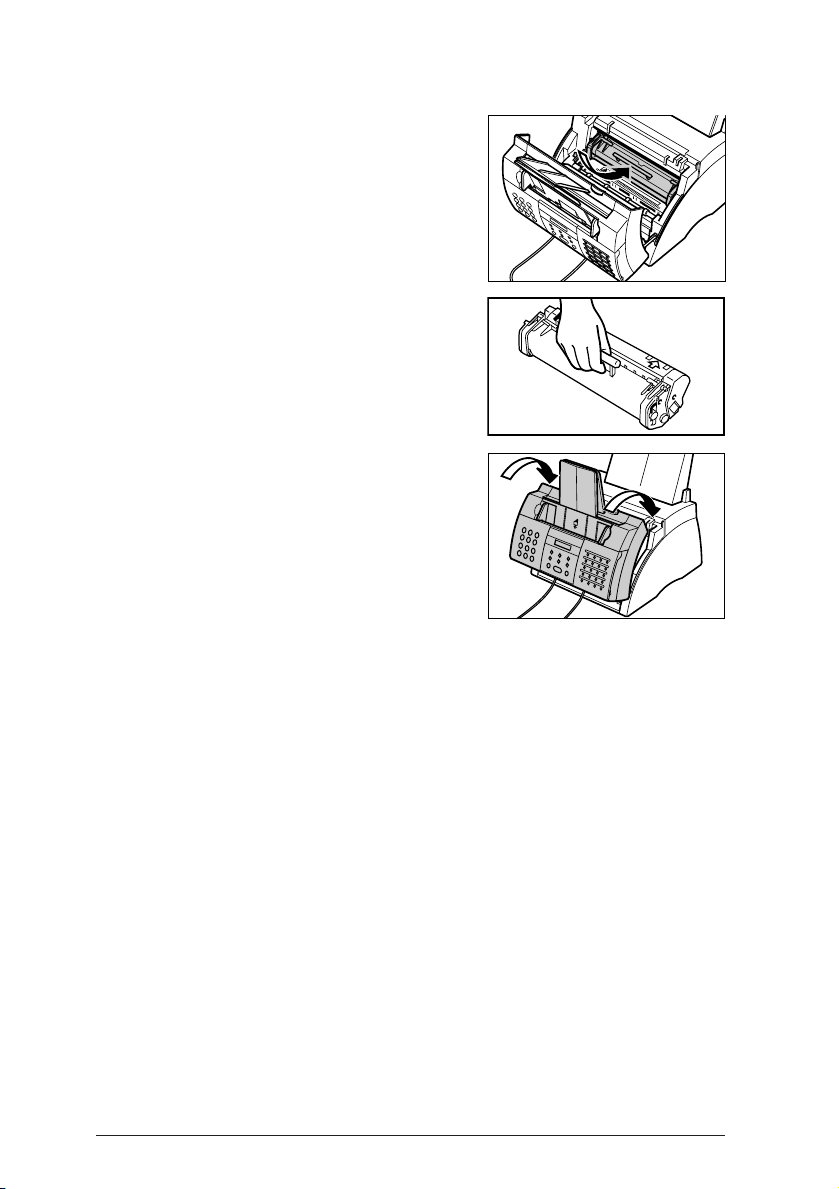
6 Hold the toner cartridge by its
handle and insert it into the FAX
as far as it will go, making sure
that its tabs are aligned with the
rails inside the unit.
❏ Hold the toner cartridge as
shown.
7 Use both hands to close the front
cover.
detailed information.
5The numbers in parentheses indicate the pages in the FAX-L280/L200 User’s Guide on which you can find
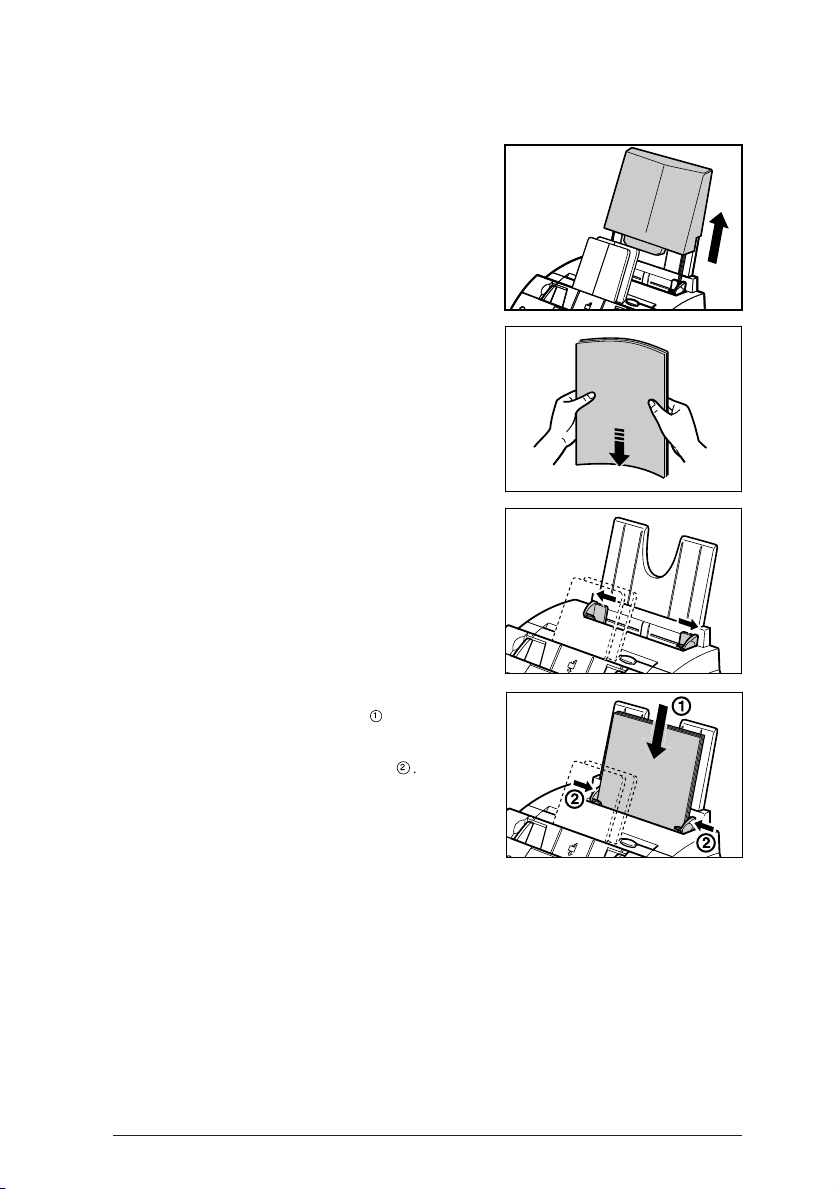
Loading Paper (2-14)
Remove the multi-purpose tray
1
cover from the FAX.
2 Prepare a stack of paper by
tapping it on a flat surface to even
its edges.
3 Open the paper guides to the
approximate width of the stack.
4 Insert the stack into the
multi-purpose tray
1
. (print side
facing you and top edge first),
then adjust the paper guides to
the width of the paper
2
..
❏ Make sure there are no gaps
between the paper guides and
the paper stack.
5 Replace the multi-purpose tray cover.
❏ Be sure to replace this cover to
prevent dust accumulating inside
the unit.
Your FAX is now ready to print.
6 The numbers in parentheses indicate the pages in the FAX-L280/L200 User’s Guide on which you can find
detailed information.