

Canon iR6020i, iR5020i, iR5020N Copying Manual

iR6020i/iR5020i
iR5020N
Copying Guide
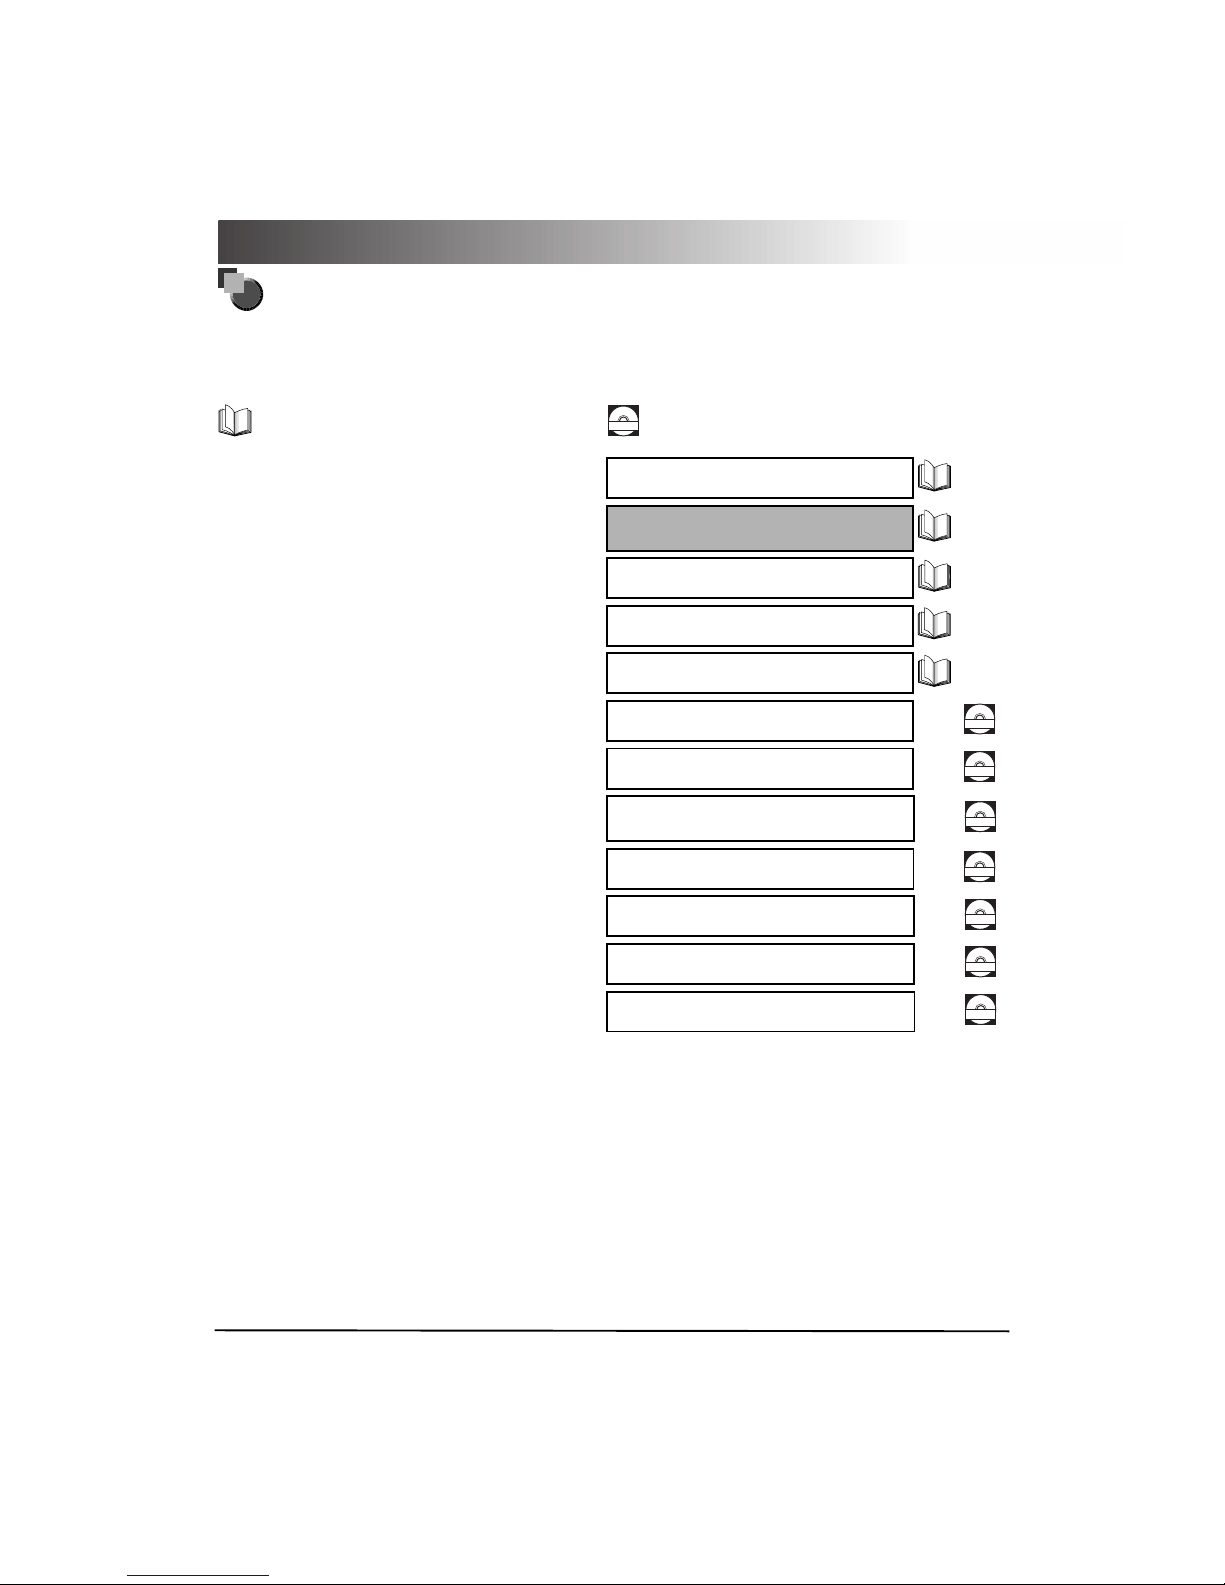
Manuals for the Machine
The manuals for this machine are divided as follows. Please refer to them for detailed information.
The manuals supplied with optional equipment are included in the list below. Depending on the system
configuration and product purchased, some manuals may not be needed.
Guides with this symbol are printed manuals.
CD-ROM
Guides with this symbol are PDF manuals included on the
accompanying CD-ROM.
•
Basic Operations
•
Troubleshooting
Reference Guide
•
Copying Instructions
Copying Guide
(This Document)
•
Mail Box Instructions
Mail Box Guide
•
Sending Instructions
(iR6020i/iR5020i)
Sending Guide
•
Setting Up the Network Connection and
Installing the CD-ROM Software
Network Quick Start Guide
•
Remote User Interface Instructions
Remote UI Guide
CD-ROM
•
Network Connectivity and Setup Instructions
Network Guide
CD-ROM
•
Network ScanGear Installation and
Instructions
Network ScanGear
User’s Guide
CD-ROM
•
PS/PCL Printer Instructions
PS/PCL Printer Guide
CD-ROM
•
PCL Printer Driver Installation and
Instructions
PCL Driver Guide
CD-ROM
•
PS Printer Driver Installation and
Instructions
PS Driver Guide
CD-ROM
•
Installing MEAP Applications and Using
the Legion Service
MEAP SMS Administrator Guide
CD-ROM

1
2
3
4
How This Manual Is Organised
Basic Copying
Additional Copy Functions
Setting/Storing Specifications of the Copy Function
Appendix
Chap 1
Chap 2
Chap 3
Chap 4
Considerable effort has been made to ensure that this manual is free of inaccuracies and omissions. However, as we are constantly improving our
products, if you need an exact specification, please contact Canon.

Contents
iv
Contents
Manuals for the Machine. . . . . . . . . . . . . . . . . . . . . . . . . . . . . . . . . . . . . . . . . . . . . . . . . . . . .ii
How This Manual Is Organised . . . . . . . . . . . . . . . . . . . . . . . . . . . . . . . . . . . . . . . . . . . . . . iii
Contents . . . . . . . . . . . . . . . . . . . . . . . . . . . . . . . . . . . . . . . . . . . . . . . . . . . . . . . . . . . . . . . . . iv
How to Use This Manual . . . . . . . . . . . . . . . . . . . . . . . . . . . . . . . . . . . . . . . . . . . . . . . . . . . .vii
Symbols Used in This Manual. . . . . . . . . . . . . . . . . . . . . . . . . . . . . . . . . . . . . . . . . . . . . . vii
Keys Used in This Manual . . . . . . . . . . . . . . . . . . . . . . . . . . . . . . . . . . . . . . . . . . . . . . . . vii
Displays Used in This Manual. . . . . . . . . . . . . . . . . . . . . . . . . . . . . . . . . . . . . . . . . . . . . viii
Illustrations Used in This Manual . . . . . . . . . . . . . . . . . . . . . . . . . . . . . . . . . . . . . . . . . . viii
About Trademarks. . . . . . . . . . . . . . . . . . . . . . . . . . . . . . . . . . . . . . . . . . . . . . . . . . . . . . . . . ix
Chapter 1 Basic Copying
What the iR6020i/iR5020i and iR5020N Can Do . . . . . . . . . . . . . . . . . . . . . . . . . . . . . . . . 1-3
Various Kinds of Copies . . . . . . . . . . . . . . . . . . . . . . . . . . . . . . . . . . . . . . . . . . . . . . . . . 1-3
Flow of Copy Operations . . . . . . . . . . . . . . . . . . . . . . . . . . . . . . . . . . . . . . . . . . . . . . . . . 1-10
Entering the Copy Quantity . . . . . . . . . . . . . . . . . . . . . . . . . . . . . . . . . . . . . . . . . . . . . . . 1-17
Specifying the Required Number of Copies . . . . . . . . . . . . . . . . . . . . . . . . . . . . . . . . . 1-17
Changing the Copy Quantity . . . . . . . . . . . . . . . . . . . . . . . . . . . . . . . . . . . . . . . . . . . . . 1-18
Selecting an Output Device (Select Output Device). . . . . . . . . . . . . . . . . . . . . . . . . . . . 1-19
Selecting a Printing Destination; Giving Priority to the Copy Mode . . . . . . . . . . . . . . . 1-21
Specifying Output Device Priority . . . . . . . . . . . . . . . . . . . . . . . . . . . . . . . . . . . . . . . . . 1-23
Selecting the Copy Paper Size (Paper Select) . . . . . . . . . . . . . . . . . . . . . . . . . . . . . . . . 1-26
Automatic Paper Selection (Auto Paper Selection). . . . . . . . . . . . . . . . . . . . . . . . . . . . 1-27
Manual Paper Selection . . . . . . . . . . . . . . . . . . . . . . . . . . . . . . . . . . . . . . . . . . . . . . . . 1-29
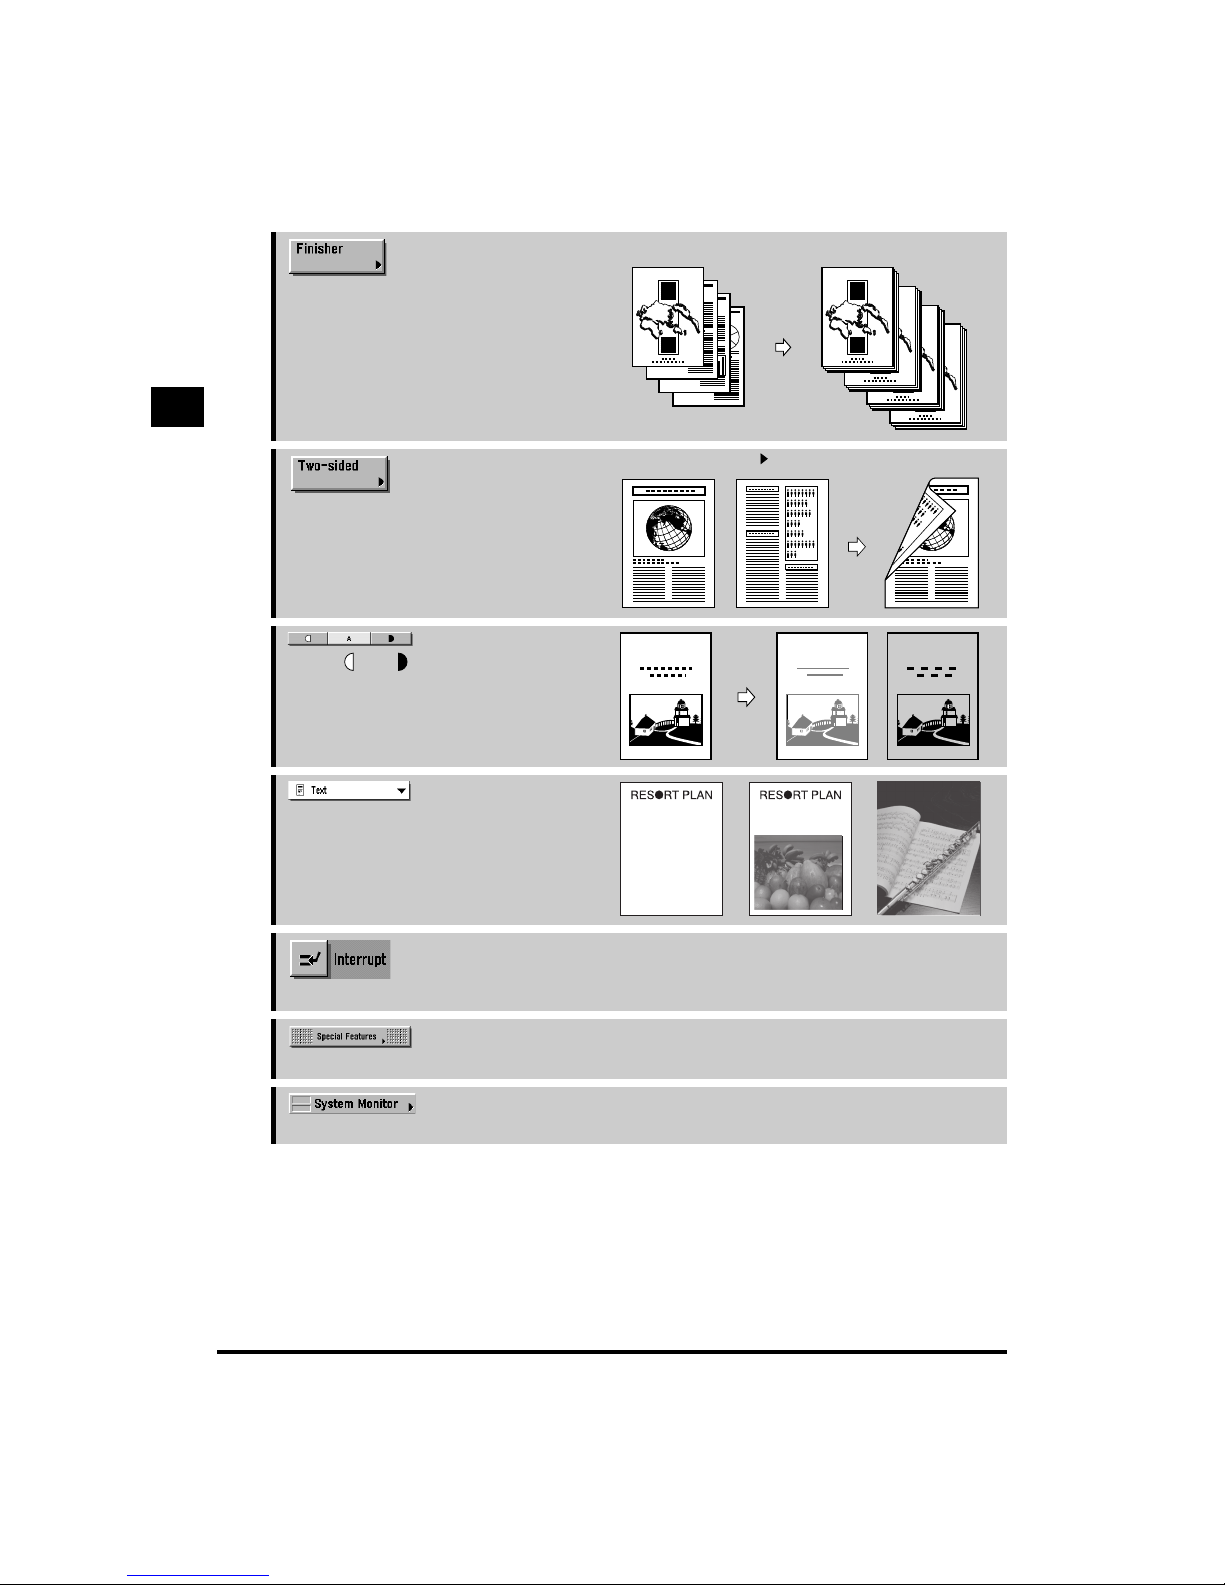
Adjusting Exposure and Image Quality (Copy Exposure) . . . . . . . . . . . . . . . . . . . . . . . 1-32
Adjusting Copy Exposure . . . . . . . . . . . . . . . . . . . . . . . . . . . . . . . . . . . . . . . . . . . . . . . 1-32
Selecting Image Quality . . . . . . . . . . . . . . . . . . . . . . . . . . . . . . . . . . . . . . . . . . . . . . . . 1-33
Automatic Adjustment of Exposure and Image Quality. . . . . . . . . . . . . . . . . . . . . . . . . 1-36
Changing the Exposure During Printing . . . . . . . . . . . . . . . . . . . . . . . . . . . . . . . . . . . . 1-37
Changing the Copy Ratio (Copy Ratio) . . . . . . . . . . . . . . . . . . . . . . . . . . . . . . . . . . . . . . 1-38
Enlarging/Reducing Originals to a Standard Size (Preset Zoom) . . . . . . . . . . . . . . . . . 1-38
Specifying the Copy Ratio by Percentage (Zoom Designation) . . . . . . . . . . . . . . . . . . 1-41
Automatically Setting the Copy Ratio Based on the Original and Copy Paper
Sizes (Auto). . . . . . . . . . . . . . . . . . . . . . . . . . . . . . . . . . . . . . . . . . . . . . . . . . . . . . . . . . 1-43
Slightly Reducing Images to Prevent the Original Periphery from Being Trimmed
(Entire Image) . . . . . . . . . . . . . . . . . . . . . . . . . . . . . . . . . . . . . . . . . . . . . . . . . . . . . . . . 1-45
Calculating the Copy Ratio Based on the Original and Copy Paper Sizes
(Zoom Program) . . . . . . . . . . . . . . . . . . . . . . . . . . . . . . . . . . . . . . . . . . . . . . . . . . . . . . 1-47
Making Copies with the Same XY Copy Ratio (Zoom) . . . . . . . . . . . . . . . . . . . . . . 1-48
Making Copies with Different XY Copy Ratios (XY Zoom) . . . . . . . . . . . . . . . . . . . 1-50
Enlarging/Reducing Originals with Copy Ratios Set Independently for X and Y
Axes (XY Zoom) . . . . . . . . . . . . . . . . . . . . . . . . . . . . . . . . . . . . . . . . . . . . . . . . . . . . . . 1-52

Contents
v
Collating Copies (Finisher) . . . . . . . . . . . . . . . . . . . . . . . . . . . . . . . . . . . . . . . . . . . . . . . . 1-56
Collating Copies into Sets in Page Order (Collate) . . . . . . . . . . . . . . . . . . . . . . . . . . . . 1-60
Collating Copies into Groups of the Same Page (Group) . . . . . . . . . . . . . . . . . . . . . . . 1-63
Collating Pages and Stapling (Staple) . . . . . . . . . . . . . . . . . . . . . . . . . . . . . . . . . . . . . 1-66
Two-Sided Copying (Two-sided) . . . . . . . . . . . . . . . . . . . . . . . . . . . . . . . . . . . . . . . . . . . 1-69
Making Two-sided Copies from One-sided Originals (1 2-Sided). . . . . . . . . . . . . . . . 1-70
Making Two-sided Copies from Two-sided Originals (2 2-Sided). . . . . . . . . . . . . . . . 1-73
Making One-sided Copies from Two-sided Originals (2 1-Sided). . . . . . . . . . . . . . . . 1-76
Making Two-sided Copies from Facing Pages in a Book (Book 2-Sided) . . . . . . . . . 1-79
Reserved Copying . . . . . . . . . . . . . . . . . . . . . . . . . . . . . . . . . . . . . . . . . . . . . . . . . . . . . . . 1-82
Making a Copy Reservation While the Machine Is Warming Up (Auto Start) . . . . . . . . 1-82
Reserving a Copy Operation During Printing . . . . . . . . . . . . . . . . . . . . . . . . . . . . . . . . 1-84
Interrupting the Current Job to Make Priority Copies (Interrupt Mode) . . . . . . . . . . . . 1-86
Checking a Sample Set Before Copying (Sample Set) . . . . . . . . . . . . . . . . . . . . . . . . . 1-88
Checking the Copy Mode Settings (Setting Confirmation) . . . . . . . . . . . . . . . . . . . . . . 1-91
Changing or Cancelling a Selected Copy Mode (Setting Confirmation/Cancel) . . . . . 1-92
Chapter 2 Additional Copy Functions
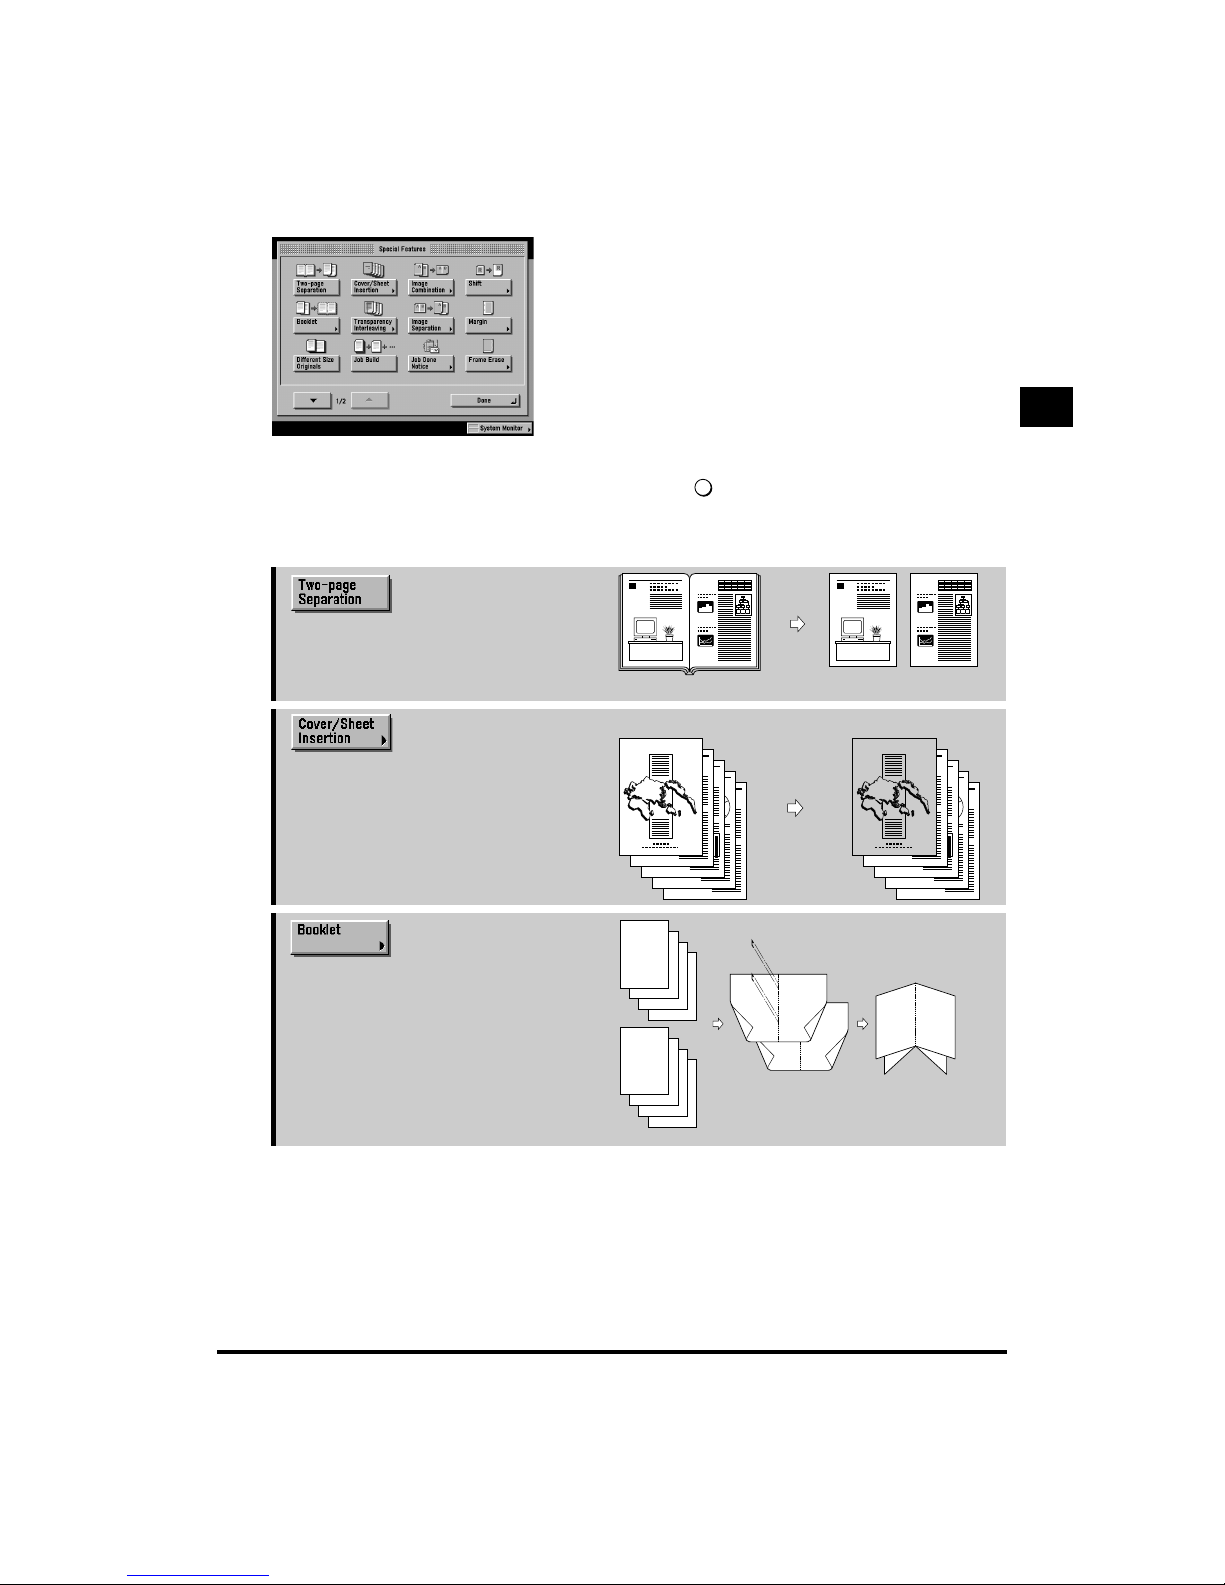
Copying Facing Pages in a Book on Two Separate Sheets of Paper
(Two-page Separation) . . . . . . . . . . . . . . . . . . . . . . . . . . . . . . . . . . . . . . . . . . . . . . . . . . . . 2-3
Adding Front and Back Covers, Sheet Insertions, and Chapter Pages to
Copy Sets (Cover/Sheet Insertion) . . . . . . . . . . . . . . . . . . . . . . . . . . . . . . . . . . . . . . . . . . 2-5
Making Copies for Use as a Booklet (Booklet) . . . . . . . . . . . . . . . . . . . . . . . . . . . . . . . . 2-11
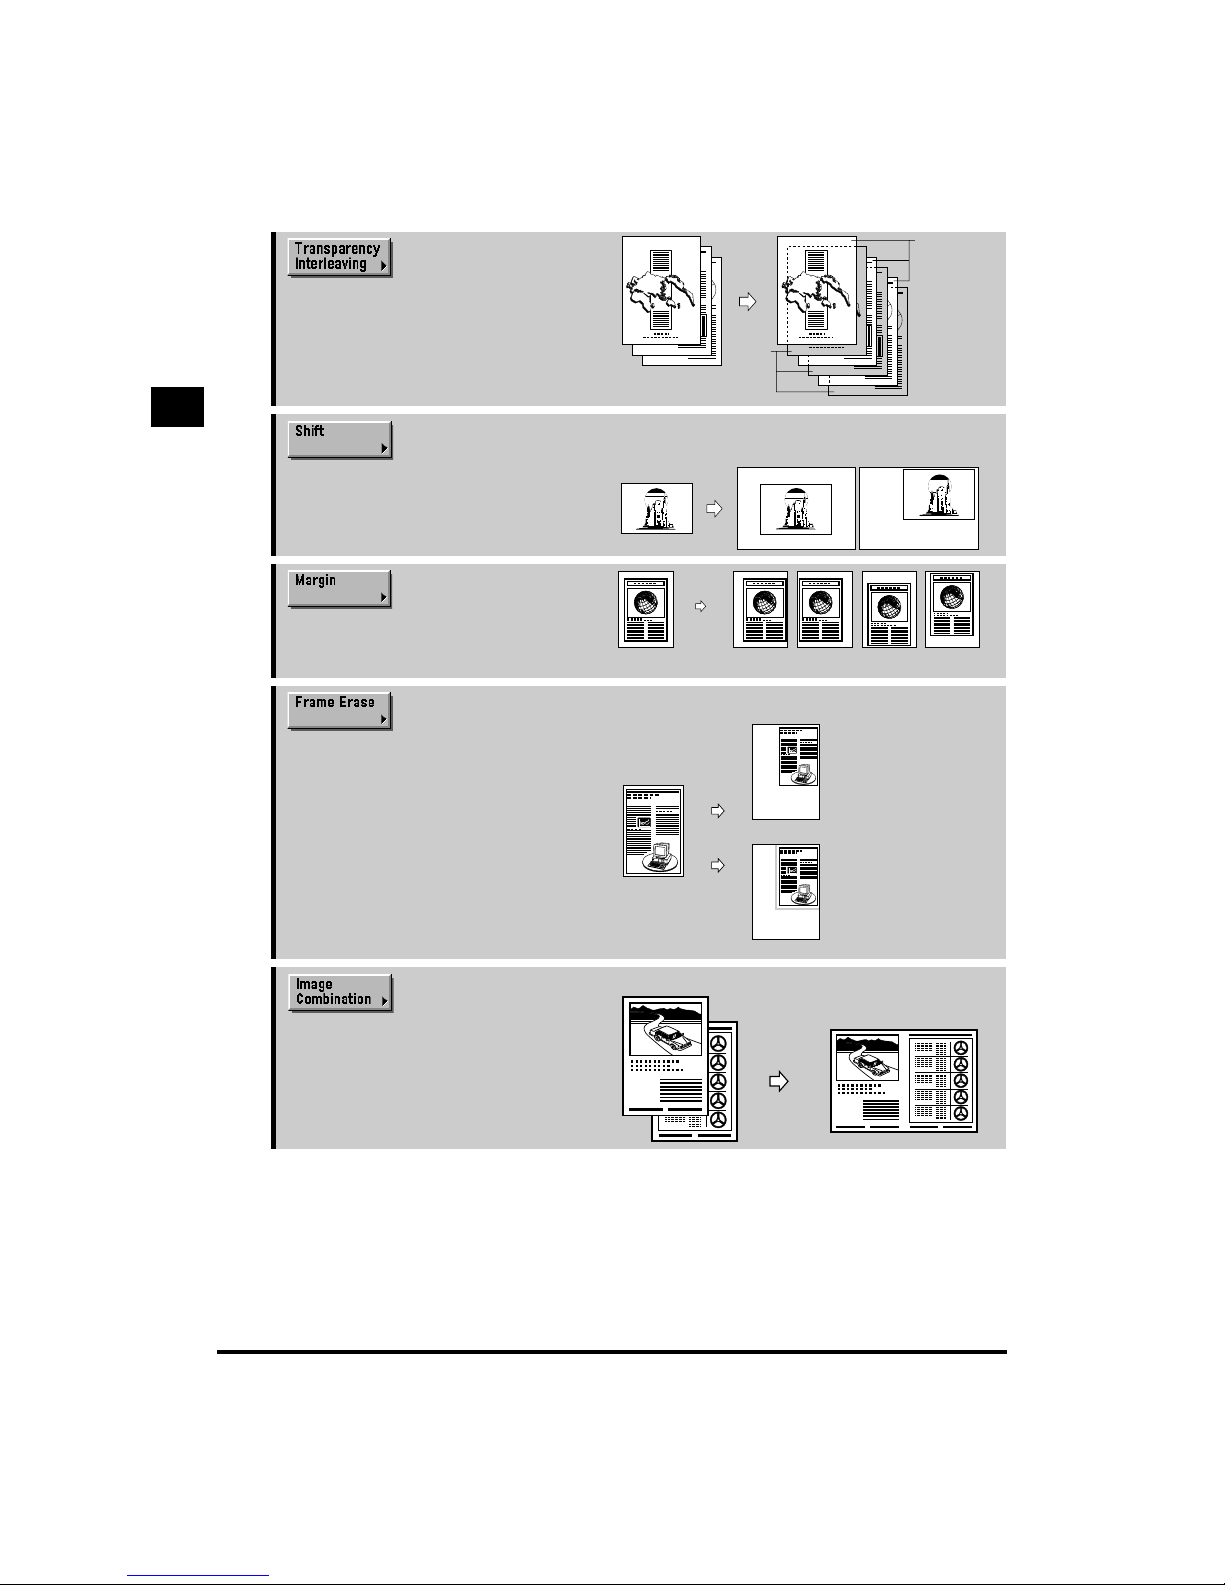
Making Copies with Sheets of Paper Interleaved Between Transparencies
(Transparency Interleaving) . . . . . . . . . . . . . . . . . . . . . . . . . . . . . . . . . . . . . . . . . . . . . . . 2-16
Making Copies with the Original Image Shifted (Shift) . . . . . . . . . . . . . . . . . . . . . . . . . 2-20
Making Copies with the Original Image Shifted to the Centre or a Corner . . . . . . . . . . 2-21
Making Copies with the Original Image Shifted Using the Number Keys . . . . . . . . . . . 2-22
Making Copies with Margins (Margin) . . . . . . . . . . . . . . . . . . . . . . . . . . . . . . . . . . . . . . . 2-24
Erasing Shadows and Frame Lines from Copies (Frame Erase) . . . . . . . . . . . . . . . . . 2-27
Making Copies by Erasing the Frame Around the Original (Original Frame Erase) . . . 2-29
Making Copies by Erasing the Book Frame (Book Frame Erase) . . . . . . . . . . . . . . . . 2-32
Making Copies by Erasing Binding Holes (Binding Erase) . . . . . . . . . . . . . . . . . . . . . . 2-34
Reducing Two, Four or Eight Originals to Fit on a Single Copy Sheet
(Image Combination). . . . . . . . . . . . . . . . . . . . . . . . . . . . . . . . . . . . . . . . . . . . . . . . . . . . . 2-36
Dividing an Original Into Equal Sections and Enlarging Each Section on a
Separate Copy Sheet (Image Separation) . . . . . . . . . . . . . . . . . . . . . . . . . . . . . . . . . . . . 2-42
Feeding Different-sized Originals Together in the Feeder
(Different Size Originals). . . . . . . . . . . . . . . . . . . . . . . . . . . . . . . . . . . . . . . . . . . . . . . . . . 2-47
Copying Separately-Set Originals (Job Build) . . . . . . . . . . . . . . . . . . . . . . . . . . . . . . . . 2-49
E-mail Notification at the End of a Copy Job (Job Done Notice) . . . . . . . . . . . . . . . . . 2-53
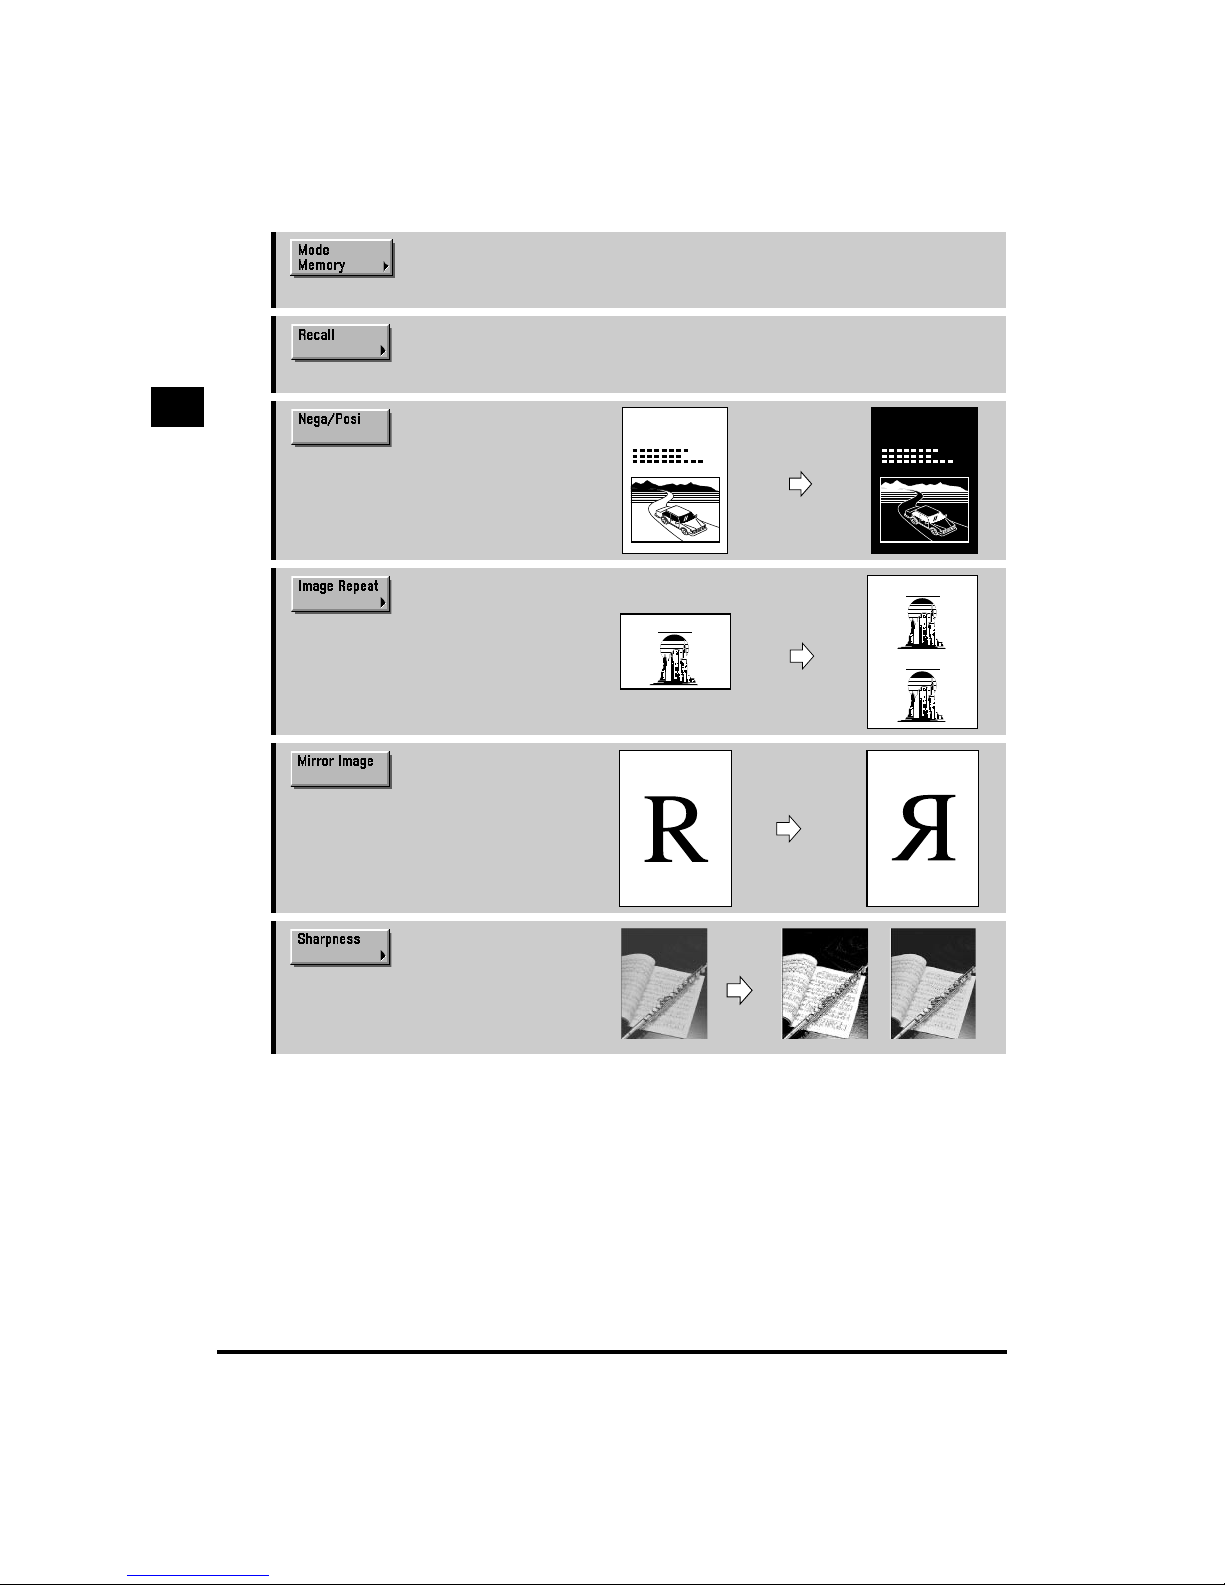
Storing/Recalling Frequently Used Copy Settings in Memory (Mode Memory) . . . . . 2-55
Storing Copy Settings . . . . . . . . . . . . . . . . . . . . . . . . . . . . . . . . . . . . . . . . . . . . . . . . . . 2-55
Storing a Memory Key Name . . . . . . . . . . . . . . . . . . . . . . . . . . . . . . . . . . . . . . . . . . . . 2-58
Recalling a Copy Mode . . . . . . . . . . . . . . . . . . . . . . . . . . . . . . . . . . . . . . . . . . . . . . . . . 2-60
Erasing a Copy Mode . . . . . . . . . . . . . . . . . . . . . . . . . . . . . . . . . . . . . . . . . . . . . . . . . . 2-61

Contents
vi
Recalling a Previous Copy Setting (Recall) . . . . . . . . . . . . . . . . . . . . . . . . . . . . . . . . . . 2-63
Inverting Original Images (Nega/Posi). . . . . . . . . . . . . . . . . . . . . . . . . . . . . . . . . . . . . . . 2-65
Making Copies with the Original Image Repeated (Image Repeat). . . . . . . . . . . . . . . . 2-66
Making Copies with the Original Image Reversed (Mirror Image) . . . . . . . . . . . . . . . . 2-69
Making Sharp Contrast Copies (Sharpness) . . . . . . . . . . . . . . . . . . . . . . . . . . . . . . . . . 2-71
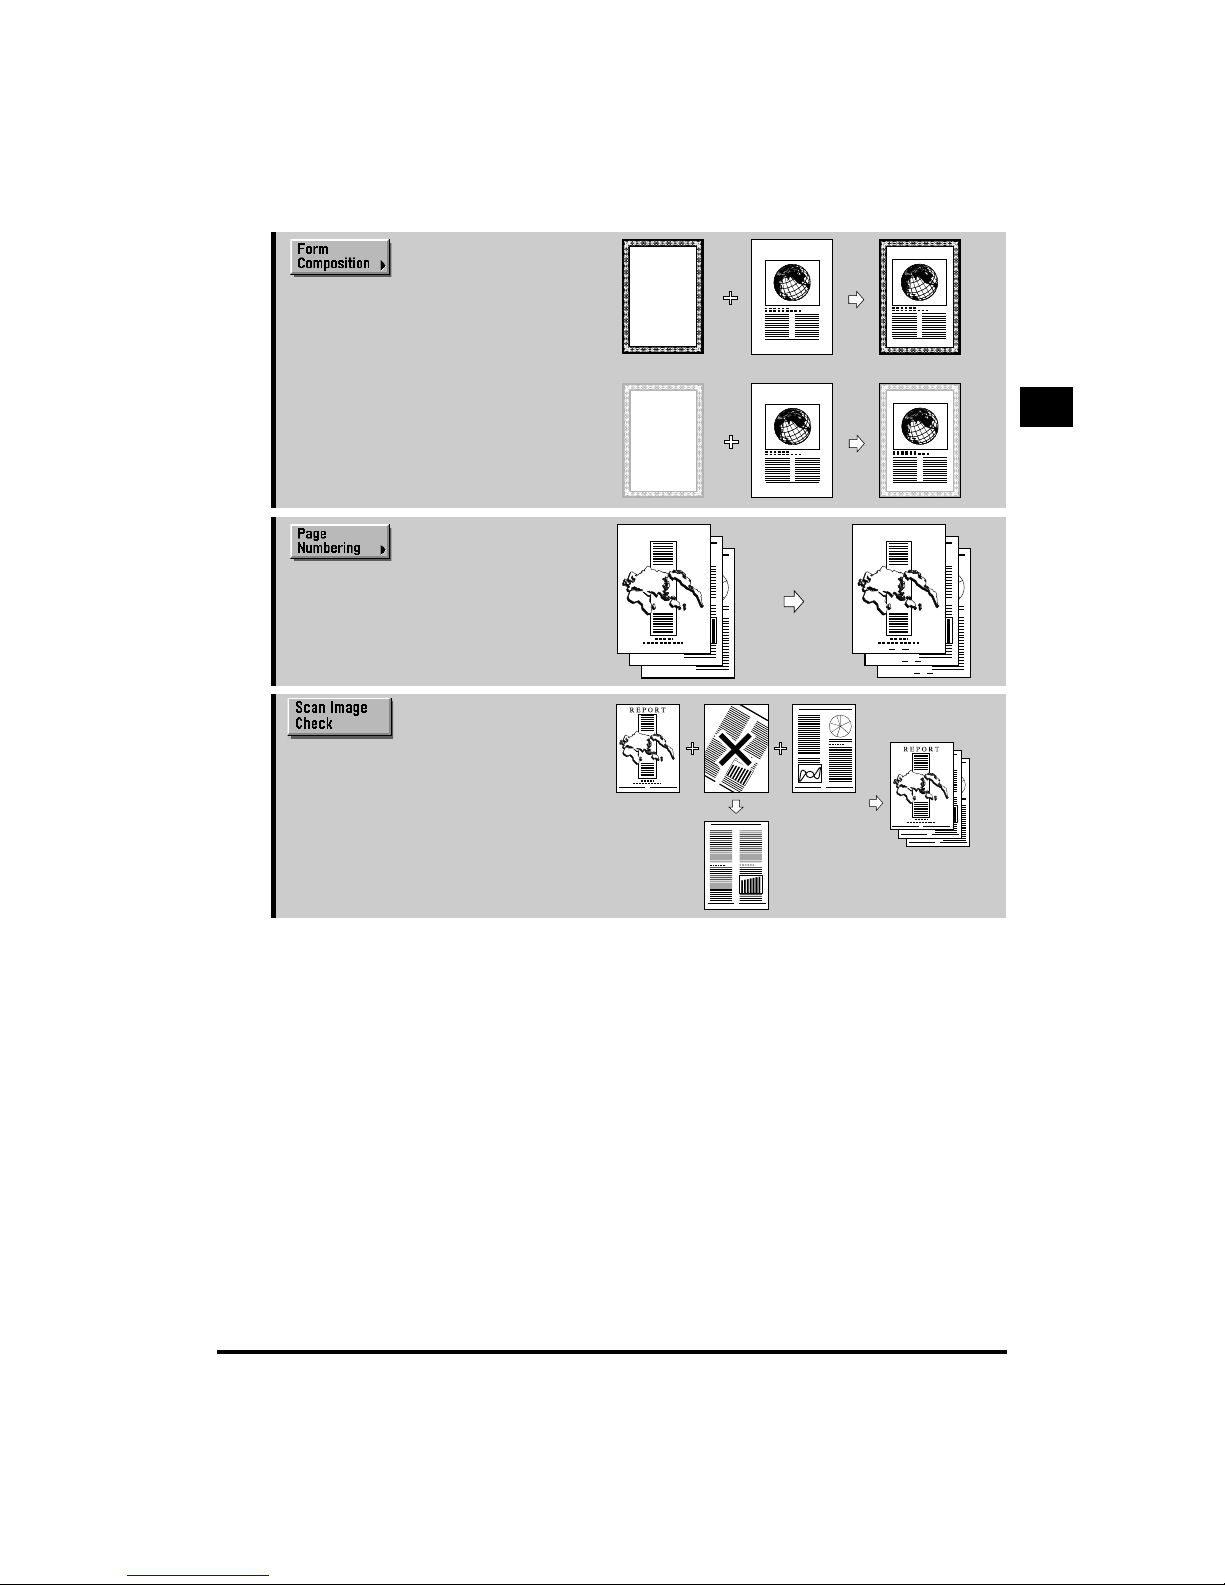
Composing Images (Form Composition) . . . . . . . . . . . . . . . . . . . . . . . . . . . . . . . . . . . . 2-73
Making Copies with Page Numbers (Page Numbering) . . . . . . . . . . . . . . . . . . . . . . . . . 2-77
Copying While Verifying Scanned Images (Scan Image Check). . . . . . . . . . . . . . . . . . 2-81
Chapter 3 Setting/Storing Specifications of the Copy Function
Copy Settings Table . . . . . . . . . . . . . . . . . . . . . . . . . . . . . . . . . . . . . . . . . . . . . . . . . . . . . . 3-2
Setting Standard Keys . . . . . . . . . . . . . . . . . . . . . . . . . . . . . . . . . . . . . . . . . . . . . . . . . . . . 3-3
Setting Automatic Collate . . . . . . . . . . . . . . . . . . . . . . . . . . . . . . . . . . . . . . . . . . . . . . . . . . 3-5
Setting Image Orientation Priority . . . . . . . . . . . . . . . . . . . . . . . . . . . . . . . . . . . . . . . . . . . 3-6
Setting the Job Duration Display . . . . . . . . . . . . . . . . . . . . . . . . . . . . . . . . . . . . . . . . . . . . 3-7
Setting Auto Orientation . . . . . . . . . . . . . . . . . . . . . . . . . . . . . . . . . . . . . . . . . . . . . . . . . . . 3-8
Setting the Photo Mode for the Copy Function . . . . . . . . . . . . . . . . . . . . . . . . . . . . . . . . 3-9
Changing the Current Standard Settings . . . . . . . . . . . . . . . . . . . . . . . . . . . . . . . . . . . . 3-10
Storing New Standard Settings for Copying . . . . . . . . . . . . . . . . . . . . . . . . . . . . . . . . . 3-10
Initializing the Standard Settings. . . . . . . . . . . . . . . . . . . . . . . . . . . . . . . . . . . . . . . . . . 3-12
Specifying the Remote Copy Printer Settings . . . . . . . . . . . . . . . . . . . . . . . . . . . . . . . . 3-14
Registering a Remote Copy Printer . . . . . . . . . . . . . . . . . . . . . . . . . . . . . . . . . . . . . . . 3-14
Confirming a Remote Device . . . . . . . . . . . . . . . . . . . . . . . . . . . . . . . . . . . . . . . . . . . . 3-16
Deleting a Remote Device . . . . . . . . . . . . . . . . . . . . . . . . . . . . . . . . . . . . . . . . . . . . . . 3-17
Setting the Remote Device Transmission Timeout . . . . . . . . . . . . . . . . . . . . . . . . . . . . 3-19
Restoring Settings to Their Default Copy Settings . . . . . . . . . . . . . . . . . . . . . . . . . . . . 3-20
Chapter 4 Appendix
Available Combination of Functions Chart . . . . . . . . . . . . . . . . . . . . . . . . . . . . . . . . . . . . 4-2
Index . . . . . . . . . . . . . . . . . . . . . . . . . . . . . . . . . . . . . . . . . . . . . . . . . . . . . . . . . . . . . . . . . . . 4-6
How to Use This Manual
vii
How to Use This Manual
Symbols Used in This Manual
The following symbols are used in this manual to explain procedures, restrictions, and handling
cautions. The manual also contains instructions that should be observed for safety.
Keys Used in This Manual
The symbols and key names used in this manual are expressed in the following way:
•
Control Panel Keys....................... <Key icon>
Example:
•
Touch Panel display Keys ............[Key Name]
Example: [Cancel]
[Done]
WARNING
Indicates a warning concerning operations that may lead to death or
injury to persons if not performed correctly. In order to use the machine
safely, always pay attention to these warnings.
CAUTION
Indicates a caution concerning operations that may lead to injury to
persons, or damage to property if not performed correctly. In order to use
the machine safely, always pay attention to these cautions.
IMPORTANT
Indicates operational warnings and restrictions. Be certain to read these
items carefully in order to operate the machine correctly, and to avoid
damage to the machine.
NOTE
Indicates a clarification of operations or additional explanations for a
procedure. Reading these notes is highly recommended.
How to Use This Manual
viii
Displays Used in This Manual
Screenshots of the touch panel display used in this manual are those taken when the optional the
Saddle Finisher-F2 and Puncher Unit-A1 are attached to the iR6020i. Note that functions that
cannot be used depending on the model or options are not displayed on the touch panel display.
The keys which you should press are marked with , as shown below in this manual. When
multiple keys are pressed on the touch panel display, all keys are marked. Select the keys which
suit your needs.
Illustrations Used in This Manual
Illustrations used in this manual are those taken when the Saddle Finisher-F2 is attached to
the iR6020i.
Example:
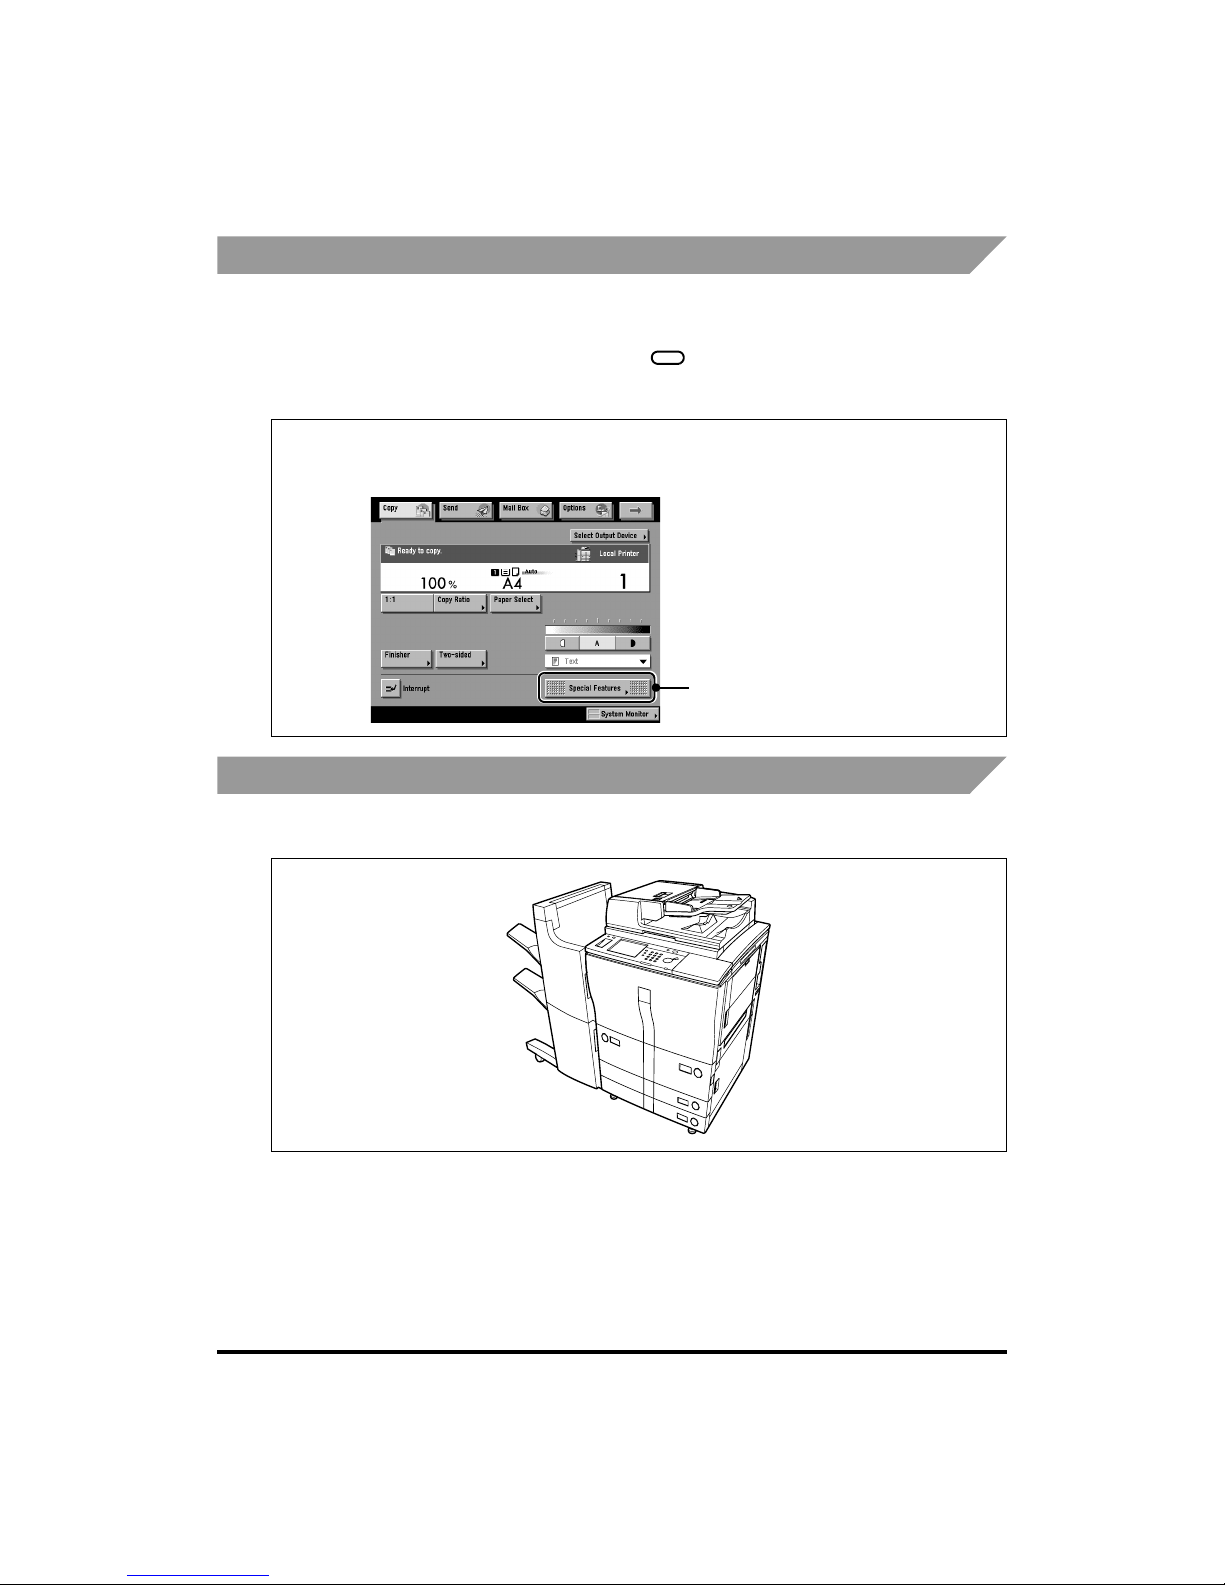
Place your original, and press [Special Features].
1
Press this key for operation

About Trademarks
ix
About Trademarks
Canon, the Canon logo, and iR are trademarks of Canon Inc.
Ethernet is a trademark of Xerox Corporation, Inc.
Other product and company names herein may be the trademarks of their respective owners.
Copyright 2003 by Canon Inc. All rights reserved.
No part of this publication may be reproduced or transmitted in any form or by any means,
electronic or mechanical, including photocopying and recording, or by any information storage or
retrieval system without the prior written permission of Canon Inc.

About Trademarks
x

CHAPTER
1-1
1
Basic Copying
This chapter describes basic copy functions.
What the iR6020i/iR5020i and iR5020N Can Do . . . . . . . . . . . . . . . . . . . . . . . . . . . . . . . . . . . . . . . . . . . .1-3
Various Kinds of Copies. . . . . . . . . . . . . . . . . . . . . . . . . . . . . . . . . . . . . . . . . . . . . . . . . . . . . . . . . . . . . 1-3
Flow of Copy Operations . . . . . . . . . . . . . . . . . . . . . . . . . . . . . . . . . . . . . . . . . . . . . . . . . . . . . . . . . . . . . 1-10
Entering the Copy Quantity . . . . . . . . . . . . . . . . . . . . . . . . . . . . . . . . . . . . . . . . . . . . . . . . . . . . . . . . . . . 1-17
Specifying the Required Number of Copies . . . . . . . . . . . . . . . . . . . . . . . . . . . . . . . . . . . . . . . . . . . . .1-17
Changing the Copy Quantity . . . . . . . . . . . . . . . . . . . . . . . . . . . . . . . . . . . . . . . . . . . . . . . . . . . . . . . . 1-18
Selecting an Output Device (Select Output Device) . . . . . . . . . . . . . . . . . . . . . . . . . . . . . . . . . . . . . . . 1-19
Selecting a Printing Destination; Giving Priority to the Copy Mode . . . . . . . . . . . . . . . . . . . . . . . . . . . 1-21
Specifying Output Device Priority. . . . . . . . . . . . . . . . . . . . . . . . . . . . . . . . . . . . . . . . . . . . . . . . . . . . . 1-23
Selecting the Copy Paper Size (Paper Select) . . . . . . . . . . . . . . . . . . . . . . . . . . . . . . . . . . . . . . . . . . . . 1-26
Automatic Paper Selection (Auto Paper Selection) . . . . . . . . . . . . . . . . . . . . . . . . . . . . . . . . . . . . . . . 1-27
Manual Paper Selection . . . . . . . . . . . . . . . . . . . . . . . . . . . . . . . . . . . . . . . . . . . . . . . . . . . . . . . . . . . . 1-29
Adjusting Exposure and Image Quality (Copy Exposure) . . . . . . . . . . . . . . . . . . . . . . . . . . . . . . . . . . 1-32
Adjusting Copy Exposure. . . . . . . . . . . . . . . . . . . . . . . . . . . . . . . . . . . . . . . . . . . . . . . . . . . . . . . . . . . 1-32
Selecting Image Quality . . . . . . . . . . . . . . . . . . . . . . . . . . . . . . . . . . . . . . . . . . . . . . . . . . . . . . . . . . . . 1-33
Automatic Adjustment of Exposure and Image Quality . . . . . . . . . . . . . . . . . . . . . . . . . . . . . . . . . . . . 1-36
Changing the Exposure During Printing. . . . . . . . . . . . . . . . . . . . . . . . . . . . . . . . . . . . . . . . . . . . . . . . 1-37
Changing the Copy Ratio (Copy Ratio) . . . . . . . . . . . . . . . . . . . . . . . . . . . . . . . . . . . . . . . . . . . . . . . . . 1-38
Enlarging/Reducing Originals to a Standard Size (Preset Zoom) . . . . . . . . . . . . . . . . . . . . . . . . . . . . 1-38
Specifying the Copy Ratio by Percentage (Zoom Designation) . . . . . . . . . . . . . . . . . . . . . . . . . . . . . . 1-41
Automatically Setting the Copy Ratio Based on the Original and Copy Paper Sizes (Auto) . . . . . . . . 1-43
Slightly Reducing Images to Prevent the Original Periphery from Being Trimmed (Entire Image) . . . 1-45
Calculating the Copy Ratio Based on the Original and Copy Paper Sizes (Zoom Program). . . . . . . . 1-47
Enlarging/Reducing Originals with Copy Ratios Set Independently for X and Y Axes (XY Zoom) . . . 1-52
Collating Copies (Finisher) . . . . . . . . . . . . . . . . . . . . . . . . . . . . . . . . . . . . . . . . . . . . . . . . . . . . . . . . . . . 1-56
Collating Copies into Sets in Page Order (Collate) . . . . . . . . . . . . . . . . . . . . . . . . . . . . . . . . . . . . . . .1-60
Collating Copies into Groups of the Same Page (Group) . . . . . . . . . . . . . . . . . . . . . . . . . . . . . . . . . . 1-63
Collating Pages and Stapling (Staple) . . . . . . . . . . . . . . . . . . . . . . . . . . . . . . . . . . . . . . . . . . . . . . . . . 1-66
Two-Sided Copying (Two-sided). . . . . . . . . . . . . . . . . . . . . . . . . . . . . . . . . . . . . . . . . . . . . . . . . . . . . . . 1-69
Making Two-sided Copies from One-sided Originals (1 2-Sided) . . . . . . . . . . . . . . . . . . . . . . . . . . . 1-70
Making Two-sided Copies from Two-sided Originals (2 2-Sided) . . . . . . . . . . . . . . . . . . . . . . . . . . . 1-73
Making One-sided Copies from Two-sided Originals (2 1-Sided) . . . . . . . . . . . . . . . . . . . . . . . . . . . 1-76
Making Two-sided Copies from Facing Pages in a Book (Book 2-Sided) . . . . . . . . . . . . . . . . . . . . . 1-79

1. Basic Copying
1-2
Basic Copying
1
Reserved Copying . . . . . . . . . . . . . . . . . . . . . . . . . . . . . . . . . . . . . . . . . . . . . . . . . . . . . . . . . . . . . . . . . . 1-82
Making a Copy Reservation While the Machine Is Warming Up (Auto Start) . . . . . . . . . . . . . . . . . . . 1-82
Reserving a Copy Operation During Printing . . . . . . . . . . . . . . . . . . . . . . . . . . . . . . . . . . . . . . . . . . . .1-84
Interrupting the Current Job to Make Priority Copies (Interrupt Mode) . . . . . . . . . . . . . . . . . . . . . . . 1-86
Checking a Sample Set Before Copying (Sample Set) . . . . . . . . . . . . . . . . . . . . . . . . . . . . . . . . . . . . . 1-88
Checking the Copy Mode Settings (Setting Confirmation) . . . . . . . . . . . . . . . . . . . . . . . . . . . . . . . . . 1-91
Changing or Cancelling a Selected Copy Mode (Setting Confirmation/Cancel) . . . . . . . . . . . . . . . . 1-92
What the iR6020i/iR5020i and iR5020N Can Do
1-3
Basic Copying
1
What the iR6020i/iR5020i and iR5020N
Can Do
Most operations for using this machine are done from the touch panel display. To use the copy
function of this machine, press keys in accordance with the messages displayed on the touch panel
display.
IMPORTANT
•
You can only use the Send function with the iR6020i/iR5020i.
Various Kinds of Copies
Basic Features Screen
The screen displayed on the left appears when
the machine is ready to make copies.
This is called the Basic Features screen.
→
p. 1-19
Press to select the printing destination for remote copying.
→
p. 1-26
Press to select the paper size and type, and the paper source.
→
p. 1-38
Press to make copies at a different copy
(zoom) ratio.
1
What the iR6020i/iR5020i and iR5020N Can Do
1-4
Basic Copying
1
→
p. 1-56
• When you select [Collate (Page order)].
Press to select or cancel the Collate,
Group, or Staple Collate modes.
→
p. 1-69
• When you select [1 2-Sided].
Press to select or cancel the Two-sided
mode. You can copy one-sided/two-sided
originals and facing pages of an original,
such as a book, on both the front and back
sides of the paper. You may also make
one-sided copies from a two-sided original.
→
p. 1-32
Press [ ] or [ ] to manually control the
copy exposure. Press [A] to select or cancel
Auto Exposure Control.
→
p. 1-33
Press to copy originals specifying the image
quality (text only, text and photo, and photo
only). You can also, select the type of photo
(printed image/photo) when you set the
photo mode from the Additional Functions
screen.
→
p. 1-86
Press to interrupt a continuous copy job when you need to make priority copies.
→
Chapter 2
Press to select the Special Features mode.
→
The Reference Guide
Press to check the progress of a copy job, change the order of printing, or cancel printing.
1
2
3
4
REPORT
1
REPORT
1
REPORT
1
REPORT
1
REPORT
SCENE
SCENESCENE
The world’s coral reefs, where
brilliantly colored fish and a
myriad of other tropical creatures
come together. Aptly nicknamed
“Tropical Forests under the sea”,
these spots of breathtaking
beauty serve as home to
countless varieties of life, and to
us of the land, this alluring,
dream-like world forms a tropical
paradise filled with romance.
The world’s coral reefs, where
brilliantly colored fish and a
myriad of other tropical creatures
come together.
1
What the iR6020i/iR5020i and iR5020N Can Do
1-5
Basic Copying
1
Special Features Screen 1/2
When you press [Special Features] on the Basic
Features screen, the Special Features screen
appears on the touch panel display. This screen
is divided into two screens. Pressing [▼] or [▲]
displays the next/previous screen. The Special
Features screen displays special functions
available for copying. In some cases, when a
function is selected, a more detailed screen for
the selected mode appears. To close the Special
Features screen and return to the Basic Features
screen, press [Done].
Pressing after selecting a function brings up a
help screen containing guidance information. This
is useful when you want to learn more about a
function.
→
p. 2-3
Press to select or cancel the Two-page
Separation mode. This mode enables you
to copy two pages of an opened book onto
separate copy sheets.
→
p. 2-5
• When you select [Front Cover].
Press to add covers, sheet insertions or
chapter pages between specified pages.
→
p. 2-11
Press to make copies of several originals to
form a booklet.
?
11
REPORT REPORT
6
5
4
3
4
3
2
1
3
8
7
6
5
8
7
2
1
6
8
1
1
What the iR6020i/iR5020i and iR5020N Can Do
1-6
Basic Copying
1
→
p. 2-16
Press to select or cancel the Transparency
Interleaving mode. This mode enables you
to insert a sheet between each
transparency when copying transparencies.
→
p. 2-20
• When you select [Center/Corner Shift].
Press to select or cancel the Shift mode.
This mode enables you to shift the position
of the original image on the copy sheet.
→
p. 2-24
Press to select or cancel the Margin mode.
This mode enables you to create margins
along the sides of copies.
→
p. 2-27
• When you select [Original Frame Erase].
Press to select or cancel the Frame Erase
mode. This mode enables you to eliminate
dark borders and lines that appear around
original images, or shadows from punched
holes.
3
→
p. 2-36
• When you select [2 On 1].
Press to select or cancel the Image
Combination mode. This mode enables you
to automatically reduce two, four, or eight
originals to fit on a one-sided or two-sided
copy sheet.
REPORT
REPORT
REPORT
Transparency
Interleaf
Sheet
Copy with original image
shifted to the corner
C
opy with original image
shifted to the centre
Original Frame Erase
Mode
Original Frame Erase
Mode Not Selected
2
1
1
2

1
What the iR6020i/iR5020i and iR5020N Can Do
1-7
Basic Copying
1
→
p. 2-42
• When you select [1 To 2].
Press to select or cancel the Image
Separation mode. This mode enables you
to divide an original into 2 or 4 sections, and
enlarge each section onto a copy sheet of a
specified size.
→
p. 2-47
Press to make copies by feeding
different-sized originals together as one
group by setting them in the feeder.
→
p. 2-49
Press to divide the originals into several
parts, scan them, and subsequently print
them all together. This is convenient when
you cannot load all of the originals to be
copied all at once.
→
p. 2-53
Press to notify the user through e-mail that the copy job has been completed.
Special Features Screen 2/2
The screen displayed shows the second half of the
Special Features screen.
2
1
1
2
CITY
CITY
CITY
Original Feeding
Direction
A3 Original
A4 Original
1
What the iR6020i/iR5020i and iR5020N Can Do
1-8
Basic Copying
1
→
p. 2-55
Press to store or recall copy settings.
→
p. 2-63
Press to recall a previously set copy job.
→
p. 2-65
Press to make copies with the entire
black/white image inverted.
→
p. 2-66
Press to copy an original with the image
repeated in the vertical or horizontal
direction.
→
p. 2-69
Press to copy an original with the image
reversed, as in a reflection in a mirror.
→
p. 2-71
Press to select or cancel the Sharpness
mode. This mode enables you to make
copies of original images reproduced with a
sharper or a softer contrast.
SCENE SCENE
CITY
CITY
CITY
1
What the iR6020i/iR5020i and iR5020N Can Do
1-9
Basic Copying
1
→
p. 2-73
Press to superimpose an image stored in
memory onto the original image for copying.
→
p. 2-77
Press to include page numbering on copies.
→
p. 2-81
Press to confirm scanned images page by
page before copying when you scan
originals on the platen glass.
REPORT REPORT
1
2
3
1
2
3
3
1
2
2
Rescan

Flow of Copy Operations
1-10
Basic Copying
1
Flow of Copy Operations
This section describes the flow of basic copy operations.
NOTE
•
For the following items, see the Reference Guide:
- Main Power and Control Panel Power (See “Chapter 1 Before You Start Using This Machine” in the
Reference Guide.)
- Routine Maintenance (See “Chapter 5 Routine Maintenance” in the Reference Guide.)
1
Press [Copy].
If the message <You must insert a control card.> appears, insert a Control Card into the Card Slot.
(See “Chapter 7 Handling Optional Equipment” in the Reference Guide.)
1
Flow of Copy Operations
1-11
Basic Copying
1
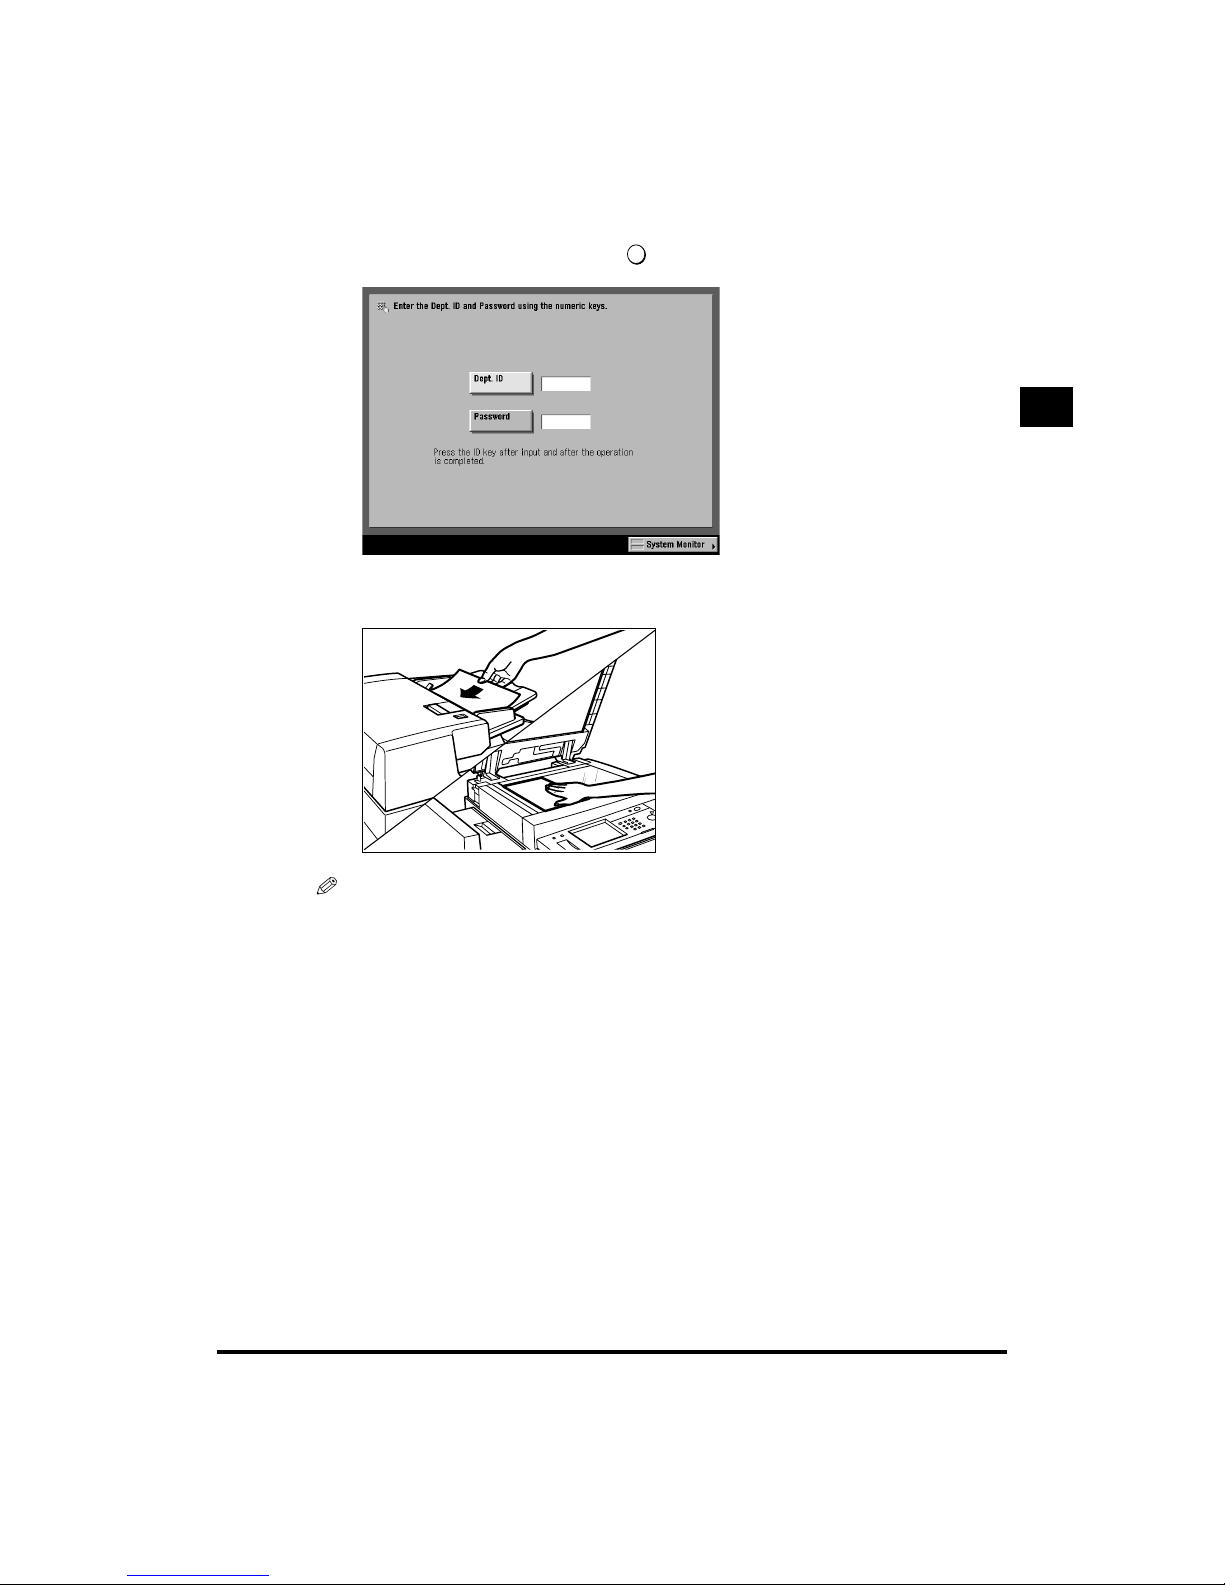
If the message <Enter the Dept. ID and Password using the numeric keys.> appears, enter the
Department ID and password, and press . (See “Chapter 1 Before You Start Using This
Machine” in the Reference Guide.)
2
Place your originals.
NOTE
•
For instructions on placing originals, see “Chapter 1 Before You Start Using This Machine” in the
Reference Guide.
•
When <Auto Collate> is set to <On>, the Collate mode or the Offset Collate mode is
automatically set when the original is placed in the feeder. (See “Setting Automatic Collate”,
on p. 3-5.)
ID
1
Flow of Copy Operations
1-12
Basic Copying
1
3
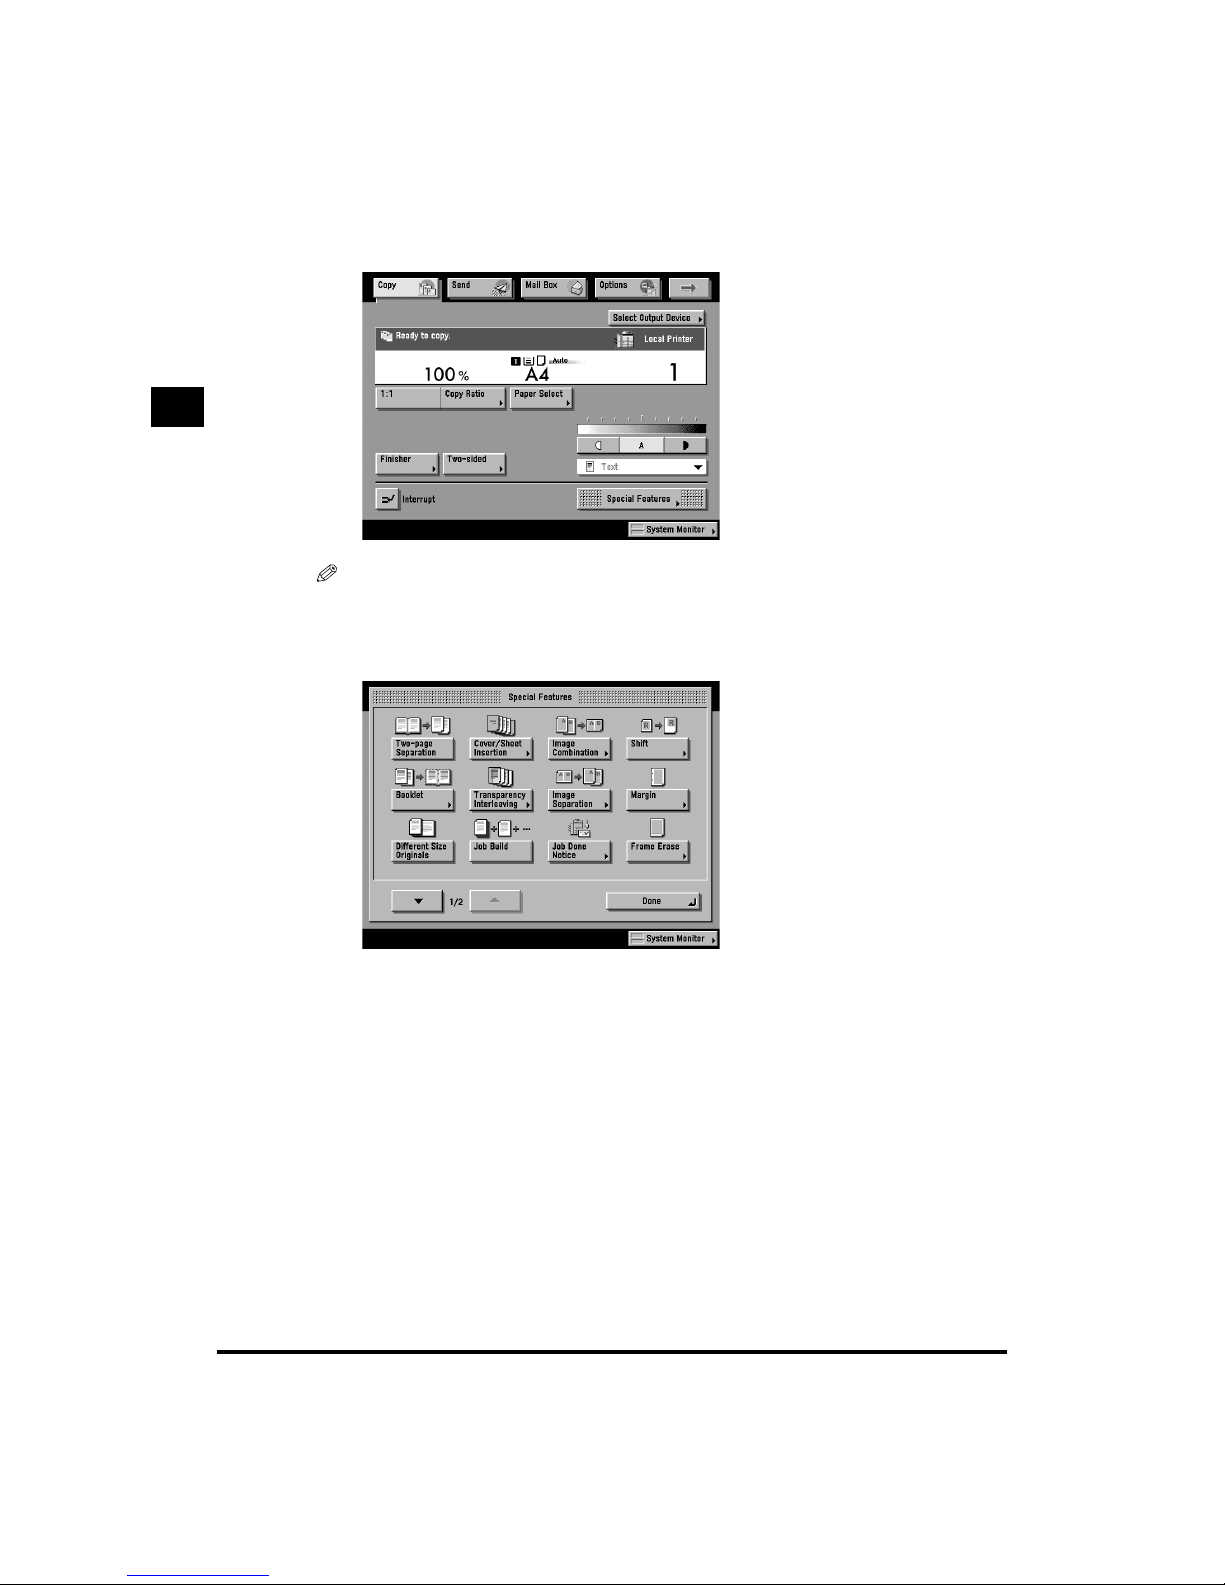
Set the copy mode on the Basic Features screen.
NOTE
•
For example, you can select the copy paper size; set exposure, image quality, copy ratio, and
two-sided mode; and select the desired collating function and remote copy printers.
4
Set the copy mode on the Special Features screen.
The Special Features screen is divided into two screens. Press [▼] or [▲] to select the desired mode.
You can continue setting other available modes. (See Chapter 2 “Additional Copy Functions”.)
1
Flow of Copy Operations
1-13
Basic Copying
1
5
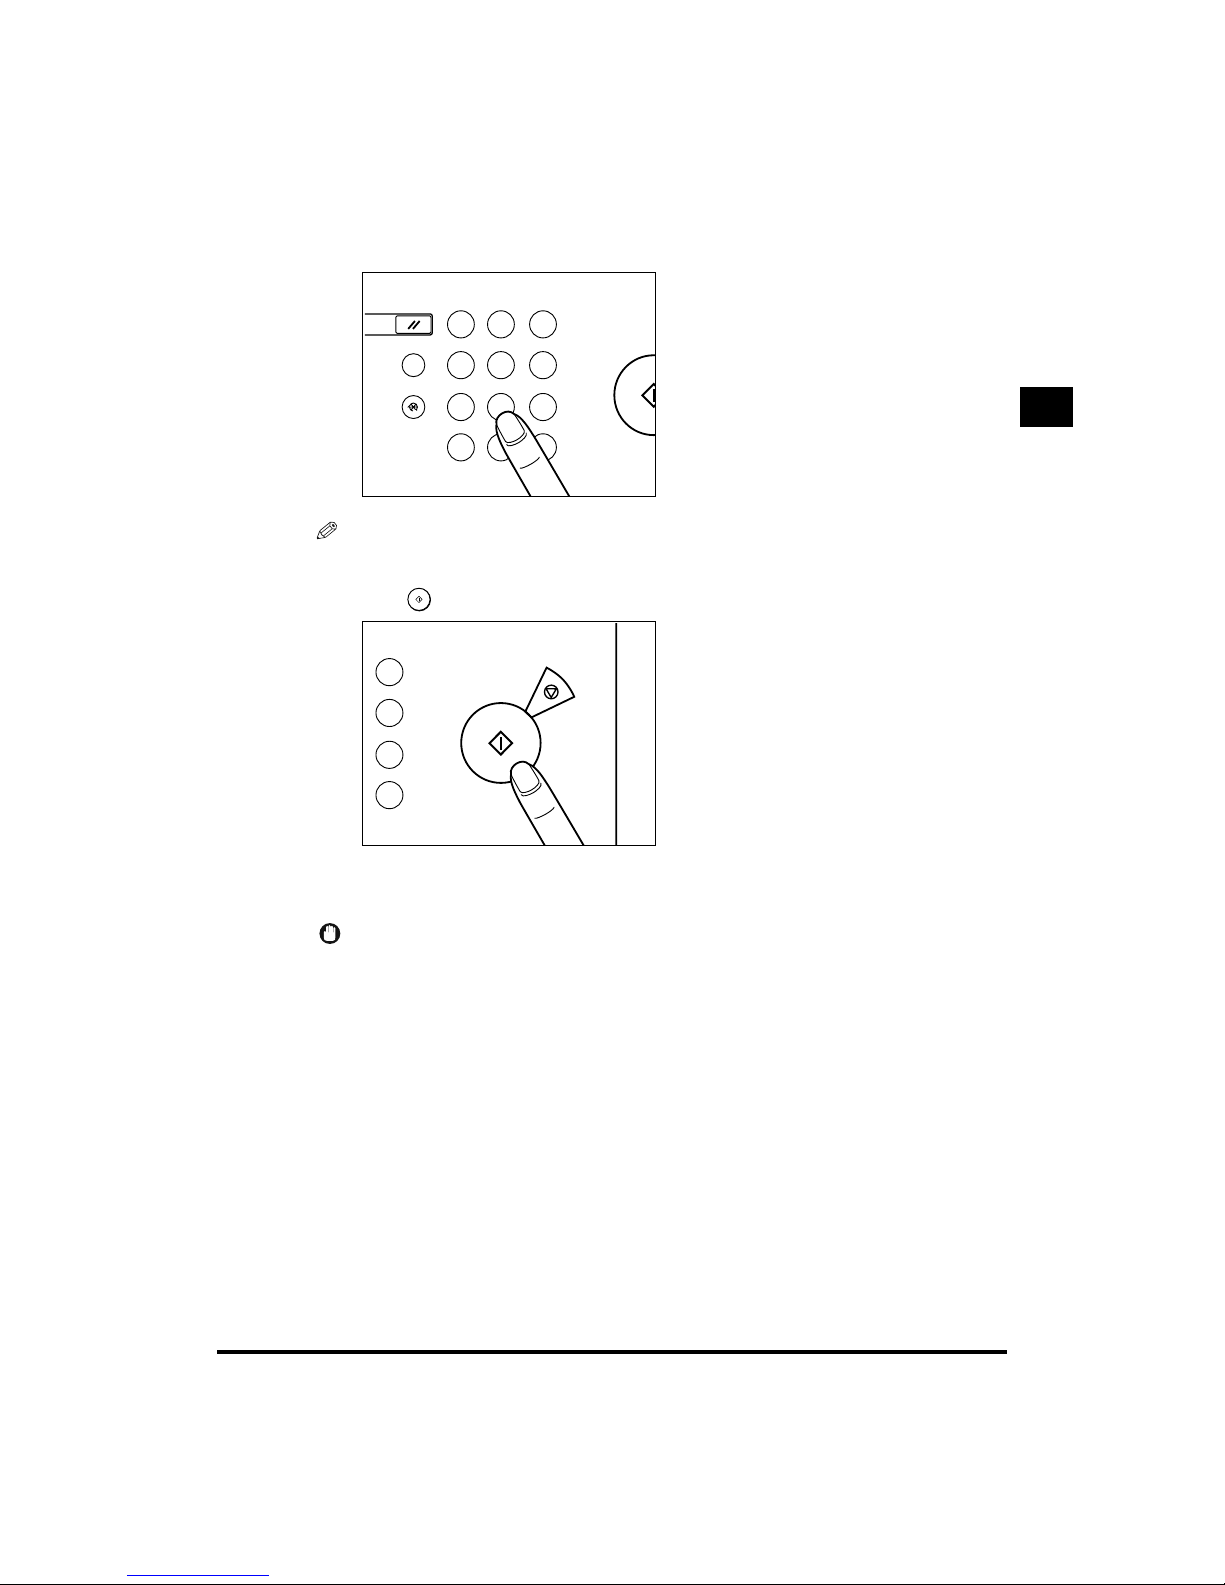
Enter the copy quantity.
NOTE
•
For instructions on setting the number of copies, see “Entering the Copy Quantity”, on p. 1-17.
6
Press .
Copying starts.
When scanning is complete, remove the original.
IMPORTANT
•
You cannot change copy mode settings such as the copy quantity, copy paper size, and copy
ratio during copying.
1 2 3
4 5 6
7 8
0
ID
9
C
?
Start
Reset
Guide
Additional Functions
Clear
3
6
9
C
Start
Stop
Clear
1
Flow of Copy Operations
1-14
Basic Copying
1
NOTE
•
If there is a current job, the machine scans the original, and waits to print it. Printing starts when
the current job is complete.
•
When the copy has been made, remove it from the output tray.
•
If the Card Reader-C1 (optional) is attached, remove the Control Card. (See “Chapter 7 Handling
Optional Equipment” in the Reference Guide.)
•
If you have set up Department ID Management, press . (See “Chapter 1 Before You Start
Using This Machine” in the Reference Guide.)
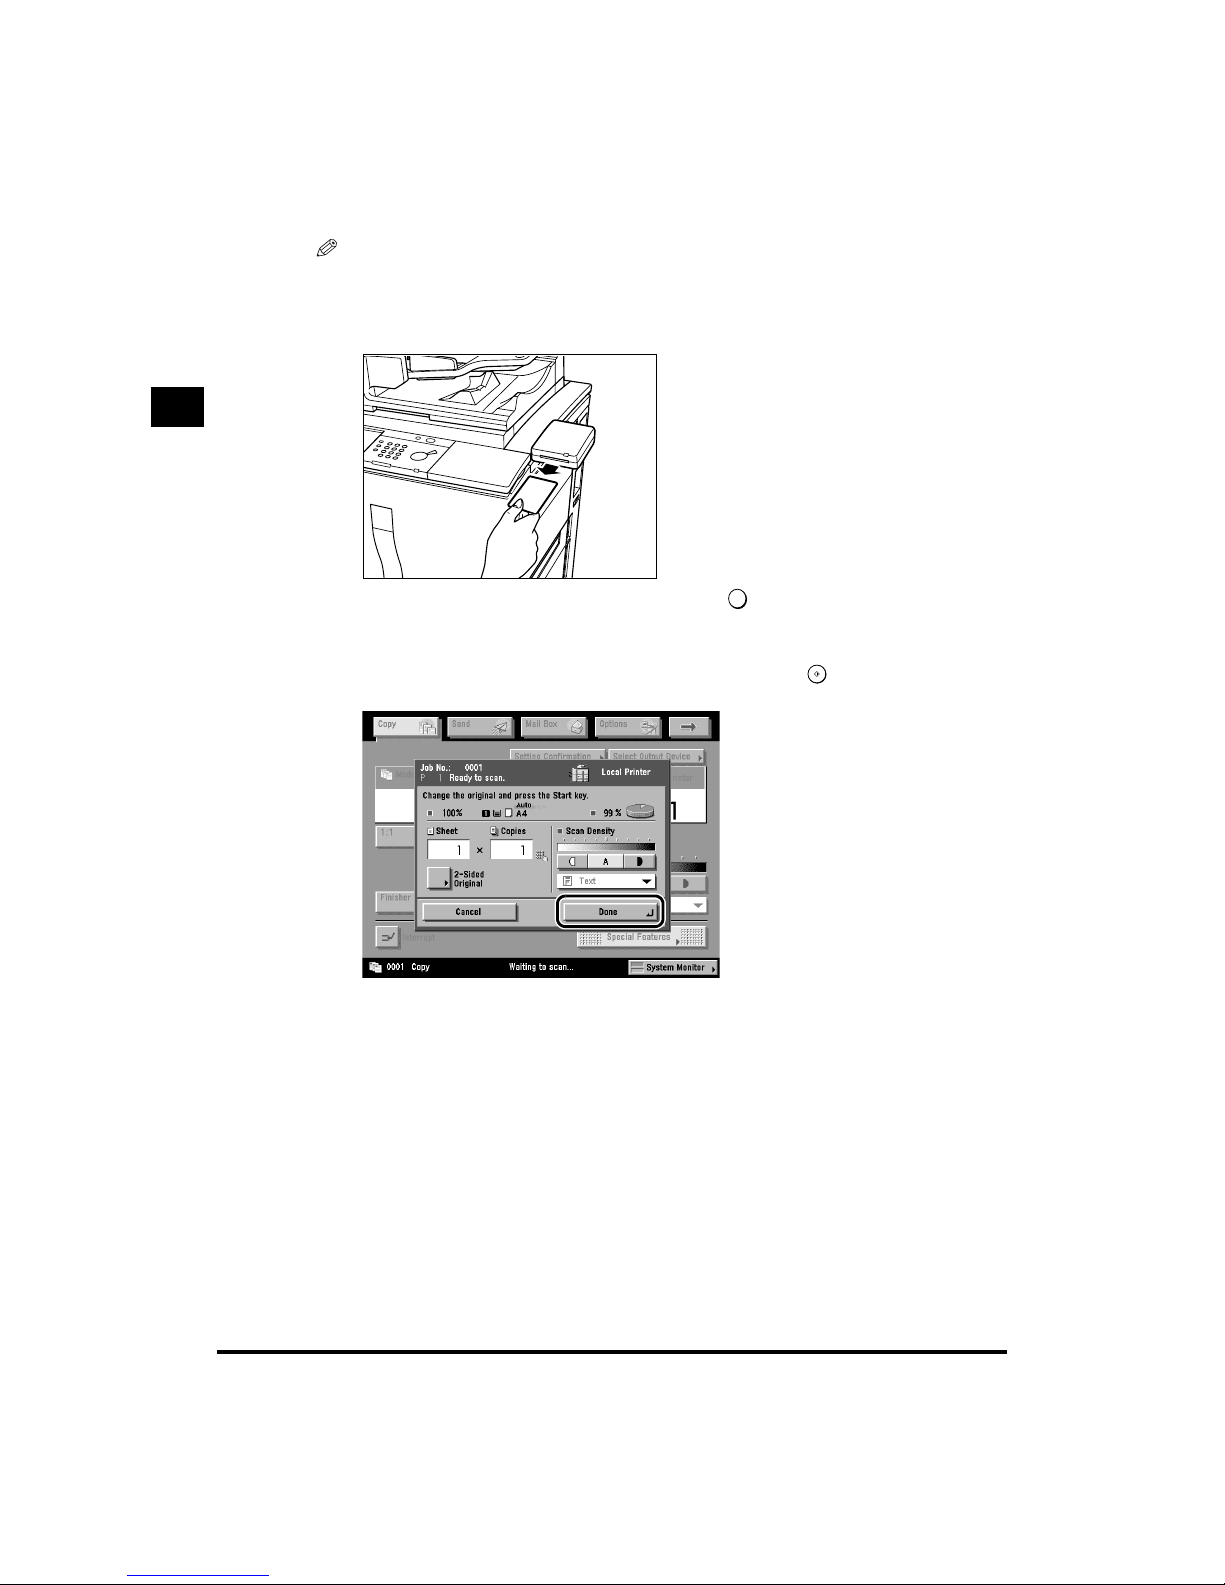
● If the following screen is displayed:
Follow the instructions on the touch panel display, and press one time for each
original. When scanning is complete, press [Done].
ID
1
Flow of Copy Operations
1-15
Basic Copying
1
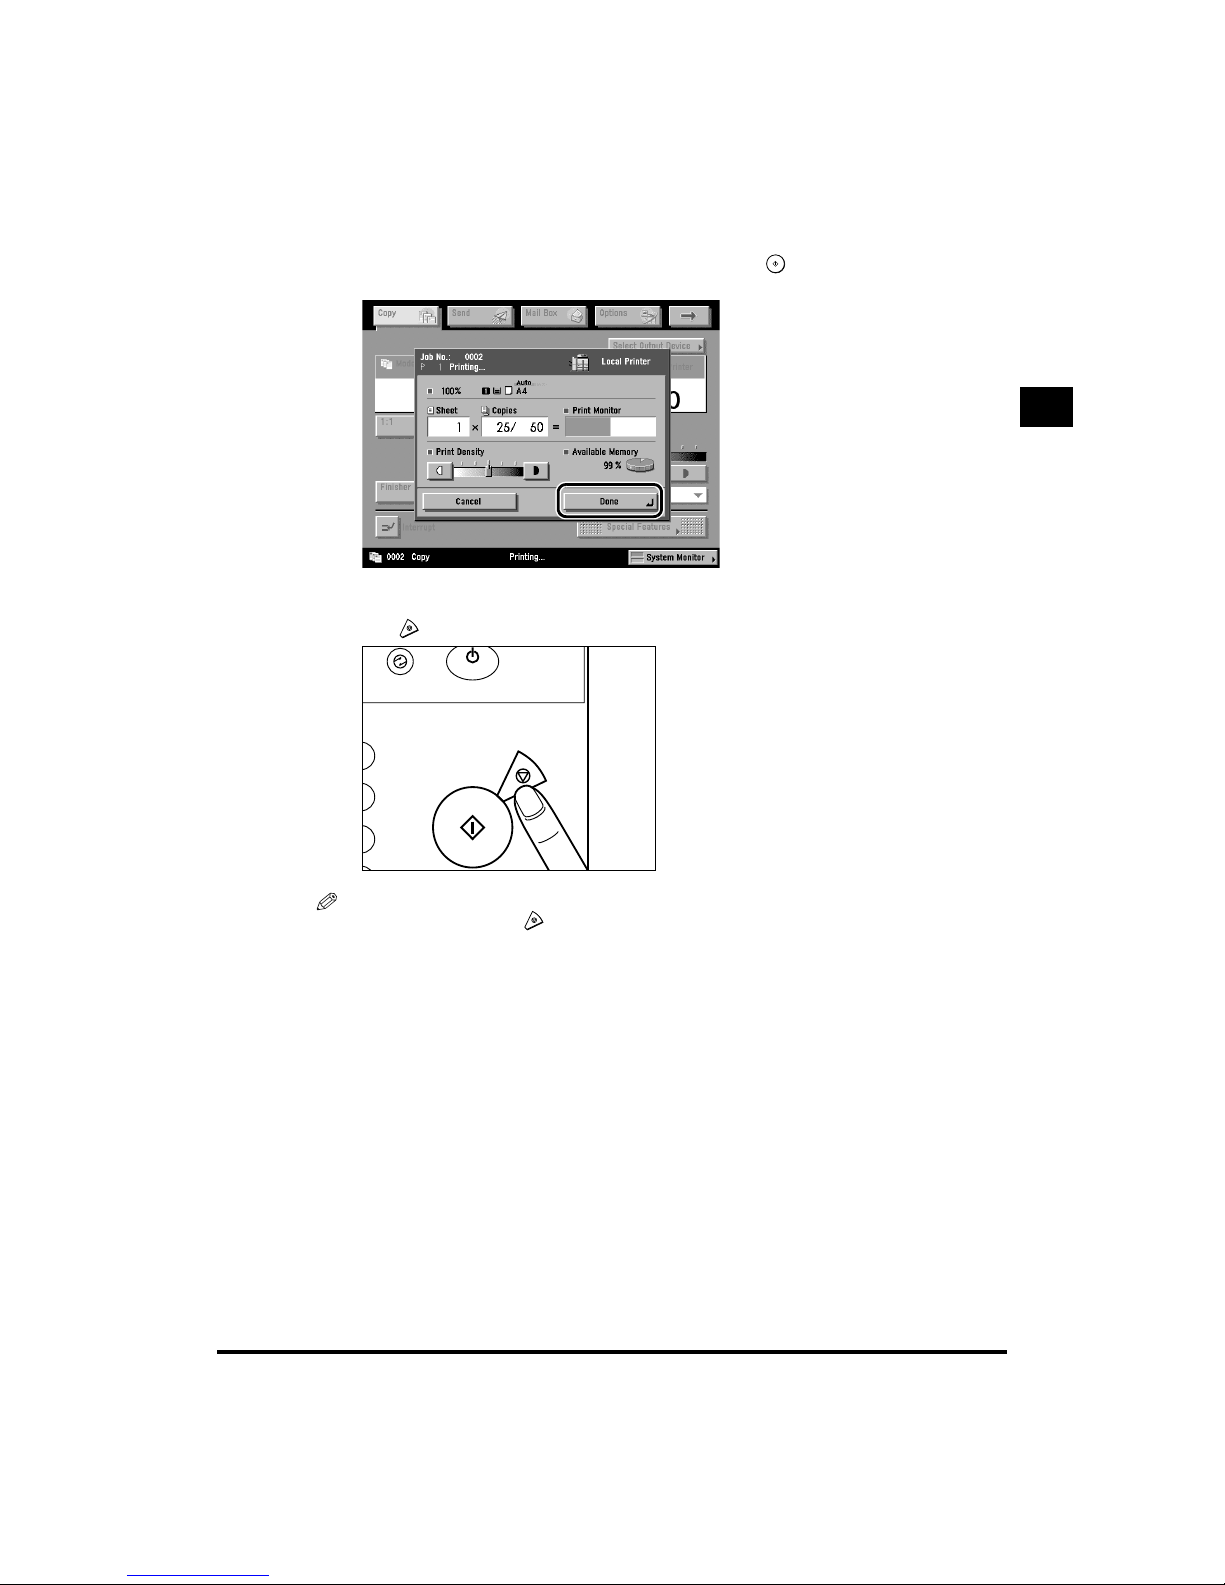
● When you want to copy a different original while printing:
Press [Done], and place the new originals. Then, press . (See “Reserved Copying”,
on p. 1-82.)
● When you want to stop a copy job:
Press .
NOTE
•
After you have pressed , several copies may have been output from the machine.
•
For instructions on how to cancel a copy job, see “Chapter 2 Checking Various Job Operations
and Device Status” in the Reference Guide.
•
You can also stop a copy job on the System Monitor screen. (See “Chapter 2 Checking Various
Job Operations and Device Status” in the Reference Guide.)
ON / OFF
Start
Stop
ar

1
Flow of Copy Operations
1-16
Basic Copying
1
● When you want to interrupt a copy job:
To interrupt a copy job when you need to make priority copies, press [Interrupt].
(See “Interrupting the Current Job to Make Priority Copies (Interrupt Mode)”, on p. 1-86.)
Entering the Copy Quantity
1-17
Basic Copying
1
Entering the Copy Quantity
You can make up to 999 copies for each copy job. However, this maximum number of copies can
also be changed. For details, contact your service representative.
Specifying the Required Number of Copies
1
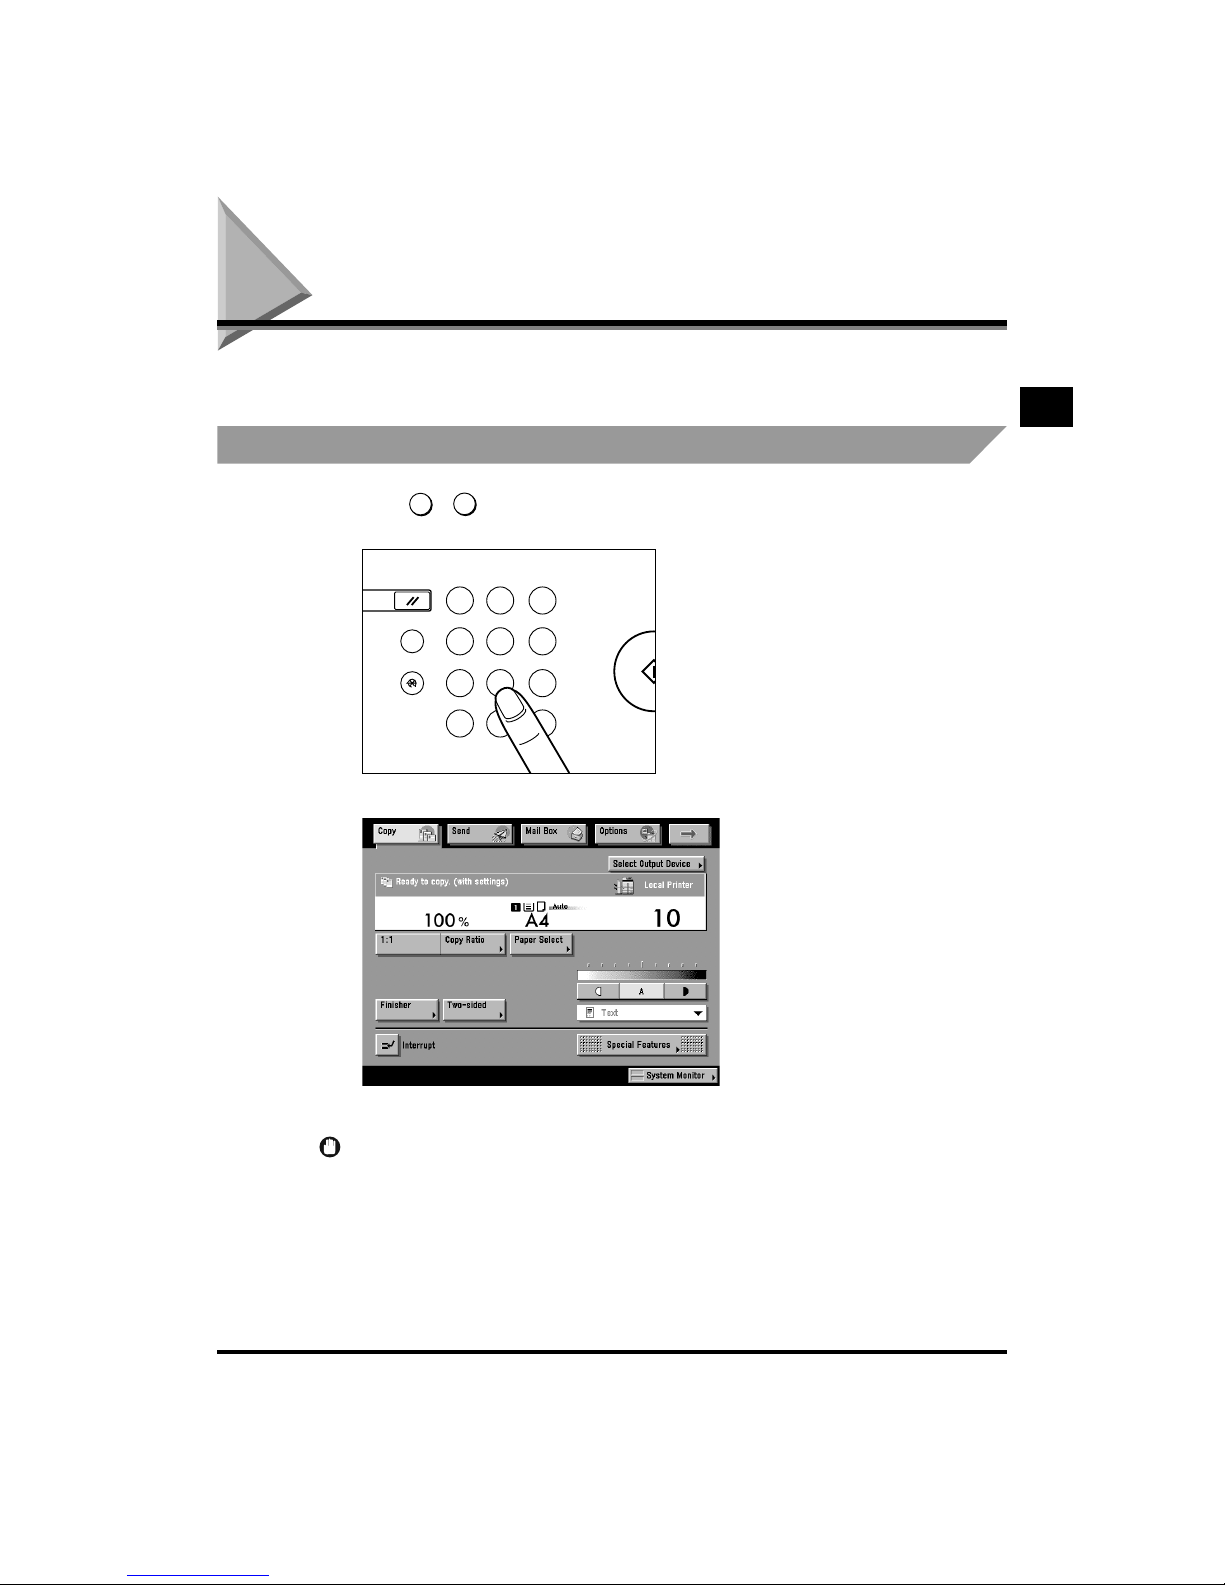
Press - (numeric keys) to enter the desired copy quantity
(1 to 999).
The copy quantity appears in the upper right side of the touch panel display.
The maximum amount of copies allowed, varies according to the copy job settings.
IMPORTANT
•
You cannot change the copy quantity during copying.
0
9
1 2 3
4 5 6
7 8
0
ID
9
C
?
Start
Reset
Guide
Additional Functions
Clear
1
Entering the Copy Quantity
1-18
Basic Copying
1
Changing the Copy Quantity
1
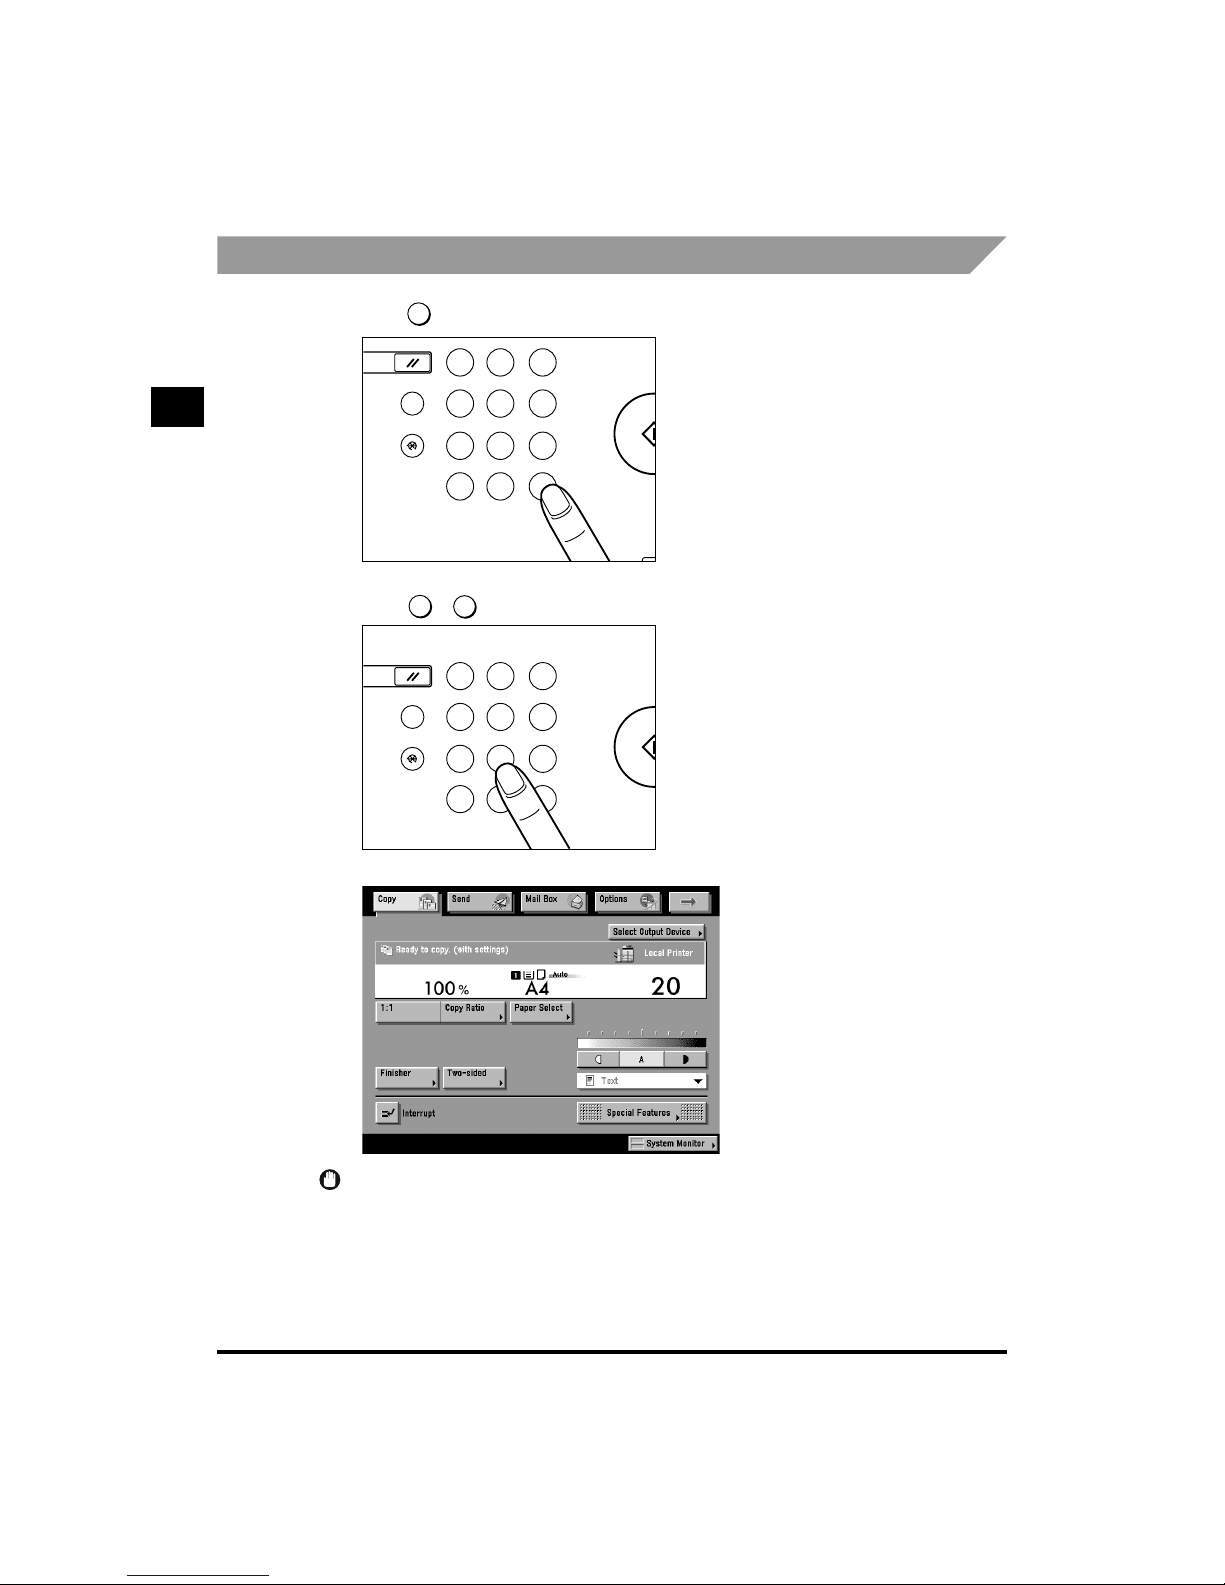
Press to clear the entered number.
2
Press - (numeric keys) to re-enter the copy quantity (1 to 999).
The copy quantity appears in the upper right side of the touch panel display.
IMPORTANT
•
You cannot change the copy quantity during copying.
C
1 2 3
4 5 6
7 8
0
ID
9
C
?
Start
Reset
Guide
Additional Functions
Processing/Data
Error
Po
w
Clear
0
9
1 2 3
4 5 6
7 8
0
ID
9
C
?
Start
Reset
Guide
Additional Functions
Clear
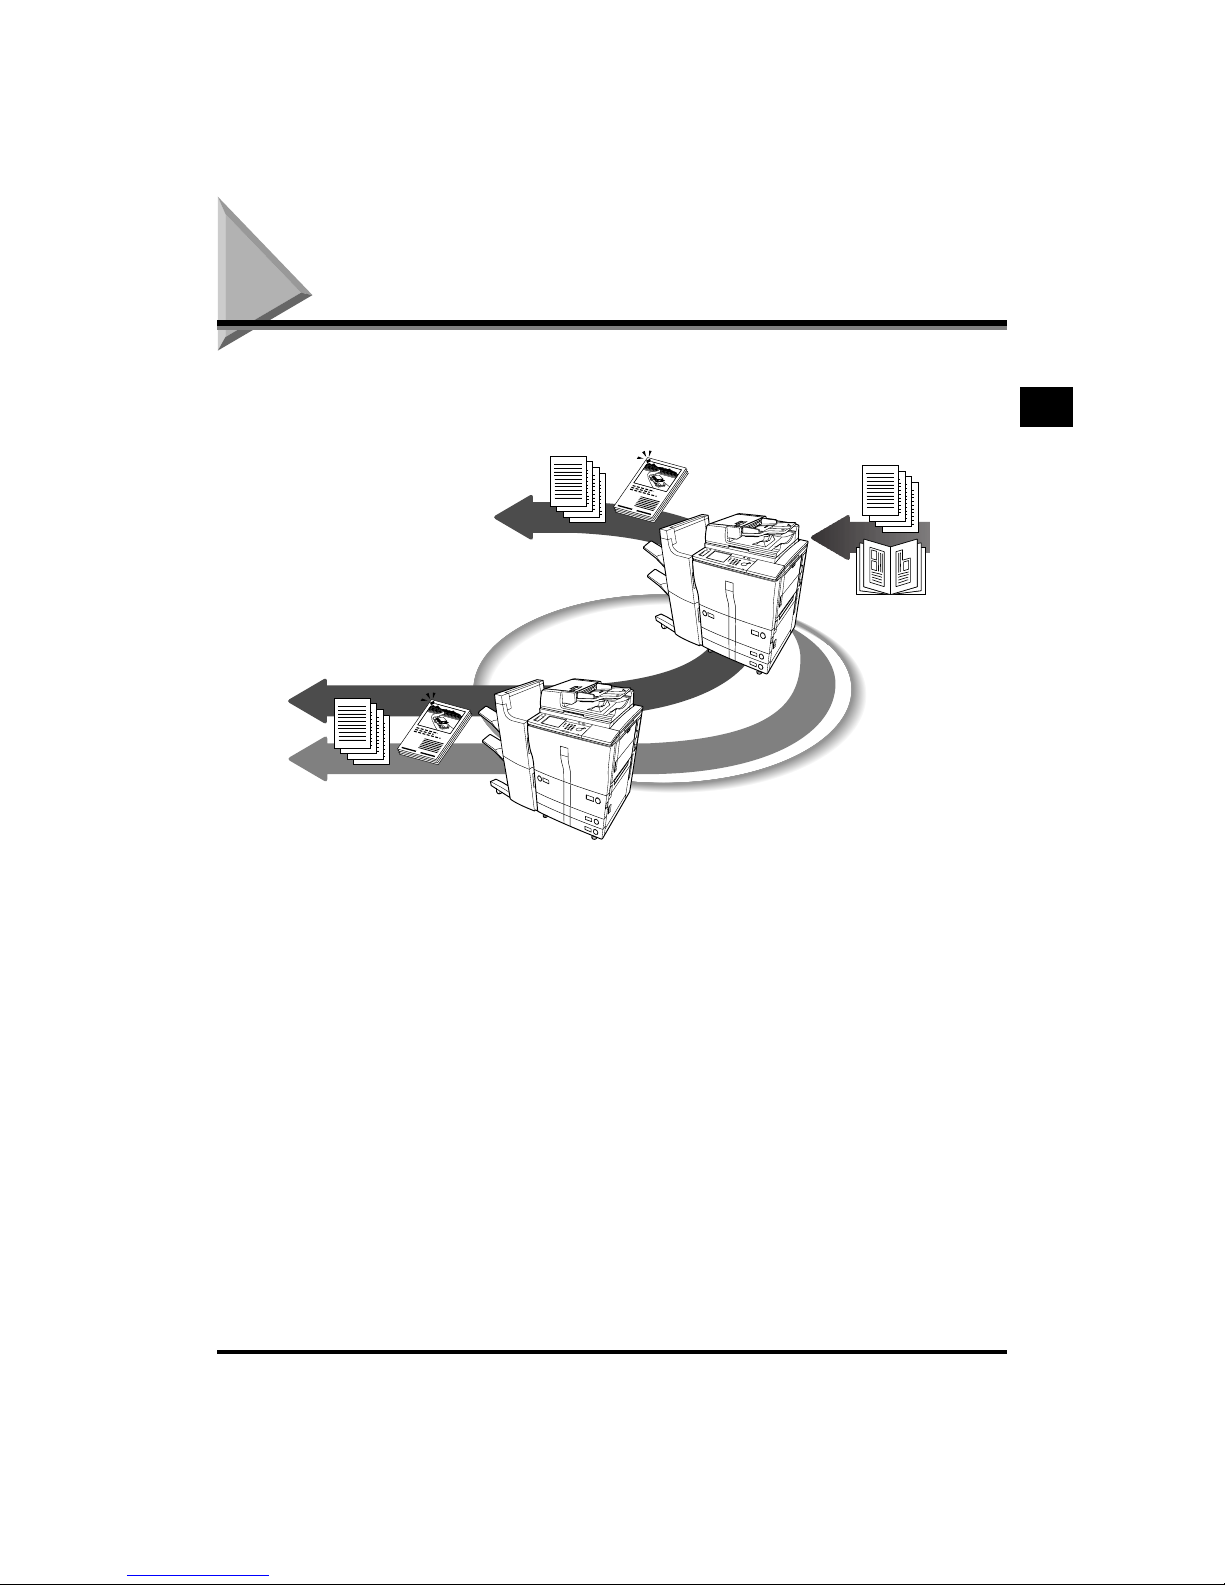
Selecting an Output Device (Select Output Device)
1-19
Basic Copying
1
Selecting an Output Device
(Select Output Device)
If a remote copy printer (iR6020i or iR5020i) is connected to a network, this machine and a remote
copy printer can be used for copying. For example, the original scanned by this machine can be
printed by the remote copy printer independently (remote copying) or simultaneously (cascade
copying).
You can select the copy settings before selecting an output device, or select the output device
before selecting the copy settings. Both of these options are described below.
■ Making the copy settings before selecting an output device:
If you set the copy mode before selecting a printing destination, only the remote copy printer
supporting the selected copy mode can be selected as the printing destination.
■ Selecting the output device before selecting the copy settings:
To select a printing destination before setting a copy mode, only the copy mode supported by
the selected remote copy printer can be selected.
1
1
Network
The Machine
(Scanning iR)
Cascade Copy
Selected iR (Printing iR)
Cascade Copy
Remote Copy

1
Selecting an Output Device (Select Output Device)
1-20
Basic Copying
1
IMPORTANT
•
You can only use remote or cascade copying with the iR6020i/iR5020i.
•
When the machine is operating in the remote or cascade copy mode, you cannot use the Rotate
Collating, Rotate Grouping, Saddle Stitch, Shift (No. Key Entry), Booklet, Transparency Interleaving,
Mirror Image, Form Composition, Scan Image Check, Page Numbering, Interrupt Copy, and Sample
Set modes.
•
If you use Cover/Sheet Insertion with the remote or cascade copy mode, Auto Orientation is not
performed.
•
If you use the Image Separation with the remote or cascade copy mode, the layout of the final page of
the original cannot be set.
•
If you power the remote copy printer back on, or re attach the Finisher, you need to refresh the settings
of the remote copy printer from the Additional Functions screen. (See “Confirming a Remote Device”,
on p. 3-16.)
•
If you connect the machine directly to other remote copy printers by crossover patch cord, you need to
configure the Ethernet driver as shown below. (See “Chapter 2 Settings Common to the Network
Protocols” in the Network Guide.)
- Auto Detect: Off
- Communication Mode: Full Duplex
- Ethernet Type: 100 Base-TX
NOTE
•
In order for a device to be selected as a remote output device used for remote copying, it must be stored
in the Store Remote Device function in the Copy Settings screen. (See “Specifying the Remote Copy
Printer Settings”, on p. 3-14.)
•
For cascade copying, the Paper Select screen of this machine is displayed. Select the paper drawer on
the machine that is loaded with the same paper size as the remote copy printers.
•
To copy the original on this machine and another remote copy printer on the network at the same time
(cascade copying), the number of copies set for this machine and the number of copies set for the
remote copy printer are split in half and printed. If an odd number of copies is set, the machine you are
copying from will print one additional copy.
•
Remote and cascade copying is available on the iR6020i/iR5020i and iR6000i/iR5000i.
•
If you select a remote copy printer before performing cascade copying, you cannot select copy settings
that are not supported by the remote copy printer. Also, if the finishers attached to this machine and the
remote copy printer are different, the finisher settings can only be set to Collate and Group modes.
•
When a remote copy or a cascade copy job is in progress, it is not possible to schedule another remote
copy or cascade copy job.
•
For the selected remote copy printer, set the same Department ID and password as this machine.
(See “Chapter 4 System Manager Settings” in the Reference Guide.)
•
When one remote copy or one cascade copy job is in progress, if an error occurs in the remote copy
printer, an error message is displayed on the Job/Print monitor area of the touch panel display of this
machine and the remote copy printer.
•
If you experience any problems when using the remote or cascade copy modes on the iR6020i/iR5020i
or iR6000i/iR5000i, contact your service representative.
 Loading...