

Page 1
Large-Format Printers
Printer Operations
1
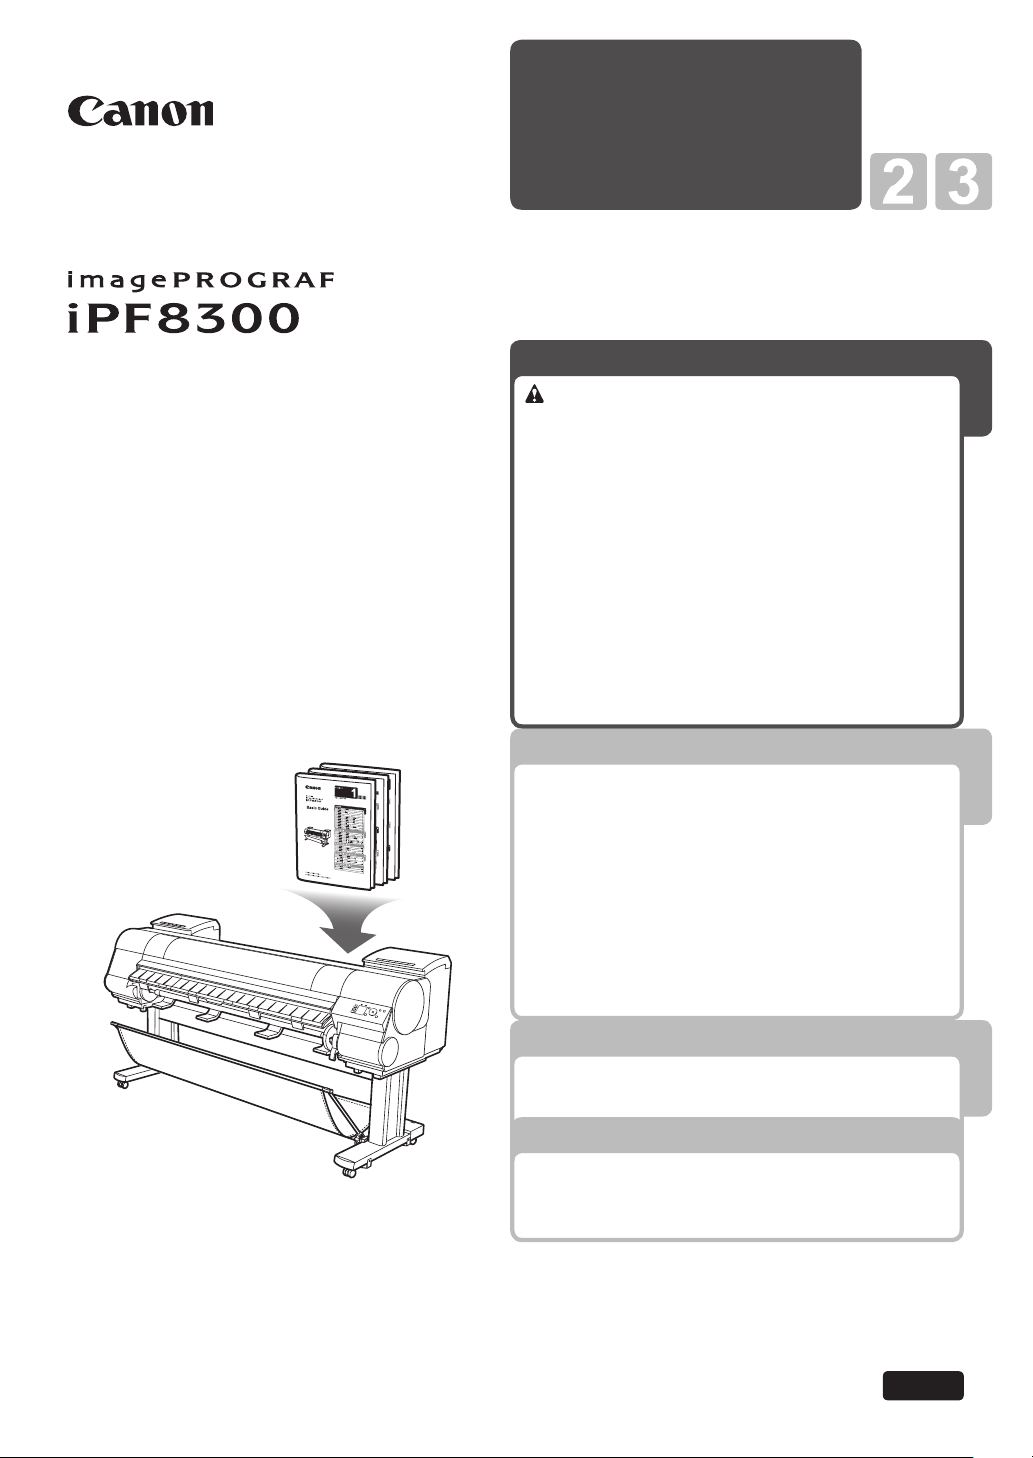
This Basic Guide includes three booklets.
Read this manual fi rst.
Basic Guide
Printer Operations
Safety Precautions ........................................2
Types of Manuals .............................................5
Documentation Conventions ............................6
Parts .................................................................8
Attaching the Roll Holder to Rolls ...................12
Loading Rolls in the Printer ............................14
Removing the Roll from the Printer ................18
Loading Sheets in the Printer .........................20
Removing Sheets ...........................................22
Consumables..................................................23
Replacing Ink Tanks .......................................24
Replacing the Maintenance Cartridge ............30
Replacing the Printhead .................................36
Menu Map.......................................................42
Troubleshooting
Troubleshooting ................................................2
If Roll Paper Jams ..........................................20
If a Sheet Jams...............................................22
If Paper is Soiled ............................................24
If Printing is Faint ............................................26
If Vertical Lines are Warped or Colors are
Misaligned ..................................................27
If Banding Occurs ...........................................29
If Line Length Does Not Match .......................31
Error Messages ..............................................33
1
2
Printer Relocation
Preparing to Transfer the Printer ......................2
Reinstalling the Printer .....................................8
Printer Driver Installation
Installing the Printer Driver (Windows) ...........12
Installing the Printer Driver (Mac OS X) .........14
Convenient Printer Driver Features ................16
Read this manual before attempting to operate the printer.
Keep this manual in a handy location for future referencing.
3
ENG
Page 2

Safety Precautions
Follow the warnings and precautions below to use the printer safely. Do not perform any operations or procedures
other than as described in this manual. Doing so may result in unexpected accidents and can cause a fi re or
electrical shocks.
Warning
█ Printer Location
Do not set up the printer in any location exposed to alcohol, thinner, or other volatile liquids. If these
•
substances come into contact with electrical components inside the printer, there is a risk of fi re or
electrical shock.
█ Power Supply
Never handle the power cable with wet hands. Doing so may cause electrical shock.•
Insert the power cable securely and completely into the power source. If the power cable is not
•
inserted completely, this could cause a fi re or electrical shock.
Do not use any power cable other than the one provided. This could cause a fi re or electrical shock.
•
Never use the power cable with any other electrical device.
Never cut the power cable or attempt to modify it, and never stretch it or bend it forcefully. Never place
•
a heavy object on the power cable. Damaged sections of the power cable could cause a short circuit
and may cause a fi re or electrical shock.
Never connect the power cable to a power strip or any power source shared by other electrical
•
devices. This could cause a fi re or electrical shock.
Never knot the power cable or wrap it around itself. This could cause a fi re or electrical shock.•
Periodically disconnect the power cable and use a dry cloth to wipe away dust that has collected on
•
the plug and the area around the power outlet. Leaving the power cable plugged in and not cleaned
for a long period, especially in an area subject to dust, oil, and humidity, could cause the insulation
material to deteriorate and lead to a fi re.
█ In an Emergency
If the printer emits smoke or strange odors, continuing to use the printer may cause a fi re or electrical
•
shock. Switch the printer off immediately and remove the power plug from the power outlet. Contact
the nearest service center.
█ Cleaning the Printer
For cleaning, use a cloth dampened in water. Never use fl ammable solvents such as alcohol,
•
benzene, or thinner. If these substances come into contact with electrical components inside the
printer, there is a risk of fi re or electrical shock.
█ Pacemakers
This printer generates a low-level magnetic fi eld. Anyone wearing a pacemaker who experiences
•
discomfort while working around the printer should leave the area. Consult a physician before
continuing to work around the printer.
2
Page 3

Caution
█ Printer Location
Never install the printer on an unstable or vibrating surface. If it falls over, this could cause personal
•
injury.
Never set up the printer in a location that is exposed to high humidity or large amounts of dust, or
•
exposed to direct sunlight, high temperature, or open fl ame. This could cause a fi re or electrical shock.
Use the printer location in an environment where temperature and humidity are within the ranges of
15°C to 30°C (59°F to 86°F) and 10 to 80% RH (with no condensation).
Never place the printer on a heavy wool or shag carpet. The fi bers may enter the printer and cause a
•
fi re.
Keep the area around the power outlet clear of items so that you can disconnect the power cable
•
immediately if the printer starts operating abnormally. In the event of a printer malfunction, remove the
power cable from the outlet as soon as possible to prevent fi re and electrical shocks.
Do not install the printer near sources of strong electromagnetic fi elds, whether equipment that
•
generates such fi elds or places where such fi elds occur. This could damage the printer or cause
malfunction.
█ Moving the Printer
The weights of main printer units are as follows:•
iPF8300: Approx. 111 kg (244.7 lb)
Moving the printer requires at least six people, holding it on both sides. Be careful to avoid back strain
•
and other injuries.
When moving the printer, fi rmly grasp the Carrying Handles under each side. The printer may be
•
unsteady if you hold it at other positions, which poses a risk of injury from dropping the printer.
Safety Precautions
█ Power Supply
Always grip the plug to remove the power cable from the power outlet. Pulling on the power cable
•
could damage the cable and lead to a fi re or electrical shock.
Never use an extension cord. This could cause a fi re or electrical shock.•
Never use any power source other than 100–120 / 220–240 V AC. This could cause a fi re or electrical
•
shock. The printer operating conditions are described below. Use the printer under the following
conditions.
Power supply voltage: 100–120 / 220–240 V AC
Power supply frequency: 50 / 60 Hz
█ Cleaning the Printer
Always disconnect the power cable from the outlet before cleaning the printer. If the printer is switched
•
on accidentally, moving parts inside the printer may cause personal injuries.
█ Printhead , Ink Tanks, and Maintenance Cartridge
Always store consumables in a safe location out of the reach of small children. If a child licks or
•
ingests ink accidentally, seek medical assistance immediately.
If ink accidentally gets in your eyes, immediately rinse with water.•
If ink gets on your skin, immediately clean it off with soap and water.
If irritation persists in your eyes or on your skin, contact a physician immediately.
Avoid dropping or shaking printheads, ink tanks, and maintenance cartridges. Spilled ink can stain
•
clothing and the work area.
Never touch the electrical contacts of the Printhead after printing. The contacts become extremely hot
•
and can cause minor burns.
3
Page 4
Safety Precautions
█ Other
•
•
•
•
•
•
Never disassemble the printer or attempt repairs. There are high voltage parts inside the printer that
can cause a fi re or electrical shock.
Never use fl ammable sprays around the printer. The gas of fl ammable sprays can cause a fi re or
electrical shock, if it contacts high voltage points inside the printer.
Never insert your hand into the printer while it is printing. Moving parts inside the printer can cause
injuries.
Never place anything on the printer such as small metal objects (paper clips, staples), liquids, any
type of liquid container that contains fl ammable liquids (alcohol, benzene, etc.). If such objects fall into
the printer, this could cause a fi re or electrical shock.
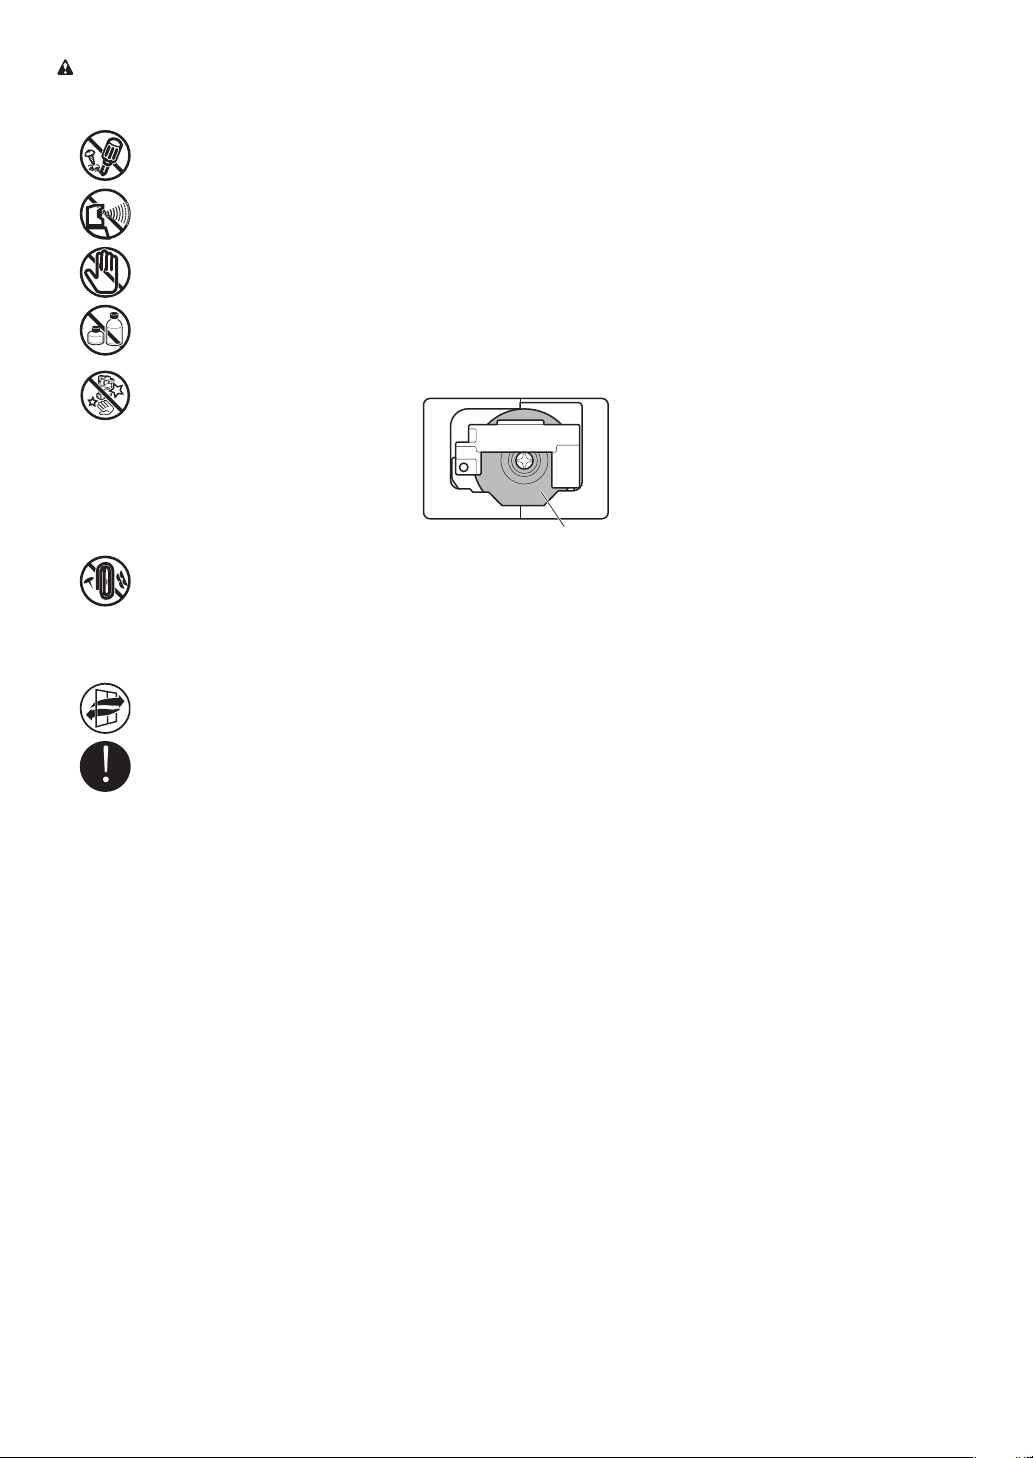
After removing the Cutter Unit , never touch the cutting edge (a). This could cause personal injury.•
a
To prevent a fi re hazard or dangerous electric shock, if a foreign object falls into or a liquid spills into
the printer, press the Power button immediately to switch the printer off, unplug the printer power cable
from the outlet, and then call for service. If you continue to use the printer, this could cause a fi re or
electrical shock.
Connect the interface cable correctly. To avoid damage, before connection make sure that the shape
of the cable connector matches the connection point on the printer.
During printing, turn on the ventilation system in the room.•
We recommend ensuring ample space for installation.•
Trademarks
Canon, the Canon logo, and imagePROGRAF are trademarks or registered trademarks of CANON INC.
Microsoft and Windows are trademarks of Microsoft Corporation, registered in the U.S. and other countries.
Macintosh is trademark of Apple Inc., registered in the U.S. and other countries.
Other company and product names in this guide are trademarks or registered trademarks of their respective
owners.
Legal Notice
It is illegal to reproduce currency, bills, negotiable securities and other documents prohibited by law. Reproduction
of such items may be subject to criminal prosecution.
It is illegal to reproduce legal certifi cates, licenses, travel tickets, and certain public and private documents
prohibited from reproduction by law. Reproduction of such items may be subject to criminal prosecution. Please
note that intellectual property protected by copyright may not be reproduced without the express permission of the
copyright holder except for personal or household use under limited circumstances.
4
Page 5
Types of Manuals
Types of manuals
Title Details
Setup Guide
Basic Guide 1 (this manual)
Printer Operations
Basic Guide 2
Troubleshooting
Basic Guide 3
Printer Relocation / Printer Driver Installation
User Manual
(electronic manual)
Paper Reference Guide
(electronic manual)
Accessing the electronic manuals
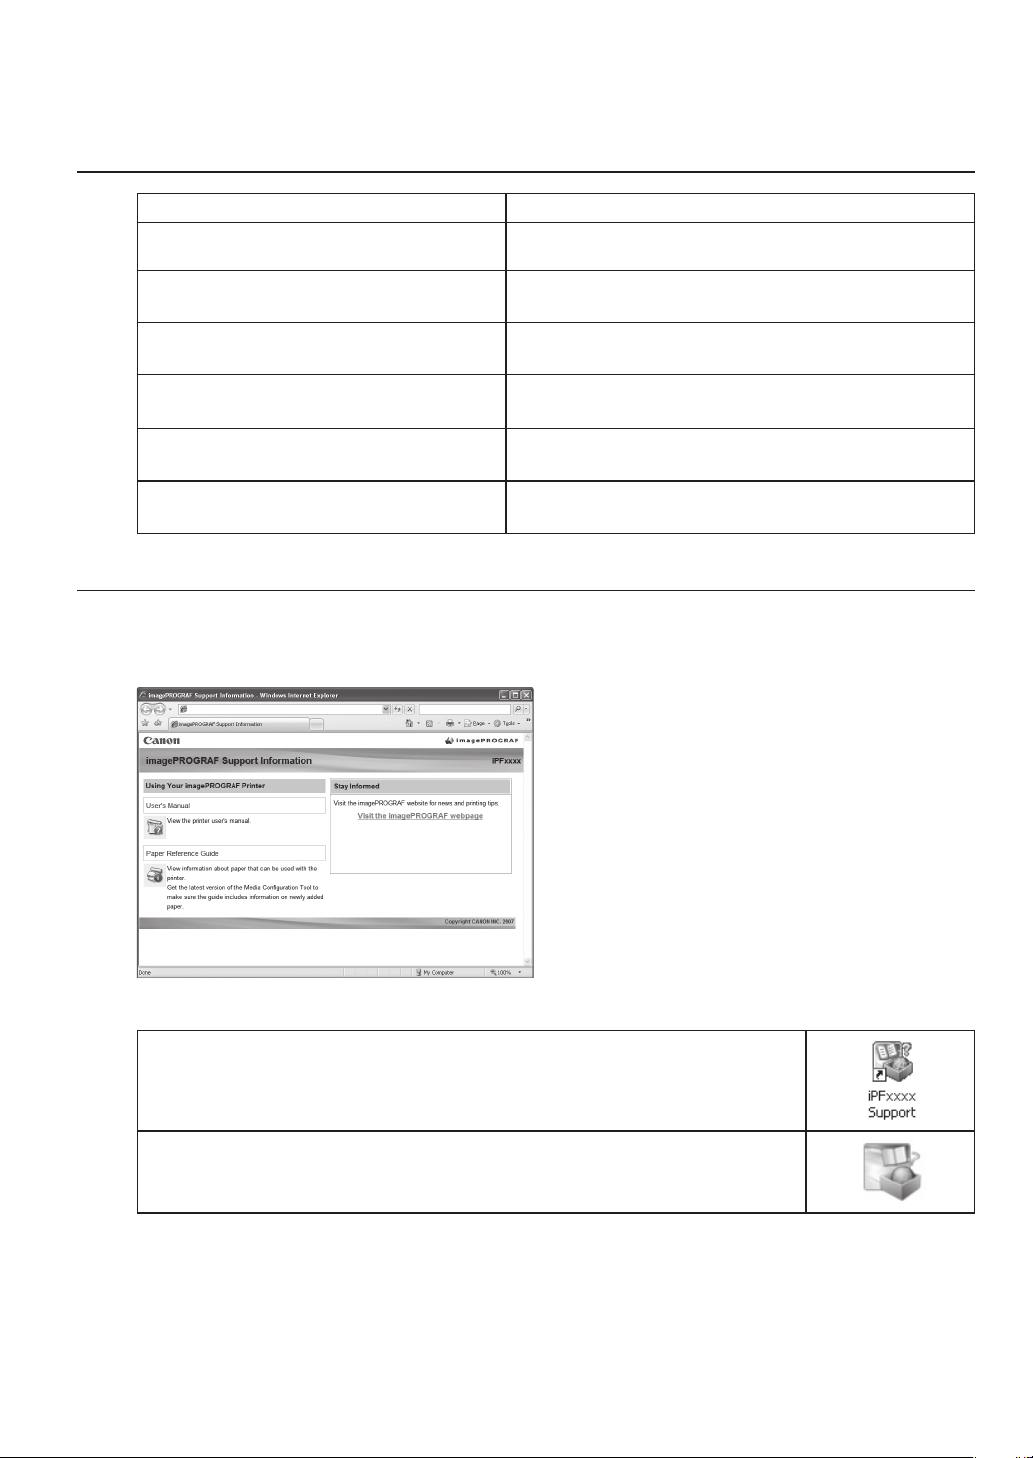
The electronic manuals are accessible from imagePROGRAF Support Information.
Besides the electronic manuals, you can also access the imagePROGRAF website from imagePROGRAF
Support Information.
Instructions for unpacking and setting up the printer, and
for installing the printer driver
Descriptions of basic printer operations
Troubleshooting tips
Instructions for preparing to relocate the printer and for
software installation
Detailed instructions for using the printer
Information on paper you can use with the printer
User Manual •
The User Manual gives detailed operating
instructions for the printer, as well as
troubleshooting tips in case of printing issues.
Paper Reference Guide •
The Paper Reference Guide identifi es the types
of paper you can use with the printer and gives
specifi cations.
Stay Informed•
Provides access to the imagePROGRAF website,
where you can fi nd news on a variety of printing
topics and tips on getting the most from your
printer.
Access imagePROGRAF Support Information as follows.
Windows
Double-click the iPFxxxx Support desktop icon. (xxxx indicates the printer
model.)
Mac OS X
Click the iPF Support icon in the Dock.
5
Page 6
Documentation Conventions
Symbols
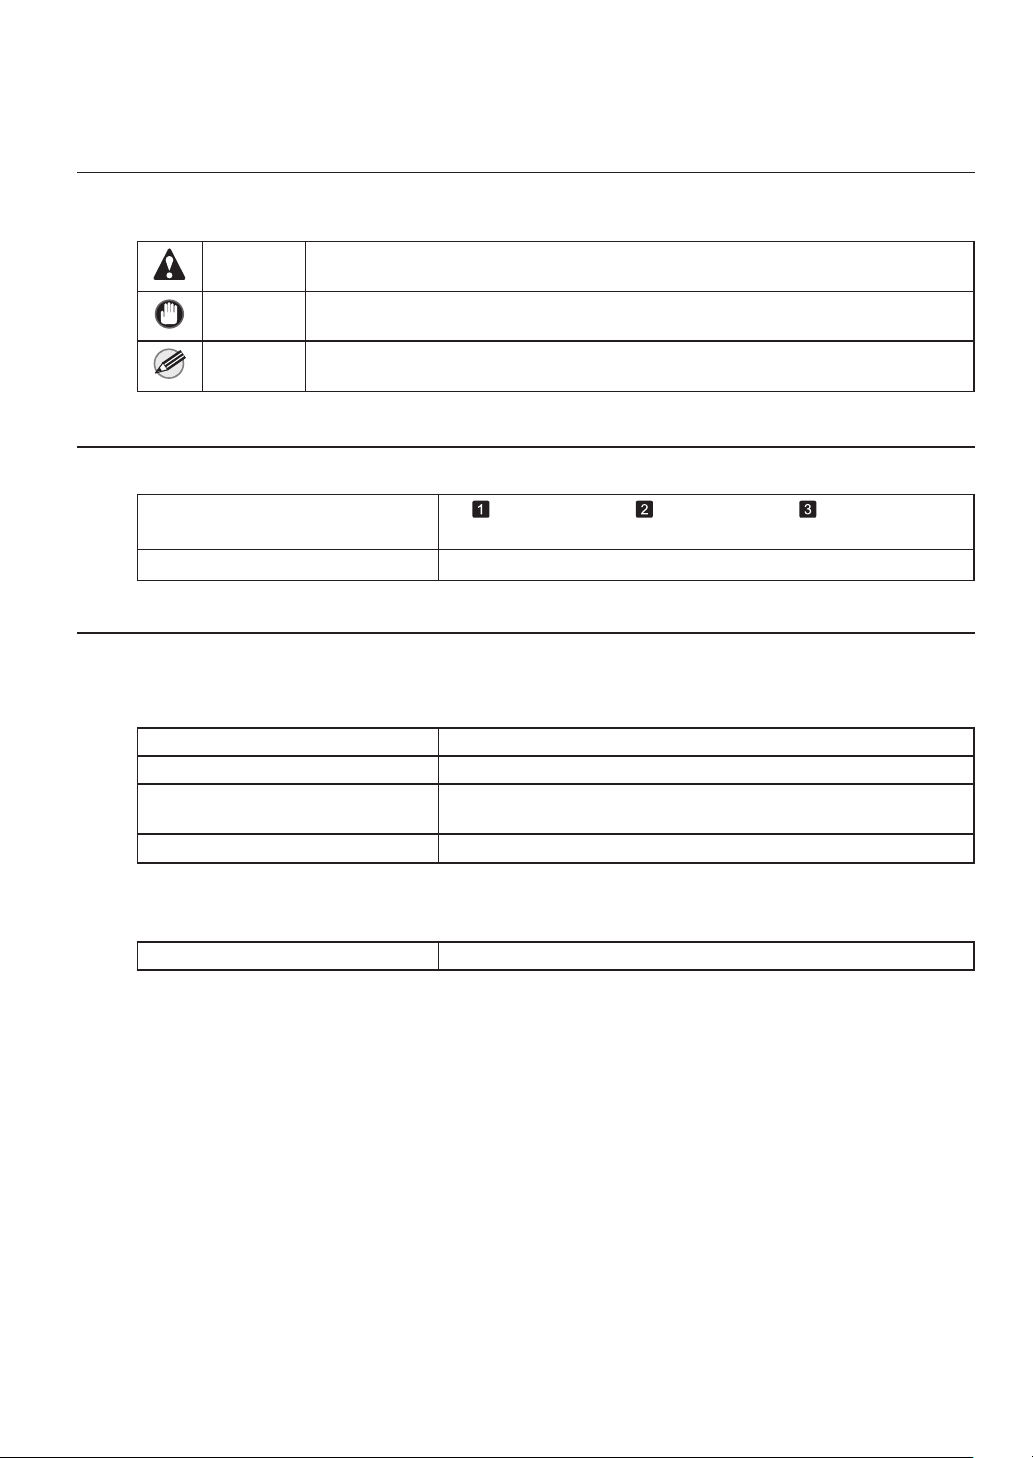
The following symbols are used in this document to indicate safety information and explanations of
restrictions or precautions in use.
Caution Indicates caution items for which operating error poses a risk of injury or damage
Important Indicates important information that must be followed when using the printer. Be
MEMO Indicates helpful reference information and supplemental information on particular
to equipment or property. To ensure safe use, always follow these precautions.
sure to read this information to prevent printer damage or operating errors.
topics.
Cross-reference
Additional sources of information are identifi ed as follows in the documentation.
In the Basic Guides:
(Guide number and section title)
In the User Manual:
(→ , Section title), (→ , Section title), (→ , Section title)
(→"Section title," User Manual)
Text conventions and illustrations
Button names and user interface elements
Key and button names on the control panel and user interface elements in software (such as menus and
buttons) are indicated as follows in this document.
Control panel buttons Example: Press the OK button.
Control panel messages Example: Head Cleaning is displayed.
Software interface items Example: Click OK .
(menus and buttons)
Keyboard keys Example: Press the Tab key.
Part names
Names of printer parts are indicated as follows in this document.
Printer part names Example: Open the Top Cover .
Figures and software screens
Screens depicted in this document for the printer driver or other software may look different from the
•
actual screens because of subsequent updates.
Windows XP screens are used in explanations of Windows operations.•
6
Page 7

FCC Regulations (U.S.A)
Canon Large Format Printer iPF8300
This device complies with Part 15 of the FCC Rules. Operation is subject to the following two conditions: (1)
This device may not cause harmful interference, and (2) this device must accept any interference received,
including interference that may cause undesired operation.
Note: This equipment has been tested and found to comply with the limits for class B digital device, pursuant
to Part 15 of the FCC Rules. These limits are designed to provide reasonable protection against harmful
interference in a residential installation.
This equipment generates, uses and can radiate radio frequency energy and, if not installed and used in
accordance with the instructions, may cause harmful interference to radio communications.
However, there is no guarantee that interference will not occur in a particular installation. If this equipment
does cause harmful interference to radio or television reception, which can be determined by turning the
equipment off and on, the user is encouraged to try to correct the interference by one or more of the following
measures:
• Reorient or relocate the receiving antenna.
• Increase the separation between the equipment and receiver.
• Connect the equipment into an outlet on a circuit different from that to which the receiver is connected.
• Consult the dealer or an experienced radio/TV technician for help.
Use of shielded cable is required to comply with Class B limits in Subpart B of Part 15 of FCC Rules.
Do not make any changes or modifi cations to the equipment unless otherwise specifi ed in the manual.
If such changes or modifi cations should be made, you could be required to stop operation of the equipment.
Canon U.S.A. Inc.
One Canon Plaza, Lake Success, NY 11042, U.S.A.
Tel No. 516-328-5600
For CA, USA Only
Included battery contains Perchlorate Material - special handling may apply.
See http://www.dtsc.ca.gov/hazardouswaste/perchlorate/ for detail.
7
Page 8
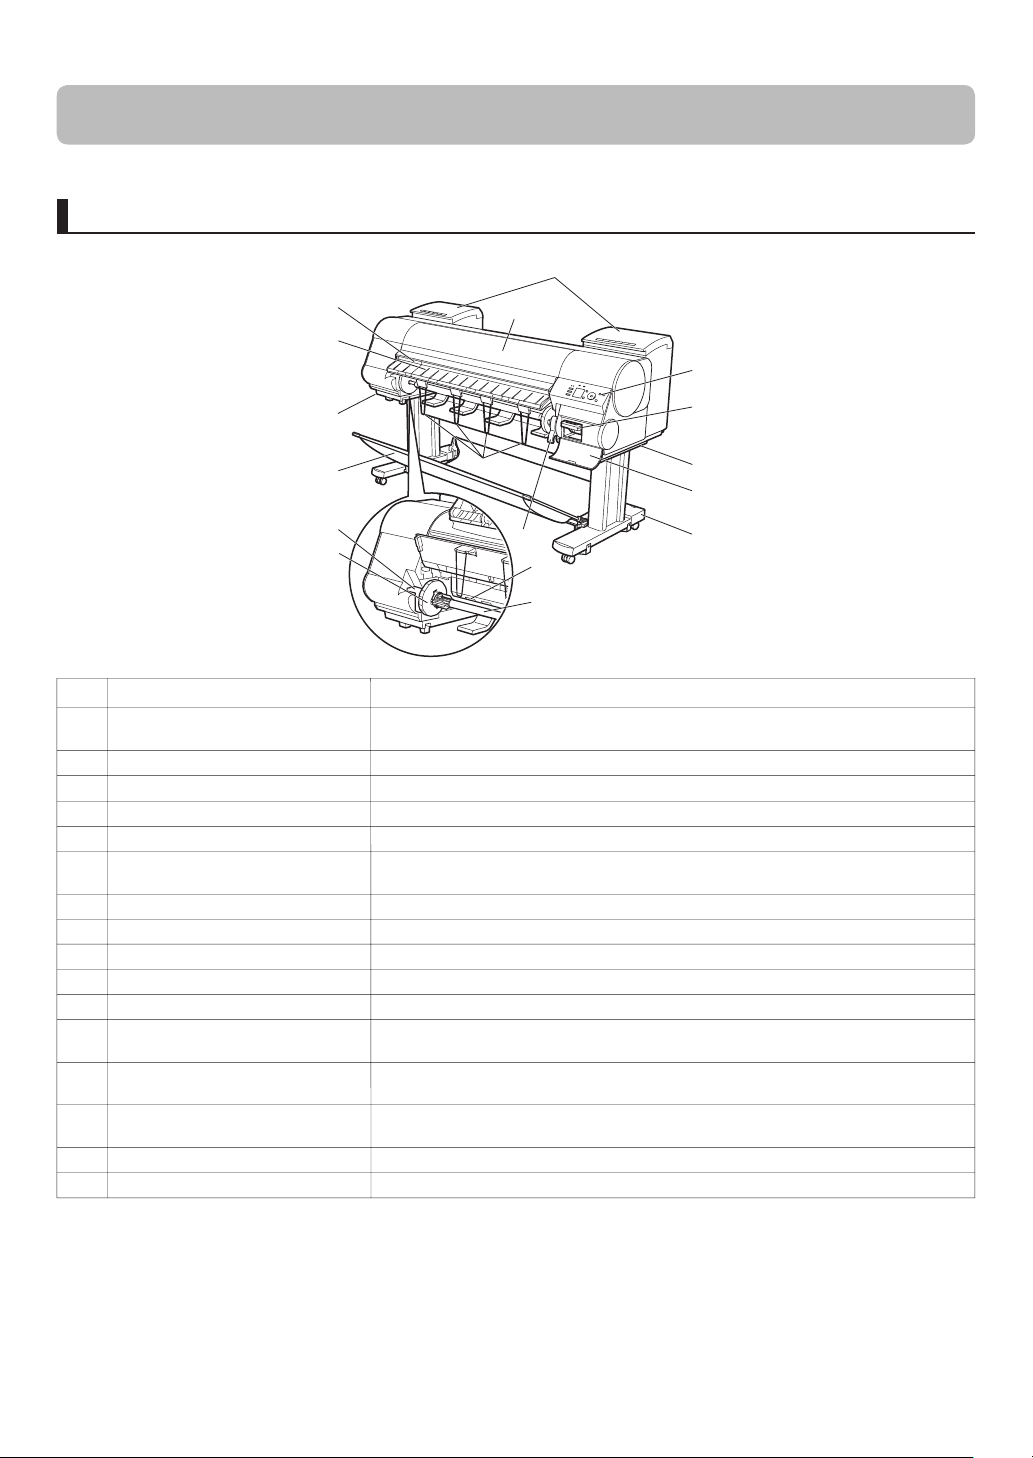
Parts
Names and functions of printer parts are as follows.
Front
j
Top Cover
a
Cutter Groove
b
Ejection Guide
c
Roll Holder Slot
d
Roll Holder
e
Ejection Support
f
Output Stacker
g
Paper Feed Slot
h
Holder Stopper
i
Ink Tank Cover
j
k
Release Lever
l
Maintenance Cartridge
m
Carrying Handles
n
Maintenance Cartridge Cover
o
Stand
p
b
a
c
k
n
g
f
m
n
o
d
i
l
h
p
e
OperationName
Open this cover to install the Printhead , load paper, and remove any jammed paper
from inside the printer as needed.
Paper is cut (using the cutter or manually with scissors) over this groove.
Guides printed documents as they are ejected. Raise the guide when loading a roll.
Slide the Roll Holder into this slot.
Load the roll on this holder.
Prevents printed documents from winding around the Roll Holder or being drawn
into the Paper Feed Slot .
A cloth tray that catches ejected documents.
When loading a roll, insert the edge of the roll paper here.
Secure rolls on the Roll Holder with this part.
Open this cover to replace an Ink Tank .
Use this panel to operate the printer and check the printer status. Control Panel
Releases the Paper Retainer . Lift this lever toward the front of the printer when
loading paper.
Absorbs ink used for maintenance purposes such as head cleaning. (Replace the
cartridge when it is full.)
When carrying the printer, have four people hold it by these handles under both
sides.
Open this cover to replace the Maintenance Cartridge .
A stand that holds the printer. Equipped with casters to facilitate moving it.
8
Page 9
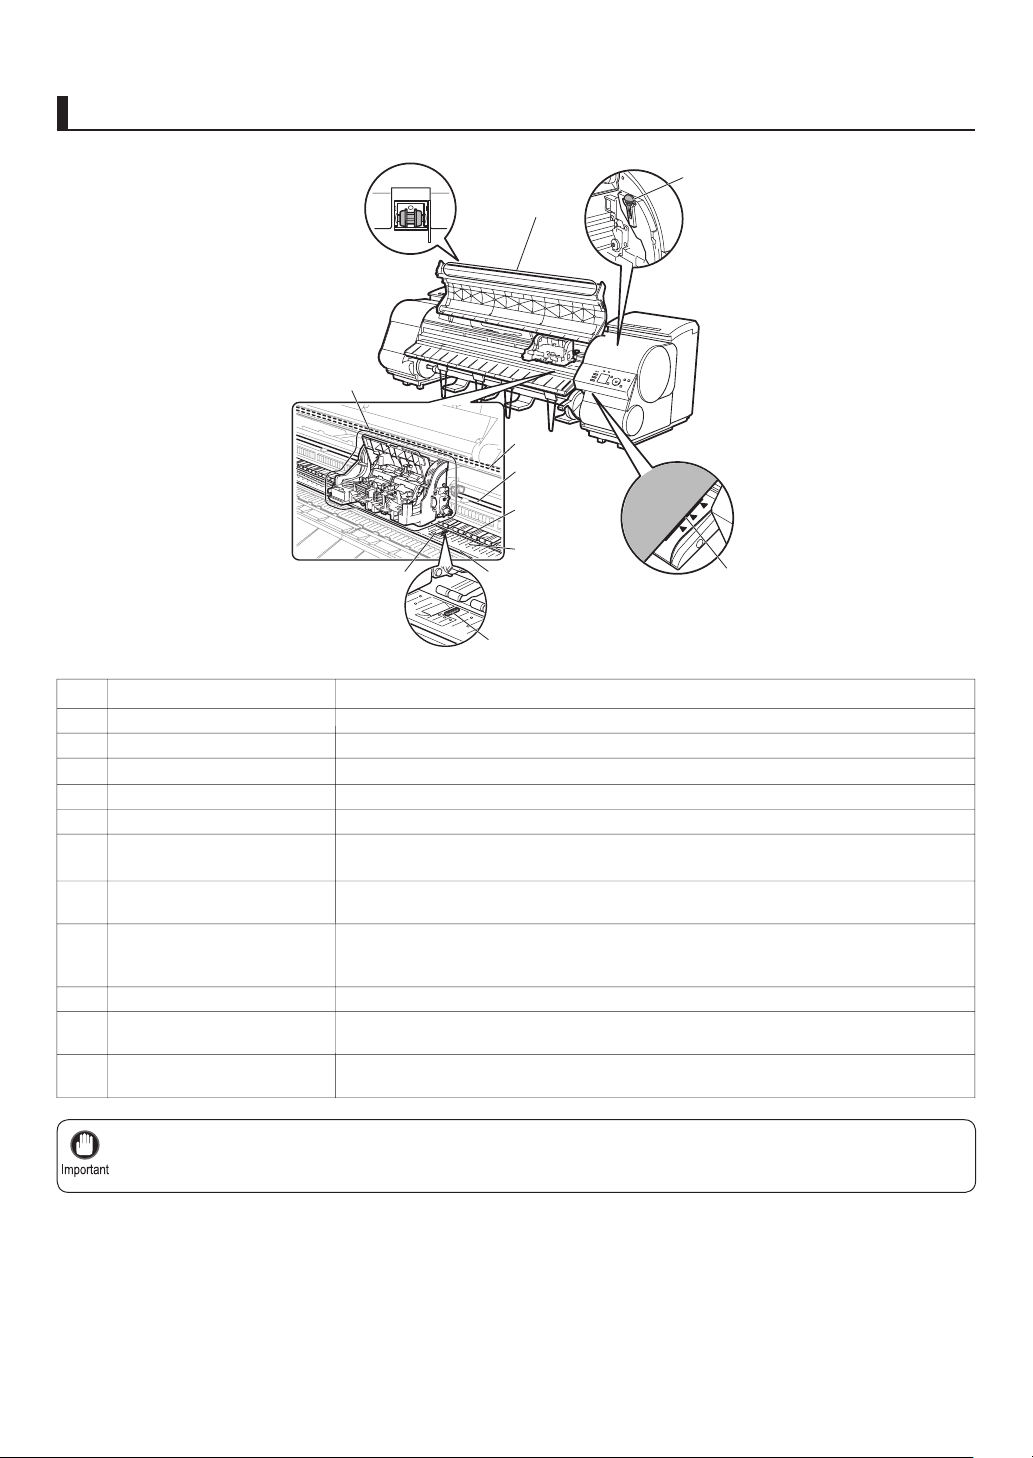
Top Cover (Inside)
Parts
h
a
c
j
d
e
a
Top Cover Roller
b
Paper Alignment Line
c
Carriage
d
Carriage Shaft
e
Paper Retainer
f
Platen
g
Borderless Printing Ink
Grooves
h
Cleaning Brush
i
Fixed Blade
j
Linear Scale
k
Switch
f
g
i
b
k
OperationName
Prevents paper from rising when ejected.
Align paper with this line when loading it.
Moves the Printhead . The carriage serves a key role in printing.
The Carriage slides along this shaft.
Important in supplying the paper. This retainer holds paper as it is fed.
The Printhead moves across the platen to print. Vacuum holes on the platen hold paper
in place.
For catching ink outside the edges of paper during borderless printing.
When cleaning inside the printer under the Top Cover , use this brush to sweep away
paper dust on the Platen .
Also use the brush to move the blue Switch on the Platen .
The Cutter Unit passes over this rail to cut paper.
The linear scale serves a key role in detecting the Carriage position. Be careful not to
touch this part when cleaning inside the Top Cover or clearing paper jams.
Set the switch to the side opposite ● if the edges of printed images are blurred. Set the
switch to the ● side before borderless printing.
Do not touch the Carriage Shaft (d) or Linear Scale (j). Touching these parts may damage them.•
9
Page 10
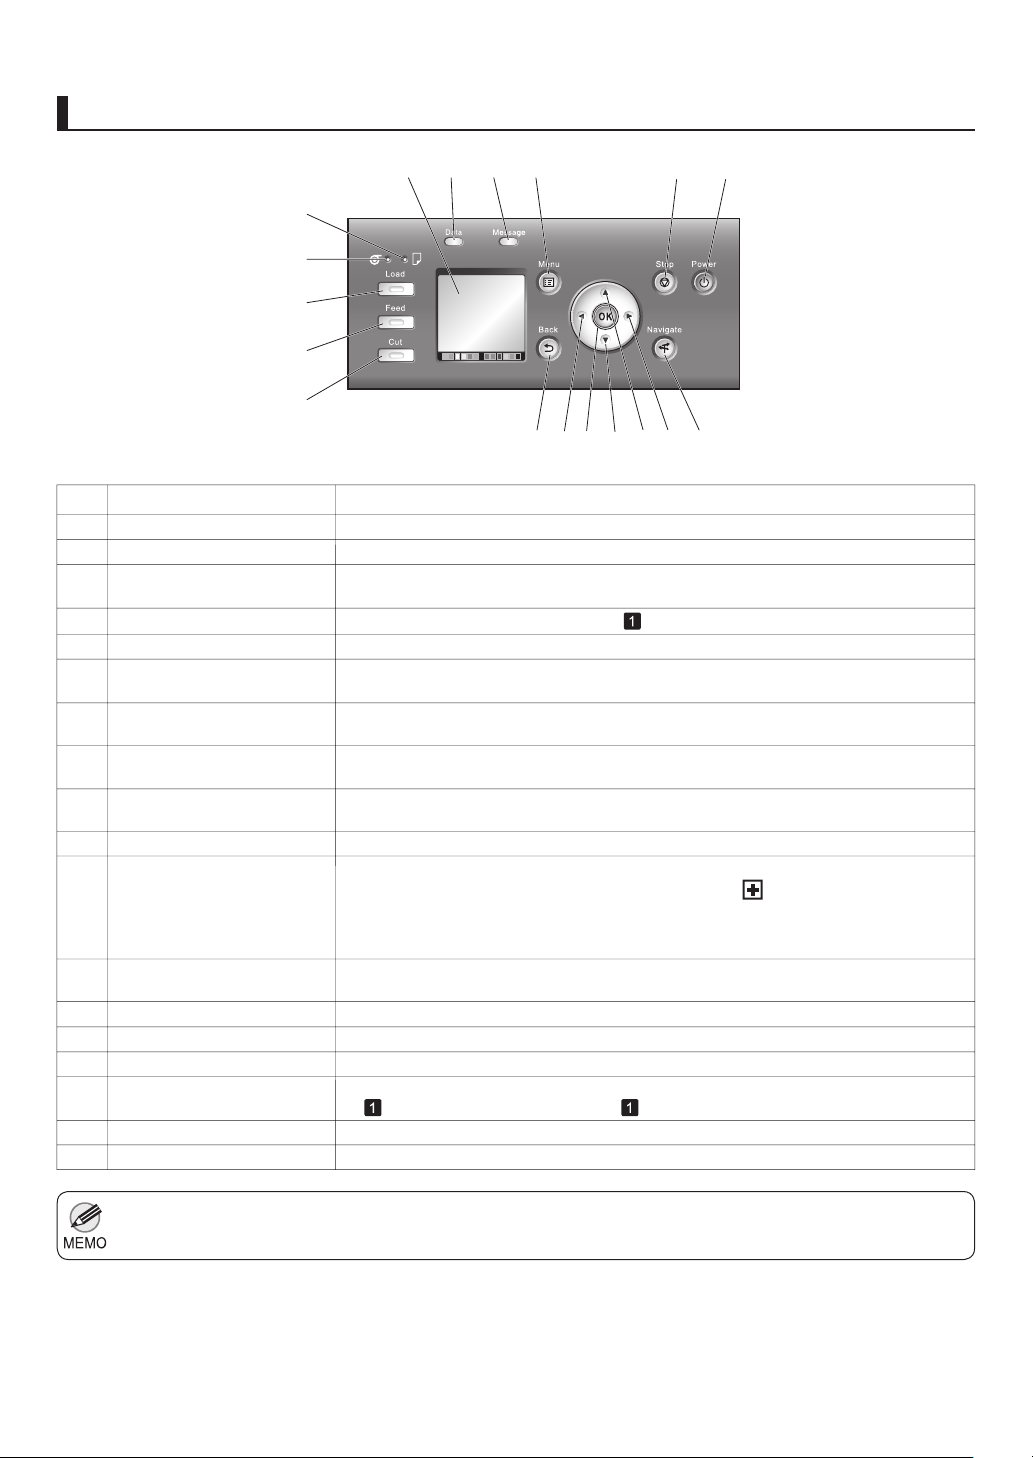
Parts
Control Panel
c dfeba
r
q
p
o
n
g
hijklm
Name
Display Screen
a
Data Lamp (green)
b
Message lamp (orange)
c
Menu button
d
Stop button
e
Power button (green)
f
g
Navigate button
h
► button
i
▲ button
j
▼ button
k
OK button
l
◄ button
m
Back button
n
Cut button
o
Feed button
p
Load button
q
Roll Media lamp (green)
Cut Sheet lamp (green)
r
Operation
Shows the printer menu, as well as the printer status and messages.
Indicates the status of print jobs or the printer firmware.
Lit or flashes when messages are displayed. When the lamp is off, the printer is
operating normally or turned off.
Displays the Tab Selection screen . (→
Cancels print jobs in progress and ends the ink drying period.
Turns the printer on and off. The power button is lit when the printer is on or in Sleep
mode.
Enables you to check instructions for loading and removing paper or replacing ink tanks
or printheads, as well as other operations.
Press this button on the Tab Selection screen to move to another tab. In menu items
requiring numerical input, press this button to move to another digit.
Press this button when viewing menus to display the previous menu item or setting
value.
Press this button when viewing menus to display the next menu item or setting value.
Press this button on the Tab Selection screen to display the menu of the tab shown.
Pressing this button in menu items of each tab for which is displayed at left will move
to the lower level of the menu item, enabling you to execute menu commands or set
menu values.
Also press this button if the Display Screen indicates to press the OK button.
Press this button on the Tab Selection screen to move to another tab. In menu items
requiring numerical input, press this button to move to another digit.
Displays the screen before the current screen.
Pressing this button when rolls are loaded cuts the paper.
Pressing this button when rolls are loaded enables you to reposition the paper.
Press this button when loading or replacing paper.
(→
, Loading Rolls in the Printer), (→ , Loading Sheets in the Printer)
Lit when rolls are selected as the paper source.
Lit when sheets are selected as the paper source.
, Menu Map)
To recover from Sleep mode, any button can be pressed except the Power button.•
10
Page 11
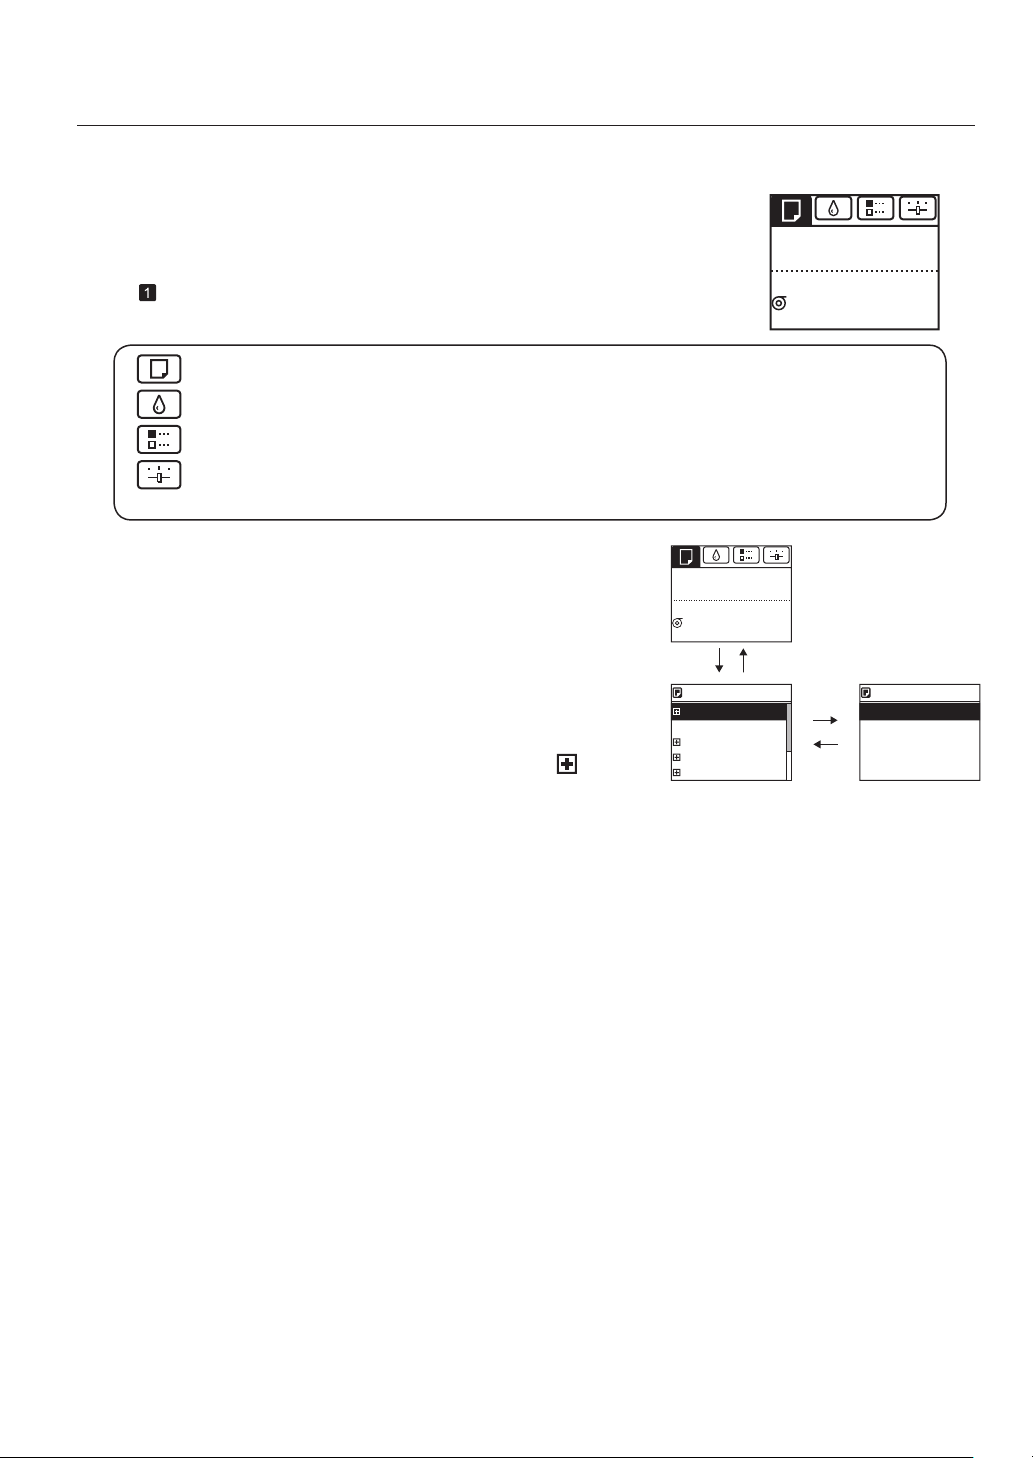
Menu operations
Navigate and perform menu operations on the control panel as follows.
After the printer starts up, the Tab Selection screen is shown on the Display
Screen .
Information is organized in four tabs, and you can press control panel buttons to
access menus and set or execute items for each tab.
, Menu Map)
(→
Parts
Ready
OK: Paper Menu
Plain Paper
ISO A2 Roll
( Paper tab )
( Ink tab )
( Job tab )
( Settings/Adj. tab )
•••••••••
•••••••••••
••••••••••
•••
A tab indicating status and showing menus related to paper.
A tab indicating status and showing menus related to ink.
A tab indicating status and showing menus related to print jobs.
A tab indicating status and showing menus related to settings and
adjustment.
Accessing tab menus•
To select tabs, press ◄ or ► on the Tab Selection screen ,
and then press the OK button.
Tab menus are now displayed.
To select a menu, press ▲ or ▼ , and then press the OK
button.
The menu is selected, and menu items are now displayed.
To access lower-level menus for menus labeled with
at left,
select the menu and press the OK button.
Specifying menu items•
Press ▲ or ▼ to select desired settings, and then press the
OK button.
The check box at left is selected, and the setting is confi rmed.
After two seconds, the display reverts to the upper-level menu.
Ready
OK: Paper Menu
Plain Paper
ISO A2 Roll
buttonOK
Paper Menu 㪈㪆㪉
Load Paper
Eject Paper
Chg. Paper Type
Chg. Paper Size
ManageRemainRoll
Back button
㪈㪆㪉
Back button
Paper Menu
buttonOK
Roll Paper
Cut Sheet
Specifying numerical values•
Follow these steps to enter numbers. In this example, network
settings items are entered.
1.
For numerical input, press ◄ or ► to move the cursor (shown
as an underscore) to other fi elds.
2.
Press the ▲ or ▼ button to enter the value.
3. Repeat steps 1 and 2, and when the settings are complete,
press the OK button.
Executing menu commands•
Press ▲ or ▼ to select the action to execute, and then press
the OK button.
The menu command is now executed.
11
Page 12
Attaching the Roll Holder to Rolls
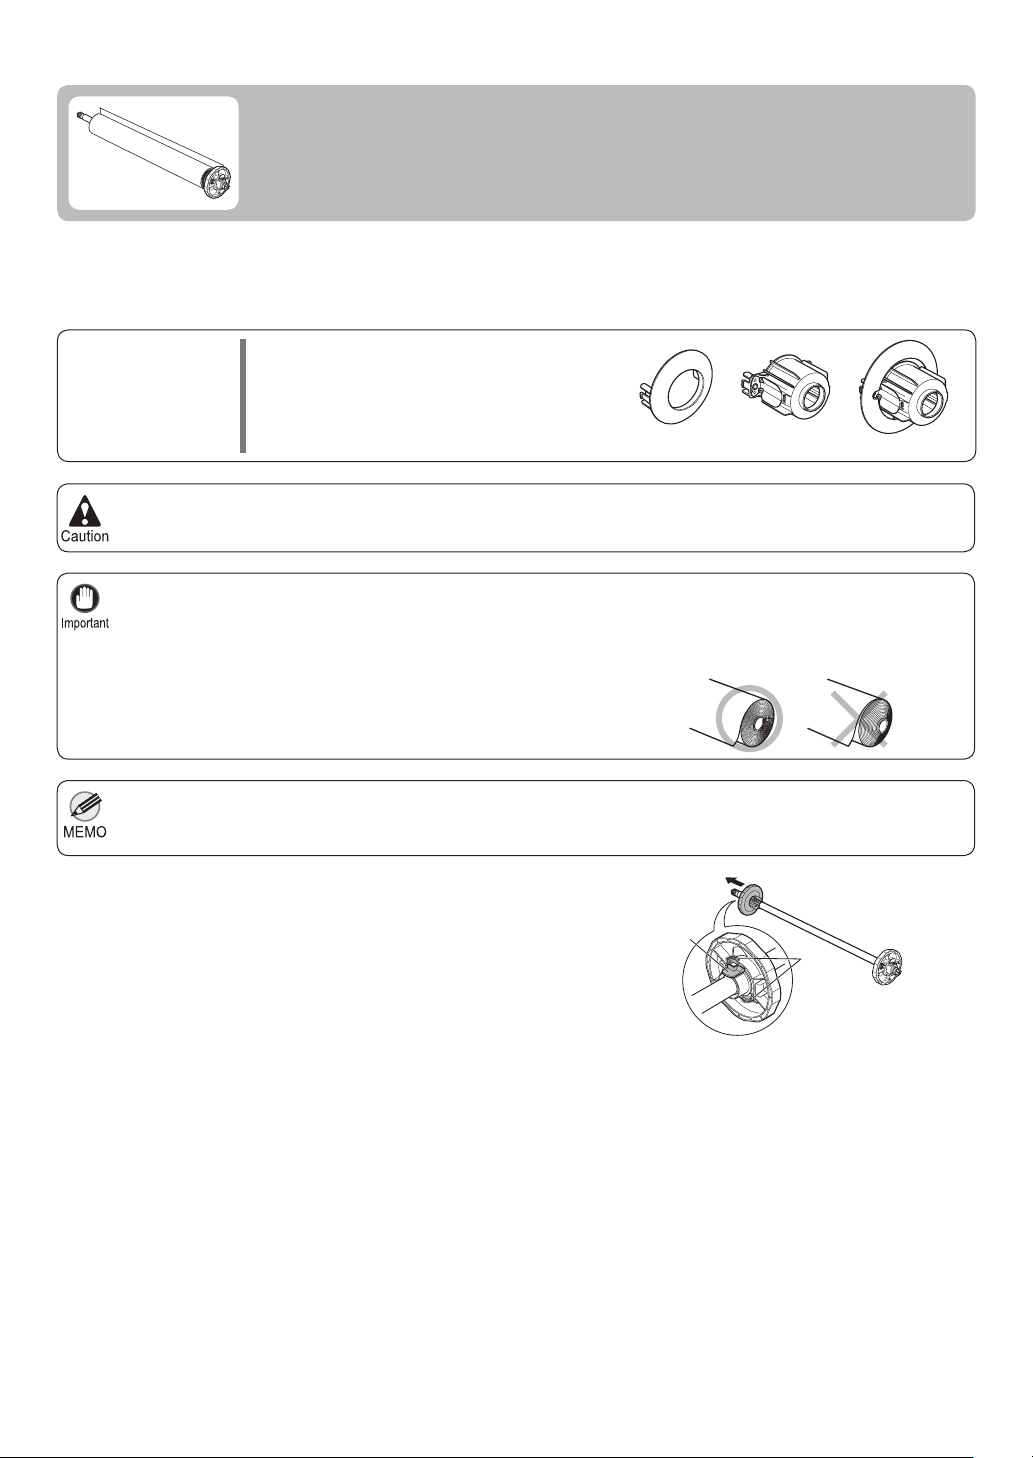
Attach the roll holder to rolls as follows.
When printing on rolls, attach the Roll Holder to the roll.
Rolls have a two- or three-inch paper core. Use the correct attachment for the paper core. The printer comes
equipped with the 2-Inch Paper Core Attachment installed.
Items to Prepare
Set the roll on a table or other fl at surface so that it does not roll or fall. Rolls are heavy, and dropping a roll may
•
cause injury.
When handling the roll, be careful not to soil the printing surface. This may affect the printing quality. We recommend
•
wearing clean cloth gloves when handling rolls to protect the printing surface.
Use scissors or a cutting tool to cut the edge of the roll paper if it is uneven, dirty, or has tape residue. Otherwise, it
•
may cause feeding problems and affect the printing quality.
Be careful not to cut through any barcodes printed on the roll.
Align the edges of the paper on both ends of the roll. Misalignment
•
may cause feeding problems.
For details on supported sizes and types of rolls, see " Paper Sizes " or the Paper Reference Guide .•
(→"Paper Sizes," User Manual) , (→"Types of Paper," User Manual)
To view instructions as you attach the Roll Holder , press the Navigate button.•
Lift the Holder Stopper lever (a) from the shaft side to
1
unlock it. Holding the Holder Stopper at the position
indicated (b), remove it from the Roll Holder .
Using rolls with a 2-inch paper core•
2-Inch Paper Core Attachment (a)
Using rolls with a 3-inch paper core•
3-Inch Paper Core Attachment #1 (b)
3-Inch Paper Core Attachment #2 (c)
acb
a
b
12
Page 13
2
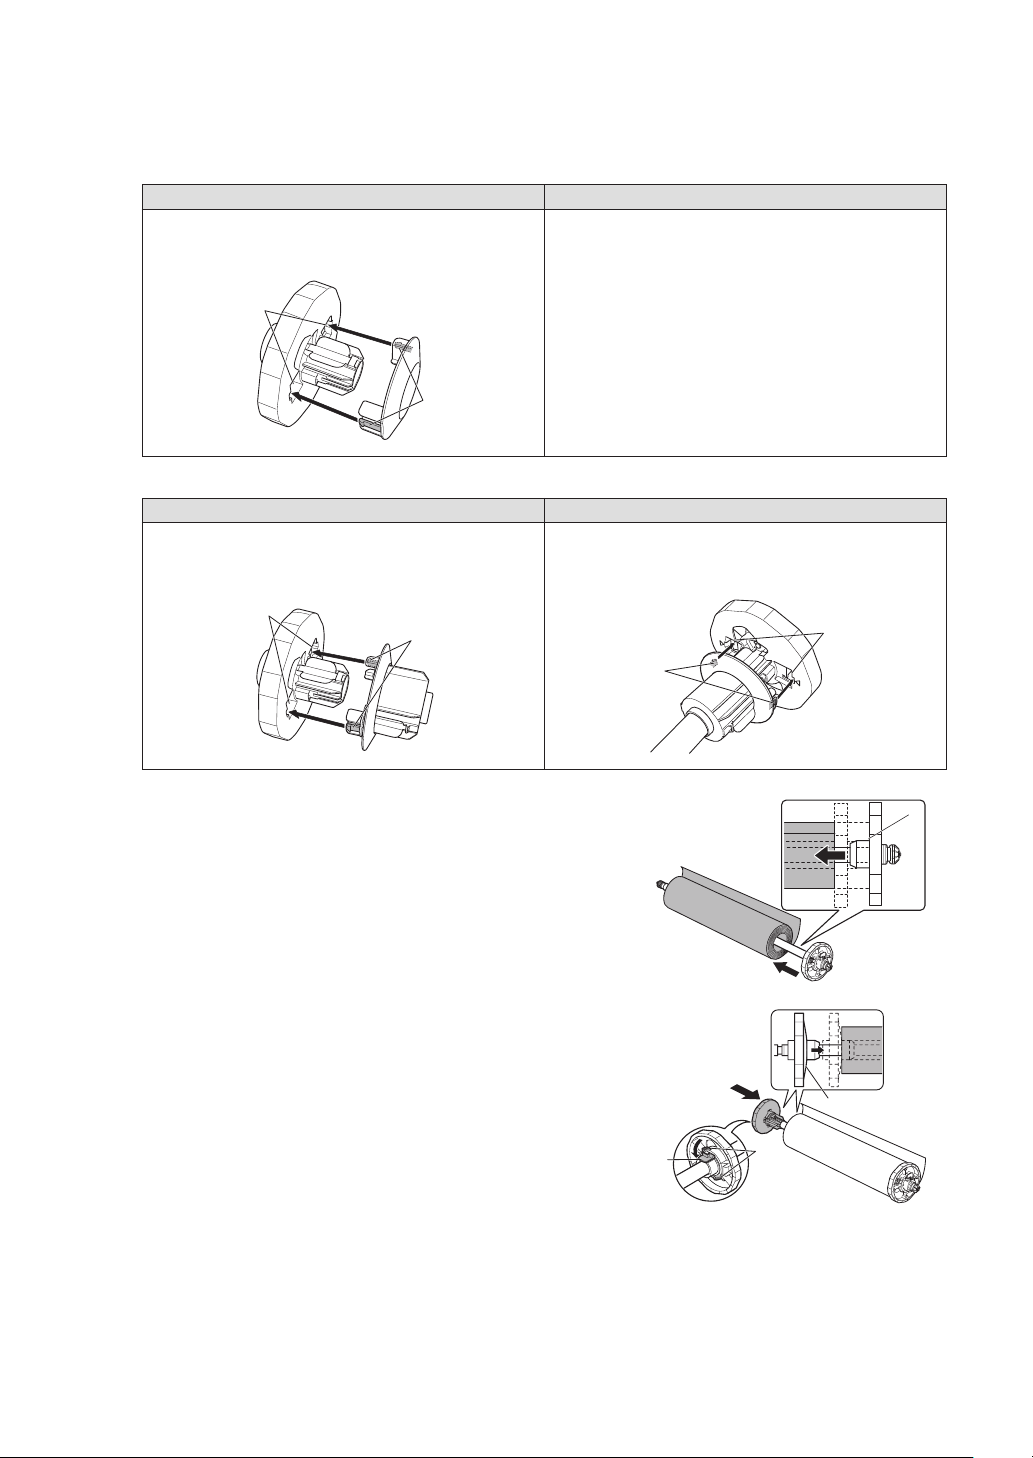
Insert the respective attachments for the roll paper core
on the Roll Holder and Holder Stopper .
Using rolls with a 2-inch paper core•
Holder Stopper Side Roll Holder Side
Align the tips (a) of the 2-Inch Paper Core
Attachment with the holes (b) of the Holder Stopper
and insert it firmly.
b
a
Using rolls with a 3-inch paper core•
Holder Stopper Side Roll Holder Side
Align the tips (a) of 3-Inch Paper Core Attachment
#2 with the holes (b) of the Holder Stopper and
insert it firmly.
No attachment is needed.
Align the tips (a) of 3-Inch Paper Core Attachment
#1 with the holes (b) of the Roll Holder and insert it
firmly.
Attaching the Roll Holder to Rolls
3
4
b
a
With the edge of the roll paper facing forward as shown,
insert the Roll Holder from the right of the roll. Insert
it fi rmly until the roll touches the fl ange (a) of the Roll
Holder , leaving no gap.
Insert the Holder Stopper from the left in the Roll Holder
as shown. Holding it at the position shown (b), push it
fi rmly in until the fl ange (a) of the Holder Stopper touches
the roll. Lock the Holder Stopper lever (c) by pushing it
down toward the shaft side.
b
a
a
a
c
b
13
Page 14
Loading Rolls in the Printer
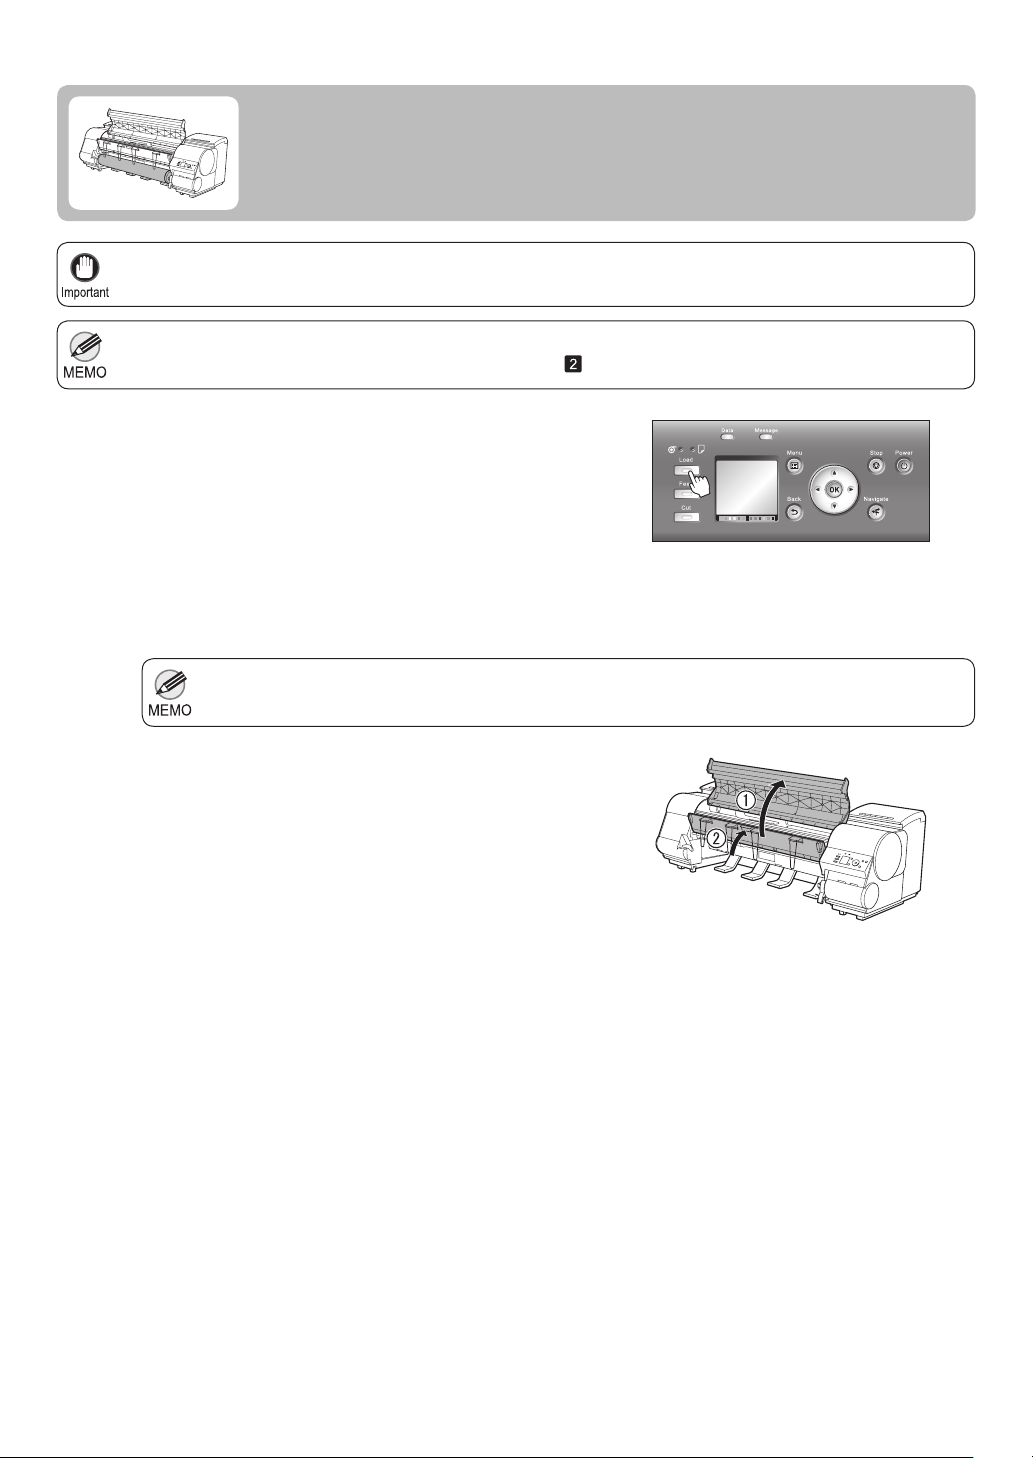
Load rolls in the printer as follows.
Always load rolls when the printer is on. If the printer is off when you load a roll, the paper may not be advanced
•
correctly when you turn the printer on.
Before loading rolls, make sure the printer is clean inside the Top Cover and around the Ejection Guide . If these
•
areas are dirty, we recommend cleaning them in advance. (→
Press the Load button.
, If Paper is Soiled)
1
Press ▲ or ▼ to select Roll Paper , and then press the
2
OK button.
If any paper has been advanced that will not be used, a message is shown requesting you to remove it.•
Press ▲ or ▼ to select Yes , and then press the OK button. Remove the paper and go to the next step.
3
Open the Top Cover and lift the Ejection Guide .
14
Page 15
Loading Rolls in the Printer
4
5
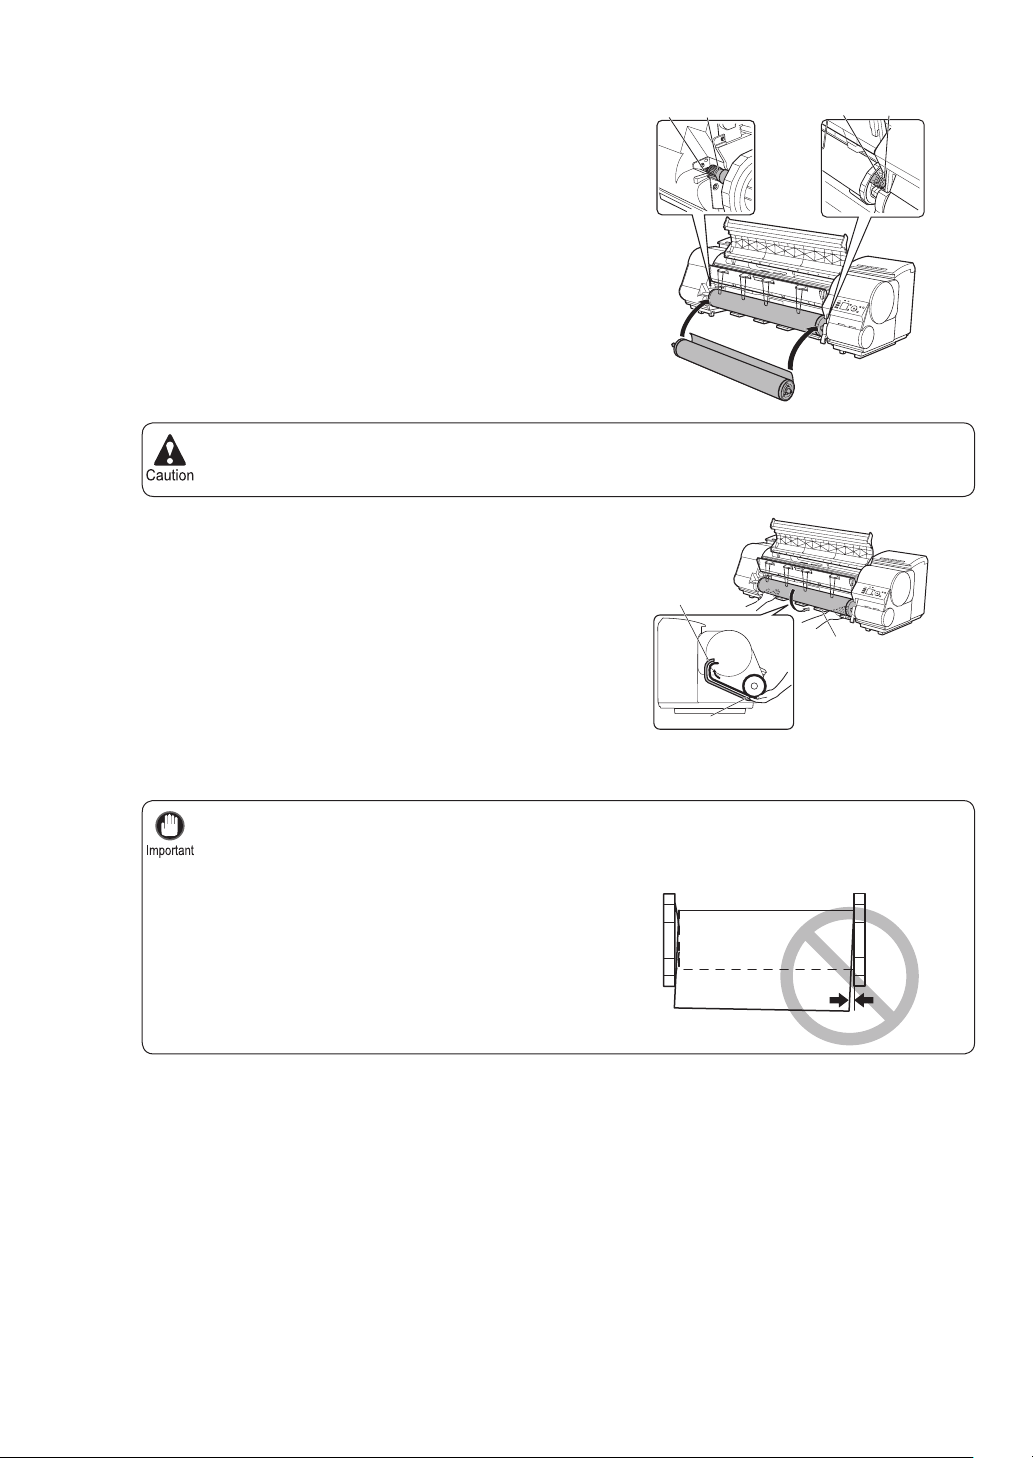
Holding the Roll Holder so that the side with the white
gear faces the side of the Roll Holder Slot with a white
gear, load the Roll Holder shaft (a) into the grooves (b)
on both ends of the Roll Holder Slot , fully into the slot.
Be careful not to drop the roll and hurt yourself when loading it.•
•
Be careful not to pinch your fi ngers between the Roll Holder shaft (a) and the guide grooves (b) when
loading rolls.
Pull out the roll evenly on both ends and insert it in the
Paper Feed Slot (a). Advance the roll until it touches the
Paper Retainer (b).
abab
b
a
Once the roll reaches the Paper Retainer , it is
automatically advanced over the Platen .
Be careful not to soil the printing surface of roll paper as you insert it in the slot. This may affect the
•
printing quality.
If the paper is wrinkled or warped, straighten it out before loading it.•
For paper that tends to curl, lift the Release Lever and manually pull the roll paper over the Platen .•
Load the roll so that there is no gap between the right
•
edge of the paper and the Roll Holder .
a
15
Page 16
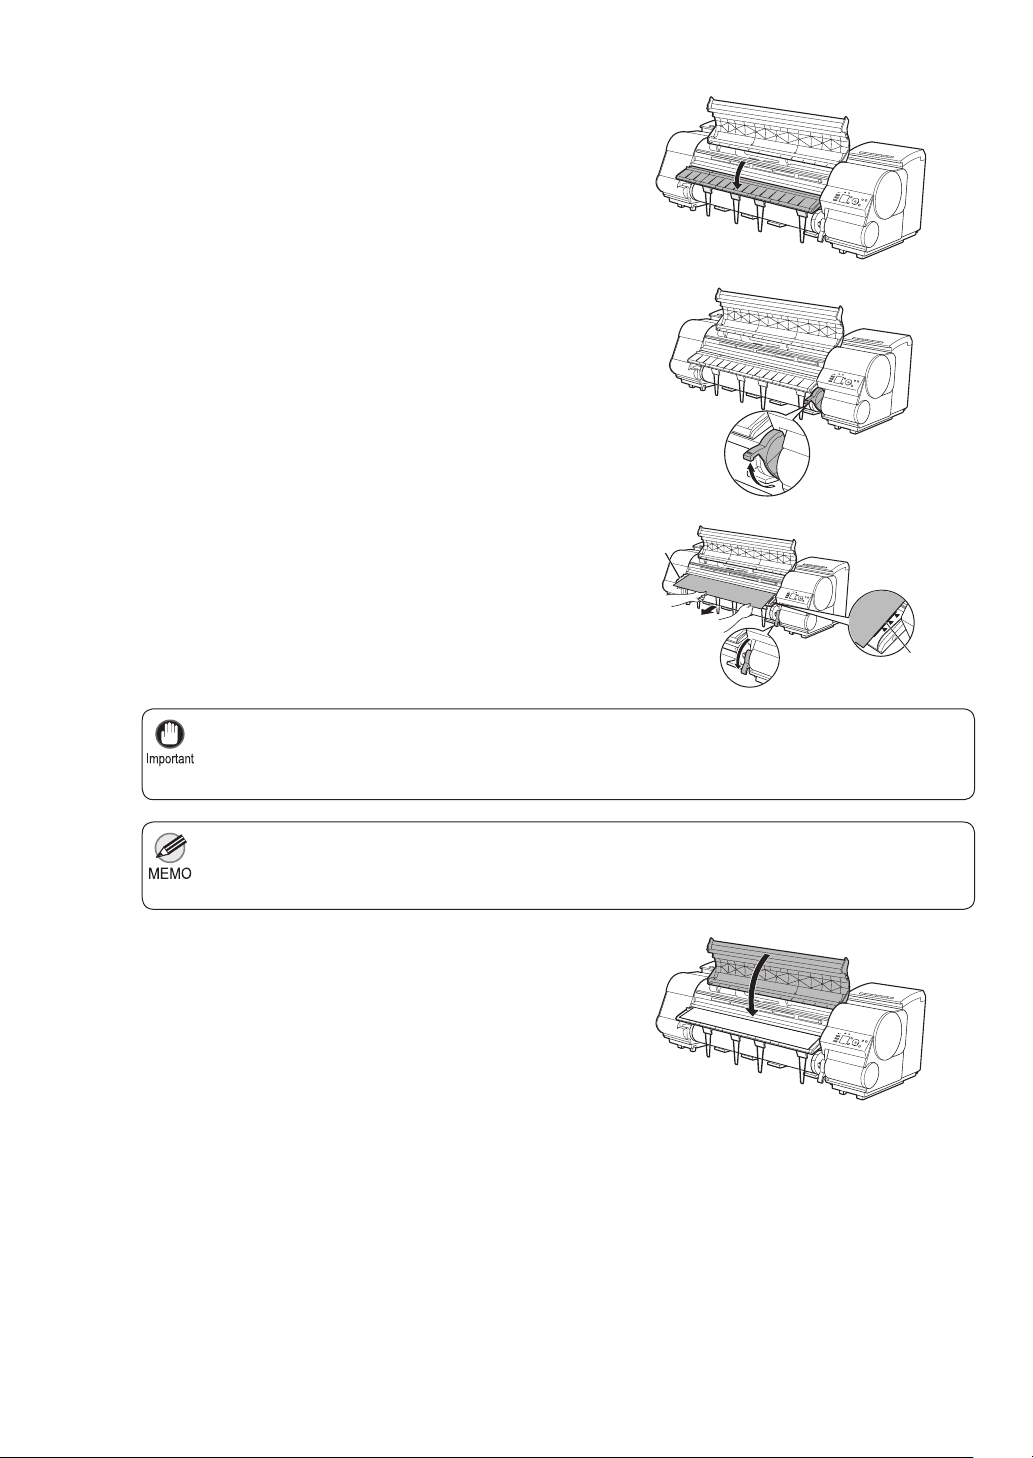
Loading Rolls in the Printer
Lower the Ejection Guide .
6
Holding the edge of the roll paper, lift the Release Lever .
7
8
9
Hold the edge of the roll paper as you gently pull it evenly
with both hands to the position of the Ejection Guide
(a). Align the right side of the roll paper with the Paper
Alignment Line (b), keeping this side parallel to the line,
and then lower the Release Lever .
Do not omit steps 7 and 8. If paper cannot be advanced straight or if it wrinkles, it may jam or rub
•
against the Printhead .
Do not force the roll paper into alignment with the paper alignment line (b). This may prevent the paper
•
from being advanced straight.
You can adjust the strength of suction holding paper against the Platen when the Release Lever is
•
released. If it is diffi cult to load paper, press the ▲ or ▼ button on the Control Panel to adjust the
strength. Set suction stronger by pressing the ▲ button or weaker with the ▼ button. Three settings are
available.
Close the Top Cover .
The paper is now advanced, and a menu for selection of
the type of paper is automatically shown on the Display
Screen .
a
b
16
Page 17

10
Press ▲ or ▼ to select the type of paper, and then press
the OK button.
For details on types of paper to select, see the Paper Reference Guide .•
, Types of Manuals)
(→
Loading Rolls in the Printer
17
Page 18
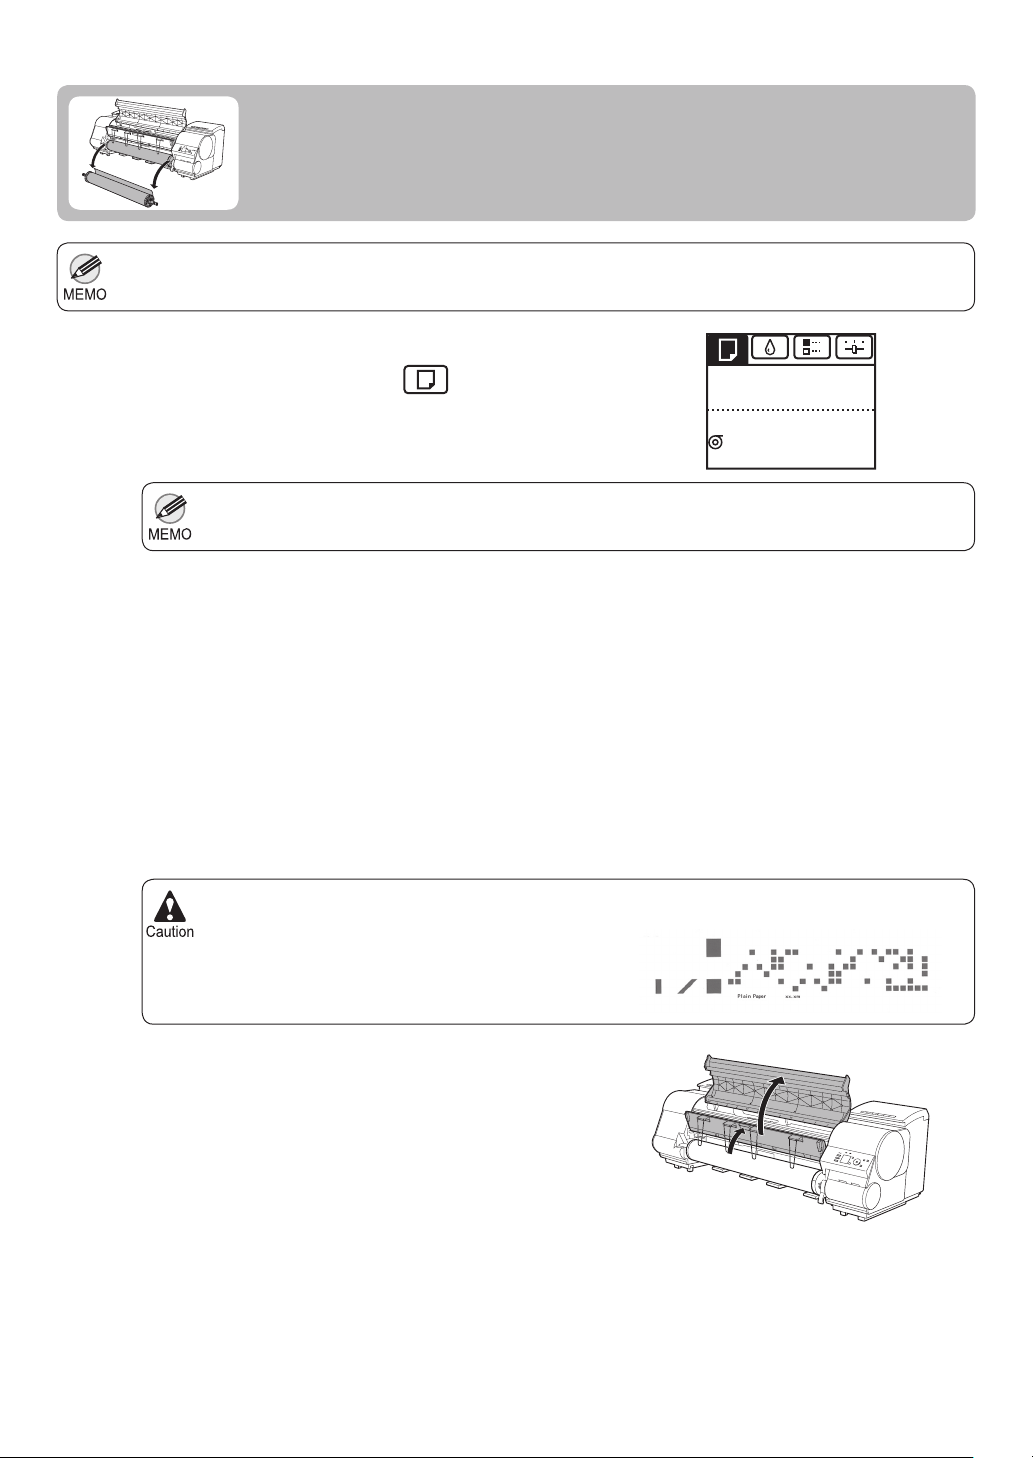
Removing the Roll from the Printer
Remove rolls from the printer as follows.
If you need to cut a roll, see the following procedure.
•
(→"Specifying the Cutting Method for Rolls," User Manual)
On the Tab Selection screen of the Control Panel , press
1
2
◄ or ► to select the Paper tab (
If the Tab Selection screen is not displayed, press the Menu button.•
Press the OK button.
The Paper Menu is displayed.
).
Ready
OK: Paper Menu
Plain Paper
ISO A2 Roll
3
4
5
Press ▲ or ▼ to select Eject Paper , and then press the
OK button.
Press ▲ or ▼ to select Yes , and then press the OK
button.
The roll is now rewound and ejected.
If you have selected ManageRemainRoll > On in the Control Panel menu, a barcode is printed on the
•
leading edge of the roll.
Do not remove the roll before the barcode is printed.
•
You will be unable to keep track of the amount of roll
paper left. (→"Keeping Track of the Amount of Roll
Paper Left," User Manual)
Open the Top Cover and lift the Ejection Guide .
18
Page 19
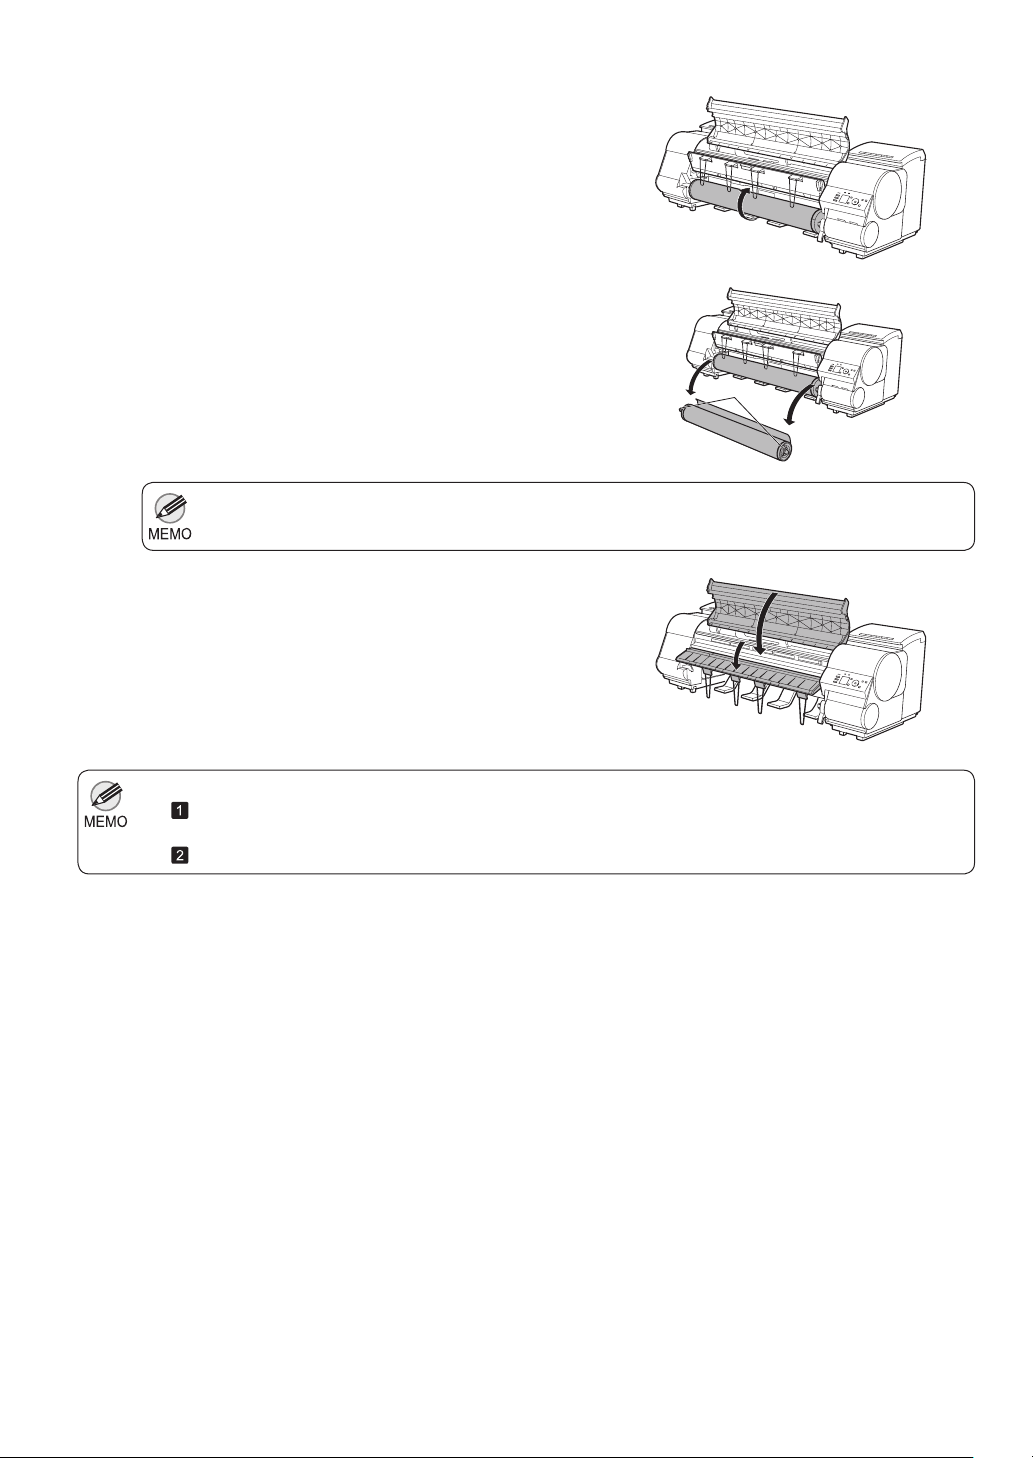
6
7
8
Removing the Roll from the Printer
Using both hands, rotate the Roll Holder in the direction
of the arrow to rewind the roll.
Holding the Roll Holder fl ange (a), remove the holder
from the Roll Holder Slot .
a
See the following procedure for instructions on removing the Roll Holder from the roll.•
(→"Removing Rolls From the Roll Holder," User Manual)
Lower the Ejection Guide and close the Top Cover .
To load new paper in the printer at this point, see the following procedure.•
, Loading Rolls in the Printer)
(→
Clean inside the top cover before loading paper.•
(→
, If Paper is Soiled)
19
Page 20
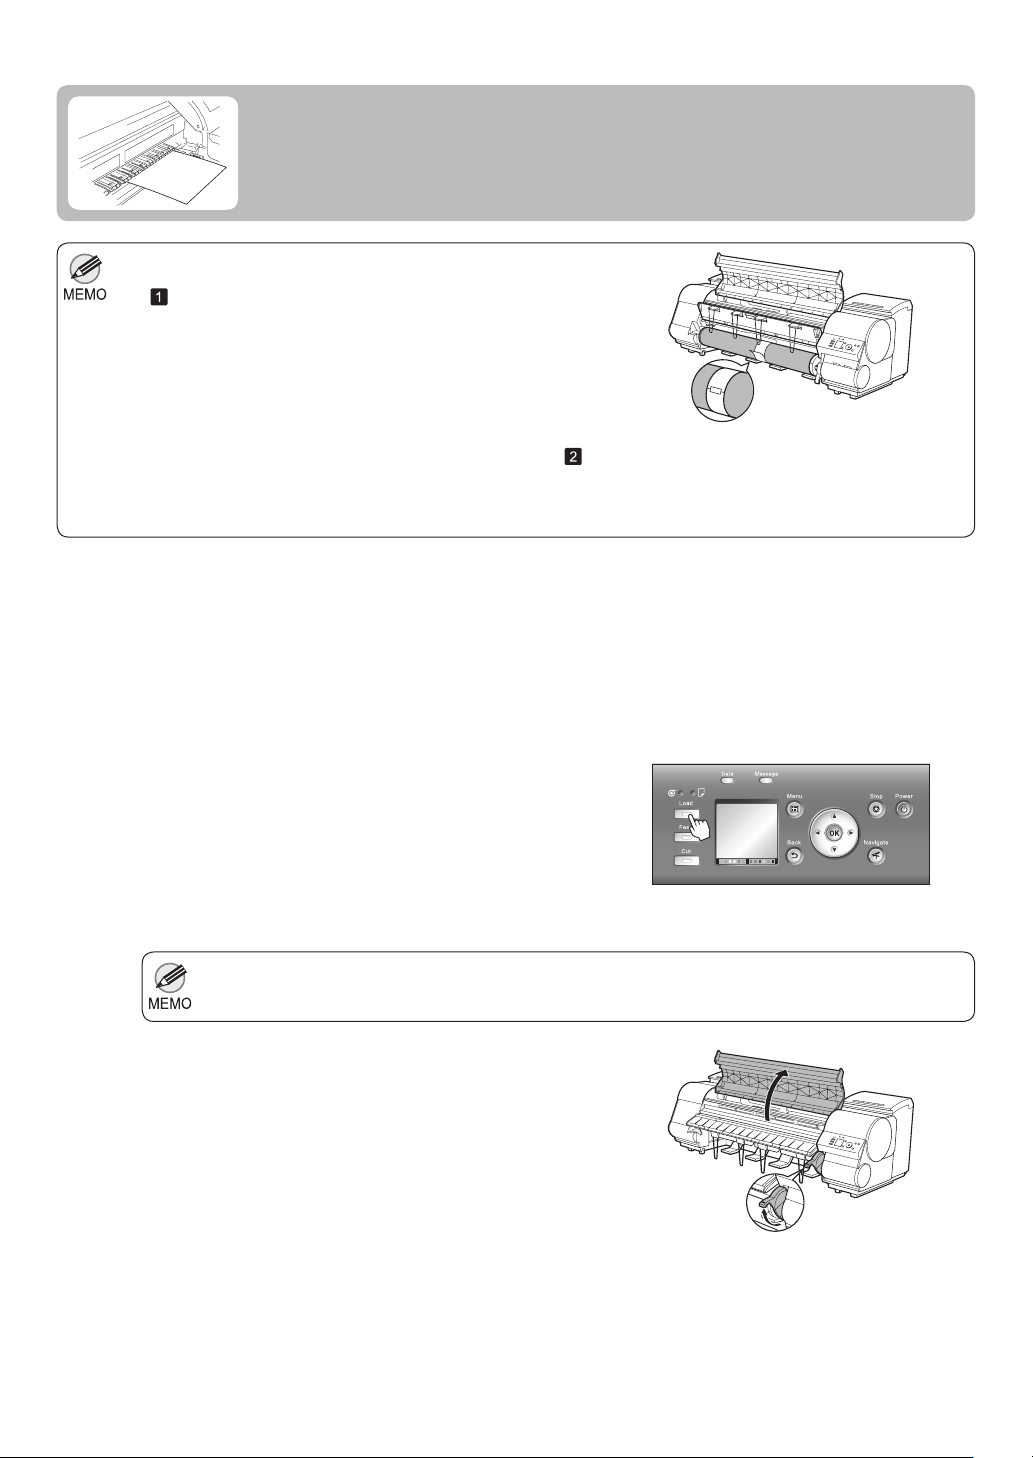
Loading Sheets in the Printer
Load sheets in the printer as follows.
Loading sheets when a roll is already loaded in the printer may
•
cause jams. We recommend removing rolls before loading sheets.
(→
, Removing the Roll from the Printer)
To prevent the roll from unwinding if you leave it loaded, wrap a
sheet of paper around the roll and tape it.
Before loading sheets, make sure the printer is clean inside the Top Cover and around the Ejection Guide . If these
•
areas are dirty, we recommend cleaning them in advance. (→ , If Paper is Soiled)
Store unused paper in the original package, away from high temperature, humidity, and direct sunlight.•
Paper that is wrinkled or warped may jam. If necessary, straighten the paper and reload it.•
Load the paper straight. Loading paper askew will cause an error.•
Select sheets as the paper source.
1
If a print job was received•
Sheets are automatically selected, and the media type
and size specifi ed by the print job are shown on the
Display Screen .
Press ▲ or ▼ to select Load Paper , and then press the
OK button.
If no print job was received•
1.
Press the Load button.
2
Press ▲ or ▼ to select Cut Sheet , and then press
2.
the OK button.
If any paper has been advanced that will not be used, a message is shown requesting you to remove it.•
Press ▲ or ▼ to select Yes , and then press the OK button. Remove the paper and go to the next step.
Lift the Release Lever and open the Top Cover .
20
Page 21
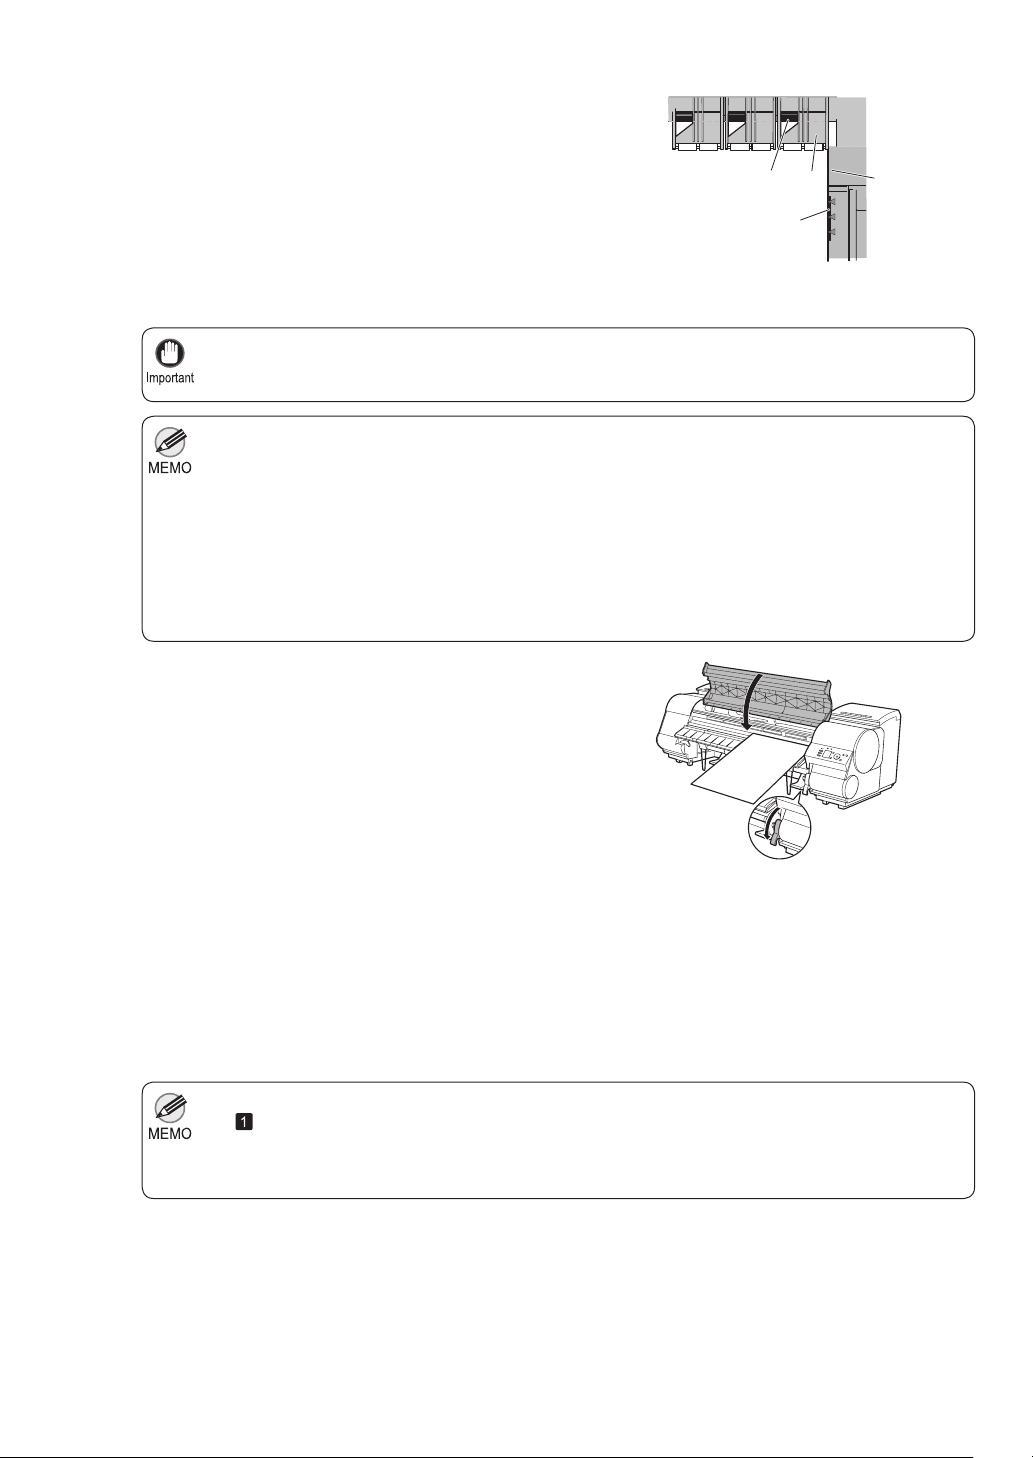
3
With a sheet lengthwise and printing-side up, insert it
between the Platen (a) and the Paper Retainer (b). Align
the edges of the sheet as follows.
Align the sheet with the Paper Alignment Line (c) at
1.
right.
Align the inserted edge of the sheet with the leading
2.
edge of the Paper Alignment Line (d), as shown.
When inserted, sheets are automatically held by suction
against the Platen .
•
Load a sheet so that it is parallel to the Paper Alignment Line at right (c). Loading paper askew will
cause an error.
Warped paper may rub against the Printhead . Straighten paper if it is warped before loading it.•
You can adjust the strength of suction holding paper against the Platen when the Release Lever is up.
•
If it is diffi cult to load paper, press the ▲ or ▼ button on the Control Panel to adjust the strength. Set
suction stronger by pressing the ▲ button or weaker with the ▼ button. Three settings are available.
However, even if you increase the suction, it may not be suffi cient to hold some types of paper against
the Platen well. In this case, use your hand to load the paper.
Sheets are held in place by suction through holes on the Platen . Although the suction may produce a
•
noise when paper is loaded in some positions, it does not indicate a problem. If the noise is distracting,
try moving the paper over slightly to the left or right (up to 1 mm [0.039 in]) while keeping it parallel to
the Paper Alignment Line .
The suction remains on for about 30 seconds during loading. If you cannot fi nish loading a sheet during
•
this time, pull the sheet away and reinsert it to start the suction again.
Loading Sheets in the Printer
d
ab
c
4
Lower the Release Lever and close the Top Cover .
If a print job was received•
Pressing the OK button will advance the paper, and then
printing will begin.
If no print job was received•
A menu for selection of the type of paper is automatically
shown on the Display Screen .
Press ▲ or ▼ to select the type of paper, and then press
the OK button.
The printer now starts feeding the paper.
For details on types of paper to select, see the Paper Reference Guide .•
(→
, Types of Manuals)
When using the Output Stacker , if you will print on large, stiff sheets, we recommend adjusting the
•
Output Stacker into the lowest position to prevent printed sheets from being bent.
(→"Using the Output Stacker," User Manual)
21
Page 22
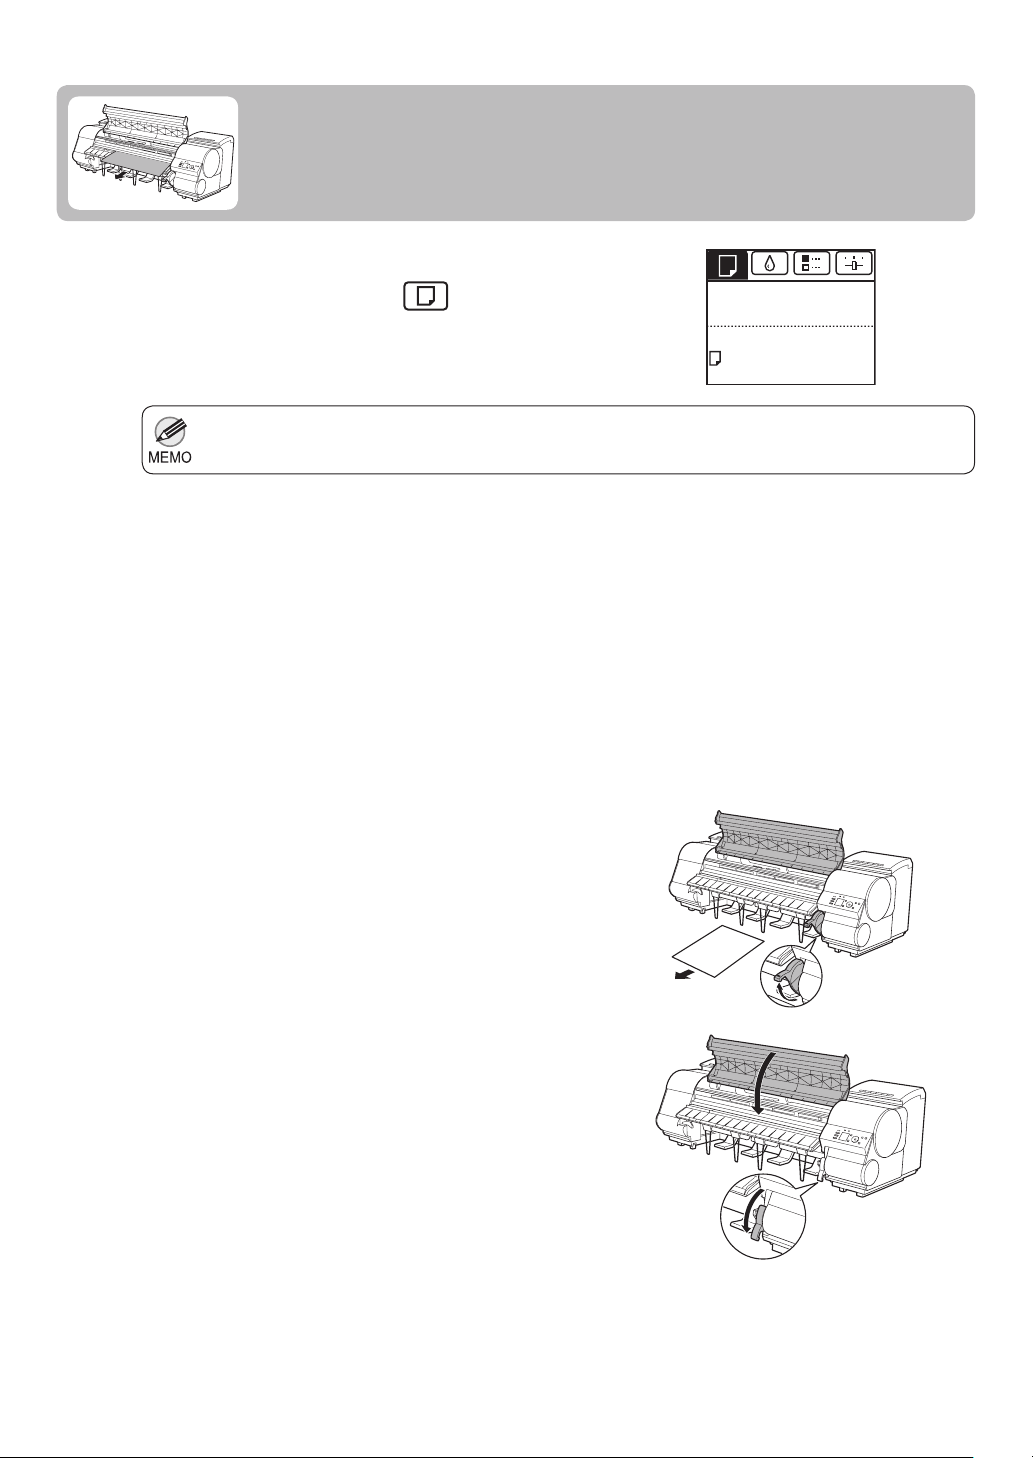
1
2
3
Removing Sheets
This section describes how to remove sheets from the printer.
On the Tab Selection screen of the Control Panel , press
◄ or ► to select the Paper tab (
If the Tab Selection screen is not displayed, press the Menu button.•
Press the OK button.
The Paper Menu is displayed.
Press ▲ or ▼ to select Eject Paper , and then press the
OK button.
).
Ready
OK: Paper Menu
Plain Paper
ISO A2
4
5
6
Press ▲ or ▼ to select Yes , and then press the OK
button.
The paper is ejected from the front of the printer.
Open the Top Cover , lift the Release Lever , and remove
the sheet.
Lower the Release Lever and close the Top Cover .
22
Page 23
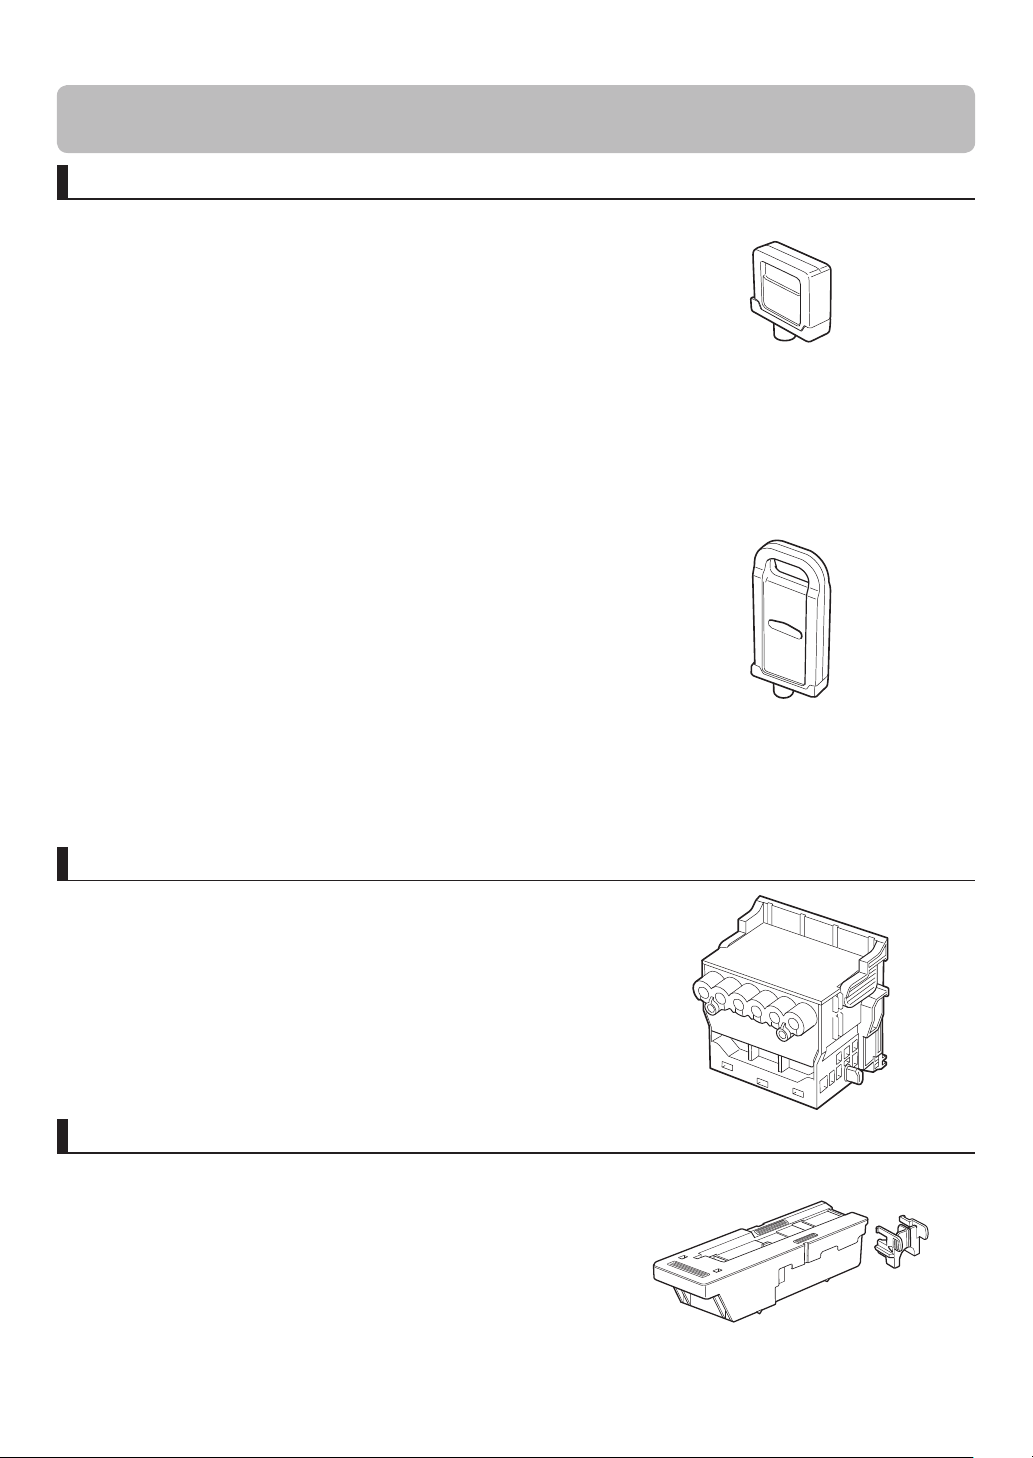
Consumables
Ink Tanks
When purchasing ink tanks, make sure the following Ink Tank serial numbers are printed on the label.
330 ml (11.2 fl oz)
PC Ink Tank PFI-304PC •
C Ink Tank PFI-304C •
MBK Ink Tank PFI-304MBK •
Y Ink Tank PFI-304Y •
M Ink Tank PFI-304M •
PM Ink Tank PFI-304PM •
R Ink Tank PFI-304R •
G Ink Tank PFI-304G •
B Ink Tank PFI-304B •
PGY Ink Tank PFI-304PGY •
GY Ink Tank PFI-304GY •
BK Ink Tank PFI-304BK •
700 ml (23.7 fl oz)
PC Ink Tank PFI-704PC •
C Ink Tank PFI-704C •
MBK Ink Tank PFI-704MBK •
Y Ink Tank PFI-704Y •
M Ink Tank PFI-704M •
PM Ink Tank PFI-704PM •
R Ink Tank PFI-704R •
G Ink Tank PFI-704G •
B Ink Tank PFI-704B •
PGY Ink Tank PFI-704PGY •
GY Ink Tank PFI-704GY •
BK Ink Tank PFI-704BK •
Printhead
•
Printhead PF-05
Maintenance Cartridge
The maintenance cartridge is provided with a shaft cleaner.
Maintenance Cartridge MC-08 •
23
Page 24
Replacing Ink Tanks
P
M
M
B
K
R
G
B
Compatible ink tanks
Replacement ink tanks in 330 ml (11.2 fl oz) and 700 ml (23.7 fl oz) capacities are supported.
, Consumables)
(→
Precautions when handling ink tanks
Take the following precautions when handling ink tanks.
There may be ink around the ink supply section of ink tanks you removed. Handle ink tanks carefully during
•
replacement. The ink may stain clothing.
We recommend using up an Ink Tank in the course of printing within six months after breaking the seal. Printing
•
quality may be affected if you use older ink tanks.
Do not leave the printer without ink tanks installed for extended periods (a month or more). Residual ink may
•
become clogged inside the printer and affect printing quality.
Make sure the printer is ready for ink tank replacement
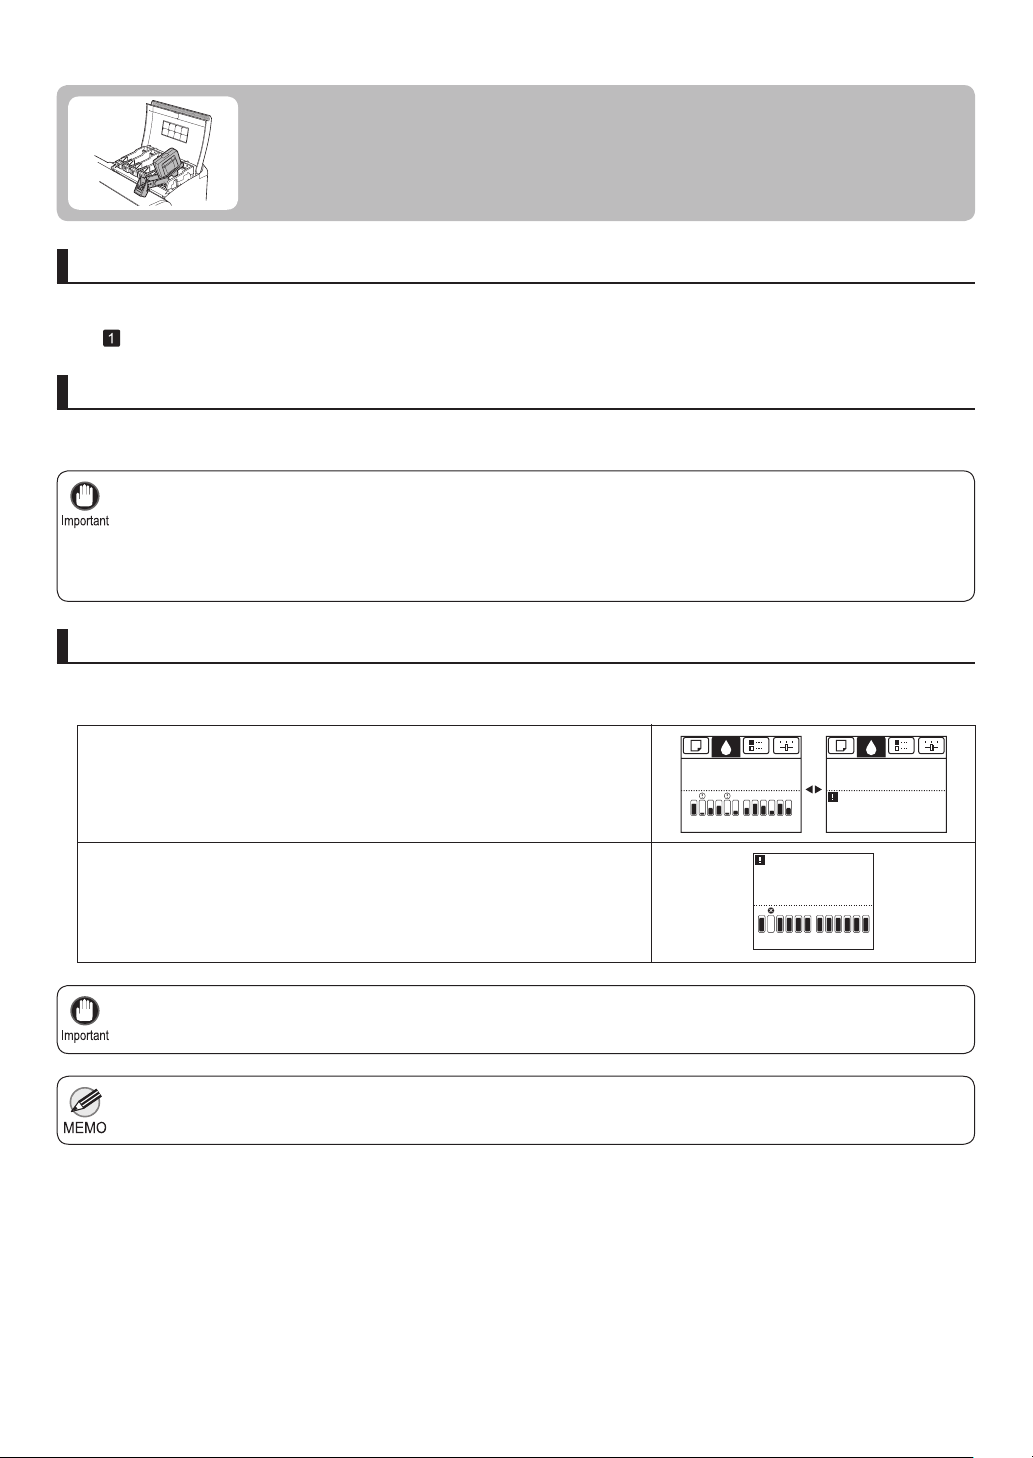
Ink Tank replacement is possible in the following cases.
Replace ink tanks as follows.
You can replace ink tanks if the Display Screen advises you to check the
amount of ink left or replace ink tanks.
If a message requests you to replace ink tanks, press the OK button.
In this case, go to " Remove the ink tanks " without following the instructions in
" Access the menu for ink tank replacement. "
Printing
OK: Ink Menu
M
CY
PMRB B
B
K
C
P
G
GMP
G
Y
K
Y
No ink left.
Replace ink tank.
OK
M
PMRB
CY
B
K
C
Printing
OK: Ink Menu
Not much ink is
left. Prepare to
replace the ink.
GMP
Do not remove an Ink Tank during initialization immediately after turning on the printer, or during printhead cleaning.•
Ink Tank replacement is possible even during printing, when print jobs are being canceled, or when paper is being
•
advanced.
P
B
G
G
K
Y
Y
24
Page 25
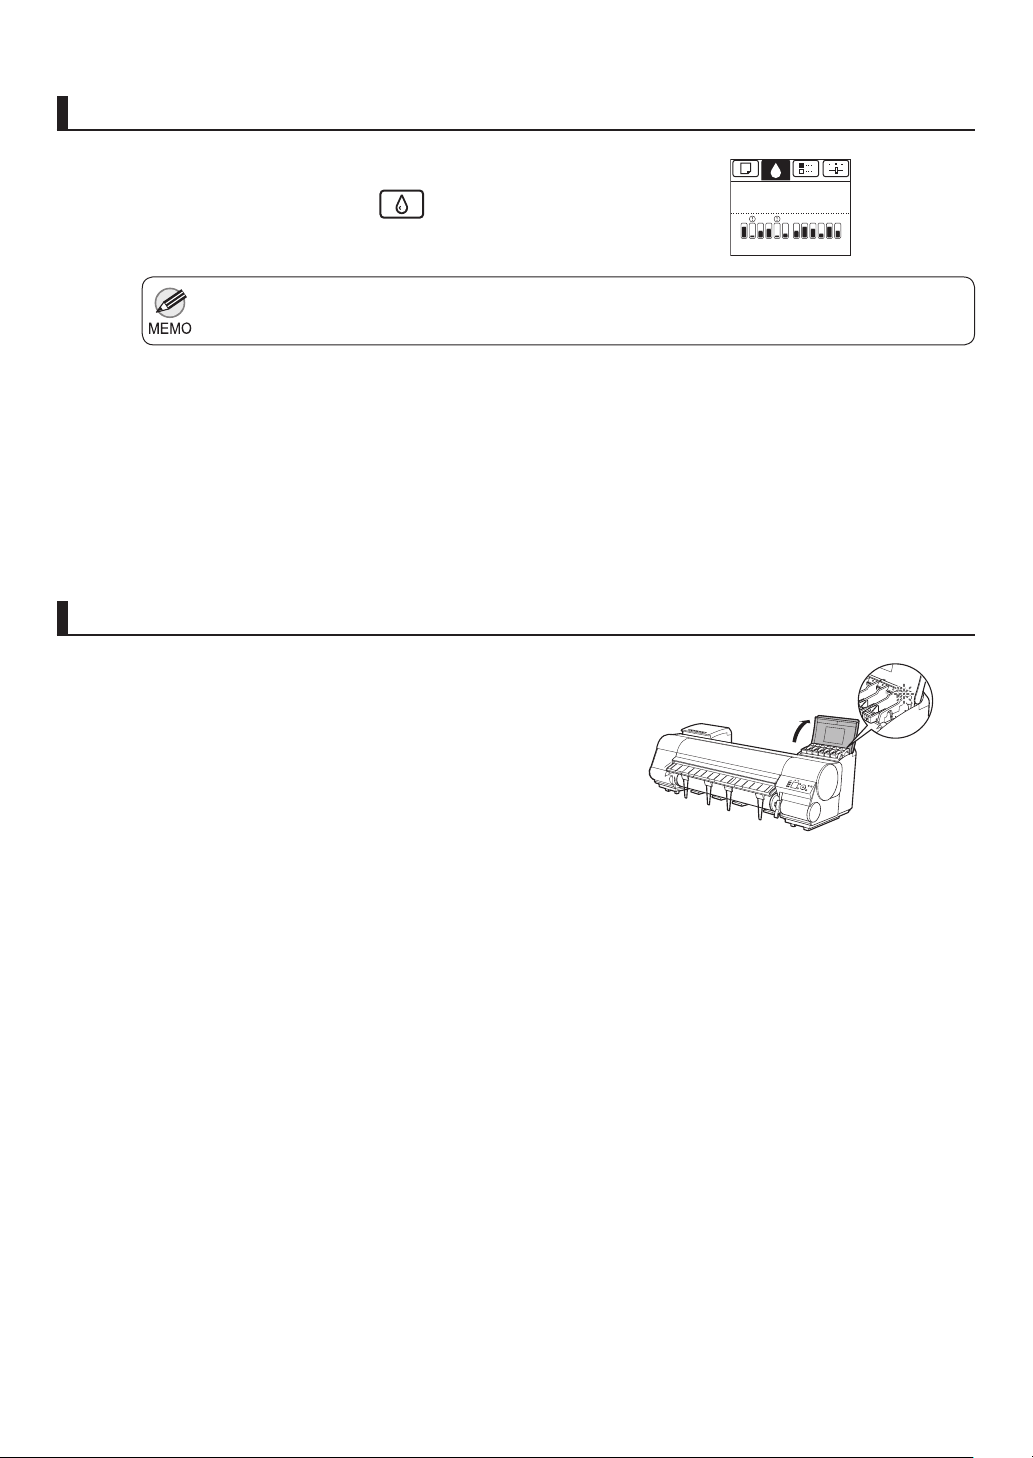
Access the menu for ink tank replacement
Replacing Ink Tanks
On the Tab Selection screen of the Control Panel , press
1
2
3
◄ or ► to select the Ink tab ( ).
If the Tab Selection screen is not displayed, press the Menu button.•
Press the OK button.
The Ink Menu is displayed.
Press ▲ or ▼ to select Rep. Ink Tank , and then press the
OK button.
A message on the Display Screen requests you to open
the Ink Tank Cover . Remove the Ink Tank at this point.
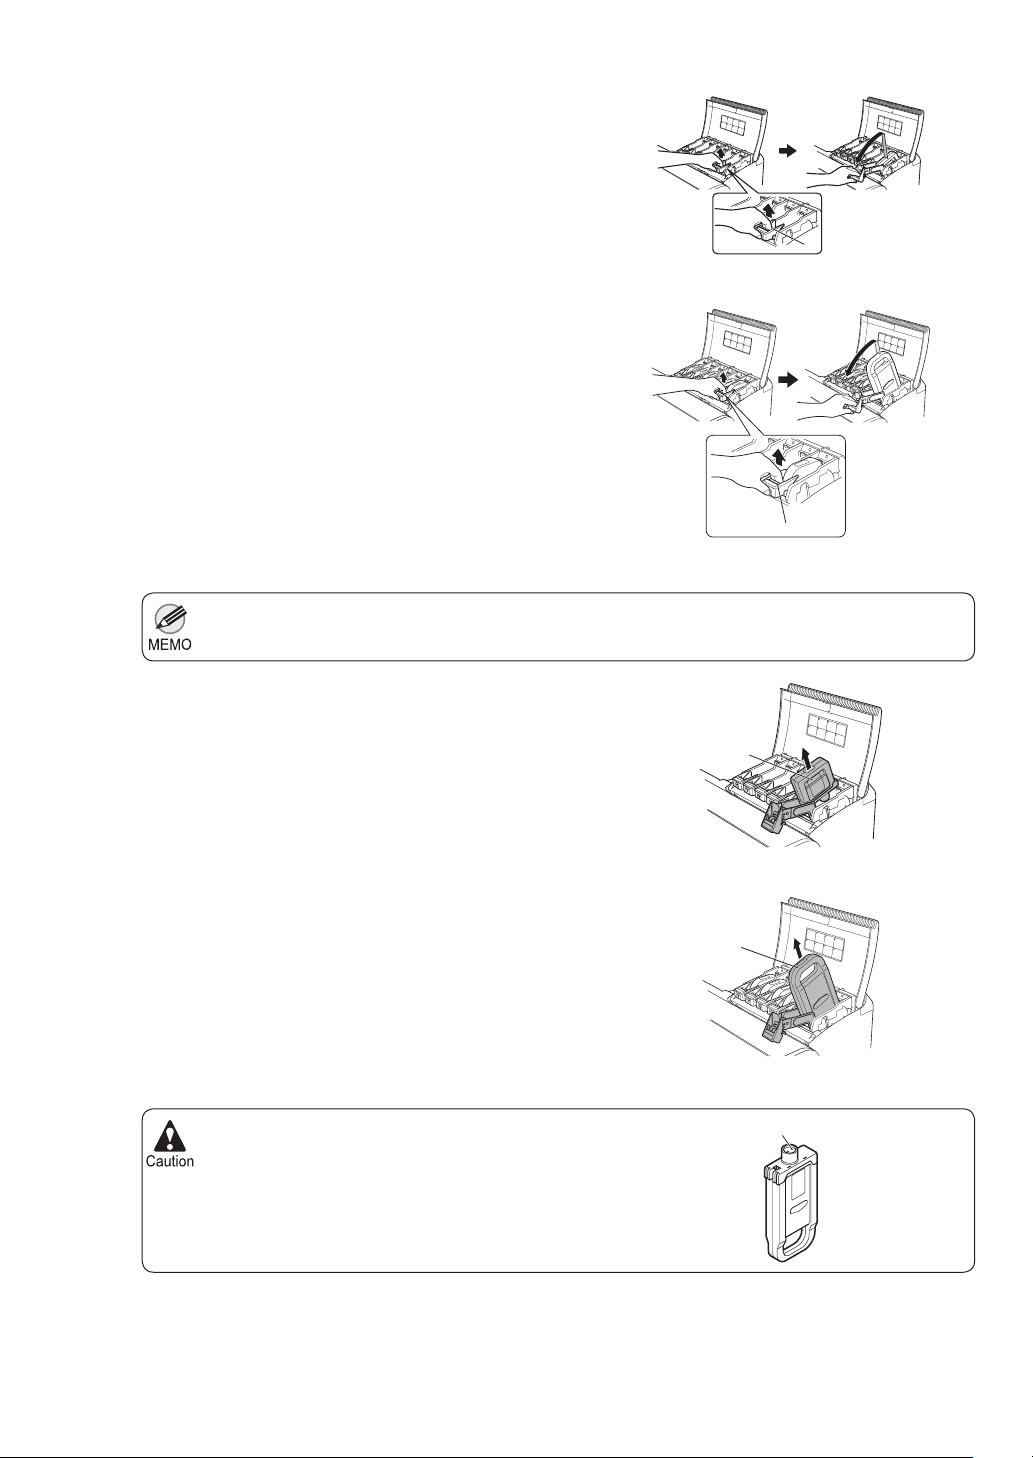
Remove the ink tanks
Open the Ink Tank Cover of the tank for replacement and
1
check the Ink Lamp .
The Ink Lamp fl ashes quickly if there is no ink left.
Printing
OK: Ink Menu
M
CY
PMRB
B
K
C
P
B
G
GMP
G
Y
K
Y
B
25
Page 26
Replacing Ink Tanks
Lift the stopper (a) of the Ink Tank Lock Lever for the
2
color to replace. Lift the Ink Tank Lock Lever until it
stops, and then push it down to the front.
P
M
M
B
K
R
P
M
M
B
K
R
Push the Ink Tank Lock Lever down until it locks.•
Make sure the Ink Tank Lock Lever does not return to the original position.
•
G
G
B
B
330 ml tanks
G
G
B
B
700 ml tanks
P
M
M
B
K
R
G
G
B
a
P
M
M
B
K
R
G
G
B
a
3
Hold the Ink Tank by the grips (a) or handle (b) and
remove it. Press the OK button.
Store the Ink Tank you removed in the box with the ink hole (a)
•
facing up. Otherwise, ink may leak and cause stains.
a
PM
M
BK
R
G
B
330 ml tanks
b
PM
M
BK
R
G
B
700 ml tanks
a
26
Page 27
Install the ink tanks
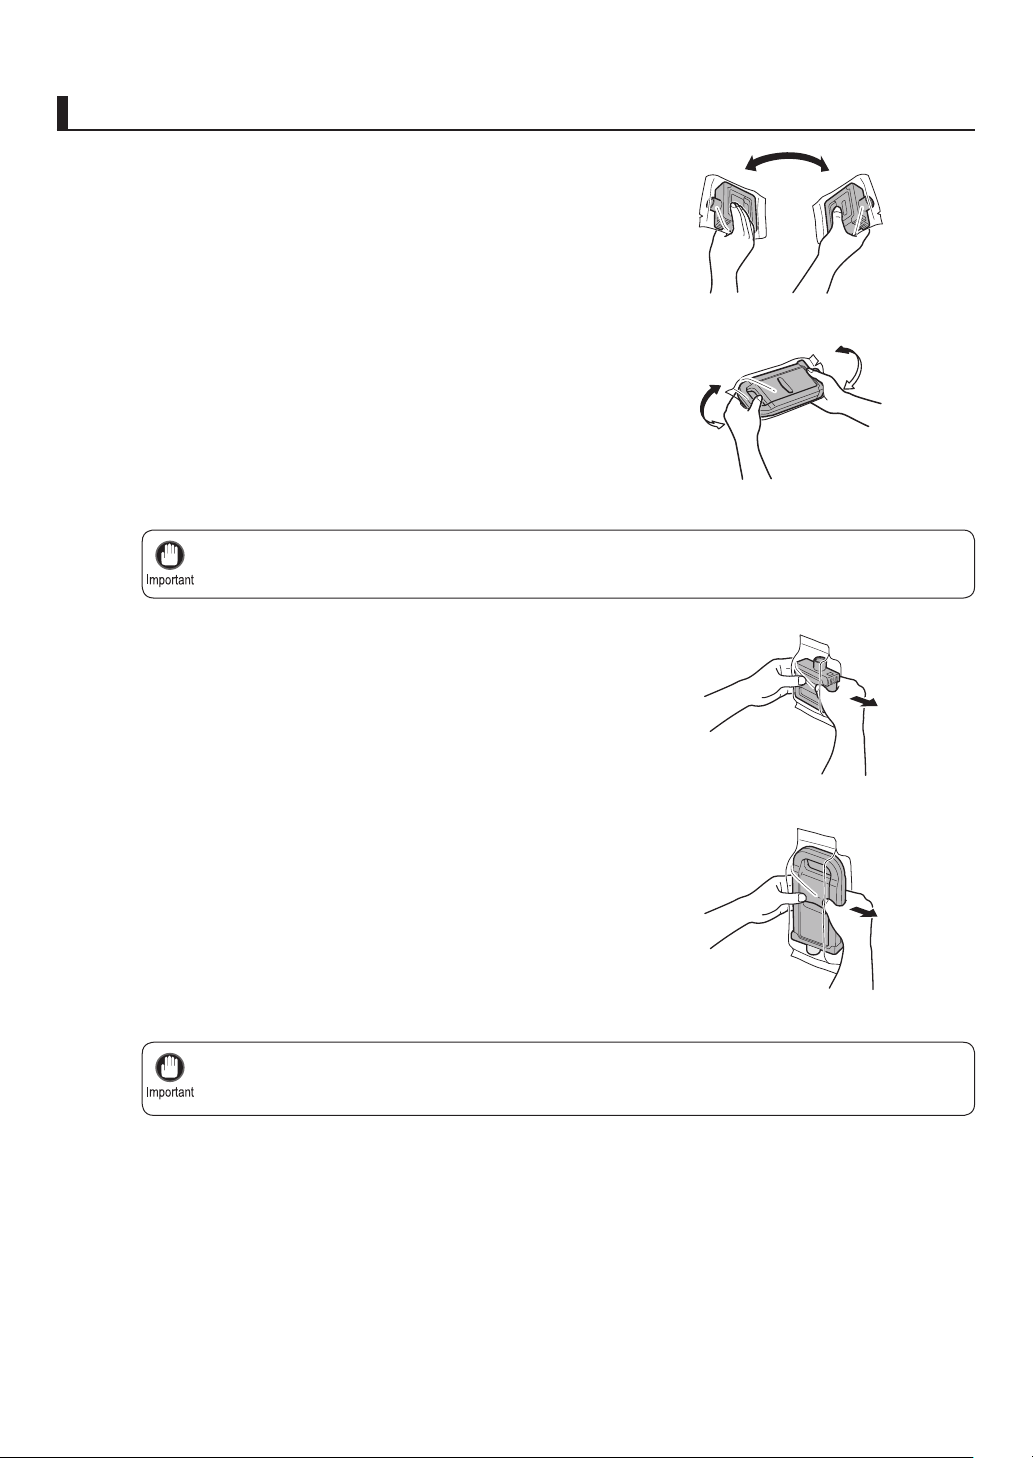
Before opening the pouch, tilt the Ink Tank to the left
1
and right gently seven or eight times. Hold 330 ml ink
tanks in one hand and 700 ml ink tanks in two hands,
as shown.
If you do not agitate the Ink Tank , the ink may settle, which may affect printing quality.•
Replacing Ink Tanks
330 ml tanks
700 ml tanks
2
Open the pouch and remove the Ink Tank .
Never touch the ink hole or electrical contacts. This may cause stains, damage the Ink Tank , and affect
•
printing quality.
Do not remove and agitate ink tanks that have already been installed in the printer. Ink may leak out.•
330 ml tanks
700 ml tanks
27
Page 28
Replacing Ink Tanks
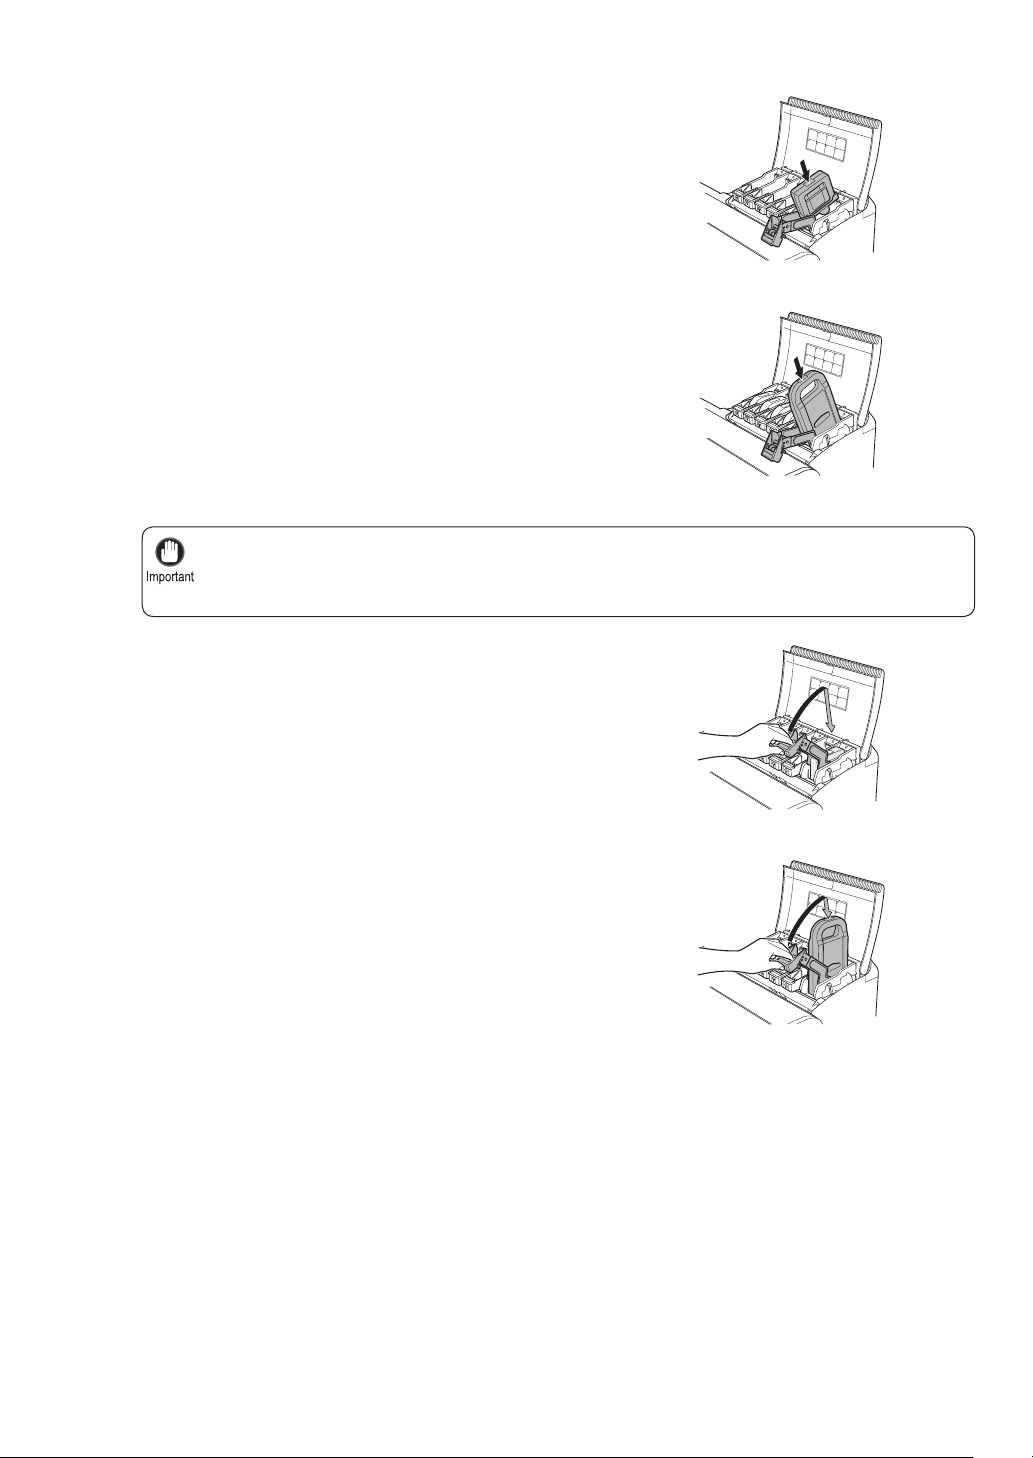
Press the OK button and insert the Ink Tank into the
3
holder with the ink hole facing down, as shown.
P
M
M
B
K
R
G
B
330 ml tanks
PM
M
B
K
R
G
B
700 ml tanks
Ink tanks cannot be loaded in the holder if the color or orientation is incorrect.•
If the Ink Tank does not fi t in the holder, do not force it into the holder. Make sure the color of the Ink
Tank Lock Lever matches the color of the Ink Tank , and check the orientation of the Ink Tank before
reloading it.
4
Lift the Ink Tank Lock Lever until it stops, and then push
it down until it clicks into place.
PM
B
M
BK
R
G
330 ml tanks
PM
B
M
BK
R
G
700 ml tanks
28
Page 29
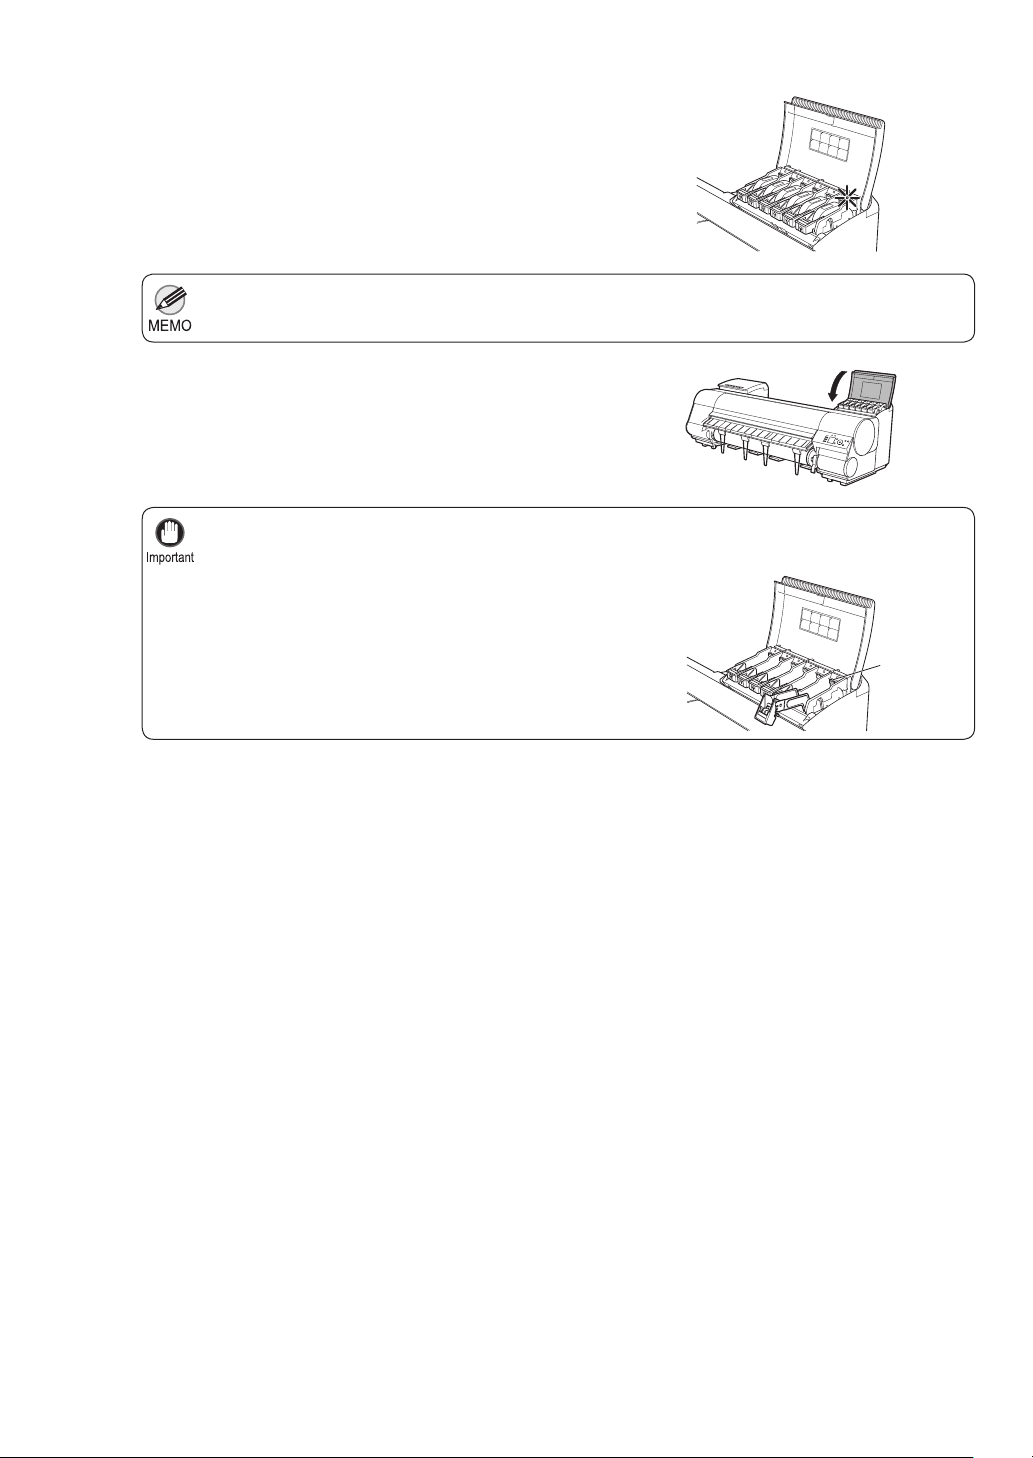
5
6
Make sure the Ink Lamp is lit.
If the Ink Lamp is not lit, reload the tank.•
Close the Ink Tank Cover .
After Ink Tank replacement, always close the Ink Tank Cover . If the Ink Tank Cover cannot close,
•
some Ink Tank Lock Lever may not be closed completely. Make sure all ink tank lock levers are fully
closed.
To close the Ink Tank Cover when no Ink Tank is
•
installed (as when moving the printer), push the release
lever (a) as shown while returning the Ink Tank Lock
Lever to the original position.
Replacing Ink Tanks
P
M
M
B
K
R
G
B
P
M
M
B
K
R
G
B
a
29
Page 30
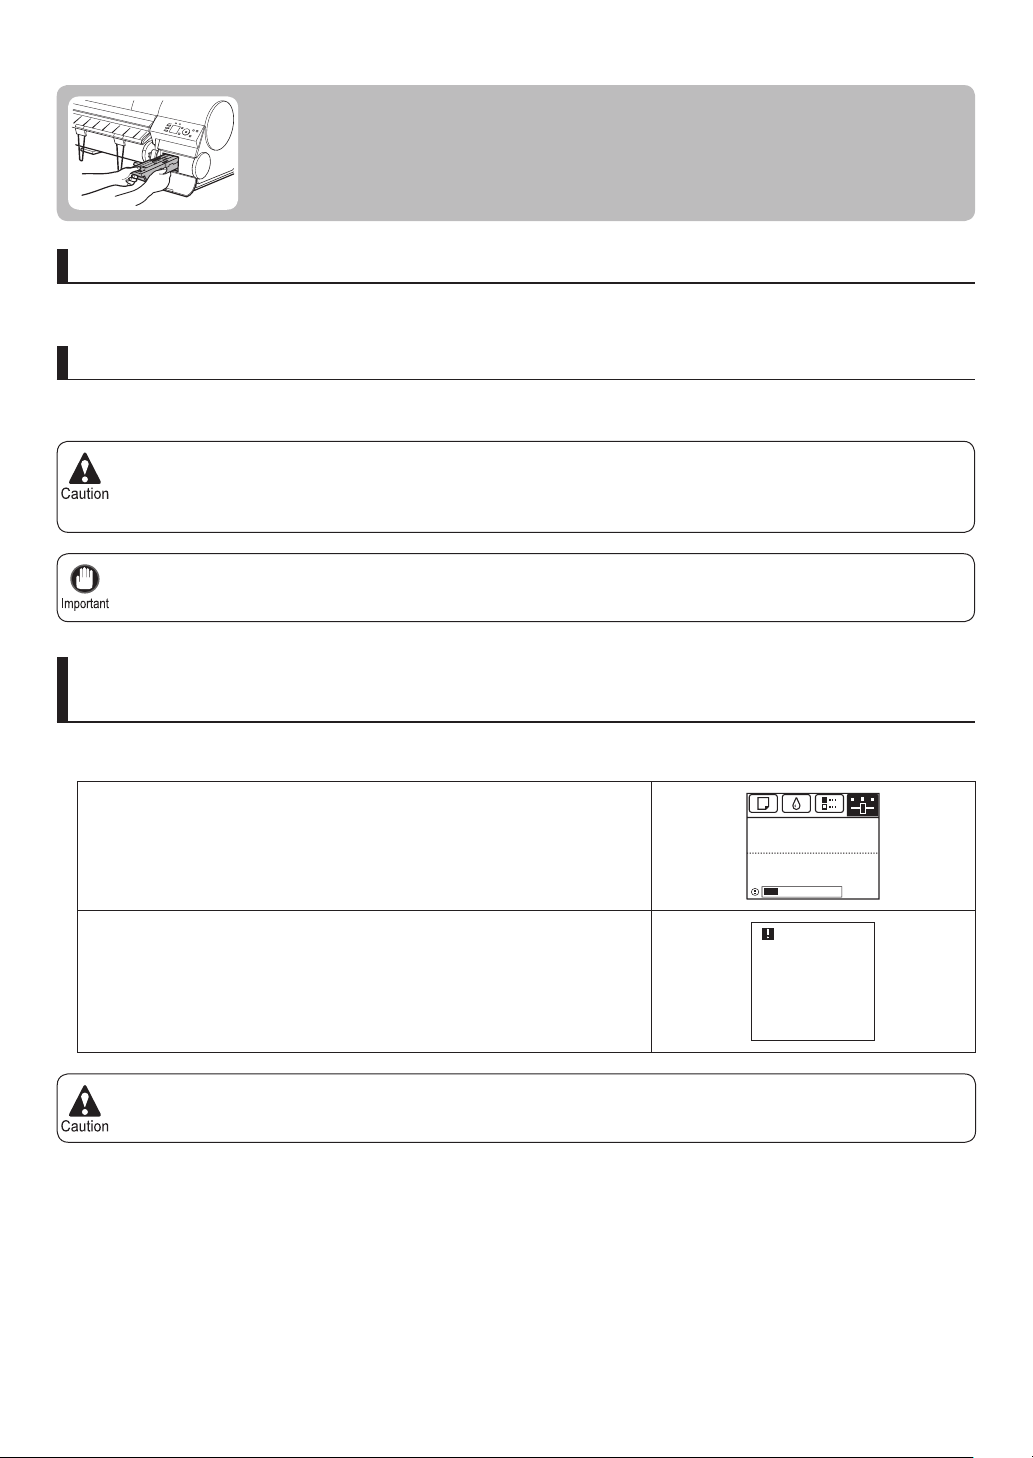
Replacing the Maintenance Cartridge
Replace the Maintenance Cartridge as follows.
Compatible maintenance cartridges
Use Maintenance Cartridge MC-08 .
Precautions when handling the maintenance cartridge
Take the following precautions when handling the Maintenance Cartridge .
To prevent ink from leaking from a used Maintenance Cartridge , avoid dropping the cartridge or storing it at an
•
angle. Otherwise, ink may leak and cause stains.
Ink adheres to the top of the Maintenance Cartridge after it has been used. Handle the Maintenance Cartridge
•
carefully during replacement. The ink may stain clothing.
Do not remove the Maintenance Cartridge except to replace it.•
Make sure the printer is ready for maintenance cartridge
replacement
Maintenance Cartridge replacement is possible in the following cases.
You can replace cartridges if the Display Screen advises you to check the
remaining capacity or replace the Maintenance Cartridge .
If a message is displayed requesting Maintenance Cartridge replacement,
skip the step " Access the menu for maintenance cartridge replacement. "
Follow the instructions in " Replace the maintenance cartridge. "
Do not replace the Maintenance Cartridge during initialization immediately after turning on the printer, during
•
Printhead cleaning, or when ink is being absorbed. Ink may leak out.
Printing
OK:Setting/Adj. Menu
Maint. cart.
The level is low
䇭䇭Maintenance
cartridge full.
Replace
the maintenance
cartridge.
30
Page 31

Replacing the Maintenance Cartridge
Access the menu for maintenance cartridge replacement
1
2
3
4
On the Tab Selection screen of the Control Panel , press
◄ or ► to select the Settings/Adj. tab (
If the Tab Selection screen is not displayed, press the Menu button.•
Press the OK button.
The Set./Adj. Menu is displayed.
Press ▲ or ▼ to select Maintenance , and then press the
OK button.
Press ▲ or ▼ to select Repl. Maint. C , and then press
the OK button.
A message on the Display Screen advises you to open
the Maintenance Cartridge Cover .
).
Printing
OK:Setting/Adj. Menu
Maint. cart.
The level is low
31
Page 32
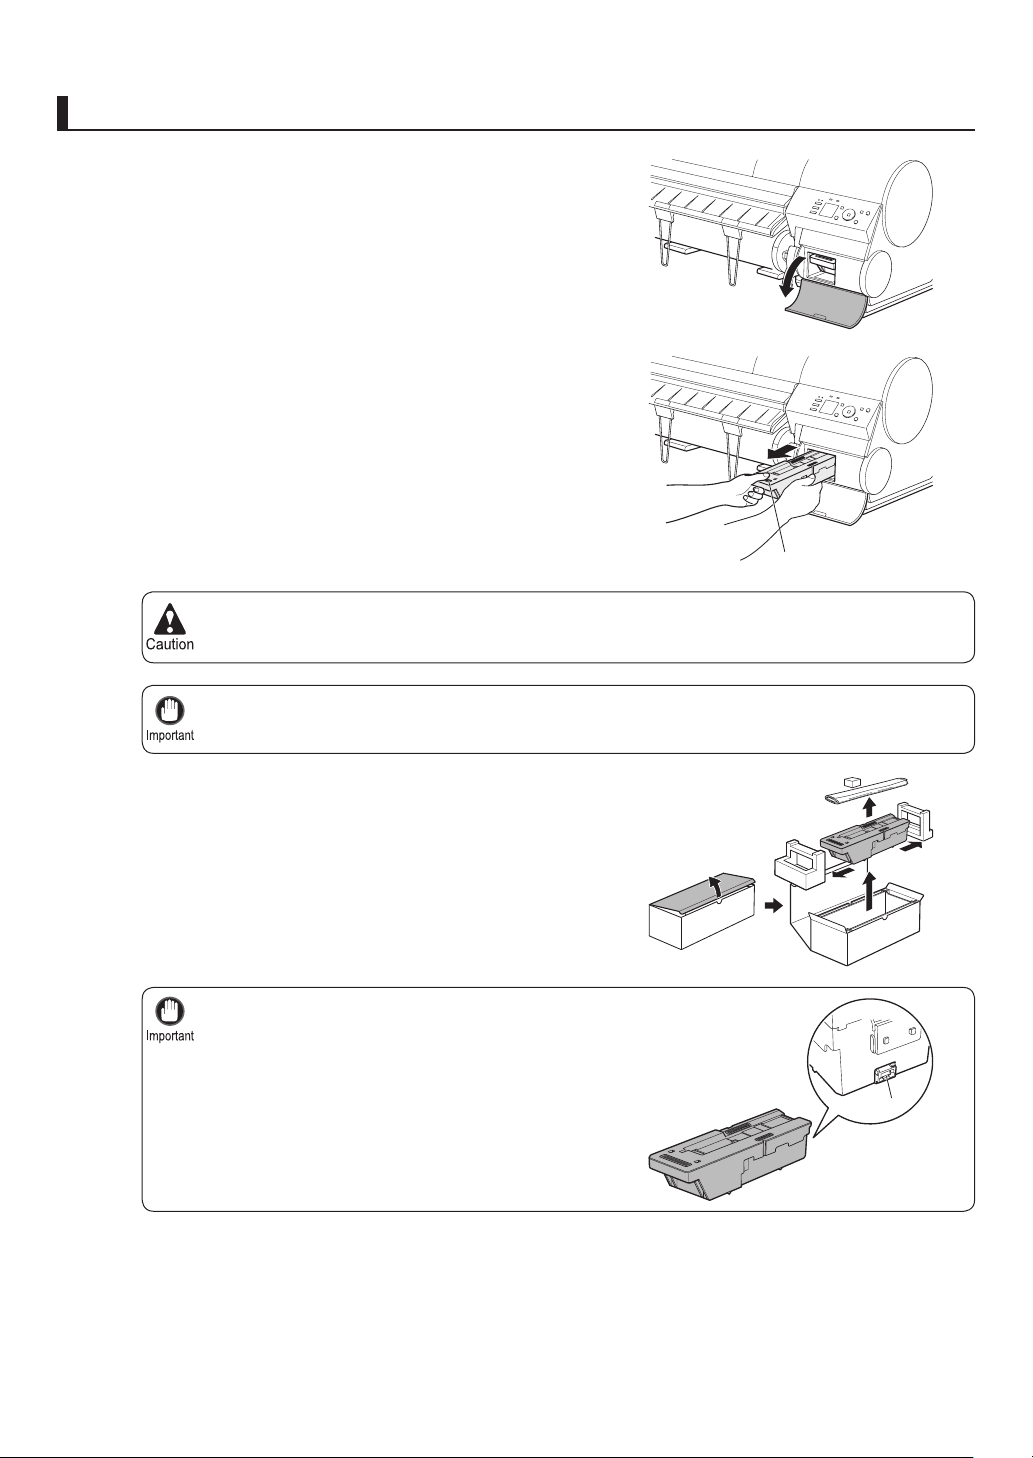
Replacing the Maintenance Cartridge
Replace the maintenance cartridge
Open the Maintenance Cartridge Cover .
1
Hold the used Maintenance Cartridge by the grip (a) with
2
one hand and put your other hand under the Maintenance
Cartridge to hold it fi rmly on the bottom, keeping it level as
you pull it out.
Used maintenance cartridges are heavy. Always grasp the cartridge fi rmly and keep the cartridge level
•
during removal and storage. If you drop a used Maintenance Cartridge or store it at an angle, ink may
leak and cause stains.
a
3
The remaining Maintenance Cartridge capacity is recorded on each printer. Do not install a used
•
Maintenance Cartridge in another printer.
Open the box, remove the plastic bag, packaging material,
and Shaft Cleaner , and take out the Maintenance
Cartridge .
Never touch the metal contacts (a). This may damage
•
the Maintenance Cartridge .
a
32
Page 33
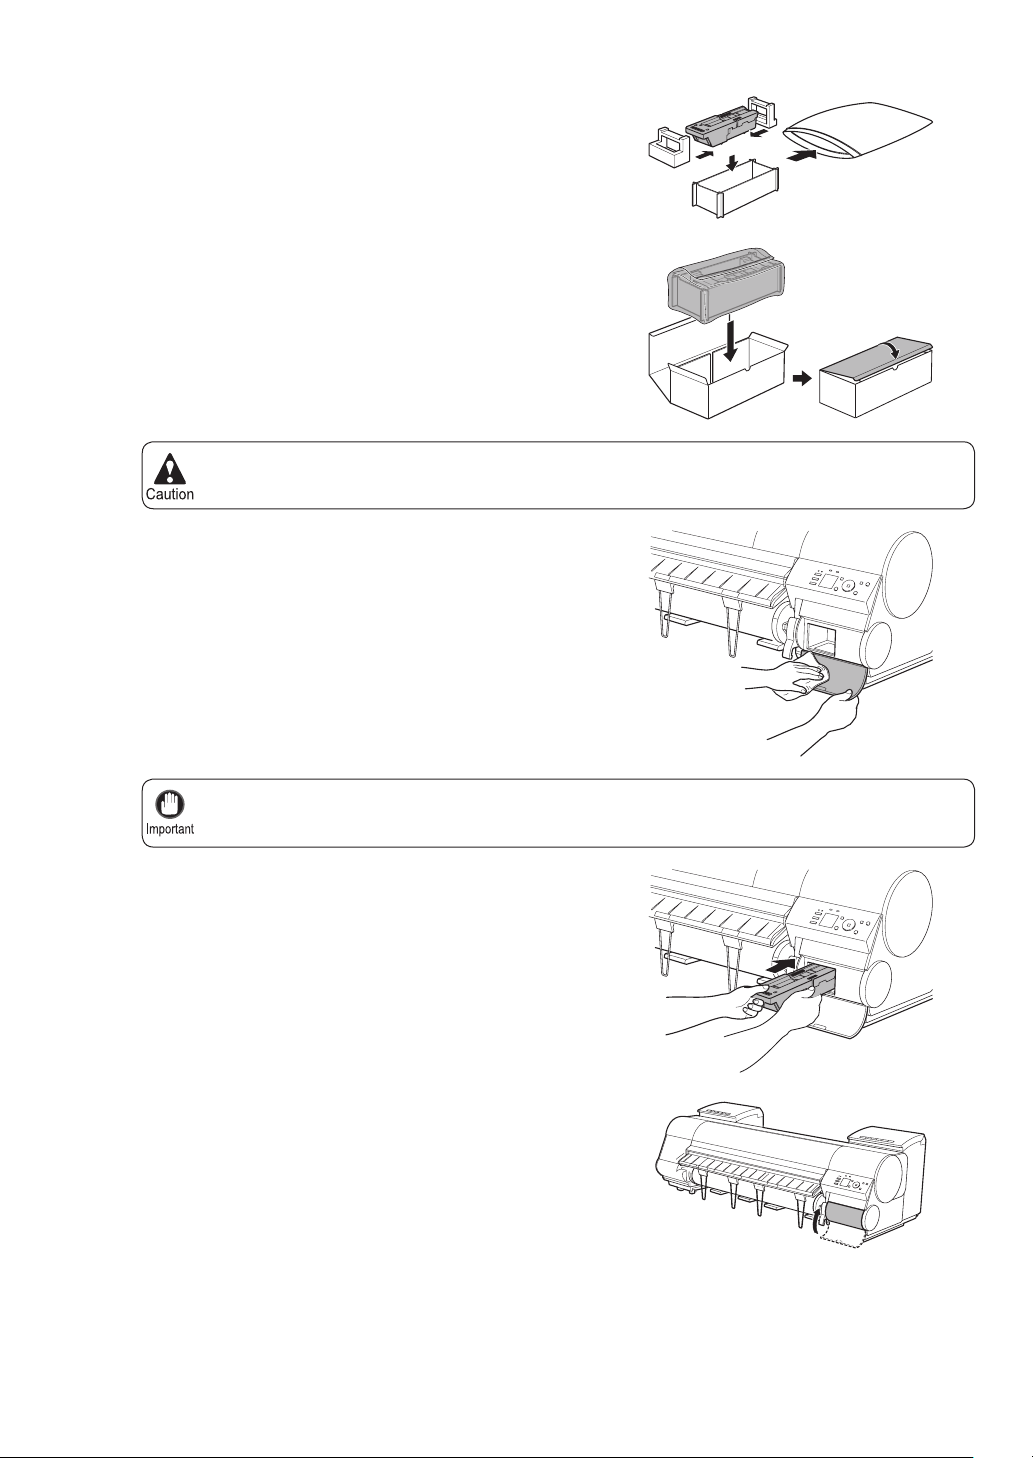
4
5
6
Attach the packaging material to the used Maintenance
Cartridge and put it in the box. Keep it level as you put it in
the plastic bag. Expel excess air from the plastic bag and
seal the zipper.
Confi rm the Maintenance Cartridge is right-side up, put it
in the box, and store it so that it stays level.
Always put the used Maintenance Cartridge back in the box and store the box on a fl at surface.
•
Otherwise, ink may leak and cause stains.
Wipe away any soiling on the Maintenance Cartridge
Cover .
Replacing the Maintenance Cartridge
7
8
Support the Maintenance Cartridge Cover from underneath as you wipe it.•
Keeping the new Maintenance Cartridge level, insert it all
the way in.
Close the Maintenance Cartridge Cover .
33
Page 34

Replacing the Maintenance Cartridge
Press the OK button.
9
The printer now initializes the Maintenance Cartridge .
Next, replace the Shaft Cleaner .
34
Page 35
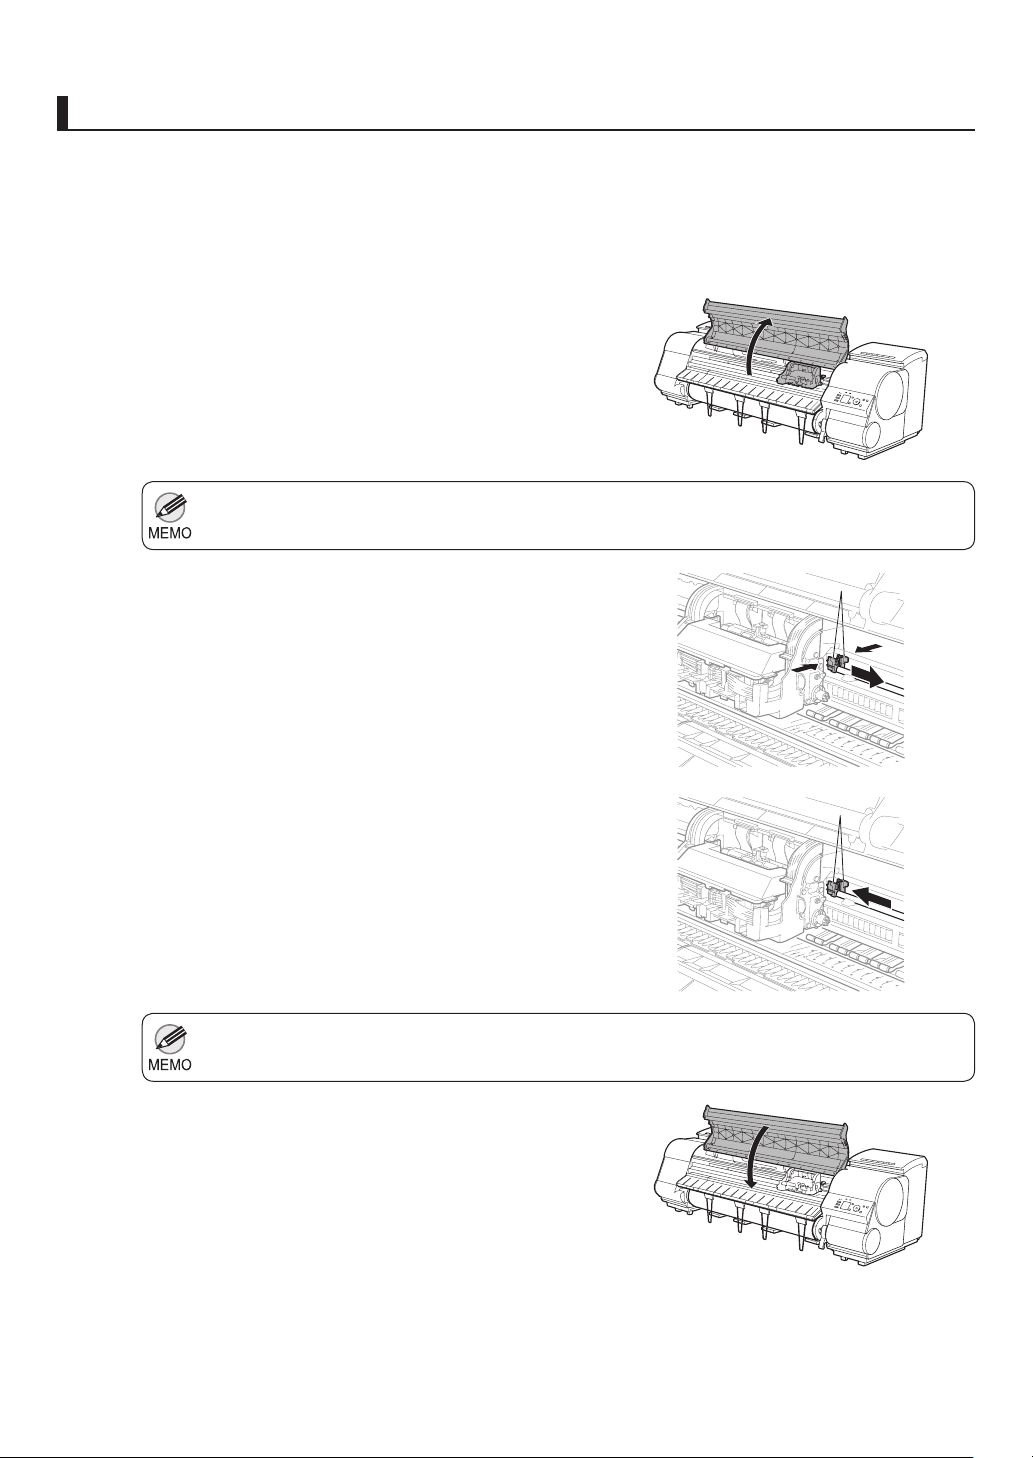
Replace the shaft cleaner
After the message is displayed regarding Shaft Cleaner
1
replacement, press ▲ or ▼ to select Yes , and then press
the OK button.
After the Carriage is moved, the Display Screen indicates
Open Upper Cover .
Open the Top Cover .
2
If you do not respond within two minutes, shaft cleaner replacement is canceled. In this case, repeat the
•
procedure.
Replacing the Maintenance Cartridge
3
4
5
Hold the Shaft Cleaner on the right side of the Carriage
by the grips (a) and pull it to the right to remove it.
Holding the new Shaft Cleaner by the grips (a), attach it
to the Carriage .
Be sure to put the used Shaft Cleaner in the small box before putting it in the larger box with the used
•
Maintenance Cartridge for disposal.
Close the Top Cover .
a
a
The Carriage moves back into position.
35
Page 36
Replacing the Printhead
Replace the Printhead as follows.
When to replace the printhead
This printer is equipped with two printheads.
Replace one or both printheads in the following situations.
If the printing quality does not improve even after one or two cycles of Head Cleaning B from the printer
•
menu
Replace any printheads with poor printing performance.
If the Display Screen indicates Open top cover and replace the left printhead. •
Replace the Printhead on the left side.
If the Display Screen indicates Open top cover and replace the right printhead. •
Replace the Printhead on the right side.
If your Canon dealer has advised you to replace the Printhead •
Replace the Printhead as directed.
Compatible printheads
Use Printhead PF-05 .
Precautions when handling the printhead
Take the following precautions when handling the Printhead .
There may be ink around the nozzles of the Printhead you remove. Handle the Printhead carefully during
•
replacement. The ink may stain clothing.
Do not open the Printhead pouch until immediately before installation. After removing the Printhead from the pouch,
•
install it right away. If the Printhead is left after the pouch is opened, the nozzles may dry out, which may affect
printing quality.
36
Page 37
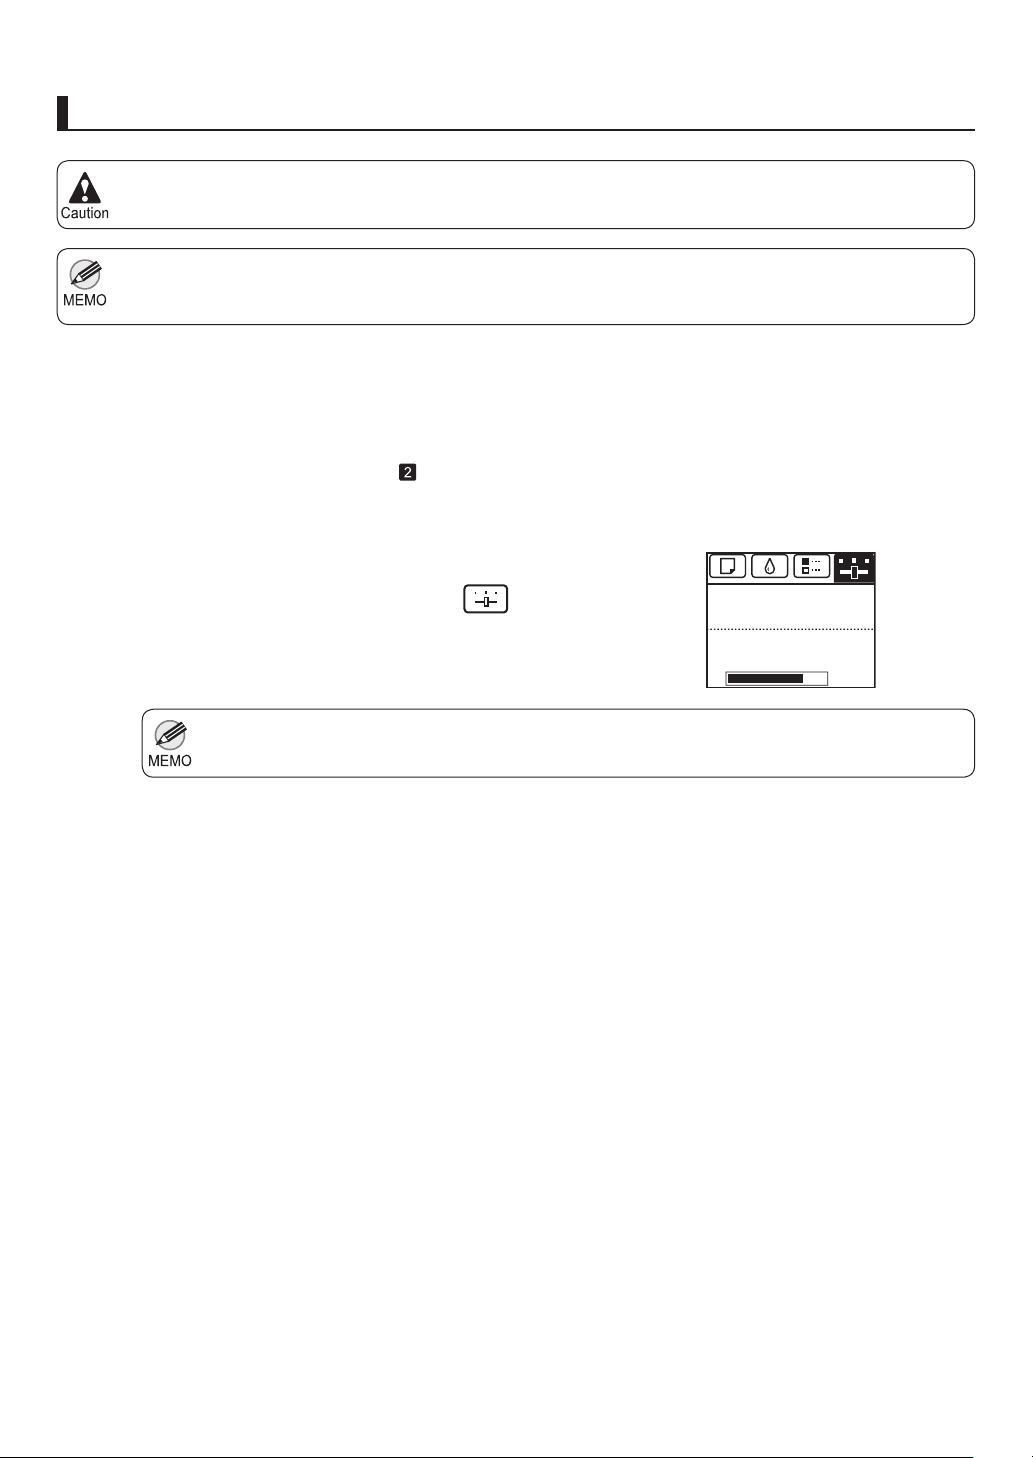
Replacing the Printhead
Access the menu for printhead replacement
When replacing the Printhead immediately after printing, wait a few minutes before replacing it. The metal parts of
•
the Printhead become hot during printing, and there is a risk of burns from touching these parts.
Prepare a new Ink Tank when ink levels are low.•
Your hands may become dirty during Printhead replacement. Use the gloves provided with the new Printhead for
•
replacement.
If the roll is not ejected because of the cutting method
1
selected, cut it manually and remove it.
(→"Cutting Roll Paper After Printing," User Manual)
2
3
4
5
6
Clean inside the Top Cover . (→
On the Tab Selection screen of the Control Panel , press
◄ or ► to select the Settings/Adj. tab (
If the Tab Selection screen is not displayed, press the Menu button.•
Press the OK button.
The Set./Adj. Menu is displayed.
Press ▲ or ▼ to select Maintenance , and then press the
OK button.
Press ▲ or ▼ to select Replace P.head , and then press
the OK button.
, If Paper is Soiled)
).
Ready
OK:Setting/Adj. Menu
Maint. cart.
Remaining Amount
㪏㪇㩼
7
Press ▲ or ▼ to select the Printhead for replacement.
Select Printhead L when replacing the left printhead,
Printhead R when replacing the right printhead, and L
& R Printheads when replacing both. Make sure your
selection is correct.
37
Page 38
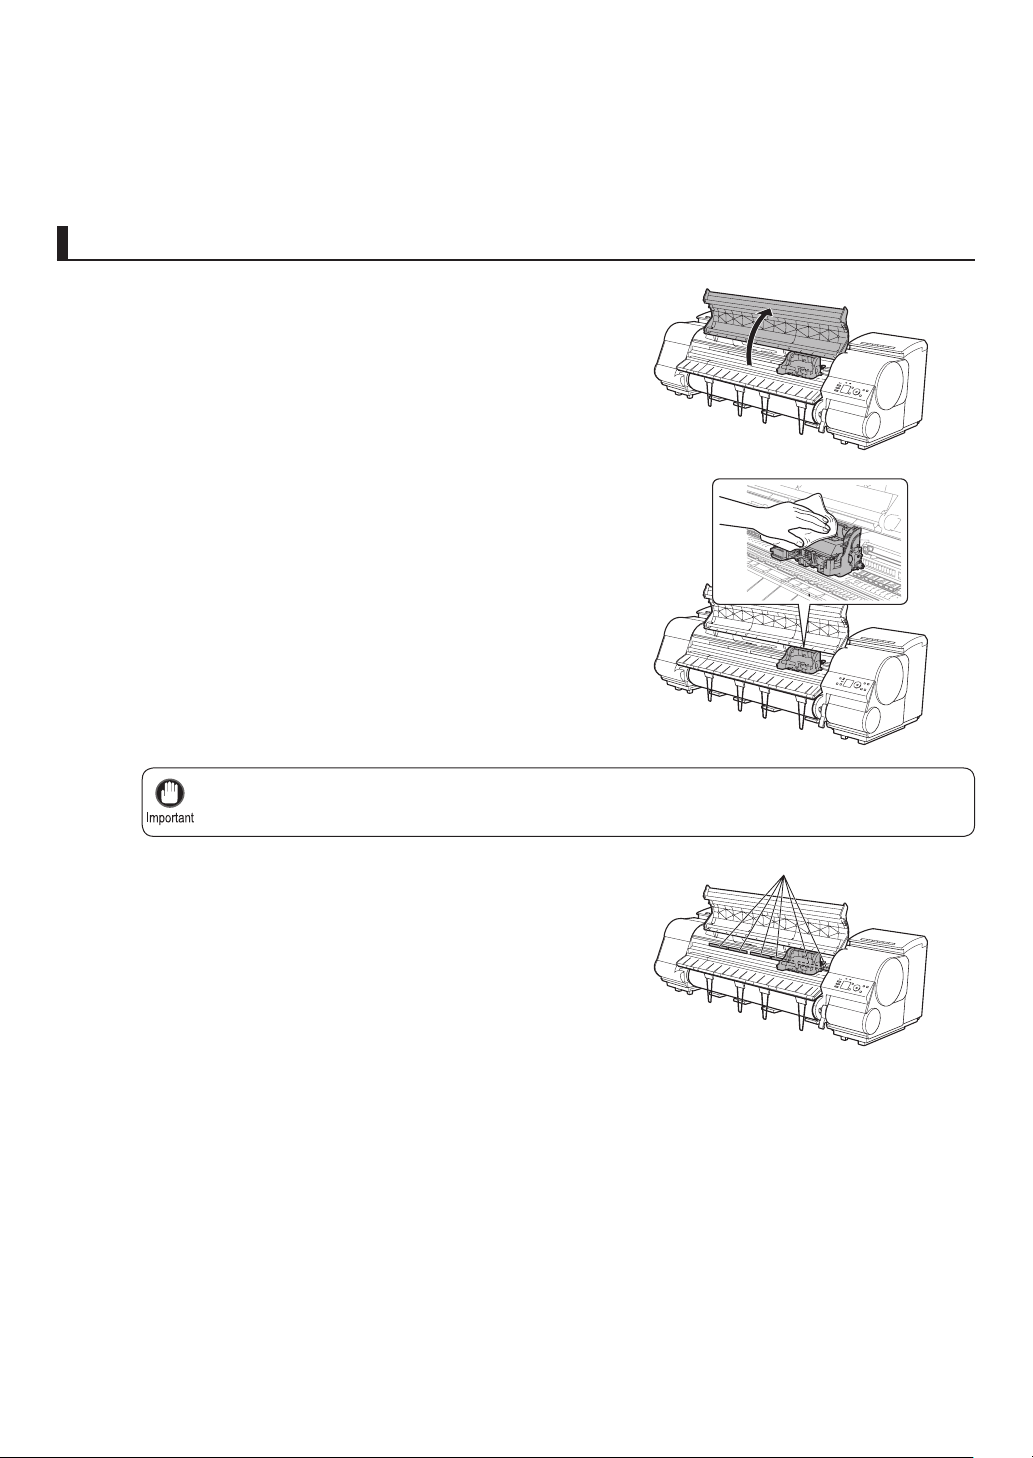
Replacing the Printhead
Press the OK button.
8
Replace the printhead
Ink is now fi lled.
After about three minutes, a message is shown on the
Display Screen instructing you to open the Top Cover .
Open the Top Cover .
1
Instructions are now shown on the Display Screen
regarding head replacement.
If the Carriage Cover is dirty, use a damp cloth that you
2
have wrung out completely to wipe it clean.
3
Never touch the metal contacts of the Carriage . This may damage the printer.•
If the ventilation duct (a) is dirty, use a damp cloth that you
have wrung out completely to wipe it clean.
Move the Carriage out of the way manually if the Carriage
is concealing the ventilation duct, and then clean the duct.
a
38
Page 39
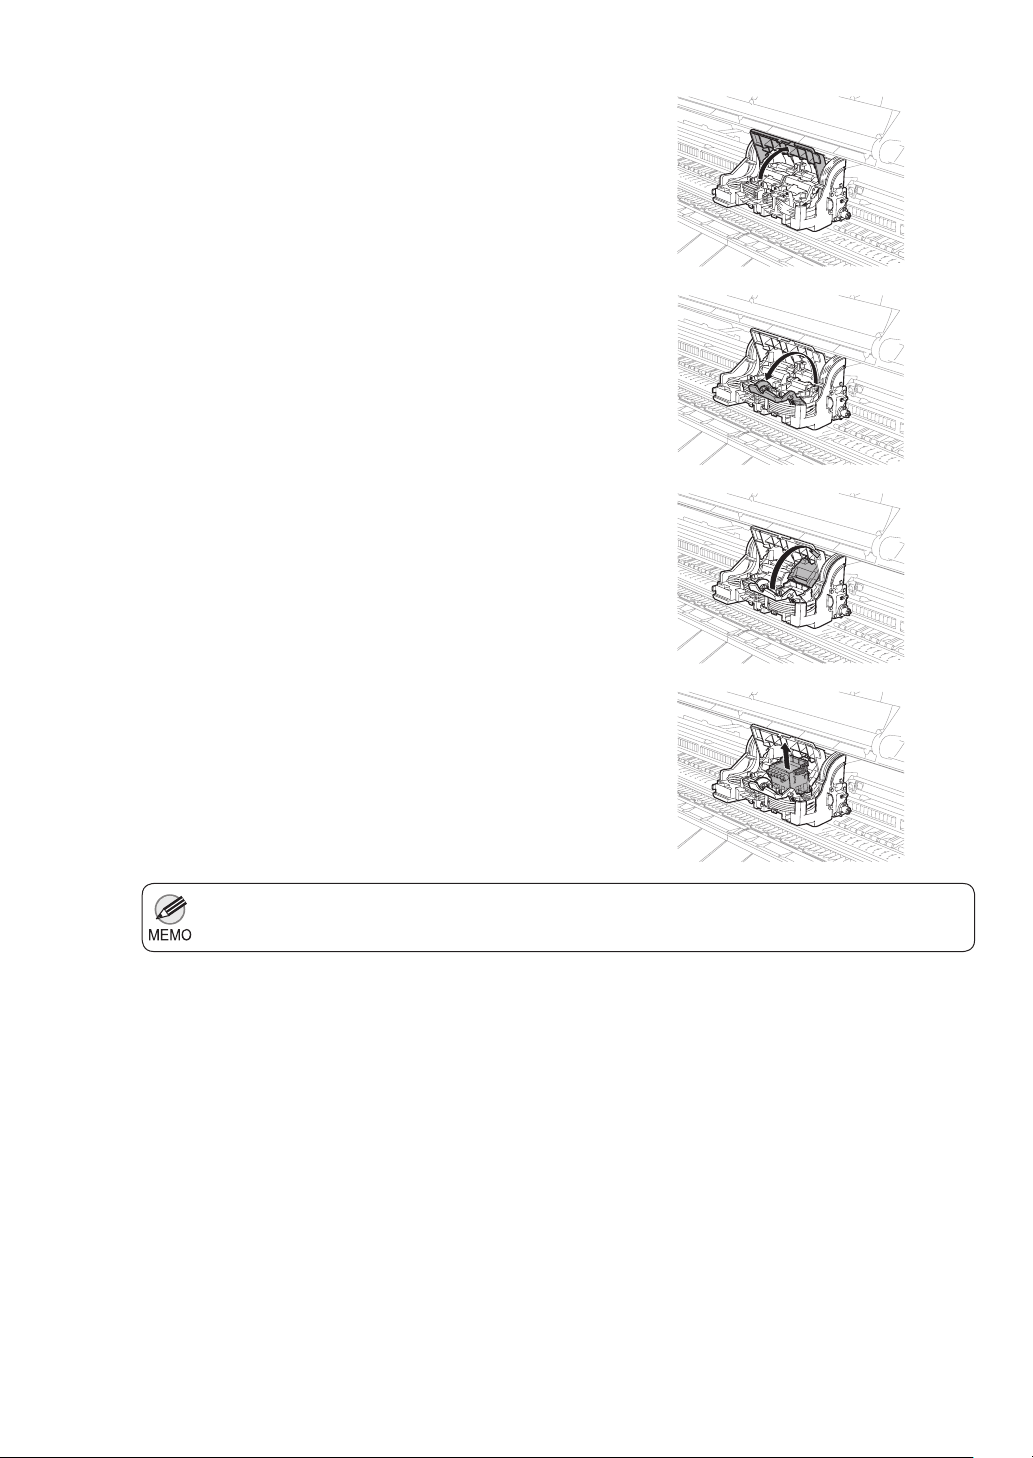
4
5
6
Replacing the Printhead
Pull up the Carriage Cover to open it completely.
Pull the Printhead Fixer Lever forward all the way to
open it completely.
Pull up the Printhead Fixer Cover to open it completely.
7
Remove the Printhead and press the OK button.
Dispose of the used Printhead in accordance with local regulations.•
39
Page 40
Replacing the Printhead
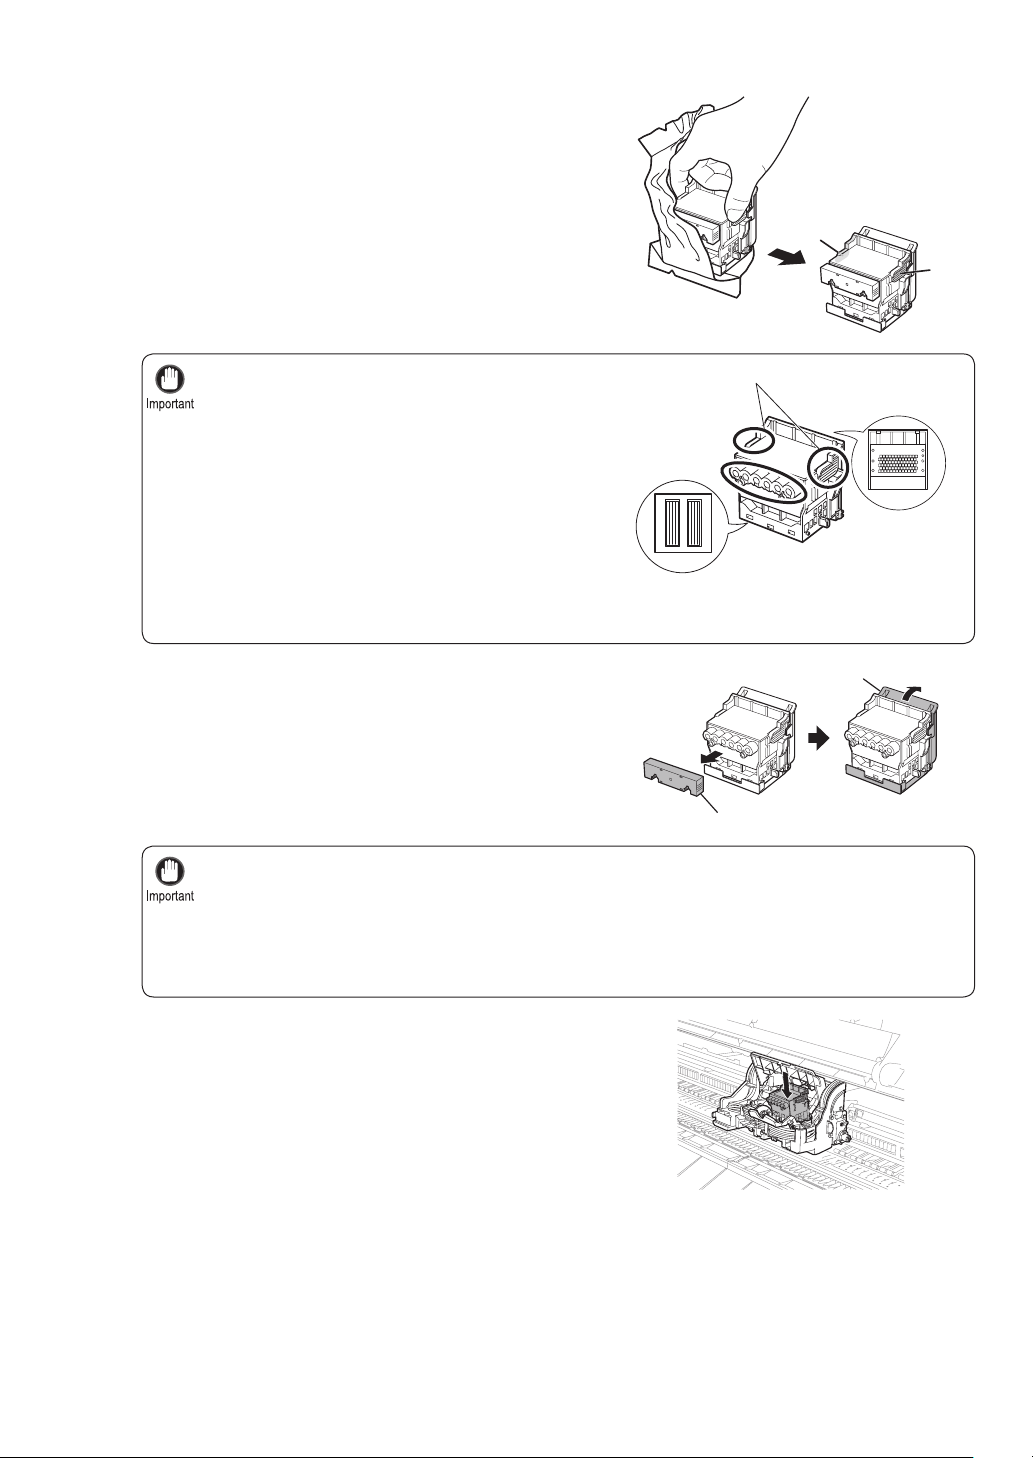
Holding the new Printhead by the grips (a), remove it from
8
the pouch.
•
•
•
a
When handling the Printhead , always hold it by the
grips (a). Never touch the nozzles (b) or metal contacts
(c). This may damage the Printhead and affect printing
quality.
Never touch the ink supply section (d). This may cause
printing problems.
b
If you need to put a Printhead somewhere temporarily before installation, do not keep the nozzles and
metal contacts facing down. If the nozzles or metal contacts are damaged, it may affect the printing
quality.
a
d
c
a
9
10
While fi rmly holding the Printhead you have removed,
use your other hand to remove the orange Protective Part
(a). Squeeze the grips (c) of Protective Part (b) and pull it
down to remove it.
The inside surface of the Protective Part (a) and Protective Part (b) is coated with ink to protect the
•
nozzles. Be careful not to touch these surfaces when removing the caps.
The Printhead contains ink to protect the nozzles. We recommend removing Protective Part (b) as you
•
hold it over the Printhead package or safely out of the way to avoid spilling ink and staining your clothes
or the surrounding area. If ink accidentally spills, wipe off the ink with a dry cloth.
Do not reattach the Protective Part or protective material. Dispose of these materials in accordance with
•
local regulations.
With the nozzles facing down and the metal contacts
toward the back, tilt the Printhead slightly forward and
insert it into the Carriage . Carefully push the printhead
fi rmly into the Carriage , ensuring that the nozzles and
metal contacts do not touch the carriage.
a
b
c
40
Page 41
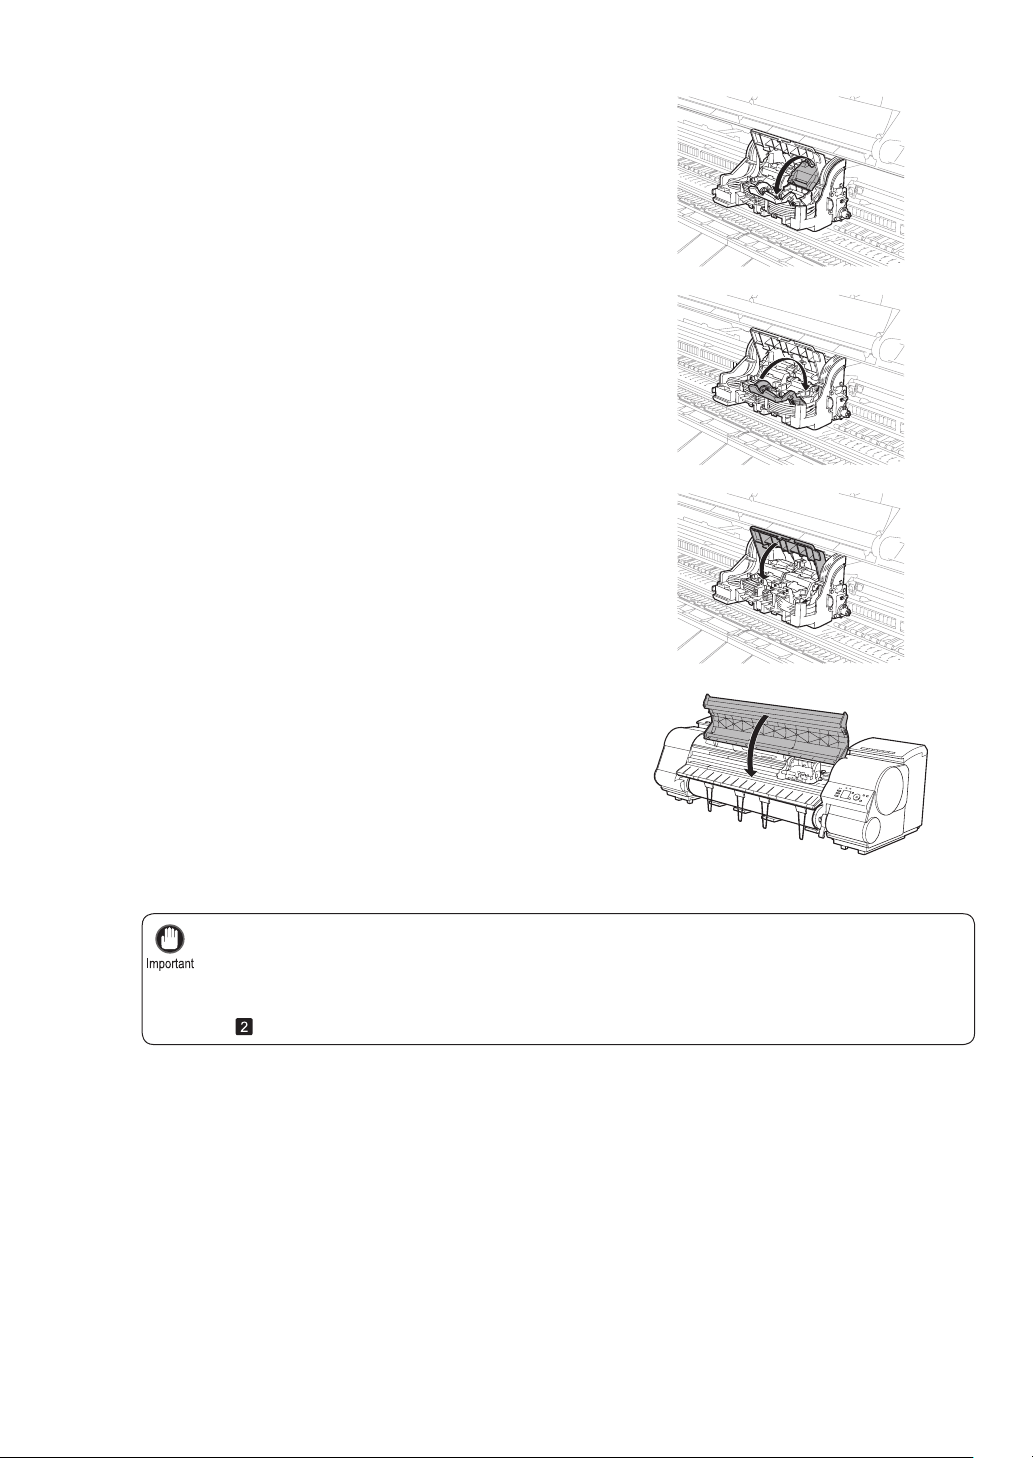
11
12
13
Replacing the Printhead
Pull the Printhead Fixer Cover down toward the front to
lock the Printhead in place.
Push the Printhead Fixer Lever toward the back of the
printer until it clicks.
Push the Carriage Cover down toward the front.
14
Close the Top Cover .
Ink now fi lls the system. It takes about 13 minutes for ink
to fi ll the system.
Never remove an Ink Tank while the system is fi lling with ink.•
After the Printhead has been replaced and fi lled with ink, Head Posi. Adj. ( Auto(Advanced) ) is
•
performed if you have selected Rep.P.head Print > On in the Control Panel menu. In this case, follow
the instructions displayed for Printhead adjustment.
If Rep.P.head Print is Off , perform Head Posi. Adj. ( Auto(Advanced) ) yourself.
(→ , If Vertical Lines are Warped or Colors are Misaligned)
41
Page 42
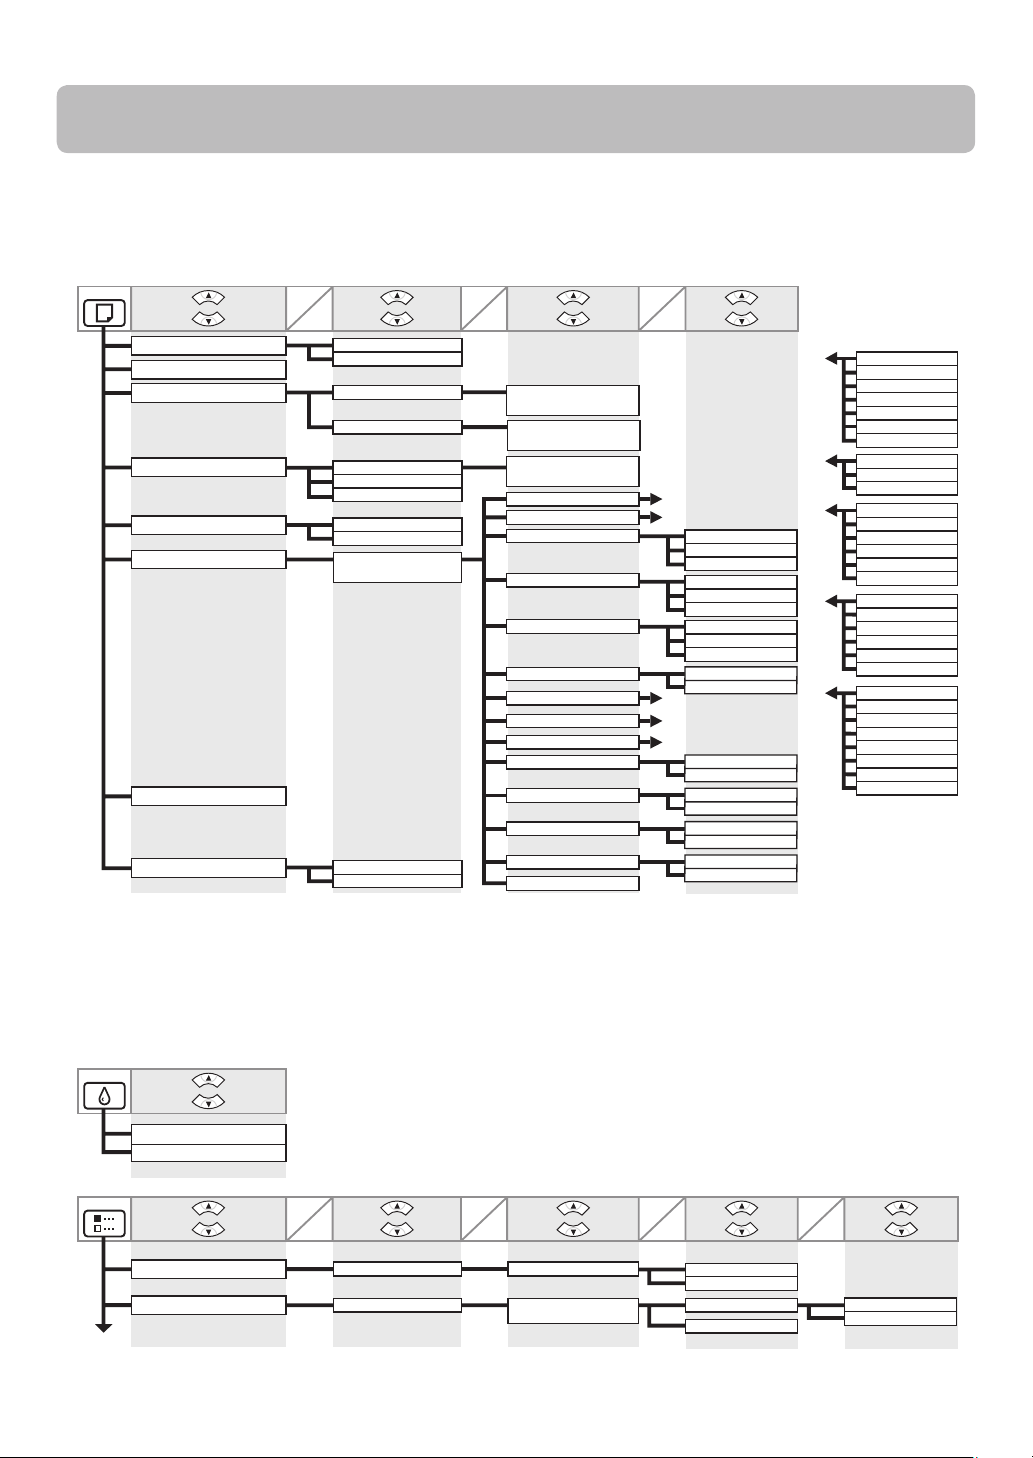
Menu Map
The structure of Tab Selection screen menus on the control panel is as follows. Values at right labeled with an
asterisk (
To access tab menus, press the Menu button to display the Tab Selection screen, press ◄ or ► to select the tab,
and then press the OK button.
) are the defaults. For details on settings values, refer to the User Manual.
*
Paper Menu
Load Paper
Eject Paper
Chg. Paper Type
*1
Chg. Paper Size
ManageRemainRoll
Paper Details
Paper Details
Keep Paper Type
OK
Back
Roll Paper
Cut Sheet
Roll Paper
Cut Sheet
Sheet Size
*4
Roll Length
*3
Roll Width
*4
Off
On
(The paper type is
*1
displayed here.)
Off
On
OK
Back
*1
*1
*2
*
*
(The paper type is
displayed here.)
(The paper type is
displayed here.)
(The paper size is
displayed here.)
Head Height
Skew Check Lv.
Cutting Mode
Cut Speed
Trim Edge First
CutDustReduct.
VacuumStrngth
Scan Wait Time
Roll DryingTime
NearEnd RollMrgn
NearEnd Sht Mrgn
Bordless Margin
Width Detection
Return Defaults
OK
Back
A
B
C
D
E
Automatic
Eject
Manual
Fast
Standard
Slow
Automatic
Off
On
Off
On
5mm
20mm
5mm
20mm
Automatic
Fixed
Off
On
A
B
C
D
E
*
*1: For information on the types of paper the printer supports, refer to the Paper Reference Guide.
The paper type setting in the printer driver and related software (as well as on the Control Panel) is updated when you
install the printer driver from the User Software CD-ROM or if you change paper information by using the Media
Configuration Tool.
For information on the sizes of paper the printer supports, refer to the User Manual.
*2:
(→"Paper Sizes," User Manual)
Available only if ManageRemainRoll is On.
*3:
*4:
Available only if Width Detection is set to Off.
Ink Menu
Automatic
Highest
High
Standard
Low
Lowest
Super Low
Standard
Loose
Off
Automatic
Strongest
Strong
Standard
Weak
Weakest
Off
1 sec.
3 sec.
5 sec.
7 sec.
9 sec.
Off
30 sec.
1 min.
3 min.
5 min.
10 min.
30 min.
60 min.
*
*
*
Rep. Ink Tank
Head Cleaning A
Job Menu
Print Job
Stored Job
OK
Back
Job List (Select Print Job.)
Mailbox List Job List
OK
Back
a
*14: Print Anyway is displayed when a job being held is selected.
(Enter a password if one
has been set.)
42
OK
Back
*14
Delete
Preempt Jobs
Print Job List
OK
Back
Print
Delete
Page 43
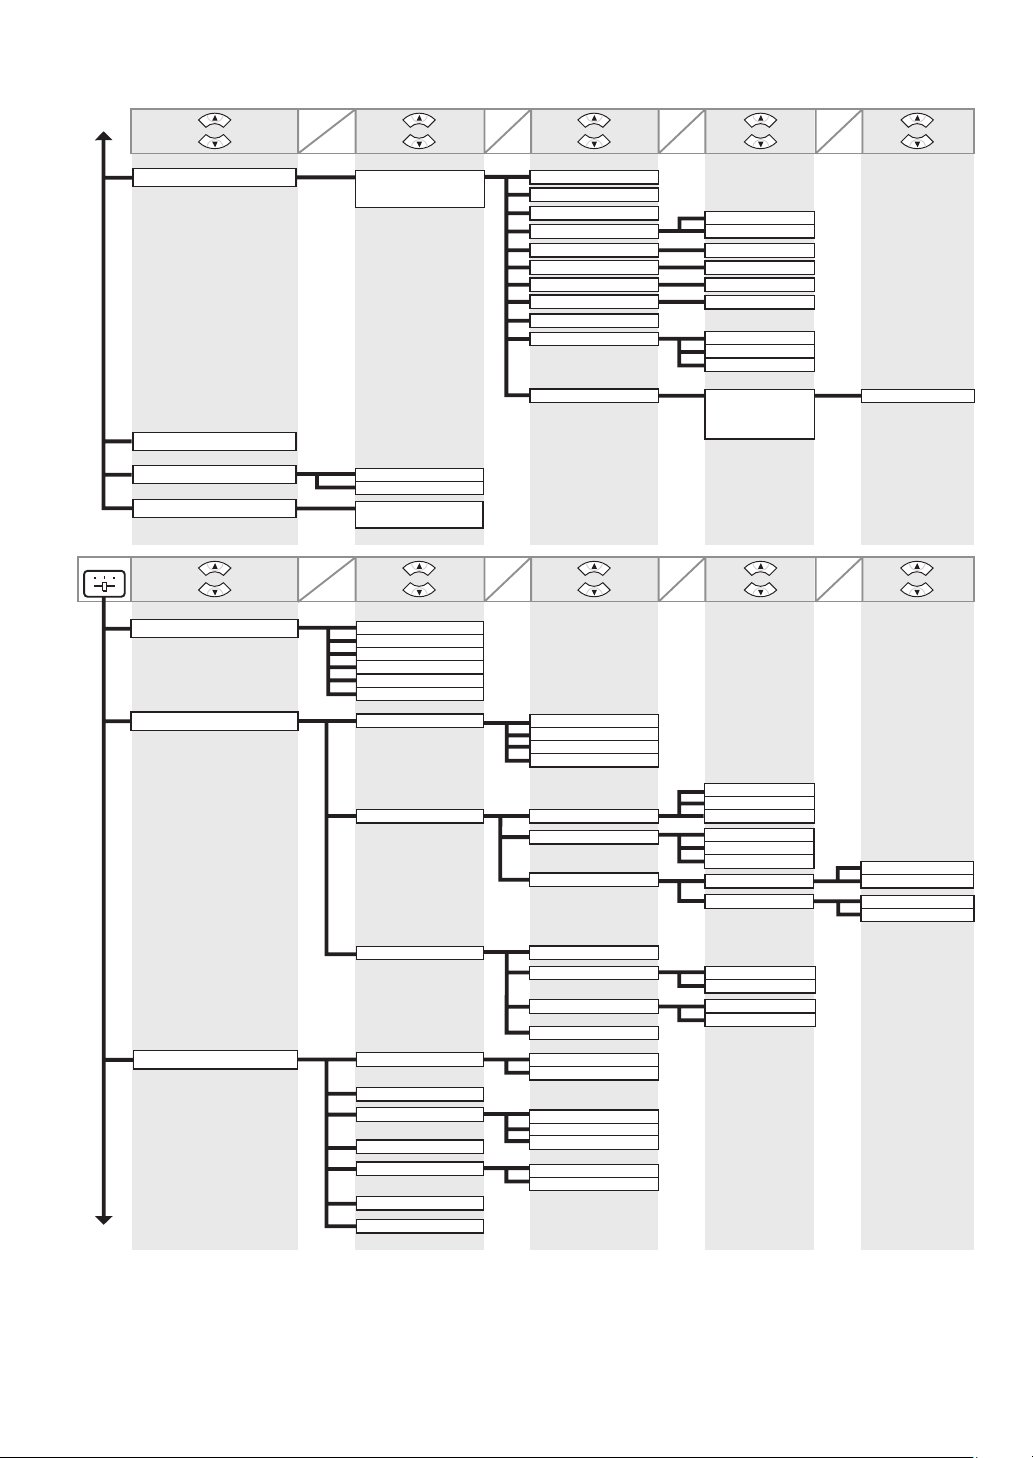
Menu Map
a
Set./Adj. Menu
Job Log
Print Job Log
Pause Print
HDD Information
Test Print
Adjust Printer
OK
Back
OK
Back
(Choose from information
about the latest three
print jobs.)
Off
On
Total capacity
Box free space
Nozzle Check
Status Print
Interface Print
Paper Details
Print Job Log
Menu Map
Head Posi. Adj.
Feed Priority
OK
*
OK
Back
Back
*5
*5
*8
*6*8
*7*8
Document Name
User Name
Page Count
Job Status
Print Start Time
Print End Time
Print Time
Print Size
Media Type
Interface
Ink Consumed
Auto(Standard)
Auto(Advanced)
Auto(Expansion)
Manual
Adj. Priority
Adj. Quality
Adjust Length
OK
Back
OK
Back
OK
CANCELED
yyyy/mm/dd hh:mm:ss
yyyy/mm/dd hh:mm:ss
xxxsec.
xxxxxxxxsq.mm
USB
Network
HDD
(The total amount of ink
consumed and ink
colors are displayed
here.)
Automatic
Print Quality
Print Length
Auto(GenuinePpr)
Auto(OtherPaper)
Manual
AdjustmentPrint
Change Settings
OK
OK
*
Back
Back
xxx.xxx ml
A:High
B:Standard/Draft
A:High
B:Standard/Draft
Calibration
Maintenance
b
*5:
Available after Auto(Advanced) in Head Posi. Adj. has
Head Cleaning
Nozzle Check
Replace P.head
Repl. maint cart
Head Info
Repl. S. Cleaner
Change Cutter
been used once.
*6:
Available when you have specified Feed Priority > Adj.
Priority > Automatic or Print Quality.
Auto Adjust
Calibration Log
Use Adj. Value
Return Defaults
Head Cleaning A
Head Cleaning B
Printhead L
Printhead R
L & R Printheads
Printhead L
Printhead R
*7:
Available when you have specified Feed Priority > Adj.
Date
Paper Type
Disabled
Enabled
Priority > Automatic or Print Length.
*8:
Displayed if a sheet is loaded in the printer.
43
*
Page 44
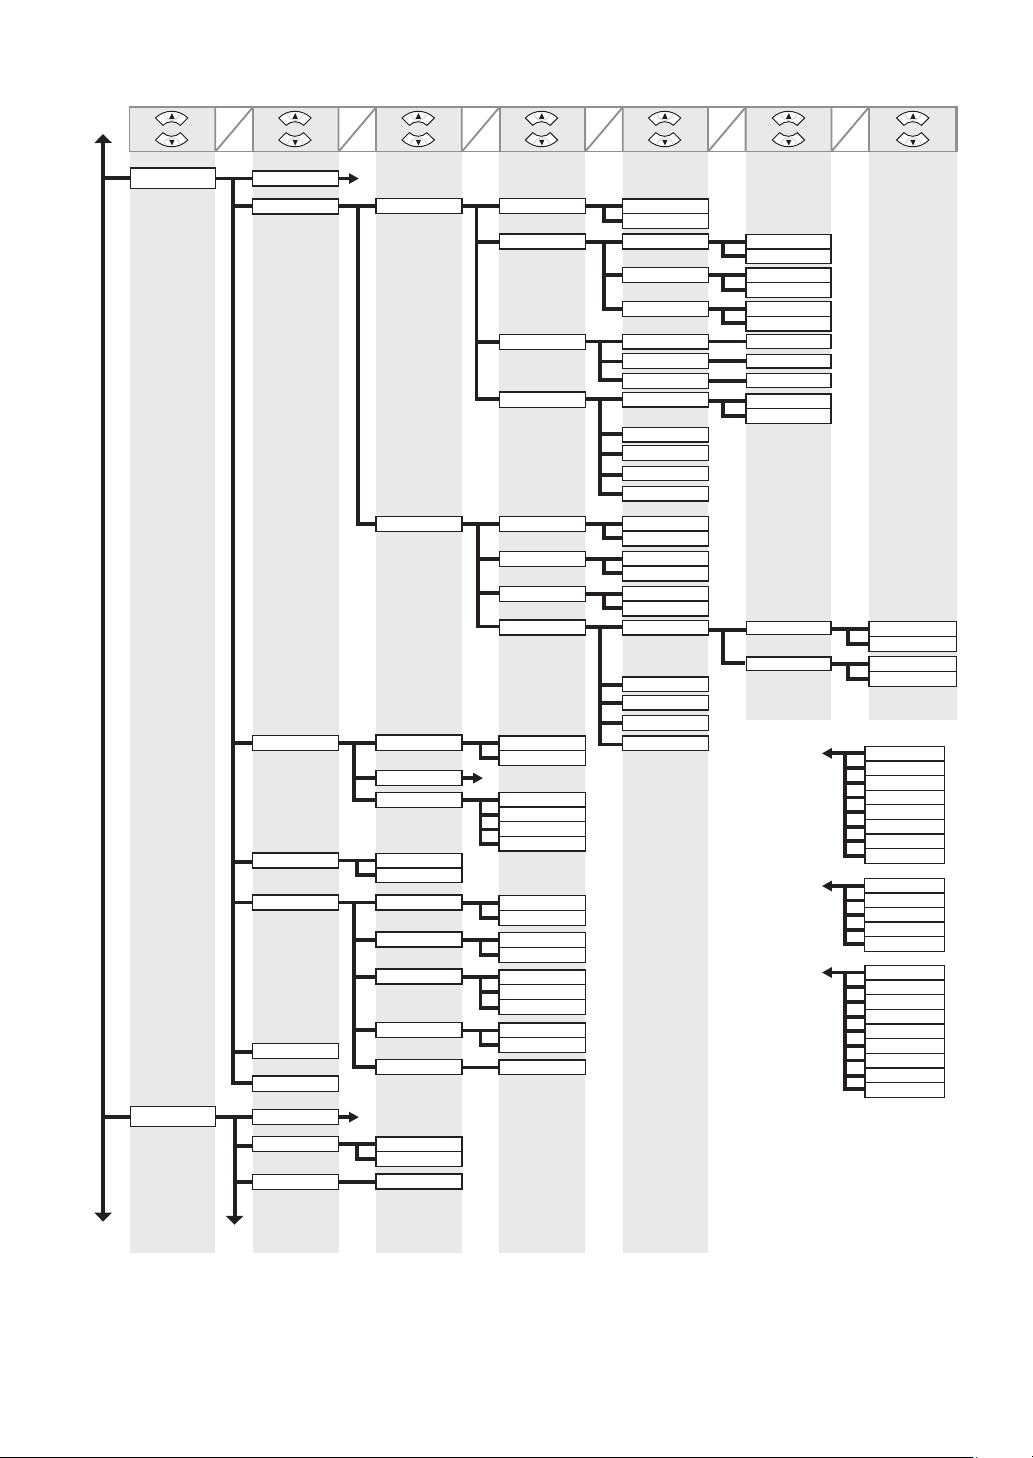
Menu Map
b
Interface Setup
System Setup
OK
Back
EOP Timer
*15
TCP/IP
*15
NetWare
*15
AppleTalk
*15
Ethernet Driver
*15
Interface Print
*15
Return Defaults
*15
Sleep Timer
Buzzer
Contrast Adj.
OK
OK
Back
F
IPv4
IPv6 IPv6 Support
NetWare
Frame Type
*10
Print Service
*10
On
Off
Auto Detect
Comm.Mode
*13
Ethernet Type
*13
Spanning Tree
MAC Address
*
H
Off
On
-4,-3,-2,-1,0*,+1,+2,+3,+4
*
Back
IPv4 Mode
Protocol DHCP
*9
IPv4 Settings
*16
DNS Settings
*16
IPv6 StlessAddrs
*11
DHCPv6
*11
DNS Settings
*11*16
On
Off
G
BinderyPServer
RPrinter
NDSPServer
NPrinter
On
Off
Half Duplex
Full Duplex
10 Base-T
100 Base-TX
1000 Base-T
Not Use
Use
xxxxxxxxxxxx
OK
Back
*
*
*
*
*
*
Automatic
Manual
BOOTP
RARP
IP Address
Subnet Mask
Default G/W
DNS Dync update
Pri. DNS SrvAddr
Sec. DNS SrvAddr
DNS Host Name
DNS Domain Name
On
Off
On
Off
On
Off
DNS Dync update
Pri. DNS SrvAddr
Sec. DNS SrvAddr
DNS Host Name
DNS Domain Name
OK
*
*
*
*
Back
On
Off
On
Off
On
Off
xxx.xxx.xxx.xxx
xxx.xxx.xxx.xxx
xxx.xxx.xxx.xxx
On
Off
Statefull Addr
Stateless Addr
OK
Back
*
*
*
*
On
Off
On
Off
10 sec.
F
30 sec.
1 min.
2 min.
5 min.
10 min.
30 min.
60 min.
G
H
Auto Detect
Ethernet 2
Ethernet 802.2
Ethernet 802.3
Ethernet SNAP
5 min.
10 min.
15 min.
20 min.
30 min.
40 min.
50 min.
60 min.
240 min.
*
*
*
*
*
c
*9:
Not shown if you have set IPv4 Mode to Manual.
*10:
Not shown if you have set NetWare to Off.
*11:
Not displayed if IPv6 Support is Off.
*13:
Not shown if you have set Auto Detect to On.
*15:
Viewing and configuration is possible for administrators, and only viewing for other users.
*16:
Viewing and configuration is possible for administrators only.
d
44
Page 45
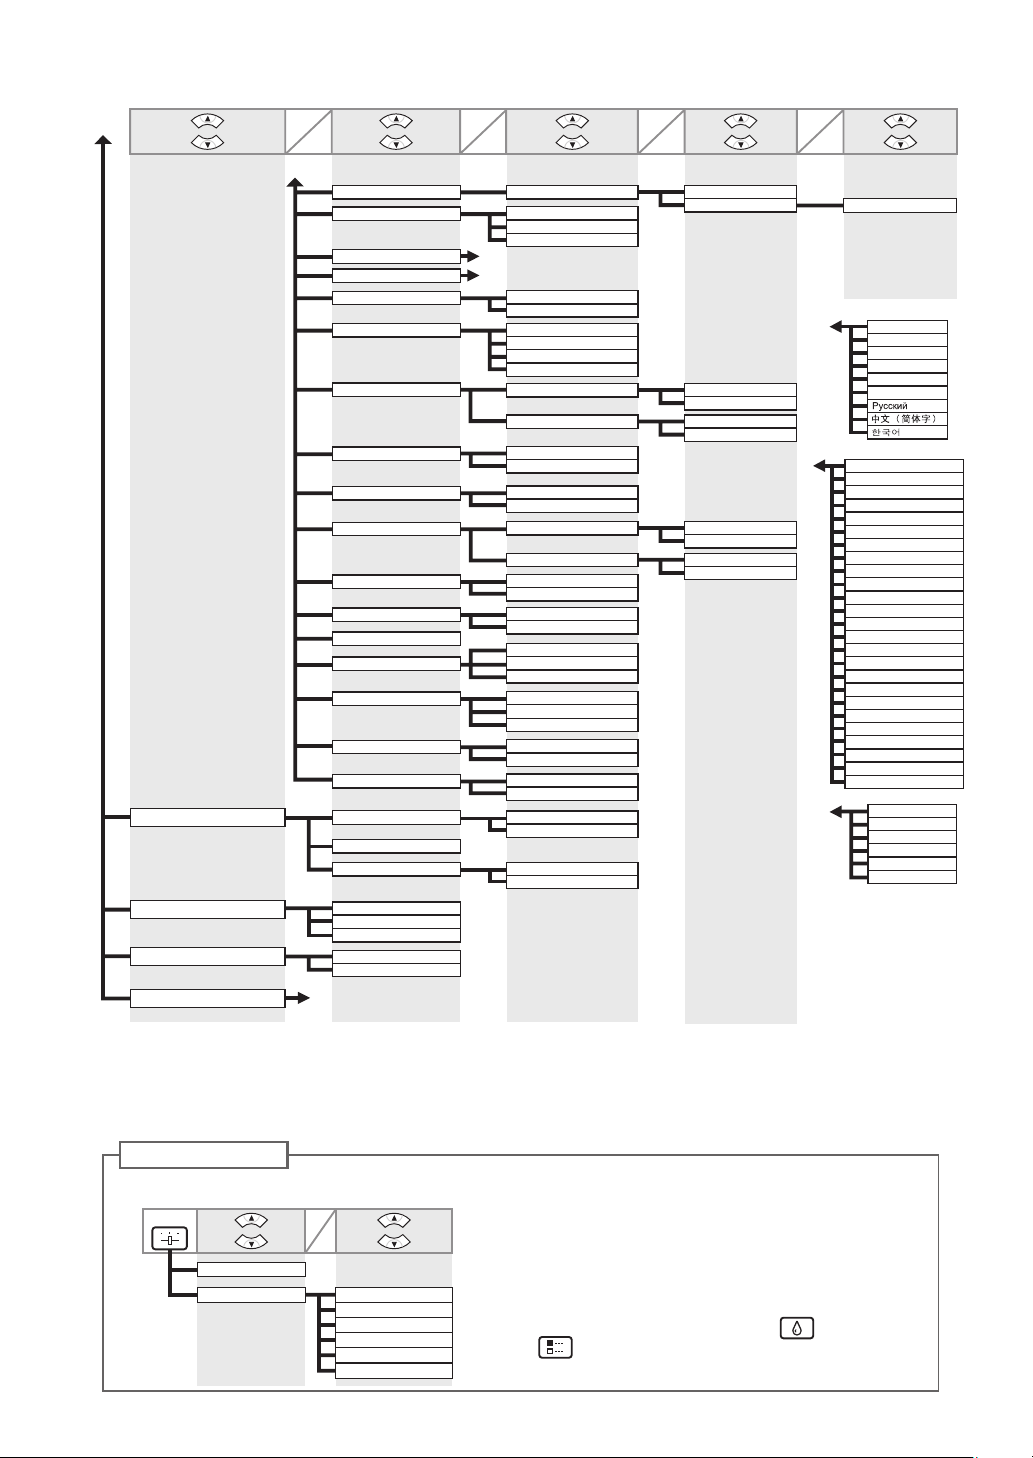
Menu Map
c
Take-up Reel
*17
Prep.MovePrinter
Admin. Menu
*15
Printer Info
OK
Back
d
K
Date & Time
*15
Date Format
*15
Language
Time Zone
*15
Length Unit
Detect Mismatch
Paper Size Basis
Keep Paper Size
Rep.P.head Print
Nozzle Check
CarriageScanWdth
Use RemoteUI
*15
Reset PaprSetngs
*15
Erase HDD Data
*15
Output Method
Print After Recv
Common Box Set.
*15
Use Take-up Reel
Auto Feed
*18
Skip Take-Up Err
*19
Level 1
Level 2
Level 3
Change Password
*16
Init.Admin.Pswd
*16
OK
Back
I
J
Date
yyyy/mm/dd
dd/mm/yyyy
mm/dd/yyyy
meter
feet/inch
Pause
Warning
None
Hold Job
Sht Selection 1
Sht Selection 2
Off
On
Off
On
Frequency
Warning
Automatic
Fixed
On
Off
High Speed
Secure High Spd.
Secure
Print
Print (Auto Del)
Save: Box XX
Off
On
Print
Print (Auto Del)
Disable
Enable
Off
On
OK
*
*
*
*
*
*
*
*
*
*
*
*
Back
*12
yyyy/mm/dd
Time
ISO A3+
13"x19"(Super B)
ISO B1
28"x40" (ANSI F)
Standard
1 page
Off
On
OK
*
*
J
*
*
Back
I
K
hh:mm
English
ᣣᧄ⺆
Français
Italiano
Deutsch
Español
0:London(GMT)
+1:Paris,Rome
+2:Athens,Cairo
+3:Moscow
+4:Eerevan,Baku
+5:Islamabad
+6:Dacca
+7:Bangkok
+8:Hong Kong
+9:Tokyo,Seoul
+10:Canberra
+11NewCaledonia
+12:Wellington
-12:Eniwetok
-11:Midway is.
-10Hawaii(AHST)
-9:Alaska(AKST)
-8:Oregon (PST)
-7:Arizona(MST)
-6:Texas(CST)
-5:NewYork(EST)
-4:Santiago
-3:Buenos Aires
-2:
-1:Cape Verde
Paper Info
Ink Info
Head Info
System Info
Error Log
Other Counter
*
*12:
Follows the setting in Date Format.
*15:
Viewing and configuration is possible for
*17:
*18:
administrators, and only viewing for other users.
*16:
Viewing and configuration is possible for
administrators only.
*19:
Menu When Printing
The following operations are available from the menu during printing.
Set./Adj. Menu
Adj. Fine Feed
Printer Info
OK
Back
*6
Paper Info
Ink Info
Head Info
System Info
Error Log
Other Counter
*6: Available when you have specified Feed Priority >
The same menus as usual are shown in (Ink Menu)
and (Job Menu).
45
Displayed only when the Media Take-up Unit is attached.
Available if: (a) Use Take-up Reel is Enable, (b) roll paper is
loaded, and (c) you have not executed Auto Feed for the loaded
roll.
Available when Use Take-up Reel is Enable.
Adj. Priority > Automatic or Print Quality.
Page 46

Index
Numerics
2-Inch Paper Core Attachment ................................... 12
3-Inch Paper Core Attachment ................................... 12
C
Consumables..............................................................23
F
Flange.........................................................................13
I
imagePROGRAF Support Information .........................5
Ink hole ....................................................................... 26
Ink Lamp ............................................................... 25, 29
Ink tab ................................................................... 11, 25
Ink Tank Lock Lever .............................................. 26, 28
Ink tank replacement .................................................. 24
J
Job tab ........................................................................ 11
M
Maintenance cartridge replacement ........................... 30
Menu map (menu structure) ....................................... 42
Menu operations ......................................................... 11
T
Tab Selection screen ............................................ 11, 42
U
User Manual ................................................................. 5
P
Paper Reference Guide ................................................ 5
Paper tab ........................................................ 11, 18, 22
Parts ............................................................................. 8
Printhead Fixer Cover...........................................39, 41
Printhead Fixer Lever ........................................... 39, 41
Printhead replacement ...............................................36
R
Roll loading in the printer ............................................ 14
Roll loading on the Roll Holder ................................... 12
Roll removal................................................................18
S
Settings/Adj. tab ............................................. 11, 31, 37
Shaft Cleaner..................................................23, 32, 35
Sheet loading..............................................................20
Sheet removal ............................................................22
46
Page 47

Page 48

Canon Inc.
30-2, Shimomaruko 3-chome, Ohta-ku, Tokyo 146-8501, Japan
Canon U.S.A., Inc.
One Canon Plaza, Lake Success, NY 11042 U.S.A
Canon Europe Ltd.
3 The Square, Stockley Park, Uxbridge, Middlesex, UB11 1ET United Kingdom
Canon (China) Co., Ltd.
15F Jinbao Building No.89 Jinbao Street, Dongcheng District, Beijing 100005, China
Canon Australia Pty. Ltd.
1 Thomas Holt Drive, North Ryde, Sydney, N.S.W.2113, Australia
©CANON INC. 2010 Printed in JAPANQT5-2367-V1
*QT52367V1*
 Loading...