


Canon imagePROGRAF TX-2000, imagePROGRAF TX-4000, imagePROGRAF TX-3000 Introductory Information

479
Setup Guide
Read this manual before attempting to operate the printer.
Keep this manual in a handy location for future reference.
• Instructions in this Setup Guide show the TX-4000 printer. Note that your printer may look different from these illustrations in some cases. However, the basic
operations are the same.
Caution
Before Setting Up the Printer
In order to ensure that this product is used safely, be sure to read the precautions.
-> Quick Guide (separate manual)
Conrming the Installation Space
It is recommended that you reserve space of the following dimensions to allow you to work around the printer.
Check the completed image of the printer you purchased and make sure you have enough space to install the printer.
• The printer stand and roll unit may be options depending on the model. Care is required because the required space may differ depending on whether or not the
Important
options are used.
• The space required in front of the printer differs on how the basket supplied with the printer stand is used. This shows the installation space when used in the
position in the illustration.
Introductory Information
ENGLISH
TX-2000
Installation space (W x D x H)
• When not using the stand
59.5 x 56.5 x 40.2 inches (1510 x 1434 x 1020 mm)
• When using the stand
59.5 x 66.3 x 61.5 inches (1510 x 1684 x 1560 mm)
5.9 inches (150 mm)
3.9 inches
7.9 inches
(200 mm)
23.6 inches
(600 mm)
(When not
using the stand)
23.6 inches
(600 mm)
(When using the stand)
(100 mm)
(When not using
the stand)
7.9 inches
(200 mm)
3.9 inches (100 mm)
(When using the
stand)
TX-3000
Installation space (W x D x H)
70.5 x 66.3 x 61.5 inches (1790 x 1684 x 1560 mm)
5.9 inches
(150 mm)
7.9 inches
(200 mm)
23.6 inches
(600 mm)
7.9 inches
(200 mm)
3.9 inches
(100 mm)
Overview of Setup
TX-4000
Installation space (W x D x H)
78.5 x 66.3 x 61.5 inches (1993 x 1684 x 1560 mm)
5.9 inches
(150 mm)
7.9 inches
(200 mm)
23.6 inches
(600 mm)
7.9 inches
(200 mm)
3.9 inches
(100 mm)
Set up the printer using the following procedure.
Assemble the Stand
*
Attach the Alignment Rod
Install the Printer
Attach the Roll Unit
*
Attach the Basket
*
Assemble the Stacker
*
Turn On the Printer
Install the Ink Tanks
Install the Print Head
Load the Paper
(P. 3)
(P. 3)
(P. 3)
(P. 5)
(P. 5)
(P. 5)
(P. 5)
(P. 7)
(P. 9)
(P.10)
* Refer to the separate
manual
* Refer to the separate
manual
* Refer to the separate
manual
* Refer to the separate
manual
If an error message appears during setup or other problems occur,
refer to "Responding to Messages" on p.14.
• Windows is a trademark or registered trademark of Microsoft Corporation in the
U.S. and/or other countries.
• Perform Print Head Adjustment
and Select the Connection Method
(P.11 ~ 12)
• Connect to the Printer
• Check this also after setup is complete.
Storage Locations
How to Display the Online Manuals
QT6-2184-V01 PRINTED IN XXXXXXXXXXXXXXXX © CANON INC. 2017
(P.13)
(P.14)
RMC (Regulatory Model Code): K10475
RMC (Regulatory Model Code): K10474
RMC (Regulatory Model Code): K10473
1
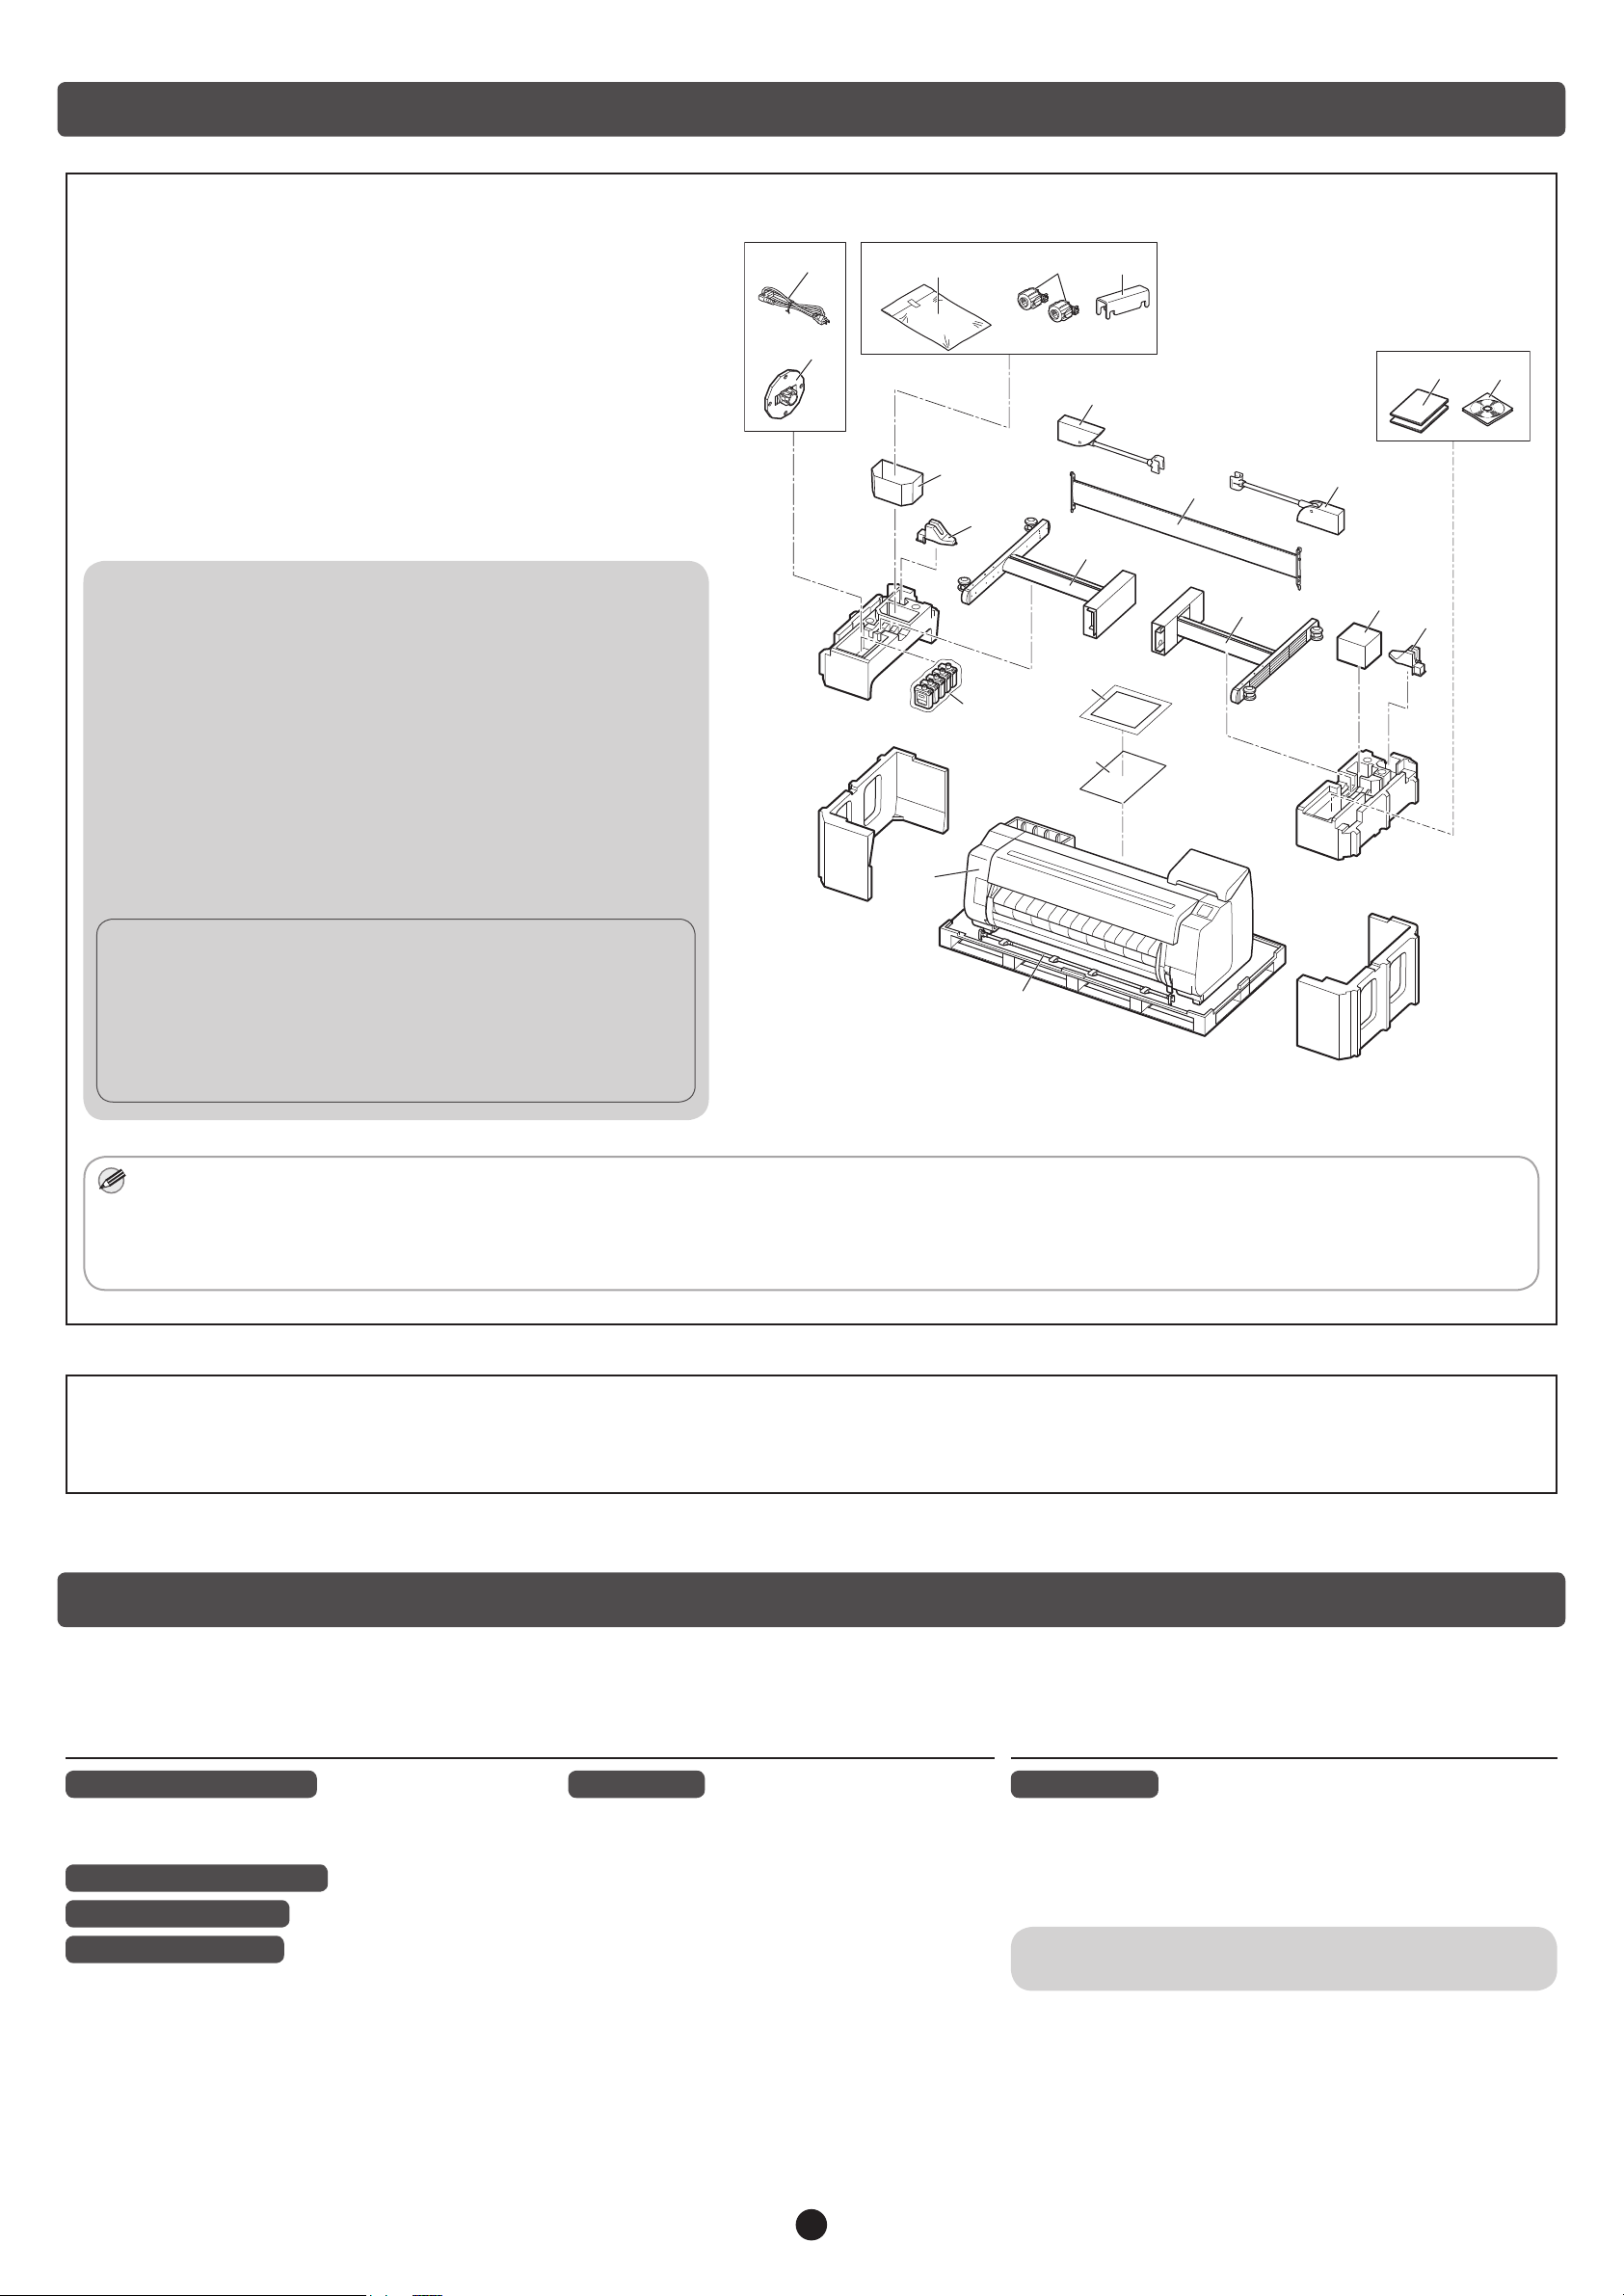
● Printer
Package Contents
A. Printer
B. Paper for adjustment
C. Setup Guide (this manual)
D. Starter ink tanks (C, M, Y, MBK, BK)
E. Set of CD-ROMs
F. Set of printer documentation
G. Print head
H. Power cord
I. Holder stopper*
* The holder stopper is used when loading roll paper.
For details, refer to the Online Manual.
● Stand
Only included with models where the stand is included as standard.
Furthermore, it may be packaged in a separate box depending on the
region where you purchased the printer.
J. Stand leg L
K. Stand leg R
L. Stand stay
M. M4 hex screw (x 9)
N. M8 hex screw (x 4)
O. M8 Allen wrench
P. M4 Allen wrench
Q. Accessory pocket
R. 3-inch paper core attachment (x 2)
H
M, N, O, P, U R
W
I
F E
T
Q
L
T
S
J
K
G
S
C
D
B
A
● Basket
These items might not be included depending on your region.
S. Rod holder (x 2)
T. Basket arm (x 2)
U. M4 Hex screw for basket arm (x 4)
V. Basket rod / Basket cloth
W. Basket locking support (x 2)
• Some items are included with the printer but not described in this manual.
Keep these items in a safe place after setup because they are used in various printing applications.
Note
• For instructions on the included items not described in this manual, refer to the Online Manual. ("How to Display the Online Manuals" on p.14)
• A cable to connect the printer to a computer is not provided with the printer.
● Roll Unit
Depending on your region, these might be included as standard or they might be available as optional accessories.
Refer to the included setup guides for details on the products included in the boxes.
V
● Stacker
The Manuals Supplied with This Printer
The following manuals are included with this printer.
* Might not be included depending on your region and selected purchase options.
Printed Manuals
Setup Guide (this manual)
Describes how to setup the printer.
Printer Stand Setup Guide*
Roll Unit Setup Guide*
Stacker Setup Guide*
Describes how to assemble the optional accessories.
Quick Guide
Contains information related to warnings for
using this product safely and information related
to replacing paper, ink tanks, and the print head.
Electronic Manuals
Online Manual
This manual describes advanced usage of the printer such
as paper saving tips, how to print a poster and banner with
the supplied software and print quality adjusting method, in
addition to the basic instructions for printing on roll paper or cut
sheet.
To view the electronic manuals, refer to "How to Display the
Online Manuals" (p.14).
2
Assemble the Stand
• When using the stand
-> Assemble the stand on which you will install the printer by referring to the
• When not using the stand
-> Proceed to
"Install the Printer"
.
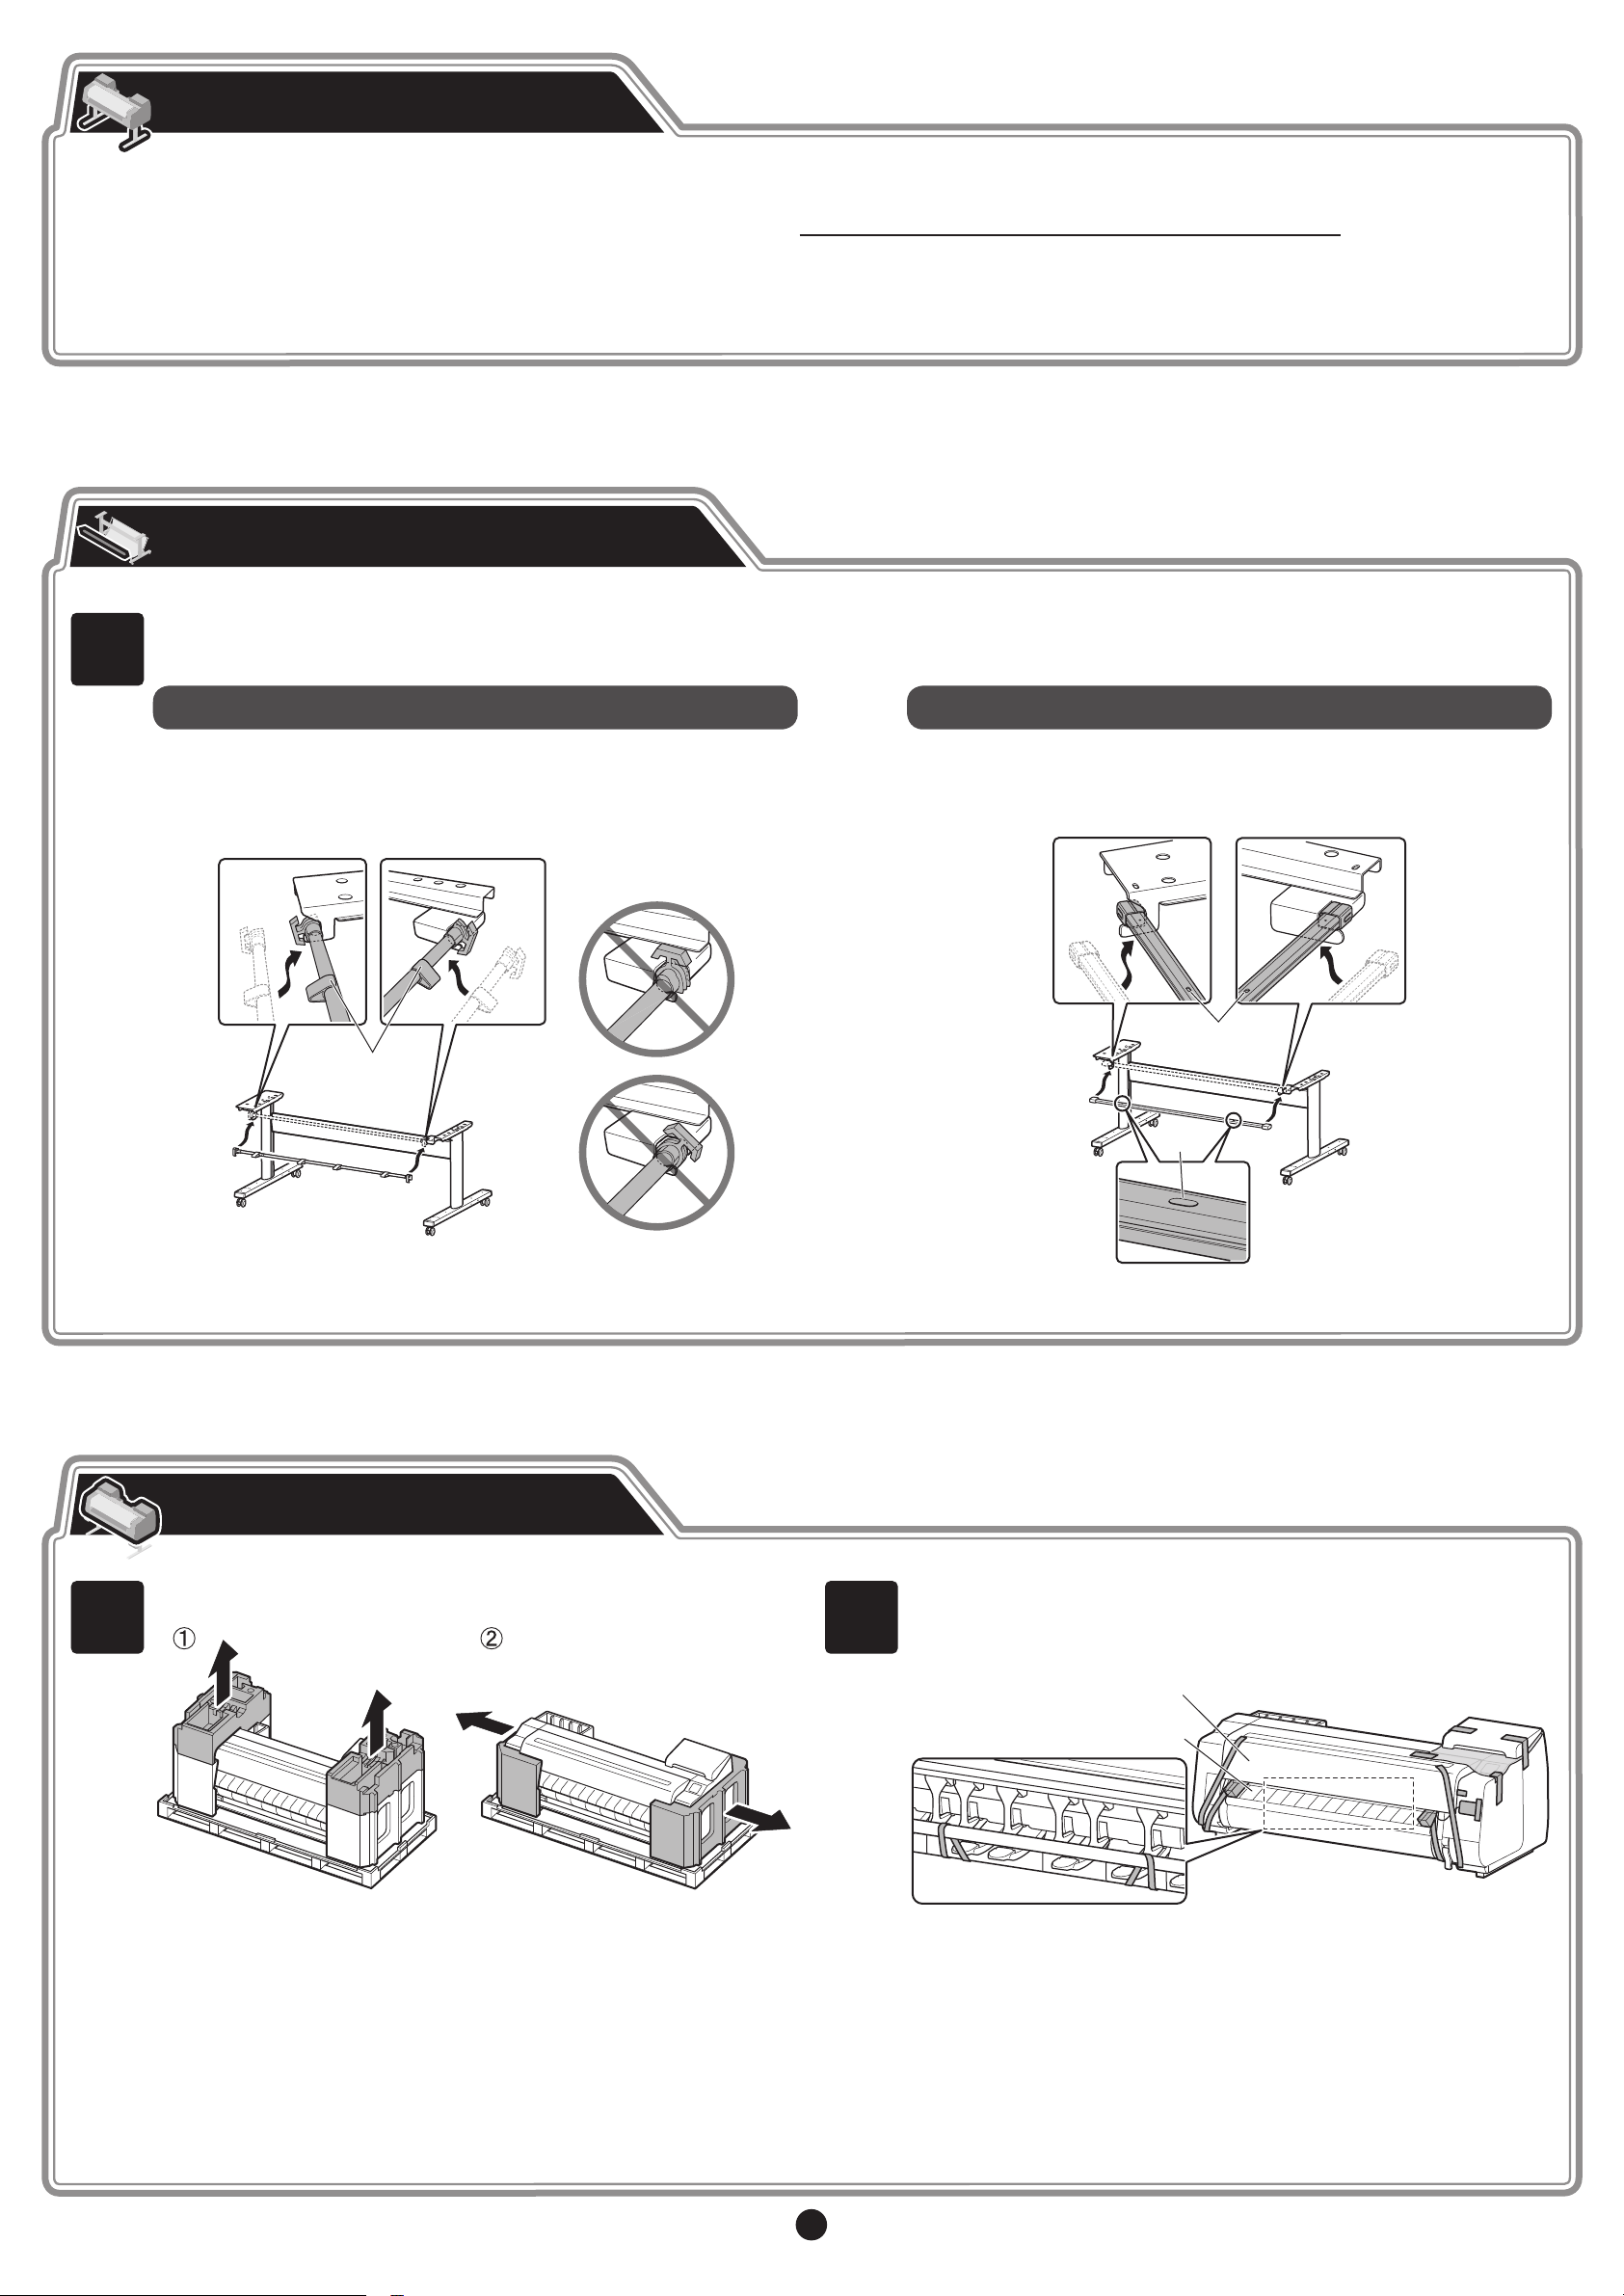
Attach the Alignment Rod
Attach the rod for aligning the printer to the stand.
1
When using the basket included with the stand When using the stacker
1. Prepare the basket rod (cord side).
2. Hook the basket rod onto the supporting plates of the stand legs.
Attach such that the protrusions (A) on the basket rod are facing
towards you.
Printer Stand Setup Guide (separate manual)
1. Open the stacker box and take out rod 2.
2. Hook rod 2 onto the supporting plates of the stand legs. Attach
such that the holes (A) on rod 2 are facing up.
.
1
A
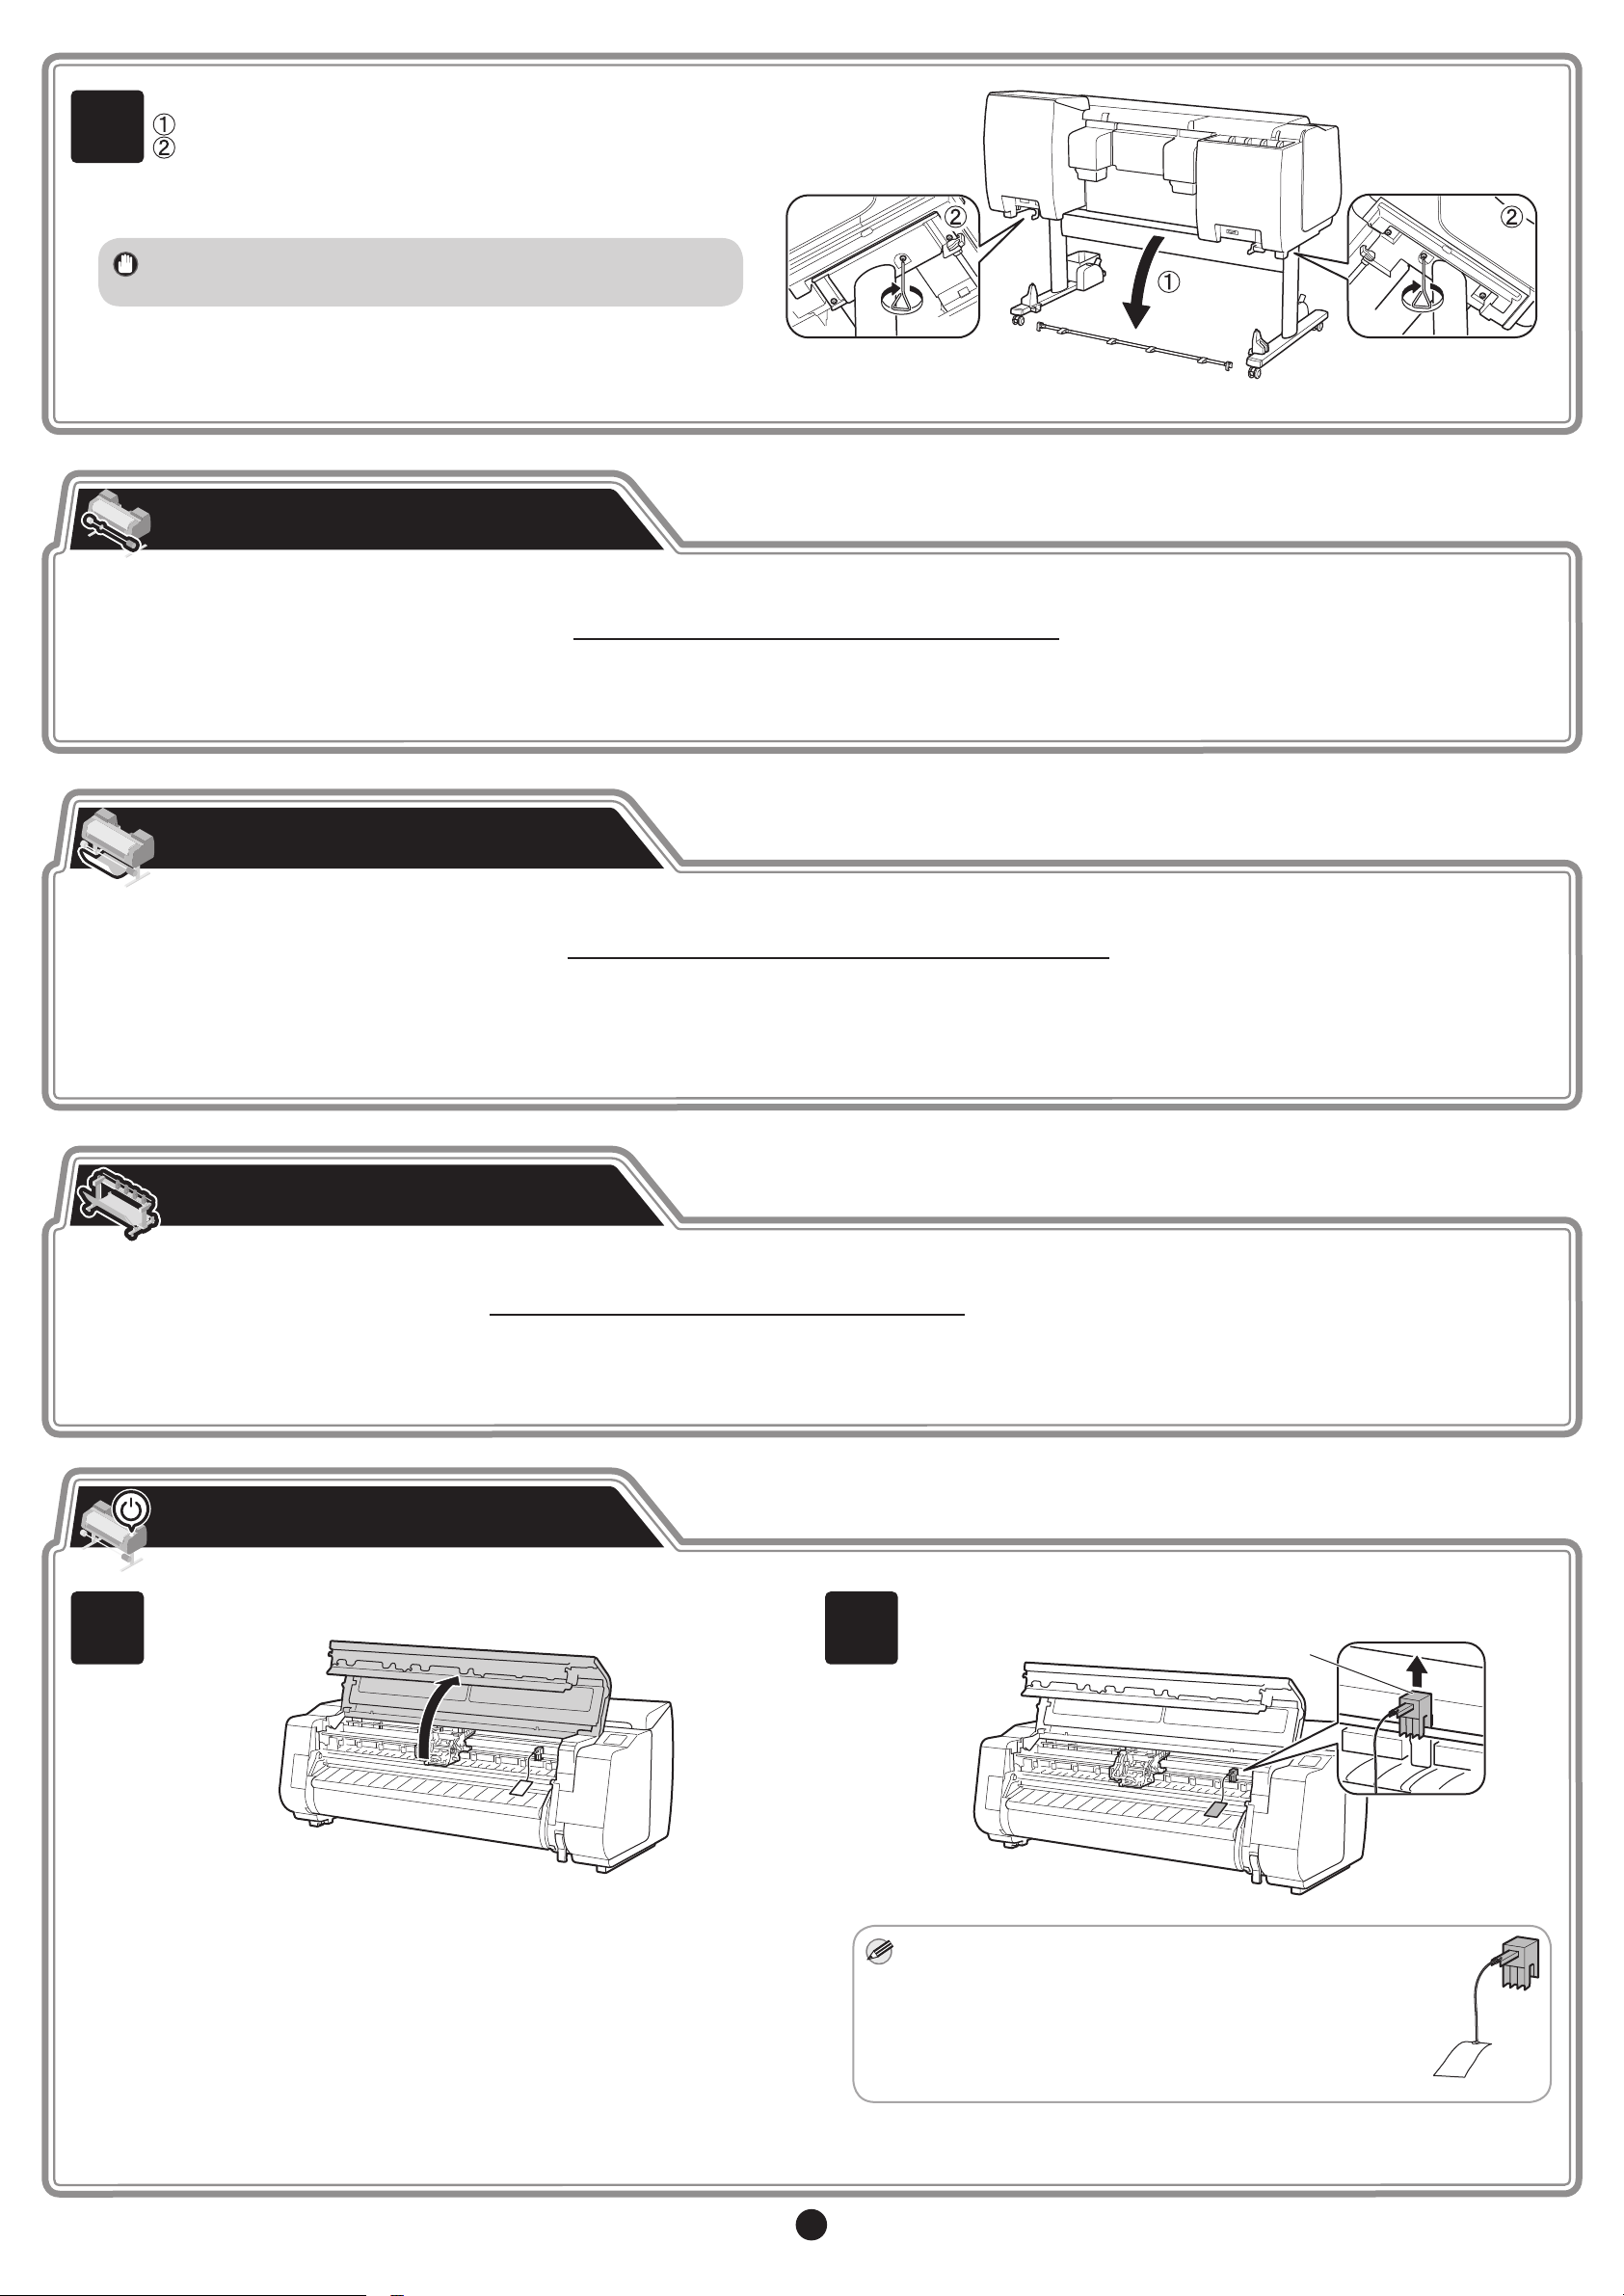
Install the Printer
Remove the packaging material.
2
A
A
Remove all of the tape and other packaging material. Open the top
cover (A) and output guide (B), and then remove the tape afxed to
the roll holder.
A
B
3

3
With 3 people holding the carrying handles under the printer on both ends, lift the printer.
• Moving the printer requires at least 6 people, 3
on either side. Be careful to avoid back strain and
Caution
other injuries due to the weight of the printer.
<Printer weight (printer only)>
- TX-4000 : Approx. 211 lb (96 kg)
- TX-3000 : Approx. 191 lb (87 kg)
- TX-2000 : Approx. 163 lb (74 kg)
• When standing the printer up, make sure the side
with the control panel is up, and place cardboard
or other material underneath to prevent scratching.
Furthermore, make sure that the weight of the
printer is taken by the corner of the printer. If the
weight is taken by any other part of the printer, the
printer may become damaged.
• When moving the printer, rmly grasp the carrying
handles (A) under each side. Holding the printer at
other positions is dangerous and may cause injury
and damage if the printer is dropped.
A
A
• When standing up the printer or supporting the
printer, hold the metal parts of the printer. If
you hold a plastic part, the printer may become
damaged.
• When setting the printer down temporarily, make
sure to put the printer on a at, stable place.
• Carrying the printer with only the center of the
printer loaded may cause damage to the printer.
4
Align the position of the printer.
When using the basket included with the stand When using the stacker
Place the printer on the stand such that the protrusion (A) for aligning
the position of the printer under the rear side of the printer is aligned
with the position of the black marker on the stand rod attached to the
supporting plate.
A A
Place the printer on the stand such that the protrusion (A) for aligning
the position of the printer under the rear side of the printer is aligned
with the position of the holes on rod 2 attached to the supporting
plate.
A A
Important
• If you are not using a stand, place the printer in the installation
location and proceed to "Turn On the Printer".
• If you are not using a stand, place the printer in the installation
Important
location and proceed to "Turn On the Printer".
4
Afx the printer to the stand.
5
Important
Remove the alignment rod.
Use an M4 Allen wrench to securely afx three M4 hex
screws each on the left and right from the bottom of the
supporting plate.
• The removed alignment rod will be used when attaching the
basket.
Attach the Roll Unit
• When using the roll unit
-> Attach the roll unit to the stand by referring to the
• When not using the roll unit
-> Proceed to
"Attach the Basket"
.
Attach the Basket
• When using the basket included with the stand
-> Attach the basket to the stand by referring to the
Proceed to
• When not using the basket
-> Proceed to
"Attach the Basket"
.
"Assemble the Stacker"
.
Roll Unit Setup Guide (separate manual)
.
Printer Stand Setup Guide (separate manual)
.
Assemble the Stacker
• When using the stacker
-> Assemble the stacker by referring to the
• When not using the stacker
-> Proceed to
"Turn On the Printer"
Turn On the Printer
Open the top cover.
1
Stacker Setup Guide (separate manual)
.
2
.
Pull up and remove the belt stopper (A).
A
• Keep the belt stopper you removed for future use. You
Note
5
will need them in case you move the printer to another
location.
• When you open the top cover, a cleaning brush is
stored on the right side. Take it out and use it when
cleaning inside the top cover.