


User Manual
ENG
Large Format Printer


Contents
Contents ��
Contents
Introduction 1
How to use th�s manual ....................................................................................1
About Th�s User Manual ..............................................................................................................1
Search�ng Top�cs .........................................................................................................................3
HTML Vers�on of the Manual for Pr�nt�ng .....................................................................................5
Printer Parts 13
Pr�nter parts ....................................................................................................13
Front ..........................................................................................................................................13
Back ..........................................................................................................................................15
Top Cover (Ins�de) .....................................................................................................................16
Carr�age .....................................................................................................................................18
Ink Tank Cover (Ins�de) ..............................................................................................................19
Stat�onary Output Stacker .........................................................................................................20
Us�ng the Stat�onary Output Stacker .........................................................................................21
Stow�ng the Stat�onary Output Stacker .....................................................................................23
Control Panel .............................................................................................................................25
Control Panel ..................................................................................................27
Control Panel .............................................................................................................................27
Turn�ng the Pr�nter On and Off ..................................................................................................29
Pr�nter Modes ............................................................................................................................31
Sw�tch�ng Modes .......................................................................................................................36
Pr�nter Menu Operat�ons ...........................................................................................................38
Ma�n Menu Operat�ons ..............................................................................................................40
Menu Structure ..........................................................................................................................44
Ma�n Menu Sett�ngs ...................................................................................................................57
Ma�n Menu Sett�ngs (Dur�ng Pr�nt�ng) .......................................................................................70
Submenu D�splay ......................................................................................................................71
Status Pr�nt ................................................................................................................................73
Check�ng Instruct�ons Dur�ng Pr�nter Operat�ons ......................................................................80
Opt�onal accessor�es ......................................................................................82
Roll Holder Set ..........................................................................................................................82
IEEE 1394 (F�reW�re) Expans�on Board ....................................................................................83
Med�a Take-up Un�t....................................................................................................................84
Us�ng the Med�a Take-up Un�t ...................................................................................................86
Remov�ng Pr�nted Documents from the Med�a Take-up Un�t.....................................................93
Wheeled Output Stacker ...........................................................................................................96
Us�ng the Wheeled Output Stacker ...........................................................................................97
Printer Specications ......................................................................................99
Specications ............................................................................................................................99
Bas�c Env�ronmental Performance ..........................................................................................104
Pr�nt Area .................................................................................................................................105

�� Contents
Contents
Basic Printing Workow 106
Pr�nt�ng procedure ........................................................................................106
Pr�nt�ng Opt�ons Us�ng Rolls and Sheets ................................................................................106
Load�ng and Pr�nt�ng on Rolls .................................................................................................108
Load�ng and Pr�nt�ng on Sheets ..............................................................................................112
Pr�nt�ng �n W�ndows .................................................................................................................115
Pr�nt�ng �n Mac OS X ...............................................................................................................116
Us�ng the Stat�onary Output Stacker .......................................................................................118
Cancel�ng pr�nt jobs ......................................................................................120
Cancel�ng Pr�nt Jobs from the Control Panel ..........................................................................120
Cancel�ng Pr�nt Jobs from W�ndows ........................................................................................121
Cancel�ng Pr�nt Jobs from Mac OS X ......................................................................................123
Handling Paper 125
Paper ............................................................................................................125
Types of Paper ........................................................................................................................125
Paper S�zes .............................................................................................................................130
Handl�ng rolls ................................................................................................133
Select�ng the Paper Source .....................................................................................................133
Select�ng the Paper Type (Roll) ...............................................................................................134
Spec�fy�ng the Paper Length (Roll) ..........................................................................................135
Attach�ng the Roll Holder to Rolls ............................................................................................136
Load�ng Rolls �n the Pr�nter .....................................................................................................139
Remov�ng the Roll from the Pr�nter .........................................................................................143
Remov�ng the Roll Holder from Rolls ......................................................................................145
Clear�ng Jammed Roll Paper ..................................................................................................147
Feed�ng Roll Paper Manually ..................................................................................................151
Keep�ng Track of the Amount of Roll Paper Left .....................................................................152
Spec�fy�ng the Ink Dry�ng T�me for Rolls ..................................................................................153
Spec�fy�ng the Cutt�ng Method for Rolls ..................................................................................155
Cutt�ng the Lead�ng Edge of Roll Paper Automat�cally ............................................................159
Reduc�ng Dust from Cutt�ng Rolls ...........................................................................................160
Roll Holder Set ........................................................................................................................161
Handl�ng sheets for paper feed slots ............................................................162
Select�ng the Paper Source .....................................................................................................162
Select�ng the Paper Type (Sheet)............................................................................................163
Load�ng Sheets �n the Pr�nter ..................................................................................................164
Manually Load�ng Paper to the Pos�t�on for Pr�nt�ng ...............................................................167
Remov�ng Sheets ....................................................................................................................169
Clear�ng a Jammed Sheet .......................................................................................................170
Working With Various Print Jobs 172
Pr�nt�ng Photos and Images ..........................................................................172
Pr�nt�ng Photos and Images ....................................................................................................172
Pr�nt�ng Photos and Images (W�ndows) ..................................................................................174

Contents
Contents ���
Pr�nt�ng Photos and Images (Mac OS X) ................................................................................176
Pr�nt�ng Photos �n Monochrome ..............................................................................................179
F�ne-Tun�ng Monochrome Sett�ngs When Pr�nt�ng Photos (W�ndows) ....................................180
F�ne-Tun�ng Monochrome Sett�ngs When Pr�nt�ng Photos (Mac OS X) ..................................182
Pr�nt�ng CAD Draw�ngs .................................................................................185
Pr�nt�ng CAD Draw�ngs ............................................................................................................185
Pr�nt�ng L�ne Draw�ngs and Text ..............................................................................................185
Pr�nt�ng L�ne Draw�ngs and Text (W�ndows) ............................................................................187
Pr�nt�ng L�ne Draw�ngs and Text (Mac OS X) ..........................................................................189
Pr�nt�ng CAD Draw�ngs �n Monochrome ..................................................................................192
F�ne-Tun�ng Monochrome Sett�ngs When Pr�nt�ng L�ne Draw�ngs (W�ndows) ........................193
F�ne-Tun�ng Monochrome Sett�ngs When Pr�nt�ng L�ne Draw�ngs (Mac OS X) ......................195
Spec�fy�ng Colors and Pr�nt�ng CAD Draw�ngs ........................................................................198
Spec�fy�ng Colors and Pr�nt�ng CAD Draw�ngs (W�ndows) ......................................................199
HP-GL/2 Pr�nt�ng .....................................................................................................................201
Printing Ofce Documents ............................................................................202
Printing Ofce Documents .......................................................................................................202
Printing Ofce Documents (Windows) .....................................................................................203
Printing Ofce Documents (Mac OS X) ...................................................................................205
Us�ng the Pr�nter W�th a Color �mageRUNNER ............................................207
Pr�nt�ng Enlargements of Scanned Or�g�nals from a Color �mageRUNNER ............................207
Pr�nt�ng Enlargements of Scanned Or�g�nals from a Color �mageRUNNER (W�ndows) ..........207
Pr�nt�ng Enlargements of Scanned Or�g�nals from a Color �mageRUNNER (Mac OS X) ........210
Enhanced Printing Options 212
Adjust�ng Images ..........................................................................................212
Adjust�ng the Color �n the Pr�nter Dr�ver ..................................................................................212
F�ne-Tun�ng Colors of Photos and Images (W�ndows) ............................................................216
F�ne-Tun�ng Colors of Photos and Images (Mac OS X) ..........................................................219
G�v�ng Pr�or�ty to Part�cular Graph�c Elements and Colors for Pr�nt�ng ...................................222
Choos�ng the Document Type and Pr�nt�ng Cond�t�ons (W�ndows) .........................................226
Choos�ng the Document Type and Pr�nt�ng Cond�t�ons (Mac OS X) .......................................228
Choos�ng Paper for Pr�nt�ng ..........................................................................231
Choos�ng a Paper for Pr�nt�ng .................................................................................................231
Select�ng the Paper Type (Roll) ...............................................................................................232
Select�ng the Paper Type (Sheet)............................................................................................233
Spec�fy�ng Paper �n the Pr�nter Dr�ver .....................................................................................234
Spec�fy�ng Paper �n the Pr�nter Dr�ver (W�ndows) ...................................................................235
Spec�fy�ng Paper �n the Pr�nter Dr�ver (Mac OS X) .................................................................237
Pr�nt�ng enlargements or reduct�ons .............................................................239
Res�z�ng Or�g�nals to Match the Paper S�ze ............................................................................239
Res�z�ng Or�g�nals to Match the Paper S�ze (W�ndows) ..........................................................240
Res�z�ng Or�g�nals to Match the Paper S�ze (Mac OS X) ........................................................242
Res�z�ng Or�g�nals to F�t the Roll W�dth ...................................................................................245
Res�z�ng Or�g�nals to F�t the Roll W�dth (W�ndows) .................................................................246
Res�z�ng Or�g�nals to F�t the Roll W�dth (Mac OS X) ...............................................................248

�v Contents
Contents
Res�z�ng Or�g�nals by Enter�ng a Scal�ng Value.......................................................................251
Res�z�ng Or�g�nals by Enter�ng a Scal�ng Value (W�ndows).....................................................252
Res�z�ng Or�g�nals by Enter�ng a Scal�ng Value (Mac OS X) ...................................................254
Pr�nt�ng Enlargements of Scanned Or�g�nals from a Color �mageRUNNER ............................257
Pr�nt�ng Enlargements of Scanned Or�g�nals from a Color �mageRUNNER (W�ndows) ..........258
Pr�nt�ng Enlargements of Scanned Or�g�nals from a Color �mageRUNNER (Mac OS X) ........260
Pr�nt�ng at full s�ze .........................................................................................262
Pr�nt�ng on Overs�zed Paper ...................................................................................................262
Pr�nt�ng at Full S�ze (W�ndows) ...............................................................................................264
Pr�nt�ng at Full S�ze (Mac OS X) ..............................................................................................266
Borderless Pr�nt�ng at Actual S�ze ...........................................................................................269
Borderless Pr�nt�ng at Actual S�ze (W�ndows) .........................................................................271
Borderless Pr�nt�ng at Actual S�ze (Mac OS X) .......................................................................273
Borderless Pr�nt�ng .......................................................................................276
Borderless Pr�nt�ng on Paper of Equ�valent S�ze .....................................................................276
Borderless Pr�nt�ng by Res�z�ng Or�g�nals to Match the Paper S�ze (W�ndows) ......................278
Borderless Pr�nt�ng by Res�z�ng Or�g�nals to Match the Paper S�ze (Mac OS X) ....................280
Borderless Pr�nt�ng by Res�z�ng Or�g�nals to F�t the Roll W�dth ...............................................283
Borderless Pr�nt�ng by Res�z�ng Or�g�nals to F�t the Roll W�dth (W�ndows) .............................285
Borderless Pr�nt�ng by Res�z�ng Or�g�nals to F�t the Roll W�dth (Mac OS X) ...........................287
Borderless Pr�nt�ng at Actual S�ze ...........................................................................................290
Borderless Pr�nt�ng at Actual S�ze (W�ndows) .........................................................................292
Borderless Pr�nt�ng at Actual S�ze (Mac OS X) .......................................................................294
Pr�nt�ng banners or at other non-standard s�zes ...........................................297
Pr�nt�ng Vert�cal or Hor�zontal Banners (Large-Format Pr�nt�ng) .............................................297
Pr�nt�ng Vert�cal or Hor�zontal Banners (Large-Format Pr�nt�ng; W�ndows) .............................299
Pr�nt�ng Vert�cal or Hor�zontal Banners (Large-Format Pr�nt�ng; Mac OS X) ...........................303
Pr�nt�ng on Non-Standard Paper S�zes ...................................................................................307
Pr�nt�ng on Non-Standard Paper S�zes (W�ndows) .................................................................308
Pr�nt�ng on Non-Standard Paper S�zes (Mac OS X) ................................................................312
T�l�ng and mult�ple pages per sheet ..............................................................314
Pr�nt�ng Mult�ple Or�g�nals Next to Each Other ........................................................................314
Pr�nt�ng Mult�ple Or�g�nals Next to Each Other (W�ndows) ......................................................316
Pr�nt�ng Mult�ple Or�g�nals Next to Each Other (Mac OS X) ....................................................318
Pr�nt�ng Mult�ple Pages Cont�nuously ......................................................................................320
Pr�nt�ng Mult�ple Pages Cont�nuously (W�ndows) ....................................................................321
Pr�nt�ng Mult�ple Pages Cont�nuously (Mac OS X) ..................................................................323
Pr�nt�ng Mult�ple Pages Per Sheet ...........................................................................................325
Pr�nt�ng Mult�ple Pages Per Sheet (W�ndows) .........................................................................326
Pr�nt�ng Mult�ple Pages Per Sheet (Mac OS X) .......................................................................328
Pr�nt�ng Posters �n Sect�ons ....................................................................................................331
Pr�nt�ng Large Posters (W�ndows) ...........................................................................................332
Center�ng or�g�nals ........................................................................................334
Pr�nt�ng Or�g�nals Centered on Rolls .......................................................................................334
Pr�nt�ng Or�g�nals Centered on Rolls (W�ndows) .....................................................................335
Pr�nt�ng Or�g�nals Centered on Rolls (Mac OS X) ...................................................................337
Pr�nt�ng Or�g�nals Centered on Sheets ....................................................................................340

Contents
Contents v
Pr�nt�ng Or�g�nals Centered on Sheets (W�ndows) ..................................................................341
Pr�nt�ng Or�g�nals Centered on Sheets (Mac OS X) ................................................................343
Conserv�ng roll paper ....................................................................................345
Conserv�ng Roll Paper by Rotat�ng Or�g�nals 90 Degrees ......................................................345
Conserv�ng Roll Paper by Rotat�ng Or�g�nals 90 Degrees (W�ndows) ....................................346
Conserv�ng Roll Paper by Rotat�ng Or�g�nals 90 Degrees (Mac OS X) ...................................348
Conserv�ng Roll Paper by Pr�nt�ng Or�g�nals W�thout Top and Bottom Marg�ns ......................351
Conserv�ng Roll Paper by Pr�nt�ng Or�g�nals W�thout Top and Bottom Marg�ns (W�ndows) ....352
Conserv�ng Roll Paper by Pr�nt�ng Or�g�nals W�thout Top and Bottom Marg�ns (Mac OS X) ..354
Check�ng Images Before Pr�nt�ng .................................................................357
Check�ng the Layout �n a Prev�ew Before Pr�nt�ng ..................................................................357
Check�ng the Layout �n a Prev�ew Before Pr�nt�ng (W�ndows) ................................................359
Check�ng the Layout �n a Prev�ew Before Pr�nt�ng (Mac OS X) ..............................................362
Other useful sett�ngs .....................................................................................363
Pr�nt�ng W�th Watermarks ........................................................................................................363
Pr�nt�ng w�th Watermarks-COPY, FILE COPY, and so on (W�ndows)......................................364
Mak�ng the Or�g�nal Or�entat�on Match the Paper Or�entat�on .................................................366
Mak�ng the Or�g�nal Or�entat�on Match the Paper Or�entat�on (W�ndows) ...............................367
Mak�ng the Or�g�nal Or�entat�on Match the Paper Or�entat�on (Mac OS X) .............................369
Us�ng Favor�tes .......................................................................................................................372
Us�ng Favor�tes (W�ndows) .....................................................................................................373
Us�ng Favor�tes (Mac OS X) ....................................................................................................375
Cutt�ng Roll Paper After Pr�nt�ng ..............................................................................................376
Cutt�ng Roll Paper After Pr�nt�ng (W�ndows) ............................................................................377
Cutt�ng Roll Paper After Pr�nt�ng (Mac OS X) ..........................................................................378
Windows Software 380
Pr�nter Dr�ver .................................................................................................380
Pr�nter Dr�ver Sett�ngs (W�ndows) ...........................................................................................380
Spec�fy�ng Paper �n the Pr�nter Dr�ver (W�ndows) ...................................................................382
Conrming Print Settings (Windows) .......................................................................................384
Check�ng the Layout �n a Prev�ew Before Pr�nt�ng (W�ndows) ................................................386
Us�ng Favor�tes (W�ndows) .....................................................................................................389
Access�ng the Pr�nter Dr�ver D�alog Box from Appl�cat�ons (W�ndows) ...................................391
Access�ng the Pr�nter Dr�ver D�alog Box from the Operat�ng System Menu (W�ndows) .........393
Ma�n Sheet (W�ndows) ............................................................................................................395
Paper Informat�on on Pr�nter D�alog Box (W�ndows) ...............................................................398
Med�a Deta�led Sett�ngs D�alog Box (W�ndows) ......................................................................399
V�ew Sett�ngs D�alog Box for the Pr�nt�ng Appl�cat�on (W�ndows)............................................400
Color Adjustment Sheet: Color (W�ndows) ..............................................................................401
Match�ng Sheet (W�ndows) .....................................................................................................403
Color Adjustment Sheet: Monochrome (W�ndows) ..................................................................405
Page Setup Sheet (W�ndows) .................................................................................................407
Paper S�ze Opt�ons D�alog Box (W�ndows) .............................................................................409
Layout Sheet (W�ndows) .........................................................................................................410
Page Opt�ons D�alog Box (W�ndows) ......................................................................................412
Spec�al Sett�ngs D�alog Box (W�ndows) ..................................................................................413
Favor�tes Sheet (W�ndows) .....................................................................................................414

v� Contents
Contents
Ut�l�ty Sheet (W�ndows) ...........................................................................................................416
Support Sheet (W�ndows) .......................................................................................................417
Dev�ce Sett�ngs Sheet (W�ndows) ...........................................................................................418
Sett�ngs Summar�es D�alog Box (W�ndows) ............................................................................419
Status Mon�tor ...............................................................................................420
�magePROGRAF Status Mon�tor (W�ndows) ...........................................................................420
D�g�tal Photo Front-Access ...........................................................................421
D�g�tal Photo Front-Access ......................................................................................................421
PosterArt�st ...................................................................................................422
Us�ng PosterArt�st to Compose Or�g�nals ................................................................................422
Us�ng PosterArt�st to Compose Or�g�nals (W�ndows) ..............................................................423
Dev�ce Setup Ut�l�ty .......................................................................................425
�magePROGRAF Dev�ce Setup Ut�l�ty .....................................................................................425
Install�ng �magePROGRAF Dev�ce Setup Ut�l�ty .....................................................................426
Conguring the IP Address Using imagePROGRAF Device Setup Utility ...............................427
Mac OS X Software 428
Pr�nter Dr�ver .................................................................................................428
Pr�nter Dr�ver Sett�ngs (Mac OS X) .........................................................................................428
Spec�fy�ng Paper �n the Pr�nter Dr�ver (Mac OS X) .................................................................429
Conrming Print Settings (Mac OS X) .....................................................................................431
Check�ng the Layout �n a Prev�ew Before Pr�nt�ng (Mac OS X) ..............................................433
Us�ng Favor�tes (Mac OS X) ....................................................................................................434
Access�ng the Pr�nter Dr�ver D�alog Box from Appl�cat�ons (Mac OS X) .................................435
Ma�n Pane (Mac OS X) ...........................................................................................................436
Paper Informat�on on Pr�nter D�alog Box (Mac OS X) .............................................................439
Med�a Deta�led Sett�ngs D�alog Box (Mac OS X) ....................................................................440
V�ew Sett�ngs D�alog Box for the Pr�nt�ng Appl�cat�on (Mac OS X) ..........................................441
Color Sett�ngs Pane: Color (Mac OS X) ..................................................................................442
Color Sett�ngs Pane: Monochrome (Mac OS X) ......................................................................444
Page Setup Pane (Mac OS X) ................................................................................................445
Ut�l�ty Pane (Mac OS X) ..........................................................................................................447
Add�t�onal Sett�ngs Pane (Mac OS X) .....................................................................................448
Support Pane (Mac OS X) .......................................................................................................449
Pr�ntmon�tor ..................................................................................................450
�magePROGRAF Pr�ntmon�tor (Mac�ntosh) .............................................................................450
Network Setting 451
Network Sett�ng ............................................................................................451
Network Env�ronment ..............................................................................................................451
Conguring the IP Address on the Printer ...............................................................................453
Conguring the IP Address Using imagePROGRAF Device Setup Utility ...............................454
Conguring the IP Address Using the Printer Control Panel ...................................................455
Conguring the IP Address Using ARP and PING Commands ...............................................456
Us�ng RemoteUI ......................................................................................................................457

Contents
Contents v��
Conguring the Printer's TCP/IP Network Settings .................................................................458
Conguring the Printer's AppleTalk Network Settings .............................................................460
Conguring the Printer's NetWare Network Settings ...............................................................461
Spec�fy�ng Pr�nter-Related Informat�on ....................................................................................463
Email Notication When Printing is Finished or Errors Occur .................................................464
In�t�al�z�ng the Network Sett�ngs ..............................................................................................465
Network Sett�ng (W�ndows) ..........................................................................466
Conguring the Printer Driver Destination (Windows) .............................................................466
Shar�ng the Pr�nter �n W�ndows ...............................................................................................467
Conguring the Printer's NetWare Network Settings ...............................................................469
Specifying the Printer's Frame Type ........................................................................................471
Spec�fy�ng NetWare Pr�nt Serv�ces ..........................................................................................473
Spec�fy�ng NetWare Protocols .................................................................................................476
Conguring NetWare Network Settings ...................................................................................478
Install�ng �magePROGRAF Dev�ce Setup Ut�l�ty .....................................................................479
Conguring the IP Address Using imagePROGRAF Device Setup Utility ...............................480
Network Sett�ng (Mac OS X) .........................................................................481
Conguring the Printer Driver Destination (Macintosh) ...........................................................481
Conguring the Printer's AppleTalk Network Settings .............................................................482
Conguring the Destination for AppleTalk Networks (Macintosh) ............................................483
Conguring the Destination for TCP/IP Network (Macintosh) .................................................486
Conguring the Destination for Bonjour Network (Macintosh) ................................................489
Hard Disk 490
Hard D�sk ......................................................................................................490
Pr�nter Hard D�sk Operat�ons ..................................................................................................490
Saved Pr�nt Jobs .....................................................................................................................492
Sav�ng Pr�nt Jobs Sent from Sources Other than the Pr�nter Dr�ver .......................................494
Sav�ng Pr�nt Jobs ....................................................................................................................495
Do Not Save Pr�nt Jobs �n the Common Box ..........................................................................499
Manag�ng Queued Jobs (Delet�ng or Preempt�ng Other Jobs) ...............................................500
Sett�ng Passwords for Personal Boxes ...................................................................................503
Nam�ng Personal Boxes ..........................................................................................................508
D�splay�ng a L�st of Saved Jobs ..............................................................................................513
Pr�nt�ng a L�st of Saved Jobs ...................................................................................................518
Pr�nt�ng Saved Jobs ................................................................................................................519
Mov�ng Saved Jobs .................................................................................................................526
D�splay�ng Deta�ls of Saved Jobs ............................................................................................532
Renam�ng Saved Jobs ............................................................................................................537
Delet�ng Saved Jobs ...............................................................................................................544
Check�ng the Free Hard D�sk Space .......................................................................................549
Erasing Data on the Printer's Hard Disk ..................................................................................552

v��� Contents
Contents
Adjustments for Better Print Quality 553
Adjust�ng the Pr�nthead .................................................................................553
Adjust�ng the Pr�nthead ...........................................................................................................553
Automat�c Stra�ghten�ng of L�nes and Colors (Auto Head Adj.) ...............................................554
Manual Stra�ghten�ng of L�nes and Colors (Manual Head Adj) ................................................556
Adjust�ng L�ne M�sal�gnment (Head Inc. Adj.) ..........................................................................558
Troubleshoot�ng Paper Abras�on and Blurry Images (Head He�ght) ........................................561
Adjust�ng the feed amount ............................................................................562
Adjust�ng the Feed Amount .....................................................................................................562
Select�ng a Feed Amount Adjustment Method (Feed Pr�or�ty) .................................................563
Auto Band Adjustment (Auto Band Adj.) ..................................................................................564
Manual Band Adjustment (Manual Band Adj) ..........................................................................566
Band�ng Adjustment Dur�ng Pr�nt�ng (F�ne Band Adj.) .............................................................568
Adjust�ng L�ne Length (Adjust Length) ....................................................................................569
Adjust�ng the Vacuum Strength (VacuumStrngth) ...................................................................571
Maintenance 572
Ink Tanks .......................................................................................................572
Ink Tanks .................................................................................................................................572
Replac�ng Ink Tanks ................................................................................................................573
Check�ng Ink Tank Levels ........................................................................................................584
When to Replace Ink Tanks .....................................................................................................585
Pr�ntheads .....................................................................................................586
Pr�nthead .................................................................................................................................586
Check�ng for Nozzle Clogg�ng .................................................................................................587
Clean�ng the Pr�nthead ............................................................................................................588
Replac�ng the Pr�nthead ..........................................................................................................589
Ma�ntenance Cartr�dge .................................................................................595
Ma�ntenance Cartr�dge ............................................................................................................595
Replac�ng the Ma�ntenance Cartr�dge .....................................................................................595
Check�ng the Rema�n�ng Ma�ntenance Cartr�dge Capac�ty .....................................................603
When to Replace the Ma�ntenance Cartr�dge .........................................................................604
Clean�ng the Pr�nter ......................................................................................605
Clean�ng the Pr�nter Exter�or ...................................................................................................605
Clean�ng Ins�de the Top Cover ................................................................................................606
Clean�ng the Pr�nthead ............................................................................................................609
Other Ma�ntenance .......................................................................................610
Prepar�ng to Transfer the Pr�nter .............................................................................................610
Updat�ng the F�rmware ............................................................................................................615

Contents
Contents �x
Troubleshooting 616
Frequently Asked Quest�ons .........................................................................616
Frequently Asked Quest�ons ...................................................................................................616
Problems Regard�ng Paper ..........................................................................619
Clear�ng Jammed Roll Paper ..................................................................................................619
Clear�ng a Jammed Sheet .......................................................................................................623
Troubleshoot�ng When Paper Jams are not Found .................................................................625
Roll paper cannot be �nserted �nto the Paper Feed Slot ..........................................................627
Cannot Load Sheets ................................................................................................................627
Paper �s not cut stra�ght ...........................................................................................................627
Paper �s not cut .......................................................................................................................627
The Med�a Take-up Un�t Cont�nues Rotat�ng ...........................................................................628
Pr�nt�ng does not start ...................................................................................629
The Data lamp on the Control Panel does not l�ght up ............................................................629
The pr�nter does not respond even �f pr�nt jobs are sent .........................................................629
The display screen indicates the system is lling with ink .......................................................629
The pr�nter stops dur�ng a pr�nt job ...............................................................630
An error message �s shown on the D�splay Screen .................................................................630
The pr�nter ejects blank, unpr�nted paper ................................................................................630
The pr�nter stops when pr�nt�ng a HP-GL/2 job (the carr�age stops mov�ng) ...........................630
Problems w�th the pr�nt�ng qual�ty .................................................................631
Pr�nt�ng �s fa�nt .........................................................................................................................631
Paper rubs aga�nst the pr�nthead ............................................................................................632
The edges of the paper are d�rty .............................................................................................633
The surface of the paper �s d�rty ..............................................................................................634
The back s�de of the paper �s d�rty ..........................................................................................634
Pr�nted colors are �naccurate ...................................................................................................635
Band�ng �n d�fferent colors occurs ...........................................................................................636
Colors �n pr�nted �mages are uneven .......................................................................................637
Image Edges are Blurred or Wh�te Band�ng Occurs ...............................................................638
Sett�ng the Blue Sw�tch on the Platen .....................................................................................639
The contrast becomes uneven dur�ng pr�nt�ng ........................................................................641
The length of pr�nted �mages �s �naccurate ..............................................................................641
Documents are pr�nted crooked ..............................................................................................641
Documents are pr�nted �n monochrome ..................................................................................642
L�ne th�ckness �s not un�form ...................................................................................................642
L�nes are m�sal�gned ...............................................................................................................643
Problems w�th the pr�nt�ng qual�ty caused by the type of paper ..............................................643
Cannot pr�nt over a network ..........................................................................644
Cannot connect the pr�nter to the network ..............................................................................644
Conguring the Communication Mode Manually .....................................................................645
Cannot pr�nt over a TCP/IP network ........................................................................................646
Cannot pr�nt over a NetWare network .....................................................................................646
Cannot pr�nt over AppleTalk or Bonjour networks ...................................................................647

x Contents
Contents
Installat�on problems .....................................................................................648
The IEEE 1394 Dr�ver Cannot Be Installed Correctly ..............................................................648
Remov�ng Installed Pr�nter Dr�vers ..........................................................................................649
HP-GL/2 problems ........................................................................................650
L�nes or �mages are m�ss�ng �n the HP-GL/2 data that was pr�nted. .......................................650
L�nes Are Pr�nted Too Th�ck or Th�n Dur�ng HP-GL/2 Pr�nt�ng .................................................650
HP-GL/2 jobs are pr�nted �n monochrome (or color). ..............................................................650
Pr�nted Colors �n L�ne Draw�ngs are Inaccurate Dur�ng HP-GL/2 Pr�nt�ng ..............................650
HP-GL/2 pr�nt�ng takes a long t�me. ........................................................................................650
The pr�nter stops when pr�nt�ng a HP-GL/2 job (the carr�age stops mov�ng) ...........................651
Other problems .............................................................................................652
The pr�nter does not go on ......................................................................................................652
If the Pr�nter Makes a Strange Sound .....................................................................................653
Messages adv�s�ng to check the ma�ntenance cartr�dge are not cleared ................................654
The pr�nter consumes a lot of �nk ............................................................................................654
Ink level detect�on ....................................................................................................................655
Error Message 657
Respond�ng to Messages .............................................................................657
Respond�ng to Messages ........................................................................................................657
Error Messages .......................................................................................................................658
Messages regard�ng paper ...........................................................................660
Papr Type M�smatch ................................................................................................................660
PaprTypeM�smatch ..................................................................................................................660
The paper �s too small. ............................................................................................................661
RollWdthM�smatch ..................................................................................................................661
Paper s�ze not detected. ..........................................................................................................662
Insufcient paper for job ..........................................................................................................663
Th�s paper cannot be used. .....................................................................................................663
Roll pr�nt�ng �s selected. ..........................................................................................................663
Roll pr�nt�ng �s selected, but sheets are loaded. ......................................................................664
The roll �s empty. .....................................................................................................................665
Sheet removed. .......................................................................................................................666
Sheet pr�nt�ng �s selected. .......................................................................................................666
Regular pr�nt�ng �s selected, but a roll �s loaded. .....................................................................666
Paper jam. ...............................................................................................................................666
Paper loaded askew. ...............................................................................................................667
Paper cutt�ng fa�led. ................................................................................................................668
End of paper feed. ...................................................................................................................668
Rel lever �s �n wrong pos�t�on. ..................................................................................................669
Rew�nd�ng error. ......................................................................................................................669
Med�a take-up un�t ready. ........................................................................................................669
Turn on the med�a take-up un�t. ...............................................................................................669
Borderless pr�ntng not poss�ble. ..............................................................................................670

Contents
Contents x�
Messages regard�ng �nk ................................................................................671
Ink insufcient. .........................................................................................................................671
No �nk left. ...............................................................................................................................671
Rema�n�ng level of the �nk cannot be correctly detected. ........................................................671
Close Ink Tank Cover ..............................................................................................................671
Ink tank �s empty. .....................................................................................................................672
Not much �nk �s left. .................................................................................................................672
No �nk tank loaded. ..................................................................................................................672
Wrong �nk tank. ........................................................................................................................672
The d�splay screen �nd�cates Ag�tat�ng ....................................................................................673
Messages regard�ng pr�nt�ng or adjusment ...................................................674
Use another paper. ..................................................................................................................674
Cannot print as specied. ........................................................................................................674
Cannot adjust band. ................................................................................................................674
Cannot adjust pr�nthead. .........................................................................................................675
Borderless pr�ntng not poss�ble. Paper stretched or shrank. ...................................................675
Before borderless pr�nt�ng, move the blue platen sw�tch. ........................................................675
Blue platen sw�tch �s d�rty. ......................................................................................................676
Messages regard�ng pr�ntheads ...................................................................677
Cannot adjust pr�nthead. .........................................................................................................677
Cannot adjust band. ................................................................................................................677
PHead needs clean�ng. ...........................................................................................................678
Wrong pr�nthead. .....................................................................................................................678
Problem w�th Pr�nthead ...........................................................................................................678
Pr�nthead error ........................................................................................................................678
No pr�nthead ............................................................................................................................678
Messages regard�ng the ma�ntenance cartr�dge ...........................................679
Insert the ma�ntenance cartr�dge. ............................................................................................679
Wrong ma�ntenance cartr�dge. ...............................................................................................679
Prepare for ma�nt cart replacement. ........................................................................................679
No Ma�ntenance Cartr�dge capac�ty.........................................................................................679
Ma�ntenance cartr�dge full. ......................................................................................................679
Ma�ntenance cartr�dge problem. ..............................................................................................679
Messages regard�ng the hard d�sk ................................................................680
Hard d�sk error. ........................................................................................................................680
F�le read error. ........................................................................................................................680
The ma�l box �s full. .................................................................................................................680
Ma�l box full. Now pr�nt�ng w�thout sav�ng data. .......................................................................680
Ma�l box nearly full. ..................................................................................................................680
Max�mum jobs stored. .............................................................................................................681
Too many jobs for ma�l box. .....................................................................................................681
Messages regard�ng HP-GL/2 ......................................................................682
Th�s type of paper �s not compat�ble w�th HP-GL/2. ...............................................................682
GL2: Wxxxx The memory �s full. (xxxx �s 0501, 0903, or 0904) ..............................................682
GL2: W0502 The parameter �s out of range. ...........................................................................682
GL2: W0504 Th�s command �s not supported. ........................................................................682

x�� Contents
Contents
Other Messages ...........................................................................................683
GARO Wxxxx (x represents a number) ...................................................................................683
ERROR Exxx-xxxx (x represents a letter or number) ..............................................................683
Hardware error. xxxxxxxx-xxxx (x represents a letter or number) ...........................................683
Top cover �s open. ...................................................................................................................683
Prepare for parts replacement. ................................................................................................684
Parts replacement t�me has passed. .......................................................................................684
Unknown le. ...........................................................................................................................684
Mult�-sensor error ....................................................................................................................684
How to use this manual
Introduction
How to use this manual
About This User Manual
• Symbols
The following symbols are used in this User Manual to indicate safety information and explanations
on restrictions or precautions in use.
Important Indicates important information that must be followed when using the printer . Be
sure to read this information to prevent printer damage or operating errors.
Caution Indicates caution items for which operating error poses a risk of injury or damage
to equipment or property . T o ensure safe use, always follow these precautions.
Note Indicates helpful reference information and supplemental information on particular
topics.
• Button names and user interface elements
Key and button names on the control panel and user interface elements in software (such as menus and
buttons) are indicated as follows in this User Manual.
Control panel buttons Example: Press the OK button.
Control panel messages Example: Head Cleaning is displayed.
Software interface items
(Menus and Buttons)
Example: Click OK .
Keyboard keys Example: Press the T ab key .
• Part names
Names of printer parts are indicated as follows in this User Manual.
Printer part names Example: Open the T op Cover .
Introduction 1

How to use this manual
• Cross-reference
Other pages or manuals that provide related information are indicated as follows in this User Manual.
Cross-reference in the same User Manual Example: see “T urning the Printer On and Of f”.
(→P .29)
Click the link to jump to the corresponding page.
Cross-reference in related manuals Example: See the Paper Reference Guide .
Other cross-reference Example: See the printer driver help.
• Figures and software screens
• Figures in this User Manual may be dif ferent from the actual appearance of the printer in some
cases.
• Screens depicted in this User Manual for the printer driver or other software may be dif ferent from
the actual screens because of subsequent updates.
• Windows XP screens are used in explanations of Windows operations in this User Manual.
• T rademarks
• Canon, the Canon logo, and imagePROGRAF are trademarks or registered trademarks of Canon
Inc.
• Microsoft and Windows are registered trademarks of Microsoft Corporation in the United States
and other countries.
• Macintosh is a registered trademark of Apple Inc. in the United States and other countries.
• Other company and product names are trademarks or registered trademarks of their respective
owners.
• Copyright
© 2008 Canon Inc.
• Unauthorized reproduction of this User Manual in whole or part is prohibited.
• May we request
Thank you for understanding the following points.
• The information in this User Manual is subject to change without notice.
• W e strive to ensure accuracy of information in this User Manual, but if you notice errors or
omissions, please contact us.
2 Introduction
How to use this manual
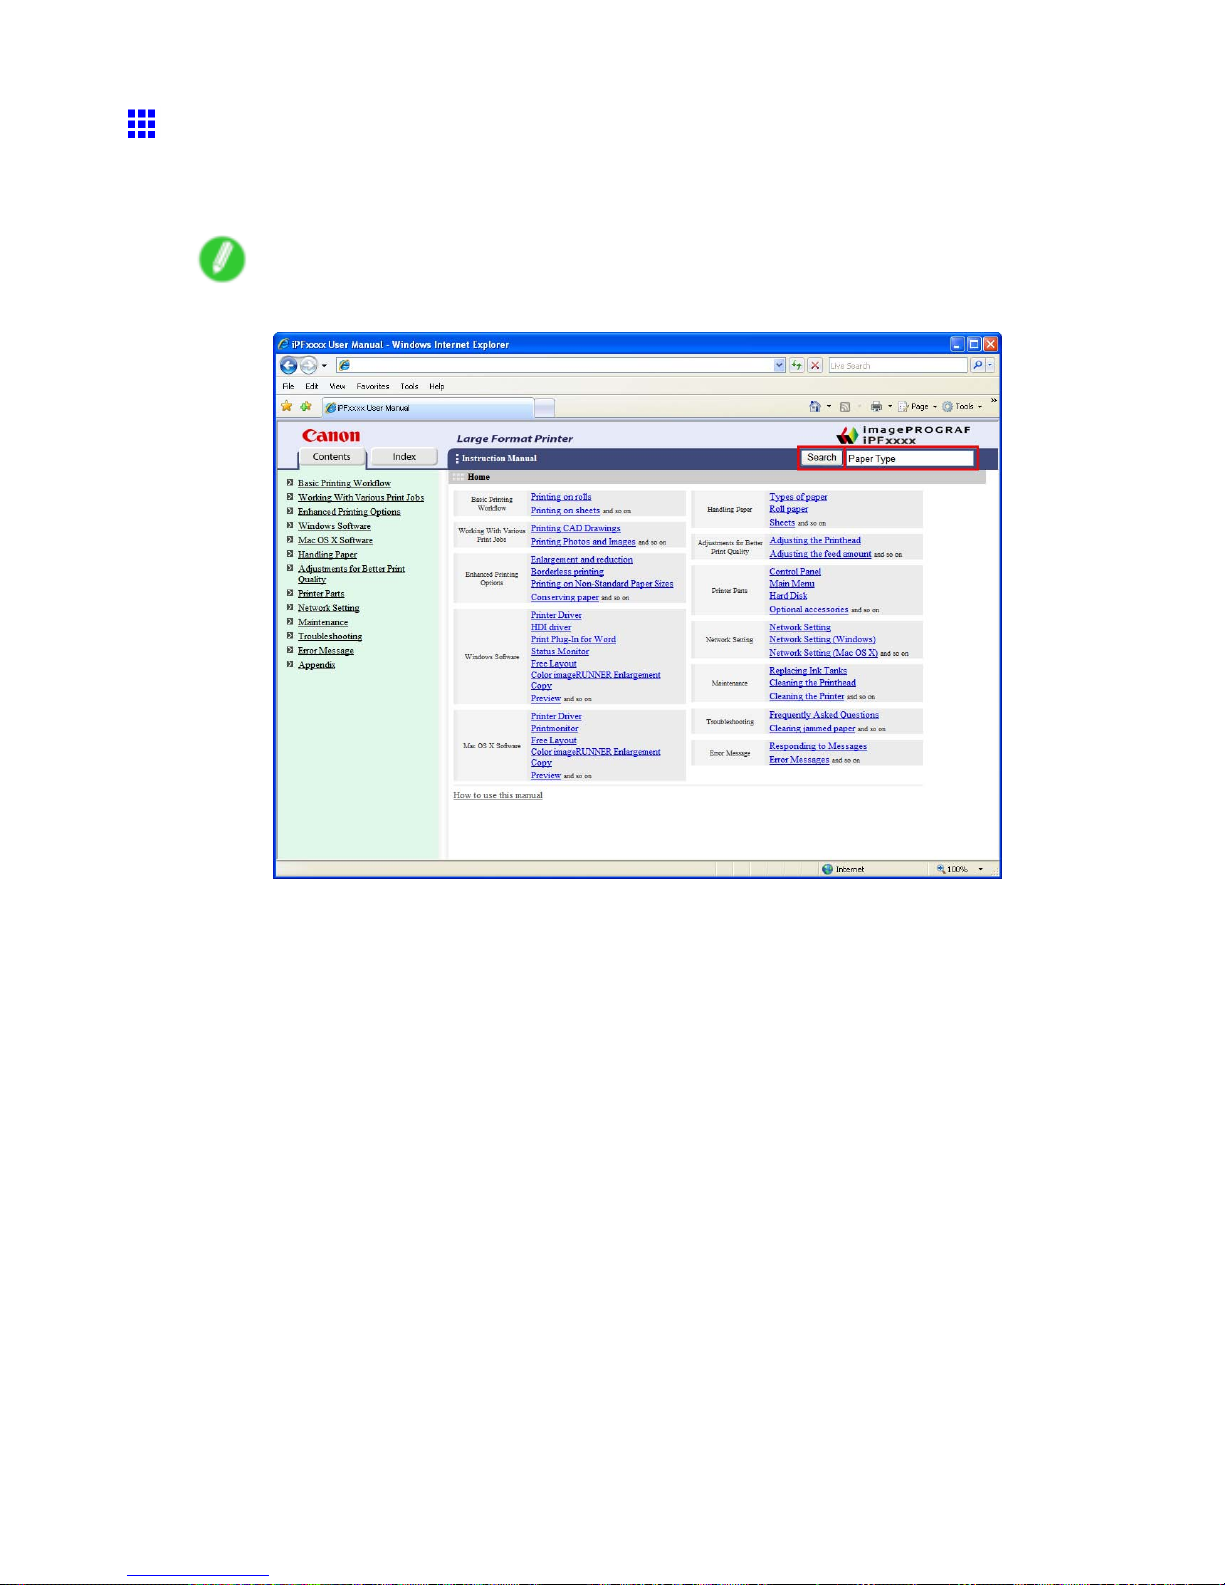
Searching T opics
Y ou can nd information in topics of this User Manual by searching for relevant terms.
1. Enter a term and click the Search button.
Note
• T o search for multiple terms at once, enter a space between each term.
Search results are listed at left.
Introduction 3
How to use this manual
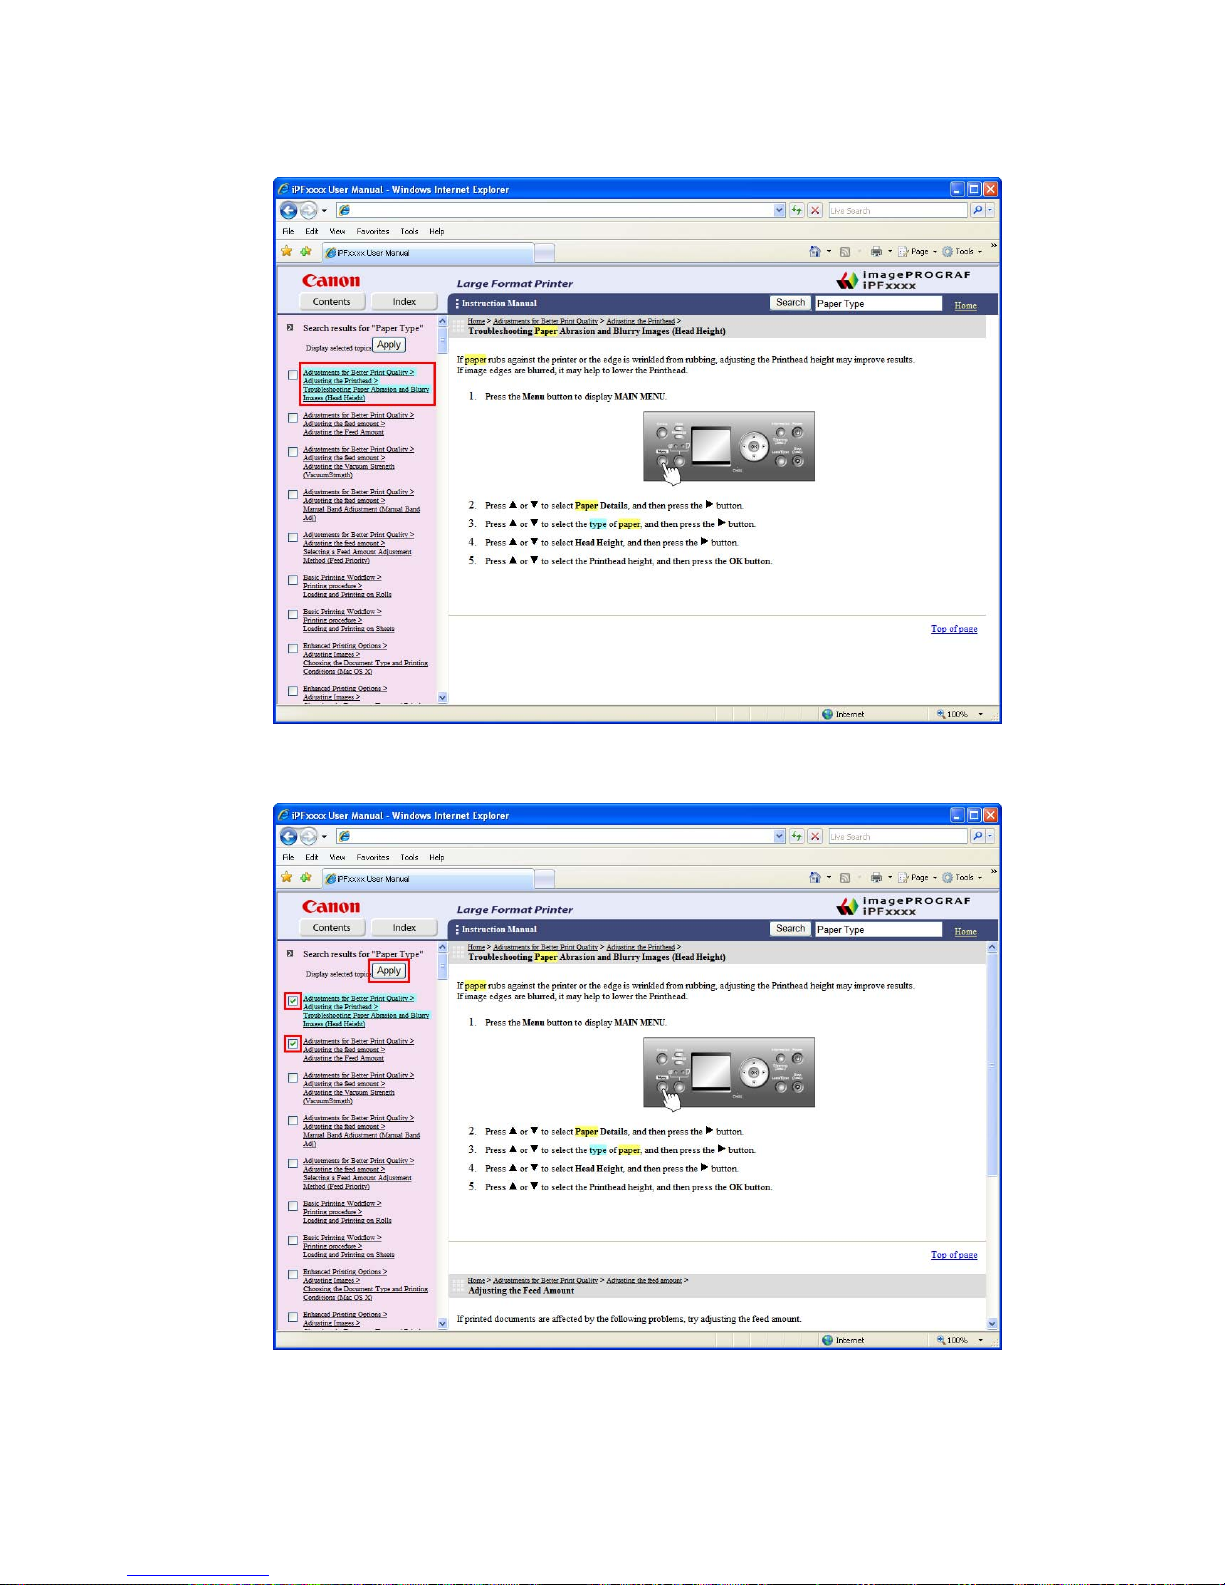
2. Click a topic you want to read.
The terms you searched for will be highlighted in the topic.
T o review multiple topics at once, select the check box of desired topics and click the Apply
button.
4 Introduction
How to use this manual
HTML V ersion of the Manual for Printing
Y ou can select a group of topics in the table of contents or individual topics in this manual for printing.
The following procedure describes how to do this, using the information in Basic Printing W orkow as an
example.
Printing a group of topics in the manual
When you access printable HTML versions of the content from section titles in the table of contents, you
can specify a group of topics to print.
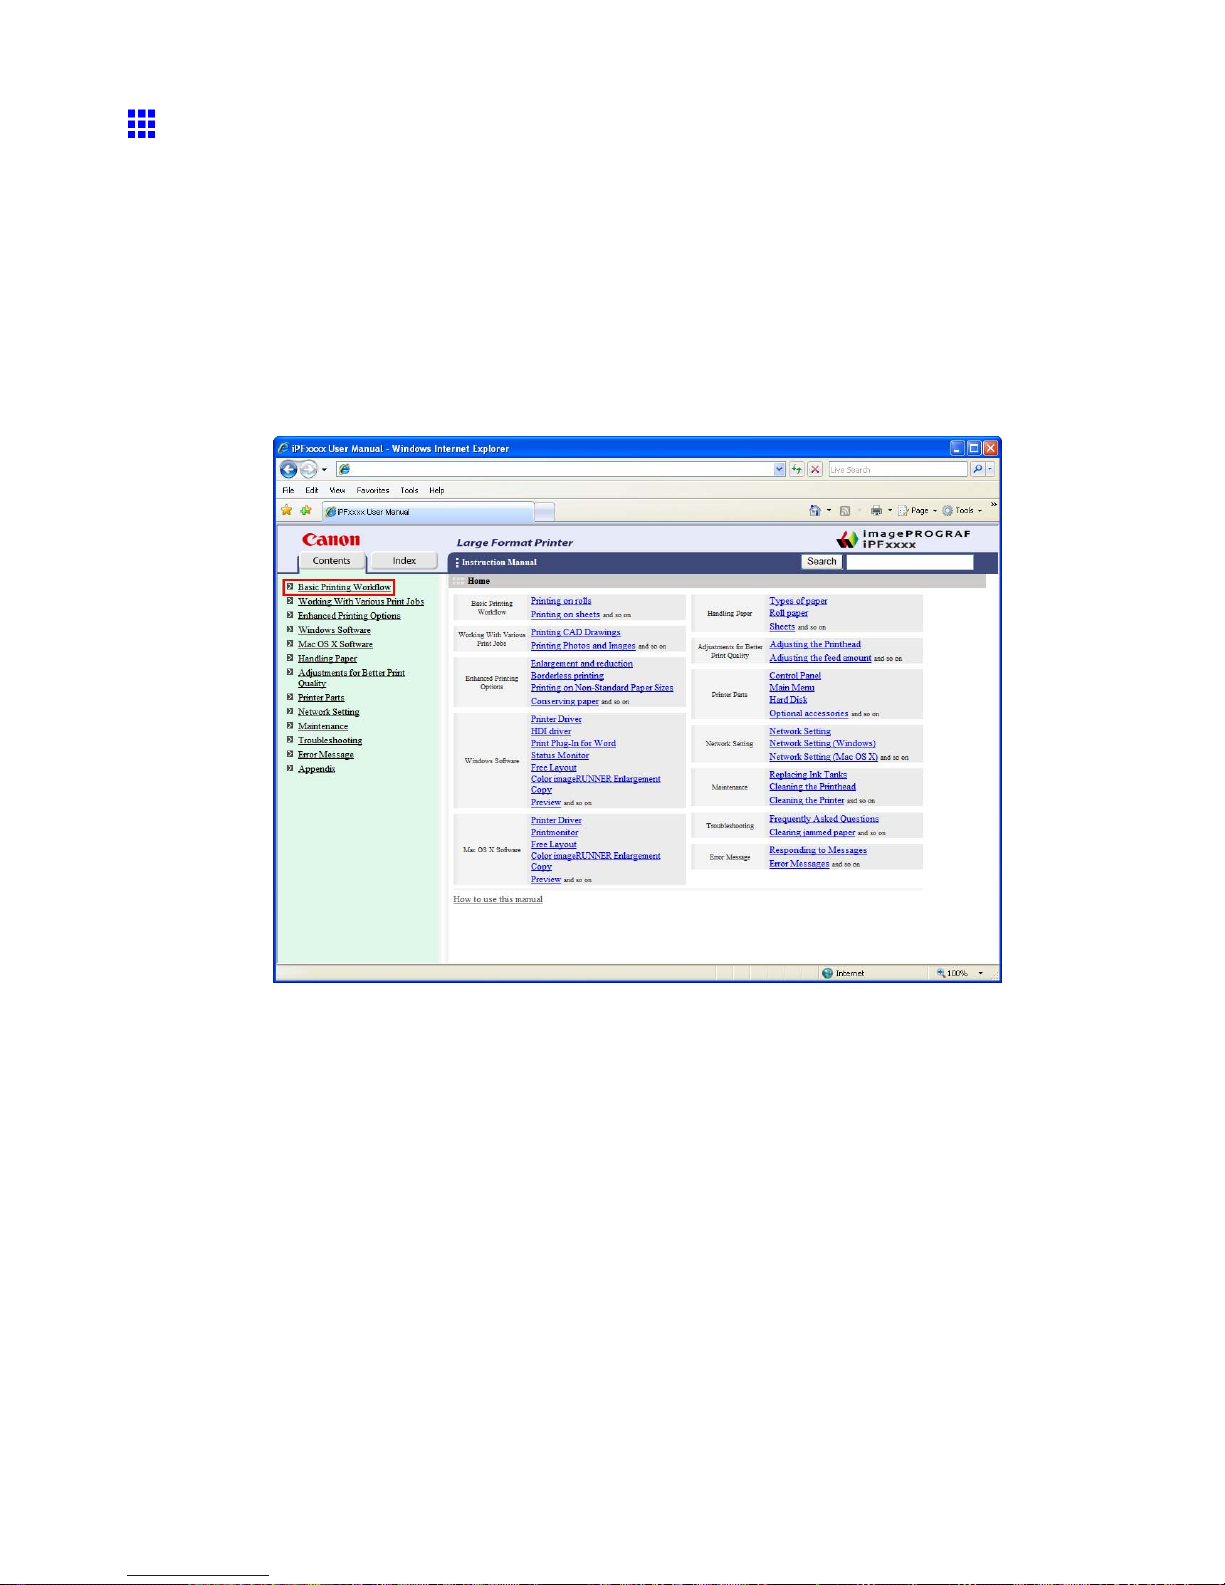
1. Click a section title in the table of contents. Here, Basic Printing W orkow is used as an
example.
Introduction 5
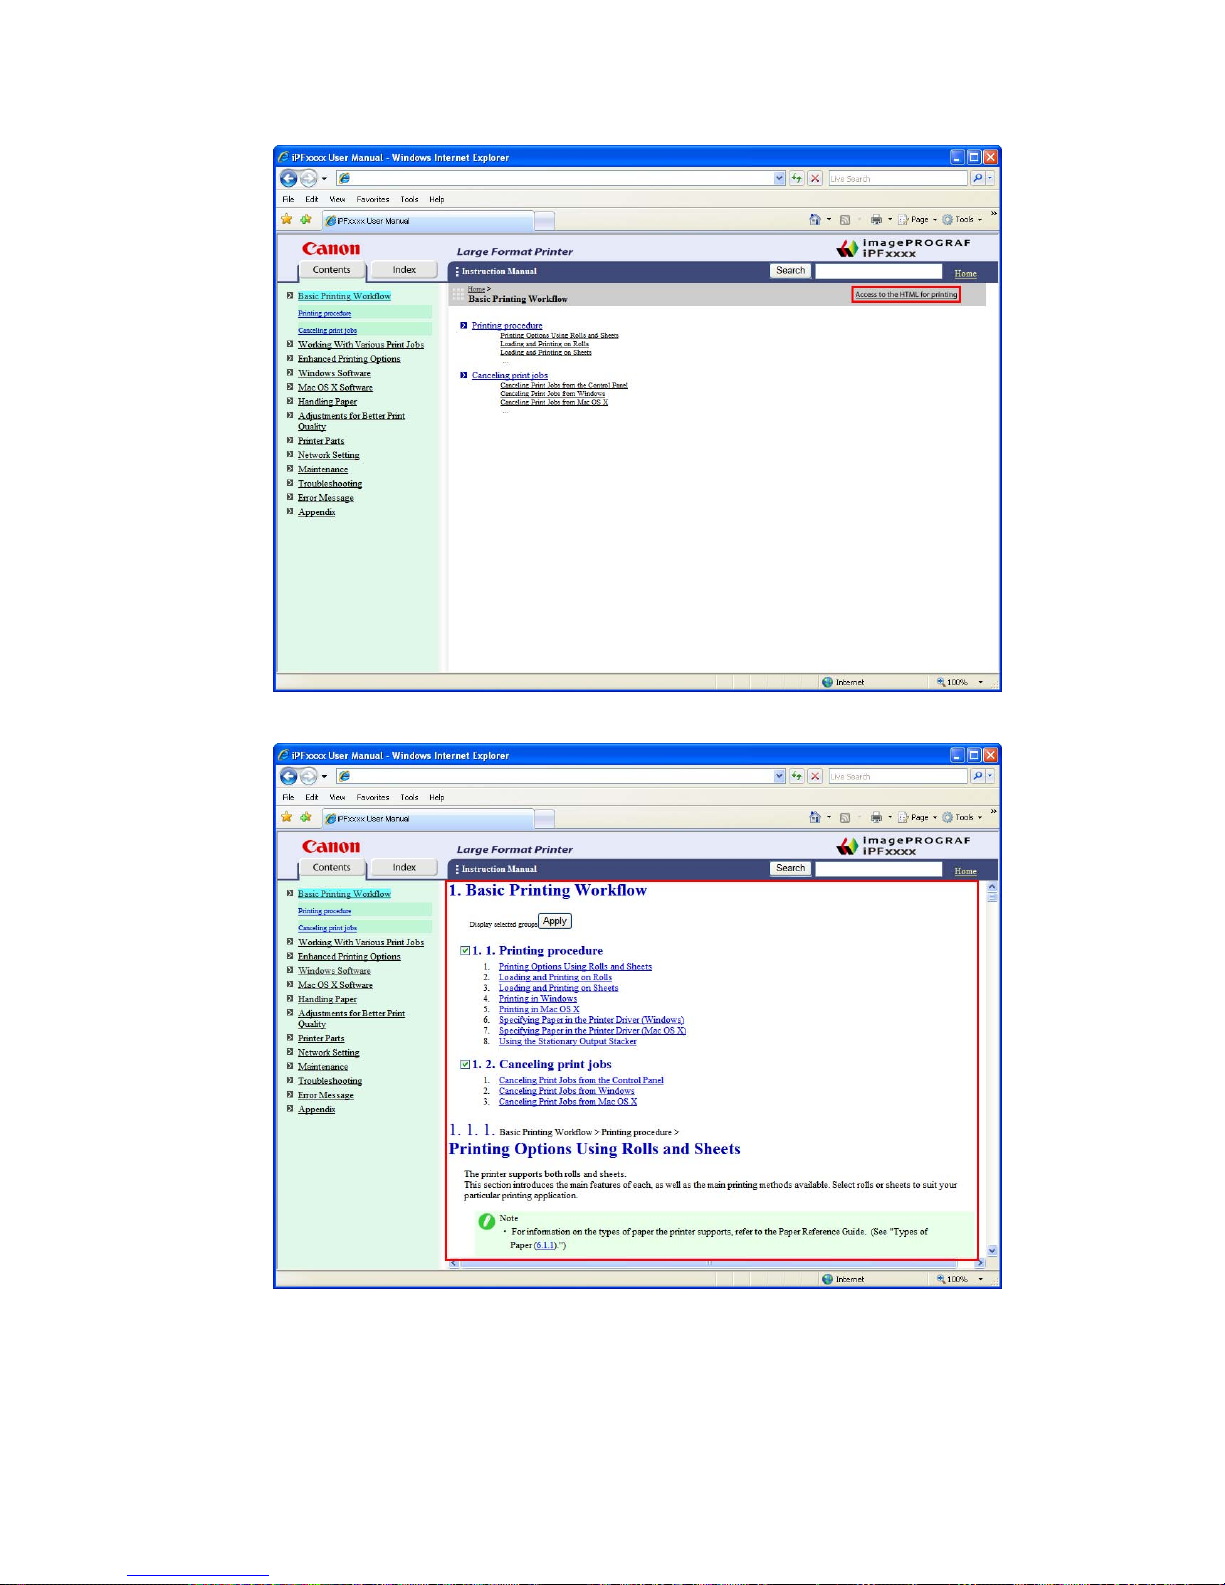
How to use this manual
2. Click Access to the HTML for printing in the title area.
The topics in Basic Printing W orkow are displayed together in HTML format, ready for printing.
6 Introduction
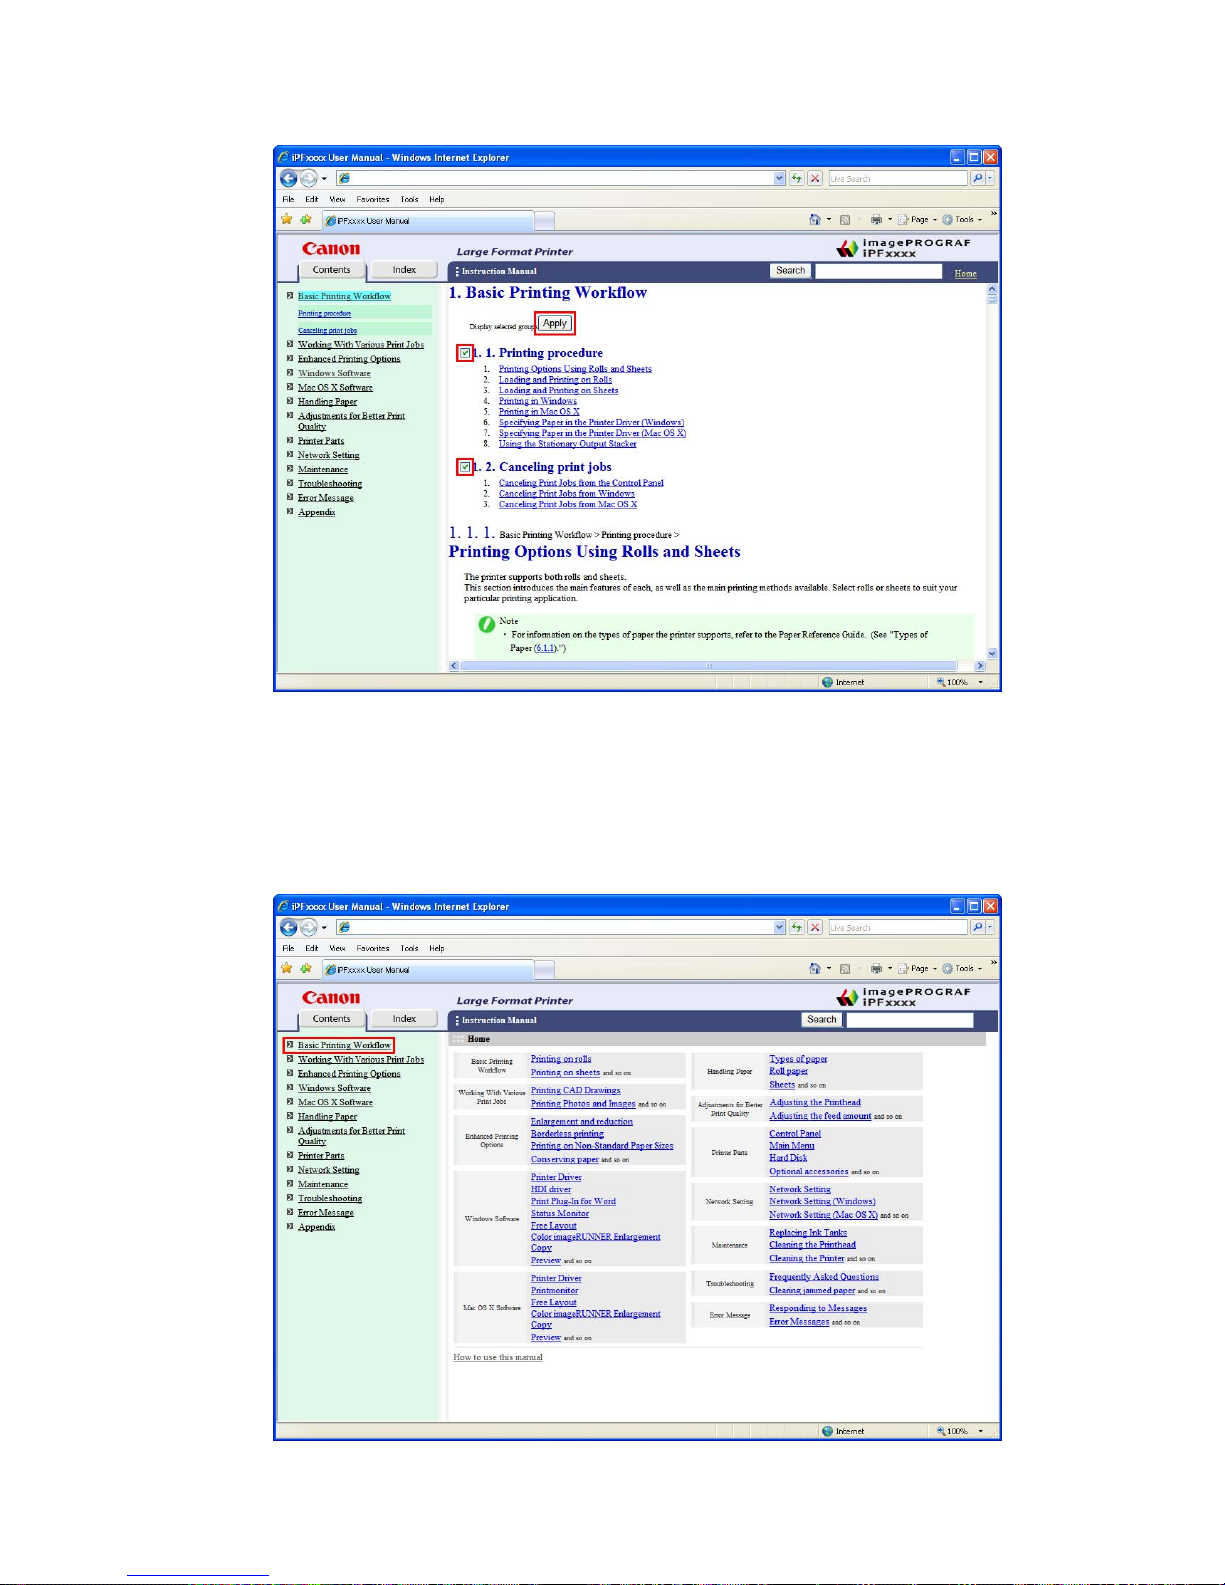
How to use this manual
3. Clear the sections you will not print and click the Apply button.
Printing a group of individual topics in the manual
When you access printable HTML versions from subtitles in the table of contents, you can specify a group
of topics to print.
1. Click a section title in the table of contents. Here, Basic Printing W orkow is used as an
example.
Introduction 7
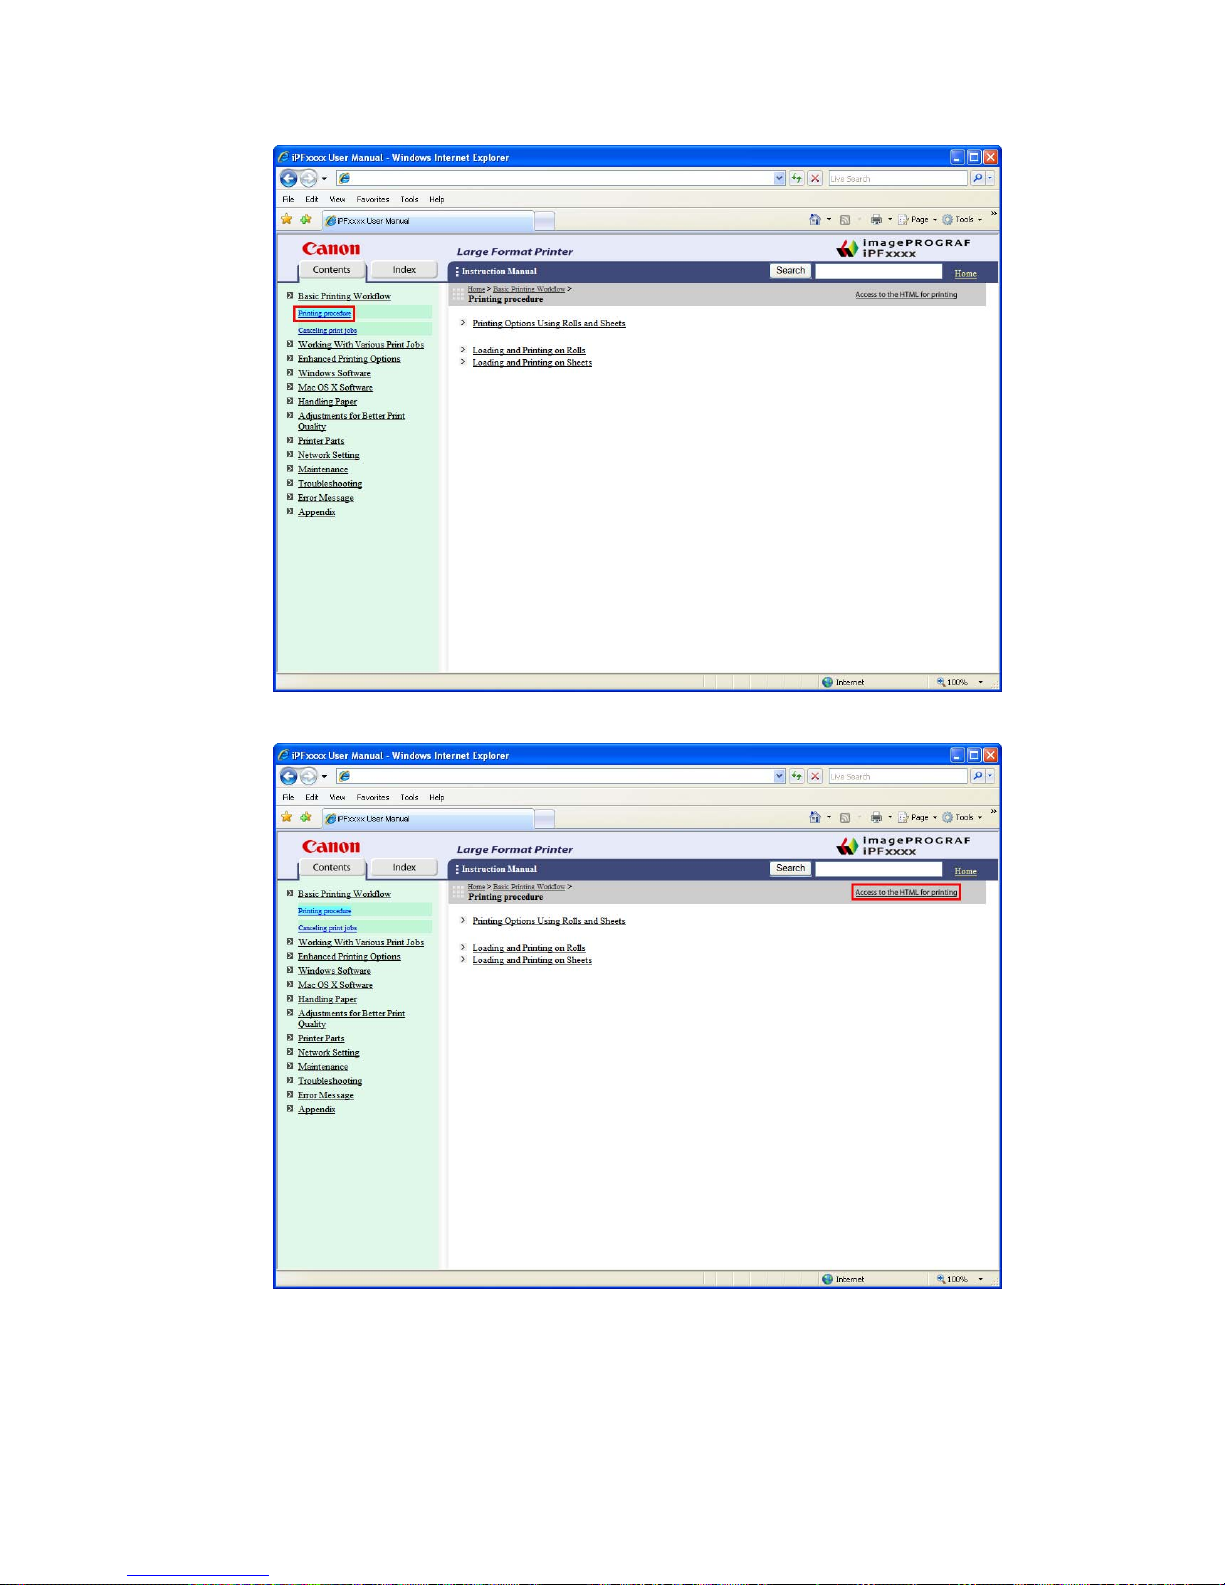
How to use this manual
2. Under Basic Printing W orkow , click Printing Procedure .
3. Click Access to the HTML for printing in the title area.
8 Introduction
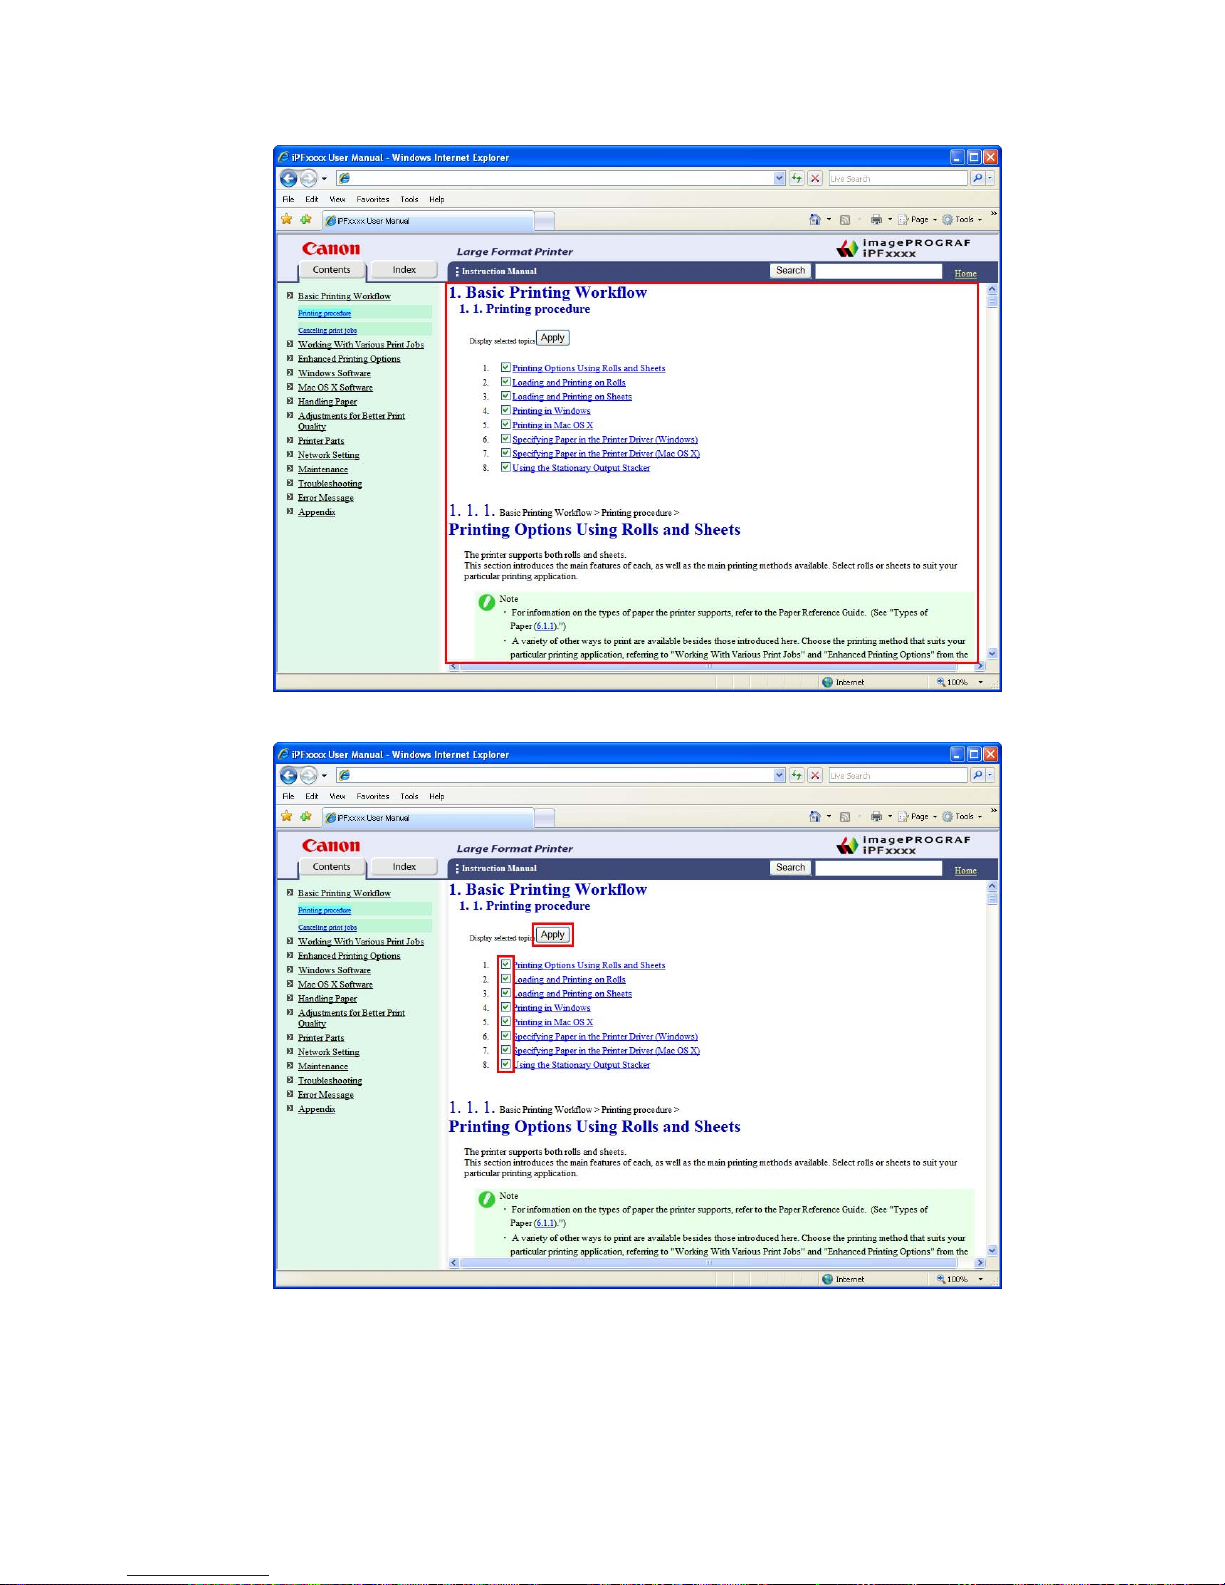
How to use this manual
The topics in Printing Procedure are displayed together in HTML format, ready for printing.
4. Clear the topics you will not print and click the Apply button.
Introduction 9
How to use this manual
Printing selected topics
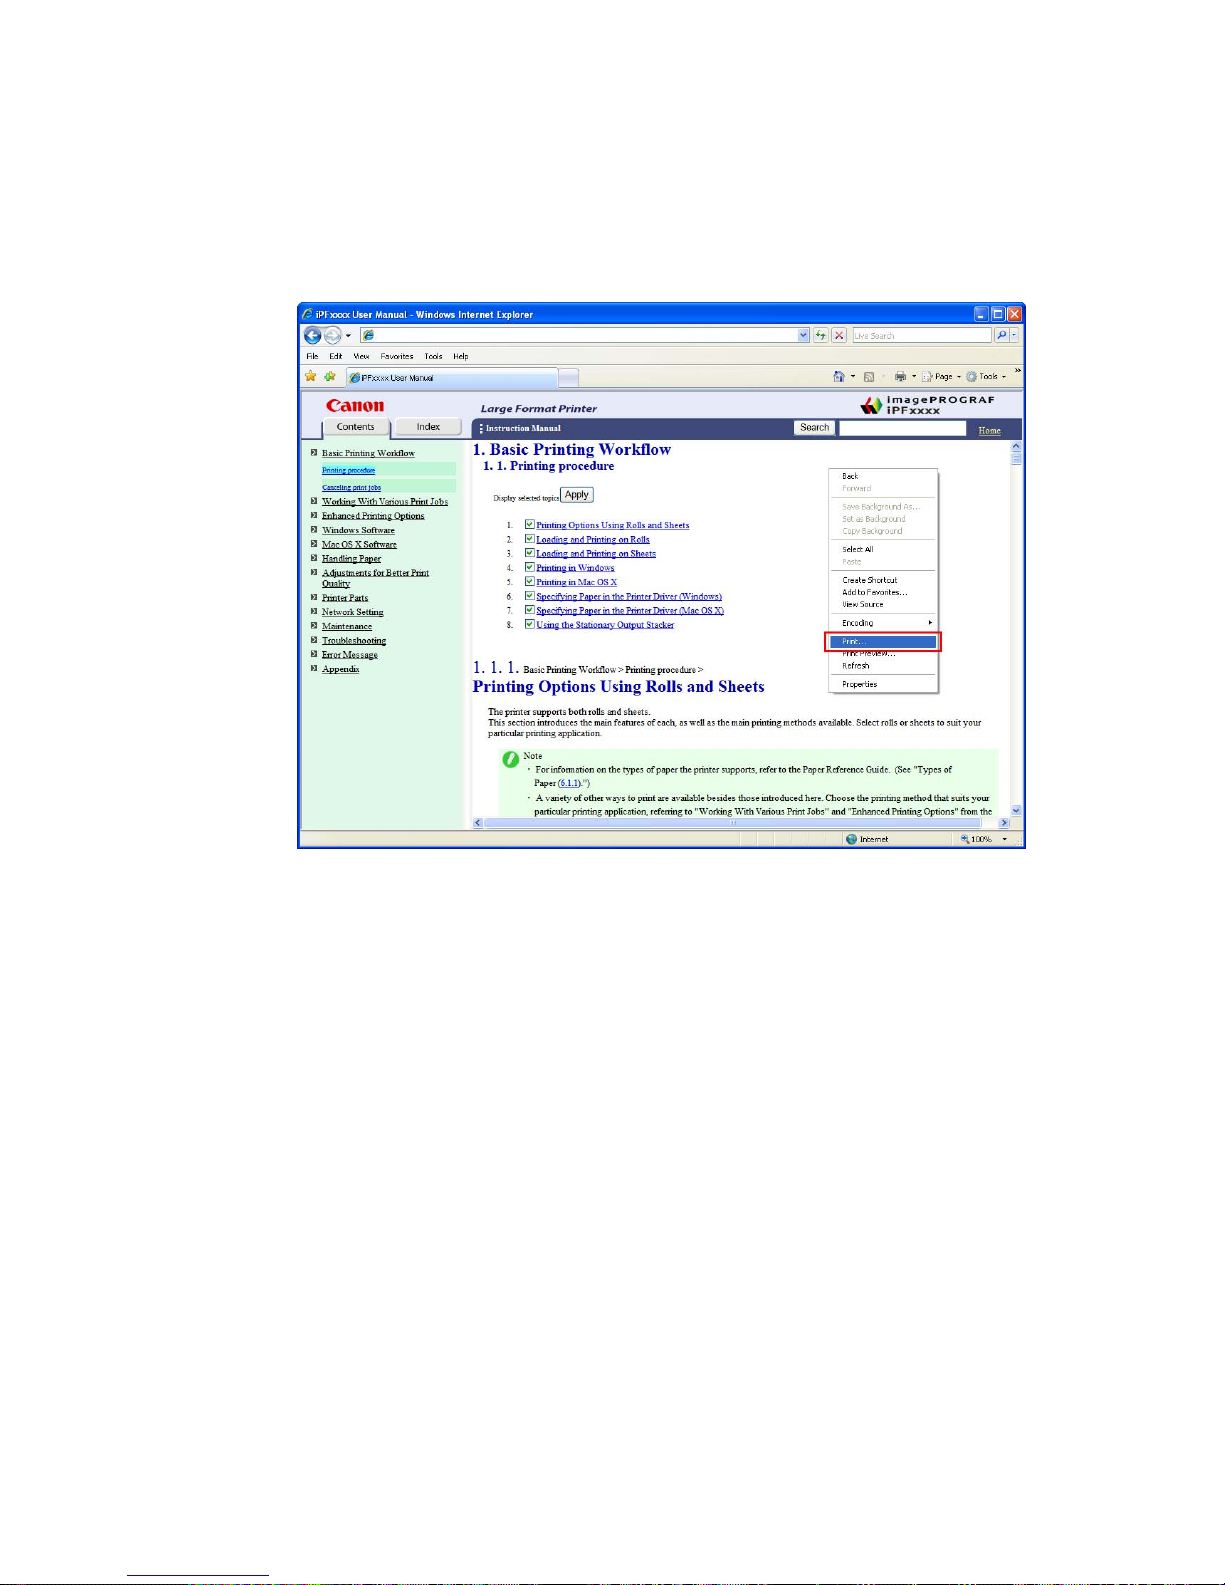
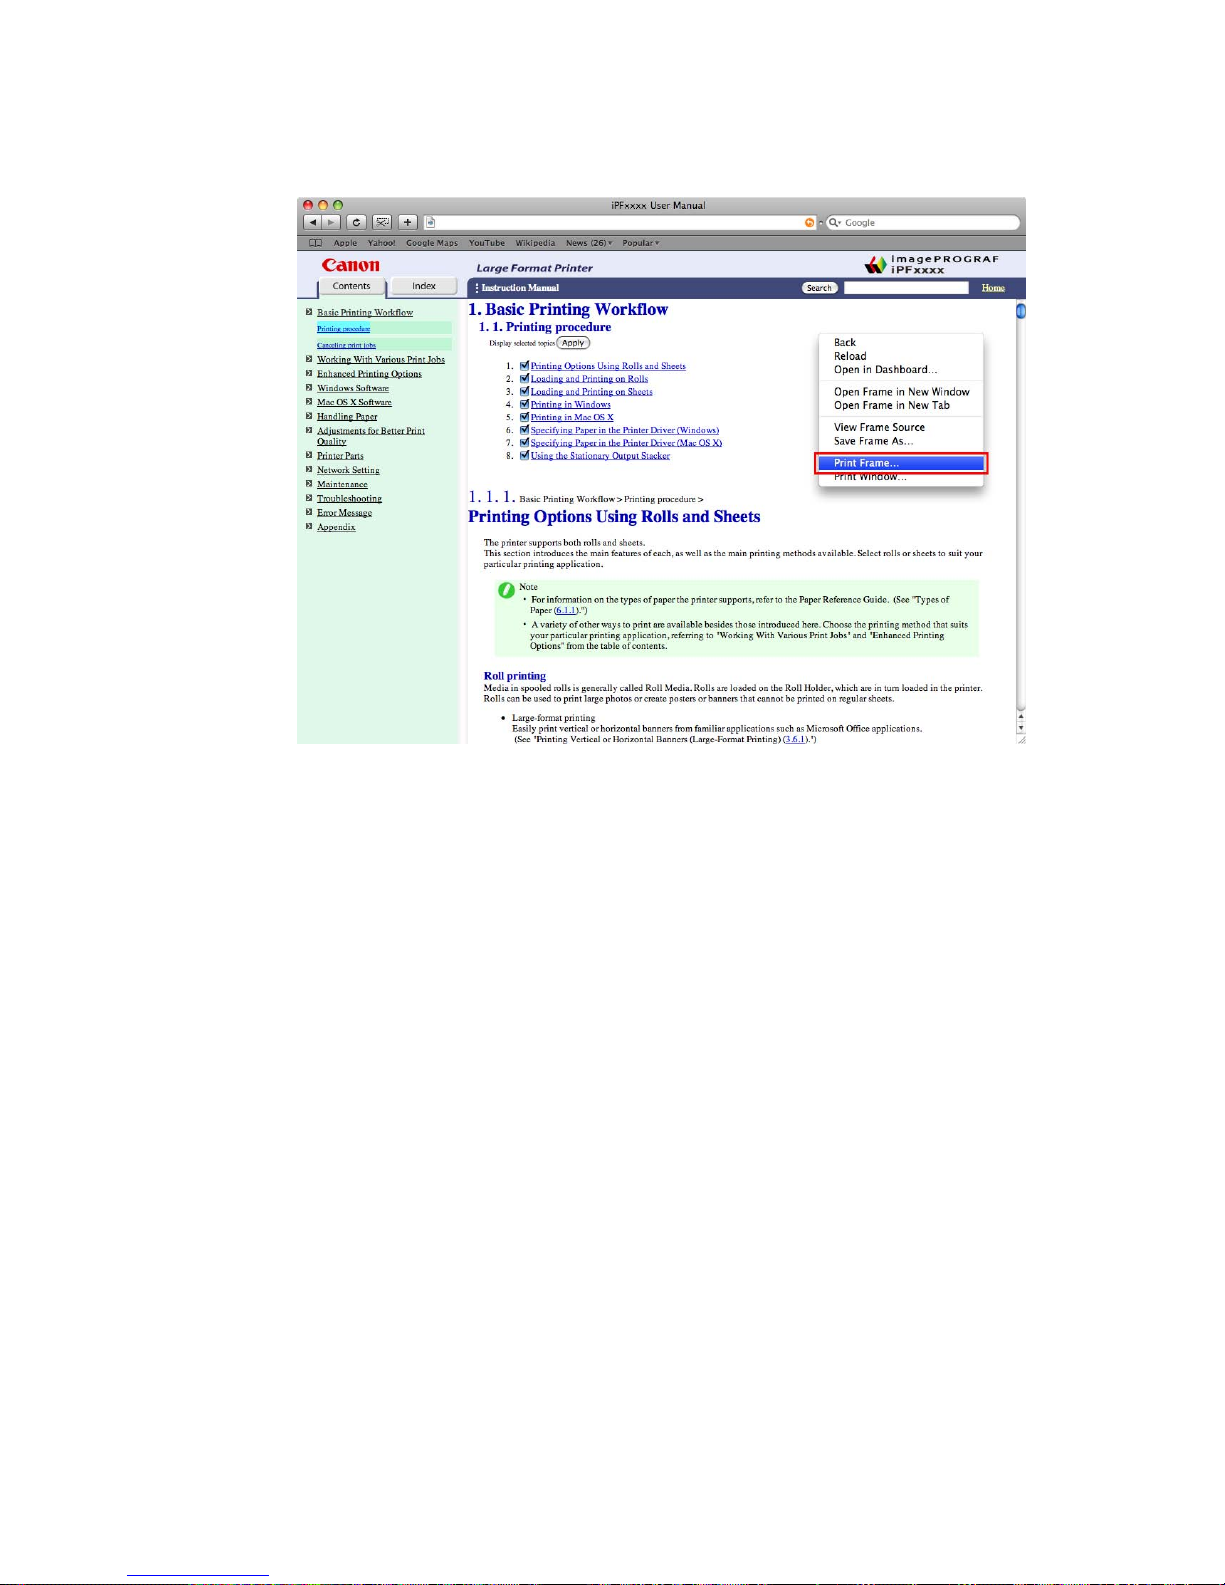
Print selected topics as follows.
1. Access the printing dialog box as follows, depending on your computer ’ s operating system.
• Windows
In Windows, right-click anywhere in the explanation area except on a gure or a link.In the shortcut
menu, click Print to display the Print dialog box.
10 Introduction
How to use this manual
• Macintosh
On a Macintosh computer , click anywhere in the explanation area except on a gure or a link while
holding the Ctrl key . In the shortcut menu, click Print Frame to display the Print dialog box.
Introduction 1 1
How to use this manual
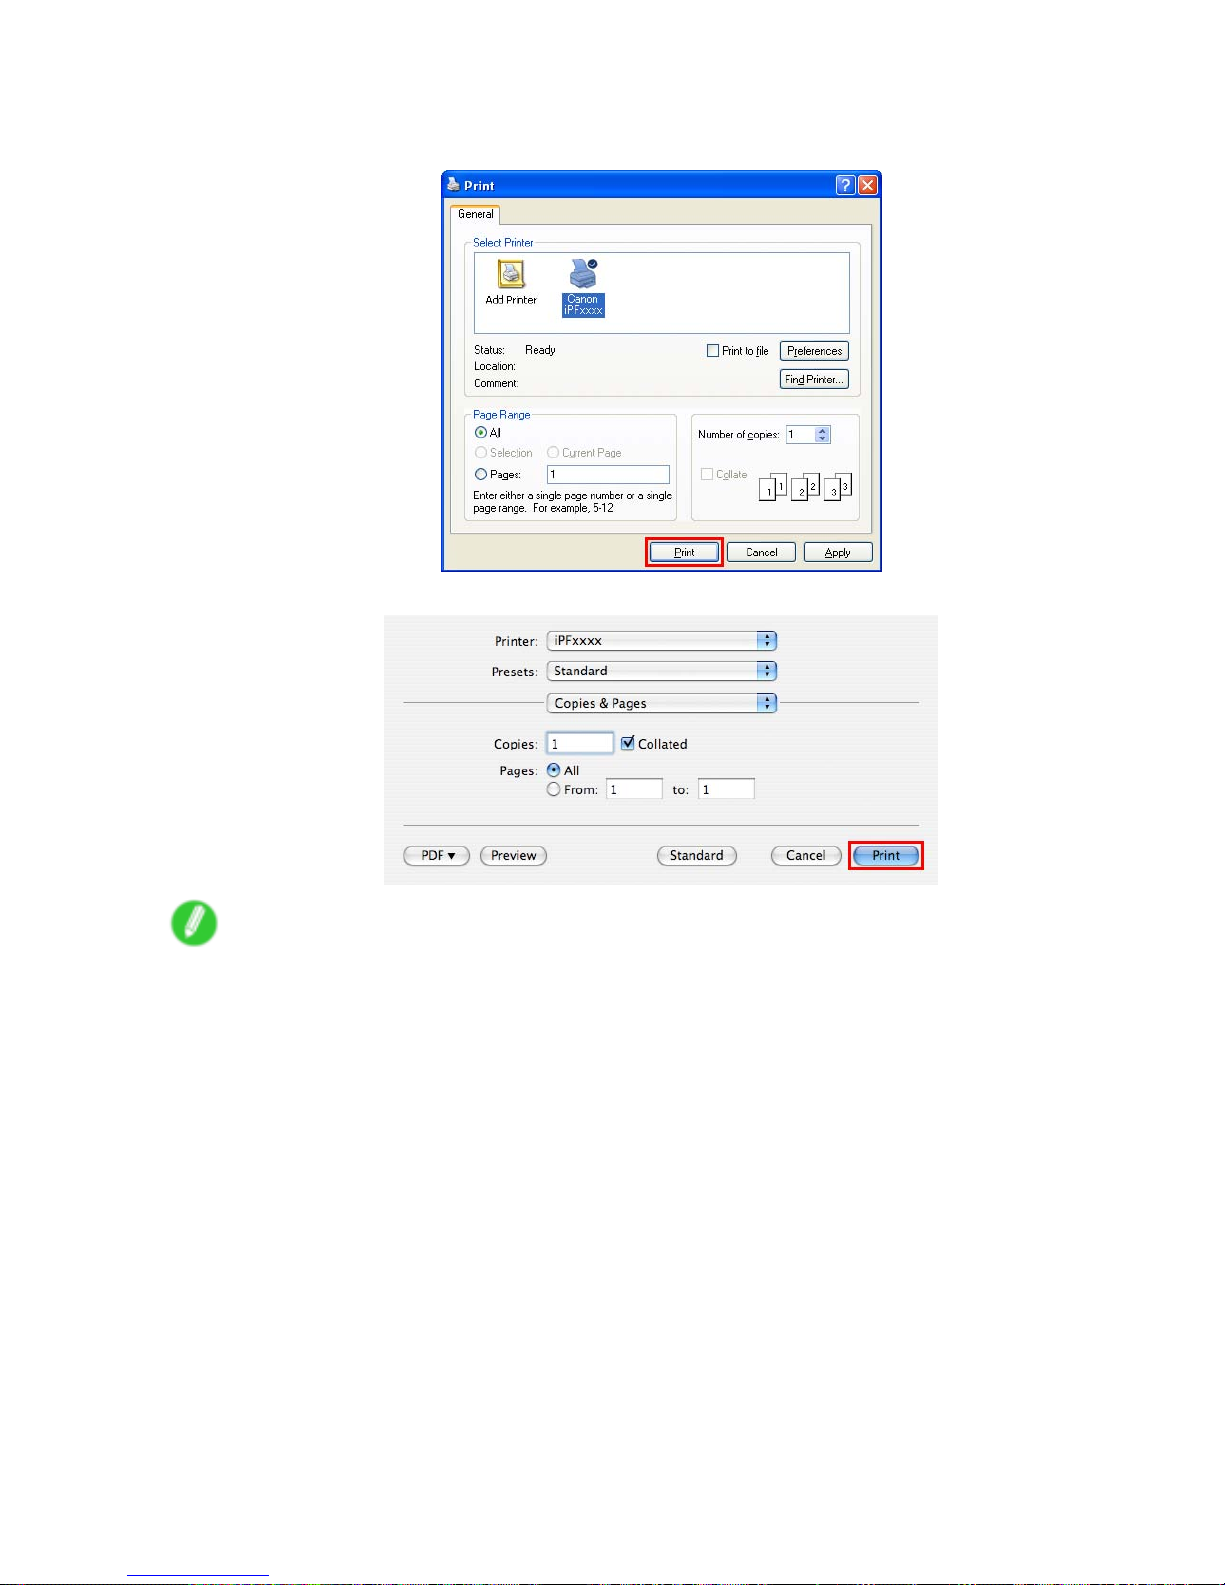
2. Specify conditions as needed, and then click Print (Windows) or Print (Macintosh).
• Windows
• Macintosh
Note
• T o print only individual topics that are displayed, use this method.
12 Introduction
Printer parts
Printer Parts
Printer parts
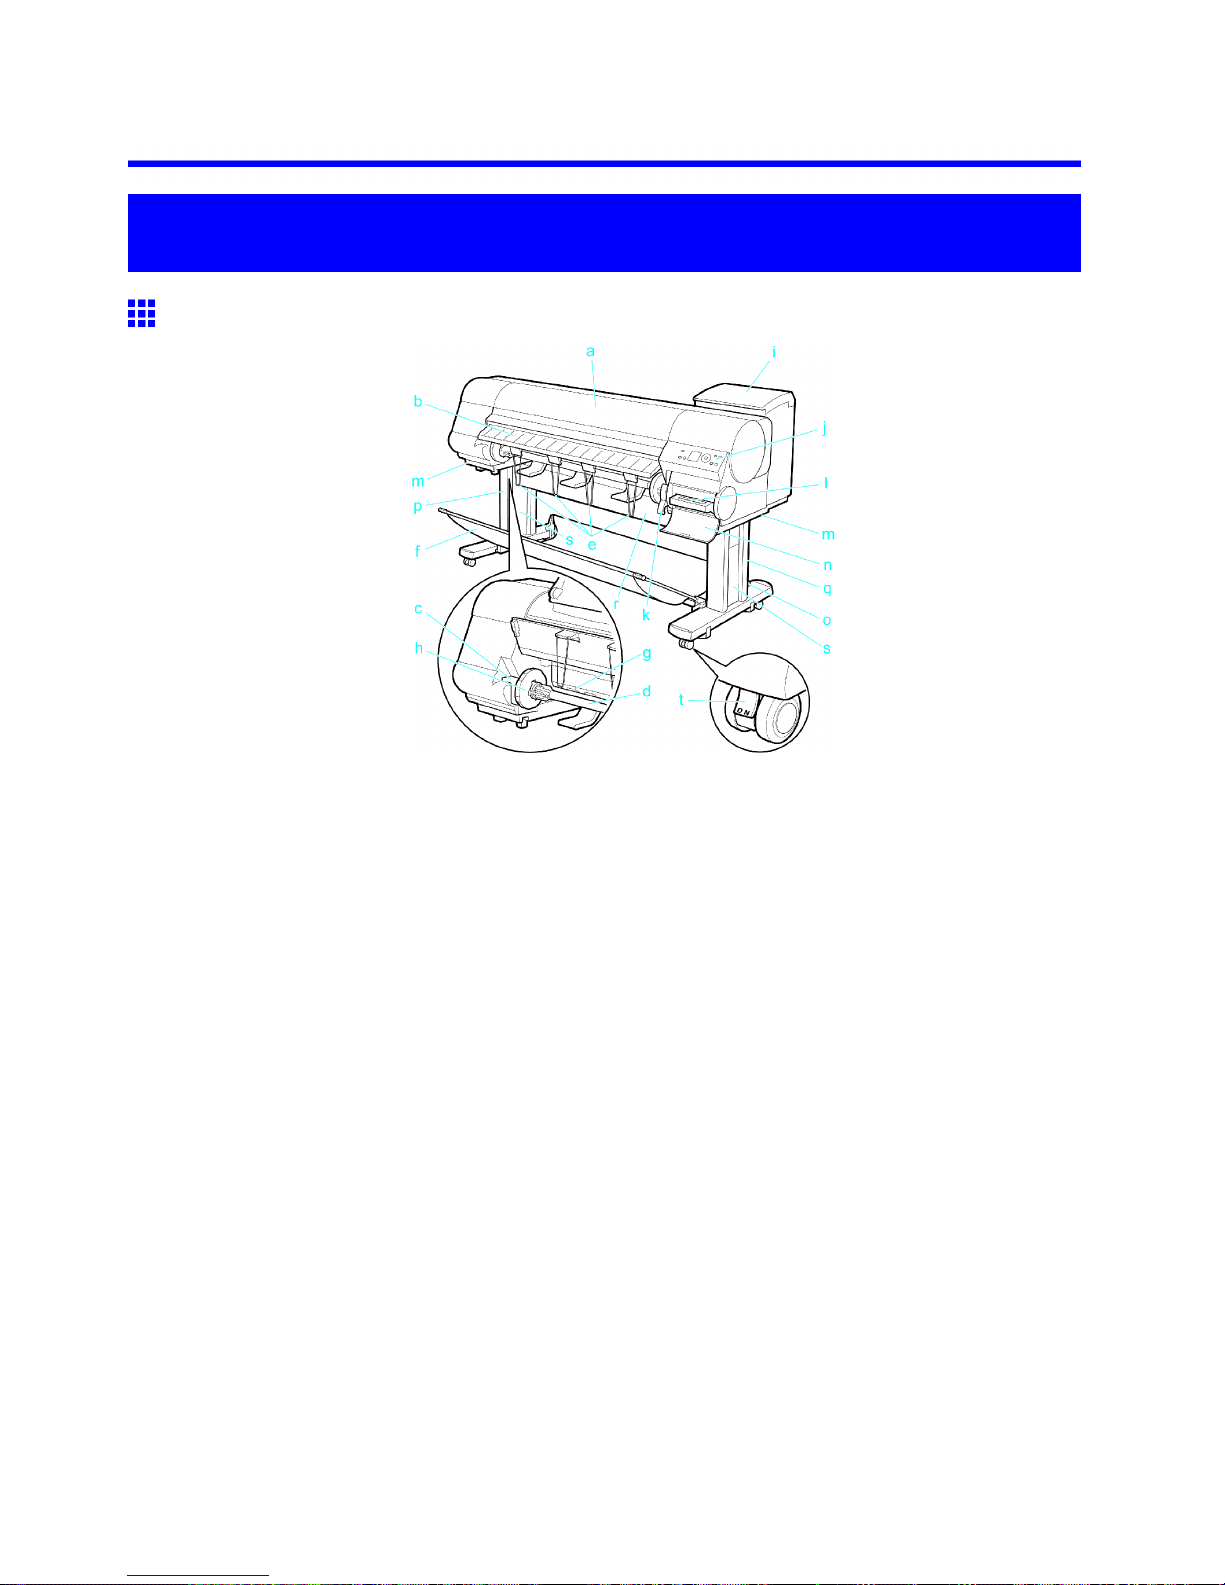
Front
a. T op Cover
Open this cover to install the Printhead , load paper , and remove any jammed paper from inside the
printer as needed. ( → P .16)
b. Ejection Guide
Guides printed documents as they are ejected. Open this guide when loading a roll.
c. Roll Holder Slot
Slide the Roll Holder into this slot.
d. Roll Holder
Load the roll on this holder .
e. Ejection Support
Prevents printed documents from winding around the Roll Holder or being drawn into the Paper
Feed Slot .
f. Stationary Output Stacker
A cloth tray that catches ejected documents. ( → P .20)
g. Paper Feed Slot
When loading a roll, insert the edge of the roll paper here.
h. Holder Stopper
Secure rolls on the Roll Holder with this part.
i. Ink T ank Cover
Open this cover to replace an Ink T ank . ( → P .19)
j. Control Panel
Use this panel to operate the printer and check the printer status. ( → P .25)
Printer Parts 13

Printer parts
k. Release Lever
Releases the Paper Retainer . Lift this lever toward the front of the printer when loading paper .
l. Maintenance Cartridge
Ink used for maintenance purposes such as head cleaning is absorbed. (Replace the cartridge
when it is full.)
m. Carrying Handles
When carrying the printer , have six people hold it by these handles under both sides.
n. Maintenance Cartridge Cover
Open this cover to replace the Maintenance Cartridge .
o. Stand
A stand that holds the printer . Equipped with casters to facilitate moving it.
p. Stand L
The left leg of the Stand .
q. Stand R
The right leg of the Stand .
r . T op Stand Stay
Supports Stand L and Stand R . Attach the optional Media T ake-up Unit to this part.
s. Leg Covers
Covers for Stand L and Stand R .
t. Stopper
Locks the Stand casters.
Always release the Stopper before moving the printer . Moving the printer while the Stopper is locked
may scratch the casters or the oor .
14 Printer Parts

Printer parts
Back
a. Carrying Handles
When carrying the printer , have six people hold it by these handles under both sides.
b. Media T ake-up Unit Power Inlet
Connect the power cord of the optional Media T ake-up Unit here.
c. Expansion Board Slots
Install an optional IEEE 1394 (FireWire) expansion board, as desired.
d. Ethernet Port
Connect an Ethernet cable to this port. The lamp is lit if the Ethernet cable is connected correctly
and communication is possible between the computer and printer .
e. USB Port
Connect a USB cable to this port. The printer is compatible with Hi-Speed USB connections.
f. Manual Pocket
Store printer manuals in this pocket.
g. Power Supply Connector
Connect the power cord to this connector .
h. Accessory Pocket
Store assembly tools, Roll Holder attachments, and other items in this pocket.
Printer Parts 15
Printer parts
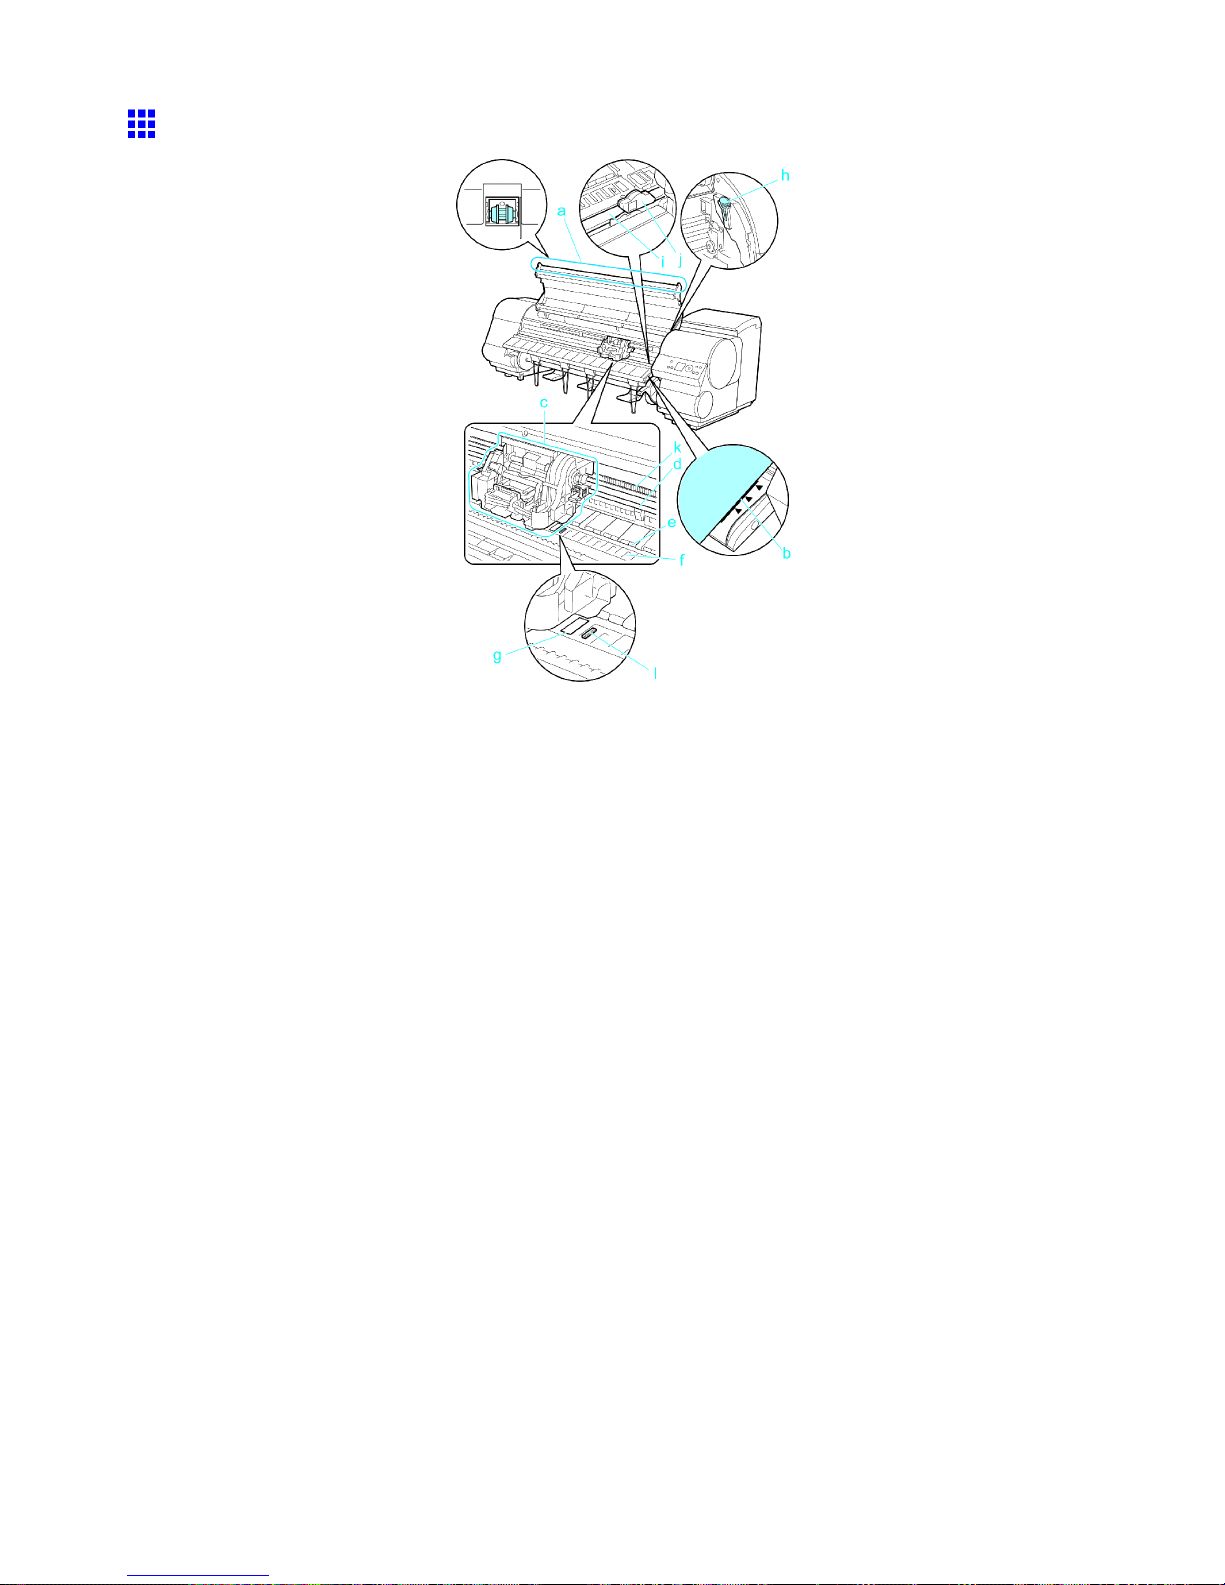
T op Cover (Inside)
a. T op Cover Roller
Prevents paper from rising when ejected.
b. Paper Alignment Line
Align paper with this line when loading it.
c. Carriage
Moves the Printhead . The carriage serves a key role in printing. ( → P .18)
d. Carriage Shaft
The Carriage slides along this shaft.
e. Paper Retainer
Important in supplying the paper . This retainer holds paper as it is fed.
f. Platen
The Printhead moves across the platen to print. V acuum holes on the platen hold paper in place.
g. Borderless Printing Ink Grooves
For catching ink outside the edges of paper during borderless printing.
h. Cleaning Brush
When cleaning inside the printer under the T op Cover , use this brush to sweep away paper dust on
the Platen .
Also use the brush to move the blue Switch on the Platen .
16 Printer Parts

Printer parts
i. Cutter Rail
The Cutter Unit passes over this rail to cut paper .
j. Cutter Unit
A round-bladed cutter for automatic paper cutting.
k. Linear Scale
The linear scale serves a key role in detecting the Carriage position. Be careful not to touch this
part when cleaning inside the T op Cover or clearing paper jams.
l. Switch
Set the switch to the side opposite ● if the edges of printed images are blurred. Set the switch to
the ● side before borderless printing. ( → P .639 )
Printer Parts 17

Printer parts
Carriage
a. Printhead Fixer Cover
Holds the Printhead in place.
b. Printhead
The printhead is equipped with ink nozzles. The carriage serves a key role in printing.
c. Printhead Fixer Lever
Locks the Printhead Fixer Cover .
d. Shaft Cleaner
Prevents the Carriage Shaft from becoming dirty .
e. Angle Adjustment Lever
Use this lever to ne-tune the printer to correct misalignment of printed lines.
18 Printer Parts

Printer parts
Ink T ank Cover (Inside)
Note: The gure shows the printer as loaded with 700 ml (23.7 oz) Ink T ank .
a. Ink T anks
Cartridges of ink in various colors.
b. Ink T ank Lock Lever
A lever that locks the Ink T ank in place and protects it. Lift and lower the lever when replacing an Ink
T ank . T o open it, lift the stopper of the lever until it stops, and then push it down toward the front. T o
close it, push it down until it clicks into place.
c. Ink Lamp (Red)
Indicates the state of the Ink T ank as follows when the Ink T ank Cover is opened.
• On
The Ink T ank is installed correctly .
• Of f
No Ink T ank is installed, or the ink level detection function is disabled.
• Flashing Slowly
Not much ink is left.
• Flashing Rapidly
Ink tank is empty .
d. Ink Color Label
Load an Ink T ank that matches the color and name on this label.
e. Ink Set
An Ink T ank that can be used in the printer is labeled with a white letter “A” in a black circle on the
side. When purchasing an Ink T ank , make sure an “A” is printed on the label. ( → P .572)
Printer Parts 19

Printer parts
Stationary Output Stacker
a. Output Stacker
A cloth tray that catches ejected documents.
b. White tag
A point of reference for attaching the Output Stacker in the right direction.
c. Basket Arm R and Basket Arm L
Holds the Basket Rod (tag side) attached to the Output Stacker . When the Output Stacker is not
used, push it down and store it next to the Stand Leg .
d. Basket Rod (tag side) and Basket Rod (cord side)
Holds the cloth Output Stacker securely in specic positions.
e. Basket Rod
Keeps Basket Arm R and Basket Arm L at the same angle.
f. Rear Holder
Holds the middle of the Basket Rod (cord side).
( → P .21)
Note
• The printer can be used with either a Stationary Output Stacker or a separate, mobile Wheeled Output
Stacker .
The Stationary Output Stacker is normally provided as the standard stacker , but the Wheeled Output
Stacker may be the standard stacker in some sales regions. If the Wheeled Output Stacker has been
provided as the standard stacker , the Stationary Output Stacker is not included.
For more information about the Wheeled Output Stacker , see “ Wheeled Output Stacker ”. (→P .96)
20 Printer Parts

Printer parts
Using the Stationary Output Stacker
The Stationary Output Stacker can be used in three positions, as shown.
• When storing printed documents on the Output Stacker
Use position (1).
• When the Output Stacker is not used
Move the stacker into position (2).
• When the Media T ake-up Unit is used, or when the Output Stacker is stored for long periods
Lower it to position (3) for storage. ( → P .23)
When using the Output Stacker again after storage, reattach the Basket Rod on the front of the Output
Stacker to the tips of the left and right basket arms and pull the side rods out completely .
• When printing on large, stif f sheets
Use position (3).
Important
• When storing printed documents on the Output Stacker , always use it in position (1). If you do not, printed
documents may not be dropped into the Output Stacker , and the printed surface may become soiled.
• The Output Stacker can accommodate one sheet. When printing multiple pages, remove each sheet
after it is printed.
• Before using the Output Stacker , remove the Rewind Spool . If you do not, it may prevent printed
documents from being held correctly , and they may be scratched.
• The Output Stacker can hold printed documents from rolls that are 62 inches (1,575 mm) long. When
printing longer documents, use the optional Media T ake-up Unit .
Printer Parts 21

Printer parts
The Output Stacker locks into position if you lift it to position (1) or (2). T o lower the Output Stacker , lift the
front Basket Rod lightly to release the lock, and then lower the stacker .
22 Printer Parts

Printer parts
Stowing the Stationary Output Stacker
Stow the Stationary Output Stacker if you will use the Media T ake-up Unit or if you will not use the Stationary
Output Stacker for an extended period.
1. When the Output Stacker is in the position used when storing printed documents (a), lift the front
Basket Rod gently to release the lock, lower the stacker toward the front (b), and push it all
the way back.
2. Remove the front Basket Rod from the left and right Basket Arms . Roll up the Basket Cloth and
put it at the back of the Bottom Stand Stay .
Important
• When using the optional Media T ake-up Unit , position the Basket Cloth and Basket Rod so they do
not interfere with the Media T ake-up Sensor (indicated by the dashed line).
Printer Parts 23

Printer parts
3. Push in the left and right Basket Arm toward the back all the way , until they stop.
24 Printer Parts

Printer parts
Control Panel
a. Online Button (Green)
Switches the printer online and of ine. ( → P .36)
• On
The printer is online.
• Flashing
The printer is switching modes.
• Of f
The printer is of ine.
b. Menu Button
Displays the main menu of the printer . ( → P .57)
c. Data lamp (Green)
• Flashing
During printing, the Data lamp ashes when the printer is receiving or processing print jobs.
Otherwise, this lamp ashes when the print job is paused or the printer is updating the rmware.
• Of f
There are no active print jobs when the Data lamp is of f.
d. Message lamp (Orange)
• On
A warning message is displayed.
• Flashing
An error message is displayed.
• Of f
The printer is of f or is operating normally .
e. Paper Source Section
After you press the Feeder Selection button, the lamp for your chosen paper source is lit.
1. Roll Media lamp (Green)
• On
Indicates that a roll is selected as the paper source.
• Of f
Indicates that a sheet is selected as the paper source.
2. Cut Sheet lamp (Green)
• On
Indicates that a sheet is selected as the paper source.
• Of f
Indicates that a roll is selected as the paper source.
Printer Parts 25

Printer parts
f. Feeder Selection Button
Switches the paper source. Each time you press this button, the paper source switches between the
roll and the sheet, and the corresponding lamp on the Paper Source Section is lit.
g. Display Screen
Shows the printer menu, as well as the printer status and messages.
h. Color Label
This label indicates the Ink T ank color . The label corresponds to the ink level on the Display Screen .
i. HDD lamp (Green)
• On
Indicates the printer is accessing the hard disk.
• Of f
Indicates the printer is not accessing the hard disk.
j. ◄ Button
Menu mode: Press this button to display the menu one level higher .
k. ▲ Button
Of ine: Press this button to rewind rolls manually . ( → P .151)
Menu mode: Press this button to display the previous menu item or setting value.
l. ▼ Button
Of ine mode: Press this button to feed the roll manually in the direction of ejection, as needed.
( → P .151)
Menu mode: Press this button to display the next menu item or setting value.
m. ► Button
Menu mode: Press this button to display the menu one level lower .
n. OK Button
In Menu mode, press this button to conrm or execute the selected item or setting. Also press this
button if the Display Screen indicates to press the OK button.
o. Information Button
Displays printer submenus. Press this button to display information about ink, paper , and so on.
( → P .71)
Y ou can also hold down this button for three seconds to clean the Printhead ( Head Cleaning A ).
p. Power Button
T urns the printer on and of f. ( → P .29)
q. Load/Eject Button
By pressing this button, you can check instructions on loading and removing paper . Instructions for
loading paper are shown on the Display Screen if pressed when no paper is loaded, and instructions
for removing paper are shown if paper is loaded.
r . Stop Button
Hold down for at least a second to cancel print jobs in progress or end the ink drying period.
Note
• In Sleep mode, you can press any button except the Power button to bring the printer online again.
26 Printer Parts

Control Panel
Control Panel
Control Panel
a. Online Button (Green)
Switches the printer online and of ine. ( → P .36)
• On
The printer is online.
• Flashing
The printer is switching modes.
• Of f
The printer is of ine.
b. Menu Button
Displays the main menu of the printer . ( → P .57)
c. Data lamp (Green)
• Flashing
During printing, the Data lamp ashes when the printer is receiving or processing print jobs.
Otherwise, this lamp ashes when the print job is paused or the printer is updating the rmware.
• Of f
There are no active print jobs when the Data lamp is of f.
d. Message lamp (Orange)
• On
A warning message is displayed.
• Flashing
An error message is displayed.
• Of f
The printer is of f or is operating normally .
e. Paper Source Section
After you press the Feeder Selection button, the lamp for your chosen paper source is lit.
1. Roll Media lamp (Green)
• On
Indicates that a roll is selected as the paper source.
• Of f
Indicates that a sheet is selected as the paper source.
2. Cut Sheet lamp (Green)
• On
Indicates that a sheet is selected as the paper source.
• Of f
Indicates that a roll is selected as the paper source.
Printer Parts 27

Control Panel
f. Feeder Selection Button
Switches the paper source. Each time you press this button, the paper source switches between the
roll and the sheet, and the corresponding lamp on the Paper Source Section is lit.
g. Display Screen
Shows the printer menu, as well as the printer status and messages.
h. Color Label
This label indicates the Ink T ank color . The label corresponds to the ink level on the Display Screen .
i. HDD lamp (Green)
• On
Indicates the printer is accessing the hard disk.
• Of f
Indicates the printer is not accessing the hard disk.
j. ◄ Button
Menu mode: Press this button to display the menu one level higher .
k. ▲ Button
Of ine: Press this button to rewind rolls manually . ( → P .151)
Menu mode: Press this button to display the previous menu item or setting value.
l. ▼ Button
Of ine mode: Press this button to feed the roll manually in the direction of ejection, as needed.
( → P .151)
Menu mode: Press this button to display the next menu item or setting value.
m. ► Button
Menu mode: Press this button to display the menu one level lower .
n. OK Button
In Menu mode, press this button to conrm or execute the selected item or setting. Also press this
button if the Display Screen indicates to press the OK button.
o. Information Button
Displays printer submenus. Press this button to display information about ink, paper , and so on.
( → P .71)
Y ou can also hold down this button for three seconds to clean the Printhead ( Head Cleaning A ).
p. Power Button
T urns the printer on and of f. ( → P .29)
q. Load/Eject Button
By pressing this button, you can check instructions on loading and removing paper . Instructions for
loading paper are shown on the Display Screen if pressed when no paper is loaded, and instructions
for removing paper are shown if paper is loaded.
r . Stop Button
Hold down for at least a second to cancel print jobs in progress or end the ink drying period.
Note
• In Sleep mode, you can press any button except the Power button to bring the printer online again.
28 Printer Parts

Control Panel
T urning the Printer On and Off
T urning the printer on
1. Press the Power button to turn on the printer .
The printer will now start up.
After the Display Screen shows the Canon logo, Starting up... Please wait. is displayed.
2. The printer goes online in preparation for printing after startup, and the Online lamp and paper
source section lamp remain lit.
The printer will not go online in the following situations. T ake action as needed.
• The T op Cover is open
Close the T op Cover .
• The Ink T ank Cover is open
Close the Ink T ank Cover .
• The Printhead is not installed
Please see “Replacing the Printhead”. (→P .589)
• Ink T ank is not installed
Please see “Replacing Ink T anks”. (→P .573)
• “ERROR” is shown on the Display Screen
T urn of f the printer and contact your Canon dealer .
• The Online lamp and Message lamp are not lit (even once), and nothing appears on the Display
Screen
Make sure the printer is plugged in correctly . Check the connection at the plug and electrical outlet.
• No paper is loaded
Load paper . ( → P .108) ( → P .1 12)
Important
• Starting the printer when it is connected via the USB cable to a Macintosh computer that is of f may
cause the computer to start up at the same time. T o prevent this, disconnect the USB cable before
starting the printer . Connecting the printer to the computer via a USB hub may solve this issue.
Printer Parts 29

Control Panel
T urning the printer off
Important
• Never disconnect the printer ’ s power supply or unplug it during a print job. This could damage the printer .
1. Make sure no print jobs are in progress.
If the Message lamp is ashing, check the message on the Display Screen and take action as
necessary . ( → P .658)
If the Data lamp is ashing, the printer is receiving a print job. T urn of f the printer only after
printing is nished.
2. Hold down the Power button for more than a second.
After Shut Down.. Please W ait.. is shown on the Display Screen , the printer shuts of f.
30 Printer Parts

Control Panel
Printer Modes
Printer modes are classied as follows and described in this topic.
• Modes (→P .31)
• Mode transition (→P .32)
• Online, and state of the Control Panel (→P .33)
• Of ine, and state of the Control Panel (→P .33)
• Menu mode, and state of the Control Panel (→P .34)
• Submenu mode, and state of the Control Panel (→P .35)
Modes
The printer has ve modes as follows:
• Online
The printer is ready to receive jobs sent from the computer . Jobs sent from the computer are processed
immediately . If jobs are received in other modes, they are printed the next time the printer goes online.
• Of ine
Any jobs sent from the computer are held without being printed.
While the printer is of ine, you can feed or cut roll paper manually .
The printer goes of ine automatically if jobs cannot be processed, such as if errors occur .
• Menu mode
Menus are displayed on the printer , and you can select, set, or execute menu items. Any jobs sent
from the computer are held without being printed.
• Submenu mode
Submenus are displayed regarding ink and paper information. Jobs can be received and printing is
possible while submenus are displayed and the printer is online. In other modes, any jobs sent from the
computer are held without being printed while submenus are displayed.
• Sleep mode
The printer is in power-saving mode. The printer automatically enters Sleep mode to conserve power if
it is idle for a specic period (by factory default, ve minutes), that is, if no print jobs are received or
buttons are pressed while all covers are closed.
Y ou can specify the period before the printer enters Sleep mode in the Sleep T imer menu. ( → P .57)
If any print jobs are received when the printer is in Sleep mode (after it was originally online), the
printer goes online and prints the jobs.
Printer Parts 31

Control Panel
Mode transition
The printer mode transitions are as follows:
*1: When submenus are displayed, you can press any button other than the Information button to return
to the previous mode.
*2: The printer automatically enters Sleep mode if it is idle for a specic period (by factory default, ve
minutes), that is, if no print jobs are received or buttons are pressed while all covers are closed.
However , it does not enter Sleep mode while error messages are displayed.
*3: In Sleep mode, the printer can be restored to the previous state by pressing any button. Sleep mode is
also terminated if a print job is received or a command is issued from RemoteUI .
32 Printer Parts

Control Panel
Online, and state of the Control Panel
Not printing
Printing in progress (receiving or
processing print jobs)
Display Screen
• T op Line of the Display Screen
The printer status is displayed here. The selected paper source is indicated by an icon to the left of
the type of paper .
• Middle Level of the Display Screen
The rst and second lines display the paper type and size.
Any warning messages are displayed here on lines 2-4. T ake the appropriate action. ( → P .658)
• Bottom Line of the Display Screen
Here, the remaining ink level is indicated. ( → P .584)
Control Panel
• Online lamp
Lit when the printer is online.
• Data lamp
Flashes when print jobs are being received or processed.
• Message lamp
Lit when warning messages are displayed.
Ofine, and state of the Control Panel
Of ine
Not printing Printing is paused
Display Screen
• Display Screen
The printer status is displayed here. The selected paper source is indicated by an icon to the left of
the type of paper .
• Middle Level of the Display Screen
The rst and second lines display the paper type and size.
Any warning messages are displayed here on lines 2-4. T ake the appropriate action. ( → P .658)
• Bottom Line of the Display Screen
Here, the remaining ink level is indicated. ( → P .584)
Control Panel
• Message lamp
Lit when warning messages are displayed.
Printer Parts 33

Control Panel
Error Messages
If action can be taken If no action can be taken
• T op Line of the Display
Screen
Error messages are
displayed.
• Bottom Line of the
Display Screen
Here, the remaining
ink level is indicated.
( → P .584)
• T op Line of the Display
Screen
Error messages are
displayed.
• Bottom Line of the
Display Screen
The corrective actions
are displayed here.
• T op Line of the Display
Screen
The error message
is displayed with the
following instructions:
T urn off printer , wait,
then turn on again. .
• Display Screen
“ERROR” is displayed,
followed by the error
code and Call for
service. .
• Data lamp
Flashes when print jobs are being received.
• Message lamp
Flashes when error messages are displayed.
• Data lamp
Flashes when print jobs are being received.
• Message lamp
Flashes when error messages are displayed.
T ake the appropriate action. ( → P .658) T urn of f the printer and wait at least three seconds
before restoring the power .
If the message is still displayed after this, write down
the error code and message, turn of f the printer , and
contact the Canon dealer for assistance.
Menu mode, and state of the Control Panel
Main menu
Menu items and settings
Main menu (during printing)
• Display Screen
Pressing the Menu button
when printing is not in progress
displays the main menu.
The title of the selected menu
is displayed on the rst line,
and menus immediately under
the current menu are displayed
on the second and subsequent
lines. Lower level menus are
available if “►” is displayed at
right. ( → P .40)
• Display Screen
The title of the selected menu
is displayed on the rst line,
and menu items or settings are
displayed on the second and
subsequent lines. ( → P .40)
The menu of options available
during printing (top gure) can
be displayed by pressing the ►
button when the main menu is
displayed (left gure).
• Display Screen
Menus available during printing
are displayed if you press the
Menu button during printing.
If you select a menu, the title of
the selected menu is displayed
on the rst line, and menus
immediately under the current
menu are displayed on the
second and subsequent lines.
Lower level menus are available
if “►” is displayed at right.
( → P .40)
34 Printer Parts

Control Panel
Submenu mode, and state of the Control Panel
Remaining Maintenance
Cartridge capacity
and ink levels
Information on the
loaded paper
Printer information
HP-GL/2 setting
information
Press the Information button to display this information, one after another: the Maintenance Cartridge
capacity and remaining ink levels, paper information, printer information, and GL2 settings information.
( → P .71)
Printer Parts 35

Control Panel
Switching Modes
Switching the Printer Online/Ofine
Press the Online button to switch the printer online or of ine.
The Online lamp is lit in Online mode. Printing is possible in this mode.
The Online lamp is of f in Of ine mode.
Depending on the status, the printer switches online and of ine as follows.
Printer Status When Online is Pressed
Online The printer switches of ine and the Online lamp goes
of f.
Online, printing Switches of ine and printing is paused.
When printing is paused, the Printing menu is
available.
Of ine If paper has been advanced, the printer goes online
and the Online lamp is lit.
In the case of error messages other than those
shown below or if paper is not loaded, the printer
remains of ine until you solve the problem. The
Online lamp remains of f.
Of ine, when an error message is displayed
If the following error messages are displayed, the
printer goes online and printing is resumed.
• Insufcient paper for job
• PHead needs cleaning.
• Papr Size Mismatch
• Papr T ype Mismatch
Menu mode If paper has been advanced, the printer goes online
and the Online lamp is lit.
Menu mode, printing Switches online and the Online lamp is lit.
Print is resumed.
36 Printer Parts

Control Panel
Switching to Menu Mode
Press the Menu button to display the main menu.
Depending on the status, the printer switches to Menu mode as follows.
Printer Status
When Menu is Pressed
Online Switches to Menu mode.
Online, printing Either menus available during printing or a screen to
manage print jobs is displayed. If you select a menu,
the printer switches to that menu mode.
Of ine Switches to Menu mode.
Of ine, printing Menus available during printing are displayed.
Of ine, when an error message is displayed Y ou cannot access Menu mode until the problem is
solved.
Press the Information button to display the submenus.
Press the Information button to display the Maintenance Cartridge capacity and remaining ink levels, as well
as information on the loaded paper and the printer . Press the Information button repeatedly to change the
information displayed. ( → P .71)
Press any button other than the Information button to restore the previous mode.
After you display a submenu, the printer will revert to the previous mode in about ten seconds if no print
job is received or if you do not operate the printer .
Note
• Y ou can start Head Cleaning A by holding down the Information button for three seconds or more.
( → P .588 )
Printer Parts 37

Control Panel
Printer Menu Operations
The printer menu includes a main menu and submenus.
• Main menu operations when no print job is in progress (→P .38)
• Main menu operations during printing (→P .38)
• Submenu operations (→P .39)
Main menu operations when no print job is in progress
Access the main menu by pressing the Menu button on the Control Panel .
Note
• The main menu will not be displayed in the following case even if you press the Menu button.
• An error message is displayed:
Switches to Menu mode after the problem is solved.
The following operations are available from the main menu.
• Paper settings
• Print settings
• Printer settings
• HP-GL/2 settings
• Job management menu operations
For a description of specic items available in the main menu, see “Main Menu Settings”. (→P .57)
For instructions on selecting and setting main menu items, see “Main Menu Operations”. (→P .40)
Note
• By default, main menu settings apply to all print jobs. However , for settings that are also available in the
printer driver , the values specied in the printer driver take priority .
Main menu operations during printing
The Menu Durng Prtng and Job Mgmt Menu can be accessed from the Menu Selection screen by pressing
the Menu button on the control panel during printing. Other menus are available after printing is nished.
Note
• The Menu Selection screen will not be displayed in the following case even if you press the Menu
button.
• An error message is displayed:
Switches to Menu mode after the problem is solved.
The following operations are available from the main menu during printing.
Menu Durng Prtng
• Printhead cleaning
• Manual adjustment of the paper feed amount
• Display of printer-related information
Job Mgmt Menu
• Job management menu operations
For a description of specic items available in the main menu during printing, see “Main Menu Settings
(During Printing)”. (→P .70)
For instructions on selecting and setting main menu items during printing, see “Main Menu Operations”.
(→P .40)
38 Printer Parts

Control Panel
Submenu operations
Access submenus by pressing the Information button on the Control Panel . Y ou can check the following
information in submenus.
• Remaining Maintenance Cartridge capacity
• Ink levels
• Information on the loaded paper
• Printer information
• HP-GL/2 setting information
For a description of specic items displayed in submenus, see “Submenu Display”. (→P .71)
Printer Parts 39

Control Panel
Main Menu Operations
Press the Menu button to display the main menu. For details, see “Main Menu Settings”. (→P .57)
• Main menu (displayed if you press the Menu button when printing is not in progress)
• Menu selection (if you press the Menu button when printing is in progress)
Note
• The main menu will not be displayed in the following case even if you press the Menu button.
• When an error message is displayed
Y ou can switch to Menu mode after the problem is solved.
Simply press buttons on the Control Panel to access various function menus from the main menu and set
or execute menu items.
The following section describes menu operations and how they are presented in this User Manual .
• Accessing menus (→P .41)
• Specifying menu items (→P .42)
• Specifying numerical values (→P .43)
• Executing menu commands (→P .43)
40 Printer Parts

Control Panel
Accessing menus
Printer menus are grouped by function.
Menus are displayed with the upper line selected. Use the buttons on the Control Panel to access each menu.
• Press ▲ to access a higher level menu on the same screen, and press ▼ to access a lower one. If
not all menus can be displayed on the screen at once, press ▲ and ▼ to scroll the menu. Items you
select are highlighted.
The scroll bar at right indicates the current position in the overall menu.
• Lower level menus are available if “►” is displayed at right. T o access these lower level menus, select
a menu and press ► .
• Upper level menus are available if “◄” is displayed at left in the top line. T o access these upper level
menus, press ◄ .
Printer Parts 41

Control Panel
Specifying menu items
Follow these steps to specify menu items.
1. Press ▲ or ▼ to select a menu, and then press the ► button.
Repeat these steps until the desired menu options are displayed.
2. Press ▲ or ▼ to select a setting item to complete, and then press the OK button.
The check box at left is selected, and the setting is conrmed.
After two seconds, the display reverts to the upper level menu.
3. Press the Online button to bring the printer online.
Note
• If a conrmation message is displayed regarding the setting you entered, press the OK button. The
setting is applied, and the printer goes online.
42 Printer Parts

Control Panel
Specifying numerical values
Follow these steps to enter numbers. In this example, network settings items are entered.
1. Press ▲ or ▼ to select Interface Setup , and then press the ► button.
2. Press ▲ or ▼ to select TCP/IP , and then press the ► button.
3. Press ▲ or ▼ to select IP Setting , and then press the ► button.
4. Press ▲ or ▼ to select IP Address , and then press the ► button.
5. Press ◄ or ► to move the cursor (_) to each eld for entering numbers.
6. Press ▲ or ▼ to enter the number , and then press the OK button.
Note
• Hold down ▲ or ▼ to increase or decrease the value continuously .
• Make sure the IP address you enter for the printer is not the same as any computer IP address
in your network.
7. Repeat steps 5 and 6 to continue entering numbers.
8. Press the Online button to bring the printer online.
Note
• If a conrmation message is displayed regarding the setting you entered, press the OK button. The
setting is applied, and the printer goes online.
Executing menu commands
Follow these steps to execute menu commands.
1. Press ▲ or ▼ to select a menu, and then press the ► button.
Repeat these steps until the desired menu options are displayed.
2. Press ▲ or ▼ to select a setting item to execute, and then press the OK button.
After two seconds, the menu command is executed. After commands are executed, in most
cases the printer reverts to the state before the menu operation, either online or of ine.
Printer Parts 43

Control Panel
Menu Structure
Main Menu
The structure of the main menu is as follows. V alues at right indicated by an asterisk “*” are the defaults.
For instructions on menu operations, see “Main Menu Operations”. (→P .40)
For details on menu items, see “Main Menu Settings”. (→P .57)
First Level
Second Level
Third Level Fourth Level
Fifth Level Sixth Level
Paper Cutting
( *1 )
No *
Y es
Rep. Ink T ank No *
Y es
Head Cleaning Head Cleaning
A *
Head Cleaning
B
Auto Feed ( *1 1 ) No *
Y es
T ake-up Reel
( *9 )
Disable *
Enable
Paper Menu Cut Sheet T ype (The paper type
is displayed
here.) ( *5 )
Roll Media T ype
( *1 )
(The paper type
is displayed
here.) ( *5 )
Roll Length Set
( *1 , *2 )
### m
### feet ( *13 )
ManageRemain
Roll
Off *
On
Paper Details (The paper type
is displayed
here.) ( *5 )
Roll
DryingT ime
Off
30 sec.
1 min.
3 min.
5 min.
10 min.
30 min.
44 Printer Parts

Control Panel
First Level
Second Level
Third Level Fourth Level
Fifth Level Sixth Level
60 min.
Scan W ait T ime Off
1 sec.
3 sec.
5 sec.
7 sec.
9 sec.
Feed Priority Automatic *
Band Joint
Print Length
Adjust Length
A
From -0.70% to
0.70%
Adjust Length
B
From -0.70% to
0.70%
Head Height Automatic *
Highest
High
Standard
Low
Lowest
Skew Check
Lv .
Standard *
Loose
Off
V acuumStrngth Automatic *
Strongest
Strong
Standard
W eak
W eakest
W idth
Detection
Off
On *
NearEnd
RollMrgn
3mm
20mm
Cut Speed Fast
Printer Parts 45

Control Panel
First Level
Second Level
Third Level Fourth Level
Fifth Level Sixth Level
Standard
Slow
T rim Edge First Automatic
Off
On
Cutting Mode Automatic
Eject
Manual
Bordless
Margin
Automatic
Fixed
CutDustReduct. Off
On
NearEnd Sht
Mrgn
3mm
20mm
Return
Defaults
No
Y es
Job
Management
Print Job Job List (Choose a print
job.)
Delete
Preempt Jobs
Stored Job Mailbox List (Enter a
password if one
has been set.)
Job List Print
Delete
Print Job List No
Y es
Job Log (Choose from
information
about the latest
three print jobs.)
Document
Name
User Name
Page Count
Job Status OK
CANCELED
Print Start T ime yyyy/mm/dd
hh:mm
46 Printer Parts

Control Panel
First Level
Second Level
Third Level Fourth Level
Fifth Level Sixth Level
Print End T ime yyyy/mm/dd
hh:mm
Print T ime xxxsec.
Print Size xxxxxxxxsq.mm
Media T ype
Interface USB
Network
IEEE1394
Ink Consumed xx.x ml
HDD
Information
HDDSpace
:xx.x GB
GL2 Settings Color Mode Monochrome
Color (CAD) 1 *
Color (CAD) 2
Color (CAD) 3
Color (CAD) 4
Color (CAD) 5
Color (CAD) 6
Print Quality Fast
Standard *
High
Print
(Economy)
Off *
On
Input
Resolution
600dpi *
300dpi
Paper Source Automatic *
Roll Paper
Cut Sheet
Conserve Paper Off *
On
Line Cap Software *
Rounded
Smoothing Software *
Smooth
Line W idth 1 dot
Printer Parts 47

Control Panel
First Level
Second Level
Third Level Fourth Level
Fifth Level Sixth Level
2 dots
3 dots
4 dots *
5 dots
6 dots
7 dots
ThickenFine
Lines
Off *
On
AdjustFaint
Lines
Off
On *
Auto Rotate Off
On *
Nesting Use Nesting Off *
On
Nesting
W aitT ime
1-99 minutes
Cut Lines Off *
On
On-the-Fly Off *
On
Adjust Printer Auto Head Adj. Standard Adj. No
Y es
Advanced Adj. No
Y es
Auto Print Off
On *
Manual Head
Adj ( *10 )
No
Y es
Auto Band Adj. Standard Adj. No
Y es
Advanced Adj. No
Y es
Manual Band
Adj
No
48 Printer Parts

Control Panel
First Level
Second Level
Third Level Fourth Level
Fifth Level Sixth Level
Y es
Adjust Length
( *3 )
A:High No
Y es
B:Standard/
Draft
No
Y es
Head Inc. Adj. No
Y es
Interface Setup EOP T imer 10 sec.
30 sec.
1 min.
2 min.
5 min.
10 min. *
30 min.
60 min.
TCP/IP IP Mode Automatic
Manual *
Protocol ( *4 ) DHCP On
Off *
BOOTP On
Off *
RARP On
Off *
IP Setting ( *12 ) IP Address 0.0.0.0 -
255.255.255.255
Subnet Mask 0.0.0.0 -
255.255.255.255
Default G/W 0.0.0.0 -
255.255.255.255
NetW are NetW are On
Off *
Frame T ype
( *6 )
Auto Detect
Ethernet 2
Ethernet 802.2
*
Printer Parts 49

Control Panel
First Level
Second Level
Third Level Fourth Level
Fifth Level Sixth Level
Ethernet 802.3
Ethernet SNAP
Print Service
( *6 )
BinderyPServer
RPrinter
NDSPServer *
NPrinter
AppleT alk On
Off *
Ethernet Driver Auto Detect On *
Off
Comm.Mode
( *7 )
Half Duplex *
Full Duplex
Ethernet T ype
( *7 )
10 Base-T *
100 Base-TX
Spanning T ree Not Use *
Use
MAC Address 000085XXXXXX
Ext. Interface No *
IEEE1394
Return Defaults No *
Y es
Maintenance Repl. maint cart No
Y es
Replace P .head No
Y es
Repl. S.
Cleaner
No
Y es
Move Printer Level 1 *
Level 2
Level 3
System Setup W arning Buzzer Off
On *
50 Printer Parts

Control Panel
First Level
Second Level
Third Level Fourth Level
Fifth Level Sixth Level
Detect
Mismatch
Pause
W arning
None *
Skip T ake-Up
Err ( *9 )
Off *
On
Keep Paper
Size
Off *
On
Paper Size
Basis
Sht Selection 1 ISO A3+ *
13"x19"(Super
B)
Sht Selection 2 ISO B1
28"x40" (ANSI
F)
Noz. Check
Freq.
Off
1 page
10 pages
Automatic *
CarriageScan
Wdth
Automatic *
Fixed
Sleep T imer 5 min. *
10 min.
15 min.
20 min.
30 min.
40 min.
50 min.
60 min.
240 min.
Length Unit meter *
feet/inch
T ime Zone 0:London
(GMT)
Printer Parts 51

Control Panel
First Level
Second Level
Third Level Fourth Level
Fifth Level Sixth Level
+1:Paris,Rome
+2:Athens,
Cairo
+3:Moscow
+4:Eerevan,
Baku
+5:Islamabad
+6:Dacca
+7:Bangkok
+8:Hong Kong
+9:T okyo,Seoul
+10:Canberra
+1 1New
Caledonia
+12:W ellington
-12:Eniwetok
-1 1:Midway is.
-10Hawaii
(AHST)
-9:Alaska
(AKST)
-8:Oregon
(PST)
-7:Arizona
(MST)
-6:T exas (CST)
-5:NewY ork
(EST)
-4:Santiago
-3:Buenos
Aires
-2:
-1:Cape V erde
Date Format yyyy/mm/dd *
dd/mm/yyyy
mm/dd/yyyy
Date & T ime Date yyyy/mm/dd
( *8 )
T ime hh:mm
52 Printer Parts

Control Panel
First Level
Second Level
Third Level Fourth Level
Fifth Level Sixth Level
Language
Contrast Adj. -4, -3, -2, -1, 0*,
+1, +2, +3, +4
Reset
PaprSetngs
No
Y es
Erase HDD Data High Speed No
Y es
Secure High
Spd.
No
Y es
Secure No
Y es
Output Method Print *
Print (Auto Del)
Save: Box
Save and Print Off *
On
Save: Shared
Box
Off
On *
T est Print Status Print No
Y es
Paper Details No
Printer Parts 53

Control Panel
First Level
Second Level
Third Level Fourth Level
Fifth Level Sixth Level
Y es
Print Job Log No
Y es
Menu Map No
Y es
Nozzle Check No
Y es
Information System Info
Error Log 1:xxxxxxxx-xxxx
2:xxxxxxxx-xxxx
*1: A vailable only if a roll is loaded.
*2: A vailable only if ManageRemainRoll is On .
*3: A vailable if Feed Priority is Automatic or Print Length .
*4: Not displayed if IP Mode is Manual .
*5: For information on the types of paper the printer supports, refer to the Paper Reference Guide .
( → P .125) The paper type setting in the printer driver and related software (as well as on the Control
Panel ) is updated when you install the printer driver from the User Software CD-ROM or if you change
paper information by using the Media Conguration T ool .See the Media Conguration T ool Guide
(Windows) or Media Conguration T ool Guide (Macintosh).
*6: Not displayed if NetW are is Off .
*7: Not displayed if Auto Detect is On .
*8: Follows the setting in Date Format .
*9: Displayed if the Media T ake-up Unit is attached.
*10: A vailable after you have used Advanced Adj. in Auto Head Adj. once.
*1 1: A vailable if: (a) T ake-up Reel is Enable , (b) roll paper is loaded, and (c) you have not executed
Auto Feed for the loaded roll.
*12: Not displayed if IP Mode is Automatic .
*13: Follows the setting in Length Unit .
Caution
• Only the following menus are displayed during printing.
• Menu Durng Prtng
Choose this menu to display Head Cleaning , Fine Band Adj. , and Information .
• Job Mgmt Menu
Choose this menu to display Job Management .
54 Printer Parts

Control Panel
Submenus
Each time you press the Information button on the Control Panel , printer information is displayed in the
following order .
• The remaining Maintenance Cartridge capacity and ink levels
• Information on the loaded paper
• Printer information
• HP-GL/2 settings information
For details on submenu screens, see “Submenu Display”. (→P .71)
Printer Parts 55

Control Panel
Main menu during printing
The structure of the main menu during printing is as follows.
For instructions on menu operations, see “Main Menu Operations”. (→P .40)
For details on menu items available during printing, see “Main Menu Settings (During Printing)”. (→P .70)
First Level
Second
Level
Third Level Fourth Level
Fifth Level Sixth Level
Seventh
Level
Menu Durng
Prtng
Head
Cleaning *
Head
Cleaning A
*
Head
Cleaning B
Fine Band
Adj.
From -5 to 5
Information System Info
Error Log 1:xxxxxxxx -
xxxx
2:xxxxxxxx xxxx
56 Printer Parts

Control Panel
Main Menu Settings
Main menu items are described in the following tables.
For instructions on selecting or setting menu items, see “Main Menu Operations”. (→P .40)
For details on menu levels and values, see “Menu Structure”. (→P .44)
Setting Item
Description, Instructions
Paper Cutting This command is available only if a roll is loaded.
Choose Y es to cut the roll at the current position. However , if paper cannot be
advanced to the cut position, it will not be cut. In this case, manually advance the
roll before cutting it. ( → P .151)
Rep. Ink T ank When replacing the Ink T ank , choose Y es and follow the instructions on the
screen. ( → P .573)
Head Cleaning Printhead cleaning options. ( → P .588)
Choose Head Cleaning A if printing is faint, oddly colored, or contains foreign
substances.
Choose Head Cleaning B if no ink is printed at all, or if printing is not improved
by Head Cleaning A .
Auto Feed This command is available only if T ake-up Reel is set to Enable . Choose Y es
to advance roll paper automatically on the Rewind Spool , up to the fastening
position.
T ake-up Reel Choose Enable to use the Media T ake-up Unit .
Paper Menu Specify the type and size of paper . ( → P .58)
Paper Details Specify detailed paper-related settings, including the ink drying time and
borderless printing options. ( → P .59)
Job Management Manage print jobs on the printer ’ s hard disk. ( → P .61)
GL2 Settings Specify settings for HP-GL/2 printing. ( → P .62)
Adjust Printer Adjust the Printhead alignment or amount of feed by printing a test pattern.
( → P .64)
Interface Setup Congure the EOP timer and network settings. ( → P .65)
Maintenance Access maintenance settings when replacing the Printhead or preparing to move
the printer . ( → P .66)
System Setup Specify the printer system settings, including the date format and display
language. ( → P .67)
T est Print Choose Status Print to print information about the printer .
Choose Paper Details to print the paper settings as specied in Paper Details .
Choose Print Job Log to print a record of print jobs, including the paper type and
size, amount of ink used, and so on. (Information on ink consumption is general,
not specic in nature.)
Choose Menu Map to print a list of the main menu options.
Choose Nozzle Check to print a test pattern for checking the nozzles.
Information Displays printer information and an error log. ( → P .69)
Printer Parts 57

Control Panel
Paper Menu
Setting Item Description, Instructions
Cut Sheet T ype ( *1 ) Choose the type of sheets.
( → P .163)
Roll Media T ype ( *1 ) Choose the type of roll.
( → P .134)
Roll Length Set Displayed if ManageRemainRoll is On .
If a barcode is not printed on rolls, specify the roll length. The roll length is
displayed in meters or feet, depending on the setting in Length Unit .
ManageRemainRoll Choose On to print a barcode at the end of a roll before you remove it. The
printed barcode can be used in managing the amount of roll paper left. Choose
Off if you prefer not to print the barcode.
( → P .152)
*1: For information on the types of paper the printer supports, refer to the Paper Reference Guide .
( → P .125) The types of paper indicated in the printer driver and related software (as well as on the
Control Panel ) are updated when you install the printer driver from the User Software CD-ROM or if
you change paper information by using the Media Conguration T ool . (See Media Conguration T ool
Guide (Windows) or Media Conguration T ool Guide (Macintosh).)
58 Printer Parts

Control Panel
Paper Details
Setting Item Description, Instructions
Roll DryingT ime Specify the time to wait for the ink to dry for each sheet.
Scan W ait T ime Specify the time to wait for the ink to dry between each scan
in bidirectional printing, in consideration of how quickly the ink
dries. Note that printing will take longer if you specify a wait time.
Feed Priority Specify exact paper feeding, if desired. Normally , select
Automatic . Choose Print Length if you prefer to feed the paper
an exact amount. However , note that choosing Print Length
may result in slight banding in the direction of Carriage scanning.
Adjust Length Displayed if Feed Priority is Print Length .
Adjustment relative to the amount of stretching or shrinkage of
the current paper .
Enter either the adjustment results from Print Pattern or the
discrepancy that you measured (as a percentage).
For paper that tends to stretch, increase the feed amount by
choosing a higher adjustment value. For paper that tends
to shrink, decrease the feed amount by choosing a lower
adjustment value.
Head Height Adjust the Printhead height. ( → P .561)
Skew Check Lv . If you print on Japanese paper (washi) or other handmade paper
that has an irregular width, choose Loose for a higher skew
detection threshold, or choose Off to disable skew detection.
However , if paper is loaded askew when detection is Off , note
that paper jams or Platen soiling may occur .
V acuumStrngth Specify the level of suction that holds paper against the Platen .
( → P .571)
W idth Detection Specify this option to print inside boundaries or in other cases
when specifying a particular starting position for printing. Paper
width and skew are not detected if you select Off . If paper is
loaded askew , note that paper jams or Platen soiling may occur .
NearEnd RollMrgn Specify the minimum margin at the leading edge of roll paper to
ensure better printing quality at the leading edge.
Note that if you choose 3mm , it may lower the printing quality
at the leading edge and af fect feeding accuracy . The printed
surface may be scratched, and ink may adhere to the leading
edge. It may also cause the Platen to become soiled.
Cut Speed Choose the cutting speed. If you use adhesive paper , choosing
Slow helps prevent adhesive from sticking to the cutter and
keeps the cutter sharp.
T rim Edge First If a roll is loaded, the end of the paper will be cut.
(The type of paper is
displayed here.)( *1 )
Cutting Mode Specify whether or not to cut with the standard round-bladed
cutter .
Choose Automatic to have the roll cut automatically after
printing. If you choose Manual , the paper will not be cut after
printing. Instead, a line will be printed at the cut position.
Choose Eject if you prefer not to have documents dropped
immediately after printing, as when waiting for ink to dry .
Printer Parts 59

Control Panel
Setting Item Description, Instructions
Bordless Margin Adjust the margin during borderless printing.
Choose Automatic to have the printer automatically detect the
paper width and congure the margin settings for borderless
printing. If margins are mistakenly created when Automatic
is selected, choose Fixed . In this case, the paper width is not
detected automatically , and the document is printed without
borders, using the margin settings required by the printer .
CutDustReduct. If you choose On , a line will be printed at the cut position when
paper cutting is selected. This option reduces the amount of
debris given of f after cutting. It also helps prevent adhesive
from sticking to the cutter and keeps the cutter sharp if you use
adhesive paper . ( → P .160)
NearEnd Sht Mrgn Specify a margin at the leading edge of sheets to ensure better
printing quality at the leading edge.
Note that if you choose 3mm , it may lower the printing quality
at the leading edge and af fect feeding accuracy . The printed
surface may be scratched, and ink may adhere to the leading
edge.
(The type of paper is
displayed here.)( *1 )
Return Defaults Choose Y es to restore Paper Details to the default values.
*1: For information on the types of paper the printer supports, refer to the Paper Reference Guide .
( → P .125) The type of paper indicated in the printer driver and related software (as well as on the
Control Panel ) is changed when you install the printer driver from the User Software CD-ROM or if you
update paper information by using the Media Conguration T ool .
60 Printer Parts

Control Panel
Job Management
Setting Item Description, Instructions
Delete Delete the current job or
queued jobs. ( → P .500)
Print Job Job List (Choose a
print job)
Preempt
Jobs
Print the job rst after the
current print job is nished.
( → P .500)
Print Print the saved job.Mailbox
List
(Enter a
password
if one has
been set.)
Job List (Choose a
print job)
Delete Delete the saved job.
Stored
Job
Print Job
List
Print a list of saved print
jobs.
Document
Name
Displays the document
name in the last print job.
User Name Displays the name of the
user who sent the print job.
Page
Count
Displays the number of
pages in the print job.
Job Status Displays the results of the
print job processed.
Print Start
T ime
Displays the time when the
print job was started.
Print End
T ime
Displays the time when the
print job was nished.
Print T ime Displays the time required
to print the job.
Print Size Displays the paper size in
the print job.
Media T ype Displays the paper type in
the print job.
Interface Displays the interface used
for the print job.
Job Log (Choose
from
information
about the
last three
print jobs.)
Ink
Consumed
Displays the ink
consumption.
HDD
Information
HDDSpace Displays the space available
on the printer ’ s hard disk.
Printer Parts 61

Control Panel
GL2 Settings
Setting Item Description, Instructions
Monochrome Print in monochrome.
Color (CAD) 1 * Print in standard colors.
Color (CAD) 2 Print in brighter colors.
Color (CAD) 3 Print emulating the Canon BJ-W3000/W3050, in colors
resembling colors produced by these printers.( *1 )
Color (CAD) 4 Print emulating the HP Designjet 500/800, in colors resembling
colors produced by these printers.( *1 )
Color (CAD) 5 Print emulating the HP Designjet 1000, in colors resembling
colors produced by this printer .( *1 )
Color Mode
Color (CAD) 6 Print emulating the HP Designjet 4000/4500, in colors
resembling colors produced by these printers.( *1 )
Print Quality Choose the print quality .
Print (Economy) Although printing quality is diminished, less ink is consumed
than in regular printing. Select On to conserve ink.
Input Resolution Choose the printer input resolution, 600dpi or 300dpi .
Paper Source Choose the source of paper for HP-GL/2 printing.
Conserve Paper Conserves paper when printing.
Line Cap Choose the shape of the end point, determined by Software
or Rounded .
• If you choose Software
Operation is determined by the application. If nothing is
specied by the application, the result is as shown in the
gure.
• If you choose Rounded
Smoothing Choose whether to print arcs as smooth curved lines or as
multiple connected line segments.
• If you choose Software
Operation is determined by the application. If nothing is
specied by the application, the result is as shown in the
gure.
Note: By default, this is a 72-sided gure
62 Printer Parts

Control Panel
Setting Item Description, Instructions
Smoothing
• If you choose Smooth
Line W idth Choose the width for printing lines if no width is specied in the
data. Dots in the line width are 300 dpi each.
ThickenFineLines Select On to print ne lines more distinctly .
AdjustFaintLines If ne lines are printed in colors that do not match the colors
of other shapes, selecting Off may help produce the expected
results. However , lines in some colors may appear broken.
Auto Rotate If the long side of an original is shorter than the roll width, the
original is automatically rotated 90 degrees to conserve paper .
Similarly , if the long side of an original in landscape orientation is
longer than the roll width and the short side is shorter than the
roll width, the original is repositioned to t on the paper .
HP R TL print jobs are not rotated.( *2 )
Use Nesting Selecting On will store print jobs until multiple documents can
be arranged to ll up the roll width, instead of printing each print
job as it is received.
Nesting W aitT ime Specify a time to wait until printing, as desired.
Nesting
Cut Lines Select On to print cut lines between each document on the roll.
On-the-Fly Selecting On will start printing jobs sooner if you are printing
only HP R TL print jobs and printing would not start until later .
However , images may be omitted in some cases, so be sure
to check the printing results.
*1: It is not possible to match the colors and image quality produced by the specied printer exactly .
*2: Because HP R TL images are not rotated even if the paper is rotated 90 degrees, images may be cut of f
or the blank paper may be ejected. In this case, set Auto Rotate to Off .
Printer Parts 63

Control Panel
Adjust Printer
Setting Item Description, Instructions
Standard Adj. Choose Y es to have the printer print and read a test pattern for
the automatic adjustment of Printhead alignment relative to the
printing direction. ( → P .554)
Advanced Adj. Choose Y es to have the printer print and read a test pattern
for the automatic adjustment of Printhead alignment relative to
spaces between nozzles and colors and the printing direction.
( → P .554)
Auto Head Adj.
Auto Print Choose On to have the printer automatically execute the
Advanced Adj. operations after you replace the Printhead .
( → P .554)
Manual Head Adj Choose Y es to print a test pattern for adjustment of Printhead
alignment relative to the printing direction. Enter the adjustment
value manually based on the resulting pattern. ( → P .556)
Standard Adj. Choose Y es to have the printer print and read a band adjustment
test pattern for automatic adjustment of the feed amount.
( → P .564)
Auto Band Adj.
Advanced Adj. Choose this option when using paper other than genuine Canon
paper , or paper for purposes other than checking output.
Choose Y es to have the printer print and read a band adjustment
test pattern for automatic adjustment of the feed amount. Note
that this function takes more time and requires more ink than
Standard Adj. . ( → P .564)
Manual Band Adj Choose Y es to print a test pattern for adjusting the feed amount
based on the paper type.
( → P .566)
Adjust Length A:High ( Adjust
Length A )
B:Standard/Draft (
Adjust Length B )
Prints a test pattern for particular types of paper to compensate
for paper stretching or shrinkage, after which you can enter the
amount of adjustment. ( → P .569)
Head Inc. Adj. Choose Y es to print a test pattern for adjusting the orientation of
the Printhead . ( → P .558)
64 Printer Parts

Control Panel
Interface Setup
Setting Item Description, Instructions
EOP T imer Specify the timeout period before cancellation of
print jobs that cannot be received by the printer .
IP Mode Choose whether the printer IP address is
congured automatically or a static IP address
is entered manually .
DHCP
BOOTP
Protocol
RARP
Specify the protocol used to congure the IP
address automatically .
IP Address
Subnet Mask
TCP/IP
IP Setting
Default G/W
Specify the printer network information when
using a static IP address.
Enter the IP address assigned to the printer , as
well as the network subnet mask and default
gateway .
NetW are Specify the NetW are protocol. T o apply your
changes, choose Register Setting .
Frame T ype Specify the frame type to use.
NetW are
Print Service Choose the print service.
AppleT alk Specify whether to use the AppleT alk protocol.
T o apply your changes, choose Register
Setting .
Auto Detect Specify the communication method. T o apply
your changes, choose Register Setting .
Choose On for automatic conguration of the
LAN communication protocol. Choose Off
to apply Comm.Mode and Ethernet T ype
settings.
Comm.Mode Choose the LAN communication method.
Ethernet T ype Choose the LAN transfer rate.
Spanning T ree Choose whether spanning-tree packets are
supported over the LAN.
Ethernet Driver
MAC Address Displays the MAC address.
Ext. Interface Specify whether or not to use the optional
expansion interface when it is installed.
Return
Defaults
Return Defaults/Execute? is displayed if you
press the ▼ button. Choose OK to restore the
network settings to the default values.
Printer Parts 65

Control Panel
Maintenance
Setting Item Description, Instructions
Repl. maint cart When replacing the Maintenance Cartridge , choose Y es and follow
the instructions on the screen. ( → P .595)
Replace P .head Not displayed during a warning message that the remaining
Maintenance Cartridge capacity is low .
When replacing the Printhead , choose Y es and follow the instructions
on the screen. ( → P .589)
Repl. S. Cleaner When replacing the Shaft Cleaner , choose Y es and follow the
instructions on the screen. ( → P .595)
Move Printer Not displayed during a warning message that the remaining
Maintenance Cartridge capacity is low .
When transferring the printer to another location, choose Y es and
follow the instructions on the screen. ( → P .610)
66 Printer Parts

Control Panel
System Setup
Setting Item Description, Instructions
Buzzer Set the buzzer . Choose On for the buzzer to sound once for
warnings and three times for errors.
Detect Mismatch Choose W arning for notication (display of a warning message)
during printing if the type of paper specied in the printer menu
does not match the type in the printer driver . Choose None to
continue to print without notication. Choose Pause to have
printing paused under these circumstances. In this case, you
can continue printing by pressing the Online button.
W arning
Skip T ake-Up Err Choose On to continue with printing even if an error occurs with
the Media T ake-up Unit . Choose Off to have the printer pause
before printing if a rewinding error occurs.
Keep Paper Size Choose On to use the paper size setting as the basis for printing
instead of other settings. The margin setting of the printer menu
will be used instead of the margin setting of the printer driver if
the latter is smaller , which may prevent text or images in the
margin from being printed.
Choose Off to use the printer driver settings instead. Even if the
margin setting of the printer driver is smaller than that of the
printer menu, text or images will not be cut of f. However , this
requires longer paper because the actual margin will be equal to
the margin setting of the printer driver plus the margin setting of
the printer menu.
Sht Selection 1 If sheet size detection is activated, choose whether ISO A3+
or 13"x19"(Super B) is applied when an intermediate size is
detected.
Paper Size Basis
Sht Selection 2 If sheet size detection is activated, choose whether ISO B1
or 28"x40" (ANSI F) is applied when an intermediate size is
detected.
Noz. Check Freq. Specify the timing for automatic checks of nozzle clogging.
Choose 1 page to check once per printed page. Choose 10
pages to check once per ten printed pages. Choose Automatic
to have the printer automatically adjust the timing for checks
based on the frequency of nozzle use.
CarriageScanWdth For specifying the carriage scan width during printing. Select
Automatic for movement equivalent to the width of paper
loaded. Selecting Fixed will reduce any soiling on the back of
the paper , although printing may take a little longer .
Printer Parts 67

Control Panel
Setting Item Description, Instructions
Sleep T imer Specify the period before the printer enters sleep mode.
Length Unit Choose the unit of measurement when roll length is displayed.
Y ou can switch the unit displayed for Roll Length Set and the
remaining paper amount displayed in the submenu.
T ime Zone Specify the time zone. T ime zone options indicate a main city in
this time zone and the dif ference from Greenwich Mean T ime.
Date Format Specify the date format.
Date Set the current date.Date & T ime
T ime Set the current time. A vailable only if the Date setting is
specied.
Language Specify the language used on the Display Screen .
Contrast Adj. Adjust the Display Screen contrast level.
Reset PaprSetngs Restores settings that you have changed with Media
Conguration T ool to the default values.
High Speed Erases le management data for print job data stored on the
printer ’ s hard disk. ( → P .552)
Secure High Spd. Overwrites the entire hard disk with random data. ( → P .552)
Erase HDD Data
Secure Overwrites the entire hard disk with 00, FF , and random data
(one time each). V erication is performed to check if the data
was correctly written. ( → P .552)
Print
Print (Auto Del)
Output Method
Save: Box 01
Select the output method.
T o print as usual, select Print . Selecting Print (Auto Del) will
print the job and then delete the data from the printer ’ s hard
disk. Selecting Save: Box 01 will only save the print job in the
box, without printing it.
Save and Print Select On to print the job after it has been saved.
Save: Shared Box Select Off to print without saving jobs in the box shared among
multiple users.
68 Printer Parts

Control Panel
Information
Setting Item Description, Instructions
Firmware Displays the printer rmware version.
Boot Displays the version of the boot ROM.
MIT Displays the version of the MIT database format.
s/n Displays the printer ’ s serial number .
MAC Displays the MAC address of the printer .
System Info
IP Displays the printer ’ s IP address.
Error Log ########-#### Displays the most recent error messages (up to two).
Printer Parts 69

Control Panel
Main Menu Settings (During Printing)
Main menu items during printing are described in the following tables.
For instructions on selecting or setting menu items, see “Main Menu Operations”. (→P .40)
For details on menu levels and values, see “Menu Structure”. (→P .44)
Setting Item
Description, Instructions
Head Cleaning Printhead cleaning options. ( → P .588)
Choose Head Cleaning A if printing is faint, oddly
colored, or contains foreign substances.
Choose Head Cleaning B if no ink is printed at all, or
if printing is not improved by Head Cleaning A .
Fine Band Adj. Fine-tune the feed amount manually .
Menu Durng Prtng
Information Displays the information about the printer and history
of print jobs. ( → P .70)
Information
Setting Item Description, Instructions
Firmware Displays the version of the printer and rmware.
Boot Displays the version of the boot ROM.
MIT Displays the version of the MIT database format.
s/n Displays the printer ’ s serial number .
MAC Displays the MAC address.
IP Displays the IP address.
System Info
HDDSpace Displays the space available on the printer ’ s hard
disk.
1: xxxxxxxx-xxxxError Log
2: xxxxxxxx-xxxx
Displays the two most recent error message
numbers, most recent rst.
70 Printer Parts

Control Panel
Submenu Display
Press the Information button to display this information, one after another: the Maintenance Cartridge
capacity and remaining ink levels, paper information, printer information, and HP-GL/2 settings information.
Each time you press the Information button, the following submenus are displayed.
Note
• Press any button other than the Information button to restore the previous mode.
• After you display a submenu, the printer will revert to the previous mode in about ten seconds if no print
job is received or if you do not operate the printer .
Remaining Maintenance Cartridge capacity and ink levels
The remaining Maintenance Cartridge capacity is shown on the top level of the Display Screen .
The remaining level of each ink is shown on the bottom level of the Display Screen . Ink levels shown on the
Display Screen correspond to the inks identied by the color labels on the bottom of the Display Screen .
These symbols may be displayed above the ink level: “!” if ink is low , “×” if no ink is left, and “?” if ink level
detection is not on.
Remaining ink is indicated as follows.
Information on the loaded paper
Here, the paper size, type, and related printer settings are displayed.
Printer Parts 71

Control Panel
Printer information
Displays the rmware version, serial number , free hard disk space, IP address, and interface information.
HP-GL/2 setting information
HP-GL/2 settings information is displayed on three screens.
72 Printer Parts

Control Panel
Status Print
Y ou can print a Status Print report indicating the current status of the printer .
With Status Print , information is printed regarding the printer rmware version, various settings, and the
utilization level of consumables.
Printing Status Print Reports
1. Load paper .
If using sheets, load paper A4/Letter-sized. Y ou will need at least four sheets.
2. Press the Menu button to display MAIN MENU .
3. Press ▲ or ▼ to select T est Print , and then press the ► button.
4. Press ▲ or ▼ to select Status Print , and then press the ► button.
5. Press ▲ or ▼ to select Y es , and then press the OK button.
Checking the information in the Status Print report
The following information is included in the Status Print report.
Canon imagePROGRAF iPFxxxx Status Print Printer model
Firm Firmware version
Boot Boot ROM version
MIT(DBF) MIT database format version
MIT(DB) MIT database version
S/N Printer serial number
MAC Printer MAC address
IP Printer IP address
MC Maintenance Cartridge capacity (%)
C, M, Y , MBK, BK Ink levels.
The remaining ink is displayed in a ve-level scale.
T akeup-Reel Status of the Media T ake-up Unit
Media Menu
Cut Sheet T ype
Roll Media T ype
ManageRemainRoll
Information on the loaded paper .
Job Management
HDD Information
HDD Space
The free space on the printer ’ s hard disk drive.
Printer Parts 73

Control Panel
GL2 Settings
Color Mode
Print Quality
Print (Economy)
Input Resolution
Paper Source
Conserve Paper
Line Cap
Smoothing
Line Width
ThickenFineLines
AdjustFaintLines
Auto Rotate
Nesting
Use Nesting
Nesting W aitT ime
Cut Lines
On-The-Fly
HP-GL/2 setting values.
Adjust Printer Current printer settings.
Auto Head Adj.
Auto Print
Printhead adjustment value.
Information
Error Log
01 - 05
The past ve error codes.
74 Printer Parts

Control Panel
Interface Setup Current network settings.
EOP T imer Sets the elapsed time between receiving last data and
canceling printing.
TCP/IP
IP Mode
Protocol
DHCP
BOOTP
RARP
Settings related to TCP/IP .
IP Setting
IP Address
Subnet
Mask
Default
G/W
IP Setting values.
NetW are
NetW are
Frame T ype
Print Service
NetW are settings.
AppleT alk V alues that specify whether AppleT alk is active or not.
Ethernet Driver
Auto Detect
Comm.Mode
Ethernet T ype
Spanning T ree
MAC Address
Ethernet Driver settings.
Ext.Interface Information about the extended interface.
Printer Parts 75

Control Panel
System Setup System settings.
W arning
Buzzer
Detect Mismatch
Skip T ake-Up Err
Current warning and error settings.
Keep Media Size
Paper Size Basis
Sheet Selection
1
Sheet Selection
2
Roll Switching
T rimEdge Reload
Current paper-related settings.
Noz. Check Freq. Nozzle-check settings.
CarriageScanWdth Carriage scan width setting.
Sleep T imer
Length Unit
T ime Zone
Date Format
Language
Contrast Adj.
Printer system settings.
Output Method
Save and Print
Save:Shared Box
Current output method setting.
76 Printer Parts

Control Panel
Network (RemoteUI)
TCP/IP
Frame T ype
Use DHCP
Use BOOTP
Use RARP
Enable DNS Dynamic
Update
Use Zeroconf Function
IP Address*
Subnet Mask*
Gateway Address*
LPD Printing
IPP Printing
IPP Printer URI
RA W Printing
Raw Port Number
Raw Mode Bi-direction
FTP Printing
SMTP Server Address*
Primary DNS Server
Address*
Secondary DNS Server
Address*
DNS Host Name*
DNS Domain Name*
Multicast DNS Service
Name
Current network settings used by RemoteUI.
*:Blank if the status has been saved by using Status Monitor .
NetW are
Frame T ype
IPX External Network
Number*
Node Number*
Print Service
NetW are settings.
*:Depending on the NetW are print service settings, information on one of the following four items is printed.
Printer Parts 77

Control Panel
Bindery PServer
File Server
Name*
Print Server
Name*
Print Server
Password*
Polling Interval
V alues set when NetW are > Print Service > Bindery PServer is
selected.
RPrinter
Print Server
Name*
Printer Number*
V alues set when NetW are > Print Service > RPrinter is selected.
NDS PServer
T ree Name*
Context Name*
Print Server
Name*
Print Server
Password*
Polling Interval*
V alues set when NetW are > Print Service > NDS PServer is selected.
NPrinter
Print Server
Name*
Printer Number*
V alues set when NetW are > Print Service > NPrinter is selected.
*:Blank if the status has been saved by using Status Monitor .
AppleT alk
Phase T ype
Name*
Network Number*
Zone*
Current AppleT alk settings.
*:Blank if the status has been saved by using Status Monitor .
78 Printer Parts

Control Panel
HEAD LOT NUMBER
LOT
Printhead lot number .
P AR TS ST A TUS
COUNTER A-Y
Utilization status of replacement parts that require servicing.
COUNTER
CUTTER
MEDIA
MEDIA1-7
NAME
TTL
ROLL
CUTSHEET
AFTER INST ALLA TION
Utilization status of the cutter , media, and other items (indicating how
much they have been used).
Printer Parts 79

Control Panel
Checking Instructions During Printer Operations
Y ou can refer to instructions on the printer control panel when loading paper , replacing ink tanks, or performing
other operations.
How to view instructions
Once you complete an action described in the instructions, the printer detects the action and switches to the
next instruction screen.
In the case of actions the printer cannot detect, instruction screens are switched every four seconds, and
the sequence of operations is shown repeatedly .
When all actions in the sequence are nished, the instruction screen for the next step is displayed.
Note
• During a continuous display of instructions, you can press the ◄ button to pause the instructions
on the current screen.
Press the ◄ or ► button to display the previous or next screens. If you do not press the ◄ or ► button
within 30 seconds, continuous display is resumed.
Press the OK button to display the instruction screen for the next step.
80 Printer Parts

Control Panel
V iewing instructions for loading or removing rolls
1. Press the Load/Eject button.
2. Press ▲ or ▼ to select Load Roll or Remove Roll , and then press the OK button.
Instructions are now displayed.
V iewing instructions for loading or removing sheets
1. Press the Load/Eject button.
Instructions are now displayed.
Printer Parts 81

Optional accessories
Optional accessories
Roll Holder Set
Load a roll on the roll holder and then load the holder in the printer . The Roll Holder in the Roll Holder Set RH2-44 is
for use with both 2-inch and 3-inch paper cores. Use the correct attachment for the particular paper core. ( → P .136)
• Roll Holder Set RH2-44
• Roll Holder (for 2- and 3-inch paper cores)
• Attachments
Using the 2-Inch Paper
Core Attachment
Using the 3-Inch Paper Core Attachment
2-Inch Paper Core Attachment 3-Inch Paper Core Attachment
#1
3-Inch Paper Core Attachment
#2
82 Printer Parts

Optional accessories
IEEE 1394 (FireW ire) Expansion Board
An interface board to add an IEEE 1394 (also called "FireWire") port.
• IEEE1394 Expansion Board EB-05
Caution
• Note that EB-04 is incompatible.
For instructions on installing the IEEE 1394 expansion board, refer to the documentation provided with the
optional IEEE 1394 expansion board.
Printer Parts 83

Optional accessories
Media T ake-up Unit
Use the optional Media T ake-up Unit to have documents that are printed on rolls rewound automatically after
printing. This is convenient for large-format printing, or when printing large-volume jobs continuously .
• Media T ake-up Unit TU-06
Note
• For instructions on installing the Media T ake-up Unit , refer to the Media T ake-up Unit Setup Guide .
• For information on the types of paper compatible with the Media T ake-up Unit , refer to the Paper
Reference Guide . ( → P .125)
• For Media T ake-up Unit instructions, see “Using the Media T ake-up Unit ”. (→P .86)
84 Printer Parts

Optional accessories
Parts
■Main Unit
a. Left Media T ake-up Unit
Load the Rewind Spool here.
b. Right Media T ake-up Unit
Load the Rewind Spool here. Includes the Media T ake-up Unit Power button, ▲ and ▼ buttons to
advance or rewind paper , and a power cord.
c. Rewind Spool
Winds documents printed on rolls.
d. 3-inch Adapter
When rewinding rolls with 3-inch paper cores, attach the adapter to the Rewind Spool .
e. Media T ake-up Sensor
A sensor for automatically rewinding rolls.
■W eight
a. W eight Roll (6)
W eights required when rewinding rolls. Use one weight roll or combine two (with a W eight Joint ),
depending on the roll width.
b. W eight Joint
Fastens two weight rolls.
c. W eight Flange (2 sets)
Attached to the ends of W eight Roll to adjust the weight. Use W eight Flange 1 or W eight Flange
2 , depending on the type of paper . ( → P .86 )
Printer Parts 85

Optional accessories
Using the Media T ake-up Unit
This topic describes how to use the Media T ake-up Unit .
Important
• The Media T ake-up Unit cannot be used with sheets.
• Do not put anything near the Media T ake-up Sensor that might interfere with it. This may impair
operation.
• Rolls are not cut automatically when the Media T ake-up Unit is used, regardless of the Cutting Mode
setting in the printer menu or the Automatic Cutting setting in the printer driver .
• Color tones after printing may change during the ink drying period for some types of paper . Allow
ample drying time before the nal check of colors, and do not remove printed documents from the
Media T ake-up Unit too soon.
• In humid environments, documents printed on relatively insubstantial media such as Fabric Banner ,
Synthetic Paper , or lightweight Coated Paper may not be retracted evenly by the unit. In this case, take
steps to control humidity in the operating environment, or adjust the Roll DryingT ime or Scan W ait
T ime settings so that printed documents are retracted after the ink has fully dried. ( → P .57)
1. When using the Stationary Output Stacker , stow the Stationary Output Stacker before this
procedure. ( → P .23)
Important
• Arrange the Basket Cloth and Basket Rod so they do not interfere with the Media T ake-up Sensor .
2. Unlock the ange on the left side of the Rewind Spool by lifting the lever (a) from the shaft
side. Remove the ange.
3. When rewinding rolls with 3-inch paper cores, insert the 3-inch Adapter on the anges at both
ends.
86 Printer Parts
 Loading...