

Page 1

Large Format Printer
User's Guide
Basic Printing Workflow 13
Enhanced Printing Options 27
Printing CAD Drawings.............................................................38
Printing enlargements or reductions.........................................58
Printing at full size.................................................................... 68
Borderless Printing................................................................... 77
Printing banners or at other non-standard sizes.......................86
Tiling and multiple pages per sheet..........................................99
Centering originals..................................................................113
and so on
Windows Software 139
Printer Driver...........................................................................140
Preview...................................................................................169
Free Layout.............................................................................179
Color imageRUNNER Enlargement Copy.............................. 201
Print Plug-In for Office............................................................ 210
and so on
Mac OS Software 247
Printer Driver...........................................................................248
Preview...................................................................................265
Free Layout.............................................................................286
and so on
Manuals for this printer
Setup Guide
Quick Guide
Basic Guide Electronic manual
User's Guide Electronic manual
Paper Reference Guide Electronic manual
Downloaded from ManualsPrinter.com Manuals
Handling and Use of Paper 309
Control Panel 397
Printer Parts 431
Network Setting 441
Print Job Management 461
Adjustments for Better Print Quality 479
Maintenance and Consumables 495
Troubleshooting 527
Error Message 555
Specifications 575
Appendix 579
ver1.00 2014-12-10
ENG
Page 2
Contents
Basic Printing Workflow
Basic Printing Workflow 13
Printing procedure 14
Printing Options Using Rolls and Sheets .................................................................................................................. 14
Turning the Printer On and Off .................................................................................................................................. 15
Loading and Printing on Rolls ................................................................................................................................... 16
Loading and Printing on Sheets ............................................................................................................................... 18
Printing in Windows ................................................................................................................................................. 20
Printing from Mac OS ............................................................................................................................................... 21
Canceling print jobs 22
Canceling Print Jobs from the Control Panel ............................................................................................................ 22
Canceling Print Jobs from Windows ......................................................................................................................... 22
Canceling Print Jobs from Mac OS .......................................................................................................................... 23
Pausing Printing 25
Pausing Printing ....................................................................................................................................................... 25
Enhanced Printing Options
Enhanced Printing Options 27
Choosing Paper for Printing 28
Choosing a Paper for Printing .................................................................................................................................. 28
Specifying Paper in the Printer Driver ....................................................................................................................... 28
Printing Photos and Office Documents 29
Printing Photos and Images ..................................................................................................................................... 29
Printing Photos and Images (Windows) .............................................................................................................. 29
Printing Photos and Images (Mac OS) ................................................................................................................ 31
Printing Office Documents ........................................................................................................................................ 33
Printing Office Documents (Windows) ................................................................................................................. 33
Printing Office Documents (Mac OS) ................................................................................................................... 34
Using PosterArtist to Compose Originals .................................................................................................................. 36
Printing CAD Drawings 38
Printing CAD Drawings ............................................................................................................................................. 38
Printing Line Drawings and Text ............................................................................................................................... 38
Printing Line Drawings and Text (Windows) ........................................................................................................ 39
Printing Line Drawings and Text (Mac OS) .......................................................................................................... 40
Printing from AutoCAD ............................................................................................................................................. 42
Specifying Colors and Printing CAD Drawings .......................................................................................................... 43
Specifying Colors and Printing CAD Drawings (Windows) ................................................................................... 44
HP-GL/2 Printing ..................................................................................................................................................... 45
Adjusting Images 46
Adjusting the Color in the Printer Driver .................................................................................................................... 46
Fine-Tuning Colors of Photos and Images (Windows) ......................................................................................... 47
Fine-Tuning Colors of Photos and Images (Mac OS) ........................................................................................... 49
Giving Priority to Particular Graphic Elements and Colors for Printing ....................................................................... 52
Choosing the Document Type and Printing Conditions (Windows) ...................................................................... 54
Choosing the Document Type and Printing Conditions (Mac OS) ........................................................................ 56
2
Printing enlargements or reductions 58
Resizing Originals to Match the Paper Size .............................................................................................................. 58
Resizing Originals to Match the Paper Size (Windows) ........................................................................................ 58
Resizing Originals to Fit the Roll Width ..................................................................................................................... 60
Resizing Originals to Fit the Roll Width (Windows) .............................................................................................. 60
Resizing Originals to Fit the Roll Width (Mac OS) ................................................................................................ 61
Resizing Originals by Entering a Scaling Value .......................................................................................................... 63
Resizing Originals by Entering a Scaling Value (Windows) ................................................................................... 64
Downloaded from ManualsPrinter.com Manuals
Page 3

Enhanced Printing Options
Resizing Originals by Entering a Scaling Value (Mac OS) ..................................................................................... 65
Printing at full size 68
Printing on Oversize Paper ....................................................................................................................................... 68
Printing at Full Size (Windows) ............................................................................................................................ 69
Printing at Full Size (Mac OS) .............................................................................................................................. 70
Borderless Printing at Actual Size ............................................................................................................................. 72
Borderless Printing at Actual Size (Windows) ...................................................................................................... 73
Borderless Printing at Actual Size (Mac OS) ........................................................................................................ 74
Borderless Printing 77
Borderless Printing on Paper of Equivalent Size ....................................................................................................... 77
Borderless Printing by Resizing Originals to Match the Paper Size (Windows) ..................................................... 78
Borderless Printing by Resizing Originals to Fit the Roll Width .................................................................................. 80
Borderless Printing by Resizing Originals to Fit the Roll Width (Windows) ............................................................ 81
Borderless Printing by Resizing Originals to Fit the Roll Width (Mac OS) ............................................................. 83
Printing banners or at other non-standard sizes 86
Printing Vertical or Horizontal Banners (Large-Format Printing) ................................................................................. 86
Printing Vertical or Horizontal Banners (Large-Format Printing; Windows) ........................................................... 87
Printing Vertical or Horizontal Banners (Large-Format Printing; Mac OS) ............................................................. 90
Printing on Non-Standard Paper Sizes ..................................................................................................................... 93
Printing on Non-Standard Paper Sizes (Windows) .............................................................................................. 93
Printing on Non-Standard Paper Sizes (Mac OS) ................................................................................................ 96
Tiling and multiple pages per sheet 99
Printing Multiple Originals Next to Each Other .......................................................................................................... 99
Printing Multiple Originals Next to Each Other (Windows) .................................................................................. 100
Printing Multiple Originals Next to Each Other (Mac OS) .................................................................................... 101
Printing Multiple Pages Continuously ...................................................................................................................... 102
Printing Multiple Pages Continuously (Windows) ............................................................................................... 103
Printing Multiple Pages Continuously (Mac OS) ................................................................................................. 104
Printing Multiple Pages Per Sheet ........................................................................................................................... 106
Printing Multiple Pages Per Sheet (Windows) .................................................................................................... 107
Printing Multiple Pages Per Sheet (Mac OS) ...................................................................................................... 108
Printing Posters in Sections .................................................................................................................................... 110
Printing Large Posters (Windows) ..................................................................................................................... 110
Centering originals 113
Printing Originals Centered on Rolls ....................................................................................................................... 113
Printing Originals Centered on Rolls (Windows) ................................................................................................. 113
Printing Originals Centered on Rolls (Mac OS) .................................................................................................. 115
Printing Originals Centered on Sheets .................................................................................................................... 117
Printing Originals Centered on Sheets (Windows) ............................................................................................. 117
Printing Originals Centered on Sheets (Mac OS) ............................................................................................... 118
Conserving roll paper 121
Conserving Roll Paper by Rotating Originals 90 Degrees ........................................................................................ 121
Conserving Roll Paper by Rotating Originals 90 Degrees (Windows) ................................................................. 121
Conserving Roll Paper by Rotating Originals 90 Degrees (Mac OS) ................................................................... 122
Conserving Roll Paper by Printing Originals Without Top and Bottom Margins ........................................................ 124
Conserving Roll Paper by Printing Originals Without Top and Bottom Margins (Windows) ................................. 125
Conserving Roll Paper by Printing Originals Without Top and Bottom Margins (Mac OS) ................................... 126
Checking Images Before Printing 128
Checking the Layout in a Preview Before Printing ................................................................................................... 128
Other useful settings 129
Printing With Watermarks ....................................................................................................................................... 129
Printing with Watermarks—COPY, FILE COPY, and so on (Windows) ............................................................... 130
Making the Original Orientation Match the Paper Orientation .................................................................................. 131
Making the Original Orientation Match the Paper Orientation (Windows) ........................................................... 132
Making the Original Orientation Match the Paper Orientation (Mac OS) ............................................................. 133
Using Favorites ...................................................................................................................................................... 135
3
Downloaded from ManualsPrinter.com Manuals
Page 4

Enhanced Printing Options
Windows Software
Cutting Roll Paper After Printing ............................................................................................................................. 135
Cutting Roll Paper After Printing (Windows) ...................................................................................................... 135
Cutting Roll Paper After Printing (Mac OS) ........................................................................................................ 136
Windows Software 139
Printer Driver 140
Printer Driver Settings ............................................................................................................................................ 140
Specifying Paper in the Printer Driver ..................................................................................................................... 142
Confirming Print Settings ....................................................................................................................................... 143
Checking the Layout in a Preview Before Printing .................................................................................................. 143
Using Favorites ..................................................................................................................................................... 144
Accessing the Printer Driver Dialog Box from Applications ..................................................................................... 146
Accessing the Printer Driver Dialog Box from the Operating System Menu ............................................................ 147
Main Sheet ............................................................................................................................................................ 148
Paper Information on Printer Dialog Box .......................................................................................................... 151
Paper Detailed Settings Dialog Box ................................................................................................................. 152
View Settings Dialog Box for the Printing Application ....................................................................................... 153
Color Adjustment Sheet: Color ........................................................................................................................ 154
Object Adjustment Dialog box: Color ................................................................................................................ 155
Matching Sheet ............................................................................................................................................... 155
Color Adjustment Sheet: Monochrome ............................................................................................................ 157
Object Adjustment Dialog box: Monochrome .................................................................................................... 158
Page Setup Sheet ................................................................................................................................................. 159
Paper Size Options Dialog Box ........................................................................................................................ 161
Layout Sheet ......................................................................................................................................................... 162
Page Options Dialog Box ................................................................................................................................. 163
Special Settings Dialog Box ............................................................................................................................. 164
Favorites Sheet ..................................................................................................................................................... 165
Utility Sheet ........................................................................................................................................................... 166
Support Sheet ....................................................................................................................................................... 167
Settings Summaries Dialog Box ....................................................................................................................... 167
Device Settings Sheet ........................................................................................................................................... 168
Preview 169
The Features of Preview ......................................................................................................................................... 169
Starting Preview ..................................................................................................................................................... 169
Preview Main Window ............................................................................................................................................ 170
Dialog Area ............................................................................................................................................................ 172
Enlarge/Reduce the screen display ........................................................................................................................ 173
Moving a Page ....................................................................................................................................................... 173
Using the ruler ........................................................................................................................................................ 173
Priority setting for rotating 90 degrees .................................................................................................................... 174
Printing with Selecting the Layout ........................................................................................................................... 175
Print on the Center ................................................................................................................................................. 177
Not Print Spaces at the Top/Bottom ....................................................................................................................... 178
4
Free Layout 179
The Features of Free Layout ................................................................................................................................... 179
Starting Free Layout ............................................................................................................................................... 179
Free Layout Main Window ...................................................................................................................................... 181
Detailed Settings .................................................................................................................................................... 182
Preferences Dialog Box .......................................................................................................................................... 183
Page Options Dialog Box ....................................................................................................................................... 184
Zoom Dialog Box ................................................................................................................................................... 185
Format Dialog Box ................................................................................................................................................. 185
Downloaded from ManualsPrinter.com Manuals
Page 5

Windows Software
Laying out a Multiple-File Document on One Page ................................................................................................. 187
Laying out a Document Created with Multiple Application Programs on One Page ................................................. 189
Selecting an Object ................................................................................................................................................ 191
Changing the Object Size ....................................................................................................................................... 191
Moving an Object ................................................................................................................................................... 192
Rotating an Object ................................................................................................................................................. 192
Laying out Objects Automatically ............................................................................................................................ 193
Aligning Objects ..................................................................................................................................................... 193
Changing the Object Overlapping Order ................................................................................................................. 195
Pasting a Copied or Cut Object .............................................................................................................................. 196
Folded Duplex Window .......................................................................................................................................... 197
Finished Size Settings Dialog Box .......................................................................................................................... 198
Binding Settings Dialog Box ................................................................................................................................... 199
Prints using Folded Duplex ..................................................................................................................................... 200
Color imageRUNNER Enlargement Copy 201
The Features of Color imageRUNNER Enlargement Copy ...................................................................................... 201
Starting Color imageRUNNER Enlargement Copy .................................................................................................. 201
Color imageRUNNER Enlargement Copy Dialog Box ............................................................................................. 202
Hot Folder .............................................................................................................................................................. 203
Creating a New Hot Folder ..................................................................................................................................... 203
Specifying an Existing Shared Folder as a Hot Folder ............................................................................................. 206
Setting the Print Parameters ................................................................................................................................... 208
Printing Enlargements of Scanned Originals from a Color imageRUNNER .............................................................. 209
Print Plug-In for Office 210
Print Plug-In for Officefeatures ................................................................................................................................ 210
Steps to install ....................................................................................................................................................... 210
Steps to uninstall .................................................................................................................................................... 213
When Print Plug-In for Office is not displayed ......................................................................................................... 213
To start from Microsoft Word .................................................................................................................................. 216
Print Matching Roll Width(Word) ............................................................................................................................. 218
Borderless Printing(Word) ....................................................................................................................................... 220
Multi-Page Printing(Word) ....................................................................................................................................... 222
Register the settings (Word) ................................................................................................................................... 223
Print Using Registered Settings(Word) .................................................................................................................... 224
Portrait Orientation/Landscape Orientation(Word) ................................................................................................... 226
To start from Microsoft PowerPoint ......................................................................................................................... 227
Print Matching Roll Width(PowerPoint) ................................................................................................................... 229
Borderless Printing(PowerPoint) ............................................................................................................................. 230
Multi-Page Printing(PowerPoint) ............................................................................................................................. 232
Register the settings (PowerPoint) .......................................................................................................................... 234
Print Using Registered Settings(PowerPoint) .......................................................................................................... 235
Portrait Orientation/Landscape Orientation(PowerPoint) ......................................................................................... 236
To start from Microsoft Excel .................................................................................................................................. 238
Print Entire Sheet(Excel) ......................................................................................................................................... 239
Print Selected Area(Excel) ...................................................................................................................................... 242
Configuring Binding (Excel) ..................................................................................................................................... 244
Configuring Special Settings ................................................................................................................................... 245
Mac OS Software
Mac OS Software 247
Printer Driver 248
Printer Driver Settings ............................................................................................................................................ 248
Specifying Paper in the Printer Driver ..................................................................................................................... 249
Confirming Print Settings ....................................................................................................................................... 250
Checking the Layout in a Preview Before Printing .................................................................................................. 251
Using Favorites ..................................................................................................................................................... 251
Accessing the Printer Driver Dialog Box from Applications ..................................................................................... 252
Main Pane ............................................................................................................................................................. 252
Paper Detailed Settings Dialog Box ................................................................................................................. 256
View set. Dialog Box for the Printing Application .............................................................................................. 258
Downloaded from ManualsPrinter.com Manuals
5
Page 6

Mac OS Software
Matching pane ................................................................................................................................................. 258
Color Settings Pane: Color .............................................................................................................................. 260
Object Adjustment dialog box: Color ................................................................................................................ 261
Color Settings Pane: Monochrome .................................................................................................................. 262
Object Adjustment dialog box: Monochrome .................................................................................................... 263
Page Setup Pane .................................................................................................................................................. 263
Preview 265
The Features of Preview ......................................................................................................................................... 265
Starting Preview ..................................................................................................................................................... 265
Preview Main Window ............................................................................................................................................ 266
Paper Settings Panel .............................................................................................................................................. 269
Easy Settings ................................................................................................................................................... 270
Advanced Settings ........................................................................................................................................... 271
Output Settings Panel ............................................................................................................................................ 272
Color Settings Panel ............................................................................................................................................... 274
Color Adjustment .............................................................................................................................................. 275
Matching .......................................................................................................................................................... 276
Driver Matching Mode ................................................................................................................................. 278
ICC Matching Mode .................................................................................................................................... 279
ColorSync ................................................................................................................................................... 280
Preferences Dialog Box .......................................................................................................................................... 280
Zoom Dialog Box ................................................................................................................................................... 280
Go to Page Dialog Box ........................................................................................................................................... 281
Print with No Borders ............................................................................................................................................. 281
Print on the Center ................................................................................................................................................. 282
Not Print Spaces at the Top/Bottom ....................................................................................................................... 282
Print Page Rotated 90 Degrees .............................................................................................................................. 283
Display with Fitting to the Width of the Paper ......................................................................................................... 283
Display with All ....................................................................................................................................................... 283
Display with Actual Size .......................................................................................................................................... 284
Moving a Page ....................................................................................................................................................... 284
Free Layout 286
The Features of Free Layout ................................................................................................................................... 286
Starting Free Layout ............................................................................................................................................... 286
Free Layout Main Window ...................................................................................................................................... 287
Paper Settings Panel .............................................................................................................................................. 289
Easy Settings ................................................................................................................................................... 290
Advanced Settings ........................................................................................................................................... 291
Color Settings Panel ............................................................................................................................................... 292
Color Adjustment .............................................................................................................................................. 293
Matching .......................................................................................................................................................... 295
Driver Matching Mode ................................................................................................................................. 297
ICC Matching Mode .................................................................................................................................... 298
ColorSync ................................................................................................................................................... 299
Preferences Dialog Box .......................................................................................................................................... 299
Page Setup Dialog Box .......................................................................................................................................... 300
Zoom Dialog Box ................................................................................................................................................... 301
Format Dialog Box ................................................................................................................................................. 302
Laying out a Multiple-File Document on One Page ................................................................................................. 302
Laying out a Document Created with Multiple Application Programs on One Page ................................................. 303
Selecting an Object ................................................................................................................................................ 303
6
Changing the Object Size ....................................................................................................................................... 303
Moving an Object ................................................................................................................................................... 304
Rotating an Object ................................................................................................................................................. 304
Laying out Objects Automatically ............................................................................................................................ 305
Aligning Objects ..................................................................................................................................................... 305
Changing the Object Overlapping Order ................................................................................................................. 307
Pasting a Copied or Cut Object .............................................................................................................................. 308
Downloaded from ManualsPrinter.com Manuals
Page 7
Handling and Use of Paper
Handling and Use of Paper 309
Paper 310
Types of Paper ....................................................................................................................................................... 310
Paper Sizes ............................................................................................................................................................ 310
Using Paper Other Than Genuine Paper and feed confirmed Paper ....................................................................... 312
Printing on Paper Other Than Genuine Paper and feed confirmed Paper Using Existing Settings
Displaying the Paper Reference Guide ................................................................................................................... 313
Updating paper information .................................................................................................................................... 316
Handling rolls 320
Attaching the Roll Holder to Rolls ........................................................................................................................... 320
Loading Rolls in the Printer ..................................................................................................................................... 322
Changing the Type of Paper ................................................................................................................................... 325
Specifying the Paper Length .................................................................................................................................. 326
Removing the Roll from the Printer ......................................................................................................................... 327
Removing the Roll Holder from Rolls ...................................................................................................................... 329
Feeding Roll Paper Manually .................................................................................................................................. 330
Keeping Track of the Amount of Roll Paper Left ..................................................................................................... 331
Specifying the Ink Drying Time for Rolls .................................................................................................................. 331
Specifying the Cutting Method for Rolls .................................................................................................................. 333
Cutting the Leading Edge of Roll Paper Automatically ............................................................................................ 337
Reducing Dust from Cutting Rolls ........................................................................................................................... 338
........................................ 312
Handling sheets 340
Loading Sheets in the Printer ................................................................................................................................. 340
Printing From a Desired Starting Point .................................................................................................................... 342
Removing Sheets ................................................................................................................................................... 344
Output Stacker 346
Using the Output Stacker ....................................................................................................................................... 346
Media Configuration Tool (Windows) 351
The Features of Media Configuration Tool ............................................................................................................... 351
Installation Procedures ........................................................................................................................................... 351
Updating Media Information After Installation .......................................................................................................... 353
Media Configuration Tool Main Window .................................................................................................................. 357
Editing Media Type Information for Genuine Paper and Feed Confirmed Paper ....................................................... 358
Adding Media Types ......................................................................................................................................... 359
Changing Media Names ................................................................................................................................... 363
Deleting Media Types You Have Added ............................................................................................................. 365
Switching Media Types Display Show/Hide ....................................................................................................... 367
Changing the Display Order of Media Types ...................................................................................................... 369
Applying a Saved Media Information File on Another Computer ........................................................................ 371
Checking the update .............................................................................................................................................. 372
Media Configuration Tool (Mac OS) 373
The Features of Media Configuration Tool ............................................................................................................... 373
Procedures for Installing ......................................................................................................................................... 373
Updating Media Information After Installation .......................................................................................................... 375
Media Configuration Tool Main Window .................................................................................................................. 379
Editing Media Type Information for Genuine Paper and Feed Confirmed Paper ....................................................... 381
Adding Media Types ......................................................................................................................................... 382
Changing Media Names ................................................................................................................................... 386
Deleting Media Types You Have Added ............................................................................................................. 389
Switching Media Types Display Show/Hide ....................................................................................................... 390
Changing the Display Order of Media Types ...................................................................................................... 392
Applying a Saved Media Information File on Another Computer ........................................................................ 394
Checking the update .............................................................................................................................................. 396
7
Downloaded from ManualsPrinter.com Manuals
Page 8

Control Panel
Control Panel 397
Operations and Display Screen 398
Control Panel ......................................................................................................................................................... 398
Control Panel Display ............................................................................................................................................. 400
How to View Instructions with Navigate .................................................................................................................. 404
Checking Instructions During Printer Operations .................................................................................................... 405
Printer Menu 406
Printer Menu Operations ........................................................................................................................................ 406
Menu Operations ................................................................................................................................................... 407
Menu Structure ...................................................................................................................................................... 410
Menu Settings ........................................................................................................................................................ 416
Status Print ............................................................................................................................................................ 425
Printing Interface Setting Reports ........................................................................................................................... 428
Printer Parts
Printer Parts 431
Printer parts 432
Front ...................................................................................................................................................................... 432
Side ....................................................................................................................................................................... 434
Top Cover (Inside) .................................................................................................................................................. 435
Roll Cover (Inside) .................................................................................................................................................. 436
Carriage ................................................................................................................................................................. 436
Ink Tank Cover (Inside) ........................................................................................................................................... 437
Optional accessories 438
Roll Holder Set ....................................................................................................................................................... 438
Stand ..................................................................................................................................................................... 438
Network Setting
Network Setting 441
Network Environment 442
Network Environment ............................................................................................................................................. 442
Using RemoteUI 444
Using RemoteUI ..................................................................................................................................................... 444
Initial Settings 446
Configuring the IP Address on the Printer ............................................................................................................... 446
Configuring the IP Address Using the Printer Control Panel .............................................................................. 446
Configuring the IP Address Using ARP and PING Commands .......................................................................... 447
Configuring TCP/IPv6 Network Settings ................................................................................................................. 448
Configuring the Printer Driver Destination (Windows) .............................................................................................. 449
Configuring the Printer Driver Destination (Mac OS) ................................................................................................ 449
Configuring the Printer's TCP/IP Network Settings With RemoteUI ......................................................................... 450
Mac OS Settings 453
Configuring the Destination in TCP/IP Networks .................................................................................................... 453
Configuring the Destination for Bonjour Network ................................................................................................... 453
Other Settings 454
8
Specifying Printer-Related Information .................................................................................................................... 454
Configuring the Communication Mode Manually ..................................................................................................... 455
Email Notification When Printing is Finished or Errors Occur ................................................................................... 456
Initializing the Network Settings .............................................................................................................................. 456
Device Setup Utility (Windows) 457
imagePROGRAF Device Setup Utility ..................................................................................................................... 457
Installing imagePROGRAF Device Setup Utility ....................................................................................................... 457
Configuring the IP Address Using imagePROGRAF Device Setup Utility ................................................................. 457
Downloaded from ManualsPrinter.com Manuals
Page 9

Print Job Management
Print Job Management 461
Status Monitor (Windows) 462
The Features of imagePROGRAF Status Monitor ................................................................................................... 462
Job Management Using imagePROGRAF Status Monitor ...................................................................................... 463
Printmonitor (Mac OS) 464
The Features of imagePROGRAF Printmonitor ....................................................................................................... 464
Job Management Using imagePROGRAF Printmonitor .......................................................................................... 465
Accounting (Windows) 466
Accounting Manager .............................................................................................................................................. 466
Launching the Accounting Manager ....................................................................................................................... 466
Accounting Manager Main Window ........................................................................................................................ 467
Job List Area .............................................................................................................................................. 469
Accounting Manager Basic Procedures .................................................................................................................. 470
Configuring Unit Costs in Accounting Manager ...................................................................................................... 470
Setting the Unit Cost for Ink .............................................................................................................................. 471
Setting the Unit Cost for Paper ......................................................................................................................... 472
Setting the Unit Cost for Items Other Than Ink and Paper ................................................................................. 473
Configuring Units and Display Settings in Accounting Manager .............................................................................. 474
Automatically Acquiring Print Job Logs at Regular Intervals .................................................................................... 474
Canceling Regular Print Job Log Acquisition .......................................................................................................... 475
Switching Between Displaying Jobs on Printer and Regularly Acquired Jobs .......................................................... 475
Exporting Print Job Data as a CSV File ................................................................................................................... 475
Displaying Job Properties or Period Properties ....................................................................................................... 476
Showing, Saving and Loading Selected Unit Cost Data .......................................................................................... 477
Showing the Total Amount of Ink and Paper Consumed ......................................................................................... 477
Adjustments for Better Print Quality
Adjustments for Better Print Quality 479
Adjusting the Printhead 480
Adjusting the Printhead .......................................................................................................................................... 480
Automatic Adjustment to Straighten Lines and Colors ...................................................................................... 480
Manual Adjustment to Straighten Lines and Colors ........................................................................................... 481
Adjusting Line Misalignment ................................................................................................................................... 483
Troubleshooting Paper Abrasion and Blurry Images ................................................................................................ 485
Adjusting the feed amount 487
Adjusting the Feed Amount .................................................................................................................................... 487
Selecting a Feed Amount Adjustment Method .................................................................................................. 487
Automatic Banding Adjustment ........................................................................................................................ 488
Manual Banding Adjustment ............................................................................................................................. 489
Fine-Tuning the Paper Feed Amount ................................................................................................................. 491
Adjusting Line Length ....................................................................................................................................... 491
Adjusting the Vacuum Strength .............................................................................................................................. 493
Maintenance and Consumables
Maintenance and Consumables 495
Ink Tanks 496
Ink Tanks ................................................................................................................................................................ 496
Replacing Ink Tanks ............................................................................................................................................... 496
Checking Ink Tank Levels ....................................................................................................................................... 500
When to Replace Ink Tanks .................................................................................................................................... 501
9
Printheads 502
Printhead ............................................................................................................................................................... 502
Checking for Nozzle Clogging ................................................................................................................................ 502
Cleaning the Printhead ........................................................................................................................................... 503
Replacing the Printhead ......................................................................................................................................... 504
Downloaded from ManualsPrinter.com Manuals
Page 10
Maintenance and Consumables
Maintenance Cartridge 510
Maintenance Cartridge ........................................................................................................................................... 510
Replacing the Maintenance Cartridge ..................................................................................................................... 510
Checking the Remaining Maintenance Cartridge Capacity ...................................................................................... 513
When to Replace the Maintenance Cartridge ......................................................................................................... 514
Cleaning the Printer 515
Cleaning the Printer Exterior ................................................................................................................................... 515
Cleaning Inside the Top Cover ................................................................................................................................ 515
Other Maintenance 519
Preparing to Transfer the Printer ............................................................................................................................. 519
Reinstalling the Printer ............................................................................................................................................ 522
Updating the Firmware ........................................................................................................................................... 525
Troubleshooting
Troubleshooting 527
Frequently Asked Questions 528
Frequently Asked Questions ................................................................................................................................... 528
Problems Regarding Paper 529
Clearing Jammed Roll Paper .................................................................................................................................. 529
Clearing a Jammed Sheet ...................................................................................................................................... 532
Clearing Jammed Paper (Paper Feed Slot) ............................................................................................................. 535
Roll paper cannot be inserted into the Paper Feed Slot .......................................................................................... 536
Cannot load sheets ................................................................................................................................................ 537
Paper is not cut neatly ............................................................................................................................................ 537
Paper is not cut ...................................................................................................................................................... 537
Depression on the leading edge is left .................................................................................................................... 537
The size of clear film cannot be detected ............................................................................................................... 537
Roll Paper is Continuously Ejected ......................................................................................................................... 537
10
Printing does not start 538
The Data lamp on the Control Panel does not light up ............................................................................................ 538
The printer does not respond even if print jobs are sent ......................................................................................... 538
Ink Filling.. is displayed ........................................................................................................................................... 538
The display screen indicates Agitating .................................................................................................................... 538
The printer stops during a print job 539
An error message is shown on the Display Screen ................................................................................................. 539
The printer ejects blank, unprinted paper ............................................................................................................... 539
Problems with the printing quality 540
Printing is faint ........................................................................................................................................................ 540
Paper rubs against the Printhead ........................................................................................................................... 541
The edges of the paper are dirty ............................................................................................................................. 541
The surface of the paper is dirty ............................................................................................................................. 542
The back side of the paper is dirty .......................................................................................................................... 542
Printed colors are inaccurate .................................................................................................................................. 542
Banding in different colors occurs .......................................................................................................................... 543
Colors in printed images are uneven ....................................................................................................................... 543
Image edges are blurred or white banding occurs .................................................................................................. 544
The contrast becomes uneven during printing ........................................................................................................ 544
The length of printed images is inaccurate in the feeding direction .......................................................................... 545
Images are printed crooked .................................................................................................................................... 545
Documents are printed in monochrome ................................................................................................................. 545
Line thickness is not uniform .................................................................................................................................. 545
Lines are misaligned ............................................................................................................................................... 545
Cannot print over a network 547
Cannot connect the printer to the network ............................................................................................................. 547
Cannot print over a TCP/IP network ....................................................................................................................... 547
Downloaded from ManualsPrinter.com Manuals
Page 11

Troubleshooting
Cannot print over a Bonjour network ...................................................................................................................... 547
Installation problems 548
The computer does not recognize the printer ......................................................................................................... 548
Removing Installed Printer Drivers .......................................................................................................................... 548
HP-GL/2 problems 550
With HP-GL/2, printing is misaligned ...................................................................................................................... 550
Lines or images are missing in printed HP-GL/2 jobs. ............................................................................................ 550
Lines are printed too thick or thin in HP-GL/2 print jobs ......................................................................................... 550
HP-GL/2 jobs are printed in monochrome (or color) ............................................................................................... 550
Printed colors of lines are inaccurate during HP-GL/2 printing ................................................................................ 550
HP-GL/2 jobs are printed 6 mm larger than specified ............................................................................................. 551
HP-GL/2 jobs are printed at maximum size, even if a standard size is specified ...................................................... 551
HP-GL/2 printing takes a long time ........................................................................................................................ 551
Replotting with HP-GL/2 jobs is not possible. ........................................................................................................ 551
The printer stops when printing a HP-GL/2 job (the carriage stops moving) ............................................................ 551
Other problems 552
The printer does not go on ..................................................................................................................................... 552
If the Printer Makes a Strange Sound ..................................................................................................................... 552
Messages advising to check the maintenance cartridge are not cleared ................................................................. 552
The printer consumes a lot of ink ........................................................................................................................... 552
Ink Level Detection ................................................................................................................................................. 553
Error Message
Error Message 555
Error Messages 556
Messages regarding paper 558
Paper mismatch ..................................................................................................................................................... 558
MediaType Mismatch ............................................................................................................................................. 558
The paper is too small. ........................................................................................................................................... 559
The paper is too small. ........................................................................................................................................... 559
PaprWidth Mismatch .............................................................................................................................................. 560
Paper size not detected. ........................................................................................................................................ 560
Insufficient paper for job ......................................................................................................................................... 561
This paper cannot be used. .................................................................................................................................... 561
Roll printing is selected. .......................................................................................................................................... 561
Roll printing is selected, but sheets are loaded. ...................................................................................................... 561
The roll is empty. .................................................................................................................................................... 562
Sheet printing is selected. ...................................................................................................................................... 562
Regular printing is selected, but a roll is loaded. ..................................................................................................... 562
Paper jam .............................................................................................................................................................. 563
Paper is crooked. ................................................................................................................................................... 563
Paper not aligned with right guide. ......................................................................................................................... 563
Cannot detect papr ................................................................................................................................................ 564
Leading edge detection error. ................................................................................................................................. 564
Paper cutting failed. ............................................................................................................................................... 564
End of paper feed. ................................................................................................................................................. 564
Rel lever is in wrong position. ................................................................................................................................. 564
Borderless printng not possible. ............................................................................................................................. 565
Paper position not suitable for borderless printing. ................................................................................................. 565
Roll paper is not securely in contact with roll holder. ............................................................................................... 565
Messages regarding ink 566
Ink insufficient. ....................................................................................................................................................... 566
No ink left. .............................................................................................................................................................. 566
Remaining level of the ink cannot be correctly detected. Check ink tank. ............................................................... 566
Cannot detect ink level correctly. Close tank cover. ................................................................................................ 566
Close Ink Tank Cover ............................................................................................................................................. 566
Ink tank is empty. ................................................................................................................................................... 567
Not much ink is left. ............................................................................................................................................... 567
11
Downloaded from ManualsPrinter.com Manuals
Page 12

Error Message
No ink tank loaded. ................................................................................................................................................ 567
Check if ink tank is set, and its color and direction. ................................................................................................ 567
The following ink tanks cannot be recognized. ....................................................................................................... 567
Do not pull out ink tank. ......................................................................................................................................... 567
Messages regarding printing or adjustment 568
Cannot adjust paper feed. ...................................................................................................................................... 568
Check printed document. ....................................................................................................................................... 568
Messages regarding printheads 569
Cannot adjust printhead. ........................................................................................................................................ 569
Wrong printhead. ................................................................................................................................................... 569
Printhead error ....................................................................................................................................................... 569
Cannot recognize print head. ................................................................................................................................. 569
Execute printhead cleaning. ................................................................................................................................... 570
Messages regarding the maintenance cartridge 571
Insert the maintenance cartridge. ........................................................................................................................... 571
Wrong maintenance cartridge. ............................................................................................................................... 571
Maint. cart. The level is low .................................................................................................................................... 571
No Maintenance Cartridge capacity. ....................................................................................................................... 571
Maintenance cartridge full. ..................................................................................................................................... 571
Maintenance cartridge problem. ............................................................................................................................. 571
Messages regarding HP-GL/2 572
This type of paper is not compatible with HP-GL/2. ............................................................................................... 572
GL2: Wxxxx The memory is full. (xxxx is 0501, 0903, or 0904) ............................................................................... 572
GL2: W0502 The parameter is out of range. .......................................................................................................... 572
GL2: W0504 This command is not supported. ....................................................................................................... 572
Other Messages 573
GARO Wxxxx (x represents a number) ................................................................................................................... 573
ERROR Exxx-xxxx (x represents a letter or number) ............................................................................................... 573
Hardware error. xxxxxxxx-xxxx (x represents a letter or number) ............................................................................. 573
Top cover is open. .................................................................................................................................................. 574
Prepare for parts replacement. ............................................................................................................................... 574
Parts replacement time has passed. ...................................................................................................................... 574
Unknown file. ......................................................................................................................................................... 574
Multi-sensor error ................................................................................................................................................... 574
Error in cutter position. ........................................................................................................................................... 574
Specifications
Specifications 575
Printer Specifications 576
Specifications ......................................................................................................................................................... 576
Print Area ............................................................................................................................................................... 578
Appendix
Appendix 579
Safety Precautions 580
Safety Precautions ................................................................................................................................................. 580
Legal Notices ......................................................................................................................................................... 582
12
Manuals for this printer 584
Manuals for this printer ........................................................................................................................................... 584
About This User Manual ......................................................................................................................................... 584
Disposal of the product 586
WEEE Directive ...................................................................................................................................................... 586
Downloaded from ManualsPrinter.com Manuals
Page 13
iPF670
User's Guide
Basic Printing Workflow
Basic Printing Workflow
Printing procedure ............................................................................... 14
Canceling print jobs ............................................................................. 22
Pausing Printing .................................................................................. 25
Enhanced Printing Options 27
Windows Software 139
Mac OS Software 247
Handling and Use of Paper 309
Control Panel 397
Printer Parts 431
Network Setting 441
Print Job Management 461
Adjustments for Better Print Quality 479
Maintenance and Consumables 495
Troubleshooting 527
Error Message 555
Specifications 575
Appendix 579
13
Downloaded from ManualsPrinter.com Manuals
imagePROGRAF
Page 14
Printing Options Using Rolls and Sheets
Printing procedure
Printing procedure
Basic Printing Workflow Printing procedure
Printing Options Using Rolls and Sheets ........................................................................................................... 14
Turning the Printer On and Off .......................................................................................................................... 15
Loading and Printing on Rolls ........................................................................................................................... 16
Loading and Printing on Sheets ........................................................................................................................ 18
➔ Specifying Paper in the Printer Driver (Windows) ............................................................................ 142
➔ Specifying Paper in the Printer Driver (Mac OS) .............................................................................. 249
Printing in Windows ..........................................................................................................................................20
Printing from Mac OS ....................................................................................................................................... 21
Printing Options Using Rolls and Sheets
Printing Options Using Rolls and Sheets
The printer supports both rolls and sheets.
This section introduces the main features of each, as well as the main printing methods available. Select rolls or
sheets to suit your particular printing application.
•
For information on the types of paper the printer supports, see "Types of Paper." ➔P.310
Note
•
A variety of other ways to print are available besides those introduced here. For details, see "Enhanced Printing
Options." ➔P.27
iPF670
Roll printing
Media in spooled rolls is generally called Roll Media. Rolls are loaded on the Roll Holder, which are in turn loaded
in the printer.
Rolls can be used to print large photos or create posters or banners that cannot be printed on regular sheets.
•
Large-format printing
Easily print vertical or horizontal banners from familiar applications such as Microsoft Office applications.
(See "Printing Vertical or Horizontal Banners (Large-Format Printing).") ➔P.86
•
Borderless printing
Print without a margin (border) around posters or photos.
(See "Borderless Printing on Paper of Equivalent Size.") ➔ P.77
(See "Borderless Printing by Resizing Originals to Fit the Roll Width.") ➔ P.80
(See "Borderless Printing at Actual Size.") ➔ P.72
•
Banner printing
You can print multiple pages as a single continuous image, without margins between pages.
(See "Printing Multiple Pages Continuously.") ➔ P.102
•
90-degree rotation before printing
Originals in portrait orientation are rotated 90 degrees when possible to use paper more efficiently.
(See "Conserving Roll Paper by Rotating Originals 90 Degrees.") ➔ P.121
•
Enlarged/reduced printing
You can freely adjust the size of originals by enlarging or reducing originals before printing.
(See "Resizing Originals to Match the Paper Size.") ➔ P.58
(See "Resizing Originals to Fit the Roll Width.") ➔ P.60
(See "Resizing Originals by Entering a Scaling Value.") ➔ P.63
•
Free Layout (Windows) and imagePROGRAF Free Layout (Mac OS)
Print multiple documents from multiple applications (such as word-processing programs, spreadsheet programs, and so on) next to each other.
(See "Printing Multiple Originals Next to Each Other.") ➔ P.99
Sheet printing
Sheets refer to individual sheets of paper.
Insert the sheet between the Platen and the Paper Retainer.
•
Enlarged/reduced printing
User's Guide
Downloaded from ManualsPrinter.com Manuals
Page 15
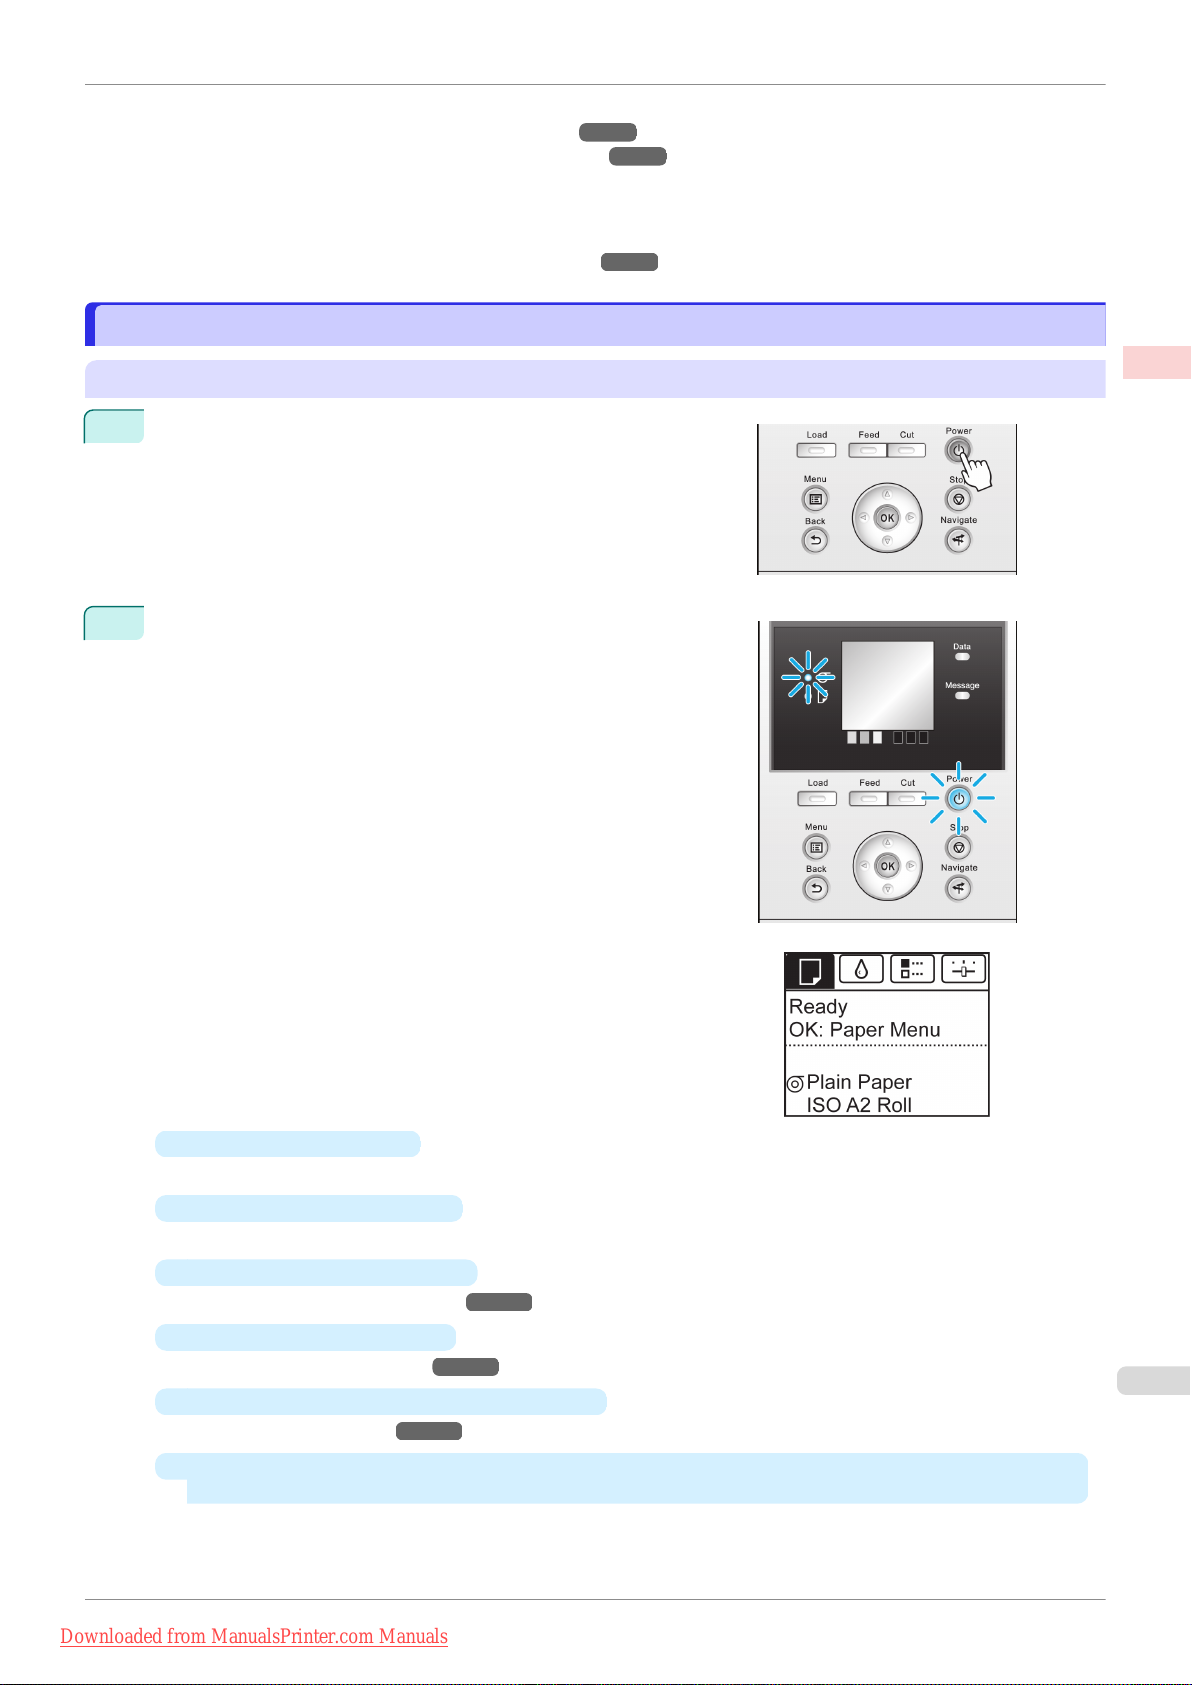
iPF670
Turning the Printer On and Off
You can freely adjust the size of originals by enlarging or reducing originals before printing.
(See "Resizing Originals to Match the Paper Size.") ➔ P.58
(See "Resizing Originals by Entering a Scaling Value.") ➔ P.63
•
Free Layout (Windows) and imagePROGRAF Free Layout (Mac OS)
Print multiple documents from multiple applications (such as word-processing programs, spreadsheet programs, and so on) next to each other.
(See "Printing Multiple Originals Next to Each Other.")
Turning the Printer On and Off
Turning the Printer On and Off
➔P.99
Basic Printing Workflow Printing procedure
Turning the printer on
Press the Power button to turn on the printer.
1
The printer will now start up.
After the Display Screen shows the Canon logo, "Starting up...
Please wait." is displayed.
The Power Lamp is lit when the printer finishes starting up, and
2
the printer is now in Standby.
The printer will not go into Standby in the following situations.
Take the appropriate action.
•
The Top Cover is open
Close the Top Cover.
•
The Ink Tank Cover is open
Close the Ink Tank Cover.
•
The Printhead is not installed
see "Replacing the Printhead." ➔ P.504
•
An Ink Tank is not installed
see "Replacing Ink Tanks." ➔P.496
•
If "
ERROR" is shown on the Display Screen
see "Error messages." ➔ P.556
•
The
Power Lamp and Message Lamp are not lit (even once), and nothing appears on the
Display Screen
Make sure the printer is plugged in correctly. Check the connection at the plug and electrical outlet.
User's Guide
Downloaded from ManualsPrinter.com Manuals
15
Page 16
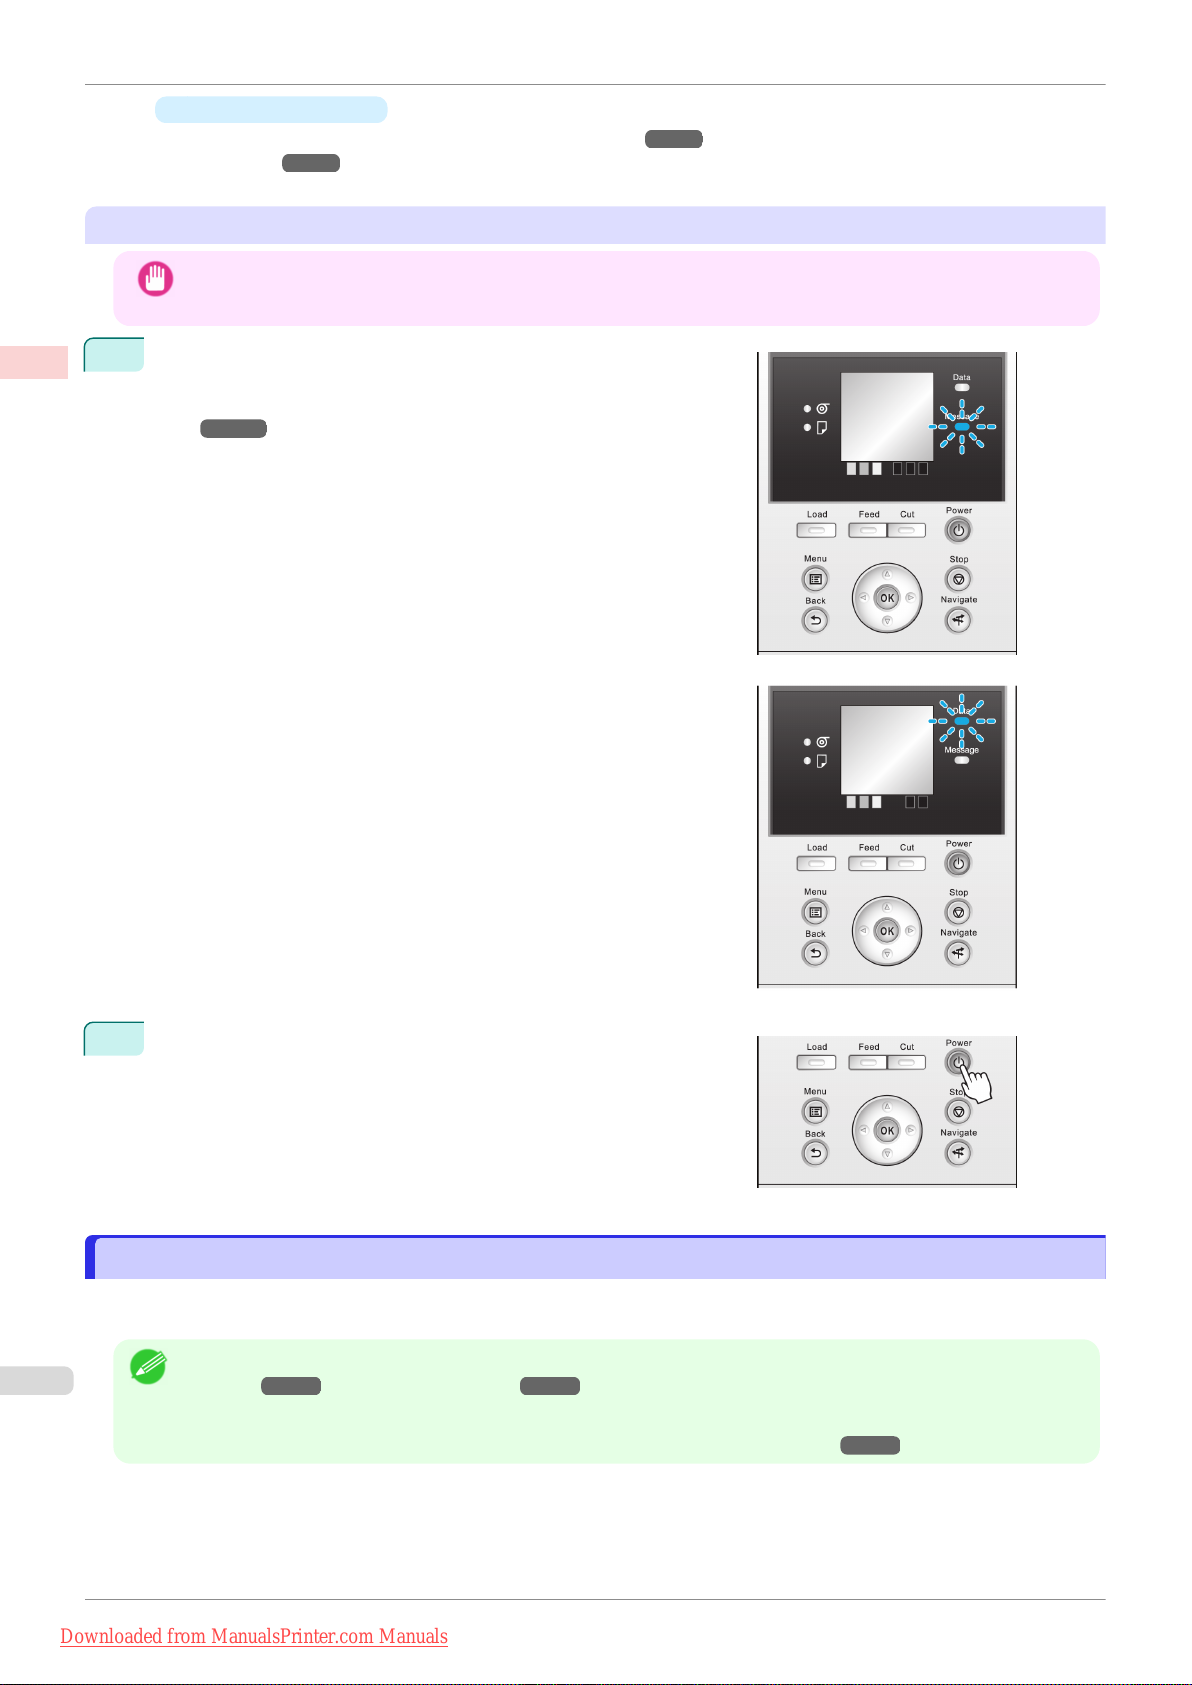
Loading and Printing on Rolls
•
No paper is loaded
Load paper. (See "Loading and Printing on Rolls.") ➔P.16 (See "Loading and Printing on
Basic Printing Workflow Printing procedure
Sheets.") ➔ P.18
Turning the printer off
•
Never disconnect the printer's power supply or unplug it during a print job. This may damage the printer.
Important
Make sure no print jobs are in progress.
1
If the Message Lamp is flashing, check the message on the Display Screen and take action as necessary. (See "Error Messag-
es.") ➔ P.556
iPF670
If the Data Lamp is flashing, the printer is receiving a print job.
Turn off the printer only after printing is finished.
Hold down the Power button for more than a second.
2
After "Shut Down.. Please Wait.." is shown on the Display
Screen, the printer shuts off.
Loading and Printing on Rolls
Loading and Printing on Rolls
These are the basic steps for loading and printing on rolls.
Follow these steps to load and print on rolls.
For details on supported sizes and types of rolls, see Paper Sizes or the Paper Reference Guide. (See "Paper
•
Note
User's Guide
Downloaded from ManualsPrinter.com Manuals
Sizes.") ➔P.310 (See "Types of Paper.") ➔P.310
•
If you prefer to wait for the ink to dry after printing and simply eject the document, you can deactivate automatic
cutting and cut the paper manually. (See "Specifying the Cutting Method for Rolls.") ➔P.333
Page 17
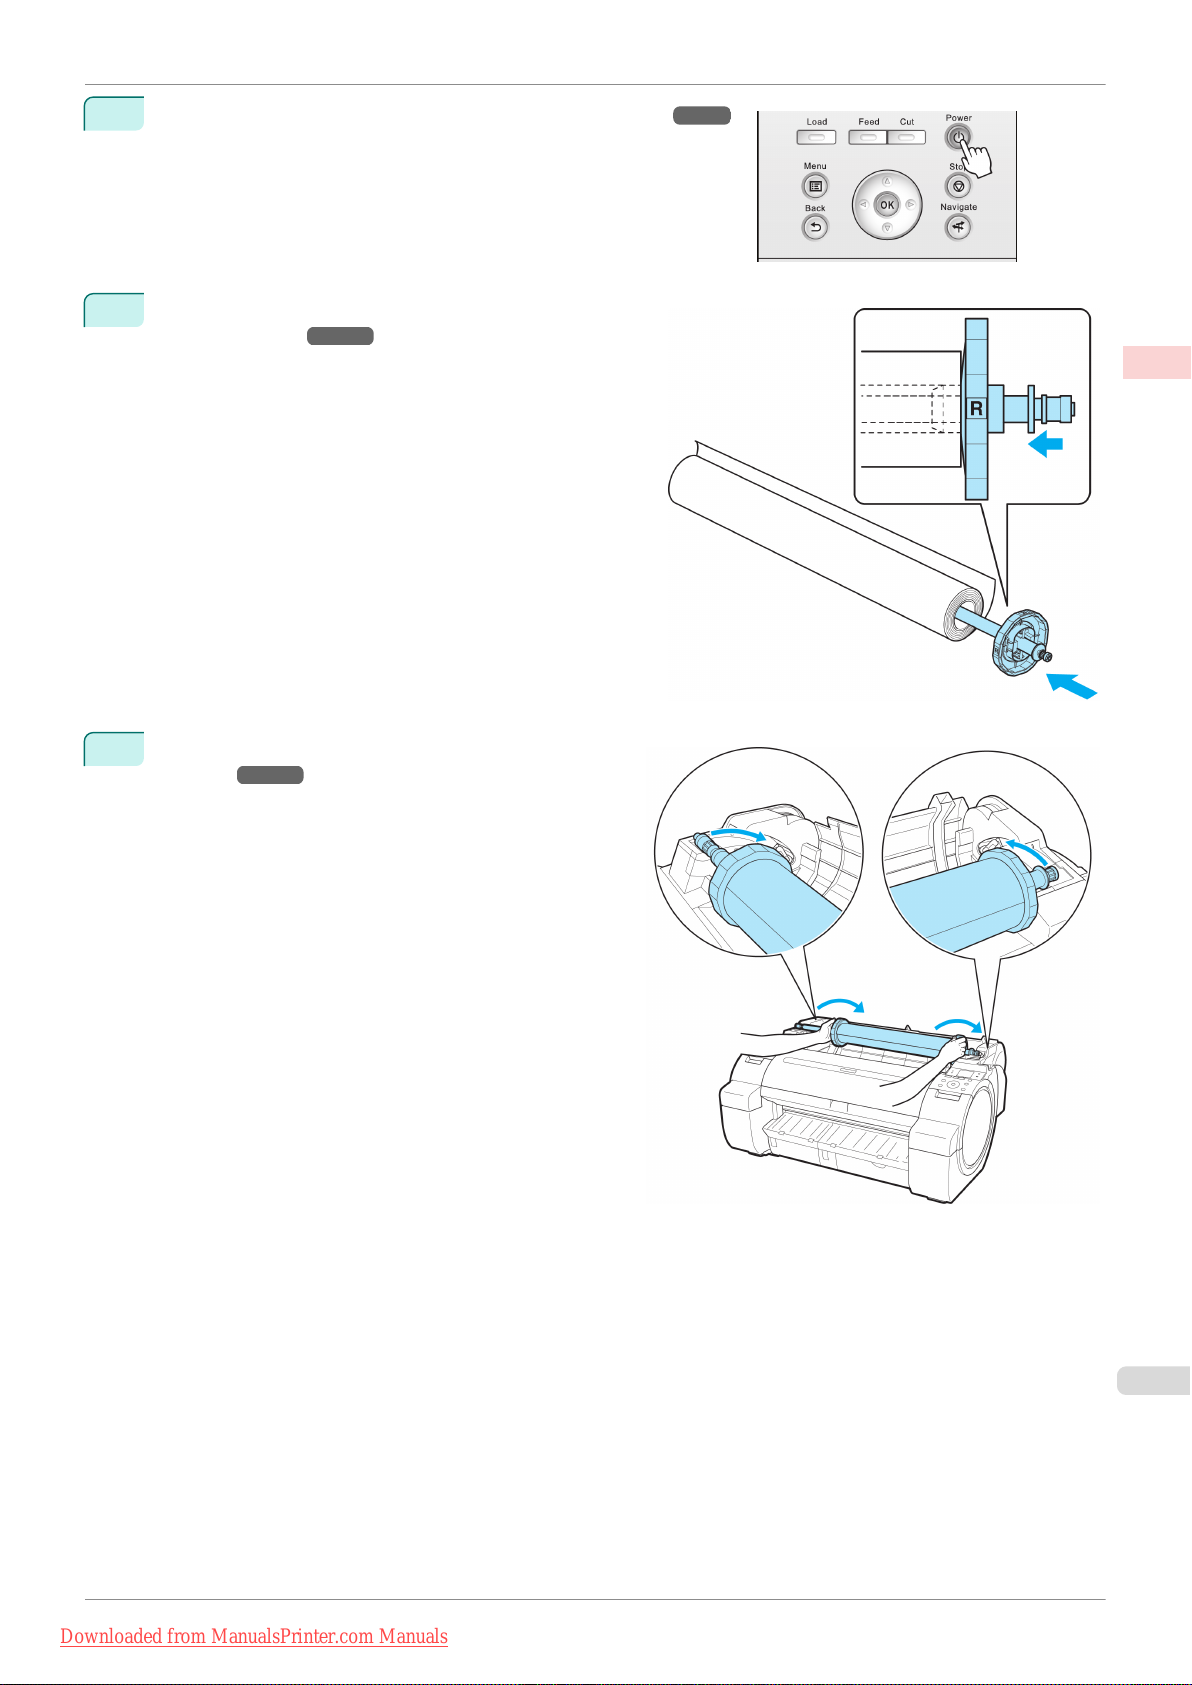
iPF670
Loading and Printing on Rolls
Turn the printer on. (See "Turning the Printer On and Off.") ➔ P.15
1
Load the roll on the Roll Holder. (See "Attaching the Roll
2
Holder to Rolls.")
➔P.320
Basic Printing Workflow Printing procedure
Load the roll in the printer. (See "Loading Rolls in the
3
Printer.")
➔P.322
User's Guide
Downloaded from ManualsPrinter.com Manuals
17
Page 18
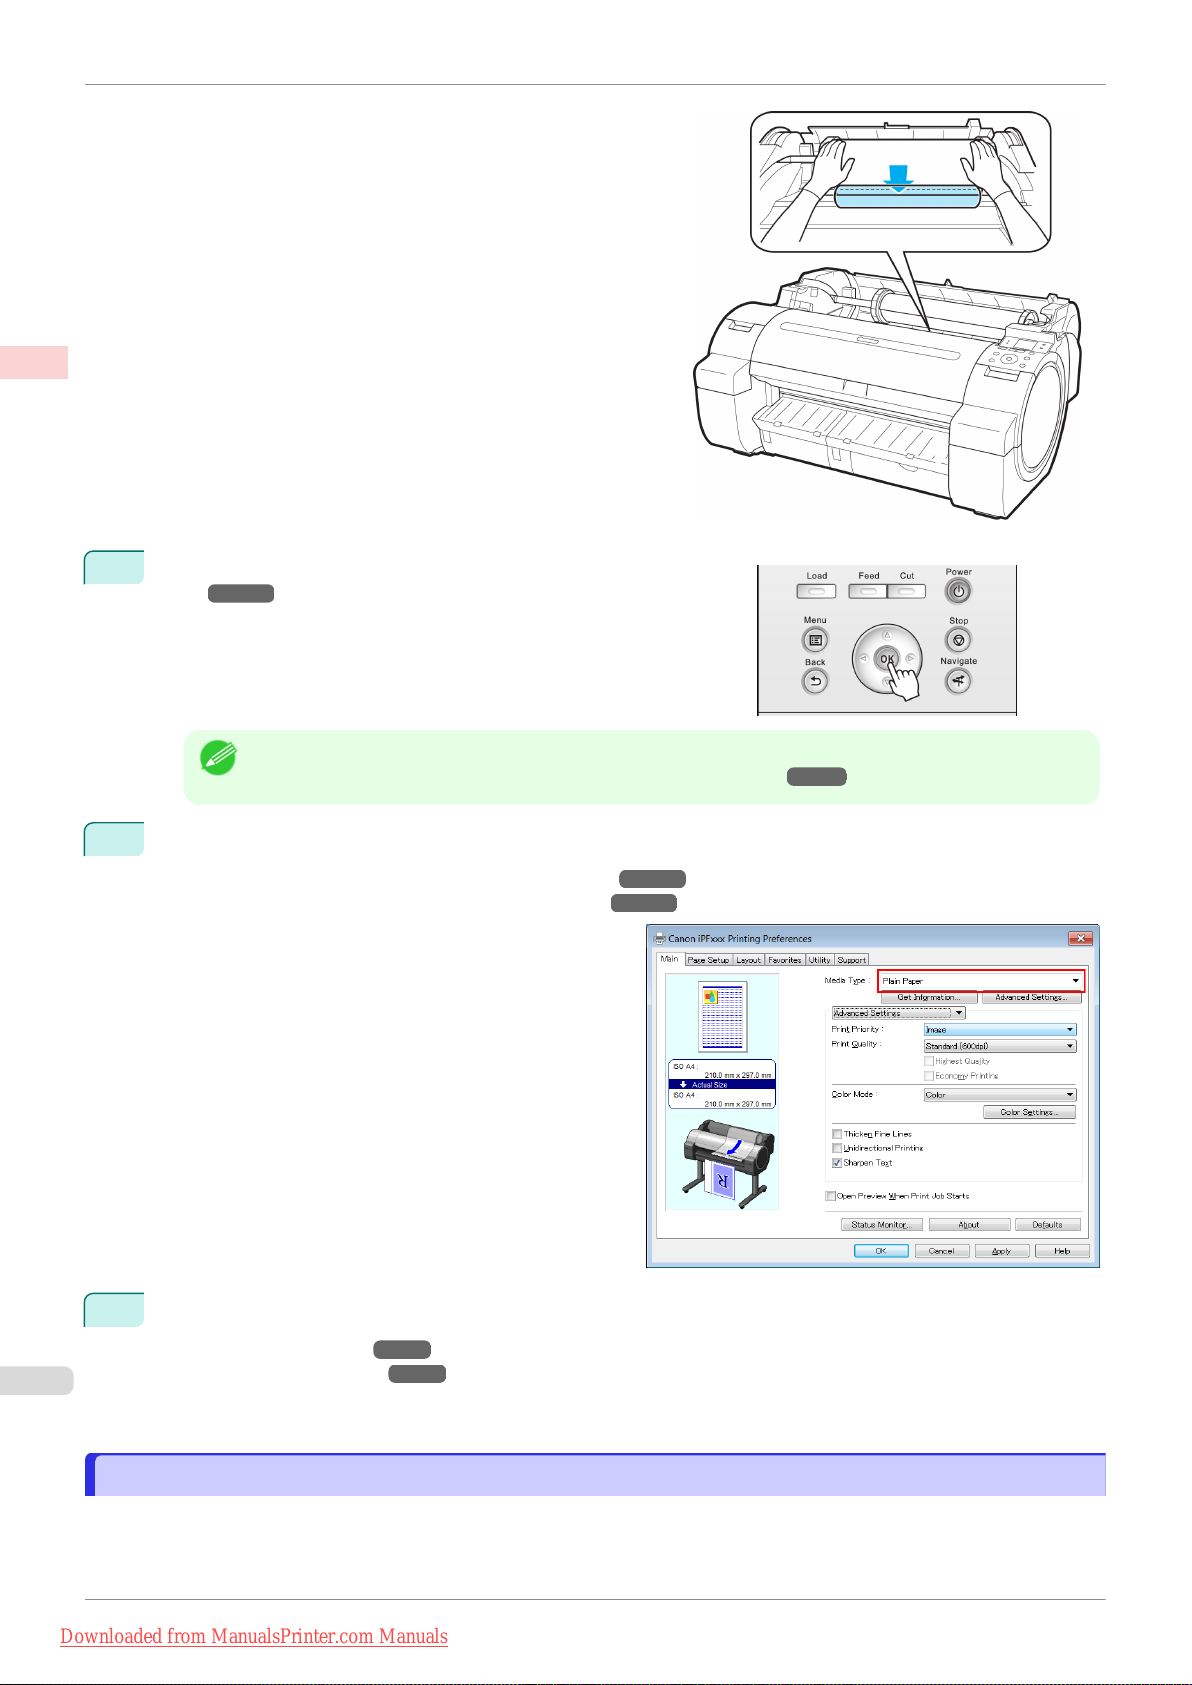
Loading and Printing on Sheets
Basic Printing Workflow Printing procedure
Select the type of paper. (See "Changing the Type of Pa-
4
per.") ➔ P.325
iPF670
•
If no barcode has been printed on the roll and you have set ManageRemainRoll to On, specify the roll
Note
5
Complete settings in the printer driver for the type of paper and other details.
•
Specifying Paper in the Printer Driver (Windows) ➔ P.142
•
Specifying Paper in the Printer Driver (Mac OS) ➔ P.249
length after the type of paper. (See "Specifying the Paper Length.") ➔P.326
6
Send the print job.
•
Printing in Windows ➔ P.20
•
Printing from Mac OS ➔ P.21
The printer now starts printing the print job.
Loading and Printing on Sheets
Loading and Printing on Sheets
These are the basic steps for loading sheets and then printing.
Follow the steps below to load and print on sheets.
User's Guide
Downloaded from ManualsPrinter.com Manuals
Page 19
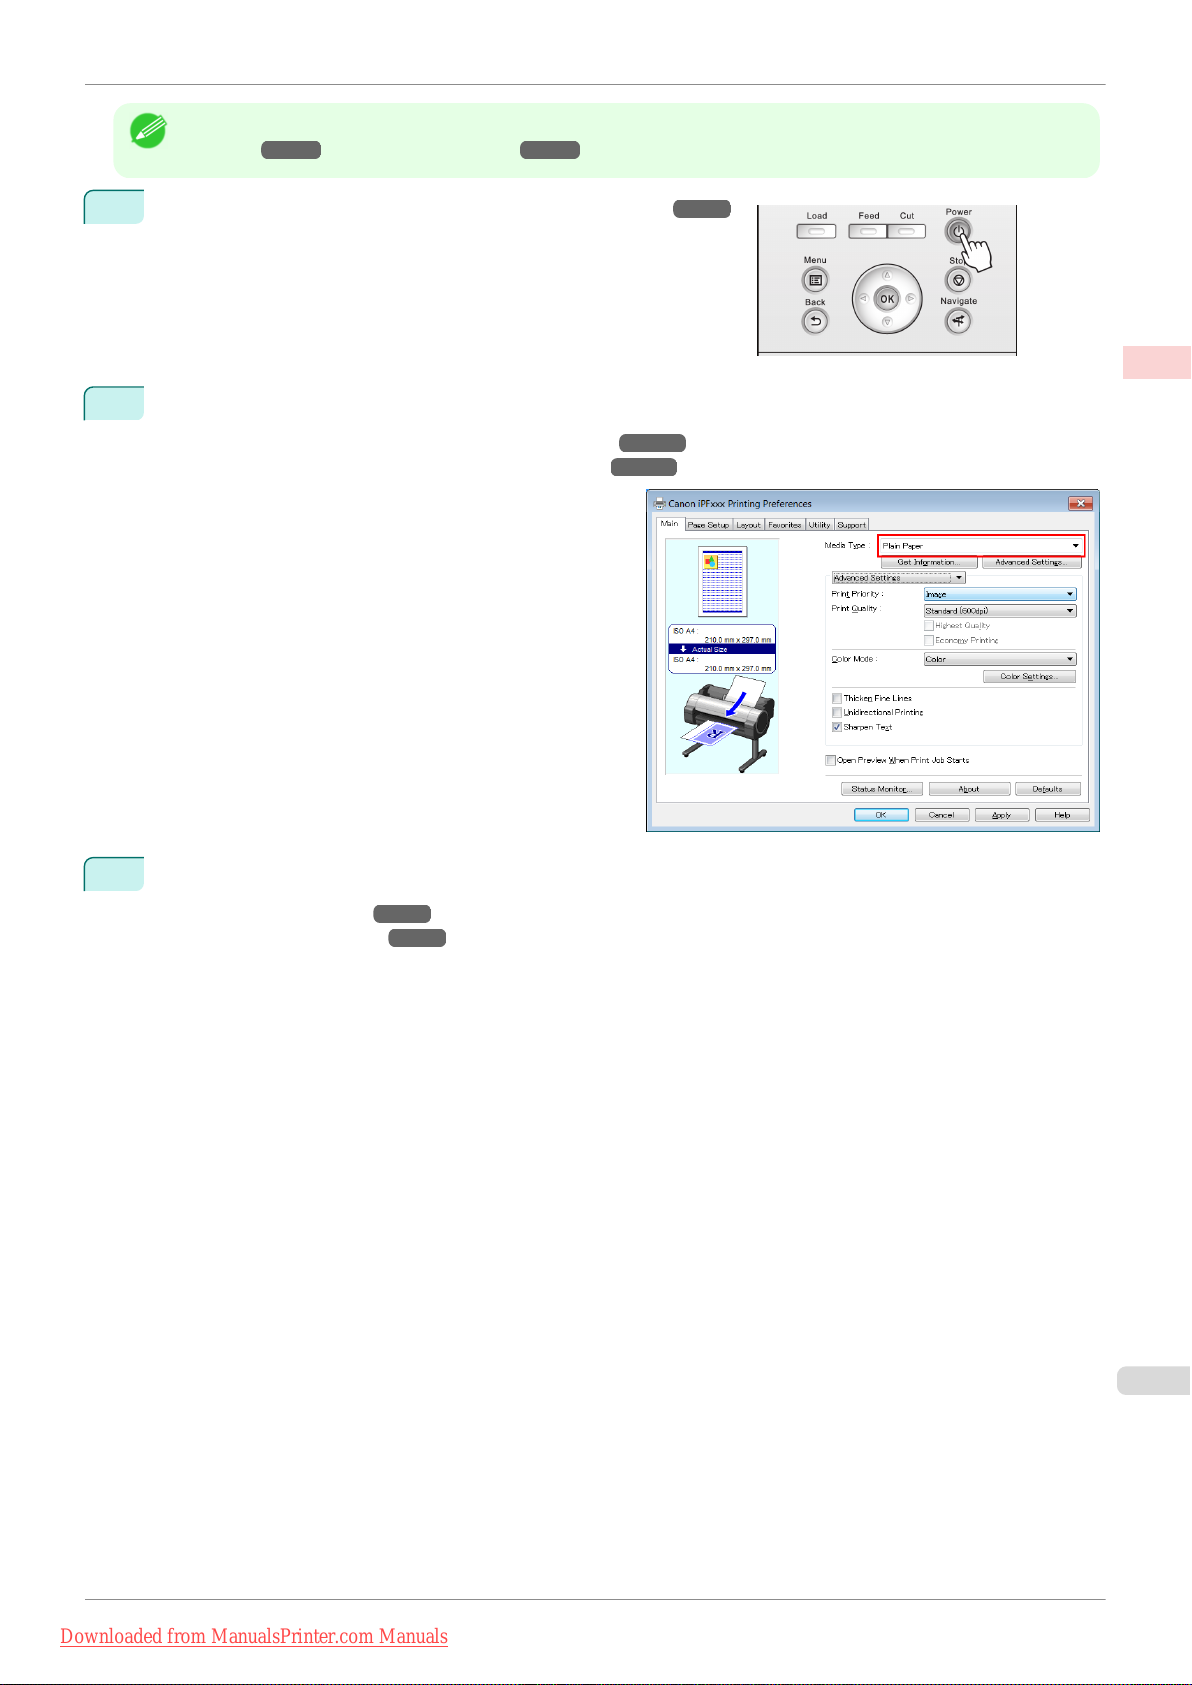
iPF670
Loading and Printing on Sheets
•
For details on supported types and sizes of paper, see Paper Sizes or the Paper Reference Guide. (See "Paper
Note
1
Sizes.") ➔P.310 (See "Types of Paper.") ➔P.310
Turn the printer on. (See "Turning the Printer On and Off.") ➔ P.15
Basic Printing Workflow Printing procedure
2
Complete settings in the printer driver for the type of paper and other details.
•
Specifying Paper in the Printer Driver (Windows) ➔ P.142
•
Specifying Paper in the Printer Driver (Mac OS) ➔ P.249
3
Send the print job.
•
Printing in Windows ➔ P.20
•
Printing from Mac OS ➔ P.21
User's Guide
Downloaded from ManualsPrinter.com Manuals
19
Page 20
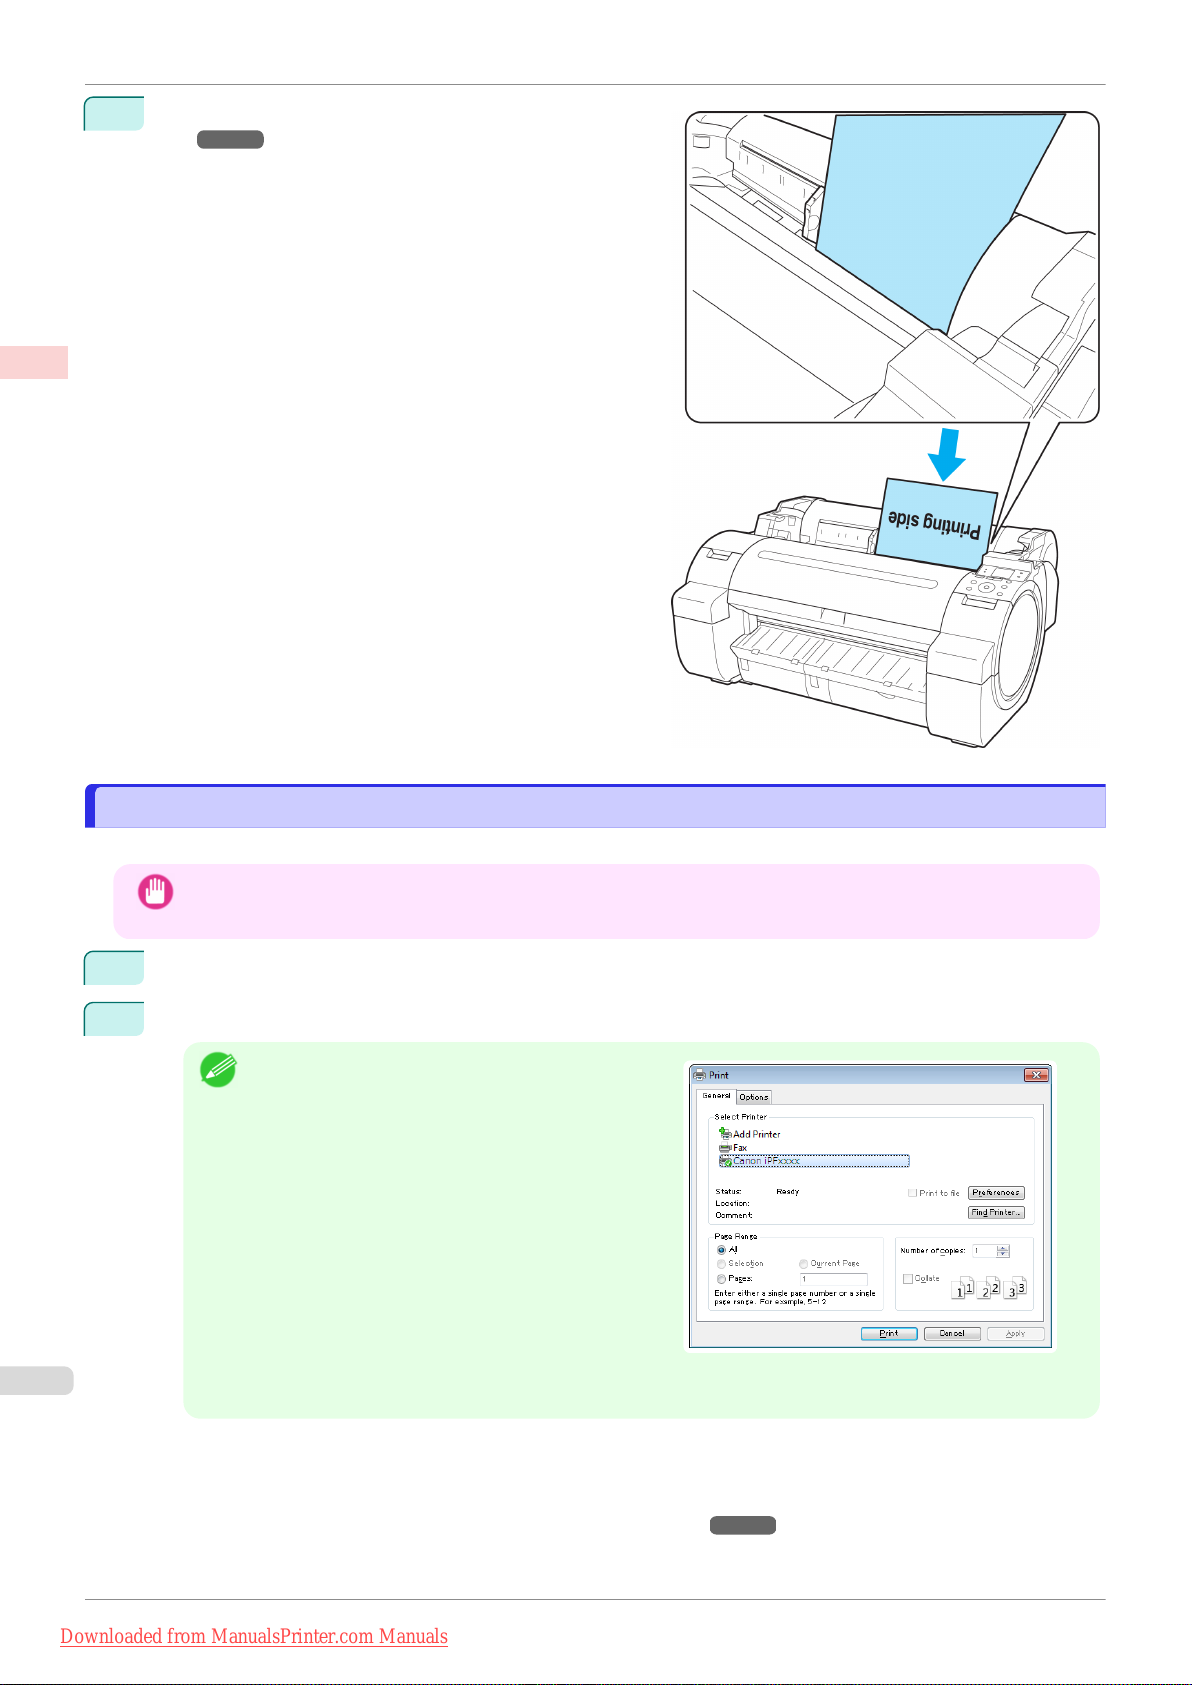
Printing in Windows
Load the sheet. (See "Loading Sheets in the Print-
4
er.") ➔ P.340
Basic Printing Workflow Printing procedure
The printer now starts printing the print job.
iPF670
Printing in Windows
Printing in Windows
Print from the application menu.
We recommend exiting unnecessary applications before printing. Running several applications while printing may
•
Important
1
2
interrupt the transfer of print data and affect printing quality.
In the source application, select Print from the File menu to display the dialog box for printing conditions.
After confirming that the printer is selected in the dialog box, click Print or OK to start printing.
The appearance of the dialog box varies depending
•
Note
on the software application. In most cases, the dialog box includes basic printing options and enables
you to choose the printer, specify the range of pages, number of copies, and so on.
Example: Print dialog box displayed by the application
•
If another printer is selected, select the printer you want to use under Select Printer or in the dialog box
displayed after clicking Printer.
Settings for many printing methods (including enlarged or reduced printing, borderless printing, and so on) are displayed in the printer driver dialog box. There are two ways to access the printer driver dialog box, as follows.
•
From the application
(See "Accessing the Printer Driver Dialog Box from Applications .") ➔ P.146
•
From the operating system menu
User's Guide
Downloaded from ManualsPrinter.com Manuals
Page 21
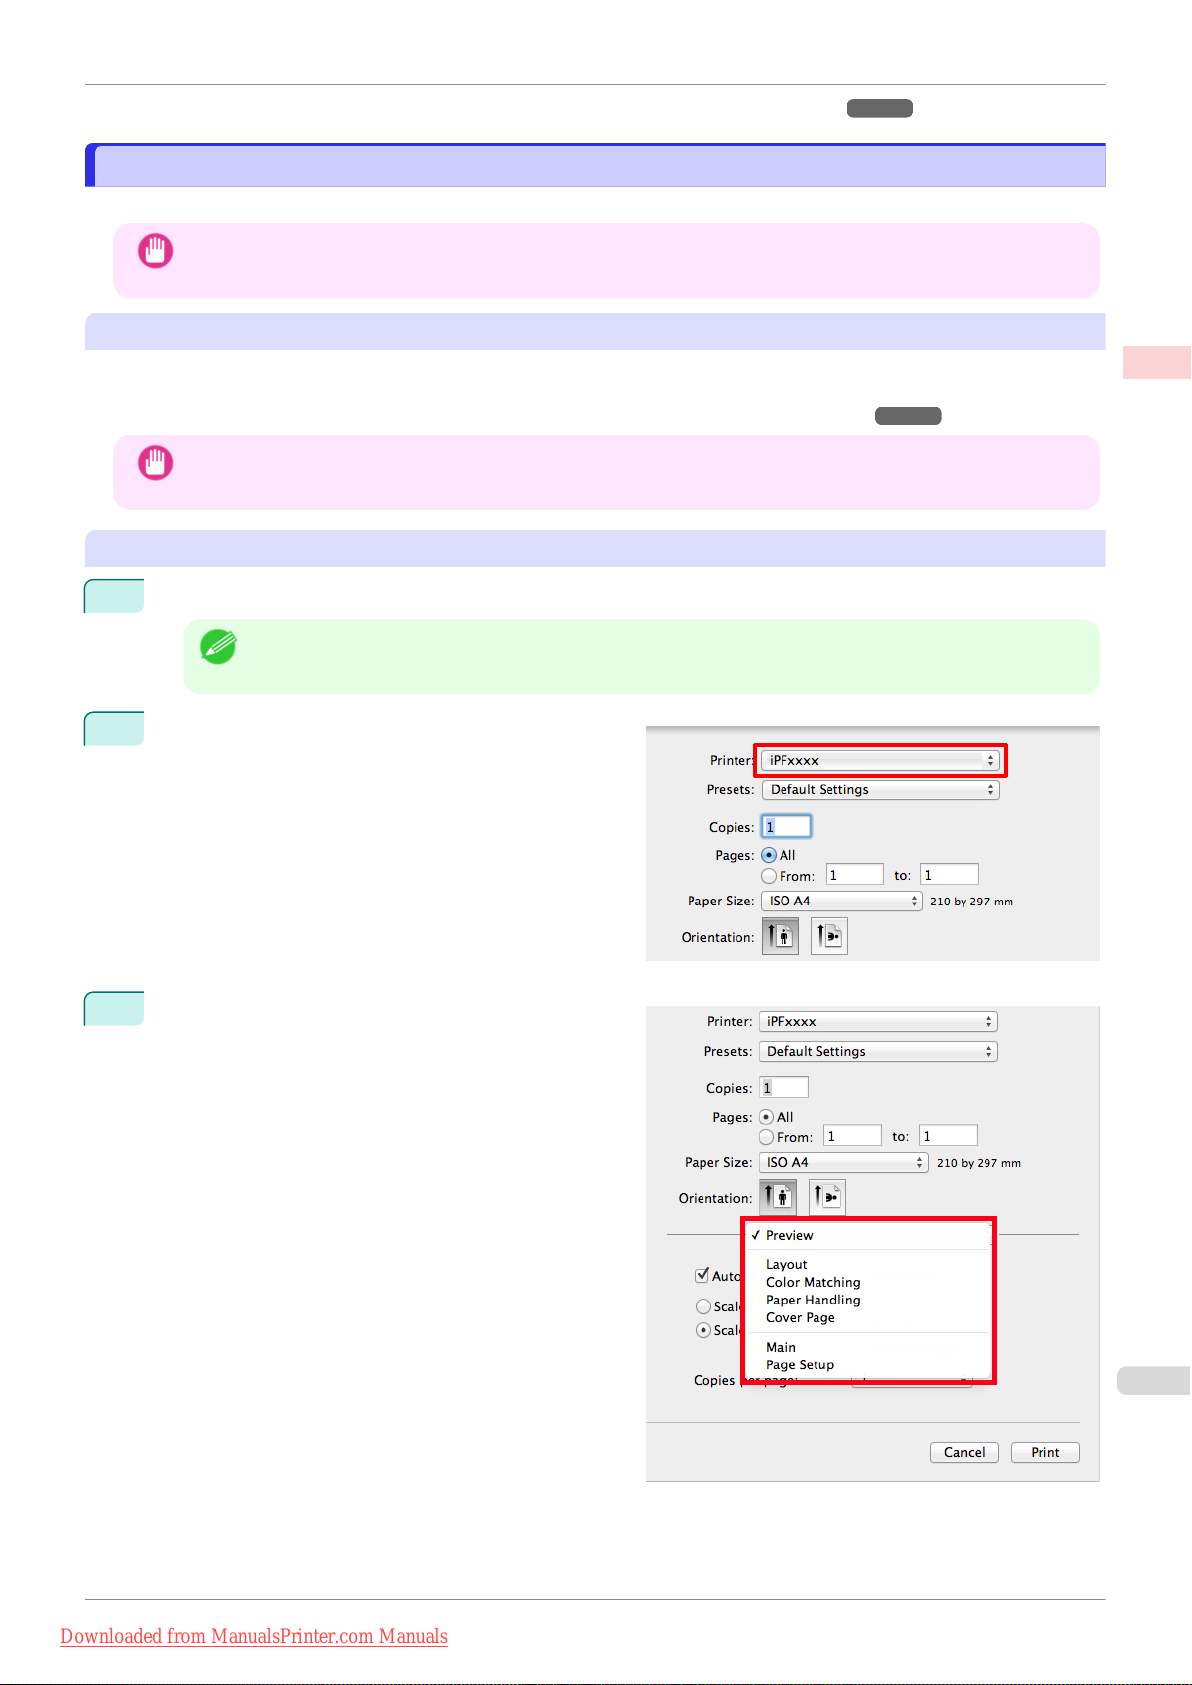
iPF670
Printing from Mac OS
(See "Accessing the Printer Driver Dialog Box from the Operating System Menu .") ➔ P.147
Printing from Mac OS
Printing from Mac OS
Print from the application menu after registering the printer.
•
We recommend exiting unnecessary applications before printing. Running several applications while printing may
Important
interrupt the transfer of print data and affect printing quality.
Registering the printer
The printer needs to be registered in Print & Scan (identified as Printers & Scanners or Print & Fax in other versions of Mac OS X) in System Preferences before printing.
For instructions on registering the printer, see "Configuring the Printer Driver Destination ." ➔P.449
•
During this setup process, the printer will not be listed among available printers if it is off or disconnected.
Important
Printing from the application software
1
In the application software, select Print from the File menu to display the dialog box for printing conditions.
•
This dialog box includes basic printing options and enables you to choose the printer, specify the range of
Note
Select the printer in the Printer list.
2
pages, number of copies, and so on.
Basic Printing Workflow Printing procedure
Click Print to start printing.
3
As shown in the following illustration, you can switch
to other panes in this dialog box to complete settings
for various methods of printing, including enlarged
and reduced printing, borderless printing, and so on.
21
User's Guide
Downloaded from ManualsPrinter.com Manuals
Page 22
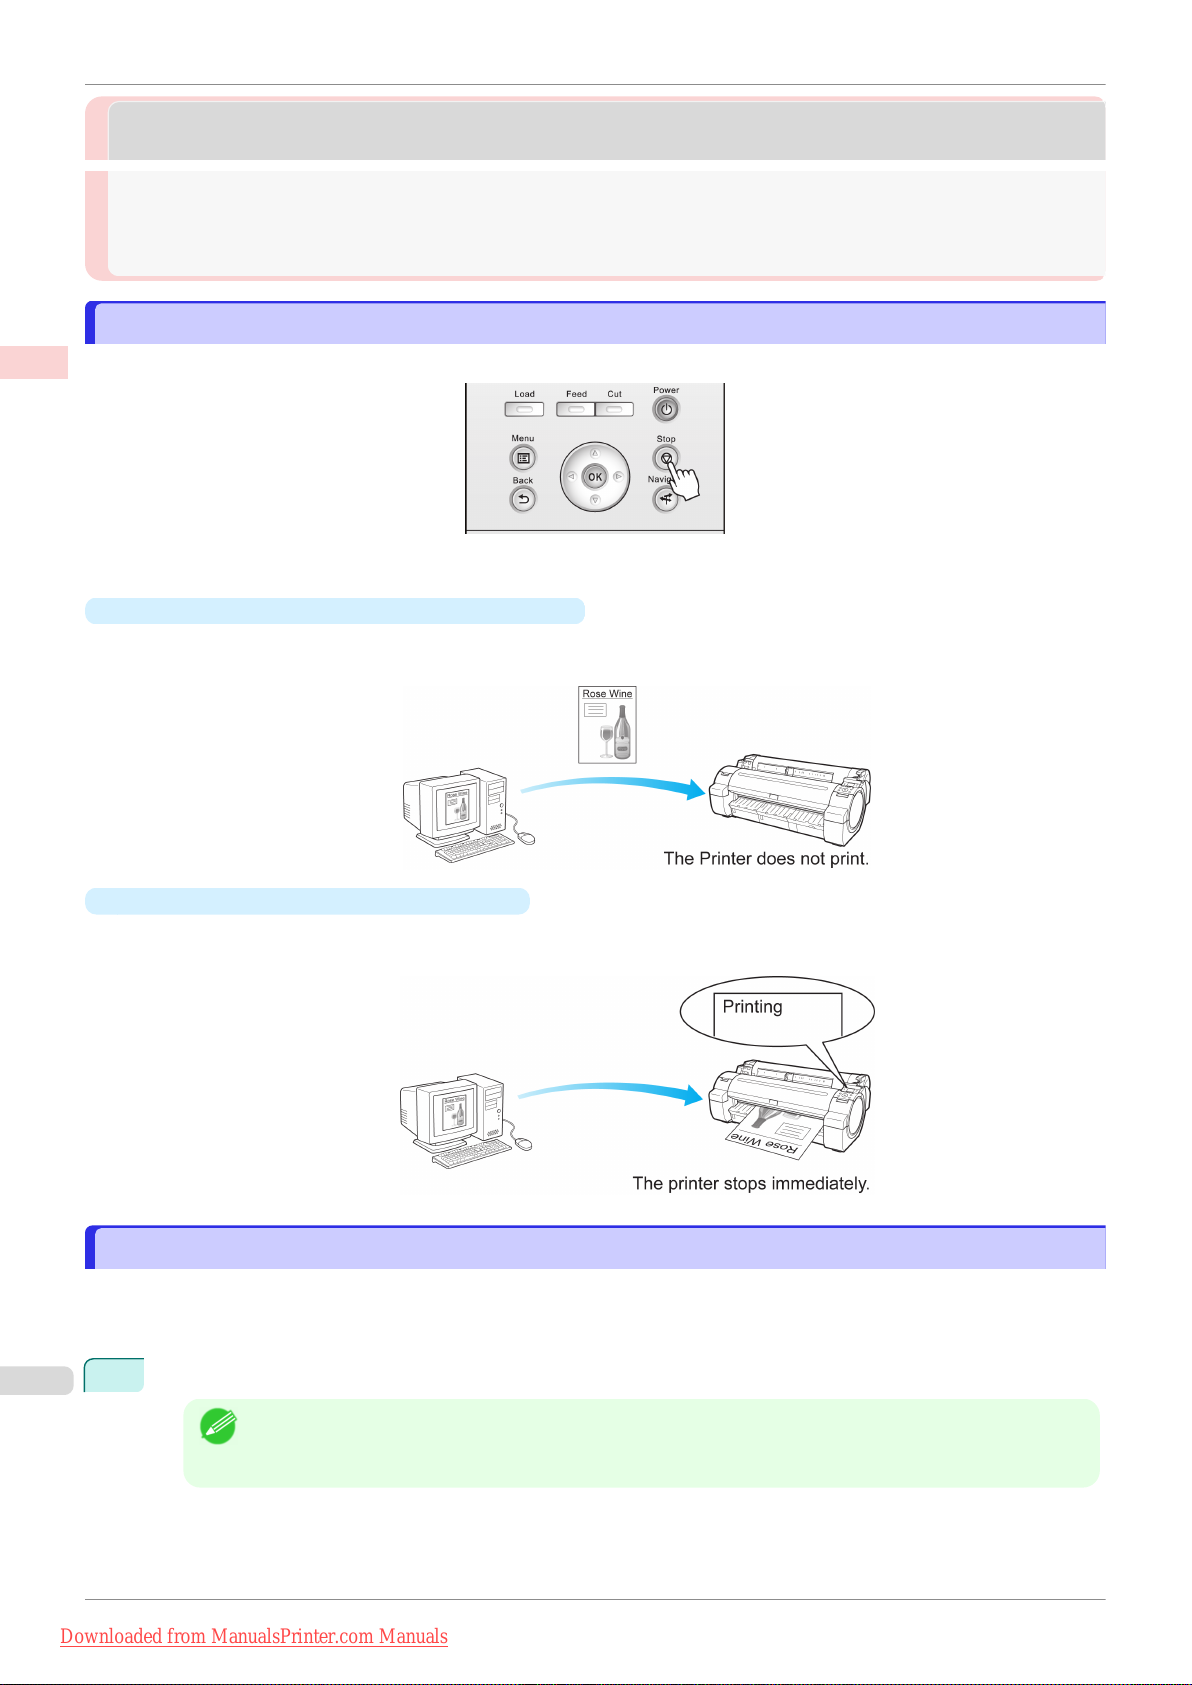
Canceling Print Jobs from the Control Panel
Canceling print jobs
Canceling print jobs
Basic Printing Workflow Canceling print jobs
Canceling Print Jobs from the Control Panel .................................................................................................... 22
Canceling Print Jobs from Windows ................................................................................................................. 22
Canceling Print Jobs from Mac OS ................................................................................................................... 23
Canceling Print Jobs from the Control Panel
Canceling Print Jobs from the Control Panel
To cancel printing or reception of print jobs, press the Stop button on the Control Panel.
When you press the Stop button during printing, printer operation varies depending on the current status.
If you press the Stop button before printing starts
•
Pressing the Stop button before printing starts will display a confirmation message. To cancel the print job,
select Yes.
iPF670
•
If you press the Stop button during printing
Pressing the Stop button during printing will display a confirmation message. To cancel the print job immedi-
ately, select Yes.
Canceling Print Jobs from Windows
Canceling Print Jobs from Windows
In the printer window, you can cancel jobs that are being sent to the printer.
Using imagePROGRAF Status Monitor, you can cancel print jobs that have already been received by the printer
or that are currently being printed.
1
Click the printer icon in the taskbar to display the printer window.
You can proceed from the folder for configuring the printer settings in the OS you are using.
•
Note
For example, in Windows 7, open the Devices and Printers window from the start menu and doubleclick the printer icon.
User's Guide
Downloaded from ManualsPrinter.com Manuals
Page 23
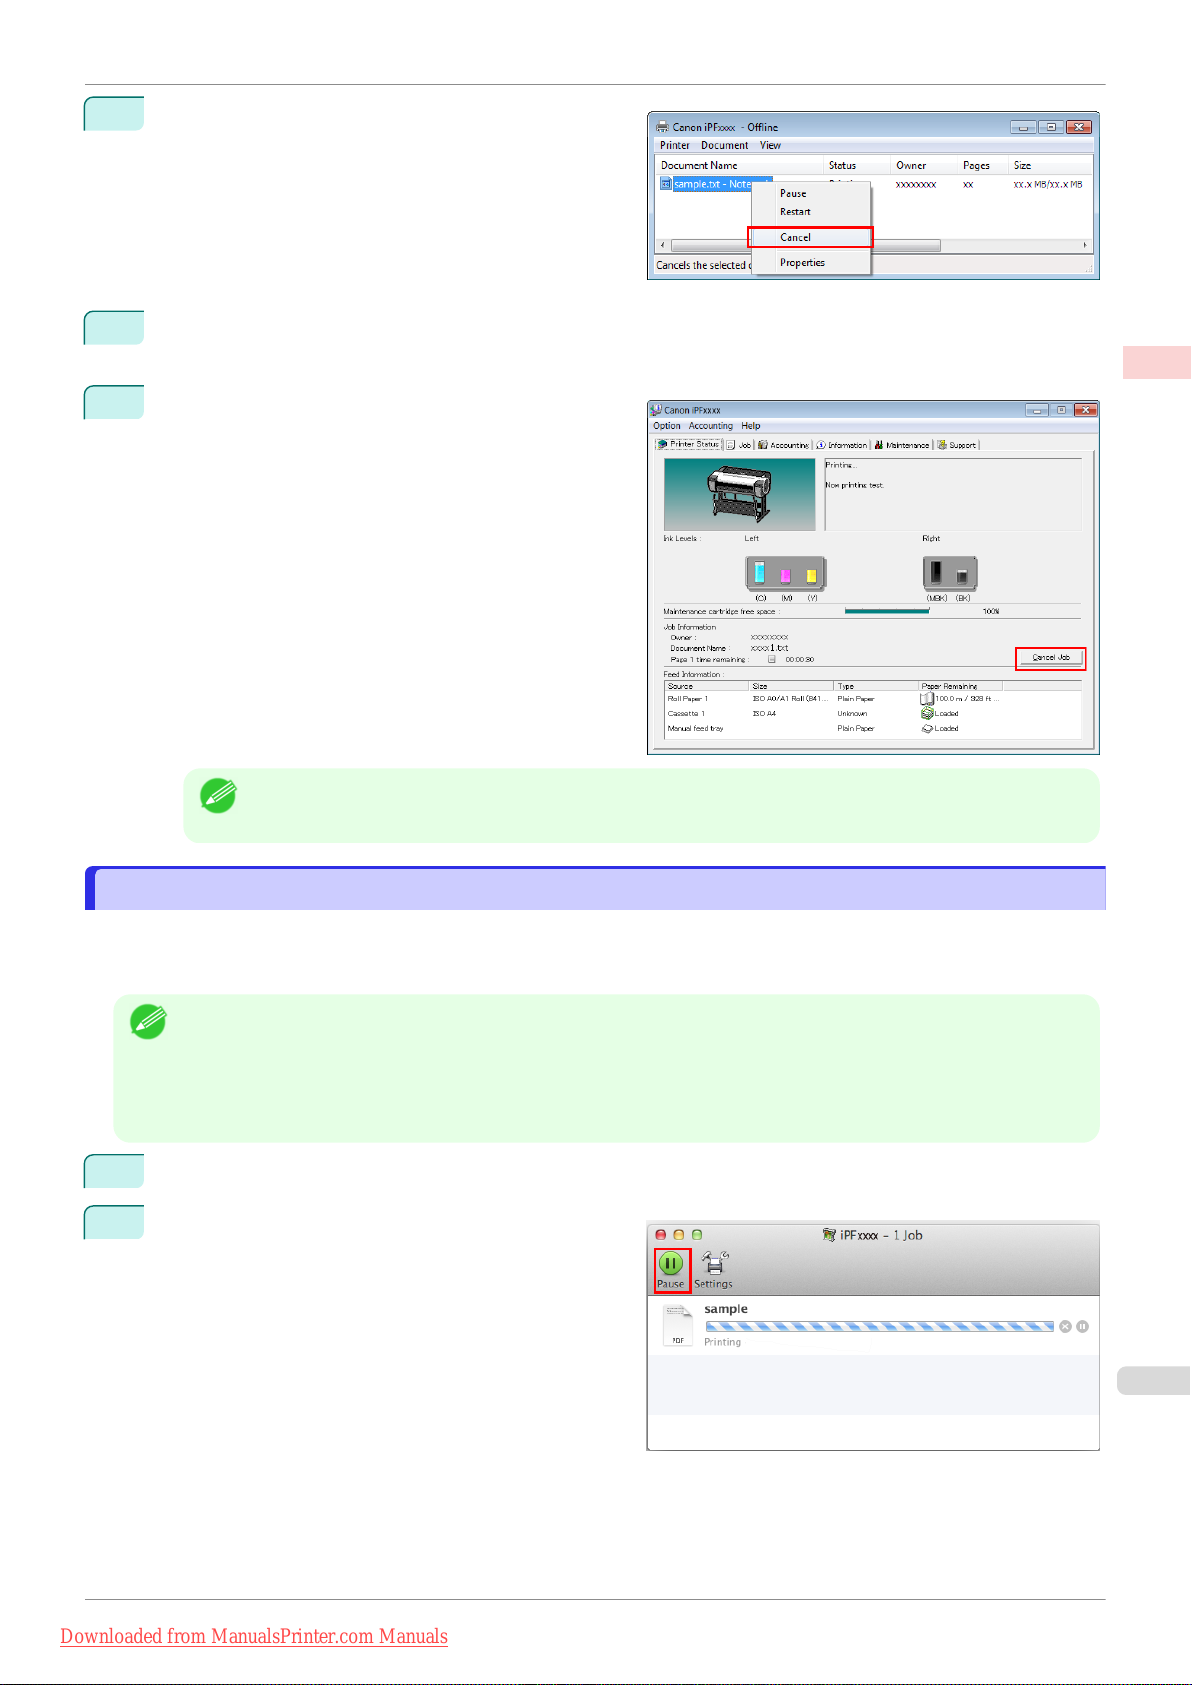
iPF670
Canceling Print Jobs from Mac OS
Right-click the job to cancel and select Cancel.
2
3
If the job to cancel is not shown in the printer window (that is, if the print data has already been received by
the printer), double-click the taskbar icon to display imagePROGRAF Status Monitor.
On the Printer Status sheet, click Cancel Job.
4
Basic Printing Workflow Canceling print jobs
•
The screen may differ slightly depending on the model you are using.
Note
Canceling Print Jobs from Mac OS
Canceling Print Jobs from Mac OS
In the printer window, you can cancel jobs that are being sent to the printer.
Otherwise, you can cancel jobs from imagePROGRAF Printmonitor if they have been received by the printer or are
currently being printed.
Print jobs are shown in the printer window while they are being sent from the computer. After transmission, jobs are
•
Note
1
2
not displayed even during printing.
•
Print jobs are displayed in the imagePROGRAF Printmonitor window from the moment the printer starts receiving
the print data until the moment printing is finished. They are not displayed before print data is sent to the printer,
even if the computer has started preparing the print data.
Click the printer icon in the Dock to display the printer window.
Click Pause or Pause Printer to pause printing.
User's Guide
Downloaded from ManualsPrinter.com Manuals
23
Page 24
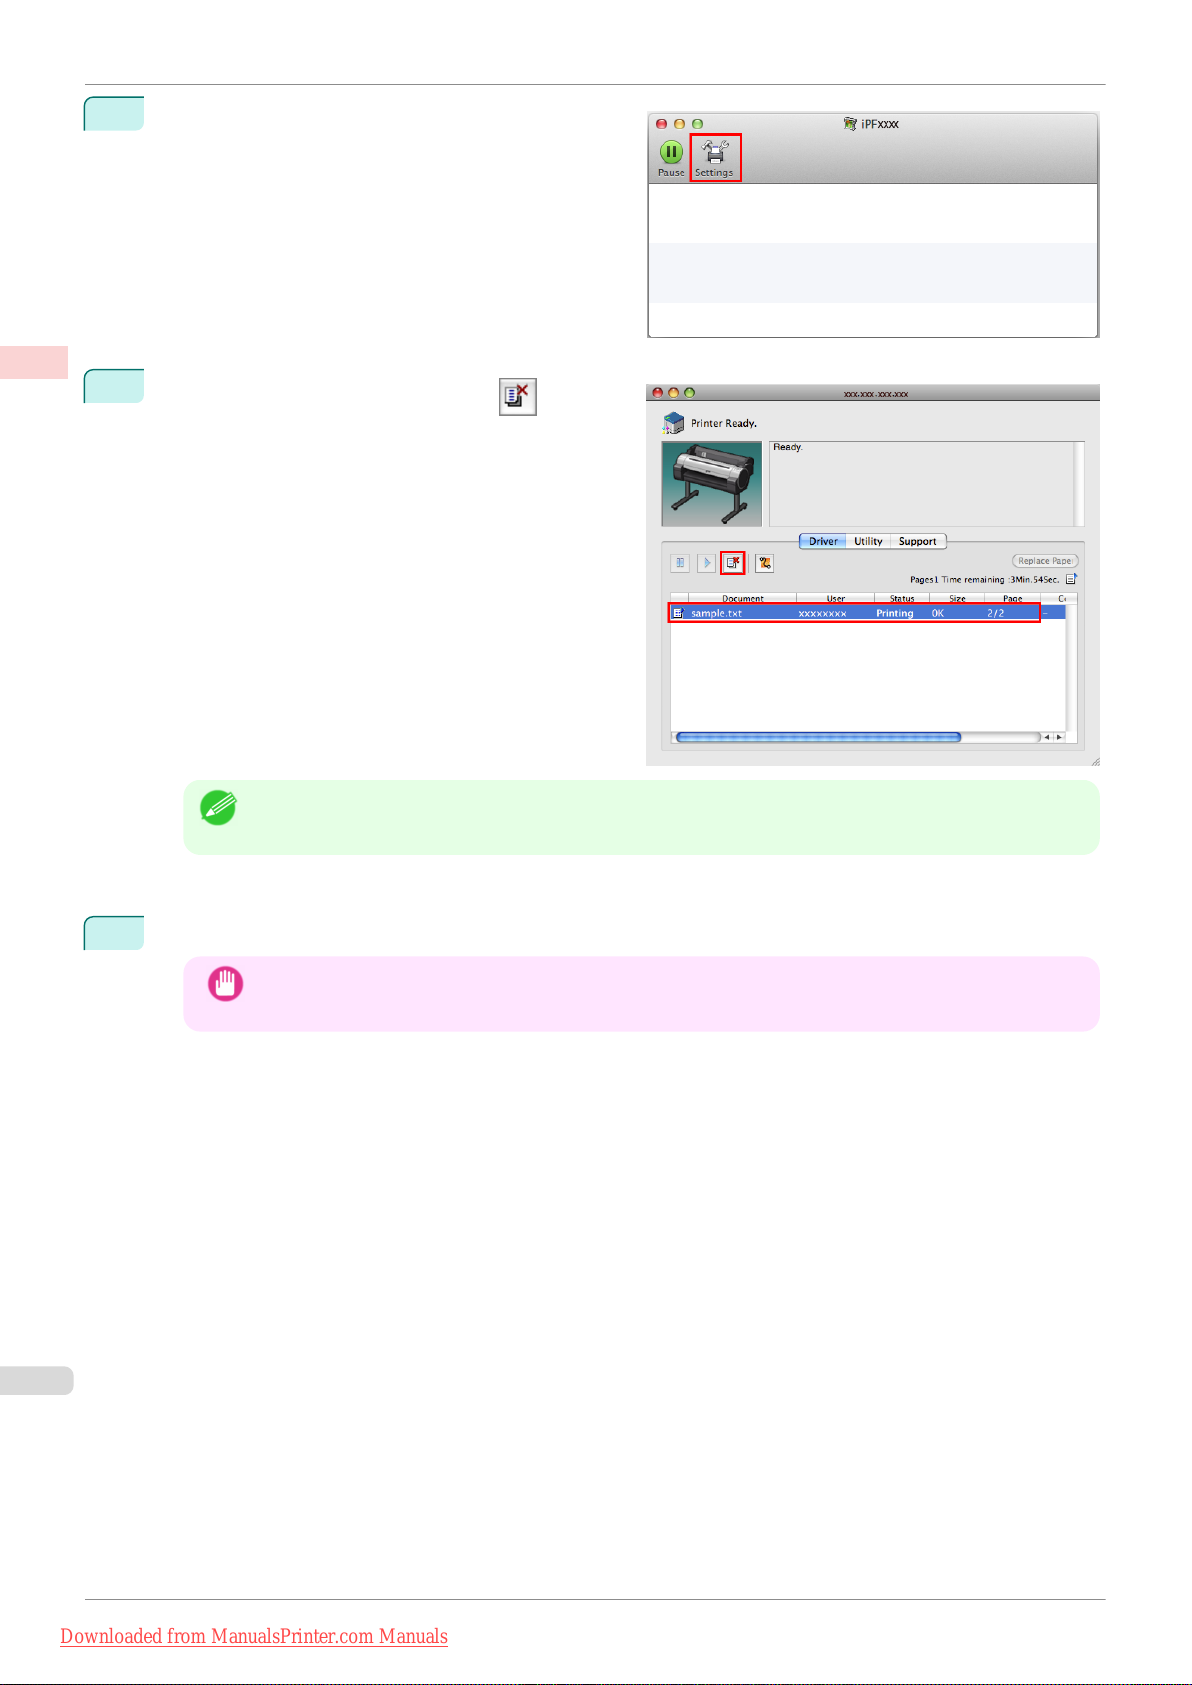
Canceling Print Jobs from Mac OS
If there are no jobs to stop in the printer window (if
3
sending the print data to the printer has finished), ei-
Basic Printing Workflow Canceling print jobs
ther click Settings, Utility, and then Open Printer
Utility, or click Utility to open the imagePROGRAF
Printmonitor.
4
Select the print job to cancel and click to delete
the print job.
iPF670
•
The screen may differ slightly depending on the model you are using.
Note
The job sent to the printer is canceled.
5
Exit imagePROGRAF Printmonitor. In the printer window, click Resume Printer.
Always follow these steps if you cancel print jobs from imagePROGRAF Printmonitor. If you do not re-
•
Important
start job processing, the next job cannot be printed.
User's Guide
Downloaded from ManualsPrinter.com Manuals
Page 25

iPF670
Pausing Printing
Pausing Printing
Pausing Printing
Pausing Printing
Pausing Printing
During printing, if you set Pause Print in the Control Panel menu to On, printing is stopped at that point and the
printer enters a state in which printing is paused. (See "Control Panel Display.") ➔ P.400
Printing from the job queue is not possible in this state.
To restore normal operation after this state, set Pause Print to Off.
•
In the following cases, the status is cleared even if you do not set Pause Print to Off, and printing from the job
Note
1
queue resumes.
•
When paper is advanced
•
When you execute Chg. Paper Type in the Paper Menu
During printing, on the Tab Selection screen of the Control Panel,
press ◀ or ▶ to select the Job tab ( ).
Basic Printing Workflow Pausing Printing
•
If the Tab Selection screen is not displayed, press the Menu button.
Note
2
Press the
The Job Menu is displayed.
3
Press ▲ or ▼ to select Pause Print, and then press the OK button.
4
Press ▲ or ▼ to select On or Off, and then press the OK button.
OK button.
User's Guide
Downloaded from ManualsPrinter.com Manuals
25
Page 26

iPF670
User's Guide
Downloaded from ManualsPrinter.com Manuals
Page 27

iPF670
User's Guide
Enhanced Printing Options
Basic Printing Workflow 13
Enhanced Printing Options
Choosing Paper for Printing ................................................................ 28
Printing Photos and Office Documents ............................................... 29
Printing CAD Drawings ........................................................................ 38
Adjusting Images ................................................................................. 46
Printing enlargements or reductions .................................................... 58
Printing at full size ............................................................................... 68
Borderless Printing .............................................................................. 77
Printing banners or at other non-standard sizes ................................. 86
Tiling and multiple pages per sheet ..................................................... 99
Centering originals ............................................................................. 113
Conserving roll paper ........................................................................ 121
Checking Images Before Printing ...................................................... 128
Other useful settings .......................................................................... 129
Windows Software 139
Mac OS Software 247
Handling and Use of Paper 309
Control Panel 397
Printer Parts 431
Network Setting 441
Print Job Management 461
Adjustments for Better Print Quality 479
Maintenance and Consumables 495
Troubleshooting 527
Error Message 555
Specifications 575
Appendix 579
imagePROGRAF
27
Downloaded from ManualsPrinter.com Manuals
Page 28

Choosing a Paper for Printing
Choosing Paper for Printing
Choosing Paper for Printing
iPF670
Enhanced Printing Options Choosing Paper for Printing
Choosing a Paper for Printing ........................................................................................................................... 28
➔ Changing the Type of Paper ................................................................................................................ 325
Specifying Paper in the Printer Driver ................................................................................................................ 28
➔ Specifying Paper in the Printer Driver (Windows) ................................................................................. 142
➔ Specifying Paper in the Printer Driver (Mac OS) ................................................................................... 249
Choosing a Paper for Printing
Choosing a Paper for Printing
Select the appropriate media type from the printer control panel or printer driver to match the paper loaded in the
printer. The appropriate media type differs between the case of genuine Canon paper or Canon feed confirmed paper and the case of paper other than Canon feed confirmed paper. Select the media type by following the description below.
For information on how to select the media type in the printer control panel, see Changing the Type of Pa-
per
➔P.325 , and for information on how to select the media type in the printer driver, see Specifying Paper in the
Printer Driver (Windows) ➔ P.142 or Specifying Paper in the Printer Driver (Mac OS) ➔ P.249 .
•
If you use paper other than Canon feed confirmed paper, Canon provides absolutely no guarantees regarding
Important
Note
print quality or paper feed properties.
•
Genuine Canon paper and Canon feed confirmed paper are detailed in Paper Reference Guide.
•
An error message is displayed on the printer Control Panel if the media type specified in the printer driver does not
match the media type specified in the printer. Although you can print under these conditions, the printing results
may not be suitable.
Genuine Canon paper or Canon feed confirmed paper
•
For genuine Canon paper or Canon feed confirmed paper, select the settings that are optimized for that type of
paper. For more information on the settings for genuine Canon paper or Canon feed confirmed paper, see
"Displaying the Paper Reference Guide." ➔ P.313
•
Paper other than Canon feed confirmed paper
For paper other than Canon feed confirmed paper, printing can be performed easily by selecting the existing
settings provided by the printer control panel or printer driver. For details, see "Using Paper Other Than Genu-
ine Paper and feed confirmed Paper." ➔ P.312
Specifying Paper in the Printer Driver
Specifying Paper in the Printer Driver
If you replace the paper, complete the printer driver settings for the paper type and size.
For instructions on configuring paper settings in the printer driver, refer to the following topics, as appropriate for
your computer and operating system.
•
Specifying Paper in the Printer Driver (Windows) ➔ P.142
•
Specifying Paper in the Printer Driver (Mac OS) ➔ P.249
User's Guide
Downloaded from ManualsPrinter.com Manuals
Page 29

iPF670
Printing Photos and Images
Printing Photos and Office Documents
Printing Photos and Office Documents
Printing Photos and Images ............................................................................................................................. 29
Printing Photos and Images (Windows) ....................................................................................................... 29
Printing Photos and Images (Mac OS) ......................................................................................................... 31
Printing Office Documents ................................................................................................................................ 33
Printing Office Documents (Windows) .......................................................................................................... 33
Printing Office Documents (Mac OS) ........................................................................................................... 34
Using PosterArtist to Compose Originals .......................................................................................................... 36
Printing Photos and Images
Printing Photos and Images
By selecting the following Print Target from Easy Settings of the printer driver, you can easily configure the print-
ing of illustrations and photos.
Print Target Description
Photo (Color) Print photographic images from digital cameras with an optimal
setting.
Poster An optimal setting for posters. Print in vivid colors with impact
and high saturation.
Enhanced Printing Options Printing Photos and Office Documents
Faithful Color Reproduction Print with minimum color difference. Suitable for printing scan-
ner images and when print results are too vivid.
•
Depending on the Media Type setting, some Print Target options may not be available.
Important
•
You can check the settings values for each print target by clicking View Settings.
Note
•
You can also fine-tune these values as needed. (Advanced Settings)
For details on Advanced Settings, see "Giving Priority to Particular Graphic Elements and Colors for Print-
ing." ➔P.52
For instructions on printing photos and images, refer to the following topics, as appropriate for your computer and
operating system.
•
Printing Photos and Images (Windows) ➔ P.29
•
Printing Photos and Images (Mac OS) ➔ P.31
Printing Photos and Images (Windows)
Printing Photos and Images (Windows)
This topic describes how to print photos based on the following example.
•
Document: Photo image from a digital camera
•
Page size: 10×12 inches (254.0×304.8 mm)
•
Paper: Roll
•
Paper type: Canon Premium Glossy Paper 2 280
•
Roll paper width: 10 inches (254.0 mm)
29
1
Choose Print in the application menu.
2
Select the printer in the dialog box, and then display the printer driver dialog box. (See "Accessing the Print-
er Driver Dialog Box from Applications .") ➔ P.146
User's Guide
Downloaded from ManualsPrinter.com Manuals
Page 30

Printing Photos and Images (Windows)
Make sure the Main sheet is displayed.
3
Enhanced Printing Options Printing Photos and Office Documents
4
In the AMedia Type list, select the type of paper that is loaded. In this case, click Canon Premium Glos-
sy Paper 2 280.
In the AMedia Type, choose the type of paper used for printing, such as Glossy Paper, Canon Coated
Paper, and so on. Make sure the paper you select is loaded in the printer.
•
The paper type setting in the printer driver and related software (as well as on the Control Panel ) is upda-
Note
ted when you install the Media Configuration Tool from the User Software CD-ROM or if you change paper information by using the Media Configuration Tool. For details, see "Media Configuration Tool." ➔P.351
iPF670
5
After confirming that DEasy Settings is selected, click Photo (Color) in the E Print Target list.
You can check the settings values selected in the E Print Target list by clicking G View Settings.
•
Note
Click the Page Setup tab to display the Page Setup
6
sheet.
7
In the APage Size list, click the size of the original as specified in the application. In this case, click
10"x12".
8
Select and click a roll paper in the LPaper Source list.
9
Select the width of the loaded roll in the MRoll Paper Width list—in this case, 10-in. Roll (254.0mm).
10
Specify additional printing conditions.
For details on available printing conditions, see "Printer Driver Settings ." ➔ P.140
User's Guide
Downloaded from ManualsPrinter.com Manuals
Page 31

iPF670
Printing Photos and Images (Mac OS)
11
Confirm the print settings and print as desired.
•
For instructions on confirming print settings, see "Confirming Print Settings ." ➔ P.143
Note
Printing Photos and Images (Mac OS)
Printing Photos and Images (Mac OS)
This topic describes how to print photos based on the following example.
•
Document: Photo image from a digital camera
•
Page size: 10×12 inches (254.0×304.8 mm)
•
Paper: Roll paper
•
Paper type: Canon Premium Glossy Paper 2 280
•
Roll paper width: 10 inches (254.0 mm)
Choose Page Setup from the application menu to
1
display the Page Attributes dialog box.
Enhanced Printing Options Printing Photos and Office Documents
Page Setup might not be displayed in the menu de-
•
Note
2
Select the printer in the
3
In the CPaper Size list, click the size of the original. In this case, click 10"x12".
4
Click FOK to close the dialog box.
5
Choose Print in the application menu.
pending on the OS you are using and the application software.
In this case, select Print from the menu in the application software, and configure the settings in the upper part of the printer driver screen that is displayed.
B Format for list.
User's Guide
Downloaded from ManualsPrinter.com Manuals
31
Page 32

Printing Photos and Images (Mac OS)
Access the Main pane.
6
Enhanced Printing Options Printing Photos and Office Documents
iPF670
7
In the AMedia Type list, select the type of paper that is loaded. In this case, click Canon Premium Glos-
sy Paper 2 280.
Make sure the paper you select is loaded in the printer.
The types of paper indicated in the printer driver and related software (as well as on the Control Panel)
•
Note
8
After confirming that DEasy Settings is selected, click Photo (Color) in the E Print Target list.
Note
9
Make your selection in the FPrint Quality list.
Access the Page Setup pane.
10
are updated when you install the Media Configuration Tool from the User Software CD-ROM or if you
change paper information by using the Media Configuration Tool. For details, see "Media Configuration
Tool."
➔P.373
For information on settings optimized for printing photos and images, see "Printing Photos and Im-
•
ages." ➔P.29
•
You can check the settings values selected in the E Print Target list by clicking G View set..
11
Select and click a roll paper in the A Paper Source list.
User's Guide
Downloaded from ManualsPrinter.com Manuals
Page 33

iPF670
Printing Office Documents
12
Select the paper width of the roll loaded in the printer for B Roll Width. In this case, 10 in. (254.0mm) is
selected.
13
Specify additional printing conditions.
For details on available printing conditions, see "Printer Driver Settings ." ➔ P.248
14
Confirm the print settings, and then click MPrint to start printing.
•
For tips on confirming print settings, see "Confirming Print Settings ." ➔P.250
Note
Printing Office Documents
Printing Office Documents
By selecting Office Document from Easy Settings of the printer driver, you can easily configure settings for printing office documents.
Print Target Description
Office Document Setting optimized for printing general office documents such as
materials for distribution so that they can be viewed easily.
•
You can check the settings values for each print target by clicking View Settings.
Note
•
You can also fine-tune these values as needed. (Advanced Settings)
For details on Advanced Settings, see "Giving Priority to Particular Graphic Elements and Colors for Printing." ➔ P.52
Enhanced Printing Options Printing Photos and Office Documents
Printing Office Documents (Windows)
Printing Office Documents (Windows)
This topic describes how to print office documents based on the following example.
•
Document: Office document created using word-processing or spreadsheet programs
•
Page size: A4 (210.0 × 297.0 mm [8.3 × 11.7 in])
•
Paper: Sheets
•
Paper type: Plain Paper
•
Paper size: A4 (210.0 × 297.0 mm [8.3 × 11.7 in])
1
Choose Print in the application menu.
2
Select the printer in the dialog box, and then display the printer driver dialog box. (See "Accessing the Print-
er Driver Dialog Box from Applications .") ➔ P.146
Make sure the Main sheet is displayed.
3
4
In the AMedia Type list, select the type of paper that is loaded. In this case, click Plain Paper.
User's Guide
Downloaded from ManualsPrinter.com Manuals
33
Page 34

Printing Office Documents (Mac OS)
5
After confirming that DEasy Settings is selected, click Office Document in the E Print Target list.
•
You can check the settings values selected in the E Print Target list by clicking G View Settings.
Enhanced Printing Options Printing Photos and Office Documents
6
7
Note
Click the Page Setup tab to display the Page Setup
sheet.
In the APage Size list, click the size of the original as specified in the application. In this case, click ISO
A4.
iPF670
8
Click Manual in the LPaper Source list.
9
Specify additional printing conditions.
For details on available printing conditions, see "Printer Driver Settings ." ➔ P.140
10
Confirm the print settings and print as desired.
For tips on confirming print settings, see "Confirming Print Settings ." ➔P.143
•
Note
Printing Office Documents (Mac OS)
Printing Office Documents (Mac OS)
This topic describes how to print office documents based on the following example.
•
Document: Office document created using word-processing or spreadsheet programs
•
Page size: A4 (210.0 × 297.0 mm [8.3 × 11.7 in])
•
Paper: Sheets
•
Paper type: Plain Paper
•
Paper size: A4 (210.0 × 297.0 mm [8.3 × 11.7 in])
Choose Page Setup from the application menu to
1
display the Page Attributes dialog box.
User's Guide
Downloaded from ManualsPrinter.com Manuals
Page 35

iPF670
Printing Office Documents (Mac OS)
Page Setup might not be displayed in the menu de-
•
Note
2
Select the printer in the BFormat for list.
3
In the CPaper Size list, click the size of the original. In this case, click ISO A4 - for Paper Tray (Large
Margins).
4
Click FOK to close the dialog box.
5
Choose Print in the application menu.
Access the Main pane.
6
pending on the OS you are using and the application software.
In this case, select Print from the menu in the application software, and configure the settings in the upper part of the printer driver screen that is displayed.
Enhanced Printing Options Printing Photos and Office Documents
7
In the AMedia Type list, select the type of paper that is loaded. In this case, click Plain Paper.
8
After confirming that DEasy Settings is selected, click Office Document in the E Print Target list.
You can check the settings values selected in the E Print Target list by clicking G View set..
•
Note
9
Make your selection in the FPrint Quality list.
35
User's Guide
Downloaded from ManualsPrinter.com Manuals
Page 36

Using PosterArtist to Compose Originals
Access the Page Setup pane.
10
Enhanced Printing Options Printing Photos and Office Documents
11
Click Manual in the APaper Source list.
12
Specify additional printing conditions.
For details on available printing conditions, see "Printer Driver Settings ." ➔ P.248
iPF670
13
Confirm the print settings, and then click MPrint to start printing.
For tips on confirming print settings, see "Confirming Print Settings ." ➔P.250
•
Note
Using PosterArtist to Compose Originals
Using PosterArtist to Compose Originals
You can print a variety of source documents from word-processing or spreadsheet programs or screen shots from
web browsers after composing an original with them using PosterArtist.
This topic describes how to use PosterArtist to compose originals from multiple applications, creating a poster layout for printing.
1
Choose Print in the application menu.
2
Select the printer in the dialog box, and then open the printer driver dialog box. (See "Accessing the Printer
Driver Dialog Box from Applications (Windows).") ➔ P.146
Make sure the Main sheet is displayed.
3
User's Guide
Downloaded from ManualsPrinter.com Manuals
Page 37

iPF670
Using PosterArtist to Compose Originals
Click the Layout tab to display the Layout sheet.
4
5
Select the APage Layout check box.
6
Click in the Edit Using PosterArtist in the APage Layout list.
•
This function cannot be used with a 64-bit version OS.
Note
Enhanced Printing Options Printing Photos and Office Documents
When you attempt to print, PosterArtist starts up and
7
the PageCapture window is displayed. (At this point,
the document will not be printed yet.)
8
Choose the page to load in PosterArtist.
9
Edit and rearrange the image in the PosterArtist window as desired.
Without closing the PosterArtist window, repeat steps 1-8 to arrange originals from multiple applications on
the same page.
For details on how to edit and sort images, refer to the PosterArtist Manual.
•
Note
10
Print from the PosterArtist menu.
User's Guide
Downloaded from ManualsPrinter.com Manuals
37
Page 38

Printing CAD Drawings
Printing CAD Drawings
Printing CAD Drawings
iPF670
Enhanced Printing Options Printing CAD Drawings
Printing CAD Drawings ..................................................................................................................................... 38
Printing Line Drawings and Text ........................................................................................................................38
Printing Line Drawings and Text (Windows) ................................................................................................. 39
Printing Line Drawings and Text (Mac OS) ................................................................................................... 40
Printing from AutoCAD ..................................................................................................................................... 42
Specifying Colors and Printing CAD Drawings .................................................................................................. 43
Specifying Colors and Printing CAD Drawings (Windows) ............................................................................44
HP-GL/2 Printing .............................................................................................................................................. 45
Printing CAD Drawings
Printing CAD Drawings
Using this printer, you can print fine lines and text clearly and sharply. It's easy to produce highly precise drawings
from CAD applications.
For instructions on CAD printing, refer to the following topics, as appropriate for your computer and operating system.
•
Printing Line Drawings and Text (Windows) ➔P.39
•
Printing Line Drawings and Text (Mac OS) ➔P.40
Printing Line Drawings and Text
Printing Line Drawings and Text
Printing is easy when you simply choose the type of original to print.
•
Easy Settings
Simply choose the printing application in the list for optimal printing results.
•
Print Target
Choose presets that match the type of document to be printed.
Print targets for line drawings and text
Print Target Description
CAD (Color Line Drawing) Settings optimized to print intricate lines in CAD drawings clear-
ly.
CAD (Monochrome Line
Drawing )
Perspective, GIS Settings optimized for printing 3D CAD drawings, perspective
You can check the settings values for each print target by clicking View Settings.
•
Settings optimized to print black lines in CAD drawings clearly.
drawings, and maps, including GIS maps.
Note
•
You can also fine-tune these values as needed. ( Advanced Settings )
For details on Advanced Settings, see "Giving Priority to Particular Graphic Elements and Colors for Print-
ing." ➔P.52
•
Print Quality
Choose the print quality.
User's Guide
Downloaded from ManualsPrinter.com Manuals
Page 39

iPF670
Printing Line Drawings and Text (Windows)
The printing mode is determined by a combination of the print quality and resolution.
Print Quality Description
Highest A setting for printing at the highest resolution when quality is most important. Printing
takes longer and consumes more ink than in other modes, but this mode offers superior
printing quality.
High Choose this setting to print at high resolution when quality is most important.
Printing takes longer and consumes more ink than in Standard or Fast modes, but this
mode offers exceptional printing quality.
Standard Choose this setting to print at standard resolution when quality and speed are both impor-
tant.
Printing takes less time than in Highest or High mode.
Fast Choose this setting to print faster.
Printing in draft mode can help you work more efficiently when checking layouts.
For instructions on printing line drawings and text, refer to the following topics, as appropriate for your computer and operating system.
•
Printing Line Drawings and Text (Windows) ➔P.39
•
Printing Line Drawings and Text (Mac OS) ➔P.40
Printing Line Drawings and Text (Windows)
Printing Line Drawings and Text (Windows)
This topic describes how to print line drawings based on the following example.
Enhanced Printing Options Printing CAD Drawings
•
Document: CAD drawing
•
Page size: A3 (297.0 × 420.0 mm [11.7 × 16.5 in])
•
Paper: Roll paper
•
Paper type: Plain Paper
•
Roll paper width: A2/A3 roll (420.0 mm [16.5 in])
1
Choose Print in the application menu.
2
Select the printer in the dialog box, and then display the printer driver dialog box. (See "Accessing the Print-
er Driver Dialog Box from Applications .") ➔ P.146
Make sure the Main sheet is displayed.
3
4
In the AMedia Type list, select the type of paper that is loaded. In this case, click Plain Paper.
5
After confirming that DEasy Settings is selected, click CAD (Color Line Drawing) or CAD (Monochrome
Line Drawing ) in the EPrint Target list.
You can check the settings values selected in the E Print Target list by clicking G View Settings.
•
Note
User's Guide
Downloaded from ManualsPrinter.com Manuals
39
Page 40

Printing Line Drawings and Text (Mac OS)
Click the Page Setup tab to display the Page Setup
6
sheet.
Enhanced Printing Options Printing CAD Drawings
7
In APage Size, click the size of the original as specified in the application. In this case, click ISO A3.
8
Select and click a roll paper in the LPaper Source list.
9
Select the width of the loaded roll in the MRoll Paper Width list—in this case, ISO A2/A3 Roll
(420.0mm).
iPF670
10
Specify additional printing conditions.
For details on available printing conditions, see "Printer Driver Settings ." ➔ P.140
11
Confirm the print settings and print as desired.
For tips on confirming print settings, see "Confirming Print Settings ." ➔P.143
•
Note
Printing Line Drawings and Text (Mac OS)
Printing Line Drawings and Text (Mac OS)
This topic describes how to print line drawings based on the following example.
•
Document: CAD drawing
•
Page size: A3 (297.0 × 420.0 mm [11.7 × 16.5 in])
•
Paper: Roll
•
Paper type: Plain Paper
•
Roll paper width: A2/A3 roll (420.0 mm [16.5 in])
Choose Page Setup from the application menu to
1
display the Page Attributes dialog box.
User's Guide
Downloaded from ManualsPrinter.com Manuals
Page 41

iPF670
Printing Line Drawings and Text (Mac OS)
Page Setup might not be displayed in the menu de-
•
Note
2
Select the printer in the BFormat for list.
3
In the CPaper Size list, click the size of the original. In this case, click ISO A3.
pending on the OS you are using and the application software.
In this case, select Print from the menu in the application software, and configure the settings in the upper part of the printer driver screen that is displayed.
Enhanced Printing Options Printing CAD Drawings
4
Click FOK to close the dialog box.
5
Choose Print in the application menu.
Access the Main pane.
6
7
In the AMedia Type list, select the type of paper that is loaded. In this case, click Plain Paper.
8
After confirming that DEasy Settings is selected, click CAD (Color Line Drawing) or CAD (Monochrome
Line Drawing ) in the EPrint Target list.
You can check the settings values selected in the E Print Target list by clicking G View set..
•
Note
9
Make your selection in the FPrint Quality list.
41
User's Guide
Downloaded from ManualsPrinter.com Manuals
Page 42

Printing from AutoCAD
Access the Page Setup pane.
10
Enhanced Printing Options Printing CAD Drawings
11
Select and click a roll paper in the A Paper Source list.
12
Select the paper width of the roll loaded in the printer for B Roll Width. In this case, ISO A2/A3 (420.0mm)
is selected.
iPF670
13
Specify additional printing conditions.
For details on available printing conditions, see "Printer Driver Settings ." ➔ P.248
14
Confirm the print settings, and then click MPrint to start printing.
For tips on confirming print settings, see "Confirming Print Settings ." ➔P.250
•
Note
•
You can conserve roll paper by configuring settings suitable for the document.
For details on how to conserve paper and print, see "Conserving Roll Paper by Rotating Originals 90 De-
grees ." ➔P.122
Printing from AutoCAD
Printing from AutoCAD
Printer Driver Optimization Module for AutoCAD is software for printing optimally from AutoCAD with the printer
driver.
By optimally controlling the processing resolution of raster data and the memory to be used in image processing of
AutoCAD, printing superior in reliability and productivity is realized.
If you install Printer Driver Optimization Module for AutoCAD on a computer on which supported AutoCAD is installed, it will be installed automatically.
Printer Driver Optimization Module for AutoCAD is applied automatically when you print from AutoCAD, and opti-
•
Note
mal printing is performed.
Confirming the Installation of Printer Driver Optimization Module for AutoCAD
You can confirm whether Printer Driver Optimization Module for AutoCAD is installed by the following method.
1
From the File menu of AutoCAD, select Print.
User's Guide
Downloaded from ManualsPrinter.com Manuals
Page 43

iPF670
Specifying Colors and Printing CAD Drawings
The Printing dialog box is displayed.
2
Printer Driver Optimization Module for AutoCAD is installed if in Plotter of Printer/plotter this is displayed:iPFxxxx - Optimized driver - by Canon Inc..
Enhanced Printing Options Printing CAD Drawings
Installation of Printer Driver Optimization Module for AutoCAD
If Printer Driver Optimization Module for AutoCAD is not installed, install it by the following method.
1
Insert User Software CD-ROM in the CD-ROM drive and start the installer.
2
In the Setup Menu window, click Install Individual Software.
3
Click Install of Printer Driver Optimization Module for AutoCAD.
4
Follow the instructions on the screen.
Specifying Colors and Printing CAD Drawings
Specifying Colors and Printing CAD Drawings
You can complete color settings when Color (CAD) is selected in Color Mode.
Colors can be adjusted before printing as follows when Color Compatibility is selected.
Color (CAD) is displayed when you select Advanced Settings on the Main sheet and set Print Priority to Line
•
Note
Drawing/Text.
Color Compatibility
Color Setting Item
Color Setting Description
Color (CAD) 1 Print in standard colors.
Color (CAD) 2 Print with approximate colors emulating Canon iPF750, iPF755, iPF650, iPF655, iPF760,
iPF765.
Color (CAD) 3 Print with approximate colors emulating Canon iPF500, iPF600, iPF700, iPF510, iPF610,
iPF710, iPF605, iPF720, iPF810, iPF820, iPF815, iPF825.
Color (CAD) 4 Print emulating the HP Designjet 500/800, in colors resembling colors produced by these
printers.
Color (CAD) 5 Print emulating the HP Designjet T1100, in colors resembling colors produced by this
printer.
43
If you have selected Color (CAD) 2, Color (CAD) 3, Color (CAD) 4, or Color (CAD) 5, it is not possible to match
•
Important
User's Guide
Downloaded from ManualsPrinter.com Manuals
the colors and image quality produced by the specified printer exactly.
Page 44

Specifying Colors and Printing CAD Drawings (Windows)
For instructions on configuring Color Compatibility, refer to the following topics.
•
Specifying Colors and Printing CAD Drawings (Windows) ➔ P.44
Enhanced Printing Options Printing CAD Drawings
Specifying Colors and Printing CAD Drawings (Windows)
Specifying Colors and Printing CAD Drawings (Windows)
You can complete color settings when Color (CAD) is selected in Color Mode.
•
Color (CAD) is displayed when you select Advanced Settings on the Main sheet and set Print Priority to Line
Note
1
2
Drawing/Text.
•
This section describes the procedure in Windows 7.
Click start >Devices and Printers.
Right-click the icon of this printer and choose Printer
Properties to open the printer properties window.
iPF670
Click the Device Settings tab to display the Device
3
Settings sheet.
4
Click AColor Compatibility to display the Color Compatibility dialog box.
5
Select the desired color settings in the AColor Compatibility list.
For details on color settings, see "Specifying Colors and Printing CAD Drawings." ➔ P.43
•
Note
For printing instructions, refer to the following topic.
•
Choosing the Document Type and Printing Conditions ➔P.54
User's Guide
Downloaded from ManualsPrinter.com Manuals
Page 45

iPF670
HP-GL/2 Printing
HP-GL/2 Printing
HP-GL/2 Printing
This printer supports printing using the original Canon GARO printer control language and printing using HP-GL/2
and HP RTL emulation to print in colors resembling the colors produced by printers from other companies.
The printer automatically switches to the corresponding processing depending on whether a GARO or HP-GL/2
and HP RTL emulation job is received.
•
GARO is an abbreviation of Graphic Arts Language with Raster Operations.
Note
•
HP-GL/2 is an abbreviation of Hewlett-Packard Graphics Language/2, and HP RTL is an abbreviation of HewlettPackard Raster Transfer Language.
•
Emulation is good for obtaining results similar to printing on other printers.
Enhanced Printing Options Printing CAD Drawings
When printing from applications that support HP-GL/2 output, specify HP-GL/2 in the application's plotter output
settings.
HP-GL/2 and HP RTL emulation related settings such as the printer to emulate are configured from the printer Control Panel. (Refer to "Menu Structure ➔ P.410 " and "Menu Settings ➔ P.416 ")
•
For instructions on configuring these settings, refer to the software documentation.
Note
It may not be possible to print jobs with excessively large amounts of data correctly.
•
For information on CAD colors other than HP-GL/2 and HP RTL emulation, see "Menu Settings." ➔P.416
User's Guide
Downloaded from ManualsPrinter.com Manuals
45
Page 46

Adjusting the Color in the Printer Driver
Adjusting Images
Adjusting Images
iPF670
Enhanced Printing Options Adjusting Images
Adjusting the Color in the Printer Driver ............................................................................................................ 46
Fine-Tuning Colors of Photos and Images (Windows) .................................................................................. 47
Fine-Tuning Colors of Photos and Images (Mac OS) .................................................................................... 49
Giving Priority to Particular Graphic Elements and Colors for Printing ............................................................... 52
Choosing the Document Type and Printing Conditions (Windows) ............................................................... 54
Choosing the Document Type and Printing Conditions (Mac OS) .................................................................56
Adjusting the Color in the Printer Driver
Adjusting the Color in the Printer Driver
Color settings specified in the application for your documents are essentially given priority over other settings for
each print job, but further color adjustment is possible in the printer driver.
•
Color Mode
Choose how the printer driver processes color, as desired.
The available options vary depending on the color mode.
Color Mode Description Color Adjustment
Color Print in color. You can select the color balance and color
matching functions.
Monochrome Print in grayscale. You can adjust the color balance.
Color (CAD) A color mode optimized for line drawings
(2D-CAD). Lines in red, yellow, and other colors are printed especially clearly.
Monochrome (BK ink) A color mode for printing line drawings.
Only Black ink is used.
Monochrome Bitmap Print in a color mode for CAD, using Col-
or Ink, with all non-white portions printed
in black.
No color correction (*1) Prints without performing color-matching
in the printer driver.
You can adjust the color balance.
You can adjust the color balance.
No color adjustment is supported.
You can adjust the color balance.
*1: If No color correction is selected, the Matching sheet / Matching pane is not displayed.
•
Color Adjustment
You can adjust colors separately for images, graphics, and text documents.
Adjustment Item Description
Cyan Fine-tune color tones by adjusting the levels of Cyan, Magenta, and Yellow.
Magenta
Yellow
Gray Tone Adjust the grayscale, in a range from cool, blue tones to warm, red tones.
Brightness Adjust the brightness of printed images while keeping the darkest and lightest portions in-
tact.
Contrast Adjust the contrast of the darkest and lightest portions relative to each other.
For soft gradation, decrease the contrast. For hard gradation, increase the contrast.
Saturation Adjust the level of color saturation, in a range from subdued to vivid.
Click Object Adjustment to open the Object Adjustment dialog box, which allows you to select the color
•
Note
•
Matching
You can choose the color-matching mode and method.
By adjusting the color-matching mode and method, you can make printed colors match the colors of on-screen
images more closely.
adjustment target from Image, Graphics, and Text.
User's Guide
Downloaded from ManualsPrinter.com Manuals
Page 47

iPF670
Fine-Tuning Colors of Photos and Images (Windows)
•
If No color correction is selected under Color Mode, the Matching cannot be changed.
Important
Matching Mode Description Remarks
Driver Matching Mode Enables printing of optimal color tones
using a driver specific color profile.
ICC Matching Mode Enables color matching using ICC pro-
files.
Select this if you want to print by specifying the input profile, printer profile, and
matching method in detail.
Host ICM Mode Enables color matching by the host com-
puter using the ICM function of Windows.
Select this if you want to print from an
application that supports the ICM function.
ColorSync Enables color matching by using the
ColorSync function of Mac OS.
Select this if you want to perform soft
proofing using ColorSync before printing.
You should normally select this mode.
This allows you to use ICC profiles for digital cameras and scanners, ICC profiles
created using the profile creation tool, etc.
Available when using Windows.
Available when using Mac OS.
To select ColorSync, choose ColorSync
on the Color Matching panel.
Enhanced Printing Options Adjusting Images
Matching Method Description Remarks
Auto Color-matching optimized for images,
graphics, or text.
Perceptual Color-matching optimized for printing
typical photos attractively. Smooth gradation is a feature. This is also an easyto-use mode when performing color adjustment using application software.
Colorimetric Color-matching optimized for printing im-
age data with accurate colors in input
color space. This is the easiest-to-use
mode when you want to adjust the color
and print. However, gradation may be
lost for colors of wider range than the
color reproduction range of the printer.
Generally, this is also called relative colorimetric.
Colorimetric (No Wht-pnt Corr) The processing method of color-match-
ing is identical to Colorimetric. Use this
when you want to further reproduce the
target paper material color of the image
data. Generally, this also is called absolute colorimetric
Saturation Color-matching optimized for printing
posters, etc., vividly.
The available options and their display order vary depending on your selected color-matching mode, as well as the operating system.
For instructions on color adjustment, refer to the following topics, as appropriate for your computer and operating system.
•
Fine-Tuning Colors of Photos and Images (Windows) ➔ P.47
•
Fine-Tuning Colors of Photos and Images (Mac OS) ➔ P.49
Fine-Tuning Colors of Photos and Images (Windows)
Fine-Tuning Colors of Photos and Images (Windows)
You can specify your own print settings instead of using the Print Target presets. This topic describes how to finetune the color tone of photos before printing.
1
Choose Print in the application menu.
User's Guide
Downloaded from ManualsPrinter.com Manuals
47
Page 48

Fine-Tuning Colors of Photos and Images (Windows)
2
Select the printer in the dialog box, and then display the printer driver dialog box. (See "Accessing the Print-
er Driver Dialog Box from Applications .") ➔ P.146
Enhanced Printing Options Adjusting Images
Make sure the Main sheet is displayed.
3
iPF670
4
In the
5
Click DAdvanced Settings to switch the print mode.
6
Click Color in the GColor Mode list.
7
Click HColor Settings to display the Color Settings dialog box.
A Media Type list, select the type of paper that is loaded.
8
On the Color Adjustment sheet, adjust the color tones, brightness, and so on as desired.
Adjustment Item Description
D Cyan
Fine-tune color tones by adjusting the levels of Cyan, Magenta, and Yellow.
E Magenta
User's Guide
Downloaded from ManualsPrinter.com Manuals
Page 49

iPF670
Fine-Tuning Colors of Photos and Images (Mac OS)
Adjustment Item Description
F Yellow
G Gray Tone
H Brightness
I Contrast
J Saturation
•
Click Object Adjustment to open the Object Adjustment dialog box, which allows you to select the color
Note
9
Close the Color Settings dialog box.
Click the Page Setup tab to display the Page Setup
10
sheet.
adjustment target from Image, Graphics, and Text.
Fine-tune color tones by adjusting the levels of Cyan, Magenta, and Yellow.
Adjust the gray tone. Choose cool black (tinged with blue), pure black (neutral), warm
black (tinged with red), and so on.
Adjust the brightness of printed images while keeping the darkest and lightest portions
intact.
Adjust the contrast of the darkest and lightest portions relative to each other.
For soft gradation, decrease the contrast. For hard gradation, increase the contrast.
Adjust the level of color saturation, in a range from subdued to vivid.
Enhanced Printing Options Adjusting Images
11
Confirm the settings of APage Size, L Paper Source, and so on.
12
Confirm the print settings and print as desired.
For tips on confirming print settings, see "Confirming Print Settings ." ➔P.143
•
Note
Fine-Tuning Colors of Photos and Images (Mac OS)
Fine-Tuning Colors of Photos and Images (Mac OS)
You can specify your own print settings instead of using the Print Target presets. This topic describes how to finetune the color tone of photos before printing.
Choose Page Setup from the application menu to
1
display the Page Attributes dialog box.
49
User's Guide
Downloaded from ManualsPrinter.com Manuals
Page 50

Fine-Tuning Colors of Photos and Images (Mac OS)
Page Setup might not be displayed in the menu de-
•
pending on the OS you are using and the application software.
In this case, select Print from the menu in the application software, and configure the settings in the upper part of the printer driver screen that is displayed.
Enhanced Printing Options Adjusting Images
2
3
4
5
6
Note
Select the printer in the BFormat for list.
Choose the original size in the C Paper Size list.
Click FOK to close the dialog box.
Choose Print in the application menu.
Access the Main pane.
iPF670
7
In the AMedia Type list, select the type of paper that is loaded.
User's Guide
Downloaded from ManualsPrinter.com Manuals
Page 51

iPF670
Fine-Tuning Colors of Photos and Images (Mac OS)
8
Click DAdvanced Settings to switch the print
mode.
Enhanced Printing Options Adjusting Images
9
Click Color in the HColor Mode list.
10
Click ISet to display the Color Settings dialog box.
11
On the Color Adjustment pane, adjust the color tones, brightness, and so on as desired.
Adjustment Item Description
D Cyan
Fine-tune color tones by adjusting the levels of Cyan, Magenta, and Yellow.
E Magenta
F Yellow
G Gray Tone
H Brightness
I Contrast
J Saturation
Click Object Adjustment to open the Object Adjustment dialog box, which allows you to select the color
•
Note
User's Guide
Downloaded from ManualsPrinter.com Manuals
adjustment target from Images, Graphics, and Text.
Adjust the gray tone. Choose cool black (tinged with blue), pure black (neutral), warm
black (tinged with red), and so on.
Adjust the brightness of printed images while keeping the darkest and lightest portions
intact.
Adjust the contrast of the darkest and lightest portions relative to each other.
For soft gradation, decrease the contrast. For hard gradation, increase the contrast.
Adjust the level of color saturation, in a range from subdued to vivid.
51
Page 52

Giving Priority to Particular Graphic Elements and Colors for Printing
12
Click OK to close the Color Settings dialog box.
Access the Page Setup pane.
Enhanced Printing Options Adjusting Images
13
14
Confirm the print settings, and then click MPrint to start printing.
iPF670
•
For tips on confirming print settings, see "Confirming Print Settings ." ➔P.250
Note
Giving Priority to Particular Graphic Elements and Colors for Printing
Giving Priority to Particular Graphic Elements and Colors for Printing
You can specify detailed print settings as desired for the quality level, colors, and other criteria.
•
Advanced Settings
For printing results that appear just as expected for your original, you can specify which graphic elements and
colors to prioritize for printing.
Easy Settings are also available, providing convenient presets. To use the presets, simply choose the print-
•
Note
•
Print Priority
Choose the graphic elements that you want to emphasize for printing.
Image A setting for posters or other documents made up mainly of photos or images, or for em-
Line Drawing/Text Choose this setting for CAD drawings made up mainly of intricate lines, or wall newspa-
Office Document Choose this setting for better legibility of documents combining text and graphics, such as
ing application.
For details on Easy Settings, refer to the following topics.
Printing Photos and Images
•
•
Printing Line Drawings and Text ➔ P.38
•
Printing Office Documents ➔P.33
Print Priority (*1) Description
➔P.29
phasizing photos or images in printed documents.
pers and other notices with a large amount of text. Suitable for emphasizing detailed text
in printed documents.
However, the quality may not be sufficient when printing photos or images that require a
lot of color coverage. In this case, choose Image instead.
documents and presentation material created with typical office applications.
*1: Options suitable for the selected type of paper are listed under Print Priority.
•
Print Quality
Choose the print quality.
User's Guide
Downloaded from ManualsPrinter.com Manuals
Page 53

iPF670
Giving Priority to Particular Graphic Elements and Colors for Printing
The printing mode is determined by a combination of the print quality and resolution.
Print Quality (*1) Description Print Priority
Highest A setting for printing at the highest resolution
when quality is most important. Printing takes longer and consumes more ink than in other modes,
but this mode offers superior printing quality.
High Choose this setting to print at high resolution
when quality is most important.
Printing takes longer and consumes more ink than
in Standard or Fast modes, but this mode offers
exceptional printing quality.
Standard Choose this setting to print at standard resolution
when quality and speed are both important.
Printing takes less time than in Highest or High
mode.
Fast Choose this setting to print faster.
Printing in draft mode can help you work more efficiently when checking layouts.
Image
Image
Line Drawing/Text
Image
Line Drawing/Text
Office Document
Image
Line Drawing/Text
*1: Options suitable for the selected Print Priority are listed under Print Quality.
•
Color Settings
Setting Item Options Description
Color Mode (*1) Color
Monochrome
Color (CAD)
Monochrome (BK ink)
Monochrome Bitmap
No color correction
Color Adjustment Cyan
Magenta
Yellow
Gray Tone
Brightness
Contrast
Saturation
Color-Matching Modes Driver Matching Mode
ICC Matching Mode
Host ICM Mode (Windows)
ColorSync (Mac OS)
Color-Matching Method (*2) Auto
Perceptual
Colorimetric
Saturation
Gamma 2.2
1.8
Choose whether to print in color or monochrome.
(See "Adjusting the Color in the Printer Driver.") ➔P.46
You can adjust the levels of cyan, magenta, and
yellow as well as the brightness, contrast, saturation, and gray tones.
If you choose Monochrome or Monochrome (BK
ink) in Color Mode only Brightness and Contrast can be adjusted.
Image, Graphics, and Text are available as Object Adjustment options.
Choose the color-matching mode.
Choose the color-matching method. The available
options vary depending on your selection in Col-
or-Matching Mode.
You can adjust the gradation of intermediate tones
in an image.
You can select only after Driver Matching Mode
has been selected in Matching Mode.
Enhanced Printing Options Adjusting Images
*1: Options suitable for the selected Print Priority are listed under Color Mode.
*2: The order of options displayed varies depending on the operating system.
•
Enhancing printing quality
Setting Item Description
Highest quality This prints at the highest resolution. Printing takes longer and consumes more ink than in
other modes, but this mode offers superior printing quality.
Thicken Fine Lines Prints making fine lines appear thicker.
Sharpen Text Choose this option to print intricate text more distinctly.
User's Guide
Downloaded from ManualsPrinter.com Manuals
53
Page 54

Choosing the Document Type and Printing Conditions (Windows)
Setting Item Description
Reduce Print Unevenness (*1) Choose this option to counteract uneven printing.
Enhanced Printing Options Adjusting Images
Unidirectional Printing Prints by suppressing color variations and misaligned ruled lines. However, this takes
more time than regular printing.
Economy Printing When this mode is selected, less ink is consumed than in regular printing, but the quality is
diminished.
Select this mode if you want to conserve ink when checking drawings, for example. Depending on the Media Type and Print Quality settings, this mode may not be available.
*1:Displayed in Mac OS.
•
To print at a higher level of quality, in the printer driver, choose High or Highest in Print Quality, and select
Note
For instructions on specifying the print quality and color settings before printing, refer to the following topics, as
appropriate for your computer and operating system.
•
Choosing the Document Type and Printing Conditions (Windows) ➔P.54
•
Choosing the Document Type and Printing Conditions (Mac OS) ➔P.56
Choosing the Document Type and Printing Conditions (Windows)
Choosing the Document Type and Printing Conditions (Windows)
You can specify your own print settings instead of using the Print Target presets. As an example, this topic describes how to print CAD drawings as clearly as possible, with sharp lines and text.
the Unidirectional Printing check box.
iPF670
1
Choose Print in the application menu.
2
Select the printer in the dialog box, and then display the printer driver dialog box. (See "Accessing the Print-
er Driver Dialog Box from Applications .") ➔ P.146
Make sure the Main sheet is displayed.
3
4
In the AMedia Type list, select the type of paper that is loaded.
User's Guide
Downloaded from ManualsPrinter.com Manuals
Page 55

iPF670
Choosing the Document Type and Printing Conditions (Windows)
5
Click DAdvanced Settings to switch the print mode.
6
Click Line Drawing/Text in the EPrint Priority list.
7
Click High (1200dpi) in the FPrint Quality list.
•
Options displayed in the FPrint Quality list vary depending on the paper type.
Note
Enhanced Printing Options Adjusting Images
8
9
10
11
Color (CAD) in the GColor Mode list.
Click
To adjust the color, click H Color Settings.
For instructions on adjusting color, see "Adjusting the Color in the Printer Driver." ➔P.46
•
Note
Select the KSharpen Text check box.
Click the Page Setup tab to display the Page Setup
sheet.
12
Confirm the settings of APage Size, L Paper Source, and so on.
13
Confirm the print settings and print as desired.
For tips on confirming print settings, see "Confirming Print Settings ." ➔P.143
•
Note
User's Guide
Downloaded from ManualsPrinter.com Manuals
55
Page 56

Choosing the Document Type and Printing Conditions (Mac OS)
Choosing the Document Type and Printing Conditions (Mac OS)
Choosing the Document Type and Printing Conditions (Mac OS)
You can specify your own print settings instead of using the Print Target presets. This topic describes how print
photographic images in monochrome.
Enhanced Printing Options Adjusting Images
Choose Page Setup from the application menu to
1
display the Page Attributes dialog box.
Page Setup might not be displayed in the menu de-
•
Note
pending on the OS you are using and the application software.
In this case, select Print from the menu in the application software, and configure the settings in the upper part of the printer driver screen that is displayed.
iPF670
2
Select the printer in the
3
Choose the original size in the C Paper Size list.
4
Click FOK to close the dialog box.
5
In the application menu, choose Print.
Access the Main pane.
6
B Format for list.
7
In the AMedia Type list, select the type of paper that is loaded.
User's Guide
Downloaded from ManualsPrinter.com Manuals
Page 57

iPF670
Choosing the Document Type and Printing Conditions (Mac OS)
8
Click DAdvanced Settings to switch the print
mode.
Enhanced Printing Options Adjusting Images
9
Click Image in the EPrint Priority list.
10
Click High (600dpi) in the FPrint Quality list.
Options displayed in the FPrint Quality list vary depending on the paper type.
•
Note
11
Click Monochrome in the HColor Mode list.
12
To adjust the brightness and contrast, click I Set.
For instructions on adjusting brightness and contrast, see "Adjusting the Color in the Printer Driver." ➔ P.46
•
Note
Access the Page Setup pane.
13
14
Confirm the print settings, and then click MPrint to start printing.
For tips on confirming print settings, see "Confirming Print Settings ." ➔P.250
•
Note
User's Guide
Downloaded from ManualsPrinter.com Manuals
57
Page 58

Resizing Originals to Match the Paper Size
Printing enlargements or reductions
Printing enlargements or reductions
iPF670
Enhanced Printing Options Printing enlargements or reductions
Resizing Originals to Match the Paper Size ....................................................................................................... 58
Resizing Originals to Match the Paper Size (Windows) ................................................................................ 58
Resizing Originals to Fit the Roll Width ..............................................................................................................60
Resizing Originals to Fit the Roll Width (Windows) ....................................................................................... 60
Resizing Originals to Fit the Roll Width (Mac OS) ......................................................................................... 61
Resizing Originals by Entering a Scaling Value .................................................................................................. 63
Resizing Originals by Entering a Scaling Value (Windows) ............................................................................ 64
Resizing Originals by Entering a Scaling Value (Mac OS) ..............................................................................65
Resizing Originals to Match the Paper Size
Resizing Originals to Match the Paper Size
You can freely adjust the size of originals by enlarging or reducing them as desired.
•
Enlarged/Reduced Printing
Enlarge or reduce the original in the printer driver, as desired.
•
Fit Paper Size
Enlarge or reduce the original to match the size of the paper you are using.
For instructions on printing with resizing to fit the paper size, refer to the following topics.
•
Resizing Originals to Match the Paper Size (Windows) ➔ P.58
To print with resizing to fit the paper size on Mac OS, use Scale to fit paper size in the Paper Handling
•
Note
Resizing Originals to Match the Paper Size (Windows)
Resizing Originals to Match the Paper Size (Windows)
This topic describes how to enlarge originals before printing to match the paper size, based on the following example.
•
Document: Any Type
•
Page size: A4 (210.0×297.0 mm)/Letter (8.3 × 11.7 in)
•
Paper: Roll
•
Paper type: Plain Paper
panel provided by the OS.
For more information, see the Mac OS User Manual.
•
For better printing results when enlarging photos from a digital camera in TIFF or JPEG format, use an image-editing application software such as Adobe Photoshop to specify an image resolution of 150 dpi or more
at actual size.
User's Guide
Downloaded from ManualsPrinter.com Manuals
Page 59

iPF670
Resizing Originals to Match the Paper Size (Windows)
•
Roll paper width: A2/A3 roll (420.0 mm [16.5 in])
1
Choose Print in the application menu.
2
Select the printer in the dialog box, and then open the printer driver dialog box. (See "Accessing the Printer
Driver Dialog Box from Applications .") ➔ P.146
Make sure the Main sheet is displayed.
3
Enhanced Printing Options Printing enlargements or reductions
4
In the AMedia Type list, select the type of paper that is loaded. In this case, click Plain Paper.
5
Select the printing application in the E Print Target list.
Click the Page Setup tab to display the Page Setup
6
sheet.
7
Select and click a roll paper in the LPaper Source list.
8
Select the width of the loaded roll in the MRoll Paper Width list—in this case, ISO A2/A3 Roll
(420.0mm).
9
In the APage Size list, click the size of the original as specified in the application. In this case, click ISO
A4.
10
Select the CEnlarged/Reduced Printing check box.
11
Select the DFit Paper Size check box.
12
Click ISO A3 in the GPaper Size list.
User's Guide
Downloaded from ManualsPrinter.com Manuals
59
Page 60

Resizing Originals to Fit the Roll Width
13
Confirm the print settings and print as desired.
•
For tips on confirming print settings, see "Confirming Print Settings ." ➔P.143
Enhanced Printing Options Printing enlargements or reductions
Resizing Originals to Fit the Roll Width
Resizing Originals to Fit the Roll Width
You can freely adjust the size of originals by enlarging or reducing them as desired.
•
Enlarged/Reduced Printing
Enlarge or reduce the original in the printer driver, as desired.
Fit Roll Paper Width
•
Enlarge or reduce the original as a whole to match the roll paper width, as desired.
Note
iPF670
Resizing Originals to Fit the Roll Width (Windows)
Resizing Originals to Fit the Roll Width (Windows)
This topic describes how to enlarge originals before printing to match the roll width, based on the following example.
•
Document: Any type
•
Page size: A4 (210.0×297.0 mm)/Letter (8.3 × 11.7 in)
•
Paper: Roll
•
Paper type: Plain Paper
•
Roll paper width: 16 inches (406.4 mm)
1
Choose Print in the application menu.
Select the printer in the dialog box, and then display the printer driver dialog box. (See "Accessing the Print-
2
er Driver Dialog Box from Applications .") ➔ P.146
Make sure the Main sheet is displayed.
3
User's Guide
Downloaded from ManualsPrinter.com Manuals
Page 61

iPF670
Resizing Originals to Fit the Roll Width (Mac OS)
4
In the AMedia Type list, select the type of paper that is loaded. In this case, click Plain Paper.
5
Select the printing application in the E Print Target list.
Click the Page Setup tab to display the Page Setup
6
sheet.
7
Select and click a roll paper in the LPaper Source list.
Enhanced Printing Options Printing enlargements or reductions
8
In the APage Size list, click the size of the original as specified in the application. In this case, click ISO
A4 or Letter (8.5"x11").
9
Select the CEnlarged/Reduced Printing check box.
If the CEnlarged/Reduced Printing check box is
•
Note
not displayed on the Page Setup sheet, clear the
B Borderless Printing check box.
10
Click EFit Roll Paper Width.
After you click EFit Roll Paper Width, the Information dialog box is displayed. Select the width of the
•
Note
loaded roll in the Roll Paper Width list and click OK.
•
Make sure the roll paper width you specify matches the width of the loaded roll.
11
Confirm the print settings and print as desired.
For tips on confirming print settings, see "Confirming Print Settings ." ➔P.143
•
Note
Resizing Originals to Fit the Roll Width (Mac OS)
Resizing Originals to Fit the Roll Width (Mac OS)
This topic describes how to enlarge originals before printing to match the roll width, based on the following example.
•
Document: Any Type
•
Page size: A4 (210.0 × 297.0 mm [8.3 × 11.7 in])
•
Paper: Roll paper
User's Guide
Downloaded from ManualsPrinter.com Manuals
61
Page 62

Resizing Originals to Fit the Roll Width (Mac OS)
•
Paper type: Plain Paper
•
Roll paper width: 16 inches (406.4 mm)
Choose Page Setup from the application menu to
Enhanced Printing Options Printing enlargements or reductions
1
display the Page Attributes dialog box.
Page Setup might not be displayed in the menu de-
•
Note
pending on the OS you are using and the application software.
In this case, select Print from the menu in the application software, and configure the settings in the upper part of the printer driver screen that is displayed.
iPF670
2
Select the printer in the BFormat for list.
3
In CPaper Size, click the size of the original. In this case, click ISO A4.
4
Click FOK to close the dialog box.
5
Choose Print in the application menu.
Access the Main pane.
6
7
In the AMedia Type list, select the type of paper that is loaded. In this case, click Plain Paper.
8
Make your selection in the EPrint Target list.
User's Guide
Downloaded from ManualsPrinter.com Manuals
Page 63

iPF670
Resizing Originals by Entering a Scaling Value
9
Make your selection in the FPrint Quality list.
Access the Page Setup pane.
10
11
Select and click a roll paper in the A Paper Source list.
Enhanced Printing Options Printing enlargements or reductions
12
Select the paper width of the roll loaded in the printer for B Roll Width. In this case, 16 in. (406.4mm) is
selected.
13
Select the DEnlarged/Reduced Printing check box.
14
Click FFit Roll Paper Width.
15
Confirm the print settings, and then click MPrint to start printing.
For tips on confirming print settings, see "Confirming Print Settings ." ➔P.250
•
Note
Resizing Originals by Entering a Scaling Value
Resizing Originals by Entering a Scaling Value
You can freely adjust the size of originals by enlarging or reducing them as desired.
•
Enlarged/Reduced Printing
Enlarge or reduce the original in the printer driver, as desired.
•
Scaling
Enlarge or reduce originals by a particular amount, as desired.
For instructions on entering a scaling value to resize originals, refer to the following topics, as appropriate for
your computer and operating system.
•
Resizing Originals by Entering a Scaling Value (Windows) ➔ P.64
•
Resizing Originals by Entering a Scaling Value (Mac OS) ➔ P.65
User's Guide
Downloaded from ManualsPrinter.com Manuals
63
Page 64

Resizing Originals by Entering a Scaling Value (Windows)
•
For better printing results when enlarging photos from a digital camera in TIFF or JPEG format, use an im-
Note
Enhanced Printing Options Printing enlargements or reductions
Resizing Originals by Entering a Scaling Value (Windows)
Resizing Originals by Entering a Scaling Value (Windows)
This topic describes how to enlarge originals before printing by entering a scaling value, based on the following
example.
•
Document: Any Type
•
Page size: A4 (210.0 × 297.0 mm [8.3 × 11.7 in])
•
Paper: Roll paper
•
Paper type: Plain Paper
•
Roll paper width: A2/A3 roll (420.0 mm [16.5 in])
Important
1
Choose Print in the application menu.
2
Select the printer in the dialog box, and then display the printer driver dialog box. (See "Accessing the Print-
er Driver Dialog Box from Applications .") ➔ P.146
Make sure the Main sheet is displayed.
3
age-editing application software such as Adobe Photoshop to specify an image resolution of 150 dpi or more
at actual size.
•
In borderless printing, you cannot resize originals by entering a scaling value.
iPF670
4
In the AMedia Type list, select the type of paper that is loaded. In this case, click Plain Paper.
5
Select the printing application in the E Print Target list.
Click the Page Setup tab to display the Page Setup
6
sheet.
7
Select and click a roll paper in the LPaper Source list.
User's Guide
Downloaded from ManualsPrinter.com Manuals
Page 65

iPF670
Resizing Originals by Entering a Scaling Value (Mac OS)
8
Select the width of the loaded roll in the MRoll Paper Width list—in this case, ISO A2/A3 Roll
(420.0mm).
9
In the APage Size list, click the size of the original as specified in the application. In this case, click ISO
A4.
10
Select the CEnlarged/Reduced Printing check box.
11
Click ISO A4 in the GPaper Size list.
12
Click FScaling and enter 120.
•
You can specify enlargement that exceeds the paper size, but in this case, the portions off the bottom and
Note
right edges of the paper will not be printed.
If the original size after enlargement or reduction is
•
smaller than the paper size, the original is printed in
the upper-left corner. In this case, you can center
originals by selecting EPrint Centered on the Lay-
out sheet.
Enhanced Printing Options Printing enlargements or reductions
13
Confirm the print settings and print as desired.
For tips on confirming print settings, see "Confirming Print Settings ." ➔P.143
•
Note
Resizing Originals by Entering a Scaling Value (Mac OS)
Resizing Originals by Entering a Scaling Value (Mac OS)
This topic describes how to enlarge originals before printing by entering a scaling value, based on the following
example.
•
Document: Any Type
•
Page size: A4 (210.0 × 297.0 mm [8.3 × 11.7 in])
•
Paper: Roll paper
•
Paper type: Plain Paper
•
Roll paper width: A2/A3 roll (420.0 mm [16.5 in])
Choose Page Setup from the application menu to
1
display the Page Attributes dialog box.
65
User's Guide
Downloaded from ManualsPrinter.com Manuals
Page 66

Resizing Originals by Entering a Scaling Value (Mac OS)
Page Setup might not be displayed in the menu de-
•
Note
Enhanced Printing Options Printing enlargements or reductions
2
Select the printer in the BFormat for list.
3
In CPaper Size, click the size of the original. In this case, click ISO A4.
4
Click FOK to close the dialog box.
5
Choose Print in the application menu.
Access the Main pane.
6
pending on the OS you are using and the application software.
In this case, select Print from the menu in the application software, and configure the settings in the upper part of the printer driver screen that is displayed.
iPF670
7
In the AMedia Type list, select the type of paper that is loaded. In this case, click Plain Paper.
8
Make your selection in the EPrint Target list.
9
Make your selection in the FPrint Quality list.
User's Guide
Downloaded from ManualsPrinter.com Manuals
Page 67

iPF670
Resizing Originals by Entering a Scaling Value (Mac OS)
Access the Page Setup pane.
10
11
Select and click a roll paper in the A Paper Source list.
12
Select the paper width of the roll loaded in the printer for B Roll Width. In this case, ISO A2/A3 (420.0mm)
is selected.
Enhanced Printing Options Printing enlargements or reductions
13
Select the DEnlarged/Reduced Printing check box.
14
Click GScaling and enter 120.
You can specify enlargement that exceeds the paper size, but in this case, the portion off the edge of the
•
Note
15
Confirm the print settings, and then click MPrint to start printing.
Note
paper will not be printed.
•
If the original size after enlargement or reduction is smaller than the paper size, the original is printed in
the upper-left corner. In this case, you can center originals by selecting the J Print Centered check box.
For tips on confirming print settings, see "Confirming Print Settings ." ➔P.250
•
User's Guide
Downloaded from ManualsPrinter.com Manuals
67
Page 68

Printing on Oversize Paper
Printing at full size
Printing at full size
iPF670
Enhanced Printing Options Printing at full size
Printing on Oversize Paper ............................................................................................................................... 68
Printing at Full Size (Windows) .....................................................................................................................69
Printing at Full Size (Mac OS) ...................................................................................................................... 70
Borderless Printing at Actual Size ..................................................................................................................... 72
Borderless Printing at Actual Size (Windows) ............................................................................................... 73
Borderless Printing at Actual Size (Mac OS) ................................................................................................ 74
Printing on Oversize Paper
Printing on Oversize Paper
You can print all areas of the original at full scale by selecting the paper size from Oversize (sizes where the margins needed for printer operation have been added to the page size).
We recommend when printing with a focus on image.
•
If you prepare an original for printing without a margin and print it on paper of regular size, the image near the edge
Note
Oversize
•
When printing on standard paper sizes, printing is performed by taking the margins necessary for printer operations inside the region of the original. (See "Print Area.") ➔ P.578 For example, printing the A4 size (210 x 297
mm) original shown in Figure (b) gives the result as shown in Figure (a).
However, if Oversize paper is selected, printing is performed by taking the margins necessary for printer operations outside of the region of the original to give the result as shown in Figure (c).
The A4 size print as shown in Figure (b) can then be obtained by trimming the margins from the periphery after
printing.
will not be printed.
When printing on Oversize paper, load paper larger than the page size—a size that includes the margin
•
Important
Note
For instructions on oversized printing, refer to the following topics, as appropriate for your computer and operating system.
User's Guide
Downloaded from ManualsPrinter.com Manuals
required by the printer.
•
Sheets: Load paper that is at least 10 mm (0.39 in) wider and 28 mm (1.10 in) higher than the page size
•
Rolls:Load paper that is at least 10 mm (0.39 in) wider and 10 mm (0.39 in) higher than the page size
•
Paper larger than the maximum size supported by the printer cannot be used as paper for oversized printing.
(See "Paper Sizes.") ➔P.310
•
Oversized printing (selecting Oversize in Page Size) is only available in Windows.
•
If you are performing oversized printing in Mac OS, you need to configure printing on non-standard paper
sizes.
•
To specify a non-standard paper size in oversized printing, register the paper size as a Custom Paper Size.
Oversized printing is not available with Custom Size. (See "Printing on Non-Standard Paper Sizes.") ➔ P.93
Page 69

iPF670
Printing at Full Size (Windows)
•
Printing at Full Size (Windows) ➔ P.69
•
Printing at Full Size (Mac OS) ➔ P.70
Printing at Full Size (Windows)
Printing at Full Size (Windows)
This topic describes how to print at full size based on the following example. (Oversized Printing)
•
Document: Any Type
•
Page size: A4 (210.0×297.0 mm)/Letter (8.3 × 11.7 in)
•
Paper: Roll
•
Paper type: Plain Paper
•
Roll paper width: A2/A3 roll (420.0 mm [16.5 in])
1
Choose Print in the application menu.
2
Select the printer in the dialog box, and then display the printer driver dialog box. (See "Accessing the Print-
er Driver Dialog Box from Applications .") ➔ P.146
Make sure the Main sheet is displayed.
3
Enhanced Printing Options Printing at full size
4
In the AMedia Type list, select the type of paper that is loaded. In this case, click Plain Paper.
Click the Page Setup tab to display the Page Setup
5
sheet.
6
Click OSize Options to display the Paper Size Options dialog box.
7
In the Paper Size Options dialog box, select the Oversize check box in Display Series.
69
8
Click OK to close the Paper Size Options dialog box.
9
Click Oversize - ISO A4 in the APage Size list.
10
Select and click a roll paper in the LPaper Source list.
User's Guide
Downloaded from ManualsPrinter.com Manuals
Page 70

Printing at Full Size (Mac OS)
11
Select the width of the loaded roll in the MRoll Paper Width list—in this case, ISO A2/A3 Roll
(420.0mm).
iPF670
Enhanced Printing Options Printing at full size
12
Confirm the print settings and print as desired.
•
For tips on confirming print settings, see "Confirming Print Settings ." ➔P.143
Note
Printing at Full Size (Mac OS)
Printing at Full Size (Mac OS)
This topic describes how to print at full size based on the following example. (Oversized Printing)
•
Document: Any Type
•
Page size: A4 (210.0 × 297.0 mm [8.3 × 11.7 in])
•
Paper: Roll paper
•
Paper type: Plain Paper
•
Roll paper width: A2/A3 roll (420.0 mm [16.5 in])
Choose Page Setup from the application menu to
1
display the Page Attributes dialog box.
Page Setup might not be displayed in the menu de-
•
Note
2
Select the printer in the
3
In CPaper Size, click the size of the original. In this case, click ISO A4 - Oversize.
4
Click FOK to close the dialog box.
5
Choose Print in the application menu.
pending on the OS you are using and the application software.
In this case, select Print from the menu in the application software, and configure the settings in the upper part of the printer driver screen that is displayed.
B Format for list.
User's Guide
Downloaded from ManualsPrinter.com Manuals
Page 71

iPF670
Printing at Full Size (Mac OS)
Access the Main pane.
6
Enhanced Printing Options Printing at full size
7
In the AMedia Type list, select the type of paper that is loaded. In this case, click Plain Paper.
8
Make your selection in the EPrint Target list.
9
Make your selection in the FPrint Quality list.
Access the Page Setup pane.
10
11
Select and click a roll paper in the A Paper Source list.
12
Select the paper width of the roll loaded in the printer for B Roll Width. In this case, ISO A2/A3 (420.0mm)
is selected.
13
Confirm the print settings, and then click MPrint to start printing.
For tips on confirming print settings, see "Confirming Print Settings ." ➔P.250
•
Note
User's Guide
Downloaded from ManualsPrinter.com Manuals
71
Page 72

Borderless Printing at Actual Size
Borderless Printing at Actual Size
Borderless Printing at Actual Size
Take advantage of borderless printing to print documents such as posters (made up mainly of photos or images)
without a surrounding margin, or border.
Enhanced Printing Options Printing at full size
In regular printing, a margin required by the printer is added around the original. With borderless printing, you can
print documents without the margin, so that the printed image covers the entire surface of the paper.
•
Borderless printing is only available with rolls.
•
Paper you can use for borderless printing is restricted to particular types of paper and rolls of particular widths.
(See "Displaying the Paper Reference Guide.") ➔ P.313
•
Although it normally prints borderless on the top, bottom, left, and right (4-edge borderless), in the following
cases, it becomes borderless only on the left and right (2-edge borderless) because the top and bottom of the
printed image are not automatically cut.
•
When paper where the borderless printing is described as two edges only in the Paper Reference Guide
(paper where printed image areas cannot be cut cleanly) is selected
•
When the following settings are made in the printer control panel
•
Cutting Mode is Manual
•
CutDustReduct. is On
•
When auto cut is configured as not performed in the printer driver
iPF670
•
Borderless printing is not possible if details such as crop marks and margins are included as data on the periph-
Important
Choose the method of borderless printing that suits the original, as desired.
•
Print Image with Actual Size
Prints originals at actual size, without enlarging or reducing them. We recommend when focusing on image
quality. You should create the original at a size larger by 3 mm on each side than the paper size.
ery of the original.
•
If the length of the image to print is short, then since the roll paper is fed out to a prescribed length before cutting
in order to prevent cutting problems and ejection problems, the trailing edge of the roll paper might not be printed
borderless.
•
These features cannot be used in combination with borderless printing: special page layouts, centering originals,
and printing cut lines on rolls.
•
If Fit Paper Size or Print Image with Actual Size (Windows only) is selected while performing borderless printing, Rotate Page 90 degrees (Conserve Paper) cannot be selected. Note that if borderless printing is possible,
then even if the original is rotated 90 degrees, it will be printed by automatically rotating the page by 90 degrees.
Not all page sizes are available.
•
Note
•
When performing borderless printing without using Print Image with Actual Size, the image deteriorates
slightly because the image is automatically enlarged.
For instructions on borderless printing of photos and images at actual size, refer to the following topics, as appropriate for your computer and operating system.
•
Borderless Printing at Actual Size (Windows) ➔ P.73
User's Guide
Downloaded from ManualsPrinter.com Manuals
Page 73

iPF670
Borderless Printing at Actual Size (Windows)
•
Borderless Printing at Actual Size (Mac OS) ➔ P.74
Borderless Printing at Actual Size (Windows)
Borderless Printing at Actual Size (Windows)
This topic describes how to print borderlessly at actual size based on the following example.
•
When borderless printing is used, the edge of the paper is cut during printing. Thus, ink density may be uneven at
Important
•
Document: Any type
•
Page size: 10×12 inches (254.0×304.8 mm)
•
Paper: Roll
•
Paper type: Canon Glossy Photo Paper 170gsm
•
Roll paper width: 10 inches (254.0 mm)
1
the edges. If you require higher image quality, select No from the Automatic Cutting list in the Roll Paper Options dialog box. In this case, the paper can be printed without borders on the left and right sides only. Once
printed and cut, please cut the upper and lower bands with scissors.
Create the original in the source application 3 mm (0.12 in) larger on each side than 254.0×304.8 mm (10 ×
12 in) —that is, 260.0×310.8 mm (10.2 × 12.2 in)
•
If you can specify the margin, as in Microsoft Word, set the margin at 0 mm. For instructions on specifying
Note
the margin, refer to the software documentation.
•
The extra 3 mm (0.12 in) on each side will not be printed. Create the original so that it fits inside the paper
area to be printed on.
Enhanced Printing Options Printing at full size
2
Choose Print in the application menu.
3
Select the printer in the dialog box, and then display the printer driver dialog box. (See "Accessing the Print-
er Driver Dialog Box from Applications .") ➔ P.146
Make sure the Main sheet is displayed.
4
5
In the AMedia Type list, select the type of paper that is loaded. In this case, click Canon Glossy Photo
Paper 170gsm.
6
Select the print target in the EPrint Target list.
When you are using paper that takes longer for ink to adhere for borderless printing and the Cutter Unit
•
Important
User's Guide
Downloaded from ManualsPrinter.com Manuals
touches printing surfaces that are not dry yet, it may damage the paper or the edge of the document that
is cut, depending on frequency of use. In this kind of situation, change the ink drying time using the
following procedure.
•
Click Advanced Settings in Media Type.
•
Select an ink drying time in the list for the Between Pages setting of Drying Time.
73
Page 74

Borderless Printing at Actual Size (Mac OS)
Click the Page Setup tab to display the Page Setup
7
sheet.
Enhanced Printing Options Printing at full size
8
In the APage Size list, click the size of the original as specified in the source application. In this case, click
10"x12".
9
Select and click a roll paper in the LPaper Source list.
10
Select the BBorderless Printing check box to display the Information dialog box.
iPF670
11
Select the width of the loaded roll in the Roll Paper Width list—in this case, click 10-in. Roll (254.0mm).
12
Click OK to close the Information dialog box.
13
In CBorderless Printing Method, click F Print Image with Actual Size.
14
Confirm the print settings and print as desired.
For tips on confirming print settings, see "Confirming Print Settings ." ➔P.143
•
Note
Borderless Printing at Actual Size (Mac OS)
Borderless Printing at Actual Size (Mac OS)
This topic describes how to print borderlessly at actual size based on the following example.
When borderless printing is used, the edge of the paper is cut during printing. Thus, ink density may be uneven at
•
Important
•
Document: Any type
•
Page size: 10 × 12 inches (254.0×304.8 mm)–Borderless
the edges. If you require higher image quality, select No from the Automatic Cutting list in the Paper Detailed
Settings dialog box. In this case, the paper can be printed without borders on the left and right sides only. Once
printed and cut, please cut the upper and lower bands with scissors.
User's Guide
Downloaded from ManualsPrinter.com Manuals
Page 75

iPF670
Borderless Printing at Actual Size (Mac OS)
•
Paper: Roll
•
Paper type: Canon Glossy Photo Paper 170gsm
•
Roll paper width: 10 inches (254.0 mm)
Choose Page Setup from the application menu to
1
display the Page Attributes dialog box.
Page Setup might not be displayed in the menu de-
•
Note
pending on the OS you are using and the application software.
In this case, select Print from the menu in the application software, and configure the settings in the upper part of the printer driver screen that is displayed.
Enhanced Printing Options Printing at full size
2
Select the printer in the BFormat for list.
3
In the CPaper Size list, choose a paper size supported for borderless printing. Here, click 10"x12" - Borderless.
Paper sizes supported for borderless printing are indicated by -Borderless.
•
Note
4
Click FOK to close the dialog box.
5
In the application, create an original that takes up the entire space of the paper size.
6
Choose Print in the application menu.
User's Guide
Downloaded from ManualsPrinter.com Manuals
75
Page 76

Borderless Printing at Actual Size (Mac OS)
Access the Main pane.
7
Enhanced Printing Options Printing at full size
iPF670
8
In the AMedia Type list, select the type of paper that is loaded. In this case, click Canon Glossy Photo
Paper 170gsm.
9
Select the print target in the EPrint Target list.
When you are using paper that takes longer for ink to adhere for borderless printing and the Cutter Unit
•
Important
Access the Page Setup pane.
10
touches printing surfaces that are not dry yet, it may damage the paper or the edge of the document that
is cut, depending on frequency of use. In this kind of situation, change the ink drying time in Between
Pages in the Paper Detailed Settings dialog box.
11
Select and click a roll paper in the A Paper Source list.
Select the paper width of the roll loaded in the printer for B Roll Width. In this case, 10 in. (254.0mm) is
selected.
12
Confirm the print settings, and then click MPrint to start printing.
For tips on confirming print settings, see "Confirming Print Settings ." ➔P.250
•
Note
User's Guide
Downloaded from ManualsPrinter.com Manuals
Page 77

iPF670
Borderless Printing on Paper of Equivalent Size
Borderless Printing
Borderless Printing
Borderless Printing on Paper of Equivalent Size ................................................................................................ 77
Borderless Printing by Resizing Originals to Match the Paper Size (Windows) ............................................. 78
Borderless Printing by Resizing Originals to Fit the Roll Width ........................................................................... 80
Borderless Printing by Resizing Originals to Fit the Roll Width (Windows) .................................................... 81
Borderless Printing by Resizing Originals to Fit the Roll Width (Mac OS) ...................................................... 83
Borderless Printing at Actual Size ..................................................................................................................... 72
Borderless Printing at Actual Size (Windows) ............................................................................................... 73
Borderless Printing at Actual Size (Mac OS) ................................................................................................ 74
Borderless Printing on Paper of Equivalent Size
Borderless Printing on Paper of Equivalent Size
Take advantage of borderless printing to print documents such as posters (made up mainly of photos or images)
without a surrounding margin, or border.
In regular printing, a margin required by the printer is added around the original. With borderless printing, you can
print documents without the margin, so that the printed image covers the entire surface of the paper.
•
Borderless printing is only available with rolls.
•
Paper you can use for borderless printing is restricted to particular types of paper and rolls of particular widths.
(See "Displaying the Paper Reference Guide.") ➔ P.313
•
Although it normally prints borderless on the top, bottom, left, and right (4-edge borderless), in the following
cases, it becomes borderless only on the left and right (2-edge borderless) because the top and bottom of the
printed image are not automatically cut.
Enhanced Printing Options Borderless Printing
•
When paper where the borderless printing is described as two edges only in the Paper Reference Guide
(paper where printed image areas cannot be cut cleanly) is selected
•
When the following settings are made in the printer control panel
•
Cutting Mode is Manual
•
CutDustReduct. is On
•
When auto cut is configured as not performed in the printer driver
Borderless printing is not possible if details such as crop marks and margins are included as data on the periph-
•
Important
Choose the method of borderless printing that suits the original, as desired.
ery of the original.
•
If the length of the image to print is short, then since the roll paper is fed out to a prescribed length before cutting
in order to prevent cutting problems and ejection problems, the trailing edge of the roll paper might not be printed
borderless.
•
These features cannot be used in combination with borderless printing: special page layouts, centering originals,
and printing cut lines on rolls.
•
If Fit Paper Size or Print Image with Actual Size (Windows only) is selected while performing borderless printing, Rotate Page 90 degrees (Conserve Paper) cannot be selected. Note that if borderless printing is possible,
then even if the original is rotated 90 degrees, it will be printed by automatically rotating the page by 90 degrees.
User's Guide
Downloaded from ManualsPrinter.com Manuals
77
Page 78

Borderless Printing by Resizing Originals to Match the Paper Size (Windows)
•
Fit Paper Size
Enlarge or reduce the original to match the size of the paper you are using.
Enhanced Printing Options Borderless Printing
•
The printer driver automatically enlarges originals 3 mm (0.12 in) past the dimensions of the paper on each
Note
side. The 3 mm portion beyond the edge on each side is not printed.
iPF670
For instructions on borderless printing of photos, images, and other documents to match the paper size, refer
to the following topics, as appropriate for your computer and operating system.
•
Borderless Printing by Resizing Originals to Match the Paper Size (Windows) ➔ P.78
To perform borderless printing with resizing to fit the paper size on Mac OS, select borderless in Paper
•
Note
Borderless Printing by Resizing Originals to Match the Paper Size (Windows)
Borderless Printing by Resizing Originals to Match the Paper Size (Windows)
This topic describes how to enlarge originals before borderless printing to match the paper size, based on the following example.
When borderless printing is used, the edge of the paper is cut during printing. Thus, ink density may be uneven at
•
Important
the edges. If you require higher image quality, select No from the Automatic Cutting list in the Roll Paper Op-
tions dialog box. In this case, the paper can be printed without borders on the left and right sides only. Once
printed and cut, please cut the upper and lower bands with scissors.
Size and use Scale to fit paper size in the Paper Handling panel provided by the OS.
For more information, see the Mac OS User Manual.
•
Document: Any type
•
Page size: 10×12 inches (254.0×304.8 mm)
•
Paper: Roll
•
Paper type: Canon Glossy Photo Paper 170gsm
•
Roll paper width: 10 inches (254.0 mm)
1
In the application, create an original that takes up the entire space of the paper size.
If you can specify the margin, as in Microsoft Word, set the margin at 0 mm. For instructions on specifying
•
Note
2
Choose Print in the application menu.
User's Guide
Downloaded from ManualsPrinter.com Manuals
the margin, refer to the software documentation.
Page 79

iPF670
Borderless Printing by Resizing Originals to Match the Paper Size (Windows)
3
Select the printer in the dialog box, and then display the printer driver dialog box. (See "Accessing the Print-
er Driver Dialog Box from Applications .") ➔ P.146
Make sure the Main sheet is displayed.
4
Enhanced Printing Options Borderless Printing
5
In the
Paper 170gsm.
6
Select the print target in the EPrint Target list.
Click the Page Setup tab to display the Page Setup
7
sheet.
A Media Type list, select the type of paper that is loaded. In this case, click Canon Glossy Photo
When you are using paper that takes longer for ink to adhere for borderless printing and the Cutter Unit
•
Important
touches printing surfaces that are not dry yet, it may damage the paper or the edge of the document that
is cut, depending on frequency of use. In this kind of situation, change the ink drying time using the
following procedure.
•
Click Advanced Settings in Media Type.
•
Select an ink drying time in the list for the Between Pages setting of Drying Time.
8
In the APage Size list, click the size of the original as specified in the application. In this case, click
10"x12".
9
Select and click a roll paper in the LPaper Source list.
User's Guide
Downloaded from ManualsPrinter.com Manuals
79
Page 80

Borderless Printing by Resizing Originals to Fit the Roll Width
10
Select the BBorderless Printing check box to display the Information dialog box.
Enhanced Printing Options Borderless Printing
11
Select the width of the loaded roll in the Roll Paper Width list—in this case, click 10-in. Roll (254.0mm).
12
Click OK to close the Information dialog box.
13
In CBorderless Printing Method, click D Fit Paper Size.
iPF670
14
Click Match Page Size in the GPaper Size list.
15
Confirm the print settings and print as desired.
For tips on confirming print settings, see "Confirming Print Settings ." ➔P.143
•
Note
Borderless Printing by Resizing Originals to Fit the Roll Width
Borderless Printing by Resizing Originals to Fit the Roll Width
Take advantage of borderless printing to print documents such as posters (made up mainly of photos or images)
without a surrounding margin, or border.
In regular printing, a margin required by the printer is added around the original. With borderless printing, you can
print documents without the margin, so that the printed image covers the entire surface of the paper.
•
Borderless printing is only available with rolls.
•
Paper you can use for borderless printing is restricted to particular types of paper and rolls of particular widths.
(See "Displaying the Paper Reference Guide.") ➔ P.313
•
Although it normally prints borderless on the top, bottom, left, and right (4-edge borderless), in the following
cases, it becomes borderless only on the left and right (2-edge borderless) because the top and bottom of the
printed image are not automatically cut.
•
When paper where the borderless printing is described as two edges only in the Paper Reference Guide
(paper where printed image areas cannot be cut cleanly) is selected
•
When the following settings are made in the printer control panel
•
Cutting Mode is Manual
•
CutDustReduct. is On
•
When auto cut is configured as not performed in the printer driver
User's Guide
Downloaded from ManualsPrinter.com Manuals
Page 81

iPF670
Borderless Printing by Resizing Originals to Fit the Roll Width (Windows)
•
Borderless printing is not possible if details such as crop marks and margins are included as data on the periph-
Important
ery of the original.
•
If the length of the image to print is short, then since the roll paper is fed out to a prescribed length before cutting
in order to prevent cutting problems and ejection problems, the trailing edge of the roll paper might not be printed
borderless.
•
These features cannot be used in combination with borderless printing: special page layouts, centering originals,
and printing cut lines on rolls.
•
If Fit Paper Size or Print Image with Actual Size (Windows only) is selected while performing borderless printing, Rotate Page 90 degrees (Conserve Paper) cannot be selected. Note that if borderless printing is possible,
then even if the original is rotated 90 degrees, it will be printed by automatically rotating the page by 90 degrees.
Enhanced Printing Options Borderless Printing
Choose the method of borderless printing that suits the original, as desired.
•
Scale to fit Roll Paper Width
Enlarge or reduce the original as a whole to match the roll paper width.
•
You can combine this function with rotating pages 90 degrees before printing so that the original width (rela-
Note
For instructions on borderless printing of photos, images, and other documents to match the roll paper width,
refer to the following topics, as appropriate for your computer and operating system.
tive to portrait orientation) matches the roll paper width in borderless printing.
•
Borderless Printing by Resizing Originals to Fit the Roll Width (Windows) ➔ P.81
Borderless Printing by Resizing Originals to Fit the Roll Width (Windows)
Borderless Printing by Resizing Originals to Fit the Roll Width (Windows)
This topic describes how to enlarge originals before borderless printing to match the roll width, based on the following example.
When borderless printing is used, the edge of the paper is cut during printing. Thus, ink density may be uneven at
•
Important
•
Document: Any type
•
Page size: A4 (210.0×297.0 mm)/Letter (8.3 × 11.7 in)
•
Paper: Roll
•
Paper type: Canon Glossy Photo Paper 170gsm
•
Roll paper width: 10 inches (254.0 mm)
1
the edges. If you require higher image quality, select No from the Automatic Cutting list in the Roll Paper Options dialog box. In this case, the paper can be printed without borders on the left and right sides only. Once
printed and cut, please cut the upper and lower bands with scissors.
In the application, create an original that takes up the entire space of the paper size.
If you can specify the margin, as in Microsoft Word, set the margin at 0 mm. For instructions on specifying
•
Note
the margin, refer to the software documentation.
81
User's Guide
Downloaded from ManualsPrinter.com Manuals
Page 82

Borderless Printing by Resizing Originals to Fit the Roll Width (Windows)
2
Choose Print in the application menu.
3
Enhanced Printing Options Borderless Printing
Select the printer in the dialog box, and then display the printer driver dialog box. (See "Accessing the Print-
er Driver Dialog Box from Applications .") ➔ P.146
Make sure the Main sheet is displayed.
4
5
In the AMedia Type list, select the type of paper that is loaded. In this case, click Canon Glossy Photo
Paper 170gsm.
iPF670
6
Select the print target in the EPrint Target list.
When you are using paper that takes longer for ink to adhere for borderless printing and the Cutter Unit
•
Important
Click the Page Setup tab to display the Page Setup
7
sheet.
touches printing surfaces that are not dry yet, it may damage the paper or the edge of the document that
is cut, depending on frequency of use. In this kind of situation, change the ink drying time using the
following procedure.
•
Click Advanced Settings in Media Type.
•
Select an ink drying time in the list for the Between Pages setting of Drying Time.
8
In the APage Size list, click the size of the original as specified in the application. In this case, click ISO
A4.
9
Select and click a roll paper in the LPaper Source list.
User's Guide
Downloaded from ManualsPrinter.com Manuals
Page 83

iPF670
Borderless Printing by Resizing Originals to Fit the Roll Width (Mac OS)
10
Select the BBorderless Printing check box to display the Information dialog box.
11
Select the width of the loaded roll in the Roll Paper Width list—in this case, click 10-in. Roll (254.0mm).
12
Click OK to close the Information dialog box.
13
In CBorderless Printing Method, make sure E Scale to fit Roll Paper Width is selected.
Enhanced Printing Options Borderless Printing
14
Confirm the print settings and print as desired.
For tips on confirming print settings, see "Confirming Print Settings ." ➔P.143
•
Note
Borderless Printing by Resizing Originals to Fit the Roll Width (Mac OS)
Borderless Printing by Resizing Originals to Fit the Roll Width (Mac OS)
This topic describes how to enlarge originals before borderless printing to match the roll width, based on the following example.
When borderless printing is used, the edge of the paper is cut during printing. Thus, ink density may be uneven at
•
Important
•
Document: Any type
•
Page size: A4 (210.0×297.0 mm)/Letter (8.3 × 11.7 in)
•
Paper: Roll
•
Paper type: Canon Glossy Photo Paper 170gsm
•
Roll paper width: 10 inches (254.0 mm)
1
the edges. If you require higher image quality, select No from the Automatic Cutting list in the Paper Detailed
Settings dialog box. In this case, the paper can be printed without borders on the left and right sides only. Once
printed and cut, please cut the upper and lower bands with scissors.
Choose Page Setup from the application menu to
display the Page Attributes dialog box.
User's Guide
Downloaded from ManualsPrinter.com Manuals
83
Page 84

Borderless Printing by Resizing Originals to Fit the Roll Width (Mac OS)
Page Setup might not be displayed in the menu de-
•
pending on the OS you are using and the application software.
In this case, select Print from the menu in the application software, and configure the settings in the upper part of the printer driver screen that is displayed.
•
All sizes are available in borderless printing if you resize originals to fit the roll width.
Enhanced Printing Options Borderless Printing
2
3
4
5
6
7
Note
Select the printer in the BFormat for list.
In CPaper Size, click the size of the original. In this case, click ISO A4.
Note
Click FOK to close the dialog box.
In the application, create an original that takes up the entire space of the paper size.
Choose Print in the application menu.
Access the Main pane.
iPF670
8
In the AMedia Type list, select the type of paper that is loaded. In this case, click Canon Glossy Photo
Paper 170gsm.
9
Select the print target in the EPrint Target list.
When you are using paper that takes longer for ink to adhere for borderless printing and the Cutter Unit
•
Important
User's Guide
Downloaded from ManualsPrinter.com Manuals
touches printing surfaces that are not dry yet, it may damage the paper or the edge of the document that
is cut, depending on frequency of use. In this kind of situation, change the ink drying time in Between
Pages in the Paper Detailed Settings dialog box.
Page 85

iPF670
Borderless Printing by Resizing Originals to Fit the Roll Width (Mac OS)
Access the Page Setup pane.
10
11
Select and click a roll paper in the A Paper Source list.
12
Select the paper width of the roll loaded in the printer for B Roll Width. In this case, 10 in. (254.0mm) is
selected.
Enhanced Printing Options Borderless Printing
13
Select the DEnlarged/Reduced Printing check box.
14
Select the HBorderless Printing check box.
This ensures that FFit Roll Paper Width is automatically selected in D Enlarged/Reduced Printing.
15
Confirm the print settings, and then click MPrint to start printing.
For tips on confirming print settings, see "Confirming Print Settings ." ➔P.250
•
Note
User's Guide
Downloaded from ManualsPrinter.com Manuals
85
Page 86

Printing Vertical or Horizontal Banners (Large-Format Printing)
Printing banners or at other non-standard sizes
Printing banners or at other non-standard sizes
iPF670
Enhanced Printing Options Printing banners or at other non-standard sizes
Printing Vertical or Horizontal Banners (Large-Format Printing) ......................................................................... 86
Printing Vertical or Horizontal Banners (Large-Format Printing; Windows) .................................................... 87
Printing Vertical or Horizontal Banners (Large-Format Printing; Mac OS) ...................................................... 90
Printing on Non-Standard Paper Sizes ............................................................................................................. 93
Printing on Non-Standard Paper Sizes (Windows) ....................................................................................... 93
Printing on Non-Standard Paper Sizes (Mac OS) ......................................................................................... 96
Printing Vertical or Horizontal Banners (Large-Format Printing)
Printing Vertical or Horizontal Banners (Large-Format Printing)
On this printer, large-format printing of up to 18.0 m is available using rolls.
If you use Print Plug-In for Office or PosterArtist, you can easily print maximum 18.0 m vertical or horizontal banners. (Refer to "Print Plug-In for Officefeatures (Windows)" ➔ P.210 and "Using PosterArtist to Compose Origi-
nals" ➔ P.36 .)
However, you may not be able to print 18.0 m due to restrictions in the settable document size according to the
application software.
Fit Roll Paper Width
To match the width of vertical and horizontal banners with the width of rolls, use the printer driver function for automatically enlarging/reducing and printing.
For example, if you automatically enlarge a document created with application software such as Microsoft Word,
you can print the full width of the roll easily.
For instructions on printing vertical or horizontal banners, refer to the following topics, as appropriate for your computer and operating system.
•
Printing Vertical or Horizontal Banners (Large-Format Printing; Windows) ➔P.87
•
Printing Vertical or Horizontal Banners (Large-Format Printing; Mac OS) ➔P.90
Before printing, check how much of the roll paper is left. If you have activated automatic detection of the remain-
•
Important
User's Guide
Downloaded from ManualsPrinter.com Manuals
ing roll paper, a warning message is displayed when there is not enough roll paper left.
•
If not much ink is left, prepare replacement ink tanks.
•
To print at a higher level of quality, in the printer driver, choose High or Highest in Print Quality, and choose
Unidirectional Printing as the direction of printing.
Page 87

iPF670
Printing Vertical or Horizontal Banners (Large-Format Printing; Windows)
Printing Vertical or Horizontal Banners (Large-Format Printing; Windows)
Printing Vertical or Horizontal Banners (Large-Format Printing; Windows)
By automatic enlargement of a document created with an application software by the printer driver, you can print
maximum 18.0 m vertical or horizontal banners.
However, you may not be able to print 18.0 m due to restrictions in the settable document size according to the
application software.
This topic describes how to print a banner about five times as long as the roll width based on the following example.
•
Document: A horizontal banner created in Microsoft Word
•
Page size: Non-standard (100×500 mm [3.9×19.7 in])
•
Paper: Roll
•
Paper type: Plain Paper
•
Roll paper width: 16 in (406.4 mm)
The print procedure is as follows.
1.
Register a Custom Paper Size in the printer driver.
Call a non-standard paper size registered in the printer driver with Custom Paper Size.
Once you register Custom Paper Size, you then can select it repeatedly from the paper size list.
Custom Paper Size can be set up to 18.0 m.
2.
In the application, create an original in the size you registered.
3.
Print the banner, using the settings that correspond to banners.
Enhanced Printing Options Printing banners or at other non-standard sizes
Registering a Custom Paper Size
This example describes how to register a paper size that is horizontally elongated and suitable for banners in either
horizontal or vertical format.
1
Display the printer driver dialog box. (See "Accessing the Printer Driver Dialog Box from the Operating Sys-
tem Menu .") ➔ P.147
Click the Page Setup tab to display the Page Setup
2
sheet.
3
Select and click a roll paper in the LPaper Source list.
4
Click OSize Options to display the Paper Size Options dialog box.
5
Enter a desired paper name in Custom Paper Size Name. My Horizontal Banner is used in this example.
6
In Units, click mm.
7
Under Paper Size, enter 100 in Width and 500 in Height.
8
Click Add to add the paper size of My Horizontal Banner.
9
Click OK to close the Paper Size Options dialog box.
User's Guide
Downloaded from ManualsPrinter.com Manuals
87
Page 88

Printing Vertical or Horizontal Banners (Large-Format Printing; Windows)
10
Close the printer driver dialog box.
•
Enhanced Printing Options Printing banners or at other non-standard sizes
Note
Creating the banner in the application
Follow the steps below to create the banner in Microsoft Word using the Custom Paper Size you registered.
1
2
3
Although you can even set Custom Size for the paper size, the maximum settable size is 3.2 m. The setting of
Custom Size is disabled when you exit the application software.
For more information, see "Printing on Non-Standard Paper Sizes ." ➔ P.93
Start Microsoft Word.
Choose Page Setup from the File menu to display the Page Setup dialog box.
Under Paper Size, click the Custom Paper Size you registered—My Horizontal Banner in this example.
•
If My Horizontal Banner is not listed, make sure this printer is selected as the printer to use.
iPF670
Important
Set the printing orientation to horizontal.
4
5
Create the banner.
Printing the banner
Follow these steps to print the banner using the corresponding banner settings.
1
Choose Print in the Microsoft Word menu.
2
Select the printer in the dialog box, and then display the printer driver dialog box. (See "Accessing the Print-
er Driver Dialog Box from Applications .") ➔ P.146
Make sure the Main sheet is displayed.
3
•
In applications such as Microsoft PowerPoint that do not enable you to choose registered paper sizes,
use the custom paper size setting in Custom and specify 100×500 mm (3.9×19.7 in)
4
In the AMedia Type list, select the type of paper that is loaded. In this case, click Plain Paper.
5
After confirming that DEasy Settings is selected, click Poster in the E Print Target list.
User's Guide
Downloaded from ManualsPrinter.com Manuals
Page 89

iPF670
Printing Vertical or Horizontal Banners (Large-Format Printing; Windows)
Click the Page Setup tab to display the Page Setup
6
sheet.
7
In the APage Size list, click the size you registered, My Horizontal Banner.
8
Select the CEnlarged/Reduced Printing check box.
If the CEnlarged/Reduced Printing check box is
•
Note
not displayed on the Page Setup sheet, clear the
B Borderless Printing check box.
Enhanced Printing Options Printing banners or at other non-standard sizes
9
Select and click a roll paper in the
10
After you click EFit Roll Paper Width, the Information dialog box is displayed.
11
Select the width of the loaded roll in the Roll Paper Width list. In this case, click 16-in. Roll (406.4mm),
and then click OK.
12
Confirm the print settings and print as desired.
For tips on confirming print settings, see "Confirming Print Settings ." ➔P.143
•
Note
L Paper Source list.
89
User's Guide
Downloaded from ManualsPrinter.com Manuals
Page 90

Printing Vertical or Horizontal Banners (Large-Format Printing; Mac OS)
If printing is unsuccessful, you may be able to print after completing the following setting.
1
On the Layout sheet, click JSpecial Settings to
Enhanced Printing Options Printing banners or at other non-standard sizes
display the Special Settings dialog box.
In the FineZoom Settings list, click Yes.
2
iPF670
Printing Vertical or Horizontal Banners (Large-Format Printing; Mac OS)
Printing Vertical or Horizontal Banners (Large-Format Printing; Mac OS)
By automatic enlargement of a document created with an application software by the printer driver, you can print
maximum 18.0 m vertical or horizontal banners.
This topic describes how to print a banner about five times as long as the roll width based on the following example.
•
Document: An original designed for a horizontal banner
•
Page Size: Non-standard (100×500 mm [3.9×19.7 in])
•
Paper: Roll
•
Paper type: Plain Paper
•
Roll paper width: 16 inches (406.4 mm)
The print procedure is as follows.
1.
In the application, create an original in the format of a horizontal or vertical banner.
2.
In Page Setup, register Custom Paper Sizes.
Once you register Custom Paper Sizes, you then can select it repeatedly from the paper size list.
Custom Paper Sizes can be set up to 18.0 m.
3.
Print the banner, using the settings that correspond to banners.
The following instructions are for OS X v10.7. The method of setting up non-standard paper sizes varies depending
•
Note
on the version and settings of Mac OS X.
Register a Custom Paper Sizes
This example describes how to register and print using a page size that is horizontally elongated and suitable for
banners in either horizontal or vertical format.
1
Create the document in the application.
User's Guide
Downloaded from ManualsPrinter.com Manuals
Page 91

iPF670
Printing Vertical or Horizontal Banners (Large-Format Printing; Mac OS)
Choose Print in the application menu.
2
3
Select the printer in the APrinter list.
4
Click Manage Custom Sizes in the FPaper Size list
to display the Custom Paper Sizes dialog box.
Enhanced Printing Options Printing banners or at other non-standard sizes
5
Double-click Untitled in the list at left, and then enter a name for the page size you want to register. Here,
enter 100*500.
If the Untitled size is not listed at left, click + below the list.
6
Under Paper Size, enter 100 in Width and 500 in Height. Here, measurements are entered in millimeters.
7
Specify the margins by entering 3 in Non-Printable Area. Here, too, measurements are entered in millimeters.
8
Click OK to close the Custom Paper Sizes dialog box.
9
In the FPaper Size list, click the size of the original. In this case, click 100*500, the size you registered.
10
In GOrientation, click the icon of the document in landscape orientation.
11
If you configured the settings using the Page Attributes dialog box, click OK to close the dialog box.
Print the banner
Follow the steps below to print the banner using the corresponding banner settings.
1
Choose Print in the application menu.
User's Guide
Downloaded from ManualsPrinter.com Manuals
91
Page 92

Printing Vertical or Horizontal Banners (Large-Format Printing; Mac OS)
Access the Main pane.
2
Enhanced Printing Options Printing banners or at other non-standard sizes
iPF670
3
In the AMedia Type list, select the type of paper that is loaded. In this case, click Plain Paper.
4
Make your selection in the EPrint Target list.
5
Make your selection in the FPrint Quality list.
Access the Page Setup pane.
6
7
Select and click a roll paper in the APaper Source list.
8
Select the paper width of the roll loaded in the printer for B Roll Width. In this case, 16 in. (406.4mm) is
selected.
9
Select the DEnlarged/Reduced Printing check box.
10
Click FFit Roll Paper Width.
User's Guide
Downloaded from ManualsPrinter.com Manuals
Page 93

iPF670
Printing on Non-Standard Paper Sizes
11
Confirm the print settings, and click MPrint to start printing.
•
For tips on confirming print settings, see "Confirming Print Settings ." ➔P.250
Note
Printing on Non-Standard Paper Sizes
Printing on Non-Standard Paper Sizes
For printing on non-standard size paper, first register the paper size in the printer driver.
Once you register a paper size, you then can select it repeatedly from the paper size list. The paper size can be set
up to 18.0 m.
•
In Windows, although you can even set Custom Size for the paper size, the maximum settable size is 3.2 m. The
Note
For instructions on specifying non-standard paper sizes for printing, refer to the following topics, as appropriate for
your computer and operating system.
•
Printing on Non-Standard Paper Sizes (Windows) ➔ P.93
•
Printing on Non-Standard Paper Sizes (Mac OS) ➔ P.96
Printing on Non-Standard Paper Sizes (Windows)
Printing on Non-Standard Paper Sizes (Windows)
For printing on non-standard size paper, first register the paper size in the printer driver.
Call a non-standard paper size registered in the printer driver with Custom Paper Size.
Once you register Custom Paper Size, you then can select it repeatedly from the paper size list.
Custom Paper Size can be set up to 18.0 m.
setting of Custom Size is disabled when you exit the application software.
Enhanced Printing Options Printing banners or at other non-standard sizes
Although you also can set Custom Size for the paper size temporarily, the maximum settable size is 3.2 m. Also,
•
Note
the setting of Custom Size is disabled when you exit the application software.
Registering and Printing With a Custom Paper Size
This topic describes how to register a non-standard paper size by the name of 430 mm Square and print based on
the following example.
•
Document: Any Type
•
Page Size: A square sheet (430 × 430 mm [16.9 × 16.9 in])
•
Paper: Sheets
•
Media Type: Any type
•
Paper Size: A square sheet (430 × 430 mm [16.9 × 16.9 in])
1
Load the square paper (430 × 430 mm [16.9 × 16.9 in]) in the printer.
2
Choose Print in the application menu.
3
Select the printer in the dialog box, and then display the printer driver dialog box. (See "Accessing the Print-
er Driver Dialog Box from Applications .") ➔ P.146
User's Guide
Downloaded from ManualsPrinter.com Manuals
93
Page 94

Printing on Non-Standard Paper Sizes (Windows)
Make sure the Main sheet is displayed.
4
Enhanced Printing Options Printing banners or at other non-standard sizes
5
In the AMedia Type list, select the type of paper that is loaded.
6
After confirming that DEasy Settings is selected, select from the E Print Target list.
Click the Page Setup tab to display the Page Setup
7
sheet.
iPF670
8
Click OSize Options to display the Paper Size Options dialog box.
9
Enter a desired paper name in Custom Paper Size Name. 430 mm Square is used in this example.
10
Select mm in Units.
11
Enter 430 (16.9 in) in both Width and Height.
If you select the Fix the Ratio of the Width to Height check box, after you enter a value in either Width
•
Note
12
Click Add to register 430 mm Square.
13
Click OK to close the Paper Size Options dialog box.
14
Click Manual in the LPaper Source list.
15
In the APage Size list, click the size you added,430 mm Square.
or Height, the other value will be automatically applied based on the original aspect ratio.
User's Guide
Downloaded from ManualsPrinter.com Manuals
Page 95

iPF670
Printing on Non-Standard Paper Sizes (Windows)
16
Confirm the print settings and print as desired.
•
For tips on confirming print settings, see "Confirming Print Settings ." ➔P.143
Note
Printing by using Custom Size
This section describes how to print using Custom Size based on the following example.
•
Document: Any Type
•
Page size: Square of non-standard dimensions (430×430 mm [16.9×16.9 in])
•
Paper: Sheets
•
Paper type: Any type
•
Paper Size: A square sheet (430 × 430 mm [16.9 × 16.9 in])
1
Load the square paper (430 × 430 mm [16.9 × 16.9 in]) in the printer.
2
Choose Print in the application menu.
3
Select the printer in the dialog box, and then display the printer driver dialog box. (See "Accessing the Print-
er Driver Dialog Box from Applications .") ➔ P.146
Make sure the Main sheet is displayed.
4
Enhanced Printing Options Printing banners or at other non-standard sizes
5
In the AMedia Type list, select the type of paper that is loaded.
6
After confirming that DEasy Settings is selected, select from the E Print Target list.
Click the Page Setup tab to display the Page Setup
7
sheet.
8
Click Manual in the LPaper Source list.
95
User's Guide
Downloaded from ManualsPrinter.com Manuals
Page 96

Printing on Non-Standard Paper Sizes (Mac OS)
9
Click Custom Size in the APage Size list to display the Custom Size Settings dialog box.
10
Enhanced Printing Options Printing banners or at other non-standard sizes
For printing on non-standard size paper, first register the paper size in the printer driver.
Call a non-standard paper size registered in the printer driver with Custom Paper Sizes .
Once you register Custom Paper Sizes, you then can select it repeatedly from the paper size list.
Custom Paper Sizes can be set up to 18.0 m.
This topic describes how to register a non-standard paper size by the name of 430*430 and print based on the
following example.
Confirm that mm is selected in Units.
11
Enter 430 (16.9 in) in both Width and Height.
12
Click OK to close the Custom Size Settings dialog box.
13
Confirm the print settings and print as desired.
•
For tips on confirming print settings, see "Confirming Print Settings ." ➔P.143
Note
Printing on Non-Standard Paper Sizes (Mac OS)
Printing on Non-Standard Paper Sizes (Mac OS)
iPF670
•
Document: Any Type
•
Page Size: A square sheet (430 × 430 mm [16.9 × 16.9 in])
•
Paper: Sheets
•
Media Type: Any type
•
Paper Size: A square sheet (430 × 430 mm [16.9 × 16.9 in])
The following instructions are for OS X v10.7. The method of setting up non-standard paper sizes varies depending
•
Note
1
2
3
4
5
on the version and settings of Mac OS X.
Create the document in the application.
Load the square paper (430 × 430 mm [16.9 × 16.9 in]) in the printer.
Choose Print in the application menu.
Select the printer in the APrinter list.
Click Manage Custom Sizes in the FPaper Size list
to display the Custom Paper Sizes dialog box.
User's Guide
Downloaded from ManualsPrinter.com Manuals
Page 97

iPF670
Printing on Non-Standard Paper Sizes (Mac OS)
6
In Paper Size, enter the height and width of the original. Here, enter 430 mm in Height and Width.
7
In Non-Printable Area, enter 5 for the top and side margins and 23 for the bottom margin. Here, measurements are entered in millimeters.
8
Double-click Untitled in the list at left in the Custom Paper Sizes dialog box and enter the paper name—in
this case, 430*430.
9
Click OK to close the Custom Paper Sizes dialog box.
In the FPaper Size list, click the size of the original. In this case, click 430*430, the size you registered.
10
Enhanced Printing Options Printing banners or at other non-standard sizes
11
If you configured the settings using the Page Attributes dialog box, click OK to close the dialog box, and
then select Print from the application software menu.
Access the Main pane.
12
13
In the AMedia Type list, select the type of paper that is loaded.
14
After confirming that DEasy Settings is selected, select from the E Print Target list.
15
Make your selection in the FPrint Quality list.
User's Guide
Downloaded from ManualsPrinter.com Manuals
97
Page 98

Printing on Non-Standard Paper Sizes (Mac OS)
Access the Page Setup pane.
16
Enhanced Printing Options Printing banners or at other non-standard sizes
17
Click Manual in the APaper Source list.
18
Confirm the print settings, and then click MPrint to start printing.
iPF670
Note
•
For tips on confirming print settings, see "Confirming Print Settings ." ➔P.250
User's Guide
Downloaded from ManualsPrinter.com Manuals
Page 99

iPF670
Printing Multiple Originals Next to Each Other
Tiling and multiple pages per sheet
Tiling and multiple pages per sheet
Printing Multiple Originals Next to Each Other ................................................................................................... 99
Printing Multiple Originals Next to Each Other (Windows) ...........................................................................100
Printing Multiple Originals Next to Each Other (Mac OS) ............................................................................ 101
Printing Multiple Pages Continuously .............................................................................................................. 102
Printing Multiple Pages Continuously (Windows) ........................................................................................ 103
Printing Multiple Pages Continuously (Mac OS) .......................................................................................... 104
Printing Multiple Pages Per Sheet ................................................................................................................... 106
Printing Multiple Pages Per Sheet (Windows) .............................................................................................107
Printing Multiple Pages Per Sheet (Mac OS) .............................................................................................. 108
Printing Posters in Sections ............................................................................................................................ 110
Printing Large Posters (Windows) .............................................................................................................. 110
Printing Multiple Originals Next to Each Other
Printing Multiple Originals Next to Each Other
By arranging originals from word-processing or spreadsheet programs or web browser screen shots next to each
other on single sheets, you can create highly expressive presentation materials, easy-to-understand meeting materials, and a variety of other printed documents.
•
Free Layout (Windows)
Besides combining multiple pages in a single-page layout, you can combine originals from multiple files—even
multiple source applications—in a single-page layout.
Enhanced Printing Options Tiling and multiple pages per sheet
User's Guide
Downloaded from ManualsPrinter.com Manuals
99
Page 100

Printing Multiple Originals Next to Each Other (Windows)
•
Free Layout (Mac OS)
Besides combining multiple pages in a single-page layout, you can combine originals from multiple files—even
multiple source applications—in a single-page layout.
Enhanced Printing Options Tiling and multiple pages per sheet
For instructions on arranging originals from multiple applications, refer to the following topics.
•
Printing Multiple Originals Next to Each Other (Windows) ➔ P.100
•
Printing Multiple Originals Next to Each Other (Mac OS) ➔ P.101
iPF670
Printing Multiple Originals Next to Each Other (Windows)
Printing Multiple Originals Next to Each Other (Windows)
This topic describes how to arrange multiple originals using the Free Layout function.
1
Choose Print in the application menu.
2
Select the printer in the dialog box, and then display the printer driver dialog box. (See "Accessing the Print-
er Driver Dialog Box from Applications .") ➔ P.146
Make sure the Main sheet is displayed.
3
User's Guide
Downloaded from ManualsPrinter.com Manuals
 Loading...