

Page 1

FOXTEL MiniMote
Remote Control
For Ages 3 and Up
USER GUIDE
1
Page 2

TABLE OF CONTENTS
Quick Start..............................................................3
Low Battery Indication........................................6
Functions And Key Charts...................................7
Additional Programming Options....................9
Advanced Functions...........................................10
Manufacturer’s Codes........................................13
Setup Codes for TVs..........................................16
Setup Codes for TV/DVD Combos....................23
Setup Codes for TV/VCR Combos.....................24
Setup Codes for TV/VCR/DVD Combos............25
Battery Safety
• Batteries are small objects. Batteries must be replaced
by an adult.
• Follow the polarity (+/-) diagram in the battery
compartment.
• Promptly remove dead batteries from the remote.
• Dispose of used batteries properly.
• Remove batteries for prolonged storage.
• Only batteries of the same or equivalent type as
recommended are to be used.
• DO NOT incinerate used batteries.
• DO NOT dispose of batteries in re, as batteries may
explode or leak.
• DO NOT mix old and new batteries or types of batteries
(i.e., alkaline/standard).
• DO NOT use rechargeable batteries.
• DO NOT recharge non-rechargeable batteries.
• DO NOT short-circuit the supply terminals.
2
Page 3

QUICK START
MiniMote was designed specically for children ages three
or older, with safety and simplicity in mind. MiniMote offers
a simple means of control over what content your children
are exposed to when they watch television.
Basic setup is very simple, so you can give the remote to
the children in your household to begin using in just a few
minutes.
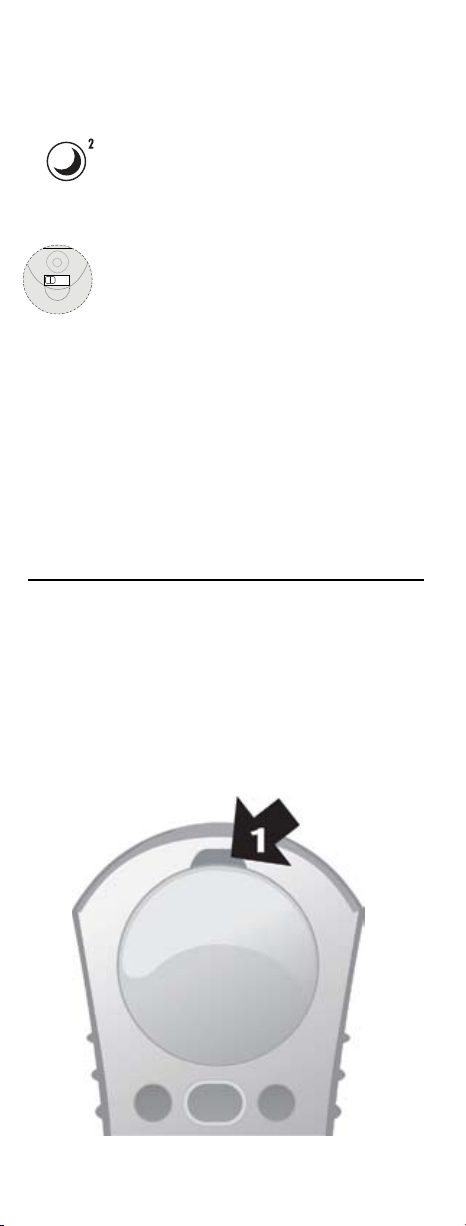
Step 1: Installing Batteries
Using a screwdriver, remove the battery cover from the
back side of the remote control. Insert 2 AAA batteries
as shown below. Do not replace cover on battery
compartment until programming is complete.
Step 2: Set Remote to Programming Mode
Set the switch located in the battery compartment to the
middle position P to enter programming mode as shown
below.
child
3-position switch
adult
P
3
Page 4

Step 3: Set TV Control (Optional)
1. With your television ON, and the remote in
Programming mode, press the VOL + key.
The LED blinks twice.
2. Refer to the TV codes in the back of this
manual. Find your TV brand and enter the rst
code for that brand by using the number keys
on the remote. When you press the fourth
number key, the LED on the remote blinks twice
to conrm a valid code.
To test the new TV code:
3. Slide the switch on the back of the remote to
CHILD mode.
adult
child
P
3-position switch
4. Point the remote at the TV and press
If the TV is muted, the code is correct. If the TV
does not mute, you must try the next code for
your brand.
5. Set the switch back to P for programming.
adult
child
P
3-position switch
6. If MUTE did not work, repeat the SET TV
Control process until the TV responds to
MUTE.
NOTE: The remote must be in CHILD or ADULT
mode to test the code.
MUTE.
7. TV control can also be set by using a simple
code search as shown on page 9.
Step 4: Programming the STAR and MOON
buttons (optional)
MiniMote comes pre-programmed with 8 favourite kids
channels assigned to keys 3 through 0. Two additional
favourite channels can be added to the STAR(1) and
MOON(2) keys on the remote.
1. While in Programming mode, press and hold
the
the LED blinks twice.
2. Press the digits for the channel number for the
favourite channel that you wish to save to the
STAR(1) button.
STAR(1) button. Release the key when
4
Page 5
3. Press and hold the STAR(1) button until
the LED blinks twice. STAR(1) now is
programmed to the channel that you have
assigned.
4. Repeat steps above to assign a favourite
channel to the MOON(2) button.
Step 5: Set the remote to CHILD mode
Set the switch located in the battery
compartment to the left position to enter
adult
child
P
CHILD user mode. CHILD mode is for children
and limits them to only have access to the ten
3-position switch
programmed channels on the remote.
Step 6: Replace battery door
Secure the battery compartment door back
in place with a screwdriver using the screw
provided.
Your MiniMote remote is now ready for use!
Refer to this manual for additional features and functions.
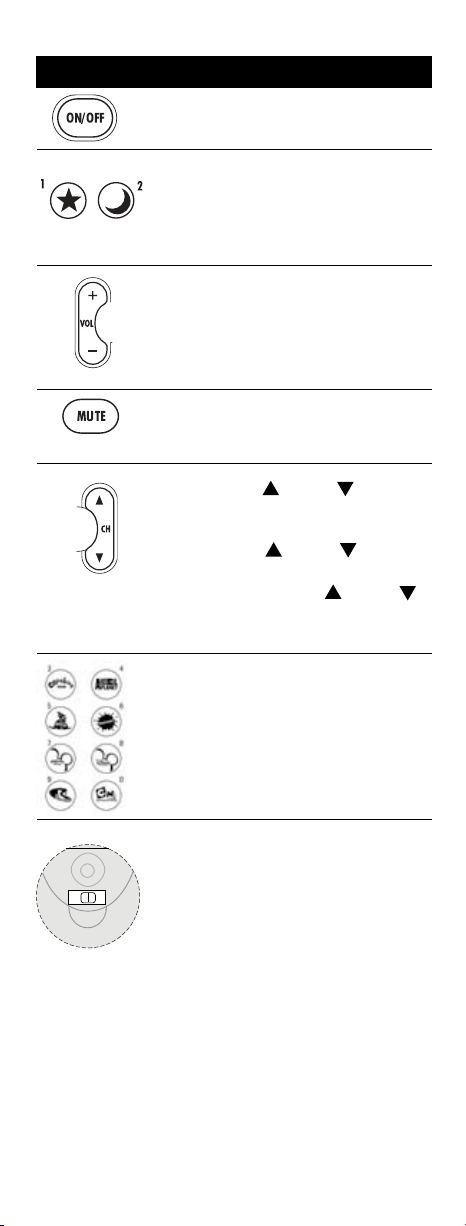
CUSTOMISING THE IMAGE COMPARTMENT
MiniMote comes with a customisable image compartment.
This allows the remote to be customised for the child or
children using the remote. A photo or image of your child’s
favourite character can be inserted in this location.
To replace default image
1. Using a coin or at screwdriver,
gently pry off the plastic lens
5
Page 6

Cut a photo or another image to the size of the
circular image compartment and insert photo
into opening. TIP: use the MiniMote character image
that comes with the remote as a template.
Replace clear plastic cover.
1. Slide tab in
2. Push down
LOW BATTERY INDICATION
When the battery power is low in the MiniMote, the LED
ashes ve times with each key-press. Refer to “Step 1:
Installing Batteries” on page 3 for battery replacement
instructions
6
Page 7
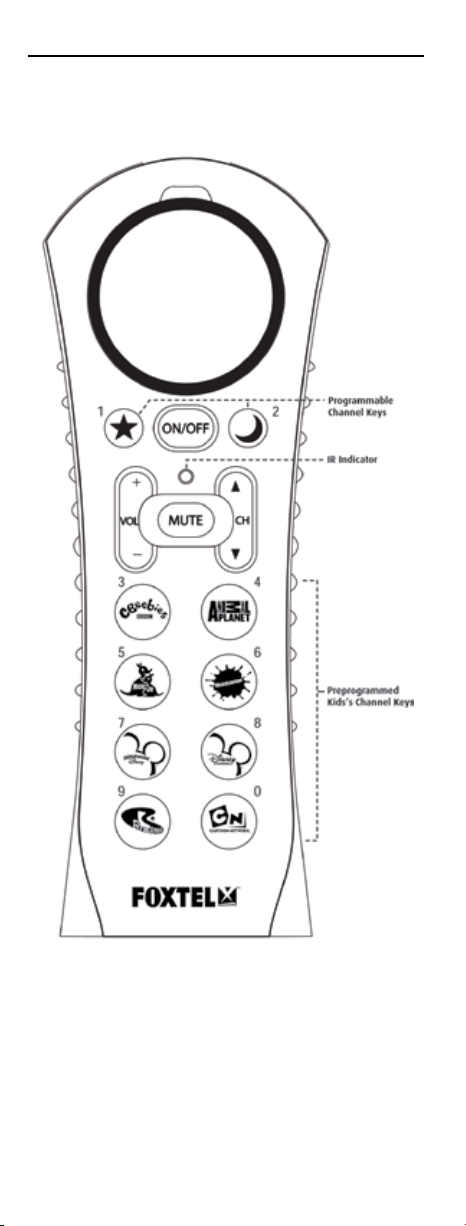
FUNCTIONS AND KEY CHARTS
Use the illustration below to locate features on the
MiniMote and then study the Key Charts (on the next
three pages) to learn how they function.
7
Page 8
Key Charts
Key Function
Press ON/OFF to turn the television
and Set Top Unit (STU) on or off.
The STAR(1) and MOON(2) keys
can be programmed to jump directly
to the channel of your choice. When in
programming mode,
and MOON is the 2 key,
VOL + turns the TV volume up.
VOL - turns the TV volume down.
When in programming mode,
initiates programming for TV and VOL -
initiates programming for the STU
MUTE mutes the TV volume. When in
programming mode, MUTE acts as the
SAVE key.
Child Mode: CH and CH cycles
through the ten programmed kids
channels on the remote.
Adult Mode: CH and CH cycles
through ALL channels.
Programming Mode: CH and CH
cycles through codes to set control of
your television or STU.
STAR is the 1 key
VOL +
.
adult
child
P
3-position switch
The eight pre-programmed keys with
children network icons jump directly to
the channel associated with the icon
when in Child mode or Adult mode.
While in Programming mode, these
keys act as number keys 3-0 for
programming favourite channels.
The three-position switch in the battery
compartment is used to set the user
(Child/Adult) or Programming mode.
CHILD mode is for children and limits
them to only have access to the ten
programmed channels on the remote.
ADULT mode is for older kids or adults
and allows access to all channels when
using channel up/down.
P is Programming mode and is used
while setting up the remote control to
control the TV, STU, and to add or modify
favourite channels.
8
Page 9

ADDITIONAL PROGRAMMING OPTIONS
Locate the three position switch within the battery
compartment. Set the switch to the middle position P to
enter programming mode.
When programming is complete, set the switch to either
CHILD mode or ADULT mode before replacing the battery
compartment door.
SETTING TV CONTROL
TV control can be set by inputting the code for your
brand of TV or via a simple code search. Setting TV
control by code input is described in the Quick Start on
page 4.
Setting TV Code by Code Search
1. With your television ON, and the remote in
Programming Mode, press the CH key.
The LED blinks twice.
2. Press the ON/OFF key once.
3. Press the CH key once per second until the
TV turns off.
4. Press ON/OFF. If the TV turns on, press MUTE
to save the TV code.
5. If the TV does not turn on, press
to the previous TV code and press MUTE to
save once the TV turns on.
CH to go
NOTE: There are over 200 possible codes, so this may
take a few minutes.
RE-PROGRAMMING FAVOURITE CHANNEL
KEYS
MiniMote comes pre-programmed with 8 favourite kids
channels assigned to keys 3 through 0 (refer to Key chart on
Page 7). The preprogrammed buttons can be programmed
to new channels by following the steps below.
CAUTION: This will program over the channel that was
pre-programmed!
To program a favourite channel, follow these
steps:
1. While in Programming Mode, press and hold
the key that you wish to assign a favourite
channel. Release the key when the LED blinks
twice.
2. Press the digits for the channel number for the
favourite channel that you wish to add.
3. Press and hold the key that you wish to assign
again until the LED blinks twice.
9
Page 10

4. Repeat steps above to assign another favourite
channel.
5. If the LED ashes one long blink, the entry
failed and must be repeated.
ADVANCED FUNCTIONS
Most users won’t need to perform any of the set-up
procedures in this section.
Volume Control Settings
Volume control functions are defaulted to the TV that
the remote is set to control. The volume control setting
can be changed by following these instructions.
1. In CHILD or ADULT mode, hold down both
MUTE and ON/OFF for three seconds, until
the LED blinks twice.
2. Enter
control to the Set Top Unit (STU).
Or
3. Enter
control to the TV.
Channel Control Settings
Volume control functions are defaulted to the STU. The
channel control setting can be changed to be through the
TV by following these instructions.
1. While in CHILD or ADULT mode, hold down
both MUTE and ON/OFF for three seconds,
until the LED blinks twice.
2. Enter
control to the TV
Or
3. Enter 9 7 3 and press VOL - to lock volume
control to STU.
9 9 3 and press VOL - to lock volume
9 9 3 and press VOL+ to lock volume
9 7 3 and press VOL+ to lock volume
POWER CONTROL SETTINGS
The ON/OFF key has a default setting to control power
on both the STU and TV each time it is pressed. Power
control can be changed by following these steps:
1. In CHILD or ADULT mode, hold down both MUTE and
ON/OFF for three seconds, until the LED blinks twice.
2. Enter 9 9 5
3. Press POWER
4. Press one of the following options:
• (0) to set ON/OFF to control STU and TV Power, STU rst
• (1) to set
• (2) to set ON/OFF to control STU power only
• (3) to set ON/OFF to control TV power only
5. Press and hold
ON/OFF to control TV and STU Power, TV rst
MUTE until the LED blinks two times.
10
Page 11

WARRANTY
Universal Electronics B.V. warrants to the original purchaser
that this product will be free from defects in materials and
workmanship under normal and correct use for a period of
one (1) year from the date of original purchase.
This product will be replaced free of charge if it has been
proven to be defective within the one (1) year warranty
period. This warranty does not cover product parts that
are subject to wear, that can be considered as consumable
parts by their nature or that are made of glass. Further, this
warranty does not cover cartons, carrying cases, batteries,
broken or marred cabinets or any other item used in
connection with the product. To obtain warranty service
during the warranty period, please contact our customer
service. Please notice that we need your purchase receipt
so that we may establish your eligibility for service.
11
Page 12

MANUFACTURER’S CODE
Setup Codes for TVs
3M 0737
A-Mark 0003
Abex 0032
Accurian 1803
Action 0873
Admiral 0093, 0463
Advent 0761, 0782, 0783, 0784,
0807, 0815, 0817, 0842,
1528, 1933
Adventura 0046
Aiko 0092
Aiwa 0701, 1914
Akai 0812, 0702, 0030, 0098,
0591, 0672, 1207, 1903,
1935
Alaron 0179, 0183, 0216
Albatron 0700, 0843
Ambassador 0177
America Action 0180
Ampro 0751
Anam 0180, 0004, 0009, 0068
Anam National 0055, 0161
AOC 0030, 0003, 0019, 0052,
0137, 0185, 1365
Apex Digital 0748, 0879, 0765, 0767,
0890, 1217, 1943
Archer 0003
Astar 1531, 1548
Audiovox 0451, 0180, 0092, 0003,
0623, 0713, 0802, 0846,
0875, 1284, 1937, 1951,
1952
Aurora Systems 0801
Aventura 0171
Axion 1937
Bang & Olufsen 0620
Barco 0410, 0479, 0556
Belcor 0019
Bell & Howell 0154, 0016
BenQ 1032, 1212, 1315
12
Page 13

Bradford 0180
Brillian 1007, 1255, 1257, 1258
Brockwood 0019
Broksonic 0236, 0463, 0003, 0426,
1905, 1911, 1929, 1935,
1938
Bush 0355
Byd:sign 1309, 1311
Cadia 1283
Candle 0030, 0046, 0056, 0186
Canon 0793, 1396
Carnivale 0030
Carver 0054, 0170
Casio 0611, 1205
CCE 0217, 0329
Celebrity 0000
Celera 0765
Champion 1362
Changhong 0765
Cinego 1986
Citizen 0060, 0030, 0092, 0039,
0046, 0056, 0186, 0280,
0561, 1928, 1935
Clairtone 0185
Clarion 0180
Classic 1984
Colt 1906
Commercial Solutions 1447, 0047, 1125, 1126
Compaq 0749, 0750
Concerto 0056
Contec 0180, 0157, 0158, 0185
Craig 0180, 0161
Crosley 0054
Crown 0180, 0039
Curtis Mathes 0047, 0054, 0154, 0451,
0093, 0060, 0702, 0030,
0145, 0166, 1919, 1347,
1147, 0747, 0466, 0415,
0056, 0039, 0016
CXC 0180
CyberHome 0794
Cytron 1326, 2003
Daewoo 0451, 0092, 1661, 0019,
0039, 0066, 0067, 0091,
13
Page 14

0623, 0661, 0672, 1909,
1928
Daytron 0019
Dell 1080, 1178, 1264, 1403
Denon 0145, 0511
Denstar 0628
Diamond Vision 1801, 1996, 1997
Digistar 1565
Digital Projection Inc. 1408, 1482
Dumont 0017, 0019
Durabrand 0463, 0180, 0178, 0171,
1034, 0003
Dwin 0720, 0774
Dynatech 0049
Eiki 0735
Electroband 0000, 0185
Electrograph 1623, 1755
Electrohome 0463, 0381, 0389, 0409,
0446, 1570
Emerson 0154, 0236, 0463, 0180,
0178, 0171, 0282, 0623,
1394, 1905, 1909, 1911,
1913, 1928, 1929, 1944,
1963, 0280, 0270, 0185,
0183, 0182, 0181, 0179,
0177, 0158, 0039, 0038,
0019
Emprex 1422, 1546
Envision 0030, 0813, 1365
Epson 0831, 0833, 0840, 0881,
1122, 1290
Erae 1222
ESA 0812, 0171, 1944, 1963
Fisher 0154, 0159
FlexVision 0713
Fujitsu 0179, 0186, 0683, 0809,
0853
Funai 0180, 0171, 0179, 1199,
1271, 1904, 1963, 1979
Futuretech 0180
Hantarex 1338
Gateway 1001, 1002, 1003, 1004,
1755, 1756
GE 1447, 0047, 0051, 0451,
14
Page 15

0178, 1922, 1919, 1917,
1907, 1347, 0747, 0282,
0279, 0251, 0174, 0138,
0135, 0055, 0029, 0027, 0021
Gibralter 0017, 0030, 0019
Go Video 0886
GoldStar 0178, 0030, 0001, 0002,
0019, 0032, 0106, 0409,
1378, 1926
Goodmans 0360
Gradiente 0392
Grunpy 0180, 0179
H & B 1366
Haier 1034, 0768, 1009
Hallmark 0178
Hannspree 1348, 1351, 1352
Harley Davidson 0043, 0179, 1904
Harman/Kardon 0054, 0078
Harvard 0180, 0068
Havermy 0093
Helios 0865
Hello Kitty 0451
Hewlett Packard 1088, 1089, 1101, 1494,1502
Hisense 0748
Hitachi 1145, 0145, 1960, 1904,
1445, 0797, 0770, 0723,
0576, 0413, 0409, 0279,
0227, 0173, 0151, 0097,
0095, 0056, 0038, 0032,
0016
HP 1088, 1089, 1101, 1494,
1502
Hyundai 0849, 1219, 1294
iLo 1286, 1603, 1990
Innity 0054
InFocus 0736, 0738, 0741, 0752,
0759, 0781, 1164
Initial 1603, 1990
Insignia 0171, 1204, 1326, 1517,
1963, 2002
Inteq 0017
IX 0877
Janeil 0046
JBL 0054
15
Page 16

JCB 0000
Jensen 0761, 0050, 0807, 0815,
0817, 1299, 1933
JVC 0053, 0036, 0069, 0160,
0169, 0182, 0731, 1253,
1302, 1349, 1923
Kamp 0216
Kawasho 0158, 0216, 0308
Kaypani 0052
KDS 1498
KEC 0180
Kenwood 0030, 0019
KLH 0765, 0767, 1962
Kloss 0024, 0046, 0078
KMC 0106
Konka 0628, 0632, 0638, 0703,
0707,1939, 1940
Kost 1262, 1483
Kreisen 0876, 1474
KTV 0180, 0030, 0039, 0183,
0185, 0217, 0280
LG 1265, 0178, 0442, 0700,
0823, 0829, 0856, 1178,
1325, 1378, 1423, 1637,
1758, 1934, 1993
Lloyd’s 1904
Loewe 0136, 0633, 0693, 0694
Logik 0016
Luce 0837, 1031
Luxman 0056
LXI 0047, 0054, 0154, 0156,
0178, 0148, 0747
MAG 1498
Magnasonic 1913, 1928
Magnavox 1454, 0054, 0030, 0706,
1990, 1963, 1944, 1931,
1913, 1904, 1525, 1365,
1254, 1198, 1054, 0802,
0386, 0230, 0187, 0186,
0179, 0096, 0036, 0028,
0024, 0020
Magnin 1907
Majestic 0015, 0016
Marantz 0054, 0030, 0444, 0704,
16
Page 17

0854, 0855, 1054, 1154, 1398
Matsushita 0250, 0650
Maxent 0762, 1211, 1755
Megapower 0700
Megatron 0178, 0145, 0003
MEI 0185
Memorex 0154, 0463, 0150, 0178,
0016, 0106, 0179, 0877,
1037, 1570, 1911, 1920,
1924, 1926, 1927
MGA 0150, 0178, 0030, 0019,
0155, 1907
Micro 1436
Midland 0047, 0017, 0051, 0032,
0039, 0135, 0747
Mintek 1603, 1990
Minutz 0021
Mitsubishi 0093, 1250, 0150, 0178,
1917, 1550, 1392, 1350,
1279, 1278, 0868, 0836,
0592, 0358, 0331, 0155,
0098, 0019, 0014
Monivision 0700, 0843
Motorola 0093, 0055, 0835
Moxell 0835
MTC 0060, 0030, 0019, 0049,
0056, 0091, 0185, 0216
Multitech 0180, 0049, 0217
NAD 0156, 0178, 0056, 0866,
1156
Nakamichi 1493
Naxa 1998
NEC 0030, 0019, 0036, 0056,
0170, 0434, 0455, 0497,
0882, 1135, 1398, 1704
NetTV 0762, 1755
Nikko 0178, 0030, 0092, 0317
Niko 1581, 1618
Noblex 0430
Norcent 0748, 0824, 1089, 1365,
1589, 1590, 1591
Norwood Micro 1286, 1296, 1303
Noshi 0018
NTC 0092
17
Page 18

Olevia 1144, 1240, 1331, 1610
Olympus 1342
On Command 0531
Onwa 0180
Optimus 0154, 0250, 0166, 0650,
1913, 1924, 1927
Optoma 0887, 1263, 1301
Optonica 0093, 0165
Orion 0236, 0463, 1463, 0179,
1905, 1911, 1929
Ovation 0734
Panasonic 0250, 0051, 0055, 0162,
0226, 0338, 0375, 0650,
1291, 1410, 1919, 1924,
1927, 1941, 1946, 1947
Penney 0047, 0156, 0051, 0060,
0178, 0030, 1926, 1919,
1907, 1378, 1347, 0747,
0309, 0149, 0138, 0135,
0110, 0039, 0032, 0027,
0021, 0019, 0018, 0003, 0002
Petters 1523
Philco 0054, 0030, 0019, 0020,
0028, 0096, 0302
Philips 1454, 0054, 0645, 0690,
1054, 1154, 1354, 1483, 1961
Pilot 0030, 0019, 0039
Pioneer 0166, 0038, 0172, 0679,
0776, 0866, 1260, 1398
Planar 1496
Polaroid 0765, 0865, 1262, 1276,
1314, 1316, 1326, 1327,
1328, 1341, 1498, 1523,
1991, 1992
Portland 0092, 0019, 0039
Prima 0761, 0783, 0807, 0815,
0817, 1933
Princeton 0685, 0700, 0717
Prism 0051
ProPresenter 0733
Proscan 1447, 0047, 0747, 1347, 1922
Proton 0178, 0003, 0031, 0052, 0466
Protron 1320, 1323
Proview 0835, 1401, 1498
18
Page 19

Proxima 0734, 0735, 0737, 0742,
0743, 0758
Pulsar 0017, 0019
Pvision 1222
Quasar 0250, 0051, 0055, 0165,
0219, 0650, 1919, 1924
RadioShack 0047, 0154, 0180, 0178,
0030, 0019, 0032, 0039,
0056, 0165, 0409, 0747,
1904, 1920
RCA 1447, 0047, 2002, 1958,
1953, 1948, 1922, 1919,
1917, 1907, 1547, 1347,
1247, 1147, 1047, 0747,
0679, 0278, 0254, 0174,
0135, 0090, 0038, 0029,
0019, 0018
Realistic 0154, 0180, 0178, 0030,
0019, 0032, 0039, 0056,
0165
Rhapsody 0183, 0185, 0216
Runco 0017, 0030, 0251, 0494,
0497, 0603, 0612, 1292,
1344, 1346, 1397, 1398,
1629
Sampo 0030, 0032, 0039, 0052,
0100, 0110, 0762, 1755
Samsung 0060, 0812, 0702, 0178,
0030, 1959, 1903, 1575,
1395, 1312, 1060, 0814,
0766, 0482, 0427, 0408,
0329, 0056, 0032, 0019
Samsux 0039
Sansui 0463, 1409, 1904, 1911,
1929, 1935
Sanyo 0154, 0088, 0107, 0146,
0159, 0232, 0484, 0798,
0799, 0893, 1142, 1907
Sceptre 0878, 1217, 1360, 1599
Scimitsu 0019
Scotch 0178
Scott 0236, 0180, 0178, 0019,
0179, 0309
Sears 0047, 0054, 0154, 0156,
19
Page 20

0178, 0171, 1926, 1904,
1007, 0747, 0281, 0179,
0168, 0159, 0149, 0148,
0146, 0056, 0015
Sharp 0093, 1917, 1602, 1136,
0852, 0851, 0818, 0689,
0688, 0491, 0398, 0386,
0281, 0220, 0165, 0157,
0153, 0039
Sharper Image 1950
Sheng Chia 0093
Sherwood 1399
Shogun 0019
Signature 0016
Signet 0800, 0844, 1262
SIM2 Multimedia 1297
Simpson 0186, 0187
Sinudyne 0347
Solarism 1220
Sony 1100, 0000, 0011, 0080,
0111, 0273, 0353, 0810,
0834, 1317, 1904, 1925,
1651
Soundesign 0180, 0178, 0179, 0186
Sova 1320, 1952
Soyo 1520
Spectricon 0003, 0137
Spectroniq 1498
Squareview 0171
SSS 0180, 0019
Starlite 0180
Studio Experience 0843
SunBrite 1420, 1435
Superscan 0093, 0864
Supre-Macy 0046
Supreme 0000
SVA 0748, 0587, 0768, 0865,
0870, 0871, 0872
Sylvania 0054, 0030, 0171, 0020,
0028, 0065, 0096, 0381,
1271, 1314, 1394, 1931,
1944, 1963
Symphonic 0180, 0171, 1904, 1913,
1944
20
Page 21

Syntax 1144, 1240, 1331
Tandy 0093, 0218
Tashiko 0588
Tatung 0003, 0049, 0055, 0396,
1101, 1285, 1286, 1287,
1288, 1361, 1756
Technics 0250, 0051
Technol Ace 0179
Technovox 0007
Techview 0847
Techwood 0051, 0003, 0056
Teco 1040
Teknika 0054, 0180, 0150, 0060,
0092, 0016, 0019, 0039,
0056, 0175, 0179, 0186,
0312, 0322
Telefunken 0702, 0056, 0074, 0101
Telemagic 0735
Tera 0031
Thomas 1904
Thomson 0209, 0210, 0625
TMK 0178, 0056, 0177
TNCi 0017, 0709
Toshiba 0154, 1256, 0156, 1265,
0060, 1945, 1936, 1935,
1918, 1704, 1656, 1635,
1356, 1343, 1325, 1306,
1164, 1156, 0845, 0832,
0822, 0650, 0149, 0036, 1971
Tosonic 0185
Totevision 0039
Trical 0157
TVS 0463
Ultra 0391, 1323
Universal 0027
Universum 1337
US Logic 1286, 1303
Vector Research 0030
VEOS 1007
Victor 0053
Video Concepts 0098
Vidikron 0054, 0242, 1292, 1302,
1397, 1398, 1629
Vidtech 0178, 0019, 0036
21
Page 22

Viewsonic 0724, 0775, 0777, 0797,
0857, 0864, 0885, 1330,
1342, 1578, 1627, 1755
Viking 0046, 0312
Viore 1207
Visart 1336
Vizio 0864, 0885, 1499, 1756, 1758
Wards 0054, 0178, 0030, 1156,
0866, 0202, 0179, 0174,
0165, 0111, 0096, 0080,
0056, 0029, 0028, 0027,
0021, 0020, 0019, 0016
Waycon 0156
Westinghouse 0885, 0889, 0890, 1282, 1577
White Westinghouse 0463, 0623, 1909
WinBook 1381
Wyse 1365
Yamaha 0030, 0019, 0769, 0797,
0833, 0838, 0839, 1526,
1527
Zenith 0017, 0463, 1265, 0178,
0092, 0016, 0624, 1904,
1909, 1911, 1929
Zonda 0003
Setup Codes for TV/DVD Combos
Accurian 1803
Advent 1933
Akai 1935
Apex Digital 1943
Audiovox 1937, 1951, 1952
Axion 1937
Broksonic 1935
Cinego 1986
Citizen 1935
Classic 1984
Cytron 2003
Diamond Vision 1801, 1997
Emerson 1394, 1963
ESA 1963
Funai 1963
Hitachi 1960
22
Page 23

iLo 1990
Initial 1990
Insignia 1963, 2002
Jensen 1933
KLH 1962
Konka 1939, 1940
LG 1993
Magnavox 1963, 1990
Mintek 1990
Naxa 1998
Panasonic 1941
Philips 1961
Polaroid 1991
Prima 1933
RCA 1948, 1958, 2002
Samsung 1903
Sansui 1935
Sova 1952
Sylvania 1394, 1963
Toshiba 1635, 1935
Setup Codes for TV/VCR Combos
Aiwa 1914
America Action 0180
Audiovox 0180
Broksonic 1905, 1911, 1929
Citizen 1928
Colt 1906
Curtis Mathes 1919
Daewoo 1909, 1928
Emerson 0236, 1905, 1909, 1911,
1913, 1928, 1929
Funai 1904
GE 1907, 1917, 1919, 1922
GoldStar 1926
Harley Davidson 1904
Hitachi 1904
JVC 1923
LG 1934
Lloyd’s 1904
Magnasonic 1913, 1928
Magnavox 1904, 1913, 1931
23
Page 24

Magnin 1907
Memorex 1920, 1924, 1926, 1927
MGA 1907
Mitsubishi 1917
Optimus 1913, 1924, 1927
Orion 1905, 1911, 1929
Panasonic 1919, 1924, 1927
Penney 1907, 1919, 1926
Quasar 1919, 1924
RadioShack 1904, 1920
RCA 1907, 1917, 1919, 1922
Samsung 1959
Sansui 1904, 1911, 1929
Sanyo 1907
Sears 1904, 1926
Sony 1904, 1925
Sylvania 1931
Symphonic 1904, 1913
Thomas 1904
Toshiba 1918, 1936
White Westinghouse 1909
Zenith 1904, 1909, 1911, 1929
Setup Codes for TV/VCR/DVD Combos
Akai 1903
Broksonic 1938
Diamond Vision 1996
Emerson 1944
ESA 1944
Funai 1199, 1979
Magnavox 1944
Panasonic 1946, 1947
Polaroid 1992
RCA 1953
Sharp 1917
Sylvania 1944
Symphonic 1944
Toshiba 1945
24
Page 25

25
 Loading...