

Page 1

Canon
English Edition
INSTRUCTIONS
Page 2

Thank you for purchasing a Canon product.
The EOS is a very compact autofocus, single
lens reflex camera. It has many basic and
advanced picture-taking modes to suit various
picture-taking requirements.
Try out your new camera while following the
instructions in this booklet.
• Precautions
• Before using the camera for an important
event such as a wedding, be sure to take
test shots to make sure the camera
operates properly.
• EOS cameras have a lens mount fitted
with electronic contacts for dedicated
operation (autofocusing, exposure
control, etc.) with EF lenses. Using a nonEF lens with an EOS camera may not
result in proper camera or lens operation.
Also, the warranty does not cover any
camera malfunction or damage occurring
with the use of non-Canon accessories.
Symbols used in this Instructions:
41 : Warning for preventing camera
malfunction or damage.
0 : Supplementary notes for basic camera
operation.
: Helpful tip for operating your camera
and taking pictures.
• Page numbers in parentheses indicate
where you can find more information.
- Also read “Handling Precautions” on
page 62 to prevent camera malfunction
and damage.
• Retain this instructions for future
reference.
I. Before You
Start
II. Basic
Operation
III. Self-Timer and
Quartz Date
(QD model only)
IV. Advanced
Operations
V. E-TTL Autoflash
VI. Reference
2
Page 3
Quick Start Guide
.................................
4 Viewfinder Information
......................
8
Nomenclature
LCD Panel
.......................................
.........................................
6 Command Dial
8
..................................
Attaching the neck strap...................10 Shutter Button and
Installing the Batteries and Autofocusing Operations
Checking the Battery Level
.........
10 Loading and Unloading Film
..................
Mounting and Detaching a Lens.... 12
Full Auto Mode
Setting Red-Eye Reduction
Portrait Mode................................20 Night Scene Mode
Landscape Mode
Self-timer Operation
Imprinting the Date or Time
........................
..............
........................
.........................
.............
16 Close-up Mode
18 Sports Mode
............................
................................
.......................
21
25 Replacing the Quartz
26 Date Battery...........................................27
.............
9
13
14
22
23
24
Setting the Date and Time
Focusing Point Selection
...............
.................
27
28
Focusing an Off-Center Subject.... 30
Program AE
Shutter-Speed Priority AE
Aperture-Priority AE
Manual Exposure
1
Automatic Depth-of-Field AE... 38
Using the Built-in Flash
................................
...........
...................
........................
...............
31
33
35
37
39
E-TTL Autoflash with EX-Series Speedlites
Basic Terminology
Troubleshooting Guide
...........................
....................
56
58
Partial Metering and AE Lock
Exposure Compensation
..........
.................
42
43
Autoexposure Bracketing (AEB).. 44
Bulb Exposure...................46
Multiple Exposures
iso Setting the ISO Film Speed
.....................
.......
47
49
■<i| Silencing the In-Focus Beeper.. 50
as Midroll Film Rewind.....................51
.........................................................
52
Major Accessories...........................61
Handling Precautions
......................
62
Exposure Warnings
.........................
Feature Availability Table
AF Modes and
Film Advance Modes
................
..................
59
60
60
Major Specifications.........................64
3
Page 4
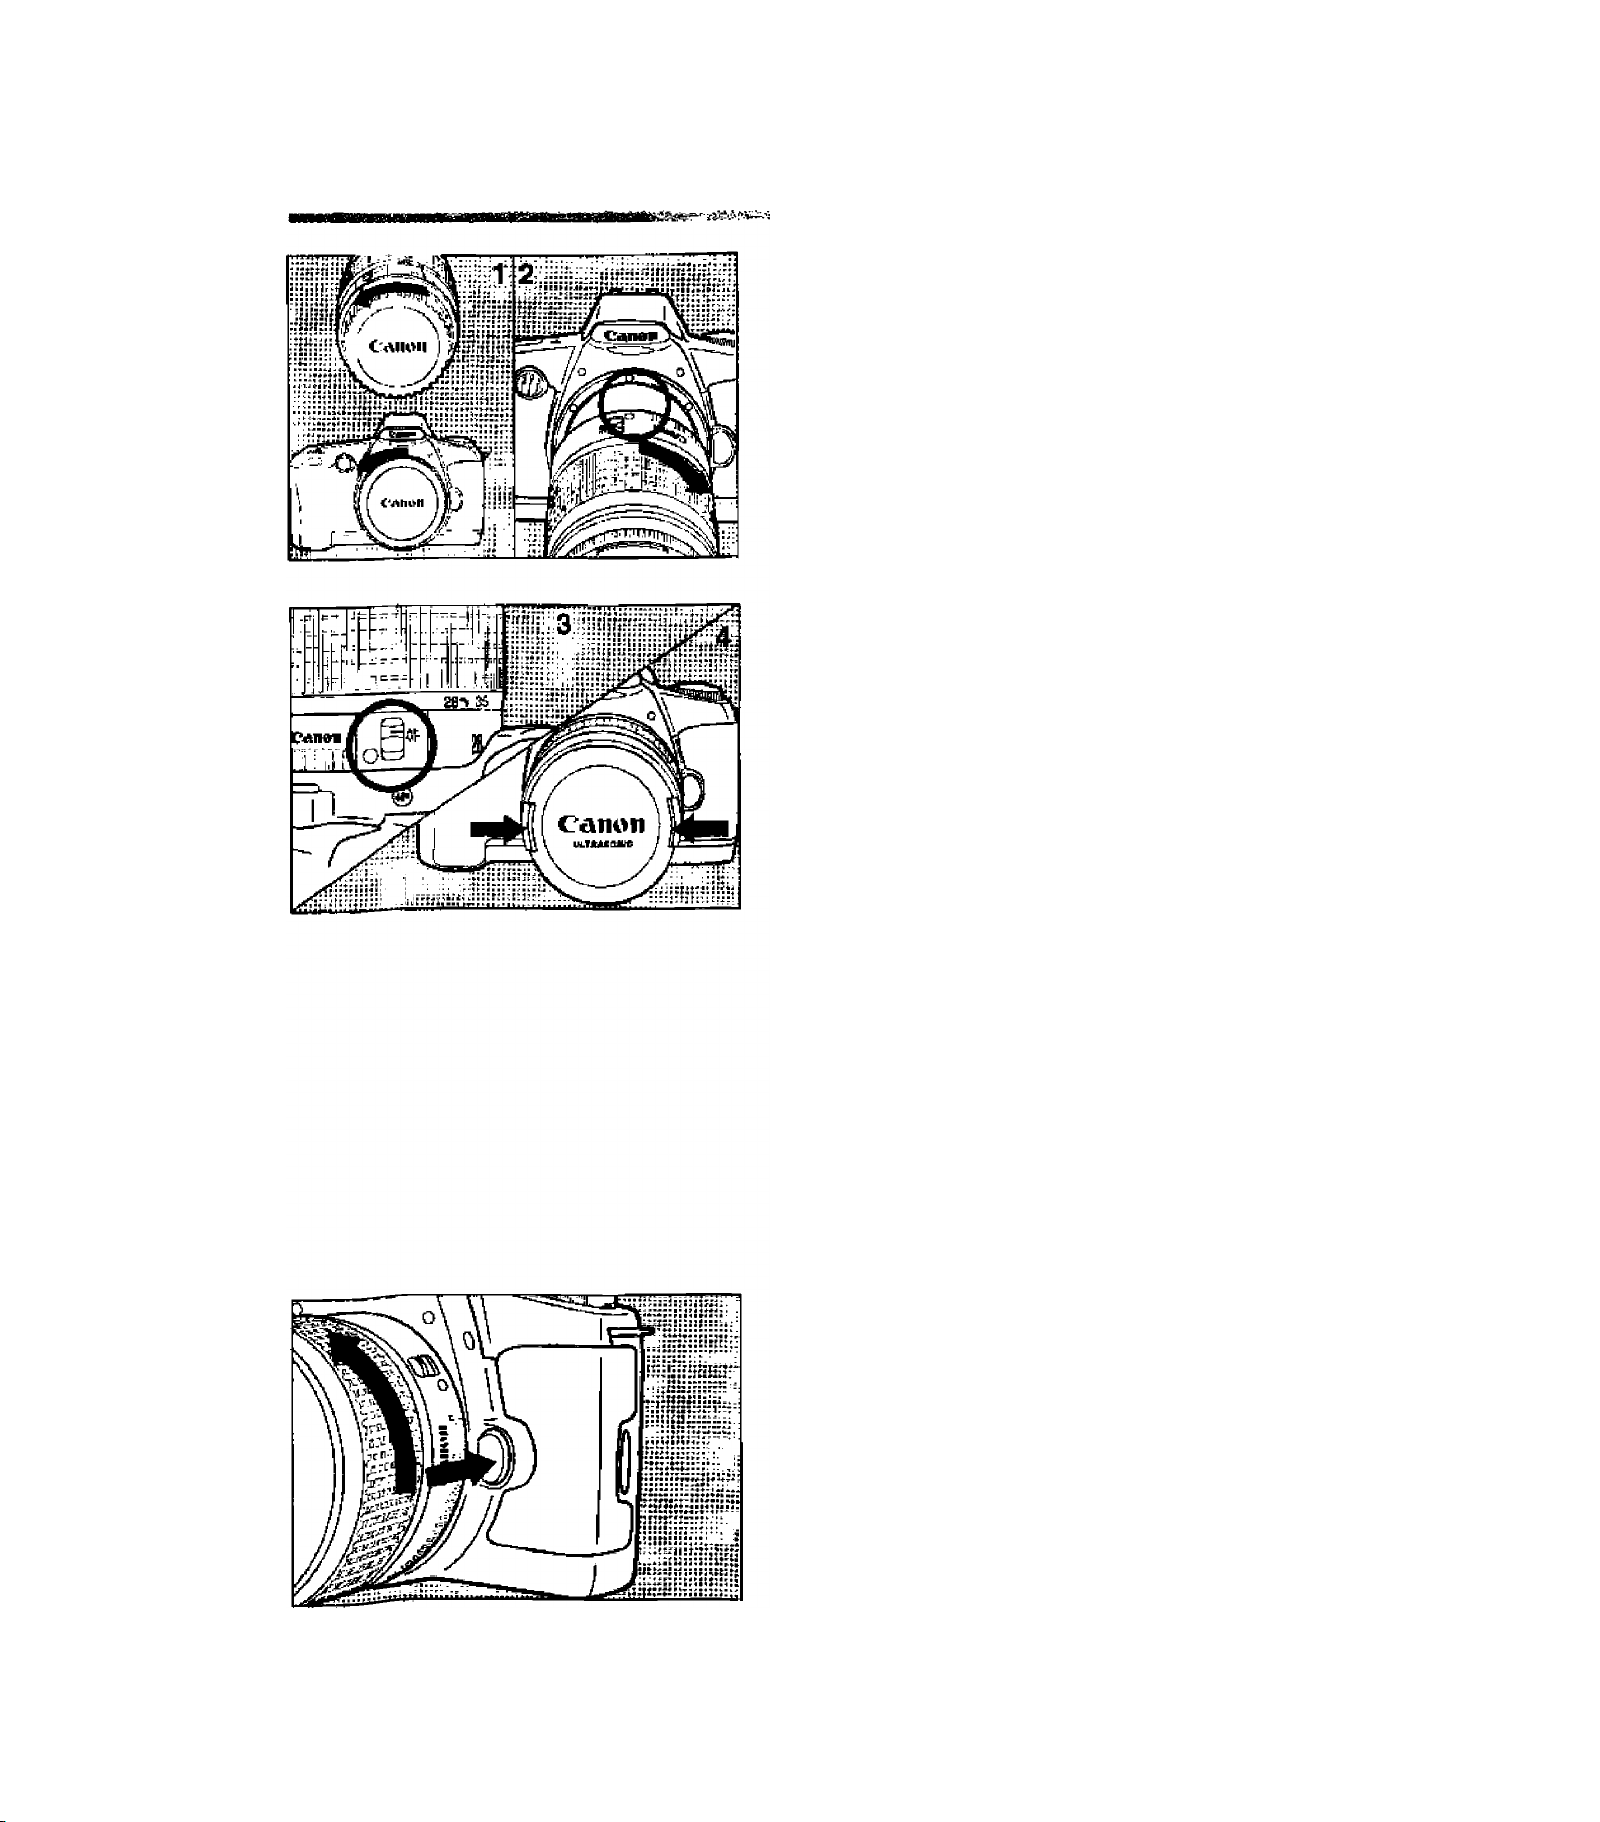
Quick Start Guide
^ Install the batteries.
As shown in the figure, open the battery
compartment cover and insert two DL123A
(or CR123A) lithium batteries.
2 Attach a lens.
Align the red dots on the lens and camera
and turn the lens clockwise until it snaps in
place.
3 On the lens, set the focus mode
switch to AF.
Set the Command Dial to
4
4
Page 5
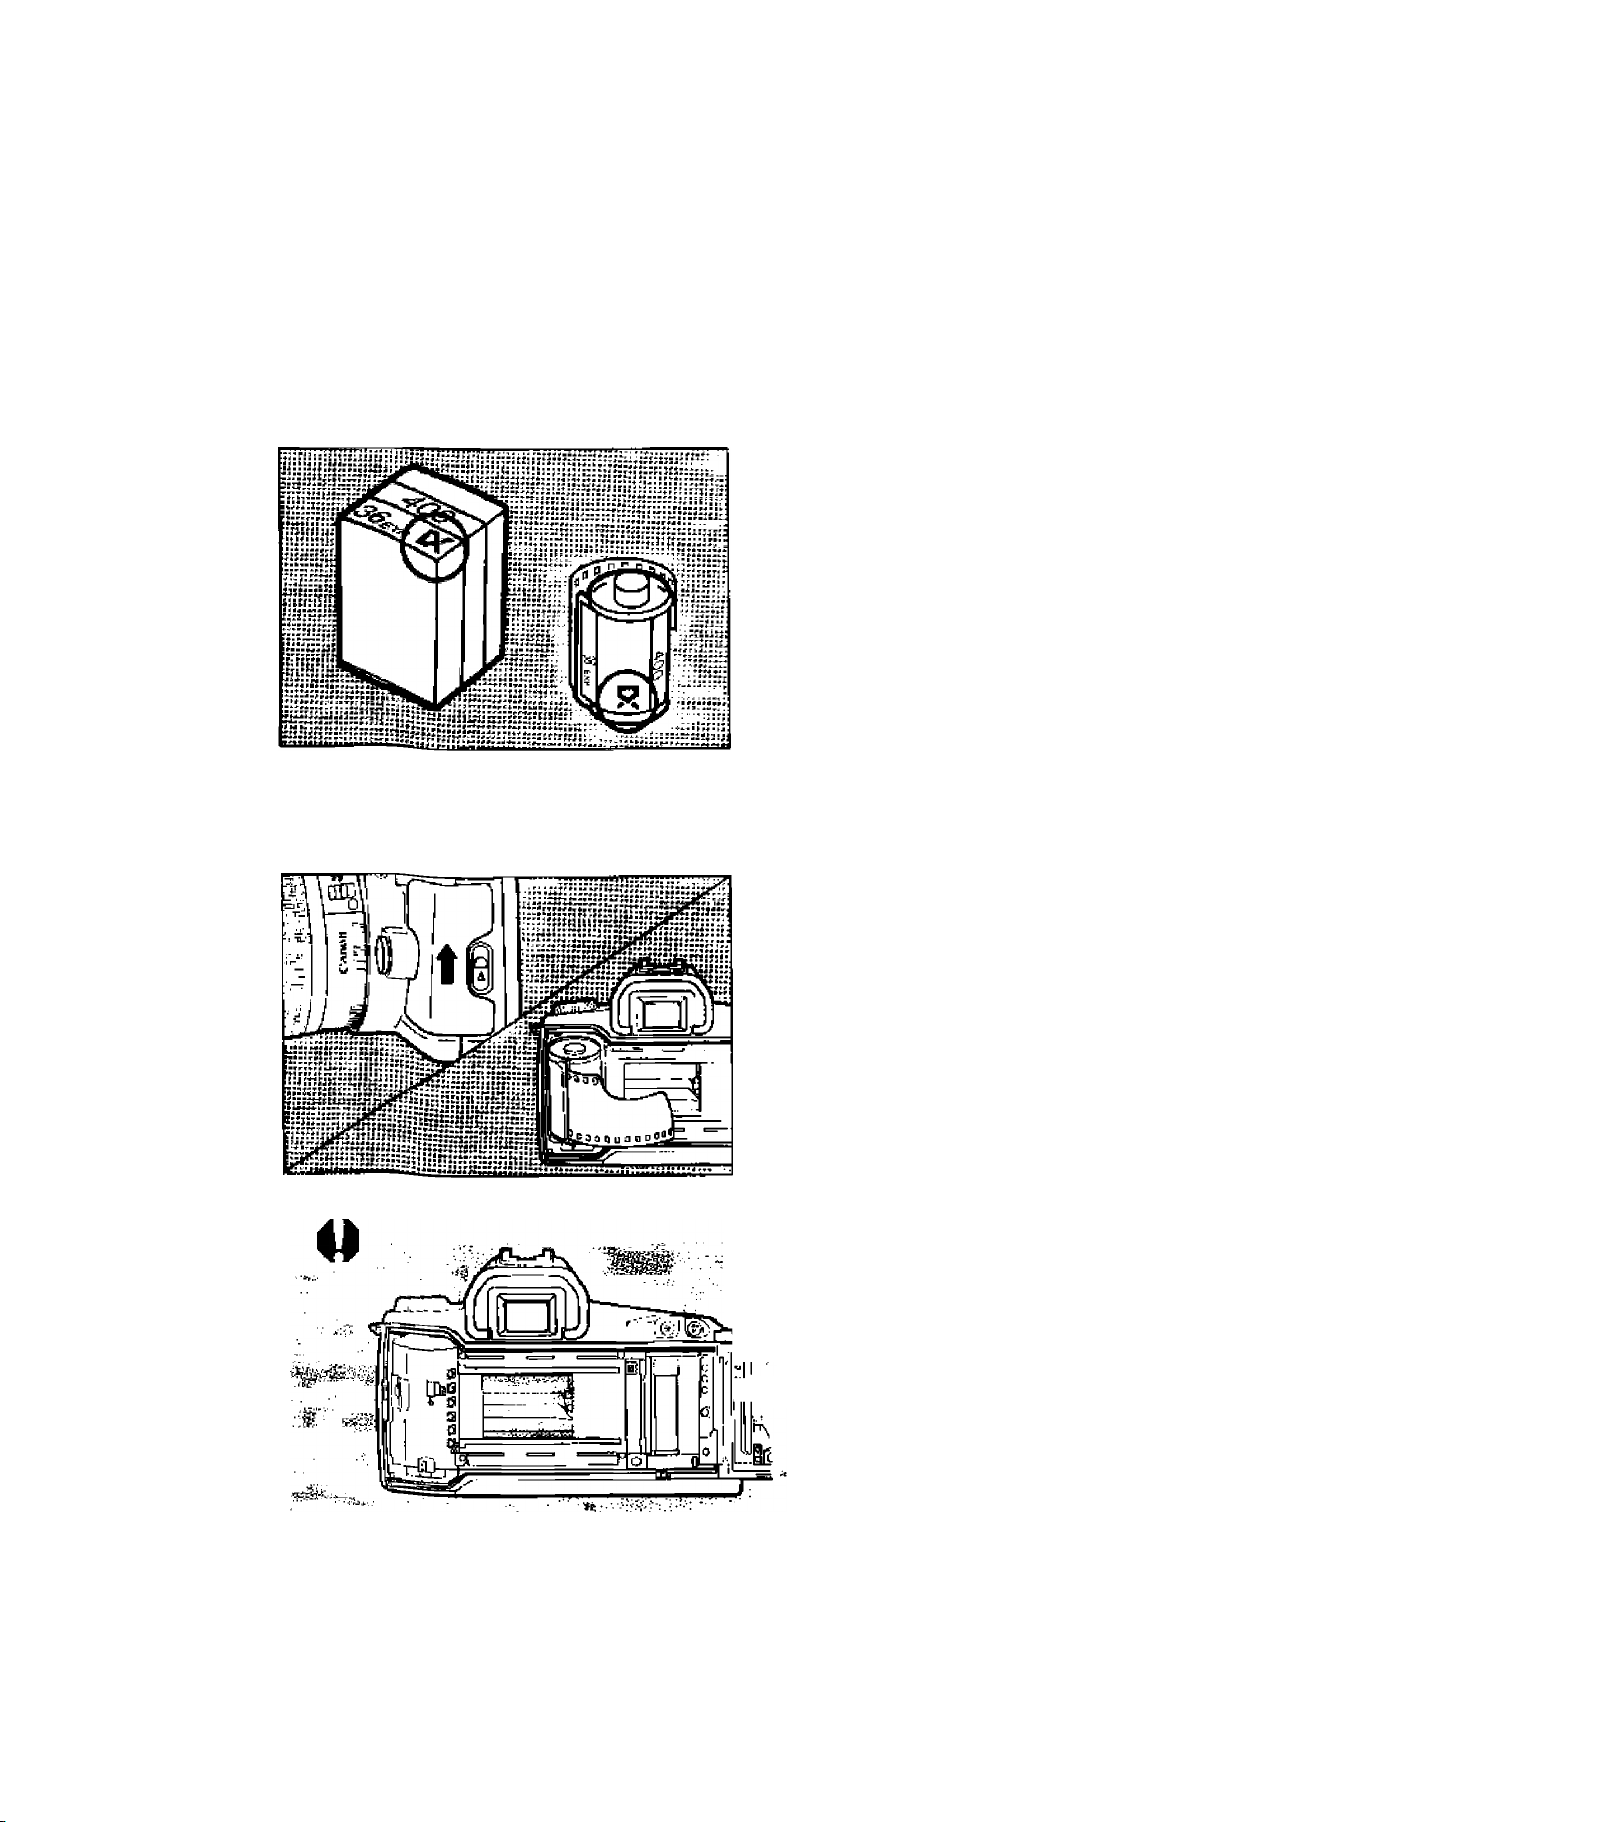
Quick Start Guide
0 Load the film.
Align the edge of the film leader with the
orange mark on the camera and dose the
camera back until it snaps shut. The film will
then advance to frame 1 automatically.
Focus the subject.
Aim the focusing point (□ □ □) on the
subject and press the shutter button lightly to
autofocus.
^ Take the picture.
Press the shutter button completely to take
the picture.
0 Unloading the film.
At the end of the roll, the film rewinds
automatically. Open the camera back and
remove the film cartridge.
Page 6
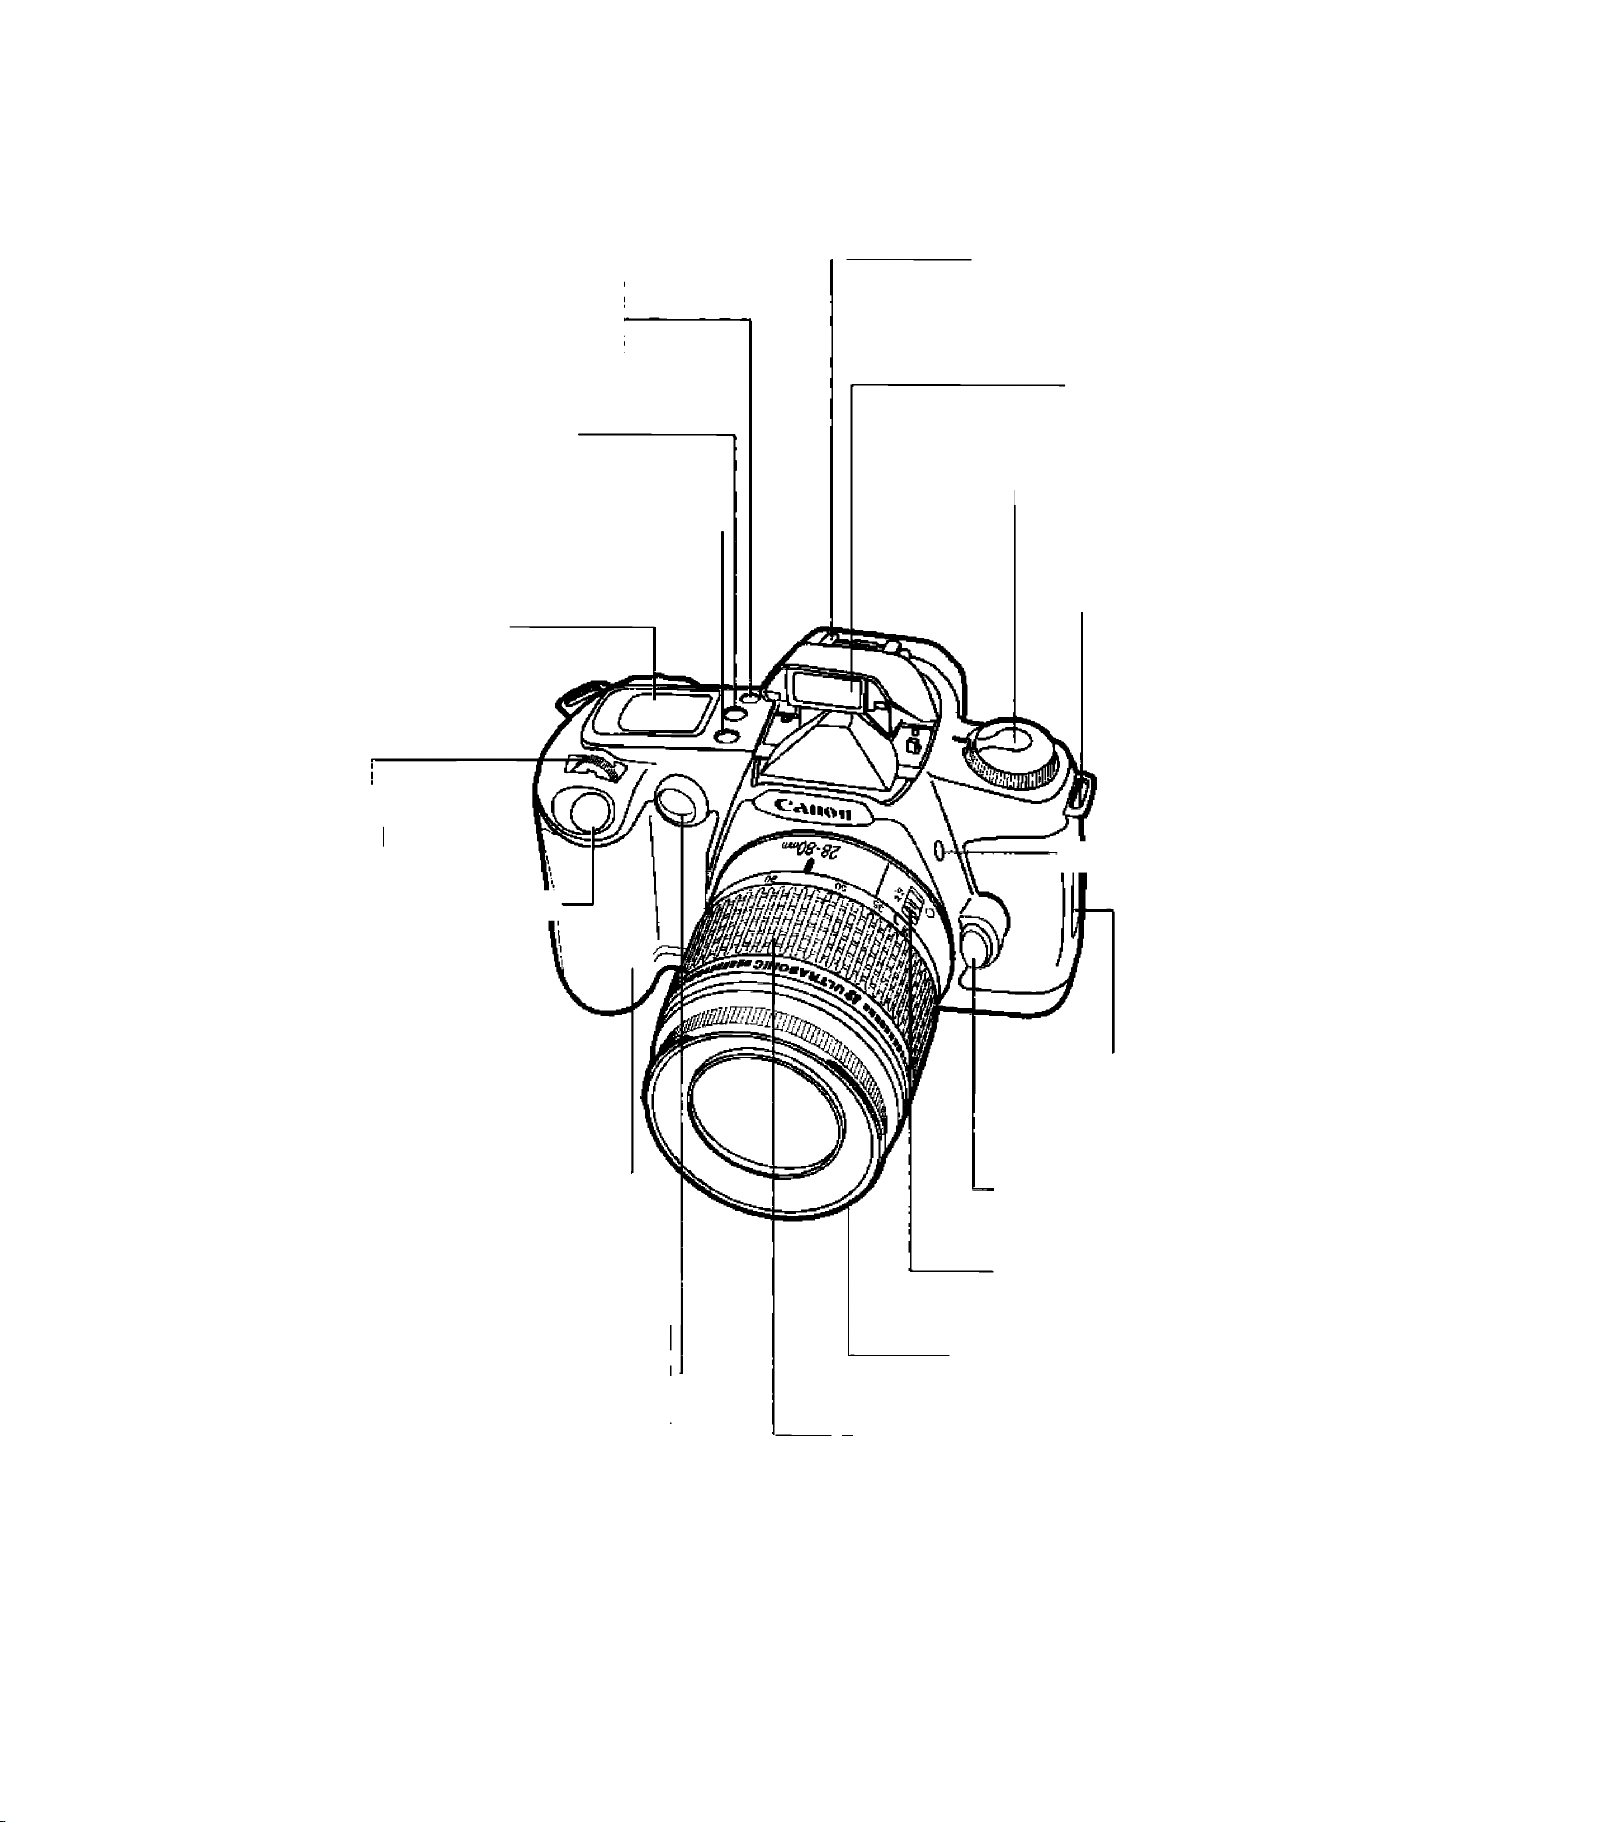
Nomenclature
2W8®SSWHS(W«!S9SS»K(»S®»^K^9»*>ia6S^i3»»Si!j»$!?te«^
Self-timer button (page 25}
Film rewind button (page 51)
Function button (page 44)
Focusing point selector (page 28) —
LCD pane! (page 8)
Main Dia
Hot shoe (page 61)
■ For dedicated Canon Speedlites
(sold separately), etc.
Built-in flash (page 39)
— Command Dial (page 9)
Neck strap eyelet (page 10)
-i Flash button (page 39}
Shutter button (page 13)I\
Grip (battery compartment)
(page 10)
AF-assist beam emitter (page 19) —
Red-eye reduction lamp (page 18}
Self-timer lamp (page 25)
Camera back lock-release lever
(page 14)
Lens release button (page 12)
Focus mode switch (page 12)
Focusing ring (page 58)
Zoom ring
6
*For details, see the page number in parentheses.
Page 7
Nomenclature
■-'Ww. ^ . .‘f
Eyecup
Film window
Eyepiece (page 8)
m
Partial metering / AE lock /
FE lock button (page 42)
Exposure compensation
button (page 43)
Aperture button (page 37)
Quartz date display
panel (page 26)
Display mode button (page 27)
Digit selection button (page 27)
Digit set button (page 27)
Remote control
jack (page 61)
• Connects io
Remote Switch
RS-60E3 (sold
separately).
Grip positioning hole
Battery compartment cover lever
(page 10)
Camera back
Tripod socket
7
Page 8
Nomenclature
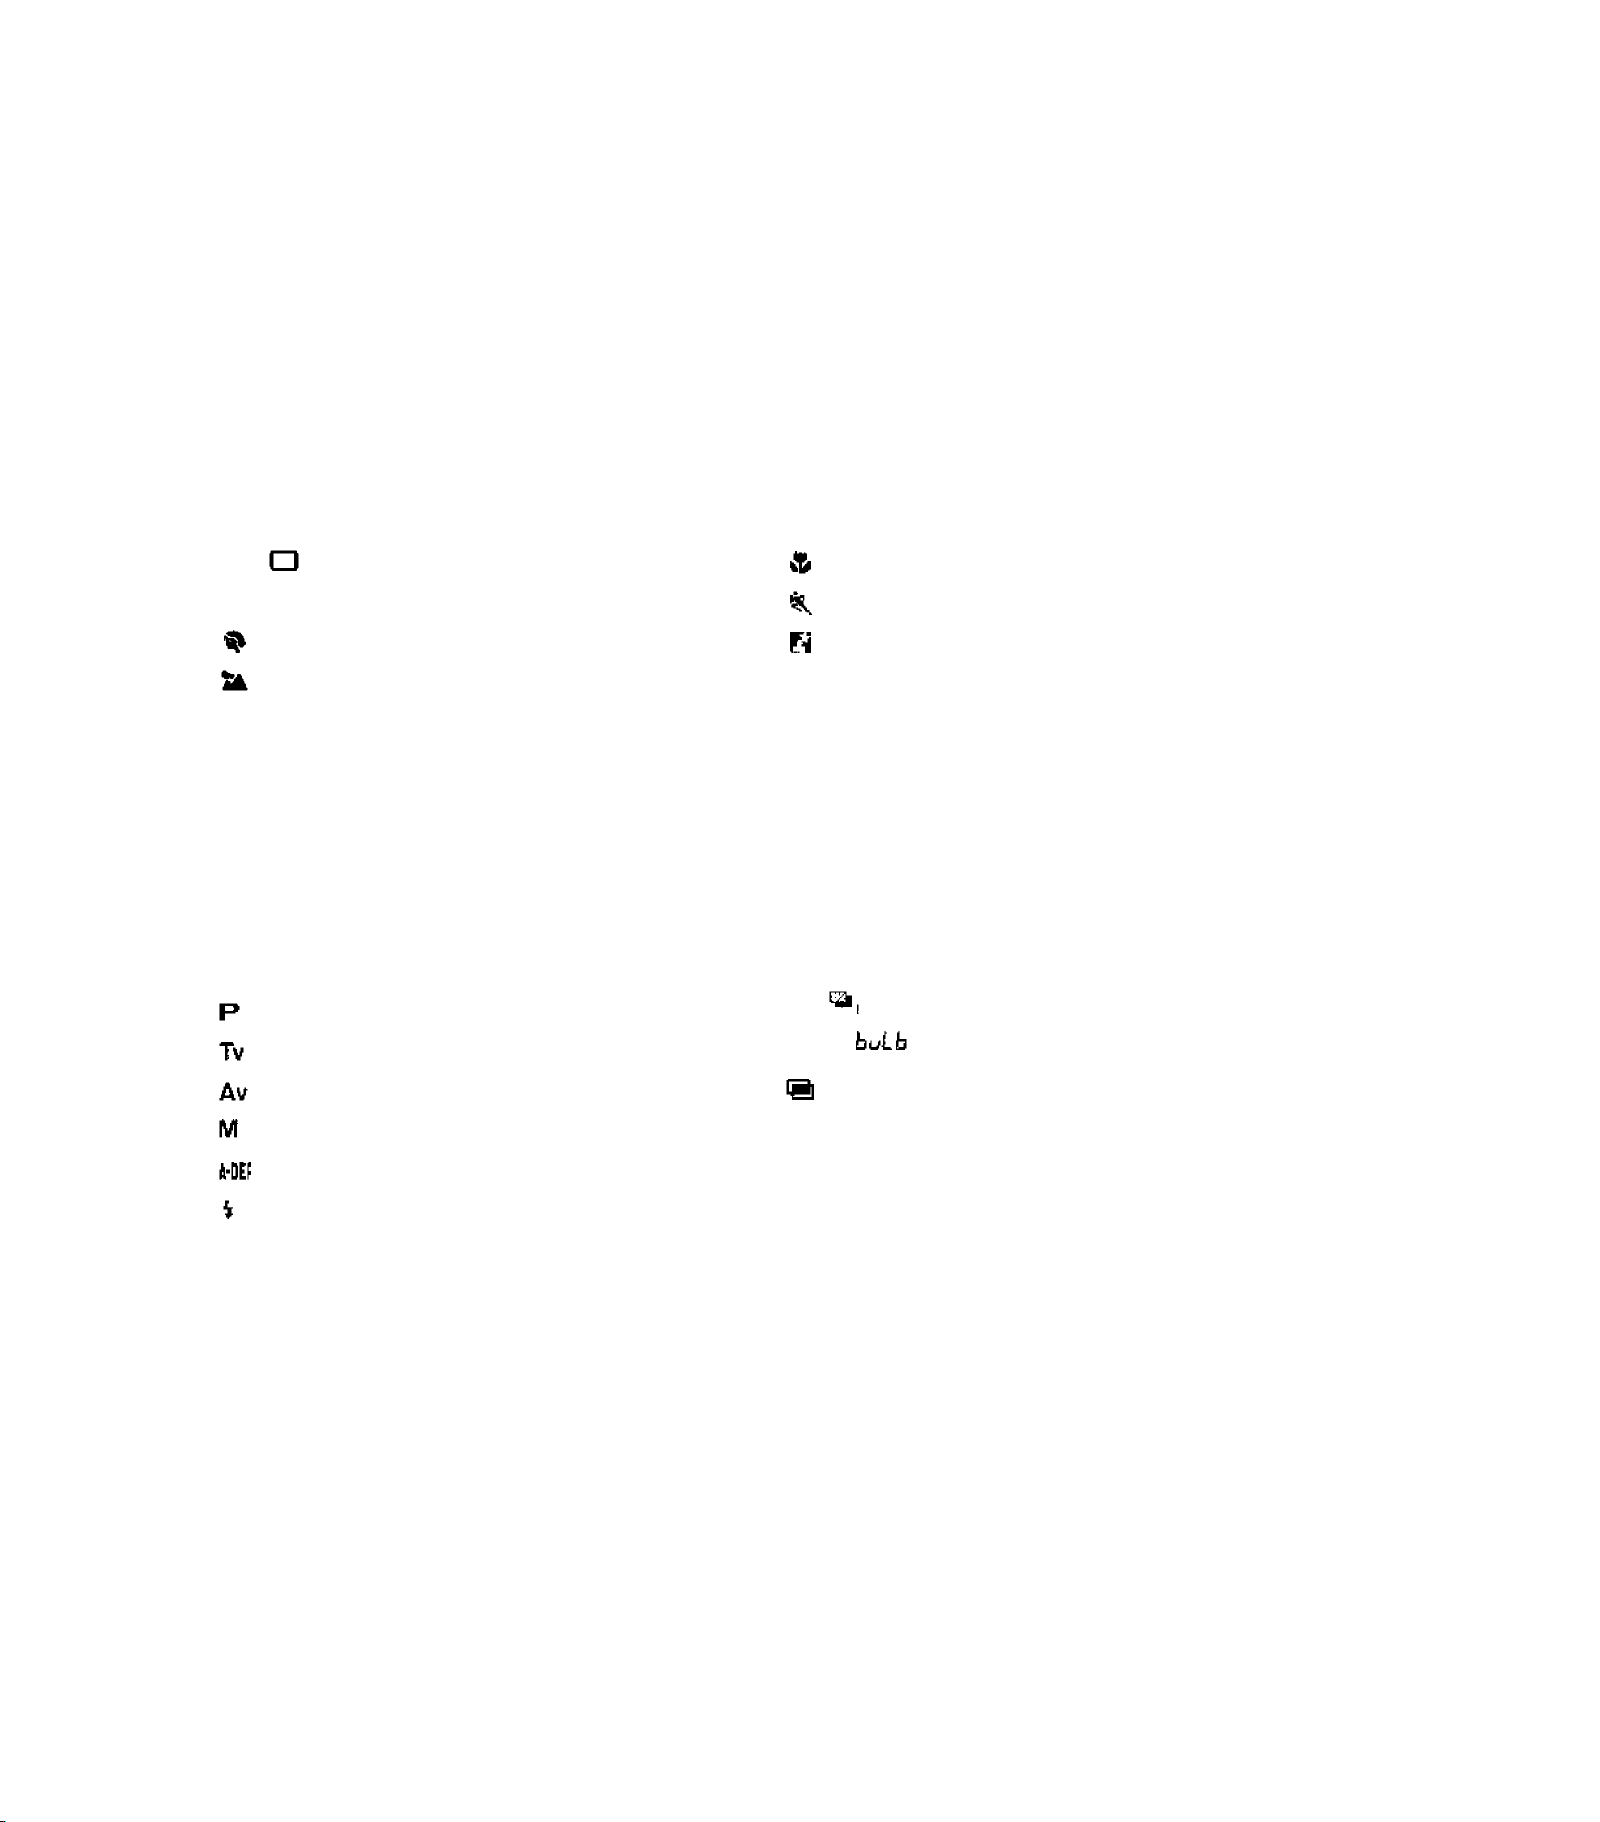
LCD Panel
Shutter speed / ISO film speed —
ISO symbol
Battery symbol
Battery level indicator
Focusing point indicator
Film status
Film loaded
Film rewind completed
Manual-focus symbol
Exposure display
• Exposure compensation amount
• Exposure level scale
■ Exposure level indicator
The LCD panel is shown with ail the information displayed.
-— Self-timer symbol
Aperture display
Red-eye reduction setting
Beeper setting
AEB amount
Red-eye reduction symbol
Beeper symbol
Multiple-exposure symbol
AEB symbol
— Function pointer
Frame counter
No. of multiple exposures set
No. of multiple exposures remaining
Self-timer count down
Metered manual-exposure level indicator
AEB amount indicator
Red-eye reduction lamp-on indicator
Viewfinder Information
The viewfinder is shown with all the information displayed.
Partial metering circle
Focusing screen
Focusing points
AE lock indicator
Flash-ready indicator
FE-lock warning indicator _.
High-sync speed (FP flash) indicator
Shutter speed
Aperture
-------—-----------------------
-------------------------—----------
______________
In-focus indicator
Exposure display
Exposure compensation amount
Exposure level scale
Exposure level indicator
Metered manual-exposure level indicator
Red-eye reduction lamp-on indicator
e gijuoii ry ^i^atit nikum»v<
8
Page 9
Command Dial
The Command Dial cannot be rotated to where there is no symbol on the
dial.
Function Set Zone
Full AutO (page 16)
The camera takes care of everything.
Just aim and press the shutter button.
Programmed Image
Control Zone
Fully automatic operation can be set to
suit the type of subject.
Portrait (page 20)
Landscape (page 21)
Close-up (page 22)
Sports (page 23)
Night Scene (page 24)
Creative Zone
Allows you to create your own
photographic effects.
Program AE (page 31)
Shutter speed-priority AE
(page 33)
Aperture-priority AE (page 35)
Manual exposure (page 37)
Depth-of-field AE (page 38)
Function Set Zone
To set the ISO film speed
manually, (page 49)
For mid roll film rewind, (page 51)
Lock
Set to this position when the camera is
not to be used. This turns off the
camera.
When the camera is not to be used, set the Command Dial to This will prevent accidental
battery drainage if the shutter button is held down inadvertently.
*For details, see the page number in parentheses.
Page 10

I. Before You Start
To have your camera ready for picture-taking, follow the procedures
below. . \
_______
:
V
Attaching the neck strap
Pass the end of the strap through the
clasp on the inner side. Pull the strap to
make sure it does not slip out of the
clasp.
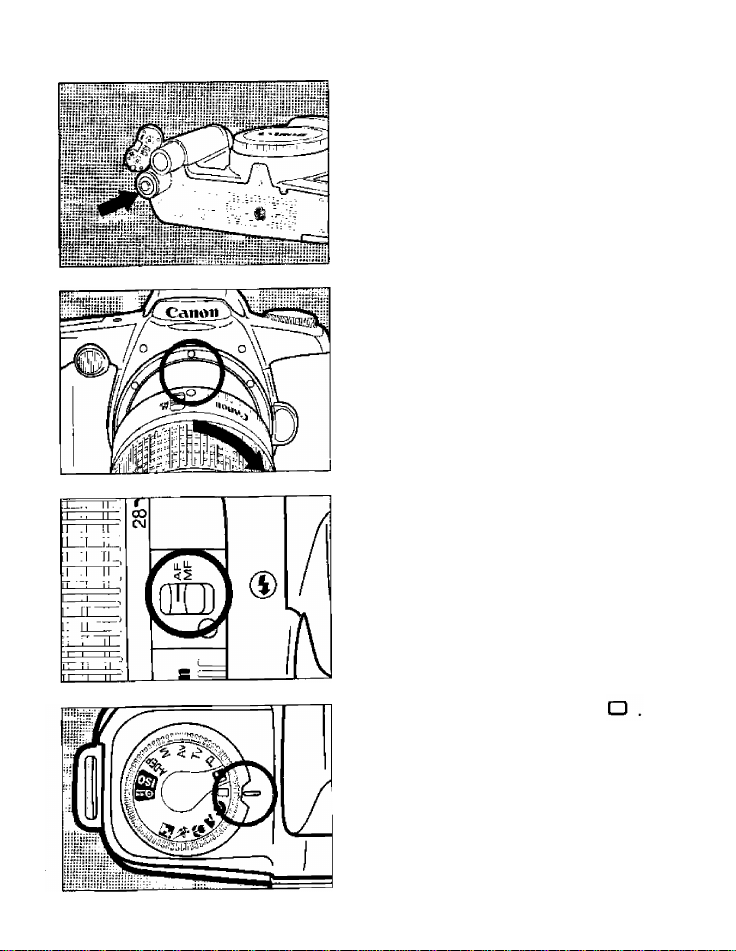
Installing the Batteries and Checking the Battery Level
Installing the Batteries
Use DL123A (or CR123A) lithium batteries.
Slide the battery compartment
cover lever as shown by the arrow
and open the battery compartment
cover.
P Insert the batteries with the
contacts oriented as shown on the
battery compartment cover.
10
Close the battery compartment
cover.
Page 11
I. Before You Start
Checking the Battery Level
-I Turn the Command Dial to a
* Programmed Image Control mode
or Creative Zone mode.
p The battery level will be displayed
^ on the LCD panel by one of the
following battery level indicator
symbols:
: Battery level OK.
o ; Keep spare battery handy.
t=p : Replace the battery.
-Jjp^^-See page 63.
* The battery level can be checked when the
Command Dial is unlocked.
• DL123A (or CR123A) Lithium Battery Service Life
Ambient
Temperature
At 2CTC
At -10°C
* No. of 24-exposure rolls based on Canon’s Standard Test Method with new batteries.
* Operating the camera without film will still consume battery power and reduce the number
of rolls that can be taken with the batteries.
!f nothing is displayed on the LCD panel, the batteries may have been installed incorrectly.,.
Take out the batteries and install correctly.
0% Flash Use
85 rolls 35 rolls
60 rolls 25 rolls 12 rolls
h:
. M-
50% Flash Use
v!
'
*
100% Flash Use
17 rolls
Q
• Before using the camera, be sure to check the battery level.
• In areas where DL123A (or CR123A) batteries may not be easily available, take spare
batteries with you.
Page 12
Mounting and Detaching a Lens
Mounting a Lens
H Remove the rear lens cap and the
* camera body cap by turning the
cap as shown by the arrow.
p Align the red dots on the lens and
^ camera and turn the lens as shown
by the arrow until it snaps in place.
On the lens, set the focus mode
3
switch to AF.
* If the focus mode switch is set to MF (or M
on some lenses), autofocus will not
operate.
- While the lens autofocuses, do not touch
the rotating part of the lens.
^ Remove the front lens cap.
Detaching the Lens
While pressing the lens release
button, turn the lens as shown by the
arrow until it stops, then remove the
lens.
12
Page 13

Shutter Button and Autofocusing Operations
The EOS camera’s shutter button can be depressed halfway or all the
way. It operates as described below (with autofocus enabled).
When it is pressed
halfway:
Autofocusing is activated, and when the
subject is focused, the camera beeps and the
in-focus indicator in the viewfinder lights in
green. At the same time, the focusing point
indicator for the active focusing point is
displayed.
The shutter speed and aperture are also set
and displayed on the LCD panel and in the
viewfinder.
When it is pressed
completely:
• The shutter is released to take the picture and
then the film advances by one frame.
Camera movement during the moment of exposure is called camera shake. Camera shake
can cause blurred pictures.
To prevent blurred pictures due to camera shake:
Hold the camera steady.
First press the shutter button halfway, then press all the way.
Use a faster shutter speed.
tv?*.
13
Page 14
Loading and Unloading Film
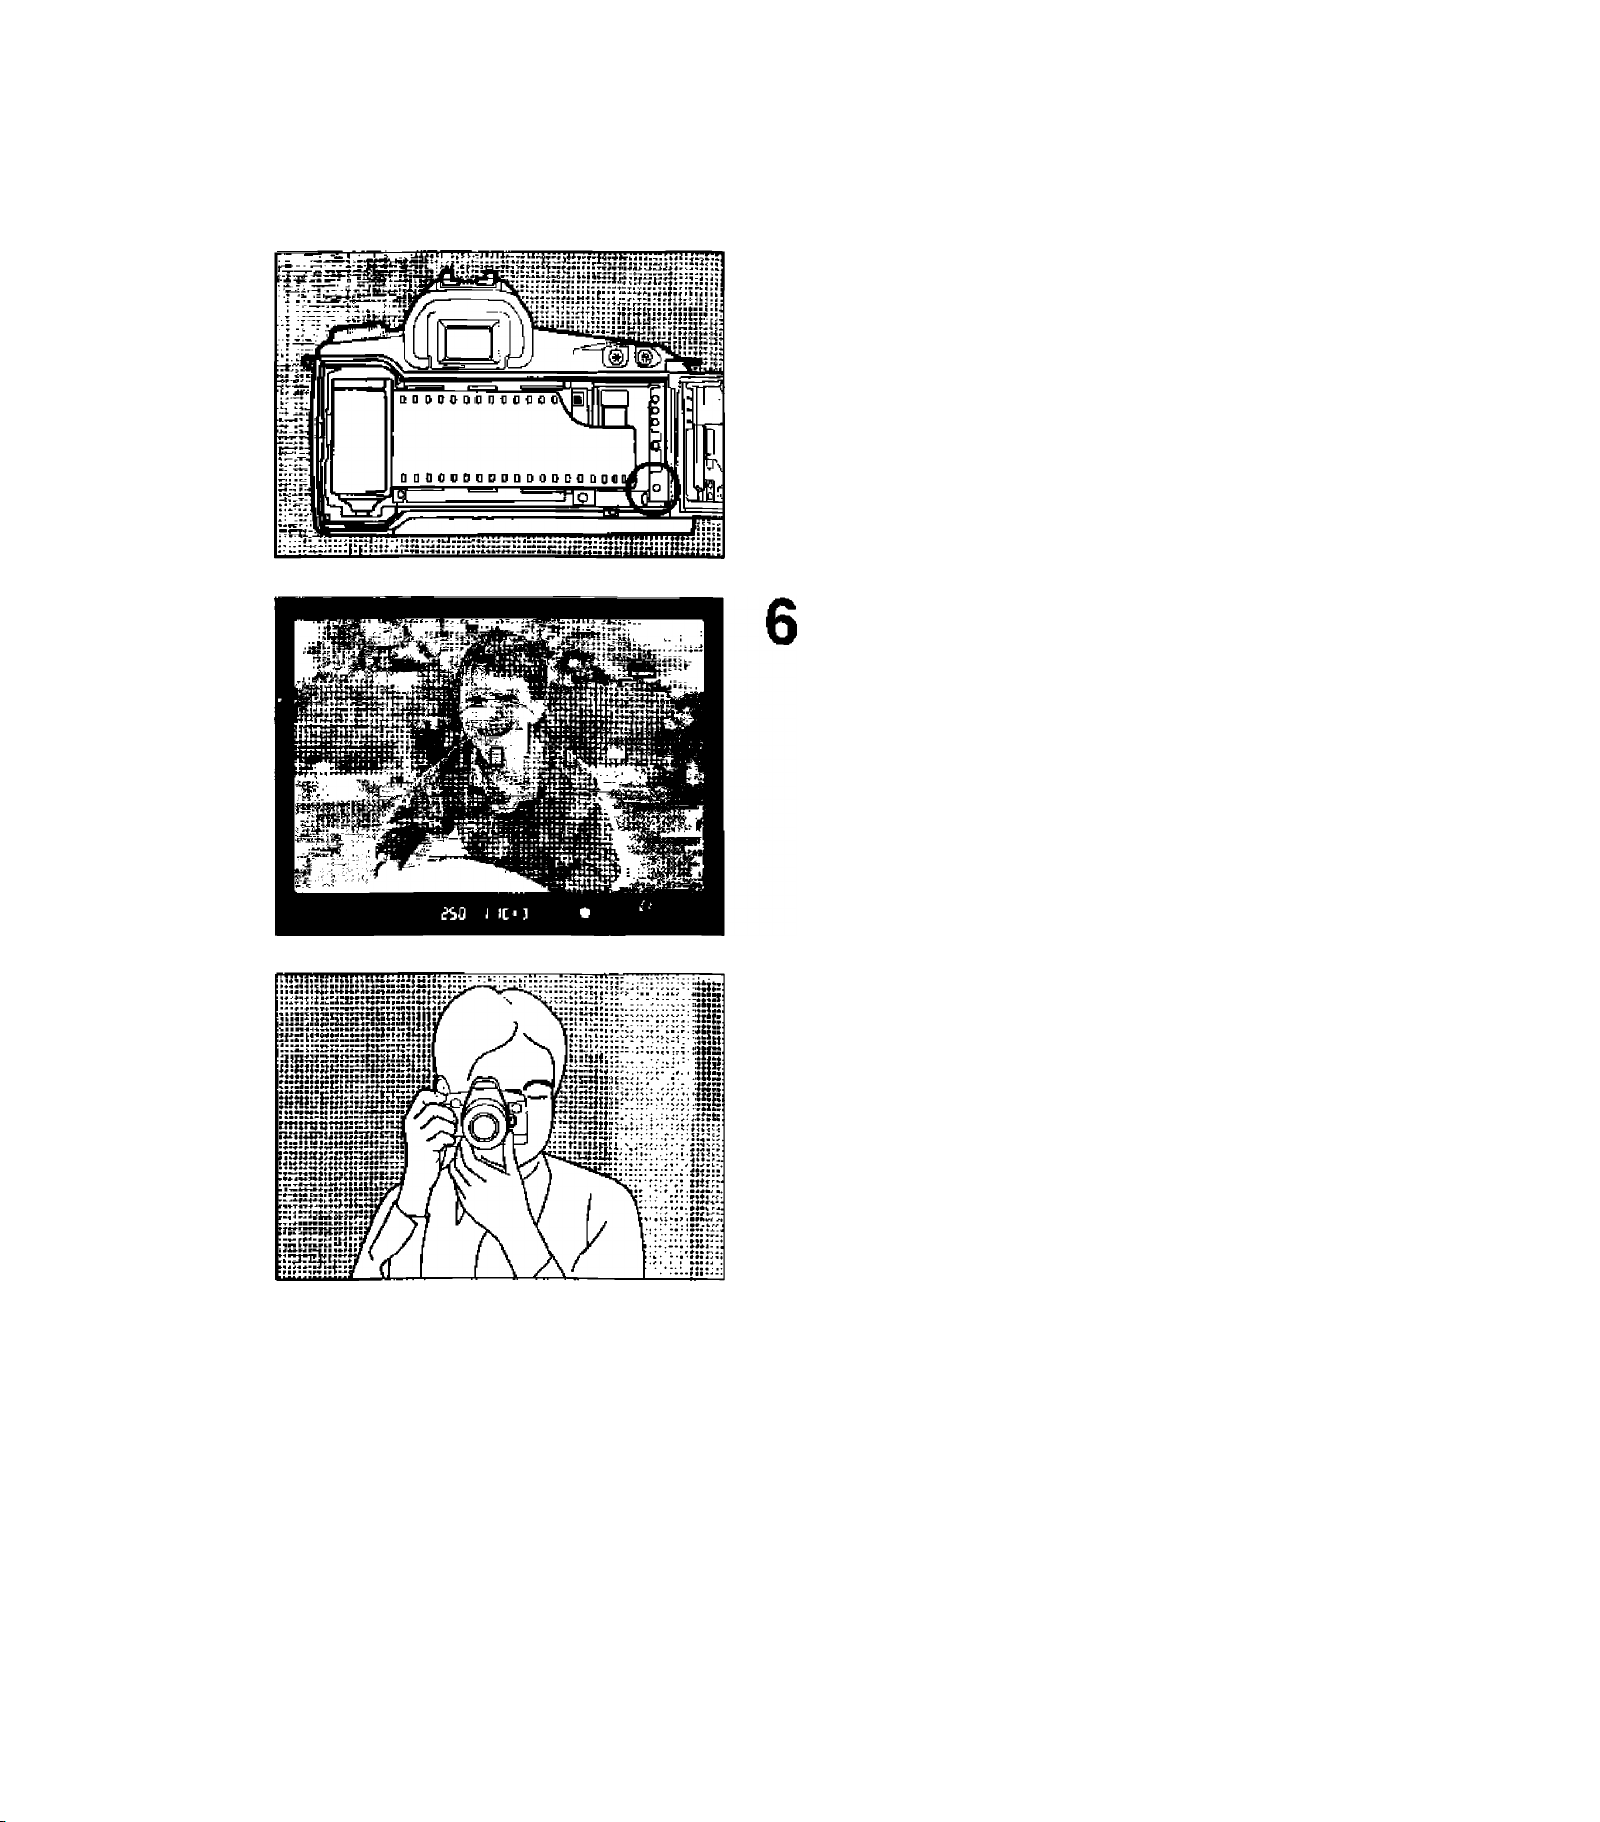
Loading Film
When a roll of film is loaded, the camera first winds the whole roll onto the
camera’s spool. Then each time a picture is taken and the frame
advances, one frame of film is rewound back into the film cartridge.
With DX-coded film, the camera
automatically sets the film’s ISO
speed.
• If the film is not DX-coded, set the ISO speed
manually. See ^Setting the ISO Speed" on
page 49.
Unlock the Command Dial.
1
Slide down the camera back lockrelease lever to open the camera
back.
Insert the film cartridge at an angle
as shown in the figure.
Infrared film cannot be used with this camera.
4%
.JThe shutter curtain is manufactured with very
w high precision. To prevent damage, never
touch the shutter curtain. When loading or
Unloading film, be careful not to touch the
shutter curtain with your fingers or the film.
w'
•
•
4
Page 15
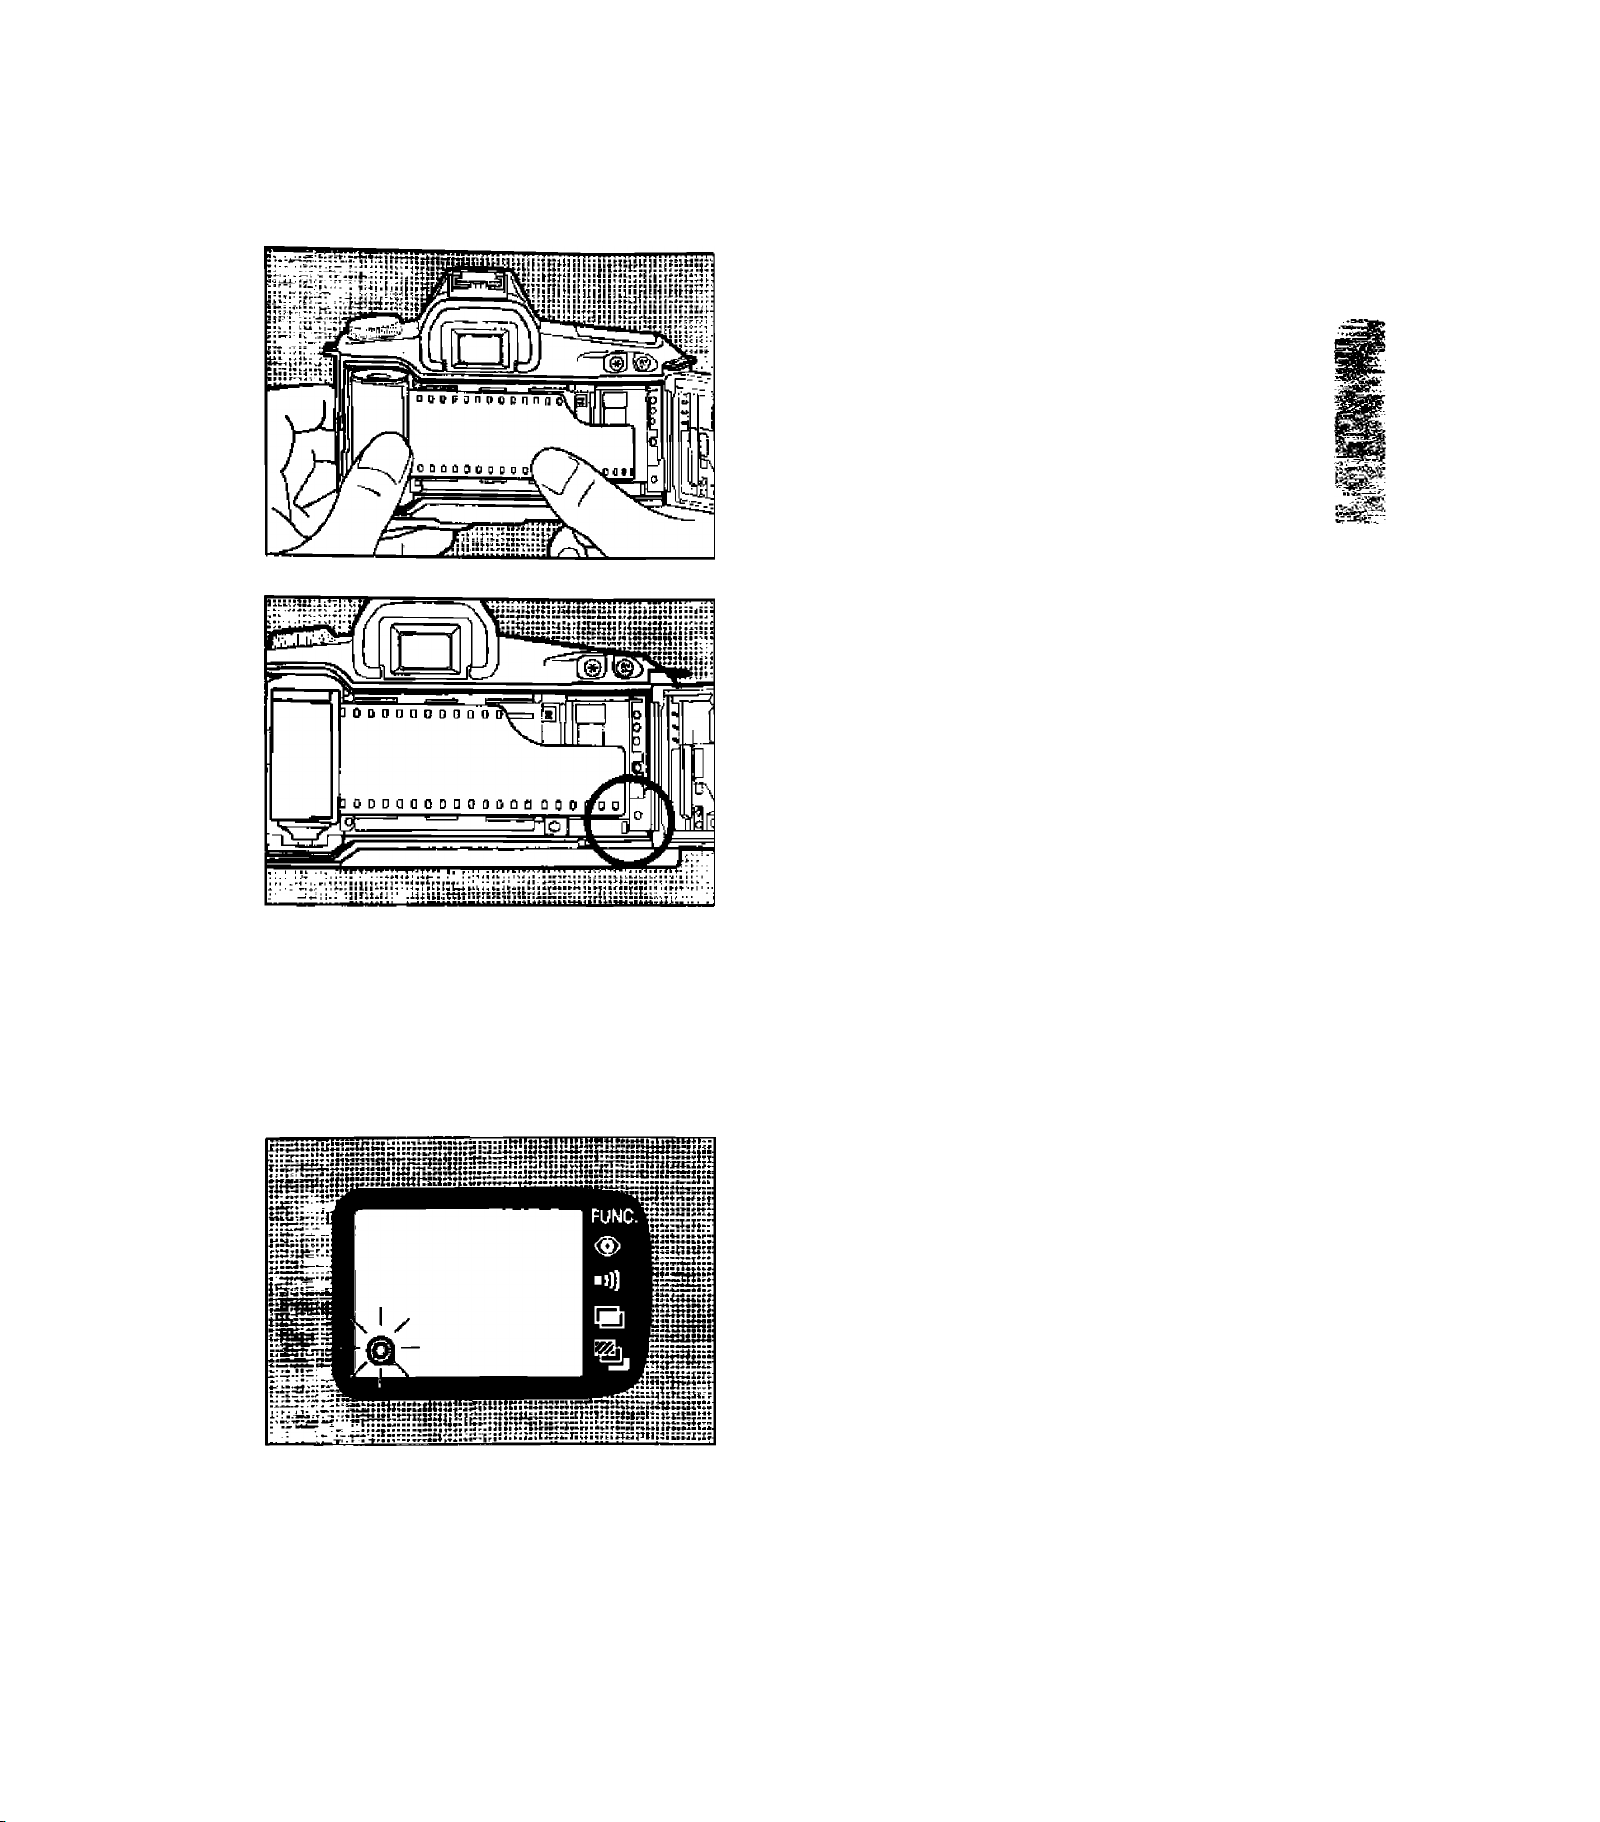
__
I. Before You Start
A Hold down the film cartridge and
^ pull the edge of the film leader to
the orange mark on the camera.
• If the edge of the film leader goes beyond
the orange mark, rewind some of the film
back into the cartridge.
C After checking that the film leader
^ edge is correctly aligned with the
orange mark, close the camera
p
back. The film will then wind on the
spool and the frame counter will
count up. The camera will then
make a shutter release sound and
the film symbol (@) will be
displayed.
* While the film is being wound, the ISO film
speed will be displayed on the LCD panel.
■ If the film has not been loaded properly,
the frame count will not be displayed and
the film symbol will blink. Load the film
again.
Unloading Film
After the film’s last frame is exposed,
the camera rewinds the film
automatically. When the film rewind
ends, only the film symbol will blink on
the LCD panel.
Check that the film symbol is blinking,
then open the camera back and
unload the film.
• The film symbol will blink for 3 seconds, then it
will stay on.
15
Page 16
II. Basic Operation
Easy picture-taking with the Command Dial’s Fuil Auto^and Programmed ^
H* Jmage Control modes is described here. With these fully-automatic
picture-taking modes, all you do* is press the shatter button and the
■'camera does the rest. ^
The Full Auto mode and Programmed Image Control modes override all
camera controls except the shutter button.
□ Full Auto Mode
The Full Auto mode is for any type of subject. You only need to press the
shutter button. One of the three focusing points is used to focus the
subject for easy picture-taking.
Turn the Command Dial to O
1
16
Q Look through the viewfinder and
^ aim one of the three focusing
points on the subject.
• The camera will select a focusing point to
focus what it perceives as the subject.
• It none of the focusing points cover the
subject, see “Focus Lock" on page 30.
Page 17
- " .....wKi _ ->3t' .it • :tfty.
3 Press the shutter button halfway.
The subject will be focused and the
shutter speed and aperture will be
set automatically.
* When focus is achieved, the green in
focus indicator lights.
■ The active focusing point will light on the
LCD panel and in the viewfinder.
■ The shutter speed and aperture will be displayed
on the LCD panel and in the viewfinder.
• In low-light or backlit conditions, the built-in
flash fires automatically.
II. Basic Operation
£50 I IC- ■]
a
A Press the shutter button completely
^ to take the picture.
■ In-focus indicator warning
It the in-focus indicator blinks, the shutter cannot be released. See page 58.
■ Display of the multiple focusing points
When focus is achieved, more than one focusing point indicator at the bottom of the
viewfinder may light. This indicates that those corresponding focusing points have
achieved focus.
■ How the focusing point is selected automatically
As a general principle, the focusing point covering the closest, focusable object is selected
automatically.
17
Page 18
II. Basic Operation
— ...... «—■ * — ■ '.tffl&T'-
Automatic Flash Operation
In the Full Auto mode □ or in the ^ , and 0 Programmed Image
Control modes, the built-in flash pops up and fires automatically for dark
or backlit (fill-in flash) subjects.
4*
If the built-in flash Is obstructed from popping up automatically, the battery level indicator
on the LCD panel will blink for 3 seconds and then remain displayed as a warning. If this
happens, press the shutter button halfway to cancel the warning.
If you do not want to use flash, use the P (Program AE) mode.See page 31.
The Red-Eye Effect
When flash is used in low-light situations, it may reflect off the subject's
pupils and make the eyes look red in the photograph.
Setting Red-Eye Reduction
The red-eye reduction feature helps reduce red eye with the camera’s
red-eye reduction lamp which gently shines into the subject’s eyes to
decrease the pupil diameter, thereby reducing the chances of red eye
from occurring. Red-eye reduction can be set in any picture-taking mode.
A Press the function button until the
* function pointer points to the red
eye reduction symbol (<§>) on the
LCD panel.
O Turn the Main Dial as shown by
^ the arrow so that “1” appears on
the LCD panel.
• To disable red-eye reduction, turn the
Main Dial in the opposite direction to set it
to “0".
• The function pointer ► will disappear
and the red-eye reduction feature will be
disabled.
18
o The setting will take effect 6
^ seconds later or when the Main
Dial is turned.
Page 19

II. Basic Operation
• The red-eye reduction lamp lights after the shutter button is pressed halfway and focus has
been achieved,
• The red-eye reduction lamp will light again if the shutter button is pressed halfway again.
• While the red-eye reduction lamp is iitf the red-eye reduction lamp-on indicator in the
viewfinder will gradually fade.
• Red-eye reduction may be effective only when the subject looks at the red-eye reduction
lamp. The actual effectiveness will depend on the subject.
• To increase the effectiveness of red-eye reduction, take the picture after the red-eye
reduction lamp-on indicator in the viewfinder turns off.
• The picture can be taken at anytime even while the red-eye reduction lamp is lit. Just press
the shutter button completely.
AF-Assist Beam
Under difficult autofocusing conditions, the AF-assist beam is emitted
automatically to assist autofocus,
* The AF-assist beam can be activated in any Programmed Image Control mode and Creative
Zone mode.
■ if Speedlite 540EZ is used with the camera, the AF-assist beam will be emitted by the
Speedlite instead. With any other external, EOS-dedicated Speedlite, the AF-assist beam
will be emitted by the camera. However, if the center focusing point has been selected
manually in a Creative Zone mode, the AF-assist beam will be emitted by the EOSdedicated Speedlite instead of the camera.
Single-frame and continuous shooting
• When the shutter button is held down completeiy, the shooting mode (single-frame or
continuous) is set automatically by the current picture-taking mode. Refer to page 65 to
see which shooting mode is set.
19
Page 20
^ Portrait Mode
This mode blurs the background to
make the human subject stand out.
* Holding down the shutter button enables
continuous shooting.
* For dark or backlit (fill-in flash) subjects, the
built-in flash pops up and fires automatically.
Set the Command Dial to ^ .
• The picture-taking procedure is the same as for
the Full Auto mode (page 16).
■ Head-and-shoulder shots result in the best background blur effect, Also, the further away
the subject is from the background, the more blurred the background will become.
* Using a telephoto lens also blurs the background further. If a zoom lens is used, use the
longest focal length. (For example, a 28-80mm zoom lens set to 80 mm.)
20
Page 21
Landscape Mode
Jfflwnniiiwr
This is for sweeping scenery, sunsets,
etc.
■ The built-in flash does not operate in this
mode.
Set the Command Dial to
* The picture-taking procedure is the same as for
the Full Auto mode (page 16).
• If a zoom lens is attached, use the shortest focal length. (For example, a 28-80mm zoom
lens set to 28 mm.) The resulting photograph will have more depth from the foreground to
the background and a wider breadth.
• If the shutter speed display blinks, the shutter speed may be too slow to prevent"a blurred
picture due to camera shake. Hold the camera steady or use a tripod. (The shutter speed
will still blink even while a tripod is used.)
01
Page 22

Set this mode when using the lens'
built-in macro feature for taking closeup shots of flowers, insects, etc,
■ For dark or backlit (fill-in flash) subjects, the
built-in flash pops up and fires automatically.
Set the Command Dial to ft .
• The picture-taking procedure is the same as for
the Full Auto mode (page 16).
* Focus the subject at the lens’ minimum focusing distance.
* If a zoom lens is used, use the longest focai length to obtain a larger magnification.
* For better close-ups, an EF macro lens and Macro Ring Lite ML-3 (both sold separately)
are recommended.
22
Page 23

^ Sports Mode
• • - K I«U twJAP • • • • ^W3f5&6£cJ» -«-«—® ■l^®J'
This mode is ideal for sports
photography and capturing fastmoving subjects.
• Holding down the shutter button enables
continuous shooting.
■ The built-in flash does not operate in this
mode.
Set the Command Dial to ^,
• The picture-taking procedure is the same as for
the Full Auto mode (page 16).
■ Using ISO 400 or faster film is recommended.
* For sports photography, a telephoto lens such as the EF 80-200mm f/4.5-5.6 USM or EF
75-300mm f/4-5.6 is recommended.
If the shutter speed display blinks, the shutter speed may be too slow to prevent a blurred
picture due to camera shake. Hold the camera steady or use a tripod, (The shutter speed wifi
still blink even while a tripod is used.)
23
Page 24

Pi Night Scene Mode
Use this mode when taking a photo of
a human subject at sunset or at night.
Flash is used to illuminate the subject
and a slow shutter speed is used to
expose the background, resulting in a
natural-looking exposure.
Set the Command Dial to R .
0
• Using ISO 400 or faster film is recommended.
■ When using this mode, use a tripod to prevent camera shake.
* For scenery only (no human subjects), use the Landscape mode Sfc .
• The Night Scene mode uses a slow shutter speed. Tell the subject not to move
immediately alter the flash fires.
• If the self-timer is used, the red-eye reduction lamp will flash after the exposure is
completed.
* An external EOS-dedicated Speedlite will also work with this mode.
* If the Night Scene mode is used in daylight, it will be the same as the Full Auto mode.
24
Page 25

.... ■' -5^.. 1 '■ £
III. Self-Timer and Quartz Date (QD model only)
■: ^ ..w ■ ■ ^ ■
The camera has a self-timer/ and QD models have a quartz date feature
to imprint the date or time.
■'9
Self-timer Operation
The self-timer can be used in any picture-taking mode. Using a tripod is
recommended.
Press the self-timer button.
• The symbol will be displayed on the
LCD panel.
* To cancel the self-timer, press the self-
timer button again or turn the Command
Dial to H.
.5*:
■ If you start the self-timer while
standing in front of the camera, the
focus may be incorrect.
■ To cancel the self-timer, press the
self-timer button again.
■ When using the self-timer to take a
picture of only yourself, first lock the
focus (see page 30) on an object
near where you will be in the picture.
Press the shutter button halfway to
focus, and check the shutter speed
and aperture setting.
While still looking through the
viewfinder, press the shutter button
completely to start the self-timer.
The beeper will sound and the
shutter will be released after 10
sec.
The beeper beeps slowly (twice/sec.) during
the first 8 seconds and faster (8 times/sec.)
during the final two seconds before the
shutter is released.
* The self-timer display on the LCD panel
counts down in seconds.
* The camera's red-eye reduction lamp
lights two seconds before the shutter is
released.
*
25
Page 26

Imprinting the Date or Time (QD model only)
QD models have a quartz date feature which maintains an automatic
calendar to the year 2019. It can imprint the date or time on the
photographs you take. The year, month, and day are initially displayed on
the quartz date display panel. If left unchanged, the date in this format will
be imprinted on the photograph at the same time the photograph is taken.
The date or time can be imprinted in any picture-taking mode.
Pressing the MODE button changes the date/time format to be imprinted,
in the sequence shown on the display panel as follows:
Year, month, day
l
Day, hour, minute
l
’nr
30inIU
jn
cu
i >5 ■
:9S
Hyphens
M
Month, day, year
Day, month, year
■ "M” is displayed above the month.
• When the picture is taken, " blinks to indicate that the date or time has been imprinted
m
IU
-rn
cu
c u
M
t n
l Li
’95
’95
(1996 Oct. 20)
(20th 16:45)
(Blank)
(Oct. 20, 1996)
(20 Oct. 1996)
Disabling Date or Time Imprinting
■ The date or time is imprinted as
shown in the above photograph. The
actual imprinted date or time does not
have the “M” or ” displayed on the
display panel.
26
If you do not want to imprint the date
or time on the photograph, press the
MODE button until the LCD panel
displays “ -
.............
Page 27

II!. Self-Timer and Quartz Date (QD model only)
Setting the Date and Time
To set or change the date and time, follow the procedure below:
MODE
OE>o o
SELECT SET
MODE
CD)® O
SELECT SET
! MODE
COo ®
SELECT SET
MODE
CD)® O
SELECT SET
rvi
’0c in
j u r u
(VI
’on * C_
JU
’DC ih—Dn.
D 0 IU C LL
^|V
[VI
’0 c
DO
m ;m
i u C u
-l Press the MODE button to display
■ the date or time to be set.
Q Press the SELECT button so that
^ the digit to be changed blinks.
Keep pressing the SET button until
the correct number appears.
Press the SELECT button until
none of the digits blink. This sets
the new date or time.
Replacing the Quartz Date Battery
When the quartz date display panel looks faded, replace the CR2025
lithium battery as follows. Battery life is about 3 years.
H Open the camera back and loosen
1
the screw to remove the battery
compartment cover as shown in
the figure.
2 Take out the battery.
O Insert a new battery with the
^ positive contact facing you. Then
reattach the battery compartment
cover.
A Close the camera back and set the
^ correct date and time.
27
Page 28

I IV. Advanced Operations
The Creative Zone modes make picture-taking more flexible with shutter
£?: speed-priority and aperture-priority modes, user-selected focusing points,
f and options for changing the exposure settings. The Creative Zone
modes are described here along with other advanced operations.
Focusing Point Selection
M'S’ ■ —
The focusing points are the little boxes which focus the subject. The
focusing point can be selected automatically by the camera or manually
by you.
In the Full Auto, A-DEP, and all Programmed Image Control modes, the
focusing point can only be selected automatically. In the P, Tv, Av, and M
modes, the focusing point can be selected either automatically or
manually.
Automatic selection: The camera selects the focusing point
Manual selection: You can select any focusing point to focus the
r
~ 7 ~ZZ 'Z. -
automatically depending on the scene. Ideal for
snapshots.
subject. This ensures that the camera focuses the
subject you want. It is also effective for focusing
off-center subjects quickly.
28
Selecting the focusing
point automatically or
manually
Set the Command Dial to the P,
Tv, Av, or M mode.
Press the focusing point selector.
• The focusing point indicator for the current
focusing point is displayed.
• The locusing point indicator remains
displayed for 6 seconds after the focusing
point selector is released.
Page 29

(V. Advanced Operations
O Look at the focusing point indicator
^ on the LCD panel or in the
viewfinder and turn the Main Dial
until the desired focusing point
indicator is displayed.
■ ■] :Sets the focusing point selection to
automatic.
[■ ] :Selects the left focusing point.
£ ■ rSelectsthe center focusing point.
E :Selects the right focusing point.
* The focusing point indicator changes in the
above looping sequence as the Main Dial
is turned.
A Press the shutter button halfway to
register the focusing point selection.
* if the shutter button is not pressed halfway
within 6 seconds, the focusing point
selection will be registered automatically.
If you select the focusing point manually and then you set the Command Dial to Full Auto or a
Programmed Image Control mode, your focusing point selection will be overidden and
automatic focusing point selection will take effect.
29
Page 30

IV. Advanced Operations
Focusing an Off-Center Subject
If you want to focus an off-center subject not covered by any of the
focusing points, following the procedure below.
■I Aim the manually-selected focusing
point on the subject, then press the
shutter button halfway to focus.
O Keep pressing the shutter button
^ halfway and recompose the picture.
O Press the shutter button completely
^ to take the picture.
30
Page 31

P Program AE_
Like the Full Auto mode (CD), this is a
general-purpose picture-taking mode.
The camera automatically sets the
shutter speed and aperture to suit the
scene’s brightness.
Press the shutter button halfway to
focus the subject.
* The shutter speed and aperture will be
displayed in the viewfinder and on the LCD
panel display.
■ After the shutter button is pressed halfway
and released, the shutter speed and
aperture will remain displayed for about 4
seconds.
8.oc-r
2,1,
i
O Check the shutter speed and
^ aperture, then press the shutter
4.
button completely to take the
picture.
31
Page 32

IV* Advanced Operations
In a Creative Zone mode, the LCD panel and viewfinder wilt show the exposure level scale and
exposure level indicator in addition to the shutter speed and aperture. The exposure level indicator
indicates the exposure compensation amount and exposure level in the manual exposure mode.
Difference Between Program AE Mode and Full Auto Mode
The Program AE (P) mode and Full Auto (CD) mode obtain the same
shutter speed and aperture settings for picture-taking. However, the
Program AE mode is more flexible by allowing you to override the
camera settings and use the features below.
O: Settable by the user, x: Not settable by the user.
Feature
Continuous shooting
Program shift
Exposure compensation
Autoexposure bracketing
Partial metering/AE lock
Manual focusing point selection
Manual firing of built-in flash
High-speed sync with EX-series Speedlite ^
FE lock with EX-series Speedlite
P
O
o
o
o
0
O ””I
o
o
o
Full Auto
X
X
X
X
X
X
X
X
X
Shifting the Program
In the Program AE mode, you can freely change the shutter speed and
aperture combination (program) set by the camera while maintaining
the same exposure value. This is called shifting the program.
To shift the program, press the shutter button halfway and turn the
Main Dial until the desired shutter speed or aperture is displayed,
• After the picture is taken with the shifted program, the shifted program is canceled
automatically and the original program is restored.
■ If the built-in flash is used, the program cannot be shifted.
■ The program can be shifted only to a shutter speed from 30 to 1/2000 sec. and within
the minimum and maximum aperture settings of the lens.
32
Page 33

Tv Shutter-Speed Priority AE
In this mode, you set the shutter speed
and the camera sets the aperture
automatically to suit the brightness of
the scene. (Tv stands for Time value.)
By setting a fast shutter speedt you
can freeze the motion of a fast-moving
subject. And by setting a slow shutter
speed, you can blur the subject to give
the impression of motion.
Taken at a fast shutter speed
To photograph a scene on a TV screen, use a
shutter speed of 1/15 sec. for best results. Use a
tripod to prevent blur.
Taken at a slow shutter speed
i.SKtiiStfKSiBKt-'- : -Xa:.
•:laa'.lflilf.SB.ilf :l :■ ".t:
M4|
fowfesatfiaiHI
•r«!■ ->'
■ 1 **•*»■* * •
--“iHissBasj;
tiiihtiff* p* ■ >
Set the Command Dial to Tv,
2 Turn the Main Dial until the desired
shutter speed is displayed.
i w’Wt!!''
33
Page 34

IV. Advanced Operations
Q Press the shutter button halfway to
^ focus the subject.
* The shutter speed and aperture will be
displayed in the viewfinder and on the LCD
panel.
rn r cr ■ n"2.1 .*» 1 *2+i
Qu j. C' L 1 J | '
Check the aperture and take the
picture.
* If the maximum aperture (the smallest Fnumber) blinks, the scene is too dark. In such a
case, turn the Main Dial to set a slower shutter speed until the aperture stops blinking.
■ If the minimum aperture (the largest f-number) blinks, the scene is too bright. In such a
case, turn the Main Dial to set a faster shutter speed until the aperture stops blinking.
Shutter Speed Display
The shutter speed can be set and displayed in full and half steps as shown below. Shutter
speeds from 2 to 2000 indicate the denominator of the fractional shutter speed. For example,
125 is 1/125 second. For slower shutter speeds, the numeral is appended with the seconds
mark (“). For example, 0"7 is 0,7 second and 15” is 15 seconds.
30" 20” 15” 10” 8" 6” 4” 3” 2" 1”5 1” 0"7
2 3 4 6 8 10 15 20 30 45 60 90 125 180 250 350 500 750 1000 1500 2000
34
Page 35

Av Aperture-Priority AE
Taken with a large aperture
In this mode, you set the aperture and
the camera sets the shutter speed
automatically to suit the brightness of
the scene- (Av stands for aperture
value.)
By setting a larger aperture (smaller f-
number), you can blur the background
and make the subject stand out.
Or, by setting a smaller aperture
(larger f-number), you can increase the
depth of field to make both the
foreground and background look
sharp.
-• ftMHtrrnMa*!
*r;:r u
•+H ttlirp •ITtHlJl
fltTttU4MIMa«tUiaxrr. „
UunulkiJljfMiHTa_____
<
t-P
H
' ’ fM liltfU»IM< ■
----
• ■ It ■« HMfUMpiM h
, . J
r
j
a. a ..
r:.r:SISj [iji;:::
*•
■■ >i!J:
" * HAIakii ^iifeaSaa
' ;255******»+*tsiSIw'
Jiil"
-Hilt*
Set the Command Dial to Av.
1
2 Turn the Main Dial until the desired
aperture is displayed.
35
Page 36

IV. Advanced Operations
Q Press the shutter button halfway to
focus the subject.
• The shutter speed and aperture will be
displayed in the viewfinder and on the LCD
panel.
I "7 I"
■L 0
A Check the shutter speed and take
** the picture.
■ If the 30" shutter speed blinks, the scene is too dark. In such a case, turn the Main Dial to
set a larger aperture {smaller f-number) until the shutter speed stops blinking.
inn ij nr i i
II L' ■. ■_! L
“2.1 if, 1 i£+i
1
J
11 the 2000 shutter speed blinks, the scene is too bright. In such a case, turn the Main Dial
to set a smaller aperture {a larger f-number) until the shutter speed stops blinking.
3 n n r
i ikii
Aperture Display
The aperture can be set and displayed in full and half stops as shown below. The higher the
aperture setting (f-number), the smaller the aperture opening will be. The displayable range of
aperture settings depends on the lens mounted on the camera. When no lens is mounted on
the camera, (<00” is displayed for the aperture setting,
1.0 1-2 1-4 1.8 2.0 2.5 2.8 3.5 4.0 4.5 5.6 6.7 8.0 9.5
11 13 16 19 22 27 32 38 45 54 64
36
Page 37

M Manual Exposure^
In this mode, you set the shutter speed and the aperture for total
exposure control. The exposure level of the shutter speed and aperture
combination you set is indicated on the exposure level scale so you can
see whether the exposure is suitable.
Set the Command Dial to M.
p Turn the Main Dial to set the
^ shutter speed.
Indicates a correct
exposure "2.1.0.1.2+
Indicates
overexposure
Indicates
underexposure
~2
-2
•1.0.1.2+
.1.0.1.2+
■
Q Press and hold down the aperture
^ button and turn the Main Dial to set
the desired aperture.
A Press the shutter button halfway to
^ focus the subject. f-
• Check the exposure level indicator in the
viewfinder or on the LCD panel.
0 Look at the exposure level
indicator and adjust the exposure
level if necessary.
Correct exposure; This is the standard
reference point for a
l
Overexposure: To achieve the correct
Underexposure: To achieve the correct
correct exposure.
exposure, increase the
shutter speed or set a
smaller aperture.
exposure, decrease the
shutter speed or set a
larger aperture.
Take the picture.
37
Page 38

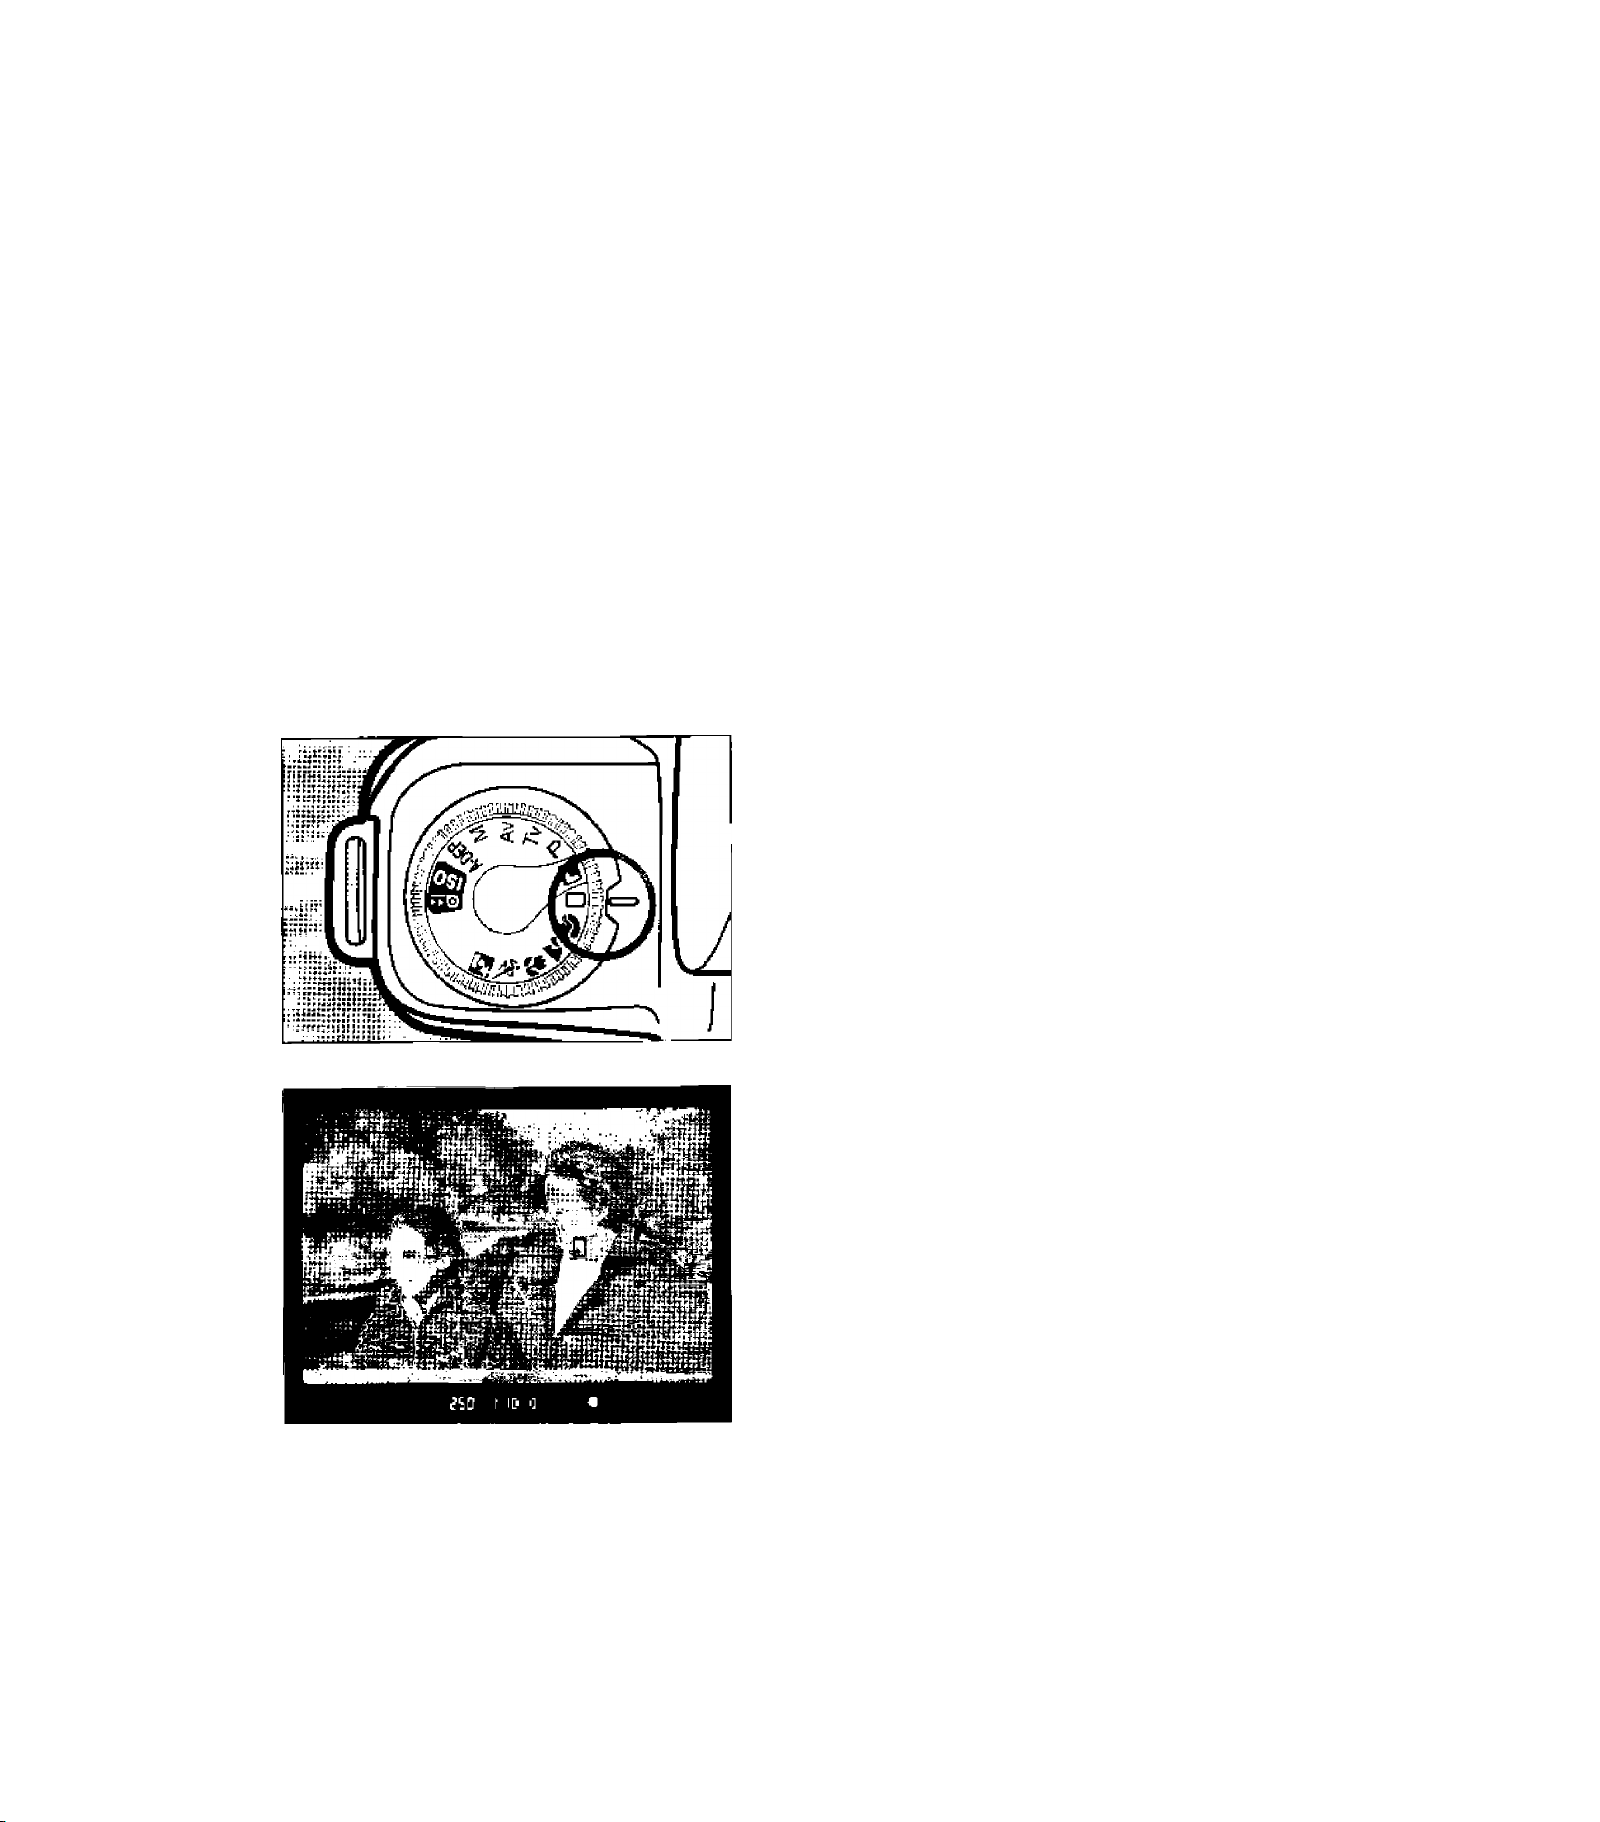
A'DEP Automatic Depth-of-Field AE
This mode is for obtaining a wide depth of field automatically between a
near subject and far subject. It is effective for large-group photos and
landscapes.
The camera uses the three focusing points to detect the nearest subject
and the farthest subject.
■1 Set the Command Dial to A-DEP
and make sure the focus mode
switch on the lens is set to AF.
p Press the shutter button halfway to
^ focus the subject.
■ The active focusing points, the shutter
speed, and aperture are displayed in the
viewfinder and on the LCD panel. The
area between the nearest subject covered
by a focusing point and the furthest subject
covered by another focusing point will be
in sharp focus.
Q Check the shutter speed and
aperture and take the picture.
In this example, the focus will be sharp from the
right subject covered by the right focusing point
up to the left subject covered by the left focusing
point,
■ If the aperture blinks, it indicates that the exposure level is correct but the desired depth of
field cannot be achieved. Either use a wide-angle lens or move further away from the
subjects,
• You cannot freely change the shutter speed and aperture. If the camera sets a slow shutter
speed, hold the camera steady or use a tripod,
• Automatic depth-of-field AE cannot be used if the lens’ focus mode switch is set to MF (or
M on some lenses).
38
Page 39

i Using the Built-in Flash
r
-----
In Creative Zone modes, flash photography is possible at any time
regardless of the ambient light level. Whether the built-in flash or an
external EOS-dedicated Speedlite is used, the basic operation is the
same as with an AE mode.
When flash is used in a Creative Zone mode, the shutter speed (the
maximum sync speed or slower) and/or the aperture can be set as usual.
The flash output is controlled automatically to match the set aperture.
Since the 3-zone TTL autoflash system is linked to the active focusing
point, the flash exposure is weighted on the subject in focus.
• For automatic flash photography, set the Command Dial to P.
The shutter speed and aperture will be set automatically as with the
Full Auto mode. The flash exposure will be weighted on the subject
that is in focus.
• To set the flash aperture manually, set the Command Dial to Av.
In low-light conditions, a slow sync speed will be set automatically to
obtain a suitable exposure of the subject and background. For the
subject, the flash output is set automatically to match the set aperture
for a proper exposure. For the background, the sync speed is set
automatically to obtain a proper exposure.
* When a slow sync speed is set, using a tripod is recommended.
• To set the sync speed manually, set the Command Dial to Tv.
The flash aperture is set automatically to match the sync speed for a
proper exposure, and the flash output is controlled automatically to
match the flash aperture.
• If you set a shutter speed faster than 1/90 sec., the sync speed will be set automatically
to 1 /90 sec,
• To set both the flash aperture and the sync speed manually, set the
Command Dial to M.
For the background, the shutter speed and aperture can be set
manually. The flash output is then controlled automatically to match
the manually-set flash aperture for a proper exposure.
*
&
•JCf-.-v
* If A-DEP is set and flash is used, the result will be the same as using flash in the P
(Program AE) mode.
39
Page 40

IV. Advanced Operations
Press the flash button to pop up
the flash,
■ To retract the flash head after use, push it
down,
O Press the shutter button halfway
and focus the subject.
O Check that the lightning symbol in
^ the viewfinder lights, then take the
picture.
Setting Red-Eye Reduction
When flash is used in a low-light environment, the subject's eyes may
look red in the photograph. This happens when the light from the flash
reflects off the pupils of the eyes. To set the camera’s red-eye reduction
feature, see page 18.
40
Page 41

IV. Advanced Operations
Effective Flash Range cwsth ef 28-80mm 1/35-5.6 lens)
—
------ ■ ■
-------
ISO
--------------------
Negative Film
28 mm
Reversal Film
80 mm
Negative Film Reversal Film
100
400
1 - 4.8 m
1.2-9.6 m
1 - 3.4 m
1.5 -6.8 m
Flash Exposure Indications
Mode
Tv
(Shutter speed-
priority AE)
Av
(Aperture-priority
AE)
The lens’ maximum
aperture blinks.
The lens' minimum
aperture blinks.
The 1/90 sec.
shutter speed blinks.
The 30” shutter
speed blinks.
Warnings
Background
overexposure
warning.
Background
underexposure
warning.
Overexposure
warning.
Underexposure
warning.
Description
1 -3m
1 - 6m 1.5 - 4.3 m
The subject will be
correctly exposed.
The subject will be
correctly exposed. If the
aperture is changed, the
shutter speed may
change.
1 -2.1 m
Remarks
■ When using the built-in flash, keep at least 1 meter away from the subject. Otherwise, part
of the photo will look dark because the lens barrel will partially obstruct the flash coverage.
■ When using the built-in flash, detach any hood attached to the lens. A lens hood will
partially obstruct the flash coverage.
* Using the built-in flash with any of the following lenses may partially obstruct the flash
coverage. Use an external flash unit instead.
* EF 17-35mm f/2,8L USM, EF 28-70mm f/2.8L USM, and other large-aperture lenses.
* EF 300mm f/2.8L USM, EF 600mm f/4L USM, and other super telephoto lenses.
* The built-in flash cannot be used together with an external flash unit.
* ff an EOS-dedicated Speed!ite, etc,, is attached to the hot shoe, the built-in flash will not
operate.
* Before attaching an EOS-dedicated Speedlite, etc., retract the built-in flash.
41
Page 42

Partial Metering and AE Lock
>;:V•V'V•■•’-■....-.v.v - -^ =vr.v-. v>V-0 • • '•*:-~: ■. LV‘-' ‘'--VV'.:
In high-contrast situations such as a person spotlighted against a dark
background, the exposure may turn out too bright or too dark in certain
areas of the photograph. To obtain a more accurate exposure in such
cases, use AE lock to lock the subject’s exposure level.
■I Set the Command Dial to a
1
Creative Zone mode.
O Aim the active focusing point where
^ you want to lock the exposure, then
press the shutter button halfway to
achieve focus.
■ The exposure setting (shutter speed and
aperture) will be displayed in the
viewfinder and on the LCD panel.
Partial metering circle
O If necessary, move the partial
^ metering circle over the area where
you want to lock the exposure, then
press the AE lock button (* ).
* The AE lock indicator ( * ) in the
viewfinder lights and the exposure level
locks. The exposure level will be locked for
about 4 seconds after the AE lock button is
released.
* Whenever the AE lock button is pressed, it
locks the exposure level for the area
currently covered by the partial metering
circle.
■ AE lock will be canceled 4 seconds after
the AE lock button is released or if the
Command Dial is turned.
■ If the Command Dial is set to M (see page
37), the exposure level indicator will
indicate the difference between the
exposure setting you have set and the
partial metering exposure level of the
subject.
42
A Recompose the shot, focus if
** necessary, then take the picture.
To take continuous shots with AE lock, hold
down the AE lock button ( *) and press the
shutter button.
Page 43

Exposure Compensation
Changing the exposure level set by the camera is called exposure
compensation. Exposure compensation can be used to make the picture
darker or brighter intentionally. Exposure compensation can be set up to 2
stops in half steps.
Set the Command Dial to a
Creative Zone mode except M.
9 Press the shutter button halfway
^ and focus the subject.
The shutter speed and aperture will be
displayed in the viewfinder and on the LCD
panel.
cnn rr r . -i_2.1 if i1 .2+a
iug 3.0L ■ J | •
O Press and hold down the exposure
^ compensation button and turn the
Main Dial until the desired
exposure compensation amount is
set.
■ The plus side of the scale indicates
overexposure and the minus side of the
scale indicates underexposure.
• To cancel the exposure compensation
setting, set the exposure fevel indicator to
0.
^ Take the picture.
* The exposure compensation setting will be canceled if the Command Dial is set to a
Programmed image Control mode.
• Assuming that a shutter speed of 1/125 sec. and an aperture of f/5.6 will give a correct
exposure, setting the exposure compensation amount to plus or minus 1 stop on the
exposure level scale will be equivalent tD the following settings:
Shutter Speed
Aperture
—1 stop
250
8.0 <— 5.6
€—
<—
0 +1 stop
125
-¥
—>
60
4.0
43
Page 44

Autoexposure Bracketing (AEB)
With autoexposure bracketing, the camera automatically changes the
exposure level within the set range for three successive frames. The
bracketing amount centers on the correct exposure (or the exposure
compensation setting), and the exposure can be varied up to 2 stops in
half stops. The three bracketed shots are exposed in the following
sequence: correct exposure, underexposure, and overexposure. The film
advances according to the current picture-taking mode. (See “Feature
Availability Table” on page 60.) Bracketing is useful for obtaining the
desired exposure or effect, especially with reversal film which has a
narrow exposure latitude.
Correct exposure Underexposure (-0.5 stop) Overexposure (+0.5 stop)
Set the Command
Dial to a
1
Creative Zone mode.
O Press the function button until the
" function setting pointer points to
Turn the Main Dial to set the
desired bracketing amount.
■ The bracketing amount is displayed on
the LCD panel. For example, it it is set to
0.5, the bracketing sequence will be:
correct exposure, underexposure by -0.5
stop, and overexposure by +0.5 stop.
• To cancel autoexposure bracketing, set
the bracketing amount to 0.0.
44
Page 45

“2,1.0.1.2+ * Bracketing amount of
1 1 1
1 stop
“2.1.G.1*2* * Bracketing amount of
1
• * -1 stop
-4$
IV. Advanced Operations
If the set bracketing amount exceeds 2
stops, the display will be as shown on
the left. Autoexposure bracketing and
the bracketing amount will still work
properly.
"2.1.GM.2+
■l l
-2.1.0.1.2+
■ ■
Bracketing amount of
-1.5 stop
Bracketing amount of
-2 stops
A Turn the Main Dial or wait for 4
^ seconds until the bracketing
amount takes effect.
C Take the bracketed shots with the
** film advance mode set with the
current picture-taking mode. See
“Feature Availability Table” on
page 61.
• The exposure level scale in the viewfinder
and on the LCD panel will show the
bracketing amount for each bracketed
shot.
* The AEB symbol’s function setting pointer
and dot will blink while the bracketed
pictures are taken.
Correct exposure
Underexposure .
Overexposure ...
• If the Command Dial is set to a Programmed Image Control mode or if the built-in flash or a
Canon Speedlite is used, the autoexposure bracketing setting will be canceled.
• The three bracketed shots can be taken continuously by holding down the shutter button in
the continuous shooting mode. However, the bracketed amount for each shot will not be
displayed in the viewfinder.
• If the self-timer is used with autoexposure bracketing, the three bracketed shots will be
taken continuously 10 sec. after the self-timer is activated.
*2.1 if1112
-2.1.*.1.2+
I
"2.1if.1.2
+
I
+
I
45
Page 46

Bulb Exposure
t i irrrr-—i — rfm"——f -
When bulb is set, you can expose the film for as long as you press the
shutter button completely. Bulb exposures are useful when long
exposures are required for night scenes, fireworks, etc. Use a tripod when
making a bulb exposure. Remote Switch RS-60E3 (sold separately)
makes taking bulb exposures easier.
j
Tt ■**
^ Set the Command Dial to M,
p Turn the Main Dial until W.6
^ (which follows ) is displayed for
the shutter speed.
O Press and hold down the aperture
^ button and turn the Main Dial to set
the desired aperture.
^ Frame the shot, then press and
hold down the shutter button
completely for the duration of the
exposure.
■ During bulb exposure, buLb biinks on the
LCD panel.
* With a new set of batteries, a bulb
exposure can be as iong as about 6
hours.
46
Page 47

Multiple Exposures
By not advancing the film, a single frame can be exposed multiple times
to obtain a special effect.
O Press the function button until the
^ function pointer points to the
multiple-exposure symbol (0) on
the LCD panel.
* "1” will be displayed on the film counter on
the LCD panel.
O Turn the Main Dial to set the
** desired number of multiple
exposures.
• The film counter on the LCD panel will
show the number of multiple exposures
that is set.
• Up to 9 multiple exposures can be set.
• Press the shutter button halfway or wait 6
seconds tor the setting to take effect.
• To cancel the multiple-exposure setting,
set the number of multiple exposures to 1.
ife
%
> ./A
tea®
St®
47
Page 48

IV. Advanced Operations
A Compose the shot and press the
^ shutter button completely to
expose the same frame each time.
■ While multiple exposures are taker, the
multiple-exposure symbol’s function
pointer ^ blinks on the LCD panel during
the 4 seconds while the exposure
information is displayed.
* After the set number of multiple exposures
are taken, the film advances to the next
frame and the multiple exposure setting is
canceled.
• When taking multiple exposures on a single frame of film, exposure compensation must be
set before the multiple exposures are taken. Also see "Exposure Compensation” on page
43.
As a general guide, you should set the exposure compensation amount shown below for
the respective number of multiple exposures.
No. of Multiple Exposures
Underexposure Amount
These are only suggested exposure compensation amounts. The optimum amount depends
on the scene. Experiment to discover the optimum compensation amount.
* Turning the Command Dial to a Programmed Image Control mode will cancel the multiple-
exposure setting.
■ Multiple exposures can be set for bulb exposures.
2
-1.0 stop
3
-1.5 stop
*
4
-2.0 stops
46
Page 49

Setting the ISO Film Speed
If the film is not DX-coded or if you want to set a different ISO film speed,
you can set the ISO film speed manually* The ISO film speed can be set
from 6 to 6400.
Turn the Command Dial to ISO.
* The ISO symbol and the current ISO film
speed will be displayed on the LCD panel.
p Turn the Main Dial until the desired
^ ISO film speed appears on the
LCD panel.
O Turn the Command Dial to the
** desired mode.
The previously-set ISO film speed will remain effective until another DX-coded film is foaded
or until the ISO film speed is changed manually.
49
Page 50

Silencing the In-Focus Beeper
7 ^.V . .J&: «■ - -- **
The in-focus beeper can be silenced for all picture-taking modes.
Press the function button until the
function pointer points to the
beeper symbol (■»])) on the LCD
panel.
• The film counter on the LCD panel will
show “1”.
Turn the Main Dial until the film
counter on the LCD panel displays
“0”.
• The beeper symbol’s function pointer on
the LCD panel will disappear and fhe
beeper will no longer sound when focus is
achieved.
■ To activate the in-focus beeper again, set
the film counter on the LCD panel to "1”
again.
Turn the Command Dial or wait 6
3
seconds for the setting to take
effect.
50
Page 51

Midroli Film Rewind
To rewind and unload the film before reaching the last frame, follow the steps below.
Press and hold down the film rewind button (self-timer button) for at least 1 second.
• The film will start rewinding. When the film
rewind ends, there will be a shutterrelease sound and the film symbol {@) on
the LCD panel will blink. After about 3
seconds, the film symbol will stop blinking
and just stay on.
Open the camera back remove the film.
If the film is removed from the camera in midroll without being rewound and then a new roll of
fitm is loaded, the new roll (film leader) will only be rewound into the film cartridge. To prevent
this, close the camera back and press the shutter button completely before loading a new roil
of film. ■ &
51
Page 52

V. E-TTL Autoflash with an EX-Series Speed!ite
With an EX-series Speedlite like the 380EX or 220EX, flash photography is
easy with the E-TTL (Evaluative-Through-The-Lens) autoflash system which
is linked to the active focusing point. It is as easy as using the built-in flash.
An external Speedlite is recommended when a high flash output is
required for group shots and special lighting effects.
E-TTL Autoflash System Features
(1) Since the E-TTL autoflash system (with
preflash evaluative metering) is linked
to the active focusing point, proper flash
exposure is obtained for the subject in
focus.
(2) Even for fill-flash and indoor situations,
a natural-looking flash exposure is
obtained automatically.
(3) With the Command Dial set to Av, a slow sync speed is set automatically in
low-light situations to obtain a balanced exposure between the subject and
background.
(4) FE (Flash Exposure) lock enables you to lock the correct flash exposure for
any part of the picture.
(5) High-speed sync (FP or Focal-Plane flash) can be used to synchronize the
flash with all shutter speeds from 30 sec. to 1/2000 sec.
(6) In a Creative Zone mode, the aperture and shutter speed (1/90 sec. or slower)
can be set manually.
(7) With multi-flash accessories, multiple Speedlites can be used automatically
with the TTL autoflash system which is linked to the active focusing point.
*
* In the AF mode, the flash output is controlled automatically to match the flash aperture.
Since the flash metering is linked to the focusing point, the E-TTL autoflash system weights
the Hash exposure on the subject in fucus.
* When the Speedlite is on in the Full Auto mode or a Programmed Image Control mode, the
flash fires each time a picture is taken,
■ The camera’s red-eye reduction lamp operates even when an external EOS-dedicated
Speedlite has been attached to the camera.
52
Page 53

V. E-TTL Autoflash with an EX-Series Speedlite
Normal Flash Operation
H Set the Command Dial to any
* picture-taking mode except A-DEP.
* If A-DEP is set and flash is used, it will be
the same as using flash in the P (Program
AE) mode.
O Turn on Speedlite 220EX’s power
^ switch.
• Make sure the Speedlite’s high-speed
sync (FP flash) lamp is off. If it is on, press
the high-speed sync button to turn off the
lamp.
O Press the shutter button halfway
^ and focus the subject.
4 In the viewfinder, check that the H
symbol, shutter speed, and
aperture are displayed.
C Press the shutter button
** completely to take the picture.
Page 54

V. E-TTL Autoflash with an EX-Series Speedlite
- -up*: :ate—** “
----
1 — ■ '
High-Speed Sync (FP Flash)
With the Speedlite’s high-speed sync switch set to Vh , high-speed sync
(focal-plane flash) is set automatically when the shutter speed is set faster
than 1/90 sec. The Speedlite can then synchronize with all shutter
speeds. When high-speed sync is in effect, “H" is displayed on the right of
i in the viewfinder.
High-speed sync is effective in the
following cases:
1 When you want to use fill-in flash
for a portrait and maintain
background blur with a large
aperture.
2 When you want to produce a
catchlight in the subject’s eyes.
3 When you want to use fill-in flash to
eliminate shadows
* High-speed sync can be used only in Creative Zone modes. In Programmed Image Control
modes, the normal sync speed is set.
■ When high-speed sync is used, the Speedfite’s Guide No. decreases. If the ambient light is
insufficient, using high-speed sync may result in underexposure.
FE Lock
FE (flash exposure) lock obtains and locks the correct flash exposure for
the desired portion of the scene.
FE lock operates only in Creative Zone modes, and the camera’s AE lock
button functions as an FE lock button.
Turn the Command Dial to a
Creative Zone mode.
O Check that the Speedlite’s 'lamp is
^ lit.
• The flash mode can be either normal or
high-speed sync (FP fiash). FE lock will
work with either mode.
Page 55

V. E-TTL Autoflash with an EX-Series Speedlite
O Aim the focusing point where you
^ want to achieve focus and press
the shutter button halfway to focus.
Keep pressing the shutter button
halfway.
A Aim the partial metering circle over
^ the subject where you want to lock
the flash exposure, then press the
FE lock button.
■ The Speedlite fires a preflash and
remembers the required flash amount.
■ In the viewfinder, the * symbol is
displayed together with the i or *h
symbol.
* If the i symbol in the viewfinder blinks,
the subject is outside the effective range of
the Speedlite. This may result in
underexposure. Reduce the distance
between the subject and camera until the
symbol stops blinking after the FE lock
button is pressed.
* The FE lock button remains effective for
16 sec. after it is released. The FE lock
setting is therefore still effective during this
time.
C Press the shutter button completely
** to take the picture.
Using a Non-EX-Series Speedlite
If the camera is used with a non-EX-series EOS-dedicated Speedlite (540EZ, 430EZ, 420EZ,
or 300EZ, etc.), the 3-zone A-TTL or TTL autoflash system will operate. Flash pictures (even
with multi-flash accessories) can still be taken as easily as normal autoexposure pictures.
55
Page 56

VI. Reference
This Reference section is provided to enable you to better understand
your camera and take full advantage of its capabilitiesr^g^^
Basic terminology, a troubleshooting guide, accessories guide, and other
information are covered.
■m
Basic Terminology
Shutter speed
The shutter speed is the length of time the camera’s shutter curtain opens
to expose the film to the light coming through the lens. The shutter speed
displayed on the camera's LCD panel and in the viewfinder ranges from
30 to 1/2000 sec. and bulb.
Aperture
The aperture (or f-number) indicates
the size of the aperture opening in the
lens. The aperture opening is adjusted
by several aperture blades which
open and close to adjust the aperture
diameter. The aperture setting
displayed on the camera's LCD panel
and in the viewfinder can range
anywhere from 1.0 to 32, depending
on the lens attached to the camera.
The larger the f-number, the smaller
the aperture. And the smaller the f-
number, the larger the aperture.
56
Page 57

nr:. - • : ;,
ISO film speed
The ISO film speed indicates the film’s
sensitivity to light. The higher the film
speed, the more sensitive the film is. The
more sensitive the film is, the less light is
required to obtain a correct exposure.
Therefore, a high-speed film is suited for
low-light situations. The ISO film speed is
set in accordance with standards set by
the International Standards Organization
(ISO).
A film speed from 6 to 6400 can be set
with the camera. The film speed is
displayed on the LCD panel and in the
l
VI. Reference
viewfinder.
Depth of field
This is the range in front of and behind the plane of optimum focus where
acceptable focus can be achieved. The smaller the aperture (the larger the fnumber), the deeper the depth of field will be. And the larger the aperture (the
smaller the f-number), the shallower the depth of field will be.
The depth of field is affected as described below:
(1) A smaller aperture (a larger f-number) increases the depth of field.
(2} A lens with a shorter focal length increases the depth of field.
A wide-angle fens obtains a deeper depth of field than a telephoto lens.
(3) A longer distance between the camera and subject increases the depth of
field.
(4) The depth of field behind the plane of optimum focus is longer than the
depth of field in front of the plane of optimum focus.
57
Page 58

Troubleshooting Guide
—
If there is a problem, first refer to this Troubleshooting Guide. If the problem still persists, take your camera to your nearest Canon Service Center. Canon Service Centers are listed on the back of this booklet.
Problem
___
■ 11»' iwwf 1 ■ ' ■ m >i i
Probable Cause
Solution , •
3
age No.
1. Nothing is
displayed
on the LCD
panel,
2. The shutter
does not
release.
The batteries are exhausted,
The batteries have been installed
incorrectly.
The film has not been loaded
correctly, (The frame No. is not
displayed on the LCD panel.)
Rewound film is still in the camera.
(The frame counter on the LCD
panel is blank.)
Focus has not been achieved. (The
in-focus indicator in the viewfinder
is blinking.)
Replace the batteries with new
ones.
Install the batteries correctly.
Load the film correctly.
Take out the film cartridge and load
a new roll of film.
Press the shutter button halfway
until focus is achieved. If focus still
cannot be achieved, set the focus
mode switch on the lens to MF (or
M on some lenses) and focus
manually with the focusing ring,
10
10
14
14
12
3. The
photograph
is out ol
focus.
4. Only q
blinks or
appears on
the LCD
panel.
The focus mode switch on the lens
was set to MF (or M on some
lenses) (Manual Focus).
[ The shutter speed was too slow to
prevent blur caused by camera
shake.
The battery level is very low.
The camera is not operating
properly.
Set the focus mode switch on the
lens to AF (Autofocus).
Press the shutter button without
shaking the camera or use a faster
shutter speed.
Replace the batteries with new
ones and check that the battery
level is displayed on the LCD panel.
Press the shutter button halfway to
return the camera to normal.
* If o is still displayed even after
the above solutions are
executed repeatedly, the
camera needs repair, Take it to
the nearest Canon Service
Center.
12
13
11
11
Back
cover
58
Page 59

Exposure Warnings
l Command
Dial Mode
D
Tv
T— V-
--------
-----
--------------
Blinking Display (Warning)
-^SO^iS—
^ i ^ i
v
-
30" shutter speed and
lens’ maximum aperture
X- , -^ | v.
1/2000 shutter speed and
lens' minimum aperture
e5>a,5
<"
Lens' maximum aperture
Lens’ minimum aperture
^ i ""
Description
The subject is too dark.
The subject is too bright.
Countermeasures
Use flash.
Attach a neutral density
filter to the tens.
The picture will be
underexposed.
The picture will be
-
overexposed.
Turn the Main Dial to set a
slower shutter speed.
Turn the Main Dial to set a
faster shutter speed.
Av
A-DEP
’X I /
— 30“ -5.6
i x-
30” shutter speed
— EDOS-5£
"" I
1 /2000 shutter speed
/ i %s*
Current aperture
^ 1 ^ | ^
30" shutter speed and
lens' maximum aperture
-^POSS^',? —
^ 1 ^ I \
1/2000 shutter speed and
lens’ minimum aperture
The picture will be
underexposed.
The picture will be
overexposed.
The desired depth o1 field
cannot be obtained.
The subject is too dark.
The subject is too bright.
Turn the Main Dial to set a
larger aperture.
Turn the Main Dial to set a
smaller aperture.
1) Move away from the
subject and try again.
2) If a zoom lens is used,
use the shortest focal
length.
Use flash.
\v**S«Cfr:-
: ; ;;^:v
Attach a neutral density
filter to the lens.
59
Page 60

Feature Availability Table
Film Advance
Single
*
•
•
•
•
Command
Dial Mode
a
9
A
Pi
p
Tv
Av
M
A'DEP
Autofocus
One-
Shot AF
•
•
•
•
•
Al Servo
AF
•
•
•
•
•
•
Focusing Point Selection
Auto
•
Manual
•
•
•
•
•
0
O
O
O
o o
o 0
•
Continuous
Evaluative
•
•
•
•
•
•
Metering Mode
Centerweighted
averaged
•
•
•
•
•
•
•
•
•
•
sh
_____
Fla
Partial
Automatic
Firing
Manual
•
•
:-i-
•
•
(•}*
(•)*
(•r
•
(•)*
(•>*
•
•
•
•
•
#: Set automatically, O: User-selectable. * Available only while the partial metering button is pressed.
One-Shot AF: The exposure setting (shutter speed and aperture) is set when focus is
achieved. The picture cannot be taken unless the subject is focused.
Al Focus AF: Normally, One-Shot AF is set. However, if the subject starts to move, the
camera detects the subject’s movement and switches to Al Servo AF
automatically. The exposure setting is set right belore the picture is taken.
Al Servo AF: In this mode, the camera focuses continuously. Suited for a moving subject.
The exposure setting is set right before the picture is taken.
Continuous advance: This is for taking continuous shots. While the shutter button is held
down, the camera can shoot continuously as fast as 1 frame per
second.
Evaluative metering: The difference in the brightness level between the subject and
background, subject size, etc., are taken into account to set a suitable
exposure setting.
Partial metering: The exposure setting is based on the brightness of the area covered by the
partial metering circle on the viewfinder screen.
Centerweighted averaging metering; The metering is weighted at the center and then
averaged for the entire scene.
AF Modes and Film Advance Modes
Film Advance Mode
Single
jv !■?-"; _~'T-
Continuous
One-Shot AF
The shutter cannot be released until focus
is achieved, When focus is achieved, AF is
locked. In the evaluative metering mode,
the exposure setting (set right before the
picture is taken) is also locked.
The same conditions above apply during
continuous shooting. (At about one frame
per second.)
Al Servo AF
Autofocus tracks the moving subject, and
the exposure setting is set when the shutter
is released,
The same conditions above apply during
continuous shooting. Autoiocusing operates
during continuous shooting, (At about one
frame per second.)
Page 61

Major Accessories (Sold separately)
Grip GR-80TP comes with a hand
strap and serves as a camera grip
for holding ease, It can also
unfolds as a mini-tripod.
Remote Switch RS-60E3
Dedicated cable release for use
with a tripod-mo unted camera to
prevent camera shake during
close-ups and bulb exposures.
Connects to the camera's remote
control jack.
Eyepiece Extender EP-EX15
When attached to the camera, this
eyepiece extender extends the
EOS camera’s eye relief by 15
mm. The viewfinder magnification
also becomes 0.5x.
Battery Pack BP-8
An external battery pack which
uses size-AA batteries. Convenient
when lithium batteries are not
readily available,
Dioptric Correction Lens E
Attaching a dioptric correction lens
E on the eyepiece allows near- or
far-sighted users to see the
viewfinder dearly without
eyeglasses. The camera’s
eyepiece lens is -1 diopter. Ten
dioptric correction lenses are
available. When choosing a
dioptric correction lens, attach it to
the eyepiece and look through the
viewfinder to see if it suits your
vision.
* The number on the dioptric
correction lenses indicates the
diopter when it is attached to the
camera’s eyepiece. It is not the
diopter of the dioptric correction
lens itself.
EX-Series Speedlites
These include the high-output
380EX (Guide No. 38 at ISO 100
in meters) and the compact 220EX
(Guide No. 22 at ISO 100 in
meters). Either can be mounted on
the camera’s hot shoe.
Camera Case EH8-L and EH8-LL
Dedicated case which
accommodates the camera with
any of the following lenses
attached:
EH8-L: EF 35-90mm f/4-5.6 USM
EF 35-105mm 1/45-5.6 USM
EH8-LL: EF 28-80mm 03,5-5.6 IV USM
EF 80-200mm 1/4-56 USM
o *
-vtrfi
When using an external
flash unit, an EOS-dedicated
Speed life fe recommended.
Using a flash unit (equipped
with several contacts on the
hot shoe foot) dedicated to a
different-brand camera or
using a high-voltage batterytype flash unit or
accessories may result in
camera misoperation or
malfunction.
•a
61
Page 62

Handling Precautions
..............
• ~ ~ r ~
Camera Care
1. This camera is not waterproof and cannot be used in rain or
underwater. If the camera gets really wet, consult your nearest Canon
Service Center. Wipe off any water droplets with a dry cloth. If the
camera has been exposed to salty air, wipe with a well-wrung damp
cloth.
2. Do not leave the camera in places prone to excessive heat such as in
a car on a sunny day. Excessive heat can cause the camera to
malfunction.
3. The camera contains high-voltage circuitry. Never attempt to
disassemble the camera.
4. Use only a blower brush to remove any dust on the lens or in the film
compartment Do not use a an organic solvent-containing cleaner to
clean the camera body or lens. For stubborn dirt, consult your nearest
'
" ~ w.^1, _ . j jm
mi
-i.&mfwmwm.
—f-k_ - , «-
Canon Service Center.
5. If the camera is not to be used for an extended period, remove the
battery. Store the camera in a well-ventilated, cool, dry place. During
the storage period, release the shutter a few times once in a while.
6. Avoid storing the camera in a laboratory, cabinet, etc., where
corrosive chemicals are present.
7. If the camera has not been used for an extended period or if the
camera is to be used for an important event, check all the camera
operations yourself or take it to the nearest Canon Service Center.
LCD Panel
In time, the camera's LCD (liquid-crystal display) panel indications may
become light and difficult to read. If this happens, have it replaced (at
cost) by a Canon Service Center.
At low temperatures, the display response of the LCD panel may become
slower. And at 60°C or higher temperatures, the display may blacken. In
either case, the display will return to normal at room temperature.
62
Page 63

VI. Reference
Lithium Batteries
The camera operates on two DL123A (or CR123A) lithium batteries.
Check the battery level in the following cases:
1. After replacing the batteries.
2. After not using the camera for an extended period.
3. The shutter does not work.
4. The camera is being used in a low-temperature environment.
5. Before using the camera for an important event.
Also note the following:
■ Before installing the batteries, wipe the battery contacts to remove any fingerprints and
smudges. This is to prevent faulty connections and corrosion.
* Never disassemble or recharge the batteries. Also, never store the batteries in high-
temperature places or short circuit the battery contacts or toss the battery into a fire.
* Although the batteries work well even at low temperatures, battery performance may
suffer slightly at freezing temperatures. In such a case, keep spare batteries warm in a
pocket, etc., and use and warm the batteries alternately.
Low Battery Power
When only the 'em symbol blinks on the LCD panel, a picture can still be
taken at the proper exposure. However, there may not be enough battery
power to advance and rewind the film automatically. Replace with new
batteries.
Lens
To avoid getting the lens surface and electronic contacts scratched,
attach the rear lens cap to the detached lens or always put down the lens
with the rear end up.
63
Page 64

Major Specifications
Type
35 mm autofocus/autoexposure single-lens reflex camera with focal-
plane shutter, built-in motor drive, built-in flash, and quartz date back."
Picture size
24 mm x 36 mm
Compatible lenses Canon EF lenses
Lens mount
-
Picture coverage
Magnification
Standard diopter
Focusing screen
Canon EF mount (Fully electronic control)
90% vertical, 90% horizontal.
0.7 X (with 50mm lens focused at infinity).
-1 diopter. 18,5mm eye relief.
Fixed, New Laser-matte screen with focusing points and partial metering
circle.
Exposure modes
0 Program AE (shiftable)
(D Shutter speed-priority AE
(3) Aperture-priority AE
0 Automatic depth-of-fieild AE
@ Full Auto (non-shiftable)
(§) Programmed Image Control modes (5)
® Flash AE: E-TTL program flash AE with Speedlite 220EX or 380EX,
TTL program flash AE with the built-in flash, A-TTL and TTL
program flash AE with other EOS-dedicated Speedlites
(§) Metered manual.
Camera-shake warning
Metering range
ISO film speed range
Exposure compensation
Autobracketing
Multiple exposures
* QD models only
64
Provided with Full Auto and Programmed Image Control modes (except
Night Scene mode). Shutter speed display blinks if the shutter speed is
slower than the reciprocal of the lens focal length by more than one-half
stop.
EV 2-20 (at 20°C and normal humidity with a 50mm f/1,4 lens, ISO 100)
ISO 6-6400 (ISO 25-5000 for DX-coded film)
±2 stops in half stops (unavailable in Programmed Image Control
modes)
±2 stops in half stops. Sequence: Correct exposure, underexposure,
and overexposure in single-frame or continuous shooting mode.
Max, 9 settable.
l'
Page 65

VI. Reference
AF control
AF working range
Focusing point selection
AF-assist beam
Shutter
Shutter speeds
TTL-CT-SIR (Through-the-Lens Cross-Type Secondary Image
Registration) with multiple BASIS (Base-Stored Image Sensor).
© One-Shot AF: AF locks when focus is achieved. Shutter can be
released only when focus is achieved.
© At Focus AF: Switches between One-Shot AF mode and Al Servo
AF automatically.
(§) Manual focusing: Enabled by setting the lens’ focus mode switch to
"M” and turning the focusing ring.
EV 1,5-18 (at ISO 100, standard chart)
© Automatic: Camera-selected.
@ Manual: User-selected.
Built-in AF-assist beam emitted automatically
Vertical-travel, focal-piane shutter with all speeds electronicallycontrolled,
30 to 1/2000 sec, (in half steps) and bulb. X-sync at 1/90 sec,
Self-timer
Film loading
Film advance
Film rewind
Built-in flash
Flash contacts
Power source
Electronicaily-controlied for 10-sec. delay.
Automatic, After film is loaded and the back is closed, the film is pre
wound.
Automatic.
© Single-frame
© Continuous (Max. 1 frame per sec.)
Automatic at the end of the roll. Midroll rewind possible.
Built-in, retractable flash head in the pentaprism with TTL autoflash
system, serially controlled.
© Guide No. 12 (in meters at ISO 100)
© Recycling time: Approx. 2 sec.
© Flash coverage: 28mm lens covered.
X-sync for direct connection on hot shoe.
Two DL123A (or CR123A) lithium batteries.
Battery check
Dimensions (mm)
Weight
Battery level displayed automatically when Command Dial is set to any
mode except the Function Set Zone.
145.7 (W) x 92 (H) x 61.9 (D)
370 g (Body only, excluding batteries) j
Page 66

VI. Reference
Lens .; £
* ' -V • .;•>
Diagonal extent
Angle of view
Vertical extent
Horizontal extent
Lens construction
(eiements/groupS)
Min. aperture - •.
Focusing distance range;
Max. magnification
and picture area
*5 EF28 - 80mm
F3.5- 5.6 IV USM
75° - 30°
46°-17°
65s *25
Q
10 elements in
10 groups
f/22 - 32
v EF35 *■ 80mm
... F4 • 5.6 IN
63° - 30° 32D111 * 8a15
38°- 17° 18°11T - 4°35'
54° - 25° 27° - 6°50'
8 elements in
8 groups
f/22 - 32
EF75 - 300mm
F4 - 5.611
9 elements in
13 groups
0 38m * 3= 0.4m - = 1.5m - ®
28mm
0.10 (255x393mm) 0.11 (228x352mm)
80mm
35mm
0.06 (372x558mm)
80mm 300mm
1
f/32 - 45
75mm
0.23 (104x154mm) 0.25 (95x142mm)
52mm, 1 58mm, 1
Filter size and attachable
0.26 (91x135mm)
58mm, 1
quantity
Length x Max. diameter
Weight
71.2x66.4mm
200g
65x63.5mm
175g
71x122.1mm
480g
■ Specifications are subject to change without notice. All specifications have been obtained through
Canon’s Standard Test Methods
66
Page 67

This device complies with Part 15 of the FCC Rules. Operation is
subject to the following two conditions: (1) This device may not cause
harmful interference, and (2) this device must accept any interference
received, including interference that may cause undesired operation.
Do not make any changes or modifications to the equipment unless
otherwise specified in the instructions. If such changes or
modifications should be made, you could be required to stop
operation of the equipment.
This equipment has been tested and found to comply with the limits
for a class B digital device, pursuant to part 15 of the FCC Rules.
These limits are designed to provide reasonable protection against
harmful interference in a residential installation. This equipment
generates, uses and can radiate radio frequency energy and, if not
installed and used in accordance with the instructions, may cause
harmful interference to radio communications.
However, there is no guarantee that interference will not occur in a
particular installation. If this equipment does cause harmful
interference to radio or television reception, which can be determined
by turning the equipment off and on, the user is encouraged to try to
correct the interference by one or more of the following measures:
• Reorient or relocate the receiving antenna.
• Increase the separation between the equipment and receiver.
■ Consult the dealer or an experienced radio/TV technician for help.
This digital apparatus does not exceed the Class B limits for radio
noise emissions from digital apparatus as set out in the interfernce-
causing equipment standard entitled "Digital Apparatus”, ICES-003 of
the Industry Canada.
The CE Mark is a Directive conformity mark of the European
Community (EC)
67
Page 68

Canon
CANON INC. 30-2, Shimomaruko 3-chome, Ohta-ku, Tokyo 146-8501, Japan
U.S.A.---------------- CANON U.S.A. INC.
For all inquiries concerning this camera, call toll free in the U.S.
1-B00-B2B-4040
or write to:
Customer Relations,
Canon U.S.A., Inc.
One Canon Plaza, Lake Success, N.Y, 11042-1198
CANADA------------ CANON CANADA INC. HEADQUARTERS
6390 Dixie Road. Mississauga, Ontario L5T 1P7, Canada
CANON CANADA INC. MONTREAL BRANCH
5990, Cote-de-Liesse, Montreal Quebec H4T 1V7, Canada
CANON CANADA INC. CALGARY OFFICE
2S28, 1 Sth Street, N.E. Calgary, Alberta T2E 7K7, Canada
For all inquiries concerning this camera, call toll free in Canada
1-800-828-4040
EUROPE,
AFRICA & Bovenkerkerweg 59-61, P.O. Box 2262, 1180 EG Amstelveen,
MIDDLE EAST The Netherlands
CENTRAL &
SOUTH AMERICA 6505 Blue Lagoon Drive, Suite 325, Miami, FL33126 U.S.A.
----------
-------
CANON EUROPA N.V.
CANON PHOTO VIDEO FRANCE S.A.
11, Avenue Dubonnet Le Doublon 92407 Courbevcie Cedex. France
CANON UK LTD.
Brent Trading Centre, North Circular Road. London NW10 OJF, United
Kingdom
CANON EURO-PHOTO G. m. b, H.
Siemensring 90-92, D-47877 Willich, Germany
CANON ITALIA S.p.A.
Palazzo L. Strada 6. 20089 Rozzano, Milanofiori, Milano, Italy
CANON Benelux N.VVS.A.
Bessenveldstraat 7,1631 Diegem (Machelen), Belgium
CANON Schweiz AG
GeschSttsbereich Wiederverkauf, Industriestrasse 12, CH-8305
Dietlikon, Switzerland
CANON G. m. fa. H.
Oberlaaerstrasse 233. 4th floor, 1100 Wien, Austria
CANON LATIN AMERICA, INC. DEPTO DE VENTAS
CANON LATIN AMERICA, INC. CENTRO DE SERVICIO Y
REPARACION
Apartado 2019, Zona Libre de Col6n, Republica de Panama
ASIA------------------CANON SINGAPORE PTE. LTD.
79 Anson Road #09-01/06 Singapore 079906
OCEANIA
JAPAN
-----------
--------------
CANON AUSTRALIA PTY. LTD.
1 Thomas Holt Drive. North Ryde. N.S.W. 2113, Australia
CANON NEW ZEALAND LTD.
Fred Thomas Drive, P.O. Box 33-336, Takapuna, Auckland, New Zealand
CANON SALES CO., INC,
12-15 Mita, 3-Chome, Minato-ku, Tokyo 108-8011, Japan
CT1-1112-000 ©CANON INC. 1996
PRINTED IN TAIWAN
 Loading...