

Page 1

EOS 70D (W)
COPY
Wi-Fi Function
Instruction Manual
E
INSTRUCTION
MANUAL
Page 2
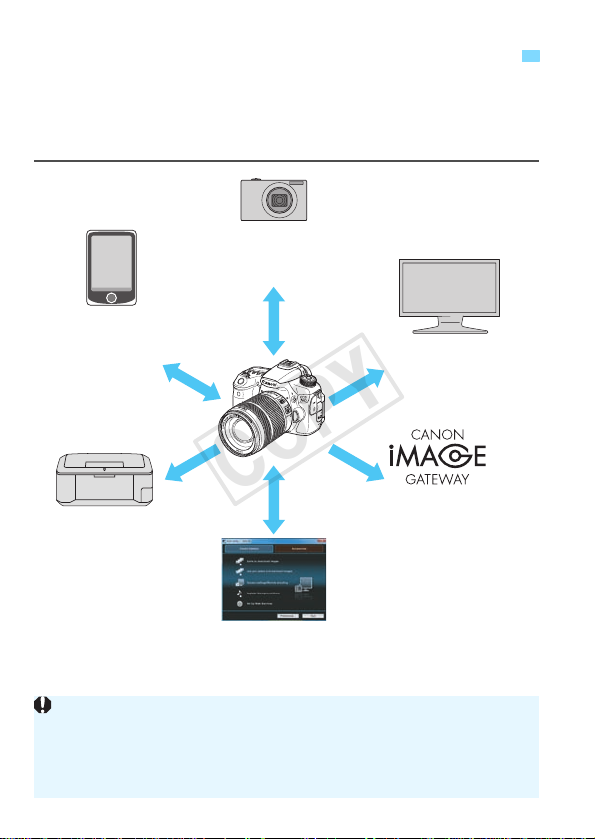
What You Can Do Using the Wireless LAN Functions
COPY
This camera’s wireless LAN functions let you perform a range of tasks
wirelessly, from sending images to Web services and other cameras to
controlling the camera remotely, simply by connecting to a Wi-Fi
network or other device supporting this camera’s wireless LAN functions.
(1) Transfer images
between cameras
Exchange images
(2) Connect to a
smartphone
Make images
viewable on a
smartphone
Shoot remotely
with a smartphone
(6) View images using
a media player
View images
®
(3) Print images using
a Wi-Fi printer
Print images
(4) Operate the camera
remotely using EOS Utility
Remotely control the camera
CANON iMAGE GATEWAY Web services are not supported in certain countries
and areas. For information on countries and areas supporting CANON iMAGE
GATEWAY services, refer to the Canon Web site (http://canon.com/cig).
Settings for “Send images to a Web service” may not be performed fr om
a computer in certain countries and areas.
(Canon Image Gateway)
(5) Send images to
a Web service
Save and share images
2
Page 3

What You Can Do Using the Wireless LAN Functions
COPY
(1)z Transfer images between cameras (p.19)
Transfer images between this camera and other Canon cameras
with built-in wireless LAN functions.
(2)q Connect to a smartphone (p.31, 75)
View saved images or operate the camera from your smartphone.
Install the dedicated application “EOS Remote” on your smartphone
to use these functions.
(3)l Print images using a Wi-Fi printer (p.45, 87)
Connect the camera to a wireless LAN compatible printer supporting
PictBridge (Wireless LAN) to print images wirelessly.
(4)D Operate the camera remotely using EOS Utility (p.93)
Connect the camera and a computer wirelessly and operate your
camera remotely using the provided software EOS Utility.
(5)w Send images to a Web service (p.103)
Upload your images to CANON iMAGE GATEWAY, an online ph oto
service for Canon users (free registration required), to share them
with family and friends.
(6) View images using a media player (p.131)
Display images on the camera’s memory card on your TV set, by
using a media player supporting DLNA* via a wireless LAN.
* Digital Living Network Alliance
3
Page 4
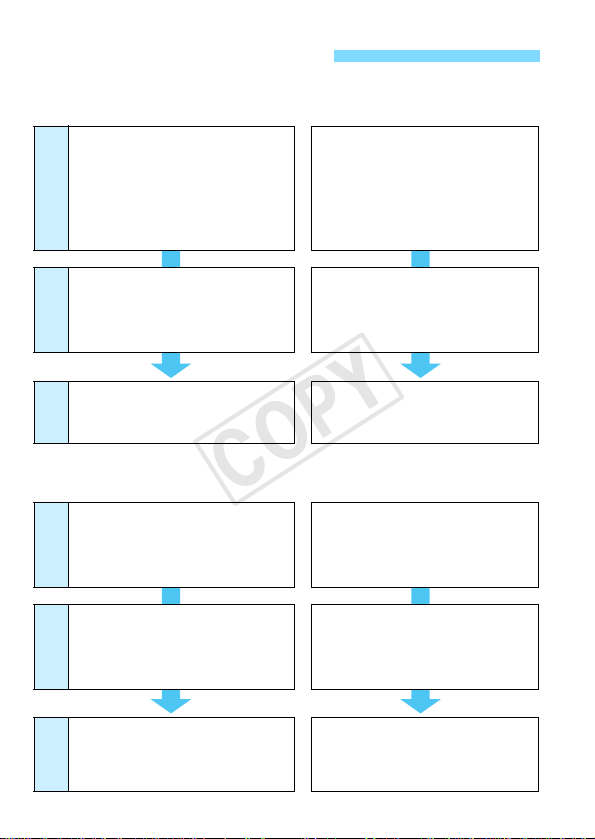
Wi-Fi Function Flowchart
COPY
z Transfer images between cameras q Connect to a smartphone
Set up another Canon camera with
built-in wireless LAN functions
Setup
Connect the cameras directly via a
wireless LAN
method
Connection
Transfer images between cameras
can...
Now you
l Print images using a Wi-Fi printer
Set up a Wi-Fi printer supporting
PictBridge (Wireless LAN)
Setup
• Camera access point mode*1
• Infrastructure mode*
method
Connection
Play and print images
can...
Now you
2
4
Install EOS Remote on a smartphone
• Camera access point mode*1
• Infrastructure mode*
• View images on the camera
• Shoot remotely
D Operate the camera remotely
using EOS Utility
Set up a wireless LAN and a
computer with EOS Utility installed
• Infrastructure mode*
• Ad hoc mode*
Operate the camera remotely using
EOS Utility
2
2
3
Page 5
w Send images to a Web service
COPY
• Set up a computer with EOS Utility
installed and a wireless LAN access
point that can access the Internet
• Sign up as a CANON iMAGE
GATEWAY member
Setup
• Configure the camera for Web
service access
Wi-Fi Function Flowchart
View images using a media
player
• Set up devices supporting DLNA
and a wireless LAN access point
• Connect a media player to a TV set
Infrastructure mode*
method
Connection
• Send images to Web services
• Send Emails to your acquaintances
can...
Now you
*1 Camera access point mode:
A simple wireless LAN mode where a camera and smartphone, or a camera and
printer can be directly connected via a wireless LAN.
*2 Infrastructure mode:
A wireless LAN mode that connects to each Wi-Fi device via a wireless LAN access
point. In this mode, communication to a distant Wi-Fi device can be established as
long as a wireless LAN access point is located nearby.
*3 Ad hoc mode:
A wireless LAN mode that connects directly to a computer with built-in wireless LAN
functions. When setting the computer’s wireless LAN functions to ad hoc mode, the
camera can be connected using the same operation as when set to infrastructure
mode.
CANON iMAGE GATEWAY Web services are not supported in certain
countries and areas. For information on countries and areas supporting
CANON iMAGE GATEWAY services, refer to the Canon Web site
(http://canon.com/cig).
Settings for “Send images to a Web service” may not be performed from
a computer in certain countries and areas.
2
Infrastructure mode*
View images on the camera by
operating the media player
2
5
Page 6

Conventions Used in This Manual
COPY
In this manual, the term “wireless LAN” is used as a general term for
Wi-Fi and Canon’s original wireless communication functions.
The term “access point” indicates wireless LAN terminals (wireless
LAN access points or wireless LAN adapters) that relay wireless
LAN connection.
Brackets [ ] indicate buttons or icon names or other software
elements displayed on the computer screen. Brackets also indicate
camera menu items.
The ** (numbers) for “(p.**)” in this manual indicate reference page
numbers for more information.
Sections of this manual labeled with the following symbols contain
particular types of information as described below.
:
Warnings to prevent potential problems during operation.
:
Additional information provided to supplement the content about
basic operations.
Microsoft and Windows are trademarks or registered trademarks of
Microsoft Corporation in the United S tates and/or other countries.
Macintosh and Mac OS are trademarks of Apple Inc., re gistered in the U. S.
and other countries.
Wi-Fi is a registered trademark of the Wi-Fi Alliance.
Wi-Fi Certified, WP A, WPA2, and the Wi-Fi Certified logo are trademarks of
the Wi-Fi Alliance.
WPS used on camera settings screens and in this manua l stands for Wi-Fi
Protected Setup.
UPnP is a trademark of the UPnP Implementers Corporation.
All other trademarks are the property of their respective owners.
Note that Canon cannot be held liable for any loss or damage from erroneous
wireless LAN settings for using the camera. In addition, Canon cannot be he ld
liable for any other loss or damage caused by use of the camera.
6
Page 7

Chapters
1
456
1011
121314
COPY
Introduction
Basic Settings for Wireless LAN Functions
Transferring Images Between Cameras
2
Connecting to a Smartphone - 1
3
Printing Images Using a Wi-Fi Printer - 1
Using a Wi-Fi Wireless LAN Access Point
Connecting to a Smartphone - 2
Printing Images Using a Wi-Fi Printer - 2
7
Remote Operation Using EOS Utility
8
Sending Images to a Web Service
9
Viewing Images Using a Media Player
Using Quick Control to Connect to a Wireless LAN
Managing Settings
2
11
19
31
45
55
75
87
93
103
131
139
145
Troubleshooting Guide
Reference
151
169
7
Page 8

Contents
COPY
Introduction 2
What You Can Do Using the Wireless LAN Functions..................... 2
Wi-Fi Function Flowchart.................................................................. 4
Conventions Used in This Manual.................................................... 6
Chapters........................................................................................... 7
Basic Settings for Wireless LAN Functions 11
1
Registering a Nickname ................................................................. 12
Basic Operation and Settings......................................................... 15
Transferring Images Between Cameras 19
2
Selecting the Connection Destination ............................................ 20
Sending Images ............................................................................. 22
Reconnecting ................................................................................. 26
Registering Multiple Connection Settings....................................... 27
Changing Setting Names ............................................................... 28
Connecting to a Smartphone - 1 31
3
Preparation..................................................................................... 32
Using Camera Access Point Mode to Establish a Connection....... 33
Operating the Camera Using a Smartphone.................................. 37
Reconnecting ................................................................................. 39
Specifying Viewable Images .......................................................... 40
Registering Multiple Connection Settings....................................... 43
Printing Images Using a Wi-Fi Printer - 1 45
4
Using Camera Access Point Mode to Establish a Connection....... 46
Printing........................................................................................... 50
Reconnecting ................................................................................. 51
Registering Multiple Connection Settings....................................... 52
8
Page 9

Using a Wi-Fi Wireless LAN Access Point 55
COPY
5
Checking the Type of Access Point................................................56
Easy Connection via WPS (PBC Mode).........................................57
Easy Connection via WPS (PIN Mode)...........................................62
Manual Connection by Searching Networks...................................67
Connecting to a Smartphone - 2 75
6
Using Infrastructure Mode to Establish a Connection.....................76
Operating the Camera Using a Smartphone...................................78
Reconnecting..................................................................................80
Specifying Viewable Images...........................................................81
Registering Multiple Connection Settings.......................................84
Printing Images Using a Wi-Fi Printer - 2 87
7
Using Infrastructure Mode to Establish a Connection.....................88
Printing............................................................................................90
Reconnecting..................................................................................91
Registering Multiple Connection Settings.......................................92
Remote Operation Using EOS Utility 93
8
Configuring EOS Utility Communication Settings...........................94
Using EOS Utility ............................................................................98
Reconnecting..................................................................................99
Registering Multiple Connection Settings.....................................100
Contents
Sending Images to a Web Service 103
9
Preparation ...................................................................................104
Checking the Type of Access Point..............................................106
Easy Connection via WPS (PBC Mode).......................................107
Easy Connection via WPS (PIN Mode).........................................111
9
Page 10

Contents
COPY
Manual Connection by Searching Networks ................................ 115
Sending Images to a Web Service............................................... 120
Reconnecting ............................................................................... 126
Registering Multiple Connection Settings..................................... 127
Viewing Images Using a Media Player 131
10
Configuring Media Player Communication Settings..................... 132
Displaying Images on a TV set..................................................... 133
Reconnecting ............................................................................... 135
Registering Multiple Connection Settings..................................... 136
Using Quick Control to Connect to a Wireless LAN 139
11
Connecting from Quick Control .................................................... 140
Connecting from a Playback Screen............................................ 141
Managing Settings 145
12
Checking or Changing Settings.................................................... 146
Clearing Wireless LAN Settings ................................................... 149
Troubleshooting Guide 151
13
Responding to Error Messages.................................................... 152
Troubleshooting Guide................................................................. 163
Wireless LAN Notes ..................................................................... 164
Checking Network Settings .......................................................... 166
Reference 169
14
Specifications ............................................................................... 170
Index............................................................................................. 171
10
Page 11

Basic Settings for
COPY
Wireless LAN Functions
This chapter describes settings necessary for using the
camera’s wireless LAN functions.
11
Page 12
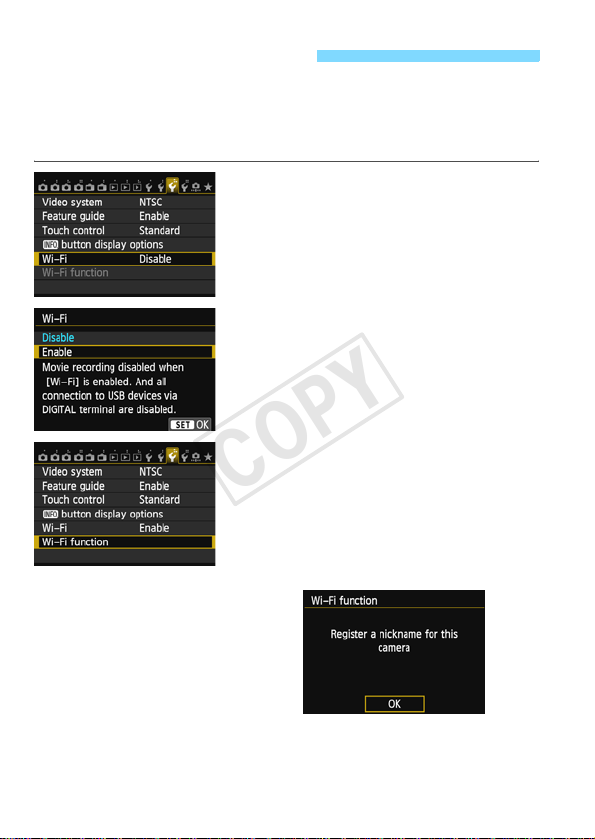
Registering a Nickname
COPY
First, set the camera’s nickname.
When the camera is connected to another device via a wireless LAN,
the nickname will be displayed on the device. Be sure to set a nickname
for your camera.
Select [Wi-Fi].
1
Under the [53] tab, select [Wi-Fi],
then press <0>.
Select [Enable].
2
Press the <V> key to select
[Enable], then press <0>.
X [Wi-Fi function] is now selectable.
Select [Wi-Fi function].
3
Under the [53] tab, select [Wi-Fi
function], then press <0>.
X When this setting is selected for the
first time, a screen to register a
nickname is displayed. Select [OK]
and proceed on to step 4.
12
Page 13
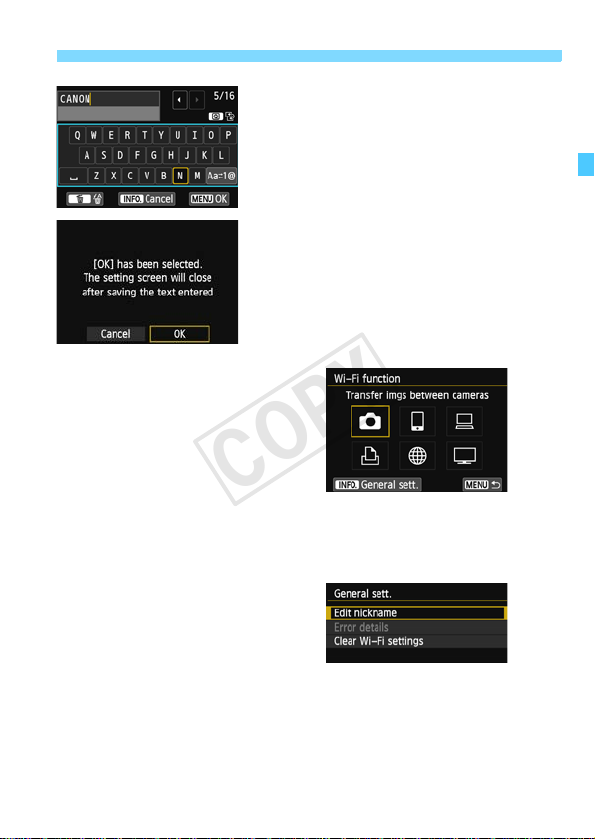
Registering a Nickname
COPY
Enter a nickname.
4
For instructions on entering
characters, see “Virtual Keyboard
Operation” on the next page.
Up to 16 characters can be entered.
Finish.
5
When you are finished, press the
<M> button.
Select [OK] on the confirmation
screen, then press <0>. The
nickname is registered, and the [Wi-
Fi function] screen will appear.
To change the nickname, press the
<B> button on the screen above,
then select [Edit nickname] on the
screen displayed.
13
Page 14

Registering a Nickname
COPY
Virtual Keyboard Operation
Switching to other input areas
To switch between top and bottom
input areas, press the <Q> button.
Moving the cursor
T o move the cursor, press the <U>
key in the top area.
Entering text
In the bottom input area, press the <V> or <U> key to select
characters and press <0> to enter them.
You can check how many characters you have entered, and how
many more can be entered, by referring to [*/*] on the upper right of
the screen.
Switching to other input modes*
Select [ ] at the lower right of the bottom area. Each time you
press <0>, the input mode changes. The input mode changes in
the following order: lower-case characters9numbers/symbols 1
9numbers/symbols 29upper-case characters.
* When [Touch control: Disable] is set, you can enter all characters on one
screen.
Deleting text
Press the <L> button to erase one character.
Finishing text entry
Press the <M> button to confirm what you have entered and
exit. If a confirmation screen is displayed, select [OK] to exit.
Canceling text entry
Press the <B> button to cancel text entry and exit. If a
confirmation screen is displayed, select [OK] to exit.
14
Page 15
Basic Operation and Settings
COPY
Using the Camera While Wireless LAN Functions Are Active
When you want to prioritize wireless LAN functions, do not operate
the shutter button, Mode Dial, or playback button. Otherwise,
shooting or playback operation may be prioritized and wireless LAN
functions may be terminated during the process. Also, the
connection may be terminated when the LCD monitor is closed
facing inward.
When [Wi-Fi] in the [53] tab is set to [Enable], movie shooting is
disabled. Even if the camera is connected to a computer, printer,
GPS receiver, or other device via an interface cable, they cannot be
used (p.17).
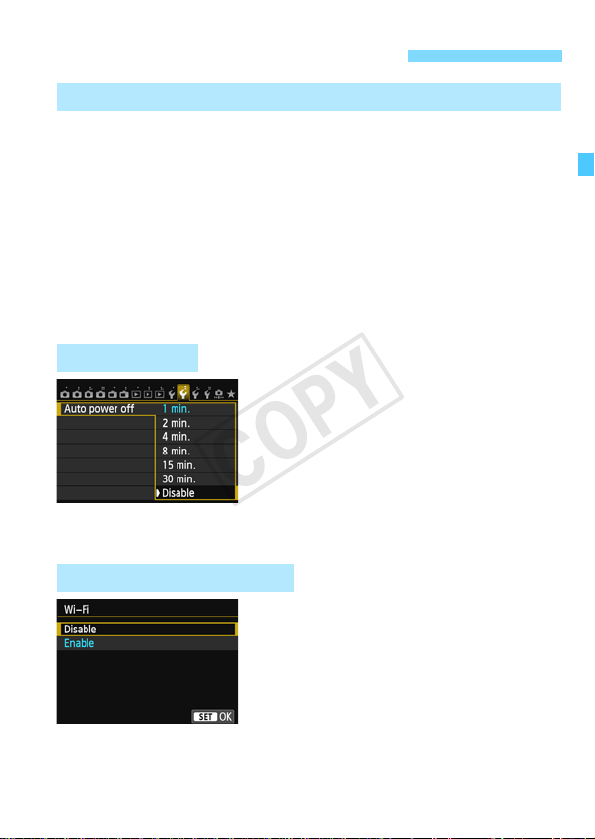
Auto Power Off
If necessary, set [Auto power off]
under the [52] tab to [Disable].
If the camera’s auto power off is
activated during the wireless LAN
connection, the wireless LAN function
[Wi-Fi] Under the [53] Tab
will turn off. Wireless LAN connection
is restored when the camera wakes
up from auto power off.
When the use of electronic devices
and wireless devices is prohibited,
such as on board airplanes or in
hospitals, set [Wi-Fi] to [Disable].
15
Page 16
Basic Operation and Settings
COPY
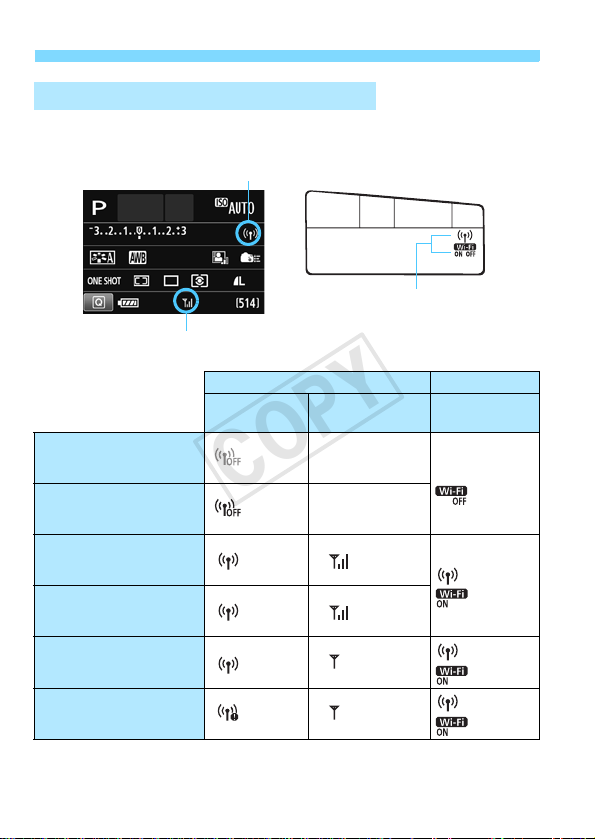
[Wi-Fi] Settings and Connection Status
Settings and connection status for [Wi-Fi] under the [53] tab can be
checked on the camera’s LCD monitor and LCD panel.
Wi-Fi function
Wi-Fi function
Wi-Fi connection status
LCD monitor LCD panel
Wi-Fi connection
status
(Off)
(Off)
Wi-Fi function
(Off)
When [Wi-Fi] is set to
[Disable]
When [Wi-Fi] is set to
[Enable] but there is no
connection
Connected
Wi-Fi function
Data is being
transmitted
Waiting for connection/
Waiting for
reconnection
Connection error
16
(IJ)
(Blinking)
(Blinking)
(Blinking)
(Blinking)
(Blinking)
Page 17

Basic Operation and Settings
COPY
Touch Control
Y ou can operate wireless LAN functions by touching the screen as well.
For details, refer to “Using the Touch Screen” in the Camera Instruction
Manual.
Connecting with an Interface Cable
When [53: Wi-Fi] is set to [Enable], interface cable connection is
disabled. Set it to [Disable] to connect the interface cable.
When the camera is connected to a computer, printer, GPS receiver, or
any other devices via an interface cable, the settings for [Wi-Fi] cannot
be changed. Disconnect the interface cable and then configure settings.
Using an Eye-Fi Card
When [53: Wi-Fi] is set to [Enable], image transfer using an Eye-Fi card
is disabled.
17
Page 18

MEMO
COPY
18
Page 19

Transferring Images
COPY
Between Cameras
Images can be transferred between Canon cameras via
the built-in wireless LAN functions.
Wireless connection is possible for Canon cameras with built-in
wireless LAN functions marketed in 2012 or later. Note that the
camera cannot be connected to Canon camcorders, even if they
have built-in wireless LAN functions.
The camera cannot be connected to Canon cameras without
built-in wireless LAN functions, even if they support Eye-Fi
cards.
Still photos can be transferred only if their file format is JPEG.
Although movies can be transferred, some target cameras may
not be able to play them back depending on their functionality.
19
Page 20
Selecting the Connection Destination
COPY
Register the target camera to connect to via a wireless LAN. The
camera can be connected to only one camera at a time.
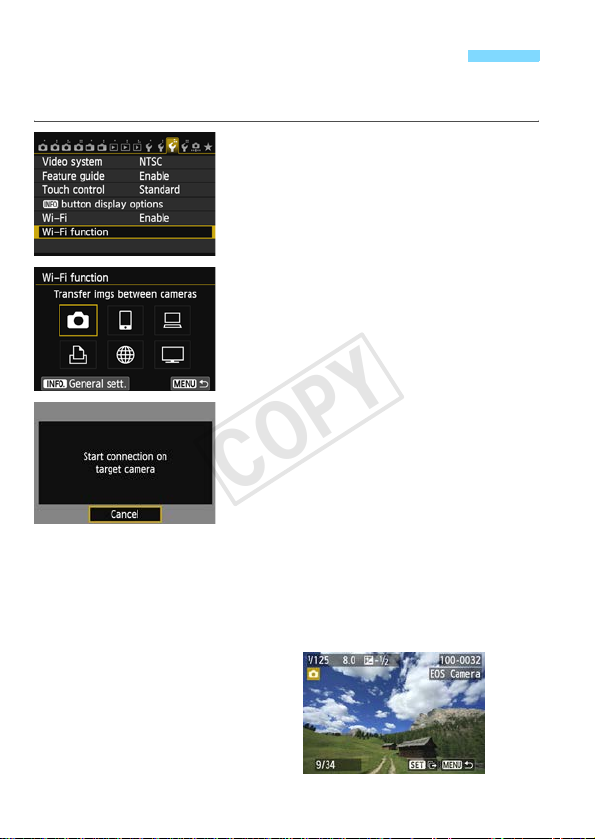
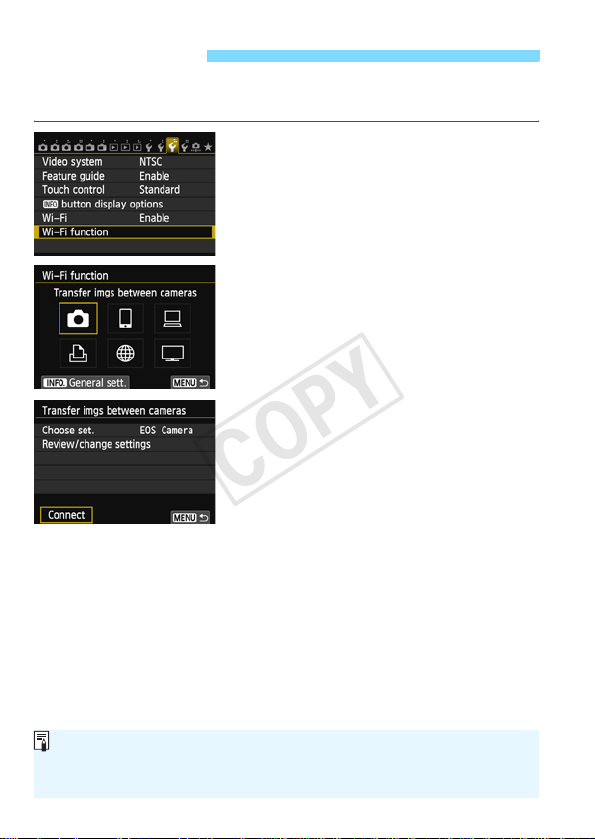
Select [Wi-Fi function].
1
Under the [53] tab, set [Wi-Fi] to
[Enable], then select [Wi-Fi
function].
Select [z].
2
Press the <V> or <U> key to
select [z] (Transfer imgs between
cameras), then press <0>.
Start the connection on the target
3
camera.
When the screen on the left is
displayed on the camera, start the
connection on the target camera as
well. For the operation procedure,
refer to the instruction manual of the
target camera.
When a connection is established,
the settings are automatically saved
and an image on the card is
displayed.
20
Page 21

Selecting the Connection Destination
COPY
Select the images to send.
4
Select images on the camera sending
the images (p.22).
Do not operate the camera receiving
the images.
Note that GPS information is not displayed on the camera’s playback screen
even if GPS information is appended to the received image. Shooting
locations can be viewed on a virtual map, using the Map Utility software.
The connection settings are automatically saved/registered with the
nickname of the camera to which a connection was established.
Auto power off does not function when the camera is connected to
another camera.
21
Page 22
Sending Images
COPY
Sending Images One by One
Selected images are sent one by one.
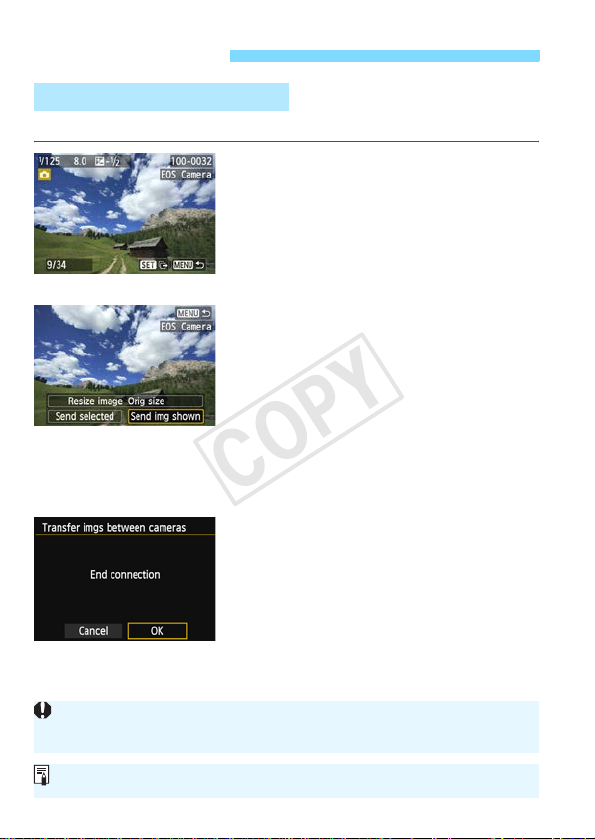
Select an image to send.
1
Press the <U> key to select an
image to send, then press <0>.
You can also press the <I>
button to select an image in the index
display. To return to the single-image
display, press the <u> button.
Select [Send img shown].
2
To select a size at which to send the
image, select [Resize image] and
press <0>.
Press the <U> key to select [Send
img shown], then press <0>.
X The transfer progress screen is
displayed.
To send another image, repeat steps
1 and 2.
Terminate connection.
3
Press the <M> button to display
the confirmation screen. Press the
<U> key to select [OK], then press
<0> to terminate the connection.
X The [Wi-Fi function] screen will
reappear.
If playback or shooting operation is started during the connection, the
connection will be terminated.
RAW images cannot be sent.
22
Page 23
Sending Selected Images
COPY
Multiple images can be selected and sent.
Press <0>.
1
Select [Send selected].
2
To select a size at which to send the
images, select [Resize image] and
press <0>.
Press the <U> key to select [Send
selected], then press <0>.
Select the images to send.
3
Press the <U> key to select the
images to send, then press <0>.
X <X> is displayed on the upper left of
the image to send.
You can also press the <I>
button to select an image in the threeimage display. To return to the singleimage display, press the <u> button.
After selecting the images to send,
press the <Q> button.
Sending Images
23
Page 24
Sending Images
COPY
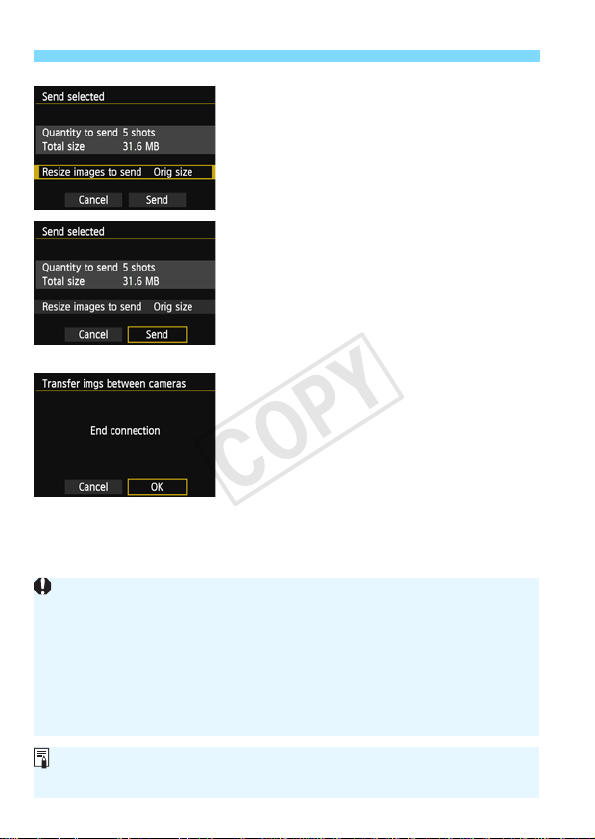
Reduce the image size.
4
Set it if necessary.
For the setting procedures, see the
next page.
Send the images.
5
Press the <V> key to select [Send],
then press <0> to send the images.
X The transfer progress screen is
displayed.
To send another image, repeat steps
1 to 5.
Terminate connection.
6
Press the <M> button to display
the confirmation screen. Press the
<U> key to select [OK], then press
<0> to terminate the connection.
X The [Wi-Fi function] screen will
reappear.
If playback or shooting operation is started during the connection, th e
connection will be terminated. Operations such as shooting cannot be
performed when data is being sent or received. When [Cancel] is
selected on the camera being used to send images, image transfer is
stopped so that shooting and other operations can be performed.
When sending a large number of images or large files (total size), make
sure that the battery is adequately charged so it does not run out during
the process.
RAW images cannot be sent.
You can select up to 50 files.
24
Page 25

Sending Images
COPY
Reducing the Size of the Image to Send
When [Send selected] is selected, the confirmation screen for sending
images also lets you select the size at which to send them.
Select [Resize images to send].
1
On the confirmation screen for
sending images, press the <V> key
to select [Resize images to send],
then press <0>.
Select the image size.
2
Press the <V> key to select an
image size, then press <0>.
Send the images.
3
Press the <V> key to select [Send],
then press <0> to send the images.
All images to be sent at the same time are resized except those that are
already smaller than the selected image size.
Movies cannot be resized.
[Resize:S2] and [Resize:S3] are enabled only for still photos shot with
the EOS 70D. Images shot with other cameras are sent without resizing.
The file size (total size) is based on the file sizes before resizing the
images.
25
Page 26
Reconnecting
COPY
The camera can reconnect to another camera for which connection
settings have been registered.
Select [Wi-Fi function].
1
Under the [53] tab, set [Wi-Fi] to
[Enable], then select [Wi-Fi
function].
Select [z].
2
Select [z] (Transfer imgs between
cameras) and press <0>.
Establish a connection.
3
Select [Connect] and press <0>.
On the confirmation screen, select [OK].
Perform the reconnection procedure
on the target camera as well.
X
The images on the card are displayed
and the images to send can be selected.
When settings for multiple connection
destinations are registered, select
[Choose set.], select the connection
destination, then connect to the
destination.
By default, settings are named after
the nickname of the camera that was
connected to.
If Wi-Fi settings on the target camera are cleared (p.149), reconnection will
no longer be established. Select [Review/change settings] and change the
settings (p.148).
26
Page 27

Registering Multiple Connection Settings
COPY
You can register up to three camera connection settings.
Select [Wi-Fi function].
1
Under the [53] tab, set [Wi-Fi] to
[Enable], then select [Wi-Fi
function].
Select [z].
2
Select [z] (Transfer imgs between
cameras) and press <0>.
Select [Choose set.].
3
Select [Choose set.] and press
<0>.
Select [Unspecified].
4
Select [Unspecified] and press
<0>.
X The connection settings screen is
displayed. Follow the procedures
displayed to complete the connection
settings.
The name of the setting can be changed later (p.28).
27
Page 28

Changing Setting Names
COPY
The names displayed for reconnection settings can be changed after
the settings are completed.
Select [Wi-Fi function].
1
Under the [53] tab, set [Wi-Fi] to
[Enable], then select [Wi-Fi
function].
Select [z].
2
Select [z] (Transfer imgs between
cameras) and press <0>.
Select [Review/change settings].
3
Select [Review/change settings]
and press <0>.
Select [Change settings name].
4
Select [Change settings name] and
press <0>.
28
Page 29

Changing Setting Names
COPY
Change the setting name.
5
Change the name of the setting using
the virtual keyboard (p.14). Up to 30
characters can be entered.
When you are finished, press the
<M> button.
Select [OK] on the confirmation
screen and press <0> to complete
the change.
29
Page 30

MEMO
COPY
30
Page 31

Connecting to a
COPY
Smartphone - 1
Connecting the camera to a smartphone lets you use
the smartphone to view, manage, and receive images
stored in the camera. You can also use the smartphone
to perform remote shooting. Note that movie shooting is
disabled.
31
Page 32

Preparation
COPY
EOS Remote Installation Required
T o communicate with a smartphone, the camera needs to be connected
to the smartphone using the dedicated application EOS Remote.
EOS Remote can be downloaded from the App Store or Google
Play. Install EOS Remote on the smartphone and then perform the
procedures to establish the connection.
To use EOS Remote, a smartphone on which iOS or Android
installed is necessary. For information on supported operating
system, refer to the download site of EOS Remote software.
32
Page 33

Using Camera Access Point Mode to Establish a Connection
COPY
The camera and smartphone can be directly connected via a wireless
LAN.
Because the camera acts as an access point, no other access point is
necessary, so you can est ablish communications easily even when you
are out.
To establish connection, operations on the smartphone are required.
For details, refer to the smartphone instruction manual.
Select [Wi-Fi function].
1
Under the [53] tab, set [Wi-Fi] to
[Enable], then select [Wi-Fi
function].
Select [q].
2
Select [q] (Connect to smartphone)
and press <0>.
Select [Camera access point
3
mode].
Press the <V> key to select
[Camera access point mode], then
press <0>.
Select [OK] and press <0> to go to
the next screen.
Select [Easy connection].
4
Press the <V> key to select [Easy
connection], then press <0>.
Select [OK] and press <0> to go to
the next screen.
For manual connection, see page 36.
33
Page 34

Using Camera Access Point Mode to Establish a Connection
COPY
Connect the smartphone to the
5
camera.
On the Wi-Fi settings menu of the
smartphone, select the SSID
(network name) displayed on the
camera’s LCD monitor.
For the password, enter the
encryption key displayed on the
camera’s LCD monitor.
X The next screen may be
automatically displayed even when
the operation on the smartphone is
not completed.
Start EOS Remote on the
6
smartphone.
When the Wi-Fi settings are
completed, start EOS Remote on the
smartphone.
Select [Camera Connection] on
7
the smartphone.
Select [Camera Connection] on
EOS Remote.
34
Select the target camera on the
8
smartphone.
Select the camera to connect to from
the [Detected Cameras] on EOS
Remote.
X Pairing starts.
Page 35

Using Camera Access Point Mode to Establish a Connection
COPY
Non-alphanumeric characters
are displayed as 8.
Connect to the camera.
9
When pairing is completed, the
screen on the left is displayed. Press
the <U> key to select [OK], then
press <0>.
To specify viewable images (p.40),
press the <B> button.
Perform further settings.
10
To finish settings in this stage, press
the <V> key to select [OK], then
press <0> to go to step 11.
To change the name of the settings,
select [Settings name] and press
<0>.
X The virtual keyboard is displayed
(p.14). Up to 30 characters can be
entered for the name of the settings.
Save the settings.
11
Select [OK] and press <0> to save
the settings.
X The [qConnection] screen will be
displayed.
To return to the menu, press the
<M> button.
The settings for communicating with a smartphone are now complete.
35
Page 36

Using Camera Access Point Mode to Establish a Connection
COPY
When [Manual connection] Is Selected
If you have selected [Manual connection] in step 4 on page 33, set
[SSID], [Channel setting], and [Encryption settings] on each screen
displayed.
Enter an SSID.
1
Enter any character using the virtual
keyboard (p.14).
When you are finished, press the
<M> button.
Select [Auto setting].
2
Select [Auto setting] and press
<0>.
Select [OK] and press <0> to go to
the next screen.
To select manually, select [Manual
setting] and turn the <6> dial.
Select [None].
3
Select [None] and press <0>.
Select [OK] and press <0>. The
screen shown in step 5 on page 34
will appear.
For encryption, select [AES], then
enter any encryption key using the
virtual keyboard (p.14).
36
Page 37

Operating the Camera Using a Smartphone
COPY
You can use a smartphone with EOS Remote installed to view images
stored in the camera and shoot remotely.
EOS Remote Main Screen
The main functions of EOS Remote are
described below. Touch the screen to
learn the operation procedures.
[Camera Image Viewing]
Images stored in the camera can be
viewed.
Images stored in the camera can be
saved on a smartphone.
Operations such as deletion can be
performed on images stored in the
camera.
[Remote Shooting]
The camera’s Live View image can
be viewed using a smartphone.
Camera settings can be changed.
You can shoot using remote
operation.
(Settings button)
Use this button to access various
settings for EOS Remote.
When viewable images are specified (p.40), functions of EOS Remote
will be limited.
Shooting may not be possible when the camera is connected to a
smartphone.
When you perform remote shooting, set the Live View shooting/Movie
shooting switch to <A>.
37
Page 38

Operating the Camera Using a Smartphone
COPY
Terminating the Connection
Select [Exit].
1
If the screen on the left is not
Select [Exit] and press <0>.
Select [OK].
2
Press the <U> key to select [OK],
displayed, select [Wi-Fi function]
under the [53] tab.
then press <0> to terminate the
connection.
JPEG and RAW images are resized and saved as JPEG images in the
most appropriate format for smartphones.
Although movies are included in the list, they cannot be saved.
If the camera’s auto power off is activated during the wireless LAN
connection, the wireless LAN function will turn off. Wireless LAN
connection is restored when the camera wakes up from auto power off.
When you establish a connection, deactivating the smartphone’s power
saving function is recommended.
38
Page 39

Reconnecting
COPY
The camera can reconnect to a smartphone for which connection
settings have been registered.
Select [Wi-Fi function].
1
Under the [53] tab, set [Wi-Fi] to
[Enable], then select [Wi-Fi
function].
Select [q].
2
Select [q] (Connect to smartphone)
and press <0>.
Establish a connection.
3
Select [Connect] and press <0>.
On the confirmation screen, select
[OK].
X The camera will reconnect to the
smartphone.
When settings for multiple connection
destinations are registered, select
[Choose set.], select the connection
destination, then connect to the
destination.
39
Page 40

Specifying Viewable Images
COPY
You can specify images viewable from a smartphone by operating the
camera. Images can be specified during connection settings or after the
connection is terminated.
Select [Wi-Fi function].
1
Under the [53] tab, set [Wi-Fi] to
[Enable], then select [Wi-Fi
function].
Select [q].
2
Select [q] (Connect to smartphone)
and press <0>.
Select [Review/change settings].
3
Select [Review/change settings]
and press <0>.
Select [Viewable imgs].
4
Select [Viewable imgs] and press
<0>.
40
Page 41

Select an item.
COPY
5
Press the <V> key to select an item,
then press <0>.
Select [OK] and press <0> to
display the setting screen.
[All images]
All images stored on the card become viewable.
[Images from past days]
Specify viewable images on the
shooting-date basis. Images shot up to
nine days ago can be specified.
Press the <V> key to select an item,
then press <0>.
When [Images shot in past days] is
selected, images shot up to the
[Select by rating]
specified number of days before the
current date become viewable. When
<r> is shown for the number of
days, turn the <5> dial to specify the
number of days, then press <0> to
confirm the selection.
Select [OK] and press <0> to
specify the viewable images.
Specify viewable images depending on
whether a rating has been added (or not
added) or by the type of rating.
Press the <V> key to select a
rating, then press <0> to specify the
viewable images.
Specifying Viewable Images
41
Page 42

Specifying Viewable Images
COPY
[File number range] (Select range)
Select the first and last images from
images arranged by the file number to
specify the viewable images.
1 Press the <U> key to select the
first image to be set viewable.
2 Press <0> to display the image
First image Last image
selection screen.
Select an image using the <U>
key, <5> dial, or <6> dial.
You can also press the <I>
button to select an image in the index
display. To return to the single-image
display, press the <u> button.
3 Select an image and press <0> to
determine the selection.
4 Specify the last image to be set
viewable by the same operation.
Select an image shot later than the
image selected as the first image.
5 When the first and last images are
specified, press the <V> key to
select [OK], then press <0>.
42
Page 43

Registering Multiple Connection Settings
COPY
You can register up to three smartphone connection settings.
Select [Wi-Fi function].
1
Under the [53] tab, set [Wi-Fi] to
[Enable], then select [Wi-Fi
function].
Select [q].
2
Select [q] (Connect to smartphone)
and press <0>.
Select [Choose set.].
3
Select [Choose set.] and press
<0>.
Select [Unspecified].
4
Select [Unspecified] and press
<0>.
X The connection settings screen is
displayed. Follow the procedures
displayed to complete the connection
settings.
43
Page 44

MEMO
COPY
44
Page 45

4
COPY
Printing Images Using
a Wi-Fi Printer - 1
You can directly print images by connecting the camera
with a wireless LAN compatible printer supporting
PictBridge (Wireless LAN) via a wireless LAN.
Images can be printed by connecting this camera with a
printer by PictBridge via a wireless LAN. PictBridge is a
standard for easily printing images by directly connecting
digital cameras to printers and other devices supporting
the standard.
45
Page 46

Using Camera Access Point Mode to Establish a Connection
COPY
The camera and a printer can be directly connected via a wireless LAN.
Because the camera acts as an access point, no other access point is
necessary, so you can print images easily no matter where you are.
To connect via a Wi-Fi access point, see “Using a Wi-Fi Wireless LAN
Access Point” (p.55).
Select [Wi-Fi function].
1
Under the [53] tab, set [Wi-Fi] to
[Enable], then select [Wi-Fi
function].
Select [l].
2
Select [l] (Print from Wi-Fi printer)
and press <0>.
Select [Camera access point
3
mode].
Press the <V> key to select
[Camera access point mode], then
press <0>.
Select [OK] and press <0> to go to
the next screen.
Select [Easy connection].
4
Press the <V> key to select [Easy
connection], then press <0>.
Select [OK] and press <0> to go to
the next screen.
For manual connection, see page 49.
46
Page 47

Using Camera Access Point Mode to Establish a Connection
COPY
Set the printer’s Wi-Fi settings to
5
connect to the camera.
On the Wi-Fi settings menu of the
printer to be used, select the SSID
(network name) displayed on the
camera’s LCD monitor.
For the password, enter the
encryption key displayed on the
camera’s LCD monitor.
For the printer operation procedure,
refer to the printer’s instruction
manual.
Select the printer to connect to.
6
When a list of detected printers is
displayed, select the printer to
connect to and press <0>.
X Some printers may make a beeping
sound.
When 16 or more printers are
detected or search takes over 3
minutes, you can select [Search
again].
47
Page 48

Using Camera Access Point Mode to Establish a Connection
COPY
Perform further settings.
7
To finish settings in this stage, press
the <V> key to select [OK], then
press <0> to go to step 8.
To change the name of the settings,
select [Settings name] and press
<0>.
X The virtual keyboard is displayed
(p.14). Up to 30 characters can be
entered for the name of the settings.
Save the settings.
8
Select [OK] and press <0> to save
the settings.
X The [lConnection] screen will be
displayed.
To return to the menu, press the
<M> button.
The settings for communicating with a printer are now complete.
48
Page 49

Using Camera Access Point Mode to Establish a Connection
COPY
When [Manual connection] Is Selected
If you have selected [Manual connection] in step 4 on page 46, set
[SSID], [Channel setting], and [Encryption settings] on each screen
displayed.
Enter an SSID.
1
Enter any character using the virtual
keyboard (p.14).
When you are finished, press the
<M> button.
Select [Auto setting].
2
Select [Auto setting] and press
<0>.
Select [OK] and press <0> to go to
the next screen.
To select manually, select [Manual
setting] and turn the <6> dial.
Select [None].
3
Select [None] and press <0>.
Select [OK] and press <0>. The
screen shown in step 5 on page 47
will be displayed.
For encryption, select [AES], then
enter any encryption key using the
virtual keyboard (p.14).
49
Page 50

Printing
COPY
Play back an image.
Press the <x> button.
For further operations, refer to
Terminating the Connection
Select [Exit].
1
If the screen on the left is not
Select [Exit] and press <0>.
Select [OK].
2
Press the <U> key to select [OK],
X An image is displayed and the <w>
icon appears on the upper left of the
screen indicating that the printer is
connected.
“Printing Images” in the Camera
Instruction Manual. You can also
perform “Direct Printing of PrintOrdered Images”.
displayed, select [Wi-Fi function]
under the [53] tab.
then press <0> to terminate the
connection.
50
Page 51

Reconnecting
COPY
The camera can reconnect to a printer for which connection settings
have been registered.
Select [Wi-Fi function].
1
Under the [53] tab, set [Wi-Fi] to
[Enable], then select [Wi-Fi
function].
Select [l].
2
Select [l] (Print from Wi-Fi printer)
and press <0>.
Establish a connection.
3
Select [Connect] and press <0>.
On the confirmation screen, select
[OK].
X The camera will reconnect to the
printer.
When settings for multiple connection
destinations are registered, select
[Choose set.], select the connection
destination, then connect to the
destination.
51
Page 52

Registering Multiple Connection Settings
COPY
You can register up to three printer connection settings.
Select [Wi-Fi function].
1
Under the [53] tab, set [Wi-Fi] to
[Enable], then select [Wi-Fi
function].
Select [l].
2
Select [l] (Print from Wi-Fi printer)
and press <0>.
Select [Choose set.].
3
Select [Choose set.] and press
<0>.
Select [Unspecified].
4
Select [Unspecified] and press
<0>.
X The connection settings screen is
displayed. Follow the procedures
displayed to complete the connection
settings.
52
Page 53

MEMO
COPY
53
Page 54

MEMO
COPY
54
Page 55

Using a Wi-Fi Wireless
COPY
LAN Access Point
Connecting to a Wi-Fi wireless LAN access point gives
you access to the following functions:
• Connecting to a smartphone
• Printing images using a Wi-Fi printer
• Remote operation using EOS Utility
• Sending images to a Web service*
• Viewing images using a media player
* To send images to a Web service, skip the explanation in this chapter
and see page 103.
Connecting to a Smartphone
To use [q] (Connect to smartphone), the dedicated
application EOS Remote must be installed on the
smartphone in advance. EOS Remote can be downloaded
from the App Store or Google Play.
To use EOS Remote, a smartphone on which iOS or
Android installed is necessary. For information on
supported operating system, refer to the download site of
EOS Remote software.
55
Page 56

Checking the Type of Access Point
COPY
When Wi-Fi Protected Setup (WPS) is supported
• p.57: Easy Connection via WPS (PBC Mode)
• p.62: Easy Connection via WPS (PIN Mode)
When WPS is not supported
• p.67: Manual Connection by Searching Networks
If you do not know if the access point you use is WPS-compatible, refer
to the access point instruction manual or other documentation.
When connecting to a network that has a network administrator, ask the
administrator about the detailed setting procedures.
If the network you use filters by MAC address, register the MAC address of
the camera at the access point. The MAC address can be checked on the
[General sett.] screen (p.149).
56
Page 57

Easy Connection via WPS (PBC Mode)
COPY
This is a connection mode available when using an access point
compatible with Wi-Fi Protected Setup (WPS). In pushbutton
connection mode (PBC mode), the camera and the access point can be
connected simply by pressing the WPS button on the access point.
Note that if multiple access points are active in the surrounding area, it
may be more difficult to establish a connection. In this case, try using
[WPS (PIN mode)] to establish a connection.
Check the position of the WPS button on the access point in advance.
It may take approx. one minute to establish a connection.
If stealth functions of the access point are enabled, connection
may be disabled. Deactivate stealth functions.
Select [Wi-Fi function].
1
Under the [53] tab, set [Wi-Fi] to
[Enable], then select [Wi-Fi
function].
Select an item.
2
Select either [q] [D] [l] or [ ],
then press <0>.
57
Page 58

Easy Connection via WPS (PBC Mode)
COPY
3
4
5
6
Select [Infrastructure mode].
Displayed when [q] or [l] is
selected. Go to step 4 when selecting
[D] or [ ].
Press the <V> key to select
[Infrastructure mode], then press
<0>.
Select [OK] and press <0> to go to
the next screen.
Select [WPS (PBC mode)].
Press the <V> key to select [WPS
(PBC mode)], then press <0>.
Select [OK] and press <0> to go to
the next screen.
Connect to the access point.
Press the access point’s WPS button.
For details about where the button is
located and how long to press it, refer
to the access point’s instruction
manual.
Select [OK] and press <0> to
establish a connection with the
access point.
X When a connection with the access
point is established, the [IP address
set.] screen is displayed.
Set the IP address.
Press the <V> key to select the IP
address setting method, then press
<0>.
58
Page 59

Easy Connection via WPS (PBC Mode)
COPY
[Auto setting]
Configures the settings available in [Manual setting] automatically.
However, this option can only be used in environments using DHCP
servers, or access points or routers with DHCP server functionality,
such that IP addresses and related settings are assigned and
configured automatically.
Select [OK] and press <0> to display the setting screen for the
communication method (p.60).
If an error is displayed even though the IP address and related
settings is set to be automatically assigned and configured, select
[Manual setting].
[Manual setting]
If [Auto setting] results in an error, enter the IP address manually.
Enter the IP address assigned to the camera when prompted for the IP
address.
Select [OK] and then select an item on the screen displayed. When
finished, press <0>.
When entering numbers, turn the <6>
dial to move the input position in the
upper area and turn the <5> dial to
select the number. Press <0> to enter
the selected number. When you have
finished entering information, press the
<M> button. A confirmation screen
is not displayed.
When you have completed setting all items, select [OK] and press
<0>. The setting screen for the communication method will be
displayed (p.60).
If you are not sure what to enter, see “Checking Network Settings”
(p.166), or ask the network administrator or another person
knowledgeable about the network.
59
Page 60

Easy Connection via WPS (PBC Mode)
COPY
Specifying Settings for the Communication Method
This section explains setting screens for the communication method of
each device and service that the camera is connected to. Read the
page that introduces the selected communication method.
Connecting to a Smartphone: Chapter 6 (p.75)
Printing Images Using a Wi-Fi Printer: Chapter 7 (p.87)
60
Page 61

Easy Connection via WPS (PBC Mode)
COPY
Remote Operation Using EOS Utility: Chapter 8 (p.93)
Windows 8/7/Vista Users
When operating the camera remotely using EOS Utility, perform the
operations as follows before performing the operations described on page
94 and after. If these operations are not performed, the Pairing Software
described on page 95 may not start.
Open the [C Drive] 9 [Program Files] 9 [Canon] 9 [EOS Utility] 9
[WFTPairing] folder (in this order), and then double-click the [WFT
FirewallSettings] icon. (The folder names above are examples. The
location of files differs according to the environment.) After performing this
operation, perform the operation described on page 94.
Viewing Images Using a Media Player: Chapter 10 (p.131)
61
Page 62

Easy Connection via WPS (PIN Mode)
COPY
This is a connection mode available when using an access point
compatible with Wi-Fi Protected Setup (WPS). In PIN code connection
mode (PIN mode), an 8-digit identification number specified on the
camera is set at the access point to establish a connection.
Even if there are multiple access points active in the surrounding area,
a relatively reliable connection can be established using this shared
identification number.
It may take approx. one minute to establish a connection.
If stealth functions of the access point are enabled, connection
may be disabled. Deactivate stealth functions.
Select [Wi-Fi function].
1
Under the [53] tab, set [Wi-Fi] to
[Enable], then select [Wi-Fi
function].
Select an item.
2
Select either [q] [D] [l] or [ ],
then press <0>.
Select [Infrastructure mode].
3
Displayed when [q] or [l] is
selected. Go to step 4 when selecting
[D] or [ ].
Press the <V> key to select
[Infrastructure mode], then press
<0>.
Select [OK] and press <0> to go to
the next screen.
62
Page 63

Easy Connection via WPS (PIN Mode)
COPY
Select [WPS (PIN mode)].
4
Press the <V> key to select [WPS
(PIN mode)], then press <0>.
Select [OK] and press <0> to go to
the next screen.
Specify the PIN code at the
5
access point.
At the access point, specify the 8-digit
PIN code displayed on the camera’s
LCD monitor.
For instructions on setting PIN codes
at the access point, refer to the
access point’s instruction manual.
After the PIN code is specified, select
[OK] and press <0>.
Connect to the access point.
6
Select [OK] and press <0> to
establish a connection with the
access point.
X When a connection with the access
point is established, the [IP address
set.] screen is displayed.
Set the IP address.
7
Press the <V> key to select the IP
address setting method, then press
<0>.
63
Page 64

Easy Connection via WPS (PIN Mode)
COPY
[Auto setting]
Configures the settings available in [Manual setting] automatically.
However, this option can only be used in environments using DHCP
servers, or access points or routers with DHCP server functionality,
such that IP addresses and related settings are assigned and
configured automatically.
Select [OK] and press <0> to display the setting screen for the
communication method (p.65).
If an error is displayed even though the IP address and related
settings is set to be automatically assigned and configured, select
[Manual setting].
[Manual setting]
If [Auto setting] results in an error, enter the IP address manually.
Enter the IP address assigned to the camera when prompted for the IP
address.
Select [OK] and then select an item on the screen displayed. When
finished, press <0>.
When entering numbers, turn the <6>
dial to move the input position in the
upper area and turn the <5> dial to
select the number. Press <0> to enter
the selected number. When you have
finished entering information, press the
<M> button. A confirmation screen
is not displayed.
When you have completed setting all items, select [OK] and press
<0>. The setting screen for the communication method will be
displayed (p.65).
If you are not sure what to enter, see “Checking Network Settings”
(p.166), or ask the network administrator or another person
knowledgeable about the network.
64
Page 65

Easy Connection via WPS (PIN Mode)
COPY
Specifying Settings for the Communication Method
This section explains setting screens for the communication method of
each device and service that the camera is connected to. Read the
page that introduces the selected communication method.
Connecting to a Smartphone: Chapter 6 (p.75)
Printing Images Using a Wi-Fi Printer: Chapter 7 (p.87)
65
Page 66

Easy Connection via WPS (PIN Mode)
COPY
Remote Operation Using EOS Utility: Chapter 8 (p.93)
Windows 8/7/Vista Users
When operating the camera remotely using EOS Utility, perform the
operations as follows before performing the operations described on page
94 and after. If these operations are not performed, the Pairing Software
described on page 95 may not start.
Open the [C Drive] 9 [Program Files] 9 [Canon] 9 [EOS Utility] 9
[WFTPairing] folder (in this order), and then double-click the [WFT
FirewallSettings] icon. (The folder names above are examples. The
location of files differs according to the environment.) After performing this
operation, perform the operation described on page 94.
Viewing Images Using a Media Player: Chapter 10 (p.131)
66
Page 67

Manual Connection by Searching Networks
COPY
Selecting the Wireless Network
When [Find network] is selected, a list of active access points nearby
is displayed, accompanied by information about them. Select the SSID
(or ESS-ID) of the access point to connect to.
Select [Wi-Fi function].
1
Under the [53] tab, set [Wi-Fi] to
[Enable], then select [Wi-Fi
function].
Select an item.
2
Select either [q] [D] [l] or [ ],
then press <0>.
Select [Infrastructure mode].
3
Displayed when [q] or [l] is
selected. Go to step 4 when selecting
[D] or [ ].
Press the <V> key to select
[Infrastructure mode], then press
<0>.
Select [OK] and press <0> to go to
the next screen.
Select [Find network].
4
Press the <V> key to select [Find
network], then press <0>.
Select [OK] and press <0> to go to
the next screen.
67
Page 68

Manual Connection by Searching Networks
COPY
(2)
(1)
(1) Indicates whether the device is in infrastructure or ad hoc mode
(2) An icon is displayed if the access point is encrypted
(3) First characters of the SSID
(4) Channel used
Access Point Encryption
This camera supports the following options for [Authentication] and
[Encryption settings]. Therefore, the encryption used by the access
point should be one of the following.
[Authentication]: Open system, Shared key, WPA-PSK, or WPA2-
PSK
[Encryption settings]: WEP, TKIP, or AES
[Enter connection] and [Search again]
To configure settings for the access point manually, select [Enter
connection] and press <0>. Enter the SSID using the virtual
keyboard and then configure settings following the instructions
displayed.
To search for access points again, select [Search again] and press
<0>.
(3)
(4)
Select an access point.
5
Press <0> to enable the selection of
an access point.
Press the <V> key to select an
access point, then press <0>.
Select [OK] and press <0> to go to
the next screen (p.69).
68
Page 69

Manual Connection by Searching Networks
COPY
Entering the Wireless LAN Encryption Key
Go to the next page when the [IP address set.] screen is displayed.
Set the encryption key specified for the access point. For details on the
specified encryption key, refer to the access point’s instruction manual.
Note that the screens displayed in steps 1 to 3 below vary depending on
the authentication and encryption specified for the access point.
The [Key index] screen is displayed
1
only if WEP encryption is used by the
access point.
Press the <V> key to select the key
index number specified for the access
point, then press <0>.
Select [OK] and press <0> to go to
the next screen.
Press the <V> key to select the
2
format and the number of characters
used for the key, then press <0>.
Select [OK] and press <0> to go to
the next screen.
Enter the encryption key using the
3
virtual keyboard (p.14).
X The [IP address set.] screen (p.70)
will be displayed.
69
Page 70

Manual Connection by Searching Networks
COPY
Setting the IP Address
Press the <V> key to select how the
IP address should be set, then press
<0>.
[Auto setting]
Configures the settings available in [
However, this option can only be used in environments using DHCP servers,
or access points or routers with DHCP server functionality, such that IP
addresses and related settings are assigned and configured automatically.
Select [OK] and press <0> to display the setting screen for the
communication method (p.71).
If an error is displayed even though the IP address and related
settings is set to be automatically assigned and configured, select
[Manual setting].
[Manual setting]
If [
Auto setting
IP address assigned to the camera when prompted for the IP address.
Select [OK] and then select an item on the screen displayed. When
finished, press <0>.
When entering numbers, turn the <6>
dial to move the input position in the
upper area and turn the <5> dial to
select the number. Press <0> to enter
the selected number. When you have
finished entering information, press the
<M> button. A confirmation screen
is not displayed.
When you have completed setting all items, select [OK] and press
<0>. The setting screen for the communication method will be
displayed (p.71).
] results in an error, enter the IP address manually. Enter the
Manual setting
] automatically.
70
Page 71

Manual Connection by Searching Networks
COPY
If you are not sure what to enter, see “Checking Network Settings”
(p.166), or ask the network administrator or another person
knowledgeable about the network.
Specifying Settings for the Communication Method
This section explains setting screens for the communication method of
each device and service that the camera is connected to. Read the
page that introduces the selected communication method.
Connecting to a Smartphone: Chapter 6 (p.75)
Printing Images Using a Wi-Fi Printer: Chapter 7 (p.87)
71
Page 72

Manual Connection by Searching Networks
COPY
Remote Operation Using EOS Utility: Chapter 8 (p.93)
Windows 8/7/Vista Users
When operating the camera remotely using EOS Utility, perform the
operations as follows before performing the operations described on page
94 and after. If these operations are not performed, the Pairing Software
described on page 95 may not start.
Open the [C Drive] 9 [Program Files] 9 [Canon] 9 [EOS Utility] 9
[WFTPairing] folder (in this order), and then double-click the [WFT
FirewallSettings] icon. (The folder names above are examples. The
location of files differs according to the environment.) After performing this
operation, perform the operation described on page 94.
Viewing Images Using a Media Player: Chapter 10 (p.131)
72
Page 73

MEMO
COPY
73
Page 74

MEMO
COPY
74
Page 75

Connecting to a
COPY
Smartphone - 2
Connecting the camera to a smartphone lets you use
the smartphone to view, manage, and receive images
stored in the camera. You can also use the smartphone
to perform remote shooting. Note that movie shooting is
disabled.
These instructions should be followed only after the
smartphone is connected to an access point. For
information about settings and configuration, refer to the
documentation provided with each device or contact the
manufacturer.
75
Page 76

Using Infrastructure Mode to Establish a Connection
COPY
These instructions are continued from Chapter 5.
To establish connection, operations on the smartphone are required.
For details, refer to the smartphone’s instruction manual.
To connect in the camera access point mode, see “Using Camera
Access Point Mode to Establish a Connection” (p.33).
Start EOS Remote on the
1
smartphone.
When the screen on the left is
displayed on the camera, start EOS
Remote on the smartphone.
Select [Camera Connection] on
2
the smartphone.
Select [Camera Connection] on
EOS Remote.
Select the camera to connect to
3
on the smartphone.
Select the camera to connect to from
the [Detected Cameras] on EOS
Remote.
If multiple cameras are displayed,
identify the camera to connect to by
its MAC address displayed on the
camera’s LCD monitor.
The MAC address can also be
checked on the [General sett.]
screen (p.149).
X Pairing starts.
76
Page 77

Non-alphanumeric characters
COPY
are displayed as 8.
Using Infrastructure Mode to Establish a Connection
Connect to the camera.
4
When pairing is completed, the
screen on the left is displayed. Press
the <U> key to select [OK], then
press <0>.
To specify viewable images (p.81),
press the <B> button.
Perform further settings.
5
To finish settings in this stage, press
the <V> key to select [OK], then
press <0> to go to step 6.
To change the name of the settings,
select [Settings name] and press
<0>.
X The virtual keyboard is displayed
(p.14). Up to 30 characters can be
entered for the name of the settings.
Save the settings.
6
Select [OK] and press <0> to save
the settings.
X The [qConnection] screen will be
displayed.
To return to the menu, press the
<M> button.
The settings for networking with the smartphone are now complete.
77
Page 78

Operating the Camera Using a Smartphone
COPY
You can use a smartphone with EOS Remote installed to view images
stored in the camera and shoot remotely.
EOS Remote Main Screen
The main functions of EOS Remote are
described below. Touch the screen to
learn the operation procedures.
[Camera Image Viewing]
Images stored in the camera can be
viewed.
Images stored in the camera can be
saved on a smartphone.
Operations such as deletion can be
performed on images stored in the
camera.
[Remote Shooting]
The camera’s Live View image can
be viewed using a smartphone.
Camera settings can be changed.
You can shoot using remote
operation.
(Settings button)
Use this button to access various
settings for EOS Remote.
When viewable images are specified (p.81), functions of EOS Remote
will be limited.
Shooting may not be possible when the camera is connected to a
smartphone.
When you perform remote shooting, set the Live View shooting/Movie
shooting switch to <A>.
78
Page 79

Terminating the Connection
COPY
Select [Exit].
1
If the screen on the left is not
Select [Exit] and press <0>.
Select [OK].
2
Press the <U> key to select [OK],
Operating the Camera Using a Smartphone
displayed, select [Wi-Fi function]
under the [53] tab.
then press <0> to terminate the
connection.
JPEG and RAW images are resized and saved as JPEG images in the
most appropriate format for smartphones.
Although movies are included in the list, they cannot be saved.
If the camera’s auto power off is activated during the wireless LAN
connection, the wireless LAN function will turn off. Wireless LAN
connection is restored when the camera wakes up from auto power off.
When you establish a connection, deactivating the smartphone’s power
saving function is recommended.
79
Page 80

Reconnecting
COPY
The camera can reconnect to a smartphone for which connection
settings have been registered.
Select [Wi-Fi function].
1
Under the [53] tab, set [Wi-Fi] to
[Enable], then select [Wi-Fi
function].
Select [q].
2
Select [q] (Connect to smartphone)
and press <0>.
Establish a connection.
3
Select [Connect] and press <0>.
On the confirmation screen, select
[OK].
X The camera will reconnect to the
smartphone.
When settings for multiple connection
destinations are registered, select
[Choose set.], select the connection
destination, then connect to the
destination.
80
Page 81

Specifying Viewable Images
COPY
You can specify images viewable from a smartphone by operating the
camera. Images can be specified during connection settings or after the
connection is terminated.
Select [Wi-Fi function].
1
Under the [53] tab, set [Wi-Fi] to
[Enable], then select [Wi-Fi
function].
Select [q].
2
Select [q] (Connect to smartphone)
and press <0>.
Select [Review/change settings].
3
Select [Review/change settings]
and press <0>.
Select [Viewable imgs].
4
Select [Viewable imgs] and press
<0>.
81
Page 82

Specifying Viewable Images
COPY
Select an item.
5
Press the <V> key to select an item,
then press <0>.
Select [OK] and press <0> to
display the setting screen.
[All images]
All images stored on the card become viewable.
[Images from past days]
Specify viewable images on the
shooting-date basis. Images shot up to
nine days ago can be specified.
Press the <V> key to select an item,
then press <0>.
When [Images shot in past days] is
selected, images shot up to the
specified number of days before the
current date become viewable. When
<r> is shown for the number of
days, turn the <5> dial to specify the
number of days, then press <0> to
confirm the selection.
Select [OK] and press <0> to
specify the viewable images.
[Select by rating]
Specify viewable images depending on
whether a rating has been added (or not
added) or by the type of rating.
Press the <V> key to select a
rating, then press <0> to specify the
viewable images.
82
Page 83

[File number range] (Select range)
COPY
Select the first and last images from
images arranged by the file number to
specify the viewable images.
1 Press the <U> key to select the
first image to be set viewable.
2 Press <0> to display the image
First image Last image
selection screen.
Select an image using the <U>
key, <5> dial, or <6> dial.
You can also press the <I>
button to select an image in the index
display. To return to the single-image
display, press the <u> button.
3 Select an image, then press <0> to
determine the selection.
4 Specify the last image to be set
viewable by the same operation.
Select an image shot later than the
image selected as the first image.
5 When the first and last images are
specified, press the <V> key to
select [OK], then press <0>.
Specifying Viewable Images
83
Page 84

Registering Multiple Connection Settings
COPY
You can register up to three smartphone connection settings.
Select [Wi-Fi function].
1
Under the [53] tab, set [Wi-Fi] to
[Enable], then select [Wi-Fi
function].
Select [q].
2
Select [q] (Connect to smartphone)
and press <0>.
Select [Choose set.].
3
Select [Choose set.] and press
<0>.
Select [Unspecified].
4
Select [Unspecified] and press
<0>.
X The connection settings screen is
displayed. Follow the procedures
displayed to complete the connection
settings.
84
Page 85

MEMO
COPY
85
Page 86

MEMO
COPY
86
Page 87

7
COPY
Printing Images Using
a Wi-Fi Printer - 2
You can directly print images by connecting the camera
with a wireless LAN compatible printer supporting
PictBridge (Wireless LAN) via a wireless LAN.
These instructions should be followed only after the
printer is connected to an access point. For information
about settings and configuration, refer to the
documentation provided with each device or contact the
manufacturer.
Images can be printed by connecting this camera with a
printer by PictBridge via a wireless LAN. PictBridge is a
standard for easily printing images by directly connecting
digital cameras to printers and other devices supporting
the standard.
87
Page 88

Using Infrastructure Mode to Establish a Connection
COPY
These instructions are continued from Chapter 5.
To connect in camera access point mode, see “Using Camera Access
Point Mode to Establish a Connection” (p.46).
Select the printer to connect to.
1
When a list of detected printers is
displayed, select the printer to
connect to and press <0>.
X Some printers may make a beeping
sound.
When 16 or more printers are
detected or search takes over 3
minutes, you can select [Search
again].
Perform further settings.
2
To finish settings in this stage, press
the <V> key to select [OK], then
press <0> to go to step 3.
To change the name of the settings,
select [Settings name] and press
<0>.
X The virtual keyboard is displayed
(p.14). Up to 30 characters can be
entered for the name of the settings.
88
Page 89

Using Infrastructure Mode to Establish a Connection
COPY
Save the settings.
3
Select [OK] and press <0> to save
the settings.
X The [lConnection] screen will be
displayed.
To return to the menu, press the
<M> button.
The settings for networking with the printer are now complete.
89
Page 90

Printing
COPY
Play back an image.
Press the <x> button.
For further operations, refer to
Terminating the Connection
Select [Exit].
1
If the screen on the left is not
Select [Exit] and press <0>.
Select [OK].
2
Press the <U> key to select [OK],
X An image is displayed and the <w>
icon appears on the upper left of the
screen indicating that the printer is
connected.
“Printing Images” in the Camera
Instruction Manual. You can also
perform “Direct Printing of PrintOrdered Images”.
displayed, select [Wi-Fi function]
under the [53] tab.
then press <0> to terminate the
connection.
90
Page 91

Reconnecting
COPY
The camera can reconnect to a printer for which connection settings
have been registered.
Select [Wi-Fi function].
1
Under the [53] tab, set [Wi-Fi] to
[Enable], then select [Wi-Fi
function].
Select [l].
2
Select [l] (Print from Wi-Fi printer)
and press <0>.
Establish a connection.
3
Select [Connect] and press <0>.
On the confirmation screen, select
[OK].
X The camera will reconnect to the
printer.
When settings for multiple connection
destinations are registered, select
[Choose set.], select the connection
destination, then connect to the
destination.
91
Page 92

Registering Multiple Connection Settings
COPY
You can register up to three printer connection settings.
Select [Wi-Fi function].
1
Under the [53] tab, set [Wi-Fi] to
[Enable], then select [Wi-Fi
function].
Select [l].
2
Select [l] (Print from Wi-Fi printer)
and press <0>.
Select [Choose set.].
3
Select [Choose set.] and press
<0>.
Select [Unspecified].
4
Select [Unspecified] and press
<0>.
X The connection settings screen is
displayed. Follow the procedures
displayed to complete the connection
settings.
92
Page 93

Remote Operation
COPY
Using EOS Utility
You can perform remote operation using EOS Utility via
a wireless LAN. In addition to remote shooting, various
camera operations are available because a wireless
LAN is used instead of an interface cable. Note that
movie shooting is disabled.
These instructions should be followed only after the
computer with EOS Utility installed is connected to an
access point. For information about settings and
configuration, refer to the documentation provided with
each device or contact the manufacturer.
Settings may be disabled when an older version of software is
used. Use the software installed from the CD provided with this
camera.
93
Page 94

Configuring EOS Utility Communication Settings
COPY
These instructions are continued from Chapter 5.
With EOS Utility, you can use the provided Pairing Software to est ablish
a connection between the camera and a computer.
Pairing Software is installed automatically during “easy installation” of
the software provided with the camera. If it is not installed, install it on
the computer to be connected to the camera in advance.
The configuration procedure is as follows, using Windows 7 as an
example.
Select [OK].
1
First, the pairing screen is displayed.
Press the <U> key to select [OK],
then press <0>. The following
message is displayed.
“******” represents the last six digits of
the MAC address of the camera to be
connected.
94
Page 95

Configuring EOS Utility Communication Settings
COPY
Start the pairing software.
2
Start the pairing software on the
computer. Normally, it is installed in
the same location as EOS Utility.
X After the pairing software starts up, an
icon is displayed on the task bar.
X When the camera is detected, a
message is displayed.
Double-click the pairing software
3
icon.
X Detected cameras are listed.
Cameras that have already been
connected are not included in the list.
Click [Connect].
4
If multiple cameras are displayed,
identify the camera to connect to by
its MAC address displayed on the
camera’s LCD monitor.
The MAC address can also be
checked on the [General sett.]
screen (p.149).
95
Page 96

Configuring EOS Utility Communication Settings
COPY
Select [OK].
5
When the camera detects the
computer on which you clicked
[Connect] in step 4, the screen on
the left is displayed.
Press the <U> key to select [OK],
then press <0>.
Perform further settings.
6
To finish settings in this stage, press
the <V> key to select [OK], then
press <0> to go to step 7.
To change the name of the settings,
select [Settings name] and press
<0>.
X The virtual keyboard is displayed
(p.14). Up to 30 characters can be
entered for the name of the settings.
Save the settings.
7
Select [OK] and press <0> to save
the settings.
X The [DConnection] screen is
displayed.
To return to the menu, press the
<M> button.
The EOS Utility network settings are now complete.
96
Page 97

Configuring EOS Utility Communication Settings
COPY
There is no need to complete pairing again if you will continue using
a particular camera and computer together after pairing without
changing the settings.
To reconnect to the same computer, simply turn on the camera and
start the pairing software. The connection between the camera and
computer will be established automatically.
You can add the pairing software to the software launched on your
computer at startup. In EOS Utility, select [Preferences] and the
[Basic Settings] tab, then append [Add WFT Pairing Software to
the Startup folder] (for Macintosh, [Register WFT Paring Software
in Login Options]) with a checkmark.
In Remote Live View shooting, the rate of image transmission is slower as
compared to connection via an interface cable. Therefore, the motion of
moving subjects cannot be displayed smoothly.
If the camera’s auto power off is activated during the wireless LAN
connection, the wireless LAN function will turn off. Wireless LAN connection
is restored when the camera wakes up from auto power off.
97
Page 98

Using EOS Utility
COPY
For EOS Utility instructions, refer to the EOS Utility instruction manual
(CD-ROM). In addition to remote shooting, various camera operations
are available. Note that movie shooting is disabled.
Terminating the Connection
98
Select [Exit].
1
If the screen on the left is not
Select [Exit] and press <0>.
Select [OK].
2
Press the <U> key to select [OK],
displayed, select [Wi-Fi function]
under the [53] tab.
then press <0> to terminate the
connection.
Page 99

Reconnecting
COPY
The camera can reconnect to a computer for which connection settings
have been registered.
Select [Wi-Fi function].
1
Under the [53] tab, set [Wi-Fi] to
[Enable], then select [Wi-Fi
function].
Select [D].
2
Select [D] (Remote control (EOS
Utility)) and press <0>.
Establish a connection.
3
Select [Connect] and press <0>.
On the confirmation screen, select
[OK].
X The camera will reconnect to the
computer.
When settings for multiple connection
destinations are registered, select
[Choose set.], select the connection
destination, then connect to the
destination.
99
Page 100

Registering Multiple Connection Settings
COPY
You can register up to three EOS Utility connection settings.
Select [Wi-Fi function].
1
Under the [53] tab, set [Wi-Fi] to
[Enable], then select [Wi-Fi
function].
Select [D].
2
Select [D] (Remote control (EOS
Utility)) and press <0>.
Select [Choose set.].
3
Select [Choose set.] and press
<0>.
Select [Unspecified].
4
Select [Unspecified] and press
<0>.
X The connection settings screen is
displayed. Follow the procedures
displayed to complete the connection
settings.
100
 Loading...