

Page 1

lOOU
и©11.^Э
Page 2

Advanced Shooting
This chapter builds on Chapter 3 and introduces more
ways to shoot creatively.
The first half of this chapter explains how to use the <Tv>
< Av> <M> <A-DEP> modes on the Mode Dial.
All the functions explained in Chapter 3 can also be used in
the <Tv>, <Av>, and <M> modes.
To see which functions can be used in each shooting mode,
see page 232.
The ☆ mark shown on the right of the page title indicates
that the function is available only in Creative Zone modes
(p.22).
About the Main Dial Pointer
The pointer icon <^H> displayed
together with the shutter speed, aperture
setting, or exposure compensation
amount indicates that you can turn the
<Si> dial to adjust the respective
setting.
Si
91
Page 3
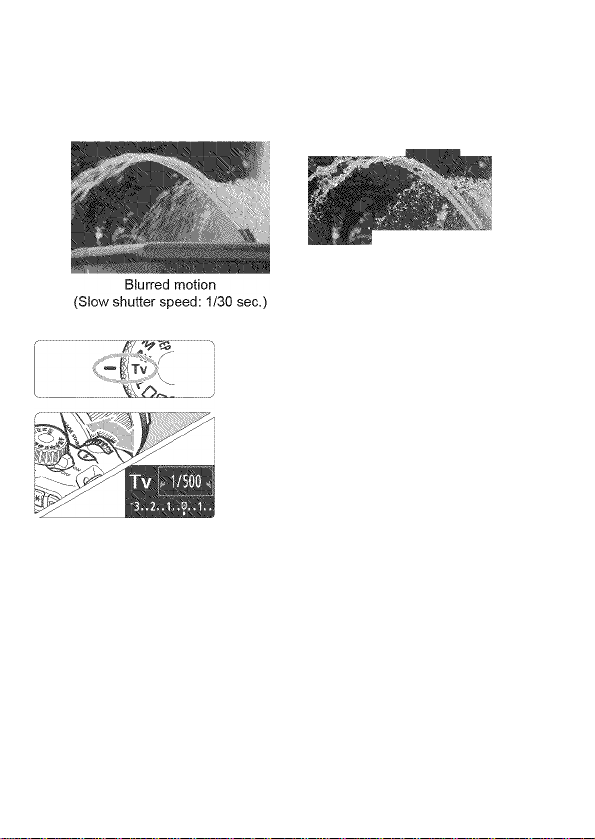
Tv: Action Shots
You can either freeze the action or create motion biur with the <Tv>
(Shutter-priority AE) mode on the Mode Diai.
* <Tv> stands for Time value.
'.'i:
(Fast shutter speed: 1/2000 sec.)
Frozen action
Set the Mode Dial to <Tv>.
Set the desired shutter speed.
See “Shooting Tips” for advice on
setting the shutter speed.
Turning the <£S> diai to the right
sets a faster shutter speed, and
turning it to the ieft sets a siower one.
Take the picture.
When you focus and press the
shutter button compieteiy, the picture
wiii be taken at the seiected shutter
speed.
Q Shutter Speed Display
The LCD monitor displays the shutter speed as a fraction. However, the
viewfinder displays only the denominator. Also, “0”5” indicates 0.5 sec. and
“15"” is 15 sec.
92
Page 4

Tv: Action Shots
> Shooting Tips
To freeze the action or moving subject.
Use a fast shutter speed such as 1/4000 sec. to 1/500 sec.
To blur a running child or animal giving the impression of fast
movement.
Use a medium shutter speed such as 1/250 sec. to 1/30 sec. Follow
the moving subject through the viewfinder and press the shutter
button to take the picture. If you use a telephoto lens, hold It steady
to prevent camera shake.
How to blur a flowing river or water fountain.
Use a slow shutter speed of 1/30 sec. or slower. Use a tripod to
prevent hand-held camera shake.
Set the shutter speed so that the aperture display does not
blink in the viewfinder.
If you press the shutter button halfway and change
the shutter speed while the aperture Is displayed,
the aperture display will also change to maintain the
same exposure (amount of light reaching the Image
sensor). If you exceed the adjustable aperture
range, the aperture display will blink to Indicate that
the standard exposure cannot be obtained.
If the exposure will be too dark, the maximum aperture (smallest
number) will blink. If this happens, turn the < /S > dial to the left to
set a slower shutter speed or Increase the ISO speed.
If the exposure will be too bright, the minimum aperture (highest
number) will blink. If this happens, turn the < /S > dial to the right to
set a faster shutter speed or decrease the ISO speed.
I
I
% Using the Built-in Flash
To obtain a correct flash exposure, the flash output will be set
automatically (autoflash exposure) to match the automatically-set
aperture. The flash sync speed can be set from 1/200 sec. to 30 sec.
93
Page 5
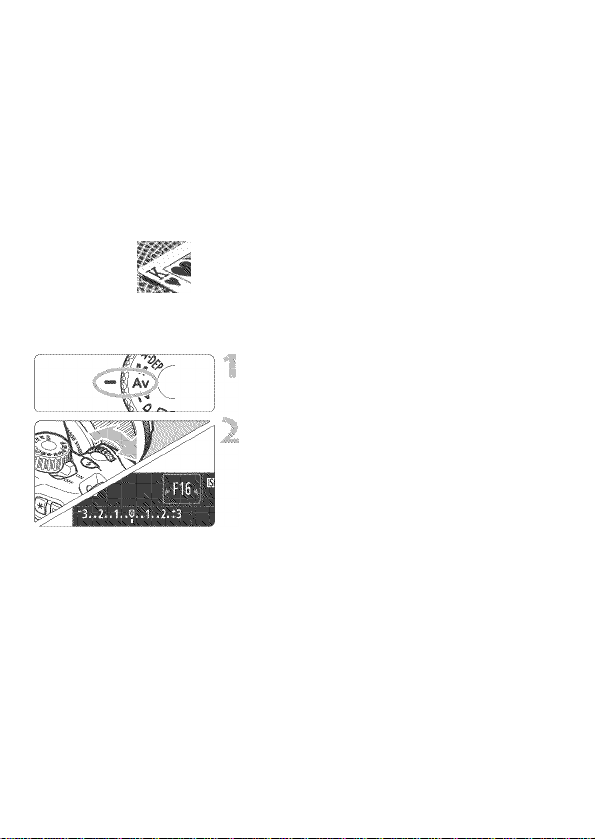
Av: Changing the Depth of Field
To blur the background or to make everything near and far look sharp,
set the Mode Dial to < Av> (Aperture-priority AE) to adjust the depth of
field (range of acceptable focus).
*<Av> stands for Aperture value which is the size of the diaphragm hole inside the lens.
Blurred background
(With a low aperture f/number: f/5.6)
Sharp foreground and background
(With a high aperture f/number: f/32)
Set the Mode Dial to <Av>.
Set the desired aperture.
The higher the f/number, the wider
the depth of field where sharper focus
is obtained in both the foreground
and background.
Turning the <£S> dial to the right will
set a higher f/number (smaller
aperture opening), and turning it to
the left will set a lower f/number
(larger aperture opening).
Take the picture.
Focus and press the shutter button
completely. The picture will be taken
with the selected aperture.
51 Aperture Display
The higher the f/number, the smaller the aperture opening will be. The
apertures displayed will differ depending on the lens. If no lens is attached to
the camera, “00” will be displayed for the aperture.
94
Page 6

Av: Changing the Depth of Field
Shooting Tips
When using an aperture with a high f/number, note that camera
shake can occur in low light scenes.
A higher aperture f/number will make the shutter speed slower.
Under low light, the shutter speed can be as long as 30 sec. In such
cases, increase the ISO speed and hold the camera steady or use a
tripod.
The depth of field depends not only on the aperture, but also on
the lens and on the subject distance.
Since wide-angle lenses have a wide depth of field (range of
acceptable focus in front of and behind the point of focus), you need
not set a high aperture f/number to obtain a sharp picture from the
foreground to the background. On the other hand, a telephoto lens
has a narrow depth of field.
And the closer the subject, the narrower the depth of field. A farther
subject will have a wider depth of field.
Set the aperture so that the shutter speed display does not
blink.
If you press the shutter button halfway and change , ,
the aperture while the shutter speed Is displayed, I
the shutter speed display will also change to
maintain the same exposure (amount of light
reaching the image sensor). If you exceed the
adjustable shutter speed range, the shutter speed
display will blink to indicate that the standard
exposure cannot be obtained.
If the picture will be too dark, the “30" ” (30 sec.) shutter speed
display will blink. If this happens, turn the </S> dial to the left to set
a lower aperture f/number or increase the ISO speed.
If the picture will be too bright, the “4000 ” (1/4000 sec.) shutter
speed display will blink. If this happens, turn the </S> dial to the
right to set a higher aperture f/number or decrease the ISO speed.
I
95
Page 7

Av: Changing the Depth of Field
% Using the Built-in Flash
To obtain a correct flash exposure, the flash output will be set
automatically to match the set aperture (autoflash exposure). The
shutter speed will be set automatically between 1/200 sec. - 30 sec. to
suit the scene’s brightness.
In low light, the main subject Is exposed with the automatic flash, and
the background Is exposed with a slow shutter speed set automatically.
Both the subject and background look properly exposed (automatic
slow-speed flash sync). If you are handholding the camera, keep it
steady to prevent camera shake. Using a tripod Is recommended.
If you do not want a slow shutter speed to be used, set [2; Flash sync,
speed in Av mode] to [1:1/200-1/60 sec. auto] or [2:1/200 sec.
(fixed)] in [%: Custom Functions (C.Fn)] (p.218).
nmn Depth of Field Preview
The aperture opening (diaphragm) changes only at the moment when
the picture Is taken. Otherwise, the aperture remains fully open.
Therefore, when you look at the scene through the viewfinder or LCD
monitor, the depth of field will look narrow. With the procedure below,
you can check the depth of field before taking the picture.
Enable depth-of-field preview to be used.
Under [%: Custom Functions (C.Fn)], set [8: Assign SET
button] to [5: Depth-of-field preview] (p.222).
For details about Custom Function settings, see page 216.
Exit the menu.
Press the <MENU> button two times to exit the menu.
.i)- Press <0>.
The aperture will be stopped down so you can see the depth of field.
While looking at the Live View image (p.122) and holding down the <
i
button, you can change the aperture and see how the depth of field
changes.
96
Page 8

M: Manual Exposure
You can set both the shutter speed and aperture manually as desired.
While referring to the exposure level Indicator In the viewfinder, you can
set the exposure as desired. This method Is called manual exposure.
* <M> stands for Manual.
Set the Mode Dial to <M>.
pF
<AvlM>
Standard exposure index
Exposure level mark
1
Set the shutter speed and
aperture.
To set the shutter speed, turn the
<- ~ i> dial.
To set the aperture, hold down the
<Av0> button and turn the <£S> dial.
Focus the subject.
Press the shutter button halfway.
The exposure setting will be
displayed In the viewfinder.
The exposure level mark <l> indicates
how far the current exposure level is
from the standard exposure level.
Set the exposure and take the
picture.
Set the shutter speed and aperture as
desired.
If the exposure set exceeds ±2 stops from
the standard exposure, the end of the
exposure level indicator will display <^>
or <^> in the viewfinder. (On the LCD
monitor, if the exposure level is higher
than ±3 stops, the <i> icon will blink at
where <-3> or <+3> is displayed.)
#
If [Ql= Auto Lighting Optimizer] (p.107) is set to any setting other than
[Disable], the image may still look bright even if a darker exposure has been set.
97
Page 9

M: Manual Exposure
% Using the Built-in Flash
To obtain a correct flash exposure, the flash output will be set
automatically (autoflash exposure) to match the manually-set aperture.
The flash sync speed can be set from 1/200 sec. to 30 sec. and bulb.
BULB: Bulb Exposures
A bulb exposure keeps the shutter open
for as long as you hold down the shutter
button. It can be used to photograph
fireworks, etc.
In step 2 on the preceding page, turn the
</S> dial to the left to set <BULB>.
The elapsed exposure time will be
displayed on the LCD monitor.
Elapsed exposure time
m
During bulb exposures, do not point the lens toward the sun. The sun’s
heat can damage the camera’s internal components.
Since bulb exposures produce more noise than usual, the image might
look a little grainy.
You can reduce the noise due to long exposures by setting [3: Long exp.
noise reduction] to [1: Auto] or [2: On] in the Custom Functions
(C.Fn)] (p.219).
For bulb exposures, using a tripod and Remote Switch (sold separately,
B
p.229) is recommended.
98
Page 10

A-DEP: Automatic Depth-of-Field AE
Objects in the foreground and background will be in focus automatically.
All the AF points will function to detect the subject, and the aperture
required to attain the necessary depth of field will be set automatically.
*< A-DEP > stands for Auto-Depth of field. This mode sets the depth of field
automatically.
Set the Mode Dial to < A-DEP>.
Focus the subject.
Aim the AF points over the subjects
and press the shutter button halfway
(®4).
All the subjects covered by the AF
points flashing in red will be in focus.
If focus Is not achieved, the picture
cannot be taken.
Take the picture.
FAQ
The aperture display in the viewfinder blinks.
The exposure Is correct, but the desired depth of field cannot be
obtained. Either use a wide-angle lens or move farther away from
the subjects.
The shutter speed display in the viewfinder blinks.
If the “30" ” shutter speed blinks, it means that the subject is too dark.
Increase the ISO speed. If the “4000 ” shutter speed blinks, it means
that the subject Is too bright. Decrease the ISO speed.
A slow shutter speed has been set.
Use a tripod to steady the camera.
I want to use flash.
Flash can be used, however, the result will be the same as using the
<P> mode with flash. The desired depth of field will not be obtained.
99
Page 11
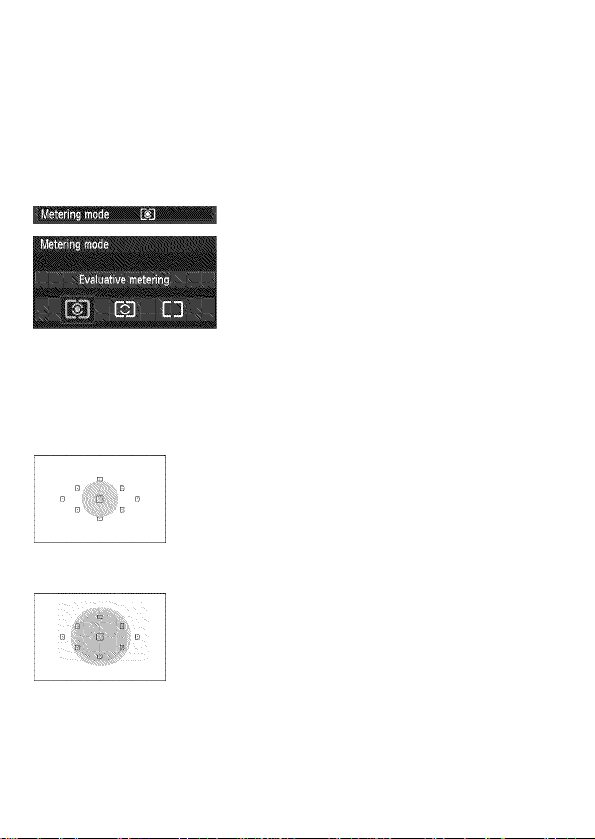
[U Changing the Metering Mode^
Three methods (metering modes) to measure the subject’s brightness
are provided. Normaiiy, evaiuative metering is recommended,
in Basic Zone modes, evaiuative metering is set automaticaiiy.
Select [Metering mode].
Under the [O'] tab, seiect [Metering
mode], then press <©>.
; Set the metering mode.
Seiect the desired metering mode,
then press <©>.
G0 Evaluative metering
This is an aii-around metering mode suited for
portraits and even backiit subjects. The camera
sets the exposure automaticaiiy to suit the
scene.
E3 Partial metering
Effective when the background is much brighter
than the subject due to backiighting, etc. The
gray area in the ieft figure is where the
brightness is metered to obtain the standard
exposure.
CD Center-weighted average metering
The brightness is metered at the center and
then averaged for the entire scene. This
metering mode is for advanced users.
Q With 00, the exposure setting will be locked when you press the shutter
button halfway and focus is achieved. With G3 and CD, the exposure setting
is set at the moment of exposure. (The exposure setting is not locked when
you press the shutter button halfway.)
100
Page 12
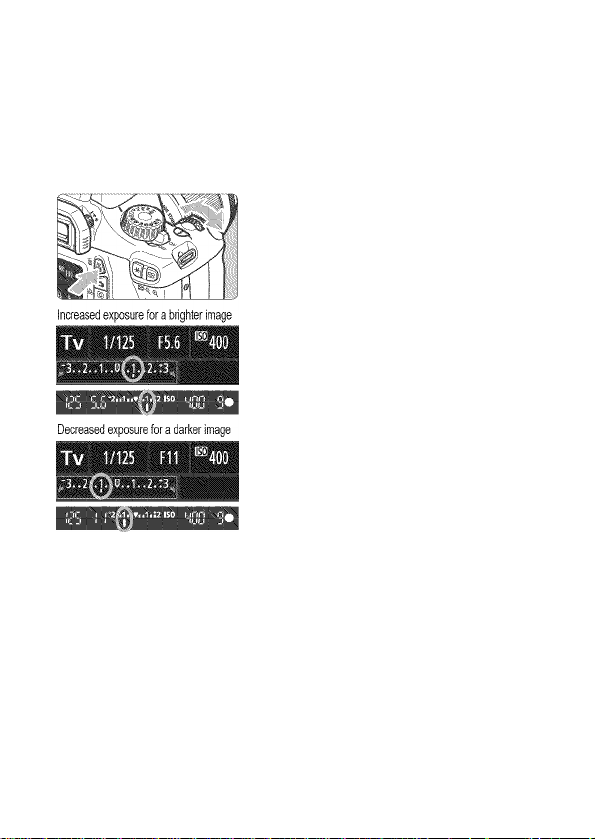
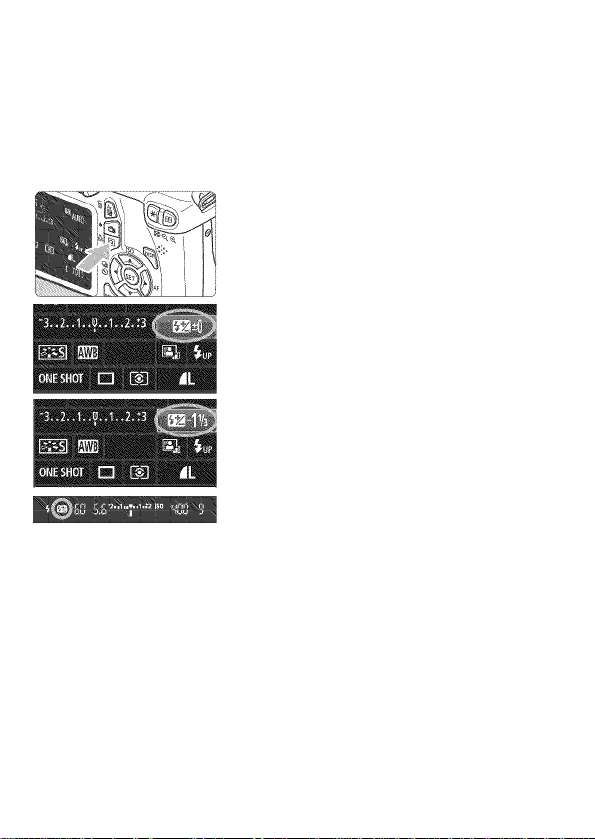
Setting Exposure Compensation
AvH Setting Exposure Compensation
Set exposure compensation if the exposure (without flash) does not come out
as desired. This feature can be used in Creative Zone modes (except <M>).
You can set the exposure compensation up to ±5 stops in 1/3-stop increments.
Making it brighter:
Hold down the <Av0> button and
turn the <£S> dial to the right.
(Increased exposure)
Making it darker:
Hold down the <Av0> button and
turn the <iSs> dial to the left.
(Decreased exposure)
As shown In the figure, the exposure
level Is displayed on the LCD monitor
and In the viewfinder.
After taking the picture, cancel the
exposure compensation by setting
it back to 0.
Dark exposure Increased exposure for a brighter image
3 The exposure compensation amount displayed in the viewfinder goes up
to only ±2 stops. If the exposure compensation amount exceeds ±2
stops, the end of the exposure level indicator will display <^> or <►>.
The exposure compensation can also be set with [O' Expo, comp./
AEB] (p.103). If you will set exposure compensation exceeding ±2 stops,
you should use [Qf" Expo. comp./AEB] to set it.
101
Page 13
Setting Exposure Compensation*
m Flash Exposure Compensation
Set flash exposure compensation if the flash exposure of the subject
does not come out as desired. You can set the flash exposure
compensation up to ±2 stops in 1 /3-stop increments.
Press the <(o)> button. (¿10)
The Quick Control screen will appear
(p.40).
Select I®].
Press the < v> key to select [W*
[Flash exposure comp.] will be
displayed at the bottom.
‘ Set the flash exposure
compensation amount.
To make the flash exposure brighter,
turn the <£S> dial to the right.
(Increased exposure)
To make it darker, turn the <£S> dial
to the left. (Decreased exposure)
When you press the shutter button
halfway, the <W> icon will appear in
the viewfinder.
After taking the picture, cancel the
flash exposure compensation by
setting it back to 0.
m If [Ql‘ Auto Lighting Optimizer] (p.107) is set to any setting other than
[Disable], the image may look bright even if a decreased exposure
compensation or decreased flash exposure compensation has been set.
3 You can also set flash exposure compensation with [Built-in flash func.
setting] in [Cl* Fiash controi] (p.167).
102
Page 14
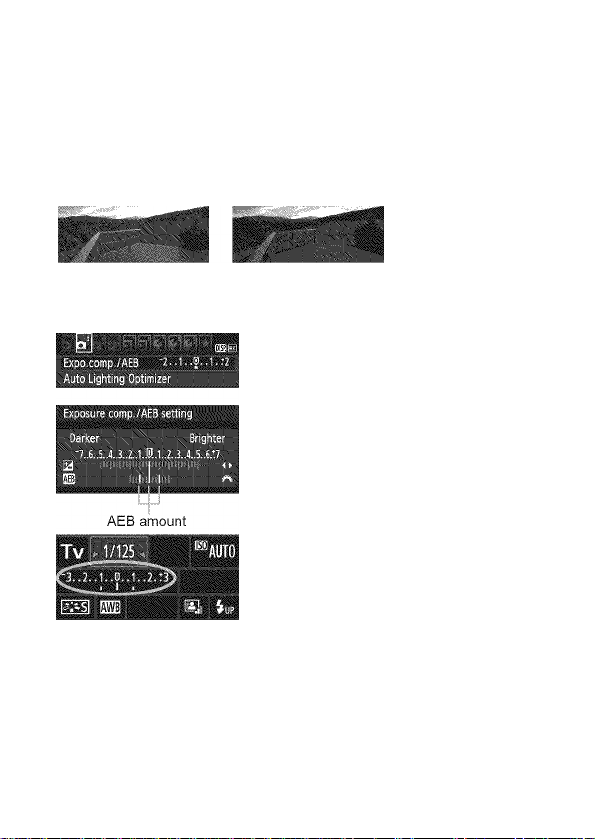
Auto Exposure Bracketing
This feature takes exposure compensation a step further by varying the
exposure automaticaiiy (up to ±2 stops in 1 /3-stop increments) with
three shots as shown beiow. You can then choose the best exposure.
This is caiied AEB (Auto Exposure Bracketing).
Standard exposure
Darker exposure
(Decreased exposure)
Brighter exposure
(Increased exposure)
Select [Expo. comp./AEB],
Under the [O'] tab, seiect [Expo.
comp./AEB], then press <©>.
Set the AEB amount.
Turn the <£S> dial to set the AEB
amount.
Press the <-^^> key to set the
exposure compensation amount, if
AEB is combined with exposure
compensation, AEB will be applied
centering on the exposure
compensation amount.
Press <©> to set it.
When you press the <MENU> button
to exit the menu, the AEB ievei will be
displayed on the LCD monitor.
Take the picture.
Focus and press the shutter button
compieteiy. The three bracketed
shots will be taken in this sequence:
Standard exposure, decreased
exposure, and increased exposure.
103
Page 15

Auto Exposure Bracketing ”
Canoeliog AEB
Follow steps 1 and 2 to turn off the AEB amount display.
The AEB setting will also be canceled automatically If the power
switch Is set to <OFF>, flash recycling Is completed, etc.
Shooting Tips
Using AEB with continuous shooting;
If <Э1> continuous shooting (p.86) has been set and you press the
shutter button completely, the three bracketed shots will be taken
continuously In this sequence: Standard exposure, decreased
exposure, and Increased exposure.
Using AEB with <□> single shooting;
Press the shutter button three times to take the three bracketed
shots. The three bracketed shots will be exposed in the following
sequence: Standard exposure, decreased exposure, and increased
exposure.
Using AEB with the self-timer;
If you use the self-timer <ci)> <ci)2> (p.87), the three bracketed
shots will be taken continuously after 10 sec. or 2 sec. With <Ci)c>
(p.87) set, the number of continuous shots will be three times the
number set.
Ш
Neither flash nor bulb exposures can be used with AEB.
If [S’ Auto Lighting Optimizer] (p.107) is set to any setting other than
[Disable], the AEB’s effect might be minimal.
104
Page 16

* Locking the Exposure
You can lock the exposure when the area of focus is to be different from
the exposure metering area or when you want to take multiple shots at
the same exposure setting. Press the <*> button to lock the exposure,
then recompose and take the shot. This is called AE (autoexposure)
lock. It Is effective for backlit subjects.
☆
Focus the subject.
.
i
il
Press the shutter button halfway.
The exposure setting will be
displayed.
Press the <4f > button. (M)
.
The <*> icon lights in the viewfinder
to indicate that the exposure setting is
locked (AE lock).
Each time you press the <*> button,
it locks the current autoexposure
setting.
Recompose and take the picture.
If you want to maintain the AE lock
while taking more shots, hold down
the <*> button and press the shutter
button to take another shot.
AE Lock Effets :
Meterinq Mode
(P 100)
00*
Ban
When the lens' focus mode switch is set to <MF>, AE lock is applied at the center AF point.
AF Point Selection Method (p.33)
Automatic Selection Manual Selection
AE lock is applied at the AF
point that achieved focus.
AE lock is applied at the center AF point.
AE lock is applied at the
selected AF point.
105
Page 17

* Locking the Flash Exposure*
If the subject is on the side of the frame and you use flash, the subject may
turn out to be too bright or dark depending on the background, etc. This is
when you should use FE look. After setting the proper flash exposure for
the subject, you can recompose (put the subject toward the side) and
shoot. This feature can also be used with a Canon EX-series Speedlite.
* FE stands for Flash Exposure.
^ Press the <%> button.
■ The built-in flash will rise.
Press the shutter button halfway and
look in the viewfinder to check that
the <t> icon is lit.
Focus the subject.
Press the <4f > button. ($16)
Aim the viewfinder center over the
subject where you want to lock the flash
exposure, then press the <*> button.
The flash will fire a preflash and the
required flash output is calculated
and retained in memory.
In the viewfinder, “FEL” is displayed
for a moment and <4*> will light.
Each time you press the <*> button, a
preflash is fired and the required flash output
is calculated and retained in memory.
Take the picture.
Compose the shot and press the
shutter button completely.
The flash is fired when the picture is
taken.
______,_____________
<V> icon will blink. Get closer to the subject and repeat steps 2 to 4.
ly and beyond the effective range of the flash, the
106
Page 18
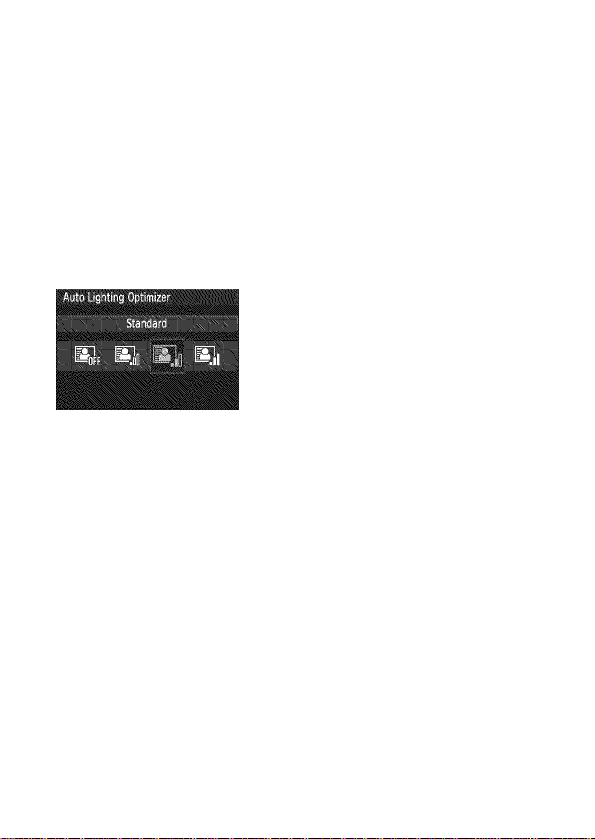
Correcting the Brightness and Contrast Automatically ^
If the image comes out dark or the contrast is low, the brightness and
contrast can be corrected automatically. This feature is called Auto
Lighting Optimizer. The default setting is [Standard]. With JPEG images,
the correction is done when the image is captured. For RAW images, it can
be corrected with Digital Photo Professional (provided software, p.270).
Select [Auto Lighting Optimizer],
Under the [Cl'] tab, select [Auto
I
Without correction With correction
m
Under Custom Functions (C.Fn)], if [5: Highlight tone priority] is
set to [1: Enable], the Auto Lighting Optimizer will be set automatically to
[Disable] and you cannot change this setting.
Depending on the shooting conditions, noise might increase.
If a setting other than [Disable] is set and you use exposure
compensation, flash exposure compensation, or manual exposure to
darken the exposure, the image might still come out bright. If you want a
darker exposure, set [Auto Lighting Optimizer] to [Disable] first.
Lighting Optimizer], then press
<@ >.
Select the setting.
Select the desired setting, then press
<(:et)>.
Take the picture.
The image will be recorded with the
brightness and contrast corrected if
necessary.
In Basic Zone modes, [Standard] is set automatically.
a
107
Page 19

Correcting the Image’s Dark Corners
Due to the lens characteristics, the four corners of the picture might look
darker. This phenomenon is called lens light fall-off or drop in peripheral
illumination and can be corrected automatically. The default setting Is
[Enable]. With JPEG images, the correction is done when the image is
captured. For RAW images, it can be corrected with Digital Photo
Professional (provided software, p.270).
Select [Peripheral illumin.
■■«■■■■I
correct.].
Under the [O'] tab, select
[Peripheral illumin. correct.], then
press <©>.
Select the setting.
On the screen, check that
[Correction data available] is
displayed for the attached lens.
If [Correction data not available] is
displayed, see “About the Lens
Correction Data” on the next page.
Select [Enable], then press <©>.
Take the picture.
The image will be recorded with the
corrected peripheral illumination.
108
Correction disabled Correction enabled
Page 20

Correcting the Image’s Dark Corners
About the Lens Correction Data
The camera already contains lens peripheral illumination correction
data for about 25 lenses. In step 2, if you select [Enable], the peripheral
light correction will be applied automatically for any lens whose
correction data has been registered in the camera.
With EOS Utility (provided software, p.270), you can check which
lenses have their correction data registered in the camera. You can also
register the correction data for unregistered lenses. For details, see the
Software Instruction Manual (CD-ROM) for EOS Utility (p.272).
#
For JPEG images already captured, lens peripheral illumination
correction cannot be applied.
Depending on shooting conditions, noise might appear on the image
periphery.
When using a non-Canon lens, setting the correction to [Disable] is
recommended, even if [Correction data available] is displayed.
Lens peripheral light correction is also applied when an Extender is
B
attached.
If the correction data for the attached lens has not been registered to the
camera, the result will be the same as when the correction is set to
[Disable].
The correction amount applied will be slightly lower than the maximum
correction amount settable with Digital Photo Professional (provided
software).
If the lens does not have distance information, the correction amount will
be lower.
The higher the ISO speed, the lower the correction amount will be.
109
Page 21
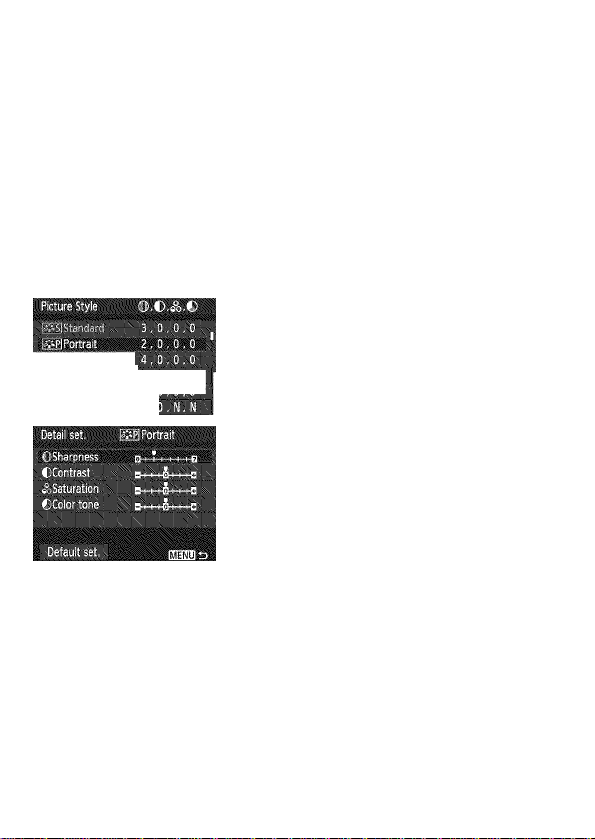
Customizing Image Characteristics
You can customize a Picture Styie by adjusting individuai parameters
iike [Sharpness] and [Contrast], To see the resuiting effects, take test
shots. To customize [Monochrome], see page 112.
Select [Picture Style].
Under the [O'] tab, select [Picture
Style], then press <©>.
The Picture Styie selection screen will
appear.
☆
I
Select a Picture Style.
Select a Picture Style, then press the
<DISR> button.
The Detail set. screen will appear.
Select a parameter.
Select a parameter such as
[Sharpness], then press <©>.
Set the parameter.
Press the <-^^> key to adjust the
parameter as desired, then press
<©>.
Press the <MENU> button to save
the adjusted parameters. The Picture
Style selection screen will reappear.
Any parameter settings different from
the default will be displayed in blue.
110
Page 22

Customizing Image Characteristics *
Parameter Settings and Effects
g. Sharpness
Adjusts the sharpness of the image.
To make it less sharp, set it toward the 0 end. The closer it is to 0,
the softer the image will look.
To make it sharper, set it toward the B end. The closer it is to B, the
sharper the image will look.
D Contrast
Adjusts the image contrast and the vividness of colors.
To decrease the contrast, set it toward the minus end. The closer it is
to H, the blander the image will look.
To increase the contrast, set it toward the plus end. The closer it is to
□, the crisper the image will look.
Saturation
The image’s color saturation can be adjusted.
To decrease the color saturation, set it toward the minus end. The
closer it is to H, the more diluted the colors will look.
To increase the color saturation, set it toward the plus end. The
closer it is to □, the bolder the colors will look.
® Color tone
The skin tones can be adjusted.
To make the skin tone redder, set it toward the minus end. The
closer it is to H, the redder the skin tone will look.
To make the skin tone less red, set it toward the plus end. The closer
it is to □, the more yellow the skin tone will look.
Eil By selecting [Default set.] in step 3, you can revert the respective
Picture Style to its default parameter settings.
To shoot with the Picture Style you modified, follow step 2 on page 79 to
select the modified Picture Style and then shoot.
111
Page 23
' Customizing Image Characteristics’^
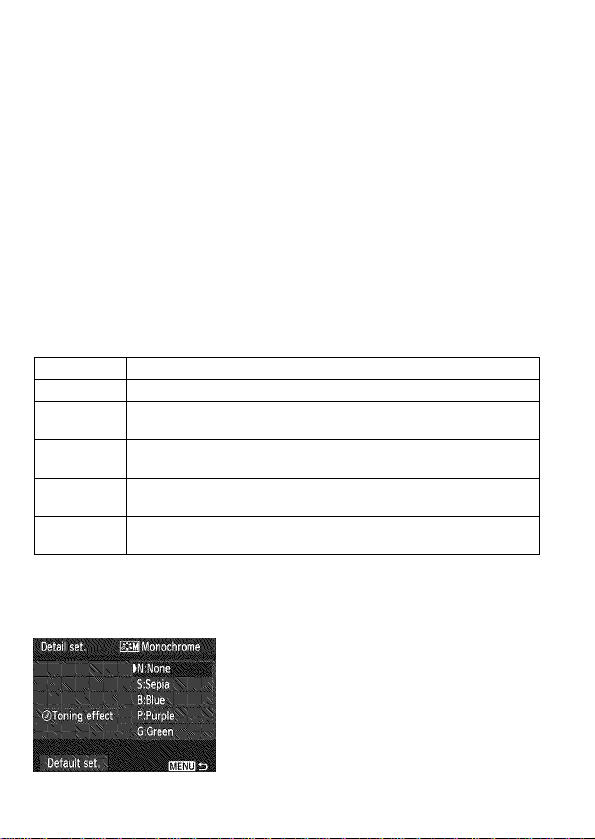
Eil Monochrome Adjustment
For Monochrome, you can also set [Filter effect] and [Toning effect] in
addition to [Sharpness] and [Contrast] explained on the preceding
page.
% Filter Effect
With a filter effect applied to a
monochrome image, you can make
white clouds or green trees stand out
more.
Filter Sample Effects
N: None Normal black-and-white image with no filter effects.
Ye: Yellow
Or: Orange
R: Red
G: Green
Ell Increasing the [Contrast] will make the filter effect more pronounced.
The blue sky will look more natural, and the white clouds will look
crisper.
The blue sky will look slightly darker. The sunset will look more
brilliant.
The blue sky will look quite dark. Fall leaves will look crisper and
brighter.
Skin tones and lips will look fine. Tree leaves will look crisper and
brighter.
0Toning Effect
112
By applying a toning effect, you can
create a monochrome image in that
color. It can make the image look more
impressive.
You can select the following: [N:None],
[StSepia], [BtBlue], [PiPurple] or
[GiGreen].
Page 24
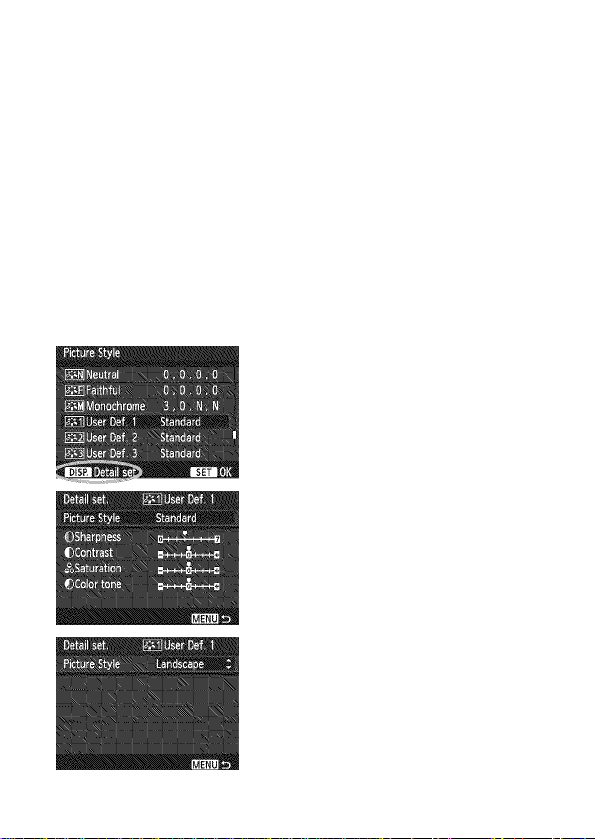
Registering Preferred Image Characteristics ^
You can select a base Picture Style such as [Portrait] or [Landscape],
adjust its parameters as desired and register it under [User Def. 1],
[User Def. 2], or [User Def. 3].
You can create Picture Styles whose parameter settings such as
sharpness and contrast are different. You can also adjust the
parameters of a Picture Style which has been registered to the camera
with EOS Utility (provided software, p.270).
Select [Picture Style].
Under the [Dl'j tab, select [Picture
Style], then press <©>.
The Picture Style selection screen will
appear.
Select [User Def.].
Select [User Def. *], then press the
<DISR> button.
The Detail set. screen will appear.
Press <0>.
With [Picture Style] selected, press
Select the base Picture Style.
Press the < AT> key to select the
base Picture Style, then press <©>.
To adjust the parameters of a Picture
Style which has been registered to
the camera with EOS Utility (provided
software), select the Picture Style
here.
113
Page 25
Recisienn!:: Preferred lirace Characiensiics
Select a parameter.
Select a parameter such as
[Sharpness], then press <©>.
Set the parameter.
Press the <-^^> key to adjust the
parameter as desired, then press
<©>.
For details, see “Customizing Image
Characteristics” on pages 110-112.
Press the <MENU> button to register
the modified Picture Style. The
Picture Style selection screen will
then reappear.
The base Picture Style will be
indicated on the right of [User Def. *].
The name of the Picture Style having
any modified settings (different from
the default) registered under [User
Def. *] will be displayed in blue.
r
If a Picture Style has already been registered under [User Def. *],
changing the base Picture Style in step 4 will nullify the parameter
settings of the registered Picture Style.
If you execute [Clear all camera settings] (p.164), all the [User Def. *]
settings will revert to the default. Any Picture Style registered via EOS
Utility (provided software) will have only its modified parameters reverted
to the default setting.
To shoot with a registered Picture Style, follow step 2 on page 79 to select
B
[User Def. *] and then shoot.
114
Page 26
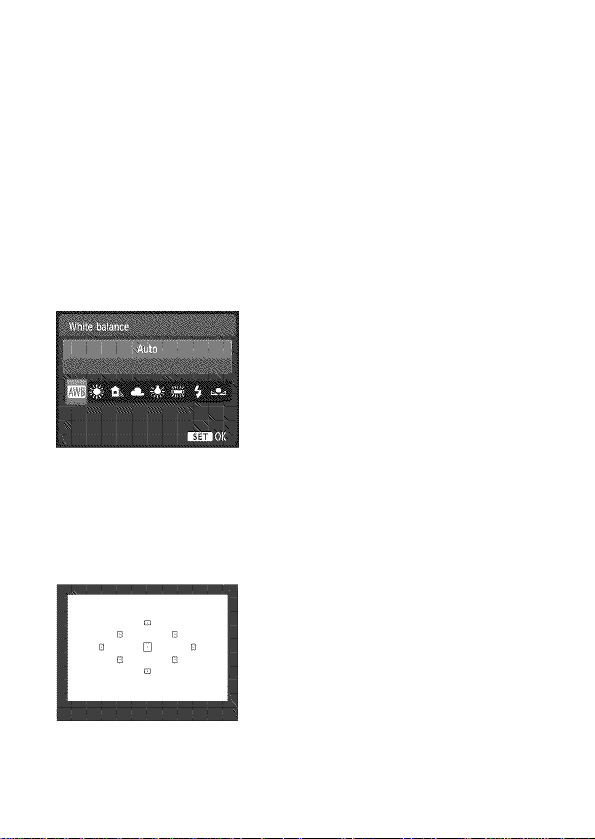
WB: Matching the Light Source^
The function adjusting the coior tone so that white objects iook white in
the picture is caiied white baiance (WB). Normaiiy, the <M> (Auto)
setting wiii obtain the correct white baiance. if naturai-iooking coiors
cannot be obtained with <M>, you can seiect the white baiance to
match the iight source or set it manuaiiy by shooting a white object.
150 Idisp\
|iiQ©y A1
B
iA, Custom White Balance
Custom white baiance enabies you to manuaiiy set the white baiance
for a specific iight source for better accuracy. Do this procedure under
the actuai iight source to be used.
Press the <T WB> button.
[White balance] wiii appear.
Select the white balance.
Press the <◄►> key or turn the
<SSi> dial to seiect the desired white
baiance, then press <©>.
The “Approx. (K: Keivin)
dispiayed for the foiiowing white
baiance settings <ttk>,
< A>, <5^:-> or <w> is the
respective coior temperature.
. Photograph a white object.
A piain, white object shouid fill the
viewfinder’s center.
Focus manuaiiy and set the standard
exposure for the white object.
You can set any white baiance.
115
Page 27

WB: Matching the Light Source*
Select [Custom White Balance],
Under the [Qi'] tab, select [Custom
White Balance], then press <©>.
The custom white balance selection
screen will appear.
f
1,1^;
m
If the exposure obtained in step 1 is way off, a correct white balance
might not be obtained.
If the image was captured while the Picture Style was set to
[Monochrome] (p.80), it cannot be selected in step 3.
Instead of a white object, an 18% gray card (commercially available) can
B
produce a more accurate white balance.
The personal white balance registered with EOS Utility (provided
software, p.270) will be registered under <tAi>. If you do step 3, the data
for the registered personal white balance will be erased.
Import the white balance data.
Select the image that was captured in
step 1, then press <©>.
On the dialog screen which appears,
select [OK] and the data will be
imported.
When the menu reappears, press the
<MENU> button to exit the menu.
Select the custom white balance.
I -I'
Press the <T WB> button.
Select [tAa], then press <©>.
116
Page 28
1^5 Adjusting the Color Tone for the Light Source *
You can correct the white balance that has been set. This adjustment
will have the same effect as using a commercially-available color
temperature conversion filter or color compensating filter. Each color
can be corrected to one of nine levels.
This Is for advanced users who are familiar with using color temperature
conversion or color compensating filters.
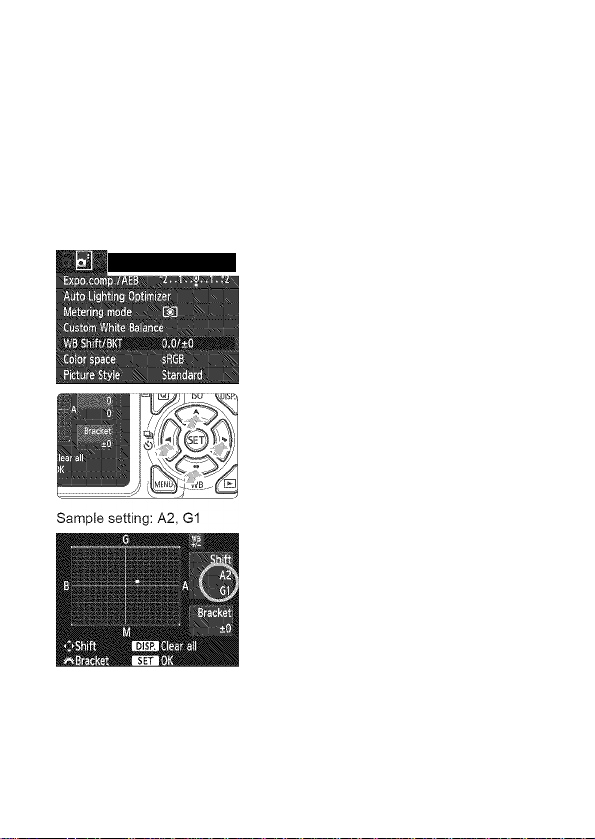
White Balance Correction
Select [WB Shift/BKT],
Under the [O'] tab, select [WB Shift/
BKT], then press <©>.
The WB correction/WB bracketing
screen will appear.
Set the white balance correction.
Press the < v > key to move the
mark to the desired position.
B is for blue, A is amber, M is
magenta, and G is green. The color in
the respective direction will be
corrected.
On the upper right, “Shift” indicates
the direction and correction amount.
Pressing the <DISR> button will
cancel all the [WB Shift/BKT]
settings.
Press <@> to exit the setting and
return to the menu.
During the white balance correction, <SS> will be displayed in the
viewfinder and on the LCD monitor.
One level of the blue/amber correction is equivalent to 5 mireds of a color
temperature conversion filter. (Mired: Measuring unit indicating the
density of a color temperature conversion filter.)
117
Page 29
Adjusting the Color Tons for the Lighi Source ■■
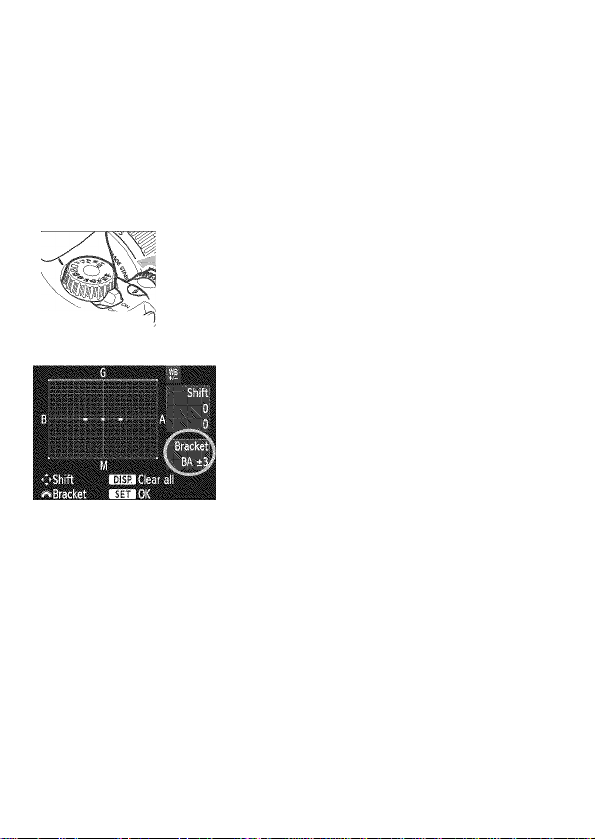
White Balance Auto Bracketing
With just one shot, three images having a different color balance can be
recorded simuitaneously. Based on the color temperature of the current white
balance setting, the image wiil be bracketed with a blue/amber bias or
magenta/green bias. This is called white balance bracketing (WB-BKT). White
balance bracketing is possible up to ±3 levels in single-level increments.
Set the white balance bracketing amount.
In step 2 for white balance correction,
when you turn the <£S> dial, the
mark on the screen will change to “■ ■ ®”
\ Co.
B/A bias ±3 levels
(3 points). Turning the dial to the right sets
the B/A bracketing, and turning it to the
left sets the MIG bracketing.
On the right, “Bracket” indicates the
bracketing direction and correction amount.
Pressing the <DISR> button will cancel
all the [WB Shift/BKT] settings.
Press <©> to exit the setting and
return to the menu.
Bracketing Sequence
The images will be bracketed in the following sequence: 1. Standard
white balance, 2. Blue (B) bias, and 3. Amber (A) bias, or 1. Standard
white balance, 2. Magenta (M) bias, and 3. Green (G) bias.
m During WB bracketing, the continuous shooting speed will be slower. The
maximum burst for continuous shooting will also be lower and the number of
possible shots will decrease to one-third the normal number.
You can also set white balance correction and AEB (p.103) together with
a
white balance bracketing. If you set AEB in combination with white balance
bracketing, a total of nine images will be recorded for a single shot.
Since three images are recorded for one shot, the card will take longer to
record the shot.
“BKT” stands for Bracketing.
118
Page 30
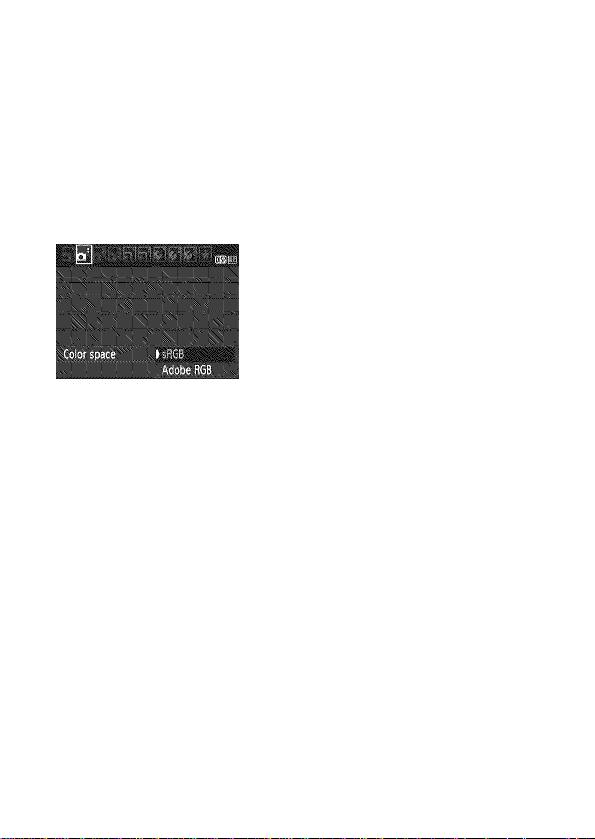
Setting the Color Reproduction Range
The range of reproducible colors is called the color space. With this
camera, you can set the color space to sRGB or Adobe RGB for
captured images. For normal shooting, sRGB Is recommended.
In Basic Zone modes, sRGB Is set automatically.
ir
Select [Color space].
Under the [O'] tab, select [Color
space], then press <©>.
; Set the desired color space.
Select [sRGB] or [Adobe RGB], then
press <©>.
About Adobe RGB
This color space Is mainly used for commercial printing and other
industrial uses. This setting Is not recommended if you do not know
about image processing, Adobe RGB, and Design rule for Camera File
System 2.0 (Exit 2.21).
The image will look very subdued in a sRGB personal computer
environment and with printers not compatible with Design rule for
Camera File System 2.0 (Exit 2.21). Post-processing of the image with
software will therefore be required.
Eil If the image is captured with the color space set to Adobe RGB, the file
name will start with (first character is an underscore).
The ICC profile is not appended. See explanations about the ICC profile
in the Software Instruction Manual (p.272) in the CD-ROM.
119
Page 31

Page 32

Shooting with the LCD Monitor
(Live View Shooting)
You can shoot while viewing the image on the camera’s
LCD monitor. This is called “Live View shooting”.
Live View shooting is effective for still subjects which do
not move.
If you handhold the camera and shoot while viewing the
LCD monitor, camera shake can cause blurred images.
Using a tripod is recommended.
Q About Remote Live View Shooting
With EOS Utility (provided software, p.270) installed in your
computer, you can connect the camera to the computer and shoot
remotely while viewing the computer screen. For details, see the
Software Instruction Manual (p.272) in the CD-ROM.
121
Page 33

O Shooting with the LCD Monitor
Display the Live View image.
Press the <^> button.
The Live View image wiii appear on
the LCD monitor.
The Live View image wiii cioseiy
refiect the brightness ievei of the
actuai image you capture.
Focus the subject.
When you press the shutter button
haifway, the camera wiii focus with
the current AF mode (p.128-134).
Take the picture.
Press the shutter button completely.
The picture will be taken and the
captured image is displayed on the
LCD monitor.
After the image review ends, the
camera will return to Live View
shooting automatically.
Press the <G|> button to exit Live
View shooting.
The image's field of view is approx. 99% (when the image-recording
B
quality is set to JPEG J L).
The metering mode will be fixed to evaluative metering for Live View
shooting.
In Creative Zone modes, you can check the depth of field by setting [8r
Assign SET button] to [5: Depth-of-field preview] in the [%= Custom
Functions (C.Fn)].
During continuous shooting, the exposure set for the first shot will also
oe applied to subsequent shots.
Using <A‘DEP> will be the same as using <P>.
122
Page 34

l3i Shooting with the LCD Monitor
Enabling Live View Shooting
Set [Live View shoot.] to [Enable],
In Basic Zone modes, [Live View
shoot.] will be displayed under [O'],
in Creative Zone modes, it will be
displayed under [Qi],
Battery Life with Live View Shooting [Approx, number of shots]
Temperature
At23°C/73°F 240 220
At 0°C / 32°F 230 210
The figures above are based on a fully-charged Battery Pack LP-E10 and
CIPA (Camera & Imaging Products Association) testing standards.
With a fully-charged Battery Pack LP-E10, continuous Live View shooting is
possible for approx. 2 hr. at 23°C / 73°F and approx. 1 hr. 40 min. at
0°C / 32°F.
#
During Live View shooting, do not point the lens toward the sun. The
sun’s heat can damage the camera’s internal components.
Cautions for using Live View shooting are on pages 136-137.
Shooting Conditions
No Flash 50% Flash Use
and
3 ' When flash is used, there will be two shutter sounds, but only one shot
will be taken.
If the camera is not operated for a prolonged period, the power will turn
off automatically as set with [V Auto power off] (p.155). If [%‘ Auto
power off] is set to [Off], the Live View function will terminate
automatically after 30 min. (camera power remains on).
With an HDMI cable (sold separately), you can display the Live View
image on a TV (p.191).
123
Page 35

rli Shooting with the LCD Monitor
About the Information Display
Each time you press the <D!SR> button, the information display will
change.
AF mode
• AFB : Live mode i
• AF X : Face detection Live mode:
•AfM : Quick mode
Shooting mode
Drive mode
White balance
Auto Lighting.....
Optimizer
Image-recording
.....
.....
......
...
quality
AE lock
‘k Flash-ready
© Flash off
m Flash exposure
compensation
External flash exposure
compensation
Vh High-speed sync
Shutter speed
Picture Style
.....
Aperture
......
AF point (Quick mode)
Magnifying frame
' " ‘..im
Eye-Fi card
transmission
status
■■
.....
Possible shots
Exposure level indicator/
AEB range
FEB
AEB
Exposure
simulation
Battery check
Highlight tone
priority
ISO speed
51 When <M1> is displayed in white, it indicates that the Live View image
brightness is close to what the captured image will look like.
If <B> is blinking, it indicates that the Live View image is not being
displayed at the suitable brightness due to low- or bright-light conditions.
However, the actual image recorded will reflect the exposure setting.
If flash is used or bulb is set, the <Mi> icon and histogram will be
grayed out (for your reference). The histogram might not be properly
displayed in low- or bright-light conditions.
124
Page 36

l3i Shooting with the LCD Monitor
Final Image Simulation
The final image simulation reflects the effects of the Picture Style, white
balance, etc., in the Live View image so you can see what the captured
image will look like.
During still photo shooting, the Live View image will automatically reflect
the settings listed below.
Final image simulation during Live View shooting
Picture Style
* All parameters such as sharpness, contrast, color saturation, and color tone
will be reflected.
White balance
White balance correction
Shoot by ambience selection
Shoot by lighting or scene type
Exposure
Depth of field preview (With C.Fn-8-5 set and <@> ON)
Auto Lighting Optimizer
Peripheral illumination correction
Highlight tone priority
125
Page 37

Shooting Function Settings
Function settings particuiar to Live View shooting are expiained here.
(Qj Quick Control
Whiie the image is dispiayed on the LCD monitor in Creative Zone
modes, pressing the <[q]> button wiii enabie you to set the AF mode,
drive mode, white baiance. Picture Styie, Auto Lighting Optimizer,
image-recording quaiity, and iSO speed, in Basic Zone modes, you can
set the AF mode and the settings shown in the tabie on page 63.
"fe ' Press the <(o)> button.
The functions settabie with Quick
Controi wiii appear on the iett of the
screen.
if the AF mode is <AFEB>,the AF
point wiii aiso be dispiayed. You can
aiso seiect the AF point.
; Select a function and set it.
Press the < AT > key to seiect a
function.
The seiected function and Feature
guide (p.47) wiii appear.
Press the <◄►> key or turn the
<£S> dial to change the setting.
Pressing <©> wiii dispiay the
respective function’s setting screen.
0 In Creative Zone modes, if [9: Flash button function] is set to [1: ISO
speed] in [4'i Custom Functions (C.Fn)], you can raise the built-in flash
with Quick Control. The ISO speed will be set with the <V> button.
126
Page 38

Qi Menu Function Settings
The menu options below are displayed.
In Basic Zone modes, the Live View
menu options will be displayed under
[O'], and in Creative Zone modes, they
will be displayed under [Q!].
Live View shooting
You can set Live View shooting to [Enable] or [Disable],
AF mode
You can select [Live mode] (p.128), [i' Live mode] (p.129), or
[Quick mode] (p.133).
Grid display
With [Grid 1 =H=] or [Grid 2#S], you can display grid lines. It can
help you level the camera vertically or horizontally.
Metering timer*
You can change how long the exposure setting is displayed (AE lock
time). This option is not displayed in Basic Zone modes. (Metering
timer is fixed at 16 sec.)
3 The settings for these menu options will apply only to Live View
shooting. They do not take effect during viewfinder shooting.
If you select [№ Dust Delete Data], [%' Clean manually], [4'i Clear
settings], or [frl Firmware Ver.], the Live View shooting will terminate.
127
Page 39

Changing the Autofocus Mode
Selecting the AF Mode
The AF modes available are [Live mode], [X' Live mode] (face
detection, p.129), and [Quick mode] (p.133).
If you want to achieve precise focus, set the lens focus mode switch to
<MF>, magnify the image, and focus manually (p.135).
Select the AF mode.
Under the [di] tab, select [AF mode].
Select the desired AF mode, then
press <©>.
While the Live View image is
displayed, you can press the <[o]>
button to select the AF mode on the
Quick Control screen (p.126).
Live Mode: AFffl
The image sensor is used to focus. Although AF is possible with the
Live View image displayed, the AF operation will take longer than
with the Quick mode. Also, achieving focus may be more difficult than
with the Quick mode.
Display the Live View image.
Press the <El> button.
The Live View image will appear on
the LCD monitor.
The AF point <D> will appear.
Move the AF point.
AF point
Press the < -«*► > key to move the AF
point to where you want to focus (it
cannot go to the edges of the picture).
To return the AF point to the center,
press <©>. (If C.Fn-8 has been set,
press <Av0> + <@>.)
128
Page 40

Changing the Autofocus Mode
Focus the subject.
Aim the AF point over the subject and
press the shutter button haifway.
When focus is achieved, the AF point
wiii turn green and the beeper wiii
sound.
if focus is not achieved, the AF point
wiii turn orange.
Take the picture.
Check the focus and exposure, then
press the shutter button compieteiy to
take the picture (p.122).
X (Face detection) Live Mode:
With the same AF method as the Live mode, human faces are detected
and focused. Have the target person face the camera.
AF x
• » Display the Live View image.
Press the <r*h> button.
The Live View image wiii appear on
the LCD monitor.
When a face is detected, the <' >
frame wiii appear over the face to be
focused.
if muitipie faces are detected, << >>
wiii be dispiayed. Press the <-^^>
key to move the << >> frame over
the desired target face.
129
Page 41

Changing the Autofocus Mode
Focus the subject.
Press the shutter button halfway and
the camera will focus the face
covered by the <[ > frame.
When focus Is achieved, the AF point
will turn green and the beeper will
sound.
If focus Is not achieved, the AF point
will turn orange.
If a face cannot be detected, the AF
point <D> will be displayed and AF
will be executed at the center.
Take the picture.
eck the focus and exposure, then
iss the shutter button completely to
take the picture (p.122).
___
If the focus is way off, face detection will not be possible. If the lens
enables manual focusing even while the lens focus mode switch is set to
<AF>, turn the focusing ring to attain rough focus. The face will then be
detected and <[ ]> will be displayed.
An object other than a human face might be detected as a face.
Face detection will not work if the face is very small or large in the picture,
too bright or too dark, titled horizontally or diagonally, or partially hidden.
The <!! > focusing frame might cover only part of the face.
When you press <@>, the AF mode will switch to the Live mode
B
(p.128). You can press the <^*^> key to move the AF point. Press <©>
again to return to the X* (face detection) Live mode. (If C.Fn-8 has been
set, press <Av0> + <©>.)
Since AF is not possible with a face detected near the edge of the
picture, the <[ > will be grayed out. Then if you press the shutter button
halfway, the center AF point <D> will be used to focus.
130
Page 42

Changing the Autofocus Mode
Live Mode and X (Face Detection) Live Mode Notes
AF operation
Focusing will take slightly longer.
Even when focus has been achieved, pressing the shutter button
halfway will focus again.
The image brightness may change during and after the AF
operation.
If the light source changes while the Live View image is displayed,
the screen might flicker and focusing may be difficult. If this
happens, stop the Live View shooting and autofocus under the
actual light source first.
if you press the <®.> button in the Live mode, the image will be
magnified atthe AF point. If focusing is difficult in the magnified view,
return to the normal view and autofocus. Note that the AF speed
may differ between the normal and magnified views.
If you autofocus in the Live mode’s normal view and then magnify
the image, the focus might be off.
In the X' Live mode, pressing the < Q. > button will not magnify the
image.
In the Live mode or X (face detection) Live mode, if you shoot a
peripheral subject and it is slightly out of focus, aim the center AF point
over the subject to focus, then take the picture.
The AF-assist beam will not be emitted. However, if an EX-series
Speedlite (sold separately) equipped with a LED light is used, the LED
light will turn on for AF-assist when necessary in the Live mode and X
(face detection) Live mode.
131
Page 43

Changing the Autofocus Mode
Shooting conditions which can make focusing difficult:
Low-contrast subjects such as the blue sky and solid-color, flat
surfaces.
Subjects in low light.
Stripes and other patterns where there Is contrast only in the
horizontal direction.
Under a light source whose brightness, color, or pattern keeps
changing.
Night scenes or points of light.
Under fluorescent lighting or when the image flickers.
Extremely small subjects.
Subjects at the edge of the picture.
Subjects strongly reflecting light.
The AF point covers both a near and faraway subject (such as an
animal in a cage).
Subjects which keep moving within the AF point and cannot keep
still due to camera shake or subject blur.
A subject approaching or moving away from the camera.
Autofocusing while the subject is way out of focus.
Soft focus effect is applied with a soft focus lens.
A special effects filter is used.
132
Page 44

Changing the Autofocus Mode
Quick Mode:
The dedicated AF sensor is used to focus in One-Shot AF mode (p.81),
using the same AF method as with viewfinder shooting.
Aithough you can focus the target area quickiy, the Live View image
will be interrupted momentarily during the AF operation.
AF point
■■I
viuliuCii .fdiCCI'ori
Display the Live View image.
Press the <Oi> button.
The Live View image wiii appear on
the LCD monitor.
The smaii boxes on the screen are
the AF points, and the iarger box is
the magnifying frame.
frame
Select the AF point. *
Press the <[q]> button ($10) to
display the Quick Control screen.
The settable functions will be
displayed on the left of the screen.
Press the < AT> key to make the AF
point selectable.
Turn the <£S> dial to select the AF
point.
133
Page 45

Changing the Autofocus Mode
Focus the subject.
Aim the AF points over the subject
and press the shutter button haifway.
The Live View image wiii turn off, the
refiex mirror wiii go back down, and
AF wiii be executed.
When focus is achieved, the AF point
which achieved focus wiii turn green
and the Live View image wiii
reappear.
if focus is not achieved, the AF point
wiii turn orange and biink.
Take the picture.
Check the focus and exposure, then
press the shutter button compieteiy to
take the picture (p.122).
Q You cannot take a picture during autofocusing. Take the picture while the
Live View image is displayed.
134
Page 46

MF: Focusing Manually
You can magnify the image and focus precisely manually.
Set the lens focus mode switch to
<MF>.
Turn the lens focusing ring to focus
roughly.
Move the magnifying frame.
Press the < v > key to move the
magnifying frame to the position
where you want to focus.
To return the magnifying frame to the
Magnifying frame
AE lock ; ,
Magnified area position :
Magnification
center, press <@>. (If C.Fn-8 has
been set, press <Av0> + <@>.)
Magnify the image.
Press the <®.> button.
The area within the magnifying frame
will be magnified.
Each time you press the <©.> button,
the view will change as follows:
r-> 5x -► 10x -► Normal view
Focus manually.
While looking at the magnified image,
turn the lens focusing ring to focus.
After achieving focus, press the <©.>
button to return to the normal view.
Take the picture.
Check the focus and exposure, then
press the shutter button to take the
picture (p.122).
135
Page 47

m
Live View Shooting Cautions
White <0> and Red <®> Internal Temperature Warning Icons
if the camera’s internal temperature increases due to prolonged Live
View shooting or a high ambient temperature, a white <0> icon will
appear. If you continue shooting while this icon is displayed, the image
quality of still photos may deteriorate. You should stop the Live View
shooting and allow the camera to cool down before shooting again.
If the camera’s internal temperature further increases while the white
<@> icon is displayed, a red <0> icon will start blinking. This blinking
icon is a warning that the Live View shooting will soon be terminated
automatically. If this happens, you will not be able to shoot again until the
camera’s internal temperature decreases. Turn off the power and let the
camera rest for a while.
Shooting with the Live View function at a high temperature for a
prolonged period will cause the <E!> and <0> icons to appear earlier.
When not shooting, turn off the camera.
Live View Image Cautions
Under low- or bright-light conditions, the Live View image might not
reflect the brightness of the captured image.
If the light source within the image changes, the screen might flicker. If
this happens, stop the Live View shooting and resume shooting under
the actual light source to be used.
If you point the camera in a different direction, it might throw off the Live
View image’s correct brightness momentarily. Wait until the brightness
level stabilizes before shooting.
If there is a very bright light source in the picture, such as the sun, the
bright area might appear black on the LCD monitor. However, the actual
captured image will correctly show the bright area.
In low light, if you set the [V‘ LCD brightness] to a bright setting,
chrominance noise may appear in the Live View image. However, the
chrominance noise will not be recorded in the captured image.
When you magnify the image, the image sharpness may look more
pronounced than it really is.
136
Page 48

® Live View Shooting Cautions
Shooting Result Cautions
When you shoot continuously with the Live View function for a long
period, the camera’s internal temperature may increase and it can
degrade image quality. Terminate Live View shooting when not shooting
images.
Before taking a long exposure, stop Live View shooting temporarily and
wait several minutes before shooting. This is to prevent image
degradation.
Live View shooting in high temperatures and at high ISO speeds may
cause noise or irregular colors.
When you shoot at high ISO speeds, noise (banding, dots of light, etc.)
may become noticeable.
If you take the picture during magnified view, the exposure might not
come out as desired. Return to the normal view before taking the picture.
During the magnified view, the shutter speed and aperture will be
displayed in orange. Even if you take the picture during magnified view,
the image will be captured in the normal view.
' If [iS‘ Auto Lighting Optimizer] (p.107) is not set to [Disable], the
image may look bright even if a decreased exposure compensation or
decreased flash exposure compensation has been set.
If you use a TS-E lens to shift the lens vertically or use an Extension
Tube, the standard exposure might not be obtained or an irregular
exposure may result.
Custom Function Cautions
During Live View shooting, certain Custom Function settings will not take
effect (p.217).
Lens and Flash Cautions
The focus preset feature on super telephoto lenses cannot be used.
FE lock is not possible when the built-in flash or an external Speedlite is
used. Modeling flash will not work with an external Speedlite.
137
Page 49

mККККККККККККККm
___________
■иииииммии
Page 50

Shooting Movies
When you set the Mode Dial to
<’W>, you can shoot High
sio:
® Cards which can record movies
When shooting movies, use a large-capacity SD card rated SD
Speed Class 6 “class@” or higher.
If you use a slow-writing card when shooting movies, the movie
might not be recorded properly. And if you playback a movie on a
card having a slow reading speed, the movie might not playback
properly.
To check the card’s read/write speed, refer to the card
manufacturer’s Web site.
Definition (HD) movies. The
movie recording format will be
MOV.
139
Page 51

Shooting Movies
When you set the shooting mode to <*W>, you can easily shoot High
Definition (HD) movies with autoexposure. When playing movies,
connecting the camera to a TV set is recommended (p.184, 191).
Set the Mode Dial to >.
The reflex mirror will make a sound,
then the image will appear on the
LCD monitor.
; Focus the subject.
Before shooting a movie, autofocus
or manual focus (p.128-135).
When you press the shutter button
halfway, the camera will focus with
the current AF mode.
* Shoot the movie.
Press the < ^ > button to start
shooting a movie. To stop movie
shooting, press <[3i> again.
While the movie is being shot, the
Recording movie
Microphone
mark will be displayed on the
upper right of the screen.
140
Page 52

Shooting Movies
#
In the movie shooting mode, you cannot take a still photo even if you
press the shutter button completely.
During movie shooting, do not point the lens toward the sun. The sun’s
heat can damage the camera’s internal components.
Cautions for movie shooting are on pages 150 and 151.
If necessary, also read the Live View shooting cautions on pages
136 and 137.
Q ' A movie file is recorded each time you shoot a movie.
The image’s field of view is approx. 99%.
The ISO speed, shutter speed, and aperture are set automatically.
AE lock is possible by pressing the <■)(•> button (p.105). To cancel AE
lock during movie shooting, press the <EE> button.
By holding down the <Av|2> button and turning the dial, you can
set the exposure compensation.
When you press the shutter button halfway, the exposure setting
displayed at the screen bottom is for your reference.
The sound will be recorded by the camera’s built-in monaural
microphone (p.140).
The sound recording level will be adjusted automatically.
With a fully-charged Battery Pack LP-E10, the total shooting time will be
as follows: At 23°C/73°F: Approx. 1 hr. 50 min., At 0°C/32°F: Approx.
1 hr. 30 min.
Using an EX-series Speedlite (Sold Separately) Equipped with a LED Light
This camera is compatibie with the function turning on the LED iight
automaticaiiy in iow-iight conditions. For details, see the EX
Speedlite’s instruction manual.
141
Page 53

'f? Shooting Movies
About the information Display
:D!SR> button, the information dispiay wiiiEach time you press the ■
change.
Movie shooting mode
AF mode
• AFH : Live mode
• AF X : Face detection
Live mode
• AfB; Quick mode
....
Frame rate
r-pi
White balance
Picture Style
Auto Lighting
Optimizer
Movie recording size
AE lock
LED light
Shutter speed..^
Aperture
Movie shooting remaining time/
Elapsed time
;
...
AF point (Quick mode)
I ;
.....
Magnifying frame
Recording
Battery check
Movie
autoexposure
I '
......
Eye-Fi card
j transmission
status
ISO speed
Exposure compensation amount
Q If there is no card in the camera, the movie shooting remaining time will
be displayed in red.
When movie shooting starts, the movie shooting remaining time will
change to the elapsed time.
142
Page 54

*?? Shooting Movies
Final image Simulation
The final image simulation reflects the effects of the Picture Style, white
balance, etc., in the movie image so you can see what the captured
movie will look like.
During movie shooting, the movie image will automatically reflect the
settings listed below.
Final image simulation for movie shooting
Picture Style
* All parameters such as sharpness, contrast, color saturation, and color tone
will be reflected.
White balance
Exposure
Depth of field
Auto Lighting Optimizer
Peripheral illumination correction
Highlight tone priority
143
Page 55

Shooting Function Settings
Function settings particuiar to movie shooting are expiained here.
(Qi Quick Control
Whiie the movie image is dispiayed on the LCD monitor, you can press
the <[q]> button to enabie the foiiowing to be set: AF mode, white
baiance. Picture Styie, and Auto Lighting Optimizer.
Press the <(o)> button. (S10)
1
The functions settabie with Quick
Controi wiii appear on the iett of the
screen.
if the AF mode is < AfUBl >, the AF
point wiii aiso be dispiayed.
Select a function and set it.
Press the < AT > key to seiect a
function.
The seiected function and Feature
guide (p.47) wiii appear.
Press the <◄►> key or turn the
<£S> dial to change the setting.
Pressing <©> wiii dispiay the
respective function’s setting screen.
144
Page 56

Menu Function Settings
The menu options displayed under the ['W'], [’W‘], and tabs are
explained below.
[►■■] tab
AF mode
The AF modes will be the same as described on pages 128-134.
You can select [Live mode], [i' Live mode], or [Quick mode]. Note
that continuous focusing of a moving subject is not possible.
AF with shutter button during (movie recording)
When [Enable] is set, AF is possible during movie shooting.
However, continuous autofocusing is not possible. If you autofocus
during movie shooting, you might momentarily throw the focus way
off or change the exposure. The movie will also record the lens
operation noise.
During movie shooting, if the [Quick mode] AF mode is set, AF will
be executed in [Live mode].
3 The settings under the [’W'/’P'/’W:] menu tabs will take effect only
in the <’P> mode. They will not be applied in shooting modes other
than the <’W> mode.
The [AF mode] setting will also be applied to Live View shooting.
145
Page 57

Menu Function Settings
’WShutter/AE lock button
You can change the function assigned to the shutter button’s haifway
position and to the AE iock button.
• AF/AE lock:
Normal function. Press the shutter button halfway to execute AF.
Press the <-)f> button for AE lock.
• AE lock/AF:
Press the shutter button halfway for AE lock. For AF, press the
<-)f> button. Convenient when you want to focus and meter at
different parts of the picture.
• AF/AF lock, no AE lock:
Press the shutter button halfway to execute AF. While you
autofocus by pressing the shutter button halfway, you can pause
the autofocus by holding down the <-)t> button. You can resume
the autofocus by letting go of the <-)f> button. AE lock is not
possible.
• AE/AF, no AE lock:
Press the shutter button halfway for metering. For AF, press the
<-)f> button. AE lock is not possible.
’^Highlight tone priority
If [Enable] is set, highlight detail will be improved. The dynamic
range is expanded from the standard 18% gray to bright highlights.
The gradation between the grays and highlights becomes smoother.
The settable ISO speed range will be ISO 200-6400. The Auto
Lighting Optimizer will also be set automatically to [Disable] and
cannot be changed.
146
Page 58

Menu Function Settings
[►■=] tab
Movie recording size
The movie will be recorded in [1280x720] High-Definition (HD)
quality. You can select the frame rate [it)] or [lös] (recorded frames
per second) to suit your TV set’s video format.
* The frame rate is expressed as fps or frames per second.
[ifo] : For areas where the TV video format is NTSC (North
America, Japan, Korea, Mexico, etc.).
[lös] : For areas where the TV video format is PAL (Europe,
Russia, China, Australia, etc.).
Total Movie Recording Time and File Size per Minute
Due to the file system, movie shooting will stop automatically if the
file size of a single movie clip reaches 4GB.
You can immediately resume shooting another movie by pressing
the <0> button. (A new movie file starts being recorded.)
Movie-recording
Size
[1280x720] Boil
#
An increase of the camera’s internal temperature may cause movie
shooting to stop before the maximum recording time shown in the table
above (p.150).
The maximum recording time of one movie clip is 29 min. 59 sec.
Total Recording Time (approx.)
4GB Card 8GB Card 16GB Card
17 min. 34 min. 1 hr. 8 min. 222.6 MB/min.
File Size
(approx.)
Movie shooting in Full High-Definition (Full HD) or Standard Definition
(SD) quality is not possible.
With ZoomBrowser EX/lmageBrowser (provided software, p.270), you
can extract still photos from a movie. The quality of the extracted still
photo will be [1280x720] for about 920,000 pixels.
147
Page 59

Menu Function Settings
Sound recording
When the sound recording is set to [On], sound wiii be recorded by
the buiit-in monaurai microphone. The sound recording ievei wiii be
adjusted automaticaiiy. An externai microphone cannot be used.
Metering timer
You can change how iong the exposure setting is dispiayed (AE iock
time).
Grid display
With [Grid 1 =H=] or [Grid 2#S], you can dispiay grid iines. it can
heip you ievei the camera verticaiiy or horizontaiiy.
The sound will be recorded at a 48 kHz sampling frequency and 16-bit
a
for both L and R.
The Metering timer and Grid display settings will also be reflected in Live
View shooting.
148
Page 60

Menu Function Settings
['■:] tab
I
Exposure compensation
You can set exposure compensation for movies up to ±3 stops in
1 /3-stop increments.
Auto Lighting Optimizer
The Auto Lighting Optimizer can be set as expiained on page 107.
if the ['W'] menu tab’s ['^Highlight tone priority] is set to
[Enable], the Auto Lighting Optimizer wiii be set automaticaiiy to
[Disable] and cannot be changed.
Custom White Balance
As explained on page 115, the image for custom white balance can
be selected. Note that still photos cannot be taken in the <*W>
mode. Set a shooting mode other than <*f|> and take a still photo.
Then select it for the custom white balance.
Picture Style
The Picture Style can be set as explained on pages 79.
149
Page 61

m
About the Red <M > Internal Temperature Warning Icon
If the camera’s internal temperature is high, a blinking red icon <0> may
appear. This blinking icon is a warning that the movie shooting will soon
be terminated automatically. If this happens, you will not be able to shoot
again until the camera’s internal temperature decreases. Turn off the
power and let the camera rest for a while.
Movie shooting at a high temperature for a prolonged period will cause
the <0> icon to appear sooner. When not shooting, turn off the camera.
©
Movie Shooting Cautions
Recording and image Quality
If the attached lens has an Image Stabilizer, the Image Stabilizer will
operate at all times even if you do not press the shutter button halfway.
The Image Stabilizer will thereby consume battery power and may
shorten the total movie shooting time or decrease the number of possible
shots. If you use a tripod or if the Image Stabilizer is not necessary, you
should set the IS switch to <OFF>.
The camera’s built-in microphone will also record camera operation
noise.
If movie shooting is not possible due to insufficient remaining capacity of
the card, the movie recording size and movie shooting remaining time
(p.142) will be displayed in red.
If you use a card having a slow writing speed, a five-level
indicator might appear on the right of the screen during
movie shooting. It indicates how much data has not yet been
written to the card (remaining capacity of the internal buffer
memory). The slower the card, the faster the indicator will
climb upward. If the indicator becomes full, movie shooting
will stop automatically.
If the card has a fast writing speed, the indicator will either
not appear or the level (if displayed) will hardly go upward.
First, shoot a few test movies to see if the card can write fast enough.
I
Indicator
150
Page 62

#
Movie Shooting Cautions
Playback and TV connection
If the brightness changes during movie shooting, that part might look
momentarily still when you playback the movie.
If you connect the camera to a TV set with an HDMl cable (p.191) and
shoot a movie, the movie being shot will be displayed at a small size on
the TV. But the movie will still be properly recorded in High-Definition
(HD) quality.
If you connect the camera to a TV set and shoot a movie, the TV will not
output any sound during the shooting. However, the sound will be
properly recorded.
151
Page 63

ииииииииииииииииииииииииииии
■ЯЯИ
^Б
Page 64

Handy Features
Silencing the Beeper (p.154)
Card Reminder (p.154)
Setting the Image Review Time (p.154)
Setting the Auto Power-off Time (p.155)
Adjusting the LCD Monitor Brightness (p.155)
Creating and Selecting a Folder (p.156)
File Numbering Methods (p.158)
Setting Copyright Information (p.160)
Auto Rotation of Vertical Images (p.162)
Checking Camera Settings (p.163)
Reverting the Camera to the Default Settings (p.164)
Turning the LCD Monitor Off/On (p.166)
Changing the Shooting Settings Screen Color (p.166)
Setting the Flash (p.167)
Appending Dust Delete Data (p.171)
Manual Sensor Cleaning (p.173)
153
Page 65

Handy Features
UllIDI Silencing the Beeper
You can prevent the beeper from sounding when focus is achieved or
during seif-timer operation.
Under the [Di'] tab, seiect [Beep], then
imii press <©>. Seiect [Disable], then
Card Reminder
This prevents shooting if there is no card in the camera.
e ease snutter without car
_____
I
iTHifin Setting the Image Review Time
You can set how long the image is displayed on the LCD monitor
immediately after capture. If [Off] is set, the image will not be displayed
immediately after image capture. If [Hold] is set, the image review will
be displayed up until the [Auto power off] time.
During image review, if you operate any camera controls such as
pressing the shutter button halfway, the image review will end.
press <©>.
Under the [O'] tab, seiect [Release
shutter without card], then press
<©>. Select [Disable], then press
<©>.
If there is no card installed and you press
the shutter button, “Card” will be
displayed in the viewfinder, and you
cannot release the shutter.
Under the [Qi'] tab, select [Image
review], then press <©>. Select the
desired setting, then press <©>.
154
Page 66

Handy Features
Setting the Auto Power-off Time
To save battery power, the camera turns off automatically after the set
time of idle operation elapses. You can set this auto power-off time.
When the camera has turned off due to auto power off, you can wake it
up by pressing the shutter button halfway or pressing any of the
following buttons: <MENU>, <H>, <G|>, etc.
If [Off] has been set, either turn off the camera yourself or press
the <DISR> button to turn off the LCD monitor to save battery
power.
Even if [Off] has been set and the camera is not used for 30 min.,
the LCD monitor will turn off automatically. To turn on the LCD
monitor again, press the <DISR> button.
Under the [f] tab, select [Auto power
off], then press <©>. Select the desired
setting, then press <©>.
Adjusting the LCD Monitor Brightness
You can adjust the brightness of the LCD monitor to make it easier to read.
I Under the [!*■ ] tab, select [LCD
brightness], then press <©>. With the
------------------------------------- <-^^> key to adjust the brightness, then
adjustment screen displayed, press the
press <©>.
When checking the exposure of an
image, set the LCD monitor brightness to
4 and prevent the ambient light from
affecting the reviewed image.
i
i
155
Page 67

Handy Features
iTHifin Creating and Selecting a Folder
You can freely create and select the folder where the captured images
are to be saved.
This is optional since a folder will be created automatically for saving
captured Images.
Create a Folder
Select [Select folder].
Under the [fr'] tab, select [Select
_ folder], then press <©>.
Select [Create folder].
Select [Create folder], then press
<@ >.
Create a new folder.
Select [OK], then press <@>.
A new folder with a higher one-up
folder number Is created.
156
Page 68

Handy Features
Selecting a Folder
Lowest file number
Number of images ;
lisWwj.wiiiM I MKa ■
___
Folder name
in folder :
■I
iHl
Highest file number
About Folders
As with iOOCANON ” for example, the folder name starts with three digits
(folder number) followed by five alphanumeric characters. A folder can contain
up to 9999 images (file No. 0001 - 9999). When a folder becomes full, a new
folder with a higher one-up folder number is created automatically. Also, if
manual reset (p.159) is executed, a new folder will be created automatically.
Folders numbered from 100 to 999 can be created.
With the folder selection screen
displayed, select a folder and press
<@ >.
The folder where the captured
images will be saved is selected.
Subsequent captured images will be
recorded into the selected folder.
Creating Folders with a Personal Computer
With the card open on the screen, create a new folder named “DCIM ”. Open
the DCIM folder and create as many folders as necessary to save and
organize your images. The folder name must follow the “100ABC__D” format
where the first three digits is 100 - 999 followed by five alphanumeric
characters. The five characters can be a combination of upper- or lower-case
letters from A to Z, numerals, and an underscore There can be no space in
the folder name. Also, folder names cannot have the same three-digit number
such as “100ABC D” and “100W XYZ” even if the letters are different.
157
Page 69

Handy Features
File Numbering Methods
The image files will be numbered from 0001 to 9999 in the order the
images are taken, then saved in a folder. You can change how the file
number is assigned.
The file number will appear on your computer in this format:
IMG_0001.JPG.
Under the [%‘] tab, select [File
numbering], then press <©>. The
available settings are described below.
Select one, then press <©>.
[Continuous]: The file numbering continues in sequence even
after you replace the card or create a folder.
Even after you replace the card or create a new folder, the file
numbering continues in sequence up to 9999. This is convenient
when you want to save images numbered anywhere between 0001
to 9999 in multiple cards or folders into one folder in your personal
computer.
If the replacement card or existing folder already contains images
recorded previously, the file numbering of the new images might
continue from the file numbering of the existing images in the card or
folder. If you want to use continuous file numbering, you should use
a newly-formatted card each time.
File numbering after
replacing the card
File numbering after
creating a folder
r
/¡00 ^
Card-1
---------------
□
XXX -0051 XXX -0052
/¡oiN
--
-
--------------□
/
Next sequential file number
158
Page 70

Handy Features
[Auto reset]: The file numbering is reset to 0001 whenever you
replace the card or create a folder.
Whenever the card is replaced or a new folder created, the file
numbering starts from 0001. This is convenient if you want to
organize images according to cards or folders.
If the replacement card or existing folder already contains images
recorded previously, the file numbering of the new images might
continue from the file numbering of the existing images in the card or
folder. If you want to save images with the file numbering starting
from 0001, use a newly formatted card each time.
File numbering after
replacing the card
' Ca rd-1 ' C ard-2
XXX -0051 I 100 0001
File numbering is reset
1
File numbering after
creating a folder
Card-1
ГсГ
XXX -0051
Ч.
[Manual reset]: To reset the file numbering to 0001 manually or
to start from file number 0001 in a new folder.
When you reset the file numbering manually, a new folder is created
automatically and the file numbering of images saved to that folder
starts from 0001.
This is convenient if you want to use different folders for the images
taken yesterday and the ones taken today, for example.
After the manual reset, the file numbering returns to continuous or
auto reset. (There will be no Manual reset confirmation screen.)
m If the file number in folder No. 999 reaches 9999, shooting will not be
possible even if the card still has storage capacity. The LCD monitor will
display a message telling you to replace the card. Replace it with a new
card.
For both JPEG and RAW images, the file name will start with “IMG_”. Movie
i
file names will start with The extension will be “.JPG” for JPEG
images, “.CR2” for RAW images, and MOV” for movies.
159
Page 71

Handy Features
ITilllii Setting Copyright Information *
When you set the copyright information, it wiii be appended to the
image as Exit information.
Select [Copyright information].
1 CoDvriqh: information
Under the [I*:] tab, seiect [Copyright
information], then press <©>.
Select the option to be set.
k Erter author's name i
HBBH
Seiect [Enter author’s name] or
[Enter copyright details], then press
<©>.
The text entry screen wiii appear.
Seiect [Display copyright info.] to
check the copyright information
currentiy set.
Seiect [Delete copyright
information] to delete the copyright
information currentiy set.
Enter text.
Refer to “Text Entry Procedure” on
the next page and enter the copyright
information.
Enter up to 63 aiphanumeric
characters and symbols.
160
Exit the setting.
After entering the text, press the
<MENU> button to exit.
Page 72

Handy Features
Text Entry Procedure
Changing the entry area;
Press the <[q]> button to toggle
between the top and bottom entry
areas.
Moving the cursor:
Press the <-^^> key to move the
cursor.
Entering text:
In the bottom area, press the < v> key or turn the <£S> dial to
select a character, then press <@> to enter It.
Deleting a character:
Press the <|j> button to delete one character.
Exiting;
After entering the text, press the <MENU> button to finalize the text
entry and return to the screen in step 2.
Canceling the text entry:
To cancel the text entry, press the <DISR> button to cancel it and
return to the screen in step 2.
3 You can also set or check the copyright information with EOS Utility
(provided software, p.270).
161
Page 73

Handy Features
iMWl Auto Rotation of Vertical Images
Veriicai images are rotated automatically so they are
displayed vertically on the camera’s LCD monitor
and on the personal computer instead of horizontally.
The setting of this feature can be changed.
Under the [f] tab, select [Auto rotate],
then press <©>. The available settings
are described below. Select one, then
press <©>.
[Onù*]:
The vertical image is automatically rotated during playback
on both the camera’s LCD monitor and on the computer.
[OnW] :
The vertical image Is automatically rotated only on the
computer.
[Off] :
The vertical image Is not automatically rotated.
FAQ
The vertical image is not rotated during the image review
immediately after it is captured.
Press the <H> button and the image playback will display the
rotated image.
[On O ■] is set, but the image does not rotate during playback.
Auto rotate will not work with vertical images captured while [Auto
rotate] was set to [Off]. If the vertical image is taken while the camera
is pointed up or down, the image might not be rotated automatically for
playback. In such a case, see “Rotating the Image” on page 179.
On the camera’s LCD monitor, I want to rotate an image
captured when [OnB] had been set.
Set [On OB], then playback the image. It will be rotated.
The vertical image does not rotate on the computer screen.
The software used Is not compatible with image rotation. Use the
software provided with the camera instead.
162
Page 74

Handy Features
DISP. Checking Camera Settings
While the menu is displayed, press the <DISR> button to display the
camera’s major function settings.
While the menu is displayed, press
the <DISR> button to display the
settings.
Press the <DISR> button again to
return to the menu.
Settings display
Card remaining capacity
Color space (p.119)
WB correction (p.117)/
WB bracketing (p.118)
Live View shooting (p.121)
Red-eye reduction (p.89)
Auto rotate dispiay (p.162)
Date/Time (p.33)
Beeper (p. 154)
Auto power off (p.155)
163
Page 75

Handy Features
niiSlII Reverting the Camera to the Default Settings *
The camera’s shooting settings and menu settings can be reverted to
the default. This can be done in Creative Zone modes.
Select [Clear settings].
Under the [I*:] tab, select [Clear
settings], then press <©>.
Select [Clear all camera settings].
Select [Clear all camera settings],
then press <©>.
Select [OK],
Select [OK], then press <©>.
Setting [Clear all camera settings]
will reset the camera to the default
settings on the next page.
FAQ
Clearing ail camera settings;
After the procedure above, go to [%= Clear settings] and select
[Clear all Custom Func. (C.Fn)] to clear all the Custom Function
settings (p.216).
164
Page 76

Handy Features
AF mode One-Shot AF
AF point selection Automatic selection
Drive mode □ (Single shooting)
Metering mode
ISO speed AUTO (Auto)
ISO Auto Max.: 3200
Exposure
compensafion/AEB
Flash exposure
compensation
Custom Functions Unchanged
Auto power off 30 sec.
Beep Enable
Release shutter
without card
Image review 2 sec.
Histogram Brightness
Image jump fio (10 images)
Auto rotate OnOW
LCD brightness
LCD off/on button Her button
Date/Time Unchanged
Language Unchanged
Feature guide Enable
Copyright information Unchanged
Control over HDMI ible
Eye-FI transmission Disable
My Menu settings Unchanged
Live View shooting Enable
AF mode Live mode
Grid display Off
Metering timer 16 sec.
Shooting Settings Image-recording Settings
00 (Evaluative
metering)
Canceled
0 (Zero)
Camera Settings
Enable
Live View Shooting Settings
Quality
Picture Style Standard
Auto Lighting
Optimizer
Peripheral
illumination
correction
Color space sRGB
White balance
Custom white
balance
WB correction reeled
WB-BKT Canceled
File numbering Continuous
Dust Delete Data Erased
Movie Shooting Settings
AF mode i mode
AF w/ shutter
button during
•■■Shutter/AE lock
button
'Pi Highlight tone
priority
Movie recording sizeUnchanged
Sound recording On
Metering timer " 6 sec.
Grid display Off
Exposure
compensation
Auto Lighting
Optimizer
Custom white
balance
Picture Style Standard
ML
Standard
Enable/
Correction data
retained
EE (Auto)
Canceled
Disable
AF/AE lock
Disable
Canceled
Standard
tceled
165
Page 77

Handy Features
nii3nn Turning the LCD monitor Off/On
The shooting settings dispiay (p.46) can be turned on or off by pressing
the shutter button haifway.
Under the [%'] tab, seiect [LCD off/on
btn], then press <©>. The avaiiabie
settings are described beiow. Seiect one,
then press <©>.
[Shutter btn.] : When you press the shutter button haifway, the
dispiay wiii turn off. And when you iet go of the
shutter button, the dispiay wiii turn on.
[Shutter/DISP]: When you press the shutter button haifway, the
dispiay wiii turn off. And when you iet go of the
shutter button, the dispiay wiii remain off. To turn on
the dispiay, press the <DISR> button.
[Remains on] : Dispiay remains on even when you press the shutter
button haifway. To turn off dispiay, press the <DISR>
button.
iTHMI Changing the Shooting Settings Screen Color
You can change the background color of the shooting settings screen.
Under the [l*‘] tab, select [Screen
color], then press <©>. Select the
desired color, then press <©>.
When you exit the menu, the selected
color will be displayed for the shooting
settings screen.
166
Page 78

Setting the Flash'
The built-in flash and external Speedlite settings can be set with the
camera’s menu. You can use the camera’s menu to set the external
Speedlite function settings only if the attached EX-series Speedlite is
compatible with this function.
The setting procedure is the same as setting a camera menu function.
Select [Flash control].
Under the [Cl'] tab, select [Flash
control], then press <©>.
The flash control screen will appear.
[Flash firing]
Normally, set this to [Enable].
If [Disable] is set, neither the builtin flash nor the external Speedlite
will fire. This is useful when you only
want to use the flash’s AF-assist
beam.
[Built-in flash func. setting] and [External flash func. setting]
With [Built-in flash func. setting] and [External flash func. setting],
you can set the functions listed on the next page. The functions
displayed under [External flash func. setting] will vary depending on
the Speedlite model.
Select [Built-in flash func. setting]
or [External flash func. setting].
The flash functions will be displayed.
The functions not dimmed can be
selected and set.
E3 Even if [Flash firing] has been set to [Disable], if focus is difficult to achieve
in low light, the built-in flash may still fire a series of flashes (AF-assist
beam, p.84).
167
Page 79

Setting the Flash ^
[Built-in flash funo. setting] and [External flash func.
setting] Settable Functions
Function
Flash mode E-TTL II (Fixed) 168
Shutter sync. O 169
FEB* — I O
Flash exposure
compensation
E-TTL II meter. o 169
Zoom*
Wireless setting*
* Regarding [FEB] (Flash exposure bracketing), [Zoom], and [Wireless set.],
refer to the Speedlite’s instruction manual.
[Built-In flash
func. setting]
—
—
Flash mode
With an external Speedlite, you can select the flash mode suiting
your objective.
[External flash
fune, setting]
Page
—
o 102
O
O
[E-TTL II] is the standard mode of
—
—
EX-series Speedlites for automatic
flash shooting.
[Manual flash] enables you to set the
flash output yourself. This is for
advanced users.
For other flash modes, refer to your
Speedlite’s instruction manual.
168
Page 80

ilSMIl Setting the Flash*
Shutter sync.
Normally, set this to [1st curtain] so that the flash fires Immediately
after the exposure starts.
If [2nd curtain] Is set, the flash will fire right before the exposure
ends. When this Is combined with a slow sync speed, you can create
a trail of light such as from car headlights at night. With 2nd-curtaln
sync, a preflash Is fired when you press the shutter button
completely. This Is to determine the exposure. Then Immediately
before the exposure ends, the real flash Is fired. Therefore, two
flashes will be fired. However, with shutter speeds faster than 1/30
sec., 1st curtain sync will automatically take effect.
If an external Speedllte Is attached, you can also set [Hi-speed]. For
details, see the Speedlite’s instruction manual.
Flash exposure compensation
See “W Flash Exposure Compensation” on page 102.
E-TTL II flash metering
For normal flash exposures, set it to [Evaluative]. [Average] Is for
advanced users. As with an external Speedllte, the metering area Is
averaged. Flash exposure compensation may be necessary.
Clear flash settings
On the [External flash func. setting] screen, press the <DISR>
button to display the screen to clear the flash settings. When you
select [OK], the settings for the built-in flash and external
Speedllte will be cleared.
169
Page 81

Setting the Fiash"^
Setting the External Speedlite Custom Functions
The Custom Functions displayed under [External flash C.Fn setting]
will vary depending on the Speedlite model.
Display the Custom Function.
Select [External flash C.Fn setting],
then press <©>.
Set the Custom Function.
Press the <-^^> key to select the
function number, then set the
function. The procedure Is the same
as setting the camera’s Custom
Functions (p.216).
To clear all the Custom Function
settings, select [Clear ext. flash C.Fn
set.] in step 1.
170
Page 82

Appending Dust Delete Data
Dust entering the camera can adhere to the image sensor and cause
dust spots to be visibie on the captured images. To erase these dust
spots, you can append the Dust Deiete Data to the images. The Dust
Deiete Data is used by Digitai Photo Professionai (provided software,
p.270) to erase the dust spots automaticaiiy.
if
Preparation
Get a soiid-white object (paper, etc.).
Set the iens focai iength to 50mm or ionger.
Set the iens focus mode switch to <MF> and set the focus to infinity
(oo). if the iens has no distance scaie, iookatthe front of the iens and
turn the focusing ring ciockwise all the way.
Obtain the Dust Deiete Data
•,) Select [Dust Delete Data],
Hll Under the [Q:] tab, select [Dust
Delete Data], then press <©>.
Select [OK].
Select [OK], then press <@ =
Instructions will appear.
__________
171
Page 83

Appending Dust Delete Data"*
; Photograph a solid-white object.
At a distance of 20 cm - 30 cm (0.7 ft.
-1.0 ft.), fill the viewfinder with a
patternless, solid-white object and
take a picture.
The picture will be taken in aperture-
priority AE mode at an aperture of
f/22.
Since the image will not be saved, the
data can still be obtained even if there
is no card in the camera.
When the picture is taken, the camera will
start collecting the Dust Delete Data.
When the Dust Delete Data is obtained, a
message will appear.
Select [OK], and the menu will reappear.
If the data was not obtained
successfully, a message to that effect
will appear. Follow the “Preparation”
procedure on the preceding page, then
select [OK]. Take the picture again.
About the Dust Delete Data
After the Dust Delete Data is obtained, it is appended to all the JPEG
and RAW images captured thereafter. Before an important shoot, you
should update the Dust Delete Data by obtaining it again.
For details about using Digital Photo Professional (provided software,
p.270) to erase dust spots, see the Software Instruction Manual (p.272)
in the Software Instruction Manual CD-ROM.
The Dust Delete Data appended to the image is so small that it hardly
affects the image file size.
® Be sure to use a solid-white object such as a new sheet of white paper. If the
paper has any pattern or design, it may be recognized as dust data and
affect the accuracy of the dust deletion with the software.
172
Page 84

Manual Sensor Cleaning
If dust adhere to the image sensor and dust spots appear on the
images, you can clean the image sensor yourself with a camera blower.
The surface of the image sensor is extremely delicate. If the
sensor needs to be cleaned directly, having it done by a Canon
Service Center is recommended.
Before cleaning the sensor, detach the lens from the camera.
Select [Clean manually].
Under the [%■ ] tab, select [Clean
manually], then press <©>.
Select [OK].
Select [OK], then press <©>.
In a moment, the reflex mirror will
lockup and the shutter will open.
Clean the sensor.
End the cleaning.
Set the power switch to <OFF>.
For the power source, using AC Adapter Kit ACK-E10 (sold separately)
i
is recommended.
If you use a battery, make sure it is fully recharged.
173
Page 85

Manual Sensor Cleaning"*^
M
While cleaning the sensor, never do any of the following. If the
power is cut off, the shutter will close and the shutter curtains and
image sensor might get damaged.
• Setting the power switch to <OFF>.
• Opening the card/battery compartment cover.
The surface of the image sensor is extremely delicate. Clean the sensor
with care.
Use a plain blower without any brush attached. A brush can scratch the
sensor.
Do not insert the blower tip inside the camera beyond the lens mount. If
the power is turned off, the shutter will close and the shutter curtains or
reflex mirror might get damaged.
Never use canned air or gas to clean the sensor. The blowing force can
damage the sensor or the spray gas can freeze on the sensor.
If the battery level becomes low while you clean the sensor, the beeper
will sound as a warning. Stop cleaning the sensor.
If a smudge that cannot be removed with a blower remains, having the
sensor cleaned by a Canon Service Center is recommended.
174
Page 86

Image Playback
This chapter explains features related to viewing photos
and movies, going into more detail than in Chapter 2
“Basic Shooting and Image Playback.” Here you will
find explanations about how to playback and erase
photos and movies with the camera and viewing them
on a TV set.
About images taken with another camera;
The camera might not be able to properly display images captured
with a different camera or edited with a computer or whose file name
was changed.
175
Page 87

H Searching for Images Quickly
S Display Multiple Images on One Screen (Index display)
Search for images quickly with the index display showing four or nine
images on one screen.
i Playback the image.
M When you press the <H> button, the
I
last image captured will be displayed.
Switch to the index display.
Press the button.
The 4-image index display will
appear. The currently-selected image
will be highlighted in a blue frame.
Press the button again to
switch to the 9-image index display.
Pressing the <®.> button will switch
the display between 9 images, 4
images and one image displayed.
176
Select an image.
Press the < v> key to move the blue
frame to select an image.
Turning the <£S> dial will display the
next screen or previous image.
Press <@> and the selected image
will be displayed as a single image.
Page 88

H Searching for Images Quickly
Bl Jump through images (Jump display)
With the single image display, you can turn the <£S> dial to jump
through the images forward or back according to the jump method that
was set.
Select [Image jump wliPh],
Under the [E'j tab, select [Image
jump w/Si], then press <©>.
Select the jump method.
Press the < v> key to select the
jump method, then press <©>.
n: Display images one by one
Ho: Jump 10 images
ffio: Jump 100 images
^: Display by date
iS: Display by folder
s»: Display movies only
!3: Display stills only
ft: Display by image rating (p.180)
■I
■1
Jump method i
Playback position
Turn the <£S> dial to select the
rating.
Browse by jumping.
Press the <H> button to playback
images.
On the single-image display, turn the
~ i> dial.
3 To search images according to the shooting date, select [Date].
To search images according to folder, select [Folder].
If the card contains both [Movies] and [Stills], select either one to
display only movies or stills.
If no images match the selected [Rating], browsing through the images
with <i^> is not possible.
177
Page 89

Magnified View
You can magnify a shot image by 1.5x to 10x on the LCD monitor.
,
-------
_ Magnify the image.
During image piayback, press the
<©.> button.
The image wiii be magnified,
if you hoid down the <©.> button, the
image wiii be magnified untii it
reaches the maximum magnification.
Press the <H-Q,> button to reduce
the magnification, if you hoid down
the button, the magnification wiii be
reduced to the singie image dispiay.
Magnified area position
Scroll around the image.
Use the < v> key to scroii around the
magnified image.
To exit the magnified dispiay, press
the <H> button and the singie image
dispiay wiii return.
'ou can turn the <i£S> dial to view another image while the
lagnification is maintained.
'he image cannot be magnified during the image review immediately
ifter shooting.
A movie cannot be magnified.
178
Page 90

SI Rotating the Image
You can rotate the displayed image to the desired orientation.
; Select [Rotate].
Under the [3‘] tab, select [Rotate],
then press <©>.
Select an image.
Press the <-^^> key to select the
image to be rotated.
You can also select an image on the
■ HHI
index display (p.176).
Rotate the image.
Each time you press <©>, the
image will rotate clockwise as follows:
90° ^ 270° ^ 0°
To rotate another image, repeat steps
2 and 3.
To exit and return to the menu, press
the <MENU> button.
3 ' If you have set Auto rotate] to [OnÛS] (p.162) before taking
vertical shots, you need not rotate the image as described above.
If the rotated image is not displayed in the rotated orientation during
image playback, set Auto rotate] to [OnûS].
A movie cannot be rotated.
179
Page 91

Setting Ratings
You can rate images and movies with one of five rating marks: [*]/[**]/
ra/[:a/[:*a.
Select [Rating],
Under the [E‘] tab, seiect [Rating],
then press <©>.
Select an image or movie.
Press the <-^^> key to seiect the
image or movie to be rated.
You can dispiay three images by
pressing the <HA> button. To
return to the singie-image dispiay,
press the <©.> button.
:ate the image or movie.
Press the <AT> key to seiect a rating
mark.
The totai number of images and
movies rated wiii be counted for each
rating.
To rate another image or movie,
repeat steps 2 and 3.
To exit and return to the menu, press
the <MENU> button.
m
mm
s
1H|
180
Page 92

Setting Ratings
Q The number next to the rating marks {[*]/[**i/[A]/C3/[M]) can only go up to
999. If there are 1,000 or more images for a rating, [###] will be displayed.
Taking advantage of ratings
With the [E' Image jump w/^S] option, you can display only the rated
images and movies.
With the [E* Slide show] option, you can playback only the rated
images and movies.
With Digital Photo Professional (provided software, p.270), you can
select only the rated images and movies.
With Windows Vista and Windows 7, you can see the rating with the file
information display or the provided image viewer.
181
Page 93

(q) Quick Control During Playback
When you press the <[o]> button during image piayback, you can set
the foiiowing: [o-n Protect images, @ Rotate, ★ Rating, Ho image
jump w/iS], Note that movies cannot be rotated (@ Rotate).
; Press the <(o)> button.
During image piayback, press the
<[q]> button.
The functions settabie with Quick
Controi wiii appear on the iett of the
screen.
Select a function and set it.
Press the < AT > key to select a
function.
The name and current setting of the
selected function are displayed at the
bottom.
Set it by pressing the <-^^> key.
Exit the setting.
Press the < [oj > button to turn off the
Quick Control icons and function
settings.
© To rotate an image, set [%‘ Auto rotate] to [OniQl Wj. If [%‘ Auto rotate] is
set to [On*] or [Off], the Rotate] setting will be recorded to the image,
but the camera will not rotate the image for display.
182
Page 94

I Quick Control During Playback
Pressing the <0> button during the index display will switch to the
i
single-image display and the Quick Control icons will appear. Pressing
the <(q]> button again will return to the index display.
For images taken with another camera, selectable functions may be
limited.
183
Page 95

Enjoying Movies
Basically, you can playback movies in the following three ways:
Playback on a TV ;
The camera does not have an audio/video OUT terminal. Therefore, the
camera cannot be connected to a TV set with an analog AV cable.
Movies on a card can be played only by devices compatible with MOV
files.
Since hard disk recorders do not have an HDMI IN terminal, the camera
cannot be connected to a hard disk recorder with an HDMI cable.
Even if the camera is connected to a hard disk recorder with a USB
cable, movies and still photos cannot be played nor saved.
Using HDMI Cable HTC-100 (sold separately) is recommended.
B
(p.191)
An HDMI cable (sold separately) is
¡1
necessary to connect the camera to a
TV set. The TV set must also have an
HDMI terminal.
When the camera Is connected to a TV
set with an HDMI cable, you can
playback movies and still photos on the
TV set. If you use a High-Definition TV
set to playback High-Definition (HD)
movies shot with this camera, you can
watch the movies in high definition.
184
Page 96

Enjoying Movies
Playback on the Camera’s LCD Monitor (p.i86-i90)
. .You can playback movies on the
camera’s LCD monitor. You can also edit
out the movie’s first and last scenes, and
playback the Images and movies In the
card In an automatic slide show.
m A movie edited with a personal computer cannot be rewritten to the card and
played back with the camera.
Playback and Editing with a Personal Computer
(See the PDF file instruction manual for ZoomBrowser EX/lmageBrowser, p.272)
The movie files recorded in the card can
be transferred to a personal computer
and played or edited with ZoomBrowser
EX/lmageBrowser (provided software,
p.270).
You can also extract a single frame from
a movie and save it as a still photo.
#
To have the movie playback smoothly on a personal computer, use a
high-performance personal computer. Regarding the computer hardware
requirements for ZoomBrowser EX/lmageBrowser, see the PDF file
instruction manual.
If you want to use commercialiy-available software to playback or edit the
movies, be sure it is compatible with MOV files. For details on
commercialiy-available software, inquire the software maker.
185
Page 97

Playing Movies
I
Speaker
Playback the image.
Press the <H> button to display
images.
Select a movie.
Press the <-^^> key to select a
movie.
On the single-image display, the
<*g icon displayed on the
upper left indicates a movie.
On the index display, the perforation
on the left edge of the image
indicates a movie. As movies
cannot be played on the index
display, press <@> to switch to
the single-image display.
On the single-image display,
press <0>.
The movie playback panel will appear
on the bottom.
Playback the movie.
Select [►] (Play), then press <©>.
The movie will start playing.
You can pause the movie playback by
pressing <©>.
During movie playback, you can turn
the <£S> dial to adjust the built-in
speaker’s sound volume.
For more details on the playback
procedure, see the next page.
Page 98

Function Playback Description
±> Exit Returns to the single-image dispiay.
► Play Pressing <@> toggles between play and stop.
!► Slow motion
Adjust the slow motion speed by pressing the < ◄► >
key. The slow-motion speed is indicated on the upper
right.
M First frame Displays the movie's first frame.
Each time you press <0>, a single previous frame
■ til Previous frame
!!► Next frame
is displayed. If you hold down <@>, it will rewind the
movie.
Each time you press < 0 >, the movie will play frameby-frame. If you hold down <0>, it will fast forward
the movie.
►H Last frame Displays the movie’s last frame.
K Edit
mm’ ss” Playback time (minutes:seconds)
lili Volume
With a fully-charged Battery Pack LP-E10, the continuous playback time
B
at 23°C/73°F will be as follows: Approx. 4 hr.
During the single-image display, you can press the <DlSR> button to
change the display format (p.199).
If you connect the camera to a TV set (p.184, 191) to playback a movie,
adjust the sound volume with the TV set. (Turning the dial will not
adjust the sound volume.)
This camera cannot playback Full High-Definition (Full HD) or High
Definition (HD) movies (60/50 fps frame rate) taken with another EOS
camera. This camera can only playback High-Definition (HD) and
Standard-Definition (SD) movies having a 30/25 fps frame rate.
Displays the editing screen (p.188).
Playback position
You can adjust the built-in speaker's (p.186) sound
volume by turning the dial.
Playing Movies
187
Page 99

^ Editing a Movie’s First and Last Scenes
You can edit out the first and iast scenes of a movie in 1-sec. increments.
mm
a—
...
__
On the movie playback screen,
select [K].
The editing screen wiii be dispiayed.
Specify the part to be edited out.
Seiect either [lid] (Cut beginning) or
[Dli] (Cut end), then press <©>.
Press the <-^^> key to see the
previous or next frames. Hoiding it
down wiii fast forward the frames.
After deciding which part to edit out,
press <©>. The portion highiighted
in biue on the top of the screen is
what wiii remain.
Check the edited movie.
Select [►] and press < @ > to playback
the portion highlighted in blue.
To change the editing, go back to step 2.
To cancel the editing, select [Id] and
press <©>.
Save the movie.
Select [C?], then press <@>.
The save screen will appear.
To save it as a new movie, select
[New file]. To save it and overwrite
the original movie file, select
[Overwrite]. Then press <©>.
Since the editing is done in 1-sec. increments (position indicated by
a
[3C]), the exact position where the movie is edited may differ slightly from
the position you specified.
If the card does not have enough room, [New file] will not be selectable.
More movie editing functions are available with ZoomBrowser EX/
ImageBrowser (provided software, p.270).
188
Page 100

Slide Show (Auto Playback)
You can playback the images in the card as an automatic slide show.
Select [Slide show].
Under the [E‘] tab, select [Slide
show], then press <©>.
Number of images to be played
liicSi i'B w
Select the images to be played.
Press the < AT > key to select the
desired option, then press <©>.
[All images/Mov ies/Sti I Is]
Press the <AT> key to select one of the
following: [QlAII images/’ff Movies/
OStills], Then press <©>.
[Date/Folder/Rating]
Press the < AT> key to select one of
the following: [HDate/HFolder/
Rating],
When <mw!Ji'P> is highlighted,
press the <DISR> button.
Press the < AT > key to select the
desired option, then press <©>.
I
Item Playback Description
QlAII images All the still photos and movies in the card will be played back.
EH Date
M Folder Still photos and movies in the selected folder will be played back.
•W Movies Only the movies in the card will be played back.
astiiis Only the still photos in the card will be played back.
★ Rating
Still photos and movies taken on the selected shooting date will
be played back.
Only the still photos and movies with the selected rating will be
played back.
189
 Loading...