

Page 1

Canon
GOSiooof
INSTRUCTIONS
Page 2

Introduction
Thank you for selecting a Canon autofocus SLR
camera.
EOS 1000F, developed as Canon’s new stan
dard model autofocus SLR camera, is the ligh
test and most compact camera with a built-in
flash in the EOS series.
Features such as simple dial operation and
super-fast autofocus make it easier than ever to
take great pictures any time.
EOS 1000F employs Al Focus, which automati
cally switches between One-shot AF and Al
Servo AF* based on the subjeot’s movement. As
a result, accurate focusing can be obtained
even when the subjeot is moving toward or
away from the oamera.
* One-shot AF: Focusing stops once complet
ed. The original focus remains locked as long
as the shutter button is kept pressed halfway.
Al Servo AF: An advanced autofocus mode
which continuously focuses moving subjects
as long as the shutter button is kept pressed
halfway.
Page 3

• The instructions in this book assume use of the
EF 35-80 mm f/4-5.6 zoom lens; however, opera
tions with a different lens are basically the same.
Please read this instruction book carefully for a thor
ough understanding before using your EOS 10OOF.
Attention
IMPORTANT INFORMATION
The Canon EOS 1000F will give optimum perfor
mance together with specially designed Canon EF
lenses, flash units and other Canon brand ac
cessories. It is possible that the use of incompati
ble lenses or other accessories may result in unsa
tisfactory performance or damage to your Canon
EOS 1000F. We therefore suggest the use of
Canon EF lenses and accessories. Damage to
your Canon EOS 1000F as a result of malfunction
or improper connections caused by the use of in
compatible products may void its warranty.
While reading these instructions, unfold the front
and back flaps for easy reference to the camera’s
parts.
Page 4
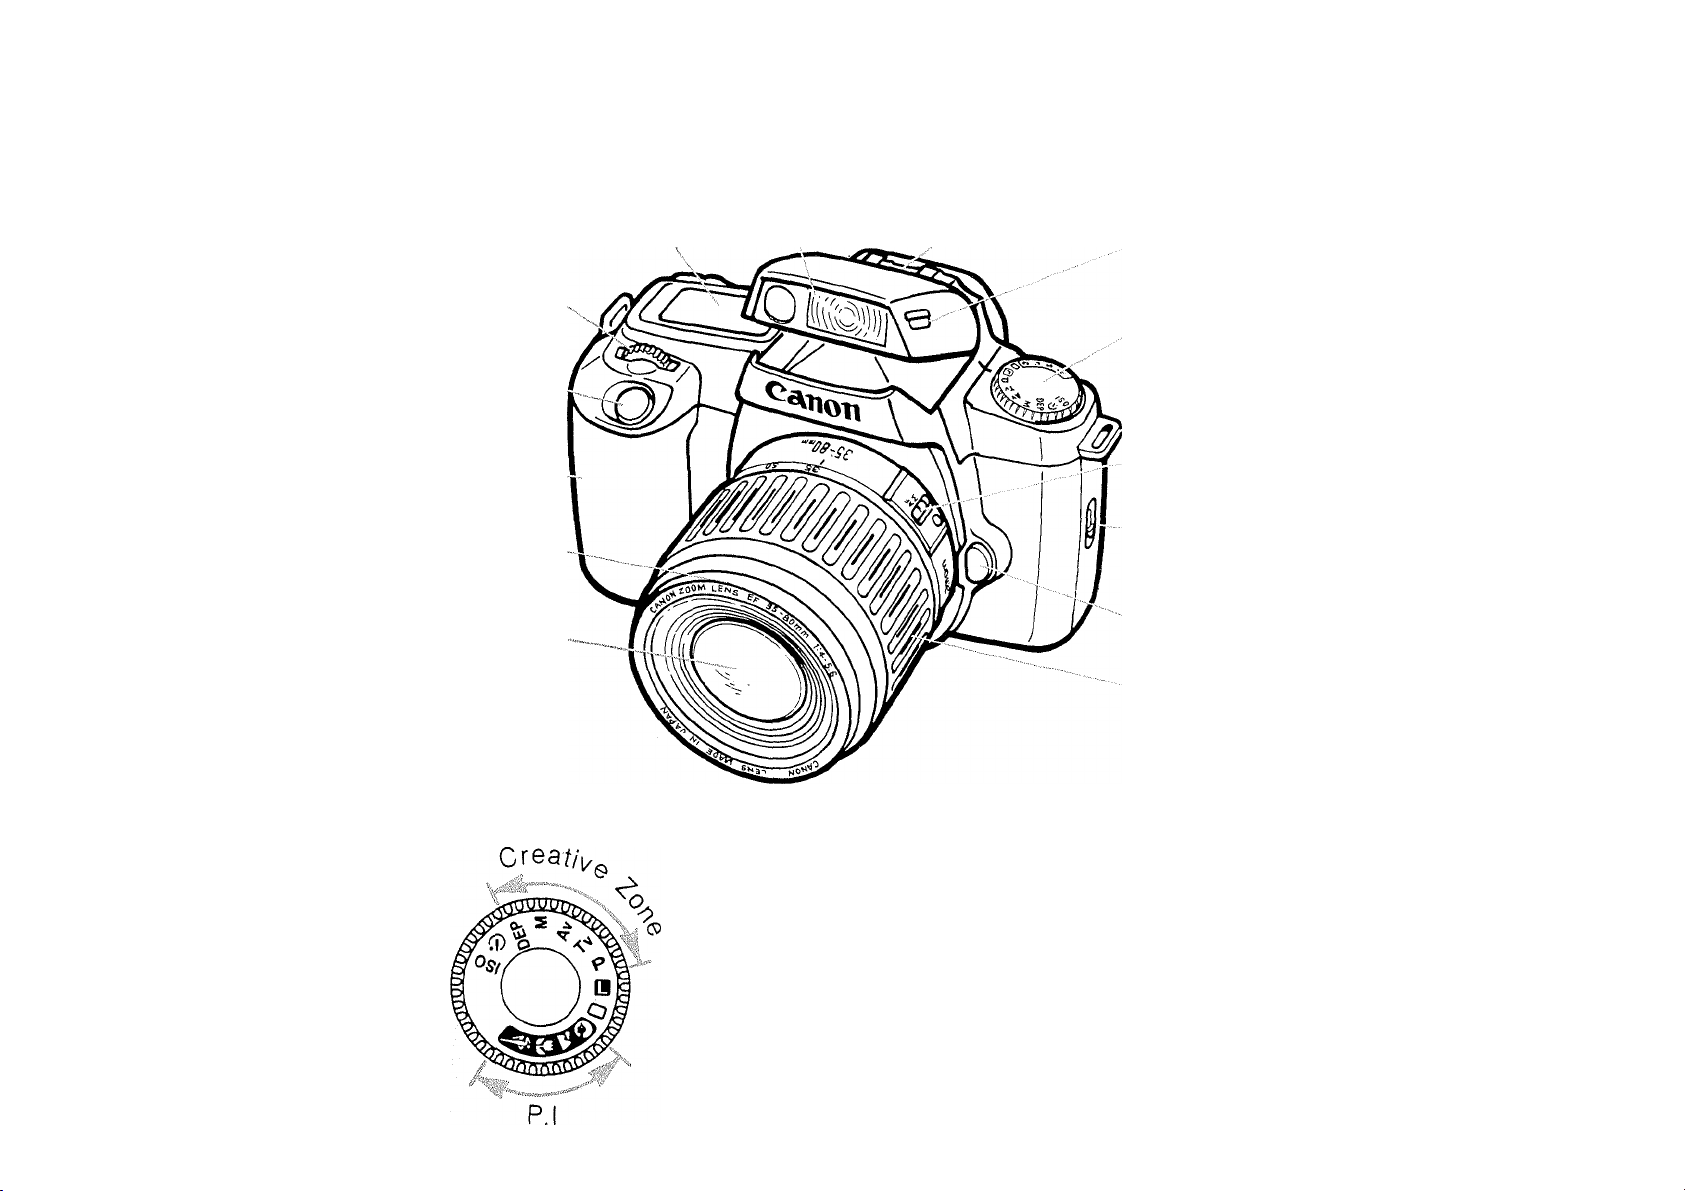
Nomenclature
LCD Panel
Electronic Input Dialx
Shutter Button.^
Grip-—
______
^
Manual Focusing Ring
EF 35-80 mm f/4-5.6 Lens
. Built-in Flash
Flash Tab
Accessory Shoe
Command Dial
Strap Fixture
Focus Mode Switch
Back Cover Latch
Lens Release Button
Zoom Ring
PROGRAMMED IMAGE
CONTROL
O
v^: Sports
Portrait
Landscape
Close-up
Q ; Green Zone
E
ISO
(S)
Lock (OFF)
Manual Film Speed Setting
Self-timer
CREATIVE ZONE
DEP
M
Av
Tv
P
Depth-of-Field AE
Manual Exposure
Aperture-priority AE
Shutter-priority AE
Program AE
Page 5

Table of Contents
I. BASIC OPERATION
[1] Preparations
1. Battery Load and Check.................................7
2. Lens Attachment
3. Holding the Camera
4. Focusing
- Difficult Subjects for Autofocus
[Manual Focusing]......................................13
[2] Taking Pictures
1. Film Loading ................................................14
2. Basic Picture Taking - Green Zone
- Focus Lock
- Film Rewind ..............................................19
3. Programmed Image Control
- Portrait
- Landscape
- Close-up....................................................21
- Sports
......................................................
.......................................................
.......................................................
............................................
....................................
.............
................................................
........................
................................................
9
10
11
16
18
20
20
21
22
II. ADVANCED OPERATION
1. Creative Zone .............................................24
P - Program AE.............................................24
Tv- Shutter-priority AE...................................26
Av- Aperture-priority AE
M - Manual Exposure ...................................28
DEP- Depth-of-Field AE................................30
2. Self-timer
3. Flash Photography
.....................................................
...............................
......................................
27
33
34
Page 6

III. APPLICATIONS
1. Partial Metering...........................................40
2. Exposure Connpensation
3. Multiple Exposures
4. Bulb (Long Exposure)
5. Manual Film Speed Setting
IV. REFERENCE
1. Comparisons Between AF Mode and
Film Wind Mode...........................................47
2. Film Shooting Capacity................................48
3. Program Lines
V. ACCESSORIES
1. Dedicated Canon Speedlites
2. Grip Extension GR-70 .................................52
3. Dioptric Adjustment Lenses
4. Lens Hoods and Filters................................53
.....................................
.............................................
............................
.................................
.........................
......................
........................
42
43
45
46
49
51
52
VI. CAMERA CARE
1. Cleaning.......................................................54
2. Liquid Crystal Display/Battery Notes ... .55
3. Attaching the Strap
VII. SPECIFICATIONS 58
......................................
57
Page 7

Precautions
1) This camera is not resistant to water
and should not be used outdoors in
snow or rain. If accidentally dropped
in water, contact an authorized Canon
service facility. Keep the cannera out
of salt spray, and protect it from exces
sive humidity. If used at the beach,
clean it thoroughly afterward with a dry
cloth.
2) Do not attempt to disassemble the
camera yourself. Always take it to an
authorized Canon service facility for
repair.
3) Remove the battery if you do not ex
pect to use the camera for about three
weeks or longer.
4) When storing the camera, wrap it in a
clean, soft cloth and place in a cool,
dry, dust-free place. Be sure to keep
the camera out of direct sunlight, and
away from “hot spots’’ such as the
trunk or rear window shelf of a car.
Avoid places where moth balls are
used, and in extreme humidity, use a
desiccant.
Page 8

5) Carefully check the camera’s opera
tion after lengthy storage.
6) The battery may explode or cause
burns if disassembled, recharged,
shorted, exposed to high tempera
tures, or disposed of in fire.
7) Film passing through X-ray examina
tions at airports may be exposed and
ruined even if loaded in the camera.
Request a hand-checked inspection to
avoid damage.
8) Aerosol spray dust removers are not
recommended for the shutter curtain.
9) Condensation is a problem when bring
ing cold equipment into a warm room.
If the autofocus optics cloud over, ac
curacy may be seriously affected. Be
fore entering a warm room, put
equipment in a plastic bag so conden
sation forms on the outside of the bag.
10) Color reproduction may be adversely
affected if the film is left in the camera
for a long time'. Always develop ex
posed film promptly.
* Please see p. 54 for camera care in
formation.
Page 9

First-time SLR users shouid read this section carefully.
Page 10
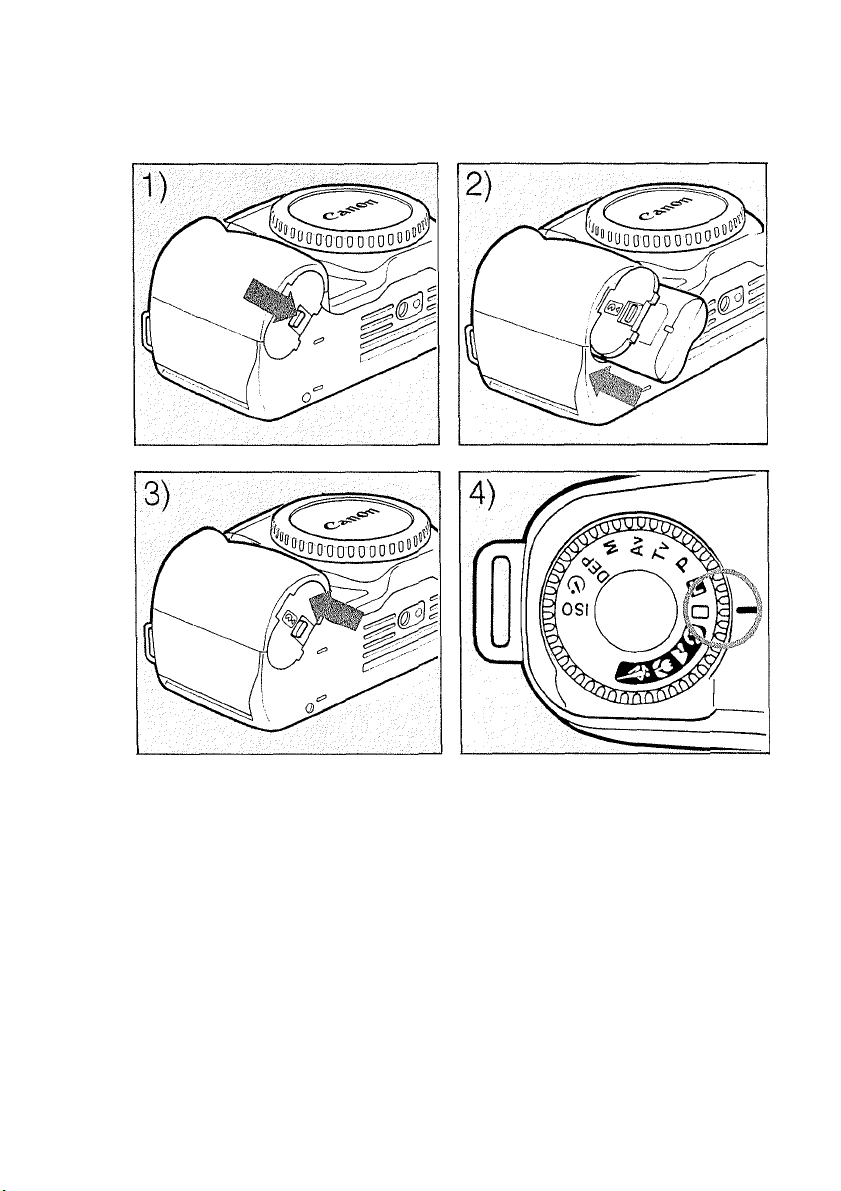
1. Battery Load and Check
Page 11

[1] Preparations
The camera operates on a 2CR5 lithium
battery.
1) Slide the battery cover lock down to
open. The cover cannot be removed
from the camera.
2) Insert the battery as shown with the ter
minals facing toward the shutter button.
3) Close the cover and hold it down until
it locks with a click.
4) Turn the command dial to “ P ” or
“ Q ” to check the battery.
The battery check symbol (mm) in the
LCD panel displays the remaining bat
tery power as shown in the illustrations.
• If nothing is displayed in the LCD
panel, the battery is probably insert
ed upside down. Remove the battery
and re-insert it correctly.
• See p. 55 for other important battery
information.
Page 12
8
Page 13

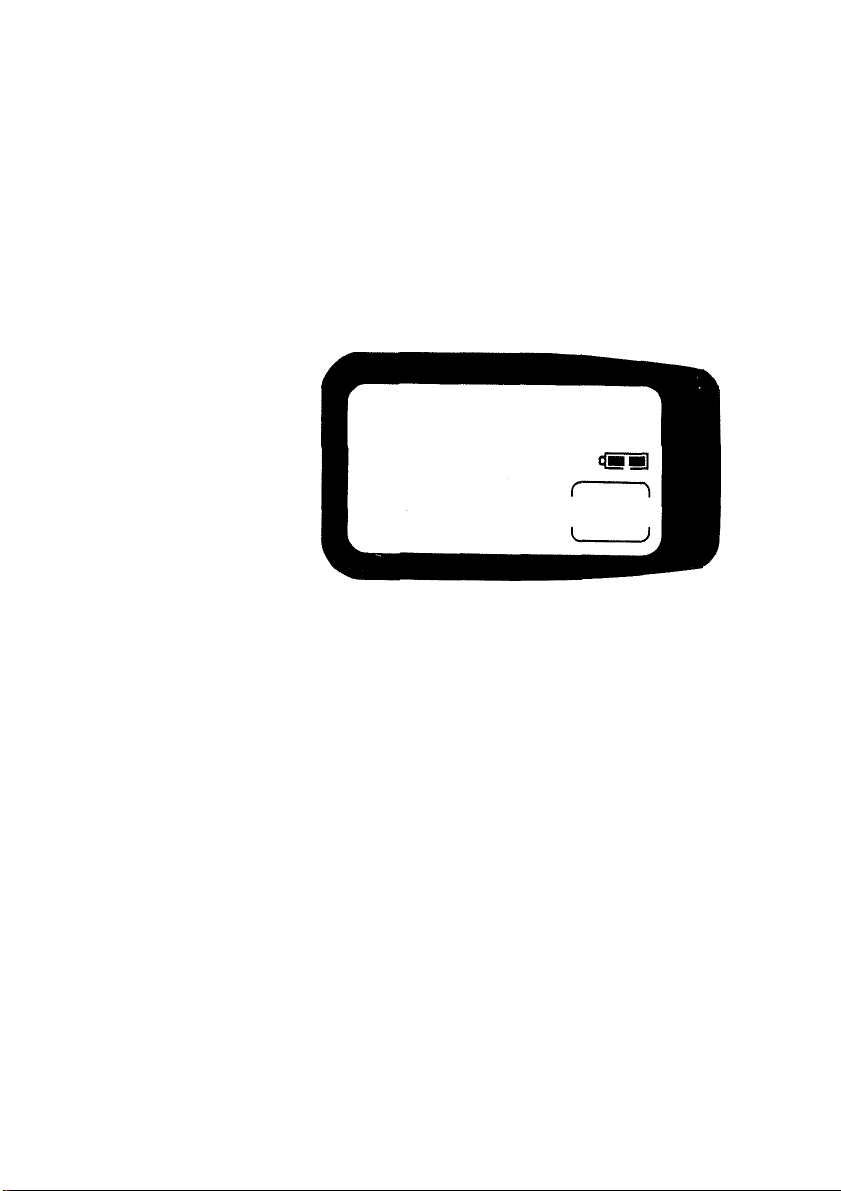
Battery Check Symbols
Panel
Battery power sufficient.
Have a new battery handy.
the LC
cr_]
^ « X
Replace the battery.
dzi™(blinking): See p. 55.
• When not using the camera, always be
sure to set the command dial to “L” to
prevent battery drain due to accidental
pressing of the shutter button.
• Always check the battery condition be
fore taking pictures.
• Carry a spare battery when going on
trips or when planning to take many
pictures.
• See p. 48 for shooting capacity.
Page 14
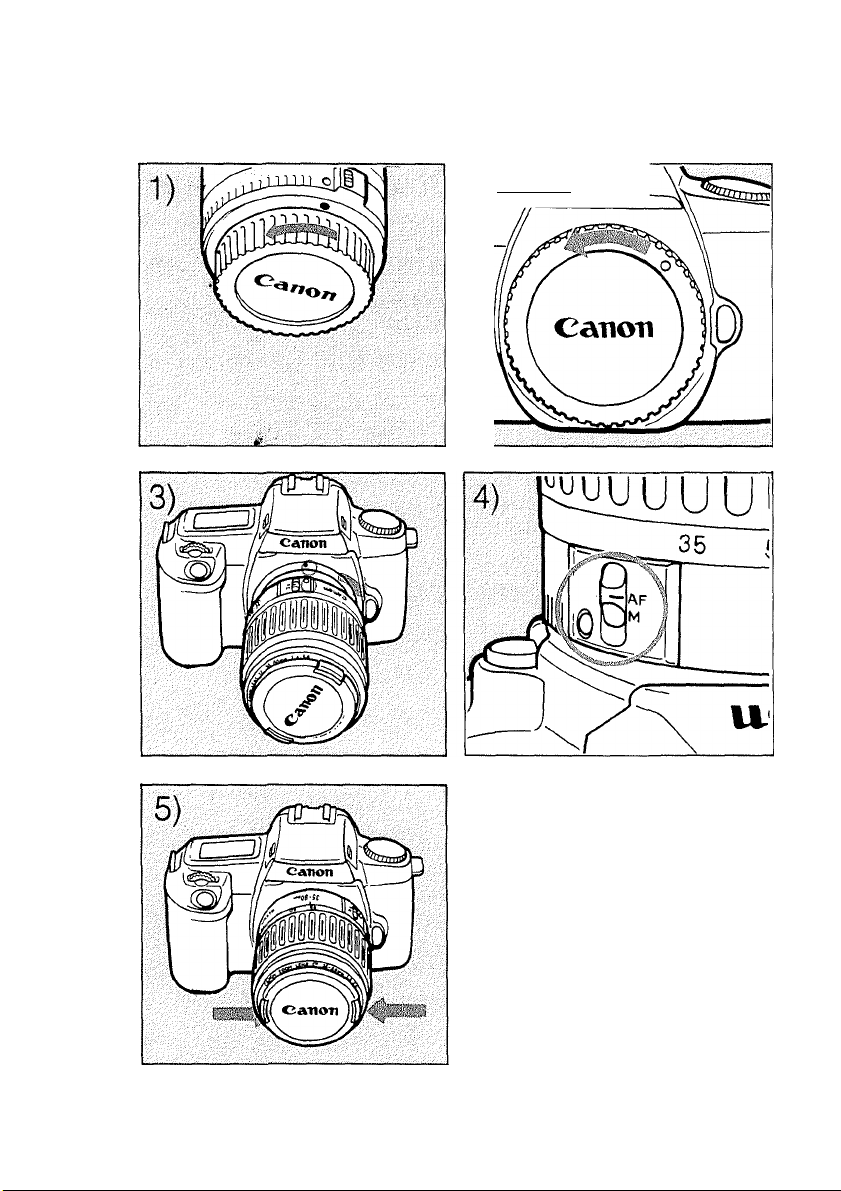
2. Lens Attachment
2) CAtlon
Page 15

1) Remove the rear lens cap by turning it
counterclockwise.
2) Remove the body cap by turning it coun
terclockwise.
3) Align the lens’ red dot to the camera’s
red dot and turn the lens clockwise un
til it stops and locks with a click.
• To remove the lens, turn the lens
counterclockwise while pressing the
lens release button.
4) Set the lens’ focus mode switch to AF.
5) Remove the front lens cap.
•The electronic contacts must be clean
for proper connection. Do not touch
these contacts.
•Do not set the lens on its rear end
without the lens cap attached to pre
vent damage to the electronic
contacts.
Page 16
3. Holding the Camera
10
Page 17

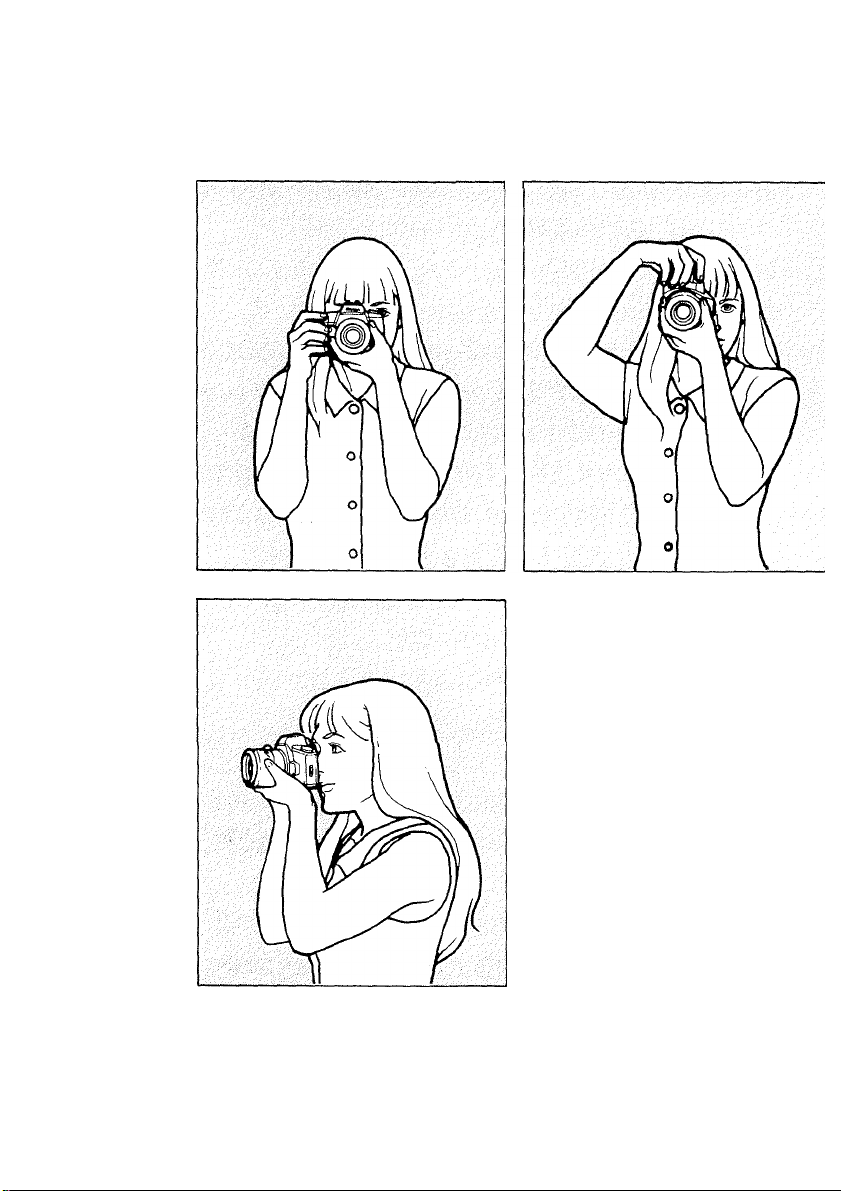
Sharp pictures require that the camera be
held still to prevent unnecessary move
ment called “camera shake” that can
ruin your pictures. Try the suggested tips
below.
1) Hold the camera firmly in your right
hand. Place the palm of your left hand
on the bottom of the camera to support
the lens.
2) Keep both elbows close to your body.
3) Spread your feet apart about shoulder
width for a steady natural stance.
4) Lightly hold the camera against your
nose and look into the viewfinder.
There is no one correct way to hold the
camera. Experiment to find the most
comfortable position. Whenever possi
ble, lean against a steady support such as
a tree, wall, or table to help you keep the
camera still.
Page 18
4. Focusing
Page 19

Before practicing, set the command dial to
“ a ” (Green Zone).
1) Look through the viewfinder and cover
the subject with the focus mark (cd).
2) Press the shutter button halfway to start
focus. When the subject is in focus, the
green AF symbol “ • ” lights up in the
viewfinder and a short double beep is
emitted.
3) Without letting up on the shutter button,
press the shutter button completely to
take the picture.
• In low-light or backlit conditions, the
shutter speed or the flash symbol “ J ”
blink in the viewfinder. See p. 17 when
the shutter speed blinks or see p. 34
when the flash symbol “ J ’’blinks.
11
Page 20
12
Page 21

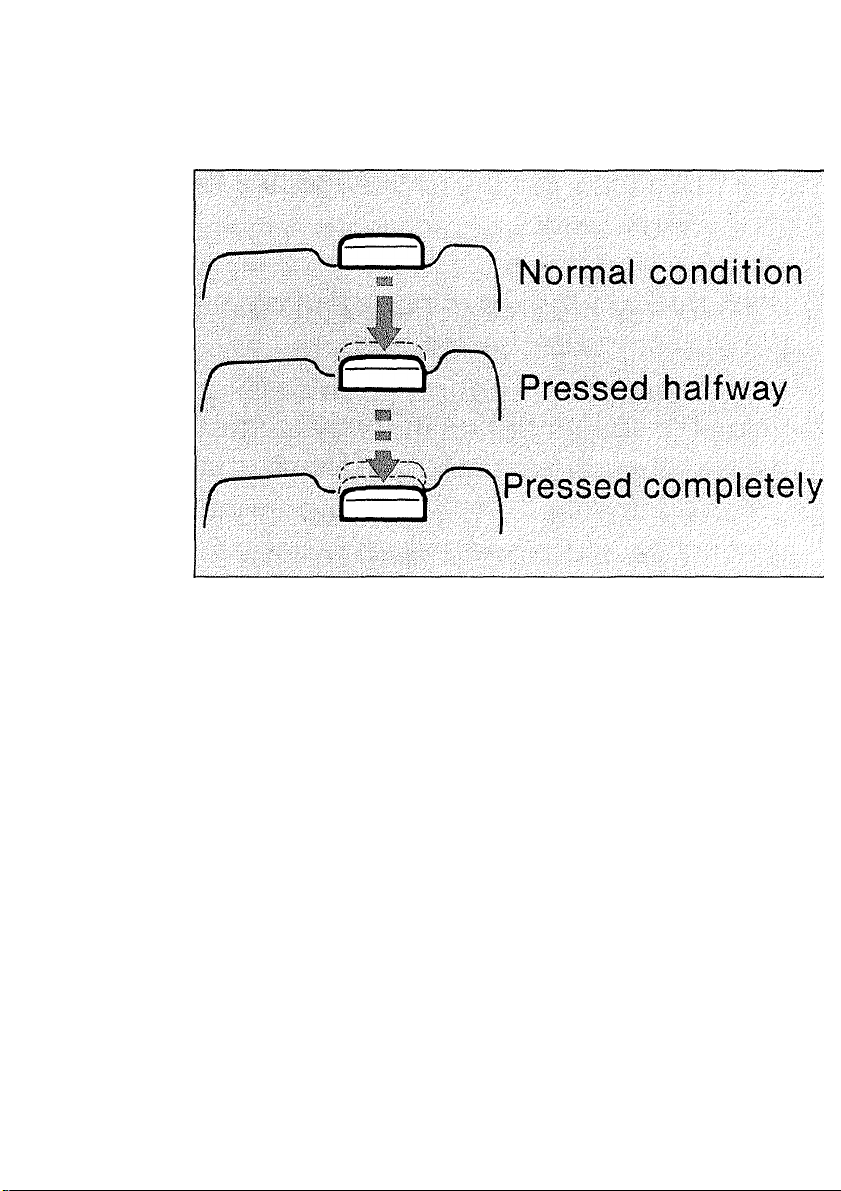
Shutter button action plays an important
part in taking good pictures. A quick
stroke with the tip of your finger may
cause “camera shake.’’
the shutter button slowly and gently
with the ball of your finger.
Be sure not to touch the front of the lens
during focusing.
When the subject cannot be focused,
the green AF symbol “ • ’’ starts blink
ing and the shutter will not release. (See
the next page.)
Always press
Page 22
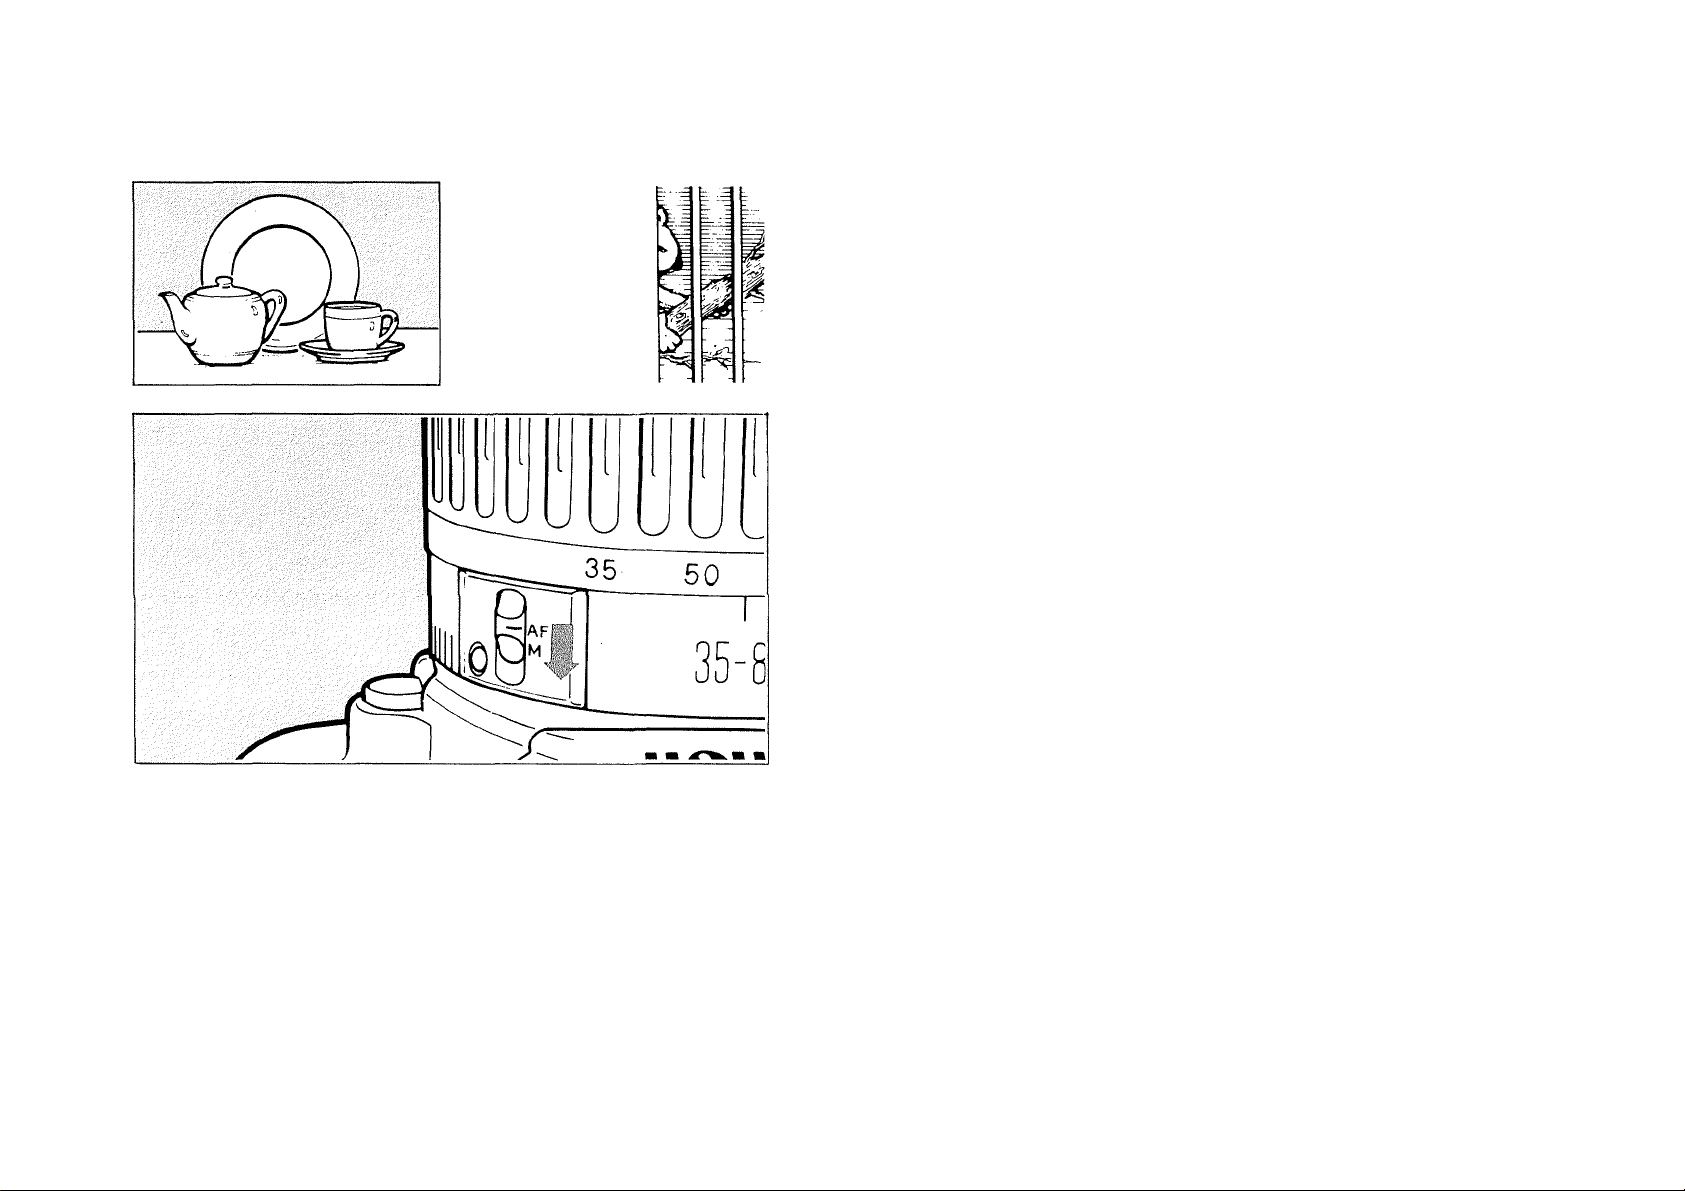
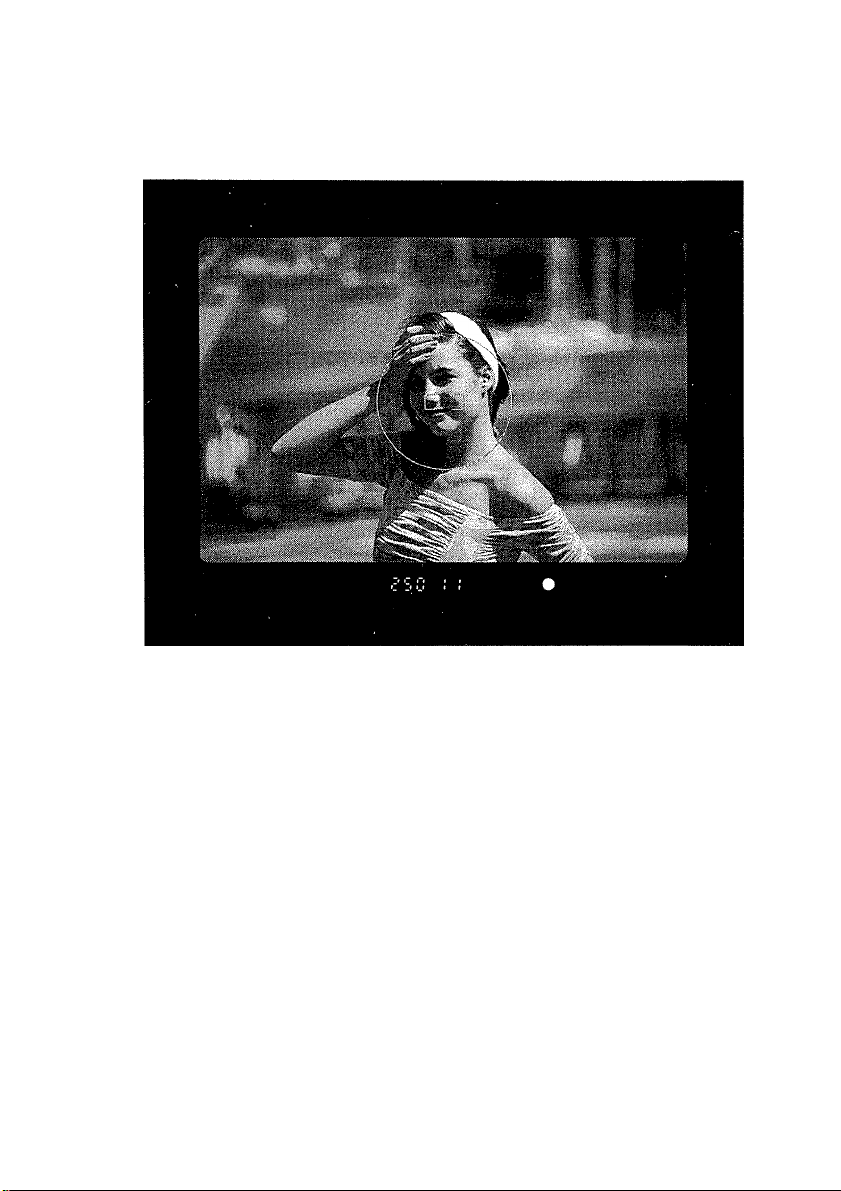
Difficult Subjects for Autofocus [Manual Focusing]
s
cts
Low-contrast subjects—misty scenes,
light-colored or white objects.
Subjects in extremely low-hight situa
tions—a dark room, night scenes.
Subjects having generally horizontal
patterns (window blinds).
Subjects with an object in front of
them—animals in a cage, subjects be
hind a wire fence.
Strong, bright reflections—shiny metal,
ice, surface of a lake.
Fast-moving subjects—difficult to keep
within the focus mark.
There are a few subjects that may be
difficult for the camera to focus. The green
AF symbol will blink in the viewfinder to
warn you of this condition.
Focus these subjects by setting the lens’
focus mode switch to “M” and turning the
manual focusing ring until the image is
sharp.
13
Page 23
1. Film Loading
14
Page 24

[2] Taking Pictures
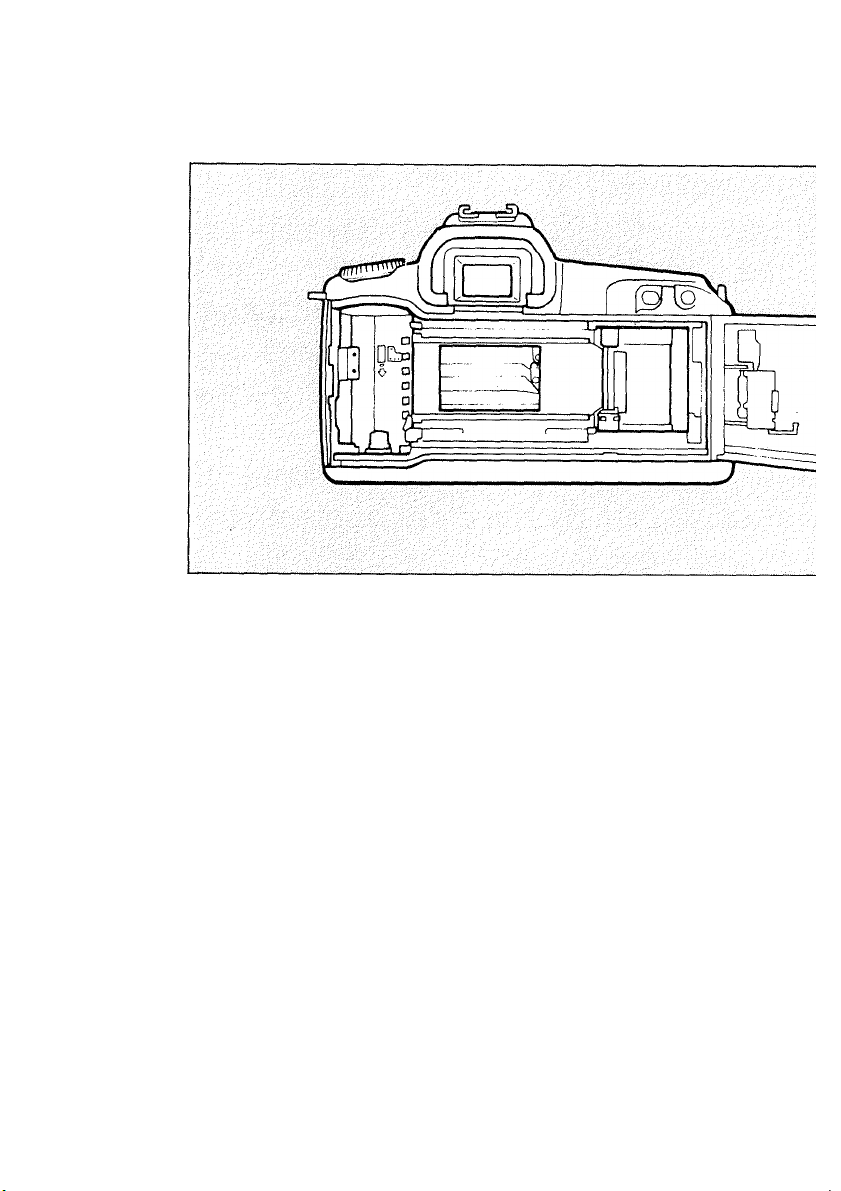
•Always load film out of direct sunlight.
• Never touch the shutter curtain. Its
precision design makes it sensitive to
pressure. When loading film, be care
ful that the film tip does not touch the
shutter curtain.
This camera uses a prewind system. When
film is loaded, the camera first winds all of
the film onto the take-up spool and then re
winds it back into the film cartridge one
frame at a time as each picture is taken.
The frame counter on the LCD panel
decreases as pictures are taken, allowing
you to always see at a glance the remain
ing frames.
For DX-coded film, the camera automati
cally sets the film speed when the film is
loaded. (For manual film speed setting, see
p. 46.)
Page 25

Page 26

1) Make sure the command dial is not at L.
2) Open the back cover by sliding the latch
down.
3) Insert the film as shown with the flat end
of the cartridge on top.
4) Carefully pull the film tip across until it
reaches the orange mark.
5) Make sure the film lies fiat and close the
back cover.
Film winding starts and the frame counter
counts up. When the film is completely
wound, the shutter is released once;
however, no picture is taken. The film car
tridge symbol and the number of available
frames are displayed in the LCD panel.
• If the film cartridge symbol blinks, the
film has not been loaded properly and
the shutter will not release. Reload the
film.
• Film becomes soft and tears easily in
high humidity. Keep it stored in its
canister until loading.
15
Page 27
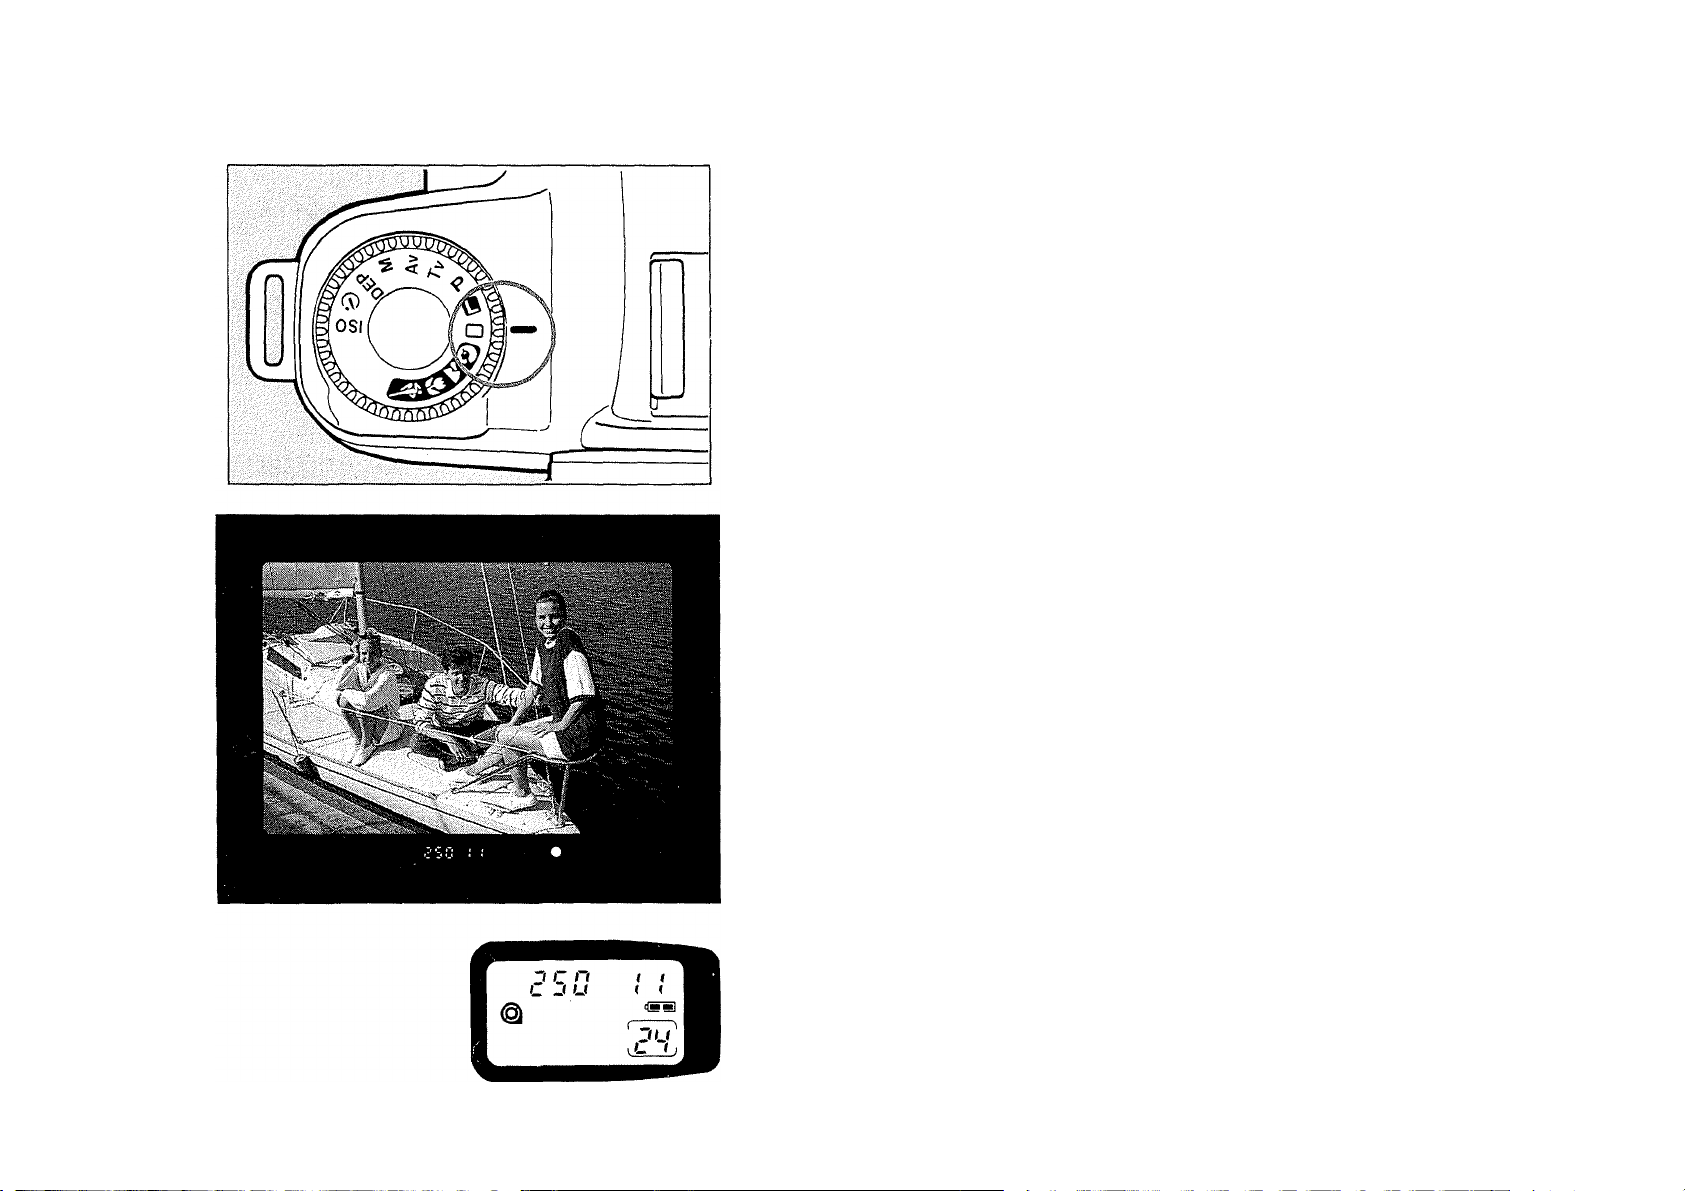
2. Basic Picture Taking - Green Zone
This setting for basic operation allows you
to begin shooting immediately without mak
ing any settings before taking pictures.
1) Set the command dial to “ Q
2) Compose the picture and make sure the
focus mark ( cd) covers the subject.
• If you are using a zoom lens, turn the
zoom ring to vary the size of the
subject.
3) Press the shutter button halfway.
When the subject is in focus, the green
AF symbol, shutter speed and aperture
value light up in the viewfinder and a
16
short double beep sounds. Press the
shutter button all the way down to take
the picture.
• The shutter speed and aperture value
are also displayed in the LCD panel.
• In low light or backlit conditions, the
“ ^ ” mark blinks in the viewfinder.
Switch to flash photography (see p.
34) or use a tripod.
Page 28

Page 29

Blinking shutter speed
icamotf. snahr warnirial)
In Green Zone and Programmed Image
Control modes, the shutter speed will blink
on the LCD panel and in the viewfinder if
the shutter speed is too slow to hand-hold.
In this case, we recommend switching to
flash photography or using a tripod.
17
Page 30
18
Page 31

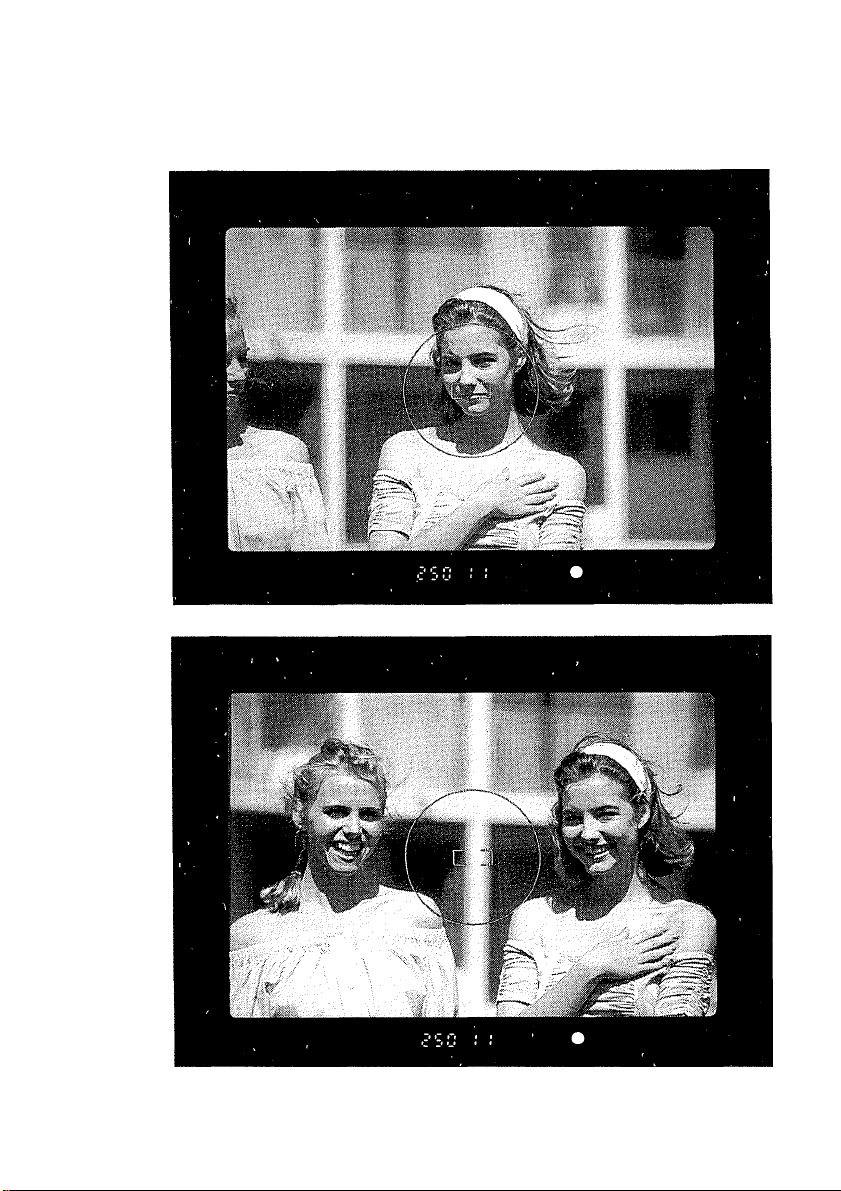
This camera focuses on the subject co
vered by the focus mark in the center of
the viewfinder. For off-center subjects, use
focus lock to set the focus and then recom
pose the picture as desired.
1) Cover the subject with the focus mark
and press the shutter button halfway.
2) Keeping the shutter button pressed half
way, recompose the picture as desired
and then press the shutter button all the
way down to take the picture.
Page 32

й:
' 1 ■ '
mm
г
L
J
Page 33

' I
When the last picture is taken, the remain
ing film automatically rewinds into the car
tridge. When completed, rewinding stops
and the film cartridge symbol blinks in the
LCD panel.
If you want to develop the film before the
end of the roll, remove the lens and turn
the command dial to "ISO". Press both the
exposure compensation button and the
partial metering button simultaneously.
19
Page 34

3. Programmed image Control (P.I.C.)
With P.I.C., focus and film wind settings as well as shutter speed and aperture value set
tings are made automatically for four types of pictures; portraits, landscapes, close-ups,
and sports. This allows you to take pictures easily and concentrate on composition.
• If the“ ^ ’’mark blinks in the viewfinder, switch to flash photography or use a tripod.
• If the shutter speed blinks to warn of camera shake, we recommend switching to flash
photography or using a tripod.
o Portrait Settings; One-shot AF/Continu-
ous wind/Evaluative metering
Shallow depth of field is generally used to
emphasize the subject, therefore large
apertures (small numbers) are set. Focus
20
on the subject’s eyes. Continuous film wind
helps keep up with the subtle changes in
expression.
For effective background blur, separate
the subject from the background as much
as possible and use a telephoto lens or the
telephoto setting on your zoom lens (80
mm on the EF 35-80 mm f/4-5.6).
Page 35

л
Page 36

Landscape Settings; One-shot AF/Sin-
gle franne wind/Evaluative metering
Deep depth of field is usually the primary
concern in landscape photography.
This setting automatically sets small aper
tures (large numbers) for deep depth of
field.
Use a wide-angle lens or the wide-angle
setting on your zoom lens to create a feel
ing of expansiveness and depth.
Close-Up Settings: One-shot AF/Single
frame wind/Partial metering
Move as close as possible to the subject
for the maximum magnification.
When using a zoom lens, you can achieve
maximum magnification by setting the lens
to the telephoto position.
21
Page 37

22
Page 38

Sports Settings; Al focus AF/Continuous
wind/Evaluative, nnetering
Faster shutter speeds are emphasized to
help you keep up with all the action while
Al servo tracks the subject’s movement.
Keep the focus mark on the subject.
• Continuous shooting is possible by hold
ing the shutter button down.
Page 39

к.
i J
и ШтШ
т тй. mí
23
Page 40

1. Creative Zone
The command dial’s “Creative Zone’’ provides five shooting modes, enabling you to select
the mode and values which best match your subject and photographic objectives.
Also, with “Creative Zone’’ modes, you can use functions such as exposure compensa
tion and multiple exposure (explained in the Applications section) to further expand your
creativity.
Select the desired mode by turning the command dial.
P; Program AE Settings; Al focus
AF/Continuous wind/Evaluative metering
The camera sets both aperture and shut
ter speed automatically, taking into ac
count the lens in use.
Checking the Exposure
If the exposure data blink, the exposure is
not correct. Use a flash in low light situa
tions or use an ND (neutral density) filter
in bright situations.
Page 41

In the Creative Zone, an exposure lev
el scale and exposure level mark ap
pear in the viev\/finder and LCD panel in
addition to the exposure data (shutter
speed and aperture value). The ex
posure level mark indicates the amount
of exposure compensation in the four
AE modes and the exposure level in
manual exposure mode.
Page 42

arri
111
In Program AE mode, the automatically set
shutter speed and aperture combination
(program) can be changed while maintain
ing the same exposure.
To shift the program, press the shutter but
ton halfway to display the exposure data
and turn the electronic input dial to select
the desired shutter speed or aperture
value.
• See p. 50 for program shift charac
teristics.
• Program shift is not possible when us
ing a flash.
Six-second Timer
Even if you release the shutter button
after pressing it down halfway, the ex
posure data (shutter speed and aper
ture) in the viewfinder and LCD panel
appear for about six seconds.
25
Page 43

26
Page 44

Tv : Shutter-priority AE Settings: Al
focus AF/Continuous wind/Evaluative
metering
In this mode the user selects the shutter
speed and the camera sets the aperture
value tor the lighting conditions. This mode
is best tor taking pictures ot moving sub
jects by controlling the shutter speed.
Faster shutter speeds freeze subject mo
tion, while slower shutter speeds can
produce artistic blur effects.
• The initial shutter speed setting is al
ways 125 (1 /125). Turn the electronic in
put dial tor the desired shutter speed.
fiPf
!l il W '4s
Underexposure - The lens’ maximum aper
ture starts blinking. Set a slower shutter
speed until it stops blinking.
Overexposure - The lens’ minimum aper
ture starts blinking. Set a taster shutter
speed until it stops blinking.
Page 45

Page 46

Av: Aperture-priority AE Settings: Al
focus AF/Continuous wind/Evaluative
metering
In this mode the user selects the aperture
value and the camera sets the correct
shutter speed tor the lighting conditions.
Use this mode tor taking portraits, land
scapes, and still life photography where
depth of field is an important factor. Larg
er apertures produce a shallow depth of
field appropriate for portraits, and smaller
apertures produce a deep depth of field
desirable for landscapes.
• The initial aperture value setting is al
ways 5.6 (f/5.6). Turn the electronic in
put dial for the desired aperture value.
/f% I
Underexposure - The shutter speed of 30”
(30 sec.) blinks. Set a larger aperture until
the shutter speed stops blinking.
Overexposure - The shutter speed of 1000
(1/1000 sec.) blinks. Set a smaller aperture
until the shutter speed stops blinking.
27
Page 47

2)
28
Page 48

Wl: Manual Exposure Settings; Ai to-
cus AF/Continuous wind/Center-weighted
average metering.
This creative mode allows you to complete
ly control exposure by setting both the
shutter speed and aperture value.
The initial setting is always 1/125 sec. at
f/5.6.
1) Set the command dial to “M” and turn
the electronic input dial to set the
desired shutter speed.
2) While pressing the exposure compensa
tion button, turn the electronic input dial
to set the desired aperture value.
3) Press the shutter button halfway and
check the exposure data.
• The exposure level mark is displayed
in the viewfinder and LCD panel as
shown in the illustrations.
Page 49

“ 2i1if lii2 +
I
-2i1ifi1i2 +
I
- 2i1 if 1112 +
- 2111 f 1112 +
É
- 2111 f 1112 +
Page 50

Adjust the exposure according to the po
sition of the exposure level mark.
Metered standard exposure: The current
settings will result in a correct exposure.
Overexposure: Close the aperture or set
a faster shutter speed until correct ex
posure is obtained.
Overexposure (More than 2 stops)
Underexposure: Open the aperture or set
a slower shutter speed until correct ex
posure is obtained.
Underexposure (More than 2 stops)
29
Page 51

30
Page 52

DEP: Depth-of-Field AE Settings:
One-shot AF/Single frame wind/Evaluative
metering
Depth-of-Field AE mode places everything
between user set points in the foreground
and background in focus. The points are
set using the focus mark in the viewfinder.
The camera sets the necessary aperture
value and shutter speed to obtain the best
possible results under the existing lighting.
This mode cannot be used with flash.
Page 53

Page 54

1) Set the command dial to “DEP”.
2) Place the focus mark on the first point
(a) and press the shutter button halfway.
• Remove your finger when the green
AF symbol and ‘‘dEP 1 ” light up in the
viewfinder.
3) Repeat step #2 for the second point (b);
“dEP 2“.
4) Recompose the picture and press the
shutter button halfway. After the AF
symbol and exposure data light up,
press the shutter button completely to
take the picture.
31
Page 55

Checking the Exposyre
• If the minimum aperture value of the
lens in use blinks, clear the focus points
by turning the command dial to another
position and returning it to DEP. Move
back from the subject or sv\/itch to a
wide-angle lens or zoom lens’ wide-
angle setting and repeat steps #2
through 4. When the aperture value
stops blinking, the distance range will be
sharply focused and correct exposure
will be obtained.
• If both the shutter speed and the aper
32
ture value blink, the exposure is not cor
rect. Use an ND filter in bright
situations. The flash can not be com
bined with this mode.
Page 56

■ ■■ ■■■■■■ ■ ■■■ ■ ■
.. . , ,
:
. ■■ ■ ..■■■■ ■ .
Additional Information
• To cancel Depth-of-Field AE in mid
operation, set the command dial to
another position.
• When using a zoom lens, do not change
the focal length after setting the first
point. Always set the focal length first.
• Wide-angle lenses are best used in this
mode for maximum depth-of-field effect.
Lenses with a focal length longer than
200 mm are not recommended for deep
depth of field.
• This mode can also be used to minimize
depth of field by focusing on the same
point both times. A telephoto lens gives
portraits the best shallow depth-of-field
effect.
• If the focus points are extremely near
and far, the shutter speed may be very
slow. We recommend using a tripod.
Page 57

2. (i) ; Self-timer
Page 58

Ci) : Self-timer Settings; One-shot
AF/Evaluative metering
Use the self-timer function to delay shut
ter release for 10 seconds and include
yourself in the picture. Place the camera
on a tripod, table, or other steady surface.
• Shooting mode is automatically set to
Program AE.
1) Set the command dial to “ ”.
2) Compose the picture and press the shut
ter button to start the timer while look
ing into the viewfinder. A beeper tone
sounds to monitor the countdown. Two
seconds before the picture is taken, the
beeper tone sounds rapidly.
• Be careful not to stand in front of
the camera when you press the shut
ter button.
• To cancel the self-timer, turn the
command dial to another position.
33
Page 59

3. Flash Photography
When the “ ^ ” mark blinks in the viewfinder, pull the built-in flash up manually for flash photography.
When pulled up, the flash fires automatically in low-light and backlit conditions in P.I.C. modes and green
zone mode.
Notes
1) Always pull the flash up gently by
grasping the flash tabs.
2) When not in use or when using an exter
nal flash, push the built-in flash down
gently to retract. An external flash
cannot be used together with the built-
in flash.
3) For flash photography, do not press the
shutter button completely until the “ ^ ”
Flash Coupling Distance Range
ISO Color Print Film Slide Film Color Print Film Slide Film
0.7-4.3m
100
2,3-14.1 ft
0,7-8.5m
400
2,3-27.9 ft
34
WIDE
1-3m
3.3-9.8ft
1.5-6 m
4.9-19.7 ft
mark lights steadily in the viewfinder.
TELE
0.7-3 m
2.3-9.8ft
1-6m
3.3-19.7 ft
1-2.1 m
3.3-6.9 ft
1.5-4.3 m
4.9-14.1 ft
Page 60

4) “ ” will not blink in the “Creative
Zone”, it will always fire regardless of the
shooting conditions.
5) In low-light conditions, the built-in AF
auxiliary light is emitted automatically if
necessary when the shutter button is
pressed halfway.
6) Using the following large-diameter
lenses may cause shading at the lower
part of flash photos:
EF 200 mm f/1.8 L
EF300mmf/2.8L
EF 20-35 mm f/2.8L
EF 28-80 mm f/2.8-4 L
EF 80-200 mm f/2.8L
EF 50-200 mm f/3.5-4.5
EF 50-200 mm f/3.5-4.5 L
7) Using a lens of a focal length shorter
than 35 mm may cause shading around
the edges of flash photos.
8) To prevent shading, do not use a lens
hood when using the built-in flash.
35
Page 61

A subject’s eyes may appear red in flash
photos due to the light reflected from the
retina. To minimize this, have the subject
avoid looking directly at the camera. If
indoors, turn on additional room lighting.
36
Page 62

Page 63

Viewfinder IfitwHua!'«)'". V'' '
Shooting mode
(P) Program AE
(Tv) Shutter-priority AE
(Av) Aperture-priority
Warning dispiay
During daylight fill-in
flash photography, the
lens’ minimum aperture
value blinks.
The lens’ minimum
aperture value blinks.
The lens’ maximum
aperture value blinks.
The fastest possible x-
sync shutter speed 90
(1/90 sec.) blinks.
The slowest shutter
speed 30” (30 sec.)
blinks.
Condition Note
The background is
overexposed.
The background is
overexposed.
The background is un
derexposed.
The background is
overexposed.
The background is un
derexposed.
The subject is correctly
exposed.
The subject is correctly
exposed. Blinking may
stop if a faster shutter
speed is set.
The subject is correctly
exposed. Blinking may
stop if a slower shutter
speed is set.
The subject is correctly
exposed. Blinking may
stop if a smaller aper
ture Is set.
The subject is correctly
exposed. Blinking may
stop if a larger aperture
is set.
37
Page 64

X-sync Shutter Speed an
H
fi am:
Shooting mode
X-sync shutter speed Aperture value
Flash aperture value automatically
Program AE
Automatically set to 1/60 - 1/90 sec.
set according to existing lighting and
TTL program.
Aperture value automatically set ac
cording to the set shutter speed and
existing lighting.
Manually set to any desired aperture
value.
Manually set to any desired aperture
value.
Shutter-priority AE
Aperture-priority AE
Manual
Manually set to any desired shutter
speed of 1/90 sec. or slower*.
Automatically set between 30” and
1/90 sec. according to the set aper
ture value and existing lighting.
Manually set to any desired shutter
speed of 1/90 sec. or slower*.
* If the shutter speed is set to a value faster than 1/90 sec., the camera will automatically lower it to 1/90
sec.
38
Page 65

With these functions you can expand your creativity by
taiioring the operation of your camera to match shooting
conditions or your photographic objectives.
The functions described in the Applications section cannot be set in Green Zone
or any of the P.I.C. modes.
39
Page 66

1. Partial Metering
40
Page 67

The main light metering system used in this
camera is called “evaluative metering.’’ It
evaluates the entire picture area by divid
ing it into three zones to determine the best
exposure taking into consideration differ
ences in brightness between the subject
and background and the size of the sub
ject, With a backlit subject, for example,
the camera automatically compensates to
obtain correct exposure for the main
subject.
Partial metering, on the other hand, reads
only
This is particularly suited for photography
in theaters and other situations when there
is a significant difference in brightness be
tween the main subject and background.
The exposure setting is automatically
locked in partial metering mode, allowing
you to freely recompose the picture after
metering.
9.5%
of the center of the picture area.
Page 68

Partial Metering Area Mark
Page 69

1) Compose the picture and focus the
subject.
2) Keeping the shutter button pressed half
way, place the partial metering area
mark on the subject you want metered
and press the partial metering button.
The partial metering mark “ ” ap
pears in the viewfinder. After “ ”
lights up, you may remove your finger
from the partial metering button. The ex
posure is locked.
3) Continue pressing the shutter button
halfway, recompose the picture if
desired and press the shutter button
completely.
41
Page 70

2. Exposure Compensation
42
Page 71

Use exposure compensation for intention
ally underexposed or overexposed pic
tures. The compensation range is up to
+ 1-2 stops in half-stop increments.
While pressing the exposure compensation
button, turn the electronic input dial until
the exposure level mark is set to the
desired exposure compensation amount.
• Exposure compensation remains ac
tive until canceled.
• To cancel exposure compensation,
repeat the above procedure to return
the value to 0, or set the command dial
to the green zone or to any of the P.I.C.
modes.
• When used in the manual exposure
mode, the metered standard value is
also compensated.
Page 72

3. Multiple Exposures
Try this function for creative and dramatic
effects. Up to nine exposures can be made
on the same frame with minimal operation.
1) Press the exposure compensation but
ton and the partial metering button
together to display “ME” in the LCD
panel.
2) Turn the electronic input dial to set the
desired number of exposures.
3) Press the shutter button to start.
• “ME” blinks in the LCD panel during
multiple exposure operation.
• The film winds to the next frame after
the set number of exposures have been
taken.
• To clear preset exposures, repeat steps
#1 and 2 to set the number of ex
posures to 1.
43
Page 73

Shooting
For best results, we recommend setting
exposure compensation depending on the
number of exposures.
Number of exposures
Two
Three
Four
Exposure compensation
amount
-1.0
-1.5
-2.0
44
Page 74

• This table is a general guideline. The ac
tual exposure connpensation annount
varies according to the subject and
desired effect. This kind of photo re
quires experimentation for best results.
Page 75

4. Bulb (Long Exposure)
Use bulb for exposures longer than 30 se
conds, such as for fireworks or night
scenes. The exposure continues as long
as the shutter button is held down.
Make sure the camera does not move dur
ing exposure by placing it on a tripod or
other steady surface.
1) Set the command dial to “M”.
2) Turn the electronic input dial until
"buLb” (after 30") is displayed.
3) Set the aperture value by turning the
electronic input dial while pressing the
exposure compensation button.
4) Press the shutter button completely to
take the picture.
• Bulb can be combined with the multiple
exposure function.
45
Page 76

5. Manual Film Speed Setting
46
Page 77

When using non DX-coded filnn or when
you want to set the effective speed of a film
determined from your own tests, you can
manually set the film speed to any value
from ISO 6-6400 in 1/3-step increments,
The setting is canceled after the film is re
moved and replaced with another DXcoded film.
1) Set the command dial to ISO. “ISO” and
a film speed appear in the LOD panel.
2) Turn the electronic input dial to set the
desired film speed.
Page 78

IV. REFERENCE
1. Comparisons Between AF Mode and Film Wind Mode
Film wind mode
Single
Continuous
One-shot
AF lock and AE lock in the
evaluative metering mode
take place simultaneously on
AF completion. The shutter
releases only after AF com
pletion.
AF lock and AE lock in the
evaluative metering mode
take place simultaneously on
AF completion, then continu
ous exposure is activated.
(Approx. 1 fps maximum.)
Al Servo
AF follows the subject and
the exposure is determined at
the moment of shutter
release The shutter
releases only after AF com
pletion.
AF follows the subject and
the exposure is determined at
the moment of shutter
release. AF is adjusted to fol
low the subject during the
series of exposure.
(Approx. 1 fps maximum.)
The shutter releases only
after AF completion.
47
Page 79

2. Film Shooting Capacity
The battery’s shooting capacity varies depending on the number of flash use and on the tem
perature of the environment. Refer to the table below.
Temperature
Normal (20°C)
Low (—20°C)
Based on a new 2CR5 lithium battery using the EF 35-80 mm f/4-5.6 lens and 24-exp. film.
The data are based on Canon’s Standard Test Method.
Without Flash
75 rolls 40 rolls
45 rolls 25 rolls
With 50% Flash
With 100% Flash
15 rolls
10 rolls
48
Page 80

3. Program Lines (Program Characteristics)
This camera is equipped with advanced
“Intelligent Program AE’’ which chooses
the best shutter speed/aperture combina
tions, taking the lens’ focal length into ac
count (for green zone mode and Program
AE mode).
In green zone mode, the automatically set
shutter speed blinks when it becomes 0 to
0.5 steps slower than “1/focal length of
the lens in use”. This shutter speed
(1/focal length of the lens in use) is gener
ally said to be the limit for hand-held
shooting.
• When using the EF 35-80mm f/4-5.6.
Red : WIDE
Black : TELE
49
Page 81

Program Shift Cliaracteristics
(EF 50 mm f/1.8 - example with shift at EV 13)
• Indicates the shutter speed/aperture combinations with program shift.
6
7 8 9 10 11 12 13 14 15 16 17 18 19 20
f/NO
50
Page 82

V. ACCESSORIES
The accessories described in this section are sold separately.
1. Dedicated Canon Speedlites
If you need a flash with a little higher output
than that of the built-in flash, attach the
extra-compact and simple Speedlite 200E
(guide number: 66-ft/20-m at ISQ 100) to
the camera. All you have to do is switch it
on and point and shoot.
In addition to the 200E, the powerful
430EZ zoom flash with the maximum
guide number of 141 •ft/43-m (at ISO
100), and the 300EZ with the maximum
guide number of 98-ft/30-m (at ISO 100)
are available. With the 430EZ in particular,
advanced functions such as flash output
level compensation, stroboscopic flash,
second-curtain sync, bounce flash, and
slow synchronization are possible in addi
tion to large output. An external battery
pack is also available for the 43dEZ.
51
Page 83

52
Page 84

2. Grip Extension GR-70
The grip extension increases the size of the
grip to provide a more comfortable and se
cure hold for large hands. An adjustable
padded strap is included for easier han
dling. Fastens into the tripod socket with
a lock nut screw.
3. Dioptric Adjustment Lenses
For eyeglass wearers, there are 10 correc
tion lenses available from -f 3 to -4 dpt.
Conduct a test before purchase for the
best match to your prescription and make
viewing more comfortable.
Page 85

Page 86

4. Lens Hoods and Filters
Use lens hoods and filters to keep unwant
ed light from entering the lens and provide
special effects. Select the right hood size
to match your lens and select filters ac
cording to your photographic objectives.
• When attaching the hood to the EF
35-80 mm f/4-5.6 Power Zoom, EF 35-80
mm f/4-5.6 or EF 80-200 mm f/4.5-5.6,
first screw the hood adapter into the
lens and attach the hood to the adapter.
• When attaching both the hood and filter
to the EF 35-80 mm f/4-5.6, screw the
filter into the hood adapter.
53
Page 87

VL CAMERA CARE
Keep your camera in top condition by fol
lowing these suggestions for periodic
cleaning. See the precautions on p. 5 for
other important information.
1. Cleaning the lens surface—
Blow off dust with a blower brush and
gently wipe the lens surface with a piece
of lens cleaning paper moistened with
lens cleaner. Clean in a spiral motion
from the center outwards.
2. Cleaning mirror and focusing
screen—
Use a blower brush reserved for this
purpose only. If more cleaning is neces
sary, NEVER attempt to do it yourself.
Take the camera to an authorized Can
on service facility.
54
Page 88

3. Cleaning the film chamber—
Use a blower brush to remove accumu
lated film dust particles that might
scratch the film. Be careful NOT TO
TOUCH the shutter curtain.
4. Cleaning the film pressure plate and
film guide rails—
Lightly wipe the surface with a piece of
lens cleaning paper moistened with lens
cleaning. Be careful NOT TO TOUCH
the shutter curtain.
• Use of aerosol spray dust removers
is not recommended.
Page 89

Liquid Crystai Dispiay/Battery
Notes
The LCD panel uses liquid crystal to show
exposure information. After about five
years, the display may become difficult to
read. If this occurs, have it replaced at an
authorized Canon service facility. Replace
ment is at the owner’s expense.
Liquid crystal may also respond relatively
slowly in temperatures below 32°F/0°C. It
may also darken in temperatures around
140°F/60°C. The LCD panel will return
when the temperature returns to normal.
Page 90

Battery Information
Lithium Battery Check
Always check the battery at the following
times:
1. When loading a new battery
2. After lengthy storage
3. Before an important shooting as
signment
4. In cold weather
5. If the shutter will not release
Battery Use Information
1. Wipe the battery terminals with a clean,
dry cloth to ensure proper connection.
2. Remove the battery if you do not expect
to use the camera for more than three
weeks.
3. Battery performance deteriorates slight
ly in temperatures below 32°F/0°C.
Keep the camera and especially a spare
battery close to your body or in an in
side pocket to keep it warm until use.
55
Page 91

4. The battery may explode or cause burns
if disassembled, recharged, shorted, ex
posed to high temperatures, or disposed
of in fire. Be sure to observe all precau
tions indicated on the battery package.
Always keep it out of the reach of
children.
5. If the battery check symbol blinks or
does not appear in the LCD panel dur
ing battery check, exposure will be okay
as long as the shutter releases. Film ad
vance and rewind will be impaired by in
sufficient battery power. If wind or
rewind stops due to the exhausted bat
56
tery, the film cartridge symbol will blink.
Film transport resumes after a new bat
tery is loaded.
Page 92

Blinking “cn” Display
There are two conditions when the blink
ing “ «crzi” will appear in the LCD panel.
1. If the battery is nearly exhausted, the
blinking “ crzi ” will appear when the
shutter button is pressed halfway or
when the battery is checked.
2. If the remaining battery power does not
show a replacement condition, but the
camera’s self-test process detects an
internal malfunction, the blinking “ crz] ”
will appear when the shutter button is
pressed halfway.*
* In this case, remove the battery once.
Wipe the battery terminals and reload
it. Check the battery again. If the blink
ing “ €T3 ” still appears, the camera
needs to be examined by an autho
rized Canon service facility.
Page 93

Page 94

Thread the ends of the neckstrap through
the fixtures as shown.
57
Page 95

VII. SPECIFICATIONS
TYPE AND MAJOR COMPONENTS
Type: 35 mm focal plane shutter SLR
(single-lens reflex) autofocus/auto expo
sure camera, with built-in motor drive
and flash.
Lens Mount: Canon EF mount (electronic
signal transfer system)
Usable Lenses: Canon EF lenses
Viewfinder: Fixed eye-level pentaprism.
Gives 90% vertical and horizontal
coverage of actual picture area and
0.75X magnification with 50 mm lens at
infinity.
Standard Diopter: Adjusted to -1
Focusing Screen: Fixed, new laser-matte
screen with focus mark and partial
metering mark.
Shutter: Vertical-travel, focal plane shut
ter with all speeds electronically con
trolled.
Shutter Speed: 1 /1000 - 30 sec. and bulb.
58
Page 96

Set in 1/2-stop increments. X-sync is
1/90 sec.
AUTOFOCUS
AF Control System: TTL-SIR (Secondary
Image Registration) phase detection
type using BASIS (Base-Stored Image
Sensor). Two modes available; One-shot
and A! Focus that automatically
switches to One-shot or Al Servo ac
cording to subject.
Manual focusing also possible.
AF Working Range: EV 1 -18 at ISO 100.
AF Auxiliary Light: Automatically project
ed when necessary by the specified
Speedlite.
Page 97

EXPOSURE CONTROL
Camera Shake Warning: Operates in
Light Metering: TTL full-aperture meter
ing using an SPC (Silicon Photocell).
Three metering patterns available:
3-zone evaluative metering, partial
metering which covers approx. 9.5% of
the central picture area and center-
weighted average metering (only when
selecting the manual exposure mode).
Metering Range: EV 2-20 with 50 mm f/1.4
lens at ISO 100.
Shooting Modes:
1. Green Zone (Intelligent Program AE)
2. Programmed image Control (Portrait,
Landscape, Close-up, Sports)
3. Intelligent Program AE
Green Zone and Programmed Image
Control modes. Shutter speed blinks
when automatically-set shutter speed is
0 to 0.5 steps slower than “1/focal
length of the lens in use.”
Multiple Exposures: Up to nine exposures
can be preset. Automatically clears
upon completion.
Exposure Compensation: +1-2 stops in
1/2-stop increments.
FILM TRANSPORT
Film Speed Setting: Automatically set ac
cording to DX code (ISC 25-5000) or set
by user (ISC 6-6400).
4. Shutter-priority AE
5. Aperture-priority AE
6. Metered Manual
7. Depth-of-Field AE
8. Flash AE (A-TTL or TTL program flash
AE with the flash)
Film Loading: Automatic prewind system.
After film positioning and back cover
closure, the film automatically winds to
the end of the roll and stops.
59
Page 98

Film Wind: Automatic. One of two modes
is automatically set; Single Frame and
Continuous (1 fps maximum).
Film Rewind: Automatic rewind at end of
roll.
POWER SOURCE
Battery: One six-volt lithium battery
(2CR5).
OTHER
Self-timer: Electronically controlled with a
10-sec. delay.
DIMENSIONS
Size: 5-7/8” (W) x 3-13/16” (H) x
2-11/16” (D)
148(W) X 99.8(H) X 68 (D) mm
Weight: 15.8 oz. (450 g) without battery
17.2 oz (490 g) with battery
60
Page 99

LENSES
EF 35-80 mm
f/4-5.6
Angle of
View
Optical Construction 8 elements in
Minimum Aperture 22-32
Shooting Distance
Maximum
Magnification and
Field of View
Diagonal
Vertical
Horizontal
63° - 30°
30° - 17°
54° - 25°
8 groups
1.2 ft/0,37 m-infinity
35 mm
0.12X (200X300mm)
7-7/8'X11-13/16"
80 mm
0.25X (96X144mm)
3-3/4"X5-11/16"
Filter Size
Hood
Case (hard/snap) LH-C13/ES-C9
Length x Max.
Diameter
Weight
52 mm
EW-62 ET-62 II
2-3/8” X 2-11/16”
61 X 68.6 mm
6.3 oz. (180 g) 9.7 oz. (275 g)
EF 80-200 mm
f/4.5-5.6
30° - 12°
17° - 7°
25° - 10°
10 elements in
7 groups
22-27
4.9 ft/1.5 m- infinity
80 mm
0.065X (368X578mm)
14-1/2"X21-9/16"
200 mm
0.156X (152X225mm)
5-15/16"X8-7/8"
52 mm
LH-C13/ES-C13
3-1/16” X 2-13/16”
77.8 X 71.2 mm
BUILT-IN FLASH
Type: Built-in TTL automatic flash. Manual
ly retractable. Series control system.
Page 100

Guide Number (ISO 100): 39 ft/12 m
Flash Coverage Angle: Covers the angle
of view of a 35 mm lens
Recycling Time: Approx. 2 sec.
Flash Duration: 1 ms or less
Sync Timing: First curtain sync only.
Flash Control System: TTL automatic
control by metering light reflected from
the film plane.
Shooting Distance Range: 2.3-14.1
ft/0.7-4.3 m (Based on ISO 100 film. The
shooting distance range changes ac
cording to film speed.)
AF Auxiliary Light: Automatically emitted
when the shutter button is pressed half
way if necessary. Effective distance
range: 3.3-13.1 ft/1-4 m
Power Source: Same as that of the body
61
 Loading...