


tr
ffi
I
P
I
engtisn
tt"ti"no
fl
E
l>(us L.7l
rrangais
espanot
E
P
Deutsch
eortuguCs
I
E
AR/AXSFD'
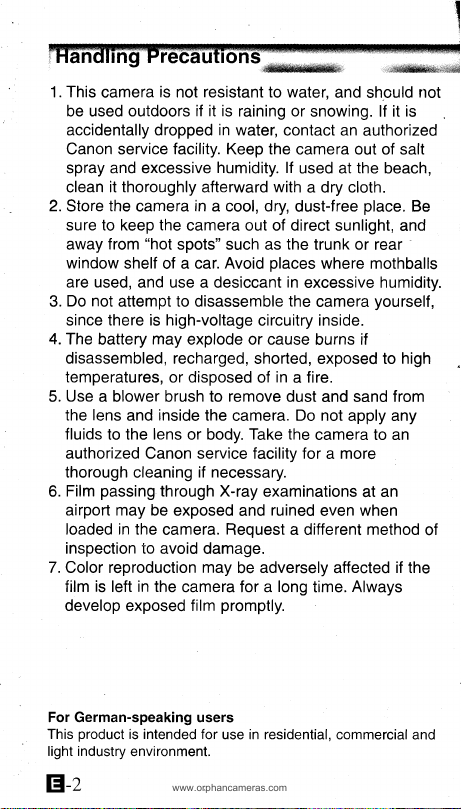
Handllng Precautions
www.orphancameras.com
This
1.
be used outdoors
accidentally dropped
Canon service facility. Keep the
spray and excessive
clean
2.
Store
sure
away
window
used,
are
Do not
3.
since
4. The
battery
disassembled, recharged,
temperatures,
5. Use a blower brush to
lens
the
fluids
is
resistant
camera
not
if it is
it thoroughly
the
camera
to keep the
from
shelf
afterward
in
camera out of direct sunlight,
"hot
spots" such as the trunk or rear
a car. Avoid
of
and use a desiccant
attempt to disassemble
there is high-voltage
may
explode or cause
or disposed
inside
and
to the
lens
the
or body.
,;r****;;,,
to water,
raining or
in
water,
humidity. lf
a cool, dry,
with
places
circuitry inside.
shorted, exposed to
of
remove
camera.
Take
authorized Canon service facility for
thorough cleaning
passing
Film
6.
airport may
loaded in
inspection to
7.
Color reproduction
film
develop
is
left in the
exposed
the
if necessary.
through
X-ray examinations
be exposed
camera.
Request
avoid damage.
may
camera for a
promptly.
film
ruined
and
be adversely affected
and
should
snowing. lf it
contact an
authorized
camera out of salt
the
used at
a dry cloth.
dust-free
place.
where mothballs
in
excessive
the
in
fire.
a
dust
Do not
the
yourself,
camera
if
burns
and sand
apply any
camera to an
more
a
at
when
even
a different method
long
trme.
Always
,**,,*,,*,n
not
is
beach,
Be
and
-
humidity.
high
from
an
if
the
of
For German-speaking users
product
This
light industry
EI-z
is intended for
environment.
use in residential,
commercial and
F-
This device
is
not
accept any interference
may cause
Do not make
unless otherwise specified in the instructions.
or
stop operation
This
limits for
FCC
protection
installation.
radio frequency
accordancewiththeinstructions,maycauseharmfu|
interference
However,
in
harmful interference
be determined
encouraged to try to
the
.
Reorient
.Increase
.
Consult the dealer or an
help.
This
radio
interference-causing
Apparatus", ICES-003
Cet appareil
radio6lectriques
Classe B
"Appareils
Canada.
| ?
\ E
complies with Paft 15
subject to the following two
cause harmful interference,
received, including interference
Undesired
modifications
equipment
a class B
These
Rules.
against
This
operation.
any changes
should
be
the
of
equipment.
has
been tested
digital device,
limits
are designed to
harmful interference
equipment
or modifications
made,
energy and, if not installed
radio
to
communications.
guarantee
is no
there
particular
a
installation.
radio
to
turning
by
lf this
the
correct the interference
following
measures:
or relocate the receiving
the separation
between the equipment
experienced
digital apparatus does not
noise emissions from
digital apparatus
equipment standard entitled
of the Industry
num6rique
respecte les limiteg
applicables
prescrites
The
European
dans la norme
Num6riques",
Mark is a Directive
CE
Community
NM8-003
of the FCC Rules.
and
and
you
(1)This
(2)
this
could be
found
conditions:
pursuant
provide
in
generates,
a residential
uses and can radiate
that interference
equipment does cause
or television reception,
equipment off and on, the
antenna.
radio/TV
exceed the
Canada.
aux appareils num6riques
le
sur
mat6riel brouilleur:
6dict6e
conformity mark
(EC)
Operation
device may
must
device
to the equipment
lf
to comply
part
to
and
by one or more of
Class
as set out
de bruits
par
that
such changes
required
to
with the
15
of the
reasonable
in
used
will not
occur
which
user
receiver.
and
technician for
B limits for
in
"Digital
de
l'lndustrie
the
of
the
can
is
t'
l=l
15
''
I
{
I
l
tr-:
you
www.orphancameras.com
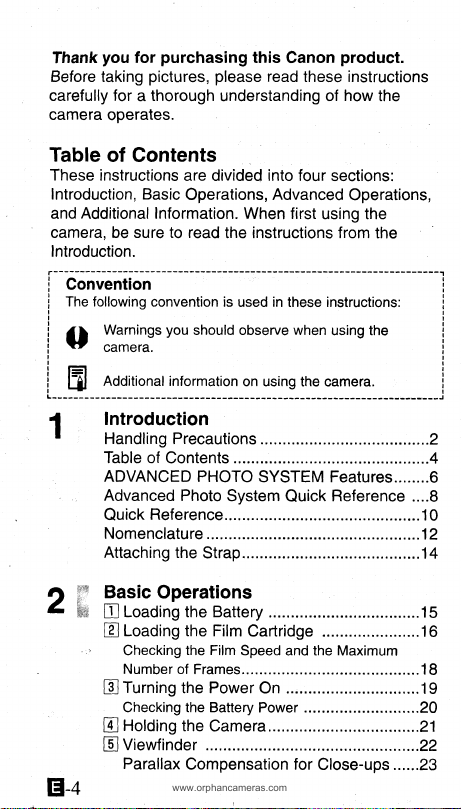
Thank
Before taking
carefully
camera
Table
These
instructions
lntroduction, Basic
Additional Information.
and
camera, be sure to read
Introduction.
i--ffffiiil-
following
ffre
i
g
gil:ffs
i
im
Additional
IJJ
i
;';;ilffi;
t
Table of
ADVANCED PHOTO
Quick
Attaching the
t
E
,1i;n
E
B
'
E
E
E
tr-+
purchasing
for
pictures, please
for
thorough
a
operates.
this
Canon
read
understanding of
of Contents
are divided
Operations, Advanced
convention is
you
shoutd observe when
information
Handling Precautions
into
When first
the instructions from
in
used
these instructions:
on using the camera.
Contents
SYSTEM Features........6
Reference...
Nomenclature
Strap.... ........14
Basic
Operations
Loading the
LoaOing the
Checking
Number
Turning
Checking the Battery
Holding
Battery
Film
the Film
of
the Power
Cartridge
Speed and the Maximum
Frames.....
On .
Power
the
Camera.
Viewfinder
Parallax
Compensation for
product.
these instructions
how
the
four
sections:
Operations,
using the
the
usins the
..........2
.........4
......10
......12
........16
.......18
.....20
.....21
Close-ups ......23
......22
i
I
i
i
i
Setecting
E
Strutter
E
Shooting through
Green/Orange
Removing
E
Film
Handling
Advanced Operations
3l
Focus
Date and Time
Switching the
Setting and
lmprinting Titles
Selecting the
Selecting
Changing the
Red-eye Reduction Function.... ........37
Auto
Auto
Flash
Flash
Slow-synchro
Self-timer Shooting.
Shooting
Replacing
Additional f nformation
4l
Troubleshooting ......... ,......46
Questions
Specif
the Print Type
Button Action.... .......25
a Window
Indicators
Film
the
Cartridge
Processing... ......28
Film Cartridges
Lock .......
lmprinting....
Date
Adjusting
Title
Language .... ........34
Title
the
Flash Mode .....36
Mode without Red-eye
Flash
Mode with
Flash
ON
OFF
.... ....40
Mode
Mode ......41
Mode
with the
Optional
Remote
the
Answers.... ....47
&
ications ......48
(C|H/P)
Cartridge....
After Exposure
Format
Date/Time ............32
the
Red-eye Reduction
Red-eye Reduction ....42
with
Remote
Control
.G*
.......24
.....25
..26
........27
........28
.....30
.......31
..34
.......35
Reduction....38
.... ... .39
....43
..44
Control
Battery .....45
tr-s

E,-
www.orphancameras.com
l------r----------
This is
i
system as well
made it
than any
Here
system.
E
The 1X240 new
a compact film cartridge with
no leader. This
film
anyone, and replaces
previous
ln
exposure indicator
of the cartridge shows whether
unexposed, exposed,
*This
has
El
The
allows
cartridges
compact
(Canon
Moreover.
technology has made
compact
ADVAN.ED PHoTo
Advanced
an
Photo
as Canon's advanced technology has
possible
previous
produce
to
camera.
are some of the
New Film
film comes in
new
can be easily loaded
hard{o-load films.
addition, the visual
camera model
been
New
Advanced Photo System
cameras and film
than
modelcomparison).
camera.
drop-in
all
on the
or
partially
does not mark
exposed
Gamera
to be much more
previously
Canon's advanced
possible
it
System camera. This
a camera that is
new
special
Visual
by
top
the film
processed.
(
D
the
indicator).
Size
,.
I
produce
to
i
i
\-
possible
SYSTEM
features
exposure indicators
cartridge
film
to show when it
this
of
is
ultra
smaller
this
L--
tr-o
Features
New Type
Lfl
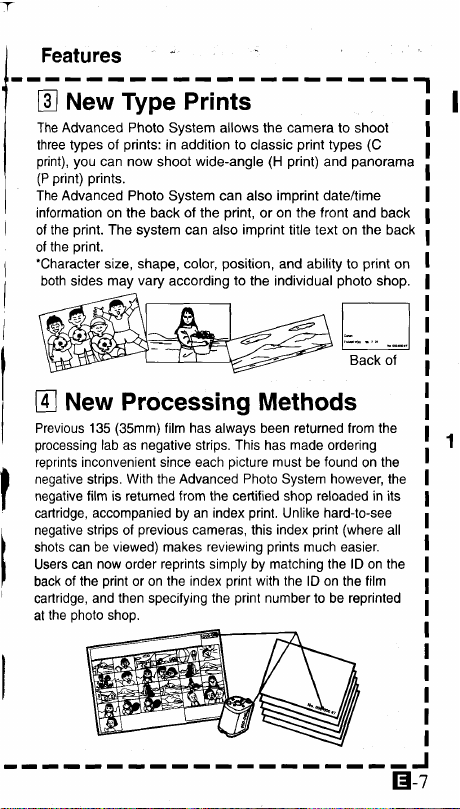
Advanced Photo
The
types of
three
print), you
(P print) prints.
The
information on the back of the
of
of
'Character
E
Previous
processing
reprints
negative
negative film
cartridge,
negative strips of
shots
Users
back
cartridge,
at
can now shoot
Advanced Photo
print.
the
The system can also
print.
the
size,
both sides
may vary
New Processing Methods
(35mm)
135
lab
as
inconvenient since each
strips.
is
accompanied
can be viewed) makes
now
can
print
of the
and then specifying the
photo
the
shop.
Prints
System allows the camera to shoot
prints:
addition to
in
System can also
shape, color,
according
has
film
negative
With the Advanced
from the certified shop reloaded in its
returned
by
previous
reprints simply by matching the lD on the
order
or on the
index
classic
wide-angle
strips.
an index
cameras,
reviewing
(H
print,
or
imprint
position,
to
the individual
always been returned from the
This
has made ordering
picture
must be
Photo
print.
this
prints
print
with the
print
number to be reprinted
print
print)
imprint date/time
on
the
title text on the back
and ability to
System however, the
Unlike hard-to-see
index
much easier.
print
lD
types
and
front
found
on
panorama
and back
print
photo
tl
t*l
ll
Back of
on
(where
the film
(C
shop.
-l
on
the
all
J
El-t
Advanced Photo System
www.orphancameras.com
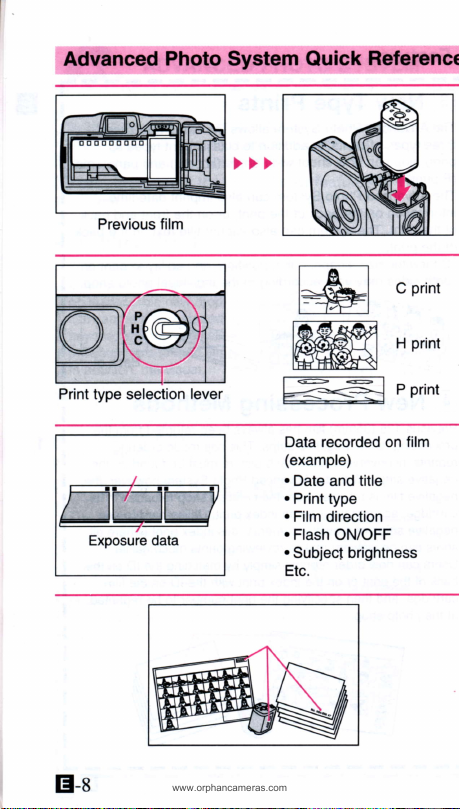
Quick
Reference
Previous
Print type selection
1+
Exposure data
tr-e
film
lever
[E_l
Hrl
ffi
l---::--€-l
!-<=.Qi
:
recorded
Data
(example)
.
Date and title
.
Print type
.
Film direction
.
Flash ON/OFF
.
Subject brightness
Etc.
on
print
C
print
H
print
P
film
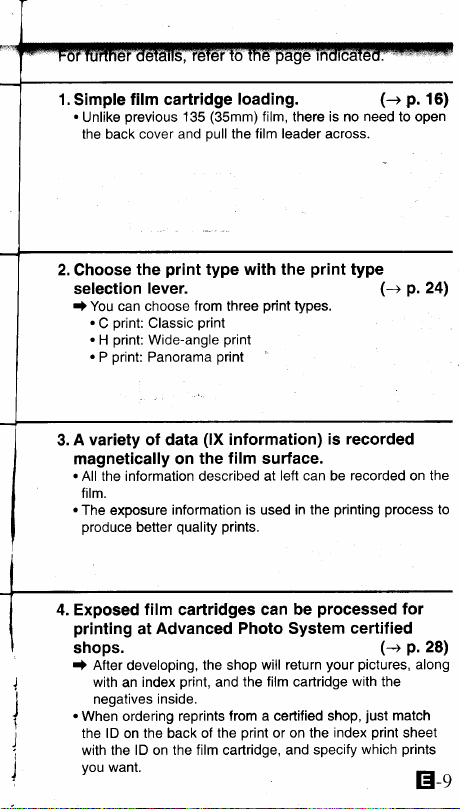
1.
Simple
.
the back
Unlike
previous
film cartridge
cover and
135
(35mm)
pull
loading.
film, there is no need to open
film leader
the
across.
(+
p.
16)
print
2.
Choose
the
selection
I You can choose
.
print:
C
.
print:
H
.
print:
P
A variety of data
3.
magnetically on
.
All the information described at
film.
.
The exposure
produce
better
4. Exposed
printing
film
at
type with the
lever.
from
print
Classic
Wide-angle
Panorama
(lX
the
information is used in the
quality
cartridges can
Advanced Photo System
shops.
After
I
developing,
with
an
negatives
.
When ordering reprints
the lD
on
lD on the film canridge, and
with the
you
want.
print,
index
inside.
the back of
the shop
print
three
print
print
information)
film
surface.
prints.
will return
the film
and
from a
certified
print
the
or on the
print
type
p.2a)
types.
(+
is recorded
left can be recorded on the
process
printing
processed
be
for
certified
your
caftridge
shop,
specify
with
index
the
just
print
which
match
sheet
prints
along
p.28)
(-+
pictures,
tr-q
to
Quick
www.orphancameras.com
Reference For
further
details,
refer
to the
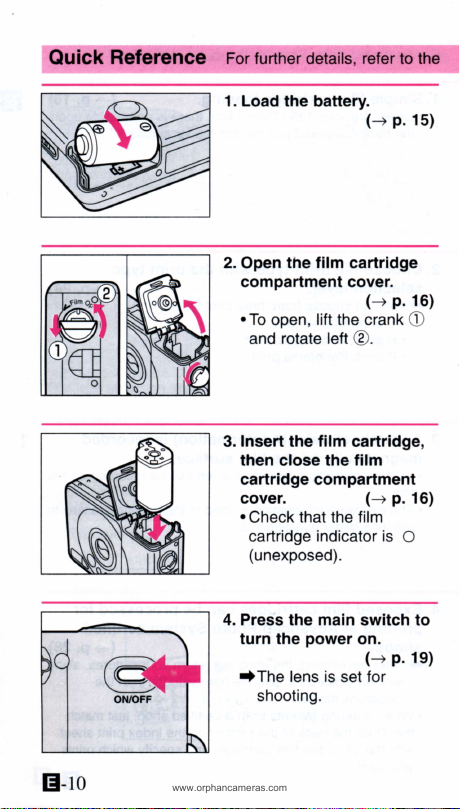
1. Load the
2. Open tne
battery.
film
cartridge
compartment cover.
.To
and rotate
Insert the film
3.
open,
lift the
left
@.
cartridge,
then close the film
cartridge compartment
cover.
.
Check that the film
cartridge indicator
(unexposed).
4. Press the main
turn the
tThe
lens is set for
shooting.
power
switch to
on.
(--+
(-+
crank
(--+
is
(-+
p.
p.
p.
p.
ls)
16)
''T,
16)
O
19)
E-to
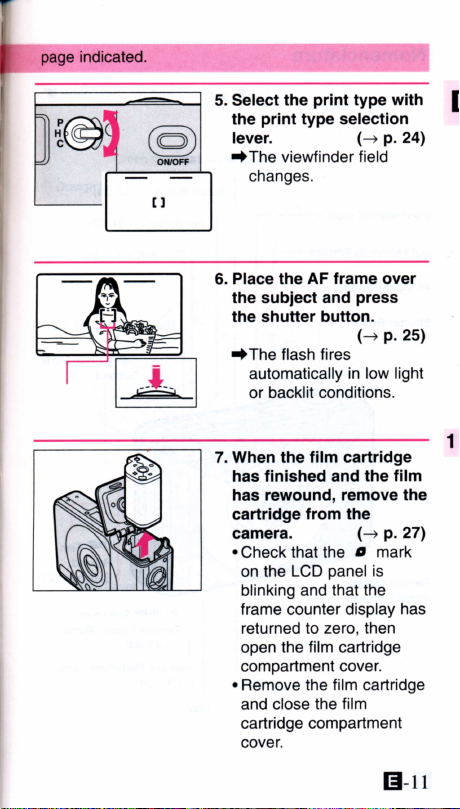
page
indicated.
print
the
the
print
type selection
5. Select
lever.
tThe viewfinder field
changes.
type with
p.2a)
(-+
Place the AF
6.
the subject
the
shutter
frame
press
and
button.
(-+
over
p.2s)
lThe flash fires
automatically
or backlit
7. When the film cartridge
has finished and the
has rewound, remove
cartridge
camera.
.
Check that the
on the
blinking
frame counter display
returned
the film cartridge
open
compartment cover.
.
Remove
and close
cartridge
cover.
in low light
conditions.
from the
(-+
o
panel
LCD
and that the
to zero. then
the film cartridge
compartment
the
is
film
film
p.271
mark
E-tt
the
has
'(+
www.orphancameras.com
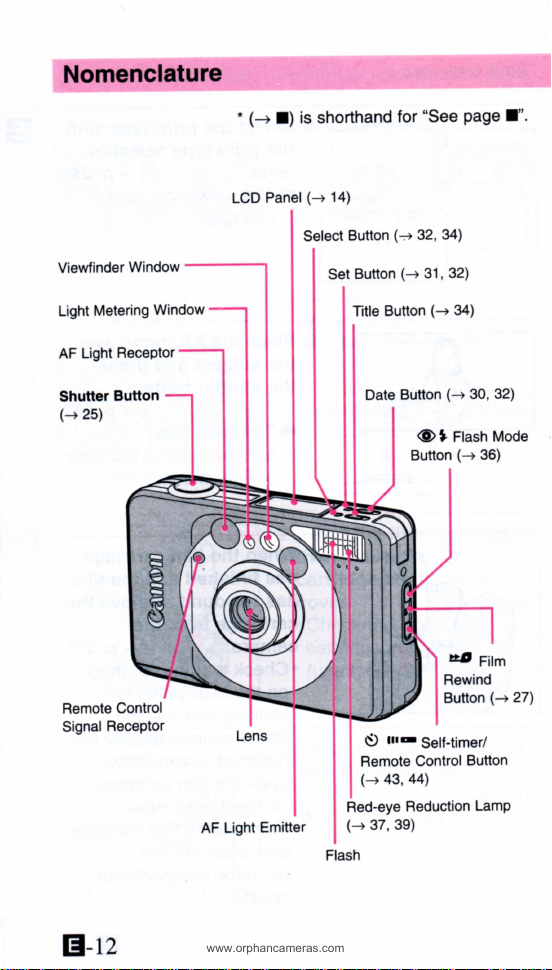
is shorthand
l)
for'See
Page
f.
Metedng
Ught
2s)
Window
Receptor
Button
Gontrol
Meuffnder
Light
AF
Shutbr
(+
Remote
SignalReceptor
Window
AF
LCD
Ught
Panel(+
Emitter
la)
Select
Set
Button
Button
Button
Tiile
Date
trc
C)
Remote
(-r
4dl,
Red-eye
(+
37,39)
(+
32,34)
(+
31,32)
(+
Button
Ol
Button
Self-timer/
Control
4.4)
Reduclion
34)
(-+
30,
Rastr
(-r
t4
Rewind
Button
Button
32)
UoOe
36)
Fltm
(+271
LamP
7E.-tz
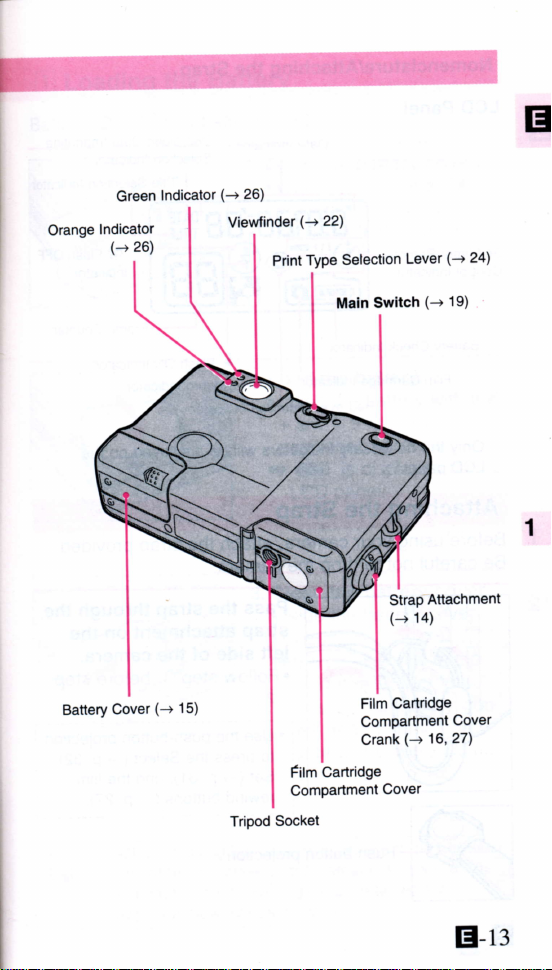
Orange
Battery
Green
Indicator
(-r
26)
Cover
Indicator
(+
15)
(-+
26)
Viewfinder
Tripod
(+
22)
Type
Print
Cartridge
Film
Compartment
Socket
Selection
Maln
Switch
Strap
(-+
Cover
Lever
(-+
Attachment
14)
(-r
19)
24)
El-ts
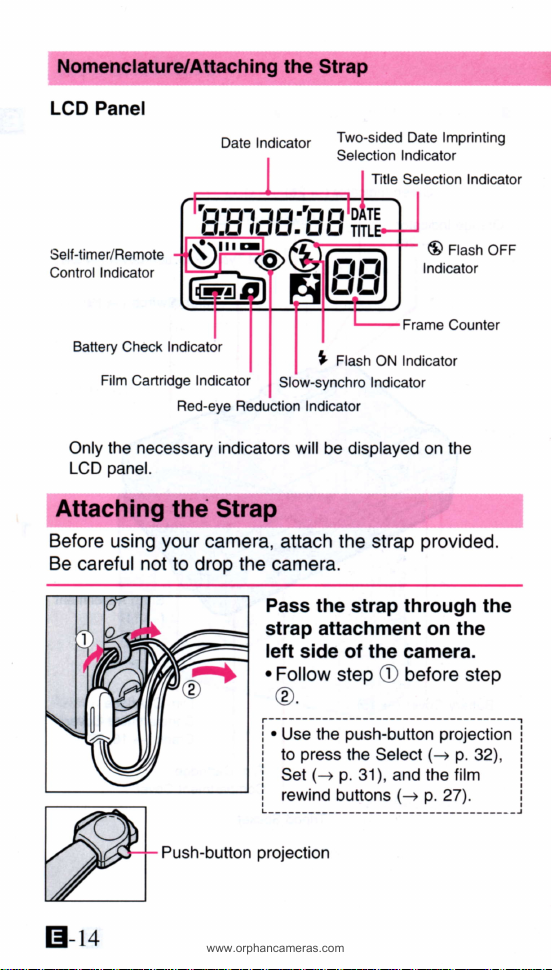
LCD Panel
www.orphancameras.com
Self-timer/Remote
lndicator
Control
Battery
Check
Film Cartridge Indicator
Indicator
Red-eye
Date Indicator
Slow-synchro
Reduction Indicator
Two-sided Date lmprinting
Selection
I
Rasn
Indicator
Title Selection Indicator
Frame
Counter
Indicator
ON
Indicator
Only the necessary indicators will
panel.
LCD
Before
Be
using
careful
El-t+
your
not
to drop the
Push-button
be displayed on the
camera,
attach
the
strap
camera.
Pass the
strap
strap attachment on the
left side
.
Follow
@.
the
of
step O before step
Itll"il"pil+'tt;il;i,;;ffii
press
to
i
Set
i
L__:::11!_I_:111t_1lt_',!):
projection
the Select
(+ p.
31), and the film
provided.
through
camera.
(+ p.
the
32),
i
i
_: