


Camera User Guide
ENGLISH
•Make sure you read this guide, including the “Safety Precautions” section (=7), before using the camera.
•Reading this guide will help you learn to use the camera properly.
•Store this guide safely so that you can use it in the future.
•Click the buttons in the lower right to access other pages.
 : Next page
 : Previous page
 : Page before you clicked a link
•To jump to the beginning of a chapter, click the chapter title at right.
From chapter title pages, you can access topics by clicking their titles.
Before Use
Basic Guide
Advanced Guide
Camera Basics
Auto Mode
Other Shooting
Modes
P Mode
Playback Mode
Setting Menu
Accessories
Appendix
Index
©CANON INC. 2014 |
CDD-E570-010 |
1 |

 Package Contents
Before use, make sure the following items are included in the package. If anything is missing, contact your camera retailer.
Camera |
Battery Pack |
Battery Charger |
|
NB-11LH/NB-11L |
CB 2LF/CB 2LFE |
Printed Matter
Wrist Strap
• A memory card is not included (=2).
 Compatible Memory Cards
The following memory cards (sold separately) can be used, regardless of capacity.
•SD memory cards*
•SDHC memory cards*
•SDXC memory cards*
•Eye-Fi cards
*Cards conforming to SD standards. However, not all memory cards have been verified to work with the camera.
 About Eye-Fi Cards
This product is not guaranteed to support Eye-Fi card functions (including wireless transfer). In case of an issue with an Eye-Fi card, please check with the card manufacturer.
Also note that an approval is required to use Eye-Fi cards in many countries or regions. Without approval, use of the card is not permitted. If it is unclear whether the card has been approved for use in the area, please check with the card manufacturer.
Before Use
Basic Guide
Advanced Guide
Camera Basics
Auto Mode
Other Shooting
Modes
P Mode
Playback Mode
Setting Menu
Accessories
Appendix
Index
2

 Preliminary Notes and Legal
Information
•Take and review some test shots initially to make sure the images were recorded correctly. Please note that Canon Inc., its subsidiaries and affiliates, and its distributors are not liable for any consequential damages arising from any malfunction of a camera or accessory, including memory cards, that result in the failure of an image to be recorded or to be recorded in a way that is machine readable.
•Images recorded by the camera shall be for personal use. Refrain from unauthorized recording that infringes on copyright law, and note that even for personal use, photography may contravene copyright or other legal rights at some performances or exhibitions, or in some commercial settings.
•The camera warranty is valid only in the area of purchase. In case of camera problems while abroad, return to the area of purchase before contacting a Canon Customer Support Help Desk.
•Although the LCD monitor is produced under extremely high-precision manufacturing conditions and more than 99.99% of the pixels meet design specifications, in rare cases some pixels may be defective or may appear as red or black dots. This does not indicate camera damage or affect recorded images.
•The LCD monitor may be covered with a thin plastic film for protection against scratches during shipment. If covered, remove the film before using the camera.
•When the camera is used over an extended period, it may become warm. This does not indicate damage.
Before Use
Basic Guide
Advanced Guide
Camera Basics
Auto Mode
Other Shooting
Modes
P Mode
Playback Mode
Setting Menu
Accessories
Appendix
Index
3
 Part Names and Conventions in This Guide
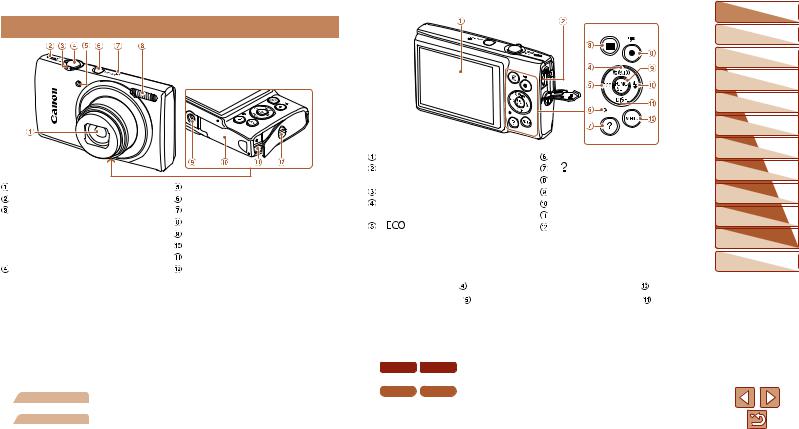
Lens |
Lamp |
Speaker |
Power button |
Zoom lever |
Microphone |
Shooting: <i (telephoto)> / |
Flash |
<j (wide angle)> |
Tripod socket |
Playback: <k (magnify)> / |
Memory card/battery cover |
<g (index)> |
DC coupler cable port |
Shutter button |
Strap mount |
•Shooting modes and on-screen icons and text are indicated in brackets.
• : Important information you should know
•
 : Notes and tips for expert camera use
•=xx: Pages with related information (in this example, “xx” represents a page number)
•Instructions in this guide apply to the camera under default settings.
•For convenience, all supported memory cards are simply referred to as the “memory card”.
•The tabs shown above titles indicate whether the function is used for still images, movies, or both.
: Indicates that the function is used when shooting or viewing still images.
: Indicates that the function is used when shooting or viewing movies.
Screen (LCD monitor) |
Indicator |
|
AV OUT (Audio/video output) / |
< (Help)> button |
|
DIGITAL terminal |
Movie button |
|
<1 (Playback)> button |
FUNC./SET button |
|
<A (Auto)> / <a (Single-image |
<h (Flash)> / Right button |
|
erase)> / Up button |
<l (Display)> / Down button |
|
< |
> / Left button |
<n> button |
•In this guide, icons are used to represent the corresponding camera buttons on which they appear, or which they resemble.
•The following camera buttons and controls are represented by icons.
<o> |
Up button |
on back |
<r> |
Right button |
on back |
<q> |
Left button |
on back |
<p> |
Down button |
on back |
•The following icons are used to indicate functions that differ depending on the camera model:
|
|
|
: Functions and precautions for the PowerShot |
ELPH 150 IS |
IXUS 155 |
||
|
|
|
ELPH 150 IS/IXUS 155 only |
ELPH 140 IS |
IXUS 150 |
: Functions and precautions for the PowerShot |
|
|
|
|
ELPH 140 IS/IXUS 150 only |
ELPH 135 |
IXUS 145 |
: Functions and precautions for the PowerShot |
|
|
|
|
ELPH 135/IXUS 145 only |
•This guide uses PowerShot ELPH 150 IS/IXUS 155 illustrations and screenshots for all explanations.
Before Use
Basic Guide
Advanced Guide
Camera Basics
Auto Mode
Other Shooting
Modes
P Mode
Playback Mode
Setting Menu
Accessories
Appendix
Index
4

 Table of Contents
Package Contents.......................... |
2 |
Compatible Memory Cards............. |
2 |
Preliminary Notes and Legal |
|
Information...................................... |
3 |
Part Names and Conventions |
|
in This Guide.................................. |
4 |
Table of Contents........................... |
5 |
Common Camera Operations........ |
6 |
Safety Precautions......................... |
7 |
Basic Guide.................... |
10 |
Initial Preparations........................ |
11 |
Trying the Camera Out................. |
15 |
Advanced Guide............. |
19 |
Camera Basics........................... |
19 |
On/Off........................................... |
20 |
Shutter Button.............................. |
21 |
Shooting Display Options............. |
21 |
Using the FUNC. Menu................ |
22 |
Using Menus................................. |
23 |
Indicator Display........................... |
24 |
Auto Mode................................... |
25 |
Shooting with Camera-Determined |
|
Settings......................................... |
26 |
Common, Convenient Features... |
31 |
Image Customization Features.... |
36 |
Customizing Camera Operation... |
38 |
Other Shooting Modes............... |
39 |
Brightness / Color Customization |
|
(Live View Control)....................... |
40 |
Specific Scenes............................ |
40 |
Applying Special Effects............... |
42 |
Special Modes for Other |
|
Purposes...................................... |
45 |
P Mode........................................ |
47 |
Shooting in Program AE |
|
([P] Mode)..................................... |
48 |
Image Brightness (Exposure)....... |
48 |
Adjusting White Balance.............. |
51 |
Shooting Range and Focusing..... |
52 |
Flash............................................. |
56 |
Using Eco Mode........................... |
57 |
Other Settings.............................. |
58 |
Playback Mode........................... |
61 |
Viewing......................................... |
62 |
Browsing and Filtering Images..... |
63 |
Image Viewing Options................. |
65 |
Protecting Images........................ |
66 |
Erasing Images............................ |
68 |
Rotating Images........................... |
69 |
Editing Still Images....................... |
70 |
Setting Menu............................... |
73 |
Adjusting Basic Camera |
|
Functions...................................... |
74 |
Accessories................................ |
80 |
System Map.................................. |
81 |
Optional Accessories.................... |
82 |
Using Optional Accessories.......... |
84 |
Using the Software....................... |
86 |
Printing Images............................ |
89 |
Using an Eye-Fi Card................... |
96 |
Appendix..................................... |
98 |
Troubleshooting............................ |
99 |
On-Screen Messages................. |
101 |
On-Screen Information............... |
103 |
Functions and Menu Tables........ |
105 |
Handling Precautions................. |
111 |
Specifications............................. |
111 |
Index........................................... |
116 |
Before Use
Basic Guide
Advanced Guide
Camera Basics
Auto Mode
Other Shooting
Modes
P Mode
Playback Mode
Setting Menu
Accessories
Appendix
Index
5

 Common Camera Operations
4 Shoot
zzUse camera-determined settings (Auto Mode)..................................... 26
Shooting people well |
|
|
I |
|
P |
Portraits |
Against Snow |
|
(=40) |
|
(=41) |
Matching specific scenes |
|
|
|
|
t |
Low Light |
|
Fireworks |
(=40) |
|
(=41) |
Applying special effects |
|
|
Vivid Colors |
Poster Effect |
Fish-Eye Effect |
(=42) |
(=42) |
(=42) |
Miniature Effect |
Toy Camera Effect |
Monochrome |
(=43) |
(=44) |
(=44) |
zzWhile adjusting image settings (Live View Control) |
.............................. 40 |
zzFocus on faces......................................................................... |
26 , 40 , 53 |
zzWithout using the flash (Flash Off)................................................. |
33 , 57 |
zzInclude yourself in the shot (Self-Timer)......................................... |
32 , 45 |
zzAdd a date stamp................................................................................. |
34 |
1 View |
|
zzView images (Playback Mode)............................................................. |
62 |
zzAutomatic playback (Slideshow)........................................................... |
65 |
zzOn a TV................................................................................................ |
84 |
zzOn a computer...................................................................................... |
86 |
zzBrowse through images quickly............................................................ |
63 |
zzErase images........................................................................................ |
68 |
E Shoot/View Movies |
|
zzShoot movies........................................................................................ |
26 |
zzView movies (Playback Mode).............................................................. |
62 |
c Print |
|
zzPrint pictures......................................................................................... |
89 |
Save |
|
zzSave images to a computer.................................................................. |
87 |
Before Use
Basic Guide
Advanced Guide
Camera Basics
Auto Mode
Other Shooting
Modes
P Mode
Playback Mode
Setting Menu
Accessories
Appendix
Index
6

 Safety Precautions
•Before using the product, ensure that you read the safety precautions described below. Always ensure that the product is used correctly.
•The safety precautions noted here are intended to prevent you and other persons from being injured or incurring property damage.
•Be sure to also check the guides included with any separately sold accessories you use.
 Warning Denotes the possibility of serious injury or death.
•Do not trigger the flash in close proximity to people’s eyes.
Exposure to the intense light produced by the flash could damage eyesight.
In particular, remain at least 1 meter (3.3 feet) away from infants when using the flash.
•Store this equipment out of the reach of children and infants.
A strap wound around a child’s neck may result in asphyxiation.
If your product uses a power cord, mistakenly winding the cord around a child’s neck may result in asphyxiation.
•Use only recommended power sources.
•Do not disassemble, alter, or apply heat to the product.
•Avoid dropping or subjecting the product to severe impacts.
•Do not touch the interior of the product if it is broken, such as when dropped.
•Stop using the product immediately if it emits smoke or a strange smell, or otherwise behaves abnormally.
•Do not use organic solvents such as alcohol, benzine, or thinner to clean the product.
•Avoid contact with liquid, and do not allow liquid or foreign objects inside.
This could result in electrical shock or fire.
If the product gets wet, or if liquid or foreign objects get inside, remove the battery pack/batteries or unplug immediately.
•Do not look through the viewfinder (if your model has one) at intense light sources, such as the sun on a clear day or an intense artificial light source.
This could damage your eyesight.
•Do not touch the product during thunderstorms if it is plugged in.
This could result in electrical shock or fire. Immediately stop using the product and distance yourself from it.
•Use only the recommended battery pack/batteries.
•Do not place the battery pack/batteries near or in direct flame.
This may cause the battery pack/batteries to explode or leak, resulting in electrical shock, fire, or injuries. If leaking battery electrolyte comes into contact with eyes, mouth, skin, or clothing, immediately flush with water.
•If the product uses a battery charger, note the following precautions.
-Remove the plug periodically and, using a dry cloth, wipe away any dust and dirt that has collected on the plug, the exterior of the power outlet, and the surrounding area.
-Do not insert or remove the plug with wet hands.
-Do not use the equipment in a manner that exceeds the rated capacity of the electrical outlet or wiring accessories. Do not use if the plug is damaged or not fully inserted in the outlet.
-Do not allow dust or metal objects (such as pins or keys) to contact the terminals or plug.
-Do not cut, damage, alter, or place heavy items on the power cord, if your product uses one.
This could result in electrical shock or fire.
• Turn the camera off in places where camera use is prohibited.
The electromagnetic waves emitted by the camera may interfere with the operation of electronic instruments and other devices. Exercise adequate caution when using the product in places where use of electronic devices is restricted, such as inside airplanes and medical facilities.
Before Use
Basic Guide
Advanced Guide
Camera Basics
Auto Mode
Other Shooting
Modes
P Mode
Playback Mode
Setting Menu
Accessories
Appendix
Index
7

 Caution Denotes the possibility of injury.
•When carrying the product by the strap, be careful not to bang it, subject it to strong impacts or shocks, or let it get caught on other objects.
•Be careful not to bump or push strongly on the lens.
This could lead to injury or damage the camera.
• Be careful not to subject the screen to strong impacts.
If the screen cracks, injury may result from the broken fragments.
•When using the flash, be careful not to cover it with your fingers or clothing.
This could result in burns or damage to the flash.
•Avoid using, placing, or storing the product in the following places:
-Places subject to direct sunlight
-Places subject to temperatures above 40 °C (104 °F)
-Humid or dusty places
These could cause leakage, overheating, or an explosion of the battery pack/batteries, resulting in electrical shock, fire, burns, or other injuries. Overheating and damage may result in electrical shock, fire, burns, or other injuries.
•The slideshow transition effects may cause discomfort when viewed for prolonged periods.
•When using optional lenses, lens filters, or filter adapters (if applicable), be sure to attach these accessories firmly.
If the lens accessory becomes loose and falls off, it may crack, and the shards of glass may lead to cuts.
•On products that raise and lower the flash automatically, make sure to avoid pinching your fingers with the lowering flash.
This could result in injury.
Caution Denotes the possibility of property damage.
•Do not aim the camera at intense light sources, such as the sun on a clear day or an intense artificial light source.
Doing so may damage the image sensor or other internal components.
•When using the camera on a sandy beach or at a windy location, be careful not to allow dust or sand to enter the camera.
•On products that raise and lower the flash automatically, do not push the flash down or pry it open.
This may cause the product to malfunction.
•Wipe off any dust, grime, or other foreign matter on the flash with a cotton swab or cloth.
The heat emitted from the flash may cause foreign matter to smoke or the product to malfunction.
•Remove and store the battery pack/batteries when you are not using the product.
Any battery leakage that occurs may cause product damage.
•Before you discard the battery pack/batteries, cover the terminals with tape or other insulators.
Contacting other metal materials may lead to fire or explosions.
•Unplug any battery charger used with the product when not in use. Do not cover with a cloth or other objects when in use.
Leaving the unit plugged in for a long period of time may cause it to overheat and distort, resulting in fire.
• Do not leave any dedicated battery packs near pets.
Pets biting the battery pack could cause leakage, overheating, or explosion, resulting in product damage or fire.
Before Use
Basic Guide
Advanced Guide
Camera Basics
Auto Mode
Other Shooting
Modes
P Mode
Playback Mode
Setting Menu
Accessories
Appendix
Index
8

•If your product uses multiple batteries, do not use batteries that have different levels of charge together, and do not use old and new batteries together. Do not insert the batteries with the + and – terminals reversed.
This may cause the product to malfunction.
•Do not sit down with the camera in your pant pocket.
Doing so may cause malfunctions or damage the screen.
•When putting the camera in your bag, ensure that hard objects do not come into contact with the screen. Also close the screen (so that it faces the body), if your product’s screen closes.
•Do not attach any hard objects to the product.
Doing so may cause malfunctions or damage the screen.
Before Use
Basic Guide
Advanced Guide
Camera Basics
Auto Mode
Other Shooting
Modes
P Mode
Playback Mode
Setting Menu
Accessories
Appendix
Index
9

Basic Guide
Basic information and instructions, from initial preparations to shooting and playback
Initial Preparations........................................... |
11 |
Trying the Camera Out..................................... |
15 |
Attaching the Strap................................................ |
11 |
Shooting (Smart Auto)........................................... |
15 |
Holding the Camera............................................... |
11 |
Viewing.................................................................. |
17 |
Charging the Battery Pack..................................... |
11 |
Accessing the Help Menu...................................... |
18 |
Inserting the Battery Pack and Memory Card........ |
12 |
|
|
Setting the Date and Time..................................... |
13 |
|
|
Display Language.................................................. |
15 |
|
|
Before Use
Basic Guide
Advanced Guide
Camera Basics
Auto Mode
Other Shooting
Modes
P Mode
Playback Mode
Setting Menu
Accessories
Appendix
Index
10
 Initial Preparations
Prepare for shooting as follows.
 Attaching the Strap
zzThread the end of the strap through the strap hole ( ), and then pull the other end of the strap through the loop on the threaded end (
 ).
).
 Holding the Camera
zzPlace the strap around your wrist.
zzWhen shooting, keep your arms close to your body and hold the camera securely to prevent it from moving. Do not rest your fingers on the flash.
 Charging the Battery Pack
Before use, charge the battery pack with the included charger. Be sure to charge the battery pack initially, because the camera is not sold with the battery pack charged.
1 Insert the battery pack.
zzAfter aligning the marks on the battery pack and charger, insert the battery pack
|
by pushing it in ( ) and down ( ). |
|
2 Charge the battery pack. |
|
zzCB-2LF: Flip out the plug ( ) and plug |
|
the charger into a power outlet ( ). |
|
zzCB-2LFE: Plug the power cord into the |
CB-2LF |
charger, then plug the other end into a |
|
power outlet. |
|
zzThe charging lamp turns orange, and |
|
charging begins. |
|
zzWhen charging is finished, the lamp turns |
CB-2LFE |
green. |
|
|
|
3 Remove the battery pack. |
|
zzAfter unplugging the battery charger, |
|
remove the battery pack by pushing it in |
|
( ) and up ( ). |
Before Use
Basic Guide
Advanced Guide
Camera Basics
Auto Mode
Other Shooting
Modes
P Mode
Playback Mode
Setting Menu
Accessories
Appendix
Index
11

•To protect the battery pack and keep it in optimal condition, do not charge it continuously for more than 24 hours.
•For battery chargers that use a power cord, do not attach the charger or cord to other objects. Doing so could result in malfunction or damage to the product.
•For details on charging time and the number of shots and recording time possible with a fully charged battery pack, see “Number of Shots/Recording Time, Playback Time” (=112).
•Charged battery packs gradually lose their charge, even when they are not used. Charge the battery pack on (or immediately before) the day of use.
•The charger can be used in areas with 100 – 240 V AC power (50/60 Hz). For power outlets in a different format, use a commercially available adapter for the plug. Never use an electrical transformer designed for traveling, which may damage the battery pack.
 Inserting the Battery Pack and Memory Card
Insert the included battery pack and a memory card (sold separately). Note that before using a new memory card (or a memory card formatted in another device), you should format the memory card with this camera (=76).
1 Open the cover.
zzSlide the cover ( ) and open it (
 ).
).
2 Insert the battery pack. zzWhile pressing the battery lock in the
direction of the arrow, insert the battery pack as shown and push it in until it clicks into the locked position.
Terminals Battery Lock
Before Use
Basic Guide
Advanced Guide
Camera Basics
Auto Mode
Other Shooting
Modes
P Mode
Playback Mode
Setting Menu
Accessories
Appendix
Index
12
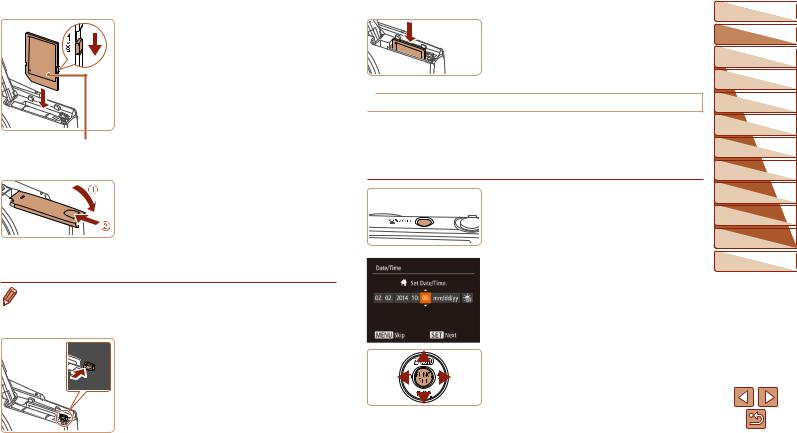
3 Check the card’s write-protect
tab and insert the memory card.
zzRecording is not possible on memory
cards with a write-protect tab when the
tab is in the locked position. Slide the tab
to the unlocked position.
zzInsert the memory card facing as shown
until it clicks into the locked position.
zzMake sure the memory card is facing the Label right way when you insert it. Inserting
memory cards facing the wrong way may damage the camera.
4 Close the cover.
zzLower the cover ( ) and hold it down as
you slide it, until it clicks into the closed
position ( ).
).
zzIf the cover will not close, make sure you inserted the battery pack facing the right way in step 2.
• For guidelines on how many shots or hours of recording can be saved on one memory card, see “Number of Shots per Memory Card” (=113).
 Removing the Battery Pack and Memory Card
Remove the battery pack.
zzOpen the cover and press the battery
lock in the direction of the arrow. zzThe battery pack will pop up.
Remove the memory card. zzPush the memory card in until it clicks,
and then slowly release it. zzThe memory card will pop up.
 Setting the Date and Time
Set the current date and time correctly as follows if the [Date/Time] screen is displayed when you turn the camera on. Information you specify this way is recorded in image properties when you shoot, and it is used when you manage images by shooting date or print images showing the date.
You can also add a date stamp to shots, if you wish (=34).
1 Turn the camera on. zzPress the power button.
zzThe [Date/Time] screen is displayed.
2 Set the date and time.
zzPress the <q><r> buttons to choose an option.
zzPress the <o><p> buttons to specify the date and time.
zzWhen finished, press the <m> button.
Before Use
Basic Guide
Advanced Guide
Camera Basics
Auto Mode
Other Shooting
Modes
P Mode
Playback Mode
Setting Menu
Accessories
Appendix
Index
13
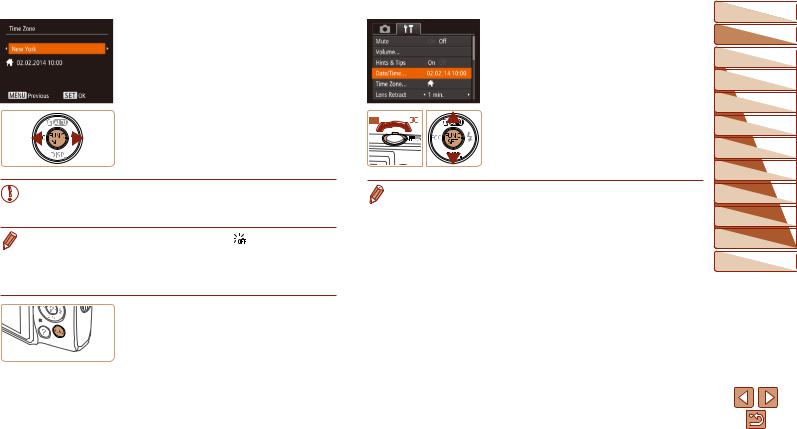
3 Set the home time zone. zzPress the <q><r> buttons to choose
your home time zone.
4 Finish the setup process. zzPress the <m> button to complete the
setting. The setting screen is no longer displayed.
zzTo turn off the camera, press the power button.
• Unless you set the date, time, and home time zone, the [Date/Time] screen will be displayed each time you turn the camera on. Specify the correct information.
• To set daylight saving time (1 hour ahead), choose [  ] in step 2 and then choose [
 ] by pressing the <o><p> buttons.
 Changing the Date and Time
Adjust the date and time as follows.
1 Access the camera menu. zzPress the <n> button.
2 Choose [Date/Time].
zzMove the zoom lever to choose the [3] tab.
zzPress the <o><p> buttons to choose [Date/Time], and then press the <m> button.
3 Change the date and time. zzFollow step 2 in “Setting the Date and
Time” (=13) to adjust the settings.
zzPress the <n> button to close the menu.
• Date/time settings can be retained for about 3 weeks by the camera’s built-in date/time battery (backup battery) after the battery pack is removed.
•The date/time battery will be charged in about 4 hours once you insert a charged battery pack or connect the camera to an AC adapter kit (sold separately, =82), even if the camera is left off.
•Once the date/time battery is depleted, the [Date/Time] screen will be displayed when you turn the camera on. Set the correct date and time as described in “Setting the Date and Time” (=13).
Before Use
Basic Guide
Advanced Guide
Camera Basics
Auto Mode
Other Shooting
Modes
P Mode
Playback Mode
Setting Menu
Accessories
Appendix
Index
14

 Display Language
Change the display language as needed.
1 Enter Playback mode. zzPress the <1> button.
2 Access the setting screen. zzPress and hold the <m> button, and
then press the <n> button.
3 Set the display language. zzPress the <o><p><q><r> buttons to
choose a language, and then press the <m> button.
zzOnce the display language has been set, the setting screen is no longer displayed.
• You can also change the display language by pressing the <n> button and choosing [Language  ] on the [3] tab.
Still Images |
Movies |
 Trying the Camera Out
Follow these instructions to turn the camera on, shoot still images or movies, and then view them.
 Shooting (Smart Auto)
For fully automatic selection of the optimal settings for specific scenes, simply let the camera determine the subject and shooting conditions.
1 Turn the camera on. zzPress the power button.
zzThe startup screen is displayed.
2 Enter [
 ] mode.
zzPress the <o> button several times until [
 ] is displayed.
zzAim the camera at the subject. The camera will make a slight clicking noise as it determines the scene.
ELPH 150 IS IXUS 155 |
ELPH 140 IS |
IXUS 150 |
zzIcons representing the scene and image stabilization mode are displayed in the upper right of the screen.
ELPH 135 IXUS 145
zzA scene icon is displayed in the upper right of the screen.
zzFrames displayed around any detected subjects indicate that they are in focus.
Before Use
Basic Guide
Advanced Guide
Camera Basics
Auto Mode
Other Shooting
Modes
P Mode
Playback Mode
Setting Menu
Accessories
Appendix
Index
15

3 Compose the shot. |
Shooting Movies |
||
zzTo zoom in and enlarge the subject, move |
Start shooting. |
||
the zoom lever toward <i> (telephoto), |
zzPress the movie button. The camera |
||
and to zoom away from the subject, move |
beeps once as recording begins, and |
||
it toward <j> (wide angle). |
[ Rec] is displayed with the elapsed time. |
||
4 Shoot. |
Elapsed Time |
|
|
ELPH 150 IS |
IXUS 155 ELPH 140 IS IXUS 150 |
||
Shooting Still Images |
zzBlack bars are displayed on the top and |
||
Focus. |
bottom edges of the screen, and the |
||
zzPress the shutter button lightly, halfway |
subject is slightly enlarged. The black |
||
down. The camera beeps twice after |
bars indicate image areas not recorded. |
||
focusing, and AF frames are displayed to |
ELPH 135 |
IXUS 145 |
|
indicate image areas in focus. |
zzBlack bars displayed on the top and |
||
|
bottom edges of the screen indicate |
||
|
image areas not recorded. |
||
|
zzFrames displayed around any detected |
||
|
faces indicate that they are in focus. |
||
|
zzOnce recording begins, take your finger |
||
Shoot. |
off the movie button. |
||
Finish shooting. |
|||
zzPress the shutter button all the way |
|||
down. |
zzPress the movie button again to stop |
||
zzAs the camera shoots, a shutter sound |
shooting. The camera beeps twice as |
||
recording stops. |
|||
is played, and in low-light conditions, the |
|||
|
|
||
flash fires automatically. |
|
|
|
zzKeep the camera still until the shutter sound ends.
zzAfter displaying your shot, the camera will revert to the shooting screen.
Before Use
Basic Guide
Advanced Guide
Camera Basics
Auto Mode
Other Shooting
Modes
P Mode
Playback Mode
Setting Menu
Accessories
Appendix
Index
16
 Viewing
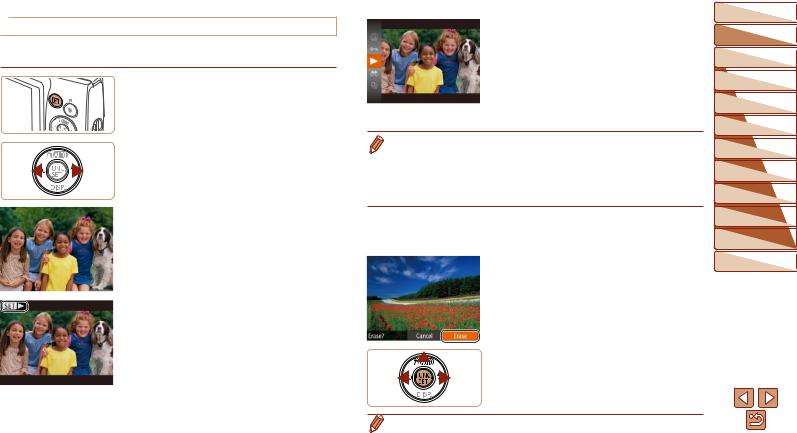
After shooting images or movies, you can view them on the screen as follows.
1 Enter Playback mode. zzPress the <1> button. zzYour last shot is displayed.
2 Browse through your images. zzTo view the previous image, press the <q> button. To view the next image,
press the <r> button.
zzPress and hold the <q><r> buttons to browse through images quickly.
zzMovies are identified by a [

 ] icon. To play movies, go to step 3.
3 Play movies.
zzPress the <m> button, press the <o><p> buttons to choose [  ], and then press the <m> button again.
zzPlayback now begins, and after the movie is finished, [

 ] is displayed.
zzTo adjust the volume, press the <o><p> buttons.
• To switch to Shooting mode from Playback mode, press the shutter button halfway.
 Erasing Images
You can choose and erase unneeded images one by one. Be careful when erasing images, because they cannot be recovered.
1 Choose an image to erase. zzPress the <q><r> buttons to choose an
image.
2 Erase the image. zzPress the <o> button.
zzAfter [Erase?] is displayed, press the <q><r> buttons to choose [Erase], and then press the <m> button.
zzThe current image is now erased.
zzTo cancel erasure, press the <q><r> buttons to choose [Cancel], and then press the <m> button.
Before Use
Basic Guide
Advanced Guide
Camera Basics
Auto Mode
Other Shooting
Modes
P Mode
Playback Mode
Setting Menu
Accessories
Appendix
Index
• You can also erase all images at once (=68).
17

Still Images |
Movies |
 Accessing the Help Menu
Access on-screen descriptions of scenes detected by the camera, shooting advice, and playback instructions as follows.
zzPress the < > button to access the Help menu.
zzPress the < > button again to return to the original display.
zzIn Shooting mode, a description of the scene detected by the camera is displayed. Shooting advice is also displayed depending on the scene.
zzIn Playback mode, press the <o><p> buttons and choose an item. The zoom lever and buttons are displayed
overlaying the illustration of the camera.
zzChoose an item and press the <r> button. An explanation of the item is displayed. To continue reading the explanation, press the <o><p> buttons to scroll up or down the screen. Press the <q> button to return to the left hand screen.
• The Help menu can also be used in shooting modes other than [
 ], and in those modes it will display the same as when in Playback mode.
Before Use
Basic Guide
Advanced Guide
Camera Basics
Auto Mode
Other Shooting
Modes
P Mode
Playback Mode
Setting Menu
Accessories
Appendix
Index
18

Advanced Guide
Camera Basics
Other basic operations and more ways to enjoy your camera, including shooting and playback options
On/Off................................................................. |
20 |
Using the FUNC. Menu..................................... |
22 |
|
Power-Saving Features (Auto Power Down)......... |
20 |
Using Menus..................................................... |
23 |
|
Shutter Button................................................... |
21 |
Indicator Display |
24 |
|
Shooting Display Options |
21 |
|||
|
|
Before Use
Basic Guide
Advanced Guide
Camera Basics
Auto Mode
Other Shooting
Modes
P Mode
Playback Mode
Setting Menu
Accessories
Appendix
Index
19

 On/Off
Shooting Mode
zzPress the power button to turn the camera on and prepare for shooting.
zzTo turn the camera off, press the power button again.
Playback Mode
zzPress the <1> button to turn the camera
on and view your shots.
zzTo turn the camera off, press the <1> button again.
• To switch to Playback mode from Shooting mode, press the <1> button.
• To switch to Shooting mode from Playback mode, press the shutter button halfway (=21).
•The lens will be retracted after about one minute once the camera is in Playback mode. You can turn the camera off when the lens is retracted by pressing the <1> button.
 Power-Saving Features (Auto Power Down)
As a way to conserve battery power, the camera automatically deactivates the screen (Display Off) and then turns itself off after a specific period of inactivity.
 Power Saving in Shooting Mode
The screen is automatically deactivated after about one minute of inactivity. In about two more minutes, the lens is retracted and the camera turns itself off. To activate the screen and prepare for shooting when the screen is off but the lens is still out, press the shutter button halfway (=21).
 Power Saving in Playback Mode
The camera turns itself off automatically after about five minutes of inactivity.
• You can deactivate Auto Power Down and adjust the timing of Display Off, if you prefer (=75).
•Power saving is not active while the camera is connected to a computer (=87).
Before Use
Basic Guide
Advanced Guide
Camera Basics
Auto Mode
Other Shooting
Modes
P Mode
Playback Mode
Setting Menu
Accessories
Appendix
Index
20
 Shutter Button
To ensure your shots are in focus, always begin by holding the shutter button halfway down, and once the subject is in focus, press the button all the way down to shoot.
In this manual, shutter button operations are described as pressing the button halfway or all the way down.
1 Press halfway. (Press lightly to focus.)
zzPress the shutter button halfway. The camera beeps twice, and AF frames are displayed around image areas in focus.
2Press all the way down. (From the halfway position, press fully
to shoot.)
zzThe camera shoots, as a shutter sound is played.
zzKeep the camera still until the shutter sound ends.
• Images may be out of focus if you shoot without initially pressing the shutter button halfway.
•Length of shutter sound playback varies depending on the time required for the shot. It may take longer in some shooting scenes, and images will be blurry if you move the camera (or the subject moves) before the shutter sound ends.
 Shooting Display Options
Press the <p> button to view other information on the screen, or to hide the information. For details on the information displayed, see “On-Screen Information” (=103).
Information is displayed |
No information is |
|
displayed |
• Screen brightness is automatically increased by the night view function when you are shooting under low light, making it easier to check how shots are composed. However, on-screen image brightness may not match the brightness of your shots. Note that any on-screen image distortion or jerky subject motion will not affect recorded images.
• For playback display options, see “Switching Display Modes” (=63).
Before Use
Basic Guide
Advanced Guide
Camera Basics
Auto Mode
Other Shooting
Modes
P Mode
Playback Mode
Setting Menu
Accessories
Appendix
Index
21
 Using the FUNC. Menu
Configure commonly used functions through the FUNC. menu as follows.
Note that menu items and options vary depending on the shooting mode (=106 – 107) or playback mode (=110).
 Options
Menu Items
1Access the FUNC. menu. zzPress the <m> button.
2Choose a menu item.
zzPress the <o><p> buttons to choose a menu item, and then press the <m> or <r> button.
zzDepending on the menu item, functions can be specified simply by pressing the
<m> or <r> button, or another screen is displayed for configuring the function.
3 Choose an option.
zzPress the <o><p> buttons to choose an option.
zzOptions labeled with a [ ] icon can be configured by pressing the <n> button.
zzTo return to the menu items, press the <q> button.
4 Finish the setup process. zzPress the <m> button.
zzThe screen before you pressed the <m> button in step 1 is displayed again, showing the option you configured.
•To undo any accidental setting changes, you can restore the camera’s default settings (=79).
Before Use
Basic Guide
Advanced Guide
Camera Basics
Auto Mode
Other Shooting
Modes
P Mode
Playback Mode
Setting Menu
Accessories
Appendix
Index
22

 Using Menus
Configure a variety of camera functions through other menus as follows.
Menu items are grouped by purpose on tabs, such as shooting [4], playback [1], and so on. Note that available menu items vary depending on the selected shooting or playback mode (=108 – 110).
1 Access the menu. zzPress the <n> button.
2 Choose a tab.
zzMove the zoom lever to choose a tab.
zzAfter you have pressed the <o><p> buttons to choose a tab initially, you can switch between tabs by pressing the <q><r> buttons.
3 Choose a menu item.
zzPress the <o><p> buttons to choose a menu item.
zzFor menu items with options not shown, first press the <m> or <r> button to switch screens, and then press the <o><p> buttons to select the menu item.
zzTo return to the previous screen, press the <n> button.
4 Choose an option.
zzPress the <q><r> buttons to choose an option.
5 Finish the setup process. zzPress the <n> button to return to the
screen displayed before you pressed the <n> button in step 1.
• To undo any accidental setting changes, you can restore the camera’s default settings (=79).
Before Use
Basic Guide
Advanced Guide
Camera Basics
Auto Mode
Other Shooting
Modes
P Mode
Playback Mode
Setting Menu
Accessories
Appendix
Index
23

 Indicator Display
The indicator on the back of the camera (=4) lights up or blinks depending on the camera status.
Color |
Indicator |
Camera Status |
|
Status |
|||
|
|
||
|
On |
Connected to a computer (=87), or display off |
|
|
(=20, 35, 57, 75) |
||
Green |
|
||
Blinking |
Starting up, recording/reading/transmitting images, or |
||
|
|||
|
shooting long exposures (=46) |
||
|
|
• When the indicator blinks green, never turn the camera off, open the memory card/battery cover, or shake or jolt the camera, which may corrupt images or damage the camera or memory card.
Before Use
Basic Guide
Advanced Guide
Camera Basics
Auto Mode
Other Shooting
Modes
P Mode
Playback Mode
Setting Menu
Accessories
Appendix
Index
24

Auto Mode
Convenient mode for easy shots with greater control over shooting
Shooting with Camera-Determined |
|
Settings............................................................ |
26 |
Shooting (Smart Auto)........................................... |
26 |
Scene Icons........................................................... |
29 |
Image Stabilization Icons....................................... |
29 |
On-Screen Frames................................................ |
30 |
Common, Convenient Features....................... |
31 |
Zooming In Closer on Subjects (Digital Zoom)...... |
31 |
Using the Self-Timer.............................................. |
32 |
Deactivating the Flash........................................... |
33 |
Adding a Date Stamp............................................. |
34 |
Continuous Shooting............................................. |
35 |
Using Eco Mode.................................................... |
35 |
Image Customization Features........................ |
36 |
Changing Image Resolution (Size)........................ |
36 |
Red-Eye Correction............................................... |
36 |
Changing Movie Image Quality.............................. |
37 |
Checking for Closed Eyes..................................... |
37 |
Before Use
Basic Guide
Advanced Guide
Camera Basics
|
|
Auto Mode |
|
|
Other Shooting |
|
|
Modes |
|
|
P Mode |
|
|
Playback Mode |
|
|
Setting Menu |
Customizing Camera Operation |
38 |
Accessories |
|
||
Deactivating the Lamp........................................... |
38 |
Appendix |
Index
25

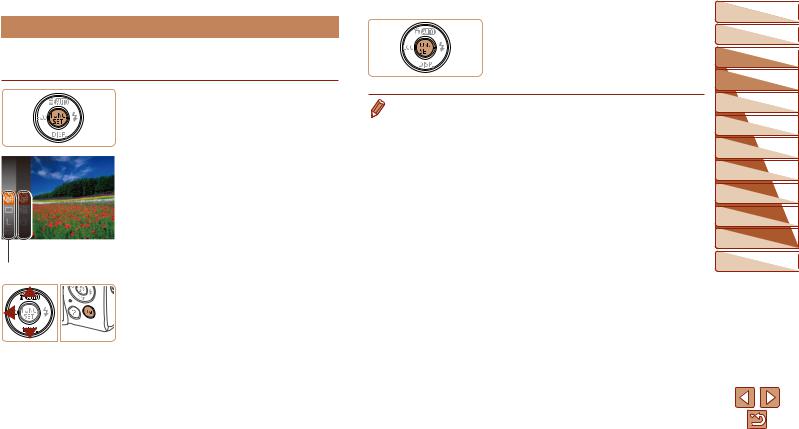
 Shooting with Camera-Determined Settings
For fully automatic selection of the optimal settings for specific scenes, simply let the camera determine the subject and shooting conditions.
Still Images |
Movies |
 Shooting (Smart Auto)
1 Turn the camera on. zzPress the power button.
zzThe startup screen is displayed.
2 Enter [
 ] mode.
zzPress the <o> button several times until [
 ] is displayed.
zzAim the camera at the subject. The camera will make a slight clicking noise as it determines the scene.
ELPH 150 IS IXUS 155 |
ELPH 140 IS |
IXUS 150 |
zzIcons representing the scene and image stabilization mode are displayed in the upper right of the screen (=29).
ELPH 135 IXUS 145
zzA scene icon is displayed in the upper right of the screen (=29).
zzFrames displayed around any detected subjects indicate that they are in focus.
Zoom Bar
3 Compose the shot.
zzTo zoom in and enlarge the subject, move the zoom lever toward <i> (telephoto), and to zoom away from the subject, move it toward <j> (wide angle). (A zoom bar showing the zoom position is displayed.)
4 Shoot.
Shooting Still Images
 Focus.
zzPress the shutter button halfway. The camera beeps twice after focusing, and AF frames are displayed to indicate image areas in focus.
zzSeveral AF frames are displayed when multiple areas are in focus.
Before Use
Basic Guide
Advanced Guide
Camera Basics
Auto Mode
Other Shooting
Modes
P Mode
Playback Mode
Setting Menu
Accessories
Appendix
Index
26
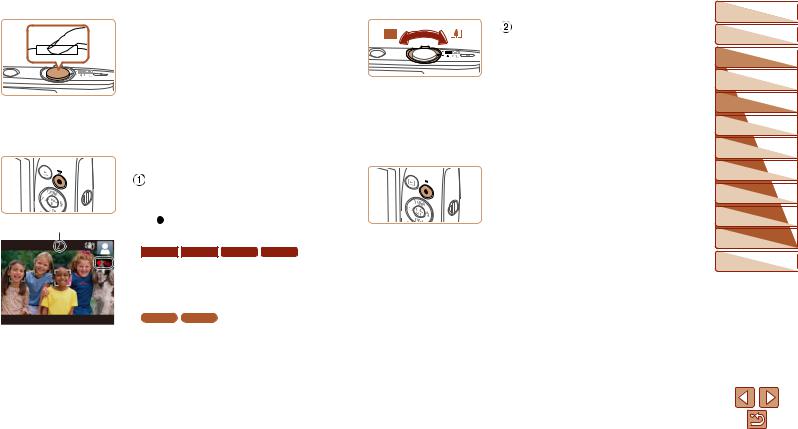
 Shoot.
zzPress the shutter button all the way down.
zzAs the camera shoots, a shutter sound is played, and in low-light conditions, the flash fires automatically.
zzKeep the camera still until the shutter sound ends.
zzAfter displaying your shot, the camera will revert to the shooting screen.
|
Shooting Movies |
|
|
Start shooting. |
|
|
zzPress the movie button. The camera |
|
|
beeps once as recording begins, and |
|
Elapsed Time |
[ Rec] is displayed with the elapsed |
|
time. |
|
|
|
|
|
|
ELPH 150 IS |
IXUS 155 ELPH 140 IS IXUS 150 |
|
zzBlack bars are displayed on the top and |
|
|
bottom edges of the screen, and the |
|
|
subject is slightly enlarged. The black |
|
|
bars indicate image areas not recorded. |
|
|
ELPH 135 |
IXUS 145 |
|
zzBlack bars displayed on the top and |
|
|
bottom edges of the screen indicate |
|
|
image areas not recorded. |
|
zzFrames displayed around any detected faces indicate that they are in focus.
zzOnce recording begins, take your finger off the movie button.
Resize the subject and recompose the shot as needed.
zzTo resize the subject, repeat the operations in step 3 (=26).
However, note that the sound of camera operations will be recorded. Note that movies shot at zoom factors shown in blue will look grainy.
zzWhen you recompose shots, the focus, brightness, and colors will be automatically adjusted.
 Finish shooting.
zzPress the movie button again to stop shooting. The camera beeps twice as recording stops.
zzRecording will stop automatically when the memory card becomes full.
Before Use
Basic Guide
Advanced Guide
Camera Basics
Auto Mode
Other Shooting
Modes
P Mode
Playback Mode
Setting Menu
Accessories
Appendix
Index
27
 Still Images/Movies
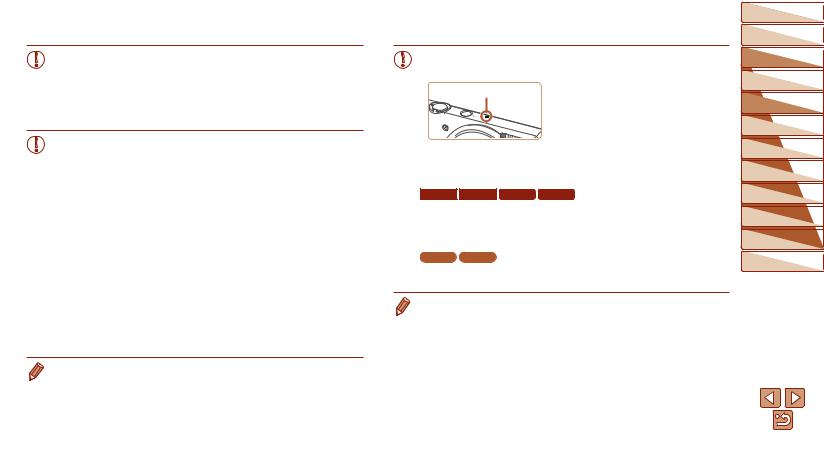
• If the camera is turned on while the <p> button is held down, the camera will no longer sound. To activate sounds again, press the <n> button and choose [Mute] on the [3] tab, and then press the <q><r> buttons to choose [Off].
 Still Images
• A blinking [ ] icon warns that images are more likely to be blurred by camera shake. In this case, mount the camera on a tripod or take other measures to keep it still.
•If your shots are dark despite the flash firing, move closer to the subject. For details on the flash range, see “Flash Range” (=114).
•The subject may be too close if the camera only beeps once when you press the shutter button halfway. For details on the focusing range (shooting range), see “Shooting Range” (=114).
•To reduce red-eye and to assist in focusing, the lamp may be activated when shooting in low-light conditions.
•A blinking [h] icon displayed when you attempt to shoot indicates that shooting is not possible until the flash has finished recharging. Shooting can resume as soon as the flash is ready, so either press the shutter button all the way down and wait, or release it and press it again.
•Although you can shoot again before the shooting screen is displayed, your previous shot may determine the focus, brightness, and colors used.
• You can change how long images are displayed after shots (=58).
 Movies
• The camera may become warm when shooting movies repeatedly over an extended period. This does not indicate damage.
Microphone |
• Keep your fingers away from the |
|
microphone while shooting movies. |
|
Blocking the microphone may prevent |
|
audio from being recorded or may |
|
cause the recording to sound muffled. |
•Avoid touching camera controls other than the movie button when shooting movies, because sounds made by the camera will be recorded.
ELPH 150 IS IXUS 155 ELPH 140 IS IXUS 150
• Once movie recording begins, the image display area changes and subjects are enlarged to allow for correction of significant camera shake. To shoot subjects at the same size shown before shooting, adjust the image stabilization setting (=59).
ELPH 135 IXUS 145
•To prevent excessive motion blur when recording movies, mount the camera on a tripod or take other measures to hold it still.
• Audio recording is monaural.
Before Use
Basic Guide
Advanced Guide
Camera Basics
Auto Mode
Other Shooting
Modes
P Mode
Playback Mode
Setting Menu
Accessories
Appendix
Index
28
Still Images |
Movies |
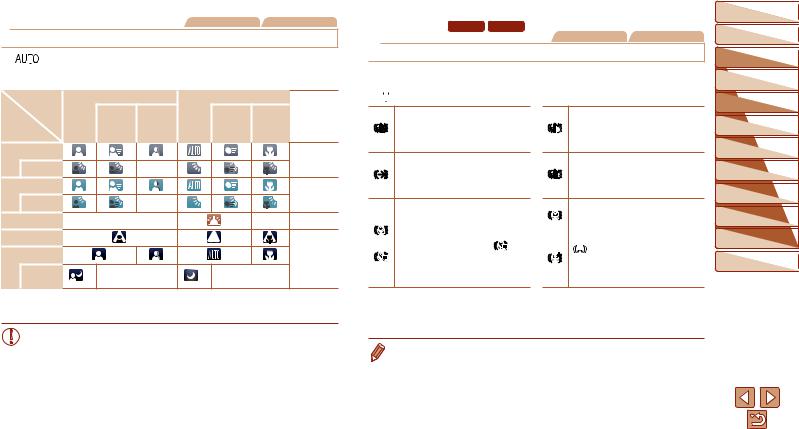
 Scene Icons
In [

 ] mode, shooting scenes determined by the camera are indicated by the icon displayed, and corresponding settings are automatically selected for optimal focusing, subject brightness, and color.
Subject |
People |
|
Other Subjects |
Icon |
||
|
|
|
|
|
|
|
|
In |
Shadows |
|
In |
At Close Background |
|
Background |
Motion*1 |
on Face*1 |
|
Motion*1 |
Range |
Color |
|
|
|
|
|
|
|
Bright |
|
|
|
|
|
Gray |
Backlit |
|
– |
|
|
|
|
|
|
|
|
|
||
With Blue Sky |
|
|
|
|
|
Light Blue |
Backlit |
|
– |
|
|
|
|
|
|
|
|
|
||
Sunsets |
– |
|
|
|
– |
Orange |
Spotlights |
|
|
|
|
|
|
Dark |
|
|
|
|
|
Dark Blue |
|
|
|
|
|
|
|
Tripod |
*2 |
– |
*2 |
– |
|
|
Used |
|
|
||||
|
|
|
|
|
|
|
*1 Not displayed for movies.
*2 Displayed in dark scenes when the camera is held still, as when mounted on a tripod.
• Try shooting in [G] mode (=47) if the scene icon does not match actual shooting conditions, or if it is not possible to shoot with your expected effect, color, or brightness.
ELPH 150 IS |
|
IXUS 155 |
ELPH 140 IS |
IXUS 150 |
Movies |
|
|
|
|
Still Images |
 Image Stabilization Icons
Optimal image stabilization for the shooting conditions is automatically applied (Intelligent IS). Additionally, the following icons are displayed in [
 ] mode.
Image stabilization for still images (Normal)
Image stabilization for still images when panning* (Panning)
Image stabilization for macro shots (Hybrid IS).
During movie recording, [ |
] is |
displayed, and image stabilization for macro movie recording is used.
Image stabilization for movies, reducing strong camera shake, as when shooting while walking (Dynamic)
Image stabilization for slow camera shake, such as when shooting movies at telephoto (Powered)
No image stabilization, because the camera is mounted on a tripod or held still by other means. However, during movie recording, [ 

 ] is displayed, and image stabilization to counteract wind or other sources of vibration is used. (Tripod IS)
*Displayed when you pan, following moving subjects with the camera. When you follow subjects moving horizontally, image stabilization only counteracts vertical camera shake, and horizontal stabilization stops. Similarly, when you follow subjects moving vertically, image stabilization only counteracts horizontal camera shake.
• To cancel image stabilization, set [IS Mode] to [Off] (=59). In this case, an IS icon is not displayed.
Before Use
Basic Guide
Advanced Guide
Camera Basics
Auto Mode
Other Shooting
Modes
P Mode
Playback Mode
Setting Menu
Accessories
Appendix
Index
29

Still Images |
Movies |
 On-Screen Frames
A variety of frames are displayed once the camera detects subjects you are aiming the camera at.
•A white frame is displayed around the subject (or person’s face) determined by the camera to be the main subject, and gray frames are displayed around other detected faces. Frames follow moving subjects within a certain range to keep them in focus.
However, if the camera detects subject movement, only the white frame will remain on the screen.
•When you are pressing the shutter button halfway and the camera detects subject movement, a blue frame is displayed, and the focus and image brightness are constantly adjusted (Servo AF).
• Try shooting in [G] mode (=47) if no frames are displayed, if frames are not displayed around desired subjects, or if frames are displayed on the background or similar areas.
Before Use
Basic Guide
Advanced Guide
Camera Basics
Auto Mode
Other Shooting
Modes
P Mode
Playback Mode
Setting Menu
Accessories
Appendix
Index
30
 Loading...