

Page 1

Page 2

Color imageRUNNER
C3200
Sending Guide
Page 3
Manuals for the Machine
The manuals for this machine are divided as follows. Please refer to them for detailed information.
The manuals supplied with optional equipment are included in the list below. Depending on the system
configuration and product purchased, some manuals may not be needed.
Guides with this symbol are printed manuals.
Basic Operations
•
•
Troubleshooting
Copying Instructions
•
Mail Box Instructions
•
•
Sending Instructions
•
Fax Instructions
•
Setting Up the Network Connection and
Installing the CD-ROM Software
Remote User Interface Instructions
•
•
Network Connectivity and Setup Instructions
•
Color Network ScanGear Installation and
Instructions
Guides with this symbol are PDF manuals included on the
CD-ROM
accompanying CD-ROM.
Reference Guide
Copying Guide
Mail Box Guide
Sending Guide
(This Document)
Facsimile Guide
Network Quick Start Guide
Remote UI Guide
Network Guide
Color Network ScanGear
User's Guide
CD-ROM
CD-ROM
CD-ROM
•
PS/PCL/UFR Printer Instructions
PCL Printer Driver Installation and
•
Instructions
PS Printer Driver Installation and
•
Instructions
•
UFR Printer Driver Installation and
Instructions
PS/PCL/UFR Printer Guide
PCL Driver Guide
PS Driver Guide
UFR Driver Guide
CD-ROM
CD-ROM
CD-ROM
CD-ROM
Page 4

•
Fax Driver Installation and Instructions
Fax Driver Guide
CD-ROM
The machine illustration on the cover may differ slightly from your machine.
Page 5

How This Manual Is Organized
Chapter 1
Chapter 2
Chapter 3
Chapter 4
Chapter 5
Chapter 6
Chapter 7
Chapter 8
Chapter 9
Chapter 10
Introduction to Sending Functions
Basic Sending Methods
Basic Scanning Features
Special Scanning Features
Sending Documents
Receiving Documents
Checking/Changing the Send/Receive Status
Customizing Communications Settings
Storing/Editing Address Book Settings
System Manager Settings
Chapter 11
Chapter 12
Chapter 13
Considerable effort has been made to ensure that this manual is free of inaccuracies and omissions. However, as we are constantly improving our
products, if you need an exact specification, please contact Canon.
Printing Communication Reports
Troubleshooting
Appendix
Includes the report samples, glossary, and index.
Page 6

Contents
Preface . . . . . . . . . . . . . . . . . . . . . . . . . . . . . . . . . . . . . . . . . . . . . . . . . . . . . . . . . xi
How To Use This Manual . . . . . . . . . . . . . . . . . . . . . . . . . . . . . . . . . . . . . . . . . . . . xi
Symbols Used in This Manual . . . . . . . . . . . . . . . . . . . . . . . . . . . . . . . . . . . . . . xi
Keys Used in This Manual . . . . . . . . . . . . . . . . . . . . . . . . . . . . . . . . . . . . . . . . . xi
Displays Used in This Manual . . . . . . . . . . . . . . . . . . . . . . . . . . . . . . . . . . . . . .xii
Illustrations Used in This Manual. . . . . . . . . . . . . . . . . . . . . . . . . . . . . . . . . . . xiii
Abbreviations Used in This Manual . . . . . . . . . . . . . . . . . . . . . . . . . . . . . . . . . xiii
Legal Notices . . . . . . . . . . . . . . . . . . . . . . . . . . . . . . . . . . . . . . . . . . . . . . . . . . . . xiv
Trademarks . . . . . . . . . . . . . . . . . . . . . . . . . . . . . . . . . . . . . . . . . . . . . . . . . . . xiv
Copyright . . . . . . . . . . . . . . . . . . . . . . . . . . . . . . . . . . . . . . . . . . . . . . . . . . . . . xv
Disclaimers . . . . . . . . . . . . . . . . . . . . . . . . . . . . . . . . . . . . . . . . . . . . . . . . . . . xv
Chapter 1 Introduction to Sending Functions
What This Machine Can Do. . . . . . . . . . . . . . . . . . . . . . . . . . . . . . . . . . . . . . . . . 1-2
Overview of the Color imageRUNNER C3200 . . . . . . . . . . . . . . . . . . . . . . . . . . 1-5
Things You Must Do Before Using This Machine . . . . . . . . . . . . . . . . . . . . . .1-10
Setting the Display Language . . . . . . . . . . . . . . . . . . . . . . . . . . . . . . . . . . . .1-11
Setting the Current Date and Time . . . . . . . . . . . . . . . . . . . . . . . . . . . . . . . .1-11
Registering Sender Names . . . . . . . . . . . . . . . . . . . . . . . . . . . . . . . . . . . . . . 1-16
Registering the Unit's Name . . . . . . . . . . . . . . . . . . . . . . . . . . . . . . . . . . . . .1-19
Flow of Sending Operations. . . . . . . . . . . . . . . . . . . . . . . . . . . . . . . . . . . . . . .1-22
Placing Originals . . . . . . . . . . . . . . . . . . . . . . . . . . . . . . . . . . . . . . . . . . . . . . . .1-35
Orientation . . . . . . . . . . . . . . . . . . . . . . . . . . . . . . . . . . . . . . . . . . . . . . . . . . .1-36
Platen Glass. . . . . . . . . . . . . . . . . . . . . . . . . . . . . . . . . . . . . . . . . . . . . . . . . .1-37
Feeder (DADF-K1) (Optional) . . . . . . . . . . . . . . . . . . . . . . . . . . . . . . . . . . . . 1-40
Canceling a Job . . . . . . . . . . . . . . . . . . . . . . . . . . . . . . . . . . . . . . . . . . . . . . . . . 1-42
Using the Touch Panel Display. . . . . . . . . . . . . . . . . . . . . . . . . . . . . . . . . . . .1-42
Using the Stop Key . . . . . . . . . . . . . . . . . . . . . . . . . . . . . . . . . . . . . . . . . . . .1-43
Using the System Monitor Screen . . . . . . . . . . . . . . . . . . . . . . . . . . . . . . . . .1-44
Chapter 2 Basic Sending Methods
Specifying Destinations . . . . . . . . . . . . . . . . . . . . . . . . . . . . . . . . . . . . . . . . . . .2-2
Using the Address Book . . . . . . . . . . . . . . . . . . . . . . . . . . . . . . . . . . . . . . . . .2-2
Using the New Address Tab. . . . . . . . . . . . . . . . . . . . . . . . . . . . . . . . . . . . . . . 2-5
Specifying an E-Mail Address . . . . . . . . . . . . . . . . . . . . . . . . . . . . . . . . . . 2-6
Specifying an I-Fax Address . . . . . . . . . . . . . . . . . . . . . . . . . . . . . . . . . . . 2-8
v
Page 7

Specifying a File Server . . . . . . . . . . . . . . . . . . . . . . . . . . . . . . . . . . . . . 2-13
Specifying a User Inbox . . . . . . . . . . . . . . . . . . . . . . . . . . . . . . . . . . . . . 2-32
Using the One-Touch Buttons . . . . . . . . . . . . . . . . . . . . . . . . . . . . . . . . . . . 2-34
Using the Favorites Buttons . . . . . . . . . . . . . . . . . . . . . . . . . . . . . . . . . . . . . 2-36
Using a Server . . . . . . . . . . . . . . . . . . . . . . . . . . . . . . . . . . . . . . . . . . . . . . . 2-38
Checking/Changing a Destination . . . . . . . . . . . . . . . . . . . . . . . . . . . . . . . . . 2-49
Erasing a Destination . . . . . . . . . . . . . . . . . . . . . . . . . . . . . . . . . . . . . . . . . . . 2-52
Chapter 3 Basic Scanning Features
Selecting a Scan Mode . . . . . . . . . . . . . . . . . . . . . . . . . . . . . . . . . . . . . . . . . . . 3-2
Scan Settings . . . . . . . . . . . . . . . . . . . . . . . . . . . . . . . . . . . . . . . . . . . . . . . . . . . 3-5
Two-Sided Originals . . . . . . . . . . . . . . . . . . . . . . . . . . . . . . . . . . . . . . . . . . . . 3-5
Document Size. . . . . . . . . . . . . . . . . . . . . . . . . . . . . . . . . . . . . . . . . . . . . . . . 3-7
Specifying the Document Size . . . . . . . . . . . . . . . . . . . . . . . . . . . . . . . . . 3-7
Registering the Specified Document Size . . . . . . . . . . . . . . . . . . . . . . . 3-12
Resolution . . . . . . . . . . . . . . . . . . . . . . . . . . . . . . . . . . . . . . . . . . . . . . . . . . 3-15
Scan Exposure and Original Type Settings . . . . . . . . . . . . . . . . . . . . . . . . . 3-17
Manual Exposure Adjustment . . . . . . . . . . . . . . . . . . . . . . . . . . . . . . . . 3-17
Original Type Selection. . . . . . . . . . . . . . . . . . . . . . . . . . . . . . . . . . . . . . 3-19
Automatic Exposure Adjustment . . . . . . . . . . . . . . . . . . . . . . . . . . . . . . 3-22
Changing Color Modes . . . . . . . . . . . . . . . . . . . . . . . . . . . . . . . . . . . . . . . . . . 3-24
Automatic Color Selection (Full Color/Grayscale) . . . . . . . . . . . . . . . . . . . . 3-24
Automatic Color Selection (Full Color/Black-and-White) . . . . . . . . . . . . . . . 3-26
Full Color . . . . . . . . . . . . . . . . . . . . . . . . . . . . . . . . . . . . . . . . . . . . . . . . . . . 3-28
Grayscale . . . . . . . . . . . . . . . . . . . . . . . . . . . . . . . . . . . . . . . . . . . . . . . . . . . 3-30
Black-and-White. . . . . . . . . . . . . . . . . . . . . . . . . . . . . . . . . . . . . . . . . . . . . . 3-31
Chapter 4 Special Scanning Features
Two-Page Separation. . . . . . . . . . . . . . . . . . . . . . . . . . . . . . . . . . . . . . . . . . . . . 4-2
Frame Erase . . . . . . . . . . . . . . . . . . . . . . . . . . . . . . . . . . . . . . . . . . . . . . . . . . . . 4-5
Original Frame Erase . . . . . . . . . . . . . . . . . . . . . . . . . . . . . . . . . . . . . . . . . . . 4-6
Book Frame Erase . . . . . . . . . . . . . . . . . . . . . . . . . . . . . . . . . . . . . . . . . . . . 4-10
Binding Erase. . . . . . . . . . . . . . . . . . . . . . . . . . . . . . . . . . . . . . . . . . . . . . . . 4-13
Different Size Originals . . . . . . . . . . . . . . . . . . . . . . . . . . . . . . . . . . . . . . . . . . 4-17
Job Build. . . . . . . . . . . . . . . . . . . . . . . . . . . . . . . . . . . . . . . . . . . . . . . . . . . . . . 4-19
Adjusting the Contrast (Sharpness) . . . . . . . . . . . . . . . . . . . . . . . . . . . . . . . 4-24
Image Quality Adjustment. . . . . . . . . . . . . . . . . . . . . . . . . . . . . . . . . . . . . . . . 4-27
Remove Background . . . . . . . . . . . . . . . . . . . . . . . . . . . . . . . . . . . . . . . . . . 4-27
Prevent Bleeding . . . . . . . . . . . . . . . . . . . . . . . . . . . . . . . . . . . . . . . . . . . . . 4-31
User Preset Keys . . . . . . . . . . . . . . . . . . . . . . . . . . . . . . . . . . . . . . . . . . . . . . . 4-34
Storing Scan Settings. . . . . . . . . . . . . . . . . . . . . . . . . . . . . . . . . . . . . . . . . . 4-34
Naming a User Preset Key. . . . . . . . . . . . . . . . . . . . . . . . . . . . . . . . . . . . . . 4-38
vi
Page 8

Erasing Scan Settings . . . . . . . . . . . . . . . . . . . . . . . . . . . . . . . . . . . . . . . . . .4-40
Chapter 5 Sending Documents
Sending Methods. . . . . . . . . . . . . . . . . . . . . . . . . . . . . . . . . . . . . . . . . . . . . . . . . 5-2
Sending an E-Mail Message . . . . . . . . . . . . . . . . . . . . . . . . . . . . . . . . . . . . . .5-2
Sending an I-Fax . . . . . . . . . . . . . . . . . . . . . . . . . . . . . . . . . . . . . . . . . . . . . .5-14
Sending a Job to a File Server. . . . . . . . . . . . . . . . . . . . . . . . . . . . . . . . . . . .5-23
Sending a Job to a User Inbox. . . . . . . . . . . . . . . . . . . . . . . . . . . . . . . . . . . .5-28
Delaying a Send Job . . . . . . . . . . . . . . . . . . . . . . . . . . . . . . . . . . . . . . . . . . . 5-31
Previewing Originals . . . . . . . . . . . . . . . . . . . . . . . . . . . . . . . . . . . . . . . . . . . . . 5-34
Job Done Notice . . . . . . . . . . . . . . . . . . . . . . . . . . . . . . . . . . . . . . . . . . . . . . . .5-37
Job Recall. . . . . . . . . . . . . . . . . . . . . . . . . . . . . . . . . . . . . . . . . . . . . . . . . . . . . . 5-41
Chapter 6 Receiving Documents
Receiving Print, Fax, and I-Fax Documents . . . . . . . . . . . . . . . . . . . . . . . . . . .6-2
Receiving Documents . . . . . . . . . . . . . . . . . . . . . . . . . . . . . . . . . . . . . . . . . . . 6-3
Setting the Memory Lock Mode . . . . . . . . . . . . . . . . . . . . . . . . . . . . . . . . . . . .6-4
Memory RX Inbox Settings . . . . . . . . . . . . . . . . . . . . . . . . . . . . . . . . . . . . . . .6-5
Setting the Memory RX Inbox Password . . . . . . . . . . . . . . . . . . . . . . . . . . 6-5
Storing Received I-Fax Documents in Memory . . . . . . . . . . . . . . . . . . . . .6-8
Memory Lock Start Time Settings . . . . . . . . . . . . . . . . . . . . . . . . . . . . . . .6-9
Memory Lock End Time Settings . . . . . . . . . . . . . . . . . . . . . . . . . . . . . . .6-14
Forwarding Received Documents . . . . . . . . . . . . . . . . . . . . . . . . . . . . . . . . . 6-18
Erasing Received Documents . . . . . . . . . . . . . . . . . . . . . . . . . . . . . . . . . . . .6-19
Available Paper Sizes . . . . . . . . . . . . . . . . . . . . . . . . . . . . . . . . . . . . . . . . . . . .6-23
Chapter 7 Checking/Changing the Send/Receive Status
Checking/Changing the Status of Send Jobs. . . . . . . . . . . . . . . . . . . . . . . . . .7-2
Checking Send Job Details . . . . . . . . . . . . . . . . . . . . . . . . . . . . . . . . . . . . . . . 7-2
Changing the Destination. . . . . . . . . . . . . . . . . . . . . . . . . . . . . . . . . . . . . . . . .7-7
Resending a Job . . . . . . . . . . . . . . . . . . . . . . . . . . . . . . . . . . . . . . . . . . . . . .7-11
Printing the Send Job Status/Log . . . . . . . . . . . . . . . . . . . . . . . . . . . . . . . . .7-14
Checking/Changing the Status of Receive Jobs . . . . . . . . . . . . . . . . . . . . . . 7-17
Checking Receive Job Details . . . . . . . . . . . . . . . . . . . . . . . . . . . . . . . . . . . .7-17
Printing the Receive Job Log. . . . . . . . . . . . . . . . . . . . . . . . . . . . . . . . . . . . .7-19
Checking the Arrival of an I-Fax. . . . . . . . . . . . . . . . . . . . . . . . . . . . . . . . . . .7-21
Checking the Status of Jobs That Have Been Forwarded . . . . . . . . . . . . . . .7-22
Chapter 8 Customizing Communications Settings
Communications Settings Table. . . . . . . . . . . . . . . . . . . . . . . . . . . . . . . . . . . . .8-2
Automatic Document Deletion . . . . . . . . . . . . . . . . . . . . . . . . . . . . . . . . . . . . . .8-4
vii
Page 9

JPEG Compression Ratio for Color Send Jobs . . . . . . . . . . . . . . . . . . . . . . . 8-6
Handling Documents That Fail to Be Forwarded . . . . . . . . . . . . . . . . . . . . . . 8-8
Number of Retry Attempts . . . . . . . . . . . . . . . . . . . . . . . . . . . . . . . . . . . . . . . 8-10
Standard Send Settings . . . . . . . . . . . . . . . . . . . . . . . . . . . . . . . . . . . . . . . . . 8-12
Favorites Buttons. . . . . . . . . . . . . . . . . . . . . . . . . . . . . . . . . . . . . . . . . . . . . . . 8-15
Registering a Favorites Button . . . . . . . . . . . . . . . . . . . . . . . . . . . . . . . . . . . 8-15
Naming a Favorites Button . . . . . . . . . . . . . . . . . . . . . . . . . . . . . . . . . . . . . . 8-18
Erasing a Favorites Button . . . . . . . . . . . . . . . . . . . . . . . . . . . . . . . . . . . . . . 8-20
PDF Compression Priority . . . . . . . . . . . . . . . . . . . . . . . . . . . . . . . . . . . . . . . 8-23
Initial Send Screen Display . . . . . . . . . . . . . . . . . . . . . . . . . . . . . . . . . . . . . . . 8-26
Printing the TX Terminal ID . . . . . . . . . . . . . . . . . . . . . . . . . . . . . . . . . . . . . . . 8-28
Gamma Value for Color Send Jobs . . . . . . . . . . . . . . . . . . . . . . . . . . . . . . . . 8-33
Initializing TX Settings . . . . . . . . . . . . . . . . . . . . . . . . . . . . . . . . . . . . . . . . . . . 8-35
Two-Sided Printing . . . . . . . . . . . . . . . . . . . . . . . . . . . . . . . . . . . . . . . . . . . . . 8-37
Paper Drawer Selection. . . . . . . . . . . . . . . . . . . . . . . . . . . . . . . . . . . . . . . . . . 8-39
Reducing a Received Document . . . . . . . . . . . . . . . . . . . . . . . . . . . . . . . . . . 8-42
Printing Footer Information on a Received Document. . . . . . . . . . . . . . . . . 8-46
2 On 1 Log . . . . . . . . . . . . . . . . . . . . . . . . . . . . . . . . . . . . . . . . . . . . . . . . . . . . 8-48
Chapter 9 Storing/Editing Address Book Settings
Address Book Settings Table . . . . . . . . . . . . . . . . . . . . . . . . . . . . . . . . . . . . . . 9-2
About the Address Book. . . . . . . . . . . . . . . . . . . . . . . . . . . . . . . . . . . . . . . . . . 9-3
Storing New Addresses. . . . . . . . . . . . . . . . . . . . . . . . . . . . . . . . . . . . . . . . . . . 9-5
E-Mail Addresses . . . . . . . . . . . . . . . . . . . . . . . . . . . . . . . . . . . . . . . . . . . . . . 9-5
I-Fax Addresses . . . . . . . . . . . . . . . . . . . . . . . . . . . . . . . . . . . . . . . . . . . . . . 9-10
File Server Addresses . . . . . . . . . . . . . . . . . . . . . . . . . . . . . . . . . . . . . . . . . 9-19
Group Addresses . . . . . . . . . . . . . . . . . . . . . . . . . . . . . . . . . . . . . . . . . . . . . 9-25
Address Obtained via a Server . . . . . . . . . . . . . . . . . . . . . . . . . . . . . . . . . . 9-34
Editing Address Details. . . . . . . . . . . . . . . . . . . . . . . . . . . . . . . . . . . . . . . . . . 9-50
Erasing Addresses . . . . . . . . . . . . . . . . . . . . . . . . . . . . . . . . . . . . . . . . . . . . . 9-54
Naming an Address Book . . . . . . . . . . . . . . . . . . . . . . . . . . . . . . . . . . . . . . . . 9-58
Storing/Editing One-Touch Buttons. . . . . . . . . . . . . . . . . . . . . . . . . . . . . . . . 9-60
Erasing One-Touch Buttons . . . . . . . . . . . . . . . . . . . . . . . . . . . . . . . . . . . . . . 9-87
Chapter 10 System Manager Settings
System Settings Table . . . . . . . . . . . . . . . . . . . . . . . . . . . . . . . . . . . . . . . . . . . 10-2
Communications Settings. . . . . . . . . . . . . . . . . . . . . . . . . . . . . . . . . . . . . . . . 10-4
E-Mail/I-Fax Settings . . . . . . . . . . . . . . . . . . . . . . . . . . . . . . . . . . . . . . . . . . 10-4
Memory RX Inbox Settings . . . . . . . . . . . . . . . . . . . . . . . . . . . . . . . . . . . . 10-10
Setting the Memory RX Inbox Password . . . . . . . . . . . . . . . . . . . . . . . 10-10
viii
Page 10

Storing Received I-Fax Documents in Memory . . . . . . . . . . . . . . . . . . .10-13
Memory Lock Start Time Settings . . . . . . . . . . . . . . . . . . . . . . . . . . . . .10-14
Memory Lock End Time Settings . . . . . . . . . . . . . . . . . . . . . . . . . . . . . .10-18
Manage/Access to Address Book . . . . . . . . . . . . . . . . . . . . . . . . . . . . . . . . .10-22
Address Book Password . . . . . . . . . . . . . . . . . . . . . . . . . . . . . . . . . . . . . . . 10-22
Access Number Management . . . . . . . . . . . . . . . . . . . . . . . . . . . . . . . . . . .10-24
Forwarding Settings . . . . . . . . . . . . . . . . . . . . . . . . . . . . . . . . . . . . . . . . . . . .10-26
Storing Forwarding Settings. . . . . . . . . . . . . . . . . . . . . . . . . . . . . . . . . . . . .10-26
When Forwarding Destinations Do Not Match the Forwarding
Conditions . . . . . . . . . . . . . . . . . . . . . . . . . . . . . . . . . . . . . . . . . . . . . . . . . .10-49
Checking/Changing Forwarding Settings. . . . . . . . . . . . . . . . . . . . . . . . . . .10-60
Forwarding Received Documents . . . . . . . . . . . . . . . . . . . . . . . . . . . . . . . . 10-62
Erasing Forwarding Settings . . . . . . . . . . . . . . . . . . . . . . . . . . . . . . . . . . . . 10-63
Printing Forwarding Settings . . . . . . . . . . . . . . . . . . . . . . . . . . . . . . . . . . . . 10-64
LDAP Server Settings . . . . . . . . . . . . . . . . . . . . . . . . . . . . . . . . . . . . . . . . . . .10-66
Registering an LDAP Server . . . . . . . . . . . . . . . . . . . . . . . . . . . . . . . . . . . . 10-66
Changing an LDAP Server Setting . . . . . . . . . . . . . . . . . . . . . . . . . . . . . . .10-80
Deleting an LDAP Server. . . . . . . . . . . . . . . . . . . . . . . . . . . . . . . . . . . . . . . 10-82
Printing LDAP Server Settings. . . . . . . . . . . . . . . . . . . . . . . . . . . . . . . . . . . 10-83
Chapter 11 Printing Communication Reports
Report Settings Table . . . . . . . . . . . . . . . . . . . . . . . . . . . . . . . . . . . . . . . . . . . . 11-2
Specifying Report Settings. . . . . . . . . . . . . . . . . . . . . . . . . . . . . . . . . . . . . . . . 11-3
Send TX Report . . . . . . . . . . . . . . . . . . . . . . . . . . . . . . . . . . . . . . . . . . . . . . .11-3
Activity Report . . . . . . . . . . . . . . . . . . . . . . . . . . . . . . . . . . . . . . . . . . . . . . . . 11-5
Printing Lists . . . . . . . . . . . . . . . . . . . . . . . . . . . . . . . . . . . . . . . . . . . . . . . . . . . 11-9
Address Book List . . . . . . . . . . . . . . . . . . . . . . . . . . . . . . . . . . . . . . . . . . . . .11-9
User's Data List . . . . . . . . . . . . . . . . . . . . . . . . . . . . . . . . . . . . . . . . . . . . . . 11-11
Chapter 12 Troubleshooting
When Problems Occur . . . . . . . . . . . . . . . . . . . . . . . . . . . . . . . . . . . . . . . . . . . 12-2
Sending Documents. . . . . . . . . . . . . . . . . . . . . . . . . . . . . . . . . . . . . . . . . . . .12-2
Receiving Documents . . . . . . . . . . . . . . . . . . . . . . . . . . . . . . . . . . . . . . . . . . 12-5
Other Situations . . . . . . . . . . . . . . . . . . . . . . . . . . . . . . . . . . . . . . . . . . . . . . .12-7
Error Messages . . . . . . . . . . . . . . . . . . . . . . . . . . . . . . . . . . . . . . . . . . . . . . . . . 12-8
Self-Diagnostic Display . . . . . . . . . . . . . . . . . . . . . . . . . . . . . . . . . . . . . . . . . 12-8
List of Error Codes without Messages . . . . . . . . . . . . . . . . . . . . . . . . . . . . .12-12
Questions & Answers . . . . . . . . . . . . . . . . . . . . . . . . . . . . . . . . . . . . . . . . . . .12-25
Chapter 13 Appendix
Report and List Samples . . . . . . . . . . . . . . . . . . . . . . . . . . . . . . . . . . . . . . . . .13-2
Send Job List . . . . . . . . . . . . . . . . . . . . . . . . . . . . . . . . . . . . . . . . . . . . . . . . .13-2
ix
Page 11

Send TX Report . . . . . . . . . . . . . . . . . . . . . . . . . . . . . . . . . . . . . . . . . . . . . . 13-3
Activity Report . . . . . . . . . . . . . . . . . . . . . . . . . . . . . . . . . . . . . . . . . . . . . . . 13-5
Forwarding Conditions List. . . . . . . . . . . . . . . . . . . . . . . . . . . . . . . . . . . . . . 13-7
Registered LDAP Server List . . . . . . . . . . . . . . . . . . . . . . . . . . . . . . . . . . . . 13-8
Address Book List . . . . . . . . . . . . . . . . . . . . . . . . . . . . . . . . . . . . . . . . . . . . 13-9
User's Data List . . . . . . . . . . . . . . . . . . . . . . . . . . . . . . . . . . . . . . . . . . . . . 13-11
Glossary . . . . . . . . . . . . . . . . . . . . . . . . . . . . . . . . . . . . . . . . . . . . . . . . . . . . . 13-12
Index . . . . . . . . . . . . . . . . . . . . . . . . . . . . . . . . . . . . . . . . . . . . . . . . . . . . . . . . 13-17
x
Page 12

Preface
Thank you for purchasing the Canon Color imageRUNNER C3200. Please read this manual
thoroughly before operating the machine in order to familiarize yourself with its capabilities,
and to make the most of its many functions. After reading this manual, store it in a safe place
for future reference.
How To Use This Manual
Symbols Used in This Manual
The following symbols are used in this manual to explain procedures, restrictions,
handling precautions, and instructions that should be observed for safety.
WARNING
CAUTION
IMPORTANT
NOTE
Indicates a warning concerning operations that may lead to death or
injury to persons if not performed correctly. In order to use the machine
safely, always pay attention to these warnings.
Indicates a caution concerning operations that may lead to injury to
persons, or damage to property if not performed correctly. In order to
use the machine safely, always pay attention to these cautions.
Indicates operational requirements and restrictions. Be sure to read
these items carefully in order to operate the machine correctly, and to
avoid damage to the machine.
Indicates a clarification of an operation, or contains additional
explanations for a procedure. Reading these notes is highly
recommended.
Keys Used in This Manual
The following symbols and key names are a few examples of how keys to be
pressed are expressed in this manual:
Touch Panel Display Keys: [Key Name]
•
Examples: [Cancel]
[Done]
Control Panel Keys: <Key icon> + (Key Name)
•
Examples: (Start)
(Stop)
xi
Page 13
Displays Used in This Manual
Screen shots of the touch panel display used in this manual are those taken when
the Color imageRUNNER C3200 has the following optional equipment attached to
it: the Feeder (DADF-K1), Color Universal Send Kit, Resolution Switching Board,
Color Network Multi-PDL Printer Kit, Saddle Finisher-N2, and Cassette Feeding
Unit-X1.
Note that functions that cannot be used depending on the model or options, are not
displayed on the touch panel display.
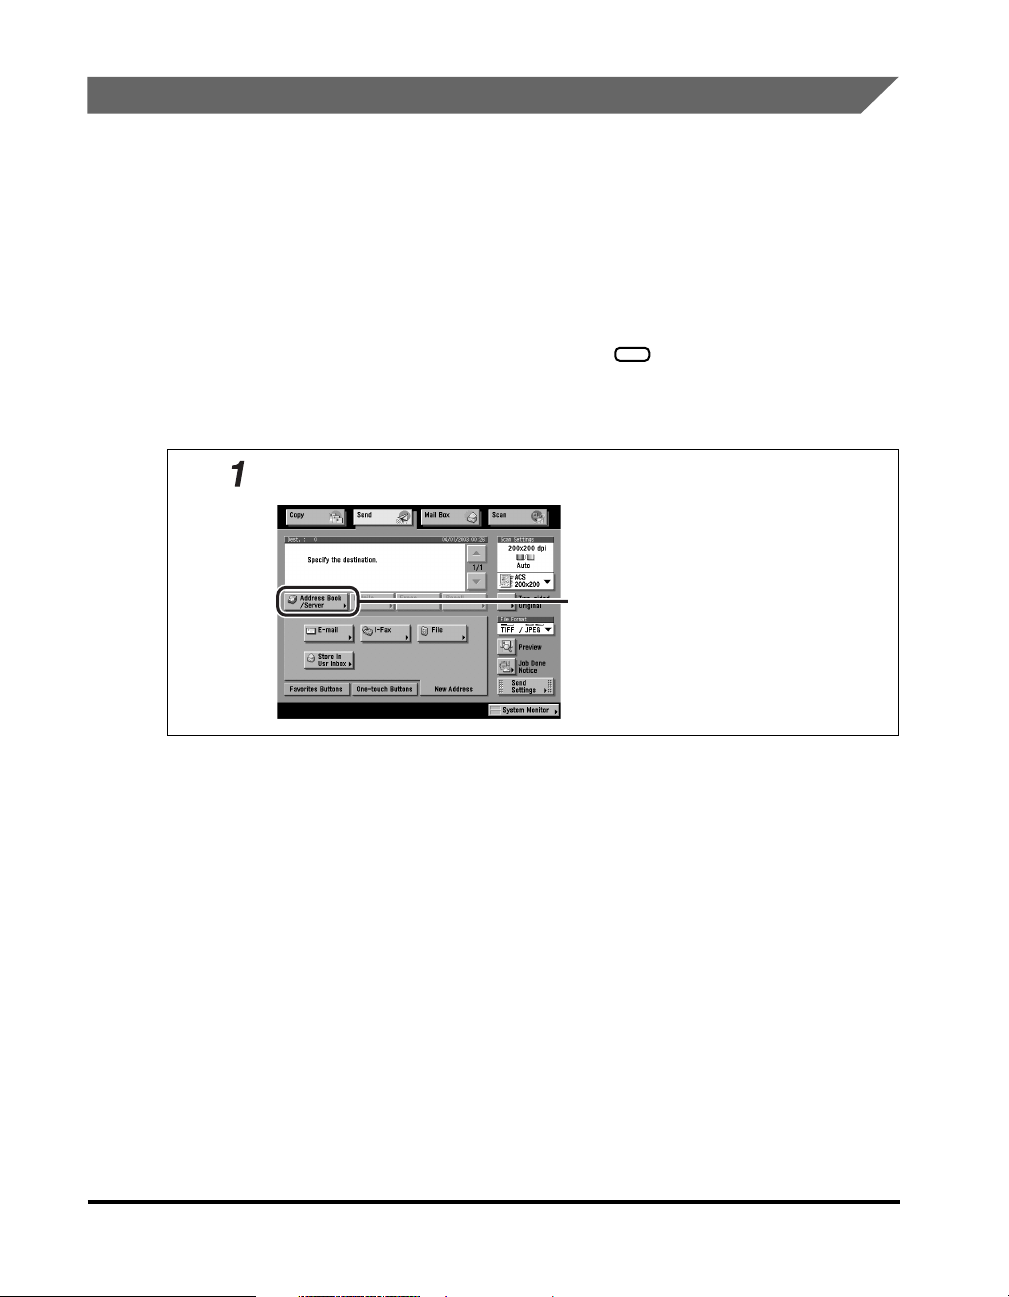
The keys which you should press are marked with , as shown below.
When multiple keys can be pressed on the touch panel display, all keys are marked.
Select the keys which suit your needs.
Press [Address Book/Server].
Press this key for operation.
xii
Page 14
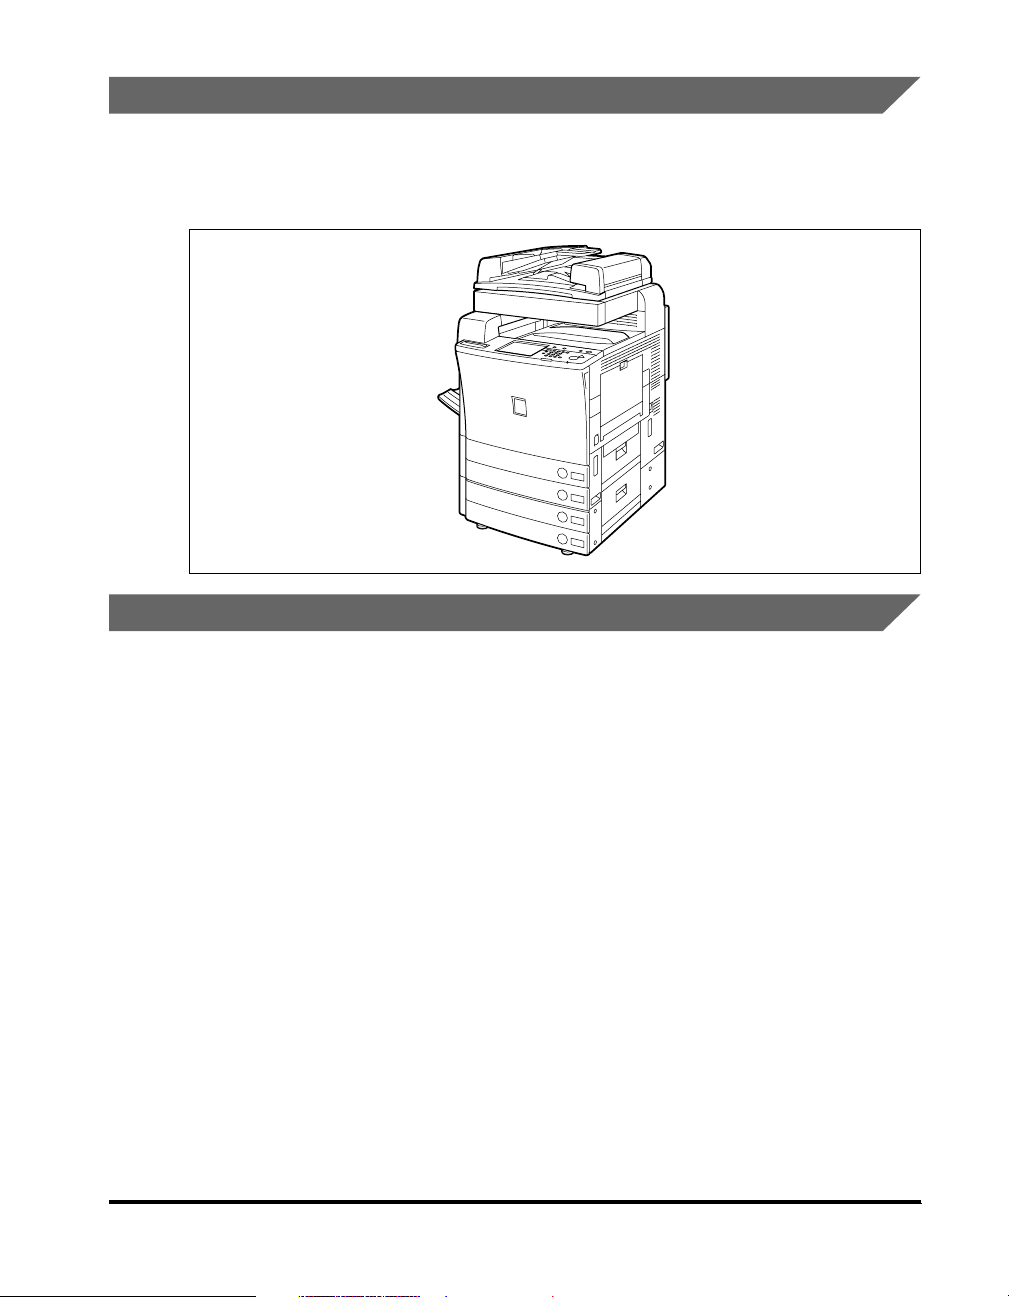
Illustrations Used in This Manual
Illustrations used in this manual are those displayed when the Color
imageRUNNER C3200 has the following optional equipment attached to it: the
Feeder (DADF-K1), and Cassette Feeding Unit-X1.
Abbreviations Used in This Manual
In this manual, product names and model names are abbreviated as follows:
Microsoft
Microsoft
Microsoft
Microsoft
Microsoft
Microsoft
Microsoft
®
Windows
®
Windows® 98 operating system: Windows 98
®
Windows® Millennium Edition operating system: Windows Me
®
Windows NT® operating system: Windows NT
®
Windows
®
Windows® XP operating system: Windows XP
®
Windows
Novell NetWare
®
95 operating system: Windows 95
®
2000 operating system: Windows 2000
®
operating system: Windows
®
: NetWare
xiii
Page 15

Legal Notices
Trademarks
Canon, the Canon logo, and imageRUNNER are trademarks of Canon Inc.
Adobe and Acrobat are trademarks of Adobe Systems Incorporated.
Mac OS is a trademark of Apple Computer, Inc.
IBM and OS/2 are trademarks of International Business Machines Corporation.
Microsoft, MS-DOS, Windows, and Windows NT are registered trademarks of
Microsoft Corporation in the United States and other countries.
NetWare
and other countries.
NDS is a trademark of Novell, Inc.
Sun and Solaris are trademarks of Sun Microsystems, Inc. in the United States and
other countries.
Ethernet is a trademark of Xerox Corporation.
UNIX is a registered trademark in the United States and other countries, licensed
exclusively X/Open Company Limited.
®
and Novell are registered trademarks of Novell, Inc. in the United States
xiv
Bitstream Inc. licenses the following fonts:
Dutch 801 Bold, Dutch 801 Bold Italic, Dutch 801 Italic, Dutch 801 Roman, Swiss
721 Bold, Swiss 721 Bold Oblique, Swiss 721 Oblique, Symbol.
Other product and company names herein may be the trademarks of their
respective owners.
Page 16

Copyright
Copyright 2003 by Canon Inc. All rights reserved.
No part of this publication may be reproduced or transmitted in any form or by any
means, electronic or mechanical, including photocopying and recording, or by any
information storage or retrieval system without the prior written permission of
Canon Inc.
Disclaimers
The information in this document is subject to change without notice.
CANON INC. MAKES NO WARRANTY OF ANY KIND WITH REGARD TO THIS
MATERIAL, EITHER EXPRESS OR IMPLIED, EXCEPT AS PROVIDED HEREIN,
INCLUDING WITHOUT LIMITATION, THEREOF, WARRANTIES AS TO
MARKETABILITY, MERCHANTABILITY, FITNESS FOR A PARTICULAR
PURPOSE OF USE OR AGAINST INFRINGEMENT OF ANY PATENT. CANON
INC. SHALL NOT BE LIABLE FOR ANY DIRECT, INCIDENTAL, OR
CONSEQUENTIAL DAMAGES OF ANY NATURE, OR LOSSES OR EXPENSES
RESULTING FROM THE USE OF THIS MATERIAL.
xv
Page 17

xvi
Page 18

Introduction to Sending Functions
This chapter is an introduction to the Send function.
What This Machine Can Do . . . . . . . . . . . . . . . . . . . . . . . . . . . . . . . . . . . . . . . . . . . . . . . 1-2
Overview of the Color imageRUNNER C3200 . . . . . . . . . . . . . . . . . . . . . . . . . . . . . . . . .1-5
Things You Must Do Before Using This Machine . . . . . . . . . . . . . . . . . . . . . . . . . . . . . . 1-10
Setting the Display Language . . . . . . . . . . . . . . . . . . . . . . . . . . . . . . . . . . . . . . . . . . . . . . . . . .1-11
Setting the Current Date and Time. . . . . . . . . . . . . . . . . . . . . . . . . . . . . . . . . . . . . . . . . . . . . . .1-11
Registering Sender Names . . . . . . . . . . . . . . . . . . . . . . . . . . . . . . . . . . . . . . . . . . . . . . . . . . . .1-16
Registering the Unit's Name. . . . . . . . . . . . . . . . . . . . . . . . . . . . . . . . . . . . . . . . . . . . . . . . . . . .1-19
Flow of Sending Operations . . . . . . . . . . . . . . . . . . . . . . . . . . . . . . . . . . . . . . . . . . . . . .1-22
Placing Originals. . . . . . . . . . . . . . . . . . . . . . . . . . . . . . . . . . . . . . . . . . . . . . . . . . . . . . . 1-35
Orientation . . . . . . . . . . . . . . . . . . . . . . . . . . . . . . . . . . . . . . . . . . . . . . . . . . . . . . . . . . . . . . . . .1-36
Platen Glass . . . . . . . . . . . . . . . . . . . . . . . . . . . . . . . . . . . . . . . . . . . . . . . . . . . . . . . . . . . . . . . .1-37
Feeder (DADF-K1) (Optional). . . . . . . . . . . . . . . . . . . . . . . . . . . . . . . . . . . . . . . . . . . . . . . . . . .1-40
Canceling a Job . . . . . . . . . . . . . . . . . . . . . . . . . . . . . . . . . . . . . . . . . . . . . . . . . . . . . . . 1-42
Using the Touch Panel Display. . . . . . . . . . . . . . . . . . . . . . . . . . . . . . . . . . . . . . . . . . . . . . . . . .1-42
Using the Stop Key. . . . . . . . . . . . . . . . . . . . . . . . . . . . . . . . . . . . . . . . . . . . . . . . . . . . . . . . . . .1-43
Using the System Monitor Screen . . . . . . . . . . . . . . . . . . . . . . . . . . . . . . . . . . . . . . . . . . . . . . .1-44
1
CHAPTER
1-1
Page 19

What This Machine Can Do
1
The Color imageRUNNER C3200 is packed with various send functions.
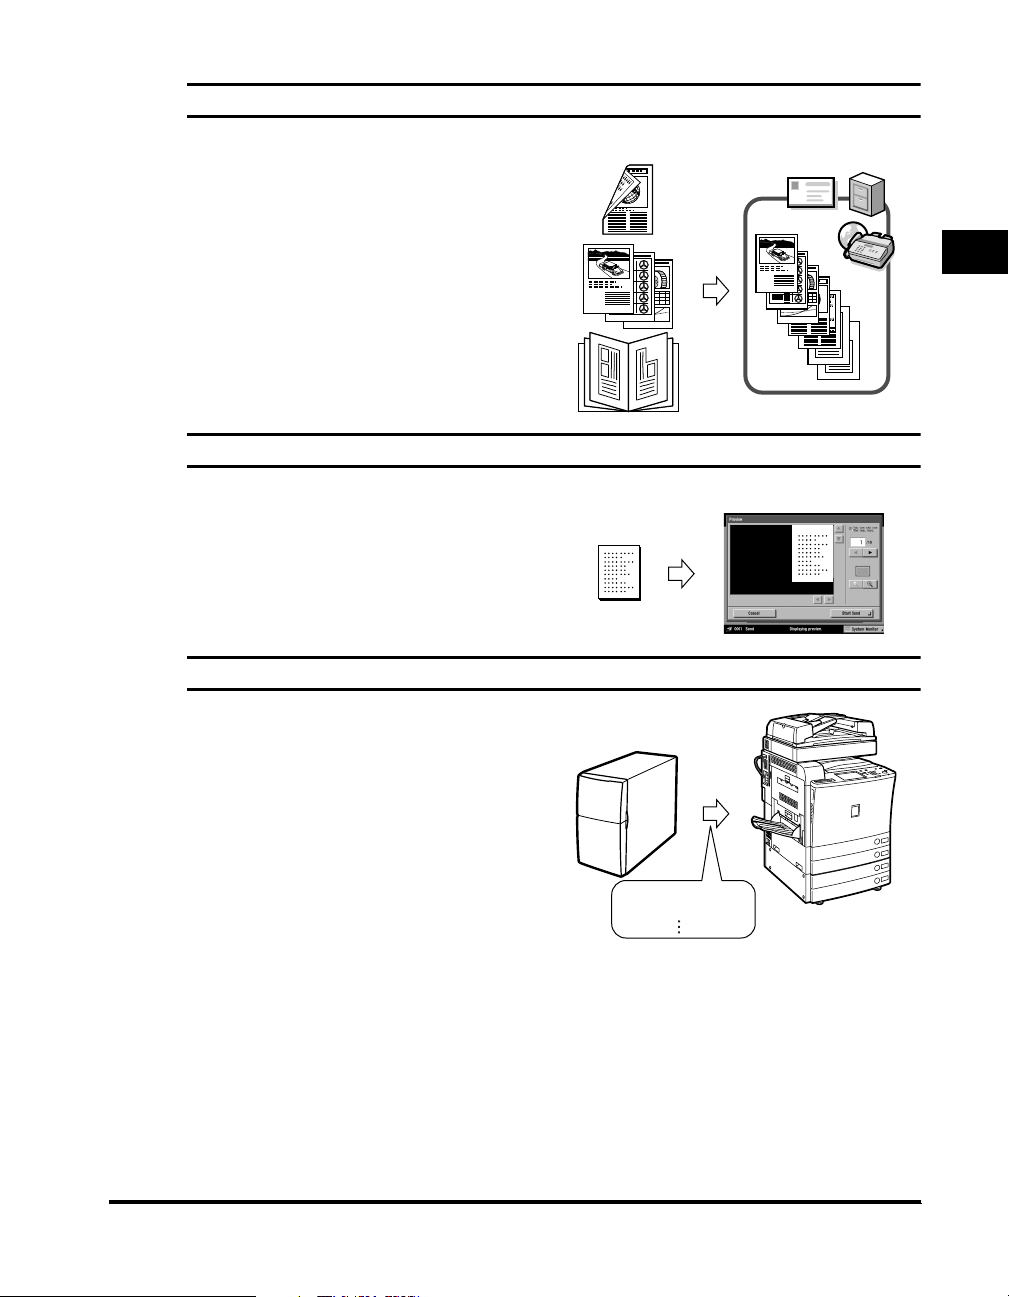
Diverse Sending Methods
You can easily scan paper documents and
send them to one or multiple recipients
through e-mail or I-fax, bringing to your
work environment increased efficiency in
the arena of document exchange. The
ability to send documents to FTP, SMB,
and NetWare file servers also serves to
help digitize paper documents for
convenient data access and management.
Sending documents through fax is available
only if the optional Super G3 FAX Board is
Introduction to Sending Functions
installed.
File Formats for Every Need
You can send documents in a variety of file
formats, including TIFF, MTIFF, JPEG, and
PDF. The document's color mode and the
file's compression ratio can also be set.
This gives you the freedom to send
documents in a manner that is best suited
to the purpose of the document, as well as
the recipient's document handling
environment.
Inbox
E-mail
TIFF
File Server
Original
MTIFF
Fax
I-Fax
PDF
JPEG
1-2
What This Machine Can Do
Page 20
Flexible Scan Features
This machine offers a variety of convenient
scanning features, such as the scanning of
two-sided and book originals, as well as
the ability to merge and send documents
that are scanned separately. You can also
set the exposure, color mode, and
document size to match the type of original
that you are scanning. In addition, you can
store preferred scan settings and retrieve
them at any time.
Preview Function
The Preview function enables you to check
the contents of documents before sending
them. This is useful in preventing mistakes.
Instant Address Search with LDAP
You can search for addresses stored on
LDAP (Lightweight Directory Access
Protocol) servers on the network and use
them as recipients for send jobs or store
them in the Address Book.
Originals Send
1
Original Preview
Introduction to Sending Functions
LDAP Server
john@canon.com
bob@canon.com
What This Machine Can Do
1-3
Page 21
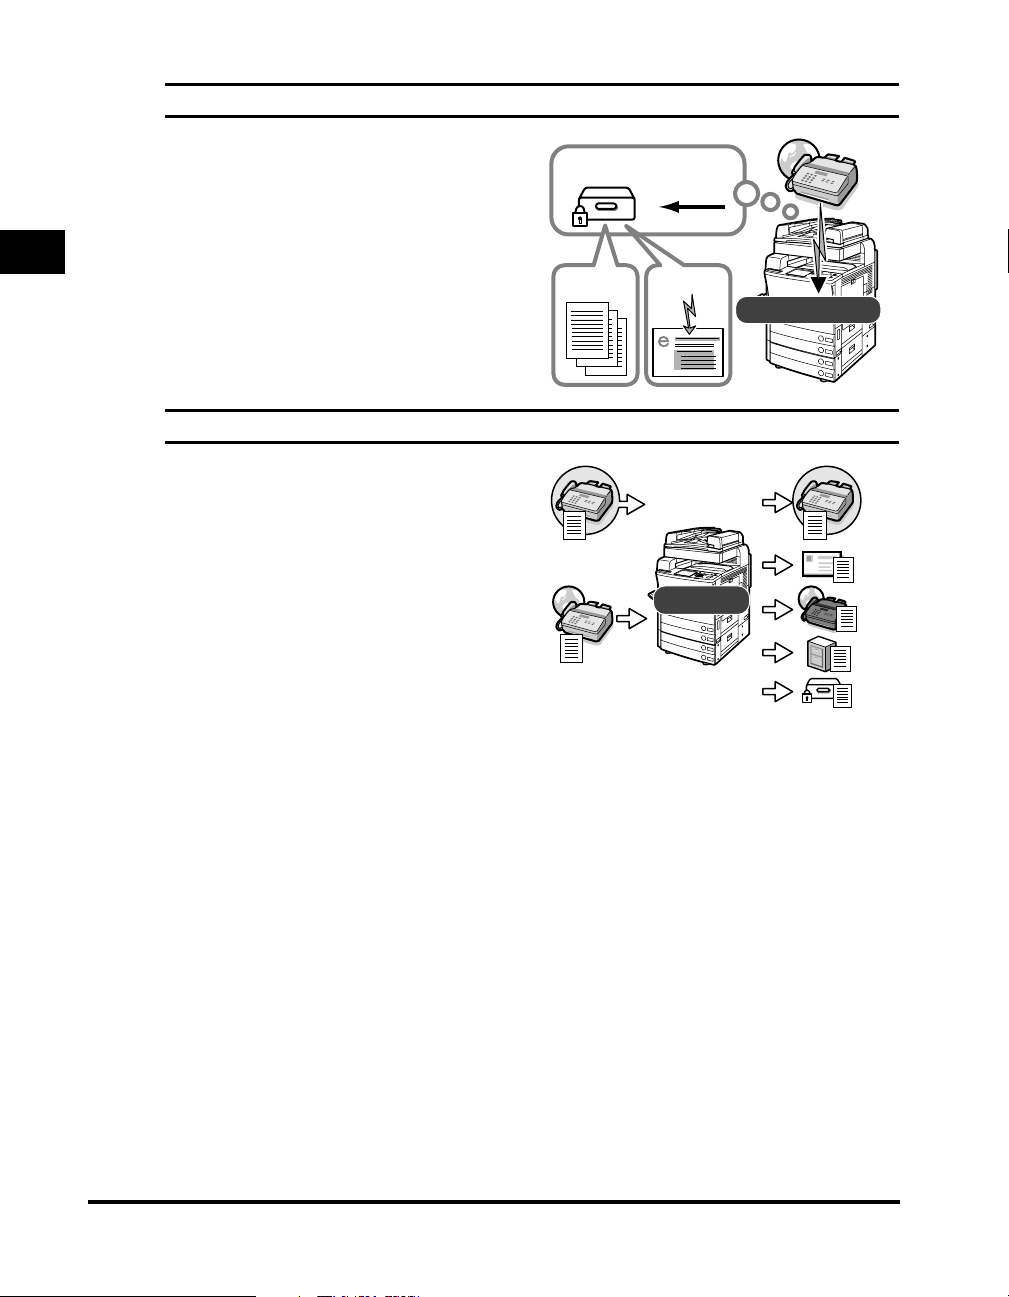
Receiving I-Faxes in Memory
Received I-fax documents can be stored in
the Memory RX Inbox instead of being
printed out. You can check the sender
information and the number of pages that
each document contains before printing it
1
or forwarding it to another destination.
Receiving faxes in memory is available only if
the optional Super G3 FAX Board is installed.
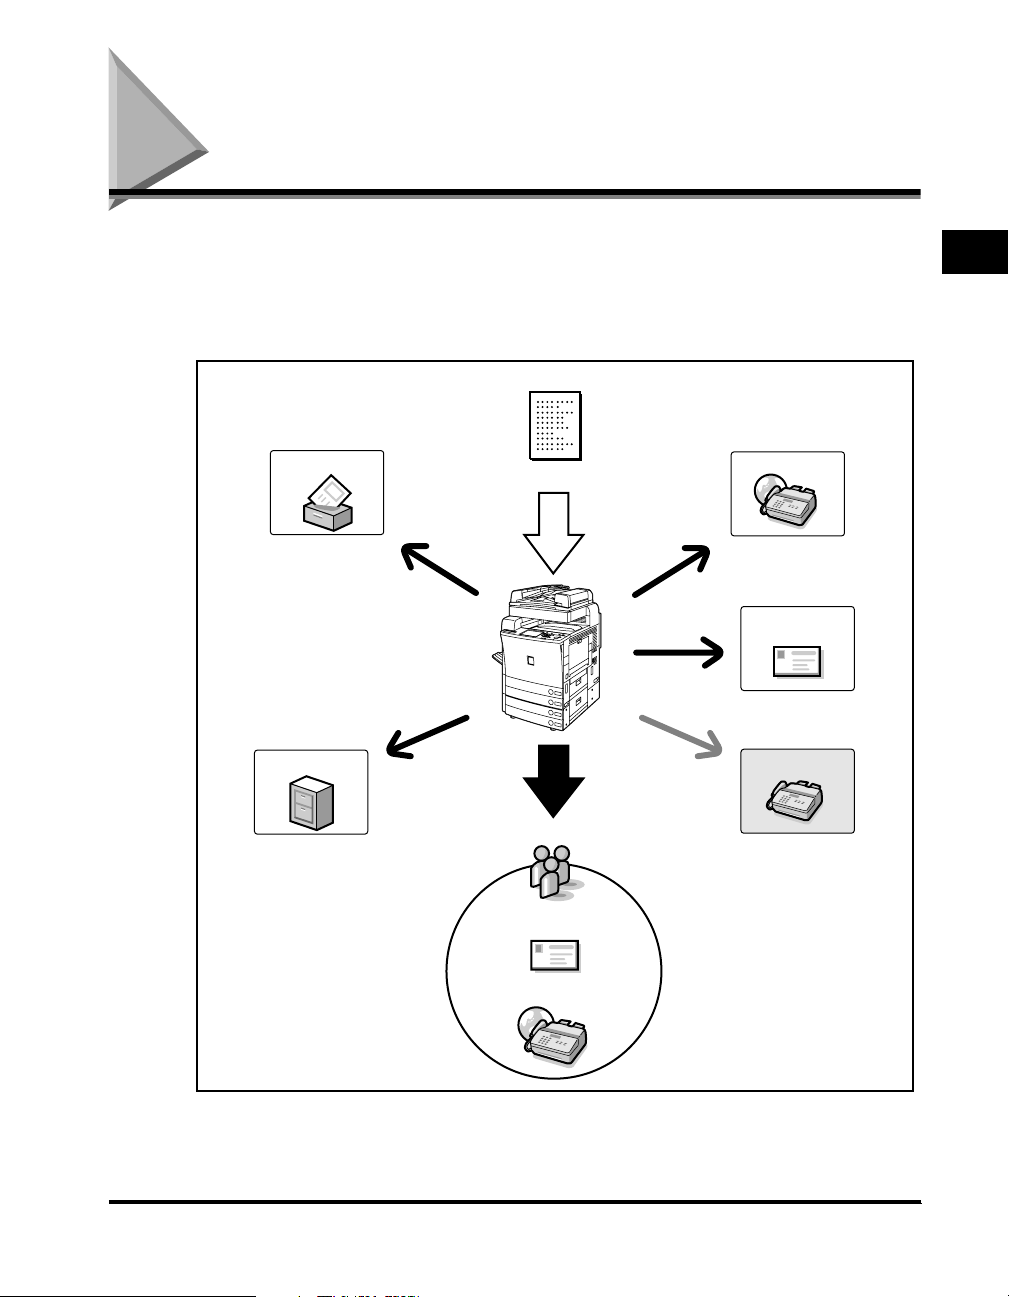
Automatic Forwarding
The machine can be set to automatically
forward received I-fax documents that
match the specified forwarding conditions
to any destination using the desired send
settings. You can forward I-fax documents
Introduction to Sending Functions
to other machines (relay function) or store
received documents that are confidential in
Confidential Fax Inboxes. The forwarding
function can be set to activate during any
specified time. Since received documents
that do not match the forwarding conditions
can also be forwarded to any desired
destination, this function can be used to
sort and deliver received I-fax documents
to the appropriate destinations.
If the optional Super G3 FAX Board is installed,
the machine can also receive faxes and forward
both received fax and I-fax documents to fax
machines.
Memory
RX Inbox
Print
Memory
Lock
Send
I-Fax Reception
Forward
Confidential
Fax Inbox
1-4
What This Machine Can Do
Page 22
Overview of the Color imageRUNNER C3200
If you press [Send], the Send Basic Features screen appears. The Send function
enables you to scan documents, and send them to specified destinations via e-mail
or I-fax, save them to a file server, or store them in an inbox in order to process
them at a later date. You can also send documents to multiple destinations
simultaneously using various sending methods, such as e-mail and I-fax.
Original
Inbox
File Server
Scan
I-Fax
E-mail
Fax *1
1
Introduction to Sending Functions
Group
E-mail
I-Fax
*1 If the optional Super G3 FAX Board is installed, faxing is possible. You can also register the fax numbers in group
addresses.
Overview of the Color imageRUNNER C3200
1-5
Page 23
IMPORTANT
•
You can use the sending functions of the Color imageRUNNER C3200 only if the optional
Color Image Reader-C1 is attached. If the optional Color Image Reader-C1 is not
attached, you cannot use any sending function, and therefore, this guide is not
necessary.
•
Network settings have to be specified in order to be able to send scanned documents to
an e-mail address, an I-fax address, or a file server. (See the Network Guide.)
1
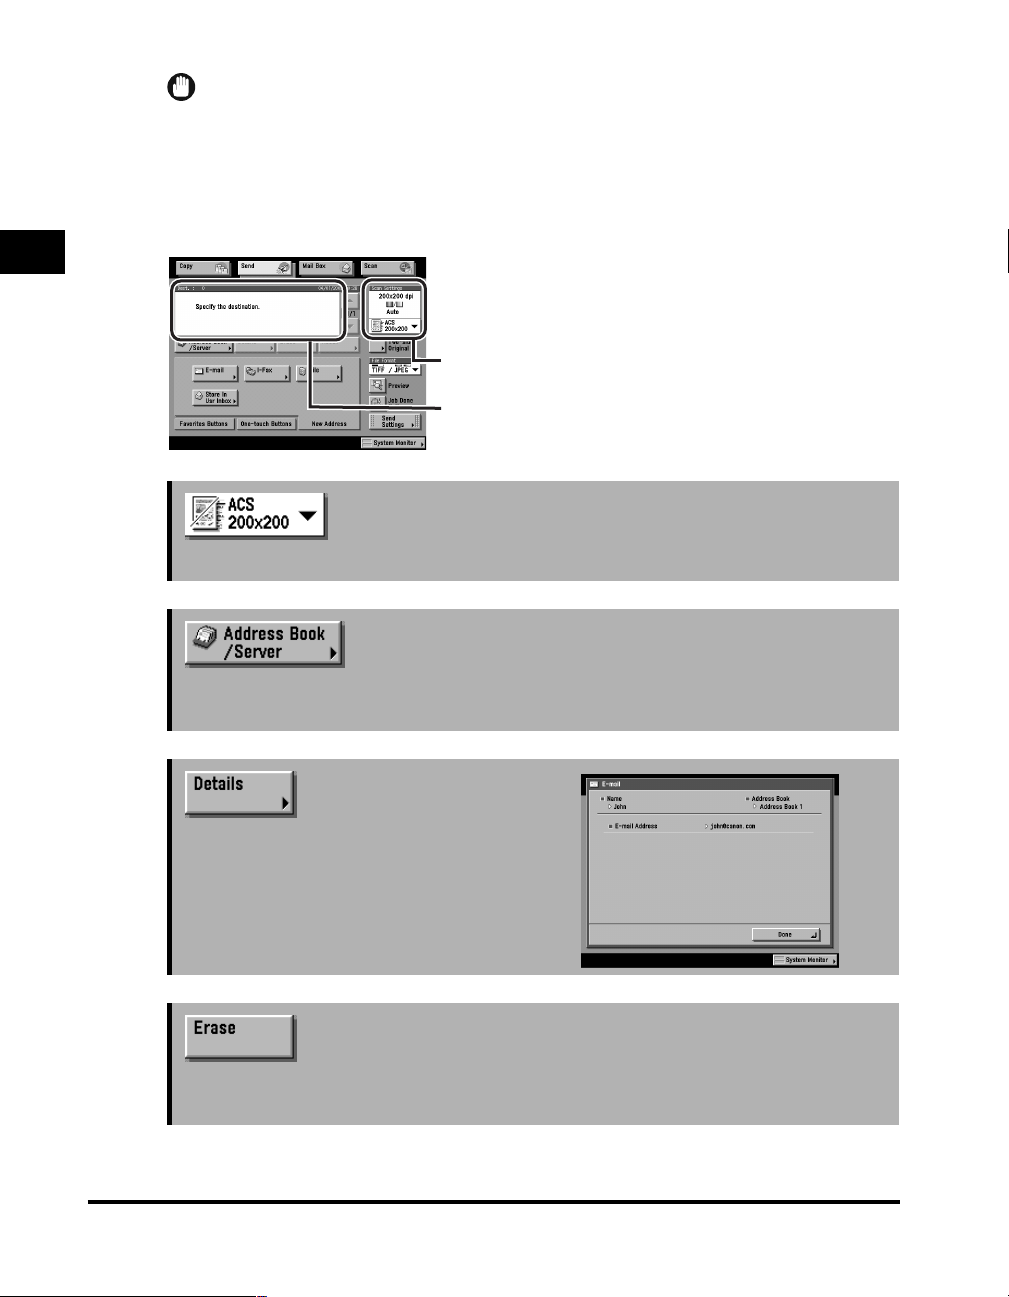
➞ See p. 3-2
Send Basic Features Screen
The screen on the left, which appears when [Send] is
selected, is called the Send Basic Features screen.
Displays the current scan settings.
Destination List
Displays a list of destinations.
Introduction to Sending Functions
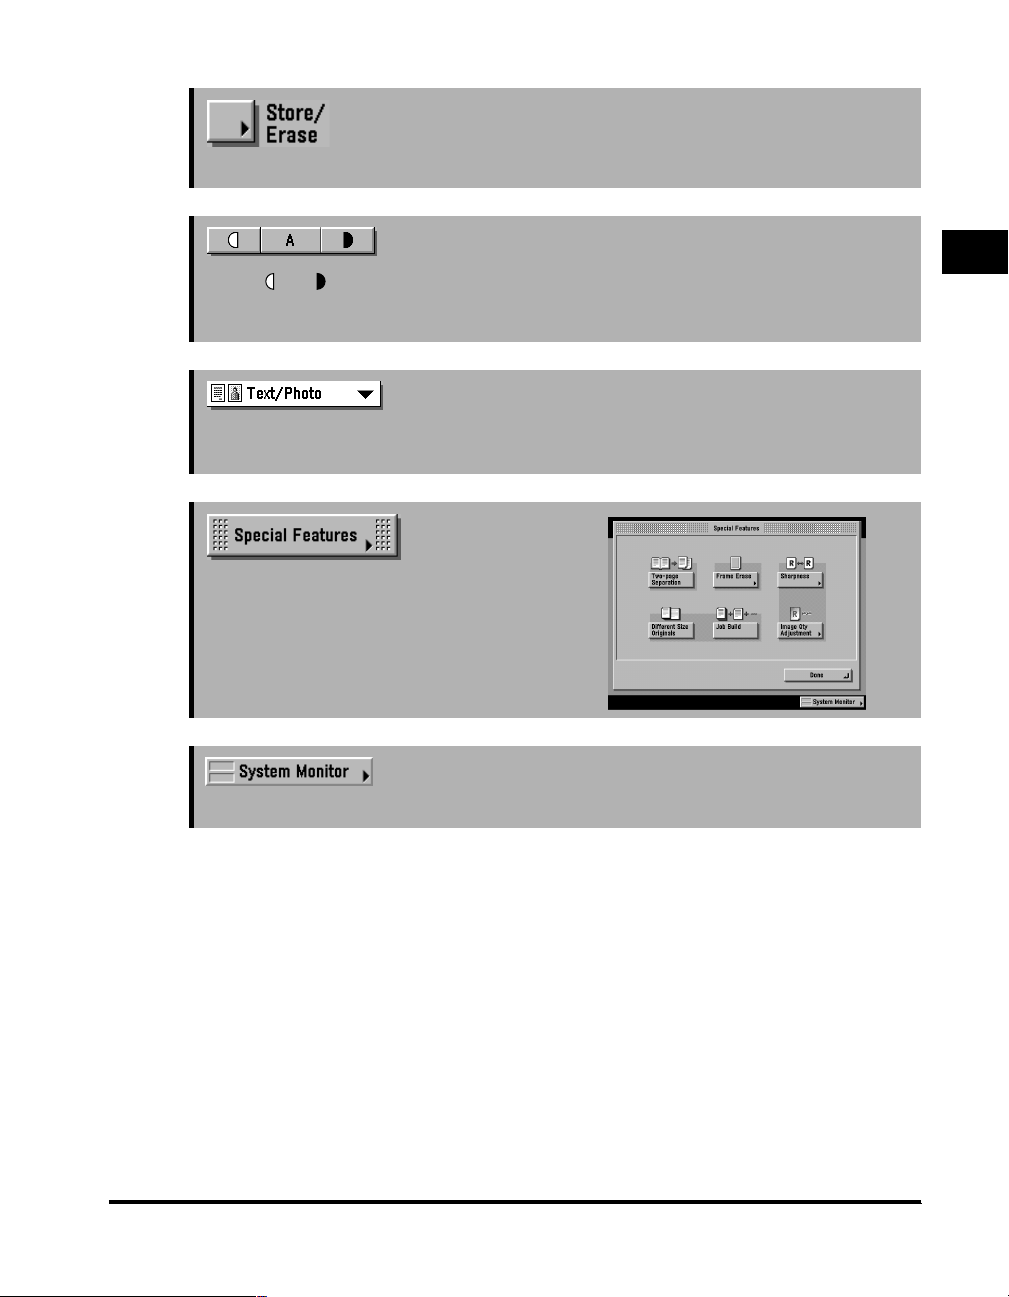
Press to select the scan mode. (See "Selecting a Scan Mode," on p. 3-2.)
Press to select a destination from the Address Book. (See "Using the Address Book," on
p. 2-2.)
Press to check or change the destination
information selected from the destination
list. (See "Checking/Changing a
Destination," on p. 2-49.)
Press to erase the destination displayed in the destination list. (See "Erasing a
Destination," on p. 2-52.)
➞ See p. 2-2
➞ See p. 2-49
➞ See p. 2-52
1-6
Overview of the Color imageRUNNER C3200
Page 24
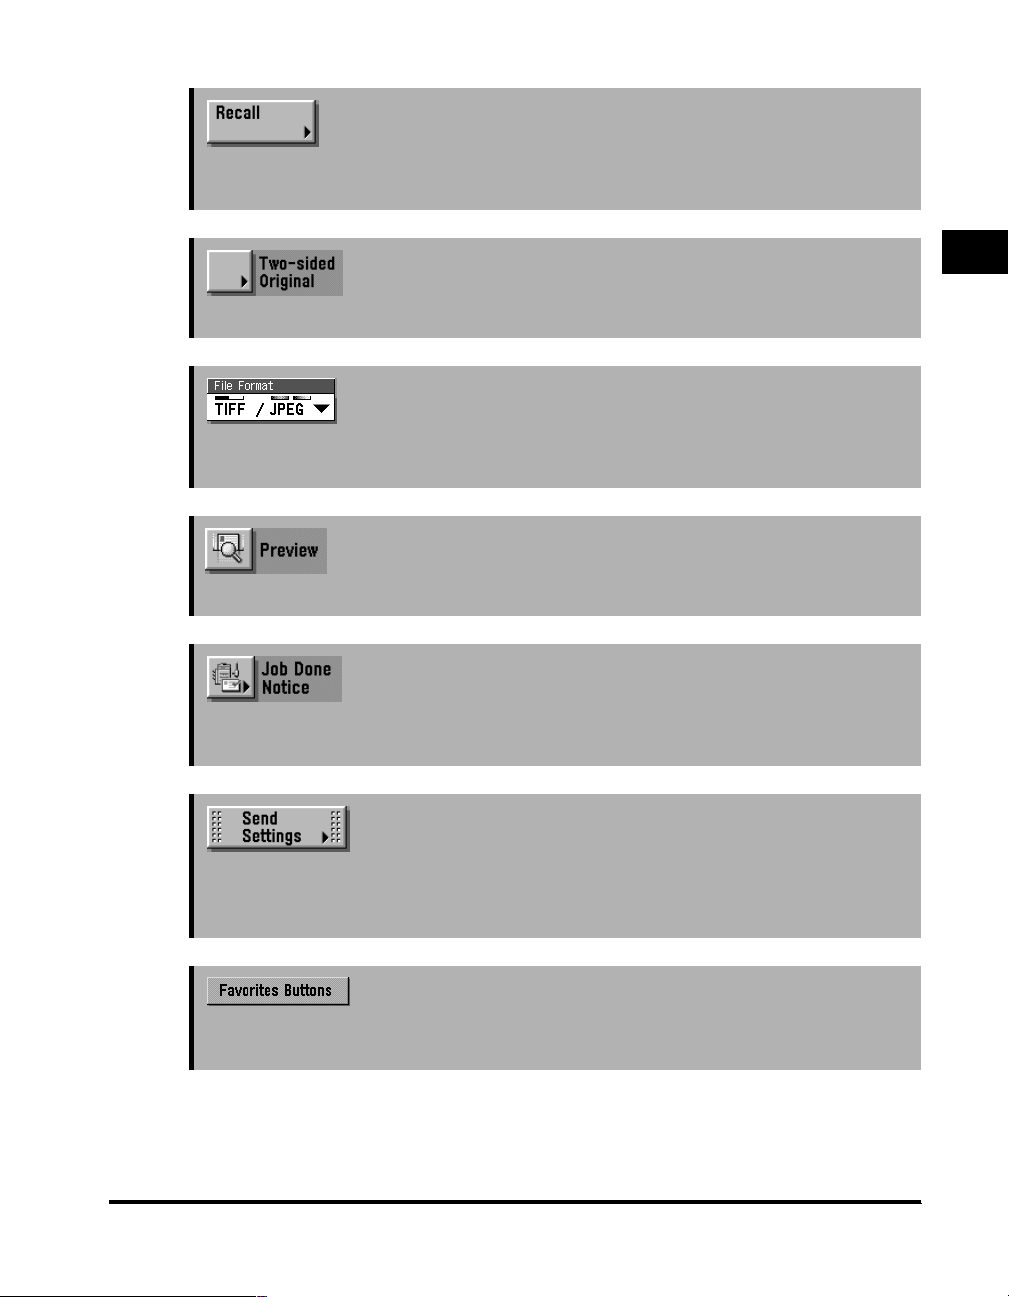
➞ See p. 5-41
Press to recall previously set send jobs including the destinations, scan settings, and
send settings. (See "Job Recall," on p. 5-41.)
➞ See p. 3-5
Press to scan both sides of the original. (See "Two-Sided Originals," on p. 3-5.)
Press to select the file format of the document you are going to send (TIFF/JPEG,
MTIFF/PDF, PDF/PDF, or PDF (Compct)).
➞ See p. 5-34
Press to verify the images before sending. (See "Previewing Originals," on p. 5-34.)
➞ See p. 5-37
Press to notify the user through e-mail that the send job has been completed. (See "Job
Done Notice," on p. 5-37.)
➞ See p. 5-2
1
Introduction to Sending Functions
Press to set the send settings. You can specify various settings here, such as setting for
the document to be sent at a specified time, or entering a subject for an e-mail or an I-fax.
(See "Sending Methods," on p. 5-2.)
➞ See p. 2-36
Press to recall the destinations and settings stored in a favorites button. (See "Using the
Favorites Buttons," on p. 2-36.)
Overview of the Color imageRUNNER C3200
1-7
Page 25

➞ See p. 2-34
Press to recall the destinations stored in a one-touch button. (See "Using the One-Touch
Buttons," on p. 2-34.)
1
Press to specify addresses not stored in the Address Book. (See "Using the New
Address Tab," on p. 2-5.)
Introduction to Sending Functions
Press to select the Color mode for scanning. (See "Changing Color Modes," on p. 3-24.)
Press to select the resolution. (See "Resolution," on p. 3-15.)
➞ See p. 2-2
Scan Settings Screen
The screen on the left, which appears when you select
[Option] from the Scan Settings drop-down list, is
called the Scan Settings screen.
Display this screen to set the scan settings for sending
documents.
➞ See p. 3-24
➞ See p. 3-15
1-8
➞ See p. 3-7
Press to select the size of the original that you want to scan. (See "Document Size," on
p. 3-7.)
➞ See p. 3-2
Press to select a stored scan mode and resolution. (See "Selecting a Scan Mode," on
p. 3-2.)
Overview of the Color imageRUNNER C3200
Page 26
➞ See p. 4-34
Press to store or erase a scan mode. (See "User Preset Keys," on p. 4-34.)
➞ See p. 3-17
Press [ ] or [ ] to manually control the scan exposure. Press [A] to select or cancel the
automatic exposure control. (See "Scan Exposure and Original Type Settings," on
p. 3-17.)
➞ See p. 3-17
Press to select the type of original (Text /Photo, Photo, or Text) that you are going to scan.
(See "Scan Exposure and Original Type Settings," on p. 3-17.)
➞ Chapter 4
Press to use the special features available
for scanning.
➞ Chapter 7
Press to check the status or details of a send or receive job, or to cancel a job.
1
Introduction to Sending Functions
Overview of the Color imageRUNNER C3200
1-9
Page 27
Things You Must Do Before Using This Machine
1
Introduction to Sending Functions
be done before the machine is used for sending operations.
IMPORTANT
•
If you attempt to use the machine without registering the necessary information correctly,
the machine may not function properly.
•
Network settings have to be specified in order to send scanned documents to an e-mail
address, an I-fax address, or a file server. (See the Network Guide.)
NOTE
If the optional Super G3 FAX Board is installed, you must set the type of telephone line
connected to the machine. For more information on selecting the telephone line type, see
Chapter 1, "Introduction to Fax Functions," in the Facsimile Guide.
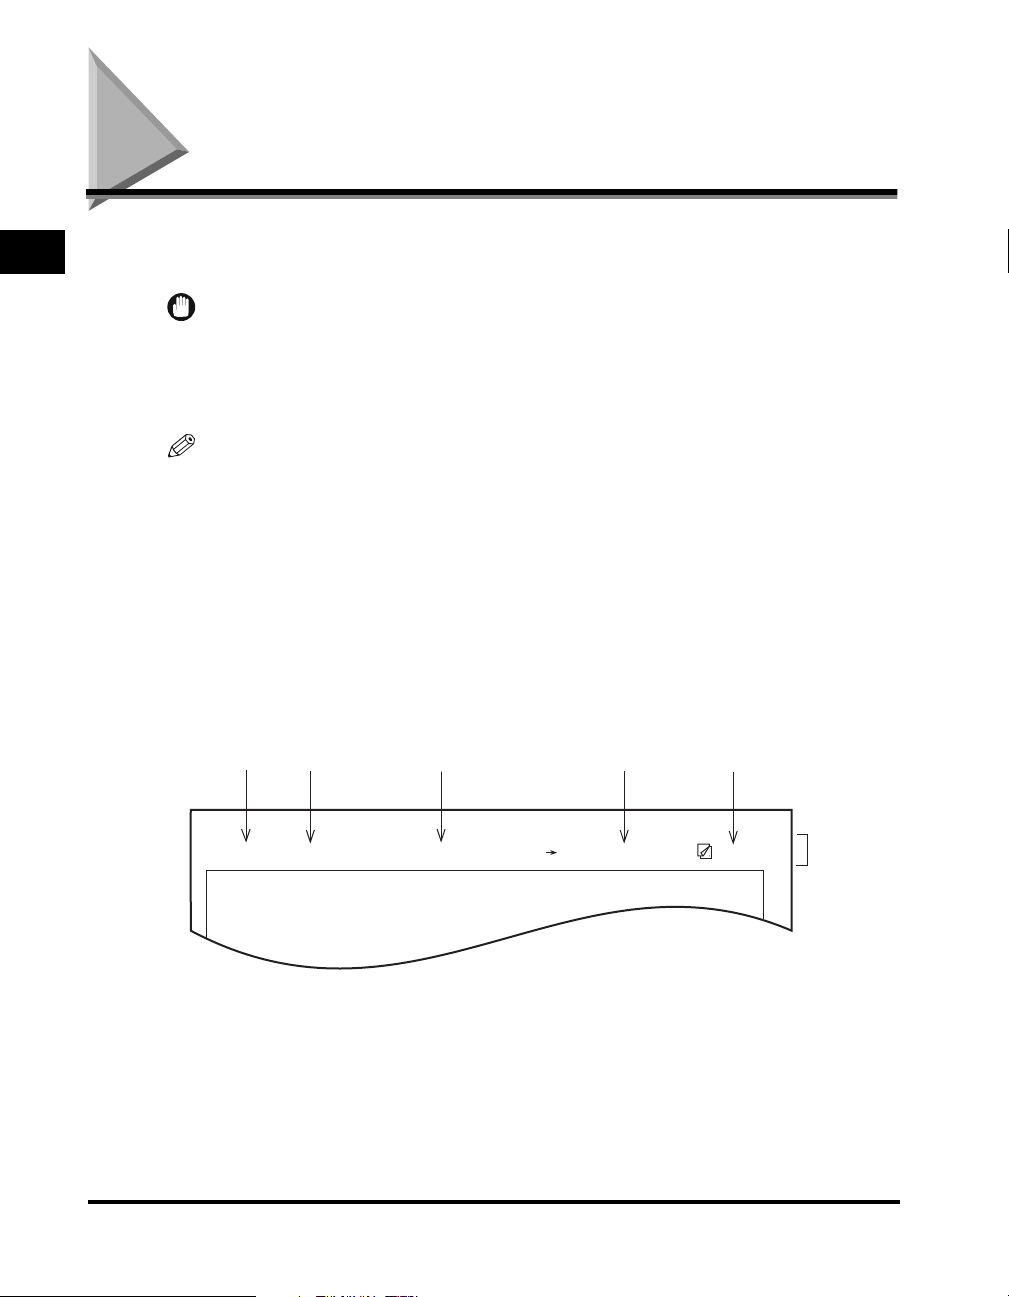
■ Registering the Sending Record
The sending record is printed at the top of the recording paper when you send an I-fax.
The following sender information must be printed on every I-fax transmission:
• Your machine's I-fax address
• The name of your company and department
• Date and time of transmission
Date Time
This section describes the important setting registrations and procedures that must
I-Fax Address Page Number
Destination Name
1-10
05/18/2003 15:00
• Date and Time
- The date and time of the transmission.
• I-Fax Address
- Your machine's I-fax address.
Things You Must Do Before Using This Machine
IFAX john@canon.co.jp
Atlanta office
001/001
Sender information
Page 28

• Destination Name
- If you send an original and select a destination from the Address Book, the stored
destination's name appears on the sending record. (See "Storing New Addresses," on
p. 9-5.)
• Page Number
- The current page number out of the total number of pages of the original is recorded.
NOTE
•
You can set the machine so that the sending record is not printed. However, for users in
the United States, this information must be printed at the top of every fax or I-fax that you
send. Therefore, the TX Terminal ID setting must always be turned 'On'. (See "Printing
the TX Terminal ID," on p. 8-28.)
•
If the machine is set so that the sending record is printed at the top of the recording
paper, and not all of the items are registered, only the required registered items and the
total number of original pages are printed.
Setting the Display Language
If you decide to switch the display language, set the Language Switch setting to
'On' before inputting characters.
If the Language Switch setting is set to 'Off', and then you set it to 'On' after
inputting characters, the characters may not be displayed correctly. If this happens,
either reenter the characters after setting the Language Switch setting to 'On', or
enter characters with the Language Switch setting set to 'Off'.
Setting the Current Date and Time
You can set the current date and time. The current date and time settings are used
as standard timer settings for functions that require them.
• GMT: The time at the Greenwich Observatory in England is
called GMT (Greenwich Mean Time).
• Time Zone: The standard time zones of the world are expressed
globally in terms of the difference in hours (± up to 12
hours) from GMT (± 0 hours). A time zone is a region
throughout which this time difference is the same.
• Daylight Saving Time: In some countries, time is advanced throughout the
summer season. The period in which this is applied is
called "Daylight Saving Time."
1
Introduction to Sending Functions
Things You Must Do Before Using This Machine
1-11
Page 29
1
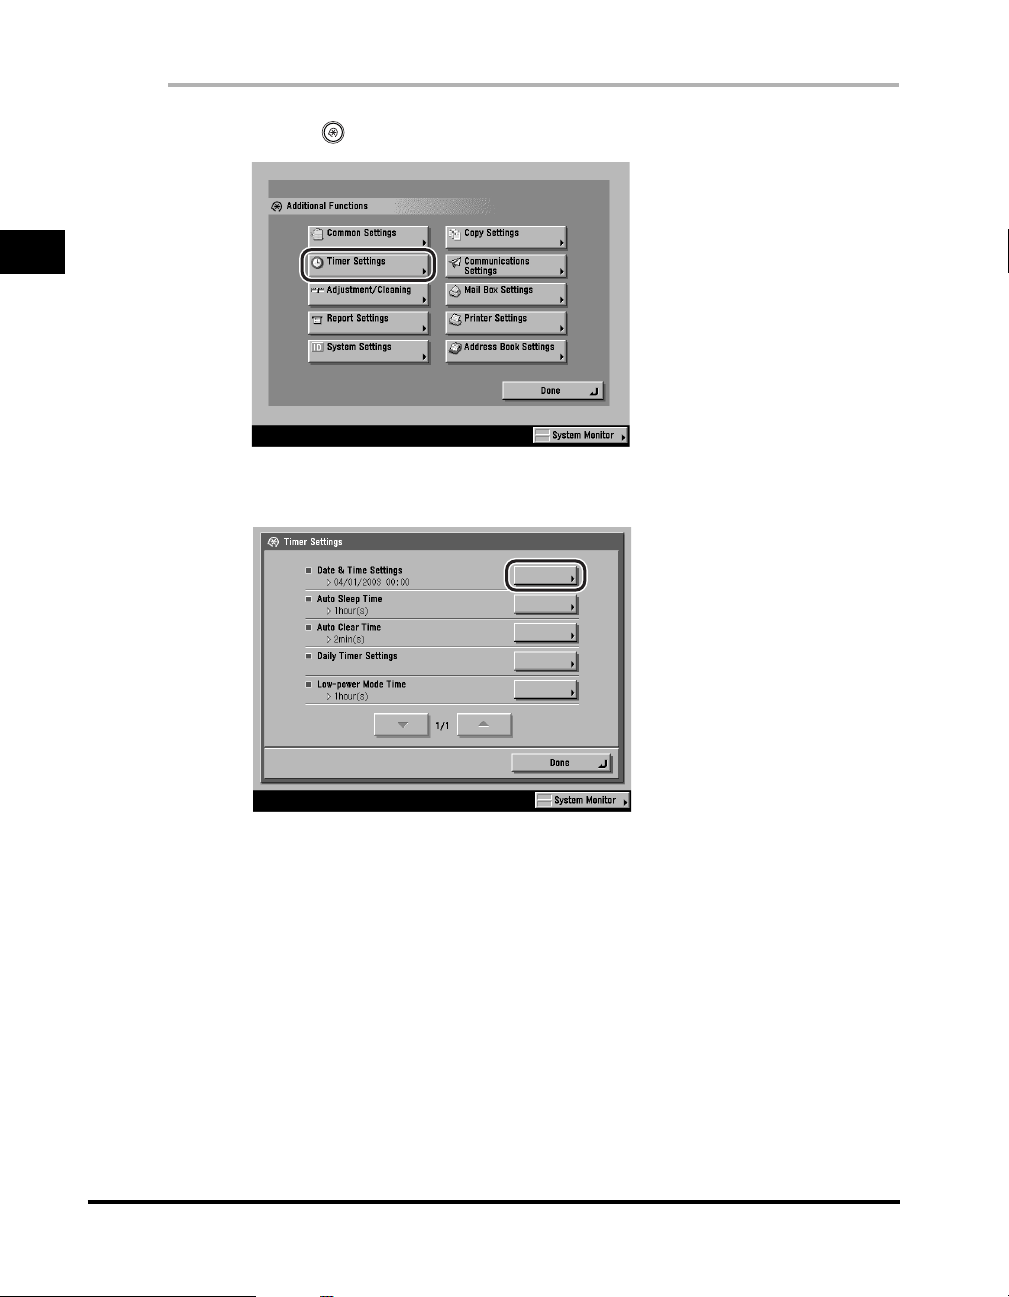
Press (Additional Functions) ➞ [Timer Settings].
1
2
Press [Date & Time Settings].
Introduction to Sending Functions
1-12
Things You Must Do Before Using This Machine
Page 30
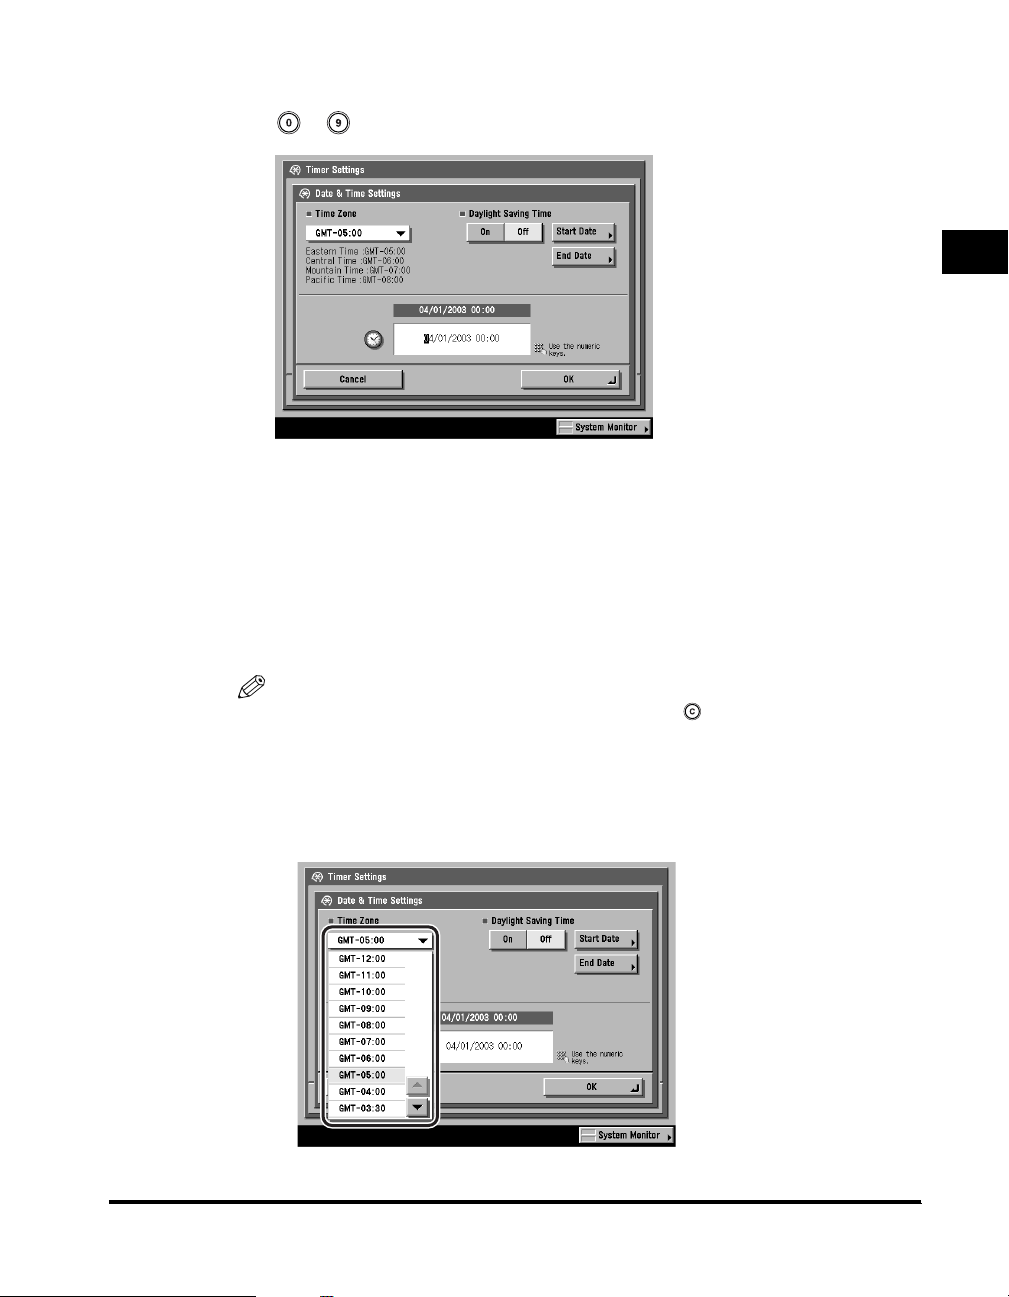
3
Enter the current date (month, day, year) and time using
- (numeric keys).
Enter the month and the day using four digits.
Enter all four digits of the year, and the time in 24-hour notation as four digits
without a space.
Examples:
May 6 ➞ 0506
7:05 a.m. ➞ 0705
11:18 p.m. ➞ 2318
1
Introduction to Sending Functions
NOTE
If you make a mistake when entering values, press (Clear) ➞ enter the values
again, starting with the month.
● If you are setting the Time Zone:
❑ Press the Time Zone drop-down list ➞ select the time zone where the machine
is located.
Things You Must Do Before Using This Machine
1-13
Page 31

NOTE
•
The default setting is 'GMT-5:00'.
•
Eastern Time (US/Canada): GMT-5:00
•
Central Time (US/Canada): GMT-6:00
•
Mountain Time (US/Canada): GMT-7:00
•
Pacific Time (US/Canada): GMT-8:00
•
1
If the desired time zone is not displayed, press [▼] or [▲] to scroll through the list.
● If you are setting Daylight Saving Time:
❑ Press [On] ➞ [Start Date].
Introduction to Sending Functions
❑ Select the month and day from the Month and Day drop-down lists,
respectively.
❑ Press [-] or [+] to enter the time of day you want Daylight Saving Time to take
effect ➞ press [OK].
1-14
Things You Must Do Before Using This Machine
Page 32

❑ Press [End Date] ➞ make the settings in the same way as [Start Date] ➞
press [OK].
NOTE
•
If you set Daylight Saving Time, the machine automatically sets the standard time
of the machine one hour forward at the specified date and time.
•
The default setting is 'Off'.
•
You can also use - (numeric keys) to enter the time, and (Clear) to clear
your entry.
•
You can change the value under <Hours> by pressing [-] or [+], even if you have
entered the value using - (numeric keys).
•
The time can be set in one hour increments, from 0 to 23 hours.
1
Introduction to Sending Functions
4
Press [OK].
The selected mode is set.
5
Press [Done] repeatedly until the Send Basic Features screen
appears.
Things You Must Do Before Using This Machine
1-15
Page 33

Registering Sender Names
You can register any name as the sender's name, such as the section or
department's name, or an individual's name.
If each user registers their personal name as a sender name, they can select their
sender name to replace the unit's name which is printed at the top of the
1
Introduction to Sending Functions
documents that they send.
NOTE
•
You can set to display and print the sender's name instead of the name stored as the
unit's name with the Sender's Names setting from the Send Settings screen. (See
"Sending an E-Mail Message," on p. 5-2, and "Sending an I-Fax," on p. 5-14.)
•
If the optional Super G3 FAX Board is installed, the sender name can be printed in the TX
Terminal ID.
1
Press (Additional Functions) ➞ [Communications
Settings].
1-16
Things You Must Do Before Using This Machine
Page 34

2
Press [TX Settings] under <Common Settings>.
3
Press [Sender's Names (TTI)].
1
Introduction to Sending Functions
NOTE
If the desired setting is not displayed, press [▼] or [▲] to scroll to the desired
setting.
Things You Must Do Before Using This Machine
1-17
Page 35

4
Select the number under which you want to register the
sender's name ➞ press [Register/Edit].
1
You can store up to 99 sender names (01 to 99).
If the desired number is not displayed, press [▼] or [▲].
You can also enter and specify the number under which you want to register the
sender's name using - (numeric keys).
Introduction to Sending Functions
To delete a stored sender's name, select the number under which the name is
registered ➞ press [Erase]. Only one sender name can be erased at a time.
5
Enter the sender's name ➞ press [OK].
1-18
You can enter up to 24 characters for the sender's name.
To cancel registering the sender's name, press [Cancel].
The selected mode is set.
Things You Must Do Before Using This Machine
Page 36

NOTE
•
For instructions on entering characters, see Chapter 2, "Basic Operations," in the
Reference Guide.
•
To delete all of the entered characters, press (Clear).
6
Press [Done] repeatedly until the Send Basic Features screen
appears.
Registering the Unit's Name
Your name or company's name must be registered as the unit's name (a
department name is optional).
For example:
• Your name: John Smith
• Company name: Canon
• Company name and department: Canon-Accounting Dept.
When you send a document, the recipient's machine displays or prints your name
or company's name (and department's name, if applicable) as the sender's
information on the recording paper.
NOTE
If the optional Super G3 FAX Board is installed, the sender name can be printed in the TX
Terminal ID.
1
Introduction to Sending Functions
1
Press (Additional Functions) ➞ [Communications
Settings] ➞ [TX Settings] under <Common Settings>.
If necessary, see the screen shots in steps 1 and 2 of "Registering Sender
Names," on p. 1-16.
Things You Must Do Before Using This Machine
1-19
Page 37

2
Press [Unit Name].
1
NOTE
If the desired setting is not displayed, press [▼] or [▲] to scroll to the desired
setting.
3
Introduction to Sending Functions
Enter a name ➞ press [OK].
1-20
You can enter up to 24 characters for the unit's name.
To cancel registering the unit's name, press [Cancel].
The selected mode is set.
NOTE
•
For instructions on entering characters, see Chapter 2, "Basic Operations," in the
Reference Guide.
•
To delete all of the entered characters, press (Clear).
Things You Must Do Before Using This Machine
Page 38

4
Press [Done] repeatedly until the Send Basic Features screen
appears.
1
Introduction to Sending Functions
Things You Must Do Before Using This Machine
1-21
Page 39

Flow of Sending Operations
1
This section describes the flow of basic sending operations.
NOTE
•
Before using the Send function, it is useful to read the following topics:
- Main power and control panel power (See Chapter 1, "Before You Start Using This
Machine," in the Reference Guide.)
- Routine maintenance (See Chapter 7, "Routine Maintenance," in the Reference
Guide.)
•
The maximum number of send jobs that the machine can hold is 120 (including jobs with
error codes). However, the actual number of send jobs that the machine can handle may
be less than 120, depending on the following conditions:
- Multiple documents are being sent at the same time
- Large documents are being sent
•
You can print a report that contains the results of all send jobs. (See "Send TX Report,"
Introduction to Sending Functions
on p. 11-3.)
1
Press the appropriate keys in accordance with the messages
displayed on the touch panel display.
If there are no messages displayed, proceed to step 2.
● If the message <You must insert a control card.> appears:
❑ Insert a control card into the optional Card Reader-D1.
1-22
The Basic Features screen is displayed.
Flow of Sending Operations
Page 40

NOTE
For instructions on using the optional Card Reader-D1, see Chapter 3, "Optional
Equipment," in the Reference Guide.
● If the message <Enter the Department ID and Password using the
numeric keys.> appears:
❑ Press [Dept. ID] ➞ enter the Department ID using - (numeric keys).
❑ Press [Password] ➞ enter the password using - (numeric keys).
❑ Press (ID).
The Basic Features screen is displayed.
NOTE
For instructions on using Department ID Management, see Chapter 6, "System
Manager Settings," in the Reference Guide.
2
Press [Send].
1
Introduction to Sending Functions
The Send Basic Features Screen
Flow of Sending Operations
1-23
Page 41

3
Place your originals.
1
NOTE
For instructions on placing your originals, see "Placing Originals," on p. 1-35.
4
Specify the destinations.
NOTE
•
Introduction to Sending Functions
A maximum of 256 destinations can be specified at the same time. (Out of the 256
destinations, 64 new addresses, including those obtained through a server, can be
specified.) If you specify a group address, which is made up of several
destinations, the whole group is counted as one address.
•
The icons that are displayed on the screen are:
- : Group
- : E-mail
- : I-Fax
- : File Server
- : Inbox
- : Fax (if the optional Super G3 FAX Board is installed)
1-24
Flow of Sending Operations
Page 42

● If a destination is stored in the Address Book:
❑ Press [Address Book/Server] ➞ select the desired destination. (See "Using the
Address Book," on p. 2-2.)
● If a destination is not stored in the Address Book:
❑ Press [New Address] ➞ select a sending method ➞ select the desired
destination. (See "Using the New Address Tab," on p. 2-5.)
1
Introduction to Sending Functions
NOTE
A maximum of 64 new addresses and addresses obtained through a server (User
Inboxes are not included in this count) can be specified at the same time.
Flow of Sending Operations
1-25
Page 43

● If a destination is stored in a One-Touch Button:
❑ Press [One-touch Buttons] ➞ select the one-touch button that contains the
desired destination. (See "Using the One-Touch Buttons," on p. 2-34.)
1
● If a destination is stored in a Favorites Button:
❑ Press [Favorites Buttons] ➞ select the favorites button that contains the
desired destination. (See "Using the Favorites Buttons," on p. 2-36.)
Introduction to Sending Functions
1-26
Flow of Sending Operations
Page 44

● If you want to specify a destination using a server:
❑ Press [Address Book/Server] ➞ search through the directory listing on the
server (LDAP) to specify the destination. (See "Using a Server," on p. 2-38.)
NOTE
A maximum of 64 new addresses and addresses obtained through a server (User
Inboxes are not included in this count) can be specified at the same time.
1
Introduction to Sending Functions
Flow of Sending Operations
1-27
Page 45

5
Press the Scan Settings drop-down list ➞ select a scan
setting.
1
If you do not see the desired scan setting, press [▼] or [▲] to scroll through the
list.
To change the Scan mode settings, select [Option] from the Scan Settings
drop-down list, and adjust the settings. (See "Scan Settings," on p. 3-5.)
Introduction to Sending Functions
1-28
NOTE
For instructions on setting the Scan mode, see "Selecting a Scan Mode," on p. 3-2.
Flow of Sending Operations
Page 46

6
Press [Send Settings] ➞ enter the send settings ➞ press
[Done].
1
Introduction to Sending Functions
NOTE
For instructions on specifying the Send Settings, see "Sending Methods," on p. 5-2.
Flow of Sending Operations
1-29
Page 47

7
Press the File Format drop-down list ➞ select a file format.
1
This part of the procedure is not necessary if any one of the following is true:
- An I-fax address is specified as the destination
- A User Inbox is specified as the destination
- A Fax number is specified as the destination (if the optional Super G3 FAX
Board is installed)
Introduction to Sending Functions
File Formats:
[TIFF/JPEG]: Sends images in either the TIFF (Black-and-White) or JPEG
[MTIFF/PDF]: Enables you to insert multiple images into a single MTIFF or
[PDF/PDF]: Enables you to insert multiple images into a single PDF file.
[PDF (Compct)]: Enables you to send files containing text originals or text/photo
(Grayscale/Color) format.
PDF file. Sends the file in either the MTIFF (Black) or PDF
(Grayscale/Color) format.
Sends the file in the PDF format regardless of the color mode.
originals using a high compression ratio. You can also send
multiple images together as one PDF file.
The Auto-Color Select (Full Color/Black-and-White) and
Black-and-White color modes cannot be set together.
If you select 'PDF (Compct)' as the file format, it is
recommended that you set the original type setting to either
'Text/Photo' or 'Text', depending on the image type.
1-30
Flow of Sending Operations
Page 48

NOTE
•
For more information on the different file formats, see "File Formats," in the
Glossary on p. 13-12.
•
If [PDF (Compct)] is selected as the File Format, set the JPEG Compression Ratio
in TX Settings in Communications Settings (from the Additional Functions screen)
to 'Normal' or 'Low Ratio'. If the Compression Ratio is set to 'High Ratio', the
images output may be of a low quality even if [Image Priority] is selected in Image
Level for PDF (Compct) in TX Settings in Communications Settings (from the
Additional Functions screen). (See "JPEG Compression Ratio for Color Send
Jobs," on p. 8-6.)
8
Press [Job Done Notice] ➞ select the destination to which to
send the notification message ➞ press [OK].
1
Introduction to Sending Functions
You can set the notification message if necessary.
If you select a destination that is protected by Access Number Management,
press [Access Number] ➞ enter the access number for the selected destination.
(See "Specifying Destinations," on p. 2-2.)
Flow of Sending Operations
1-31
Page 49

NOTE
•
To display [Access Number], set the Access Number Management to 'On'. To
access the Access Number Management setting, press (Additional Functions)
➞ [System Settings] ➞ [Manage/Access to Address Book] ➞ [Access Number
Management]. (See "Manage/Access to Address Book," on p. 10-22.)
•
For instructions on setting the Job Done Notice, see "Job Done Notice," on p. 5-37.
1
Introduction to Sending Functions
9
Press (Start).
If the following screen is displayed, follow the instructions on the touch panel
display ➞ press (Start) once for each original. When scanning is complete,
press [Done].
1-32
Scanning starts.
The scanned data is sent to the specified destination when scanning is complete.
NOTE
If the Preview key is lit, the Preview display setting is turned on, and you can verify
the images from the Preview screen before sending your document. (See
"Previewing Originals," on p. 5-34.)
Flow of Sending Operations
Page 50

10
If you want to cancel sending, press (Stop).
NOTE
•
You can press the (Stop) button to cancel a send job that is being scanned.
•
For instructions on canceling a send job, see "Canceling a Job," on p. 1-42.
•
You can also cancel a send job from the System Monitor screen. (See "Using the
System Monitor Screen," on p. 1-44.)
11
When scanning is complete, remove your originals.
12
If the optional Card Reader-D1 is attached, remove the control
card.
1
Introduction to Sending Functions
NOTE
For instructions on using the optional Card Reader-D1, see Chapter 3, "Optional
Equipment," in the Reference Guide.
Flow of Sending Operations
1-33
Page 51

13
If Department ID Management is set, press (ID).
NOTE
For instructions on using Department ID Management, see Chapter 6, "System
Manager Settings," in the Reference Guide.
1
Introduction to Sending Functions
1-34
Flow of Sending Operations
Page 52

Placing Originals
You can use the Color imageRUNNER C3200 to scan originals only if the optional
Color Image Reader-C1 and Platen Cover Type G are attached, or if the optional
Color Image Reader-C1 and Feeder (DADF-K1) are attached.
Place your originals on the platen glass or in the feeder, depending on the size and
type of original that you want to scan and send, and the send settings that you have
specified.
NOTE
If the original has too many pages to be placed in the feeder all at once, use the Job Build
mode on the Special Features screen (press [Option] from the Scan Settings drop-down
list). (See "Job Build," on p. 4-19.)
■ Platen Glass
Place the originals on the platen glass when scanning bound originals (such as books
and magazines), originals on heavy or lightweight paper, and transparencies.
■ Feeder
Place the originals in the feeder when you want to scan several originals at the same time,
and press (Start). The machine automatically feeds the originals onto the platen glass
and scans them. Two-sided originals can also be automatically turned over and scanned
as two-sided documents.
1
Introduction to Sending Functions
Placing Originals
1-35
Page 53

Orientation
You can place an original either vertically or horizontally. Always align the top edge
of your original with the back edge of the platen glass (by the arrow in the top left
corner), or the back edge of the feeder.
1
Vertical Placement Horizontal Placement
Introduction to Sending Functions
Place the original
face down.
Place the original
face up.
Platen Glass
Place the original
face down.
Feeder
Place the original
face up.
1-36
Vertical Placement
NOTE
•
If the top edge of the original is not aligned with the back edge of the platen glass (by the
arrow in the top left corner), your original may not be scanned correctly, depending on the
scan and send modes that you have set.
•
Originals of the following sizes can be placed either vertically or horizontally. However,
the scanning speed for horizontally placed originals is somewhat slower than for
vertically placed originals. Place originals horizontally when scanning with a Preset
Zoom, such as when enlarging an LTR original onto 11" x 17" paper.
- Platen glass: LTR, STMT
- Feeder: LTR
•
Horizontally placed LTR and STMT originals are referred to as LTRR and STMTR.
•
11" x 17" and LGL originals must be placed horizontally.
Placing Originals
Horizontal Placement
Page 54

Platen Glass
You should use the platen glass when scanning bound originals (such as books
and magazines), originals on heavy or lightweight paper, and transparencies into
memory. You should also place the original on the platen glass when you want to
scan an 11" x 17" original with an image that extends all the way to the edges
without the periphery of the original being cut off. (See "Document Size," on p. 3-7.)
NOTE
The machine automatically detects the size of the following originals: 11" x 17", LGL,
LTR, and LTRR.
1
Lift the feeder/platen cover.
Sensor
1
Introduction to Sending Functions
IMPORTANT
This machine is equipped with an open/close sensor on the feeder/platen cover
(see circled area in the above illustration). When placing originals on the platen
glass, lift the feeder/platen cover about 11 7/8" (300 mm) so that the sensor
detaches from the feeder/platen cover. If the sensor does not detach from the
feeder/platen cover, the size of the originals may not be detected correctly.
2
Place your originals face down.
Placing Originals
1-37
Page 55

The surface of the original that you want to scan must be placed face down.
Align the top edge of your original with the back edge of the platen glass (by the
arrow in the top left corner).
1
Place books and other bound originals on the platen glass in the same way.
NOTE
When you are enlarging an LTR or STMT original onto 11" x 17" or LGL paper,
place the original horizontally on the platen glass, and align it with the LTRR or
STMTR marks.
Introduction to Sending Functions
3
Gently close the feeder/platen cover.
CAUTION
• Close the feeder/platen cover gently to avoid catching your hands, as this
may result in personal injury.
• Do not press down hard on the feeder/platen cover when using the platen
glass to scan thick books. Doing so may damage the platen glass and
result in personal injury.
1-38
Placing Originals
Page 56

IMPORTANT
•
If you are placing the original on the platen glass, the size of the original is detected
after the feeder/platen cover is closed. Be sure to close the feeder/platen cover
before scanning.
•
If the original contains fine text or print, such as a map, the machine may need to
read or scan the document several times. Do not remove the original from the
platen glass until scanning is complete.
NOTE
•
Remove the original from the platen glass when scanning is complete.
1
•
The size of STMT and STMTR originals cannot be detected. After pressing
(Start), follow the instructions on the screen to specify the original size. You can
also manually select the paper size.
Introduction to Sending Functions
Placing Originals
1-39
Page 57

Feeder (DADF-K1) (Optional)
You should use the feeder when you want to scan several originals at the same
time. Place the originals in the feeder and press (Start). The machine
automatically feeds the originals onto the platen glass and scans them into
memory. Two-sided originals can also be automatically turned over and scanned as
1
Introduction to Sending Functions
two-sided documents.
You can place the following originals in the feeder's original supply tray:
• Weight: 14 to 28 lb bond (52 to 105 g/m
• Size: 11" x 17", LGL, LTR, LTRR, or STMT
• Tray Capacity:
- 11" x 17", LGL: 15 sheets (20 lb bond (80 g/m2))
- LTR or STMT: 30 sheets (20 lb bond (80 g/m2))
IMPORTANT
•
Do not place the following types of originals in the feeder:
- Originals with tears or large binding holes
- Severely curled originals or originals with sharp folds
- Clipped or stapled originals
- Carbon backed paper or other originals which might not feed smoothly
- Transparencies and other highly transparent originals
•
If the same original is fed through the feeder repeatedly, the original may fold or become
creased, and make feeding impossible. Limit repeated feeding to a maximum of 30 times.
(This number varies, depending on the type and quality of the original.)
•
If the feeder rollers are dirty from scanning originals written in pencil, perform the feeder
cleaning procedure. (See Chapter 7, "Routine Maintenance," in the Reference Guide.)
•
Always smooth out any folds in your originals before placing them in the feeder.
2
)
1-40
1
Adjust the slide guides to fit the size of your originals.
Placing Originals
Page 58

2
Neatly place your originals with the side to be scanned face
up in the original supply tray.
Place your originals as far into the feeder as they will go, until the Original Set
indicator is lit.
Original Set Indicator
IMPORTANT
•
Do not add or remove originals while they are being scanned.
•
When scanning is complete, remove the originals from the original output area to
avoid paper jams.
1
Introduction to Sending Functions
Original Output Area
NOTE
•
When you are enlarging LTR originals to 11" x 17" or LGL paper, place your
originals horizontally.
•
The scanned originals are output to the original output area in the order they are
fed into the feeder.
•
You can place different size originals together in the feeder if you set the Different
Size Originals mode. However, the length (vertical direction) of the different paper
sizes must be the same. For example, 11" x 17" and LTR paper can be placed
together. (See "Different Size Originals," on p. 4-17.)
Placing Originals
1-41
Page 59

Canceling a Job
1
This section explains how to cancel a send job in several ways.
Using the Touch Panel Display
You can cancel a send job by pressing [Cancel], when the job has been scanned
with the optional Color Image Reader-C1 attached.
1
Press [Cancel] on the screen shown below, which appears
while the machine is scanning.
Introduction to Sending Functions
1-42
The send job is canceled.
2
Remove your originals.
Canceling a Job
Page 60

Using the Stop Key
You can cancel a send job by pressing (Stop), when the job has been scanned
with the optional Color Image Reader-C1 attached.
NOTE
You can press (Stop) only to cancel a send job that is being scanned.
1
Press (Stop).
The send job is canceled.
1
Introduction to Sending Functions
2
Remove your originals.
Canceling a Job
1-43
Page 61

Using the System Monitor Screen
You can cancel a send job while it is waiting to be processed, or while it is being
sent.
1
Introduction to Sending Functions
1
Press [System Monitor].
2
Press [Send].
1-44
Canceling a Job
Page 62

3
Press [Status].
4
Select the job to be canceled ➞ press [Cancel].
1
Introduction to Sending Functions
If the job that you want to cancel is not displayed, press [▼] or [▲] to scroll
through the list.
You cannot select multiple jobs and cancel them all at once. Select and cancel
one job at a time.
If a job is in the process of being sent, it may not be canceled even if you press
[Cancel].
The message <Is it OK to cancel?> appears on the touch panel display.
Canceling a Job
1-45
Page 63

5
Press [Yes].
1
If you do not want to cancel the send job, press [No].
The message <Canceling...> appears for approximately two seconds on the touch
panel display.
The send job is canceled.
Introduction to Sending Functions
NOTE
The canceled job is displayed as <NG> (No Good) on the Log screen.
6
Press [Done].
The display returns to the Send Basic Features screen.
1-46
Canceling a Job
Page 64

Basic Sending Methods
This chapter describes how to specify, check, change, and erase destinations.
Specifying Destinations . . . . . . . . . . . . . . . . . . . . . . . . . . . . . . . . . . . . . . . . . . . . . . . . . .2-2
Using the Address Book . . . . . . . . . . . . . . . . . . . . . . . . . . . . . . . . . . . . . . . . . . . . . . . . . . . . . . .2-2
Using the New Address Tab. . . . . . . . . . . . . . . . . . . . . . . . . . . . . . . . . . . . . . . . . . . . . . . . . . . . .2-5
Using the One-Touch Buttons . . . . . . . . . . . . . . . . . . . . . . . . . . . . . . . . . . . . . . . . . . . . . . . . . .2-34
Using the Favorites Buttons . . . . . . . . . . . . . . . . . . . . . . . . . . . . . . . . . . . . . . . . . . . . . . . . . . . .2-36
Using a Server . . . . . . . . . . . . . . . . . . . . . . . . . . . . . . . . . . . . . . . . . . . . . . . . . . . . . . . . . . . . . .2-38
Checking/Changing a Destination . . . . . . . . . . . . . . . . . . . . . . . . . . . . . . . . . . . . . . . . .2-49
Erasing a Destination . . . . . . . . . . . . . . . . . . . . . . . . . . . . . . . . . . . . . . . . . . . . . . . . . . . 2-52
2
CHAPTER
2-1
Page 65

Specifying Destinations
This section describes how to specify a destination for a send job. You can select a
destination stored in the Address Book or a one-touch button, or specify a new
address altogether. You can also recall the destinations and settings stored in the
2
favorites buttons to check their contents, edit them, or delete them.
Using the Address Book
You must specify the destination (such as an e-mail address, I-fax address, or file
server address) in order to send documents. If you store addresses in the Address
Book, you can easily select them. Addresses are stored in Address Book Settings
(from the Additional Functions screen). (See "Storing New Addresses," on p. 9-5.)
Basic Sending Methods
NOTE
•
A maximum of 256 destinations can be specified at the same time. (Out of the 256
destinations, 64 new addresses, including those obtained through a server, can be
specified.) If you specify a group address, which is made up of several destinations, the
whole group is counted as one address.
•
Address Books can be saved, imported, and transferred using the Remote User
Interface. (See Chapter 2, "Checking and Managing Functions," and Chapter 3,
"Customizing Settings," in the Remote UI Guide.)
1
Press [Address Book/Server].
2-2
Specifying Destinations
Page 66

2
Select the desired destination from the Address Book.
● If Access Number Management is set to 'On', and you want to select
a destination that is stored with an access number or in a private
address book:
❑ Press [Access Number].
2
❑ Enter the access number using - (numeric keys) for the private address
book or destination ➞ press [OK].
If you press [No Access Number], the destinations that are not managed with
the Access Number setting are displayed.
To cancel entering the Access Number, press [Cancel].
Basic Sending Methods
Specifying Destinations
2-3
Page 67

2
Basic Sending Methods
❑ Select the destination ➞ press [OK].
● If Access Number Management is set to 'Off', or the destination is
not stored with an access number or in a private address book:
❑ Select the destination ➞ press [OK].
2-4
You can select multiple destinations.
Press the alphabet keys (e.g., [ABC]) to display the range of entries. Press the
same key again to return to the full address list.
If the desired destination is not displayed, press [▼] or [▲] to scroll to the
desired destination.
You can restrict the type of destinations displayed in the results list by pressing
the Type drop-down list.
Press the Address Book/Server drop-down list to display a list of subaddress
books (subaddress books 1 to 10, or one-touch buttons). Subaddress books
categorize the addresses stored in the Address Book.
You can also specify a destination by searching the directory listings on a
network server. (See "Using a Server," on p. 2-38.)
If the optional Super G3 FAX Board is installed, you can also specify fax
numbers.
Specifying Destinations
Page 68

The selected destination appears on the Send Basic Features screen.
NOTE
•
To display [Access Number], set Access Number Management to 'On'. To access
the Access Number Management setting, press (Additional Functions) ➞
[System Settings] ➞ [Manage/Access to Address Book] ➞ [Access Number
Management]. (See "Manage/Access to Address Book," on p. 10-22.)
•
To cancel a selected destination, select the destination again to clear the check
mark.
•
To view the detailed information of a selected destination, select the destination ➞
press [Details].
•
If you select only one destination, press (Start) to send from the Search
Address Book/Server screen.
•
You can erase the destinations selected from the Address Book before you scan
the document. (See "Erasing a Destination," on p. 2-52.)
Using the New Address Tab
You must specify the destination (such as an e-mail address, I-fax address, or file
server address) in order to send documents. This section describes the procedure
for specifying a new destination that has not been stored in the Address Book.
NOTE
•
If you frequently send documents to the same destinations, store these destinations in
the Address Book beforehand. (See "Storing New Addresses," on p. 9-5.)
•
A maximum of 64 new addresses and addresses obtained through a server (User
Inboxes are not included in this count) can be specified at the same time.
•
If the optional Super G3 FAX Board is installed, you can also specify fax numbers.
2
Basic Sending Methods
Specifying Destinations
2-5
Page 69

Specifying an E-Mail Address
This mode enables you to specify a new e-mail address. You can enter an e-mail
address directly from the keyboard on the touch panel display.
1
2
Basic Sending Methods
2
Press [New Address] ➞ [E-mail].
Press [E-mail Address].
2-6
Specifying Destinations
Page 70

3
Enter the e-mail address ➞ press [OK].
You can enter up to 128 characters for the e-mail address.
You can also use - (numeric keys) to enter numbers, and (Clear) to
clear your entry.
NOTE
For instructions on entering characters, see Chapter 2, "Basic Operations," in the
Reference Guide.
4
Press [OK].
2
Basic Sending Methods
The specified e-mail address appears on the Send Basic Features screen.
IMPORTANT
The e-mail address you just entered is not stored in the Address Book. It is deleted
once the document is sent.
NOTE
•
To view the detailed information of a selected destination, select the destination ➞
press [Details].
•
You can edit an e-mail address from the Details screen before you scan your
documents. (See "Checking/Changing a Destination," on p. 2-49.)
•
You can erase the specified destination from the destination list before you scan
your documents. (See "Erasing a Destination," on p. 2-52.)
Specifying Destinations
2-7
Page 71

Specifying an I-Fax Address
This mode enables you to specify a new I-fax address. Regardless of the distance
and area, I-fax helps you to reduce transmission cost by making transactions via
the Internet. You can enter an I-fax address directly from the keyboard on the touch
panel display. You can also specify the scan settings and the settings at the
destination when using I-fax.
IMPORTANT
2
NOTE
•
•
Basic Sending Methods
If the destination is an I-fax address, the original is always scanned and sent in the
Black-and-White mode.
Sending by I-fax has the following limitations.
- Size is fixed to LTR. This is because the sender does not know whether the machine at
the destination can receive sizes other than LTR.
- Resolution is fixed to 200 x 200 dpi. (200 x 100 dpi also can be selected optionally.)
- Images can be sent only in monochrome. They are sent in TIFF-MH format.
If you send by e-mail, the above-mentioned limitations do not apply. The image is sent as
a file attached to the e-mail.
- Sizes other than LTR can be selected.
- The resolution can be selected.
- Images can be sent in color also. Color images are sent in JPEG or PDF format, and
monochrome images are sent in TIFF-MMR format.
2-8
1
Press [New Address] ➞ [I-Fax].
Specifying Destinations
Page 72

2
Press the Mode drop-down list ➞ select [Simple] or [Full].
[Simple]: Sends scanned data as an image via the Internet.
[Full]: Sends scanned data as an image via the Internet, and enables you to
receive a delivery confirmation message telling you whether your
I-fax was sent successfully.
2
NOTE
•
In order for you to receive a confirmation message telling you the delivery status of
your I-fax document, the recipient's machine must have I-fax capabilities and be
compatible with the Full mode.
•
If you send documents using the Full mode to a machine that does not support the
Full mode, delivery confirmation cannot be carried out. When this happens, the job
concerned is not considered as complete even though the actual sending of the
document is successful. Such jobs are displayed as <Waiting for result...> on the
Status screen until the time set for Full Mode TX Timeout in E-mail/I-Fax Settings in
Communications Settings in System Settings (from the Additional Functions
screen) has lapsed. After the timeout, the job is moved to the log, and the result is
shown as <->.
3
Press [I-Fax Address].
Basic Sending Methods
Specifying Destinations
2-9
Page 73

4
2
Basic Sending Methods
Enter the I-Fax address ➞ press [OK].
You can enter up to 128 characters for the I-Fax address.
You can also use - (numeric keys) to enter numbers, and (Clear) to
clear your entry.
NOTE
•
For instructions on entering characters, see Chapter 2, "Basic Operations," in the
Reference Guide.
•
If you do not send documents via a server, and the recipient's IP address is not
registered on a DNS server, use the following format to enter the domain name:
(user)@(the recipient's IP address).
2-10
5
Press [Destination Conditions] to set how the document is
received by the recipient.
Specifying Destinations
Page 74

6
Specify the receiving conditions of the destination ➞ press
[OK].
The following conditions are always selected:
- Paper Size: A4/LTR
- Compression Method: MH (Modified Huffman)
- Resolution: 200 x 100 dpi and 200 x 200 dpi
The paper sizes LTR, LGL, and STMT are included in [LTR].
IMPORTANT
Set the destination conditions according to the specifications of the recipient's
machine. An error in transmission may occur if you set conditions that the
recipient's machine does not support.
2
Basic Sending Methods
NOTE
Available compression methods are:
- MH (Modified Huffman) - a coding system that horizontally scans and
compresses extended areas of white and black dots.
- MR (Modified Read) - a coding system that horizontally and vertically scans and
compresses white and black areas. Faster than MH.
- MMR (Modified Modified Read) - an adaptation of Modified Read, originally for
use in digital machines. Faster than MR.
Specifying Destinations
2-11
Page 75

7
2
Basic Sending Methods
Select [On] or [Off] for <Send Via Server>.
[On]: Sends your I-fax documents via a mail server. This enables you to send
documents to destinations via the Internet in the same way that you send
an e-mail.
[Off]: Does not send your I-fax documents via a server. You can send large
amounts of image data to a recipient within the same LAN (Local Area
Network) environment without placing a burden on the mail server. This
enables you to send documents quickly and directly to the recipient. To
use this setting, it is necessary to set up an MX (Mail eXchange) record
on the DNS server. Ask your System Manager whether this type of
sending is possible before you set <Send Via Server> to 'Off'.
2-12
IMPORTANT
The Send Via Server setting is available only if <Use Send Via Server> is set to
'On' from the E-mail/I-Fax Settings screen. To access this screen, press
(Additional Functions) ➞ [System Settings] ➞ [Communications Settings] ➞
[Email/I-Fax Settings]. If <Use Send Via Server> is set to 'Off', <Send Via Server>
is grayed out, and I-fax jobs are always sent via the server. (See "E-Mail/I-Fax
Settings," on p. 10-4.)
NOTE
Even if <Send Via Server> is set to 'Off', delivery confirmation of documents sent
using the Full mode is carried out via the server.
Specifying Destinations
Page 76

8
Press [OK].
The selected modes are set, and the specified I-fax address appears on the Send
Basic Features screen.
IMPORTANT
The I-fax address you just specified is not stored in the Address Book. It is deleted
once the document is sent.
NOTE
•
To view the detailed information of a selected destination, select the destination ➞
press [Details].
•
You can edit a destination from the Details screen before you scan your
documents. (See "Checking/Changing a Destination," on p. 2-49.)
•
You can erase the specified destination from the destination list before you scan
your documents. (See "Erasing a Destination," on p. 2-52.)
Specifying a File Server
This section describes the three procedures for specifying a file server on the
network as the destination of a send job. You can use the keyboard, Browse key if
you select Windows (SMB) as the server protocol, or Browse key if you select
NetWare (IPX) as the server protocol.
IMPORTANT
Windows NT/2000/XP restricts the number of users or clients that can be accessed.
Once the limit of users or clients has been reached, it is not possible to send documents
to a file server using Windows NT/2000/XP.
2
Basic Sending Methods
NOTE
•
Set the following items when sending to a file server:
- Protocol
- Host Name
- File Path
- User
- Password
•
For examples of the settings that are needed to send documents to a file server, see the
Network Guide.
•
For instructions on entering characters, see Chapter 2, "Basic Operations," in the
Reference Guide.
•
You can use - (numeric keys) to enter numbers, and (Clear) to clear your
entry.
•
If you are sending to an imageWARE Document Manager folder, set the FTP server
address specified in imageWARE Gateway as the destination. By using imageWARE
Document Manager and the send function of the imageRUNNER, you can manage
digitized paper documents and computer data on the network.
Specifying Destinations
2-13
Page 77

■ Using the Keyboard
You can specify a file server as the destination directly from the keyboard displayed on the
touch panel display. Press [Host Name], [File Path], [User], and [Password] to specify the
file server settings.
■ Using the Browse Key (Windows (SMB))
If you select [Windows (SMB)] as the server protocol, you can specify a file server
connected to a specific network by pressing [Browse] on the File screen.
■ Using the Browse Key (NetWare (IPX))
2
If you select [NetWare (IPX)] as the server protocol, you can specify a file server
connected to a specific network by pressing [Browse] on the File screen.
■ Using the Keyboard
1
Basic Sending Methods
Press [New Address] ➞ [File].
2-14
2
Press the Protocol drop-down list ➞ select the desired server
protocol.
Specifying Destinations
Page 78

The following server protocols may be used:
[FTP]: Select this protocol if you are sending documents to a
computer running Sun Solaris 2.6 or later, Mac OS X or later,
Internet Information Server 4.0 under Windows NT Server 4.0,
Internet Information Services 5.0 under Windows 2000 Server,
or Internet Information Services 5.1 under Windows XP
Professional.
[Windows (SMB)]: Select this protocol if you are sending documents to a
computer using Windows NT 4.0 or Windows 95/98/Me/2000/
XP.
[NetWare (IPX)]: Select this protocol if you are sending documents to a
computer using Novell NetWare 3.2 or later.
3
Press [Host Name].
2
Basic Sending Methods
A host name is a name assigned to a host computer that provides services on
the Internet. A specific host name is assigned to each host computer to specify it
on the Internet. In this entry box, enter the name of the file server on the network
as the destination of the send job.
If you select [Windows (SMB)] or [NetWare (IPX)] as the server protocol, you can
specify the file server by pressing [Browse]. For instructions on using the Browse
key, see "Using the Browse Key (Windows (SMB))," on p. 2-21, or "Using the
Browse Key (NetWare (IPX))," on p. 2-26.
Specifying Destinations
2-15
Page 79

4
2
Basic Sending Methods
5
Enter the host name ➞ press [OK].
When FTP is selected as the server protocol, you can also specify a port number
after the host name address by entering a colon (:) and the port number.
Example: 192.168.100.50:21000
When FTP is selected as the server protocol, make sure to enter the same port
number for the Host Name as the one specified for the FTP server to which you
are sending your documents.
You can enter up to 128 characters for the host name.
Press [File Path].
2-16
A file path is a series of characters that signify the location of the folder. Specify a
folder in the file server as the destination of the send job.
Specifying Destinations
Page 80

6
Enter the file path ➞ press [OK].
You can enter up to 128 characters for the file path.
NOTE
If you are sending to an imageWARE Document Manager folder, enter the folder
name set in imageWARE Gateway.
7
Press [User].
2
Basic Sending Methods
Specifying Destinations
2-17
Page 81

8
2
Basic Sending Methods
Enter the user name ➞ press [OK].
You can enter up to 24 characters when FTP or NetWare (IPX) is selected as the
server protocol for the user name.
If 'Windows (SMB)' is selected as the server protocol, enter the required user
name information in the manner shown below:
- To enter the user name only
Example: user_name
Maximum 20 characters
- To enter the user name and the domain name
Example: domain_name\user_name
Domain name: Maximum 15 characters
User name: Maximum 20 characters
- To enter a UPN (User Principal Name)
Example: user_name@domain_name.com
Maximum 128 characters
2-18
NOTE
•
If you are sending to an imageWARE Document Manager folder, enter the user
name set in imageWARE Gateway.
•
UPN (User Principal Name) can be used only if you are sending to a computer
belonging to a domain operated with Active Directory.
Specifying Destinations
Page 82

9
Press [Password].
Setting the password is optional.
10
Enter a password ➞ press [OK].
2
Basic Sending Methods
You can enter up to 24 characters (14 characters when Windows (SMB) is
selected as the server protocol) for the password.
The password appears as asterisks (*****) on the file settings screen.
NOTE
If you are sending to an imageWARE Document Manager folder, enter the
password set in imageWARE Gateway.
Specifying Destinations
2-19
Page 83

11
2
Basic Sending Methods
Confirm your settings ➞ press [OK].
The specified file server address appears on the Send Basic Features screen.
IMPORTANT
The file server that you just specified is not stored in the Address Book. It is deleted
once the document is sent.
NOTE
•
To view the detailed information of a selected destination, select the destination ➞
press [Details].
•
You can edit a destination from the Details screen before you scan your
documents. (See "Checking/Changing a Destination," on p. 2-49.)
•
You can erase the specified destination from the destination list before you scan
your documents. (See "Erasing a Destination," on p. 2-52.)
2-20
Specifying Destinations
Page 84

■ Using the Browse Key (Windows (SMB))
1
Press [New Address] ➞ [File].
2
Press the Protocol drop-down list ➞ select [Windows (SMB)].
2
Basic Sending Methods
Specifying Destinations
2-21
Page 85

3
2
Basic Sending Methods
4
Press [Browse].
IMPORTANT
After turning the main power ON, you must wait for the time set in Startup Time
Settings to elapse before pressing [Browse]. Network transmission is not possible
until this startup time has elapsed. To access Startup Time Settings, press
(Additional Functions) ➞ [System Settings] ➞ [Network Settings] ➞ [▼]. (See
Chapter 3, "Using a TCP/IP Network," in the Network Guide.)
Select the desired workgroup ➞ press [Down].
2-22
If the desired workgroup is not displayed, press [▼] or [▲] to scroll to the desired
workgroup.
Specifying Destinations
Page 86

5
Select the desired file server ➞ press [Down].
To move up one level, press [Up].
If the desired file server is not displayed, press [▼] or [▲] to scroll to the desired
file server.
2
6
If the Enter Network Password screen is displayed, enter your
user name and network password.
❑ Press [User].
Basic Sending Methods
Specifying Destinations
2-23
Page 87

2
Basic Sending Methods
❑ Enter your user name ➞ press [OK].
You can enter up to 128 characters for the user name.
❑ Press [Password] ➞ enter your network password ➞ press [OK].
2-24
You can enter up to 14 characters for the password.
After pressing [OK], the password that you entered appears as asterisks
(*****) on the Enter Network Password screen.
Specifying Destinations
Page 88

❑ Confirm your settings ➞ press [OK].
7
Press [Down] ➞ select the folder on the specified server to
which you want to send your documents ➞ press [OK].
2
Basic Sending Methods
To go down one level, press [Down].
To move up one level, press [Up].
If the desired folder is not displayed, press [▼] or [▲] to scroll to the desired
folder.
Specifying Destinations
2-25
Page 89

8
2
Basic Sending Methods
Confirm your settings ➞ press [OK].
The file server destination appears on the Send Basic Features screen.
IMPORTANT
The file server that you just specified is not stored in the Address Book. It is deleted
once the document is sent.
NOTE
•
To view the detailed information of a selected destination, select the destination ➞
press [Details].
•
You can edit a destination from the Details screen before you scan your
documents. (See "Checking/Changing a Destination," on p. 2-49.)
•
You can erase the specified destination from the destination list before you scan
your documents. (See "Erasing a Destination," on p. 2-52.)
2-26
■ Using the Browse Key (NetWare (IPX))
1
Press [New Address] ➞ [File].
Specifying Destinations
Page 90

2
Press the Protocol drop-down list ➞ select [NetWare (IPX)].
3
Press [Browse].
2
Basic Sending Methods
IMPORTANT
After turning the main power ON, you must wait for the time set in Startup Time
Settings to elapse before pressing [Browse]. Network transmission is not possible
until this startup time has elapsed. To access Startup Time Settings, press
(Additional Functions) ➞ [System Settings] ➞ [Network Settings] ➞ [▼]. (See
Chapter 3, "Using a TCP/IP Network," in the Network Guide.)
Specifying Destinations
2-27
Page 91

4
2
Basic Sending Methods
Press the drop-down list ➞ select [NDS] or [Bindery] from the
drop-down list.
[NDS]: One of the directory services provided by Novell for managing the
information of user and server names. Select [NDS] when you are
using Novell NetWare V.4.x.
[Bindery]: One of the directory services provided by Novell for managing the
information of user and server names. Select [Bindery] when you are
using Novell NetWare V.3.x.
If you select [Bindery], follow the procedure from step 5 in "Using the Browse Key
(Windows (SMB))," on p. 2-21.
If you select [NDS], follow the steps below.
2-28
5
Select the desired NDS tree ➞ press [Down].
To move up one level, press [Up].
If the desired NDS tree is not displayed, press [▼] or [▲] to scroll to the desired
tree.
Specifying Destinations
Page 92

6
Select a folder on the specified server in which you want to
log into ➞ press [Log In].
If you do not want to log into a folder, press [Log In] to log into the Novell server.
To go down one level, press [Down].
To move up one level, press [Up].
If the desired folder is not displayed, press [▼] or [▲] to scroll to the desired
folder.
The Enter Network Password screen is displayed.
2
Basic Sending Methods
7
Enter your user name and network password.
❑ Press [User].
Specifying Destinations
2-29
Page 93

2
Basic Sending Methods
❑ Enter your user name ➞ press [OK].
You can enter up to 24 characters for the user name.
❑ Press [Password] ➞ enter your network password ➞ press [OK].
2-30
You can enter up to 24 characters for the password.
After pressing [OK], the password that you entered appears as asterisks
(*****) on the Enter Network Password screen.
Specifying Destinations
Page 94

8
Confirm your settings ➞ press [OK].
9
Press [Down] ➞ select the folder to where you want to send
your file ➞ press [OK].
2
Basic Sending Methods
To move up one level, press [Up].
If the desired folder is not displayed, press [▼] or [▲] to scroll to the desired
folder.
Specifying Destinations
2-31
Page 95

10
2
Basic Sending Methods
Confirm your settings ➞ press [OK].
The file server destination appears on the Send Basic Features screen.
IMPORTANT
The file server that you just specified is not stored in the Address Book. It is deleted
once the document is sent.
NOTE
•
To view the detailed information of a selected destination, select the destination ➞
press [Details].
•
You can edit a destination from the Details screen before you scan your
documents. (See "Checking/Changing a Destination," on p. 2-49.)
•
You can erase the specified destination from the destination list before you scan
your documents. (See "Erasing a Destination," on p. 2-52.)
2-32
Specifying a User Inbox
You can store a scanned document in a User Inbox. User Inboxes selected in the
Send function are the same User Inboxes that you can select using the Mail Box
function. If you include a User Inbox as one of the destinations to which you are
sending your document, the document is stored in the selected User Inbox for later
use. Documents stored in a User Inbox can be printed and sent to other
destinations.
IMPORTANT
•
Documents that are scanned using a paper size specified by pressing [Other Size] in
Document Size Select, cannot be stored in a User Inbox.
•
Documents stored in a User Inbox are automatically erased after three days. However,
you can change this setting. (See Chapter 6, "Customizing Settings," in the Mail Box
Guide.)
Specifying Destinations
Page 96

1
Press [New Address] ➞ [Store In Usr Inbox].
2
Select the desired User Inbox ➞ press [OK].
2
Basic Sending Methods
User Inboxes specified as destinations correspond to the inboxes that appear on
the Inbox Selection screen for the Mail Box function.
If the desired User Inbox is not displayed, press [▼] or [▲] to scroll to the
desired User Inbox.
The display returns to the Send Basic Features screen, and the selected User
Inbox is displayed in the destination list.
NOTE
•
You can erase the specified User Inbox from the destination list before you scan
your documents. (See "Erasing a Destination," on p. 2-52.)
•
Only one User Inbox can be specified as the destination at a time.
Specifying Destinations
2-33
Page 97

Using the One-Touch Buttons
You can specify up to 200 destinations in one-touch buttons.
Follow this procedure to start a transmission and send a document with the press of
a one-touch button.
IMPORTANT
2
NOTE
Basic Sending Methods
1
To use this feature, you must register destinations in one-touch buttons by pressing
(Additional Functions) ➞ [Address Book Settings] ➞ [One-touch Buttons]. (See "Storing/
Editing One-Touch Buttons," on p. 9-60.)
A maximum of 256 destinations can be specified at the same time. (Out of the 256
destinations, 64 new addresses, including those obtained through a server, can be
specified.) If you specify a group address, which is made up of several destinations, the
whole group is counted as one address.
Press [One-touch Buttons].
2-34
Specifying Destinations
Page 98

2
Select the desired One-touch Button.
Each one-touch button is assigned a three digit number. If you know the
one-touch button's three digit number, you can press (One-Touch Button
Number) ➞ enter the number for the desired one-touch button using -
(numeric keys).
2
Basic Sending Methods
One-Touch Button
Number
The selected destination appears in the destination list on the Send Basic
Features screen.
NOTE
•
To view the detailed information of a selected destination, select the destination ➞
press [Details].
•
You can erase the specified destination from the destination list before you scan
your documents. (See "Erasing a Destination," on p. 2-52.)
•
You can select multiple one-touch buttons.
•
To cancel the selected one-touch button, press the one-touch button again.
Specifying Destinations
2-35
Page 99

Using the Favorites Buttons
If you frequently send documents with the same document settings to the same
destination, store these settings in a favorites button. Then, when you need to
specify the destination, all you have to do is select the favorites button containing
your stored document settings and the desired destination, and send your
document.
IMPORTANT
2
To use this feature, you must first register the desired document settings and destinations
in favorites buttons. (See "Favorites Buttons," on p. 8-15.)
NOTE
A maximum of 256 destinations can be specified at the same time. (Out of the 256
destinations, 64 new addresses, including those obtained through a server, can be
specified.) If you specify a group address, which is made up of several destinations, the
whole group is counted as one address.
Basic Sending Methods
1
Press [Favorites Buttons].
2-36
Specifying Destinations
Page 100

2
Select the desired Favorites Button.
The specified destination(s) appear in the destination list on the Send Basic
Features screen, and the stored document settings are recalled.
NOTE
•
To view the detailed information of a selected destination, select the destination ➞
press [Details].
•
You can erase the specified destination(s) from the destination list before you scan
your documents. (See "Erasing a Destination," on p. 2-52.)
•
You can manually change the recalled settings from the selected favorites button
before you send your documents.
•
If you press another favorites button, the settings stored in that button are recalled.
•
To cancel all settings and return the machine to the Standard mode, press
(Reset).
•
If multiple destinations are stored under the selected favorites button, the
destinations may not be listed in the order in which they were set.
2
Basic Sending Methods
Specifying Destinations
2-37
 Loading...