

Canon 950IS User Manual

ENGLISH
Basic
The Components Guide
Preparations
Shooting
Playback/Erasing
Menus and Settings
Printing
Downloading Images to
a Computer
Camera User Guide
Please Read This First
This guide explains how to prepare the camera and use its basic features.
CEL-SG6WA210

Flowchart and Reference Guides
The following guides are available. Refer to them as necessary according to the
flowchart below.
For information on included items and
items sold separately
The Components Guide
System Map
• Charging the battery
• Installing the battery and memory card
• Setting the date, time and language
Handling precautions, references to the
various shooting and playback functions
• Installing the software
• Downloading images to a computer
• Using the software
You may not be able to achieve the full
performance of this camera with the
included memory card.
In this guide, the Basic Camera User Guide is called the Basic Guide, and the Advanced
Camera User Guide is called the Advanced Guide. Also, "battery" refers to the battery pack.
Preparations
Shooting
Playback/Erasing
Menus and Settings
Printing
Basic Camera User
Guide (This Guide)
• Read this first.
Advanced Camera
User Guide
Direct Print User
Guide
Basic Camera User
Guide (This Guide)
Software Starter Guide
Viewing the PDF Manuals
Adobe Reader or Adobe Acrobat Reader must be installed to view
the PDF Manuals. If this software is not installed in your computer,
access the following web site and download the software.
http://www.adobe.com/products/acrobat/readstep2.html

The Components Guide
Front View
def
b
g
c
a
Attaching the Wrist Strap
a Wrist Strap Mount
b Microphone
c Viewfinder Window (Advanced Guide p. 18)
d AF-assist Beam (Advanced Guide p. 24)
e Red-Eye Reduction Lamp (Advanced Guide p. 36)
f Self-Timer Lamp (p. 16)
g Flash (p. 14)
h Lens
In order to avoid dropping the camera, wear the wrist strap
when using the camera.
h
The Components Guide
1

Back View
a
b
c
d
f
h
g
a LCD Monitor (Advanced Guide pp. 12, 15)
b Viewfinder (Advanced Guide p. 18)
c A/V OUT (Audio/Video output) Terminal (Advanced Guide p. 104)
d Ter m i n al Co v er
e DIGITAL Terminal (p. 27)
f Tripod Socket
g DC Coupler Terminal Cover (Advanced Guide p. 134)
h Memory Card Slot/Battery Cover (p. 8)
The interface cable and AV cable cannot be connected
simultaneously.
The LCD monitor may be covered with a thin plastic film
for protection against scratches during shipment. If so,
remove the film before using the camera.
2
e

Controls
ec
a
a Speaker
b Indicators (p. 6)
c Power Lamp
d ON/OFF button (p. 10)
e Zoom Lever (p. 14, Advanced Guide p. 80)
Shooting: (Wide Angle)/ (Telephoto)
Playback: (Index)/ (Magnify)
f Shut ter Bu tton (p. 10)
g Mode Dial (pp. 10, 11 )
h (Print/Share) Button (pp. 22, 30, Advanced Guide pp. 70, 71)
i Touch Control Dial
j DISP. (Display) Button (Advanced Guide p. 12)
k FUNC./SET (Function/ Set) Button ( p. 20, Advanced Guide p. 22)
l MENU Button (p. 21, Advanced Guide p. 23)
m (Macro)/ (Infinity)/ Button (p. 15)
n (ISO Speed)/ (Jump)/ Button (Advanced Guide pp. 69, 83)
o (Flash)/ Button (p. 14)
p (Single Image Erase)/ (Continuous)/ (Self-timer)
/ Button (pp. 16, 19, Advanced Guide p. 37)
bd
f
g
h
mn
i
k
j
l
o
p
The Components Guide
3

Using the Touch Control Dial
Touching the Dial
A magnified image of the touch control dial displays on the LCD
monitor when you place your finger on the dial. Circling your finger on
the dial allows you to configure the functions assigned to each button.
Touch Icons
Sample in shooting mode
• Functions that cannot be configured are shown in gray.
• The dial display (Touch Icons) can be turned On/Off in
the (Set up) menu (Advanced Guide p. 26).
• When Touch Icons is set to [Off], the icon of the function
being touched appears in green on the LCD monitor.
Circling Your Finger on the Dial
You can select categories or images by circling your finger on the dial.
Circling counterclockwise works the same as the button and
circling clockwise the same as the button. (It may also work as the
/ buttons with some functions.)
Sample of selecting manual
mode
4

The following functions can be operated using the touch control dial.
Please note that some of the options for some functions cannot be
operated with it.
Reference Pag e
Basic Advanced
p. 11
pp. 14,
15, 16
p. 18 pp. 80, 81,
– pp. 84, 86
–
–
p. 21 p. 23
–
pp. 37, 69
82, 83,
102, 105
pp. 94, 95
pp. 107,
111
Shooting
Playback
Shooting
and
Playback
Operable Functions
Selecting a shooting mode
(When mode dial is set to
(Manual), (SCN) or
Selecting / / / / /
Selecting options in the FUNC. menu p. 20 p. 22
Selecting images
Operations for playing/editing movies
Operations for sound memos and the
Sound Recorder
Operations for DPOF print settings and
direct transfer settings.
Selecting options in menus
Selecting time zones for the world clock – p. 20
Selecting options for the My Camera settings – p. 113
(Movie))
The Components Guide
5

Indicators
The camera indicators light or blink under the following
circumstances.
Never do the following while an indicator is blinking green.
These actions may corrupt image data.
• Shake or jolt the camera
• Shut off the power, or open the memory card slot/battery
cover
Upper Indicator
Green: Ready to shoot (camera beeps twice)
Blinking Green: Time Lapse (movie) recording/Image recording/
Orange: Ready to shoot (flash on)
Blinking Orange: Ready to shoot (camera shake warning)
reading/erasing/transferring (when connected to
a computer/printer)
Lower Indicator
Yellow: Macro mode/infinity mode/AF lock mode
Blinking Yellow: Focusing difficulty (camera beeps once)
Preparations
1.
Charging the Battery.
Charge the battery before use under the following circumstances.
• When using the battery for the first time.
• When the "Change the battery pack." message displays.
1. Insert the battery into the battery charger.
2. Plug the battery charger (CB-2LX) into a power outlet, or
attach the power cord to the battery charger (CB-2LXE) and
plug it into a power outlet.
• Battery charger model names and types vary by region.
6

The charge indicator will light orange while the battery is
charging. It will change to green when the charge is complete.
Charging takes approximately 2 hours 5 minutes.
Charge Indicator
Align these symbols
For CB-2LX For CB-2LXE
To protect the battery and prolong its life, do not charge it for
longer than 24 hours continuously.
See the Advanced Guide: Battery Handling (p. 130).
Î
2.
Installing the Battery.
1.
Slide the memory card slot/battery cover and open it (a, b).
2. Push the battery lock in the direction of the arrow (c) and
insert the battery until it locks.
To remove the battery, push the battery lock in the direction of
the arrow (c) and hold it while pulling the battery out.
b
a
Battery Lock
c
Preparations
7
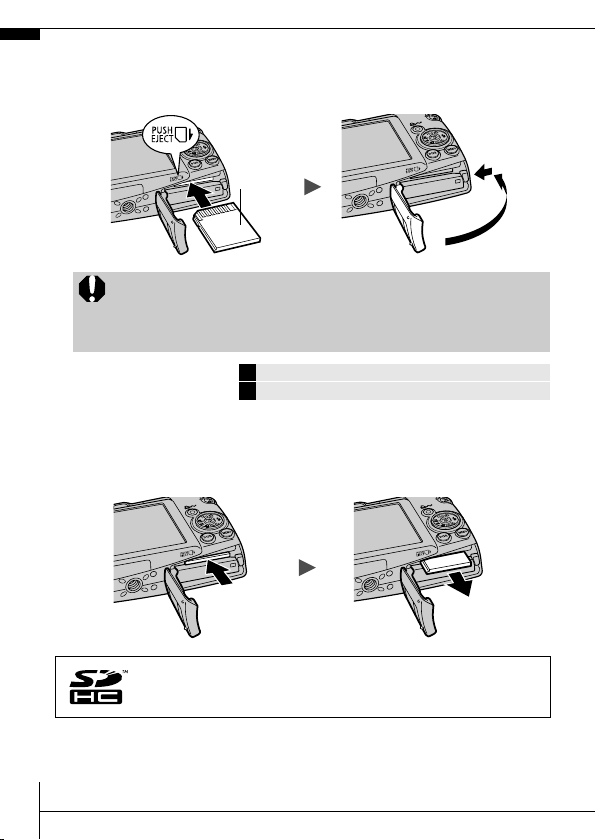
3.
Inserting the Memory Card.
1. Insert the memory card until it clicks into place.
2. Close the memory card slot/battery cover (
a, b).
b
Back
Ensure that the memory card is correctly oriented before
inserting it in the camera. Inserting it backward may cause
the camera to fail to recognize the memory card or to
malfunction.
See the Advanced Guide: Handling the Memory Card (p. 132).
Î
See t he Advanced Guide: Format ting Memory C ards (p. 29).
Î
To Remove the Memory Card
Use a finger to push the memory card in until you hear a click, then
release it.
a
You can use SD memory cards, SDHC memor y cards and
Multi MediaCards wit h this camera. Th ese cards are coll ecti vely
called memory cards in this guide.
8

First Time Settings
a
Setting the Date/Time
1. Press the ON/OFF button (a).
2. Use the or button to select an item and the or
button to change its value (
To set the daylight saving option, select the icon and use the
or button to configure the setting.
3. Confirm that the correct time is displayed and press the
FUNC./SET button (
The date and time can also be set in the Set up menu (p. 21).
• A rechargeable lithium battery is built into the camera
to save such settings as the date/time. This battery
charges when the main battery is in the camera. When
you purchase the camera, place the main battery in it
for appr oximately four hours or use AC Adapter Kit
ACK-DC30 (sold separately) to charge the lithium battery. It will charge even if the camera is turned off.
• The date/time settings may be lost after approximately
three weeks if you remove the main battery. Reset the
date/time settings if this occurs.
Î
Setting the Display Language
1. Turn the mode dial to (playback).
2. Hold down the FUNC./SET button and press the MENU
button.
3. Use the ,
press the FUNC./SET button.
The display language can also be set in the Set up menu (p. 21).
, or button to select a language and
b).
c).
See the Advanced Guide: Setting the World Clock (p. 20).
b
c
Preparations
9

Shooting
1.
Press the ON/OFF button.
The start-up sound will play and the
start-up image will display in the LCD
monitor.
• Pressing the ON/OFF button
turns the power off.
• To switch to the setting that mutes all
sounds (except for the warning sound),
press and hold the DISP. button while
pressing the ON/OFF button.
2.
Turn the mode dial to (Auto).
3.
Aim the camera at the subject.
4.
Focus and shoot.
1. Press the shutter button halfway to
focus.
When the camera focuses, it beeps
twice and the indicator lights green
(orange when the flash fires). In
addition, a green AF frame appears in
the LCD monitor on the portion of the
image used to set the focus.
again
See t he Advanced Guide: Using the LCD Monitor (p. 12).
Î
See t he Advanced Guide: Power Saving Fun ctio n (p. 19 ).
Î
See t he Advanced Guide: Set up Menu (p. 26) .
Î
See t he Advanced Guide: My Camera Menu (p. 28).
Î
ON/OFF button
DISP. button
Indicators
10
 Loading...