

Page 1

iP8700 series
Online Manual
Printing
Downloaded from ManualsPrinter.com Manuals
English
Page 2

Contents
Printing. . . . . . . . . . . . . . . . . . . . . . . . . . . . . . . . . . . . . . . . . . . . . . . . . . . . . . . . . 4
Printing from a Computer. . . . . . . . . . . . . . . . . . . . . . . . . . . . . . . . . . . . . . . . . . . . . . . . . . . 5
Printing with Application Software that You are Using (Printer Driver). . . . . . . . . . . . . . . . . . . . . . . . . . . 6
Printing with Easy Setup. . . . . . . . . . . . . . . . . . . . . . . . . . . . . . . . . . . . . . . . . . . . . . . . . . . . . . . . . . 7
Setting the Media Type with the Printer Driver. . . . . . . . . . . . . . . . . . . . . . . . . . . . . . . . . . . . . 9
Various Printing Methods. . . . . . . . . . . . . . . . . . . . . . . . . . . . . . . . . . . . . . . . . . . . . . . . . . . . . . . . . 10
Setting a Page Size and Orientation. . . . . . . . . . . . . . . . . . . . . . . . . . . . . . . . . . . . . . . . . . . . 11
Setting the Number of Copies and Printing Order. . . . . . . . . . . . . . . . . . . . . . . . . . . . . . . . . . 12
Setting the Stapling Margin. . . . . . . . . . . . . . . . . . . . . . . . . . . . . . . . . . . . . . . . . . . . . . . . . . . 14
Execute Borderless Printing. . . . . . . . . . . . . . . . . . . . . . . . . . . . . . . . . . . . . . . . . . . . . . . . . . 16
Fit-to-Page Printing. . . . . . . . . . . . . . . . . . . . . . . . . . . . . . . . . . . . . . . . . . . . . . . . . . . . . . . . . 19
Scaled Printing. . . . . . . . . . . . . . . . . . . . . . . . . . . . . . . . . . . . . . . . . . . . . . . . . . . . . . . . . . . . . 21
Page Layout Printing. . . . . . . . . . . . . . . . . . . . . . . . . . . . . . . . . . . . . . . . . . . . . . . . . . . . . . . . 24
Tiling/Poster Printing. . . . . . . . . . . . . . . . . . . . . . . . . . . . . . . . . . . . . . . . . . . . . . . . . . . . . . . . 26
Booklet Printing. . . . . . . . . . . . . . . . . . . . . . . . . . . . . . . . . . . . . . . . . . . . . . . . . . . . . . . . . . . . 29
Duplex Printing. . . . . . . . . . . . . . . . . . . . . . . . . . . . . . . . . . . . . . . . . . . . . . . . . . . . . . . . . . . . 31
Stamp/Background Printing. . . . . . . . . . . . . . . . . . . . . . . . . . . . . . . . . . . . . . . . . . . . . . . . . . . 33
Registering a Stamp. . . . . . . . . . . . . . . . . . . . . . . . . . . . . . . . . . . . . . . . . . . . . . . . . . . . . . . . 36
Registering Image Data to be Used as a Background. . . . . . . . . . . . . . . . . . . . . . . . . . . . . . . 39
Setting Up Envelope Printing. . . . . . . . . . . . . . . . . . . . . . . . . . . . . . . . . . . . . . . . . . . . . . . . . . 42
Printing on Postcards. . . . . . . . . . . . . . . . . . . . . . . . . . . . . . . . . . . . . . . . . . . . . . . . . . . . . . . . 44
Displaying the Print Results before Printing. . . . . . . . . . . . . . . . . . . . . . . . . . . . . . . . . . . . . . 46
Setting Paper Dimensions (Custom Size). . . . . . . . . . . . . . . . . . . . . . . . . . . . . . . . . . . . . . . . 47
Editing the Print Document or Reprinting from the Print History. . . . . . . . . . . . . . . . . . . . . . . 49
Changing the Print Quality and Correcting Image Data. . . . . . . . . . . . . . . . . . . . . . . . . . . . . . . . . . 52
Setting the Print Quality Level (Custom). . . . . . . . . . . . . . . . . . . . . . . . . . . . . . . . . . . . . . . . . 53
Printing a Color Document in Monochrome. . . . . . . . . . . . . . . . . . . . . . . . . . . . . . . . . . . . . . . 55
Adjusting Tone. . . . . . . . . . . . . . . . . . . . . . . . . . . . . . . . . . . . . . . . . . . . . . . . . . . . . . . . . . . . . 57
Specifying Color Correction. . . . . . . . . . . . . . . . . . . . . . . . . . . . . . . . . . . . . . . . . . . . . . . . . . . 59
Optimal Photo Printing of Image Data. . . . . . . . . . . . . . . . . . . . . . . . . . . . . . . . . . . . . . . . . . . 61
Adjusting Colors with the Printer Driver. . . . . . . . . . . . . . . . . . . . . . . . . . . . . . . . . . . . . . . . . . 62
Printing with ICC Profiles. . . . . . . . . . . . . . . . . . . . . . . . . . . . . . . . . . . . . . . . . . . . . . . . . . . . . 64
Interpreting the ICC Profile. . . . . . . . . . . . . . . . . . . . . . . . . . . . . . . . . . . . . . . . . . . . . . . . . . . 67
Adjusting Color Balance. . . . . . . . . . . . . . . . . . . . . . . . . . . . . . . . . . . . . . . . . . . . . . . . . . . . . 68
Adjusting Color Balance Using Sample Patterns (Printer Driver). . . . . . . . . . . . . . . . . . . . . . 70
Adjusting Brightness. . . . . . . . . . . . . . . . . . . . . . . . . . . . . . . . . . . . . . . . . . . . . . . . . . . . . . . . 74
Adjusting Intensity. . . . . . . . . . . . . . . . . . . . . . . . . . . . . . . . . . . . . . . . . . . . . . . . . . . . . . . . . . 76
Downloaded from ManualsPrinter.com Manuals
Page 3

Adjusting Contrast. . . . . . . . . . . . . . . . . . . . . . . . . . . . . . . . . . . . . . . . . . . . . . . . . . . . . . . . . . 78
Adjusting Intensity/Contrast Using Sample Patterns (Printer Driver). . . . . . . . . . . . . . . . . . . . 80
Overview of the Printer Driver. . . . . . . . . . . . . . . . . . . . . . . . . . . . . . . . . . . . . . . . . . . . . . . . . . . . . 84
Canon IJ Printer Driver. . . . . . . . . . . . . . . . . . . . . . . . . . . . . . . . . . . . . . . . . . . . . . . . . . . . . . 85
How to Open the Printer Driver Setup Window. . . . . . . . . . . . . . . . . . . . . . . . . . . . . . . . . . . . 86
Canon IJ Status Monitor. . . . . . . . . . . . . . . . . . . . . . . . . . . . . . . . . . . . . . . . . . . . . . . . . . . . . 87
Checking the Ink Status from Your Computer. . . . . . . . . . . . . . . . . . . . . . . . . . . . . . . . . . . . . 88
Canon IJ Preview. . . . . . . . . . . . . . . . . . . . . . . . . . . . . . . . . . . . . . . . . . . . . . . . . . . . . . . . . . . 89
Deleting the Undesired Print Job. . . . . . . . . . . . . . . . . . . . . . . . . . . . . . . . . . . . . . . . . . . . . . . 90
Instructions for Use (Printer Driver). . . . . . . . . . . . . . . . . . . . . . . . . . . . . . . . . . . . . . . . . . . . . 91
Printer Driver Description. . . . . . . . . . . . . . . . . . . . . . . . . . . . . . . . . . . . . . . . . . . . . . . . . . . . . . . . . 93
Quick Setup tab Description. . . . . . . . . . . . . . . . . . . . . . . . . . . . . . . . . . . . . . . . . . . . . . . . . . 94
Main tab Description. . . . . . . . . . . . . . . . . . . . . . . . . . . . . . . . . . . . . . . . . . . . . . . . . . . . . . . 100
Page Setup tab Description. . . . . . . . . . . . . . . . . . . . . . . . . . . . . . . . . . . . . . . . . . . . . . . . . . 106
Maintenance tab Description. . . . . . . . . . . . . . . . . . . . . . . . . . . . . . . . . . . . . . . . . . . . . . . . . 118
Canon IJ Preview Description. . . . . . . . . . . . . . . . . . . . . . . . . . . . . . . . . . . . . . . . . . . . . . . . 125
Canon IJ XPS Preview Description. . . . . . . . . . . . . . . . . . . . . . . . . . . . . . . . . . . . . . . . . . . . 128
Canon IJ Status Monitor Description. . . . . . . . . . . . . . . . . . . . . . . . . . . . . . . . . . . . . . . . . . . 137
Updating the Printer Driver. . . . . . . . . . . . . . . . . . . . . . . . . . . . . . . . . . . . . . . . . . . . . . . . . . . . . . 140
Obtaining the Latest Printer Driver. . . . . . . . . . . . . . . . . . . . . . . . . . . . . . . . . . . . . . . . . . . . 141
Deleting the Unnecessary Printer Driver. . . . . . . . . . . . . . . . . . . . . . . . . . . . . . . . . . . . . . . . 142
Before Installing the Printer Driver. . . . . . . . . . . . . . . . . . . . . . . . . . . . . . . . . . . . . . . . . . . . . 143
Installing the Printer Driver. . . . . . . . . . . . . . . . . . . . . . . . . . . . . . . . . . . . . . . . . . . . . . . . . . 144
Printing from a Digital Camera. . . . . . . . . . . . . . . . . . . . . . . . . . . . . . . . . . . . . . . . . . . . . 145
Printing Photographs Directly from a PictBridge (Wireless LAN) Compliant Device. . . . . . . . . . . . . . . 146
About PictBridge (Wireless LAN) Print Settings. . . . . . . . . . . . . . . . . . . . . . . . . . . . . . . . . . . . . . . . . . . 148
Downloaded from ManualsPrinter.com Manuals
Page 4

Printing
Printing from a Computer
Printing with Application Software that You are Using (Printer Driver)
Printing from a Digital Camera
Printing Photographs Directly from a PictBridge (Wireless LAN) Compliant Device
About PictBridge (Wireless LAN) Print Settings
Downloaded from ManualsPrinter.com Manuals
4
Page 5

Printing from a Computer
Printing with Application Software that You are Using (Printer Driver)
Downloaded from ManualsPrinter.com Manuals
5
Page 6

Printing with Application Software that You are Using (Printer
Driver)
Printing with Easy Setup Basic
Various Printing Methods
Changing the Print Quality and Correcting Image Data
Overview of the Printer Driver
Printer Driver Description
Updating the Printer Driver
Downloaded from ManualsPrinter.com Manuals
6
Page 7

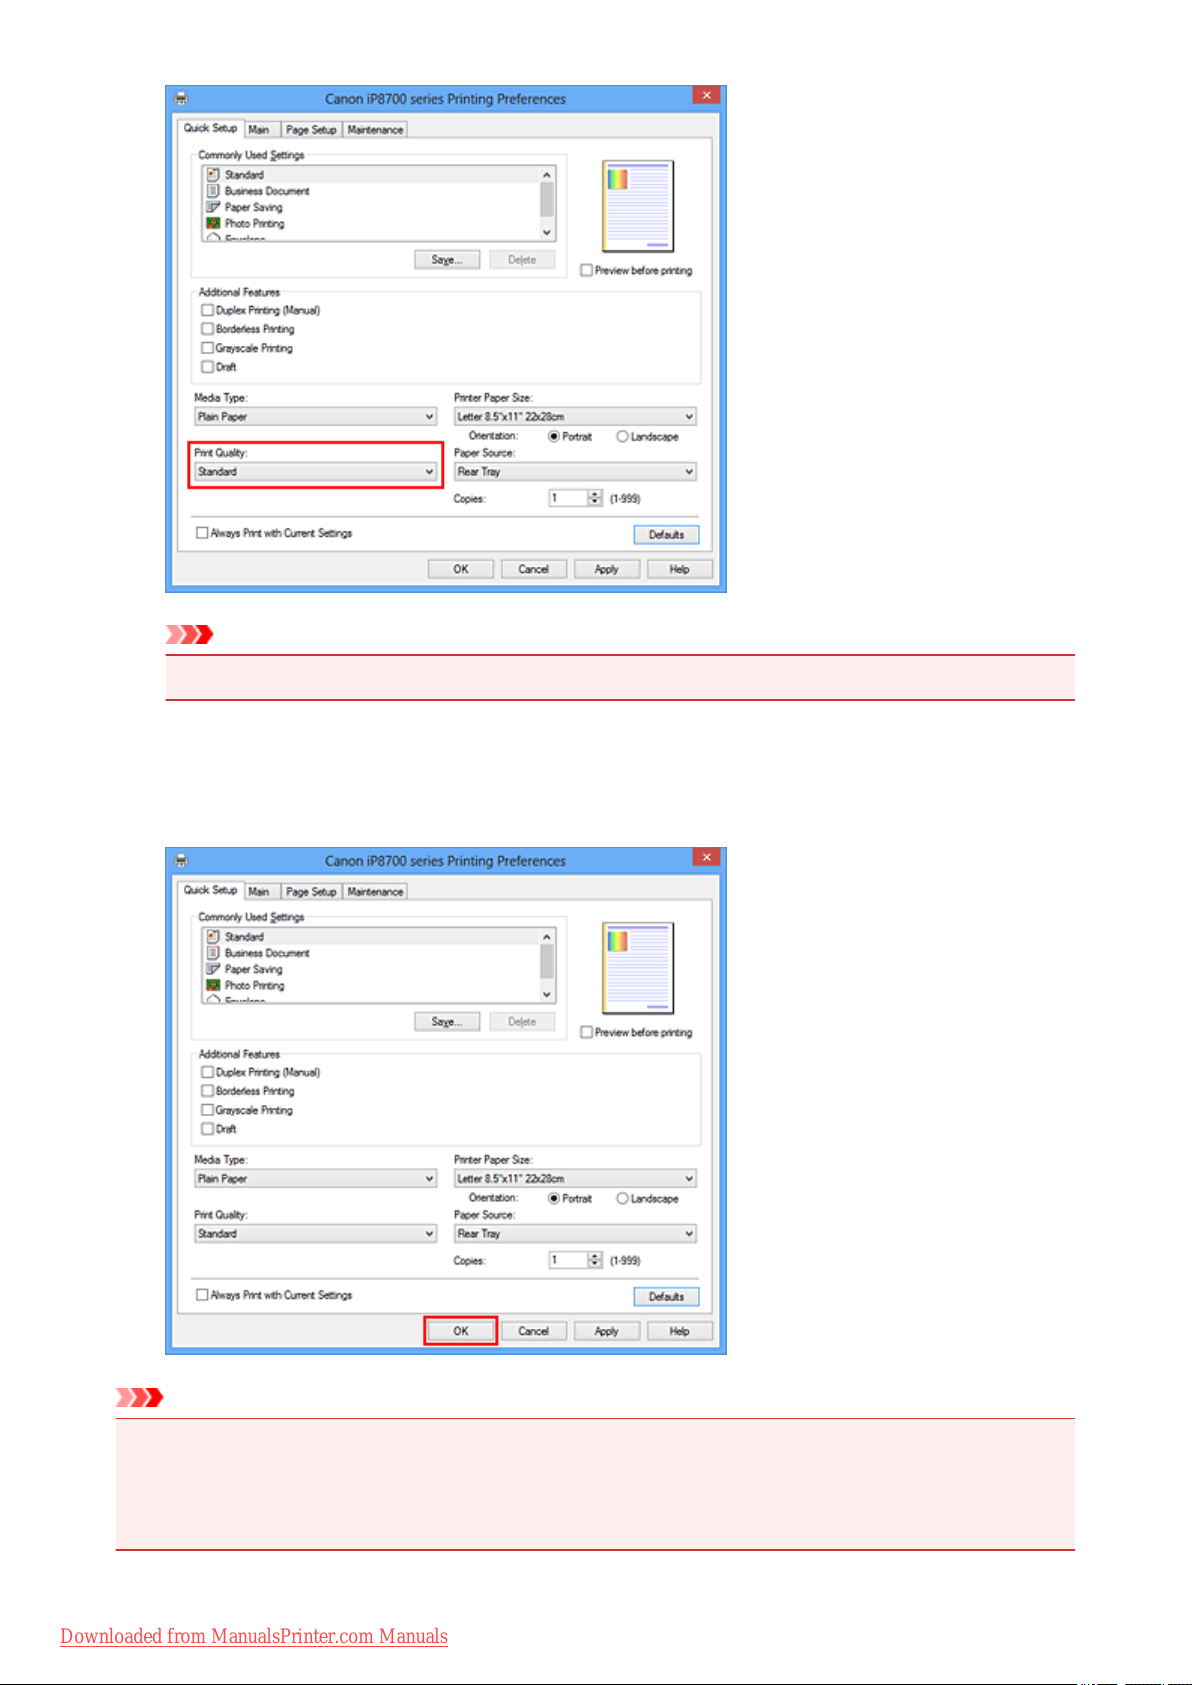
Printing with Easy Setup
This section describes the simple procedure for setting the Quick Setup tab so that you can carry out
appropriate printing on this printer.
1. Check that the printer is turned on
Load paper on the printer
2.
Open the printer driver setup window
3.
4.
Select a frequently used profile
In Commonly Used Settings on the Quick Setup tab, select a printing profile suited for the purpose.
When you select a printing profile, the Additional Features, Media Type, and Printer Paper Size
settings are automatically switched to the values that were preset.
Select the print quality
5.
For Print Quality, select High, Standard, or Draft according to your purpose.
Downloaded from ManualsPrinter.com Manuals
7
Page 8
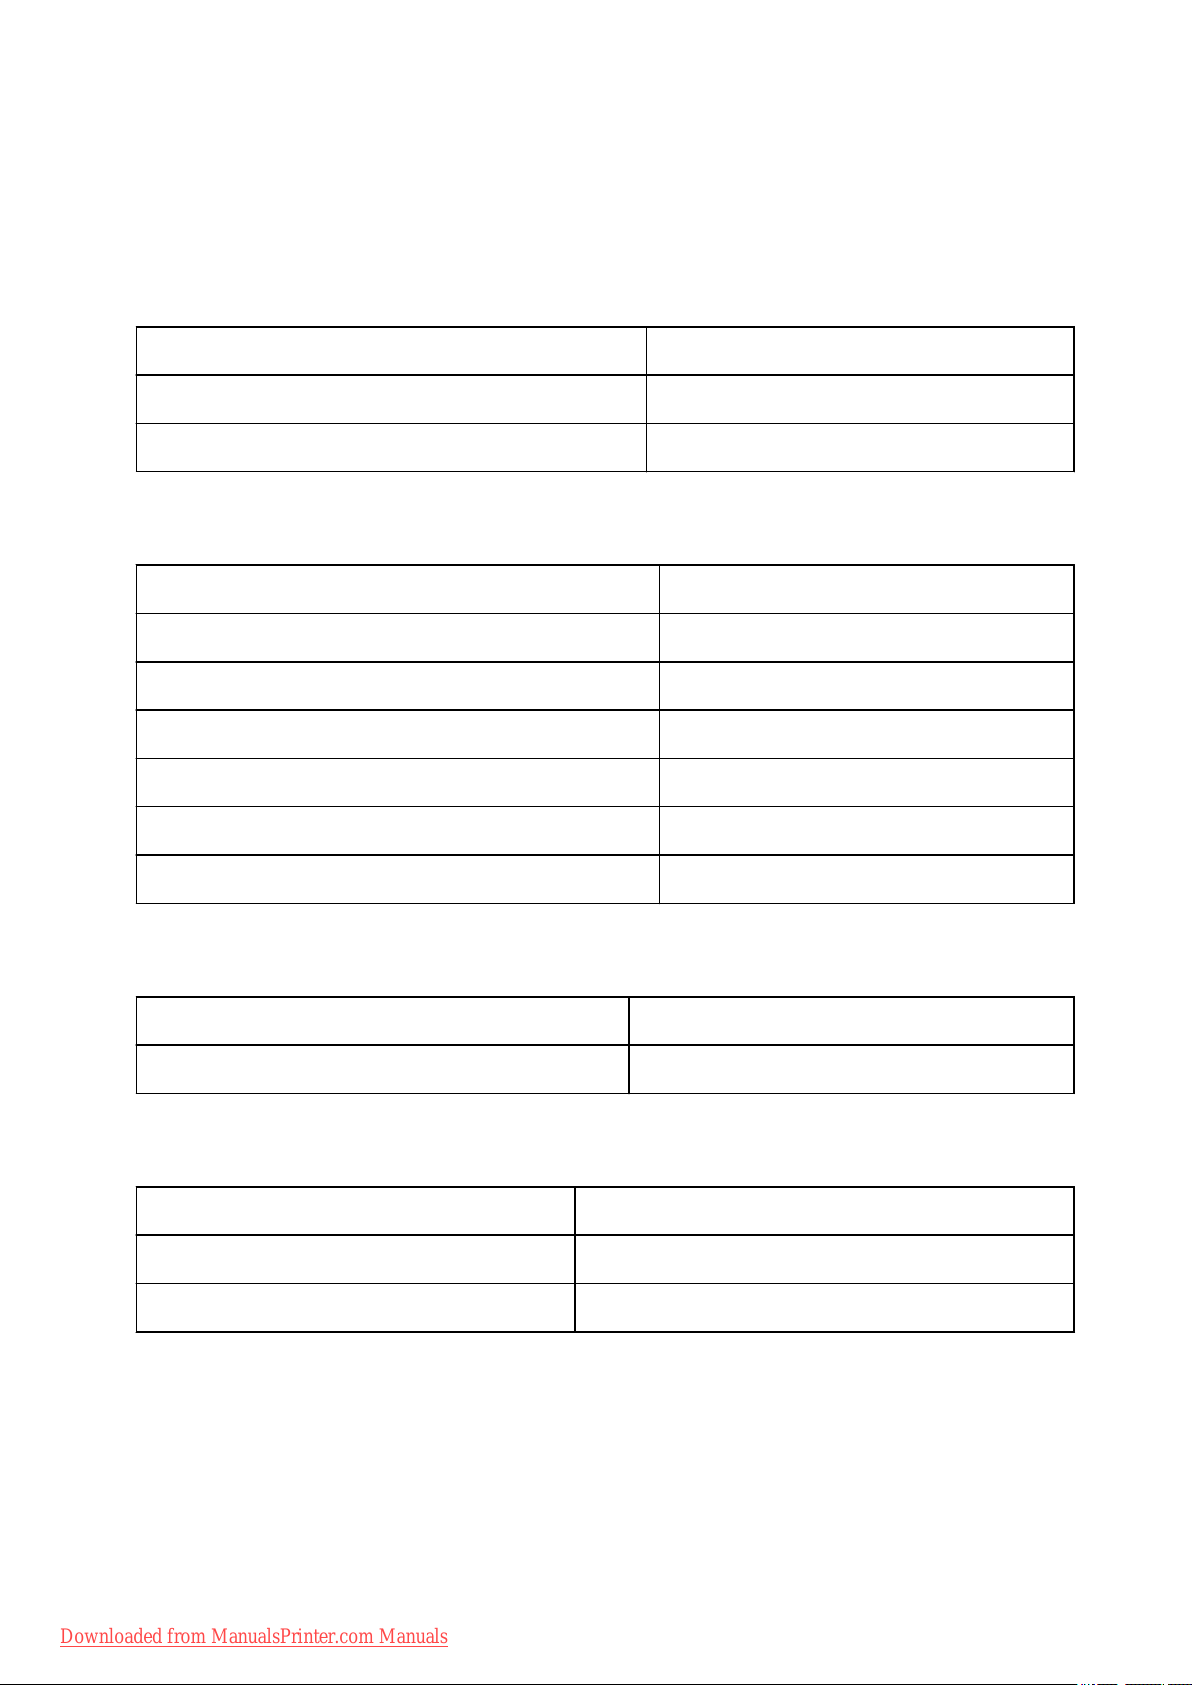
Important
• The print quality settings that can be selected may differ depending on a printing profile.
6.
Complete the setup
Click OK.
When you execute print, the document is printed with settings that match your purpose.
Important
• When you select the Always Print with Current Settings check box, all settings specified on the
Quick Setup, Main, and Page Setup tabs are saved, and you can print with the same settings from the
next time as well.
• In the Commonly Used Settings window, click Save... to register the specified settings.
Downloaded from ManualsPrinter.com Manuals
8
Page 9
Setting the Media Type with the Printer Driver
When you use this printer, selecting a media type that matches the print purpose will help you achieve the
best print results.
You can use the following media types on this printer.
Commercially available papers
Media name Media Type in the printer driver
Plain Paper (including recycled paper) Plain Paper
Envelopes Envelope
Canon genuine papers (Photo Printing)
Media name <Model No.> Media Type in the printer driver
Photo Paper Plus Glossy II <PP-201> Photo Paper Plus Glossy II
Photo Paper Pro Platinum <PT-101> Photo Paper Pro Platinum
Photo Paper Pro Luster <LU-101> Photo Paper Pro Luster
Photo Paper Plus Semi-gloss <SG-201> Photo Paper Plus Semi-gloss
Photo Paper Glossy <GP-501/GP-601> Glossy Photo Paper
Matte Photo Paper <MP-101> Matte Photo Paper
Canon genuine papers (Business Letter Printing)
Media name <Model No.> Media Type in the printer driver
High Resolution Paper <HR-101N> High Resolution Paper
Canon genuine papers (Original Products)
Media name <Model No.> Media Type in the printer driver
T-Shirt Transfers <TR-301> T-Shirt Transfers
Photo Stickers <PS-101> Photo Paper Plus Glossy II
Downloaded from ManualsPrinter.com Manuals
9
Page 10
Various Printing Methods
Setting a Page Size and Orientation
Setting the Number of Copies and Printing Order
Setting the Stapling Margin
Execute Borderless Printing
Fit-to-Page Printing
Scaled Printing
Page Layout Printing
Tiling/Poster Printing
Booklet Printing
Duplex Printing
Stamp/Background Printing
Registering a Stamp
Registering Image Data to be Used as a Background
Setting Up Envelope Printing
Printing on Postcards
Displaying the Print Results before Printing
Setting Paper Dimensions (Custom Size)
Editing the Print Document or Reprinting from the Print History
Downloaded from ManualsPrinter.com Manuals
10
Page 11
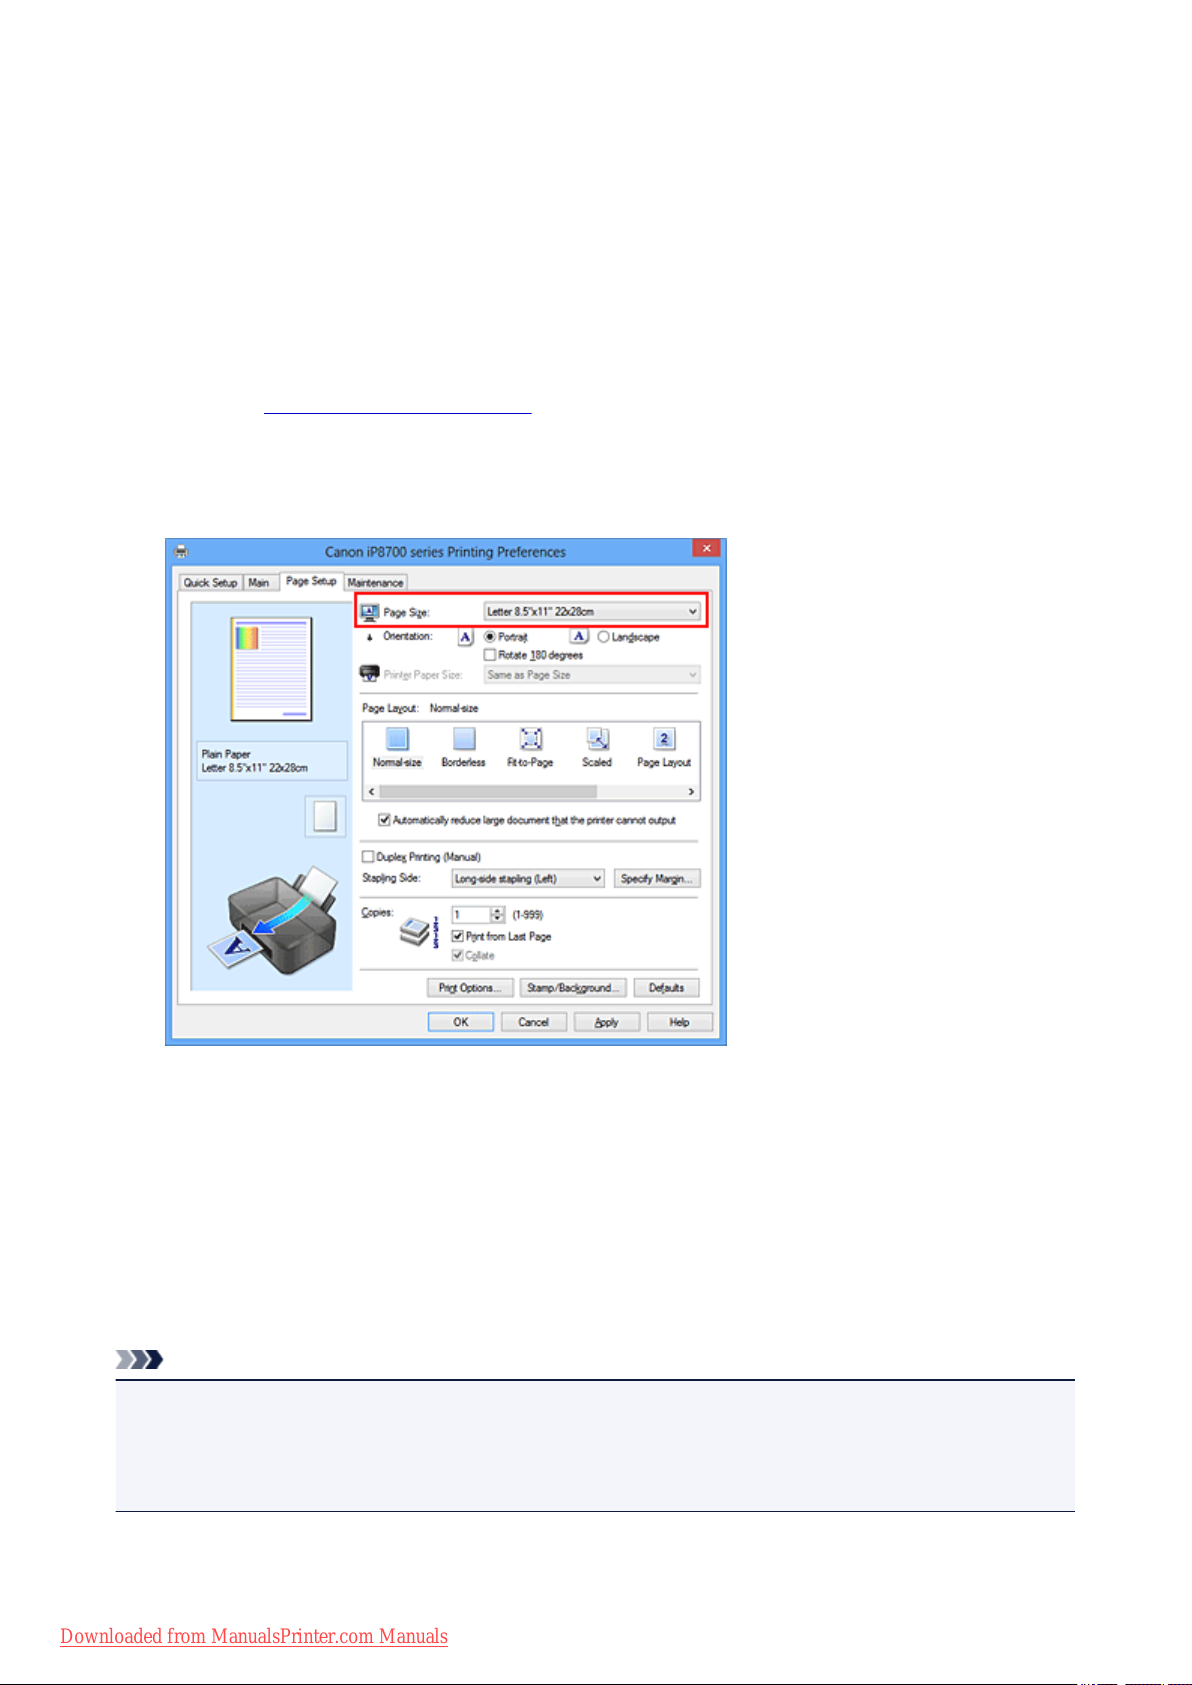
Setting a Page Size and Orientation
The paper size and orientation are essentially determined by the application software. When the page size
and orientation set for Page Size and Orientation on the Page Setup tab are same as those set with the
application software, you do not need to select them on the Page Setup tab.
When you are not able to specify them with the application software, the procedure for selecting a page size
and orientation is as follows:
You can also set page size and orientation on the Quick Setup tab.
1.
Open the printer driver setup window
2.
Select the paper size
Select a page size from the Page Size list on the Page Setup tab.
3.
Set Orientation
Select Portrait or Landscape for Orientation. Check Rotate 180 degrees check box when you want to
perform printing with the original being rotated 180 degrees.
4. Complete the setup
Click OK.
When you execute print, the document will be printed with the selected page size and the orientation.
Note
• If Normal-size is selected for Page Layout, then Automatically reduce large document that the
printer cannot output is displayed.
Normally, you can leave the check box checked. During printing, if you do not want to reduce large
documents that cannot be printed on the printer, uncheck the check box.
Downloaded from ManualsPrinter.com Manuals
11
Page 12
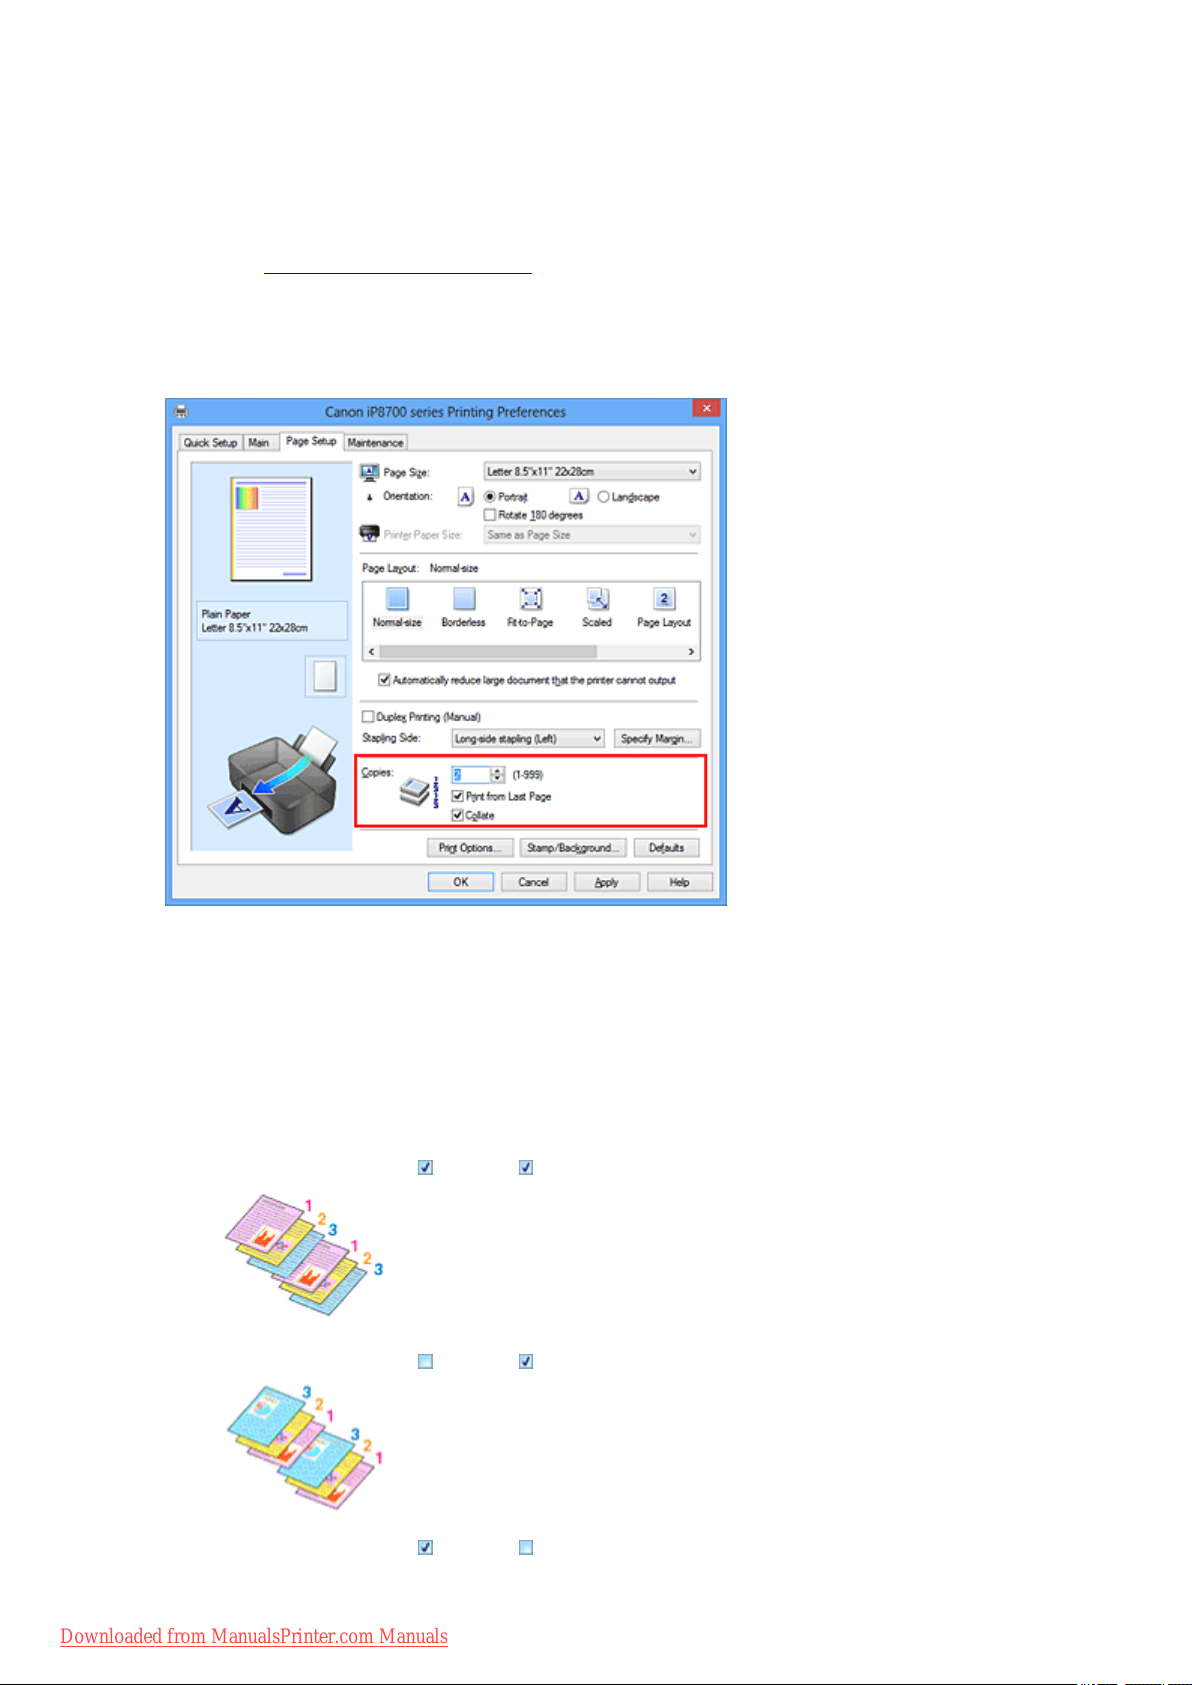
Setting the Number of Copies and Printing Order
The procedure for specifying the number of copies and printing order is as follows:
You can also set the number of copies on the Quick Setup tab.
1. Open the printer driver setup window
Specify the number of copies to be printed
2.
For Copies on the Page Setup tab, specify the number of copies to be printed.
3.
Specify the print order
Check the Print from Last Page check box when you want to print from the last page in order, and
uncheck the check box when you want to print from the first page.
Check the Collate check box when you are printing multiple copies of a document and want to print out
all pages in each copy together. Uncheck this check box when you want to print all pages with the same
page number together.
•
Print from Last Page: /Collate:
•
Print from Last Page: /Collate:
•
Print from Last Page: /Collate:
Downloaded from ManualsPrinter.com Manuals
12
Page 13
• Print from Last Page: /Collate:
4.
Complete the setup
Click OK.
When you execute print, the specified number of copies will be printed with the specified printing order.
Important
• When the application software that you used to create the document has the same function, specify the
settings on the printer driver. However, if the print results are not acceptable, specify the function
settings on the application software. When you specify the number of copies and the printing order with
both the application software and this printer driver, the number of copies may be multiplied numbers of
the two settings or the specified printing order may not be enabled.
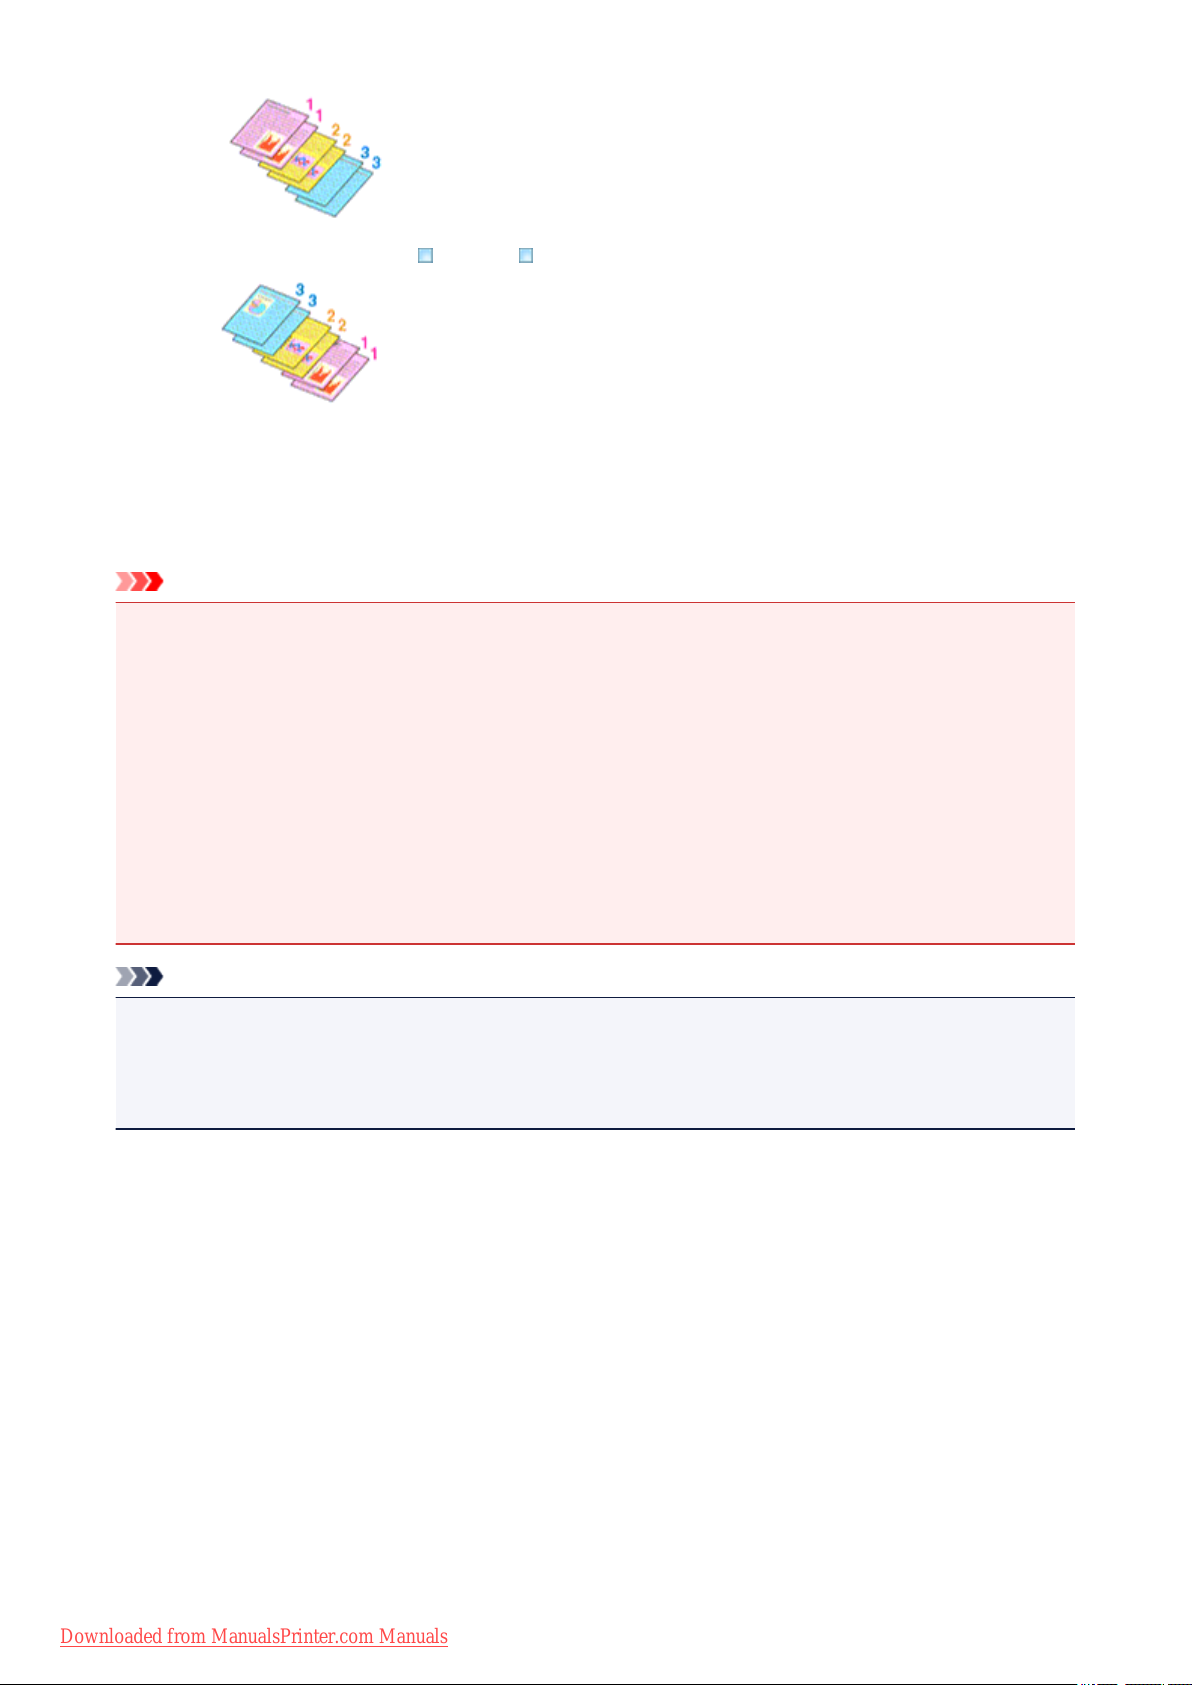
• Print from Last Page appears grayed out and is unavailable when Tiling/Poster is selected for Page
Layout.
• When Booklet is selected for Page Layout, Print from Last Page and Collate appear grayed out and
cannot be set.
• When Duplex Printing (Manual) is selected, Print from Last Page appears grayed out and cannot be
set.
Note
• By setting both Print from Last Page and Collate, you can perform printing so that papers are collated
one by one starting from the last page.
These settings can be used in combination with Normal-size, Borderless, Fit-to-Page, Scaled, and
Page Layout.
Downloaded from ManualsPrinter.com Manuals
13
Page 14
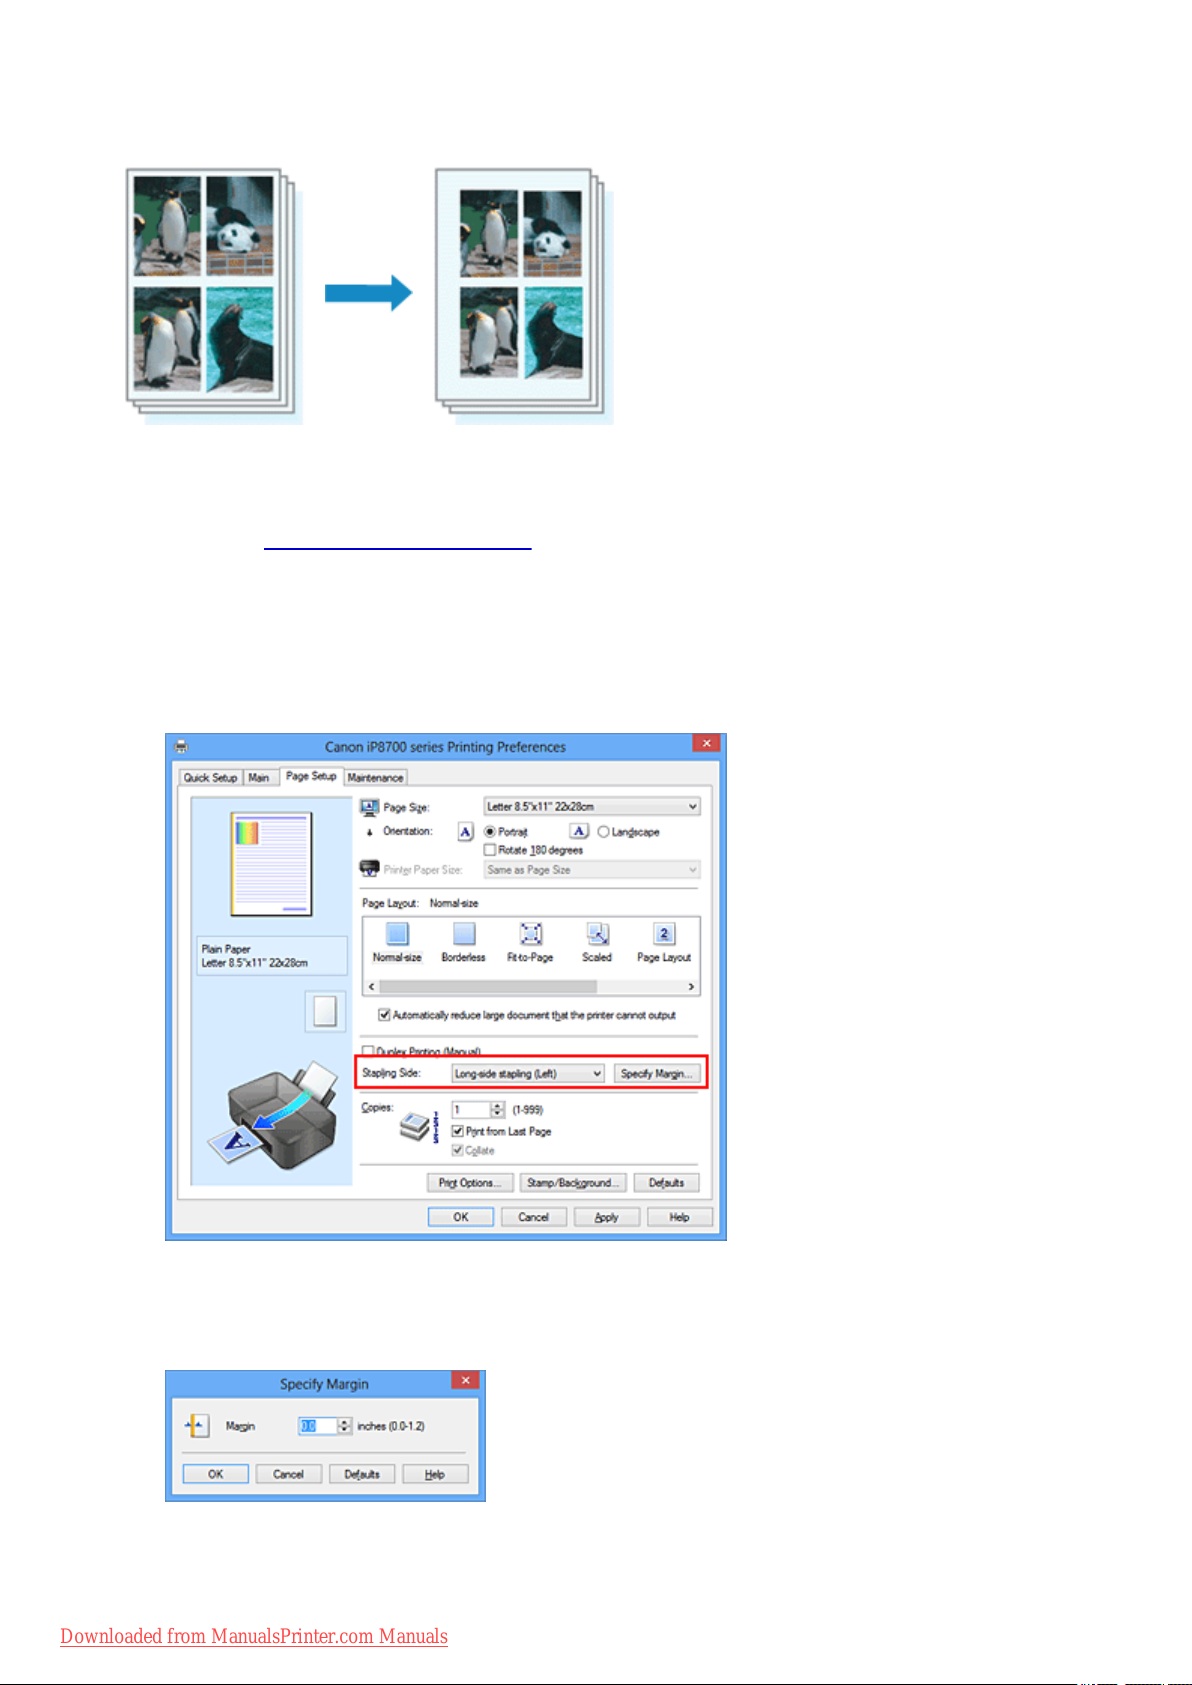
Setting the Stapling Margin
The procedure for setting the staple side and the margin width is as follows:
1.
Open the printer driver setup window
2.
Specify the side to be stapled
Check the position of the stapling margin from Stapling Side on the Page Setup tab.
The printer analyzes the Orientation and Page Layout settings, and automatically selects the best
staple position. When you want to change the setting, select from the list.
3. Set the margin width
If necessary, click Specify Margin... and set the margin width, and then click OK.
Downloaded from ManualsPrinter.com Manuals
14
Page 15
Note
• The printer automatically reduces the print area depending on the staple position margin.
4. Complete the setup
Click OK on the Page Setup tab.
When you execute print, the data is printed with the specified staple side and margin width.
Important
• Stapling Side and Specify Margin... appear grayed out and are unavailable when:
• Borderless, Tiling/Poster, or Booklet is selected for Page Layout
• Scaled is selected for Page Layout (When Duplex Printing (Manual) is also selected, only
Stapling Side can be specified.)
Downloaded from ManualsPrinter.com Manuals
15
Page 16
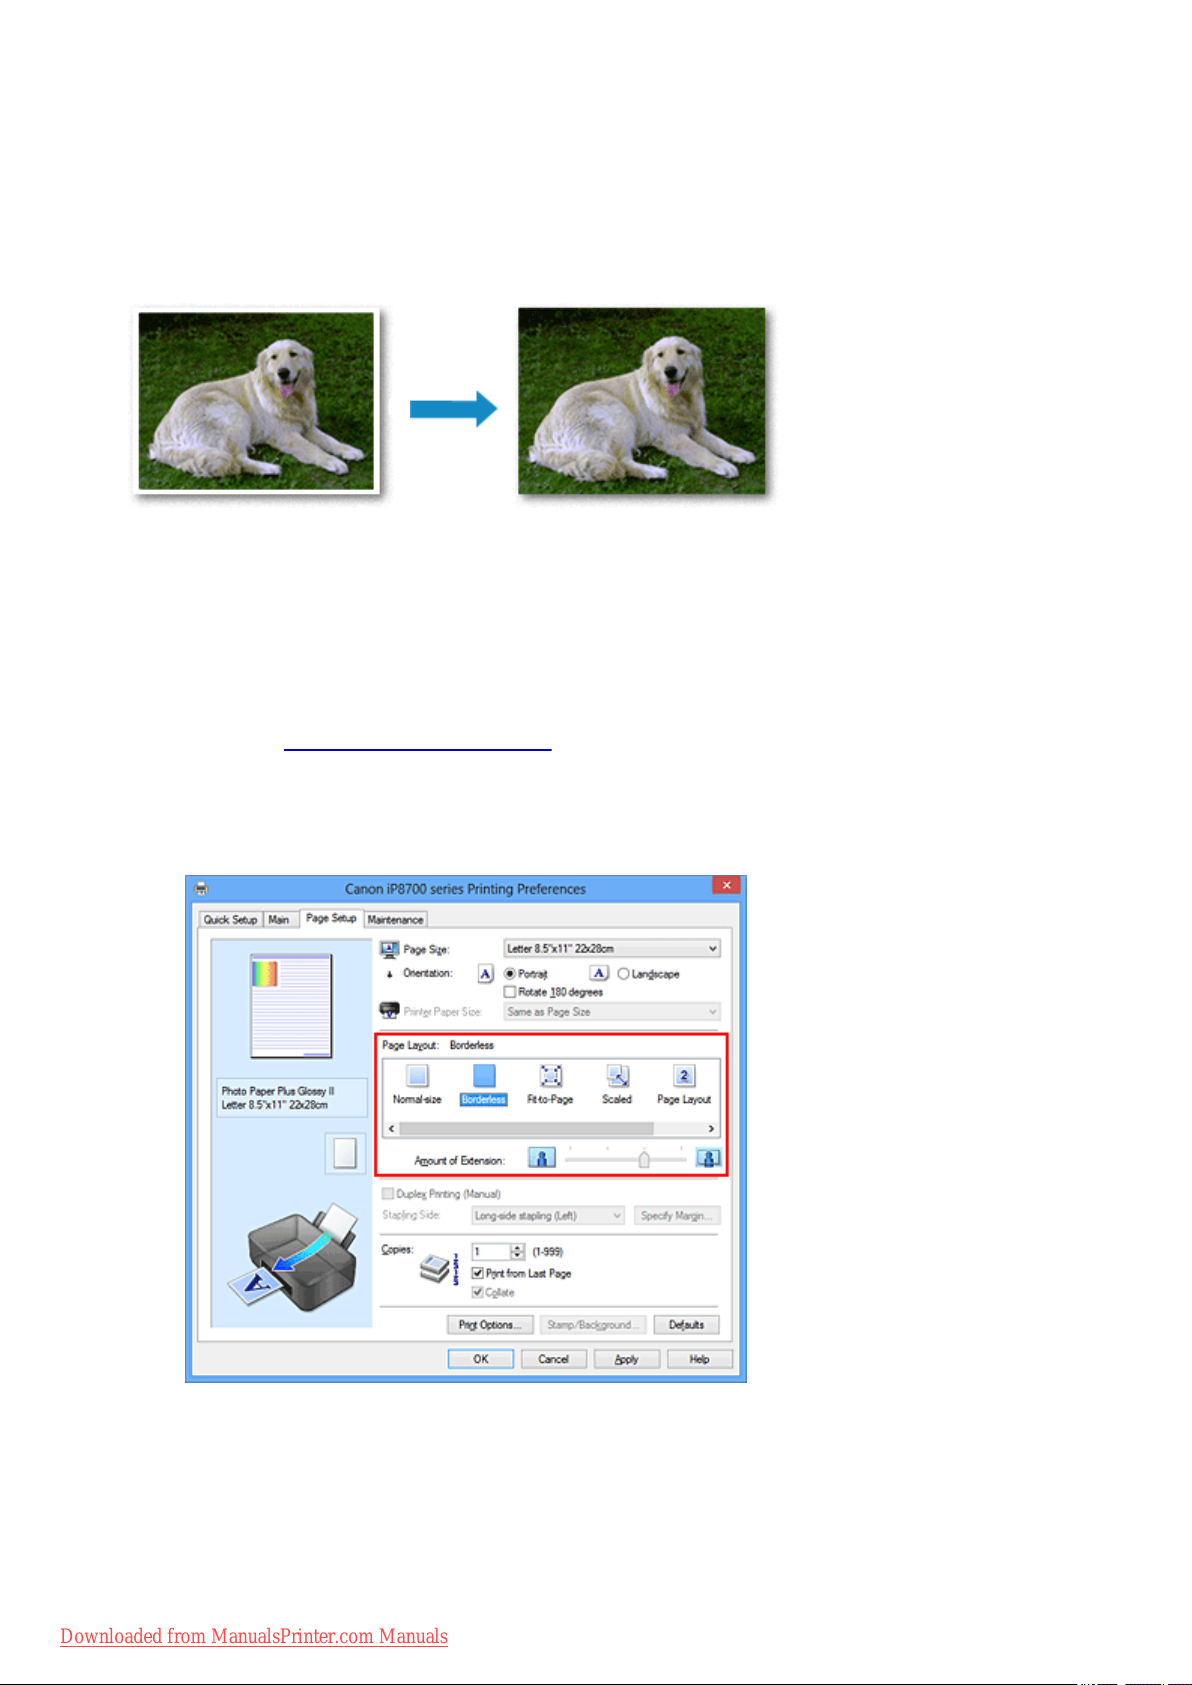
Execute Borderless Printing
The borderless printing function allows you to print data without any margin by enlarging the data so that it
extends slightly off the paper. In standard printing, margins are created around the document area.
However, in borderless printing function, these margins are not created. When you want to print data such
as a photo without providing any margin around it, set borderless printing.
The procedure for performing borderless printing is as follows:
You can also set borderless printing in Additional Features on the Quick Setup tab.
Setting Borderless Printing
1.
Open the printer driver setup window
2.
Set borderless printing
Select Borderless from the Page Layout list on the Page Setup tab.
Click OK when the confirmation message appears.
When a message prompting you to change the media type appears, select a media type from the list
and click OK.
3. Check the paper size
Downloaded from ManualsPrinter.com Manuals
16
Page 17
Check the Page Size list. When you want to change it, select another page size from the list. The list
displays only sizes that can be used for borderless printing.
4.
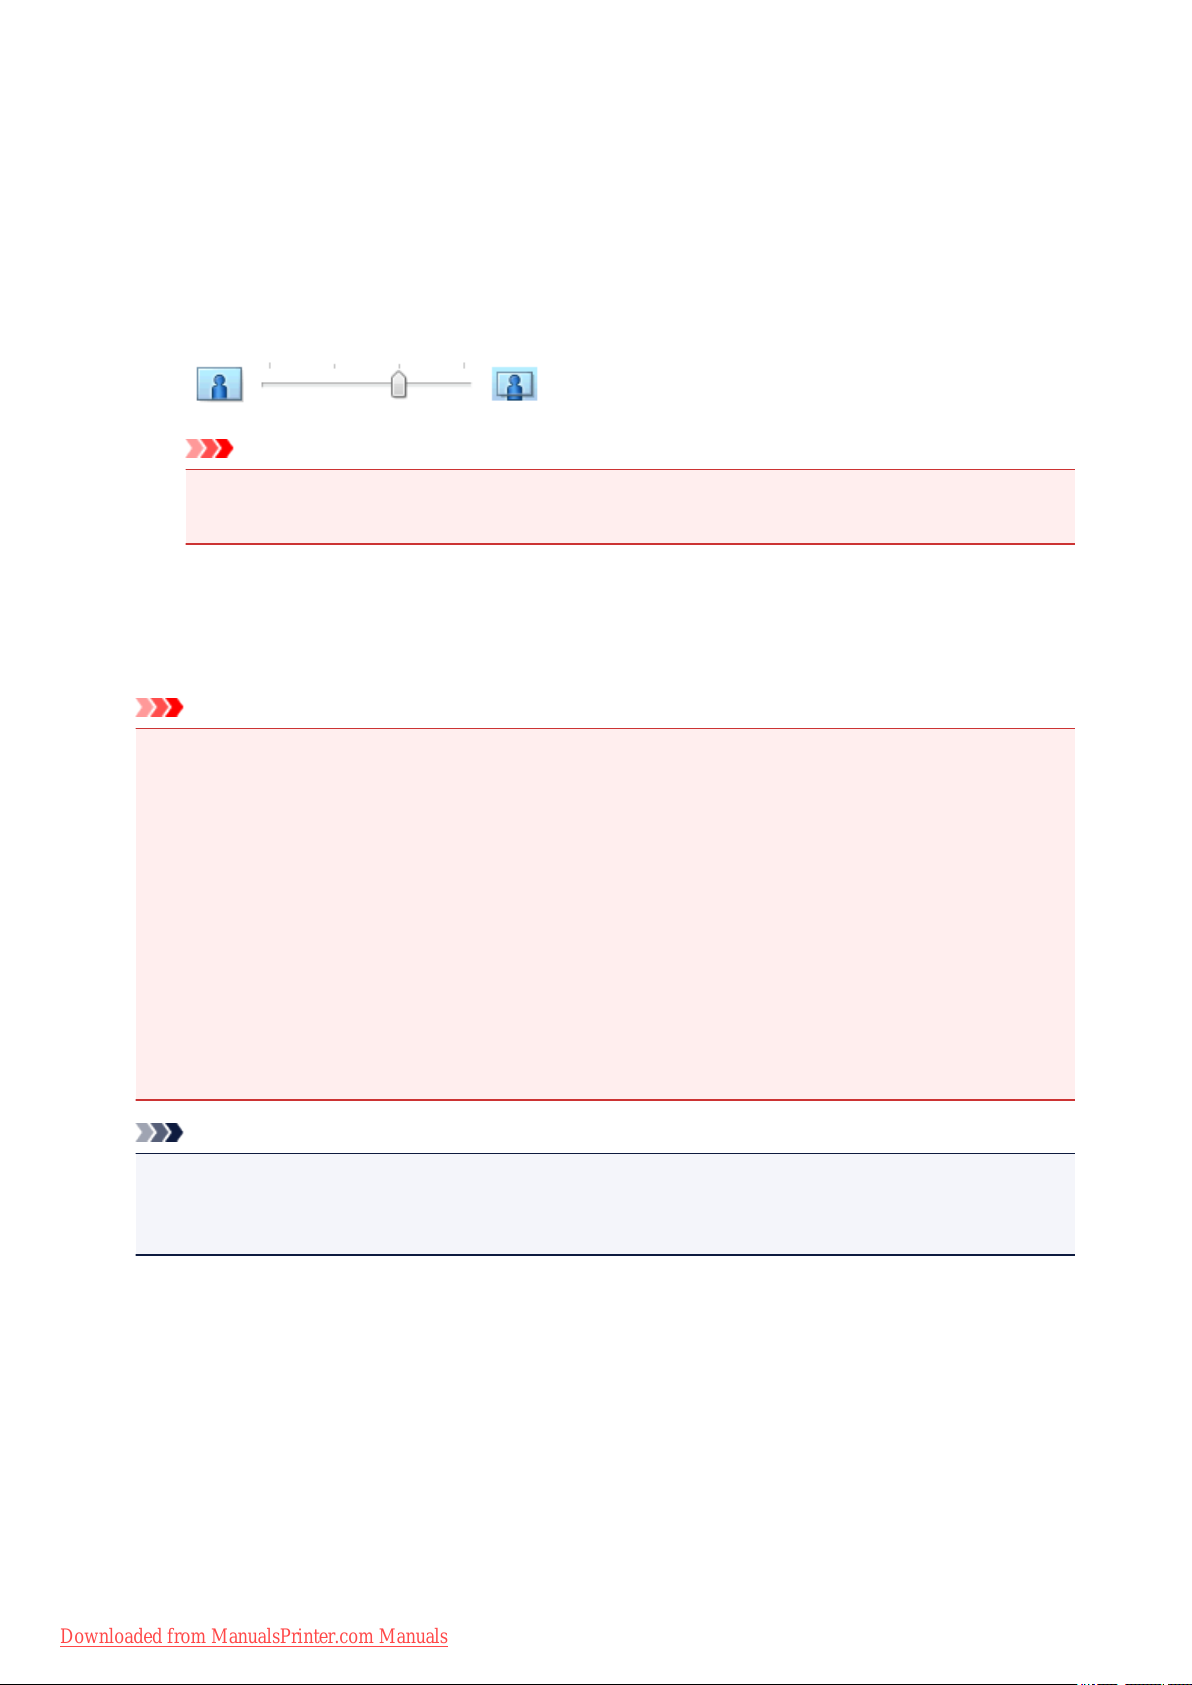
Adjust the amount of extension from the paper
If necessary, adjust the amount of extension using the Amount of Extension slider.
Moving the slider to the right increases the amount extending off the paper, and moving the slider to
the left decreases the amount.
It is recommended to set the slider at the second position from the right for most cases.
Important
When the Amount of Extension slider is set to the rightmost position, the back side of the
•
paper may become smudged.
5.
Complete the setup
Click OK.
When you execute print, the data is printed without any margins on the paper.
Important
• When a page size that cannot be used for borderless printing is selected, the size is automatically
changed to the valid page sizes for borderless printing.
• When Borderless is selected, the Printer Paper Size, Duplex Printing (Manual), Stapling Side
settings, and the Stamp/Background... (Stamp...) button on the Page Setup tab appear grayed out
and are unavailable.
• When Other Fine Art Paper, Envelope, High Resolution Paper or T-Shirt Transfers is selected
from the Media Type list on the Main tab, you cannot perform borderless printing.
• Depending on the type of the media used during borderless printing, the print quality may deteriorate
at the top and bottom of the sheet or stains may form.
• When the ratio of the height to the width differs from the image data, a portion of the image may not
be printed depending on the size of the media used.
In this case, crop the image data with an application software according to the paper size.
Note
• When Plain Paper is selected for Media Type on the Main tab, borderless printing is not
recommended. Therefore, the message for media selection appears.
When you are using plain paper for test printing, select Plain Paper, and click OK.
Expanding the Range of the Document to Print
Setting a large amount of extension allows you to perform borderless printing with no problems. However,
the portion of the document extending off the paper range will not be printed and for this reason, the
subjects around the perimeter of a photo may not be printed.
When you are not satisfied with the result of borderless printing, reduce the amount of extension. The
extension amount decreases as the Amount of Extension slider is moved to the left.
Downloaded from ManualsPrinter.com Manuals
17
Page 18

Important
• When the amount of extension is decreased, an unexpected margin may be produced on the print,
depending on the size of the paper.
Note
• When the Amount of Extension slider is set to the leftmost position, image data will be printed in the
full size. If you set this when printing the address side of a postcard, the postal code of the sender is
printed in the correct position.
• When Preview before printing is checked on the Main tab, you can confirm whether there will be no
margin before printing.
Downloaded from ManualsPrinter.com Manuals
18
Page 19
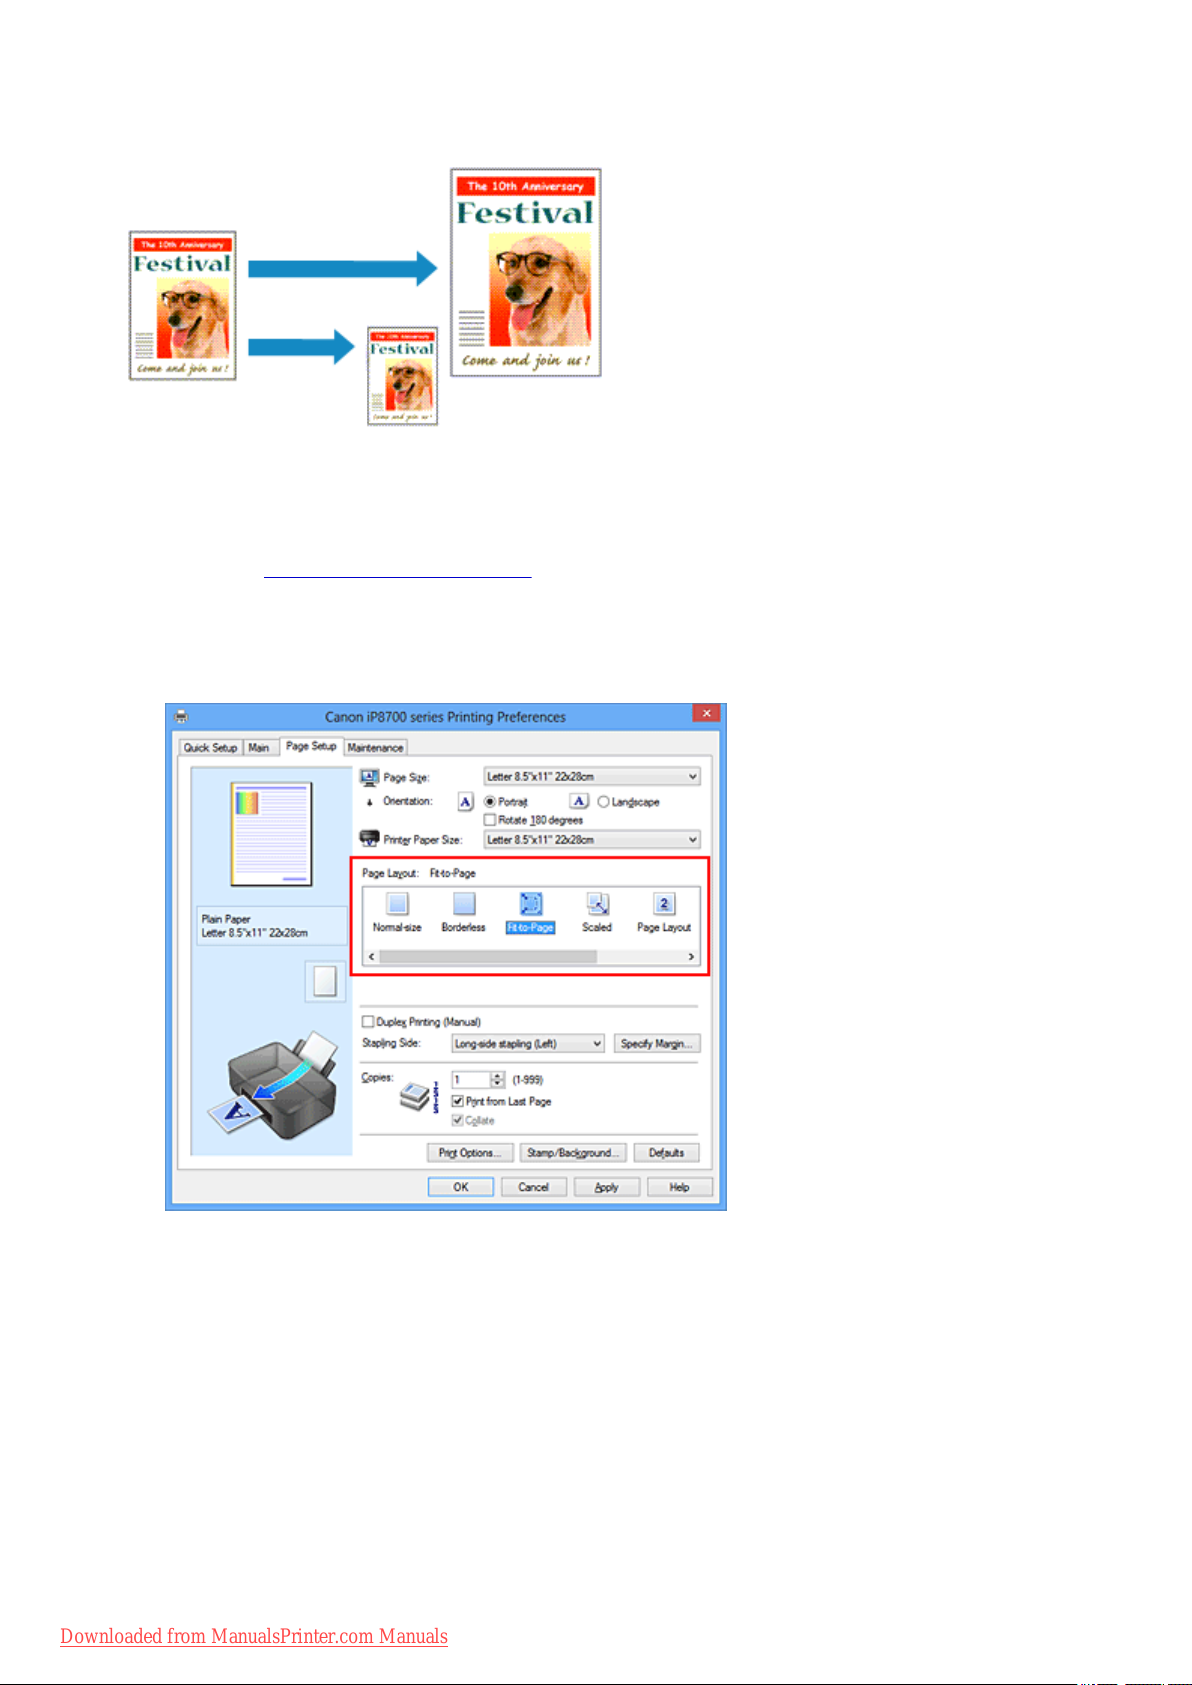
Fit-to-Page Printing
The procedure for printing a document that is automatically enlarged or reduced to fit the page size to be
used is as follows:
1.
Open the printer driver setup window
2.
Set fit-to-page printing
Select Fit-to-Page from the Page Layout list on the Page Setup tab.
3. Select the paper size of the document
Using Page Size, select the page size that is set with your application software.
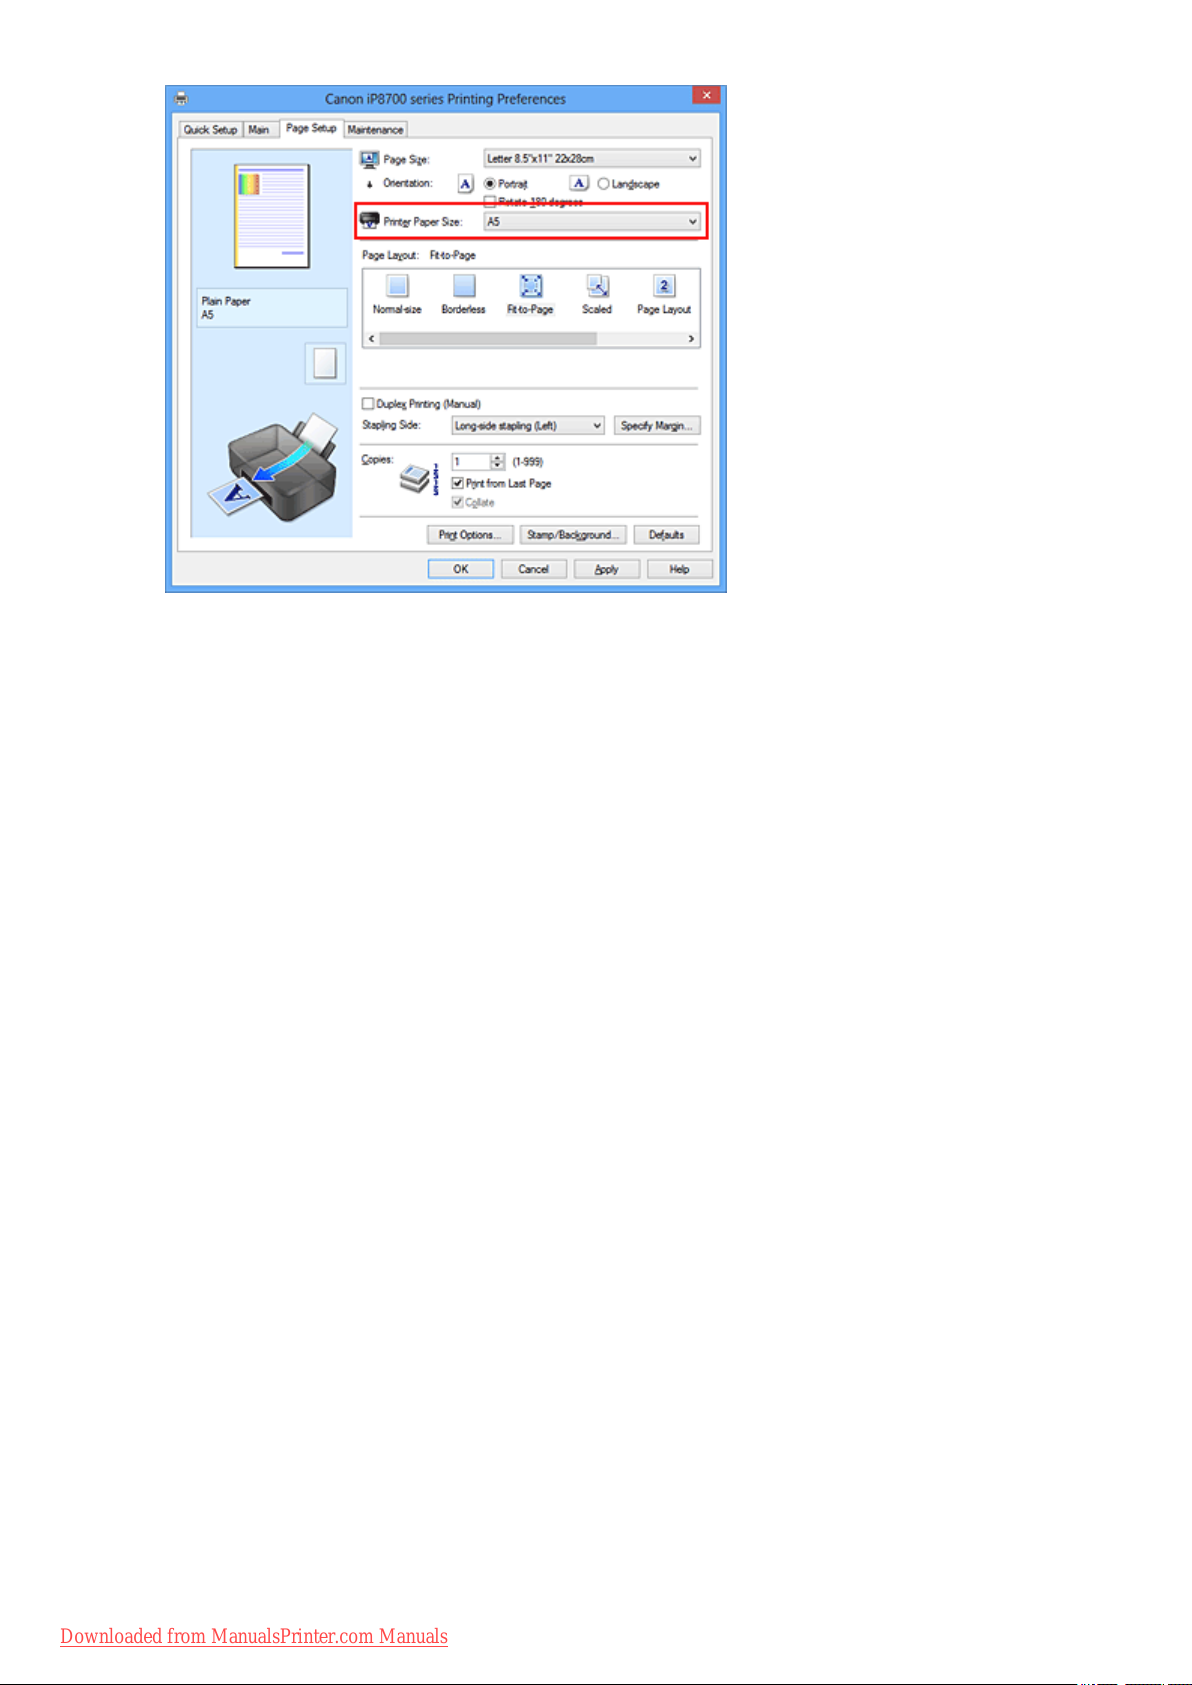
4. Select the print paper size
Select the size of the paper loaded in the printer from the Printer Paper Size list.
When the Printer Paper Size is smaller than the Page Size, the page image will be reduced. When the
Printer Paper Size is larger than the Page Size, the page image will be enlarged.
The current settings are displayed in the settings preview on the left side of the printer driver.
Downloaded from ManualsPrinter.com Manuals
19
Page 20
5.
Complete the setup
Click OK.
When you execute print, the document will be enlarged or reduced to fit to the page size.
Downloaded from ManualsPrinter.com Manuals
20
Page 21
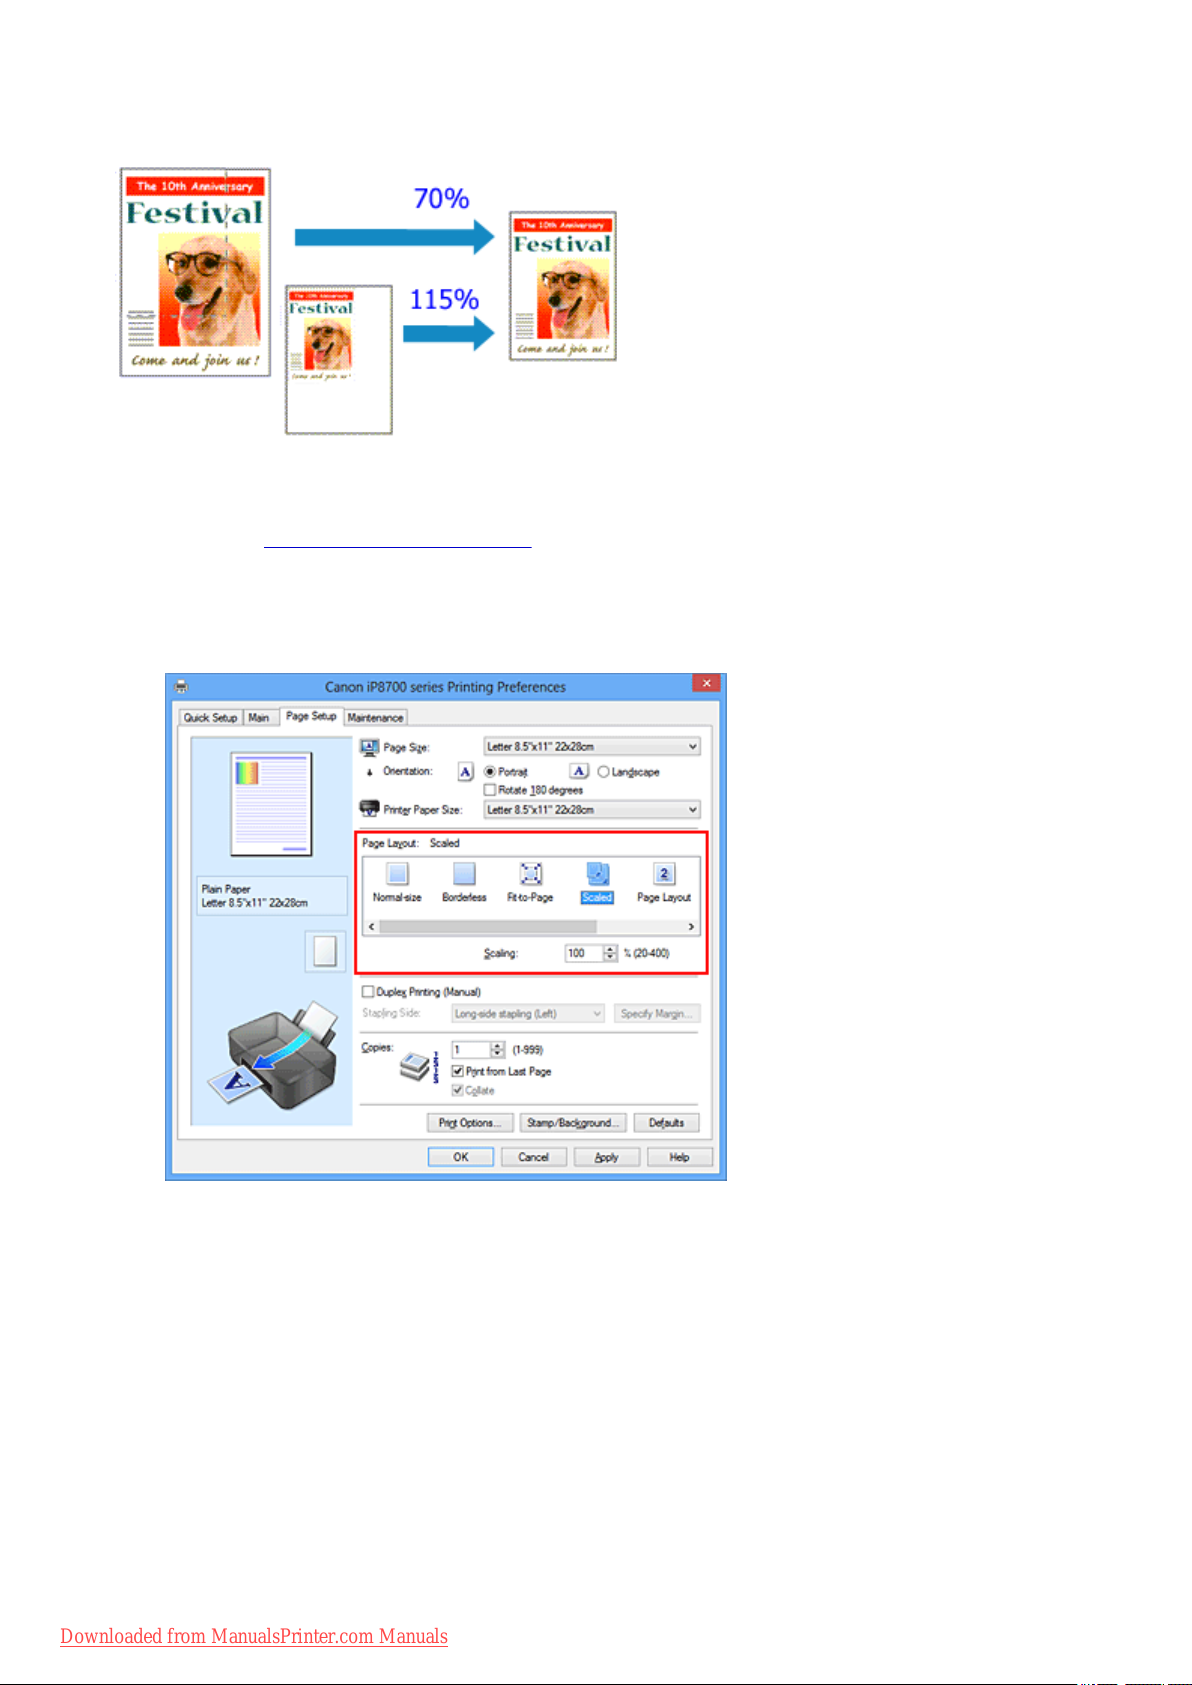
Scaled Printing
The procedure for printing a document with pages enlarged or reduced is as follows:
1.
Open the printer driver setup window
2.
Set scaled printing
Select Scaled from the Page Layout list on the Page Setup tab.
3. Select the paper size of the document
Using Page Size, select the page size that is set with your application software.
4. Set the scaling rate by using one of the following methods:
•
Select a Printer Paper Size
When the printer paper size is smaller than the Page Size, the page image will be reduced. When
the printer paper size is larger than the Page Size, the page image will be enlarged.
Downloaded from ManualsPrinter.com Manuals
21
Page 22
•
Specify a scaling factor
Directly type in a value into the Scaling box.
The current settings are displayed in the settings preview on the left side of the printer driver.
5. Complete the setup
Click OK.
When you execute print, the document will be printed with the specified scale.
Important
• When the application software which you used to create the original has the scaled printing function,
configure the settings on your application software. You do not need to configure the same setting in
the printer driver.
Downloaded from ManualsPrinter.com Manuals
22
Page 23

Note
• Selecting Scaled changes the printable area of the document.
Downloaded from ManualsPrinter.com Manuals
23
Page 24
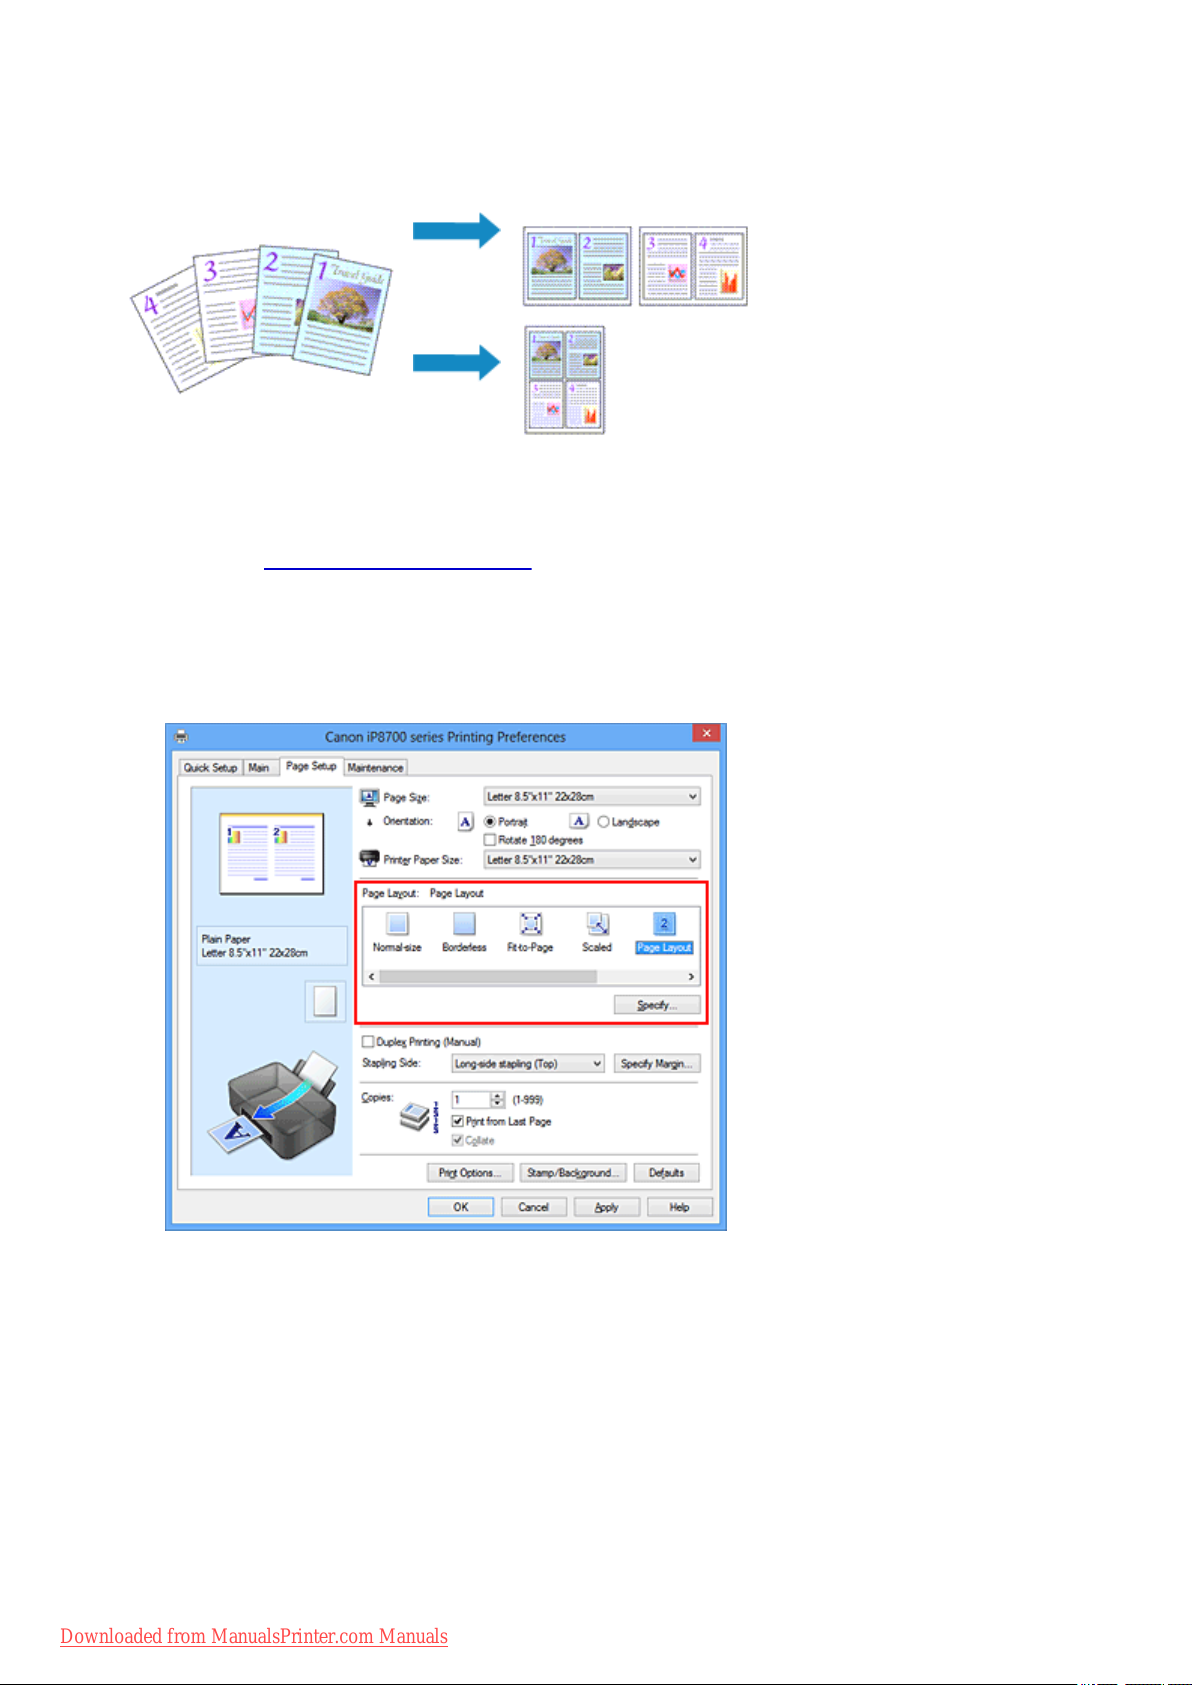
Page Layout Printing
The page layout printing function allows you to print more than one page image on a single sheet of paper.
The procedure for performing page layout printing is as follows:
1.
Open the printer driver setup window
2.
Set page layout printing
Select Page Layout from the Page Layout list on the Page Setup tab.
The current settings are displayed in the settings preview on the left side of the printer driver.
3. Select the print paper size
Select the size of the paper loaded in the printer from the Printer Paper Size list.
4. Set the number of pages to be printed on one sheet and the page order
If necessary, click Specify..., specify the following settings in the Page Layout Printing dialog box, and
click OK.
Downloaded from ManualsPrinter.com Manuals
24
Page 25
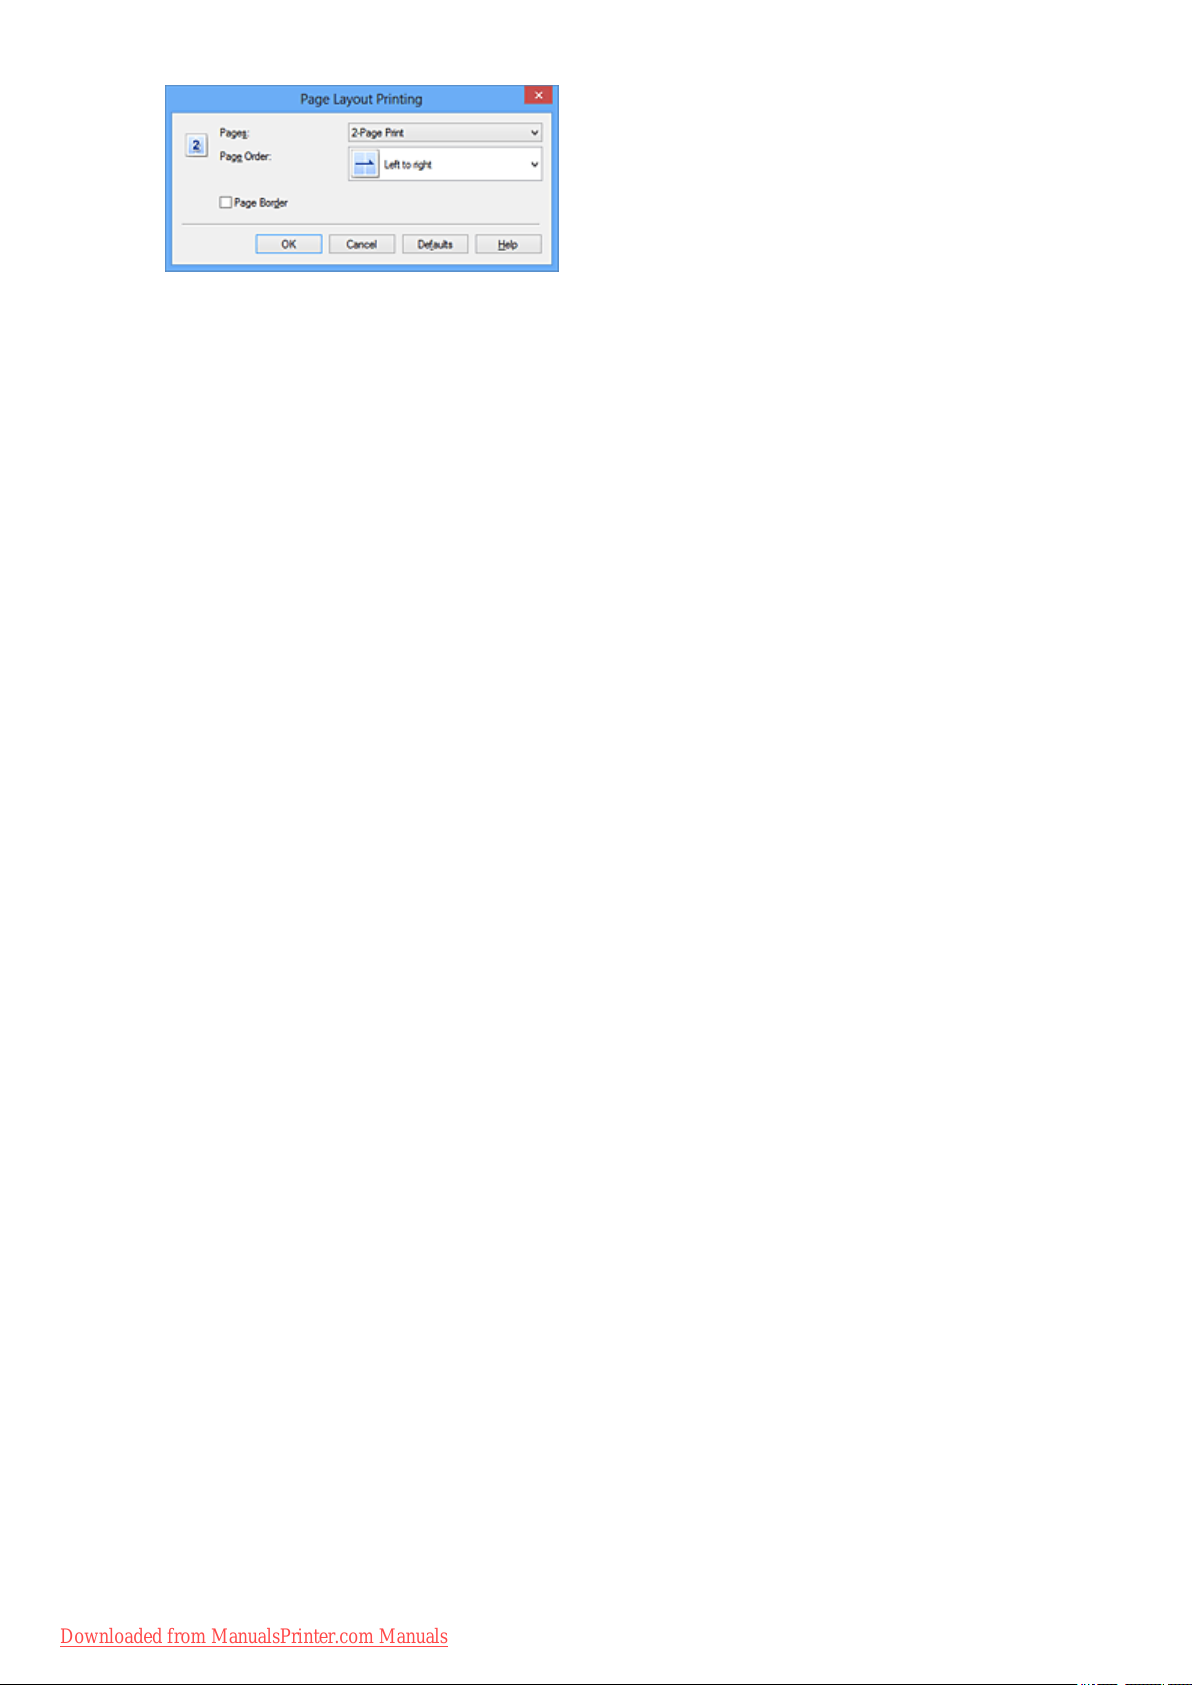
Pages
To change the number of pages to be printed on a single sheet of paper, select the number of
pages from the list.
Page Order
To change the page arrangement order, select a placement method from the list.
Page Border
To print a page border around each document page, check this check box.
5.
Complete the setup
Click OK on the Page Setup tab.
When you execute print, the specified number of pages will be arranged on each sheet of paper in the
specified order.
Downloaded from ManualsPrinter.com Manuals
25
Page 26
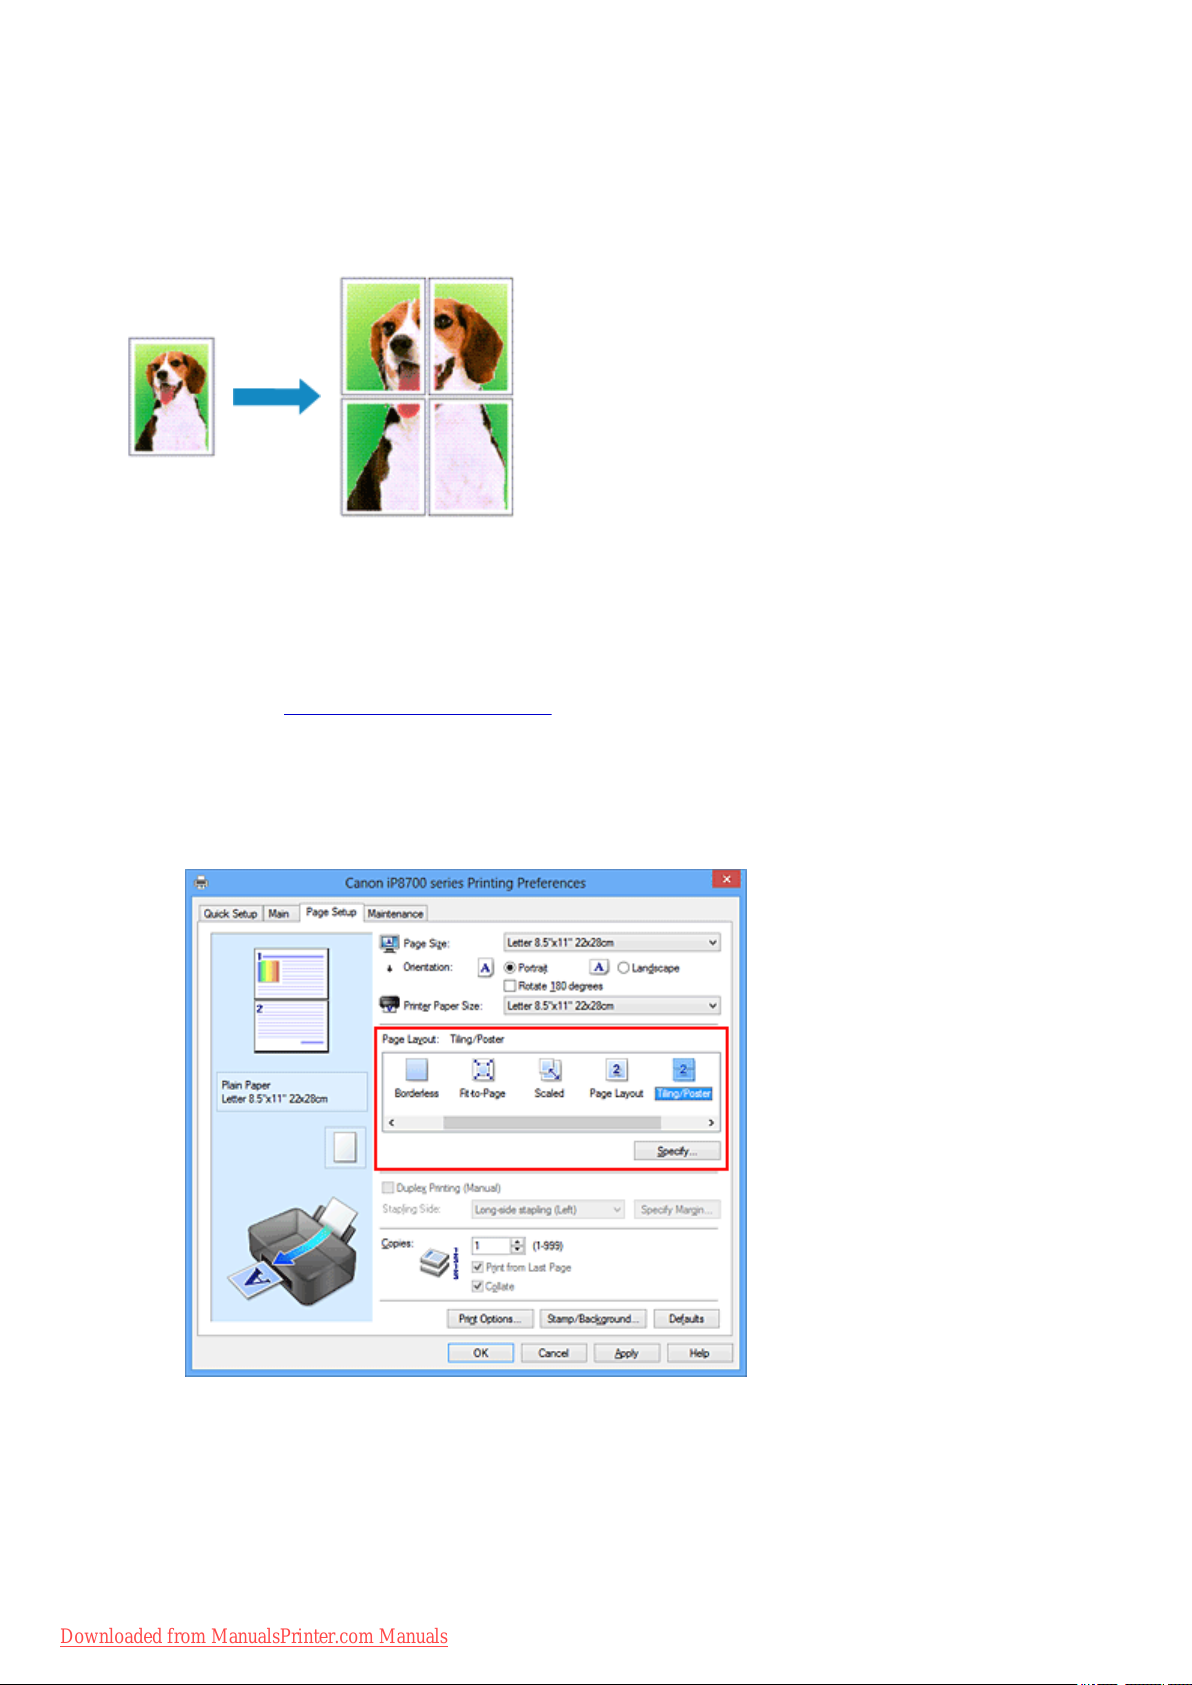
Tiling/Poster Printing
The tiling/poster printing function allows you to enlarge image data, divide it into several pages, and print
these pages on separate sheets of paper. You can also paste the pages together to create a large print like
a poster.
The procedure for performing tiling/poster printing is as follows:
Setting Tiling/Poster Printing
1.
Open the printer driver setup window
2.
Set tiling/poster printing
Select Tiling/Poster from the Page Layout list on the Page Setup tab.
The current settings are displayed in the settings preview on the left side of the printer driver.
3. Select the print paper size
Select the size of the paper loaded in the printer from the Printer Paper Size list.
4. Set the number of image divisions and the pages to be printed
Downloaded from ManualsPrinter.com Manuals
26
Page 27
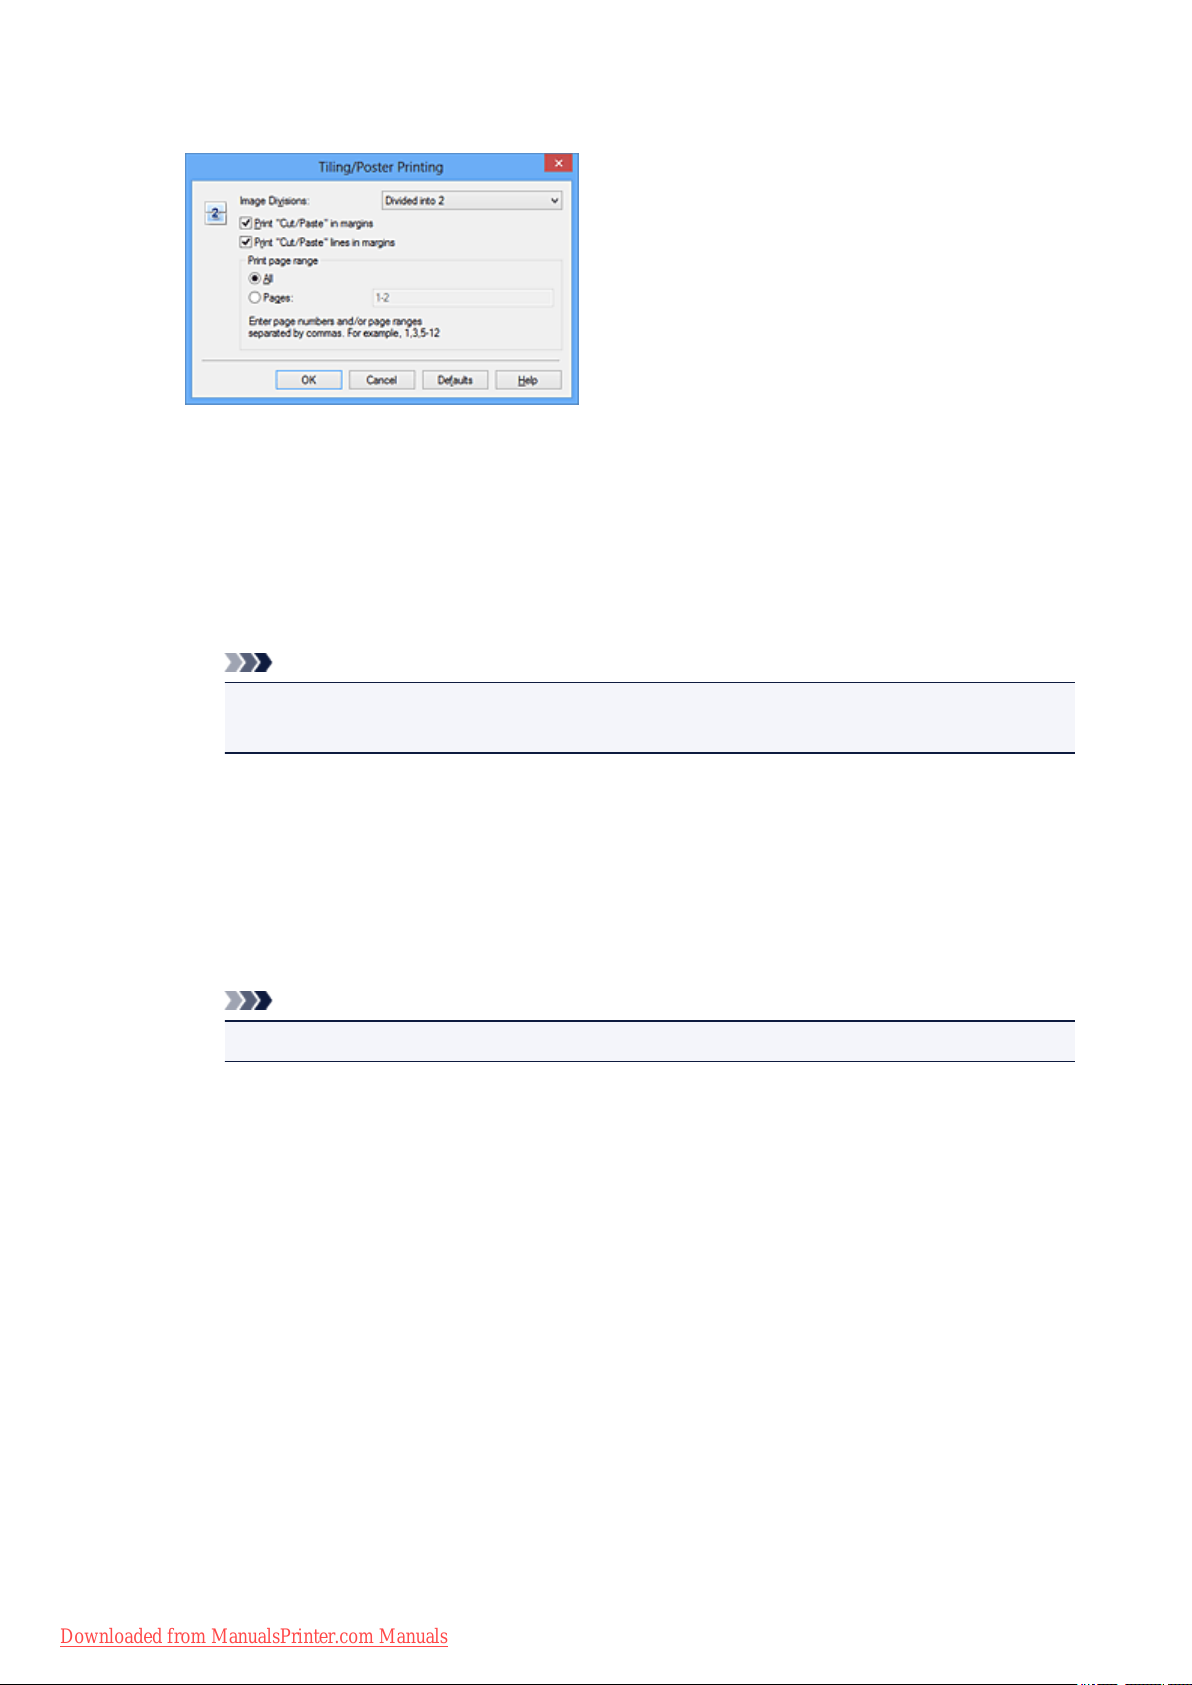
If necessary, click Specify..., specify the following settings in the Tiling/Poster Printing dialog box,
and then click OK.
Image Divisions
Select the number of divisions (vertical x horizontal).
As the number of divisions increases, the number of sheets used for printing increases. If you are
pasting pages together to create a poster, increasing the number of divisions allows you to create
a larger poster.
Print "Cut/Paste" in margins
To leave out words "Cut" and "Paste", uncheck this check box.
Note
• This feature may be unavailable when certain printer drivers or operating environments are
used.
Print "Cut/Paste" lines in margins
To leave out cut lines, uncheck this check box.
Print page range
Specifies the printing range. Select All under normal circumstances.
To reprint only a specific page, select Pages and enter the page number you want to print. To
specify multiple pages, enter the page numbers by separating them with commas or by entering a
hyphen between the page numbers.
Note
• You can also specify the print range by clicking the pages in the settings preview.
5.
Complete the setup
Click OK on the Page Setup tab.
When you execute print, the document will be divided into several pages during printing.
Printing Only Specific Pages
If ink becomes faint or runs out during printing, you can reprint only the specific pages by following the
procedure below:
1. Set the print range
In the settings preview on the left of the Page Setup tab, click the pages that do not need to be
printed.
The pages that were clicked are deleted, and only the pages to be printed are displayed.
Downloaded from ManualsPrinter.com Manuals
27
Page 28
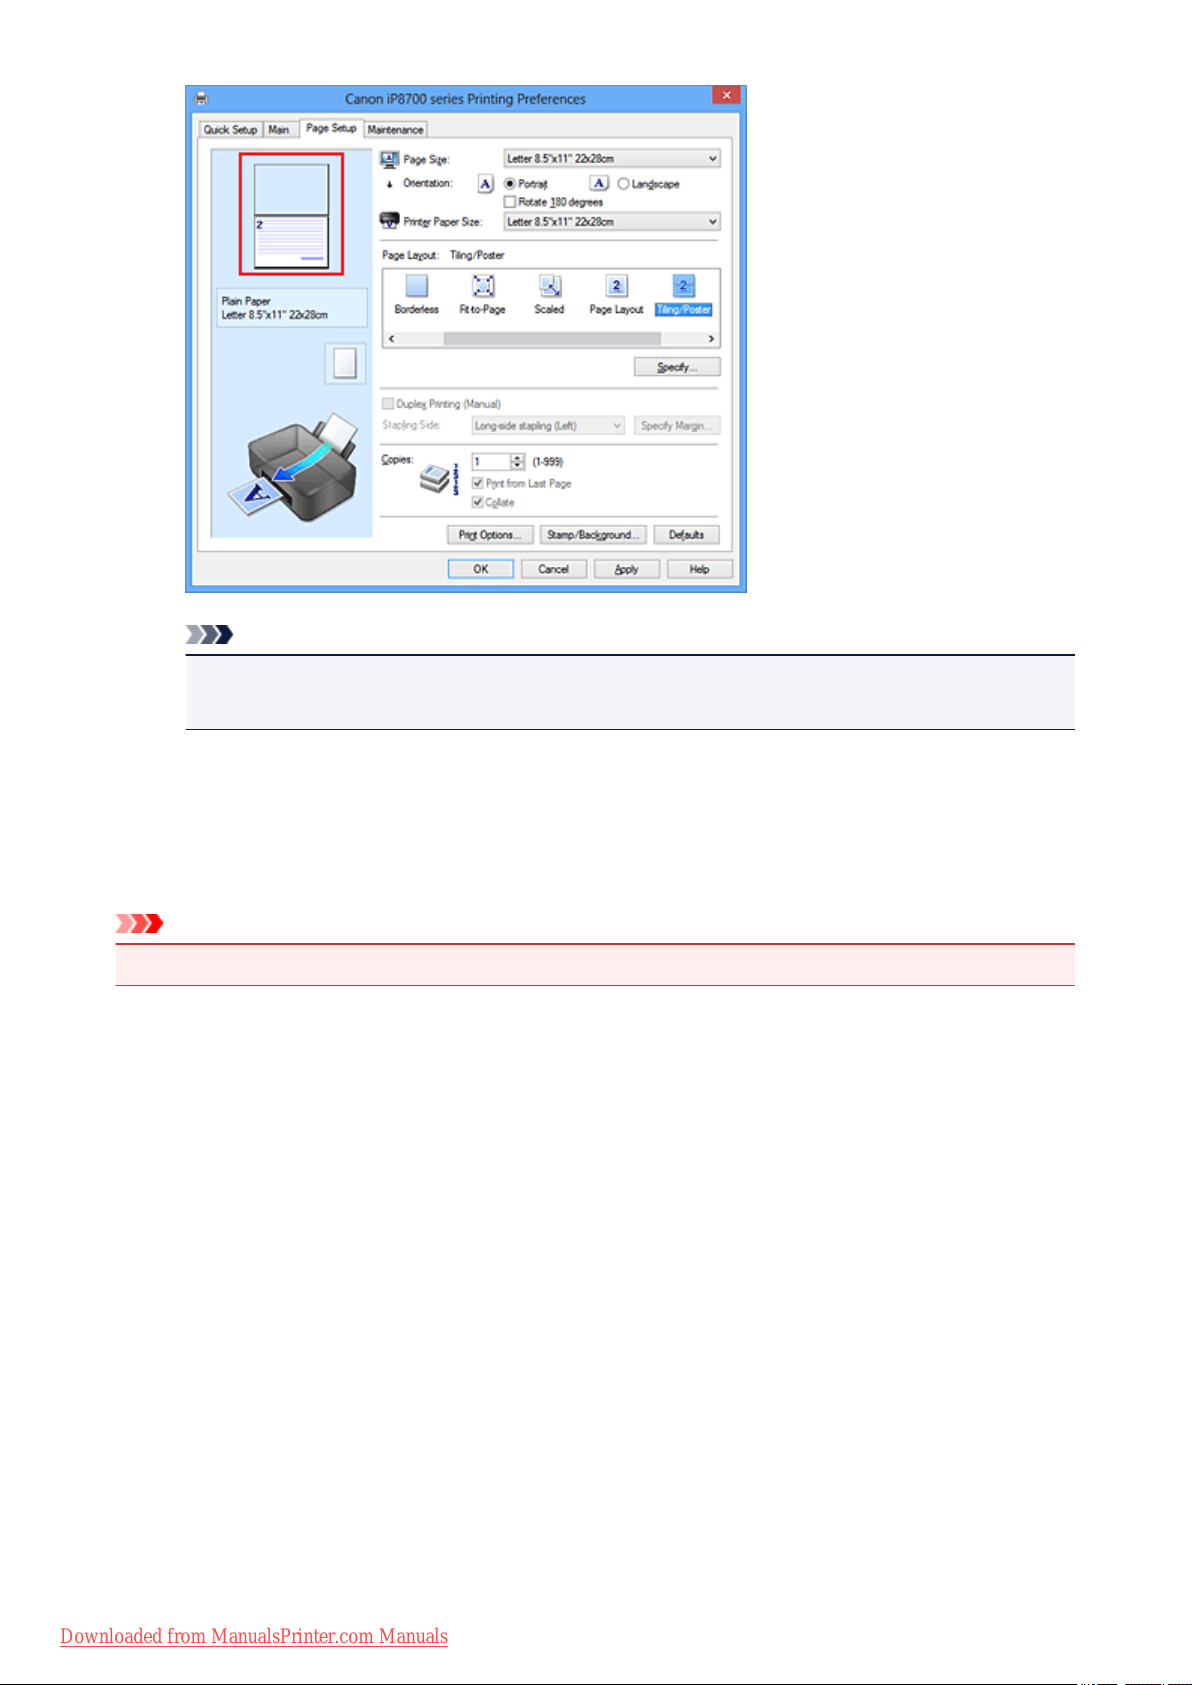
Note
• Click the deleted pages to display them again.
• Right-click the settings preview to select Print all pages or Delete all pages.
2.
Complete the setup
After completing the page selection, click OK.
When you execute print, only specified pages will be printed.
Important
• Since tiling/poster printing enlarges the document when printing it, the print results may become coarse.
Downloaded from ManualsPrinter.com Manuals
28
Page 29
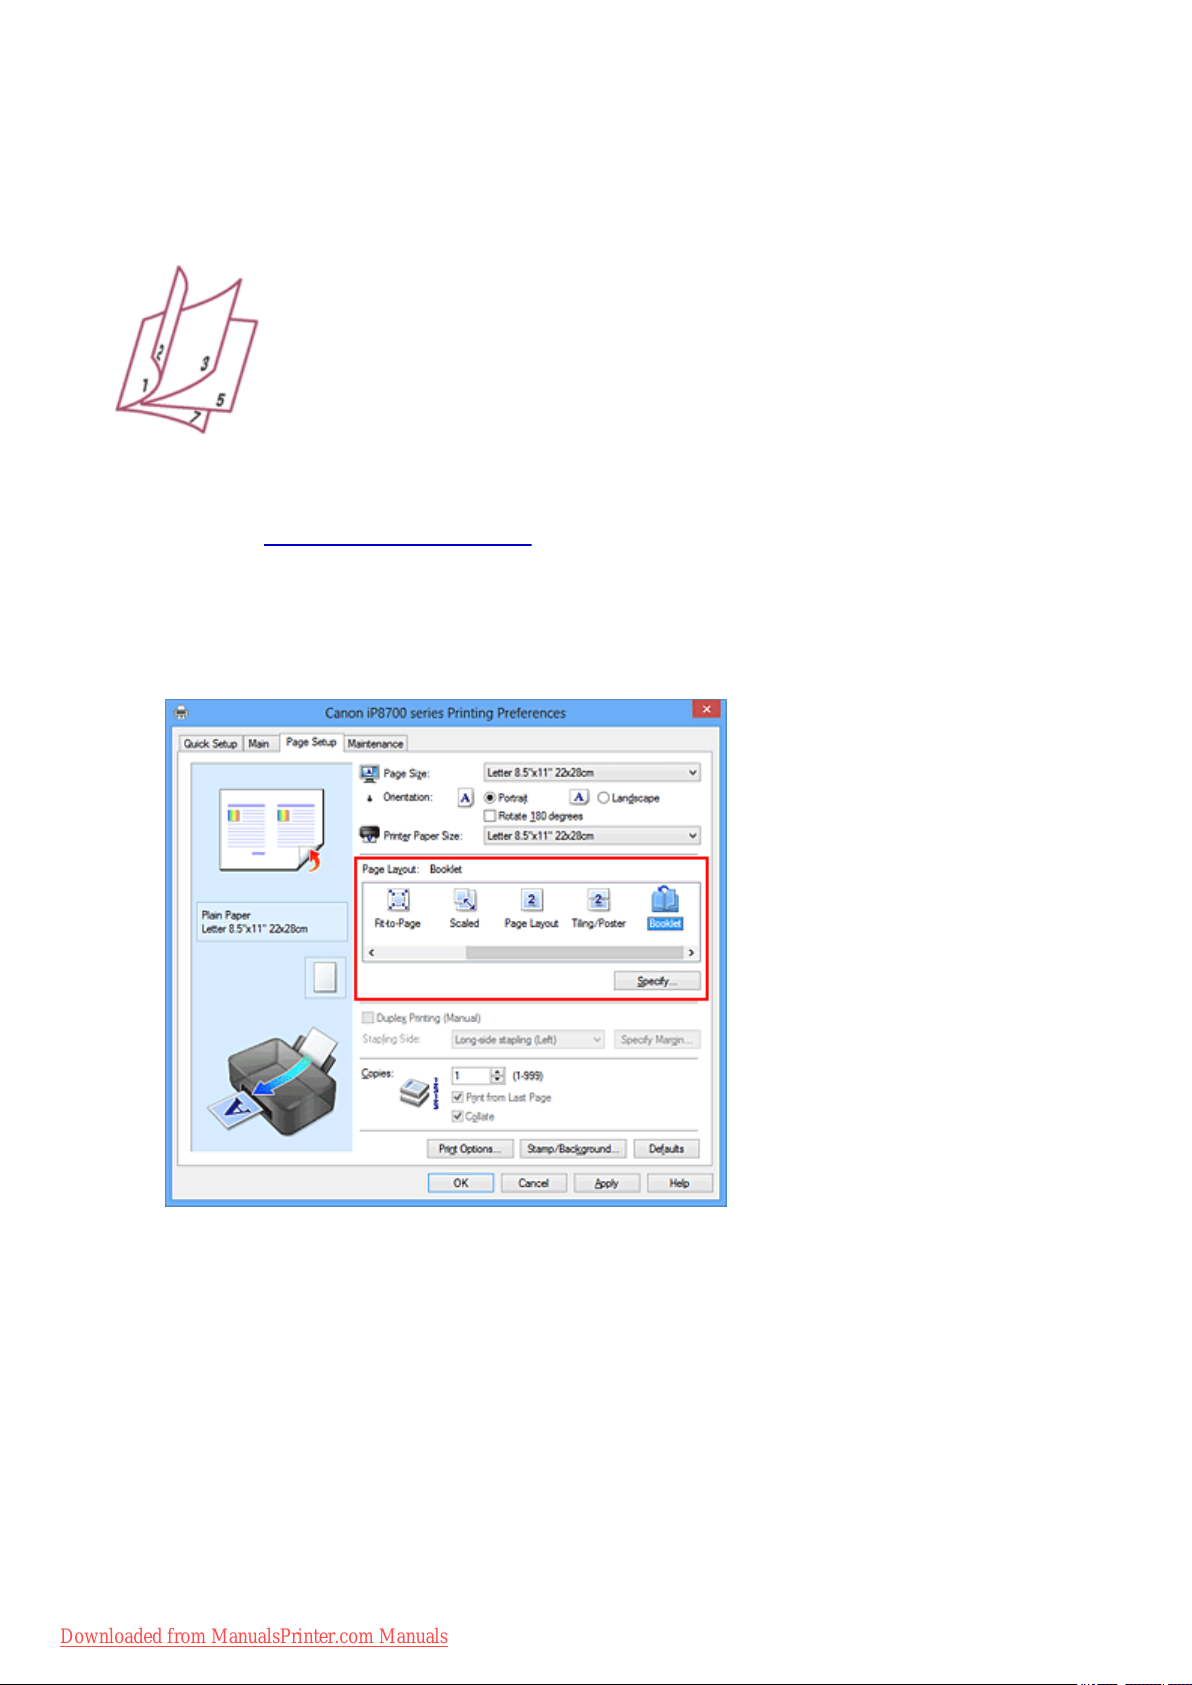
Booklet Printing
The booklet printing function allows you to print data for a booklet. Data is printed on both sides of the
paper. This type of printing ensures that pages can be collated properly, in page number order, when the
printed sheets are folded and stapled at the center.
The procedure for performing booklet printing is as follows:
1.
Open the printer driver setup window
2.
Set booklet printing
Select Booklet from the Page Layout list on the Page Setup tab.
The current settings are displayed in the settings preview on the left side of the window.
3.
Select the print paper size
Select the size of the paper loaded in the printer from the Printer Paper Size list.
4. Set the margin for stapling and the margin width
Click Specify... and specify the following settings in the Booklet Printing dialog box, and then click OK.
Downloaded from ManualsPrinter.com Manuals
29
Page 30
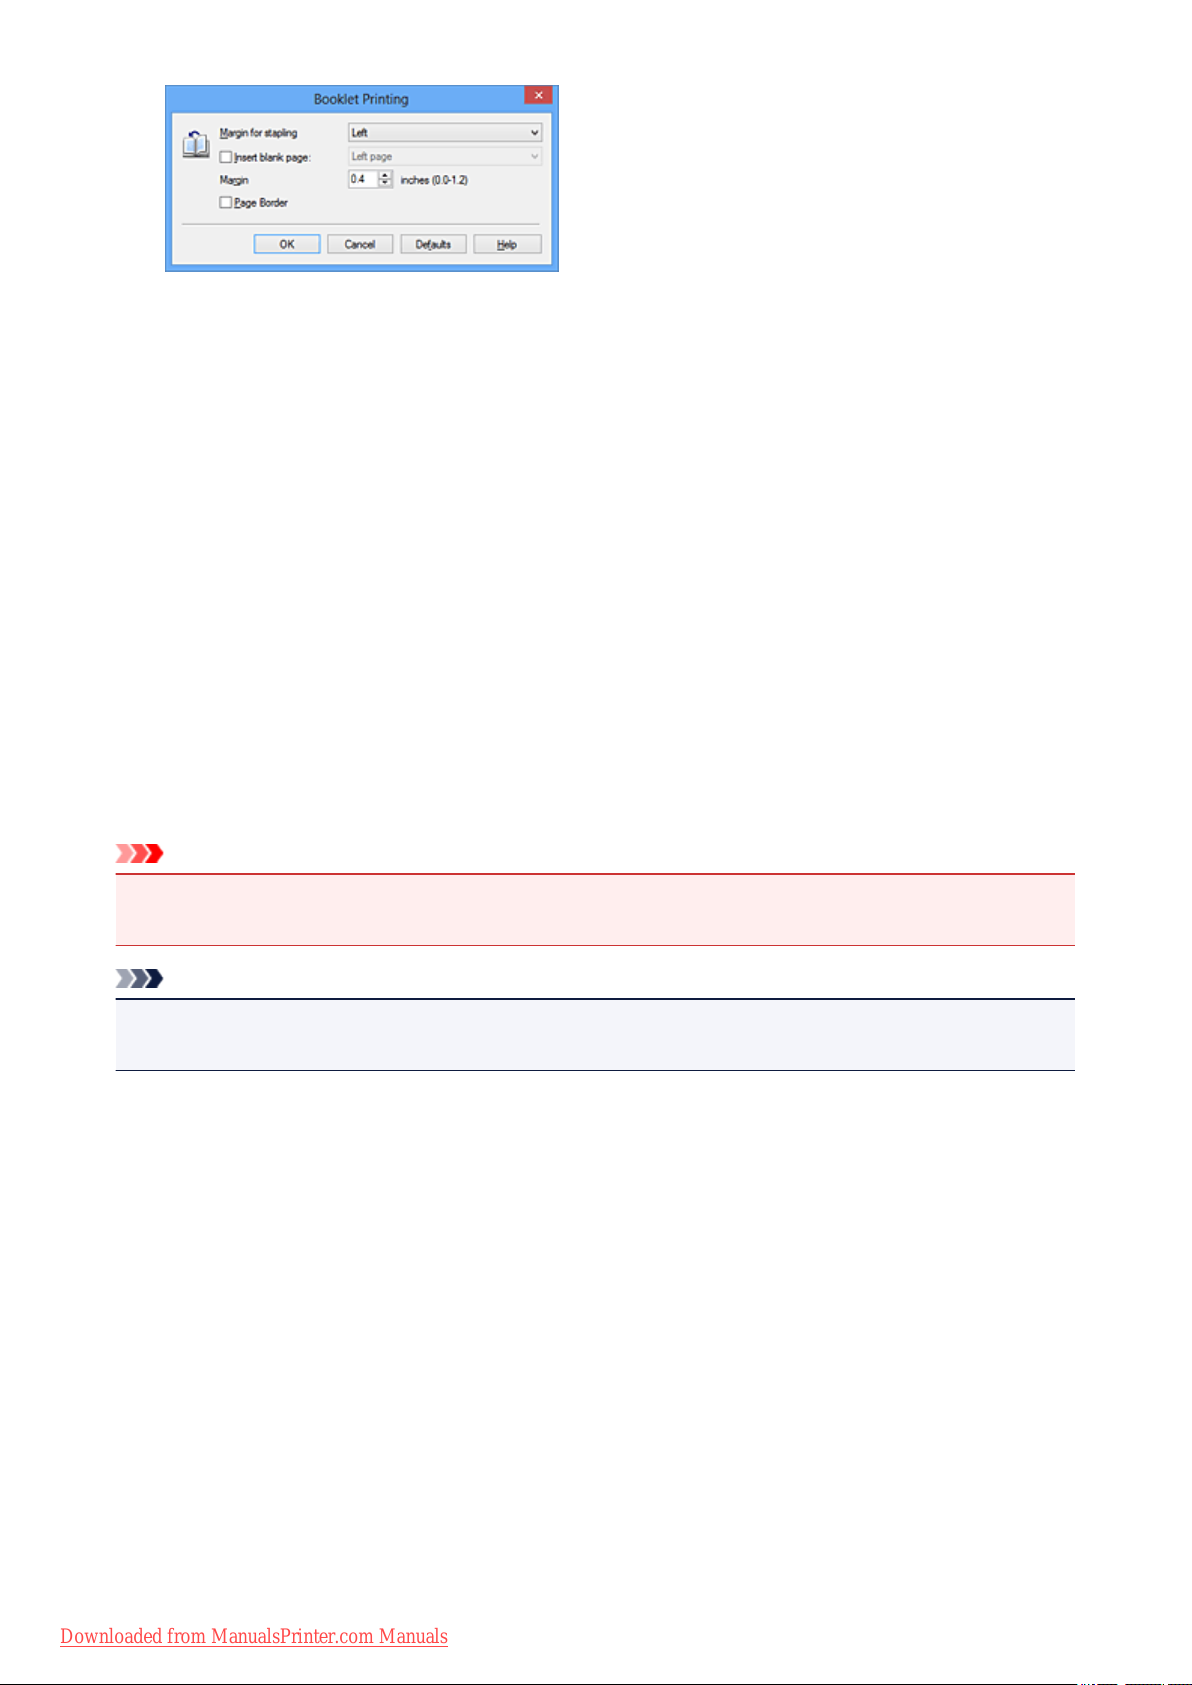
Margin for stapling
Select which side should the stapling margin be on when the booklet is completed.
Insert blank page
To leave one side of a sheet blank, check the check box, and select the page to be left blank.
Margin
Enter the margin width. The specified width from the center of the sheet becomes the margin width
for one page.
Page Border
To print a page border around each document page, check the check box.
5.
Complete the setup
Click OK on the Page Setup tab.
When you execute print, the document will be printed on one side of a sheet of paper. When the printing
of one side is complete, set the paper correctly by following the message and click OK.
When the printing of the other side is complete, fold the paper at the center of the margin and make a
booklet.
Important
• Booklet cannot be selected when a media type other than Plain Paper is selected for Media Type on
the Main tab.
Note
• The stamp and background are not printed on the inserted blank sheets with the Insert blank page
function of booklet printing.
Downloaded from ManualsPrinter.com Manuals
30
Page 31

Duplex Printing
The procedure for printing data on both sides of a sheet of paper is as follows:
You can also set duplex printing in Additional Features on the Quick Setup tab.
1.
Open the printer driver setup window
2.
Set duplex printing
Check the Duplex Printing (Manual) check box on the Page Setup tab.
Select the layout
3.
Select Normal-size, Fit-to-Page, Scaled, or Page Layout from the Page Layout list.
4. Specify the side to be stapled
The best Stapling Side is selected automatically from the Orientation and Page Layout settings. To
change the setting, select another stapling side from the list.
5. Set the margin width
If necessary, click Specify Margin... and set the margin width, and then click OK.
6.
Complete the setup
Downloaded from ManualsPrinter.com Manuals
31
Page 32

Click OK on the Page Setup tab.
When you execute print, the document is first printed on one side of a sheet of paper. After one side is
printed, reload the paper correctly according to the message.
Then click Start Printing to print the opposite side.
Important
• When a media type other than Plain Paper is selected from Media Type on the Main tab, Duplex
Printing (Manual) appears grayed out and is unavailable.
• When Borderless, Tiling/Poster or Booklet is selected from the Page Layout list, Duplex Printing
(Manual) and Stapling Side appear grayed out and are unavailable.
Note
• If the back side of the paper becomes smudged during duplex printing, perform Bottom Plate Cleaning
in the Maintenance tab.
Related Topics
Cleaning Inside the Printer
Changing the Printer Operation Mode
Downloaded from ManualsPrinter.com Manuals
32
Page 33

Stamp/Background Printing
Stamp or Background may be unavailable when certain printer drivers or operating environments are used.
The Stamp function allows you to print a stamp text or a bitmap over or behind document data. It also
allows you to print date, time and user name. The Background function allows you to print a light illustration
behind the document data.
The procedure for performing stamp/background printing is as follows:
Printing a Stamp
"CONFIDENTIAL," "IMPORTANT," and other stamps that are used often in companies are pre-registered.
1.
Open the printer driver setup window
2.
Click Stamp/Background... (Stamp...) on the Page Setup tab
The Stamp/Background (Stamp) dialog box opens.
Note
•
With the XPS printer driver, the Stamp/Background... button has become the Stamp... button
and only the stamp function can be used.
Downloaded from ManualsPrinter.com Manuals
33
Page 34

3. Select a stamp
Check the Stamp check box, and select the stamp to be used from the list.
The current settings are displayed in the settings preview on the left side of the Page Setup tab.
4. Set the stamp details
If necessary, specify the following settings, and then click OK.
Define Stamp... button
To change the stamp text, bitmap, or position, click this.
Place stamp over text
To print the stamp on the front of the document, check this check box.
Note
The stamp is given priority because the stamp is printed over the document data in the
•
sections where the stamp and the document data overlap. When this check box is
unchecked, the stamp is printed behind the document data and may be hidden in the
overlapping sections depending on the application software used.
• Place stamp over text cannot be used when the XPS printer driver is used.
When the XPS printer driver is used, the stamp is normally printed in the foreground of the
document.
Print semitransparent stamp
Check this check box to print a semi-transparent stamp on the document.
This function is available only when the XPS printer driver is used.
Stamp first page only
To print the stamp only on the first page, check this check box.
5.
Complete the setup
Click OK on the Page Setup tab.
When you execute print, the data is printed with the specified stamp.
Printing a Background
Two bitmap files are pre-registered as samples.
1. Open the printer driver setup window
2. Click Stamp/Background... on the Page Setup tab
The Stamp/Background dialog box opens.
3. Select the background
Check the Background check box, and select the background to be used from the list.
The current settings are displayed in the settings preview on the left side of the Page Setup tab.
4. Set the background details
If necessary, complete the following settings, and then click OK.
Downloaded from ManualsPrinter.com Manuals
34
Page 35

Select Background... button
To use another background or change the layout or density of a background, click this.
Background first page only
To print the background only on the first page, check this check box.
5. Complete the setup
Click OK on the Page Setup tab.
When you execute print, the data is printed with the specified background.
Important
• When Borderless is selected, the Stamp/Background... (Stamp...) button appears grayed out and is
unavailable.
Note
• The stamp and background are not printed on blank sheets inserted with the Insert blank page
function of booklet printing.
Related Topics
Registering a Stamp
Registering Image Data to be Used as a Background
Downloaded from ManualsPrinter.com Manuals
35
Page 36

Registering a Stamp
This feature may be unavailable when certain printer drivers or operating environments are used.
You can create and register a new stamp. You can also change and re-register some of the settings of an
existing stamp. Unnecessary stamps can be deleted at any time.
The procedure for registering a new stamp is as follows:
Registering a New Stamp
1.
Open the printer driver setup window
2.
Click Stamp/Background... (Stamp...) on the Page Setup tab
The Stamp/Background (Stamp) dialog box opens.
Note
•
With the XPS printer driver, the Stamp/Background... button has become the Stamp... button
and only the stamp function can be used.
3. Click Define Stamp...
The Stamp Settings dialog box opens.
Downloaded from ManualsPrinter.com Manuals
36
Page 37

4.
Configure the stamp while viewing the preview window
• Stamp tab
Select Text, Bitmap, or Date/Time/User Name that matches your purpose for Stamp Type.
◦ For Text registration, the characters must already be entered in Stamp Text. If necessary,
change the TrueType Font, Style, Size, and Outline settings. You can select the color of
the stamp by clicking Select Color....
◦ For Bitmap, click Select File... and select the bitmap file (.bmp) to be used. If necessary,
change the settings of the Size and Transparent white area.
◦ For Date/Time/User Name, the creation date/time and user name of the printed object are
displayed in Stamp Text. If necessary, change the settings of TrueType Font, Style, Size,
and Outline. You can select the color of the stamp by clicking Select Color....
Important
Stamp Text appears grayed out and is unavailable when Date/Time/User Name is
•
selected.
• Placement tab
Select the stamp position from the Position list. You can also select Custom from the Position
list and specify coordinates for X-Position and Y-Position.
You can also change the stamp position by dragging the stamp in the preview window.
To change the stamp position angle, type a value in the Orientation box directly.
Important
•
Orientation cannot be changed when Bitmap is selected for Stamp Type on the Stamp tab.
5. Save the stamp
Click the Save settings tab and enter a title in the Title box, and then click Save.
Click OK when the confirmation message appears.
Note
•
Spaces, tabs, and returns cannot be entered at the beginning or end of a title.
Downloaded from ManualsPrinter.com Manuals
37
Page 38

6. Complete the setup
Click OK. The Stamp/Background (Stamp) dialog box opens again.
The registered title appears in the Stamp list.
Changing and Registering Some of Stamp Settings
Select the stamp for which the settings are to be changed
1.
Select the Stamp check box in the Stamp/Background (Stamp) dialog box. Then from the list, select
the title of the stamp to be changed.
Click Define Stamp...
2.
The Stamp Settings dialog box opens.
Configure the stamp while viewing the preview window
3.
4.
Overwrite save the stamp
Click Save overwrite on the Save settings tab.
When you want to save the stamp with a different title, type a new title in the Title box and click Save.
Click OK when the confirmation message appears.
5.
Complete the setup
Click OK. The Stamp/Background (Stamp) dialog box opens again.
The registered title appears in the Stamp list.
Deleting an Unnecessary Stamp
1.
Click Define Stamp... in the Stamp/Background (Stamp) dialog box
The Stamp Settings dialog box opens.
2.
Select the stamp to be deleted
Select the title of the stamp you want to delete from the Stamps list on the Save settings tab. Then
click Delete.
Click OK when the confirmation message appears.
3. Complete the setup
Click OK. The Stamp/Background (Stamp) dialog box opens again.
Downloaded from ManualsPrinter.com Manuals
38
Page 39

Registering Image Data to be Used as a Background
This feature may be unavailable when certain printer drivers or operating environments are used.
You can select a bitmap file (.bmp) and register it as a new background. You can also change and register
some of the settings of an existing background. An unnecessary background can be deleted.
The procedure for registering image data to be used as a background is as follows:
Registering New Background
1.
Open the printer driver setup window
2.
Click Stamp/Background... on the Page Setup tab
The Stamp/Background dialog box opens.
Note
•
With the XPS printer driver, the Stamp/Background... button has become the Stamp... button
and Background cannot be used.
3. Click Select Background...
The Background Settings dialog box opens.
Downloaded from ManualsPrinter.com Manuals
39
Page 40

Select the image data to be registered to the background
4.
Click Select File.... Select the target bitmap file (.bmp), and then click Open.
5.
Specify the following settings while viewing the preview window
Layout Method
Select how the background image data is to be placed.
When Custom is selected, you can set coordinates for X-Position and Y-Position.
You can also change the background position by dragging the image in the preview window.
Intensity
Set the intensity of the background image data with the Intensity slider. Moving the slider to the
right darkens the background, and moving the slider to the left lightens the background. To print
the background at the original bitmap intensity, move the slider to the rightmost position.
6.
Save the background
Click the Save settings tab and enter a title in the Title box, and then click Save.
Click OK when the confirmation message appears.
Note
•
Spaces, tabs, and returns cannot be entered at the beginning or end of a title.
7. Complete the setup
Click OK, then it returns to Stamp/Background dialog box.
The registered title appears in the Background list.
Changing and Registering Some Background Settings
1. Select the background for which the settings are to be changed
Select the Background check box in the Stamp/Background dialog box. Then from the list, select
the title of the background you want to change.
2. Click Select Background...
Downloaded from ManualsPrinter.com Manuals
40
Page 41

The Background Settings dialog box opens.
3. Specify each item on the Background tab while viewing the preview window
4. Save the background
Click Save overwrite on the Save settings tab. When you want to save the background with a
different title, enter a new title in the Title box and click Save.
Click OK when the confirmation message appears.
Complete the setup
5.
Click OK, then it returns to Stamp/Background dialog box.
The registered title appears in the Background list.
Deleting an Unnecessary Background
1.
Click Select Background... in the Stamp/Background dialog box
The Background Settings dialog box opens.
2.
Select the background to be deleted
Select the title of the background you want to delete from the Backgrounds list on the Save settings
tab, and then click Delete.
Click OK when the confirmation message appears.
3.
Complete the setup
Click OK, then it returns to Stamp/Background dialog box.
Downloaded from ManualsPrinter.com Manuals
41
Page 42

Setting Up Envelope Printing
The procedure for performing envelope printing is as follows:
1. Load envelope on the printer
2. Open the printer driver setup window
Select the media type
3.
Select Envelope from Commonly Used Settings on the Quick Setup tab.
4.
Select the paper size
When the Envelope Size Setting dialog box is displayed, select Envelope Com 10, Envelope DL,
Yougata 4 4.13"x9.25", or Yougata 6 3.86"x7.48", and then click OK.
5. Set the orientation
To print the addressee horizontally, select Landscape for Orientation.
6. Select the print quality
Select High or Standard that matches your purpose for Print Quality.
7. Complete the setup
Click OK.
When you execute print, the information is printed on the envelope.
Downloaded from ManualsPrinter.com Manuals
42
Page 43

Important
• When you execute envelope printing, guide messages are displayed.
To hide the guide messages, check the Do not show this message again check box.
To show the guide again, click the View Printer Status button on the Maintenance tab, and start the
Canon IJ Status Monitor.
Then click Envelope Printing from Display Guide Message of the Option menu to enable the setting.
Downloaded from ManualsPrinter.com Manuals
43
Page 44

Printing on Postcards
This section describes the procedure for postcard printing.
1. Load postcard on the printer
2. Open the printer driver setup window
Select commonly used settings
3.
Display the Quick Setup tab, and for Commonly Used Settings, select Standard.
Select the media type
4.
For Media Type, select Hagaki A, Ink Jet Hagaki, Hagaki K, or Hagaki.
Important
This printer cannot print on postcards that have photos or stickers attached.
•
• When printing on each side of a postcard separately, you will get cleaner printing if you print the
message side first and then print the address side.
5.
Select the paper size
For Printer Paper Size, select Hagaki 100x148mm or Hagaki 2 200x148mm.
Important
• Return postcards can be used only when you print them from the computer.
• When printing a return postcard, always set the paper size to Hagaki 2 200x148mm from your
application software or the printer driver.
• Do not fold the return postcard. If a crease is formed, the printer will not be able to feed the
postcard properly, and this condition will cause line shifts or a paper jam.
• With return postcards, borderless printing cannot be used.
6.
Set the print orientation
To print the address horizontally, set Orientation to Landscape.
7.
Select the print quality
For Print Quality, select High or Standard, whichever best suits the purpose.
8. Complete the setup
Click OK.
When you execute printing, the data will be printed onto the postcard.
Important
• When you execute postcard printing, a guide message is displayed.
When the guide message is displayed, select Do not show this message again if you do not want any
guide messages to be displayed.
To display guide messages again, open the Maintenance tab and click View Printer Status to start the
Downloaded from ManualsPrinter.com Manuals
44
Page 45

Canon IJ Status Monitor.
On the Option menu, choose Display Guide Message and click Hagaki Printing to enable the setting.
• When printing on media other than postcards, load the media according to usage method of that media,
and click Start Printing.
Downloaded from ManualsPrinter.com Manuals
45
Page 46

Displaying the Print Results before Printing
If you are using the XPS printer driver, replace "Canon IJ Preview" with "Canon IJ XPS Preview" when
reading this information.
You can display and check the print result before printing.
The procedure for displaying the print result before printing is as follows:
You can also set the print results display on the Quick Setup tab.
1.
Open the printer driver setup window
2.
Set the preview
Check the Preview before printing check box on the Main tab.
3.
Complete the setup
Click OK.
When you execute print, the Canon IJ Preview opens and displays the print results.
Important
• In the Manual Color Adjustment dialog box, the Color Adjustment tab contains the Print a pattern
for color adjustment check box. When this check box is selected, the Preview before printing
appears grayed out and is unavailable.
Related Topic
Canon IJ Preview
Downloaded from ManualsPrinter.com Manuals
46
Page 47

Setting Paper Dimensions (Custom Size)
You can specify the height and width of paper when its size cannot be selected from the Page Size. Such a
paper size is called "custom size."
The procedure for specifying a custom size is as follows:
You can also set a custom size in Printer Paper Size on the Quick Setup tab.
1. Open the printer driver setup window
2.
Select the paper size
Select Custom... for Page Size on the Page Setup tab.
The Custom Paper Size dialog box opens.
3.
Set the custom paper size
Specify Units, and enter the Width and Height of the paper to be used. Then click OK.
4. Complete the setup
Click OK on the Page Setup tab.
When you execute print, the data is printed with the specified paper size.
Downloaded from ManualsPrinter.com Manuals
47
Page 48

Important
• When the application software that created the document has a function for specifying the height and
width values, use the application software to set the values. When the application software does not
have such a function or if the document does not print correctly, use the printer driver to set the values.
• Printing may be disabled depending on the size of the specified user-defined media.
For information about printable sizes for user-defined media, see "Media Types You Can Use."
Downloaded from ManualsPrinter.com Manuals
48
Page 49

Editing the Print Document or Reprinting from the Print History
This function is unavailable when the standard IJ printer driver is used.
In the Canon IJ XPS preview window, you can edit the print document or retrieve the document print history
to print the document.
The procedure for using the Canon IJ XPS Preview is as follows:
Print
Combine Documents
Delete Document
Reset Documents
View Thumbnails
Move Document
Undo
Move Page
Delete Page
Note
• By clicking View Thumbnails, you can display or hide thumbnails of the print documents selected
in the Document Name list.
• Clicking Undo reverses the change that just performed.
Downloaded from ManualsPrinter.com Manuals
49
Page 50

Editing and Printing a Print Document
When printing multiple documents or pages, you can combine documents, change the print sequence of
the documents or pages, or delete documents or pages.
1. Open the printer driver setup window
Set the preview
2.
Check the Preview before printing check box on the Main tab.
3.
Complete the setup
Click OK.
The Canon IJ XPS Preview will start and the print result will be displayed before printing.
4.
Editing print documents and print pages
Combining print documents
•
You can combine multiple print documents to form a single document. By combining print
documents, you can prevent blank pages from being inserted when you execute duplex printing
or page layout printing.
From the Document Name list, select the documents to be combined. On the Edit menu, select
Combine Documents from Documents to combine the documents in the listed sequence.
To select multiple print documents, hold down the Ctrl key and click the documents to be
merged, or hold down the Shift key and press the upper arrow or lower arrow key. You can also
click a blank area in the document list and drag the mouse to select multiple documents.
When you combine documents, the documents selected before the combining are deleted from
the list and the combined document is added to the list.
Changing the sequence of print documents or print pages
•
◦ To change the sequence of the print documents, go to the Document Name list, and select
the print document to be moved. Next, on the Edit menu, select Move Document from
Documents, and select the appropriate item. You can also click and drag a print document
to change the print sequence.
◦ To change the sequence of the print pages, click View Thumbnails from the Option menu,
and select the print page to be moved. Next, on the Edit menu, select Move Page from
Pages, and select the appropriate item. You can also click and drag a print page to change
the print sequence.
•
Deleting print documents and print pages
◦
To delete a print document, select the target document from the Document Name list, and
on the Edit menu, choose Documents and then Delete Document.
◦
To delete a print page, click View Thumbnails from the Option menu, and select the print
page to be deleted. Next, on the Edit menu, select Delete Page from Pages.
•
Print page recovery
You can recover pages that were deleted with Delete Page.
To recover pages, select the View Deleted Pages check box from the Option menu, and select
the pages to be recovered from among the displayed thumbnail pages. Then from the Edit menu
chose Pages and then Restore Page.
Downloaded from ManualsPrinter.com Manuals
50
Page 51

After editing the print documents or print pages, you can change the print settings on the Page
Information, Layout and Manual Color Adjustment tabs as necessary.
Important
• To display the multiple documents in the list, open the preview and execute print again.
• To return the print documents to their original condition before they were edited in the preview,
on the Edit menu, select Reset Documents from Documents.
• If the documents to be combined have different print settings, a message may be displayed.
Check the contents of the displayed message before combining the documents.
• If the documents to be combined have different output paper sizes and duplex printing or page
layout printing is to be performed, the printer may not produce the expected print results for
certain print pages.
Check the preview before printing.
Depending on the print settings of the print document, some functions may not be available in
•
the Canon IJ XPS preview.
Note
You can rename Document Name to any name.
•
5.
Executing print
Click Print.
When you execute print, the printer uses the specified settings to print the data.
Reprinting from the Print History
When you click Save Print History on the File menu to enable the setting, the document printed from the
preview is saved, and you can reprint the document with the same settings.
1.
Displaying the print history
Open the printer driver setup window. Then on the Maintenance tab, select View Print History.
The saved print document is displayed in the preview.
Important
•
To limit the number of print history registrations, click History Entry Limit on the File menu.
•
If the limit on the number of registration is exceeded, the print history registrations are deleted
starting from the oldest one.
2. Selecting a print document
From the Document Name list, select the document to be printed.
3. Executing print
Click Print.
Related Topic
Displaying the Print Results before Printing
Downloaded from ManualsPrinter.com Manuals
51
Page 52

Changing the Print Quality and Correcting Image Data
Setting the Print Quality Level (Custom)
Printing a Color Document in Monochrome
Adjusting Tone
Specifying Color Correction
Optimal Photo Printing of Image Data
Adjusting Colors with the Printer Driver
Printing with ICC Profiles
Interpreting the ICC Profile
Adjusting Color Balance
Adjusting Color Balance Using Sample Patterns (Printer Driver)
Adjusting Brightness
Adjusting Intensity
Adjusting Contrast
Adjusting Intensity/Contrast Using Sample Patterns (Printer Driver)
Downloaded from ManualsPrinter.com Manuals
52
Page 53

Setting the Print Quality Level (Custom)
The print quality level can be set in the Custom.
The procedure for setting the print quality level is as follows:
1. Open the printer driver setup window
Select the print quality
2.
On the Main tab, select Custom for Print Quality, and click Set....
The Custom dialog box opens.
3. Setting the print quality level
Drag the slider bar to select the print quality level and click OK.
4. Complete the setup
Click OK on the Main tab.
When you execute print, the image data is printed with the selected print quality level.
Important
• Certain print quality levels cannot be selected depending on the settings of Media Type.
Downloaded from ManualsPrinter.com Manuals
53
Page 54

Related Topics
Specifying Color Correction
Adjusting Color Balance
Adjusting Brightness
Adjusting Intensity
Adjusting Contrast
Downloaded from ManualsPrinter.com Manuals
54
Page 55

Printing a Color Document in Monochrome
The procedure for printing a color document in monochrome is as follows:
You can also set a grayscale printing in Additional Features on the Quick Setup tab.
Open the printer driver setup window
1.
2.
Set grayscale printing
Check the Grayscale Printing check box on the Main tab.
3. Complete the setup
Click OK.
When you execute print, the document is converted to grayscale data. It allows you to print the color
document in monochrome.
Important
• When the Grayscale Printing check box is checked, the printer driver processes image data as sRGB
data. In this case, actual colors printed may differ from those in the original image data.
When using the grayscale printing function to print Adobe RGB data, convert the data to sRGB data
using an application software.
Downloaded from ManualsPrinter.com Manuals
55
Page 56

Note
• During Grayscale Printing, inks other than black ink may be used as well.
Related Topic
Adjusting Tone
Downloaded from ManualsPrinter.com Manuals
56
Page 57

Adjusting Tone
When printing black and white photos, you can produce the cooling effects of cool colors and the warming
effects of warm colors.
Cool is selected Standard is selected Warm is selected
The procedure for adjusting tone is as follows:
Open the printer driver setup window
1.
2.
Select the media type
For Media Type on the Main tab, select Photo Paper Plus Glossy II, Photo Paper Pro Platinum,
Photo Paper Pro Luster, Photo Paper Plus Semi-gloss or Other Fine Art Paper.
3.
Set grayscale printing
Check the Grayscale Printing check box.
4. Select the manual color adjustment
Select Manual for Color/Intensity, and click Set....
The Manual Color Adjustment dialog box opens.
5. Adjusting monochrome tones
Downloaded from ManualsPrinter.com Manuals
57
Page 58

Moving the Tone slider to the right brings out the warm colors (warm tones), and moving it to the left
brings out the cool colors (cool tones).
You can also directly enter a value linked to the slider. Enter a value in the range from -50 to 50.
After adjusting the tones, click OK.
6.
Complete the setup
Click OK on the Main tab.
When you execute print, the color document is converted to grayscale data with adjusted tones. It allows
you to print the color document in monochrome.
Related Topics
Printing a Color Document in Monochrome
Adjusting Brightness
Adjusting Intensity
Adjusting Contrast
Downloaded from ManualsPrinter.com Manuals
58
Page 59

Specifying Color Correction
You can specify the color correction method suited to the type of document to be printed.
Normally, the printer driver adjusts the colors by using Canon Digital Photo Color so that data is printed with
color tints that most people prefer. This method is suitable for printing sRGB data.
When you want to print by using the color space (Adobe RGB or sRGB) of the image data effectively, select
ICM (ICC Profile Matching). When you want to use an application software to specify a printing ICC profile,
select None.
The procedure for specifying color correction is as follows:
You can also set color correction on the Quick Setup tab by choosing Photo Printing under Commonly
Used Settings, and then choosing Color/Intensity Manual Adjustment under Additional Features.
1.
Open the printer driver setup window
2.
Select the manual color adjustment
On the Main tab, select Manual for Color/Intensity, and click Set....
The Manual Color Adjustment dialog box opens.
3. Select color correction
Click Matching tab, select Color Correction setting that matches your purpose from the following, and
click OK.
Downloaded from ManualsPrinter.com Manuals
59
Page 60

Driver Matching
With Canon Digital Photo Color, you can print sRGB data with color tints that most people prefer.
ICM (ICC Profile Matching)
Adjusts the colors by using an ICC profile when printing.
Specify the input profile or rendering intent to be used.
None
The printer driver does not perform color correction. Select this value when you are specifying an
individually created printing ICC profile or a printing ICC profile for special Canon paper in an
application software to print data.
4.
Complete the setup
Click OK on the Main tab.
When you execute print, the document data is printed with the specified color correction.
Important
• When ICM is disabled in the application software, ICM is unavailable for Color Correction and the
printer may not be able to print the image data properly.
• When the Grayscale Printing check box on the Main tab is checked, Color Correction appears
grayed out and is unavailable.
Related Topics
Optimal Photo Printing of Image Data
Adjusting Colors with the Printer Driver
Printing with ICC Profiles
Interpreting the ICC Profile
Downloaded from ManualsPrinter.com Manuals
60
Page 61

Optimal Photo Printing of Image Data
When people print images taken with digital cameras, they sometimes feel that the printed color tones differ
from those of actual image or those displayed on the monitor.
To get the print results as close as possible to the desired color tones, you must select a printing method
that is best suited to the application software used or to your purpose.
Color Management
Devices such as digital cameras, scanners, monitors, and printers handle color differently. Color
management (color matching) is a method that manages device-dependent "colors" as a common color
space.
For Windows, a color management system called "ICM" is built into the operating system.
Adobe RGB and sRGB are popularly used as common color spaces. Adobe RGB has a wider color space
than sRGB.
ICC profiles convert device-dependent "colors" into a common color space. By using an ICC profile and
carrying out color management, you can draw out the color space of the image data within the color
reproduction area that the printer can express.
Selecting a Printing Method Suited to the Image Data
The recommended printing method depends on the color space (Adobe RGB or sRGB) of the image data
or the application software to be used.
There are two typical printing methods.
Check the color space (Adobe RGB or sRGB) of the image data and the application software to be used,
and then select the printing method suited to your purpose.
Adjusting Colors with the Printer Driver
Describes the procedure for printing sRGB data by using the color correction function of the printer
driver.
• To print using Canon Digital Photo Color
The printer prints data with color tints that most people prefer, reproducing colors of the original
image data and producing three-dimensional effects and high, sharp contrasts.
• To print by directly applying editing and touch-up results of an application software
When printing the data, the printer brings out subtle color difference between dark and light
areas, while leaving the darkest and lightest areas intact.
When printing the data, the printer applies fine adjustment results, such as brightness
adjustments made with an application software.
Printing with ICC Profiles
Describes the procedure for printing by using the color space of Adobe RGB or sRGB effectively.
You can print with a common color space by setting up the application software and the printer driver
so that the color management matches the input ICC profile of the image data.
The method for setting up the printer driver differs depending on the application software to be used.
Related Topic
Interpreting the ICC Profile
Downloaded from ManualsPrinter.com Manuals
61
Page 62

Adjusting Colors with the Printer Driver
You can specify the color correction function of the printer driver to print sRGB data with color tints that most
people prefer through the use of Canon Digital Photo Color.
When printing from an application software that can identify ICC profiles and allows you to specify them, use
a printing ICC profile in the application software, and select settings for color management.
The procedure for adjusting colors with the printer driver is as follows:
1.
Open the printer driver setup window
2.
Select the manual color adjustment
On the Main tab, select Manual for Color/Intensity, and click Set....
The Manual Color Adjustment dialog box opens.
3.
Select color correction
Click Matching tab, and select Driver Matching for Color Correction.
4. Set the other items
If necessary, click Color Adjustment tab, and adjust the color balance (Cyan, Magenta, Yellow) and
adjust Brightness, Intensity, and Contrast settings, and then click OK.
5. Complete the setup
Click OK on the Main tab.
When you execute print, the printer driver adjusts the colors when printing the data.
Related Topics
Setting the Print Quality Level (Custom)
Specifying Color Correction
Adjusting Color Balance
Downloaded from ManualsPrinter.com Manuals
62
Page 63

Adjusting Brightness
Adjusting Intensity
Adjusting Contrast
Downloaded from ManualsPrinter.com Manuals
63
Page 64

Printing with ICC Profiles
When the image data has a specified input ICC profile, you can print by using the color space (Adobe RGB
or sRGB) of the data effectively.
The printer driver setting procedure varies depending on the application software used to print.
Specify an ICC Profile from the Application Software and Print the Data
When you print the editing and touch-up results of Adobe Photoshop, Canon Digital Photo Professional,
or any application software that allows you to specify input and printing ICC profiles, you print by
effectively using the color space of the input ICC profile specified in the image data.
To use this printing method, use your application software to select color management items and specify
an input ICC profile and a printing ICC profile in the image data.
Even if you print using a printing ICC profile that you created yourself or one for special Canon paper, be
sure to select color management items from your application software.
For instructions, refer to the manual of the application software you are using.
1.
Open the printer driver setup window
2.
Select the manual color adjustment
On the Main tab, select Manual for Color/Intensity, and click Set....
The Manual Color Adjustment dialog box opens.
3.
Select color correction
Click Matching tab, and select None for Color Correction.
4. Set the other items
If necessary, click Color Adjustment tab, and adjust the color balance (Cyan, Magenta, Yellow) and
adjust Brightness, Intensity, and Contrast settings, and then click OK.
Downloaded from ManualsPrinter.com Manuals
64
Page 65

5. Complete the setup
Click OK on the Main tab.
When you execute print, the printer uses the color space of the image data.
Specify an ICC Profile with the Printer Driver, and then Print
Print from an application software that cannot identify input ICC profiles or does allow you to specify one
by using the color space of the input ICC profile (sRGB) found in the data. When printing Adobe RGB
data, you can print the data with the Adobe RGB color space even if the application software does not
support Adobe RGB.
1.
Open the printer driver setup window
2.
Select the manual color adjustment
On the Main tab, select Manual for Color/Intensity, and click Set....
The Manual Color Adjustment dialog box opens.
3.
Select color correction
Click Matching tab, and select ICM (ICC Profile Matching) for Color Correction.
4. Select the input profile
Select an Input Profile that matches the color space of the image data.
•
For sRGB data or data without an input ICC profile:
Select Standard.
•
For Adobe RGB data:
Select Adobe RGB (1998).
Downloaded from ManualsPrinter.com Manuals
65
Page 66

Important
• When the application software specifies an input profile, the input profile setting of the printer
driver becomes invalid.
• When no input ICC profiles are installed on your computer, Adobe RGB (1998) will not be
displayed.
5. Select the rendering intent
Select the coloring adjustment method in Rendering Intent.
Saturation
•
This method reproduces images even more vividly than the Perceptual method.
Perceptual
•
This method reproduces images by focusing on color tints that most people prefer. Select this
method to print photos.
Relative Colorimetric
•
When image data is converted to the color space of the printer, this method converts the image
data so the color reproduction approximates the shared color regions. Select this method to print
image data with colors that are close to the original colors.
• Absolute Colorimetric
When Relative Colorimetric is selected, white spots are reproduced as white spots of the paper
(background color). However, when Absolute Colorimetric is selected, how the white spots are
reproduced depends on the image data.
Important
• When Windows XP SP2 or Windows XP SP3 is used, this function is disabled.
6.
Set the other items
If necessary, click Color Adjustment tab, and adjust the color balance (Cyan, Magenta, Yellow) and
adjust Brightness, Intensity, and Contrast settings, and then click OK.
7.
Complete the setup
Click OK on the Main tab.
When you execute print, the printer uses the color space of the image data.
Related Topics
Setting the Print Quality Level (Custom)
Specifying Color Correction
Adjusting Color Balance
Adjusting Brightness
Adjusting Intensity
Adjusting Contrast
Downloaded from ManualsPrinter.com Manuals
66
Page 67

Interpreting the ICC Profile
When you need to specify the printer profile, select the ICC profile for the paper to print on.
The ICC profiles installed for this printer appear as follows.
• (1) is the model name of the printer.
• (2) is the media type. This notation corresponds to the following media type:
◦ GL: Photo Paper Plus Glossy II
◦ PT: Photo Paper Pro Platinum
◦ SG/LU: Photo Paper Plus Semi-gloss / Photo Paper Pro Luster
◦ MP: Matte Photo Paper
◦ Other Fine Art Paper: Other Fine Art Paper
• (3) is the print quality.
The print quality is divided into 5 levels, ranging from high speed to high quality. As the number
decreases, the print quality becomes higher. This value corresponds to the slider bar position in the
Custom dialog box of the printer driver.
Downloaded from ManualsPrinter.com Manuals
67
Page 68

Adjusting Color Balance
You can adjust the color tints when printing.
Since this function adjusts color balance of the output by changing the ink ratios of each color, it changes
the total color balance of the document. Use the application software when you want to change the color
balance significantly. Use the printer driver only when you want to adjust the color balance slightly.
The following sample shows the case when color balance is used to intensify cyan and to diminish yellow so
that the overall colors are more uniform.
No adjustment Adjust color balance
The procedure for adjusting color balance is as follows:
You can also set color balance on the Quick Setup tab by choosing Photo Printing under Commonly
Used Settings, and then choosing Color/Intensity Manual Adjustment under Additional Features.
1.
Open the printer driver setup window
2.
Select the manual color adjustment
On the Main tab, select Manual for Color/Intensity, and click Set....
The Manual Color Adjustment dialog box opens.
3. Adjust color balance
Downloaded from ManualsPrinter.com Manuals
68
Page 69

There are individual sliders for Cyan, Magenta, and Yellow. Each color becomes stronger when the
corresponding slider is moved to the right, and becomes weaker when the corresponding slider is moved
to the left. For example, when cyan becomes weaker, the color red becomes stronger.
You can also directly enter a value linked to the slider. Enter a value in the range from -50 to 50. The
current settings are displayed in the settings preview on the left side of the printer driver.
After adjusting each color, click OK.
Important
• Adjust the slider gradually.
4.
Complete the setup
Click OK on the Main tab.
When you execute print, the document is printed with the adjusted color balance.
Important
• When the Grayscale Printing check box on the Main tab is checked, the color balance (Cyan,
Magenta, Yellow) appear grayed out and are unavailable.
Related Topics
Setting the Print Quality Level (Custom)
Specifying Color Correction
Adjusting Color Balance Using Sample Patterns (Printer Driver)
Adjusting Brightness
Adjusting Intensity
Adjusting Contrast
Adjusting Intensity/Contrast Using Sample Patterns (Printer Driver)
Downloaded from ManualsPrinter.com Manuals
69
Page 70

Adjusting Color Balance Using Sample Patterns (Printer Driver)
You can look at the print results of pattern print and adjust the color balance.
When you change the color balance or intensity/contrast of a document, the pattern print function prints the
adjustment results in a list, together with the adjustment values.
Described below is the procedure for adjusting the color balance while looking at the pattern.
Open the printer driver setup window
1.
2.
Select the manual color adjustment
On the Main tab, select Manual for Color/Intensity, and click Set....
The Manual Color Adjustment dialog box opens.
3.
Selecting pattern print
On the Color Adjustment tab, select the Print a pattern for color adjustment check box, and click
Pattern Print preferences....
Downloaded from ManualsPrinter.com Manuals
70
Page 71

4.
Setting pattern print
When the Pattern Print dialog box opens, set the following items, and then click OK.
Parameters to Adjust
Select Cyan/Magenta/Yellow.
Important
• When the Grayscale Printing check box on the Main tab is checked, Cyan/Magenta/Yellow
appear grayed out and are unavailable.
Printer Paper Size
Select the paper size to be used for pattern printing.
Note
•
Depending on the paper size selected on the Page Setup tab, there may be sizes that cannot
be selected.
Amount of Pattern Instances
Select Largest, Large, or Small to set the number of patterns to be printed.
Note
•
Largest and Large cannot be selected when certain paper sizes or output paper sizes are
selected.
Color Variation Between Instances
Set the amount of color change between neighboring patterns.
Downloaded from ManualsPrinter.com Manuals
71
Page 72

Note
• Large is about double the size of Medium, and Small is about half the size of Medium.
5. Checking the print results of pattern print
On the Color Adjustment tab, select OK to close the Manual Color Adjustment dialog box.
On the Main tab, select OK, and then execute printing. The printer then prints a pattern in which the
color balance that you set is the center value.
6.
Adjusting the color balance
Look at the print results and select the image that you like best. Then enter the color balance numbers
indicated at the bottom of that image into the Cyan, Magenta, and Yellow fields on the Color
Adjustment tab.
Clear the Print a pattern for color adjustment check box, and click OK.
Downloaded from ManualsPrinter.com Manuals
72
Page 73

Note
• You can also set color balance on the Quick Setup tab by choosing Photo Printing under
Commonly Used Settings, and then choosing Color/Intensity Manual Adjustment under
Additional Features.
7.
Complete the setup
Click OK on the Main tab.
Then when you execute printing, the document is printed with the color balance that was adjusted by the
pattern print function.
Important
• When Print a pattern for color adjustment is selected on the Color Adjustment tab, the following
items are grayed out and cannot be set:
• Preview before printing on the Main tab
• Stapling Side and Specify Margin... on the Page Setup tab (When Duplex Printing (Manual) is
set, only Stapling Side can be set.)
• You can print a pattern only if the Page Layout setting on the Page Setup tab is Normal-size or
Borderless.
• When the Grayscale Printing check box on the Main tab is checked, Cyan, Magenta, and Yellow
appear grayed out and are unavailable.
• Depending on your application software, this function may not be available.
Related Topics
Adjusting Color Balance
Adjusting Intensity
Adjusting Contrast
Adjusting Intensity/Contrast Using Sample Patterns (Printer Driver)
Downloaded from ManualsPrinter.com Manuals
73
Page 74

Adjusting Brightness
You can change the brightness of the overall image data during printing.
This function does not change pure white or pure black but it changes the brightness of the intermediate
colors.
The following sample shows the print result when the brightness setting is changed.
Light is selected Normal is selected Dark is selected
The procedure for adjusting brightness is as follows:
You can also set brightness on the Quick Setup tab by choosing Photo Printing under Commonly Used
Settings, and then choosing Color/Intensity Manual Adjustment under Additional Features.
1.
Open the printer driver setup window
2.
Select the manual color adjustment
On the Main tab, select Manual for Color/Intensity, and click Set....
The Manual Color Adjustment dialog box opens.
3. Specify the brightness
Select Light, Normal, or Dark for Brightness, and click OK. The current settings are displayed in the
settings preview on the left side of the printer driver.
Downloaded from ManualsPrinter.com Manuals
74
Page 75

4.
Complete the setup
Click OK on the Main tab.
When you execute print, the data is printed at the specified brightness.
Related Topics
Setting the Print Quality Level (Custom)
Specifying Color Correction
Adjusting Color Balance
Adjusting Intensity
Adjusting Contrast
Downloaded from ManualsPrinter.com Manuals
75
Page 76

Adjusting Intensity
You can dilute (brighten) or intensify (darken) the colors of the overall image data during printing.
The following sample shows the case when the intensity is increased so that all colors become more intense
when the image data is printed.
No adjustment Higher intensity
The procedure for adjusting intensity is as follows:
You can also set intensity on the Quick Setup tab by choosing Photo Printing under Commonly Used
Settings, and then choosing Color/Intensity Manual Adjustment under Additional Features.
1.
Open the printer driver setup window
2.
Select the manual color adjustment
On the Main tab, select Manual for Color/Intensity, and click Set....
The Manual Color Adjustment dialog box opens.
3. Adjust intensity
Moving the Intensity slider to the right intensifies (darkens) the colors, and moving the slider to the left
dilutes (brightens) the colors.
You can also directly enter a value linked to the slider. Enter a value in the range from -50 to 50. The
current settings are displayed in the settings preview on the left side of the printer driver.
After adjusting each color, click OK.
Downloaded from ManualsPrinter.com Manuals
76
Page 77

Important
• Adjust the slider gradually.
4.
Complete the setup
Click OK on the Main tab.
When you execute print, the image data is printed with the adjusted intensity.
Related Topics
Setting the Print Quality Level (Custom)
Specifying Color Correction
Adjusting Color Balance
Adjusting Color Balance Using Sample Patterns (Printer Driver)
Adjusting Brightness
Adjusting Contrast
Adjusting Intensity/Contrast Using Sample Patterns (Printer Driver)
Downloaded from ManualsPrinter.com Manuals
77
Page 78

Adjusting Contrast
You can adjust the image contrast during printing.
To make the differences between the light and dark portions of images greater and more distinct, increase
the contrast. On the other hand, to make the differences between the light and dark portions of images
smaller and less distinct, reduce the contrast.
No adjustment Adjust the contrast
The procedure for adjusting contrast is as follows:
You can also set contrast on the Quick Setup tab by choosing Photo Printing under Commonly Used
Settings, and then choosing Color/Intensity Manual Adjustment under Additional Features.
1.
Open the printer driver setup window
2.
Select the manual color adjustment
On the Main tab, select Manual for Color/Intensity, and click Set....
The Manual Color Adjustment dialog box opens.
3. Adjust the contrast
Moving the Contrast slider to the right increases the contrast, and moving the slider to the left decreases
the contrast.
You can also directly enter a value linked to the slider. Enter a value in the range from -50 to 50. The
current settings are displayed in the settings preview on the left side of the printer driver.
Downloaded from ManualsPrinter.com Manuals
78
Page 79

After adjusting each color, click OK.
Important
• Adjust the slider gradually.
4.
Complete the setup
Click OK on the Main tab.
When you execute print, the image is printed with the adjusted contrast.
Related Topics
Setting the Print Quality Level (Custom)
Specifying Color Correction
Adjusting Color Balance
Adjusting Color Balance Using Sample Patterns (Printer Driver)
Adjusting Brightness
Adjusting Intensity
Adjusting Intensity/Contrast Using Sample Patterns (Printer Driver)
Downloaded from ManualsPrinter.com Manuals
79
Page 80

Adjusting Intensity/Contrast Using Sample Patterns (Printer Driver)
You can look at the print results of pattern print and adjust the intensity/contrast.
When you change the color balance or intensity/contrast of a document, the pattern print function prints the
adjustment results in a list, together with the adjustment values.
Described below is the procedure for adjusting the intensity/contrast while looking at the pattern.
Open the printer driver setup window
1.
2.
Select the manual color adjustment
On the Main tab, select Manual for Color/Intensity, and click Set....
The Manual Color Adjustment dialog box opens.
3.
Selecting pattern print
On the Color Adjustment tab, select the Print a pattern for color adjustment check box, and click
Pattern Print preferences....
Downloaded from ManualsPrinter.com Manuals
80
Page 81

4.
Setting pattern print
When the Pattern Print dialog box opens, set the following items, and then click OK.
Parameters to Adjust
Select Intensity/Contrast.
Printer Paper Size
Select the paper size to be used for pattern printing.
Note
•
Depending on the paper size selected on the Page Setup tab, there may be sizes that cannot
be selected.
Amount of Pattern Instances
Select Largest, Large, or Small to set the number of patterns to be printed.
Note
•
Largest and Large cannot be selected when certain paper sizes or output paper sizes are
selected.
Color Variation Between Instances
Set the amount of color change between neighboring patterns.
Note
•
Large is about double the size of Medium, and Small is about half the size of Medium.
5. Checking the print results of pattern print
Downloaded from ManualsPrinter.com Manuals
81
Page 82

On the Color Adjustment tab, select OK to close the Manual Color Adjustment dialog box.
On the Main tab, select OK, and then execute printing. The printer then prints a pattern in which the
intensity/contrast that you set is the center value.
6.
Adjusting the intensity/contrast
Look at the print results and select the image that you like best. Then enter the intensity/contrast
numbers indicated at the bottom of that image into the Intensity and Contrast fields on the Color
Adjustment tab.
Clear the Print a pattern for color adjustment check box, and click OK.
Downloaded from ManualsPrinter.com Manuals
82
Page 83

Note
• You can also set intensity/contrast on the Quick Setup tab by choosing Photo Printing under
Commonly Used Settings, and then choosing Color/Intensity Manual Adjustment under
Additional Features.
7. Complete the setup
Click OK on the Main tab.
Then when you execute printing, the document is printed with the intensity/contrast that was adjusted by
the pattern print function.
Important
• When Print a pattern for color adjustment is selected on the Color Adjustment tab, the following
items are grayed out and cannot be set:
• Preview before printing on the Main tab
• Stapling Side and Specify Margin... on the Page Setup tab (When Duplex Printing (Manual) is
set, only Stapling Side can be set.)
• You can print a pattern only if the Page Layout setting on the Page Setup tab is Normal-size or
Borderless.
• Depending on your application software, this function may not be available.
Related Topics
Adjusting Color Balance
Adjusting Color Balance Using Sample Patterns (Printer Driver)
Adjusting Intensity
Adjusting Contrast
Downloaded from ManualsPrinter.com Manuals
83
Page 84

Overview of the Printer Driver
Canon IJ Printer Driver
How to Open the Printer Driver Setup Window
Canon IJ Status Monitor
Checking the Ink Status from Your Computer
Canon IJ Preview
Deleting the Undesired Print Job
Instructions for Use (Printer Driver)
Downloaded from ManualsPrinter.com Manuals
84
Page 85

Canon IJ Printer Driver
The Canon IJ printer driver (called printer driver below) is a software that is installed on your computer for
printing data with this printer.
The printer driver converts the print data created by your application software into data that your printer can
understand, and sends the converted data to the printer.
Because different models support different print data formats, you need a printer driver for the specific
model you are using.
Printer Driver Types
On Windows Vista SP1 or later, you can install the XPS printer driver in addition to the regular printer
driver.
The XPS printer driver is suited to print from an application software that supports XPS printing.
Important
• To use the XPS printer driver, the standard printer driver must already be installed on your computer.
Installing the Printer Driver
• To install the regular printer driver, load the Setup CD-ROM that comes with the printer, and then
install the driver from Start Setup Again.
• To install the XPS printer driver, load the Setup CD-ROM that comes with the printer, and then select
XPS Driver from Add Software.
Specifying the Printer Driver
To specify the printer driver, open the Print dialog box of the application software you are using, and
select "XXX" (where "XXX" is your model name) to specify the regular printer driver or select "XXX XPS"
(where "XXX" is your model name) to specify the XPS printer driver.
Displaying the Manual from the Printer Driver
To display a description of a tab in the printer driver setup window, click the Help button found on the tab.
Related Topic
How to Open the Printer Driver Setup Window
Downloaded from ManualsPrinter.com Manuals
85
Page 86

How to Open the Printer Driver Setup Window
You can display the printer driver setup window from the application software in use or from the printer icon.
Open the Printer Driver Setup Window through the Application Software
Follow the procedure below to configure printing profile when printing.
Select the command that you perform printing on the application software
1.
In general, select Print on the File menu to open the Print dialog box.
Select your model name and click Preferences (or Properties)
2.
The printer driver setup window appears.
Note
Depending on application software you use, command names or menu names may vary and
•
there may be more steps. For details, refer to the user's manual of your application software.
Opening the Printer Driver Setup Window from the Printer Icon
Follow the procedure below to perform printer maintenance operations such as print head cleaning, or to
configure a printing profile that is common to all application software.
1.
Select as described below:
• If you are using Windows 8, from the Desktop charms, select Settings -> Control Panel ->
Hardware and Sound -> Devices and Printers.
• If you are using Windows 7, select the Start menu -> Devices and Printers.
• If you are using Windows Vista, select the Start menu -> Control Panel -> Hardware and
Sound -> Printers.
• If you are using Windows XP, select the start menu -> Control Panel -> Printers and Other
Hardware -> Printers and Faxes.
2.
Right-click your model name icon, and then select Printing preferences from the
displayed menu
The printer driver setup window appears.
Important
•
Opening the printer driver setup window through Printer properties (Windows 8, Windows 7)
or Properties (Windows Vista, Windows XP) displays such tabs regarding the Windows
functions as the Ports (or Advanced) tab. Those tabs do not appear when opening through
Printing preferences or application software. For tabs regarding Windows functions, refer to
the user's manual for the Windows.
Downloaded from ManualsPrinter.com Manuals
86
Page 87

Canon IJ Status Monitor
The Canon IJ Status Monitor is an application software that shows the status of the printer and the progress
of printing. You will know the status of the printer with graphics, icons, and messages.
Launching the Canon IJ Status Monitor
The Canon IJ Status Monitor launches automatically when print data is sent to the printer. When
launched, the Canon IJ Status Monitor appears as a button on the task bar.
Click the button of the status monitor displayed on the task bar. The Canon IJ Status Monitor appears.
Note
• To open the Canon IJ Status Monitor when the printer is not printing, open the printer driver setup
window and click View Printer Status on the Maintenance tab.
• The information displayed on the Canon IJ Status Monitor may differ depending on the country or
region where you are using your printer.
When Errors Occur
The Canon IJ Status Monitor is automatically displayed if an error occurs (e.g., if the printer runs out of
paper or if the ink is low).
In such cases, take the appropriate action as described.
Downloaded from ManualsPrinter.com Manuals
87
Page 88

Checking the Ink Status from Your Computer
You can check the remaining ink level and the ink tank types for your model.
1. Open the printer driver setup window
2. Launching the Canon IJ Status Monitor
On the Maintenance tab, click View Printer Status.
The Canon IJ Status Monitor opens and displays an image of the ink status.
Note
• The information displayed on the Canon IJ Status Monitor may differ depending on the country or
region where you are using your printer.
• When you receive a notice about the remaining ink level, a mark appears above the ink icon.
For example:
Ink tank is running low. Prepare a new ink tank.
• When you print on A3 paper or larger paper sizes, the ink may run out before printing is finished
or the printing may become faint or streaky (with white lines).
3.
If necessary, click Ink Details
You can check the ink-related information.
If a warning or error related to the remaining ink amount occurs, a notification icon is displayed at the top
of the image in the Ink Details dialog box.
In such cases, take the appropriate action as described on the screen.
Note
•
You can also display the Ink Details dialog box by selecting the ink icon on the Canon IJ Status
Monitor.
Downloaded from ManualsPrinter.com Manuals
88
Page 89

Canon IJ Preview
The Canon IJ Preview is an application software that displays what the print result will look like before a
document is actually printed.
The preview reflects the information that is set within the printer driver and allows you to check the
document layout, print order, and number of pages. You can also change the media type settings.
When you want to display a preview before printing, open the printer driver setup window, click the Main
tab, and check the Preview before printing check box.
When you do not want to display a preview before printing, uncheck the check box.
Important
• If you are using the XPS printer driver, see "Editing the Print Document or Reprinting from the Print
History."
Related Topic
Displaying the Print Results before Printing
Downloaded from ManualsPrinter.com Manuals
89
Page 90

Deleting the Undesired Print Job
If you are using the XPS printer driver, replace "Canon IJ Status Monitor" with "Canon IJ XPS Status
Monitor" when reading this information.
If the printer does not start printing, canceled or failed print job data may be remaining.
Delete the undesired print job by using the Canon IJ Status Monitor.
Display the Canon IJ Status Monitor
1.
Click the icon of the Canon IJ Status Monitor displayed on the task bar.
The Canon IJ Status Monitor appears.
2.
Display the print jobs
Click Display Print Queue.
The print queue window opens.
3.
Delete the print jobs
Select Cancel All Documents from the Printer menu.
When the confirmation message appears, click Yes.
The deletion of the print job is complete.
Important
• Users who have not been granted access permission for printer management cannot delete the print
job of another user.
Note
• When you perform this operation, all print jobs are deleted. If the print queue list contained a necessary
print job, start the printing process over from the beginning.
Downloaded from ManualsPrinter.com Manuals
90
Page 91

Instructions for Use (Printer Driver)
This printer driver is subject to the following restrictions. Keep the following points in mind when using the
printer driver.
Restrictions on the Printer Driver
• With some applications, the Copies setting in the Page Setup tab of the printer driver may not be
enabled.
In this case, use the copies setting in the Print dialog box of the application software.
• If the selected Language in the About dialog box of the Maintenance tab does not match the
operating system interface language, the printer driver setup window may not be displayed properly.
• Do not change the Advanced tab items of the printer properties. If you change any of the items, you
will not be able to use the following functions correctly.
Also, if Print to file is selected in the Print dialog box of the application software and with applications
that prohibit EMF spooling, such as Adobe Photoshop LE and MS Photo Editor, the following
functions will not operate.
◦ Preview before printing on the Main tab
◦ Prevention of Print Data Loss in the Print Options dialog box on the Page Setup tab
◦ Page Layout, Tiling/Poster, Booklet, Duplex Printing (Manual), Specify Margin..., Print from
Last Page, Collate, and Stamp/Background... (Stamp...) on the Page Setup tab
◦ Print a pattern for color adjustment on the Color Adjustment tab in the Manual Color
Adjustment dialog box
• Since the resolution in the preview display differs from the printing resolution, text and lines in the
preview display may appear different from the actual print result.
• With some applications, the printing is divided into multiple print jobs.
To cancel printing, delete all divided print jobs.
• If image data is not printed correctly, display the Print Options dialog box from the Page Setup tab
and change the setting of Disable ICM required from the application software. This may solve the
problem.
Note
• Disable ICM required from the application software cannot be used when the XPS printer
driver is used.
• Do not start up the Canon IJ Network Tool while printing.
• Do not print when the Canon IJ Network Tool is running.
Points to Note About Applications with Restrictions
• There are following restrictions in Microsoft Word (Microsoft Corporation).
◦ When Microsoft Word has the same printing functions as the printer driver, use Word to specify
them.
◦ When Fit-to-Page, Scaled, or Page Layout is used for Page Layout on the Page Setup tab of
the printer driver, the document may not print normally in certain versions of Word.
◦ When Page Size in Word is set to "XXX Enlarge/Reduce", the document may not print normally in
certain versions of Word.
If this happens, follow the procedure below.
1. Open Word's Print dialog box.
Downloaded from ManualsPrinter.com Manuals
91
Page 92

2. Open the printer driver setup window, and on the Page Setup tab, set Page Size to the same
paper size that you specified in Word.
3. Set the Page Layout that you want, and then click OK to close the window.
4. Without starting printing, close the Print dialog box.
5. Open Word's Print dialog box again.
6. Open the printer driver setup window and click OK.
7. Start printing.
• If bitmap printing is enabled in Adobe Illustrator (Adobe Systems Incorporated), printing may take time
or some data may not be printed. Print after unchecking the Bitmap Printing check box in the Print
dialog box.
Downloaded from ManualsPrinter.com Manuals
92
Page 93

Printer Driver Description
Quick Setup tab Description
Main tab Description
Page Setup tab Description
Maintenance tab Description
Canon IJ Preview Description
Canon IJ XPS Preview Description
Canon IJ Status Monitor Description
Downloaded from ManualsPrinter.com Manuals
93
Page 94

Quick Setup tab Description
The Quick Setup tab is for registering commonly used print settings. When you select a registered setting,
the printer automatically switches to the preset items.
Commonly Used Settings
The names and icons of frequently used printing profiles are registered. When you select a printing
profile according to the purpose of the document, settings that match the purpose are applied.
In addition, functions that are thought to be useful for the selected printing profile are displayed in
Additional Features.
You can also change a printing profile and register it under a new name. You can delete the registered
printing profile.
You can rearrange the profiles either by dragging the individual profiles or by holding down the Ctrl key
and pressing the up or down arrow keys.
Standard
These are the factory settings.
If Page Size, Orientation, and Copies were set from the application software, those settings have
priority.
Business Document
Select this setting when printing a general document.
If Page Size, Orientation, and Copies were set from the application software, those settings have
priority.
Paper Saving
Select this setting to save paper when printing a general document. The 2-on-1 Printing and
Duplex Printing (Manual) check boxes are checked automatically.
If Page Size, Orientation, and Copies were set from the application software, those settings have
priority.
Photo Printing
If you select this setting when printing a photo, the photo paper and photo size generally used are
set. The Borderless Printing check box is checked automatically.
If Orientation and Copies were set from the application software, those settings have priority.
Downloaded from ManualsPrinter.com Manuals
94
Page 95

Envelope
If you select this setting for printing an envelope, Media Type is set automatically to Envelope. In
the Envelope Size Setting dialog box, select the size of the envelope to be used.
Note
• The combination of the Additional Features that was displayed for the printing profile that had
been selected when the added printing profile was saved is also displayed when that added
printing profile is selected.
Save...
Displays the Save Commonly Used Settings dialog box.
Click this button when you want to save the information that you set on the Quick Setup, Main, and
Page Setup tabs to Commonly Used Settings.
Delete
Deletes a registered printing profile.
Select the name of the setting to be deleted from Commonly Used Settings, and click Delete. When a
confirmation message is displayed, click OK to delete the specified printing profile.
Note
• Printing profiles that are registered in the initial settings cannot be deleted.
Settings Preview
The paper illustration shows how the original will be laid out on a sheet of paper.
You can check an overall image of the layout.
Preview before printing
Shows what the print result will look like before you actually print the data.
Check this check box to display a preview before printing.
Uncheck this check box if you do not want to display a preview.
Important
• To use the Canon IJ XPS Preview, you must have Microsoft .NET Framework 4 Client Profile
installed on your computer.
Additional Features
Displays the frequently used, convenient functions for the printing profile that you selected for
Commonly Used Settings on the Quick Setup tab.
When you move the mouse pointer near a function that can be changed, a description of that function is
displayed.
To enable a function, check the corresponding check box.
For some functions, you can set detailed settings from the Main and Page Setup tabs.
Important
• Depending on the printing profiles, certain function may be grayed out and you will not be able to
change them.
2-on-1 Printing
Prints two pages of the document, side by side, on one sheet of paper.
To change the page sequence, click the Page Setup tab, select Page Layout for Page Layout,
and click Specify.... Then in the Page Layout Printing dialog box that appears, specify the Page
Order.
Downloaded from ManualsPrinter.com Manuals
95
Page 96

4-on-1 Printing
Prints four pages of the document, side by side, on one sheet of paper.
To change the page sequence, click the Page Setup tab, select Page Layout for Page Layout,
and click Specify.... Then in the Page Layout Printing dialog box that appears, specify the Page
Order.
Duplex Printing (Manual)
Select whether to print the document to both sides of the paper manually or to one side of the
paper.
To change the staple side or the margins, set the new values from the Page Setup tab.
Borderless Printing
Performs borderless printing without any margins on the paper.
With the borderless printing function, the document to be printed is enlarged, so that it extends
slightly off the paper. In other words, the document is printed without any margin.
To adjust the amount that the document extends beyond the paper, click the Page Setup tab,
choose Borderless, and enter the value in Amount of Extension.
Grayscale Printing
This function converts the data to monochrome data when printing your document.
Draft
This setting is appropriate for test printing.
Rotate 180 degrees
Prints the document by rotating it 180 degrees against the paper feed direction.
The width of print area and the amount of extension that are configured in other application
software will be reversed vertically and horizontally.
Color/Intensity Manual Adjustment
Select when you set the Color Correction method and individual settings such as Cyan, Magenta,
Yellow, Tone, Brightness, Intensity, and Contrast, etc.
Media Type
Selects a type of printing paper.
Select a media type that matches the paper that is loaded in the printer. This ensures that printing is
carried out properly for the specified paper.
Printer Paper Size
Selects the size of paper actually loaded into the printer.
Normally, the paper size is set automatically according to the output paper size setting, and the
document is printed with no scaling.
When you set 2-on-1 Printing or 4-on-1 Printing in Additional Features, you can manually set the
paper size with Page Size on the Page Setup tab.
If you select a paper size that is smaller than the Page Size, the page image will be reduced.
If you select a paper size that is larger than the Page Size, the page image will be enlarged.
Orientation
Selects the printing orientation.
If the application used to create your document has a similar function, select the same orientation that
you selected in that application.
Portrait
Prints the document so that its top and bottom positions are unchanged relative to the paper feed
direction. This is the default setting.
Downloaded from ManualsPrinter.com Manuals
96
Page 97

Landscape
Prints the document by rotating it 90 degrees relative to the paper feed direction.
You can change the rotation direction by going to the Maintenance tab, opening the Custom
Settings dialog box, and then using Rotate 90 degrees left when orientation is [Landscape]
check box.
To rotate the document 90 degrees to the left when printing, select the Rotate 90 degrees left
when orientation is [Landscape] check box.
Print Quality
Selects your desired printing quality.
Select one of the following to set the print quality level that is appropriate for the purpose.
To set the print quality level individually, click the Main tab, and for Print Quality, select Custom. The
Set... becomes enabled. Click Set... to open the Custom dialog box, and then specify the desired
settings.
High
Gives priority to print quality over printing speed.
Standard
Prints with average speed and quality.
Draft
This setting is appropriate for test printing.
Paper Source
Shows the source from which paper is supplied.
Rear Tray
Paper is always supplied from the rear tray.
Copies
Specifies the number of copies you want to print. You can specify a value from 1 to 999.
Important
• When the application software that you used to create the document has the same function,
specify the settings on the printer driver. However, if the print results are not acceptable, specify
the function settings on the application software.
Always Print with Current Settings
Prints documents with the current settings starting from the next print execution.
When you select this function and then close the printer driver setup window, the information that you
set on the Quick Setup, Main, and Page Setup tabs are saved and printing with the same settings is
possible starting from the next print execution.
Important
• If you log on with a different user name, the settings that were set when this function was enabled
are not reflected in the print settings.
• If a setting was specified on the application software, it has priority.
Defaults
Restores all the settings you have changed to their default values.
Click this button to return all settings on the Quick Setup, Main, and Page Setup tabs to their default
values (factory settings).
Downloaded from ManualsPrinter.com Manuals
97
Page 98

Save Commonly Used Settings dialog box
This dialog box allows you to save the information that you set on the Quick Setup, Main, and Page
Setup tabs and add the information to the Commonly Used Settings list on the Quick Setup tab.
Name
Enter the name for the printing profile you wish to save.
Up to 255 characters can be entered.
The name appears, with its associated icon, in the Commonly Used Settings list on the Quick
Setup tab.
Options...
Opens the Save Commonly Used Settings dialog box.
Changes the details of printing profile to be saved.
Save Commonly Used Settings dialog box
Select the icons of the printing profiles to be registered to Commonly Used Settings, and change the
items to be saved in the printing profiles.
Icon
Select the icon for the printing profile you wish to save.
The selected icon appears, with its name, in the Commonly Used Settings list on the Quick
Setup tab.
Save the paper size setting
Saves the paper size to the printing profile in Commonly Used Settings.
To apply the saved paper size when the printing profile is selected, check this check box.
If this check box is unchecked, the paper size is not saved, and consequently the paper size setting
is not applied when the printing profile is selected. Instead the printer prints with the paper size
specified with the application software.
Save the orientation setting
Saves the Orientation to the printing profile in Commonly Used Settings.
To apply the saved print orientation when the printing profile is selected, check this check box.
If this check box is unchecked, the print orientation is not saved, and consequently the Orientation
setting is not applied when the printing profile is selected. Instead the printer prints with the print
orientation specified with the application software.
Save the copies setting
Saves the Copies setting to the printing profile in Commonly Used Settings.
To apply the saved copies setting when the printing profile is selected, check this check box.
If this check box is unchecked, the copies setting is not saved, and consequently the Copies
setting is not applied when the printing profile is selected. Instead the printer prints with the copies
setting specified with the application software.
Custom Paper Size dialog box
This dialog box allows you to specify the size (width and height) of the custom paper.
Units
Select the unit for entering a user-defined paper size.
Downloaded from ManualsPrinter.com Manuals
98
Page 99

Paper Size
Specifies the Width and the Height of the custom paper. Measurement is shown according to the
units specified in Units.
Related Topics
Printing with Easy Setup
Setting a Page Size and Orientation
Setting the Number of Copies and Printing Order
Execute Borderless Printing
Duplex Printing
Setting Up Envelope Printing
Printing on Postcards
Displaying the Print Results before Printing
Setting Paper Dimensions (Custom Size)
Printing a Color Document in Monochrome
Specifying Color Correction
Adjusting Color Balance
Adjusting Color Balance Using Sample Patterns (Printer Driver)
Adjusting Brightness
Adjusting Intensity
Adjusting Contrast
Adjusting Intensity/Contrast Using Sample Patterns (Printer Driver)
Registering a Frequently Used Printing Profile
Downloaded from ManualsPrinter.com Manuals
99
Page 100

Main tab Description
The Main tab allows you to create a basic print setup in accordance with the media type. Unless special
printing is required, normal printing can be performed just by setting the items on this tab.
Settings Preview
The paper illustration shows how the original will be laid out on a sheet of paper.
You can check an overall image of the layout.
Media Type
Selects a type of printing paper.
Select a media type that matches the paper that is loaded in the printer. This ensures that printing is
carried out properly for the specified paper.
Paper Source
Shows the source from which paper is supplied.
Rear Tray
Paper is always supplied from the rear tray.
Print Quality
Selects your desired printing quality.
Select one of the following to set the print quality level that is appropriate for the purpose.
Important
• Depending on the Media Type settings, the same print results may be produced even if the Print
Quality is changed.
High
Gives priority to print quality over printing speed.
Standard
Prints with average speed and quality.
Draft
This setting is appropriate for test printing.
Downloaded from ManualsPrinter.com Manuals
100
 Loading...