

Page 1
USER’S GUIDE
ENGLISH
USER’S GUIDE
ENGLISH
CANON INC.
3-30-2, Shimomaruko, Ohta-ku, Tokyo 146-8501, Japan
CANON U.S.A., INC.
One Canon Plaza, Lake Success, N.Y. 11042, U.S.A.
CANON CANADA INC.
6390 Dixie Road, Mississauga, Ontario, L5T 1P7, Canada
CANON EUROPA N.V.
Bovenkerkerweg 59-61, P.O. Box 2262, 1180 EG Amstelveen,
The Netherlands
CANON DEUTSCHLAND GmbH
P.O. Box 528-47705 Krefeld, Europark Fichtenhain A10, 47807 Krefeld, Germany
CANON (U.K.) LTD.
Woodhatch, Reigate, Surrey, RH2 8BF, United Kingdom
CANON FRANCE S.A.
17, quai du President Paul Doumer 92414 Courbevoie Cedex, France
CANON LATIN AMERICA, INC.
6505, Blue Lagoon Drive, Suite 325, Miami, Florida 33126, U.S.A.
CANON AUSTRALIA PTY., LTD.
1 Thomas Holt Drive, North Ryde, Sydney, N.S.W. 2113, Australia
CANON SINGAPORE PTE. LTD.
79 Anson Road, # 09-01/06, Singapore 079906
CANON HONG KONG CO., LTD.
9/F., The Hong Kong Club Building, 3A Chater Road, Central, Hong Kong
HT1-2171-000-V.1.0 XXXXXXA © CANON INC. 2001 PRINTED IN CHINA
120V
Page 2

ii Preface
Copyright
This User’s Guide is copyrighted by Canon U.S.A., Inc. with all rights reserved. Under
the copyright laws, this User’s Guide may not be reproduced in any form, in whole or
part, without prior written consent of Canon U.S.A.
© 2001 Canon U.S.A., Inc.
Disclaimer
Canon U.S.A., Inc. has reviewed this User’s Guide thoroughly in order to make it an
easy to use guide for your Canon LASER CLASS 1060P system. All statements,
technical information, and recommendations in this guide and in any guides or related
documents are believed reliable, but the accuracy and completeness thereof are not
guaranteed or warranted, and they are not intended to be, nor should they be
understood to be, representations or warranties concerning the products described.
Your LASER CLASS 1060P has been sold to you subject to the limited warranties set
forth in the warranty cards. Further, Canon U.S.A. reserves the right to make changes
in the specifications of the products described in this guide at any time without notice
and without obligation to notify any person of such changes.
Trademarks
Canon and LASER CLASS are registered trademarks, and UHQ is a trademark of
Canon Inc.
All other product and brand names are registered trademarks, trademarks or service
marks of their respective owners.
As an ENERGY STAR®Partner, Canon U.S.A. has determined that
the LASER CLASS 1060P meets the ENERGY STAR®guidelines
for energy efficiency.
Super G3 is a phrase used to describe the new generation of fax
units that use ITU-T V.34 standard 33.6 Kbps* modems. Super G3
High Speed Fax units allow transmission time of approximately
three seconds* per page which results in reduced telephone line
charges.
*Approximately three seconds per page document transmission time based on ITU-T No. 1 Chart,
standard mode, at 33.6 Kbps modem speed. The Public Switched Telephone Network (PSTN) currently
supports 28.8 Kbps modem speeds or lower, depending on telephone line conditions.
Page 3

Preface iii
Users in the U.S.A.
Pre-Installation Requirements for Canon Facsimile
Equipment
A. Location
Supply a suitable table, cabinet, or desk. See page 2-2 for the unit’s dimensions,
and page A-2 for the unit’s weight.
B. Order Information
1. Only a single line, touch-tone or rotary telephone set is to be used.
2. Order an RJ11-C modular jack (USOC code), which should be installed by the
telephone company. If the RJ11-C jack is not present, installation cannot occur.
3. Order a normal business line from your telephone company’s business
representative. The line should be a regular voice grade line or the equivalent.
Use one line per unit.
DDD (DIRECT DISTANCE DIAL) LINE
-orIDDD (INTERNATIONAL DIRECT DISTANCE DIAL) LINE IF YOU
COMMUNICATE OVERSEAS
n
Canon recommends an individual line following industry standards, e.g. the 2500 (Touch
Tone) or 500 (Rotary/Pulse Dial) telephones. A dedicated extension off a PBX unit without
“Call Waiting” can be used with your LASER CLASS 1060P. Key telephone systems are
not recommended because they send non-standard signals to individual telephones for
ringing and special codes, which may cause a fax error.
C. Power Requirements
This equipment should be connected to a standard 120-volt AC, three-wire grounded
outlet only. Do not connect this unit to an outlet or power line shared with other
appliances that cause “electrical noise.” Air conditioners, electric typewriters, copiers,
and machines of this sort generate electrical noise which often interferes with
communications equipment and the sending and receiving of documents.
Connection of the Equipment
This equipment complies with Part 68 of the FCC rules. On the rear panel of this
equipment is a label that contains, among other information, the FCC Registration
Number and Ringer Equivalence Number (REN) for this equipment. If requested, this
information must be given to the telephone company. This equipment may not be used
on coin service provided by the telephone company. Connection to party lines is
subject to state tariffs.
Page 4

iv Preface
In Case of Equipment Malfunction
Should any malfunction occur which cannot be corrected by the procedures described
in this User’s Guide, disconnect the equipment from the telephone line or unplug the
power cord. The telephone line should not be reconnected or the power cord plugged
in until the problem is completely resolved.
Rights of the Telephone Company
Should the equipment cause harm to the telephone network, the telephone company
may temporarily disconnect service. The telephone company also retains the right to
make changes in facilities and services which may affect the operation of this
equipment. When such changes are necessary, the telephone company is required to
give adequate prior notice to the user.
FCC Notice
LASER CLASS 1060P: Facsimile Transceiver, Model H12204
This device complies with Part 15 of the FCC Rules. Operation is subject to the
following two conditions:
(1)This device may not cause harmful interference, and
(2)this device must accept an interference received, including interference that may
cause undesired operation.
n
This equipment has been tested and found to comply with the limits for a class B digital
device, pursuant to Part 15 of the FCC Rules. These limits are designed to provide
reasonable protection against harmful interference in a residential installation. This
equipment generates, uses and can radiate radio frequency energy and, if not installed
and used in accordance with the instructions, may cause harmful interference to radio
communications. However, there is no guarantee that interference will not occur in a
particular installation. If this equipment does cause harmful interference to radio or
television reception, which can be determined by turning the equipment off and on, the
user is encouraged to try to correct the interference by one or more of the following
measures:
• Reorient or relocate the receiving antenna.
• Increase the separation between the equipment and receiver.
• Connect the equipment into an outlet on a circuit different from that to which the receiver
is connected.
• Consult the dealer or an experienced radio/TV technician for help.
Use of shielded cable is required to comply with class B limits in Subpart B of Part 15
of FCC Rules.
Page 5

Preface v
Do not make any changes or modifications to the equipment unless otherwise specified
in the User’s Guide. If such changes or modifications should be made, you could be
required to stop operation of the equipment.
Canon U.S.A. Inc.
One Canon Plaza, Lake Success, NY 11042, U.S.A.
TEL No. 1-800-OK-CANON
The Telephone Consumer Protection Act of 1991 makes it unlawful for any person to
use a computer or other electronic device to send any message via a telephone fax
machine unless such message clearly contains in a margin at the top or bottom of each
transmitted page or on the first page of the transmission, the date and time it is sent
and an identification of the business or other entity, or other individual sending the
message and the telephone number of the sending machine or such business, other
entity, or individual.
In order to program this information into your LASER CLASS 1060P, follow the
instructions in Chapter 3 of this User’s Guide.
Page 6

vi Preface
Users in Canada
Pre-Installation Requirements for Canon Facsimile
Equipment
A. Location
Supply a suitable table, cabinet, or desk. See page 2-2 for the unit’s dimensions,
and page A-2 for the unit’s weight.
B. Order Information
1. Provide only a single-line to touch-tone or rotary telephone set terminated with a
standard 4-pin modular phone plug. (Touch-tone is recommended if available in
your area.)
2. Order an RJ11-C modular jack (USOC code), which should be installed by the
telephone company. If the RJ11-C jack is not present, installation cannot occur.
3. Order a normal business line from your telephone company’s business
representative. The line should be a regular voice grade line or equivalent. Use
one line per unit.
DDD (DIRECT DISTANCE DIAL) LINE
-orIDDD (INTERNATIONAL DIRECT DISTANCE DIAL) LINE IF YOU
COMMUNICATE OVERSEAS
n
Canon recommends an individual line following industry standards [e.g., the 2500 (touch
tone) or 500 (rotary/pulse dial) telephones]. Adedicated extension off a PBX without
“Camp On” signals is also permissible with your LASER CLASS 1060P. Key telephone
systems are not recommended because they send non-standard signals to individual
telephones for ringing and special codes, which may cause a fax error.
C. Power Requirements
The power outlet should be a three-prong grounded receptacle (Single or Duplex). It
should be independent from copiers, heaters, air conditioners or any electric
equipment that is thermostatically controlled. The rated value is 120 volts and 15
amperes. The RJ11-C modular jack should be relatively close to the power outlet to
facilitate installation.
Notice
The Industry Canada label identifies certified equipment. This certification means that
the equipment meets telecommunications networks protective, operational and safety
requirements as prescribed in the appropriate Terminal Equipment Technical
Requirements document(s). The Department does not guarantee the equipment will
operate to the user’s satisfaction.
Page 7

Preface vii
Before installing this equipment, users should ensure that it is permissible to be
connected to the facilities of the local telecommunications company. The equipment
must also be installed using an acceptable method of connection. The customer should
be aware that compliance with the above conditions may not prevent degradation of
service in some situations.
Repairs to certified equipment should be coordinated by a representative designated by
the supplier. Any repairs or alterations made by the user to this equipment, or
equipment malfunctions, may give the telecommunications company cause to request
the user to disconnect the equipment.
Users should ensure for their own protection that the electrical ground connections of
the power utility, telephone lines and internal metallic water pipe system, if present, are
connected together. This precaution may be particularly important in rural areas.
c
Users should not attempt to make such connections themselves, but should contact
the appropriate electric inspection authority, or electrician, as appropriate.
n
This Class B digital apparatus meets all requirements of the Canadian InterferenceCausing Equipment Regulations.
Cet appareil numérique de la classe B respecte toutes les exigences du Règlement sur le
matériel brouilleur du Canada.
The Ringer Equivalence Number (REN) assigned to each terminal device provides an
indication of the maximum number of terminals allowed to be connected to a telephone
interface. The termination on an interface may consist of any combination of devices
subject only to the requirement that the sum of the Ringer Equivalence Numbers of all
the devices does not exceed 5. The REN of this product is 0.3.
CANON CANADA INC.
1-800-263-1121
24 HOURS ADAY, SEVEN DAYS A WEEK
Page 8
viii Preface
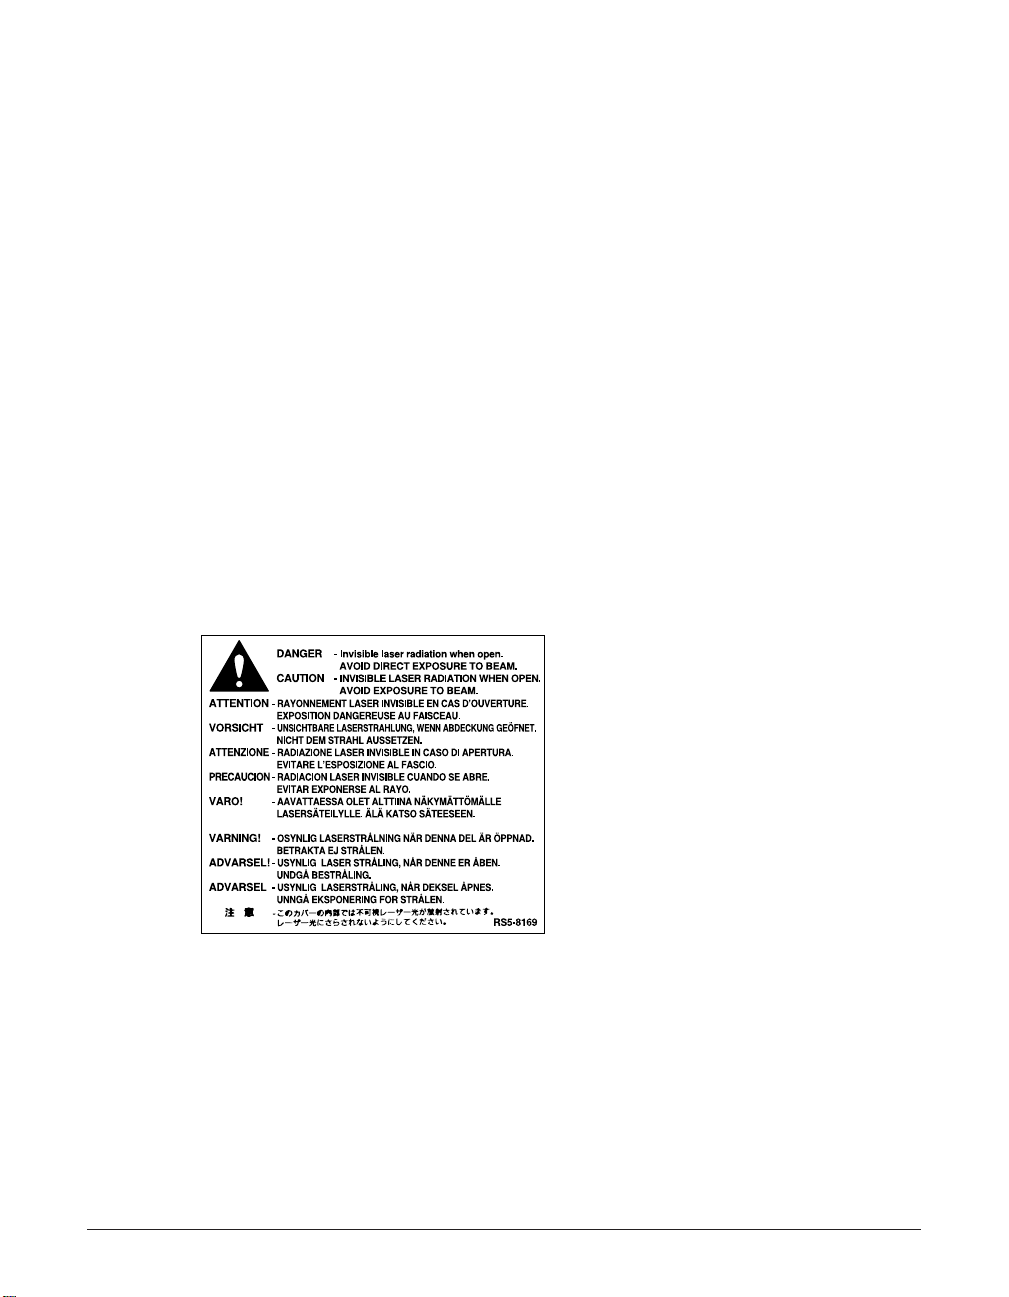
Laser Safety
This unit complies with 21 CFR Chapter 1 Subchapter J as a Class 1 laser product
under the U.S. Department of Health and Human Services (DHHS) Radiation
Performance Standard according to the Radiation Control for Health and Safety Act of
1968. This means that the unit does not produce hazardous radiation.
Since radiation emitted inside the unit is completely confined within protective housings
and external covers, the laser beam cannot escape from the machine during any phase
of user operation.
CDRH Regulations
The Center for Devices and Radiological Health (CDRH) of the U.S. Food and Drug
Administration implemented regulations for laser products on August 2, 1976. These
regulations apply to laser products manufactured from August 1, 1976. Compliance is
mandatory for products marketed in the United States.
c
Use of controls, adjustments, or performance of procedures other than those
specified in this User’s Guide may result in hazardous radiation exposure.
The label is attached to the laser scanner unit inside the unit and is not in a user
access area.
c
Performance of procedures other than those specified herein may result in
hazardous radiation exposure.
Page 9

Preface ix
Contents
Chapter 1: Introduction
Welcome................................................................................................................1-2
Main Features of the LASER CLASS....................................................................1-3
Using Your Documentation ....................................................................................1-4
How to Use This Guide......................................................................................1-4
Type Conventions Used in This Guide..............................................................1-5
Customer Support..................................................................................................1-6
Important Safety Instructions.................................................................................1-7
Chapter 2: Setting Up
Choosing a Location for the LASER CLASS.........................................................2-2
Dimensions........................................................................................................2-2
Unpacking the LASER CLASS..............................................................................2-3
Do You Have Everything?..................................................................................2-3
Removing Shipping Materials............................................................................2-5
Assembling the LASER CLASS ............................................................................2-6
Making Connections..............................................................................................2-7
Connecting the Telephone Line Cord and External Devices.............................2-7
Connecting the LASER CLASS to Your PC ......................................................2-8
Connecting the Power Cord ..............................................................................2-9
Main Components of the LASER CLASS............................................................2-10
Operation Panel...............................................................................................2-11
Special Function Buttons.............................................................................2-11
Installing the Toner Cartridge ...............................................................................2-12
Loading Paper .....................................................................................................2-15
Testing the LASER CLASS ..................................................................................2-17
Chapter 3: Registering Information
Guidelines for Entering Numbers, Letters, and Symbols ......................................3-2
Correcting a Mistake..........................................................................................3-4
Registering Required Sender Information.............................................................3-5
What is Sender Information?.............................................................................3-5
Registering Your Sender Information.................................................................3-6
Setting the Telephone Line Type...........................................................................3-8
Chapter 4: Document Handling
Document Requirements.......................................................................................4-2
Scanned Area of a Document...........................................................................4-2
Loading Documents ...............................................................................................4-3
Adding Pages to the Document in the ADF.......................................................4-4
Page 10

x Preface
Chapter 5: Print Media Handling
Print Media Requirements.....................................................................................5-2
Printable Areas ..................................................................................................5-3
Selecting and Loading Print Media........................................................................5-4
Paper.................................................................................................................5-4
Envelopes..........................................................................................................5-4
Transparencies..................................................................................................5-6
Selecting Face-Up or Face-Down Delivery ...........................................................5-7
Changing the Paper Size Setting ..........................................................................5-9
Adjusting the Toner Saver Setting .......................................................................5-11
Chapter 6: Speed Dialing
What is Speed Dialing?.........................................................................................6-2
Speed Dialing Methods .....................................................................................6-2
Registering One-Touch Speed Dialing ..................................................................6-3
Registering Coded Speed Dialing .........................................................................6-8
Registering Group Dialing....................................................................................6-13
Using Speed Dialing............................................................................................6-16
Sending a Document With Speed Dialing.......................................................6-16
Making a Telephone Call With Speed Dialing .................................................6-17
Printing Speed Dialing Lists.................................................................................6-18
Chapter 7: Sending Faxes
Preparing to Send a Fax........................................................................................7-2
Documents You Can Fax...................................................................................7-2
Setting the Scanning Resolution .......................................................................7-2
Setting the Scanning Contrast ...........................................................................7-3
Dialing Methods.................................................................................................7-4
Sending Methods ...................................................................................................7-5
Memory Sending................................................................................................7-5
Manual Sending Via the Handset......................................................................7-6
Canceling Sending.................................................................................................7-8
Redialing When the Line is Busy...........................................................................7-9
Manual Redialing...............................................................................................7-9
Canceling Manual Redialing ..........................................................................7-9
Automatic Redialing ...........................................................................................7-9
What is Automatic Redialing?........................................................................7-9
Canceling Automatic Redialing......................................................................7-9
Setting the Options for Automatic Redialing................................................7-10
Sending the Same Document to Several Fax Numbers (Sequential
Broadcasting) ...................................................................................................7-12
Delayed Sending .................................................................................................7-14
Scanning a Document into Memory for Delayed Sending ..............................7-14
Printing a Document Set for Delayed Sending................................................7-16
Page 11

Preface xi
Deleting a Document Set for Delayed Sending...............................................7-17
Chapter 8: Receiving Faxes
Receiving Methods................................................................................................8-2
Receiving Both Faxes and Telephone Calls Automatically: Fax/Tel Mode........8-3
Setting Fax/Tel Mode.....................................................................................8-3
Setting the Options for Fax/Tel Mode............................................................8-4
Receiving Faxes Manually: MANUAL MODE....................................................8-6
Setting MANUAL MODE................................................................................8-6
Receiving a Fax Manually .............................................................................8-6
Receiving Faxes Automatically: FAX ONLY MODE ..........................................8-8
Setting FAX ONLY MODE.............................................................................8-8
Receiving With an Answering Machine: ANS.MACHINE MODE ......................8-9
Setting ANS.MACHINE MODE......................................................................8-9
Using the LASER CLASS With an Answering Machine................................8-9
Receiving With the Distinctive Ring Pattern Detection Feature: DRPD..........8-10
Ring Patterns...............................................................................................8-10
Setting DRPD ..............................................................................................8-10
How DRPD Responds to Calls ....................................................................8-14
Communicating With DRPD........................................................................8-14
Receiving While Performing Other Tasks............................................................8-15
Receiving Faxes in Memory When a Problem Occurs........................................8-15
Canceling Receiving............................................................................................8-15
Chapter 9: Special Features
Special Dialing.......................................................................................................9-2
Dialing Through a Switchboard .........................................................................9-2
Entering Pauses in a Fax/Telephone Number...................................................9-2
Switching Temporarily to Tone Dialing...............................................................9-3
Documents Stored in Memory...............................................................................9-4
Printing a List of Documents Stored in Memory ................................................9-4
Printing a Document Stored in Memory ............................................................9-5
Sending a Document Stored in Memory ...........................................................9-6
Deleting a Document Stored in Memory ...........................................................9-8
Polling....................................................................................................................9-9
What is Polling?.................................................................................................9-9
Polling Receiving...............................................................................................9-9
Polling Another Fax Machine.........................................................................9-9
Canceling Polling Receiving........................................................................9-11
Polling Sending................................................................................................9-11
Setting Up the Polling Box ...........................................................................9-11
Scanning a Document into the Polling Box.................................................9-14
Changing or Deleting the Polling Box Settings ...........................................9-14
Restricting Reception...........................................................................................9-16
Page 12

xii Preface
Chapter 10: Copying
Documents You Can Copy ..................................................................................10-2
Making Copies.....................................................................................................10-2
Chapter 11: Reports and Lists
Summary of Reports and Lists ............................................................................11-2
ACTIVITY REPORT.............................................................................................11-3
TX (Transmission) REPORT................................................................................11-4
MULTI TX/RX (Transaction) REPORT.............................................................11-5
RX (Reception) REPORT ....................................................................................11-5
Chapter 12: Maintenance
Periodic Cleaning.................................................................................................12-2
Cleaning the Unit’s Exterior.............................................................................12-2
Cleaning the Unit’s Interior..............................................................................12-2
Cleaning the Scanner Components.................................................................12-4
Replacing the Toner Cartridge.............................................................................12-6
Chapter 13: Troubleshooting
Clearing Jams ......................................................................................................13-2
Jams in the ADF..............................................................................................13-2
Paper Jams......................................................................................................13-3
Jams in the Paper Delivery Slots ................................................................13-3
Jams Inside the Unit....................................................................................13-3
LCD Messages....................................................................................................13-8
Paper Feeding Problems...................................................................................13-13
Printing Problems ..............................................................................................13-14
Faxing Problems ................................................................................................13-15
Sending Problems .........................................................................................13-15
Receiving Problems .......................................................................................13-16
Copying Problems .............................................................................................13-18
Telephone Problems..........................................................................................13-19
General Problems ..............................................................................................13-19
If You Cannot Solve a Problem .........................................................................13-20
If a Power Failure Occurs..................................................................................13-21
Chapter 14: Summary of Settings
Understanding the Menu System........................................................................14-2
Printing a List to Check the Current Settings..................................................14-2
Accessing the Menus ......................................................................................14-3
USER SETTINGS Menu......................................................................................14-4
REPORT SETTINGS Menu.................................................................................14-5
TX (Transmission) SETTINGS Menu..................................................................14-6
RX (Reception) SETTINGS Menu.......................................................................14-7
Page 13

Preface xiii
PRINTER SETTINGS Menu................................................................................14-8
POLLING BOX Menu...........................................................................................14-9
SYSTEM SETTINGS Menu...............................................................................14-10
Appendix A: Specifications
General Specifications ..........................................................................................A-2
Printer....................................................................................................................A-2
Facsimile ...............................................................................................................A-2
Copier....................................................................................................................A-3
Telephone..............................................................................................................A-3
Appendix B: Options
Optional Handset...................................................................................................B-2
Package Contents.............................................................................................B-2
Attaching the Handset to Your Unit...................................................................B-3
Maintaining Your Handset .................................................................................B-4
Glossary .............................................................................................................G-1
Index .....................................................................................................................I-1
Page 14

xiv Preface
Page 15

Chapter 1 Introduction 1-1
Introduction
Chapter 1
Introduction
This chapter introduces you to the main features of the unit. It also explains how to get
the most out of the documentation provided, and gives important safety instructions.
Welcome....................................................................................................1-2
Main Features of the LASER CLASS......................................................1-3
Using Y our Documentation......................................................................1-4
How to Use This Guide..........................................................................1-4
Type Conventions Used in This Guide ...................................................1-5
Customer Support....................................................................................1-6
Important Safety Instructions .................................................................1-7
Page 16
1-2 Introduction Chapter 1
Welcome
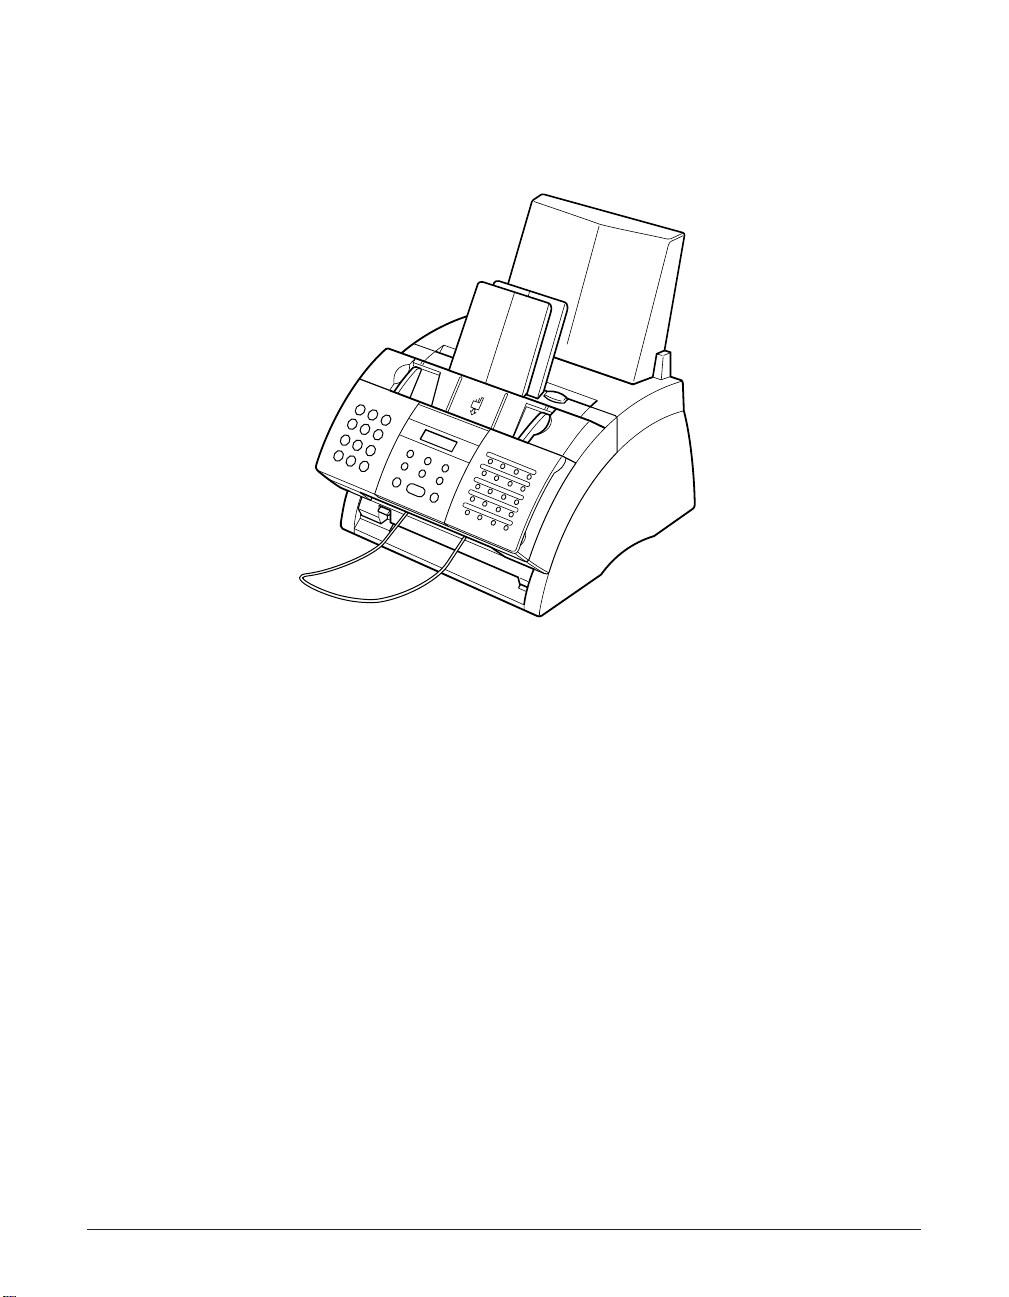
Thank you for purchasing the Canon LASER CLASS 1060P (hereafter referred to as
the LASER CLASS or unit).
Your unit is a complete multifunction system for your home or small office. It combines
the following essential office machines into a single, convenient desktop unit.
• Printer
• Plain Paper Fax Machine
• Copier
• Telephone*
With its multitasking ability, your unit enables you to perform a number of operations
simultaneously. For example, you can print or make copies at the same time you are
sending from memory or receiving a fax into memory.
*Requires the optional handset, a telephone, or an answering machine to be connected to the unit.
Page 17

Chapter 1 Introduction 1-3
Introduction
Main Features of the LASER CLASS
■ Printer Features
• 600 ¥ 600 dpi laser beam printing for high resolution text and graphics
• Exceptional printing speed of approximately 6 letter-size pages* per minute
• Easy and clean installation of the toner cartridge
• Convenient multi-purpose tray for loading a variety of paper and other print media
• Toner saving feature for less toner consumption and a longer cartridge life
■ Plain Paper Fax Features
• Automatic switching between fax and voice calls
• Increased transmission speed with G3 data encoding—up to approximately 3
seconds* per page
• 256-page* memory for storing faxes
• Canon’s Ultra High Quality (UHQ™) Image Processing System for enhanced definition
in faxed photos
• Error Correction Mode (ECM) to reduce transmission errors when sending to or
receiving from fax machines with ECM capability
• Automatic dialing and broadcasting—one-touch, coded speed dialing, and group
dialing
• Answering machine connection possible for automatically receiving both messages
and faxes
• Automatic reduction of received faxes when paper in the unit does not match
transmitted page size
• Special faxing features, such as delayed sending, polling, and reception restriction
• DRPD (Distinctive Ring Pattern Detection) capability (subscription to a DRP service
necessary)
■ Copier Features
• Up to 99 copies of a document
• 400 ¥ 300 dpi high-resolution copying (single copies)
• Copy reduction—90%, 80%, or 70%
■ Telephone Features
• Connection for the optional handset or a telephone, as well as one other external
device (additional telephone, answering machine, or data modem)
• One-touch and coded speed dialing for quick and efficient dialing
*Based on ITU-T No. 1 Chart, standard mode.
Page 18

1-4 Introduction Chapter 1
Using Your Documentation
Your unit includes the following three manuals:
• LASER CLASS 1060P User’s Guide (this guide): Refer to this guide for instructions
on setting up your unit, setting your unit to send and receive, and making copies.
There is also information on selecting and loading print media and documents,
instructions on unit maintenance, and a troubleshooting section if you have difficulties
operating your unit.
• Printer Driver Manual: Refer to this manual (included in the CD-ROM) for
instructions on printing from your PC. Here you will find detailed instructions on
installing the printer driver software, operating it, and other relevant information for
using your unit as a printer. Refer to the troubleshooting section if you have trouble
printing.
• Printer Driver Quick Start Guide: This guide provides a quick reference on how to
install the printer driver into your PC, and how to print from your PC with your unit.
How to Use This Guide
To make the best use of this guide, be sure to do the following:
• Read this chapter to learn about your unit’s main features, and for guidelines on using
the unit safely.
• Carefully follow the instructions in Chapter 2, Setting Up, to get your unit unpacked,
assembled, and ready for use.
• Read Chapter 3, Registering Information, to learn how to enter information in the unit,
and how to register the required sender information.
• Refer to Chapter 4, Document Handling, for details on the document requirements for
your unit and how to load them.
• Refer to Chapter 5, Print Media Handling, for details on paper and other print media
you can load on your unit, guidelines for selecting them, and other information relating
to print media and printing.
• Read Chapter 6, Speed Dialing, to learn how to register numbers for speed dialing
and how to use speed dialing to send documents.
• Read Chapters 7 through 10 to master the unit’s operating procedures, such as
sending and receiving faxes, special dialing, and making copies.
• Refer to Chapter 11, Reports and Lists, to learn about the reports and lists that can
be automatically or manually printed from your unit.
• Look over Chapter 12, Maintenance, to become familiar with procedures for cleaning
the unit and replacing the toner cartridge.
• If your unit is not operating properly, use Chapter 13, Troubleshooting, to try to fix the
problem.
• Refer to Chapter 14, Summar y of Settings, to learn how to change default settings,
and how to customize your unit to your needs.
Page 19

Chapter 1 Introduction 1-5
Introduction
• Refer to Appendix A, Specifications, for the unit’s technical specifications.
• If you have purchased the optional handset, refer to Appendix B, Options, for details
on attaching it to your unit.
• If there are terms in this guide you do not understand, refer to the Glossary.
If you still have questions on how to use your unit, please contact your local authorized
Canon Facsimile Dealer. They will be happy to answer your questions.
n
You must register your fax number, your name or company name, and the date and time
on your unit before using it. This is required by the FCC rules governing the use of fax
equipment. For details, see p. 3-5.
Type Conventions Used in This Guide
Please read the list below of symbols, terms, and abbreviations used in this guide. A
complete glossary of terms is included at the end of this guide.
c
Cautions tell you how to avoid actions that could injure you or damage your unit. In
order to use your unit safely, always observe these cautions.
n
Notes provide advice on using your unit more effectively, describe operating restrictions,
and tell you how to avoid minor difficulties. Reading these is recommended to make the
most of your unit and its functions.
(1 p. n-nn) A number preceded by an arrow and enclosed in parenthesis
references a page number (p.) or page numbers (pp.) that
contain more information on the topic of the previous sentence.
(1 Printer Driver Refer to the Printer Driver Manual for details on the topic of the
Manual) previous sentence.
default A setting that remains in effect unless you change it.
document or fax The original sheet(s) of paper you send or receive with your unit.
menu A list of settings from which you select an item to set up or
change. Amenu has a title which appears in the LCD.
Ex: Example of a message or setting displayed in the LCD.
LCD Liquid Crystal Display. The display on the operation panel that
displays messages and settings.
In addition, this guide uses distinctive typefaces to identify buttons and information in
the LCD:
• The buttons you press appear in this typeface: Stop.
• Information in the LCD appears in this typeface: USER SETTINGS.
Page 20

1-6 Introduction Chapter 1
Customer Support
Your unit is designed with the latest technology to provide trouble-free operation. The
warranty information describes Canon’s limited warranty for its products. Be sure to
read this warranty information.
If you have a problem with the unit’s operation, try to solve it by referring to the
information in Chapter 13. If you cannot solve the problem or if you think your unit
needs servicing, contact your local authorized Canon Facsimile Dealer. If you think
your unit needs service, only an authorized Canon Facsimile Dealer will do warranty
service.
n
You must have your sales receipt for warranty service.
Page 21
Chapter 1 Introduction 1-7
Introduction
Important Safety Instructions
Read these safety instructions thoroughly before using your unit.
c
Except as specifically described in this guide, do not attempt to service the unit
yourself. Never attempt to disassemble the unit: opening and removing its interior
covers will expose you to dangerous voltages and other risks. For all service,
contact your local authorized Canon Facsimile Dealer.
■ Handling and Maintenance
• Follow all warnings and instructions marked on the unit.
• Do not subject the unit to strong physical shocks or vibrations.
• Always unplug the unit before moving or cleaning it.
• To avoid paper jams, never unplug the power cord, open the front cover, or add or
remove paper in the multi-purpose tray while printing.
• When transporting the unit, be sure to remove the toner cartridge from the unit. Place
the toner cartridge in its original protective bag or wrap it in a thick cloth to prevent
exposure to light.
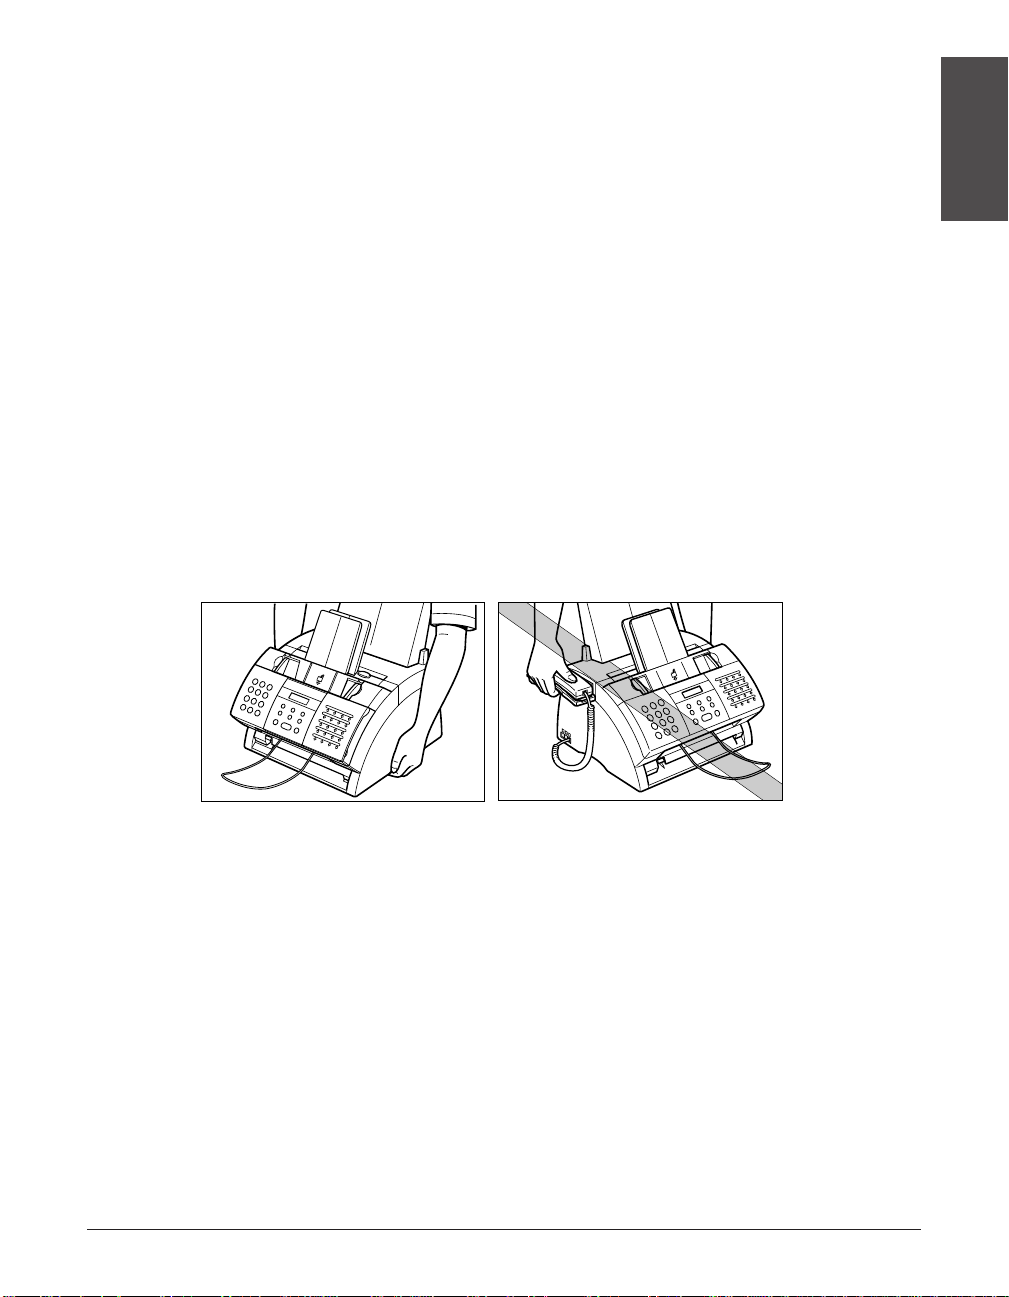
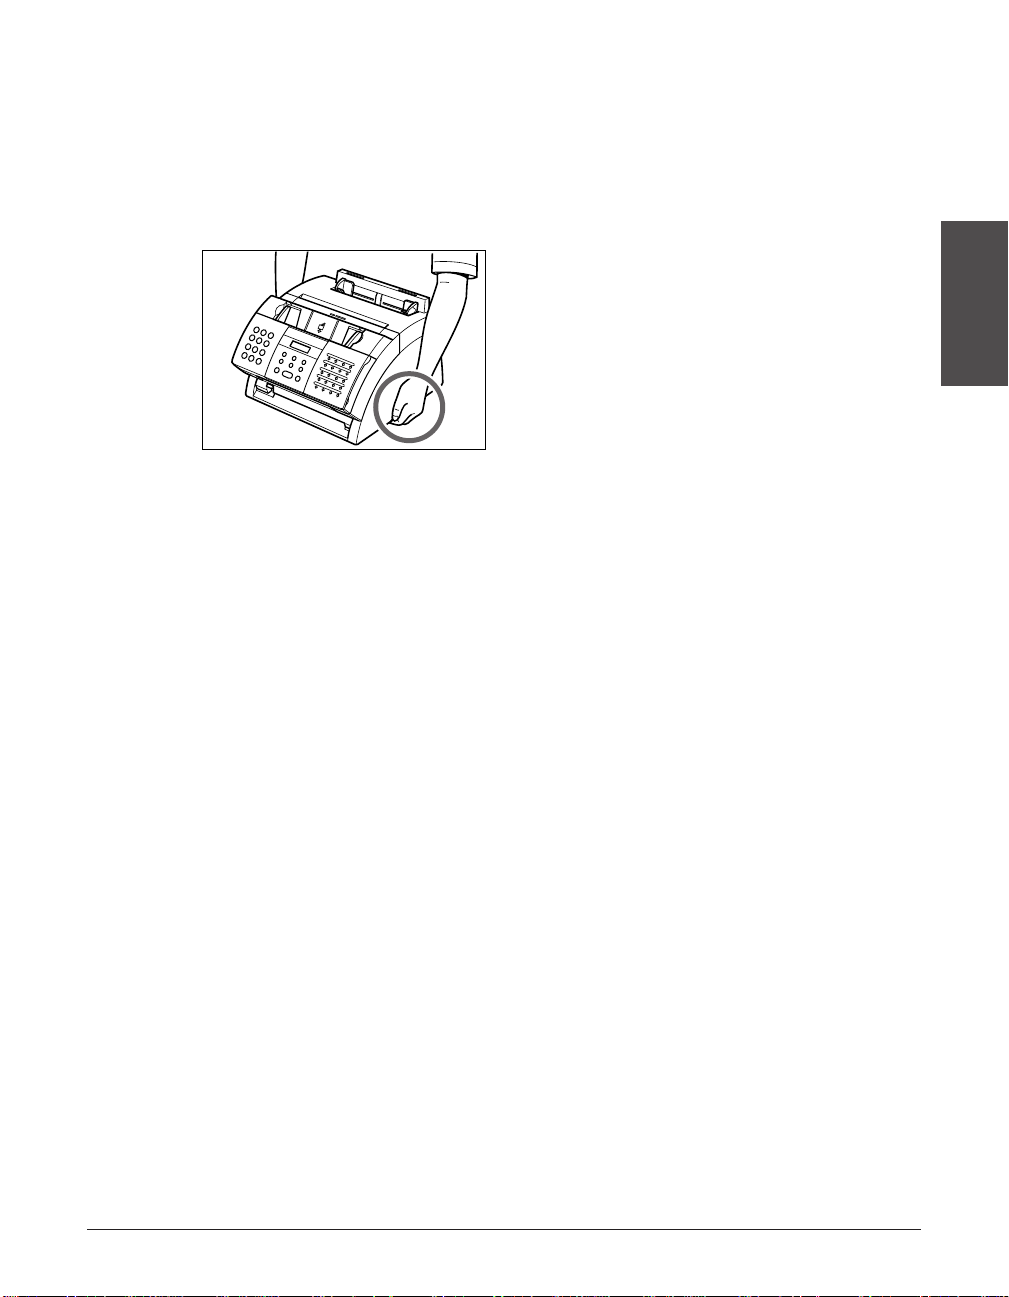
• Always lift the unit as shown below. Never lift it by any of its attachments.
• Do not insert any objects into the slots or openings on the unit since they may touch
dangerous voltage points or short out parts. This could result in fire or electric shock.
• Do not allow small objects (such as pins, paper clips, or staples) to fall into the unit. If
something does fall into it, unplug the unit immediately and contact your local
authorized Canon Facsimile Dealer.
• To avoid spillage in or around the unit, do not eat or drink near it. If you spill liquid or if
any substance falls into it, unplug the unit immediately and contact your local
authorized Canon Facsimile Dealer.
• Keep the unit clean. Dust accumulation can prevent the unit from operating properly.
Page 22

1-8 Introduction Chapter 1
• Unplug the unit from the wall outlet and contact your local authorized Canon
Facsimile Dealer in any of the following cases:
– When the power cord or plug is damaged or frayed.
– If liquid has spilled into the unit.
– If the unit has been exposed to rain or water.
– If the unit does not operate normally when you have followed the instructions in this
guide. Adjust only those controls that are covered by the instructions in this guide.
Improper adjustment of other controls may result in damage and may require
extensive work by a qualified technician to restore the product to normal operation.
– If the unit has been dropped or the cabinet has been damaged.
– If the unit exhibits a distinct change in performance, indicating a need for servicing.
■ Location
• Place the unit on a flat, stable, vibration-free surface that is strong enough to support
its weight (approx. 24.3 lb./11 kg).
• Place the unit in a cool, dry, clean, well ventilated place.
– Make sure the area is free from dust.
– Make sure the location is not affected by extreme temperature changes, and always
stays between 50° and 90.5°F (10° and 32.5°C).
– Make sure the area’s relative humidity is always between 20% and 80%.
• Keep the unit away from direct sunlight as this can damage it. If you have to place it
near a window, install heavy curtains or blinds.
• Do not use the unit near water. Make sure that no wet or humid objects come into
contact with the unit.
• Do not use or store the unit outdoors.
• Do not install the unit near devices that contain magnets or generate magnetic fields,
such as speakers.
• If possible, place the unit near an existing telephone line outlet for easy connection of
the telephone line cord, and to avoid the expense of installing a new outlet.
• Place the unit near a standard 120 V AC (60 Hz) power outlet.
• Place the unit near the PC you will be connecting it to. Make sure you can reach it
easily since you will be using it as a printer, fax machine, and copier.
• To ensure reliable operation of the unit and to protect it from overheating (which can
cause it to operate abnormally and create a fire risk), do not block the exhaust vent.
Never block or cover any openings on the unit by placing it on a bed, sofa, rug, or
other similar surface. Do not place the unit in a closet or built-in installation, or near a
radiator or other heat register unless proper ventilation is provided. Leave
approximately 4 inches (10 cm) space around all sides of the unit. For the dimensions
of the unit, see p. 2-2.
Page 23

Chapter 1 Introduction 1-9
Introduction
• Do not stack boxes or furniture around the power outlet. Keep the area free so you
can reach the outlet quickly. If you notice anything unusual (smoke, strange odors,
noises) around the unit, unplug the unit immediately. Contact your local authorized
Canon Facsimile Dealer.
• Do not allow anything to rest on the power cord, and do not place the unit where the
cord will be walked on. Make sure the cord is not knotted or kinked.
■ Power Supply
• During electrical storms, disconnect the power cord from the power outlet. (Please
note that any documents stored in the unit’s memory will be deleted when you unplug
the unit.)
• Whenever you unplug the unit, wait at least five seconds before plugging it in again.
• Do not plug the unit into an uninterruptible power supply (UPS).
c
This product emits low level magnetic flux.
If you use a cardiac pacemaker and feel abnormalities, please move away from this
product and consult your doctor.
Page 24

1-10 Introduction Chapter 1
Page 25

Chapter 2 Setting Up 2-1
Setting Up
Chapter 2
Setting Up
This chapter explains all the necessary steps to get your unit ready for use. You will
find instructions for unpacking, assembling, and connecting your unit, and learn how to
install the toner cartridge and load paper.
Choosing a Location for the LASER CLASS .........................................2-2
Dimensions.............................................................................................2-2
Unpacking the LASER CLASS ................................................................2-3
Do You Have Everything? ......................................................................2-3
Removing Shipping Materials.................................................................2-5
Assembling the LASER CLASS ..............................................................2-6
Making Connections ................................................................................2-7
Connecting the Telephone Line Cord and External Devices..................2-7
Connecting the LASER CLASS to Your PC...........................................2-8
Connecting the Power Cord...................................................................2-9
Main Components of the LASER CLASS .............................................2-10
Operation Panel ....................................................................................2-11
Special Function Buttons ..................................................................2-11
Installing the Toner Cartridge ................................................................2-12
Loading Paper.........................................................................................2-15
Testing the LASER CLASS ....................................................................2-17
Page 26

2-2 Setting Up Chapter 2
Choosing a Location for the LASER CLASS
Before unpacking your unit, be sure to choose a suitable location for it (1 p. 1-8).
Dimensions
Make sure the location you choose provides enough space around the unit for
adequate ventilation, and to allow paper to flow freely into and out of the unit. Leave
approximately 4 inches (10 cm) space around all sides of the unit. The illustrations
below show the dimensions of the unit.
n
If you need help installing the unit or have any questions about it, please
contact your local authorized Canon Facsimile Dealer.
15.8" (401 mm)
14.6" (372 mm)
22.8" (578 mm)
22.8" (578 mm)
15.9" (404 mm)
22.8" (578 mm)
14.6" (372 mm)
15.8" (401 mm)
TOP VIEW
SIDE VIEW
BOTTOM VIEW
17.5" (445 mm)17.5" (445 mm)
Page 27
Chapter 2 Setting Up 2-3
Setting Up
Unpacking the LASER CLASS
Follow the directions below to unpack the unit properly and to make sure you have all
its components.
n
When lifting the unit out of the box or when moving it, lift it from the recessed areas on the
sides of the unit. Make sure you hold the unit firmly and level.
Do You Have Everything?
Carefully remove all items from the box. You should have someone help you hold the
box while you lift out the unit and its protective packaging. Save the carton and
packaging in case you need to transport the unit in the future.
Make sure you have all the items on the following page:
Page 28

2-4 Setting Up Chapter 2
If any items are damaged or missing, notify your local authorized Canon Facsimile
Dealer immediately.
n
• The actual packaging may differ in shape, quantity, and position from the one shown
above.
• Important! Save your sales receipt for proof of purchase in case your unit requires
warranty service.
• If you are connecting your unit to a PC, you will need to purchase a printer cable
(1 p. 2-8).
• If you have purchased the optional handset, see Appendix B for the items included.
q MAIN UNIT
w FX-3 TONER
CARTRIDGE
e SUPPORT TRA YS
r DOCUMENTATION
and LABELS
y TELEPHONE LINE
CORD
u POWER CORD
i MULTI-PURPOSE
TRAY COVER
o DOCUMENT
SUPPORT
t PAPER REST
Page 29
Chapter 2 Setting Up 2-5
Setting Up
Removing Shipping Materials
Follow this procedure to remove the shipping materials. Keep them in case you need to
transport the unit in the future.
n
The actual shipping materials may differ in shape, quantity, and position from the ones
shown above.
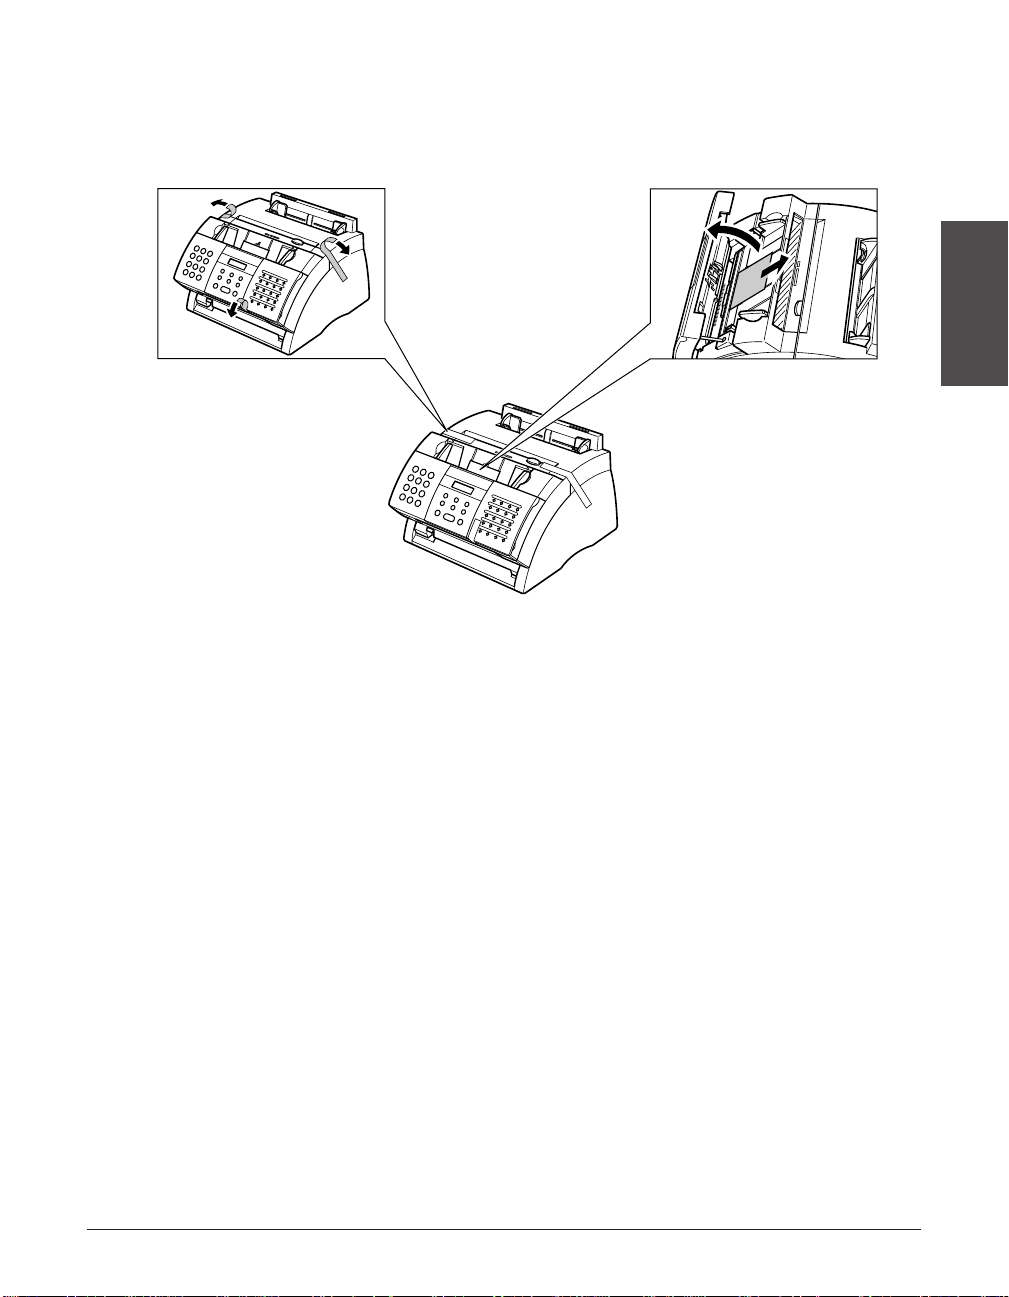
1
Remove all shipping
tapes from the FAX.
2
Use both hands to
gently open the
operation panel (it
only opens partially).
Then remove the
protective sheet from
the ADF.
Close the operation
panel by pressing it
down from the
center until it locks
into place.
Page 30
2-6 Setting Up Chapter 2
Assembling the LASER CLASS
Follow this procedure to assemble your unit:
n
• To see how your unit looks fully assembled, see p. 2-10.
• For details on attaching the optional handset to your unit, see Appendix B.
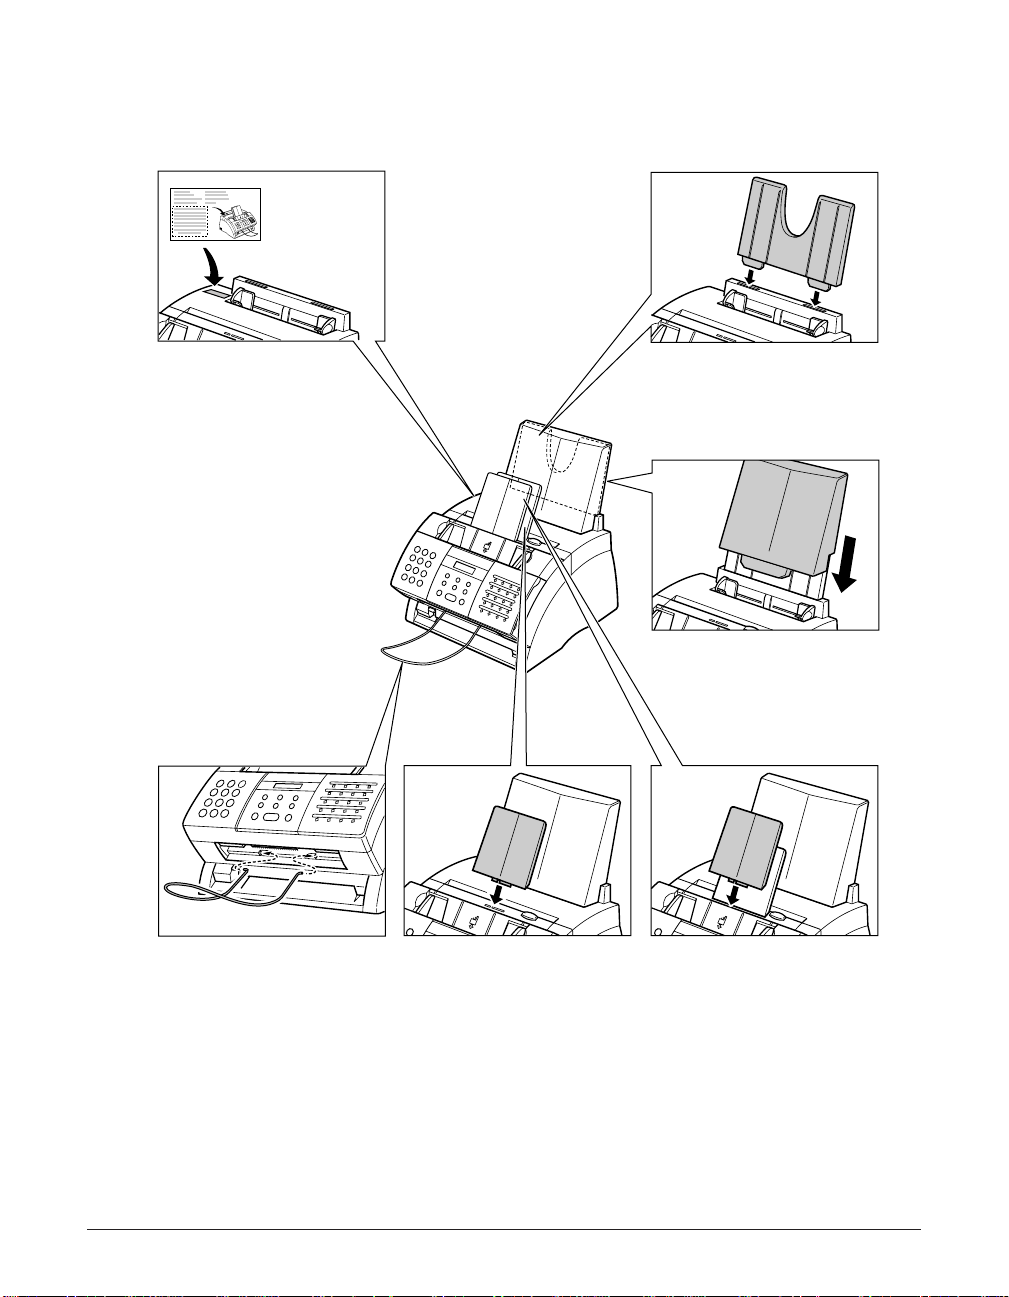
1
Attach the paper
loading warning
label to the left of the
multi-purpose tray.
2
Insert the tabs of the
paper rest into the
slots on the unit.
3
Slide the multipurpose tray cover
over the paper rest.
4
Insert the ends of the
document support
into the slots on the
unit.
5
Insert the tabs of one
of the support trays
into the corresponding
slots above the facedown delivery slot.
6
Insert the tabs of the
other support tray into
the corresponding
slots above the ADF.
Page 31
Chapter 2 Setting Up 2-7
Setting Up
Making Connections
Connecting the Telephone Line Cord and
External Devices
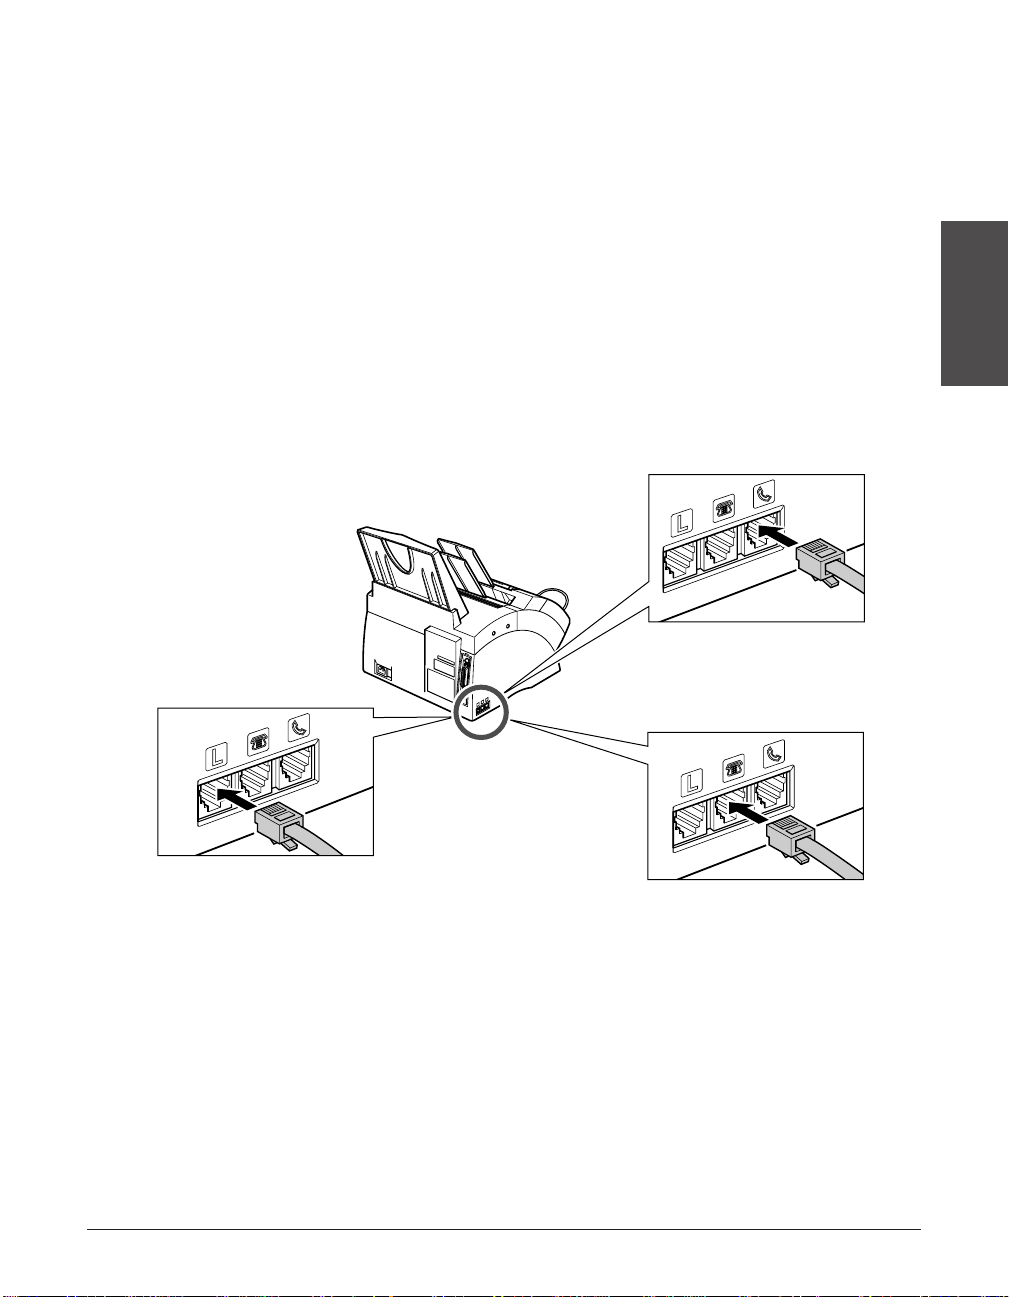
Your unit has three jacks on the side for connection of the following:
• Telephone line cord
• Optional handset or telephone
• Additional telephone, answering machine, or data modem
If you only have one telephone line and plan to use your unit for receiving both faxes and
voice calls, you will need to connect the optional handset, a telephone, or an answering
machine to your unit.
Be sure to connect any external device before using your unit. Follow this procedure to
connect the telephone line cord and external device(s):
n
• Canon cannot guarantee that all answering machines will be compatible with your unit,
due to varying specifications.
• If you have connected an external device to your unit, be sure to set the correct receive
mode (1 Chapter 8).
• To connect an additional telephone as well as an answering machine, connect the additional
telephone to the answering machine, and then the answering machine to your unit.
• If you use your data modem extensively, you may prefer to have a dedicated telephone
line for it.
Optional handset or
telephone
Connect the cord to the
h jack.
Additional telephone,
answering machine,
or data modem
Connect the cord to the
t jack.
Telephone line cord
Connect the supplied
cord to the
L jack. Then
connect the other end
to the telephone line
jack on your wall.
Page 32

2-8 Setting Up Chapter 2
Connecting the LASER CLASS to Your PC
To connect your unit to a PC, you will need to purchase a printer cable suitable for the
interface connector on your PC:
• A Centronics®-compatible parallel cable (IEEE 1284-compliant) no longer than 6.6 feet
(2 meters)
-or-
• A USB cable no longer than 16.4 feet (5 meters)
You can purchase either of these cables from your local authorized Canon dealer.
Follow this procedure to connect the appropriate cable:
n
• You only need to connect one of the above cables.
• If using a USB cable, make sure your PC is running Microsoft Windows
®
98/Me or
Windows
®
2000, preinstalled by a computer manufacturer on purchase. (The USB port
operation also needs to be assured by the manufacturer.)
■ Connecting a Parallel Cable
Connect the parallel cable to
the unit and PC before
installing the software. Be
sure to secure the cable
connectors with the wire
clips.
■ Connecting a USB Cable
To ensure proper operation
of the printer driver, connect
the USB cable to the unit
and PC during software
installation (1 Printer Driver
Manual).
Page 33

Chapter 2 Setting Up 2-9
Setting Up
Connecting the Power Cord
Before connecting the power cord, see Power Supply, p. 1-9.
Follow this procedure to connect the power cord:
n
• The unit is equipped with a three-prong, grounding-type plug provided with a third
(grounding) pin. This plug will only fit into a grounding-type outlet. This is a safety
feature. If you are unable to insert the plug into your outlet, contact an electrician to
replace the outlet. Do not defeat the safety purpose of the grounding-type plug by
breaking off the third prong or using a 3-to-2 adapter.
• Do not plug the unit into the same circuit as an appliance such as an air conditioner,
electric typewriter, television, or copier. Such devices generate electrical noise that can
interfere with your unit’s ability to send and receive faxes.
The unit has no power switch, so its power is on as long as it is plugged in. When you
connect the unit, the LCD displays these messages:
Unit is warming up.
Ex: Unit is in standby mode (date and receive mode
displayed) and ready for use.
If the toner cartridge has not been installed, this
message alternates with the standby mode display.
PUT IN CARTRIDGE
12/27 FaxTel
PLEASE WAIT
Connect the supplied
power cord to the power
cord connector. Then
connect the other end into
a properly grounded 120 V
AC three-prong outlet.
Page 34

2-10 Setting Up Chapter 2
Main Components of the LASER CLASS
SUPPORT TRA YS
MUL TI-PURPOSE TRAY CO VER
ADF (AUTOMATIC
DOCUMENT FEEDER)
DOCUMENT GUIDES
OPERATION PANEL
PAPER DELIVERY
SELECTOR
DOCUMENT SUPPORT
FACE-UP DELIVERY SLOT
FRONT COVER
FACE-DOWN DELIVERY
SLOT
LATCH
PAPER GUIDES
MUL TI-PURPOSE TRAY
PAPER REST
FX-3 TONER CARTRIDGE
COMPARTMENT
TRANSFER CHARGING
ROLLER
(DO NOT TOUCH)
PAPER RELEASE
LEVER
FIXING ASSEMBLY
FRONT COVER
Page 35

Chapter 2 Setting Up 2-11
Setting Up
Operation Panel
Alarm
GHI JKL MNO
ABC DEF
TUV WXY
SYMBOLSOPER
Tone
PRS
Stop
Hook
Coded DialPause
Receive Mode
Redial
Start/Copy
Resolution
Set
01 02 03
04
05 06 07
08
09 10 11
12
13 14 15
16
17 18 19
20
1
0#
7
8
9
45
6
2
3
21 22 23
24
Registration
Transmission
Data
Delayed
Reference
Memory
Polling
Report
+ Space
Clear
• Numeric Buttons
• One-Touch Speed Dialing
Buttons
• LCD
• Resolution Button
• Coded Dial Button
• Start/Copy Button
• Receive Mode Button
• Pause Button
• Hook Button
• Alarm Light
• Set Button
• Redial Button
• Stop Button
• One-Touch Speed Dial Panel
Open the one-touch speed dial panel to
expose the special function buttons below.
• Data Registration
Button
• Delayed Transmission
Button
• Report Button
• + Button
• Clear Button
• Polling Button
• Memory Reference
Button
• ¨, ∂ Buttons
• ¬, ® Buttons
• Space Button
Special Function Buttons
Page 36

2-12 Setting Up Chapter 2
Installing the Toner Cartridge
This section describes how to install the toner cartridge in the unit for the very first time.
If you are replacing a used toner cartridge, see p. 12-6.
Before installing the toner cartridge, be sure to read the following:
• Use only FX-3 toner cartridges in your unit.
• Keep the toner cartridge away from computer screens, disk drives, and floppy disks.
The magnet inside the toner cartridge may harm these items.
• Do not store the toner cartridge in direct sunlight.
• Avoid locations subject to high temperature, high humidity, or rapid changes in
temperature. Store the toner cartridge between 32° and 95°F (0° and 35°C).
• Do not expose the toner cartridge to direct sunlight or bright light for longer than five
minutes.
• Store the toner cartridge in its protective bag. Do not open the bag until you are ready
to install the toner cartridge in the unit.
• Save the toner cartridge’s protective bag in case you need to repack and transport
the toner cartridge at a later date.
• Do not store the toner cartridge in a salty atmosphere or where there are corrosive
gases such as from aerosol sprays.
• Do not remove the toner cartridge from the unit unnecessarily.
• Do not open the drum protective shutter on the toner cartridge.
Print quality may deteriorate if the drum surface is exposed to
light or is damaged.
• Hold the toner cartridge by its handle so that your hand is
not touching the drum protective shutter.
• Do not stand the toner cartridge on end, and do not turn it
upside down. If toner becomes caked in the toner cartridge,
it may prove impossible to free it even by shaking the toner
cartridge.
c
Do not place the toner cartridge in fire. Toner powder is flammable.
Page 37

Chapter 2 Setting Up 2-13
Setting Up
Follow this procedure to install the toner cartridge in the unit:
1 Make sure the unit is plugged in.
2 Lift the latch and open the front cover.
c
Do not open the front cover
without lifting the latch since this
may damage your unit.
3 Remove the new FX-3 toner cartridge
from its protective bag.
• Save the protective bag in case you
need to repack the toner cartridge at a
later date.
4 Gently rock the toner cartridge from
side to side a few times to distribute
the toner evenly inside it.
• Poor print quality may result if the toner
is unequally distributed.
Page 38

2-14 Setting Up Chapter 2
5 Place and support the toner cartridge
on a flat, clean surface, then gently
pull on the plastic tab to remove the
plastic seal.
• Use a firm, even pull to avoid breaking
the seal.
6 Hold the toner cartridge by its handle
and insert it into the unit as far as it
will go, making sure that its tabs are
aligned with the rails inside the unit.
• Always hold the toner cartridge by its
handle.
7 Use both hands to close the front
cover.
TOP VIEW
SIDE VIEW
PULL WITHIN
THIS RANGE
PULL WITHIN
THIS RANGE
Page 39
Chapter 2 Setting Up 2-15
Setting Up
Loading Paper
This section explains how to load plain paper in the multi-purpose tray.
For complete details on paper and other print media for use with your unit, see Chapter 5.
Before loading paper, be sure to read the following:
c
The laser printing process uses high temperatures to fuse toner to the paper. Use
paper that will not melt, vaporize, discolor, or emit dangerous fumes at temperatures
near 338°F (170°C). For example, do not use vellum paper in a laser printer. Make
sure any letterhead or colored paper you use can withstand high temperatures.
• Your unit supports regular copier paper, cotton bond paper, and typical letterhead
paper. It does not require special media. Use cut-sheet paper only, not paper that
comes on a roll.
• Be sure to load paper of the correct size, weight, and quantity recommended for your
unit (1 Chapter 5).
• The multi-purpose tray is factory-set for loading letter-size paper, but you can change
this setting to other paper sizes (1 p. 5-9).
• You can choose whether paper is delivered through the face-up or face-down delivery
slot (1 p. 5-7). Choose according to the print media and task you are performing.
• The face-down delivery slot can hold up to approximately 50 sheets of paper. To
prevent paper jams, remove paper from this slot before the count reaches 50.
• Do not load paper while the unit is printing.
• Do not leave paper stacked in the multi-purpose tray for long periods of time since it
may bend or curl and cause problems.
• Certain environmental conditions, such as extreme temperatures or humidity, can
cause some paper to misfeed in the multi-purpose tray. If you have trouble, feed one
sheet at a time.
• Take care not to drop any foreign objects into the multi-purpose tray.
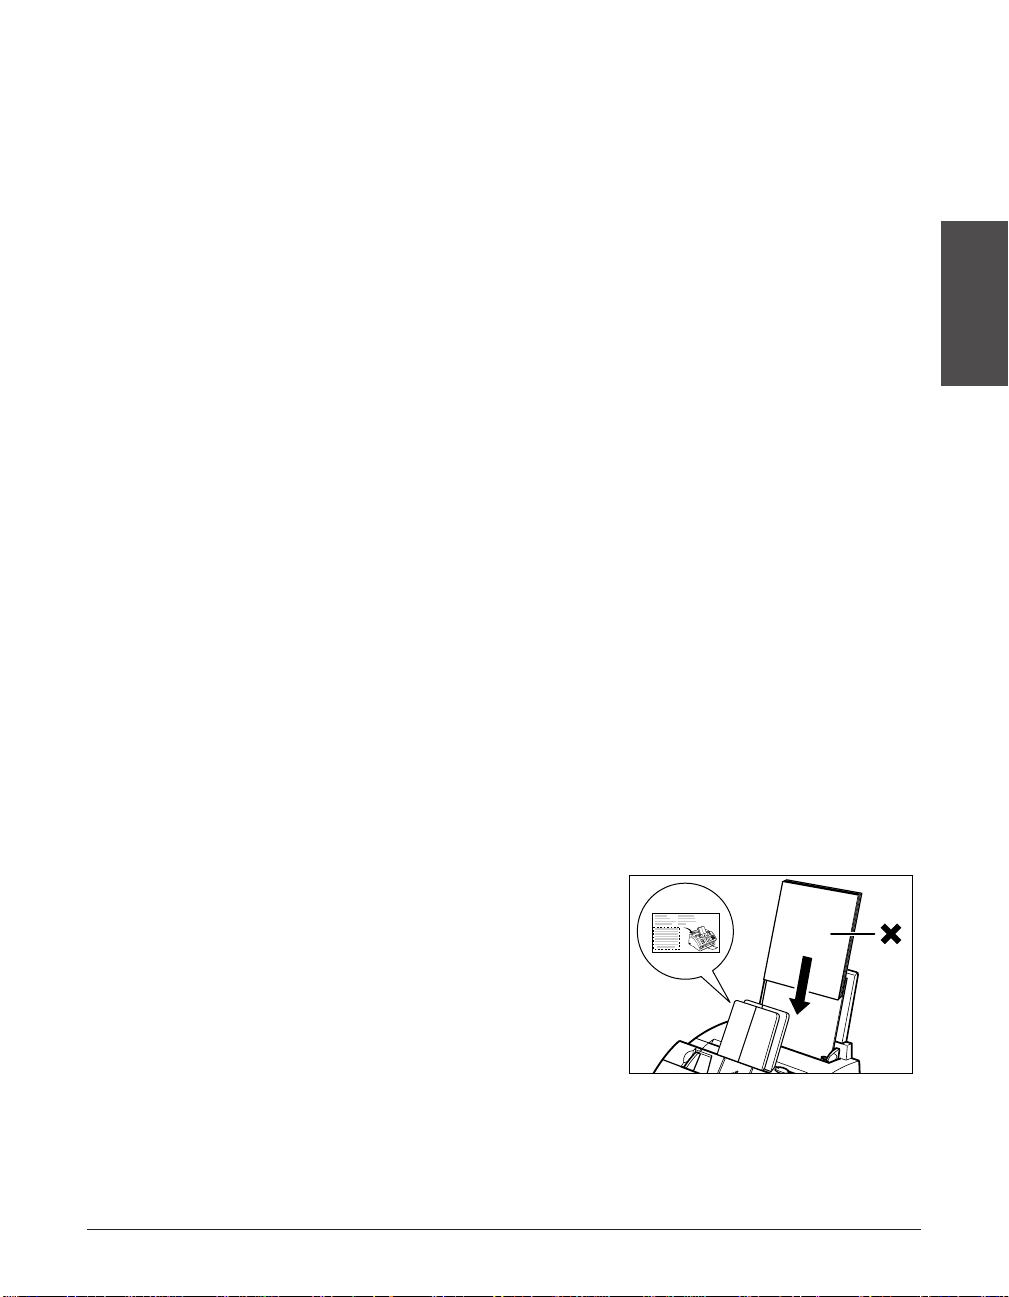
• Avoid mixing new stock with paper
already loaded in the multi-purpose tray.
Adding new stock without removing the
paper already loaded will cause paper
jams. If you must add new stock, remove
the loaded paper and reload it together
with the new stock.
Page 40
2-16 Setting Up Chapter 2
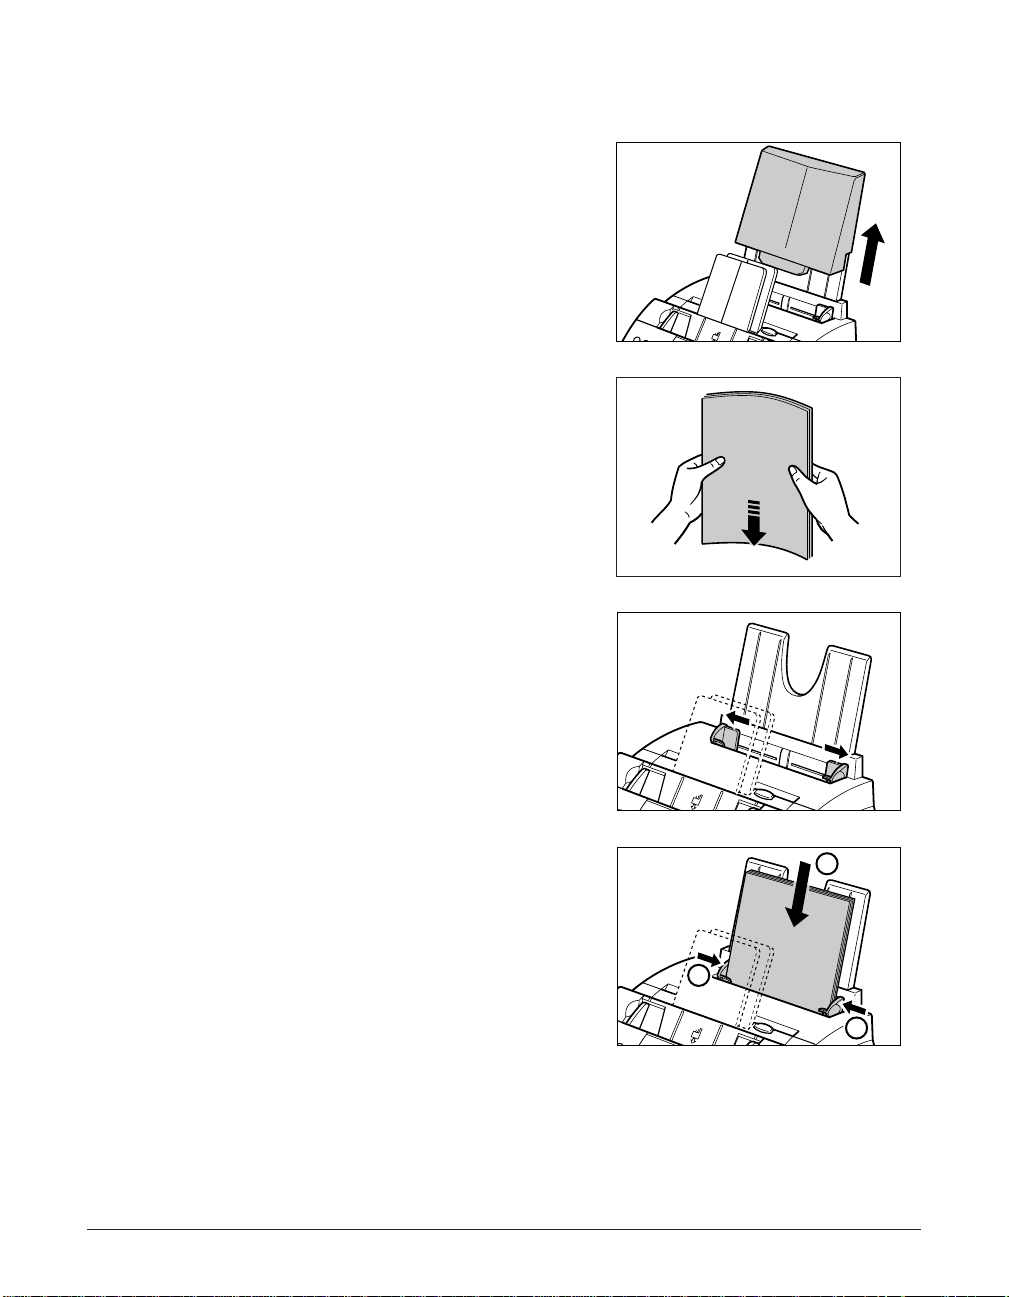
Follow this procedure to load a stack (max. 0.4 in./10 mm stack height) of letter-size
plain paper in the multi-purpose tray:
1 Remove the multi-purpose tray cover
from the unit.
2 Prepare a stack of paper by tapping
it on a flat surface to even its edges.
3 Open the paper guides to the
approximate width of the stack.
4 Insert the stack into the multi-purpose
tray q (print side facing you and top
edge first), then adjust the paper
guides to the width of the paper w.
• Make sure there are no gaps between
the paper guides and the paper stack.
1
2
2
Page 41

Chapter 2 Setting Up 2-17
Setting Up
5 Replace the multi-purpose tray cover.
• Be sure to replace this cover to prevent
dust accumulating inside the unit.
6 Adjust the paper delivery selector if
necessary (1 p. 5-7).
n
For details on how to change the paper size setting, see p.5-9.
Testing the LASER CLASS
Once you have assembled your unit, installed the toner cartridge, and loaded paper,
you can make sure your unit is printing properly by making several copies of a
document (1 p. 10-2).
If you have problems printing, see Chapter 13.
Page 42

2-18 Setting Up Chapter 2
Page 43

Chapter 3 Registering Information 3-1
Registering
Information
Chapter 3
Registering Information
This chapter explains how to enter information in your unit. You will also find
instructions for registering the sender information that you are required to enter.
Guidelines for Entering Numbers, Letters, and Symbols.....................3-2
Correcting a Mistake ..............................................................................3-4
Registering Required Sender Information.............................................3-5
What is Sender Information?..................................................................3-5
Registering Your Sender Information .....................................................3-6
Setting the Telephone Line Type.............................................................3-8
Page 44
3-2 Registering Information Chapter 3
Guidelines for Entering Numbers, Letters,
and Symbols
When you come to a step that requires you to enter a name or number, refer to the
table below to determine which numeric button to press for the character you want:
n
If you pause for more than 60 seconds between entering data, the unit will automatically
return to standby mode.
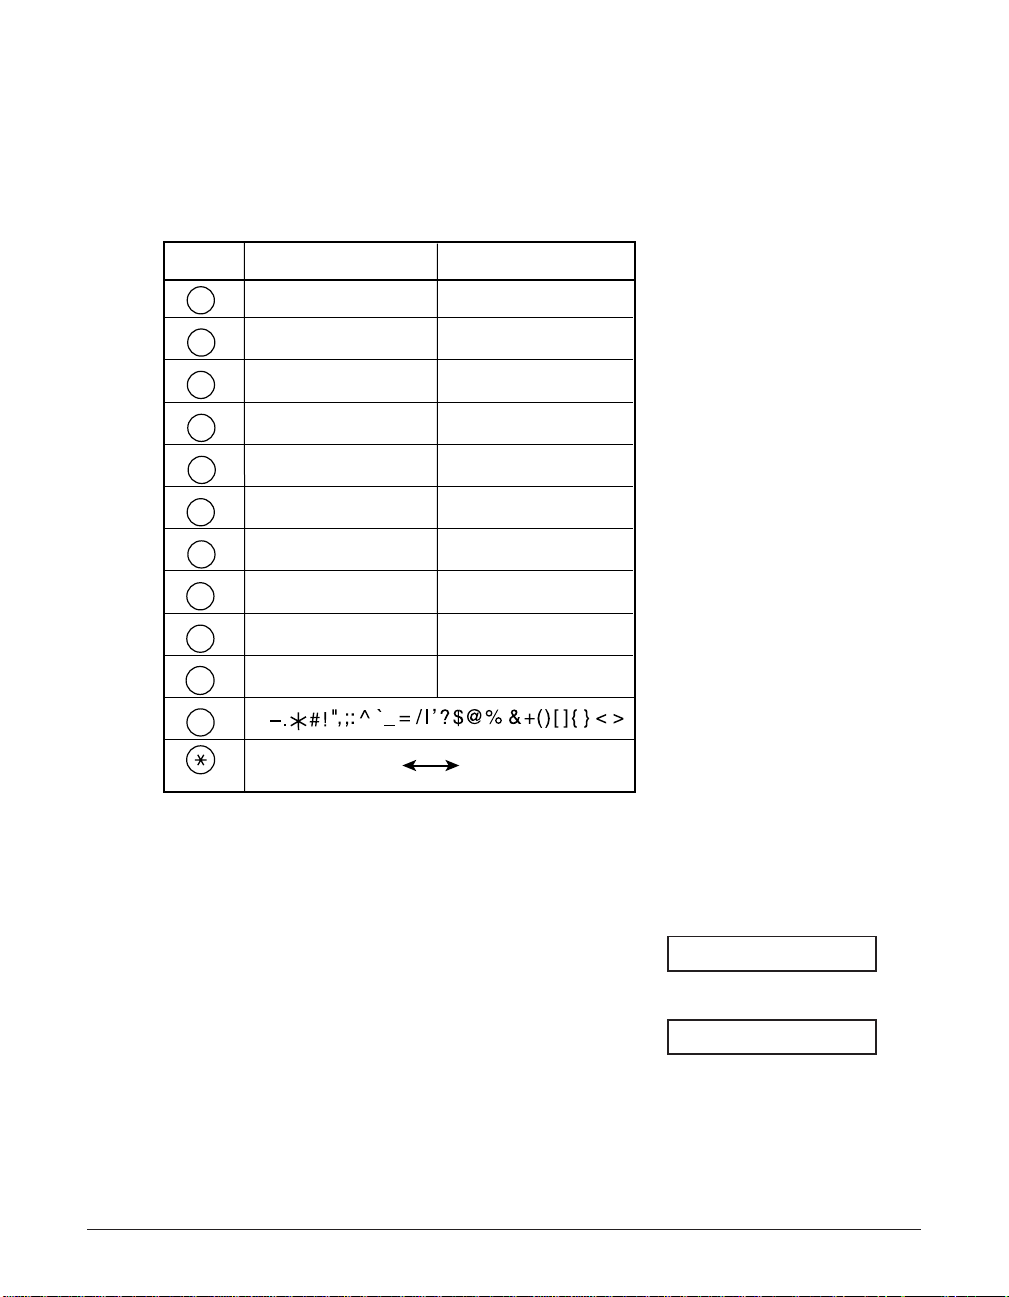
■ Changing Between Number Mode and Letter Mode
Press T to select number mode (:1) or
letter mode (:A).
(Number mode)
(Letter mode)
_:A
_:1
Button Letters (:A) Numbers (:1)
1
ABC
2
DEF
3
GHI
4
JKL
5
MNO
6
PRS
7
TUV
8
WXY
9
OPER
0
SYMBOLS
#
Tone
ABCabc 2
DEFdef 3
GHIghi 4
JKLjkl 5
MNOmno 6
PQRSpqrs 7
TUVtuv 8
WXYZwxyz 9
Letter input (:A) Number input (:1)
1
0
Page 45

Chapter 3 Registering Information 3-3
Registering
Information
■ Entering Letters
1 Press T to switch to letter mode (:A).
2 Press the numeric button that contains
Ex:
the letter you want.
• Press repeatedly until the letter you want
appears. Each button cycles through the
letters it contains.
• If you are unsure which button to press for
the letter you want, see p. 3-2.
3 Continue entering other letters using
Ex:
the numeric buttons.
• If the next letter you want to enter is under
a different numeric button, simply press that
button until the letter you want appears.
-orIf the next letter you want to enter is under
the same numeric button you pressed in
step 2, press ® to move the cursor to the
right. Then press that same numeric button
repeatedly until the letter you want appears.
• To enter a space, press Space.
■ Entering Numbers
1 Press T to switch to number mode (:1).
2 Press the numeric button that contains
Ex:
the number you want.
• To enter a space, press Space.
3 Continue entering other numbers using
Ex:
the numeric buttons.
■ Entering Symbols
1 Press # repeatedly until the symbol
Ex:
you want appears.
2 If you want to enter another symbol,
Ex:
press ® to move the cursor to the
right, then press # repeatedly until the
symbol you want appears.
n
Some of the buttons described above are located under the one-touch speed dial panel.
#–
:1
# :1
10_ :1
1_ :1
_:1
CA
:A
C :A
_:A
Page 46

3-4 Registering Information Chapter 3
Correcting a Mistake
You can delete an entire entry by pressing Clear. Alternatively, follow this procedure to
correct individual characters:
1 Use ¬ or ® to move the cursor under
Ex:
the incorrect character.
2 Press the numeric button that contains
Ex:
the correct letter, to enter it over the
incorrect character.
• If you are unsure which button to press
for the letter you want, see p. 3-2.
3 When you have finished making
corrections, press Set to register your
new entry.
n
Some of the buttons described above are located under the one-touch speed dial panel.
CANO
N:A
CANEN:A
Page 47
Chapter 3 Registering Information 3-5
Registering
Information
Registering Required Sender Information
In the United States, FCC rules governing the use of facsimile equipment state that the
following sender information must be printed on every facsimile transmission:
• Your fax number
• Your personal name or company name
• The time and date of transmission
Your unit has been designed to print this information at the top of every fax you send.
You must therefore register your unit’s telephone/fax number, your personal name or
company name, and the current date and time before using your unit. This section
gives details on registering your sender information.
What is Sender Information?
When you receive a fax, the name of the person or company who sent you the fax,
their fax/telephone number, and the date and time of transmission will be printed in
small type at the top of each page. This information is called the Sender information or
the Transmit T erminal Identification (TTI). Similarly, you must register your details in
your unit so that whenever you send a fax, the other party knows who sent it, and when
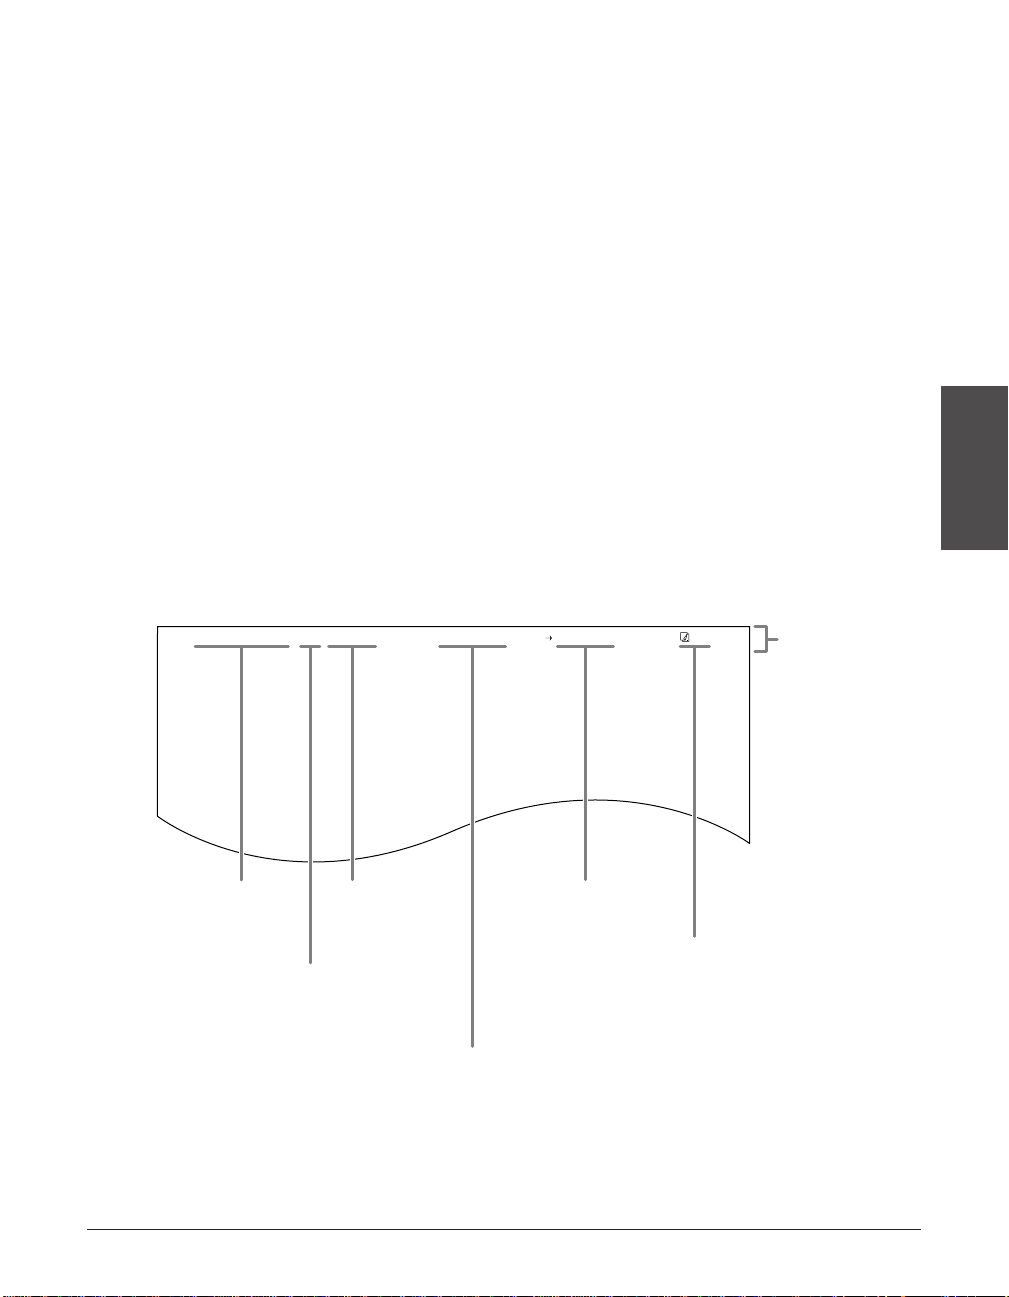
it was sent. Below is an example of how your sender information would print on a fax
sent from your unit:
To enter the sender information in your unit, follow the procedures on the following
pages.
12/27/2001 10:12 FAX 123 4567 YOUR NAME RECEIVER 001
THE SLEREXE COMPANY LIMITED
SAPORS LANE•BOOLE•DORSET•BH25 8ER
TELEPHONE BOOLE (945 13) 51617 – FAX 123456
Our Ref. 350/PJC/EAC
Date and time
of transmission.
You can select if
FAX or TEL is
displayed before
the number
(1 TELEPHONE #
MARK, p. 14-4).
Your fax or
telephone
number.
Your name or
company name.
Receiver’s name
appears here if
you used memory
sending and
dialed their fax
number using
speed dialing.
The page
number of
the fax.
You can select
if the sender
information is
printed inside
or outside the
image area
(1 TTI
POSITION,
p. 14-4).
Page 48

3-6 Registering Information Chapter 3
Registering Your Sender Information
Follow this procedure to set the current date and time, register your fax/telephone
number, and register your name or company name:
1 Open the one-touch speed dial panel.
2 Press Data Registration.
3 Press Set three times.
• The date and time currently set for your
unit are displayed.
Ex:
4 Use the numeric buttons to enter the
Ex:
correct month, day, year, and time in
this order.
• Enter only the last two digits of the year.
• Use the 24-hour format for the time
(e.g. 1:00 p.m. as 13:00), and precede
single digits with a zero.
• If you make a mistake, press Clear and
re-enter the date and time.
5 Press Set twice.
Ex:
6 Use the numeric buttons to enter your
Ex:
fax/telephone number (max. 20 digits,
including spaces).
• To enter a space, press Space. Spaces
are optional but make the number
easier to read.
• To enter a plus sign (+) before the
number, press +.
• If you make a mistake, press Clear and
re-enter the number.
TEL= 123 4567
TEL=
UNIT TELEPHONE #
DATA ENTRY OK
12/27/2001 15:00
12/20/2001 13:30
DATE & TIME
USER SETTINGS
DATA REGSTRATION
Page 49

Chapter 3 Registering Information 3-7
Registering
Information
7 Press Set twice.
Ex:
8 Use the numeric buttons to enter your
Ex:
name or company name (max. 24
characters, including spaces).
• If you are unsure how to enter
characters, see p. 3-2.
• If you make a mistake, press Clear and
re-enter the name.
9 Press Set.
10 Press Stop to return to standby mode.
Ex:
n
To check the sender information registered in your unit, you can print the USER’S DATA
LIST (1 p. 14-2).
12/27 FaxTel
TX TERMINAL ID
DATA ENTRY OK
CAN0N :A
_:A
UNIT NAME
DATA ENTRY OK
Page 50

3-8 Registering Information Chapter 3
Setting the Telephone Line Type
Before using your unit, make sure it is set for the telephone line type of your telephone
system. If you are unsure of your telephone line type, check with your local telephone
company.
Your unit is factory-set to operate for tone dialing (TOUCH TONE setting). If you need to
change this setting for pulse dialing (ROTARY PULSE setting), follow this procedure:
1 Open the one-touch speed dial panel.
2 Press Data Registration.
3 Press Set twice.
4 Use ∂ or ¨ to select TEL LINE TYPE.
5 Press Set.
6 Use ∂ or ¨ to select ROTARY PULSE.
7 Press Set.
8 Press Stop to return to standby mode.
Ex:
12/27 FaxTel
REPORT SETTINGS
ROTARY PULSE
TOUCH TONE
TEL LINE TYPE
DATE & TIME
USER SETTINGS
DATA REGSTRATION
Page 51

Chapter 4 Document Handling 4-1
Document
Handling
Chapter 4
Document Handling
This chapter describes the documents you can load in your unit for sending and
copying.
Document Requirements.........................................................................4-2
Scanned Area of a Document................................................................4-2
Loading Documents.................................................................................4-3
Adding Pages to the Document in the ADF...........................................4-4
Page 52
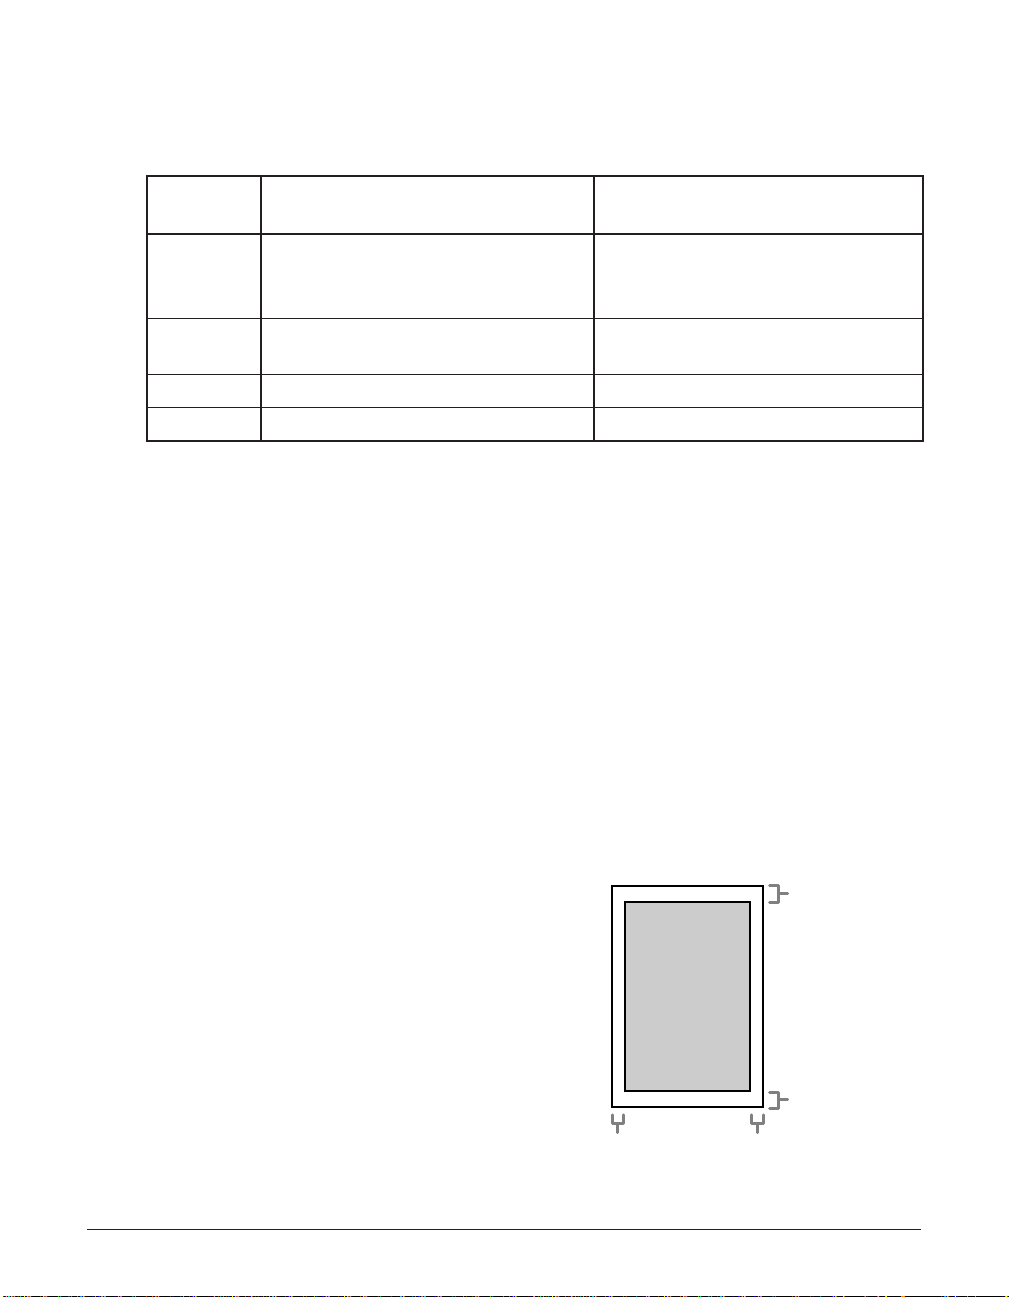
4-2 Document Handling Chapter 4
Document Requirements
The documents you load in the ADF for sending and copying must meet the following
requirements:
One-page document Multipage document of the
same thickness and weight
Size Min. 5.8 ¥ 4.1 in. (Min. 148 ¥ 105 mm) Min. 5.8 ¥ 4.1 in. (Min. 148 ¥ 105 mm)
(W ¥ L)
Max. 8.5 ¥ Approx. 39.4 in. Max. 8.5 ¥ 14 in.
(Max. 216 mm ¥ Approx. 1 m) (Max. 216 ¥ 356 mm)
Quantity 1 sheet Max. 20 letter- or A4-size sheets*
Max. 10 legal-size sheets*
Thickness 0.002 to 0.009 in. (0.06 to 0.23 mm) 0.002 to 0.005 in. (0.06 to 0.13 mm)
Weight 9.3 to 64 lb. (35 to 240 g/m2) 10.7 to 24 lb. (40 to 90 g/m2)
■ Problem Documents
• To prevent document jams in the ADF, do not use any of the following:
– Wrinkled or creased paper – Carbon paper or carbon-backed paper
– Curled or rolled paper – Coated paper
– Torn paper – Onion skin or thin paper
• Remove all fasteners (staples, paper clips, etc.) before loading the document in the ADF.
• Make sure any glue, ink, or correction fluid on the document is completely dry before
loading it in the ADF.
• If you have a document that will not feed properly in the ADF, make a photocopy of
the document and load the copy instead.
• If you will be sending a document that you have printed from your unit, be sure to use
face-down delivery when printing that document (1 p. 5-7).
Scanned Area of a Document
The shaded area shows the scanned
area of a document. Make sure your
document’s text and graphics fall within
this area.
MAX. 0.16"
(MAX. 4 mm)
MAX. 0.16"
(MAX. 4 mm)
MAX. 0.12"
(MAX. 3 mm)
MAX. 0.12"
(MAX. 3 mm)
Letter/Legal
*20 lb. (75 g/m2) paper
Page 53

Chapter 4 Document Handling 4-3
Document
Handling
Loading Documents
Follow this procedure to load documents in the ADF:
1 Adjust the document guides to the
width of the document.
2 Gently insert the top of the document,
face down, in the ADF until you hear a
beep.
• Tap multipage documents on a flat
surface to even the edges before
inserting them in the ADF.
The document is now ready for scanning.
n
• For a multipage document, the pages are fed one by one from the bottom of the stack.
• Wait until all pages of your document have been scanned before starting a new job.
■ Problems With Multipage Documents
If you have trouble feeding multipage documents in the ADF, remove the stack and tap
it on a flat surface to even the edges. Then “slant” the stack so that its front edge is
bevelled, and insert the stack in the ADF.
n
To avoid feeding problems, make sure the document meets the document requirements
(
1 p. 4-2).
Page 54

4-4 Document Handling Chapter 4
Adding Pages to the Document in the ADF
If you need to add pages to your document in the ADF, wait until the last page starts
feeding, then load up to 20 additional pages (10 legal size). The last and first page
should overlap by about one inch (2.5 cm).
1"
(2.5 cm)
Page 55

Chapter 5 Print Media Handling 5-1
Print Media
Handling
Chapter 5
Print Media Handling
This chapter describes the print media you can load in your unit, and other information
related to print media and printing.
Print Media Requirements.......................................................................5-2
Printable Areas.......................................................................................5-3
Selecting and Loading Print Media.........................................................5-4
Paper......................................................................................................5-4
Envelopes...............................................................................................5-4
Transparencies.......................................................................................5-6
Selecting Face-Up or Face-Down Delivery ............................................5-7
Changing the Paper Size Setting............................................................5-9
Adjusting the Toner Saver Setting........................................................5-11
Page 56

5-2 Print Media Handling Chapter 5
Print Media Requirements
You can load the following print media in the multi-purpose tray:
Once you have decided which paper you want to load, be sure to do the following:
• Check that the print media is compatible with your unit (1 p. 5-4).
• If you are loading paper, check that the paper size setting of the multi-purpose tray is
set for the paper size you are loading (1 p. 5-9). (The default setting is letter size.)
• Check that paper delivery is set correctly for the print media and task you are
performing (1 p. 5-7).
• Check that you have loaded the print media correctly in the multi-purpose tray
(1 p. 5-4).
3.6 ¥ 5 in.
(92 ¥ 127 mm)
8.5 ¥ 14 in.
(216 ¥ 356 mm)
8.5 ¥ 11 in.
(216 ¥ 279 mm)
8.5 ¥ 14 in.
(216 ¥ 356 mm)
8.3 ¥ 11.7 in.
(210 ¥ 297 mm)
8.5 ¥ 12.5 in. to
8.5 ¥ 13.4 in.
(216 ¥ 317 mm to
216 ¥ 340 mm)*
8.5 ¥ 10 in. to
8.5 ¥ 11.2 in.
(216 ¥ 254 mm to
216 ¥ 285 mm)*
9.5 ¥ 4.1 in.
(241 ¥ 104 mm)
8.7 ¥ 4.3 in.
(220 ¥ 110 mm)
8.5 ¥ 11 in.
(216 ¥ 279 mm)
8.3 ¥ 11.7 in.
(210 ¥ 297 mm)
Quantity & Weight
Quantity:
Max. stack height:
0.4 in./10 mm
(Approx. 100 sheets of
20 lb. (75 g/m
2
) paper)
Weight:
17 to 24 lb. (64–90 g/m
2
)
1 sheet: 17 to 28 lb.
(64–105 g/m
2
)
7 envelopes
1 sheet
Size (W ¥ L)
Min.
Max.
LTR (Letter)
LGL (Legal)
A4
CUSTOM1/LONG*
CUSTOM2/SHORT*
U.S. Commercial
No. 10
European DL
LTR (Letter)
A4
Print Media
Plain Paper
Envelopes
Transparencies
*For this setting, you may need to load fewer sheets.
Page 57
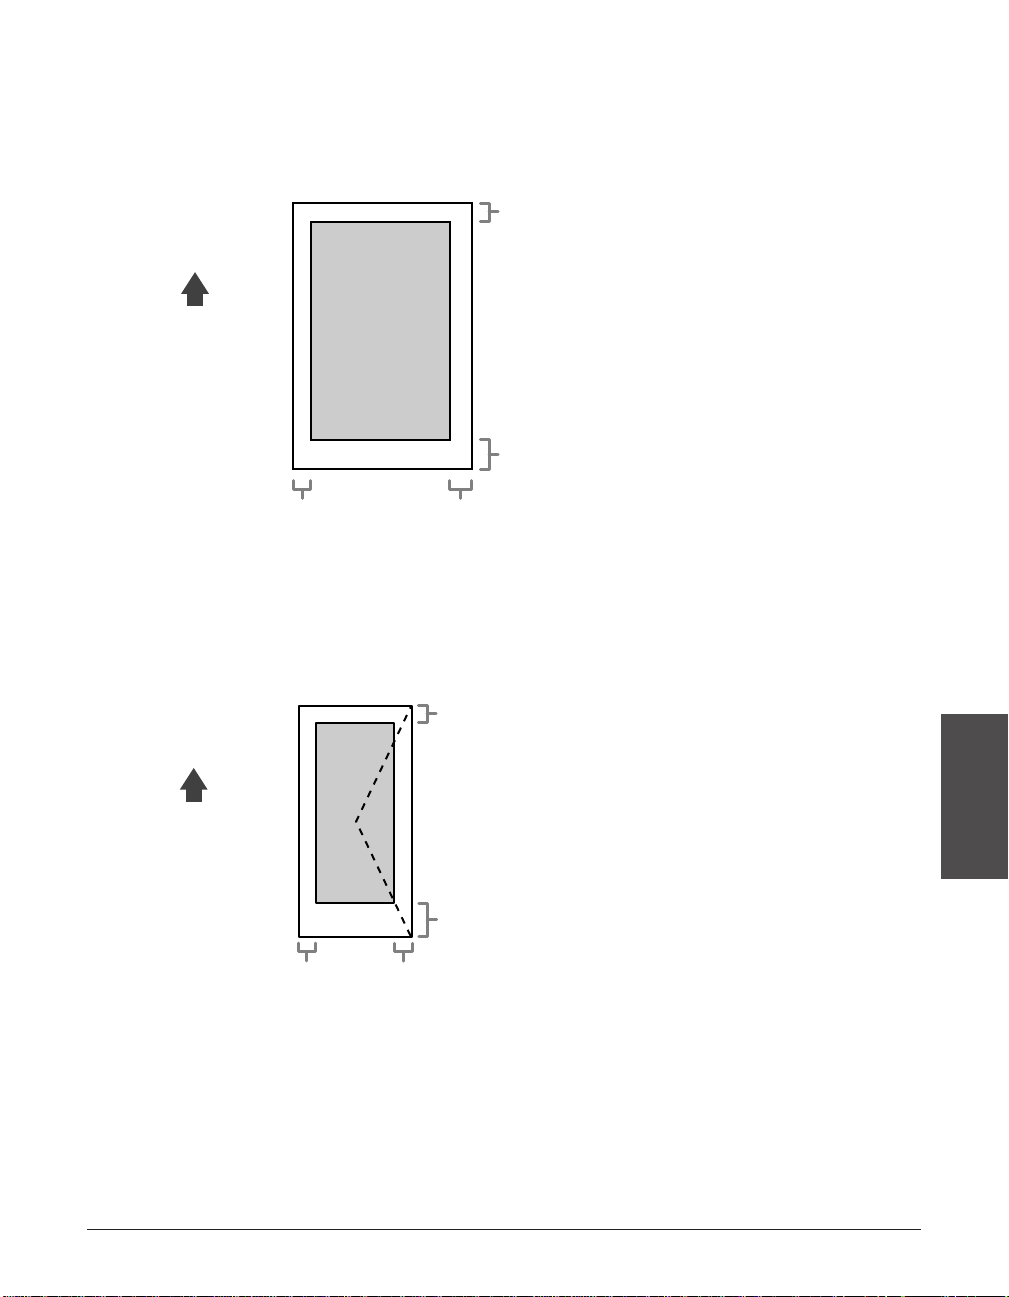
Chapter 5 Print Media Handling 5-3
Print Media
Handling
Printable Areas
3 Paper
The shaded area shows the printable area of letter-size paper.
3 Envelope
The shaded area shows the printable area of U.S. Commercial No. 10-size envelopes.
U.S. Commercial
No. 10
MAX. 0.39"
(MAX. 10 mm)
MAX. 0.16"
(MAX. 4 mm)
MAX. 0.2"
(MAX. 5 mm)
MAX. 0.16"
(MAX. 4 mm)
FEED
DIRECTION
MAX. 0.16"
(MAX. 4 mm)
MAX. 0.39"
(MAX. 10 mm)
MAX. 0.2"
(MAX. 5 mm)
MAX. 0.16"
(MAX. 4 mm)
Letter
FEED
DIRECTION
Page 58

5-4 Print Media Handling Chapter 5
Selecting and Loading Print Media
Paper
3 Selecting Paper
• To prevent paper jams in the multi-purpose tray, do not use any of the following:
– Wrinkled or creased paper – Curled or rolled paper
– Coated paper – Torn paper
– Damp paper – Onion skin or very thin paper
• The following types of paper do not print well:
– Highly textured paper – Very smooth paper
– Shiny paper
• Make sure the paper is free from dust, lint, and oil stains.
• Be sure to test paper before purchasing large quantities.
• Store all paper wrapped and on a flat surface until ready to use. Keep opened packs
in their original packaging, in a cool, dry location.
• Store paper at 64.4°–75.2°F (18°–24°C), 40%–60% relative humidity.
3 Loading Paper
For instructions on loading paper in the multi-purpose tray, see p. 2-15.
Envelopes
3 Selecting Envelopes
• Use standard envelopes with diagonal seams and flaps.
• To prevent jams in the multi-purpose tray, do not use the following:
–Envelopes with windows, holes, perforations, cutouts, and double flaps
–Envelopes made with special coated paper or deeply embossed paper
–Envelopes with peel-off sealing strips
–Envelopes with letters enclosed
• You may be able to load other size envelopes than those listed on the previous page.
However, Canon cannot guarantee consistent performance on these.
n
When printing on envelopes, be sure to use face-up delivery (1 p. 5-7).
Page 59
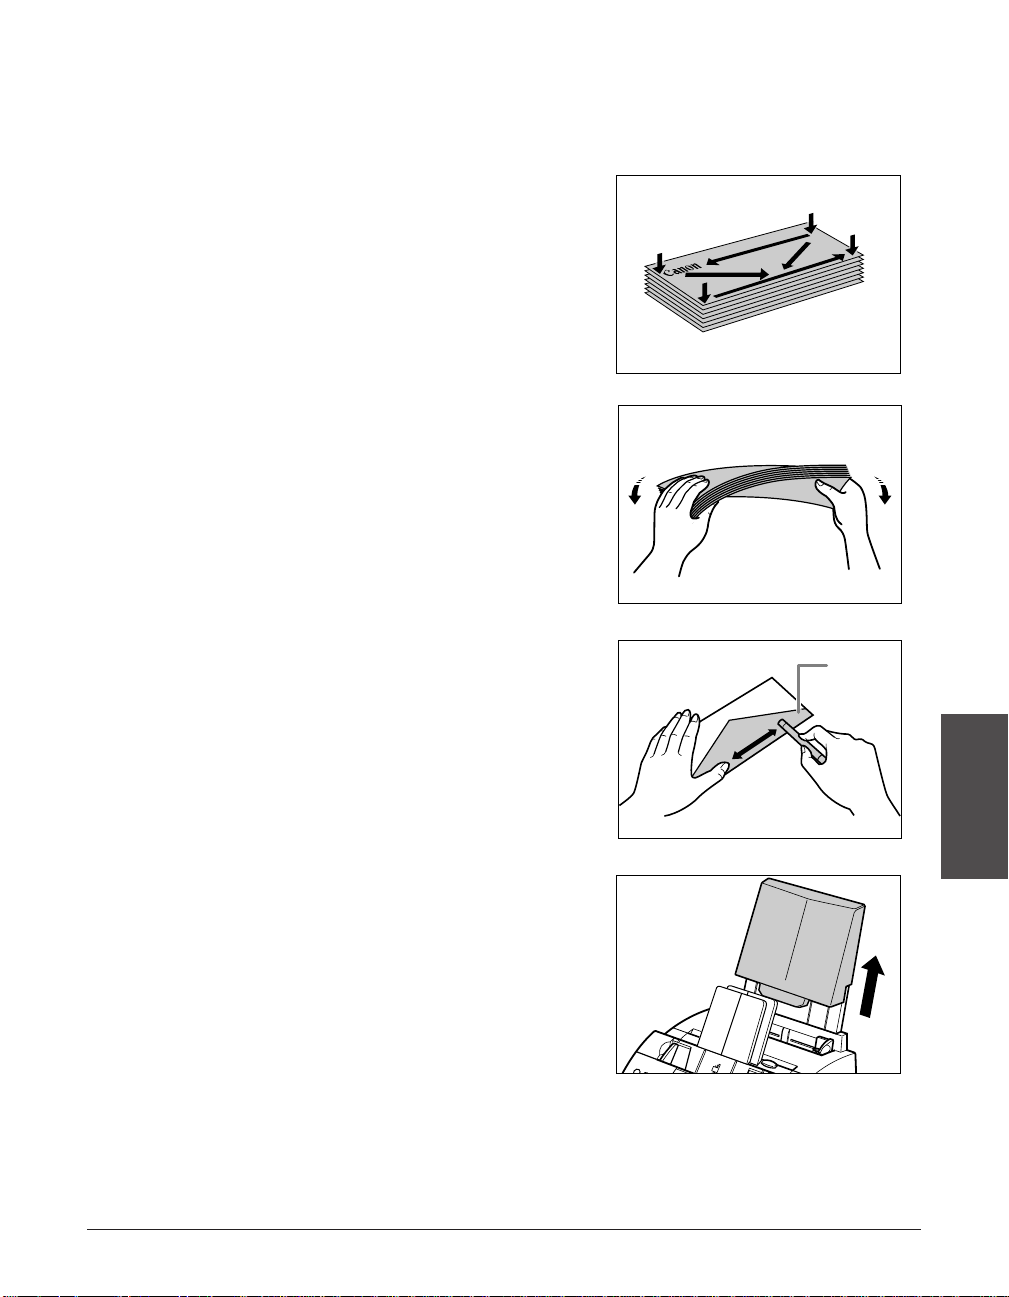
Chapter 5 Print Media Handling 5-5
Print Media
Handling
3 Loading Envelopes
Follow this procedure to load up to 7 envelopes in the multi-purpose tray:
1 Prepare the envelopes.
❚ Arrange the stack of envelopes on a
firm, clean surface, and press down
firmly on the edges to make the folds
crisp.
• Press all the way around the envelopes
to remove any curls and expel air from
inside the envelopes. Also, press firmly
on the area that corresponds to the
edges of the back flap.
❚ Remove any curling from the
envelopes by holding the edges
diagonally and bending them gently.
❚ Run a pen or other rounded object
along the back flaps to flatten them.
• The flaps should not bulge more than
0.2 in. (5 mm).
2 Remove the multi-purpose tray cover
from the unit.
FLAP
Page 60

5-6 Print Media Handling Chapter 5
3 Insert the stack into the multi-purpose
tray q (print side facing you), then
adjust the paper guides to the width of
the stack w.
4 Replace the multi-purpose tray cover.
• Be sure to replace this cover to prevent
dust accumulating inside the unit.
5 Adjust the paper delivery selector to
U (face-up delivery). For details,
see p. 5-7.
The unit is now ready to print.
Transparencies
3 Selecting Transparencies
• Use only special laser printer transparencies.
n
• When printing on transparencies, be sure to use face-up delivery (1 p. 5-7).
• To prevent the transparency from curling, remove it as soon as it exits the unit and place
it on a flat surface to cool.
3 Loading Transparencies
Load transparencies in the multi-purpose tray as for paper (1 p. 2-15). However, load
only one transparency at a time.
2
2
1
Page 61
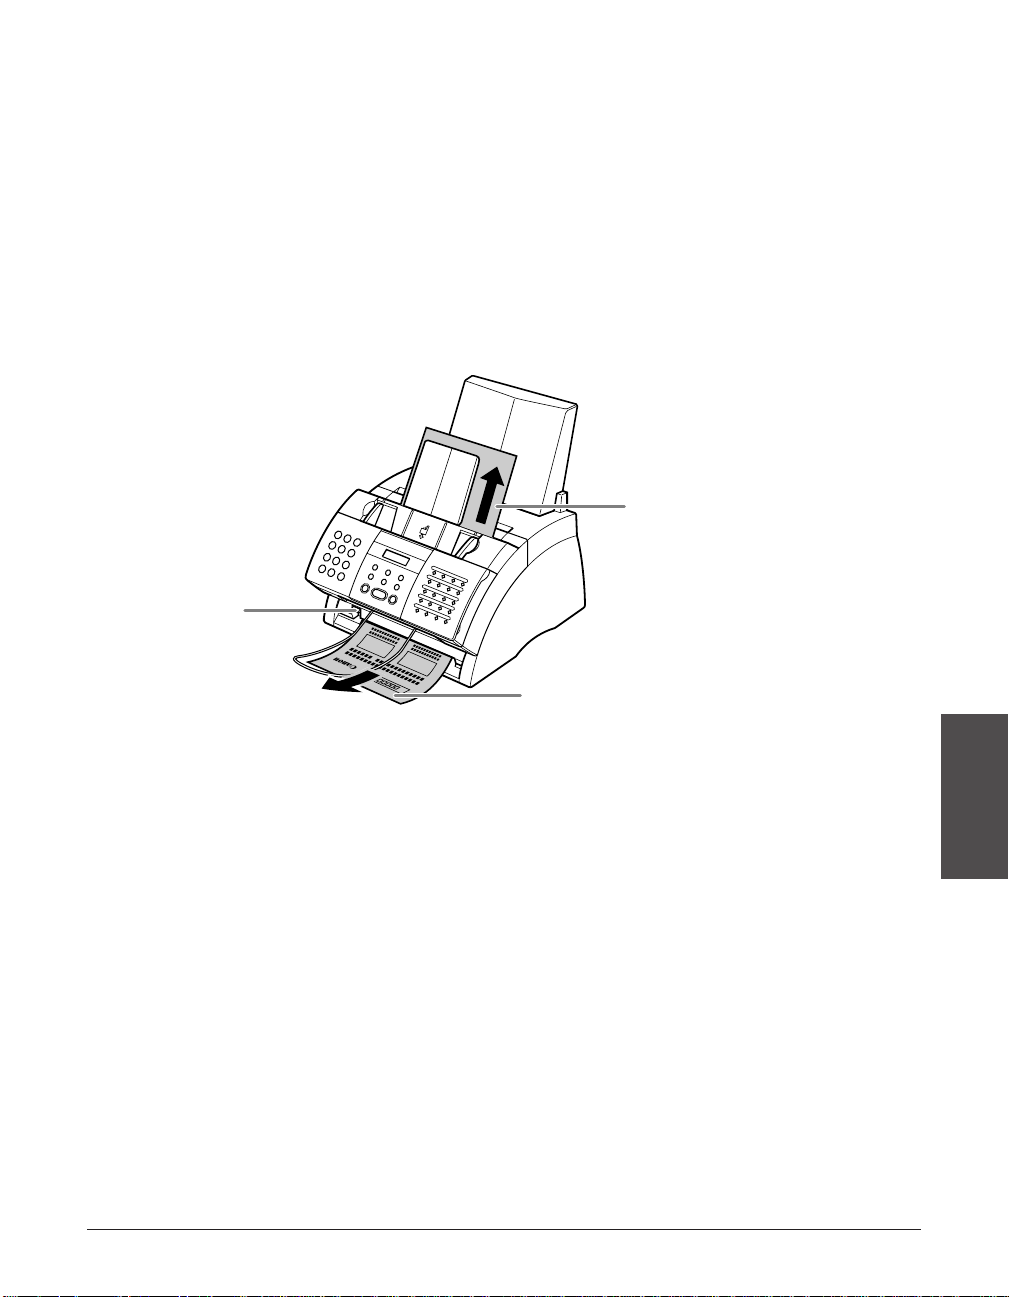
Chapter 5 Print Media Handling 5-7
Print Media
Handling
Selecting Face-Up or Face-Down Delivery
■ Paper Path
Understanding how paper feeds through the unit will help you determine which paper
delivery slot is appropriate for the print media and task you are performing.
First, the paper travels to the toner cartridge where a laser beam “draws” the print
image on the drum, which in turn applies toner to the paper. The paper travels to the
fixing assembly where the toner is “fixed” (fused) to the paper. It then exits the unit
through the face-up delivery slot (front of the unit) or the face-down delivery slot (top of
the unit).
■ Before Setting the Paper Delivery Selector
Before selecting paper delivery, be sure to take note of the following:
• Always set the paper delivery selector before printing.
• Changing paper delivery while the unit is printing will cause problems. Wait for the
printout to exit the unit completely before changing paper delivery.
• The face-down delivery slot can hold up to approximately 50 sheets of paper. To
prevent paper jams, remove paper from this slot before the count reaches 50.
• Make sure there is enough room for the paper to exit from the face-up delivery slot.
Remove each sheet as it is delivered from this slot.
• Never pull the paper as it comes out of the unit.
FACE-DOWN
DELIVERY
FACE-UP DELIVERY
PAPER
DELIVERY
SELECTOR
Page 62

5-8 Print Media Handling Chapter 5
• Select face-down delivery when:
–printing on paper.
–you want the printed pages to stack in the correct page order.
–you are printing a small number of pages.
–you only receive a small number of faxes, and of few pages.
–you will be faxing a document you have printed from your unit.
• Select face-up delivery when:
–printing on envelopes.
–printing on transparencies.
–you are expecting to print or receive a large number of pages, or plan to be away and
want to receive faxes during your absence. If this is the case, place your unit near the
edge of a table so that the pages can fall away from your unit without blocking the
face-up delivery slot. Place a container below your unit to collect the pages.
■ Setting the Paper Delivery Selector
Select face-up or face-down delivery with the paper delivery selector.
c
When using face-up delivery,you must remove each sheet as it is delivered.
Failure to do this may cause jams in the face-up delivery slot and result in damage
to your unit.
FACE-DOWN
DELIVERY (D)
FACE-UP
DELIVERY (
U)
Page 63

Chapter 5 Print Media Handling 5-9
Print Media
Handling
Changing the Paper Size Setting
The multi-purpose tray is factory-set for loading letter-size paper. If you want to load a
different paper size (1 p. 5-2), follow this procedure to change the paper size setting:
1 Open the one-touch speed dial panel.
2 Press Data Registration.
3 Press Set.
4 Use ∂ or ¨ to select PRINTER
SETTINGS.
5 Press Set.
6 Use ∂ or ¨ to select PAPER SIZE.
7 Press Set.
Ex:
8 Use ∂ or ¨ to select the paper size
you want for the multi-purpose tray.
• You can select from the following:
– LT R
– LGL
– CUSTOM
– A4
• For details on the paper sizes above,
see p. 5-2.
■ If you selected LTR, LGL, or A4 in step 8:
9 Press Set.
10 Press Stop to return to standby mode.
Ex:
■ If you selected CUSTOM in step 8:
9 Press Set.
Ex:
CUSTOM1/LONG
12/27 FaxTel
ECONOMY PRT
LTR
PAPER SIZE
RX REDUCTION
PRINTER SETTINGS
USER SETTINGS
DATA REGSTRATION
Page 64

5-10 Print Media Handling Chapter 5
10 Use ∂ or ¨ to select the custom
paper size setting.
• You can select from the following:
– CUSTOM1/LONG
– CUSTOM2/SHORT
• For details on the paper sizes above,
see p. 5-2.
11 Press Set.
12 Press Stop to return to standby mode.
Ex:
12/27 FaxTel
ECONOMY PRT
Page 65

Chapter 5 Print Media Handling 5-11
Print Media
Handling
Adjusting the Toner Saver Setting
By enabling the toner saver setting, you can reduce toner consumption of the toner
cartridge by approximately 30% to 40%. This will extend the toner cartridge life.
n
By enabling this setting, print quality will be reduced. For highest print quality, disable this
setting.
Follow this procedure to enable or disable the toner saver setting:
1 Open the one-touch speed dial panel.
2 Press Data Registration.
3 Press Set.
4 Use ∂ or ¨ to select PRINTER
SETTINGS.
5 Press Set.
6 Use ∂ or ¨ to select ECONOMY PRT.
7 Press Set.
Ex:
8 Use ∂ or ¨ to select the setting you
want.
• You can select from the following:
– ON (Enable toner saving)
– OFF (Disable toner saving)
9 Press Set.
10 Press Stop to return to standby mode.
Ex:
12/27 FaxTel
TONER SUPPLY LOW
OFF
ECONOMY PRT
RX REDUCTION
PRINTER SETTINGS
USER SETTINGS
DATA REGSTRATION
Page 66

5-12 Print Media Handling Chapter 5
Page 67

Chapter 6 Speed Dialing 6-1
Speed Dialing
Chapter 6
Speed Dialing
This chapter describes how to register and use speed dialing.
What is Speed Dialing?............................................................................6-2
Speed Dialing Methods..........................................................................6-2
Registering One-Touch Speed Dialing...................................................6-3
Registering Coded Speed Dialing...........................................................6-8
Registering Group Dialing.....................................................................6-13
Using Speed Dialing...............................................................................6-16
Sending a Document With Speed Dialing............................................6-16
Making a Telephone Call With Speed Dialing......................................6-17
Printing Speed Dialing Lists..................................................................6-18
Page 68

6-2 Speed Dialing Chapter 6
What is Speed Dialing?
Instead of having to dial a fax or telephone number using regular dialing (i.e. with the
numeric buttons), you can simplify the dialing procedure by registering the
fax/telephone number for speed dialing. This will reduce the number of buttons you
need to press to dial the fax/telephone number, making it convenient for frequently
dialed numbers.
Speed dialing also allows you to register several fax numbers under one speed dialing
button or code so that you can send a document to all those fax numbers in one
operation.
See below for details on the different speed dialing methods.
Speed Dialing Methods
Your unit offers the following speed dialing methods:
■ One-Touch Speed Dialing (2 p. 6-3)
Register a fax/telephone number under a one-touch speed dialing button so that you
only have to press one button to dial that fax/telephone number.
There are 24 one-touch speed dialing buttons available for you to register
fax/telephone numbers.
■ Coded Speed Dialing (2 p. 6-8)
Register a fax/telephone number under a coded speed dialing code so that you only
have to press Coded Dial and enter the registered two-digit code (with the numeric
buttons) to dial that fax/telephone number.
There are 100 codes available for you to register fax/telephone numbers.
■ Group Dialing (2 p. 6-13)
“Group” up to 123 fax numbers together, so you can send to those fax numbers in one
quick operation. Agroup is registered under a one-touch speed dialing button or a
coded speed dialing code.
Page 69

Chapter 6 Speed Dialing 6-3
Speed Dialing
Registering One-Touch Speed Dialing
By registering a fax/telephone number under a one-touch speed dialing button, you can
simplify dialing of that number to the press of a single button.
When you register one-touch speed dialing, you will:
–assign one of the 24 one-touch speed dialing buttons for the fax/telephone number
you want to register.
–register the fax/telephone number under that one-touch speed dialing button.
–register a name for the one-touch speed dialing button. This name appears in speed
dialing lists, in reports, and at the top of the recipient’s fax if you use memory sending
(1 p. 7-5).
–set the transmission type for the fax number you have registered. You can set a
subaddress and/or password if the other party’s fax machine requires these settings.
Follow this procedure to register one-touch speed dialing:
1 Open the one-touch speed dial panel.
2 Press Data Registration.
3 Use ∂ or ¨ to select TEL
REGISTRATION.
4 Press Set twice.
Ex:
5 Use ∂ or ¨ to select the one-touch
Ex:
speed dialing button (01 to 24) under
which you want to register the
fax/telephone number.
• If a one-touch speed dialing button has
already been registered, the number
registered under that button appears.
• If a group is already registered under a
one-touch speed dialing button, GROUP
DIAL appears.
6 Press Set twice.
Ex:
TEL=_
TELEPHONE NUMBER
04=
01=
1-TOUCH SPD DIAL
TEL REGISTRATION
DATA REGSTRATION
Page 70

6-4 Speed Dialing Chapter 6
7 Use the numeric buttons to enter the
Ex:
fax/telephone number you want to
register (max. 120 digits, including
spaces and pauses).
• To enter a space, press Space. Spaces
are optional and are ignored during
dialing.
• To enter a pause, press Pause
(1 p. 9-2).
• To correct a mistake in the number,
press ¬ to delete the rightmost digit.
Alternatively, press Clear to delete the
entire number.
• To cancel one-touch speed dialing for
the button you selected, press Clear
then Set. Press Stop to return to
standby mode. The fax/telephone
number and name registered under that
button will be deleted.
• If you have already registered a number
that you want to keep, ignore this step.
8 Press Set twice.
Ex:
9 Use the numeric buttons to enter a
Ex:
name for the one-touch speed dialing
button (max. 16 characters, including
spaces).
• If you are unsure how to enter
characters, see p. 3-2.
• If you have already registered a name
that you want to keep, ignore this step.
10 Press Set.
OPTIONAL SETTING
DATA ENTRY OK
Canon EUROPA
:A
_:A
NAME
DATA ENTRY OK
TEL=20 545 8545_
Page 71

Chapter 6 Speed Dialing 6-5
Speed Dialing
11 This completes the basic one-touch
speed dialing settings.
To continue registering other one-
Ex:
touch speed dialing buttons, press
Data Registration and repeat the
procedure from step 5.
-orTo end registering one-touch speed
Ex:
dialing buttons, press Stop to return to
standby mode.
-orTo register the transmission type for
the current button you are registering,
continue with the steps below.
12 Press Set.
Ex:
13 Use ∂ or ¨ to select ON.
14 Press Set twice.
Ex:
15 Use ∂ or ¨ to select the transmission
type setting you want.
• You can select from the following:
– REGULAR TX
Normal transmission.
– PSWD/SUBADDRESS
Transmission with a subaddress
and/or password. For details, see the
following page.
REGULAR TX
TX TYPE
ON
OFF
12/27 FaxTel
05=
Page 72

6-6 Speed Dialing Chapter 6
■ If you selected REGULAR TX in step 15:
16 Press Set.
Ex:
17 Press Stop to return to standby mode.
Ex:
■ If you selected PSWD/SUBADDRESS in step 15:
The other party’s fax machine may require an ITU-T-standard subaddress and/or
password to receive faxes. The subaddress/password you register here must match
exactly the one(s) registered on the other party’s fax machine. Contact the other party
to check their settings.
When sending with a subaddress/password, the other party’s fax machine receives the
fax only if your subaddress/password matches theirs. Their fax machine then handles
the received fax according to the feature they are using.
You also need to register a subaddress/password when polling a fax machine that
requires these settings (1 p. 9-9).
Continue with the steps below to register a subaddress/password:
16 Press Set twice.
Ex:
17 If a subaddress is required, use the
Ex:
numeric buttons to enter it (max. 20
digits).
• If a subaddress is not required, ignore
this step.
• If you have already registered a
subaddress that you want to keep,
ignore this step.
18 Press Set twice.
Ex:
19 If a password is required, use the
Ex:
numeric buttons to enter it (max. 20
digits).
• If a password is not required, ignore this
step.
• If you have already registered a
password that you want to keep, ignore
this step.
4321
PASSWORD
1234
SUBADDRESS
12/27 FaxTel
05=
Page 73

Chapter 6 Speed Dialing 6-7
Speed Dialing
20 Press Set.
Ex:
21 To continue registering other one-
touch speed dialing buttons, repeat
the procedure from step 5.
-orPress Stop to return to standby mode.
Ex:
n
• Use the destination labels provided with your unit to label the one-touch speed dialing
buttons. Stick the labels above each corresponding button.
• To check your entries, you can print a list of all the numbers and names registered for
one-touch speed dialing (1 p. 6-18).
12/27 FaxTel
05=
Page 74

6-8 Speed Dialing Chapter 6
Registering Coded Speed Dialing
By registering a fax/telephone number under a coded speed dialing code, you can
simplify dialing of that number to pressing Coded Dial and entering the registered twodigit code.
When you register coded speed dialing, you will:
–assign one of the 100 codes for the fax/telephone number you want to register.
–register the fax/telephone number under that coded speed dialing code.
–register a name for the coded speed dialing code. This name appears in speed
dialing lists, in reports, and at the top of the recipient’s fax if you use memory sending
(1 p. 7-5).
–set the transmission type for the fax number you have registered. You can set a
subaddress and/or password if the other party’s fax machine requires these settings.
Follow this procedure to register coded speed dialing:
1 Open the one-touch speed dial panel.
2 Press Data Registration.
3 Use ∂ or ¨ to select TEL
REGISTRATION.
4 Press Set.
5 Use ∂ or ¨ to select CODED SPEED
DIAL.
6 Press Set.
Ex:
7 Use ∂ or ¨ to select the coded speed
Ex:
dialing code (00 to 99) under which
you want to register the fax/telephone
number.
• Alternatively, press Coded Dial and use
the numeric buttons to enter the code.
• If a coded speed dialing code has
already been registered, the number
registered under that code appears.
• If a group is already registered under a
coded speed dialing code, GROUP DIAL
appears.
A01=
A00=
CODED SPEED DIAL
1-TOUCH SPD DIAL
TEL REGISTRATION
DATA REGSTRATION
Page 75

Chapter 6 Speed Dialing 6-9
Speed Dialing
8 Press Set twice.
Ex:
9 Use the numeric buttons to enter the
Ex:
fax/telephone number you want to
register (max. 120 digits, including
spaces and pauses).
• To enter a space, press Space. Spaces
are optional and are ignored during
dialing.
• To enter a pause, press Pause
(1 p. 9-2).
• To correct a mistake in the number,
press ¬ to delete the rightmost digit.
Alternatively, press Clear to delete the
entire number.
• To cancel coded speed dialing for the
code you selected, press Clear then
Set. Press Stop to return to standby
mode. The fax/telephone number and
the name registered under that code will
be deleted.
• If you have already registered a number
that you want to keep, ignore this step.
10 Press Set twice.
Ex:
11 Use the numeric buttons to enter a
Ex:
name for the coded speed dialing
code (max. 16 characters, including
spaces).
• If you are unsure how to enter
characters, see p. 3-2.
• If you have already registered a name
that you want to keep, ignore this step.
Canon Inc.
:A
_:A
NAME
DATA ENTRY OK
TEL=3 3758 2111_
TEL=_
TELEPHONE NUMBER
Page 76

6-10 Speed Dialing Chapter 6
12 Press Set.
13 This completes the basic coded speed
dialing settings.
To continue registering other coded
Ex:
speed dialing codes, press Data
Registration and repeat the
procedure from step 7.
-orTo end registering coded speed
Ex:
dialing codes, press Stop to return
to standby mode.
-orTo register the transmission type for
the current code you are registering,
continue with the steps below.
14 Press Set.
Ex:
15 Use ∂ or ¨ to select ON.
16 Press Set twice.
Ex:
17 Use ∂ or ¨ to select the transmission
type setting you want.
• You can select from the following:
– REGULAR TX
Normal transmission.
– PSWD/SUBADDRESS
Transmission with a subaddress
and/or password. For details, see the
following page.
REGULAR TX
TX TYPE
ON
OFF
12/27 FaxTel
A02=
OPTIONAL SETTING
DATA ENTRY OK
Page 77

Chapter 6 Speed Dialing 6-11
Speed Dialing
■ If you selected REGULAR TX in step 17:
18 Press Set.
Ex:
19 Press Stop to return to standby mode.
Ex:
■ If you selected PSWD/SUBADDRESS in step 17:
The other party’s fax machine may require an ITU-T-standard subaddress and/or
password to receive faxes. The subaddress/password you register here must match
exactly the one(s) registered on the other party’s fax machine. Contact the other party
to check their settings.
When sending with a subaddress/password, the other party’s fax machine receives the
fax only if your subaddress/password matches theirs. Their fax machine then handles
the received fax according to the feature they are using.
You also need to register a subaddress/password when polling a fax machine that
requires these settings (1 p. 9-9).
Continue with the steps below to register a subaddress/password:
18 Press Set twice.
Ex:
19 If a subaddress is required, use the
Ex:
numeric buttons to enter it (max. 20
digits).
• If a subaddress is not required, ignore
this step.
• If you have already registered a
subaddress that you want to keep,
ignore this step.
20 Press Set twice.
Ex:
21 If a password is required, use the
Ex:
numeric buttons to enter it (max. 20
digits).
• If a password is not required, ignore this
step.
• If you have already registered a
password that you want to keep, ignore
this step.
4321
PASSWORD
1234
SUBADDRESS
12/27 FaxTel
A02=
Page 78

6-12 Speed Dialing Chapter 6
22 Press Set.
Ex:
23 To continue registering other coded
speed dialing codes, repeat the
procedure from step 7.
-orPress Stop to return to standby mode.
Ex:
n
To check your entries, you can print a list of all the numbers and names registered for
coded speed dialing (
1 p. 6-18). You may want to keep this list near your unit to refer to it
when dialing.
12/27 FaxTel
A02=
Page 79

Chapter 6 Speed Dialing 6-13
Speed Dialing
Registering Group Dialing
If you frequently send documents to the same group of fax numbers, you can “group”
these numbers under a one-touch speed dialing button or coded speed dialing code.
You can then send to all the fax numbers in the group in one quick and simple
operation.
When you register group dialing, you will:
–assign a one-touch speed dialing button or a coded speed dialing code for the group
of fax numbers you want to register.
–group up to 123 fax numbers under that button or code. The fax numbers must
already be registered for one-touch or coded speed dialing (i.e. you cannot enter the
fax numbers with the numeric buttons).
–register a name for the group. This name appears in speed dialing lists.
Follow this procedure to register group dialing:
1 Open the one-touch speed dial panel.
2 Press Data Registration.
3 Use ∂ or ¨ to select TEL
REGISTRATION.
4 Press Set.
5 Use ∂ or ¨ to select GROUP DIAL.
6 Press Set.
Ex:
7 Select a one-touch speed dialing
button or coded speed dialing code
under which you want to register the
group.
❚ To register a group under a one-
touch speed dialing button:
Use ∂ or ¨ to select the one-touch
Ex:
speed dialing button (01 to 24)
under which you want to register the
group.
• If a one-touch speed dialing button has
already been registered, 1-TOUCH
SPD or GROUP DIAL appears.
03=
01=1-TOUCH SPD
GROUP DIAL
1-TOUCH SPD DIAL
TEL REGISTRATION
DATA REGSTRATION
Page 80

6-14 Speed Dialing Chapter 6
❚ To register a group under a coded
speed dialing code:
Press Coded Dial, then use the
Ex:
numeric buttons to enter the coded
speed dialing code (00 to 99) under
which you want to register the group.
• If a coded speed dialing code has
already been registered, CODED
SPEED or GROUP DIAL appears.
n
If you wish to register a group
under a button or code already
registered for speed dialing, you
must delete the previous
information first (1 pp. 6-3, 6-8).
8 Press Set twice.
Ex:
9 Enter the one-touch and/or coded
speed dialing numbers you want to
register in the group.
❚ To enter a fax number registered
for one-touch speed dialing:
Press the one-touch speed dialing
Ex:
button(s) assigned to the number(s)
you want to register in the group.
❚ To enter a fax number registered
for coded speed dialing:
Press Coded Dial, then use the
Ex:
numeric buttons to enter the twodigit code assigned to the number
you want to register in the group.
Repeat for other codes.
• The number registered under the
button or code you enter appears.
• You can also enter groups registered
under buttons or codes. In this case,
GROUP DIAL appears.
• You cannot enter numbers not
registered for one-touch or coded
speed dialing (i.e. with the numeric
buttons).
A01=03 3758 2111
01=905 795 1111
TEL=
TELEPHONE NUMBER
A21=
Page 81

Chapter 6 Speed Dialing 6-15
Speed Dialing
• To add fax numbers to a previously
registered group, simply enter them as
explained in this step.
• If you enter the wrong destination, or if
you want to delete a destination
already registered in a group, use ∂ or
¨ to select that entry, then press
Clear.
• To cancel group dialing for the button
or code you selected, press Clear until
all entries are deleted, then press Set.
Press Stop to return to standby mode.
All fax numbers and the name of the
group registered under that button or
code will be deleted.
10 Press Set twice.
Ex:
11 Use the numeric buttons to enter a
Ex:
name for the group (max.16
characters, including spaces).
• If you are unsure how to enter
characters, see p. 3-2.
• If you have already registered a name
that you want to keep, ignore this step.
12 Press Set.
Ex:
13 To continue registering other groups,
repeat the procedure from step 7.
-orPress Stop to return to standby mode.
Ex:
n
• If you registered groups under one-touch speed dialing buttons, use the destination
labels provided with your unit to label the buttons. Stick the labels above each
corresponding button.
• To check your entries, you can print a list of all the numbers and names registered for
group dialing (1 p. 6-18). You may want to keep this list near your unit to refer to it when
dialing.
12/27 FaxTel
04=1-TOUCH SPD
DATA ENTRY OK
Canon GROUP 2_ :1
_:A
NAME
Page 82

6-16 Speed Dialing Chapter 6
Using Speed Dialing
Once you have registered fax/telephone numbers for one-touch speed dialing
(1 p. 6-3), coded speed dialing (1 p. 6-8), or group dialing (1 p. 6-13), you can begin
to send documents or make telephone calls with speed dialing.
Sending a Document With Speed Dialing
Follow this procedure to send a document using one-touch speed dialing, coded speed
dialing, or group dialing:
1 Load the document, face down in the
Ex:
ADF (1 p. 4-3).
• To adjust the resolution and contrast,
(Currently used memory)
see pp. 7-2, 7-3.
• You may be unable to send if the
memory used (shown in the LCD) is (Standby to scan)
close to 100%. To free up space in the
unit’s memory: print, send, or delete any
documents you no longer need to be
stored in memory (1 p. 9-4).
2 Enter the one-touch speed dialing
button or coded speed dialing code
assigned to the fax number or group
you want to send to.
❚ One-touch speed dialing button:
Press the one-touch speed dialing
button you want.
❚ Coded speed dialing code:
Press Coded Dial, then use the
numeric buttons to enter the twodigit code you want.
• If you make a mistake, press Stop and
repeat this step.
• NO TEL # appears if no fax/telephone
number or group is assigned to the
speed dialing button or code you
pressed.
3 Press Start/Copy to begin scanning
for sending, or wait a few seconds for
your unit to begin scanning
automatically.
• If you do not want your unit to begin
scanning automatically after a few
seconds, disable the TIME OUT setting
(
1 p. 14-6).
DOCUMENT READY
MEMORY USED 0%
Page 83

Chapter 6 Speed Dialing 6-17
Speed Dialing
Making a Telephone Call With Speed Dialing
Follow this procedure to dial a telephone number registered for one-touch or coded
speed dialing on your unit:
1 Make sure you have connected the
optional handset or a telephone to
your unit (1 p. 2-7).
2 Press Hook.
• You can also lift the handset instead of
pressing Hook.
3 Enter the one-touch speed dialing
button or coded speed dialing code
assigned to the telephone number you
want to dial.
❚ One-touch speed dialing button:
Press the one-touch speed dialing
button you want.
❚ Coded speed dialing code:
Press Coded Dial, then use the
numeric buttons to enter the twodigit code you want.
• If you make a mistake, press Hook or
hang up the handset and start again
from step 2.
• NO TEL # appears if no fax/telephone
number is assigned to the speed
dialing button or code you pressed.
• NOT AVAILABLE appears if you
entered a speed dialing button or code
assigned to a group of fax numbers.
4 When you hear the other party answer
the call, pick up the handset to start
talking.
5 When you are finished, simply hang
up.
TEL=
Page 84

6-18 Speed Dialing Chapter 6
Printing Speed Dialing Lists
To check the fax/telephone numbers and names registered for speed dialing, you can
print the speed dialing lists. You may want to keep these lists near your unit to refer to
them when dialing.
Follow this procedure to print speed dialing lists:
1 Open the one-touch speed dial panel.
2 Press Report.
3 Use ∂ or ¨ to select SPEED DIAL
LIST.
4 Press Set.
5 Use ∂ or ¨ to select the list you want
to print.
• You can select from the following:
– 1-TOUCH LIST
– CODED DIAL LIST
– 1-TOUCH (DETAIL)
– CODED (DETAIL)
– GROUP DIAL LIST
■ If you selected GROUP DIAL LIST in step 5:
6 Press Set.
• The unit prints the list.
■ If you selected a list other than GROUP DIAL LIST in step 5:
6 Press Set.
7 Select in what order you want the lists
to be printed.
Press T to print the list with the
destination names (CONNECTION ID
on the reports) in alphabetical order
(sorted).
-orPress # to print the list in code or
button order (unsorted).
• The unit prints the list.
Samples of the lists are shown on the following pages.
YES=(A) NO=(#)
SORTED OUTPUT
1-TOUCH LIST
SPEED DIAL LIST
ACTIVITY REPORT
Page 85
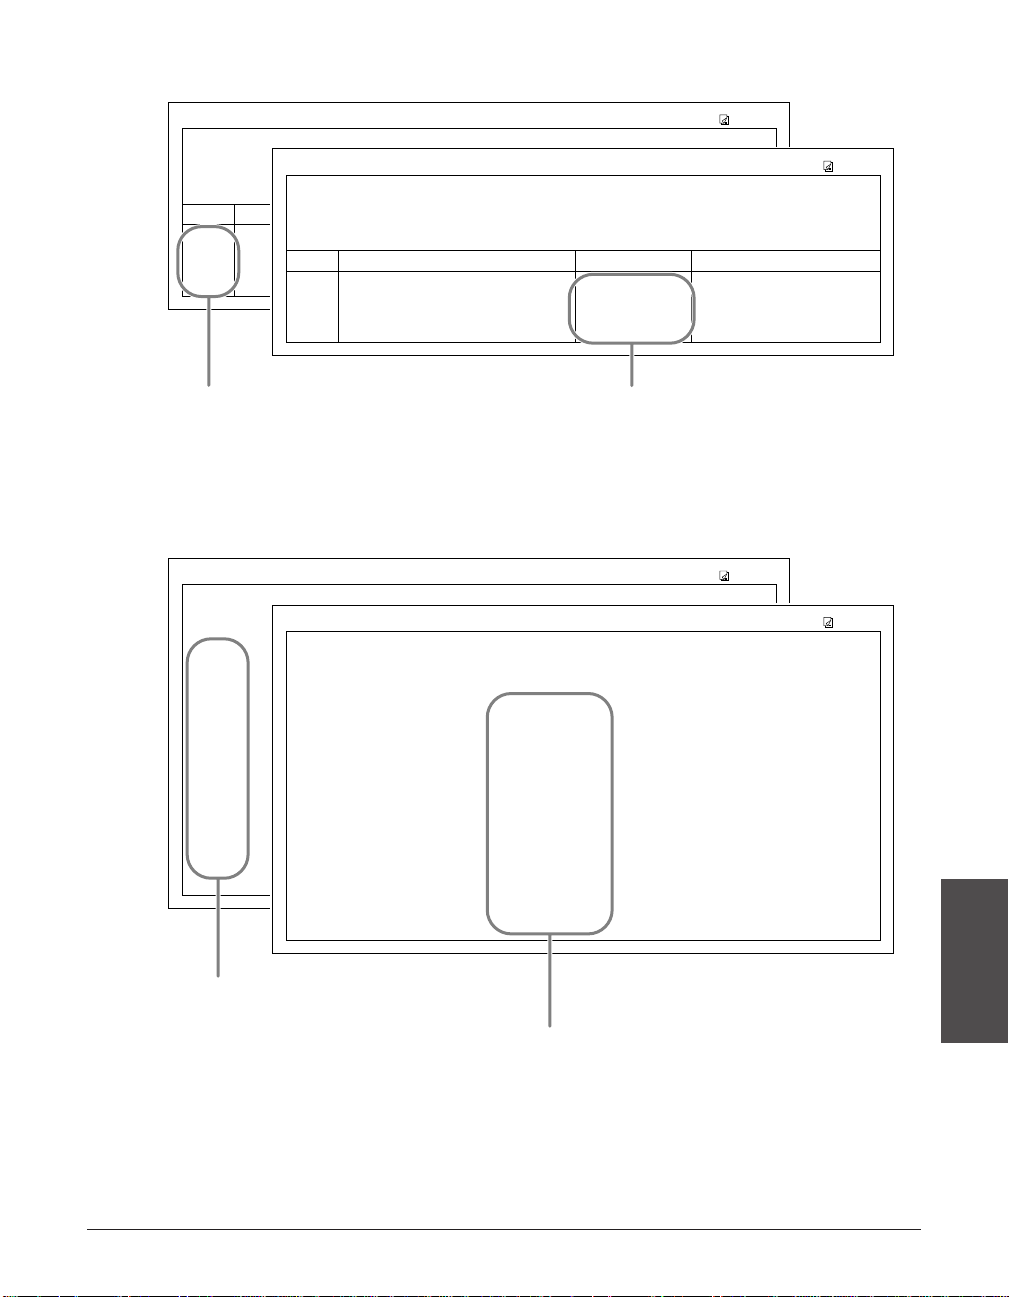
Chapter 6 Speed Dialing 6-19
Speed Dialing
■ 1-TOUCH SPD DIAL LIST 1
■ 1-TOUCH SPD DIAL LIST 2 (Detailed List)
***********************************
***********************************
*** ***
1-TOUCH SPD DIAL LIST 2
[ 01] CONNECTION TEL 905 795 1111
CONNECTION ID Canon CANADA
TX TYPE REGULAR TX
[ 03] CONNECTION TEL GROUP DIAL
CONNECTION ID GROUP 2
[ 04] CONNECTION TEL 2 50921
CONNECTION ID Canon ITALIA
TX TYPE REGULAR TX
[ 05] CONNECTION TEL 1 432 2060
CONNECTION ID Canon OPTICS
TX TYPE PSWD/SUBADD.
SUBADDRESS 1323
[ 12] CONNECTION TEL 2 887 0166
CONNECTION ID Canon AUSTRALIA
TX TYPE REGULAR TX
12/27/2001 17:23 FAX 123 4567 CANON 001
***********************************
***********************************
*** ***
1-TOUCH SPD DIAL LIST 2
[ 12] CONNECTION TEL 2 887 0166
CONNECTION ID Canon AUSTRALIA
TX TYPE REGULAR TX
[ 01] CONNECTION TEL 905 795 1111
CONNECTION ID Canon CANADA
TX TYPE REGULAR TX
[ 03] CONNECTION TEL GROUP DIAL
CONNECTION ID Canon GROUP 2
[ 04] CONNECTION TEL 2 50921
CONNECTION ID Canon ITALIA
TX TYPE REGULAR TX
[ 05] CONNECTION TEL 1 432 2060
CONNECTION ID Canon OPTICS
TX TYPE PSWD/SUBADD.
SUBADDRESS 1323
12/27/2001 17:23 FAX 123 4567 CANON 001
IF YOU PRESS T IN STEP 7 (1 p. 6-18),
THE DESTINATIONS ARE LISTED IN
ALPHABETICAL ORDER (SORTED).
IF YOU PRESS # IN STEP 7 (1 p. 6-18),
THE DESTINATIONS ARE LISTED IN
BUTTON ORDER (UNSORTED).
***********************************
***********************************
*** ***
1-TOUCH SPD DIAL LIST 1
NO. CONNECTION TEL CONNECTION ID TX TYPE
[ 01] 905 795 1111 Canon CANADA REGULAR TX
[ 03] GROUP DIAL GROUP 2
[ 04] 2 50921 Canon ITALIA REGULAR TX
[ 05] 1 432 2060 Canon OPTICS PSWD/SUBADD.
[ 12] 2 887 0166 Canon AUSTRALIA REGULAR TX
12/27/2001 17:23 FAX 123 4567 CANON 001
***********************************
***********************************
*** ***
1-TOUCH SPD DIAL LIST 1
NO. CONNECTION TEL CONNECTION ID TX TYPE
[ 12] 2 887 0166 Canon AUSTRALIA REGULAR TX
[ 01] 905 795 1111 Canon CANADA REGULAR TX
[ 03] GROUP DIAL Canon GROUP 2
[ 04] 2 50921 Canon ITALIA REGULAR TX
[ 05] 1 432 2060 Canon OPTICS PSWD/SUBADD.
12/27/2001 17:23 FAX 123 4567 CANON 001
IF YOU PRESS T IN STEP 7 (1 p. 6-18),
THE DESTINATIONS ARE LISTED IN
ALPHABETICAL ORDER (SORTED).
IF YOU PRESS # IN STEP 7 (1 p. 6-18),
THE DESTINATIONS ARE LISTED IN
BUTTON ORDER (UNSORTED).
Page 86

6-20 Speed Dialing Chapter 6
■ CODED SPEED DIAL LIST 1
■ CODED SPEED DIAL LIST 2 (Detailed List)
[A 00] CONNECTION TEL 2131 1250
CONNECTION ID Canon DEUTSCH.
TX TYPE REGULAR TX
[
A 01] CONNECTION TEL 03 3758 2111
CONNECTION ID Canon TOKYO
TX TYPE REGULAR TX
[
A 02] CONNECTION TEL 1 49 39 25 25
CONNECTION ID Canon FRANCE
TX TYPE REGULAR TX
[
A 03] CONNECTION TEL 516p488 6700
CONNECTION ID Canon U.S.A.
TX TYPE REGULAR TX
[
A 21] CONNECTION TEL GROUP DIAL
CONNECTION ID Canon GROUP 1
[
A 32] CONNECTION TEL 81 773 3173
CONNECTION ID Canon UK
TX TYPE PSWD/SUBADD.
SUBADDRESS 1323
12/27/2001 17:23 FAX 123 4567 CANON 001
***********************************
***********************************
*** ***
CODED SPEED DIAL LIST 2
[A 00] CONNECTION TEL 2131 1250
CONNECTION ID Canon DEUTSCH.
TX TYPE REGULAR TX
[
A 02] CONNECTION TEL 1 49 39 25 25
CONNECTION ID Canon FRANCE
TX TYPE REGULAR TX
[
A 21] CONNECTION TEL GROUP DIAL
CONNECTION ID Canon GROUP 1
[
A 01] CONNECTION TEL 03 3758 2111
CONNECTION ID Canon TOKYO
TX TYPE REGULAR TX
[
A 03] CONNECTION TEL 516p488 6700
CONNECTION ID Canon U.S.A.
TX TYPE REGULAR TX
[
A 32] CONNECTION TEL 81 773 3173
CONNECTION ID Canon UK
TX TYPE PSWD/SUBADD.
SUBADDRESS 1323
12/27/2001 17:23 FAX 123 4567 CANON 001
***********************************
***********************************
*** ***
CODED SPEED DIAL LIST 2
IF YOU PRESS T IN STEP 7 (1 p. 6-18),
THE DESTINATIONS ARE LISTED IN
ALPHABETICAL ORDER (SORTED).
IF YOU PRESS # IN STEP 7 (1 p. 6-18),
THE DESTINATIONS ARE LISTED IN CODE
ORDER (UNSORTED).
***********************************
***********************************
*** ***
CODED SPEED DIAL LIST 1
NO. CONNECTION TEL CONNECTION ID TX TYPE
[
A 00] 2131 1250 Canon DEUTSCH. REGULAR TX
[
A 01] 03 3758 2111 Canon TOKYO REGULAR TX
[
A 02] 1 49 39 25 25 Canon FRANCE REGULAR TX
[
A 03] 516p488 6700 Canon U.S.A. REGULAR TX
[
A 21] GROUP DIAL Canon GROUP 1
[
A 32] 81 773 3173 Canon UK PSWD/SUBADD.
12/27/2001 17:23 FAX 123 4567 CANON 001
***********************************
***********************************
*** ***
CODED SPEED DIAL LIST 1
NO. CONNECTION TEL CONNECTION ID TX TYPE
[
A 00] 2131 1250 Canon DEUTSCH. REGULAR TX
[
A 02] 1 49 39 25 25 Canon FRANCE REGULAR TX
[
A 21] GROUP DIAL Canon GROUP 1
[
A 01] 03 3758 2111 Canon TOKYO REGULAR TX
[
A 03] 516p488 6700 Canon U.S.A. REGULAR TX
[
A 32] 81 773 3173 Canon UK PSWD/SUBADD.
12/27/2001 17:23 FAX 123 4567 CANON 001
IF YOU PRESS T IN STEP 7 (1 p. 6-18),
THE DESTINATIONS ARE LISTED IN
ALPHABETICAL ORDER (SORTED).
IF YOU PRESS # IN STEP 7 (1 p. 6-18),
THE DESTINATIONS ARE LISTED IN CODE
ORDER (UNSORTED).
Page 87

Chapter 6 Speed Dialing 6-21
Speed Dialing
■ GROUP DIAL LIST
***************************
***************************
*** ***
GROUP DIAL LIST
[ 03] Canon GROUP 2 [ 04] 2 50921 Canon ITALIA
[A 00] 2131 1250 Canon DEUTSCH.
[A 02] 1 49 39 25 25 Canon FRANCE
[A 32] 81 773 3173 Canon UK
[
A 21] Canon GROUP 1 [ 01] 905 795 1111 Canon CANADA
[A 03] 516p488 6700 Canon U.S.A.
12/27/2001 17:23 FAX 123 4567 CANON 001
Page 88

6-22 Speed Dialing Chapter 6
Page 89

Chapter 7 Sending Faxes 7-1
Sending Faxes
Chapter 7
Sending Faxes
This chapter describes all the necessary steps to send faxes and use the different
sending features.
Preparing to Send a Fax..........................................................................7-2
Documents You Can Fax........................................................................7-2
Setting the Scanning Resolution............................................................7-2
Setting the Scanning Contrast................................................................7-3
Dialing Methods......................................................................................7-4
Sending Methods......................................................................................7-5
Memory Sending ....................................................................................7-5
Manual Sending Via the Handset...........................................................7-6
Canceling Sending...................................................................................7-8
Redialing When the Line is Busy............................................................7-9
Manual Redialing....................................................................................7-9
Canceling Manual Redialing...............................................................7-9
Automatic Redialing................................................................................7-9
What is Automatic Redialing?............................................................7-9
Canceling Automatic Redialing...........................................................7-9
Setting the Options for Automatic Redialing....................................7-10
Sending the Same Document to Several Fax Numbers
(Sequential Broadcasting)..................................................................7-12
Delayed Sending.....................................................................................7-14
Scanning a Document into Memory for Delayed Sending...................7-14
Printing a Document Set for Delayed Sending ....................................7-16
Deleting a Document Set for Delayed Sending ...................................7-17
Page 90

7-2 Sending Faxes Chapter 7
Preparing to Send a Fax
Documents You Can Fax
For information on the types of documents you can fax, their requirements, and details
on loading documents, see Chapter 4.
Setting the Scanning Resolution
You can set the scanning resolution of documents you send. The higher the resolution
the higher the output quality at the other end, but the slower the transmission speed.
Adjust the scanning resolution according to the type of document you are sending.
If you are sending a document that requires some pages to be scanned at a different
resolution from the others, you can change the resolution setting while the document is
being scanned. However, please note that the new setting will only be effective from
the next page scanned.
Follow this procedure to set the scanning resolution:
1 Press Resolution repeatedly until the
Ex:
resolution setting you want is
displayed.
• You can select from the following:
– FAX STANDARD
Suitable for most text-only
documents.
– FAX FINE
Suitable for fine-print documents.
– FAX PHOTO
Suitable for documents that contain
images such as photos. With this
setting, areas of the document that
contain photos are automatically
scanned with 64 levels of gray, rather
than just in black & white.
– SUPER FINE
Suitable for documents that contain
fine print and images. This setting is
four times the resolution of the FAX
STANDARD setting.
2 Continue with the operation you are
performing.
• If you do not proceed with any other
operation, the LCD returns to standby
mode after about 10 seconds.
FAX PHOTO
Page 91

Chapter 7 Sending Faxes 7-3
Sending Faxes
Setting the Scanning Contrast
You can adjust the degree of contrast at which your document is scanned for sending
and copying. Adjust according to how light or how dark your document is.
Follow this procedure to set the scanning contrast for sending and copying:
1 Open the one-touch speed dial panel.
2 Press Data Registration.
3 Press Set twice.
4 Use ∂ or ¨ to select SCAN
CONTRAST.
5 Press Set.
Ex:
6 Use ∂ or ¨ to select the scanning
contrast you want.
• You can select from the following:
– STANDARD
Adequate for most documents.
– DARKER
Suitable for light documents.
– LIGHTER
Suitable for dark documents.
7 Press Set.
8 Press Stop to return to standby mode.
Ex:
12/27 FaxTel
OFFHOOK ALARM
STANDARD
SCAN CONTRAST
DATE & TIME
USER SETTINGS
DATA REGSTRATION
Page 92

7-4 Sending Faxes Chapter 7
Dialing Methods
There are several ways of dialing the fax number(s) you want to send to. They are as
follows:
• Regular Dialing
Dial a fax number by using the numeric buttons, similar to dialing a telephone
number.
• One-Touch Speed Dialing
Dial a fax number by pressing the one-touch speed dialing button (01 to 24) assigned
to the fax number. For details on registering and using one-touch speed dialing,
see pp. 6-3, 6-16.
• Coded Speed Dialing
Dial a fax number by pressing Coded Dial and entering the two-digit code (00 to 99)
assigned to the fax number. For details on registering and using coded speed dialing,
see pp. 6-8, 6-16.
• Group Dialing
Send a document to a predefined group of fax numbers registered for speed dialing.
For details on registering groups and using group dialing, see pp. 6-13, 6-16.
Page 93

Chapter 7 Sending Faxes 7-5
Sending Faxes
Sending Methods
This section explains the two main sending methods: Memory sending and Manual
sending via the handset.
Memory Sending
Memory sending is a quick and easy way to send a document. As the unit scans the
first page of a multipage document into its memory, it begins calling the other party and
transmitting the information even as the remaining pages are being scanned.
Since your unit is multitasking, you can even scan a document into memory while
performing other tasks.
Your unit has enough memory to store up to approximately 256 pages* (fewer if the
document contains many graphics or particularly dense text).
Follow this procedure to send a document using memory sending:
1 Load the document, face down in the
Ex:
ADF (1 p. 4-3).
• To adjust the resolution and contrast,
(Currently used memory)
see pp. 7-2, 7-3.
• You may be unable to send if the
memory used (shown in the LCD) is (Standby to scan)
close to 100%. Use manual sending
via the handset instead (1 p. 7-6).
2 Dial the other party’s fax number.
Ex:
• For dialing methods, see p. 7-4.
• If you enter the wrong number, press
Stop, then enter the correct number.
• If you are connected to a PBX and need
to first dial an outside line access
number (“9”, for example), add a pause
after that number by pressing Pause
(1 p. 9-2).
TEL= 9p7654321
DOCUMENT READY
MEMORY USED 0%
*Based on ITU-T No. 1 Chart, standard mode.
Page 94

7-6 Sending Faxes Chapter 7
3 Press Start/Copy to begin scanning
for sending, or if you used speed
dialing, wait a few seconds for your
unit to begin scanning automatically.
• If you do not want your unit to begin
scanning automatically after a few
seconds, disable the TIME OUT setting
(1 p. 14-6).
• To cancel sending once dialing has
started, press Stop then T (1 p. 7-8).
• If the number you are calling is busy,
your unit redials the number
automatically after a few minutes
(1 p. 7-9).
n
• You can have up to 20 different jobs waiting in memory to be sent.
• The document is automatically deleted from memory after sending. This occurs even if
an error prevents complete transmission of the document.
Manual Sending Via the Handset
Manual sending via the handset allows you to talk to the other party before sending a
document. This method is useful if the other party must manually activate their fax
machine to receive a fax.
n
For this mode, you need to connect the optional handset or a telephone to your unit
(1 p. 2-7).
Follow this procedure to send a document using manual sending via the handset:
1 Make sure you have connected the
optional handset or a telephone to
your unit (1 p. 2-7).
2 Load the document, face down in the
Ex:
ADF (1 p. 4-3).
• To adjust the resolution and contrast,
(Currently used memory)
see pp. 7-2, 7-3.
(Standby to scan)
3 Press Hook.
• You can also lift the handset instead of
pressing Hook.
TEL=
DOCUMENT READY
MEMORY USED 0%
Page 95

Chapter 7 Sending Faxes 7-7
Sending Faxes
4 Dial the other party’s fax/telephone number.
Ex:
• For dialing methods, see p. 7-4.
• If you make a mistake during dialing,
press
Hook or hang up the handset
and start again from step 3.
■ If you hear a high-pitched signal instead of a voice:
5 Press Start/Copy to begin sending
the document.
• If you picked up the handset to dial,
press Start/Copy and hang up.
■ If you hear a voice:
5 Pick up the handset and start your
conversation.
• If you pressed Hook instead of lifting
the handset in step 3, you will hear the
other party’s voice but they will not be
able to hear you through the speaker.
Pick up the handset to talk to the other
party.
6 When you are ready to send your
document, ask the other party to press
the start button on their fax machine.
7 When you hear the high-pitched signal
of the other party’s fax machine, press
Start/Copy and hang up to begin
sending the document.
n
• If using the handset, be sure to hang up after you press Start/Copy on the unit,
otherwise the call will be disconnected.
• Your unit will alert you by beeping if the handset is not hung up properly. Make sure the
handset is seated properly in its cradle. If you do not want the unit to beep, disable the
OFFHOOK ALARM setting (1 p. 14-4).
TEL= 7654321
Page 96

7-8 Sending Faxes Chapter 7
Canceling Sending
Follow this procedure if you want to stop sending a document before transmission is
completed:
■ If you are sending a document using manual sending via the
handset:
1 Press Stop.
• The transmission is canceled.
• The unit prints an ERROR TX REPORT
(1 p. 11-4).
■ If you are sending a document using memory sending:
1 Press Stop.
• Your unit asks you to confirm that you
want to cancel sending.
2 Press T to cancel sending.
• Sending is not canceled until you
press T.
• If you change your mind and want to
continue sending, press #.
• To cancel transmission of a document
waiting to be sent (e.g. delayed
sending, between redialings), you will
have to delete it from memory
(1 pp. 7-17, 9-8).
• The unit prints an ERROR TX REPORT
(1 p. 11-4).
n
When you cancel sending, you may need to open the operation panel to remove the
document from the ADF (1 p. 13-2).
YES=(A) NO=(#)
CANCEL? AYES #NO
Page 97

Chapter 7 Sending Faxes 7-9
Sending Faxes
Redialing When the Line is Busy
There are two methods of redialing: Manual redialing and Automatic redialing. This
section explains these two methods.
Manual Redialing
Press Redial to dial the last number you dialed with the numeric buttons. (This starts
redialing regardless of whether automatic redialing is enabled.)
Canceling Manual Redialing
To cancel manual redialing, press Stop.
Automatic Redialing
What is Automatic Redialing?
When you are sending a document using memory sending (1 p. 7-5) and the other
party’s line is busy, your unit waits the specified time interval and then redials the
number automatically. This is called Automatic redialing.
You will know that your unit is waiting to redial when AUTO REDIAL and the transaction
number (TX/RX NO.) are displayed in the LCD.
The automatic redialing options allow you to customize the number of times your unit
redials, as well as the time interval between redials. You can also disable automatic
redialing if you prefer your unit not to do so.
If all automatic redialing attempts are unsuccessful, the unit cancels the transmission
and prints an ERROR TX REPORT to notify you that the transmission was not
completed (1 p. 11-4).
Canceling Automatic Redialing
Automatic redialing cannot be canceled with the Stop button while the unit is waiting to
redial. You can either wait until your unit begins redialing and then follow the procedure
below, or if you want to cancel while your unit is waiting to redial, you will have to
delete the document from memory (1 p. 9-8).
Follow this procedure to cancel automatic redialing when your unit begins redialing:
1 Wait until your unit begins redialing.
DIALING
Page 98

7-10 Sending Faxes Chapter 7
2 Press Stop.
• Your unit asks you to confirm that you
want to cancel automatic redialing.
3 Press T to cancel redialing.
• Redialing is not canceled until you press
T.
• If you change your mind and want to
continue redialing, press #.
• The unit prints an ERROR TX REPORT
(1 p. 11-4).
Setting the Options for Automatic Redialing
You can set the following options for automatic redialing:
• Whether the unit redials automatically (default: on).
• The number of times the unit attempts to redial (default: twice).
• The time interval between redialing attempts (default: two minutes).
Follow this procedure to adjust the automatic redialing options:
1 Open the one-touch speed dial panel.
2 Press Data Registration.
3 Press Set.
4 Use ∂ or ¨ to select TX SETTINGS.
5 Press Set.
6 Use ∂ or ¨ to select AUTO REDIAL.
7 Press Set.
Ex:
ON
AUTO REDIAL
ECM TX
TX SETTINGS
USER SETTINGS
DATA REGSTRATION
YES=(A) NO=(#)
CANCEL? AYES #NO
Page 99

Chapter 7 Sending Faxes 7-11
Sending Faxes
8 Use ∂ or ¨ to select the setting you
want.
• You can select from the following:
– ON
Enables automatic redialing.
– OFF
Disables automatic redialing.
■ If you selected OFF in step 8:
9 Press Set.
10 Press Stop to return to standby mode.
Ex:
■ If you selected ON in step 8:
9 Press Set twice.
Ex:
10 Use the numeric buttons to enter the
Ex:
number of times you want the unit to
redial.
• You can select from 1 to 10 times.
11 Press Set twice.
Ex:
12 Use the numeric buttons to enter the
Ex:
time interval between redials.
• You can select from 2 to 99 minutes.
13 Press Set.
14 Press Stop to return to standby mode.
Ex:
12/27 FaxTel
TIME OUT
5MIN.
2MIN.
REDIAL INTERVAL
5TIMES
2TIMES
REDIAL TIMES
12/27 FaxTel
TIME OUT
Page 100

7-12 Sending Faxes Chapter 7
Sending the Same Document to Several
Fax Numbers (Sequential Broadcasting)
This feature, also called Sequential Broadcasting, allows you to send the same
document to several fax numbers in one operation. Simply load the document, enter
the fax numbers, and the unit will then scan the document into its memory and send
the document to all the fax numbers you entered, one after the other.
You can send the same document to as many as 125 fax numbers using this feature.
Please note, however, that the fax numbers you enter must be registered for one-touch
or coded speed dialing (1 Chapter 6). You will only be able to enter one fax number
using regular dialing (i.e. with the numeric buttons).
n
If you frequently send documents to the same group of fax numbers, you can register
these numbers for group dialing instead (1 p. 6-13). This will simplify dialing.
Follow this procedure to send the same document to several fax numbers:
1 Load the document, face down in the
Ex:
ADF (1 p. 4-3).
• To adjust the resolution and contrast,
(Currently used memory)
see pp. 7-2, 7-3.
• You may be unable to send if the
memory used (shown in the LCD) is (Standby to scan)
close to 100%. To free up space in the
unit’s memory: print, send, or delete any
documents you no longer need to be
stored in memory (1 p. 9-4).
2 Enter up to 125 fax numbers using
any of the following methods:
❚ One-touch speed dialing:
Press the one-touch speed dialing
Ex:
button(s) you want.
❚ Coded speed dialing:
Press Coded Dial, then use the
Ex:
numeric buttons to enter the two-
digit code you want. Repeat for other
Ex:
codes.
• Be sure to press Coded Dial before
each code.
❚ Regular dialing:
Use the numeric buttons to enter the
Ex:
fax number you want, then press
Set.
• You can only enter one fax number this
way.
TEL= 2 887 0166
TEL=03 3758 2111
A01
TEL=905 795 1111
DOCUMENT READY
MEMORY USED 0%
 Loading...