

Page 1

Canon
Authorized Send
Installation and Configuration
Guide
for imageRUNNER Machines
Version 4.1
08011-41-UD2-003
Page 2

This page is intentionally left blank.
2 Authorized Send Installation and Configuration Guide for imageRUNNER Machines
Page 3

Contents
Preface........................................................................................................7
How to Use This Manual...............................................................................................7
Symbols Used in This Manual ...................................................................................7
Keys and Buttons Used in This Manual.....................................................................8
Displays Used in This Manual....................................................................................9
Abbreviations and Terms Used in This Manual .......................................................10
Hyperlinks................................................................................................................10
Legal Notices..............................................................................................................11
Trademarks..............................................................................................................11
Copyright .................................................................................................................11
Disclaimers ..............................................................................................................11
Chapter 1 Overview ...............................................................................13
1.1 System Requirements......................................................................................15
1.1.1 Hardware Requirements...............................................................................15
1.1.2 Server Requirements....................................................................................16
1.1.3 Software Requirements................................................................................. 17
1.1.4 Home Directory Requirements......................................................................17
1.1.5 Distributed File System Requirements..........................................................19
1.1.6 Communication Interfaces.............................................................................20
1.1.7 Supported Authentication Protocols..............................................................21
1.1.8 MEAP Application Coexistence Support.......................................................21
1.2 Communication Environment...........................................................................22
1.2.1 Communication Diagrams.............................................................................26
1.2.1.1 Authentication Communication Diagrams................................................ 26
1.2.1.2 Address Book Communication Diagrams ................................................ 27
Chapter 2 Installing Authorized Send..................................................29
Chapter 3 Configuring Authorized Send..............................................35
3.1 Flow of Configuration Operations ....................................................................35
3.2 Creating an Authentication Server...................................................................49
3.3 Editing an Authentication Server......................................................................62
3.4 Deleting an Authentication Server ...................................................................64
3.5 Configuring the E-Mail Service Settings........................................................... 65
3.6 Creating an Address Book Server ...................................................................67
3.7 Editing an Address Book Server......................................................................90
3.8 Deleting an Address Book Server....................................................................92
3.9 Configuring Scan to E-Mail Settings ................................................................ 93
3.10 Configuring Scan to Fax Settings .................................................................... 97
3.11 Configuring Scan to Folder Settings ..............................................................100
3.12 Creating a Pres et Share ................................................................................ 103
3.13 Editing a Pres et Share...................................................................................106
3.14 Deleting a Preset Share................................................................................. 107
Authorized Send Installation and Configuration Guide for imageRUNNER Machines 3
Page 4

3.15 Configuring Scan Settings ............................................................................. 108
3.16 Configuring Optional Settings ........................................................................113
3.17 Configuring Log Settings................................................................................117
3.18 Changing the Login ID and Password............................................................122
3.19 Using the Brand Configuration Tool (Optional)..............................................124
Chapter 4 Configuring the MEAP Device...........................................135
4.1 Setting DNS Server Settings.......................................................................... 135
4.2 Specifying the Auto Clear Mode for Auto Log Off.......................................... 140
4.3 Synchronizing the Device and Server Time................................................... 142
4.3.1 Specifying Automatic Time Synchronization ............................................... 142
4.3.2 Manually Adjusting the Device Time...........................................................147
Chapter 5 Troubleshooting.................................................................149
Chapter 6 List of Error Messages.......................................................151
6.1 Configuration Screen Error Messages........................................................... 152
6.1.1 Authentication Servers Screen Error Message ...........................................152
6.1.2 Create/Update Authentication Server Screen Error Messages...................152
6.1.3 E-Mail Service Configuration Screen Error Messages ................................ 155
6.1.4 Address Book Servers Screen Error Message............................................156
6.1.5 Create/Update Address Book Server Screen Error Messages....................156
6.1.6 Scan to E-Mail Configuration Screen Error Messages................................157
6.1.7 Scan to Fax Configuration Screen Error Messages....................................158
6.1.8 Scan to Folder Configuration Screen Error Messages................................158
6.1.9 Create/Update Share Name Screen Error Messages.................................159
6.1.10 Options Screen Error Messages.................................................................160
6.1.11 Logs Screen Error Messages......................................................................161
6.1.12 Change Login ID & Password Screen Error Messages...............................162
6.1.13 Brand Configuration Servlet Screen Error Message ................................... 162
6.1.14 Authorized Send Configuration Servlet Log On Screen Error Messages....163
6.2 SIGN IN Screen Notification Messages.........................................................164
6.2.1 General Authentication Notification Messages............................................ 164
6.2.2 Kerberos Authentication Notification Messages..........................................165
6.2.3 NTLM Authentication Notification Messages...............................................166
6.2.4 Simple Authentication Notification Messages..............................................167
6.3 MAIN Screen Notification Messages..............................................................168
6.3.1 LDAP Failure Notification Messages...........................................................168
6.3.2 Configuration Notification Message.............................................................170
6.3.3 Warning Notification Message.....................................................................170
6.4 SCAN TO EMAIL Screen Notification Messages........................................... 171
6.4.1 SCAN TO EMAIL Warning Message........................................................... 171
6.4.2 SCAN TO EMAIL Input Request Messages................................................171
6.4.3 SCAN TO EMAIL Notification Messages.....................................................172
6.4.4 SCAN TO EMAIL Error Messages..............................................................172
6.5 SCAN TO FAX Screen Notification Messages............................................... 173
6.5.1 SCAN TO FAX Warning Message ..............................................................173
4 Authorized Send Installation and Configuration Guide for imageRUNNER Machines
Page 5

6.5.2 SCAN TO FAX Input Request Messages .................................................... 173
6.5.3 SCAN TO FAX Notification Messages ........................................................174
6.5.4 SCAN TO FAX Error Messages..................................................................174
6.6 SCAN TO FOLDER Screen Notification Messages.......................................175
6.6.1 SCAN TO FOLDER Warning Message.......................................................175
6.6.2 SCAN TO FOLDER Input Request Messages............................................175
6.6.3 SCAN TO FOLDER Notification Messages.................................................176
6.6.4 SCAN TO FOLDER Error Messages ..........................................................176
Authorized Send Installation and Configuration Guide for imageRUNNER Machines 5
Page 6

This page is intentionally left blank.
6 Authorized Send Installation and Configuration Guide for imageRUNNER Machines
Page 7

Preface
Thank you for purchasing the Authorized Send software application. Please read this manual
thoroughly before operating the product on your MEAP-enabled machine to familiarize
yourself with its capabilities, and to make the most of its many functions. After reading this
manual, store it in a safe place for future reference.
How to Use This Manual
This manual assumes that the reader has a good understanding of MEAP (Multifunctional
Embedded Application Platform). This manual does not provide instructions for using or
operating the Authorized Send application. For instructions on using the Authorized Send
application, see the Authorized Send User’s Guide for imageRUNNER Machines.
Symbols Used in This Manual
The following symbols are used in this manual to explain procedures, restrictions, and
instructions that should be observed for safety.
IMPORTANT Indicates operational requirements and restrictions. Be sure to read these
items carefully to operate the machine correctly, and avoid damaging the
machine.
NOTE Indicates a clarification of an operation, or contains additional explanations
for a procedure. Reading these notes is highly recommended.
Authorized Send Installation and Configuration Guide for imageRUNNER Machines 7
Page 8
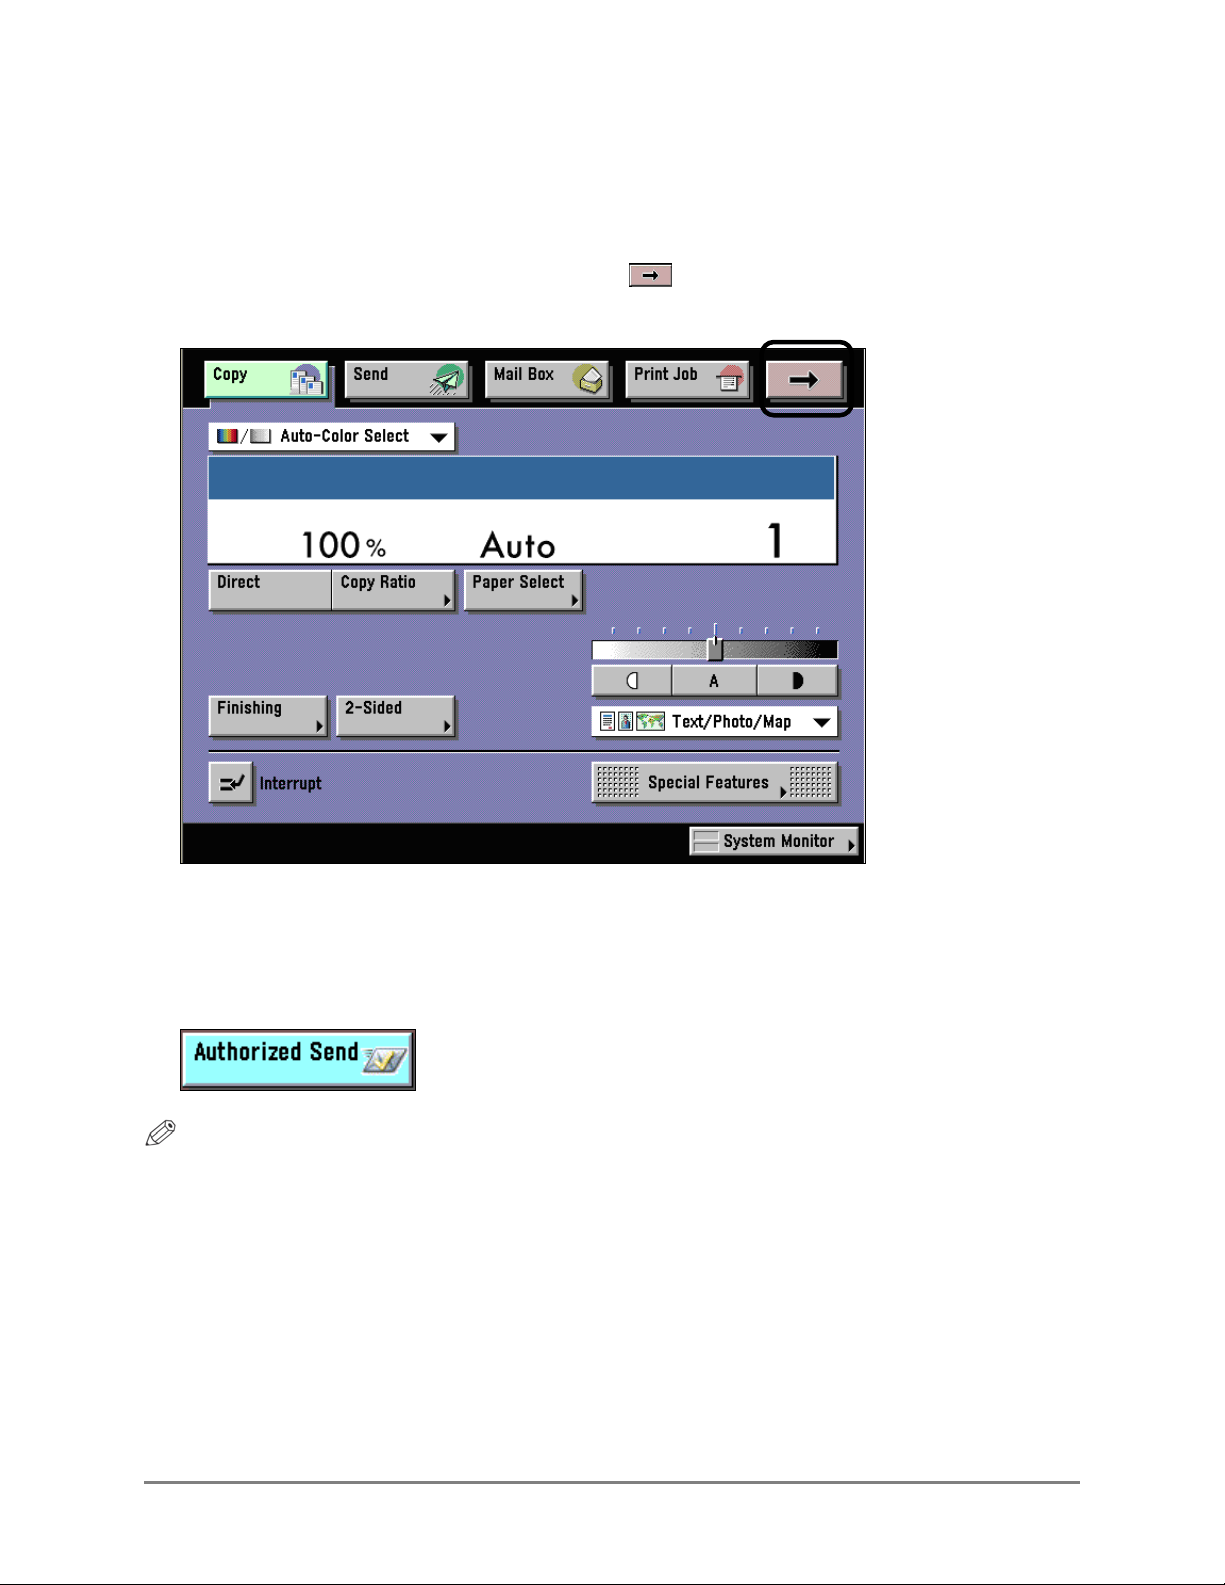
Keys and Buttons Used in This Manual
Keys for using the machine’s main functions are located on the top of the touch panel
display. To use any of the desired function’s features, you must first press the key or
application tab for the desired function. Press [ ] (arrow key) to access installed MEAP
applications.
On the MEAP Application screen, there may be several application tabs that you can select.
Select only the proper tab for the application that you want to use.
The default application tab for Authorized Send is:
NOTE
The default tab name can be customized, and therefore the Authorized Send tab could have
a different name.
8 Authorized Send Installation and Configuration Guide for imageRUNNER Machines
Page 9

The following key and button names are a few examples of how keys and buttons to be
pressed and clicked are represented in this manual:
Touch Panel Display Keys: [Key Name]
Examples: [Scan]
[Cancel]
Control Panel Keys: Key Icon (Key Name)
Examples: ~ (Start)
(Stop)
Buttons on Computer Operations Screens: [Key Name]
Examples: [Install]
[OK]
Displays Used in This Manual
Most screen shots used in this manual are those taken when Authorized Send is being
installed using MEAP SMS (Service Management Service), or when Authorized Send is
running on the Color imageRUNNER C5185, unless otherwise specified.
The keys/buttons you should select or click are marked with a circle, as shown below. When
multiple keys/buttons can be selected on the screen, all keys/buttons are circled.
Example:
1. Select the [Authorized Send] radio button ➞ click [Start].
Select
these
buttons
for
Authorized Send Installation and Configuration Guide for imageRUNNER Machines 9
operation
Page 10

Abbreviations and Terms Used in This Manual
The following abbreviations are used in this manual.
Abbreviation Definition
AD
ADF
DFS
DN
FQDN
HID
HTTP
HTTPS
IP
KDC
LAN
LDAP
LMS
MEAP
MEAP device
NTLM
Printable ASCII
SMS
SMTP
SSL
STRING
UDP
UI
URL
Active Directory
Automatic Document Feeder
Distributed File System
Distinguished Name
Fully Qualified Domain Name
Human Interface Device
Hypertext Transfer Protocol
Hypertext Transfer Protocol Secure
Internet Protocol
Key Distribution Center
Local Area Network
Lightweight Directory Access Protocol
License Management System
Multifunctional Embedded Application Platform
Supported Canon imagePRESS, imageRUNNER, or
Color imageRUNNER multifunctional machine featuring
embedded MEAP technology.
NT LAN Manager
These characters are from ‘ ’ (space) up to and including
‘~’ (tilde) on the ASCII table (the decimal values for the
characters, x , are: 32 (space) ≤ x ≤ 126 (tilde)).
Service Management Service
Simple Mail Transfer Protocol
Secure Sockets Layer
A set of consecutive characters that the user is able to
input into a text box. If input into a text box is required, a
string consisting of all spaces is not valid.
User Datagram Protocol
User Interface
Uniform Resource Locator
Hyperlinks
When this manual is in its native PDF form, the blue underlined text represents a hyperlink to
the corresponding sections of this manual or to external Web sites.
For example: See
Likewise, all entries in the Table of Contents are hyperlinks.
10 Authorized Send Installation and Configuration Guide for imageRUNNER Machines
Chapter 1, “Overview,” on p. 13.
Page 11

Legal Notices
Trademarks
Canon, the Canon logo, imageRUNNER, Color imageRUNNER, imagePRESS, and MEAP
are registered trademarks, and the MEAP logo is a trademark, of Canon Inc. in the United
States and may also be trademarks or registered trademarks in other countries.
Windows and .NET Framework are registered trademarks of Microsoft Corporation in the
United States and are trademarks or registered trademarks of Microsoft Corporation in other
countries.
Java and all Java-based trademarks and logos are the trademarks or registered trademarks of
Sun Microsystems, Inc. in the United States or other countries.
Other product and company names herein are, or may be, the trademarks of their respective
owners.
Copyright
Copyright 2009 by Canon U.S.A., Inc. All rights reserved.
No part of this publication may be reproduced or transmitted in any form or by any means,
electronic or mechanical, including photocopying and recording, or by any information
storage or retrieval system without the prior written permission of Canon U.S.A., Inc.
Disclaimers
The information in this document is subject to change without notice.
CANON U.S.A., INC. MAKES NO WARRANTY OF ANY KIND WITH REGARD TO
THIS MATERIAL, EITHER EXPRESS OR IMPLIED, EXCEPT AS PROVIDED HEREIN,
INCLUDING WITHOUT LIMITATION, THEREOF, WARRANTIES AS TO
MARKETABILITY, MERCHANTABILITY, FITNESS FOR A PARTICULAR PURPOSE
OR USE OR NON-INFRINGEMENT. CANON U.S.A., INC. SHALL NOT BE LIABLE
FOR ANY DIRECT, INCIDENTAL, OR CONSEQUENTIAL DAMAGES OF ANY
NATURE, OR LOSSES OR EXPENSES RESULTING FROM THE USE OF THIS
MATERIAL.
Authorized Send Installation and Configuration Guide for imageRUNNER Machines 11
Page 12

This page is intentionally left blank.
12 Authorized Send Installation and Configuration Guide for imageRUNNER Machines
Page 13

Chapter 1 Overview
Authorized Send is a customized MEAP application. It should be installed and operated on a
Canon MEAP-enabled device, and provides authenticated scan to e-mail, scan to fax, and
scan to folder functionalities. Authorized Send does not require the user to be authenticated
to use the native functions of the machine, such as Copy, Print, and Scan, and does not
interfere with any of these functions.
MEAP (Multifunctional Embedded Application Platform) is a software platform embedded
in Canon imageRUNNER and imagePRESS machines that enables the development of
custom applications, which run alongside native functions, such as Copy, Print, and Scan.
MEAP, developed by Canon, is based on Sun Microsystems’ Java and Java 2 Micro Edition
technology.
“MEAP device” is a MEAP-enabled Canon imageRUNNER or imagePRESS that is running
the Authorized Send application. It may also be referred to as “MEAP imageRUNNER” or
“machine.”
imageRUNNER machines are the Canon imageRUNNERs, Color imageRUNNERs, and
imagePRESS multifunctional machines.
Authorized Send is designed to perform the following functions once configured from the
Authorized Send Configuration servlet:
• Authenticate against an LDAP server.
• Ability to disable LDAP authentication.
• Authenticate to an address book server anonymously.
• Retrieve a user’s e-mail address and home directory.
• Search the LDAP address book server for e-mail addresses.
• Browse a network for valid share folders.
• Provide the ability to configure preset shares.
• Scan and send a document to a valid e-mail address, networked folder, or fax server.
• Enables a System Administrator to control the features that are available to a user.
• Enables a System Administrator to set default values for the Scan to E-Mail function.
• If activated, enables the use of the Searchable PDF, Encrypted PDF, and Compact PDF
modes.
• Logs error and debugging information that is generated by the application to your local
hard drive and to optional remote syslog servers.
• Scan in the PDF, TIFF, TIFF(Single), and JPEG file formats.
• Create folders that do not exist dynamically (in particular, using the user’s User Name).
Authorized Send Installation and Configuration Guide for imageRUNNER Machines 13
Page 14

• Authenticate to a separate domain when scanning to a folder.
• Provide the ability to use NTLM Authentication for Scan to Folder, regardless of the
authentication method used.
• Provide the ability to dynamically locate the closet available domain controller within the
domain, and cache that domain controller until it becomes no longer available.
• Provide the ability to populate the User Name text box from a login application.
• Authenticate to a separate SMTP server.
• Job Build feature
• Ability to upgrade from previous versions of Authorized Send.
• MEAP Configuration Tool 1.0 compatibility.
• Ability to change the application display name.
• Ability to configure the application’s images and colors.
• Ability to alter address book search results.
• Provide USB keyboard support.
• Enables a System Administrator to configure default scan settings for each file type.
IMPORTANT
• Basic knowledge of networking and imageRUNNER/imagePRESS machines is necessary
to install and configure the Authorized Send application.
• For instructions on using Authorized Send, see the Authorized Send User’s Guide for
imageRUNNER Machines.
• The device must support MEAP Spec Version 13 to use the PDF Encryption feature.
14 Authorized Send Installation and Configuration Guide for imageRUNNER Machines
Page 15

1.1 System Requirements
Authorized Send requires the proper installation and configuration of all items
documented in this guide. Failure to correctly install or configure the application will
affect its operation.
If Authorized Send is not working properly, the problem can likely be traced to an
installation or configuration issue. Please consult the appropriate chapters (including
Chapter 5, “Troubleshooting,” on p. 149) before contacting Canon U.S.A.’s e-Support.
1.1.1 Hardware Requirements
Authorized Send is designed to operate on the following Canon MEAP-enabled
devices using the minimum specified MEAP Contents version.
Device Family MEAP Contents
imageRUNNER 2270/2870/3570/4570 32.02
imageRUNNER 8070/9070/85+/105+ 11.03
imageRUNNER 5570/5070/6570 35.02
imageRUNNER C3170 20.25
imageRUNNER 7105/7095/7086 35.02
imageRUNNER C6870/C5870 11.03
imageRUNNER C5180/C4580/C4080 20.05
imagePRESS C1 1.08
imageRUNNER C3380/C2880 10.02
imageRUNNER 3025/3030/3035/3045 10.05
imageRUNNER 5075/5065/5055 10.04
imageRUNNER C5185/C5180/C4580/C4080
(Version up)
imageRUNNER C3380/C2880
(Version up)
imagePRESS C7000VP/C6000VP/C6000 10.07
imageRUNNER C5058/C5068 60.13
imageRUNNER 5055/5065/5075 V2 30.04
imageRUNNER 5050 30.04
imageRUNNER
7086/7086N/7086B/7095/7095P/7105/7105B V2
imageRUNNER C2550/C3480 75.45
imageRUNNER 3225/3230/3235/3245 21.06
imagePRESS C1+ 1.10
65.13
60.06
55.03
Authorized Send Installation and Configuration Guide for imageRUNNER Machines 15
Page 16

IMPORTANT
• MEAP and Use HTTP settings (from the Additional Functions screen) on the
MEAP device must be enabled. (See the Reference Guide or the appropriate
e-manual that came with your machine.)
• Access to System Manager Settings (from the Additional Functions screen) on the
MEAP device is necessary.
• There must be network connectivity between the MEAP device, Active Directory
servers, an e-mail server, and shared file servers.
• Inbox 99 on the MEAP device must be available for use, and without password
protection.
1.1.2 Server Requirements
Authorized Send communicates with the following servers:
• Supported authentication servers:
- Windows 2000 SP4/2003 SP2/2008 SP1 Active Directory
- Lotus Domino Version 7
- Novell NetWare 6.5/eDirectory 8.7 SP1 (or later)
• Supported address book servers:
- Windows 2000 SP4/2003 SP2/2008 SP1 Active Directory
- Lotus Domino Version 7
- Novell NetWare 6.5/eDirectory 8.7 SP1 (or later)
• Supported name servers:
- Windows 2000 SP4/2003 SP2/2008 SP1 (or later) DNS server
• Supported Scan to E-Mail servers:
- Microsoft Exchange Server 2000/2003/2007 SP1
• Supported Scan to Network Share servers (with the exclusion of Cluster Server
environment):
- Windows Vista SP1/XP SP2/2000 SP4/2003 SP2 (or later)/2008 SP1 Local Share
- Windows Vista SP1/XP SP2/2000 SP4/2003 SP2 (or later)/2008 SP1 Domain
Share
- Windows DFS (Distributed File System) Share
- Windows Vista SP1/XP SP2/2000 SP4/2003 SP2/2008 SP1
• The following fax servers have been tested:
- Relay Fax 6.7 by ALT-N Technologies
(In order for the Scan to Fax function to work successfully with Relay Fax, each
fax number used must have a corresponding e-mail address.)
16 Authorized Send Installation and Configuration Guide for imageRUNNER Machines
Page 17
1.1.3 Software Requirements
Microsoft Internet Explorer 6.0 or later, with JavaScript enabled, must be installed
and configured prior to installing the Authorized Send application.
KDC is necessary for running Kerberos authentication.
1.1.4 Home Directory Requirements
If the System Administrator wants to configure the Retrieve Home Directory (Active
Directory only) feature, the following three types of configurations are supported.
■ Local Share
This configuration illustrates when the home directory exists on the authentication
server as a local share. No text manipulation is required, and the value entered is
used exactly as is.
Home Directory as a Local Share
Authorized Send Installation and Configuration Guide for imageRUNNER Machines 17
Page 18
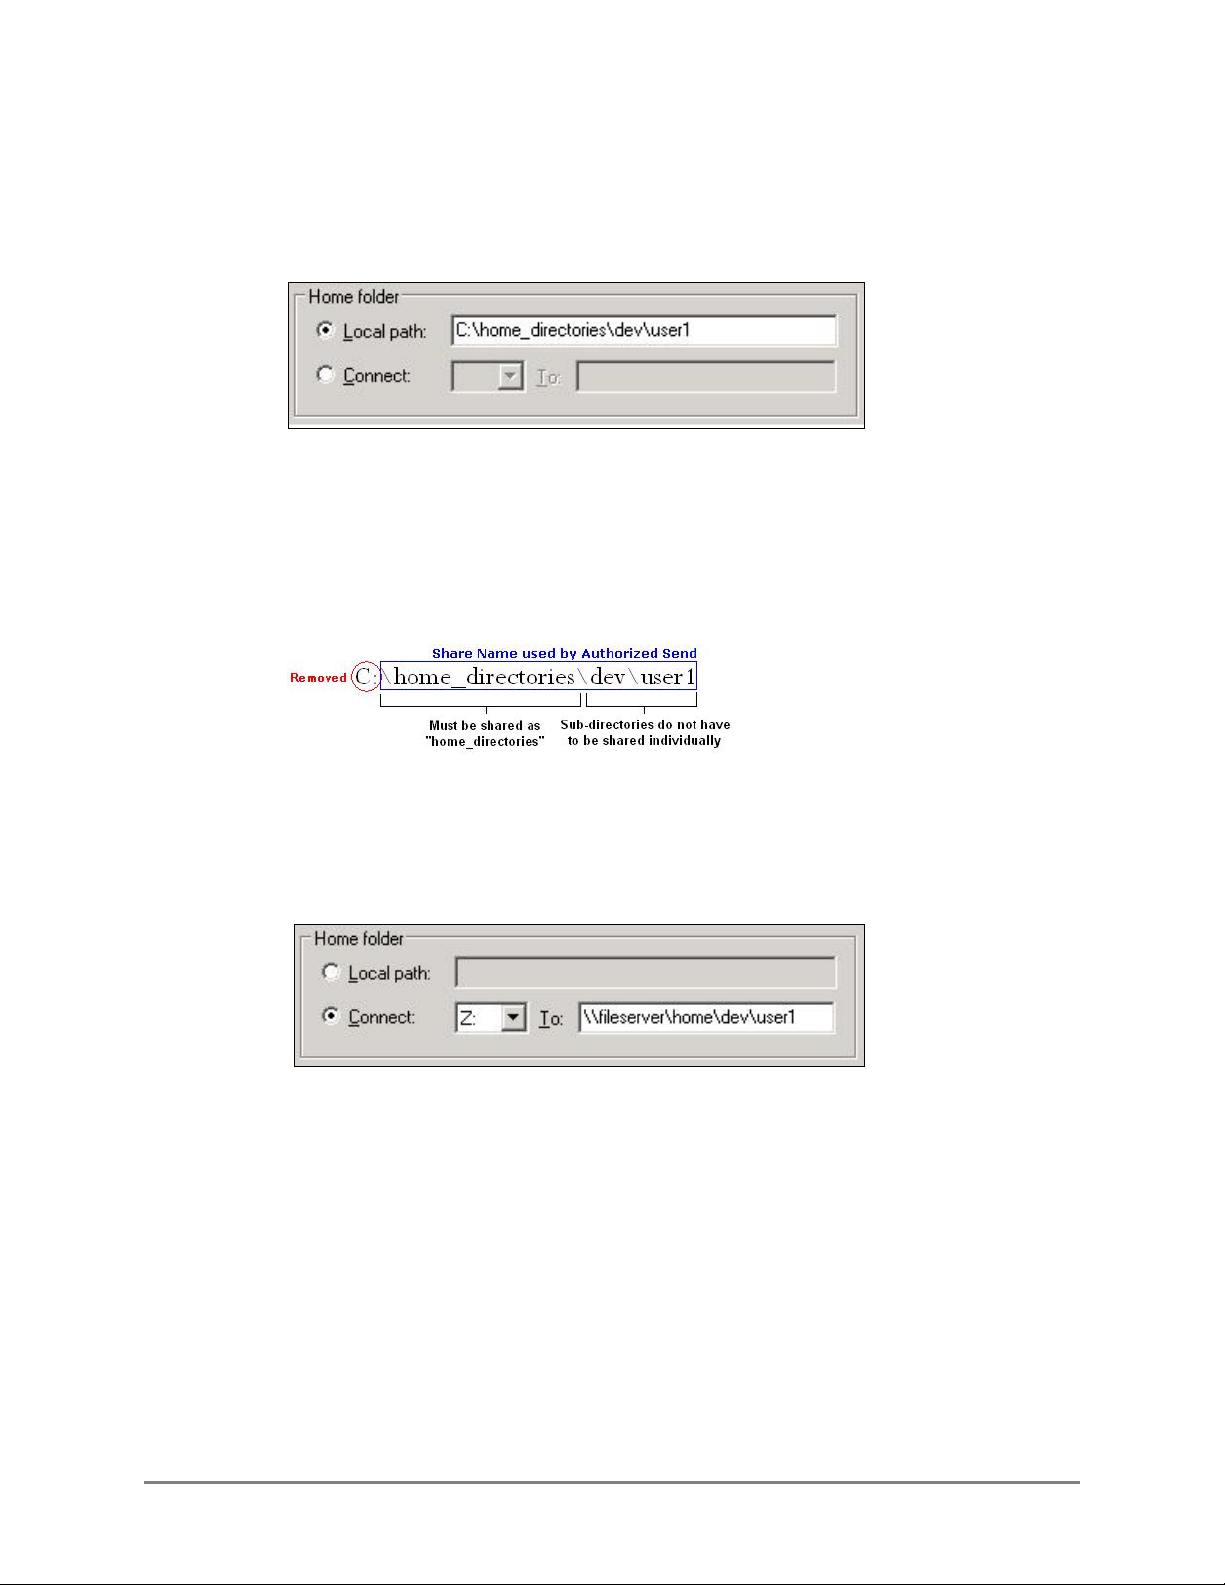
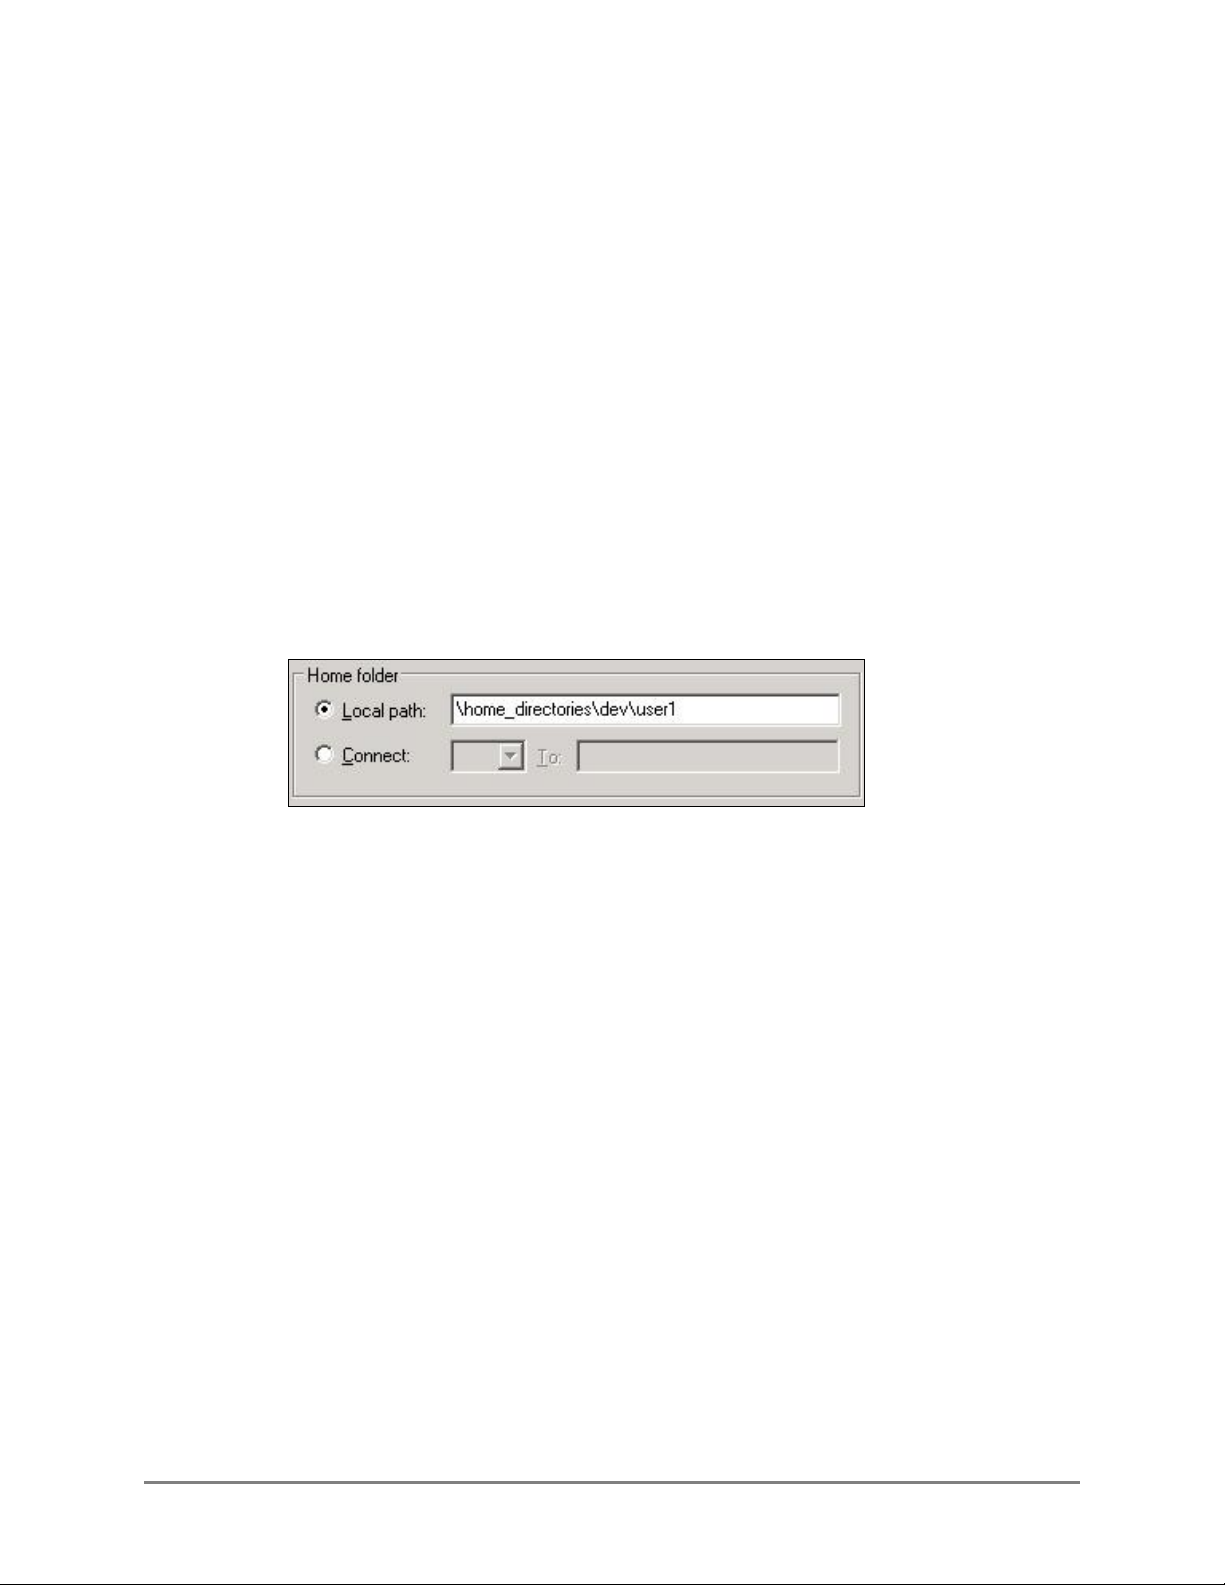
■ Local Path
This configuration illustrates when the home directory exists on the authentication
server as a local folder.
Home Directory as a Local Path
When the home directory exists on the authentication server as a local folder, it is
impossible for Authorized Send to use the text as it is. Therefore, some text
manipulation is required. In this case, Authorized Send removes the leading drive
letter (in this case, “C:”), and then the rest of the text is treated as a local share. In
this example, “home_directories” must be a valid share name.
■ Mapped Share
This configuration illustrates when the home directory exists as a mapped share.
In this example, “fileserver” is used as the host name of the file server, and
“\home\dev\user1” is used as the share’s file path.
Home Directory as a Mapped Share
18 Authorized Send Installation and Configuration Guide for imageRUNNER Machines
Page 19

1.1.5 Distributed File System Requirements
Authorized Send supports the following two DFS (Distributed File System) roots.
■ Stand-alone DFS root
■ Domain-based DFS root
Successful domain-based DFS root support for Authorized Send requires that
certain configuration settings be implemented and understood.
1. End users can only access the domain-based DFS roots that belong to the
domain against which they were authenticated.
2. The authentication server created with Authorized Send’s Configuration
servlet must have the Domain Name configured to match the FQDN.
IMPORTANT
If the authentication server is configured with a NetBIOS domain name,
access is granted to the application; however, you will not be able to access
any domain-based DFS roots.
3. Browsing for domain-based DFS roots are not supported. A preset share or
home directory must be configured, or be manually entered in the share
location.
IMPORTANT
If you configure a preset share for a domain-based DFS root, the file server
must be configured with the FQDN of the Domain (i.e., If the domain name
is “MyCompany.com,” then the file server must be configured with the
FQDN “MyCompany.com.” The FQDN is not case-sensitive.). This results
in the domain-based DFS root’s preset share on the file server matching the
authentication server’s domain name.
4. The first successful DFS target is used; otherwise, the end user will not be
able to scan to the DFS root.
Authorized Send Installation and Configuration Guide for imageRUNNER Machines 19
Page 20

1.1.6 Communication Interfaces
The table below shows the different communication interfaces, their specific port
numbers, and descriptions used with Authorized Send.
Communication Interface Port Description
NTLM
Kerberos UDP/TCP Port 88 Used for authentication.
LDAP TCP Port 389
SMB
SMTP TCP Port 25
HTTP TCP Port 8000
HTTPS TCP Port 8443
SSL TCP Port 636
Syslog UDP Port 514
Determined by AD
server
TCP Port 139 and
TCP Port 445
Used for authentication.
Used to retrieve e-mail
addresses.
Used for the Scan to Folder
function.
Used for the Scan to E-Mail
function.
Used to access the
administration Web page.
Used to access the secure
administration Web page.
Used to communicate with the
LDAP server.
Used to communicate with the
syslog server.
20 Authorized Send Installation and Configuration Guide for imageRUNNER Machines
Page 21

1.1.7 Supported Authentication Protocols
Kerberos and NTLM are the supported protocols when communicating with a
Microsoft Active Directory server.
Simple Binding is the supported protocol when communicating with Novell
eDirectory and Lotus Domino.
Anonymous Binding is the protocol reserved for communication with any of the
supported address book servers (when applicable).
IMPORTANT
If Simple is selected as the authentication method and Novell eDirectory is the
targeted authentication server, set the following settings on the eDirectory server:
- Disable “Require TLS for Simple Binds with Password” for the LDAP Group.
- Disable “Require TLS for all operations” for the LDAP Server in the Connections
section.
- In the Restrictions section, select [Use Low Cipher (56 or 64-bit)].
1.1.8 MEAP Application Coexistence Support
Authorized Send can coexist with other installed MEAP applications that have
received verification by Canon U.S.A., Inc., provided that there are sufficient
resources available on the MEAP device.
The following table shows the maximum values for MEAP resources that Authorized
Send could use in a MEAP device.
MEAP Device Resource Requirements Maximum
File space usage 25,000 KB
Memory usage 5,000 KB
File descriptor usage 20
Socket usage 16
Thread usage 50
Authorized Send has been confirmed to coexist with the following applications:
• Scan to Database 1.1
• Pharos 2.3.10 with Uniprint 8.0 (Not supported when the [Enable USB Keyboard
input] check box on the Options screen is selected.)
Authorized Send Installation and Configuration Guide for imageRUNNER Machines 21
Page 22
1.2 Communication Environment
Authorized Send must be installed on a MEAP-enabled device. There must be network
connectivity between the MEAP device, DNS, authentication servers, address book
servers, SMTP server, and shared file servers.
It is necessary to configure Authorized Send to communicate with the authentication
servers and address book servers.
The following table lists the supported authentication servers and authentication
methods.
Supported Authentication Servers Authentication Methods
Windows Active Directory NTLM, Kerberos (with or without SSL)
Novell NetWare 6.5/eDirectory 8.7 SP1 Simple LDAP (with or without SSL)
Lotus Domino v7 Simple LDAP (with or without SSL)
The following table lists the supported address book servers and binding methods.
Supported Address Book Servers Binding Methods
Windows Active Directory NTLM, Kerberos (with or without SSL)
Novell NetWare 6.5/eDirectory 8.7 SP1 Simple LDAP (with or without SSL)
Lotus Domino v7 Simple LDAP (with or without SSL)
22 Authorized Send Installation and Configuration Guide for imageRUNNER Machines
Page 23
The following illustrations represent a flow of operations for the Scan to E-Mail,
Scan to Fax, and Scan to Folder functions of the Authorized Send application.
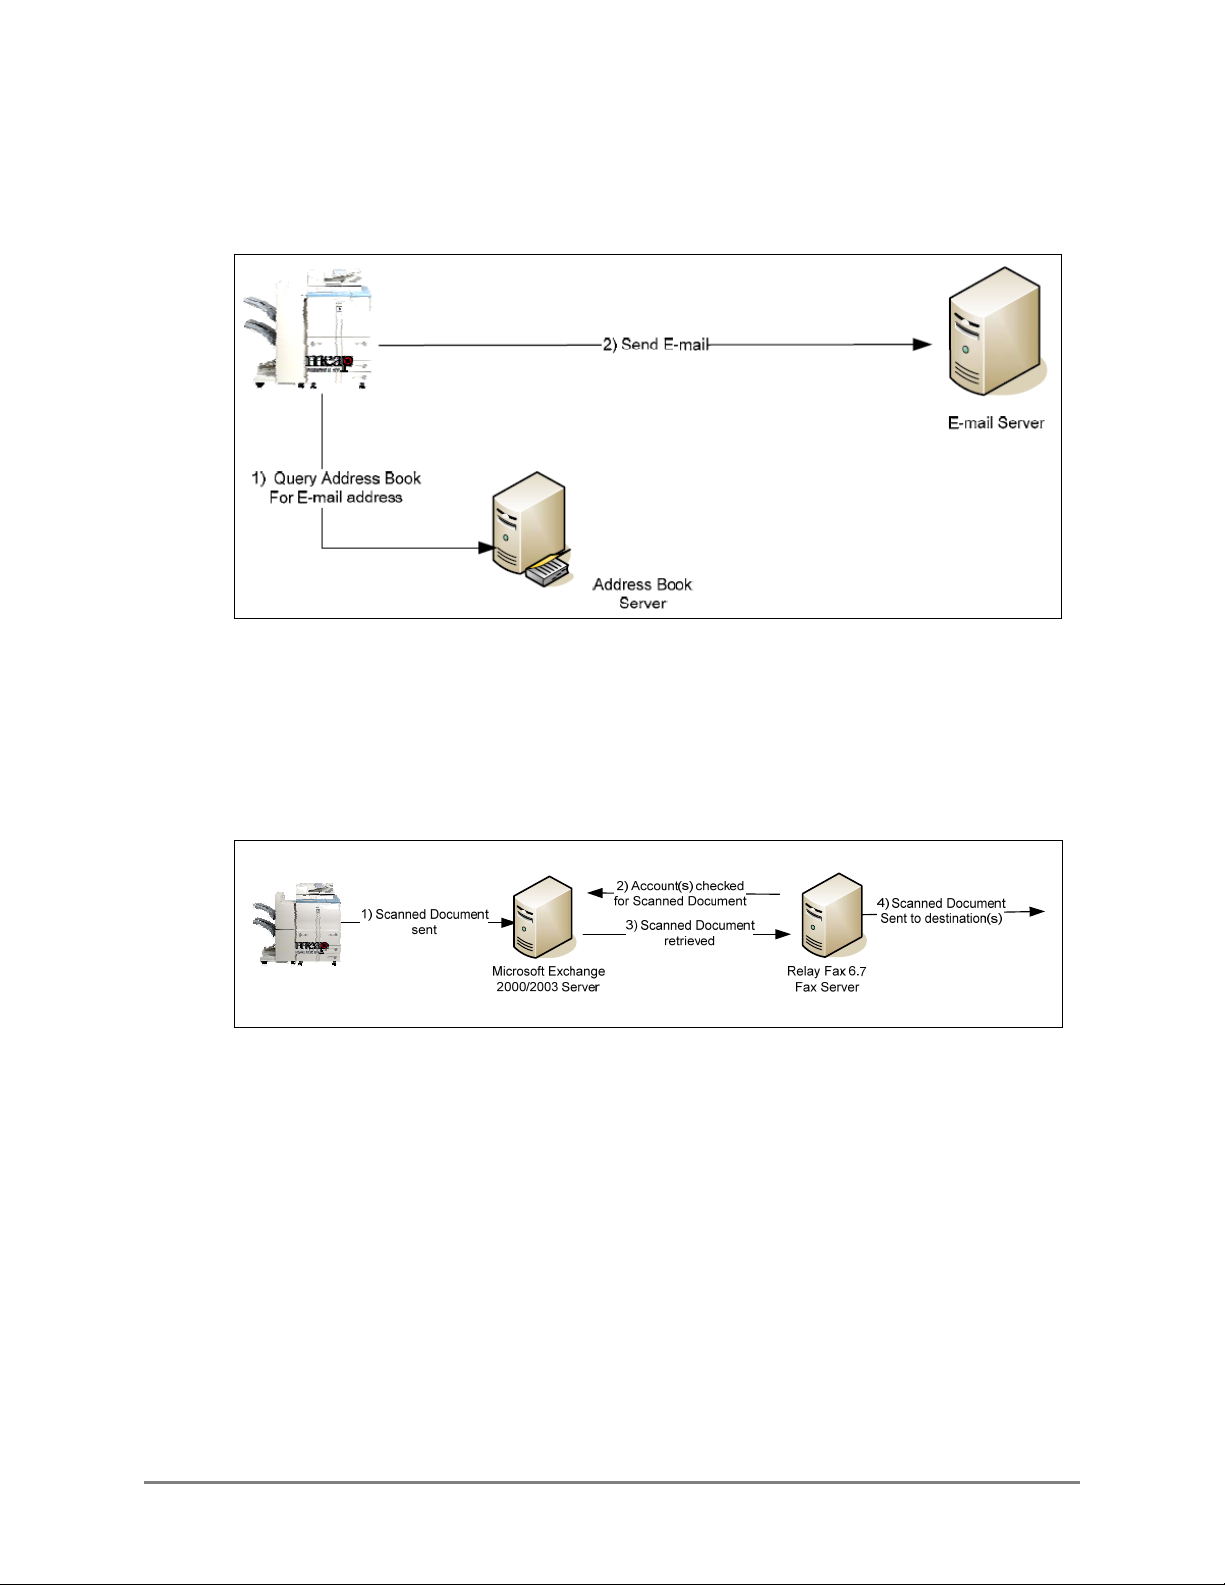
Scan to E-Mail
1. The user makes an address book query from the Scan to E-Mail function on the
MEAP machine. The machine sends an LDAP query to the address book server to
retrieve the desired list of e-mail addresses.
2. Once all e-mail addresses are verified and selected, the machine sends the e-mail
message to the E-mail or SMTP server.
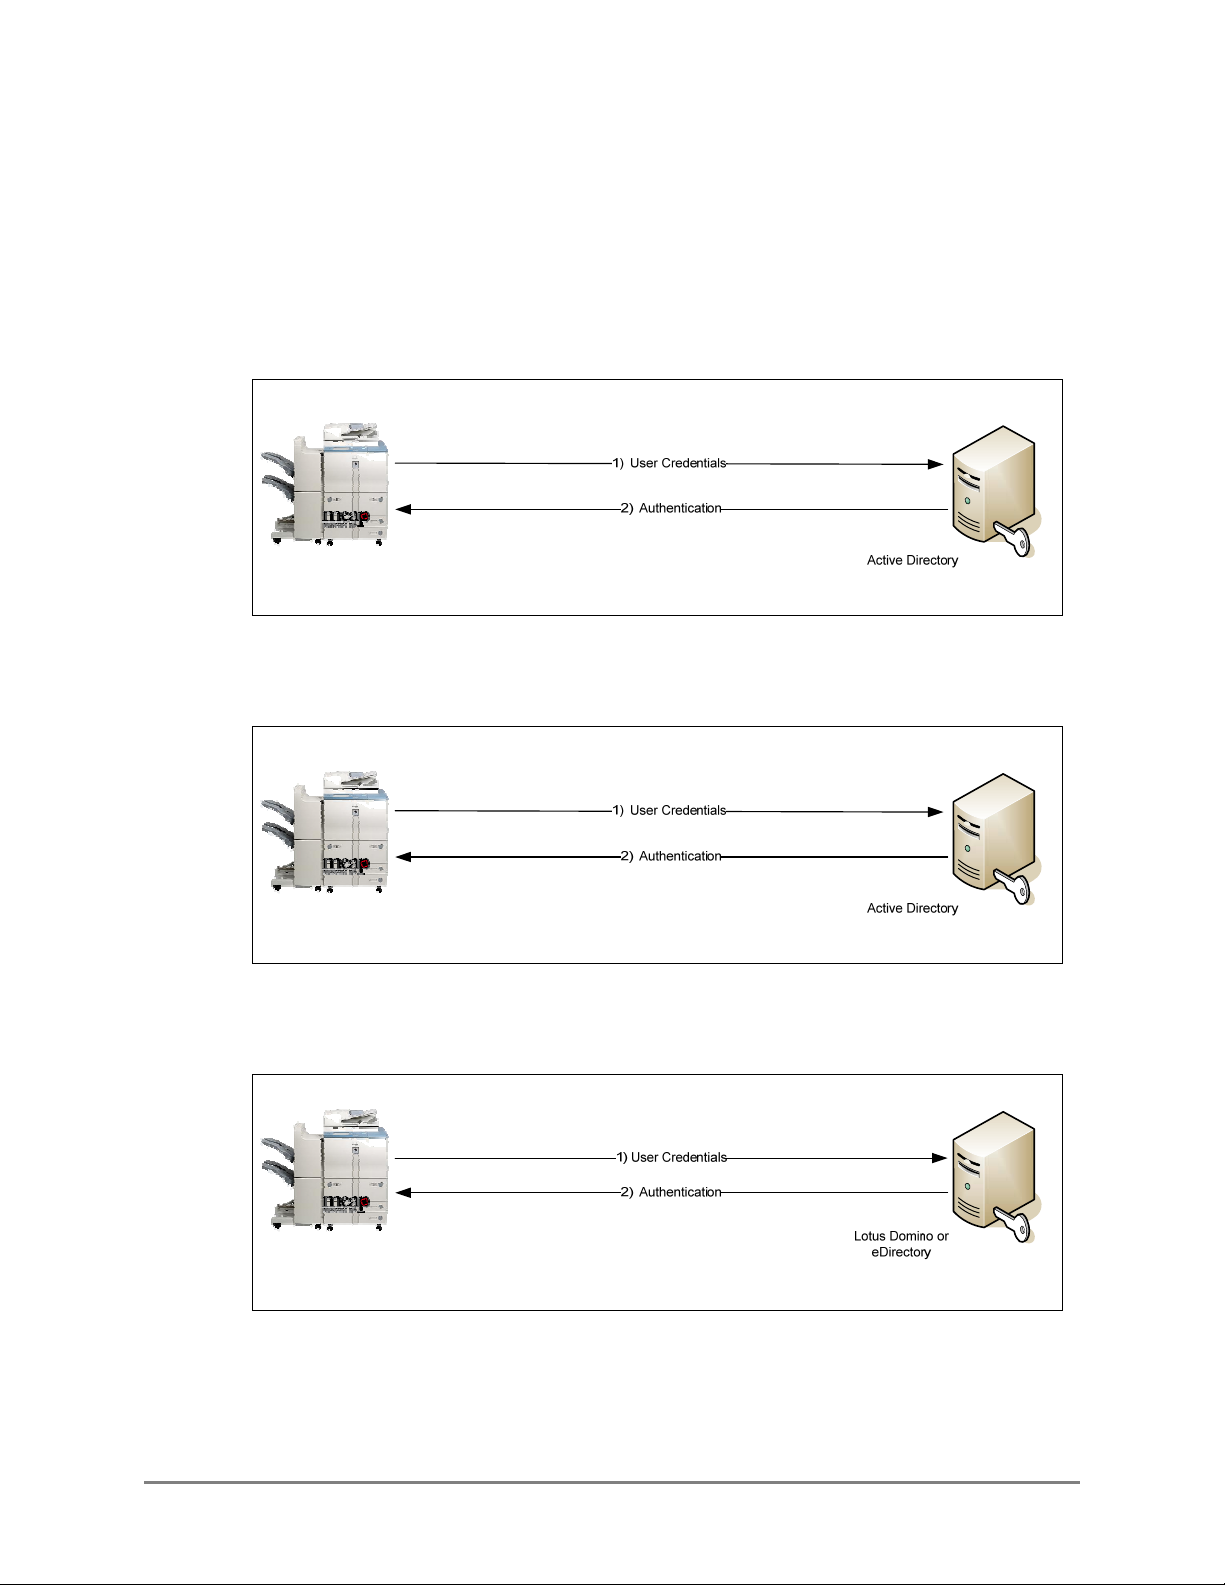
Scan to Fax
1. The user manually inputs the recipient’s fax number.
2. The machine sends the scanned document to the SMTP server.
3. The SMTP server sends the scanned document to the fax server.
4. The fax server sends the scanned document to the destination.
Authorized Send Installation and Configuration Guide for imageRUNNER Machines 23
Page 24

Scan to Folder
1. The user browses for the desired folder on the file server directly from the machine.
2. Once the directory is found and selected, the machine sends the file to the
designated location on the file server.
NOTE
When a user accesses a network share, they are authenticated against that share using
their credentials. If they do not have access rights to that share, they will be prompted
to enter a user name and password.
Scan to Folder with NTLM Authentication
1. The user logs on to the machine using one of the authentication methods.
2. The user browses and enters their credentials to gain access to a network shared
folder using NTLM as the authentication method.
3. Once access is granted, the scanned document is stored in the selected folder.
24 Authorized Send Installation and Configuration Guide for imageRUNNER Machines
Page 25

Scan to a Dynamically Created Folder
1. The authenticated user selects a folder, enters a document name, and scans the
document.
2. The scanned document is automatically stored in a sub-folder (that was dynamically
created) of the selected folder.
Dynamic Domain Controller Location
1. The user tries to log on to the machine using one of the authentication methods.
2. The system is unable to contact the authentication server previously cached.
3. The system locates the next closest available domain controller.
4. Authentication or address book lookup is performed by the new domain controller.
5. The new domain controller is cached.
Authorized Send Installation and Configuration Guide for imageRUNNER Machines 25
Page 26
1.2.1 Communication Diagrams
This section shows the flow of communication protocols based on the authentication
method that you select. You can configure up to 10 authentication servers.
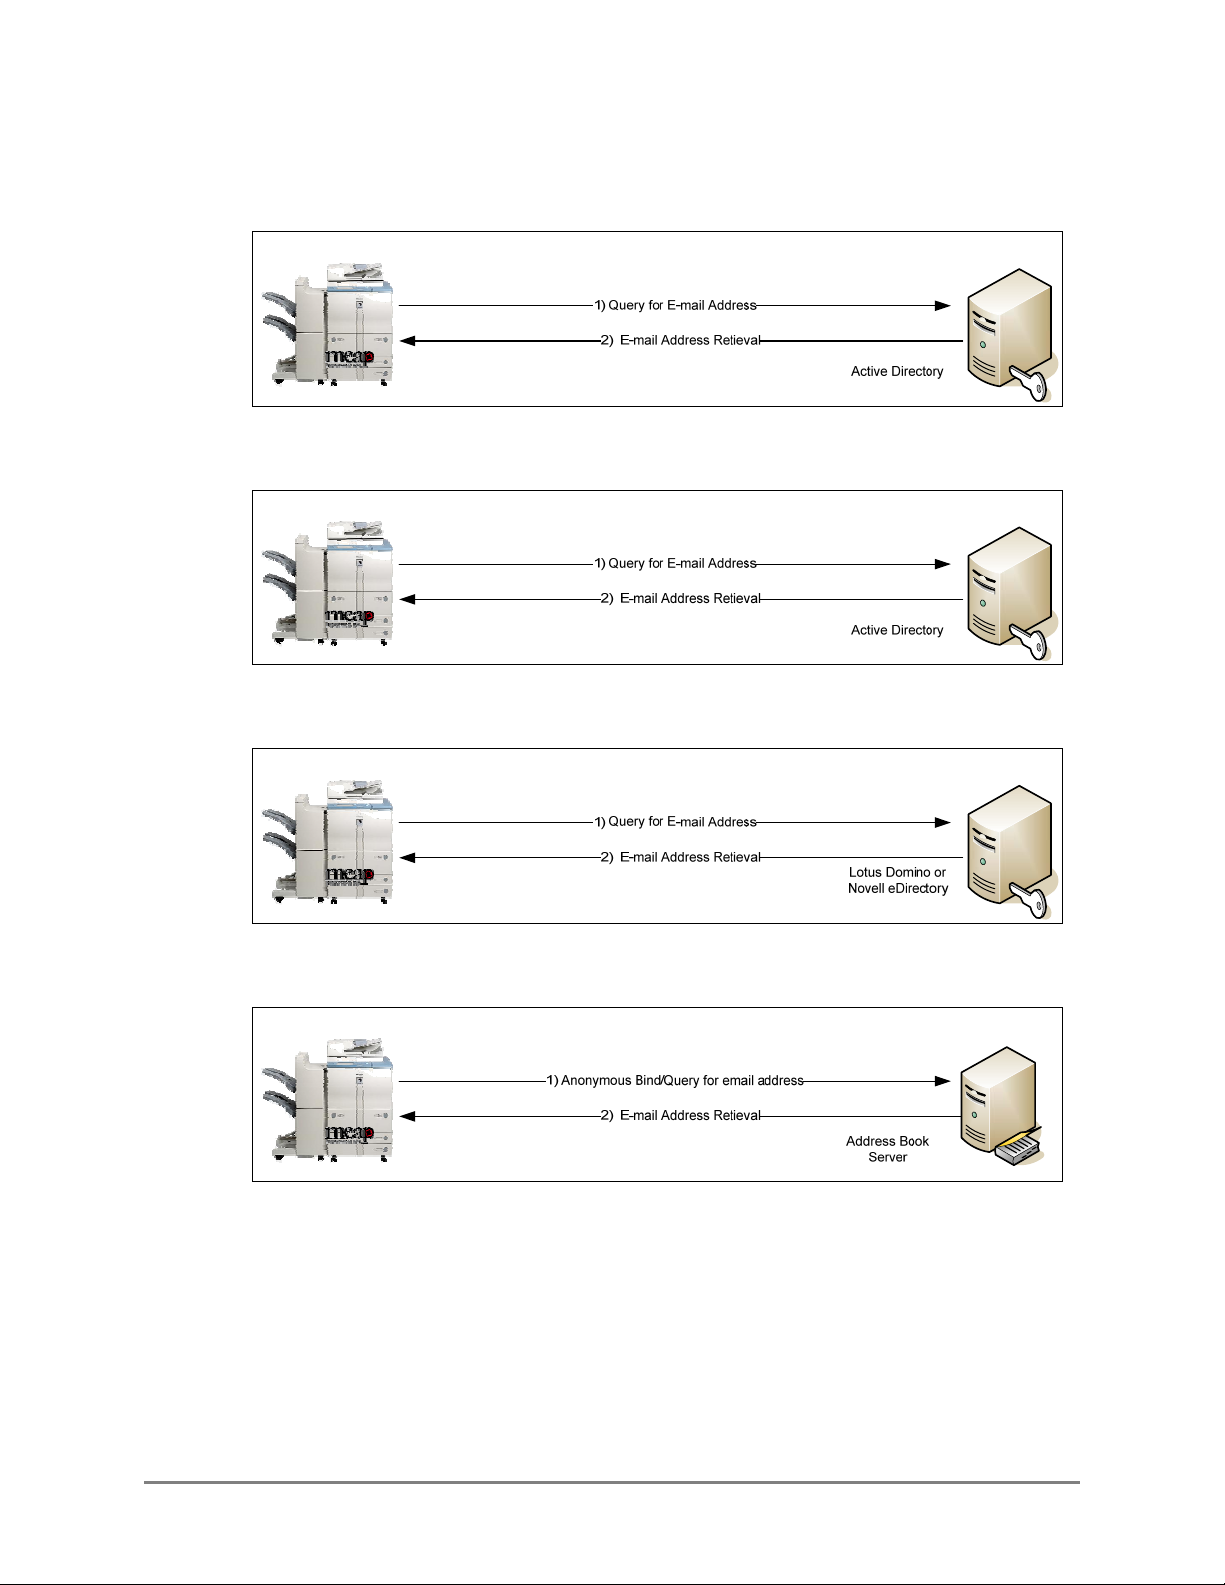
1.2.1.1 Authentication Communication Diagrams
Kerberos Authentication
Communication Protocol LDAP/Kerberos
NTLM Authentication
Communication Protocol LDAP/NTLM
Simple Authentication
Communication Protocol LDAP/Simple
26 Authorized Send Installation and Configuration Guide for imageRUNNER Machines
Page 27
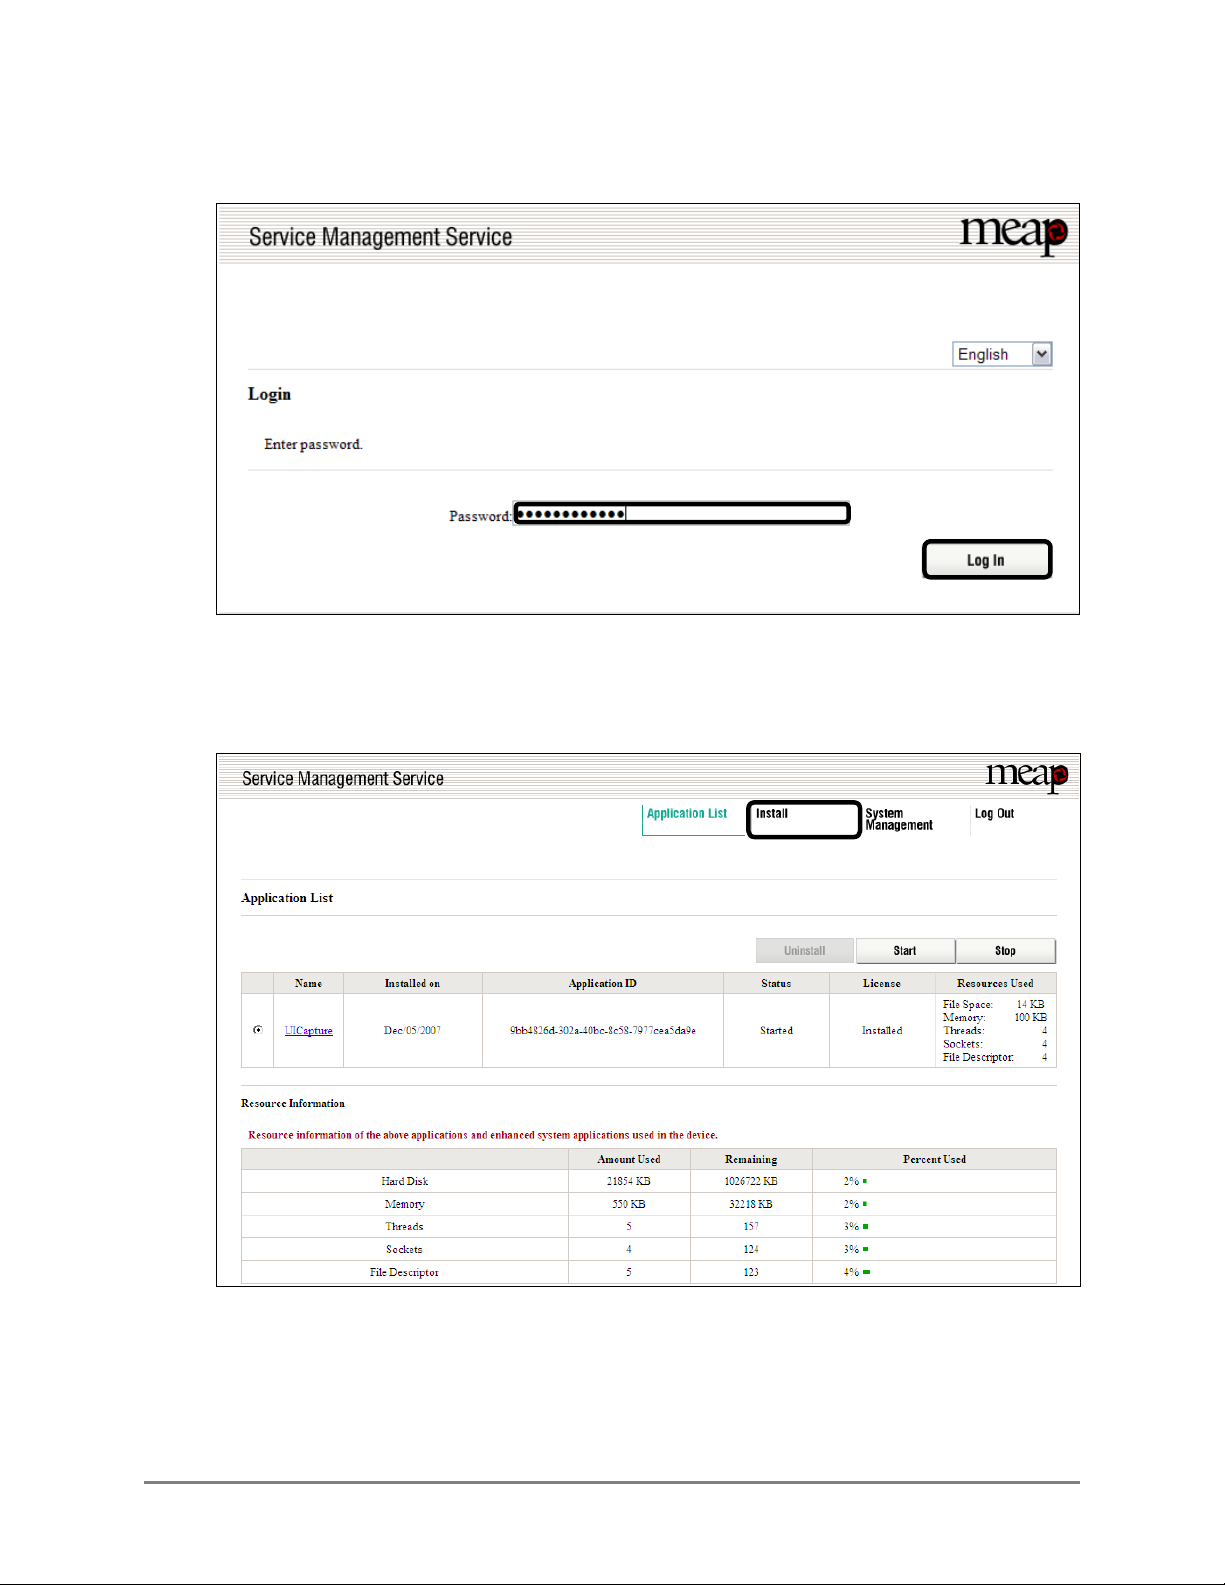
1.2.1.2 Address Book Communication Diagrams
Kerberos Communication with an Address Book Server
NTLM Communication with an Address Book Server
Simple Communication with an Address Book Server
Anonymous Bind Communication Using LDAP with an Address Book Server
Authorized Send Installation and Configuration Guide for imageRUNNER Machines 27
Page 28

This page is intentionally left blank.
28 Authorized Send Installation and Configuration Guide for imageRUNNER Machines
Page 29

Chapter 2 Installing Authorized Send
This chapter describes how to install Authorized Send on a MEAP-enabled machine using
the MEAP SMS program.
The System Administrator for the target MEAP device is best suited for installing the
Authorized Send application, using a networked computer that is connected to the Internet
and the device.
Before installation, you must obtain the license file from
the IP address of the MEAP-enabled device.
IMPORTANT
• This chapter describes the procedure for a new installation of Authorized Send Version 4.1.
• If you want to upgrade from a previous version of Authorized Send, you must uninstall the
previous version from the MEAP device before installing this version. If you are upgrading
from version 3.0, 3.51, 3.52, or 4.0 you do not have to uninstall the previous version if you
are using the same license file (although you still must [Stop] the program).
• Do not use the browser’s [Back] and [Forward] buttons during the installation process.
Only use the clickable links in the browser’s window.
• For more information on using SMS and uninstalling MEAP applications, see the MEAP
SMS Administrator Guide that came with your MEAP device.
1. Open a browser window ➞ enter the following URL:
http://<device IP>:8000/sms
https://<device IP>:8443/sms (if you are using SSL for communications)
(Replace <device IP> with the IP address of the MEAP device.)
www.canon.com/Meap, and have
Authorized Send Installation and Configuration Guide for imageRUNNER Machines 29
Page 30
2. Enter MeapSmsLogin in [Password] ➞ click [Log In].
The SMS Application List screen is displayed.
3. Click the [Install] tab.
The SMS Install Application/License screen is displayed.
30 Authorized Send Installation and Configuration Guide for imageRUNNER Machines
Page 31

4. Under <Application File>, click [Browse] to the right of Path.
5. Navigate to the drive or directory containing the .jar file ➞ select the file ➞ click
[Open].
IMPORTANT
Make sure that you select the file that ends with the .jar extension for the application
file.
6. Verify that the correct file was selected.
Authorized Send Installation and Configuration Guide for imageRUNNER Machines 31
Page 32

7. Under <License File>, click [Browse] to the right of Path.
IMPORTANT
The license file must be downloaded from the LMS beforehand. For more information,
contact your local authorized Canon dealer.
8. Navigate to the drive or directory containing the .lic file ➞ select the file ➞ click [Open].
IMPORTANT
Make sure that you select the file that ends with the .lic extension for the license file.
9. Verify that the correct file was selected ➞ click [OK].
The SMS Confirm Install Application/License screen is displayed.
32 Authorized Send Installation and Configuration Guide for imageRUNNER Machines
Page 33

10. Click [OK].
During installation, the message <Installing…Please wait a moment.> is displayed.
Authorized Send Installation and Configuration Guide for imageRUNNER Machines 33
Page 34

11. Click the [Authorized Send] radio button ➞ click [Start].
Note that the status of the Authorized Send application is <Installed> before clicking
[Start].
The status will change to <Started> if successful.
Installation is complete.
12. Click [Log Out] to exit SMS.
34 Authorized Send Installation and Configuration Guide for imageRUNNER Machines
Page 35

Chapter 3 Configuring Authorized Send
This chapter describes how to configure Authorized Send from a Web browser and set up the
authentication servers, address book servers, share names, and options for the Scan to
E-Mail, Scan to Fax, and Scan to Folder functions. It also describes how to configure the
application’s interface appearance using the optional Brand Configuration Tool.
The Authorized Send Configuration page contains the following items for configuring
Authorized Send:
Authentication: Create up to 10 authentication servers.
E-Mail Service:
General: Configure an SMTP server.
Address Book: Configure up to 10 address book servers.
Scan to E-Mail: Configure the Scan to E-Mail settings.
Scan to Fax: Configure the Scan to Fax Settings.
Scan to Folder:
General: Configure the Scan to Folder settings.
Preset Shares: Create preset folders for users to scan to.
Options: Configure the optional settings.
Logs: Configure the log settings, remote syslog servers, and download and view
the logs.
About: Display the Authorized Send version information.
3.1 Flow of Configuration Operations
From the Authorized Send Configuration screen, you can configure the settings
necessary to use the Authorized Send application.
1. Open a browser window ➞ enter the following URL:
http://<device IP>:8000/AuthSendConfiguration
(Replace <device IP> with the IP address of the MEAP device.)
The Please enter Login ID and Password screen is displayed.
IMPORTANT
• Enter AuthSendConfiguration exactly as shown, as it is case-sensitive.
• If Portal Service is installed, you can also access the Authorized Send
Configuration screen by entering http://<device IP>:8000 ➞ click the
Authorized Send Configuration link. (Replace <device IP> with the IP address of
the MEAP device.)
Authorized Send Installation and Configuration Guide for imageRUNNER Machines 35
Page 36

2. Enter your user name in [Login ID] and your password in [Password] ➞ click
[Login].
The default Login ID is ‘Administrator’, and the default password is ‘Admin’.
The Authentication Servers screen is displayed.
IMPORTANT
If you are using a temporary license and the license has expired, the message
<The Authorized Send license has expired. Please contact your Canon dealer.>
will be displayed. You must update your license file, or you will not be able to
access the Configuration servlet.
3. Click [Add].
The Create Authentication Server screen is displayed.
36 Authorized Send Installation and Configuration Guide for imageRUNNER Machines
Page 37

4. Select the authentication method ➞ configure the settings based on the selected
authentication method ➞ click [Create]. (See “Creating an Authentication Server,”
on p. 49.)
The available settings vary, depending on the selected authentication method.
The Authentication Server is created, and is added to the list on the Authentication
Servers screen.
5. Click [E-Mail Service] ➞ [General].
The E-Mail Service screen is displayed.
Authorized Send Installation and Configuration Guide for imageRUNNER Machines 37
Page 38

6. Configure the settings under <General Settings> ➞ click [Save]. (See “Configuring
E-Mail Service Settings,” on p. 65.)
7. Click [E-Mail Service] ➞ [Address Book].
The Address Book Servers screen is displayed.
8. Click [Add].
The Create Address Book Server screen is displayed.
38 Authorized Send Installation and Configuration Guide for imageRUNNER Machines
Page 39

9. Configure the settings on the Create Address Book Server screen ➞ click [Create].
The address book server is created, and is added to the list on the Address Book
Servers screen.
10. Click [Scan to E-Mail].
The Scan to E-Mail screen is displayed.
Authorized Send Installation and Configuration Guide for imageRUNNER Machines 39
Page 40

11. Click the [Enable Scan to E-mail] check box ➞ click [Save].
If you want to restrict users to only send e-mail messages to themselves, select the
[E-mail to self only] check box.
If you want to restrict access to the [Address Book] key or the [To], [Subject],
[Body], or [File Name] text boxes on the SCAN TO EMAIL screen on the machine,
select the respective check boxes under <Disabled>.
If you want to restrict the [To] text box to only show the user’s e-mail address,
select the [Self] check box.
If you require that the [Subject] text box is always populated, select the [Required]
check box.
You can set up default recipients, subjects, and body text by entering their default
values in the [To], [Subject], and [Body] text boxes under <Default Value>.
If you want to send a copy of the scanned document to the e-mail address registered
to your user account, select the [E-mail CC to self] check box.
A message is displayed, informing you that the settings have been saved.
40 Authorized Send Installation and Configuration Guide for imageRUNNER Machines
Page 41

12. Click [Scan to Fax].
The Scan to Fax screen is displayed.
13. Click the [Enable Scan to Fax] check box ➞ enter the appropriate template
configuration in the [Fax Recipient Template] text box ➞ click [Save]. (See
“Configuring Scan to Fax Settings,” on p. 97.)
A message is displayed, informing you that the settings have been saved.
NOTE
The Scan to Fax function is disabled by default.
Authorized Send Installation and Configuration Guide for imageRUNNER Machines 41
Page 42

14. Click [Scan to Folder] ➞ [General].
The Scan to Folder screen is displayed.
15. Select the [Enable Scan to Folder] check box ➞ configure the Scan to Folder
Access Controls ➞ enter the IP address of the NetBIOS name server in [WINS
Server IP] ➞ click [Save].
Select the [Scan to Home Directory/Preselected Share only] check box if you want
to automatically disable the [Preset Share], [File Server/Path], and [Browse] check
boxes with one click.
If you want to manually restrict user access to the Preset Share drop-down list, File
Server and File Path text boxes, Browse key, or File Name text box on the SCAN
TO FOLDER screen on the machine, select the [Preset Share], [File Server/Path],
[Browse], or [File Name] check boxes under <Disabled>.
42 Authorized Send Installation and Configuration Guide for imageRUNNER Machines
Page 43

Select the [Test] check box if you want the connection to the WINS server to be
verified before you save the settings.
Select the [Enable Dynamic Folder Creation] check box if you want a sub-folder to
be automatically created when a user tries to scan to a folder that does not exist.
Select the [Only for Preset Shares] check box to restrict a user to only scan to a
dynamic folder that was created as a preset share by the System Administrator
beforehand. When this option is selected, the user must enter a valid file server/file
path manually.
A message is displayed, informing you that the settings have been saved.
16. Click [Scan to Folder] ➞ [Preset Shares].
The Preset Shares screen is displayed.
Authorized Send Installation and Configuration Guide for imageRUNNER Machines 43
Page 44

17. Click [Add] ➞ specify the Share Name settings ➞ click [Create]. (See “Creating a
Preset Share,” on p. 103.)
The new preset share is added to the list on the Preset Shares screen.
17.1 If you want to specify your home directory as a preselected share that will
automatically appear in the Preset Share drop-down list on the SCAN TO
FOLDER screen, select [Home Directory (if exists)] from the Preselected
Share drop-down list ➞ click [Save]. (See “Creating a Preset Share,” on
p. 103.)
A message is displayed, informing you that the settings have been saved.
44 Authorized Send Installation and Configuration Guide for imageRUNNER Machines
Page 45

18. Click [Scan Settings]
The Scan Settings screen is displayed.
19. Specify the scan settings, as necessary ➞ click [Save]. (See “Configuring Scan
Settings,” on p. 108.)
A message is displayed, informing you that the settings have been saved.
Authorized Send Installation and Configuration Guide for imageRUNNER Machines 45
Page 46

20. Click [Options].
The Options screen is displayed.
21. Specify the optional settings, as necessary ➞ click [Save]. (See “Configuring
Optional Settings,” on p.113.)
A message is displayed, informing you that the settings have been saved.
46 Authorized Send Installation and Configuration Guide for imageRUNNER Machines
Page 47

22. Click [Logs].
The Logs screen is displayed.
23. Check the [Enable Logging] check box ➞ specify the Severity Level ➞ configure
the syslog servers ➞ click [Save]. (See “Configuring Log Settings,” on p. 117.)
You can also view, download, or delete the current log file. For more information,
see “Configuring Log Settings,” on p. 117.
Authorized Send Installation and Configuration Guide for imageRUNNER Machines 47
Page 48

24. If you want to verify the version number of Authorized Send, click [About].
25. Click [Logout].
48 Authorized Send Installation and Configuration Guide for imageRUNNER Machines
Page 49

3.2 Creating an Authentication Server
You can create up to 10 domains for authentication.
IMPORTANT
If you select the Kerberos protocol for the authentication method, make sure that the
device clock setting is properly synchronized with the configured authentication
server and address book server. For more information on synchronizing the device
clock with the server clock, see “Synchronizing the Device and Server Time,” on
p. 142.
1. Display the Authorized Send Configuration screen.
NOTE
For instructions on displaying the Authorized Send Configuration screen, see
“Flow of Configuration Operations,” on p. 35.
2. Enter your user name in [Login ID] and your password in [Password] ➞ click
[Login].
NOTE
For more details on logging on to the Authorized Send Configuration screen, see
“Flow of Configuration Operations,” on p. 35.
3. Click [Authentication] ➞ [Add].
Authorized Send Installation and Configuration Guide for imageRUNNER Machines 49
Page 50

4. Click the Method drop-down list to select the authentication method.
[Kerberos]: The machine communicates directly to Active Directory.
[NTLM]: The machine communicates directly to Active Directory.
[Simple]: Necessary if you use Domino or eDirectory for authentication.
[Anonymous]: Configuring an anonymous authentication server enables you to
use Authorized Send without logging on to the application.
IMPORTANT
• If an Anonymous authentication server is configured, the
Authorized Send SIGN IN screen on the machine is always
bypassed, and the user is logged in as an anonymous user.
• If an Anonymous server is created, other servers cannot be used.
• To disable Anonymous authentication, the Anonymous
authentication server must be deleted. When Anonymous
authentication is deleted, the default screen is the Authorized
Send SIGN IN screen on the machine. For details about deleting
an Anonymous authentication server, see "Deleting an
Authentication Server," on p. 64.
50 Authorized Send Installation and Configuration Guide for imageRUNNER Machines
Page 51

5. Specify the settings for the selected authentication method.
5.1 If you select [Kerberos] as the authentication method, specify the
Authentication Settings, Retrieve User E-Mail Address During
Authentication, Scan to Home Directory Settings, and Scan to Folder
Authentication Settings.
Authentication Settings
Method: Kerberos
Pull Host from Select [Yes] to automatically pull the host information
DNS: from the DNS after you click [Create]. Select [No] if you
want to manually configure the host information. The
default setting is ‘No’.
If you select the [Yes] radio button, the first “live”
domain controller is used as the authentication server
after you click [Create].
Host: This text box is only displayed if Pull Host from DNS is
set to ‘No’. Enter the DNS name or IP address of the
authentication server.
Authorized Send Installation and Configuration Guide for imageRUNNER Machines 51
Page 52

Port: This text box is only displayed if Pull Host from DNS is
set to ‘No’ and if the [Pull Port from DNS] check box is
not selected. Enter the connecting port number of the
authentication server. You can enter a maximum of five
numbers. The default port number is ‘389’.
SSL: This check box is only displayed if Pull Host from DNS
is set to ‘No’ and if the [Pull Port from DNS] check box
is not selected. Select this check box if you want the
authentication server to use SSL. If you select this check
box, the host port number automatically changes to ‘636’.
Test: This check box is only displayed if Pull Host from DNS
is set to ‘No’. Select this check box if you want the
connection to the authentication server to be verified
before you save the settings. The [Test] check box is
selected by default.
Hostname: This text box is only displayed for Kerberos if Pull Host
from DNS is set to ‘No’. Enter the host name of the
authentication server.
Domain Name: Enter the domain name of the authentication server.
Pull Port from This check box is only displayed if Pull Host from DNS
DNS: is set to ‘Yes’. Select the [Pull Port from DNS] check box
if you want the Port text box to be dynamically populated
from the DNS.
Retrieve User E-Mail Address During Authentication
Address Book If you have already configured an address book server
Server: select the address book server from which your e-mail
address will be retrieved from the drop-down list.
52 Authorized Send Installation and Configuration Guide for imageRUNNER Machines
Page 53

Scan to Home Directory Settings
Retrieve Home Select this check box to obtain the currently logged on
Directory user’s home directory information from the
(Active authentication server. This will create a Home Directory
Directory only): element in the Preselected Share drop-down list on
the Scan to Folder Preset Shares configuration screen.
IMPORTANT
If this check box is selected, and the [Retrieve Home
Directory (Active Directory only)] check box on the
Create Address Book Server screen is also selected, the
authentication server is checked first for the Home
Directory. If no Home Directory is found on the
authentication server, then the address book server is
searched.
Search Root: Specify the search root for searching the user’s home
directory via LDAP.
Depending on your environment, you must enter the Base
DN (Distinguished Name) of the location of the user
accounts.
If the directory server is authenticating against Active
Directory and the domain is, for example, us.canon.com,
then the search root is dc=us, dc=canon, dc=com.
[Search Root] only appears if the [Retrieve Home
Directory (Active Directory only)] check box is selected.
LDAP Match Select [sAMAccountName] or [userPrincipalName]
Attribute: from the drop-down list. This enables you to search for
the user’s Home Directory.
Authorized Send Installation and Configuration Guide for imageRUNNER Machines 53
Page 54

Scan to Folder Authentication Settings
NTLM Select this check box to use NTLM as the authentication
Authentication: method for the Scan to Folder feature, regardless of the
authentication method you selected for the authentication
server.
NTLM Enter the domain name to be used for NTLM
domain name: authentication of a share for the Scan to Folder feature.
IMPORTANT
If you select the Kerberos protocol for the authentication method, make
sure that the device clock setting is properly synchronized with the
configured authentication server and address book server. For more
information on synchronizing the device clock with the server clock, see
“Synchronizing the Device and Server Time,” on p. 142.
5.2 If you select [NTLM] as the authentication method, specify the
Authentication Settings, Retrieve User E-Mail Address During
Authentication, Scan to Home Directory Settings, and Scan to Folder
Authentication Settings.
54 Authorized Send Installation and Configuration Guide for imageRUNNER Machines
Page 55

Authentication Settings
Method: NTLM
Pull Host from Select [Yes] to automatically pull the host information
DNS: from the DNS after you click [Create]. Select [No] if you
want to manually configure the host information. The
default setting is ‘No’.
If you select the [Yes] radio button, the first “live”
domain controller is used as the authentication server
after you click [Create].
Host: This text box is only displayed if Pull Host from DNS is
set to ‘No’. Enter the DNS name or IP address of the
authentication server.
Port: This text box is only displayed if Pull Host from DNS is
set to ‘No’ and if the [Pull Port from DNS] check box is
not selected. Enter the connecting port number of the
authentication server. You can enter a maximum of five
numbers. The default port number is ‘389’.
SSL: This check box is only displayed if Pull Host from DNS
is set to ‘No’ and if the [Pull Port from DNS] check box
is not selected. Select this check box if you want the
authentication server to use SSL. If you select this check
box, the host port number automatically changes to ‘636’.
Test: This check box is only displayed if Pull Host from DNS
is set to ‘No’. Select this check box if you want the
connection to the authentication server to be verified
before you save the settings. The [Test] check box is
selected by default.
Domain Name: Enter the domain name of the authentication server.
Pull Port from This check box is only displayed if Pull Host from DNS
DNS: is set to ‘Yes’. Select the [Pull Port from DNS] check box
if you want the Port text box to be dynamically populated
from the DNS.
Authorized Send Installation and Configuration Guide for imageRUNNER Machines 55
Page 56

Retrieve User E-Mail Address During Authentication
Address Book If you have already configured an address book server
Server: select the address book server from which your e-mail
address will be retrieved from the drop-down list.
Scan to Home Directory Settings
Retrieve Home Select this check box to obtain the currently logged on
Directory user’s home directory information from the
(Active authentication server. This will create a Home Directory
Directory only): element in the Preselected Share drop-down list on
the Scan to Folder Preset Shares configuration screen.
IMPORTANT
If this check box is selected, and the [Retrieve Home
Directory (Active Directory only)] check box on the
Create Address Book Server screen is also selected, the
authentication server is checked first for the Home
Directory. If no Home Directory is found on the
authentication server, then the address book server is
searched.
Search Root: Specify the search root for searching the user’s home
directory via LDAP.
Depending on your environment, you must enter the Base
DN (Distinguished Name) of the location of the user
accounts.
If the directory server is authenticating against Active
Directory and the domain is, for example, us.canon.com,
then the search root is dc=us, dc=canon, dc=com.
[Search Root] only appears if the [Retrieve Home
Directory (Active Directory only)] check box is selected.
LDAP Match Select [sAMAccountName] or [userPrincipalName]
Attribute: from the drop-down list. This enables you to search for
the user’s Home Directory.
56 Authorized Send Installation and Configuration Guide for imageRUNNER Machines
Page 57

Scan to Folder Authentication Settings
NTLM Select this check box to use NTLM as the authentication
Authentication: method for the Scan to Folder feature, regardless of the
authentication method you selected for the authentication
server.
NTLM Enter the domain name to be used for NTLM
domain name: authentication of a share for the Scan to Folder feature.
5.3 If you select [Simple] as the authentication method, specify the
Authentication Settings, Retrieve User E-Mail Address During
Authentication, Scan to Home Directory Settings, and Scan to Folder
Authentication Settings.
Authentication Settings
Method: Simple
Host: Enter the DNS name or IP address of the authentication
server.
Authorized Send Installation and Configuration Guide for imageRUNNER Machines 57
Page 58

Port: Enter the connecting port number of the authentication
server. You can enter a maximum of five numbers. The
default port number is ‘389’.
SSL: Select this check box if you want the authentication
server to use SSL. If you select this check box, the host
port number automatically changes to ‘636’.
Test: Select this check box if you want the connection to the
authentication server to be verified before you save the
settings. The [Test] check box is selected by default.
Domain Name: Enter the domain name of the authentication server.
Use Public Select [Yes] to configure the public credentials (Public
Credentials: DN and Public Password), or select [No] to use
anonymous binding.
Public DN: This text box is only displayed if Use Public Credentials
is set to ‘Yes’. Enter the user’s login Distinguished Name
to use when performing the first bind of the Simple
Binding process.
Public Password: This text box is only displayed if Use Public Credentials
is set to ‘Yes’. It is used as the password for
authentication against the address book server. It is an
optional text box, with no limit on the number of
characters that can be used.
LDAP Match Enter the user name’s LDAP attribute to be matched with
Attribute: the user name when performing the first bind of the
Simple Binding process.
Search Root: Enter the root to search for the authenticating user’s
Domain Name.
If the directory server is authenticating against
eDirectory or Domino and the organization is, for
example, Canon, then the search root is o=canon.
Retrieve User E-Mail Address During Authentication
Address Book If you have already configured an address book
Server: server, select the address book server from which your
e-mail address will be retrieved from the drop-down list.
58 Authorized Send Installation and Configuration Guide for imageRUNNER Machines
Page 59

Scan to Home Directory Settings
Retrieve Home Select this check box to obtain the currently logged on
Directory user’s home directory information from the
(Active authentication server. This will create a Home Directory
Directory only): element in the Preselected Share drop-down list on
the Scan to Folder Preset Shares configuration screen.
IMPORTANT
If this check box is selected, and the [Retrieve Home
Directory (Active Directory only)] check box on the
Create Address Book Server screen is also selected, the
authentication server is checked first for the Home
Directory. If no Home Directory is found on the
authentication server, then the address book server is
searched.
Search Root: Specify the search root for searching the user’s home
directory via LDAP.
[Search Root] only appears if the [Retrieve Home
Directory (Active Directory only)] check box is selected.
LDAP Match Select [sAMAccountName] or [userPrincipalName] from
Attribute: the drop-down list. This enables you to search for the
user’s Home Directory.
Scan to Folder Authentication Settings
NTLM Select this check box to use NTLM as the authentication
Authentication: method for the Scan to Folder feature, regardless of the
authentication method you selected for the authentication
server.
NTLM Enter the domain name to be used for NTLM
domain name: authentication of a share for the Scan to Folder feature.
Authorized Send Installation and Configuration Guide for imageRUNNER Machines 59
Page 60

5.4 If you select [Anonymous] as the authentication method, specify the
Anonymous User Information, and Address Book Server for E-Mail
Lookup.
Authentication Settings
Method: Anonymous
Anonymous User Information
Anonymous Enter the user name for anonymous sending. You can
User Name: enter a maximum of 40 characters. Validation cannot
occur if this text box is blank. The default setting is
‘anonymous’.
Anonymous This text box is used as the sender’s e-mail address for
User E-Mail: the Scan to Fax and Scan to E-Mail functions. Enter the
Anonymous user’s e-mail address. You can enter a
maximum of 64 characters for the first (local) part, and a
maximum of 255 characters for the domain part. This text
box is optional.
60 Authorized Send Installation and Configuration Guide for imageRUNNER Machines
Page 61

IMPORTANT
• If an anonymous authentication server is configured, the SIGN IN screen
on the machine is bypassed, and the user is logged on as an anonymous
user. If more than one Authorized Send function is enabled, the MAIN
screen on the machine is displayed. If only one Authorized Send function
is enabled, that function’s screen is displayed.
• If the [Anonymous User E-Mail] text box is blank, the Scan to Fax and
Scan to E-Mail functions do not work on the machine.
• If only one function is enabled but that function is inaccessible due to
insufficient data (such as no sender’s e-mail address for the SCAN TO
EMAIL or SCAN TO FAX screens on the machine), the MAIN screen on
the machine is displayed with that function’s button disabled and an error
message.
NOTE
Validation of the Anonymous User Name and Anonymous User E-Mail
occurs when [Create] is clicked. If validation fails, an error message is
displayed.
Address Book Server for E-Mail Lookup
Address Book Select a configured address book server to use with the
Server: e-mail lookup feature of the Scan to E-Mail function.
6. Click [Create].
If you make a mistake while configuring the authentication server settings, click
[Reset] to return the settings to their original values.
To cancel creating the authentication server and return to the Authentication Servers
screen, click [Cancel].
A message is displayed informing you that the configuration has been saved, and
the screen returns to the Authentication Servers screen.
IMPORTANT
• Click the [Test] check box next to <Host> if you want to test the validity of the IP
addresses you entered before saving.
• If validation fails, an error message will be displayed. Enter the correct
information ➞ click [Save].
Authorized Send Installation and Configuration Guide for imageRUNNER Machines 61
Page 62

3.3 Editing an Authentication Server
You can edit a previously created authentication server from the Authorized Send
Configuration screen.
1. Click [Authentication] ➞ select the check box next to the authentication server you
want to edit ➞ click [Edit].
62 Authorized Send Installation and Configuration Guide for imageRUNNER Machines
Page 63

2. Edit the settings for the authentication server as necessary ➞ click [Update].
If you make a mistake, click [Reset] to return the settings to their original values.
To cancel editing the authentication server and return to the Authentication Servers
screen, click [Cancel].
Authorized Send Installation and Configuration Guide for imageRUNNER Machines 63
Page 64

3.4 Deleting an Authentication Server
You can delete a previously created authentication server from the Authorized Send
Configuration screen.
1. Click [Authentication] ➞ select the check box next to the authentication server you
want to delete ➞ click [Delete].
2. Click [OK].
If you do not want to delete the authentication server, click [Cancel].
The authentication server is deleted from the list.
64 Authorized Send Installation and Configuration Guide for imageRUNNER Machines
Page 65

3.5 Configuring the E-Mail Service Settings
You can configure the settings for the SMTP server.
NOTE
The E-Mail Service Settings must be configured to use the Scan to E-Mail and Scan
to Fax functions.
1. Click [E-Mail Service] ➞ [General].
If necessary, see the screen shot in step 5 of
p.
35.
2. Configure the settings as necessary.
"Flow of Configuration Operations," on
General Settings
SMTP Server Enter the IP Address or DNS name of the SMTP server.
Address:
Port: Enter the connecting port number of the SMTP server. You can
enter a maximum of five numbers. The default port number
is ‘25’.
Test: Select this check box if you want the connection to the SMTP
server to be verified before you save the settings. The [Test]
check box is selected by default.
Enable SMTP Select this check box to have the user authenticated on the
Authentication: SMTP server when using the Scan to E-Mail or Scan to Fax
function.
Authorized Send Installation and Configuration Guide for imageRUNNER Machines 65
Page 66

Use Public Select [Yes] to configure the SMTP public credentials
Credentials: (Public User Name, Public Password). If [Yes] is selected, enter
the user’s SMTP public name and password for SMTP
authentication. If [No] is selected, the user’s normal login
credentials are used.
SMTP Public If [Yes] is selected for Use Public Credentials, you must enter
Username: the user name for SMTP authentication.
SMTP Public If [Yes] is selected for Use Public Credentials, you must enter
Password: the password for SMTP authentication.
3. Click [Save].
If you make a mistake while configuring the settings, click [Reset] to return the
settings to their original values.
A message is displayed informing you that the configuration has been saved.
IMPORTANT
• Click the [Test] check box if you want to test the validity of the IP address you
entered before saving.
• If validation fails, an error message will be displayed. Enter the correct
information ➞ click [Save].
NOTE
The [Test] check box is selected by default. If you do not want to test the validity
of the address you entered, click the check box to clear the check mark.
66 Authorized Send Installation and Configuration Guide for imageRUNNER Machines
Page 67

3.6 Creating an Address Book Server
You can create up to 10 address book Servers.
When you create an address book server, you can either associate it with an
authentication server, which has been previously created, or you can create a standalone
address book server with no association to an authentication server.
IMPORTANT
• You must configure an address book for an authentication server to retrieve an e-mail
address for the end user when authenticating against the authentication server.
• If you select the Kerberos protocol for the authentication method, make sure that the
device clock setting is properly synchronized with the configured authentication
server and address book server. For more information on synchronizing the device
clock with the server clock, see
p.
142.
NOTE
• To associate an address book with an authentication server, you must first create an
authentication server for Authorized Send. For instructions on creating an
authentication server, see “Creating an Authentication Server,” on p. 49.
• This option may be initially set on this screen, as well as configured and edited on the
Create Authentication Server screen.
• If you select [None] from the Authentication Server drop-down list when creating an
address book server, the address book server will not be associated with an
authentication server and will not interact with any other features of Authorized Send.
Select [None] if you want to create an address book server that can be configured at a
later time.
1. Click [E-Mail Service] ➞ [Address Book] ➞ [Add] on the Address Book Servers
screen.
If necessary, see the screen shots in steps 7 and 8 of
Operations," on p. 35.
“Synchronizing the Device and Server Time,” on
"Flow of Configuration
Authorized Send Installation and Configuration Guide for imageRUNNER Machines 67
Page 68

2. Specify whether you want to create an address book server with or without an
association to an authentication server.
2.1 If you want to create an address book server with an association to an
authentication server, select [Kerberos], [NTLM], [Simple], or
[Anonymous] from the Authentication Server drop-down list under
<Retrieve User E-Mail Address for the Following Authentication Server>.
IMPORTANT
If you select [Kerberos], [NTLM], or [Simple] as the authentication
server, [Same as Authentication Server] appears as an additional setting
under <Address Book Settings>. Select [Yes] to create the address book
with the same credentials as the selected authentication server. If you
select [No], you must enter the configuration information for the
authentication method.
NOTE
The items in the Authentication Server drop-down list correspond to
previously registered authentication servers.
68 Authorized Send Installation and Configuration Guide for imageRUNNER Machines
Page 69

2.1.1 If you select a Kerberos or NTLM authentications server, specify
the Address Book Settings and Scan to Home Directory Settings
➞ proceed to step 4.
Address Book Settings
Same as Select [Yes] to create the address book with the
Authentication same credentials as the selected authentication
Server: server. If you select [No], proceed to step 3 and
enter the configuration information for the
authentication method.
NOTE
Although step 3 shows a standalone address
book server with no association to an
authentication server, the configuration
information is identical to if you were creating
an address book server with an association to
an authentication server (except for selecting
[None] for the authentication server and not
displaying [Same as Authentication Server]).
Search Root: Depending on your environment, you must enter
the Base DN (Distinguished Name) of the
location of the user accounts.
If the directory server is authenticating against
Active Directory and the domain is, for
example, us.canon.com, then the search root is
dc=us, dc=canon, dc=com.
Authorized Send Installation and Configuration Guide for imageRUNNER Machines 69
Page 70

LDAP Match Enter the LDAP Match Attribute to be used for
Attribute: e-mail address retrieval. If the [Retrieve Home
Directory (Active Directory only] check box is
selected under <Scan to Home Directory
Settings>, the value entered here is also used for
Home Directory retrieval.
An example for Active Directory is
‘sAMAccountName’ or ‘userPrincipalName’.
LDAP Email Enter the e-mail LDAP attribute to pull the
Attribute: user’s e-mail address.
An example for Active Directory is ‘mail’.
Maximum Select [10], [25], [50], [75], or [100] from the
Search Results: drop-down list for the maximum number of
search results that you want displayed on the
ADDRESS BOOK screen of the machine. The
default setting is ‘25’.
70 Authorized Send Installation and Configuration Guide for imageRUNNER Machines
Page 71

Scan to Home Directory Settings
Retrieve Home Select this check box to obtain the currently
Directory logged on user’s home directory information
(Active from the address book server with the LDAP
Directory only): attribute of “Home Directory.” This will create a
Home Directory element in the Preselected
Share drop-down list on the Scan to Folder
Preset Shares configuration screen.
IMPORTANT
If this check box is selected, and the [Retrieve
Home Directory (Active Directory only]
check box on the Create Authentication Server
screen is also selected, the authentication
server is checked first for the Home Directory.
If no Home Directory is found on the
authentication server, then the address book
server is searched.
IMPORTANT
If you select the Kerberos protocol for the authentication method,
make sure that the device clock setting is properly synchronized
with the configured authentication server and address book
server. For more information on synchronizing the device clock
with the server clock, see “Synchronizing the Device and Server
Time,” on p. 142.
Authorized Send Installation and Configuration Guide for imageRUNNER Machines 71
Page 72

2.1.2 If you select a Simple authentication server, specify the Address
Book Settings and Scan to Home Directory Settings ➞ proceed to
step 4.
Address Book Settings
Same as Select [Yes] to create the address book with the
Authentication same credentials as the selected authentication
Server: server. If you select [No], proceed to step 3 and
enter the configuration information for the
authentication method.
NOTE
Although step 3 shows a standalone address
book server with no association to an
authentication server, the configuration
information is identical to if you were creating
an address book server with an association to
an authentication server (except for selecting
[None] for the authentication server and not
displaying [Same as Authentication Server]).
LDAP Email Enter the e-mail LDAP attribute to pull the
Attribute: user’s e-mail address.
An example for Active Directory is ‘mail’.
Maximum Select [10], [25], [50], [75], or [100] from the
Search Results: drop-down list for the maximum number of
search results that you want displayed on the
ADDRESS BOOK screen of the machine. The
default setting is ‘25’.
72 Authorized Send Installation and Configuration Guide for imageRUNNER Machines
Page 73

Scan to Home Directory Settings
Retrieve Home Select this check box to obtain the currently
Directory logged on user’s home directory information
(Active from the address book server with the LDAP
Directory only): attribute of “Home Directory.” This will create a
Home Directory element in the Preselected
Share drop-down list on the Scan to Folder
Preset Shares configuration screen.
IMPORTANT
If this check box is selected, and the [Retrieve
Home Directory (Active Directory only]
check box on the Create Authentication Server
screen is also selected, the authentication
server is checked first for the Home Directory.
If no Home Directory is found on the
authentication server, then the address book
server is searched.
2.1.3 If you select an Anonymous authentication server, proceed to
step 3 and enter the configuration information for the
authentication method.
NOTE
Although step 3 shows a standalone address book server with no
association to an authentication server, the configuration
information is identical to if you were creating an address book
server with an association to an authentication server (except for
selecting [None] for the authentication server and not displaying
[Same as Authentication Server]).
Authorized Send Installation and Configuration Guide for imageRUNNER Machines 73
Page 74

2.2 If you want to create a standalone address book server with no association to
an authentication server, select [None] from the Authentication Server dropdown list under <Retrieve User E-Mail Address for the Following
Authentication Server>.
NOTE
• The items in the Authentication Server drop-down list correspond to
previously registered authentication servers.
• If you select [None] from the Authentication Server drop-down list, the
address book server you create will not be associated with an
authentication server and will not interact with any other features of
Authorized Send. Select [None] if you want to create an address book
server that can be configured at a later time.
74 Authorized Send Installation and Configuration Guide for imageRUNNER Machines
Page 75

3. Select the authentication method from the Method drop-down list.
[Kerberos]: The machine communicates directly to Active Directory.
[NTLM]: The machine communicates directly to Active Directory.
[Simple]: Necessary, if you use Domino or eDirectory for authentication.
[Anonymous]: Authorized Send will not use any user login credentials to search
the address book for e-mail addresses.
Authorized Send Installation and Configuration Guide for imageRUNNER Machines 75
Page 76

3.1 If you select [Kerberos] as the authentication method, specify the Address
Book Settings and Scan to Home Directory Settings.
Address Book Settings
Method: Kerberos
Pull Host from Select [Yes] to automatically pull the host information
DNS: from the DNS after you click [Create]. Select [No] if you
want to manually configure the host information. The
default setting is ‘No’.
If you select the [Yes] radio button, the first “live”
domain controller is used as the address book server after
you click [Create].
Host: This text box is only displayed if Pull Host from DNS is
set to ‘No’. Enter the DNS name or IP address of the
address book server.
Port: This text box is only displayed if Pull Host from DNS is
set to ‘No’ and if the [Pull Port from DNS] check box is
not selected. Enter the connecting port number of the
address book server. You can enter a maximum of five
numbers. The default port number is ‘389’.
76 Authorized Send Installation and Configuration Guide for imageRUNNER Machines
Page 77

SSL: This check box is only displayed if Pull Host from DNS
is set to ‘No’ and if the [Pull Port from DNS] check box
is not selected. Select this check box if you want the
address book server to use SSL. If you select this check
box, the host port number automatically changes to ‘636’.
Test: This check box is only displayed if Pull Host from DNS
is set to ‘No’. Select this check box if you want the
connection to the address book server to be verified
before you save the settings. The [Test] check box is
selected by default.
Hostname: This text box is only displayed if Pull Host from DNS is
set to ‘No’. Enter the host name of the address book
server.
Domain Name: Enter the domain name of the address book server.
Pull Port from This check box is only displayed if Pull Host from DNS
DNS: is set to ‘Yes’. Select the [Pull Port from DNS] check box
if you want the Port text box to be dynamically populated
from the DNS.
Use Public Select [Yes] to use the public credentials (Public User
Credentials: Name and Public Password) configured by the System
Administrator. Select [No] to use Anonymous binding.
Public User: This text box is only displayed if Use Public Credentials
is
Name: set to ‘Yes’. It is used as the user name for authentication
against the address book server. It is a required text box,
with no limit on the number of characters that can be
used.
Public Password: This text box is only displayed if Use Public Credentials
is set to ‘Yes’. It is used as the password for
authentication against the address book server. It is an
optional text box, with no limit on the number of
characters that can be used.
Authorized Send Installation and Configuration Guide for imageRUNNER Machines 77
Page 78

Search Root: Depending on your environment, you must enter the Base
DN (Distinguished Name) of the location of the user
accounts.
If the directory server is authenticating against Active
Directory and the domain is, for example, us.canon.com,
then the search root is dc=us, dc=canon, dc=com.
LDAP Match Enter the LDAP Match Attribute to be used for e-mail
Attribute: address retrieval. If the [Retrieve Home Directory (Active
Directory only] check box is selected under <Scan to
Home Directory Settings>, the value entered here is also
used for Home Directory retrieval.
An example for Active Directory is ‘sAMAccountName’
or ‘userPrincipalName’.
LDAP Email Enter the e-mail LDAP attribute to pull the user’s e-mail
Attribute: address.
An example for Active Directory is ‘mail’.
Maximum Select [10], [25], [50], [75], or [100] from the drop-down
Search Results: list for the maximum number of search results that you
want displayed on the ADDRESS BOOK screen of the
machine. The default setting is ‘25’.
78 Authorized Send Installation and Configuration Guide for imageRUNNER Machines
Page 79

Scan to Home Directory Settings
Retrieve Home Select this check box to obtain the currently logged on
Directory user’s home directory information from the address
(Active book server with the LDAP attribute of “Home
Directory only): Directory.” This will create a Home Directory element
in the Preselected Share drop-down list on the Scan to
Folder Preset Shares configuration screen.
IMPORTANT
If this check box is selected, and the [Retrieve Home
Directory (Active Directory only] check box on the
Create Authentication Server screen is also selected, the
authentication server is checked first for the Home
Directory. If no Home Directory is found on the
authentication server, then the address book server is
searched.
IMPORTANT
• If you select the Kerberos protocol for the authentication method, make
sure that the device clock setting is properly synchronized with the
configured authentication server and address book server. For more
information on synchronizing the device clock with the server clock, see
“Synchronizing the Device and Server Time,” on p. 142.
• Click the [Test] check box if you want to test the validity of the IP
addresses you entered before saving.
• If validation fails, an error message will be displayed. Enter the correct
information ➞ click [Save].
NOTE
The [Test] check box is selected by default. If you do not want to test the
validity of the addresses you entered, click the check box to clear the
check mark.
Authorized Send Installation and Configuration Guide for imageRUNNER Machines 79
Page 80

3.2 If you select [NTLM] as the authentication method, specify the Address
Book Settings and Scan to Home Directory Settings.
Address Book Settings
Method: NTLM
Pull Host from Select [Yes] to automatically pull the host information
DNS: from the DNS after you click [Create]. Select [No] if you
want to manually configure the host information. The
default setting is ‘No’.
If you select the [Yes] radio button, the first “live”
domain controller is used as the address book server after
you click [Create].
Host: This text box is only displayed if Pull Host from DNS is
set to ‘No’. Enter the DNS name or IP address of the
address book server.
Port: This text box is only displayed if Pull Host from DNS is
set to ‘No’ and if the [Pull Port from DNS] check box is
not selected. Enter the connecting port number of the
address book server. You can enter a maximum of five
numbers. The default port number is ‘389’.
80 Authorized Send Installation and Configuration Guide for imageRUNNER Machines
Page 81

SSL: This check box is only displayed if Pull Host from DNS
is set to ‘No’ and if the [Pull Port from DNS] check box
is not selected. Select this check box if you want the
address book server to use SSL. If you select this check
box, the host port number automatically changes to ‘636’.
Test: This check box is only displayed if Pull Host from DNS
is set to ‘No’. Select this check box if you want the
connection to the address book server to be verified
before you save the settings. The [Test] check box is
selected by default.
Domain Name: This text box is only displayed if Pull Host from DNS is
set to ‘No’. Enter the domain name of the address book
server.
Pull Port from This check box is only displayed if Pull Host from DNS
DNS: is set to ‘Yes’. Select the [Pull Port from DNS] check box
if you want the Port text box to be dynamically populated
from the DNS.
Use Public Select [Yes] to use the public credentials (Public User
Credentials: Name and Public Password) configured by the System
Administrator. Select [No] to use Anonymous binding.
Public User: This text box is only displayed if Use Public Credentials
is
Name: set to ‘Yes’. It is used as the user name for authentication
against the address book server. It is a required text box,
with no limit on the number of characters that can be
used.
Public Password: This text box is only displayed if Use Public Credentials
is set to ‘Yes’. It is used as the password for
authentication against the address book server. It is an
optional text box, with no limit on the number of
characters that can be used.
Search Root: Depending on your environment, you must enter the Base
DN (Distinguished Name) of the location of the user
accounts.
If the directory server is authenticating against Active
Directory and the domain is, for example, us.canon.com,
then the search root is dc=us, dc=canon, dc=com.
Authorized Send Installation and Configuration Guide for imageRUNNER Machines 81
Page 82

LDAP Match Enter the LDAP Match Attribute to be used for e-mail
Attribute: address retrieval. If the [Retrieve Home Directory (Active
Directory only] check box is selected under <Scan to
Home Directory Settings>, the value entered here is also
used for Home Directory retrieval.
An example for Active Directory is ‘sAMAccountName’
or ‘userPrincipalName’.
LDAP Email Enter the e-mail LDAP attribute to pull the user’s e-mail
Attribute: address.
An example for Active Directory is ‘mail’.
Maximum Select [10], [25], [50], [75], or [100] from the drop-down
Search Results: list for the maximum number of search results that you
want displayed on the ADDRESS BOOK screen of the
machine. The default setting is ‘25’.
82 Authorized Send Installation and Configuration Guide for imageRUNNER Machines
Page 83

Scan to Home Directory Settings
Retrieve Home Select this check box to obtain the currently logged on
Directory user’s home directory information from the address
(Active book server with the LDAP attribute of “Home
Directory only): Directory.” This will create a Home Directory element
in the Preselected Share drop-down list on the Scan to
Folder Preset Shares configuration screen.
IMPORTANT
If this check box is selected, and the [Retrieve Home
Directory (Active Directory only] check box on the
Create Authentication Server screen is also selected, the
authentication server is checked first for the Home
Directory. If no Home Directory is found on the
authentication server, then the address book server is
searched.
IMPORTANT
• Click the [Test] check box if you want to test the validity of the IP
addresses you entered before saving.
• If validation fails, an error message will be displayed. Enter the correct
information ➞ click [Save].
NOTE
The [Test] check box is selected by default. If you do not want to test the
validity of the addresses you entered, click the check box to clear the
check mark.
Authorized Send Installation and Configuration Guide for imageRUNNER Machines 83
Page 84

3.3 If you select [Simple] as the authentication method, specify the Address
Book Settings and Scan to Home Directory Settings.
Address Book Settings
Method: Simple
Host: Enter the DNS name or IP address of the address book
server.
Port: Enter the connecting port number of the address book
server. You can enter a maximum of five numbers. The
default port number is ‘389’.
SSL: Select this check box if you want the address book server
to use SSL. If you select this check box, the host port
number automatically changes to ‘636’.
Test: Select this check box if you want the connection to the
address book server to be verified before you save the
settings. The [Test] check box is selected by default.
Domain Name: Enter the domain name of the address book server.
84 Authorized Send Installation and Configuration Guide for imageRUNNER Machines
Page 85

Use Public Select [Yes] to configure the public credentials (Public
Credentials: DN and Public Password), or select [No] to use
anonymous binding.
Public DN: This text box is only displayed if Use Public Credentials
is set to ‘Yes’. Enter the user’s login Distinguished Name
to use when performing the first bind of the Simple
Binding process.
Public Password: This text box is only displayed if Use Public Credentials
is set to ‘Yes’. It is used as the password for
authentication against the address book server. It is an
optional text box, with no limit on the number of
characters that can be used.
Search Root: Depending on your environment, you must enter the Base
DN (Distinguished Name) of the location of the user
accounts.
If the directory server is authenticating against
eDirectory or Domino and the organization is, for
example, Canon, then the search root is o=canon.
LDAP Match Enter the LDAP Match Attribute to be used for e-mail
Attribute: address retrieval. If the [Retrieve Home Directory (Active
Directory only] check box is selected under <Scan to
Home Directory Settings>, the value entered here is also
used for Home Directory retrieval.
An example for eDirectory and Domino is ‘uid’.
LDAP Email Enter the e-mail LDAP attribute to pull the user’s e-mail
Attribute: address.
An example for eDirectory and Domino is ‘mail’.
Maximum Select [10], [25], [50], [75], or [100] from the drop-down
Search Results: list for the maximum number of search results that you
want displayed on the ADDRESS BOOK screen of the
machine. The default setting is ‘25’.
Authorized Send Installation and Configuration Guide for imageRUNNER Machines 85
Page 86

Scan to Home Directory Settings
Retrieve Home Select this check box to obtain the currently logged on
Directory user’s home directory information from the address
(Active book server with the LDAP attribute of “Home
Directory only): Directory.” This will create a Home Directory element
in the Preselected Share drop-down list on the Scan to
Folder Preset Shares configuration screen.
IMPORTANT
If this check box is selected, and the [Retrieve Home
Directory (Active Directory only] check box on the
Create Authentication Server screen is also selected, the
authentication server is checked first for the Home
Directory. If no Home Directory is found on the
authentication server, then the address book server is
searched.
IMPORTANT
• Click the [Test] check box if you want to test the validity of the IP
addresses you entered before saving.
• If validation fails, an error message will be displayed. Enter the correct
information ➞ click [Save].
NOTE
The [Test] check box is selected by default. If you do not want to test the
validity of the addresses you entered, click the check box to clear the
check mark.
86 Authorized Send Installation and Configuration Guide for imageRUNNER Machines
Page 87

3.4 If you select [Anonymous] as the authentication method, specify the
Address Book Settings and Scan to Home Directory Settings.
Address Book Settings
Method: Anonymous
Host: Enter the DNS name or IP address of the address book
server.
Port: Enter the connecting port number of the address book
server. You can enter a maximum of five numbers. The
default port number is ‘389’.
SSL: Select this check box if you want the address book server
to use SSL. If you select this check box, the host port
number automatically changes to ‘636’.
Test: Select this check box if you want the connection to the
address book server to be verified before you save the
settings. The [Test] check box is selected by default.
Domain Name: Enter the domain name of the address book server.
Authorized Send Installation and Configuration Guide for imageRUNNER Machines 87
Page 88

Search Root: Depending on your environment, you must enter the Base
DN (Distinguished Name) of the location of the user
accounts.
If the directory server is authenticating against Active
Directory and the domain is, for example, us.canon.com,
then the search root is dc=us, dc=canon, dc=com.
If the directory server is authenticating against
eDirectory or Domino and the organization is, for
example, Canon, then the search root is o=canon.
LDAP Match Enter the LDAP Match Attribute to be used for e-mail
Attribute: address retrieval. If the [Retrieve Home Directory (Active
Directory only] check box is selected under <Scan to
Home Directory Settings>, the value entered here is also
used for Home Directory retrieval.
An example for Active Directory is ‘sAMAccountName’
or ‘userPrincipalName’.
An example for eDirectory and Domino is ‘uid’.
LDAP Email Enter the e-mail LDAP attribute to pull the user’s e-mail
Attribute: address.
An example for Active Directory, eDirectory, and
Domino is ‘mail’.
Maximum Select [10], [25], [50], [75], or [100] from the drop-down
Search Results: list for the maximum number of search results that you
want displayed on the ADDRESS BOOK screen of the
machine. The default setting is ‘25’.
88 Authorized Send Installation and Configuration Guide for imageRUNNER Machines
Page 89

Scan to Home Directory Settings
Retrieve Home Select this check box to obtain the currently logged on
Directory user’s home directory information from the address
(Active book server with the LDAP attribute of “Home
Directory only): Directory.” This will create a Home Directory element
in the Preselected Share drop-down list on the Scan to
Folder Preset Shares configuration screen.
IMPORTANT
If this check box is selected, and the [Retrieve Home
Directory (Active Directory only] check box on the
Create Authentication Server screen is also selected, the
authentication server is checked first for the Home
Directory. If no Home Directory is found on the
authentication server, then the address book server is
searched.
IMPORTANT
• Click the [Test] check box if you want to test the validity of the IP
addresses you entered before saving.
• If validation fails, an error message will be displayed. Enter the correct
information ➞ click [Save].
NOTE
The [Test] check box is selected by default. If you do not want to test the
validity of the addresses you entered, click the check box to clear the
check mark.
4. Click [Create].
If you make a mistake while configuring the address book server settings, click
[Reset] to return the settings to their original values.
To cancel creating the address book server and return to the Address Book
Servers screen, click [Cancel].
The address book server is created and added to the address book servers list on
the Address Book Servers screen.
Authorized Send Installation and Configuration Guide for imageRUNNER Machines 89
Page 90

3.7 Editing an Address Book Server
You can edit a previously created address book server from the Address Book Servers
configuration screen.
1. Click [E-Mail Service] ➞ [Address Book] ➞ select the check box next to the
address book server you want to edit ➞ click [Edit].
90 Authorized Send Installation and Configuration Guide for imageRUNNER Machines
Page 91

2. Edit the settings for the address book server as necessary ➞ click [Update].
If you make a mistake while editing the address book server settings, click [Reset]
to return the settings to their original values.
To cancel editing the address book server and return to the Address Book Servers
screen, click [Cancel].
Authorized Send Installation and Configuration Guide for imageRUNNER Machines 91
Page 92

3.8 Deleting an Address Book Server
You can delete a previously created address book server from the Address Book
Servers configuration screen.
1. Click [E-Mail Service] ➞ [Address Book] ➞ select the check box next to the
address book server you want to delete ➞ click [Delete].
2. Click [OK].
If you do not want to delete the address book server, click [Cancel].
The address book server is deleted from the list.
92 Authorized Send Installation and Configuration Guide for imageRUNNER Machines
Page 93

3.9 Configuring Scan to E-Mail Settings
You can enable the Scan to E-Mail function, restrict user access to the [Address Book]
key and [To], [Subject], [Body], and [File Name] text boxes on the SCAN TO EMAIL
screen on the machine, as well as enable E-mail CC to self.
1. Click [Scan to E-Mail].
If necessary, see the screen shot in step 10 of “Flow of Configuration Operations,”
35.
on p.
2. Click the [Enable Scan to E-mail] check box.
If you want to disable the Scan to E-Mail function, click the [Enable Scan to
E-mail] check box to clear the check mark.
NOTE
You can only disable the Scan to E-Mail function if there is at least one other
Authorized Send function enabled.
Authorized Send Installation and Configuration Guide for imageRUNNER Machines 93
Page 94

3. Configure the settings under <Access Controls>.
Access Controls
E-mail to self only: Select this check box if you want to restrict users to only
send e-mail messages to themselves, and to automatically
disable the [Address Book] key and the [To] text box on
the SCAN TO EMAIL screen on the machine.
Disabled Column
Address Book: Select this check box if you want to restrict user access to
the [Address Book] key on the SCAN TO EMAIL screen
on the machine. If you select this check box, the [Address
Book] key is not displayed on the SCAN TO EMAIL
screen. The user can manually specify an e-mail address,
but cannot select an address from the address book.
To: Select this check box if you want to prevent the user from
manually entering an e-mail address. If you select this
check box, the [To] text box on the SCAN TO EMAIL
screen on the machine is grayed out. The user can select an
e-mail address from the address book, but cannot manually
specify an address.
94 Authorized Send Installation and Configuration Guide for imageRUNNER Machines
Page 95

Self This check box is only displayed when the [E-mail to self
only] check box is not selected. When the [Self] check box
is selected, the e-mail address of the user logged on to
Authorized Send is displayed in the [To] text box on the
SCAN TO EMAIL Screen.
Subject: Select this check box to disable the [Subject] text box on
the SCAN TO EMAIL screen.
Required: Select this check box if you require the user to enter a
subject for their e-mail messages.
Body: Select this check box to disable the [Body] text box on the
SCAN TO EMAIL screen.
File Name: Select this check box to disable the [File Name] text box on
the SCAN TO EMAIL screen.
Default Value Column
To: Enter the default e-mail address to be displayed in the [To]
text box on the SCAN TO EMAIL screen.
Subject: Enter a default subject to be displayed in the [Subject] text
box on the SCAN TO EMAIL screen.
Body: Enter a default e-mail message to be displayed in the
[Body] text box on the SCAN TO EMAIL screen.
Authorized Send Installation and Configuration Guide for imageRUNNER Machines 95
Page 96

4. If necessary, click the [E-mail CC to self] check box ➞ click [Save].
If you select [E-mail CC to self], a copy of each e-mail message sent via SCAN TO
EMAIL will be sent to the currently logged on user’s e-mail address.
IMPORTANT
You must select the [Self] check box next to the [To] text box if you selected to
disable the [Address Book] and [To] check boxes under <Disabled> at the same
time, and the default value for the [To] text box is blank.
96 Authorized Send Installation and Configuration Guide for imageRUNNER Machines
Page 97

3.10 Configuring Scan to Fax Settings
You can enable the Scan to Fax function and configure the General Settings.
1. Click [Scan to Fax].
If necessary, see the screen shot in step 12 of
on p. 35.
2. Click the [Enable Scan to Fax] check box.
“Flow of Configuration Operations,”
If you want to disable the Scan to Fax function, click the [Enable Scan to Fax]
check box to clear the check mark.
NOTE
• The Scan to Fax function is disabled by default.
• You can only disable the Scan to Fax function if there is at least one other
Authorized Send function enabled.
Authorized Send Installation and Configuration Guide for imageRUNNER Machines 97
Page 98

3. Specify the General Settings ➞ click [Save].
General Settings
Fax Recipient Template: Enter the appropriate template configuration.
For example, if you enter
${FAXNUMBER}@faxserver.company.com as the
string, and the fax number entered by the user (for
example, ‘1234567’) when sending from the Scan to Fax
screen, Authorized Send sends an e-mail message to the
SMTP server with “1234567@faxserver.company.com”
in the “To:” text box.
Append: Clicking [Append] appends a dynamic variable (set in the
Append drop-down list) to the string in the Fax Recipient
Template. This is unnecessary if the string is entered
manually in the [Fax Recipient Template] text box.
Append drop-down: Selecting [Fax Number] in conjunction with pressing
[Append] adds the fax number variable
‘${FAXNUMBER}’ to the string in the [Fax Recipient
Template] text box.
98 Authorized Send Installation and Configuration Guide for imageRUNNER Machines
Page 99

NOTE
• The user does not see the template. The user only has to enter the fax number(s)
on the Authorized Send SCAN TO FAX screen on the machine.
• If you upgrade Authorized Send from version 3.x to 4.0 or later, the fax template
is automatically updated to the current format, which would include:
'${FAXNUMBER}' as the prefix to what was configured in version 3.x.
For example, if the Domain text box on the Scan to Fax screen of the Authorized
Send Configuration servlet was configured with “auth.send.com” in Authorized
Send v3.x, when upgrading to Authorized Send v4.0 or later, the Fax Recipient
Template text box on the Scan to Fax screen of the Authorized Send
Configuration servlet is configured with ‘${FAXNUMBER}@auth.send.com’.
Authorized Send Installation and Configuration Guide for imageRUNNER Machines 99
Page 100

3.11 Configuring Scan to Folder Settings
You can enable the Scan to Folder function and configure the Access Controls and
General Settings.
1. Click [Scan to Folder] ➞ [General].
If necessary, see the screen shot in step 14 of “Flow of Configuration Operations,”
on p. 35.
2. Select the [Enable Scan to Folder] check box.
If you want to disable the Scan to Folder function, click the [Enable Scan to Folder]
check box to clear the check mark.
NOTE
You can only disable the Scan to Folder function if there is at least one other
Authorized Send function enabled.
100 Authorized Send Installation and Configuration Guide for imageRUNNER Machines
 Loading...