

Page 1
OVENS
USER INSTRUCTIONS
FORNI
ISTRUZIONI PER L'USO
HORNOS EMPOTRABLES
INSTRUCCIONES DE USO
ДУХОВКИ
РУКОВОДСТВО ПОЛЬЗОВАТЕЛЯ
PEČICE
NAVODILA ZA UPORABO
EINBAUBACKÖFEN
BEDIENUNGSANLEITUNG
GB
IT
ES
RU
SL
DE
NOTICE D'EMPLOI ET D'INSTALLATION
DES FOURS ENCASTRABLES
OVEN
GEBRUIKSAANWIJZING
FR
NL
CANDY HOOVER GROUP S.R.L. • Via Privata Eden Fumagalli • 20047 Brugherio Milano Italy
Page 2

CONTENTS
Safety Instructıons
1. General warnings
1.1 Declaration of compliance
1.2 Safety hints
1.3 Recommendations
1.4 Installation
1.5 Electrical connection
2. Accessories
2.1 Oven equipment
2.2 Rotisserie
2.3 U-SEE
2.4 Removing and cleaning wire racks
3. Cleaning the oven
4. Service centre
5. Use the electronic programmer
5.1 Before using the oven for the first time
5.2 How to use the oven
5.3 The programmation
5.4 Cooking tips
6. Pyrolytic cycle
7. Child safety
.......................................................................................06
........................................................................04
......................................................................05
.........................................................05
...............................................................................05
....................................................................05
.................................................................................05
.................................................................05
...............................................................................06
.......................................................................06
..................................................................................06
...........................................06
.....................................................................06
...........................................................................07
..............................................08
.................................................................09
...................................................................10
..............................................................................10
...........................................................................11
...............................................................................11
GB
.....................................09
COДЕРЖАНИЕ
Правила Техники Безопасности
1. Общие Меры Предосторожности
1.1 Декларация Соответствия
1.2 Меры Предосторожности
1.3 Рекомендации
1.4 Установка
1.5 Подключение К Электросети
2. Технология Pro/exp'r
2.1 Принадлежности Духовки
2.2 Вертел
2.3 U-SEE
2.4 Демонтаж и очистка металлических направляющих
3. Чистка Духовки
4. Сервисный Центр
5. Описание Дисплея
5.1 Перед Первым Использованием Духовки
5.2 Как Пользоваться Духовкой
5.3 Программирование
5.4 Советы По Приготовлению Пищи
6. Цикл Пиролитической Чистки
7. Амок От Детей
.......................................................................................30
........................................................................29
...............................................................................29
..............................................................30
....................................................................................30
.....................................................................30
..................................................................31
................................................................32
.................................................................34
.........................................................................36
...............................................28
.........................................29
.....................................................29
......................................................29
................................................29
.....................................................30
............................33
...................................................33
........................................35
..............................................35
RU
............30
INDICE
Indıcazıonı Dı Sıcurezza
1. Avvertenze Generali
1.1 Dichiarazione Di Conformità
1.2 Suggerimenti Sulla Sicurezza
1.3 Raccomandazioni
1.4 Installazione
1.5 Collegamenti Elettrici
2. Tecnologia Pro/exp'r
2.1 Accessori Del Forno
2.2 Girarrosto
2.3 U-SEE
2.4 Rimozione E Pulizia Delle Griglie
3. Pulizia Del Forno
4. Risoluzione Dei Problemi
5.
Utilizzo Del Programmatore Elettronico
5.1 Prima Di Utilizzare İl Forno Per La Prima Volta
5.2 Utilizzo Del Forno
5.3 Programmazione
5.4 Suggerimenti Per La Cottura
6. Ciclo Pirolitico
7. Funzione Di Protezione
............................................................................13
.................................................................................14
......................................................................................14
..............................................................12
...............................................................13
....................................................13
..................................................13
....................................................................13
...............................................................13
...............................................................14
................................................................14
.............................................14
......................................................................14
.......................................................15
................................16
.....................................................................17
.....................................................................18
...................................................18
.........................................................................19
...........................................................19
CONTENIDO
Instruccıones Para Un Uso Seguro
1. Advertencias Generales
1.1 Declaracıon De Cumplımıento
1.2 Consejos De Segurıdad
1.3 Recomendacıones
1.4 Instalacıón
1.5 Conexıón Eléctrıca
2. Tecnología Pro/exp’r (depende Del Modelo)
2.1 Equıpo Del Horno (depende Del Modelo)
2.2 Asador (depende Del Modelo)
2.3 U-SEE
2.4 Extracción y limpieza de las guías laterales
3. Lımpıeza Del Horno
4. Servıcıo Técnıco
5. Descrıpcıón De La Pantalla
5.1 Antes De Utılızar El Horno Por Prımera Vez
5.2 Cómo Utılızar El Horno
5.3 Programacıón
5.6 Ajuste Del Contraste De La Pantalla
6. Cıclo Pırolítıco (depende Del Modelo)
7. Consejos de cocción
.................................................................................21
.......................................................................................22
........................................................................23
...........................................................................26
...........................................................21
............................................................21
....................................................................21
...................................................................21
...................................................................22
.............................................................25
................................................................27
.............................................20
..................................................21
.................................22
..................................................22
.............................22
......................................................24
............................25
.........................................26
....................................27
IT
.......................17
ES
..........................22
VSEBINA
Varnostna Navodıla
1. Splošna Opozorila
1.1 Izjava O Skladnosti
1.2 Varnostni Napotki
1.3 Priporočila
1.4 Namestitev In Priključitev
1.5 Priključitev Pečice Na Električno Omrežje
2. Tehnologija Pro/exp'r
2.1 Oprema Pečice (Odvisno Od Modela)
2.2 Raženj (Odvisno Od Modela)
2.3 U-SEE
2.4 Snemanje in š
3 Či čenje Pečice
4. Servisiranje
5. Opis Prikazovalnika
5.1 Pred Prvo Uporabo Pečice
5.2 Uporaba Pečice
5.3 Programiranje
5.4 Nekaj Koristnih Nasvetov
6. Piroliza (Odvisno Od Modela)
7. Sistem Za Varnost Otrok
.......................................................................................39
š
......................................................................37
....................................................................38
...................................................................38
......................................................................38
.................................................................................38
či čenje žičnih vodil
..........................................................................39
................................................................................40
........................................................................42
...........................................................................43
..........................................................38
................................................................39
......................................39
...................................................39
.............................................39
..................................................................41
.......................................................42
..........................................................43
..................................................43
..........................................................44
INHALTSVERZEICHNIS
Sıcherheıtsvorschrıften
1. Allgemeine Hinweise
1.1 Konformitätserklärung
1.2 Sicherheitshinweise
1.3 Empfehlungen
1.4 Installation
1.5 Elektrischer Anschluss
2.
Pro/Exp'r Technologie (Modellabhängig)
2.1 Zubehör (Modellabhängig)
2.2 Grillspieß (Modellabhängig)
2.3 U-SEE
2.4 Entfernen Und Reinigung Des Grillrosts
3.
Reinigung
4. Technischer Kundendienst
5. Display
5.1 Nützliche Hinweise vor dem ersten Betrieb
5.2 Benutzung Des Backofens
5.3 Programmierung
5.4 Tipps
6. Pyrolytische Reinigung
7. Kindersicherung
..............................................................................46
.......................................................................................47
.................................................................................47
......................................................................................49
.........................................................................................51
..............................................................45
..............................................................46
................................................................46
..................................................................46
..........................................................................46
..............................................................46
........................................................47
........................................................47
.......................................47
......................................................48
........................................................50
.......................................................................51
............................................................51
......................................................................52
SL
................................38
DE
.................................47
................................50
Page 3

SOMMAIRE
Conseils De Sécurité
1. Instructions générales
1.1 Declaration de conformité
1.2 Consignes de sécurité
1.3 Recommandations
1.4 Installation
1.5 Raccordement éléctrique
2.
ACCESSORIES (According to model)
2.1 Equipement du four
2.2 Tournebroche
2.3 U-SEE
2.4 Retrait Et Nettoyagedes Grilles
3. Entretien général du four
4. Assistance technique
5. Présentation du tableau de bord
5.1 Conseils avant la premiere utilisation
5.2 Recommandations
5.3 La programmation
5.4 Quelques conseils de cuisson
6. Pyrolyse
7. La sécurité enfant
.................................................................................54
.......................................................................................55
....................................................................................60
....................................................................53
.............................................................54
.........................................................54
..............................................................54
....................................................................54
.........................................................54
...................................................................55
............................................................................55
.................................................55
.........................................................55
...............................................................56
.............................................57
....................................................................58
.....................................................................59
..................................................59
....................................................................60
FR
.......................................55
.......................................58
INHOUDSOPGAVE
Veiligheidsvoorschriften
1. Algemene Aanwijzingen
1.1 Conformiteit
1.2 Veiligheidsvoorschriften
1.3 Aanbevelingen
1.4 Installatie
1.5 Elektrische Aansluiting
2. Accessorıes (according To Model)
2.1 Uitrusting Van De Oven
2.2 Het Draaispit
2.3 U-SEE
2.4 Verwijderen En Reinigen Van De Zijlingse Roosters
3. Onderhoud Van De Oven
4. Diensten Service
5. Voorstelling Van Het Scherm
5.1 Tips Voorafgaande Aan Een Eerste Gebruik
5.2 Aanbevelingen
5.3 Programmering
5.4 Raadgevingen Bij Het Bakken
6. Pyrolyse
7. Kinderbeveiliging
..............................................................................62
...................................................................................62
.............................................................................63
.......................................................................................63
.....................................................................................68
..............................................................61
...........................................................62
............................................................62
..........................................................................62
..............................................................62
............................................63
............................................................63
..........................................................63
.......................................................................64
...................................................65
............................66
..........................................................................66
.........................................................................67
..................................................67
......................................................................68
NL
................63
Page 4

SAFETY INSTRUCTIONS
WARNING: The appliance and its accessible parts become hot during use. Care should be taken to avoid
touching heating elements.
• Children under 8 Year of age must be kept away from the appliance unless they are continuously
supervised.
• This appliance can be used by children aged from 8 years and above and persons with reduced
physical, sensory or mental capabilities or lack of experience and knowledge if they have been given
supervision or instruction concerning use of the appliance in a safe way and understand the hazards
involved.
• Children must not play with the appliance.
• Cleaning and user maintenance shall not be made by children without supervision.
• During use the appliance becomes hot. Care should be taken to avoid touching heating elements inside
the oven.
WARNING: Accessible parts may become hot during use. Young children must be kept away.
• Do not use harsh abrasive cleaners or sharp metal scrapers to clean the oven door glass since they can
scratch the surface, which may result in shattering of the glass.
• The oven must be switched off before removing the guard, after cleaning, the guard must be replaced in
accordance with the instructions.
• Only use the temperature probe recommended for this oven.
• Do not use a steam cleaner for cleaning operations.
• WARNING: Avoid possibility of electric shock - ensure the appliance is switched off before replacing the
lamp.
• The means for disconnection must be incorporated in the fixed wiring in accordance with the wiring
rules.
• The instructions state the type of cord to be used, taking into account the temperature of the rear surface
of the appliance.
• If the supply cord is damaged, it must be replaced by a special cord or assembly available from the
manufacturer or its service agent.
• CAUTION: In order to avoid a hazard due to inadvertent resetting of the thermal cutout, this appliance
must not be supplied through an external switching device, such as a timer, or connected to a circuit that
is regularly switched on and off by the utility.
• CAUTION: Accessible parts may be hot when the grill is in use. Young children must be kept away.
• xcess spillage must be removed before cleaning
E.
• During self-cleaning pyrolytic operation the surfaces may get hotter than usual and children MUST be
kept away.
04 GB
Page 5
1. GENERAL WARNINGS
Read the instructions carefully to make the most of your oven. We recommend you keep the instructions for installation and use for later reference,
and before installing the oven, note its serial number in case you need to get help from the after-sales service.
When you have unpacked the oven, make sure that it has not been damaged in any way. If you have any doubts at all, do not to use it. Contact a
professionally qualified person. Keep packing materials such as plastic bags, polystyrene, or nails out of the reach of children because they are
dangerous to children.
The company shall not be liable if the instructions provided in this document are not complied with.
! NOTE: Functions, properties and accessories of ovens which are mentioned in this manual, can be change depending on oven models.
1.1 DECLARATION OF COMPLIANCE
The parts of this appliance that may come into contact with foodstuffs
comply with the provisions of EEC Directive 89/109.Appliance
complies with European Directives 2006/95/EC and
2004/108/EC, and subsequent amendments.When you have
unpacked the oven, make sure that it has not been damaged in
any way. If you have any doubts at all, do not use it: contact a
professionally qualified person.
Keep packing materials such as plastic bags, polystyrene, or nails out
of the reach of children because they are dangerous to children.
1.2 SAFETY HINTS
•The oven must be used only for the purpose for which it was
designed. It must only be used for cooking food. Any other use, e.g. as
a form of heating, is an improper use of the oven and is therefore
dangerous.
•The manufacturers cannot be held responsible for any damage
caused by improper, incorrect or unreasonable use.
When using any electrical appliance you must follow a few basic rules.
- Do not pull on the power cable to remove the plug from the socket.
- Do not touch the oven with wet or damp hands or feet.
- Do not use the oven unless you are wearing something on your feet.
- It is not generally a good idea to use adapters, multiple sockets for
several plugs or cable extensions.
- If the oven breaks down or develops a fault switch it off at the mains
and do not touch it.
• If the cable is damaged it must be replaced promptly.
When replacing the cable, follow these instructions.
Remove the power cable and replace it with one of the H05VV-F type.
The cable must be able to bear the electrical current required by the
oven.Cable replacement must be carried out by properly qualified
technicians.
The earthing cable (yellow-green) must be 10 mm longer than the
power cable.
Use only an approved service centre for repairs and ensure that only
original parts are used. If the above instructions are not adhered to the
manufacturers cannot guarantee the safety of the oven.
•The oven you have just acquired has the described technical
characteristics and you must not make any modifications to it.
•Do not store flammable products in the oven; they can catch fire if the
oven comes on accidentally.
•Do not press on and do not let children sit on the oven door.
•Use kitchen oven gloves, when putting into or removing a dish from
the oven.
1.3 RECOMMENDATIONS
• After each use of the oven, a minimum of cleaning will help keep the
oven perfectly clean.
• Do not line the oven walls with aluminium foil or single-use protection
available from stores. Aluminium foil or any other protection, in direct
contact with the hot enamel, risks melting and deteriorating the
enamel of the insides.
• In order to prevent excessive dirtying of your oven and the resulting
strong smokey smells, we recommend not using the oven at very high
temperature. It is better to extend the cooking time and lower the
temperature a little.
Identification plate
1.4 INSTALLATION
The manufacturers have no obligation to carry this out. If the
assistance of the manufacturer is required to rectify faults arising from
incorrect installation, this assistance is not covered by the guarantee.
The installation instructions for professionally qualified personnel
must be followed. Incorrect installation may cause harm or injury to
people, animals or belongings. The manufacturer cannot be held
responsible for such harm or injury.
The kitchen unit in which the oven is to be fitted must be made of
material resistant to temperatures of at least 70°C.
The oven can be located high in a column or under a worktop.
Before fixing, you must ensure good ventilation in the oven space to
allow proper circulation of the fresh air required for cooling and
protecting the internal parts. Make the openings specified on last page
according to the type of fitting.
1.5 ELECTRICAL CONNECTION
THE ELECTRICAL CONNECTION SHOULD BE CARRIED OUT BY
AN APPROVED CONTRACTOR OR TECHNICIAN WITH SIMILAR
QUALIFICATIONS.
The installation receiving the appliance must comply with the standard
in force in the installation country.
The manufacturer does not accept any responsibility if this provision is
not complied with.
Connection to the network must be by earthed socket outlet, or by
means of a multipole circuit-breaker, in compliance with the
installation country.
The installation must be protected by suitable fuses, and have wires
with a large enough cross-section to supply the oven normally.
CONNECTION:
The oven is fitted with a power lead for connecting exclusively to a
voltage of 220-240 V AC across the phases or across phase and
neutral.
Connection must be carried out having first checked:
-the supply voltage indicated on the meter,
The lead protection wire (green/yellow) connected to the earth
terminal of the oven must be connected to the earth terminal of the
installation.
Caution:
•Have the earth continuity of the installation checked by an electrician
before making the connection.
•The manufacturer will not be liable for any incident, or the possible
consequences that may arise from the use of the oven not earthed, or
connected to an earth with defective continuity.
NB: Do not forget that the oven may require after-sales service.
Also, locate the socket outlet so that the oven can be connected once
it is removed from its space.
Power supply cable: If the power supply cable has to be changed,
please have this done by the after-sales service or by someone with
similar qualifications.
•In addition to the
accessories supplied with the oven, we advise you only use dishes
and baking moulds resistant
to very high Temperatures.
Code produit:
Numéro de série :
05 GB
Page 6
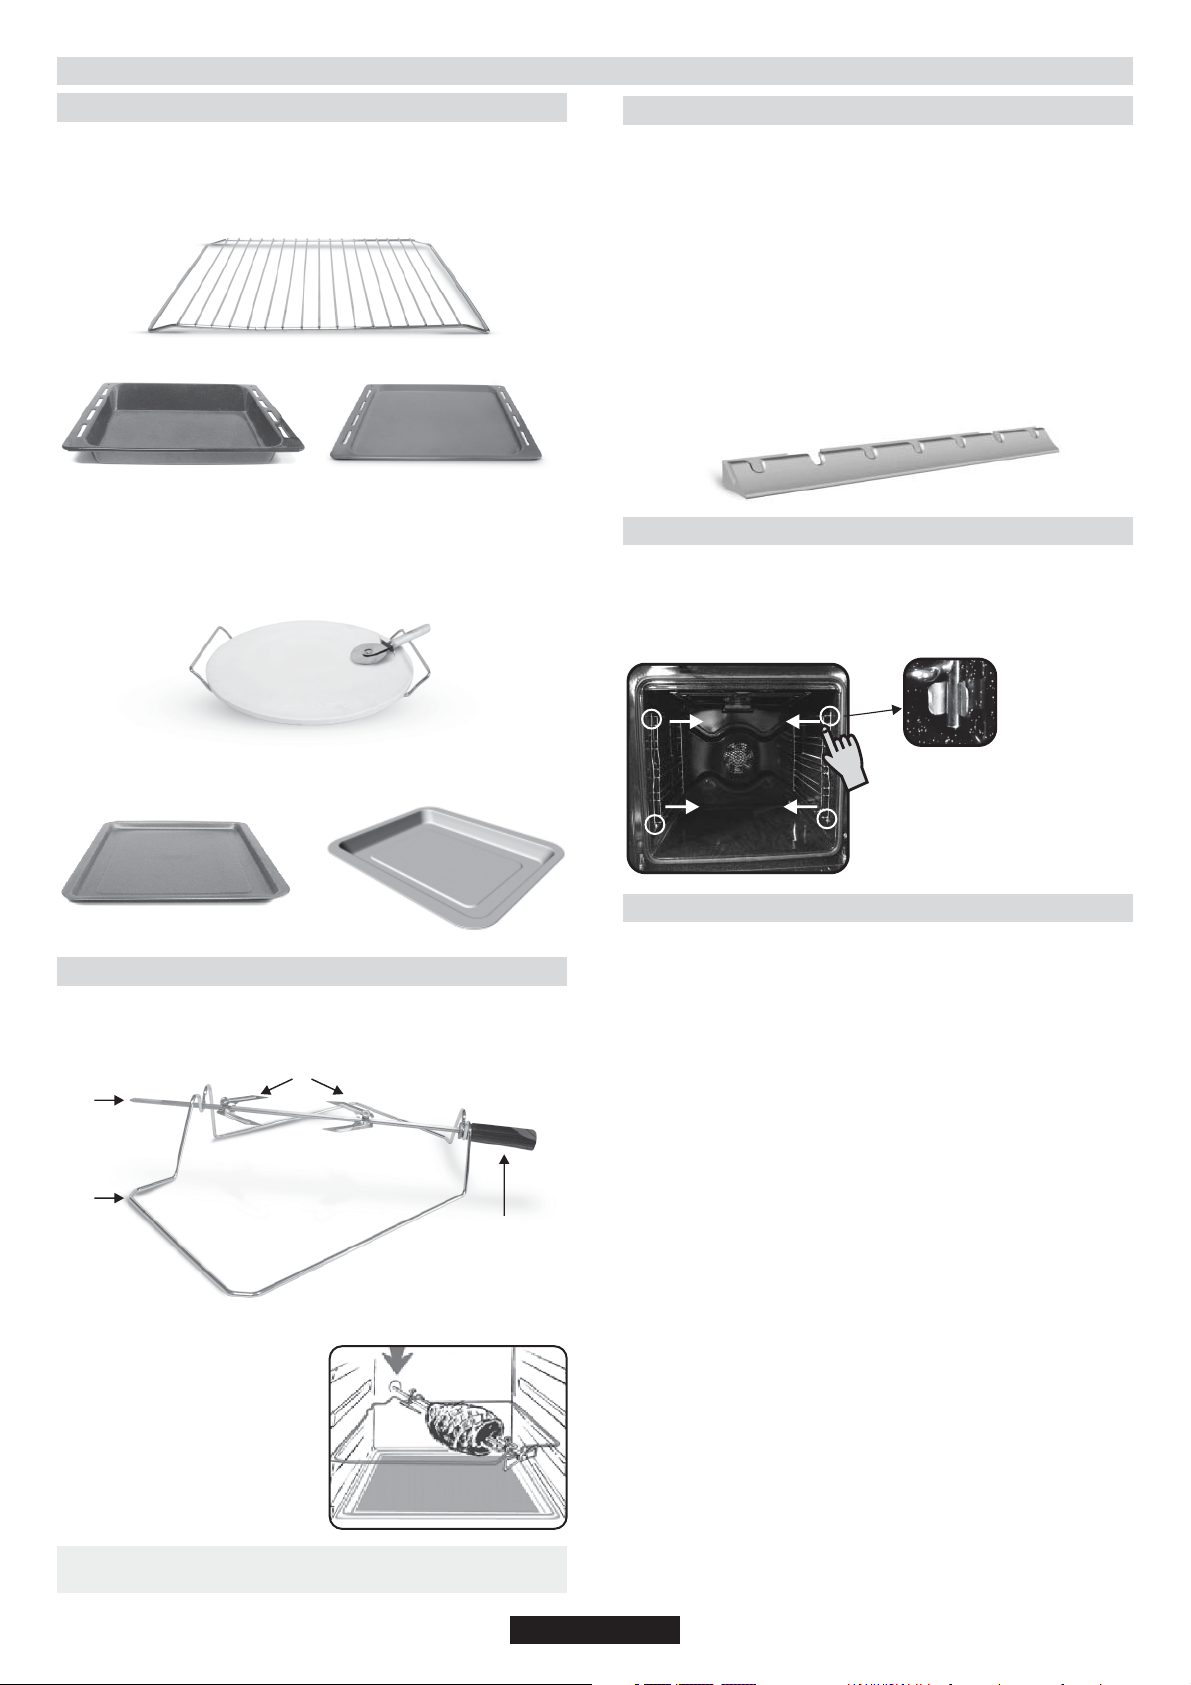
2. ACCESSORIES (According to model)
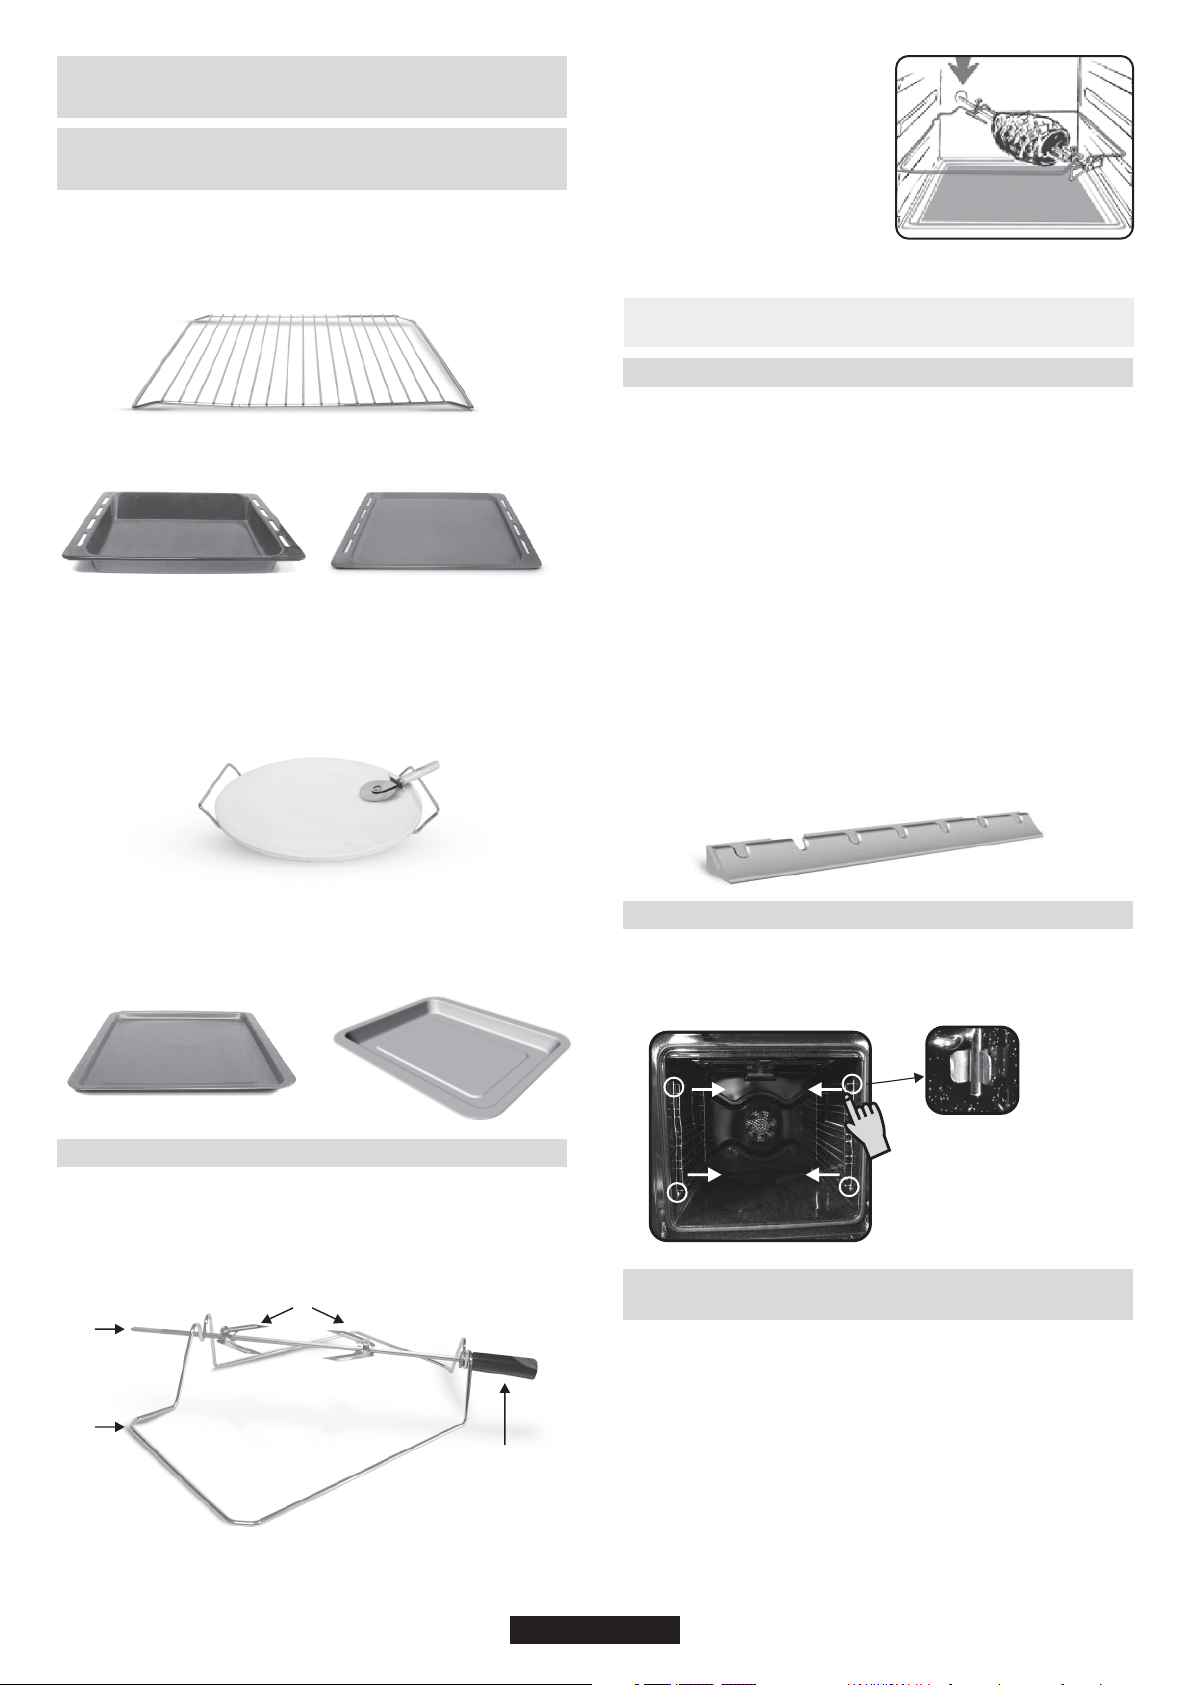
2.1 OVEN EQUIPMENT
It is necessary to do an initial cleaning of the equipment before the first
use of each of them. Wash them with a sponge. Rinse and dry off.
The shelf can take moulds and dishes.
The drip tray catches the juices from grilled foods.
Never use he drip tray as a roasting tray as fat deposits can be quickly
spread throughout the oven, which produces excess smoke.
Never place the drip tray directly on the oven bottom.
The pizza stone for a crisper pizza equipped according to the model
with its stand and the pizza roller.
2.3 U-SEE
Is an illumination system which replaces the traditional « light bulb ».
14 LED (for non-pyrolitic versions) or 10 High Power LED (for pyrolitic
versions) lights are integrated within the door. These produce white
high quality illumination which enables to view the inside of the oven
with clarity without any shadows on all the shelves.
Advantages :
This system, besides providing excellent illumination inside the oven,
lasts longer than the traditional light bulb its easier and to maintain and
most of all saves energy.
-Optimum view
-Long life illumination
-Very low energy consumption, -95% in comparison with the
traditional illumination High.
2.4 REMOVING AND CLEANING WIRE RACKS
1- Remove the wire racks by pulling them in the direction of the arrows
(see below)
2- To clean the wire racks either put them in the dishwasher or use a
wet sponge, ensuring that they are dried afterwards.
3- After the cleaning process install the wire racks in reverse order.
The pastry tray
pastries like choux, biscuits, meringues, etc...
Never place the pastry tray directly on the oven bottom.
must be placed on the shelf. It is for cooking small
2.2 ROTISSERIE
No pre-heating is required for rotisserie cooking.
Cooking with the door closed.
The energy consumption is 90-95% less than traditional system.
3
2
1
1- Grid
2- Spit
3- Hooks & Screws
4- Handle
4
3. CLEANING THE OVEN
•Wait for the oven to cool down before doing any cleaning by hand.
•Never clean your oven with abrasive cleaners, wire wool or sharp
objects, or the enamel may be damaged beyond repair.
•Only use soapy water or bleach (ammonia) cleaners.
•Never line the oven sides with aluminium foil.
GLASS PARTS
We recommend you wipe clean the glass door with absorbent kitchen
paper every time you use the oven. If the spattering is heavy, then you
can clean with a well squeezed sponge and detergent, and rinse.
Do not use harsh abrasive cleaners or sharp metal scrapers to clean the
oven door glass since they can scratch the surface, which may result in
shattering of the glass.
OVEN DOOR SEAL
If this gets dirty, clean the oven seal with a slightly damp sponge.
ACCESSORIES
Clean them with a sponge soaked in soapy water. Rinse with clean
water and dry off. Avoid abrasive cleaners.
HOW TO USE TURNSPIT
1. Unscrew the hooks
2. Put the spit into the meat
3. Fix the meat with the hooks
4. Tighten the screws
5. Insert the spit into the motor hole
6. The handle
When the oven is in use, any unused accessories should be
removed from the oven.
DRIP TRAY
After grilling, remove the drip tray from the oven. Take care to pour the
warm grease into a container. Wash and rinse the drip tray in hot water
with a sponge soaked in washing up liquid.
If residues remain attached, soak them off in water and detergent.
It can also go in a dishwasher or be cleaned with a commercial oven
cleaner.
Never place a soiled drip tray in the oven.
OVEN LIGHTING
Disconnect the power supply from the oven before cleaning or replacing
the lamp.
The bulb and its cover are made of material resistant to high
temperatures.
06 GB
Page 7
• pulling it
1
2
3
Remove the glass by gently
out of the door frame Picture
(5)
Bulb characteristics:
230 V AC - 25W- E 14 base Temperature 300°C to change a defective
bulb, just :
•Unscrew the glass cover,
•Unscrew the bulb,
•Replace it with the same type: see characteristics above,
•After replacing the defective bulb, screw back the
protective glass cover.
CLEANING THE DOOR GLASS
Internal door glass of this oven can be removed and cleaned.
In order to clean the internal glass follow these instructions;
Picture 6
After cleaning the glass re-
•
assemble the parts in the
reverse
order of removal.
• ON ALL GLASES LOW-E
sign must be properly
readable and must be
positioned on the left corner of
the door, close to the left side
hinge. In this way the printed
surface of the 1 glass will
st
remain INSIDE the door.
4. SERVICE CENTRE
Before calling the Service Centre.
Picture 5
Pyrolytic
• *For ovens, please
remove also 2 and glasses .
Picture 6)
(
d
nrd
3
Picture 7
• Open the door of the oven.
(Picture1)
• Lock the hinges as shown in Picture
2 before starting the cleaning
operation.
Unlock the hinges when the cleaning
operation is finished. Picture (2)
Picture 2
• Remove the screws as shown in
Picture Picture (3)
Picture 1
Picture 3
If the oven is not working, we recommend that:
•Check that, if the oven is properly plugged into the power supply.
If the cause of the fault cannot be detected:
•Disconnect the oven from the mains, do not touch the oven and call
the after sales service.
Before calling the Service Centre remember to make a note of the
serial number on the serial number specifications plate.
The oven is supplied with a guarantee certificate that ensures that it
will be repaired free of charge by the Service Centre whilst under
guarantee.
This appliance is marked according to the European
directive 2002/96/EC on Waste Electrical and
Electronic Equipment (WEEE).
By ensuring this product is disposed of correctly, you
will help prevent potential negative consequences for
the environment and human health, which could
otherwise be caused by inappropriate waste handling
of this product.
The symbol on the product indicates that this product
may not be treated as household waste.
Instead it shall be handed over to the applicable collection point for the
recycling of electrical and electronic equipment Disposal must be
carried out in accordance with local environmental regulations for
waste disposal.
For more detailed information about treatment, recovery and recycling
of this product, please contact your local city office, your household
waste disposal service or the shop where you purchased the product.
Picture 4
•
Remove the top metallic cover by
pulling it (4
upwards. Picture
07 GB
Page 8
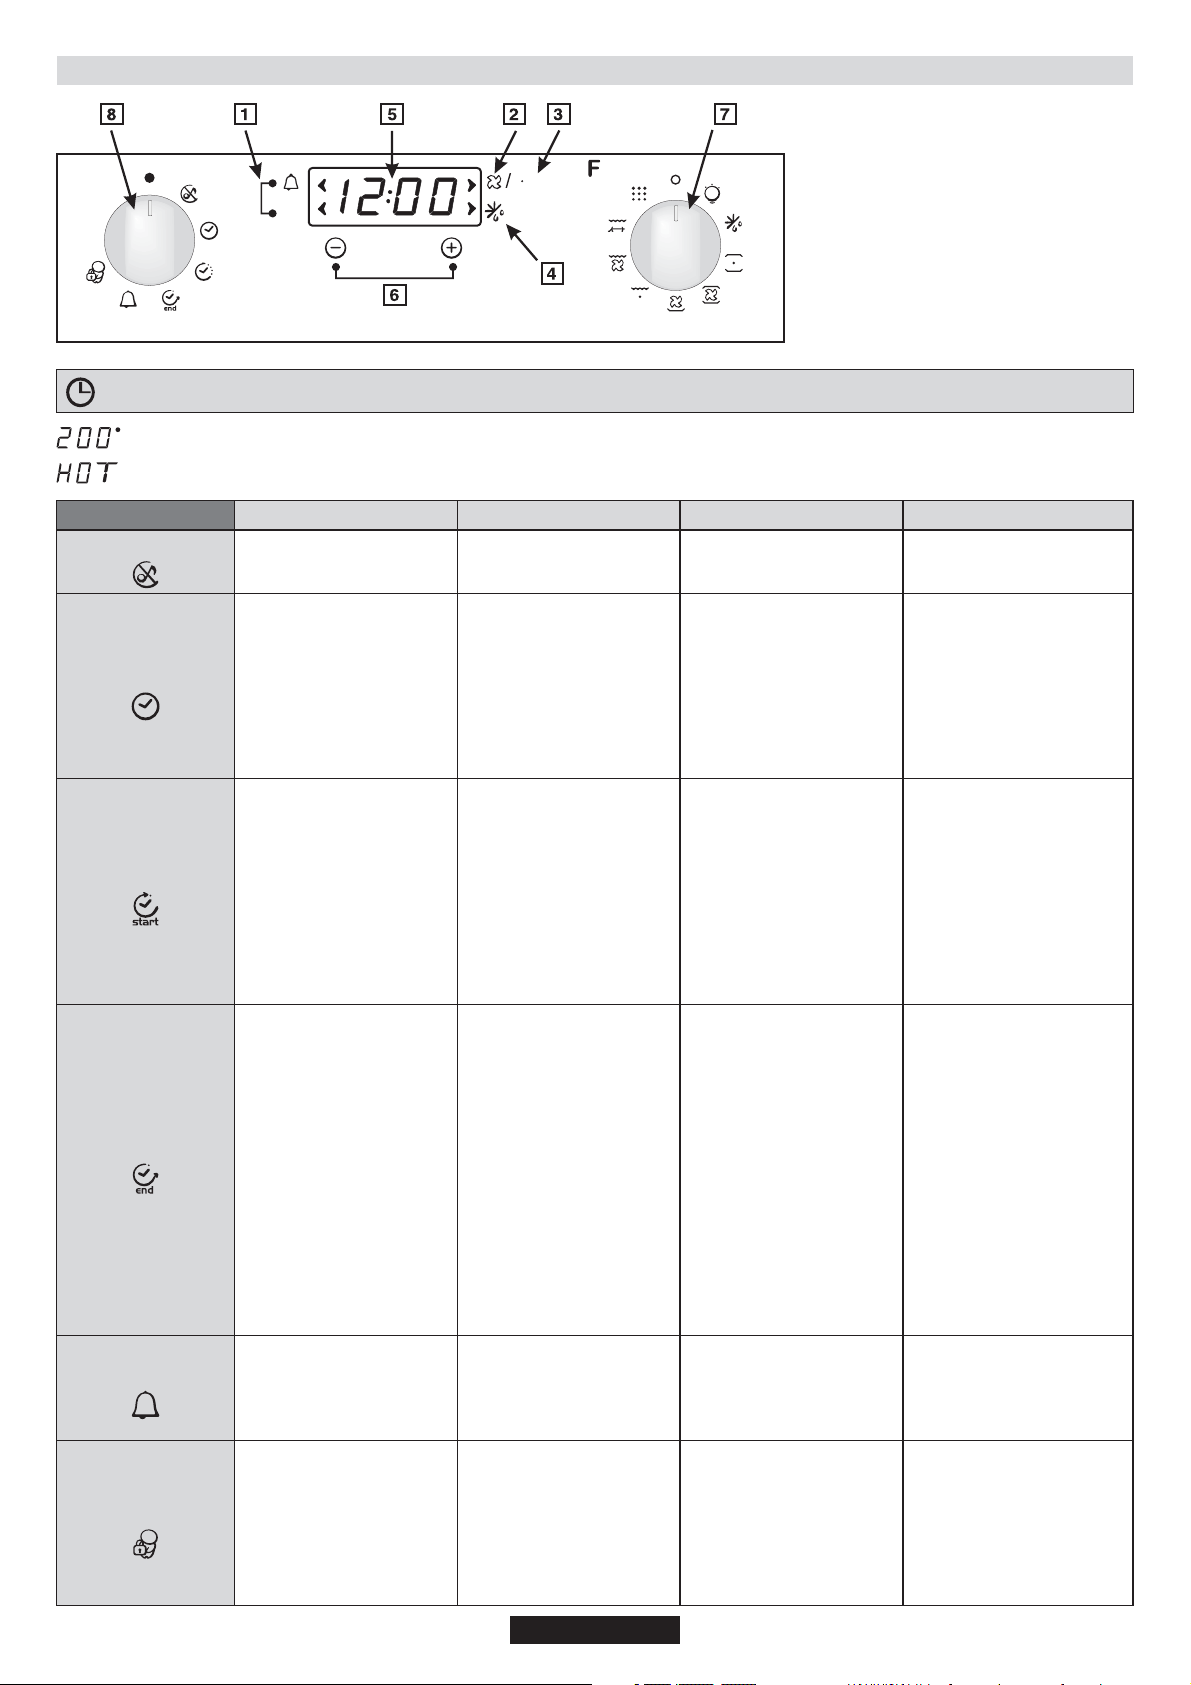
5- USE THE ELECTRONIC PROGRAMMER
5. DESCRIPTION OF THE DISPLAY
auto
U
COOK
1. Minute Minder or Auto light
2. Function with fan*
3. Function with VARIOFAN*
4. Defrost
5. Display for Temperature or Time
6. Setting buttons
7. Function selector knob
8. Function Timer knob
* ACCORDING TO THE MODEL
WARNING !
The first operation to carry out after the oven has been installed or following the interruption of power supply
(this is recognizable the display pulsating and showing12:00) is setting the correct time.
The Led “°” of the temperature indicator pulsates until the pre-set temperature is not reached.
HOT : When a cooking program is finished, if the oven is still hot, « HOT » appears on the display, alternately with the time
displays, even if the two function selectors are switched on OFF.
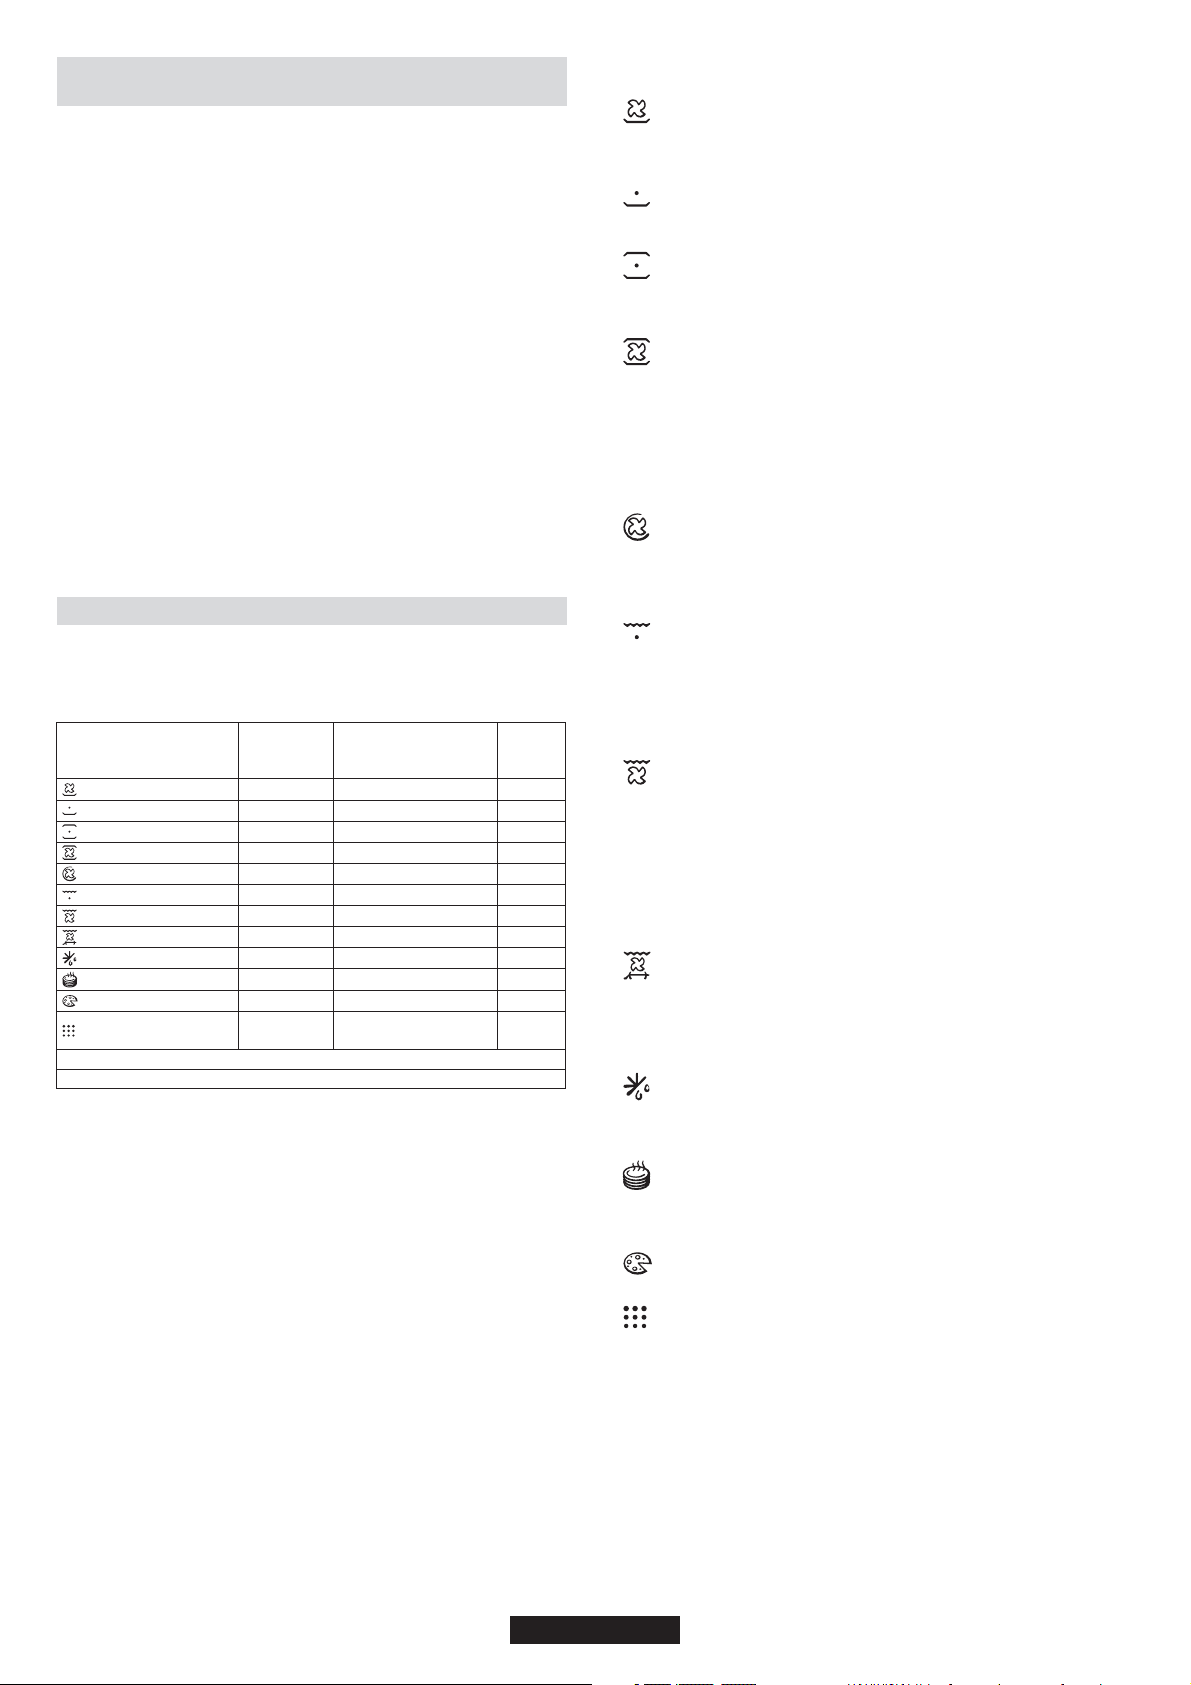
FUNCTION HOW TO ACTIVATE IT?
SILENCE MODE
SET THE TIME
COOKING TIME
DURATION
END OF
COOKING TIME
MINUTEMINDER
CHILD LOCK
• Rotate the left function
selector to the position
" Silence mode “
• Rotate the left function
selector to the position
“Set the time”.
• Use the buttons " + " or
" - " to set the time
• Turn the right function
selector to a cooking
function
• Rotate the left function
selector to the position
"Cooking Time Duration"
• Set the time of cooking
by using buttons " + " and
" - "
• Lighting Auto appears
• Turn the right function
selector to a cooking
function
• Rotate the left function
selector to the position
"End of cooking"
• Set the end time of
cooking by using buttons
" + " and " - "
• Lighting Auto appears
• Turn the left function
selector to the position
Minute Minder
• Set the time of cooking
by using buttons “+”and “-”
• Turn the left function
selector to the position
Child lock.
Press the button " + "
during 3 seconds
• Child lock is available
when " STOP " appears
on display
HOW TO SWITCH IT OFF? WHAT IT DOES ? WHAT IT IS FOR ?
• Rotate the function
selector to the position
OFF.
• Rotate the function
selector to the position
OFF.
•When the cooking time has
elapsed, the oven switch off
automatically and the alarm
rings for few seconds To stop
the cooking functions early,
turn the function control to
OFF or set the time on 00.00;
by rotating the function
selector to Cooking Time
Duration and by using the
buttons " + " and " - “
• When the cooking time
has elapsed, the oven
switch off automatically.
• To stop the cooking
functions early, turn the
function control to OFF
• Set the time on 00.00 by
turning the left function
selector to the position
Minute Minder, and using
the button " - “
• Turn back the left function
selector to Child lock and
press button " + " during 3
seconds
• Indication STOP
disappears
• Enables you to turn off the
sound of the minute
minder
• Enables you to set the
time which appears on the
display
• It allows to preset the
cooking time required for
the recipe chosen.
• When the cooking time is
set, turn the function
selector toOFF to go back
to actual time.
• To view the cooking time
selected, turn the left
function selector to
Cooking Time duration.
• It allows to preset the end
of cooking time you want.
• When the cooking time is
set, turn the function
selector to OFF to go back
to actual time.
• To view the cooking time
selected, turn the left
function selector to End of
cooking Time
• Sounds an alarm at a few
seconds at the end of the
set time
• The oven cannot be used
• To turn off the sound of the
minute minder
• To set the time
NB : Set the time when
you first install your oven
or just after a black out
(the clock is showing a
pulsating 12.00)
• For cooking the desired
recipes
• This function is used for
cooking we want to program
in advance. For example,
your recipe needs to be
cooked 45 min and to be
ready at 12.30pm ; simply
set the cooking time
duration on 45 min and the
end of cooking time on
12.30pm.
The cooking will start
automatically at 11.45
(12.30 minus 45 min) and
will continue until the preset
end of cooking time,
then the oven will switch
itself off automatically
• Allow to use the oven as
alarm even if the oven is
switch off
Useful especially when
children are at home
08 GB
Page 9
5.1 BEFORE USING THE OVEN FOR THE
FIRST TIME
• PRELIMINARY CLEANING
-Clean the oven before using for the first time:
-Wipe over external surfaces with a damp soft cloth.
-Wash all accessories and wipe inside the oven with a solution of hot water
and washing up liquid.
-Set the empty oven to the maximum temperature and leave on for about 1
hour, this will remove any lingering smells of newness. Ensure that the
room is well ventilated while this is being done.
• THINGS TO REMEMBER
Confirmation of operation on timer
Modification must be confirmed by pressing the button.
Stopping the oven:
This may be necessary if you have input an incorrect instruction.
To stop the oven .... turn back the function selector knob to the Stop
Position.
Child safety device:
To lock the oven controls, select the child safety device. Refer to the
section entitled “Programming - The child safety device”.
The cooling fan :
This protects the control panel and electronics from heat damage.
It begins and then stops automatically even when the oven is switched off.
Oven lighting :
By turning to the light symbol, you can switch on the oven light when it is
not in use.
When the oven is in use, the light stays on during all of the oven functions
and when the door is opened.
5.2 HOW TO USE THE OVEN
•THE MANUAL MODE
The cooking methods suggested in manual mode are set out in the table
below. A temperature is also suggested for each cooking method. This can
be modified within a pre-determined range.
Function Mode
according to the oven
model
Bottom + Fan
Bottom
Bottom + Top 220 50-240
Bottom + Top + Fan
Circular Heating Element + Fan
Grill
Grill + Fan
Grill + Turnspit + Fan
Defrost
Keep Warm
Pizza
Pyro Pyro
*Booster: rapid temperature raised
**O functionven must have this
1- Turn the oven selector knob to the function required to the cooking.
The heating elements in operation for the selected cooking method are
displayed.
2- The appropriate temperature according to the cooking method
selected is displayed. It can be modified within a pre-determined range see the table above.
To modify the temperature setting, turn the central button and on the
timer confirm the setting by pressing the same button.
... the temperature display is fixed but can be modified during the
cooking cycle.
The oven will start cooking and will start to heat up.
The indicator light flashes until the selected temperature has been
reached. An audible signal sounds at the end of this operation and the
indicator light becomes fixed.
3- A cooking time and an end of cooking time can be programmed by
turning the programme selector knob to “cooking time” or “end of
cooking time”.
The “cooking time” or “end of cooking time” display starts flashing. Using
the central button, modify the settings as required and on the timer
confirm.
When you have done this, do not forget to turn the programme selector
knob back to “stop position” to confirm the new setting.
For more details about programming, refer to the chapter 5.3
entitled PROGRAMMES.
4- At the end of the cooking cycle, turn the function selector knob back to
“stop position”.
The indicator flashes again, it will remain also turned on after having
extinguished the oven and it will estinguish when the inside temperature
of the oven is sufficiently low.
Pre-set
Temperature
**
**
o
C
210
160
210
180
L2
190
240
40
60
230
Pre-determined
Temperature C
50-220
50-220
50-230
50-230
50-200
180-240
ECO: 425 /
SUP: 425 / 1h 30min
o
L1-L3
No
No
230
65min
Function
Booster*
Booster
Booster
Booster
Booster
• COOKING MODE
All cooking should be carried out with the door closed.
BOTTOM + FAN - The combination of the bottom heating
element and fan is ideal for fruit flans, tarts, quiches and pastries. It
prevents food from becoming too dry and encourages bread dough to
rise. Place the shelf in the bottom position in the oven.
BOTTOM - Using the lower element. Ideal for cooking all
pastry based dishes. Use this for flans, quiches, tarts, pâté and any
cooking that needs more heat from below.
BOTTOM + TOP - Both top and bottom heating elements are
in use. This method is ideal for all traditional roasting and baking.When
cooking red meat, roast beef, leg of lamb, game, bread or foil wrapped
foods.
BOTTOM + TOP + FAN - Both top and bottom heating
elements are used in conjunction with the fan, which circulates hot air
throughout the oven.We recommend this method for poultry, pastries,
fish and vegetables. By using this method better heat penetration is
achieved and cooking and preheating times are also reduced. The fan
cooking option allows you to cook different foods together at different
positions in the oven all at the same time, providing even heat
distribution but without the risk of mingling tastes and smells. When
cooking different foods at the same time allow a further 10 minutes.
heated is blown by the fan onto the different levels. It is ideal for cooking
CIRCULAR HEATING ELEMENT + FAN - Air that has been
different types of food at the same time (e.g. Meet and fish) without
mixing tastes and smell. It cooks very gently and is ideal for sponge
cakes, pastries, etc.
GRILL - Using the top heating element. Success is guaranteed
for mixed grills, kebabs and gratin dishes. The grill should be pre-heated
to a high temperature for 5 minutes. White meats should always be
placed at some distance from the grill element, the cooking time is
slightly longer but the meat will be more succulent. Red meat and fish
fillets can be placed directly onto the shelf with the drip tray placed
beneath on lower shelf position.
GRILL + FAN - The top heating element is used in conjunction
with the fan which circulates the hot air around the oven. Pre heating is
recommended for red meats but is not necessary for white meats.
Grilling is ideal for cooking thicker food items such as pork or poultry.
Food to be grilled should be placed directly at the centre of the middle
shelf.
By sliding the drip tray underneath the shelf it will ensure that any juices
are collected. For best results always make sure that the food is not too
close to the grill element and turn the food over half way through the
cooking time.
GRILL + TURNSPIT + FAN - The advantage of using the top
oven element at the same time as the fan and rotisserie is that the food is
evenly cooked, preventing it from becoming dry and tasteless. The
rotisserie is programmed to continue rotating for approximately five
minutes after cooking, making full use of the residual oven heat.No preheating is required for rotisserie cooking.
DEFROST - When the dial is set to this position. The fan
circulates hot air around the frozen food so that it defrosts in a few
minutes without the protein content of the food being changed or altered.
The temperature is preset in 40°C constant, no regulation is possible.
KEEP WARM - This is recommended to reheat precooked
foodstuff, positioning the shelf on the second level from top, or to defrost
bread pizza or pastry by positioning the shelf on the lower level.
The temperature is preset in 60°C constant, no regulation is possible.
PIZZA - With this function hot air circulated in the oven to
ensure perfect result for dishes such as pizza or cake.
PYRO - The oven takes care of the entire inside oven cleaning
-Two choices are possible ECO, SUPER
09 GB
Page 10
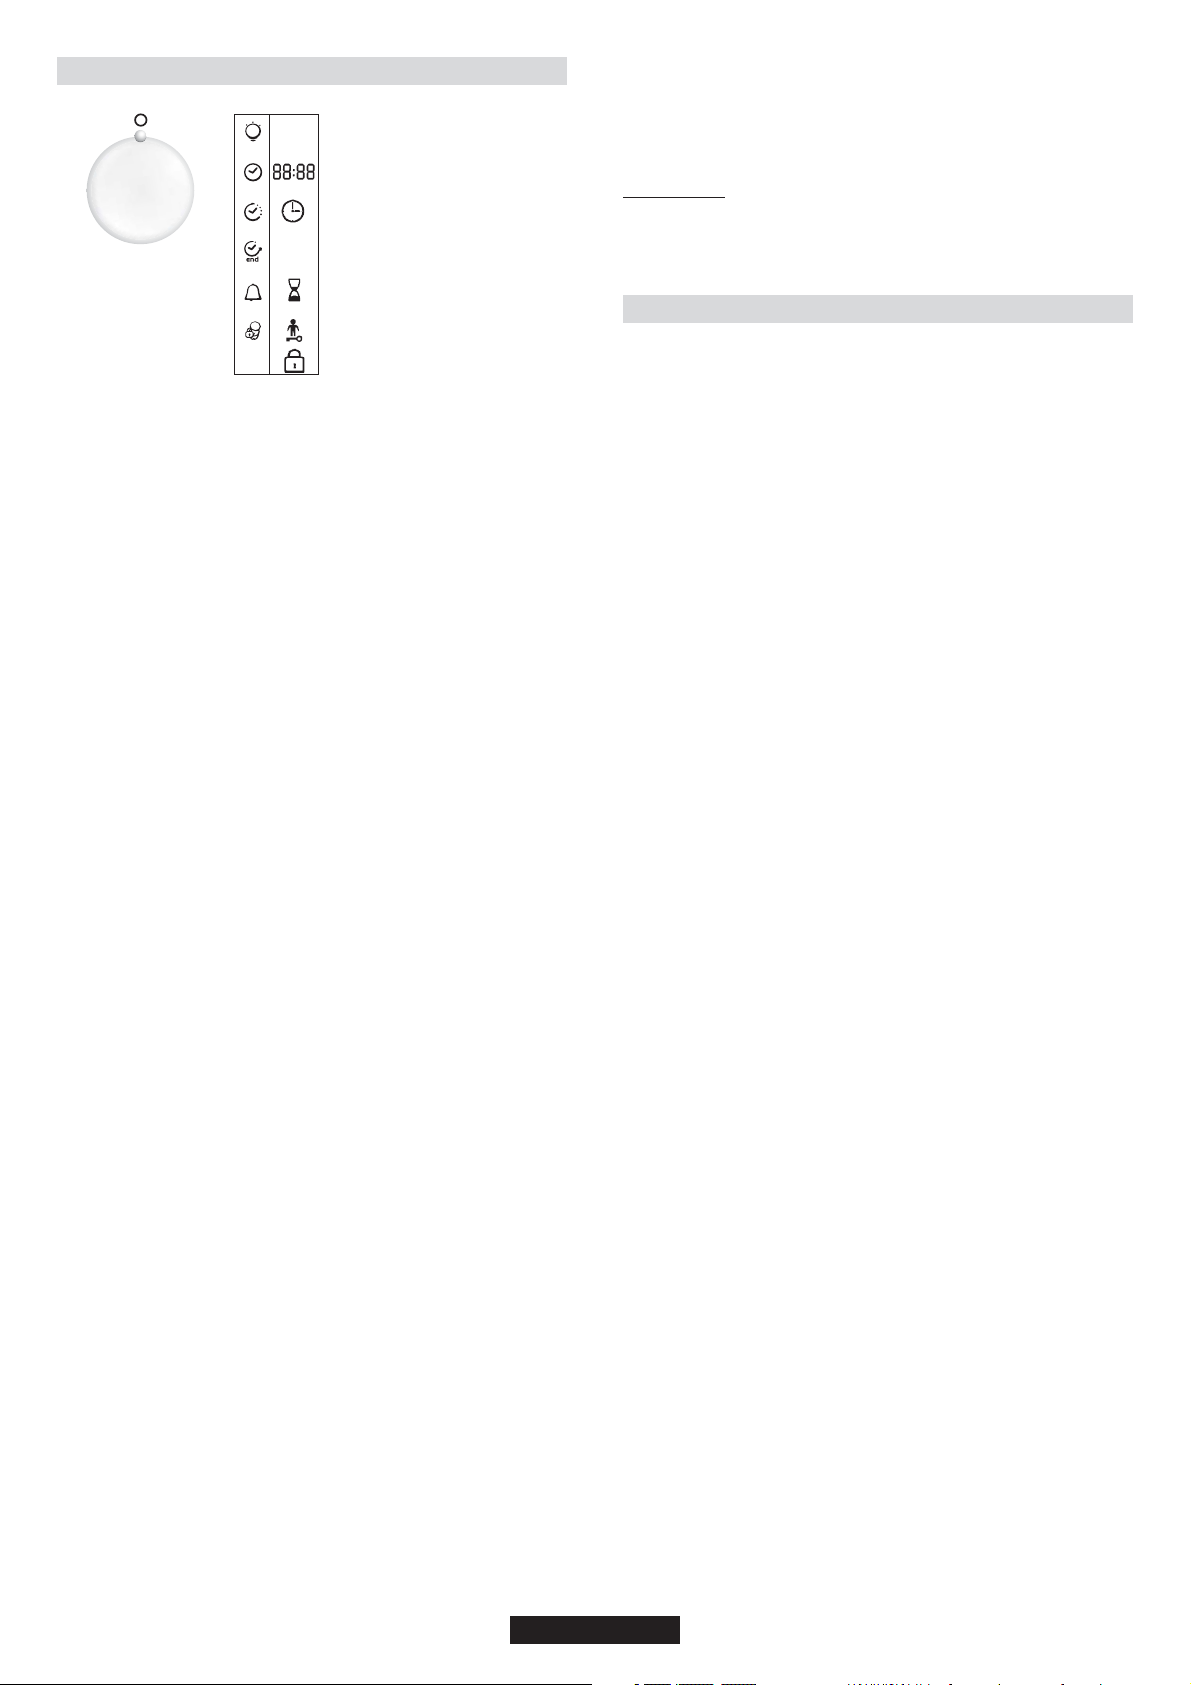
5.3 PROGRAMMES
Selecteur
programmation
DISPLAY SYMBOLS
Lamp
Time Setting
Cooking time programming
STOP
End of cooking time programming
Timer in operation
Child safety device operational
Locking oven door
- set the cooking duration time to 45 minutes
- set the end of cooking time to 12:30.
Cooking will start automatically at 11:45 (12:30 minus 45 mins)
and will continue until the pre-set end-of cooking-time, when the oven will switch itself off automatically.
WARNING.
If the END of cooking is selected without setting the length
of cooking time, the oven will start cooking immediately
and it will stop at the END of cooking time set.
5. COOKING TIPS4
It is better not to salt meats until after cooking as salt encourages the
meat to spatter fat. This will dirty the oven and make a lot of smoke.
THE TIMER:
The timer works independently of the oven and has no effect on the
heating elements. It is simply a reminder.
•Turn the knob to the Timer position. The Timer symbol will appear.
The digits 00:00 will appear on the display.
•The minutes will then flash, turn the central button to the required
number of minutes and confirm by pressing the same button.
•The hours will flash, turn the central button to the required number of
hours and confirm by pressing the same button.
•Turn the knob back to the Stop position.
When the time is up, the cooking time will disappear. An audible signal
will sound for 15 seconds and the Timer display will flash (to stop it
before the 15 seconds are up, just press the central button).
PROGRAMMING THE COOKING TIME:
Various recipes are pre-programmed with a cooking time. In Manual
mode, Defrosting or Keep warm Mode can be pre-set, if required.
•Turn the knob to the Cooking time position. The Cooking time symbol
will appear.A pre-programmed cooking time for the various recipes will
appear, or 00:00 for other functions of the oven.
•With the minutes flashing, turn the central button to the required
number of minutes confirm by pressing the same button.
•With the hours flashing, turn the central button to the required number
of hours and confirm by pressing the same button.
•Turn the programme selector knob back to the Stop position to
confirm the new cooking time.
When the time is up, the cooking time will disappear from the display.
An audible signal will sound for 15 seconds and the Cooking time and
STOP symbols will flash.
•Turn the programme function knob back to Stop. If you do not do this,
the Cooking time and STOP symbols will continue flashing.
PROGRAMMING THE END OF COOKING TIME:
Various recipes are pre-programmed with a cooking time and
therefore with an end of cooking time. In Manual Mode, Defrosting or
Keep warm mode can be pre-set, if required.
•Turn the knob to the End of cooking position.The STOP symbol will
appear. A pre-programmed end of cooking time for the various recipes
will appear, or 00:00 for other oven functions or the time of day will be
shown.
•Turn the programme selector knob to confirm the end time.
•The minutes will flash. Turn the central button to indicate the required
number of minutes, and confirm your choice by pressing the same
button.
•The hours will then flash.Turn the central button to indicate the
required number of hours, and confirm your choice by pressing the
same button.
Joints of white meat, pork, veal, lamb and fish can be put into the oven
cold. The cooking time is longer than in a preheated oven, but it cooks
through to the centre better as the heat has more time to penetrate the
joint.
Correct preheating is the basis of successful red meat cookery.
GRILLS
• Before loading the grill:
Remove the meat from the refrigerator a few hours before grilling. Lay
it on several layers of kitchen paper. This improves seizing, making it
tastier and avoids it staying cold at the centre.
Add pepper and spices to the meat before grilling, but add any salt
after cooking. This way it will seize better and stay juicy. Baste all the
food to be cooked with a little oil. This is best done with a wide flat
basting brush.Then sprinkle with more pepper and herbs (thyme,
etc.).
• During cooking:
Never pierce the food during cooking even when you turn it. This lets
the juice out and it becomes dry.
BAKING
Avoid using shiny tins, they reflect the heat and can spoil your cakes. If
your cakes brown too quickly, cover them with greaseproof paper or
aluminium foil.
Caution: The correct way to use foil is with the shiny side in towards
the cake. If not the heat is reflected by the shiny surface and does not
penetrate the food.
Avoid opening the door during the first 20 to 25 minutes of
cooking:
Soufflés, brioches, sponge cakes, etc. will tend to fall.You can check if
cakes are done by pricking the centre with a knife blade or metal
knitting needle. If the blade comes out nice and dry, your cake is ready
and you can stop cooking. If the blade comes out moist or with bits of
cake attached, continue baking but slightly lower the thermostat so
that it is finished off without burning.
NB : With a delayed start, the end of programme time will appear on
the display with the “Cooking time” and “STOP” symbols, and only the
function Recipe mode of the oven remains.
The oven automatically calculates the start time (end time minus
cooking time).
At the end of the cycle the oven switches itself off automatically. For 15
seconds, an audible signal lets you know that the cycle has ended and
the “Cooking time” and STOP symbols will flash.
•Turn the function selector knob to Stop. Unless you do this, the
symbols will continue flashing.
This function is typically used with “cooking duration” function.
•
For example if the dish has to be cooked for 45 minutes and
needs to be ready by 12:30;
- select the required function
10 GB
Page 11
6. PYROLYTIC CYCLE
7. CHILD SAFETY
**O must have function
ven this
The oven is equipped with a pyrolyser cleaning system, which
destroys food residues at high temperature.The operation is carried
out automatically by means of the programmer.The resulting fumes
are rendered “clean” by passing over a Pyrolyser wich starts as soon
as cooking begins. As very high temperatures are required by the
Pyrolyser, the oven door is fitted with a safety lock.
The pyrolyser can be stopped at any time. The door cannot be opened
until the safety lock is displayed.
NOTE : If a hob has been fitted above the oven, never use the gas
burners or the electric hot-plates while the Pyrolyser is working, this
will prevent the hob from overheating.
TWO PYROLYTIC CYCLE are pre-set.
. ECO PYROCLEAN : Cleans a moderately stained oven.Operates
for a period of 65 minutes.
. SUPER PYROCLEAN : Cleans a heavily stained oven.Operates for
a period of 90 minutes.
Never use commercially available cleaning products on a
Pyrolytic oven !
Tip : Carrying out Pyrolytic cleaning immediately after cooking allows
you to take advantage of residual heat, thus saving energy.
Before carrying out a Pyrolytic cycle :
•Remove all accessories from the oven : They cannot withstand the
high temperatures and would be damaged by pyrolytic temperatures.
•Remove any large spillages or stains as it would take too long to
destroy them. Also excessively large amounts of grease could ignite
when subject to the very high temperatures of the Pyrolyticcycle.
•Close the oven door.
•excess spillage must be removed before cleaning
This function is essential, especially when children are around. It
prevents children from switching the oven on or altering the preset
programmes.
This safety system locks the oven control panel while it is operating.
There are two levels of safety :
LEVEL 1 : Locking selector control knob and the central button.
•To activate : Turn the programmation control knob to child safety.
•Action : The control knobs are inactive*.
•To deactivate : Turn the programmation control knob to 0.
LEVEL 2 : Locking function selector knobs
•To activate : Turn the function selector knob to child safety and keep
the central button pressed in for 3 seconds.
•Action : All the controls are inactive*.
•To dactivate : the same procedure as for activating. Turn the function
selector knob to child safety and keep the central button Pressed in for
3 seconds.
*Note : In all cases, for reasons of safety, even when the controls are
locked, the oven can be switched off by turning the selector knob to 0.
At the end of the cycle, the indicator flashes again, it will remain also
turned on after having extinguished the oven and it will estinguish
when the inside temperature of the oven is sufficiently low.
Pyrolysis leaves a white residue on the oven walls. Wait for the oven to
cool completely then clean the inside of the oven with a damp sponge
to wipe off the residue.
1- Rotate the function selector to the position . On the display,
appears the indication " ECO " or " SUP "
2- The preset time is 65min, this can be varied from 65min (Eco
mode) to 90min (Sup mode) via the programmer (setting
button " + " or " - "). If the oven is very dirty, it is recommend o
increase the time to 90min, if the oven is moderately dirty reduce
the cleaning cycle time to 65min.
3- It is possible to delaythe start time of the pyroclean cycle by
changing the END time via the programmer.
4- After few minutes, when the oven reaches a high temperature,
the door will lock automatically.
5- The pyroclean cycle can be stopped at any time by turning the
function selector back to '0'.
6- Once the pyroclean cycle has finished, the pyrolysis will switch
off automatically. On the display appears the indication " END
"and "
0 - - n " until the door is locked.
7- Turn the function selector back to "
high, the "
0 - - n " indication appears to advise that the door is
locked.
0 " , if the temperature is still
11 GB
Page 12

INDICAZIONI DI SICUREZZA
• ATTENZIONE: l'apparecchio e le parti accessibili diventano calde durante l'uso. Prestare attenzione a
non toccare le parti calde.
• I bambini al di sotto di 8 anni dovrebbero essere tenuti a distanza se non continuamente supervisionati.
• L'apparecchio può essere usato da bambini dagli 8 anni in su e persone con ridotte capacità fisiche,
sensoriali o mentali o senza esperienza e conoscenza del prodotto se supervisionate o dando loro
istruzioni riguardo al funzionamento dell'apparecchio in maniera sicura e coscente del rischio possibile.
• I bambini non dovrebbero giocare con l'apparecchio.
• La pulizia e la manutenzione non dovrebbero essere fatte da bambini senza supervisione
• Durante l’uso l’apparecchio diventa molto caldo. Si dovrebbe fare attenzione a non toccare gli elementi
riscaldanti all’interno del forno.
• ATTENZIONE: Le parti accessibili possono diventare molto calde durante l’uso. I bambini dovrebbero
essere tenuti a distanza.
• Non usare per la pulizia materiali ruvidi abrasivi o raschietti metallici affilati per pulire le porte di vetro del
forno dato che possono graffiare la superficie e causare la frantumazione del vetro.
• Spegnere il forno prima di rimuovere lo schermo di protezione e, dopo la pulizia, rimontarlo secondo le
istruzioni.
• Usare solo la sonda termica raccomandata per questo forno.
• Non utilizzare un pulitore a vapore.
• ATTENZIONE: Assicurarsi che l’apparecchio sia spento prima di sostituire la lampada per evitare la
possibilità di scosse elettriche.
• Il mezzo di disconnessione deve essere incorporato nel cablaggio fisso in accordo con le leggi di
cablaggio.
• Le istruzioni devono indicare quale tipo di cavo debba essere utilizzato, tenendo presente la
temperatura della superficie posteriore dell’apparecchio.
• Se il cavo di alimentazione è danneggiato, esso deve essere sostituito da un cavo o un assieme
speciali disponibili presso il costruttore o il suo servizio assistenza tecnica.
• ATTENZIONE: Al fine di evitare ogni pericolo dovuto al riarmo accidentale del dispositivo termico di
interruzione, il presente apparecchio non deve essere alimentato con un dispositivo di manovra esterno,
quale un temporizzatore oppure essere connesso a un circuito che viene regolarmente alimentato o
disalimentato dal servizio.
• ATTENZIONE: Le parti accessibili possono diventare calde quando il grill è in uso. I bambini dovrebbero
essere tenuti a distanza.
• Gli eccessi di materiale tracimato devono essere tolti prima della pulizia.
• Durante la Pyrolisi le superfici possono scaldarsi più del solito è pertanto consigliato tenere i bambini a
distanza.
12 IT
Page 13
1. AVVERTENZE GENERALI
Per utilizzare in modo ottimale il forno, è consigliabile leggere con attenzione queste istruzioni e conservarle in un luogo sicuro in modo da poterle
consultare in caso di bisogno. Prima di installare il forno, prendere nota del numero di serie in modo da poterlo comunicare al personale del servizio
di assistenza in caso di richiesta di intervento. Dopo aver rimosso il forno dall'imballaggio, verificare che non abbia subito danni durante il trasporto.
In caso di dubbi, non utilizzare il forno e richiedere l'assistenza di un tecnico qualificato. Tenere tutto il materiale da imballaggio, come sacchetti di
plastica, polistirolo e chiodi fuori della portata dei bambini perché potrebbero essere pericolosi.
Il produttore declina ogni responsabilità in caso di mancata osservanza delle istruzioni contenute in questo documento.
NOTA: le funzioni, le proprietà e gli accessori dei forni citati in questo manuale possono variare a seconda dei modelli.
1.1 DICHIARAZIONE DI CONFORMITÀ
Tutti i componenti di questo elettrodomestico destinati a venire a
contatto con gli alimenti
sono conformi che le disposizione della Direttiva CEE 89/109.
Il forno è conforme alle Direttive europee 73/23/CEE e
89/336/CEE, sostituite dalle direttive 2006/95/CE e 2004/108/CE e
successive modifiche.
1.2 SUGGERIMENTI SULLA SICUREZZA
•Utilizzare il forno solo per lo scopo per cui è stato progettato, ossia
solo per la cottura di alimenti. Qualsiasi altro utilizzo, ad esempio
come fonte di riscaldamento, è considerato improprio e quindi
pericoloso.
•Il produttore declina ogni responsabilità per eventuali danni dovuti a
un uso improprio, errato o irragionevole del forno. Durante l'uso di
elettrodomestici elettrici, è indispensabile attenersi ad alcune semplici
regole di base:
-Non tirare il cavo di alimentazione per staccare la spina dalla presa a
muro
-Non toccare il forno con mani o piedi bagnati o umidi
-Non utilizzare i forno con i piedi scalzi
- È generalmente sconsigliabile utilizzare adattatori, basette di
alimentazione o prolunghe.
- Se il forno si guasta o uno degli interruttori risulta difettoso, spegnerlo
immediatamente e non utilizzarlo.
•Sostituire immediatamente il cavo di alimentazione se danneggiato.
Attenersi alle seguenti istruzioni per sostituire il cavo di alimentazione.
Rimuovere il cavo di alimentazione difettoso e sostituirlo con uno dei
seguenti modelli: H05RR-F, H05VV-F o H05V2V2-F. Verificare che le
specifiche elettriche del cavo di alimentazione corrispondano a quelle
del forno. Fare sostituire il cavo di alimentazione da un tecnico
qualificato. Verificare che il cavo di messa a terra (giallo/verde) sia 10
mm più lungo del cavo di alimentazione. Rivolgersi solo a centri di
assistenza autorizzati e verificare che vengano utilizzate solo parti di
ricambio originali. Il produttore non è in grado di garantire la sicurezza
del forno in caso di mancata osservanza delle istruzioni indicate in
precedenza.
•Il forno ha le caratteristiche tecniche descritte in questo documento e
non deve essere in alcun modo modificato.
•Non utilizzare mai vapore o getti ad alta pressione per pulire il forno.
•Non conservare materiale infiammabile nel forno perché potrebbe
incendiarsi nel caso in cui il forno venga accidentalmente acceso.
•Non esercitare pressione sullo sportello del forno e impedire ai
bambini di sedervisi sopra.
•Utilizzare sempre guanti per inserire e rimuovere le pietanze nel/dal
forno.
1.3 RACCOMANDAZIONI
•Dopo l'uso, sono sufficienti alcune semplici operazioni di pulizia per
mantenerlo perfettamente pulito.
•Non rivestire le pareti del forno con fogli d'alluminio da cucina o fogli
monouso commerciali, perché potrebbero fondersi a contatto con le
superfici in smalto caldo e danneggiare le superfici in smalto
all'interno del forno.
•Per evitare di sporcare eccessivamente il forno e prevenire la
diffusione di fumo maleodorante, è consigliabile non utilizzare il forno
a temperature molto alte. È generalmente preferibile impostare un
tempo di cottura più lungo e utilizzare una temperatura più bassa.
1.4 INSTALLAZIONE
Il produttore non è obbligato a occuparsi dell'installazione. Gli
eventuali interventi di assistenza necessari per correggere problemi
dovuti a un'errata installazione non sono coperti da garanzia.
L'installazione deve essere effettuata da un tecnico qualificato e in
conformità con queste istruzioni. Un'installazione impropria potrebbe
causare infortuni alle persone, agli animali domestici o danni alle
attrezzature. Il produttore declina ogni responsabilità per eventuali
lesioni o danni dovuti a un'errata installazione. L'unità della cucina in
cui viene installato il forno deve essere fabbricato in un materiale in
grado di tollerare una temperatura di almeno 70°C.
Il forno può essere installato sopra una colonna o sotto a un piano di
lavoro.
Prima di fissare in posizione il forno, verificare che lo spazio attorno
allo stesso sia sufficiente a garantire la circolazione del flusso di aria
fresco necessario a garantire il raffreddamento del forno e la
sicurezza dei componenti interni. Realizzare le aperture indicate
nell'ultima pagina del manuale, a seconda del tipo di installazione.
1.5 COLLEGAMENTI ELETTRICI
FARE EFFETTUARE I COLLEGAMENTI ELETTRICI A
UN'ELETTRICISTA O TECNICO QUALIFICATO. La rete di
alimentazione a cui viene collegato il forno deve essere conforme con
le normative in vigore nel paese di installazione. Il produttore declina
ogni responsabilità per eventuali danni derivanti dalla mancata
osservanza di tali disposizioni. Il forno deve essere collegato alla rete
elettrica tramite una presa a muro con messa a terra o tramite un
sezionatore con più poli, a seconda delle disposizioni in vigore nel
paese di installazione. La rete elettrica deve essere protetta mediante
fusibili idonei e devono essere utilizzati cavi con una sezione
trasversale idonea a garantire una corretta alimentazione del forno.
COLLEGAMENTO
Il forno viene fornito con un cavo di alimentazione, che deve essere
collegato solo a una rete elettrica con una tensione di 230 VCA tra le
fasi o tra la fase e il neutro. Prima di collegare il forno alla rete elettrica,
è indispensabile controllare: - la tensione di alimentazione indicata sul
misuratore, - l'impostazione del sezionatore. Il filo di messa a terra
(giallo/verde) collegato al morsetto di terra del forno deve essere
collegato al morsetto di terra della rete elettrica.
Attenzione:
•Prima di collegare il forno alla rete elettrica, far controllare la
continuità della messa a terra della rete elettrica a un elettricista
qualificato.
•Il produttore declina ogni responsabilità per eventuali incidenti o altri
problemi derivanti dal mancato collegamento a terra del forno o dal
suo collegamento a una messa a terra con una continuità difettosa.
Nota: poiché il forno potrebbe richiedere interventi di assistenza, è
consigliabile prevedere la disponibilità di un'ulteriore presa a muro a
cui collegare il forno dopo che è stato rimosso dallo spazio in cui è
stato installato.
Cavo di alimentazione:
sostituito solo dal personale dell'assistenza tecnica o da tecnici con
qualifiche analoghe.
il cavo di alimentazione deve essere
Oltre agli accessori forniti con il forno, è consigliabile utilizzare piatti e
teglie resistenti alle alte temperature.
Code produit:
Numéro de série :
13 IT
Page 14
2. TECNOLOGIA PRO/EXP'R
(A SECONDA DEI MODELLI)
2.1 ACCESSORI DEL FORNO
(A SECONDA DEI MODELLI)
Prima di utilizzare il forno per la prima volta, è necessario pulire tutti gli
accessori, lavandoli con una spugna bagnata, sciacquandoli e
asciugandoli.
La può sostenere e piattigriglia teglie
La serve a raccogliere i che sgocciolano durante
leccarda residui
la cottura di alimenti con il grill.
MODALITÀ UTILIZZO
GIRARROSTO
1. Svitare i ganci
2. Infilare lo spiedo all'interno
della carne
3. Bloccare la carne con i ganci
4. Stringere le viti dei ganci
5. Inserire lo spiedo all'interno
della cavità del forno
6. Smontare l'impugnatura prima di iniziare la cottura
Quando il forno è in funzione bisogna togliere dalla cavità tutti
gli accessori inutilizzati.
2.3 U-SEE
Questo sistema di illuminazione sostituisce le “lampadine”
tradizionali. I 14 LED (sui modelli non pirolitici) o i 10 LED ad alta
potenza (sui modelli pirolitici) sono integrati direttamente nello
sportello. Questi LED producono una luce bianca di alta qualità che
consente di vedere bene tutti i ripiani all'interno del forno senza
ombre.
Non utilizzare la vaschetta di gocciolamento come teglia per gli arrosti
perché i depositi di grasso possono disperdersi rapidamente
all'interno del forno e causare la produzione di un fumo eccessivo.
La piastra per pizza, che consente di cucinare pizze più croccanti, è
munita di una base e di uno stendipizza.
La deve essere collocata sul vassoio e può essere
teglia per i dolci
utilizzata per cucinare pasticcini, come bignè, biscotti, meringhe,
ecc.... Non collocare mai la teglia per i dolci direttamente sul ripiano
inferiore del forno.
Vantaggi
Oltre a garantire una buona visibilità all'interno del forno, questo
sistema è più resistente rispetto alla lampadine tradizionali, richiede
una minore manutenzione e consuma meno dei sistemi tradizionali.
- Ottima visibilità
- Illuminazione di lunga durata
-Consumi ultra-ridotti, Consuma il 95% in meno rispetto ai sistemi
tradizionali
«Elettrodomestico con luci LED bianche di classe 1M, conforme a IEC
60825- 1:1993 + A1: 1997 + A2: 2001 (equivalente allo standard EN
60825-1: 1994 + A1: 2002 + A2: 2001); emissione luminosa massima
pari a 459 nm < 150uW.
:
2.4 RIMOZIONE E PULIZIA DELLE GRIGLIE
1. Rimuovere le griglie tirandole verso il senso della freccia
2. Pulire le griglie lavandole in lavastoviglie o con una spugna bagnata
e asciugandole subito dopo
3. Dopo aver pulito le griglie, installarle nuovamente
2.2 FUNZIONE GIRARROSTO
Per arrostire non è richiesto il pre riscaldamento del forno
Effettuare la cottura con la porta forno chiusa
Il consumo di energia è inferiore del 90-95% rispetto al metodo
tradizionale
3
2
1
4
1- riglia
G
2- Spiedo
3- Ganci e viti
4- Impugnatura
3. PULIZIA DEL FORNO 4. RISOLUZIONE DEI
PROBLEMI
•Attendere che il forno si raffreddi prima di effettuare operazioni di pulizia
manuali.
•Non utilizzare mai detergenti abrasivi, pagliette di ferro o oggetti appuntiti
per la pulizia per non danneggiare in modo irreparabile le parti smaltate.
•Utilizzare solo acqua e sapone o detergenti a base di candeggina
(ammoniaca).
•Non rivestire mai le pareti del forno con fogli d'alluminio da cucina.
PARTI IN VETRO
È consigliabile pulire lo sportello in vetro con carta assorbente da cucina
dopo ogni utilizzo del forno. Per rimuovere le macchie più ostinate, è
possibile anche utilizzare una spugna imbevuta di detergente ben strizzata e
sciacquare con acqua.
*Non utilizzare mai detergenti abrasivi o oggetti appuntiti perché potrebbero
graffiare la superficie in vetro o frantumarla.
14 IT
Page 15
GUARNIZIONE DELLO SPORTELLO DEL FORNO
1
2
3
Se sporca, la guarnizione può essere pulita con una spugna leggermente
inumidita.
ACCESSORI
Pulire gli accessori con una spugna imbevuta con acqua e sapone,
sciacquarli e asciugarli. Evitare di usare detergenti abrasivi.
VASCHETTA DI GOCCIOLAMENTO
Dopo l'uso del grill, rimuovere la vaschetta dal forno. Versare il grasso caldo
in un contenitore. Lavare e sciacquare la vaschetta in acqua calda
utilizzando una spugna e del detergente per piatti. Se rimangono dei residui
di grasso, immergere la vaschetta in acqua e detergente. In alternativa, è
possibile anche lavare la vaschetta nella lavastoviglie oppure utilizzare un
detergente per forni di tipo commerciale. Non reinserire mai una vaschetta
sporca nel forno.
LUCE DEL FORNO
Scollegare il forno dall'alimentazione elettrica prima di pulire o sostituire la
lampadina. La lampadina e la sua copertura sono fabbricati in materiale
plastico resistente alle temperature elevate.
• Rimuovere le viti come nella
Figura 3. (Figura 3)
•
superiore tirandola verso l'alto.
(Figura 4)
Figura 4
• Rimuovere il vetro estraendolo con
molta cura dalla controporta del
forno. (Figura 5)
Figura 3
Rimuovere la copertura metallica
Caratteristiche della lampadina:
230 VCA 2 5W E 14, temperatura di base 300°C. Per sostituire una
lampadina difettosa:
•Allentare la copertura in vetro.
•Svitare la lampadina.
•Sostituirla con una nuova dello stesso modello (vedere le
caratteristiche descritte in precedenza).
•Dopo aver sostituito la lampadina difettosa, riavvitare la
copertura in vetro.
PULIZIA PORTAIN VETRO
È possibile rimuovere e pulire la porta vetro interna.
Al fine di pulire il vetro interno, seguire le seguenti istruzioni:
Figura 6
• * Per i forni pirolitici, rimuovere
anche il secondo e il
terzo vetro. (Figura 6)
Figura 5
• Al termine della pulizia del
vetro, riassemblare le parti
nell'ordine opposto alla
rimozione
• SU TUTTI I VETRI, l'indicazione
"Low-E" deve essere
correttamente leggibile e
posizionata sul lato sinistro
della porta, vicino alla cerniera
laterale sinistra. In questo modo,
l'etichetta stampata del primo
vetro rimarrà INTERNA alla porta.
Figura 7
4. ASSISTENZA TECNICA
Prima di rivolgersi all'assistenza tecnica:
Se il forno non funziona, è consigliabile:
•Controllare che il forno sia correttamente collegato all'alimentazione
elettrica.
Aprire la porta del forno
•
(Figura 1)
Figura 2
Figura 1
Prima di iniziare l'operazione di pulizia,
•
bloccare le cerniere come mostrato
nella Figura 2. Sbloccare le cerniere
una volta terminata l'operazione.
(Figura 2)
Se non è possibile individuare la causa del guasto:
•Scollegare il forno dall'alimentazione elettrica, non toccarlo e rivolgersi
all'assistenza tecnica.
Prima di chiamare il centro di assistenza, ricordarsi di prendere nota del
numero di serie riportato sulla targhetta identificativa.
Il forno viene fornito con un certificato di garanzia che ne garantisca la
riparazione gratuita presso un centro di assistenza durante il periodo di
validità della garanzia.
Il forno è marcato in conformità con la Direttiva europea
2002/96/CE relativa alle apparecchiature elettriche ed
elettroniche usate (WEEE). Uno smaltimento corretto del
prodotto evita di causare danni all'ambiente e alla salute
umana. Il simbolo riportato sul prodotto indica che non
può essere smaltito come normale rifiuto domestico.
Il forno deve essere invece consegnato a un centro di
raccolta specializzato nello smaltimento di
apparecchiature elettriche ed elettroniche usate. Questo
elettrodomestico deve essere smaltito in conformità con i
regolamenti locali in materia di smaltimento di rifiuti. Per ulteriori
informazioni sullo smaltimento, il recupero e il riciclaggio di questo
prodotto, rivolgersi all'ufficio locale responsabile, al servizio di raccolta di
rifiuti locali o al punto vendita presso cui è stato acquistato.
15 IT
Page 16
5- UTILIZZO DEL PROGRAMMATORE ELETTRONICO
1.Luce: Timer / Modalità automatica
2.Funzione con ventola*
COOK
U
auto
Attenzione! La prima operazione da fare dopo l’installazione o dopo l'interruzione di corrente (situazioni di questo tipo
possono essere riconosciute in quanto il display è acceso e lampeggia 12:00) è l'impostazione del tempo.
Il Led " ° " della temperatura lampeggia fino a che la temperatura visualizzata non è stata raggiunta
Quando un programma è finito, se il forno è ancora caldo, il display mostra "HOT", in alternanza con il tempo e anche se le
maniglie sono posizionate su "OFF”
3.Funzione con ventola a sistema
variabile*
4.Modalità scongelamento
5.Display per temperatura o orologio
6.Bottoni di regolazione
7.Manopola di selezione funzione
8.Manopola di selezione programmatore
* SECONDO MODELLO
FUNZIONI
Modalità silenziosa
Impostazione
dell’orologio
Durata di cottura
Fine di cottura
TIMER
Sicurezza
bambini
COME SI UTILIZZANO? COME SI DISATTIVANO? COSA FA A COSA SERVE?
•Ruotare la manopola del
programmatore sulla
“Modali tà Silenziosa”
• Impostare la manopola
sulla posizione
“impostazione
dell’orologio”
• Usare i tasti + e per impostare l'ora.
• Selezionare una funzione
di cucina
• Impostare la manopola del
programmatore sulla
durata di cottura
• Regolare il tempo di
cottura utilizzando
i tasti + e -.
• Auto display si illumina.
• Selezionare una funzione
di cottura.
• Regolare la manopola sulla
posizione Fine di cottura.
• Regolare l’ora di fine
cottura utilizzando i
tasti + e -.
• Auto display si illumina
• Regolare la manopola del
programmatore sulla
posizione TIMER.
• Regolare il tempo di
cottura utilizzando i tasti + e -.
•Regolare la manopola del
programmatore sulla
posizione Sicurezza Bambini.
• Premere sul tasto + per 3
secondi.
• La sicurezza bambini è in
funzione quando sul display
appare STOP.
• Ruotare la manopola sulla
posizione off
• Ruotare la manopola sulla
posizione off
• Una volta che il tempo è
trascorso, il forno viene
automaticamente disattivato.
Per fermare la cottura prima,
si deve impostare la
manopola delle funzioni su
OFF, o regolare il tempo di
cottura su 00:00,
posizionando la manopola
sulla Durata della cottura e
utilizzando il tasto + e -.
• Quando la cottura è
terminata, il forno si
spegne automaticamente.
Per bloccare la cottura
anticipatamente, ruotare
la manopola delle funzioni
su OFF.
• Regolare il tempo su 00:00,
posizionando la manopola
del programmatore sulla
posizione TIMER, ed
utilizzando i tasti + e -.
• Riposizionare la manopola
sulla funzione Sicurezza
bambini e premere il tasto
– per 3 secondi.
• L’indicazione sul display
sparisce.
• Permette di spegnere il
suono del timer
• Permette di regolare l’ora
che appare sul display
• Permette di regolare il
tempo di cottura.
• Quando il tempo di cottura
è regolato, posizionare la
manopola su OFF per
ritornare alla visualizzazione
dell’ora attuale.
• Per visualizzare l’ora
selezionata, posizionare il
selettore delle funzioni di
sinistra su Durata di cottura.
• Permette di regolare l’ora
di fine cottura.
• Quando l’ora di fine cottura
è regolata, ruotare il
selettore di funzione su
OFF per ritornare all’ora
attuale.
• Per vedere il tempo di
cottura selezionato, ruotare
il selezionatore di funzione
di sinistra sulla posizione
Fine di cottura.
• Questa funzione attiva un
allarme sonoro di qualche
secondo alla fine del
tempo impostato.
• Il forno non può essere
utilizzato
• Questa funzione è
utilizzata per spegnere il
suono del timer
• Questa funzione vi
permette di regolare l’ora
utilizzando i tasti + e –
Nota: impostare l’ora al
momento dell'installazione
del vostro forno o
subito dopo un’interruzione
di corrente (12:00
lampeggia sullo schermo).
• Quando il tempo di cottura
è finito, la cottura si
arresta automaticamente
e l'allarme suona per
qualche secondo.
• Questa funzione è anche
utilizzata per le cotture che
possono essere programmate
in anticipo. Ad esempio, se il
tuo piatto deve essere
cucinato per 45 minuti e deve
essere pronto alle 12.30:
impostare semplicemente la
durata di 45 minuti e l'ora di
Fine cottura alle 12:30.
La cottura inizierà automaticamente alle 11:45 (12:30
meno45min) e proseguirà fino
a che l'ora di fine cottura è
stata raggiunta.
A questo punto il forno si
spegnerà automaticamente.
• Utile per ricordare,
l’allarme sonoro funziona
indipendentemente dal
fatto che il forno sia acceso.
•Questa funzione è utile
quando ci sono dei
bambini in casa.
16 IT
Page 17
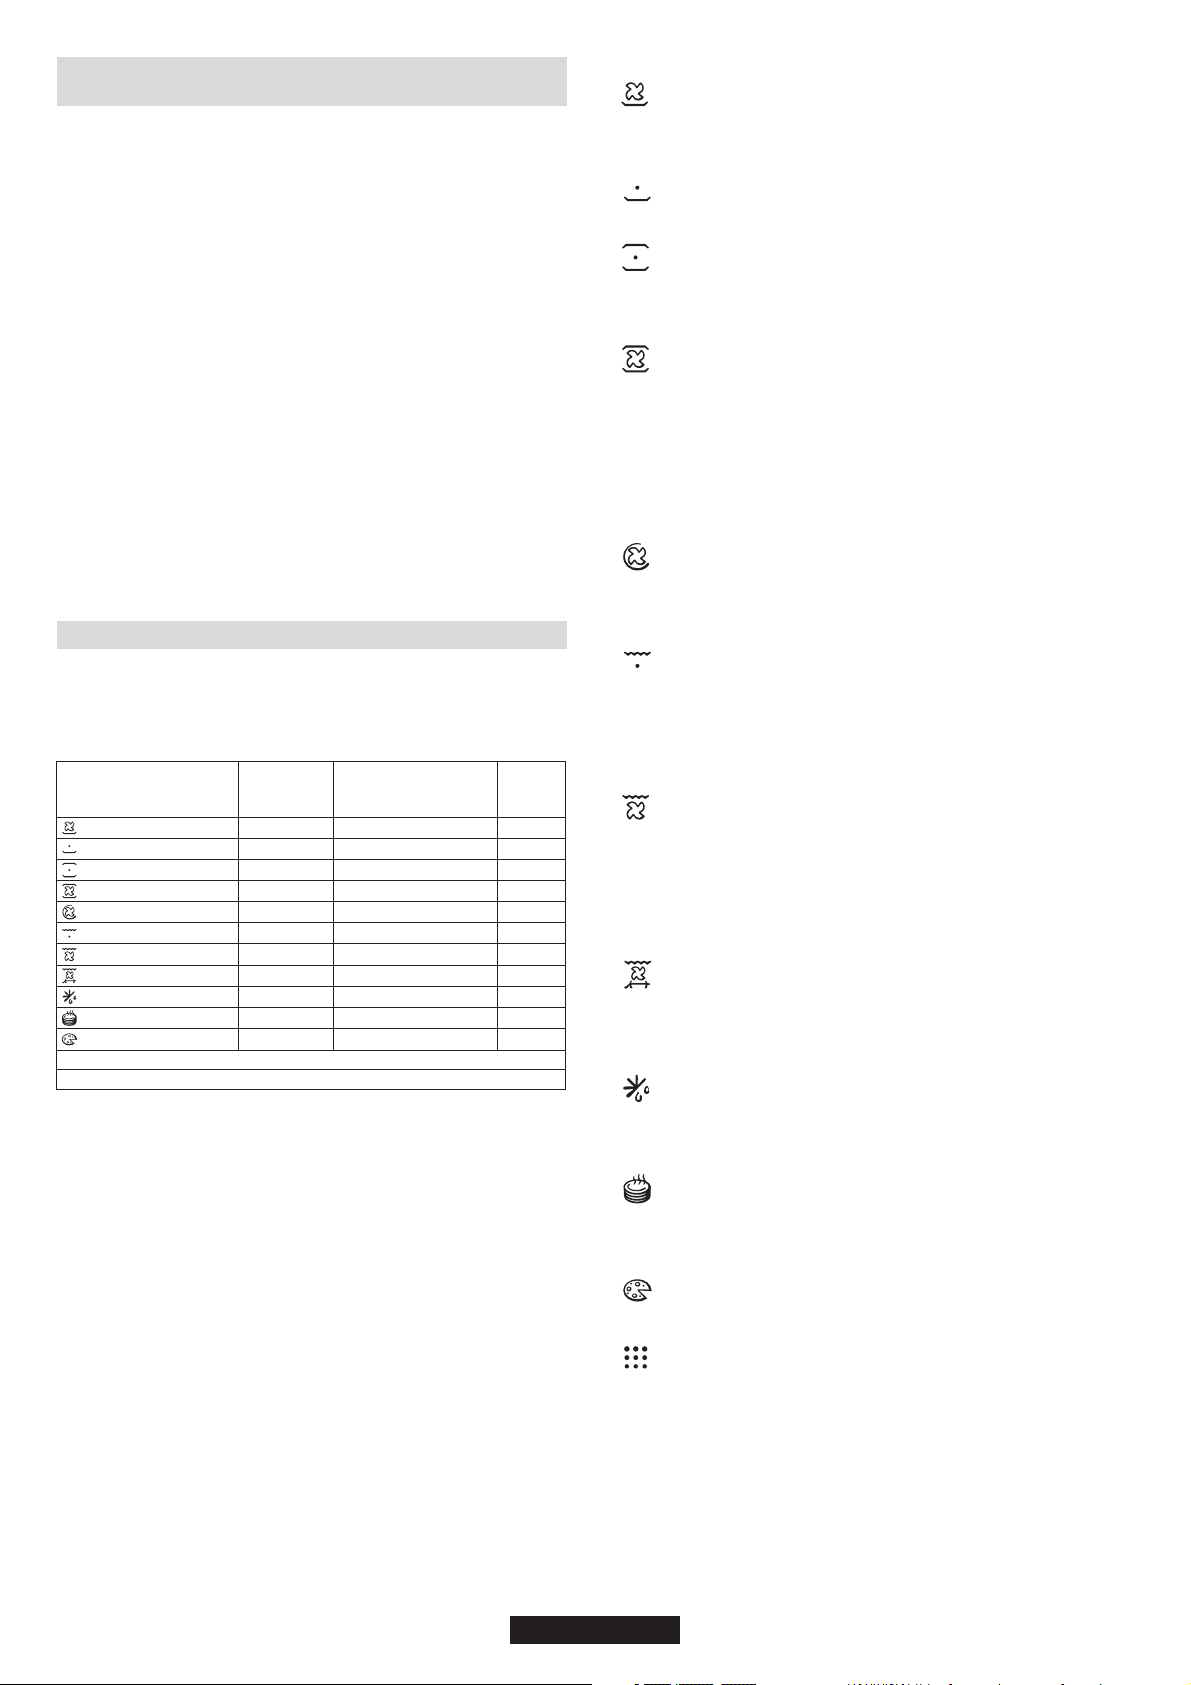
5.1 PRIMA DI UTILIZZARE IL FORNO PER LA
PRIMA VOLTA
PULIZIA PRELIMINARE
-Pulire sempre il forno prima di utilizzarlo per la prima volta:
-Pulire le superfici esterne con un panno morbido leggermente inumidito.
-Lavare tutti gli accessori e pulire l'interno del forno con del detergente per
piatti ed acqua calda.
-Verificare che il forno sia vuoto, impostare la temperatura massima e
lasciarlo acceso per almeno 1 ora per rimuovere tutti gli odori normalmente
presenti nei forni nuovi. Verificare che la cucina sia ben ventilata durante
l'esecuzione di queste operazioni.
PROMEMORIA
Controllare che il timer funzioni correttamente
Premere il pulsante del timer per verificare che funzioni.
Arresto del forno
Può essere necessario effettuare questa operazione se si seleziona un
comando errato. Per arrestare il forno, ruotare all'indietro il selettore e
portarlo in posizione di arresto.
Blocco dei comandi
Per bloccare i comandi del forno, selezionare il dispositivo di protezione del
forno. Per ulteriori informazioni, consultare la sezione intitolata
“Programmazione del dispositivo di sicurezza”.
Ventola di raffreddamento
Lo scopo della ventola è proteggere il pannello di controllo e l'elettronica dal
calore. La ventola si avvia automaticamente e si arresta al momento in cui
viene spento il forno.
Luce del forno
Ruotando il selettore della luce, è possibile spegnere la luce del forno quando
questo non è in uso. La luce è sempre accesa quando il forno è in uso e si
accende quando si apre lo sportello.
5.2 COME UTILIZZARE IL FORNO
•À
MODALIT MANUALE
I metodi di cottura consigliati per la modalità manuale sono descritti nella
seguente tabella, che riporta anche la temperatura consigliata per ciascun
metodo di cottura. La temperatura può tuttavia essere impostata su
qualsiasi valore compreso entro l'intervallo indicato.
Modalita di
funzionamento secondo
il modello di forno
Parte inferiore+Ventole
Parte inferiore
Parte inferiore Parte superiore+
Parte inferiore+Parte superiore+Ventole
Elemento di riscaldamento circolare + Ventole
Grill
Grill+Ventole
Grill+Girarrosto+Ventole
Sbrinamento
Mantenere in caldo
Pizza
*Booster: aumento rapido della temperatura.
**Il forno deve avere questa funzione
1-Ruotare il selettore del forno impostandolo sulla funzione di cottura
desiderata. Vengono visualizzati gli elementi di riscaldamento che verranno
utilizzati per il metodo di cottura scelto.
2-Viene quindi visualizzata la temperatura appropriata per il metodo di cottura
selezionato. La temperatura può tuttavia essere impostata su qualsiasi valore
compreso entro l'intervallo indicato (vedere la tabella precedente). Per
modificare la temperatura, ruotare il pulsante centrale e premerlo appena il
timer visualizza la temperatura corretta. La temperatura visualizzata sul
display è fissa, ma può comunque essere modificata in fase di cottura. Il forno
avvia il ciclo di cottura e inizia a riscaldarsi. L'indicatore luminoso lampeggia
fino al raggiungimento della temperatura selezionata. Al termine
dell'operazione, il forno emette un avviso acustico e l'indicatore luminoso si
accende fisso.
3-Per programmare il tempo di cottura e l'ora di fine del ciclo di cottura, è
sufficiente ruotare il selettore dei programmi e posizionarlo sul “tempo di
cottura” o “l'ora di fine del ciclo di cottura” desiderati. L'icona del “tempo di
cottura” o “dell'ora di fine del ciclo di cottura” inizia a lampeggiare. Utilizzare il
pulsante centrale per modificare le impostazioni e controllare che il timer
visualizzi i tempi desiderati. Dopo aver effettuato queste operazioni, riportare il
selettore in posizione di “arresto” per confermare la nuova impostazione.
Per ulteriori informazioni sulla programmazione, fare riferimento al
Capitolo 5.3 - PROGRAMMAZIONE.
4 - Al termine del ciclo di cottura, riportare il selettore delle funzioni in posizione
di arresto. L'indicatore luminoso inizia nuovamente a lampeggiare e continua a
rimanere acceso anche dopo che il forno è stato spento, fino a quando la
temperatura non si abbassa a sufficienza.
Temperatura
pre-impostata
°C
210
160
220 50-240
210
180
L2
190
240
40
60
230
**
Temperatura
pre-determinata °C
50-220
50-220
50-230
50-230
L1-L3
50-200
180-240
No
No
230
Funzione
Booster*
Booster
Booster
Booster
Booster
• MODALITÀ DI COTTURA
utilizzato l'elemento inferiore. Questa modalità è ideale per cuocere tutti i piatti
a base di pasta; ad esempio flan, quiche, paté e qualsiasi pietanza che richieda
più calore e irradiazione dal basso.
Tenere sempre lo sportello del forno chiuso durante la cottura.
combinato dell'elemento riscaldante inferiore e della ventola è ideale per la
cottura di torte di frutta, crostate, quiche e dolci.
questa modalità di cottura vengono utilizzati entrambi gli elementi riscaldanti,
ossia quello inferiore e superiore. Questo metodo è ideale per gli arrosti e le
pietanze più tradizionali, come la carne rossa, il roastbeef, le cosce di agnello,
la selvaggina, il pane e le pietanze avvolte in fogli di alluminio.
VENTOLA - In questa modalità vengono utilizzati entrambi gli elementi
riscaldanti, ossia quello superiore e inferiore, ma viene contemporaneamente
fatta circolare aria calda all'interno del forno. È consigliabile utilizzare questo
metodo per cucinare carne bianca, torte salate, pesce e verdura. Questo
metodo assicura una maggiore penetrazione del calore e richiede un tempo di
pre-riscaldamento minore. L'uso della ventola consente di cucinare
temporaneamente tipi di alimenti diversi, perché consente di distribuire
uniformemente il calore senza il rischio che si mescolino sapori e odori.
Quando si cucinano più tipi di alimenti contemporaneamente, è consigliabile
incrementare di 10 minuti il tempo di cottura.
modalità di cottura vengono contemporaneamente utilizzati gli elementi
riscaldanti inferiore, superiore e circolare, che provvede a far circolare aria
calda all'interno del forno. Questa modalità di cottura è indicata per le stesse
pietanze indicate nella sezione relativa alla cottura con ventola.
riscaldante superiore. Questa modalità di cottura è particolarmente indicata per
i piatti grigliati, gli spiedini e i piatti gratinati. Il grill deve essere pre-riscaldato a
una temperatura alta per 5 minuti. Per ottenere risultati di cottura ottimali e
rendere la carne più succulenta, è consigliabile collocarla a una certa distanza
dal grill anche se i tempi di cottura sono più lunghi. I filetti di carne rossa e pesce
devono essere collocati direttamente sul ripiano con la vaschetta di
gocciolamento posizionata sotto al ripiano inferiore.
l'elemento riscaldante superiore insieme alla ventola per fare circolare aria
calda all'interno del forno. È consigliabile pre-riscaldare il forno solo per le carni
rosse, ma non per quelle bianche. Il grill è ideale per le pietanze con un
maggiore spessore, come la carne di suino o pollo. Gli alimenti da grigliare
devono essere collocati al centro del ripiano intermedio. Collocare la vaschetta
di gocciolamento sotto al ripiano per raccogliere l'eventuale grasso che
gocciola in fase di cottura. Per ottenere risultati ottimali, non collocare gli
alimenti troppo vicino al grill e girare la carne a metà del ciclo di cottura.
dell'elemento riscaldante superiore e della ventola e del girarrosto consentono
di cucinare le pietanze in modo uniforme senza che si secchi e diventi insapore.
Il girarrosto è programmato per continuare a ruotare per circa cinque minuti
dopo la cottura, in modo da consentire l'uso del calore residuo del forno.
Quando si utilizza il girarrosto, non è necessario pre-riscaldare il forno.
selettore in questa posizione. La ventola fa circolare aria calda attorno
all'alimento congelato e ne consente quindi uno scongelamento rapido senza
alcuna alterazione del sapore originale.
La temperatura è preimpostata su 40°C e non può essere modifica
riscaldare alimenti pre-cotti (che devono essere posizionati sul secondo ripiano
in basso dall'alto) o per scongelare pasta o pizza congelata (in questo caso è
necessario utilizzare il ripiano più basso).
La temperatura è preimpostata su 60°C e non può essere modificata.
all'interno del forno ed è particolarmente indicata per pietanze come pizze o
dolci.
ELEMENTO RISCALDANTE INFERIORE In questa modalità viene
ELEMENTO RISCALDANTE INFERIORE + VENTOLA - L'uso
ELEMENTO RISCALDANTE INFERIORE + SUPERIORE - In
ELEMENTO RISCALDANTE INFERIORE + SUPERIORE +
ELEMENTO RISCALDANTE CIRCOLARE + VENTOLA In questa
GRILL In questa modalità di cottura viene utilizzato solo l'elemento
GRILL+ VENTOLA In questa modalità di cottura viene utilizzato
GRILL+ GIRARROSTO+ VENTOLA - L'uso simultaneo
SCONGELAMENTO Questa modalità si attiva quando si sposta il
ta.
RISCALDAMENTO Questa modalità è quella consigliata per
PIZZA Questa funzione consente di far circolare aria calda
PYRO - The oven takes care of the entire inside oven cleaning
-Two choices are possible ECO, SUPER
17 IT
Page 18

5.3 PROGRAMMAZIONE
SIMBOLI VISUALIZZATI SUL DISPLAY
Luce
Timer
Programmazione del tempo di cottura
Programmazione dell'ora di fine cottura
STOP
Selettore
dei programmi
:
TIMER
Il funzionamento del timer è indipendente dal forno e non ha alcun effetto
sugli elementi riscaldanti. Il suo scopo è fungere semplicemente da
promemoria.
•Spostare la manopola in posizione timer. Sul display vengono visualizzati
prima il simbolo del timer, quindi le cifre 00:00.
•Appena i minuti iniziano a lampeggiare, ruotare il pulsante centrale,
posizionarlo sul numero di minuti desiderato e premere nuovamente il
pulsante per confermare.
•Appena le ore iniziano a lampeggiare, ruotare il pulsante centrale,
posizionarlo sul numero di ore desiderato, quindi premere nuovamente il
pulsante per confermare.
•Spostare la manopola in posizione di arresto. Alla scadenza dell'intervallo
impostato, il tempo di cottura scompare dal display. Viene generato un
segnale acustico per 15 secondi e l'icona del timer inizia a lampeggiare
(per disattivare l'icona prima dell'intervallo di 15 secondi, premere il
pulsante centrale).
PROGRAMMAZIONE DEL TEMPO DI COTTURA:
Il tempo di cottura è pre-programmato per numerose ricette. Se
necessario, è possibile impostare un tempo di cottura in modalità
Manuale, Scongelamento o Riscaldamento.
•Spostare la manopola in posizione di cottura. Sul display viene
visualizzata l'icona del tempo di cottura. Successivamente, vengono
visualizzati il tempo di cottura per le varie ricette oppure 00:00 per le altre
funzioni del forno.
•Appena i minuti iniziano a lampeggiare, ruotare il pulsante centrale,
posizionarlo sul numero di minuti desiderato e premere nuovamente il
pulsante per confermare.
•Appena le ore iniziano a lampeggiare, ruotare il pulsante centrale,
posizionarlo sul numero di ore desiderato, quindi premere nuovamente il
pulsante per confermare.
•Riportare la manopola in posizione di arresto per confermare il nuovo
tempo di cottura. Alla scadenza dell'intervallo impostato, il tempo di cottura
scompare dal display. Viene generato un segnale acustico per 15 minuti e i
simboli del tempo di cottura e di arresto iniziano a lampeggiare.
•Riportare la manopola in posizione di arresto. Se non si effettua questa
operazione, i simboli del tempo di cottura e di arresto continuano a
lampeggiare.
Timer attivo
Protezione del forno attiva
Chiusura dello sportello del forno
- Impostare il termine della cottura alle ore 12.30
La cottura inizierà alle 11.45 (ovvero 12.30 meno 45 minuti) e continuerà
fino all'ora precedentemente impostata; il forno si spegnerà
automaticamente al termine del tempo impostato.
ATTENZIONE:
S
e la funzione "FINE della cottura" è stata selezionata senza stabilire
la durata totale, il forno inizierà a funzionare immediatamente e si
fermerà nel momento in cui il timer indicherà l'ora impostata tramite
la funzione.
5. SUGGERIMENTI PER LA COTTURA 4
È
consigliabile salare la carne solo al termine della cottura, perché il sale
favorisce gli schizzi di grasso, che sporca il forno e produce molto fumo.
I tagli di carne bianca, di maiale, vitello e pesce possono essere inseriti
freddi nel forno. Benché questo accorgimento allunghi i tempi di cottura,
consente di cuocere meglio la porzione centrale del taglio di carne
perché il calore a disposizione più tempo per penetrare nel taglio di
carne.
Per cucinare in modo corretto la carne rossa, è indispensabile preriscaldare in modo appropriato il forno.
GRILL
•Prima di utilizzare il grill
Rimuovere la carne dal congelatore qualche ora prima della cottura.
Collocare la carne su più strati di carta da cucina per mantenere
inalterato il sapore delle pietanze ed evitare che la porzione centrale
rimanga cruda. Aggiungere pepe e spezie alla carne prima di grigliarla,
ma non aggiungere sale per mantenere la carne più succosa e tenera.
Applicare un leggero strato di olio alla carne, preferibilmente con un
pennello da cucina largo. Quindi, cospargere altro pepe e spezie (timo,
ecc.) sulla carne.
•:
Durante la cottura
Non perforare mai la carne mentre la si gira, perché ciò provoca la
dispersione del sugo e rende la carne più secca.
COTTURA DI DOLCI
Evitare di usare teglie lucide perché riflettono il calore e possono
rovinare la cottura. Se il dolce cuoce troppo rapidamente, coprirlo con
carta oleata o carta d'alluminio. Attenzione: applicare la carta d'alluminio
in modo che il lato lucido sia rivolto verso il dolce perché altrimenti il
calore viene riflesso dalla superficie lucida e non penetra nel dolce.
Evitare di aprire lo sportello durante i primi 20-15 minuti
L'apertura dello sportello del forno potrebbe provocare lo
“sgonfiamento” di sufflè, brioche, pandispagna, ecc. Per controllare se il
dolce è perfettamente cotto, è sufficiente punzecchiare il centro con la
lama di un coltello o un ago da maglia in metallo. Se l'ago estratto è
asciutto, il dolce è pronto e la cottura può definirsi conclusa. Se l'ago che
si estrae dal dolce è umido o se ci sono pezzetti di dolce attaccati,
proseguire la cottura, abbassando leggermente la temperatura del forno
per evitare che il dolce si bruci.
PROGRAMMAZIONE DELL'ORA DI FINE COTTURA:
Il tempo di cottura e di fine cottura è pre-programmato per molte ricette. Se
necessario, è possibile tempi diversi in modalità Manuale, Scongelamento
o Riscaldamento.
•Spostare la manopola in posizione di fine cottura. Viene visualizzato il
simbolo di arresto. Vengono visualizzati i tempi di fine cottura per varie
ricette oppure 00:00 per le altre funzioni o l'ora del giorno.
•Ruotare il selettore dei programmi per confermare l'ora di fine cottura.
•Appena i minuti iniziano a lampeggiare, ruotare il pulsante centrale e
impostarlo sul numero di minuti desiderato, quindi premerlo nuovamente
per confermare.
•Appena le ore iniziano a lampeggiare, ruotare il pulsante centrale e
impostarlo sul numero di ore desiderato, quindi premerlo nuovamente per
confermare.
Nota: quando si imposta un avvio differito, l'ora di fine cottura viene
visualizzata sul display insieme ai simbolo del tempo di cottura e di
arresto, ed è possibile selezionare solo la modalità Ricetta. Il forno calcola
automaticamente l'ora di inizio e l'ora di fine in base al tempo di cottura,
spegnendosi automaticamente al termine del ciclo di cottura. Al termine
del ciclo di cottura, viene generato anche un avviso acustico della durata di
15 secondi e sul display iniziano a lampeggiare i simbolo del tempo di
cottura e di arresto.
•Ruotare il selettore delle funzioni e impostarlo in posizione di arresto. Se
non si effettua questa operazione, i simboli continuano a lampeggiare sul
display.
Ad esempio, se il piatto che si desidera preparare deve essere cotto per 45
minuti e deve essere pronto alle 12.30, è necessario:
- Selezionare la funzione desiderata
- Impostare la durata di cottura pari a 45 minuti
18 IT
Page 19

6. CICLO PIROLITICO (A SECONDA DEI MODELLI)
7. DISPOSITIVO DI PROTEZIONE
automaticamente la pulizia Le due opzioni disponibili sono ECO e
SUPER
**L'opzione può essere configurata solo sui forni dotati di tale funzione
Il forno è dotato di un sistema di pulizia con pirolizzatore ad alta
temperatura che distrugge i residui di cibo. L'operazione viene eseguita
automaticamente tramite il programmatore. I fumi risultanti vengono
“puliti” perché vengono convogliati attraverso un pirolizzatore che si
avvia al momento dell'inizio della cottura. Sullo sportello di questo tipo di
forni, viene installata una chiusura di sicurezza a causa del fatto che il
pirolizzatore utilizza temperature molto elevate. Il pirolizzatore può
essere arrestato in qualsiasi momento, tuttavia non è possibile aprire lo
sportello finché non viene visualizzata l'icona della chiusura di
sicurezza.
NOTA: se il forno è dotato di piastre, non utilizzare il becco a gas o le
piastre elettriche mentre il pirolizzatore è in funzione per evitare che le
piastre si surriscaldino eccessivamente.
Sono disponibili due CICLI PIROLITICI pre-programmati.
•CICLO PIROLITICO ECO: questo ciclo consente di pulire i forni
moderatamente sporchi ed ha la durata di 65 minuti.
•CICLO PIROLITICO SUPER: questo ciclo è indicato per i forni
particolarmente sporchi ed ha la durata di 90 minuti.
Non utilizzare detergenti commerciali per pulire forni pirolitici.
Suggerimento: l'esecuzione del ciclo pirolitico al termine della cottura
consente di sfruttare il calore residuo al termine del ciclo di cottura e di
risparmiare energia.
Prima di eseguire un ciclo pirolitico:
•Rimuovere tutti gli accessori dal forno perché non sono in grado di
tollerare le temperature elevate utilizzate durante il ciclo di pulizia
pirolitico.
•Rimuovere tutte le tracce di grasso e le macchie estese che potrebbero
richiedere troppo tempo per rimuovere. Questo tipo di macchie
potrebbero incendiarsi a causa delle temperature estremamente
elevate del ciclo pirolitico.
•Chiudere lo sportello del forno.
Al termine del ciclo, l'indicatore luminoso inizia nuovamente a
lampeggiare, rimane acceso dopo lo spegnimento del forno e si spegne
solo al momento in cui la temperatura interna del forno è abbastanza
bassa.
La pirolisi lascia un residuo di colore biancastro sulle pareti del forno.
Attendere che il forno si sia completamente raffreddato prima di
rimuovere tali residui con una spugna umida.
PYRO È possibile configurare il forno in modo che esegua
1 - Ruotare il selettore di funzione sulla posizione .
Sul display, appare l’indicazione " ECO" o " SUP"
Questa funzione deve sempre essere attivata se nell'abitazione ci
sono dei bambini, perché impedisce loro di accendere il forno o di
modificare i programmi pre-impostati. Questa funzione di sicurezza
impedisce l'uso del pannello di controllo mentre il forno è in funzione.
È possibile impostare due livelli di sicurezza:
LIVELLO 1 : blocco del selettore dei comandi e il pulsante centrale.
•Per attivare la funzione: ruotare il selettore dei comandi e impostarlo
sulla funzione di protezione.
•Risultato: i selettori vengono disattivati*.
•Per disattivare la funzione: ruotare il selettore dei comandi e
impostarlo su 0.
•LIVELLO 2 : blocco dei selettori delle funzioni.
•Per attivare la funzione: ruotare il selettore delle funzioni e
impostarlo sulla funzione di sicurezza, quindi premere e tenere
premuto il pulsante per 3 secondi.
•Risultato: tutti i comandi vengono disattivati*.
•Per disattivare la funzione: effettuare le operazioni descritte per la
procedura di attivazione. Ruotare il selettore delle funzioni e
impostarlo sulla funzione di protezione, quindi premere e tenere
premuto il pulsante centrale per 3 secondi.
*Nota : per motivi di sicurezza, anche se tutti i comandi sono bloccati,
è comunque spegnere il forno impostando il selettore su 0.
ATTENZIONE!
necessaria per fissare le viti in posizione potrebbe ostruire le aperture
di ventilazione su entrambi i lati. Verificare che l'apertura di questi
canali di ventilazione sia pari ad almeno 2 mm dopo
l'installazione del mobilio.
Il sacchetto all'interno del forno contiene quattro viti di fissaggio.
Fissaggio
Quando lo sportello del forno è aperto, è possibile accedere ai fori
su entrambi i lati.
Utilizzare le viti fornite in dotazione per fissare in posizione il forno.
Il produttore declina ogni responsabilità per inesattezze contenute
nel documento stampato o per errori di trascrizione contenuti in
questa brochure. Inoltre, si riserva il diritto di apportare modifiche al
prodotto, nell'interesse dei consumatori, senza alcun pregiudizio
per la sua sicurezza o funzionalità.
L'applicazione di una coppia superiore a quella
2 - Il tempo preimpostato è 65min. e può essere variato da 65 min.
(modalità Eco) a 90min. (modalità Sup) attraverso il
programmatore (tasti " +" o " -" ) Se il forno è molto sporco, è
raccomandato aumentare il tempo a 90min., se il forno è poco
sporco ridurre il tempo per il ciclo di pulizia a 65 min.
3 - È possibile differire l’ora di inizio del ciclo di pirolisi variando il
tempo di fine attraverso il programmatore.
4 - Dopo pochi minuti, quando il forno ha raggiunto una
temperatura alta, la porta si chiude automaticamente.
5 - Il ciclo di pulizia pirolitica può essere fermato in qualunque
momento riportando il selettore di funzione su “0”
6- Una volta che il ciclo di pulizia pirolitica è terminato, la pirolisi si
spegnerà automaticamente. Sul display apparirà l’indicazione "
END" e, sino a quando la porta è bloccata, "
7- Riportare il selettore di funzione su "
ancora alta, l’indicazione "
0 - - n " appare per informare che la
0 ", se la temperatura è
0 - - n "
porta è bloccata.
19 IT
Page 20

INSTRUCCIONES PARA UN USO SEGURO
ADVERTENCIA: El aparato y sus componentes accesibles se calientan durante el uso. Se debe tener
cuidado de no tocar los elementos calefactores.
• Los niños menores de 8 años deben permanecer alejados o supervisados de forma continuada por
una persona adulta.
• Este aparato puede ser usado por niños mayores de 8 años y personas con capacidades físicas,
sensoriales o mentales reducidas o falta de experiencia y conocimiento siempre y cuando hayan sido
supervisadas o instruidas sobre el uso del aparato de forma segura y del conocimiento de los riesgos
que comporta.
• Los niños no deben jugar con el aparato.
• La limpieza y el mantenimiento que debe realizar el usuario no será realizada por niños sin supervisión.
• Durante el uso, se calienta el aparato. Se debe tener cuidado de no tocar los elementos calefactores del
interior del horno.
ADVERTENCIA: Las partes accesibles pueden calentarse durante el uso. Los niños deben permanecer
alejados.
• No utilizar limpiadores abrasivos o rascadores metálicos afilados para limpiar el cristal de la puerta del
horno ya que pueden rayar la superficie, pudiendo comportar la rotura del cristal.
• Se debe apagar el horno antes de retirar la pantalla, después de la limpieza, se debe colocar según las
instrucciones.
• Use solamente el sensor de temperatura recomendado para este horno.
• No utilice limpiadores de vapor para la limpieza del aparato.
ADVERNTENCIA: Asegúrese de que el aparato está apagado antes de sustituir la lámpara para evitar la
posibilidad de una descarga eléctrica.
• Los medios de desconexión deben ser incorporados en el cableado fijo en conformidad con las reglas
del cableado.
• las instrucciones indicarán el tipo de cable a utilizar, teniendo en cuenta la temperature de la parte
posterior del aparato.
• Si el cable de alimentación está dañado, se debe sustituir por un cable o conjunto especial suministrado
por el fabricante o el servicio técnico.
PRECAUCIÓN: Con el fin de evitar peligros derivados de alteraciones en el suministro energético, este
aparato no debe ser suministrado a través de un dispositivo de conmutación externo, como un
temporizador, o conectado a un circuito que sea encendido y apagado frecuentemente por los servicios
públicos.
PRECAUCIÓN: Las partes accesibles se pueden calentar con el uso del grill. Los niños deben
permanecer alejados.
• Se debe eliminar el exceso de derrames antes de la limpieza.
• Durante la operación de auto limpieza pirolítica, las superficies pueden calentarse más de lo habitual;
los niños deben permanecer alejados.
20 ES
Page 21
1. ADVERTENCIAS GENERALES
Leer las instrucciones detalladamente para sacar el mejor partido del horno. Recomendamos conservar las instrucciones de instalación y utilización
para futuras consultas. Antes de instalar el horno anote el número de serie por si necesitase contactar con el servicio de atención al cliente.
Una vez desembalado el horno, asegurarse de que no está dañado. En caso de tener dudas, no utilizar. Contactar con una persona cualificada.
Conservar el embalaje (bolsas de plástico, polietileno o clavos) fuera del alcance de los niños ya que puede ser peligroso para ellos.
La compañía no se hará responsable en caso de no cumplir las instrucciones indicadas en este documento.
ANTENCIÓN: Las funciones, propiedades o accesorios del horno mencionadas en este manual pueden variar dependiendo del modelo de horno.
1.1 CONSEJOS DE CUMPLIMIENTO
Las piezas del aparato que puedan estar en contacto con
alimentos cumplen las disposiciones de la Directiva EEC
89/109.
CE El Aparato cumple las Directivas Europeas 73/23/EEC y
89/336/EC, sustituidas por la 2006/95/EC y la 2004/108/EC y sus
enmiendas correspondientes
1.2 TRUCOS DE SEGURIDAD
El horno ha de utilizarse únicamente con el fin para el que ha sido
•
diseñado. Sólo se puede utilizar para cocinar alimentos. Otros uso, como
por ejemplo, medio de calefacción, es un uso indebido del horno y por lo
tanto es peligroso.
Todas las piezas accesibles y elementos de calefactores están calientes
•
cuando esté en funcionamiento el horno. Ha de tenerse cuidado y no
tocarlas.
•El fabricante no puede responsabilizarse de caños causados por un uso
inadecuado, incorrecto o no razonable.
Cuando se utilicen dispositivos eléctricos han de seguirse las normas
siguientes:
- No tirar del cable eléctrico para desenchufarlo.
- No tocar el horno con las manos (o los pies) húmedas o mojadas.
- No utilizar el horno salvo que lleve calzado en los pies.
-No suele ser recomendable la utilización de alargadores o ladrones para
varios enchufes o alargadores.
- Si el horno se estropea o tiene un fallo desenchúfelo de la corriente y no
lo toque.
- Si el cable está dañado ha de sustituirse inmediatamente.
Cuando se sustituya el cable, síganse las instrucciones siguientes:
Extraer el cable y sustituir por uno del tipo H05RR-F, H05VV-F, H05V2V2F. El cable tiene que poder soportar la carga eléctrica que requiere el
horno. La sustitución del cable tiene que hacerla un técnico cualificado.
El cable de tierra (amarillo-verde) tiene que ser 10 mm más largo que el
cable eléctrico.
Utilizar sólo el servicio de atención al cliente adecuado para las
reparaciones y asegurar que sólo se utilizan piezas originales. Si no se
siguen las instrucciones anteriores, los fabricantes no pueden garantizar
la seguridad del horno.
•El horno adquirido tiene las características técnicas descritas y usted no
puede modificarlas.
•Jamás utilice un espray de difusión o a presión para limpiar el horno.
•No guardar en el horno productos inflamables, podrían prender fuego si
se accionase el horno accidentalmente.
•No permitir que los niños se sienten en la puerta del horno, menos aún
cuando esté encendido.
•Utilizar guantes de horno cuando introduzca o saque los recipientes del
horno.
CUIDADO: Puede que las piezas internas del horno esten calientes
cuando se utilice el grill. Mantener alejados a los ninos.
1.3 RECOMENDACIONES
•
Una limpieza mínima después de utilizar el horno ayudará a
mantenerlo limpio durante más tiempo.
•
No forrar las paredes del horno con aluminio u otras protecciones
disponibles en tiendas. El aluminio o los protectores, en contacto
directo con el esmalte caliente puede derretirse y deteriorar el
esmalte del interior.
•Para evitar un exceso de suciedad en el horno y que pueden derivar
en olores y humo en exceso, recomendamos no utilizar el horno a
temperaturas muy elevadas. Es mejor ampliar el tiempo de cocción y
bajar un poco la temperatura.
Placa de identificación
1.4 INSTALACIÓN
No es obligación del fabricante instalar el horno. Si se requiere la
ayuda del fabricante para subsanar fallos derivados de una
instalación incorrecta, dicha asistencia no la cubrirá la garantía.
Han de seguirse a rajatabla las instrucciones de instalación para
personal cualificado. Una instalación incorrecta puede provocar
daños personales, materiales o en animales. El fabricante no se hace
responsable de esos posibles daños.
La cocina en la que se vaya a instalar el horno tiene que estar hecha
de un material resistente a temperaturas de al menos 70ºC.
El horno se puede colocar encima, en una columna, o debajo de una
encimera.
Antes de fijar el horno hay que asegurar una buena ventilación en el
hueco donde se vaya a colocar y que el aire necesario para enfriar y
proteger las piezas internas circula sin problema. Realizar las
aperturas especificadas en la última página según el tipo de altura.
1.5 CONEXIÓN ELÉCTRICA
LA CONEXIÓN ELÉCTRICA HA DE REALIZARLA UN
CONTRATISTA APROBADO O UN TÉCNICO CON FORMACIÓN
SIMILAR.
La instalación a la que va a conectarse el horno tiene que cumplir los
estándares vigentes en el país de instalación.
El fabricante no asume responsabilidad alguna si no se cumple la
presente esta disposición.
La conexión a la red debe tener toma de tierra, o un cortacircuitos
multipolar, como corresponda al país de instalación.
La instalación tiene que disponer de los fusibles correspondientes y
los cables han de tener un cruce de sección de largo suficiente como
para alimentar eléctricamente el horno.
CONEXIÓN:
El horno está diseñado para una conexión exclusiva de 230 voltios AC
en las fases o en la fase y el neutro.
La conexión tiene que hacerse comprobando primero:
- el voltaje indicado.
- la configuración del cortacircuitos.
El cable correspondiente a la toma de tierra (amarillo/verde) del horno
tiene que conectarse a la toma de tierra de la instalación.
Atención:
•
Antes de la conexión el electricista tiene que comprobar la
continuidad de tierra de la instalación.
•El fabricante no se responsabiliza de incidente, o consecuencias del
mismo, que puedan derivarse del uso de hornos que no tengan toma
de tierra o conectados a una toma de tierra con continuidad
defectuosa.
NB: Recordar que el horno puede necesitar el servicio de atención al
cliente. También es importante que el enchufe esté ubicado en un sitio
accesible para conectar el horno una vez que éste esté colocado.
Cable eléctrico: Si hay que cambiar el cable eléctrico, contactar con
el servicio de atención al cliente o con alguien de cualidades similares
•Además de los accesorios
proporcionados con el
horno, sugerimos utilizar
sólo recipientes y moldes
resistentes a temperaturas
muy elevadas.
Code produit:
Numéro de série :
21 ES
Page 22

2.
TECNOLOGÍA PRO/EXP’R
(DEPENDE DEL MODELO)
2.1 EQUIPAMIENTO DEL HORNO
(DEPENDE DEL MODELO)
Es necesario hacer una limpieza inicial de todas las partes del equipo
antes de utilizarlo por primera vez. Lavar con una esponja. Enjuagar y
secar.
La rejilla puede sostener moldes y bandejas.
CÓMO UTILIZAR EL ASADOR
1.Desenroscar los ganchos
2.Atravesar la carne con el asador
3.Fijar la carne con los ganchos
4.Ajustar las tuercas
5.Insertar el asador en el agujero
del motor
6.Desmontar el mango
Cuando se está utilizando el horno, los accesorios innecesarios han
de extraerse del interior del horno.
2.3 U-SEE
Es un sistema de iluminación que sustituye el tradicional sistema “de
bombilla”. En la puerta del horno se integran 14 luces LED (en versiones
no pirolíticas) o 10 luces LED de Potencia Superior (en modelos
pirolíticos). Las luces LED crean una iluminación blanca de calidad que
permite ver dentro del horno con claridad todas las bandejas sin sombras.
La bandeja recoge los flujos de los alimentos asados.
No utilizar nunca la bandeja como bandeja de asar ya que la grasa
puede esparcirse rápidamente por todo el horno, lo que provocaría un
exceso de humo.
Soporte para pizza, para una pizza crujiente acorde al modelo del
horno, con agarraderas y cortapizzas.
La bandeja de repostería
Se utiliza para cocinar dulces como cremas, bizcochos, merengues,
etc…
No colocar jamás la bandeja de repostería en el horno en contacto
con la parte inferior del mismo.
tiene que colocarse encima de la rejilla.
Ventajas:
Este sistema, además de proporcionar una iluminación excelente dentro
del horno, dura más que la bombilla tradicional, tiene un mantenimiento
más sencillo y, sobre todo, ahorra energía.
-Visión óptima
-Iluminación duradera
consumo energético muy bajo, reducción del 95% en comparación con la
iluminación tradicional.
“Los hornos con luz blanca LED Clase 1M según el IEC 60825- 1:1991 +
A1:1997 + A2:2001n(equivalente a la EN 60825-1:1994 +A1:2002 +
A2:2001); la potencia máxima de luz emitida es 459nm<150uW.
No observar directamente con instrumentos óptimos.”
2.4 EXTRACCIÓN Y LIMPIEZA DE LAS GUÍAS LATERALES
1- Quitar las guías laterales metálicas tirando de ellas, siguiendo la
dirección de las flechas.
2- Limpiar las guías laterales metálicas en el lavavajillas o bien empleando
una esponja húmeda y secándolas posteriormente.
3- Después del proceso de limpieza, montar las guías laterales metálicas
en orden inverso al mencionado anteriormente.
2.2 ASADOR (DEPENDE DEL MODELO)
No se requiere calentamiento previo del horno para esta función.
Cocinar con la puerta cerrada.
El consumo de energía es de un 90-95% menos que con el sistema
tradicional.
3
2
1
4
1-Rejilla
2-Asador
3-Ganchos y tuercas
4-Mango
3. LIMPIEZA DEL HORNO
•Esperar a que se enfríe el horno antes de limpiarlo manualmente.
•No limpiar el horno con limpiadores abrasivos, estropajo de metal o
cuchillas. El esmalte tampoco ya que podría resultar dañado.
•Utilizar sólo agua con jabón o limpiadores con lejía (amoníaco)
•No forrar jamás las paredes internas del horno con papel de aluminio.
PIEZAS DE CRISTAL
Recomendamos limpiar el cristal de la puerta con papel de cocina cada
vez que se utilice el horno. Si el cristal tiene muchas salpicaduras, limpiar
con una esponja y detergente, y secar posteriormente.
•No utilizar limpiadores abrasivos o cuchillas ya que podrían rayar el
cristal y derivar en salpicaduras en el mismo.
SELLO DE LA PUERTA DEL HORNO
En caso de ensuciarse, limpiar el sello del horno con una esponja
ligeramente humedecida.
•No utilizar limpiadores abrasivos o rascadores metálicos afilados para
limpiar el cristal de la puerta del horno ya que pueden rayar la superficie,
pudiendo comportar la rotura del cristal.
22 ES
Page 23

1
2
3
ACCESORIOS
Después del uso, sacar la bandeja del horno. Lavar la rejilla con una
esponja, agua caliente y jabón. Secar.
Si quedan residuos, sumergir en agua y detergente.
También se puede meter en el lavavajillas o con limpiadores comerciales
para hornos.
No colocar rejillas sucias en el horno.
ILUMINACIÓN DEL HORNO
Desconectar del horno antes de limpiar o sustituir a bombilla.
La bombilla y su cubierta están hechas de un material resistente a
temperaturas elevadas.
•
superior tirando de ella hacia arriba.
(Figura 4)
Figura 4
• Quitar el cristal tirando de él fuera
del marco de la puerta. (Figura 5)
Retirar la cubierta metálica
Características de la bombilla:
230 V AC -25W 14 Base Temperatura 300ºC para cambiar una bombilla
estropeada, simplemente:
•Desatornillar la cubierta de cristal
•Desatornillas la bombilla
•Sustituirla por una igual: ver características superiores.
•Después de recolocar la bombilla, volver a atornillar la
cubierta protectora de cristal.
LIMPIEZA DEL CRISTAL DE LA PUERTA
El cristal interno de la puerta puede ser desmontado y limpiado. Con el fin
de poder limpiar el cristal interno, se deben seguir las instrucciones
siguientes:
Figura 6
• Después de limpiar el
cristal, volver a montar las
piezas en el orden inverso al
desmontaje.
• “En todos los cristales, se debe
leer correctamente la señal
LOW-E, colocándose en la
esquina izquierda de la puerta,
cerca de la bisagra del lado
izquierdo. De esta manera, la
superficie impresa del primer
cristal permanecerá en el
INTERIOR de la puerta.
4. SERVICIO TÉCNICO
Antes de llamar al Servicio Técnico.
Figura 5
• *Para los hornos pirolíticos,
también se deben quitar el 2º y
3er cristal. (Figura 6)
Figura 7
• Abrir la puerta del horno. (Figura 1)
• Bloquear las bisagras tal y como se
muestra en la Figura 2 antes de
proceder a la limpieza del cristal.
Desbloquear las bisagras una vez se
haya limpiado. (Figura 2)
Figura 2
• Retirar los tornillos tal y como se
muestra en la Figura 3. (Figura 3)
Figura 1
Figura 3
Si el horno no funciona, recomendamos:
•Comprobar si el horno está bien conectado a la red eléctrica.
Si no se puede detectar el fallo:
•Desconectar el horno de la corriente, no tocar el horno y llamar al servicio
de atención al ciudadano.
Antes de llamar al Servicio Técnico recordar tomar nota del número de
serie de la placa de especificaciones del número de serie.
El horno tiene un certificado de garantía que asegura que se reparará de
forma gratuita por parte del Servicio Técnico mientras dicha garantía esté
en vigor.
Este electrodoméstico dispone de la marca de la
Directiva Europea 2002/96/EC sobre Residuos de
Aparatos Eléctricos y Electrónicos (WEEE).
Asegurándose de que este producto se elimina de forma
correcta se evitarán consecuencias negativas
potenciales para el medioambiente y la salud que
podrían darse en caso contrario.
El símbolo en el producto indica que el producto no
puede tratarse como residuo doméstico. En su lugar
debe llevarse al punto de recogida para el
reciclaje de equipos eléctricos y electrónicos. Debe eliminarse de acuerdo
con la normativa local medioambiental para la eliminación de residuos.
Para más información sobre el tratamiento, recuperación y reciclaje del
producto, póngase en contacto con su oficina local, el servicio de recogida
de residuos o la tienda en la que haya comprado el producto.
23 ES
Page 24

5- USO DEL PROGRAMADOR ELECTRONICO
COOK
U
auto
1.LuzMinutero/Auto
2.Funciónconventilador*
3.FunciónconVARIOFAN*
4.Descongelación
5.Displayparatemperaturaotiempo
6.Teclas para pulsar
7.Selección de función
8.Funcióntemporizador
*SEG ÚN MODELO
CUIDADO!
ElLed”°”indicadordelatemperaturaparpadeamientrasquenollegaalatemperaturaprogramada.
HOT:Cuandoelprogramadecocciónseterminayelhornosiguecaliente,eneldisplayaparecelapalabraHOT,juntocon
eltiempo, aunquelos2 mandosdeseleccióndefunción están apagados.
FUNCIÓN
MODO
SILENCIO
PONER EN
HORA
DURACIÓN DE
LA COCCIÓN
FIN DE
COCCIÓN
MINUTERO
Una vez se realice la instalación, lo primeroquehayque hacer es poner lahoracorrecta (esto lo
podremosreconocer pulsandoel Display y viendo12:00 parpadeando).
MODODE
ACTIVACIÓN
Gireel mandodeltiempo
•
hastalaposición“Modo
Silencio”
Gireelmandodetiempo
•
hastalaopcióndeponer
en hora (reloj)
Utilicelosbotones“+”o
•
“-”parafijarlahora
Gireelmandoderecho
•
selectordefunciónhasta
lafuncióndeseada.
Gireelmandoizquierdo
•
temporizadorhastala
posición“duracióndela
cocción”
Pongaeltiempode
•
cocciónusandolos
botones“+” y“-”.
Gireelmandoderecho
•
hastalafunciónde
coccióndeseada
Gireelmandoizquierdo
•
hastalaposiciónfinde
cocción
Fijelahorafinalde
•
cocciónusandolos
botones“+” y “-”
AparecelaLuzAuto
•
Gireelmandoizquierdo
•
hastalaposicióndel
minutero(campana)
Pongaeltiempode
•
cocinadousandolos
botones“+” y “-”.
MODO DE
DESCONEXIÓN
Gire el mando del tiempo
•
hastalaposiciónOFF
Gireel mando del tempo-
•
rizador hasta la posición
OFF.
Cuandoeltiempode
•
cocciónhapasado,elhorno
se apaga automáticamente
y la alarma suenadurante
unossegundos.Para
desconectarlafunciónde
cocción,gireelmando
derechohastalaopción
OFFopongaeltiempoa
00.00;girandoelmando
izquierdoopulsandolas
opciones “+”y “-”.
Cuando finaliza el tiempo
•
decocción,elhornose
apagaautomáticamente.
Paradesconectarla
•
funciónde cocción, gire el
mandoderechohastala
opciónOFF.
Pongalahoraen00.00
•
girandoelmandoizquierdo
hasta el minutero, usando
elbotón“-”
FUNCIONAMIENTO FINALIDAD
Daopciónaquitarel
•
sonidodelminutero.
Daopciónafijarlahora
•
queapareceenelDisplay.
Permite prefijar el tiempo
•
cocción requeridopara la
recetaescogida.
Cuandosefijaladuración
•
delacocción,gireel
mandoizquierdopara
volveralahorareal.
Paravereltiempode
•
cocciónquesehaseleccionado,gireelmando
izquierdo hastala opción
de duración de la cocción
Permiteprogramarelfin
•
decoccióndeseado.
Cuando se fija la duración
•
delacocción,gireel
mandoizquierdopara
volveralahorareal.
Paravereltiempode
•
cocciónquesehaseleccionado,gireelmando
izquierdohastalaopción
de fin de cocción
Laalarmasuenadurante
•
unossegundoscuando
llegala hora fijada.
Quitarelsonidodel
•
minutero.
Poner en hora
•
NB:pongalahoraunavez
queinstaleelhornoo
antesdeapagarlo(elreloj
apareceráparpadeando
12.00)
Paracocinarlasrecetas
•
deseadas
Estafunciónseusapara
•
programarde antemanolo
que queremos cocinar.Por
ejemplo,sisureceta
necesita un cocinadode 45
minytienequeestarlisto
paralas12.30delmediodía,
simplemente,ponga
duracióndelacocción45
minyquefinalicealas
12.30.
Deestaforma,elhorno
comenzaraacocinaralas
11.45yseguiráen
funcionamientohastala
horafinalprogramada,
luego elhornoseapagará
automáticamente.
Permiteusarelhorno
•
comoalarmainclusosi
está apagado.
BLOQUEO
SEGURIDAD
Gireelmandoizquierdo
•
hastalaposicióndel
candado.Presioneel
botón“+”durante3
segundos
Elhorno se habrá
•
bloqueadocuandoenel
displayaparezca“STOP”.
Gireelmandoizquierdo
•
hastalaposicióndel
candado.Presioneel
botón“+”durante3
segundos.
La palabra STOP
•
desaparece
24 ES
El hornono sepuede usar•Es una función útil
•
especialmentecuandohay
niños en casa.
Page 25

5.1 ANTES DE UTILIZAR EL HORNO POR
PRIMERA VEZ
•LIMPIEZA PREVIA
-Limpiar el horno antes de utilizarlo por primera vez:
-Limpiar la superficie externa con un paño húmedo.
-Lavar todos los accesorios y el interior del horno con agua caliente y líquido
limpiador.
-Poner el horno vacío a temperatura máxima durante 1 hora, con ello se
eliminarán los olores del dispositivo nuevo. Asegurar una buena ventilación de
la habitación durante esa hora.
•RECORDAR
Confirmación del temporizador
Las modificaciones se tiene que confirmar pulsando el botón.
Detención del horno:
Puede ser necesario en caso de configurar una orden incorrecta.
Para detener el horno… girar el mando de selector de función a la posición de
Stop.
Dispositivo de seguridad para niños:
Para bloquear los controles del horno, seleccionar el dispositivo de seguridad
para niños. Ver la sección “Programación- Dispositivo de seguridad para
niños”.
Ventilador refrigerante:
Protege el panel de control y la electrónica de los daños por calor.
Se arranca y se para automáticamente cuando se apaga el horno.
Iluminación del horno:
Colocando el mando en el símbolo de luz se puede encender la luz del horno
cuando no se está utilizando.
Cuando se está utilizando el horno la luz permanece encendida durante todas
las funciones y cuando la puerta está abierta.
5.2 CÓMO UTILIZAR EL HORNO
•EN MODO MANUAL
Los métodos de cocción que se sugieren en el modo manual aparecen en
la tabla siguiente. También se recomienda la temperatura para cada
método de cocina. Estos valores pueden modificarse dentro de un rango
predeterminado.
Modo Función según
modelo de horno
Base + Ventilador
Base
Base + Superior
Base + Superior +Ventilador
Resistencia circular + Ventilador
Grill
Grill + Ventilador
Grill + asador + ventilador
Descongelado
Conservar el calor
Pizza
Pyro Pyro
* Booster: aumento rápido de la temperatura
** El horno ha de tener esa función
1-Girar el selector del horno hacia la función necesaria para cocinar.
Se muestran en pantalla los elementos de calentamiento operativos en el
modo de cocción seleccionado..
2-Se muestra en pantalla la temperatura adecuada según el método
seleccionado. Se puede modificar dentro del rango predeterminado –ver
arriba.
Para modificar la configuración de la temperatura, girar el botón central y
confirmar en el temporizador la configuración pulsando el mismo botón.
Se fija la temperatura seleccionada, pero se puede modificar durante el
ciclo de cocinado.
El horno empezará a funcionar y aumentará su temperatura.
El indicador parpadea hasta alcanzar la temperatura seleccionada.
Suena un pitido al final de esta operación y el indicador luminoso deja de
parpadear.
3- Se puede programar el tiempo de cocción y su finalización girando el
selector de programa a “tiempo de cocción” o “final del cocción”.
Empieza a parpadear en la pantalla el “tiempo de cocinado” o “final del
cocción”. Utilizar el botón central para modificar las configuraciones y
confirmar el temporizador.
Una vez hecho esto, no olvidar girar el selector de programa a la posición
“Stop” para confirmar la nueva configuración.
Más datos sobre programación en el capítulo 5.3 PROGRAMACIÓN.
4- Al final del ciclo de cocción, girar el selector de función a la posición
“stop”.
El indicador vuelve a parpadear, seguirá encendido hasta que se apague
el horno y se apagará cuando la temperatura interior del horno sea lo
suficientemente baja.
• MODO DE COCCIÓN
Todos los procesos de cocinado han de realizarse con la puerta cerrada.
Temperatura
en ºC
configurada
210
160
220 50-240
210
180
L2
190
240
40
60
230
**
**
Temperatura
en ºC
predeterminada
50-220
50-220
50-230
50-230
L1-L3
50-200
180-240
No
No
230
ECO: 425 /
SUP: 425 / 1h 30min
65min
Función
Booster
Booster
Booster
Booster
calentamiento inferior y el ventilador es ideal para fruta, tartas, quiches y
BASE + VENTILADOR – La combinación del elemento de
repostería. Evita que los alimentos se deshidraten en exceso y hace que
la masa suba. Colocar la bandeja en la parte inferior del horno.
BASE – Utilizar el elemento inferior. Ideal para todo tipo de
repostería. Utilizar para flanes, quiches, tartas, pastas y procesos que
requieran más calor desde abajo.
BASE + TECHO – Ambos elementos de calentamiento están en
uso. Esta función es ideal para los asados tradicionales. Carne roja, roast
beef, pierna de cordero, caza, papillote y bollos.
BASE + TECHO + VENTILADOR – Utilización de los elementos
inferior y superior en combinación con el ventilador que facilita la
circulación del aire caliente en todo el horno. Se recomienda este modo
para pollo, repostería, pescado y verduras. Con este modo se mejora la
penetración del calor reduciéndose el tiempo de cocina y
precalentamiento. El ventilador permite cocinar distintos alimentos a la
vez en diferentes posiciones en el horno distribuyendo el calor sin riesgo
de que se mezclen los olores y los sabores. Cuando se cocinen distintos
alimentos al mismo tiempo añada 10 minutos al período normal de asado.
RESISTENCIA CIRCULAR + VENTILADOR - Utilización de los
elementos inferior y superior en combinación con el ventilador que facilita
la circulación del aire caliente en todo el horno. Su definición es la misma
que la del método de cocinado con Ventilador.
GRILL – Utilización del elemento de calentamiento superior.
Éxito asegurado para gratinados varios, kebabs y parrilla. El grill ha de
calentarse previamente a temperatura elevada durante 5 minutos. Las
carnes blancas han de colocarse siempre a cierta distancia del grill, el
tiempo de cocinado es ligeramente superior pero la carne queda más
suculenta. Las carnes rojas y el pescado se pueden colocar directamente
en la bandeja con la bandeja antigoteo justo debajo.
GRILL + VENTILADOR – Se utiliza el elemento superior de
calentamiento en combinación con el ventilador circulando así el aire
caliente en todo el horno. Se recomienda el calentamiento previo para
carnes rojas y no es necesario en caso de carnes blancas. El grill es ideal
para cocinar alimentos de mayor grosor, como el cerdo o el pollo. Los
alimentos que se vayan a hacer al grill han de colocarse directamente en
el centro de la bandeja.
Si se coloca la bandeja antigoteo debajo de la bandeja de la comida se
asegura que los jugos que pueda soltar no se esparcirán por el horno.
Para un mejor resultado asegurarse de que los alimentos no está
demasiado cerca del grill y poder voltear los alimentos a mitad de proceso.
GRILL + ASADOR + VENTILADOR - La ventaja de utilizar la
parte superior del horno más el ventilador y el asador es que los alimentos
se cocinan evitando que se deshidraten y se queden sin sabor. El asador
está programado para seguir girando durante unos cinco minutos una vez
finalizado el período de cocina, utilizando por completo el calor residual
del horno. No se requiere calentamiento previo para este modo de cocina.
DESCONGELADO – Cuando se pone el mando en esta opción.
El ventilador activa el aire caliente alrededor del alimento congelado y lo
descongela en unos minutos sin cambiar o alterar el contenido proteínico
del alimento. La temperatura preestablecida es de 40ºC constantes, no
siendo posible su regulación.
CONSERVAR EL CALOR – Se recomienda para recalentar los
alimentos cocinados previamente, colocando la bandeja en el segundo
nivel desde arriba, o para descongelar pan, pizza o repostería colocando
la bandeja en la parte más inferior.
La temperatura preseleccionada es de 60ºC constantes, no siendo
posible su regulación.
PIZZA – Con esta función el aire caliente circula por todo el
horno asegurando un resultado perfecto para platos como Pizza o
Bizcochos.
PYRO – El horno se encarga de limpiar el interior del horno.
-Existen dos opciones ECO ó SUPER
n
25 ES
Page 26

5.3 PROGRAMACIÓN
SÍMBOLOS DE LA PANTALLA
Luz
Configuración temporizador
Temporizador en funcionamiento
La cocción se iniciará automáticamente a las 11:45 (12:30 menos 45
minutos) y continuará hasta el fin del tiempo de cocción preestablecido,
cuando el horno se apagará automáticamente.
ADVERTENCIA:
Si se selecciona el final de la cocción sin fijar la duración del tiempo
de cocción, el horno empezará inmediatamente a cocinar y se
detendrá al final del tiempo de cocción establecido.”
Programación del tiempo de
STOP
Selector de
Programación
TEMPORIZADOR:
El temporizador funciona independientemente del horno y no afecta a los
elementos de calentamiento. Sólo es un recordador.
Girar el mando a la posición Temporizador. Aparecerá el símbolo en la
•
pantalla. Aparecerá en pantalla 00:00
• Cuando parpadeen los minutos, girar el botón central hasta el número de
minutos necesario y confirmar pulsando el mismo botón.
Cuando parpadeen las horas, girar el botón central hasta el número de
•
horas necesario y confirmar pulsando el mismo botón.
• Volver a poner el botón en la posición Stop.
Cuando finaliza el tiempo, el tiempo de cocina desaparece. Se escuchará
un pitido durante 15 segundos y parpadeará el Temporizador de la
pantalla (para parar el pitido antes de los 15 segundos sólo hay que pulsar
el botón central).
PROGRAMACIÓN DEL TIEMPO DE COCCIÓN:
Dispone de varias recetas programadas con el tiempo de cocción. En el
modo Manual, Descongelado o Conservar Calor se puede preseleccionar
si es necesario.
•Girar el mando a la posición de “cocción”. Aparecerá el símbolo de tiempo
de cocción. Aparecerá el tiempo de cocción programado para distintas
recetas, o 00:00 para otras funciones del horno.
•Cuando parpadeen los minutos, girar el botón central hasta el número de
minutos necesario y confirmar pulsando el mismo botón.
•Cuando parpadeen las horas, girar el botón central hasta el número de
horas necesario y confirmar pulsando el mismo botón.
•Volver a poner el botón en la posición Stop para confirmar el nuevo
tiempo.
Cuando finaliza el tiempo, el tiempo de cocción desaparece. Se
escuchará un pitido durante 15 segundos y parpadearán los símbolos de
tiempo de cocinado y STOP.
•Girar el mando de función de programa a la posición Stop. En caso
contrario, los símbolos de Tiempo de cocción y STOP seguirán
parpadeando.
PROGRAMACIÓN DEL FINAL DEL TIEMPO DE COCCIÓN:
Hay varias recetas que tienen programado un tiempo de cocción y por
tanto, con un final de tiempo de cocción. En el Modo Manual,
Descongelación o Conservación de Calor se puede configurar si se
quiere.
•Girar el mando a la posición de Final de cocción. Aparecerá el símbolo
STOP. Aparecerá un final del tiempo de cocinado para varias recetas, o
00:00 para otras funciones o la hora del día.
•Girar el mando de selector de programa para confirmar el final del tiempo.
•Cuando parpadeen los minutos, girar el botón central hasta el número de
minutos necesario y confirmar pulsando el mismo botón.
•Cuando parpadeen las horas, girar el botón central hasta el número de
horas necesario y confirmar pulsando el mismo botón.
Final de la programación del
tiempo de
En funcionamiento el dispositivo
de seguridad para niños
Cierre de la puerta del horno
cocción
cocción
5. CONSEJOS DE COCCIÓN4
Es mejor no salar la comida hasta después de cocinarla ya que la sal
hace que pierda antes la grasa, lo que ensuciará el horno y creará
mucho humo.
Las carnes blancas, cerdo, ternera, cordero y pescado con hueso o
espina se pueden meter en el horno sin calentarlo previamente. El
tiempo de cocinado es superior que en un horno precalentado, pero
cocina mejor porque el calor tiene más tiempo para llegar a la zona del
hueso.
Un calentamiento previo correcto es la base de un asado de carne
roja en su punto.
GRILL
•
Antes de utilizar el grill del horno
Sacar la carne de la nevera unas horas antes. Dejarla sobre varias
capas de papel de cocina. Con ello se consigue que temple y quede
más jugosa evitando que se quede fría en el medio.
Añadir pimienta y especias a la carne antes del grill, pero la sal
después. Así se hará mejor y quedará jugosa. Añadir a la comida que
se va a cocinar con poco de aceite (esto es mejor hacerlo con un
pincel plano). Luego añadir más pimienta y hierbas aromáticas
(tomillo, etc.)
• Durante el asado:
No pinchar los alimentos cuando se están haciendo, ni siquiera
cuando se les de la vuelta ya que haría que perdiese el jugo y se
secase.
ASADO
Evitar utilizar recipientes brillantes ya que reflejarían el calor podrían
estropear los bizcochos. Si el bizcocho se dora muy rápido, cubrir con
papel antiadherente o papel de aluminio.
Atención: La forma correcta de utilizar el papel es con la parte brillante
hacia el bizcocho ya que de lo contrarío el calor se reflejaría en la
superficie brillante y no llegaría a la comida.
Evitar abrir la puerta durante los primeros 20 o 25 minutos
durante el cocinado:
Los soufflés, brioches, bizcochos, etc. tienden a desinflarse. Se
puede comprobar si están hechos introduciendo un cuchillo o una
aguja de metal en el centro. Si la hoja sale limpia y seca, es que está
listo y se puede detener la cocción. Si la hoja sale mojada o con
trocitos de bizcocho adherido, dejar el horno en funcionamiento pero
bajando la temperatura del termostato para que termine de hacerse
pero sin quemarse.
NB: En el inicio diferido, aparecerá en la pantalla el final del tiempo de
cocinado junto con los símbolos de “tiempo de cocinado” y “STOP”, y sólo
queda la función Modo Receta del horno.
El horno calcula automáticamente la hora de inicio (el tiempo final menos
el tiempo de cocción).
Al final del ciclo el horno se apaga automáticamente. Durante 15
segundos sonará un pitido que indica el final del ciclo y parpadearán los
símbolos de “Tiempo de cocción” y “STOP”.
•Girar el mando del selector de función hasta Stop. En caso contrario los
símbolos seguirán parpadeando.
•Esta función se suele utilizar con la función “duración de la cocción”.
Por ejemplo, si el plato requiere 45 minutos de cocción y debe estar listo a
las 12:30 h:
- Seleccionar la funcocción
- Establecer el tiempo de duración de la cocción a 45 minutos
- Definir el final del tiempo de cocción a las 12:30.
26 ES
Page 27

6. CICLO PIROLÍTICO (DEPENDE DEL MODELO)
7. SEGURIDAD DE LOS NIÑOS
PYRO .El horno se ocupa de la limpieza del interior.
-Hay dos opciones posibles, ECO y SUPER.
** El horno debe tener esta función
El horno dispone de un sistema de limpieza por pirolisis que destruye
los residuos de comida a alta temperatura. La operación se hace
automáticamente mediante el programador. Como se necesitan
temperaturas muy altas, la puerta del horno se fija con un cierre de
seguridad.
La pirolisis se puede detener en todo momento. La puerta no se podrá
abrir hasta que se muestre el cierre de seguridad.
NOTA: Si hay una encimera de cocción encima del horno no utilizar los
quemadores de gas o las placas eléctricas cuando esté en
funcionamiento el sistema pirolítico para evitar que se caliente en
exceso la cocina.
Se disponen DOS CICLOS PIROLÍTICOS preconfigurados:
•ECO PYROCLEAN:
durante 65 minutos.
•SUPER PYROCLEAN: Limpia hornos muy sucios. Funciona durante
90 minutos.
No utilizar productos de limpieza en un horno pirolítico.
Consejo: La limpieza pirolítica inmediatamente posterior a la
utilización del horno permite utilizar el calor residual, con lo que se
consigue un ahorro energético.
Antes del Ciclo pirolítico:
•Retirar del horno todos sus accesorios: No pueden soportar
temperaturas elevadas y podrían dañarse con las temperaturas de
pirolisis.
•Retirar todos los restos ya que se tardaría mucho en destruirlos.
Asimismo una gran cantidad de grasa podría dar lugar a fuego cuando
se sometiese a temperaturas muy elevadas durante el ciclo de pirolisis.
•Cerrar la puerta del horno.
Limpia hornos medianamente sucios. Funciona
Esta función es esencial, especialmente cuando hay niños cerca.
Evita que los niños enciendan el horno o modifiquen los programas
configurados.
El sistema de seguridad bloquea el panel de control del horno cuando
está en funcionamiento.
Hay dos niveles de seguridad:
NIVEL 1: Bloqueo del mando del control del selector y el botón
central.
•
Activación: Girar el mando de control de programación hasta
seguridad para niños.
•Acción: los mandos de control están inoperativos*.
•Desactivación: Girar el mando de control de programación a 0.
NIVEL 2: Bloqueo de los mandos del selector de función
•Activación: Girar el mando del selector de función a seguridad para
niños u mantener presionado el botón central durante 3 segundos.
•Acción: Todos los controles están inoperativos*.
Desactivación: el mismo proceso que para la activación. Girar el
mando del selector de función hasta seguridad para niños y mantener
el botón central Pulsado durante 3 segundos.
*Nota: En todos los casos, por motivos de seguridad, aunque los
controles estén bloqueados, el horno se puede desconectar
poniendo el mando del selector en 0.
Al final del ciclo el indicador parpadea de nuevo y seguirá encendido
hasta que el horno se apague (se apagará cuando la temperatura
interna del horno sea lo suficientemente baja).
La pirólisis deja restos blancos en las paredes. Esperar a que el horno
se enfríe completamente, luego limpiar el interior del horno con una
esponja húmeda y retirar los restos.
1. Gire el mando de las funciones hasta la posición .
En el display, aparece la opción “ECO” o “SUP”
2. El tiempo fijado es de 65min, que puede ser variado desde
65min. (modo ECO) hasta 90min. (modo SUP) mediante el
programador (opciones “+” y “-”). Si el horno está muy sucio, es
recomendable incrementar el tiempo a 90min, si no está
excesivamente sucio, reducirlo a 65 min.
3. Es posible introducir el inicio diferido en el ciclo de pirólisis
mediante el programador cambiando la hora de fin.
4. Después de unos minutos, cuando el horno alcanza una alta
temperatura, la puerta se bloquea automáticamente.
5. El ciclo de pirólisis se puede parar en cualquier momento
moviendo el mando de las funciones hasta la posición "
0 ".
6. Cuando el ciclo de pirólisis finaliza, se termina, se apagará esta
función automáticamente. Una vez que en el display aparece que
ha terminado, se desbloqueará la puerta "
0 - - n ".
7. Puede girar el mando hasta la opción "
0 " y apagar el ciclo,
pero como la temperatura es alta, la puerta aparecerá como
bloqueada hasta que disminuya la temperatura.
27 ES
Page 28

ПРАВИЛА ТЕХНИКИ БЕЗОПАСНОСТИ
• ПРЕДУПРЕЖДЕНИЕ: Бытовой электроприбор и его открытые части во время работы могут
нагреваться до высокой температуры. Соблюдайте осторожность, не дотрагивайтесь до них.
• Дети моложе 8 лет не должны приближаться к бытовому прибору без постоянного надзора.
• Данным бытовым электроприбором могут пользоваться дети старше 8 лет, а также люди с
нарушенными физическими или умственными способностями или с отсутствием надлежащего
опыта в том случае, если они находятся под наблюдением и проинструктированы относительно
безопасного использования бытового прибора, а также, если они осведомлены об имеющихся
опасностях.
• Не разрешайте детям играть с бытовым прибором.
• Чистка и обслуживание бытового прибора не должны выполняться детьми без надзора
взрослых.
• бытовой прибор во время работы нагреваются до высокой температуры. Соблюдайте
осторожность, не дотрагивайтесь до электронагревательных элементов, расположенных внутри
печи.
• ПРЕДУПРЕЖДЕНИЕ: Открытые части бытового электроприбора во время его работы могут
нагреваться до высокой температуры. Не разрешайте подходить к нему маленьким детям.
• Не пользуйтесь для чистки стеклянной дверцы печи абразивными чистящими средствами и
острыми металлическими скребками, так как они могут поцарапать поверхность, что, в свою
очередь, может привести к растрескиванию стекла.
• Перед снятием ограждения печь должна быть выключена. После выполнения чистки
ограждение должно быть установлено на место, как написано в инструкции.
• Используйте только такой датчик температуры, который рекомендован для этой печи.
• Не пользуйтесь для чистки парогенератором.
• ПРЕДУПРЕЖДЕНИЕ: Чтобы избежать поражения электрическим током, перед заменой лампы
проверьте, что бытовой электроприбор выключен.
• Электрическое подключение бытовой прибора должно быть выполнено с использованием
разъединительного устройства в соответствии с действующими правилами и нормами
электробезопасности.
• в инструкции должен быть указан тип электрошнура. При этом должна учитываться температура
задней стенки электроприбора.
• В случае повреждения шнура питания он должен быть заменен специальным шнуром питания,
который можно приобрести у производителя или у агента по техобслуживанию.
• ВНИМАНИЕ: Чтобы избежать опасности, связанной со случайным сбросом устройства тепловой
защиты, данный бытовой электроприбор не должен запитываться через наружные
переключающие устройства, например, таймер, или другое устройство, которое регулярно
включает и выключает электроприбор.
ВНИМАНИЕ: При использовании гриля наружные детали могут нагреваться до высокой
температуры. Не разрешайте детям подходить к печи.
• перед выполнением чистки следует удалить пролившуюся жидкость.
• Во время выполнения пиролитической самоочистки поверхности могут нагреваться сильнее чем
обычно. Не разрешайте подходить к печи детям.
1. ОБЩИЕ МЕРЫ ПРЕДОСТОРОЖНОСТИ
Чтобы добиться наилучших результатов при эксплуатации духовки, внимательно прочтите это руководство.
Рекомендуется сохранить данное руководство по установке и эксплуатации и обращаться к нему по мере необходимости. В случае обращения
за помощью в сервисный центр сообщите серийной номер духовки, указанный в ее паспортной табличке.
После того как вы распакуете духовку, проверьте, что на ней нет никаких повреждений. В случае каких-либо сомнений не пользуйтесь духовкой,
а свяжитесь с квалифицированным специалистом по обслуживанию.
Храните упаковочные материалы (пластиковые мешки, прокладки из полистирола, гвозди) в недоступном для детей месте, так как эти
материалы являются опасными для детей.
В случае несоблюдения инструкций, представленных в данном руководстве, производитель не несет никакой ответственности за возможные
повреждения и убытки.
ПРИМЕЧАНИЕ: Функции, характеристики и принадлежности духовки, о которых упоминается в данном руководстве, могут
изменяться в зависимости от модели духовки.
28 RU
Page 29

1.1 ДЕКЛАРАЦИЯ СООТВЕТСТВИЯ
Все детали данного электроприбора, которые могут входить в
•
контакт с пищей, отвечают требованиям директивы
Европейского экономического сообщества 89/109/ЕЕС. ХХХ
Этот электроприбор соответствует требованиям директив
Европейского экономического сообщества 73/23/EEC и
89/336/EEC, которые были заменены директивами 2006/95/ЕС и
2004/108/ЕС с внесенными в них поправками. После того как вы
распакуете духовку, проверьте, что на ней нет никаких повреждений.
В случае каких-либо сомнений не пользуйтесь духовкой, а
свяжитесь с квалифицированным специалистом по обслуживанию.
Храните упаковочные материалы (пластиковые мешки, прокладки
из полистирола, гвозди) в недоступном для детей месте, так как эти
материалы являются опасными для детей.
1.4 УСТАНОВКА
Ответственность за установку духовки несет пользователь.
Производитель не обязан выполнять установку электроприбора. Если
потребуется помощь производителя для устранения неисправностей,
вызванных неправильной установкой, то за эту работу будет выставлен
счет, так как эта работа не входит в сферу действия гарантии.
Специалист, выполняющий установку духовки, должен соблюдать
инструкции по установке. Неправильная установка может нанести вред
здоровью людей и животных, а также привести к порче имущества.
Производитель не несет ответственности за такие потери.
Материалы, которыми отделано помещение, в котором
устанавливается духовка, должны выдерживать температуру не ниже
70°С.
Духовка может устанавливаться в верхней части стойки или
под рабочей поверхностью.
1.2 МЕРЫ ПРЕДОСТОРОЖНОСТИ
•
Духовка должна использоваться только по ее прямому
назначению, то есть, только для приготовления пищи. Любые
другие применения духовки, например, использование ее для
обогрева помещения, запрещаются, так как они являются
опасными.
•Производитель не несет ответственность за какие-либо
повреждения, вызванные неправильным использованием
духовки или небрежным обращением с ней.
При использовании электроприборов следует соблюдать
следующие основные правила техники безопасности:
При извлечении вилки кабеля питания из электрической розетки
слудует держаться за вилку, а не за сам кабель.
Не прикасайтесь к духовке мокрыми или влажными руками или
ногами.
Не пользуйтесь духовкой, если на ваших ногах нет обуви.
Не пользуйтесь переходниками, тройниками и/или
удлинительными шнурами.
В случае повреждения духовки в результате ее падения или по
другой причине, выключите духовку, отсоедините кабель питания
от электросети и не дотрагивайтесь до духовки.
•В случае повреждения кабеля питания его необходимо заменить
должным образом.
Отсоедините кабель и замените его новым кабелем типа H05RRF, H05VVF, или H05V2V2-F. Кабель должен иметь достаточную
нагрузочную способность, чтобы пропускать ток, потребляемый
духовкой.
Замена кабеля должна выполняться квалифицированным
специалистом.
Провод заземления (желто-зеленый) должен быть на 10 мм
длиннее остальных проводов кабеля.
Для выполнения ремонта пользуйтесь услугами только
утвержденного сервисного центра, и проследите за тем, чтобы
использовались только фирменные запасные части. При
несоблюдении приведенных выше требований прозводитель не
может гарантировать безопасность духовки.
•Не изменяйте характеристики духовки путем введения в ее
конструкцию каких-либо модификаций.
•Не храните в духовке горючие материалы, так как при случайном
включении духовки они могут воспламениться.
•Не разрешайте детям садиться на дверцу духовки или повисать
не ней.
•При загрузке в духовку пищи и извлечении из нее пищи
пользуйтесь защитными перчатками.
1.3 РЕКОМЕНДАЦИИ
• После каждого использования духовки выполняйте ее чистку.
• Не покрывайте внутренние поверхности духовки алюминиевой
фольгой и другими одноразовыми упаковочными материалами,
которые продаются в хозяйственных магазинах. Алюминиевая
фольга или другой упаковочный материал при контакте с горячей
эмалированной поверхностью духовки может расплавиться и
повредить внутреннюю эмалированную поверхность духовки.
• Во избежание чрезмерного загрязнения духовки и выделения
сильного дыма и запахов не рекомендуется использовать духовку с
очень высокой температурой. Лучше немного уменьшить
температуру и увеличить время приготовления пищи.
Перед тем как закрепить духовку проверьте, что в отсеке, где
устанавливается духовка, обеспечивается нормальная циркуляция
воздуха; это необходимо для охлаждения духовки и защиты ее деталей
от перегрева. Сделайте отверстия, показанные на последней странице
данного руководства, в соответствии с типом установки.
1.5 ПОДКЛЮЧЕНИЕ К ЭЛЕКТРОСЕТИ
ПОДКЛЮЧЕНИЕ К ЭЛЕКТРОСЕТИ ДОЛЖНО ВЫПОЛНЯТЬСЯ
СОТРУДНИКОМ УТВЕРЖДЕННОГО СЕРВИСНОГО ЦЕНТРА
ИЛИ СПЕЦИАЛИСТОМ, ИМЕЮЩИМ СООТВЕТСТВУЮЩУЮ
КВАЛИФИКАЦИЮ.
Подключение к электросети должно выполняться в соответствии
с действующими электротехническими правилами и нормами.
Производитель не несет ответственности за повреждения,
возникшие из-за того, что установка электроприбора не была
выполнена в соответствии с правилами электробезопасности.
Духовка должна подлкючаться к розетке, снабженной контактом
заземления, или должна подлкючаться через многополюсный
автоматический выключатель, в соответствии с
электротехническими правилами и нормами, действующими в
стране, где выполняется установка электроприбора.
При подключении духовки к электросети должны использоваться
подходящие предохранители и провода достаточно большого
сечения.
ПОДКЛЮЧЕНИЕ:
Духовка снабжена кабелем питания для подключения к
электросети 230 В переменного тока (между двумя фазами или
между фазой и нейтралью).
Перед подключением электроприбора к электросети проверьте:
напряжение в электросети
ток, при котором срабатывает автоматический выключатель
Провод защитного заземления (желто-зеленый),
подсоединенный к клемме заземления духовки, должен быть
подсоединен к контакту заземления электросети.
Внимание:
• Перед подключением духовки проверьте отсутствие обрыва в
цепи защитного заземления.
• Производитель не несет ответственности за повреждения и
несчастные случаи, возникшие из-за того, что духовка не была
заземлена, или из за наличия обрыва в цепи защитного
заземления.
ВАЖНОЕ ЗАМЕЧАНИЕ: Не забывайте о том, что может
потребоваться послепродажное обслуживание духовки.
Электрическая розетка, от которой запитывается духовка,
должна располагаться в таком месте, чтобы после изменения
местоположения духовки ее снова можно было подключить к
электрической розетке.
Кабель питания: Замена кабеля питания должна выполняться
службой послепродажного обслуживания или специалистом,
имеющим достаточную квалификацию.
Паспортная табличка
• В дополнение к
поставляемым в
комплекте
принадлежностями рекомендуется использовать только
термостойкую посуду и термостойкие формочки для выпечки.
Кодовый номер изделия :
Серийный номер изделия :
29 RU
Page 30

2. ТЕХНОЛОГИЯ PRO/EXP'R
2.1 ПРИНАДЛЕЖНОСТИ ДУХОВКИ
Перед первым использованием духовки вымойте ее
принадлежности губкой. Сполосните водой и высушите. На полку
можно ставить формочки для выпечки и кухонную посуду.
Для сбора соков, выделяющихся при приготовлении пищи на
гриле, используется поддон.
Никогда не используйте поддон в качестве противня для
приготовления пищи, так как отложения жира могут
быстро распространяться по объему духовки, что
приводит к созданию сильного дыма.
Когда духовка работает, в ней не должно быть неиспользуемых
принадлежностей.
2.3 U-SEE
В духовке вместо обычной лампочки накаливания используется
светодиодная система освещения. В дверцу духовки встроено14
светодиодов (для моделей без системы пиролитической очистки) или
10 мощных светодиодов (для моделей с системой пиролитической
очистки). Это обеспечивает внутри духовки высококачественное
освещение белым светом без теней от полок.
Преимущества:
Данная система, кроме того, что она обеспечивает превосходное
освещение внутри духовки, имеет более длительный срок службы,
чем обычная лампочка накаливания и потребляет гораздо меньше
электроэнергии.
-Оптимальное освещение
-Большой срок службы
-Очень низкое потребление электроэнергии (на 95% меньше чем
обычная лампочка накаливания)
В комплект поставки некоторых моделей входит камень для
приготовления хрустящей пиццы, а также подставка для него и
ролик для разрезания пиццы.
Противень для выпечки должен
устанавливаться на полку. Он
предназначен для приготовления мелкой выпечки, такой как,
например, эклеры, печенье, безе, и т. п. Никогда не ставьте
противень для выпечки прямо на дно духовки.
2.2 ВЕРТЕЛ
Для приготовления пищи на вертеле не требуется
предварительного разогрева духовки. При этом дверца духовки
должна быть закрыта.
Потребление электроэнергии на 90-95% меньше, чем при
использовании традиционной системы.
3
1- сетка
2- коса
3- крючки и винты
4- ручка
КАК ИСПОЛЬЗОВАТЬ ВЕРТЕЛ
1. Открутите крючки
2. Насадите мясо на вертел
3. Зафиксируйте мясо на вертеле
с помощью крюков
4. Затяните крючки
5. Установите вертел в
специальные крутящие отверстия
6. Отсоедините ручку
2
1
4
2.4 ДЕМОНТАЖ И ОЧИСТКА МЕТАЛЛИЧЕСКИХ НАПРАВЛЯЮЩИХ
1 – Снимите металлические направляющие потянув их в направлении
указанных стрелками на рисунке.
2 – Произведите очистку металлических направляющих помыв их в
посудомоечной машине или очистив при помощи влажной губки.
Просушите металлические направляющие после очистки.
3 – После очистки установите металлические направляющие в
обратном порядке.
3. ЧИСТКА ДУХОВКИ
•Перед выполнением ручной чистки дайте духовке остынуть.
•Никогда не пользуйтесь для чистки духовки абразивными
чистящими средствами, металлическими мочалками, и острыми
предметами. Это может привести к невосстановимому повреждению
эмалированных поверхностей духовки.
•Используйте только мыльную воду или отбеливающие чистящие
средства (на основе аммиака).
•Никогда не покрывайте боковые стенки духовки алюминиевой
фольгой.
СТЕКЛЯННЫЕ ДЕТАЛИ
После каждого использования духовки рекомендуется очищать
стеклянную дверцу духовки с помощью впитывающей кухонной
бумаги. В случае сильного загрязнения дверцы духовки вы можете
использовать для ее очистки смоченную в растворе детергента и
хорошо отжатую губку.
*Никогда не пользуйтесь абразивными чистящими средствами, и
острыми предметами, так как они могут поцарапать стекло, что может
привести к его растрескиванию.
УПЛОТНИТЕЛЬНАЯ ПРОКЛАДКА ДВЕРЦЫ ДУХОВКИ
Если прокладка загрязнилась, очистите ее с помощью слегка
смоченной губки.
30 RU
Page 31

ПРИНАДЛЕЖНОСТИ
1
2
3
Очистите принадлежности с помощью губки, смоченной в мыльной
воде. Сполосните их чистой водой и высушите. Не пользуйтесь
абразивными чистящими средствами.
ПОДДОН
После приготовления пищи на гриле извлеките поддон из духовки.
Осторожно слейте теплый жир в контейнер. Вымойте поддон губкой,
смоченной в горячем водном растворе моющей жидкости.
Если на поддоне остались пригоревшие остатки жира, замочите
поддон в воде с моющим средством.
Поддон также можно вымыть в посудомоечной машине или очистить
с помощью специального чистящего средства для духовок.
Никогда не устанавливайте в духовку грязный поддон.
ОСВЕЩЕНИЕ В ДУХОВКЕ
Перед выполнением чистки или замены лампочки обязательно
отсоедините духовку от электросети.
Лампочка и ее защитный колпачок изготовлены из жаростойкого
материала.
Характеристики лампочки:
230 В переменного тока – 25 Вт – цоколь Е 14, температура 300 °С
Чтобы заменить лампочку:
•Выверните стеклянный колпачок.
•Выверните лампочку,
•Вверните новую лампочку того же типа (см. представленные выше
характеристики),
•После замены неисправной лампочки вверните защитный
стеклянный колпачок.
ЧИСТКА СТЕКЛЯННОЙ ДВЕРЦЫ ДУХОВОГО ШКАФА
Дверца духового шкафа может быть снята и разобрана для очистки
ее внешних и внутренних поверхностей. Для того чтобы произвести
очистку внутреннего стекла, следуйте следующим инструкциям:
• Откройте дверцу духового
шкафа. Рисунок 1 (Figure 1)
Figure 1
• Петли дверцы духового шкафа
заблокированы. Разблокируйте их,
как указано на рисунке 2 (Figure 2),
для того, чтобы снять дверцу.
Figure 2
• Удалите винты как показано на
рисунке 3 (Figure 3)
• Снимите верхнюю металлическую
крышку, потянув ее вверх,
как указано на рисунке 4 (Figure 4)
Figure 4
• Снимите стекло, осторожно потянув
его из рамки дверцы, как указано на
рисунке 5 (Figure 5).
• * Для духовых шкафов с
пиролитической очисткой,
пожалуйста, снимите также второе
и третье стекла, как указанно на
рисунке 6 (Figure 6)
Figure 6
• После завершения очистки
дверцы, соберите ее,
произведя действия в
обратном порядке
• НА ВСЕХ СТЕКЛАХ знак LOW-E
должен правильно читаться и
должен быть расположен в левом
углу двери, рядом с левой петлей.
Таким образом, напечатанный
символ на первом стекле
остается с внутренний стороны
дверцы.
4. СЕРВИСНЫЙ ЦЕНТР
Прежде чем позвонить в сервисный центр.
Если духовка не работает:
• Проверьте, что она правильно подключена к электросети.
Если вы не можете самостоятельно определить причину
неисправности:
• Отсоедините духовку от электросети, не прикасайтесь к ней, и
обратитесь за помощью в сервисный центр.
Перед тем как позвонить в сервисный центр запишите серийный номер
изделия, указанный в его паспортной табличке.
Если не истек срок действия гарантии, указанный в гарантийном
талоне, ремонт изделия в сервисном центре будет выполнен бесплатно.
Данный электроприбор промаркирован в
соответствии с требованиями, изложенными в
директиве 2002/96/ЕС относительно утилизации
электрического и электронного оборудования
(WEEE).
Правильно выполняя утилизацию данного изделия,
вы поможете предотвратить загрязнение
окружающей среды и нанесение вреда здоровью
людей.
изделие не должно выбрасываться, как обычный бытовой мусор.
Вместо этого оно должно быть отправлено на пункт сбора
отслужившего свой срок электрического и электронного
оборудования для выполнения его последующей утилизации и
повторного использования материалов. Утилизация должна
выполняться в соответствии с местными законами по охране
окружающей среды.
Для получения более подробной информации относительно
обработки, восстановления и повторного использования материалов
данного изделия, свяжитесь органами местной власти, службой
вывоза бытовых отходов, или торговой организацией, в которой вы
приобрели данное изделие.
31 RU
Этот символ на изделии указывает на то, что данное
Figure 3
Figure 5
Figure 7
Page 32

5-
auto
U
COOK
12-
*
3-
*
45678-
32 RU
Page 33

5.1
ПЕРЕД ПЕРВЫМ ИСПОЛЬЗОВАНИЕМ
ДУХОВКИ
•
ЧИСТКА ПЕРЕД ПЕРВЫМ ИСПОЛЬЗОВАНИЕМ
Пред первым использованием духовки очистите ее следующим
образом:
Протрите наружные поверхности духовки мягкой влажной
тряпкой.
Вымойте все принадлежности и протрите внутренние
поверхности духовки тряпкой, смоченной в горячем водном
растворе жидкого моющего средства.
Дайте поработать пустой духовке при максимальной
температуре в течение одного часа. Это необходимо для того,
чтобы удалить из духовки запахи. При выполнении этой
операции помещение, в котором установлена духовка, должно
хорошо проветриваться.
• ВЕЩИ, О КОТОРЫХ НЕ СЛЕДУЕТ ЗАБЫВАТЬ
Подтверждение операции, выполняемой с помощью таймера
Изменения параметров должны подтверждаться с помощью
нажатия кнопки.
Выключение духовки:
Эта операция может потребоваться в случае ввода
неправильной команды. Чтобы выключить духовку … установите
ручку программирования в положение СТОП.
Замок от детей:
Чтобы заблокировать действие органов управления духовки,
выберите функцию замка от детей. См. раздел
"Программирование – Замок от детей".
Охлаждающий вентилятор:
Защищает панель управления и электронные устройства от
перегрева. Он включается автоматически и выключается при
выключении духовки.
Освещение в духовке:
Чтобы включить освещение в духовке, нужно установить ручку
программирования на символ освещения.
Если духовка работает, лампочка будет гореть при выборе любой
функции, и будет продолжать гореть после открывания дверцы.
5.2 КАК ПОЛЬЗОВАТЬСЯ ДУХОВКОЙ
•
РУЧНОЙ РЕЖИМ
Методы приготовления пищи в ручном режиме перечислены в
представленной ниже таблице. Для каждого метода
приготовления пищи также указана рекомендуемая
температура. Температура может меняться в указанном
диапазоне температур.
Режим работы в
соответствии с
моделью духовки
Нагрев снизу + вентилятор
Нагрев снизу
Нагрев снизу + нагрев сверху
Нагрев снизу + нагрев сверху +
вентилятор
КРУГЛЫЙ НАГРЕВАТЕЛЬНЫЙ ЭЛЕМЕНТ
вентилятор
Гриль
Гриль + вентилятор
Гриль + вертел + вентилятор
Размораживание
Поддержание пищи в разогретом
состоянии
Пицца
Пиролитическая чистка
*Ускоренный нагрев: быстрое повышение температуры
** Духовка должна иметь эту функцию
Заранее
установленная
температура, °С
210
160
220 50-240
210
+
180
L2
190
240
40
60
230
**
Пиролитическая
**
чистка
Диапазон
температур, °С
50-220
50-220
50-230
50-230
L1-L3
50-200
180-240
No
No
230
ECO: 425 / 65
SUP: 425 / 1 час 30 мин.
мин.
1 - Установите ручку выбора функции в положение, соответствующее
нужному вам режиму приготовления пищи". На дисплее
отображаются символы нагревательных элементов, работающих в
выбранном вами режиме приготовления пищи.
2 - На дисплее отображается температура приготовления пищи для
выбранного метода приготовления пищи. Эта температура может
изменяться в указанном диапазоне температур (см.
представленную выше таблицу).
Температура может изменяться с помощью поворота центральной
кнопки. Выберите нужное вам значение температуры и подтвердите
с помощью нажатия этой кнопки.
…температура отображается на дисплее ровным светом, но может
изменяться во время цикла приготовления пищи.
Духовка начинает нагреваться, и начинается приготовление пищи.
Световой индикатор будет мигать до тех пор, пока температура в
духовке не поднимется до заданного значения. После этого подается
звуковой сигнал, и этот символ продолжает гореть ровным светом.
Функция
ускоренного
нагрева*
Booster
Booster
Booster
Booster
3 - Время приготовления пищи и время окончания приготовления
пищи могут изменяться с помощью установки ручки выбора
программы в положение "время приготовления пищи" или в
положение "время окончания приготовления пищи". Индикатор
"время приготовления пищи" или "время окончания приготовления
пищи" начинает мигать. С помощью центральной кнопки измените
установки в соответствии с вашими требованиями, и подтвердите
это с помощью нажатия центральной кнопки.
После выполнения этих операций не забудьте вернуть ручку выбора
программы в положение СТОП, чтобы подтвердить новые
установки.
Для получения дополнительной информации относительно
программирования работы духовки обратитесь к
параграфу 5.3 ПРОГРАММИРОВАНИЕ
4 - В конце цикла приготовления пищи установите ручку выбора
функции в положение СТОП.
После завершения цикла приготовления пищи индикатор
температуры снова начинает мигать. Он будет продолжать мигать
после выключения духовки, и погаснет только после того, как
температура в духовке снизиться до достаточно низкого значения.
• РЕЖИМЫ ПРИГОТОВЛЕНИЯ ПИЩИ
Приготовление пищи всегда должно выполняться только с закрытой
дверцей духовки.
НАГРЕВ СНИЗУ + ВЕНТИЛЯТОР - Используются нижний
нагревательный элемент и вентилятор. Этот метод идеально
подходит для приготовления открытых пирогов с фруктовой
начинкой, пирожков с открытой фруктовой начинкой, и пирожных.
При этом выпечка не пересушивается и обеспечивается подъем
теста. Установите полку в нижнее положение.
НАГРЕВ СНИЗУ - Используется нижний нагревательный
элемент. Этот метод идеально подходит для приготовления любых
мучных изделий. Используйте его для приготовления открытых
пирогов с фруктовой или ягодной начинкой, пирогов с заварным
кремом и различной начинкой, пирожков с открытой фруктовой
начинкой, пирожков с мясом или рыбой и другой пищи, для
приготовления которой требуется более интенсивный нагрев снизу.
НАГРЕВ СНИЗУ + НАГРЕВ СВЕРХУ - Используются
верхний и нижний нагревательные элементы. Этот метод идеально
подходит для традиционного зажаривания пищи и для выпечки. Он
используется при приготовлении черного мяса, говядины, ноги
ягненка, дичи, хлеба, или продуктов, завернутых в фольгу.
НАГРЕВ СНИЗУ + НАГРЕВ СВЕРХУ + ВЕНТИЛЯТОР Используются верхний и нижний нагревательные элементы, а также
работает вентилятор, с помощью которого осуществляется
циркуляция горячего воздуха в духовке. Этот метод рекомендуется
использовать для приготовления домашней птицы, выпечки, рыбы и
овощей. При использовании этого метода обеспечивается лучшее
проникновение тепла внутрь пищи, и также снижается время
приготовления пищи и предварительного разогрева. Метод
приготовления пищи с использованием вентилятора позволяет
одновременно готовить различные виды пищи на разных полках
духовки. При этом обеспечивается более равномерное
распределение тепла и предотвращается поглощение одним видом
пищи запаха другого вида пищи. При одновременном приготовлении
разных видов пищи следует увеличить время приготовления пищи на
10 минут.
КРУГЛЫЙ НАГРЕВАТЕЛЬНЫЙ ЭЛЕМЕНТ +
ВЕНТИЛЯТОР - Используются верхний и нижний нагревательные
элементы, а также нагревательный элемент круглой формы и
осуществляется циркуляция горячего воздуха в духовке. Это метод
приготовления пищи с вентилятором.
ГРИЛЬ - Используется верхний нагревательный элемент.
Этот метод идеально подходит для приготовления различных блюд
на гриле, кебабов, и гратинов (блюда, запеченные под сыром). Гриль
должен предварительно разогреваться до высокой температуры в
течение 5 минут. Куски белого мяса должны располагаться на
одинаковом расстоянии от нагревательного элемента гриля. Время
приготовления пищи при этом увеличивается, но мясо получается
более сочным. Черное мясо и филе рыбы можно класть прямо на
решетку, под которую необходимо установить поддон для сбора
жидкости.
ГРИЛЬ + ВЕНТИЛЯТОР - Используются верхний
нагревательный элемент и вентилятор, с помощью которого
осуществляется циркуляция горячего воздуха в духовке. Для
приготовления черного мяса рекомендуется предварительный
33 RU
Page 34

разогрев духовки, а для приготовления белого мяса
предварительный разогрев духовки не требуется. Приготовление на
гриле идеально подходит для зажаривания больших кусков мяса и
домашней птицы. Приготавливаемая на гриле пища располагается в
центре средней полки.
Для сбора соков, которые выделяются при приготовлении пищи на
гриле, под полку нужно установить поддон для сбора жидкости. Для
получения оптимальных результатов проследите за тем, чтобы
приготавливаемая пища не располагалась слишком близко от
нагревательного элемента гриля, и переверните куски пищи, когда
пройдет время, равное половине времени приготовления пищи.
данного метода приготовления пищи, в котором используется
верхний нагревательный элемент, вентилятор, и вертел, является
то, что пища прожаривается равномерно, и при этом не становится
сухой и безвкусной. Вертел будет продолжать вращаться
приблизительно еще пять минут после выключения нагрева. Это
обеспечивает полное использование оставшегося в духовке тепла.
При приготовлении пищи на вертеле предварительный разогрев
духовки не требуется.
установлена в это положение, с помощью вентилятора
осуществляется циркуляция теплого воздуха вокруг замороженных
продуктов, что обеспечивает их размораживание в течение
нескольких минут без изменения содержания в пище протеинов.
Этот режим рекомендуется для разогревания пищи, расположенной
на полке, установленной на второй позиции сверху, или для
размораживания пиццы или выпечки, расположенных на полке,
установленной на нижний уровень.
Используется постоянная температура 60 °С, температура не
регулируется.
воздуха, что обеспечивает превосходные результаты при
приготовлении таких блюд как пицца или кекс.
внутренних поверхностей духовки-Имеется два режима
пиролитической чистки: ECO (ЭКОНОМНАЯ) и SUPER (СУПЕР)
ГРИЛЬ + ВЕРТЕЛ + ВЕНТИЛЯТОР - Преимуществом
РАЗМОРАЖИВАНИЕ - Когда ручка регулировки
ПОДДЕРЖАНИЕ ПИЩИ В РАЗОГРЕТОМ СОСТОЯНИИ –
ПИЦЦА – В этом режиме в духовке происходит циркуляция
ПИРОЛИТИЧЕСКАЯ ЧИСТКА – Выполняется чистка всех
5.3 ПРОГРАММИРОВАНИЕ
СИМВОЛЫ, ОТОБРАЖАЕМЫЕ НА
ДИСПЛЕЕ:
Освещение
Настройка часов
Программирование времени
приготовления
Программирование окончания
STOP
Ручка
программирования
ТАЙМЕР:
Таймер не управляет работой нагревательных элементов
духовки. Он используется только для индикации времени.
•Установите ручку программирования в положение "таймер". На
дисплее появляется символ таймера и разряды 00:00.
•После того как начнут мигать разряды минут, установите нужное
количество минут с помощью поворота центральной кнопки, и
подтвердите установку с помощью нажатия этой кнопки.
•После этого начинают мигать разряды часа, установите нужное
количество часов с помощью поворота центральной кнопки, и
подтвердите установку с помощью нажатия этой кнопки.
•Установите ручку программирования в положение СТОП.
После того как истечет заданное время, индикатор времени
приготовления пищи исчезнет с дисплея. После этого в течение
15 секунд будет подаваться звуковой сигнал, и на дисплее
начинает мигать символ STOP (СТОП). (Чтобы выключить
звуковой сигнал до того, как истекут 15 секунд, просто нажмите
центральную кнопку).
приготовления
Звуковой таймер
Активирован замок от детей
Блокировка дверцы духовки
ПРОГРАММИРОВАНИЕ ВРЕМЕНИ ПРИГОТОВЛЕНИЯ ПИЩИ:
В различных рецептах запрограммировано время приготовления
пищи. При выборе ручного режима можно запрограммировать
время работы духовки при работе в режимах размораживания и
приготовления пиццы.
•Установите ручку программирования в положение "время
приготовления пищи". На дисплее появляется символ "время
приготовления пищи", а также запрограммированное время
приготовления пищи для различных рецептов, или разряды 00:00
для других функций духовки.
•После того, как начнут мигать разряды минут, установите нужное
количество минут с помощью поворота центральной кнопки, и
подтвердите установку с помощью нажатия этой кнопки.
•После этого начинают мигать разряды часа, установите нужное
количество часов с помощью поворота центральной кнопки, и
подтвердите установку с помощью нажатия этой кнопки.
•Установите ручку программирования в положение СТОП, чтобы
подтвердить выбранное время приготовления пищи.
После того как истечет заданное время, индикатор времени
приготовления пищи исчезнет с дисплея. После этого в течение
15 секунд будет подаваться звуковой сигнал, и на дисплее
начинают мигать символы "время приготовления пищи" и STOP.
•Установите ручку программирования в положение СТОП. Если
вы не сделаете этого, символы "время приготовления пищи" и
STOP будут продолжать мигать.
ПРОГРАММИРОВАНИЕ ВРЕМЕНИ ОКОНЧАНИЯ
ПРИГОТОВЛЕНИЯ ПИЩИ:
В различных рецептах запрограммировано время приготовления
пищи, а, следовательно, и время окончания приготовления пищи.
При выборе ручного режима можно запрограммировать время
работы духовки при работе в режимах размораживания и
приготовления пиццы.
•Установите ручку программирования в положение "время
окончания приготовления пищи". На дисплее появляется символ
STOP, "время приготовления пищи", а также
запрограммированное время окончания приготовления пищи
для различных рецептов, или разряды 00:00 для других функций
духовки, или текущее время.
•Установите ручку программирования в положение СТОП, чтобы
подтвердить режим установки времени окончания приготовления
пищи.
•После того, как начнут мигать разряды минут, установите нужное
количество минут с помощью поворота центральной кнопки, и
подтвердите установку с помощью нажатия этой кнопки.
• После этого начинают мигать разряды часа, установите нужное
количество часов с помощью поворота центральной кнопки, и
подтвердите установку с помощью нажатия этой кнопки.
ВАЖНОЕ ЗАМЕЧАНИЕ: При выборе режима включения духовки
с задержкой на дисплее будет отображаться время окончания
приготовления пищи и символы "время приготовления пищи" и
STOP, а также символ режима работы духовки.
Духовка автоматически рассчитывает время начала
приготовления пищи (время окончания приготовления пищи
минус время приготовления пищи).
В конце цикла приготовления пищи духовка автоматически
выключается. В течение 15 секунд подается звуковой сигнал,
сообщающий о том, что цикл приготовления пищи закончен, и на
дисплее начинают мигать символы "время приготовления пищи"
и STOP.
• Установите ручку программирования в положение СТОП. Если
вы не сделаете этого, символы "время приготовления пищи" и
STOP будут продолжать мигать.
• Эта функция обычно используется с функцией «время
приготовления пищи».
Например, если блюдо должно готовиться на протяжении 45
минут, и оно должно быть готово к 12.30;
- выберите нужную функцию
- установите время приготовления 45 минут
- установите время окончания приготовления в 12.30
Приготовление автоматически начнется в 11.45 (12.30 минус 45
минут) и продолжится до установленного времени, после чего
духовка автоматически отключится.
ПРЕДУПРЕЖДЕНИЕ
Если время окончания приготовления выбрано без установки
длительности всего приготовления, духовка сразу автоматически
начнет приготовление и прекратит цикл только в установленное
время окончания.
34 RU
Page 35

5. 4 СОВЕТЫ ПО ПРИГОТОВЛЕНИЮ ПИЩИ
Рекомендуется солить мясо после его приготовления, так как
соль вызывает разбрызгивание жира. При этом духовка
загрязняется и образуется дым.
Куски белого мяса (свинина, телятина, ягненок), и рыба могут
помещаться в холодную духовку. При этом время приготовления
пищи будет больше времени приготовления пищи в
предварительно разогретой духовке, но куски мяса будут лучше
прожариваться в середине, так как время проникновения тепла
внутрь пищи при этом увеличивается.
Правильный предварительный разогрев духовки является
необходимым условием для успешного приготовления черного
мяса.
ПРИГОТОВЛЕНИЕ ПИЩИ НА ГРИЛЕ:
• Перед загрузкой пищи для приготовления на гриле:
Выньте мясо из холодильника за несколько часов до его
приготовления на гриле. Положите его на несколько слоев
кухонной (впитывающей) бумаги. Это обеспечит удаление влаги
и лучший прогрев мяса в середине. Перед приготовлением мяса
на гриле посыпьте его перцем и другими специями, но не солите
его перед приготовлением. Посолите мясо после его
приготовления. В этом случае мясо будет более сочным.
Смажьте мясо тонким слоем растительного масла. Это лучше
всего делать с помощью плоской широкой кисти. Затем еще раз
посыпьте мясо перцем и другими специями (например,
чебрецом).
• Во время приготовления пищи:
Никогда не прокалывайте мясо во время его приготовления, даже
когда вы его переворачиваете. Это приведет к тому, что из мяса
будет вытекать сок, и оно будет становиться сухим.
ПРИГОТОВЛЕНИЕ ВЫПЕЧКИ:
Никогда не пользуйтесь блестящими формочками, они отражают
тепло, и могут испортить ваши пирожки или пирожные. Если ваши
пирожки подрумяниваются слишком быстро, покройте их
жиронепроницаемой бумагой или алюминиевой фольгой.
Внимание: блестящая сторона фольги должна быть обращена к
пирожкам. В противном случае тепло будет отражаться
блестящей поверхностью и не будет проникать в пищу.
Не открывайте дверцу духовки в течение первых 20-25
минут приготовления пищи: суфле, сдобные булочки,
бисквиты могут осесть. Вы можете проверить, готова ли выпечка,
проколов ее в центре ножом или металлической вязальной
спицей. Если лезвие ножа выходит из выпечки чистым и сухим, то
выпечка готова, и вы можете остановить процесс выпекания.
Если лезвие ножа выходит из выпечки влажным или с налипшими
на нем частичками выпечки, продолжите выпекание, но немного
уменьшите температуру для того, чтобы выпечка не подгорела.
6. ЦИКЛ ПИРОЛИТИЧЕСКОЙ ЧИСТКИ
** Духовка должна иметь эту функцию.
Никогда не пользуйтесь в духовке с функцией
пиролитической чистки имеющимися в продаже чистящими
средствами!
Совет: Выполнение пиролитической чистки сразу же после
приготовления пищи позволяет использовать остаточный нагрев
духовки, что, в свою очередь, обеспечивает экономию
электроэнергии.
Перед выполнением цикла пиролитической чистки:
• Выньте из духовки все принадлежности. Они не выдерживают
воздействие высоких температур и могут быть повреждены в
результате воздействия температур, при которых выполняется
пиролитическая чистка.
• Удалите большие проливы и крупные пятна механически, так
как для их разложения потребуется слишком много времени.
Кроме этого, большие скопления жира могут возгораться при
воздействии на них высоких температур, при которых
выполняется пиролитическая чистка.
• Закройте дверцу духовки.
Охлаждающий вентилятор будет продолжать работать до тех
пор, пока температура внутри духовки не понизится до нужного
значения.
В конце цикла индикатор снова начинает мигать. Он также будет
продолжать гореть после выключения духовки, и погаснет, когда
температура внутри духовки станет достаточно низкой.
После выполнения пиролитической чистки на стенках духовки
остается осадок. Подождите, пока духовка полностью не остынет,
а затем протрите внутренние поверхности духовки влажной
губкой, чтобы удалить осадок.
1- Поверните селектор функции в позицию .
На экране появится показатель "ECO" или "SUP"
2- Установленное время составляет 65 мин. Это значение
можно изменять от 65 мин. (режим Eco) до 90 мин. (режим
Sup) с помощью программатора (выбирается с помощью
кнопки "+" или "-"). Если печь слишком загрязнена,
рекомендуется увеличить время до 90 мин., если печь
умеренно загрязненна, сократите время очистительного
цикла до 65 мин.
3- С помощью изменения времени END через программатор
возможно отложить время начала пиролитического цикла.
4 - Через несколько минут, после того как температура в печи
поднялась, двери автоматически запираются.
5- Цикл пиролитической очистки может быть остановлен в
любой момент с помощью поворота селектора функции в
исходное положение '0 '.
6- После завершения пиролитического цикла пиролиз
автоматически выключается. На дисплее включается
показатель "END". Значение “
0 - - n " высвечивается на
протяжении закрытой двери.
7- Поверните селектор функции обратно в положение "0";
если температура все еще высокая, на индикаторе
высвечивается “
0 - - n ", что означает, что дверь закрыта.
Духовка снабжена системой пиролитической чистки, которая
разлагает остатки пищи под действием высоких температур.
Чистка выполняется автоматически с помощью
программирования. Образующийся дым "очищается" с помощью
прохождения через пиролизатор, который запускается, как
только начинается приготовление пищи. Так как для работы
пиролизатора требуется очень высокая температура, на дверце
духовки установлен защитный замок.
Пиролизатор может быть остановлен в любое время. Нельзя
открыть дверцу духовки, пока на дисплее отображается символ
замка.
ПРИМЕЧАНИЕ: Если над духовкой установлена варочная
поверхность, никогда не пользуйтесь газовыми горелками или
электрическими плитками во время работы пиролизатора. Это
необходимо для того, чтобы предотвратить перегревание
варочной поверхности.
Имеется ДВА РЕЖИМА ПИРОЛИТИЧЕСКОЙ ЧИСТКИ.
Пиролитическая чистка ECO: используется для умеренно
загрязненной духовки. Выполняется в течение 65 минут.
Пиролитическая чистка SUPER: используется для сильно
загрязненной духовки. Выполняется в течение 90 минут.
35 RU
Page 36

7. АМОК ОТ ДЕТЕЙ
Если в доме имеются дети, эта функция может оказаться очень
полезной. Она предотвращает включение духовки детьми и
изменение ими запрограммированных программ.
Замок от детей обеспечивает блокировку панели управления
духовки.
Имеется два уровня защиты:
УРОВЕНЬ 1: Блокировка ручки выбора режима приготовления
пищи и центральной кнопки
• Чтобы активировать: установите ручку программирования в
положение "замок от детей".
• Результат: ручка выбора режима приготовления пищи и
центральная кнопка перестают действовать.
• Для отмены: установите ручку программирования в положение
0.
УРОВЕНЬ 2: Блокировка всех ручек управления
• Чтобы активировать: установите ручку программирования в
положение "замок от детей" и удерживайте центральную кнопку в
нажатом положении в течение 3 секунд.
• Результат: все ручки управления перестают действовать.
• Для отмены: Выполните ту же самую процедуру, что и для
активации. Установите ручку программирования в положение
"замок от детей" и удерживайте центральную кнопку в нажатом
положении в течение 3 секунд.
Примечание: Даже если действия ручек управления
заблокированы, духовку можно выключить, установив ручку
программирования в положение 0. Это предусмотрено в целях
безопасности.
36 RU
Page 37

VARNOSTNA NAVODILA
OPOZORILO: Aparat in njegovi dostopni deli se med uporabo segrejejo. Pazite, da se ne dotaknete
grelcev!
• Otroci, mlajši od 8 let, naj se aparatu ne približujejo nenadzorovani.
• Otroci, starejši od 8 let, ter osebe z zmanjšanimi fizičnimi, zaznavnimi ali umskimi sposobnostmi ali
pomanjkljivimi izkušnjami ter znanjem lahko uporabljajo aparat le pod nadzorom oseb, ki so odgovorne
za njihovo varnost, in ki so jih seznanili z varno uporabo aparata ter le v primeru, da razumejo tveganje, ki
je s tem povezano.
• Otroci se ne smejo igrati z aparatom.
• Otroci lahko sodelujejo pri čiščenju in vzdrževalnih delih le pod nadzorom odraslih.
POZOR: Dostopni deli se med uporabo zelo segrejejo. Pazite, da se majhni otroci ne približajo!
• Ne uporabljajte grobih ali jedkih čistil ali ostrih kovinskih strgal za čiščenje vrat pečice, saj bi lahko
opraskali površino, zaradi takih poškodb pa bi lahko steklo počilo.
• Pred odstranjevanjem zaščite morate pečico izklopiti; po čiščenju zaščito namestite nazaj, kot je to
pojasnjeno v navodilih za uporabo.
• Uporabljajte samo temperaturno sondo, ki je namenjena uporabi v tej pečici.
• Pri čiščenju ne uporabljajte aparatov za čiščenje s paro.
POZOR: Pred zamenjavo žarnice izključite aparat iz električnega omrežja, da se izognete tveganju za
električni udar.
• Pri fiksni priključitvi mora biti zagotovljena možnost izklopa iz električnega omrežja skladno z veljavnimi
predpisi.
• V navodilih je navedena ustrezna vrsta priključnega kabla, saj je potrebno upoštevati temperaturo na
hrbtni strani aparata.
• Če je priključni električni kabel poškodovan, ga je treba zamenjati z enakovrednim ali sklopom, ki vam je
na voljo pri pooblaščenem servisu.
• POZOR: Da bi se izognili slučajnemu resetiranju termičnega prekinjala, aparat ne sme biti napajan
preko zunanje naprave, npr. programske ure, ter ne sme biti priključen na tokokrog, ki ga redno vklaplja
oz. izklaplja dobavitelj energije.
POZOR: Dostopni deli se lahko med uporabo žara segrejejo. Pazite, da se majhni otroci ne približajo.
• Razlito tekočino pred čiščenjem obrišite.
• Med samodejnim čiščenjem s pirolizo se lahko površina segreje bolj kot običajno. Pazite, da se otroci ne
približajo!
37 SL
Page 38

1. SPLOŠNA OPOZORILA
Pozorno preberite navodila, da boste lahko izrabili vse mo
shranite. Pred vgradnjo pečice si zapišite serijsko številko, saj jo boste potrebovali, ko boste potrebovali pomoč pooblaščenega servisa.
Ko dobite svojo novo pečico, se najprej prepričajte, da med transportom ni pri Če je pečica po
prodajalca. Če niste prepričani, se posvetujte s strokovnjakom. Odstranite vso embalažo in jo odnesite na ustrezno odlagališče. Pazite, da
predvsem plastične vrečke, polistirol in žeblji ne pridejo v roke majhnim otrokom.
Proizvajalec ne prevzema odgovornosti za morebitno
Opomba: Funkcije, lastnosti in oprema pe
čice, navedeni v tem priročniku, se lahko spreminjajo odvisno od modela pečice.
žnosti, ki vam jih ponuja pečica. Priporočamo, da navodila za priključitev in uporabo
šlo do poškodb. škodovana, se takoj obrnite na
škodo ali poškodbe, če ta navodila niso bila upoštevana!
1.1 IZJAVA O SKLADNOSTI
• V pe žene opreme uporabljajte samo ustrezne peka
Deli aparata, ki pridejo v stik z
evropskimi predpisi (smernica CEE 89/109).
Aparat je izdelan v skladu z evropskima smernicama
73/23/CEE in 89/336/CEE, nadomestno 2006/95/EC in
2004/108/ EC ter nadaljnjimi spremembami.
Ko odstranite embalažo, se prepričajte, da vaša nova pečica ni
poškodovana. Če niste prepričani, je ne smete uporabiti, ampak se
posvetujte s strokovnjakom. Poskrbite, da embalaža, npr. plastične
vrečke, polistirol, žeblji ipd. ne pridejo v roke majhnim otrokom, saj so
zanje lahko nevarni.
živili, so izdelani skladno z veljavnimi
čici poleg prilo če,
odporne na zelo visoke temperature.
Code produit:
Numéro de série :
1.4 NAMESTITEV IN PRIKLJUČITEV
1.2 VARNOSTNI NAPOTKI
•Pe
čica je izdelana le za pečenje in kuhanje jedi v gospodinjstvu.
Uporaba pečice v kakršnekoli druge namene je (npr. za segrevanje
prostora) je neprimerna in zaradi tega tudi nevarna.
•Med delovanjem pečice se dostopni deli in grelci zelo segrejejo.
Pazite, da se jih ne dotaknete!
•Proizvajalec in prodajalec ne prevzemata odgovornosti za morebitne
poškodbe oseb in/ali materialno škodo, ki bi nastala zaradi
neprimerne, napačne in nespametne uporabe pečice. Pri uporabi
kakršnega koli električnega aparata morate upoštevati naslednja
osnovna varnostna pravila:
•Ne vlecite priključnega kabla, če želite iztakniti vtikač iz vtičnice, pač
pa primite za vtikač in ga lepo iztaknite iz vtičnice.
•Ne dotikajte se aparata, če imate vlažne roke ali noge.
•Ne dotikajte se aparata, če ste bosi.
•Priključitev aparata na električno omrežje preko adapterjev,
podaljškov in razdelilcev ni priporočljiva.
•V primeru okvare in/ali slabega delovanja aparat takoj izklopite in ga
ne uporabljajte naprej.
•Če se poškoduje priključni kabel, ga morate takoj zamenjati.
Odstranite poškodovani priključni kabel in ga zamenjajte s kablom
tipa H05RRF, H05VV-F, H05V2V2-F ustrezne dolžine in preseka.
Kabel mora biti sposoben prenesti obremenitev. Priključnega kabla ne
menjajte sami, pač pa naj vam ga zamenja ustrezno usposobljen
strokovnjak! Pripominjamo, da mora biti vodnik za ozemljitev (rumenzelen) obvezno za 10 mm daljši od vodnikov za priključitev na
električno omrežje.
Za morebitna popravila se obrnite na enega od naših pooblaščenih
serviserjev ter ob morebitni zamenjavi posameznih elementov vedno
zahtevajte vgradnjo originalnih Candyjevih rezervnih delov.
Neupoštevanje zgornjih navodil lahko vpliva na varno delovanje
aparata.
•Kakršnokoli spreminjanje značilnosti pečice ni dovoljeno.
•V pečico ne shranjujte vnetljivih snovi; ob slučajnem vklopu pečice bi
se ti lahko vneli.
•Ne pritiskajte na vrata pečice; otrokom ne smete dovoliti, da stopajo
ali sedijo na vratih.
•Uporabljajte zaščitne kuhinjske rokavice!
•Med ujporabo se aparat segreje. Ne dotikajte se grelcev v notranjosti
pečice.
•POZOR: Dostopni deli se lahko med uporabo žara segrejejo. Pazite,
da se majhni otroci ne približajo.
1.3 PRIPOROČILA
•Priporo
•Sten pečice ne oblagajte z alu-folijo ali v oblogami za enkratno
uporabo, ki so na voljo v trgovinah, saj bi se te snovi lahko stalile ob
stiku z vročim emajlom, kar bi poškodovalo emajl.
•Ne nastavljajte previsoke temperature, saj se bo tako pečica manj
umazala in se ne bo razvijal dim. Bolje je, da nekoliko znižate
temperaturo in podaljšate čas pečenja.
•Tablica s podatki je ob strani pečice:
čamo, da po vsaki uporabi na hitro očistite pečico.
Za priklju
odgovornost proizvajalca. Morebitni posegi s strani pooblaščenega
servisa niso vključeni v garancijo. Električna inštalacija, na katero bo
aparat priključen, mora biti urejena v skladu z veljavnimi lokalnimi
predpisi in v skladu z navodili proizvajalca, zato priporočamo, da vam
električno inštalacijo pred priključitvijo aparata pregledajo
usposobljeni strokovnjaki. Morebitna napačna priključitev in
namestitev lahko povzroči poškodbe oseb, živali ali premoženja.
Proizvajalec in prodajalec ne prevzemata odgovornosti za morebitne
poškodbe oseb in/ali nastalo materialno škodo, do katere bi prišlo
zaradi napačne priključitve in/ali vgradnje aparata.
Dovoljena je vgradnja pečice pod delovni pult ali v nišo v visoki
kuhinjski omarici. Zagotoviti morate ustrezno kroženje zraka, ki je
potrebno za hlajenje in zaščito delov v notranjosti. Upoštevajte mere,
ki so navedene na skici na zadnji strani teh navodil.
čitev aparata in morebitno vgradnjo poskrbi kupec in ni
1.5 PRIKLJU
ČITEV PEČICE NA ELEKTRIČNO
OMREŽJE
Vsa potrebna dela mora opraviti ustrezno usposobljen strokovnjak, ki
mora upoštevati vse veljavne predpise.
Proizvajalec ne prevzema odgovornosti v primeru neupoštevanja teh
navodil.
Pečico priključite na ozemljeno vtičnico, ali preko ustreznega
večpolnega stikala, zaščiteno z ustreznimi varovalkami skladno z
veljavnimi predpisi.
PRIKLJUČITEV
Pečica je opremljena s kablom za priključitev na električno omre
napetostjo 230 V AC med fazami ali med fazo in nulo. Pred
priključitvijo preverite:
- priključno napetost, ki je navedena na števcu;
- nastavitev prekinjala.
Ozemljitveni vod (zelen/rumen) mora povezovati ozemljitveni
terminal na pečici in ozemljitveni terminal v omrežju.
Opozorilo:
•Pred priključitvijo mora strokovnjak preveriti brezhibnost kontinuitete
ozemljitve.
•Proizvajalec ne prevzema odgovornosti za škodo ali poškodbe
zaradi uporabe neozemljene pečice ali v primeru ozemljitve z
nepravilno kontinuiteto.
Opomba: Upoštevajte, da bo morda pečico kdaj potrebno popraviti, in
poskrbite, da jo bo mogoče izključiti iz električnega omrežja, ko jo
odstranite iz niše.
Priključni kabel: Če je treba zamenjati priključni električni kabel,
morajo to delo opraviti strokovnjaki pooblaščenega servisa ali
ustrezno usposobljena oseba.
žje z
38 SL
Page 39

2. TEHNOLOGIJA PRO/EXP'R
2.3 U-SEE
2.1 OPREMA PEČICE (odvisno od modela)
Pred prvo uporabo pe šine z blago raztopino
čistila, nato pa z gobico izperite površine s čisto vodo in jih obrišite s
suho krpo.
Na rešetko postavite različne pekače.
Globji peka šč je namenjen lovljenju ma čobe, ki med peko na žaru.
Tega peka
maščoba hitro razpršila po pečici, se žgala in povzročila dim.
Nekateri modeli so opremljeni tudi s posebnim kamnitim podstavkom
za pečenje hrustljavih pizz s podstavkom in posebnim rezilom za
rezanje pizze.
ča nikoli ne uporabljajte za peko pečenk, saj bi se lahko
čice očistite vse povr
Ta sistem osvetlitve nadomeš
svetilnih diod (pri modelih brez pirolize) ali 10 zmogljivih svetilnih diod
High Power LED, ki proizvajajo belo svetlobo in zagotavljajo
kakovostno osvetlitev celotne pečice brez senčnih delov.
Prednosti:
Sistem razen odlične osvetlitve pečice zagotavlja tudi dolga
življenjska doba, lažje vzdrževanje in predvsem prihranek energije.
- odlična vidljivost
- dolga življenjska doba
- zelo majhna poraba energije, -95 % v primerjavi z običajnim načinom
osvetlitve.
ča klasično žarnico. V vratih pečice je 14
2.4 SNEMANJE IN ČIŠČENJE ŽIČNIH VODIL
1- Snemitevodilatako, da jihpotegnetev smeri puščic.
2- Očistitevodila. Lahkojihpomijete v stroju, ali pajihočistite z vlažnogobico in
jih nato obrišete do suhega.
3-Po čiščenjunamestitevodilanazajpozgornjihnavodilih v
obratnemvrstnemredu.
Pekač za sladice postavite na rešetko.
drobnega peciva – piškotov, beljakovih poljub
Nikoli ga ne smete postaviti neposredno na dno pečice!
Primeren je za peko
čkov ipd.
2.2 RAŽENJ
Pri peki na ra
Peka poteka pri zaprtih vratih pečice.
Poraba energije je za 90-95 % manjša kot pri tradicionalnih pečicah.
2
1
UPORABA RAŽNJA
1.Odvijte držala
2.Potisnite raženj v meso.
3.Pritrdite meso s pomočjo držal
4.Zategnite vijake
5.Potisnite raženj v luknjo na
motorčku
6.Snemite ročaj
žnju predgrevanje pečice ni potrebno.
3
1-Rešetka
4
2-Raženj
3-Držala & vijaki
4-Ročaj
3. ŠČI ČENJE PEČICE
• Pred kakršnim koli ročnim čiščenjem počakajte, da se pečica ohladi.
• Nikoli ne čistite pečice z jedkimi čistili, blazinicami iz jeklene volne ali
ostrimi pripomočki, saj bi lahko nepopravljivo poškodovali emajl.
• Za čiščenje uporabljajte samo milnico ali čistila na bazi amonijaka.
• Ne oblagajte stranic pečice z alu-folijo.
STEKLENI DELI
Priporočamo, da steklo na vratih po vsaki uporabi obrišete z vpojnim
kuhinjskim papirjem. Če je pečica zelo umazana, površine očistite z dobro
ožeto gobico in detergentom, nato pa jih izperite s čisto vodo.
*Nikoli ne uporabljajte jedkih čistil ali ostrih čistilnih pripomočkov, da ne
opraskate stekla, saj bi to lahko pozneje med delovanjem pečice počilo.
*Ne uporabljajte grobih ali jedkih čistil ali ostrih kovinskih strgal za čiščenje
vrat pečice, saj bi lahko opraskali površino, zaradi takih poškodb pa bi
lahko steklo počilo.
TESNILO NA VRATIH
Če se umaže, ga očistite s vlažno gobico.
OPREMA PEČICE
Po peki na žaru vzemite pekač za lovljenje maščobe iz pečice; odlijte toplo
maščobo v ustrezno posodo. Nato pladenj pomijte z vročo vodo,
detergentom za pomivanje posode in gobico. Če s tem ne odstranite
nečistoče, ga nekaj časa namakajte v vodi z detergentom. Lahko pa ga
tudi pomijete v stroju ali očistite z namenskim čistilom za pečice.
Nikoli ne puščajte umazanega pekača v pečici.
LUČ V PEČICI
Pred čiščenjem ali zamenjavo žarnice izključite pečico iz električnega
omrežja.
Žarnica in pokrovček nad njo so izdelani iz na visoke temperature
odpornih materialov.
Med uporabo pečice iz nje odstranite vso opremo, ki ni v uporabi.
39 SL
Page 40

slika 4
1
2
3
• Odstranite steklo – previdno ga
izvlecite iz okvirja vrat (slika 5).
• Snemite zgornji kovinski pokrovček
– potegnite ga navzgor (slika 4).
Zna
čilnosti žarnice:
230 V AC – 25 W – grlo E 14, temperatura 300 C.
Ko želite zamenjati žarnico:
ČIŠČENJE STEKLA NA VRATIH PEČICE
Pri tej pečici lahko notranje steklo snamete in ga očistite. To storite na
naslednji način:
· Odprite vrata pečice (slika 1).
- odvijte stekleni pokrovček;
- odvijte
- nadomestite jo z enakovredno.
- Ko zamenjate žarnico, znova privijte zaščitni stekleni
pokrovček.
žarnico,
°
slika 1
slika 5
slika 6
• Po čiščenju stekla znova
sestavite vse dele;
upoštevajte zgornja navodila
v obratnem vrstnem redu.
• OZNAKA LOW-E na vseh
steklih mora biti v pravilnem
položaju, in sicer v levem vogalu
vrat, ob levem tečaju. Na ta
način bo potiskana površina na
1. steklu NA NOTRANJI strani
vrat.
• * Pri pirolitskih pečicah morate
odstraniti tudi 2. in 3. steklo. (slika 6)
slika 7
4. SERVISIRANJE
Preden pokli š šajte sami
odpraviti nepravilnost v delovanju pečice po spodnjih navodilih:
čete poobla čeni servis, najprej posku
·Pred začetkom čiščenja zapahnite
tečaja, kot je to prikazano na sliki 2.
Ko končate s čiščenjem, ponovno
odpahnite tečaja (slika 2).
slika 2
• Odvijte vijake, kot je to prikazano
na sliki 3.
slika 3
Če pečica ne deluje
•Se najprej prepričajte, da je pravilno priključena na električno
omrežje.
Če vam ne uspe odkriti razloga za nepravilnost v delovanju:
•Izklopite pečico iz električnega omrežja, ne dotikajte se je in pokličite
pooblaščeni servis.
Pred tem si zabeležite serijsko številko, ki je navedena na tablici s
podatki.
Pečici je priložen garancijski list, ki zagotavlja, da bo pooblaščeni
servis v garancijskem roku popravilo opravil brezplačno.
Izdelek je ozna
Gospodarske zbornice 2002/96 o odpadni električni
in elektronski opremi (WEEE).
S pravilnim načinom odstranjevanja izdelka boste
pomagali preprečiti morebitne negativne posledice
na okolje in zdravje ljudi, ki bi jih lahko povzročilo
nepravilno odstranjevanje aparata.
Simbol na izdelku označuje, da s tem izdelkom ni
dovoljeno ravnati kot z običajnimi gospodinjskimi
odpadki. Izdelek odpeljite na ustrezno zbirno mesto
za predelavo električne in elektronske opreme.
Odstranjevanje mora biti opravljeno skladno z lokalnimi
okoljevarstvenimi predpisi o odstranjevanju odpadkov.
Za podrobnejše informacije o odstranjevanju in predelavi tega izdelka
se obrnite na pristojen mestni organ za odstranjevanje odpadkov,
komunalno službo ali trgovino, v kateri ste izdelek kupili.
čen skladno z direktivo evropske
40 SL
Page 41

5- UPORABA ELEKTRONSKE PROGRAMSKE URE
COOK
U
auto
1.Kontrolna lučka števca minut ali
samodejnega delovanja
.Funkcije z ventilatorjem
2*
.Funkcije z VARIOFAN
3*
.Odtaljevanje
4
.Prikaz temperature ali časa
5
.Tipke za nastavitve
6
.Gumb za izbiranje funkcij
7
.Gumb programske ure
8
* ODVISNO OD MODELA
OPOZORILO!
Lučka »º« indikatorja temperature utripa, dokler se pečica ne segreje na nastavljeno temperaturo.
Ko je program pečenja zaključen, se na prikazovalniku izmenično kaže čas in napis »HOT«, tudi če sta oba gumba v izklopljenem
položaju.
FUNKCIJA
TIHI NAČIN
NASTAVLJANJE
ČASA
TRAJANJE
PEČENJA
KONEC PEČENJA
Po priključitvi ali izpadu električnega toka morate najprej nastaviti točen ča
(na prikazovalniku utripa vrednosti 12:00).
KAKO JO AKTIVIRATE?
• Obrnite gumb na levi na
tihi način.
• Obrnite gumb na levi na
simbol ure. S pomočjo tipk
»-« ali »+« nastavite čas.
• Obrnite gumb na desni na
ustrezno funkcijo.
Obrnite gumb na levi na
simbol za trajanje pečenja.
S pomočjo tipk »-« ali »+«
nastavite trajanje pečenja.
Osvetli se napis Auto.
• Obrnite gumb na desni na
ustrezno funkcijo.
Obrnite gumb na levi na
simbol za konec pečenja.
•
S pomočjo tipk »-« ali »+«
nastavite trajanje pečenja.
Osvetli se napis Auto.
KAKO JO IZKLOPITE?
•Obrnite gumb na OFF.
• Obrnite gumb na OFF.
•Ko preteče nastav-ljeni čas,
se pečica samodejno izklopi
in nekaj sekund se oglaša
zvočni signal. Če želite
predčasno prekiniti pečenje,
obrnite gumb za izbiranje
funkcij na OFF ali nastavite
čas 00:00, tako da obrnete
gumb na levi na simbol za
trajanje pečenja in s pomočjo
tipk »-« ali »+« nastavite
vrednost 00:00.
• Ko preteče nastavljeni čas,
se pečica samodejno izklopi.
Če želite predčasno prekiniti
pečenje, obrnite gumb za
izbiranje funkcij na OFF.
UČINEK ?
• Utišate zvok števca minut.
• Nastavljate čas, ki je
prikazan na prikazovalniku.
• Tako lahko določite trajanje
pečenja za posamezen
recept.
Ko ste nastavili trajanje
pečenja, obrnite gumb na
OFF, da se spet prikaže čas
dneva. Če želite preveriti
nastavljeni čas, obrnite
gumb na simbol za trajanje
pečenja.
•
Tako lahko določite trajanje
pečenja za posamezen
recept.
Ko ste nastavili čas za
•
konec pečenja, obrnite
gumb na OFF, da se spet
prikaže čas dneva.
•
Če želite preveriti
nastavljeni čas, obrnite
gumb na simbol za trajanje
pečenja.
NAMEN ?
• Izklop zvočnega opozorila
ob preteku časa
• Nastavljanje časa.
Opomba: Po priklju-čitvi ali
izpadu električnega toka
morate najprej na-staviti
točen čas (na
prikazovalniku
utripa vrednosti 12:00).
• Za pečenje različnih jedi.
•
Ta funkcija omogo-ča
programiranje vnaprej.
Če npr. že-lite, da se jed peče
45 min in da je goto-va ob
12.30, nasta-vite trajanje
pečenja in čas za konec
pečenja 12.30.
Pečica se začne segrevati
ob 11.45 (12.30 minus 45)
in se izklopi ob
nas-tavljenem času.
ŠTEVEC MINUT
KLJUČAVNICA
ZA VARNOST
OTROK
• Obrnite levi gumb na
funkcijo števca minut in
določite čas s pomočjo
tipk »-« ali »+«.
• Obrnite levi gumb na
simbol ključavnice in v roku
3 sekund pritisnite na
tipko »+«.
Ko se na prikazovalniku
prikaže napis STOP, je
ključavnica aktivirana
• Obrnite levi gumb na
funkcijo števca minut in s
pomočjo tipk »-« ali »+«
nastavite čas 00:00.
•
Obrnite levi gumb na
simbol ključavnice in v roku
3 sekund pritisnite na
tipko »+«.
•
Napis STOP izgine s
prikazovalnika.
41 SL
• Nekaj sekund po preteku
nastavljenega časa se
oglaša zvočni signal.
• Pečice ni mogoče
uporabljati.
•
Ta funkcija deluje, tudi če
pečice ne uporabljate in je
izklopljena.
•
Zelo koristno, predvsem če
imate majhne otroke.
Page 42

5.1 PRED PRVO UPORABO PEČICE
ČI ČENJE
PRVO Š
- Pred prvo uporabo pečico očistite.
- Obrišite vse zunanje površine z vlažno krpo.
- Operite vso opremo in obrišite notranjost pe
detergenta za pomivanje posode.
- Vklopite prazno pečico za približno 1 uro na najvišjo temperaturo, da
odstranite vonj po novem. Pred tem poskrbite za zračenje prostora!
NA KAJ MORATE BITI POZORNI
Potrditev delovanja na programski uri
Vse vnesene spremembe morate potrditi s pritiskom na gumb.
Ustavitev pečice:
To bo morda potrebno, če ste vnesli napačne nastavitve. Ko želite pečico
ustaviti, obrnite gumb za izbiranje funkcij nazaj na položaj Stop.
Varovalo za otroke
Če želite 'zakleniti' stikalno ploščo pečice, aktivirajte varovalo za otroke.
Več lahko preberete v poglavju Programiranje – Varovalo za otroke.
Ventilator za hlajenje
Varuje stikalno ploščo in elektroniko pred poškodbami zaradi vročine.
Začne delovati samodejno in deluje tudi potem, ko pečico izklopite, nato
pa se samodejno izklopi.
Luč v pečici:
Z obračanjem gumba na simbol luči lahko prižgete luč v pečici, tudi če
pečice ne uporabljate.
Ko pečico uporabljate, luč v notranjosti ves čas gori, tudi medtem ko so
odprta vrata.
čice z raztopino vode in
5.2 UPORABA PEČICE
RO
ČNI NAČIN
V spodnji razpredelnici so navedeni na
obenem s primernimi temperaturami. Te lahko spreminjate znotraj
predvidenega območja.
čin delovanja
Na
odvisno od modela
pečice
Spodnji grelec + ventilator
Spodnji grelec
Spodnji + zgornji grelec
Spodnji + zgornji grelec + ventilator
Krožni grelec + ventilator
Žar
Žar+ ventilator
Žar+ raženj + ventilator
Odtaljevanje
Ohranjanje toplote
Pizza
Pyro Pyro
*Booster: hiter porast temperature
** Model pečice mora omogočati to funkcijo
1. Gumb za izbiranje funkcij pe
žejo se grelci, ki so aktivni pri izbranem na
Prika činu pečenja.
Predvidena
temperatura
o
210
160
220 50-240
210
180
L2
190
240
40
60
230
**
**
čice obrnite na ustrezno funkcijo.
2. Prikaže se predvidena temperatura za izbrani način pečenja. To
lahko prilagodite znotraj predvidenega območja – gl. zgornjo
razpredelnico.
Če želite prilagoditi temperaturo, obrnite osrednji gumb in nato na
programski uri potrdite nastavitev s pritiskom na isti gumb.
Prikaz temperature je fiksen, lahko ga pa spreminjate med potekom
pečenja.
Pečica začne delovati in se segrevati.
Kontrolna lučka utripa, dokler ni dosežena nastavljena temperatura.
Na konec segrevanja vas opozori zvočni signal, kontrolna lučka
preneha utripati in ostane osvetljena.
3. S pomočjo ustreznega gumba lahko programirate čas za konec
pečenja in trajanje pečenja. Utripati začne indikator izbranega načina.
S pomočjo osrednjega gumba po potrebi spreminjate nastavitve in
nastavitev potrdite s pritiskom na gumb.
Če ste uporabili ta način, na koncu ne smete pozabiti obrniti gumba za
nastavitve nazaj v položaj STOP, da potrdite novo nastavitev.
Podrobnej
ši opis je v poglavju 5.3 Programiranje.
4. Ob koncu pečenja obrnite gumb za izbiranje funkcij nazaj na položaj
STOP.
Indikator znova utripa; ostane osvetljen tudi po izklopu pečice in
ugasne šele, ko se temperatura v pečici dovolj zniža.
čini pečenja v ročnem načinu,
Temperaturno
C
območje C
50-220
50-220
50-230
50-230
L1-L3
50-200
180-240
No
No
230
ECO: 425 /
SUP: 425 / 1h 30min
65min
o
Funkcija
Booster
(segrevanje s
pojačano močjo)
Booster
Booster
Booster
Booster
ČINI PEČENJA
NA
Pečenje vedno poteka ob zaprtih vratih pečice!
Spodnji grelec + ventilator: Kombinacija spodnjega grelca in
ventilatorja je idealna za peko sadnih in zelenjavnih pit in drugega
peciva. Jed se ne izsuši, kvašeno testo pa lepše vzhaja. Rešetko
postavite na najnižjo višino.
Spodnji grelec: Deluje samo spodnji grelec. Ta na
čin je
idealen za peko vseh jedi s testom spodaj – za pite ipd., ter za jedi, ki
zahtevajo večjo toploto od spodaj.
Spodnji + zgornji grelec: Delujeta tako zgornji kot spodnji
grelec. Ta način je najbolj primeren za tradicionalen način pečenja
pečenk in peciva – rdeče meso, govejo pečenko, jagnječje stegno,
divjačino, pa tudi kruh ali v folijo zavite jedi.
Spodnji + zgornji grelec + ventilator: Delujejo zgornji in
spodnji grelec ter ventilator, tako da vroči zrak kroži v notranjosti
pečice. Ta način priporočamo za peko perutnine, peciva, rib in
zelenjave. Toplota hitreje prodre v živilo, trajanje pečenja in
predgrevanja je krajše. Delovanje ventilatorja tudi omogoča hkratno
pečenje različnih jedi na različnih višinah vodil, saj se toplota
enakomerno razporedi v notranjosti pečice, vonji in okusi pa se ne
pomešajo. Če pečete več jedi hkrati, čas pečenja podaljšajte za pribl.
10 minut.
Krožni grelec + ventilator: Delujejo zgornji, spodnji in krožni
grelec ter ventilator, tako da vroč zrak kroži v notranjosti pečice. Učinek
je podoben kot pri načinu pečenja z ventilatorjem.
Žar: Deluje zgornji grelec za žar, kar omogoča uspešno
pripravo jedi na žaru, kebaba in gratiniranih jedi. Žar vklopite na
ustrezno temperaturo in ga predgrevajte 5 minut. Belo meso naj bo
nekoliko bolj oddaljeno od grelca in se peče nekoliko dlje, da bo ostalo
sočno. Rdeče meso in ribe pa lahko postavite na najvišjo višino, pod
rešetko potisnite pekač za lovljenje maščobe.
Žar+ ventilator: Delujeta zgornji grelec in ventilator, s
pomočjo katerega vroči zrak kroži v notranjosti pečice. Za rdeče meso
priporočamo predgrevanje pečice, za belo meso to ni potrebno. Ta
način je idealen za peko nekoliko debelejših kosov mesa, na primer
svinjine ali perutnine. Meso postavite na sredino rešetke na srednji
višini.
Pod rešetko potisnite pekač za lovljenje maščobe, v katerem se bodo
zbirali sokovi in maščoba. Najboljše rezultate boste dosegli, če meso
ne bo preblizu grelca; na polovici predvidenega časa pečenja meso
obrnite.
Žar+ raženj + ventilator: Prednost tega načina, pri katerem
delujejo zgornji grelec, ventilator in motorček za raženj, je v tem, da se
bo živilo enakomerno peklo in se ne bo izsušilo ter s tem postalo
neokusno. Raženj se vrti še približno pet minut po koncu pečenja in s
tem izrabi preostalo toploto v pečici. Predgrevanje pri peki na ražnju ni
potrebno.
Odtaljevanje: Pri tej funkciji okoli zamrznjenega živila kroži
topel zrak, kar pospeši odtaljevanje, ne da bi vročina vplivala na
vsebnost proteinov. Prednastavljena je temperatura 40° C, ki je ni
mogoče spreminjati.
Ohranjanje toplote: Ta način je primeren za pogrevanje
kuhanih jedi. Jed postavite na drugo višino šteto od zgoraj. Primeren je
tudi za odtaljevanje kruha, piz in peciva – živilo postavite na spodnjo
višino. Prednastavljena je temperatura 60°C, ki je ni mogoče
spreminjati.
Pizza: Pri tej funkciji vroči zrak kroži v notranjosti pečice, kar
zagotavlja popolne rezultate pri peki pizz, kolačev ipd.
PYRO – Pri pečicah s funkcijo pirolize se notranjost pečice
očisti samodejno. Na voljo sta možnosti ECO in SUPER.
42 SL
Page 43

5.3 PROGRAMIRANJE
PRIKAZ SIMBOLOV
Luč
Nastavljanje Časa
Števec minut
Programiranje časa za
STOP
konec programa
Gumb za
programiranje
ŠTEVEC MINUT
Če izberete to možnost, programska ura deluje neodvisno od pečice
kot števec minut, in ne vpliva na delovanje grelcev.
•Obrnite gumb na simbol števca minut; prikaže se ustrezen simbol. Na
prikazovalniku je vidna vrednost 00:00.
•Utripa vrednost za minute. Z obračanjem osrednjega gumba nastavite
ustrezno število minut in potrdite izbiro s pritiskom na isti gumb.
•Utripati začne vrednost za ure. Z obračanjem osrednjega gumba
nastavite ustrezno število ur in potrdite izbiro s pritiskom na isti gumb.
•Obrnite gumb nazaj na položaj STOP.
Ko preteče nastavljeni čas, prikaz časa izgine. 15 sekund se oglaša
zvočni signal, simbol števca minut utripa. Če želite predčasno utišati
zvočni signal, pritisnite na osrednji gumb.
PROGRAMIRANJE TRAJANJA PEČENJA
Pri številnih receptih je trajanje pečenja vnaprej določeno. Trajanje
pečenja lahko določite v ročnem načinu, v načinu za odtaljevanje ali
ohranjanje toplote.
•Obrnite gumb na simbol za trajanje pečenja; prikaže se ustrezen
simbol. Prikaže se predvideno trajanje pečenja za različne recepte, pri
drugih izbranih funkcijah pa je na prikazovalniku vidna vrednost 00:00.
•Utripa vrednost za minute. Z obračanjem osrednjega gumba nastavite
ustrezno število minut in potrdite izbiro s pritiskom na isti gumb.
•Utripati začne vrednost za ure. Z obračanjem osrednjega gumba
nastavite ustrezno število ur in potrdite izbiro s pritiskom na isti gumb.
•Obrnite gumb nazaj na položaj STOP v potrditev novega trajanja
pečenja.
Ko preteče nastavljeni čas, prikaz časa izgine. 15 sekund se oglaša
zvočni signal, simbola za trajanje pečenja in STOP pa utripata.
•Obrnite gumb za izbiranje funkcij nazaj na položaj STOP. Če tega ne
storite, bosta simbola za trajanje pečenja in STOP še naprej utripala.
Programiranje trajanja pečenja
Aktivirano varovalo za otroke
Zaklenjena vrata pečice
nadaljuje do predhodno nastavljenega časa za konec pečenja, ko se
pečica samodejno izklopi.
OPOZORILO
Če izberete funkcijo Konec pečenja, ne da bi nastavili čas za Trajanje
pečenja, začne pečica delovati takoj in se izklopi ob času,
nastavljenem za Konec pečenja.
5. NEKAJ KORISTNIH NASVETOV4
Bolje je, da mesa ne solite, saj maš še bolj intenzivno
brizga iz mesa. Tako se pečica bolj umaže, pojavi pa se tudi več dima.
Belo meso, svinjino, teletino, jagnjetino in ribe lahko postavite v
hladno pečico. Pečenje bo trajalo nekoliko dlje kot v prej ogreti pečici,
toda meso se bo dobro speklo tudi v sredini, ker ima tako toplota več
časa, da prodre v notranjost večjega kosa mesa.
Za uspešno peko rdečega mesa pa je ključnega pomena predhodno
segrevanje pečice!
ŽAR
• Pred postavljanjem mesa v pe
Meso vzemite iz hladilnika več ur pred peko na žaru. Položite kose na
več plasti papirnatih brisačk – tako bo meso bolj okusno in v sredini ne
bo ostalo hladno.
Meso pred peko na žaru poprajte in začinite, sol pa dodajte po
pečenju. Tako se bo lepše speklo in ostalo sočno. Kose namažite z
malo olja, najbolje s širokim čopičem. Nato kose še malo popoprajte in
začinite z zelišči (timijan ipd.).
• Med peko
Nikoli ne prebadajte mesa, niti pri obračanju kosov. Tako iz njega
izteče sok in se izsuši.
Pecivo
Izogibajte se uporabi svetlih pekačev, saj ti odbijajo toploto in lahko
pokvarijo rezultat pečenja. Če pecivo prehitro potemni, ga pokrijte s
povoščenim papirjem ali alu-foljijo.
Pozor: Folijo obrnite s svetlečo stranjo proti kolaču. Če ne, se toplota
odbija od svetleče strani in ne prodre v živilo.
Prvih 20 do 25 minut pečenja ne odpirajte vrat pečice.
Narastki, brijoši, biskvit ipd. se rado posede. Ko želite preveriti, če je
jed gotova, pecivo prebodite z nožem ali kovinsko pletilko na sredini.
Če je nož ali pletilka čista in suha, je pecivo gotovo. Če pa je nož ali
pletilka vlažna ali se oprime nanj testo, nadaljujte s pečenjem, vendar
nekoliko znižajte temperaturo, da se speče do konca, a se pri tem ne
zažge.
čoba zaradi soli
čico
PROGRAMIRANJE ČASA ZA KONEC PEČENJA
Pri številnih receptih je trajanje pečenja vnaprej določeno, tako da
veste, čez koliko časa bo jed gotova. Čas za konec pečenja lahko
določite v ročnem načinu, v načinu za odtaljevanje ali ohranjanje
toplote.
• Obrnite gumb na simbol za konec pečenja; prikaže se simbol STOP.
Prikaže se predvideni konec pečenja za različne recepte, pri drugih
izbranih funkcijah pa je na prikazovalniku vidna vrednost 00:00 ali čas
dneva.
• Z obračanjem gumba potrdite čas za konec pečenja.
• Utripa vrednost za minute. Z obračanjem osrednjega gumba
nastavite ustrezno število minut in potrdite izbiro s pritiskom na isti
gumb.
• Utripati začne vrednost za ure. Z obračanjem osrednjega gumba
nastavite ustrezno število ur in potrdite izbiro s pritiskom na isti gumb.
Opomba: Ob nastavitvi zamika vklopa se na prikazovalniku ob
simbolih Trajanje pečenja in Stop prikaže tudi Konec programa, ostane
prikazana še samo funkcija Recepti.
Pečica samodejno preračuna čas za vklop (čas konca pečenja minus
določeni čas pečenja).
Ko preteče potrebni čas, se pečica samodejno izklopi. 15 sekund se
oglaša zvočni signal, simbola za trajanje pečenja in STOP pa utripata.
• Obrnite gumb za izbiranje funkcij nazaj na položaj STOP. Če tega ne
storite, simboli za še naprej utripajo.
Ta funkcija se običajno uporablja v kombinaciji s funkcijo Trajanje
•
pečenja.
Če na primer želite, da se jed peče 45 minut, gotova pa mora biti ob
12:30:
- izberite ustrezno funkcijo;
- nastavite Trajanje pečenja 45 minut;
- nastavite čas za Konec pečenja na 12:30.
Pečenje se začne samodejno ob 11:45 (12:30 minut 45 minut) in se
6. PIROLIZA (odvisno od modela)
** To velja samo za pečice, ki imajo to funkcijo!
Pečica je opremljena s sistemom za pirolitsko čiščenje, pri katerem se
ostanki hrane sežgejo pri visoki temperaturi. Ta postopek poteka
samodejno na osnovi programiranja. Dim, ki pri tem nastaja, se očisti
pri prehajanju skozi pirolizator, ki se aktivira, takoj ko se začne izvajati
postopek. Ker so za ta postopek potrebne zelo visoke temperature, so
vrata pečice opremljena s posebnim varnostnim zapahom.
Postopek lahko v vsakem trenutku prekinete, vrat pa ne morete
odpreti, dokler je prikazan simbol za zaklenjena vrata.
OPOMBA: Če je nad pečico vgrajena kuhalna plošča, nikoli ne
prižigajte gorilnikov za plin in ne vklapljajte kuhališč, dokler poteka
piroliza, da ne bi prišlo do pregrevanja kuhalne plošče.
Prednastavljena sta dva pirolitska programa:
- ECO PYROCLEAN: za čiščenje zmerno umazane pečice; traja 65
minut.
- SUPER PYROCLEAN: za čiščenje zelo umazane pečice; traja 90
minut.
Za čiščenje pirolitske pečice nikoli ne uporabljajte čistil za
pečice, ki so na voljo v trgovinah.
Nasvet: Če vklopite čiščenje s pirolizo takoj po pečenju, s tem izrabite
preostalo toploto in prihranite na energiji!
Pred vklopom programa pirolize:
-Odstranite vso opremo iz pečice. Oprema namreč ne prenese tako
visokih temperatur, kot se razvijejo med pirolizo, in bi se poškodovala.
-Očistite večje madeže in razlito tekočino, saj bi ti zahtevali
predolgotrajno segrevanje, da bi se sežgali. Če je zelo veliko
maščobe, bi se lahko ta vžgala zaradi zelo visokih temperatur med
pirolizo.
43 SL
Page 44

-Zaprite vrata pečice.
-Razlito tekočino pred čiščenjem obrišite.
Ob koncu programa indikator ponovno utripa in ostane osvetljen,
dokler se temperatura v notranjosti pečice ne zniža.
Po pirolizi na stenah pečice ostanejo bele sledi. Počakajte, da se
pečica povsem ohladi, nato pa notranjost do čistega obrišite z vlažno
gobico.
1- Obrnite stikalo za izbiranje funkcij na položaj .
Na prikazovalniku se prikažeta kratici " ECO" ali "SUP".
2. Predvideno trajanje pirolize je 65minut; ta čas lahko s
programsko uro spremenite s 65minut (način Eco) na 90 minut
(način Sup) – to storite s tipko + ali - . Če je pečica zelo
"" ""
umazana, priporočamo, da izberete trajanje v času 90minut, če pa
je pečica srednje umazana, izberite krajši program 65 minut.
3. Začetek pirolize lahko zamaknete – s pomočjo programske ure
spremenite čas za konec programa (END).
4. Po nekaj minutah, ko se temperatura v notranjosti pečice
dvigne, se vrata samodejno zaklenejo.
5. Program pirolize lahko v vsakem trenutku prekinete – obrnete
stikalo za izbiranje funkcij nazaj na .
"
0 "
6- Ko je program pirolize zaključen, se piroliza samodejno izklopi.
Na prikazovalniku se prikaže napis " END" in " " " dokler so
0 - - n
vrata zaklenjena.
7- Obrnite gumb za izbiranje funkcij nazaj na " ". Če je
0
temperatura v notranjosti pečice še visoka, se spet prikaže napis
" " kar vas opozarja, da so vrata zaklenjena.
n
0 - -
7. SISTEM ZA VARNOST OTROK
Varnost je zelo pomembna, še predvsem,
funkcija preprečuje, da bi otrok slučajno vklopil pečico ali spremenil
nastavitve.
Sistem omogoča, da onemogočite delovanje tipk – jih 'zaklenete',
medtem ko pečica deluje.
Na voljo sta dve stopnji varnosti:
STOPNJA 1: Zaklepanje gumba za izbiranje funkcij in osrednjega
gumba.
- Aktiviranje: Obrnite gumb za programiranje na Varnost otrok.
- Učinek: Gumba se ne odzivata.*
- Deaktiviranje: Obrnite gumb za izbiranje funkcij na 0.
STOPNJA 2: Zaklepanje gumba za izbiranje funkcij.
- Aktiviranje: Obrnite gumb za izbiranje funkcij na Varnost otrok in 3
sekunde pritiskajte na osrednji gumb.
- Učinek: Noben od gumbov se ne odziva.*
- Deaktiviranje: Postopek je enak kot pri aktiviranju. Obrnite gumb za
izbiranje funkcij na Varnost otrok in 3 sekunde pritiskajte na osrednji
gumb.
*Opomba: V vseh primerih lahko zaradi večje varnosti pečico
izklopite z obračanjem na 0, tudi če so gumbi 'zaklenjeni'.
če so v družini otroci. Ta
44 SL
Page 45

SICHERHEITSVORSCHRIFTEN
WARNUNG: Das Gerät und die zugänglichen Teile des Gerätes werden während des Betriebs heiß. Das
Berühren der heißen Geräteteile sollte vermieden werden.
• Kinder unter 8 Jahren sollten ohne Aufsicht nicht in die Nähe des Gerätes gelassen werden.
• Dieses Gerät ist nicht bestimmt zum Gebrauch durch Personen (einschließlich Kindern) mit
beeinträchtigten körperlichen, sensorischen oder geistigen Fähigkeiten oder durch Personen, die keine
entsprechenden Erfahrungen oder Kenntnisse besitzen, es sei denn, sie werden beaufsichtigt oder
angewiesen durch eine Person, die für ihre Sicherheit verantwortlich ist.
• Kinder dürfen nicht mit dem Gerät spielen.
• Die Reinigung und Wartung des Gerätes darf nicht durch Kinder ohne Aufsicht durchgeführt werden.
• Während des Betriebs wird das Gerät heiß. Bitte vermeiden Sie die Berührung der heißen Geräteteile.
WARNUNG: zugängliche Geräteteile werden während des Betriebs heiß. Kinder sollten fern gehalten
werden.
• Nutzen Sie keine scharfen oder scheuernden Reiniger oder scharfe Metallreiniger um den Herd und
das Glass zu reinigen, da dadurch Kratzer auf der Oberfläche entstehen können.
• Der Ofen muss ausgeschaltet werden, bevor der Deckel zur Reinigung entfernt wird. Anschließend den
Deckel gemäß der Anweisungen wieder montieren.
• Nutzen Sie nur die empfohlene Temperatureinstellung für den Ofen.
• Nutzen Sie kein Dampfreinigungsgerät zur Reinigung des Ofens.
WARNUNG: Um einen elektrischen Schlag zu vermeiden, vergewissern Sie sich, dass der Herd
ausgeschaltet ist, bevor Sie die Ofenlampe auswechseln.
• Die Abschaltung muss mit einer festen Verdrahtung im Einklang mit den Verkabelungsregeln
durchgeführt werden.
• Die Bedienungsanleitung legt die Art des Kabels, das genutzt werden soll, in Abhängigkeit von der
Maximal-Temperatur des Geräts fest.
• Ist das Gerätekabel beschädigt, muss es durch ein spezielles Kabel ersetzt werden, welches beim
Kundendienst/Hersteller erhältlich ist.
ACHTUNG: Um elektrische Schläge durch unbeabsichtigtes Zurückstellen des Wärmerelais zu
vermeiden, sollte das Gerät nicht über eine externe Schalteinrichtung versorgt werden, wie
beispielsweise ein Timer oder einem Stromkreislauf, der regelmäßig ausgeschaltet wird.
ACHTUNG: Zugängliche Teile können sich erhitzen, wenn der Grill in Benutzung ist. Kinder sollten daher
fern gehalten werden.
• Verschüttete Lebensmittel/Flüssigkeiten müssen beseitigt werden.
• Während der Selbstreinigung kann die Oberfläche heißer werden als gewöhnlich. Bitte halten Sie daher
Kinder fern.
45 DE
Page 46

1. ALLGEMEINE HINWEISE
Lesen Sie diese Bedienungsanleitung aufmerksam durch: sie enthält wichtige Hinweise zur korrekten Benutzung Ihres Gerätes. Bewahren Sie
dieses Dokument zur späteren Benutzung sorgfältig auf. Notieren Sie die Seriennummer Ihres Gerätes im Falle, dass Sie Hilfe vom Kundendienst
benötigen. Wenn Sie Ihr Gerät ausgepackt haben, stellen Sie sicher, dass das Gerät nicht beschädigt ist. Achten Sie bitte darauf, dass Sie
Materialien wie Plastikbeutel, Polystyrol oder Nägel aus der Reichweite von Kindern fernhalten. Der Hersteller ist nicht verantwortlich, wenn die in
diesem Dokument zur Verfügung gestellten Anleitungen nicht erfüllt werden.
ACHTUNG: Funktionen, Eigenschaften und Zubehörteile von Backöfen die in diesem Handbuch erwähnt werden, können modellabhängig sein.
1.1 KONFORMITÄTSERKLÄRUNG
Dieses Gerät entspricht der EU-Vorschrift 89/109 für die
Bereiche, die mit Lebensmitteln in Berührung kommen.
Das Gerät entspricht den Europäischen Richtlinien 2006/95CE
und 2004/108/EC sowie deren nachträglichen Veränderungen.
1.2 SICHERHEITSHINWEISE
•
Dieses Gerät darf ausschließlich für den Zweck eingesetzt werden,
für den es hergestellt wurde, nämlich die Zubereitung von Speisen.
Jede andere Anwendung (beispielsweise das Heizen von Räumen)
ist deshalb als zweckentfremdet zu betrachten und demzufolge
gefährlich. Der Hersteller kann für eventuelle Schäden, die auf einen
ungeeigneten, fehlerhaften und unvernünftigen Einsatz
zurückzuführen sind, nicht verantwortlich gemacht werden.
Die Verwendung jedes elektrischen Gerätes erfordert die Beachtung
einiger grundsätzlichen Regeln. Das sind insbesondere:
-das Gerät nicht mit nassen oder feuchten Händen oder Füßen
berühren.
- das Gerät nicht barfuss bedienen
- verhindern Sie, dass Kinder oder unfähige Personen unbeaufsichtigt
am Gerät hantieren
-bei Ausfällen und/oder Funktionsstörungen ist das Gerät
abzuschalten. Versuchen Sie nicht, den Fehler auf eigene Faust zu
beheben.
Bei Beschädigung des Zuleitungskabels ist dieses so schnell wie
möglich auszutauschen. Dies ist ausschließlich durch qualifiziertes
Fachpersonal durchzuführen, unter Beachtung folgender Hinweise:
Blechschutzdeckel abnehmen, Kabel abschrauben und durch ein
anderes Typ H05VV-F ersetzen. Das Kabel muß der Leistung des
Gerätes entsprechen. Der Erdleiter (gelb-grün) muß
vorschriftsgemäß10mm länger sein als die Hauptleiter. Bei einer
erforderlichen Reparatur wenden Sie sich bitte an Ihren zuständigen
Werkskundendienst und verlangen Sie die Verwendung von OriginalErsatzteilen.
•Der Ofen, den Sie gerade erworben haben, hat die beschriebenen
technischen Eigenschaften, und Sie müssen keine Modifizierungen
dazu machen.
•Verwenden Sie nie Dampf oder Spray, um den Ofen zu reinigen.
Bewahren Sie feuergefährliche (leicht entzündliche) Teile nicht im
Ofen auf; sie können Feuer fangen, wenn der Ofen eingeschaltet wird.
•Lassen Sie Kinder nicht auf der Ofentür sitzen. Benutzen Sie
Handschuhe, wenn Sie etwas darin stellen wollen oder einen Teller
vom Ofen entfernen.
•VORSICHT: Zugängliche Teile können heiß werden, wenn der Grill in
Gebrauch ist. Kleine Kinder sollten ferngehalten werden.
1.4 INSTALLATION
Der Hersteller hat keine Verpflichtung die Installation auszuführen.
Eventuell an den Hersteller herangetragene Ansprüche, die auf einen
falschen Einbau zurückgehen, sind von jeder Garantieleistung
ausgeschlossen. Der Einbau muss entsprechend der Anleitung und
durch qualifiziertes Fachpersonal erfolgen. Durch einen falschen
Einbau können Schäden an Personen, Tieren oder Sachen
verursacht werden, für die der Hersteller nicht verantwortlich gemacht
werden kann. Damit eine einwandfreie Funktion des Einbaugerätes
gewährleistet ist, muss der Umbauschrank unbedingt über
entsprechende Eigenschaften verfügen. Die Wände der am Backofen
angrenzenden Schränke müssen aus einem 70 Grad
hitzebeständigem Material sein.
Der Ofen kann hoch in einer Säule oder unter einer Arbeitsplatte
gelegen werden. Damit eine gute Belüftung gewährleistet ist, muss
der Backofen unter Einhaltung der angegebenen Abstände installiert
werden.
1.5 ELEKTRISCHER ANSCHLUSS
Der elektrische Anschluss darf ausschließlich durch qualifiziertes
Fachpersonal (Elektroinstallateur) erfolgen. Die Installation muss den
Sicherheitsvorschriften der Normanstalten entsprechen. Beim
direkten Anschluss ans Netz ist darauf zu achten, dass zwischen dem
Gerät und dem Versorgungsnetz ein der Last entsprechender,
genormter Mehrfachschalter eingebaut wird. Der Netzanschluss
muss bei dem eingebauten Gerät jederzeit leicht zugänglich sein. Die
elektrische Sicherheit dieses Gerätes ist nur dann gewährleistet,
wenn es vorschriftsgemäß an einen einwandfrei funktionierenden
Erdleiter angeschlossen ist, in Übereinstimmung mit den für die
elektrische Sicherheit geltenden Normen.
Anschluss:
Der Herd ist mit einem Stromanschlusskabel ausgestattet, welches
einen Anschluss von 220-240 V zwischen Phasen-Wechselstrom und
Neutralleiter ermöglicht.
Vor dem Anschluss müssen folgende Punkte überprüft werden:
-Spannung und Versorgungsfrequenz auf der Typenkennzeichnung
-WICHTIG: Der Hersteller kann für eventuelle Schäden, die auf eine
fehlende oder fehlerhafte Erdung zurückzuführen sind, nicht zur
Verantwortung gezogen werden.
1.3 EMPFEHLUNGEN
Nach jedem Gebrauch des Ofens wird ein Minimum der Reinigung
helfen, den Ofen vollkommen sauber zu halten. Linieren Sie die OfenWände mit Aluminiumfolie. Aluminiumfolie oder jeder andere Schutz,
im direkten Kontakt mit dem heißen Email, vermeidet, dass das Email
im Inneren(Innenseiten) des Ofens beschädigt wird. Um
übermäßigen Schmutz im Ofen und dem daraus resultierende
starken qualmigen Geruch zu vermeiden, empfehlen wir, den Ofen bei
einer sehr hohen Temperatur nicht zu verwenden. Es ist besser, die
Kochzeit zu verlängern und die Temperatur ein wenig zu senken.
Typenkennzeichnung:
Code produit:
Numéro de série :
46 DE
Page 47

2. ZUBEHÖR (Modellabhängig)
2.1 BACKOFEN ZUBEHÖR
Vor dem ersten Gebrauch des Zubehörs ist es notwendig die
einzelnen Zubehörteile zu reinigen.
Dem Grillrost können Formen und Teller aufgelegt werden.
Wie benutzt man den Drehspieß:
1.Lösen Sie die Schrauben vom Haken
2.Setzen Sie den Spieß in das Fleisch
3.Fixieren Sie das Fleisch mit den Haken
4.Ziehen Sie die Schrauben zu
5.Legen Sie den Spieß in den Ofen
6.Demontieren Sie den Griff
Wenn der Ofen in Betrieb ist, sollte das nicht verwendete Zubehör
aus dem Ofen entfernt werden.
2.3 U-SEE
Der Soßenfänger ist zum Auffangen des Saftes der Grillstücke
bestimmt. Den Soßenfänger niemals als Unterlage zum Braten
verwenden.
Der Pizza-Stein für eine knusprige Pizza: Ist modellabhängig und mit
einem Pizza Roller ausgestattet.
Das Backblech ist für das Backen verschiedener Gebäckteile wie
z.B. Kekse. Stellen Sie das Backblech nie auf dem Ofen-Boden.
Das ist ein Beleuchtungssystem, dass die traditionelle Glühbirne
ersetzt. 14 LED-Leuchten sind in der Backofentür integriert. Das
erzeugte Licht ist sehr hell und ermöglicht eine fast schattenfreie Sicht
auf allen Ebenen im Backofeninneren.
Die Vorteile:
Neben der herausragenden Qualität und Intensität der Beleuchtung,
bietet das System U-See auch eine längere Lebensdauer im
Vergleich zu herkömmlichen Backofenlampen, ist außerdem leicht zu
reinigen und vor allem sehr sparsam im Enerigeverbrauch.
- optimale Übersicht auf allen Backofenebenen
- zuverlässige Funktion und lange Lebensdauer
- hohe Helligkeit bei sehr niedrigen Energieverbrauch, bis zu 95%
weniger als herkömmliche Backofenbeleuchtung
- leicht zu reinigen
2.4 ENTFERNEN UND REINIGUNG DES GRILLROSTS
1. Entfernen Sie den Rost durch ziehen aus der Vorrichtung.
2. Reinigen Sie den Rost in der Spülmaschine oder reinigen Sie es mit
einem nassen Schwamm und trocknen Sie danach ab
3. Nach dem Reinigungsprozess installieren Sie den Rost in umgekehrter
Reihenfolge.
2.2 GRILLSPIEß (MODELLABHÄNGIG)
Für das Benutzen des Grillspießes, ist das Vorheizen nicht notwendig.
Das Grillen nur mit geschlossener Backofentür. Bei Verwendung des
Grillspießes ist der Energieverbrauch 90-95% geringer als bei
herkömmlichen Systemen.
3
2
1
4
1- Rost
2- Spieß
3- Haken und Schrauben
4- Griff
3. REINIGUNG DES BACKOFENS
Warten Sie bis der Ofen herunterkühlt um den Ofen mit der Hand zu
•
reinigen.
•Vermeiden Sie unbedingt den Gebrauch von scheuernden
Reinigungsmitteln in Pulverform, da diese die Emaille des Backofens
und die äußeren Zierteile beschädigen können.
•Vermeiden Sie unbedingt den Gebrauch von scheuernden
Reinigungsmitteln in Pulverform, da diese die Emaille des Backofens
und die äußeren Zierteile beschädigen können.
•Bedecken Sie nicht die Backofenseiten mit Aluminiumfolie.
Glass Teile
Wir empfehlen Ihnen, dass Sie die Glastür mit absorbierendem
Küchenpapier wischen. Wenn die Glass Teile stark verschmutzt sind,
können Sie Reinigungsmittel verwenden.
Benutzen Sie keine scheuernden oder ätzenden Mittel und keine
Stahlwolle um die Backofentür zu reinigen. Diese können die
Backofentür beschädigen.
Zubehör
Reinigen Sie das Zubehör mit Seifenwasser. Benutzen Sie kein
scheuerndes oder ätzendes Mittel.
47 DE
Page 48

Soßenfänger
1
2
3
Nachdem Grillen entfernen Sie den Soßenfänger vom Backofen.
Achten Sie darauf, dass das warme Fett in einem Behälter gegossen
wird. Reinigen Sie den Soßenfänger mit heißem Wasser und
Spülmittel. Lassen Sie nie den Soßenfänger verschmutzt im
Backofen stehen.
Backofenbeleuchtung
Bevor Sie die Beleuchtung im Backofen reinigen trennen Sie den
Backofen vom Netz (elektrischen Anschluß). Die Glühbirne und der
zugehörige Deckel sind aus einem widerstandsfähigen Material für
hohe Temperaturen hergestellt worden.
• Entfernen Sie die obere metallische
Abdeckung indem Sie sie nach oben
rausziehen. (Abbildung 4)
Abbildung 4
• Entfernen Sie das Glas indem Sie es
vorsichtig aus dem Türrahmen
rausziehen ( 5)Abbildung
Eigenschaften der Glühbirne
230 V AC – 25W-E 14 Temperatur 300 Grad. Um eine Glühbirne zu
wechseln gehen Sie wie folgt vor:
•Schrauben Sie den Glassdeckel raus
•Schrauben Sie die Glühbirne raus
•Ersetzen Sie die Glühbirne durch denselben Typ, siehe
Eigenschaften oben.
•Nachdem Sie die Glühbirne ausgetauscht haben,
schrauben Sie beide Teile die Glühbirne und den
Glassdeckel in die Ursprungsposition wieder zurück.
REINIGUNG DER BACKOFEN-GLASTÜR
Das innere Glas der Backofentür kann vom Backofen entfernt und
gereinigt werden. Zur Reinigung des inneren Glas folgen Sie diesen
Anweisungen;
•Öffnen Sie die Tür des Backofens.
(Abbildung 1)
Abbildung 1
• Verriegeln Sie die Scharniere bevor
Sie den Reinigungsvorgang starten.
Abbildung 2. Öffnen Sie die Scharniere
wenn der Reinigungsvorgang beendet
ist. (Abbildung 2)
Abbildung 2
• Entfernen Sie die Schrauben wie
in Abbildung 3 dargestellt.
( 3)Abbildung
Abbildung 5
Abbildung 6
• Nach der Reinigung des Glas
montieren Sie die Teile in
umgekehrter Reihenfolge des
Ausbaus.
• Das Low-E Zeichen muss auf
alle Backofengläser problemlos
lesbar sein und sollte links am
Türanschlag positioniert werden
(in der Nähe des linken
Scharniers). Auf diese Weise ist
die bedruckte Glasoberfläche
des ersten Backofenglas an der
Innenseite der Tür.
• * Für Pyrolyse Backöfen
entfernen Sie bitte auch das 2. und
3. Backofenglas. (Abbildung 6)
Abbildung 7
4. TECHNISCHER KUNDENDIENST
Sollte Ihr Backofen einmal nicht richtig funktionieren, prüfen Sie zuerst, ob
die Stromversorgung gewährleistet ist. Ist die Ursache der Fehlfunktion
nicht ausfindig zu machen, wenden Sie sich bitte an Ihren zuständigen
Werkskundendienst unter Angabe des Modells und der Seriennummer,
die auf dem Typenschild angegeben sind. Auf Ihr Gerät gewähren wir eine
Garantie von 24 Monaten ab Kaufdatum. Bewahren Sie Ihre
Kaufrechnung sorgfältig auf und legen Sie sie bei Bedarf als
Garantienachweis dem Kundendienst vor. Die Garantiebedingungen sind
im beigefügten Serviceheft angegeben.
Dieses Elektrohaushaltsgerät ist entsprechend der EURichtlinie 2002/96/CE über Elektro- und ElektronikAltgeräte (WEEE) gekennzeichnet. Bitte sorgen Sie
dafür, dass das Gerät ordnungsgemäß entsorgt wird,
damit mögliche negative Auswirkungen auf Umwelt und
Gesundheit vermieden werden, die bei einer
unsachgemäßen Entsorgung des Altgerätes entstehen
könnten.
Das Symbol auf dem Produkt bedeutet, dass dieses
den jeweiligen kommunalen Rücknahmesystemen für Elektro-und
Elektronik-Altgeräte übergeben werden muss. Die Entsorgung muss im
Einklang mit den geltenden Umweltrichtlinien für die Abfallentsorgung
erfolgen. Für nähere Informationen über Entsorgung und Recycling
dieses Produktes wenden Sie sich bitte an Ihre kommunalen
Einrichtungen (Umwelt amt) oderandie Abfallentsorgungsgesellschaft
Ihrer Stadt bzw. an Ihren Händler.
Gerät nicht in den normalen Hausmüll gehört, sondern
Abbildung 3
48 DE
Page 49

5- BEDIENUNG DER ELEKTRONISCHEN PROGRAMMIEREINHEIT
1. Anzeige Minutenzähler bzw.
Anzeige AUTO (automatischer Betrieb)
2. Umluft mit Ventilator
3. Umluft mit VARIOFAN
auto
U
COOK
4. Abtauen
5. Anzeige für Temperatur bzw. Uhrzeit
6. Einstelltasten
7. Wahlschalter für Betriebsarten
8. Wahlschalter Funktionen und Backzeit
* JE NACH MODELL
WICHTIG! Nach der Installation des Gerätes und nach einem eventuellen Stromausfall (erkennbar durch die blinkende
Anzeige 12:00 im Display) muss zuerst die aktuelle Uhrzeit eingestellt werden.
Die LED-Leuchte “ ° “ der Temperaturanzeige blinkt im Display, bis die eingestellte Temperatur erreicht worden ist.
Wenn der Backofen nach dem Ende eines Backprogramms noch heiß ist, erscheint im Display die Aufschrift HOT abwechselnd
zu der Uhrzeit, selbst wenn die beiden Wahlschalter auf OFF eingestellt sind.
FUNKTION
Signal aus
Uhrzeit
ZUM AKTIVIEREN
• Drehen Sie linken den
Wahlschalter der
Funktionen auf „Signal aus“
• Drehen Sie den linken
Wahlschalter für die das
Symbol „Zei tvorwahl“
• Drücken Sie die
Einstelltasten “+“ bzw. “-“
um die Zeit einzustellen
ZUM AUSSCHALTEN AUSWIRKUNG
• Drehen Sie den
Wahlschalter der
Funktionen au OFF
• Drehen Sie den
Wahlschalter der
Funktionen au OFF
• Schaltet den Signalton
des Minutenzählers aus
• Stellt die im Display
angezeigte Uhrzeit
DIENT ZU:
• Zum Ausschalten des
Signaltons des
Minutenzählers
• Zum Einstellen der Uhrzeit
HINWEIS:
Die Uhrzeit muss nach der
Erstinstallation und nach
einem St romaus f a l l
(Anzeige 12:00 blinkt)
eingestellt werden
dauer des
backvorgangs
Backzeitende
Minutenzähler
Kindersicherung
• Drehen Sie den rechten
Wahlschal ter auf die
gewünschte Betriebsart
• Drehen Sie den linken
Wahlschalter auf das Symbol
„Backdauer“
• Stellen Sie die Dauer durch
Betätigen der Tasten “+“ bzw.
“-“ ein
• Die Anzeige „AUTO“(automatischer Betrieb)leuchtet auf
• Drehen Sie den rechten
Wahlschalter auf die
gewünschte Betriebsart
• Drehen Sie den linken
Wahlschalter auf das
Symbol „Backzeitende“
• Stellen Sie die Zeit durch
Betätigen der Tasten “+“
bzw. “-“ ein
• Die Anzeige „AUTO“
(automatischer Betrieb)
leuchtet auf
• Drehen Sie den linken
Wahlschalter auf das
Symbol Minutenzähler
• Stellen Sie die Zeit durch
Betätigen der Tasten “+“ bzw.
“-“ ein
• Drehen Sie den linken
Wahlschalter auf das
Symbol Kindersicherung
• Drücken Sie die Taste “+“
3 Sekunden lang.
• Die Kindersicherung ist
aktiv, wenn im Display die
Aufschrift „STOP“ erscheint
• Is t die Backdauer
abgelaufen, schaltet sich der
Backofen automatisch aus
und der Summer ertönt einige
Sekunden lang. Um den
Backofen vorher
auszuschalten, drehen Sie
den linken Schalter auf OFF
oder stellen Sie die Zeit auf
00.00 durch Drehen des
Schalters auf das Symbol
„Backdauer“ und durch
Betätigen der Einstelltaste “-“
• Wenn die Backzeit zu
Ende ist, schaltet sich der
Backofen automatisch aus
und der Summer ertönt
einige Sekunden lang. Um
den Backofen vorher
auszuschalten, drehen Sie
den linken Schalter auf
OF
• Stellen Sie die Zeit auf
00.00 durch Drehen des
Schalters auf das Symbol
„ Minutenzähler“ und durch
Betätigen der Einstelltaste
“-“
• Drehen Sie den linken
Wahlschalter auf das
Symbol Kindersicherung
und drehen Sie die Taste
“+“ 3 Sekunden lang
• Die Anzeige STOP im
Display erlischt
49 DE
• Ermöglicht die
Voreinstellung der
Backdauer für das
ausgewählte Rezept.
• Nach erfolgter Einstellung
drehen sie den
Funktionsschalter auf OFF
um zur aktuellen Uhrzeit
zurückzukehren.
• Um die eingestellte
Backzeit anzuzeigen,
drehen Sie den linken
Funktionsschalter auf das
Symbol Backdauer
• Ermöglicht die Einstellung
des Backzeitendes nach
Wunsch
• Nach erfolgter Einstellung
drehen sie den
Funktionsschalter auf OFF
um zur aktuellen Uhrzeit
zurückzukehren.
• Um die eingestell te
Backzeit anzuzeigen,
drehen Sie den linken
Funktionsschalter auf das
Symbol Backzeitende
• Es ertönt ein kurzer
Signalton am Ende der
eingestellten Zeit
• Der Backkofen kann nicht
eingeschaltet werden
• Zum Backen mit
festgelegter Backdauer
• Diese Funktion dient zur
Programmierung einer
Startzeitvorwahl.Wenn Ihr
Rezept z.B. 45 Min
gebacken werden soll und
um 12:30 Uhr fertig sein
soll, stellen Sie einfach die
Backdauer auf 45 Min und
das Backzeitende auf
12:30 Uhr. Der Backofen
wird um 11:45 Uhr
automatisch starten und
sich nach 45 Minuten
automatisch ausschalten
• Ermöglicht die Nutzung
des Timers als
Minutenzähler selbst wenn
der Backofen
ausgeschaltet ist
• Nützlich vor allem wenn
Kinder im Haus sind
Page 50

5.1
NÜTZLICHE HINWEISE VOR DEM ERSTEN
BETRIEB DES BACKOFENS
Reinigung
-Reinigen Sie den Backofen vor der ersten Nutzung:
-Wischen Sie die Außenoberfläche mit einem feuchtem weichem Tuch.
-Reinigen Sie das komplette Zubehör und waschen Sie den
Backofeninnenraum mit einer Lösung aus heißem Wasser.
-Vergewissern Sie sich das Sie kein Zubehör im Ofen liegen lassen.
Schließen Sie nach der Reinigung des leeren Backofens die Tür und
stellen Sie die maximale Temperatur ein. Warten Sie 1 Stunde und
schalten Sie den Backofen wieder aus. Mit dieser Vorgehensweise
lassen sich alle unangenehmen Gerüche neuer Produkte entfernen.
•Denken Sie an folgende Punkte:
Jede Änderung muss über die Bedientaste bestätigt werden.
Den Backofen stoppen:
Dies ist erforderlich wenn Sie eine falsche Funktion eingestellt haben.
Um den Backofen zu stoppen drehen Sie den Knebel auf die StoppPosition zurück.
Kindersicherung:
Um die Bedientasten des Backofens zu sperren müssen Sie das Symbol
der Kindersicherung auswählen. Lesen Sie hierzu die Einstellung –
Programmierung der Kindersicherung.
Der Kühlventilator:
Das Bedienfeld und die Elektronik des Backofens werden hierdurch
geschützt. Es startet und endet automatisch, selbst wenn der Backofen
ausgeschaltet wird.
Backofenbeleuchtung:
Um die Backofenbeleuchtung zu aktivieren drehen Sie den Schalter auf
das Symbol der Beleuchtung. Ist der Ofen in Gebrauch dann bleibt die
Beleuchtung über alle Funktionen hinweg eingeschaltet.
5.2 BENUTZUNG DES BACKOFENS
•Manueller Modus
Die empfohlenen manuellen Einstellungen für das Backen und Grillen
werden in der unteren Tabelle verdeutlicht. Eine Temperatur wird
ebenfalls für jede Einstellung empfohlen.
Funktion
(modellabhängig)
Umluft + Unterhitze
Unterhitze
Unterhitze + Oberhitze
Unterhitze + Oberhitze + Umluft
Heißluft
Grill
Grill + Umluft
Grill + Drehspieß + Umluft
Auftauen
Warm halten
Pizza
Pyro Pyro
*Booster: schnelle steigende Temperatur
**Backofen muss mit dieser Funktion ausgestattet sein
Voreinstellung
Temperatur
°C
210
160
220 50-240
210
180
L2
190
240
40
60
230
**
**
1- Drehen Sie den Wahlschalter zu der gewünschten Funktion. Die
Beheizung zu der ausgewählten Funktion wird auf dem Display
angezeigt.
2- Die passende Temperatur gemäß der ausgewählten Funktion wird
angezeigt. Sie kann innerhalb der vordefinierten Temperaturreihe
(siehe obige Tabelle) verändert werden. Um die
Temperatureinstellung zu ändern, drehen Sie die Bedientaste in der
Mitte und bestätigen Sie die Einstellung indem Sie die gleiche Taste
drücken. ….die Temperaturanzeige ist vorgegeben aber
kann während des Backvorgangs verändert werden. Der Backofen ist
nun eingeschaltet und startet die Aufheizphase. Die Anzeigelampe
blinkt mehrere Male bis die ausgewählte Temperatur erreicht wird. Ein
hörbares Signal ertönt wenn dieser Vorgang abgeschlossen ist.
3- Die Backdauer oder das Backzeitende kann dadurch eingestellt
werden, wenn Sie den Wahlschalter auf die Position „Backdauer“
oder "Backzeitende" drehen. Die Anzeige „Backdauer“ oder das
„Backzeitende“ fängt an zu blinken. Stellen Sie die Zeiten indem Sie
die Bedientaste in der Mitte betätigen. Bestätigen Sie dann durch
Vordefinierte
Temperatur
°C
50-220
50-220
50-230
50-230
L1-L3
50-200
180-240
No
No
230
ECO: 425 /
SUP: 425 / 1h 30min
65min
Funktion
Booster*
Booster
Booster
Booster
Booster
drücken. Vergessen Sie nicht den Wahlschalter auf die Position STOP
zurückzudrehen um die neuen Einstellungen abzuspeichern.
Für weitere Details über das Programmieren sehen Sie dazu Kapitel
5.3 Programmierungen.
4- Drehen Sie den Wahlschalter am Ende des Backvorgangs auf die
Position Stopp zurück. Die Anzeige blinkt nochmals. Die Anzeige
erlischt bis die Temperatur des Backofens eine niedrige Temperatur
erreicht hat.
Backfunktionen
Umluft + Unterhitze: Diese Funktion eignet sich
insbesondere für Kuchen mit saftigen Früchten und Gebäck. Sie
verhindert das Austrocknen der Lebensmittel und fördert das
„Aufgehen“ des Teigs, der Kuchen, des Brotes und jeder Speise, die
mit Unterhitze gebacken werden soll. Bei dieser Betriebsart schieben
Sie die Ablage in die untere Ebene ein.
Unterhitze: Bei dieser Funktion wird die größte Hitze im
unteren Bereich des Ofens erreicht. Unterhitze eignet sich besonders
für Gebäck und Kuchen.
Unterhitze + Oberhitze: Bei dieser Funktion werden
Lebensmittel gleichmäßig von oben und unten erhitzt. Es ist die
traditionelle Art zu garen. Ausgezeichnet geeignet zum Braten von
Rindfleisch, Keulen und ideal für Plätzchen und Kekse und für alle
Speisen die knusprig werden sollen.
Unterhitze + Oberhitze + Umluft: Bei dieser Funktion wird
heiße Luft an den oberen und unteren Heizelementen entlang geleitet
und durch den Lüfter gleichmäßig im Inneren des Backofens verteilt.
Diese Funktion empfehlen wir für Geflügel, Fisch, Gemüse und
Gebäck.
Heißluft: Luft die aufgeheizt worden ist wird in die
verschiedenen Ebenen im Backraum geblasen. Es ist ideal um
verschiedene Gerichte (z.B. Fleisch und Fisch) zur gleichen Zeit zu
braten ohne dabei den Geruch und den Geschmack zu vermischen.
Geeignet auch für schonendes Backen, z.B. für Blätterteig, Biskuitteig
o.Ä.
Grill: Wenn Sie den Grill benutzen, muss die Ofentür
geschlossen sein. Es wird nur das obere Heizelement verwendet. 5
Minuten Vorwärmezeit sind notwendig, bis das Heizelement zu
glühen anfängt. Diese Betriebsart garantiert ausgezeichnete
Ergebnisse beim Grillen von Fleisch oder Fisch, Spießchen: auch
zum Gratinieren wird sie vorzugsweise verwendet. Weißes Fleisch
sollte nicht allzu nahe am Grillelement gelegt werden, dadurch
verlängert sich zwar die Grillzeit, das verreicht jedoch dem
Geschmack der Gerichte zum Vorteil. Rotes Fleisch und Fischfilets
können auf den Grillrost gelegt werden, mit der Auffangschale
darunter.
Grill + Umluft: Bei dieser Funktion arbeiten Grill, oberes
Heizelement und Umluft zusammen und sorgen für ein besonders
gleichmäßiges Garen. Grillgerichte geben Sie auf das Grillrost, das
Sie auf der höchsten Stufe einschieben. Nachdem Sie das Backblech
in der 3. Position von unten eingeschoben haben, beginnen Sie mit
dem Grillen. Das auf der 3. Position von unten eingeschobene
Backblech sorgt dafür, dass von den Lebensmitteln herabtropfendes
Öl oder Fett aufgefangen wird.
Grill + Drehspieß + Umluft: Der Vorteil alle 3 Funktionen
gleichzeitig zu nutzen Grill, Drehspieß und Umluft ist, dass das
Gericht gleichmäßig gebraten wird. Es verhindert das Austrocknen
der Lebensmittel. Ein Vorheizen ist bei dieser Funktion nicht
erforderlich.
Auftauen: In dieser Einstellung erfolgt eine Luftzirkulation
bei Raumtemperatur zum Auftauen von Tiefkühlkost in wenigen
Minuten, ohne eine Veränderung des Proteingehalts herbeizuführen.
Die Temperatur wird in 40 ° C voreingestellt. Eine Änderung ist nicht
möglich.
Warm halten: Diese Funktion wird empfohlen um fertig
gekochte Lebensmittel wieder aufzuheizen. Dafür schieben Sie das
Backblech von oben aus gesehen in die 2. Ebene. Um Brot oder
Gebäck aufzutauen legen Sie das Backblech in die niedrigste Ebene.
Die Temperatur wird in 60 ° C voreingestellt. Eine Änderung ist
nicht möglich.
50 DE
Page 51

im Backofen ähnliche Bedingungen wie im Holzofen einer Pizzeria.
Pizza: Die umfassende Hitze dieser Funktion reproduziert
Pyro: Bei dieser Funktion wird die Reinigung im Inneren des
Backofens vorgenommen. Zwei Möglichkeiten zur Auswahl, ECO
oder SUPER.
5.3 PROGRAMMIERUNGEN
SYMBOLANZEIGE
Leuchte
Zeiteinstellung
NB: Der Backofen kalkuliert automatisch den Start (Backzeitende
minus Backdauer). Am Ende des Backvorgangs schaltet sich der
Backofen automatisch aus. Ein hörbares Signal ertönt 15 Sekunden
lang, dass daran erinnert, dass das Backzeitende erreicht worden ist.
Die Symbolanzeige Backdauer und STOP fangen an zu blinken.
•Drehen Sie den Wahlschalter auf die Position Stop zurück. Wenn Sie
dies nicht tun, blinken beide Symbole fortlaufend.
ACHTUNG:
Wenn das Backzeitende eingestellt wird ohne dabei die Länge
der Backzeit zu definieren, startet der Backofen den
Backvorgang sofort und stoppt bis zum Ende der eingestellten
Backzeit.
Backdauer einstellen
STOP
Backzeitende einstellen
Wahlschalter
Der Timer:
Der Timer funktioniert unabhängig von den Backofenfunktionen. Er
hat keinen Einfluss auf die Beheizungsarten. Er ist eine
Erinnerungsfunktion.
•Drehen Sie den Schalter in die Timer Position. Die Symbolanzeige
erleuchtet. Auf dem Display erscheint ebenfalls die Anzeige zur
Zeiteinstellung.
•Die Minutenanzeige fängt an zu blinken. Drehen Sie die Bedientaste
zu der gewünschten Minutenzahl und bestätigen Sie indem Sie die
Bedientaste drücken.
•Die Stundenanzeige fängt an zu blinken. Drehen Sie die Bedientaste
zu der gewünschten Stundenzahl und bestätigen Sie indem Sie die
Bedientaste drücken.
•Drehen Sie den Wahlschalter in Ausgangsposition Stop zurück.
Wenn die Zeit abgelaufen ist, erlischt die Backdauer. Ein hörbares
Signal ertönt für 15 Sekunden und die Timeranzeige blinkt auf (um es
zu stoppen bevor die 15 Sekunden abgelaufen sind drücken Sie die
Bedientaste).
Backdauer einstellen:
Für verschiedene Gerichte ist die Backdauer voreingestellt. Wenn
erwünscht, kann die Auftau- und Warmhalte- Funktion im manuellen
Modus voreingestellt werden.
•Drehen Sie den Wahlschalter auf das Symbol der Backdauer. Die
Symbolanzeige erleuchtet. Eine voreingestellte Backdauer (für
verschiedene Gerichte) oder 00:00 für andere Backofenfunktionen
erscheint auf dem Display.
•Die Minutenanzeige fängt an zu blinken. Drehen Sie die Bedientaste
zu der gewünschten Minutenzahl und bestätigen Sie indem Sie die
Bedientaste drücken.
•Die Stundenanzeige fängt an zu blinken. Drehen Sie die Bedientaste
zu der gewünschten Stundenzahl und bestätigen Sie indem Sie die
Bedientaste drücken.
•Drehen Sie den Wahlschalter in Ausgangsposition Stop zurück um
die neue Backdauer abzuspeichern. Wenn die Zeit abgelaufen ist,
erlischt die Backdauer. Ein hörbares Signal ertönt für 15 Sekunden.
Die Symbolanzeige Backdauer/Stop fangen an zu blinken.
•Drehen Sie den Wahlschalter auf die Position Stop zurück. Wenn Sie
dies nicht tun, blinken beide Symbole die Backdaueranzeige und das
Stop Symbol fortlaufend.
Backzeitende einstellen:
Für verschiedene Gerichte ist die Backdauer und das Backzeitende
voreingestellt. Wenn erwünscht, kann die Auftau- und WarmhalteFunktion im manuellen Modus voreingestellt werden.
•Drehen Sie den Schalter auf das Symbol Backzeitende. Das STOP
Symbol erleuchtet. Ein voreingestelltes Backzeitende (für
verschiedene Gerichte) oder 00:00 für andere Backofenfunktionen
oder die Uhrzeit erscheinen auf dem Display.
•Drehen Sie den Wahlschalter um das Backzeitende zu bestätigen.
•Die Minutenanzeige fängt an zu blinken. Drehen Sie die Bedientaste
zu der gewünschten Minutenzahl und bestätigen Sie indem Sie die
Bedientaste drücken.
•Die Stundenanzeige fängt an zu blinken. Drehen Sie die Bedientaste
zu der gewünschten Stundenzahl und bestätigen Sie indem Sie die
Bedientaste drücken.
Timer im Zeitablauf
Kindersicherung
Backofentür sperren
5. TIPPS4
Es ist besser das Fleisch erst nach dem braten, grillen zu salzen, da
das Salz das Spritzen des Fetts fördert. Dies verunreinigt u.a. den
Backofen und macht eine Menge Rauch.
Richtiges Vorheizen ist die Basis für ein gelungenes Fleischgericht.
Grillen:
Bevor man mit dem Grillen anfängt:
Entnehmen Sie das Grillgut einige Stunden vom Kühlschrank. Legen
Sie es auf mehrere Schichten Küchenpapier. Dies macht es
schmackhafter und vermeidet, dass es in der Mitte kalt bleibt. Fügen
Sie Gewürze vor dem Grillen hinzu und salzen Sie das Fleisch erst
nach dem grillen. Grillen Sie das Fleisch mit ein wenig Öl. Das Fleisch
können Sie am besten mit einem breiten flachen Pinsel einölen. Dann
bestreichen Sie es mit Gewürzen wie Pfeffer, Thymian etc.
Während des Grillvorgangs:
Stechen Sie niemals in das Fleisch hinein auch wenn Sie es drehen
möchten. Dies lässt das Fleisch trocken werden.
Backen:
Vermeiden Sie die Verwendung von glänzenden Backformen. Diese
lassen die Hitze reflektieren und haben Einfluss auf den
Backvorgang. Wenn der Kuchen zu schnell bräunt decken Sie es mit
Backpapier oder Aluminiumfolie.
Achtung: Um die Aluminiumfolie richtig zu verwenden, legen Sie die
glänzende Seite auf den Kuchen. Wenn Sie dies nicht tun, wird die
Wärme durch die glänzende Oberfläche reflektiert und dringt nicht in
das Gebäck.
6. PYROLYTISCHE REINIGUNG
** Der Backofen muss mit dieser Funktion ausgestattet sein
Der Backofen ist mit einem pyrolytischen Reinigungssystem, dass
Speisereste bei hohen Temperaturen zerstört, ausgestattet. Da sehr
hohe Temperaturen für das Pyrolysesystem erforderlich sind, ist die
Backofentür mit einem Sicherheitsschloss versehen.
Hinweis: Wenn ein Kochfeld über den Backofen eingebaut ist, dann
dürfen Sie das Kochfeld nicht gleichzeitig mit dem pyrolytischen
Reinigungssystem verwenden. Das Kochfeld kann sonst überhitzt
werden.
Zwei pyrolytische Abläufe sind voreingestellt.
ECO PYROCLEAN: Reinigt einen mäßig verschmutzten Ofen.
Arbeitet in einem Zeitablauf von 65 Minuten.
SUPER PYROCLEAN: Reinigt einen stark verschmutzten Ofen.
Arbeitet in einem Zeitablauf von 90 Minuten.
Aktivierung des pyrolytischen Reinigungssystems:
1-Drehen Sie den Wahlschalter auf „Pyrolytic Modus“. „PYRO“
erleuchtet auf dem Display. Der ECO Modus blinkt.
Zur Erinnerung: ECO – Zeitablauf 65 Minuten. Mäßig verschmutzt.
SUP- Zeitablauf 90 Minuten. Stark verschmutzt.
2-Mit der Bedientaste wählen Sie den gewünschten „Pyrolytic
Modus“: ECO oder SUP.
Ihre Auswahl ist nach 3 Sekunden gespeichert…Der Backofen starten
die Reinigung. Der „Pyrolytic Modus“ blinkt und der Timer-sowie das
Stop-Symbol erleuchten. Während des Reinigungsvorgangs
erleuchtet das Symbol der versperrten Backofentür. Sie gibt Hinweise
darauf, dass die Backofentür gesichert ist.
1. Drehen Sie den Wahlschalter der Betriebsarten auf die Position
. Auf dem Display erscheint die Anzeige " ECO" bzw. " SUP"
.
51 DE
Page 52

2. Die voreingestellte Dauer ist 65min , sie kann jedochvon 65
min. (Eco) auf 90 min. (Sup) verändert werden, wenn man die
Tasten " + " bzw. " - " der Programmiereinheit drückt. Wenn der
Backraum besonders stark verschmutzt ist, empfiehlt sich, die
Dauer der Pyrolyse auf 90min. zu erhöhen. Wenn der Backraum
nur leicht verschmutzt ist, reduzieren Sie die Dauer auf 65min.
3. Es ist möglich, die Startzeit für die Pyrolyse-Reinigung
vorzuprogrammieren. Hierzu geben Sie einfach das gewünschte
Ende des Programms mit der Programmiereinheit ein.
4. Nach wenigen Minuten, sobald der Backofen die hohe
Temperatur erreicht hat, verriegelt sich die Tür automatisch.
5. Der Pyrolyse-Reinigungszyklus kann jederzeit durch Drehen
des Schalters zurück auf 0 abgebrochen werden.
6. Am Ende der Pyrolyse schaltet sich das Programm automatisch
aus. Im Display erscheint dann die Anzeige " END "
solange die Tür noch verriegelt ist, dann die Aufschrift "
0 - - n "
7. Wenn Sie den Wahlschalter zurück auf "
0 " gedreht haben, um
die Pyrolyse abzubrechen, aber der Backofen ist noch sehr heiß,
erscheint im Display die Anzeige "
0 - - n " als Warnung, da
7. KINDERSICHERUNG
Diese Funktion ist wichtig, vor allem wenn Kinder in der Umgebung
sind. Es verhindert, dass die Kinder den Backofen einschalten oder
Änderungen an den voreingestellten Funktionen vornehmen. Dieses
Sicherheitssystem sperrt das Bedienfeld des Backofens.
Es liegen 2 Ebenen des Sicherheitssystems vor:
EBENE 1: Um die Kindersicherung zu aktivieren, drehen Sie den
Wahlschalter auf Kindersicherung. Nach der Aktivierung sind
Bedientasten inaktiv. Um die Kindersicherung zu deaktivieren drehen
Sie den Wahlschalter auf „0“.
EBENE 2: Um die Kindersicherung zu aktivieren, drehen Sie den
Wahlschalter auf Kindersicherung und halten Sie dabei die
Bedientaste in der Mitte für 3 Sekunden gedrückt. Nun sind alle
Bedientasten inaktiv. Um die Kindersicherung zu deaktivieren halten
Sie die Bedientaste für 3 Sekunden gedrückt.
Bemerkungen: In allen Fällen, auch wenn die Bedientasten inaktiv
sind, können Sie den Ofen ausschalten indem Sie den Wahlschalter
auf 0 drehen.
52 DE
Page 53

CONSEILS DE SÉCURITÉ
• AVERTISSEMENT: L'appareil et les parties accessibles deviennent chauds pendant l'utilisation. Des
précautions doivent être prises pour éviter de toucher les éléments chauffants.
• Les enfants de moins de 8 ans doivent être tenus à l'écart à moins d'être surveillés continuellement.
• Cet appareil n'est pas destiné à être utilisé par des personnes (y compris les enfants) dont les capacités
physiques, sensorielles ou mentales sont réduites, ou ayant un manque d'expérience et de
connaissances, à moins qu'elles n'aient été formées à l'utilisation de l'appareil, par une personne
responsable de leur sécurité.
• Les enfants ne doivent jouer avec l'appareil.
• Le nettoyage et l'entretien par l'utilisateur ne doit pas être fait par des enfants sans surveillance.
• En cours d'utilisation l'appareil devient chaud. Des précautions doivent être prises pour éviter de
toucher les éléments chauds à l'intérieur du four.
AVERTISSEMENT: Les parties accessibles peuvent devenir chaudes pendant l'utilisation. Les jeunes
enfants doivent être tenus à l'écart.
• Ne pas utiliser de nettoyants abrasifs ou de racloirs métalliques tranchants pour nettoyer la vitre de la
porte du four car ils peuvent rayer la surface, entrainant des risques d'explosion.
•Le four doit être éteint avant d'enlever la protection et après le nettoyage, la protection doit être replacé
en respectant les instructions.
• Utiliser seulement la sonde de température recommandée pour ce four.
• Ne pas utiliser de nettoyants vapeur pour le nettoyage.
• AVERTISSEMENT: Assurez-vous que l'appareil est éteint avant de remplacer la lampe afin d'éviter les
risques d'électrocution.
• Un système de déconnexion doit être incorporé dans le compteur conformément aux règles de
câblage.
• Les instructions ndiquent le type de cordon à utiliser, en tenant compte de la température de la surface
arrière de l'appareil.
• Si le cordon d'alimentation est endommagé, il doit être remplacé par un cordon spécial disponible
auprès du fabricant ou de stations de dépannage agrées.
ATTENTION: Pour éviter tout danger dû à une réinitialisation accidentelle, cet appareil ne doit pas être
alimenté par un dispositif de commutation externe, comme une minuterie, ou connecté à un circuit qui est
régulièrement allumé et éteint par l'utilitaire.
ATTENTION: Les parties accessibles peuvent être chaudes lorsque le barbecue est en cours
d'utilisation. les jeunes enfants doivent être tenus à l'écart.
• Le liquide débordé doit être enlevé avant de nettoyer.
• Pendant le fonctionnement de la pyrolyse, les surfaces peut devenir plus chaude que d'habitude et les
enfants doivent être tenus à l'écart.
53 FR
Page 54

1. INSTRUCTIONS GENERALES
Lire attentivement les instructions contenues dans cette brochure, elles fournissent d’importantes indications sur la sécurité d’installation, l’emploi
du four et son entretien. Conserver soigneusement cette notice d’utilisation pour toutes consultations ultérieures.
- Après avoir déballé votre four, vérifier que l’appareil est complet. Les emballages comme le plastique, le polystyrène, peuvent constituer un
danger pour les enfants. Ne pas les laisser à leur portée.
Notre responsabilité ne saurait être engagée en cas de non respect des instructions fournies dans la notice.
Lors de la première utilisation du four, il peut se produire un dégagement de fumée âcre provoqué par le premier échauffement du collant des
panneaux d’isolation enveloppant le four. Ce phénomène est normal. Attendez que la fumée cesse avant de cuire des aliments.
Noter le numéro de série pour tout contact avec le service après-vente
NOTE: Les fonctions, propriétés et accessoires du four peuvent changer selon le modéle.
1.1 DECLARATION DE CONFORMITÉ:
Les parties de cet appareil pouvant être en contact avec des
substances alimentaires sont conformes à la prescription de la Dir.
CEE 89/109.Produit compatible avec les Directives
Européennes 2006/95/EC et 2004/108/EC, et les
modifications successives.
1.2 CONSIGNES DE SECURITE
Cet appareil est conçu pour cuire des aliments. Tout autre utilisation
(exemple chauffage d’appoint) doit être considéré comme impropre.
Le constructeur ne peut être tenu comme responsable en cas de
dommages liés à une mauvaise utilisation ou à des modifications
techniques du produit.
•L’emploi d’un appareil électrique néce
sécurité.
- Ne pas tirer sur le fil électrique pour débrancher la prise.
- Ne pas toucher l’appareil avec les pieds ou les mains mouillés.
- Evitez d’utiliser l’appareil pieds nus.
L’utilisation de multiprises et de rallonges pour raccorder votre
appareil est fortement déconseillé. En cas de panne ou de mauvais
fonctionnement il faut éteindre le four avant de le démonter. En cas de
détérioration du fil électrique, remplacez-le rapidement en suivant les
indications suivantes: ôtez le fil d’alimentation électrique et
remplacez-le par un (du type H05VV-F) adapté à la puissance de
l’appareil.Vous veillerez à ce que cette opération soit effectuée par un
centre technique agréé. Pour l’utilisateur c’est la certitude d’obtenir
des pièces de rechange d’origine. Le non-respect de ces règles peut
compromettre la sécurité de l’appareil.
•Le four que vous venez d'acquérir possède des caractéristiques
techniques définies et en aucun cas vous ne pourrez apporter des
modifications sur cet appareil.
•Ne jamais utiliser de nettoyeur vapeur ou à haute pression pour le
nettoyage du four.
•Ne pas stocker de produits inflammables dans le four ; ils pourraient
s'enflammer lors d'une mise en route involontaire du four.
•Ne pas s'appuyer et ne pas laisser les enfants s'asseoir sur la porte
du four.
•Utiliser des gants thermiques de cuisine, pour enfourner ou pour
retirer un plat du four.
•Si votre four présente un défaut quelconque, ne pas le brancher ou le
débrancher de l'alimentation générale et faire appel directement à un
service technique agréé du constructeur.
ssite quelques règles de
1.3 RECOMMANDATIONS
Après chaque utilisation du four, réaliser un petit entretien qui
favorisera le nettoyage parfait du four.
• Ne pas tapisser les parois du four avec des feuilles en aluminium ou
des protections jetables du commerce. La feuille d'aluminium ou toute
autre protection, en contact direct avec l'émail chauffé, risque de
fondre et de détériorer l'émail du moufle.
Avant installation de l'appareil, il faut relever le numéro de série et le
noter ci-dessous en cas d'éventuelle demande d'intervention.
Plaque signalétique
Code produit:
Numéro de série :
Afin d'éviter les salissures excessives de votre four ainsi que les fortes
odeurs de fumées pouvant en résulter, nous recommandons de ne
pas utiliser le four à trop forte température. Il est préférable de
rallonger le temps de cuisson et de baisser la température.
• Nous vous conseillons de n'utiliser que des plats, des moules à
pâtisserie résistants à de très hautes températures.
1.4 INSTALLATION
La mise en service de l’appareil est à la charge de l’acheteur, le
constructeur est dégagé de ce service. Les pannes liées à une
mauvaise installation ne seront pas couvertes par la garantie. Une
mauvaise installation peut provoquer des dommages aux personnes,
aux animaux domestiques; dans ce cas la responsabilité du
constructeur ne peut être engagée.
L'installation du four doit être réalisée par un installateur agréé ou un
technicien de qualification similaire.
Le meuble dans lequel le four doit être encastré doit être réalisé en
matériaux résistant à de hautes températures 70°C.
Le four peut être placé en hauteur dans une colonne ou enchâssé
sous un plan de travail.
Avant sa fixation: il est indispensable d'assurer une bonne aération
dans la niche d'encastrement afin de permettre la bonne circulation de
l'air frais nécessaire au refroidissement et à la protection des organes
intérieurs. Pour cela, réaliser les ouvertures spécifiées selon le type
d'encastrement (dernière page).
1.5 RACCORDEMENT ELECTRIQUE
LE BRANCHEMENT ELECTRIQUE DOIT ÊTRE REALISE PAR UN
INSTALLATEUR AGREE OU UN TECHNICIEN DE QUALIFICATION
SIMILAIRE.
• L'installation recevant l'appareil doit être conforme à NFC 15100. Le
constructeur décline toute responsabilité en cas de non respect de
cette exigence.
Important:
Faire vérifier la continuité de la terre de l’installation avant de procéder
au raccordement.
Notre responsabilité ne saurait être engagée pour tout incident, ou
ses conséquences éventuelles qui pourraient survenir à l'usage d'un
appareil non relié à la terre, ou relié à une terre dont la continuité serait
défectueuse.
Le raccordement au réseau doit être effectué par une prise de courant
avec prise de terre, ou par l'intermédiaire d'un dispositif à coupure
omnipolaire, selon norme en vigueur dans le pays d’installation.
• L'installation doit obligatoirement être protégée par des fusibles
appropriés, et comporter des fils d'une section suffisante pour
alimenter normalement l'appareil.
Raccordement: cet appareil est équipé d’un cordon d’alimentation
permettant le raccordement exclusivement sous une tension de 220240 V~ entre phases ou entre phase et neutre.
• Le raccordement devra être effectué après avoir vérifié :
. la tension d’alimentation indiquée au compteur et,
. le réglage du disjoncteur.
• Le fil de protection du cordon (vert/jaune) relié à la Borne Terre de
l’appareil doit être relié à la Borne Terre de l’installation.
NOTA: ne pas oublier que l'appareil peut nécessiter une opération de
S.A.V. Aussi, placez la prise de courant de façon à pouvoir brancher le
four une fois sorti de sa niche.
Câble d'alimentation: si le changement du câble d'alimentation
s'avère nécessaire, nous vous demandons de faire réaliser cette
opération par le service après-vente ou une personne de qualification
similaire.
54 FR
Page 55

2. EQUIPEMENT DU FOUR (PAR MODÈLE)
2.1 EQUIPEMENT DU FOUR
Avant la première utilisation des différents accessoires, nous
recommandons un nettoyage avec une éponge suivi d'un rinçage et
d'un séchage.
La grille simple sert de support aux moules et aux plats.
COMMENT UTILISER TOURNEBROCHE?
1. Dévisser les crochets
2. Insérer la broche dans la
viande à cuire
3. Fixer la viande grâce aux
crochets
4. Serrer les vis
5. Insérer la broche dans le trou où
se trouve le moteur
6. Enlever le poignée
Pendant l’utilisation du four, les accessoires non utilisés doivent
être retirés du four.
2.3 U-SEE
Le plat récolte-sauce est destiné à recevoir le jus des grillades.
Ne jamais utiliser ce plat comme plat à rôtir, il en résulterait des
dégagements de fumée, des projections de graisse et un
encrassement rapide du four.
Ne jamais placer cet accessoire sur la sole du four.
La pierre à pizza pour une pizza plus croustillante, livrée selon
modèle avec son support inox et la roulette à pizza.
Le plat à pâtisserie - on y déposera les petites pâtisseries telles que
choux, sablés, meringues. Il vous permettra de confectionner des
fonds de tarte, génoise, etc...
Ne jamais placer cet accessoire sur la sole du four.
Ce système d éclairage remplace les « ampoules » traditionnelles. 14
LED (pour les versions non-pyrolyse) ou 10 LED haute puissance
(pour les versions pyrolyse) sont intégrés dans la contre porte du four.
Celles-ci illuminent la cavité avec une lumière diffuse permettant une
vision de la cuisson sans ombres, sur plusieurs niveaux.
Les leds s'éteignent
les fours à pyrolyse).
Les avantages :
-Visibilité optimale des plats
-Durée de vie prolongée
-Consommation énergétique extrêmement basse “-95%” par rapport
au système traditionnel d'éclairage du four.
’
lors de l'ouverture de la porte (uniquement pour
2.4 RETRAIT ET NETTOYAGEDES GRILLES
1-Retirez lesgrillesen les tirant vers l’intérieur du four (voir schéma)
2- Mettez les grilles directement au lave-vaisselle ou lavez-les simplement
avec une éponge humide et veillez à bien les essuyer.
3-Une fois les grilles nettoyées, reclipser-les dans le four ( voir schéma)
2.2 TOURNEBROCHE
Le préchauffage n'est pas nécessaire pour les cuissons au
tournebroche.
Les cuissons au tournebroche se font porte fermée.
Le gain d’énérgie est de 90-95°% par rapport au système tradionnel.
3
2
1
4
1- Grille
2- Broche
3- Crochets et vis
4- Poignée
3. ENTRETIEN GENERAL DU FOUR
•Attendre le refroidissement du four, avant de réaliser une opération
de nettoyage manuel.
•Ne jamais utiliser de produits abrasifs, d’éponges métalliques ou
d’objets tranchants pour nettoyer de four, l’émail serait
irrémédiablement abîmé.
•N’utiliser que de l’eau savonneuse ou des produits liquides
ammoniaqués.
•Ne jamais tapisser les parois du four avec du papier aluminium.
•Les objets métalliques tels que les couteaux, les fourchettes, les
cuillères et les couvercles ne doivent pas être mis sur la table de
cuisson car ils peuvent devenir chaudes.
•Le nettoyage et l'entretien par l'utilisateur ne doit pas être fait par des
enfants sans surveillance
LES PARTIES VITREES
A la fin de chaque utilisation, essuyer avec un papier absorbant.
Si les projections sont trop importantes, nettoyer avec une éponge et
un produit détergent.
* e pas utiliser de nettoyants abrasifs ou de racloirs métalliques
N
tranchants pour nettoyer la vitre de la porte du four car ils peuvent
rayer la surface, entrainant des risques d'explosion.
55 FR
Page 56

LE JOINT PORTE DE FOUR
1
2
3
Nettoyer avec une éponge et un produit détergent.
LES ACCESSOIRES
Nettoyer avec une éponge imbibée d’eau savonneuse. Rincer avec
de l’eau propre et sècher. Eviter les produits abrasifs.
LE PLAT RECOLTE-SAUCE
Après une grillade, retirer le plat récolte-sauce du four. Prendre soin
de reverser les graisses (tièdes) dans l’évier. Laver et rincer le plat
récolte-sauce dans de l’eau chaude, avec une éponge imbibée de
produit lessiviel. Si les résidus restent collés, le faire tremper dans de
l’eau et un produit détergent. Il peut aussi être nettoyé dans un lavevaisselle ou avec un produit du commerce.
Ne jamais replacer le plat récolte-sauce encrassé dans un four.
ECLAIRAGE DU FOUR
Pour changer l’ampoule d’éclairage du four veillez à débrancher
électriquement le four. Les ampoules de four sont spécifiques, elles
sont conçues pour résister à une température élevée.
• Enlever les vis comme présenté
sur l'image 3.
Image 4
• Retirer les verres en le tirant
délicatement du cadre de porte.
(Figure 5)
Image 3
•
Enlever la partie métallique
supérieure, pour pouvoir enlever
les vitres.
Caractéristiques de l'ampoule :
230 V~ - 25 W - Culot E 14 - Température 300°C Pour la substitution
de l'ampoule défectueuse, il vous suffit de:
•Démonter le cache en verre en le dévissant,
•Dévisser l'ampoule,
•La remplacer par un modèle identique:
Voir caractéristiques ci-dessus,
•Après remplacement de l'ampoule défectueuse, remonter
le cache verre qui sert de protection en le revissant.
NETTOYAGE DE LA VITRE DU FOUR
La vitre intérieure de ce four peut être enlevée et nettoyée. Pour
nettoyer la vitre intérieure du four, merci de suivre les instructions
suivantes:
• Ouvrir la porte du four. (Image 1)
Image 1
• Bloquer les charnieres comme il est
montré sur l'image 2 avant de
commencer l'opération de nettoyage.
Débloquer les charnières quand l'
opération de nettoyage est finie.
Image 2
Image 6
• Apres le nettoyage des
vitres, replacer les vitres
dans le même ordre qu'avant
le nettoyage.
• Sur toutes les vitres le signe
LOW-E doit être correctement
lisible et doit être positionné sur
le coin gauche de la porte, près
de la charnière gauche. De cette
façon, la surface imprimée de la
1ère vitre restera à l'intérieur de
la porte.
• * Pour les fours pyrolyse, merci
d'enlever également les deuxieme
et troisieme vitre. (Image 6)
Image 5
Image
7
4. ASSISTANCE TECHNIQUE
En cas de mauvais fonctionnement, vérifier si la prise est branchée.
Après ces vérifications, adressez vous à votre revendeur ou prévenez
directement notre service technique qui interviendra dans les plus brefs
délais. Veiller à ce que le coupon de garantie fourni avec le produit soit
correctement rempli, avec la date d’achat du four.
Cet appareil est commercialisé en accord avec la
directive européenne 2002/96/CE sur les déchets des
équipements électriques et électroniques (DEEE).
En vous assurant que ce produit est correctement
recyclé, vous participez à la prévention des
conséquences négatives sur l’environnement et la santé
publique qui pourrait être causé par une mise au rebut
inappropriée de ce produit.
Le symbole sur ce produit indique qu’il ne doit pas être
jusqu’à un point de recyclage des déchets électriques et électroniques.
La collecte de ce produit doit se faire en accord avec les réglementations
environnementales concernant la mise au rebut de ce type de déchets.
Pour plus d’information au sujet du traitement, de la collecte et du
recyclage de ce produit, merci de contacter votre mairie, votre centre de
traitement des déchets ou le magasin où vous avez acheté ce produit.
traité comme un déchet ménager. Il doit être rapporté
56 FR
Page 57

5.
auto
U
COOK
2.
*
*
57 FR
Page 58

5.1 CONSEILS AVANT LA PREMIERE UTILISATION
•UN PREMIER NETTOYAGE
-passer un chiffon doux et humide sur les surfaces extérieures de
l'appareil.
-nettoyer avec une éponge additionnée de produit lessiviel, les
accessoires et l'intérieur du four. Rincer et sécher.
-faire chauffer le four à vide une bonne heure à la température maximale
pour faire disparaître l'odeur du neuf. Pendant cette opération, bien aérer
la pièce.
• CE QU’IL FAUT SAVOIR
Toute modificiation doit être validée, en appuyant sur la touche centrale.
Arrêt du four:
il est possible qu’en cours de manipulation, une fausse manoeuvre
intervienne.
Pour arrêter le four ... ramener la manette du sélecteur de fonction sur la
position arrêt.
La sécurité «enfant»:
un verrouillage des commandes du four est possible en sélectionnant la
sécurité enfant. Se reporter au chapitre “La sécurité enfant”.
Turbine de refroidissement:
elle protège et refroidit les commandes électroniques ainsi que le tableau
de bord du four, elle se déclenche et s’arrête automatiquement même si le
four est à l’arrêt.
Eclairage du four:
il reste allumé pendant toute la durée de fonctionnement et dès ouverture
de la porte. S’allume en tournant la manette de programmation sur le
symbole “Eclairage”.
doit être réalisé avant la première utilisation
5.2 RECOMMANDATIONS
• LE MODE MANUEL
Les modes de cuisson proposés en mode Manuel sont décrits dans le
tableau ci-dessous. Une température pour chaque mode de cuisson est
proposée, elle reste modifiable dans une plage pré-définie.
Modes de fonction
selon modèle de four
Sole + Brassée
Sole
Convection Naturelle
Chaleur Brassée
Élément de chauffage
circulaire+ Brassee
Gril
Turbo Gril
Turbo Broche
Décongélation
Etuve
Pizza
Mode Pyrolyse
Température
pré-réglée
o
210 50-220 Booster
160 50-220
220
210
180
L2
190
240
40
60
**
230
**
Pyrolyse
*Booster: montée rapide en température
** Suivant modèle de four.
1- Positionner la manette du sélecteur des fonctions sur le mode de
cuisson nécessaire à la cuisson.
Les éléments chauffants fonctionnels pour le mode de cuisson choisi
s'affichent.
2- En fonction du mode de cuisson enregistré, une température de
consigne s'affiche, elle est modifiable dans une plage prédéfinie, voir
tableau ci-dessus.
Pour la modifier tourner la touche centrale pour régler la température et
appuyer sur le même bouton pour valider.
... l'affichage de la température est fixe mais reste modifiable pendant
toute la durée de la cuisson.
Le four démarre la cuisson et commence la montée en température.
Le voyant clignote tant que la température de consigne n'est pas atteinte.
A la fin du préchauffage, un bip sonore retentit et le voyant devient fixe.
3-Il est possible de programmer une durée et une fin de cuisson, en
positionnant la manette de programmation sur "durée" ou sur "heure de
fin".
L'affichage de la durée ou l'heure de fin clignote. Avec la touche centrale
modifier les enregistrements selon votre besoin et valider sur le
programmateur.
A la fin de cette modification, ne pas oublier de ramener la manette de
programmation sur “Position Arrêt” pour valider la nouvelle
programmation.
Pour plus de détails sur la programmation, se reporter au chapitre 5.3
PROGRAMMATION.
4- A la fin de la cuisson, ramener le sélecteur des fonctions sur “Position
Arrêt”. Le voyant de température clignote à nouveau et reste allumé même
si le four est éteint. Il clignote pendant la descente de température et
disparaît définitivement lorsqu’il atteint une température suffisamment
basse.
Température plage de
C
pré-réglée C
ECO: 425 /
SUP: 425 / 1h 30min
50-240
50-230
50-230
L1-L3
50-200
180-240
No
No
230
65min
Fonction
o
Booster*
Booster
Booster
Booster
• LES MODES DE CUISSON
- Toutes les cuissons sont réalisées porte fermée -
SOLE BRASSEE - Utilisation de la résistance de sole plus la
turbine qui brasse l'air dans l'enceinte du four. Cette fonction est idéale
pour les tartes à fruits juteux, les tourtes, les quiches, les pâtés. Elle évite
le dessèchement des aliments et favorise la levée pour les cuissons de
cake, pâte à pain et autres cuissons par le dessous. Placer la grille sur le
gradin inférieur.
SOLE - Utilisation de la résistance de sole. Idéale pour la
cuisson de crème caramel, flans, terrine, cuissons lentes, en cocotte
(poulet, boeuf ...).
CONVECTION NATURELLE - Utilisation simultanée de la
résistance de sole et de voûte. Cette fonction est idéale pour toutes les
cuissons à l'ancienne, pour saisir les viandes rouges, les rosbifs, gigots,
gibiers, le pain, les papillotes, les feuilletages.
CHALEUR BRASSEE - Utilisation simultanée de la résistance
de sole, de voûte, et de la turbine qui brasse l'air dans l'enceinte du four.
Cette fonction est recommandée pour les volailles, les pâtisseries, les
poissons, les légumes.... La chaleur pénètre mieux à l'intérieur du mets à
cuire et réduit le temps de cuisson. Vous pouvez réaliser des cuissons
combinées avec préparations identiques ou non sur un ou deux gradins.
Ce mode de cuisson assure en effet une répartition homogène de la
chaleur et ne mélange pas les odeurs. Prévoir une dizaine de minutes de
plus, pour la cuisson combinée.
ÉLÉMENT DE CHAUFFAGE CIRCULAIR + BRASSÉE Utilisation simultanée de la résistance circulaire et de la turbine qui brasse
l'air dans l'enceinte du four. La définition de cette fonction est équivalente à
celle de la chaleur brassée.
GRIL - Utilisation de la résistance de voûte uniquement. Un
préchauffage de 5 minutes est nécessaire pour le rougissement de la
résistance. C'est le succès assuré pour les grillades, les brochettes et pour
les gratins.
Les viandes blanches doivent être écartées du grilloir ; le temps de
cuisson sera alors plus long,mais la viande sera plus savoureuse. Pour les
viandes rouges et filets de poissons, ils peuvent être placés sur la grille
avec le plat récolte sauce glissé dessous. Le récolte-sauce peut
également être positionné sur une grille située sur le gradin inférieur.
TURBO GRIL - Utilisation de la résistance de voûte plus la
turbine qui brasse l'air dans l'enceinte du four. Un préchauffage est
nécessaire pour les viandes rouges et inutile pour les viandes blanches.
Idéal pour les cuissons de volume épais, de pièce entière telles que rôti de
porc, volailles etc... Placer le mets à cuire directement sur la grille au
centre du four, à un niveau moyen. Glisser le récolte-sauce sous la grille
de façon à récupérer les graisses. S'assurer que le mets ne soit pas trop
près du grilloir. Retourner la pièce à cuire à mi-cuisson.
TOURNEBROCHE VENTILE - Utilisation de la résistance de
voûte, de la turbine, et du tournebroche qui permet la rotation du mets à
cuire.Le tournebroche est temporisé en mode programmation c'est-à-dire
il continue de tourner cinq minutes après la fin de cuisson pour répartir les
derniers rayonnements résiduels. Idéal pour retrouver toutes les saveurs
de la rôtisserie à l'ancienne. On ne fait pas de préchauffage pour les
cuissons au tournebroche.
DECONGELATION - Fonctionnement de la turbine de cuisson
qui brasse l’air dans l’enceinte du four. Idéale pour réaliser une
décongélation avant une cuisson.
La température est pré-réglée à 40°C constants, aucun réglage n'est
possible.
LE MODE ETUVE - Utilisation simultanée de la résistance de
voûte et de sole plus la turbine qui brasse l'air dans l'enceinte du four. Idéal
pour maintenir un plat au chaud sans risque de surcuisson et pratique
aussi pour chauffer les assiettes vides.
La température est pré-réglée à 60°C constants aucun réglage n'est
possible.
PIZZA - La forte chaleur produite par la fonction Pizza est très
proche de celle d’un feu de bois dans un four traditionnel
MODE PYROLYSE - le four prend en charge le nettoyage du
four - Deux choix possibles ECO, SUPER
58 FR
Page 59

5.3 LA PROGRAMMATION
AFFICHAGE SYMBOLES
Lampe
Reglage De L'heure
Fonctionnement du minuteur
Programmation durée
STOP
Selecteur
programmation
MINUTEUR :
son fonctionnement est indépendant du four et n'a aucune incidence
sur les éléments chauffants. Il sert simplement d'aide-mémoire
sonore.
•Tourner la manette sur la position Minuterie, le symbole Minuteur
apparaît. Sur le cadran, s'affiche près de l'horloge 00 : 00.
•Les minutes clignotent, tourner la touche centrale pour ajuster les
minutes nécessaires. Puis valider en appuyant sur cette même
touche.
•Les heures clignotent, tourner la touche centrale pour ajuster l'heure
nécessaire. Puis valider en appuyant sur cette même touche.
•Ramener la manette du programmateur sur la position “ • ”. Lorsque
le temps est écoulé, l'affichage de la durée disparaît. Pendant 15
secondes, un bip sonore retentit et l'affichage du Minuteur clignote
(pour écourter le temps, il suffit d'appuyer sur la touche centrale)...
PROGRAMMATION D'UNE DUREE :
les différentes recettes sont pré-programmées avec une durée. En
Mode Manuel, Décongélation, Etuve, une programmation d'une
durée est possible mais pas indispensable pour le fonctionnement du
four.
•Programmer le four pour un mode de fonctionnement.
•Tourner la manette sur la position Durée de cuisson, le symbole
durée apparaît. Sur le cadran, s'affiche près de l'horloge une durée
pré-enregistrée pour les recettes, ou 00:00 pour les autres modes de
fonctionnement du four.
•Les minutes clignotent, tourner la touche centrale pour ajuster les
minutes nécessaires. Puis valider en appuyant sur cette même
touche.
•Les heures clignotent, tourner la touche centrale pour ajuster l'heure
nécessaire. Puis valider en appuyant sur cette même touche.
•Ramener la manette du programmateur sur “Position Arrêt” pour
valider la nouvelle durée.
Lorsque le temps est écoulé, le four se coupe automatiquement.
Pendant 15 secondes, un bip sonore retentit pour vous avertir et les
symboles Durée et STOP clignotent.
•Ramener la manette du sélecteur des fonctions sur “Position Arrêt”,
si cette dernière opération n'est pas réalisée les symboles Durée et
STOP continueront de clignoter.
PROGRAMMATION D'UNE HEURE DE FIN :
les différentes recettes sont pré-programmées avec une durée donc
une heure de fin de cuisson.En Mode Manuel, Décongélation,
Etuve, une programmation d'une heure de fin de cuisson est possible
mais pas indispensable.
•Programmer le four pour un mode de fonctionnement (Mode Auto ou
Mode de cuisson).
•Tourner la manette sur la position Fin de cuisson, le symbole STOP
apparaît. Sur le cadran, s'affiche près de l'horloge une heure de fin
pré-enregistrée pour les recettes, ou l'heure du moment pour les
autres modes de fonctionnement du four.
•Ramener la manette du programmateur sur “Position Arrêt” pour
valider la nouvelle heure de fin.
•Les minutes clignotent, tourner la touche centrale pour ajuster les
minutes nécessaires. Puis valider en appuyant sur cette même
touche.
•Les heures clignotent, tourner la touche centrale pour ajuster l'heure
nécessaire. Puis valider en appuyant sur cette même touche.
Programmation heure de fin
Programmation sécurité enfant
Verrouillage porte de four
•Le four calcule automatiquement l'heure de départ (heure de fin
moins la durée).
Lorsque l'heure de fin est atteinte, le four se coupe automatiquement.
Pendant 15 secondes, un bip sonore retentit pour vous avertir et les
symboles Durée et STOP clignotent.
•Ramener la manette du sélecteur des fonctions sur “Position Arrêt”,
si cette dernière opération n'est pas réalisée les symboles Durée et
STOP continueront de clignoter.
5. QUELQUES CONSEILS DE CUISSON4
Il est préférable de ne saler les viandes qu'en fin de cuisson, car le sel
favorise les projections de graisse, donc un encrassage rapide du four
et des fumées importantes.
Les rôtis de viande blanche, porc, veau, agneau, les poissons
peuvent être placés dans le four froid. La cuisson est alors plus longue
que dans le four chauffé préalablement, mais elle se fait mieux au
centre de l'aliment à cuire, la chaleur ayant plus de temps pour se
propager vers le milieu de l'aliment.
Un bon préchauffage est toujours à l'origine de la réussite d'une
cuisson de viande rouge.
POUR LES GRILLADES :
. avant d’enfourner : sortir la viande du réfrigérateur quelques heures
avant de la griller. Nous vous conseillons de la poser sur des
épaisseurs de papier absorbant : elle sera mieux saisie, plus
savoureuse et ne risquera pas de rester froide à l'intérieur. Poivrer et
épicer la viande avant de la faire griller, mais ne la saler qu'une fois
cuite, sinon elle serait mal saisie et moins juteuse. Badigeonner toutes
les pièces à cuire avec un peu d'huile. Le mieux est d'utiliser un
pinceau large et plat. Saupoudrer ensuite de poivre et de quelques
herbes (thym, etc..).
. Pendant la cuisson : ne jamais piquer les aliments en cours de
cuisson, ni lorsque vous les retournez : leur jus s'écoulerait et la
grillade serait sèche.
Les viandes devront être retournées à mi-cuisson, exceptées avec le
Tournebroche qui se charge lui-même de la rotation du mets à cuire.
Attention : si votre four est enfumé, la température affichée est trop
forte, pour y remédier, il faut réduire la température.
Ne jamais utiliser le plat récolte-sauce comme plat à rôtir.
POUR LES PATISSERIES : éviter d'utiliser des moules brillants.Ils
réfléchissent la chaleur et peuvent nuire à la cuisson des gâteaux. Si
vos gâteaux dorent trop vite, recouvrez-les avec une feuille de papier
sulfurisé, ou bien avec une feuille de papier aluminium.
Attention : utiliser la feuille d'aluminium dans le bon sens : la face
brillante doit être face au gâteau. Dans le cas contraire, la chaleur se
réflètera sur la face brillante et ne pénètrera pas à l'intérieur du plat.
Eviter d'ouvrir la porte du four pendant les 20 à 25 premières minutes
de cuisson : les soufflés, brioches, biscuits de Savoie, etc...
retomberaient aussitôt.
Pour contrôler la cuisson de vos pâtisseries, piquer le centre avec la
lame d'un couteau. Si elle ressort bien sèche, votre gâteau est
cuit.Vous pouvez arrêter la cuisson. Si la lame ressort humide ou avec
quelques particules de gâteau collées dessus, continuer la cuisson
mais en baissant légèrement la température pour que la pâtisserie
finisse de cuire sans brûler.
Attention : en départ différé, sur le cadran s'affiche l'heure de fin avec
les symboles Durée et STOP, et reste seulement l’affichage de la
recette pour le mode Recettes.
59 FR
Page 60

6. PYROLYSE
Le four est équipé d'un système de nettoyage par pyrolyse, c'est-àdire par destruction à haute température des salissures. Cette
opération se fait automatiquement au moyen du programmateur. Les
fumées en résultant sont rendues "propres" par passage sur un
pyrolyseur dont l'action commence dès la cuisson des aliments.
A cause de la température élevée nécessaire à la pyrolyse, la porte du
four est munie d'une sécurité qui permet son verrouillage pendant le
cycle.
La Pyrolyse peut être stoppée à tout moment. Cependant, la porte ne
s'ouvrira pas tant que le voyant verrouillage de porte est affiché.
NOTA : Si une table de cuisson est installée au dessus du four, ne
jamais utiliser la table pendant l'opération de pyrolyse dans le but
d'éviter un échauffement excessif du tableau de bord du four.
DEUX CYCLES DE PYROLYSE sont pré-programmés.
•PYRO ECO : nettoyage du four moyennement sale. Fonctionnement
pendant une durée de 65 minutes.
•PYRO SUP: nettoyage du four très sale. Fonctionnement pendant
une durée de 90 minutes.
Ne jamais utiliser des produits distribués dans le commerce
avant de réaliser le nettoyage du four à pyrolyse !
Remarque : un nettoyage enchaîné derrière une cuisson permet de
bénéficier de la chaleur déjà emmagasinée dans le four d'où une
économie d'énergie.
Avant de réaliser une Pyrolyse
- Retirer du four les accessoires : ils ne supporteraient pas sans
dommage la température de pyrolyse.
- Enlever les débordements importants ou gros déchets dont la
destruction demanderait un temps trop long.De plus, des résidus gras
en quantité élevée sont en effet susceptibles de s'enflammer sous
l'action de la chaleur intense que dégage la pyrolyse.
- Fermer la porte du four.
•Le liquide débordé doit être enlevé avant de nettoyer.
7. LA SECURITE ENFANT
Cette fonction est une sécurité essentielle surtout en présence de
jeunes enfants. Elle évite que l'enfant puisse mettre en
fonctionnement le four ou modifier les données programmées. Cette
sécurité entraîne le verrouillage du tableau de bord à l'arrêt du four
comme en cours d'utilisation (mode cuisson ou pyrolyse).
Deux niveaux de sécurité sont possibles :
NIVEAU 1 : Blocage des commandes Sélecteur modes de cuisson et
Touche centrale
•Pour l'activer : positionner le programmateur sur sécurité enfant
•Action : le sélecteur modes de cuisson et la touche centrale sont
inactifs*.
•Pour le désactiver : positionner le programmateur sur 0.
NIVEAU 2 : Blocage de toutes les commandes
•Pour l'activer : positionner le programmateur sur sécurité enfant et
maintenir la touche centrale appuyée pendant 3 secondes.
•Action : toutes les commandes sont inactives*.
•Pour le désactiver : procédure identique à celle de l'activation.
Positionner le programmateur sur sécurité enfant et maintenir la
touche centrale appuyée pendant 3 secondes.
*Nota : dans tous les cas, pour des raisons de sécurité, même lorsque
les commandes sont verrouillées, le retour à zéro du sélecteur
entraîne un arrêt du four.
La turbine de refroidissement ne s'arrête que lorsque la température
pour les composants électroniques est raisonnable.
A la fin du cycle pyrolyse, le voyant de température clignote à nouveau
et reste allumé même si le four est éteint. Il clignote pendant la
descente de température et disparaît définitivement lorsqu’il atteint
une température suffisamment basse.
La pyrolyse laisse sur les parois du four un dépôt de quelques résidus
blanchâtres. Attendre le refroidissement du four. Nettoyer l'enceinte
du four pour les éliminer avec une éponge humide.
1- Tourner le sélecteur demode de cuisson sur la position “
”. Le display affiche “ECO” ou “SUP”.
2- La durée de pyrolyse par défaut est de 65min. réglable de
65min. (Mode Eco) à 90min. (Mode Sup) par l’intermédiaire de la
touche de réglage “+” ou “-”. Si le four est très sale, nous vous
conseillons d’augmenter la durée à 90min. , dans le cas contraire
si le four est peu sale vous pouvez réduire la durée à 65min.
3- Il est également possible de différer le départ de la pyrolyse en
modifiant l’heure de fin de cycle à l’aide du programmateur.
4- Après quelques minutes lorsque le four atteint une température
élevée, la porte se verrouille.
5- La pyrolyse peut être interrompue à n’importe quel moment en
tournant le sélecteur de mode de cuisson sur la position 0.
6- A la fin du cycle pyrolyse, le cycle pyrolyse s’arrête
automatiquement. Le display affiche l’indication “End” tant que la
porte est verrouillée puis .
7- Vous pouvez ramener la manette des fonctions sur “0”, mais si
la température du four est encore élevée, le display affichera pour
signaler que la porte est verrouillée.
60 FR
Page 61

VEILIGHEIDSVOORSCHRIFTEN
WAARSCHUWING: Het apparaat en de bereikbare delen worden heet tijdens het gebruik. Zorg ervoor
dat u de warmingselementen niet aanraakt.
• Kinderen jonger dan 8 jaar niet bij het apparaat llaten mits onder continue toezicht.
• Dit apparaat kan op een veilige manier worden gebruikt door kinderen van 8 jaar en ouder en personen
met verminderde lichamelijke, zintuiglijke of geestelijke vermogens of gebrek aan ervaring en kennis als
zij onder toezicht staan of worden geïnstrueerd over het gebruik van het apparaat.
• Kinderen niiet met het apparaat laten spelen.
• Schoonmaak en onderhoud niet door kinderen laten doen zonder toezicht.
• Tijdens het gebruik wordt het apparaat heet. Pas op dat u de verwarmingselementen in de oven niet
aanraakt.
WAARSCHUWING: Onderdelen kunnen heet worden. Hou jonge kinderen op afstand.
• Gebruik geen agressieve schuurmiddelen of scherpe metalen schrapers om de oven glazen deur
schoon te maken, aangezien zij kunnen krassen op het oppervlak, tevens kan dit een barst in het glas
veroorzaken.
• De oven moet uitgeschakeld worden voordat u de beveiliging verwijderd, deze moet vervolgens
geplaatst worden zoals aangegeven in de handleiding.
• Gebruik alleen de aanbevolen temperatuursmeter voor deze oven.
• Gebruik geen stoomreiniger.
WAARSCHUWING: Verzeker u ervan dat de kookplaat uiitgeschakeld is voordat u de lamp gaat
vervangen ivm een electrische schok.
• De middelen voor ontkoppeling moeten zijn opgenomen in de vaste bedrading in overeenstemming
met de bedradingsregels.
• De instructie vermeldt het type van de kabel dat moet worden gebruikt, rekening houdend met de
temperatuur van de achterkant van het apparaat.
• Als het snoer beschadigd is, moet het worden vervangen door een speciaal snoer verkrijgbaar bij de
fabrikant of service center.
LET OP: Om een gevaar als gevolg van onbedoeld resetten van de thermische beveiliging te
voorkomen, moet dit apparaat niet worden gevoed via een externe schakelaar, zoals een timer, of
aangesloten worden op een circuit dat regelmatig wordt in-en uitgeschakeld.
LET OP: Toegankelijke onderdelen kunnen heet zijn wanneer de grill in gebruik is. Jonge kinderen
dienen weggehouden te worden.
• Voor het schoonmaken moet overtollig vuil verwijderd worden.
• Tijdens het zelf -reinigende pyrolytische werking kan het oppervak warmer worden dan normaal, houdt
kinderen op afstand.
61 NL
Page 62

1. ALGEMENE AANWIJZINGEN
De handleiding aandachtig lezen zodat u de oven optimaal kan gebruiken. Wij raden u aan de installatie- en gebruikshandleiding voor een latere
raadpleging te bewaren en er, vóór de installatie van de oven, het serienummer van het toestel op te noteren voor de aanvraag van een eventuele
interventietussenkomst door de dienst-na-verkoop.
Nadat u uw oven uit de verpakking hebt gehaald, moet u controleren of het toestel compleet is.Verpakkingsmateriaal zoals plastiek en polystyreen
kan gevaarlijk zijn voor kinderen.Houd het uit hun buurt.
Onze aansprakelijkheid of verantwoordelijkheid geldt niet wanneer u de richtlijnen in deze handleiding niet naleeft.
Wanneer u de oven een eerste keer gebruikt, kan er een doordringende rook ontstaan.
Die wordt veroorzaakt door het feit dat de kleefstof van de isolerende panelen rond de oven een eerste keer wordt opgewarmd.Dit is volledig
normaal.Wacht tot de rook is verdwenen voor u de oven effectief gaat gebruiken.
Opmerking: De functies, eigenschappen en accessoires van de oven kunnen verschillend zijn afhankelijk van het model.
1.1 CONFORMITEIT
De onderdelen, die in contact komen met voedsel voldoen aan de
EEC richtlijn 89/109.
Dit apparaat voldoet aan de EEC richtlijn 2006/95/EC,
2004/108/EC en eventuele wijzigigingen.
1.2 VEILIGHEIDSVOORSCHRIFTEN
Het apparaat dient uitsluitend gebruikt te worden voor het
doel,waarvoor het is ontworpen, d.w.z. het bereiden van voedsel.
Elk ander doel, bijvoorbeeld als verwarming, is onjuist gebruik van de
oven en gevaarlijk.
De fabrikant is niet verantwoordelijk voor mogelijke schade ten
gevolge van een onjuist, verkeerd of onverstanding gebruik van de
oven.
Bij het gebruik van elk elektrische apparaat dienen verschillende
regels in acht genomen te worden:
- Trek niet aan de kabel om de stekker uit het stopcontact te halen;
- Raak het apparaat niet met vochtige of natte handen of voeten aan;
- Gebruik het apparaat niet indien u geen schoeisel draagt;
- Zorg ervoor dat kinderen en/of onbevoegde personen het apparaat
niet zonder toezicht gebruiken;
- Gebruik geen adapters, tussenverbindingen en/of verlengsnoeren;
- Zet het apparaat bij hapering of slechte werking af en ga er niet aan
sleutelen.
De kabel dient bij beschadiging direct vervangen te worden en wel op
de volgende wijze:
- Haal de stekker uit het stopcontact of schakel de gehele elektrische
installatie uit;
- Verwijder de kabel en vervang hem door een even lange nieuwe,
(van het type H05RR-F, H05W-F, H05V2V2F). Deze kabel moet
geschikt zijn voor het vermogen van het apparaat en dient door een
technische specialist uitgevoerd te worden.
Voor reparaties aan het apparaat dient u zich uitsluitend tot een
officiële technische service te wenden, alwaar u originele onderdelen
kunt bestellen. Indien al hetgeen hierboven niet in acht wordt
genomen, kan de veiligheid van het apparaat niet gegarandeerd
worden.
De oven die u net aanschafte, bezit bepaalde technische kenmerken
en u mag onder geen enkel beding wijzigingen aan dit toestel
aanbrengen.
Geen brandbare producten in de oven bewaren; ze kunnen
ontvlammen bij het onvrijwillig aanzetten van de oven.
U mag niet op de ovendeur leunen en u mag er ook geen kinderen op
laten zitten.
U moet hittebestendige ovenwanten gebruiken om een schotel in de
oven te plaatsen of eruit te halen.
Wanneer uw oven een defect vertoont, mag u deze niet aansluiten of
moet u deze van het stroomnet halen en onmiddellijk een beroep
doen op een erkende technische dienst.
1.3 AANBEVELINGEN
Na elk gebruik voert u een klein onderhoud uit zodat het
schoonmaken van de oven gemakkelijker verloopt.
De ovenwanden niet bekleden met aluminiumfolie of
wegwerpverpakkingen die in de handel verkrijgbaar zijn. De
aluminiumfolie of eender welke andere bescherming die rechtstreeks
in contact komt met de verwarmde lak, kan smelten en de lak van de
moffel beschadigen.
Om een buitensporige vervuiling van uw oven evenals sterke
rookgeuren te vermijden, raden wij u aan de oven op een niet al te
hoge temperatuur te gebruiken. Het is verkieslijk om de baktijd te
verlengen en de temperatuur iets lager in te stellen.
Naast de bij de oven geleverde accessoires raden wij u aan enkel
schotels en bakvormen te
gebruiken die tegen zeer
hoge temperaturen bestand
zijn.
Code produit:
Numéro de série :
1.4 INSTALLATIE
De installatie valt onder de verantwoordelijkheid van de koper zelf. De
fabrikant is voor de installatie niet verantwoordelijk. Eventuele bijstand
van de fabrikant bij onjuiste installatie valt niet onder de garantie.
Een slechte installatie kan leiden tot letsel aan personen of
huisdieren.In dergelijk geval kan de constructeur niet aansprakelijk
gesteld worden.
De oven dient door een technisch bevoegd persoon geïnstalleerd te
worden volgens de installatie instructies. De fabrikant is niet
verantwoordelijk voor eventuele persoonlijke of materiële schade ten
gevolge van een onjuiste installatie.Het meubel waarin de oven in te
bouwen is, moet vervaardigd zijn in materialen die bestand zijn tegen
een minimale temperatuur van 70°C.
De oven kan in de hoogte geplaatst worden in een kolom of ingebouwd
worden onder het werkvlak.
Vóór de plaatsing: u moet voor een goede verluchting van de
inbouwniche zorgen zodat de voor de afkoeling en bescherming van de
interne organen noodzakelijke luchtcirculatie gewaarborgd is. Hiervoor
moet u de op laatste pagina verduidelijkte openingen aanbrengen
volgens het inbouwtype.
1.5 ELEKTRISCHE AANSLUITING
De elektrische aansluiting moet door een erkende installateur of een
technicus met een gelijkaardige knowhow uitgevoerd worden.
De installatie waarin het toestel te plaatsen is, moet conform de
geldende norm in het land van installatie zijn. De constructeur wijst elke
aansprakelijkheid of verantwoordelijkheid af bij het niet naleven van
deze vereiste.
Opgepast:
U moet een professional gebruiken om na te gaan of de aarding
van de installatie overloopt voordat u met de aansluiting verder
gaat.
Onze aansprakelijkheid en verantwoordelijkheid is niet van
toepassing voor eender welke incidenten of de eventuele
gevolgen ervan die kunnen optreden door het gebruik van een
toestel dat niet op een aarding aangesloten is of dat op een aarding
met een defecte overloop aangesloten werd.
De aansluiting op het net dient te gebeuren aan de hand van een
geaard stopcontact of via een voorziening voor omnipolaire
stroomonderbreking met een openingsafstand tussen de contacten
van minstens 3 mm.
De installatie moet met gepaste zekeringen beschermd worden en een
bedrading van een voldoende doorsnede krijgen voor een normale
voeding van het toestel.
De aansluiting: Dit toestel is uitgerust met een snoer waarbij er enkel
een aansluiting kan gebeuren met een spanning van 220 - 240 V~
tussen fases of tussen fase en neutraal.
De aansluiting moet in overeenstemming gebeuren nadat u het
volgende controleerde:
de voedingsspanning op de teller,
de regeling van de hoofdschakelaar.
De beveiligingsdraad van het snoer (groen/geel) die op de Aardklem
van het toestel aangesloten is, moet ook op de Aardklem van de
installatie aangesloten zijn.
Opmerking: U mag niet vergeten dat het toestel een tussenkomst van
de DNV kan vereisen. U moet er ook op letten dat het stopcontact zo
geplaatst wordt dat u het snoer kan uittrekken wanneer de oven uit de
niche gehaald is.
Snoer: wanneer het snoer te vervangen is, raden wij u aan dit door de
dienst-naverkoop of een persoon met een gelijkaardige knowhow te
laten uitvoeren.
62 NL
Page 63

2. ACCESSOIRES (naar gelang model)
2.1 UITRUSTING VAN DE OVEN
Alvorens u de verschillende accessoires een eerste keer gaat
gebruiken, raden we u aan die met een spons schoon te maken, te
spoelen en te drogen.
Het eenvoudige rooster dient als steun voor vormen en schotels.
De lekbak is bestemd voor het opvangen van de jus bij het grillen.
De lekbak nooit als bakschaal gebruiken, er kan zich
rookontwikkeling, vetverspreiding en een snelle vervuiling van de
oven voordoen.
Een pizzasteen voor een nog knapperigere pizza, geleverd
naargelang het model
met inox dragers en pizzarol.
2.3 U-SEE
Dit systeem vervangt de traditionele lampen. 14 LED's (voor non-
pyrolyse versies) of 10 LED's met een hoog vermogen (voor pyrolyse
versies) zijn geïntegreerd in de deur van de oven. Dankzij deze
verlichting hebben we een algemeen overzicht van de inhoud van de
oven zonder schaduwen en dit op verschillende niveaus. Bij het
openen van de deur gaan deze LED lampen uit (voor pyrolyse
versies).
De voordelen :
- Optimaal zicht van de schotels
- Langere levensduur
- Energieverbruik zeer laag, “-95%”, tegenover een traditioneel
verlichtingssysteem.
“Toestellen die beschikken over witte LED lampen van klasse 1M
hebben een maximaal verlichtingsvermogen van 459 nm < 150 uW
volgens de norm IEC 60825 1: 1993 + 1A: 1997 +A2: 2001 (
gelijkwaardig aan de norm EN 60825-1: 1994+1A: 2002+A2:2001).
Gegevens die niet onmiddelijk werden waargenomen met optische
instrumenten.”
2.4 VERWIJDEREN EN REINIGEN VAN DE
ZIJLINGSE ROOSTERS
1 - Verwijder het rooster door ze stevig uit de hengsels in de richting van de
pijlen te trekken.
2 - Reinig de roosters in een vaatwasser of met een vochtige spons en droog
ze daarna.
3 - Na het reinigingsproces installeer de roosters in omgekeerde volgorde.
De Bakplaat
de oven. De bakplaat is o.a. voor het bakken van koekjes, friet enz.
Plaats de plaat NOOIT op de bodem van de oven.
moet geplaatst worden in de geleiders aan de zijkant van
2.2 HET DRAAISPIT
Bij het draaispit moet er niet voorverwarmd worden. Het bakken
met het draaispit gebeurt met een gesloten deur.
U doet 90-95% winst op uw energie tegenover een traditioneel
systeem.
2
1
GEBRUIK VAN HET DRAAISPIT
1. Draai de haken los
2. Steek het spit in het vlees
3. Klem het vlees vast met de haken
4. Draai de schroeven vast
5. Steek het spit in het draaigat
6. De hendel
Wanneer u de oven gebruikt, moet u alle niet benutte
accessoires uit de oven verwijderen.
3
1- Rooster
2- Spit
3- Haken en schroeven
4- Hendel
4
3. ONDERHOUD VAN DE OVEN
De oven laten afkoelen voordat u deze manueel schoonmaakt.
Nooit schuurmiddelen, metalen sponsjes of snijdende voorwerpen
gebruiken om de oven schoon te maken. Zo beschadigt u namelijk
onherroepelijk de lak.
Enkel zeepwater of vloeibare middelen met ammoniak gebruiken.
De ovenwanden niet bekleden met aluminiumfolie of
wegwerpverpakkingen die in de handel verkrijgbaar zijn.
De glazen onderdelen
Wij bevelen u aan om na elk gebruik het glas van de ovendeur schoon te
maken d.m.v. absorberend papier. Indien er teveel vetspatten op zitten
kan u deze nadien met een uitgewrongen spons en een
schoonmaakmiddel reinigen en daarna spoelen.
*Nooit schuurmiddelen of snijdende voorwerpen gebruiken.
De dichting van de ovendeur
Bij grote vervuiling moet u de dichting van de ovendeur met een lichtjes
vochtige spons schoonmaken.
De accessoires
Deze moet u met een spons en wat zeepwater schoonmaken. Spoelen
met helder water en afdrogen. Schuurmiddelen zijn steeds te vermijden.
De lekbak
Na het grillen de lekbak uit de oven halen. De vetten in een recipiënt
gieten. De lekbak wassen en spoelen in warm water met een spons
doordrenkt van detergent. Indien de resten blijven kleven de lekbak in
water met een schoonmaakmiddel laten weken. Deze kan natuurlijk ook in
de vaatwasser of met een product dat in de handel verkrijgbaar is,
schoongemaakt worden.
Een vuile lekbak nooit opnieuw in de oven plaatsen. Een lekbak nooit een
pyrolysecyclus laten doorlopen.
63 NL
Page 64

Ovenverlichting
1
2
3
Het toestel van de stroomtoevoer halen voor u de verlichting schoonmaakt
of de lamp vervangt. De lamp en zijn bescherming zijn vervaardigd uit
materialen die zeer warmtebestendig zijn.
• Verwijder het bovenste metalen
deksel door deze omhoog te
trekken. (figuur 4)
Figuur 4
• Verwijder het glas door het
voorzichtig uit de lijst te trekken.
(Figuur 5)
Kenmerken van de lamp:
230 V~ - 25 W - Huls E 14 - Temperatuur 300°C
Voor het vervangen van de lamp volstaat het:
. de glazen bescherming te verwijderen,
. de lamp weg te nemen,
. deze te vervangen door een identiek model: zie bovenstaande
kenmerken,
. na vervanging van de defecte lamp, de glazen bescherming
terugplaatsen.
HET VENSTER REINIGEN
Het glas van de binnendeur van deze oven kan worden verwijderd
en gereinigd. Om het interne glas te reinigen, volg de onderstaande
instructies:
• Open de deur van de oven
(figuur 1)
Figuur 6
Na het reinigen het glas
•
opnieuw monteren in de
omgekeerde volgorde zoals
het verwijderen.
• Het laag-E-teken moet op
alle glazen goed leesbaar
blijven op de linkerhoek van
de deur dichtbij de linker
scharnier. Op deze manier
blijft het gedrukte oppervlak op
het eerste glas en binnenin de
deur.
• * Voor pyrolyse ovens, verwijder
ook het tweede en derde glas.
(figuur 6)
Figuur 5
Figuur 7
4. DIENSTEN SERVICE
Indien de oven niet werkt, raden wij u aan om na te gaan of het
apparaat goed is aangesloten. Indien u de oorzaak niet kunt
ontdekken, bel dan de Service Dienst.
Noteert u, voordat u de Service Dienst belt, het typenummer van
uw oven (zie binnenzijde van de ovendeur).
• Vergrendel de scharnieren zoals in
figuur 2 alvorens u gaat reinigen. Maak
de scharnieren terug los wanneer de
reiniging is voltooid. (figuur 2)
Figuur 2
• Verwijder de schroeven zoals
aangegeven in figuur 3. (figuur 3)
Figuur 2
Figuur 3
Dit apparaat voldoet aan de Europese richtlijnen
2002/96/EC voor elektrische en elektronische afval.
Door dit apparaat correct te verwijderen, helpt u het
potentiële negatieve gevolg voor de omgeving en
menselijke gezondheid te voorkomen, welke anders
door onjuiste verwijdering zou kunnen worden
veroorzaakt.
Het symbool op het product duidt aan dat dit
product niet behandeld zal worden als huishuidelijk
afval. In plaats daarvan zal het apparaat naar het
verzamelpunt voor de recycling van elektrische en elektronische
uitrusting gaan.
De verwijdering moet in overeenstemming met plaatselijke
milieuvoorschriften voor afvalverwerking uitgevoerd worden Voor
meer gedetailleerde informatie over de verwijderingvan dit product,
neemt u contact op met uw gemeenlijke reinigingsdienst of de
dealer waar u het apparaat heeft gekocht.
64 NL
Page 65

5. GEBRUIK VAN HET ELECTRONISCHE PROGRAMMA
1. Kookwekker of Auto lampje
2. Functie met ventilator*
3. Functie met VARIOVAN*
4. Ontdooien
auto
U
COOK
5. Display for temperatuur en tijd.
6. Instel toetsen
7. Functie keuze knop
8. Tijd keuze knop
* AFHANKELİJK VAN MODEL
LET OP! Het eerste wat u moet doen als de oven is geinstalleerd of na een stroomstoring is de tijd instellen (dit kunt u
herkennen aan de knipperende 12:00)
Het lampje “ ° ” van de temperatuur indicatie knippert totdat de ingestelde temperatuur is bereikt.
HOT: Als het kookprogramma is beeindigd en de oven nog heet is zal << HOT>> in het diplay verschijnen, afgewisseld met
de tijd, ook als de twee keuze knoppen op uit staan.
FUNCTIE
Stille stand
Tijd instellen
HOE IN WERKING
STELLEN?
• Draai de linker keuze knop
naar de "Stille stand”
• Draai de linker keuze knop
op de positie "tijd instellen"
• gebruik de "+" en "- " om
in te stellen.
HOE UITSCHAKELEN?
• Draai de keuze knop naar
de UIT positie
• Draai de keuzee knop
naar de UIT positie
WAT DOET HET?
• Mogelijkheid tot
uitschakelen van het
geluid van de kookwekker
• Instellen van de tijd welke
op het display verschijnt
WAAR IS HET
VOOR BEDOELD?
• Het uitschakelen van het
geluid van de kookwekker
• Om de tijd in te stellen.
Tip. Stel altijd eerst de tijd
in als de oven is
geinstalleerd of na een
stroomstoring
(knipperende 12:00)
Kooktijd instellen
Kooktijd einde
Kookwekker
• Draai de rechter keuze
knop naar een
kookfunctie.
• Draai de linker keuze knop
naar de positie "kooktijd
instellen"
• Stel de kooktijd in dmv de
"+"en de "-".
• Lampje Auto gaat branden
• Draai de rechterknop op
een kookfunctie.
• Draai de linkerknop op
"Kooktijd einde"
• Stel de tijd in dmv de "+"en
de "-"
• het lampje auto gaat
branden.
• Draai de linker knop op de
"kookwekker"
• Stel de tijd in met de "+'en
de "-”
• Als de kooktijd is verstreken
schakeld de oven
automatisch uit en gaat er
een aantal seconden een
alarm klinken.
Om het koken vroegtijdig te
beeindigen, stel de tijd in op
00:00 door de linkerknop
naar “kooktijd instellen” te
draaien en met de “+”en “-”
in te stellen.
• Als de ingestelde tijd
verstreken is gaat de oven
automatisch uit.
• Om het programma
vroegtijdig te stoppen
draaid u de knop naar UIT.
• Stel de tijd op 00:00 in
door de linker knop op
"kookwekker" te draaien
en gebruik de "+"en "-”
• Instellen van de kooktijd
bij een gekozen recept.
• Als de kooktijd is ingesteld
kunt u de actuele tijd weer
zien door rechterknop op
UIT te zetten
• Mogelijkheid tot instellen
van de eindtijd van een
programma.
• Om de kooktijd te bekijken
draaid u de knop naar
"Kooktijd einde”
• Laat een alarm klinken
voor een paar seconden
aan het einde van de
ingestelde tijd.
• Voor het koken van de
gewenste recepten
• Deze functie is bedoeld
om vooruit te plannen.
Biiv.
het gerecht moet 45 min
koken en klaar zijn om
12:30; u stelt de kooktijd
in op 45 min en de Kooktijd
einde om 12:30.
Het koken begint dan
automatisch om 11:45 en
zal stoppen als de
gewenste kooktijd voorbij
is en vervolgens gaat de
oven automatisch uit
• Gebruik maken van de
oven als alarm terwijl de
oven uitgeschakeld is.
Kinderslot
• Draai de linker knop naar
"kinderslot" Druk
vervolgens 3 sec. op de
"+" toets.
• kinderslot actief STOP
verschijnt in het display
• Draai de linker knop naar
"kinderslot" Druk
vervolgens 3 sec. op de
"+" toets.
• STOP verdwijnt in het
display
65 NL
• De oven kan niet gebruikt
worden.
• Handig en veilig als er
kinderen in huis zijn.
Page 66

5.1
TIPS VOORAFGAANDE AAN EEN EERSTE
GEBRUIK
Een eerste reiniging
eerste keer wordt gebruikt:
-maak met een zachte en vochtige doek de buitenvlakken schoon van
het apparaat;
-de accessoires en de binnenkant van de oven maakt u schoon met
een spons en wat schoonmaakmiddel.Spoelen en drogen;
- laat de lege oven een uur werken op de hoogste temperatuur om de
'nieuwgeur' te doen verdwijnen.Gedurende deze handeling moet u de
ruimte goed verluchten.
Wat u dient te weten
Elke verandering moet worden bevestigd door te drukken op de
centrale knop.
De oven stoppen:
het kan gebeuren dat u tijdens de bediening iets verkeerds doet.
Om de oven te stoppen, zet u de ovenfunctiedraaiknop opnieuw in d e
stop-positie.
Kinderbeveiliging:
de bediening van de oven kan worden vergrendeld door de
kinderbeveiliging te selecteren.Raadpleeg het hoofdstuk
“Kinderbeveiliging”.
Koelturbine:
deze beschermt en koelt de elektronische bedieningselementen en
het bedieningspaneel van de oven.Ze wordt automatisch in- en
uitgeschakeld, ook al staat de oven uit.
Verlichting van de oven:
die blijft aan tijdens de hele werkingsduur van de oven en wanneer de
deur wordt geopend.Wordt ingeschakeld wanneer de
programmeerdraaiknop op het symbooltje “Verlichting” wordt
gedraaid.
dient te worden uitgevoerd vóór de oven een
5.2 AANBEVELINGEN
MANUELE MODUS
De bakmethodes die worden voorgesteld in Manuele modus worden
beschreven in de onderstaande tabel.Voor elke bakmethode wordt
een temperatuur voorgesteld.Die temperatuur kan worden
aangepast binnen bepaalde grenswaarden.
Vooropinges
Functies
Bodemweerstand + heteluchtcirculatie
Bodemweerstand
telde
temperatuur °C
210
160
Natuurlijkeconvectie 220 50-240
Heteluchtcirculatie
Heteluchtpuls
Grill
Turbo Grill
Turbo draaispit
Ontdooien
Warmhoudfunctie
Pizza
Pyro Pyro
*Booster: snelle temperatuurstijging
**Oven moet uitgerust zijn met deze functie
210
180
L2
190
240
40
60
230
**
**
1- Zet de ovenfunctiedraaiknop in de door u gewenste
bakmethode.De functionele warmte-elementen voor de gekozen
bakmethode worden weergegeven.
2- Op grond van de geselecteerde bakmethode wordt een
aangeraden baktemperatuur weergegeven; deze temperatuur kan
nog worden aangepast binnen vooraf bepaalde grenzen.Zie de
bovenstaande tabel.Om die temperatuur aan te passen, draait u aan
de centrale temperatuurknop en drukt u op die knop om te bevestigen.
... de weergave van de temperatuur blijft onveranderd, maar kan wel
nog worden gewijzigd tijdens de hele duur van het bakproces.De oven
start het bakproces en de temperatuur neemt geleidelijk aan toe.Het
lampje knippert zolang de aanbevolen temperatuur niet is bereikt.Aan
het einde van de voorverwarming is een geluidssignaal hoorbaar en
blijft het lampje ononderbroken branden.
3- U kunt de duur en de eindtijd van een bakproces programmeren,
door de programmeerdraaiknop in te stellen op “duur” of op “eindtijd”.
De weergave van de duur of van de eindtijd knippert.Met de centrale
knop kunt u de registraties naar eigen goeddunken aanpassen en
bevestigen via de programmeerdraaiknop.
Op het einde van deze programmering mag u niet vergeten om de
programmeerdraaiknop terug op de stand “Stop” te zetten om de
nieuwe programmering te bevestigen.
Temperatu
urbereikvoo
ropingesteld °C
50-220
50-220
50-230
50-230
L1-L3
50-200
180-240
No
No
230
ECO: 425 /
SUP: 425 / 1h 30min
65min
Booster
functie*
Booster
Booster
Booster
Booster
Voor meer details over de programmering verwijzen we naar
hoofdstuk 5.3 PROGRAMMERING.
4- Op het einde van het bakproces zet u programmeerdraaiknop op de
stand “Stop”.Het temperatuurlampje knippert opnieuw en blijft aan,
zelfs al staat de oven uit.Dat lampje blijft knipperen tijdens de
temperatuurdaling en gaat helemaal uit wanneer een voldoende lage
temperatuur bereikt is.
Bereidingstechnieken
Alle bereidingen worden met gesloten deur uitgevoerd
VLOER GECOMBINEERD MET HETELUCHTCIRCULATIE
De onderste weerstand werkt samen met de turbine die de lucht in de
ovenruimte stuwt. Deze functie is ideaal voor taarten met sappig fruit,
gebakken, quiches en pasteien. Zo voorkomt men het uitdrogen van
de eetwaren en bevordert men het rijzen van cakes, brooddeeg, enz.
Het bakken gebeurt langs de onderzijde. Het rooster op het onderste
schap zetten.
BODEMWEERSTAND
Ideaal voor bereidingen als caramel crème, vla, pot, trage
bakmethodes, “en cocotte” (kip, rundvlees …)
NATUURLIJKE CONVECTIE
Tegelijkertijd gebruiken van de boven- en onderweerstanden. Wij
raden aan de oven een tiental minuten voor te verwarmen. Uitermate
geschikt voor alle traditionele bakmethodes en voor het bakken van
rood vlees, rosbief, schapenbout, wild, brood, papilloten en
bladerdeeg. Het te bereiden gerecht en de schotel op een rooster
plaatsen en op het middenschap zetten.
HETELUCHTCIRCULATIE
Tegelijkertijd gebruik maken van de boven- en onderweerstanden en
de turbine die de lucht in de ovenruimte stuwt. Deze functie is ideaal
voor het bakken van gevogelte, gebak, vis, groenten, … De warmte
dringt beter in het gerecht door en vermindert de baktijd evenals de tijd
die nodig is om voor te verwarmen. U kan gecombineerd bakken met
al dan niet identieke bereidingen op één
of twee schappen. Deze bakwijze garandeert een gelijkmatige
verdeling van de warmte in de oven en vermengt de geuren niet. Een
tiental minuten extra voorzien voor het gecombineerd bakken.
ROND VERWARMELEMENT + VENTILATOR
Verwarmde lucht wordt door de ventilator over de verschillende
niveaus geblazen. Het is ideaal voor het tegelijkertijd bereiden van
verschillende types voedsel (bijv. vlees en vis) zonder dat de smaken
en geuren mengen. Het bereid zeer langzaam en is ideaal voor
luchtige cakes, gebak, enz.
GRILL: U moet de grill met een gesloten deur gebruiken.
Enkel de bovenweerstand wordt gebruikt en u heeft de mogelijkheid
om de temperatuur te regelen. U moet 5 minuten voorverwarmen om
de weerstand te laten gloeien. Succes verzekerd bij het grillen,
bereiden van brochettes en bij het gratineren. Wit vlees moet van de
grill verwijderd blijven, hierdoor wordt de baktijd langer, maar blijft het
vlees sappiger. Rood vlees en visfilets moeten op het rooster gelegd
worden en met daaronder de lekbak.
TURBOGRILL: U moet de turbogrill met een gesloten
deur gebruiken
Gebruiken van de bovenweerstand en de turbine die de lucht in de
ovenruimte stuwt. Voor rood vlees is voorverwarmen noodzakelijk,
voor wit vlees is dit nutteloos. Ideaal voor het grillen van dikkere
stukken, het braden van grote stukken, zoals varkensgebraad,
gevogelte, Het te bakken gerecht rechtstreeks op het rooster in het
midden van de oven op middenhoogte plaatsen. De lekbak onder het
rooster schuiven om zo de vetten op te vangen. Zeker zijn dat het
gerecht niet te dicht bij de grill staat. Halfweg het te bakken stuk
omdraaien.
GEVENTILEERD DRAAISPIT
Gebruik van de onderweerstand, van de turbine, en van het draaispit
waarmee te bakken gerechten gedraaid kunnen worden.Het draaispit
is in de programmeermodus voorzien van een vertragingssysteem,
wat betekent dat het spit nog vijf minuten blijf draaien na het einde van
de baktijd om de laatste warmtestraling toch nog gelijk te kunnen
verdelen.Ideaal om opnieuw kennis te maken met de heerlijke smaak
van klassiek gebraad.Voor bakmethodes met draaispit hoeft de oven
niet voorverwarmd te worden.
ONTDOOIEN
Werking van de bakturbine die de hete lucht in de ovenruimte stuwt.
Ideaal voor het ontdooien van voedingswaren vóór het bakken. De
66 NL
Page 67

temperatuur is constant vooraf ingesteld op 40°C. Geen andere
temperatuurinstellingen zijn mogelijk.
DE WARMHOUDFUNCTIE
Gelijktijdig gebruik van de onderweerstand en de bovenweerstand,
met de turbine die lucht blaast in de ovenruimte.Ideaal om een
gerecht warm te houden zonder dat u het risico loopt dat het te lang
blijft bakken, eveneens een handige functie om lege borden op te
warmen.De temperatuur is vooraf ingesteld op een constante 60 °C,
deze temperatuur kan niet worden gewijzigd.
PIZZA
De PIZZA-functie produceert een zeer hoge temperatuur die
gelijkaardig is aan deze van een houtvuur in een traditionele oven.
PYROLYSE MODUS
De oven ondersteunt de reiniging van de oven. Twee mogelijkheden:
ECO, SUPER.
Het instellen van een eindtijd:
de verschillende recepten zijn voorgeprogrammeerd met een
bepaalde duur, waaronder een eindtijd.In de modus Manueel,
Ontdooien, Warmhouden kan een eindtijd worden
geprogrammeerd, maar dit is niet noodzakelijk.
Programmeer de oven voor een werkingsmodus (Modus Auto of
Bakmodus).
Zet de programmeerdraaiknop op de stand “Einde baktijd”, het
symbool STOP verschijnt.Op het scherm verschijnt naast de klok
een voorgeprogrammeerde eindtijd voor de recepten of het uur
van het moment voor de ander bakmethodes van de oven.
Zet de programmeerdraaiknop op de stand “ ” om de nieuwe
eindtijd te bevestigen.
De minuten knipperen.Draai aan de centrale knop om de minuten
aan te passen.Bevestigen doet u door op diezelfde toets te
drukken.
De uren knipperen.Draai aan de centrale knop om het uur aan te
passen.Bevestigen doet u door op diezelfde toets te drukken.
5.3 PROGRAMMERING
SCHERMSYMBOLEN
Lamp
Tijdsinstelling
Werking van de timer
Tijdsduur van het programma
STOP
Eindtijd van het programma
Selecteur
programmation
Timer:
De werking van de timer staat los van de oven en heeft geen
enkele invloed op de verwarmingselementen.De timer doet dus
enkel dienst als geheugensteuntje met geluid.
Zet de programmeerdraaiknop op de stand “Timer”.Het timersymbool verschijnt.Op het scherm verschijnt naast de klok 00:00.
De minuten knipperen.Draai aan de centrale knop om de minuten
aan te passen.Bevestigen doet u door op diezelfde toets te
drukken.
De uren knipperen.Draai aan de centrale knop om het uur aan te
passen.Bevestigen doet u door op diezelfde toets te drukken.
Zet de programmeerdraaiknop op de stand “ ”.Wanneer de tijd
verstreken is, verdwijnt de weergave van de duur.Gedurende 15
seconden is een geluidssignaal hoorbaar en de weergave van de
Timer knippert (om die tijd in te korten, hoeft u alleen maar op de
centrale knop te drukken).
Tijdsduur instellen:
de verschillende recepten hebben een voorgeprogrammeerde
duurtijd.In de modus Manueel, Ontdooien, Warmhouden kan de
duur worden geprogrammeerd, hoewel dat niet noodzakelijk is
voor de werking van de oven.
De oven programmeren voor een bepaalde werkingsmodus.
Zet de programmeerdraaiknop op de stand “Baktijd”.Het
symbooltje voor de duur verschijnt.Op het scherm is naast het
uurwerk een voorgeprogrammeerde duur te zien voor de
recepten, of 00:00 voor de andere werkingsmodi van de oven.
De minuten knipperen.Draai aan de centrale knop om de minuten
aan te passen.Vervolgens bevestigt u uw keuze door nog eens op
deze knop te drukken.
De uren knipperen.Draai aan de centrale knop om het uur aan te
passen.Vervolgens bevestigt u uw keuze door nog eens op deze
knop te drukken.
Zet de programmeerdraaiknop op de stand “·” om de nieuwe duur
te bevestigen.
Wanneer de tijd is verstreken, schakelt de oven zichzelf
automatisch uit.Gedurende 15 seconden is een geluidssignaal
hoorbaar en knipperen de symbolen Duur en STOP.
Zet de programmeerdraaiknop op de stand “·”; wanneer dit niet
gebeurt, zullen de symbolen Duur en STOP blijven knipperen.
Programma kinderbeveiliging
Sluiting van de deur
Opgelet:In het geval van een uitgestelde start, verschijnt op het
scherm de eindtijd met de symbolen Duur en STOP; enkel de
weergave van het recept blijft voor de modus Recepten.
De oven berekent automatisch het startuur (eindtijd min de
duur).Wanneer de eindtijd is bereikt, schakelt de oven zichzelf
automatisch uit.Gedurende 15 seconden is een geluidssignaal
hoorbaar en gaan de symbolen Duur en STOP knipperen.
Zet de programmeerdraaiknop op de stand “ ”; wanneer dit niet
gebeurt, zullen de symbolen Duur en STOP blijven knipperen.
5. 4 RAADGEVINGEN BIJ HET BAKKEN
Wij raden aan het vlees pas te zouten op het einde van het bakken
omdat zout het vet activeert en dus zorgt voor een snellere vervuiling
van de oven en aanzienlijke rookontwikkeling.
De gebraden van wit vlees, varken, kalf, lam en vis kunnen in een
koude oven geplaatst worden. Het bakken gaat hier iets trager dan bij
een reeds voorverwarmde oven, maar gebeurt beter in het midden
van het te bakken stuk aangezien de warmte meer tijd heeft om tot het
midden van de eetwaren door te dringen.
Goed voorverwarmen ligt steeds aan de basis van een goed
gebraden stuk rood vlees.
Om te grillen
Voordat u het grillstuk in de oven stopt:
Het vlees enkele uren voor het grillen uit de koelkast nemen. Wij raden
u aan dit op laagjes absorberend papier te leggen : het bruint
makkelijker, blijft sappiger en blijft niet koud aan de binnenzijde.
Het vlees kruiden voor u het op de grill legt, maar het zout slechts
gebruiken na het bakken, want anders zal het vlees slecht bruinen en
minder sappig zijn. Alle te bakken stukken met een beetje olie
insmeren. Het best gebruikt u een lang en vlak penseel. Vervolgens
met peper en enkele kruiden (tijm, …) besprenkelen. Het grillstuk in de
oven stoppen.
Tijdens het bakken:
Nooit in de eetwaren prikken tijdens het bakken , ook niet wanneer u
ze omdraait: het sap loopt eruit en het vlees wordt droog.
Halfweg het te bakken stuk omdraaien, behalve bij het draaispit omdat
de rotatie zelf voor het bakken van de schotel zorgt.
Opgelet:wanneer uw oven zich met rook begint te vullen, dan is de
weergegeven temperatuur te hoog.Om dat op te lossen, moet u de
temperatuur verlagen.Gebruik nooit de opvangschaal als bakschaal.
Gebak
U moet steeds vermijden om glanzende vormen te gebruiken,
aangezien deze de warmte weerkaatsen en het bakken van de taart
nadelig kunnen beïnvloeden. Wanneer uw taarten te vlug goudbruin
bakken, moet u ze met een vel perkament- of aluminiumpapier
bedekken.
Opgepast: u moet het aluminiumpapier wel langs de juiste zijde
gebruiken: de glanzende zijde moet naar de taart gericht zijn. Is dit niet
het geval, dan zal de warmte op het glanzende oppervlak
weerkaatsen en niet tot de kern van het gerecht doordringen.
U moet ook vermijden de ovendeur tijdens de eerste 20 tot 25 minuten
te openen: de soufflés, taarten, koekjes, gebakjes kunnen invallen.
Om het bakken van uw gebak te controleren, moet u in de kern met
een mes of een breinaald prikken. Wanneer deze er droog uitkomt, is
uw taart klaar. U kan de oven dan stoppen. Wanneer het mes er
vochtig of met enkele taartdeeltjes uitkomt, moet u blijven bakken
maar met een lichtjes lagere temperatuur zodat de taart blijft bakken
zonder aan te branden.
67 NL
Page 68

6. PYROLYSE
De oven is uitgerust met een systeem voor schoonmaak via pyrolyse,
wat betekent dat vuil tegen zeer hoge temperaturen wordt
vernietigd.Deze operatie gebeurt automatisch via de
programmeerdraaiknop.De rook die ontstaat bij dit proces wordt
“gewassen” door een pyrolysator die in actie treedt bij het bakken van
voedingsproducten.Door de hoge temperatuur die nodig is voor de
pyrolyse, is de deur van de oven voorzien van een beveiliging
waardoor die vergrendeld blijft tijdens deze cyclus.
De pyrolyse kan te allen tijde worden stopgezet.De ovendeur blijft
daarbij evenwel vergrendeld zolang het vergrendellampje blijft
branden.
6. Als de pyroclean klaar is, zal de pyrolyse auitomatisch
uitschakelen. Op het display komt dan " END" te staan totdat de
deur opslot gaat dan verschijnt "
7. U kunt de functie keuze knop tnaar de "
temperatuur is nogsteeds hoog, "
0 - - n " .
0 " stand maar de
0 - - n " staat in het diplay dit
betekend dat de deur nog opslot is.
7. KINDERBEVEILIGING
NOTA:Wanneer er boven de oven een kookplaat is geïnstalleerd, dan
mag u die kookplaat nooit gebruiken wanneer er een pyrolyse aan de
gang is.Op die manier vermijdt u oververhitting van het
bedieningspaneel van de oven.
TWEE PYROLYSECYCLI zijn voorgeprogrammeerd.
PYRO ECO:schoonmaak van een middelmatig vervuilde oven.De
pyrolyse duurt 65 minuten.
PYRO SUP:schoonmaak van een zeer vuile oven. de pyrolyse duurt
hier 90 minuten.
Gebruik nooit in de handel verkrijgbare schoonmaakproducten
alvorens u overgaat tot het schoonmaken van de oven via
pyrolyse!
Opmerking:wanneer u een schoonmaak via pyrolyse doorvoert net
nadat de oven werd gebruikt om te bakken, kunt u gebruik maken van
de warmte die reeds in de oven aanwezig is, waardoor u dus heel wat
energie bespaart.
BELANGRIJK:
Voordat u de pyrolyse methode gaat gebruiken:
verwijder alle accessoires uit de oven; deze zullen, als u ze niet
verwijderd, beschadigen tijdens het gebruik van de pyrolyse methode
Verwijder alle losse en grote delen etensresten, deze kunnen namelijk
vlamvatten door de hitte van de pyrolyse methode.
Sluit de ovendeur.
Als uw kookplaat boven de oven is geïnstalleerd, gebruik dan NOOIT
de gaspitten of elektrische kookzones tijdens de pyrolyse schoonmaak
methode.
Wij adviseren u om geen schoonmaakmiddelen te gebruiken bij het
reinigen van de oven.
De pyrolyse methode laat een witte laag op de ovenwand achter, wacht
tot de oven is afgekoeld, daarna kunt u de laag verwijderen met een
vochtige spons.
Opmerking:
U bespaart energie door de oven direct na gebruik schoon te
maken. U maakt dan gebruik van de overgebleven hitte van de
oven.
Zolang het hangslotsymbool te zien is, kunt u de deur om
veiligheidsredenen niet openen omdat de temperatuur in de oven nog
te hoog is.
De koelturbine stopt enkel wanneer de elektronische onderdelen een
redelijke temperatuur bereikt hebben.
Op het einde van de pyrolysecyclus gaat het temperatuurlampje
opnieuw knipperen en het blijft branden ook al staat de oven uit.Het
knippert terwijl de temperatuur daalt en verdwijnt definitief wanneer de
oven een voldoende lage temperatuur bereikt.
Na de pyrolyse blijft er op de wanden van de oven een witachtig residu
achter.Wacht tot de oven helemaal is afgekoeld.Maak de binnen kant
van de oven vervolgens schoon met een vochtige spons.
Deze functie vormt een essentiële beveiliging, vooral wanneer er
jonge kinderen aanwezig zijn.Ze zorgt ervoor dat kinderen de oven
niet kunnen inschakelen en de geprogrammeerde gegevens niet
kunnen wijzigen.Deze beveiliging impliceert de vergrendeling van het
bedieningspaneel, zowel wanneer de oven niet in werking is, als
wanneer een oven wel in gebruik is (bakmethode of pyrolyse).
Er zijn twee veiligheidsniveaus mogelijk:
NIVEAU 1:Blokkering van de bakmethodeselectie en de centrale
knop
Om die te activeren zet u de programmeerdraaiknop op de stand
“kinderbeveiliging”
Actie:de bakmethodeselectie en de centrale knop zijn inactief*.
Om te deactiveren:zet de programmeerdraaiknop op stand 0.
NIVEAU 2:Blokkering van alle bediening
Om te activeren:zet de programmeerdraaiknop op de stand
“kinderbeveiliging” en houd de centrale knop gedurende 3 seconden
ingedrukt.
Actie:alle bediening is gedeactiveerd*.
Om te deactiveren:zelfde procedure als bij de activering.
Zet de programmeerdraaiknop op de stand “kinderbeveiliging” en
houd de centrale knop gedurende 3 seconden ingedrukt.
*Nota:In alle gevallen zorgt de nulstand van de
programmeerdraaiknop om veiligheidsredenen voor een
uitschakeling van de oven, zelfs wanneer de bediening vergrendeld
is.
1. Draai de keuze knop naar de Postitie
Op het display komt nu " ECO" of " SUP " te staan.
2. De vooraf ingestelde tijd is 65min, dit kan varieeren van 65 min.
(Eco mode) tot 90min. (Sup mode) via de programmatoetsen " + "
or " - " . Als de oven erg vuil is, raden wij u aan de tijd te verhogen
naar 90min, als de oven minder vuil is kunt u de tijd reduceren naar
65min.
3. Het is mogelijk om de starttijd van de pyroclean uit te stellen
door de eindtijd te veranderen via de programmaknop.
4. na een paar minuten, als de oven een hoge temperatuur heft
bereikt, zal de deur automatisch op slot gaan.
5. De pyroclean cyclus kan op elk moment beëindigd worden door
de functieknop naar "
0 ".
68 NL
Page 69

Page 70

ISTN ALLATION GB
INSTALLAZIONE IT
GB
Oven in column (dimensions mm)
IT
Forno in colonna (dimensioni in mm)
ES
Horno en columna (dimensiones en mm)
Установка духовки в стойке
RU
(размеры в миллиметрах)
560
550
560
min
560
440
590
595
17
INSTALACIÓN ES
УСТАНОВКА
ATTENTION !
Applying torque more than needed to fix the screws can close the ventilation
channels on both sides. Please be sure that, these ventilation channels are
2mm open after installation to furniture.
ATTENZIONE!
578
L'applicazione di una coppia superiore a quella necessaria per fissare le
viti in posizione potrebbe ostruire le aperture di ventilazione su entrambi i lati.
Verificare che l'apertura di questi canali di ventilazione sia pari ad almeno 2 mm
dopo l'installazione nel mobile. Il sacchetto all'interno del forno contiene quattro viti
di fissaggio.
¡ATENCIÓN!
Más presión de la necesaria para fijar los tornillos podría cerrar los canales de
ventilación de ambos lados. Asegurar una apertura de 2 mm de los canales de
ventilación después de instalar el horno en el mueble.
ВНИМАНИЕ!
Заворачивание крепежных винтов с приложением слишком большого крутящего
момента может привести к закрыванию вентиляционных каналов на обеих
сторонах духовки. Проверьте, что эти вентиляционные каналы открыты на 2
552
мм после установки духовки в кухонную мебель.
di serraggio
RU
GB
Opening 500 x 45
IT
Apertura 500 x 45
ES
Apertura 500 x 45
RU
Отверстие
4x4.5 5x2
500 x 45
GB
If the furniture is equpped w
bottom at the back part, provide an
opening for the power supply cable.
IT
Se il mobile è equipaggiato con
una copertura posteriore, provvedere
ad una apertura per il passaggio del
cavo di alimentazione.
ES
Si el mueble tiene fondo en la
parte trasera hacer una apertura
para el cable eléctrico.
RU
заднюю стенку, сделайте в ней
отверстие для ввода кабеля питания
GB
Opening 500 x 10
IT
Apertura 500 x 10
ES
Apertura 500 x 10
RU
Отверстие 500 x 10
595
Если кухонная мебель имеет
600 min
GB
Opening 500 x 10
IT
Apertura 560 x 45
ES
Apertura 500 x 10
RU
Отверстие 500 x 10
ith a
546
22
TABLE / TOP
FOUR / OVEN
2mm
2mm
10 min
GB
Oven fitted under worktop (dimensions mm)
IT
Forno installato sotto il piano di lavoro
ES
Horno colocado debajo de la encimera
RU
Установка духовки под рабочей поверхностью
GB
Opening 560 x 45
IT
Apertura 560 x 45
ES
Apertura 560 x 45
RU
Отверстие 560 x 45
GB
Fixing in the location
Inside the oven there is a bag with four fixing screws. When the oven door is open, holes are accessible, they are located on each side. Use the screws
provided to fix the oven.
IT
Fissaggio in nicchia
Dentro al forno, c'è una busta con quattro viti di fissaggio. Quando la porta forno è aperta, i fori di fissaggio sono accessibili e si trovano sui
montanti laterali. Utilizzare le viti fornite per fissare il forno.
ES
Fijación del horno
Dentro del horno hay una bolsa con tornillos fijadores. Con la puerta abierta se accede a los agujeros y se encuentran a los lados. Para fijar el horno
utilizar los tornillos que se proporcionan con el mismo.
RU
Крепление духовки на месте установки
Внутри духовки имеется пакет с четырьмя крепежными винтами. Когда дверца духовки открыта, обеспечивается доступ к крепежным
отверстиям. Эти отверстия расположены на боковых сторонах духовки. Закрепите духовку с помощью винтов, которые поставляются вместе с ду хо вк ой .
Fixing:
Fissaggio:
Fijación:
Крепление:
Page 71

VGRADNJA PEČICE SL
INSTALLATION
DE
INSTALLATION DU FOUR
INSTALLATIE
FR
NL
560
min
560
590
SL
V visoko omarico (mere v mm)
DE
Einbau des Ofens in einem säulenförmigen Hohlraum
FR
Four en colonne (dimensions en mm)
NL
Oven op kolom (afmetingen in mm)
560
440
595
SL
Če je na omarici tudi hrbtna stran,
morate v njej narediti odprtino za
napajalni kabel.
DE
Wenn der Küchenschrank mit einer
Hinterwand ausgestattet ist, dann ist eine
Öffnung notwendig damit das Stromkabel
angeschlossen werden kann.
FR
Si le meuble est équipé d’un fond à l’arrière :
prévoir une ouverture pour le passage du câble
d'alimentation.
NL
Een opening aan de achterkant
van de niche is nodig voor de
voedingskabel.
550
595
VGRADNJA POZOR!
Če privijete vijake z večjim navorom, kot je to res potrebno, lahko zaprete odprtini za
zračenje na obeh straneh. Poskrbite, da po vgradnji v pohištvo odprtina meri 2 mm!
Achtung!
Vergewissern Sie sich, dass Sie beim Einbau des Backofens einen 2 mm Spalt zu den
Küchenschränken einhalten. Dieser Spalt muss für die Lüftungskanäle
17
578
22
552
546
sichergestellt werden.
ATTENTION !
Un Serrage excessif des vis de fixation peut entraîner une obstruction de la ventilation sur les
deux côtès du produit. Assurez-vous qu›un espace de 2 mm est toujours prèsent après
installation dans le meuble.
OPGEPAST!
De schroeven te hard aanspannen kan deventilatiekanalenaan beide zijden
sluiten. Zorg ervoor dat de ventilatiekanalen 2mm open blijven nadat de
oven in de niche werd geplaatst.
2mm
2mm
SL
Odprtina 500 x 45
DE
Öffnung 500 x 45
FR
Ouvertureе
NL
Opening 500 x 45
4x4.5 5x2
500 x 45
SL
Odprtina 500 x 10
DE
Öffnung 500 x 10
FR
Ouverture 500 x 10
NL
Opening 500 x 10
TABLE / TOP
10 min
SL
Za vgradnjo pod delovni pult
DE
Backofen unter der Arbeitsplatte montiert
(Abmessungen mm)
Four enchâssé sous plan de travail (dimensions en mm)
600 min
SL
Odprtina 500 x 10
DE
Opening 500 x 10
FR
Ouverture 500 x 10
NL
Opening 500 x 10
SL
Pritrditev V Nišo
V pečici je vrečka s štirimi vijaki za pritrditev. Ko so vrata pečice odprta, so dostopne luknje na straneh pečice.Pritrdite jo
na omarico s priloženimi vijaki.
Montage (Fixierung der Schrauben)
DE
Im Inneren des Backofens befindet sich ein Plastikbeutel mit insgesamt 4 Befestigungsschrauben. Fixierung: Wenn Sie den Backofen öffnen, sehen Sie auf
der linken und rechten Seite 2 Löcher die für die Fixierung vorgesehen sind. Verwenden Sie für die Fixierung die mitgelieferten Schrauben.
FR
Fixation dans la niche d'encastrement
Vous trouverez dans un sachet à l'intérieur du four les vis de fixation. Pour la fixation: lorsque la porte du four est ouverte, les trous
sont accessibles, ils sont situés de chaque côté des montants latéraux. Utiliser les vis fournies pour fixer le four.
Het toestel vast maken
NL
In de oven bevindt zich een zak met vier schroeven. Het toestel vastmaken: Bij de opening van de ovendeur, zijn er gaten
zichtbaar aan weerszijden. Gebruik de bijgeleverde schroeven om de oven vast te maken.
FOUR / OVEN
Pritrditev:
FR
De oven onder het werkblad plaatsen (afmetingen mm)
NL
NL
SL
Odprtina 560 x 45
DE
Opening 560 x 45
FR
Ouverture 560 x 45
NL
Opening 560 x 45
Page 72

GB
The manufacturer will not be responsible for any inaccuracy resulting from printing or transcript errors contained in this brochure. We reserve the right to carry out modifications to products as
required, including the interests of consumption, without prejudice to the characteristics relating to safety or function.
IT
Il produttore declina ogni responsabilità per inesattezze contenute nel documento stampato o per errori di trascrizione contenuti in questa brochure. Inoltre, si riserva il diritto di apportare
modifiche al prodotto, nell'interesse dei consumatori, senza alcun pregiudizio per la sua sicurezza o funzionalità.
ES
El fabricante no se responsabiliza de las inexactitudes debidas a fallos de impresión o transcripción contenidos en este folleto. Nos reservamos el derecho a modificar los productos como sea
necesario, incluidos los intereses de consumo, sin perjuicio de las características relacionadas con la seguridad o su funcionamiento.
RU
Производитель не несет ответственности за неточности, связанные с опечатками и неправильным переводом, которые могут иметь место в данной брошюре. Производитель
оставляет за собой право вносить изменения в конструкцию выпускаемых им изделий, включая такие изменения, которые могут оказывать влияние на их эксплуатационные
характеристики, при условии, что эти изменения не снижают безопасность и функциональные возможности изделия.
SL
Proizvajalec ne prevzema odgovornosti za morebitne tiskarske napake v tej knjižici. Pridržuje si pravico do sprememb na aparatu brez predhodnega obvestila vključno s porabo, ki ne vplivajo
na varnost ali delovanje pečice.
DE
Der Hersteller übernimmt keine Haftung für eventuelle Druck- oder Übersetzungsfehler dieser Bedienungsanleitung. Der Hersteller behält sich vor technische Änderungen zurVerbesserung
der Produktqualität im Interesse des Endverbrauchers vorzunehmen.
FR
Le constructeur décline toute responsabilité concernant d’éventuelles inexacitudes imputables à des erreurs d’impression ou de transcription contenue dans
cette notice. Le constructeur se réserve le droit de modifier les produits en cas de nécessité, même dans l’intérêt de l’utilisation, sans causer de préjudices
aux caractéristiques de fonctionnement de sécurité des appareils.
NL
De fabrikant is niet aansprakelijkvoor eniğe onnauvvkeurigheid die hetgevolg is van drukfouten of transcriptiefouten in deze brochure. Wij behouden ons het
recht voor zo nodig, önder meer in het belang van een gunstiger verbruik, vvijzigingen aan producten aan te brengen, zonder dat dit gevolgen heeft voor de
kenmerken ten aanzien van veiligheid of functionering.
08 4 A.201 • REV: • 42814007
 Loading...