

Page 1
FORNI
ISTRUZIONI PER L’USO
OVENS
USER INSTRUCTIONS
HORNOS EMPOTRABLES
INSTRUCCIONES DE USO
EINBAUBACKKÖFEN
BEDIENUNGSANLEITUNG
FOURS ENCASTRABLES
NOTICE D’EMPLOI ET D’INSTALLATION
FORNOS
MANUAL DE INSTRUÇÕES DE UTILIZAÇÃO
Духовые шкафы
Инстукции для пользователей
IT
GB
ES
DE
FR
PT
RU
PIEKARNIKI DO ZABUDOWY
INSTRUKJA OBSŁUGI
TROUBY
NÁVOD K OBSLUZE
CANDY HOOVER GROUP S.R.L. • Via Privata Eden Fumagalli • 20047 Brugherio Milano Italy
PL
CZ
Page 2

CONTENUTO
Indicazioni Di Sicurezza
1. Avvertenze Generali
1.1 Dichiarazione Di Conformità
1.2 Informazioni Sulla Sicurezza
1.3 Installazione
1.4 Inserimento Del Mobile
1.5 Importante
1.6 Allacciamento Elettrico
Dotazione Del Forno (secondo Modello)1.7
2. Consıglı Utili
2.1 Griglie Forno - Sistema Di Arresto
2.2 La Cottura Al Grıll
2.3 Secondo Modello Led Vision
2. 4 Tempı Di Cottura
2. 5 Pulizia E Manutenzione
2.6 Pulızıa E Manutenzıone
2. 7 Servizio Assistenza Clienti
3. Descrizione Del Display
3.1 Prima Di Utilizzare İl Forno Per La Prima Volta
3.2 Utilizzo Del Forno
3.3 Programmazione
3.4 Suggerimenti Per La Cottura
3.5 Regolazione Del Contrasto Del Display
4. Funzione Di Protezione
5. Funzione WIFI
6. Tabella Tempi Di Cottura
....................................................................................05
.....................................................................................05
...................................................................................06
.....................................................................................08
...................................................................04
.......................................................................05
..........................................................05
..........................................................05
....................................................................05
..................................................................05
.......................................05
.................................................06
............................................................................06
..........................................................06
............................................................................06
.................................................................06
..................................................................07
............................................................07
.....................................................................09
..................................................................09
............................................................................10
......................................................10
.........................................................................10
...............................................................11
...............................................................................11
..........................................................12-13
IT
INHALTSVERZEICHNIS
SICHERHEITSVORSCHRIFTEN
1. Allgemeine Hinweise
1.1 Konformitätserklärung:
1.2 Sicherheitshınweise
1.3 Installation
1.4 Einbau In Den Schrank
1.5 Wichtig
1.6 Elektrischer Anschluß
1.7 Ofenausstattung (je Nach Modell)
2. Einige Nützliche Hinweise
2.1. Kippgesicherte Gitterroste
2.2. Grillen
2.3 The U_cook Models
2.4 Beleuchtungssystem U-see - Je Nach Modell
2.5 Katalytisches Selbstreinigungsset
2.6 Reinigung Und Wartung
2.7 Technischer Kundendienst
3. Display
3.1 Nützliche Hinweise vor dem ersten Betrieb
3.2 Benutzung Des Backofens
3.3 Programmierung
3.4 Tipps
3.5 Kontrasteinstellung
4. Kindersicherung
5. WIFI
6. Garzeiten
......................................................................................33
..........................................................................................33
...........................................................................................34
.............................................................................................37
.................................................................................................38
..................................................................................39-40
......................................................................33
......................................................................34
...............................................................................35
............................................................................37
..........................................................................37
...........................................................................38
........................................................32
....................................................................32
..................................................................32
..................................................................33
....................................................................33
.................................................33
............................................................34
............................................................34
.................................................34
................................................................34
............................................................34
....................................36
..............................................................36
DE
..............................34
CONTENTS
Safety Instructions
1. General Warnings
1.1 Declaration Of Compliance
1.2 Safety Hints
1.3 Installation
1.4 Fitting The Oven Into The Kitchen Unit
1.5 Important
1.6 Connecting To The Power Supply
1.7 Oven Equipment (according To The Model)
2. Useful Tips
2.1 Shelf Safety System
2.2 Grilling
2.3 The U-Cook Models
2.4 U-See
2.5 Self-cleaning Oven With Catalytic
2.6 Cleaning And Maintenance
2.7 Service Centre
3. Description of the display
3.1 Before using the oven for the first time
3.2 How to use the oven
3.3 The programmation
3.4 Cooking tips
3.5 Adjusting the display contrast
4. Child safety
5. WIFI Feature
6. Tables Of Cooking Times
...........................................................................................16
.............................................................................................16
................................................................................................17
.............................................................................14
............................................................................14
...........................................................14
....................................................................................15
.....................................................................................15
.........................................15
......................................................................................15
..................................................15
......................................................................................16
.....................................................................16
.....................................................................16
.................................................16
............................................................16
..............................................................................16
.................................................................18
...................................................18
................................................................19
...............................................19
......................................................................19
............................................................19
....................................................................................20
..........................................................21-22
CONTENIDO
Instruccıones Para Un Uso Seguro
1. Instrucciones Generales
1.1 Declaración De Conformidad
1.2 Información Sobre Seguridad
1.3 Instalación
1.4 Introducción Del Mueble
1.5 Importante
1.6 Conexión Eléctrica
1.7 Equipamiento Del Horno - Según El Modelo -
2. Consejos Útiles
2.1 Rejillas Horno - Sistema De Sujeción
2.2 La Coccıón Al Grill
2.3 Los Modelos U-cook
2.4 Segùn Modelos U-see
2.5 Horno Autolımpiante Catalítico
2.6 Limpieza Y Mantenimiento
2.7 Asistencıa Técnica
3. Descrıpcıón De La Pantalla
3.1 Antes De Utılızar El Horno Por Prımera Vez
3.2 Cómo Utılızar El Horno
3.3 Programacıón
3.4 Consejos De cocción
3.5 Ajuste Del Contraste De La Pantalla
4. Segurıdad De Los Nıños
5. Características WIFI
6. Tablas De Tiempos De Cocción
...................................................................................24
.....................................................................................24
........................................................................24
................................................................................25
........................................................................25
..................................................................25
...................................................................25
.........................................................................25
.........................................................................................26
..........................................................................27
...................................................................27
........................................................................28
........................................................................28
....................................................................29
.........................................................................29
....................................................23
...............................................................23
.......................................................23
.......................................................24
................................................................24
............................................25
......................................................25
...........................................................25
............................................28
..............................................30-31
GB
.................................15
ES
...............................24
SOMMAIRE
CONSEILS DE SÉCURITÉ
1. Instructions Generales
1.1 Declaration De Conformité
1.2 Consignes De Securite
1.3 Installation
1.4 Mise En Place Du Four Dans Son Meuble
1.5 Important
1.6 Alimentation Electrique
1.7 Important
1.8 Equipement Du Four Equipement Different Selon Le Type De Four
2. Consignes Utiles
2.1 Grilles Du Four, Nouveau Système D’arrêt
2.2 La Cuısson Au Gril
2.3 Selon Modèle Le Pack U-cook
2.4 Selon Modèle U-see
2.5 Four Autonettoyant Par Catalyse
2.6 Conseils De Nettoyage Et D’entretien
2.7 Assistance Technique
3. Présentation du tableau de bord
3.1 Conseils avant la premiere utilisation
3.2 Recommandations
3.3 La programmation
3.4 Quelques conseils de cuisson
3.5 Réglage du contraste du cadran d’affichage
4. Pyrolyse
5. La sécurité enfant
6. Temps De Cuisson
.....................................................................................42
........................................................................................42
......................................................................................42
............................................................................43
..........................................................................................44
...........................................................................................47
..............................................................41
...................................................................41
.............................................................41
...................................................................42
....................................42
..................................................................42
...................................43
.......................................................................43
.....................................................43
...................................................................43
..................................................43
...........................................43
....................................................................43
......................................................45
.............................................45
.......................................................................46
....................................................46
......................................................46
...........................................................................47
....................................................................48-49
CONTEÚDO
INSTRUÇÕES DE SEGURANÇA
1. Indicações De Carácter Geral
1.1 Declaração De Conformidade:
1.2 Informação Sobre Segurança
1.3 Instalação
1.4 Montagem Do Forno
1.5 Importante
1.6 Ligação Do Forno À Rede De Alimentação De Energia
1.7 Equipamento Do Forno (de Acordo Com Modelo)
2. Sugestões Úteis
2.1 Sistema De Segurança Das Prateleiras
2.2 Grelhar
2.3 Os Models -u-cook
2.4 De Acordo Com O Modelo U-see
2.5 Forno Auto-limpante Com Revestimento Catalitico
2.6 Limpeza E Manutenção
2.7 Assistêncıa Técnica
2.8 Condições De Garantia
3. Descrição do painel
3.1 Antes de usar o forno pela primeira vez
3.2 Como usar o forno
3.3 Programação
3.4 Dicas de cozedura
3.5 Ajustar o contraste do painel
4. Segurança para crianças
5. Característıcas Do Wıfı
6. Tabelas De Tempos De Cozedura
.....................................................................................51
.....................................................................51
...................................................................................51
..............................................................................52
..........................................................................................52
........................................................................52
......................................................................53
...............................................................................................54
.........................................................................55
.................................................................................56
.........................................................................56
.......................................................50
.........................................................50
......................................................51
.......................................................51
........................51
........................................52
..................................................52
......................52
................................................................53
...............................................................53
.........................................55
.........................................................57
........................................................57
..............................................................57
..........................................58-59
02
FR
...42
PT
...............51
Page 3
COДЕРЖАНИЕ
ПРАВИЛА ТЕХНИКИ БЕЗОПАСНОСТИ
2.1 СИСТЕМА БЕЗОПАСНОСТИ ПОЛОК
полезные советы2.
2.3
2.4
2.5
2.6
2.7
3. Описание Дисплея
3.1 Перед Первым Использованием Духовки
3.2 Как Пользоваться Духовкой
3.3 Программирование
3.4 Советы По Приготовлению Пищи
3.5 Регулировка Контрастности Дисплея
4. Амок От Детей
5. Wi-Fi Функция
6.
........................................................................61
..........................................................61
.........................................................61
.....................................................................................61
............................................................61
.....................................................................62
.................................................................62
.....................................................................62
...............................................................63
...............................................................64
........................................................................65
..........................................................66
.......................................................................67
................................................................................67
................................................................................67
...........................................60
........................................61
..........................................62
.....................................................63
................................................67
..........................................67
....................................68-69
RU
..................................62
.......................................63
...................................65
OBSAH
BEZPEČNOSTNÍ POKYNY
1. Všeobecná Upozornění
1.1 Prohlášení O Shodě
1.2 Bezpečnostní Tipy
1.3 Instalace
1.4 Vestavění Trouby Do Kuchyňské Linky
1.5 Důležité
1.6 Připojení K Elektrické Síti
1.7 Vybavení Trouby ( Podle Modelu)
2. Užitečné Tipy
2.1 Bezpečnostní Systém Roštu
2.2 Grilování
2.3 U-cook Modely
2.4 Podle Modelu Led Vision
2.5 Samočištění Trouby Pomocí Katalytické Vložky
2.6 Čištění A Údržba
2.7 Servisní Středisko
3. Popıs Displeje
3.1 Před Prvnim Použitim Trouby
3.2 Použiti Trouby
3.3 Programovani
3.4 Typy K Pečeni
3.5 Nastaveni Kontrastu Displeje
4. Dětsky Zamek
5. WIFI
6. Tabulky Časů Přípravy
........................................................................................81
.........................................................................................81
.................................................................................82
..........................................................................................82
......................................................................................83
..............................................................................84
...............................................................................84
..............................................................................85
................................................................................85
...............................................................................86
................................................................................................86
................................................................80
................................................................81
.......................................................................81
.........................................................................81
.........................................81
...............................................................81
................................................81
..........................................................82
........................................................................82
..............................................................82
..........................................................................82
.......................................................................82
.........................................................85
............................................................87-88
CZ
...........................82
SPIS TREŚCI
INSTRUKCJE BEZPIECZEŃSTWA
1. Wskaz wki Og lneóó
1.1 Deklaracja Zgodno ciś
1.2 Uwaga
1.3Instalacja
1.4 Osadzenie Ur adzenia W Obudowież
1.5 Pod czenie Elektrycznełą
1.6 Wyposa enie Piekarnikaż
2. Użteczne Wskazówki
2.2 Pieczenie Z Grillem
2.3 Modele U.COOK
2.4 Zaleznie Od Modelu U.SEE
2.5 Katalityczny Piekarnik Samooczyszczający Się
2.6 Czyszczenie I Konserwacja
2.7 Serwis Techniczny
3. Panel Sterowania
3.1 Przed Użyciem Piekarnika Po Raz Pierwszy
3.2 Używanie Piekarnika
3.3 Programowanie
3.4 Wskazówki Dotyczące Pieczenia
3.5 Regulacja Kontrastu Wyświetlacza
4. Blokada Przed Dostępem Dzıeci
5. WIFI
6. Tabela Czasów Wypieku
.............................................................................................71
..........................................................................................71
..................................................................................................77
.......................................................................71
.......................................................................71
.....................................................................72
.......................................................................72
...........................................................................72
.........................................................................73
........................................................................74
..........................................................................76
............................................................................76
....................................................70
.............................................71
................................................................71
................................................................72
...........................................................72
.............................73
............................................................73
.................................................................75
...................................75
.................................................................76
...........................................................77
..........................................................78-79
PL
03
Page 4

INDICAZIONI DI SICUREZZA
• ATTENZIONE: l'apparecchio e le parti accessibili diventano calde durante l'uso. Prestare attenzione a
non toccare le parti calde.
• I bambini al di sotto di 8 anni dovrebbero essere tenuti a distanza se non continuamente supervisionati.
• L'apparecchio può essere usato da bambini dagli 8 anni in su e persone con ridotte capacità fisiche,
sensoriali o mentali o senza esperienza e conoscenza del prodotto se supervisionate o dando loro
istruzioni riguardo al funzionamento dell'apparecchio in maniera sicura e coscente del rischio possibile.
• I bambini non dovrebbero giocare con l'apparecchio.
• La pulizia e la manutenzione non dovrebbero essere fatte da bambini senza supervisione
• Durante l’uso l’apparecchio diventa molto caldo. Si dovrebbe fare attenzione a non toccare gli elementi
riscaldanti all’interno del forno.
• ATTENZIONE: Le parti accessibili possono diventare molto calde durante l’uso. I bambini dovrebbero
essere tenuti a distanza.
• Non usare per la pulizia materiali ruvidi abrasivi o raschietti metallici affilati per pulire le porte di vetro del
forno dato che possono graffiare la superficie e causare la frantumazione del vetro.
• Spegnere il forno prima di rimuovere lo schermo di protezione e, dopo la pulizia, rimontarlo secondo le
istruzioni.
• Usare solo la sonda termica raccomandata per questo forno.
• Non utilizzare un pulitore a vapore.
• ATTENZIONE: Assicurarsi che l’apparecchio sia spento prima di sostituire la lampada per evitare la
possibilità di scosse elettriche.
• Il mezzo di disconnessione deve essere incorporato nel cablaggio fisso in accordo con le leggi di
cablaggio.
• Le istruzioni devono indicare quale tipo di cavo debba essere utilizzato, tenendo presente la
temperatura della superficie posteriore dell’apparecchio.
• Se il cavo di alimentazione è danneggiato, esso deve essere sostituito da un cavo o un assieme
speciali disponibili presso il costruttore o il suo servizio assistenza tecnica.
• ATTENZIONE: Al fine di evitare ogni pericolo dovuto al riarmo accidentale del dispositivo termico di
interruzione, il presente apparecchio non deve essere alimentato con un dispositivo di manovra esterno,
quale un temporizzatore oppure essere connesso a un circuito che viene regolarmente alimentato o
disalimentato dal servizio.
• ATTENZIONE: Le parti accessibili possono diventare calde quando il grill è in uso. I bambini dovrebbero
essere tenuti a distanza.
• Gli eccessi di materiale tracimato devono essere tolti prima della pulizia.
• Durante la Pyrolisi le superfici possono scaldarsi più del solito è pertanto consigliato tenere i bambini a
distanza.
04 IT
Page 5

1- AVVERTENZE GENERALI
Vi ringraziamo per aver scelto uno dei nostri prodotti, per ottenere da questo elettrodomestico le migliori prestazioni consigliamo di:
• Leggere attentamente le avvertenze contenute nel presente libretto.
• Conservare con cura questo libretto per ogni ulteriore consultazione.
Durante l’uso il forno diventa caldo, fare attenzione a non toccare gli elementi riscaldanti all’interno del forno.
Alla prima accensione del forno può svilupparsi fumo di odore acre, causato dal primo riscaldamento del collante dei pannelli d’isolamento
avvolgenti il forno. Si tratta di un fenomeno assolutamente normale e, in caso si verificasse, occorre attendere la cessazione del fumo prima di
introdurre le vivande.
Il forno è per sua natura un apparecchio che diventa caldo, in modo particolare in corrispondenza del cristallo porta.
1.1. DICHIARAZIONE DI CONFORMITÀ
Dichiarazione di conformità: questo apparacchio, nelle parti
progettate per venire a contatto con cibi, è conforme con le
regolamentazioni espresse nelle direttive EEC 89/109.
Apponendo la marcatura su questo prodotto, dichiariamo,
sotto la nostra responsabilità, di ottemperare a tutti i requisiti relativi
alla tutela di sicurezza, salute e ambiente previsti dalla legislazione
europea in essere per questo prodotto.
1.2 INFORMAZIONI SULLA SICUREZZA
•Questo apparecchio dovrà essere destinato solo all’uso per il quale è
stato espressamente concepito, e cioè per la cottura di alimenti.
Ogni altro uso (ad esempio riscaldamento ambiente) è da
considerarsi improprio e quindi pericoloso. Il costruttore non può
essere considerato responsabile per eventuali danni derivanti da usi
impropri, erronei ed irragionevoli.
•L’uso di un qualsiasi apparecchio elettrico comporta
l’osservanza di alcune regole fondamentali.
In particolare:
-non tirare il cavo di alimentazione per staccare la spina dalla presa di
corrente
-non toccare l’apparecchio con mani o piedi bagnati o umidi
-non usare l’apparecchio a piedi nudi
-in generale è sconsigliabile l’uso di adattatori, prese multiple e
prolunghe.
- In caso di guasto e/o di cattivo funzionamento dell’apparecchio,
spegnerlo e non manometterlo.
•In caso di danneggiamento del cavo, provvedere tempestivamente
alla sua sostituzione secondo le seguendi indicazioni:
aprire il coperchio morsettiera, togliere il cavo di alimentazione e
sostituirlo con uno corrispondente, (tipo H05RR-F, H05VVF,
H05V2V2-F) e adeguato alla portata dell’apparecchio.
Tale operazione dovrà essere eseguita da personale
professionalmente qualificato. Il conduttore di terra (giallo-verde),
deve obbligatoriamente essere più lungo di circa 10 mm rispetto ai
conduttori di linea.
Per l’eventuale riparazione rivolgersi solamente ad un centro di
assistenza tecnica autorizzato e richiedere l’utilizzo di ricambi
originali.
Il mancato rispetto di quanto sopra può compromettere la sicurezza
dell’apparecchio.
•Non rivestire le pareti del forno con fogli d'alluminio da cucina o
fogli monouso commerciali, perche potrebbero fondersi a
contatto con le superfici in smalto caldo e danneggiare le
superfici in smalto all'interno del forno.
1.3 INSTALLAZIONE
L’installazione è a carico dell’acquirente e la Casa Costruttrice è
esonerata da questo servizio; gli eventuali interventi richiesti alla
Casa Costruttrice che dipendono da una errata installazione non sono
compresi nella garanzia.
L’installazione deve essere effettuata secondo le istruzioni da
personale professionalmente qualificato. Una errata installazione può
causare danni a persone, animali o cose, nei confronti dei quali il
costruttore non può essere considerato responsabile.
1.4 INSERIMENTO DEL MOBILE
Inserire l’apparecchio nel vano del mobile (sottopiano o in colonna). Il
fissaggio si esegue con 4 viti attraverso i fori della cornice, visibili
aprendo la porta.(vedere ultima pagina). Per consentire la migliore
aerazione del mobile, i forni devono essere incassati rispettando le
misure e le distanze indicate nella figura in ultima pagina.
Nota: per i forni da abbinamento con piano cottura è indispensabile
rispettare le istruzioni contenute nel libretto allegato all’
apparecchiatura da abbinare.
1.5 IMPORTANTE
Per garantire un buon funzionamento dell’apparecchio da incasso è
necessario che il mobile sia di caratteristiche adatte. I pannelli dei
mobili adiacenti il forno dovranno essere in materiale resistente al
calore. In particolare nel caso di mobili in legno impiallicciato le colle
dovranno essere resistenti alla temperatura di 120°C: materiali
plastici o collanti non resistenti a questa temperatura sono causa di
deformazioni o scollature. In conformità alle norme di sicurezza, una
volta incassato l’apparecchio, non debbono essere possibili eventuali
contatti con le parti elettriche. Tutte le parti che assicurano la
protezione debbono essere fissate in modo tale da non poter essere
tolta senza l’aiuto di qualche utensile.
Per garantire una buona areazione è necessario eliminare la
parete posteriore del vano; inoltre il pianale di appoggio deve
avere una luce posteriore di almeno 45 mm.
1.6 ALLACCIAMENTO ELETTRICO
Inserire la spina in una presa di corrente munita di un terzo contatto
corrispondente alla presa di terra, che deve essere collegata in modo
efficiente.
Per i modelli sprovvisti di spina, montare sul cavo una spina
normalizzata che sia in grado di sopportare il carico indicato in targa. Il
conduttore di messa a terra e contraddistinto dai colori giallo-verde.
Tale operazione dovrà essere eseguita da personale professionalmente qualificato.
In caso di incompatibilità tra la presa e la spina dell’apparecchio fare
sostituire la presa con altra di tipo adatto, da personale professionalmente qualificato. Si può effettuare anche l’allacciamento alla rete
interponendo tra l’apparecchio e la rete un interruttore omnipolare
dimensionato al carico e rispondente alle norme in vigore. Il cavo di
terra giallo-verde non deve essere interrotto dall’interruttore. La presa
o l’interruttore omnipolare usati per l’allacciamento devono essere
facilmente accessibili ad elettrodomestico installato.
Importante: in fase di installazione, posizionare il cavo di
alimentazione in modo che in nessun punto si raggiungano
temperature superiori di 50°C alla temperatura ambiente.
L’apparecchio è conforme ai requisiti di sicurezza previsti dagli istituti
normativi. La sicurezza elettrica di questo apparecchio è assicurata
soltanto quando lo stesso è correttamente collegato ad un efficace
impianto di messa a terra come previsto dalle vigenti norme di
sicurezza elettrica, (in caso di dubbio, richiedere un controllo accurato
dell’impianto da parte di personale professionalmente qualificato).
Importante: la ditta costruttrice resta sollevata da ogni
responsabilità per eventuali danni a persone o cose, derivanti
dal mancato allacciamento della linea di terra.
ATTENZIONE: la tensione e la frequenza di alimentazione sono
indicate in targa matricola (figura in ultima pagina). Verificare
che la portata elettrica dell’impianto e delle prese di corrente
siano adeguate alla potenza massima dell’apparecchio indicate
in targa. In caso di dubbio rivolgersi ad una persona
professionalmente qualificata.
1.7 DOTAZIONE DEL FORNO (secondo modello)
Prima di utilizzare gli accessori del forno per la prima volta è
necessario pulirli. Per questa operazione si consiglia di utilizzare
una spugna. Successivamente risciacquare ed asciugare gli
accessori.
La griglia semplice serve da supporto per teglie, pirofile, stampi per i
dolci.
La griglia porta-piatto serve in
particolare per le grigliate di carne
poiché sostiene anche la leccarda che
raccoglie i grassi che colano.
Grazie ai loro profili speciali, le griglie
restano sempre in orizzontale, anche
quando vengono estratte verso l'esterno.
Non c'é nessun rischio quindi che i tegami scivolino o si ribaltino.
05 IT
Page 6
La leccarda serve a raccogliere i grassi che colano durante la cottura con il grill. Deve essere utilizzata solamente con il
grill, il girarrosto o il turbo girarrosto, secondo il modello.
Attenzione: in tutti gli altri modi di cottura, la leccarda deve essere tolta dal forno.
Non usare mai la leccarda per cuocere gli arrosti perché ne risulterebbe un eccessivo sviluppo di fumo e vapori e il
forno si sporcherebbe inultimente.
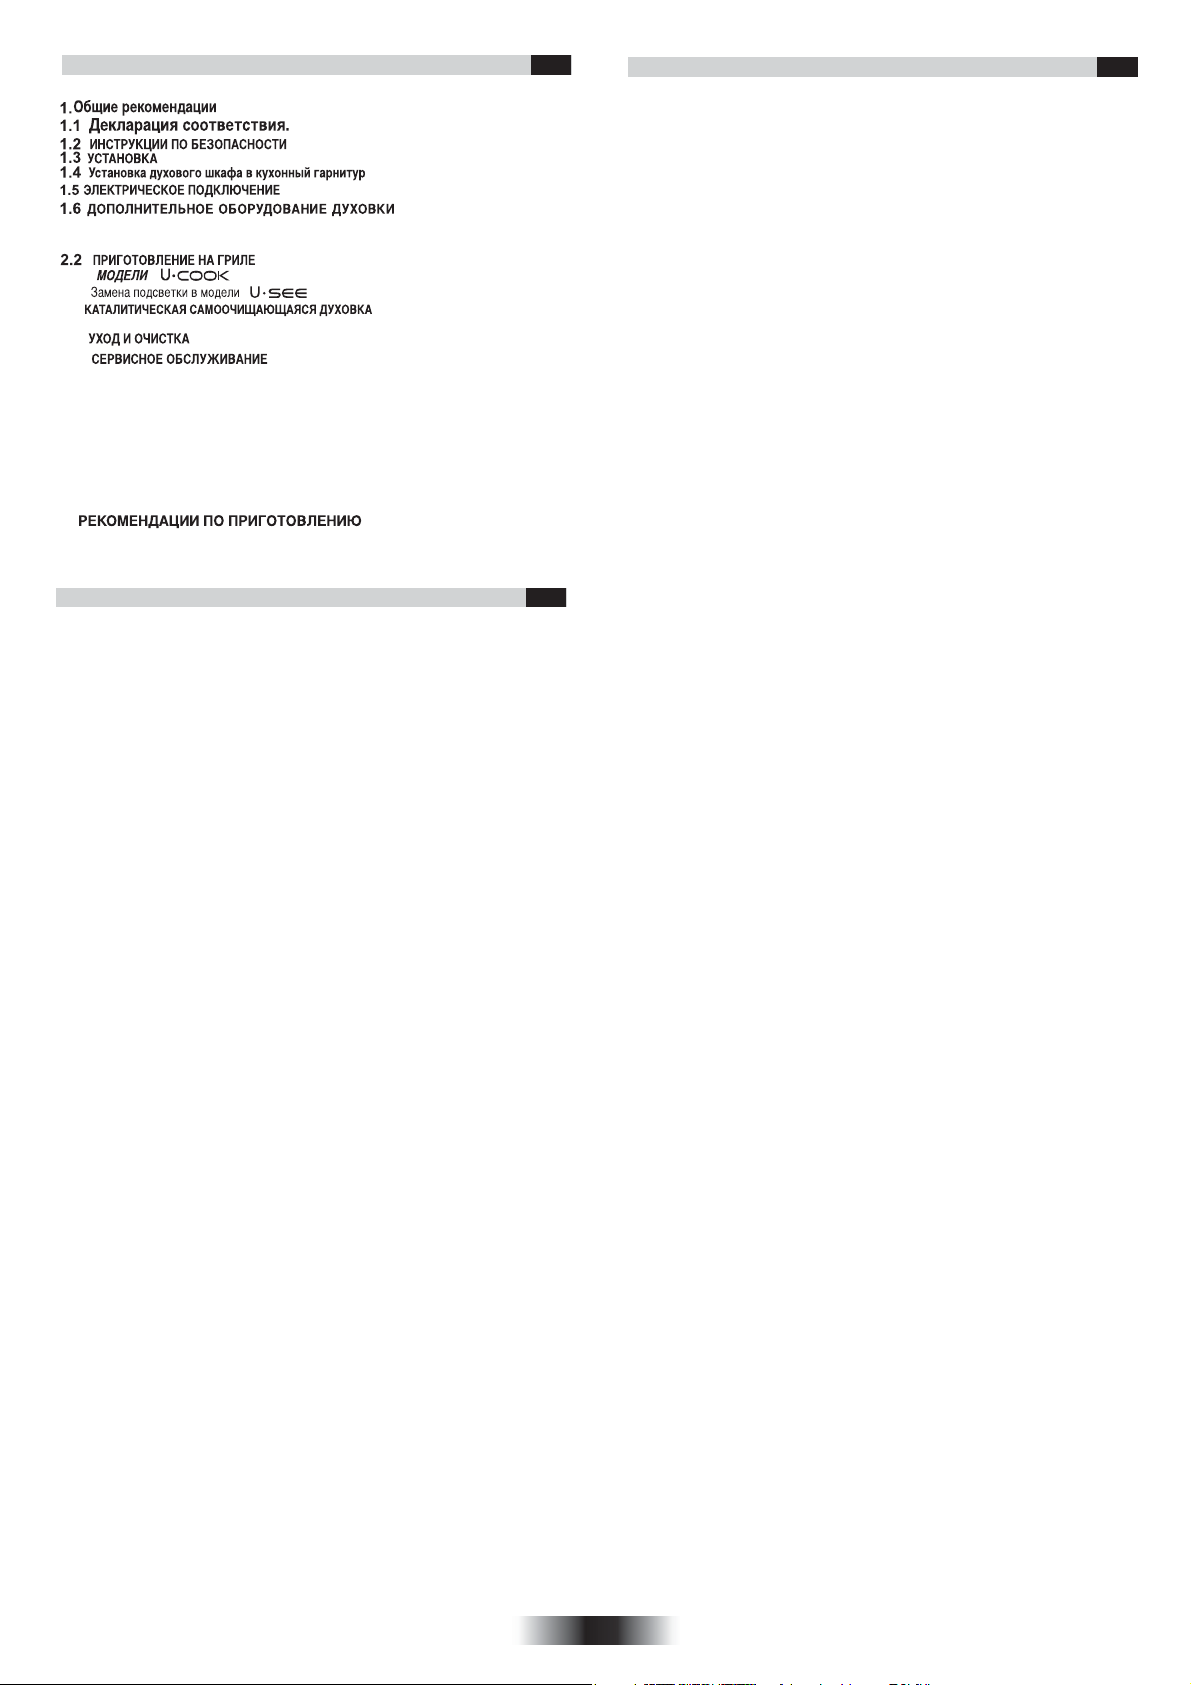
Pizza set é l'idéale per la cottura delle
pizze. Il set deve essere utilizzato in
abbinamento alla funzione Pizza.
Gli accessori devono essere tolti dal forno se non vengono utilizzati.
RIMOZIONE E PULIZIA DELLE GRIGLIE
1. Svitare in senso antiorario i dadi zigrinati
2. Rimuovere le griglie tirandole verso se stessi
3. Pulire le griglie lavandole in lavastoviglie o con una spugna bagnata e
asciugandole subito dopo
4. Dopo aver pulito le griglie, installarle nuovamente
5. Fissare i dadi zigrinati
2- CONSIGLI UTILI
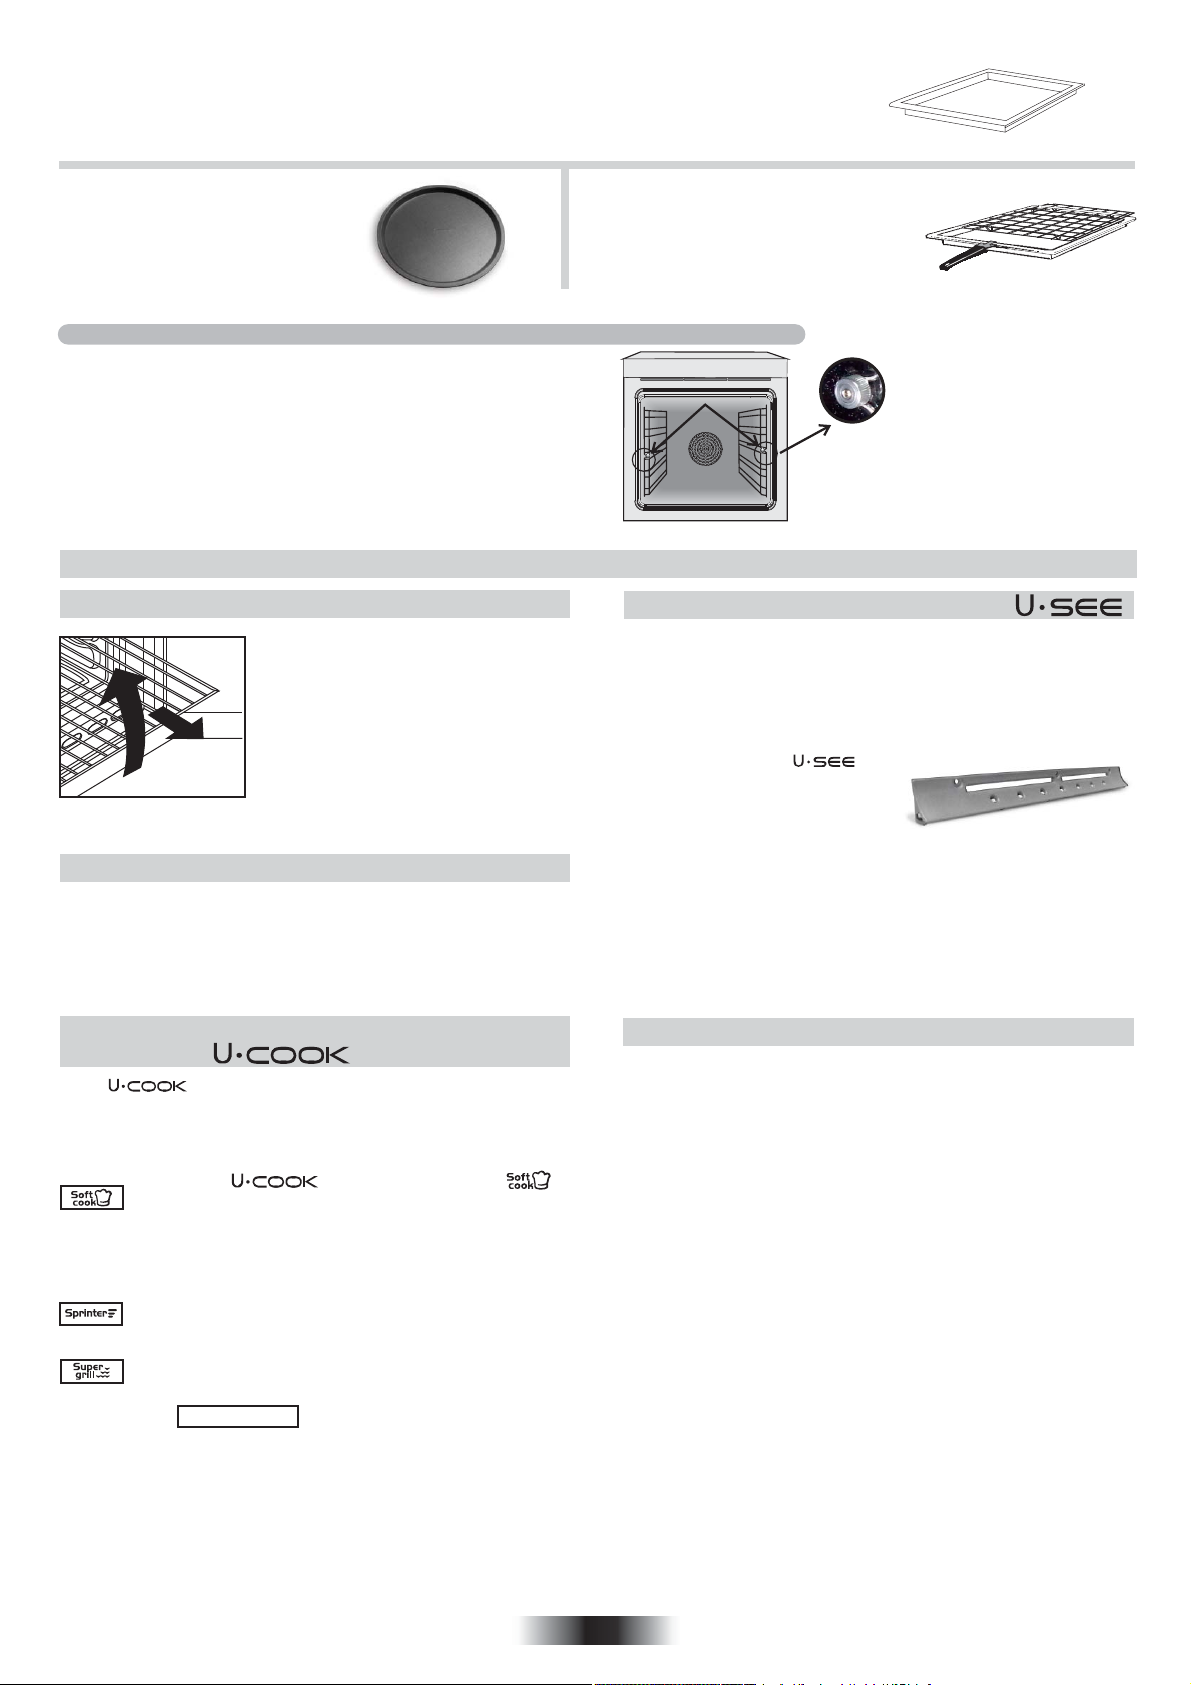
2.1 GRIGLIE FORNO - SISTEMA DI ARRESTO
Il forno è dotato di un nuovo sistema di
arresto griglie. Questo sistema consente
di estrarre le griglie quasi completamente
senza che queste fuoriescano dal forno
mantenendole perfettamente in piano,
consentendo di verificare e mescolare il
cibo con la massima tranquillità e
sicurezza.
Per estrarre le griglie è sufficiente, come indicato sul disegno, alzarle,
prendendole dalla parte anteriore e tirarle.
2.2. LA COTTURA AL GRILL
Questo tipo di cottura consente la doratura rapida dei cibi. A questo
scopo consigliamo di inserire la griglia generalmente nel 3° o 4°
ripiano, secondo le dimensioni dei cibi (Fig. pag. 8). Quasi tutte le
carni possono essere cotte al grill, fanno eccezione alcune carni
magre di selvaggina ed i polpettoni. La carne ed il pesce da cucinare
al grill vanno leggermente unti con olio.
La griglia piatta da combinare con la
leccarda per tutti i tipi di grigliate. Una
presina è fornita per permettere di estrarre
l’insieme dal forno senza scottarsi.
Non lasciare mai la presina nel forno.
A
2.4 SECONDO MODELLO
E’ un sistema che si sostituisce all’illuminazione con tradizionali
lampadine ad incandescenza; nella controporta del forno, completamente
in vetro temprato, sono stati inseriti 14 Led, di altissima qualità a luce
bianca, che illuminano l’interno del forno con una luce diffusa permettendo
una visione della cottura senza ombre, su più livelli.
Il design creato per il supporto dei 14 Led regala un elegante effetto hightech
Vantaggi del sistema :
•Visibilità forno ottimale,
•Durata prolungata nel tempo,
•Consumo energetico
estremamemente
basso -95% dei tradizionali sistemi
di illuminazione forni,
•Elevato rendimento,
•Design high tech.
“Apparecchio con luce LED bianca di classe 1M secondo la IEC 60825- 1:1993 +
A1:1997 + A2:2001 (equivalente a EN 60825-1: 1994 + A1:2002 + A2:2001) ;
massima potenza ottica emessa =459nm < 150uW. Non osservare direttamente con
strumenti ottici.”
2.3 Secondo modello pacchetto di funzioni
del sistema
I forni sono dotati di controllo elettronico della ventilazione
di cottura, brevettato VarioFan; il sistema cambia automaticamente la
velocità della ventola del multifunzione per ottimizzare le correnti
d'aria e la temperatura interna della cavità mentre il forno sta
cucinando.
Tutti i forni sono dotati di funzione ,
permettendo una gestione della distribuzione di umidità e
temperatura. Riduce la perdita degli alimenti fino al 50%,
donando morbidezza e fragranza alle pietanze. Una
cottura cosi delicata è indicata sopratutto per il pane e la
pasticceria.
Riduce il tempo di preriscaldamento dei forni: sono
sufficienti solo 8 minuti per raggiungere i 200°C.
Offre la possibilità di personalizzare il livello e l'intensità gr
di grigliatura, fino al 50% in più rispetto ad un forno
multifunzione tradizionale.
La nuova porta ”WIDE DOOR” ha un'ampia superficie in vetro che
assicura una più facile pulizia e un miglior isolamento termico.
2.5 FORNO AUTOPULENTE CATALITICO
Speciali pannelli autopulenti ricoperti da uno smalto a struttura
microporosa, offerti come accessori opzionali per tutti i modelli,
eliminano la pulizia manuale del forno.
I grassi proiettati sulle pareti durante la cottura, vengono decomposti
dallo smalto, mediante un processo catalitico di ossidazione e
trasformati in prodotti gassosi.
Schizzi eccessivi di grasso possono ostruire i pori e quindi impedire
l’autopulizia. Tale caratteristica può essere ripristinata mediante un
riscaldamento per circa 10-20 minuti del forno vuoto impostando la
manopola forno in corrispondenza della massima temperatura.
Non usare prodotti abrasivi, pagliette metalliche, oggetti appuntiti,
panni ruvidi, prodotti chimici o detersivi che possono danneggiare
irrimediabilmente lo smalto.
Si consiglia inoltre di utilizzare pentole a bordi alti nel caso di cotture di
vivande particolarmente grasse (arrosti, ecc.) e di usare la leccarda
quando si esegue la cottura al grill.
Qualora, per particolari condizioni di sporco, non fosse sufficiente
l’azione precedente, si consiglia di intervenire asportando i grassi con
un panno morbido od una spugna inumiditi con acqua calda.
La porosità dello smalto è fondamentale per garantire l’azione
autopulente.
N.B.: Tutti i pannelli autopulenti in commercio hanno un’efficacia di
rendimento di circa 300 ore di funzionamento forno. Dopo tale limite i
pannelli dovrebbero essere sostituiti.
06 IT
Page 7
2.6 PULIZIA E MANUTENZIONE
Per la pulizia dei vetri della porta del forno non utilizzare materiali
abrasivi raschietti o oggetti che possono graffiare la superficie del
vetro. Pulire le superfici in acciaio inox e smaltate con acqua tiepida e
sapone, oppure con appositi prodotti in commercio, evitando
assolutamente l’uso di polveri abrasive che danneggerebbero le
superfici e le parti estetiche.
La pulizia del forno è molto importante e deve essere effettuata ogni
volta che questo viene usato. Infatti, sulle pareti si depositano grassi
sciolti durante la cottura che potrebbero, alla successiva accensione,
produrre odori sgradevoli che nuocerebbero al buon esito della
cottura. Per la pulizia usare acqua calda e detersivo, sciacquando
accuratamente.
Per eliminare questo fastidioso intervento, su tutti i modelli possono
essere inseriti pannelli autopulenti, offerti come accessori opzionali:
vedere apposito paragrafo«FORNO AUTOPULENTE CATALITICO »
Usare detersivi e pagliette d’acciaio per le griglie inox. La pulizia delle
superfici in cristallo temperato deve essere eseguita quando le
superfici sono fredde. Eventuali rotture dovute alla non osservanza di
questa regola elementare non rientrano nei termini di garanzia.
La lampada forno può essere sostituita disinserendo elettricamente
l’apparecchio e svitando l’ampolla che la racchiude, sostituendo la
lampada non funzionante con una analoga resistente alle alte
temperature.
2.7 SERVIZIO ASSISTENZA CLIENTI
CERTIFICATO DI GARANZIA CONVENZIONALE: cosa fare?
Il Suo prodotto è garantito, alle condizioni e nei termini riportati sul
certificato inserito nel prodotto ed in base alle previsioni del
decreto legislativo 24/02, nonché del decreto legislativo 6
settembre 2005, n. 206, per un periodo di 24 mesi decorrenti dalla
data di consegna del bene.
Così come riportato nei testi dei Decreti Legislativi citati, il
certificato di garanzia dovrà essere da Lei conservato,
debitamente compilato, per essere mostrato al Servizio
Assistenza Tecnica Autorizzato, in caso di necessità, unitamente
ad un documento fiscalmente valido rilasciato dal rivenditore al
momento dell’acquisto (bolla di consegna, fattura, scontrino
fiscale, altro) sul quale siano indicati il nominativo del rivenditore,
la data di consegna, gli estremi identificativi del prodotto ed il
prezzo di cessione. Resta pure inteso che, salvo prova contraria,
poiché si presume che i difetti di conformità che si manifestano
entro sei mesi dalla consegna del bene esistessero già a tale data,
a meno che tale ipotesi sia incompatibile con la natura del bene o
con la natura del difetto di conformità, il Servizio diAssistenza
Tecnica Autorizzato Gias, verificato il diritto all’intervento, lo
effettuerà senza addebitare il diritto fisso di intervento a domicilio,
la manodopera ed i ricambi. Per contro, nel successivo periodo di
diciotto mesi di vigenza della garanzia, sarà invece onere del
consumatore che intenda fruire dei rimedi accordati dalla garanzia
stessa provare l’esistenza del difetto di conformità del bene sin dal
momento della consegna; nel caso in cui il consumatore non fosse
in grado di fornire detta prova, non potranno essere applicate le
condizioni di garanzia previste e pertanto il Servizio di Assistenza
Tecnica Autorizzato Gias effettuerà l’intervento addebitando al
consumatore tutti i costi
relativi.
ESTENSIONE DELLA GARANZIA FINO A 5 ANNI: come?
Le ricordiamo inoltre che sullo stesso certificato di garanzia
convenzionale Lei troverà le informazioni ed i documenti
necessari per prolungare la garanzia dell’apparecchio sino a 5
anni e così, in caso di guasto, non pagare il diritto fisso di
intervento a domicilio, la manodopera ed i ricambi.
Per qualsiasi informazione necessitasse, La preghiamo rivolgersi
al numero telefonico del Servizio Clienti 199.12.13.14.
ANOMALIE E MALFUNZIONAMENTI: a chi rivolgersi?
Per qualsiasi necessità il centro assistenza autorizzato è a Sua
completa disposizione per fornirLe i chiarimenti necessari;
comunque qualora il Suo prodotto presenti anomalie o mal
funzionamenti, prima di rivolgersi al Servizio Assistenza
Autorizzato, consigliamo vivamente di effettuare i controlli indicati
sopra.
UN SOLO NUMERO TELEFONICO PER OTTENERE
ASSISTENZA
Qualora il problema dovesse persistere,
componendo il “Numero Utile” sotto
indicato, sarà messo in contatto
direttamente con il ServizioAssistenza
TecnicaAutorizzato che opera nella Sua
zona di residenza. Attenzione, la chiamata
è a pagamento; il costo verrà comunicato, tramite messaggio
vocale, dal Servizio clienti dell’operatore telefonico utilizzato.
Dettagli sono presenti sul sito internet www.candy-group.com
MATRICOLA DEL PRODOTTO. Dove si trova?
E’ indispensabile che comunichi al Servizio Assistenza Tecnica
Autorizzato la sigla del prodotto ed il numero di matricola (16
caratteri che iniziano con la cifra 3) che troverà sul certificato di
garanzia oppure sulla targa matricola del prodotto (figura in ultima
pagina). In questo modo Lei potrà contribuire ad evitare trasferte
inutili del tecnico, risparmiando oltretutto i relativi costi.
Questo apparecchio è contrassegnato in
conformità alla Direttiva europea 2012/19/EU
sulle apparecchiature elettriche ed elettroniche
(WEEE). I WEEE contengono sia le sostanze
inquinanti (che possono provocare
conseguenze negative sull'ambiente) che
componenti di base (che possono essere
riutilizzati). È importante che i WEEE siano
soggetti a rattamenti specifici, per rimuovere e smaltire
correttamente tutti gli inquinanti e recuperare e riciclare tutti i
materiali.
I singoli possono giocare un ruolo importante nell'assicurare
che i WEEE non diventino un problema ambientale; è
essenziale seguire alcune regole di base:
• I WEEE non devono essere trattati come rifiuti domestici.
• I WEEE devono essere portati ai punti di raccolta appositi
gestiti dal comune o da società registrate. In molti Paesi, per i
WEEE grandi, potrebbe essere presente la raccolta
domestica.
• Quando si acquista un nuovo apparecchio, quello vecchio
potrebbe essere restituito al rivenditore che deve acquisirlo
gratuitamente su base singola, sempre che l'apparecchio sia
del tipo equivalente e abbia le stesse funzioni di quello
acquistato.
RISPARMIARE E RISPETTARE L'AMBIENTE
Ove possibile, evitare di pre-riscaldare il forno e cercare
sempre di riempirlo. Aprire la porta del forno quanto
necessario, perché vi sono dispersioni di calore ogni volta che
viene aperta. Per risparmiare molta energia sarà sufficiente
spegnere il forno dai 5 ai 10 minuti prima della fine del tempo
di cottura pianificato, e servirsi del calore che il forno continua
a generare. Tenere le guarnizioni pulite e in ordine, per evitare
eventuali dispersioni di energia. Se si dispone di un contratto
di energia elettrica a tariffa oraria, il programma “cottura
ritardata” renderà più semplice il risparmio spostando l’avvio
del programma negli orari a tariffa ridotta.
07 IT
Page 8
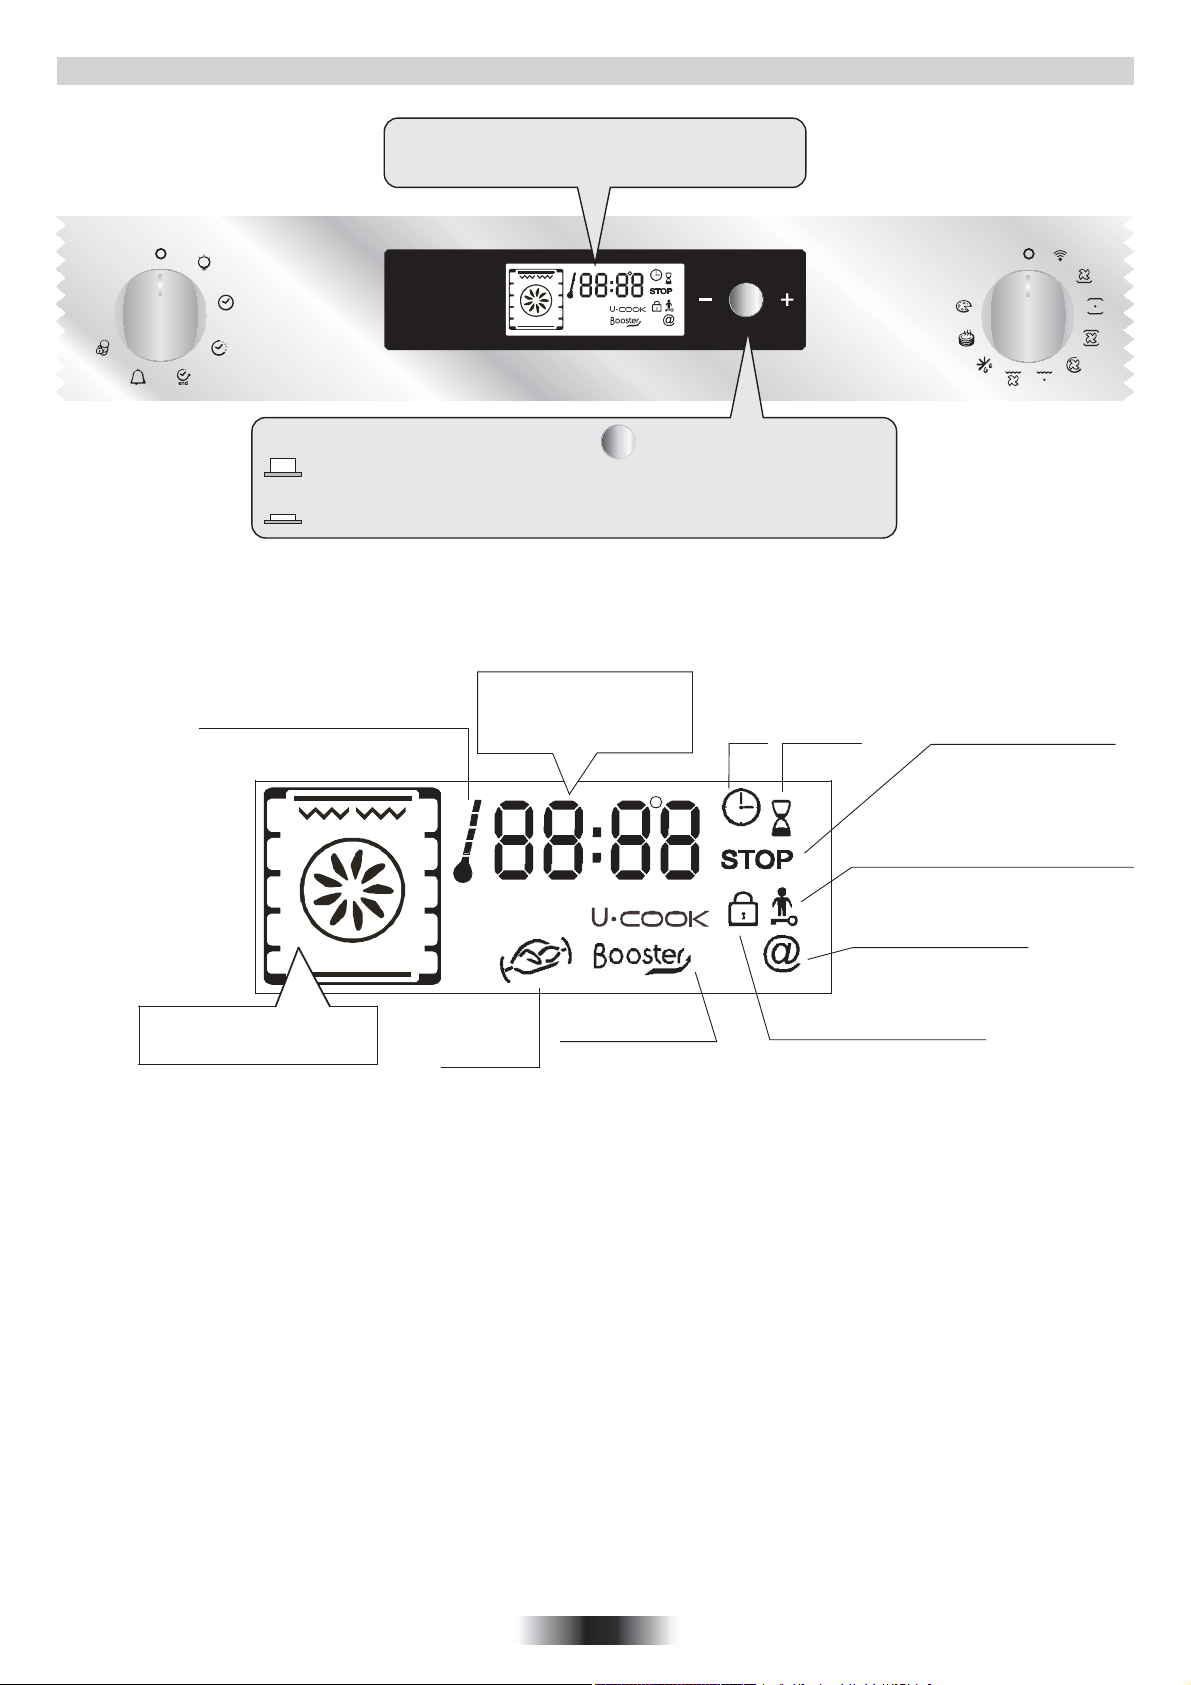
3. DESCRIZIONE DEL DISPLAY
PULSANTE PER REGOLARE - + CONFERMARE
Impostazioni: temperatura, programmazione del ciclo di cottura e della fine
del ciclo di cottura, regolabile ruotando il selettore verso “-“ oppure “+”
Per confermare l'impostazione: premere il pulsante
Display: orario, programmazione della modalità di
cottura, indicatori luminosi, temperatura di cottura
e posizionamento delle mensole.
Indicatore luminoso:
incremento della temperatura
Stato operativo del forno
e livello consigliato
Orologio /
Programmazione /
Temperatura di cottura
PYRO
Display Booster
Girarrosto
Pre-riscaldamento
Simbolo programma: cottura
Tempo Timer
Indicatore luminoso
Dispositivo di protezione del forno
fine del ciclo di cottura
Indicatore luminoso
WIFI
Indicatore luminoso
Chiusura sportello forno
08 IT
Page 9
3.1 PRIMA DI UTILIZZARE IL FORNO PER LA
PRIMA VOLTA
PULIZIA PRELIMINARE
-Pulire sempre il forno prima di utilizzarlo per la prima volta:
-Pulire le superfici esterne con un panno morbido leggermente inumidito.
-Lavare tutti gli accessori e pulire l'interno del forno con del detergente per
piatti ed acqua calda.
-Verificare che il forno sia vuoto, impostare la temperatura massima e
lasciarlo acceso per almeno 1 ora per rimuovere tutti gli odori normalmente
presenti nei forni nuovi. Verificare che la cucina sia ben ventilata durante
l'esecuzione di queste operazioni.
PROMEMORIA
Controllare che il timer funzioni correttamente
Premere il pulsante del timer per verificare che funzioni.
Arresto del forno
Può essere necessario effettuare questa informazione se si seleziona un
comando errato. Per arrestare il forno, ruotare all'indietro il selettore e
portarlo in posizione di arresto.
Blocco dei comandi
Per bloccare i comandi del forno, selezionare il dispositivo di protezione del
forno. Per ulteriori informazioni, consultare la sezione intitolata
“Programmazione del dispositivo di sicurezza”.
Ventola di raffreddamento
Lo scopo della ventola è proteggere il pannello di controllo e l'elettronica dal
calore. La ventola si avvia automaticamente e si arresta al momento in cui
viene spento il forno.
Luce del forno
Ruotando il selettore della luce, è possibile spegnere la luce del forno quando
questo non è in uso. La luce è sempre accesa quando il forno è in uso e si
accende quando si apre lo sportello.
•IMPOSTAZIONE DELL'OROLOGIO
L'orologio deve sempre essere reimpostato quando si collega il forno
all'alimentazione elettrica o dopo un'interruzione prolungata
dell'alimentazione elettrica.
Per impostare l'orologio
1- Ruotare il selettore dei comandi e impostarlo sul simbolo
dell'orologio;
2- utilizzare il pulsante centrale per impostare l'orologio e ruotare la
manopola in direzione “-” o “+”;
3- riportare la manopola di comando in posizione di ARRESTO.
10:30
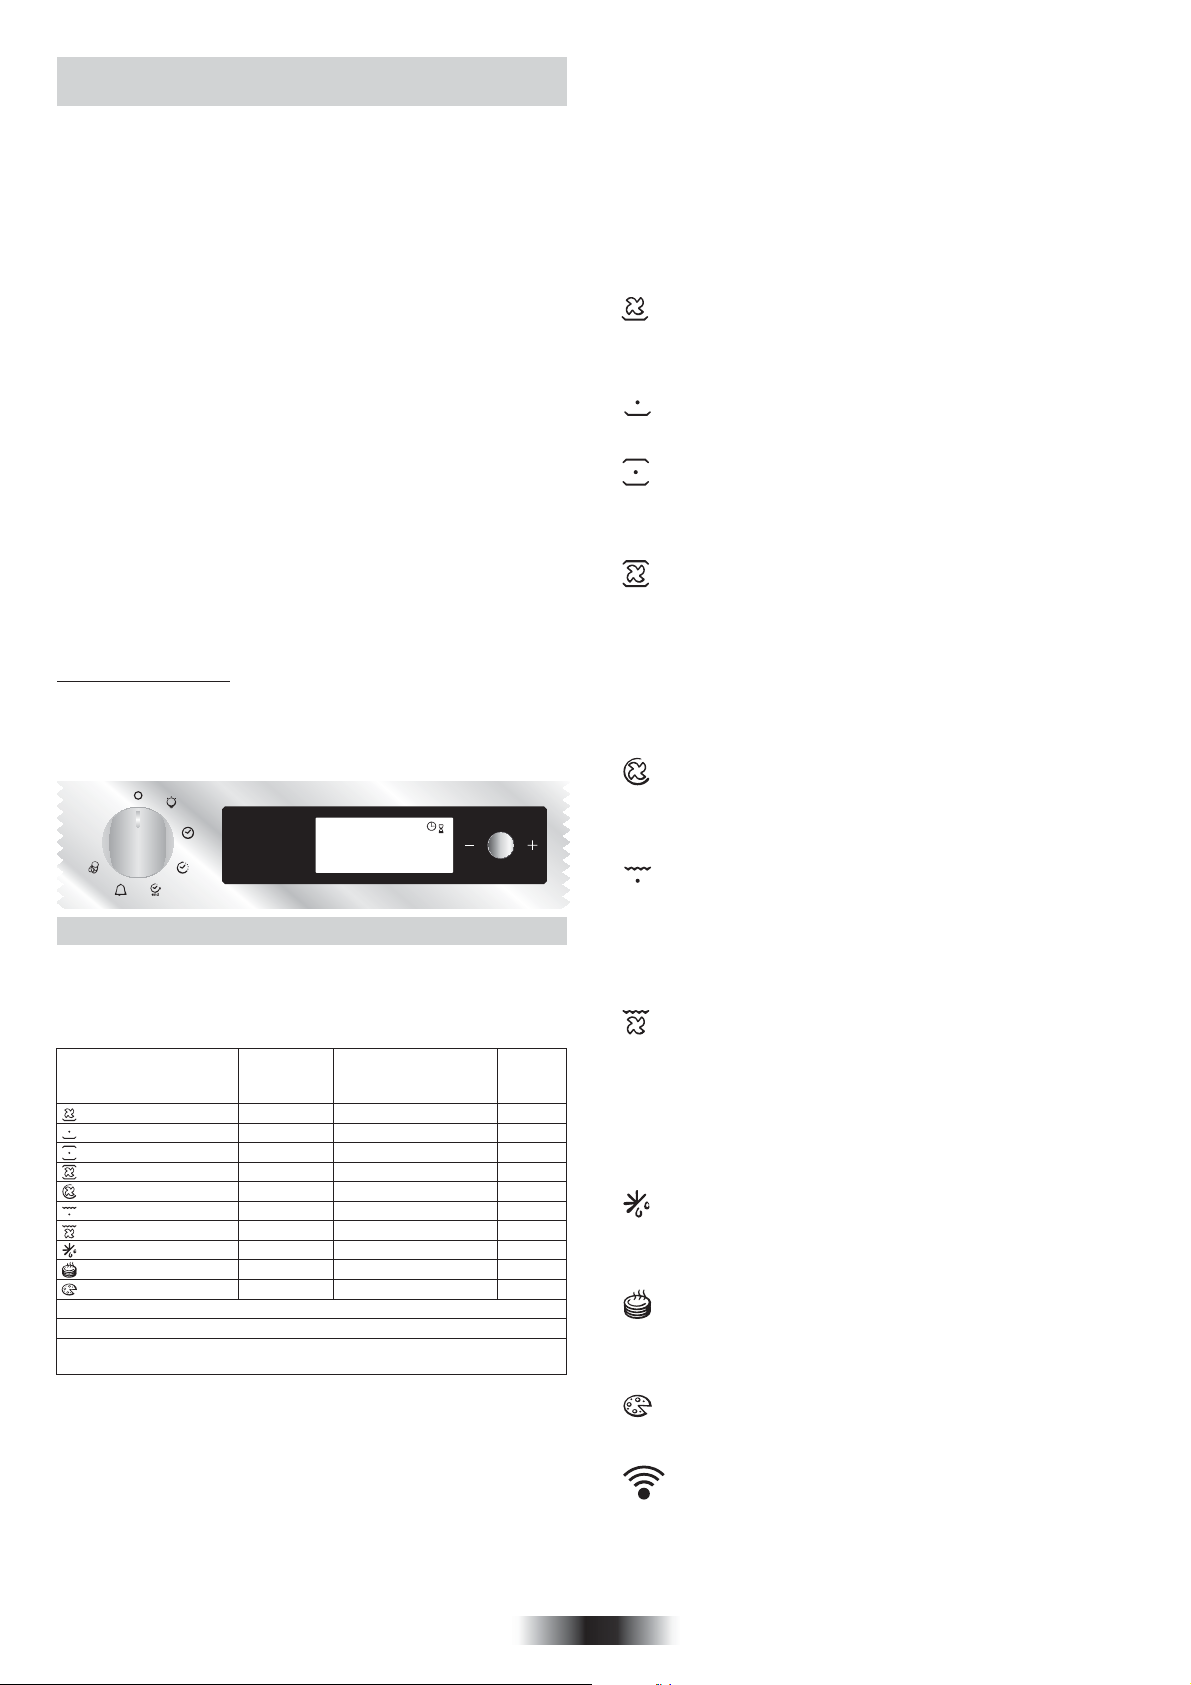
3.2 COME UTILIZZARE IL FORNO
•MODALITÀ MANUALE
I metodi di cottura consigliati per la modalità manuale sono descritti nella
seguente tabella, che riporta anche la temperatura consigliata per ciascun
metodo di cottura. La temperatura può tuttavia essere impostata su
qualsiasi valore compreso entro l'intervallo indicato.
Modalita di
funzionamento secondo
il modello di forno
Parte inferiore+Ventole
Parte inferiore
Parte inferiore+Parte superiore
Parte inferiore+Parte superiore+Ventole
Elemento di riscaldamento circolare + Ventole
Grill
Grill+Ventole
Sbrinamento
Mantenere in caldo
Pizza
*Booster: aumento rapido della temperatura.
**Il forno deve avere questa funzione
*** Programma di prova secondo CENELEC EN 60350-1 utilizzato per
la definizione della classe energetica.
1-Ruotare il selettore del forno impostandolo sulla funzione di cottura
desiderata. Vengono visualizzati gli elementi di riscaldamento che verranno
utilizzati per il metodo di cottura scelto.
2-Viene quindi visualizzata la temperatura appropriata per il metodo di cottura
selezionato. La temperatura può tuttavia essere impostata su qualsiasi valore
compreso entro l'intervallo indicato (vedere la tabella precedente). Per
modificare la temperatura, ruotare il pulsante centrale e premerlo appena il
timer visualizza la temperatura corretta. La temperatura visualizzata sul
display è fissa, ma può comunque essere modificata in fase di cottura. Il forno
avvia il ciclo di cottura e inizia a riscaldarsi. L'indicatore luminoso lampeggia
fino al raggiungimento della temperatura selezionata. Al termine
dell'operazione, il forno emette un avviso acustico e l'indicatore luminoso si
accende fisso.
Temperatura
pre-impostata
°C
210
160
220 50-240
***
210
180
L2
190
***
40
60
230
**
Temperatura
pre-determinata °C
50-220
50-220
50-230
50-230
L1-L3
50-200
No
No
230
Funzione
Booster*
Booster
Booster
Booster
3-Per programmare il tempo di cottura e l'ora di fine del ciclo di cottura, è
sufficiente ruotare il selettore dei programmi e posizionarlo sul “tempo di
cottura” o “l'ora di fine del ciclo di cottura” desiderati. L'icona del “tempo di
cottura” o “dell'ora di fine del ciclo di cottura” inizia a lampeggiare. Utilizzare il
pulsante centrale per modificare le impostazioni e controllare che il timer
visualizzi i tempi desiderati. Dopo aver effettuato queste operazioni, riportare il
selettore in posizione di “arresto” per confermare la nuova impostazione.
Per ulteriori informazioni sulla programmazione, fare riferimento al
Capitolo 5.3 - PROGRAMMAZIONE.
4 - Al termine del ciclo di cottura, riportare il selettore delle funzioni in posizione
di arresto. L'indicatore luminoso inizia nuovamente a lampeggiare e continua a
rimanere acceso anche dopo che il forno è stato spento, fino a quando la
temperatura non si abbassa a sufficienza.
• MODALITÀ DI COTTURA
ELEMENTO RISCALDANTE INFERIORE In questa modalità viene
utilizzato l'elemento inferiore. Questa modalità è ideale per cuocere tutti i piatti
a base di pasta; ad esempio flan, quiche, paté e qualsiasi pietanza che richieda
più calore e irradiazione dal basso.
Tenere sempre lo sportello del forno chiuso durante la cottura.
ELEMENTO RISCALDANTE INFERIORE + VENTOLA - L'uso
combinato dell'elemento riscaldante inferiore e della ventola è ideale per la
cottura di torte di frutta, crostate, quiche e dolci.
ELEMENTO RISCALDANTE INFERIORE + SUPERIORE - In
questa modalità di cottura vengono utilizzati entrambi gli elementi riscaldanti,
ossia quello inferiore e superiore. Questo metodo è ideale per gli arrosti e le
pietanze più tradizionali, come la carne rossa, il roastbeef, le cosce di agnello,
la selvaggina, il pane e le pietanze avvolte in fogli di alluminio.
ELEMENTO RISCALDANTE INFERIORE + SUPERIORE +
VENTOLA - In questa modalità vengono utilizzati entrambi gli elementi
riscaldanti, ossia quello superiore e inferiore, ma viene contemporaneamente
fatta circolare aria calda all'interno del forno. È consigliabile utilizzare questo
metodo per cucinare carne bianca, torte salate, pesce e verdura. Questo
metodo assicura una maggiore penetrazione del calore e richiede un tempo di
pre-riscaldamento minore. L'uso della ventola consente di cucinare
temporaneamente tipi di alimenti diversi, perché consente di distribuire
uniformemente il calore senza il rischio che si mescolino sapori e odori.
Quando si cucinano più tipi di alimenti contemporaneamente, è consigliabile
incrementare di 10 minuti il tempo di cottura.
ELEMENTO RISCALDANTE CIRCOLARE + VENTOLA In questa
modalità di cottura vengono contemporaneamente utilizzati gli elementi
riscaldanti inferiore, superiore e circolare, che provvede a far circolare aria
calda all'interno del forno. Questa modalità di cottura è indicata per le stesse
pietanze indicate nella sezione relativa alla cottura con ventola.
GRILL In questa modalità di cottura viene utilizzato solo l'elemento
riscaldante superiore. Questa modalità di cottura è particolarmente indicata per
i piatti grigliati, gli spiedini e i piatti gratinati. Il grill deve essere pre-riscaldato a
una temperatura alta per 5 minuti. Per ottenere risultati di cottura ottimali e
rendere la carne più succulenta, è consigliabile collocarla a una certa distanza
dal grill anche se i tempi di cottura sono più lunghi. I filetti di carne rossa e pesce
devono essere collocati direttamente sul ripiano con la vaschetta di
gocciolamento posizionata sotto al ripiano inferiore.
GRILL+ VENTOLA In questa modalità di cottura viene utilizzato
l'elemento riscaldante superiore insieme alla ventola per fare circolare aria
calda all'interno del forno. È consigliabile pre-riscaldare il forno solo per le carni
rosse, ma non per quelle bianche. Il grill è ideale per le pietanze con un
maggiore spessore, come la carne di suino o pollo. Gli alimenti da grigliare
devono essere collocati al centro del ripiano intermedio. Collocare la vaschetta
di gocciolamento sotto al ripiano per raccogliere l'eventuale grasso che
gocciola in fase di cottura. Per ottenere risultati ottimali, non collocare gli
alimenti troppo vicino al grill e girare la carne a metà del ciclo di cottura.
SCONGELAMENTO Questa modalità si attiva quando si sposta il
selettore in questa posizione. La ventola fa circolare aria calda attorno
all'alimento congelato e ne consente quindi uno scongelamento rapido senza
alcuna alterazione del sapore originale.
La temperatura è preimpostata su 40°C e non può essere modificata.
RISCALDAMENTO Questa modalità è quella consigliata per
riscaldare alimenti pre-cotti (che devono essere posizionati sul secondo ripiano
in basso dall'alto) o per scongelare pasta o pizza congelata (in questo caso è
necessario utilizzare il ripiano più basso).
La temperatura è preimpostata su 60°C e non può essere modificata.
PIZZA Questa funzione consente di far circolare aria calda
all'interno del forno ed è particolarmente indicata per pietanze come pizze o
dolci.
WIFI
09 IT
Page 10
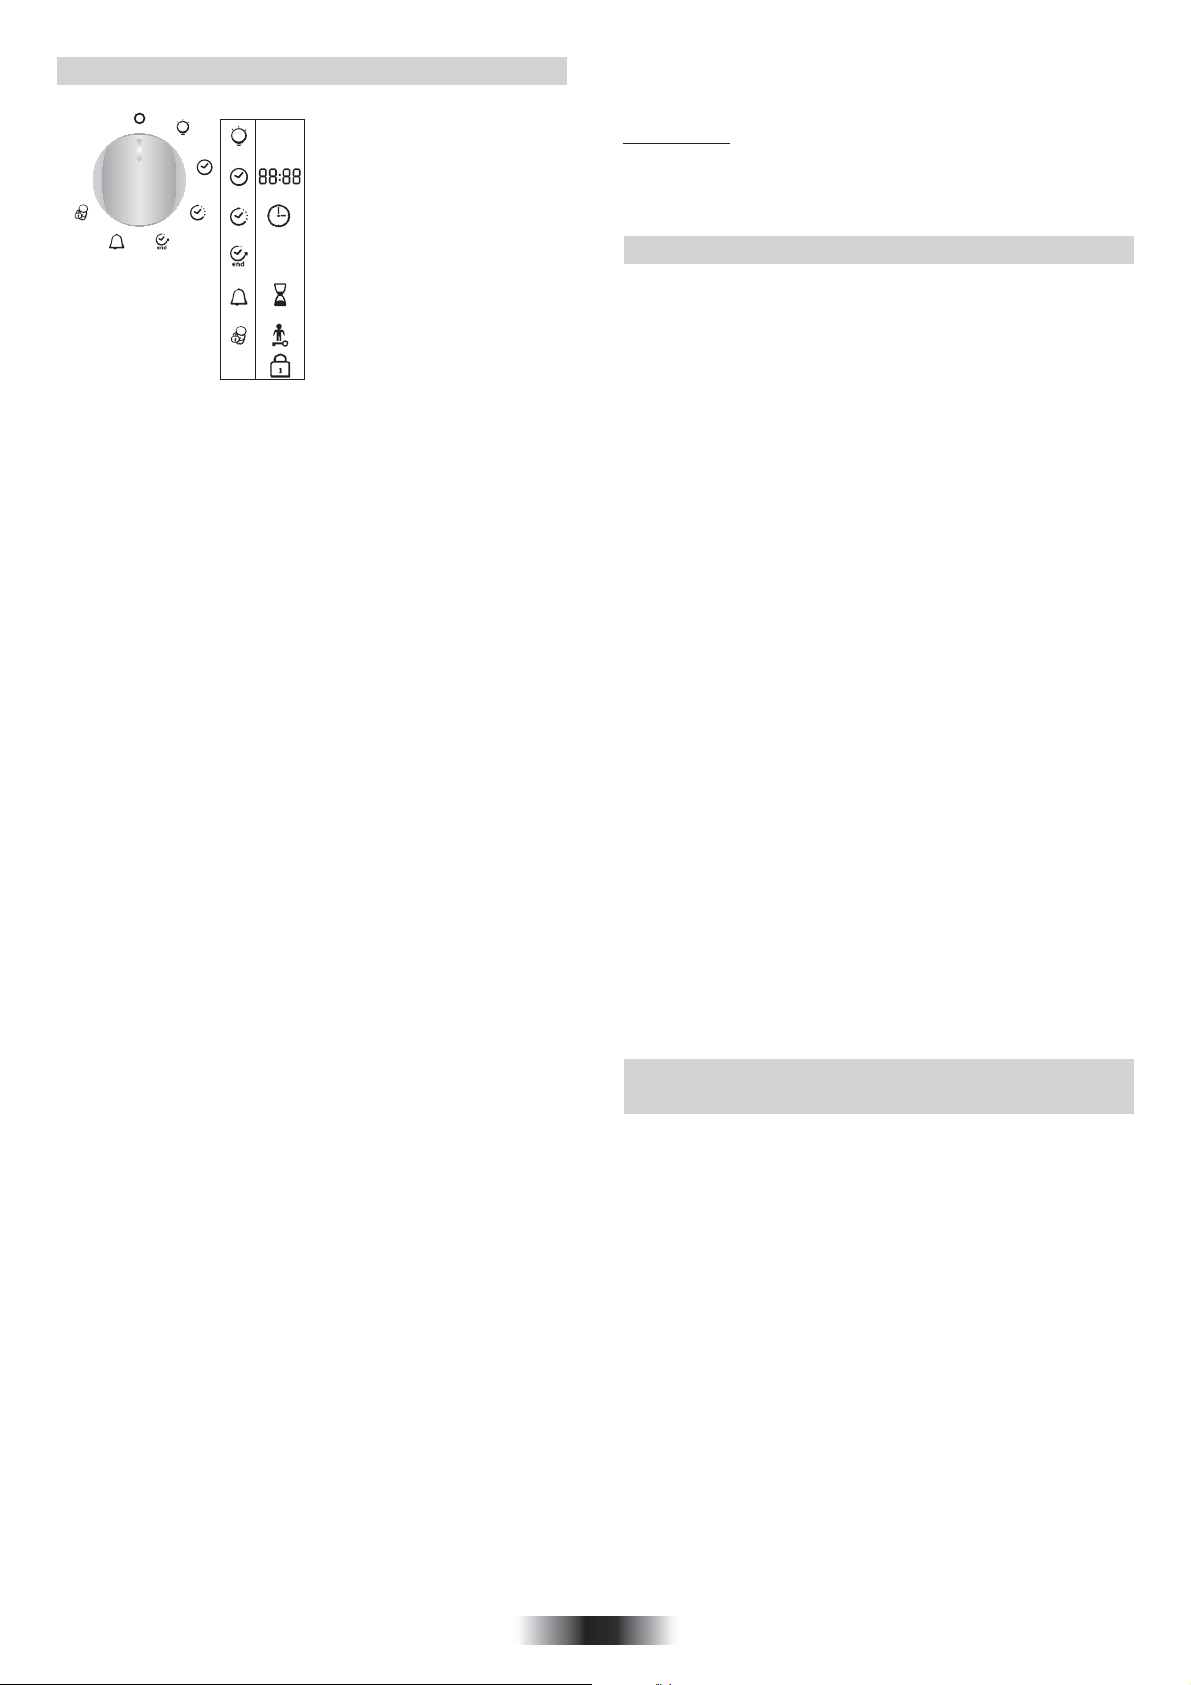
3.3 PROGRAMMAZIONE
SIMBOLI VISUALIZZATI SUL DISPLAY
Luce
Timer
Programmazione
dell'ora di fine cottura
Programmazione dell'ora di
STOP
fine cottura
Selettore
dei programmi
TIMER:
Il funzionamento del timer è indipendente dal forno e non ha alcun effetto
sugli elementi riscaldanti. Il suo scopo è fungere semplicemente da
promemoria.
•Spostare la manopola in posizione timer. Sul display vengono visualizzati
prima il simbolo del timer, quindi le cifre 00:00.
•Appena i minuti iniziano a lampeggiare, ruotare il pulsante centrale,
posizionarlo sul numero di minuti desiderato e premere nuovamente il
pulsante per confermare.
•Appena le ore iniziano a lampeggiare, ruotare il pulsante centrale,
posizionarlo sul numero di ore desiderato, quindi premere nuovamente il
pulsante per confermare.
•Spostare la manopola in posizione di arresto. Alla scadenza dell'intervallo
impostato, il tempo di cottura scompare dal display. Viene generato un
segnale acustico per 15 secondi e l'icona del timer inizia a lampeggiare
(per disattivare l'icona prima dell'intervallo di 15 secondi, premere il
pulsante centrale).
PROGRAMMAZIONE DEL TEMPO DI COTTURA:
Il tempo di cottura è pre-programmato per numerose ricette. Se
necessario, è possibile impostare un tempo di cottura in modalità
Manuale, Scongelamento o Riscaldamento.
•Spostare la manopola in posizione di cottura. Sul display viene
visualizzata l'icona del tempo di cottura. Successivamente, vengono
visualizzati il tempo di cottura per le varie ricette oppure 00:00 per le altre
funzioni del forno.
•Appena i minuti iniziano a lampeggiare, ruotare il pulsante centrale,
posizionarlo sul numero di minuti desiderato e premere nuovamente il
pulsante per confermare.
•Appena le ore iniziano a lampeggiare, ruotare il pulsante centrale,
posizionarlo sul numero di ore desiderato, quindi premere nuovamente il
pulsante per confermare.
•Riportare la manopola in posizione di arresto per confermare il nuovo
tempo di cottura. Alla scadenza dell'intervallo impostato, il tempo di cottura
scompare dal display. Viene generato un segnale acustico per 15 minuti e i
simboli del tempo di cottura e di arresto iniziano a lampeggiare.
•Riportare la manopola in posizione di arresto. Se non si effettua questa
operazione, i simboli del tempo di cottura e di arresto continuano a
lampeggiare.
PROGRAMMAZIONE DELL'ORA DI FINE COTTURA:
Il tempo di cottura e di fine cottura è pre-programmato per molte ricette. Se
necessario, è possibile tempi diversi in modalità Manuale, Scongelamento
o Riscaldamento.
•Spostare la manopola in posizione di fine cottura. Viene visualizzato il
simbolo di arresto. Vengono visualizzati i tempi di fine cottura per varie
ricette oppure 00:00 per le altre funzioni o l'ora del giorno.
•Ruotare il selettore dei programmi per confermare l'ora di fine cottura.
•Appena i minuti iniziano a lampeggiare, ruotare il pulsante centrale e
impostarlo sul numero di minuti desiderato, quindi premerlo nuovamente
per confermare.
•Appena le ore iniziano a lampeggiare, ruotare il pulsante centrale e
impostarlo sul numero di ore desiderato, quindi premerlo nuovamente per
confermare. Nota: quando si imposta un avvio differito, l'ora di fine cottura
viene visualizzata sul display insieme ai simbolo del tempo di cottura e di
arresto, ed è possibile selezionare solo la modalità Ricetta. Il forno calcola
automaticamente l'ora di inizio e l'ora di fine in base al tempo di cottura,
spegnendosi automaticamente al termine del ciclo di cottura. Al termine
del ciclo di cottura, viene generato anche un avviso acustico della durata di
15 secondi e sul display iniziano a lampeggiare i simbolo del tempo di
cottura e di arresto.
•Ruotare il selettore delle funzioni e impostarlo in posizione di arresto. Se
non si effettua questa operazione, i simboli continuano a lampeggiare sul
display.
Ad esempio, se il piatto che si desidera preparare deve essere cotto per 45
minuti e deve essere pronto alle 12.30, è necessario:
- Selezionare la funzione desiderata
- Impostare la durata di cottura pari a 45 minuti
- Impostare il termine della cottura alle ore 12.30
Timer attivo
Protezione del forno attiva
Chiusura dello sportello del forno
La cottura inizierà alle 11.45 (ovvero 12.30 meno 45 minuti) e continuerà
fino all'ora precedentemente impostata; il forno si spegnerà
automaticamente al termine del tempo impostato.
ATTENZIONE:
Se la funzione "FINE della cottura" è stata selezionata senza stabilire
la durata totale, il forno inizierà a funzionare immediatamente e si
fermerà nel momento in cui il timer indicherà l'ora impostata tramite
la funzione.
3.4 SUGGERIMENTI PER LA COTTURA
È consigliabile salare la carne solo al termine della cottura, perché il sale
favorisce gli schizzi di grasso, che sporca il forno e produce molto fumo.
I tagli di carne bianca, di maiale, vitello e pesce possono essere inseriti
freddi nel forno. Benché questo accorgimento allunghi i tempi di cottura,
consente di cuocere meglio la porzione centrale del taglio di carne
perché il calore a disposizione più tempo per penetrare nel taglio di
carne.
Per cucinare in modo corretto la carne rossa, è indispensabile preriscaldare in modo appropriato il forno.
GRILL
•Prima di utilizzare il grill
Rimuovere la carne dal congelatore qualche ora prima della cottura.
Collocare la carne su più strati di carta da cucina per mantenere
inalterato il sapore delle pietanze ed evitare che la porzione centrale
rimanga cruda. Aggiungere pepe e spezie alla carne prima di grigliarla,
ma non aggiungere sale per mantenere la carne più succosa e tenera.
Applicare un leggero strato di olio alla carne, preferibilmente con un
pennello da cucina largo. Quindi, cospargere altro pepe e spezie (timo,
ecc.) sulla carne.
•Durante la cottura:
Non perforare mai la carne mentre la si gira, perché ciò provoca la
dispersione del sugo e rende la carne più secca.
COTTURA DI DOLCI
Evitare di usare teglie lucide perché riflettono il calore e possono
rovinare la cottura. Se il dolce cuoce troppo rapidamente, coprirlo con
carta oleata o carta d'alluminio. Attenzione: applicare la carta d'alluminio
in modo che il lato lucido sia rivolto verso il dolce perché altrimenti il
calore viene riflesso dalla superficie lucida e non penetra nel dolce.
Evitare di aprire lo sportello durante i primi 20-15 minuti
L'apertura dello sportello del forno potrebbe provocare lo
“sgonfiamento” di sufflè, brioche, pandispagna, ecc. Per controllare se il
dolce è perfettamente cotto, è sufficiente punzecchiare il centro con la
lama di un coltello o un ago da maglia in metallo. Se l'ago estratto è
asciutto, il dolce è pronto e la cottura può definirsi conclusa. Se l'ago che
si estrae dal dolce è umido o se ci sono pezzetti di dolce attaccati,
proseguire la cottura, abbassando leggermente la temperatura del forno
per evitare che il dolce si bruci.
3.5 REGOLAZIONE DEL CONTRASTO DEL
DISPLAY
È possibile regolare il contrasto del display in qualsiasi momento.
L'impostazione predefinita è “C5”. Per regolare il contrasto, attenersi alla
seguente procedura:
Ruotare il selettore dei programmi e impostarlo su “Luce”, quindi ruotare
il selettore delle funzioni e impostarlo su “O”. Premere il pulsante
centrale per 3 secondi e attendere che venga visualizzato il
messaggio“CX” sul display, dove X è il livello di contrasto. Ruotare il
pulsante centrale per regolare il contrasto. È possibile impostare un
qualsiasi valore compreso tra 1 e 9. Premere nuovamente il pulsante
centrale per 3 secondi per confermare.
10 IT
Page 11

4. DISPOSITIVO DI PROTEZIONE
Questa funzione deve sempre essere attivata se nell'abitazione ci
sono dei bambini, perché impedisce loro di accendere il forno o di
modificare i programmi pre-impostati. Questa funzione di sicurezza
impedisce l'uso del pannello di controllo mentre il forno è in funzione.
È possibile impostare due livelli di sicurezza:
LIVELLO 1 : blocco del selettore dei comandi e il pulsante centrale.
•Per attivare la funzione: ruotare il selettore dei comandi e impostarlo
sulla funzione di protezione.
•Risultato: i selettori vengono disattivati*.
•Per disattivare la funzione: ruotare il selettore dei comandi e
impostarlo su 0.
•LIVELLO 2 : blocco dei selettori delle funzioni.
•Per attivare la funzione: ruotare il selettore delle funzioni e
impostarlo sulla funzione di sicurezza, quindi premere e tenere
premuto il pulsante per 3 secondi.
•Risultato: tutti i comandi vengono disattivati*.
•Per disattivare la funzione: effettuare le operazioni descritte per la
procedura di attivazione. Ruotare il selettore delle funzioni e
impostarlo sulla funzione di protezione, quindi premere e tenere
premuto il pulsante centrale per 3 secondi.
*Nota : per motivi di sicurezza, anche se tutti i comandi sono bloccati,
è comunque spegnere il forno impostando il selettore su 0.
5. FUNZIONE WIFI
CONFIGURAZIONE WIFI
• Ruotare il selettore programmi sulla posizione WiFi ( il simbolo “@”
lampeggia).
• Una volta che il forno connesso ad un router il simbolo “@” rimane è
acceso.
• In caso di mancata connessione il simbolo “@” continua a
lampeggiare (vedere il paragrafo gestione spia @).
• Se il selettore programmi viene ruotato su WiFi, il forno può essere
controllato solo da remoto (il selettore funzioni e l’encoder sono
disabilitati).
• Nelle altre posizioni di cottura, il forno non è controllabile dall’esterno
ma fornisce i parametri di funzionamento se interrogato.
RESET
Per resettare il WiFi, ruotare il selettore programmi su WiFi (non ci
deve essere un programma in corso) e premere il tasto encoder per 3
secondi.
Dopo 3 secondi compare sul display la scritta”rSt” ed il simbolo “@”
inizia a lampeggiare.
GESTİONE SPİA “@”
• Quando il forno è spento, la spia è spenta
• Quando il selettore programmi è in posizione WiFi la spia lampeggia
(1’’ accesa e 1’’ spenta) se il forno è in modalita acces point
(collegamento punto a punto) mentre è accesa fissa se il forno è
collegato ad un router.
• Quando il forno è acceso in posizione WiFi e sta cercando di
collegarsi ad un router, la spia lampeggia (3’’ accesa e 1’’ spenta).
• Quando il forno è acceso ma non in posizione Wi-Fi (sola lettura) la
spia lampeggia (1’ accesa e 3’’ spenta).
CANDY SIMPLY-FI:
Per informazioni dettagliate su COME CONNETTERE
il tuo elettrodomestico simply-Fi e su COME USARLO
al meglio, vai su http://www.candysimplyfi.com o
visita il sito dedicato al Servizio Clienti simply-Fi
http://simplyfiservice.candy-hoover.com
11 IT
Page 12
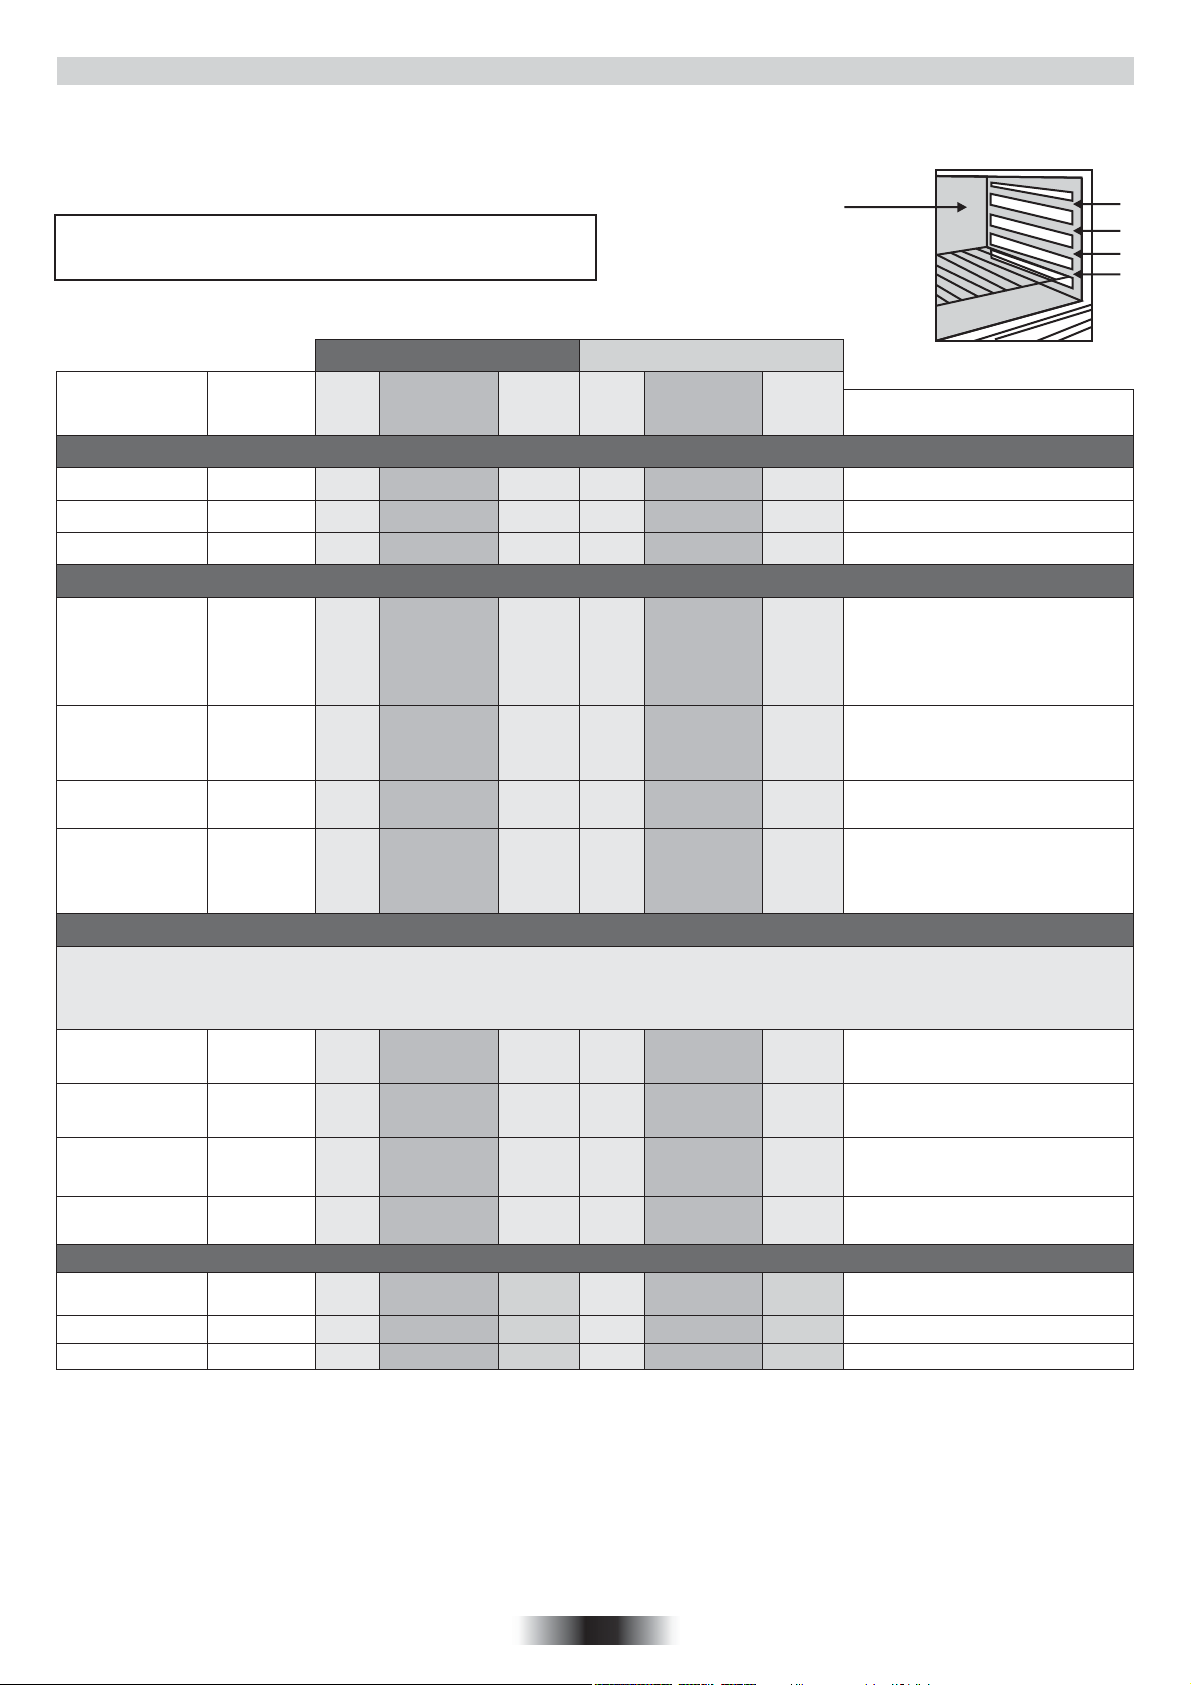
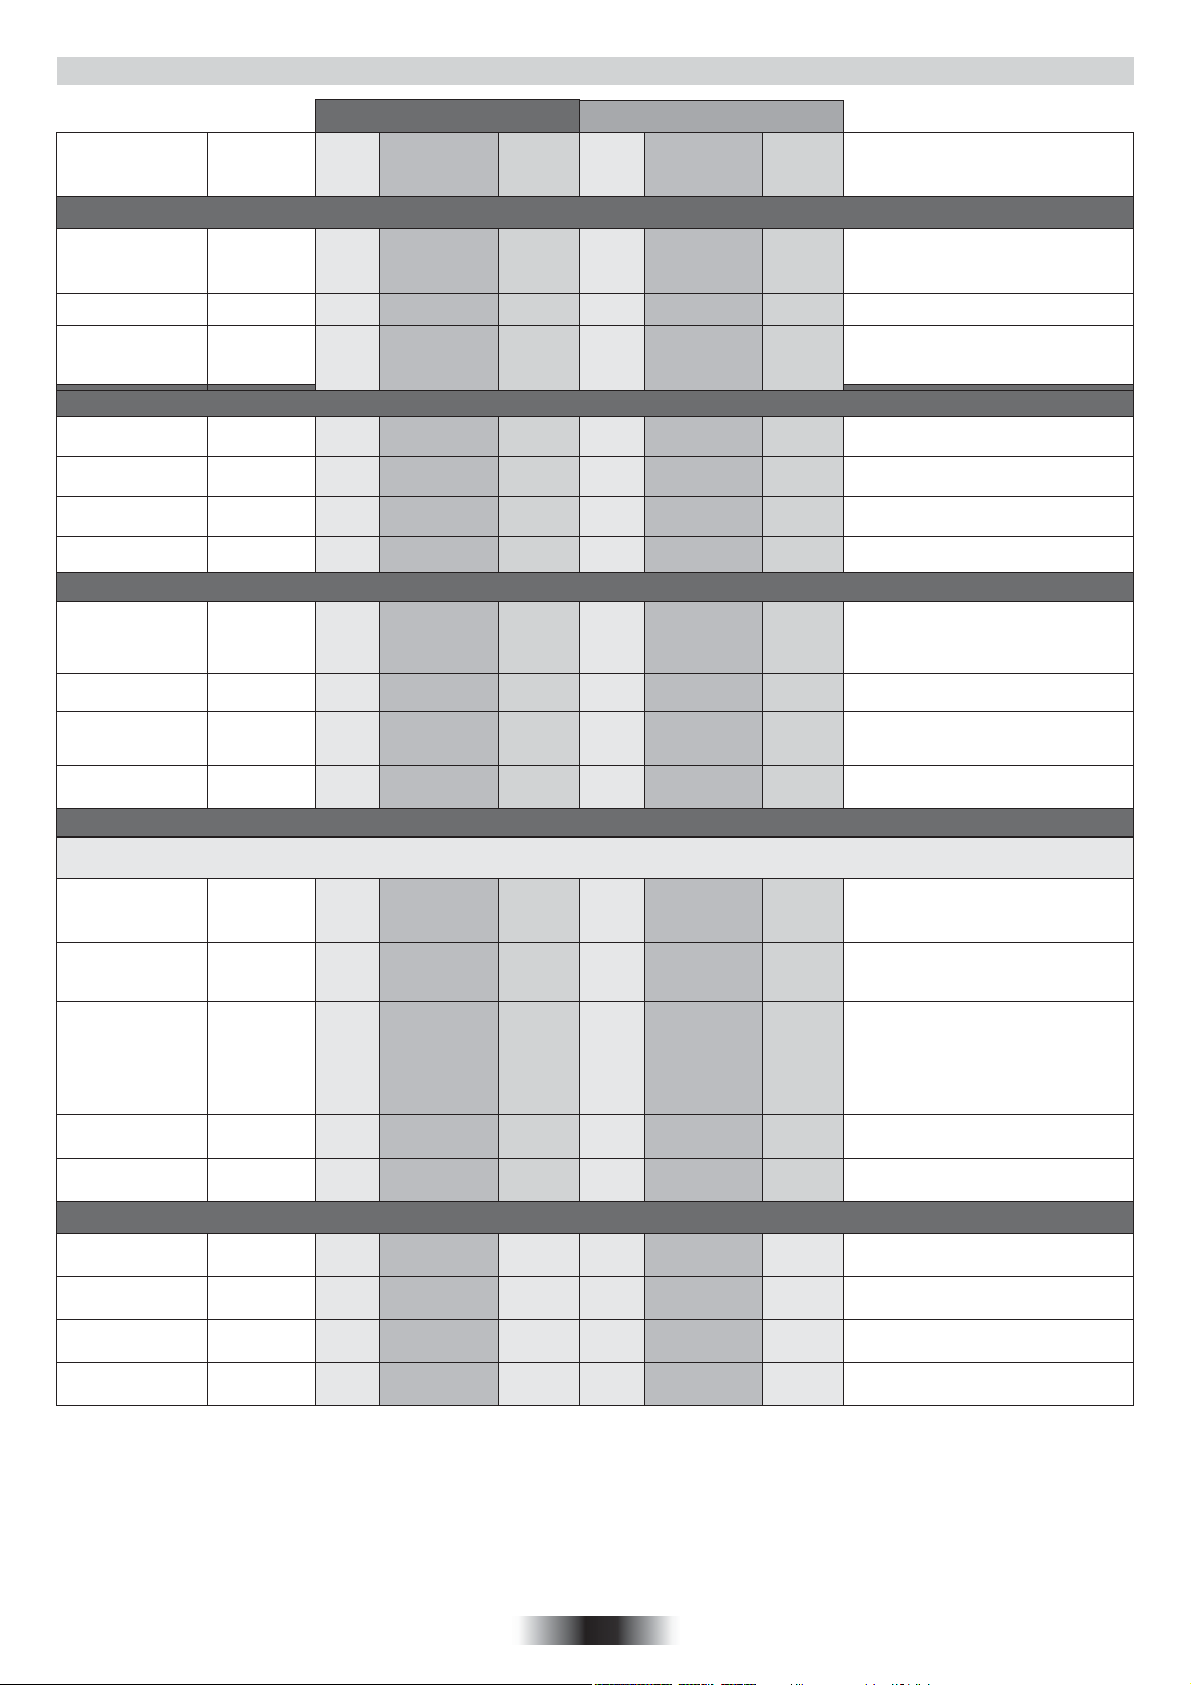
6. TABELLA TEMPI DI COTTURA
I tempi suggeriti nelle seguenti tabelle sono indicativi, infatti possono variare secondo la qualità, la freschezza, la dimensione e lo spessore degli
alimenti e secondo il vostro gusto. Lasciare sempre riposare per alcuni minuti prima di servire, perché tutti gli alimenti continuano a cuocere dopo
averli tolti dal forno.
CONSIGLIO UTILE: Per non rendere le superfici troppo secche è
consigliato abbassare la temperatura e allungare i tempi di cottura.
Forno elettrico statico Forno elettrico ventilato
Pietanza
Quantità
Ripiano
Tempo
di cottura
in minuti
Tempe-
ratura
forno
• Pasta
Lasagne
Cannelloni
Pasta al forno
Kg 3,5
Kg 1,8
Kg 2,5
22
22
22
70 ÷ 75
50 ÷ 60
55 ÷ 60
220
220
220
• Paste salate
Pane
Pizze
Pasta sfoglia
Vol au vent
Focaccia
(n° 4)
(Surgelati)
Kg 1
di pasta
Kg 1
n° 24
gr. 200
di pasta cad
22
35
prerisc.10
25 ÷ 35
30 ÷ 35
25 ÷ 30
200
190
220
200
Ripiano
11
21
22
Posizione ripiani
Tempo
di cottura
in minuti
60 ÷ 65
40 ÷ 50
45 ÷ 50
30 ÷ 35
prerisc.10
20 ÷ 25
25 ÷ 30
20 ÷ 25
Tempe-
ratura
forno
200
200
200
180
190
200
180
4
3
2
1
Osservazioni
Inserire le lasagne nel forno freddo
Inserire i cannelloni nel forno freddo
Inserire la pasta al forno nel forno freddo
Preparate la pasta a forma di pagnotta e
incidere con un coltello una croce sulla
parte superiore della forma. Lasciare
lievitare a temperatura ambiente almeno 2
ore, ungere la leccarda e posizionate la
forma bene al centro della stessa.
Preriscaldate per 15min. il forno e
preparate le pizze nella leccarda
smaltata con pomodori, mozzarella e
prosciutto, olio, sale, origano
Disponete 24 vol au vent nella leccarda
e cuocete.
Preriscaldate per 15 min., ungere la teglia
del forno, disporre le 4 focacce oliate e
salate prima di infornare, lasciare lievitare
a temperatura ambiente per almeno 2 ore
• Carne
Tutte le carni possono essere cotte in recipiente con bordo basso o bordo alto.
È consigliabile coprire il recipiente a bordo basso con un coperchio per evitare di sporcare il forno con schizzi del condimento.
Le carni coperte risultano più morbide e succose, mentre quelle scoperte risultano più croccanti.
I tempi indicati valgono per cotture con recipiente coperto o scoperto.
Roastbeef
intero
Arrosto di maiale
arrotolato
Arrosto di vitello
arrotolato
Arrosto di manzo
filetto
Kg 1
Kg 1
Kg 1,3
Kg 1
70 ÷ 80
100 ÷ 110
90 ÷ 110
2
80 ÷ 90
220
220
220
220
33
22
21
2
50 ÷ 60
80 ÷ 90
90 ÷ 100
80 ÷ 90
200
200
200
200
Disporre la carne in una teglia Pirex a
bordo alto con sale pepe. Voltare a
metà cottura
Cuocere come sopra
Cuocere come sopra
Cuocere come sopra
• Frutta
Mele intere
Pere
Pesche
Kg 1
Kg 1
Kg 1
1
1
1
45 ÷ 55
45 ÷ 55
45 ÷ 55
220
220
220
2
2
2
45 ÷ 55
45 ÷ 55
45 ÷ 55
200
200
200
Cuocere la frutta in teglia di Pirex o ceramica
non coperta. Lasciare raffreddare in forno.
Come sopra
Come sopra
12 IT
Page 13
6. TABELLA TEMPI DI COTTURA
Forno elettrico statico Forno elettrico ventilato
Pietanza
Quantità
Ripiano
Tempo
di cottura
in minuti
Tempe-
ratura
forno
Ripiano
Tempo
di cottura
in minuti
Tempe-
ratura
forno
Osservazioni
• Pollame, Coniglio
Faraona
Pollo
Coniglio a pezzi
Kg 1-1,3
Kg 1,5-1,7
Kg 1-1,2
22
22
22
60 ÷ 80
110 ÷ 120
55 ÷ 65
220
220
220
60 ÷ 70
100 ÷ 110
50 ÷ 60
200
200
200
Sistemare la faraona in teglia Pirex o
ceramica a bordo alto condita con aromi
naturali e pochissimo olio.
Come per la faraona
Mettete i pezzi di uguali dimensioni nella
leccarda smaltata, condite con aromi
naturali. Se necessario voltate i pezzi.
• Dolci, Torte
Torta cacao
Torta margherita
Torta di carote
Torta crostata
albicocca
Scatola
Scatola
Scatola
700 gr
1
1
1
1
55
55
65
40
180
175
180
200
1
1
1
2
50
40 ÷ 45
50 ÷ 60
30 ÷ 35
160
160
160
180
In teglia per torte Ø 22. Prerisc. per 10
min.
In teglia per torte Ø 22. Prerisc. per 10
min.
In teglia per torte Ø 22. Prerisc. per 10
min.
In teglia per torte Ø 22. Prerisc. per 10
min.
• Verdura
Disponete i finocchi tagliati in 4 parti e
Finocchi
Zucchine
Patate
Carote
800 gr
800 gr
800 gr
800 gr
1
1
2
1
70 ÷ 80
70
60 ÷ 65
80 ÷ 85
220
220
220
220
1
1
2
1
60 ÷ 70
60 ÷ 70
60 ÷ 65
70 ÷ 80
200
200
200
200
coperti in teglia di Pirex con burro e sale
e possibilmente con la parte interna
verso l’alto
Affettate le zucchine e cuocete in teglia
Pirex coperte con burro e sale
Tagliate le patate in parti uguali e
cuocetele coperte con olio, sale e
origano o rosmarino in teglia Pirex.
Tagliate le carote a fettine, copritele e
cuocetele in teglia Pirex.
• Cottura a grill
La cottura con il grill deve essere eseguita ponendo il cibo sotto il grill elettrico. Attenzione: durante il funzionamento il grill diventa di colore rosso vivo. La
leccarda deve essere inserita sotto la griglia per raccogliere i sughi.
Pane carrè
tostato
Toasts farciti
Salsiccie
Costate di manzo
Coscie di pollo
• Fish
• Pesci
Trota
Salmone
Sogliola
Orata
4 fette
4
n°6 / Kg 0,9
n°4 / Kg 1,5
n°4 / Kg 1,5
3 intere/Kg 1
700 g a fette
2,5 cm s.p.
Filetti / Kg 1
2 intere
44
5 (5 prerisc.)
10 (5 prerisc.)
33
44
44
33
25/30
(5 prerisc.)
25
(5 prerisc.)
50/60
(5 prerisc.)
40 ÷ 45
30 ÷ 35
40 ÷ 45
Grill Grill
Grill Grill
Grill Grill
Grill Grill
Grill Grill
220
220
220
40 ÷ 45 220
5 (10 prerisc.)
22
22
22
22
5/8
(10 prerisc.)
15/20
(10 prerisc.)
15/20
(10 prerisc.)
50/60
(10 prerisc.)
35 ÷ 40
30 ÷ 25
35 ÷ 40
35 ÷ 40
200
200
200
200
Inserire il pane carrè sulla griglia supporto.
Dopo la 1° cottura capovolgere fino a
cottura ultimata.
Inserire i toasts sulla griglia supporto
leccarda;dopo la prima brunitura
capovolgere i toasts fino a brunitura ultimata.
Tagliare le salsiccie a metà e disporle sulla
griglia, con la parte interna verso l’alto. A metà
cottura capovolgere le salsiccie fino a cottura
ultimata. Avvertenza: ogni tanto controllate
visivamente l’uniformità di cottura. Nel caso
di disuniformità intercambiare quelle cotte
con quelle meno cotte.
Disporre le fette bene sotto l’azione del grill
e voltarle due volte.
Condite con aromi naturali e voltatele ogni
tanto.
Cuocere le trote coperte con olio, sale e
cipolle in teglia Pirex.
Cuocere il salmone non coperto in teglia
Pirex con sale, pepe e olio.
Cuocete la sogliola con sale e un
cucchiaio d’olio.
Cuocere in recipiente coperto le orate con
olio e sale
13 IT
Page 14
SAFETY INSTRUCTIONS
WARNING: The appliance and its accessible parts become hot during use. Care should be taken to avoid
touching heating elements.
• Children under 8 Year of age must be kept away from the appliance unless they are continuously
supervised.
• This appliance can be used by children aged from 8 years and above and persons with reduced
physical, sensory or mental capabilities or lack of experience and knowledge if they have been given
supervision or instruction concerning use of the appliance in a safe way and understand the hazards
involved.
• Children must not play with the appliance.
• Cleaning and user maintenance shall not be made by children without supervision.
• During use the appliance becomes hot. Care should be taken to avoid touching heating elements inside
the oven.
WARNING: Accessible parts may become hot during use. Young children must be kept away.
• Do not use harsh abrasive cleaners or sharp metal scrapers to clean the oven door glass since they can
scratch the surface, which may result in shattering of the glass.
• The oven must be switched off before removing the guard, after cleaning, the guard must be replaced in
accordance with the instructions.
• Only use the temperature probe recommended for this oven.
• Do not use a steam cleaner for cleaning operations.
• WARNING: Avoid possibility of electric shock - ensure the appliance is switched off before replacing the
lamp.
• The means for disconnection must be incorporated in the fixed wiring in accordance with the wiring
rules.
• The instructions state the type of cord to be used, taking into account the temperature of the rear surface
of the appliance.
• If the supply cord is damaged, it must be replaced by a special cord or assembly available from the
manufacturer or its service agent.
• CAUTION: In order to avoid a hazard due to inadvertent resetting of the thermal cutout, this appliance
must not be supplied through an external switching device, such as a timer, or connected to a circuit that
is regularly switched on and off by the utility.
• CAUTION: Accessible parts may be hot when the grill is in use. Young children must be kept away.
• Excess spillage must be removed before cleaning.
• During self-cleaning pyrolytic operation the surfaces may get hotter than usual and children MUST be
kept away.
This appliance is marked according to the European directive 2012/19/EU on Waste Electrical and Electronic Equipment (WEEE).
WEEE contains both polluting substances (which can cause negative consequences for the environment) and basic components
(which can be re-used). It is important to have WEEE subjected to specific treatments, in order to remove and dispose properly all
pollutants, and recover and recycle all materials. Individuals can play an important role in ensuring that WEEE does not become an
environmental issue; it is essential to follow some basic rules:
• WEEE shall be handed over to the relevant collection points managed by the municipality or by registered companies. In many countries, for
large WEEE, home collection could be present.
• When you buy a new appliance, the old one may be returned to the retailer who has to collect it free of charge on a one-to-one basis, as long as
the equipment is of equivalent type and has the same functions as the supplied equipment.
• WEEE shall not be treated as household waste.
ENERGY SAVING AND RESPECTING THE ENVIRONMENT
Where possible, avoid pre-heating the oven and always try to fill it. Open the oven door as infrequently as possible, because heat from the cavity
disperses every time it is opened. For a significant energy saving, switch off the oven between 5 and 10 minutes before the planned end of the
cooking time, and use the residual heat that the oven continues to generate. Keep the seals clean and in order, to avoid any heat dispersal outside
of the cavity. If you have an electric contract with an hourly tariff, the "delayed cooking" programme makes energy saving more simple, moving
the cooking process to start at the reduced tariff time slot.
1. GENERAL WARNINGS
Thank you for choosing one of our products. To get the most out of your oven we recommend that you:
• Read the notes in this manual carefully: they contain important instructions on how to install, use and service this oven safely.
• Keep this booklet in a safe place for easy, future reference.
All accessible parts are hot when the appliance is in operation, take care to not touch these elements.
When the oven is first switched on it may give out acrid smelling fumes. This is because the bonding agent for insulating panels around the oven has
been heated up for the first time.
This is a completely normal, if it does occur you merely have to wait for the fumes to clear before putting the food into the oven.
An oven by its very nature becomes very hot. Especially the glass of the oven door.
14 GB
Page 15
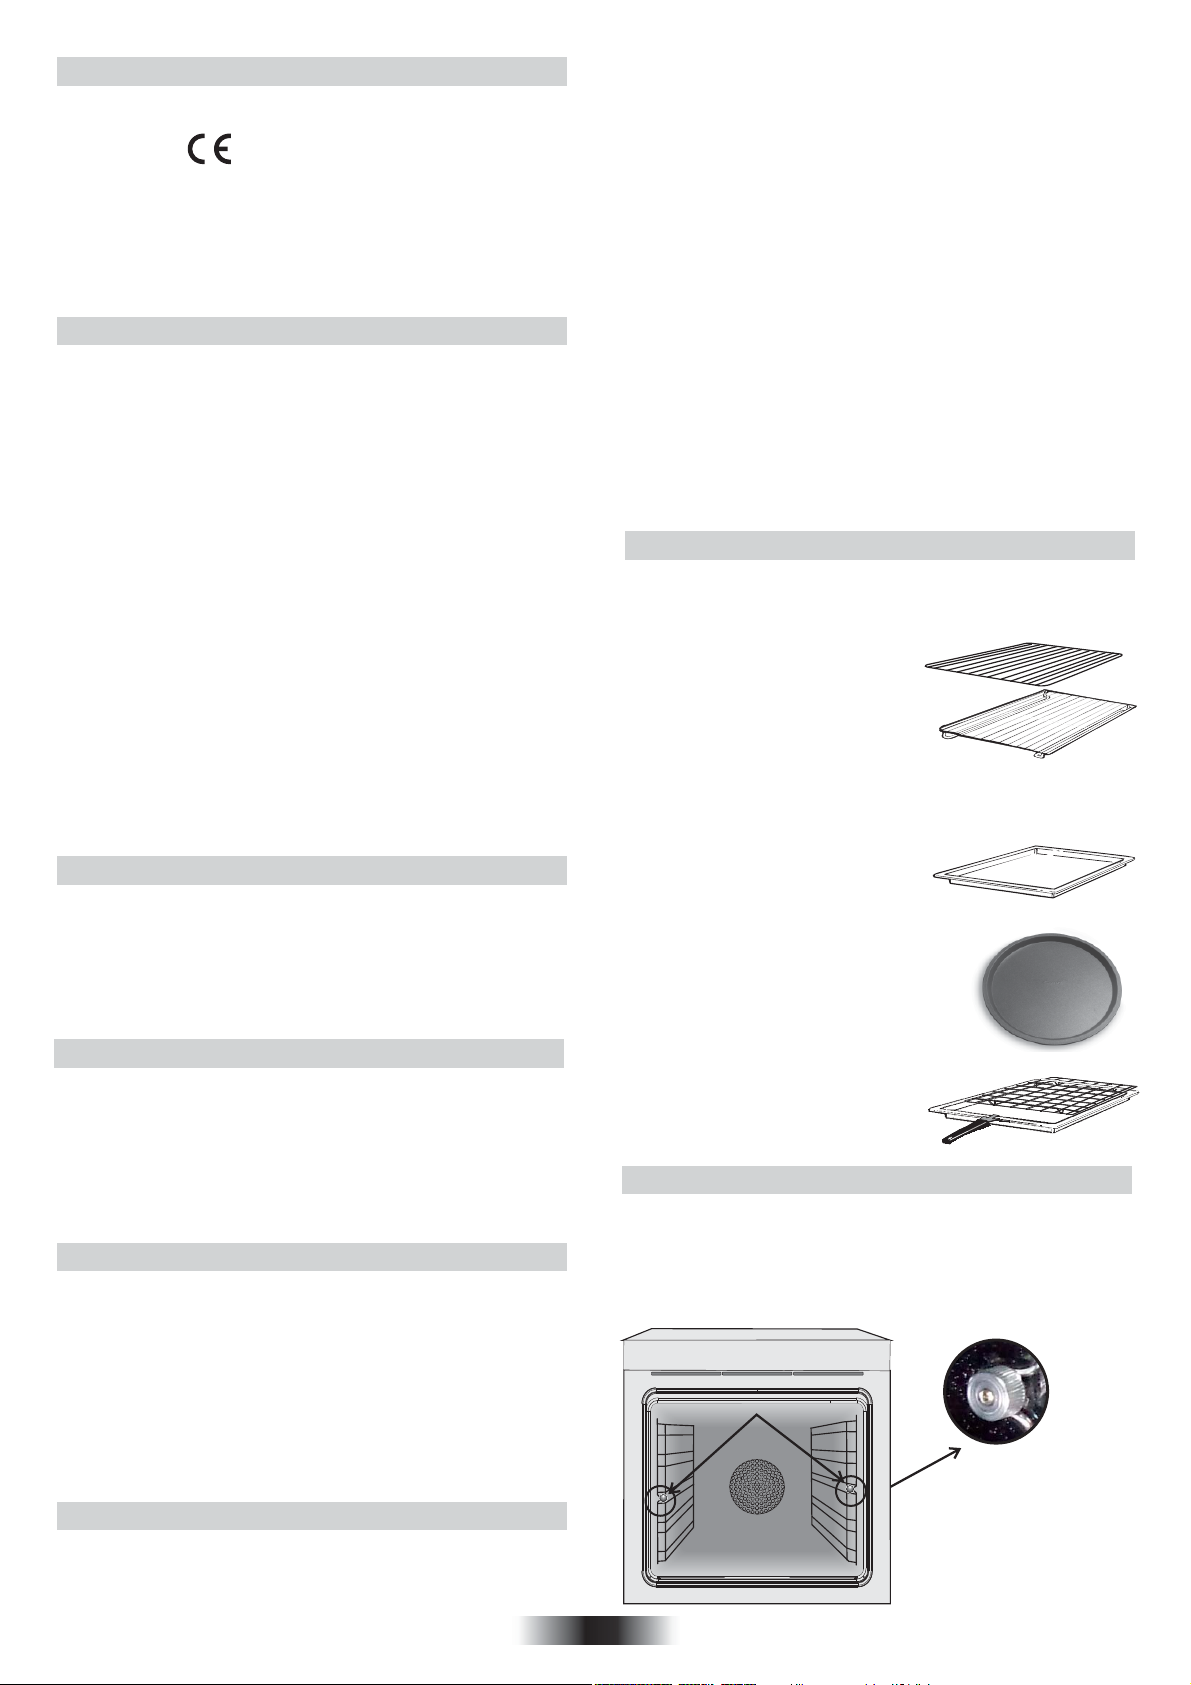
1.1 DECLARATION OF COMPLIANCE
The parts of this appliance that may come into contact with foodstuffs
comply with the provisions of EEC Directive 89/109.
By placing the mark on this product, we are confirming
compliance to all relevant European safety, health and environmental
requirements which are applicable in legislation for this product.
When you have unpacked the oven, make sure that it has not been
damaged in any way. If you have any doubts at all, do not use it: contact
a professionally qualified person. Keep packing materials such as
plastic bags, polystyrene, or nails out of the reach of children because
they are dangerous for children.
1.2 SAFETY HINTS
•The oven must be used only for the purpose for which it was designed: it
must only be used for cooking food. Any other use, e.g. as a form of
heating, is an improper use of the oven and is therefore dangerous.
•The manufacturers cannot be held responsible for any damage caused
by improper, incorrect or unreasonable use. When using any electrical
appliance you must follow a few basic rules.
– Do not pull on the power cable to remove the plug from the socket.
– Do not touch the oven with wet or damp hands or feet.
– Do not use the oven unless you are wearing something on your feet.
– It is not generally a good idea to use adapters, multiple sockets for
several plugs and cable extensions.
– If the oven breaks down or develops a fault switch it off at the mains and
do not touch it.
•If the cable is at all damaged it must be replaced promptly.
When replacing the cable, follow these instructions. Remove the power
cable and replace it with one of the H05RRF, H05VV-F, H05V2V2-F type.
The cable must be able to bear the electrical current required by the oven.
Cable replacement must be carried out by properly qualified technicians.
The earthing cable (yellow-green) must be 10 mm longer than the power
cable.
Use only an approved service centre for repairs and ensure that only
original parts are used. If the above instructions are not adhered to the
manufacturers cannot guarantee the safety of the oven.
•Do not line the oven walls with aluminium foil or single-use
protection available from stores. Aluminium foil or any other
protection, in direct contact with the hot enamel, risks melting and
deteriorating the enamel of the insides.
1.3 INSTALLATION
Installation is the customer’s responsibility. The manufacturers have no
obligation to carry this out. If the assistance of the manufacturer is required
to rectify faults arising from incorrect installation, this assistance is not
covered by the guarantee.
The installation instructions for professionally qualified personal must be
followed. Incorrect installation may cause harm or injury to people,
animals or belongings. The manufacturer cannot be held responsible for
such harm or injury.
1.4 FITTING THE OVEN INTO THE KITCHEN UNIT
Fit the oven into the space provided in the kitchen unit; it may be fitted
underneath a work top or into an upright cupboard. Fix the oven in position
by screwing into place, using the four fixing holes in the frame. (Fig.on last
page).
To locate the fixing holes, open the oven door and look inside.To allow
adequate ventilation, the measurements and distances indicated in the
diagram on last page must be adhered to when fixing the oven.
Note: For ovens that are combined with a hob unit the instructions
contained in the manual for the hob unit must be followed.
1.5 IMPORTANT
If the oven is to work properly, the kitchen housing must be suitable. The
panels of the kitchen unit that are next to the oven must be made of a heat
resistant material. Ensure that the glues of units made of veneered wood
can withstand temperatures of at least 120 °C. Plastics or glues that
cannot withstand such temperatures will melt and deform the unit. Once
the oven has been lodged inside the unit, the electrical parts must be
completely insulated. This is a legal safety requirement. All guards must be
firmly fixed into place so that it is impossible to remove them without using
special tools.
Remove the back of the kitchen unit to ensure an adequate current of
air circulates around the oven. The hob must have a rear gap of at
least 45 mm.
specifications plate. The earthing cable is yellowgreen. The plug must be
fitted by a properly qualified person. If the socket and the plug are
incompatible the socket must be changed by a properly qualified person.A
properly qualified person must also ensure that the power cables can carry
the current required to operate the oven.
An ON/OFF switch may also be connected to the power supply. The
connections must take account of the current supplied and must comply
with current legal requirements. The yellow-green earthing cable must not
be governed by the ON/OFF switch. The socket or the ON/OFF switch
used for connecting to the power supply must be easily accessible when
the oven has been installed.
Important: During installation, position the power cable in such a way
that it will not be subjected to temperatures of above 50°C at any point.
The oven complies with safety standards set by the regulatory bodies. The
oven is safe to use only if it has been adequately earthed in compliance
with current legal requirements on wiring safety. You must ensure that the
oven has been adequately earthed.
The manufacturers cannot be held responsible for any harm or injury
to persons, animals or belongings caused by failure to properly
earth the oven.
WARNING: the voltage and the supply frequency are showed on the
rating plate (fig. on last page).
The cabling and wiring system must be able to bear the maximum electric
power required by the oven. This is indicated on the specifications plate. If
you are in any doubt at all, use the services of a professionally qualified
person.
1.7 OVEN EQUIPMENT (according to the model)
It is necessary to do an initial cleaning of the equipment before the
first use of each of them.Wash them with a sponge. Rinse and dry off.
The simple shelf can take moulds and
dishes.
The tray holder shelf is especially
good for grilling things. Use it with the
drip tray.
The special profile of the shelves
means they stay horizontal even when
pulled right out. There is no risk of a dish
sliding or spilling.
The drip tray catches the juices from grilled foods. It is only used with
the Grill, Rotisserie, or Fan Assisted Grill ;
remove it from the oven for other cooking
methods.
Never use the drip tray as a roasting tray
as this creates smoke and fat will spatter your
oven making it dirty.
The pizza set is designed for pizza cooking.
In order to obtain the best results the set
must be used together with Pizza function.
The tray holder
The tray holder shelf is ideal for grilling.
Use it in conjunction with the drip tray. A
handle is included to assist in moving the
both accessories safely. Do no leave the
handle inside the oven.
Removing and cleaning wire racks
1- Remove the knurled nuts by turning them counter clockwise.
2- Remove the wire racks by pulling them towards yourself.
3- To clean the wire racks either put them in the dishwasher or use
a wet sponge, ensuring that they are dried afterwards.
4- After the cleaning process install the wire racks in reverse order.
5- Replace the knurled nuts.
A
1.6 CONNECTING TO THE POWER SUPPLY
Plug into the power supply. Ensure first that there is a third contact that acts
as earthing for the oven. The oven must be properly earthed.
If the model of oven is not fitted with a plug, fit a standard plug to the power
cable. It must be able to bear the power supply indicated on the
15 GB
Page 16
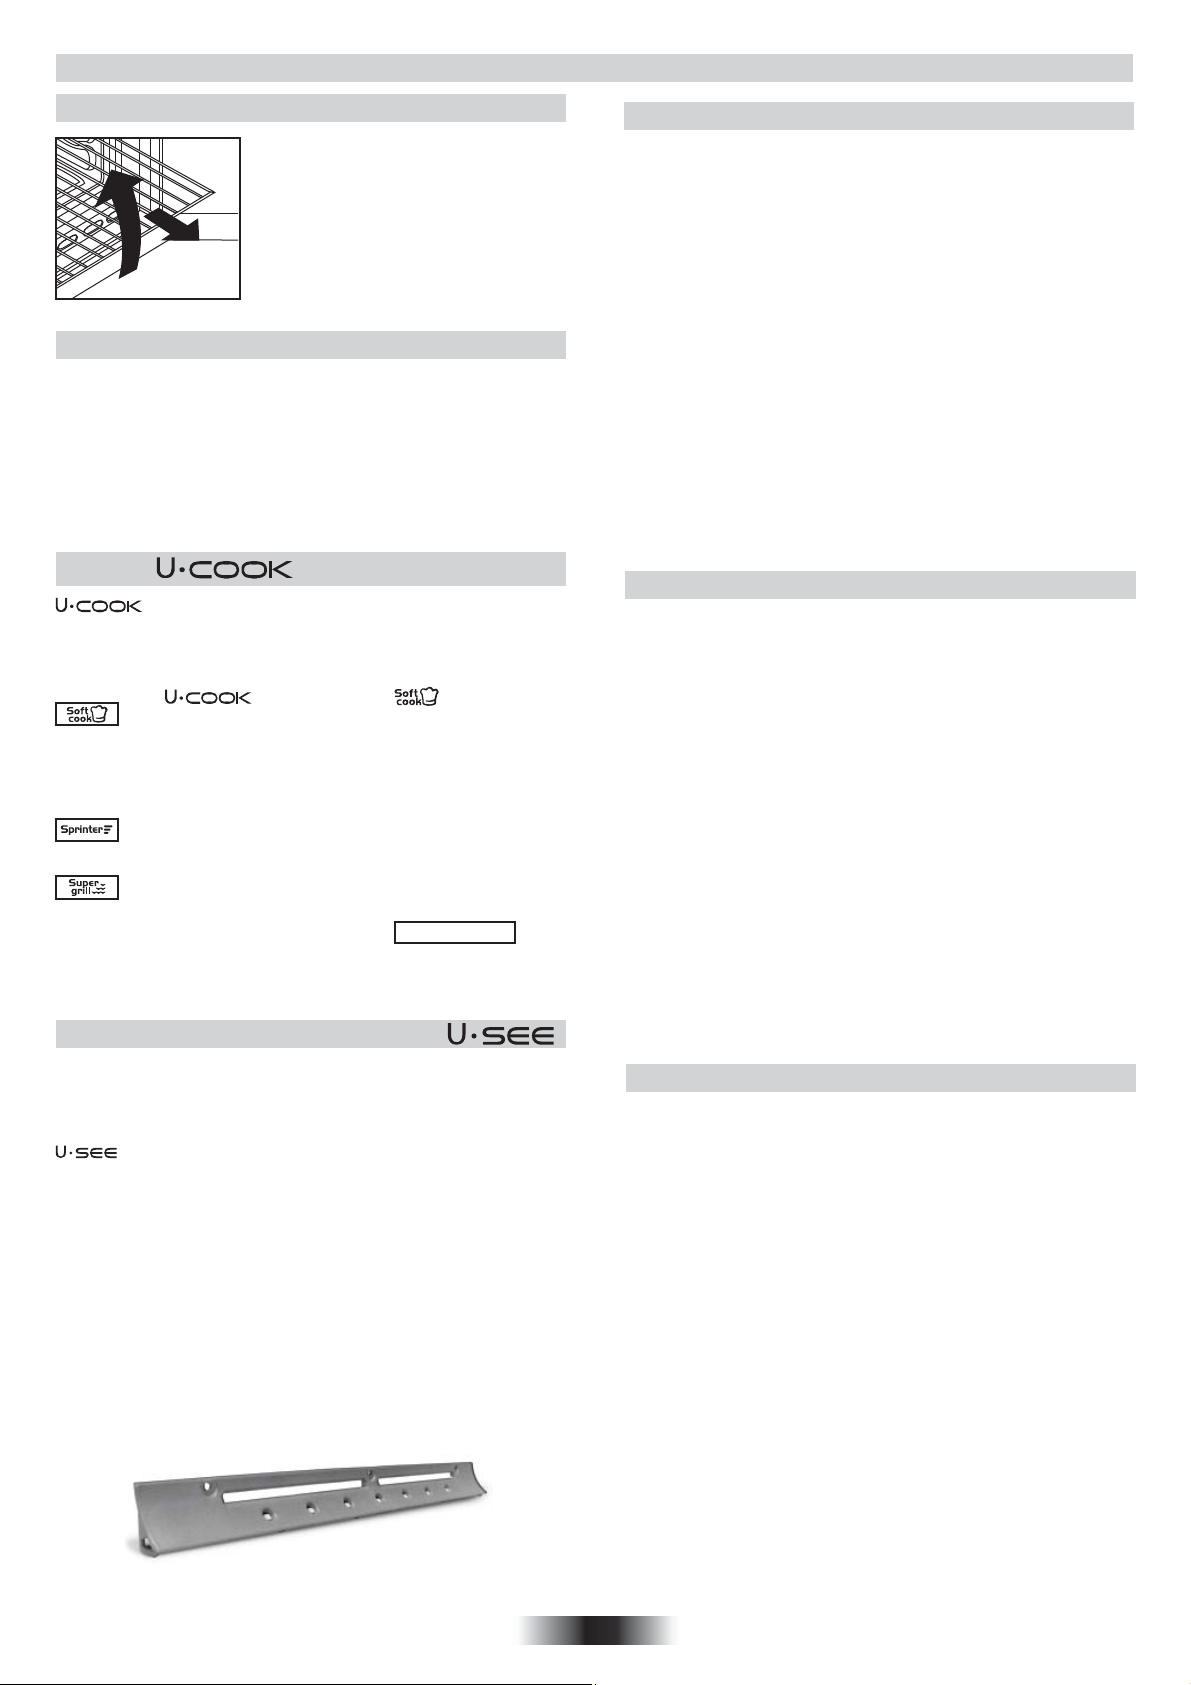
2. USEFUL TIPS
2.1 SHELF SAFETY SYSTEM
The oven features a new shelf safety
system.
This allows you to pull out the oven
shelves when inspecting the food
without danger of food spillages or
shelves falling accidentally out of the
oven.
To remove the shelves pull out and lift.
2.2 GRILLING
Grilling makes it possible to give food a rich brown colour quickly.
For browning we recommend that you insert the grill onto the
fourth level, depending on the proportions of the food (see fig.
page 7).
Almost all food can be cooked under the grill except for very lean
game and meat rolls.
Meat and fish that are going to be grilled should first be lightly
doused with oil.
2.3 The MODELS
Ovens have an electronic control of the fan speed, called
and patented VARIOFAN. During the cooking, this system changes
automatically the speed of the fan (in multifunction mode) in order to
optimize the air flow and the internal temperature in the cavity of the
oven.
Some ovens are equipped with the new doorj " WIDE DOOR " which
has a bigger window area, this allows better maintenance and a
improved thermal insulation.
All ovens feature the function.
This allows a management of the distribution of moisture
and temperature. It reduces the loss of humidity of the 50
%, which guarantees the food remains tender and tastes
better. This a delicate cooking is recommended for the
baking of the bread and pastry.
It reduces the time of preheating of ovens: only 8 minutes
to reach 200 degrees Celsius.
It gives the possibility of setting level and intensity of
grilling, up to 50 % more power in comparison with a
traditional multifunction oven.
2.4 According to the model
Is an illumination system which replaces the traditional « light bulb ».
14 LED lights are integrated within the door. These produce white high
quality illumination which enables to view the inside of the oven with
clarity without any shadows on all the shelves.
Advantages :
System, besides providing excellent illumination inside the
oven, lasts longer than the traditional light bulb its easier and to
maintain and most of all saves energy.
• Optimum view
• Long life illumination
• Very low energy consumption, -95% in
comparison with the traditional
illumination High
“Appliance with white light LED of the 1M Class according to IEC
60825- 1:1993 + A1: 1997 + A2: 2001 (equivalent to EN 60825-1: 1994
+ A1: 2002 + A2: 2001); the maximum light power emitted
150uW.
Not observed directly with optical instruments. “
λ459nm <
2.5 SELF-CLEANING OVEN WITH CATALYTIC
Special self-cleaning panels covered in a micro-porous coating are
available as optional extras for all models. If they are fitted, the oven
no longer needs to be cleaned by hand.
The fat that is splattered onto the sides of the oven during roasting is
eliminated by the microporous coating which breaks the fat down by
catalysis and transforms it into gas.
Excessive splattering may nevertheless block the pores and therefore
hinder self-cleaning. The self-cleaning capacity may be restored by
switching on the empty oven to maximum for about 10-20 minutes.
Do not use abrasive products, metal cleaning wads, sharp objects,
rough cloths, or chemical products and detergents that may
permanently damage the catalytic lining.
It is a good idea to use deep roasting trays to roast fatty foods such as
joints of meat etc. and to put a tray underneath the grill to catch surplus
fat.If the walls of the oven are so thickly coated in grease that the
catalytic lining is no longer effective remove surplus grease with a soft
cloth or sponge soaked in hot water.
The lining must be porous for self-cleaning to be effective.
N.B.: All catalytic linings currently on the market have a working life of
about 300 hours. They should therefore be replaced after about 300
hours.
2.6 CLEANING AND MAINTENANCE
Never use abrasive cleaners, wire wool or sharp objects to clean the
glass oven door.
Clean the stainless steel and enamelled surfaces with warm, soapy
water or with suitable brand products. On no account use abrasive
powders that may damage surfaces and ruin the oven’s appearance.
It is very important to clean the oven each time that it is used. Melted
fat is deposited on the sides of the oven during cooking. The next time
the oven is used this fat could cause unpleasant odours and might
even jeopardise the success of the cooking. Use hot water and
detergent to clean; rinse out thoroughly.
To make this chore unnecessary all models can be lined with catalytic
self-cleaning panels: these are supplied as an optional extra (see the
section SELF-CLEANING OVEN WITH CATALYTIC LINING).
Use detergents and abrasive metal pads like «brillo pads» for the
stainless steel grills.
The glass surfaces as the top, oven door and warming compartment
door must be cleaned when they are cold. Damage that occurs to
them because this rule was not adhered to are not covered by the
guarantee.
To replace the interior light:
• switch off the mains power supply and unscrew bulb. Replace with an
identical bulb that can withstand very high temperatures
2.7 SERVICE CENTRE
Before calling the Service Centre
If the oven is not working, we recommend that:
you check that the oven is properly plugged into the power supply.
If the cause of the fault cannot be detected:
disconnect the oven from the mains, do not touch the oven and call the
after sales service.
Before calling the Service Centre remember to make a note of the
serial number on the specifications plate (see fig. On last page).
The oven is supplied with a guarantee certificate that ensures that it
will be repaired free of charge by the Service Centre
16 GB
Page 17
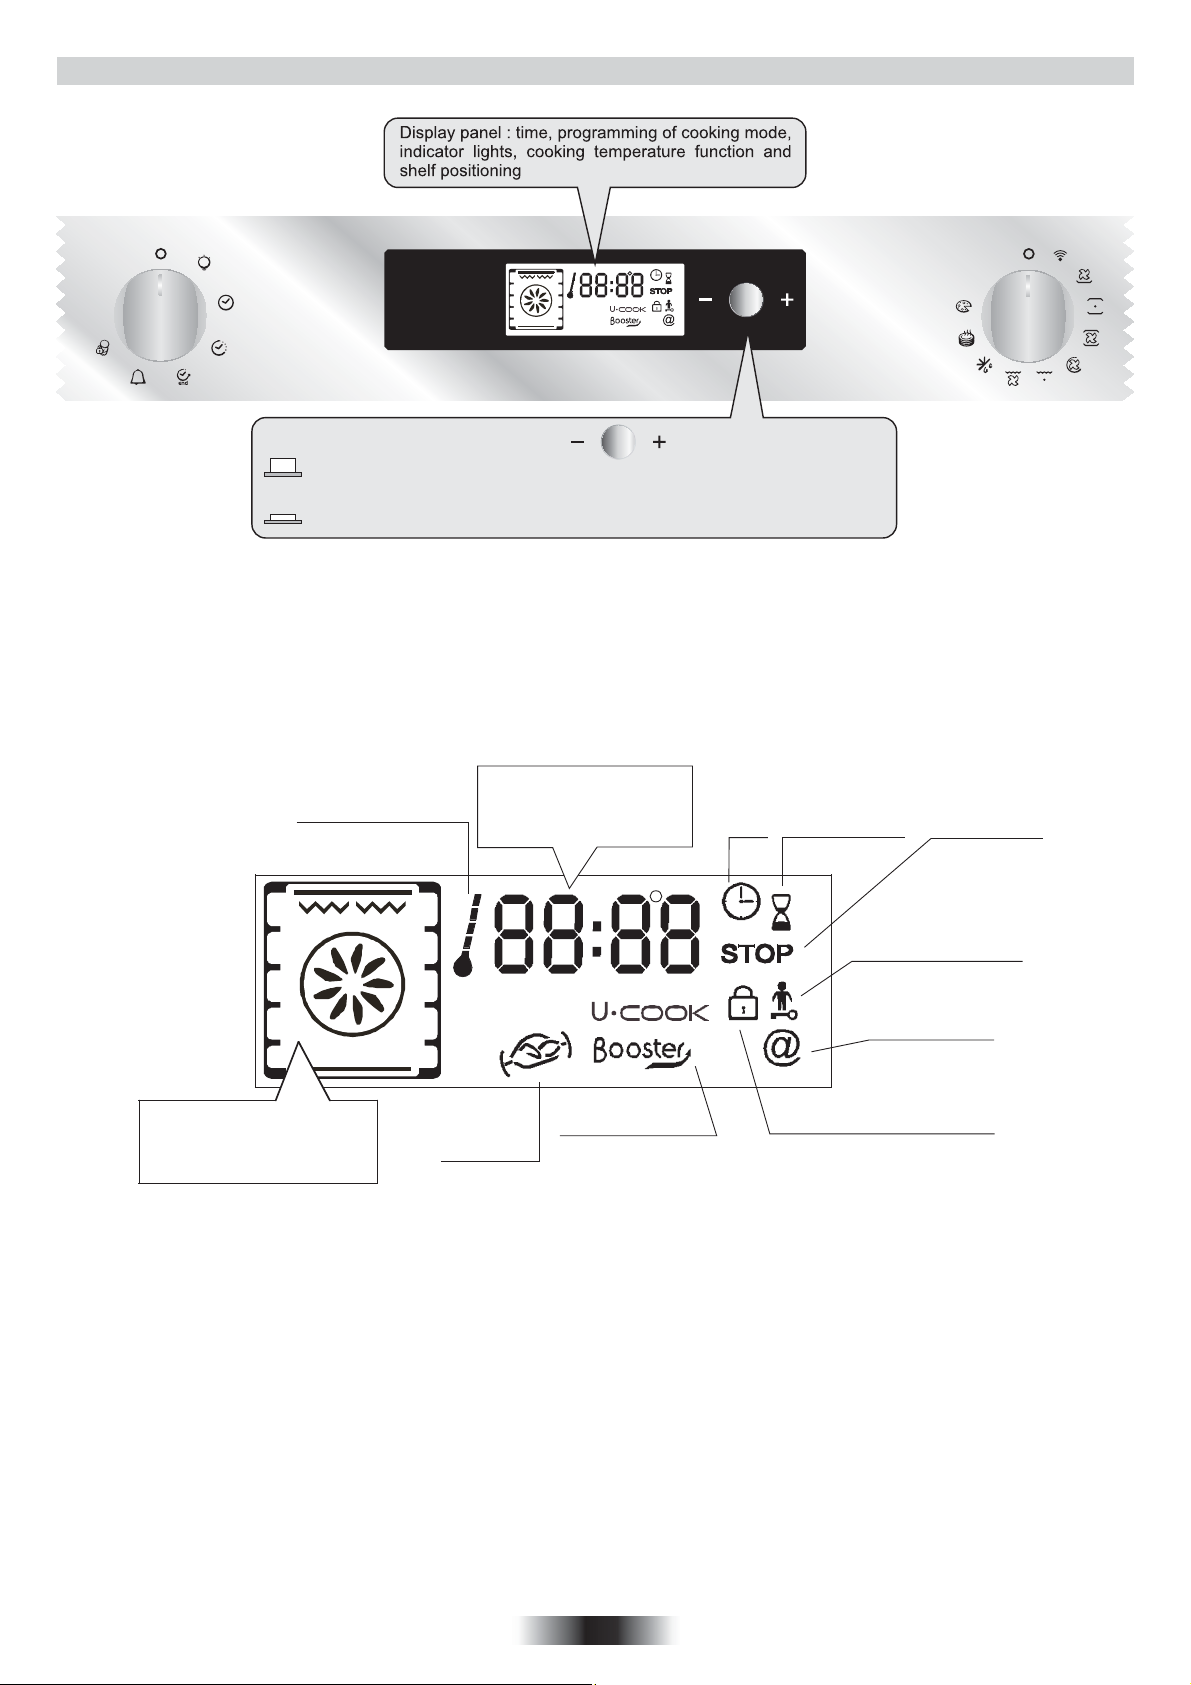
3. DESCRIPTION OF THE DISPLAY
BUTTON FOR REGULATION AND CONFIRMATION
Settings: temperature, programming cooking and end of cooking time -
Regulated by turning the button towards “ - ” or “ + ”
To confirm setting: press the button.
Indicator light:
rising temperature
Oven functionning display
and recommended level
position
Clock /
Programmation /
Cooking temperature
PYRO
Turnspit
Booster display:
Pre-heating
Programme symbol display: cooking
Time Cooking timer
Cooking end
Indicator light
Child safety device
Indicator light
WIFI
Indicator light
Closing of the oven door
17 GB
Page 18
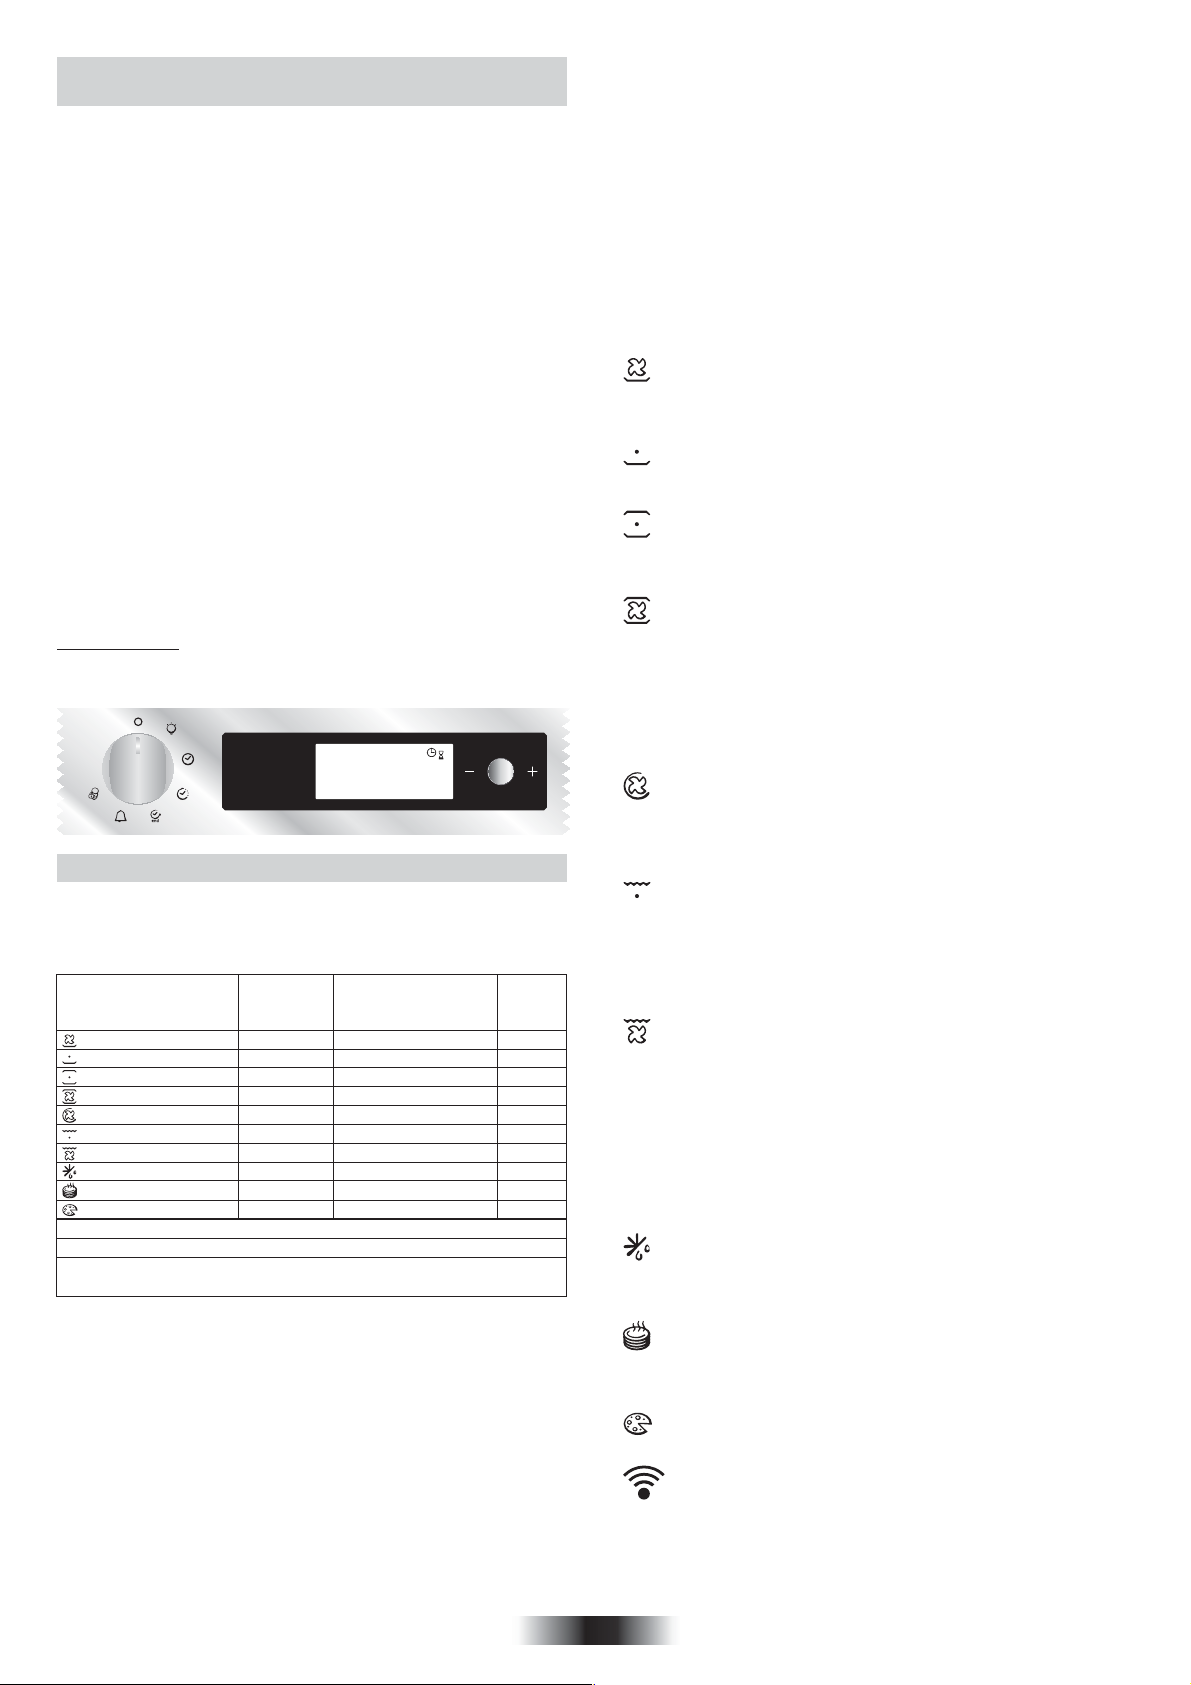
3.1 BEFORE USING THE OVEN FOR THE
FIRST TIME
• PRELIMINARY CLEANING
-Clean the oven before using for the first time:
-Wipe over external surfaces with a damp soft cloth.
-Wash all accessories and wipe inside the oven with a solution of hot water
and washing up liquid.
-Set the empty oven to the maximum temperature and leave on for about 1
hour, this will remove any lingering smells of newness. Ensure that the
room is well ventilated while this is being done.
• THINGS TO REMEMBER
Confirmation of operation on timer
Modification must be confirmed by pressing the button.
Stopping the oven:
This may be necessary if you have input an incorrect instruction.
To stop the oven .... turn back the function selector knob to the Stop
Position.
Child safety device:
To lock the oven controls, select the child safety device. Refer to the
section entitled “Programming - The child safety device”.
The cooling fan :
This protects the control panel and electronics from heat damage.
It begins and then stops automatically even when the oven is switched off.
Oven lighting :
By turning to the light symbol, you can switch on the oven light when it is
not in use.
When the oven is in use, the light stays on during all of the oven functions
and when the door is opened.
• CLOCK SETTING
When the oven is connected to the electricity supply or after a long power
cut, the clock must be re-set.
To set the clock :
1 - Turn the control knob to the “Clock” symbol :
2 - Set the clock with the central button by turning to the “-” or “+”,
3 - Turn back the control knob to the STOP position.
10:30
3.2 HOW TO USE THE OVEN
•THE MANUAL MODE
The cooking methods suggested in manual mode are set out in the table
below. A temperature is also suggested for each cooking method. This can
be modified within a pre-determined range.
Function Mode
according to the oven
model
Bottom + Fan
Bottom
Bottom + Top 220 50-240
Bottom + Top + Fan
Circular Heating Element + Fan
Grill
Grill + Fan
Defrost
Keep Warm
Pizza
*Booster: rapid temperature raised
**Oven must have this function
*** Tested in accordance with the CENELEC EN 60350-1 used for
definition of energy class.
1- Turn the oven selector knob to the function required to the cooking.
The heating elements in operation for the selected cooking method are
displayed.
2- The appropriate temperature according to the cooking method
selected is displayed. It can be modified within a pre-determined range see the table above.
To modify the temperature setting, turn the central button and on the
timer confirm the setting by pressing the same button.
... the temperature display is fixed but can be modified during the
cooking cycle.
The oven will start cooking and will start to heat up.
The indicator light flashes until the selected temperature has been
reached. An audible signal sounds at the end of this operation and the
indicator light becomes fixed.
Pre-set
Temperature
***
***
**
o
C
210
160
210
180
L2
190
40
60
230
Pre-determined
Temperature C
50-220
50-220
50-230
50-230
50-200
o
L1-L3
No
No
230
Function
Booster*
Booster
Booster
Booster
3- A cooking time and an end of cooking time can be programmed by
turning the programme selector knob to “cooking time” or “end of cooking
time”.
The “cooking time” or “end of cooking time” display starts flashing. Using
the central button, modify the settings as required and on the timer
confirm.
When you have done this, do not forget to turn the programme selector
knob back to “stop position” to confirm the new setting.
For more details about programming, refer to the chapter 5.3
entitled PROGRAMMES.
4- At the end of the cooking cycle, turn the function selector knob back to
“stop position”.
The indicator flashes again, it will remain also turned on after having
extinguished the oven and it will estinguish when the inside temperature
of the oven is sufficiently low.
• COOKING MODE
All cooking should be carried out with the door closed.
BOTTOM + FAN - The combination of the bottom heating
element and fan is ideal for fruit flans, tarts, quiches and pastries. It
prevents food from becoming too dry and encourages bread dough to
rise. Place the shelf in the bottom position in the oven.
BOTTOM - Using the lower element. Ideal for cooking all
pastry based dishes. Use this for flans, quiches, tarts, pâté and any
cooking that needs more heat from below.
BOTTOM + TOP - Both top and bottom heating elements are
in use. This method is ideal for all traditional roasting and baking.When
cooking red meat, roast beef, leg of lamb, game, bread or foil wrapped
foods.
BOTTOM + TOP + FAN - Both top and bottom heating
elements are used in conjunction with the fan, which circulates hot air
throughout the oven.We recommend this method for poultry, pastries,
fish and vegetables. By using this method better heat penetration is
achieved and cooking and preheating times are also reduced. The fan
cooking option allows you to cook different foods together at different
positions in the oven all at the same time, providing even heat
distribution but without the risk of mingling tastes and smells. When
cooking different foods at the same time allow a further 10 minutes.
CIRCULAR HEATING ELEMENT + FAN - Air that has been
heated is blown by the fan onto the different levels. It is ideal for cooking
different types of food at the same time (e.g. Meet and fish) without
mixing tastes and smell. It cooks very gently and is ideal for sponge
cakes, pastries, etc.
GRILL - Using the top heating element. Success is guaranteed
for mixed grills, kebabs and gratin dishes. The grill should be pre-heated
to a high temperature for 5 minutes. White meats should always be
placed at some distance from the grill element, the cooking time is
slightly longer but the meat will be more succulent. Red meat and fish
fillets can be placed directly onto the shelf with the drip tray placed
beneath on lower shelf position.
GRILL + FAN - The top heating element is used in conjunction
with the fan which circulates the hot air around the oven. Pre heating is
recommended for red meats but is not necessary for white meats.
Grilling is ideal for cooking thicker food items such as pork or poultry.
Food to be grilled should be placed directly at the centre of the middle
shelf.
By sliding the drip tray underneath the shelf it will ensure that any juices
are collected. For best results always make sure that the food is not too
close to the grill element and turn the food over half way through the
cooking time.
DEFROST - When the dial is set to this position. The fan
circulates hot air around the frozen food so that it defrosts in a few
minutes without the protein content of the food being changed or altered.
The temperature is preset in 40°C constant, no regulation is possible.
KEEP WARM - This is recommended to reheat precooked
foodstuff, positioning the shelf on the second level from top, or to defrost
bread pizza or pastry by positioning the shelf on the lower level.
The temperature is preset in 60°C constant, no regulation is possible.
PIZZA - With this function hot air circulated in the oven to
ensure perfect result for dishes such as pizza or cake.
WIFI
18 GB
Page 19
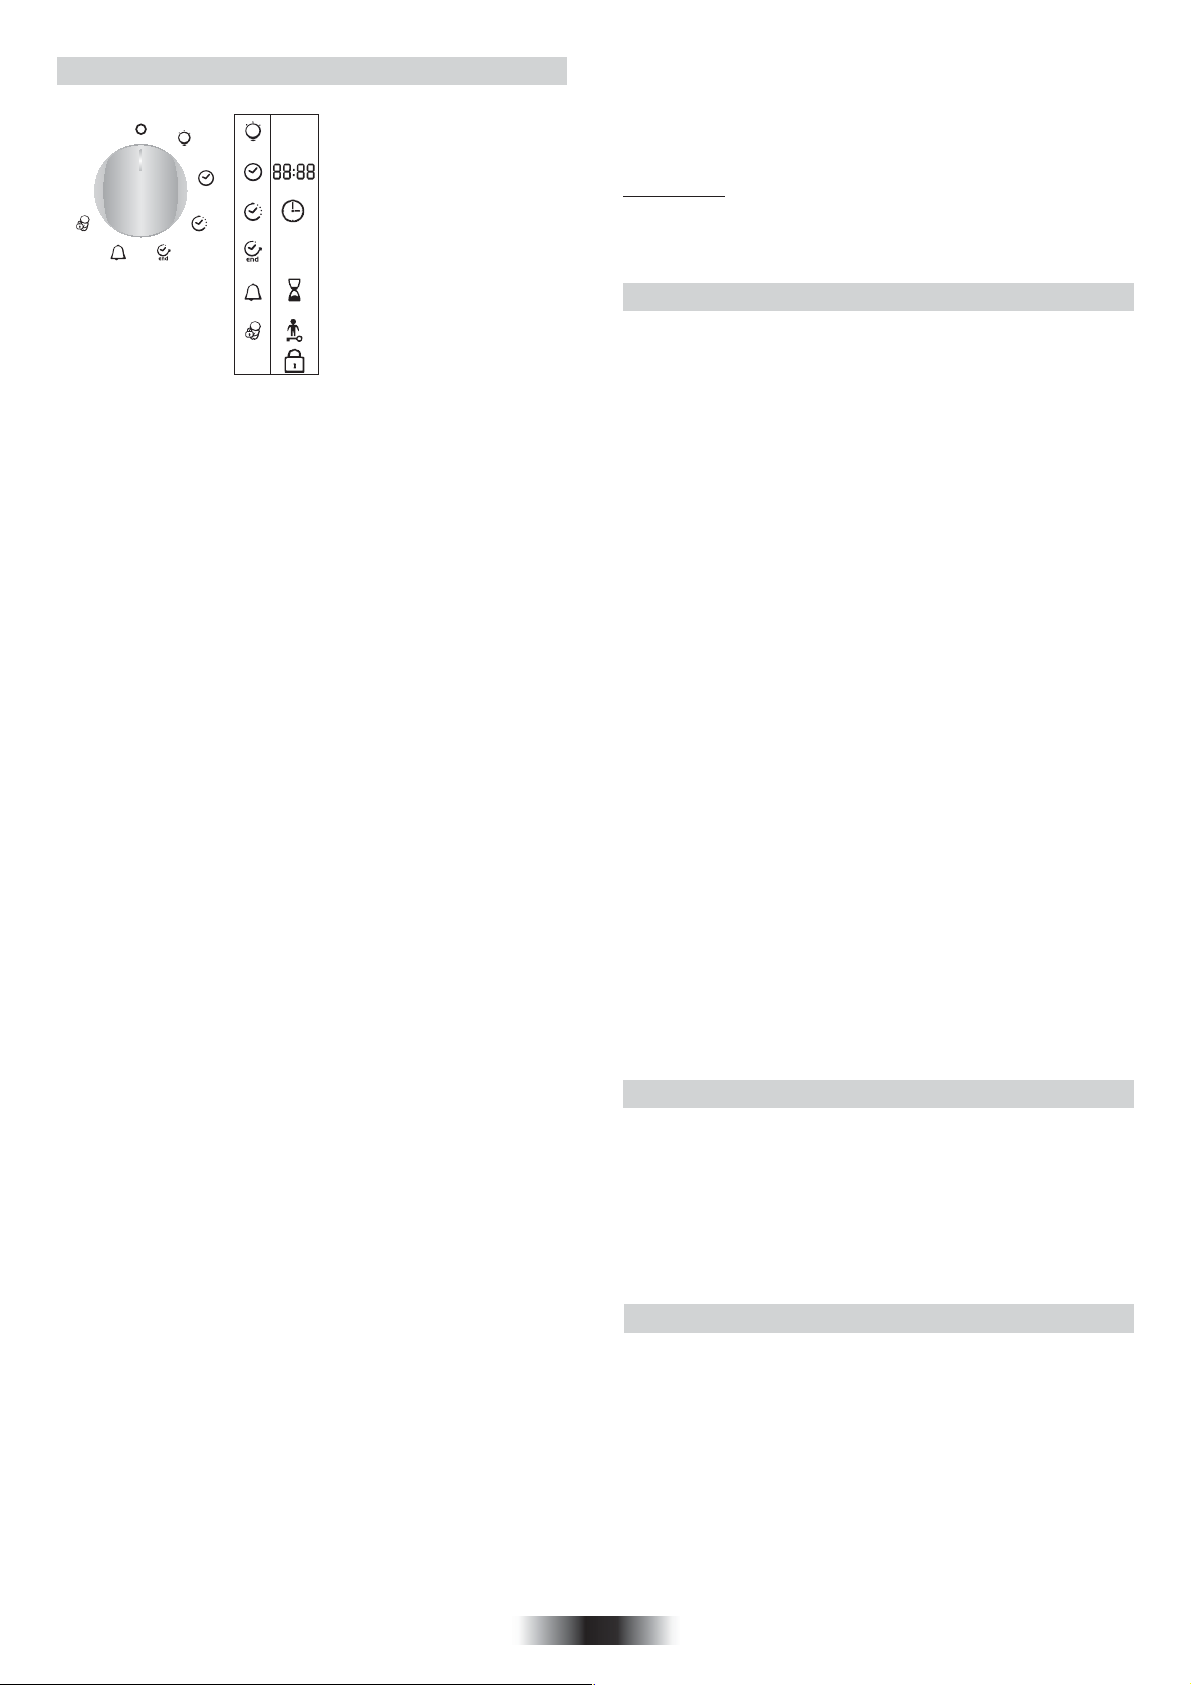
3.3 PROGRAMMES
DISPLAY SYMBOLS
Lamp
Time Setting
Cooking time programming
STOP
End of cooking time programming
- set the cooking duration time to 45 minutes
- set the end of cooking time to 12:30.
Cooking will start automatically at 11:45 (12:30 minus 45 mins)
and will continue until the pre-set end-of cooking-time, when the oven will switch itself off automatically.
WARNING.
If the END of cooking is selected without setting the length
of cooking time, the oven will start cooking immediately
and it will stop at the END of cooking time set.
Timer in operation
Selecteur
programmation
THE TIMER:
The timer works independently of the oven and has no effect on the
heating elements. It is simply a reminder.
•Turn the knob to the Timer position. The Timer symbol will appear.
The digits 00:00 will appear on the display.
•The minutes will then flash, turn the central button to the required
number of minutes and confirm by pressing the same button.
•The hours will flash, turn the central button to the required number of
hours and confirm by pressing the same button.
•Turn the knob back to the Stop position.
When the time is up, the cooking time will disappear. An audible signal
will sound for 15 seconds and the Timer display will flash (to stop it
before the 15 seconds are up, just press the central button).
PROGRAMMING THE COOKING TIME:
Various recipes are pre-programmed with a cooking time. In Manual
mode, Defrosting or Keep warm Mode can be pre-set, if required.
•Turn the knob to the Cooking time position. The Cooking time symbol
will appear.A pre-programmed cooking time for the various recipes will
appear, or 00:00 for other functions of the oven.
•With the minutes flashing, turn the central button to the required
number of minutes confirm by pressing the same button.
•With the hours flashing, turn the central button to the required number
of hours and confirm by pressing the same button.
•Turn the programme selector knob back to the Stop position to
confirm the new cooking time.
When the time is up, the cooking time will disappear from the display.
An audible signal will sound for 15 seconds and the Cooking time and
STOP symbols will flash.
•Turn the programme function knob back to Stop. If you do not do this,
the Cooking time and STOP symbols will continue flashing.
PROGRAMMING THE END OF COOKING TIME:
Various recipes are pre-programmed with a cooking time and
therefore with an end of cooking time. In Manual Mode, Defrosting or
Keep warm mode can be pre-set, if required.
•Turn the knob to the End of cooking position.The STOP symbol will
appear. A pre-programmed end of cooking time for the various recipes
will appear, or 00:00 for other oven functions or the time of day will be
shown.
•Turn the programme selector knob to confirm the end time.
•The minutes will flash. Turn the central button to indicate the required
number of minutes, and confirm your choice by pressing the same
button.
•The hours will then flash.Turn the central button to indicate the
required number of hours, and confirm your choice by pressing the
same button.
NB : With a delayed start, the end of programme time will appear on
the display with the “Cooking time” and “STOP” symbols, and only the
function Recipe mode of the oven remains.
The oven automatically calculates the start time (end time minus
cooking time).
At the end of the cycle the oven switches itself off automatically. For 15
seconds, an audible signal lets you know that the cycle has ended and
the “Cooking time” and STOP symbols will flash.
•Turn the function selector knob to Stop. Unless you do this, the
symbols will continue flashing.
This function is typically used with “cooking duration” function.
•
Child safety device operational
Locking oven door
For example if the dish has to be cooked for 45 minutes and
needs to be ready by 12:30;
- select the required function
3.4 COOKING TIPS
It is better not to salt meats until after cooking as salt encourages the
meat to spatter fat. This will dirty the oven and make a lot of smoke.
Joints of white meat, pork, veal, lamb and fish can be put into the oven
cold. The cooking time is longer than in a preheated oven, but it cooks
through to the centre better as the heat has more time to penetrate the
joint.
Correct preheating is the basis of successful red meat cookery.
GRILLS
• Before loading the grill:
Remove the meat from the refrigerator a few hours before grilling. Lay
it on several layers of kitchen paper. This improves seizing, making it
tastier and avoids it staying cold at the centre.
Add pepper and spices to the meat before grilling, but add any salt
after cooking. This way it will seize better and stay juicy. Baste all the
food to be cooked with a little oil. This is best done with a wide flat
basting brush.Then sprinkle with more pepper and herbs (thyme,
etc.).
• During cooking:
Never pierce the food during cooking even when you turn it. This lets
the juice out and it becomes dry.
BAKING
Avoid using shiny tins, they reflect the heat and can spoil your cakes. If
your cakes brown too quickly, cover them with greaseproof paper or
aluminium foil.
Caution: The correct way to use foil is with the shiny side in towards
the cake. If not the heat is reflected by the shiny surface and does not
penetrate the food.
Avoid opening the door during the first 20 to 25 minutes of
cooking:
Soufflés, brioches, sponge cakes, etc. will tend to fall.You can check if
cakes are done by pricking the centre with a knife blade or metal
knitting needle. If the blade comes out nice and dry, your cake is ready
and you can stop cooking. If the blade comes out moist or with bits of
cake attached, continue baking but slightly lower the thermostat so
that it is finished off without burning.
3.5 ADJUSTING THE DISPLAY CONTRAST
The display contrast can be adjusted at any time.
The default setting is “C5”. To adjust the setting, carry out the following:
•Turn the programme selector to “Light” and the function selector to “0”.
Press in the central key for 3 seconds and “CX” will appear on the display
(where X = the contrast level).
Turn the central key to adjust the contrast setting. The settings go from 1
to 9. Confirm the new setting by pressing the central key for 3 seconds.
4. CHILD SAFETY
This function is essential, especially when children are around. It
prevents children from switching the oven on or altering the preset
programmes.
This safety system locks the oven control panel while it is operating.
There are two levels of safety :
LEVEL 1 : Locking selector control knob and the central button.
•To activate : Turn the programmation control knob to child safety.
•Action : The control knobs are inactive*.
•To deactivate : Turn the programmation control knob to 0.
19 GB
Page 20
LEVEL 2 : Locking function selector knobs
•To activate : Turn the function selector knob to child safety and keep
the central button pressed in for 3 seconds.
•Action : All the controls are inactive*.
•To dactivate : the same procedure as for activating. Turn the function
selector knob to child safety and keep the central button Pressed in for
3 seconds.
*Note : In all cases, for reasons of safety, even when the controls are
locked, the oven can be switched off by turning the selector knob to 0.
5. WIFI FEATURE
WIFI CONFIGURATION
• Turn the oven selector knob to the WiFi position (the “@” symbol
flashes).
• When the oven is connected to a wireless router and the WiFi
function is selected the “@’” symbol stays on continuously,
• If the oven is not connected to a wireless router the “@” symbol
flashes. (see section on “@” symbol management).
• If the Wifi function is selected, the oven can only be remotely
controlled (function selector and encoder are disabled);
• In the other cooking positions the oven cannot be externally
controlled.
RESET
To reset the WiFi , turn the oven selector knob to the WifI position while
no program is running and push the encoder for 3 seconds.
After 3 seconds, on the display will appear "rSt" and the "@" symbol
starts to flash.
"@" SYMBOL MANAGEMENT
• When the oven is off, the symbol is off;
• When the oven selector knob is in the Wi-Fi position, the symbol
flashes (1" on, and 1" off) if this oven is in “access point” mode
(connected point-to-point), while stays steadily on if the oven is in
“client” mode (connected to a router);
• When the oven selector knob is turned on to the Wi-Fi position and
the oven is trying to connect to a router, the symbol flashes (3 " on, and
1" off);
• When the oven selector knob is turned on but not on Wi-Fi position
(read-only), the symbol flashes (1 "on and 3" off).
CANDY SIMPLY-FI:
For detailed information about HOW TO CONNECT
your simply-Fi appliance and HOW TO USE it at its
best, go to http://www.candysimplyfi.com or visit
the dedicated simply-Fi Customer Service website
http://simplyfiservice.candy-hoover.com
20 GB
Page 21
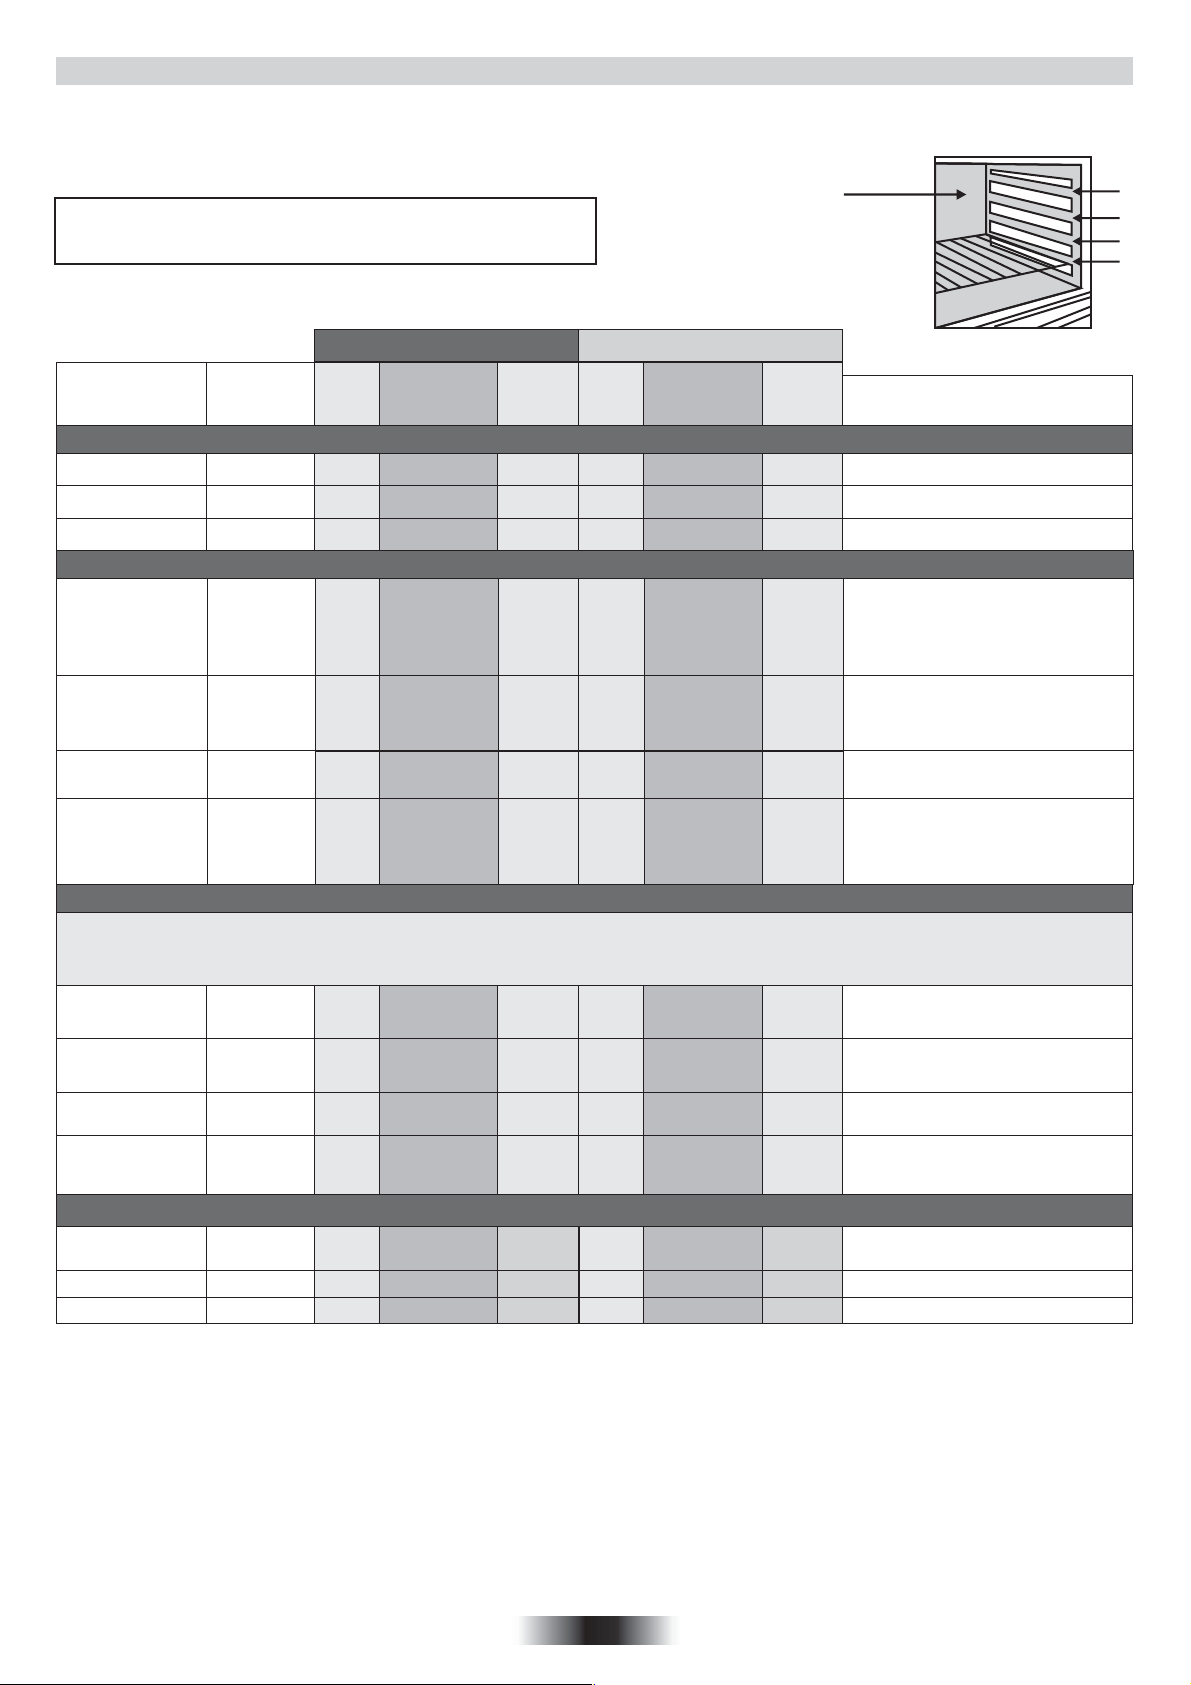
6. TABLES OF COOKING TIMES
The overall suggested cooking times set out below are intended as a rough guide only. They may in fact vary according to the quality, the freshness,
the size and the thickness of the food cooked and of course cooking time is also partly a matter of taste. Let the food stand for a few minutes before
serving because the ingredients continue cooking after they have been removed from the oven.
Shelf position
HANDY TIP: Lower the temperature so as to avoid the surface of the
food becoming hard and dry.
Electric fan oven
Shelf
of cooking
in minutes
Time
Food
Quantity
Static electric oven
Shelf
Time
of cooking
in minutes
Oven
tempe-
rature
• Pasta
Lasagne
Cannelloni
Oven baked
pasta
Kg 3,5
Kg 1,8
Kg 2,5
22
22
22
70 ÷ 75
50 ÷ 60
55 ÷ 60
220
220
220
60 ÷ 65
40 ÷ 50
45 ÷ 50
• Baking (not cakes)
Bread
Pizza
Pastry (frozen)
vol au vents
Focaccia
(n° 4)
Kg 1
di pasta
Kg 1
n° 24
gr. 200 of
dough each
22
35
10
(pre-heating)
25 ÷ 35
30 ÷ 35
25 ÷ 30
200
190
220
200
11
21
22
30 ÷ 35
10
(pre-heating)
20 ÷ 25
25 ÷ 30
20 ÷ 25
• Meat
All meats can be roasted in shallow or deep roasting trays.
It is advisable to cover the shallow trays to avoid splattering the sides of the oven with grease.
The roasting times are the same whether the meat has been covered up or not.
Whole joint of
beef
Joint of
deboned
Joint of
deboned veal
Joint of
fillet of beef
Kg 1
Kg 1
Kg 1,3
Kg 1
70 ÷ 80
100 ÷ 110
90 ÷ 110
80 ÷ 90
220
220
220
220
33
22
21
22
50 ÷ 60
80 ÷ 90
90 ÷ 100
80 ÷ 90
Oven
tempe-
rature
200
200
200
180
190
200
180
200
200
200
200
Remarks
Put the lasagne into an unheated oven
Put the cannelloni into an unheated oven
Put the oven baked pasta into an
unheated oven
Form the dough into a loaf and make a
cross with a knife on top of the dough
leave the dought to rise for at least 2
hours. Grease the baking tin and put the
dough in the middle of it.
Warm the oven for 15 minutes and
place the pizzas on the greased baking
tray. Garnish them with tomatoes,
mozzarella, ham, oil, salt and origano.
Place 24 vol au vents in the oven and
bake.
Warm the oven for 15 minutes, grease
the baking tray, season the 4 focaccia
with oil and salt and leave them to rise at
room temperature for at least 2 hours
before put ting them in the oven.
Put the meat into a deep Pyrex dish and
season with salt and pepper; turn the
meat half way through cooking.
Cook the meat in a covered Pyrex dish
with herbs, spice, oil and butter.
Cook as indicated above
Cook as indicated above.
4
3
2
1
• Fruit
Whole apples
Pears
Peaches
Kg 1
Kg 1
Kg 1
1
1
1
45 ÷ 55
45 ÷ 55
45 ÷ 55
220
220
220
2
2
2
45 ÷ 55
45 ÷ 55
45 ÷ 55
200
200
200
Bake the fruit in an open Pyrex or earthenware dish. Leave it to cool inside the oven.
Follow procedure above.
Follow procedure above.
21 GB
Page 22
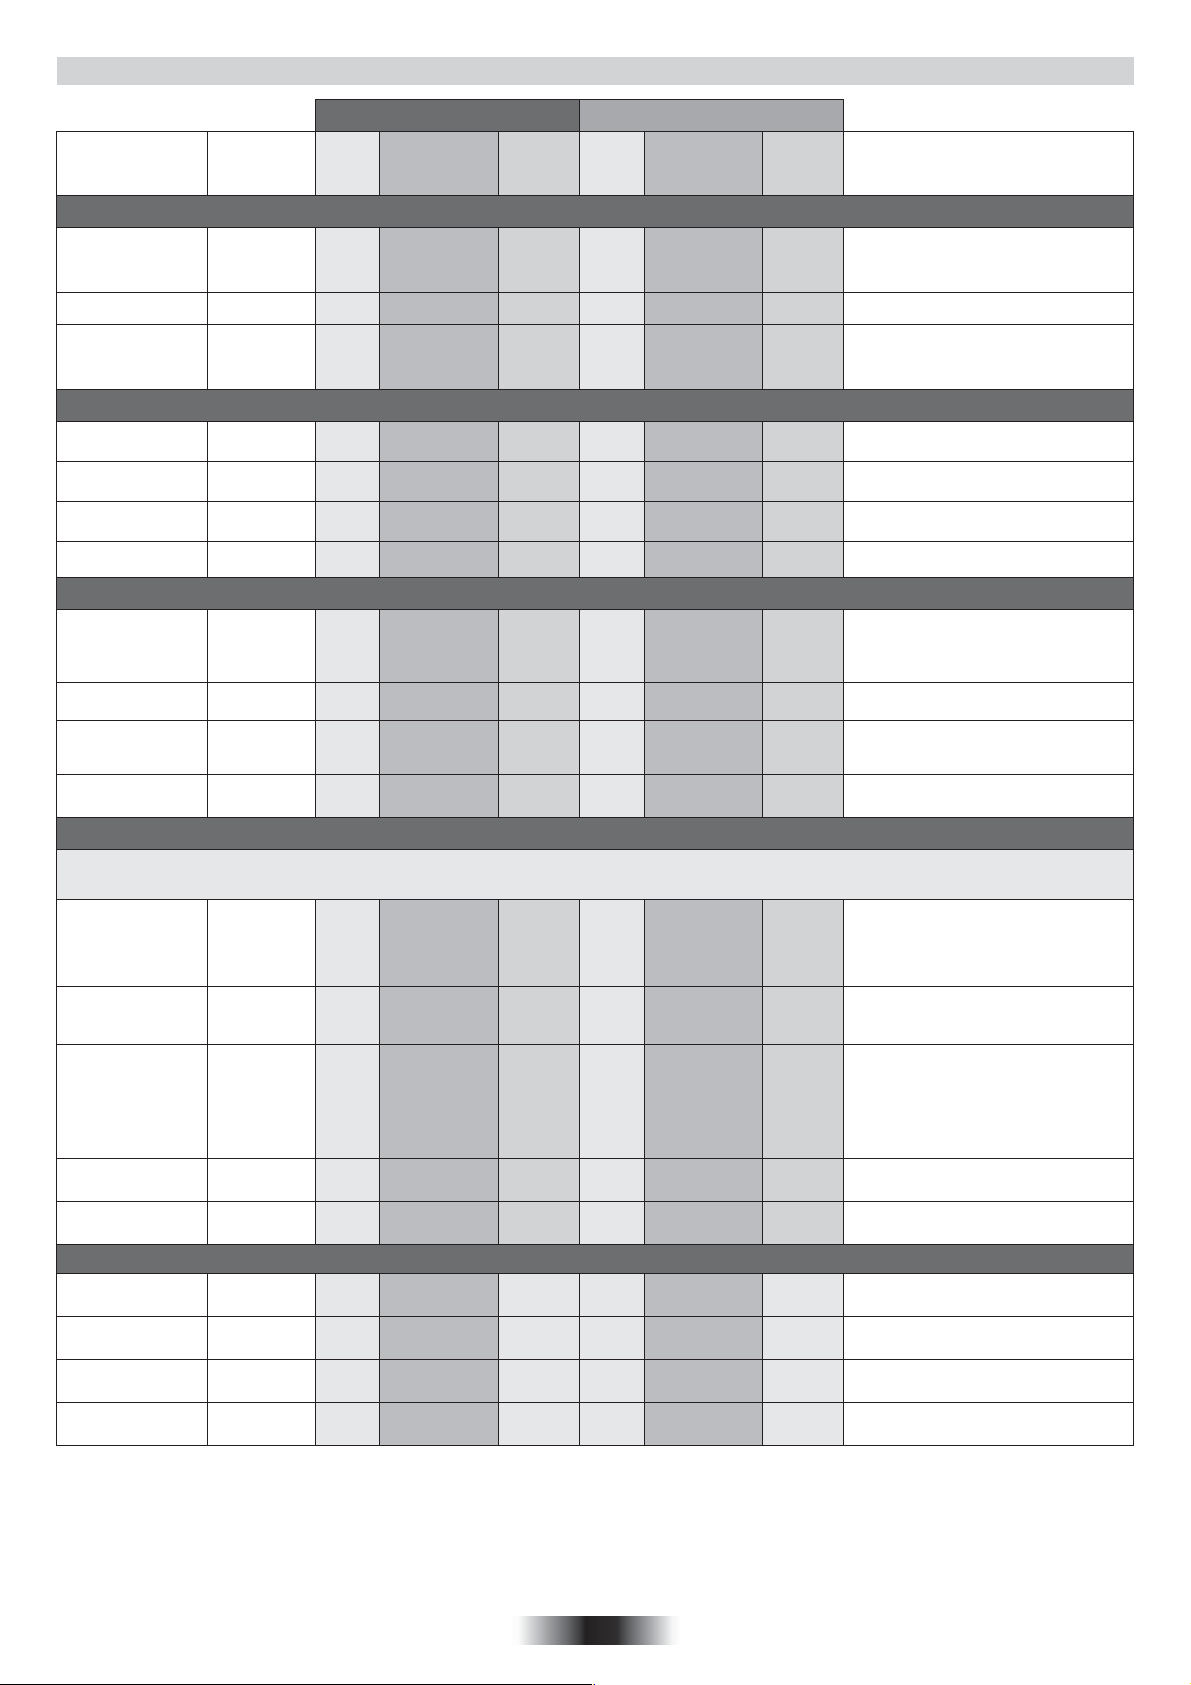
6. TABLES OF COOKING TIMES
Electric fan oven
Shelf
of cooking
in minutes
Time
Oven
tempe-
rature
Remarks
Food
Quantity
Static electric oven
Shelf
Time
of cooking
in minutes
Oven
tempe-
rature
• Rabbits and Poultry
Guinea fowl
Chicken
Rabbit pieces
Kg 1-1,3
Kg 1,5-1,7
Kg 1-1,2
22
22
22
60 ÷ 80
110 ÷ 120
55 ÷ 65
220
220
220
60 ÷ 70
100 ÷ 110
50 ÷ 60
200
200
200
Place the guinea fowl in a deep Pyrex or
pottery dish with very little oil and
season with herbs and spices.
Follow the procedure for cooking the
guinea fowl.
Put all the pieces of the same size in the
glazed tray.Season with herbs and spices.
Turn the pieces as and when required.
• Cakes
Coconut cake
baked in a tin
Sponge cake
Carrot cake
baked in a tin
Apricot pie
700 gr
1
1
1
1
55
55
65
40
180
175
180
200
1
1
1
2
50
40 ÷ 45
50 ÷ 60
30 ÷ 35
160
160
160
180
Use a tin that is 22 cm deep. Pre-heat for
10 mins.
Use a tin that is 22 cm deep. Pre-heat for
10 mins.
Use a tin that is 22 cm deep. Pre-heat for
10 mins.
Use a tin that is 22 cm deep. Pre-heat for
10 mins.
• Vegetable
Cut the fennel into four pieces, add
Fennel
Courgettes
Potatoes
Carrots
800 gr
800 gr
800 gr
800 gr
1
1
2
1
70 ÷ 80
70
60 ÷ 65
80 ÷ 85
220
220
220
220
1
1
2
1
60 ÷ 70
60 ÷ 70
60 ÷ 65
70 ÷ 80
200
200
200
200
butter, salt and potatoes if required and
place in a Pyrex face up. Cover the dish.
Slice the courgettes, place in a Pyrex
dish and add butter and salt.
Cut the potatoes into equal parts and
place in a Pyrex dish. Season with salt,
origano and rosemary. Cook in oil.
Slice the carrots, place in a Pyrex dish and
cook.
• Grilling
Place the food to be grilled underneath the infra-red grill. Warning: When the grill is on it takes on a bright red colour. Place the tray underneath the grill to
collect juices and fat from the food being grilled.
Squares of
bread for
toasting
Toasted
sandwiches
Sausages
Ribs of beef
Chicken legs
• Fish
• Fish
Trout
Salmon
Sole
Bream
4 pieces
4
n°6 / Kg 0,9
n°4 / Kg 1,5
n°4 / Kg 1,5
3 whole trout
or / Kg 1
700 g
2,5 cm slice
Kg 1
2 whole ones
5
(5 to heat up
44
grill)
Grill Grill
10
(10 to heat up
33
grill)
Grill Grill
25/30
(5 to heat up
44
44
33
grill)
25 (5 to
heat up grill)
50/60 (5 to
heat up grill)
40 ÷ 45
30 ÷ 35
40 ÷ 45
40 ÷ 45 220
Grill Grill
Grill Grill
Grill Grill
220
220
220
22
22
22
22
5
(10 to heat up
grill)
5/8
(10 to heat up
grill)
15/20
(10 to heat up
grill)
15/20 (10 to
heat up grill)
50/60 (10 to
heat up grill)
35 ÷ 40
30 ÷ 25
35 ÷ 40
35 ÷ 40
200
200
200
200
Lay the bread on the grill tray. When one
side of the bread has been toasted, turn
over and toast the other side. Remember:
keep the toast warm at the bottom of the
oven until you are ready to serve it.
Lay the bread on the grill tray. When one
side of the sandwich has been toasted, turn
over and toast the other side.
Cut the sausages in half and lay them face
down on the grill. Half way through grilling
turn them over. Every so often, check that
they are being cooked equally all over. (If
this is not happening, turn and reposition
the ones being cooked ether less or more
than the others.
Make sure that the ribs of beef are exposed
to the full effect on the main grill.
Turn them over twice during grilling
Cover the trout with salt, oil and onions
and cook in a Pyrex dish.
Cook the salmon in an open Pyrex dish
with salt, pepper and oil.
Cook the sole with salt and a spoonful
of oil.
Cook the bream in oil and salt in a
covered dish.
22 GB
Page 23
INSTRUCCIONES PARA UN USO SEGURO
ADVERTENCIA: El aparato y sus componentes accesibles se calientan durante el uso. Se debe tener
cuidado de no tocar los elementos calefactores.
• Los niños menores de 8 años deben permanecer alejados o supervisados de forma continuada por
una persona adulta.
• Este aparato puede ser usado por niños mayores de 8 años y personas con capacidades físicas,
sensoriales o mentales reducidas o falta de experiencia y conocimiento siempre y cuando hayan sido
supervisadas o instruidas sobre el uso del aparato de forma segura y del conocimiento de los riesgos
que comporta.
• Los niños no deben jugar con el aparato.
• La limpieza y el mantenimiento que debe realizar el usuario no será realizada por niños sin supervisión.
• Durante el uso, se calienta el aparato. Se debe tener cuidado de no tocar los elementos calefactores del
interior del horno.
ADVERTENCIA: Las partes accesibles pueden calentarse durante el uso. Los niños deben permanecer
alejados.
• No utilizar limpiadores abrasivos o rascadores metálicos afilados para limpiar el cristal de la puerta del
horno ya que pueden rayar la superficie, pudiendo comportar la rotura del cristal.
• Se debe apagar el horno antes de retirar la pantalla, después de la limpieza, se debe colocar según las
instrucciones.
• Use solamente el sensor de temperatura recomendado para este horno.
• No utilice limpiadores de vapor para la limpieza del aparato.
ADVERNTENCIA: Asegúrese de que el aparato está apagado antes de sustituir la lámpara para evitar la
posibilidad de una descarga eléctrica.
• Los medios de desconexión deben ser incorporados en el cableado fijo en conformidad con las reglas
del cableado.
• las instrucciones indicarán el tipo de cable a utilizar, teniendo en cuenta la temperature de la parte
posterior del aparato.
• Si el cable de alimentación está dañado, se debe sustituir por un cable o conjunto especial suministrado
por el fabricante o el servicio técnico.
PRECAUCIÓN: Con el fin de evitar peligros derivados de alteraciones en el suministro energético, este
aparato no debe ser suministrado a través de un dispositivo de conmutación externo, como un
temporizador, o conectado a un circuito que sea encendido y apagado frecuentemente por los servicios
públicos.
PRECAUCIÓN: Las partes accesibles se pueden calentar con el uso del grill. Los niños deben
permanecer alejados.
• Se debe eliminar el exceso de derrames antes de la limpieza.
• Durante la operación de auto limpieza pirolítica, las superficies pueden calentarse más de lo habitual;
los niños deben permanecer alejados.
Este aparato está etiquetado conforme a la Directiva europea 2012/19/EU sobre residuos de aparatos eléctricos y electrónicos.
(RAEE). La RAEE contiene tanto sustancias contaminantes (que pueden generar consecuencias negativas para el medio ambiente) como
componentes básicos (que pueden reutilizarse). Es importante someter los RAEE a tratamientos específicos, con el fin de retirar y eliminar
correctamente todos los contaminantes y reciclar todos los materiales. Los usuarios pueden desempeñar una función importante para
garantizar que los RAEE no representen un problema ambiental; es esencial que se sigan algunas reglas:
• Los RAEE no se deben tratar como residuos domésticos.
• Los RAEE se deben depositar en los puntos de recolección correspondientes gestionados por la municipalidad o por empresas
registradas. En muchos países, para los RAEE de gran tamaño, puede existir la recolección domiciliaria.
siempre que el equipo sea de un tipo equivalente y que tenga las mismas funciones que el equipo entregado.
• Cuando compre un nuevo aparato, el anterior debe devolverse al vendedor que lo debe recolectar gratuitamente de manera individual,
AHORRAR Y RESPETAR EL MEDIO AMBIENTE
Cuando es posible, evitar el precalentamiento del horno y evitar hacerlo funcionar vacío. Abrir la puerta del horno únicamente cuando es necesario,
porque hay desperdición de calor cada vez que se abre. Para un ahorro de energía significativo, apagar el horno entre 5 y 10 minutos antes del final
previsto de la cocción, y usar el calor que el horno sigue generando. Mantener las juntas limpias y en buen estado, para evitar cualquier deperdición de
energía. Si tiene un contrato eléctrico con una tarifa de horas valles, el programa "cocción diferida" puede permitirle ahorrar energía, desplazando el
principio del programa a una franja horaria con tarifa reducida.
1. INSTRUCCIONES GENERALES
Le agradecemos que haya elegido uno de nuestros productos. Para obtener de este electrodoméstico las mejores prestaciones aconsejamos:
• Leer atentamente las advertencias contenidas en el presente manual.
• Conservar con cuidado este manual para cualquier consulta posterior.
Cuando el aparato està en funcionamento todos sus elementos assessibles, estan calientes. Por ello, tenga cuidado de no tocar estos elementos.
Durante la primera puesta en funcionamiento del horno puede producirse un humo de olor acre causado por el primer calentamiento del pegamento de los
paneles de aislamiento que envuelven el horno. Se trata de un fenómeno absolutamente normal y, en caso de verificarse, es preciso esperar a la extinción
del humo antes de introducir los alimentos.
Por su naturaleza el horno es un aparato que se calienta, de modo particular el cristal de la puerta.
23 ES
Page 24
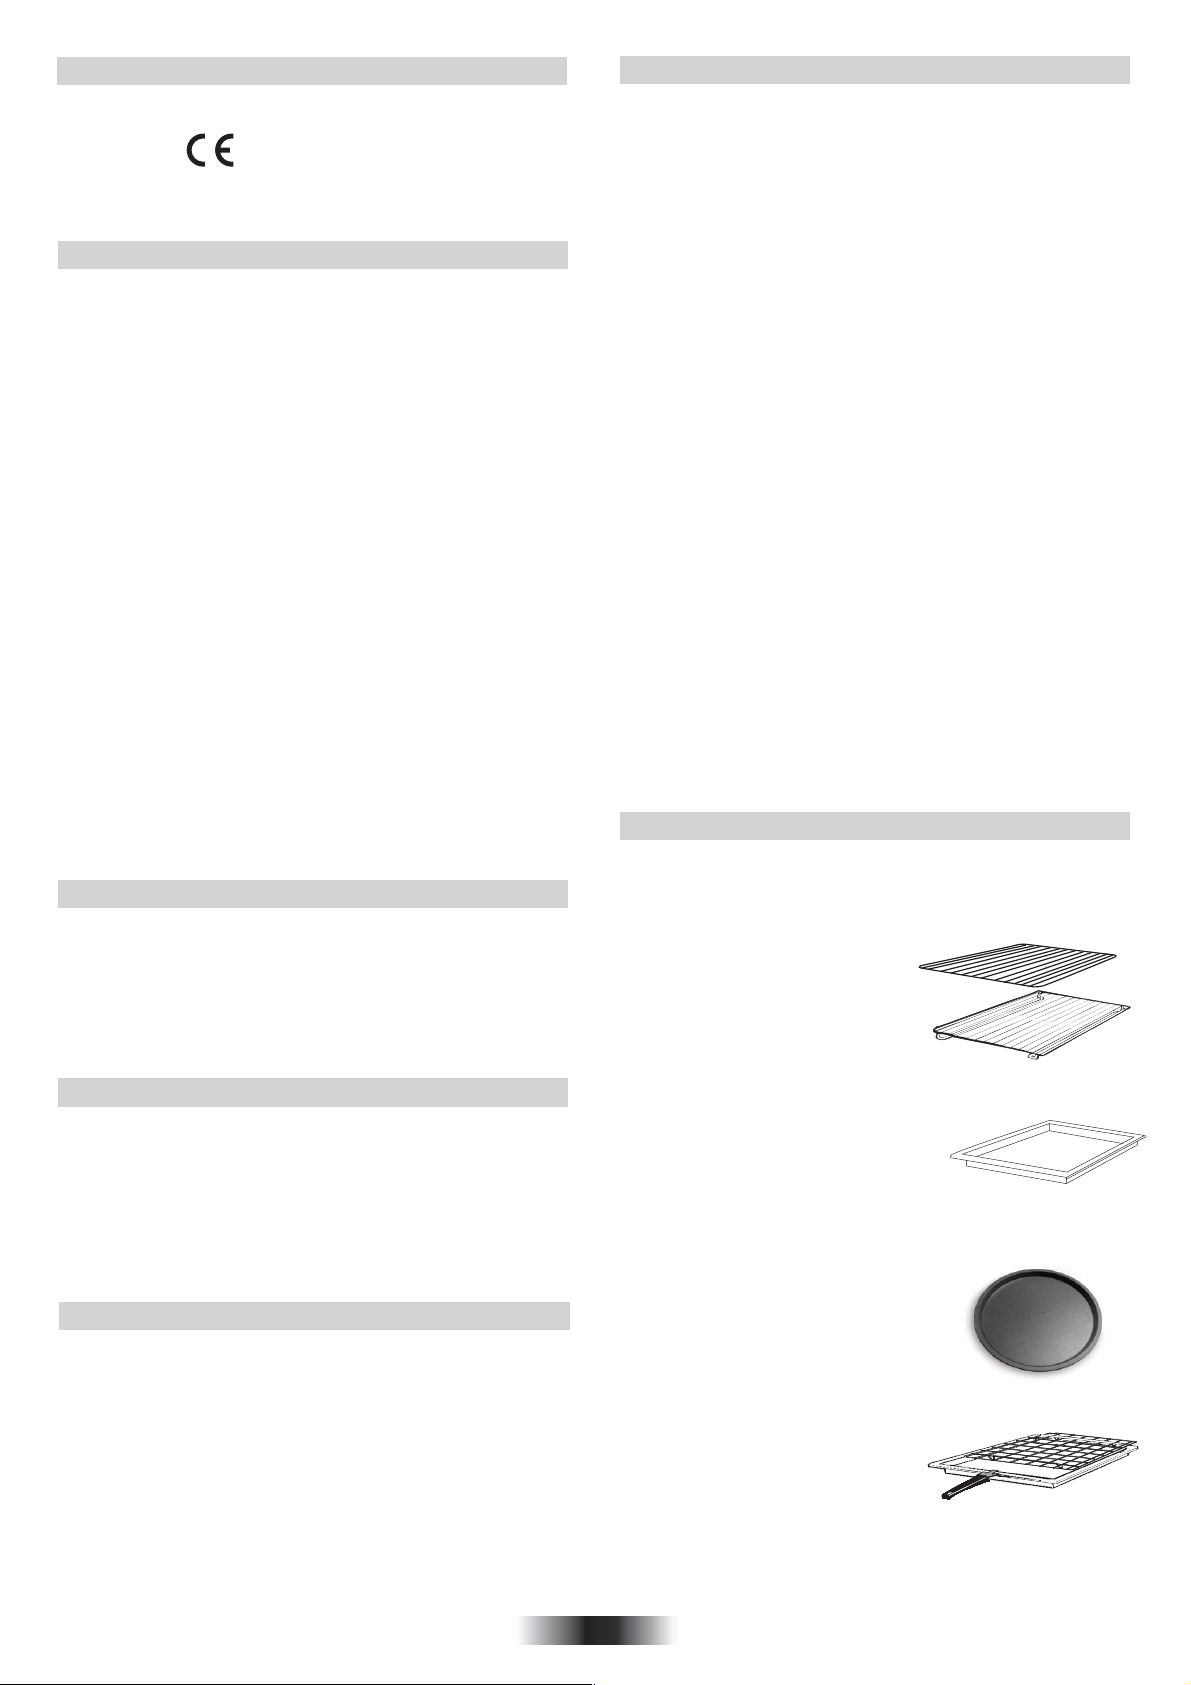
1.1 DECLARACIÓN DE CONFORMIDAD
Este aparato, en las partes destinadas a estar en contacto con los
alimentos cumple la Directiva CEE 89/109.
Al mostrar el logo marcado en este producto, declaramos, bajo
nuestra propia responsabilidad, el cumplimiento de todos los
requisitos europeos en términos de seguridad, salud y medio
ambiente, establecidos en la legislación de este producto.
1.2 INFORMACIÓN SOBRE SEGURIDAD
•Este aparato deberá destinarse únicamente al uso para el cual ha
sido especialmente concebido, es decir, para la cocción de alimentos.
Cualquier otro uso (por ejemplo, calentamiento a temperatura
ambiente) debe considerarse impropio, y por lo tanto peligroso.
El fabricante declina toda responsabilidad por los posibles daños
causados por el uso impropio, erróneo e irracional del aparato.
•El uso de cualquier aparato eléctrico comporta la observación de
algunas reglas fundamentales. En particular:
— No tire del cable de alimentación para desenchufar el aparato.
— No toque el aparato con las manos o los pies húmedos o mojados.
— No utilice el aparato si no lleva calzado.
— No utilice adaptadores, ladrones ni alargadores.
— En caso de avería o de mal funcionamiento del aparato, apáguelo y
no lo manipule.
•En caso de deterioro del cable, sustitúyalo inmediatamente con
arreglo a las siguientes indicaciones:
— saque el cable de alimentación y sustitúyalo por uno (tipo H05RRF, H05VV-F, H05V2V2-F) y adecuado a la potencia del aparato.
— esta operación deberá realizarla un técnico especializado. El hilo
de tierra (amarillo-verde) debe ser obligatoriamente 10 mm más largo
que los conductores de línea.
En caso de que el aparato precise ser reparado, diríjase únicamente a
un centro de asistencia técnica autorizado y exija piezas de recambio
originales.
No observar todo lo mencionado puede comprometer la seguridad del
aparato.
•No forrar las paredes del horno con aluminio u otras
protecciones disponibles en tiendas. El aluminio o los
protectores, en contacto directo con el esmalte caliente puede
derretirse y deteriorar el esmalte del interior.
1.3 INSTALACIÓN
La instalación corre a cargo del comprador y el Fabricante queda
exento de este servicio; eventuales intervenciones requeridas a la
Casa Constructora que dependan de una instalación incorrenta no
están incluidas en la Garantia.
La instalación debe ser efectuada según las instrucciones por
personal profesionalmente cualificado. Una instalación errónea
puede causar daños a personas, animales o cosas, de los cuales el
fabricante no puede ser considerado responsable.
1.4 INTRODUCCIÓN DEL MUEBLE
Introduzca el aparato en el hueco del mueble (bajo encimera o en
columna). El horno se fija introduciendo 4 tornillos en los agujeros del
marco, visibles al abrir la puerta.
Con el objeto de permitir una mejor ventilación del mueble, empotre el
horno respetando las medidas y las distancias indicadas en la última
página.
Nota: Para los hornos que deban acoplarse a una encimera, resulta
indispensable respetar las instrucciones contenidas en el manual
adjunto al aparato a acoplar.
1.5 IMPORTANTE
Para garantizar un correcto funcionamiento del aparato encastrable,
es necesario que el mueble tenga las características adecuadas. Los
paneles de los muebles adyacentes al horno deberán ser de un
material resistente al calor. En el caso de los muebles de madera
chapada, el encolado deberá resistir una temperatura de 120°C: los
materiales plásticos o encolados que no resistan esta temperatura
pueden deformarse o despegarse.
De acuerdo con las normas de seguridad, una vez empotrado el
aparato no deben existir contactos con las piezas eléctricas. Todas
las piezas protectoras deben fijarse de manera que no puedan
sacarse sin la ayuda de un utensilio.
Para garantizar una buena ventilación debe eliminarse la pared
posterior del hueco, y el panel de apoyo debe tener una apertura
mínima de 45 mm.
1.6 CONEXIÓN ELÉCTRICA
Enchufe la clavija en una base provista de un tercer contacto
correspondiente a la toma de tierra, la cual deberá conectarse
correctamente.
En los modelos desprovistos de clavija, monte una clavija estándar en
el cable capaz de soportar la carga indicada en la placa de
características. El hilo de tierra es de color amarillo-verde. Esta
operación deberá realizarla un técnico especializado.
En caso de que la base y la clavija del aparato sean incompatibles,
haga que un técnico especializado le cambie la base por otra
adecuada.
También puede efectuar la conexión a la red intercalando entre el
aparato y la red un interruptor omnipolar, preparado para la carga y
con arreglo a las normas vigentes. El hilo de tierra amarilloverde no
debe quedar interrumpido por el interruptor.
La base o el interruptor omnipolar utilizados para la conexión deben
estar situados en un lugar fácilmente accesible y cerca del
electrodoméstico instalado.
Importante: en la fase de instalación, coloque el cable de
alimentación de manera que en ningún punto alcance una
temperatura superior a los 50 °C a temperatura ambiente.
El aparato cumple los requisitos de seguridad previstos por los
institutos normativos. Sólo se garantiza la seguridad eléctrica de este
aparato si ha sido conectado correctamente a una instalación de toma
de tierra eficaz, con arreglo a lo dispuesto en las normas vigentes de
seguridad eléctrica, (en caso de duda, exija un control exhaustivo de
la instalación por parte de un técnico especializado). El fabricante
declina toda responsabilidad por los posibles daños causados por la
falta de conexión a tierra de la instalación.
Importante: el fabricante queda exento de cualquier responsabilidad
por los posibles daños personales o materiales causados por la falta
de conexión a tierra.
ATENCIÓN: La tensión y frecuencia de alimentación están
indicadas en la tarjeta de matrícula (en la última página).
Compruebe que la capacidad eléctrica de la instalación de las bases
sean adecuadas para la potencia máxima del aparato, indicada en la
placa de características. En caso de duda, diríjase a un técnico
cualificado.
1.7 EQUIPAMIENTO DEL HORNO - según el modelo -
Es necesario limpiar el equipamiento del horno antes de su primer
uso. Limpie con una esponja, y séquelo.
La rejilla simple sirve de soporte para los moldes y las fuentes.
La rejilla para sostener las fuentes sirve más especialmente para
colocar las parrilladas. Debe utilizarse
junto con la bandeja que recoge el jugo
de cocción (grasera).
Gracias a su perfil especial, las rejillas
permanecen en horizontal hasta el
tope. No hay ningún riesgo de
deslizamiento o de desbordamiento de
la fuente.
La grasera sirve para recoger el jugo de
las parrilladas. Sólo se debe utilizar en
modo Grill, Asador o Turbogrill (según el
modelo). Para los otros modos de cocción,
retírela del horno.
No utilice nunca la grasera como fuente para asar. Ello provocaría
emanación de humos, salpicaduras de grasa y un ensuciamiento
rápido
El Set para Pizza es ideal para cocinar
pizzas. El set debe utilizarse de forma
combinada con la función Pizza.
La bandeja del horno.
La bandeja del horno es ideal para asar.
Úselo junto con la bandeja de goteo. Un
pomo o manivela viene incluido para
ayudar a mover los accesorios de
manera segura. No deje este pomo o
manivela dentro del horno.
Durante la utilización del horno, los accesorios que no utilice
deben ser retirados del mismo.
24 ES
Page 25
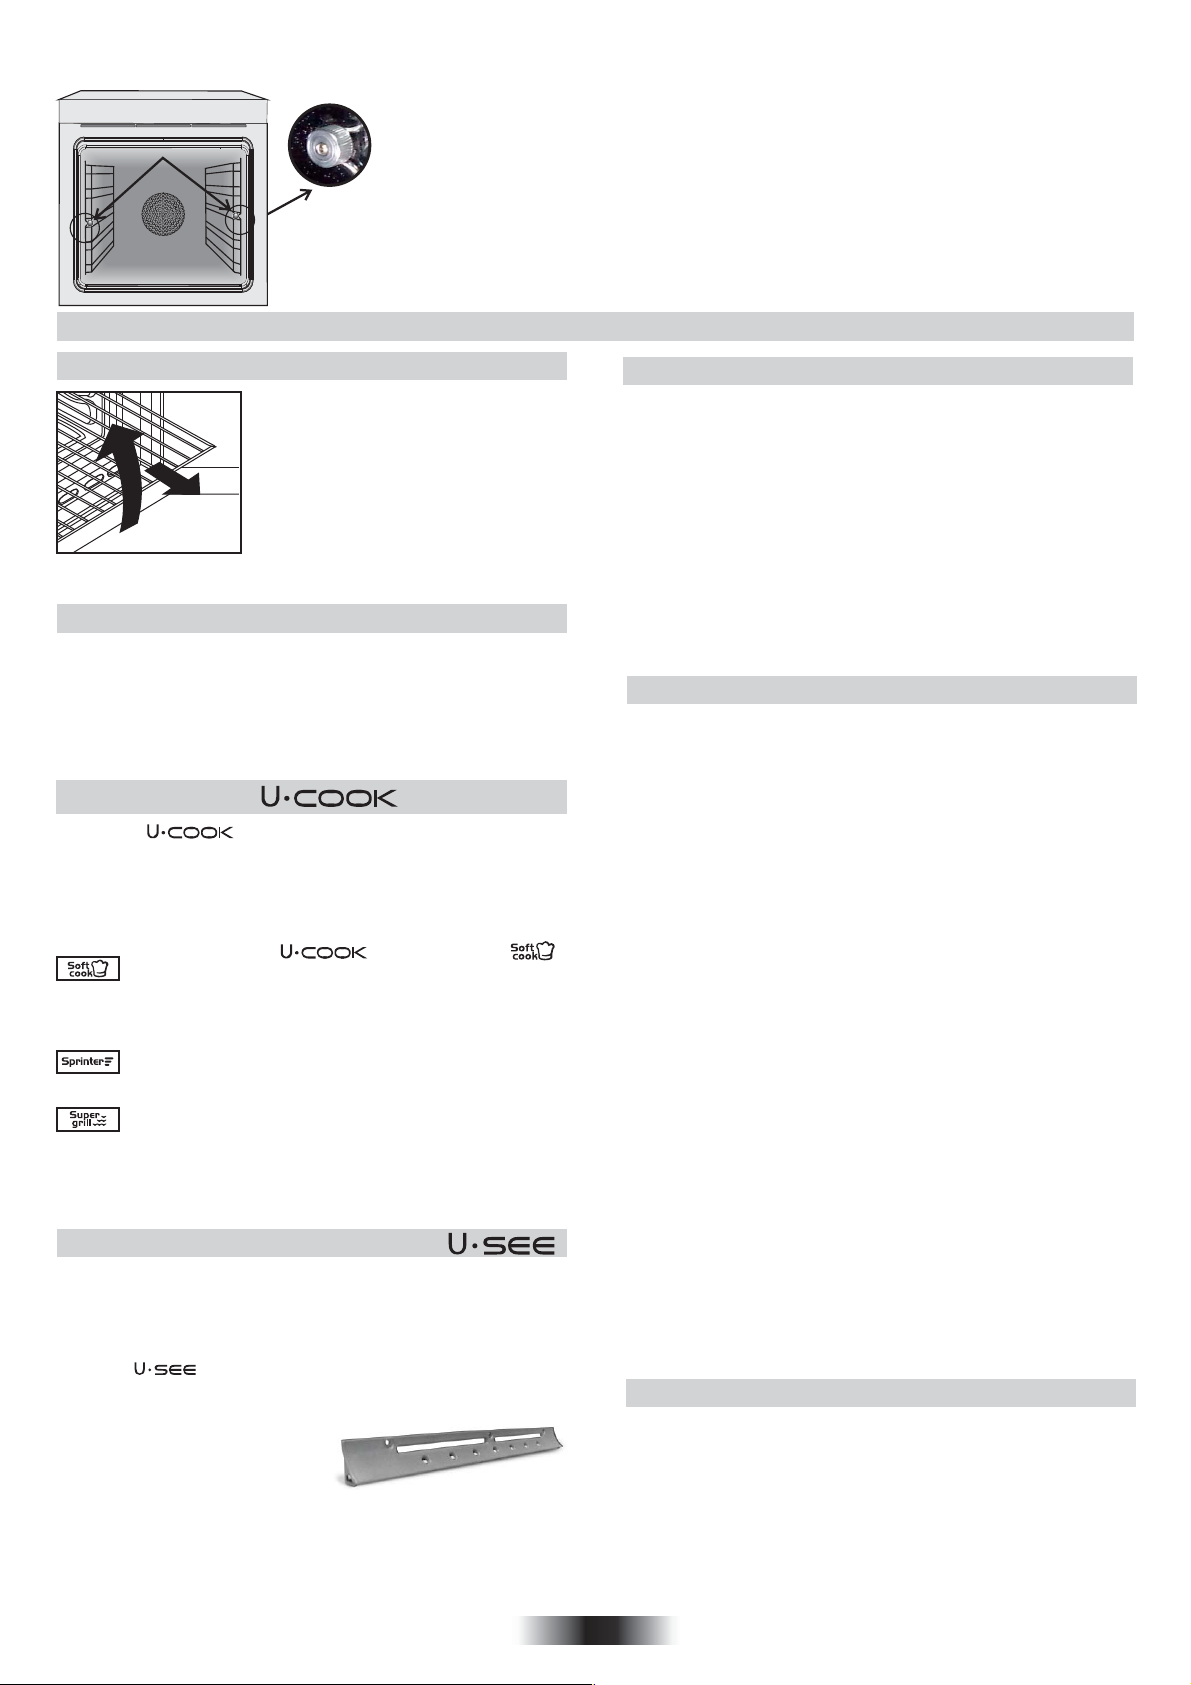
A
Extracción y limpieza de las guías laterales
1- Quitar las tuercas moleteadas, girándolas en sentido contrario a las
agujas del reloj.
2- Quitar las guías laterales metálicas, tirando de ellas hacia ti.
3- Limpiar las guías laterales metálicas en el lavavajillas o bien empleando
una esponja húmeda y secándolas posteriormente.
4- Después del proceso de limpieza, montar las guías laterales metálicas
en orden inverso al mencionado anteriormente.
5- Fijar las tuercas moleteadas.
2. CONSEJOS ÚTILES
2.1 REJILLAS HORNO - SISTEMA DE SUJECIÓN
El horno está dotado de un nuevo sistema
de sujeción de las rejillas.
Este sistema permite extraer las rejillas
casi por completo sin que caigan y
manteniéndolas perfectamente en plano,
permitiendo verificar y mezclar los
alimentos con la máxima tranqu-ilidad y
seguridad.
Para extraer las rejillas es suficiente, como
se indica en el dibujo, levantarlas,
cogiéndolas por la parte anterior y tirar de ellas.
2.2 LA COCCIÓN AL GRILL
Este tipo de cocción permite el dorado rápido de los alimentos. Con
este fin, le aconsejamos introducir la rejilla generalmente en el 3° o 4°
estante, según las dimensiones de los alimentos. (pág. 24) Casi todas
las carnes pueden ser cocidas al grill, excepto algunas carnes tiernas
de caza y albóndigas.
La carne y el pescado para cocinar al grill deben ser ligeramente
untados con aceite.
2.3 Los modelos
Los hornos tienen un control electrónico de la velocidad
del ventilador que está patentado por Candy y que se llama
VARIOFAN. Durante la cocción, este sistema cambia
automáticamente la velocidad del ventilador (en el modo
multifunción) para optimizar el flujo de aire y la temperature interna
del horno.
Todos los hornos tienen la función .
Esta función permite la distribución de la humedad y de la
temperatura. Reduce la perdida de humedad en un 50 %,
lo que garantiza un alimento más sabroso y tierno. Esta
función es recomendada para cocinar pasteles y pan.
La función Sprinter reduce el tiempo de calentamiento del
horno; en sólo 8 minutos alcanza 200°.
La función Supergrill dá la posibilidad de aumentar la
intensidad del tostado. La potencia Supergrill se
incrementa un 50% respecto a un grill convencional.
Algunos hornos vienen equipados con la nueva contrapuerta de
cristal la cual tiene una mayor área de cristal y permite un mejor
aislamiento.
2.4 SEGÙN MODELOS
Es un sistema de iluminación que reemplaza a la tradicional lámpara. 14
luces LED´s están integrados en el interior de la puertas. Estas producen
una luz blanca de calidad la cual permite ver el interior del horno con
claridad sin ningún tipo de sombra en las diferentes alturas o baldas del
horno.
Ventajas:
El sistema , además de ofrecer una excelente iluminación
dentro del horno, duramucho más tiempo que la bombilla tradicional
y consume mucho menos, por lo que
ahorra energía.
- Visión óptima
- Gran vida útil
- Consumo muy bajo de energía, -95 %
en comparación con la tradicional
iluminación.
El electrodoméstico que lleva un LED blanco de la 1M Clase según IEC
60825-1:1993 + A1: 1997 + A2: 2001 (equivalente a EN 60825-1: 1994 +
A1: 2002 + A2: 2001); la potencia de luz máxima que emite 459nm
<150uW. No observado directamente con los instrumentos ópticos.
2.5 HORNO AUTOLIMPIANTE CATALÍTICO
Los paneles especiales autolimpiantes recubiertos por un esmalte
con estructura microporosa (ofrecidos como accesorios opcionales
en unos modelos o de serie en otros) eliminan la limpieza manual del
horno.
Las grasas proyectadas sobre las paredes durante la cocción, son
descompuestas por el esmalte, mediante un proceso catalítico de
oxidación y son transformados en productos gasos.
Salpicaduras excesivas de grasa pueden obstruir los poros y por
consiguiente impedir la autolimpieza, tal característica puedé ser
restablecidá mediante un calentamiento de unos 10-20 minutos del
horno vacío programándo el horno a la máxima temperatura. No usar
productos abrasivos, barillas metálicas, objetos de punta, paños
rugosos, productos químicos o jabones que puedieran dañar
irremediablemente el esmalte.
2.6 LIMPIEZA Y MANTENIMIENTO
Limpiar las superficies de acero inox y esmaltadas con agua templada
y jabón, o con productos específicos de comercios especializados,
evitando absolutamente el uso de polvos abrasivos que dañarían las
superficies y partes estéticas.
La limpieza del horno es muy importante y debe ser efectuada cada
vez que éste es utilizado. En las paredes se depositan grasas
derretidas durante la cocción que podrían, en el sucesivo encendido,
producir olores desagradables que afectarían a la cocción. Para la
limpieza utilizar agua caliente y jabón, aclarando cuidadosamente.
Para eliminar esta tarea, las paredes del horno pueden ser
revestidas con paneles autolimpiantes especiales, accesorios
opcionales en algunos modelos: ver parágrafo específico
“HORNO AUTOLIMPIANTECATALÍTICO”
Utilizar jabón y barillas de acero para las rejillas inox. La limpieza de
las superficies de cristal templado debe ser efectuada cuando las
superficies estén frias. Eventuales roturas debidas a la no
observación de esta regla elemental no están cubiertos por la
garantia.
La bombilla del horno puede ser sustituida desconectando
eléctricamente el aparato y destornillando la ampolla que la encierta,
sustituyendo la bombilla por una análoga resistente a altas
temperaturas.
Se aconseja además utilizar fuentes con bordes altos en el caso de
cocciones de alimentos particularmente grasos (asados, etc) y utilizar
la grasera al realizar la cocción al grill.
Para el caso que, por condiciones particulares de suciedad, no fuera
suficiente la acción precedente, se aconseja apartar las grasas con
un paño mullido o una esponja humedecidos con agua caliente. La
porosidad del esmalte es fundamental para garantizar la acción
autolimpiante.
N.B. Todos los paneles autolimpiantes comercializados en el
mercado tienen una eficacia de rendimiento de aproximadamente
300 horas de funcionamiento del horno. Pasado dicho límite los
paneles deberían ser sustituidos.
2.7 ASISTENCIA TÉCNICA
En caso de incorrecto funcionamiento del horno le aconsejamos:
—verificar la buena conexión del enchufe en la toma de corriente.
En caso de que no se determine la causa del mal funcionamiento:
apagar el aparato sin manipularlo y llamar al Servicio de Asistencia
Técnica. Antes de llamar al Centro de Asistencia recuerde tomar nota
del número de matrícula situado en la tarjeta matrícula del producto
(Fig. última página).
El aparato está dotado de un certificado de garantía que le permite
disponer del Servicio Asistencia Técnica.
25 ES
Page 26
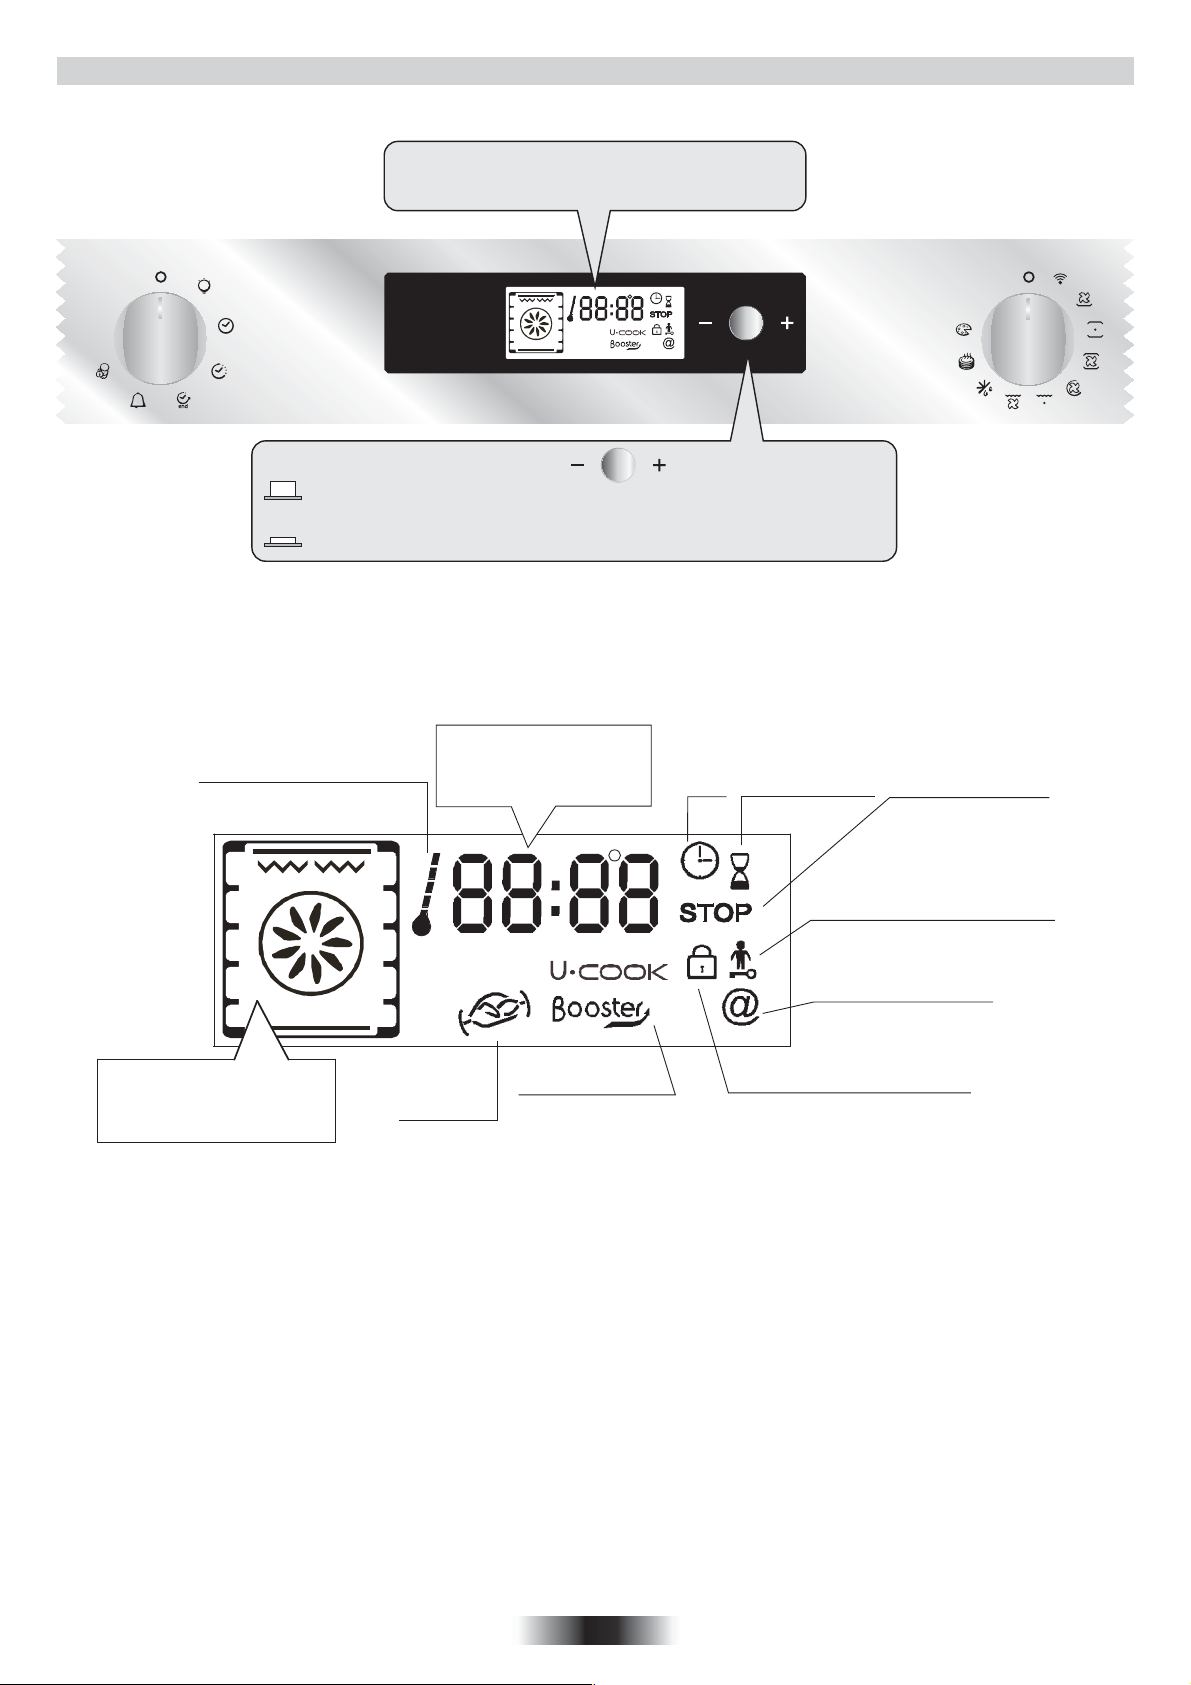
3. DESCRIPCIÓN DE LA PANTALLA
Pantalla: tiempo, programación del modo de cocción,
luces de indicación, temperatura de cocinado y
posición de la bandeja.
BOTÓN DE REGULACIÓN Y CONFIRMACIÓN
Configuraciones: temperatura, programación de cocción y finalización del
tiempo de cocción – Se regula girando el botón hacia “-“ o “+”
Para confirmar la configuración: pulsar el botón.
Aumento de temperatura
NOTA: La función “bloqueo para
niños” se puede activar tanto si el
horno está encendido (ON) como
apagado (OFF).
Indicador:
Giratorio
Reloj/
Programación/
Temperatura de cocción
PYRO
Asador Booster:
Calentamiento previo
Símbolo de pantalla del programa: cocinando
Tiempo de cocción
Hora
Final de cocción
Indicador luminoso
Dispositivo seguridad niños
Indicador luminoso
WIFI
Indicador luminoso
Cierre de la puerta del horno
26 ES
Page 27
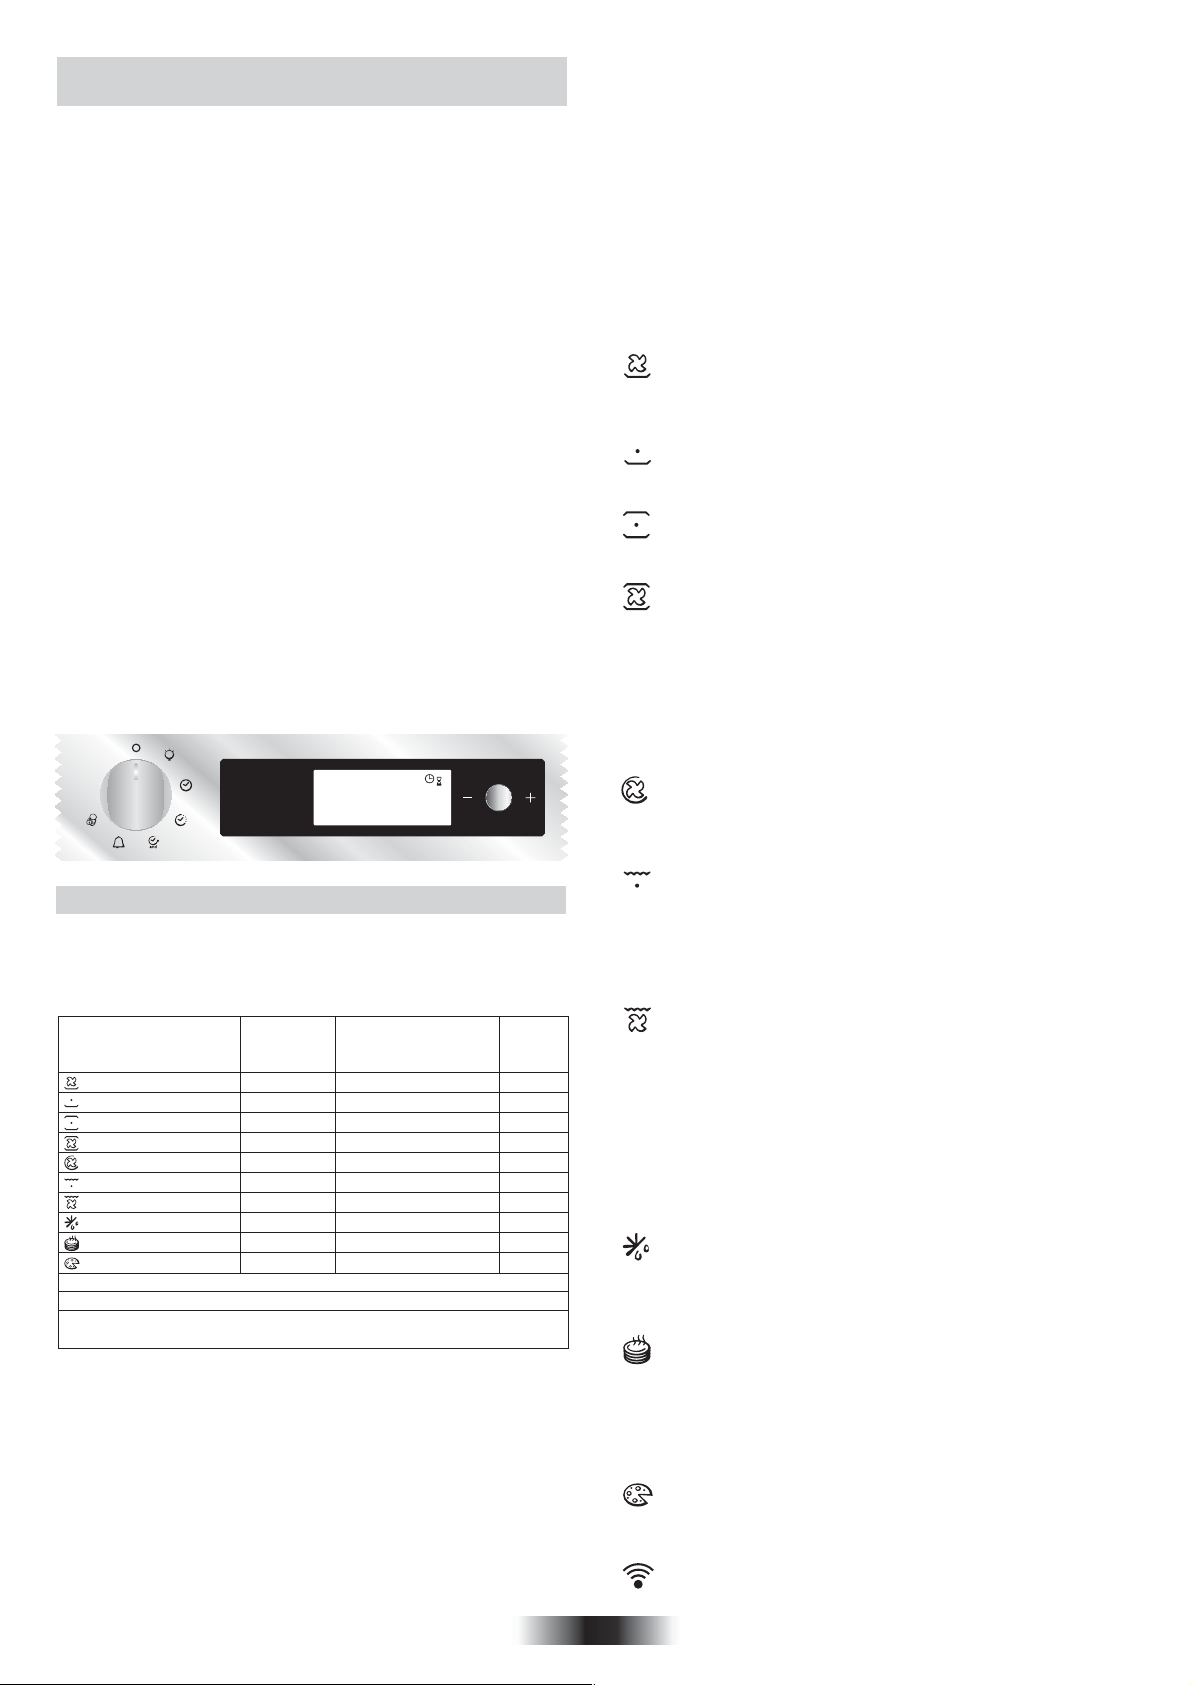
3.1 ANTES DE UTILIZAR EL HORNO POR
PRIMERA VEZ
•LIMPIEZA PREVIA
-Limpiar el horno antes de utilizarlo por primera vez:
-Limpiar la superficie externa con un paño húmedo.
-Lavar todos los accesorios y el interior del horno con agua caliente y líquido
limpiador.
-Poner el horno vacío a temperatura máxima durante 1 hora, con ello se
eliminarán los olores del dispositivo nuevo. Asegurar una buena ventilación de
la habitación durante esa hora.
•RECORDAR
Confirmación del temporizador
Las modificaciones se tiene que confirmar pulsando el botón.
Detención del horno:
Puede ser necesario en caso de configurar una orden incorrecta.
Para detener el horno… girar el mando de selector de función a la posición de
Stop.
Dispositivo de seguridad para niños:
Para bloquear los controles del horno, seleccionar el dispositivo de seguridad
para niños. Ver la sección “Programación- Dispositivo de seguridad para
niños”.
Ventilador refrigerante:
Protege el panel de control y la electrónica de los daños por calor.
Se arranca y se para automáticamente cuando se apaga el horno.
Iluminación del horno:
Colocando el mando en el símbolo de luz se puede encender la luz del horno
cuando no se está utilizando.
Cuando se está utilizando el horno la luz permanece encendida durante todas
las funciones y cuando la puerta está abierta.
•CONFIGURACIÓN DEL RELOJ
Habrá que configurarse nuevamente cuando se conecte el horno a la
corriente o después de mucho tiempo sin utilizarlo
Configurar el reloj:
1-Girar el mando de control a la posición con el símbolo “Reloj”:
2-Configurar el reloj con el botón central girando hacia “-“ ó “+”,
3-Volver a colocar el mando de control en la posición STOP.
10:30
3- Se puede programar el tiempo de cocción y su finalización girando el
selector de programa a “tiempo de cocción” o “final del cocción”.
Empieza a parpadear en la pantalla el “tiempo de cocinado” o “final del
cocción”. Utilizar el botón central para modificar las configuraciones y
confirmar el temporizador.
Una vez hecho esto, no olvidar girar el selector de programa a la
posición “Stop” para confirmar la nueva configuración.
Más datos sobre programación en el capítulo 5.3
PROGRAMACIÓN.
4- Al final del ciclo de cocción, girar el selector de función a la posición
“stop”.
El indicador vuelve a parpadear, seguirá encendido hasta que se
apague el horno y se apagará cuando la temperatura interior del horno
sea lo suficientemente baja.
• MODO DE COCCIÓN
Todos los procesos de cocinado han de realizarse con la puerta cerrada.
BASE + VENTILADOR – La combinación del elemento de
calentamiento inferior y el ventilador es ideal para fruta, tartas, quiches y
repostería. Evita que los alimentos se deshidraten en exceso y hace que
la masa suba. Colocar la bandeja en la parte inferior del horno.
BASE – Utilizar el elemento inferior. Ideal para todo tipo de
repostería. Utilizar para flanes, quiches, tartas, pastas y procesos que
requieran más calor desde abajo.
BASE + TECHO – Ambos elementos de calentamiento están
en uso. Esta función es ideal para los asados tradicionales. Carne roja,
roast beef, pierna de cordero, caza, papillote y bollos.
BASE + TECHO + VENTILADOR – Utilización de los
elementos inferior y superior en combinación con el ventilador que
facilita la circulación del aire caliente en todo el horno. Se recomienda
este modo para pollo, repostería, pescado y verduras. Con este modo
se mejora la penetración del calor reduciéndose el tiempo de cocina y
precalentamiento. El ventilador permite cocinar distintos alimentos a la
vez en diferentes posiciones en el horno distribuyendo el calor sin riesgo
de que se mezclen los olores y los sabores. Cuando se cocinen distintos
alimentos al mismo tiempo añada 10 minutos al período normal de
asado.
RESISTENCIA CIRCULAR + VENTILADOR - Utilización de
los elementos inferior y superior en combinación con el ventilador que
facilita la circulación del aire caliente en todo el horno. Su definición es la
misma que la del método de cocinado con Ventilador.
3.2 CÓMO UTILIZAR EL HORNO
•EN MODO MANUAL
Los métodos de cocción que se sugieren en el modo manual aparecen
en la tabla siguiente. También se recomienda la temperatura para cada
método de cocina. Estos valores pueden modificarse dentro de un
rango predeterminado.
Modo Función según
modelo de horno
Base + Ventilador
Base
Base + Superior
Base + Superior +Ventilador
Resistencia circular + Ventilador
Grill
Grill + Ventilador
Descongelado
Conservar el calor
Pizza
* Booster: aumento rápido de la temperatura
** El horno ha de tener esa función
*** Tested in accordance with the CENELEC EN 60350-1 used for
definition of energy class.
Temperatura
en ºC
configurada
210
160
220 50-240
***
210
180
L2
190
***
40
60
230
**
1-Girar el selector del horno hacia la función necesaria para cocinar.
Se muestran en pantalla los elementos de calentamiento operativos en
el modo de cocción seleccionado..
2-Se muestra en pantalla la temperatura adecuada según el método
seleccionado. Se puede modificar dentro del rango predeterminado
–ver arriba.
Para modificar la configuración de la temperatura, girar el botón
central y confirmar en el temporizador la configuración pulsando el
mismo botón.
Se fija la temperatura seleccionada, pero se puede modificar durante el
ciclo de cocinado.
El horno empezará a funcionar y aumentará su temperatura.
El indicador parpadea hasta alcanzar la temperatura seleccionada.
Suena un pitido al final de esta operación y el indicador luminoso deja
de parpadear.
Temperatura
en ºC
predeterminada
50-220
50-220
50-230
50-230
L1-L3
50-200
No
No
230
Función
Booster
Booster
Booster
GRILL – Utilización del elemento de calentamiento superior.
Éxito asegurado para gratinados varios, kebabs y parrilla. El grill ha de
calentarse previamente a temperatura elevada durante 5 minutos. Las
carnes blancas han de colocarse siempre a cierta distancia del grill, el
tiempo de cocinado es ligeramente superior pero la carne queda más
suculenta. Las carnes rojas y el pescado se pueden colocar
directamente en la bandeja con la bandeja antigoteo justo debajo.
GRILL + VENTILADOR – Se utiliza el elemento superior de
calentamiento en combinación con el ventilador circulando así el aire
caliente en todo el horno. Se recomienda el calentamiento previo para
carnes rojas y no es necesario en caso de carnes blancas. El grill es
ideal para cocinar alimentos de mayor grosor, como el cerdo o el pollo.
Los alimentos que se vayan a hacer al grill han de colocarse
directamente en el centro de la bandeja.
Si se coloca la bandeja antigoteo debajo de la bandeja de la comida se
asegura que los jugos que pueda soltar no se esparcirán por el horno.
Para un mejor resultado asegurarse de que los alimentos no están
demasiado cerca del grill y poder voltear los alimentos a mitad de
proceso.
DESCONGELADO – Cuando se pone el mando en esta
opción. El ventilador activa el aire caliente alrededor del alimento
congelado y lo descongela en unos minutos sin cambiar o alterar el
contenido proteínico del alimento. La temperatura preestablecida es de
40ºC constantes, no siendo posible su regulación.
CONSERVAR EL CALOR – Se recomienda para recalentar
los alimentos cocinados previamente, colocando la bandeja en el
segundo nivel desde arriba, o para descongelar pan, pizza o repostería
colocando la bandeja en la parte más inferior.
La temperatura preseleccionada es de 60ºC constantes, no siendo
posible su regulación.
PIZZA – Con esta función el aire caliente circula por todo el
horno asegurando un resultado perfecto para platos como Pizza o
Bizcochos.
WIFI
27 ES
Page 28

3.3 PROGRAMACIÓN
SÍMBOLOS DE LA PANTALLA
Luz
Configuración temporizador
Temporizador en funcionamiento
Programación del tiempo de
STOP
Selector de
Programación
TEMPORIZADOR:
El temporizador funciona independientemente del horno y no afecta a los
elementos de calentamiento. Sólo es un recordador.
• Girar el mando a la posición Temporizador. Aparecerá el símbolo en la
pantalla. Aparecerá en pantalla 00:00
• Cuando parpadeen los minutos, girar el botón central hasta el número de
minutos necesario y confirmar pulsando el mismo botón.
• Cuando parpadeen las horas, girar el botón central hasta el número de
horas necesario y confirmar pulsando el mismo botón.
• Volver a poner el botón en la posición Stop.
Cuando finaliza el tiempo, el tiempo de cocina desaparece. Se escuchará
un pitido durante 15 segundos y parpadeará el Temporizador de la
pantalla (para parar el pitido antes de los 15 segundos sólo hay que pulsar
el botón central).
PROGRAMACIÓN DEL TIEMPO DE COCCIÓN:
Dispone de varias recetas programadas con el tiempo de cocción. En el
modo Manual, Descongelado o Conservar Calor se puede preseleccionar
si es necesario.
•Girar el mando a la posición de “cocción”. Aparecerá el símbolo de tiempo
de cocción. Aparecerá el tiempo de cocción programado para distintas
recetas, o 00:00 para otras funciones del horno.
•Cuando parpadeen los minutos, girar el botón central hasta el número de
minutos necesario y confirmar pulsando el mismo botón.
•Cuando parpadeen las horas, girar el botón central hasta el número de
horas necesario y confirmar pulsando el mismo botón.
•Volver a poner el botón en la posición Stop para confirmar el nuevo
tiempo.
Cuando finaliza el tiempo, el tiempo de cocción desaparece. Se
escuchará un pitido durante 15 segundos y parpadearán los símbolos de
tiempo de cocinado y STOP.
•Girar el mando de función de programa a la posición Stop. En caso
contrario, los símbolos de Tiempo de cocción y STOP seguirán
parpadeando.
PROGRAMACIÓN DEL FINAL DEL TIEMPO DE COCCIÓN:
Hay varias recetas que tienen programado un tiempo de cocción y por
tanto, con un final de tiempo de cocción. En el Modo Manual,
Descongelación o Conservación de Calor se puede configurar si se
quiere.
•Girar el mando a la posición de Final de cocción. Aparecerá el símbolo
STOP. Aparecerá un final del tiempo de cocinado para varias recetas, o
00:00 para otras funciones o la hora del día.
•Girar el mando de selector de programa para confirmar el final del tiempo.
•Cuando parpadeen los minutos, girar el botón central hasta el número de
minutos necesario y confirmar pulsando el mismo botón.
•Cuando parpadeen las horas, girar el botón central hasta el número de
horas necesario y confirmar pulsando el mismo botón.
NB: En el inicio diferido, aparecerá en la pantalla el final del tiempo de
cocinado junto con los símbolos de “tiempo de cocinado” y “STOP”, y sólo
queda la función Modo Receta del horno.
El horno calcula automáticamente la hora de inicio (el tiempo final menos
el tiempo de cocción).
Al final del ciclo el horno se apaga automáticamente. Durante 15
segundos sonará un pitido que indica el final del ciclo y parpadearán los
símbolos de “Tiempo de cocción” y “STOP”.
•Girar el mando del selector de función hasta Stop. En caso contrario los
símbolos seguirán parpadeando.
Final de la programación del
tiempo de
En funcionamiento el dispositivo
de seguridad para niños
Cierre de la puerta del horno
cocción
cocción
minutos) y continuará hasta el fin del tiempo de cocción preestablecido,
cuando el horno se apagará automáticamente.
ADVERTENCIA:
Si se selecciona el final de la cocción sin fijar la duración del tiempo
de cocción, el horno empezará inmediatamente a cocinar y se
detendrá al final del tiempo de cocción establecido.”
3.4 CONSEJOS DE COCCIÓN
Es mejor no salar la comida hasta después de cocinarla ya que la sal
hace que pierda antes la grasa, lo que ensuciará el horno y creará
mucho humo.
Las carnes blancas, cerdo, ternera, cordero y pescado con hueso o
espina se pueden meter en el horno sin calentarlo previamente. El
tiempo de cocinado es superior que en un horno precalentado, pero
cocina mejor porque el calor tiene más tiempo para llegar a la zona del
hueso.
Un calentamiento previo correcto es la base de un asado de carne
roja en su punto.
GRILL
• Antes de utilizar el grill del horno
Sacar la carne de la nevera unas horas antes. Dejarla sobre varias
capas de papel de cocina. Con ello se consigue que temple y quede
más jugosa evitando que se quede fría en el medio.
Añadir pimienta y especias a la carne antes del grill, pero la sal
después. Así se hará mejor y quedará jugosa. Añadir a la comida que
se va a cocinar con poco de aceite (esto es mejor hacerlo con un
pincel plano). Luego añadir más pimienta y hierbas aromáticas
(tomillo, etc.)
• Durante el asado:
No pinchar los alimentos cuando se están haciendo, ni siquiera
cuando se les de la vuelta ya que haría que perdiese el jugo y se
secase.
ASADO
Evitar utilizar recipientes brillantes ya que reflejarían el calor podrían
estropear los bizcochos. Si el bizcocho se dora muy rápido, cubrir con
papel antiadherente o papel de aluminio.
Atención: La forma correcta de utilizar el papel es con la parte brillante
hacia el bizcocho ya que de lo contrarío el calor se reflejaría en la
superficie brillante y no llegaría a la comida.
Evitar abrir la puerta durante los primeros 20 o 25 minutos
durante el cocinado:
Los soufflés, brioches, bizcochos, etc. tienden a desinflarse. Se
puede comprobar si están hechos introduciendo un cuchillo o una
aguja de metal en el centro. Si la hoja sale limpia y seca, es que está
listo y se puede detener la cocción. Si la hoja sale mojada o con
trocitos de bizcocho adherido, dejar el horno en funcionamiento pero
bajando la temperatura del termostato para que termine de hacerse
pero sin quemarse.
3.5 AJUSTE DEL CONTRASTE DE LA PANTALLA
El contraste de la pantalla se puede ajustar en todo momento.
La configuración por defecto es “C5”. Para ajustar la configuración
hay que:
•Girar el selector de programa hasta “luz” y el selector de función en
“0”. Presionar la llave central durante 3 segundos y aparecerá en la
pantalla “CX” (siendo X el nivel de contraste).
Girar el mando central para ajustar la configuración de contraste. Las
configuraciones van de 1 a 9. Confirmar la nueva configuración
presionando el punto central durante 3 segundos.
•Esta función se suele utilizar con la función “duración de la cocción”.
Por ejemplo, si el plato requiere 45 minutos de cocción y debe estar listo a
las 12:30 h:
- Seleccionar la funcocción
- Establecer el tiempo de duración de la cocción a 45 minutos
- Definir el final del tiempo de cocción a las 12:30.
La cocción se iniciará automáticamente a las 11:45 (12:30 menos 45
28 ES
Page 29

4. SEGURIDAD DE LOS NIÑOS
Esta función es esencial, especialmente cuando hay niños cerca.
Evita que los niños enciendan el horno o modifiquen los programas
configurados.
El sistema de seguridad bloquea el panel de control del horno cuando
está en funcionamiento.
Hay dos niveles de seguridad:
NIVEL 1: Bloqueo del mando del control del selector y el botón
central.
•Activación: Girar el mando de control de programación hasta
seguridad para niños.
•Acción: los mandos de control están inoperativos*.
•Desactivación: Girar el mando de control de programación a 0.
NIVEL 2: Bloqueo de los mandos del selector de función
•Activación: Girar el mando del selector de función a seguridad para
niños u mantener presionado el botón central durante 3 segundos.
•Acción: Todos los controles están inoperativos*.
Desactivación: el mismo proceso que para la activación. Girar el
mando del selector de función hasta seguridad para niños y mantener
el botón central Pulsado durante 3 segundos.
*Nota: En todos los casos, por motivos de seguridad, aunque los
controles estén bloqueados, el horno se puede desconectar
poniendo el mando del selector en 0.
5. CARACTERÍSTICAS WIFI
PARA CONFİGURAR UNA TABLET PARA CONEXİÓN WIFI
• Gire el mando de la función en el horno a la posición de WiFi (el
símbolo "@" parpadeará).
• Si el aparato no está conectado a su router inalámbrico el símbolo
"@" parpadeará. (Véase la sección sobre la gestión del símbolo "@").
• Si se selecciona la función Wi-fi, el horno sólo puede ser controlado
mediante la tablet. (El Selector de funciones y demás opciones estarán
desconectadas);
• En otras posiciones de cocción, el horno no se puede controlar
externamente. Sin embargo, el display mostrará el tiempo de cocción,
la temperatura, etc.
RESET
Para restablecer conexión WiFi, gire el selector de programas en la
posición wifi (aunque no haya programas en ejecución) y mantenga
presionado el codificador durante 3 segundos.
Después de 3 segundos, en la pantalla aparecerá el mensaje "rSt" y el
símbolo "@" comenzará a parpadear.
GESTİÓN DEL SÍMBOLO "@"
• El indicador de "@" es el siguiente:
• Cuando no haya energía en los productos, la luz se apagará;
• Cuando el producto está en la posición de conexión Wi-Fi, el
indicador parpadeará (1 " on, 1" off) si tiene un "punto de acceso"
(conectado punto a punto), mientras que aparecerá de manera
constante si usted es "cliente "( es decir, conectado a un router);
• Cuando el producto está encendido en la posición de conexión Wi-Fi
y está intentando conectarse a un router, la luz parpadea (3 "on, 1" off);
• Cuando el producto está encendido pero no en la posición de Wi-Fi
(sólo lectura), la luz parpadea (1 " on, 3" off).
CANDY SIMPLY-FI:
Para información detallada sobre CÓMO
CONECTAR tu electrodoméstico simply-Fi y CÓMO
SACARLE el mejor partido, ves a
http://www.candysimplyfi.com o visita la Web
Atención al cliente http://simplyfiservice.candy-
hoover.com
29 ES
Page 30

6. TABLAS DE TIEMPOS DE COCCIÓN
Los tiempos sugeridos en las tablas siguientes son indicativos y pueden variar según la calidad, frescura, dimensión y espesor de los alimentos y
según su gusto. Dejar siempre reposar durante unos minutos antes de servir, ya que todos los alimentos siguen cociéndose tras extraerlos del
horno.
CONSEJO ÚTIL: Apagar el horno al menos 10 minutos antes del
tiempo indicado dejando los alimentos en el interior del mismo. Ello le
permitirá ahorrar energiá y completar la cocción según sus gustos.
Para no secar demasiado las superficies es indispensable bajar la
temperatura.
Posición de las repisas
Horno Eléctrico Estático Horno Eléctrico Ventilado
Plato
Cantidad
Estante
Tiempo de
cocción en
minutos
Tempe-
ratura
horno
Estante
Tiempo de
cocción en
minutos
Tempe-
ratura
horno
Observaciones
• Pasta
Lasañas
Canelones
Pasta al horno
Kg 3,5
Kg 1,8
Kg 2,5
2 2
2 2
2 2
70 ÷ 75
50 ÷ 60
55 ÷ 60
220
220
220
60 ÷ 65
40 ÷ 50
45 ÷ 50
200
200
200
Introduzca la lasaña en el horno frío.
Introduzca la canelones en el horno frío.
Introduzca la pasta en el horno frío.
• Pastas saladas
Preparar la pasta en forma redonda e
incida con un cuchillo una cruz sobre la
parte superior de la forma.
Dejar a temperatura ambiente al menos
2 horas, untar la grasera y situar la
forma en el centro de la misma.
Precalentar durante 15 minutos el
horno. Preparar la pizza en la grasera
esmaltada con tomates, mozzarella y
jamón, aceite, sal, orégano.
Situar 24 vol au vent en la grasera y
cocer
Precalentar durante 15 minutos el
horno. Dejar a temperatura ambiente al
menos 2 horas, untar la grasera y situar
la forma en el centro de la misma.
Pan
Pizza
Hojaldre n. 24
vol au vent
Focaccia
(n° 4)
Kg 1
pasta
Kg 1
n° 24
gr. 200
di pasta cad.
2 2
35
prerisc.10
25 ÷ 35
30 ÷ 35
25 ÷ 30
200
190
220
200
30 ÷ 35
prerisc.10
11
21
22
20 ÷ 25
25 ÷ 30
20 ÷ 25
180
190
200
180
• Carne
Todas las carnes pueden ser cocidas en recipientes de borde bajo o borde alto.
Es aconsejable cubrir el recipiente de borde bajo con una tapa para evitar ensuciar el horno con salpicaduras del condimento.
Las carnes cubiertas resultan más blandas y jugosas, mientras que las descubiertas resultan más crujientes.
Los tiempos indicados valen para cocciones con recipiente cubierto o descubierto.
Roastbeef
entero
Solomillo de
cerdo enrollado
Solomillo de
ternera
enrollado
Kg 1
Kg 1
Kg 1,3
70 ÷ 80
100 ÷ 110
90 ÷ 110
220
220
220
33
22
21
50 ÷ 60
80 ÷ 90
90 ÷ 100
200
200
200
Situar la carne en una bandeja Pirex de
borde alto con sal y pimienta.
Dele la vuelta a mitad cocción.
Cocer la carne en bandeja Pirex
cubierta con sal,pimienta,aromas
naturales,aceite y mantequilla.
Cocer como arriba
Solomillo de
buey filete
• Fruta
Manzanas
enteras
Peras
Molocotones
Kg 1
Kg 1
Kg 1
Kg 1
80 ÷ 90
1
1
1
45 ÷ 55
45 ÷ 55
45 ÷ 55
220
220
220
220
22
2
2
2
80 ÷ 90
45 ÷ 55
45 ÷ 55
45 ÷ 55
200
200
200
200
Cocer como arriba.
Cocer la fruta en bandeja de Pirex o cerámica
no cubierta. Dejar enfriar en horno.
Como arriba.
Como arriba.
30 ES
Page 31

6. TABLAS DE TIEMPOS DE COCCIÓN
Horno Eléctrico Estático Horno Eléctrico Ventilado
Plato
Cantidad
Estante
Tiempo de
cocción en
minutos
Tempe-
ratura
horno
Estante
Tiempo de
cocción en
minutos
Tempe-
ratura
horno
Observaciones
• Aves, Conejo
Coloque la pintada en bandeja Pirex o
Pintada
Pollo
Conejo troceado
Kg 1-1,3
Kg 1,5-1,7
Kg 1-1,2
22
22
22
60 ÷ 80
110 ÷ 120
55 ÷ 65
220
220
220
60 ÷ 70
100 ÷ 110
50 ÷ 60
200
200
200
cerámica de borde alto condimentado con
aromas naturales y poquísimo aceite.
Como para la pintada.
Trocear el conejo en partes iguales y
situarlas en la grasera esmaltada,
condi-mente con aromas naturales.
Si fuera necesario darle la vuelta
• Dulces, Pasteles
Pastel cacao en
bote
Pastel Margarita
en bote
Pastel de
zanahorias en bote
Torta crostata
albicocca
Scatola
Scatola
Scatola
700 gr
1
1
1
1
55
55
65
40
180
175
180
200
1
1
1
2
50
40 ÷ 45
50 ÷ 60
30 ÷ 35
160
160
160
180
En bandeja para pasteles Ø 22. Prec.
durante 10 min.
En bandeja para pasteles Ø 22. Prec.
durante 10 min.
En bandeja para pasteles Ø 22. Prec.
durante 10 min.
En bandeja para pasteles Ø 22. Prec.
durante 10 min.
• Verdura
Colocar los hinojos cortados en 4
Hinojos
Calabacín
Patatas
Zanahorias
800 gr
800 gr
800 gr
800 gr
1
1
2
1
70 ÷ 80
70
60 ÷ 65
80 ÷ 85
220
220
220
220
1
1
2
1
60 ÷ 70
60 ÷ 70
60 ÷ 65
70 ÷ 80
200
200
200
200
partes y tapados en bandeja Pirex,con
mantequilla y sal y preferiblemente con
la parte interna hacia arriba.
Rabanar los calabacines y cocer en bandeja
Pirex, cubiertas con mantequilla y sal.
Cortar las patatas en partes iguales y
cocerlas cubiertas con aceite, sal y
orégano o romero en bandeja Pirex.
Cortar las zanahorias y cocerlas
ubiertas en bandeja Pirex.
• Cocción al grill
La cocción al grill debe ser realizada colocando el alimento bajo el grill eléctrico a rayos infrarrojos. Atención: durante el funcionamiento el grill está al rojo
vivo. La grasera debe ser colocada bajo la rejilla para recoger las salsas.
Introducir el pan de molde sobre la parrilla
Pan de molde
tostado
Bikinis
Salchichas
Costillas de buey
Muslos de pollo
• Fish
• Pescado
Trucha
Salmon
Lenguado
Dorada
4 rebanadas
4
n°6 / Kg 0,9
n°4 / Kg 1,5
n°4 / Kg 1,5
3 enteras/
Kg 1
700 g a rodajas
de 2,5 cm esp.
Filetes / Kg 1
2 enteras
44
33
44
44
33
5
(5 precal.)
10
(5 precal.)
25/30
(5 precal.)
25
(5 precal.)
50/60
(5 precal.)
40 ÷ 45
30 ÷ 35
40 ÷ 45
40 ÷ 45 220
Grill Grill
Grill Grill
Grill Grill
Grill Grill
Grill Grill
220
220
220
22
22
22
22
5
(10 precal.)
5/8
(10 precal.)
15/20
(10 precal.)
15/20
(10 precal.)
50/60
(10 precal.)
35 ÷ 40
30 ÷ 25
35 ÷ 40
35 ÷ 40
200
200
200
200
soporte. Tras la 1a cocción dar la vuelta hasta
ultimar la cocción. Advertencia:mantener el
pan de molde en calinete en el fondo del
horno antes de servir.
Introducir los bikins sobre la parrilla soporte
grasera; tras la 1a bruñidura dar la vuelta al
bikini hasta ultimar la bruñidera.
Cortar las salchichas por la mitad y disponerlas
sobre la parrilla, con la parte interna hacia
arriba. A mitad cocción dar la vuelta a las
salchichas hasta ultimar la cocción.
Advertencia: De vez en cuando controlar
visualmente la uniformidad de la cocción. En
caso de desuniformidad intercambiar las
cocidas con las menos cocidas
Disponer las piezas debajo de la acción del
grill grande y darles la vueltas dos veces.
Condimente con aromas naturales y darles
la vuelta de vez en cuando.
Cocer las truchas cubiertas aceite, sal y
cebollas en bandejas de Pirex.
Cocer el salmón no tapado en bandeja
Pirex con sal, pimienta y aceite
Cocer el lenguado con sal y una
cuchara de aceite.
Cocer las doradas en recipiente
cubierto con aceite y sal.
31 ES
Page 32

SICHERHEITSVORSCHRIFTEN
WARNUNG: Das Gerät und die zugänglichen Teile des Gerätes werden während des Betriebs heiß. Das
Berühren der heißen Geräteteile sollte vermieden werden.
• Kinder unter 8 Jahren sollten ohne Aufsicht nicht in die Nähe des Gerätes gelassen werden.
• Dieses Gerät ist nicht bestimmt zum Gebrauch durch Personen (einschließlich Kindern) mit
beeinträchtigten körperlichen, sensorischen oder geistigen Fähigkeiten oder durch Personen, die keine
entsprechenden Erfahrungen oder Kenntnisse besitzen, es sei denn, sie werden beaufsichtigt oder
angewiesen durch eine Person, die für ihre Sicherheit verantwortlich ist.
• Kinder dürfen nicht mit dem Gerät spielen.
• Die Reinigung und Wartung des Gerätes darf nicht durch Kinder ohne Aufsicht durchgeführt werden.
• Während des Betriebs wird das Gerät heiß. Bitte vermeiden Sie die Berührung der heißen Geräteteile.
WARNUNG: zugängliche Geräteteile werden während des Betriebs heiß. Kinder sollten fern gehalten
werden.
• Nutzen Sie keine scharfen oder scheuernden Reiniger oder scharfe Metallreiniger um den Herd und
das Glass zu reinigen, da dadurch Kratzer auf der Oberfläche entstehen können.
• Der Ofen muss ausgeschaltet werden, bevor der Deckel zur Reinigung entfernt wird. Anschließend
den Deckel gemäß der Anweisungen wieder montieren.
• Nutzen Sie nur die empfohlene Temperatureinstellung für den Ofen.
• Nutzen Sie kein Dampfreinigungsgerät zur Reinigung des Ofens.
WARNUNG: Um einen elektrischen Schlag zu vermeiden, vergewissern Sie sich, dass der Herd
ausgeschaltet ist, bevor Sie die Ofenlampe auswechseln.
• Die Abschaltung muss mit einer festen Verdrahtung im Einklang mit den Verkabelungsregeln
durchgeführt werden.
• Die Bedienungsanleitung legt die Art des Kabels, das genutzt werden soll, in Abhängigkeit von der
Maximal-Temperatur des Geräts fest.
• Ist das Gerätekabel beschädigt, muss es durch ein spezielles Kabel ersetzt werden, welches beim
Kundendienst/Hersteller erhältlich ist.
ACHTUNG: Um elektrische Schläge durch unbeabsichtigtes Zurückstellen des Wärmerelais zu
vermeiden, sollte das Gerät nicht über eine externe Schalteinrichtung versorgt werden, wie
beispielsweise ein Timer oder einem Stromkreislauf, der regelmäßig ausgeschaltet wird.
ACHTUNG: Zugängliche Teile können sich erhitzen, wenn der Grill in Benutzung ist. Kinder sollten
daher fern gehalten werden.
• Verschüttete Lebensmittel/Flüssigkeiten müssen beseitigt werden.
• Während der Selbstreinigung kann die Oberfläche heißer werden als gewöhnlich. Bitte halten Sie
daher Kinder fern.
1. ALLGEMEINE HINWEISE
Herzlichen Glückwunsch! Sie haben ein hochwertiges Qualitätsprodukt erworben. Damit Ihr Gerät stets zu Ihrer Zufriedenheit arbeitet,
raten wir Ihnen folgendes:
• Lesen Sie dieses Heft aufmerksam durch: es enthält wichtige Hinweise zur korrekten Benutzung Ihres Gerätes
• Bewahren Sie diese Bedienungsanleitung zur späteren Benutzung sorgfältig auf.
Bei der ersten Inbetriebnahme kann es zu Rauchentwicklung und beißendem Geruch kommen. Hierbei handelt es sich um einen ganz
normalen Vorgang, der auf die erste Erwärmung des Isolierplattenklebers zurückzuführen ist, welcher zur Verkleidung des Backofens
verwendet wurde. Warten Sie mi t dem Einschieben der Speisen, bis kein Rauch mehr vorhanden ist. Die Backofentür wird während des
Betriebes naturgemäß heiß.
1.1 KONFORMITÄTSERKLÄRUNG:
Dieses Gerät entspricht der EU-Vorschrift 89/109 für die Bereiche, die mit Lebensmitteln in Berührung kommen.
Mit der Anbringung des -Zeichens am Gerät zeigen wir an, dass wir sämtliche für dieses Produkt geltenden und notwendigen
europäischen Sicherheits-, Gesundheits- und Umweltstandards einhalten und hierfür haftbar sind.
32 DE
Page 33

1.2 SICHERHEITSHINWEISE
•Dieses Gerät darf ausschließlich für den Zweck eingesetzt werden,
für den es hergestellt wurde, nämlich die Zubereitung von Speisen.
Jede andere Anwendung (beispielsweise das Heizen von Räumen)
ist deshalb als zweckentfremdet zu betrachten und demzufolge
gefährlich. Der Hersteller kann für eventuelle Schäden, die auf einen
ungeeigneten, fehlerhaften und unvernünftigen Einsatz
zurückzuführen sind, nicht verantwortlich gemacht werden.
Die Verwendung jedes elektrischen Gerätes erfordert die Beachtung
einiger grundsätzlichen Regeln. Das sind insbesondere:
- das Gerät nicht mit nassen oder feuchten Händen oder Füßen
berühren.
- das Gerät nicht barfuß bedienen.
- bei Ausfällen und/oder Funktionsstörungen ist das Gerät
abzuschalten. Versuchen Sie nicht, den Fehler auf eigene Faust zu
beheben.
- Bei Beschädigung des Zuleitungskabels ist dieses so schnell wie
möglich auszutauschen. Dies ist ausschließlich durch qualifiziertes
Fachpersonal durchzuführen, unter Beachtung folgender Hinweise:
Blechschutzdeckel abnehmen, Kabel abschrauben und durch ein
anderes (Typ H05RR-F, H05VVF, H05V2V2-F) ersetzen. Das Kabel
muß der Leistung des Gerätes entsprechen. Der Erdleiter (gelb-grün)
muß vorschriftsgemäß 10 mm länger sein als die Hauptleiter. Bei
einer erforderlichen Reparatur wenden Sie sich bitte an Ihren
zuständigen Werkskundendienst und verlangen Sie die Verwendung
von Original-Ersatzteilen.
Die Mißachtung der vorgenannten Hinweise kann die Sicherheit des
Gerätes beeinträchtigen.
•Linieren sie die ofen wande mit aluminiumfolie. Aluminiumfolie
oder jeder andere schutz, im direkten kontakt mit dem heisen
email, vermeidet, dass das email im inneren(innenseiten) des
ofens beschadigt wird.
1.3 INSTALLATION
Der Einbau erfolgt auf Kosten des Endverbrauchers. Der Hersteller ist
von diesem Dienst entbunden. Eventuell an den Hersteller
herangetragene Ansprüche, die auf einen falschen Einbau
zurückgehen, sind von jeder Garantieleistung ausgeschlossen. Der
Einbaumuß entsprechend der Anleitung und durch qualifiziertes
Fachpersonal erfolgen. Durch einen falschen Einbau können
Schäden an Personen, Tieren oder Sachen verursacht werden, für die
der Hersteller nicht verantwortlich gemacht werden kann.
1.4 EINBAU IN DEN SCHRANK
Das Gerät in den Schrank an den vorgesehenen Platz einsetzen
(unterhalb der Kochfläche bzw. einzeln in separater Nische). Die
Befestigung erfolgt durch 4 Schrauben, die in die entsprechenden
Bohrungen des Rahmens eingesetzt werden, welche beim Öffnen der
Backofentür sichtbar werden.(Abbildung aufder Letzten Seite). Damit
eine gute Belüftung gewährleistet ist, muß der Backofen unter
Einhaltung der auf letzten Seite angegebenen Abstände installiert
werden.
Hinweis: Bei Backöfen, die in Kombination mit Kochmulden oder
Ceranfeldern eingebaut werden, sind unbedingt die
Montageanweisungen zu beachten, die mit den Kochfeldern
mitgeliefert sind.
1.5 WICHTIG:
Damit eine einwandfreie Funktion des Einbaugerätes gewährleistet
ist, muß der Umbauschrank unbedingt über entsprechende
Eigenschaften verfügen. Die Wände der am Backofen angrenzenden
Schränke müssen aus hitzebeständigem Material sein. Insbesondere
bei Schränken aus Furnierholz müssen die verwendeten Klebstoffe
Temperaturen bis zu 120°C widerstehen können: halten die
Kunststoffe oder die Kleber solche Temperaturen nicht stand, so sind
Verformungen und Entleimungen die Folge. Gemäß der
Sicherheitsnormen dürfen nach dem Einbau eventuelle Berührungen
mit elektrischen Teilen nicht möglich sein. Sämtliche der Sicherheit
dienende Teile müssen so befestigt sein, daß sie sich ohne
Werkzeuge nicht entfernen lassen.
Zur Gewährleistung einer guten Belüftung ist die hintere Wand
der Einbaunische zu entfernen. Außerdem muß die
Auflagefläche über einen hinteren Freiraum von mindestens 45
mm verfügen.
1.6 ELEKTRISCHER ANSCHLUß
In der Bundesrepublik Deutschland ist der Backofen direkt an die
Herdaschlussdose anzuschließen. Der elektrische Anschluß darf
ausschließlich durch qualifiziertes Fachpersonal (Elektroinstallateur)
erfolgen.
Beim direkten Anschluß ans Netz ist darauf zu achten, daß zwischen
dem Gerät und dem Versorgungsnetz ein der Last entsprechender,
genormter Mehrfachschalter eingebaut wird. Der Netzanschluß muß
bei dem eingebauten Gerät jederzeit leicht zugänglich sein.
Wichtig: Bei der Installation ist darauf zu achten, daß das
Versorgungskabel an keiner Stelle einer Temperatur von über 50°C
ausgesetzt wird.
Das Gerät entspricht den Sicherheitsvorschriften derNormanstalten.
Die elektrische Sicherheit dieses Gerätes ist nur dann gewährleistet,
wenn es vorschriftsgemäß an einen einwandfrei funktionierenden
Erdleiter angeschlossen ist, in Übereinstimmung mit den für die
elektrische Sicherheit geltenden Normen.
Diese für die Sicherheit grundsätzliche Voraussetzung muß überprüft
werden, und im Zweifelsfall ist eine sorgfältige Kontrolle der Anlage
durch geschultes Fachpersonal vorzunehmen. Es ist die elektrische
Belastung der Anlage und Steckdose zu überprüfen, um festzustellen,
ob diese für die auf dem Leistungsschild angegebene maximale
Leistung geeignet sind. Im Zweifelsfall einen Elektroinstallateur zu Rate
ziehen.
Wichtig: Der Hersteller kann für eventuelle Schäden, die auf eine
fehlende oder fehlerhafte Erdung zurückzuführen sind, nicht zur
Verantwortung gezogen werden.
ACHTUNG:
Die Spannung und die Versorgungsfrequenz sind auf dem
Matrikelschild angegeben (Abbildung auf der letzten Seite).
1.7 OFENAUSSTATTUNG (Je nach Modell)
Vor der ersten Benutzung des Zubehörs, reinigen Sie jedes Teil mit
einem feuchten Schwamm und trocknen Sie es dann mit einem Tuch.
Der einfache Rost dient als Unterlage
für Bleche und Backformen.
Der Grillrost ist vorrangig zum Ablegen
von Grillstücken vorgesehen. Er wird
zusammen mit dem Soßenfänger
verwendet. Dank ihres speziellen Profils
bleiben die Roste immer waagerecht,
auch wenn sie bis zumAnschlag
herausgezogen werden. DieGerichte können nicht herunterrutschen
oder überlaufen
Der Soßenfänger ist zum Auffangen des Saftes der Grillstücke
bestimmt.
Er kann auf den Rost gestellt, unter ihn geschoben
oder auf die Bodenplatte gestellt werden.
Den Soßenfänger niemals als Unterlage
zum Braten verwenden.
Dies würde Rauchentwicklung und Fettspritzer und
damit eine schnelle Verschmutzung des Ofens verursachen.
Das Pizza-Set ist ideal zum Pizzabacken.
Das Set muss zusammen mit dem
Backprogramm.
Gitter mit Aufnahme Das Gitter mit Aufnahme für die Fettpfanne ist
ideal zum Grillen. Verwenden Sie es hierzu in Kombination mit der
Fettpfanne. Ein Griff ist mit dem
Gittermitgeliefert, damit beide
Zubehörteile sicher ein-und
ausgezogen werden können. Lassen
Sie bitte den Griff nicht im Backofen,
wenn dieser im Betrieb ist.
Entfernen und Reinigung des Grillrosts:
1. Entfernen Sie die Radmuttern
durch Drehen gegen den
Uhrzeigersinn.
2. Entfernen Sie das Rost durch
A
Spülmaschine oder reinigen Sie es mit
einem nassen Schwamm und trocknen Sie
danach ab.
4. Nach dem Reinigungsprozess installieren
Sie den Rost in umgekehrter Reihenfolge.
5. Fixieren Sie die Radmuttern
ziehen.
3. Reinigen Sie den Rost in der
33 DE
Page 34

2. EINIGE NÜTZLICHE HINWEISE
2.1. KIPPGESICHERTE GITTERROSTE
Ihr Backofen ist mit besonders geformten
Gleitschienen ausgestattet. Die Gitterroste
können fast vollständig aus dem Back ofen
herausgezogen werden, ohne daß sie
nach unten kippen.
Dank der speziellen Gleitschienen bleiben
die Roste sicher in der Waagerechten, und
Sie können die Speisen umrühren oder
deren Garpunkt feststellen. Um die
Gitterroste ganz herauszunehmen,
müssen diese leicht angehoben und an der Vorderseite
herausgezogen werden, wie in der nebenstehenden Abbildung
dargestellt.
2.2. GRILLEN
Zum Grillen empfehlen wir, das Grillgut je nach Größe auf den 3. Oder
4. Gitterrost von unten zu schieben (s. Abb. 2 Seite 40). Fast alle
Fleischsorten eignen sich zum Grillen, mit Ausnahme von sehr
magerem Wild. Vor dem Grillen sollte das Grillgut ein wenig mit Öl
oder Fett bestrichen werden.
2.3 The MODELS
Die Modelle verfügen über ein patentiertes System zur
elektronischen Steuerung des Umluftventilators, das so genannte
VARIOFAN. Während des Backens wählt das System automatisch
die geeignete Geschwindigkeit für den Ventilator (im
Multifunktionsbetrieb), um die Umwälzung der Umluft und somit die
Temperatur im Garraum zu optimieren.
Alle Modelle verfügen über die Funktion
Softcook . Diese ermöglicht ein optimales Verhältnis
zwischen Temperatur und Feuchtigkeit. Der
Feuchtigkeitsverlust wird um 50% reduziert, so dass die Speisen
zarter und saftiger gelingen. Diese sanfte Art zu garen ist besonders
empfehlenswert zum Backen von Brot, Kuchen und Gebäck.
Dank dieser Funktion wird die Dauer des Vorheizens r
eduziert: der Backofen erreicht in nur 8 Minuten 200°C.
Diese Eigenschaft ermöglicht es, den Leistungsgrad und
die Intensität des Grills zu wählen, wobei bis zu 50% mehr
Leistung im Vergleich zu herkömmlichen
Multifunktionsbacköfen erreicht werden kann. Einige Backöfen sind
mit der neuen Tür WIDE DOOR ausgestattet, welche ein größeres
Sichtfenster besitzt und somit eine leichtere Wartung und bessere
Wärmeisolierung gewährleistet.
2.4 Beleuchtungssystem - je nach Modell
Das ist ein Beleuchtungssystem, das die traditionelle Glühbirne
ersetzt. 14 LED-Leuchten sind in der Backofentür integriert. Das
erzeugte Licht ist sehr hell und ermöglicht eine fast schattenfreie Sicht
auf allen Ebenen im Backofeninneren.
2.5 KATALYTISCHES SELBSTREINIGUNGSSET
Der Reinigungsset ist als Zubehör für alle Backöfen erhältlich. Dank
der selbstreinigenden Einsätze für die Innenwände des Backofens
wird das mühselige Reinigen von Hand überflüssig. Die Fett-, Öl-,
Fleischsaft- und Soßenspritzer im Backraum werden durch ein
katalytisches Verfahren während des Backens zersetzt und in
gasförmige Verbindungen umgewandelt. Die MikroporenBeschichtung der Einsätze kann durch größere Fettspritzer verstopft
und die selbstreinigende Wirkung dadurch vermindert werden. Dies
läßt sich jedoch sehr einfach beheben, indem der leere Backofen auf
höchste Hitze eingestellt und ca. 10 bis 20 Minuten lang aufgeheizt
wird. Benutzen Sie keine scheuernden oder ätzenden Mittel, auch
keine Stahlwolle, Schaber oder spitzen Gegenstände. Chemische
Reinigungsmittel können die Poren des Emailüberzugs verstopfen
und so die Reinigungswirkung verhindern. Zum Braten von
besonders großen bzw. Fetthaltigen Bratenstücken ist es ratsam,
einen hohen Bräter zu benutzen. Beim Grillen empfiehlt es sich, die
Fettpfanne zumAuffangen der Bratflüssigkeit zu benutzen.Entfernen
Sie eventuelle Überlaufreste oder Fettrückstände mit einem feuchten
Lappen oder Schwamm. Die Emailbeschichtung muß immer porös
bleiben, damit die Reinigungswirkung optimal gewährleistet ist.
HINWEIS: Alle handelsüblichen Selbstreinigungssysteme haben eine
begrenzte Leistungsdauer. Nach ca. 300 Betriebsstunden des
Backofens sollte Ihr Reinigungsset ausgetauscht werden.
2.6 REINIGUNG UND WARTUNG
DICHTUNG DER OFENTÜR
Wenn es notwendig ist, sie zu reinigen, benutzen Sie dabei einen
feuchten Schwamm, den Sie vorher in heiße Seifenlösung
eingetaucht haben. Spülen Sie die Dichtungen mit klarem Wasser
und trocknen Sie sie. Der Grillrost ist vorrangig zumAblegen von
Grillstücken vorgesehen. Reinigen Sie alle emaillierten Oberflächen
oder Teile aus Edelstahl mit einfachem Seifenwasser oder mit den
handelsüblichen Reinigungsmitteln. Vermeiden Sie unbedingt den
Gebrauch von scheuernden Reinigungsmitteln in Pulverform, da
diese die Emaille des Backofens und die äußeren Zierteile
beschädigen können. Der Backofen sollte nach jedem Gebrauch
sorgfältig gereinigt werden, da die Fettpartikeln, die beim Backen und
Braten sich auf den Innenwänden abgesetzt haben, unangenehme
Gerüche hervorrufen und somit das Backergebnis beeinträchtigen
können. Zur Reinigung benutzen Sie bitte warmes Wasser und einen
milden Reiniger.
Für alle unseren Backöfen ist ein besonderes Reinigungsset als
Zubehör erhältlich, der Ihnen das mühselige Reinigen von Hand
erspart. Es besteht aus selbstreinigende Einsätzen, die mit einer
speziellen Emaille beschichtet sind und an den Innenwänden des
Backofens befestigt werden. Siehe hierzu den Absatz “Katalytisches
Selbstreinigungsset” Für die Gitterroste benutzen Sie ein
handelsübliches Reinigungsmi t tel und Stahlwol le. DieOberflächen
aus Spiegelglas dürfen erst dann gereinigt werden, wenn sie
vollständig abgekühlt sind. Eventuelle Schäden, die auf die
Mißachtung dieser grundsätzlichen Regel zurückzuführen sind, fallen
nicht unter die Garantie.
Zum Austauschen der Innenlampe ist der Backofen von der
Stromversorgung zu trennen. Schrauben Sie die Glasschutzhülle der
Lampe ab und ersetzen Sie die Birne mit einer ähnlichen Typs, die
ebenfalls hitzebeständig ist.
Die Vorteile:
neben der herausragenden Qualität und Intensität der Beleuchtung,
bietet das System U.SEE auch eine längere Lebensdauer im
Vergleich zu herkömmlichen Backofenlampen, ist außerdem leicht zu
reinigen und vor allem sehr sparsam im Energieverbrauch.
- optimale Übersicht auf allen Backofenebenen
- zuverlässige Funktion und lange Lebensdauer
- hohe Helligkeit bei sehr niedriger
Energieverbrauch, bis zu
95% weniger alsherkömmliche
Backofenbeleuchtung
- leicht zu reinigen
“ Das Gerät ist ausgestattet mit weißem LED-Licht der Klasse 1M
gemäß IEC 60825-1:1993 + A1:1997 + A2:2001 (entspricht EN
60825-1: 1994 + A1:2002 + A2:2001): max. optische
Ausgangsleistung 459nm < 150μW. Nicht mit optischen Instrumenten
direkt anschauen.”
2.7 TECHNISCHER KUNDENDIENST
Sollte Ihr Backofen einmal nicht richtig funktionieren, prüfen Sie
zuerst, ob die Stromversorgung gewährleistet ist. Ist die Uhrsache der
Fehlfunktion nicht ausfindig zu machen, wenden Sie sich bitte an
Ihren zuständigen Werkskundendienst unter Angabe des Modells und
der Seriennummer, die auf dem Typenschild angegeben sind (s. Abb.
4 letzten Seite). Auf Ihr Gerät gewähren wir eine Garantie von 24
Monaten ab Kaufdatum. Bewahren Sie Ihre Kaufrechnung sorgfältig
auf und legen Sie sie bei Bedarf als Garantienachweis dem
Kundendienst vor. Die Garantiebedingungen sind im beigefügten
Serviceheft angegeben.
34 DE
Page 35

3. DISPLAYBESCHREIBUNG
Einstellungen: Temperatur, Backfunktionen und Backzeitende – Funktionen
werden eingestellt indem man die Bedientaste dreht “-” oder “+”
Um die Einstellungen zu bestätigen: Bedientaste drücken
Displayanzeige: Zeit, Funktionen programmieren,
Symbolanzeige und Temperaturanzeige
BEDIENTASTE BESTÄTIGUNG
Anzeige: steigende
Temperatur
Backofenfunktion und empfohlene
Positionseinstellung des
Backblechs
Uhr/
Programmierung/
Backtemperatur
PYRO
Drehspieß
Booster Anzeige
Vorheizen
Symbolanzeige: Backen
Zeit Backdauer
Anzeige
Kindersicherung
Leuchtanzeige
WIFI
Anzeige
Verriegelte Tür
Backzeitende
35 DE
Page 36

3.1 NÜTZLICHE HINWEISE VOR DEM ERSTEN
BETRIEB DES BACKOFENS
Reinigung
-Reinigen Sie den Backofen vor der ersten Nutzung:
-Wischen Sie die Außenoberfläche mit einem feuchtem weichem Tuch.
-Reinigen Sie das komplette Zubehör und waschen Sie den
Backofeninnenraum mit einer Lösung aus heißem Wasser.
-Vergewissern Sie sich das Sie kein Zubehör im Ofen liegen lassen.
Schließen Sie nach der Reinigung des leeren Backofens die Tür und
stellen Sie die maximale Temperatur ein. Warten Sie 1 Stunde und
schalten Sie den Backofen wieder aus. Mit dieser Vorgehensweise
lassen sich alle unangenehmen Gerüche neuer Produkte entfernen.
•Denken Sie an folgende Punkte:
Jede Änderung muss über die Bedientaste bestätigt werden.
Den Backofen stoppen:
Dies ist erforderlich wenn Sie eine falsche Funktion eingestellt haben.
Um den Backofen zu stoppen drehen Sie den Knebel auf die StoppPosition zurück.
Kindersicherung:
Um die Bedientasten des Backofens zu sperren müssen Sie das Symbol
der Kindersicherung auswählen. Lesen Sie hierzu die Einstellung –
Programmierung der Kindersicherung.
Der Kühlventilator:
Das Bedienfeld und die Elektronik des Backofens werden hierdurch
geschützt. Es startet und endet automatisch, selbst wenn der Backofen
ausgeschaltet wird.
Backofenbeleuchtung:
Um die Backofenbeleuchtung zu aktivieren drehen Sie den Schalter auf
das Symbol der Beleuchtung. Ist der Ofen in Gebrauch dann bleibt die
Beleuchtung über alle Funktionen hinweg eingeschaltet.
•Uhrzeiteinstellung:
Wird der Backofen an die Elektrizitätsversorgung neu oder nach
einem Abbau wieder angeschlossen dann muss die Uhr eingestellt
werden:
Folgende Schritte zur Uhrzeiteinstellung sind erforderlich:
1. Drehen Sie den Wahlschalter in die Position Symbol „Uhr“
2. Stellen Sie die Uhr ein indem Sie die kleine rechte Bedientaste nach „-„
oder „+“ drehen
3. Drehen Sie den Wahlschalter in die Ausgangsposition STOP zurück
1- Drehen Sie den Wahlschalter zu der gewünschten Funktion. Die
Beheizung zu der ausgewählten Funktion wird auf dem Display
angezeigt.
2- Die passende Temperatur gemäß der ausgewählten Funktion wird
angezeigt. Sie kann innerhalb der vordefinierten Temperaturreihe
(siehe obige Tabelle) verändert werden. Um die
Temperatureinstellung zu ändern, drehen Sie die Bedientaste in der
Mitte und bestätigen Sie die Einstellung indem Sie die gleiche Taste
drücken. ….die Temperaturanzeige ist vorgegeben aber
kann während des Backvorgangs verändert werden. Der Backofen ist
nun eingeschaltet und startet die Aufheizphase. Die Anzeigelampe
blinkt mehrere Male bis die ausgewählte Temperatur erreicht wird. Ein
hörbares Signal ertönt wenn dieser Vorgang abgeschlossen ist.
3- Die Backdauer oder das Backzeitende kann dadurch eingestellt
werden, wenn Sie den Wahlschalter auf die Position „Backdauer“
oder "Backzeitende" drehen. Die Anzeige „Backdauer“ oder das
„Backzeitende“ fängt an zu blinken. Stellen Sie die Zeiten indem Sie
die Bedientaste in der Mitte betätigen. Bestätigen Sie dann durch
drücken. Vergessen Sie nicht den Wahlschalter auf die Position STOP
zurückzudrehen um die neuen Einstellungen abzuspeichern.
Für weitere Details über das Programmieren sehen Sie dazu Kapitel
5.3 Programmierungen.
4- Drehen Sie den Wahlschalter am Ende des Backvorgangs auf die
Position Stopp zurück. Die Anzeige blinkt nochmals. Die Anzeige
erlischt bis die Temperatur des Backofens eine niedrige Temperatur
erreicht hat.
Backfunktionen
Umluft + Unterhitze: Diese Funktion eignet sich
insbesondere für Kuchen mit saftigen Früchten und Gebäck. Sie
verhindert das Austrocknen der Lebensmittel und fördert das
„Aufgehen“ des Teigs, der Kuchen, des Brotes und jeder Speise, die
mit Unterhitze gebacken werden soll. Bei dieser Betriebsart schieben
Sie die Ablage in die untere Ebene ein.
Unterhitze: Bei dieser Funktion wird die größte Hitze im
unteren Bereich des Ofens erreicht. Unterhitze eignet sich besonders
für Gebäck und Kuchen.
10:30
3.2 BENUTZUNG DES BACKOFENS
•Manueller Modus
Die empfohlenen manuellen Einstellungen für das Backen und Grillen
werden in der unteren Tabelle verdeutlicht. Eine Temperatur wird
ebenfalls für jede Einstellung empfohlen.
Funktion
(modellabhängig)
Umluft + Unterhitze
Unterhitze
Unterhitze + Oberhitze
Unterhitze + Oberhitze + Umluft
Heißluft
Grill
Grill + Umluft
Grill + Drehspieß + Umluft
Auftauen
Warm halten
Pizza
*Booster: schnelle steigende Temperatur
**Backofen muss mit dieser Funktion ausgestattet sein
***
Prüfprogramm gemäß CENELEC EN 60350-1 zur Feststellung der
Energieeffzienzklasse
Voreinstellung
Temperatur
°C
210
160
220 50-240
***
210
180
L2
190
***
240
40
60
230
**
Vordefinierte
Temperatur
°C
50-220
50-220
50-230
50-230
L1-L3
50-200
180-240
No
No
230
Funktion
Booster*
Booster
Booster
Booster
Booster
Unterhitze + Oberhitze: Bei dieser Funktion werden
Lebensmittel gleichmäßig von oben und unten erhitzt. Es ist die
traditionelle Art zu garen. Ausgezeichnet geeignet zum Braten von
Rindfleisch, Keulen und ideal für Plätzchen und Kekse und für alle
Speisen die knusprig werden sollen.
Unterhitze + Oberhitze + Umluft: Bei dieser Funktion wird
heiße Luft an den oberen und unteren Heizelementen entlang geleitet
und durch den Lüfter gleichmäßig im Inneren des Backofens verteilt.
Diese Funktion empfehlen wir für Geflügel, Fisch, Gemüse und
Gebäck.
Heißluft: Luft die aufgeheizt worden ist wird in die
verschiedenen Ebenen im Backraum geblasen. Es ist ideal um
verschiedene Gerichte (z.B. Fleisch und Fisch) zur gleichen Zeit zu
braten ohne dabei den Geruch und den Geschmack zu vermischen.
Geeignet auch für schonendes Backen, z.B. für Blätterteig, Biskuitteig
o.Ä.
Grill: Wenn Sie den Grill benutzen, muss die Ofentür
geschlossen sein. Es wird nur das obere Heizelement verwendet. 5
Minuten Vorwärmezeit sind notwendig, bis das Heizelement zu
glühen anfängt. Diese Betriebsart garantiert ausgezeichnete
Ergebnisse beim Grillen von Fleisch oder Fisch, Spießchen: auch
zum Gratinieren wird sie vorzugsweise verwendet. Weißes Fleisch
sollte nicht allzu nahe am Grillelement gelegt werden, dadurch
verlängert sich zwar die Grillzeit, das verreicht jedoch dem
Geschmack der Gerichte zum Vorteil. Rotes Fleisch und Fischfilets
können auf den Grillrost gelegt werden, mit der Auffangschale
darunter.
Grill + Umluft: Bei dieser Funktion arbeiten Grill, oberes
Heizelement und Umluft zusammen und sorgen für ein besonders
gleichmäßiges Garen. Grillgerichte geben Sie auf das Grillrost, das
Sie auf der höchsten Stufe einschieben. Nachdem Sie das Backblech
in der 3. Position von unten eingeschoben haben, beginnen Sie mit
dem Grillen. Das auf der 3. Position von unten eingeschobene
Backblech sorgt dafür, dass von den Lebensmitteln herabtropfendes
Öl oder Fett aufgefangen wird.
36 DE
Page 37

Grill + Drehspieß + Umluft: Der Vorteil alle 3 Funktionen
gleichzeitig zu nutzen Grill, Drehspieß und Umluft ist, dass das
Gericht gleichmäßig gebraten wird. Es verhindert das Austrocknen
der Lebensmittel. Ein Vorheizen ist bei dieser Funktion nicht
erforderlich.
Auftauen: In dieser Einstellung erfolgt eine Luftzirkulation
bei Raumtemperatur zum Auftauen von Tiefkühlkost in wenigen
Minuten, ohne eine Veränderung des Proteingehalts herbeizuführen.
Die Temperatur wird in 40 ° C voreingestellt. Eine Änderung ist nicht
möglich.
Warm halten: Diese Funktion wird empfohlen um fertig
gekochte Lebensmittel wieder aufzuheizen. Dafür schieben Sie das
Backblech von oben aus gesehen in die 2. Ebene. Um Brot oder
Gebäck aufzutauen legen Sie das Backblech in die niedrigste Ebene.
Die Temperatur wird in 60 ° C voreingestellt. Eine Änderung ist
nicht möglich.
Pizza: Die umfassende Hitze dieser Funktion reproduziert
im Backofen ähnliche Bedingungen wie im Holzofen einer Pizzeria.
WIFI
•Drehen Sie den Wahlschalter auf die Position Stop zurück. Wenn Sie
dies nicht tun, blinken beide Symbole die Backdaueranzeige und das
Stop Symbol fortlaufend.
Backzeitende einstellen:
Für verschiedene Gerichte ist die Backdauer und das Backzeitende
voreingestellt. Wenn erwünscht, kann die Auftau- und WarmhalteFunktion im manuellen Modus voreingestellt werden.
•Drehen Sie den Schalter auf das Symbol Backzeitende. Das STOP
Symbol erleuchtet. Ein voreingestelltes Backzeitende (für
verschiedene Gerichte) oder 00:00 für andere Backofenfunktionen
oder die Uhrzeit erscheinen auf dem Display.
•Drehen Sie den Wahlschalter um das Backzeitende zu bestätigen.
•Die Minutenanzeige fängt an zu blinken. Drehen Sie die Bedientaste
zu der gewünschten Minutenzahl und bestätigen Sie indem Sie die
Bedientaste drücken.
•Die Stundenanzeige fängt an zu blinken. Drehen Sie die Bedientaste
zu der gewünschten Stundenzahl und bestätigen Sie indem Sie die
Bedientaste drücken.
NB: Der Backofen kalkuliert automatisch den Start (Backzeitende
minus Backdauer). Am Ende des Backvorgangs schaltet sich der
Backofen automatisch aus. Ein hörbares Signal ertönt 15 Sekunden
lang, dass daran erinnert, dass das Backzeitende erreicht worden ist.
Die Symbolanzeige Backdauer und STOP fangen an zu blinken.
•Drehen Sie den Wahlschalter auf die Position Stop zurück. Wenn Sie
dies nicht tun, blinken beide Symbole fortlaufend.
3.3 PROGRAMMIERUNGEN
SYMBOLANZEIGE
Leuchte
Zeiteinstellung
Backdauer einstellen
STOP
Backzeitende einstellen
Wahlschalter
Der Timer:
Der Timer funktioniert unabhängig von den Backofenfunktionen. Er
hat keinen Einfluss auf die Beheizungsarten. Er ist eine
Erinnerungsfunktion.
•Drehen Sie den Schalter in die Timer Position. Die Symbolanzeige
erleuchtet. Auf dem Display erscheint ebenfalls die Anzeige zur
Zeiteinstellung.
•Die Minutenanzeige fängt an zu blinken. Drehen Sie die Bedientaste
zu der gewünschten Minutenzahl und bestätigen Sie indem Sie die
Bedientaste drücken.
•Die Stundenanzeige fängt an zu blinken. Drehen Sie die Bedientaste
zu der gewünschten Stundenzahl und bestätigen Sie indem Sie die
Bedientaste drücken.
•Drehen Sie den Wahlschalter in Ausgangsposition Stop zurück.
Wenn die Zeit abgelaufen ist, erlischt die Backdauer. Ein hörbares
Signal ertönt für 15 Sekunden und die Timeranzeige blinkt auf (um es
zu stoppen bevor die 15 Sekunden abgelaufen sind drücken Sie die
Bedientaste).
Backdauer einstellen:
Für verschiedene Gerichte ist die Backdauer voreingestellt. Wenn
erwünscht, kann die Auftau- und Warmhalte- Funktion im manuellen
Modus voreingestellt werden.
•Drehen Sie den Wahlschalter auf das Symbol der Backdauer. Die
Symbolanzeige erleuchtet. Eine voreingestellte Backdauer (für
verschiedene Gerichte) oder 00:00 für andere Backofenfunktionen
erscheint auf dem Display.
•Die Minutenanzeige fängt an zu blinken. Drehen Sie die Bedientaste
zu der gewünschten Minutenzahl und bestätigen Sie indem Sie die
Bedientaste drücken.
•Die Stundenanzeige fängt an zu blinken. Drehen Sie die Bedientaste
zu der gewünschten Stundenzahl und bestätigen Sie indem Sie die
Bedientaste drücken.
•Drehen Sie den Wahlschalter in Ausgangsposition Stop zurück um
die neue Backdauer abzuspeichern. Wenn die Zeit abgelaufen ist,
erlischt die Backdauer. Ein hörbares Signal ertönt für 15 Sekunden.
Die Symbolanzeige Backdauer/Stop fangen an zu blinken.
Timer im Zeitablauf
Kindersicherung
Backofentür sperren
ACHTUNG:
Wenn das Backzeitende eingestellt wird ohne dabei die Länge
der Backzeit zu definieren, startet der Backofen den
Backvorgang sofort und stoppt bis zum Ende der eingestellten
Backzeit.
3.4 TIPPS
Es ist besser das Fleisch erst nach dem braten, grillen zu salzen, da
das Salz das Spritzen des Fetts fördert. Dies verunreinigt u.a. den
Backofen und macht eine Menge Rauch.
Richtiges Vorheizen ist die Basis für ein gelungenes Fleischgericht.
Grillen:
Bevor man mit dem Grillen anfängt:
Entnehmen Sie das Grillgut einige Stunden vom Kühlschrank. Legen
Sie es auf mehrere Schichten Küchenpapier. Dies macht es
schmackhafter und vermeidet, dass es in der Mitte kalt bleibt. Fügen
Sie Gewürze vor dem Grillen hinzu und salzen Sie das Fleisch erst
nach dem grillen. Grillen Sie das Fleisch mit ein wenig Öl. Das Fleisch
können Sie am besten mit einem breiten flachen Pinsel einölen. Dann
bestreichen Sie es mit Gewürzen wie Pfeffer, Thymian etc.
Während des Grillvorgangs:
Stechen Sie niemals in das Fleisch hinein auch wenn Sie es drehen
möchten. Dies lässt das Fleisch trocken werden.
Backen:
Vermeiden Sie die Verwendung von glänzenden Backformen. Diese
lassen die Hitze reflektieren und haben Einfluss auf den
Backvorgang. Wenn der Kuchen zu schnell bräunt decken Sie es mit
Backpapier oder Aluminiumfolie.
Achtung: Um die Aluminiumfolie richtig zu verwenden, legen Sie die
glänzende Seite auf den Kuchen. Wenn Sie dies nicht tun, wird die
Wärme durch die glänzende Oberfläche reflektiert und dringt nicht in
das Gebäck.
3.5 KONTRAST DES DISPLAYS EINSTELLEN
Der Kontrast des Displays kann jederzeit angepasst werden. Die
Standardeinstellung ist "C5". Um die Einstellungen anzupassen
gehen Sie wie folgt vor:
Drehen Sie den Wahlschalter auf die Position „Licht“ und den
Funktionsschalter auf „0“. Drücken Sie die Bedientaste in der Mitte 3
Sekunden lang. Es erscheint „CX“ auf den Display (X= Kontrast
Level). Drehen Sie die Bedientaste in der Mitte um die
Kontrasteinstellungen anzupassen. Die Einstellungsschritte liegen
von 1 bis 9 vor. Speichern Sie die neuen Einstellungen indem Sie die
Bedientaste in der Mitte 3 Sekunden gedrückt halten.
37 DE
Page 38

4. KINDERSICHERUNG
5. WIFI FUNKTION
Diese Funktion ist wichtig, vor allem wenn Kinder in der
Umgebung sind. Es verhindert, dass die Kinder den Backofen
einschalten oder Änderungen an den voreingestellten Funktionen
vornehmen. Dieses Sicherheitssystem sperrt das Bedienfeld des
Backofens.
Es liegen 2 Ebenen des Sicherheitssystems vor:
EBENE 1: Um die Kindersicherung zu aktivieren, drehen Sie den
Wahlschalter auf Kindersicherung. Nach der Aktivierung sind
Bedientasten inaktiv. Um die Kindersicherung zu deaktivieren
drehen Sie den Wahlschalter auf „0“.
EBENE 2: Um die Kindersicherung zu aktivieren, drehen Sie den
Wahlschalter auf Kindersicherung und halten Sie dabei die
Bedientaste in der Mitte für 3 Sekunden gedrückt. Nun sind alle
Bedientasten inaktiv. Um die Kindersicherung zu deaktivieren
halten Sie die Bedientaste für 3 Sekunden gedrückt.
Bemerkungen: In allen Fällen, auch wenn die Bedientasten
inaktiv sind, können Sie den Ofen ausschalten indem Sie den
Wahlschalter auf 0 drehen.
WIFI KONFIGURATION
• Schalten Sie den Drehknebel in die WiFi Position (das "@"
Symbol blinkt auf).
• Wenn der Backofen mit einem WLAN Router verbunden ist und
die WiFi Funktion eingestellt worden ist dann erscheint das "@"
Symbol auf dem Display.
• Wenn der Backofen nicht mit einem WLAN Router verbunden ist
dann blinkt das "@" Symbol auf. ( siehe Kapitel "@" Symbol
Steuerung).
• Wenn die WiFi Funktion aktiviert ist, kann der Backofen nur
ferngesteuert werden (Funktionsgenerator und Encoder sind
deaktiviert);
• In allen anderen Backfunktions-Einstellungen kann der Backofen
nicht von außen gesteuert werden.
RESET
Um die WiFi Funktion zurückzusetzen müssen Sie den
Drehknebel in die WiFi Position drehen. Achten Sie darauf das
kein anderes Programm aktiv ist und drücken Sie den Encoder für
3 Sekunden lang. Nach 3 Sekunden erscheint auf dem Display
"rSt" und das "@" Symbol fängt an zu blinken.
@ SYMBOL STEUERUNG
• Wenn der Backofen ausgeschaltet ist, dann ist das Symbol
deaktiviert;
• Wenn der Drehknebel in der WiFi Position steht, dann blinkt das
Symbol auf (1" an und 1" aus) sobald der Backofen im
"Einwahlmodus" (Verbindungspunkt) ist. Andererseits leuchtet
das Symbol durchgehend auf wenn der Backofen im
"Clientmodus" (zu einem Router verbunden ist);
• Wenn der Drehknebel in der WiFi Position steht und der
Backofen versucht sich zu einem Router zu verbinden dann blinkt
das Symbol (3" an und 1" aus);
• Wenn der Drehknebel aktiviert ist und nicht in der WiFi Position
steht dann blinkt das Symbol (1" an und 3" aus).
CANDY SIMPLY-FI:
Weitere Informationen zum ANSCHLUSS und zur
optimalen NUTZUNG Ihres Candy simplyFiGerätes finden Sie unter
http://www.candysimplyfi.com oder auf der
speziell hierfür eingerichteten simplyFiServiceinternetseite
http://simplyfiservice.candy-hoover.com
38 DE
Page 39

6. GARZEITEN
Die in dieser Tabelle angegebenen Garzeiten dienen als Richtwerte. Diese können je nach Qualität, Frische und Größe der zuzubereitenden
Speisen sowie nach Ihrem persönlichen Geschmack variieren.
EIN RATSCHLAG:
Schalten Sie den Backofen etwa 10 Minuten vor der angegebenen
Zeit aus und lassen Sie die Speisen bei ausgeschaltetem Ofen weiter
garen. So sparen Sie nicht nur Strom, sondern Sie können den
Garpunkt nach Ihrem Geschmack bestimmen
Konventioneller Backofen Multifunktionsbackofen
Speise
Menge
Gltter-
rost
Garzeit
Min.
Tempera-
tur °C
• Nudeln
Lasagne
Cannelloni
Nudelauflauf
Kg 3,5
Kg 1,8
Kg 2,5
22
22
22
70 ÷ 75
50 ÷ 60
55 ÷ 60
220
220
220
• Teigwaren
Brot
Pizza
Kg 1
Kg 1
22
35 - 10
vorheizen
25 ÷ 35
200
190
Gltter-
rost
11
Stellung der Schienen
Garzeit
Min.
60 ÷ 65
40 ÷ 50
45 ÷ 50
30 - 35
10 vorheizen
20 ÷ 25
Tempera-
tur °C
200
200
200
180
190
4
3
2
1
Anmerkungen
Kein Vorheizen
Kein Vorheizen
Kein Vorheizen
Schneiden Sie ein Kreuz in den zum
Laib geformten Teig. Mindestens 2
Stunden gehen lassen. Teig in die Mitte
des gut gefetteten Backblechs legen
Backofen 15 Min. Vorheizen
Blätterteig
Rührteig
(Marmorkuchen)
Mürbeteig
(Obstkuchen)
• Fish
• Fisch
Forelle
Lachsfilet
Schollenfilet
Goldbrasse
24 Stk
Kg 1
700 gr.
2,5 cm dick
Kg 1
2 Stk.
30 ÷ 35
1
1
55
40
40 ÷ 45
30 ÷ 35
40 ÷ 45
40 ÷ 45 220
220
180
200
220
220
220
21
1
2
22
22
22
22
25 ÷ 30
50
30-35
35 ÷ 40
30 ÷ 25
35 ÷ 40
35 ÷ 40
200
160
180
200
200
200
200
Form mit 22 cm Ø: 10 Minuten
vorheizen
Form mit 22 cm Ø: 10 Minuten
vorheizen
Abgedeckt backen.
Nicht abdecken.
Abgedeckt backen.
39 DE
Page 40

6. GARZEITTABELLE
Konventioneller Backofen Multifunktionsbackofen
Speise
Menge
Gltter-
rost
Garzeit
Min.
Tempera-
tur °C
Gltter-
rost
Garzeit
Min.
Tempera-
tur °C
Anmerkungen
• Geflügel
Ente/Gans
Huhn
1,3 Kg.
1,5 Kg.
22
22
60 ÷ 80
110 ÷ 120
220
220
60 ÷ 70
100 ÷ 110
200
200
• Grillen
Legen Sie das Grillgut unter den Infrarotgrill. Achtung: die Grillheizung wird glühend rot. Zum Auffangen von Fett und Bratensaft schieben Sie die
Fettpfanne unter das Grillgut.
Toastbrot
Bratwurst
Kotelett
4 Sch
5 St.
4 St.
44
44
44
5
5 vorheizen
25 - 30
5 vorheizen
25
5 vorheizen
Grill Grill
Grill Grill
Grill Grill
5
10 vorheizen
15 - 20
10 vorheizen
15 - 20
10 vorheizen
Toastbrot auf den Rost legen. Von beiden
Seiten grillen. Vor dem Servieren auf dem
Backofenboden warmhalten
Beim Grillen ab und zu wenden.
• Fleisch
Fleisch können Sie sowohl in hohen Brätern als auch in niedrigen Bratpfannen braten.
Niedrige Bräter sollten abgedeckt werden, damit keine Soßen- und Fettspritzer den Backofeninnenraum übermäßig verschmutzen.
So bleibt das Fleisch außerdem saftig und zart. Ohne Deckel ist das Fleisch dagegen kroß und knusprig. Die angegebene Zeiten gelten
fürs Braten mit oder ohne Deckel.
Roastbeef
Kg 1
70 ÷ 80
220
33
50 ÷ 60
200
Fleisch in einem hohen Bräter braten.
Einmal wenden.
Schweinebraten
Kalbsrollbraten
Rinderbraten
Dieses Gerät ist in Übereinstimmung mit der europäischen Richtlinie 2012/19/EU zu elektrischen und elektronischen Altgeräten (WEEE)
gekennzeichnet. Elektrische und elektronische Altgeräte enthalten sowohl Schadstoffe (die negative Auswirkungen auf die Umwelt haben
können) als auch Basiskomponenten (die wiederverwendet werden können). Es ist wichtig, dass elektrische und elektronische Altgeräte
spezifischer Handhabung unterliegen, damit alle Schadstoffe angemessen entfernt und entsorgt und alle Materialien wiederverwertet und
recycelt werden.
Verbraucher spielen eine wichtige Rolle bei der Gewährleistung, dass elektrische und elektronische Altgeräte nicht zu Umweltproblemen
werden; es ist wichtig, einige grundlegende Regeln zu befolgen:
• Elektrische und elektronische Altgeräte können nicht als Haushaltsabfall behandelt werden.
• Elektrische und elektronische Altgeräte sollten an relevante Sammelpunkte übergeben werden, die von der Stadtverwaltung oder eingetragenen
Unternehmen verwaltet werden. In vielen Ländern können bei großen elektrischen und elektronischen Altgeräten heimische Sammeldienste verfügbar
sein.
• Wenn Sie ein neues Gerät erwerben, kann das alte Gerät möglicherweise an den Händler übergeben werden, der es kostenlos auf einer 1:1-Basis
sammeln muss, solange das Gerät von dem gleichen Typ ist und dieselben Funktionen hat wie das gelieferte Gerät
ENERGIESPAREND UND UMWELTSCHONEND
Verzichten Sie nach Möglichkeit darauf, den Ofen vorzuheizen, und machen Sie ihn stets so voll es geht. Öffnen Sie die Ofentür so selten wie möglich, da
bei jedem Öffnen Wärme aus dem Garraum entweicht. Das Abschalten des Ofens 5 bis 10 Minuten vor dem vorgesehenen Ende der Garzeit spart große
Mengen Energie ein. Dabei wird die Restwärme des Ofens zum Fertiggaren der Speisen genutzt. Achten Sie darauf, dass die Dichtungen sauber und in
einem guten Zustand sind, da sie dafür sorgen, dass keine Hitze aus dem Garraum entweichen kann. Wenn der Versorgungsvertrag mit Ihrem
Stromversorger je nach Tageszeit unterschiedliche Tarife vorsieht, können Sie durch das Garen mit „Zeitprogrammierung“ den Garbeginn auf den Anfang
des günstigen Zeitraums legen.
Kg 1
Kg 1,3
Kg 1
100 ÷ 110
90 ÷ 110
80 ÷ 90
220
220
220
22
21
22
80 ÷ 90
90 ÷ 100
80 ÷ 90
200
200
200
Bratform abdecken.
s. Oben
s. Oben
40 DE
Page 41

CONSEILS DE SÉCURITÉ
• AVERTISSEMENT: L'appareil et les parties accessibles deviennent chauds pendant l'utilisation. Des
précautions doivent être prises pour éviter de toucher les éléments chauffants.
• Les enfants de moins de 8 ans doivent être tenus à l'écart à moins d'être surveillés continuellement.
• Cet appareil n'est pas destiné à être utilisé par des personnes (y compris les enfants) dont les capacités
physiques, sensorielles ou mentales sont réduites, ou ayant un manque d'expérience et de
connaissances, à moins qu'elles n'aient été formées à l'utilisation de l'appareil, par une personne
responsable de leur sécurité.
• Les enfants ne doivent jouer avec l'appareil.
• Le nettoyage et l'entretien par l'utilisateur ne doit pas être fait par des enfants sans surveillance.
• En cours d'utilisation l'appareil devient chaud. Des précautions doivent être prises pour éviter de
toucher les éléments chauds à l'intérieur du four.
AVERTISSEMENT: Les parties accessibles peuvent devenir chaudes pendant l'utilisation. Les jeunes
enfants doivent être tenus à l'écart.
• Ne pas utiliser de nettoyants abrasifs ou de racloirs métalliques tranchants pour nettoyer la vitre de la
porte du four car ils peuvent rayer la surface, entrainant des risques d'explosion.
•Le four doit être éteint avant d'enlever la protection et après le nettoyage, la protection doit être replacé
en respectant les instructions.
• Utiliser seulement la sonde de température recommandée pour ce four.
• Ne pas utiliser de nettoyants vapeur pour le nettoyage.
• AVERTISSEMENT: Assurez-vous que l'appareil est éteint avant de remplacer la lampe afin d'éviter les
risques d'électrocution.
• Un système de déconnexion doit être incorporé dans le compteur conformément aux règles de
câblage.
• Les instructions ndiquent le type de cordon à utiliser, en tenant compte de la température de la surface
arrière de l'appareil.
• Si le cordon d'alimentation est endommagé, il doit être remplacé par un cordon spécial disponible
auprès du fabricant ou de stations de dépannage agrées.
ATTENTION: Pour éviter tout danger dû à une réinitialisation accidentelle, cet appareil ne doit pas être
alimenté par un dispositif de commutation externe, comme une minuterie, ou connecté à un circuit qui est
régulièrement allumé et éteint par l'utilitaire.
ATTENTION: Les parties accessibles peuvent être chaudes lorsque le barbecue est en cours
d'utilisation. les jeunes enfants doivent être tenus à l'écart.
• Le liquide débordé doit être enlevé avant de nettoyer.
• Pendant le fonctionnement de la pyrolyse, les surfaces peut devenir plus chaude que d'habitude et les
enfants doivent être tenus à l'écart.
1. INSTRUCTIONS GENERALES
— Lire attentivement les instructions contenues dans cette brochure, elles fournissent d’importantes indications sur la sécurité
d’installation, l’emploi du four et son entretien.
— Conserver soigneusement cette notice d’utilisation pour toutes consultations ultérieures.
— Après avoir déballé votre four, vérifier que l’appareil est complet.
— Les emballages comme le plastique, le polystyrène, peuvent constituer un danger pour les enfants. Ne pas les laisser à leur portée.
ATTENTION
Lors de la première utilisation du four, il peut se produire un dégagement de fumée âcre provoqué par le premier échauffement du collant
des panneaux d’isolation enveloppant le four. Ce phénomène est normal. Attendez que la fumée cesse avant de cuire des aliments.
Lorsque le four est en fonctionnement, la porte en verre est particulièrement chaude. ll est donc nécessaire que les enfants ne la touchent
pas.
ATTENTION: La tension et la fréquence d’alimentation sont indiquées sur la plaque signalétique (illustration dernière page).
Faites appel à un professionnel pour l’installation de votre four.
1.1 DECLARATION DE CONFORMITÉ:
Cet équipement, dans les parties destinées à entrer en contact avec les aliments, est conforme aux normes fixées par les directives CEE
89/109.
En utilisant le symbol sur ce produit, nous déclarons sur notre propre responsabilité que ce produit est conforme à toutes les normes
Européennes relatives à la sécurité, la santé et à l’environnement.
41 FR
Page 42

1.2 CONSIGNES DE SECURITE
Cet appareil est conçu pour cuire des aliments. Tout autre utilisation
(exemple chauffage d’appoint) doit être considéré comme impropre.
Le constructeur ne peut être tenu comme responsable en cas de
dommages liés à une mauvaise utilisation ou a des modifications
techniques du produit.
L’emploi d’un appareil électrique nécessite quelques règles de
sécurité.
- Ne pas tirer sur le fil électrique pour débrancher la prise.
-Ne pas toucher l’appareil avec les pieds ou les mains mouillés.
-Evitez d’utiliser l’appareil pieds nus.
L’utilisation de multiprises et de rallonges pour raccorder votre
appareil est fortement déconseillé. En cas de panne ou de mauvais
fonctionnement il faut éteindre le four avant de le démonter. En cas de
détérioration du fil électrique, remplacez-le rapidement en suivant les
indications suivantes: ôtez le fil d’alimentation électrique et
remplacez-le par un (du type H05RR-F, H05VV-F, H05V2V2F) adapté
à la puissance de l’appareil. Vous veillerez à ce que cette opération
soit effectuée par un centre technique agréé. Pour l’utilisateur c’est la
certitude d’obtenir des pièces de rechange d’origine. Le non-respect
de ces règles peut compromettre la sécurité de l’appareil.
•Ne pas tapisser les parois du four avec des feuilles en
aluminium ou des protections jetables du commerce. La feuille
d'aluminium ou toute autre protection, en contact direct avec
l'email chauffe, risque de fondre et de deteriorer l'email du
moufle..
1.3 INSTALLATION
La mise en service de l’appareil est à la charge de l’acheteur, le
constructeur est dégagé de ce service. Les pannes liées à une
mauvaise installation ne seront pas couvertes par la garantie. Une
mauvaise installation peut provoquer des dommages aux personnes,
aux animaux domestiques; dans ce cas la responsabilité du
contructeur ne peut être engagée.
1.4 MISE EN PLACE DU FOUR DANS SON MEUBLE
Une fois le four inséré dans son meuble, I’ancrage se fait par 4 vis
visibles en ouvrant la porte du four.
Pour permettre une meilleure aération du meuble, les fours doivent
être encastrés conformément aux mesures et distances indiquées sur
l’illustration de la dernière page.
N.B.: Pour les fours à associer avec des plaques de cuisson, il est
indispensable de respecter les instructions contenues dans la
brochure jointe à l’appareil à associer.
1.7 IMPORTANT
Une fois installé le fil d’alimentation doit être positionné de manière a
ce que sa température ne dépasse pas de 50°C la température
ambiante.
L’appareil est conforme aux exigences de sécurité prévues par les
organismes qui établissent les normes. La sécurité électrique de cet
appareil n’est assurée que si il est correctement installé tout en
respectant les normes de sécurité électrique en vigueur.
Le constructeur ne peut être tenu comme responsable des
dommages résultant du manque de mise à la terre de l’installation.
1.8 EQUIPEMENT DU FOUR
EQUIPEMENT DIFFERENT SELON LE TYPE DE FOUR
Avant la première utilisation des différents accessoires, nous
recommandons un nettoyage avec une éponge additionnée de
produit lessiviel, suivi d'un rinçage et d'un séchage.
La grille simple sert de support aux
moules et aux plats.
La grille porte-plat sert plus
particulièrement à recevoir les grillades.
Elle est à associer au plat récolte sauce.
Grâce à leur profil spécial, les grilles
restent à l'horizontale jusqu'en butée.
Aucun risque de glissement ou de
débordement du plat.
Le plat récolte-sauce est destiné à
recevoir le jus des grillades. Il n'est à
utiliser qu'en mode grilloir, Tournebroche
ou Turbogril (selon modèle de four).
Attention : en cuisson autre que les modes Grilloir,Tournebroche, et
Turbo-gril, le plat récolte-sauce doit être retiré du four.
Ne jamais utiliser le plat récolte-sauce comme plat à rôtir, il en
résulterait des dégagements de fumée, des projections de graisse et
un encrassement rapide du four.
1.5 IMPORTANT
Le meuble qui va supporter le four doit avoir des caractéristiques
appropriés. Les panneaux du meuble doivent pouvoir résister à la
chaleur.
Dans le cas de meubles en bois plaqué, les colles doivent résister à
une température de 120°C sinon il y a un risque de décollement ou de
déformations. Conformément aux normes de sécurité, une fois
encastré, aucun contact ne doit être possible avec les parties
électriques.
Toutes les parties qui assurent la protection doivent être fixées de
façon à ne pas pouvoir être enlevées sans outil. Pour garantir une
bonne aération, retirer la paroi arrière du meuble.
1.6 ALIMENTATION ELECTRIQUE
Brancher la fiche dans une prise de courant équipée d’un troisième
contact correspondant à la prise de terre. Montez sur le fil une prise
normaliséé capable de supporter la charge indiquée sur la plaquette.
Le fil conducteur de masse à la terre est identifié par les couleurs
jaune et verte. Veiller à ce que votre installation soit capable de
supporter toute la puissance absorbée par le four. Si votre installation
électrique n’est pas conforme faites la modifier par un électricien afin
de prévenir tous risques. On peut également effectuer le
branchement au réscau en interposant entre l’appareil et le réseau un
interrupteur omnipolaire dimensionnée en fonction de la charge et
conforme aux normes en vigueur. Le fil de terre jaune et vert ne doit
pas être interrompu par l’interrupteur. La prise et l’interrupteur
omnipolaire utilisés doivent être facilement accessibles une fois
l’appareil électroménager installé.
Retrait et nettoyage des grilles
A
1- Dévissez les écrousen les tournantdans le sens inverse des
aiguilles d’une montre
2-Retirez lesgrillesen les tirantdoucement vers vous.
3- Mettez les grilles directement au lave-vaisselle ou lavez-les
simplement avec une éponge humide et veillez à bien les essuyer.
4-Une fois les grilles nettoyées, remettez les doucement dans le four.
5-Fixer lesécrous en les tournant dans le sens des aiguilles d’une
montre.
42 FR
Page 43

2. CONSIGNES UTILES
2.5 FOUR AUTONETTOYANT PAR CATALYSE
2.1 GRILLES DU FOUR, NOUVEAU SYSTÈME
D’ARRÊT
Tous les fours bénéficient d’un nouveau
système d’arrêt des grilles. Ce système
permet de sortir complètement la grille en
totale sécurité. Parfaitement bloquée elle
ne peut pas basculer vers l’avant malgré la
présence d’un poids important. Plus
stables,ces grilles assurent une plus
grande sécurité et tranquillité.
2.2 LA CUISSON AU GRIL
Le préchauffage est superflu. La cuisson peut se faire porte close et
les aliments doivent être placés par rapport au gril en fonction des
résultats que l’on souhaite obtenir.
— Plus près pour les aliments dorés en surface et saignants.
— Plus loin pour les aliments bien cuits à l’intérieur.
Le lèchefrite permet la récupération du jus.
Ne jamais utiliser le lèchefrite comme plat à rotir, il en résulterait
dégagements de fumée, des projections de graisse et un
encrassement rapide du four.
2.3 Selon modèle Le PACK
Les panneaux autonettoyants à émail microporeux disponibles en
option évite le nettoyage manuel du four.
Pendant la cuisson les projections de graisse sont “l’absorbées”
par les parois catalytiques. La graisse est ensuite détruite par
oxydation en devenant de la poussière. En cas de cuisson
particulièrement grasse, il peut arrivér que la graisse bouche les
pores de l’émail. Pour détruire un surplus de graisse mettez en
fonctionnement votre four à vide sur la position maximale de
température pendant environ 10 à 20 minutes.
Ne jamais utiliser de grattoir, de produit chimique pour nettoyer la
catalyse. Utilisez plutôt de l’eau chaude et une éponge.
Si jamais vous cuisinez un plat très gras ou une viande au gril,
utiliser un plat avec de grands rebords pour limiter les projections
de graisse.
La porosité de la catalyse est primordiale pour vous assurer un
nettoyage optimal.
N.B.: Les panneaux autonettoyants ont une durée de
fonctionnement d’environ 300 heures. En cas de baisse
d’efficacité il est alors possible de les changer.
2.4 Selon modèle
système d'éclairage qui remplace la traditionnelle "lampe à
incandescence".
Dans la contreporte du four sont insérés 14 Leds, de haute qualité à
lumière blanche, qui illuminent la cavité avec une lumière diffuse
permettant une vision de la cuisson sans ombre, sur plusieurs
niveaux.
Le design créé pour le support des
14 Leds offre un élégant effet high-tech.
Avantages du système
Visibilité optimale des plats
- Fiabilité de fonctionnement
- Durée de vie prolongée
- Consommation énergétique extrêmement basse " - 95 % " par
rapport au système traditionnel d'éclairage du four - Rendement élevé
et Facilité d'entretien.
« Les appareils dotés de LED blanches de classe 1M selon la norme
IEC 60825-1:1993 +A1: 1997 + A2: 2001 (équivalente à la norme EN
60825-1: 1994 +A1: 2002 +A2:2001); la puissance maximale
lumineuse émise est de 459nm < 150uW. Donnée non observée
directement avec des instruments optiques. »
43 FR
Page 44

3. PRESENTATION DU TABLEAU DE BORD
Cadran affichage:
heure, programmation mode de cuisson, voyants,
température fonction cuisson et positionnement du plat.
TOUCHE DE REGLAGE ET DE VALIDATION
Ajustement des données: température, programmation durée et
heure de fin - Réglage possible en tournant la touche vers le “-” ou vers le “+”
Validation des données: appuyer sur la touche.
Voyant: montée
en température
Affichage fonctionnalité du
four et niveau gradin
recommandé
Horloge /
Programmation /
Température de cuisson
PYRO
Tournebroche
Affichage Booster
Préchauffage
Minuterie et fin
Affichage programmation:
Durée Minuterie et
Fin
Voyant
Sécurité enfant
Voyant
WIFI
Voyant
Fermeture porte du four
44 FR
Page 45

3.1 CONSEILS AVANT LA PREMIERE UTILISATION
•UN PREMIER NETTOYAGE doit être réalisé avant la première
utilisation
-passer un chiffon doux et humide sur les surfaces extérieures de
l'appareil.
-nettoyer avec une éponge additionnée de produit lessiviel, les
accessoires et l'intérieur du four. Rincer et sécher.
-faire chauffer le four à vide une bonne heure à la température maximale
pour faire disparaître l'odeur du neuf. Pendant cette opération, bien aérer
la pièce.
• CE QU’IL FAUT SAVOIR
Toute modificiation doit être validée, en appuyant sur la touche centrale.
Arrêt du four:
il est possible qu’en cours de manipulation, une fausse manoeuvre
intervienne.
Pour arrêter le four ... ramener la manette du sélecteur de fonction sur la
position arrêt.
La sécurité «enfant»:
un verrouillage des commandes du four est possible en sélectionnant la
sécurité enfant. Se reporter au chapitre “La sécurité enfant”.
Turbine de refroidissement:
elle protège et refroidit les commandes électroniques ainsi que le tableau
de bord du four, elle se déclenche et s’arrête automatiquement même si
le four est à l’arrêt.
Eclairage du four:
il reste allumé pendant toute la durée de fonctionnement et dès ouverture
de la porte. S’allume en tournant la manette de programmation sur le
symbole “Eclairage”.
• REGLAGE DE L’HEURE
A la mise sous tension ou après une coupure de courant, l’horloge du
programmateur doit impérativement être ajustée.
Pour la mise à l'heure de l'horloge, procéder comme suit :
1-Tourner la manette du programmateur jusqu'au repère “Mise à l’heure”:
2 - Ajuster avec la touche centrale, en tournant vers le "-", ou vers le "+".
3 - Ramener la manette du programmateur sur la position “ • ”.
10:30
L'affichage de la durée ou l'heure de fin clignote. Avec la touche
centrale modifier les enregistrements selon votre besoin et valider sur
le programmateur.
A la fin de cette modification, ne pas oublier de ramener la manette de
programmation sur “Position Arrêt” pour valider la nouvelle
programmation.
Pour plus de détails sur la programmation, se reporter au chapitre 5.3
PROGRAMMATION.
4- A la fin de la cuisson, ramener le sélecteur des fonctions sur
“Position Arrêt”. Le voyant de température clignote à nouveau et reste
allumé même si le four est éteint. Il clignote pendant la descente de
température et disparaît définitivement lorsqu’il atteint une
température suffisamment basse.
• LES MODES DE CUISSON
- Toutes les cuissons sont réalisées porte fermée -
SOLE BRASSEE - Utilisation de la résistance de sole plus la
turbine qui brasse l'air dans l'enceinte du four. Cette fonction est
idéale pour les tartes à fruits juteux, les tourtes, les quiches, les pâtés.
Elle évite le dessèchement des aliments et favorise la levée pour les
cuissons de cake, pâte à pain et autres cuissons par le dessous.
Placer la grille sur le gradin inférieur.
SOLE - Utilisation de la résistance de sole. Idéale pour la
cuisson de crème caramel, flans, terrine, cuissons lentes, en cocotte
(poulet, boeuf ...).
CONVECTION NATURELLE - Utilisation simultanée de la
résistance de sole et de voûte. Cette fonction est idéale pour toutes
les cuissons à l'ancienne, pour saisir les viandes rouges, les rosbifs,
gigots, gibiers, le pain, les papillotes, les feuilletages.
CHALEUR BRASSEE - Utilisation simultanée de la
résistance de sole, de voûte, et de la turbine qui brasse l'air dans
l'enceinte du four. Cette fonction est recommandée pour les volailles,
les pâtisseries, les poissons, les légumes.... La chaleur pénètre mieux
à l'intérieur du mets à cuire et réduit le temps de cuisson. Vous pouvez
réaliser des cuissons combinées avec préparations identiques ou non
sur un ou deux gradins. Ce mode de cuisson assure en effet une
répartition homogène de la chaleur et ne mélange pas les odeurs.
Prévoir une dizaine de minutes de plus, pour la cuisson combinée.
3.2 RECOMMANDATIONS
• LE MODE MANUEL
Les modes de cuisson proposés en mode Manuel sont décrits dans le
tableau ci-dessous. Une température pour chaque mode de cuisson
est proposée, elle reste modifiable dans une plage pré-définie.
Modes de fonction
selon modèle de four
Sole + Brassée
Sole
Convection Naturelle
Chaleur Brassée
Élément de chauffage
circulaire+ Brassee
Gril
Turbo Broche
Décongélation
Etuve
Pizza
*Booster: montée rapide en température
** Suivant modèle de four.
***
Température
pré-réglée
o
210 50-220 Booster
160 50-220
***
220
210
180
L2
240
***
40
60
**
230
1- Positionner la manette du sélecteur des fonctions sur le mode de
cuisson nécessaire à la cuisson.
Les éléments chauffants fonctionnels pour le mode de cuisson choisi
s'affichent.
2- En fonction du mode de cuisson enregistré, une température de
consigne s'affiche, elle est modifiable dans une plage prédéfinie, voir
tableau ci-dessus.
Pour la modifier tourner la touche centrale pour régler la température
et appuyer sur le même bouton pour valider.
... l'affichage de la température est fixe mais reste modifiable pendant
toute la durée de la cuisson.
Le four démarre la cuisson et commence la montée en température.
Le voyant clignote tant que la température de consigne n'est pas
atteinte. A la fin du préchauffage, un bip sonore retentit et le voyant
devient fixe.
3-Il est possible de programmer une durée et une fin de cuisson, en
positionnant la manette de programmation sur "durée" ou sur "heure
de fin".
Température plage de
C
pré-réglée C
50-240
50-230
50-230
L1-L3
180-240
No
No
230
o
EN 60350-1
Fonction
Booster*
Booster
Booster
ÉLÉMENT DE CHAUFFAGE CIRCULAIR + BRASSÉE Utilisation simultanée de la résistance circulaire et de la turbine qui
brasse l'air dans l'enceinte du four. La définition de cette fonction est
équivalente à celle de la chaleur brassée.
GRIL - Utilisation de la résistance de voûte uniquement. Un
préchauffage de 5 minutes est nécessaire pour le rougissement de la
résistance. C'est le succès assuré pour les grillades, les brochettes et
pour les gratins.
Les viandes blanches doivent être écartées du grilloir ; le temps de
cuisson sera alors plus long,mais la viande sera plus savoureuse.
Pour les viandes rouges et filets de poissons, ils peuvent être placés
sur la grille avec le plat récolte sauce glissé dessous. Le récolte-sauce
peut également être positionné sur une grille située sur le gradin
inférieur.
TURBO GRIL - Utilisation de la résistance de voûte plus la
turbine qui brasse l'air dans l'enceinte du four. Un préchauffage est
nécessaire pour les viandes rouges et inutile pour les viandes
blanches. Idéal pour les cuissons de volume épais, de pièce entière
telles que rôti de porc, volailles etc... Placer le mets à cuire
directement sur la grille au centre du four, à un niveau moyen. Glisser
le récolte-sauce sous la grille de façon à récupérer les graisses.
S'assurer que le mets ne soit pas trop près du grilloir. Retourner la
pièce à cuire à mi-cuisson.
DECONGELATION - Fonctionnement de la turbine de
cuisson qui brasse l’air dans l’enceinte du four. Idéale pour réaliser
une décongélation avant une cuisson.
La température est pré-réglée à 40°C constants, aucun réglage n'est
possible.
LE MODE ETUVE - Utilisation simultanée de la résistance
de voûte et de sole plus la turbine qui brasse l'air dans l'enceinte du
four. Idéal pour maintenir un plat au chaud sans risque de surcuisson
et pratique aussi pour chauffer les assiettes vides.
La température est pré-réglée à 60°C constants aucun réglage n'est
possible.
PIZZA - La forte chaleur produite par la fonction Pizza est
très proche de celle d’un feu de bois dans un four traditionnel
WIFI
45 FR
Page 46

3.3 LA PROGRAMMATION
AFFICHAGE SYMBOLES
Lampe
Reglage De L'heure
Fonctionnement du minuteur
Programmation durée
STOP
Selecteur
programmation
MINUTEUR :
son fonctionnement est indépendant du four et n'a aucune incidence
sur les éléments chauffants. Il sert simplement d'aide-mémoire
sonore.
•Tourner la manette sur la position Minuterie, le symbole Minuteur
apparaît. Sur le cadran, s'affiche près de l'horloge 00 : 00.
•Les minutes clignotent, tourner la touche centrale pour ajuster les
minutes nécessaires. Puis valider en appuyant sur cette même
touche.
•Les heures clignotent, tourner la touche centrale pour ajuster l'heure
nécessaire. Puis valider en appuyant sur cette même touche.
•Ramener la manette du programmateur sur la position “ • ”. Lorsque
le temps est écoulé, l'affichage de la durée disparaît. Pendant 15
secondes, un bip sonore retentit et l'affichage du Minuteur clignote
(pour écourter le temps, il suffit d'appuyer sur la touche centrale)...
PROGRAMMATION D'UNE DUREE :
les différentes recettes sont pré-programmées avec une durée. En
Mode Manuel, Décongélation, Etuve, une programmation d'une
durée est possible mais pas indispensable pour le fonctionnement du
four.
•Programmer le four pour un mode de fonctionnement.
•Tourner la manette sur la position Durée de cuisson, le symbole
durée apparaît. Sur le cadran, s'affiche près de l'horloge une durée
pré-enregistrée pour les recettes, ou 00:00 pour les autres modes de
fonctionnement du four.
•Les minutes clignotent, tourner la touche centrale pour ajuster les
minutes nécessaires. Puis valider en appuyant sur cette même
touche.
•Les heures clignotent, tourner la touche centrale pour ajuster l'heure
nécessaire. Puis valider en appuyant sur cette même touche.
•Ramener la manette du programmateur sur “Position Arrêt” pour
valider la nouvelle durée.
Lorsque le temps est écoulé, le four se coupe automatiquement.
Pendant 15 secondes, un bip sonore retentit pour vous avertir et les
symboles Durée et STOP clignotent.
•Ramener la manette du sélecteur des fonctions sur “Position Arrêt”,
si cette dernière opération n'est pas réalisée les symboles Durée et
STOP continueront de clignoter.
PROGRAMMATION D'UNE HEURE DE FIN :
les différentes recettes sont pré-programmées avec une durée donc
une heure de fin de cuisson.En Mode Manuel, Décongélation,
Etuve, une programmation d'une heure de fin de cuisson est possible
mais pas indispensable.
•Programmer le four pour un mode de fonctionnement (Mode Auto ou
Mode de cuisson).
•Tourner la manette sur la position Fin de cuisson, le symbole STOP
apparaît. Sur le cadran, s'affiche près de l'horloge une heure de fin
pré-enregistrée pour les recettes, ou l'heure du moment pour les
autres modes de fonctionnement du four.
•Ramener la manette du programmateur sur “Position Arrêt” pour
valider la nouvelle heure de fin.
•Les minutes clignotent, tourner la touche centrale pour ajuster les
minutes nécessaires. Puis valider en appuyant sur cette même
touche.
•Les heures clignotent, tourner la touche centrale pour ajuster l'heure
nécessaire. Puis valider en appuyant sur cette même touche.
Attention : en départ différé, sur le cadran s'affiche l'heure de fin avec
les symboles Durée et STOP, et reste seulement l’affichage de la
recette pour le mode Recettes.
Programmation heure de fin
Programmation sécurité enfant
Verrouillage porte de four
•Le four calcule automatiquement l'heure de départ (heure de fin
moins la durée).
Lorsque l'heure de fin est atteinte, le four se coupe automatiquement.
Pendant 15 secondes, un bip sonore retentit pour vous avertir et les
symboles Durée et STOP clignotent.
•Ramener la manette du sélecteur des fonctions sur “Position Arrêt”,
si cette dernière opération n'est pas réalisée les symboles Durée et
STOP continueront de clignoter.
3.4 QUELQUES CONSEILS DE CUISSON
Il est préférable de ne saler les viandes qu'en fin de cuisson, car le sel
favorise les projections de graisse, donc un encrassage rapide du four
et des fumées importantes.
Les rôtis de viande blanche, porc, veau, agneau, les poissons
peuvent être placés dans le four froid. La cuisson est alors plus longue
que dans le four chauffé préalablement, mais elle se fait mieux au
centre de l'aliment à cuire, la chaleur ayant plus de temps pour se
propager vers le milieu de l'aliment.
Un bon préchauffage est toujours à l'origine de la réussite d'une
cuisson de viande rouge.
POUR LES GRILLADES :
. avant d’enfourner : sortir la viande du réfrigérateur quelques heures
avant de la griller. Nous vous conseillons de la poser sur des
épaisseurs de papier absorbant : elle sera mieux saisie, plus
savoureuse et ne risquera pas de rester froide à l'intérieur. Poivrer et
épicer la viande avant de la faire griller, mais ne la saler qu'une fois
cuite, sinon elle serait mal saisie et moins juteuse. Badigeonner toutes
les pièces à cuire avec un peu d'huile. Le mieux est d'utiliser un
pinceau large et plat. Saupoudrer ensuite de poivre et de quelques
herbes (thym, etc..).
. Pendant la cuisson : ne jamais piquer les aliments en cours de
cuisson, ni lorsque vous les retournez : leur jus s'écoulerait et la
grillade serait sèche.
Les viandes devront être retournées à mi-cuisson, exceptées avec le
Tournebroche qui se charge lui-même de la rotation du mets à cuire.
Attention : si votre four est enfumé, la température affichée est trop
forte, pour y remédier, il faut réduire la température.
Ne jamais utiliser le plat récolte-sauce comme plat à rôtir.
POUR LES PATISSERIES : éviter d'utiliser des moules brillants.Ils
réfléchissent la chaleur et peuvent nuire à la cuisson des gâteaux. Si
vos gâteaux dorent trop vite, recouvrez-les avec une feuille de papier
sulfurisé, ou bien avec une feuille de papier aluminium.
Attention : utiliser la feuille d'aluminium dans le bon sens : la face
brillante doit être face au gâteau. Dans le cas contraire, la chaleur se
réflètera sur la face brillante et ne pénètrera pas à l'intérieur du plat.
Eviter d'ouvrir la porte du four pendant les 20 à 25 premières minutes
de cuisson : les soufflés, brioches, biscuits de Savoie, etc...
retomberaient aussitôt.
Pour contrôler la cuisson de vos pâtisseries, piquer le centre avec la
lame d'un couteau. Si elle ressort bien sèche, votre gâteau est
cuit.Vous pouvez arrêter la cuisson. Si la lame ressort humide ou avec
quelques particules de gâteau collées dessus, continuer la cuisson
mais en baissant légèrement la température pour que la pâtisserie
finisse de cuire sans brûler.
3.5 REGLAGE DU CONTRASTE DU CADRAN
D’AFFICHAGE
Le contraste du cadran d’affichage peut être réglé à tout moment. Par
défaut le niveau du contrate est “C5”. Pour modifier ce réglage, suivre
la procédure suivante :
•Positionner la manette de programmation sur “Eclairage” et le
sélecteur des modes de cuisson sur “O”. Appuyer sur la touche
centrale pendant 3 secondes, alors le cadran affiche l’indication “CX”
(X = niveau de contraste), tourner la touche centrale pour ajuster,
réglage possible entre 1 et 9, puis valider en appuyant sur cette même
touche pendant 3 secondes.
46 FR
Page 47

4. LA SECURITE ENFANT
5. FONCTION WIFI
Cette fonction est une sécurité essentielle surtout en présence de
jeunes enfants. Elle évite que l'enfant puisse mettre en
fonctionnement le four ou modifier les données programmées.
Cette sécurité entraîne le verrouillage du tableau de bord à l'arrêt
du four comme en cours d'utilisation (mode cuisson ou pyrolyse).
Deux niveaux de sécurité sont possibles :
NIVEAU 1 : Blocage des commandes Sélecteur modes de
cuisson et Touche centrale
•Pour l'activer : positionner le programmateur sur sécurité enfant
•Action : le sélecteur modes de cuisson et la touche centrale sont
inactifs*.
•Pour le désactiver : positionner le programmateur sur 0.
NIVEAU 2 : Blocage de toutes les commandes
•Pour l'activer : positionner le programmateur sur sécurité enfant
et maintenir la touche centrale appuyée pendant 3 secondes.
•Action : toutes les commandes sont inactives*.
•Pour le désactiver : procédure identique à celle de l'activation.
Positionner le programmateur sur sécurité enfant et maintenir la
touche centrale appuyée pendant 3 secondes.
*Nota : dans tous les cas, pour des raisons de sécurité, même
lorsque les commandes sont verrouillées, le retour à zéro du
sélecteur entraîne un arrêt du four.
CONFIGURATION DU WIFI
• Mettre la manette de droite sur la position Wifi ( le symbole “@”
apparait et clignote sur l’écran du programmateur).
•Quand la four est connecté au réseau domestique et que la
fonction Wifi est activée le symbole “@” reste affiché sans
clignoter.
•Si le four n’est pas connecté au réseau domestique le symbole
“@” clignote ( voir le chapitre gestion du symbole “@”).
•Si la fonction Wifi est activée, le four peut seulement être contrôlé
via l’application ( le bandeau de commande est alors désactivé).
•Si la manette n’est pas sur la position Wifi, le four ne peut pas être
contrôlé à distance.
RESET
Pour réactiver le Wifi, tourner la manette la position Wifi ( aucune
cuisson ne doit être en cours), presser la molette pendant 3
secondes. Après 3 secondes « rSt » apparait sur l’écran du
programmateur et le symbole “@” clignote.
GESTION DU SYMBOLE “@”
•Quand le four est éteint, le symbole “@” n’apparait pas.
•Quand la manette du four est sur la position Wifi, le symbole “@”
clignote (en alternance d’1 ‘’) si le four émet un signal Wifi ( en
mode relais) et reste visible sans clignoté quand le four en mode
« client » ( connecté à un routeur).
•Quand la manette du four est sur la position Wifi et que le four
essaie de se connecter au routeur, le symbole “@” clignote (en
alternance de 3‘’/ 1 ’’).
•Quand le four est allumé mais que la manette du four n’est pas
sur la position Wifi ( lecture seule) le symbole “@” clignote (en
alternance de 3‘’/ 1 ’’).
CANDY SIMPLY-FI:
Pour obtenir des informations détaillées sur la
manière de CONNECTER vos appareils et de les
UTILISER au mieux, rendez-vous sur
http://www.candysimplyfi.com ou visitez le site
support dédié aux consommateurs
http://simplyfiservice.candy-hoover.com
47 FR
Page 48

6. TEMPS DE CUISSON
48 FR
Page 49

6. TEMPS DE CUISSON
Le présent appareil est marqué conformément à la directive 2012/19/UE relative aux déchets d'équipements électriques et
électroniques
(DEEE). Les DEEE contiennent à la fois des substances polluantes (qui peuvent avoir des conséquences négatives sur
l'environnement) et
des éléments de base (réutilisables). Il est important de soumettre les DEEE à des traitements spécifiques, en vue d'extraire et
d'éliminer de façon appropriée toutes les substances polluantes, puis de récupérer et recycler tous les matériaux.
Chacun peut jouer un rôle important quant à la protection de l'environnement contre les DEEE. Pour atteindre cet objectif, il est
impératif de suivre quelques règles élémentaires :
• Les DEEE ne doivent pas être traités comme des déchets ménagers.
plusieurs pays, il est possible de collecter à domicile les DEEE volumineux.
• Lorsque vous achetez un nouvel appareil, vous devez retourner l'ancien au vendeur qui le récupère gratuitement, au cas par cas, à condition
que l'équipement soit de type équivalent et possède les mêmes fonctions que celui fourni.
ÉCONOMIE ET RESPECT DE L'ENVIRONNEMENT
Lorsque cela est possible, éviter le préchauffage du four et éviter de le faire tourner à vide. N'ouvrez la porte du four que lorsque cela est
nécessaire, car il y a des déperditions de chaleur à chaque fois qu'il est ouvert. Pour une économie d'énergie significative, éteindre le four entre 5
et 10 minutes avant la fin de cuisson prévue, et utiliser la chaleur que le four continue de générer. Gardez les joints propres et en bon état, pour
éviter toute déperdition d'énergie. Si vous avez un contrat électrique avec un tarif heure creuse, le programme "cuisson différée" peut vous faire
réaliser des économies d'énergie en déplaçant le début du programme à un intervalle de temps à tarif réduit.
• Ils doivent être remis aux points de collecte appropriés gérés par la municipalité ou par des sociétés immatriculées. Dans
49 FR
Page 50

INSTRUÇÕES DE SEGURANÇA
AVISO: Durante a sua utilização, tanto o aparelho, como os componentes acessíveis do mesmo ficam
muito quentes. Evite sempre tocar nos elementos de aquecimento.
• Mantenha as crianças de com menos de 8 anos afastadas do aparelho, excepto se estiverem a ser
supervisionadas por um adulto.
• Este electrodoméstico pode ser utilizado por crianças com oito anos ou mais e por pessoas com
capacidades físicas, sensoriais ou mentais diminuídas, ou que não disponham da experiência e dos
conhecimentos necessários, desde que lhes tenham sido dadas instruções sobre a utilização do
aparelho por uma pessoa responsável pela sua segurança, ou que o utilizem sob sua supervisão.
• Nunca deixe as crianças brincarem com este aparelho.
• Crianças sem supervisão não devem nem limpar, nem manter este aparelho.
• Durante a utilização, o aparelho fica quente. Evite sempre tocar nas resistências instaladas no interior
do forno.
AVISO: O exterior e as partes acessíveis podem ficar quentes durante a operação do forno. Mantenha
as crianças pequenas afastadas.
• Nunca utilize produtos abrasivos nem esfregões de metal para limpar o vidro da porta do forno; se o
fizer, o vidro pode ficar riscado e acabar por se partir.
• Desligue o forno antes de remover a protecção; concluída a limpeza, nunca se esqueça de voltar a
montar a protecção, de acordo com as instruções.
• Use exclusivamente a sonda térmica recomendada para este forno.
• Nunca utilize um sistema de limpeza a vapor para limpar este aparelho.
AVISO: Antes de substituir a lâmpada, e para evitar sofrer choques eléctricos, certifique-se sempre de
que o aparelho está desligado da corrente.
• O sistema de desligamento tem de estar integrado na instalação fixa, de acordo com as regras
aplicáveis à instalação e ligação eléctrica.
• As instruções têm de indicar o tipo de cabo a ser utilizado, tendo em consideração a temperatura
registada na superfície traseira do aparelho.
• Se o cabo de alimentação estiver danificado, tem de ser substituído por um cabo ou conjunto especial,
que pode ser obtido junto do fabricante ou do seu serviço de assistência técnica.
CUIDADO: Com vista a evitar perigos resultantes da reposição acidental do disjuntor térmico, este
aparelho não pode ser alimentado a partir de um comutador externo como, por exemplo, um
temporizador, nem pode ser ligado a um circuito que seja regularmente ligado e desligado pela empresa
abastecedora de electricidade.
CUIDADO: Quando o grelhador está a ser utilizado, as peças e componentes acessíveis podem ficar
quentes. Mantenha as crianças pequenas afastadas.
• Apanhe eventuais derrames antes de os limpar.
• Durante a limpeza pirolítica automática as superfícies podem ficar mais quentes do que o habitual, pelo
que deve manter as crianças à distância.
1. INDICAÇÕES DE CARÁCTER GERAL
Obrigado por ter optado por um dos nossos produtos. Para tirar o maior proveito possível do seu forno, recomendamos que:
Leia atentamente este manual de instruções de utilização; ele contém instruções importantes sobre a instalação, a utilização e a
manutenção seguras deste forno.
Mantenha este manual de instruções à mão, num local seguro, para o poder consultar sempre que necessário.
Quando o forno for ligado pela primeira vez, ele poderá emitir fumo com um cheiro acre. Isto fica a dever-se ao facto de o agente aglutinante
dos painéis de isolamento existentes à volta do forno ter sido aquecido pela primeira vez. Trata-se de um facto absolutamente normal; se
ele ocorrer, terá apenas de esperar que o fumo se dissipe antes de introduzir os alimentos no forno.
Devido à sua natureza, um forno aquece muito, em especial a sua porta de vidro.
50 PT
Page 51

1.1 DECLARAÇÃO DE CONFORMIDADE:
Os componentes utilizados neste electrodoméstico que podem entrar
em contacto com géneros alimentares satisfazem o disposto na
directiva da CEE 89/109.
Ao colocar o símbolo neste produto declaramos, sob nossa
responsabilidade, a conformidade com todas as exigências de
segurança europeia, para com a saúde e os requisitos ambientais
estabelecidos na legislação em relação a este produto.
Depois de ter retirado o seu forno da embalagem, certifiquese de que
ele não apresenta qualquer tipo de danos. Se tiver qualquer dúvida,
não o utilize e entre em contacto com um técnico qualificado.
Mantenha os materiais utilizados na embalagem, como, por exemplo,
sacos de plástico, poliestireno ou pregos, fora do alcance das crianças;
estes materiais podem constituir fontes de perigo para as crianças.
1.2 INFORMAÇÃO SOBRE SEGURANÇA
O forno só deverá ser utilizado para o fim para que foi concebido, ou
seja, o forno só deverá ser utilizado para cozinhar alimentos. Todo e
qualquer outro tipo de utilização, como, por exemplo, para aquecer o
ambiente, é considerada uma forma imprópria de utilizar o forno e,
consequentemente, é considerada perigosa. O fabricante declina
toda e qualquer responsabilidade por quaisquer danos provocados
por uma utilização imprópria, incorrecta ou irrazoável do forno.
Sempre que utilizar um aparelho eléctrico, deverá observar
determinadas regras básicas.
Não puxe pelo cabo para desligar a ficha do aparelho da tomada de
alimentação de energia.
Não toque no forno com mãos ou pés molhados ou húmidos. Nunca
utilize o forno quando est iver descalço. Normalmente nunca é boa
ideia utilizar adaptadores, fichas múltiplas e extensões.
Se o forno se avariar ou ficar defeituoso, desligue-o, retirando a ficha
do respectivo cabo de alimentação de energia da tomada, e não lhe
toque.
Se o cabo de alimentação de energia apresentar qualquer tipo de
dano, ele terá de ser imediatamente substituído. Ao proceder à
substituição do cabo siga estas instruções.
Desmonte o cabo de alimentação de energia danificado e substitua-o
por um H05RR-F, H05VV-F, H05V2V2-F apto a suportar a corrente
eléctrica de que o forno necessita. A substituição do cabo deverá ser
sempre levada a cabo por um técnico devidamente qualificado.
O cabo de ligação à terra (amarelo/verde) tem de ter um comprimento
10 mm superior ao comprimento do cabo de alimentação de energia.
Sempre que o seu forno necessitar de ser reparado, recorra
exclusivamente a um serviço de assistência técnica aprovado;
certifique-se sempre de que só são utilizadas peças sobressalentes
originais. Se estas instruções não forem cumpridas, o fabricante não
poderá assegurar a segurança do forno.
•Nunca forre as paredes do forno com papel de alumínio ou com
o material descartável de protecção, como o que se encontra à
venda no mercado. O papel de alumínio, bem como qualquer
outro tipo de protecção, quando colocado em contacto directo
com o esmalte quente, corre o risco de se derreter e de deteriorar
o esmalte do interior do forno.
1.5 IMPORTANTE
Para que este forno possa trabalhar nas devidas condições, será
necessário que o local onde ele vai ser montado seja apropriado. Os
painéis dos armários de cozinha situados de um lado e do outro do
forno deverão ser feitos de um material resistente ao calor. Certifiquese de que as colas dos armários feitos de madeira folheada estejam
aptas a suportar temperaturas de, pelo menos, 120°C. Tanto os
plásticos como as colas que não estejam aptos a suportar estas
temperaturas se derreterão, provocando a deformação do armário.
Depois do forno ter sido alojado no interior do armário, os
componentes eléctricos terão de ser totalmente isolados. Este
requisito é um requisito de segurança legal. Todas as protecções
deverão estar firmemente montadas, de modo a ser impossível
proceder à sua remoção sem recorrer a ferramentas especiais.
Remova o painel de trás do armário de cozinha em que o forno vai ser
montado, a fim de assegurar a circulação de uma corrente de ar
adequada à volta do forno. O forno deverá ter um vão na parte de trás
de, pelo menos, 45 mm.
1.6 LIGAÇÃO DO FORNO À REDE DE
ALIMENTAÇÃO DE ENERGIA
Ligue a ficha do cabo de alimentação de energia à tomada. Primeiro,
porém, deverá certificar-se de que existe um terceiro contacto que
actua como ligação do forno à terra. O forno terá de ser devidamente
ligado à terra. Se o modelo de forno que adquiriu não estiver equipado
com uma ficha, monte uma ficha padrão no cabo de alimentação de
energia. Esta ficha deverá estar apta a suportar a alimentação de
energia constante da placa de características. O cabo de ligação à
terra é amarelo/verde. A ficha deverá ser montada por um técnico
qualificado. Se a ficha do cabo e a tomada forem incompatíveis,
deverá mandar proceder à substituição da tomada por um técnico
devidamente qualificado.
Se assim o quiser, poderá igualmente instalar um interruptor de
ligar/desligar, à alimentação de energia. As ligações terão de ter em
consideração a corrente alimentada e deverão satisfazer os
requisitos legais em vigor.
1.7 EQUIPAMENTO DO FORNO (de acordo com modelo)
É necessário efectuar uma limpeza do equipamento antes da
primeira utilização. Lave com uma esponja, enxague e seque.
A grelha simples serve de suporte
para formas, travessas, etc.
A grelha porta-recipientes serve
mais particularmente para grelhados;
associa-se ao tabuleiro de recolha de
sucos.
Devido ao seu perfil especial, as
grelhas permanecem na horizontal
mesmo quando puxadas ao máximo
para o exterior, pelo que não existe
qualquer risco do recipiente que
contêm escorregar ou transbordar.
1.3 INSTALAÇÃO
Compete ao cliente proceder à instalação do forno. O fabricante não
tem qualquer obrigação de proceder à instalação do forno. Se for
necessária assistência técnica do fabricante para repar avarias ou
defeitos resultantes de uma instalação incorrecta do forno, esta
assistência técnica não está coberta pela garantia. Ainstalção deve
ser efectuada segundo as instruções dos técnicos qualificados. Uma
instalação incorrecta do forno pode causar danos em pessoas,
animais ou objectos. Neste caso, o fabricante não poderá ser
responsabilizado por esses danos.
1.4 MONTAGEM DO FORNO
Monte o forno no espaço previsto na cozinha para esse efeito; o forno
poderá ser montado sob uma bancada ou num armário vertical.
Monte o forno na posição devida, aparafusando-o nessa posição; a
armação do forno dispõe de quattro orifícios previstos para a fixação
do forno.
Para localizar estes orifícios deverá abrir a porta do forno e olhar para
o interior do mesmo.
Ao proceder àmontagem do forno, e para assegurar uma ventilação
adequada do mesmo, deverá respeitar as dimensões e distâncias
indicadas no diagrama da ultima pagina.
Nota: No caso dos fornos combinados com uma placa, as instruções
de montagem do manual da placa terão de ser seguidas.
O tabuleiro buleiro de recolha de sucos
serve para aparar o suco dos grelhados.
Pode ser colocado por cima da grelha ou
introduzido nas calhas. Só se utiliza com
o Grelhador, o Espeto ou o
Turbogrelhador. Nos outros modos de cozedura deve ser retirado do
forno. Nunca utilizar este tabuleiro como recipiente para assar, pois
causaria salpicos de gordura e fumos, e rapidamente sujaria o forno.
O conjunto de piza é o ideal para a
cozedura de pizas. Este conjunto deve
ser utilizado em conjunto com a função
Pizza
O suporte do tabuleiro; O suporte do
tabuleiro (prateleira) é indicado para
grelhados. Utilize a junção com a
pingadeira. Está incluida uma pega
para ajudar a mover em segurança
ambos os acessórios. Não deixe a
pega dentro do forno.
51 PT
Page 52

Remoção e limpeza das grelhas laterais
1 - Retire as porcas serrilhadas, desapertando no sentido dos ponteiros do relógio.
2 - Retire as grelhas, puxando no sentido indicado.
3 - Limpe as prateleiras de arame, lavando-as na máquina de lavar loiça ou com uma esponja
molhada, secando posteriormente.
4 - Após o processo de limpeza, instale as grelhas, fazendo o movimento no sentido inverso.
5 – No fim, fixar as porcas serrilhadas, apertando-as.
Durante a utilização do forno, os acessórios não usados devem ser retirados do forno.
2. SUGESTÕES ÚTEIS
A
2.1 SISTEMA DE SEGURANÇA DAS PRATELEIRAS
O forno dispõe de um novo sistema de
segurança das prateleiras.
Graças a este sistema, pode puxar as
prateleiras para fora, quando pretender
inspeccionar os alimentos que está a
cozinhar, sem correr o risco de que a
comida caia ou de que as prateleiras se
desencaixem acidentalmente das paredes
do forno, tombando. Para remover as
prateleiras totalmente, terá de as puxar
para fora e de as levantar.
2.2 GRELHAR
O grelhador do forno permite-lhe cozinhar rapidamente os alimentos,
dando-lhes um atraente tom acastanhado. Para gratinar os
alimentos, recomendamos que coloque a prateleira no quarto nível;
este posicionamento da prateleira dependerá naturalmente da
quantidade de alimentos, pelo que recomendamos que consulte a fig.
na página 57.
Quase todos os alimentos podem ser cozinhados com o grelhador, à
excepção de caça muito magra e de rolos de carne. As carnes e os
peixes a serem grelhados deverão ser previamente ligeiramente
untados com óleo ou outra gordura.
2.3 OS MODELS
Os fornos possuem um controlo electrónico da velocidade
da ventilação, chamada VARIOFAN. Durante a cozedura, o sistema muda
automaticamente a velocidade da ventilação (no modo multifunções) para
optimizar a circulação do ar e a temperatura interna na cavidade do forno.
Todos os fornos possuem a função
Esta permite a gestão e a distribuição da mistura e da
temperatura. Reduz a perda de humidade em 50%,
garante que os alimentos não perdem a suavidade e
saibem melhor. Este modo delicado de cozedura é
recomendado para cozer pão e pastas.
Reduz o tempo do pré-aquecimento do forno: atinge 200
graus Celsius em apenas 8 minutos.
Dá a possibilidade de pré seleccionar o nível e a
intensidade do grelhador, até 50% mais potência em
comparação com um forno multifunções tradicional.
Alguns modelos estão equipados com a nova porta WlDE DOOR
que possui uma área de janela maior, permitindo uma manutenção
mais fácil e um melhor isolamento térmico.
2.4 De acordo com o modelo
Um sistema de iluminação subsititui a tradicional lâmpada. 14 luzes
em LED estão integrados na parte interior da porta. Estas produzem
iluminação branca e de elevada qualidade o que permitem a
visualização do interior do forno com claridez e sem sombras em
todas as prateleiras.
Vantagens:
Sistema , além de fornecer excelente iluminação no interior
do forno, duram mais que a lâmpada tradicional, e acima de tudo
consumem menos energia.
- Excelente visualização
- Iluminação de longa duração
- Consumo muito baixo de energia,
-95% em compração com a
iluminação tradicional.
- Elevada
“Electrodoméstico com luzes brancas por LED de classe 1M de
acordo com IEC 60825-1:1993 + A1: 1997 + A2: 2001(equivalente a
EN 60825- 1: 1994 + A1: 2002 + A2: 2001); a potência máxima de luz
emitida 459nm < 150uW. Não observar directamente com
instrumentos ópticos.”
2.5 Forno auto-limpante com revestimento catalítico
Tem à sua disposição, como acessórios extra, painéis especiais,
auto-limpantes, revestidos por uma camada micro-porosa. Estes
painéis existem para todos os modelos. Uma vez instalados estes
painéis, deixa de ser necessário limpar manualmente o interior do
forno.
A gordura que salta para as paredes laterais do forno quando são
assados ou grelhados alimentos é eliminada pela camada microporosa, que decompõe a gordura por meio de catálise e a transforma
em gás.
No entanto, um excesso de salpicos de gordura poderá entupir os
poros e, por isso, impedir a auto-limpeza. Para repor a capacidade
auto-limpante, basta ligar o forno vazio à temperatura máxima,
durante cerca de 10 a 20 minutos.
Nunca utilize produtos abrasivos, esfregões de metal, objectos
afiados, panos rugosos ou produtos químicos ou detergentes que
possam danificar permanentemente o revestimento catalítico do seu
forno.
Quando pretender assar alimentos gordos, o ideal será utilizar
tabuleiros de paredes altas e colocar um tabuleiro por baixo da grelha,
para apanhar a gordura excessiva.
Se as paredes interiores do forno estiverem coberta por uma camada
de gordura tão espessa que o revestimento catalítico já não é eficaz,
remova o excesso de gordura com um pano macio ou uma esponja
embebido(a) em água quente.
Para que a limpeza automática possa ser levada a cabo com eficácia
é necessário que o revestimento catalítico do interior do forno esteja
poroso.
N.B.: Todos os revestimentos catalíticos actualmente disponíveis no
mercado têm uma vida útil de cerca de 300 horas. Por isso, deverão
ser substituídas de 300 em 300 horas de utilização.
52 PT
Page 53

2.6 LIMPEZA E MANUTENÇÃO
2.8 CONDIÇÕES DE GARANTIA
Sempre que o forno for utilizado, aconselhamos a limpar o vidro da
porta com papel absorvente. Se houver demasiados salpicos, pode
limpar depois com uma esponja seca e detergente. Nunca util izar
produtos abrasivos ou objectos cortantes. Nunca limpar o forno com
aparelhos a vapor ou a alta pressão. Limpe as superfícies de aço
inoxidável e esmaltadas com água morna, na qual diluiu uma
pequena quantidade de detergente ou com produtos indicados para a
limpeza dessas superfícies. Nunca utilize produtos abrasivos que
poderão danificar as superfícies e arruinar o aspecto do seu forno. É
muito importante limpar o forno a seguir a cada utilização.
A gordura derretida deposita-se nas paredes do forno durante a
cozedura dos alimentos.
Da próxima vez que o forno for utilizado, essa gordura poderá dar azo
a cheiros desagradáveis, podendo, inclusive, pôr em perigo o êxito
dos seus cozinhados. Limpe as paredes do forno com água quente
com detergente; passe cuidadosamente por água, para remover
todos os traços de detergente. Para que esta tarefa seja
desnecessária, todos osmodelos poderão ser equipados com painéis
catalíticos auto-limpantes: estes painéis são fornecidos como um
extra (consulte o ponto intitulado FORNO AUTOLIMPANTE COM
REVESTIMENTO CATALÍTICO) . Para limpar as grelhas de aço
inoxidável poderá utilizar detergentes e esfregões abrasivos de
metal, do tipo dos “Bravo”. As superfícies em vidro, como a parte de
cima, a porta do forno e a porta da estufa, terão de ser limpas depois
de estarem frias. O incumprimento desta regra poderá danificar essas
superfícies. Esse tipo de danos não está coberto pela garantia. Como
proceder para substituir a luz interior do forno: desligue o forno da
corrente e desatarraxe a lâmpada. Substitua-a por uma lâmpada
idêntica que possa suportar temperaturas muito elevadas.
Este electrodoméstico está abrangido por uma Garantia. Para
beneficiar desta garantia deverá apresentar o certificado de “Garantia
Internacional”, devidamente preenchido com o nome e morada do
consumidor final, modelo e número de série do aparelho, e data de
compra, além de devidamente autenticado pelo lojista. Este
documento ficará sempre na posse do consumidor.
Durante o período de Garantia os Serviços de Assistência Técnica
efectuarão a reparação de qualquer deficiência no funcionamento do
aparelho resultante de defeito de fabrico.
A Garantia não inclui deslocações a casa do cliente, que serão
debitadas de acordo com a taxa de deslocação em vigor a cada
momento. Exceptua-se a 1ª deslocação, se se efectuar no primeiro
mês de vigência da Garantia, que será gratuita.
A Garantia não inclui:
– Anomalias ocasionadas por mau trato, negligência ou manipulação
contrária às instruções contidas no manual, modificação ou
incorporação de peças de procedência diferente da do aparelho,
aplicadas por serviços técnicos não autorizados.
–Defeitos provocados por curto-circuito ou injúria mecânica.
–Qualquer serviço de instalação ou explicação do funcionamento do
aparelho em casa do cliente.
–Indemnizações por danos pessoais ou materiais causados directa
ou indirectamente.
–Troca do aparelho.
Serviço Pós-Venda
Com o objectivo de satisfazer cada vez mais o consumidor final,
colocamos à vossa disposição a nossa Rede Nacional de Assistência
Técnica, com pessoal técnico devidamente Especializado.
2.7 ASSISTÊNCIA TÉCNICA
Antes de telefonar para a assistência técnica Se o forno não estiver a
trabalhar, recomendamos que:
- verifique se o forno está devidamente ligado à corrente (ficha
correctamente introduzida na tomada).
Se lhe for impossível detectar a causa da avaria: desligue o forno da
corrente, não o tente reparar e ligue para os serviços de assistência
técnica.
Antes de ligar para os serviços de assistência técnica, porém, tome
nota do número de série do forno, constante da respectiva placa de
características (vide a figura na ultima página ).
Este aparelho está classificado de acordo com a
Diretiva Europeia 2012/19/UE relativa aos
Resíduos de Equipamentos Elétricos e Eletrónicos
(REEE). Os REEE incluem substâncias poluentes
(que podem provocar consequências negativas no
meio ambiente) e componentes básico (que podem
ser reutilizados). É importante que os REEE sejam
submetido a tratamentos específicos, a fim de
remover e eliminar corretamente todos os poluentes e recuperar
e reciclar todos os materiais.
Os cidadãos individualmente podem desempenhar um papel
importante no sentido de garantir que os REEE não se tornam
num problema ambiental; é essencial seguir algumas regras
básicas:
• Os REEE não devem ser tratados como lixo doméstico.
• Os REEE deverão ser entregues nos pontos de recolha
relevantes geridos pelo município ou por empresas registadas.
Em muitos países, no caso de grande REEE, poderão existir
serviços de recolha ao domicílio.
• quando compra um novo aparelho, o antigo pode ser devolvido
ao comerciante que terá a obrigação de o transportar
gratuitamente numa base de um-para-um, desde que o
equipamento seja de tipo equivalente e tenha as mesmas
funções que o equipamento fornecido
RESPEITA O AMBIENTE E POUPA ENERGIA
Sempre que possível, evite pré-aquecer o forno e tente sempre
rentabilizá-lo, enchendo-o ao máximo. Abra a porta do forno o
menos possível, porque isso faz dispersar o calor. Para uma
economia significativa de energia, desligue o forno entre 5 a 10
minutos antes do tempo de cozedura previsto para a receita e
aproveite o calor residual que o forno continua a gerar. Mantenha
as borrachas de vedação limpas e funcionais para evitar
qualquer dispersão de calor para fora da cavidade do forno. Se
tem um contrato eléctrico com tarifa bi-horária, utilize o início
diferido para começar a cozinhar no horário de tarifa reduzida.
53 PT
Page 54

3. DESCRIÇÃO DO PAINEL
BOTÃO PARA REGULAÇÃO e confirmação
Definições: temperatura, programas de cozedura e fim do tempo de
cozedura. Regulável rodando o botão para – ou +
Para confirmar as definições: pressione o botão
Painel display: tempo, programação do modo de
cozedura, luzes indicadoras, função da temperatura
de cozedura e posição das prateleiras.
Luzes indicadoras:
Subida da temperatura
Display das funções do forno
e nível de prateleiras
recomendado
Relógio/Programas/
Temperatura de cozedura
PYRO
Função Booster
Espeto
Pré-aquecimento
Símbolos dos programas: cozedura
Tempo
Relógio programador
Luz indicadora
Segurança para crianças
As luzes desligam-se quando
a porta é aberta
Fim de cozedura
indicador de luz
WIFI
Luzes indicadoras
Fecho da porta do forno
54 PT
Page 55

3.1 ANTES DE USAR O FORNO PELA
PRIMEIRA VEZ
Limpeza preliminar
-Limpe o forno antes de usar pela primeira vez:
-Limpe as superfícies externas com um pano macio e húmido.
-Lave todos os acessórios e limpe dentro do forno com uma solução
de água quente e detergente.
-Deixe o forno vazio e defina a temperatura máxima. Deixe ligado
cerca de 1 hora, isto irá remover quaisquer odores que existam pelo
facto do aparelho ser novo. Certifique-se de que a divisão da casa
onde se encontra está bem ventilada enquanto esta operação
decorre.
Aspectos a relembrar:
Confirmação do temporizador:
Modificações devem ser confirmadas pressionando o botão.
Parar o forno:
Pode ser necessário se programou o forno incorrectamente.
Para parar o forno, coloque o selector de funções na posição STOP.
Dispositivo de segurança para crianças:
Para bloquear os comandos do forno, seleccione o dispositivo de
segurança para crianças. Consulte a secção intitulada "Programação
- dispositivo de segurança para crianças".
Ventilador de refrigeração:
Protege o painel de controlo e componentes electrónicos de danos
causados pelo calor.
Arranca e pára automaticamente, mesmo quando o forno está
desligado.
Iluminação do forno:
Colocando o comando no símbolo da luz, pode ligar a luz do forno
quando este não está em uso. Quando o forno está em uso, a luz
permanece ligada durante a totalidade do período de funcionamento,
mesmo quando a porta é aberta.
RELÓGIO
Quando o forno está desligado algum tempo ou após corte de energia
eléctrica, o relógio deve ser redefinido.
Para programar o relógio:
1 - Gire o botão para o símbolo "Clock":
2 - Ajuste o relógio com o botão central, girando para "-" ou "+»,
3 - Volte o botão para a posição STOP.
10:30
3.2 COMO UTILIZAR O FORNO
• MODO MANUAL
Os métodos de cozedura sugeridos no modo manual constam na
tabela abaixo. A temperatura também é sugerida para cada função de
cozedura. Mas pode ser modificada, dentro de intervalos definidos
que também estão indicados.
Função
(de acordo com o
modelo do forno)
Aquecimento inferior+ventilador
Aquecimento inferior
Aquecimento inferior+superior
Aquecimento inferior+superior+ventilador
Circulação de calor+ventilador
Grill
Grill+ventilador
Descongelar
Manter quente
Pizza
*Booster: aquecimento rápido (alcança a temperatura definida de forma muito rápida)
**O forno tem que ter esta função
***
1 - Gire o botão selector do forno para a função de cozedura
escolhida.
Os elementos de aquecimento que vão operar para o método de
cozedura seleccionado são exibidos.
2 – É exibida a temperatura adequada de acordo com o método de
cozedura selecionado. Esta pode ser modificada dentro dos
intervalos pré-determinados - ver a tabela acima.
Pre-set
Temperature
Pré-definição de
temperatura ºC
210
160
220 50-240
***
210
180
L2
190
***
40
60
230
**
Intervalos de
temperatura ºC
50-220
50-220
50-230
50-230
L1-L3
50-200
No
No
230
EN 60350-1
Função
Booster*
Booster
Booster
Booster
Para modificar a configuração de temperatura, gire o botão central e,
no temporizador, confirme o ajuste pressionando o mesmo botão.
... o indicador de temperatura mostra a temperatura escolhida, mas
esta pode ser modificada durante o ciclo de cozedura.
O forno começa a cozinhar e vai começar a aquecer desde esse
momento.
A luz indicadora pisca até que a temperatura seleccionada seja
atingida. Um sinal sonoro informa quando essa temperatura é
alcançada e a luz indicadora torna-se fixa, deixando de piscar.
3 - Um tempo de cozedura e um fim do tempo de cozedura podem ser
programados girando o botão selector de programas para "tempo de
cozedura" ou "fim do tempo de cozedura".
O "tempo de cozedura" ou "fim do tempo de cozedura" começa a
piscar no painel display. Através do botão central, modifique as
configurações conforme necessário e confirme no relógio.
Depois de realizada esta operação, não se esqueça de ligar o selector
de programas no respectivo botão para voltar para a posição "parar" e
conseguir definir a nova configuração.
Para mais detalhes sobre a programação, consulte o capítulo 5.3 PROGRAMAS.
4 - No final do ciclo de cozedura, rode o selector de funções para a
posição “parar". O indicador pisca novamente e permanecerá ligado
depois de se ter desligado o forno. O indicador luminoso só se
desligará quando a temperatura dentro do forno estiver bastante
baixa.
• MODOS DE COZEDURA
Todos os modos de cozinhar devem ser realizados com a porta do forno fechada.
AQUECIMENTO INFERIOR + VENTILADOR - A
combinação do aquecimento inferior com o ventilador é ideal para
pudins, flans, tortas, quiches e doces. A função impede que os
alimentos se tornem muito secos e ajuda a massa de pão e bolos a
crescer. Coloque a prateleira na posição mais baixa no forno.
AQUECIMENTO INFERIOR – Neste modo vai ser usado
apenas o aquecimento inferior. Ideal para cozinhar praticamente tudo,
pratos salgados ou doces, pastelaria e tudo o que precise de mais
calor em baixo.
AQUECIMENTO INFERIOR + AQUECIMENTO
SUPERIOR - Ambos os elementos de aquecimento, superior e inferior,
são usados. Este método é ideal para todos os pratos tradicionais,
para cozinhar e gratinar. Todos os pratos, como carnes, peixes ou
outros alimentos que pretendemos que fiquem tostados devem ser
cozinhados assim.
AQUECIMENTO INFERIOR + AQUECIMENTO SUPERIOR
+ VENTILADOR – Produz calor a partir da parte superior e inferior,
sendo que ambos os elementos de aquecimento são utilizados em
conjunto com o ventilador. O ventilador faz circular o ar quente em todo
o forno. Recomendamos este método de cozedura para aves, bolos,
peixe e legumes. Com este método de cozedura a penetração de calor
de forma uniforme nos alimentos é alcançada. Com este modo de
cozedura os tempos de cozinhar, bem como os tempos de préaquecimento são, muitas vezes, reduzidos. O ventilador também
permite cozinhar alimentos diferentes juntos em diferentes posições
no forno, tudo ao mesmo tempo, proporcionando uma distribuição
uniforme do calor, mas sem o risco de misturar sabores e cheiros dos
vários cozinhados. Quando cozinhar diferentes pratos ao mesmo
tempo junte 10 minutos mais ao tempo de cozedura.
AQUECIMENTO CIRCULAR + VENTILADOR – O ar
aquecido é soprado pelo ventilador para os diferentes níveis do forno.
É ideal para cozinhar diferentes tipos de alimentos ao mesmo tempo
sem mistura de sabores e cheiros. Esta função cozinha muito
suavemente e é ideal para bolos tipo “esponja”, pão-de-ló, outros
doces, etc.
GRILL – Usa-se apenas o elemento de aquecimento
superior. O sucesso é garantido para grelhados, espetadas e pratos
gratinados. A grade deve ser pré-aquecido a uma temperatura elevada
durante 5 minutos. Carnes brancas devem ser sempre colocadas a
uma certa distância do elemento de aquecimento grill, pois são mais
sensíveis. Neste caso aumente um pouco mais o tempo de cozedura e
a carne ficará mais suculenta. A carne vermelha e peixes podem ser
colocados directamente sobre a prateleira com o tabuleiro colocado
na posição imediatamente abaixo.
GRILL + VENTILADOR- O elemento de aquecimento
superior é usado em conjunto com o ventilador, o que vai fazer circular
o ar quente dentro de todo o forno. É recomendado o pré-aquecimento
para carnes vermelhas, mas não é necessário para as carnes
brancas.
55 PT
Page 56

O grill desta forma é ideal para cozinhar os pedaços de alimentos
maiores, como nacos de porco ou frango.
Os alimentos a grelhar devem ser colocados directamente no centro
da prateleira. Ao colocar o tabuleiro debaixo da prateleira vai garantir
que todos os sucos são recolhidos. Para melhores resultados,
certifique-se sempre que a comida não está muito perto da resistência
do grelhador e vire os alimentos a meio do tempo de cozedura para
que não queimem nem fiquem tostados de mais.
GRILL + ESPETO + VENTILADOR - A vantagem de usar o
grill e espeto ao mesmo tempo do ventilador é que a comida está
uniformemente cozinhada, impedindo-a de se tornar seca e sem
gosto. O espeto está programado para continuar a rodar por cerca de
cinco minutos após o fim da cozedura, fazendo pleno uso do calor
residual do forno. Neste caso não é necessário pré-aquecimento.
DESCONGELAÇÃO - Quando o selector está definido para
esta posição. O ventilador faz circular o ar quente em torno dos
alimentos congelados de modo que estes descongelem em alguns
minutos sem que o teor de proteínas e características dos alimentos
sejam alteradas.
A temperatura é pré-definida a 40 ° C de forma constante, sem
regulações possíveis.
MANTER QUENTE – Função recomendada para aquecer
pratos pré-cozinhados, posicionando a prateleira no segundo nível da
parte superior, ou para descongelar massas de pizza ou pão através
do posicionamento da prateleira no nível mais baixo. A temperatura é
pré-definida a 60 ° C de forma constante, sem regulações possíveis.
PIZZA - Com esta função, o ar quente circular no forno para
garantir o resultado perfeito para pratos como pizza ou bolo.
WIFI
3.3 PROGRAMAS
SÍMBOLOS DO PAINEL
Lâmpada
Definição do relógio
Programação do tempo de cozedura
STOP
Selector de programas
Relógio temporizador
O temporizador funciona independentemente do forno e não tem
nenhum efeito sobre o aquecimento do aparelho. É simplesmente um
lembrete para a hora final de cozedura.
• Gire o botão para a posição Timer. O símbolo do temporizador irá
aparecer.
Os dígitos 0:00 aparecem no painel display.
• Os minutos vão piscar, gire o botão central para o número de
minutos pretendido e confirme pressionando o mesmo botão.
• Depois as horas começam a piscar, gire o botão central para o
número de hora pretendido e confirme pressionando o mesmo botão.
• Gire o botão para a posição Stop.
Quando o tempo acabar, o tempo de cozedura irá desaparecer. Um
sinal sonoro soará por 15 segundos e o display do temporizador pisca
(para pará-lo antes dos 15 segundos acabarem, basta pressionar o
botão central).
PROGRAMAÇÃO DO TEMPO DE COZEDURA:
Várias receitas são pré-programadas com um tempo de cozedura
pré-definido. No modo manual, as funções “descongelar” ou “manter
quente” podem ser pré-definido, se necessário.
• Gire o botão para a posição de tempo de cozedura. O símbolo do
tempo de cozedura vai aparecer. O tempo de cozedura préprogramada para as várias receitas irá aparecer, ou os dígitos 0:00
para as outras funções do forno.
• Com os minutos a piscar, gire o botão central para os minutos
pretendidos e confirme pressionando o mesmo botão.
• Com as horas a piscar, gire o botão central para acertar as horas
pretendidas e confirme pressionando o mesmo botão.
• Gire o botão selector de programa de volta à posição de parar para
confirmar o novo tempo de cozedura.
Programação do fim do tempo
de cozedura
Timer em operação
Sistema de segurança para
crianças
Tranca da porta
Quando o tempo acabar, o tempo de cozedura irá desaparecer do
painel display.
Um sinal sonoro soará por 15 segundos e o tempo de cozedura e o
símbolo PARAR vão piscar.
• Gire o botão selector para Parar. Se não fizer isto, o tempo de
cozedura e símbolo PARAR continuarão a piscar.
PROGRAMAÇÃO DO FIM DO PERÍODO DE COZINHA:
Várias receitas são pré-programadas com um tempo de cozedura e,
portanto, com o fim do tempo de cozedura. No modo manual, as
funções “descongelar” e “manter quente” podem ser pré-definidas, se
necessário.
• Gire o botão para a posição de final de tempo de cozedura. O
símbolo respectivo irá aparecer. O tempo de fim de cozedura préprogramada para as várias receitas irá aparecer, ou os dígitos 0:00
para as outras funções do forno.
• Gire o botão selector de programas para confirmar o tempo do fim.
• Os minutos piscarão. Gire o botão central para indicar o necessário
número de minutos, e confirmar a sua escolha pressionando o
mesmo botão.
• As horas vão piscar. Gire o botão central para indicar o número
necessário de horas, e confirmar a sua escolha pressionando o
mesmo botão.
NB: Com a opção de início diferido, o fim do tempo do programa
aparecerá no display juntamente com o tempo de cozedura e o
símbolo "Stop", e apenas o Modo de Receitas do forno permanecerá.
O forno calcula automaticamente a hora de início (tempo final menos
o tempo de cozedura).
No final do ciclo, o forno desliga-se automaticamente. Durante 15
segundos um sinal sonoro avisa que o ciclo terminou e o tempo de
cozedura aparece, bem como o símbolo PARAR, que estará a piscar.
• Gire o selector de funções para Parar. Se não o fizer, os símbolos
continuarão a piscar.
• Esta função é geralmente usada com a função "duração de
cozedura".
Por exemplo, se o prato tem que ser cozido durante 45 minutos e
precisa estar pronto até às 12:30:
- Seleccione a função desejada
- Defina o tempo de duração da cozedura até 45 minutos
- Defina o fim do tempo de cozedura às 12:30 h.
A função de cozedura iniciará automaticamente às 11:45 (12:30 de
menos de 45 minutos)
e continuará até que o pré-definido tempo de fim de cozedura seja
alcançado, nessa altura o forno desligar-se-á automaticamente.
! Se o final de cozedura for seleccionado sem definir a duração
do tempo de cozedura, o forno começar a cozinhar
imediatamente vai parar no final do tempo programado de
cozedura.
3.4 DICAS DE COZEDURA
É aconselhável não salgar as carnes antes da cozedura porque o sal
estimula os respingos de gordura e isso vai sujar o forno e fazer muito
fumo.
Peças de carne branca, carne de porco, vitela, cordeiro e peixes
podem ser colocadas no forno frio. O tempo de cozedura é maior do
que num forno pré-aquecido, mas as peças vão cozinhar a partir do
centro da melhor forma e o calor tem mais tempo para penetrar nas
carnes e conseguir-se uma cozedura uniforme. Um pré-aquecimento
correcto é a base do sucesso para cozinhar muitas das carnes.
GRILL
• Antes de colocar a grade:
Retire a carne do frigorífico algumas horas antes de a cozinhar.
Coloque-a em várias camadas de papel de cozinha. Isto melhora a
suculência, tornando-a saborosa e evitando que fique fria no centro.
Temperar com pimenta e especiarias antes de grelhar, mas adicionar
o sal só após a cozedura. Desta forma, a carne vai ficar mais
suculenta. Regue todos os alimentos com um pouco de óleo ou
azeite.
Faça-o com um pincel largo e de seguida coloque mais ervas
aromáticas.
• Durante a cozedura:
Nunca furar o alimento durante a cozedura, pois perde os sucos e
seca.
Cozedura:
Evite o uso de tampas de metal brilhantes, pois reflectem o calor e
podem estragar os cozinhados. Se os bolos, por exemplo, ficam
tostados e escuros muito rapidamente, cubra-os com papel
manteiga, vegetal ou folha de alumínio.
Atenção: A maneira correcta de usar a folha é com o lado brilhante
em direção o bolo e o outro para fora. De contrário, o calor é reflectido
pela superfície brilhante e não penetra no alimento.
56 PT
Page 57

Evitar a abertura da porta do forno durante os primeiros 20 a 25
minutos de cozedura.
Sufles, brioches, pão-de-ló, etc, tendem a baixar se abrir a porta.
Pode verificar se os bolos estão prontos pressionando no centro com
um palito ou esparguete seco. Se vier seco é porque a massa está
pronta e cozida. Se sair húmido ou com pedaços de massa, esta tem
que cozinhar mais tempo. Continue a cozedura, mas com
temperatura ligeiramente mais baixa para não queimar.
3.5 AJUSTAR O CONTRASTE DO PAINEL
O contraste do painel display pode ser ajustado a qualquer momento.
A configuração padrão é "C5". Para ajustar a configuração, faça o
seguinte:
Rode o selector de programa para "Light" e o selector de função para
"0".
Pressione a tecla central por 3 segundos e "CX" aparecerá no visor
(sendo X = nível de contraste).
Gire a chave central para ajustar a configuração do contraste. As
configurações vão de 1 a 9. Confirmar a nova configuração com a
tecla central para 3 segundos.
4. SEGURANÇA PARA CRIANÇAS
Esta função é essencial, especialmente quando as crianças estão por
perto. A função impede as crianças de ligarem o forno ou alterar a
predefinição de programas.
Este sistema de segurança bloqueia o painel de controlo do forno
durante o seu funcionamento.
Existem dois níveis de segurança:
5. CARACTERÍSTICAS DO WIFI
Configuração do WIFI
- Ligue o selector do forno para a posição WiFi (o símbolo @ vai
piscar).
- Quando o forno está ligado a um router sem fios (wireless) e a
função WiFi é selecionada o símbolo @ vai ficar continuamente
ligado.
- Se o forno não estiver ligado a um router wireless o símbolo @
vai estar a piscar (veja na secção sobre o símbolo @).
- Se a função WiFi for selecionada o forno só poderá ser
controlado remotamente (a função do selector fica desactivada);
- Nas outras posições de cozedura o forno não pode ser
controlado externamente.
RESET
Para fazer reset ao WiFi, gire o selector do forno para a posição
WiFi enquanto nenhum programa estiver em curso e pressione o
botão por 3 segundos.Depois de 3 segundos vai aparecer no
display o símbolo “rSt” e o símbolo @ vai começar a piscar.
Gestão do símbolo @
- Quando o forno está desligado, o símbolo está desligado.
- Quando o selector do forno está na posição WiFi, o símbolo vai
piscar (1” on e 1” off) se o forno estiver num ponto de internet
acessível (ligação ponto para ponto), o sinal vai ficar fixo se o
forno estiver se o forno estiver no modo “cliente” (ligado a um
router).
- Quando o selector do forno está na posição WiFi e o forno está a
tentar ligar-se a um router, o símbolo vai piscar (3” on e 1” off).
- Quando o selector do forno está ligado, mas sem ser na posição
WiFi, o símbolo vai piscar (1” on 3” off).
NÍVEL 1: Bloquear botão selector de controlo e o botão central.
Para activar: Gire o botão de controlo de Programação para a
segurança das crianças.
Acção: Os botões de controlo ficam inactivos *.
Para desativar: Gire o botão de controlo de Programação para 0.
NÍVEL 2: função de bloqueio botões do selector
Para ativar: Gire o selector de funções para a segurança das crianças
e mantenha o botão central pressionado por 3 segundos.
Ação: Todos os controlos estão inactivos *.
Para desactivar: o mesmo procedimento da activação. Active a
função selector para a segurança das crianças e mantenha o botão
central pressionado cerca de 3 segundos.
* Nota: Em todos os casos, por razões de segurança, mesmo quando
os controlos são bloqueados, o forno pode ser desligado, girando o
botão selector para 0.
CANDY SIMPLY-FI:
Para obter informações detalhadas sobre
COMO CONECTAR seu electrodoméstico simplyFi e COMO UTILIZA-LO, visite os sites
http://www.candysimplyfi.com ou
http: //simplyfiservice.candy- hoover.com,
site dedicado ao Service Candy simply-Fi
57 PT
Page 58

6. TABELAS DE TEMPOS DE COZEDURA
Os tempos sugeridos nas tabelas que se seguem revestem-se de mero carácter orientativo, podendo variar em função da qualidade, da frescura,
da dimensão e da espessura dos alimentos e ainda segundo o seu gosto pessoal. Deixe sempre os alimentos cozinhados repousarem alguns
minutos antes de os servir, pois todos os alimentos continuam a cozer depois de serem retirados do forno
Conselhos úteis:Desligue o forno pelo menos 10 minutos antes do
tempo indicado, deixando os alimentos no seu interior. Esta medida,
além do mais, permitir-lhe-á poupar energia e completar a cozedura
a seu gosto. Para que a superfície dos alimentos não fique
demasiado seca é indispensável reduzir a temperatura.
Forno eléctrico estático
Alimentos
Quantidade
Nível
Tempo de
cozedura
em minutos
Tempe-
ratura
do forno
Forno com ventoinha eléctrico
Nível
Posição da prateleira
Tempo de
cozedura
em minutos
Tempe-
ratura
do forno
Observações
• Massas
Lasanha
Cannellonis
Massa cozinhada
no forno
Kg 3,5
Kg 1,8
Kg 2,5
22
22
22
70 ÷ 75
50 ÷ 60
55 ÷ 60
220
220
220
60 ÷ 65
40 ÷ 50
45 ÷ 50
200
200
200
Coloque a lasanha no forno quando ele
estiver frio
Coloque a lasanha no forno quando ele
estiver frio
Coloque a lasanha no forno quando ele
estiver frio
• Pão, pizzas
Dê a forma de umpão à massa e faça
Pão
Pizzas
Pastéis
(congelados
vol au vents)
4 fogaças
Kg 1
de massa
Kg 1
n° 24
unids.
gr. 200
de massa
cada
22
35
prerisc.10
25 ÷ 35
30 ÷ 35
25 ÷ 30
200
190
220
200
11
21
22
30 ÷ 35
prerisc.10
20 ÷ 25
25 ÷ 30
20 ÷ 25
180
190
200
180
uma cruz com uma faca no topo. Deixe
a massa levedar durante, pelo menos,
2 horas. Unte a forma e coloque a
massa do pão no medio dela
Aqueça previamente o forno durante 15
minutos e coloque as pizzas numa
forma previamente untada. Guarneça a
base da pizza com tomate, queijo,
fiambre, óleo, sal e oregãos.
Coloque os 24 vol au vents no forno e
deixe-os cozinhar
Aqueça previamente o forno durante 15
minutos, unte a forma, tempera as 4
fogaças com óleo e sal e deixe-as
levedar, à temperatura ambiente,
durante pelo menos 2 horas antes de
as colocar no forno
• Carne
Todos os tipos de carne podem ser cozinhados em recipientes tanto de bordos altos como de bordos baixos. Se optar por um recipiente de bordos baixos,
é aconselhável tapá-lo, a fim de evitar que o forno fique sujo com os salpicos dos condimentos utilizados no tempero da carne. As carnes confeccionadas
em recipientes cobertos ficam mais macias e com mais sucos, enquanto que as carnes cozinhadas em recipientes descobertos resultam mais tostadas.
Os tempos de cozedura indicados aplicam-se tanto à cozedura em recipientes cobertos como à cozedura em recipientes descobertos.
Peça de vaca
inteira
Lombo de porco
assado
Lombo de vitela
assado
Lombo de vaca
assado
Kg 1
Kg 1
Kg 1,3
Kg 1
70 ÷ 80
100 ÷ 110
90 ÷ 110
80 ÷ 90
220
220
220
220
33
22
21
22
50 ÷ 60
80 ÷ 90
90 ÷ 100
80 ÷ 90
200
200
200
200
Coloque a carne num pirex de bordo
alto com sal e pimenta. Vire a carne a
meio da cozedura.
Tempere a carne com sal, pimenta,
óleo, manteiga e temperos naturais e
leve-a ao forno num pirex tapado.
Idem.
Idem.
58 PT
Page 59

6. TABELAS DE TEMPOS DE COZEDURA
Forno eléctrico estático Forno com ventoinha eléctrico
Alimentos
Quantidade
Nível
Tempo de
cozedura
em minutos
• Avex, coelho
Galinha
Frango
Coelho aos
pedaços
Kg 1-1,3
Kg 1,5-1,7
Kg 1-1,2
22
22
22
60 ÷ 80
110 ÷ 120
55 ÷ 65
• Doces e pastelaria
Tarte de chocolate
na forma
Torta de cenoura
na forma
Torte de fruta
(damascos ou
alperces)
700 gr
1
1
1
55
55
65
• Legumes
Funcho
Abobrinha
Batatas
Cenouras
800 gr
800 gr
800 gr
800 gr
1
1
2
1
70 ÷ 80
70
60 ÷ 65
80 ÷ 85
• Grelhados
Pão de forma
tostado
Tostas
recheadas
Salsichas
Entrecosto
Coxas de frango
• Fish
• Peixe
Truta
Salmão
Solha
Dourada
4 fatias
4
n°6 / Kg 0,9
n°4 / Kg 1,5
n°4 / Kg 1,5
3 interas/Kg 1
700 gr. em
postas de 2,5 cm
cm de espessura
Filetes / Kg 1
2 inteiras
5 (pré-aqec.:
44
33
44
5 min.)
10 (pré-aqec.:
5 min.)
25/30
(pré-aqec.:
5 min.)
25 (pré-aqec.:
44
33
5 min.)
50/60 (pré-
aqec.:5 min.)
40 ÷ 45
30 ÷ 35
40 ÷ 45
40 ÷ 45 220
Tempe-
ratura
Nível
do forno
220
220
220
180
175
180
220
220
220
220
Grelhador Grelhador
Grelhador Grelhador
em minutos
1
1
1
1
1
2
1
5 (pré-aqec.:
5/8 (pré-aqec.:
Tempo de
cozedura
60 ÷ 70
100 ÷ 110
50 ÷ 60
50
40 ÷ 45
50 ÷ 60
60 ÷ 70
60 ÷ 70
60 ÷ 65
70 ÷ 80
10 min.)
10 min.)
Tempe-
ratura
do forno
200
200
200
160
160
160
200
200
200
200
15/12
Grelhador Grelhador
(pré-aqec.:
10 min.)
Grelhador Grelhador
15/20
(pré-aqec.:
5 min.)
Grelhador
50/60
(pré-aqec.:
Grelhador
10 min.)
220
220
220
22
22
22
22
35 ÷ 40
30 ÷ 25
35 ÷ 40
35 ÷ 40
200
200
200
200
Observações
Tempere a galinha com condimentos
naturais e muito pouco óleo e coloquea num pirex de bordos altos
Idem.
Coloque os pedaços de coelho, de
dimensões semelhantes, na
pìingadeira e tempere com
condimentos naturais. Se necessário,
vire a carne a meio da cozedura.
Em forma de tarte de 22 cm de Ø.
Aqueça previamente o forno (10 min.).
Em forma de tarte de 22 cm de Ø.
Aqueça previamente o forno (10 min.).
Em forma de tarte de 22 cm de Ø.
Aqueça previamente o forno (10 min.).
Coloque o funcho partido em 4 bocados
com a parte de dentro voltada para
cima, tem-perados com manteiga e sal
num pirex e cubra.
Corte em fatias e coza num pirex,
cobertas, com manteiga e sal.
Corte em bocados iguais e cozinhe
num pirex coberto com óleo, sal,
oregãos ou rosmaninho
Corte às rode-las, e cozinhe num pirex
tapado.
Coloque o pão sobre a grelha. Volte as
fatias a meio. Atenção: deixe o pão ficar no
fundo do forno, a repousar, antes de servir
(forno desligado).
Coloque as tostas sobre a grelha apoiada
na pingadeira: volte-as quando ficarem
douradas.
Corte-as ao meio e coloque-as sobre a
grelha (parte de dentro voltada para cima).
Volte ameio da cozedura. Atenção: convém
controlar visualmente a uniformidade da
cozedura. Se esta não se apresentar
uniforme, troque a posição das salsichas
mais passadas com as menos passadas.
Certifique-se de que o entrecosto está
exposto aos efeitos totais do grelhador
principal.
Tempere com condimentos naturais e volte
de vez em quando.
Cozinhe as trutas num pirex, coberto,
com óleo, sal e cebolas.
Cozinhe o salmão num pirex sem
tampa, com sal, pimenta e óleo.
Cozinhe a solha temperada com sal e
1 colher de óleo.
Cozinhe em recipiente coberto, com óleo
e sal.
59 PT
Page 60

ПРАВИЛА ТЕХНИКИ БЕЗОПАСНОСТИ
• ПРЕДУПРЕЖДЕНИЕ: Бытовой электроприбор и его открытые части во время работы могут
нагреваться до высокой температуры. Соблюдайте осторожность, не дотрагивайтесь до них.
• Дети моложе 8 лет не должны приближаться к бытовому прибору без постоянного надзора.
• Данным бытовым электроприбором могут пользоваться дети старше 8 лет, а также люди с
нарушенными физическими или умственными способностями или с отсутствием надлежащего
опыта в том случае, если они находятся под наблюдением и проинструктированы относительно
безопасного использования бытового прибора, а также, если они осведомлены об имеющихся
опасностях.
• Не разрешайте детям играть с бытовым прибором.
• Чистка и обслуживание бытового прибора не должны выполняться детьми без надзора
взрослых.
• бытовой прибор во время работы нагреваются до высокой температуры. Соблюдайте
осторожность, не дотрагивайтесь до электронагревательных элементов, расположенных внутри
печи.
• ПРЕДУПРЕЖДЕНИЕ: Открытые части бытового электроприбора во время его работы могут
нагреваться до высокой температуры. Не разрешайте подходить к нему маленьким детям.
• Не пользуйтесь для чистки стеклянной дверцы печи абразивными чистящими средствами и
острыми металлическими скребками, так как они могут поцарапать поверхность, что, в свою
очередь, может привести к растрескиванию стекла.
• Перед снятием ограждения печь должна быть выключена. После выполнения чистки
ограждение должно быть установлено на место, как написано в инструкции.
• Используйте только такой датчик температуры, который рекомендован для этой печи.
• Не пользуйтесь для чистки парогенератором.
• ПРЕДУПРЕЖДЕНИЕ: Чтобы избежать поражения электрическим током, перед заменой лампы
проверьте, что бытовой электроприбор выключен.
• Электрическое подключение бытовой прибора должно быть выполнено с использованием
разъединительного устройства в соответствии с действующими правилами и нормами
электробезопасности.
• в инструкции должен быть указан тип электрошнура. При этом должна учитываться температура
задней стенки электроприбора.
• В случае повреждения шнура питания он должен быть заменен специальным шнуром питания,
который можно приобрести у производителя или у агента по техобслуживанию.
• ВНИМАНИЕ: Чтобы избежать опасности, связанной со случайным сбросом устройства тепловой
защиты, данный бытовой электроприбор не должен запитываться через наружные
переключающие устройства, например, таймер, или другое устройство, которое регулярно
включает и выключает электроприбор.
ВНИМАНИЕ: При использовании гриля наружные детали могут нагреваться до высокой
температуры. Не разрешайте детям подходить к печи.
• перед выполнением чистки следует удалить пролившуюся жидкость.
• Во время выполнения пиролитической самоочистки поверхности могут нагреваться сильнее чем
обычно. Не разрешайте подходить к печи детям.
60 RU
Page 61

1.
В соответствии с требованиями Федерального закона № 261-ФЗ от 23.11.09 и Постановлением Правительства РФ № 1222 от 31.12.09г., настоящий
товар снабжен информацией на русском языке о классе энергетической эффективности в виде специальной этикетки, которая должна быть
размещена на лицевой части прибора в месте продажи потребителям.
1.1
Данное оборудование, детали которого вступают в контакт с пищей,
отвечает требованиям Европейской директивы 89/109/ЕЕС.
Размещая маркировку на этой продукции, мы заявляем, под
нашу ответственность, о соответствии всем Европейским нормам
безопасности, охраны здоровья и экологическим требованиям,
изложенным в законодательстве для данного вида продукции.
1.2
1.3
1.4
•Не покрывайте внутренние поверхности духовки
алюминиевой фольгой и другими одноразовыми
упаковочными материалами, которые продаются в
хозяйственных магазинах. Алюминиевая фольга или другой
упаковочный материал при контакте с горячей
эмалированной поверхностью духовки может расплавиться
и повредить внутреннюю эмалированную поверхность
духовки.
1.5
I класс защиты от поражения током.
61 RU
Page 62

1.6
Демонтаж и очистка металлических направляющих.
1 – Отверните фиксирующие винты, поворачивая их против часовой стрелки.
2 – Снимите металлические направляющие, потянув их на себя.
3 – Произведите очистку металлических направляющих помыв их в посудомоечной машине
или очистив при помощи влажной губки. Просушите металлические направляющие после
очистки.
4 – После очистки установите металлические направляющие в духовой шкаф, повторив пункты
1 и 2 в обратном порядке.
5 – Зафиксируйте винты.
A
2. полезные советы
2.1 СИСТЕМА БЕЗОПАСНОСТИ ПОЛОК
2.2
2.3
2.4
62 RU
Page 63

2.5
2.6
2.7
Серийный номер состоит из 16 цифр. Первые 8 цифр код
модели. Следующие 4 цифры дата производства (год, неделя).
Последние 4 цифры заводские номера.
Данный прибор имеет маркировку в соответствии с
Европейской директивой 2012/19/ЕС об отходах
производства электрического и электронного
оборудования (WEEE). Отходы производства
электрического и электронного оборудования
содержат загрязняющие вещества (которые могут
негативно влиять на окружающую среду) и
основные компоненты (которые подлежат повторному
использованию). Важно, чтобы отходы производства
электрического и электронного оборудования подвергались
специальной обработке с целью удаления и утилизации всех
загрязняющих веществ, а также регенерации и повторного
использования всех материалов.
Каждый может сделать существенный вклад в
предотвращение экологических проблем, вызываемых
отходами производства электрического и электронного
оборудования; для этого важно придерживаться некоторых
основных правил:
• Нельзя обращаться с отходами производства электрического
и электронного оборудования, как с бытовыми отходами.
• Отходы производства электрического и электронного
оборудования следует передавать в пункты сбора,
контролируемые органами местной власти или
зарегистрированными компаниями. Во многих странах при
наличии большого количества отходов производства
электрического и электронного оборудования сбор отходов
осуществляется на дому.
• При покупке нового прибора старый прибор можно
возвратить розничному торговому предприятию, которое
обязано принять его бесплатно на основе взаимнооднозначного соответствия, если это приборы аналогичного
типа, и возвращаемый прибор имеет те же функции, что и
продаваемый.
63 RU
ЭНЕРГОСБЕРЕЖЕНИЕ И ЗАЩИТА ОКРУЖАЮЩЕЙ СРЕДЫ
По возможности следует избегать предварительного нагрева
духового шкафа и всегда заполнять его полностью.
Открывайте дверцу духового шкафа как можно реже, так как
при каждом ее открытии тепло рассеивается. Для
существенной экономии электроэнергии выключайте духовой
шкаф за 5-10 минут до планируемого окончания времени
приготовления, таким образом используется остаточное
тепло, вырабатываемое духовым шкафом. Уплотнители
следует содержать в чистоте и в надлежащем состоянии во
избежание распространения тепла за пределы камеры. В
случае если в вашем договоре на электроснабжение
предусматривается почасовой тариф, то программа "отсрочка
приготовления" упрощает процесс экономии электроэнергии
благодаря отсрочке начала процесса приготовления до начала
действия льготного тарифа.
Page 64

3. ОПИСАНИЕ ДИСПЛЕЯ
КНОПКА ДЛЯ РЕГУЛИРОВКИ И ПОДТВЕРЖДЕНИЯ
Установки: температура, программирование режима приготовления
пищи, и время окончания приготовления пищи. Регулировка выполняется с
помощью поворота кнопки в сторону "-" или "+".
Чтобы подтвердить установку: нажмите на кнопку
Дисплей: время, программирование режима
приготовления пищи, световые индикаторы,
температура приготовления пищи, и положение полки
Световой индикатор:
температура повышается
Индикатор функции
духовки и рекомендуемый
уровень полки
Часы /
Программирование /
Температура, при которой /
приготавливается пища
PYRO
Индикатор
ускоренного нагрева
Вертел
Предварительный
разогрев
Отображение символов программирования:
приготовление пищи
Окончание
Время
Таймер
приготовления пищи
Индикатор:
Функция «Детский замок»
Индикатор:
WIFI
Индикатор:
Запирание дверцы духовки
64 RU
Page 65

3.1 ПЕРЕД ПЕРВЫМ ИСПОЛЬЗОВАНИЕМ
ДУХОВКИ
• ЧИСТКА ПЕРЕД ПЕРВЫМ ИСПОЛЬЗОВАНИЕМ
Пред первым использованием духовки очистите ее следующим
образом:
Протрите наружные поверхности духовки мягкой влажной
тряпкой.
Вымойте все принадлежности и протрите внутренние
поверхности духовки тряпкой, смоченной в горячем водном
растворе жидкого моющего средства.
Дайте поработать пустой духовке при максимальной
температуре в течение одного часа. Это необходимо для того,
чтобы удалить из духовки запахи. При выполнении этой
операции помещение, в котором установлена духовка, должно
хорошо проветриваться.
• ВЕЩИ, О КОТОРЫХ НЕ СЛЕДУЕТ ЗАБЫВАТЬ
Подтверждение операции, выполняемой с помощью таймера
Изменения параметров должны подтверждаться с помощью
нажатия кнопки.
Выключение духовки:
Эта операция может потребоваться в случае ввода
неправильной команды. Чтобы выключить духовку … установите
ручку программирования в положение СТОП.
Замок от детей:
Чтобы заблокировать действие органов управления духовки,
выберите функцию замка от детей. См. раздел
"Программирование – Замок от детей".
Охлаждающий вентилятор:
Защищает панель управления и электронные устройства от
перегрева. Он включается автоматически и выключается при
выключении духовки.
Освещение в духовке:
Чтобы включить освещение в духовке, нужно установить ручку
программирования на символ освещения.
Если духовка работает, лампочка будет гореть при выборе любой
функции, и будет продолжать гореть после открывания дверцы.
• УСТАНОВКА ЧАСОВ
После первого подключения духовки к электросети и после
длительного перерыва в подаче электроэнергии необходимо
установить часы.
Чтобы установить часы:
1 - Установите ручку программирования на символ "часы»
2 - Установите часы с помощью поворота центральной кнопки в
направлении "-" или "-", подтвердите установку с помощью
нажатия этой ручки.
3 - Установите ручку программирования в положение СТОП.
1 - Установите ручку выбора функции в положение,
соответствующее нужному вам режиму приготовления пищи". На
дисплее отображаются символы нагревательных элементов,
работающих в выбранном вами режиме приготовления пищи.
2 - На дисплее отображается температура приготовления пищи для
выбранного метода приготовления пищи. Эта температура может
изменяться в указанном диапазоне температур (см.
представленную выше таблицу).
Температура может изменяться с помощью поворота центральной
кнопки. Выберите нужное вам значение температуры и
подтвердите с помощью нажатия этой кнопки.
…температура отображается на дисплее ровным светом, но может
изменяться во время цикла приготовления пищи.
Духовка начинает нагреваться, и начинается приготовление пищи.
Световой индикатор будет мигать до тех пор, пока температура в
духовке не поднимется до заданного значения. После этого
подается звуковой сигнал, и этот символ продолжает гореть ровным
светом.
3 - Время приготовления пищи и время окончания приготовления
пищи могут изменяться с помощью установки ручки выбора
программы в положение "время приготовления пищи" или в
положение "время окончания приготовления пищи". Индикатор
"время приготовления пищи" или "время окончания приготовления
пищи" начинает мигать. С помощью центральной кнопки измените
установки в соответствии с вашими требованиями, и подтвердите
это с помощью нажатия центральной кнопки.
После выполнения этих операций не забудьте вернуть ручку выбора
программы в положение СТОП, чтобы подтвердить новые
установки.
Для получения дополнительной информации
относительно программирования работы духовки
обратитесь к параграфу 5.3 ПРОГРАММИРОВАНИЕ
4 - В конце цикла приготовления пищи установите ручку выбора
функции в положение СТОП.
После завершения цикла приготовления пищи индикатор
температуры снова начинает мигать. Он будет продолжать мигать
после выключения духовки, и погаснет только после того, как
температура в духовке снизиться до достаточно низкого значения.
• РЕЖИМЫ ПРИГОТОВЛЕНИЯ ПИЩИ
Приготовление пищи всегда должно
выполняться только с закрытой
дверцей духовки.
НАГРЕВ СНИЗУ + ВЕНТИЛЯТОР - Используются нижний
нагревательный элемент и вентилятор. Этот метод идеально
подходит для приготовления открытых пирогов с фруктовой
начинкой, пирожков с открытой фруктовой начинкой, и пирожных.
При этом выпечка не пересушивается и обеспечивается подъем
теста. Установите полку в нижнее положение.
10:30
3.2 КАК ПОЛЬЗОВАТЬСЯ ДУХОВКОЙ
• РУЧНОЙ РЕЖИМ
Методы приготовления пищи в ручном режиме перечислены в
представленной ниже таблице. Для каждого метода
приготовления пищи также указана рекомендуемая
температура. Температура может меняться в указанном
диапазоне температур.
Режим работы в
соответствии с
моделью духовки
Нагрев снизу + вентилятор
Нагрев снизу
Нагрев снизу + нагрев сверху
Нагрев снизу + нагрев сверху +
вентилятор
КРУГЛЫЙ НАГРЕВАТЕЛЬНЫЙ ЭЛЕМЕНТ +
вентилятор
Гриль
Гриль + вентилятор
Размораживание
Поддержание пищи в разогретом
состоянии
Пицца
*Ускоренный нагрев: быстрое повышение температуры
** Духовка должна иметь эту функцию
***
Заранее
установленная
температура, °С
210
160
220 50-240
***
210
180
L2
190
***
40
60
230
**
Диапазон
температур, °С
50-220
50-220
50-230
50-230
L1-L3
50-200
No
No
230
EN 60350-1
Функция
ускоренного
нагрева*
Booster
Booster
Booster
НАГРЕВ СНИЗУ - Используется нижний нагревательный
элемент. Этот метод идеально подходит для приготовления любых
мучных изделий. Используйте его для приготовления открытых
пирогов с фруктовой или ягодной начинкой, пирогов с заварным
кремом и различной начинкой, пирожков с открытой фруктовой
начинкой, пирожков с мясом или рыбой и другой пищи, для
приготовления которой требуется более интенсивный нагрев снизу.
НАГРЕВ СНИЗУ + НАГРЕВ СВЕРХУ - Используются
верхний и нижний нагревательные элементы. Этот метод идеально
подходит для традиционного зажаривания пищи и для выпечки. Он
используется при приготовлении черного мяса, говядины, ноги
ягненка, дичи, хлеба, или продуктов, завернутых в фольгу.
НАГРЕВ СНИЗУ + НАГРЕВ СВЕРХУ + ВЕНТИЛЯТОР Используются верхний и нижний нагревательные элементы, а
также работает вентилятор, с помощью которого осуществляется
циркуляция горячего воздуха в духовке. Этот метод рекомендуется
использовать для приготовления домашней птицы, выпечки, рыбы
и овощей. При использовании этого метода обеспечивается лучшее
проникновение тепла внутрь пищи, и также снижается время
приготовления пищи и предварительного разогрева. Метод
приготовления пищи с использованием вентилятора позволяет
одновременно готовить различные виды пищи на разных полках
духовки. При этом обеспечивается более равномерное
распределение тепла и предотвращается поглощение одним
видом пищи запаха другого вида пищи. При одновременном
приготовлении разных видов пищи следует увеличить время
приготовления пищи на 10 минут.
КРУГЛЫЙ НАГРЕВАТЕЛЬНЫЙ ЭЛЕМЕНТ +
ВЕНТИЛЯТОР - Используются верхний и нижний нагревательные
элементы, а также нагревательный элемент круглой формы и
65 RU
Page 66

осуществляется циркуляция горячего воздуха в духовке. Это метод
приготовления пищи с вентилятором.
ГРИЛЬ - Используется верхний нагревательный элемент.
Этот метод идеально подходит для приготовления различных блюд
на гриле, кебабов, и гратинов (блюда, запеченные под сыром). Гриль
должен предварительно разогреваться до высокой температуры в
течение 5 минут. Куски белого мяса должны располагаться на
одинаковом расстоянии от нагревательного элемента гриля. Время
приготовления пищи при этом увеличивается, но мясо получается
более сочным. Черное мясо и филе рыбы можно класть прямо на
решетку, под которую необходимо установить поддон для сбора
жидкости.
ГРИЛЬ + ВЕНТИЛЯТОР - Используются верхний
нагревательный элемент и вентилятор, с помощью которого
осуществляется циркуляция горячего воздуха в духовке. Для
приготовления черного мяса рекомендуется предварительный
разогрев духовки, а для приготовления белого мяса
предварительный разогрев духовки не требуется. Приготовление
на гриле идеально подходит для зажаривания больших кусков мяса
и домашней птицы. Приготавливаемая на гриле пища
располагается в центре средней полки.
Для сбора соков, которые выделяются при приготовлении пищи на
гриле, под полку нужно установить поддон для сбора жидкости. Для
получения оптимальных результатов проследите за тем, чтобы
приготавливаемая пища не располагалась слишком близко от
нагревательного элемента гриля, и переверните куски пищи, когда
пройдет время, равное половине времени приготовления пищи.
РАЗМОРАЖИВАНИЕ - Когда ручка регулировки
установлена в это положение, с помощью вентилятора
осуществляется циркуляция теплого воздуха вокруг замороженных
продуктов, что обеспечивает их размораживание в течение
нескольких минут без изменения содержания в пище протеинов.
ПОДДЕРЖАНИЕ ПИЩИ В РАЗОГРЕТОМ СОСТОЯНИИ –
Этот режим рекомендуется для разогревания пищи,
расположенной на полке, установленной на второй позиции сверху,
или для размораживания пиццы или выпечки, расположенных на
полке, установленной на нижний уровень.
Используется постоянная температура 60 °С, температура не
регулируется.
ПИЦЦА – В этом режиме в духовке происходит циркуляция
воздуха, что обеспечивает превосходные результаты при
приготовлении таких блюд как пицца или кекс.
WIFI
3.3 ПРОГРАММИРОВАНИЕ
СИМВОЛЫ, ОТОБРАЖАЕМЫЕ НА
ДИСПЛЕЕ:
Освещение
Настройка часов
Программирование времени
приготовления
Программирование окончания
STOP
Ручка
программирования
приготовления
Звуковой таймер
Активирован замок от детей
Блокировка дверцы духовки
ТАЙМЕР:
Таймер не управляет работой нагревательных элементов
духовки. Он используется только для индикации времени.
•Установите ручку программирования в положение "таймер". На
дисплее появляется символ таймера и разряды 00:00.
•После того как начнут мигать разряды минут, установите нужное
количество минут с помощью поворота центральной кнопки, и
подтвердите установку с помощью нажатия этой кнопки.
•После этого начинают мигать разряды часа, установите нужное
количество часов с помощью поворота центральной кнопки, и
подтвердите установку с помощью нажатия этой кнопки.
•Установите ручку программирования в положение СТОП.
После того как истечет заданное время, индикатор времени
приготовления пищи исчезнет с дисплея. После этого в течение
15 секунд будет подаваться звуковой сигнал, и на дисплее
начинает мигать символ STOP (СТОП). (Чтобы выключить
звуковой сигнал до того, как истекут 15 секунд, просто нажмите
центральную кнопку).
ПРОГРАММИРОВАНИЕ ВРЕМЕНИ ПРИГОТОВЛЕНИЯ ПИЩИ:
В различных рецептах запрограммировано время приготовления
пищи. При выборе ручного режима можно запрограммировать
время работы духовки при работе в режимах размораживания и
приготовления пиццы.
•Установите ручку программирования в положение "время
приготовления пищи". На дисплее появляется символ "время
приготовления пищи", а также запрограммированное время
приготовления пищи для различных рецептов, или разряды 00:00
для других функций духовки.
•После того, как начнут мигать разряды минут, установите нужное
количество минут с помощью поворота центральной кнопки, и
подтвердите установку с помощью нажатия этой кнопки.
•После этого начинают мигать разряды часа, установите нужное
количество часов с помощью поворота центральной кнопки, и
подтвердите установку с помощью нажатия этой кнопки.
•Установите ручку программирования в положение СТОП, чтобы
подтвердить выбранное время приготовления пищи.
После того как истечет заданное время, индикатор времени
приготовления пищи исчезнет с дисплея. После этого в течение
15 секунд будет подаваться звуковой сигнал, и на дисплее
начинают мигать символы "время приготовления пищи" и STOP.
•Установите ручку программирования в положение СТОП. Если
вы не сделаете этого, символы "время приготовления пищи" и
STOP будут продолжать мигать.
ПРОГРАММИРОВАНИЕ ВРЕМЕНИ ОКОНЧАНИЯ
ПРИГОТОВЛЕНИЯ ПИЩИ:
В различных рецептах запрограммировано время приготовления
пищи, а, следовательно, и время окончания приготовления пищи.
При выборе ручного режима можно запрограммировать время
работы духовки при работе в режимах размораживания и
приготовления пиццы.
•Установите ручку программирования в положение "время
окончания приготовления пищи". На дисплее появляется символ
STOP, "время приготовления пищи", а также
запрограммированное время окончания приготовления пищи
для различных рецептов, или разряды 00:00 для других функций
духовки, или текущее время.
•Установите ручку программирования в положение СТОП, чтобы
подтвердить режим установки времени окончания приготовления
пищи.
•После того, как начнут мигать разряды минут, установите нужное
количество минут с помощью поворота центральной кнопки, и
подтвердите установку с помощью нажатия этой кнопки.
• После этого начинают мигать разряды часа, установите нужное
количество часов с помощью поворота центральной кнопки, и
подтвердите установку с помощью нажатия этой кнопки.
ВАЖНОЕ ЗАМЕЧАНИЕ: При выборе режима включения духовки
с задержкой на дисплее будет отображаться время окончания
приготовления пищи и символы "время приготовления пищи" и
STOP, а также символ режима работы духовки.
Духовка автоматически рассчитывает время начала
приготовления пищи (время окончания приготовления пищи
минус время приготовления пищи).
В конце цикла приготовления пищи духовка автоматически
выключается. В течение 15 секунд подается звуковой сигнал,
сообщающий о том, что цикл приготовления пищи закончен, и на
дисплее начинают мигать символы "время приготовления пищи"
и STOP.
• Установите ручку программирования в положение СТОП. Если
вы не сделаете этого, символы "время приготовления пищи" и
STOP будут продолжать мигать.
• Эта функция обычно используется с функцией «время
66 RU
Page 67

приготовления пищи».
Например, если блюдо должно готовиться на протяжении 45
минут, и оно должно быть готово к 12.30;
- выберите нужную функцию
- установите время приготовления 45 минут
- установите время окончания приготовления в 12.30
Приготовление автоматически начнется в 11.45 (12.30 минус 45
минут) и продолжится до установленного времени, после чего
духовка автоматически отключится.
ПРЕДУПРЕЖДЕНИЕ
Если время окончания приготовления выбрано без установки
длительности всего приготовления, духовка сразу автоматически
начнет приготовление и прекратит цикл только в установленное
время окончания.
3.4 СОВЕТЫ ПО ПРИГОТОВЛЕНИЮ ПИЩИ
Рекомендуется солить мясо после его приготовления, так как
соль вызывает разбрызгивание жира. При этом духовка
загрязняется и образуется дым.
Куски белого мяса (свинина, телятина, ягненок), и рыба могут
помещаться в холодную духовку. При этом время приготовления
пищи будет больше времени приготовления пищи в
предварительно разогретой духовке, но куски мяса будут лучше
прожариваться в середине, так как время проникновения тепла
внутрь пищи при этом увеличивается.
Правильный предварительный разогрев духовки является
необходимым условием для успешного приготовления черного
мяса.
4. Функция «Детский замок»
Если в доме имеются дети, эта функция может оказаться очень
полезной. Она предотвращает включение духовки детьми и
изменение ими запрограммированных программ.
Замок от детей обеспечивает блокировку панели управления
духовки.
Имеется два уровня защиты:
УРОВЕНЬ 1: Блокировка ручки выбора режима приготовления пищи
и центральной кнопки
• Чтобы активировать: установите ручку программирования в
положение "замок от детей".
• Результат: ручка выбора режима приготовления пищи и
центральная кнопка перестают действовать.
• Для отмены: установите ручку программирования в положение 0.
УРОВЕНЬ 2: Блокировка всех ручек управления
• Чтобы активировать: установите ручку программирования в
положение "замок от детей" и удерживайте центральную кнопку в
нажатом положении в течение 3 секунд.
• Результат: все ручки управления перестают действовать.
• Для отмены: Выполните ту же самую процедуру, что и для
активации. Установите ручку программирования в положение "замок
от детей" и удерживайте центральную кнопку в нажатом положении в
течение 3 секунд.
Примечание: Даже если действия ручек управления заблокированы,
духовку можно выключить, установив ручку программирования в
положение 0. Это предусмотрено в целях безопасности.
ПРИГОТОВЛЕНИЕ ПИЩИ НА ГРИЛЕ:
• Перед загрузкой пищи для приготовления на гриле:
Выньте мясо из холодильника за несколько часов до его
приготовления на гриле. Положите его на несколько слоев
кухонной (впитывающей) бумаги. Это обеспечит удаление влаги
и лучший прогрев мяса в середине. Перед приготовлением мяса
на гриле посыпьте его перцем и другими специями, но не солите
его перед приготовлением. Посолите мясо после его
приготовления. В этом случае мясо будет более сочным.
Смажьте мясо тонким слоем растительного масла. Это лучше
всего делать с помощью плоской широкой кисти. Затем еще раз
посыпьте мясо перцем и другими специями (например,
чебрецом).
• Во время приготовления пищи:
Никогда не прокалывайте мясо во время его приготовления, даже
когда вы его переворачиваете. Это приведет к тому, что из мяса
будет вытекать сок, и оно будет становиться сухим.
ПРИГОТОВЛЕНИЕ ВЫПЕЧКИ:
Никогда не пользуйтесь блестящими формочками, они отражают
тепло, и могут испортить ваши пирожки или пирожные. Если ваши
пирожки подрумяниваются слишком быстро, покройте их
жиронепроницаемой бумагой или алюминиевой фольгой.
Внимание: блестящая сторона фольги должна быть обращена к
пирожкам. В противном случае тепло будет отражаться
блестящей поверхностью и не будет проникать в пищу.
Не открывайте дверцу духовки в течение первых 20-25
минут приготовления пищи: суфле, сдобные булочки,
бисквиты могут осесть. Вы можете проверить, готова ли выпечка,
проколов ее в центре ножом или металлической вязальной
спицей. Если лезвие ножа выходит из выпечки чистым и сухим, то
выпечка готова, и вы можете остановить процесс выпекания.
Если лезвие ножа выходит из выпечки влажным или с налипшими
на нем частичками выпечки, продолжите выпекание, но немного
уменьшите температуру для того, чтобы выпечка не подгорела.
5. Функция WIFI
Настройка WiFi:
• Поверните ручку выбора программ в позицию WiFi (начнет
мигать символ "@").
• Когда духовой шкаф подключен к беспроводному
маршрутизатору и выбрана функция WiFi, то символ "@" горит не
мигая постоянно.
• Если духовой шкаф не подключен к беспроводному
маршрутизатору, символ "@" будет мигать. (см. раздел СИМВОЛ
УПРАВЛЕНИЯ "@").
• Если выбрана функция WiFi, то духовым шкафом можно
управлять только удаленно с мобильного устройства. (ручка
выбора программ и энкодер при этом отключаются);
• При выборе других режимов приготовления (кроме WiFi)
духовой шкаф не может управляться удаленно.
СБРОС
Для сброса функции WiFi, поверните ручку выбора программ в
позицию WiFi (пока ни одна программа не работает), нажмите и
удерживайте ручку энкодера в течение 3 секунд.
Через 3 секунды, на дисплее появится надпись "rSt" и начнет
мигать символ "@".
СИМВОЛ УПРАВЛЕНИЯ "@”
• Когда духовка выключена, символ не горит;
• Когда ручка выбора программ находится в положении Wifi,
мигающий символ (1 раз - вкл и 1 раз выкл) говорит о том, что
духовой шкаф находится в режиме "точки доступа" (т.е. соединен
напрямую с мобильным устройством), если же символ не мигает,
значит духовой шкаф находится в режиме Клиента (т.е.
подсоединен в маршрутизатор наряду с другими устройствами)
• Когда ручка выбора программ находится в положении Wifi и
духовой шкаф пытается соединиться с маршрутизатором,
символ мигает (3раза вкл и 1раз выкл).
• Когда ручка выбора программ находится во включенном
положении, но не в положении Wi-fi (ридонли) , символ мигает
(1раз вкл и 3 раза выкл).
3.5 РЕГУЛИРОВКА КОНТРАСТНОСТИ ДИСПЛЕЯ
Контрастность дисплея может быть отрегулирована в любое
время.
Установка по умолчанию – "С5". Чтобы отрегулировать
контрастность дисплея, нужно выполнить следующие операции:
• Установите ручку программирования в положение "освещение",
а ручку выбора функции в положение "0". Нажмите центральную
кнопку и удерживайте ее в нажатом положение в течение 3 с. На
дисплее появляется символ "СХ" (Х – это уровень
контрастности).
Отрегулируйте уровень контрастности с помощью поворота
центральной кнопки. Можно выбрать уровень контрастности от 1
до 9. Подтвердите новую установку с помощью нажатия
центральной кнопки и удерживания ее в нажатом положении в
течение 3 с.
CANDY SIMPLY-FI:
Для получения более подробной информации о
том, КАК ПОДКЛЮЧИТЬ ваш бытовой прибор
simply-Fi и КАК ЕГО ИСПОЛЬЗОВАТЬ
максимально эффективно, перейдите на сайт
http://www.candysimplyfi.com или посетить
специализированный сервисный сайт simply-Fi
http://simplyfiservice.candy-hoover.com
67 RU
Page 68

6.
68 RU
Page 69

6.
10 минут/кг*
10 минут/кг*
69 RU
Page 70

INSTRUKCJE BEZPIECZEŃSTWA
UWAGA: Podczas pracy urządzenie oraz jego elementy są gorące. Należy zachowac ostrożność i nie
dotykać gorących części.
• Dzieci w wieku do 8 lat nie mogą zbliżać się do urządzenia chyba że pozostaja one pod ciągłym
nadzorem.
• Dzieci w wieku powyżej 8 lat oraz ososby z ograniczeniami ruchowymi, umysłowymi, czuciowymi lub
nie posiadające odpowiedniej wiedzy lub doświadczenia mogą obsługiwać urządzenie jedynie pod
nadzorem lub po przeszkoleniu odnośnie bezpiecznego uzykowania urządzenia i związanych z tym
zagrożeń.
• Dzieci nie mogą bawić się urządzeniem.
• Dzieci bez nadzoru nie mogą obsługiwac ani czyścić urządzenia.
• Podczas użytkowania urządzenie nagrzewa się. Należy zachowac ostrożność i nie dotykać gorących
części wewnątrz piekarnika.
UWAGA: dostępne części mogą być gorące podczas użytkowania. Dzieci nie mogą zbliżać się do
urządzenia.
• Do czyszczenia szyby drzwi piekarnika nie wolno stosować substancji ściernych ani ostrych skrobaków
gdyż mogą one porysować szkło i spowodować jego stłuczenie.
• Wyłaczyć piekarnik przed usunięciem ekranu, po wyczyszczeniu zamontować ekran zgodnie z
instrukcją.
• Używać wyłacznie sondy cieplnej przeznaczonej do tego piekarnika.
• Nie stosować do czyszczenia urządzeń parowych.
UWAGA: należy upewnić się czy urządzenie jest wyłączone przed przystąpieniem do wymiany żarówki
aby uniknąć niebezpieczeństwa porażenia.
• Wyłącznik musi być podłączony do okablowania zgodnie z obowiązujacymi przepisami.
• instrukcja musi określać jaki rodzaj przewodu może być zastosowany, z uwzglednieniem temperatury
tylnej ścianki urządzenia.
• Jeżeli przewód zasilający jest uszkodzony należy go wymienić na nowy dostarczony przez producenta
lub autoryzowany serwis.
UWAGA: w celu uniknięcia zagrożeń związanych z przypadkowym zadziałaniem zabezpieczeń
termicznych urządzenie nie może być zasilane z sieci sterowanej niezależnie lub z obwodów które są
regularnie włączane i wyłączane.
UWAGA: dostępne cześci mogą być gorące podczas używania grilla. Dzieci nie mogą zbliżać się do
urządzenia.
• Pokarm który wykipiał musi być usunięty przed czyszczeniem.
• Podczas pyrolizy powierzchnie mogą się bardzo mocno nagrzewać, proszę pilnowac dzieci aby się nie
zbliżały.
70 PL
Page 71

1.
1.1
Niniejsze urządzenie, w części przeznaczonej do kontaktu ze środkami
spożywczymi spełnia wymagania przepisów ustanowionych w
Dyrektywie 89/109/EWG.
Poprzez umieszczenie oznaczenia na tym produkcie
poświadczamy na własną odpowiedzialność przestrzeganie wszystkich
wymogów europejskich dotyczących bezpieczeństwa, ochrony zdrowia i
środowiska określonych w przepisach dla tego produktu.
1.2
•Nie należy wykładać ścianek piekarnika folią aluminiową lub
jednorazowymi materiałami ochronnymi dostępnymi w sklepach. Użyta
folia aluminiowa lub inne materiały ochronne w zetknięciu z gorącą
emalią mogą spowodować nadtopienie się i pogorszenie jakości
emaliowanych ścianek wnętrza piekarnika.
1.3
1.5
1.4
71 PL
Page 72

1.6
Demontaż i czyszczenie drabinek
1- Odkręcić nakrętkę, przekręcając ją w kierunku przeciwnym do ruchu wskazówek zegara
2- Zdjąć drabinki, pociągając w kierunku do siebie.
3- Umyć drabinki w zmywarce lub ręcznie wilgotną gąbką. Po umyciu wysuszyć.
4- Po umyciu i wysuszeniu zamontować drabinki, odwrotnie do sposobu montażu
5. Przykręcić nakrętki
2.
A
2.1
2.2
2.3
2.4
72 PL
Page 73

2.5
2.6
2.7
Urządzenie to jest oznaczone zgodnie z Dyrektywą
Europejską 2012/19 / UE w sprawie zużytego sprzętu
elektrycznego i elektronicznego (WEEE). Zużyty
sprzęt elektryczny i elektroniczny zawiera zarówno
substancje zanieczyszczające (o negatywnym
oddziaływaniu na środowisko naturalne), jak i
podstawowe elementy (które można użytkować
wielokrotnie). Ważne, aby zużyty sprzęt elektryczny i elektroniczny
poddawać specjalnej obróbce w celu bezpiecznego usunięcia i
pozbycia się wszystkich środków zanieczyszczających i
odzyskania wszystkich surowców wtórnych.
Poszczególne osoby odgrywają ważną rolę w zapobieganiu
szkodliwemu oddziaływaniu zużytego sprzętu elektrycznego i
elektronicznego na środowisko, ważne aby przestrzegać kilku
podstawowych zasad:
• Zużyty sprzęt elektryczny i elektroniczny nie może być
traktowany jako odpad komunalny.
• Zużyty sprzęt elektryczny i elektroniczny przekazuje się do
właściwych punktów zbiórki prowadzonych przez gminy lub
koncesjonowane firmy. W wielu krajach, gdzie jest dużo zużytego
sprzętu elektrycznego i elektronicznego, odbiera się go z domów.
• gdy kupuje się nowe urządzenie, zużyte można zwrócić do
sprzedawcy, który musi je przyjąć bezpłatnie, na zasadzie zamiany
jeden za jeden, o ile urządzenie to jest tego samego rodzaju i ma
takie same funkcje, jak urządzenie dostarczone.
OSZCZĘDNOŚĆ ENERGII I POSZANOWANIE ŚRODOWISKA
Tam gdzie to możliwe, należy unikać wstępnego podgrzewania
piekarnika i zawsze starać się go zapełnić. Jak najrzadziej
otwierać drzwiczki piekarnika, ponieważ za każdym razem, gdy
zostaną otwarte z wnętrza ucieka ciepło. W celu uzyskania
znacznej oszczędności energii piekarnik należy wyłączyć na 5-10
minut przed planowanym zakończeniem pieczenia, co pozwoli na
wykorzystanie ciepła odpadowego, które nadal generuje
piekarnik. Uszczelki powinny być czyste i spełniać swoje zadanie,
aby uniknąć wydostawania się ciepła poza wnętrze piekarnika.
Jeśli Twoja umowa z dostawcą energii opiera się na taryfie
godzinowej, program "opóźnionego startu" upraszcza
oszczędzanie energii, uruchamiając proces pieczenia w czasie
obowiązywania niższej taryfy.
73PL
Page 74

3. PANEL STEROWANIA
Ustawienia: ilość/ciężar, temperatura, programowanie pieczenia i koniec czasu
pieczenia. Obracanie pokrętła w kierunku “-” lub “+” umożliwia regulację ustawienia.
Potwierdzenie ustawienia: naciśnięcie pokrętła potwierdza ustawienie.
Wyświetlacz: czas, tryb programowania pieczenia,
symbole, temperatura pieczenia i położenie półek.
POKRĘTŁO REGULACJI I POTWIERDZENIA WYBORU
Wskaźnik świetlny:
wzrost temperatury
Wyświetlacz funkcji
piekarnika i położenie
rusztu.
Zegar/
Funkcje/
Temperatura pieczenia
PYRO
Wskaźnik booster
podgrzew.:
Rożen
Grzanie wstępne
Wyświetlanie symbolu programu: pieczenie.
Czas Czasomierz
Koniec
Wskaźnik świetlny:
zabezpieczenie przed dziećmi.
Kontrolka
WIFI
Wskaźnik świetlny:
blokada drzwiczek
74 PL
Page 75

3.1 PRZED UŻYCIEM PIEKARNIKA PO RAZ PIERWSZY
• CZYSZCZENIE PRZED PIERWSZYM UŻYCIEM
- Wyczyść piekarnik przed pierwszym użyciem:
- wytrzyj powierzchnie zewnętrzne piekarnika miękką wilgotną szmatką.
- Umyj wszystkie elementy wyposażenia i wytrzyj wnętrze piekarnika
roztworem gorącej wody i płynu do mycia.
- Ustaw piekarnik na maksymalną temperaturę i pozostaw włączony przez
około godzinę, aby wygrzać piekarnik i usunąć zapachy. Upewnij się czy w
tym czasie pomieszczenie jest dobrze wentylowane.
• ZAPAMIĘTAJ:
Potwierdzenie operacji:
Każdą zmianę należy potwierdzić przez naciśnięcie środkowego
przycisku obrotowego.
Wyłączenie piekarnika:
Może być potrzebne w przypadku wprowadzenia nieprawidłowej
instrukcji. Aby wyłączyć piekarnik, przekręć pokrętło funkcji z powrotem do
położenia stop.
Zabezpieczenie przed dziećmi:
Umożliwia zablokowanie funkcji kontrolnych piekarnika przed dostępem
dzieci. Zobacz rozdział zatytułowany "Programowanie - Blokada".
Wentylator chłodzący:
Zabezpiecza panel sterowania i elektronikę przed uszkodzeniem wskutek
wysokiej temperatury.
Wentylator włącza się i zatrzymuje automatycznie nawet przy
wyłączonym piekarniku.
Oświetlenie piekarnika:
Obrócenie pokrętła w położenie symbolu żarówki umożliwia włączenie
oświetlenie przy wyłączonym piekarniku.
Oświetlenie jest zawsze włączone w czasie wykonywania dowolnej funkcji
pieczenia oraz po otwarciu drzwiczek piekarnika.
• USTAWIENIE ZEGARA
Zegar trzeba ustawić po podłączeniu piekarnika do zasilania
elektrycznego lub po wyłączeniu zasilania na dłuższy okres.
Aby ustawić zegar:
1. Przekręć pokrętło funkcji w położenie oznaczone symbolem zegara:
2. Przy migających minutach i godzinach ustaw czas obracając środkowy
przycisk w kierunku "-" lub "+".
3. Po ustawieniu czasu ustaw pokrętło z powrotem w położenie STOP.
10:30
3. Aby zaprogramować czas pieczenia i koniec czasu pieczenia ustaw
pokrętło programatora w położenie oznaczone symbolem "czas
pieczenia" lub "koniec pieczenia" - wybrany symbol zacznie migać.
Obracając środkowy przycisk ustaw i następnie potwierdź ustawioną
temperaturę.
Pamiętaj o zatwierdzeniu nowego ustawienia, regulując pokrętło
programatora z powrotem do pozycji STOP.
Więcej informacji o programowaniu zawarto w rozdziale
zatytułowanym PROGRAMOWANIE.
4. Po upływie czasu pieczenia ustaw pokrętło funkcji z powrotem do
położenia STOP.
Mimo wyłączenia piekarnika wskaźnik zacznie migać ponownie, aż do
odpowiedniego wystygnięcia urządzenia.
• RODZAJE PRACY PIEKARNIKA
Podczas pieczenia drzwiczki piekarnika powinny być zawsze zamknięte
PODGRZEWANIE DOLNE Z NAWIEWEM - Kombinacja, w
której włączona jest dolna grzałka i wentylator najlepiej nadaje się do
placków owocowych, tart, quiche i ciast. Ta metoda pieczenia zapobiega
wysychaniu potraw i pobudza rośnięcie ciasta. Blachę na potrawy należy
umieścić w dole piekarnika.
PODGRZEWANIE DOLNE - Wykorzystywana jest dolna
grzałka. Metoda nadaje się doskonale do pieczenia potraw na bazie
ciasta, takich jak placki, quiche, tarta, pasztet oraz do pieczenia
wymagającego większej ilości ciepła promieniującego od dołu.
KONWEKCJA NATURALNA - Włączona jest grzałka górna i
dolna. Ta metoda doskonale nadaje się do tradycyjnego pieczenia i
smażenia mięsa czerwonego, wołowiny, udźca jagnięcego, dziczyzny,
chleba lub potraw zawiniętych w folię.
GRZAŁKA OKRĄGŁA Z NAWIEWEM - Włączone są grzałki
górna i dolna oraz grzałka okrągła, wymuszająca cyrkulację gorącego
powietrza w piekarniku. Działanie jest podobne do metody pieczenia z
nawiewem.
OKRĄGŁY ELEMENT GRZEWCZY + NAWIEWEM - Włączone
są grzałki górna i dolna oraz wentylator wymuszający obieg powietrza w
piekarniku. Ta metoda zalecana jest do pieczenia drobiu, ciast, ryb i
warzyw. Tą metodą pieczenia uzyskuje się lepszą penetrację ciepła i
skrócenie czasu pieczenia oraz podgrzewania. Możliwość włączenia
wentylatora pozwala na jednoczesne pieczenie różnych potraw
umieszczonych w różnych miejscach piekarnika dzięki równomiernemu
rozłożeniu ciepła bez ryzyka mieszania się smaków i zapachów. Piekąc
różne potrawy jednocześnie czas pieczenia należy przedłużyć o 10 minut.
3.2 UŻYWANIE PIEKARNIKA
•TRYB RĘCZNY
Proponowane metody pieczenia w trybie ręcznym wymienione są w tabeli
poniżej. Dla każdej z metod podano także zaprogramowaną fabrycznie
temperaturę pieczenia. Temperaturę tą można zmienić w pewnym zakresie.
Tryb pracy w
zależności od
modelu
Podgrzewanie dolne + nawiew
Podgrzewanie dolne
Konwekcja naturalna
Okrągły element grzewczy + nawiewem
Grzałka okrągła z nawiewem
Grill
Grill z nawiewem
Grill + rożen + nawiew
Rozmrażanie
Podgrzewanie ciepłym powietrzem
Pizza
*Booster: gwałtowny wzrost temperatury
**Jeśli piekarnik posiada taką funkcję
***
Zaprogramowana
temperatura
ºC
210
160
220 50-240
***
210
180
L2
190
***
240
40
60
230
**
EN 60350-1
1. Przekręć pokrętło programatora i obracając środkowy przycisk wybierz
metodę pieczenia.
Wyświetlacz pokaże grzałki włączone w wybranym programie pieczenia.
2. Na wyświetlaczu pojawi się zaprogramowana dla wybranej metody
temperatura. Temperaturę tą można regulować w zakresie podanym w
tabeli powyżej.
Aby zmienić temperaturę obracaj środkowy przycisk i po ustawieniu
wybranej temperatury potwierdź wybór przez naciśnięcie przycisku.
... Temperatura na wyświetlaczu przestanie migać lecz w razie potrzeby
można ją w czasie cyklu pieczenia zmienić.
Piekarnik rozpocznie pieczenie w trybie ręcznym i zacznie się
podgrzewać.
Wskaźnik będzie migać aż ustawiona temperatura zostanie osiągnięta, co
zostanie zasygnalizowane włączeniem się sygnału dźwiękowego.
Zakres
temperatury
ºC
50-220
50-220
50-230
50-230
L1-L3
50-200
180-240
No
No
230
Opcja
Booster *
Booster
Booster
Booster
Booster
GRILL - Wykorzystywana jest grzałka górna. Gwarantowany
sukces dla mieszanych potraw grillowanych, kebabu i zapiekanek. Grill
należy podgrzać do wysokiej temperatury przez 5 minut. Białe mięsa
należy zawsze umieszczać w pewnej odległości od grzałki grilla - chociaż
czas pieczenia będzie nieco dłuższy to mięso będzie bardziej soczyste.
Czerwone mięsa i filety rybne można umieścić wprost na ruszcie, pod
którym należy umieścić tacę na skapujący tłuszcz.
GRILL Z NAWIEWEM - Włączona jest górna grzałka oraz
wentylator wymuszający obieg gorącego powietrza w piekarniku. Przy
grillowaniu mięs czerwonych wskazane jest podgrzewanie natomiast w
przypadku mięsa białego nie jest to konieczne. Grillowanie jest doskonałą
metodą pieczenia grubszego mięsa takiego, jak wieprzowina lub drób.
Grillowane potrawy umieszcza się w środku środkowej prowadnicy rusztu.
Pod ruszt należy wsunąć głęboką blachę na skapujące soki. Dla
uzyskania najlepszego efektu pieczenia nie należy umieszczać
grillowanych potraw zbyt blisko grzałki, natomiast należy obracać potrawę
w połowie czasu pieczenia.
GRILL + ROŻEN+ NAWIEW - Dzięki jednoczesnemu
wykorzystaniu grilla, rożna oraz nawiewu potrawy są równomiernie
upieczone, zachowują swój smak oraz nie wysychają. Rożen jest
zaprogramowany tak, aby obracał się przez około 5 minut po wyłączeniu
piekarnika wykorzystując tym samym ciepło pozostające w piekarniku.
Użycie rożna nie wymaga wstępnego podgrzewania.
ROZMRAŻANIE - gdy włączona jest ta funkcja piekarnika,
działa tylko nawiew, dzięki któremu powietrze o temperaturze pokojowej
zostaje rozprowadzone po całej komorze pieczenia, a skład żywności
pozostaje niezmieniony. Temperatura rozmrażania jest zaprogramowana
na poziomie 40º C bez możliwości jej zmiany.
PODGRZEWANIE CIEPŁYM POWIETRZEM - Funkcja ta
zalecana jest do podgrzewania przygotowanych już potraw poprzez
umieszczenie ich na drugiej półce od góry lub do rozmrażania chleba,
pizzy oraz ciast umieszczając je na najniższym poziomie. Temperatura
jest zaprogramowana na poziomie 60º C bez możliwości jej zmiany.
PIZZA - Wybór tej funkcji oznacza cyrkulację gorącego
powietrza w piekarniku. Funkcja idealna do pieczenia pizzy lub ciast.
WIFI
75 PL
Page 76

3.3 PROGRAMOWANIE
SYMBOLE WYŚWIETLACZA
Oświetlenie
Ustawienie Zegara
Czasomierz odmierza czas
Programowanie czasu pieczenia
STOP
Selecteur
programmation
CZASOMIERZ
Czasomierz działa niezależnie od piekarnika i nie ma wpływu na działanie
grzałek piekarnika. Miernik służy tylko do sygnalizacji upływu
zaprogramowanego czasu.
•Ustaw pokrętło wyboru funkcji w położeniu ze znakiem zegara. Na
wyświetlaczu pojawi się symbol zegara. Wyświetlacz pokaże czas w
formie 00:00.
•Gdy minuty zaczną migać ustaw czas w minutach obracając środkowy
przycisk i następnie potwierdź naciskając przycisk.
•Gdy zaczną migać godziny ustaw czas w godzinach obracając środkowy
przycisk i następnie potwierdź naciskając przycisk.
•Obróć pokrętło funkcji z powrotem do położenia STOP.
Po upływie zaprogramowanego czasu wyświetlacz przestanie wyświetlać
ustawiony czas. Na 15 sekund włączy się sygnał dźwiękowy a symbol
zegara zacznie migać (aby wyłączyć go przed upływem 15 sekund
naciśnij środkowy przycisk).
PROGRAMOWANIE CZASU PIECZENIA
Czasy pieczenia dla różnych receptur są zaprogramowane fabrycznie
natomiast w trybie 'tryb ręczny', 'rozmrażanie' i 'pizza' czasy te można
zaprogramować.
•Ustaw pokrętło w położeniu programowania czasu pieczenia (pojawi się
symbol czasu pieczenia). Wyświetlacz wyświetli czasy pieczenia
zaprogramowane dla różnych receptur lub 00:00 dla innych funkcji pieca.
•Gdy minuty zaczną migać ustaw czas w minutach obracając środkowy
przycisk i potwierdź naciskając przycisk.
•Gdy zaczną migać godziny ustaw czas w godzinach obracając środkowy
przycisk i potwierdź naciskając przycisk.
•Obróć pokrętło programatora z powrotem do położenia STOP, aby
zatwierdzić nowy czas pieczenia. Po upływie zaprogramowanego czasu
wyświetlacz przestanie wyświetlać ustawiony czas. Na 15 sekund włączy
się sygnał dźwiękowy i zaczną migać symbole czasu pieczenia i STOP.
•Obróć pokrętło programatora z powrotem do położenia STOP. Symbole
"czas pieczenia" i STOP będą migać tak długo aż pokrętło to zostanie
ustawione w pozycji STOP.
PROGRAMOWANIE KOŃCA CZASU PIECZENIA
Czasy pieczenia dla różnych receptur a tym samym odpowiadające im
czasy końca pieczenia są zaprogramowane fabrycznie. W trybie pracy
ręcznej, rozmrażania lub pizzy czasy te można jednak programować.
•Ustaw pokrętło w położeniu końca czasu pieczenia. Pojawi się symbol
STOP. Wyświetlacz wyświetli czasy końca pieczenia zaprogramowane
dla różnych receptur lub 00:00 dla innych funkcji pieca.
•Ustaw pokrętło programatora w pozycję programowania czasu końca
pieczenia.
•Minuty zaczną migać. Obracając środkowy przycisk ustaw czas w
minutach i potwierdź naciskając przycisk.
•Następnie zaczną migać godziny. Obracając środkowy przycisk ustaw
czas w godzinach i potwierdź naciskając przycisk.
Programowanie końca czasu
pieczenia
Blokada przed dostępem dzieci
włączona
Blokada drzwiczek
- ustaw czas gotowania na 45 minut
- ustaw zakończenie czasu gotowania na godz. 12:30.
Gotowanie rozpocznie się automatycznie o godz. 11:45 (45 minut przed
godz. 12:30), a zakończy o uprzednio wybranej godzinie, kiedy to
piekarnik wyłączy się automatycznie.
UWAGA!
Jeśli wybrany zostanie czas ZAKOŃCZENIA gotowania bez
doprecyzowania długości czasu gotowania, piekarnik zostanie
uruchomiony od razu, a proces gotowania zakończy się o uprzednio
wybranej godzinie.
3.4 WSKAZÓWKI DOTYCZĄCE PIECZENIA
Mięso należy solić po upieczeniu, ponieważ sól sprzyja pryskaniu tłuszczu
wydzielającego się z mięsa, co powoduje wytwarzanie dużej ilości dymu w
piekarniku.
Pieczeń z białego mięsa, wieprzowiny, cielęciny, jagnięciny i ryb można
wkładać do zimnego piekarnika. Czas pieczenia jest dłuższy niż w
podgrzanym piekarniku, ale mięso piecze się lepiej na wskroś, gdyż ciepło
ma więcej czasu na przeniknięcie pieczeni.
Prawidłowe podgrzanie jest podstawą sukcesu przy pieczeniu
czerwonego mięsa.
GRILL
• Przed umieszczeniem potraw na grillu:
Wyjmij mięso z lodówki kilka godzin przed grillowaniem. Połóż mięso na
kilku warstwach papieru śniadaniowego, co poprawi jego zwartość i
uczyni je smaczniejszym oraz zapewni rozmrożenie w środku.
Dodaj pieprzu i przypraw do mięsa przed grillowaniem, lecz posól dopiero
po pieczeniu. Tak przygotowane mięso pozostanie zwarte i soczyste.
Podlej grillowane mięso niewielką ilością oleju. Najlepiej wykonać to przy
pomocy szerokiego płaskiego pędzla. Następnie spryskaj mięso
dodatkową ilością pieprzu i ziół, np. tymiankiem.
• W trakcie grillowania:
Nie nakłuwaj potraw nawet, jeżeli je obracasz. Mięso utraci sok i będzie
suche.
PIECZENIE CIAST
Przy pieczeniu ciast unikaj błyszczących form odbijających
promieniowanie cieplne. Jeżeli ciasto brązowieje zbyt szybko, przykryj je
pergaminem lub folią aluminiową.
Uwaga: folię należy układać błyszczącą stroną zwróconą w stronę ciasta.
W przeciwnym przypadku promieniowanie cieplne będzie odbijane przez
folię i ciepło nie będzie wnikało do ciasta.
W czasie pierwszych 20 - 25 minut pieczenia unikaj otwierania
drzwiczek piekarnika:
Suflet, brioche lub ciasta o konsystencji gąbczastej mogą opaść. Aby
sprawdzić czy ciasto już się upiekło nakłuj je w środku nożem lub
metalową igłą. Jeżeli wyciągnięty nóż jest suchy, ciasto jest już upieczone i
pieczenie można zakończyć. Jeżeli natomiast wyjęte ostrze jest mokre i
przyklejone są do niego drobiny ciasta wówczas pieczenie należy dalej
kontynuować obniżając nieco temperaturę po to, aby ciasto "doszło" bez
przypalenia się.
3.5 REGULACJA KONTRASTU WYŚWIETLACZA
Kontrast wyświetlacza może być regulowany w każdym momencie.
Domyślnym ustawieniem jest "C5". Aby dostosować ustawienia, należy
wykonać następujące czynności:
UWAGA: Przy opóźnionym starcie wyświetlacz pokaże jednocześnie z
końcem czasu programu także symbole 'czas pieczenia' i 'STOP' i
pozostanie tylko wybrana funkcja pieca.
Piekarnik automatycznie obliczy czas włączenia (czas końca pieczenia
minus czas pieczenia).
Po upływie ustawionego końca czasu cyklu piekarnik wyłączy się
automatycznie. Na 15 sekund włączy się sygnał dźwiękowy, informujący o
zakończeniu się cyklu i jednocześnie zaczną migać symbole "czas
pieczenia" i STOP.
• Przekręć pokrętło wyboru funkcji w położenie STOP. Symbole "czas
pieczenia" i STOP będą migać tak długo aż pokrętło to zostanie ustawione
w pozycji STOP.
•Funkcja ta jest zazwyczaj stosowana łącznie z funkcją 'Regulacja czasu
gotowania'.
Jeśli dla przykładu określone danie należy gotować przez 45 minut i ma
być przygotowane na godz. 12:30, należy wykonać następujące
czynności:
- wybierz wymaganą funkcję
• Ustaw pokrętło programowania na “Światło”, a pokrętło funkcji na “0”.
Następnie przytrzymaj środkowy przycisk przez 3 sekundy, aż na ekranie
wyświetlacza pojawi się “CX” (X = stopień kontrastu).
Obracając środkowy przycisk ustaw odpowiedni kontrast, od 1 do 9. Swój
wybór potwierdź przytrzymując przez 3 sekundy środkowy przycisk.
76 PL
Page 77

4. BLOKADA PRZED DOSTĘPEM DZIECI
5. WIFI
Jest to bardzo ważna funkcja, jeżeli dostęp do piekarnika mogą mieć
dzieci. Blokada zabezpiecza piekarnik przed włączeniem lub zmianą
programów przez dzieci.
Blokada blokuje panel sterowania w czasie, gdy piekarnik jest
używany.
Blokada ma dwa poziomy bezpieczeństwa:
POZIOM 1: Blokada pokrętła funkcji i pokrętła środkowego +/-.
• Aby blokadę włączyć: Przekręć pokrętło funkcji w położenie blokady.
• Działanie: Nieaktywne stają się pokrętła programatora i środkowy
przycisk*.
• Aby blokadę wyłączyć: przekręć pokrętło wyboru funkcji w położenie
0.
POZIOM 2: Blokada wszystkich pokręteł funkcji
• Aby blokadę włączyć: przekręć pokrętło wyboru funkcji do położenia
blokady i przytrzymaj środkowy przycisk wciśnięty przez 3 sekundy.
• Działanie: wszystkie pokrętła kontrolne stają się nieaktywne.
• Aby blokadę wyłączyć: powtórz procedurę włączenia blokady.
Przekręć pokrętło wyboru funkcji do położenia blokady i przytrzymaj
środkowy przycisk wciśnięty przez 3 sekundy.
* Uwaga: we wszystkich przypadkach - nawet, jeżeli włączona jest
blokada - piekarnik można wyłączyć ustawiając pokrętło funkcji w
pozycji zero.
KONFIGURACJA WIFI
• Przekręć pokrętłem programatora na pozycję WiFi (symbol “@”
zaczyna migać).
• Gdy piekarnik podłączony jest do bezprzewodowego routera i
wybrana zostaje funkcja WIFI, symbol @ pali się stałym światłem.
• Gdy piekarnik nie jest podłączony do bezprzewodowego routera
i wybrana zostaje funkcja WIFI, symbol @ miga.
• Gdy wybrana zostanie funkcja WIFI, Piekarnik może być
sterowany wyłącznie zdalnie (działanie programatora i kodera
zostanie wyłączone);
• Inne ustawienia piekarnika nie mogą być sterowane z zewnątrz.
RESETOWANIE
Aby zresetować WiFi, przekręć pokrętłem programatora na
pozycję WIFI, gdy nie działa żaden program, i przyciśnij
przyciskiem kodera przez 3 sekundy.
Po 3 sekundach, na wyświetlaczu pojawi się "rSt" a symbol "@"
zacznie migać.
ZARZĄDZANIE SYMBOLEM "@"
• Gdy piekarnik jest wyłączony, symbol się wyłącza;
• Gdy pokrętło piekarnika jest w pozycji WIFI: symbol miga (1 x
WŁ. + 1 x WyŁ.), jeśli piekarnik jest w trybie "punktu dostępu"
(podłączony punkt-do-punktu); gdy świeci się stale, jeśli piekarnik
jest w trybie "klienta" (podłączony do routera);
• Gdy pokrętło programatora piekarnika jest włączone do pozycji
WIFI i piekarnik próbuje połączyć się z routerem, wówczas symbol
miga (3 x WŁ + 1 WyŁ.);
• Gdy pokrętło programatora piekarnika jest włączone, ale nie na
pozycji Wi-Fi (tylko do odczytu), symbol miga (1 WYŁ. + 3 x WŁ);
CANDY SIMPLY-FI:
Szczegółowe informacje na temat W JAKI
SPOSÓB PODŁĄCZYĆ urządzenie i JAK JE
UŻYWAĆ znajdziesz na
http://www.candysimplyfi.com3lub na
stronie poświęconej Obsłudze Klienta
http: //simplyfiservice.candy- hoover.com
77 PL
Page 78

6.
78 PL
Page 79

6.
79 PL
Page 80

BEZPEČNOSTNÍ POKYNY
UPOZORNĚNÍ: Spotřebič a jeho přístupné části se během použití zahřívají. Nedotýkejte se topných
prvků.
• Děti do 8 let držte mimo dosah spotřebiče, pokud nejsou neustále pod dohledem.
• Tento spotřebič smí používat děti starší 8 let a osoby se sníženými fyzickými, senzorickými nebo
mentálními schopnostmi nebo bez dostatečných zkušeností, pokud jsou pod dohledem a byly poučeny o
použití spotřebiče a možném riziku.
• Nedovolte dětem hrát si se spotřebičem.
• Čištění a údržbu nesmí provádět děti bez dohledu.
• Během použití se spotřebič zahřívá. Nedotýkejte se ohřevných prvků uvnitř trouby.
UPOZORNĚNÍ: Přístupné části mohou být během provozu horké. Udržujte děti mimo dosah spotřebiče.
• Nepoužívejte drsné čističe ani ostré kovové předměty k čištění skla dvířek trouby, neboť můžete
poškrábat povrch.
• Vypněte troubu před sejmutím ochrany a po očištění nasaďte ochranu v souladu s pokyny.
• Používejte pouze tepelní sondu doporučenou pro tuto troubu.
• K čištění nepoužívejte vysokotlaké parní čističe.
UPOZORNĚNÍ: Ujistěte se, zda je spotřebič vypnutý před výměnou žárovky, abyste zabránili možnému
úrazu elektrickým proudem.
• Odpojovací zařízení musí být včleněno do napájení v souladu s platnými předpisy.
• Pokyny uvádějí typ kabelu, s ohledem na teplotu zadní strany spotřebiče.
• Pokud je poškozený přívodní kabel, musíte jej vyměnit za speciální kabel dostupný u výrobce nebo
servisního technika.
UPOZORNĚNÍ: abyste zabránili nebezpečí z neúmyslného resetování tepelné pojistky, tento spotřebič
nesmíte napájet přes externí spínací zařízení, jako je časovač, nebo připojovat k obvodu, který se
pravidelně zapíná a vypíná elektrikářskou službou.
UPOZORNĚNÍ: Přístupné části grilu se mohou během použití zahřívat. Udržujte děti mimo dosah.
• Nadměrné množství nečistot odstdraňte před čištěním.
• Během samočisticího pyrolytického procesu může být povrch teplejší než obyčejně a proto držte děti
mimo dosah.
80 CZ
Page 81

1. VŠEOBECNÁ UPOZORNĚNÍ
Přečtěte si pozorně tyto pokyny pro maximální využití trouby. Odložte si tyto pokyny na bezpečném místě pro instalaci a použití v budoucnosti a před
instalací trouby si poznačte sériové číslo pro případ pomoci servisního střediska. Po vybalení trouby se ujistěte, zda není žádným způsobem
poškozená. Pokud máte nějaké pochybnosti, nepoužívejte ji.
Kontaktujte kvalifikovaného servisního technika. Uložte obalové materiály jako jsou plastové sáčky a polystyrén mimo dosah dětí, neboť představují
možné riziko.
Výrobce neodpovídá za nedodržení pokynů v návodu k použití.
Poznámka: Právo na změnu funkcí, vlastností a příslušenství trouby se může měnit v závislosti od modelu.
1.1 PROHLÁŠENÍ O SHODĚ
Části tohoto spotřebiče, které mohou být v kontaktu s potravinami
odpovídají předpisům EEC Směrnice 89/109.
Umístěním značky na produkt deklarujeme na vlastní
zodpovědnost shodu se všemi požadavky EU týkajícími se
bezpečnosti, zdraví a životního prostředí, které jsou zakotveny v
legislativě a týkají se daného produktu.
Po vybalení trouby se ujistěte, zda není žádným způsobem
poškozená. V případě pochybností ji nepoužívejte a kontaktujte servis.
Držte obalové materiály mimo dosah dětí, neboť představují možné
nebezpečí.
1.2 BEZPEČNOSTNÍ TIPY
Při výměně přívodní kabelu postupujte následovně: Odmontujte
přívodní kabel a nahraďte za typ H05RR-F, H05VV-F, H05V2V2-F.
Kabel musí být schopen snést elektrický proud potřebný pro troubu.
Kabel smí vyměňovat pouze kvalifikovaný servisní technik.
Uzemňovací vodič (žlutozelený) musí být o 10 mm delší než živý vodič.
Opravy smí provádět pouze autorizované servisní středisko a smí
používat pouze originální náhradní díly. Pokud nejdou dodrženy výše
uvedené pokyny, výrobce nemůže zaručit bezpečnost trouby.
• Vaše nová trouba má předepsané technické specifikace a nesmíte je
měnit.
• Upozorněni: všechny přistupne časti jsou během použiti horke.
Nedotykejte se těchto časti.
• Neskladujte hořlavé látky uvnitř trouby; mohou se vznítit.
• Netlačte na dvířka a nedovolte dětem, aby na ně stoupaly.
• K vyjmutí nádobí používejte kuchyňské rukavice.
• Trouba musí být použita pouze pro účely, ke kterým je určena: pro
přípravu potravin. Jakékoliv jiné použití, př. pro ohřev místnosti, je
nesprávné použití a proto nebezpečné.
• Výrobce neodpovídá za poškození způsobená nesprávným
použitím. Při použití elektrických spotřebičů musíte dodržovat základní
pravidla.
- Při odpojování netahejte za přívodní kabel.
- Nedotýkejte se trouby mokrýma rukama.
- Nepoužívejte troubu, pokud máte bosé nohy.
- Není vhodné používat adaptéry, vícenásobné zásuvky a
prodlužovací kabely.
- Pokud je trouba poškozená, vypněte ji a nedotýkejte se ji.
• Je-li poškozen přívodní kabel, musí být ihned vyměněn.
•UPOZORNĚNI: Přistupne časti mohou byt během použiti grilu přiliš
horke.
1.3 INSTALACE
Výrobce nenese odpovědnost za instalaci. Pokud je nutná pomoc ze
strany výrobce na odstranění závady vyplývající z nesprávné
instalace, tato pomoc není zahrnuta v záruce. Instalatér musí
dodržovat pokyny k instalaci. Nesprávná instalace může způsobit
zranění nebo poškození spotřebiče. Výrobce neodpovídá za zranění
ani poškození.
Kuchyňský nábytek, do kterého bude trouba zabudovaná, musí být z
materiálu odolného vůči teplotě nejméně 70°C.
Troubu lze instalovat do vysoké skříně nebo pod pracovní desku.
Před upevněním musíte zajistit dostatečné větrání v místě instalace
trouby pro ochranu vnitřních dílů. Dodržujte rozměry uvedené na
poslední stránce návodu.
1.4 VESTAVĚNÍ TROUBY DO KUCHYŇSKÉ LİNKY
Umístěte troubu do prostoru v kuchyňské lince; může to být pod
pracovní deskou nebo vestavená ve skříni. Upevněte troubu do
požadované pozice přišroubováním na místo použitím čtyř
upevňovacích otvorů v rámu. (Viz obrázek na poslední straně).
Pro odkrytí upevňovacích otvorů otevřete dvířka trouby a podívejte
se dovnitř. Pro zajištění dostatečné ventilace dodržujte rozměry podle
nákresu na poslední stránce.
Poznámka: Při troubách v kombinací s varnou deskou dodržujte také
pokyny v návodu k obsluze varné desky.
1.5 DŮLEŽİTÉ
Pokud má trouba fungovat správně, prostor v lince musí být vhodný k
vestavbě. Stěny kuchyňské linky, které jsou v blízkosti trouby, musí
být vyrobeny z teplu odolného materiálu. Zajistěte, aby lepidlo dílů
kuchyňské linky odolávalo teplotě nejméně 120 °C. Plasty nebo
lepidlo, které nejsou odolné těmto teplotám, můžou roztát a
deformovat spotřebič. Po umístění trouby do linky musí být elektrické
části kompletně izolovány.
Toto je platný bezpečnostní požadavek. Všechny části musí být
bezpečně upevněny na místě tak, že není možné je demontovat bez
použití speciálních nástrojů.
Pro zajištění dostatečného větrání a cirkulace vzduchu kolem
trouby odstraňte zadní stěnu kuchyňské linky. Za troubou musí
být volný prostor nejméně 45 mm.
1.6 PŘİPOJENÍ K ELEKTRİCKÉ SÍTİ
Připojte k elektrické síti. Zajistěte, aby byl použitý třetí kontakt, který
slouží k uzemnění trouby. Trouba musí být správně uzemněna.
Pokud model trouby není vybaven zástrčkou, k přívodnímu kabelu
připevněte standardní zástrčku. Musí snést proud podle požadavků
na výrobním štítku. Uzemňovací vodič je zelenožlutý. Zástrčku musí
připojit servisní technik. Pokud je zástrčka a zásuvka nekompatibilní,
zásuvku musí vyměnit kvalifikovaný technik. Technik musí taky
zajistit, aby přívodní kabel byl schopen snést proud potřebný pro
troubu. K napájení musí být taky připojen přepínač zapnutí/vypnutí s
minimálním odstupem kontaktů 3 mm. Připojení musí poskytovat
požadovaný proud a musí vyhovovat aktuálním platným předpisům.
Žlutozelený uzemňovací kabel nesmí být přerušován přepínačem
zapnutí/vypnutí. Zástrčka nebo přepínač zapnutí/vypnutí použitý pro
připojení napájení musí být při instalaci trouby vždy přístupný.
Důležité: Během instalace umístěte přívodní kabel tak, aby v žádném
bodě nebyl vystaven teplotám nad 50°C.
Trouba vyhovuje bezpečnostním standardům regulačních úřadů.
Trouba je bezpečná pro použití, pokud je správně uzemněna v
souladu s místními požadavky o připojení. Musíte zajistit, aby byla
trouba příslušně uzemněna.
Výrobce neodpovídá za poškození nebo zranění osob, zvířat
vyplývajících z nesprávného uzemnění trouby.
VAROVÁNÍ: napětí a napájecí frekvence je znázorněna na výrobním
štítku.
Kabeláž a systém připojení musí být schopen snést maximální
elektrický výkon požadovaný troubou. Toto je naznačeno na výrobním
štítku. Pokud máte pochybnosti, využijte služby kvalifikovaného
servisního technika.
1.7 VYBAVENÍ TROUBY ( Podle modelu)
Před prvním použitím je nutné vyčistit veškeré příslušenství.
Opláchněte pomocí houbičky. Opláchněte a vysušte.
Na rošty můžete postavit nádobí a mísy.
Odkapávací plech zachycuje šťávu z
grilovaných pokrmů.
Nikdy nepoužívejte odkapávací plech
jako pečicí plech, neboť zbytky tuku se
mohou dostat na stěny trouby, což
způsobí kouř.
Talíř na pizzu pro křupavější pizzu v
závislosti od modelu se stojanem a pizza
nožem.
81 CZ
Page 82

Pečicí plech musíte postavit na rošt.
Je ideální k pečení malých koláčů jako
jsou sušenky, pusinky, apod. Nikdy
nestavte pečicí plech na dno trouby.
VYJMUTÍ A ČIŠTĚNÍ DRÁTĚNÝCH ÚROVNÍ ROŠTŮ
1- Vyšroubujte matice otočením proti směru hodinových ručiček.
2- Vyjměte rošty vytažením k sobě.
3- Vyčistěte je v myčce nádobí nebo vlhkou hubkou a poté vysušte.
4- Po vyčištění instalujte rošty v opačném pořadí.
5- Našroubujte upevňující šrouby.
2. UŽİTEČNÉ TİPY
2.1 BEZPEČNOSTNÍ SYSTÉM ROŠTU
Trouba obsahuje nový bezpečnostní
systém roštu.
Tento systém vám umožňuje vysunout
rošty trouby při kontrole pokrmů bezpečně,
bez přelití šťávy nebo pádu roštu z trouby.
Pro vyjmutí potáhněte rošt a zvedněte.
2.2 GRİLOVÁNÍ
Grilování umožňuje dodat jídlu rychle bohatou zlatavou barvu. Pro
opečení doporučujeme, abyste v závislosti od vlastností jídla umístili
gril do čtvrté úrovně.
Téměř všechny druhy jídel můžete připravovat pod grilem, kromě
velmi tenkých plátků a masových rolek. Maso a ryby pro grilování je
vhodné před přípravou namočit do oleje.
2.3
MODELY
A
2.5 SAMOČİŠTĚNÍ TROUBY POMOCÍ
KATALYTİCKÉ VLOŽKY
Speciální samočisticí panely pokryté mikroporézním povrchem jsou k
dostání jako samostatný doplněk pro všechny modely. Pokud je
vložíte, troubu není nutné čistit ručně.
Tuk, který se během pečení hromadí po stranách, je eliminován
mikroporézním povrchem, který mění tuk katalýzou a mění jej na plyn.
Nadměrné stříkání tuku může i přesto zablokovat póry a proto bránit
samočištění. Samočisticí kapacitu je možné obnovit zapnutím
prázdné trouby na přibližně 10-20 minut při maximální teplotě.
Nepoužívejte drsné prostředky, kovovou čistící houbu, ostré
předměty, drsné látky nebo chemické produkty, které můžou trvale
poškodit katalytický povrch. Na pečení tukových jídel je vhodné použít
hluboké plechy a vložit nádobku pod gril pro zachycení přebytečného
tuku.
Pokud jsou stěny trouby pokryté hrubou vrstvou tuku, která
znemožňuje práci katalytického čištění, odstraňte nadbytečný tuk
jemným hadříkem nebo houbou namočenou v horké vodě. Povrch
musí být porézní pro efektivní samočištění.
Poznámka: Všechny katalytické povrchy, které jsou k dostání v
prodejnách, mají provozní životnost přibližně 300 hodin. Poté je nutné
je vyměnit.
trouby mají elektronické řízení rychlosti ventilátoru,
nazývané a patentované VARIOFAN. Během tohoto pečení systém
automaticky mění rychlost ventilátoru (v multifunkčním režimu) k
optimalizaci proudění vzduchu a vnitřní teploty v troubě.
Všechny trouby obsahují funkci. To
umožňuje zprávu rozložení vlhkosti a teploty. Redukuje
ztrátu vlhkosti o 50 %, což zaručuje, že pokrm zůstane
jemný a chutí lépe. Toto jemné pečení se doporučuje pro
pečení chleba a moučníků.
Zkracuje dobu předehřátí trouby: pouze 8 minut pro
dosažení 200°C.
Nabízí možnost nastavení úrovně a intenzity grilování, až
o 50 % více výkonu ve srovnání s klasickou multifunkční
troubou.
Některé trouby jsou vybavené novými dvířky „WIDE DOOR“, které
mají větší okýnko, což umožňuje lepší údržbu a lepší tepelní izolaci.
2.4 PODLE MODELU
Je to systém osvětlení, který nahrazuje klasické « žárovky ». 14 LED
(u nepyrolytických modelů) nebo 10 vysokovýkonných LED (u
pyrolytických modelů) je integrovaných ve dvířkách trouby. Tyto
nabízejí kvalitní osvětlení, umožňující jasné zobrazení vnitřku trouby
bez stínů na všech úrovních.
Výhody:
Tento systém nabízí vyjímečné osvětlení vnitřku trouby, má delší
životnost než klasické žárovky, snadnější údržbu a zejména šetří
energii.
LED VISION
- Optimální pohled
- Dlouhá životnost
- Velmi nízká spotřeba energie, -95% ve srovnání s klasickými
žárovkami
82 CZ
Page 83

3. POPIS DISPLEJE
Displej: čas, programování přípravy, kontrolky,
funkce teploty a pozice roštu
TLAČÍTKO K NASTAVENÍ A POTVRZENÍ
Nastavení: teplota, programování přípravy a ukončení přípravy -
Otočením tlačítka směrem k „-" nebo „+".
Potvrzení nastavení: stiskněte tlačítko
zvyšující teplota
Zobrazení funkce trouby
a doporučené úrovně
Kontrolka:
Rožeň
Hodiny/
programování/
Teplota pečení
PYRO
Zobrazení Booster:
Předhřev
Symbol programu: pečení
Čas Časovač přípravy Ukončení přípravy
Kontrolka
Dětský zámek
Kontrolka
WIFI
Kontrolka
Zavření dvířek trouby
83 CZ
Page 84

3.1 PŘED PRVNÍM POUŽITÍM TROUBY
• PRVNÍ ČIŠTĚNÍ
- Vyčistěte troubu před prvním použitím:
- Utřete vnější povrch trouby vlhkou utěrkou.
- Veškeré příslušenství a vnitřek trouby utřete roztokem horké vody a
mycího prostředku.
- Nastavte prázdnou troubu na maximální teplotu a nechte zapnutou
po dobu přibližně 1 hodiny, tímto odstraníte zbytky pachů z výroby.
Poté místnost dobře vyvětrejte.
• PAMATUJTE
Potvrzení činnosti časovače
Úpravy musíte potvrdit stisknutím tlačítka.
Zastavení trouby:
Je nutné, pokud zadáte nesprávné pokyny.
K zastavení činnosti trouby.... otočte volič funkcí zpět do pozice Stop.
Dětský zámek:
K zamčení ovládacích prvků trouby zvolte dětský zámek. Viz kapitola
"Programování - Dětský zámek".
Chladicí ventilátor:
Chrání ovládací panel a elektroniku před poškozením z tepla. Spouští
se a vypíná automaticky, i když je trouba vypnutá.
Osvětlení trouby:
Otočením na symbol osvětlení můžete zapnout osvětlení trouby, i
když se nepoužívá.
Pokud troubu používáte, osvětlení svítí během celé doby provozu a
při otevření dvířek.
• NASTAVENÍ ČASU
Po prvním připojení trouby k elektrické síti je nutné nastavit čas.
Nastavení času:
1-Otočte ovládací knoflík na symbol "Hodin".
2-Nastavte čas pomocí prostředního tlačítka směrem k „-" nebo „+".
3-Otočte ovládací knoflík zpět do pozice STOP.
tlačítka upravte nastavení podle potřeby a potvrďte. Po nastavení
nezapomeňte vrátit volič programů zpět do pozice „stop" k potvrzení
nového nastavení.
Pro podrobnější informace o programování viz kapitola 5.3
PROGRAMOVÁNÍ.
4 Na konci cyklu přípravy nastavte volič funkcí zpět do pozice „stop".
Kontrolka opět bliká, zůstane trvale svítit po vypnutí trouby a zhasne,
pokud klesne teplota uvnitř trouby na dostatečně nízkou hodnotu.
• REŽIM PŘÍPRAVY
Veškeré druhy přípravy fungují se zavřenými dvířky.
Spodní ohřev + ventilátor - Kombinace spodního ohřevného
tělesa a ventilátoru je ideální pro ovocné koláče, dorty, slané koláče a
moučníky. Brání před nadměrným vysušením pokrmu a pomáhá v
kynutí těsta. Umístěte rošt na spodní pozici trouby.
Spodní ohřev - Použití spodního ohřevného tělesa. Ideální k
pečení všech moučníků. Použijte pro dorty, slané koláče a k veškeré
přípravě, která vyžaduje vyšší teploty zespodu.
Spodní + horní ohřev - Používá se spodní a horní ohřevné
těleso. Tento způsob je ideální pro všechny klasické druhy pečení.
Pokud pečete červené maso, roštěnou, jehněcí stehna, chléb nebo
pokrmy zabalené ve fólii.
Spodní + horní + ventilátor - V provozu je spodní a horní
ohřevné těleso ve spojení s ventilátorem, který cirkuluje horký vzduch
v troubě. Doporučujeme tento způsob pro drůbež, moučníky, ryby a
zeleninu. Pomocí tohoto způsobu dosáhnete lepšího pronikání tepla
a zkrátí se také doba předhřevu. Možnost ohřevu s ventilátorem vám
umožňuje připravovat různé pokrmy společně na různých úrovních v
troubě, což nabízí rovnoměrné rozložení tepla bez rizika smíchání
chutí a vůní. Při přípravě různých pokrmů současně přidejte dalších
přibližně 10 minut k dobře přípravy.
10:30
3.2 POUŽITÍ TROUBY
• MANUÁLNÍ REŽIM
Doporučené způsoby přípravy jsou uvedeny v tabulce níže. Pro
každý způsob přípravy je také doporučená teplota. Tuto lze v
předdefinovaném rozsahu.
Funkční režim
podle modelu trouby
Spodní ohřev + ventilátor
Spodní ohřev
Spodní ohřev + horní ohřev
Spodní ohřev + horní ohřev + ventilátor
Kruhové topné těleso + ventilátor
Gril
Gril + ventilátor
Gril + rožeň + ventilátor
Odmrazování
Udržování tepla
Pizza
*Booster: rychlé zvýšení teploty
**Trouba musí obsahovat tuto funkci
*** Testováno v souladu s CENELEC EN 60350-1 použitými pro
definici energetické třídy.
Přednastavená
teplota °C
210
160
220 50-240
***
210
180
L2
190
***
240
40
60
230
**
Předvolená
teplota °C
50-220
50-220
50-230
50-230
L1-L3
50-200
180-240
No
No
230
1. Otočte volič na požadovanou funkci. Zobrazí se topné prvky určené
pro daný způsob přípravy.
2. Zobrazí se příslušná teplota podle zvoleného způsobu přípravy.
Lze ji upravit v předdefinovaném rozsahu - viz tabulka na předchozí
straně.
Pro úpravu nastavení teploty otočte prostřední ovladač a nastavení
časovače potvrďte stisknutím stejného tlačítka.
Zobrazení teploty je pevné, ale lze ji upravit během přípravy. Trouba
začne hřát. Kontrolka bliká, dokud není dosaženo nastavené teploty.
Na konci ohřevu zazní akustický signál a kontrolka zůstane svítit.
3. Dobu a čas ukončení přípravy lze naprogramovat otočením voliče
programů na „čas přípravy" nebo „konec přípravy". Zobrazení „Čas
přípravy" nebo „Konec přípravy" začne blikat. Pomocí prostředního
Funkce
Booster*
Booster
Booster
Booster
Booster
Kruhové ohřevné těleso + ventilátor - V provozu je horní i
spodní ohřevné těleso ve spojení s kruhovým ohřevným tělesem,
který rozhání horký vzduch v troubě. Použití je stejné jako u použití
ventilátoru.
Gril - Používá horní ohřevné těleso. Úspěch je zaručený pro
smíchané grilování, kebaby a pokrmy s kůrkou. Gril je nutné předehřát
na vysokou teplotu po dobu 5 minut. Bílé maso umístěte do určité
vzdálenosti od grilovacího tělesa, doba přípravy bude o něco delší,
ale maso zůstane šťavnaté. Červené maso a rybí filety lze postavit
přímo na rošt s vloženým odkapávacím zásobníkem pod ním.
Gril + ventilátor - Používá se horní ohřevné těleso ve spojení s
ventilátorem, který rozhání horký vzduch v troubě. Předhřev
doporučujeme pro červené maso, pro bílé není nutný. Grilování je
ideální pro pečení silnějších pokrmů jako je vepřové maso a drůbež.
Pokrm určený ke grilování dejte doprostřed roštu.
Zasuňte odkapávací plech pod rošt k zachycení šťávy. Pro nejlepší
výsledky se ujistěte, zda pokrm není příliš blízlo topného tělesa a v
polovině doby přípravy pokrm otočte.
Gril + rožeň + ventilátor - Výhodou použití horního ohřevného
tělesa s ventilátorem a otočným rožněm je rovnoměrné propečení
pokrmu, zabrání vysušení a ztrátě chuti. Rožeň je naprogramovaný
na nepřetržité otáčení po dobu přibližně pěti minut po dopečení, čímž
zcela využije zbytkového tepla v troubě. Pro tento druh přípravy není
nutný předhřev.
Odmrazování - Pro volbu funkce nastavte volič do této pozice.
Ventilátor rozhání horký vzduch kolem mražených pokrmů, čímž
umožní rychlé rozmrazení bez změny obsahu proteinů. Teplota je
konstantně 40°C, není možné nastavení.
Udržování tepla - Doporučujeme k ohřevu již hotových
pokrmů, umístěním roštu na druhou úroveň shora, nebo k
rozmrazování chleba, pizzy nebo moučníků umístěním roštu na
nejspodnější úroveň. Teplota je konstantně 60°C, není možná změna.
Pizza - Pomocí této funkce cirkuluje v troubě horký vzduch k
zajištění perfektních výsledků u pokrmů jako je pizza nebo koláč.
WIFI
84 CZ
Page 85

3.3 PROGRAMOVÁNÍ
SYMBOLY DISPLEJE
Kontrolka
Nastavení Času
Naprogramování doby přípravy
Naprogramování ukončení
STOP
přípravy
Programovací
volič
ČASOVAČ:
časovač funguje nezávisle od trouby a nemá vliv na ohřevné tělesa.
Slouží pouze jako minutka.
• Otočte volič na pozici časovače. Zobrazí se symbol časovače. Na
displeji se zobrazí 00:00.
• Blikají minuty, prostředním tlačítkem nastavte požadované minuty a
potvrďte stisknutím tlačítka.
• Blikají hodiny, prostředním tlačítkem nastavte požadované minuty a
potvrďte stisknutím tlačítka.
• Nastavte volič zpět do pozice Stop.
Po uplynutí času čas zmizí. 15 sekund zní akustický signál a displej
časovače bliká (k zastavení před uplynutím 15 sekund pouze
stiskněte prostřední tlačítko).
PROGRAMOVÁNÍ ČASU PŘÍPRAVY:
Různé recepty jsou naprogramované s časem přípravy. V manuálním
režimu, rozmrazování nebo režimu udržování tepla lze podle potřeby
nastavit.
• Otočte volič do pozice doby přípravy. Zobrazí se symbol doby
přípravy. Zobrazí se předprogramovaná doba přípravy pro různé
recepty, nebo 00:00 pro ostatní funkce trouby.
• Pokud blikají minuty, nastavte prostředním tlačítkem požadovanou
hodnotu a stiskněte tlačítko.
• Blikají hodiny, prostředním tlačítkem nastavte požadovanou
hodnotu a stiskněte tlačítko.
• Nastavte volič funkcí zpět do Stop pozice k potvrzení nové doby
přípravy. Po uplynutí doby zmizí doba přípravy z displeje. 15 sekund
zní akustický signál a symboly doby přípravy a STOP blikají.
• Otočte programovací volič zpět do pozice Stop. Pokud tak neučiníte,
symboly doby přípravy a STOP dále blikají.
PROGRAMOVÁNÍ UKONČENÍ PŘÍPRAVY:
Různé recepty jsou předprogramované s dobou přípravy, tudíž s
časem ukončení. V manuálním režimu, režimu rozmrazování nebo
udržování tepla můžete režim upravit.
• Nastavte programovací volič do pozice doby ukončení přípravy.
Zobrazí se symbol STOP. Zobrazí se předprogramovaná doba
ukončení přípravy pro různé recepty, nebo 00:00 pro další funkce
trouby, nebo přesný čas.
• Otočte volič programů k potvrzení doby ukončení.
• Blikají minuty. Prostředním tlačítkem nastavte minuty, poté tlačítko
stiskněte.
• Blikají hodiny. Prostředním tlačítkem nastavte hodiny, poté tlačítko
stiskněte.
Poznámka: S odloženým startem se doba ukončení přípravy zobrazí
na displeji s „Dobou přípravy" a „STOP" symboly, a zůstane pouze
funkce režimu Receptu. Trouba automaticky propočítá čas spuštění
(čas ukončení minut doba přípravy). Na konci cyklu se trouba
automaticky vypne. 15 sekund zní akustický signál a symboly „Doba
přípravy" a STOP blikají.
• Otočte volič funkcí do pozice Stop. Dokud tak neučiníte, symboly
neustále blikají.
Aktivní časovač
Dětský zámek
Zámek dvířek
pokračuje do konce přednastavené doby, kdy se trouba automaticky
vypne.
UPOZORNĚNÍ.
Pokud zvolíte čas ukončení přípravy bez nastavení doby
přípravy, trouba začne péct ihned a skončí v nastavené době
ukončení.”
3.4 TYPY K PEČENÍ
Vhodnější je nesolit maso před pečením, neboť sůl podporuje
vystřikování šťávy z masa. Tím se znečišťuje trouba a způsobuje
mnoho kouře.
Kusy bílého masa, drůbeže, telecí, jehněčí a ryb lze vložit do studené
trouby. Doba přípravy je delší než u předehřáté trouby, ale propeče se
lépe od středu, neboť teplo má více času proniknout do masa.
Správný předhřev je základem pro úspěšné pečení červeného masa.
GRILOVÁNÍ
• Před grilováním:
Vyjměte maso z chladničky několik hodin před grilováním. Dejte jej na
několik vrstev kuchyňských utěrek. Zlepší to chuť a zabráníte udržení
chladu uvnitř. Přidejte koření a bylinky k masu před grilováním, ale sůl
přidejte teprve po grilování. Tímto zůstane maso šťavnatější. Potřete
pokrmy před pečením trochou oleje. Použijte široký štětec na olej.
Poté posypte kořením a bylinkami (tymián, apod.).
• Během pečení:
Nikdy nepropichujte pokrm během pečení. Mohl by ztratit šťávu a
vysušit se.
PEČENÍ
Vyhněte se lesklým plechům, odrážejí teplo a mohou znehodnotit
koláče. Pokud koláče zhnědnou příliš rychle, zakryjte je pečicím
papírem nebo hliníkovou fólií.
Upozornění: Správný způsob použití fólie je lesklou stranou ke koláči.
V opačném případě se teplo od fólie odráží a nedostane se do
pokrmu.
Neotevírejte dvířka během prvních 20 až 25 minut pečení:
Suflé, briošky, piškotové koláče, apod. mají tendenci padnout. Koláč
můžete zkontrolovat vpíchnutím čepele nože, nebo vidličky. Pokud
vyberete čepel čistou a suchou, koláč je hotov a můžete zastavit
pečení. Pokud je čepel vlhká nebo s kousky těsta, pokračujte v
pečení, ale mírné snižte teplotu, aby se koláč nepřipálil.
3.5 NASTAVENÍ KONTRASTU DISPLEJE
Kontrast displeje lze kdykoliv nastavit. Počáteční nastavení je „C5".
Pro úpravu nastavení proveďte následující:
• Otočte volič programů na pozici „Osvětlení" a volič funkcí na „0".
Stiskněte prostřední tlačítko na 3 sekundy, zobrazí se „CX" na displeji
(kde X představuje úroveň kontrastu).
Prostředním tlačítkem upravte nastavení kontrastu. Rozsah
nastavení je od 1 do 9. Potvrďte nové nastavení stisknutím
prostředního tlačítka na 3 sekundy.
•Tato funkce se používá s funkcí "doba trvání".
Například, pokud se bude pokrm připravovat 45 minut a musí být
hotov ve 12:30;
- zvolte požadovanou funkci
- nastavte dobu přípravy na 45 minut
- nastavte čas ukončení přípravy na 12:30.
Příprava se automaticky spustí v 11:45 (12:30 minus 45 minut) a
85 CZ
Page 86

4. DĚTSKÝ ZÁMEK
5. WIFI
Tato funkce je důležitá, zejména pokud jsou v domácnosti děti.
Brání dětem v zapnutí trouby nebo změně předvolených
programů.
Tento bezpečnostní systém zamyká ovládací panel během
provozu.
Jsou dvě úrovně bezpečnosti:
ÚROVEŇ 1: uzamčení voliče funkcí a prostředního tlačítka.
• Aktivace: otočte programovací volič do pozice dětského zámku.
• Funkce: ovládací prvky jsou neaktivní*.
• Deaktivace: otočte programovací volič na 0.
Úroveň 2: zamyká voliče funkcí
• Aktivace: otočte volič funkcí do pozice dětského zámku a podržte
prostřední tlačítko stisknuté 3 sekundy.
• Funkce: všechny ovládací prvky jsou neaktivní*.
• Deaktivace: stejný postup jako u aktivace. Otočte volič funkcí do
pozice dětského zámku a stiskněte prostřední tlačítko 3 sekundy.
*Poznámka: ve všech případech, z důvodu bezpečnosti, i když
jsou ovladače uzamčené, troubu lze vypnout otočením voliče
funkcí do pozice 0.
NASTAVENÍ WIFI
• Otočte kolečkem ovladače do polohy WiFi (symbol “@” začíná
blikat).
• Je-li trouba připojena k bezdrátovému routeru a je zvolena
funkce WIFI, symbol @ svítí nepřerušovaným světlem.
• Pokud trouba není připojena k bezdrátovému routeru a je
zvolena funkce WIFI, symbol @ bliká.
• Je-li zvolena funkce WIFI, troubu lze ovládat pouze vzdáleně
(ovládací kolečko a kodér jsou vypnuty);
• Jiná nastavení trouby nelze ovládat zvenčí.
RESETOVÁNÍ
Chcete-li resetovat WiFi, přetočte kolečko ovladače do polohy
WIFI (nesmí být aktivní žádný program) a stiskněte tlačítko
kodéru na 3 sekundy.
Po 3 sekundách se na displeji zobrazí "rSt" a symbol "@" začne
blikat.
FUNKCE SYMBOLU "@"
• Pokud je trouba vypnutá, symbol se vypíná;
• Je-li kolečko ovladače v poloze WIFI: symbol bliká (1 x ZAP +
1 x VYP), pokud je trouba v režimu "přístupového bodu" (je
připojena jako bod k bodu); pokud svítí nepřerušovaným
světlem, trouba je v režimu "klienta" (připojena k routeru);
• Je-li kolečko ovladače přepnuto do polohy WIFI a trouba se
pokouší spojit s routerem, symbol bliká (3 x ZAP + 1 VYP);
• Je-li kolečko ovladače zapnuto, ale není v poloze Wi-Fi (pouze
ke čtení), symbol bliká (1 VYP + 3 x ZAP);
CANDY SIMPLY-FI:
Pro podrobnější informace o ZPŮSOBU
PŘIPOJENÍ vašeho simply-Fi spotřebiče a
ZPŮSOBU POUŽITÍ nejlepším způsobem navštivte
stránku http://www.candysimplyfi.com nebo
navštivte příslušnou webstránku zákaznického
servisu simply-Fi http://simplyfiservice.candy-
hoover.com
86 CZ
Page 87

6. TABULKY ČASŮ PŘÍPRAVY
Celkový čas popsaný níže slouží pouze jako příručka. Může se lišit v závislosti od kvality, čerstvosti, velikosti a tloušťky potravin a forma a vzhled
jídla je pouze na vaší chuti. Před podáváním nechejte potraviny chvíli odstát, protože ingredience se dále připravují i po vyjmutí z trouby.
Užitečná rada: Snižte teplotu tak, abyste zabránili
vysušení povrchu potravin.
Statická elektrická trouba
Potravina
• Těstoviny
Lasagne
Cannelloni
Zapékané těstoviny
• Pečení (ne koláče)
Chléb
Pizza
Moučník (mražený)
pirohy
Focaccia
(n° 4)
Množství Rošt
Kg 3,5
Kg 1,8
Kg 2,5
Kg 1
těsta
Kg 1
n° 24
200 g.
těsta každý
Čas v minutách
22
22
22
22
(předehřátí)
• Maso
70 ÷ 75
50 ÷ 60
55 ÷ 60
35
10
25 ÷ 35
30 ÷ 35
25 ÷ 30
Teplota
trouby
220
220
220
200
190
220
200
Pozice roštu
Elektrická trouba s ventilátorem
Rošt
11
21
22
Čas v minutách
60 ÷ 65
40 ÷ 50
45 ÷ 50
30 ÷ 35
10
(předehřátí)
20 ÷ 25
25 ÷ 30
20 ÷ 25
Teplota
trouby
200
200
200
180
190
200
180
4
3
2
1
Poznámka
Vložte lasagne do nepředehřáté trouby.
Vložte cannelloni do nepředehřáté trouby.
Vložte zapékané těstoviny do nepředehřáté
trouby.
Vyformujte těsto na bochník a nožem
udělejte na vrchní straně kříž a
nechejte bochník kynout 2 hod.
Vymastěte plech na pečení a vložte
těsto doprostřed.
Předhřejte troubu 15 minut a vložte
pizzu na vymaštěný plech.
Uložte rajčata, mozzarellu, šunku, olej,
sůl a oregano.
Vložte 24 pirohů do trouby a pečte.
Předhřívejte troubu 15 minut,
vymastěte plech, dochuťte 4 focaccia
olejem a solí a nechejte nakynout při
pokojové teplotě nejméně 2 hodiny
před vložením do trouby.
Všechny druhy masa můžete péct v mělké nebo hluboké míse. Doporučujeme zakrýt mísu, abyste zabránili vystřikování šťávy.
Čas pečení je stejný, když je maso zakryté nebo ne.
Celý kus hovězího
Kus pečínky
bez kosti
Kus telecího
bez kosti
Hovězí filet
Kg 1
Kg 1
Kg 1,3
Kg 1
70 ÷ 80
100 ÷ 110
90 ÷ 110
80 ÷ 90
220
220
220
220
33
22
21
22
50 ÷ 60
80 ÷ 90
90 ÷ 100
80 ÷ 90
200
200
200
200
Vložte maso do hluboké skleněné
mísy a ochuťte solí a kořením; otočte
v polovině přípravy.
Pečte maso v zakryté skleněné míse s
bylinkami, kořením, olejem a máslem.
Připravujte podle postupu uvedeného
výše.
Připravujte podle postupu uvedeného
výše.
87 CZ
Page 88

6. TABULKY ČASŮ PŘÍPRAVY
Elektrická trouba s ventilátorem
Rošt
Čas v minutách
Teplota
trouby
Poznámka
Potravina
Množství Rošt
Statická elektrická trouba
Čas v
minutách
Teplota
trouby
• Králík a drůbež
Umístěte perličku do hluboké skleněné nebo
Perlička
Kg 1
Kuře
Králičí kousky
Kg 1-1,3
Kg 1,5-1,7
Kg 1-1,2
22
22
22
60 ÷ 80
110 ÷ 120
55 ÷ 65
220
220
220
60 ÷ 70
100 ÷ 110
50 ÷ 60
200
200
200
keramické misky s malým množstvím oleje
aochuťte bylinkami a kořením.
Postupujte podle přípravy perliček.
Vložte kousky stejné velikosti do skleněné
mísy. Ochuťte bylinkami a kořením.
Otočte dle potřeby.
• Koláče
Kokosový koláč
v plechu
Piškot
Mrkvový koláč
v plechu
Meruňkový koláč
700 gr
1
1
1
1
55
55
65
40
180
175
180
200
1
1
1
2
50
40 ÷ 45
50 ÷ 60
30 ÷ 35
160
160
160
180
Použijte plech 22 cm hluboký. Předhřívejte
10 minut.
Použijte plech 22 cm hluboký. Předhřívejte
10 minut.
Použijte plech 22 cm hluboký. Předhřívejte
10 minut.
Použijte plech 22 cm hluboký. Předhřívejte
10 minut.
• Zelenina
Nakrájejte fenykl na čtyři plátky,
Fenykl
Cuketa
Brambory
Mrkev
800 gr
800 gr
800 gr
800 gr
1
1
2
1
70 ÷ 80
70
60 ÷ 65
80 ÷ 85
220
220
220
220
1
1
2
1
60 ÷ 70
60 ÷ 70
60 ÷ 65
70 ÷ 80
200
200
200
200
přidejte máslo, sůl a brambory a vložte
do skleněné mísy. Zakryjte.
Nakrájejte, vložte do skleněné mísy a přidejte
máslo a sůl.
Nakrájejte brambory na stejné kousky a vložte
do skleněné mísy. Ochuťte solí, oreganem a
rozmarýnem. Pečte v oleji.
Nakrájejte na plátky, vložte do skleněné mísy a
vařte.
• Grilování
Vložte jídlo na grilování pod infračervený gril. Varování: když je gril zapnut, získá jasnou červenou barvu. Vložte mísu pod gril pro zachycení šťávy
a tuku z grilované potraviny.
Položte chléb na rošt. Když je jedna
strana hotova, otočte a opečte druhou
stranu. Pamatujte: nechejte toast
ohřívat v troubě, dokud jej nebudete
servírovat.
Položte chléb na grilovací rošt. Když
je jedna strana sendviče opečena,
otočte na druhou stranu.
Rozkrojte klobásu na poloviny a
položte je na gril. V polovině grilování
je otočte. Pro rovnoměrné opečení je
často kontrolujte. (Pokud to tak není,
otočte a přemístěte kousky podle
potřeby).
Čtverce chleba
pro toasty
Toastovaný
sendvič
Klobásy
4 kousky
4
n°6 / Kg 0,9
4 4
3 3
4 4
grilu)
10
(10 rozehřátí
grilu)
25/30
(5 rozehřátí
grilu)
Gril Gril
Gril Gril
Gril Gril
5
(5 rozehřátí
5
(10 rozehřátí
grilu)
5/8
(10 rozehřátí
grilu)
15/20
(10 rozehřátí
grilu)
Hovězí žebírko
Kuřecí stehna
• Fish
• Ryby
Pstruh
Losos
Solea obyčejná
Marinované ryby
n°4 / Kg 1,5
n°4 / Kg 1,5
3 celé kusy
nebo /Kg 1
700 g
2,5 cm plátky
Kg 1
2 celé kusy
4 4
3 3
25
(5 rozehřátí grilu)
50/60
(5 rozehřátí grilu)
40 ÷ 45
30 ÷ 35
40 ÷ 45
Gril Gril
Gril Gril
220
220
220
40 ÷ 45 220
88 CZ
15/20
(10 rozehřátí grilu)
50/60
(10 rozehřátí grilu)
22
22
22
22
35 ÷ 40
30 ÷ 25
35 ÷ 40
35 ÷ 40
200
200
200
200
Zajistěte, aby bylo žebírko vystavené
plnému efektu hlavního grilu.
Během grilování je otočte dvakrát.
Ochuťte rybu solí, olejem a cibulí a
pečte v skleněné míse.
Pečte lososa v otevřené skleněné
míse se solí, kořením a olejem.
Pečte soleu se solí a lžící oleje.
Pečte ryby v oleji, soli a zakryté míse.
Page 89

INSTALLAZIONE
IT
INSTALAÇÂO
PT
INSTALLATION
INSTALACIÓN
INSTALLATION
INSTALLATION
GB
ES
DE
FR
УСТАНОВKА
INSTALACJA
INSTALACE
4x3.5x25
RU
PL
CZ
545
595
545
Protection trim (supplied with the oven when necessary)
Защитно уплътнение (доставя се с фураната ако е необходимо)
Targhetta matricola
IT
Rating plate
GB
Tarjeta matrícula
ES
Typenschild
DE
Plaque signalitique
FR
Plata de características
PT
Tabliczka znamionowa
PL
Маркировочная табличка
RU
Typový štítek
CZ
Page 90

IT
La Ditta costruttrice declina ogni responsabilità per eventuali errori di stampa contenuti nel presente libretto. Si riserva inoltre il diritto di apportare le modifiche
che si renderanno utili ai propri prodotti senza compromettere le caratteristiche essenziali.
GB
The manufacturer will not be responsible for any inaccuracy resulting from printing or transcript errors contained in this brochure. We reserve the right to carry
out modifications to products as required, including the interests of consumption, without prejudice to the characteristics relating to safety or function.
ES
La empresa constructora declina toda responsabilidad derivada de eventuales errores de impresión contenidos en el presente libro. Se reserva además el
derecho de realizar las modificaciones que se consideren útiles a los productos sin comprometer las características esenciales.
DE
Der Hersteller übernimmt keine Hauftung für eventuelle Druck-oder Übersetzungsfehler dieser Bedienungsanleitung. Der Hersteller behält sich vor,
technische Änderungen zur Verbesserung der Produktqualität im Interesse des Endverbrauchers vorzunehmen.
FR
Le constructeur décline toute responsabilité concernant d'éventuelles Inexacltudes Imputables à des erreurs d'impression ou de transcription contenue dans
cette notice. Le constructeur se réserve le droit de modifier les produits en cas de nécessité, même dans l'intérêt de l'utilisation, sans causer de préjudices
aux caractéristiques de fonctionnement de sécurité des appareils.
PT
O fabricante declina toda e qualquer responsabilidade por gralhas, erros tipográficos ou de transcrição/tradução contidos neste manual. Reservamo-nos o
direito de Introduzir alterações nos nossos produtos, conforme necessário, tendo Inclusive em atenção os Interesses relativos ao respectivo consumo, sem
prejuízo das características associadas à segurança ou ao funcionamento dos electrodomésticos.
RU
Производитель не берет на себя ответственность за ошибки в данной инструкции, возникшие в процессе печати. Производитель имеет право
вносить в свои изделия изменения, которые он сочтет полезными для своих изделий, сохраняя при этом основные характеристики.
PL
Producent nie ponosi Żadnej odpowiedzialności za ewentualne błędy w druku niniejszej instrukcji. Ponadto zastrzega sobie prawo do wprowadzania zmian
do własnych produktów, uznanych przez niego za użyteczne, bez pogarszania podstawowych parametrów.
CZ
Výrobce nezodpovídá za nepřesnosti obsažené v této příručce vzniklé při tisku nebo překladu. Vyhrazujeme se právo provádět úpravy výrobku podle
potřeby, aniž by byly dotčeny charakteristiky vztahující se k bezpečnosti nebo provozu.
07.2016 • REV.A • 42819884
 Loading...