

Page 1

COMBINATO NO FROST CON DISPLAY
E COMBINATO NO FROST MECCANICO . . . . . . . . . . . . . . . . . . . . . . . . . . . . . . . . . . . . . . da pag. 1 a pag. 2
FROST FREE FRIDGE FREEZER WITH DIGITAL DISPLAY
& FROST FREE FRIDGE FREEZER MECHANICAL . . . . . . . . . . . . . . . . . . . . . . . . . . . . . . . . . . . page 3 to page 4
RÉFRIGÉRATEUR CONGÉLATEUR NO FROST AVEC AFFICHEUR NUMÉRIQUE
ET RÉFRIGÉRATEUR CONGÉLATEUR NO FROST SANS DISPLAY ÉLECTRONIQUE . . . . de page 5 à page 6
FROSTFREIER KÜHLSCHRANK/GEFRIERSCHRANK MIT DIGITALANZEIGE
& FROSTFREIER KÜHLSCHRANK/GEFRIERSCHRANK MECHANISCH . . . . . . . . . . . . . . . . . Seite 7 bis 8
FRIGORÍFICO COMBINADO TOTAL NO FROST CON DISPLAY
Y COMBINADO TOTAL NO FROST MECÁNICO . . . . . . . . . . . . . . . . . . . . . . . . . . . . . . . . de pág. 9 a pág. 10
FRIGORÍFICO/CONGELADOR NO FROST COM VISOR DIGITAL
E FRIGORÍFICO/CONGELADOR MECÂNICO NO FROST . . . . . . . . . . . . . . . . . . . . . . . de pág. 11 à pág. 12
ΨΥΓΕΙΟΚΑΤΑΨΥΚΤΗΣ ΑΥΤΟΜΑΤΗΣ ΑΠΟΨΥΞΗΣ ΜΕ ΨΗΦΙΑΚΗ ΟΘΟΝΗ
& ΨΥΓΕΙΟΚΑΤΑΨΥΚΤΗΣ ΑΥΤΟΜΑΤΗΣ ΑΠΟΨΥΞΗΣ ΜΕ ΜΗΧΑΝΙΚΗ ΡΥΘΜΙΣΗ. . . . από σελ. 13 έωλ. 14
BEZSZRONOWA LODÓWKA-ZAMRAŻARKA Z WYŚWIETLACZEM CYFROWYM
I BEZSZRONOWA LODÓWKA-ZAMRAŻARKA MECHANICZNA . . . . . . . . . . . . . . . . . od str. 15 do str. 16
KOMBINOVANÁ CHLADNIČKA S MRAZÁKEM FROST FREE S DIGITÁLNÍM DISPLEJEM
& CHLADNIČKA S MRAZÁKEM FROST FREE S MECHANICKÝM OVLÁDÁNÍM . . . . . . . . .str. 17 až str. 18
NO FROST VRIEZER MET DIGITALE DISPLAY
& NO FROST KOELKAST/VRIEZER - MECHANISCH . . . . . . . . . . . . . . . . . . . . van pagina 19 tot pagina 20
JÄÄTYMÄTÖN JÄÄKAAPPI-PAKASTIN DIGITAALISELLA NÄYTÖLLÄ
& JÄÄTYMÄTÖN MEKAANINEN JÄÄKAAPPI-PAKASTIN . . . . . . . . . . . . . . . . . . . . . . . . . . . . . . sivu 21 - 22
FROSTFRI KJØLESKAPSFRYSER MED DIGITALT DISPLAY
OG FROSTFRI MEKANISK KJØLESKAPSFRYSER . . . . . . . . . . . . . . . . . . . . . . . . . . . . . . . . . . side 23 til 24
FROSTFRI KYL/FRYS MED DIGITAL DISPLAY
OCH MEKANISK FROSTFRI KYL/FRYS. . . . . . . . . . . . . . . . . . . . . . . . . . . . . . . . . . . .från sida 25 till sida 26
FROSTFRIT KØLEFRYSESKAB MED DIGITALT DISPLAY
& FROSTFRIT KØLEFRYSESKAB MED FJERNBETJENING . . . . . . . . . . . . . . . . . . . . . . . . . . fra side 27 til side 28
IT
EN
FR
DE
ES
PT
EL
PL
CZ
NL
FI
NO
SV
DA
Page 2

Page 3
COMBINATO NO FROST CON DISPLAY
QUADRO COMANDI
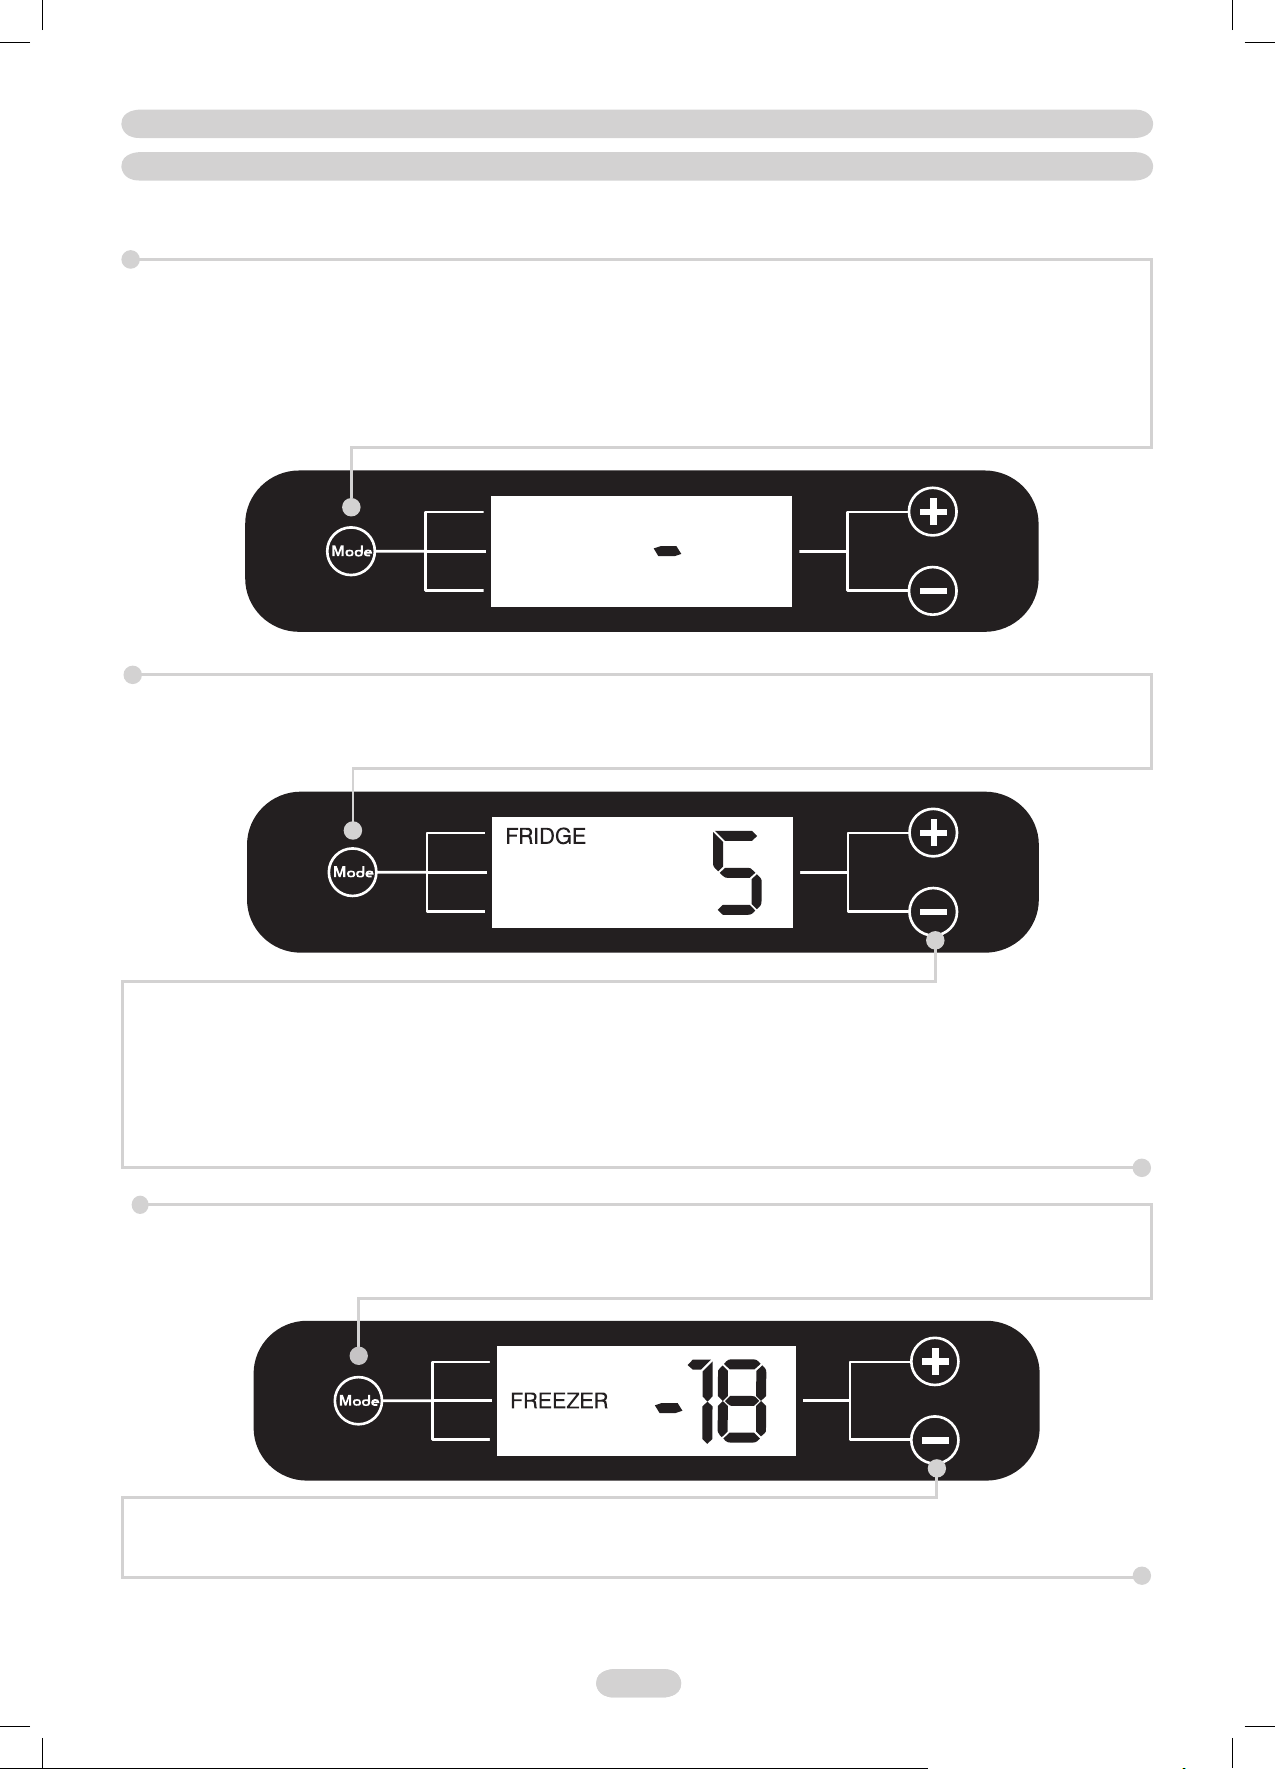
Per raggiungere il quadro comandi è suffi ciente aprire la porta superiore del frigorifero.
ACCENSIONE E SPEGNIMENTO DEL PRODOTTO
Il prodotto viene alimentato elettronicamente al collegamento del cavo d’alimentazione alla rete elettrica e rimane alimentato fi no alla rimozione
dello stesso.
Il trattino acceso sul display indica che il prodotto
In questo caso per attivare il prodotto è suffi ciente premere il tasto mode. Per disattivare il prodotto, e quindi metterlo nella funzione stand-by,
è
suffi ciente premere per alcuni secondi il tasto mode.
Una volta inserita la spina il prodotto visualizzerà sul display la temperatura consigliata per la cella frigo +5°C. Per la cella freezer il prodotto si
porterà automaticamente alla temperatura consigliata di -18°C.
è
in funzione di stand-by, è quindi collegato all’alimentazione elettrica ma non funzionante.
(fi gura 1)
IMPOSTAZIONE DEL VANO FRIGORIFERO
E’ possibile modifi care la temperatura premendo i tasti (+) e (-). E’ possibile modifi care la temperatura da 1 a 7. La temperatura consigliata dalla
casa produttrice è 5.
In fase di impostazione della temperatura del vano frigorifero la scritta fridge lampeggia. Premendo il tasto + dal 7 al 1 si troverà la modalità
OFF con la quale sarà possibile spegnere il vano frigo. Il display mostrerà solo la temperatura impostata per il vano freezer. Per riattivare il
vano frigo schiacciare il tasto MODE fi nchè la modalità fridge non lampeggerà, a questo punto sarà possibile modifi care la temperatura del
vano frigo.
IMPOSTAZIONE DEL VANO FREEZER
E’ possibile passare dalla modalità Frigo alla modalità freezer premendo il tasto (mode). Successivamente apparirà la scritta -18°C ov vero la
temperatura consigliata. E’ possibile modifi care la temperatura da -16°C a -22°C.
(fi gura 2)
Per qualsiasi variazione della temperatura dopo aver premuto il tasto MODE e con la scritta FREEZER lampeggiante premere i tasti (+) e (-)
fi no a raggiungere la temperatura desiderata. Le temperature a display sono solo indicative.
1 IT1 IT
Page 4

OPZIONE SUPERCONGELAZIONE / OPZIONE SUPER
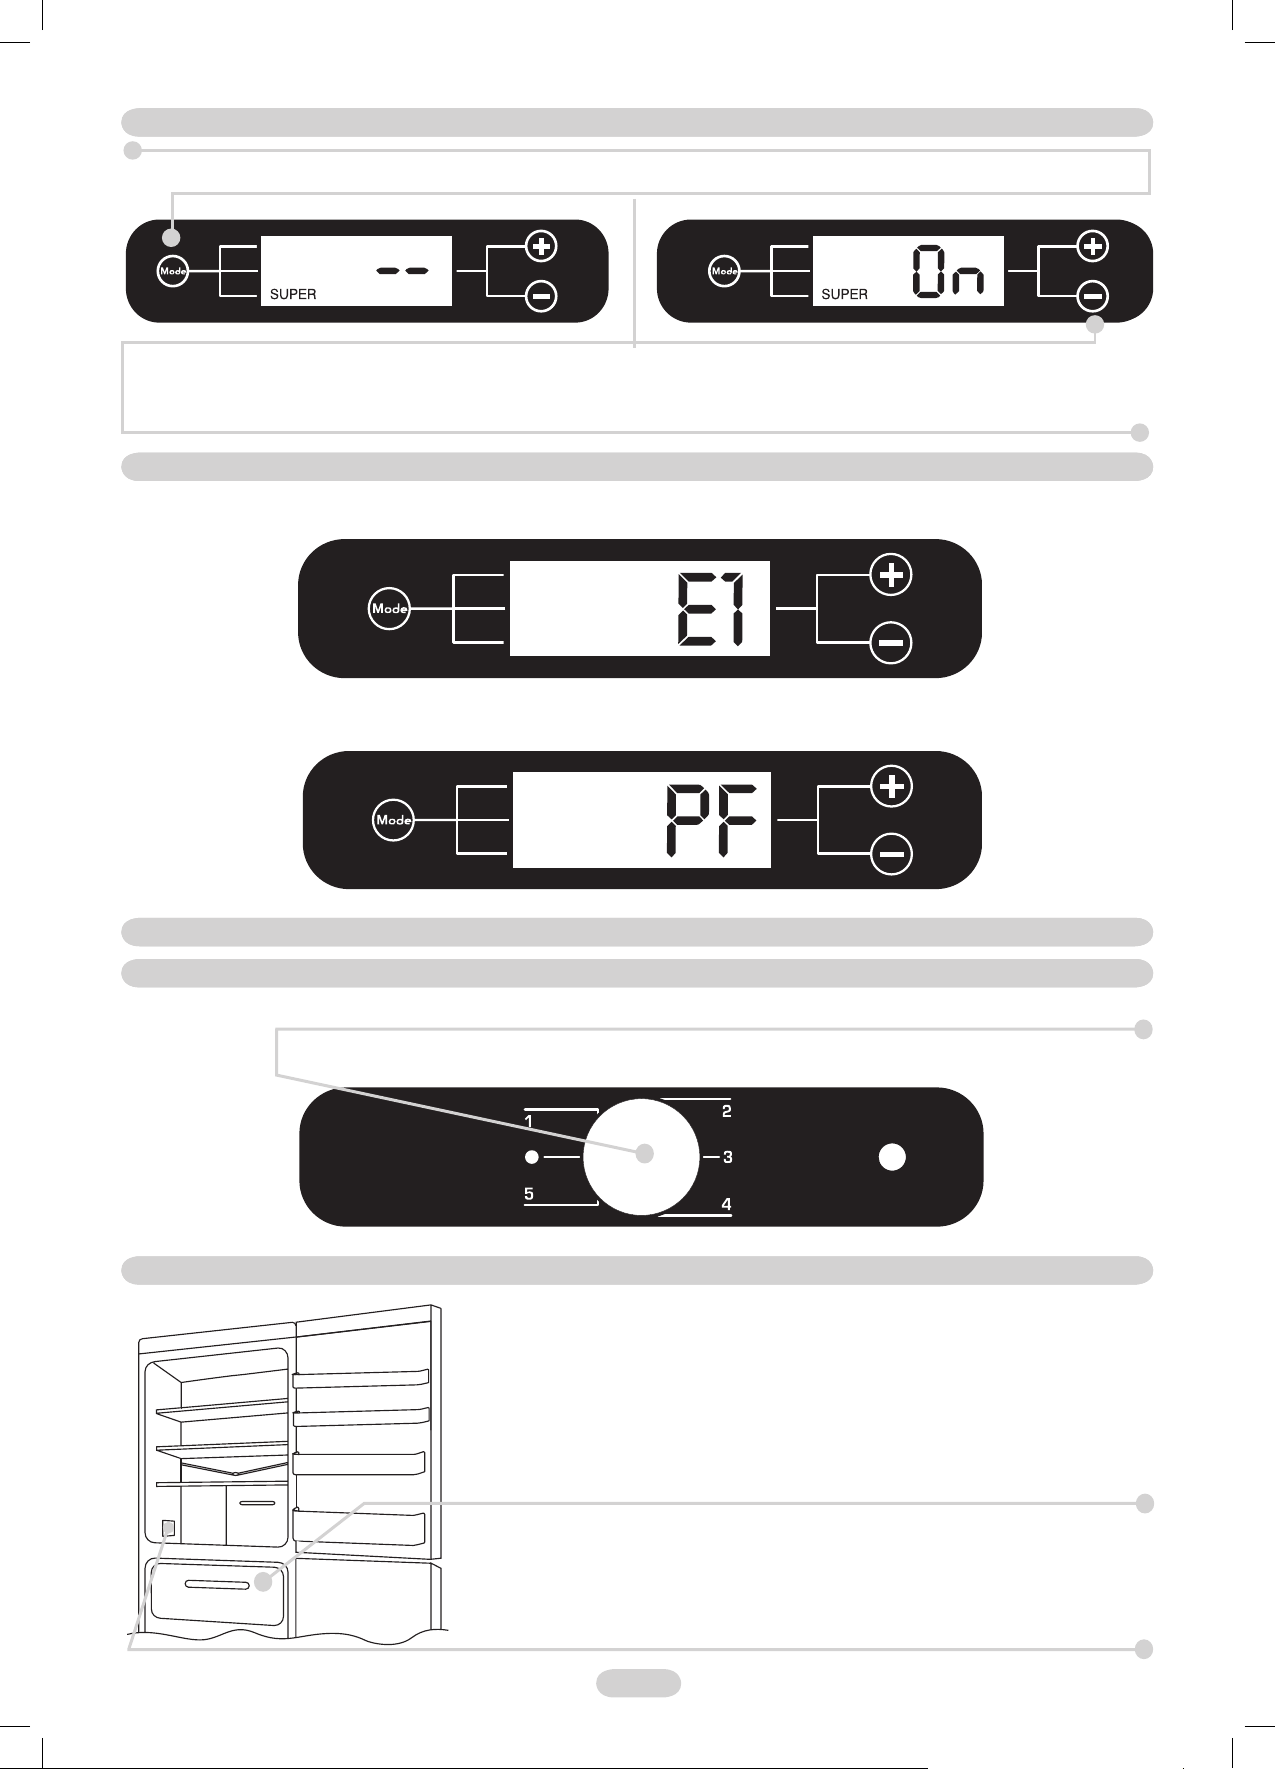
Premere più volte il tasto MODE fi no a che apparirà la scritta SUPER lampeggiante.
Disattivo Attivo
Premere il tasto (+) per attivare la funzione SUPER. Trascorse 8 ore disporre i cibi da congelare nel vano freezer. Trascorse altre 26 ore il
prodotto uscirà automaticamente dalla funzione SUPER, nel caso si voglia interrompere la funzione SUPER prima dello scadere delle 8 +
26 ore premere il tasto (-).
La quantità massima di alimenti che è possibile congelare è indicata nella targhetta matricola (vedi fi gura 6).
(fi gura 3)
OPZIONE SUPERGUASTI ED ERRORI
Ogni errore o guasto verrà segnalato automaticamente dal display che indicherà un numero preceduto dalla lettera „E“ (Errore). In questo caso
provare a spegnere e riaccendere il prodotto. Se l’errore si ripresenta contattare l’assistenza tecnica.
(fi gura 4)
Dopo un black-out sul display apparirà la scritta „PF“ (Power Fail). In caso di mancanza di corrente superiore alle 10-12 ore controllare che gli
alimenti siano rimasti inalterati per consumarli entro 24 ore o procedere alla loro cottura e successivo congelamento.
(fi gura 5)
OPZIONE SUPERCOMBINATO NO FROST MECCANICO
OPZIONE SUPERQUADRO COMANDI
Per raggiungere il quadro comandi è suffi ciente aprire la porta superiore del frigorifero.
La manopola consente di attivare tutto l’apparecchio e di impostare la temperatura del vano congelatore e Frigorifero.
Le posizioni consigliate sono 2-3. Se si ruota sulla posizione “0” si disattiva completamente l’apparecchio.
OPZIONE SUPERCONGELAZIONE
(fi gura 6)
Disporre i cibi all’interno del congelatore e per un normale funzionamento posizionare il termostato
su posizioni intermedie.
Il prodotto non necessita di sbrinamento poiché questo prodotto è dotato di un sistema
automatico che impedisce la formazione di ghiaccio.
N.B. Sul lato interno del frigorifero è presente la targhetta matricola, contenente
i dati da comunicare all’Assistenza Tecnica qualora si verifi casse un guasto.
2 IT
Page 5

FROST FREE FRIDGE FREEZER WITH DIGITAL DISPLAY
CONTROL PANEL
Open the top door of the fridge in order to access the control panel.
SWITCHING THE PRODUCT ON AND OFF
The product is electronically powered by connecting the power cable to the power outlet and remains powered on until cable is removed.
When " - " is displayed on the digital display, it indicates that the product is in stand-by mode, therefore it is connected to the power outlet but it is
not functional. To switch the appliance on, press the MODE button. To turn the product back to standby mode, press the MODE button for a few
seconds. When the product is in standby mode, any food in your fridge or freezer will not be cooled.
(Figure 1)
Once the product is switched on, the appliance will set the recommended temperature for the fridge compartment on the display +5°C. For the
freezer compartment, the product will automatically set the freezer to the recommended temperature of -18°C.
MODIFYING THE TEMPERATURE OF THE FRIDGE COMPARTMENT
It is possible to modify the temperature by pressing the buttons (+) and (-). The maximum temperature is 7, and the minimum is 1. The manufacturer's
recommended temperature is 5.
When the temperature of the fridge compartment is being set, the word FRIDGE fl ashes. By pressing the button + from 7 to 1 you will fi nd the
OFF mode with which it will be possible to switch off the fridge compartment. The display will only show the temperature set for the freezer
compartment. In order to reactivate the fridge compartment press the MODE button until the fridge mode stops blinking, at this point it will
be possible to change the temperature of the fridge compartment.
MODIFYING THE TEMPERATURE OF THE FREEZER COMPARTMENT
It is possible to switch from Fridge to Freezer mode by pressing the MODE button. The word FREEZER will now be displayed. Subsequently, the
recommended temperature -18 will be displayed. It is possible to modify the temperature from -16°C to -22°C.
(Figure 2)
To modify the temperature, press the buttons (+) and (-) until you reach the desired temperature. The display temperatures are only
indicative.
3 IT3 EN
Page 6

OPZIONE SUPERFREEZING / SUPER OPTION
The SUPER option can be selected for fast freezing food items. Ideal to use when a large amount of food has been added to your freezer.
Off On
Press the (+) button in order to activate the SUPER function. After 36 hours the product will automatically leave the SUPER function, if you
wish to interrupt the SUPER function at anytime press the (-) button. For optimum usage the manufacturer recommends that the super freeze
function is activated a few hours before putting the selected food items in the freezer. The rating plate states the maximum quantity of foods
that can be frozen, (see fi gure 6).
(fi gure 3)
OPZIONE SUPERFAULTS AND ERRORS
Every error or fault that occurs will be automatically shown on the display which will indicate a number followed by the letter "E" (Error). If this
occurs switch the product off and back on again, if the error persists, please contact our service department for assistance.
(fi gure 4)
In the event of a power failure the message "PF" (Power Fail) will be shown on the display once power is returned to the machine. In case of a
power cut lasting 10-12 hours, check that the food items have remained unchanged. Any food that has been fully or partially defrosted needs to
be consumed within 24 hours and NOT refrozen.
(fi gure 5)
OPZIONE SUPERFROST FREE FRIDGE FREEZER MECHANICAL
OPZIONE SUPERCONTROL PANEL
Open the top door of the fridge in order to access the control panel.
Turn on the thermostat dial to switch on the appliance and set the temperature of the freezer compartment and fridge.
The recommended settings are 2-3. Turn the thermostat dial to “0” to turn off the appliance.
OPZIONE SUPERFREEZING
(fi gure 6)
Place the foods inside the freezer and for a normal functioning turn the thermostat to the
recommended settings.
The product does not require defrosting because this product is equipped with an automatic
system that prevents the formation of ice.
N.B. This is the rating plate. If you need to contact our Service Department in the
event of faults, remember to give them the information on the plate.
4 EN
Page 7

RÉFRIGÉRATEUR CONGÉLATEUR NO FROST AVEC AFFICHEUR NUMÉRIQUE
PANNEAU DE COMMANDE
Ouvrez la porte supérieure du réfrigérateur afi n d'accéder au panneau de commande.
ALLUMER/ETEINDRE L'APPAREIL
L'appareil est alimenté de façon électrique en raccordant le câble d'alimentation à la prise de courant. Il reste allumé tant que la prise est
branchée.
Si " - " apparaît sur le panneau digital, cela indique que l'appareil est en mode Veille, qu'il est bien raccordé à la prise de courant mais qu'il n'est
pas en marche. Pour allumer l'appareil, appuyez sur la touche MODE. Pour faire passer l'appareil en mode Veille, appuyez sur la touche MODE
pendant quelques secondes. Lorsque l'appareil est en mode veille, les aliments présents dans le réfrigérateur et le congélateur ne sont pas
réfrigérés.
(Image 1)
Une fois la prise branchée, l'appareil indique, sur l’écran, la température recommandée pour le compartiment réfrigérateur, soit +5°C. Pour le
compartiment congélateur, l'appareil passe automatiquement à la température conseillée de -18°C.
REGLER LA TEMPERATURE DU COMPARTIMENT REFRIGERATEUR
Il est possible de modifi er la température en appuyant sur les touches (+) et (-). La température maximale est 7, et la température minimale est 1.
Le fabricant recommande une température de 5.
Une fois la température du compartiment réfrigérateur réglée, le mot FRIDGE (REFRIGERATEUR) clignote. Appuyez sur la touche + de
7 à 1 pour passer en mode OFF grâce auquel il est possible d'arrêter le compartiment réfrigérateur. L'affi cheur indiquera uniquement la
températeur réglée pour le compartiment congélateur. Pour réactiver le compartiment réfrigérateur, appuyez sur la touche MODE jusqu'à ce
que le mode réfrigérateur cesse de clignoter. Il sera alors possible de modifi er la température du compartiment réfrigérateur.
REGLER LA TEMPERATURE DU COMPARTIMENT CONGELATEUR
Il est possible de passer du mode Réfrigérateur au mode Congélateur en appuyant sur la touche MODE. Le mot FREEZER (CONGELATEUR) apparaît
alors. La température recommandée de - 18 apparaît ensuite. Il est possible de modifi er cette température entre -16°C et -22°C.
(Image 2)
Pour modifi er la température, appuyez sur les touches (+) et (-) jusqu'à avoir atteint la température voulue. Les températures affi chées sont
fournies à titre indicatif uniquement.
5FR5 FR
Page 8
OPZIONE SUPERCONGELATION / OPTION SUPER CONGÉLATION
L'option SUPER peut être activée afi n de congéler rapidement les aliments. C'est une fonction idéale quand une grande quantité d'aliments
a été placée dans le congélateur en même temps.
Arrêt Marche
Appuyez sur la touche (+) afi n d'activer la fonction SUPER. Après 36 heures l'appareil quitte automatiquement la fonction SUPER. Si vous
souhaitez interrompre la fonction SUPER, appuyez sur la touche (-) à n'importe quel moment. Pour une effi cacité optimale, le fabricant
recommande d'activer la fonction SUPER quelques heures avant de placer les aliments dans le congélateur. La plaque signalétique de
l’appareil indique la quantité d'aliments maximale pouvant être congelée. (Voir image 6).
(Image 3)
OPZIONE SUPERPANNES ET ERREURS
Toute erreur ou panne qui se produit apparaît automatiquement sur le panneau d'affi chage qui indique la lettre "E" (Erreur) suivie d'un numéro.
Si cela se produit, éteignez puis rallumez l'appareil, et, si l'erreur persiste, faites appel à l'assistance technique.
(Image 4)
En cas de coupure de courant, le message "PF" (Power Fail - Coupure Courant) apparaît sur le panneau d'affi chage une fois le courant revenu.
Si la coupure a duré entre 10 et 12 heures, vérifi ez que vos aliments n'aient pas été altérés. Tout aliment ayant été partiellement ou complètement
décongelé doit être consommé dans les 24 heures et NE DOIT PAS être recongelé.
(Image 5)
OPZIONE SUPERRÉFRIGÉRATEUR CONGÉLATEUR NO FROST SANS DISPLAY ÉLECTRONIQUE
OPZIONE SUPERPANNEAU DE COMMANDE
Ouvrez la porte supérieure du réfrigérateur afi n d'accéder au panneau de commande.
Tournez le bouton de thermostat afi n de mettre l'appareil en marche et de régler la température du compartiment congélateur
et du réfrigérateur. Les réglages recommandés sont 2-3. Tournez le bouton du thermostat sur “0” pour arrêter l'appareil.
OPZIONE SUPERCONGELATION
(Image 6)
Placez les aliments dans le congélateur et tournez le thermostat sur les réglages recommandés
pour un fonctionnement normal.
Le produit n'a pas besoin d'être dégivré, car il est équipé d'un système automatique
empêchant la formation du givre.
N.B. Ceci est la plaque signalétique. Si vous devez contacter notre service après
vente en cas de dysfonctionnement, pensez à fournir les informations fi gurant sur
cette plaque.
6 FR
Page 9

FROSTFREIER KÜHLSCHRANK/GEFRIERSCHRANK MIT DIGITALANZEIGE
BEDIENFELD
Öffnen Sie die obere Tür des Kühlschranks, um auf das Bedienfeld zuzugreifen.
AN- UND AUSSCHALTEN DES PRODUKTS
Die Stromzufuhr des Produkts erfolgt elektronisch, indem das Netzkabel an eine Steckdose angeschlossen wird und bleibt solange bestehen, bis
das Kabel abgezogen wird.
Wenn " - " in der digitalen Anzeige erscheint, bedeutet das, dass sich das Produkt im Standby-Modus befi ndet. Das heißt, es ist an die Steckdose
angeschlossen, aber nicht in Betrieb. Um das Gerät einzuschalten, drücken Sie die MODE-Taste. Um das Produkt in den Standby-Modus
zu schalten, halten Sie die MODE-Taste einige Sekunden lang gedrückt. Wenn sich das Produkt im Standby-Modus befi ndet, werden die
Nahrungsmittel in Ihrem Kühlschrank oder Gefrierschrank nicht gekühlt.
(Abbildung 1)
Wenn der Stecker angeschlossen worden ist, zeigt das Produkt die empfohlene Temperatur für den Kühlraum auf dem Display an: +5 °C. Beim
Gefrierfach wird das Produkt automatisch auf die empfohlene Temperatur von -18 °C schalten.
EINSTELLEN DER TEMPERATUR DES KÜHLSCHRANKS
Die Kühlschranktemperatur wird durch Drücken der Tasten (+) und (-) eingestellt. Die maximale Temperatur beträgt 7 °C, die minmale 1 °C. Die
vom Hersteller empfohlene Temperatur beträgt 5 °C.
Wenn die Temperatur des Kühlraums eingestellt wird, blinkt das Wort FRIDGE. Durch Drücken der Taste + von 7 bis 1 erreichen Sie
den OFF (AUS)-Modus, mit dem es möglich ist, den Kühlraum abzuschalten. Die Anzeige wird nur die Temperatur anzeigen, die für das
Gefrierfach eingestellt ist. Um den Kühlraum zu reaktivieren, drücken Sie die Taste MODE, bis der Kühlschrank-Modus nicht mehr blinkt;
nun ist es möglich, die Temperatur des Kühlraums zu ändern.
EINSTELLEN DER TEMPERATUR DES GEFRIERSCHRANKS
Es ist möglich, mit der MODE-Taste vom Kühlschrank- in den Gefrierschrank-Modus umzuschalten. Das Wort FREEZER wird nun angezeigt.
Anschließend wird die empfohlene Temperatur von -18 °C angezeigt. Es ist möglich, die Temperatur von -16 °C bis -22 °C einzustellen.
(Abbildung 2)
Mit den Tasten (+) und (-) können Sie die Temperatur ändern, bis die gewünschte Temperatur erreicht ist. Die angezeigten Temperaturen
sind nur Anhaltspunkte.
7IT7 DE
Page 10

OPZIONE SUPEROPTION EINFRIEREN / SUPER
DIe Option SUPER kann dazu verwendet werden, Nahrungsmittel schnell einzufrieren. Das ist ideal, wenn dem Gefrierschrank eine große
Menge an Nahrungsmitteln hinzugefügt werden soll.
Aus An
Drücken Sie die Taste (+), um die SUPER-Funktion zu aktivieren. Nach 36 Stunden verlässt das Produkt automatisch die SUPER-Funktion.
Wenn Sie die SUPER-Funktion vorher unterbrechen wollen, drücken Sie die Taste (-). Um die optimale Leistung sicherzustellen, ist es
empfehlenswert, die "Super Freeze"-Funktion einige Stunden vor dem Einlagern der Nahrungsmittel in den Gefrierschrank zu aktivieren. Das
Matrikelschild gibt die maximale Menge von Nahrungsmitteln an, die eingefroren werden können (siehe Abbildung 6).
(Abb. 3)
OPZIONE SUPERSTÖRUNGEN
Jeder eventuelle Fehler oder Funktionsstörung wird automatisch auf dem Display angezeigt, gekennzeichnet durch eine Nummer nach dem
Buchstaben "E" (Error). Wenn das auftritt, schalten Sie das Produkt aus und wieder ein. Wenn der Fehler dann noch immer vorhanden ist,
wenden Sie sich bitte an unseren technischen Kundendienst.
(Abb. 4)
Nach einem Stromausfall wird die Meldung "PF" (Power Fail) auf dem Display des Geräts angezeigt, sobald es wieder mit Strom versorgt
wird. Wenn der Stromausfall 10-12 Stunden andauert, prüfen Sie, dass die Nahrungsmittel dadurch nicht beeinträchtigt worden sind. Alle
Nahrungsmittel, die teilweise oder vollständig abgetaut sind, müssen innerhalb von 24 Stunden aufgebraucht werden und dürfen NICHT wieder
eingefroren werden.
(Abb. 5)
OPZIONE SUPERFROSTFREIER KÜHLSCHRANK/GEFRIERSCHRANK MECHANISCH
OPZIONE SUPERSCHALTBRETT
Öffnen Sie die obere Tür des Kühlschranks, um das Schaltbrett zu bedienen.
Drehen Sie den Thermostatwählschalter, um das Gerät einzuschalten und stellen Sie die Temperatur im Kühlschrank und im Gefrierfach
ein. Die empfohlenen Einstellungen sind 2-3. Drehen Sie den Thermostatwählschaltet auf “0”, um das Gerät auszuschalten.
OPZIONE SUPEREINFRIEREN
(Abb. 6)
Legen Sie die Lebensmittel in den Gefrierschrank und drehen Sie das Thermostat für den
Normalbetrieb auf die empfohlene Einstellung.
Das Produkt muss nicht abgetaut werden, da dieses Produkt mit einem automatischen
System ausgestattet ist, das die Eisbildung verhindert.
Hinweis: Das ist das Leistungsschild. Wenn Sie bei einer Störung den Kundendienst
kontaktieren müssen, geben Sie die Informationen auf diesem Schild an.
8 DE
Page 11

FRIGORÍFICO COMBINADO TOTAL NO FROST CON DISPLAY
PANEL DE CONTROL
Abra la puerta del frigorífi co para acceder al panel de control.
ENCENDIDO Y APAGADO DEL PRODUCTO
El producto está electrónicamente alimentado por lo que conectando el cable de alimentación a la toma de red permanecerá encendido
hasta que no se desenchufe.
Cuando el símbolo " - " aparezca en los mandos digitales, esto indica que el producto está en modo en espera, y por lo tanto, que está
conectado al enchufe de red pero no está funcionando. Para encender el aparato, pulse el botón de "MODE" (MODO). Para poner el
producto en modo en espera, mantener pulsado el botón "MODE" (MODO) durante varios segundos. Cuando el producto esté en modo en
espera, no enfriará ningún alimento del frigorífi co o del congelador.
(Figura 1)
Una vez que se ha conectado la toma, el producto mostrará la temperatura recomendada para el compartimento del frigorífi co en la pantalla
+5°C. Para el compartimento del congelador, el producto pasará automáticamente a la temperatura recomendada de -18°C.
FIJAR LA TEMPERATURA DEL COMPARTIMENTO DEL FRIGORÍFICO
Es posible cambiar la temperatura pulsando los botones (+) y (-). La temperatura máxima es 7, y la mínima es 1. La temperatura recomendada
del fabricante es 5°C.
Cuando se fi ja la temperatura del compartimento del frigorífi co, la palabra "FRIDGE" (FRIGORÍFICO) parpadeará. Pulsando el botón + desde
7 a 1 encontrará el modo APAGADO con el que podrá apagar el compartimento del frigorífi co. La pantalla sólo mostrará la temperatura
fi jada para el compartimento del congelador. Con vistas a reactivar el compartimento del frigorífi co, presione el botón de MODO hasta que
el modo de frigorífi co deje de pestañear, y en este punto, podrá cambiar la temperatura del compartimento del frigorífi co.
FIJAR LA TEMPERATURA DEL COMPARTIMENTO DEL CONGELADOR
Para pasar del modo frigorífi co al modo del congelador basta con pulsar el botón "MODE" (MODO). La palabra "FREEZER" (CONGEL ADOR)
aparecerá ahora en pantalla. La temperatura recomendada de -18°C aparecerá en pantalla. Es posible modifi car la temperatura de -16°C
a -22°C.
(Figura 2)
Para modifi car la temperatura, pulse los botones (+) y (-) hasta que alcance la temperatura deseada. Las temperaturas de la pantalla son
sólo indicativas.
9IT9 ES
Page 12

CONGELADOR / OPCIÓN SUPER
La opción "SUPER" (SÚPER) podrá ser seleccionada para los alimentos de rápida congelación. Ideal para utilizar cuando se ha añadido
una gran cantidad de comida a su congelador.
Pulse el botón (+) para poder activar la función SUPER. Al cabo de 36 horas, el producto abandonará automáticamente la función SUPER.
Si desea interrumpir la función SUPER en cualquier momento, pulse el botón (-). Para un uso óptimo, el fabricante aconseja que la función
de súper congelación esté activada durante varias horas antes de colocar los alimentos seleccionados en el congelador. La placa indicadora
muestra la cantidad máxima de comida que puede ser congelada.
OPZIONE SUPER
Apagado Encendido
(fi gura 3)
OPZIONE SUPERFALLOS Y ERRORES
Cada error o fallo ocurrido aparecerá automáticamente en la pantalla que indicará un número seguido de la letra "E" (Error). Si esto ocurre,
apague el frigorífi co y vuelva a encenderlo de nuevo, y si el error persiste, le rogamos que se ponga en contactocon nosotros para recibir
asistencia técnica.
Si se registrase un fallo de alimentación, el mensaje "PF" (fallo de alimentación) aparecerá en pantalla hasta que la máquina recupere la
alimentación. Si el corte de electricidad dura unas 10-12 horas, compruebe que los alimentos permanecen inalterados. Cualquier alimento que
haya sido descongelado parcialmente o al completo, deberá consumirse en un plazo de 24 horas y NO deberá volver a ser congelado.
(fi gura 4)
(fi gura 5)
OPZIONE SUPERCOMBINADO TOTAL NO FROST MECÁNICO
OPZIONE SUPERPANEL DE CONTROL
Abra la puerta del frigorífi co para acceder al panel de control.
Gire la rueda del termostato para encender el aparato y fi jar la temperatura del congelador y del frigorífi co. Los parámetros
aconsejados son 2-3. Gire la rueda del termostato en “0” para apagar el aparato.
OPZIONE SUPERCONGELADOR
(fi gura 6)
Coloque los alimentos dentro del congelador y para lograr un funcionamiento normal, gire el
termostato en los parámetros aconsejados.
El producto no exige una descongelación porque este producto está equipado con un
sistema automático que evita la formación del hielo.
Nota: esta es la placa de identifi cación. Si necesita contactar con nuestro servicio
de atención al cliente en caso de fallos o defectos, no olvide indicarle la información
contenida en dicha placa.
10 ES
Page 13

FRIGORÍFICO/CONGELADOR NO FROST COM VISOR DIGITAL
PAINEL DE CONTROLO
Abra a porta superior do frigorífi co para aceder ao painel de controlo.
LIGAR E DESLIGAR O EQUIPAMENTO
O aparelho é ligado electronicamente ligando o cabo de alimentação à tomada de corrente e permanece ligado até o cabo ser removido.
Quando " - " é apresentado nos controlos digitais, indica que o produto está no modo de stand-by e por conseguinte ligado à tomada de
corrente, mas não está a funcionar. Para ligar o aparelho, prima o botão MODE (Modo). Para colocar o produto no modo stand-by, prima
o botão MODE (Modo) durante alguns segundos. Se o produto estiver no modo stand-by, os alimentos no frigorífi co ou no congelador não
são arrefecidos.
(Figura 1)
Depois de ligar a fi cha, o aparelho mostra a temperatura recomendada para o frigorífi co no mostrador +5 °C. No congelador, o produto
muda automaticamente para a temperatura recomendada de -18 °C.
DEFINIR A TEMPERATURA DO FRIGORÍFICO
É possível alterar a temperatura premindo os botões (+) e (-). A temperatura máxima é 7 e a mínima 1. A temperatura recomendada do
fabricante é de 5.
Quando a temperatura do frigorífi co está a ser defi nida, a palavra FRIDGE (Frigorífi co) fi ca intermitente. Prima o botão + de 7 para
1 para aceder ao modo OFF (Desligado) com o qual pode desligar o frigorífi co. O visor apresenta apenas a temperatura defi nida para
o congelador. Para reactivar o frigorífi co, prima o botão MODE (Modo) até o modo Fridge (Frigorífi co) parar de piscar. Em seguida, pode
alterar a temperatura do frigorífi co.
DEFINIR A TEMPERATURA DO CONGELADOR
É possível mudar do modo Fridge (Frigorífi co) para Freezer (Congelador) premindo o botão MODE (Modo). É apresentada a palavra
FREEZER (Congelador). Em seguida, é apresentada a temperatura recomendada de -18 °C. É possível modifi car a temperatura de -16 °C
para -22 °C.
(Figura 2)
Para modifi car a temperatura, prima os botões (+) e (-) até atingir a temperatura pretendida. As temperaturas apresentadas servem apenas
de referência.
11IT11 PT
Page 14

OPZIONE SUPEROPÇÃO DE CONGELAÇÃO SUPER
A opção SUPER pode ser seleccionada para congelar alimentos rapidamente. Ideal para utilizar quando é adicionada uma grande
quantidade de alimentos.
Off (Desligado) On (Ligado)
Prima o botão (+) para activar a função SUPER. Passadas 36 horas, o equipamento deve sair automaticamente da função SUPER. Se quiser
interromper a função SUPER em qualquer altura, prima o botão (-). Para uma utilização óptima, o fabricante recomenda que a função de
congelação super seja activada algumas horas antes de colocar os alimentos seleccionados no congelador. A placa de identifi cação indica
a quantidade máxima de alimentos que podem ser congelados, (ver fi gura 6).
(Figura 3)
OPZIONE SUPERFALHAS E ERROS
Cada erro ou falha que ocorra é automaticamente mostrado no visor que irá indicar um número seguido da letra "E" (Erro). Se isto ocorrer,
desligue o equipamento e volte a ligá-lo. Se o erro persistir, contacte a assistência técnica.
(Figura 4)
No caso de ocorrer uma falha de corrente, é apresentada a mensagem "PF" (Falha de corrente) no visor assim que o equipamento tiver
novamente corrente. No caso de ocorrer um corte de corre que dure 10 a 12 horas, verifi que se os alimentos permaneceram inalterados.
Quaisquer alimentos que tenham sido total ou parcialmente descongelados devem ser consumidos dentro de 24 horas e NÃO podem ser
novamente congelados.
(Figura 5)
OPZIONE SUPERFRIGORÍFICO/CONGELADOR MECÂNICO NO FROST
OPZIONE SUPERPAINEL DE CONTROLO
Abra a porta superior do frigorífi co para aceder ao painel de controlo.
Carregue no botão termoestático para ligar o aparelho e regular a temperatura do compartimento do congelador
e do frigorífi co. As defi nições recomendadas são 2-3. Rode o botão termoestático para to “0” para desligar o aparelho.
OPZIONE SUPERCONGELAÇÃO
(Figura 6)
Coloque os alimentos no congelador. Para obter funcionamento normal, rode o termóstato para
as defi nições recomendadas.
O aparelho não requer descongelamento porque está equipado com um sistema automático
que impede a formação de gelo.
N.B. Esta é uma placa sinalética. Se necessitar de contactar o nosso Departamento
de assistência em caso de avarias, forneça-lhes a informação indicada na placa.
12 PT
Page 15

ΨΥΓΕΙΟΚΑΤΑΨΥΚΤΗΣ ΑΥΤΟΜ ΑΤΗΣ ΑΠΟΨΥΞΗΣ ΜΕ ΨΗΦΙΑΚΗ ΟΘΟΝΗ
ΠΙΝΑΚΑΣ ΕΛΕΓΧΟΥ
Γι α να αποκτήσετε πρόσβαση στον πίνακα ελέγχου, ανοίξτε την πάνω πόρτα του θαλάμου συντήρησης.
ΕΝΕΡΓΟΠΟΙΗΣΗ ΚΑΙ ΑΠΕΝΕΡΓΟΠΟΙΗΣΗ ΤΗΣ ΣΥΣΚΕΥΗΣ
Το προϊόν ενεργοποιείται ηλεκτρονικά συνδέοντας το καλώδιο ρεύματος στην πρίζα παροχής ρεύματος και παραμένει υπό τάση έως ότου
αποσυνδεθεί το καλώδιο ρεύματος.
Όταν στο ψηφιακό σύστημα ελέγχου εμφανιστεί η ένδειξη " - ", αυτό σημαίνει ότι η συσκευή είναι σε κατάσταση αναμονής και επομένως είναι
συνδεδεμένη στην τροφοδοσία ρεύματος αλλά δεν είναι σε λειτουργία
ΛΕΙΤΟΥΡΓΙΑΣ). Για να θέσετε τη συσκευή σε κατάσταση αναμονής, πιέστε για λίγα δευτερόλεπτα το κουμπί MODE (ΤΡΟΠΟΣ ΛΕΙΤΟΥΡΓΙΑΣ).
Όταν η συσκευή βρίσκεται σε κατάσταση αναμονής, δεν θα ψύχονται τυχόν τρόφιμα που βρίσκονται στη συντήρηση ή στην κατάψυξη.
Όταν συνδεθεί το φις στην πρίζα, η συσκευή θα δείξει στην οθόνη τη συνιστώμενη θερμοκρασία +5°C για το θάλαμο συντήρησης. Για το θάλαμο
κατάψυξης, η συσκευή θα μεταβεί αυτόματα στη συνιστώμενη θερμοκρασία των -18°C.
. Γι α να ενεργοποιήσετε τη συσκευή, πιέστε το κουμπί MODE (ΤΡΟΠΟΣ
(Εικόνα 1)
ΡΥΘΜΙΣΗ ΤΗΣ ΘΕΡΜΟΚΡΑΣΙΑΣ ΣΤΟ ΘΑΛΑΜΟ ΣΥΝΤΗΡΗΣΗΣ
Η θερμοκρασία μπορεί να τροποποιηθεί πιέζοντας τα κουμπιά (+) και (-). Η μέγιστη τιμή θερμοκρασίας είναι 7 και η ελάχιστη 1. Η συνιστώμενη
από τον κατασκευαστή θερμοκρασία είναι 5.
Όταν ρυθμιστεί η θερμοκρασία του θαλάμου συντήρησης, αναβοσβήνει η λέξη FRIDGE (ΣΥΝΤΗΡΗΣΗ). Πιέζοντας το κουμπί + από το
7 προς το 1 θα βρείτε την επιλογή OFF με την οποία μπορείτε
τη θερμοκρασία που ορίστηκε για το χώρο της κατάψυξης. Γι α να ενεργοποιήσετε πάλι το χώρο συντήρησης, πιέστε το κουμπί MODE
(Τρ ό π ο ς λειτουργίας) έως ότου πάψει να αναβοσβήνει η λειτουργία συντήρησης. Τότ ε θα είναι δυνατή η τροποποίηση της θερμοκρασίας
του χώρου συντήρησης.
να απενεργοποιήσετε το χώρο της συντήρησης. Η οθόνη θα δείχνει μόνο
ΡΥΘΜΙΣΗ ΤΗΣ ΘΕΡΜΟΚΡΑΣΙΑΣ ΣΤΟ ΘΑΛΑΜΟ ΚΑΤΑΨΥΞΗΣ
Η αλλαγή από λειτουργία Συντήρησης σε λειτουργία Κατάψυξης γίνεται πιέζοντας το κουμπί MODE (ΤΡΟΠΟΣ ΛΕΙΤΟΥΡΓΙΑΣ). Τό τε
θα εμφανιστεί στην οθόνη η λέξη FREEZER (ΚΑΤΑΨΥΞΗ). Κατόπιν θα εμφανιστεί η συνιστώμενη τιμή θερμοκρασίας -18. Η τιμή της
θερμοκρασίας μπορεί να τροποποιηθεί μεταξύ -16°C και -22°C.
(Εικόνα 2)
Γι α να τροποποιήσετε τη θερμοκρασία, πιέστε τα κουμπιά (+) και (-) έως ότου φθάσετε στην
τιμές θερμοκρασίας είναι μόνο ενδεικτικές.
επιθυμητή θερμοκρασία. Οι εμφανιζόμενες
13 EL13 EL
Page 16

OPZIONE SUPERΚΑΤΑΨΥΞΗ / ΕΠΙΛΟΓΗ SUPER (ΤΑΧΕΙΑ ΚΑΤΑΨΥΞΗ)
Η επιλογή SUPER (ΤΑ Χ ΕΙΑ ΚΑΤΑΨΥΞΗ) μπορεί να επιλεγεί για την ταχεία κατάψυξη των τροφίμων. Η λειτουργία αυτή είναι ιδανική για να
χρησιμοποιείται όταν έχει προστεθεί στον καταψύκτη μια
Απενεργοποιημένη Ενεργοποιημένη
Πιέστε το κουμπί (+) για να ενεργοποιήσετε τη λειτουργία SUPER (ΤΑΧΕΙΑ ΚΑΤΑΨΥΞΗ). Η συσκευή θα εξέλθει αυτόματα από τη λειτουργία SUPER
(ΤΑΧΕΙ Α Σ ΚΑΤΑΨΥΞΗΣ) μετά από 36 ώρες. Αν επιθυμείτε να διακόψετε τη λειτουργία SUPER (ΤΑ Χ ΕΙΑΣ ΚΑΤΑΨΥΞΗΣ) οποιαδήποτε χρονική στιγμή,
πιέστε το κουμπί (-). Γι α βέλτιστη χρήση ο κατασκευαστής συνιστά η λειτουργία ταχείας κατάψυξης να
τα τρόφιμα στην κατάψυξη. Η πινακίδα στοιχείων δείχνει τη μέγιστη ποσότητα τροφίμων που μπορούν να καταψυχθούν (δείτε την εικόνα 6).
μεγάλη ποσότητα τροφίμων.
(εικόνα 3)
ενεργοποιείται λίγες ώρες πριν τοποθετηθούν
OPZIONE SUPERΠΡΟΒΛΗΜΑΤΑ ΚΑΙ ΣΦΑΛΜΑΤΑ
Κάθε σφάλμα ή
"E" (Error - Σφάλμα). Αν συμβεί αυτό, απενεργοποιήστε τη συσκευή και ενεργοποιήστε την πάλι. Αν το σφάλμα επιμένει, επικοινωνήστε για
τεχνική βοήθεια.
πρόβλημα που προκύπτει θα εμφανίζεται αυτόματα στην οθόνη που θα δείχνει έναν αριθμό ακολουθούμενο από το γράμμα
(εικόνα 4)
Σε περίπτωση διακοπής ρεύματος, αφού αποκατασταθεί η τροφοδοσία ρεύματος στη συσκευή, στην οθόνη θα
(Power Fail - Διακοπή ρεύματος). Σε περίπτωση διακοπής ρεύματος με διάρκεια 10-12 ωρών, ελέγξτε ότι τα τρόφιμα έχουν παραμείνει
αναλλοίωτα. Τυχόν τρόφιμα που έχουν αποψυχθεί μερικά ή ολικά πρέπει να καταναλωθούν εντός 24 ωρών και να ΜΗΝ καταψυχθούν πάλι.
εμφανιστεί το μήνυμα "PF"
(εικόνα 5)
OPZIONE SUPERΨΥΓΕΙΟΚΑΤΑΨΥΚΤΗΣ ΑΥΤΟΜ ΑΤΗΣ ΑΠΟΨΥΞΗΣ ΜΕ ΜΗΧΑΝΙΚΗ ΡΥΘΜΙΣΗ
OPZIONE SUPERΠΙΝΑΚΑΣ ΕΛΕΓΧΟΥ
Ανοίξτε την πάνω πόρτα του ψυγείου για να αποκτήσετε πρόσβαση στον πίνακα ελέγχου.
Γυ ρ ί σ τ ε το περιστροφικό κουμπί του θερμοστάτη για να θέσετε τη συσκευή σε λειτουργία και ρυθμίστε τη θερμοκρασία για
το χώρο της κατάψυξης και της συντήρησης. Οι συνιστώμενες ρυθμίσεις είναι 2-3. Γι α να απενεργοποιήσετε τη συσκευή,
γυρίστε το περιστροφικό κουμπί του θερμοστάτη στη θέση “0”.
OPZIONE SUPERΚΑΤΑΨΥΞΗ
(εικόνα 6)
Τοπ ο θε τήστε τα τρόφιμα στην κατάψυξη και για κανονική λειτουργία γυρίστε το θερμοστάτη στις
συνιστώμενες ρυθμίσεις.
Το προϊόν δεν απαιτεί απόψυξη επειδή είναι εξοπλισμένο με αυτόματο σύστημα που
εμποδίζει το σχηματισμό πάγου.
Σημ.: Αυτή είναι η πινακίδα τεχνικών στοιχείων. Αν χρειαστεί να απευθυνθείτε στο
Τμήμα μας Τεχ νικής Εξυπηρέτησης σε περίπτωση κάποιου προβλήματος, θυμηθείτε
να αναφέρετε τις πληροφορίες που περιλαμβάνει αυτή η πινακίδα.
14 EL
Page 17

BEZSZRONOWA LODÓWKA-ZAMRAŻARKA Z WYŚWIETLACZEM CYFROWYM
PANEL STEROWANIA
Aby uzyskać dostęp do panelu sterowania, należy otworzyć górne drzwi lodówki.
WŁĄCZANIE I WYŁĄCZANIE URZĄDZENIA
Produkt jest włączany elektronicznie przez podłączenie kabla zasilającego do gniazdka i pozostaje zasilany do momentu jego odłączenia.
Jeśli na cyfrowym wyświetlaczu pojawi się " - ", oznacza to, że produkt jest w trybie czuwania, a więc podłączony jest do gniazdka zasilania, ale
nie pracuje. Aby włączyć urządzenie, naciśnij przycisk MODE (TRYB). Aby przełączyć produkt w tryb czuwania, przez kilka sekund przytrzymaj
przycisk MODE. Gdy produkt jest w trybie czuwania, żywność w zamrażarce lub lodówce nie jest chłodzona.
(rysunek 1)
Gdy wtyczka zostanie podłączona, na wyświetlaczu produktu pokaże się zalecana temperatura przedziału lodówki +5°C. Produkt automatycznie
ustawi zalecaną temperaturę przedziału zamrażarki na -18°C.
USTAWIANIE TEMPERATURY PRZEDZIAŁÓW LODÓWKI
Temperaturę można zmieniać za pomocą przycisków (+) i (-). Maksymalna temperatura to 7, a minimalna to 1. Producent zaleca ustawienie
temperatury 5.
Gdy ustawiana jest temperatura przedziału lodówki, błyska słowo FRIDGE (LODÓWKA). Naciskając przycisk + od 7 do 1 aktywujesz tryb
OFF (WYŁ.), w którym możliwe jest wyłączenie przedziału lodówki. Na wyświetlaczu pokazana będzie jedynie temperatura przedziału
zamrażarki. Aby ponownie włączyć przedział lodówki, naciśnij przycisk MODE (TRYB), aż tryb lodówki przestanie błyskać. W tym momencie
możliwe jest wprowadzenie zmiany temperatury przedziału lodówki.
USTAWIANIE TEMPERATURY PRZEDZIAŁÓW ZAMRAŻARKI
Przycisk MODE (TRYB) umożliwia przełączenie z lodówki na zamrażarkę. Pojawia się teraz słowo FREEZER (ZA MRAŻARKA). Następnie wyświetlana
jest zalecana temperatura -18. Możliwa jest zmiana temperatury w zakresie -16°C do -22°C.
(rysunek 2)
Aby zmienić temperaturę, użyj przycisków (+) i (-). Temperatury na wyświetlaczu to wskazania ogólne.
15 IT15 PL
Page 18

OPZIONE SUPERZAMRAŻANIE / OPCJA SUPER
Opcja SUPER może zostać włączona do szybkiego zamrażania żywności. Jest doskonała w sytuacjach, gdy do zamrażarki włożono dużą
ilość żywności.
Wył.Wł.
Naciśnij przycisk (+), aby włączyć funkcję SUPER. Po kolejnych 36 godzinach urządzenie automatycznie wyłączy funkcję SUPER. Jeśli
chcesz wyłączyć funkcję SUPER w dowolnym momencie, naciśnij przycisk (-). W celu optymalnego użytkowania producent zaleca włączenie
funkcji super na kilka godzin przed włożeniem żywności do zamrażarki. Na tabliczce znamionowej umieszczono informację o maksymalnej
ilości produktów, jaką można zamrozić (patrz rysunek 6).
(rysunek 3)
OPZIONE SUPERUSTERKI I BŁĘDY
Każdy błąd lub usterka, które się pojawią, będą automatycznie pokazywane na wyświetlaczu jako numer z literą "E" (Error - Błąd). W takim
przypadku wyłącz produkt i włącz go ponownie. Jeśli błąd się powtarza, skontaktuj się z serwisem.
(rysunek 4)
W przypadku awarii zasilania, na wyświetlaczu pojawi się komunikat "PF" (Power Fail - Awaria zasilania), gdy zasilanie zostanie włączone. W
przypadku przerw zasilania trwających 10-12 godzin, sprawdź stan przechowywanej żywności. Cała żywność, która została całkowicie lub
częściowo rozmrożona musi zostać zjedzona w ciągu 24 godzin i NIE MOŻE być ponownie zamrażana.
(rysunek 5)
OPZIONE SUPERBEZSZRONOWA LODÓWKA-ZAMRAŻARKA MECHANICZNA
OPZIONE SUPERPANEL STEROWANIA
Otwórz górne drzwi lodówki, aby uzyskać dostęp do panelu sterowania.
Ustaw tarczę termostatu na pozycję włączenia urządzenia i ustaw temperaturę przedziału zamrażarki i lodówki. Zalecane
ustawienia to 2-3. Obróć tarczę termostatu na “0”, aby wyłączyć urządzenie.
OPZIONE SUPERZAMRAŻANIE
(rysunek 6)
Umieść żywność wewnątrz zamrażarki. Do pracy standardowej ustaw termostat na zalecaną
temperaturę.
Produkt nie wymaga odmrażania, gdyż jest wyposażony w automatyczny system, który
zapobiega formowaniu się lodu.
Uwaga: w tym miejscu znajduje się tabliczka znamionowa. Jeśli musisz skontaktować
się z naszym Serwisem w przypadku awarii, pamiętaj, aby podać informacje z tej
tabliczki.
16 PL
Page 19

KOMBINOVANÁ CHLADNIČKA FROST FREE S DIGITÁLNÍM DISPLEJEM
OVLÁDACÍ PANEL
Pro přístup k ovládacímu panelu otevřete horní dvířka chladničky.
ZAPNUTÍ A VYPNUTÍ SPOTŘEBIČE
Výrobek je ovládán elektronicky po zapojení napájecího kabelu do síťové zásuvky. Je napájený, dokud kabel neodpojíte.
Jakmile se na digitálních kontrolkách zobrazí " - ", znamená to, že je výrobek v pohotovostním režimu stand-by. Je tedy připojen k síťové napájecí
zásuvce, ale nepracuje. Zapnutí spotřebiče provedete stisknutím tlačítka MODE. Opětovné nastavení spotřebiče do pohotovostního režimu
se provede stisknutím tlačítka MODE, které na několik vteřin přidržte. Pokud je spotřebič v pohotovostním režimu, nebudou potraviny ve vaší
chladničce nebo mrazničce chlazeny.
(Obrázek 1)
Po připojení zástrčky do síťové zásuvky se na displeji spotřebiče zobrazí doporučená teplota pro prostor chladničky +5°C. V prostoru mrazničky
se spotřebič automaticky zapne na doporučenou teplotu -18°C.
NASTAVENÍ TEPLOTY PROSTORU CHLADNIČKY
Teplotu je možné změnit stisknutím tlačítek (+) a (-). Maximální teplota je 7 a minimální teplota je 1. Nastavení teploty doporučené výrobcem je 5.
Jakmile nastavíte teplotu prostoru chladničky, začne blikat slovo FRIDGE. Stisknutím tlačítka + z polohy 7 k poloze 1 můžete nastavit režim
OFF, kterým lze vypnout prostor chladničky. Na displeji bude zobrazena pouze teplota nastavená pro prostor mrazáku. Pokud budete chtít
znovu zapnout chladničku, stiskněte tlačítko MODE a přidržte ho, dokud nepřestane blikat režim chladnička. V tomto okamžiku bude možné
změnit nastavení teploty v prostoru chladničky.
NASTAVENÍ TEPLOTY PROSTORU MRAZNIČKY
Přepnutí režimu z Chladničky na Mrazničku se provede stisknutím tlačítka MODE. Nyní se zobrazí slovo FREEZER. Následně se zobrazí doporučená
teplota -18. Teplotu je možné nastavovat v rozsahu od -16°C do -22°C.
(Obrázek 2)
Pokud byste chtěli teplotu změnit, opakovaným stisknutím tlačítka (+) a (-) zadejte vámi požadovanou teplotu. Zobrazené teploty jsou pouze
orientační.
17IT17 CZ
Page 20

OPZIONE SUPERMRAŽENÍ / FUNKCE SUPER
Funkce SUPER se nastavuje v případě, pokud chcete potraviny rychle zmrazit. Její použití je ideální v případě, že jste do mrazničky vložili
velké množství potravin.
VYPNUTO ZAPNUTO
Funkce SUPER se zapíná stisknutím tlačítka (+). Po 36 hodinách spotřebič funkci SUPER automaticky vypne. Pokud byste chtěli funkci SUPER
vypnout dřív, stiskněte tlačítko (-). Pro optimální používání výrobce doporučuje, abyste funkci super mražení zapnuli několik hodin před vložením
vybraných potravin do mrazničky. Typový štítek stanovuje maximální množství potravin, které mohou být zmrazeny (viz obrázek 6).
(obr. 3)
OPZIONE SUPERCHYBY A PORUCHY
Jakákoli případná chyba nebo porucha se automaticky zobrazí na displeji v podobě čísla následovaného písmenem "E" (Error). Pokud k tomuto
jevu dojde, spotřebič vypněte a znovu zapněte. Pokud porucha stále trvá, obraťte se, prosím, na autorizované servisní středisko.
(obr. 4)
V případě v ýp ad ku e le kt ric ké e nergie se na di sp leji zobrazí z pr áva "P F" (Powe r Fail) , jakmile se dodáv ka proudu do s po třebiče obnoví. V případě,
že výpadek elektrického napájení trvá 10-12 hodin, zkontrolujte, zda uložené potraviny nepodlehly zkáze. Všechny potraviny, které se částečně
nebo zcela rozmrazily, musí být zkonzumovány do 24 hodin. NESMÍ být znovu zmrazeny.
(obr. 5)
OPZIONE SUPERKOMBINOVANÁ CHLADNIČKA S MRAZÁKEM FROST FREE S MECHANICKÝM OVLÁDÁNÍM
OPZIONE SUPEROVLÁDACÍ PANEL
Pro přístup k panelu ovládání otevřete horní dvířka chladničky.
Otočte ovladačem termostatu, aby se spotřebič zapnul. Pak nastavte teplotu prostoru mrazničky i chladničky. Doporučené
nastavení je v polohách 2-3. Pokud chcete spotřebič vypnout, otočte termostatem do polohy “0”.
OPZIONE SUPERZMRAZOVÁNÍ
(obr. 6)
Potraviny uložte do mrazáku a pokud chcete nastavit běžné fungování, otočte termostat na
doporučenou polohu.
Spotřebič nevyžaduje odmrazování, protože je vybaven automatickým systémem, který
zabraňuje vytváření ledu.
Pozn.: Typový štítek. Potřebujete-li kontaktovat servisní oddělení v případě poruchy,
nezapomeňte jim poskytnout informace uvedené na tomto štítku.
18 CZ
Page 21

NO FROST VRIEZER MET DIGITALE DISPLAY
BEDIENINGSPANEEL
Open de bovenste deur van de koelkast om toegang tot het bedieningspaneel te krijgen.
HET APPARAAT IN- EN UITSCHAKELEN
De elektronica van het apparaat wordt ingeschakeld zodra de stekker in het stopcontact gestoken wordt en blijft ingeschakeld totdat de stekker uit
het stopcontact gehaald wordt.
Wanneer " - " op het bedieningspaneel weergegeven wordt, dan staat het apparaat in de stand-by stand. Dit betekent dat de stekker in het
stopcontact zit, maar het apparaat niet in werking is. Om het apparaat in te schakelen, drukt u op de MODE-toets. Om het apparaat weer in de
stand-by stand te zetten, drukt u de MODE-toets een paar seconden in. Wanneer het apparaat in de stand-by stand staat, worden de producten
in de koelkast of vriezer niet gekoeld.
(afbeelding 1)
Zodra het apparaat ingeschakeld wordt, zal de display de aanbevolen temperatuur voor het koelgedeelte weergeven (+5°C). Voor wat betreft het
vriescompartiment zal het apparaat automatisch naar de aanbevolen temperatuur van -18°C gaan.
INSTELLEN VAN DE TEMPERATUUR VAN HET KOELKASTCOMPARTIMENT
U kunt de temperatuur instellen door op de toetsen (+) en (-) te drukken. De maximum temperatuur is 7, en de minimum temperatuur is 1. De door
de fabrikant aanbevolen instelling is 5.
Wanneer de temperatuur van het koelkastcompartiment ingesteld wordt, zal het woord FRIDGE (KOELKAST) knipperen. Door op de knop
+ te drukken, treft u van 7 tot 1 de modus OFF aan, waarmee het mogelijk is het vriescompartiment uit te schakelen. Het display zal alleen
de voor het vriescompartiment ingestelde temperatuur weergeven. Om het vriescompartiment opnieuw te activeren, drukt op u op de
knop MODE totdat de vriezermodus stopt met knipperen. Op dat moment is het mogelijk de temperatuur van het vriezercompartiment te
wijzigen.
INSTELLEN VAN DE TEMPERATUUR VAN HET VRIESCOMPARTIMENT
Druk op de MODE-toets om van de koelkast- naar de vriezermodus te schakelen. Het woord FREEZER (VRIEZER) wordt nu weergegeven. De
aanbevolen temperatuur (-18) zal nu verschijnen. U kunt de temperatuur binnen een bereik van -16°C tot -22°C instellen.
(afbeelding 2)
Als u de temperatuur wilt wijzigen, drukt u op de toetsen (+) en (-) totdat u de gewenste temperatuur bereikt. Het display geeft alleen
indicatieve temperaturen weer.
19 IT19 NL
Page 22

OPZIONE SUPERVRIEZEN / SUPER FUNCTIE
Voor het snel invriezen van etenswaren kunt u de SUPER functie selecteren. Ideaal wanneer u een grote hoeveelheid etenswaren wilt
invriezen.
Uit Aan
Druk op de (+) toets om de SUPER functie te activeren. De SUPER functie wordt 36 uur hierna automatisch uitgeschakeld. Druk op de (-)
toets als u de SUPER functie eerder wilt stoppen. Voor een optimaal resultaat, raden wij u aan om de SUPER functie een paar uur eerder in
te schakelen voordat u de etenswaren in de vriezer plaatst. Op het typeplaatje staat de maximum hoeveelheid etenswaren aangegeven die
ingevroren kan worden, (zie afbeelding 6).
(afbeelding 3)
OPZIONE SUPERDEFECTEN EN STORINGEN
Iedere storing of defect wordt automatisch middels een nummer gevolgd door de letter "E" (Error) op de display weergegeven. Als dit gebeurt,
zet het apparaat dan uit en vervolgens weer aan. Als de foutmelding blijft bestaan, neem dan contact op met de technische service.
(afbeelding 4)
Wanneer de elektriciteitsvoorziening uitgevallen is en deze daarna weer hersteld is, verschijnt in de display "PF" (Power Fail) (Stroomuitval).
Als de elektriciteitsvoorziening 10-12 uur uitgevallen is, controleer dan of de etenswaren nog in goede staat zijn. Etenswaren die geheel of
gedeeltelijk ontdooid zijn moeten binnen 24 uur geconsumeerd en NIET opnieuw ingevroren worden.
(afbeelding 5)
OPZIONE SUPERNO FROST KOELKAST/VRIEZER - MECHANISCH
OPZIONE SUPERBEDIENINGSPANEEL
Open de bovenste deur van de koelkast om toegang tot het bedieningspaneel te krijgen.
Verdraai de thermostatische schakelaar om het apparaat in te schakelen en stel de temperatuur van het vriescompartiment en
de koelkast in. De geadviseerde instellingen zijn 2-3. Draai de thermostatische schakelaar op “0” om het apparaat uit te schakelen.
OPZIONE SUPERVRIEZEN
(afbeelding 6)
Plaats de etenswaren in de vriezer en stel voor een normale werking de thermostatische schakelaar
in op de geadviseerde instellingen.
Voor het apparaat is het ontdooien niet vereist, omdat het apparaat is voorzien van een
automatisch systeem dat het ontstaan van ijs voorkomt.
NB: dit is het typeplaatje. Als u voor een eventuele storing contact opneemt met onze
serviceafdeling, vergeet dan niet om de informatie op het typeplaatje door te geven.
20 NL
Page 23

JÄ ÄT YMÄTÖN JÄÄKAAPPI- PAKASTIN DIGITA ALISELL A NÄY TÖLL Ä
OHJAUSPANEELI
Avaa jääkaapin yläovi, jotta pääset käsiksi ohjauspaneeliin.
LAITTEEN KYTKEMINEN PÄÄLLE JA POIS PÄÄLTÄ
Laitteeseen kytketään virta liittämällä virtajohto verkkovirtalähteeseen ja virta jää päälle, kunnes johto irrotetaan.
Kun digitaalisissa ohjaimissa näkyy " - ", laite on valmiustilassa. Tämä merkitsee, että laite on liitetty verkkovirtaan, mutta ei ole käynnissä. Kytke
laite päälle painamalla MODE (TILA) -painiketta. Laite voidaan kytkeä taas valmiustilaan painamalla MODE (TILA) -painiketta muutaman sekunnin
ajan. Kun laite on valmiustilassa, jääkaappi tai pakastin ei jäähdytä niissä olevia ruoka-aineksia.
(Kuva 1)
Kun pistoke on liitetty, laitteen näytössä näkyy jääkaapin suositeltu lämpötila +5°C. Pakastin säätyy automaattisesti suositeltavaan -18°C
lämpötilaan.
JÄÄKAAPIN LÄMPÖTILAN ASETUS
Lämpötilaa voidaan säätää painamalla painikkeita (+) ja (-). Maksimilämpötila on 7, ja minimilämpötila vastaavasti 1. Valmistaja suosittelee
lämpötilan 5 käyttöä.
Kun jääkaapin lämpötilaa asetetaan, sana FRIDGE (JÄÄKAAPPPI) vilkkuu. Jääkaappitila voidaan kytkeä pois päältä OFF-tilaan painamalla
painiketta + arvosta 7 arvoon 1. Näytössä näk yy ainoastaan pakastintilan lämpötila. Jääkaappitila voidaan kytkeä uudelleen päälle painamalla
MODE-painiketta, kunnes jääkaappitila ei enää vilku, tällöin voidaan muuttaa jääkaapin lämpötilaa.
PAKASTIMEN L ÄMPÖTILAN ASETUS
Jääkaappitilasta voidaan siityä pakastintilaan painamalla MODE (TILA) -painiketta. Sana FREEZER (PAKASTIN) tulee näkyviin. Tämän
jälkeen näkyviin tulee suositeltu lämpötila -18. Lämpötilan säätöasteikko on -16°C - -22°C.
(Kuva 2)
Jos haluat muuttaa lämpötilaa, paina painikkeita (+) ja (-), kunnes saavutat haluamasi lämpötilan. Näytössä näkyvät lämpötilat ovat
ainoastaan viitteellisiä.
21 IT21 FI
Page 24

OPZIONE SUPERPAKASTUS / SUPER-ASETUS
SUPER-valinta voidaan valita nopeasti pakastetuille ruoka-aineksille. Se on ihanteellinen ratkaisu silloin, kun pakastimeen on lisätty suuri
määrä ruoka-aineksia.
Pois päältä Päällä
Paina (+)-painiketta, jot ta SUPER-toiminto ak tivoituu. 36 tunnin jälkeen l aite poistuu automaatti sesti SUPER-toiminno sta. Jos haluat keskeyt tää
SUPER-toiminnon tätä ennen, paina painiketta (-). Käytön optimoimiseksi valmistaja suosittelee, että SUPER-toiminto aktivoidaan muutama
tunti ennen ruoka-aineksien laittamista pakastimeen. Arvokilvessä ilmoitetaan jäädytettävien elintarvikkeiden enimmäismäärä (katso
kuva 6)
(kuva 3)
OPZIONE SUPERHÄIRIÖT JA VIRHEET
Kaikki virheet ja häiriöt näkyvät automaattisesti näytöllä, jossa näkyy numero ja kirjain "E" (Error - virhe). Jos näin käy, sammuta laite ja
käynnistä se uudelleen. Jos virhe toistuu, ota yhteyttä tekniseen palveluun.
(kuva 4)
Jos virran syötössä tapahtuu katkos, virran palatessa näytöllä näkyy viesti "PF" (Power Fail - sähkökatkos). Jos sähkökatkos kestää yli
10-12 tuntia, tarkista ruoka-ainekset niiden sulamisen varalta. Kaikki osittain tai kokonaan sulaneet ruoka-ainekset tulee käyttää 24 tunnin
sisällä, niitä EI SAA pakastaa uudelleen.
(kuva 5)
Avaa jääkaapin yläovi, jotta pääset käsiksi ohjauspaneeliin.
Käännä termostaatin valitsinta käynnistääksesi laitteen ja asettaaksesi pakastimen ja jääkaapin lämpötilan.
Suositeltavat asetukset ovat 2-3. Käännä termostaatin valitsin arvoon “0” halutessasi kytkeä laite pois päältä.
(kuva 6)
Aseta elintarvikkeet pakastimeen ja kytke normaali toiminta päälle säätämällä termostaatti
suositeltuun arvoon.
Tuote ei vaadi sulatusta, sillä siinä on automaattijärjestelmä, joka estää jään
muodostumisen.
OPZIONE SUPERJÄÄTYMÄTÖN MEKAANINEN JÄÄKAAPPI-PAKASTIN
OPZIONE SUPEROHJAUSPANEELI
OPZIONE SUPERPAKASTAMINEN
Huom. Tämä on tehokilpi. Jos sinun tarvitsee ottaa yhteyttä huoltoon vikatilanteessa,
muista ilmoittaa kilven tiedot.
22 FI
Page 25

FROSTFRI KJØLESKAPSFRYSER MED DIGITALT DISPLAY
KONTROLLPANEL
Åpne den øvre kjøleskapsdøren for å få tilgang til kontrollpanelet.
SLÅ APPARATET AV OG PÅ
Produktet eldrives ved å sette i stikkontakten og står på inntil kontakten tas ut.
Når " - " vises på det digitale betjeningspanelet, indikerer dette at produktet er i standby-modus. Det er derfor det ikke står på selv om stikkontakten
står i. Trykk på MODE-knappen for å slå på apparatet. Hold MODE-knappen inne i noen sekunder for å sette produktet i standby-modus. Når
produktet er i standby-modus, vil ikke mat i kjøleskapet eller fryseren avkjøles.
(Figur 1)
Når stikkontakten er satt i, vil produktet vise anbefalt temperatur for kjøleskapet vises på displayet +5°C. Produktet vil automatisk sette
fryseren til anbefalt temperatur på -18°C.
INNSTILLING AV TEMPERATUR PÅ KJØLESKAPET
Temperaturen kan endres ved å trykke på knappene (+) og (-). Maksimumtemperatur er 7, og minimum er 1. Fabrikantens anbefalte
temperatur er 5.
Ordet FRIDGE blinker når temperaturen på kjøleskapet stilles inn. Du fi nner OFF-modus ved å trykke på knappen + fra 7 til 1 og dette
moduset gjør det mulig å slå av kjøleskapet. Displayet vil kun vise temperaturen som er satt for dypfryseren. Trykk på MODE-knappen helt
til kjøleskapsmodusen slutter å blinke for å reaktivere kjøleskapet. Det vil nå være mulig å endre temperaturen på kjøleskapet.
INNSTILLING AV TEMPERATUR PÅ FRYSEREN
Det er mulig å bytte fra Kjøleskap- til Fryser-modus ved å trykke på MODE-knappen. Ordet FREEZER vises. Deretter vises anbefalt
temperatur på -18. Det er mulig å endre temperaturen fra -16°C til -22°C.
(Figur 2)
Hvis du vil endre temperatur, trykk på knappene (+) og (-) til du når ønsket temperatur. Temperaturene på displayet er kun indikative.
23 IT23 NO
Page 26

OPZIONE SUPERDYPFRYSING / SUPER
SUPER-alternativet kan velges for rask nedfrysning av matartikler. Ideell når store matmengder blir lagt i fryseren.
Av På
Trykk på (+)-knappen for å aktivere SUPER-funksjonen. Etter 36 timer vil apparatet automatisk deaktivere SUPER-funksjonen. Hvis du vil
avbryte SUPER-funksjonen, må du trykke på (-)-knappen. For optimal bruk, anbefaler fabrikanten at superfrys-funksjonen er aktivert noen
timer før de utvalgte matartiklene legges i fryseren. Merkeskiltet oppgir den maksimale mengden av matvarer som kan fryses ned, (se fi gur 6).
(fi gur 3)
OPZIONE SUPERFEIL
Alle feil eller mangler som oppstår vises automatisk på displayet. Det vil indikeres et tall etterfulgt av bokstaven "E" (Error). Hvis dette skjer, må
du slå produktet av og så på igjen. Ta kontakt med teknisk assistanse hvis feilen vedvarer.
(fi gur 4)
Ved strømbrudd vil meldingen "PF" (Power Fail) vises på displayet når strømmen kommer tilbake igjen. Ved strømbrudd over 10-12 timer må
du sjekke om hvorvidt matartiklene har blitt tint opp eller ikke. Mat som har blitt helt eller delvis tint opp må forbrukes innen 24 timer og IKKE
fryses på nytt.
(fi gur 5)
OPZIONE SUPERFROSTFRI MEKANISK KJØLESKAPSFRYSER
OPZIONE SUPERKONTROLLPANEL
Åpne kjøleskapets øvre dør for å få tilgang til kontrollpanelet.
Vri på hjulet på termostatboksen for å slå på apparatet og endre temperaturen i kjøleskapet og dypfryseren.
Anbefalte innstillinger er 2-3. Sett termostatboksen til “0” for å slå av apparatet.
OPZIONE SUPERDYPFRYSING
(fi gur 6)
Legg maten inn i dypfryseren og sett termostaten til anbefalt innstilling for normal funksjon.
Produktet krever ikke avriming da det er utstyrt med et automatisk system som forhindrer
isdannelse.
N.B. Dette er merkeskiltet. Hvis du blir nødt til å kontakte vår serviceavdeling i tilfelle
feil, oppgi dataene på merkeskiltet.
24 NO
Page 27

FROSTFRI KYL/FRYS MED DIGITAL DISPLAY
KONTROLLPANEL
Öppna den övre dörren av kylskåpet för att komma åt kontrollpanelen.
SÄTTA PÅ OCH STÄNGA AV PRODUKTEN
Denna produkt får sin strömförsörjning genom att kabeln kopplas till strömuttaget och den förblir inkopplad tills kabeln tas bort.
När " - " visas på de digitala kontrollerna betyder det att produkten är i standbyläge, den är alltså kopplad till strömuttaget men den är inte igång.
Sätt på apparaten genom att trycka på MODE-knappen. Ställ apparaten i standbyläge genom att trycka ner MODE-knappen i några sekunder. När
apparaten är i standbyläge hålls inte maten kyld i kylskåpet eller frysen.
(Figur 1)
När väl kontakten har satts i visas rekommenderad temperatur för kyldelen på displayen (+5 °C). När det gäller frysdelen växlar apparaten
automatiskt till den rekommenderade temperaturen -18 °C.
INSTÄLLNING AV TEMPERATUREN I KYLDELEN
Det går att ändra temperaturen med knapparna (+) och (-). Maxtemperaturen är 7, och den minsta temperaturen är 1. Tillverkarens
rekommenderade temperatur är 5.
När kyldelens temperatur ställs in blinkar ordet FRIDGE (KYL). Tryck på knappen + från 7 till 1 tills du hittar OFF-läget där du kan slå av
kylskåpet.Displayen visar endast den inställda temperaturen för frysen.Vill du återaktivera kylen trycker du på MODE-knappen tills det slutar
att blinka, sedan kan du ändra temperaturen i kylen.
INSTÄLLNING AV TEMPERATUREN I FRYSDELEN
Det går att växla från kylläge till frysläge med MODE-knappen. Nu visas ordet FREEZER (FRYS). Dessutom visas den rekommenderade
temperaturen -18 °C. Det går att ändra temperaturen från -16 °C till -22 °C.
(Figur 2)
För varje ändring, tryck på knapparna (+) och (-) tills du uppnått önskad temperatur. Displayens temperaturer är endast vägledande.
25 IT25 SV
Page 28

OPZIONE SUPERTILLVALSFUNKTION INFRYSNING/SUPER
SUPER-alternativet kan väljas för snabbfrysning av mat. Idealisk att använda när du har lagt in en stor mängd mat i frysen.
Av På
Tryck på knappen (+) för att aktivera funktionen SUPER. Efter 36 timmar, lämnar produkten automatiskt funktionen SUPER, om du vill
avbryta funktionen SUPER innan dess, trycker du på knappen (-). För optimal användning rekommenderar tillverkaren att superfunkionen
aktiveras ett par timmar innan du lägger in maten i frysen. Den maximala mängden matvaror som kan frysas in fi nns angiven på märkplåten,
(se fi gur 6).
(Figur 3)
OPZIONE SUPERSTÖRNINGAR OCH FEL
Varje fel som uppstår visas automatiskt på displayen i form av en siffra följd av bokstaven "E" (Error). Om detta inträffar stänger du av apparaten
och sätter sedan på den igen. Om felet fortfarande kvarstår, kontakta återförsäljaren för teknisk assistans.
(Figur 4)
Vid eventuellt strömavbrott visas meddelandet "PF" (Power Fail) på displayen när strömmen har kommit tillbaka. Om strömavbrottet har varat
i 10-12 timmar bör du kontrollera att maten inte har tinat. All mat som är helt eller delvis tinad måste användas inom 24 timmar och får INTE
frysas in igen.
(Figur 5)
OPZIONE SUPERMEKANISK FROSTFRI KYL/FRYS
OPZIONE SUPERKONTROLLPANEL
Öppna den övre dörren av kylskåpet för att komma åt kontrollpanelen.
Vrid termostatvredet för att slå på apparaten och ställ in temperaturen för frysutrymmet och kylskåpet. De rekommenderade
inställningarna är 2-3. Vrid termostaten till “0” för att stänga av apparaten.
OPZIONE SUPERINFRYSNING
(Figur 6)
Placera maten inuti frysen och vris termostaten till rekommenderade inställningar för bästa
funktion.
Frysen behöver inte frostas av eftersom den är utrustad med ett särskilt system som
förhindrar isbildning.
OBS! Detta är märkplåten. Om du behöver kontakta serviceavdelningen i händelse
av fel, kom ihåg att uppge informationen som är angiven på plåten.
26 SV
Page 29

FROSTFRIT KØLEFRYSESKAB MED DIGITALT DISPLAY
KONTROLPANEL
Åbn døren på køleskabet for at få adgang til kontrolpanelet.
SLÅ PRODUKTET TIL OG FRA
Produktet er elektronisk drevet ved at tilslutte strømledningen til strømstikket, og forbliver drevet indtil ledningen fjernes.
Når " - " vises på de digitale kontroller, indikerer det at produktet befi nder sig i stand-by funktion, hvilket betyder at det er tilsluttet strømstikket, men
ikke arbejder. For at tænde for apparatet, trykkes FUNKTION knappen. For at tænde for produktet i standby funktion, trykkes FUNKTION knappen
ned i et par sekunder. Når produktet befi nder sig i standby funktion vil madvarer i køleskabet eller fryseren ikke nedkøles.
(Figur 1)
Når stikket er sat til, vil produktet vise den anbefalede temperatur for køleskabet på displayet +5°C. For fryseren, vil produktet automatisk
skifte til den anbefalede temperatur på -18°C.
INDSTILLING AF TEMPERATUREN PÅ KØLESKABET
Det er muligt at ændre temperaturen ved at trykke på knapperne (+) og (-). Maksimumtemperaturen er 7 og minimum er 1. Den anbefalede
temperatur fra fabrikanten er 5.
Når temperaturen på køleskabet indstilles, blinker order KØLESK AB. Ved at trykke på knappen + fra 7 til 1 vil du fi nde tilstanden OFF,
med hvilken det vil være muligt at slukke for køleskabet. Displayet vil kun vise temperaturindstillingen for fryseskabet. For at genaktivere
køleskabet skal du trykke på knappen MODE (TILSTAND), indtil tilstanden for køleskabet stopper med at blinke, på dette tidspunkt vil det
være muligt at ændre køleskabets temperatur.
INDSTILLING AF TEMPERATUREN PÅ FRYSEREN
Det er muligt at skifte fra Køleskab til Fryser funktion ved at trykke på FUNKTION knappen. Ordet FRYSER vil nu blive vist. Efterfølgende
vil den anbefalede temperatur -18 blive vist. Det er muligt at ændre temperaturen fra -16°C til -22°C.
(Figur 2)
For at ændre temperaturen, trykkes knapperne (+) og (-) indtil du når den ønskede temperatur. De viste temperaturer er kun vejledende.
27 IT27 DA
Page 30

OPZIONE SUPERFRYSNING / SUPERINDSTILLING
SUPERINDSTILLINGEN kan vælges for hurtig frysning af madvarer. Ideel til brug af indfrysning af store mængder madvarer.
Fra Til
Tryk på (+) knappen for at aktivere SUPER funktionen. Efter 36 timer, vil produktet automatisk forlade SUPER funktionen. Hvis du ønsker at
afbryde SUPER funktionen før, trykkes på (-) knappen. For optimalt brug, anbefaler fabrikanten at superfrys funktionen aktiveres nogle timer
før omtalte madvarer puttes i fryseren. 'Typeskiltet angiver maksimal mængde madvarer, der kan nedfryses, (se fi gur 6).
(Figur 3)
OPZIONE SUPERMANGLER OG FEJL
Enhver fejl eller mangel som sker, vil automatisk vises på displayet, hvilket vil indikere et nummer efterfulgt af bogstavet "E" (Error). Hvis dette
sker, slåes produktet fra og til igen. Hvis fejlen vedbliver, kontakt venligst teknisk assistance.
(Figur 4)
I tilfælde af strømafbrydelse vil meddelelsen "PF" (Power Fail) vises på displayet når strømmen kommer tilbage. I tilfælde af strømafbrydelse på
mere end 10-12 timer, checkes det at madvarene ikke har lidt nogen overlast. Enhver madvare som er delvist eller helt optøet, skal konsumeres
indenfor 24 timer og må IKKE genfryses.
(Figur 5)
OPZIONE SUPERFROSTFRIT KØLEFRYSESKAB MED FJERNBETJENING
OPZIONE SUPERKONTROLPANEL
Åbn køleskabets øverste låge for at få adgang til kontrolpanelet.
Tænd for termostatviseren for at tænde for apparatet og for at indstille fryse- og køleskabets temperatur.
De anbefalede indstillinger er 2-3. Drej termostatviseren hen på ”0” for at slukke for apparatet.
OPZIONE SUPERFRYSNING
(Figur 6)
Placér fødevarerne inden i fryseren, og for normal funktion skal du dreje termostaten hen på de
anbefalede indstillinger.
Produktet behøver ikke at afrime, da dette produkt er udstyret med et automatisk system,
der forebygger isdannelse.
N.B. Dette er ydelsesskiltet. Hvis du har behov for at kontakte vores serviceafdeling
i tilfælde af fejl, skal du huske at oplyse dem om informationen på skiltet.
28 DA
Page 31

Page 32

Z STUDIO > 02-2008 – Cod. 41028030
 Loading...