

Page 1
Instruction Manual For Ceramic Hob
ENGLISH
FRENCH
Instruction Manual / Mode d’emploi
MODEL: CH64CCTT
Thank you for purchasing the CANDY ceramic hob. Please read this instruction manual
carefully before using the hob and keep it in a safe place for future reference.
Page 2

EN-1
By placing the
mark on this product, we are
confirming compliance to all relevant European
safety, health and environmental requirements
which are applicable in legislation for this
product.
Safety Warnings
Your safety is important to us. Please read this
information before using your cooktop.
Installation
Electrical Shock Hazard
• Disconnect the appliance from the mains
electricity supply before carrying out any work
or maintenance on it.
• Connection to a good earth wiring system is
essential and mandatory.
• Alterations to the domestic wiring system must
only be made by a qualified electrician.
• Failure to follow this advice may result in
electrical shock or death.
Cut Hazard
• Take care - panel edges are sharp.
• Failure to use caution could result in injury or
cuts.
Important safety instructions
• Read these instructions carefully before
installing or using this appliance.
• No combustible material or products should be
Page 3

EN-2
placed on this appliance at any time.
• Please make this information available to the
person responsible for installing the appliance
as it could reduce your installation costs.
• In order to avoid a hazard, this appliance must
be installed according to these instructions for
installation.
• This appliance is to be properly installed and
earthed only by a suitably qualified person.
• This appliance should be connected to a circuit
which incorporates an isolating switch
providing full disconnection from the power
supply.
• Failure to install the appliance correctly could
invalidate any warranty or liability claims.
Operation and maintenance
Electrical Shock Hazard
• Do not cook on a broken or cracked cooktop. If
the cooktop surface should break or crack, switch
the appliance off immediately at the mains power
supply (wall switch) and contact a qualified
technician.
• Switch the cooktop off at the wall before
cleaning or maintenance.
• Failure to follow this advice may result in
electrical shock or death.
Health Hazard
• This appliance complies with electromagnetic
Page 4

EN-3
safety standards.
Hot Surface Hazard
• During use, accessible parts of this appliance
will become hot enough to cause burns.
• Do not let your body, clothing or any item other
than suitable cookware contact the Induction
glass until the surface is cool.
• Metallic objects such as knives, forks, spoons
and lids should not be placed on the hob surface
since they can get hot.
• Keep children away.
• Handles of saucepans may be hot to touch.
Check saucepan handles do not overhang other
cooking zones that are on. Keep handles out of
reach of children.
• Failure to follow this advice could result in
burns and scalds.
Cut Hazard
• The razor-sharp blade of a cooktop scraper is
exposed when the safety cover is retracted. Use
with extreme care and always store safely and
out of reach of children.
• Failure to use caution could result in injury or
cuts.
Important safety instructions
• Never leave the appliance unattended when in
use. Boilover causes smoking and greasy
spillovers that may ignite.
• Never use your appliance as a work or storage
surface.
• Never leave any objects or utensils on the
Page 5

EN-4
appliance.
• Never use your appliance for warming or
heating the room.
• After use, always turn off the cooking zones
and the cooktop as described in this manual (i.e.
by using the touch controls).
• Do not allow children to play with the appliance
or sit, stand, or climb on it.
• Do not store items of interest to children in
cabinets above the appliance. Children climbing
on the cooktop could be seriously injured.
• Do not leave children alone or unattended in
the area where the appliance is in use.
• Children or persons with a disability which
limits their ability to use the appliance should
have a responsible and competent person to
instruct them in its use. The instructor should be
satisfied that they can use the appliance without
danger to themselves or their surroundings.
• Do not repair or replace any part of the
appliance unless specifically recommended in the
manual. All other servicing should be done by a
qualified technician.
• Do not use a steam cleaner to clean your
cooktop.
• Do not place or drop heavy objects on your
cooktop.
• Do not stand on your cooktop.
• Do not use pans with jagged edges or drag pans
across the Induction glass surface as this can
Page 6

EN-5
scratch the glass.
• Do not use scourers or any other harsh
abrasive cleaning agents to clean your cooktop,
as these can scratch the Induction glass.
• If the supply cord is damaged, it must be
replaced by the manufacturer, its service agent
or similarly qualified persons in order to avoid a
hazard.
•This appliance is intended to be used in
household and similar applications such as:
-staff kitchen areas in shops, offices and other
working environments; -farm houses; -by
clients in hotels, motels and other residential
type environments ; -bed and breakfast type
environments.
•WARNING: The appliance and its accessible
parts become hot during use.
Care should be taken to avoid touching heating
elements.
Children less than 8 years of age shall be kept
away unless continuously supervised.
•This appliance can be used by children aged
from 8 years and above and persons with
reduced physical, sensory or mental capabilities
or lack of experience and knowledge if they have
been given supervision or instruction concerning
use of the appliance in a safe way and
understand the hazards involved.
•Children shall not play with the appliance.
Cleaning and user maintenance shall not be
made by children without supervision.
Page 7

EN-6
•WARNING: Unattended cooking on a hob with
fat or oil can be dangerous and may result in fire.
NEVER try to extinguish a fire with water, but
switch off the appliance and then cover flame e.g.
with a lid or a fire blanket.
•WARNING: Danger of fire: do not store items on
the cooking surfaces.
• Warning: If the surface is cracked, switch off
the appliance to avoid the possibility of electric
shock, for hob surfaces of glass-ceramic or
similar material which protect live parts
•A steam cleaner is not to be used.
•The appliance is not intended to be operated by
means of an external timer or separate
remote-control system.
Congratulations on the purchase of your new Ceramic Hob.
We recommend that you spend some time to read this Instruction / Installation
Manual in order to fully understand how to install correctly and operate it.
For installation, please read the installation section.
Read all the safety instructions carefully before use and keep this Instruction /
Installation Manual for future reference.
Page 8

EN-7
Product Overview
1. max. 1800 W zone
2. max. 1200 W zone
3. max. 1800 W zone
4. max. 1200 W zone
5. Glass plate
6. Control panel
1. Heating zone selection controls
2. Timer control
3. Power / Timer regulating controls
4. keylock control
5. ON/OFF control
Top View
Control Panel
Page 9
EN-8
Product Information
The microcomputer ceramic cooker hob can meet different kinds of cuisine
demands because of resistance wire heating, micro-computerized control and
multi-power selection, really the optimal choice for modern families.
The ceramic cooker hob centers on customers and adopts personalized design.
The hob has safe and reliable performances, making your life comfortable and
enabling to fully enjoy the pleasure from life.
Before using your New Ceramic Hob
• Read this guide, taking special note of the ‘Safety Warnings’ section.
• Remove any protective film that may still be on your ceramic hob.
Using the Touch Controls
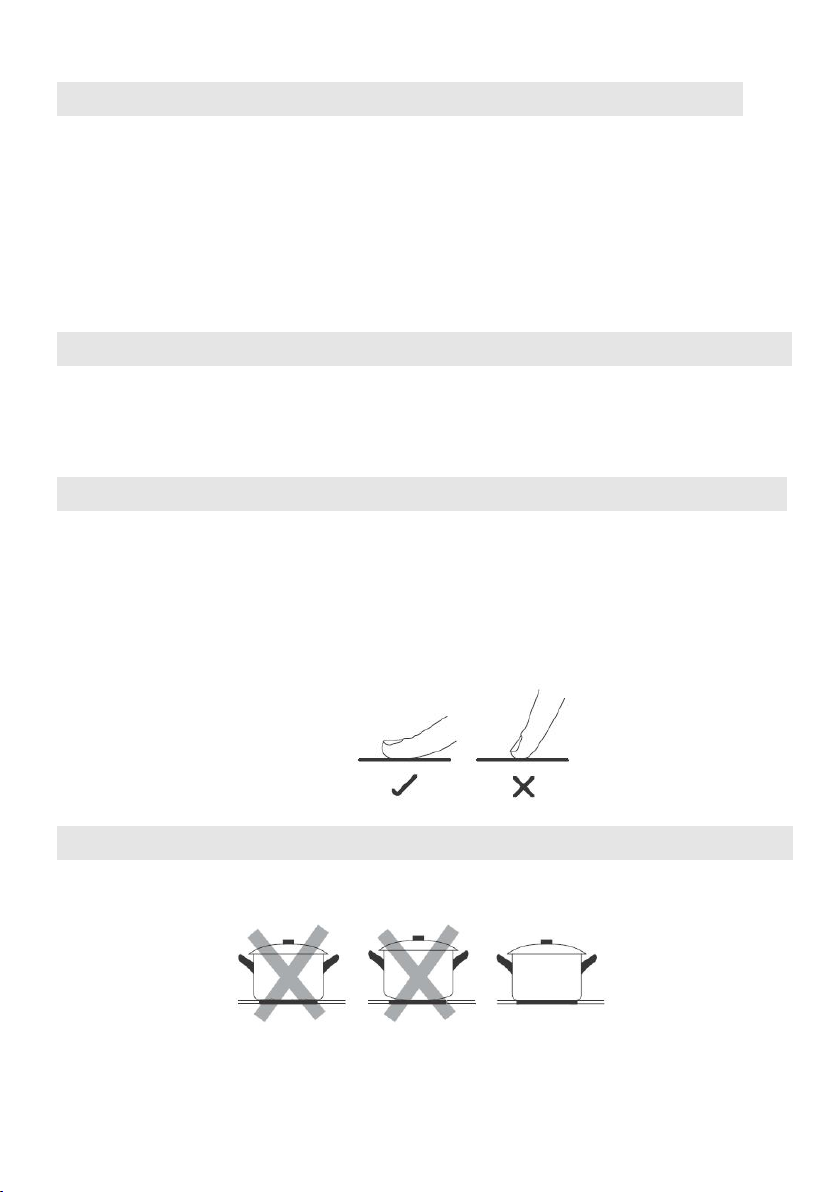
• The controls respond to touch, so you don’t need to apply any pressure.
• Use the ball of your finger, not its tip.
• You will hear a beep each time a touch is registered.
• Make sure the controls are always clean, dry, and that there is no object (e.g. a
utensil or a cloth) covering them. Even a thin film of water may make the
controls difficult to operate.
Choosing the right Cookware
Do not use cookware with jagged edges or a curved base.
Make sure that the base of your pan is smooth, sits flat against the glass, and is
the same size as the cooking zone. Always centre your pan on the cooking zone.
Page 10

EN-9
Always lift pans off the ceramic hob – do not slide, or they may scratch the glass.
3. Touching the heating zone selection control, and
a indicator next to the key will flash.
4. Set a power level by touching the “-” or “+” control.
minute, the ceramic hob will automatically
switch off. You will need to start again at
step 1.
• You can modify the heat setting at any time
1. Touching the heating zone selection control that you
wish to switch off.
Using your Ceramic Hob
To start cooking
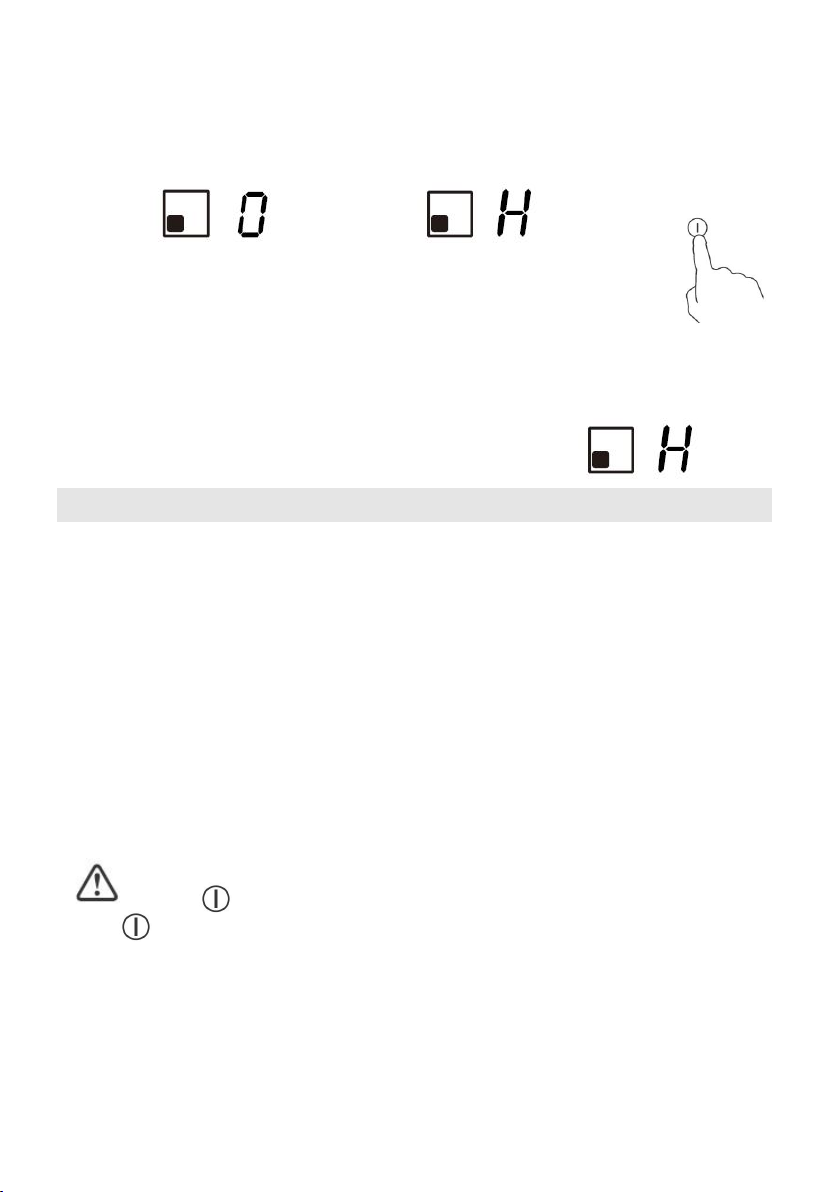
1. Touch the ON/OFF control.
After power on, the buzzer beeps once, all displays show
“ – “ or “ – – “, indicating that the induction hob has entered
the state of standby mode.
2. Place a suitable pan on the cooking zone that
you wish to use.
• Make sure the bottom of the pan and the surface
Of the cooking zone are clean and dry.
• If you don’t choose a heat setting within 1
during cooking.
When you have finished cooking
Page 11
EN-10
2. Turn the cooking zone off by touching the “-” and scrolling down to “0”, or
and then
holding the “+” and “-” button at the same time for 1 second, it will cut down to ”0”
directly.
Make sure the power display shows “0”, then shows “H”.
3. Turn the whole cooktop off by touching the “ON/OFF” control.
4. Beware of hot surfaces
“H” will show which cooking zone is hot to touch. It will disappear when the
surface has cooled down to a safe temperature. It can also be used as an energy
saving function if you want to heat further pans, use the hotplate that is still hot.
Locking the Controls
• You can lock the controls to prevent unintended use (for example children
accidentally turning the cooking zones on).
• When the controls are locked, all the controls except the ON/OFF control are
disabled.
To lock the controls
Touch the keylock control. The timer indicator will show “Lo”.
To unlock the controls
1. Make sure the ceramic hob is turned on.
2. Touch and hold the keylock control for a while.
3. You can now start using your ceramic hob.
When the hob is in the lock mode, all the controls are disable except the
ON/OFF , you can always turn the ceramic hob off with the ON/OFF
control in an emergency, but you shall unlock the hob first in the next
Operation
Over-Temperature Protection
A temperature sensor equipped can monitor the temperature inside the ceramic
hob. When an excessive temperature is monitored, the ceramic hob will stop
operation automatically.
Page 12

EN-11
Over-spillage Protection
Power level
123456789
Default working timer (hour)
888444222
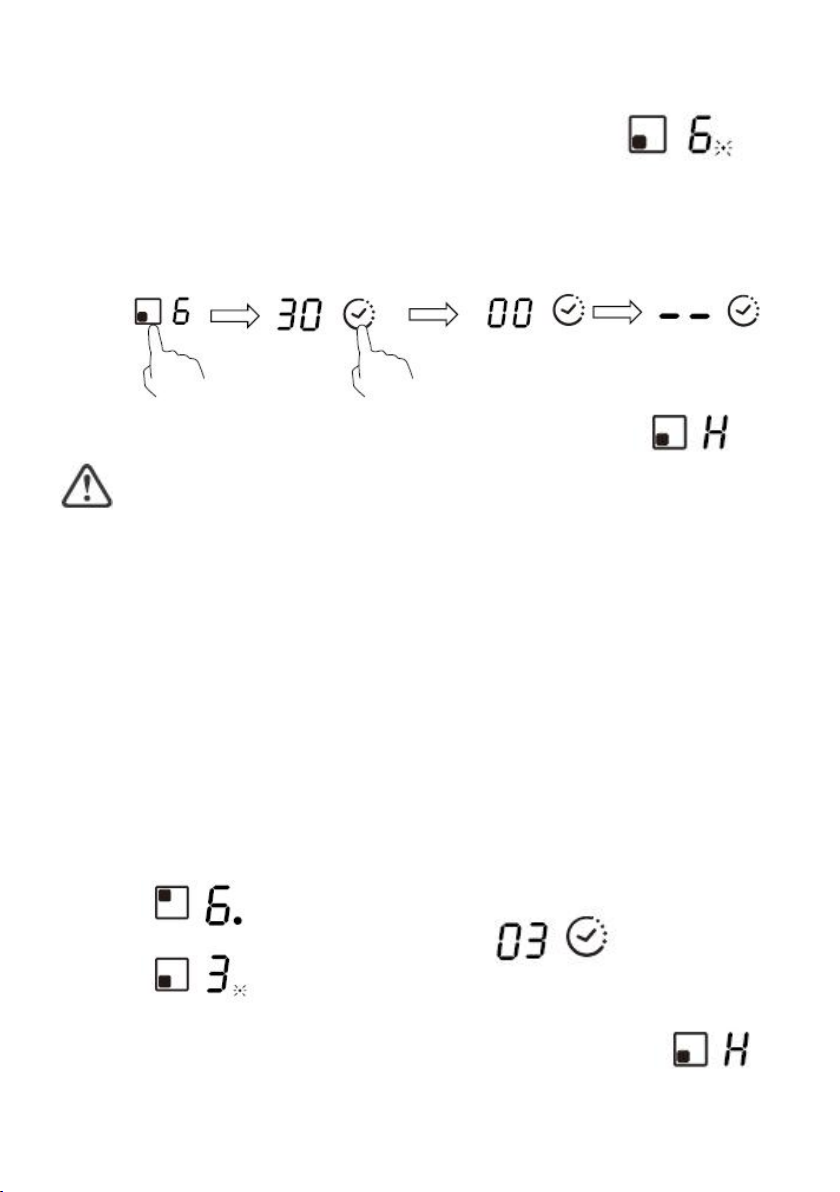
2. Touch timer control , The minder indicator will start
flashing and “30” will show in the timer display.
3. Set the time by touching the “-” or “+” control
Hint: Touch the “-” or “+” control of the timer
once to decrease or increase by 1 minute.
Over-spillage protection is a safety protection function. It switch off the hob
automatically within 10s if the water flow to the control panel, while buzzer will
beep 1 second.
Residual Heat Warning
When the hob has been operating for some time, there will be some residual
heat. The letter “ H ”appears to warn you to keep away from it.
Auto Shutdown
Auto shut down is a safety protection function for your ceramic hob. It shut down
automatically if ever you forget to turn off your cooking. The default working times
for various power levels are shown in the below table:
Using the Timer
You can use the timer in two different ways:
• You can use it as a minute minder. In this case, the timer will not turn any
cooking zone off when the set time is up.
• You can set it to turn one cooking zone off or more than one after the set time is
up.
• You can set the timer for up to 99 minutes.
Using the Timer as a Minute Minder
If you are not selecting any cooking zone
1. Make sure the cooktop is turned on.
Note: you can use the minute minder even if you’re not selecting any cooking
zones.
Page 13

EN-12
Touch and hold the “-” or “+” control of the timer to decrease or
minute display.
5. When the time is set, it will begin to count down
immediately. The display will show the remaining
time and the timer indicator will flash for 5 seconds.
6. Buzzer will beep for 30 seconds and the timer indicator
shows “- -” when the set time finished.
Cooking zones set for this feature will:
1. Touching the heating zone selection control
that you want to set the timer for. (e.g. zone 1#)
2.
Touch timer control , The minder indicator will start
flashing and “30” will show in the timer display.
4. When the time is set, it will begin to count down
immediately. The display will show the remaining time and
increase by 10 minutes.
If the setting time exceeds 99 minutes, the timer will automatically
return to 0 minute.
4. Cancel the time by touching the timer control and the”00” will show in the
Setting the timer to turn one cooking zone off
3. Set the time by touching the “-” or “+” control.
Hint: Touch the “-” or “+” control of the timer
once will decrease or increase by 1 minute.
Touch and hold the “-” or “+” control of the timer will decrease or
increase by 10 minutes.
If the setting time exceeds 99 minutes, the timer will automatically
return to 0 minute.
Page 14
EN-13
the timer indicator flash for 5 seconds.
NOTE: The red dot next to power level indicator
will illuminate indicating that zone is selected.
6. When cooking timer expires, the corresponding cooking
zone will be automatically switch off and show “H”.
(set to 6 minutes)
(set to 3 minutes)
2. When cooking timer expires, the corresponding cooking zone
will be switch off automatically and show “H” .
5.
To cancel the timer, touch the heating zone selection control, and then touch
the timer control, the timer is cancelled, and the “00” will show in the minute
display, and then “--”.
Other cooking zone will keep operating if they are turned on previously.
Setting the timer to turn more than one cooking zone
off
1. If more than one heating zone use this function, the timer indicator will show
the shortest time.
(e.g. zone 1# setting time of 3 minutes, zone 2# setting time of 6 minutes,
the timer indicator shows “3”.)
NOTE: The flashing red dot next to power level indicator means the timer
indicator is showing time of the heating zone.
If you want to check the set time of other heating zone, touch the heating
zone selection control. The timer will indicate its set time.
Page 15

EN-14
NOTE: If you want to change the time after the timer is set, you have to start
What?
How?
Important!
Everyday soiling on glass
(fingerprints, marks,
stains left by food or
non-sugary spillovers on
the glass)
1. Switch the power to the
cooktop off.
2. Apply a cooktop cleaner
while the glass is still warm
(but not hot!)
3. Rinse and wipe dry with a
clean cloth or paper towel.
4. Switch the power to the
cooktop back on.
• When the power to the cooktop is
switched off, there will be no ‘hot
surface’ indication but the
cooking zone may still be hot!
Take extreme care.
• Heavy-duty scourers, some nylon
scourers and harsh/abrasive
cleaning agents may scratch the
glass. Always read the label to
check if your cleaner or scourer is
suitable.
• Never leave cleaning residue on
the cooktop: the glass may
become stained.
Boilovers, melts, and
hot sugary spills on
the glass
Remove these immediately
with a fish slice, palette knife or
razor blade scraper suitable for
ceramic glass cooktops, but
beware of hot cooking zone
surfaces:
1. Switch the power to the
cooktop off at the wall.
2. Hold the blade or utensil at a
30° angle and scrape the
soiling or spill to a cool area
of the cooktop.
3. Clean the soiling or spill up
with a dish cloth or paper
towel.
4. Follow steps 2 to 4 for
‘Everyday soiling on glass’
above.
• Remove stains left by melts and
sugary food or spillovers as soon
as possible. If left to cool on the
glass, they may be difficult to
remove or even permanently
damage the glass surface.
• Cut hazard: when the safety
cover is retracted, the blade in a
scraper is razor-sharp. Use with
extreme care and always store
safely and out of reach of children.
Spillovers on the
touch controls
1. Switch the power to the
cooktop off.
2. Soak up the spill
3. Wipe the touch control area
with a clean damp sponge or
cloth.
4. Wipe the area completely
dry with a paper towel.
5. Switch the power to the
cooktop back on.
• The cooktop may beep and turn
itself off, and the touch controls
may not function while there is
liquid on them. Make sure you
wipe the touch control area dry
before turning the cooktop back
on.
from step 1.
Care and Cleaning
Page 16

EN-15
Hints and Tips
Problem
Possible causes
What to do
The cooktop cannot
Be turned on.
No power.
Make sure the cooktop is connected
to the power supply and that it is
switched on.
Check whether there is a power
outage in your home or area. If
you’ve checked everything and the
problem persists, call a qualified
technician.
The touch controls are
unresponsive.
The controls are locked.
Unlock the controls. See section
‘Using your ceramic cooktop’ for
instructions.
The touch controls are
difficult to operate.
There may be a slight film of
water over the controls or you
may be using the tip of your
finger when touching the
controls.
Make sure the touch control area is
dry and use the ball of your finger
when touching the controls.
The glass is being
scratched.
Rough-edged cookware.
Unsuitable, abrasive scourer or
cleaning products being used.
Use cookware with flat and smooth
bases. See ‘Choosing the right
cookware’.
See ‘Care and cleaning’.
Some pans make
crackling or clicking
noises.
This may be caused by the
construction of your cookware
(layers of different metals
vibrating differently).
This is normal for cookware and
does not indicate a fault.
Cooking Hob
CH64CCTT
Cooking Zones
4 Zones
Supply Voltage
220-240V~, 50-60Hz
Installed Electric Power
5490-6533W
Product Size L×W×H(mm)
590X520X52
Building-in Dimensions A×B (mm)
560X490
Technical Specification
Weight and Dimensions are approximate. Because we continually strive to
improve our products we may change specifications and designs without prior
notice.
Page 17

EN-16
Installation
L(mm)
W(mm)
H(mm)
D(mm)
A(mm)
B(mm)
X(mm)
590
5205248
560
490
50 mini
Selection of installation equipment
Cut out the work surface according to the sizes shown in the drawing.
For the purpose of installation and use, a minimum of 5 cm space shall be
preserved around the hole.
Be sure the thickness of the work surface is at least 30mm. Please select
heat-resistant work surface material to avoid larger deformation caused by
the heat radiation from the hotplate. As shown below:
Under any circumstances, make sure the ceramic cooker hob is well ventilated
and the air inlet and outlet are not blocked. Ensure the ceramic cooker hob is in
good work state. As shown below
Note: The safety distance between the hotplate and the cupboard above
the hotplate should be at least 760mm.
Page 18

EN-17
A(mm)
B(mm)
C(mm)
D
E
760
50 mini
30 mini
Air intake
Air exit 10 mm
Before you install the hob, make sure that
• the work surface is square and level, and no structural members interfere with
space requirements
• the work surface is made of a heat-resistant material
• if the hob is installed above an oven, the oven has a built-in cooling fan
• the installation will comply with all clearance requirements and applicable
standards and regulations
• a suitable isolating switch providing full disconnection from the mains power
supply is incorporated in the permanent wiring, mounted and positioned to
comply with the local wiring rules and regulations.
The isolating switch must be of an approved type and provide a 3 mm air gap
contact separation in all poles (or in all active [phase] conductors if the local
wiring rules allow for this variation of the requirements)
• the isolating switch will be easily accessible to the customer with the hob
installed
• you consult local building authorities and by-laws if in doubt regarding
installation
• you use heat-resistant and easy-to-clean finishes (such as ceramic tiles) for the
wall surfaces surrounding the hob.
When you have installed the hob, make sure that
• the power supply cable is not accessible through cupboard doors or drawers
• there is adequate flow of fresh air from outside the cabinetry to the base of the
hob
• if the hob is installed above a drawer or cupboard space, a thermal protection
barrier is installed below the base of the hob
• the isolating switch is easily accessible by the customer
Before locating the fixing brackets
The unit should be placed on a stable, smooth surface (use the packaging). Do not
apply force onto the controls protruding from the hob.
Fix the hob on the work surface by screw 4 brackets on the bottom case of hob
(see picture) after installation.
Page 19

EN-18
ABC
D
screw
bracket
Screw hole
base
Cautions
1. The ceramic cooker hob must be installed by qualified personnel or technicians.
We have professionals at your service. Please never conduct the operation by
yourself.
2. The ceramic cooker hob shall not be mounted to cooling equipment,
dishwashers and rotary dryers.
3. The ceramic cooker hob shall be installed such that better heat radiation can be
ensured to enhance its reliability.
4. The wall and induced heating zone above the work surface shall withstand heat.
5. To avoid any damage, the sandwich layer and adhesive must be resistant to
heat.
6. A steam cleaner is not to be used.
7. This ceramic can be connected only to a supply with system impedance no more
than 0.427 ohm. In case necessary, please consult your supply authority for
system impedance information.
Page 20

EN-19
Connecting the hob to the mains power supply
This appliance is labelled in accordance with European Directive 2012/19/EU
regarding electric and electronic appliances (WEEE). The WEEE contain both
polluting substances (that can have a negative effect on the environment) and
base elements (that can be reused). It is important that the WEEE undergo
specific treatments to correctly remove and dispose of the pollutants and
recover all the materials. Individuals can play an important role in ensuring
that the WEEE do not become an environmental problem; It is essential to
follow a few basic rules:
-the WEEE should not be treated as domestic waste;
-the WEEE should be taken to dedicated collection areas managed by the town council or a
registered company.
In many countries, domestic collections may be available for large WEEEs. When you buy a
new appliance, the old one can be returned to the vendor who must accept it free of charge as
a one-off, as long as the appliance is of an equivalent type and has the same functions as the
purchased appliance.
The power supply should be connected in compliance with the relevant standard,
or a single-pole circuit breaker. The method of connection is shown below.
Input
220-240V~
N
L
Input
220-240V~
220-240V~
L1 L2 N1 N2
Blue
Grey
Black
Brown
Yellow/Green
Black
Brown
Grey
Power Cord
Power Cord
1. If the cable is damaged or needs replacing, this should be done by an
after-sales technician using the proper tools, so as to avoid any accidents.
2. If the appliance is being connected directly to the mains supply, an omnipolar
circuit breaker must be installed with a minimum gap of 3mm between the
contacts.
3. The installer must ensure that the correct electrical connection has been made
and that it complies with safety regulations.
4. The cable must not be bent or compressed.
5. The cable must be checked regularly and only replaced by a properly qualified
person.
Blue
Yellow/Green
Input
Power Cord
220-240V~
220-240V~
400V~
L1 L2 N
Black
Brown
Grey
Blue
ellow/Green
Y
Input
Power Cord
Black
400V~
L2
L1
Blue
Grey
Brown
Yellow/Green
Page 21

EN-20
Product Information for Domestic Electric Hobs Compliant to Commission Regulation (EU) No
66/2014
Position
Symbol
Value
Unit
Model identification
CH64CCTT
Type of hob:
Electric Hob
Number of cooking
zones and/or areas
zones
4
areas
Heating technology
(induction cooking
zones and cooking
areas, radiant
cooking zones, solid
plates)
Induction cooking
zones
Induction cooking
cooking areas
radiant cooking
zones
X
solid plates
For circular cooking zones or areas:
diameter of useful surface area per
electric heated cooking zone, rounded to
the nearest 5mm
Rear left
Ø
16,5
cm
Rear central
Ø-cm
Rear right
Ø
20,0
cm
Central leftØ-
cm
Central
central
Ø-cm
Central right
Ø-cm
Front left
Ø
20,0
cm
Front central
Ø-cm
Front right
Ø
16,5
cm
For non-circular cooking zones or areas:
length and width of useful surface area
per electric heated cooking zone or area,
rounded to the nearest 5mm
Rear left
L
W
-
cm
Rear central
L
W
-
cm
Rear right
L
W
-
cm
Central left
L
W
-
cm
Page 22

EN-21
Central
centralLW
-
cm
Central right
L
W
-
cm
Front left
L
W
-
cm
Front central
L
W
-
cm
Front right
L
W
-
cm
Energy consumption for cooking zone or
area calculated per kg
Rear left
ECelectric
cooking
186,0
Wh/kg
Rear central
ECelectric
cooking
-
Wh/kg
Rear right
ECelectric
cooking
188,0
Wh/kg
Central left
ECelectric
cooking
-
Wh/kg
Central
central
ECelectric
cooking
-
Wh/kg
Central right
ECelectric
cooking
-
Wh/kg
Front left
ECelectric
cooking
188,0
Wh/kg
Front central
ECelectric
cooking
-
Wh/kg
Front right
ECelectric
cooking
186,0
Wh/kg
Energy consumption for the hob
calculated per kg
ECelectric
hob
187,0
Wh/kg
Standard applied : EN 60350-2 Household electric cooking appliances - Part 2: Hobs - Methods
for measuring performance
Suggestions for Energy Saving:
• To obtain the best efficiency of your hob, please place the pan in the centre of the cooking zone.
• Using a lid will reduce cooking times and save energy by retaining the heat.
• Minimise the amount of liquid or fat to reduce cooking times.
• Start cooking on a high setting and reduce the setting when the food has heated through.
• Use pans whose diameter is as large as the graphic of the zone selected.
Page 23

FR-1
En plaçant la marque
sur ce produit, nous
confirmons la conformité à toutes les exigences
européennes concernant la protection de
l’environnement et de la santé, ainsi que la sécurité,
applicables selon la loi à ce produit.
Consignes de sécurité
Votre sécurité est importante pour nous. Veuillez lire
ces informations avant d’utiliser votre table de cuisson.
Installation
Risque de choc électrique
• Débranchez l’appareil du réseau électrique avant
d’effectuer tout travail ou entretien sur celui-ci.
• Le raccordement à un bon système de mise à la terre
est essentiel et obligatoire.
• Seul un électricien qualifié est habilité à effectuer des
modifications sur le système de câblage domestique.
• Le non-respect de ces consignes peut entraîner un
choc électrique ou le décès.
Risque de coupure
• Faites attention - les bords des panneaux sont
tranchants.
• Le non-respect de cette précaution peut entraîner
des blessures ou des coupures.
Consignes importantes de sécurité
• Veuillez lire les instructions avant d’installer ou
d’utiliser cet appareil.
• Aucun matériau ou produit combustible ne doit être
Page 24

FR-
2
placé sur cet appareil, à aucun moment.
• Veuillez mettre ces informations à la disposition de la
personne responsable de l’installation de l’appareil
afin de réduire vos coûts d’installation.
• Afin d’éviter tout danger, cet appareil doit être installé
conformément aux présentes instructions
d’installation.
• Cet appareil doit être correctement installé et mis à la
terre uniquement par une personne qualifiée.
• Cet appareil doit être raccordé à un circuit
incorporant un sectionneur permettant une
déconnexion complète de l’alimentation électrique.
• L’installation incorrecte de l’appareil peut entraîner
l’annulation de toute garantie ou responsabilité.
Fonctionnement et entretien
Risque de choc électrique
• Ne pas cuisiner sur une table de cuisson cassée ou
fissurée. • En cas de rupture ou de fissuration de la
surface de la table de cuisson, éteignez
immédiatement l’appareil en coupant l’alimentation
électrique du réseau (interrupteur mural) et contactez
un technicien qualifié.
• Coupez l’alimentation réseau de la table de cuisson
avant le nettoyage ou l’entretien.
• Le non-respect de ces consignes peut entraîner un
choc électrique ou le décès.
Risque pour la santé
• Cet appareil est conforme aux normes de sécurité
Page 25

FR-
3
électromagnétique.
Risque de surface chaude
• Pendant l’utilisation, les parties accessibles de cet
appareil deviennent suffisamment chaudes pour
causer des brûlures.
• Ne laissez pas votre corps, vos vêtements ou tout
autre objet autre qu’un ustensile de cuisine approprié
entrer en contact avec le verre à induction jusqu’à ce
que la surface soit froide.
• Les objets métalliques tels que couteaux, fourchettes,
cuillères et couvercles ne doivent pas être posés sur
la surface de la table de cuisson, car ils peuvent
devenir chauds.
• Tenir les enfants à l’écart.
• Les poignées des casseroles peuvent être chaudes
au toucher. Vérifiez que les poignées des casseroles
ne dépassent pas des autres foyers de cuisson qui
sont en fonction. Tenir les poignées hors de portée
des enfants.
• Le non-respect de ces consignes peut entraîner des
brûlures ou un choc électrique.
Risque de coupure
• Lorsque le couvercle de protection est rétracté, la
lame d’un racleur est tranchante comme un rasoir.
Utiliser avec une extrême prudence et toujours
stocker en toute sécurité et hors de portée des
enfants.
• Le non-respect de cette précaution peut entraîner
des blessures ou des coupures.
Page 26

FR-
4
Consignes importantes de sécurité
• Ne laissez jamais l’appareil sans surveillance lorsqu’il
est utilisé. L’ébullition cause des vapeurs et des
débordements graisseux qui peuvent s’enflammer.
• N’utilisez jamais votre appareil comme surface de
travail ou de rangement.
• Ne laissez jamais d’objets ou d’ustensiles sur
l’appareil.
• N’utilisez jamais votre appareil pour réchauffer ou
chauffer la pièce.
• Après utilisation, éteignez toujours les foyers de
cuisson et la table de cuisson comme décrit dans ce
manuel (c’est-à-dire en utilisant les touches tactiles).
• Ne permettez pas aux enfants de jouer avec
l’appareil, de s’asseoir, de se tenir debout ou de
monter dessus.
• Ne rangez pas d’objets d’intérêt pour les enfants
dans des armoires au-dessus de l’appareil. Les
enfants qui montent sur la table de cuisson peuvent
être gravement blessés.
• Ne laissez pas les enfants seuls ou sans surveillance
dans la zone où l’appareil est utilisé.
• Les enfants ou les personnes ayant un handicap qui
limite leur capacité d’utiliser l’appareil devraient avoir
une personne responsable et compétente pour les
instruire sur son utilisation. L’instructeur doit s’assurer
qu’il peut utiliser l’appareil sans danger pour
lui-même ou son environnement.
• Ne réparez ou ne remplacez aucune pièce de
Page 27

FR-
5
l’appareil à moins que cela ne soit spécifiquement
recommandé dans le manuel. Tout autre entretien
doit être effectué par un technicien qualifié.
• N’utilisez pas un nettoyeur à vapeur pour les
opérations de nettoyage de la table de cuisson.
• Ne placez pas ou ne laissez pas tomber d’objets
lourds sur votre table de cuisson.
• Ne vous tenez pas debout sur votre table de cuisson.
• N’utilisez pas de casseroles avec des bords dentelés
et ne traînez pas de casseroles sur la surface de la
vitre à induction, car cela pourrait érafler le verre.
• N’utilisez pas d’éponges métalliques ou d’autres
produits abrasifs agressifs pour nettoyer votre table
de cuisson, car ils pourraient rayer la vitre à
induction.
• Si le câble d’alimentation est endommagé, il doit être
remplacé par le fabricant, son agent d’entretien ou
des personnes possédant le même type de
qualification, afin d’éviter tout risque.
• Cet appareil est destiné à un usage domestique et
autres applications similaires telles que : - espaces
cuisine du personnel dans des boutiques, bureaux et
autres espaces de travail ; - maisons de ferme ; - par
les clients dans des hôtels, motels et autres espaces
de type résidentiel ; - dans les espaces de type
chambre d’hôtes.
AVERTISSEMENT : L’appareil et ses parties
accessibles chauffent pendant l’utilisation.
Évitez de toucher les éléments chauffants.
Page 28

FR-
6
Les enfants de moins de 8 ans doivent être tenus à
l’écart à moins d’être surveillés en permanence.
• Cet appareil peut être utilisé par des enfants âgés de
8 ans et plus, par des personnes dont les capacités
physiques, sensorielles ou mentales sont réduites ou
par des personnes dénuées d’expérience et de
connaissances, mais qui ont été informées sur la
manière d’utiliser l’appareil en toute sécurité, si elles
comprennent les risques impliqués.
Les enfants ne doivent pas jouer avec l’appareil.
L’entretien et le nettoyage ne doivent pas être
effectués par des enfants sans surveillance.
AVERTISSEMENT : Faire chauffer la table sans
surveillance avec de la graisse ou de l’huile peut être
dangereux et provoquer un incendie. N’essayez
JAMAIS d’éteindre un feu avec de l’eau, mais
éteignez l’appareil, puis couvrez la flamme avec un
couvercle ou une couverture anti-feu, par exemple.
AVERTISSEMENT : Risque d’incendie : ne pas
stocker d’éléments sur les surfaces de cuisson.
Avertissement : Si la surface est fissurée, éteignez
l’appareil pour éviter tout risque d’électrocution, pour
les tables de cuisson en vitrocéramique ou matériau
similaire qui protègent les pièces sous tension
• N’utilisez jamais de nettoyeur à vapeur.
• Cet appareil n’est pas conçu pour être actionné par
une minuterie externe ou un système de commande
à distance séparé.
Page 29

FR-
7
Nous vous félicitons de votre choix de la plaque de cuisson en Vitrocéramique.
1. max. Zone 1800 W
2. max. Zone 1200 W
3. max. Zone 1800 W
4. max. Zone 1200 W
5. Table de verre
6. Panneau de commande
1. Touches de sélection du foyer de cuisson
2. Touche du temporisateur
3. Touche de réglage de la puissance et du
temporisateur
4. Touche de verrouillage
5. Touche marche/arrêt
Nous vous recommandons de prendre le temps de lire ce manuel d’instruction / d’installation
afin de bien comprendre comment l’installer et l’utiliser correctement.
Pour l’installation, veuillez lire la section installation.
Lisez attentivement toutes les consignes de sécurité avant utilisation et conservez ce
manuel d’instruction / d’installation pour référence ultérieure.
Vue d’ensemble du produit
Vue de dessus
Panneau de commande
Page 30

FR-
8
Information produit
La table de cuisson en vitrocéramique peut répondre à différents types de demandes en
matière de cuisine grâce au chauffage par résistance et à la sélection de nombreux niveaux
de puissance : le choix vraiment optimal pour les familles modernes.
La table de cuisson en vitrocéramique s’adapte à vos besoins grâce à son design
personnalisé. Les performances de cette table de cuisson faciliteront votre vie en cuisine et
vous permettra de profiter pleinement du plaisir de la vie.
Avant d’utiliser votre nouvelle plaque de cuisson en
Vitrocéramique
• Lisez ce guide en prenant note de la section « Consignes de sécurité ».
• Enlevez tout film protecteur qui pourrait encore se trouver sur votre plaque de cuisson en
Vitrocéramique .
Utilisation des commandes tactiles
• Les commandes répondent au toucher, vous n’avez donc pas besoin d’appuyer fort.
• Utilisez le bout du doigt et non pas l’ongle.
• Vous entendrez un bip à chaque fois qu’une touche est enregistrée.
• Assurez-vous que les commandes sont toujours propres et sèches et qu’aucun objet (p.
ex. un ustensile ou un chiffon) ne les recouvre. Même un mince film d’eau peut rendre les
commandes difficiles à utiliser.
Choisir une bonne batterie de cuisine
N’utilisez pas d’ustensiles de cuisson dont les bords sont dentelés ou dont la base est
incurvée.
Page 31

FR-
9
Assurez-vous que la base de votre poêle est lisse, qu’elle repose à plat contre le verre et
1. Appuyez sur la touche Marche/Arrêt.
Après la mise en marche, l’avertisseur sonore retentit une fois et
toutes les touches affichent « – » ou « – – » pour signifier que la
table à induction est en mode de veille.
2. Posez la casserole sur le foyer de cuisson que vous souhaitez
utiliser.
• Veillez à ce que le fond de la casserole et la surface du foyer de
cuisson soient propres et secs.
3. En appuyant sur la touche de sélection du foyer de cuisson, un
témoin lumineux près de la touche commence à clignoter.
qu’elle est de la même taille que la zone de cuisson. Utilisez des casseroles dont le diamètre
est aussi grand que le graphique du foyer sélectionné. Si elle est un peu plus grande,
l’énergie sera exploitée au maximum. Si vous utilisez une casserole plus petite, l’efficacité
pourrait être moindre que prévu. Centrez toujours votre casserole sur le foyer de cuisson.
Soulevez toujours les casseroles de la plaque de cuisson en Vitrocéramique - ne les faites
pas glisser, sinon elles risquent d’érafler le verre.
Utilisation de votre plaque de cuisson en
Vitrocéramique
Comme commencer la cuisson
Page 32

FR-
10
4. Réglez un niveau de puissanceà l’aide des touches « - » ou « + ».
a. Si vous ne sélectionnez pas un réglage de cuisson dans un
délai d’une minute, la table à induction s’éteint
automatiquement. Vous devrez alors tout reprendre depuis
l’étape 1.
b. Vous pouvez changer le réglage choisi à n’importe quel
moment de la cuisson.
Si la touche
clignote en alternance avec l’indication du
1. Appuyez sur la touche de sélection du foyer de cuisson
que vous souhaitez éteindre.
2. Éteignez le foyer de cuisson en appuyant sur « - » et en réduisant jusqu’à « 0 » ou en
appuyant en même temps sur les touches « + » et « - » pendant 1 seconde, cela réglera
directement sur « 0 ».
Assurez-vous que la touche affiche « 0 » puis « H ».
puis
l’énergie, si vous devez faire chauffer une autre casserole, en la
plaçant sur le foyer de cuisson encore chaud.
réglage de puissance
Cela signifie que :
• vous n’avez pas posé la casserole sur le bon foyer ou
• la casserole que vous utilisez n’est pas prévue pour la cuisson à induction ou
• la casserole utilisée est trop petite ou n’est pas correctement placée au centre du foyer.
La fonction de chauffe ne démarre pas si aucune casserole adaptée n’est placée sur le foyer
de cuisson.
Si dans un délai de 1 minute, vous n’avez pas posé de casserole adaptée, la touche s’éteint
automatiquement.
Quand vous avez fini de cuisiner
3. Éteignez la table de cuisson en appuyant sur la touche Marche/Arrêt.
4. Prenez garde aux surfaces chaudes.
« H » indique un foyer de cuisson encore trop chaud pour être touché. Cette indication
disparaît dès que la surface du foyer a suffisamment refroidi. Vous pouvez économiser de
Page 33

FR-
11
Verrouillage des touches de commande
• Vous avez la possibilité de verrouiller les touches de commande pour éviter leur utilisation
inappropriée (par des enfants, par exemple).
• Quand la touche de verrouillage est activée, toutes les touches de commande sont
verrouillées, sauf la touche marche/arrêt.
Verrouillage des touches de commande
Appuyez sur la touche de verrouillage. L’indicateur de temporisation affiche « Lo »
Déverrouillage des touches de commande
1. Vérifiez que la table de cuisson à induction est éteinte.
2. Appuyez longuement sur la touche de verrouillage.
3. Vous pouvez maintenant commencer à utiliser votre table de cuisson à induction.
Quand la table de cuisson est en mode verrouillage, toutes les touches de
commande sont désactivées sauf la touche marche/arrêt. Vous gardez la
possibilité d’éteindre la table à induction en utilisant la touche marche/arrêt en cas
d’urgence, mais, dans ce cas, vous devrez d’abord déverrouiller la table de cuisson
lors de l’utilisation suivante.
Protection contre la surchauffe
Un capteur de température intégré peut surveiller la température à l’intérieur de la plaque de
cuisson en Vitrocéramique. Lorsqu’une température excessive est détectée, la table de
cuisson à induction s’arrête automatiquement.
Protection en cas de débordement
La protection en cas de débordement est une fonction de protection de sécurité. Elle éteint
automatiquement la table de cuisson en 10 secondes si de l’eau se déverse sur le tableau
de commandes et un bip retentira pendant 1 seconde.
Avertissement de chaleur résiduelle
Après un long cycle de cuisson, lorsque la table est éteinte vous verrez apparaitre un « H »
qui indique que la table est encore chaude et qui indique donc de ne pas s’approcher.
Protection par arrêt automatique
L’arrêt automatique est une fonction de protection de sécurité pour votre plaque de cuisson
en Vitrocéramique. Elle s’éteint automatiquement si vous oubliez d’éteindre votre appareil.
Les durées d’utilisation par défaut des différents niveaux de chauffe sont indiquées dans le
tableau ci-dessous :
Page 34

FR-
12
Niveau de chauffe
123456789
Minuterie de travail par
défaut (heure)
888444222
Utilisation du temporisateur
cuisson.
2. Appuyez sur la touche du temporisateur. L’indicateur de la
minuterie commence à clignoter et « 30 » s’affiche.
touche de la minuterie.
5. Une fois le temps réglé, le décompte commence
immédiatement. La touche de temporisation affiche le temps
restant et l’indicateur de temporisation clignotera pendant
Vous pouvez utiliser le temporisateur de deux manières différentes :
• Vous pouvez l’utiliser en tant que minuteur. Dans ce cas, le temporisateur ne sert pas
à éteindre l’un des foyers de cuisson lorsque sa durée de cuisson est écoulée.
• Vous pouvez le régler pour éteindre un ou plusieurs foyers de cuisson une fois le
temps sélectionné écoulé.
• Vous pouvez régler le temporisateur jusqu’à 99 minutes.
Utilisation du temporisateur comme minuteur
Si vous ne souhaitez pas sélectionner un foyer de cuisson
1. Vérifiez que la table de cuisson est éteinte.
Remarque : vous pouvez utiliser le minuteur même sans sélectionner de foyer de
3. Réglez le temps à l’aide des touches « - » ou « + ».
Remarque : Appuyez sur « - » ou « + » une seule fois pour diminuer ou augmenter
d’une minute.
Maintenez appuyée la touche « - » ou « + » pour diminuer ou augmenter de 10
minutes en 10 minutes.
4. Supprimez la durée en appuyant sur le temporisateur et « 00 » s’affiche sur la
5 secondes.
Page 35

FR-
13
6. L’avertisseur sonore retentit pendant 30 secondes et l’indicateur
de temporisation affiche « - -» quand le temps réglé est écoulé.
1. Appuyez sur la touche de sélection du foyer de cuisson
dont vous souhaitez régler le temps de cuisson. (par ex. foyer 1#)
clignoter et « 30 » s’affiche.
3. Réglez le temps à l’aide des touches « - » ou « + ».
5. Une fois le temps réglé, le décompte commence immédiatement.
La touche de temporisation affiche le temps restant et l’indicateur de
temporisation clignote pendant 5 secondes.
REMARQUE : Le point rouge près de l’indicateur du niveau de
chauffe s’allume pour indiquer que le foyer est sélectionné.
6. Quand le temps de cuisson est terminé, le foyer de cuisson
correspondant s’éteint automatiquement et la touche affiche « H ».
Réglage du temporisateur pour éteindre une zone de cuisson
Les foyers de cuisson dotés de cette fonction permettront :
2. Appuyez sur la touche du temporisateur. L’indicateur de la minuterie commence à
Remarque : Appuyez sur « - » ou « + » une seule fois pour diminuer ou augmenter d’une
minute.
Maintenez appuyée la touche « - » ou « + » du temporisateur pour diminuer
ou augmenter de 10 minutes en 10 minutes.
Si le temps de réglage dépasse 99 minutes, la minuterie revient
automatiquement à 0 minute.
4. Pour supprimer la minuterie, appuyez sur la touche de sélection du foyer de cuisson puis
sur la touche du temporisateur ; la minuterie est supprimée et « 00 » s’affiche, puis « -- ».
Page 36

FR-
14
Les foyers éventuellement allumés auparavant continuent de fonctionner
(Réglage à 6 minutes)
(Réglage à 3 minutes)
2. Quand le temps de cuisson est terminé, le foyer de cuisson
correspondant s’éteint automatiquement et la touche affiche « H ».
normalement.
Réglage du temporisateur pour éteindre plusieurs foyers de
cuisson
1. Si vous utilisez cette fonction pour plusieurs foyers de cuisson, l’indicateur du temps
affichera le temps restant le plus court.
(par ex. temps de 3 minutes réglé sur le foyer 1#, temps de 6 minutes réglé sur le foyer
2#, l’indicateur du temps affichera « 3 ».)
REMARQUE : Le point rouge clignotant près de l’indicateur de niveau de chauffe
signifie que l’indicateur de temps affiche le temps de ce foyer de cuisson.
Si vous voulez contrôler le temps de cuisson réglé sur un autre foyer de cuisson,
appuyez sur la touche de sélection du foyer de cuisson. Le temporisateur indiquera le
temps réglé.
REMARQUE : Si vous voulez changer la durée après le réglage de la minuterie, vous
devez commencer à partir de l’étape 1.
Page 37

FR-
15
Entretien et nettoyage
Quoi ?
Comment ?
Important !
Salissure quotidienne
sur le verre (traces de
doigts, marques,
taches laissées par les
aliments ou retombées
non sucrées sur le
verre).
1. Mettez la table de cuisson hors
tension.
2. Appliquez un nettoyant pour
plaque de cuisson alors que le
verre chauffe encore (sans qu’il
soit chaud !)
3. Rincez et essuyez avec un
chiffon propre ou un
essuie-tout.
4. Mettez la table de cuisson sous
tension.
• Lorsque l’alimentation de la table de
cuisson est coupée, il n’y a pas
d’indication « surface chaude » mais
la zone de cuisson est peut-être
encore chaude ! Soyez extrêmement
prudent.
• L’usage intensif d’éponges métalliques,
de certains racleurs en nylon et de
produits de nettoyage abrasifs peut
érafler le verre. Lisez toujours
l’étiquette pour vérifier si votre
nettoyeur ou éponge métallique
convient.
• Ne laissez jamais de résidus de
nettoyage sur la table de cuisson : la
vitre peut se tacher.
Débordements d’eau
bouillante, d’aliments
et
de sucre chaud sur
le verre
Retirez-les immédiatement à l’aide
d’une pelle large, d’une spatule ou
d’un racloir à lame adapté aux
surfaces de cuisson à induction,
mais méfiez-vous des surfaces
chaudes des foyers de cuisson :
1. Coupez l’alimentation réseau de
la table de cuisson.
2. Tenez la lame ou l’ustensile à un
angle de 30° et raclez la saleté
ou le déversement vers un
endroit frais de la table de
cuisson.
3. Nettoyez les salissures ou
déversements avec un torchon
ou un essuie-tout.
4. Suivez les étapes 2 à 4
ci-dessus pour « Salissure de
tous les jours sur verre ».
• Enlevez le plus rapidement possible
les taches laissées par les aliments
fondus et sucrés ou par les
débordements. Si on les laisse refroidir
sur le verre, ils peuvent être difficiles à
enlever ou même endommager la
surface du verre de façon permanente.
• Risque de coupure : lorsque le
couvercle de protection est rétracté, la
lame d’un racleur est tranchante comme
un rasoir. Utiliser avec une extrême
prudence et toujours stocker en toute
sécurité et hors de portée des enfants.
Déversements sur les
touches de commande
1. Mettez la table de cuisson hors
tension.
2. Absorbez le déversement
3. Essuyez la zone de commande
tactile avec une éponge ou un
chiffon propre et humide.
4. Essuyez la zone complètement
avec un essuie-tout.
5. Mettez la table de cuisson sous
tension.
• La table de cuisson peut émettre un bip
et s’éteindre d’elle-même, et les
commandes tactiles peuvent ne pas
fonctionner lorsqu’il y a du liquide
dessus. Veillez à essuyer la zone de
commande tactile avant de rallumer la
table de cuisson.
Page 38

FR-
16
Conseils et astuces
Problème
Cause possible
Solution
La plaque de cuisson en
Vitrocéramique ne peut
pas être allumée.
Pas d’électricité.
Assurez-vous que la plaque de
cuisson en Vitrocéramique est
branchée à l’alimentation électrique
et qu’elle est allumée.
Vérifiez s’il y a une panne d’électricité
dans votre maison ou votre région. Si
vous avez tout vérifié et que le
problème persiste, appelez un
technicien qualifié.
Les commandes tactiles
ne répondent pas.
Les commandes sont verrouillées.
Déverrouillez les touches de
commande. Voir la section
« Utilisation de votre plaque de
cuisson en Vitrocéramique » pour les
instructions.
Les commandes tactiles
sont difficiles à utiliser.
Il se peut qu’il y ait une fine pellicule
d’eau sur les commandes ou que
vous utilisiez l’extrémité de l’ongle
lorsque vous touchez la commande.
Assurez-vous que la zone de
commande tactile est sèche et
utilisez le bout de votre doigt lorsque
vous touchez les commandes.
Le verre est éraflé.
Batterie de cuisine à bords rugueux.
Utilisation d’éponges métalliques
abrasives ou de produits de
nettoyage inadéquats.
Utilisez des ustensiles de cuisine à
fond plat et lisse. Voir la section
« Choisir une bonne batterie de
cuisine ».
Voir la section « Entretien et
nettoyage ».
Certaines casseroles
font des craquements ou
des cliquetis.
Cela peut être dû à la construction
de votre batterie de cuisine
(couches de différents métaux
vibrant de manière différenciée).
Ceci est normal pour les ustensiles
de cuisine et n’indique pas un défaut.
Table de cuisson
CH64CCTT
Zones de cuisson
4 Zones
Tension d’alimentation
220-240 V ~ 50-60Hz
Puissance électrique installée
5490-6533W
Dimensions du produit P×L×H (mm)
590X520X52
Dimensions d’encastrement A×B (mm)
560X490
Spécifications techniques
Le poids et les dimensions sont approximatifs. Du fait que nous nous efforçons
continuellement d’améliorer nos produits, nous pouvons modifier les spécifications et les
Page 39

FR-
17
conceptions sans préavis.
L (mm)
W (mm)
H (mm)
D (mm)
A (mm)
B (mm)
X (mm)
590
5205248
560
490
50 min.
A (mm)
B (mm)
C (mm)
D
E
760
50 min.
20 min.
Entrée d’air
Sortie de l’air 10 mm
Installation
Choix du matériel d’installation
Découpez la surface de travail selon les dimensions indiquées sur le dessin.
Pour l’installation et l’utilisation, un espace d’au moins 5 cm doit être préservé autour du
trou.
Assurez-vous que l’épaisseur de la surface de travail est d’au moins 30 mm. Veillez à choisir
un matériau résistant à la chaleur pour éviter toute déformation due au rayonnement
thermique de la plaque à induction. Comme illustré ci-dessous :
Assurez-vous que la plaque de cuisson en Vitrocéramique est correctement ventilée et que
l’entrée et la sortie d’air ne sont pas obstruées. Assurez-vous que la plaque de cuisson en
Vitrocéramique est en bon état de fonctionnement. Comme illustré ci-dessous
Remarque : La distance de sécurité entre la plaque de cuisson et le meuble
au-dessus doit être d’au moins 760 mm.
Page 40

FR-
18
Avant d’installer la table de cuisson, assurez-vous que
• la surface de travail est d’équerre et de niveau, qu’aucune partie n’interfère avec l’espace
nécessaire
• le plan de travail est constitué d’un matériau résistant à la chaleur
• si la plaque est installée au-dessus d’un four, le four est équipé d’un système de ventilation
interne
• l’installation soit conforme à toutes les exigences de dégagement et aux normes et
réglementations en vigueur
• un interrupteur sectionneur de déconnexion complète du réseau d’alimentation est inclus
dans le circuit électrique et installé conformément aux règles et réglementations locales
en vigueur.
L’interrupteur sectionneur doit correspondre à la typologie requise et prévoir 3 mm d’air de
séparation sur tous les pôles (ou sur tous les conducteurs actifs [phase] si la
réglementation électrique locale l’autorise)
• le client pourra facilement accéder à l’interrupteur sectionneur quand la table de cuisson
sera installée
• vous consultez les organismes de réglementation du bâtiment et les arrêtés locaux si vous
avez des doutes concernant l’installation
• vous utilisez des matériaux de finition résistants à la chaleur et faciles à nettoyer (tels que
du carrelage en céramique) pour le revêtement des murs autour de la table de cuisson.
Une fois que la table de cuisson est installée, assurez-vous que
• le câble d’alimentation n’est pas accessible par les portes d’armoire ou les tiroirs
• un flux d’air frais circule entre l’extérieur du meuble inférieur et la base de la table de
cuisson
• si la table de cuisson est installée au-dessus d’un tiroir ou d’un placard, une barrière
thermique de protection est installée sous la base de la table de cuisson
• l’interrupteur sectionneur est facilement accessible par le client.
Avant d’installer les supports de fixation
L’appareil doit être posé sur une surface lisse et stable (vous pouvez utiliser l’emballage).
N’exercez aucune pression sur les boutons qui dépassent de la table de cuisson.
Réglage de la position du support
Fixez la table de cuisson sur le plan de travail en vissant 4 supports en bas de la table de
cuisson (voir illustration) après l’avoir installée.
Page 41

FR-
19
ABC
D
Vis
Support
trou de vis
Face inférieure
verre
crochet de support
vis
ST3. 5*8
Face inférieure
Plan de travail/meuble de cuisine
Attention
1. L’installation de la table de cuisson à induction doit être effectuée par du personnel
qualifié. Nous avons des professionnels à votre service. N’effectuez en aucun cas cette
installation vous-même.
2. La table de cuisson en vitrocéramique ne doit pas être montée sur les équipements de
refroidissement, les lave-vaisselle / séchoirs.
3. La plaque de cuisson en Vitrocéramique doit être installée de manière à favoriser le
rayonnement thermique et garantir sa fiabilité.
4. Le mur et la zone de cuisson à induction à la surface de la table doivent être résistants à
la chaleur.
5. Pour éviter tout dommage, les différentes couches et la colle doivent être résistants à la
chaleur.
6. Ne pas utiliser de à vapeur pour le nettoyage de la table.
7. Cette céramique ne peut être connectée qu’à un système électrique indépendant ne
dépassant pas 0,427ohm. Si nécessaire, veuillez consulter les autorités compétentes en
matière d’indépendance de réseau électrique.
Page 42

FR-
20
Connexion de la table de cuisson au réseau d’alimentation
Cet appareil est étiqueté conformément à la directive européenne 2012/19/EU sur les
déchets des équipements électriques et électroniques (DEEE). La catégorie DEEE
recouvre à la fois les substances polluantes (pouvant avoir des retombées négatives sur
l’environnement) et les composants de base (pouvant être réutilisés). Il est important
que les DEEE subissent des traitements spécifiques pour éliminer et jeter correctement
les polluants et récupérer tous les matériaux. Chaque individu peut jouer un rôle
important en veillant à ce que les produits DEEE ne deviennent pas un problème pour
l’environnement. Pour cela, il est essentiel de suivre quelques règles de base :
- les DEEE ne doivent pas être traités comme des déchets ménagers ;
- les DEEE doivent être amenés à des zones de collecte spécifiques gérées par la municipalité ou une
société dûment enregistrée.
Dans de nombreux pays, des décharges domestiques peuvent être disponibles pour de grands DEEE.
Lorsque vous achetez un nouvel appareil, l’ancien peut être retourné au détaillant qui est en devoir de le
récupérer sans frais de manière individualisée, tant que l’équipement est de type équivalent et a les
mêmes fonctions que l’équipement fourni.
Câble
Câble
Câble
Câble
Câble
Câble
Câble
Câble
La prise d’alimentation doit être raccordée, conformément à la norme en vigueur, à un
disjoncteur unipolaire. La méthode de connexion est illustrée ci-dessous.
Entrée
d’alimentatio
d’alimentatio
220-240V~
L
Noir
Gris
Marron
N
Bleu
Entrée Entrée Entrée
Jaune / Vert
d’alimentatio
d’alimentatio
220-240V~
220-240V~
L1 L2 N1 N2
Gris
Noir
Marron
Bleu
Jaune / Vert
d’alimentatio
d’alimentatio
220-240V~
220-240V~
400V~
L1 L2 N
Gris
Noir
Marron
Bleu
Jaune / Vert
d’alimentatio
d’alimentatio
Noir
L1
Marron
400V~
Gris
L2
Bleu
Jaune / Vert
• Si le câble est endommagé ou s’il doit être remplacé, l’intervention doit être réalisée par un
technicien après-vente munis des outils appropriés, pour éviter tout accident.
• Si l’appareil est raccordé directement au réseau, un disjoncteur omnipolaire doit être
installé avec un espace minimum de 3 mm entre les contacts.
• L’installateur doit s’assurer que le raccordement électrique a été effectué et qu’il est
conforme aux règles de sécurité.
• Le câble ne doit pas être plié ou comprimé.
• Le câble doit être régulièrement contrôlé et remplacé uniquement par une personne
qualifiée.
Page 43

FR-
21
Informations sur la table de cuisson électrique à usage domestique conforme aux normes de la Commission
(UE) n° 66/2014
Position
Symbole
Valeur
Unité
Identification du modèle
CH64CCTT
Type de table de cuisson :
Table de cuisson
électrique
Nombre de foyers et/ou
de zones de cuisson
foyers
4
zones
Technologie de chauffe
(foyers et zones de
cuisson par induction,
foyers à cuisson
rayonnante, plaques
massives)
Foyers de cuisson par
induction
Zones de cuisson par
induction
Foyers à cuisson
rayonnante
X
plaques solides
Pour les foyers ou zones de cuisson
circulaires : diamètre de la surface utile des
zones de cuisson électrique, arrondi à 5mm
près
Arrière gauche
Ø mm
16,5
cm
Arrière centre
Ø mm-cm
Arrière droite
Ø mm
20,0
cm
Centre gauche
Ø mm-cm
Centre centre
Ø mm-cm
Centre droite
Ø mm-cm
Avant gauche
Ø mm
20,0
cm
Avant centre
Ø mm-cm
Avant droite
Ø mm
16,5
cm
Pour les foyers ou zones de cuisson non
circulaires : longueur et largeur de la surface
utile des zones ou foyers à cuisson électrique,
arrondi à 5mm près
Arrière gauche
L
l
-
cm
Arrière centre
L
l
-
cm
Arrière droite
L
l
-
cm
Page 44

FR-
22
Centre gauche
L
l
-
cm
Centre centre
L
l
-
cm
Centre droite
L
l
-
cm
Avant gauche
L
l
-
cm
Avant centre
L
l
-
cm
Avant droite
L
l
-
cm
Consommation d’énergie par zone ou foyer de
cuisson calculée par kg
Arrière gauche
Cuisson
électrique CE
186,0
kWh
Arrière centre
Cuisson
électrique CE
-
kWh
Arrière droite
Cuisson
électrique CE
188,0
kWh
Centre gauche
Cuisson
électrique CE
-
kWh
Centre centre
Cuisson
électrique CE
-
kWh
Centre droite
Cuisson
électrique CE
-
kWh
Avant gauche
Cuisson
électrique CE
188,0
kWh
Avant centre
Cuisson
électrique CE
-
kWh
Avant droite
Cuisson
électrique CE
186,0
kWh
Consommation d’énergie de la table de cuisson
calculée par kg
Table de
cuisson
électrique CE
187,0
kWh
Norme appliquée : EN 60350-2 pour les appareils de cuisson électriques à usage domestique - Partie 2 : Table
de cuisson - Méthodes de calcul des performances
Conseils pour des économies d’énergie :
• Pour obtenir la meilleure efficacité de votre table de cuisson, placez la casserole au centre du foyer de cuisson.
• L’utilisation d’un couvercle permet de réduire le temps de cuisson et d’économiser de l’énergie en conservant la
chaleur.
• Minimisez la quantité de liquide ou de graisse pour réduire le temps de cuisson.
• Commencez la cuisson à température élevée et réduisez-la lorsque les aliments sont bien chauds.
• Utilisez des casseroles dont le diamètre est aussi grand que le graphique du foyer sélectionné.
 Loading...