

Page 1
Instruction Book
CDC679XT
Condenser Tumble Dryer
®
English
Français
Deutsch
Italiano
40001828.qxd 02/01/2006 17:17 Page 1
Page 2
English. . . . . . . . . . . . . . . . . . 2
Français . . . . . . . . . . . . . . . . 20
Deutsch . . . . . . . . . . . . . . . . 38
Italiano . . . . . . . . . . . . . . . . 56
Introduction . . . . . . . . . . . . . . . . . . . . . . . . . . . . . . . . . . . . . . . . . . . . . . . 3
Delivery information . . . . . . . . . . . . . . . . . . . . . . . . . . . . . . . . . . . . . . . . . . . . . 3
Unpacking the Product . . . . . . . . . . . . . . . . . . . . . . . . . . . . . . . . . . . 3
Safety reminders . . . . . . . . . . . . . . . . . . . . . . . . . . . . . . . . . . . . . . . . . . 4
Installation . . . . . . . . . . . . . . . . . . . . . . . . . . . . . . . . . . . . . . . . . . . . . . . . . . . . . 4
Use . . . . . . . . . . . . . . . . . . . . . . . . . . . . . . . . . . . . . . . . . . . . . . . . . . . . . . . . . . . 4
The Laundry . . . . . . . . . . . . . . . . . . . . . . . . . . . . . . . . . . . . . . . . . . . . . . . . . . . . 4
Environmental Issues . . . . . . . . . . . . . . . . . . . . . . . . . . . . . . . . . . . . . . . . . . . . . 5
GIAS Service . . . . . . . . . . . . . . . . . . . . . . . . . . . . . . . . . . . . . . . . . . . . . . . . . . . . 5
Installation. . . . . . . . . . . . . . . . . . . . . . . . . . . . . . . . . . . . . . . . . . . . . . . . . 6
Electrical requirements . . . . . . . . . . . . . . . . . . . . . . . . . . . . . . . . . . . . . . . . . . . 6
Adjusting the feet . . . . . . . . . . . . . . . . . . . . . . . . . . . . . . . . . . . . . . . . . . . . . . . 6
Ventilation. . . . . . . . . . . . . . . . . . . . . . . . . . . . . . . . . . . . . . . . . . . . . . . . . 7
Preparing the load . . . . . . . . . . . . . . . . . . . . . . . . . . . . . . . . . . . . . . . . 8
Clothes preparation . . . . . . . . . . . . . . . . . . . . . . . . . . . . . . . . . . . . . . . . . . . . . . 8
Sorting the load. . . . . . . . . . . . . . . . . . . . . . . . . . . . . . . . . . . . . . . . . . . . . . . . . 9
Drying advice. . . . . . . . . . . . . . . . . . . . . . . . . . . . . . . . . . . . . . . . . . . . . 10
Do not tumble dry . . . . . . . . . . . . . . . . . . . . . . . . . . . . . . . . . . . . . . . . . . . . . . 10
Energy saving. . . . . . . . . . . . . . . . . . . . . . . . . . . . . . . . . . . . . . . . . . . . . . . . . . 10
Drying guide . . . . . . . . . . . . . . . . . . . . . . . . . . . . . . . . . . . . . . . . . . . . . . . . . . 10
Controls and indicators . . . . . . . . . . . . . . . . . . . . . . . . . . . . . . . . . 11
Door and Filter . . . . . . . . . . . . . . . . . . . . . . . . . . . . . . . . . . . . . . . . . . . 12
Opening the door . . . . . . . . . . . . . . . . . . . . . . . . . . . . . . . . . . . . . . . . . . . . . . 12
Filter. . . . . . . . . . . . . . . . . . . . . . . . . . . . . . . . . . . . . . . . . . . . . . . . . . . . . . . . . 12
Filter care indicator . . . . . . . . . . . . . . . . . . . . . . . . . . . . . . . . . . . . . . . . . . . . . 12
Water container . . . . . . . . . . . . . . . . . . . . . . . . . . . . . . . . . . . . . . . . . . 13
To remove the container . . . . . . . . . . . . . . . . . . . . . . . . . . . . . . . . . . . . . . . . . 13
Condenser . . . . . . . . . . . . . . . . . . . . . . . . . . . . . . . . . . . . . . . . . . . . . . . . 14
To remove the condenser . . . . . . . . . . . . . . . . . . . . . . . . . . . . . . . . . . . . . . . . 14
Selecting the Programme . . . . . . . . . . . . . . . . . . . . . . . . . . . . . . . 15
Operation . . . . . . . . . . . . . . . . . . . . . . . . . . . . . . . . . . . . . . . . . . . . . . . . . 16
Cancelling and resetting the programme . . . . . . . . . . . . . . . . . . . . . . . . . . . . 16
Start Delay . . . . . . . . . . . . . . . . . . . . . . . . . . . . . . . . . . . . . . . . . . . . . . . . . . . . 16
Cleaning and Routine Maintenance. . . . . . . . . . . . . . . . . . . . 17
Cleaning the dryer . . . . . . . . . . . . . . . . . . . . . . . . . . . . . . . . . . . . . . . . . . . . . . 17
Technical specifications . . . . . . . . . . . . . . . . . . . . . . . . . . . . . . . . . . . . . . . . . . 17
Troubleshooting . . . . . . . . . . . . . . . . . . . . . . . . . . . . . . . . . . . . . . . . . . 18
Customer Service. . . . . . . . . . . . . . . . . . . . . . . . . . . . . . . . . . . . . . . . . 19
Spares. . . . . . . . . . . . . . . . . . . . . . . . . . . . . . . . . . . . . . . . . . . . . . . . . . . . . . . . 19
GIAS Service . . . . . . . . . . . . . . . . . . . . . . . . . . . . . . . . . . . . . . . . . . . . . . . . . . . 19
2
40001828.qxd 02/01/2006 17:17 Page 2
Page 3
IInnttrroodduuccttiioonn
PPlleeaassee rreeaadd aanndd ffoollllooww tthheessee iinnssttrruuccttiioonnss ccaarreeffuullllyy
aanndd ooppeerraattee tthhee mmaacchhiinnee aaccccoorrddiinnggllyy.. TThhiiss
bbooookklleett pprroovviiddeess iimmppoorrttaanntt gguuiiddeelliinneess ffoorr ssaaffee
uussee,, iinnssttaallllaattiioonn,, mmaaiinntteennaannccee aanndd ssoommee uusseeffuull
aaddvviiccee ffoorr bbeesstt rreessuullttss wwhheenn uussiinngg yyoouurr mmaacchhiinnee..
Keep all documentation in a safe place for future
reference or for any future owners
DDeelliivveerryy iinnffoorrmmaattiioonn
Please check that the following items are
delivered with the appliance:
● Instruction manual
● Guarantee card
● Energy label
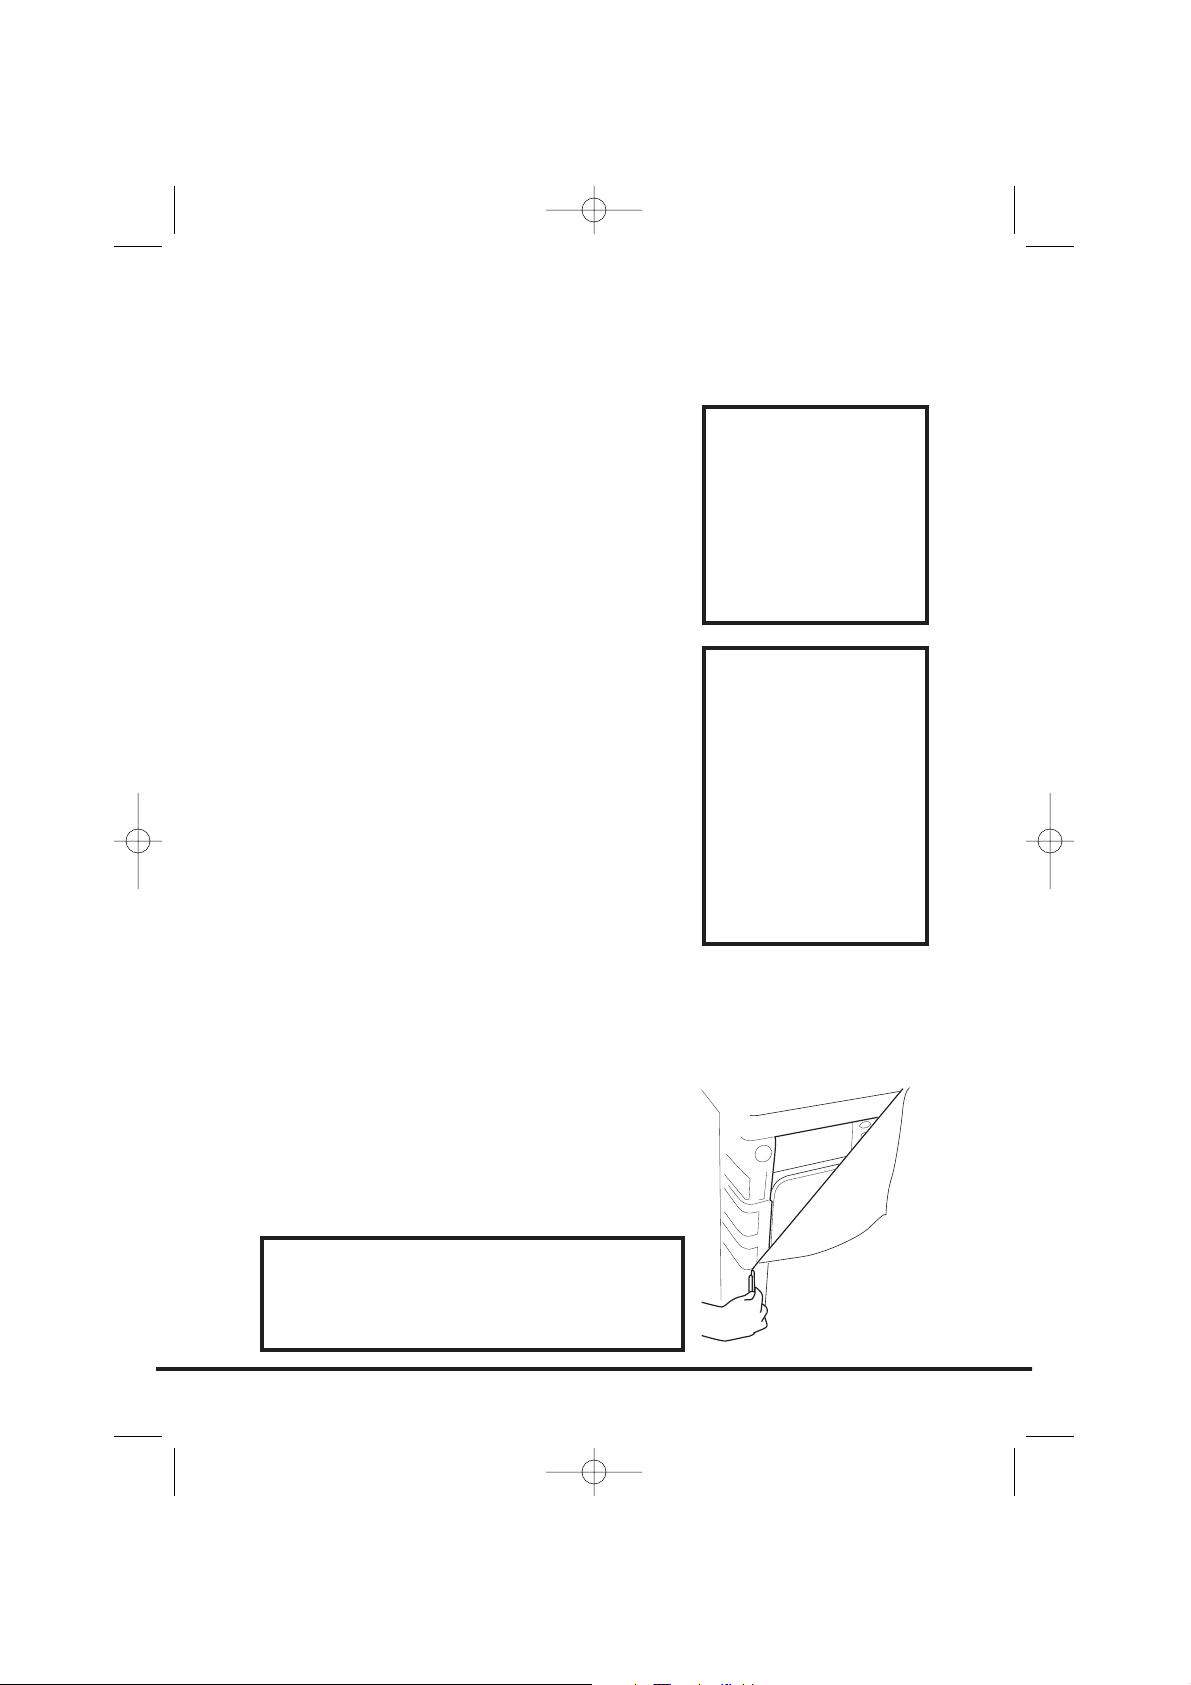
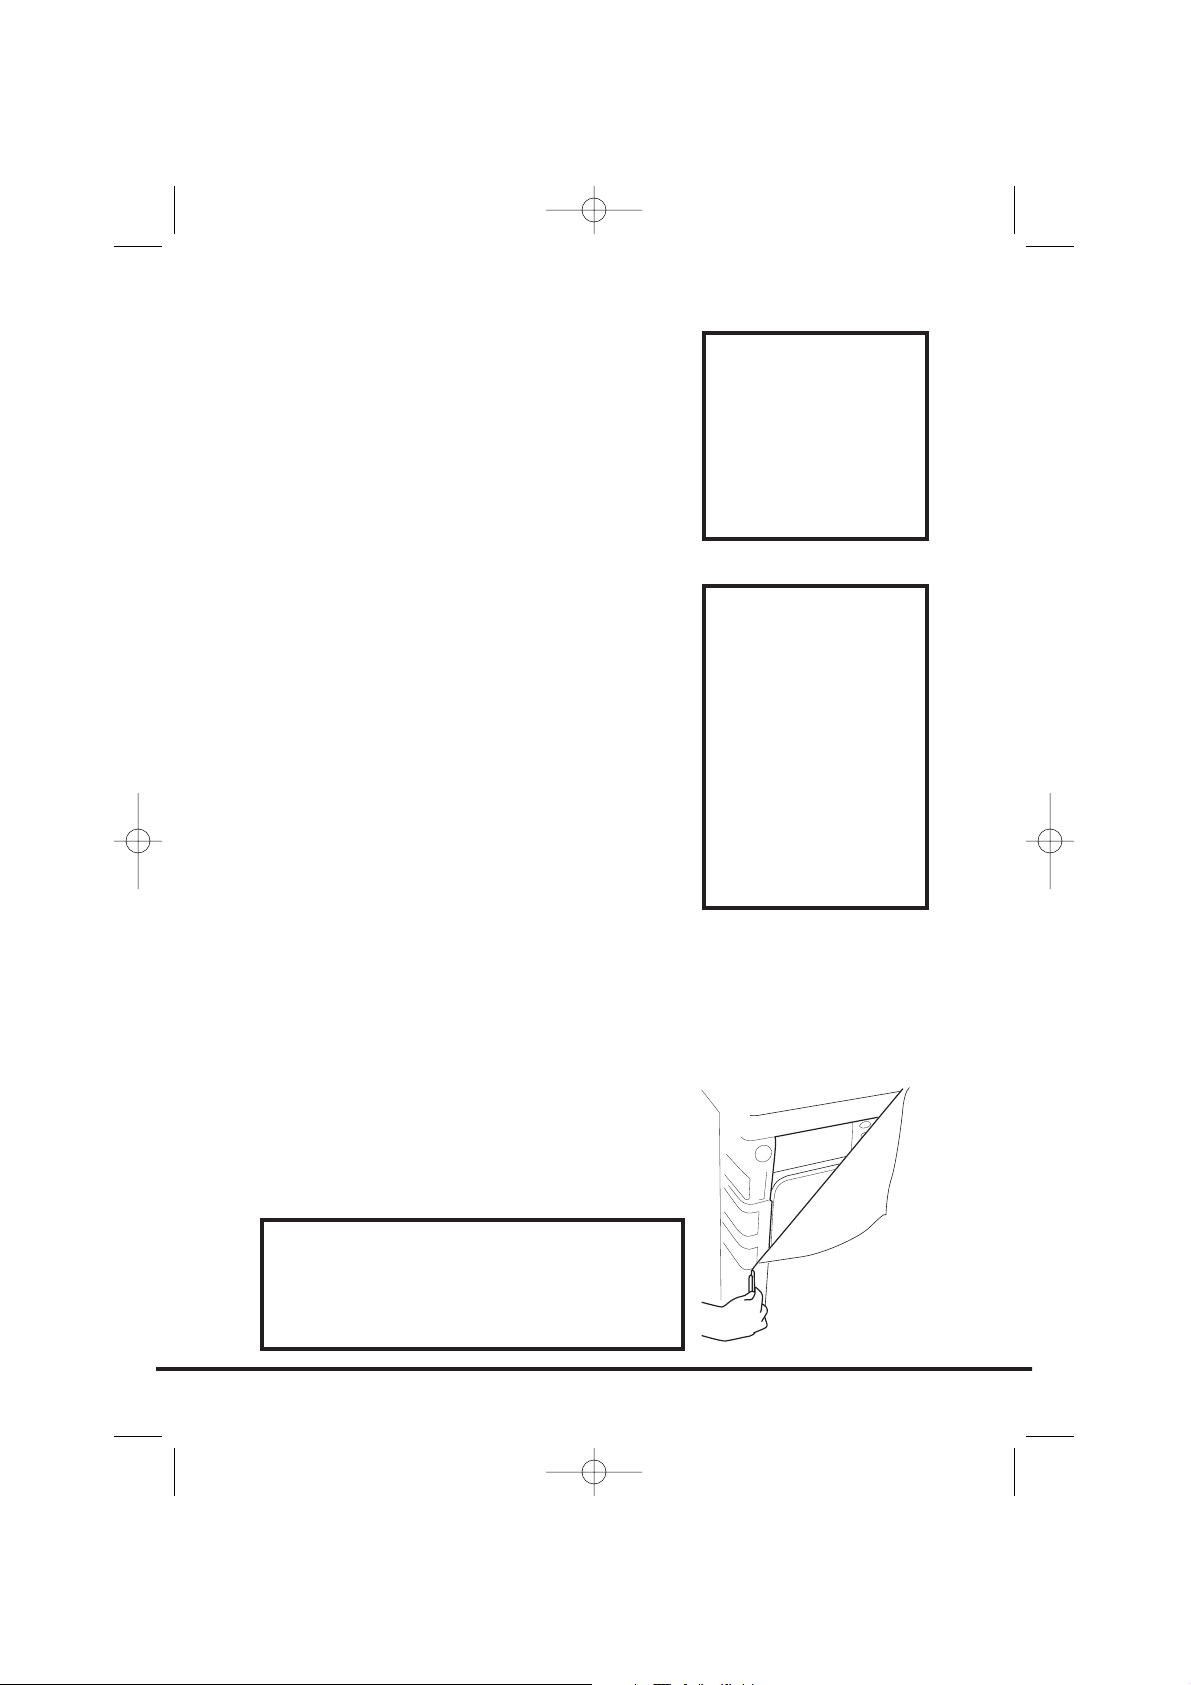
Remove the machine from its packaging close to
the final location of the machine.
11..
Cut carefully around the base of the
packaging and up one corner.
22..
Remove the polythene sleeve and lift the
dryer off the polystyrene base.
3
CChheecckk tthhaatt nnoo
ddaammaaggee hhaass
ooccccuurrrreedd ttoo tthhee
mmaacchhiinnee dduurriinngg
ttrraannssiitt.. IIff iitt hhaass,,
ccaallll ffoorr sseerrvviiccee bbyy
GGIIAASS..
FFaaiilluurree ttoo ccoommppllyy
wwiitthh tthhee aabboovvee
ccaann ccoommpprroommiissee
tthhee ssaaffeettyy ooff tthhee
aapppplliiaannccee.. YYoouu
mmaayy bbee cchhaarrggeedd
ffoorr aa sseerrvviiccee ccaallll
iiff aa pprroobblleemm wwiitthh
yyoouurr mmaacchhiinnee iiss
ccaauusseedd bbyy mmiissuussee..
UUnnppaacckkiinngg tthhee pprroodduucctt
DDiissppoossee ooff tthhee ppaacckkaaggiinngg ssaaffeellyy.. MMaakkee
ssuurree iitt iiss oouutt ooff tthhee rreeaacchh ooff cchhiillddrreenn,,
iitt iiss aa ppootteennttiiaall ssoouurrccee ooff ddaannggeerr..
40001828.qxd 02/09/2004 17:18 Page 3
Page 4

Safety reminders
Installation
● Check that the product has no visible signs of damage before use. If
damaged do not use and please call GIAS Service.
● Do not use adapters, multiple connectors and/or extensions.
● This machine should not be installed in a bathroom or shower room.
● Never install the dryer against curtains and be sure to prevent items from
falling or collecting behind the dryer.
Use
● WARNING Misuse of a tumble dryer may create a fire hazard.
● This machine is solely for domestic use, i.e. to dry household textiles and
garments.
● This machine should only be used for its intended purpose as described in
this manual. Ensure that the instructions for installation and use are fully
understood before operating the appliance.
● Do not touch the appliance when hands or feet are damp or wet.
● Do not lean on the door when loading the machine or use the door to
lift or move the machine.
● Do not allow children to play with the machine or its controls.
● WARNING Do not use the product if the fluff filter is not in position or is
damaged; fluff could be ignited.
● WARNING Where the hot surface symbol is located the temperature
rise during operation of the tumble dryer may be in excess of 60 degrees C.
● Remove the plug from the electricity supply. Always remove the plug
before cleaning the appliance.
● Do not continue to use this machine if it appears to be faulty.
● Lint and fluff must not be allowed to collect on the floor around the
outside of the machine.
● The drum inside may be very hot. Always allow the dryer to complete the
cool down period before removing the laundry.
The Laundry
● WARNING Do not tumble dry fabrics treated with dry cleaning fluids.
● WARNING Foam rubber materials can, under certain circumstances, when
heated become ignited by spontaneous combustion. Foam plastic, foam
rubber and rubber-like material are not suitable for tumble drying.
Articles made from these materials MUST NOT be placed in the dryer.
● Always refer to the laundry care labels for directions on suitability for
drying.
● Clothes should be spin dried or thoroughly wrung before they are put
into the tumble dryer. Clothes that are dripping wet should NOT be put
into the dryer.
4
40001828.qxd 02/01/2006 17:19 Page 4
Page 5

● Lighters and matches must not be left in pockets and NEVER use
flammable liquids near the machine.
● Glass fibre curtains should NEVER be put in this machine. Skin irritation
may occur if other garments are contaminated with the glass fibres.
● Garments treated or contaminated with flammable cleaning sprays or
liquids such as petrol, cooking oil or aerosol sprays MUST NOT be put in
this machine.
Environmental Issues
● All packaging materials used are environmentally-friendly and recyclable.
Please help dispose of the packaging via environmentally-friendly means.
Your local council will be able to give you details of current means of
disposal.
● To ensure safety when disposing of an old tumble dryer disconnect the
mains plug from the socket, cut the mains power cable and destroy this
together with the plug. To prevent children shutting themselves in the
machine break the door hinges or the door lock.
GIAS Service
● To ensure the continued safe and efficient operation of this appliance we
recommend that any servicing or repairs are only carried out by an
authorised GIAS Service engineer.
European directive 2002/96/EC
This appliance is marked according to the European directive 2002/96/EC on
Waste Electrical and Electronic Equipment (WEEE).
By ensuring this product is disposed of correctly, you
will help prevent potential negative consequences for
the environment and human health, which could
otherwise be caused by inappropriate waste handling
of this product.
The symbol on the product indicates that this product
may not be treated as household waste. Instead it shall
be handed over to the applicable collection point for
the recycling of electrical and electronic equipment
Disposal must be carried out in accordance with local
environmental regulations for waste disposal.
For more detailed information about treatment,
recovery and recycling of this product, please contact
your local city office, your household waste disposal
service or the shop where you purchased the product.
5
If the appliance is not running properly or breaks down,
switch it off and disconnect the plug from the socket.
Consult GIAS Service for possible repair.
40001828.qxd 02/01/2006 17:20 Page 5
Page 6
EElleeccttrriiccaall rreeqquuiirreemmeennttss
Tumble dryers are supplied to operate at a
voltage of 230V, 50 Hz single phase. Check that
the supply circuit is rated to at least 10A.
EElleeccttrriicciittyy ccaann bbee eexxttrreemmeellyy ddaannggeerroouuss..
TThhiiss aapppplliiaannccee mmuusstt bbee eeaarrtthheedd..
TThhee ssoocckkeett oouuttlleett aanndd tthhee pplluugg oonn tthhee aapppplliiaannccee
mmuusstt bbee ooff tthhee ssaammee ttyyppee..
DDoo nnoott uussee mmuullttiippllee aaddaapptteerrss aanndd//oorr eexxtteennssiioonn
lleeaaddss..
TThhee pplluugg sshhoouulldd bbee aacccceessssiibbllee ffoorr ddiissccoonnnneeccttiioonn
aafftteerr tthhee aapppplliiaannccee hhaass bbeeeenn iinnssttaalllleedd..
The wires in the mains lead are coloured in
accordance with the following codes:
BBlluuee NNEEUUTTRRAALL
BBrroowwnn LLIIVVEE
GGrreeeenn aanndd YYeellllooww EEAARRTTHH
CE Appliance complies with European Directive
89/336/EEC, 73/23/EEC and subsequent
amendments.
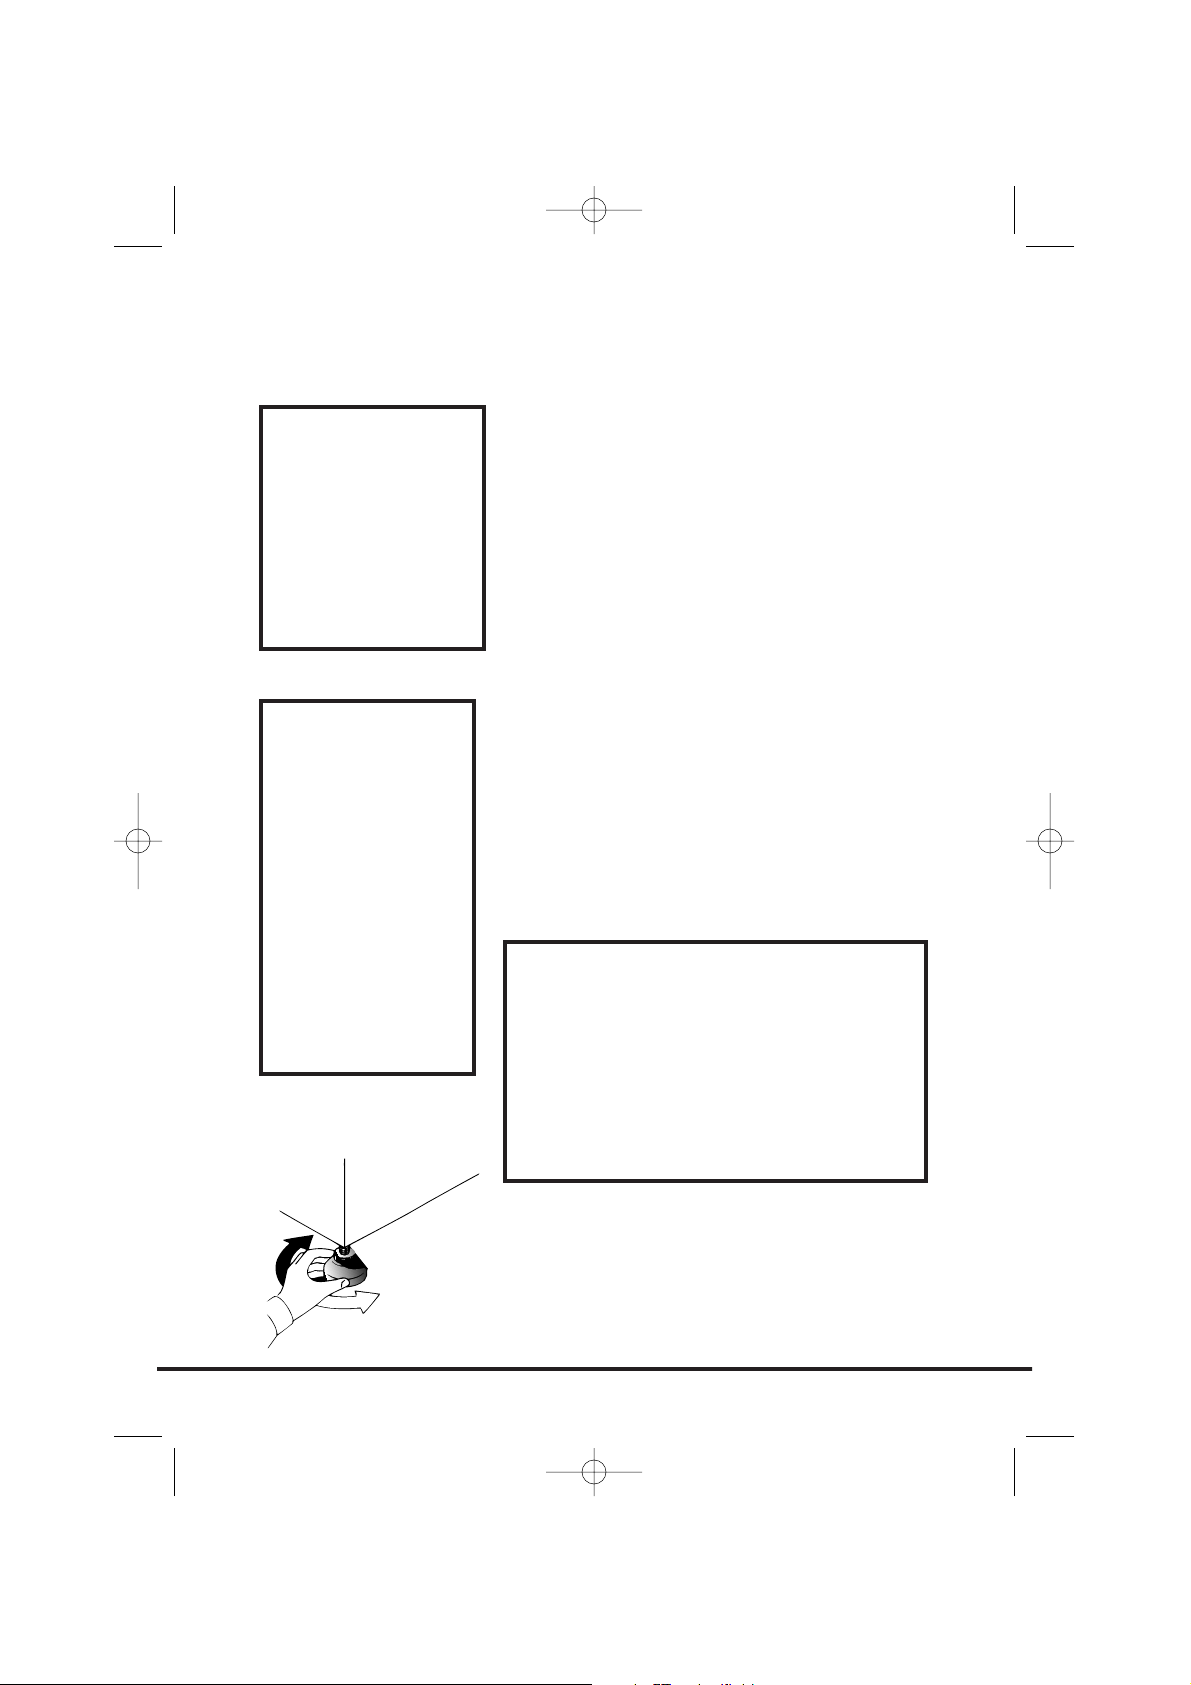
AAddjjuussttiinngg tthhee ffeeeett
Once the machine is in place the feet should be
adjusted to ensure that the machine is level.
Adjust the four feet to ensure the machine is firm
and level.
6
YYoouu mmaayy bbee
cchhaarrggeedd ffoorr aa
sseerrvviiccee ccaallll iiff aa
pprroobblleemm wwiitthh
yyoouurr mmaacchhiinnee iiss
ccaauusseedd bbyy
iinnccoorrrreecctt
iinnssttaallllaattiioonn..
IIff tthhee mmaaiinnss ccoorrdd
oonn tthhiiss aapppplliiaannccee
iiss ddaammaaggeedd,, iitt
mmuusstt bbee
rreeppllaacceedd bbyy aa
ssppeecciiaall ccoorrdd
wwhhiicchh iiss OONNLLYY
oobbttaaiinnaabbllee ffrroomm
tthhee ssppaarreess
sseerrvviiccee.. IItt mmuusstt
bbee iinnssttaalllleedd bbyy aa
ccoommppeetteenntt
ppeerrssoonn..
IInnssttaallllaattiioonn
DDoo nnoott pplluugg tthhee mmaacchhiinnee iinn aanndd sswwiittcchh
iitt oonn aatt tthhee mmaaiinnss uunnttiill tthhee iinnssttaallllaattiioonn
iiss ccoommpplleetteedd..
FFoorr yyoouurr ssaaffeettyy,, tthhiiss ddrryyeerr mmuusstt bbee
ccoorrrreeccttllyy iinnssttaalllleedd..
IIff tthheerree iiss aannyy ddoouubbtt aabboouutt iinnssttaallllaattiioonn,,
ccaallll GGIIAASS SSeerrvviiccee ffoorr aaddvviiccee..
40001828.qxd 02/09/2004 17:18 Page 6
Page 7
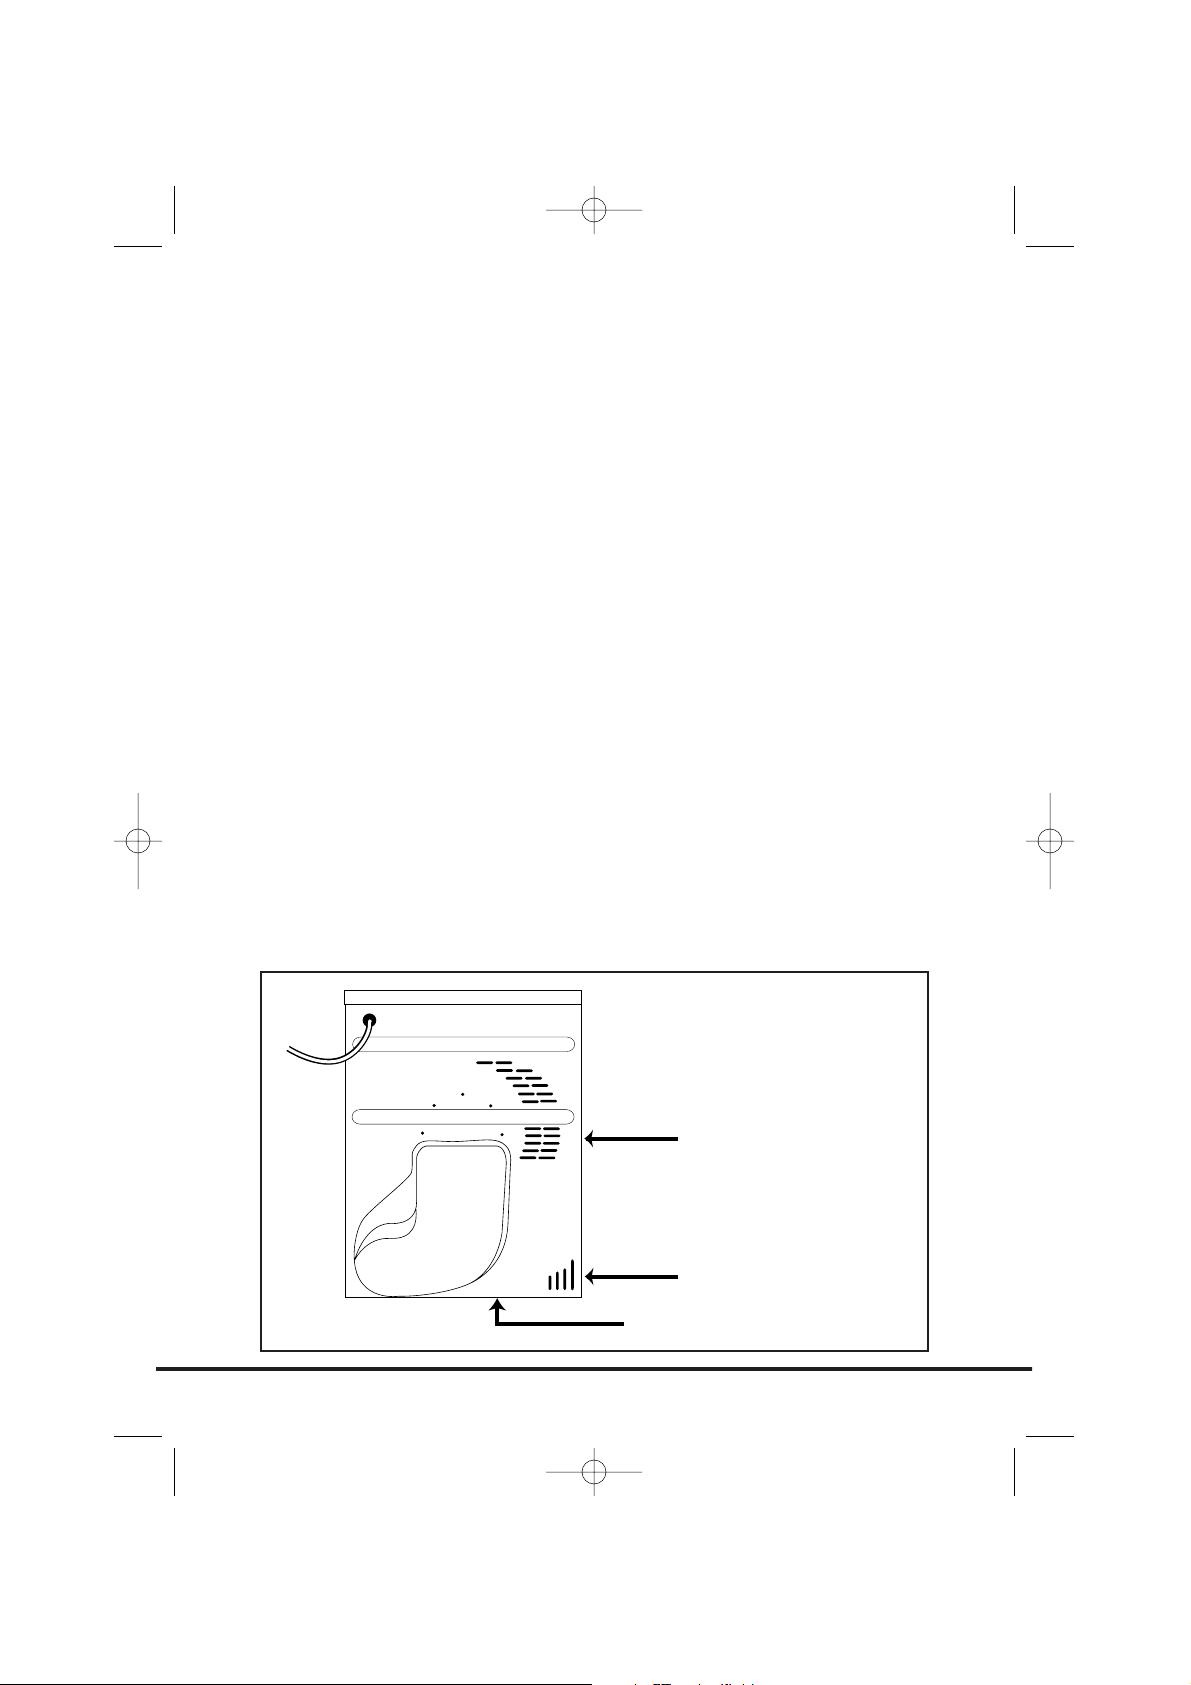
Adequate ventilation must be provided in the
room where the tumble dryer is located to
prevent gases from appliances burning other
fuels, including open fires, being drawn into the
room during operation of the tumble dryer.
● Exhaust air must not be discharged into a
flue which is used for exhausting fumes
from appliances burning gas or other fuels.
● Check regularly that the air flowing through
the dryer is not restricted.
● Check the fluff filter after use, and clean, if
necessary.
● The inlet and outlets should be kept free
from obstructions. To ensure adequate
ventilation the space between the bottom
of the machine and the floor must not be
obstructed. There should be a gap of at
least 12mm between the machine and any
obstructions.
● Prevent items from falling or collecting
behind the dryer as these may obstruct the
air inlet and outlet.
●
NNEEVVEERR
install the dryer up against curtains.
7
VVeennttiillaattiioonn
AIR OUTLETS
AIR OUTLETS IN THE BASE
AIR INLET VENTS
40001828.qxd 02/09/2004 17:18 Page 7
Page 8
Before using the tumble dryer for the first time:
● Please read this instruction book thoroughly.
● Remove all items packed inside drum.
● Wipe the inside of the drum and door with
a damp cloth to remove any dust which may
have settled in transit.
CCllootthheess pprreeppaarraattiioonn
Make sure that the laundry you are going to dry
is suitable for drying in a tumble dryer, as shown
by the care symbols on each item.
Check that all fastenings are closed and that
pockets are empty. Turn the articles inside out.
Place clothes loosely in the drum to make sure
that they don't get tangled.
MMaaxxiimmuumm ddrryyiinngg wweeiigghhtt
● Cottons Max. 7 kg
● Synthetics Max. 3.5 kg
8
PPrreeppaarriinngg tthhee llooaadd
DDoo nnoott oovveerrllooaadd
tthhee ddrruumm,, llaarrggee
iitteemmss wwhheenn wweett
ccaann eexxcceeeedd tthhee
mmaaxxiimmuumm
aaddmmiissssiibbllee
ccllootthheess llooaadd
((ffoorr eexxaammppllee::
sslleeeeppiinngg bbaaggss,,
dduuvveettss))..
40001828.qxd 02/09/2004 17:18 Page 8
Page 9
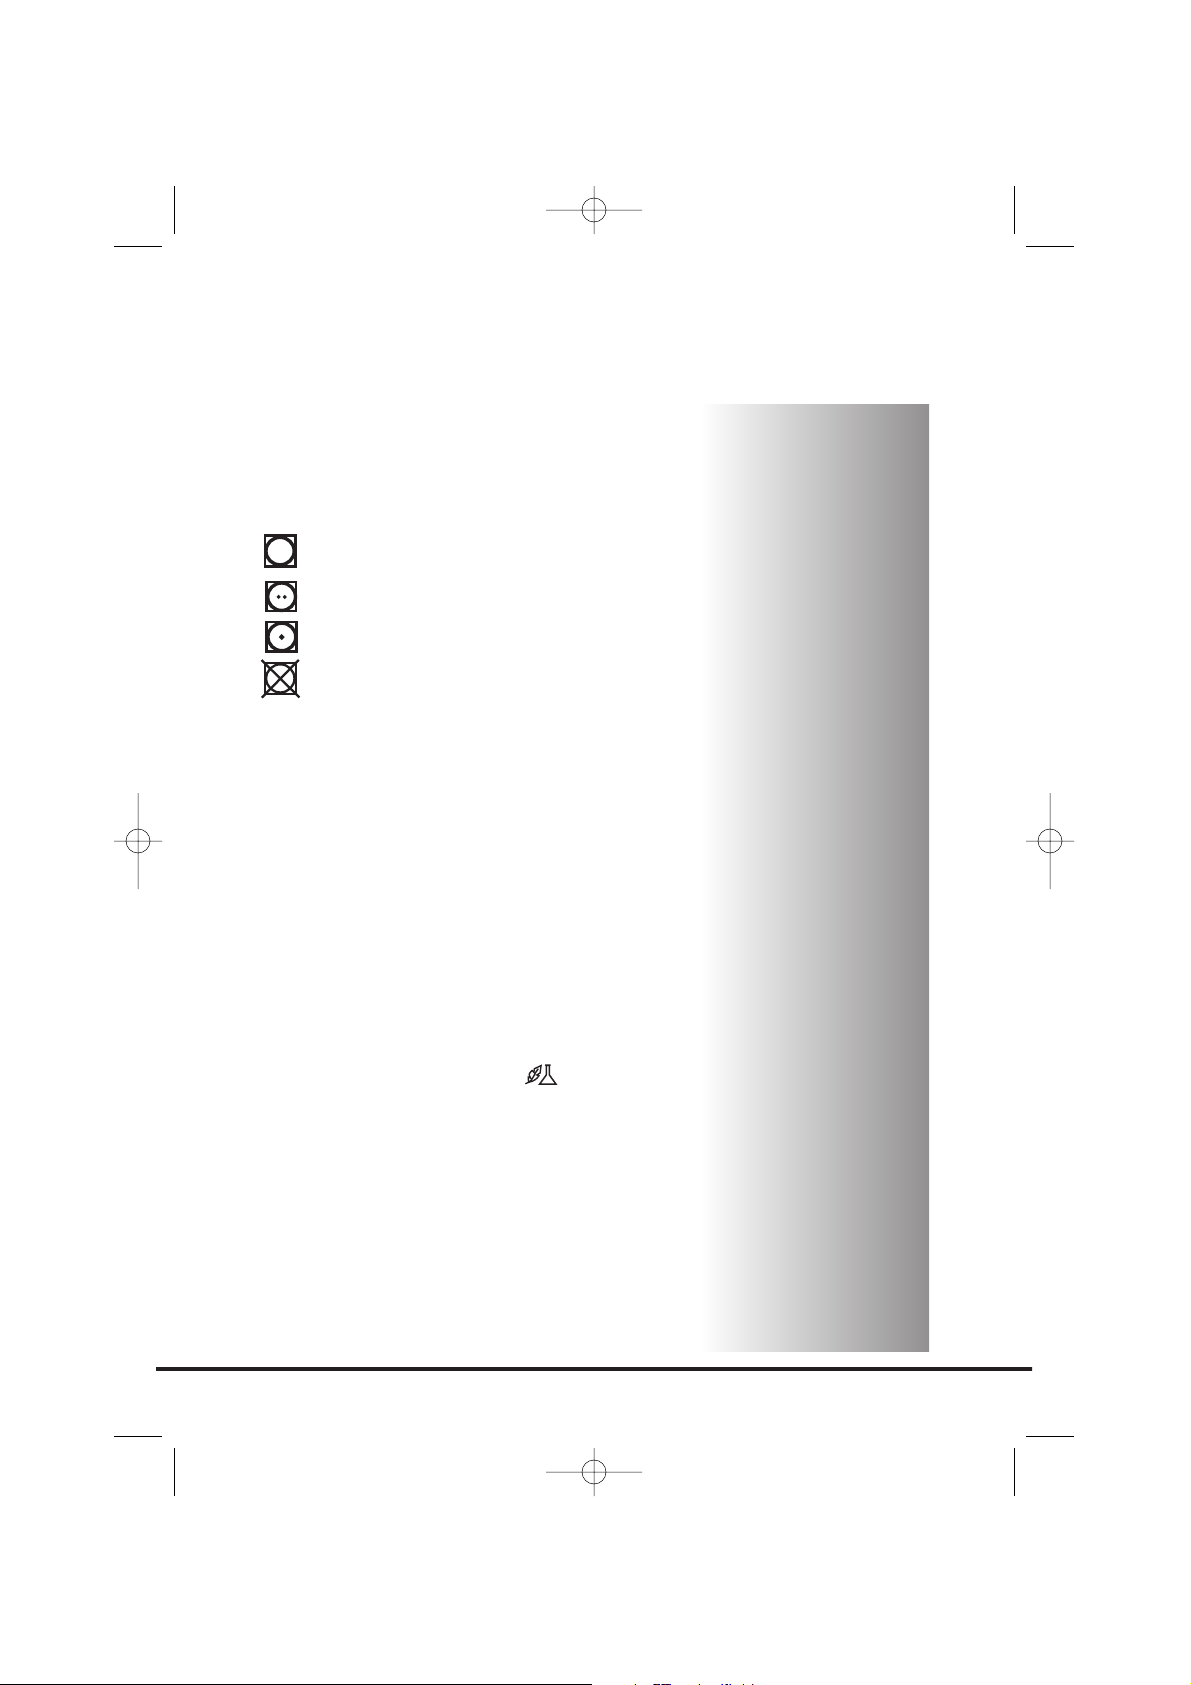
SSoorrtt tthhee llooaadd aass ffoolllloowwss::
●
BByy ccaarree ssyymmbboollss
These can be found on the collar or inside
seam:
Suitable for tumble drying.
Tumble drying at high temperature.
Tumble drying at low temperature only.
Do not tumble dry.
If the item does not have a care label it
must be assumed that it is not suitable
for tumble drying.
●
BByy aammoouunntt aanndd tthhiicckknneessss
Whenever the load is bigger than the dryer
capacity, separate clothes according to
thickness (e.g. towels from thin underwear).
●
BByy ttyyppee ooff ffaabbrriicc
CCoottttoonnss//lliinneenn::
Towels, cotton jersey, bed and
table linen.
SSyynntthheettiiccss::
Blouses, shirts, overalls, etc. made
of polyester or polyamid, as well as for
cotton/synthetic mixes.
●
BByy ddrryyiinngg lleevveell
Sort into: iron dry, cupboard dry, etc. For
delicate articles press the button to
select low drying temperature.
9
40001828.qxd 02/09/2004 17:18 Page 9
Page 10
DDoo nnoott ttuummbbllee ddrryy::
Woollens, silk, delicate fabrics, nylon stockings,
delicate embroidery, fabrics with metallic
decorations, garments with PVC or leather
trimmings, training shoes, bulky items such as
sleeping bags, etc.
EEnneerrggyy ssaavviinngg
Only put into the tumble dryer laundry which has
been thoroughly wrung or spin-dried. The drier
the laundry the shorter the drying time thus
saving electricity.
AALLWWAAYYSS
● Try to dry the maximum weight of laundry,
this will save time and electricity.
● Check that the filter is clean before every
drying cycle.
NNEEVVEERR
● Exceed the maximum weight, this will waste
time and electricity.
● Put dripping wet items into the tumble
dryer, this may damage the appliance.
DDrryyiinngg gguuiiddee
The table shows approximate drying times,
depending on the type of fabric and dampness of
the clothes.
10
DDrryyiinngg aaddvviiccee
IIMMPPOORRTTAANNTT:: DDoo
nnoott ddrryy aarrttiicclleess
wwhhiicchh hhaavvee bbeeeenn
ttrreeaatteedd wwiitthh aa
ddrryy cclleeaanniinngg fflluuiidd
oorr rruubbbbeerr ccllootthheess
((ddaannggeerr ooff ffiirree oorr
eexxpplloossiioonn))..
DDuurriinngg tthhee llaasstt
1155 mmiinnuutteess tthhee
llooaadd iiss aallwwaayyss
ttuummbblleedd iinn ccooooll
aaiirr..
FFaabbrriicc
COTTON
SYNTHETICS
ACRYLIC
HHEEAATT
SSEETTTTIINNGG
HIGH
LOW
LOW
IINNDDIICCAATTOORR
LLIIGGHHTT
OFF
ON
ON
HHEEAAVVYY
LLOOAADD
140-165 min
–
–
MMEEDDIIUUMM
LLOOAADD
70-80 min
70-80 min
50-65 min
LLIIGGHHTT
LLOOAADD
50-65 min
40-55 min
30-40 min
40001828.qxd 02/09/2004 17:18 Page 10
Page 11
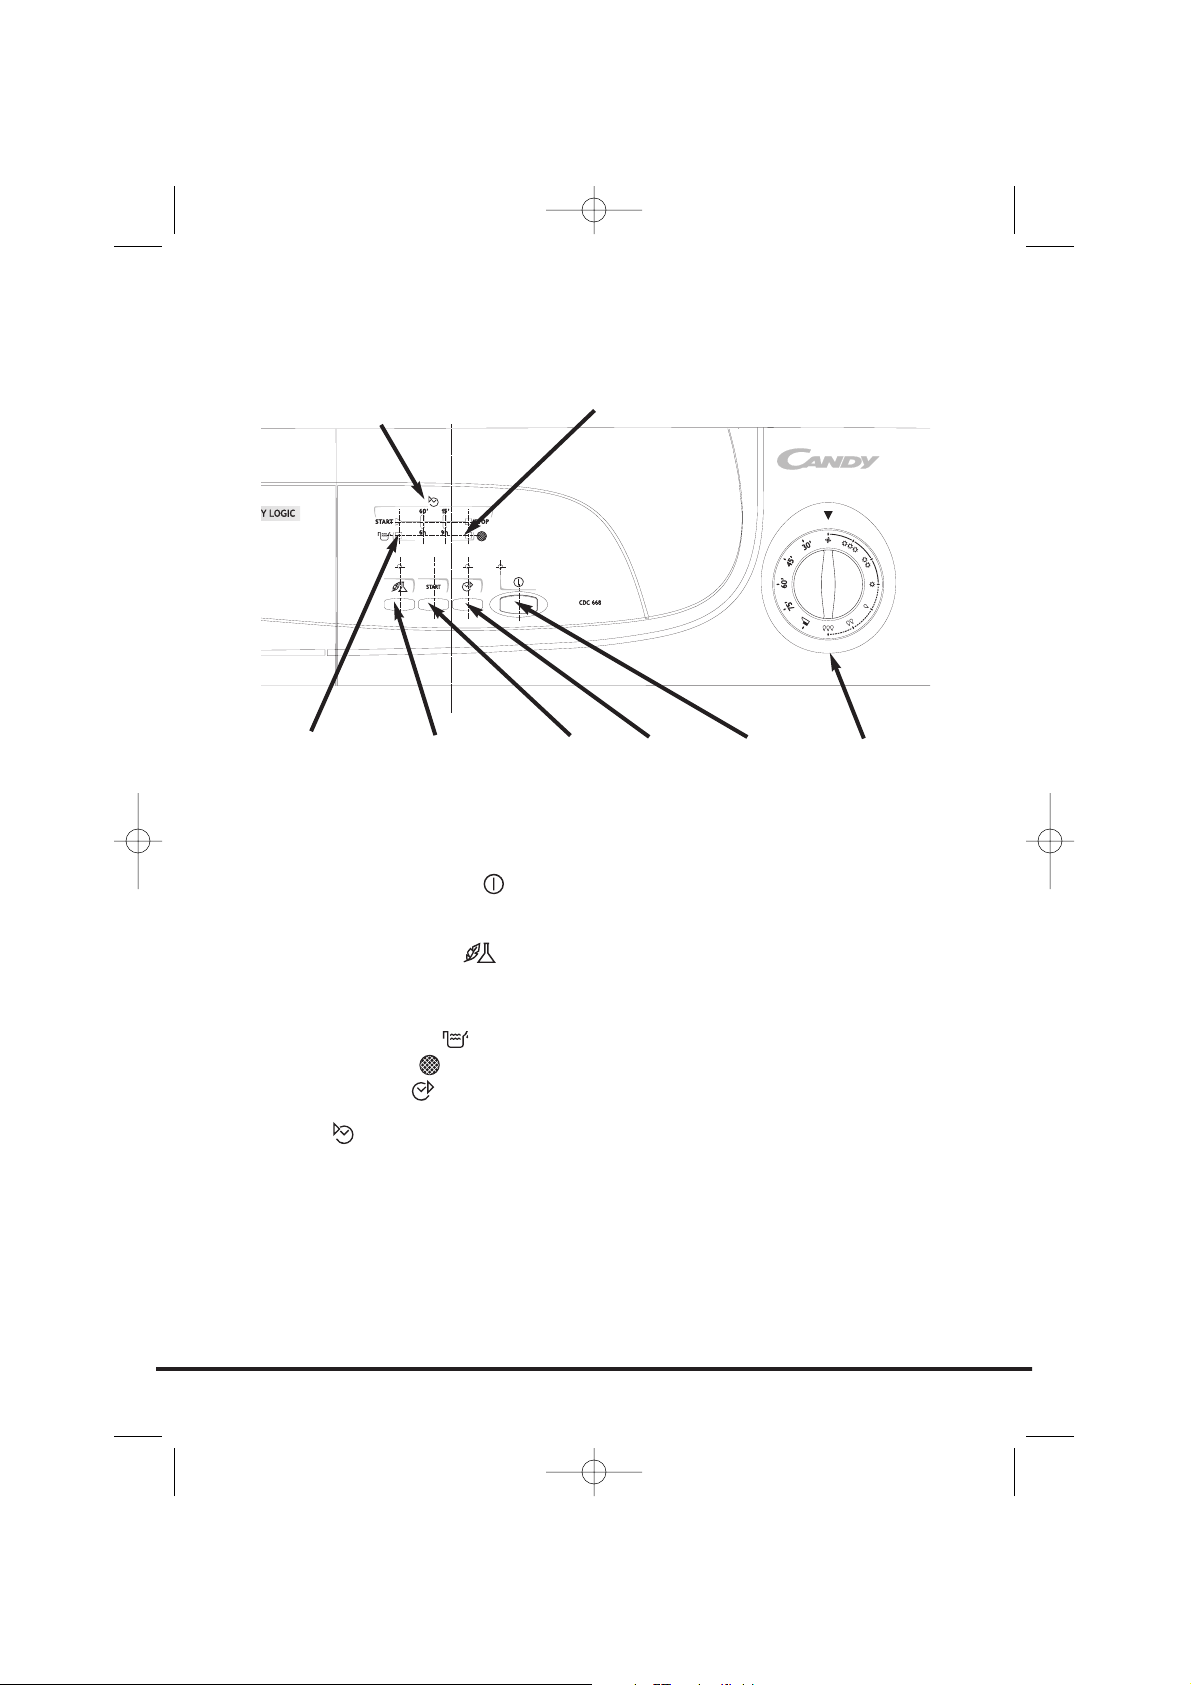
CCoonnttrrooll ppaanneell aanndd iinnddiiccaattoorr lliigghhttss
PPrrooggrraammmmee SSeelleeccttoorr
– Select the required programme
OOnn//OOffff bbuuttttoonn aanndd iinnddiiccaattoorr
– Press to switch on, the indicator will light
SSTTAARRTT
– Press START to commence the selected drying programme. Press for 5 seconds to
cancel/reset the programme
AAccrryylliiccss//SSyynntthheettiiccss bbuuttttoonn
– Press to reduce the heat level for delicate items, the
indicator above the button will light up. To change the heat setting the programme
must be reset
Low Heat – Indicator light
OONN
High Heat – Indicator light
OOFFFF
EEmmppttyy WWaatteerr iinnddiiccaattoorr
– lights when the water container is full
FFiilltteerr CCaarree iinnddiiccaattoorr
– lights when the filter needs cleaning
SSttaarrtt DDeellaayy bbuuttttoonn
– Allows the user to delay the start of the drying cycle (see
details of operation page 16)
DDiissppllaayy
SSTTAARRTT
– When the dryer is switched On the START indicator will flash, when the
programme starts the START indicator will light up
6600''
– Indicator lights when there is less than 60 minutes left until completion of the
programme
1155''
- Indicator lights when there is less than 15 minutes left until completion of the
programme. At this stage of the drying cycle the machine enters the Cool Down phase
SSTTOOPP
- Indicator lights when the programme is finished.
66hh
- 6 hour start delay (light flashes when in operation)
99hh
- 9 hour start delay (light flashes when in operation)
11
CCoonnttrroollss aanndd iinnddiiccaattoorrss
ACRYLICS/
SYNTHETICS
BUTTON
ON/OFF
BUTTON
FILTER CARE
INDICATOR
EMPTY
WATER
INDICATOR
PROGRAMME
SELECTOR
START
BUTTON
START
DELAY
BUTTON
COUNTDOWN
DISPLAY
40001828.qxd 02/09/2004 17:19 Page 11
Page 12
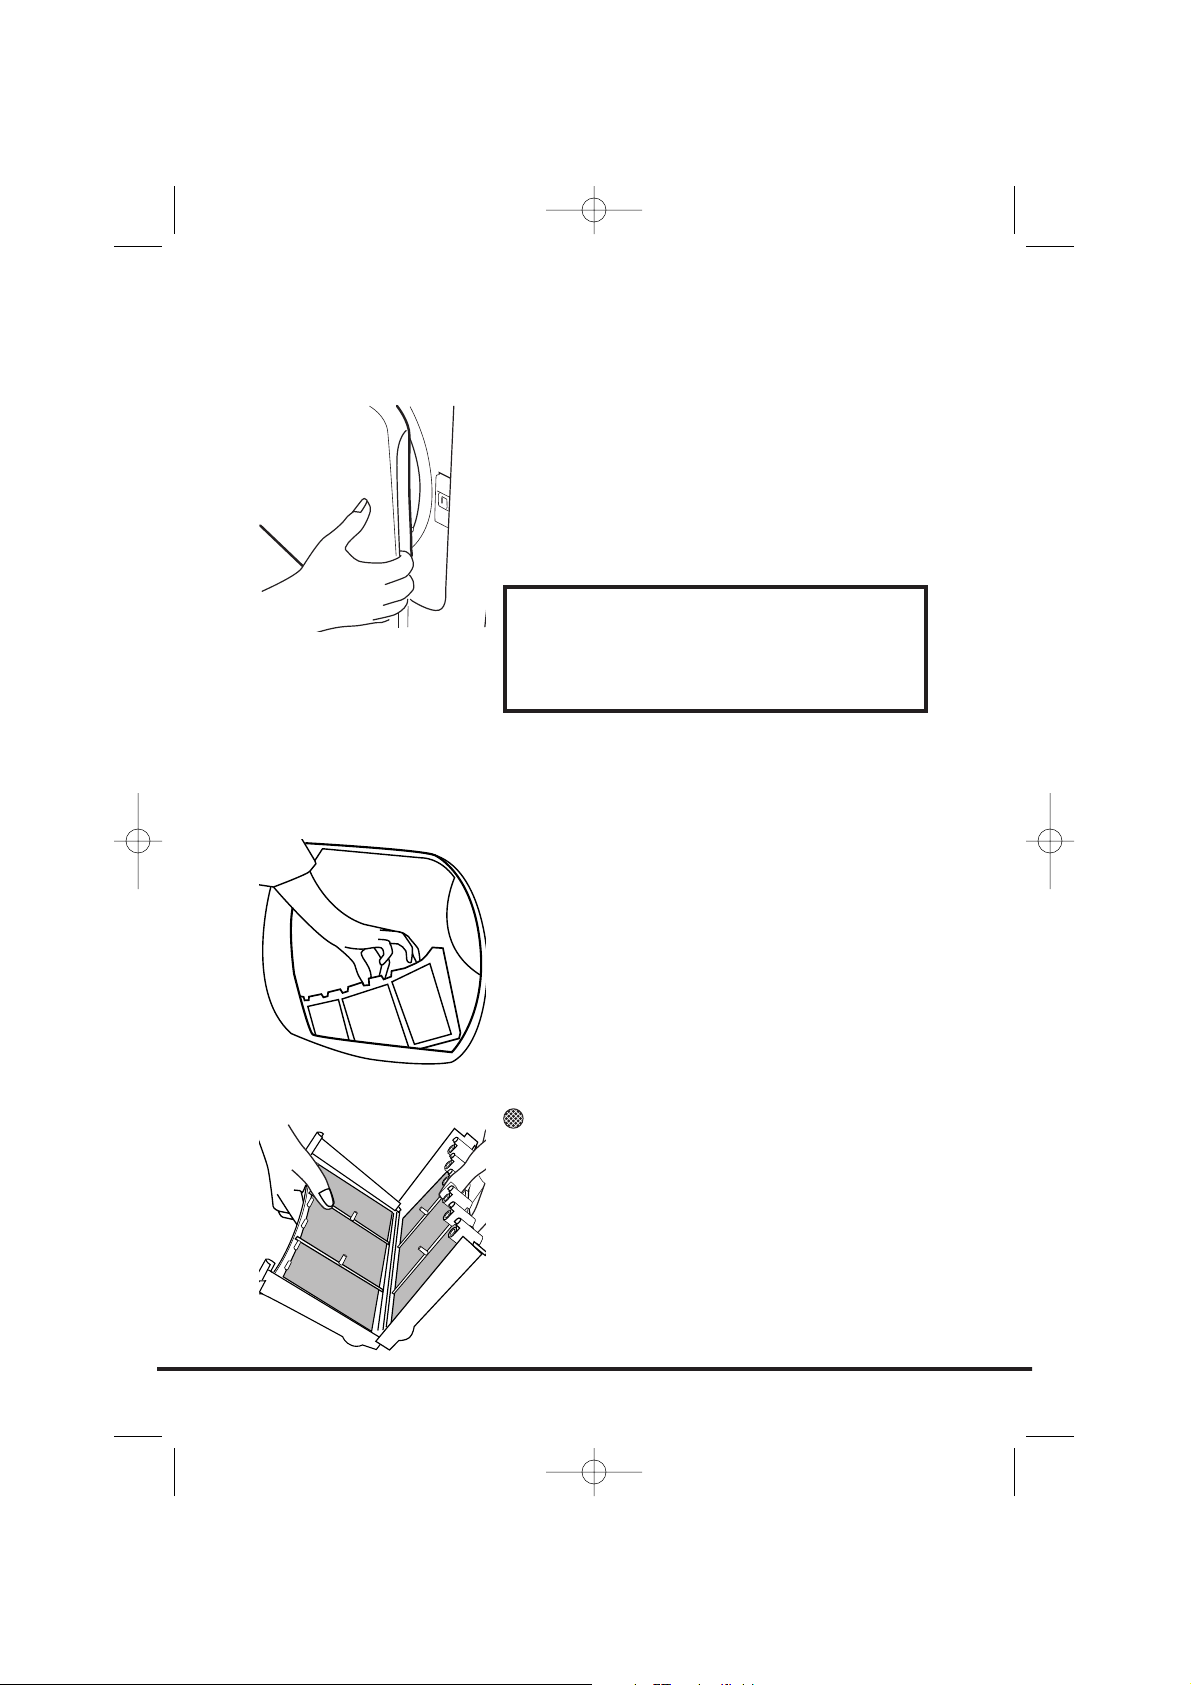
OOppeenniinngg tthhee ddoooorr
Pull on handle to open the door.
To restart the dryer, close the door and press
START.
FFiilltteerr
IIMMPPOORRTTAANNTT:: TToo mmaaiinnttaaiinn tthhee eeffffiicciieennccyy ooff tthhee
ddrryyeerr cchheecckk tthhaatt tthhee fflluuffff ffiilltteerr iiss cclleeaann bbeeffoorree
eeaacchh ddrryyiinngg ccyyccllee..
11..
Pull the filter upwards.
22..
Open filter as shown.
33..
Gently remove lint using a soft brush or
your fingertips.
44..
Snap the filter together and push back into
place.
FFiilltteerr CCaarree IInnddiiccaattoorr
lights when the filter needs cleaning.
IIff tthhee llaauunnddrryy iiss nnoott ddrryyiinngg cchheecckk tthhaatt tthhee ffiilltteerr iiss
nnoott ccllooggggeedd..
12
DDoooorr aanndd FFiilltteerr
WWAARRNNIINNGG!!
WWhheenn tthhee ttuummbbllee ddrryyeerr iiss iinn uussee tthhee
ddrruumm aanndd ddoooorr mmaayy bbee VVEERRYY HHOOTT..
40001828.qxd 02/09/2004 17:19 Page 12
Page 13
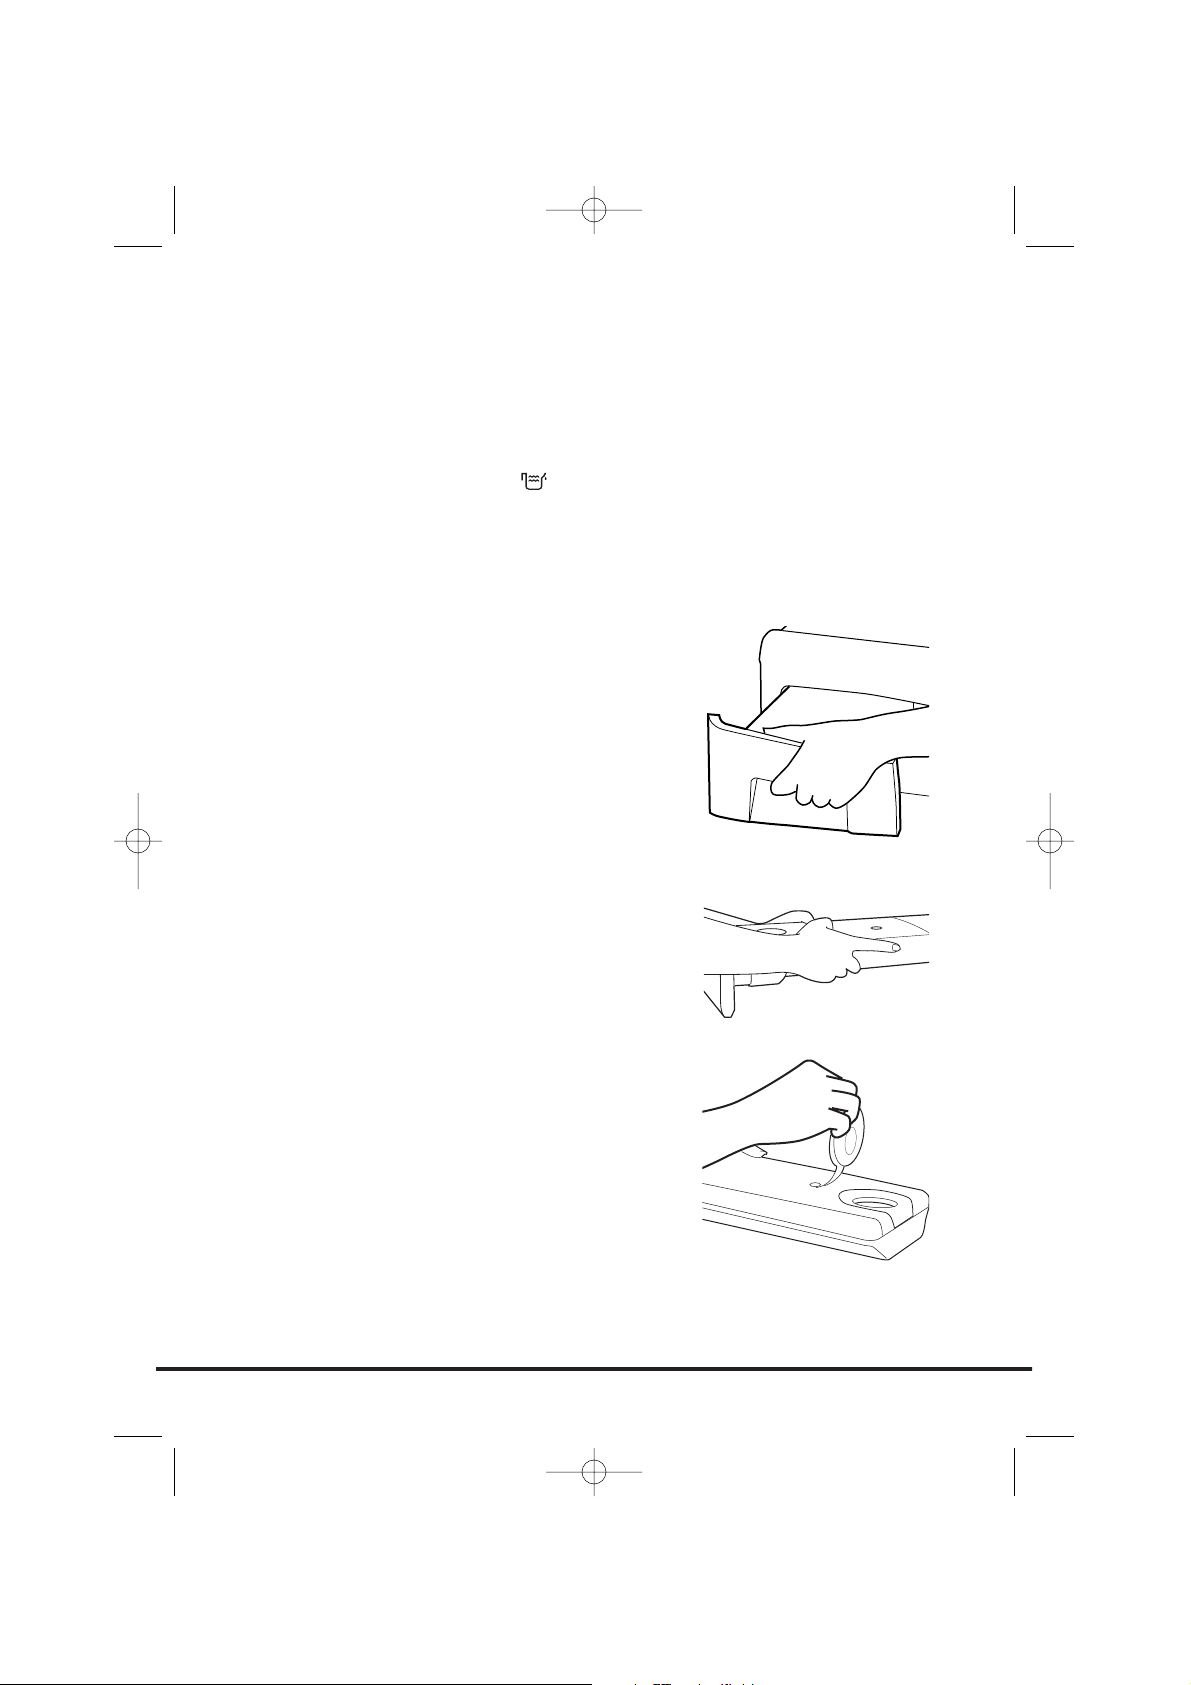
The water removed from the laundry during the
drying cycle is collected in a container at the
bottom of the dryer.
When the container is full the indicator on
the control panel will light, and the container
MMUUSSTT
be emptied. However, we recommend that
the container is emptied after each drying cycle.
NNOOTTEE:: VVeerryy lliittttllee wwaatteerr wwiillll ccoolllleecctt dduurriinngg tthhee ffiirrsstt
ffeeww ccyycclleess ooff aa nneeww mmaacchhiinnee aass aann iinntteerrnnaall
rreesseerrvvooiirr iiss ffiilllleedd ffiirrsstt..
TToo rreemmoovvee tthhee ccoonnttaaiinneerr
1. Gently pull out the tray until it is completely
removed. Support the tray with both hands.
When it is full the water container will
weigh about 4kg.
2. Open the the lid located on the top of the
container and empty the water out. Refit
the lid and slide the water container back
into position. PUSH FIRMLY INTO PLACE.
NNOOTTEE::
If you have the option of drainage near
the dryer it is possible to use the discharge kit to
provide a permanent drain for the water
collected by the dryer. This will remove the need
to empty the water tray. All the information for
assembly of the kit is contained in the kit
envelope.
13
WWaatteerr CCoonnttaaiinneerr
40001828.qxd 02/09/2004 17:19 Page 13
Page 14
IImmppoorrttaanntt:: AAllwwaayyss sswwiittcchh ooffff aanndd rreemmoovvee tthhee
pplluugg ffrroomm tthhee eelleeccttrriicciittyy ssuuppppllyy bbeeffoorree cclleeaanniinngg
tthhee ccoonnddeennsseerr..
To maintain the efficiency of the dryer regularly
check that the condenser is clean.
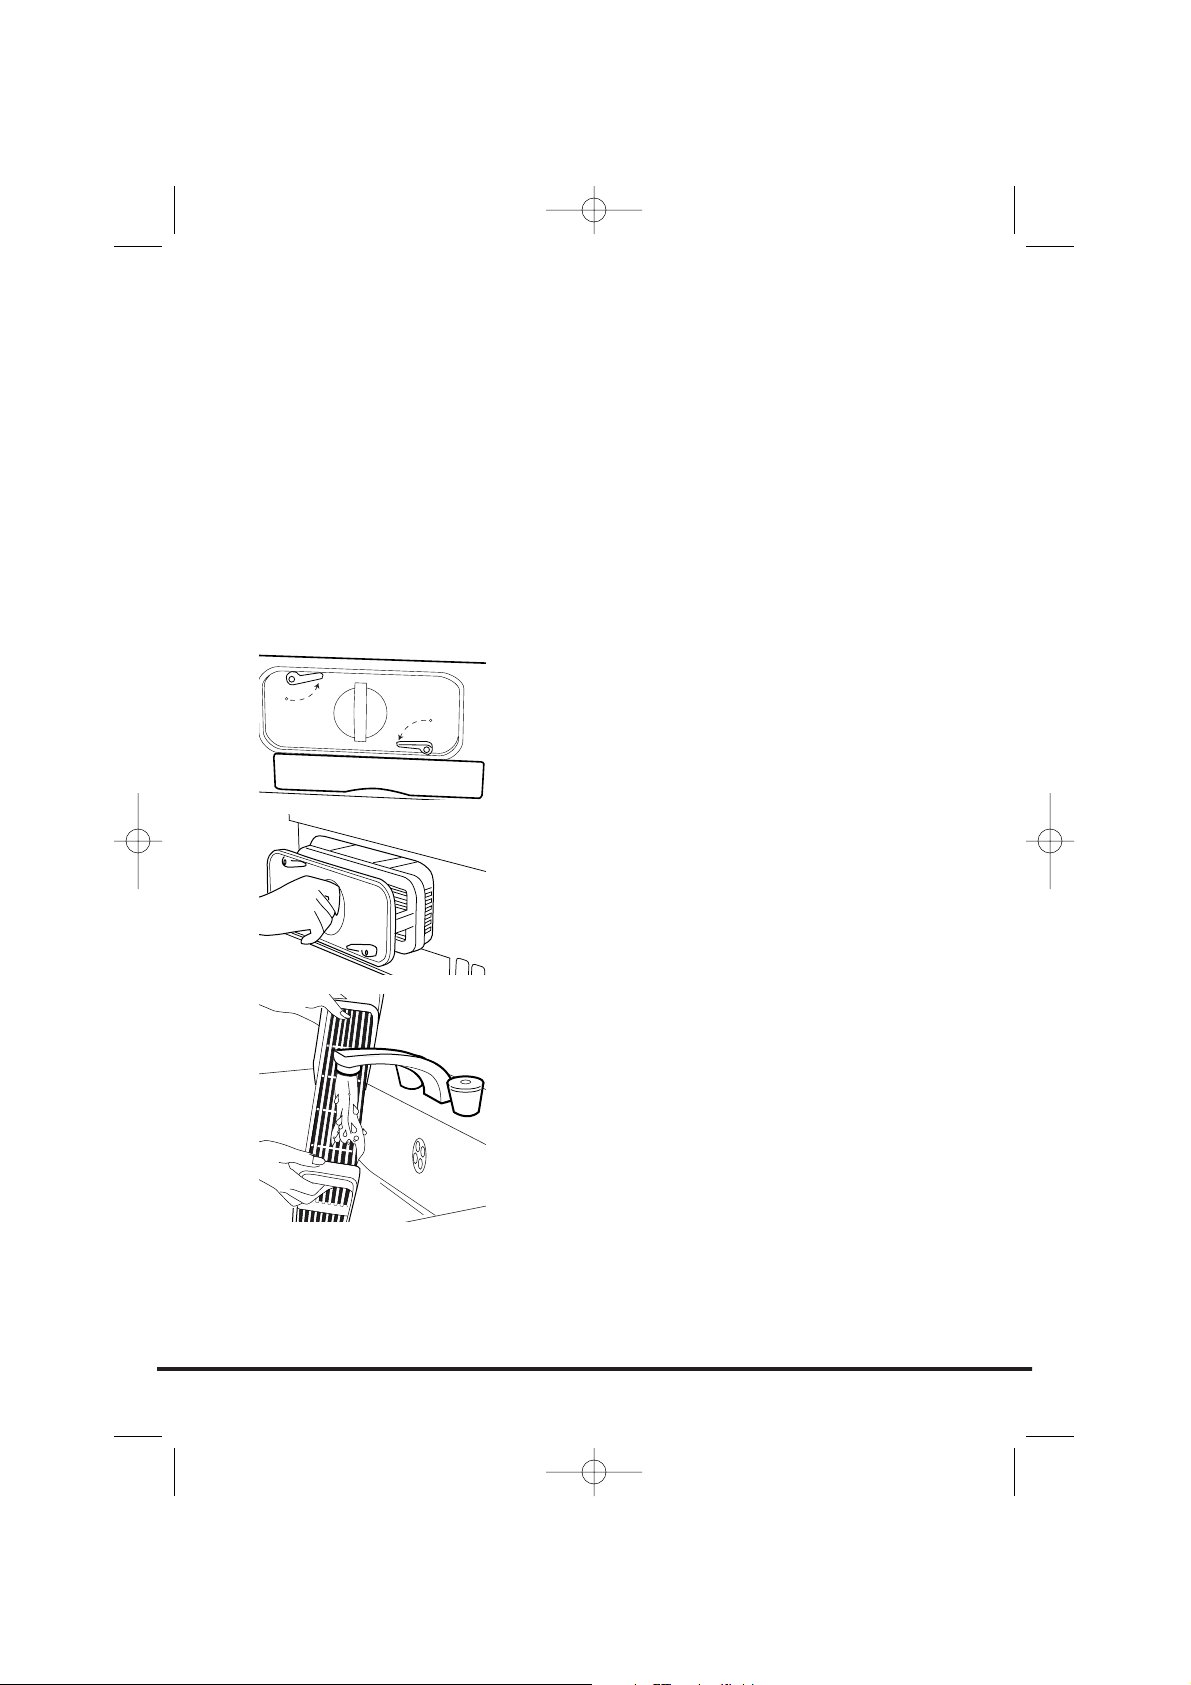
TToo rreemmoovvee tthhee
ccoonnddeennsseerr
11..
Remove the kickplate (see page 13).
22..
Turn the two locking levers anti-clockwise
and pull out the condenser.
33..
Pull out the condenser unit.
44..
Gently remove any dust or fluff with a cloth,
then wash the unit by holding it under a
running tap turning it so that water flows
between the plates, to remove any dust or
fluff.
55..
Refit the condenser ensuring it is in the
correct way (as indicated by the arrow) and
pushed firmly into place. Lock the two levers
by turning them clockwise.
66..
Refit the kickplate.
14
CCoonnddeennsseerr
40001828.qxd 02/09/2004 17:19 Page 14
Page 15
NNoottee::
The sensor may not detect a small load of
small articles. For small loads and separate items
or pre-dried fabrics with low moisture content,
use the timed programmes. Set the programme
between 30 and 75 minutes depending on the
load size and dryness required, and select high or
low heat depending upon the fabric type.
If the sensor does not detect the item the dryer
will only operate for 10 minutes before going
into cooldown.
If the load is too large or too wet to tumble dry
the dryer will automatically go into cooldown
after 180 minutes.
15
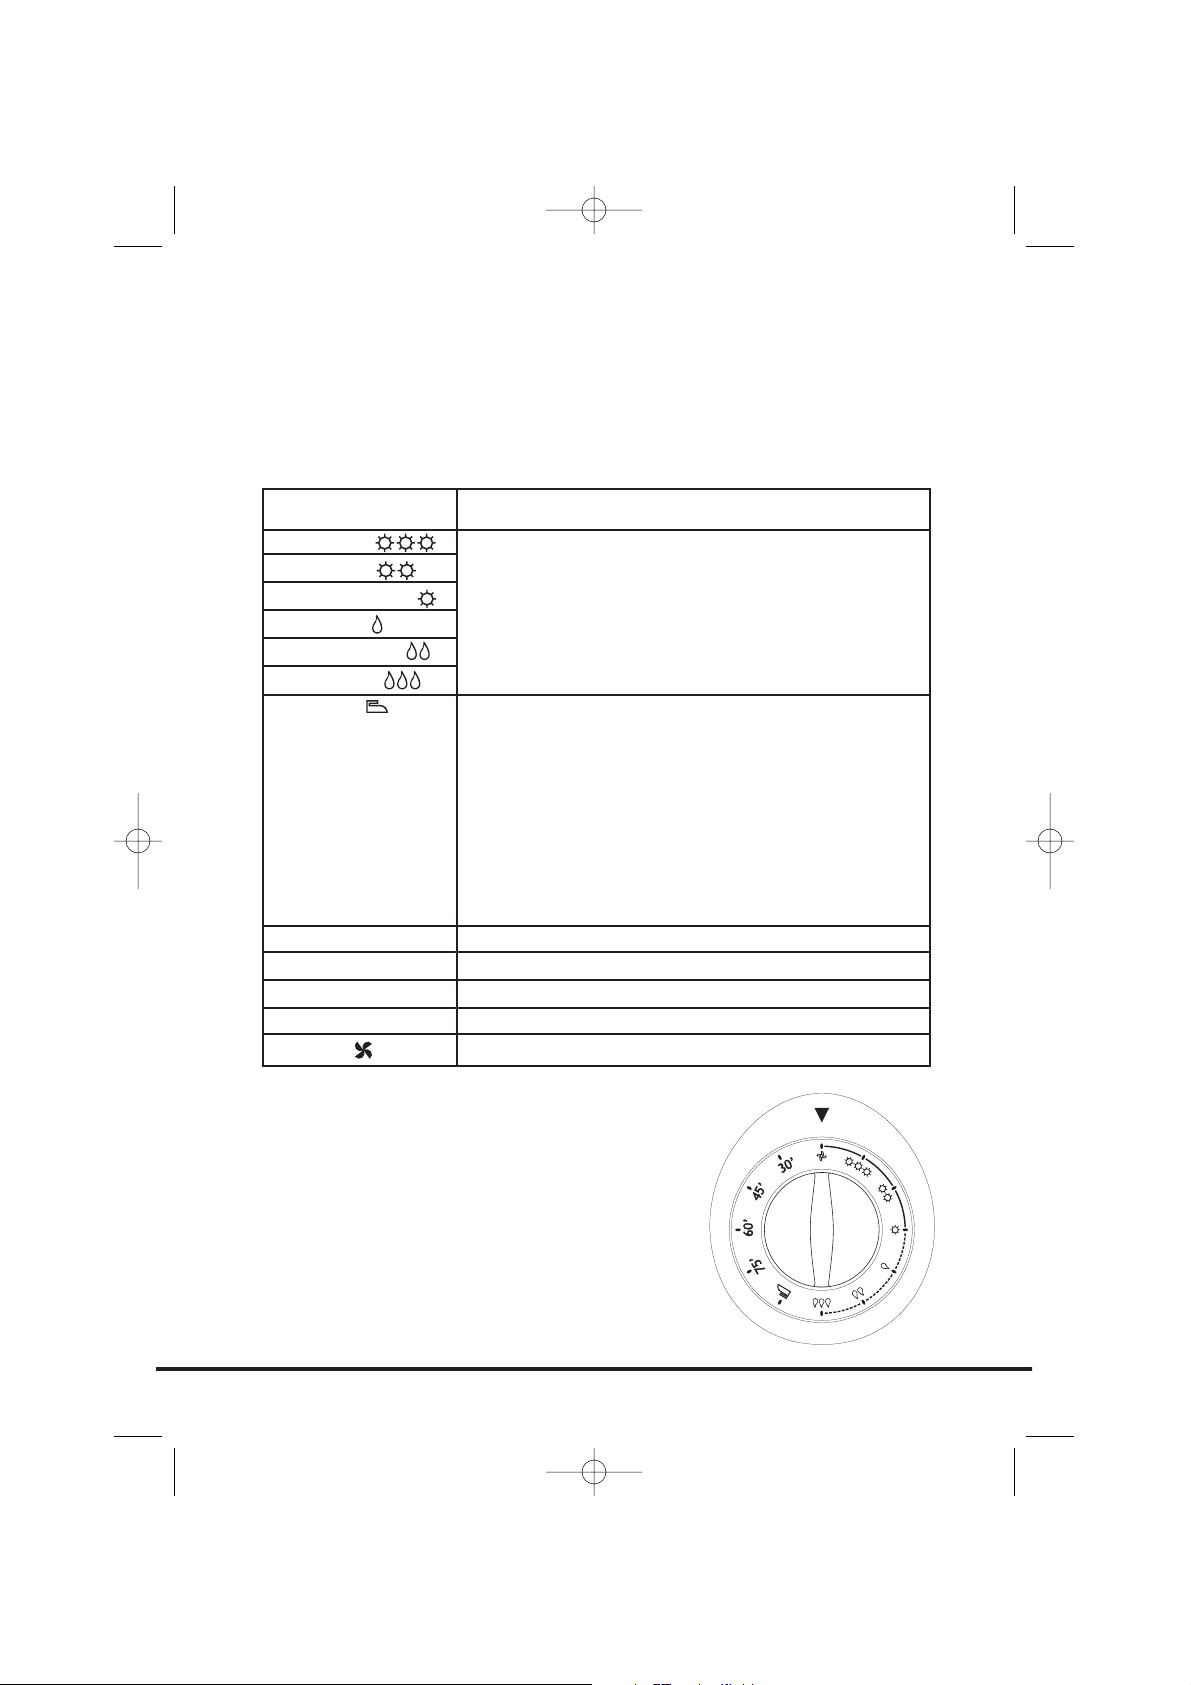
SSeelleeccttiinngg tthhee PPrrooggrraammmmee
PPrrooggrraammmmee
Bone Dry
Extra Dry
Cupboard Dry
Iron Dry
Medium Dry
Damp Dry
Fast Iron
75'
60'
45'
30'
Refresh
DDeessccrriippttiioonn
Select the degree of dryness that you require.
This ranges from Bone Dry for bath towels and
bathrobes, through Cupboard Dry for items that
will be put away without ironing, to the
programmes that leave the laundry suitable for
ironing.
The Fast Iron programme provides a conditioning
and anticrease function. The dryer will heat the
load for 9 minutes followed by a 3 minute cool
down period and is especially good for garments
which may have been left for some time prior to
ironing, in a linen basket for example. Garments
may also become stiffened when dried outside on a
washing line or inside on radiators. The Fast Iron
process relaxes the creases in the fabric making
ironing quicker and easier.
75 minutes of drying
60 minutes of drying
45 minutes of drying
30 minutes of drying
Tumbling of laundry in cool air
The Sensor Dry machine gives many options for drying the laundry to suit all
circumstances.
The table below lists the programmes and the function of each programme.
40001828.qxd 02/09/2004 17:19 Page 15
Page 16
11..
Open the door and load the drum with laundry. Ensure that garments do
not hinder closure of the door.
22..
Gently close the door pushing it slowly until you hear the door 'click'
shut.
33..
Press the button to switch on the dryer. The indicator will light up
and the START indicator will flash.
44..
Turn the Programme Selector dial to select the required drying program
(see Programme Guide).
55..
If drying synthetics, acrylics or delicate items, press the button to
reduce the heat level.
The light above the push button will light up when the machine is in low
heat setting. To deselect this status when the drying cycle has started it is
necessary to reset the machine.
66..
Press the START button. The dryer will start automatically and the START
indicator will be continuously lit.
77..
The display will show the drying progress in terms of time
remaining.
88..
If the door is opened during the programme to check the laundry, it is
necessary to press START to recommence drying after the door has been
closed.
99..
When the 15' indicator is lit the machine will enter the cool down phase,
the clothes will be tumbled in cool air allowing the load to cool down.
1100..
When the programme is complete the STOP indicator will light.
CCaanncceelllliinngg aanndd rreesseettttiinngg tthhee
pprrooggrraammmmee
To cancel a programme press the START button for 5 seconds. The machine will
indicate that it has been reset by the START indicator flashing. It is possible to
change the programme within the first 10 minutes without using the cancel
and reset function.
SSttaarrtt DDeellaayy
The Delay Start Function allows the user to delay the start of the drying
cycle by 6 or 9 hours.
When the function is first selected the display will show a delay of 6 hours, a
subsequent press of the button will increase the delay to 9 hours.
16
OOppeerraattiioonn
40001828.qxd 02/09/2004 17:19 Page 16
Page 17
To commence the programme press START and
the appliance will complete the drying cycle at
the end of this time. The 6 or 9 hour indicator
light will flash to indicate that the start delay is in
progress.
CClleeaanniinngg tthhee ddrryyeerr
● Clean the filter and empty the water
container after every drying cycle.
● Regularly clean the condenser.
● After each period of use, wipe the inside of
the drum and leave the door open for a
while to allow circulation of air to dry it.
● Wipe the outside of the machine and the
door with a soft cloth.
●
DDOO NNOOTT
use abrasive pads or cleaning
agents.
● To prevent the door sticking or the build up
of fluff periodically clean the inner door and
gasket with a damp cloth.
TTeecchhnniiccaall ssppeecciiffiiccaattiioonnss
Drum capacity 115 litres
Maximum load 7 kg
Height 85cm
Width 60cm
Depth 60cm
Energy Label Band C
17
IIMMPPOORRTTAANNTT
AAllwwaayyss sswwiittcchh ooffff
aanndd rreemmoovvee tthhee
pplluugg ffrroomm tthhee
eelleeccttrriicciittyy ssuuppppllyy
bbeeffoorree cclleeaanniinngg
tthhiiss aapppplliiaannccee..
FFoorr eelleeccttrriiccaall ddaattaa
rreeffeerr ttoo tthhee
rraattiinngg llaabbeell oonn
tthhee ffrroonntt ooff tthhee
ddrryyeerr ccaabbiinneett
((wwiitthh tthhee ddoooorr
ooppeenn))..
CClleeaanniinngg aanndd RRoouuttiinnee
MMaaiinntteennaannccee
WWAARRNNIINNGG!!
TThhee ddrruumm,, ddoooorr
aanndd llooaadd mmaayy bbee
vveerryy hhoott..
40001828.qxd 02/09/2004 17:19 Page 17
Page 18
WWhhaatt mmiigghhtt bbee tthhee ccaauussee ooff......
DDeeffeeccttss yyoouu ccaann rreemmeeddyy yyoouurrsseellff
Before calling GIAS Service for technical advice please run through the
following checklist. A charge will be made if the machine is found to be
working or has been installed incorrectly or used incorrectly. If the problem
persists after completing the recommended checks, please call GIAS Service,
they may be able to assist you over the telephone.
DDrryyiinngg ttiimmee iiss ttoooo lloonngg//ccllootthheess aarree nnoott ddrryy eennoouugghh……
● Have you selected the correct drying time/programme?
● Were the clothes too wet? Were the clothes thoroughly wrung or spin-
dried?
● Does the filter need cleaning?
● Does the condenser need cleaning?
● Is the dryer overloaded?
● Are the inlets, outlets and base of the dryer free from obstructions?
● Has the option been selected from a previous cycle?
TThhee ddrryyeerr ddooeess nnoott ooppeerraattee……
● Is there a working electricity supply to the dryer? Check using another
appliance such as a table lamp.
● Is the plug properly connected to the mains supply?
● Is there a power failure?
● Has the fuse blown?
● Is the door fully closed?
● Is the dryer switched on, both at the mains supply and at the machine?
● Has the drying time or the programme been selected?
● Has the machine been switched on again after opening the door?
● Has the dryer stopped operating because the water tray is full and needs
emptying?
TThhee ddrryyeerr iiss nnooiissyy……
● Switch off the dryer and contact GIAS Service for advice.
TThhee FFiilltteerr CCaarree IInnddiiccaattoorr iiss oonn……
● Does the filter need cleaning?
● Does the condenser need cleaning?
EEmmppttyy WWaatteerr IInnddiiccaattoorr iiss oonn……
● Does the water container need emptying?
18
TTrroouubblleesshhoooottiinngg
40001828.qxd 02/09/2004 17:19 Page 18
Page 19
Should there still be a problem with your dryer
after completing all the recommended checks,
please call GIAS Service for advice. They may be
able to assist you over the telephone or arrange
for a suitable appointment for an engineer to call
under the terms of your guarantee. However, a
charge may be made if any of the following
applies to your machine:
● Is found to be in working order.
● Has not been installed in accordance with
the installation instructions.
● Has been used incorrectly.
SSppaarreess
AAllwwaayyss uussee ggeennuuiinnee ssppaarreess,, aavvaaiillaabbllee ddiirreecctt ffrroomm
GGIIAASS SSeerrvviiccee..
GGIIAASS SSeerrvviiccee
FFoorr sseerrvviiccee aanndd rreeppaaiirrss ccaallll yyoouurr llooccaall GGIIAASS SSeerrvviiccee
eennggiinneeeerr..
The manufacturer declines all responsibility in the
event of any printing mistakes in this booklet.
The manufacturer also reserves the right to make
appropriate modifications to its products without
changing the essential characteristics.
19
CCuussttoommeerr SSeerrvviiccee
40001828.qxd 02/09/2004 17:19 Page 19
Page 20

Introduction . . . . . . . . . . . . . . . . . . . . . . . . . . . . . . . . . . . . . . . . . . . . . . 21
Informations sur la livraison . . . . . . . . . . . . . . . . . . . . . . . . . . . . . . . . . . . . . . 21
Déballage du produit . . . . . . . . . . . . . . . . . . . . . . . . . . . . . . . . . . . . 21
Rappels de sécurité . . . . . . . . . . . . . . . . . . . . . . . . . . . . . . . . . . . . . . 22
Installation . . . . . . . . . . . . . . . . . . . . . . . . . . . . . . . . . . . . . . . . . . . . . . . . . . . . 22
Utilisation. . . . . . . . . . . . . . . . . . . . . . . . . . . . . . . . . . . . . . . . . . . . . . . . . . . . . 22
Le linge . . . . . . . . . . . . . . . . . . . . . . . . . . . . . . . . . . . . . . . . . . . . . . . . . . . . . . 22
Protection de l’environnement . . . . . . . . . . . . . . . . . . . . . . . . . . . . . . . . . . . . 23
Service GIAS . . . . . . . . . . . . . . . . . . . . . . . . . . . . . . . . . . . . . . . . . . . . . . . . . . . 23
Installation. . . . . . . . . . . . . . . . . . . . . . . . . . . . . . . . . . . . . . . . . . . . . . . . 24
Besoins électriques. . . . . . . . . . . . . . . . . . . . . . . . . . . . . . . . . . . . . . . . . . . . . . 24
Ajustement des pieds. . . . . . . . . . . . . . . . . . . . . . . . . . . . . . . . . . . . . . . . . . . . 24
Ventilation . . . . . . . . . . . . . . . . . . . . . . . . . . . . . . . . . . . . . . . . . . . . . . . . 25
Préparation de la charge . . . . . . . . . . . . . . . . . . . . . . . . . . . . . . . . 26
Préparation des vêtements . . . . . . . . . . . . . . . . . . . . . . . . . . . . . . . . . . . . . . . 26
Tri de la charge . . . . . . . . . . . . . . . . . . . . . . . . . . . . . . . . . . . . . . . . . . . . . . . . 27
Conseils de séchage. . . . . . . . . . . . . . . . . . . . . . . . . . . . . . . . . . . . . . 28
Ne séchez pas en machine . . . . . . . . . . . . . . . . . . . . . . . . . . . . . . . . . . . . . . . . 28
Économies d’énergie . . . . . . . . . . . . . . . . . . . . . . . . . . . . . . . . . . . . . . . . . . . . 28
Guide de séchage. . . . . . . . . . . . . . . . . . . . . . . . . . . . . . . . . . . . . . . . . . . . . . . 28
Commandes et indicateurs . . . . . . . . . . . . . . . . . . . . . . . . . . . . . 29
Porte et filtre . . . . . . . . . . . . . . . . . . . . . . . . . . . . . . . . . . . . . . . . . . . . . 30
Ouverture de la porte . . . . . . . . . . . . . . . . . . . . . . . . . . . . . . . . . . . . . . . . . . . 30
Filtre. . . . . . . . . . . . . . . . . . . . . . . . . . . . . . . . . . . . . . . . . . . . . . . . . . . . . . . . . 30
Indicateur Entretien Filtre . . . . . . . . . . . . . . . . . . . . . . . . . . . . . . . . . . . . . . . . 30
Réservoir d’eau. . . . . . . . . . . . . . . . . . . . . . . . . . . . . . . . . . . . . . . . . . . 31
Pour retirer le réservoir . . . . . . . . . . . . . . . . . . . . . . . . . . . . . . . . . . . . . . . . . . 31
Condenseur . . . . . . . . . . . . . . . . . . . . . . . . . . . . . . . . . . . . . . . . . . . . . . . 32
Pour retirer le condenseur . . . . . . . . . . . . . . . . . . . . . . . . . . . . . . . . . . . . . . . . 32
Sélection du programme . . . . . . . . . . . . . . . . . . . . . . . . . . . . . . . . 33
Fonctionnement . . . . . . . . . . . . . . . . . . . . . . . . . . . . . . . . . . . . . . . . . 34
Annulation et réinitialisation du programme . . . . . . . . . . . . . . . . . . . . . . . . . 34
Départ Différé . . . . . . . . . . . . . . . . . . . . . . . . . . . . . . . . . . . . . . . . . . . . . . . . . 34
Nettoyage et Entretien de Routine . . . . . . . . . . . . . . . . . . . . 35
Nettoyage du sèche-linge . . . . . . . . . . . . . . . . . . . . . . . . . . . . . . . . . . . . . . . . 35
Spécifications techniques. . . . . . . . . . . . . . . . . . . . . . . . . . . . . . . . . . . . . . . . . 35
Dépistage de pannes . . . . . . . . . . . . . . . . . . . . . . . . . . . . . . . . . . . . 36
Service clientèle . . . . . . . . . . . . . . . . . . . . . . . . . . . . . . . . . . . . . . . . . . 37
Pièces de rechange. . . . . . . . . . . . . . . . . . . . . . . . . . . . . . . . . . . . . . . . . . . . . . 37
Service GIAS . . . . . . . . . . . . . . . . . . . . . . . . . . . . . . . . . . . . . . . . . . . . . . . . . . . 37
20
40001828FRE.qxd 02/01/2006 17:29 Page 20
Page 21
IInnttrroodduuccttiioonn
VVeeuuiilllleezz lliirree eett ssuuiivvrree cceess iinnssttrruuccttiioonnss aavveecc ssooiinn eett uuttiilliisseerr
llaa mmaacchhiinnee ccoonnffoorrmméémmeenntt.. CCee lliivvrreett ccoonnttiieenntt ddeess
iinnssttrruuccttiioonnss iimmppoorrttaanntteess ssuurr llaa ssééccuurriittéé dd’’uuttiilliissaattiioonn,,
ll’’iinnssttaallllaattiioonn eett ll’’eennttrreettiieenn ddee llaa mmaacchhiinnee,, aaiinnssii qquuee ddeess
ccoonnsseeiillss uuttiilleess ppoouurr oobbtteenniirr lleess mmeeiilllleeuurrss rrééssuullttaattss
ppoossssiibblleess lloorrss ddee ssoonn uuttiilliissaattiioonn..
Conservez toute la documentation dans un endroit sûr
pour pouvoir vous y reporter à une date ultérieure ou la
transmettre aux prochains propriétaires.
IInnffoorrmmaattiioonnss ssuurr llaa
lliivvrraaiissoonn
Vérifiez que les articles suivants ont bien été livrés avec
l’appareil :
● Manuel d’utilisation
● Carte de garantie
● Étiquette d’énergie
Retirez la machine de l’emballage, à proximité de son
emplacement définitif.
11..
Coupez délicatement autour de la base de
l’emballage en remontant vers l’angle supérieur.
22..
Retirer le manchon en polyéthylène et sortez le
sèche-linge de la base en polystyrène.
21
VVéérriiffiieezz qquuee llaa
mmaacchhiinnee nnee ss’’eesstt
ppaass ddééttéérriioorrééee eenn
ttrraannssiitt.. SSii cc’’eesstt llee
ccaass,, ccoonnttaacctteezz GGIIAASS
ppoouurr uunnee ooppéérraattiioonn
ddee ddééppaannnnaaggee..
LLee nnoonn--rreessppeecctt ddee
cceess iinnssttrruuccttiioonnss
ppeeuutt ccoommpprroommeettttrree
llaa ssééccuurriittéé ddee vvoottrree
aappppaarreeiill.. UUnn aappppeell
ddee sseerrvviiccee ppeeuutt
vvoouuss êêttrree ffaaccttuurréé ssii
llaa ddééffaaiillllaannccee ddee
vvoottrree aappppaarreeiill eesstt
ccaauussééee ppaarr uunnee
mmaauuvvaaiissee
uuttiilliissaattiioonn..
DDéébbaallllaaggee dduu pprroodduuiitt
MMeettttrree ll’’eemmbbaallllaaggee aauu rreebbuutt eenn ttoouuttee
ssééccuurriittéé.. CCoonnsseerrvveerr hhoorrss ddee ppoorrttééee ddeess
eennffaannttss ccaarr iill rreepprréésseennttee uunnee ssoouurrccee ddee
ddaannggeerr ppootteennttiieellllee..
40001828FRE.qxd 02/09/2004 17:09 Page 21
Page 22

Rappels de sécurité
Installation
● Vérifiez que la machine ne présente aucun signe visible de détérioration avant de
l’utiliser. En cas de détérioration, assurez-vous de ne pas l’utiliser et de contacter le
service GIAS.
● N’utilisez pas d’adaptateurs, de multi-prises et/ou de rallonges.
● Cette machine ne doit pas être installée dans une salle de bain ou de douche.
● Veillez à ne pas installer le sèche-linge contre des rideaux et assurez-vous que rien
ne pourra tomber ou s’accumuler derrière le sèche-linge.
Utilisation
● ATTENTION La mauvaise utilisation d’un sèche-linge risque de causer un d’incendie.
● Cette machine est conçue uniquement pour usage domestique, à savoir pour
sécher le linge domestique et les vêtements.
● Cette machine ne doit être utilisée que pour l’emploi auquel elle est destinée et
qui est décrit dans ce manuel. Assurez-vous d’avoir bien compris les instructions
d’installation et d’utilisation avant de faire fonctionner la machine.
● Ne touchez pas la machine si vous avez les mains ou les pieds mouillés ou humides.
● Ne vous appuyez pas sur la porte lorsque vous chargez la machine et n’utilisez pas
la porte pour soulever ou déplacer la machine.
● Ne laissez pas des enfants jouer avec la machine ou avec ses commandes.
● ATTENTION N’utilisez pas cette machine si le filtre à peluches n’est pas en place ou
s’il est endommagé ; les peluches risquent en effet de s’allumer.
● ATTENTION L’augmentation de température pendant le fonctionnement du sèche-
linge peut être supérieure à 60°C là où se trouve le symbole de surface chaude.
● Débranchez du courant de secteur. Retirez toujours la prise avant de nettoyer la
machine.
● Cessez d’utiliser la machine si elle semble défectueuse.
● Veillez à ce que les peluches ne puissent pas s’accumuler sur le sol, à l’extérieur de
la machine.
● Il se peut que l’intérieur du tambour soit très chaud. Veillez à ce que le sèche-linge
termine son cycle de refroidissement avant d’en sortir le linge.
Le linge
● ATTENTION NE séchez PAS les tissus qui ont été traités avec des liquides de
nettoyage à sec.
● ATTENTION Quand elles sont chauffées, les mousses alvéolaires peuvent dans
certains cas brûler par combustion spontanée. Les articles en plastique alvéolaire,
en caoutchouc alvéolaire et en caoutchouc ne conviennent pas au séchage en
machine. Les articles fabriqués à partir de ces matériaux NE DOIVENT PAS être
placés dans le sèche-linge.
● Reportez-vous toujours aux étiquettes d’entretien du linge pour vérifier le mode
de séchage recommandé.
● Les vêtements doivent être essorés en machine ou à la main avant d’être placés
dans le sèche-linge. Les vêtements qui dégoulinent NE DOIVENT PAS être mis dans
22
40001828FRE.qxd 02/01/2006 17:30 Page 22
Page 23
le sèche-linge.
● Enlevez les briquets et les allumettes des poches et veillez à ne JAMAIS utiliser de
liquides inflammables à proximité de la machine.
● Les rideaux en fibres de verre ne doivent JAMAIS être placés dans cette machine.
La contamination d’autres vêtements par les fibres de verre peut entraîner des
irritations de la peau.
● Les vêtements traités ou contaminés par des produits de nettoyage ou des liquides
inflammables, comme le pétrole, l’huile de cuisson ou les aérosols NE DOIVENT
PAS être placés dans la machine.
Protection de l’environnement
● Tous les matériaux de conditionnement utilisés sont écologiques et recyclables.
Veuillez les éliminer de manière écologique. Votre municipalité pourra vous
donner le détail exact des méthodes d’élimination en vigueur.
● Pour assurer la sécurité lors de l’élimination d’un vieux sèche-linge, veuillez
débrancher la fiche du courant de secteur, couper le câble d’alimentation et le
détruire avec la fiche. Pour empêcher que les enfants ne s’enferment dans la
machine, cassez les charnières de la porte ou son dispositif de verrouillage.
Service GIAS
● Pour veiller au fonctionnement efficace et sans risque de cet appareil, nous vous
recommandons de faire exclusivement appel à un technicien GIAS agréé pour son
entretien ou sa réparation éventuelle.
Directive européenne 2002/96/CE
Cet appareil est commercialisé en accord avec la directive européenne 2002/96/CE sur les
déchets des équipements électriques et électroniques (DEEE).
En vous assurant que ce produit est correctement recyclé,
vous participez à la prévention des conséquences négatives
sur l’environnement et la santé publique qui pourrait être
causé par une mise au rebut inappropriée de ce produit.
Le symbole sur ce produit indique qu’il ne doit pas être traité
comme un déchet ménager. Il doit être rapporté jusqu’à un
point de recyclage des déchets électriques et électroniques.
La collecte de ce produit doit se faire en accord avec les
réglementations environnementales concernant la mise au
rebut de ce type de déchets.
Pour plus d’information au sujet du traitement, de la collecte
et du recyclage de ce produit, merci de contacter votre mairie,
votre centre de traitement des déchets ou le magasin où vous
avez acheté ce produit.
23
Si l’appareil ne fonctionne pas correctement ou s’il tombe en
panne, mettez-le à l’arrêt et débranchez-le du courant de secteur.
Consultez le service GIAS pour prévoir une éventuelle réparation.
40001828FRE.qxd 02/01/2006 17:31 Page 23
Page 24

BBeessooiinnss éélleeccttrriiqquueess
Les sèche-linges sont prévus pour une tension
monophasée de 230 V, 50 Hz. Vérifiez que la tension
nominale du circuit d’alimentation est réglée sur 10 A
minimum.
LL’’éélleeccttrriicciittéé ppeeuutt êêttrree eexxttrrêêmmeemmeenntt ddaannggeerreeuussee..
CCeett aappppaarreeiill ddooiitt êêttrree mmiiss àà llaa tteerrrree..
LLaa pprriissee ddee ccoouurraanntt eett llaa ffiicchhee ddee llaa mmaacchhiinnee ddooiivveenntt
êêttrree dduu mmêêmmee ttyyppee..
NN’’uuttiilliisseezz ppaass ddee mmuullttii--pprriisseess eett//oouu ddee rraalllloonnggeess..
LLaa ffiicchhee ddooiitt êêttrree aacccceessssiibbllee ppoouurr ddéébbrraanncchheerr ll’’aappppaarreeiill
uunnee ffooiiss qquu’’iill aa ééttéé iinnssttaalllléé..
Les fils du câble de secteur sont colorés en fonction des
codes suivants :
BBlleeuu NNEEUUTTRREE
MMaarrrroonn SSOOUUSS TTEENNSSIIOONN
VVeerrtt eett jjaauunnee TTEERRRREE
La machine est conforme aux directives européennes
89/336/EEC, 73/23/EEC et à leurs modifications
ultérieures.
AAjjuusstteemmeenntt ddeess ppiieeddss
Lorsque la machine est en place, les pieds doivent être
ajustés pour mettre la machine de niveau.
Ajustez les quatre pieds pour stabiliser la machine et la
mettre de niveau.
24
UUnn aappppeell ddee sseerrvviiccee
ppeeuutt vvoouuss êêttrree
ffaaccttuurréé ssii llaa
ddééffaaiillllaannccee ddee
vvoottrree aappppaarreeiill eesstt
ccaauussééee ppaarr uunnee
iinnssttaallllaattiioonn
iinnccoorrrreeccttee..
SSii llee ccoorrddoonn
éélleeccttrriiqquuee ddee cceett
aappppaarreeiill eesstt
eennddoommmmaaggéé,, iill
ddooiitt êêttrree rreemmppllaaccéé
ppaarr uunn ccoorrddoonn
ssppéécciiaall qquuii eesstt
UUNNIIQQUUEEMMEENNTT
ddiissppoonniibbllee aauupprrèèss
dduu sseerrvviiccee ddeess
ppiièècceess ddee
rreecchhaannggee.. IIll ddooiitt
êêttrree iinnssttaalllléé ppaarr
uunnee ppeerrssoonnnnee
ccoommppéétteennttee..
IInnssttaallllaattiioonn
NNee bbrraanncchheezz ppaass ll’’aappppaarreeiill eett nnee mmeetttteezz
ppaass eenn mmaarrcchhee ll’’iinntteerrrruupptteeuurr ddee sseecctteeuurr
ttaanntt qquuee ll’’iinnssttaallllaattiioonn nn’’eesstt ppaass tteerrmmiinnééee..
PPaarr mmeessuurree ddee ssééccuurriittéé,, vveeiilllleezz àà iinnssttaalllleerr
ccee ssèècchhee--lliinnggee ccoorrrreecctteemmeenntt..
EEnn ccaass ddee ddoouuttee ccoonncceerrnnaanntt ssoonn
iinnssttaallllaattiioonn,, vveeuuiilllleezz ddeemmaannddeerr ccoonnsseeiill àà
GGIIAASS SSeerrvviiccee..
40001828FRE.qxd 02/09/2004 17:09 Page 24
Page 25

La pièce où se trouve le sèche-linge doit avoir une
ventilation adéquate de manière à ce que les gaz des
appareils qui brûlent d’autres combustibles, y compris
les cheminées, ne soient pas attirés dans la pièce
pendant que le sèche-linge est en marche.
● L’air d’échappement ne doit pas être évacué par
un conduit qui est également utilisé pour évacuer
les fumées d’échappement d’appareils qui brûlent
du gaz ou d’autres combustibles.
● Vérifiez régulièrement que l’air peut circuler
librement autour du sèche-linge.
● Vérifiez le filtre à peluches après usage, et
nettoyez-le le cas échéant.
● Les entrées et sorties doivent être libres
d’obstructions. Pour veiller à une ventilation
adéquate, l’espace entre le bas de la machine et
le sol ne doit pas être obstrué. Il doit y avoir un
espace d’au moins 12 mm entre la machine et
d’éventuelles obstructions.
● Veillez à ce que rien ne puisse tomber ou
s’accumuler entre les côtés et l’arrière du sèchelinge, afin de ne pas obstruer l’entrée et la sortie
d’air.
● N’installez
JJAAMMAAIISS
le sèche-linge contre des
rideaux.
25
VVeennttiillaattiioonn
PRISES D’AIR
PRISES D’AIR DANS LA BASE
ENTREES D’AIR
40001828FRE.qxd 02/09/2004 17:09 Page 25
Page 26

Avant d’utiliser le sèche-linge pour la première fois :
● Veuillez lire ce manuel d’instruction en détail.
● Retirez tous les articles qui se trouvent à
l’intérieur du tambour.
● Essuyez l’intérieur du tambour et de la porte avec
un chiffon humide pour éliminer la poussière
éventuelle qui aurait pu s’y infiltrer en transit.
PPrrééppaarraattiioonn ddeess
vvêêtteemmeennttss
Vérifiez sur les étiquettes comportant les symboles
d’entretien que le linge que vous souhaitez sécher
convient au séchage en machine.
Vérifiez que toutes les fermetures sont fermées et que
les poches sont vides. Mettez les articles à l’envers.
Placez les vêtements en vrac dans le tambour en veillant
à ce qu’ils ne s’emmêlent pas les uns avec les autres.
PPooiiddss ddee sséécchhaaggee
mmaaxxiimmuumm
● Coton, 7 kg maxi
● Synthétiques, 3,5 kg maxi
26
PPrrééppaarraattiioonn ddee llaa cchhaarrggee
NNee ssuurrcchhaarrggeezz ppaass
llee ttaammbboouurr ;;
lloorrssqquu’’iillss ssoonntt
mmoouuiillllééss,, lleess ggrraannddss
aarrttiicclleess ppeeuuvveenntt
ddééppaasssseerr llee ppooiiddss
ddee mmaaxxiimmuumm
aaddmmiissssiibbllee
((eexx :: ssaaccss ddee
ccoouucchhaaggee,,
ccoouueetttteess))..
40001828FRE.qxd 02/09/2004 17:09 Page 26
Page 27

TTrriieezz llaa cchhaarrggee ccoommmmee
ssuuiitt ::
●
PPaarr ssyymmbboollee ddee ssooiinn dd’’eennttrreettiieenn
Vous les trouverez sur le col ou la couture
intérieure :
Convient pour séchage en machine.
Séchage à haute température.
Séchage à basse température uniquement.
Ne séchez pas en machine.
Si le vêtement ne comporte aucune étiquette
de conseils de lavage, considérez qu’il ne
convient pas pour le séchage en machine.
●
PPaarr qquuaannttiittéé eett ééppaaiisssseeuurr
Lorsque la charge est plus importante que la
capacité du sèche-linge, séparez les vêtements
selon leur épaisseur (ex : les serviettes des sousvêtements fins).
●
PPaarr ttyyppee ddee ttiissssuu
CCoottoonn//ttooiillee ddee lliinn ::
Serviettes, jersey en coton,
linge de lit ou de table.
SSyynntthhééttiiqquueess ::
Chemisiers, chemises, blouses etc.
en polyester ou polyamide, ainsi que pour les
mélanges de coton/synthétique.
●
PPaarr ddeeggrréé ddee sséécchhaaggee
Triez selon : sec pour repassage, sec pour
rangement, etc. Pour les articles délicats, appuyez
sur le bouton pour sélectionner une
température de séchage basse.
27
40001828FRE.qxd 02/09/2004 17:09 Page 27
Page 28

NNee sséécchheezz ppaass eenn
mmaacchhiinnee ::
Les lainages, la soie, les tissus délicats, les bas de nylon,
les broderies délicates, les tissus ayant des décorations
métalliques, les vêtements avec des bordures en PVC ou
en cuir, les chaussures de sport, les articles volumineux
comme les sacs de couchage, etc.
ÉÉccoonnoommiieess dd’’éénneerrggiiee
Ne mettez que du linge essoré en machine ou à la main
dans le sèche-linge. Plus le linge est sec, plus le temps
de séchage sera court, ce qui économisera de l’énergie.
TTOOUUJJOOUURRSS
● Essayez de sécher le poids de linge maximum,
pour économiser du temps et de l’électricité.
● Vérifiez que le filtre est propre avant chaque cycle
de séchage.
JJAAMMAAIISS
● Ne dépassez pas le poids maximum pour ne pas
gaspiller du temps ou de l’électricité.
● Ne mettez pas d’articles dégoulinant d’eau dans
le sèche-linge pour ne pas endommager
l’appareil.
GGuuiiddee ddee sséécchhaaggee
Ce tableau indique les temps de séchage approximatifs,
selon le type de tissu et le degré d’humidité des
vêtements.
28
CCoonnsseeiillss ddee sséécchhaaggee
IIMMPPOORRTTAANNTT :: NNee
sséécchheezz ppaass lleess
aarrttiicclleess qquuii oonntt ééttéé
ttrraaiittééss aavveecc uunn
lliiqquuiiddee ddee
nneettttooyyaaggee àà sseecc oouu
lleess vvêêtteemmeennttss eenn
ccaaoouuttcchhoouucc ((rriissqquuee
dd’’iinncceennddiiee oouu
dd’’eexxpplloossiioonn))..
PPeennddaanntt lleess 1155
ddeerrnniièèrreess mmiinnuutteess,,
llaa cchhaarrggee eesstt
ttoouujjoouurrss sséécchhééee
ddaannss ddee ll’’aaiirr ffrrooiidd..
TTiissssuuss
COTON
SYNTHÉTIQUES
ACRYLIQUE
PPUUIISSSSAANNCCEE DDEE
SSÉÉCCHHAAGGEE
HAUT
BAS
BAS
TTEEMMOOIINN
LLUUMMIINNEEUUXX
ARRET
MARCHE
MARCHE
PPLLEEIINNEE
CCHHAARRGGEE
140-165 min
–
–
CCHHAARRGGEE
MMOOYYEENNNNEE
70-80 min
70-80 min
50-65 min
PPEETTIITTEE
CCHHAARRGGEE
50-65 min
40-55 min
30-40 min
40001828FRE.qxd 02/09/2004 17:09 Page 28
Page 29

PPaannnneeaauu ddee ccoommmmaannddee eett ttéémmooiinnss iinnddiiccaatteeuurrss
SSéélleecctteeuurr ddee pprrooggrraammmmeess ––
sélectionnez le programme requis
BBoouuttoonn eett iinnddiiccaatteeuurr MMaarrcchhee//AArrrrêêtt
– appuyez pour mettre en marche ; l’indicateur
s’allume.
BBoouuttoonn SSTTAARRTT ((DDééppaarrtt))
– appuyez sur ce bouton pour lancer le programme de séchage
sélectionné. Appuyez pendant 5 secondes pour annuler/réinitialiser le programme.
BBoouuttoonn SSéécchhaaggee DDéélliiccaatt
– appuyez pour réduire la température pour les articles
délicats ; l’indicateur situé au-dessus du bouton s’allume. Pour modifier le réglage de la
température, le programme doit être réinitialisé.
Basse température - témoin lumineux
AALLLLUUMMEE
Haute température - témoin lumineux
EETTEEIINNTT
IInnddiiccaatteeuurr RRéésseerrvvooiirr PPlleeiinn
– s’allume lorsque le réservoir d’eau est plein.
IInnddiiccaatteeuurr EEnnttrreettiieenn FFiillttrree
– s’allume lorsqu’il est nécessaire de nettoyer le filtre.
BBoouuttoonn DDééppaarrtt DDiifffféérréé
– permet à l’utilisateur de différer le démarrage du cycle de
séchage (voir les détails de fonctionnement en page 34)
AAffffiicchheeuurr
SSTTAARRTT
– le témoin de START clignote lorsque le sèche-linge est en marche, et est allumé
lorsque le programme débute.
6600''
– le témoin s’allume lorsqu’il reste moins de 60 minutes avant la fin du programme.
1155''
– le témoin s’allume lorsqu’il reste moins de 15 minutes avant la fin du programme.
A ce stade du cycle de séchage, la machine se met en mode Refroidissement.
SSTTOOPP
– ce témoin s’allume lorsque le programme est terminé.
66hh
– temporisation de 6 heures (le témoin clignote lorsque cette fonction est activée).
99hh
– temporisation de 9 heures ((le témoin clignote lorsque cette fonction est activée)
29
CCoommmmaannddeess eett iinnddiiccaatteeuurrss
BOUTON
SECHAGE
DELICAT
BOUTON
MARCHE/
ARRET
INDICATEUR
ENTRETIEN FILTRE
INDICATEUR
RÉSERVOIR
PLEIN
SELECTEUR DE
PROGRAMMES
BOUTON
START
(DEPART)
BOUTON
DEPART
DIFFERE
AFFICHEUR
COUNTDOWN
40001828FRE.qxd 02/09/2004 17:09 Page 29
Page 30

OOuuvveerrttuurree ddee llaa ppoorrttee
Tirez sur la poignée pour ouvrir la porte.
Pour remettre le sèche-linge en marche, fermez la porte
et appuyez START.
FFiillttrree
IIMMPPOORRTTAANNTT :: PPoouurr aassssuurreerr ll’’eeffffiiccaacciittéé dduu ssèècchhee--lliinnggee,,
vvéérriiffiieezz qquuee llee ffiillttrree àà ppeelluucchheess eesstt pprroopprree aavvaanntt cchhaaqquuee
ccyyccllee ddee sséécchhaaggee..
11..
Tirez le filtre vers le haut.
22..
Ouvrez le filtre, comme illustré.
33..
Retirez doucement les peluches à l’aide d’une
brosse douce ou du bout des doigts.
44..
Réenclenchez le filtre et poussez-le en place.
IInnddiiccaatteeuurr EEnnttrreettiieenn
FFiillttrree
s’allume lorsqu’il faut nettoyer le filtre.
SSii llee lliinnggee nnee ssèècchhee ppaass,, vvéérriiffiieezz qquuee llee ffiillttrree nn’’eesstt ppaass
ccoollmmaattéé..
30
PPoorrttee eett ffiillttrree
AATTTTEENNTTIIOONN !!
LLoorrssqquuee llee sseecchhee--lliinnggee eesstt eenn ccoouurrss
dd’’uuttiilliissaattiioonn,, iill ssee ppeeuutt qquuee llee ttaammbboouurr
eett llaa ppoorrttee ssooiieenntt TTRREESS CCHHAAUUDDSS..
40001828FRE.qxd 02/09/2004 17:09 Page 30
Page 31

L’eau récupérée du linge pendant le cycle de séchage
est recueillie dans un bac situé en bas du sèche-linge.
Quand le réservoir est plein, l’indicateur s’allume
sur le panneau de commande et le réservoir
DDOOIITT
AABBSSOOLLUUMMEENNTT
être vidé. Cependant, nous
recommandons de vider le réservoir après chaque cycle
de séchage.
NNOOTTEE :: IIll nn’’yy aa qquuee ttrrèèss ppeeuu dd’’eeaauu qquuii eesstt rrééccuuppéérréé
ppeennddaanntt lleess pprreemmiieerrss ccyycclleess dd’’uunnee nnoouuvveellllee mmaacchhiinnee,, ccaarr
llee rréésseerrvvooiirr iinnttéérriieeuurr eesstt rreemmppllii eenn pprreemmiieerr..
PPoouurr rreettiirreerr llee rréésseerrvvooiirr
1. Tirez doucement le réservoir jusqu’à l’extraire
complètement. Tenez-le fermement à deux mains.
Lorsque le réservoir est plein, il pèse environ 4 kg.
2. Ouvrez le couvercle situé sur le dessus du réservoir
et videz l’eau. Refermez le couvercle et glissez le
bac de récupération de l’eau dans sa position.
POUSSEZ-LE FERMEMENT EN PLACE.
NNOOTTEE ::
Si vous disposez d’une bouche d’évacuation
proche du sèche-linge, il est possible d’installer le kit
d’évacuation de façon permanente pour vidanger l’eau
accumulée dans le sèche-linge. Il n’y aura ainsi plus
besoin de vider le réservoir d’eau. Toutes les
informations d’assemblage du kit sont fournies avec
celui-ci.
31
RRéésseerrvvooiirr dd’’eeaauu
40001828FRE.qxd 02/09/2004 17:09 Page 31
Page 32

IImmppoorrttaanntt :: CCoouuppeezz ttoouujjoouurrss llee ccoouurraanntt eett ddéébbrraanncchheezz llaa
pprriissee aavvaanntt ddee nneettttooyyeerr llee ccoonnddeennsseeuurr..
Pour maintenir l’efficacité du sèche-linge, vérifiez
régulièrement la propreté du condenseur.
PPoouurr rreettiirreerr llee
ccoonnddeennsseeuurr
11..
Retirez la plaque de protection (voir page 31).
22..
Tournez les deux leviers de blocage dans le sens
contraire des aiguilles d’une montre et retirez le
condenseur.
33..
Tirez l’ensemble du condenseur vers l’extérieur.
44..
Retirez doucement la poussière ou les peluches
avec un chiffon, puis lavez-le en le tenant sous un
robinet d’eau pour que l’eau coule entre les
plaques afin d’enlever la poussière ou les peluches
éventuelles.
55..
Remettez correctement le condenseur en place
(en suivant la flèche) en le poussant fermement.
Bloquez les deux leviers en position en les
tournant dans le sens des aiguilles d’une montre.
66..
Remettez la plaque de protection en place.
32
CCoonnddeennsseeuurr
40001828FRE.qxd 02/09/2004 17:09 Page 32
Page 33

NNoottee ::
Il se peut que le capteur ne détecte pas les
petites charges de petits articles. Pour les petites
charges et les articles individuels ou les tissus pré-séchés
ayant une faible teneur en humidité, utilisez les
programmes à durée déterminée. Réglez le programme
entre 30 et 75 minutes selon la taille de la charge et le
degré de séchage voulu, et sélectionnez une
température haute ou basse selon le type de tissu.
Si le capteur ne détecte pas l’article, le sèche-linge ne
fonctionnera que pendant 10 minutes avant de se
mettre en mode refroidissement.
Si la charge est trop importante ou trop mouillée, le
sèche-linge se met automatiquement en mode
refroidissement après 180 minutes.
33
SSéélleeccttiioonn dduu pprrooggrraammmmee
PPrrooggrraammmmee
Complètement
sec
Extra sec
Sec
Repassage
Moyennement sec
Humide
Repassage rapide
75'
60'
45'
30'
Défroissage
DDeessccrriippttiioonn
Sélectionnez le degré de séchage souhaité.
Celui-ci s’étend de Complètement sec pour le linge de
bain et les peignoirs, à Sec pour les articles qui seront
rangés sans être repassés, et comprend également des
programmes séchant le linge qui sera repassé.
Le programme Repassage rapide comporte une fonction
assouplissant et antifroissement. Le sèche-linge chauffera
la charge pendant 9 minutes et le refroidira ensuite
pendant 3 minutes, ce qui est particulièrement utile pour
les vêtements qui ont été laissés pendant un certain
temps avant le repassage, dans le sac à linge par
exemple. Les vêtements peuvent également raidir
lorsqu’ils sont séchés en plein air sur une corde à linge
ou à l’intérieur sur des radiateurs. Le processus de
Repassage rapide détend les froissements du tissu pour
rendre le repassage plus rapide et plus facile.
75 minutes de séchage
60 minutes de séchage
45 minutes de séchage
30 minutes de séchage
Séchage de linge dans de l’air froid
La machine Sensor Dry propose diverses options de séchage du linge répondant à tous
les besoins.
Le tableau ci-après répertorie les programmes et leurs fonctions correspondantes.
40001828FRE.qxd 02/09/2004 17:09 Page 33
Page 34

11..
Ouvrez la porte et chargez le sèche-linge de linge. Vérifiez qu’aucun vêtement
n’entrave la fermeture de la porte.
22..
Fermez doucement la porte en la poussant lentement jusqu’à ce que vous
entendiez un déclic.
33..
Appuyez sur le bouton pour mettre le sèche-linge en marche. Le témoin
s’allume et le témoin de START clignote.
44..
Tournez le sélecteur de programme pour choisir le programme de séchage requis
(consultez le guide de programmation).
55..
Pour sécher des articles délicats, synthétiques ou en acrylique, appuyez sur le
bouton pour diminuer la température.
Le témoin lumineux situé au-dessus du bouton s’allume lorsque la machine est en
mode basse température. Pour désactiver ce mode lorsque le cycle de séchage a
commencé, la machine doit être réinitialisée.
66..
Appuyez sur le bouton START. Le sèche-linge démarre automatiquement et
l’indicateur START reste allumé de façon continue.
77..
L’afficheur indique le l’avancement du séchage en termes de temps restant.
88..
Si vous ouvrez la porte pendant le cycle de séchage pour vérifier le linge, il est
nécessaire d’appuyer sur Départ pour recommencer le séchage une fois la porte
refermée.
99..
Lorsque l’indicateur 15' s’allume, la machine se met en mode refroidissement et les
articles sont séchés dans de l’air froid.
1100..
Lorsque le programme est terminé, le témoin STOP s’allume.
AAnnnnuullaattiioonn eett rrééiinniittiiaalliissaattiioonn dduu
pprrooggrraammmmee
Pour annuler un programme, appuyez sur le bouton Départ pendant 5 secondes.
L’indicateur START clignote, signifiant que la machine a été réinitialisée. Il est possible de
modifier le programme dans les 10 minutes suivant le démarrage sans utiliser la fonction
d’annulation et de réinitialisation.
DDééppaarrtt DDiifffféérréé
La fonction de Départ Différé permet à l’utilisateur de programmer le démarrage
du cycle de séchage dans un délai de 6 à 9 heures.
Lorsque cette fonction est sélectionnée pour la première fois, l’afficheur indique un
délai de 6 heures. Il convient d’appuyer une nouvelle fois sur le bouton pour repousser
le délai à 9 heures.
34
FFoonnccttiioonnnneemmeenntt
40001828FRE.qxd 02/09/2004 17:09 Page 34
Page 35

Pour lancer le programme, appuyez sur START. Le cycle
de séchage débutera à l’issue de ce délai. Le témoin
lumineux de 6 ou 9 heures clignote alors pour indiquer
que la temporisation est activée.
NNeettttooyyaaggee dduu ssèècchhee--
lliinnggee
● Nettoyez le filtre et videz le réservoir d’eau après
chaque cycle de séchage.
● Nettoyez le condenseur à intervalles réguliers.
● Après chaque période d’utilisation, essuyez
l’intérieur du tambour et laissez la porte ouverte
pendant un moment pour qu’il puisse sécher
grâce à la circulation d’air.
● Essuyez l’extérieur de la machine et la porte avec
un chiffon doux.
●
NN’’uuttiilliisseezz PPAASS
de tampons ou d’agents de
nettoyage abrasifs.
● Pour empêcher que la porte n’adhère ou que les
peluches ne s’accumulent, nettoyez régulièrement
la surface intérieure et le joint de la porte avec un
chiffon humide.
SSppéécciiffiiccaattiioonnss tteecchhnniiqquueess
Capacité du tambour 115 litres
Charge maximale 7 kg
Hauteur 85 cm
Largeur 60 cm
Profondeur 60 cm
Étiquette d’énergie C
35
IIMMPPOORRTTAANNTT
CCoouuppeezz ttoouujjoouurrss llee
ccoouurraanntt eett
ddéébbrraanncchheezz llaa ffiicchhee
ddee ll’’aalliimmeennttaattiioonn
éélleeccttrriiqquuee aavvaanntt ddee
nneettttooyyeerr cceett
aappppaarreeiill..
PPoouurr lleess ddoonnnnééeess
éélleeccttrriiqquueess,, vveeuuiilllleezz
ccoonnssuulltteerr
ll’’ééttiiqquueettttee ddeess
vvaalleeuurrss nnoommiinnaalleess
qquuii ssee ttrroouuvvee àà
ll’’aavvaanntt ddee ll’’aarrmmooiirree
dduu ssèècchhee--lliinnggee
((aavveecc llaa ppoorrttee
oouuvveerrttee))..
NNeettttooyyaaggee eett EEnnttrreettiieenn ddee
RRoouuttiinnee
AATTTTEENNTTIIOONN !!
IIll eesstt ppoossssiibbllee qquuee
llee ttaammbboouurr,, llaa
ppoorrttee eett llaa cchhaarrggee
ssooiieenntt ttrrèèss cchhaauuddss..
40001828FRE.qxd 02/09/2004 17:09 Page 35
Page 36

QQuu’’eesstt--ccee qquuii ppeeuutt êêttrree àà ll’’oorriiggiinnee ddee......
DDééffaauuttss qquuee vvoouuss ppoouuvveezz rreeccttiiffiieerr vvoouuss--mmêêmmee
Avant d’appeler le service GIAS pour obtenir des conseils, veuillez suivre la liste des
vérifications ci-dessous. L’intervention sera facturée si la machine fonctionne
correctement ou si elle a été installée ou utilisée de manière incorrecte. Si le problème
persiste alors que vous avez terminé les vérifications recommandées, veuillez appeler le
service GIAS qui pourra peut-être vous aider par téléphone.
LLaa ppéérriiooddee ddee sséécchhaaggee eesstt ttrroopp lloonngguuee//lleess vvêêtteemmeennttss
nnee ssoonntt ppaass ssuuffffiissaammmmeenntt sseeccss……
● Avez-vous sélectionné le temps de séchage/le programme qui convient ?
● Les vêtements étaient-ils trop mouillés ? Les vêtements avaient-ils été
adéquatement essorés en machine ou à la main ?
● Le filtre doit-il être nettoyé ?
● Faut-il nettoyer le condenseur ?
● Le sèche-linge est-il surchargé ?
● Les entrées, sorties et la base du sèche-linge sont-elles libres d’obstructions ?
● Avez-vous sélectionné le bouton au cours d’un cycle précédent ?
LLee ssèècchhee--lliinnggee nnee ffoonnccttiioonnnnee ppaass……
● Le sèche-linge est-il branché sur une alimentation électrique adéquate ? Vérifiez à
l’aide d’un autre appareil, par exemple une lampe de chevet.
● La fiche est-elle bien branchée sur l’alimentation de secteur ?
● Y a-t-il une panne de courant ?
● Le fusible a-t-il sauté ?
● La porte est-elle bien fermée ?
● Le sèche-linge est-il en position de marche, au niveau du courant de secteur et de
la machine ?
● La période de séchage ou le programme a-t-il été sélectionné ?
● La machine a-t-elle été remise en marche après l’ouverture de la porte ?
● Le sèche-linge s’est-il arrêté parce que le réservoir d’eau est plein et qu’il faut le
vider ?
LLee ssèècchhee--lliinnggee eesstt bbrruuyyaanntt……
● Arrêtez le sèche-linge et contactez le service GIAS pour obtenir des conseils.
LL’’iinnddiiccaatteeuurr EEnnttrreettiieenn FFiillttrree eesstt aalllluumméé..
● Le filtre doit-il être nettoyé ?
● Faut-il nettoyer le condenseur ?
IInnddiiccaatteeuurr RRéésseerrvvooiirr PPlleeiinn eesstt eenn mmaarrcchhee……
● Le réservoir d’eau doit-il être vidé ?
36
DDééppiissttaaggee ddee ppaannnneess
40001828FRE.qxd 02/09/2004 17:09 Page 36
Page 37

En cas de problème après avoir effectué toutes les
inspections recommandées, veuillez contacter le Service.
Il pourra vous aider par téléphone ou organiser la visite
d’un technicien, en vertu des conditions de votre
garantie. Cependant, vous serez facturé dans l’un des
cas suivants :
● Si la machine est en bon état de marche.
● Si la machine n’a pas été installée conformément
aux instructions d’installation.
● Si la machine a été utilisée incorrectement.
PPiièècceess ddee rreecchhaannggee
UUttiilliisseezz ttoouujjoouurrss ddeess ppiièècceess ddee rreecchhaannggee ddiissppoonniibblleess
aauupprrèèss dduu sseerrvviiccee GGIIAASS..
SSeerrvviiccee GGIIAASS
PPoouurr lleess eennttrreettiieennss eett lleess rrééppaarraattiioonnss,, ccoonnttaacctteezz vvoottrree
tteecchhnniicciieenn llooccaall dduu sseerrvviiccee GGIIAASS..
Le constructeur décline toute responsabilité en cas
d’erreurs d’impression dans le présent document. Le
constructeur se réserve le droit d’apporter les
modifications nécessaires à ses produits sans en changer
les caractéristiques de base.
37
SSeerrvviiccee cclliieennttèèllee
40001828FRE.qxd 02/09/2004 17:09 Page 37
Page 38

Einführung. . . . . . . . . . . . . . . . . . . . . . . . . . . . . . . . . . . . . . . . . . . . . . . . 39
Lieferinformationen. . . . . . . . . . . . . . . . . . . . . . . . . . . . . . . . . . . . . . . . . . . . . 39
Auspacken des Produkts . . . . . . . . . . . . . . . . . . . . . . . . . . . . . . . . 39
Sicherheitshinweise. . . . . . . . . . . . . . . . . . . . . . . . . . . . . . . . . . . . . . 40
Installation . . . . . . . . . . . . . . . . . . . . . . . . . . . . . . . . . . . . . . . . . . . . . . . . . . . . 40
Gebrauch . . . . . . . . . . . . . . . . . . . . . . . . . . . . . . . . . . . . . . . . . . . . . . . . . . . . . 40
Die Wäsche . . . . . . . . . . . . . . . . . . . . . . . . . . . . . . . . . . . . . . . . . . . . . . . . . . . 40
Umweltschutz . . . . . . . . . . . . . . . . . . . . . . . . . . . . . . . . . . . . . . . . . . . . . . . . . 41
GIAS-Service . . . . . . . . . . . . . . . . . . . . . . . . . . . . . . . . . . . . . . . . . . . . . . . . . . . 41
Installation. . . . . . . . . . . . . . . . . . . . . . . . . . . . . . . . . . . . . . . . . . . . . . . . 42
Elektro-Anschluss . . . . . . . . . . . . . . . . . . . . . . . . . . . . . . . . . . . . . . . . . . . . . . . 42
Einstellen der Füße . . . . . . . . . . . . . . . . . . . . . . . . . . . . . . . . . . . . . . . . . . . . . 42
Entlüftung . . . . . . . . . . . . . . . . . . . . . . . . . . . . . . . . . . . . . . . . . . . . . . . . 43
Vorbereitung der Füllung . . . . . . . . . . . . . . . . . . . . . . . . . . . . . . . 44
Vorbereitung der Textilien . . . . . . . . . . . . . . . . . . . . . . . . . . . . . . . . . . . . . . . 44
Sortierung der Füllung . . . . . . . . . . . . . . . . . . . . . . . . . . . . . . . . . . . . . . . . . . 45
Tipps zum Trocknen. . . . . . . . . . . . . . . . . . . . . . . . . . . . . . . . . . . . . . 46
Nicht für den Trockner geeignet . . . . . . . . . . . . . . . . . . . . . . . . . . . . . . . . . . 46
Energiesparen . . . . . . . . . . . . . . . . . . . . . . . . . . . . . . . . . . . . . . . . . . . . . . . . . 46
Trocknungswerte . . . . . . . . . . . . . . . . . . . . . . . . . . . . . . . . . . . . . . . . . . . . . . . 46
Schalterblende und Anzeigen . . . . . . . . . . . . . . . . . . . . . . . . . . 47
Tür und Sieb . . . . . . . . . . . . . . . . . . . . . . . . . . . . . . . . . . . . . . . . . . . . . . 48
Öffnen der Tür. . . . . . . . . . . . . . . . . . . . . . . . . . . . . . . . . . . . . . . . . . . . . . . . . 48
Sieb . . . . . . . . . . . . . . . . . . . . . . . . . . . . . . . . . . . . . . . . . . . . . . . . . . . . . . . . . 48
Flusensieb-Anzeige . . . . . . . . . . . . . . . . . . . . . . . . . . . . . . . . . . . . . . . . . . . . . 48
Kondenswasser-Behälter. . . . . . . . . . . . . . . . . . . . . . . . . . . . . . . . 49
Um den Behälter herauszunehmen . . . . . . . . . . . . . . . . . . . . . . . . . . . . . . . . . 49
Kondensator. . . . . . . . . . . . . . . . . . . . . . . . . . . . . . . . . . . . . . . . . . . . . . 50
Entfernen des Kondensators . . . . . . . . . . . . . . . . . . . . . . . . . . . . . . . . . . . . . . 50
Auswählen des Programms . . . . . . . . . . . . . . . . . . . . . . . . . . . . . 51
Betrieb . . . . . . . . . . . . . . . . . . . . . . . . . . . . . . . . . . . . . . . . . . . . . . . . . . . . 52
Abbrechen und Zurücksetzen des Programms . . . . . . . . . . . . . . . . . . . . . . . . 52
Startverzögerung . . . . . . . . . . . . . . . . . . . . . . . . . . . . . . . . . . . . . . . . . . . . . . . 52
Reinigung und Routinewartungen . . . . . . . . . . . . . . . . . . . . . 53
Reinigung des Trockners . . . . . . . . . . . . . . . . . . . . . . . . . . . . . . . . . . . . . . . . . 53
Technische Daten. . . . . . . . . . . . . . . . . . . . . . . . . . . . . . . . . . . . . . . . . . . . . . . 53
Fehlersuche . . . . . . . . . . . . . . . . . . . . . . . . . . . . . . . . . . . . . . . . . . . . . . . 54
Kundendienst. . . . . . . . . . . . . . . . . . . . . . . . . . . . . . . . . . . . . . . . . . . . . 55
Ersatzteile . . . . . . . . . . . . . . . . . . . . . . . . . . . . . . . . . . . . . . . . . . . . . . . . . . . . 55
GIAS-Service . . . . . . . . . . . . . . . . . . . . . . . . . . . . . . . . . . . . . . . . . . . . . . . . . . . 55
38
40001828GER.qxd 02/01/2006 17:25 Page 38
Page 39

EEiinnffüühhrruunngg
BBiittttee lleesseenn SSiiee ddiieessee AAnnlleeiittuunngg ssoorrggffäällttiigg dduurrcchh uunndd
rriicchhtteenn SSiiee ssiicchh bbeeii ddeerr BBeeddiieennuunngg ddeerr WWaasscchhmmaasscchhiinnee
aann ddiiee AAnnlleeiittuunngg.. DDiieesseess HHaannddbbuucchh eenntthhäälltt wwiicchhttiiggee
HHiinnwweeiissee ffüürr ddiiee ssiicchheerree IInnssttaallllaattiioonn,, AAnnwweenndduunngg uunndd
WWaarrttuunngg ssoowwiiee eeiinniiggee nnüüttzzlliicchhee HHiinnwweeiissee ffüürr ooppttiimmaallee
EErrggeebbnniissssee bbeeiimm GGeebbrraauucchh IIhhrreerr MMaasscchhiinnee..
Heben Sie diese Dokumentation an einem sicheren Ort
auf, um jederzeit wieder darauf zurückgreifen zu
können bzw. um sie an zukünftige Besitzer weitergeben
zu können
LLiieeffeerriinnffoorrmmaattiioonneenn
Zum Lieferumfang Ihrer Waschmaschine gehören
folgende Dokumentation und Zusatzteile:
● Bedienungsanleitung
● Garantieschein
● Energieeffizienzklasse
Entfernen Sie die Verpackung der Maschine dicht an
dem Platz, wo sie aufgestellt werden soll.
11..
Schneiden Sie sie sorgfältig rund um den Boden
der Verpackung und an einer Ecke nach oben auf.
22..
Entfernen Sie die Polyethylenhülle und heben Sie
den Trockner von der Polystyrenplatte.
39
KKoonnttrroolllliieerreenn SSiiee,, oobb
ddiiee MMaasscchhiinnee dduurrcchh
ddeenn TTrraannssppoorrtt
bbeesscchhääddiiggtt wwuurrddee..
FFaallllss ddiieess ddeerr FFaallll iisstt,,
wweennddeenn SSiiee ssiicchh aann
ddeenn GGIIAASS--SSeerrvviiccee..
DDiiee SSiicchheerrhheeiitt ddeess
GGeerräättss kkaannnn
bbeeeeiinnttrrääcchhttiiggtt
wweerrddeenn,, wweennnn SSiiee
ssiicchh nniicchhtt aann ddiieessee
SSiicchheerrhheeiittsshhiinnwweeiissee
hhaalltteenn.. FFaallllss eeiinn
PPrroobblleemm mmiitt IIhhrreerr
MMaasscchhiinnee dduurrcchh
ZZwweecckkeennttffrreemmdduunngg
vveerruurrssaacchhtt wwiirrdd,,
mmüüsssseenn SSiiee
RReeppaarraattuurraarrbbeeiitteenn
mmöögglliicchheerrwweeiissee sseellbbsstt
bbeezzaahhlleenn..
AAuussppaacckkeenn ddeess PPrroodduukkttss
EEnnttssoorrggeenn SSiiee ddiiee VVeerrppaacckkuunngg
oorrddnnuunnggssggeemmääßß.. AAcchhtteenn SSiiee ddaarraauuff,, ddaassss ssiiee
nniicchhtt iinn ddiiee HHäännddee vvoonn KKiinnddeerrnn ggeellaanngg,, ddaa
ssiiee eeiinnee ppootteennttiieellllee GGeeffaahhrreennqquueellllee ddaarrsstteelllltt..
40001828GER.qxd 02/09/2004 17:53 Page 39
Page 40

Sicherheitshinweise
Installation
● Überprüfen Sie vor dem Gebrauch, ob das Produkt sichtbare Schäden aufweist.
Verwenden Sie es nicht, wenn es beschädigt ist, und wenden Sie sich an den GIASService.
● Verwenden Sie keine Adapter, Mehrfachsteckdosen und/oder Verlängerungskabel.
● Installieren Sie das Gerät nicht in einem Badezimmer oder Duschraum.
● Stellen Sie den Trockner nie in der Nähe von Vorhängen auf. Achten Sie darauf,
dass keine Gegenstände hinter den Trockner fallen oder sich dort ansammeln
können.
Gebrauch
● WARNUNG Zweckentfremdung des Trockners kann zu Brandgefahr führen.
● Diese Maschine dient als Haushaltsgerät ausschließlich zum Trocknen von
Haushaltstextilien und Kleidungsstücken.
● Verwenden Sie dieses Gerät nur für die vorgesehenen Zwecke gemäß der
Anleitung. Lesen Sie die Gebrauchsanleitung sorgfältig durch, bevor Sie das Gerät
in Betrieb nehmen.
● Berühren Sie das Gerät nicht mit feuchten oder nassen Händen oder Füßen.
● Lehnen Sie sich nicht gegen die Tür, wenn Sie die Maschine beladen, und fassen
Sie die Maschine nicht an der Tür, wenn Sie sie hochheben oder verschieben.
● Lassen Sie Kinder nicht mit der Maschine oder den Schaltern spielen.
● WARNUNG Verwenden Sie das Produkt nicht, wenn das Flusensieb nicht richtig
eingebaut oder beschädigt ist; Flusen könnten Feuer fangen.
● WARNUNG An der Stelle, an der sich das Symbol für heiße Flächen befindet ,
kann die Temperatur während des Trocknerbetriebs auf über 60°C steigen.
● Ziehen Sie den Stecker aus der Steckdose! Ziehen Sie vor dem Reinigen des Geräts
immer den Stecker heraus!
● Verwenden Sie die Maschine bei vermuteten Störungen nicht weiter.
● Fusseln und Flusen dürfen sich nicht auf dem Fußboden im Bereich um die
Maschine ansammeln.
● Die Trommel in dem Gerät kann sehr heiß werden. Lassen Sie den Trockner stets
vollständig bis zum Ende der Abkühlphase laufen, bevor Sie die Wäsche
herausnehmen.
Die Wäsche
● WARNUNG AUF KEINEN FALL Stoffe in der Maschine trocknen, die mit chemischen
Reinigungsmitteln behandelt wurden.
● WARNUNG Wenn Schaumgummimaterialien heiß werden, können sie sich unter
bestimmten Bedingungen plötzlich entzünden. Textilien, die Schaumplastik,
Schaumgummi und gummiähnliche Materialien enthalten, eignen sich nicht für
das Trocknen im Wäschetrockner. Füllen Sie AUF KEINEN FALL Textilien aus diesen
Materialien in den Trockner ein.
● Sehen Sie immer auf den Pflegeetiketten nach, ob das Material für das Trocknen
geeignet ist.
40
40001828GER.qxd 02/01/2006 17:27 Page 40
Page 41

● Textilien vor dem Einfüllen in den Trockner erst schleudern oder gründlich
auswringen. Füllen Sie KEINE tropfnassen Textilien in den Trockner.
● Feuerzeuge und Streichhölzer unbedingt aus den Taschen entfernen und AUF
KEINEN FALL mit feuergefährlichen Flüssigkeiten in der Nähe der Maschine
hantieren.
● KEINE Vorhänge aus Glasfasermaterial in die Maschine füllen. Kommen andere
Textilien mit Glasfasern in Berührung, so kann dies zu Hautreizungen führen.
● Kleidungsstücke, die mit feuergefährlichen Reinigungssprays oder Flüssigkeiten
wie Benzin, Speiseöl oder Aerosolsprays behandelt oder verunreinigt sind, DÜRFEN
NICHT in dieser Maschine getrocknet werden.
Umweltschutz
● Das gesamte Verpackungsmaterial besteht aus umweltfreundlichen,
wiederverwertbaren Materialien. Bitte helfen Sie mit, diese umweltfreundlich zu
entsorgen. Ihre Stadtverwaltung kann Sie über Entsorgungsmöglichkeiten
informieren.
● Ziehen Sie den Stecker aus der Steckdose, zerschneiden Sie das Netzkabel und
werfen Sie Netzkabel und Netzstecker getrennt in den Müll, bevor Sie Ihren alten
Trockner entsorgen. Zerstören Sie Scharniere und die Türverriegelung, damit sich
Kinder nicht versehentlich in der Waschmaschine einsperren können.
GIAS-Service
● Um einen sicheren und einwandfreien Betrieb dieses Geräts zu gewährleisten,
empfehlen wir, alle Wartungs- und Reparaturarbeiten nur von einem zugelassenen
GIAS-Kundendiensttechniker durchführen zu lassen.
Europäische Vorschrift 2002/96/EC
Dieses Elektrohaushaltsgerät ist entsprechend der EU-Richtlinie 2002/96/EC über Elektround Elektronik-Altgeräte (WEEE) gekennzeichnet.
Bitte sorgen Sie dafür, dass das Gerät ordnungsgemäß entsorgt wird, damit mögliche
negative Auswirkungen auf Umwelt und Gesundheit
vermieden werden, die bei einer unsachgemäßen Entsorgung
des Altgerätes entstehen könnten.
Das Symbol auf dem Produkt bedeutet, dass dieses Gerät
nicht in den normalen Hausmüll gehört, sondern den
jeweiligen kommunalen Rücknahmesystemen für Elektro- und
Elektronik-Altgeräte übergeben werden muss.
Die Entsorgung muss im Einklang mit den geltenden
Umweltrichtlinien für die Abfallentsorgung erfolgen.
Für nähere Informationen über Entsorgung und Recycling
dieses Produktes wenden Sie sich bitte an Ihre kommunalen
Einrichtungen (Umweltamt) oder an die Abfallentsorgungsgesellschaft Ihrer Stadt bzw. an Ihren Händler.
41
Falls das Gerät nicht richtig funktioniert oder ausfällt, schalten Sie
es aus und ziehen Sie den Stecker aus der Steckdose. Wenden Sie
sich an den GIAS-Service.
40001828GER.qxd 02/01/2006 17:28 Page 41
Page 42

EElleekkttrroo--AAnnsscchhlluussss
Dieser Trockner ist für eine Netzspannung von 230 V und
50 Hz (Einphasenstrom) ausgelegt. Stellen Sie sicher, dass
der Stromkreis eine Nennleistung von 10 A hat.
SSttrroomm kkaannnn lleebbeennssggeeffäähhrrlliicchh sseeiinn..
DDiieesseess GGeerräätt mmuussss aann eeiinnee ggeeeerrddeettee SStteecckkddoossee mmiitt
SScchhuuttzzkkoonnttaakktt aannggeesscchhlloosssseenn wweerrddeenn..
DDiiee SStteecckkddoossee uunndd ddeerr SStteecckkeerr aamm GGeerräätt mmüüsssseenn vvoomm
sseellbbeenn TTyypp sseeiinn..
VVeerrwweennddeenn SSiiee kkeeiinnee MMeehhrrffaacchhsstteecckkeerr uunndd//ooddeerr
VVeerrlläännggeerruunnggsskkaabbeell..
DDeerr SStteecckkeerr ssoollllttee ssoo aannggeebbrraacchhtt wweerrddeenn,, ddaassss eerr nnaacchh
ddeerr IInnssttaallllaattiioonn ddeess GGeerräättss lleeiicchhtt aauuss ddeerr SStteecckkddoossee zzuu
zziieehheenn iisstt..
Die Drähte im Netzanschlusskabel sind farblich gemäß
folgender Codes unterschieden:
BBllaauu NNEEUUTTRRAALL
BBrraauunn SSTTRROOMMFFÜÜHHRREENNDD
GGrrüünn uunndd GGeellbb EERRDDEE
Das Gerät stimmt mit den Bestimmungen der
Europäischen Vorschrift 89/336/EEC, 73/23/EEC sowie
deren Nachfolgebestimmungen überein.
EEiinnsstteelllleenn ddeerr FFüüßßee
Sobald sich die Maschine am endgültigen Ort befindet,
sollten die Füße so eingestellt werden, dass die
Maschine eben steht.
Stellen Sie die vier Füße so ein, dass die Maschine sicher
und eben steht.
42
FFaallllss eeiinn PPrroobblleemm
mmiitt IIhhrreerr MMaasscchhiinnee
dduurrcchh ffaallsscchhee
IInnssttaallllaattiioonn
vveerruurrssaacchhtt wwiirrdd,,
mmüüsssseenn SSiiee
RReeppaarraattuurraarrbbeeiitteenn
mmöögglliicchheerrwweeiissee
sseellbbsstt bbeezzaahhlleenn..
SSoollllttee ddaass
NNeettzzaannsscchhlluusssskkaabbee
ll aann ddiieesseemm GGeerräätt
bbeesscchhääddiiggtt sseeiinn,,
mmuussss eess dduurrcchh eeiinn
ssppeezziieelllleess KKaabbeell
eerrsseettzztt wweerrddeenn,,
ddaass NNUURR bbeeiimm
EErrssaattzztteeiillsseerrvviiccee
eerrhhäällttlliicchh iisstt.. EEss
mmuussss vvoonn eeiinneerr
ffaacchhkkuunnddiiggeenn
PPeerrssoonn iinnssttaalllliieerrtt
wweerrddeenn..
IInnssttaallllaattiioonn
SScchhlliieeßßeenn SSiiee ddiiee MMaasscchhiinnee eerrsstt aann uunndd
ddrrüücckkeenn SSiiee ddiiee EEiinnsscchhaallttttaassttee eerrsstt,, wweennnn
ddiiee IInnssttaallllaattiioonn aabbggeesscchhlloosssseenn iisstt..
ZZuu IIhhrreerr eeiiggeenneenn SSiicchheerrhheeiitt mmuussss ddeerr
TTrroocckknneerr rriicchhttiigg iinnssttaalllliieerrtt wweerrddeenn..
SSoolllltteenn SSiiee bbeezzüügglliicchh ddeerr IInnssttaallllaattiioonn
FFrraaggeenn hhaabbeenn,, wweennddeenn SSiiee ssiicchh aann ddeenn
GGIIAASS--SSeerrvviiccee..
40001828GER.qxd 02/09/2004 17:53 Page 42
Page 43

In dem Raum, in dem sich der Trockner befindet, muss eine
ausreichende Entlüftung vorhanden sein, um zu verhindern,
dass Gase aus der Verbrennung anderer Brennstoffe, zum
Beispiel offene Feuer, während des Trocknerbetriebs in den
Raum gesogen werden.
● Die Abluft darf nicht in einen Kaminschacht geleitet
werden, der für das Ableiten von Rauch aus der
Verbrennung von Gas oder anderen Brennstoffen
verwendet wird.
● Prüfen Sie regelmäßig die reibungslose Luftzirkulation
im Trockner.
● Überprüfen Sie nach Gebrauch das Flusensieb und
reinigen Sie es, wenn es erforderlich ist!
● Die Ansaug- und Abluftanschlüsse dürfen nicht
zugestellt werden. Um eine richtige Abluft zu
gewährleisten, muss die Fläche zwischen dem Boden der
Maschine und dem Fußboden frei bleiben. Zwischen der
Maschine und anderen Gegenständen sollte ein Abstand
von mindestens 12 cm eingehalten werden .
● Achten Sie darauf, dass keine Gegenstände zwischen
beiden Seitenteilen und der Rückseite des Trockners
herunterfallen und sich dort ansammeln, da hierdurch
die Ansaug- und Abluftanschlüsse blockiert werden
können.
● Der Trockner darf
AAUUFF KKEEIINNEENN FFAALLLL
in der
unmittelbaren Nähe von Vorhängen aufgestellt werden.
43
EEnnttllüüffttuunngg
ABLUFTANSCHLÜSSE
ABLUFTANSCHLÜSSE IM SOCKEL
LUFTANSAUGÖFFNUNG
40001828GER.qxd 02/09/2004 17:53 Page 43
Page 44

Bevor Sie den Trockner das erste Mal benutzen:
● Lesen Sie die Gebrauchsanleitung bitte sorgfältig
durch!
● Entfernen Sie alle in der Trommel befindlichen
Gegenstände!
● Wischen Sie die Innenseiten der Trommel und Tür
mit einem feuchten Tuch aus, um den beim
Transport eventuell dort angesammelten Staub zu
entfernen.
VVoorrbbeerreeiittuunngg ddeerr
TTeexxttiilliieenn
Vergewissern Sie sich anhand der
Pflegeanleitungssymbole in jedem Wäschestück, dass
die Wäsche, die Sie trocknen wollen, für eine Trocknung
im Trockner geeignet ist.
Überprüfen Sie, ob alle Verschlüsse zu und die Taschen
entleert sind. Wenden Sie die Innenseiten der Textilien
nach außen. Füllen Sie die Kleidungsstücke locker in die
Trommel, so dass diese sich nicht verheddern.
MMaaxxiimmaalleess
FFaassssuunnggssvveerrmmööggeenn
((TTrroocckkeennggeewwiicchhtt))
● Baumwolle max. 7 kg
● Synthetische Stoffe max. 3,5 kg
44
VVoorrbbeerreeiittuunngg ddeerr FFüülllluunngg
ÜÜbbeerrllaaddeenn SSiiee ddiiee
TTrroommmmeell nniicchhtt,,
ggrrooßßee TTeeiillee
kköönnnneenn,, wweennnn ssiiee
nnaassss ssiinndd,, ddiiee
mmaaxxiimmaall zzuulläässssiiggee
WWäässcchheellaadduunngg
üübbeerrsscchhrreeiitteenn
((zzuumm BBeeiissppiieell
SScchhllaaffssääcckkee,,
BBeettttddeecckkeenn))..
40001828GER.qxd 02/09/2004 17:53 Page 44
Page 45

SSoorrttiieerreenn SSiiee ddiiee FFüülllluunngg
ffoollggeennddeerrmmaaßßeenn::
●
AAnnhhaanndd ddeerr PPfflleeggeeaannlleeiittuunnggssssyymmbboollee
Diese finden Sie am Kragen oder der
Sauminnenseite:
Für Trockner geeignet.
Im Trockner bei hoher Temperatur.
Im Trockner nur bei geringer Temperatur.
Nicht für den Trockner geeignet.
Falls ein Wäschestück keine Pflegeanleitung
hat, muss angenommen werden, dass es nicht
für das Trocknen im Trockner geeignet ist.
●
NNaacchh MMeennggee uunndd VVoolluummeenn
Ist die Füllmenge größer als das
Fassungsvermögen des Trockners, sortieren Sie die
Wäsche nach Stoffdicke (trennen Sie z.B.
Handtücher von dünner Unterwäsche).
●
NNaacchh SSttooffffaarrtt
BBaauummwwoollllee//LLeeiinneenn::
Handtücher, Baumwolljersey,
Bett- und Tischwäsche.
TTeexxttiilliieenn aauuss KKuunnssttffaasseerr::
Blusen, Hemden,
Overalls, usw. aus Polyester oder Polyamid und
auch Baumwoll/Synthetikgemische.
●
NNaacchh TTrroocckknnuunnggssggrraadd
Sortieren Sie nach: Bügelfeucht, Schranktrocken,
usw. Für empfindliche Textilien drücken Sie zur
Wahl einer niedrigeren Trocknungstemperatur die
Taste .
45
40001828GER.qxd 02/09/2004 17:53 Page 45
Page 46

NNiicchhtt ffüürr ddeenn TTrroocckknneerr
ggeeeeiiggnneett::
Wollsachen, Seide, empfindliche Stoffe, Nylonstrümpfe,
gewirkte Textilien, Stoffe mit Metall-Dekor,
Kleidungsstücke mit PVC- oder Lederbesatz,
Trainingsschuhe, voluminöse Wäschestücke wie
Schlafsäcke usw.
EEnneerrggiieessppaarreenn
Füllen Sie nur gründlich ausgewrungene oder
geschleuderte Wäsche in den Trockner. Je trockener die
Wäsche, desto kürzer ist die Trocknungszeit, was sich
energiesparend auswirkt.
IIMMMMEERR
● Es ist wirtschaftlicher, IMMER die maximale
Füllmenge zu trocknen.
● Kontrollieren Sie IMMER vor jedem
Trocknungsvorgang, ob das Sieb sauber ist.
NNIIEE
● Überschreiten Sie NIE die maximale Füllmenge,
denn dies ist zeitaufwendig und
Energieverschwendung.
● Füllen Sie AUF KEINEN FALL tropfnasse
Kleidungsstücke in den Wäschetrockner; dies kann
zu Schäden am Gerät führen.
TTrroocckknnuunnggsswweerrttee
In der Tabelle sind die ungefähren Trocknungszeiten, je
nach Stoffart und Feuchtigkeitsgehalt der Textilien,
aufgeführt.
46
TTiippppss zzuumm TTrroocckknneenn
WWIICCHHTTIIGG::
KKlleeiidduunnggssssttüücckkee,,
ddiiee mmiitt eeiinneemm
cchheemmiisscchheenn
RReeiinniigguunnggssmmiitttteell
bbeehhaannddeelltt wwoorrddeenn
ssiinndd,, ooddeerr
GGuummmmiibbeekklleeiidduunngg
ddüürrffeenn nniicchhtt iimm
WWäässcchheettrroocckknneerr
ggeettrroocckknneett wweerrddeenn
((BBrraanndd-- ooddeerr
EExxpplloossiioonnssggeeffaahhrr))..
WWäähhrreenndd ddeerr
lleettzztteenn 1155 MMiinnuutteenn
ddeess PPrrooggrraammmmss
wwiirrdd ddiiee WWäässcchhee iimm
kkaalltteenn LLuuffttssttrroomm
aabbggeekküühhlltt..
FFaasseerrnn
BAUMWOLLE
KUNSTFASER
ACRYL
TTEEMMPPEERRAATTUURR--
SSTTUUFFEE
HOCH
NIEDRIG
NIEDRIG
AANNZZEEIIGGEE
LLAAMMPPEE
AUS
EIN
EIN
VVOOLLLLEE
BBEELLAADDUUNNGG
140-165 Min
–
–
MMIITTTTLLEERREE
BBEELLAADDUUNNGG
70-80 Min
70-80 Min
50-65 Min
GGEERRIINNGGEE
BBEELLAADDUUNNGG
50-65 Min
40-55 Min
30-40 Min
40001828GER.qxd 02/09/2004 17:53 Page 46
Page 47

SScchhaalltteerrbblleennddee:: KKoonnttrroollll-- uunndd LLiicchhttaannzzeeiiggee
PPrrooggrraammmmwwäähhlleerr
– Für die Wahl des gewünschten Programms
TTaassttee AAnn//AAuuss
– zum Anstellen drücken, die Anzeige leuchtet auf
SSTTAARRTT--TTaassttee
– Drücken Sie START, um das ausgewählte Trocknerprogramm zu starten.
Drücken Sie die Taste 5 Sekunden lang, um das Programm abzubrechen/zurückzusetzen
TTaassttee AAccrryyll//SSyynntthheettiikkwwäässcchhee
– Drücken Sie die Taste, um eine niedrigere Temperatur
für empfindliche Textilien einzustellen. Die Anzeige über der Taste leuchtet auf. Um die
Temperaturstufe zu ändern, muss das Programm zurückgesetzt werden
Niedrige Temperatur - Anzeigelampe
EEIINN
Hohe Temperatur - Anzeigelampe
AAUUSS
AAnnzzeeiiggee ‘‘KKoonnddeennsswwaasssseerr lleeeerreenn’’
– leuchtet auf, wenn der Kondenswasser-Behälter voll ist
FFlluusseennssiieebb--AAnnzzeeiiggee
– Die Anzeige leuchtet auf, wenn das Sieb gesäubert werden muss
SSttaarrttvveerrzzööggeerruunnggssttaassttee
– Taste zur Verzögerung des Beginns des Trocknungsvorgangs
(siehe Abschnitt “Betrieb” auf Seite 52)
DDiissppllaayy
SSTTAARRTT
– Wenn der Trockner angestellt wird, blinkt die START-Anzeige. Wenn das Programm
beginnt, leuchtet die START-Anzeige auf.
6600''
– Die Anzeige leuchtet auf, wenn bis zum Ende des Programms weniger als 60 Minuten
sind.
1155''
– Die Anzeige leuchtet auf, wenn bis zum Ende des Programms weniger als 15 Minuten
sind. In diesem Stadium des Trocknungsvorgangs geht das Gerät in die Abkühlphase.
SSTTOOPP
– Lichtanzeige, wenn das Programm beendet ist.
66hh
– 6 Stunden Startverzögerung (Lampe blinkt während des Betriebs)
99hh
– 9 Stunden Startverzögerung (Lampe blinkt während des Betriebs)
47
TASTE ACRYL/
SYNTHETIK
WÄSCHE
AN/AUS
BETÄTIGEN
FLUSENSIEB-ANZEIGE
KONDENSWASSER
LEEREN-ANZEIGE
PROGRAMM-
WÄHLER
START-
TASTE
START-
VERZÖGERUNGS-
TASTE
RESTZEIT-DISPLAY
SScchhaalltteerrbblleennddee uunndd
AAnnzzeeiiggeenn
40001828GER.qxd 02/09/2004 17:53 Page 47
Page 48

ÖÖffffnneenn ddeerr TTüürr
Ziehen Sie am Griff, um die Tür zu öffnen.
Um den Trocknungsvorgang wieder in Gang zu setzen,
schließen Sie die Tür und drücken START.
SSiieebb
WWIICCHHTTIIGG:: DDaammiitt ddeerr WWäässcchheettrroocckknneerr iimmmmeerr ooppttiimmaallee
LLeeiissttuunngg eerrbbrriinnggeenn kkaannnn,, üübbeerrpprrüüffeenn SSiiee vvoorr jjeeddeemm
TTrroocckknnuunnggssvvoorrggaanngg,, oobb ddaass FFlluusseennssiieebb ssaauubbeerr iisstt..
11..
Ziehen Sie das Sieb nach oben.
22..
Öffnen Sie das Sieb wie auf der Abbildung.
33..
Entfernen Sie die Flusen sanft mit einer weichen
Bürste oder den Fingerspitzen.
44..
Klappen Sie das Sieb zusammen und setzen Sie es
wieder an seinen Platz ein.
FFlluusseennssiieebb--AAnnzzeeiiggee
die Anzeige leuchtet auf, wenn das Sieb gesäubert
werden muss.
WWeennnn ddiiee WWäässcchhee nniicchhtt ttrroocckknneett,, kkoonnttrroolllliieerreenn SSiiee,, oobb
ddaass SSiieebb vveerrssttooppfftt iisstt..
48
TTüürr uunndd SSiieebb
WWAARRNNUUNNGG!!
WWäähhrreenndd ddeess TTrroocckknnuunnggssvvoorrggaannggss
kköönnnneenn TTrroommmmeell uunndd TTüürr SSEEHHRR HHEEIISSSS
wweerrddeenn..
40001828GER.qxd 02/09/2004 17:53 Page 48
Page 49

Das während des Trocknungsvorgangs aus der Wäsche
entzogene Wasser wird in einem Behälter unten im
Trockner gesammelt.
Wenn der Behälter voll ist, leuchtet die Anzeige
auf der Bedienfläche auf. Dann
MMUUSSSS
der Behälter
geleert werden. Wir empfehlen jedoch, den Behälter
nach jedem Trockengang zu leeren.
HHIINNWWEEIISS:: WWäähhrreenndd ddeerr eerrsstteenn wweenniiggeenn
TTrroocckknnuunnggsszzyykklleenn eeiinneess nneeuueenn TTrroocckknneerrss ssaammmmeelltt ssiicchh
sseehhrr wweenniigg WWaasssseerr aann,, ddaa zzuunnääcchhsstt eeiinn iinn ddeerr MMaasscchhiinnee
bbeeffiinnddlliicchheess RReesseerrvvooiirr ggeeffüülllltt wwiirrdd..
UUmm ddeenn BBeehhäälltteerr
hheerraauusszzuunneehhmmeenn
1. Ziehen Sie den Behälter vorsichtig heraus, bis er
vollständig entfernt ist. Halten Sie den Behälter
mit beiden Händen. Im gefüllten Zustand wiegt
der Kondenswasser-Behälter rund 4 kg.
2. Öffnen Sie den Deckel des Behälters und leeren
Sie das Wasser aus. Setzen Sie den Deckel wieder
auf und schieben Sie den Behälter zurück in die
Maschine. SCHIEBEN SIE IN FEST AN SEINEN PLATZ.
HHIINNWWEEIISS::
Wenn Sie einen Ablauf in der Nähe des
Trockners haben, können Sie den Ablaufbausatz
verwenden, um einen ständigen Ablauf für das vom
Trockner gesammelte Wasser einzurichten. Sie müssen
dann den Wasserbehälter nicht mehr ausleeren. Alle
Informationen für das Zusammenbauen des Bausatzes
sind im dazugehörigen Umschlag enthalten.
49
KKoonnddeennsswwaasssseerr--BBeehhäälltteerr
40001828GER.qxd 02/09/2004 17:53 Page 49
Page 50

WWiicchhttiigg:: IImmmmeerr ddaass GGeerräätt aauusssscchhaalltteenn uunndd ddeenn SStteecckkeerr
aauuss ddeerr SStteecckkddoossee zziieehheenn,, bbeevvoorr ddeerr KKoonnddeennssaattoorr
ggeerreeiinniiggtt wwiirrdd..
Damit der Trockner immer optimale Leistung erbringen
kann, überprüfen Sie regelmäßig, ob der Kondensator
sauber ist.
EEnnttffeerrnneenn ddeess
KKoonnddeennssaattoorrss
11..
Entfernen Sie die Wartungsklappe (siehe Seite 49).
22..
Drehen Sie die zwei Verschlusshebel gegen den
Uhrzeigersinn und ziehen Sie den Kondensator
heraus
33..
Ziehen Sie das Kondensator-Teil heraus.
44..
Entfernen Sie etwaigen Staub oder Flusen
vorsichtig mit einem Tuch, reinigen Sie das Teil
danach unter laufendem Wasser, wobei Sie es so
drehen, dass das Wasser zur Entfernung von Staub
und Flusen zwischen die Platten laufen kann.
55..
Passen Sie den Kondensator wieder richtig ein
(wie durch den Pfeil angegeben) und stellen Sie
sicher, dass er fest an seinen Platz gedrückt wird.
Schließen Sie die zwei Verschlusshebel durch eine
Drehung im Uhrzeigersinn.
66..
Setzen Sie die Wartungsklappe wieder ein.
50
KKoonnddeennssaattoorr
40001828GER.qxd 02/09/2004 17:53 Page 50
Page 51

HHiinnwweeiiss::
Es kann sein, dass der Sensor eine kleine
Wäschemenge nicht erfassen kann. Benutzen Sie für
kleine Wäschemengen, Einzelteile oder speziell
vorbehandelte Textilien mit einem geringen
Feuchtigkeitsgehalt die Zeitprogramme. Stellen Sie je
nach Wäschemenge und gewünschtem Trockenheitsgrad
das Programm zwischen 30 und 75 Minuten ein, und
wählen Sie je nach Art der Textilien eine hohe oder eine
geringe Temperatur.
Wenn der Sensor die Wäsche nicht erkennt, arbeitet der
Trockner nur 10 Minuten lang, bevor er die Abkühlphase
beginnt.
Bei zu großer oder zu nasser Füllung startet der Trockner
automatisch nach 180 Minuten mit der Abkühlphase.
51
AAuusswwäähhlleenn ddeess PPrrooggrraammmmss
PPrrooggrraammmm
Supertrocken
Extra trocken
Schranktrocken
Leicht trocken
Bügelfeucht
Mangelfeucht
Schnellbügeln
75 Min.
60 Min.
45 Min.
30 Min.
Auffrischen
BBeesscchhrreeiibbuunngg
Wählen Sie den gewünschten Trockenheitsgrad.
Diese reichen von Supertrocken für Badehandtücher und
Bademäntel über Schranktrocken für Textilien, die nicht
gebügelt werden, bis zu Programmen, die die Wäsche bis
zur richtigen Bügelfeuchte trocknen.
Das Schnellbügel-Programm hat eine Form- und
Knitterschutzfunktion. Der Trockner erhitzt die Füllung für
die Dauer von 9 Minuten, worauf eine Abkühlphase von 3
Minuten folgt, was insbesondere für Kleidungsstücke von
Vorteil ist, die normalerweise einige Zeit vor dem Bügeln,
z.B. in einem Wäschekorb, abgelegt werden.
Kleidungsstücke können auch hart werden, wenn sie
draußen an der Luft auf einer Wäscheleine oder in der
Wohnung über Heizungen getrocknet werden. Das
‘Schnellbügeln’-Verfahren lockert die Liegefalten im Stoff,
wodurch er sich schneller und leichter bügeln lässt.
75 Minuten Trocknen
60 Minuten Trocknen
45 Minuten Trocknen
30 Minuten Trocknen
Schleudern der Wäsche im kalten Luftstrom
Der Sensortrockner liefert Ihnen viele Möglichkeiten für das Trocknen der Wäsche.
In der folgenden Tabelle sind die Programme und die Funktionen der einzelnen
Programme aufgeführt.
40001828GER.qxd 02/09/2004 17:53 Page 51
Page 52

11..
Öffnen Sie die Tür, und füllen Sie die Wäsche in die Trommel. Achten Sie darauf,
dass keine Kleidungsstücke von der Tür eingeklemmt werden.
22..
Die Tür mit einem sanften Druck schließen, bis Sie ein ‘Klick’-Geräusch hören.
33..
Drücken Sie die Taste zum Anstellen des Trockners. Die Lichtanzeige leuchtet
auf und die START-Anzeige blinkt.
44..
Drehen Sie den Programmwählschalter, um das gewünschte Trocknerprogramm
auszuwählen (siehe Abschnitt “Waschprogramme”).
55..
Betätigen Sie zur Trocknung empfindlicher Textilien die Taste für die
Einstellung einer geringeren Temperatur.
Die Lampe über der Drucktaste leuchtet auf, wenn die Maschine auf niedrige
Temperatur eingestellt ist. Um die Auswahl dieses Status bei Beginn des
Trocknungsvorgangs aufzuheben, muss die Maschine zurückgesetzt werden.
66..
Drücken Sie die Taste START. Der Trockner startet automatisch und die STARTAnzeige leuchtet auf.
77..
Die -Anzeige zeigt die verbleibende Zeit des Trocknungsvorgangs.
88..
Wenn die Tür während des Programms geöffnet wird, um die Wäsche zu
überprüfen, müssen Sie START drücken, um nach dem Schließen der Tür den
Trocknungsvorgang fortzusetzen..
99..
Wenn das Display 15' anzeigt, beginnt das Gerät mit der Abkühlphase; die
Kleidung wird zum Abkühlen im kalten Luftstrom geschleudert..
1100..
Wenn das Programm beendet ist, leuchtet die STOPP-Anzeige auf.
AAbbbbrreecchheenn uunndd ZZuurrüücckksseettzzeenn ddeess
PPrrooggrraammmmss
Um ein Programm abzubrechen, drücken Sie die Taste START 5 Sekunden lang. Die
Maschine zeigt an, dass sie zurückgesetzt wurde, und die START-Anzeige blinkt.
Innerhalb der ersten 10 Minuten kann das Programm gewechselt werden, ohne dass die
Funktion Abbrechen oder Zurücksetzen verwendet werden muss.
SSttaarrttvveerrzzööggeerruunngg
Mit der Startverzögerungsfunktion können Sie den Beginn des Trocknungsvorgangs
um 6 bis 9 Stunden verzögern.
Wenn diese Funktion erstmalig ausgewählt wird, zeigt das Display eine Verzögerung von
6 Stunden. Durch nachfolgendes Drücken der Taste, wird die Verzögerung auf 9 Stunden
verlängert.
52
BBeettrriieebb
40001828GER.qxd 02/09/2004 17:53 Page 52
Page 53

Drücken Sie START, um das Programm zu beginnen, und
das Gerät wird den Trocknungsvorgang am Ende dieses
Zeitraums durchführen. Die Lichtanzeige für 6 oder
9 Stunden blinkt, um anzuzeigen, dass die
Startverzögerung aktiviert wurde.
RReeiinniigguunngg ddeess TTrroocckknneerrss
● Reinigen Sie nach jedem Trocknungsvorgang das
Flusensieb und leeren Sie den KondenswasserBehälter.
● Der Kondensator muss regelmäßig gereinigt
werden.
● Wischen Sie nach jeder Anwendungsphase die
Innenseite der Trommel aus und lassen Sie die Tür
einige Zeit offen stehen, damit sie durch die
Luftzirkulation getrocknet wird.
● Reinigen Sie die Außenseite der Maschine und der
Tür mit einem weichen Tuch.
●
AAUUFF KKEEIINNEENN FFAALLLL
Scheuerschwämme oder
Scheuermittel benutzen.
● Um ein Verkleben der Tür oder ein Ansammeln
von Flusen zu vermeiden, sollten Sie die Innentür
und die Türdichtung regelmäßig mit einem
feuchten Tuch reinigen.
TTeecchhnniisscchhee DDaatteenn
Trommelinhalt 115 Liter
Maximales Fassungsvermögen 7 kg
Höhe 85 cm
Breite 60 cm
Tiefe 60 cm
Energieeffizienzklasse C
53
WWIICCHHTTIIGG
SScchhaalltteenn SSiiee iimmmmeerr
ddaass GGeerräätt aauuss uunndd
zziieehheenn SSiiee ddeenn
SStteecckkeerr aauuss ddeerr
SStteecckkddoossee,, bbeevvoorr
ddaass GGeerräätt ggeerreeiinniiggtt
wwiirrdd..
DDiiee eelleekkttrriisscchheenn
DDaatteenn bbeeffiinnddeenn
ssiicchh aauuff ddeemm
BBeettrriieebbssttyyppeennsscchhiilldd
aann ddeerr VVoorrddeerrsseeiittee
ddeess TTrroocckknneerrss ((bbeeii
ooffffeenneerr TTüürr))..
RReeiinniigguunngg uunndd
RRoouuttiinneewwaarrttuunnggeenn
WWAARRNNUUNNGG!!
TTrroommmmeell,, TTüürr uunndd
ddiiee WWäässcchhee sseellbbsstt
kköönnnneenn sseehhrr hheeiißß
sseeiinn..
40001828GER.qxd 02/09/2004 17:53 Page 53
Page 54

MMöögglliicchhee GGrrüünnddee ffüürr......
FFeehhlleerr,, ddiiee SSiiee sseellbbsstt bbeehheebbeenn kköönnnneenn
Prüfen Sie alle Punkte in der folgenden Checkliste, bevor Sie sich an den GIAS-Service
wenden. Sollte die Waschmaschine funktionstüchtig sein oder unsachgemäß installiert
oder verwendet worden sein, wird Ihnen der Besuch des Kundendiensttechnikers in
Rechnung gestellt. Wenn das Problem weiterhin besteht, nachdem Sie die Checkliste
durchgegangen sind, wenden Sie sich bitte an den GIAS-Service, der Ihnen evtl.
telefonisch weiterhelfen kann.
DDiiee TTrroocckknnuunnggsszzeeiitt iisstt zzuu llaanngg//ddiiee TTeexxttiilliieenn ssiinndd nniicchhtt
ttrroocckkeenn ggeennuugg……
● Haben Sie die richtige Trocknungszeit/das richtige Programm gewählt?
● Waren die Textilien zu nass? Wurden die Textilien sorgfältig ausgewrungen oder
geschleudert?
● Muss das Sieb gereinigt werden?
● Muss der Kondensator gereinigt werden?
● Ist der Trockner überladen?
● Sind die Luftansaug- und Abluftanschlüsse sowie die Fläche unter dem Sockel des
Trockners frei?
● Ist die Taste noch von einem früher gewählten Programm gedrückt?
DDeerr TTrroocckknneerr ffuunnkkttiioonniieerrtt nniicchhtt……
● Ist der elektrische Netzanschluss für den Trockner in Ordnung? Kontrollieren Sie
diesen mit einem anderen Gerät, wie z.B. einer Tischlampe.
● Befindet sich der Stecker korrekt in der Steckdose?
● Gibt es einen Stromausfall?
● Ist die Sicherung herausgesprungen?
● Ist die Tür richtig geschlossen?
● Ist der Trockner sowohl am Netzanschluss als auch an der Maschine angestellt?
● Ist die Trocknungszeit oder das Programm gewählt worden?
● Ist die Maschine nach dem Türöffnen wieder angestellt worden?
● Hat der Trockner den Betrieb eingestellt, weil der Kondenswasser-Behälter voll ist
und entleert werden muss?
DDeerr TTrroocckknneerr iisstt zzuu llaauutt……
● Schalten Sie den Trockner aus und wenden Sie sich an den GIAS-Service.
DDiiee FFlluusseennssiieebb--AAnnzzeeiiggee lleeuucchhtteett……
● Muss das Sieb gereinigt werden?
● Muss der Kondensator gereinigt werden?
DDiiee AAnnzzeeiiggee ‘‘KKoonnddeennsswwaasssseerr lleeeerreenn’’ lleeuucchhtteett……
● Muss der Kondenswasser-Behälter geleert werden?
54
FFeehhlleerrssuucchhee
40001828GER.qxd 02/09/2004 17:53 Page 54
Page 55

Sollten trotz obengenannter Kontrollen weiterhin
Störungen bei Ihrem Trockner auftreten, wenden Sie
sich bitte an den GIAS-Service, der Sie beraten kann. Der
Kundendienst kann Sie möglicherweise telefonisch
beraten oder mit Ihnen einen geeigneten Termin für
einem Techniker im Rahmen der Garantie vereinbaren.
Ihnen wird jedoch eventuell eine Gebühr berechnet,
wenn sich herausstellt, dass Ihre Maschine:
● funktionsfähig ist.
● nicht gemäß der Installationsanweisung installiert
worden ist.
● unsachgemäß benutzt wurde.
EErrssaattzztteeiillee
VVeerrwweennddeenn SSiiee iimmmmeerr OOrriiggiinnaall--EErrssaattzztteeiillee,, ddiiee SSiiee ddiirreekktt
bbeeiimm GGIIAASS--SSeerrvviiccee eerrhhaalltteenn..
GGIIAASS--SSeerrvviiccee
WWeennddeenn SSiiee ssiicchh ffüürr WWaarrttuunnggss-- uunndd RReeppaarraattuurraarrbbeeiitteenn
aann IIhhrreenn GGIIAASS--SSeerrvviicceetteecchhnniikkeerr..
Der Hersteller übernimmt keine Verantwortung für
etwaige Druckfehler in dieser Bedienungsanleitung. Der
Hersteller behält sich das Recht vor, seine Produkte ggf.
anzupassen, ohne wesentliche Eigenschaften zu
verändern.
55
KKuunnddeennddiieennsstt
40001828GER.qxd 02/09/2004 17:53 Page 55
Page 56

Introduzione. . . . . . . . . . . . . . . . . . . . . . . . . . . . . . . . . . . . . . . . . . . . . . 57
Informazioni sulla consegna . . . . . . . . . . . . . . . . . . . . . . . . . . . . . . . . . . . . . . 57
Estrazione del prodotto dall’imballaggio. . . . . . . . . . . . . . 57
Consigli di sicurezza . . . . . . . . . . . . . . . . . . . . . . . . . . . . . . . . . . . . . 58
Installazione. . . . . . . . . . . . . . . . . . . . . . . . . . . . . . . . . . . . . . . . . . . . . . . . . . . 58
Utilizzo. . . . . . . . . . . . . . . . . . . . . . . . . . . . . . . . . . . . . . . . . . . . . . . . . . . . . . . 58
La biancheria . . . . . . . . . . . . . . . . . . . . . . . . . . . . . . . . . . . . . . . . . . . . . . . . . . 58
Tutela dell’ambiente . . . . . . . . . . . . . . . . . . . . . . . . . . . . . . . . . . . . . . . . . . . . 59
Servizio GIAS . . . . . . . . . . . . . . . . . . . . . . . . . . . . . . . . . . . . . . . . . . . . . . . . . . 59
Installazione . . . . . . . . . . . . . . . . . . . . . . . . . . . . . . . . . . . . . . . . . . . . . . 60
Requisiti elettrici . . . . . . . . . . . . . . . . . . . . . . . . . . . . . . . . . . . . . . . . . . . . . . . 60
Regolazione dei piedini . . . . . . . . . . . . . . . . . . . . . . . . . . . . . . . . . . . . . . . . . . 60
Ventilazione . . . . . . . . . . . . . . . . . . . . . . . . . . . . . . . . . . . . . . . . . . . . . . 61
Preparazione della biancheria . . . . . . . . . . . . . . . . . . . . . . . . . . 62
Preparazione dei capi . . . . . . . . . . . . . . . . . . . . . . . . . . . . . . . . . . . . . . . . . . . 62
Selezione della biancheria . . . . . . . . . . . . . . . . . . . . . . . . . . . . . . . . . . . . . . . . 63
Consigli per l’asciugatura . . . . . . . . . . . . . . . . . . . . . . . . . . . . . . . 64
Articolo non idoneo all’asciugatura meccanica . . . . . . . . . . . . . . . . . . . . . . . . 64
Risparmio energia . . . . . . . . . . . . . . . . . . . . . . . . . . . . . . . . . . . . . . . . . . . . . . 64
Guida ad una corretta asciugatura . . . . . . . . . . . . . . . . . . . . . . . . . . . . . . . . . 64
Comandi e spie di segnalazione . . . . . . . . . . . . . . . . . . . . . . . 65
Portellone e filtro . . . . . . . . . . . . . . . . . . . . . . . . . . . . . . . . . . . . . . . . 66
Apertura del portellone. . . . . . . . . . . . . . . . . . . . . . . . . . . . . . . . . . . . . . . . . . 66
Filtro. . . . . . . . . . . . . . . . . . . . . . . . . . . . . . . . . . . . . . . . . . . . . . . . . . . . . . . . . 66
Spia di pulizia filtro . . . . . . . . . . . . . . . . . . . . . . . . . . . . . . . . . . . . . . . . . . . . . 66
Vaschetta dell’acqua. . . . . . . . . . . . . . . . . . . . . . . . . . . . . . . . . . . . . 67
Per togliere la vaschetta . . . . . . . . . . . . . . . . . . . . . . . . . . . . . . . . . . . . . . . . . 67
Condensatore. . . . . . . . . . . . . . . . . . . . . . . . . . . . . . . . . . . . . . . . . . . . . 68
Per togliere il condensatore. . . . . . . . . . . . . . . . . . . . . . . . . . . . . . . . . . . . . . . 68
Selezione del programma . . . . . . . . . . . . . . . . . . . . . . . . . . . . . . . 69
Funzionamento. . . . . . . . . . . . . . . . . . . . . . . . . . . . . . . . . . . . . . . . . . . 70
Annullamento e azzeramento del programma . . . . . . . . . . . . . . . . . . . . . . . . 70
Partenza ritardata . . . . . . . . . . . . . . . . . . . . . . . . . . . . . . . . . . . . . . . . . . . . . . 70
Pulizia e manutenzione ordinaria . . . . . . . . . . . . . . . . . . . . . . 71
Pulizia dell’asciugatrice . . . . . . . . . . . . . . . . . . . . . . . . . . . . . . . . . . . . . . . . . . 71
Specifiche tecniche. . . . . . . . . . . . . . . . . . . . . . . . . . . . . . . . . . . . . . . . . . . . . . 71
Ricerca guasti. . . . . . . . . . . . . . . . . . . . . . . . . . . . . . . . . . . . . . . . . . . . . 72
Servizio assistenza clienti . . . . . . . . . . . . . . . . . . . . . . . . . . . . . . . 73
Ricambi . . . . . . . . . . . . . . . . . . . . . . . . . . . . . . . . . . . . . . . . . . . . . . . . . . . . . . 73
Servizio GIAS . . . . . . . . . . . . . . . . . . . . . . . . . . . . . . . . . . . . . . . . . . . . . . . . . . 73
56
40001828ITA.qxd 02/01/2006 17:22 Page 56
Page 57

IInnttrroodduuzziioonnee
LLeeggggeerree aatttteennttaammeennttee llee iissttrruuzziioonnii ppeerr uunn ccoorrrreettttoo
ffuunnzziioonnaammeennttoo ddeellllaa mmaacccchhiinnaa.. QQuueessttoo ooppuussccoolloo
ffoorrnniissccee iimmppoorrttaannttii lliinneeee gguuiiddaa ppeerr uunnaa mmaannuutteennzziioonnee,,
uunn uussoo ee uunn’’iinnssttaallllaazziioonnee ssiiccuurrii.. EEssssoo ccoonnttiieennee iinnoollttrree
uuttiillii ccoonnssiiggllii cchhee ccoonnsseennttiirraannnnoo ddii ssffrruuttttaarree aall mmeegglliioo llee
ppootteennzziiaalliittàà ddii qquueessttaa mmaacccchhiinnaa..
Conservare la documentazione in un luogo sicuro per
eventuali riferimenti o per futuri proprietari
IInnffoorrmmaazziioonnii ssuullllaa
ccoonnsseeggnnaa
Controllare che al momento della consegna la macchina
sia dotata dei seguenti componenti:
● Libretto di istruzioni
● Certificato di garanzia
● Etichetta efficienza energetica
Estrarre la macchina dall’imballaggio vicino al punto
previsto per l’installazione.
11..
Con cautela, eseguire un taglio lungo il perimetro
della base dell’imballaggio e un altro verso l’alto,
in corrispondenza di un angolo.
22..
Togliere la fascia in politene e sollevare
l’asciugatrice togliendola dalla base di polistirolo.
57
VVeerriiffiiccaarree cchhee dduurraannttee
iill ttrraassppoorrttoo llaa mmaacccchhiinnaa
nnoonn aabbbbiiaa ssuubbiittoo
ddaannnnii.. IInn ccaassoo
ccoonnttrraarriioo,, rriivvoollggeerrssii aall
CCeennttrroo AAssssiisstteennzzaa GGIIAASS..
LLaa mmaannccaattaa oosssseerrvvaannzzaa
ddii ttaallee pprroocceedduurraa
ppoottrreebbbbee
ccoommpprroommeetttteerree llaa
ssiiccuurreezzzzaa
ddeellll’’aappppaarreecccchhiioo.. LLaa
cchhiiaammaattaa ppuuòò eesssseerree
ssooggggeettttaa aa ppaaggaammeennttoo
ssee llee ccaauussee ddii
mmaallffuunnzziioonnaammeennttoo
ddeellllaa mmaacccchhiinnaa ssoonnoo
aattttrriibbuuiibbiillii aa uunn uussoo
iimmpprroopprriioo..
EEssttrraazziioonnee ddeell pprrooddoottttoo
ddaallll’’iimmbbaallllaaggggiioo
SSmmaallttiirree ll’’iimmbbaallllaaggggiioo iinn mmaanniieerraa ssiiccuurraa..
AAcccceerrttaarrssii cchhee ssiiaa ffuuoorrii ddaallllaa ppoorrttaattaa ddeeii
bbaammbbiinnii,, iinn qquuaannttoo ffoonnttee ppootteennzziiaallee ddii rriisscchhiioo..
40001828ITA.qxd 02/09/2004 18:15 Page 57
Page 58

Consigli di sicurezza
Installazione
● Prima dell’uso, controllare che il prodotto non presenti segni visibili di danni. Non
usare in caso di danni e contattare il Servizio Assistenza GIAS.
● Non utilizzare adattatori, connettori multipli e/o prolunghe.
● Non installare la macchina in bagno.
● Non installare l’asciugatrice vicino ai tendaggi e rimuovere tempestivamente
eventuali oggetti caduti dietro la macchina.
Utilizzo
● ATTENZIONE L’uso improprio dell’asciugatrice può provocare rischio di incendio.
● Questa macchina è prevista unicamente per uso domestico, ovvero per
l’asciugatura di capi e indumenti per la casa.
● La macchina qui descritta deve essere utilizzata esclusivamente per lo scopo al
quale è destinata secondo quanto illustrato nel presente libretto. Prima di attivare
la macchina, accertarsi di avere letto attentamente e compreso le istruzioni d’uso e
di installazione.
● Non toccare l’asciugatrice con mani o piedi umidi o bagnati.
● Non appoggiarsi al portellone per caricare la macchina; non utilizzare il portellone
per sollevare o spostare la macchina.
● Non consentire ai bambini di giocare con la macchina o con i suoi comandi.
● ATTENZIONE Non utilizzare il prodotto se il filtro antifilacce non è correttamente
posizionato o risulta danneggiato; il filtro non è ignifugo.
● ATTENZIONE Se è esposto il simbolo indicante il riscaldamento della superficie,
quando l’asciugatrice è in funzione la temperatura può essere superiore a
60 gradi C.
● Staccare la spina dalla presa elettrica. Prima di pulire la macchina, staccare sempre
la spina.
● Se si presume che la macchina sia guasta, non continuare ad usarla.
● Non accumulare cascami e filacce sul pavimento attorno alla macchina.
● Dopo il ciclo di asciugatura, l’interno del cestello può essere molto caldo. Prima di
estrarre la biancheria è pertanto opportuno lasciar raffreddare completamente la
macchina.
La biancheria
● ATTENZIONE Evitare di asciugare articoli trattati con prodotti di pulizia a secco.
● ATTENZIONE In determinate circostanze, i materiali in gomma possono essere
soggetti ad autocombustione se riscaldati. I materiali in plastica, in gomma e
similgomma non sono adatti ad essere asciugati meccanicamente. EVITARE
ASSOLUTAMENTE di asciugare articoli in questi materiali.
● Leggere attentamente le etichette con le istruzioni di lavaggio per conoscere le
caratteristiche dell’asciugatura idonea.
● Gli indumenti devono essere introdotti nell’asciugatrice solo dopo essere stati
opportunamente centrifugati in lavatrice o strizzati a mano. EVITARE di caricare
nel cestello indumenti ancora gocciolanti.
58
40001828ITA.qxd 02/01/2006 17:24 Page 58
Page 59

● Controllare accuratamente che nelle tasche degli indumenti da asciugare non
siano presenti accendini o fiammiferi ed EVITARE assolutamente l’uso di prodotti
infiammabili in prossimità della macchina.
● EVITARE ASSOLUTAMENTE di asciugare tende in fibra di vetro. La contaminazione
dei capi con le fibre di vetro può infatti dar luogo a fenomeni d’irritazione
cutanea.
● NON introdurre nella macchina indumenti trattati o contaminati con spray o
liquidi detergenti infiammabili, come benzina, olio da cucina o spray con aerosol.
Tutela dell’ambiente
● Tutti i materiali utilizzati per l’imballaggio sono ecologici e riciclabili. Smaltite
l’imballaggio con metodi ecologici. Presso il comune di residenza si potranno
reperire ulteriori informazioni sui metodi di smaltimento.
● Per garantire la sicurezza al momento dello smaltimento di una asciugatrice,
scollegare la spina dell’alimentazione dalla presa, tagliare il cavo
dell’alimentazione di rete e distruggerlo insieme alla spina. Per evitare che i
bambini possano rimanere intrappolati all’interno della lavatrice, rompere i cardini
o la chiusura dell’oblò.
Servizio GIAS
● Ai fini della durata e del buon funzionamento della macchina, per gli eventuali
interventi di assistenza o riparazione consigliamo di rivolgersi esclusivamente al
servizio assistenza autorizzato GIAS.
Direttiva Europea 2002/96/CE
Questo elettrodomestico è marcato conformemente alla Direttiva Europea 2002/96/CE
sui rifiuti da apparecchiature elettriche ed elettroniche (WEEE).
Assicurandovi che questo prodotto sia smaltito correttamente,
aiuterete ad evitare possibili conseguenze negative
all'ambiente e alla salute delle persone, che potrebbero
verificarsi a causa d'un errato trattamento di questo prodotto
giunto a fine vita.
Il simbolo sul prodotto indica che questo apparecchio non
può essere trattato come un normale rifiuto domestico; dovrà
invece essere consegnato al punto più vicino di raccolta per il
riciclo delle apparecchiature elettriche ed elettroniche.
Lo smaltimento deve essere effettuato in accordo con le
regole ambientali vigenti per lo smaltimento dei rifiuti.
Per informazioni più dettagliate sul trattamento, recupero e
riciclo di questo prodotto, per favore contattare l'ufficio
pubblico di competenza (del dipartimento ecologia e
ambiente), o il vostro servizio di raccolta rifiuti a domicilio, o
il negozio dove avete acquistato il prodotto.
59
Nel caso in cui la macchina non funzioni correttamente o sia fuori
uso, spegnere e staccare la spina dalla presa. Per la riparazione,
rivolgersi al Centro Assistenza GIAS.
40001828ITA.qxd 02/01/2006 17:25 Page 59
Page 60

RReeqquuiissiittii eelleettttrriiccii
Le asciugatrici sono state progettate per funzionare ad
una tensione di 230-240V, 50 Hz monofase. Controllare
che il circuito dell’alimentazione sia idoneo per valori di
corrente di almeno 10A.
LL’’eelleettttrriicciittàà ppuuòò eesssseerree eessttrreemmaammeennttee ppeerriiccoolloossaa..
LL’’aappppaarreecccchhiioo ddeevvee eesssseerree ooppppoorrttuunnaammeennttee ccoolllleeggaattoo aa
tteerrrraa..
LLaa pprreessaa ee llaa ssppiinnaa ddeellll’’aappppaarreecccchhiioo ddeevvoonnoo eesssseerree ddeelllloo
sstteessssoo ttiippoo..
NNoonn uuttiilliizzzzaarree aaddaattttaattoorrii mmuullttiippllii ee//oo pprroolluunngghhee..
UUnnaa vvoollttaa ccoommpplleettaattaa ll’’iinnssttaallllaazziioonnee,, llaa ssppiinnaa ddeevvee
rriissuullttaarree aacccceessssiibbiillee ee ffaacciillmmeennttee ssccoolllleeggaabbiillee..
I fili dell’impianto elettrico sono dei seguenti colori:
BBlluu NNEEUUTTRROO
MMaarrrroonnee SSOOTTTTOO TTEENNSSIIOONNEE
VVeerrddee ee ggiiaalllloo TTEERRRRAA
L’apparecchio con marchio CE è conforme alle direttive
europee 89/336/CEE, 73/23/CEE e successive modifiche.
RReeggoollaazziioonnee ddeeii ppiieeddiinnii
Una volta posizionata la macchina, si dovrebbe
procedere alla regolazione dei piedini, per garantire
una perfetta messa in bolla.
Regolare i quattro piedini per garantire che la macchina
sia stabile e in bolla.
60
LLaa cchhiiaammaattaa ppuuòò
eesssseerree ssooggggeettttaa aa
ppaaggaammeennttoo,, ssee llee
ccaauussee ddii
mmaallffuunnzziioonnaammeennttoo
ddeellllaa mmaacccchhiinnaa ssoonnoo
aattttrriibbuuiibbiillii aa
uunn’’iinnssttaallllaazziioonnee nnoonn
ccoorrrreettttaa..
NNeell ccaassoo rriissuullttii
ddaannnneeggggiiaattoo,, iill ccaavvoo
ddii aalliimmeennttaazziioonnee
ddeellll’’aappppaarreecccchhiioo
ddeevv’’eesssseerree
pprroonnttaammeennttee
ssoossttiittuuiittoo ccoonn
aappppoossiittoo ccaavvoo
rreeppeerriibbiillee
EESSCCLLUUSSIIVVAAMMEENNTTEE
pprreessssoo iill sseerrvviizziioo ddii
rriiccaammbbii..
LL’’iinnssttaallllaazziioonnee ddeevvee
eesssseerree eeffffeettttuuaattaa ddaa
ppeerrssoonnee ccoommppeetteennttii..
IInnssttaallllaazziioonnee
NNoonn iinnsseerriirree llaa ssppiinnaa nneellllaa pprreessaa ee nnoonn
aacccceennddeerree llaa mmaacccchhiinnaa ffiinncchhéé ll’’iinnssttaallllaazziioonnee
nnoonn ssaarràà ssttaattaa ccoommpplleettaattaa..
AAii ffiinnii ddeellllaa ssiiccuurreezzzzaa ppeerrssoonnaallee èè eesssseennzziiaallee cchhee
ll’’aasscciiuuggaattrriiccee vveennggaa iinnssttaallllaattaa ccoorrrreettttaammeennttee..
IInn ccaassoo ddii dduubbbbii ssuullll’’iinnssttaallllaazziioonnee,, rriivvoollggeerrssii aall
SSeerrvviizziioo AAssssiisstteennzzaa GGIIAASS..
40001828ITA.qxd 02/09/2004 18:15 Page 60
Page 61

Accertarsi che nel locale scelto per l’installazione vi sia
un ricambio d’aria sufficiente, onde evitare che i gas
provenienti da apparecchiature funzionanti con altri
combustibili, comprese fiamme libere, siano aspirati nel
locale dove l’asciugatrice è in funzione.
● Non scaricare l’aria nella canna fumaria utilizzata
per lo scarico di fumi provenienti da attrezzature
funzionanti a gas o altri combustibili.
● Controllare periodicamente che attorno
all’asciugatrice vi sia una buona circolazione
d’aria, senza impedimenti di sorta.
● Dopo l’uso ispezionare il filtro antifilacce e, se
necessario, pulirlo.
● Verificare costantemente che presa e sfiati non
siano ostruiti. Per assicurare un’idonea
ventilazione è essenziale che lo spazio tra il fondo
macchina e il pavimento non sia ostruito. Tra la
macchina ed eventuali ostacoli si dovrebbe
lasciare uno spazio di almeno 12mm.
● Rimuovere tempestivamente eventuali oggetti
caduti dietro/sotto la macchina in quanto
potrebbero ostruire le prese e gli sfiati dell’aria.
●
EEVVIITTAARREE AASSSSOOLLUUTTAAMMEENNTTEE
d’installare la
macchina contro tendaggi.
61
VVeennttiillaazziioonnee
SFIATI ARIA
SFIATI ARIA NELLA BASE
PRESE ARIA
40001828ITA.qxd 02/09/2004 18:15 Page 61
Page 62

Prima di utilizzare l’asciugatrice per la prima volta:
● Leggere attentamente il presente libretto
d’istruzioni.
● Togliere tutti gli articoli presenti all’interno del
cestello.
● Pulire l’interno del cestello e il portellone con un
panno umido in modo da eliminare l’eventuale
polvere depositata durante il trasporto.
PPrreeppaarraazziioonnee ddeeii ccaappii
Verificare che la biancheria da asciugare sia idonea per
l’asciugatura meccanica, come indicato dai simboli
sull’etichetta di lavaggio dei vari articoli.
Controllare che le chiusure siano chiuse e le tasche
vuote. Girare i capi con il rovescio all’esterno. Introdurre
i capi nel cestello uno ad uno, in modo che non si
aggroviglino.
PPeessoo mmaassssiimmoo ddii
aasscciiuuggaattuurraa
● Capi in cotone Max. 7 kg
● Capi sintetici Max. 3,5 kg
62
PPrreeppaarraazziioonnee ddeellllaa
bbiiaanncchheerriiaa
NNoonn ssoovvrraaccccaarriiccaarree
iill cceesstteelllloo,, iinn
qquuaannttoo ii ccaappii
iinnggoommbbrraannttii,, aa
ccaallddoo,, ppoossssoonnoo
ssuuppeerraarree iill ccaarriiccoo
mmaassssiimmoo
ccoonnsseennttiittoo..
((ppeerr eesseemmppiioo ssaacccchhii
aa ppeelloo ee ppiiuummoonnii))
40001828ITA.qxd 02/09/2004 18:15 Page 62
Page 63

SSeelleezziioonnaarree llaa bbiiaanncchheerriiaa
nneell mmooddoo sseegguueennttee::
●
IInn bbaassee aaii ssiimmbboollii ddeellllee eettiicchheettttee ddii llaavvaaggggiioo
Le etichette di lavaggio sono apposte sul collo o
sulle cuciture interne:
Articolo idoneo per l’asciugatura meccanica.
Asciugatura ad alta temperatura.
Solo asciugatura a bassa temperatura.
Articolo non idoneo all’asciugatura
meccanica.
Se il capo è sprovvisto di etichetta di
lavaggio, si deve presumere che non sia
idoneo all’asciugatura meccanica.
●
IInn bbaassee aall qquuaannttiittaattiivvoo eedd aallllaa ppeessaanntteezzzzaa
Se il carico è superiore alla capacità della
macchina, separare i capi in base alla pesantezza
(p. es., separare gli asciugamani dalla biancheria
leggera).
●
IInn bbaassee aall ttiippoo ddii tteessssuuttoo
CCoottoonnee,, lliinnoo::
Asciugamani, jersey di cotone,
biancheria da tavola/letto.
AArrttiiccoollii ssiinntteettiiccii::
Camicette, camicie, tute ecc. in
poliestere o poliammide e misti cotone/sintetici.
●
IInn bbaassee aall ggrraaddoo ddii aasscciiuuggaattuurraa
Selezionare fra: capi asciutti da stirare, capi pronti
da riporre ecc. Per gli articoli delicati premere il
tasto impostando una temperatura di
asciugatura ridotta.
63
40001828ITA.qxd 02/09/2004 18:15 Page 63
Page 64

EEvviittaarree ddii aasscciiuuggaarree::
Articoli di lana, seta, tessuti delicati, calze di nylon,
ricami delicati, tessuti con decorazioni metalliche,
indumenti con guarnizioni in PVC o in pelle, scarpe da
ginnastica, articoli pesanti come sacchi a pelo ecc.
RRiissppaarrmmiioo eenneerrggiiaa
Introdurre nell’asciugatrice solo biancheria
accuratamente strizzata a mano o centrifugata a
macchina. Quanto più asciutta è la biancheria, tanto più
rapido è il tempo richiesto per l’asciugatura, con
conseguente risparmio di consumo elettrico.
CCOOSSAA FFAARREE SSEEMMPPRREE
● Cercare sempre di far lavorare la macchina a
pieno carico di biancheria: si risparmia tempo ed
elettricità.
● Prima di ogni ciclo di asciugatura verificare
SEMPRE che il filtro sia pulito.
CCOOSSAA NNOONN FFAARREE MMAAII
● Non superare mai il peso massimo: si perde tempo
e si consuma più elettricità.
● Evitare di caricare capi ancora gocciolanti: si
rischia di rovinare la macchina.
GGuuiiddaa aadd uunnaa ccoorrrreettttaa
aasscciiuuggaattuurraa
In tabella sono riportati i tempi di asciugatura indicativi
in funzione del tipo di tessuto e del grado di umidità
dei capi.
64
CCoonnssiiggllii ppeerr ll’’aasscciiuuggaattuurraa
IIMMPPOORRTTAANNTTEE::
EEvviittaarree ddii aasscciiuuggaarree
aarrttiiccoollii
pprreevveennttiivvaammeennttee
ttrraattttaattii ccoonn
pprrooddoottttii ddii ppuulliizziiaa
aa sseeccccoo oo ccaappii iinn
ggoommmmaa ((ppeerriiccoolloo
dd’’iinncceennddiioo oo
eesspplloossiioonnee))..
NNeell ccoorrssoo ddeeggllii
uullttiimmii 1155 mmiinnuuttii,, iill
ccaarriiccoo vviieennee sseemmpprree
aasscciiuuggaattoo ccoonn aarriiaa
ffrreeddddaa..
TTeessssuuttoo
COTONE
SINTETICI
ACRILICI
SSEELLEEZZIIOONNEE
TTEEMMPPEERRAATTUURRAA
ELEVATA
BASSA
BASSA
SSPPIIAA DDII
SSEEGGNNAALLAAZZIIOONNEE
OFF
ON
ON
CCAARRIICCOO
PPEESSAANNTTEE
140-165 min
–
–
CCAARRIICCOO
MMEEDDIIOO
70-80 min
70-80 min
50-65 min
CCAARRIICCOO
LLEEGGGGEERROO
50-65 min
40-55 min
30-40 min
40001828ITA.qxd 02/09/2004 18:15 Page 64
Page 65

PPaannnneelllloo ddii ccoommaannddoo ee ssppiiee lluummiinnoossee
SSeelleettttoorree ddeeii pprrooggrraammmmii
– Consente di selezionare il programma desiderato
TTaassttoo ee ssppiiaa OOnn//OOffff
– Premere questi tasti per attivarli, la spia si illumina.
TTaassttoo SSTTAARRTT ((AAVVVVIIOO))
– Per dare inizio al programma di asciugatura selezionato, premere
il tasto START. Per annullare/azzerare il programma, tenere premuto per 5 secondi
TTaassttoo AAccrriilliiccii//SSiinntteettiiccii
– Premere questo tasto per ridurre la temperatura nel caso di
capi delicati. Si accenderà la spia sopra il relativo tasto. Per modificare la regolazione
della temperatura, occorre azzerare il programma
Bassa temperatura – Spia
AACCCCEESSAA
Alta temperatura – Spia
SSPPEENNTTAA
SSppiiaa EElliimmiinnaa AAccqquuaa
– si accende quando la vaschetta dell’acqua è piena
LLaa ssppiiaa ddii sseeggnnaallaazziioonnee ppuulliizziiaa ffiillttrroo
– si accende quando il filtro deve essere pulito.
TTaassttoo PPaarrtteennzzaa rriittaarrddaattaa
– Consente all’utente di ritardare la partenza del ciclo di
asciugatura (si vedano i dettagli sul funzionamento a pagina 70)
DDiissppllaayy
SSTTAARRTT
– Quando si attiva l’asciugatrice, la spia START lampeggia; quando parte il
programma, la spia START si accende
LLaa ssppiiaa 6600'' ––
si accende quando mancano meno di 60 minuti al completamento del
programma
LLaa ssppiiaa 1155'' ––
si accende quando mancano meno di 15 minuti al completamento del
programma In questa fase del ciclo di asciugatura, la macchina entra nella fase di
Raffreddamento
LLaa ssppiiaa SSTTOOPP
– si accende quando viene completato il programma.
66hh
– partenza ritardata di 6 ore (quando entra in funzione la spia lampeggia)
99hh
– partenza ritardata di 9 ore (quando entra in funzione la spia lampeggia)
65
CCoommaannddii ee ssppiiee ddii
sseeggnnaallaazziioonnee
PULSANTE
ACRILICI/
SINTETICI
IL
PULSANTE
ON/OFF
SPIA DI PULIZIA FILTRO
SPIA ELIMINA
ACQUA
SELETTORE DEI
PROGRAMMI
PULSANTE
START
(AVVIO)
PULSANTE
PARTENZA
RITARDATA
DISPLAY TEMPO RESIDUO
40001828ITA.qxd 02/09/2004 18:15 Page 65
Page 66

AAppeerrttuurraa ddeell ppoorrtteelllloonnee
Tirare la maniglia per aprire lo sportello.
Per avviare la macchina, richiudere il portellone e
premere il tasto START.
FFiillttrroo
IIMMPPOORRTTAANNTTEE:: AAii ffiinnii ddeellllaa mmaassssiimmaa eeffffiiccaacciiaa ddeellllaa
mmaacccchhiinnaa,, pprriimmaa ddii ooggnnii cciicclloo ddii aasscciiuuggaattuurraa èè eesssseennzziiaallee
vveerriiffiiccaarree llaa ppuulliizziiaa ddeell ffiillttrroo aannttiiffiillaaccccee..
11..
Tirare il filtro verso l’alto.
22..
Aprire il filtro come illustrato.
33..
Rimuovere delicatamente le filacce con la punta
delle dita o aiutandosi con uno spazzolino
morbido.
44..
Richiudere il filtro e reinserirlo in sede.
SSppiiaa ddii ppuulliizziiaa ffiillttrroo
si accende segnalando la necessità di pulire il filtro.
SSee llaa bbiiaanncchheerriiaa nnoonn ssii aasscciiuuggaa vveerriiffiiccaarree cchhee iill ffiillttrroo nnoonn
ssiiaa iinnttaassaattoo..
66
PPoorrtteelllloonnee ee ffiillttrroo
AAVVVVEERRTTEENNZZAA!!
SSii rriiccoorrddaa cchhee qquuaannddoo llaa mmaacccchhiinnaa èè iinn
ffuunnzziioonnee iill cceesstteelllloo ee iill ppoorrtteelllloonnee
ppoossssoonnoo eesssseerree MMOOLLTTOO CCAALLDDII..
40001828ITA.qxd 02/09/2004 18:15 Page 66
Page 67

L’acqua eliminata dalla biancheria durante il ciclo di
asciugatura viene raccolta in una vaschetta posta in
fondo alla macchina.
Quando la vaschetta è piena si accende la spia sul
pannello dei comandi, segnalando che si
DDEEVVEE
vuotare
la vaschetta. Tuttavia, si consiglia di svuotare la
vaschetta dopo ogni ciclo di asciugatura.
NNOOTTAA:: NNeeii pprriimmii cciiccllii,, qquuaannddoo llaa mmaacccchhiinnaa èè nnuuoovvaa,, ssii
rraaccccoogglliiee ppooccaa aaccqquuaa iinn qquuaannttoo ssii rriieemmppiiee pprriimmaa iill
sseerrbbaattooiioo iinntteerrnnoo..
PPeerr ttoogglliieerree llaa vvaasscchheettttaa
1. Estrarre con delicatezza la vaschetta, finché non
viene completamente rimossa. Sostenere la
vaschetta con entrambe le mani. Da piena, la
vaschetta dell’acqua pesa circa 4 kg.
2. Aprire il coperchio sulla vaschetta e svuotare
l’acqua. Rimontare il coperchio e reinserire la
vaschetta in sede. SPINGERE CON DECISIONE IN
SEDE.
NNOOTTAA::
se c’è uno scarico vicino all’asciugatrice, si può
usare l’apposito kit per far scaricare costantemente
l’acqua raccolta dalla macchina. Così facendo si eviterà
di svuotare la vaschetta dell’acqua. Tutte le informazioni
per il montaggio sono all’interno della confezione del
kit di scarico.
67
VVaasscchheettttaa ddeellll’’aaccqquuaa
40001828ITA.qxd 02/09/2004 18:15 Page 67
Page 68

IImmppoorrttaannttee:: PPrriimmaa ddii pprroocceeddeerree aallllaa ppuulliizziiaa ddeell
ccoonnddeennssaattoorree,, ddiissaattttiivvaarree sseemmpprree ll’’aappppaarreecccchhiioo ee
ssttaaccccaarree llaa ssppiinnaa ddaallllaa pprreessaa eelleettttrriiccaa..
Ai fini delle prestazione dell’apparecchio, è opportuno
verificare regolarmente lo stato di pulizia del
condensatore.
PPeerr ttoogglliieerree iill
ccoonnddeennssaattoorree
11..
Rimuovere lo zoccolo (vedere pagina 67).
22..
Agire sulle due leve di bloccaggio in senso
antiorario e estrarre il condensatore.
33..
Estrarre il modulo condensatore.
44..
Servendosi di un panno, eliminare delicatamente
polvere e filacce, poi lavare il modulo tenendolo
sotto l’acqua corrente e facendolo girare in modo
che l’acqua circoli tra le piastre fino a perfetta
eliminazione delle impurità.
55..
Rimontare il condensatore rispettando il verso
giusto (come indicato dalla freccia) e accertandosi
che sia perfettamente inserito in sede. Bloccare le
due leve ruotandole in senso orario.
66..
Rimontare lo zoccolo.
68
CCoonnddeennssaattoorree
40001828ITA.qxd 02/09/2004 18:15 Page 68
Page 69

NNoottaa::
Il sensore potrebbe non essere in grado di
individuare un carico ridotto di articoli di piccole
dimensioni. Per carichi ridotti e articoli separati o per
tessuti pre-asciugati leggermente umidi, selezionare i
programmi a tempo. Impostare il tempo del programma
tra 30 e 75 minuti in base alla quantità del carico e al
grado di asciugatura richiesto. Successivamente, selezionare
la temperatura alta o bassa in base al tipo di tessuto.
Se il sensore non rileva la presenza del capo, l’asciugatrice
funziona solo per 10 minuti, prima di passare alla fase di
raffreddamento.
Se il carico è troppo abbondante o troppo bagnato per
essere asciugato, l’asciugatrice passa automaticamente
alla fase di raffreddamento dopo 180 minuti.
69
SSeelleezziioonnee ddeell pprrooggrraammmmaa
PPrrooggrraammmmaa
Capi completamente
asciutti
Capi extra asciutti
Capi asciutti da riporre
Capi asciutti da stirare
Capi mediamente asciutti
Capi leggermente umidi
Stiro Facile
75'
60'
45'
30'
Rinfresca
DDeessccrriizziioonnee
Selezionare il grado di asciugatura desiderato.
Le possibilità disponibili comprendono l’opzione Capi
completamente asciutti, ideale per asciugamani e
accappatoi, l’opzione Capi asciutti da riporre, per capi
che non è necessario stirare, e i programmi che lasciano
la biancheria pronta per la stiratura.
Il programma Stiro facile assicura una funzione di
trattamento antipiega. La macchina effettua un ciclo di
riscaldamento della biancheria per 9 minuti, seguito da 3
minuti di raffreddamento. Si tratta di una funzione
particolarmente utile quando si prevede di riporre la
biancheria (ad esempio, nel cesto della biancheria) per
un certo periodo di tempo prima della stiratura. I capi
possono ‘seccarsi’ eccessivamente anche quando
vengono fatti asciugare all’aperto sul filo o vengono
posti su radiatori. Il ciclo di Stiro facile attenua le pieghe
sul tessuto rendendo più facile e più rapida la stiratura.
75 minuti di asciugatura
60 minuti di asciugatura
45 minuti di asciugatura
30 minuti di asciugatura
Asciugatura meccanica della biancheria con aria fredda
La macchina, dotata di sensore di asciugatura, offre opzioni di asciugatura in grado di
rispondere alle più svariate esigenze.
Nella tabella che segue viene riportato un elenco dei programmi con la relativa funzione.
40001828ITA.qxd 02/09/2004 18:15 Page 69
Page 70

11..
Aprire il portellone e caricare la biancheria nel cestello. Verificare che i capi non
impediscano la chiusura del portellone.
22..
Chiudere delicatamente il portellone spingendolo lentamente fino ad avvertirne lo
scatto di chiusura.
33..
Premere il tasto per attivare l’asciugatrice. La spia si accenderà e inizierà a
lampeggiare la spia START.
44..
Ruotare il selettore dei programmi selezionando il programma di asciugatura
desiderato (si veda Guida ai programmi).
55..
Per ridurre il grado di calore con capi delicati, sintetici o acrilici, premere il
tasto .
La spia sopra il tasto si accende quando è impostata la funzione bassa
temperatura. Per annullare la selezione di questa funzione quando il ciclo di
asciugatura è partito, è necessario azzerare la macchina.
66..
Premere il pulsante di START. L’asciugatrice partirà automaticamente e la spia
START resterà accesa.
77..
Sul display comparirà lo stato di avanzamento dell’asciugatura, ossia il tempo
restante prima della fine del programma.
88..
Se si apre il portellone per controllare la biancheria mentre il programma è in
funzione, per riattivare l’operazione di asciugatura è necessario chiudere il
portellone e premere nuovamente il tasto START.
99..
Quando si accende la spia 15', la macchina entra nella fase di raffreddamento. In
questa fase, i capi vengono asciugati con aria fredda e il carico può così
raffreddarsi.
1100..
Una volta completato il programma, si accenderà la spia STOP.
AAnnnnuullllaammeennttoo ee aazzzzeerraammeennttoo ddeell
pprrooggrraammmmaa
Per annullare un programma, tenere premuto il tasto START per 5 secondi. A questo
punto si vedrà lampeggiare la spia di START, a segnalare l’avvenuto azzeramento del
programma. Modificando il programma entro il primi 10 minuti, si può evitare di usare
la funzione di annullamento e azzeramento.
PPaarrtteennzzaa rriittaarrddaattaa
La funzione Partenza Ritardata consente all’utente di ritardare la partenza del ciclo
di asciugatura di 6 o 9 ore.
Agendo la prima volta sul tasto di questa funzione, comparirà sul display un ritardo di 6
ore. Premendo di nuovo il tasto, si passerà a un ritardo di 9 ore.
Per far partire il programma, premere il tasto START. Trascorso il tempo di ritardo
impostato, la macchina completerà il ciclo di asciugatura. Lampeggerà la spia delle 6 ore
o delle 9 ore, per indicare che è in funzione la partenza ritardata.
70
FFuunnzziioonnaammeennttoo
40001828ITA.qxd 02/09/2004 18:15 Page 70
Page 71

PPuulliizziiaa ddeellll’’aasscciiuuggaattrriiccee
● Si consiglia di pulire il filtro e di svuotare la
vaschetta dell’acqua dopo ogni ciclo di
asciugatura.
● Pulire regolarmente il condensatore.
● Dopo l’uso, pulire l’interno del cestello e lasciare
aperto il portellone per un certo periodo di
tempo in modo che circoli aria e si asciughi.
● Pulire l’esterno della macchina e il portellone con
un panno morbido.
●
NNOONN
usare spugnette abrasive né prodotti di
pulizia.
● Per evitare che il portellone resti ‘incollato’ o che
si accumulino filacce, pulire regolarmente il
portellone interno e le guarnizioni con un panno
umido.
SSppeecciiffiicchhee tteeccnniicchhee
Capacità del cestello 115 litri
Carico massimo 7 kg
Altezza 85 cm
Larghezza 60 cm
Profondità 60 cm
Efficienza Energetica C
71
IIMMPPOORRTTAANNTTEE
PPrriimmaa ddii pprroocceeddeerree
aallllaa ppuulliizziiaa,,
ddiissaattttiivvaarree sseemmpprree
llaa mmaacccchhiinnaa ee
ssttaaccccaarree llaa ssppiinnaa
ddaallllaa pprreessaa aa mmuurroo..
PPeerr ii ddaattii eelleettttrriiccii
vveeddeerree llaa ttaarrgghheettttaa
ddeeii ddaattii ppoossttaa ssuull
ddaavvaannttii ddeell mmoobbiillee
ddeellllaa mmaacccchhiinnaa
((ccoonn ppoorrtteelllloonnee
aappeerrttoo))..
PPuulliizziiaa ee mmaannuutteennzziioonnee
oorrddiinnaarriiaa
AAVVVVEERRTTEENNZZAA!!
IIll cceesstteelllloo,, iill
ppoorrtteelllloonnee ee iill
ccaarriiccoo ppoossssoonnoo
eesssseerree mmoollttoo ccaallddii..
40001828ITA.qxd 02/09/2004 18:15 Page 71
Page 72

QQuuaallee ppuuòò eesssseerree llaa ccaauussaa......
PPrroobblleemmii cchhee ppuuòò rriissoollvveerree ll’’uutteennttee
Prima di rivolgersi al Centro Assistenza GIAS, consultare la seguente checklist. La
chiamata verrà addebitata all’utente nel caso in cui risulti che la macchina funziona o è
stata installata o utilizzata in maniera errata. Se il problema persiste anche dopo aver
eseguito i controlli consigliati, rivolgersi al servizio di assistenza GIAS che sarà a
disposizione per suggerire eventuali soluzioni per telefono.
TTeemmppoo ddii aasscciiuuggaattuurraa eecccceessssiivvaammeennttee lluunnggoo//ccaappii nnoonn
ssuuffffiicciieenntteemmeennttee aasscciiuuttttii……
● Il programma/tempo di asciugatura selezionato è corretto?
● I capi sono stati introdotti eccessivamente bagnati? Si è provveduto a strizzare o
centrifugare adeguatamente i capi prima d’introdurli nella macchina?
● Si deve pulire il filtro?
● Si deve pulire il condensatore?
● L’asciugatrice è stata caricata eccessivamente?
● Vi sono ostruzioni a livello delle prese, degli sfiati e della base dell’asciugatrice?
● Il tasto è stato selezionato da un ciclo precedente?
LL’’aasscciiuuggaattrriiccee nnoonn ffuunnzziioonnaa……
● L’alimentazione elettrica cui è collegata la macchina è attiva? Controllare
provando con un altro apparecchio (ad esempio, lampada da tavolo).
● La spina di alimentazione è stata collegata correttamente all’alimentazione
elettrica?
● Manca la corrente?
● Fusibile bruciato?
● Il portellone è stato chiuso perfettamente?
● La macchina è stata opportunamente attivata (sia collegata all’alimentazione sia
attivata localmente)?
● È stato selezionato il tempo o il programma di asciugatura?
● La macchina è stata riattivata dopo aver aperto il portellone?
● La macchina ha smesso di funzionare perché la vaschetta dell’acqua è piena e deve
essere svuotata?
LL’’aasscciiuuggaattrriiccee ffaa mmoollttoo rruummoorree……
● Spegnere l’asciugatrice e rivolgersi al Servizio Assistenza GIAS.
LLaa ssppiiaa ddii sseeggnnaallaazziioonnee PPuulliizziiaa ffiillttrroo èè aacccceessaa……
● Si deve pulire il filtro?
● Si deve pulire il condensatore?
SSppiiaa EElliimmiinnaa AAccqquuaa aacccceessaa……
● Si deve svuotare la vaschetta dell’acqua?
72
RRiicceerrccaa gguuaassttii
40001828ITA.qxd 02/09/2004 18:15 Page 72
Page 73

Se il problema persiste anche dopo aver effettuato tutti
i controlli consigliati, rivolgersi al Servizio Assistenza
GIAS. Sarà a disposizione per suggerire eventuali
soluzioni per telefono o per fissare la visita del tecnico
in base alle condizioni di garanzia. Si ricorda che
l’intervento del tecnico può essere soggetto a
pagamento nel caso la macchina:
● Risulti perfettamente funzionante.
● Non sia stata installata secondo quanto indicato
nelle istruzioni d’installazione.
● Sia stata utilizzata in modo improprio.
RRiiccaammbbii
UUttiilliizzzzaarree sseemmpprree rriiccaammbbii oorriiggiinnaallii,, ddiissppoonniibbiillii
ddiirreettttaammeennttee pprreessssoo iill SSeerrvviizziioo AAssssiisstteennzzaa GGIIAASS..
SSeerrvviizziioo GGIIAASS
PPeerr aassssiisstteennzzaa ee rriippaarraazziioonnii,, rriivvoollggeerrssii aall tteeccnniiccoo ddeell
SSeerrvviizziioo AAssssiisstteennzzaa GGIIAASS ppiiùù vviicciinnoo..
Il produttore declina ogni responsabilità in caso di
eventuali errori di stampa nel presente opuscolo. Il
produttore si riserva il diritto di apportare le necessarie
modifiche ai propri prodotti senza modificarne le
caratteristiche essenziali.
73
SSeerrvviizziioo aassssiisstteennzzaa cclliieennttii
40001828ITA.qxd 02/09/2004 18:15 Page 73
Page 74

Page 75

Page 76

40001828
40001828.qxd 02/09/2004 17:19 Page 20
 Loading...