


Dutch Oven
Cooking
Guide
Great ideas, tips and recipes for Dutch Oven cooking
0510-CastIronRecipeBook.indd 1 |
|
|
7/1/10 9:54:18 AM |
|
|
Cast Iron Cooking Information
Dutch oven cooking is an addicting experience. The outdoor fresh taste of Dutch oven dishes has garnered a worldwide following. Whether a prominent member of the Dutch oven community or a first time backyard trial, Camp Chef Dutch ovens are the way to cook outdoors.
Choosing a Dutch Oven
Camp Chef Dutch ovens come in different sizes and capacities. Most people have found that the 10 inch, 12 inch, and 14 inch Dutch ovens are big enough for the majority of outdoor use. If you plan on feeding large groups of people you should consider the 16 inch. The chart below shows the capacity of the various oven sizes.
Classic Dutch Ovens
Our Classic series are high quality ovens with style. The animal etchings on the lid set these ovens apart from the competition. Elk, Grizzly, Whitetail, and Mule Deer each represent the various sizes. Camp Chef cast iron Dutch ovens are lifetime products that make great gifts.
Oven Size |
Oven Capacity |
|
|
10 inch |
4 quarts |
|
|
12 inch |
6 quarts |
|
|
12 inch deep |
8 quarts |
|
|
14 inch |
8 quarts |
|
|
16 inch |
12 quarts |
|
|
Deluxe Dutch Ovens
Camp Chef Deluxe Dutch ovens are designed so that lid can be an additional skillet/griddle or work as a trivet or stand for the oven itself. This is the kind of versatility you need when you don’t want to haul around an entire stove just so you can cook on a griddle. The wells (bottoms) of the ovens are slightly deeper than the standard Dutch
Oven Size |
Oven Capacity |
|
|
10 inch |
5 quarts |
|
|
12 inch |
7 quarts |
|
|
14 inch |
9 1/8 quarts |
|
|
0510-CastIronRecipeBook.indd 2-3
Cooking with Charcoal
Some recipes require you to use heat on the top. When they do, the best way to start charcoal is with the Charcoal Lighter Basket, (model CLB-9). This is the fastest and easiest way to light charcoal. You simply put your charcoal in the basket and place it over your lit Camp Chef burner. Your coals are ready in minutes. When the coals are mostly grey in color they are ready to use. Using coals that are not ready will increase your cooking time. You will need tongs to arrange your charcoal on or under your Dutch oven. Place the coals in a circular pattern under the edges to give you the most even heat.
Charcoal Distribution
The “plus 4, minus 4” rule is a good rule to get your charcoal distribution going. This means the size of your Dutch oven in inches plus 4 charcoals on top heat and the size of your Dutch oven minus 4 charcoals for bottom heat. (12 inch oven + 4 = 16 on top, -4 = 8 on the bottom).
When cooking with charcoal most ovens require the bottom charcoal placement to be in a circular pattern (except for a 16-inch oven, this should be a checkerboard pattern.) For the lid of the oven, the charcoal should be evenly spaced around the rim in a circular pattern and a smaller circular pattern around the handle.
When charcoals are in place, you may want to rotate the oven clockwise and the lid counter clockwise a quarter of a turn periodically. This helps create a more evenly heated cooking condition. For the bottom, do not place the charcoals directly in the center. The heat from the outside radiates inward, making it so there is no need for a center briquette.
Don’t be afraid to move your charcoal around if needed. If there is a place that is not cooking correctly or rising evenly, move some heat to it. Or if one area is cooking or rising to fast, remove heat from that area.
Baking Temperature Chart
|
|
Oven Temperature |
|
|
|||
|
|
350°F |
375°F |
400°F |
425°F |
450°F |
|
10” |
Total Briquettes |
16 |
17 |
18 |
19 |
20 |
|
Oven |
Top/Bottom |
11/5 |
11/7 |
12/6 |
13/6 |
14/6 |
|
Total Briquettes |
21 |
23 |
25 |
27 |
29 |
||
12” |
|||||||
Size |
Top/Bottom |
14/7 |
16/7 |
17/8 |
18/9 |
19/10 |
|
Total Briquettes |
32 |
34 |
36 |
38 |
40 |
||
14” |
|||||||
|
Top/Bottom |
21/11 |
22/12 |
24/12 |
25/13 |
26/14 |
|
16” |
Total Briquettes |
39 |
41 |
43 |
45 |
47 |
|
|
Total/Bottom |
26/13 |
27/14 |
28/15 |
29/16 |
30/17 |
|
|
|
|
|
|
|
|
|
For more information on Cast Iron Products go to www.CampChef.com
7/1/10 9:54:25 AM

Cast Iron Cooking Information
Alternate Cooking Method
By diverting, trapping, and circulating heat, the Dutch Oven Dome creates a convection oven for your cast iron. The combination of the included Heat Diffuser and the Dutch Oven Dome provides the most effective heat distribution method for cooking with a Dutch oven. By cooking on a gas stove you can also reduce or eliminate the cost and mess of charcoal.
This also allows you to cook with a Dutch oven during Model #: DOCOVER fire restrictions when fire or charcoals are not allowed.
Maintaining the Seasoning
Camp Chef Cast Iron comes Pre Seasoned and ready to cook out of the box. Follow these simple instructions to care for and maintain your cast iron cookware.
1.Let the cast iron cool. Wipe any remaining food out of the oven. Using really warm water, wash all surfaces thoroughly. Be sure to rinse and dry completely. (Note: Citrus-based soap can remove the seasoning of your cast iron if you don’t restore it after cleaning.) Camp Chef sells a wonderful simple tool called a Pan Scraper. The Pan Scraper is excellent for helping stubborn baked on food without damaging your cast irons seasoned finish. Each corner of the pan scraper has a different curve allowing your to clean every corner of your oven.
2.After each use, apply a small amount of Camp Chef Cast Iron Conditioner, and thinly coat all surfaces of the cast iron. This will keep your cast iron black – continuing to build the finish called a “patina.” This enhances your cast iron by creating a glass-like finish, giving it a natural non-stick surface.
3.If your cast iron becomes dull and dry looking (often caused by cooking acidic based food), add an extra coating of Camp Chef Conditioner. Place the oven in a direct heat source upside down and heat to 400 degrees. Cookware will smoke as the seasoning bakes in. As smoking begins to slow, remove from heat. Use or let cool and store.
Store your cookware in a dry, clean area with a light coating of Cast Iron Conditioner. Your cast iron will be ready for use the next time you retrieve it. Avoid any locations with widely fluctuating temperature conditions.
Model #: PS2
Model #: CSC8
0510-CastIronRecipeBook.indd 4-5
Essential Gear for Dutch Oven Cooking
The right tools always make Dutch oven cooking easier. Here are a few tools that we suggest for your Dutch oven cooking.
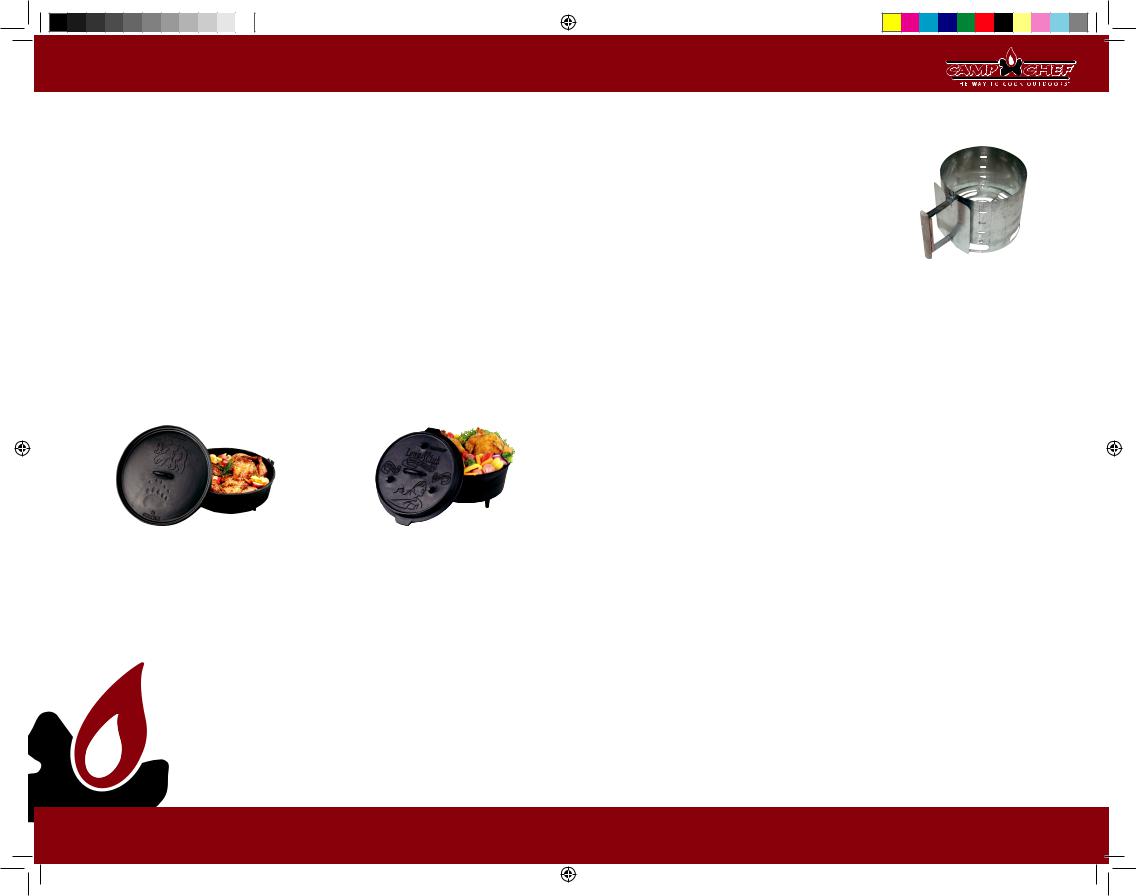
The Charcoal Lighter Basket
As mentioned before the Charcoal Lighter Basket is essential |
|
if you are going to be doing your Dutch oven cooking with |
|
charcoal. The Charcoal Lighter Basket is the quickest and |
|
easiest way to get coals hot. |
Model #: CLB9 |
Lid Lifter
The Camp Chef Lid Lifter is the perfect aid in picking up your dutch oven lid while you cook. It lifts the lid while keeping
it level. It’s important to keep the lid level to avoid getting charcoal ash in the food.
Model #: 400035 Model #: DOLL9
Model #: DOLL14
Camp Table
The Camp Table is the perfect companion to any table top stove or Dutch oven. The camp tables elevate the Dutch ovens, allowing for easy preparation and serving.
Model #: CT38
Model #: CT14
Universal Carry Bag
Camp Chef’s Universal Carry Bag fits 10, 12, and 14 inch oven sizes to help you manage and protect your ovens.
CBUNV
Camp Table
High quality, heat resistant leather gloves. Attractive red and black styling with extra long sleeves to protect your wrists and forearms.
For more information on Cast Iron Products go to www.CampChef.com
7/1/10 9:54:40 AM
 Loading...