

Page 1
Mountain SerieS 2 Burner Stove
Care, uSe and SaFetY inStruCtionS
PO Box 4057 • Logan, UT 84323
1.800.650.2433 or 1.435.752.3922
•To consumer: Keep this manual for future reference.
Thisinstructionmanual containsimportantinformation
necessary for the proper assembly and safe use of this
product.
Read and follow all warnings and instructions before
assemblingandusingtheappliance.
Follow all warnings and instructions when using the
appliance.
DONOTDISCARDTHISINSTRUCTIONMANUAL.
For outdoor use only.
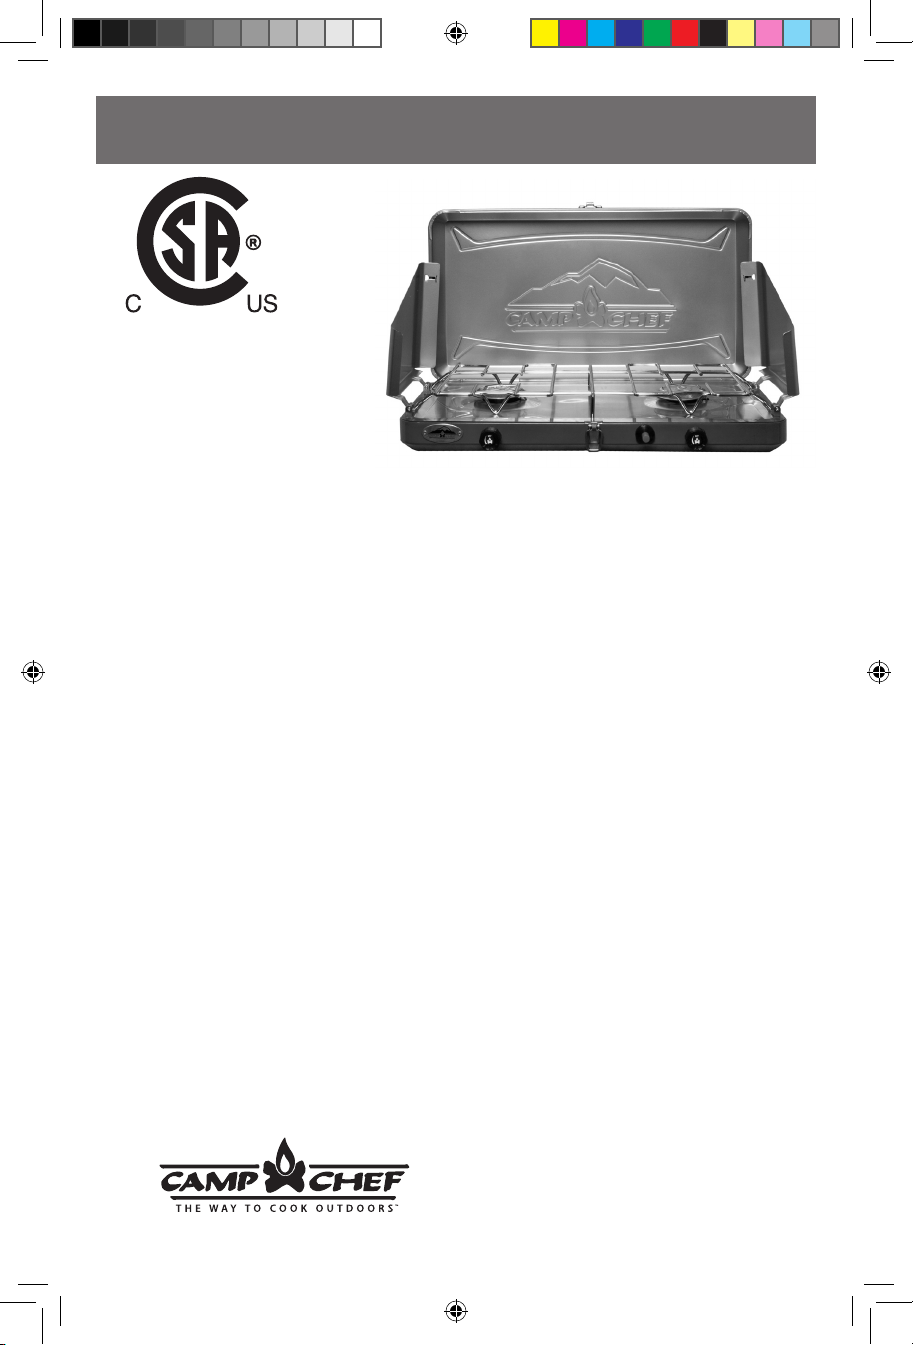
Model #: MS2
Portable Type Gas
2 Burner Stove
Conforms to ANSI STD Z21.72b-2002
Certified to CSA STD 11.2b-2002
0809-MS2-Instructions.indd 1 8/12/09 9:30:40 AM
Page 2
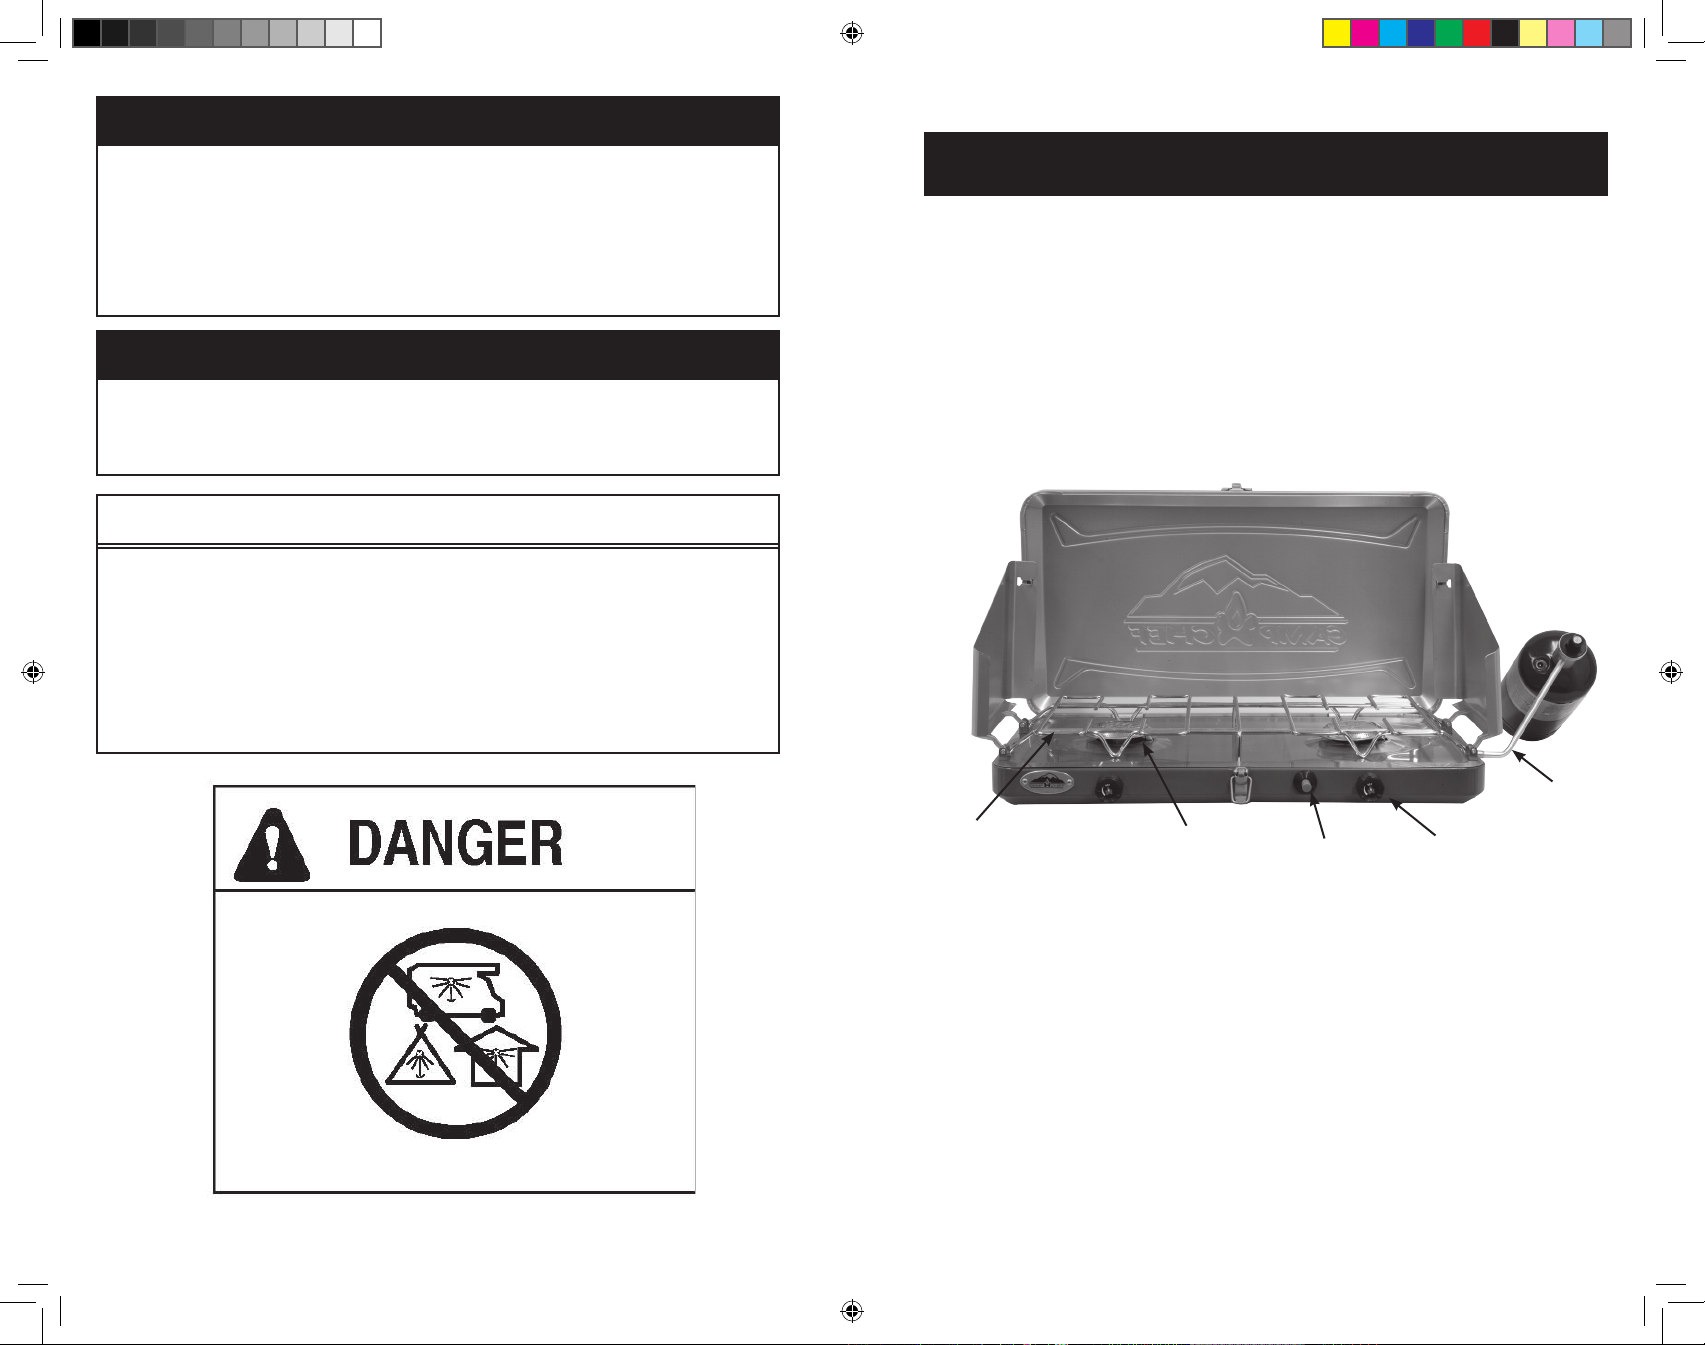
PARTS LIST
FOR YOUR SAFETY
If you smell gas:
1. Do not attempt to light the appliance.
2. Extinguish any open ame.
3. Disconnect from fuel supply.
FOR YOUR SAFETY
Do not store or use gasoline or other liquids with ammable
vapors in the vicinity of this or any other appliance.
CARBON MONOXIDE HAZARD
This appliance can produce carbon monoxide which has no
odor.
Using it in an enclosed space can kill you.
Never use this appliance in an enclosed space such as a camper, tent, car or home.
Ignitor
MS-102
Burner Assembly
MS-101
Pot Grate
MS-105
Knob
MS-103
Regulator
MS-104
0809-MS2-Instructions.indd 2-3 8/12/09 9:30:45 AM
Page 3
still a leak, remove the cylinder and
contact the manufacturer for service
or repair.
4. The regulator uses a threaded fitting
to attach to the stove. It is necessary
to hold the stove to make sure the
fitting is seated. Align the regulator
to the fuel tube on the rear of the
stove and push on. Screw on the
outer threaded sleeve in a clockwise
direction until tight.
5. Never operate stove with propane
cylinder in an inverted position.
Setup Using Optional Hose And
Refillable Cylinder
1. Make sure burner valves are off.
2. Attach Camp Chef Model HRDSP
hose to regulator & regulator to stove
(as shown).
3. Attach hose to cylinder.
4. Open cylinder valve.
5. Perform leak check on hose to
regulator, and hose to cylinder
connections with soapy water.
Bubbles indicate a leak. Check that
the connection is not cross-threaded
and that it is tight. Perform another
leak check. If there is still a leak,
remove the cylinder and contact the
manufacturer for service and repair.
6. Turn off fuel at the cylinder and
disconnect both ends of the hose
when not in use.
Dismantling Hose And
Refillable Cylinder
1. Before dismantling high pressure
hose, be sure gas pressure in hose is
eliminated.
2. Ignite stove and turn off gas valve on
cylinder.
3. Allow flame to self-extinguish.
4. When flame is out, close valves on
the appliance.
5. Remove hose.
• Use appliance only with LP (propane)
1. DO NOT leave this appliance unattended while in use. The user must
remain in the immediate area of
the product and have a clear view
of the product at all times during
operation.
2. Keep children and pets away from
burner at all times.
3. The use of alcohol, prescription or
non-prescription drugs may impair
your ability to properly assemble or
safely operate this appliance.
4. For OUTDOOR use only. Do
NOT use in a building, garage
or any other enclosed area. Do
NOT use in or on recreational
vehicles or boats. NEVER use this
appliance as a heater.
5. Do not operate appliance under
ANY overhead construction.
Keep a minimum clearance of
1 foot (0.3 m) from the sides,
front and back of appliance to
ANY construction. Keep the area
clear of all combustible material
and flammable liquids, including
wood, dry plants and grass, brush,
paper, and canvas. Never use this
appliance within 25 ft. (7.5 m) of
any flammable liquid.
6. Use ONLY on a level, stable
surface.
7. DO NOT place an empty cooking
vessel on burner while in operation.
Use caution when placing anything
in the cooking vessel while burner
is in operation.
8. Do NOT move the appliance when
in use. Allow unit to cool to 115°F
(45°C) before moving or storing.
9. This appliance will be hot during
and after use. Use insulated oven
mitts or gloves for protection
from hot surfaces or splatter from
cooking liquids.
10. In case there is a fire, call the
local fire department or dial
911. Stay clear from flames.
Do not attempt to extinguish an
oil or grease fire with water.
11. Do not obstruct the ow of com-
bustion and ventilation air.
NOTE: This appliance is set to use 16.4 oz. disposable
propane cylinders. Use only cylinders marked propane.
Disposable propane cylinders must be disconnected from
the stove when it is in storage.
Refillable Bulk LP-Gas Tanks with a maximum capacity
of 20 pounds may also be used with an optional bulk tank
adapter hose. (Use Camp Chef Model HRDSP to connect
to the bulk tank.) Refillable propane gas cylinders must be
turned off at the LP-Gas supply cylinder when the stove
is not in use.
The LP-gas cylinder(s) used with this stove must be
constructed and marked in accordance with the
specifications for LP-gas cylinders of the U.S. Department
of Transportation or Transport Canada, CAN/CSA B339.
Setup Using Disposable Bottle
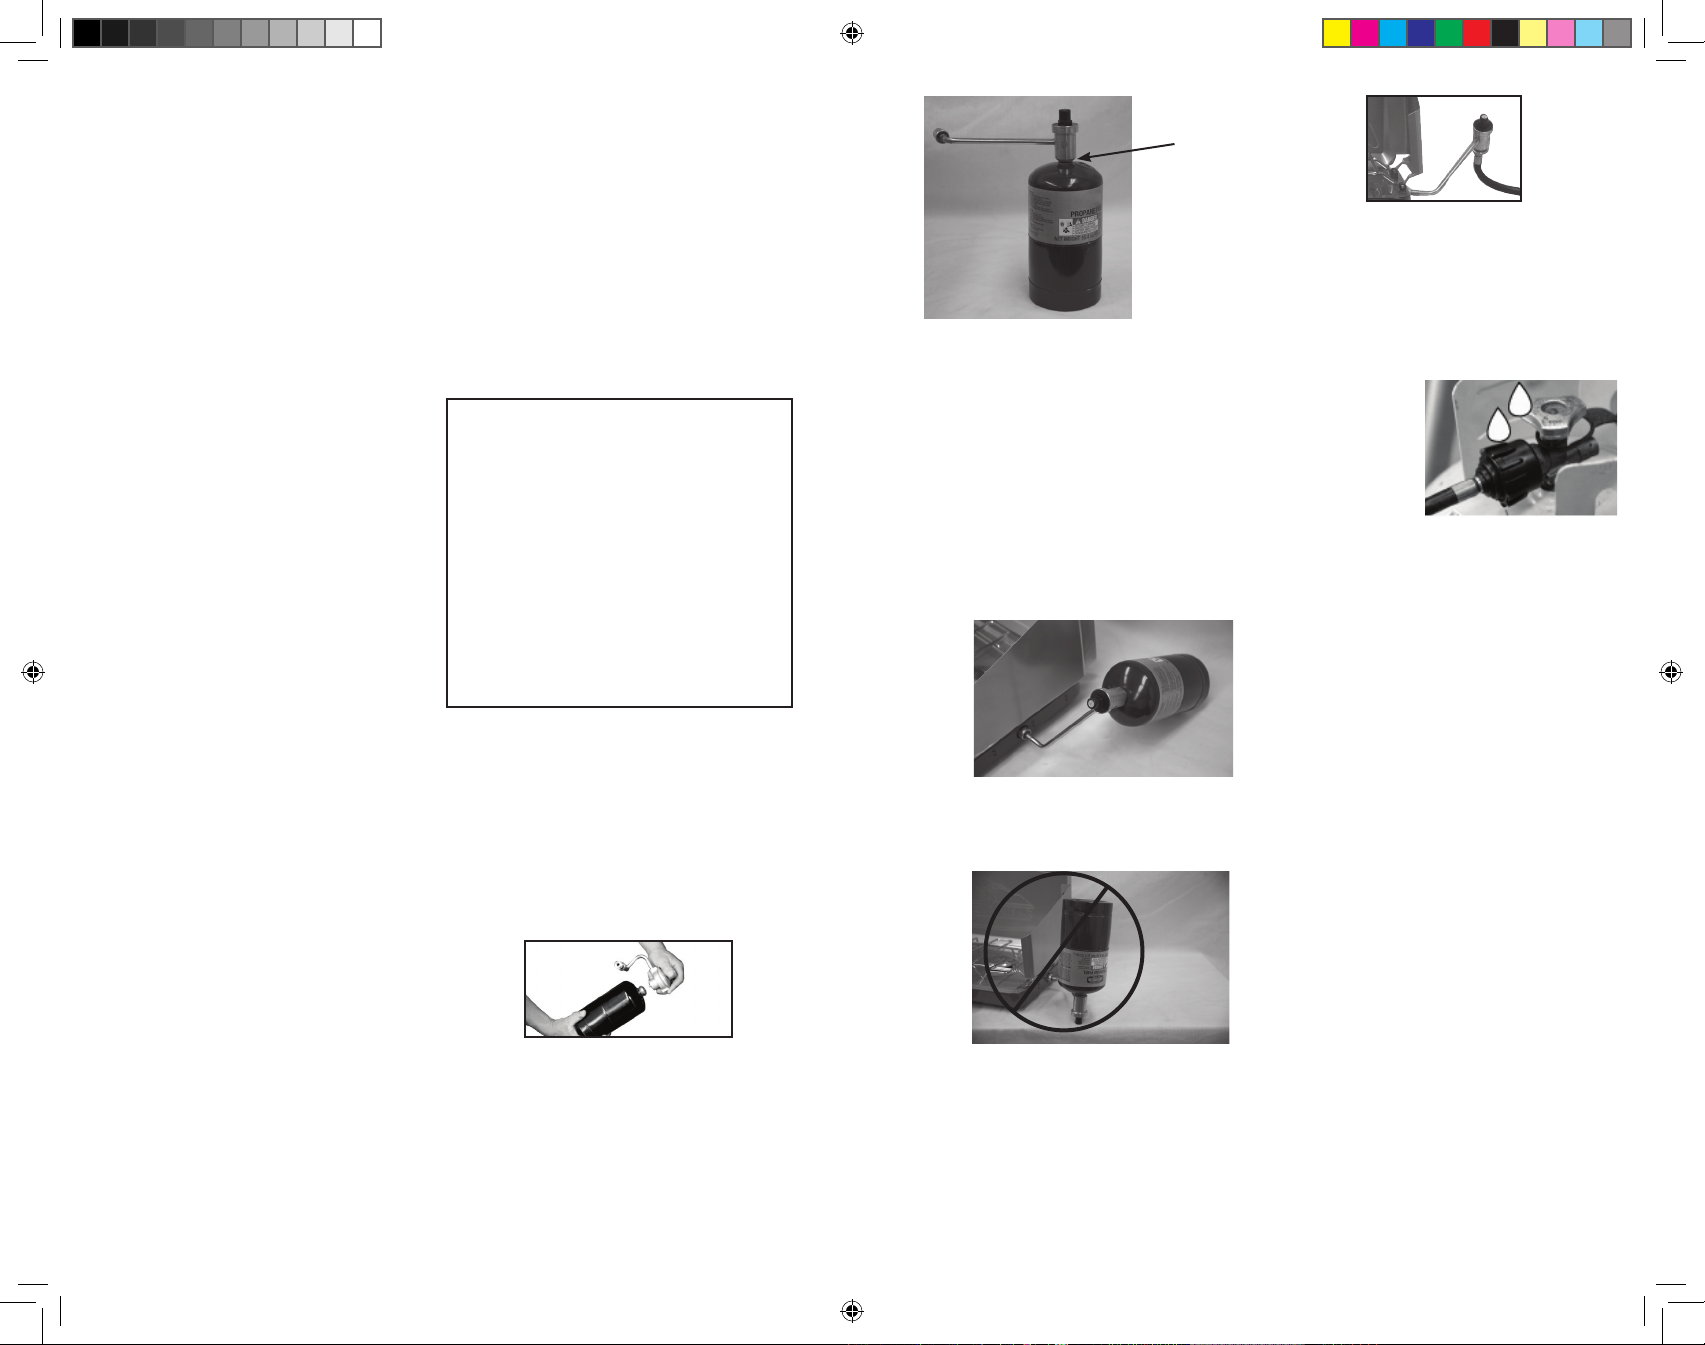
1. Make sure burner valves are off.
2. Remove plastic cap from top of
propane cylinder. Save cap for use in
storing. Screw propane cylinder into
regulator. Be careful not to cross
thread. Hand Tighten only.
3. Check the connection between the
cylinder and the regulator with
soapy water. Bubbles indicate a leak.
Check that the connection is not
cross-threaded and that it is tight.
Perform another leak check. If there is
LEAK CHECK
REGULATOR
& HOSE
Leak Test
0809-MS2-Instructions.indd 4-5 8/12/09 9:30:49 AM
Page 4

The LP tank used with your appliance
must meet the following requirements:
• Purchase LP tanks only with these
required measurements: 12” (30.5cm)
(diameter) x 18” (45.7cm) (tall) with
20 lb. (9 kg.) capacity maximum.
• Be constructed and marked in
accordance with specifications for
LP tank of the U.S. Department
of Transportation (DOT) or the
National Standard of Canada, CAN/
CSA-B339, Cylinders, Spheres and
Tubes for the Transportation of
Dangerous Goods.
• The refillable propane cylinder
used with this
appliance must
include a collar
to protect the
cylinder valve.
LP tank valve
must have:
• Type 1 outlet compatible with
regulator or appliance.
• Safety relief valve.
• UL listed Overfill Protection Device
(OPD). This OPD safety feature is
identified by a unique triangular hand
wheel. Use only tanks equipped with
this type of valve. LP tank must be
arranged for vapor withdrawal.
LP (Liquefied Petroleum Gas)
• LP gas is non-toxic, odorless and
colorless when produced. For Your
Safety, LP gas has been given an odor
(similar to rotten cabbage) so that it
can be smelled.
• LP gas is highly flammable and may
ignite unexpectedly when mixed with
air.
• All spare LP tanks must have safety
caps installed on the LP tank outlet
LP Tank Removal, Transport
and Storage
• Turn OFF all control knobs and
LP tank valve. Turn coupling nut
counterclockwise by hand only – do
not use tools to disconnect. Install
safety cap
onto LP
tank valve.
A l w a y s
use cap
and strap
supplied with valve. Failure to use
safety cap as directed may result
in serious personal injury and/or
property damage.
• A disconnected LP tank in storage or
being transported must have a safety
cap installed (as shown). Refillable
LP-Gas cylinders must be stored
outdoors in a well ventilated space,
out of the reach of children, and must
not be stored in a building, garage or
any other enclosed area. Never leave
an LP tank inside a vehicle, which
may become overheated by the sun.
• Do not store LP tanks in an area
where children play.
• Storage of an appliance indoors is
permissible only if the cylinder is
disconnected and removed from the
appliance.
• When the refillable LP-gas supply
cylinder is not disconnected from the
stove, the stove and cylinder must be
stored outdoors, in a well ventilated
space, out of the reach of children,
and must not be stored in a building,
garage or any other enclosed areas.
LP Tank
gas and the regulator/valve assembly
supplied.
• Appliance is not for use in or on
recreational vehicle and/or boats.
• Do not modify this appliance.
Modifications will result in a
safety hazard. Questions regarding
certification in other areas may be
addressed to 1-435-752-3922.
• Apartment Dwellers: Check
with management to learn the
requirements and fire codes for using
an LP Gas appliance at an apartment.
If allowed, use outside on the ground
floor with a 10 foot clearance from
walls or rails.
• Before opening LP tank valve, check
the coupling nut for tightness. When
appliance is not in use, turn off
control knob and LP tank valve on
supply cylinder.
• Never use LP tank if visibly rusted,
damaged, or out of date.
• If you notice grease or other hot
material dripping from appliance
onto valve, hose or regulator, turn
off gas supply at once. Determine
the cause, correct, clean and inspect
valve, hose and regulator before
continuing. Perform a leak test.
• The regulator may make a humming
or whistling noise during operation.
This will not affect the safety or use
of appliance.
• Clean and inspect the hose before
each use of the appliance. If there
is evidence of abrasion, wear, cuts
or leaks, the hose must be replaced
prior to the appliance being put into
operation. See product tag for hose &
regulator information.
• Do not block holes in bottom or sides
of appliance.
• Never operate appliance with LP
tanks out of correct position specified
in Assembly Instructions.
• Always close LP tank valve and
remove coupling nut before moving
LP tank form specified operating
position.
• NEVER store a spare LP tank under
or near appliance or in enclosed areas.
NEVER fill the cylinder beyond 80%
full. An overfilled spare LP tank is
hazardous due to possible gas released
from the safety relief valve. Failure
to follow these instructions exactly
could cause a fire resulting in death
or serious injury.
• If you see, smell, or hear escaping
gas, immediately get away from the
LP tank/appliance and call your fire
department.
WarninG
Combustion by-products
produced when using this
product contain chemicals
known to the State of California
to cause cancer, birth defects, or
other reproductive harm.
safety cap
OPD Hand Wheel
Warning: Hose is a trip hazard
24 “
0809-MS2-Instructions.indd 6-7 8/12/09 9:30:51 AM
Page 5

1. Place LP tank
on a secure,
level, and stable
surface.
2. Turn control knob
to the OFF position.
3. Turn LP
tank OFF
by turning
hand wheel
clockwise to
a full stop.
4. Remove the
protective
cap from LP tank valve. Always use
cap and strap supplied with valve.
Do not use a POL transport plug
(plastic part with external threads)!
It will defeat the safety feature of the
valve.
LP Tank Filling
• Use only licensed and experienced
dealers.
• LP dealer must purge tanks before
filling.
• Dealer should NEVER fill LP tank
more than 80% of LP tank volume.
Volume of propane in tanks will vary
by temperature.
• A frosty regulator indicates gas
overfill. Immediately close LP tank
valve and call local LP gas dealer for
assistance.
• Do not release liquid propane (LP)
gas into the atmosphere. This is a
hazardous practice.
• To remove gas from LP tank, contact
an LP dealer or call a local fire
department for assistance. Check
the telephone directory under “Gas
companies” for nearest certified LP
dealers.
LP Tank Exchange
• Many retailers that sell appliances
offer you the option of replacing your
empty LP tanks through an exchange
service. Use only those reputable
exchange companies that inspect,
precision fill, test and certify their
cylinders. Exchange your tank only
for an OPD safety feature-equipped
tank as described in the “LP Tank”
section of this manual.
• Always keep new and exchanged
LP tanks in upright position during
use, transit or storage.
• Leak test new and exchanged
LP tanks BEFORE connecting to
appliance.
LP Tank Leak Test
For your Safety
• Leak test must be repeated each time
LP tank is exchanged or refilled.
• Do not smoke during leak test.
• Do not use an open flame to check
for gas leaks.
• Appliance must be leak checked
outdoors in well-ventilated area, away
from ignition sources such as gas
fired or electrical appliances. During
leak test, keep appliance away from
open flames or sparks.
Use a clean paintbrush and 50/50 soap
and water solution. Use mild soap and
water. Do not use household cleaning
agents. Damage to gas train components
can result. Brush soapy solution onto
all weld seams and entire valve area.
Connecting Regulator To The
LP Tank
Only use the pressure regulator &
hose supplied with this appliance. See
assembly instructions or appliance
name tag for regulator model
number.
(B) Nipple has to
be centered into
the LP tank valve
(C) Hold coupling
nut and regulator
as shown for
proper connection
to LP tank valve
5. Hold regulator, insert nipple (B)
into LP tank valve. Hand tighten
coupling nut, holding regulator in
a straight line (C) with LP tank
valve so as not to cross thread the
connection.
6. Turn the coupling nut clockwise
to tighten to a full solid stop. The
regulator will seal on the back-check
feature in LP tank valve, resulting in
some resistance. An additional onehalf to three quarters turn is required
to complete connection. Tighten by
hand only – do not use tools.
NOTE: If you cannot complete
connection, disconnect regulator and
repeat steps 5 and 6. If you are still
unable to complete the connection,
do not use this regulator!
• Do not insert any foreign objects into
the valve outlet. You may damage
the valve and cause a leak. Leaking
propane may result in explosion, fire,
severe personal injury, or death.
• Never attempt to attach this appliance
to the self-contained LP gas system of
a camper or trailer or motor home.
Leak Testing Valves, Hoses and
Regulator
1. Turn all control knob(s) to OFF.
2. Be sure regulator is tightly connected
to LP tank.
3. Completely open LP tank valve
by turning hand wheel counter
clockwise. If you hear a rushing
sound, turn gas off immediately.
There is a major leak at the connection.
Correct before proceeding.
4. Brush soapy
solution onto
indicated
connections
shown at right.
5. If “growing”
bubbles appear,
there is a leak. Close LP tank
valve immediately and retighten
connections. If leaks cannot be
stopped, do not try to repair. Call
for replacement parts. Order new
parts by giving the serial number,
model number and name of items
WarninG
If “growing” bubbles appear, do
not use or move the LP tank.
Contact an LP gas supplier or your
fire department.
0809-MS2-Instructions.indd 8-9 8/12/09 9:30:54 AM
Page 6

needed to the Service Center at
1-435-752-3922.
6. Always close LP tank valve after
performing tank leak test by turning
hand wheel clockwise.
Setup Instructions:
• Place stove on a flat, level, sturdy
surface.
• Open the lid and attach the
windscreens to the tabs on the inside
of the lid. Snap into place as shown.
• Make sure the burners are in the off
position.
• Push regulator assembly firmly into
stove. Tighten nut securely.
• Screw propane cylinder into the
regulator.
Lighting Stove Instructions:
1. Turn burner valve on and press the
red ignitor button until the burner
lights.
2. If ignition does not occur in 5
seconds, turn the burner control(s)
off, wait 5 minutes, and repeat lighting
procedure. If built-in ignitor will not
light follow the preceding steps and
hold a lit long igniter or match next to
the burner when opening the control
valve.
4. Adjust the flame to the desired
height. Flame should be compact
and blue in color.
4. Avoid getting dirt in the valves,
regulator, and burners.
5. To shut burner off, turn the valve to
off. (Clockwise)
If the flame is accidentally
extinguished, turn the appliance
valves OFF and WAIT 5 minutes
before attempting to ignite.
Burner Flame Check
• Light burner; rotate knob(s) from
HIGH to LOW. You should see
a smaller flame in LOW position
than seen on HIGH. Always check
flame prior to each use. A good flame
should be blue with minimal yellow
tip. Some yellow tips on flames are
acceptable as long as no carbon or
soot deposits appear.
Turning LP Cooker Off
• Turn all knobs to OFF position. Turn
LP tank OFF by turning hand-wheel
clockwise to a full stop.
Hose Check
• Before each use, check to
see if hoses are cut or worn. Replace
damaged hose assembly before using
appliance. Use only valve/ hose /
regulator specified by manufacturer.
See product sheet for hose & regulator
information.
Cleaning The Burner
NOTE: Spiders and small insects can
spin webs and build nests inside the
burner. This especially occurs in late
summer and fall before frost when
spiders are most active. These nests
can obstruct gas flow and cause a
fire in and around the burner and
orifice. Such a fire can cause operator
injury and serious damage to the
appliance. To help prevent a blockage
and ensure full heat output, clean
and inspect burner tube often (once
or twice a month). NOTE: Water or
air pressure will not normally clear a
spider web.
Cleaning and Maintenance
Correct care and maintenance will keep
your appliance operating smoothly.
Clean regularly as determined by the
amount of use. NOTE: Clean the
entire appliance each year and tighten
all hardware on a regular basis (1-2
times a year or more depending on
usage). Cleaning should be done where
detergents won’t harm patio, lawn,
or the like. Keep appliance area clear
and free from combustible materials,
gasoline and other flammable vapors
and liquids. Keep the ventilation
opening(s) of the cylinder enclosure
free and clear from debris.
Suggested Cleaning Materials
• Mild dish washing liquid detergent
• Wire brush
• Nylon cleaning pad
• Hot water
• Paper clip
• Soft brass bristled brush
Component Cleaning:
• Burner should be wiped clean. Hot
soapy water and a soft bristle brush
can be used to clean the burner
surfaces. Clean clogged gas port holes
with an opened paper clip. Replace
corroded or damaged burners that
would emit excess gas.
• COOKING SURFACES, POTS AND
PANS: Clean the cooking surface with
soapy water and a nylon cleaning
pad.
• After appliance has cooled, wipe areas
where paint and finish have burned
off to minimize rusting.
Caution
All cleaning and maintenance
should only be done when the
appliance is cool and with the fuel
supply turned off at the LP cylinder.
DO NOT clean any part in a self-
cleaning oven. The extreme heat
will damage the finish.
WarninG
• Do not put hands or any other
body parts over the burner during
lighting or when in use to prevent
burns.
WarninG
• Do not use appliance until leak
checked.
• If you cannot stop a gas leak,
immediately close LP tank valve
and call LP gas supplier or your
fire department!
0809-MS2-Instructions.indd 10-11 8/12/09 9:30:56 AM
Page 7

To activate warranty, register on-line at: www.CampChef.com
The manufacturer warrants stove components (except paint and finish) to be free from
defect in materials and workmanship for 1 year from the date of purchase. All accessories
(included with stove or purchased separately) are warranted from defect in materials and
workmanship for 90 days from the original purchasing date. Within these periods, the
manufacturer will replace or repair defective parts deemed unusable from its original intent
by making available the parts thereof FOB Logan, UT 84321
Product paint and finish is not warranted. The exterior finish of the product will wear down
over time.
Clean the unit after each use to maintain the finish and prolong the life of your product.
Wipe away all grease and ashes. Keep metal products free of moisture, salts, acids and harsh
fluctuations in temperatures.
Warranty does not cover normal wear of parts or damage caused by misuse, abuse,
overheating and alteration. Repairs or alterations made by anyone other than Camp Chef
are not covered in this Warranty. Manufacturer will not be held liable for any losses due
to neglectful operation. Furthermore, this Warranty does not cover damaged caused by
natural disasters such as earthquakes, hurricanes, tornadoes, floods, lightning, fires, etc.
Upon the expiration of this warranty all such liability will terminate. No other warranties
are expressed or implied.
Keep all original sales receipts. Proof of purchase is required to obtain Warranty services.
Prior written approval and a Return Authorization Number must be obtained and accepted
for repair or replacement only. Returns must be shipped prepaid. Collect shipment or
shipments without a Return Authorization Number will not be accepted.
To obtain Warranty services call 1.800.650.2433.
*Warranty applies to the contiguous US states only.
0809-MS-Instructions
LIMITED WARRANTY
0809-MS2-Instructions.indd 12-13 8/12/09 9:31:00 AM
Page 8

teton
mountain series
r ainier
mountain series
denali
mountain series
mountain series
campfire family fun
Teton 2 Burner Stove
Model: MS2
2 Mantle Lantern
Model: MSL2
Deluxe 2 Mantle Lantern
Model: MSL2D
Deluxe 3 Mantle Lantern
Model: MSL3D
Mountain Series Carry Bags
Model: CBMS/CBMSL
Rainier 2 Burner Grill/Stove Combo
Model: MS2G
Denali 3 Burner Grill/Stove Combo
Model: MS3G
S e e t h e f u l l l i n e o f M o u n t a i n S e r i e s P r o d u c t s
and Accessories at www.campchef .com
CHECK OUT THESE ITEMS AND MORE AT
WWW.CAMPCHEF.COM
All Accessories Are Available At
www.campchef.com
Propane Fire Ring
Model #: GCLOG
TM
Popcorn Popper
Model #: CCP
Steel Griddle
Model #: FG20
10” Dutch Oven
Model #: SDO10
Roasting Sticks
Model #: SRS
Cast Iron Cooking Irons
Model #: DSPI / SSPI / RPI
Camp/Stove Table
Model #: CT38
0809-MS2-Instructions.indd 14-15 8/12/09 9:31:39 AM
Page 9

To see the whole line of Family Fun Camp Chef gear and
accessories go to
www.campchef.com
Smokers
TANK SOLD
SEPARATELY
3 Burner Stoves
&
Grills
2 Burner Stoves
&
Griddles
Single Burner
Stoves
Ovens
Cast Iron
0809-MS2-Instructions.indd 16 8/12/09 9:33:01 AM
 Loading...