

Page 1

CC640
Digital Camera
Operating Manual
Issued 9.1.08
Copyright
Printed under Licence by Campbell Scientific Ltd.
2005 Campbell Scientific (Canada) Corp..
©
CSL 573
Page 2

Page 3

Guarantee
This equipment is guaranteed against defects in materials and
workmanship. This guarantee applies for twelve months from date of
delivery. We will repair or replace products which prove to be defective
during the guarantee period provided they are returned to us prepaid. The
guarantee will not apply to:
• Equipment which has been modified or altered in any way without the
written permission of Campbell Scientific
• Batteries
• Any product which has been subjected to misuse, neglect, acts of God
or damage in transit.
Campbell Scientific will return guaranteed equipment by surface carrier
prepaid. Campbell Scientific will not reimburse the claimant for costs
incurred in removing and/or reinstalling equipment. This guarantee and
the Company’s obligation thereunder is in lieu of all other guarantees,
expressed or implied, including those of suitability and fitness for a
particular purpose. Campbell Scientific is not liable for consequential
damage.
Please inform us before returning equipment and obtain a Repair Reference Number whether the repair is under guarantee or not. Please state the
faults as clearly as possible, and if the product is out of the guarantee
period it should be accompanied by a purchase order. Quotations for repairs can be given on request.
When returning equipment, the Repair Reference Number must be clearly
marked on the outside of the package.
Note that goods sent air freight are subject to Customs clearance fees
which Campbell Scientific will charge to customers. In many cases, these
charges are greater than the cost of the repair.
Campbell Scientific Ltd,
Campbell Park, 80 Hathern Road,
Shepshed, Loughborough, LE12 9GX, UK
Tel: +44 (0) 1509 601141
Fax: +44 (0) 1509 601091
Email: support@campbellsci.co.uk
www.campbellsci.co.uk
Page 4

Page 5

Contents
PDF viewers note: These page numbers refer to the printed version of this document. Use
the Adobe Acrobat® bookmarks tab for links to specific sections.
1. Specifications .............................................................. 1
2. Introduction.................................................................. 2
2.1 Connecting................................................................................................2
2.2 Configuring...............................................................................................3
2.3 Operating..................................................................................................4
2.4 Retrieving Images.....................................................................................4
2.5 Additional Reference Material..................................................................4
2.6 CC640 Quick Check List..........................................................................4
3. Camera Hardware Description ................................... 5
3.1 Terminal Block Connections...................................................................5
3.2 Power Switch............................................................................................6
3.3 Snap Button ..............................................................................................6
3.4 Set-up Button............................................................................................6
3.5 Video Output ............................................................................................6
3.6 External I/O Connector.............................................................................7
3.7 LED (Green).............................................................................................7
3.8 Compact Flash Memory Card...................................................................8
3.8.1 Firmware Update From Memory Card..........................................8
4. Communications .........................................................9
4.1 PakBus Communications..........................................................................9
4.2 RS-232 Port ..............................................................................................9
4.3 CS I/O Port .............................................................................................13
4.4 RS-485 Port ............................................................................................14
5. Device Configuration Utility ..................................... 14
6. Operational Description............................................ 18
6.1 Self Timed Mode....................................................................................18
6.2 External Trigger Mode ......................................................................... `18
7. Image Quality ............................................................. 19
7.1 Lighting conditions.................................................................................19
7.2 Night Time Images.................................................................................19
7.3 Date and Time Stamp .............................................................................19
7.4 JPEG Compression.................................................................................20
i
Page 6

8. Lens ............................................................................ 21
8.1 Lenses and Field of View.......................................................................21
8.2 Focus and Zoom Adjustment..................................................................22
8.2.1 Temperature Variations and Focus..............................................22
8.3 Lens Filter...............................................................................................23
9. Maintenance............................................................... 23
9.1 Lithium Battery.......................................................................................23
9.2 Lens Cleaning.........................................................................................24
10. Set-up and Interface Guide .....................................24
10.1 Trigger Mode........................................................................................24
10.1.1 External Trigger........................................................................24
10.1.2 Self-Timed Trigger...................................................................24
10.1.3 Combination of External and Self-Timed Triggers..................24
10.2 Communications ...................................................................................25
10.2.1 Communications Disabled........................................................25
10.2.2 CS I/O Communications...........................................................25
10.2.3 RS-232 Communications..........................................................25
10.2.4 RS-485 Communications..........................................................26
10.2.5 Concurrent Communications....................................................26
11. Power Calculations and Timings ...........................26
11.1 Standalone Operation ...........................................................................26
11.2 Operation with Communications ..........................................................27
12. CR10X Interface Guide............................................ 29
12.1 CR10X Datalogger Requirements........................................................29
12.2 CR10X Memory Allocation .................................................................29
12.3 CR10X PakBus Settings.......................................................................29
12.4 CR10X *D15 Settings..........................................................................30
12.5 CR10X Multiple Cameras....................................................................30
12.6 CR10X Connections.............................................................................30
13. CR1000 Interface Guide .......................................... 30
13.1 CR1000 Memory Set-up.......................................................................30
13.2 CR1000 Files Manager.........................................................................31
13.3 CR1000 CS I/O Communications ........................................................31
13.4 CR1000 RS-232 Port Communications................................................31
13.5 CR1000 COM Port (control port) Communications.............................31
14. Remote Image Retrieval.......................................... 32
14.1 LNCMD.EXE.......................................................................................32
14.2 Using Loggernet File Control...............................................................33
14.3 Task Set-up / LNCMD.EXE.................................................................34
15. Installation................................................................ 37
15.1 Enclosures.............................................................................................37
15.2 Mounting Holes....................................................................................37
ii
Page 7

Appendices
A. Camera Enclosures ................................................ A-1
B. Quick Set-up and Test Procedure CC640
In Standalone Mode................................................. B-1
Figures
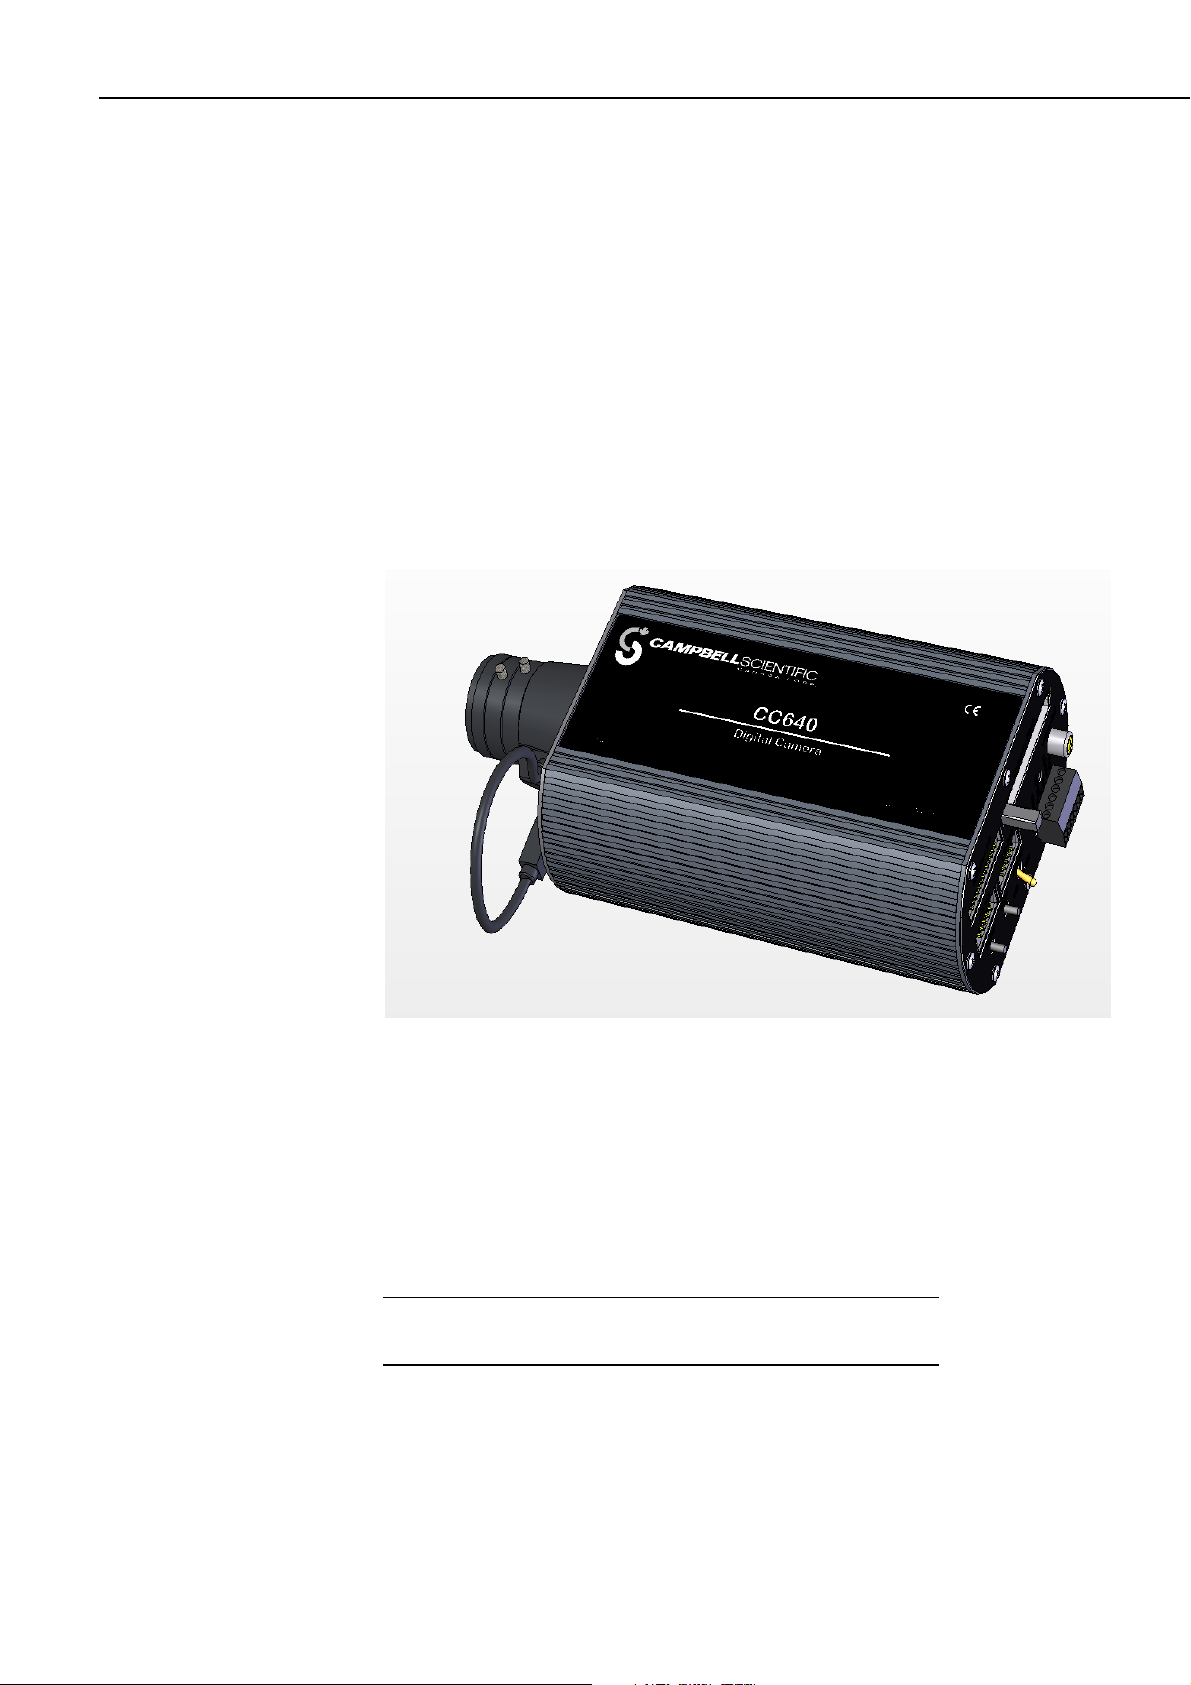
1. CC640 Camera............................................................................................2
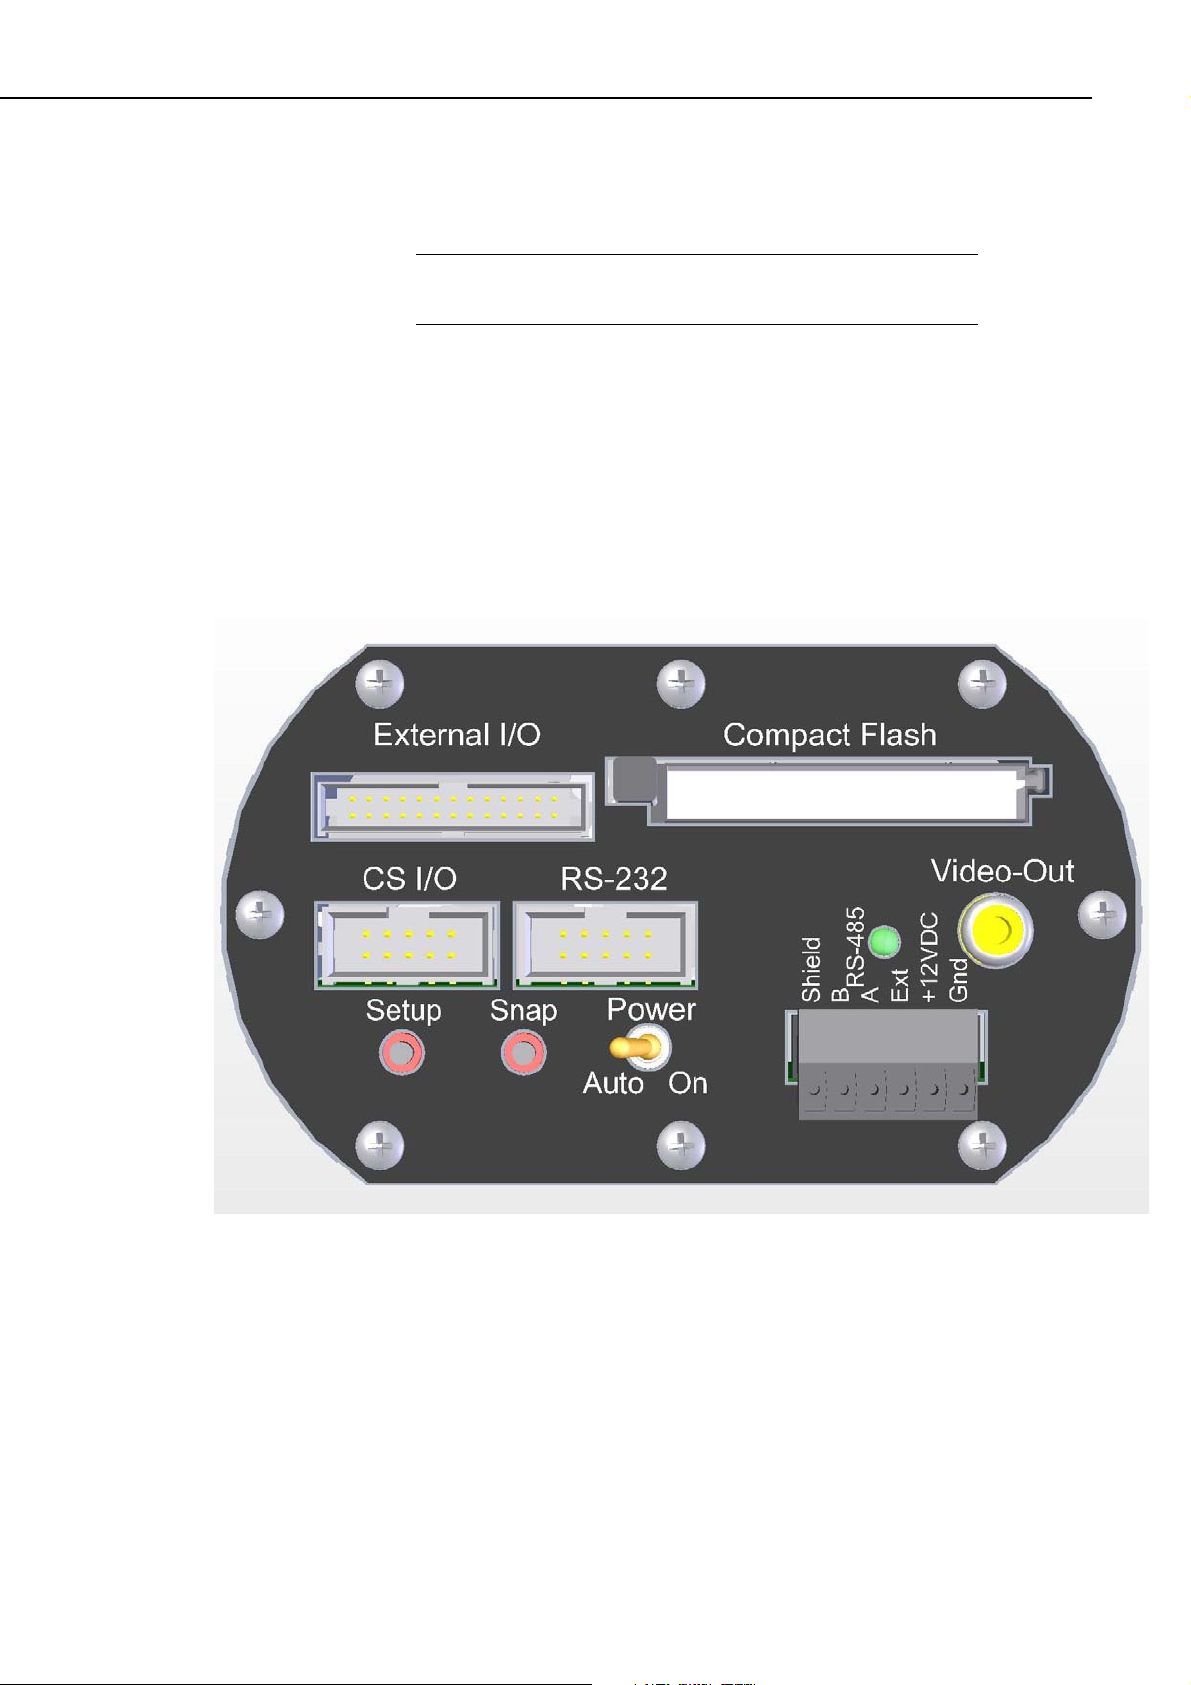
2. Terminal Block Position and Layout..........................................................5
3. Camera to Datalogger RS-232 port (DCE) connection ..............................9
4. Using C2006 adapter board to carry RS-232 TX and RX on multi-
conductor cable.........................................................................................10
5. RS-232 wiring using C2006 boards with multi-conductor cable..............11
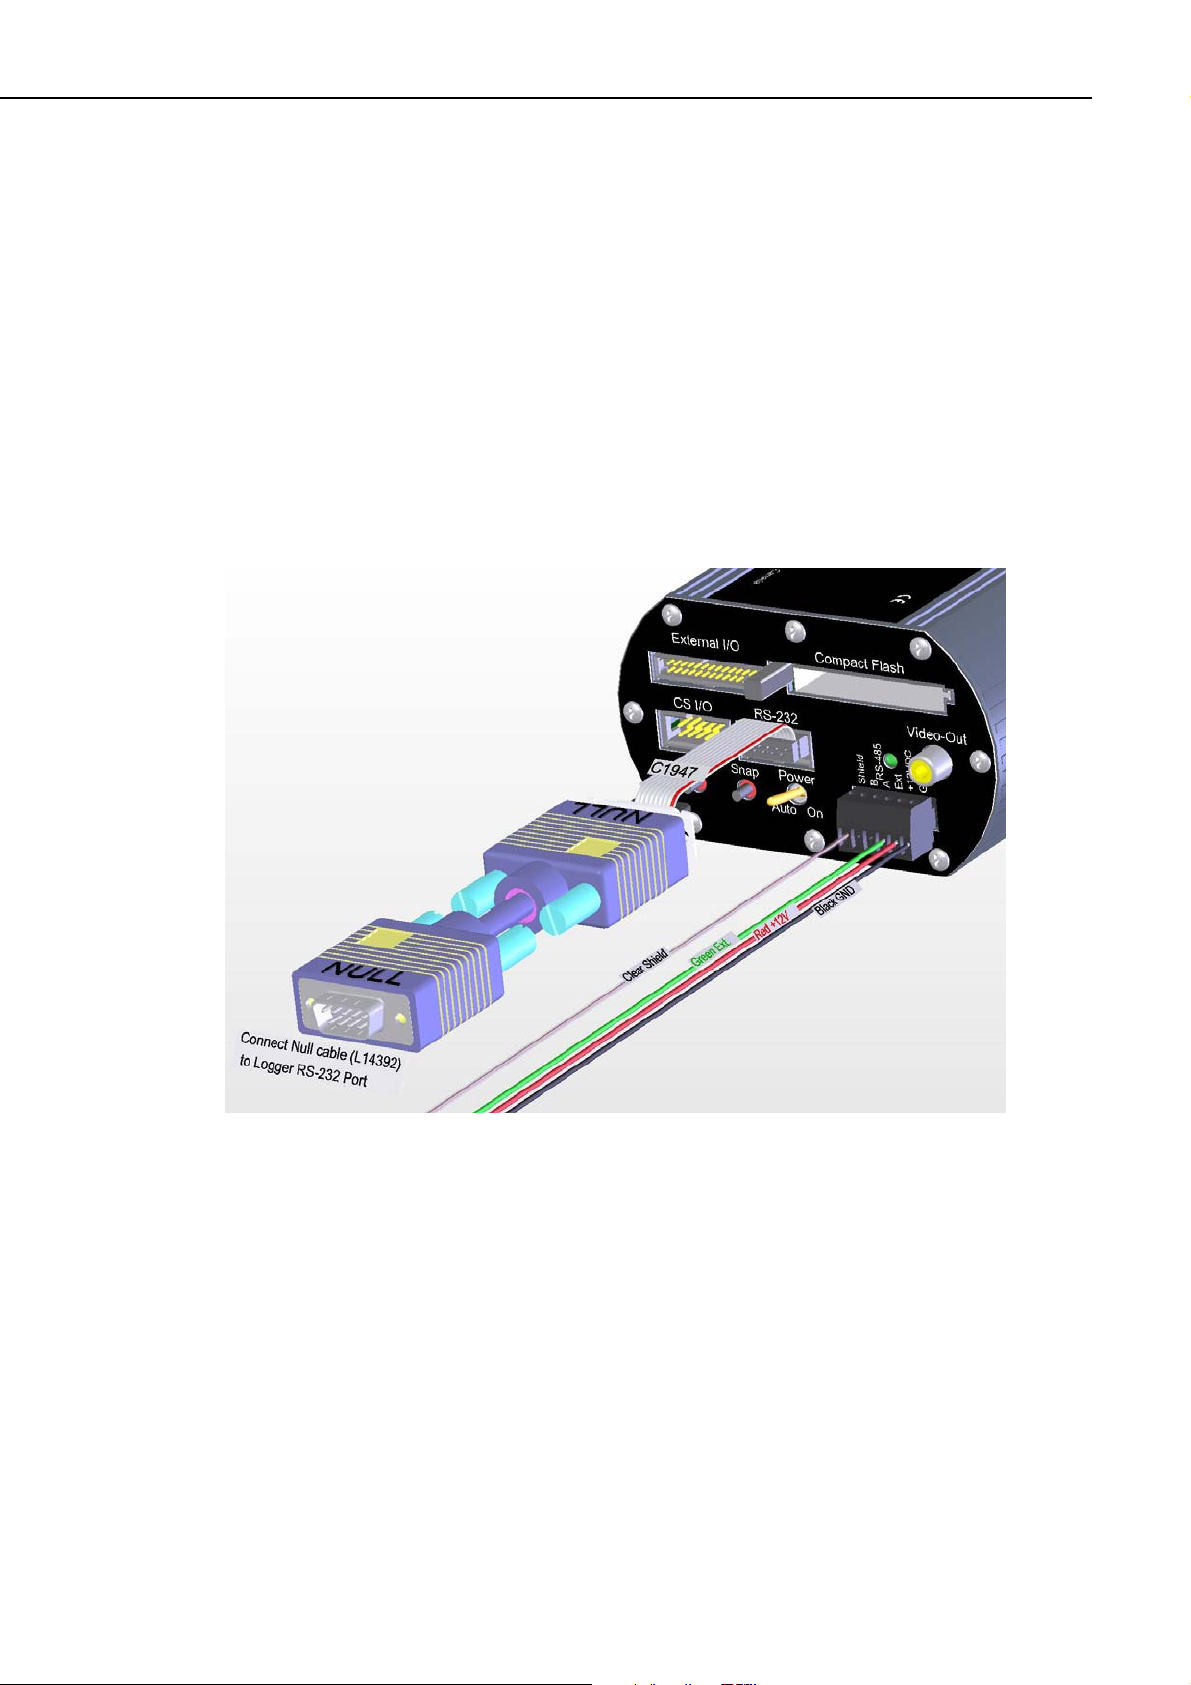
6. Connections for Configuration.................................................................12
7. Camera connections for CS I/O port operation ........................................ 13
8. Device Configuration Utility Screen ........................................................15
9. Illustration of Time Stamp Banner ...........................................................20
10. Lens and Filter........................................................................................23
11. Task Set-up.............................................................................................35
12. Task using add after to collect images after scheduled call....................36
13. Mounting Holes......................................................................................37
A-1 Enc 17/19 Mounting........................................................................... A-1
A-1a Enc 16/18 Mounting......................................................................... A-2
A-2 CC4718 Enclosure with mounting location of optional Serial
Interface Board (C2006)..................................................................... A-3
A-3 Camera on CC4718 Mounting Plate................................................... A-4
A-4 CC4718 bottom view.......................................................................... A-4
A-5 Vertical Pipe Mount ........................................................................... A-5
A-6 Horizontal Pipe Mount....................................................................... A-5
Tables
1. Recommended cable colour connections....................................................3
2. Explanation of configuration settings.......................................................16
3. Standalone operation power usages..........................................................27
4. RS-232 Port File Transfer Times and power usage per image.................28
5. CR10XPB CS I/O File Transfer Times ....................................................28
6. CR1000 CS I/O File Transfer Times........................................................28
iii
Page 8

Page 9

CC640 Digital Camera
1. Specifications
Power Supply
Operating: 9-15 VDC 250 mA Max
Quiescent: 250 uA typical
Operating Temperature -40°C to +70°C
Ext. Input Signal
Logic Low Level: 0 - 0.7 VDC (-12VDC Absolute Min)
Logic High Level: 4 – 15 VDC (15VDC Absolute Max)
RS-485
Max. BAUD Rate: 230.4 KBAUD
RS-232
Max. BAUD Rate: 230.4 KBAUD
CS I/O
Max. BAUD Rate: 76.8 KBAUD
CSDC addresses: 7 or 8
Memory Card Interface:
Type: Compact Flash
File System: FAT16
File Type: JPEG
Size: Recommended 512 Mb or less
Clock Accuracy
+/- 4 Minutes/Year (-40°C to 70°C)
Lens
Mount: CS-Type
IRIS: DC Compatible
Resolution
640 x 504 (with Time Stamp banner)
Dimensions
Length: 235 mm (9.25 inches) With Lens
Width: 110 mm (4.33 inches)
Height: 64 mm (2.52 inches)
Weight: 0.9 kg (2.0 lbs)
+/- 1 Minute/Year (0°C to 40°C)
640 x 480 (307,200 pixels)
1
Page 10
CC640 Digital Camera
2. Introduction
The CC640 digital camera was designed to meet the stringent operational
requirements necessary for remote battery powered installations. The CC640 has a
very low quiescent power draw and can operate over a wide temperature range.
The camera contains a compact flash memory card interface that turns the camera
into a powerful image logger. The combination of JPEG compression and memory
card storage enables the CC640 to store over 10,000 images.
The CC640 can operate in a stand-alone mode with image acquisitions triggered
by the cameras own precision real time clock. Image acquisitions can also be
triggered by an externally applied digital signal.
For Quick Set-up and Test Procedure in Standalone Mode – refer to Appendix B.
2.1 Connecting
NOTE
Figure 1 CC640 Camera
The camera should be connected to the datalogger and power supply using the
wiring recommendations in Table 1, Cable Colour Connections. The wiring is
based on the use of the recommended FIN6COND cable supplied by Campbell
Scientific (Canada) Corp. (CSC). The colour connections may differ if other
cables are used.
It is essential that the Ground cable be connected first when wiring
the camera to the datalogger or the power supply.
2
Page 11

Table 1. Recommended cable colour connections
Colour Required Connections Recommended Signal Connection
Operating Manual
Black
Red
Green
White
Yellow
Blue
Clear/Shield
Mandatory Ground
Mandatory +12V
Optional Ext
N/A No connection or Ground
Optional RS-485 A or RS-232 TX (Camera Output)
Optional RS-485 B or RS-232 RX (Camera Input)
Mandatory Camera Shield Terminal
After connecting the camera to a power source, turn the power switch to the ON
position and verify the proper LED sequence before connecting the camera for
communication.
For Standalone Mode, the CC640 can be connected directly to the power supply
by wiring Ground first, and then +12VDC. Capturing images in Standalone mode
requires the use of a FAT16 formatted Compact Flash Memory Card (Section 3.6).
The only wire connections to the camera are the power supply wires (ground and
+12 V) that connect to a 12 VDC source.
2.2 Configuring
The recommended cable for use with the camera is a 3 pair individually shielded
24 AWG cable. The cable part number is L9721 and the Model number for a
finished cable is a FIN6COND-L (L is the required Length). Only shielded cable
should be used with the camera for proper operation. It is recommended to use the
cable supplied by Campbell Scientific, as the cable is of high quality and well
suited for communications between the camera and datalogger.
The individual conductor colours and their recommended connections are outlined
in Table 1. Following the recommended colour scheme is not mandatory and users
may be required to select their own colour schemes for cables with different
colour arrangements.
The maximum recommended cable length of 24 AWG cable is 30 Metres (98.1
feet). Longer lengths can be used, however a heavier gaug e of wire is su g gested . It
is recommended that the individual wire resistance on the +12VDC and Ground
conductors not exceed 2.7 Ohms. Using longer cable in conjunction with RS-232
communications will require slower BAUD rates. Depending on the cable len gth
and type of cable, RS-232 may not be suitable for communications and the use of
RS-485 should be considered.
The camera uses PakBus protocol to send image files to the datalogger and both
must be configured to enable communications. The RS-232 port is used in
conjunction with the Device Configuration software to change settings and
operating parameters in the camera (Section 5, Page 14). Device Configuration
Utility is a free download from any Campbell Scientific website.
3
Page 12

CC640 Digital Camera
2.3 Operating
2.4 Retrieving Images
2.5 Additional Reference Material
The CC640 is capable of acquiring images in a self-timed mode, an external
trigger mode, and by manually taking a picture using the Snap button (Section 3.3,
page 6). Self-timed mode is set using the Device Configuration Utility, while a
short pulse applied to the Ext. Input Signal on the camera will initiate image
acquisition in the External Trigger Mode. When taking a picture manually using
the Snap button, the power switch needs to be in the ON position.
Loggernet Version 3.1.3 or newer includes the executable LNCMD.EXE that is
required for image file retrieval from dataloggers (Section 14, page 32). Images
from cameras in standalone mode can be retrieved directly from the Compact
Flash Memory Card with a PC that has a Compact Flash socket.
The CC640 Operating Manual is intended for use by those experienced in working
with Campbell Scientific dataloggers. For further information regarding the
various uses and applications of the CR1000, CR10XPB, CR23X, MD485, or any
additional technology listed in this manual, refer to the appropriate Operating
Manuals of these products.
2.6 CC640 Quick Check List
• If interfacing to a Datalogger ensure that your datalogger has the
appropriate PakBus operating system.
• The compact flash memory card must be formatted to FAT16 (Do not use
FAT32).
• Use the Device Configuration Utility to change settings in the camera.
• Use the Device Configuration Utility to change settings in MD485 or
other PakBus devices.
• The Device Configuration Utility can also be used to set the Dataloggers
memory and PakBus parameters. These parameters can be incorporated
into the datalogger program or changed with a Keyboard display.
• Verify that the lens cable is properly seated, as the connector may
inadvertently become unplugged du ri n g handling or installation.
Always ensure that the Power Switch is placed in the Auto Position
4
Page 13
3. Camera Hardware description
3.1 Terminal Block Connections
Operating Manual
NOTE
Only shielded cable should be used for connections to the terminal
block.
Gnd Power Ground
+12VDC 9-15VDC Power, 250 mA
Ext. External Trigger Input, 5.0 Volt Logic Signal, 15Volts Max
RS-485A RS-485 communications
RS-485B RS-485 communications
Shield The shield (drain wire) needs to be connected to this terminal
Figure 2 Terminal Block Position and Layout
5
Page 14

CC640 Digital Camera
3.2 Power Switch
3.3 Snap Button
The power switch can be used to power the camera continuously on or to place the
camera in Auto power mode. The switch should not be left in the On position
under normal operation. Leaving the switch in the On position will prevent the
camera from entering its low power quiescent mode of operation. The power
switch does need to be placed to the On position to perform configuration set-up
or to focus the camera.
In the Auto position the camera will automatically reduce its power consumption
to the low power quiescent mode after an image is acquired. It is recommended to
place the switch in the Auto position when images are being triggered by either
the external input or the self-timed mode.
The Snap button is used to manually take a picture. The power switch needs to be
set to the On position for the Snap button to operate.
When the Snap button is pressed the LED will slowly flash 2 times, indicating
successful initiation of an image acquisition.
3.4 Set-up Button
The Set-up button performs 2 functions: it toggles the video output on or off and
it places the camera in set-up mode. The power switch will need to be in the On
position for the Set-up Button to operate.
When the Set-up Button is pressed the LED will slowly flash once.
Pressing the Set-up button will force the camera to its default BAUD rate
(115,200) on the RS-232 port for about 40 seconds so that the Device
Configuration Software can be used to configure the camera. Image acquisitions
will also be placed on hold for the same time period. To indicate that the camera is
in Set-up mode the LED will briefly flash once per second.
If no configuration communications occur during the 40 second s, the camera will
exit set-up mode and resume its normal operating mode. The LED will flash once
every 5 seconds.
Pressing the Set-up Button will toggle the Video output on or off. The video
output is used to focus and target the camera in conjunction with a normal
television or video monitor. The video output will remain on until the set-up
button is pressed to toggle it off. The video output will be turned off when the
camera enters its quiescent mode, 5 minutes after the camera’s power switch has
been placed in the Auto position.
3.5 Video Output
The video output connector provides an anal og ue vi de o si g nal for the pur pose of
focusing and targeting the camera. The video output can be configured to NTSC
(National Television System Committee) or PAL (Phase Alternating Line) using
the Device Configuration Software. NTSC is the standard used in North America
and PAL is the standard that is used in most European countries. Consult your
monitor owner’s manual for display information.
The video output signal is intended for use with a television or monitor that has a
NTSC or PAL video input. Most monitors will have one or two audio input
6
Page 15

connectors in addition to the video input. The audio inputs shou ld remain
unconnected, as the camera does not have audio capability.
The video output can be turned on and/or off by pressing the Set-up Button when
the power switch is in the ON position.
During every image acquisition sequence the video output will be momentarily
activated when the image is acquired, allowing the operator to view the image that
is being captured.
3.6 External I/O Connector
The External I/O connector provides Inputs and Outputs fo r operating camera
peripherals, such as the optional motorized enclosure that is used for operation
under extremely harsh environmental conditions. Please contact a Campbell
Scientific sales representative for details and availability of the CC640
peripherals.
The Ext. (External Control) input signal can be used to initiate an image
acquisition. An image acquisition can be initiated on demand by applying a
voltage pulse to the Ext. input. The camera will remain in its quiescent state when
the signal to this input remains at logic low (Less that 0.7 Volts). To initiate an
image acquisition the input should be pulsed hi g h (4 .0 - 15 Volt s ) . The
recommended duration of the pulse is between 1ms and 10 seconds.
Operating Manual
3.7 LED (Green)
Leaving the Ext. input signal high for more than 10 seconds will result in another
image acquisition starting immediately after the completion of the first.
If the Ext. input signal is left in the High state continuously, the camera will not
enter its low power mode and images will be acquired on a continuous basis.
The Ext. Control Input signal is operated with the power switch in the Auto mode.
If the power switch is left in the ON position the LED will flash twice and begin
an image acquisition when a positive Ext Signal is detected, providing easy
confirmation of an externally applied signal.
The green LED is intended to provide feedback for the operator. On power up the
LED will slowly flash 4 times, indicating that a normal power-on sequence has
occurred. If the LED flashes rapidly for several seconds, it means that the camera
failed one of the power-on tests. This response is rare and will require that the
camera be returned to an authorized repair facility.
The LED will also flash once if the Set-up button is pressed and twice if the SNAP
button is pressed. During communications or a firmware update the LED will
remain ON to indicate a process is in progress that should not be interrupted.
If the power switch is in the ON position the LED should flash once every 5
seconds to indicate that it is running. If the set-up button is pressed, the LED will
briefly flash once a second to indicate that the camera is ready for set-up using the
Device Configuration Utility.
7
Page 16

CC640 Digital Camera
The following table offers LED information at a glance:
LED
Always Off
Quick Flash
Every 5 Seconds
4 Slow Flashes
Rapid Flashes for 4
Seconds
Quick Flash Every
Second
Steadily On
The camera has no power connected to it or it is in Quiescent Mode
The camera is Powered ON (Power switch is in the ON position)
Normal Power-On Sequence
A Power on test did not pass.
The camera is in Set-up Mode
The camera is carrying out a process that should not be interrupted. This includes
acquiring an Image, transmitting an image via communications, or performing a
firmware update.
3.8 Compact Flash Memory Card
The camera is equipped to use compact flash memory cards. It is important for the
memory cards to be formatted as FAT16 and not FAT32, as the camera does not
support the FAT32 file system. When formatting a memory card using a PC
ensure that FAT32 is not selected (FAT16 or just FAT should be used).
Image files are stored on the compact flash memory card as JPEG files under the
root directory “IMAGES”. Each file will be uniquely named with a sequence
number (i.e. E1234567.JPG).
The compact flash card should not be inserted or removed while the camera is in
its ON state. Insertion or removal should only be done when the camera is in its
quiescent state or when power is removed.
The use of a memory card is optional and is not required for users who utilize
communications to retrieve the images. If a card is present, the camera will write
the images to it. Once the memory card is filled, the camera will stop recording
images to it unless deleting previous files creates additional image storage space.
It is generally recommended to delete older image files from the memory card
after downloading them to a permanent storage location.
3.8.1 Firmware Update From Memory Card
CAUTION
Failure to properly follow this procedure can result in
corruption of the operating system. If this occurs, it may be
necessary to send the camera to an authorized repair facility
to have the operating system reloaded.
The compact flash card is also used to provide a means of updating the camera’s
embedded firmware. This is done by downloading the appropriate files from any
Campbell Scientific website, renaming the new firmware hex file as
“NEWCODE.HEX” (all upper case), and placing it in the root directory of the
compact flash memory card. When the camera powers up and finds the file in the
root directory it will begin to update its firmware from the file. The LED will
remain continuously on during this process, which may take up to 5 minutes. It is
imperative that the power supply is not interrupted during this process. After
completion the LED will turn off. Power down the camera, remove the memory
card, and delete the “NEWCODE.HEX” file using a PC if no other cameras need
to be updated. Leaving the file on the memory card will cause the camera to
8
Page 17
repeatedly update its firmware every time the camera wakes up from its quiescent
mode.
4. Communications
4.1 PakBus Communications
The camera uses the PakBus protocol to send image files from the camera to the
datalogger or other PakBus compatible devi ces.
Communications are not enabled while the camera is in its quiescent mode. This is
done to conserve power in its low power state. When an image file is ready to be
transmitted, the camera will initiate communications and send the JPEG image via
the selected PakBus port.
The camera is a PakBus Leaf node and is not capable of performing any routing.
Operating Manual
Figure 3 Camera to Datalogger RS-232 port (DCE) connection
4.2 RS-232 Port
The 10-pin RS-232 header connector is designed to provide a 9 Pin DCE type port
by using either of the ribbon cable adapters provided with the camera. Part number
C1946 provides a male 9-pin connector and C1947 provides a female 9-pin
connector.
The RS-232 port can also provide an additional communication port for
transmitting image files to a datalogger using the PakBus Protocol. Figure 3
illustrates the required connection to a RS-232 port on a Datalogger. A Datalogger
and camera are both DCE type RS-232 devices; thus, requiring a NULL modem
cable.
9
Page 18

CC640 Digital Camera
Figure 4 Using C2006 adapter board to carry RS-232 TX and RX on multi-conductor cable
The necessary RS-232 TX (transmit) and RX (receive) signals can also be carried
by the recommended 6 conductor cable. Figure 4 demonstrates using a DB-9 to
terminal breakout board (part C2006) and the standard cable to transmit the RS232 signals. This provides a practical means of carrying the RS-232 signals when
the camera is installed remotely from the datalogger.
If the recommended cable is used, the RS-232 can be used at distances up to 30
Metres (98.1 feet). Longer lengths or different cables may require that the BAUD
rate be set slower than the default 115200 BAUD.
10
Page 19

Operating Manual
Figure 5 RS-232 wiring using C2006 boards with multi-conductor cable
Depending on the datalogger the wires can be terminated directly on the control
ports or another C2006 adapter board can be used to provide a 9-pin connector at
the datalogger end (see Figure 5).
11
Page 20

CC640 Digital Camera
Figure 6 Connections for Configuration
The RS-232 port is used in conjunction with the Device Configuration software to
change settings in the camera such as the PakBus addresses. Figure 6 illustrates
the connections required for interfacing to a computer.
12
Page 21

Operating Manual
Figure 7 Camera connections for CS I/O port operation
4.3 CS I/O Port
The CS I/O port on the camera provides a connector for CS I/O communications.
The port is designed to communicate with Campbell Scientific dataloggers
equipped with CS I/O communication ports. A ribbon cable assembly (C1947) is
used to provide a male 9-pin connector that can plug directly to the CS I/O port or
to a SC-12 cable that connects to the CS I/O port (See Figure 7). The CS I/O port
is used to download image files to the datalogger. The image files can then be
collected remotely in conjunction with the regular data.
The camera will support only Concurrent Synchronous Device Communications
(CSDC) and will not support Modem Enabled (ME) Communications. The camera
can be assigned one of two CSDC addresses, 7 or 8. If another CSDC device is
connected to the CS I/O port, then the camera must have an address that is
different from the other device.
The CS I/O port cable lengths should be restricted to 12 feet or less to ensure
optimal operation.
13
Page 22

CC640 Digital Camera
4.4 RS-485 Port
The RS-485 terminals can be used in conjunction with the MD485 to interface a
datalogger to the camera over distances of up to 4000 feet. The +12V GND and
EXT control lines cannot be practically run these long distances. Normally the
RS-485A and RS-485B lines, and an additional ground connection, are run these
distances. Refer to the MD485 manual for additional information.
5. Device Configuration Utility
The Device Configuration Utility can be used to set the clock on the camera as
well as other operating parameters such as the PakBus addresses.
5.1 Using The Device Configuration Utility
• Connect an appropriate power supply to the camera.
• Connect the RS-232 cable to the camera and the computer.
• Turn the Power switch to the “ON” position.
• Press the Set-up Button (this temporarily forces the RS-232 port to
115KBAUD).
• Within 40 Seconds invoke the Device Configuration Utility (Figure 10).
• Select CC640 as the device and connect to the camera.
• Table 2 offers further information on con fi g u rat i on setti ngs.
14
Page 23

Operating Manual
Figure 8 Device Configuration Utility Screen
15
Page 24

CC640 Digital Camera
Table 2. Explanation of Configuration Settings
Parameter Type Description Default
Value
Version
PakBus Port
PakBus Address
PakBus Destination
Address
Extra
Communications
Delay
RS-485 BAUD rate
RS-232 BAUD rate
CS I/O SDC
ADDRESS
Compression Level
Start Minute
Stop Minute
Self-Timed Interval
Motorized Enclosure
Firmware Checksum
Read Only The firmware version of the CC640 operating system N/A
Read/Write Options: NONE, CS I/O, RS-485, RS-232
Only select a PakBus Port if communications are being used to
transfer images via PakBus.
Read/Write Options: 1 – 4094 55
A PakBus Address should be assigned to the camera for
PakBus Communications.
Read/Write Options: 1 – 4094 1
This is the PakBus address of the destination device wh ere the
image files will be transmitted. The device is normally a
Campbell Scientific datalogger.
Read/Write Options: 0 – 10 Seconds 1
Additional Delays can be added for PakBus networks with
long propagation delays.
Read/Write Options: 230400, 115200, 76800, 57600, 38400, 28800,
19200, 9600, 1200
Read/Write Options: 230400, 115200, 76800, 57600, 38400, 28800,
19200, 9600, 1200
Read/Write Options: 7 or 8 8
If other CSDC devices are connected to the same CS I/O port,
each device must have its own address.
Read/Write
Read/Write Options: 0-1339 0
Read/Write Options: 0-1440 1440
Read/Write Options: 0-1440 0
Read/Write Options: Disable, Enable Disable
Read Only This is the checksum calculated from the firmware present on
Options: Very High, High, Medium, Low, None High
This option selects the amount of compression to be applied to
the JPG files. Higher compression levels result in smaller files
but the images will lose subtle details. Selecting none will
produce a large sized (480Kb) Lossless image.
If the camera is in a Self-Timed Mode, this parameter allows a
start time from Midnight to be selected.
If the camera is in a Self-Timed Mode, this parameter allows a
stop time from Midnight to be selected.
If this parameter is non–zero then the camera will
automatically wake itself up and acquire images based on the
interval entered.
Select enable if the ENC-CC motorized covered enclosure is
used. It is important to select disable if the motorized
enclosure is not used. Selecting enable when a motorized
enclosure is not present will slow down the operation of the
camera.
the camera.
NONE
115,200
115,200
N/A
16
Page 25

Operating Manual
Video Output Type
Send Fixed Name
Fixed File Name
Time Stamp
Automatic Time Sync
Year
Month
Date
Weekday
Hour
Minute
Second
Temperature
Image Counter
Serial Number
Read/Write Options: NTSC, PAL
NTSC video is the North American Standard. PAL is the
VIDEO standard for most European Countries.
Read/Write Options: ON, OFF OFF
If set to off, then the camera will send each image with a
unique file name. The format will be
AAAA_EXXXXXXX.JPG
Where AAAA is the camera's PakBus Address and XXXXXX
is the Image Counter value.
If Send Fixed Name is on, then the image will always be sent
with the same name. The name used will be the text entered in
the Fixed File Name string followed by the JPG extension.
Read/Write Options: ON, OFF
An optional fixed name that can be used for naming the JPEG
files that are transferred from the camera. The name must be
less than 16 characters. The JPG extension will be added to
this name
The PakBus address of the camera will still be placed in front
of the filename.
This Name Field will also be placed on the IMAGE if the
Time Stamp is enabled.
Read/Write Options: ON, OFF CC640
If set to on, a date and time stamp will be placed on the image
in addition to the text entered in the Fixed File Name field.
The Images will be 640x504 pixels with the text added to the
bottom last 24 pixel rows.
Read/Write Options: ON, OFF OFF
If set to on, the camera will attempt to update its clock
automatically from the selected PakBus Destinati on A ddres s.
Read/Write Options: 2004 - 2104 N/A
Read/Write Options: Jan - Dec N/A
Read/Write Options: 1-31 N/A
Read/Write Options: Sun. – Sat. N/A
Read/Write Options: 0 – 23 N/A
In 24 Hour Format Only
Read/Write Options: 0-59 N/A
Read/Write Options: 0-59 N/A
Read Only Temperature in Degrees Celsius -55 to +125. Temperatures
beyond the operating temperature range are not recommended.
Read/Write Options: 0 – 9999999 (7 Digits) 1
The file counter can be changed if desired. The file counter
will loop back to zero after 9999999.
Read Only Serial Num ber N/A
NTSC
OFF
N/A
17
Page 26

CC640 Digital Camera
6. Operational Description
6.1 Self Timed Mode
In self-timed mode the camera is capable of waking itself up and acquiring an
image. In order to place the camera in self-timed mode use the Device
Configuration Software to set the Self-Timed Interval parameter to non-zero.
Self-Timed Example 1:
To take a picture every 15 minutes starting at Midnight the self-timed mode
parameters should be set as follows:
Start Minute: 0
Stop Minute: 1440
Self-Timed Interval: 15
Self-Timed Example 2:
To take a picture every Hour starting at 4:00AM and ending at 11:00PM the selftimed mode parameters should be set as follows:
Start Minute: 240 (4 hours * 60 Minutes)
Stop Minute: 1380 (23 Hours * 60 Minutes)
Self-Timed Interval: 60
6.2 External Trigger Mode
An image acquisition can also be triggered from the Ext. Input Signal on the
camera. It is recommended that a short pulse be used to initiate the image
acquisition. If a positive voltage is applied and not removed before the image
acquisition sequence is complete, the camera will begin another image acquisition
immediately after. An image acquisition can be as short as 10 Seconds.
NOTE
External Trigger Mode can be used in conjunction with the SelfTimed Mode by following all the steps as listed in this section.
18
Page 27

7. Image Quality
7.1 Lighting conditions
Lighting conditions have the greatest influence on image quality. The CC640
camera produces the best images under normal daylight conditions. Pictures taken
in good daylight conditions produce crisper and brighter images.
The CC640 uses the entire image to adjust the exposure settings for a particular
scene.
Scenes that contain small variations in light intensities will produce better images
as well. In scenes with high variations in light intensities, su ch as a bright sky and
a dark horizon, the image may contain portions that are under-exposed and
portions that are over-exposed, as with most cameras. The CC640 utilizes various
techniques to produce an overall good picture under most lighting conditions.
When the CC640 is over-exposed by an overly bright object, such as the sun in a
sky shot, the over-exposed object may begin to turn black. This is a result of the
CMOS image sensor being over-exposed to light and becoming saturated. It is
normal operation for the centre of the Sun to appear black under certain lighting
conditions.
Operating Manual
7.2 Night Time Images
Generally the camera does not produce distinguishable images at night time. If
lighting is present (such as street lights), then objects may become noticeable.
7.3 Date and Time Stamp
Setting the Time Stamp option of the camera to ON will add a banner to the
bottom of the images (Figure 9). The banner adds 24 pixel rows to the image and
increases the size of the image from 640x480 to 640x504 pixels.
The banner includes the text entered for the fixed file name. The text that can be
displayed includes numbers 0-9, letters A-Z (converted to upper case), and an
underscore symbol. Unsupported symbols/characters are displayed as a space.
Following the fixed file name string is the Date and time stamp. The First 3
characters are used for the month followed by the day of month and year. The time
is HH:MM in 24 hour clock format.
The banner ends with the internal camera temperature displayed in degrees
Kelvin. This is intended for diagnostic purposes. The temperature is displayed in
degrees Kelvin so that there is no confusion that the temperature represents some
ambient temperature. The temperature is internal and can vary substantially from
the actual ambient temperature. To convert the temperature to degrees Celsius
subtract 273 from the value displayed.
19
Page 28

CC640 Digital Camera
Figure 9 Illustration of Time Stamp banner
7.4 JPEG Compression
There are 5 selectable levels of JPEG compression:
• Very High (32 Kbytes Typical)
• High (48 Kbytes Typical)
• Medium (72 Kbytes Typical)
• Low (100 Kbytes Typical)
• None (Lossless) (480 Kbytes Typical)
NOTE
These are typical values with the time stamp enabled on the image
(640x504 pixels). The size of the images varies with the image
content.
Selecting None will produce the best quality JPEG files with Lossless
compression. Lossless compression does not introduce additional distortions and
every pixel is the same size as in the original image. Very High compression will
produce the smallest files but with the most degradation of the image.
Small files may be important for slow telecommunication links or for applications
that require a large number of pictures to be stored onto the memory card.
High compression is the recommended setting to produce satisfactory results for
most applications while taking advantage of the benefits of smaller file sizes.
20
Page 29

8. Lens
8.1 Lenses and Field of View
Operating Manual
The standard Lenses for the CC640 camera contain the following features:
• CS Mount
• Varifocal (manual zoom)
• Manual Focus
• DC Iris
The camera controls the iris of the lens using the cable with a 4-pin connector.
This connector must always be plugged into the receptacle (on the front lens plate
of the camera) for proper operation.
• Currently there are 2 optional lenses for the CC640 camera. A 3.5-8mm
and a 6-12mm.
• What does this mean? These numbers have a direct correlation to the
zoom or field of view.
• The 3.5-8mm Lens has a field of view ranging from 79.8 to 35.4 Degrees
• The 6-12mm Lens has a filed of view ranging from 47.3 to 23.0 Degrees
• Large angle is 79.8 Degrees Small angle is 23 degrees
21
Page 30

CC640 Digital Camera
8.2 Focus and Zoom Adjustment
The lens is equipped with manual zoom and focus adjustment rings. The most
practical way to adjust the lens is by utilizing a normal Television monitor or a
portable Television.
• Connect an appropriate video cable from the video output connector
(RCA Jack) of the camera to the video input on the video monitor of the
television.
• Turn the power switches of both the camera and the television to the ON
position and then press the Set-up Button. Within a few seconds the video
should appear on the monitor. Consult your monitor owner’ s manual for
additional instructions on displaying video from the video input jack.
• Once the video is observed on the monitor, loosen the 2 thumbscrews on
the adjustment rings of the lens.
• It is generally easier to adjust the zoom first and then the focus.
• Once the zoom is adjusted as desired tighten the thumbscrew so that the
zoom will not inadvertently move when the focus is adjusted.
• Adjust the focus ring and then tighten its thumbscrew as well.
Recommendation: If the camera is targeted at an object that is far away (100
Metres or more), then it may be beneficial to adjust the lens before taking the
camera into the field by using an object that is at a similar distance away. It is
generally much easier to use a larger monitor in an office environment, rather than
a portable TV at the installation site, as sunlight tends to make it difficult to view a
television screen outdoors.
8.2.1 Temperature Variations and Focus
The CC640 can operate under extreme temperature variations. The focus of the
lens can change slightly with large variations in temperature. For example, if a
lens is focused at +25°C the lens may be slightly out of focus at -30°C. The
change in focus will be less noticeable if the focus is adjusted closer to the
cameras operating temperature.
22
Page 31

8.3 Lens Filter
Operating Manual
The CC640 camera is equipped with an IR cut filter on its lens. This is threaded
onto the front of the lens and is required to filter out near-infrared light that can
have an undesirable affect on the images. It is recommended that the filter always
be left installed on the lens.
9. Maintenance
9.1 Lithium Battery
Figure 10 Lens and Filter
The CC640 requires little maintenance and no calibrations. Keeping the camera
clean and in a dry environment is important for the longevity of the camera.
The Camera is equipped with a Lithium Thionyl Chloride Battery. The battery
maintains the clock functionality for periods when power is not connected to the
camera. The expected battery life is 2 years. If the camera is in operation and
connected to a power supply, the battery life may be extended up to 10 Years.
It is recommended that the battery be replaced by a certified repair facility. The
sticker on the bottom of the camera indicates the date of battery installation.
23
Page 32

CC640 Digital Camera
9.2 Lens Cleaning
If the filter or lens requires cleaning, it is very important that only a proper lens
cloth (like those included with your CC640 camera) or lens tissue be used. The
use of inappropriate materials to clean the lens can permanently damage or reduce
the effectiveness of the filter or lens.
10. Set-up and Interface Guide
10.1 Trigger mode
Determine how the camera will be triggered to initiate an image acquisition. There
are 2 different trigger sources. The first is using the external trigger input and the
second is self-timed mode, which uses the cameras own real time clock. A
combination of external trigger and self-timed mode can be used as well.
10.1.1 External Trigger
If the camera is being triggered by an external signal provided by another device
then:
• Set the parameter Self-Timed Interval to zero
• Connect the external signal to the Ext input of the camera
10.1.2 Self-Timed Trigger
A camera that is used in self-timed mode should be set up as follows:
• Set the parameter Self-Timed Interval to a non zero value
• Change the Start Minute and Stop Minute values accordingly
• Leave the Ext input of the camera unconnected or connected to ground
10.1.3 Combination of External and Self-Timed Triggers
A camera that is used in this configuration should be set up as follows:
• Set the parameter Self-Timed Interval to an non zero value
• Change the Start Minute and Stop Minute values accordingly
• Connect the external signal to the Ext input of the camera
24
Page 33

10.2 Communications
Communications can enable remote retrieval and/or storage of images to external
devices such as compatible Campbell Scientific dataloggers. The PakBus protocol
is used to facilitate the transfer of images.
10.2.1 Communications Disabled
When a camera is not connected to other devices for communications then it is
important to:
• Set the parameter PakBus Port to None
10.2.2 CS I/O Communications
The camera can download images to a compatible Campbell Scientific datalogger
via the CS I/O port. The following items are required for CS I/O PakBus
communications:
• Set the parameter PakBus Port to CS I/O
Operating Manual
• Set the parameter PakBus Address to a unique value in the PakBus
network.
• Set the parameter PakBus Destination Address to the datalogger that is
intended to store the images.
• Ensure that the parameter CS I/O CSDC ADDRESS of the camera is
unique amongst the peripherals that are connected to the dataloggers’ CS
I/O port.
• Connect the camera’s CS I/O port to the datalogger using the supplied
ribbon cable adapter.
• Ensure that the dataloggers’ CS I/O BAUD rate is set to 76.8 KB or less
Refer to Figure 7 (page 13) for connections required when using the CS I/O port.
NOTE
The camera must always have +12Volts power connected to it when
connected to the CS I/O port of a datalogger. Failing to apply power
to the camera will prevent other devices from communicating with
the datalogger.
10.2.3 RS-232 Communications
The camera can download images via its RS-232 port using the PakBus protocol.
The following items are required for RS-232 PakBus communications:
• Set the parameter PakBus Port to RS-232
• Set the parameter PakBus Address to a unique value in the PakBus
network.
• Set the parameter PakBus Destination Address to the device that is
intended to retrieve the images.
• Set the RS-232 BAUD rate to match the BAUD rate of the device being
connected to the camera.
25
Page 34

CC640 Digital Camera
10.2.4 RS-485 Communications
10.2.5 Concurrent Communications
Refer to Section 4.2 for additional information and connections diagrams using the
RS-232 port.
The camera can download images via its RS-485 port using the PakBus protocol.
An MD485 can be used to transmit images via PakBus from a camera to other
devices:
• Set the parameter PakBus Port to RS-485
• Set the parameter PakBus Address to a unique value in the PakBus
network.
• Set the parameter PakBus Destination Address to the device that is
intended to retrieve the images.
• Set the RS-485 BAUD rate to match the BAUD rate of the RS-485
network that the camera is being connected to.
Refer to Section 4.4 for additional information on the RS-485 port.
PakBus allows the camera to download images to a datalogger simultaneously
with other datalogger communications. A communications task will take long er if
the datalogger is communicating with multiple devices at the same time.
It may be beneficial to set up the system to avoid image transfers when other
communications are scheduled.
For example, longer connect times on long distance telephone connections can be
avoided by scheduling image transfers from the camera to the datalogger outside
the scheduled data collection time. If a station is called on the hour to retrieve
data, image acquisitions could be initiated before the scheduled call (15 minutes
prior) to shorten the connect times.
11. Power Calculations and Timings
The CC640 was specifically designed for operation in power-constrained systems
such as solar powered sites. It is critical in such systems that the power switch on
the camera always be left in the AUTO position to take advantage of the low
power mode. This section outlines power consumption of the camera for purposes
of power supply design for a system.
11.1 Standalone Operation
In standalone mode the camera operates as a self-contained image logger.
The current draw of the camera while in low power quiescent mode is 250uA.
When the camera wakes up to take a picture, operating current draw increases to a
maximum of 250 mA for approximately 30 seconds. In order to calculate the daily
power usage of the camera, both the quiescent and operating power consumptions
need to be calculated.
26
Page 35

Operating Manual
The quiescent power consumption in Amp-Hours is calculated as follows:
P
= 250x10-6 Amps * 24 Hours = 0.006 Amp-Hrs / Day
quiescent
The operating power usage per picture in Amp-Hours is calculated as follows:
P
= 0.250 Amps * (30Sec. / 3600 Sec./Hr) = 0.00208 Amp-Hrs / Picture
operating
The daily power usage will depend on the number of pictures taken per day. The
power usage can be calculated using the following formula:
P
/ Day = 0.006 Amp-Hrs + (0.00208 Amp-Hrs * Number of Pictures Per Day)
usage
The following table shows the power usage versus the number of pictures t aken
per day:
Table 3. Standalone Operation Power Usages
Number of Pictures Per Day Power Usage Per Day
1 (Every 24 Hours) 0.008 Amp-Hrs
4 (Every 6 Hours) 0.014 Amp-Hrs
12 (Every 2 Hours) 0.031 Amp-Hrs
24 (Every 60 minutes) 0.056 Amp-Hrs
48 (Every 30 minutes) 0.106 Amp-Hrs
96 (Every 15 minutes) 0.206 Amp-Hrs
288 (Every 5 minutes) 0.606 Amp-Hrs
1440 (Every minute) 3.006 Amp-Hrs
11.2 Operation with Communications
If the camera is operating in a standalone mode, the time the camera is operational
in this mode is typically 30 seconds. The power calculations are more complicated
when communications are involved, as the amount of time the camera is in
operating mode is increased by the amount of time it takes for the camera to
transfer an image.
The transfer times are influenced by two main factors: the size of the image and
the transfer speed used to send the image. The amount of time the camera is on
will be increased as the size of the image becomes larger or as the communication
rate slows down.
To properly determine the power consum pt ion whe n usi n g communications, the
additional time the camera stays in operating mode needs to be accounted for. The
following table is a guideline for determining the amount of time it takes to
transfer an image using RS-232 Communications.
27
Page 36

CC640 Digital Camera
Table 4. RS-232 Port File Transfer Times and power usage per image
RS-232
Communica
BAUD RAT
9600
19200
38400
57600
115200
Very High High Medium Low
tio Compress
n
(32kB Files
E
47 seconds 71 seconds 105 seconds 147 seconds 706 seconds
0.0053 A-Hrs 0.007 A-H rs 0.0094 A-Hrs 0.0123 A-Hrs 0.0511 A-Hrs
26 seconds
0.0039 A-Hrs rs s rs rs
15 second 22 second 33 second 45 second 218 second
0.0031 A-H 0.0036 A-H 0.004 4 A-Hr 0.0052 A-H 0.0172 A-H
11 seconds
0.0028 A-H
8 seconds
0.0026 A-Hrs
ion Compressi Compressi
)
s
rs
rs
(42kB Files)
38 seconds 58 seconds 80 seconds 384 seconds
0.0047 A-H 0.0061 A-Hr 0.0076 A-H 0. 02 8 6 A-H
16 second
0.0032 A-H
12 seconds
0.0029 A-Hrs
on
(72kB Files
s
rs
s
rs
24 second
0.0038 A-Hr
18 seconds
0.0033 A-Hrs
o Lossless
n
) (100kb Files)
s
s
s
s
Compression
33 second
0.0044 A-H
25 seconds
0.0038 A-Hrs
s
rs
s
rs rs
None
Compression
(480kB Fil
160 seconds
0.0132 A-H
120 seconds
0.0104 A-Hrs
Table B CS I sfer T
5. CR10XP /O File Tran imes
CR10XPB-2 None
CS I/O
Comm (32kB Files (48kB Files (72kB Files (100kB File Compressi
BAUD RATE
76800
M
unication
Very High
Compression
)
49 seconds
0.0055 A-Hrs
High
Compression
)
74 seconds
0.0072 A-Hrs
Medium
Compression
)
111 seconds
0.0098 A-Hrs
Low
Compression
154 seconds
0.0128 A-Hrs
Lossless
s)
(480kB File
738 seconds
0.0533 A-Hrs
es)
s
rs
on
s)
Table 6. CR1000 CS I/O sfer Times
00 CS I/O
CR10 Very High High Medium Low None
Comm Compress Compres Compres Compress Lossless
unication
BAUD RATE
9600
19200
38400
57600
115200
(32kB Files (42kB Files (72kB Files (100kb Fil Compression
40 seconds 60 seconds 90 seconds 125 seconds 600 seconds
0.0049 A- 0.0063 A- 0.0083 A- 0.0108 A- 0.0438 A-Hrs
23 seconds
0.0037 A-Hrs Hrs Hrs rs Hrs
14 seconds
0.0031 A-Hrs
11 seconds
0.0028 A-Hrs
Do not use
ion
)
Hrs Hrs Hrs Hrs
34 seconds 51 seconds 71 seconds 342 seconds
0.0044 A- 0.0056 A- 0.007 A-H 0.0258 A21 seconds 31 seconds 43 seconds 209 seconds
0.0035 A-Hrs 0.0042 A-Hrs 0.0051 A-Hrs 0.0166 A-Hrs
16 seconds
0.0032 A-Hrs
Do not use Do not use Do not use Do not use
The communication transfer times indicated in the above tables do not include the
30 seconds that it takes for the camera to acquire the image. These times can be
used to determine the additional power used by the datalogger to receive the
image. The power usag
of on time for the camer
sion
)
File Tran
sion
)
24 seconds
0.0038 A-Hrs
e numbers, however, do include the additional 30 seconds
a.
33 seconds
0.0044 A-Hrs
ion
es)
(480kB Fil
160 seconds
0.0132 A-Hrs
es)
28
Page 37

Operating Manual
12.
CR10X Interface Guide
This section contains information for interfacing the CC640 camera to the
datalogger. The CC640 camera can interface to the CR10X datalogger via
I/O port directly or through an MD485 interfac
12.1 CR10X Datalogger Requirem
It is highly recommended that the datalogger be a 2Meg datalogger. The
datalogger must also contain the PakBus operating system to support the
communications and file storage capabilities.
12.2 CR10X Memory Allocation
Memory must be allocated in the CR10X for the purpose of storing files. The
or is allocated in m
mem y ultiples of 64Kbyte blocks. Memory allocated for file
storage comes out of final storage space. The files are stored in a circular buffer
g m mory). When new files are sent from the camera to the CR10X’s fina
(rin e l
e emory the oldest files will be deleted to make room for the new file.
storag m
The mem
ory can be allocated as follows:
• Enter *D16A
• 16:XX should be displayed . XX represents the number of 64 Kbyte
memory
blocks allocated for file storage.
CR10X
the CS
e.
ents
12.3 CR10X Pak
• Enter the number of blocks required followed by A. (Rec
blocks)
The number of memory
selected and the number of files required to reside in the dataloggers final storag
It is recommended to allocate between 6 to 16 memory blocks. If the compressio
level selected is none then 16 memory blocks (1024 kbytes) is recommended
Files can exceed 500Kbytes with N
blocks required will vary with the compression level
one selected as compression.
ommend 6 to 16
.
Bus Settings
PakBus communications facilitate the transfer of images from the camera to the
datalogger. Several parameters must be set on the CR10X to enable PakBus
communications with the Camera.
These parameters can be set either with a CR10KD, using Edlog \ Options \
PakBus Settings, or even with the Device Configuration Utility using Terminal
Emulator mode.
e.
n
29
Page 38

CC640 Digital Camera
12.4 CR10X *D15 Settings
12.5 CR10X Multiple Cameras
The *D15 Settings are used to set the PakBus Parameters necessary for
communications with the camera. Refer to PakBus Networking Guide for
additional information on PakBus and these settings. If values for parameters 01,
02, 03 are too small, you may not be able to connect to all network nodes.
• *D 13:00
• 15A 15:???? – PakBus Address (prefer 1) must match the destination
PakBus address of the camera setting.
• A 01:0000 –The Max number of Nodes recommend 3 or more
• A 02:0000 –The Max number of neighbours recommend 3 or
more.
• A 03:0000 –The Max number of routers recommend 3 or m ore.
• A 04:0000 – Default router recommend to leave at zero
Multiple cameras can be placed on a single CR10X datalogger. However, the
system should be configured so that image transfers to the datalogger from more
than one camera do not occur at the same time. If a collision does occur, images
will not get stored onto the datalogger. Each camera on the logger should be set to
have different PakBus addresses and CSDC addresses.
12.6 CR10X Connections
The Ext. connection is optional if the camera is set up in self-timed mode. It is
also recommended that the CS I/O cable length between the camera and the
CR10X be limited to 12 feet or less.
Refer to Figure 7 (page 13) for connections to the CR10X.
13. CR1000 Interface Guide
This section contains information for interfacing the CC640 camera to the
CR1000 datalogger. The CR1000 and the CC640 both have several different types
of communication ports. This provides many different interface options for the
user. This includes using the CS I/O port, the 9 Pin RS-232 Serial Port, the control
COM ports (1-4), and RS-485 if using an MD485 interface.
13.1 CR1000 Memory Set-up
To facilitate the storage of images a CFM100 allows the use of a compact flash
card on the CR1000. Memory can also be allocated from the CR1000’s internal
memory to create a virtual user drive “USR:” Entering a non-zero value for the
parameter “USR: drive size” allocates internal memory for the drive. The amount
of memory required will vary depending on each application. A good number to
start with is 524288 bytes (512K bytes which is 25% of the 2M bytes available on
a standard CR1000).
30
Page 39

The following methods can be used to set the drive size of the USR:
• The Device Configuration Utility program
• PakBus Graph
• Editing the parameter from the Status Table
• The CR1000’s optional keypad and display.
13.2 CR1000 Files Manager
The Files Manager setting on the CR1000 facilitates the management of JPEG
files that are received from the camera. The Files Manager allows the user to
specify a name for the files and the number of files kept in a ring memory type
fashion.
The format of the Files Manager setting is as follows:
(AAAA,DDD:NAME.EXT,NNNN)
• AAAA – Is the PakBus address of the camera
• DDD – Is the destination drive on the CR1000
USR for the user drive
CRD for the compact flash memory card
Operating Manual
• NAME – Is any name string that will be used to name the files
• EXT – The file extension of the incoming file must match. In the case of
the camera this must always be “JPG”.
• NNNN – The number of files kept in the ring memory. This number
should be low enough so that the memory required for the files is less
than what is available in the corresponding drive. However, for the
internal USR drive this would normally be between 3 and 10 images and
for CRD drive (memory card) this can be larger. When communications
are used to retrieve images, it is suggested to limit the number of files in
the ring memory to 200 in order to avoid long communication delays.
An example Files Manager setting is as follows:
(55,USR:SkySouth.JPG,3)
• Camera PakBus address is 55
• The files will be stored in the USR: director with a name
SkySouth####.JPG where #### is an incrementing number. Entering a
zero for this parameter will disable the automatic numbering and produce
a fixed file name.
• The 3 most recent files will be kept. A new incoming file will cause the
oldest to be deleted.
13.3 CR1000 CS I/O Communications
The camera can connect directly to the CS I/O port of the CR1000 to transfer
images to it. In addition to setting up the Memory (refer to
Memory
CR1000 SDC7 and SDC8 BAUD rates must be changed from the default 115200
BAUD to 57600 BAUD.
If desired, a control port on the CR1000 can be configured to pulse a control port
that is connected to the Ext. Input of the camera to initiate image acquisitions.
) and the Files Manager (refer to 0 13.2 CR1000 Files Manager) the
013.1 CR1000
31
Page 40

CC640 Digital Camera
13.4 CR1000 RS-232 Port Communications
Refer to Figure 7 Camera connections for CS I/O port (page 13) for an illustration
of the connections between the camera and the CR1000 datalogger.
The camera can be connected to the 9 pin RS-232 port of the CR1000. A Null
modem cable or adapter must be used between the camera and the CR1000. The
Null modem cable is required because both the camera and the CR1000 are DCE
type devices.
The camera can be left at its default RS-232 BAUD rate of 115200.
Camera to Datalogger RS-232 port (DCE) connection
camera connection required for interfacing to the CR1000.
(page 5) illustrates the
13.5 CR1000 COM Port (control port) Communications
On the CR1000 the control ports can be configured to function as RS-232
communication ports. Any of these 4 COM ports can be configured as PakBus
ports and used to communicate with the camera.
The COM ports can be activated as PakBus ports using the Device Configuration
utility or by using the SerialOpen instruction in the CR1000 program. The
following SerialOpen instruction configures COM port 2. (BAUD rate 115200,
PakBus Port - 4, transmit delay - 0, Buffer size - 1000.
SerialOpen (Com2,115200,4,0,1000)
To facilitate the RS-232 connection from the camera to the CR1000 terminal
block an adapter board can be used (Part number C2006). As illustrated in Figure
4 (page 10), terminal 2 is the RS-232 output from the camera and terminal 3 is the
RS-232 input to the camera. The C2006 adapter terminal block numbers
corresponds with the DB-9 pin numbers. For example pin 1 on a DB9 corresponds
with terminal #1 and pin 9 corresponds with terminal #9.
Figure 3
14. Remote Image Retrieval
Once the camera has transferred an image to a datalogger, existing
communications can be used to retrieve the image remotely from the datalogger
memory. For practical purposes it is recommended that the communication link
used for image retrieval maintain a speed of 9600 BAUD or more.
14.1 LNCMD.EXE
Loggernet (Version 3.1.3 or newer) include s t he execut a bl e LNC M D. EX E t hat
facilitates the image file retrieval from dataloggers. LNCMD.EXE is an
executable file that can be used to retrieve images from a datalogger. The file is
normally placed in the directory C:\Program Files\Campbellsci\LoggerNet. The
current command lines for the LNCMD.EXE executable are as follows:
• List_Stations
Lists the names of the stations available to call.
• List_Files <Station>
Lists the names of the files stored at a particular station.
32
Page 41

• Send_File <Station> <Filename>
Sends a particular file to a station.
• Delete_File <Station> <Filename>
Deletes a file stored in the datalogger. This is currently not supported on
the CR10X datalogger.
• Retrieve_File < Station > < Filename > <Output Filename >
This should be the only command required to collect images with the
CR10X. The files sent to the CR10X by the camera have a unique
filename by using a counter. To retrieve all images in memory simply use
the wildcard character * for the JPG files:
• Retrieve_File <Station> *.JPG
This will retrieve files that match the DOS type name entered.
Other options for Retrieve_File include Force and NoDateCheck
• Force: Will collect a file even if a file with the same name and date have
already been collected.
• NoDateCheck: Will collect a file with the same name only if the date is
different.
14.2 Using Loggernet File Control
Operating Manual
Images that are in the dataloggers memory can be viewed or collected on demand
by using the File Control feature that is available under the Tools menu of the
connect screen. Using the file control can also be useful for debugging purposes.
In the case of the CR10XPB datalogger only the CPU device exists where files
can be stored. In dataloggers such as the CR1000 Devices can include the CPU,
USR and the CRD (compact flash module). The devices show up in the left hand
side of the File Control panel. To view files of a certain device simply click on the
desired device listed in the panel.
33
Page 42

CC640 Digital Camera
14.3 Task Set-up / LNCMD.EXE
Automated image collection can be achieved by setting up a Task in Loggernet
that executes the LNCMD.EXE executable.
A sample screen of a Task set-up that executes LNCMD.EXE is shown in Figure
11 Task Set-up (below). In this example the station CR10XPB is a station that is
set-up in Loggernet. The Add Scheduled button can be used to create a task with a
programmable schedule. The task shown has the following functionality:
• Task schedule begins at 12:15 and collects images twice an hour at 15
minutes past and 45 minutes past, or every 30 minutes.
• Retrieves images from the station CR10XPB and stores them in the
directory C:\Temp_pics
• All files in the CR10X with the extension JPG will be collected.
LNCMD.exe will not collect previously collected files unless the Force
option is used in the command line.
34
Page 43

Operating Manual
Figure 11 Task Set-up
35
Page 44

CC640 Digital Camera
In the above example the task will execute on its own schedule separate from data
collection. A task can also be created that calls the LNCMD.EXE after scheduled
data is collected. This may be more desirable for stations that are called using a
dial up connection to eliminate separate dialling for data and images.
To set-up a task that executes after data is collected the desired station would be
selected and the Add After option would be selected in the Task Master set-up
screen. A pull down menu allows various stations event types to be selected. In
this case After Any Sched Call is selected.
Note: In the station set-up the parameter Delay Before Hangup should be Nonzero to allow the task to operate.
Figure 12 Task using Add After to collect images after scheduled call
Note that it is necessary to specify the directory in which the files are located for
the CR1000. In our example the USR: drive is selected. Another option is the
CRD: drive if the compact flash module is used with the CR1000.
36
Page 45

15. Installation
15.1 Enclosures
15.2 Mounting Holes
Operating Manual
The camera must be installed in an environmentally sealed enclosure that offers
protection from moisture or high humidity. It is also recommended that desiccant
be installed in the camera enclosure to absorb excess humidity. Failure to install or
replace the desiccant as required may cause malfunctions or damage the camera.
Refer to Appendix A for recommended encl osu res.
For flexibility, the camera is equipped with 2 different sets of mounting holes
(Figure 13). There are three ¼-20 threaded mounting holes along the centre of the
camera that are spaced 2.0” (50.8mm ) apart. The setscrew s need to be rem oved
with a 1/8” hex Allen key to use the ¼-20 threaded mounting holes. At least two
of the ¼-20 threaded holes are required for mounting the camera. The camera is
also equipped with four #4-40 threaded mounting holes that are spaced 1.5” x 5.0”
(38 mm x 127 mm) apart.
Important: The fasteners used for mounting must be 0.375 inches (9.5 mm) or
shorter. Using longer fasteners can cause damage to the camera by protruding too
far into the camera and damaging the circuit boards. It is recommended to use
only the fasteners provided with the camera.
Figure 13 Mounting Holes
37
Page 46

Page 47

Appendix A. Camera Enclosures
1. ENC 16/18-CC
The ENC16/18-CC enclosure provides a means of housing the camera along with
other equipment such as a datalogger and modem. The ENC 16/18-CC enclosure
uses the same fibreglass enclosure and mounts as the standard ENC 16/18
enclosure. The ENC 16/18-CC includes the following additional items to
facilitate the camera:
• A 100mm x 100mm window (4”x4”) is placed on the latch side of the
enclosure
• A mounting plate and grommets are included for mounting the camera on
the back-plate.
• The external sun-shroud reduces glare from the sun as well as provides
protection from rain and snow.
Using the ENC 16/18-CC enclosure eliminates the need for the external wiring
required if a separate housing is used for the camera.
Figure A-1 Enc 16/19 Mounting
A-1
Page 48

CC640 Digital Camera
Figure A-1a Enc 16/18 Mounting
A-2
Page 49

2. CC4718 Enclosure
The CC4718 Enclosure is an outdoor enclosure that can be used to house the
CC640 camera.
The FIN6COND cable would normally be used to carry power from the supply to
the camera. This cable also supplies enough conductors to use RS-485 or RS-232
communications to send images to a datalogger using PakBus. If RS-232
communications are required, then the C2006 adapter board is required.
Campbell Scientific supplies a knockout seal, which can be used to plug the
unused entry port.
Appendix A. Camera Enclosures
Figure A-2 CC4718 Enclosure with mounting location of optional Serial Interface Board (C2006)
A-3
Page 50

CC640 Digital Camera
Figure A-3 Camera on CC4718 Mounting Plate
A-4
Figure A-4 CC4718 Bottom View
Page 51

Appendix A. Camera Enclosures
Figure A-5 Vertical Pipe Mount
Figure A-6 Horizontal Pipe Mount
A-5
Page 52

Page 53

Appendix B. Quick Set-up and Test
Procedure CC640 in Standalone Mode
PURPOSE: The steps below are designed to help first time users operate the
CC640 camera. The procedures are useful to do a quick check on the camera’s
operation and familiarize the user with focusing. These procedures are intended
for use only as an initial check of the CC640’s operation. It is recommended to
read the CC640 manual prior to deployment in the field.
STEP 1: Remove the CC640 and accessories from its packaging. Ensure the lens
is free from any dust and clean the lens using the cloths provided if necessary.
ACCESSORIES
Item Part Number
RS-232 interface ribbon cable, 10 pin female header to DB9 female C1946
CS I/O interface ribbon cable, 10 pin female header to DB9 male C1947
Finished 6 conductor cable, approximately 60cm (2 Feet) long Fin6Cond
Precision slotted screw driver 2.5mm (3/32”) wide L8125
Screws – ¼-20x3/8” Philips Pan Qty 3 C2002
Screws – 4-40x3/8” Philips Pan Qty 4 L467
Lens wipes N/A
B-1
Page 54

CC640 Digital Camera
STEP 2: Using the screwdriver and cable that is provided with the camera,
connect a 12VDC power source to the CC640 using the diagram below:
RS232 v ia c ontrol p orts
CC640
Compact Flash
Exte rnal I/O
Video-Out
Gnd
+12VDC
Ext.
RS-485
Shield
CS I/O RS-232
B
A
Auto On
Power
Snap
Setu p
Black
Red
Clear
12 VDC battery
• Connect the Gnd terminal of the camera to the “-“ of your supply using
the black wire.
• Connect the Shield terminal of the camera to an earth ground of your
supply using the clear wire. If you do not have a separate earth ground on
your supply, connect the clear shield to the “-“ negative of the power
supply as well.
• Connect the +12VDC terminal from the camera to the “+“ of your supply
using the red wire.
STEP 3: Your camera will begin to flash the LED and enter an image acquisition
sequence upon applying power to the camera. If the camera has been previously
configured, following the instructions in Section 8, Device Configuration Utility,
can reset factory default settings.
STEP 4: Connect your TV or video monitor to the video-out port on the back of
the CC640 and turn it on.
STEP 5: Move the toggle switch on the back of the CC640 to the ‘On’ position.
Observe that the LED flashes 4 times. This is a normal power on sequence.
STEP 6: Press the ‘Setup’ button for 1 second. An image of what the CC640 is
pointed at should appear on the TV or video monitor.
STEP 7: If desired you may focus the CC640 by moving the adjustment screws.
The setscrews that keep focus adjustments in place may need to be loosened prior
to focusing. It is recommended to adjust the zoom first and then the focus.
STEP 8: Once you have the image in focus, tighten the setscrews finger-tight.
When mounting the CC640 in the field, you will need to repeat this procedure to
ensure you have a clear image.
B-2
Page 55

Appendix B. Quick Set-up and Test Procedure
STEP 9: Press the ‘Setup’ button again and observe that the video output turns
off. Pressing the setup button toggles the video output on and off. Ensure that the
video output is off for the next step.
STEP 10: Press the ‘Snap’ button. The LED will flash twice and the video output
will momentarily turn on and then off. You have just initiated an image
acquisition by using the manual Snap button.
NOTE
Refer to the CC640 manual for operation with a compact flash
memory card. If a properly formatted memory card is inserted in
your camera, pressing the Snap button will store the images to the
memory card.
STEP 11: You may now toggle the power switch to the Auto position. You can
disconnect your power supply at this point or you may refer to the manual and
follow the procedures to configure the camera for your necessary application.
B-3
Page 56

Page 57

Page 58

CAMPBELL SCIENTIFIC COMPANIES
Campbell Scientific, Inc. (CSI)
815 West 1800 North
Logan, Utah 84321
UNITED STATES
www.campbellsci.com
info@campbellsci.com
Campbell Scientific Africa Pty. Ltd. (CSAf)
PO Box 2450
Somerset West 7129
SOUTH AFRICA
www.csafrica.co.za
sales@csafrica.co.za
Campbell Scientific Australia Pty. Ltd. (CSA)
PO Box 444
Thuringowa Central
QLD 4812 AUSTRALIA
www.campbellsci.com.au
info@campbellsci.com.au
Campbell Scientific do Brazil Ltda. (CSB)
Rua Luisa Crapsi Orsi, 15 Butantã
CEP: 005543-000 São Paulo SP BRAZIL
www.campbellsci.com.br
suporte@campbellsci.com.br
Campbell Scientific Canada Corp. (CSC)
11564 - 149th Street NW
Edmonton, Alberta T5M 1W7
CANADA
www.campbellsci.ca
dataloggers@campbellsci.ca
Campbell Scientific Ltd. (CSL)
Campbell Park
80 Hathern Road
Shepshed, Loughborough LE12 9GX
UNITED KINGDOM
www.campbellsci.co.uk
sales@campbellsci.co.uk
Campbell Scientific Ltd. (France)
Miniparc du Verger - Bat. H
1, rue de Terre Neuve - Les Ulis
91967 COURTABOEUF CEDEX
FRANCE
www.campbellsci.fr
campbell.scientific@wanadoo.fr
Campbell Scientific Spain, S. L.
Psg. Font 14, local 8
08013 Barcelona
SPAIN
www.campbellsci.es
info@campbellsci.es
Campbell Scientific Ltd. (Germany)
Fahrenheitstrasse1, D-28359 Bremen
GERMANY
www.campbellsci.de
info@campbellsci.de
Please visit www.campbellsci.com to obtain contact information for your local US or International representative.
 Loading...