

Page 1
Airless Paint
Systems
Please read and save these instructions. Read carefully before attempting to assemble, install, operate or maintain the product described.
Protect yourself and others by observing all safety information. Failure to comply with instructions could result in personal injury and/or
property damage! Retain instructions for future reference.
Operating Instructions and Parts Manual
IN422500AV 12/02
Thank you for purchasing a Campbell Hausfeld product. If you have any technical
questions about this product, please call 1-800-626-4401.
For Parts and Accessories: 1-800-626-4401
AL2810
For parts, product & service information
visit www.chpower.com
© 2002 Campbell Hausfeld/Scott Fetzer
REMINDER: Keep your dated proof of purchase for warranty purposes! Attach it to this manual or file it for safekeeping.
BUILT TO LAST
Page 2
2
Operating Instructions and Parts Manual
Airless Paint Systems
Description
Airless paint sprayers are capable of
spraying a wide variety of latex, oilbased, and alkyd paints, as well as
stains, preservatives and other nonabrasive finishes.
These sprayers are also powerful and
versatile enough to be used with a
variety of options (roller attachment,
extra lengths of hose, etc.) to make it
an even more efficient tool.
NOTE: Guns pictured in illustrations
may be different than the one included
with your unit.
Safety Guidelines
This manual contains information that
is very important to know and
understand. This information is
provided for SAFETY and to PREVENT
EQUIPMENT PROBLEMS. To help
recognize this information, observe the
following symbols.
Danger indicates
an imminently
hazardous situation which, if not
avoided, WILL result in death or serious
injury.
Warning indicates
a potentially
hazardous situation which, if not
avoided, COULD result in death or
serious injury.
Caution indicates a
potentially
hazardous situation which, if not
avoided, MAY result in minor or
moderate injury.
Notice indicates
important
information, that if not followed, MAY
cause damage to equipment.
Unpacking
After unpacking the unit, inspect
carefully for any damage that may
have occurred during transit. Make
sure to tighten fittings, bolts, etc.,
before putting unit into service.
Do not operate
unit if damaged
during shipping, handling or use.
Damage may result in bursting and
cause injury or property damage.
General Safety
Information
1. Read all manuals included with this
product carefully. Be thoroughly
familiar with the controls and the
proper use of the equipment.
2. Always wear a mask or respirator
and eye protection when painting.
Be certain mask or respirator will
provide necessary protection
against inhalation of harmful
vapors.
3. Keep visitors away and NEVER allow
children or pets in the work area.
www.chpower.com
Table of Contents
Description . . . . . . . . . . . . . . . . . . . . . . . . . . . . . . . . . . . . .2
Specifications . . . . . . . . . . . . . . . . . . . . . . . . . . . . . . . . . . .2
Safety Guidelines . . . . . . . . . . . . . . . . . . . . . . . . . . . . . . . .2
General Safety Information . . . . . . . . . . . . . . . . . . . . . . .2
Pre-Operation . . . . . . . . . . . . . . . . . . . . . . . . . . . . . . . . . .4
Flushing . . . . . . . . . . . . . . . . . . . . . . . . . . . . . . . . . . . . .4
How to Flush . . . . . . . . . . . . . . . . . . . . . . . . . . . . . . . . .4
Setting Up . . . . . . . . . . . . . . . . . . . . . . . . . . . . . . . . . . .5
Spray Tip Selection . . . . . . . . . . . . . . . . . . . . . . . . . . . .5
Operation . . . . . . . . . . . . . . . . . . . . . . . . . . . . . . . . . . . . . .7
Starting Up . . . . . . . . . . . . . . . . . . . . . . . . . . . . . . . . . .7
Spray Technique . . . . . . . . . . . . . . . . . . . . . . . . . . . . . .8
Electrical System . . . . . . . . . . . . . . . . . . . . . . . . . . . . . . . .8
Replacement of Electrical Control Board . . . . . . . . . .8
Pressure Calibration on Electrical Board . . . . . . . . . . .9
Service . . . . . . . . . . . . . . . . . . . . . . . . . . . . . . . . . . . . . . .10
Fluid Pump . . . . . . . . . . . . . . . . . . . . . . . . . . . . . . . . .10
Inlet Valve . . . . . . . . . . . . . . . . . . . . . . . . . . . . . . . . . .11
Outlet Valve . . . . . . . . . . . . . . . . . . . . . . . . . . . . . . . .11
Clutch Replacement . . . . . . . . . . . . . . . . . . . . . . . . . .11
Maintenance . . . . . . . . . . . . . . . . . . . . . . . . . . . . . . . . . .12
Regular Maintenance . . . . . . . . . . . . . . . . . . . . . . . . .12
Oil and Lubrication Procedure . . . . . . . . . . . . . . . . .13
V-Packing Replacement . . . . . . . . . . . . . . . . . . . . . . .13
Troubleshooting Charts . . . . . . . . . . . . . . . . . . . . . . . . .14
Parts Diagrams and Parts Lists . . . . . . . . . . . . . . . . . . . .18
Warranty . . . . . . . . . . . . . . . . . . . . . . . . . . . . . . . . . . . . .32
Specifications
Max. Pressure . . . . . . . . . . . . . 3000 psi
Output. . . . . . . . . . . . . . . . . . . 1.5 GPM
Tip size . . . . . . . . . . . 1 gun up to 0.041
2 guns up to 0.028
Engine . . . . . . . . . . . . . . . 5.5HP Honda
Weight . . . . . . . . . . . . . . . . . . . 160 lbs.
AL2810
!
DANGER
!
WARNING
!
CAUTION
NOTICE
!
WARNING
Page 3
Airless Paint Systems
3
Operating Instructions and Parts Manual
General Safety
Information
(Cont.)
4. Do not smoke or eat when spraying
paint, insecticides, or other
flammable substances.
5. Always work in a clean
environment. To avoid injury and
damage to the workpiece, do not
aim the spray gun at any dust or
debris.
6. When spraying and cleaning,
always follow the instructions and
safety precautions provided by the
material manufacturer (Refer to
MSDS).
GASOLINE ENGINE PRECAUTIONS:
● Locate unit 25 feet away from
spray area in well-ventilated area.
● NEVER operate in closed building
unless exhaust is piped outside.
● NEVER allow hose to lay against
engine mufflers or hot parts.
● NEVER refill fuel tank while engine
is hot or running.
SKIN INJECTION HAZARD:
● High pressure spray
can inject toxins
into blood stream.
If injection occurs,
seek emergency medical treatment.
Use a face mask/respirator
and protective clothing
when spraying. Always
spray in a well ventilated
area to prevent health and fire
hazards. Refer to Material Safety Data
Sheets (MSDS) of spray material for
details.
● Never try to stop leaks with any
part of your body.
● This system is capable of producing
3000 psi. Use only Campbell
Hausfeld replacement parts rated
at 3000 psi or higher.
● Never spray without tip guard.
● Ensure trigger lock is functioning
properly.
● Always engage trigger lock when
not spraying.
● Do not remove spray tip while
cleaning pump.
● Never leave equipment pressurized
while unattended.
● Do not clean spray tip while it is
attached to the spray gun. Remove
spray tip from gun to clean tip
guard.
● Ensure tightness of high pressure
connections.
● Do not use pliers to tighten or
loosen high pressure connections.
● Motor is equipped with an automatic
thermal overload. Motor will restart
without warning, after cooling.
Never aim or
spray at yourself
or anyone else or serious injury could
occur.
FIRE OR EXPLOSION HAZARD:
● Do not use solvents with flash
points less than 70°F (21°C) to clean
this equipment (examples of
acceptable cleaning solvents are
water, mineral spirits, lacquer
thinner, Xylene and high flash
napha. A partial example list of
unacceptable cleaning solvents are
low flash napha, mek, acetone,
alcohol and toluene).
Do not spray flammable
materials in vicinity of
open flame or near
ignition sources. Motors, electrical
equipment and controls can cause
electrical arcs that will ignite a
flammable gas or vapor. Never store
flammable liquids or gases in the
vicinity of the unit.
Do not spray acids,
corrosive materials,
toxic chemicals, fertilizers or pesticides.
Using these materials could result in
death or serious injury.
www.chpower.com
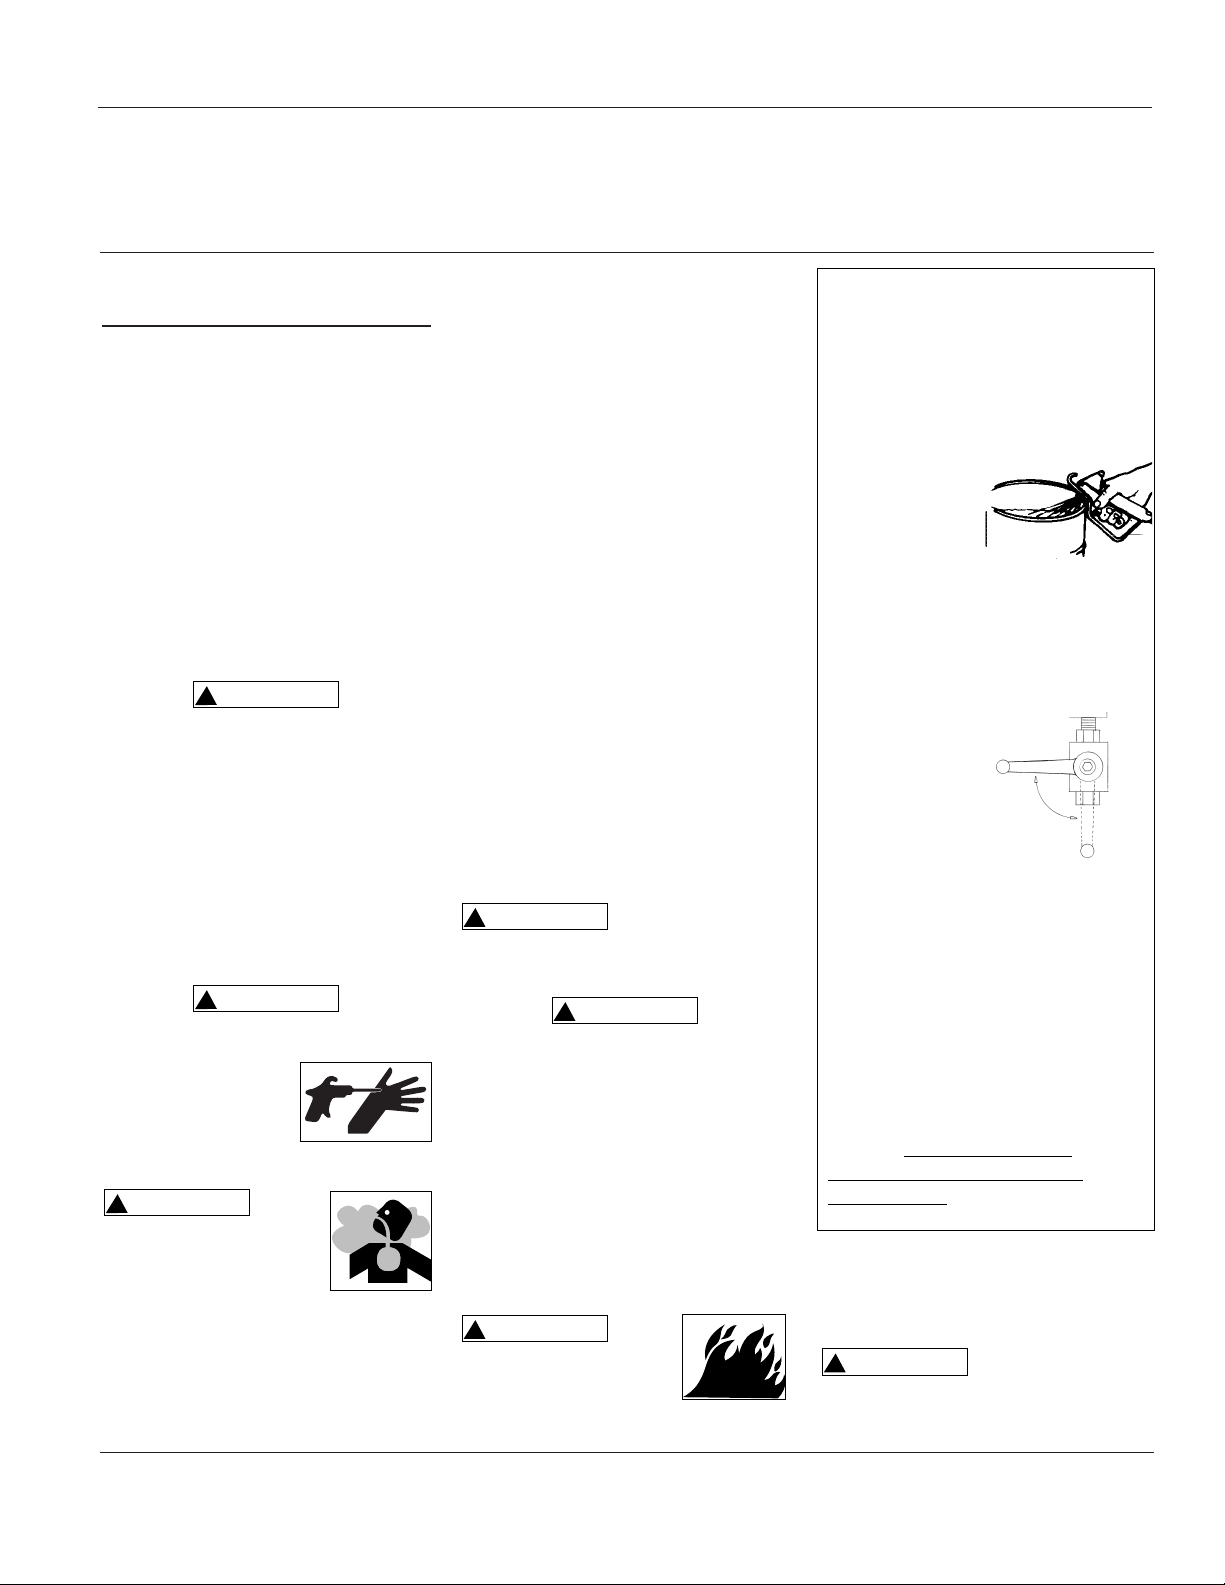
PRESSURE RELIEF PROCEDURE
Before servicing or resting unit,
relieve pressure from system by
following this procedure:
1. Engage gun trigger lock.
2. Turn off engine.
3. Disengage
gun trigger
lock and
trigger gun
to relieve
residual fluid
pressure. Hold metal part of gun
in contact with grounded metal
pail.
4. Re-engage gun trigger lock.
5. Turn
Prime/Pressure
Relief Valve to
open (priming)
position to
relieve fluid
pressure.
6. Leave
Prime/Pressure
Relief Valve OPEN until you are
ready to spray again.
NOTE: If spray tip or hose is clogged,
follow Step 1 to 5 above. Expect
paint splashing into the pail while
relieving pressure during Step 5. If
you suspect that pressure has not
been relieved after following the
above procedure, engage gun trigger
lock and take your unit to an
authorized Campbell Hausfeld
Service Center
.
AL2810
OPEN POSITION
!
WARNING
!
WARNING
!
WARNING
!
WARNING
!
!
WARNING
WARNING
!
WARNING
Page 4
4
Operating Instructions and Parts Manual
Airless Paint Systems
General Safety
Information
(Cont.)
● Paints and solvents containing
HALOGENATED HYDROCARBONS can
react explosively with aluminum. Do
not use halogenated hydrocarbons
with this equipment. Consult the
paint or solvent product label or
Material Safety Data Sheets (MSDS)
to help determine if it contains
halogenated hydrocarbons.
● Do not use fuels to clean this
equipment.
● Keep spraying area well ventilated.
Keep doors and windows open.
● Remove all ignition sources (i.e.
Static electricity, pilot lights,
cigarettes and electrical arcing).
● Airless spraying can cause static
electricity. Always ground the
pump and spraying surface.
● Do not use solvents containing
halogenated hydrocarbons.
Keep hose away
from sharp objects.
Bursting hoses may cause injury.
Examine hoses regularly and replace if
damaged.
● Check hoses for weak or worn
condition before each use, making
certain that all connections are
secure.
Pre-Operation
FLUSHING
1. NEW SPRAYER:
Your sprayer was
factory tested in an oil solution which
was left in the pump. Before using oilbased paint, flush with mineral spirits
only.Before using water-based paint
flush with mineral spirits, followed by
soapy water, then a clean water flush.
2. CHANGING COLORS:
Flush with a
compatible solvent such as mineral
spirits or water.
www.chpower.com
3. CHANGING FROM WATER-BASED TO
OIL-BASED PAINT: Flush with soapy
water, then mineral spirits.
4. CHANGING FROM OIL-BASED TO
WATER-BASED PAINT: Flush with
mineral spirits, followed by soapy
water, then a clean water flush.
5. STORAGE:
Always relieve pressure
(See pressure relief procedure on
page 3) prior to storage or when
machine is unattended. Follow the
storage procedure based on the kind of
paint you used:
● Oil-based paint: Flush with mineral
spirits.
● Water-based paint: Flush with
water, then mineral spirits. Leave
the pump, hose and gun filled with
mineral spirits.
● For longer term storage use a 50/50
mixture of mineral spirits and motor
oil. Always ensure that there is no
pressure in the unit, and close the
prime/pressure relief valve for
storage.
Never leave pump
unattended while it
is under pressure!
6. START UP AFTER STORAGE: Before
using water-base paint, flush with
soapy water and then a clean water
flush. Before using oil-based paint,
flush out the mineral spirits with
the material to be sprayed.
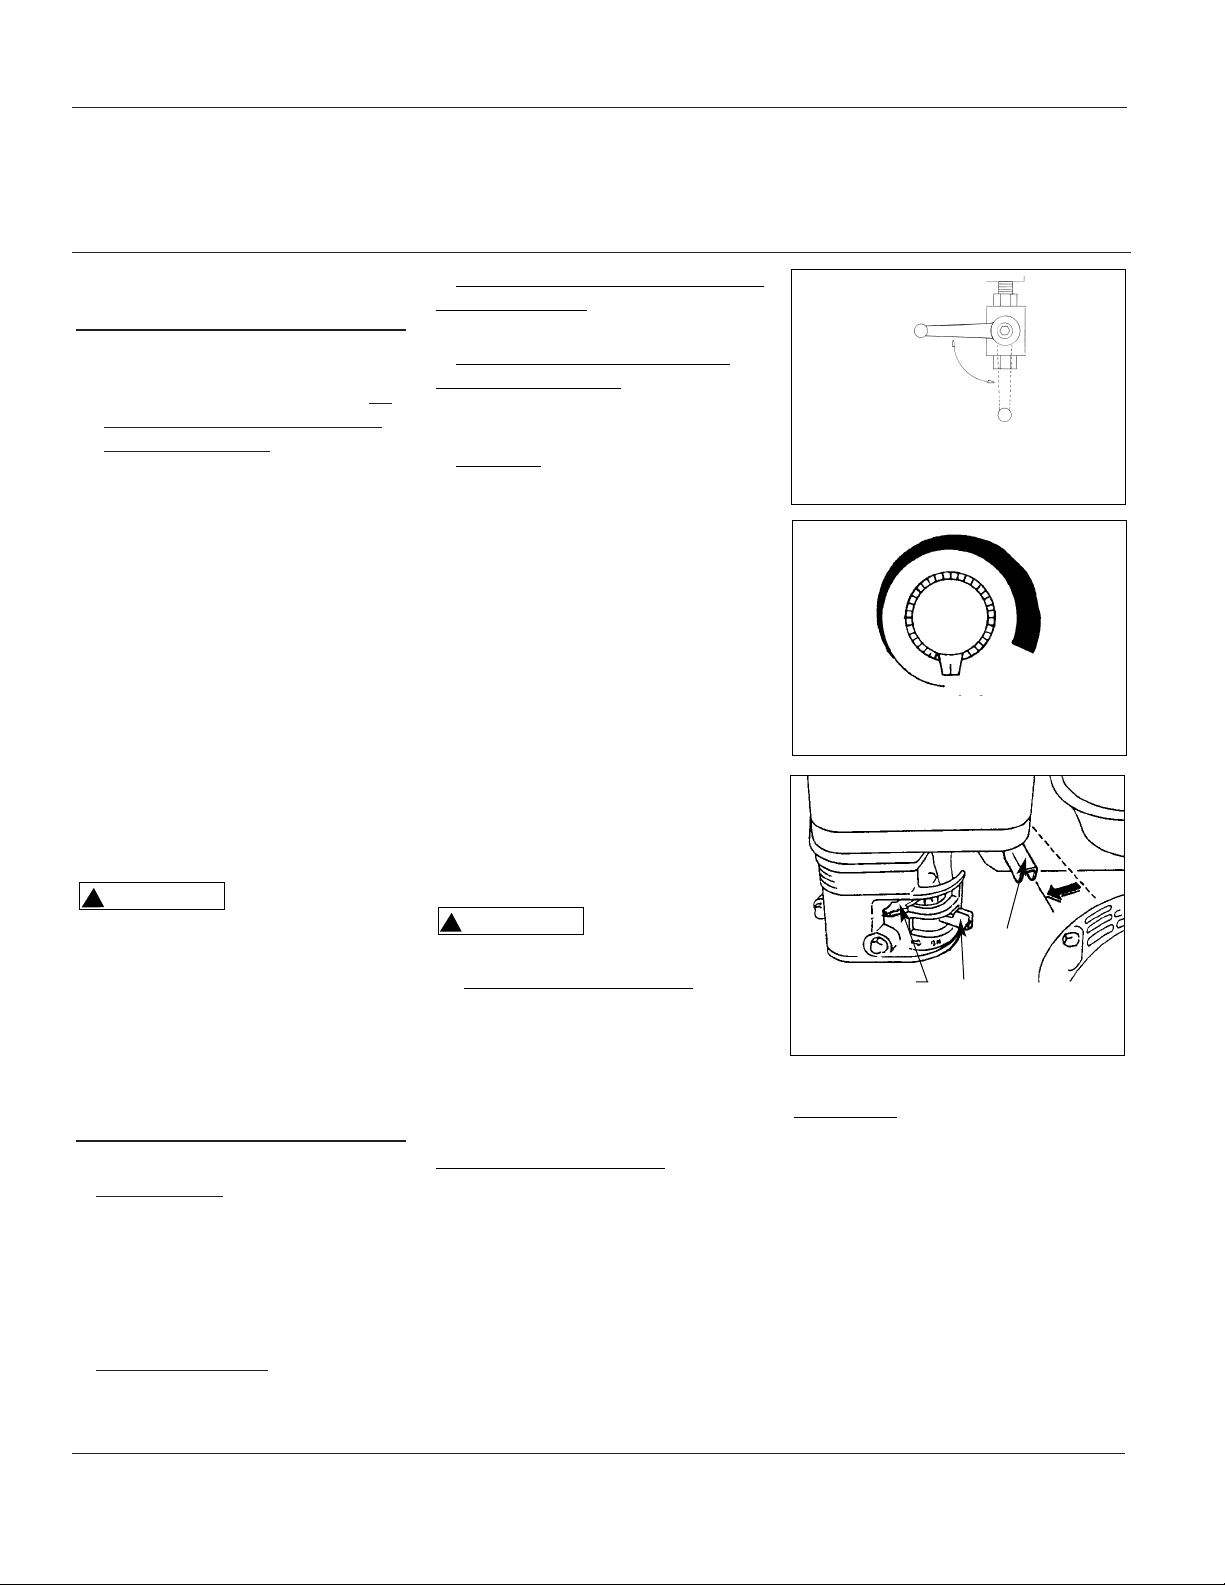
HOW TO FLUSH
IMPORTANT COMPONENTS
● Prime/Pressure Relief Valve
(Prime/PR Valve, Figure 1). Used to
relieve pressure from gun, hose and
tip and to prime the unit when in
OPEN position.
● Pressure Control Knob (Figure 2).
Used to adjust pressure. Turn
clockwise to increase pressure and
counterclockwise to decrease it.
● Choke Lever, Fuel Valve, and
Throttle Lever (Figure 3).
PROCEDURE
1. Be sure the gun safety lock is
engaged and there is no spray tip
in the gun.
2. Pour enough clean, compatible
solvent into a large,
empty metal pail to fill the pump
and hoses.
3. Place the suction tube into the pail
or place the pail under the pump.
4. Turn the pressure control knob to
low pressure. Refer to Fig. 2.
AL2810
OPEN POSITION
(Prime and Pressure Relief)
CLOSED
POSITION
(Pressure)
Figure 1 - Prime/Pressure Relief Valve
Figure 2 - Pressure Control Knob
Low Pressure
High
Pressure
Figure 3 - Choke Lever, Fuel Valve,
and Throttle Lever
Choke Lever
Fuel Valve
Throttle
Lever
!
CAUTION
!
WARNING
Page 5
Airless Paint Systems
5
Operating Instructions and Parts Manual
Pre-Operation (Cont.)
5. Open the prime valve to the open "Priming Position". This will allow
for an easy start. Refer to Figure 1
on page 4.
6. Turn the engine ON/OFF switch to
ON.
7. Move the choke toward the closed
position as per Figure 3.
8. Move the throttle lever slightly to
the left as per Figure 3.
9. Turn the fuel valve ON as per Figure
3. Pull the start rope. Pull the
engine over against compression
stroke and then let the rope rewind
slowly into the starter. Pull firmly
and rapidly to start the engine. Do
NOT drop the rope. Hold onto the
handle while rewinding, or the
rope may rewind improperly and
jam the assembly. If the engine
does not start, open the choke a
little more. If the engine floods,
open the choke all the way and
continue cranking.
10. After the engine is warm, gradually
close the choke lever, increase the
RPM of engine slightly by moving
throttle to the left. Close the prime
valve. Refer to Figure 1.
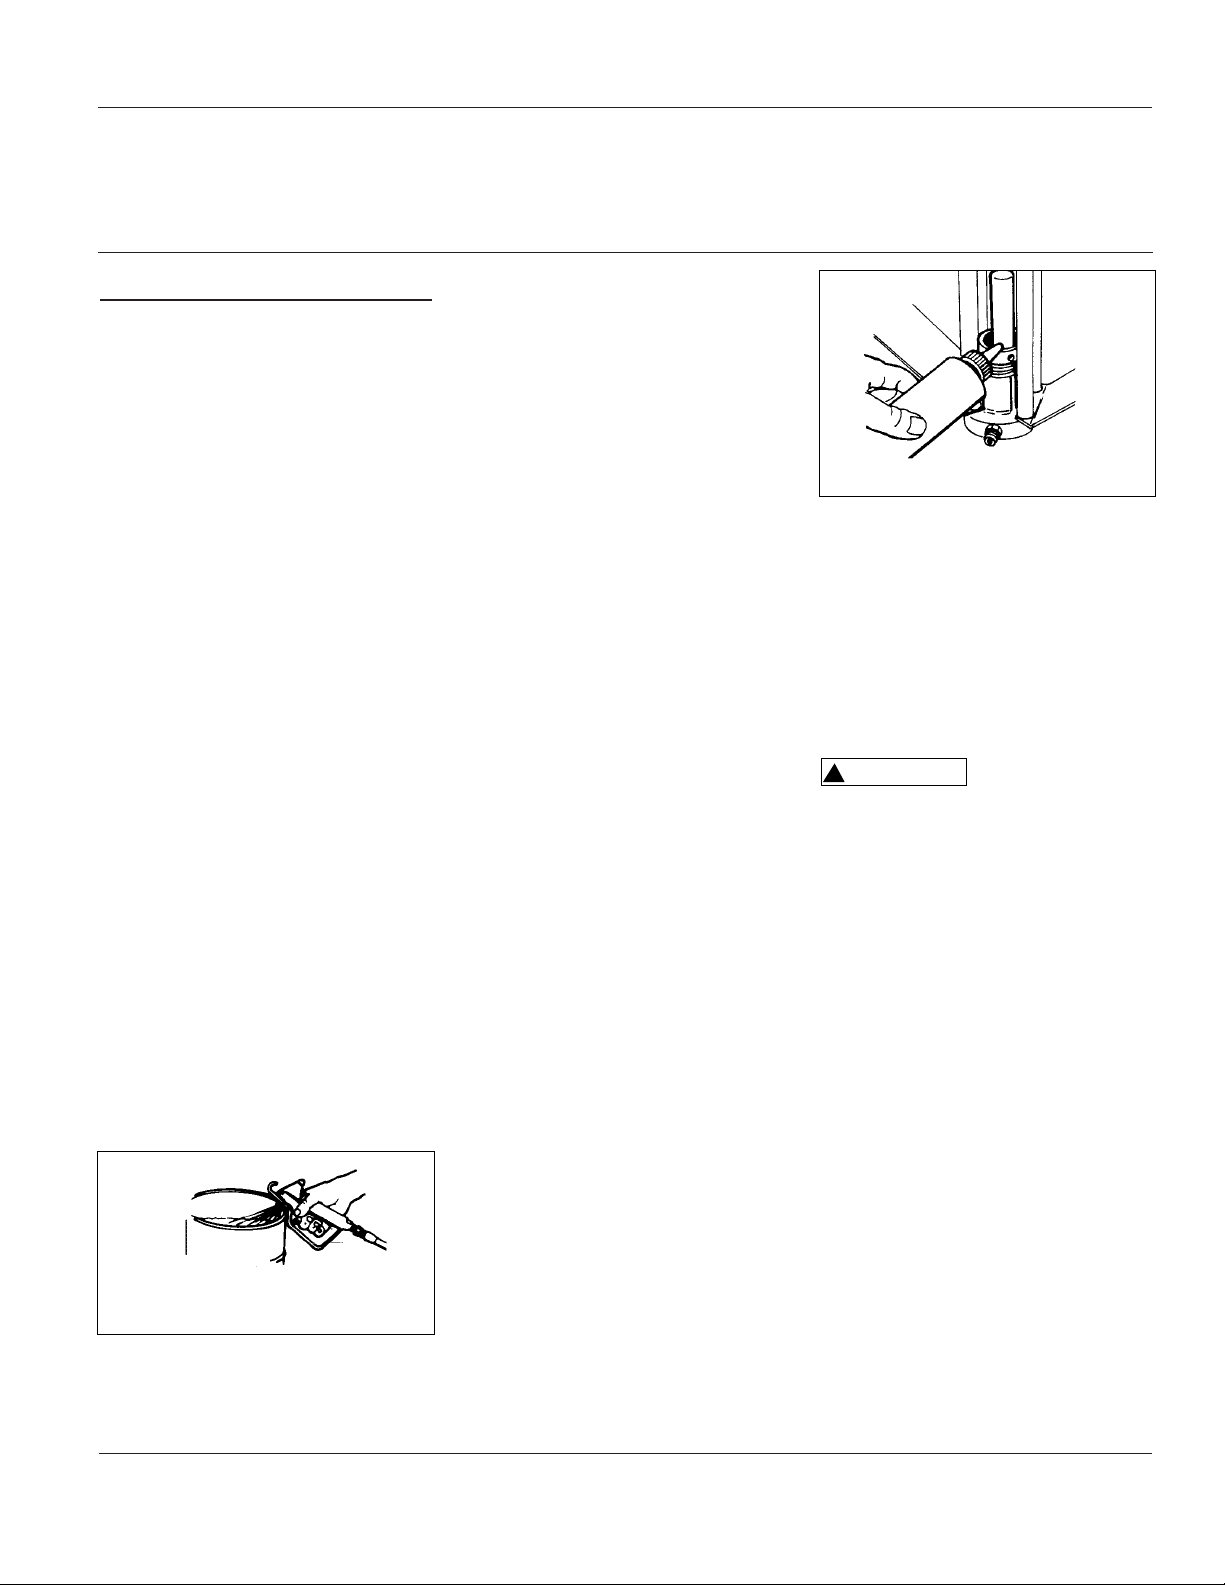
11. Point the gun into the metal pail
and hold a metal part of the gun
firmly against the pail Refer to
Figure 4.
12. Disengage the gun trigger lock and
squeeze the gun trigger. At the
same time, slowly turn the pressure
control knob clockwise just enough
www.chpower.com
to move liquid at low pressure.
13. Allow the pump to operate until
clean solvent comes from the gun.
14. Release the trigger and engage the
gun trigger lock.
15. If you are going to start spraying,
place the pump or suction tube into
the supply container. Release the
gun safety latch and trigger the
gun into another empty, metal
container, holding a metal part of
the gun firmly against the metal
pail (Figure 4) and force the solvent
from the pump and hose. When
paint starts coming from gun, turn
pressure control knob to minimum
pressure, place prime valve in prime
(open) position and engage the
gun trigger lock.
16. If you are going to store the
sprayer, remove the suction tube or
pump from the solvent pail force
the solvent from the pump and
hose. Engage the gun safety
latch and refer to the "Storage"
Procedure on page 4, Step 5.
17. Whenever you shut off the sprayer
follow the Pressure Relief
Procedure warning on page 3.
SETTING UP
1. Connect the hose and gun.
a. Remove the plastic cap plug from
the outlet and screw a conductive or
grounded 3000 psi spray hose onto
fluid outlet.
b. Connect an airless spray gun to the
other end of the hose, but do not
install the spray tip yet!
NOTE: Do not use thread sealer on
swivel unions as they are made to self
seal.
NOTE: The first 50' of hose should
always be 3/8".
2. Fill the Packing Nut/Wet Cup 1/3 full
with Throat Seal Oil (TSO) supplied.
See Figure 5.
3. Check the engine oil level.
a. Unscrew the oil fill plug. The
dipstick is attached to the plug.
b. Without threading the plug into
place, check to be sure the oil is up
to the top mark on the dipstick.
c. If oil is needed, refer to engine
manual.
4. Fill the fuel tank.
Fuel spilled on a hot
surface can cause a
fire or explosion and cause serious
bodily injury and property damage.
Always shut off engine and let it cool
before filling the tank, and carefully
follow steps a to c below, making sure
you do not spill any fuel.
a. Close the fuel shutoff valve.
b. Use only clean, fresh, wellknown brands of unleaded regular
grade gasoline.
c. Remove the fuel cap and fill
tank. Be sure the air vent in the fill
cap is not plugged so fuel can flow
to the carburetor, then replace the
cap.
SPRAY TIP SELECTION
See Tip Selection Chart on Page 6.
Spray tip selection is based on paint
viscosity, paint type, and job needs. For
light viscosity (thin paints), use a
smaller tip. For heavier viscosities
(thicker paints), use a larger tip size.
Spray tip size is based on how many
gallons of paint per minute can be
sprayed through the tip. Do not use a
tip larger than the maximum pump
AL2810
Figure 4 - Spray Gun Against Metal
Container
Figure 5 - Applying throat seal oil
!
WARNING
Page 6

6
Operating Instructions and Parts Manual
Airless Paint Systems
www.chpower.com
Pre-Operation (Cont.)
flow rate or capacity the sprayer can
accommodate. Pump flow rate is
measured in gallons per minute (GPM).
PATTERN WIDTH
Thickness of the paint coat is
determined by spray tip “fan width,”
rate of the spray gun movement, and
distance to surface.
SPRAY TIP SELECTION
Two tips having the same tip size, but
different pattern widths, will deliver
the same amount of paint over a
different area (wider or narrower
strip).
A spray tip with a narrow pattern
width makes it easy to spray in tight
places.
SPRAY TIP REPLACEMENT
During use, especially with latex paint,
high pressure will cause the orifice to
grow larger. This destroys the pattern.
Replace tips before they become
excessively worn. Worn tips waste
paint, cause overspray, make cutting-in
difficult, and decrease sprayer
performance.
Table 1 - Tip Selection Chart
AL2810
16-18 406-457
St
l
QuadraflowTM Tip
Fan Width (in.) (mm)
4-6 102-152
6-8 152-203
8-10 203-254
10-12 254-305
12-14 305-356
14-16 356-406
Gun Filter 2 types (part #)
Wood Interior
Wood Exterior
Masonry
Ceiling Hi Build, Mil White
ructural Stee
for painting
(12" from surface)
Lacquer, Varnish
Stain, Sealer
Enamel
Exterior Stain
Vinyl, Acrylic, Latex
Vinyl, Oil Base Alkyd
Latex, Acrylic
Block Filler
Elastomer
Heavy Coatings
Tip Selection Chart
Orifice Size (inches)
.009 .011 .013 .015 .017 .019 .021 .023 .025 .027 .035
AL3116 AL3117 AL3119 AL3122 AL3125
AL2211 AL2213 AL3126 AL3131
AL3118 AL3120 AL2215 AL2217 AL3130 AL3132 AL3135 AL3137
AL3121 AL3124 AL3127 AL2219 AL2221 AL3136 AL3138
AL3134
l---------AL086101AJ------l l--------------AL086100AJ---------------l
REMOVE FILTER
.029
.031
AL3139
AL3140
Water Flow Rate (gpm)
(water @ 2000psi,
138
bar)
Paint Flow Rate (gpm)
(latex paint @ 2000psi, 138
bar/1.36 spec. gr.)
Pump Minimum
Output*
*pump will support tip worn to next larger size.
.12 .18 .24 .31 .38 .47 .57 .67 .77
(lpm)
.49 .69 .91 1.17 1.47 1.79 2.15 2.54 2.96
.10 .15 .21 .27 .33 .40 .49 .58 .66
(lpm)
(gpm)
(lpm)
.38 .57 .79 1.02 1.25 1.51 1.85 2.20 2.50
.25 .25 .33 .40 .50 .60 .75 .88 1.00
1.00 1.00 1.25 1.50 1.90 2.30 2.80 3.30 3.80
Consult your paint manufacturer for application recommendation
1.03
3.90
.88
3.33
1.25
4.70
1.31
4.98
1.12
4.24
1.50
5.70
Page 7

7
Airless Paint Systems
Operating Instructions and Parts Manual
www.chpower.com
Operation
STARTING UP
1. Learn the functions of the controls
(see “How to Spray / Important
Components” for more
information).
2. Prepare the Material
a. Prepare the material according
to material manufacturer's
recommendations.
b. Place the pump or suction tube
into the material container.
3. Start the sprayer.
a. Prime/PR Valve must be open in
the priming position.
b. Pressure Control Knob must be
in low pressure position.
c. Follow procedure under “How
to Flush,” page 5, Steps 6 to 12.
To stop the unit in
an emergency or
before performing any service or
maintenance procedure follow the
Pressure Relief Procedure on page 3 to
relieve the fluid pressure.
4. Prime the pump.
a. Allow pump to operate until
paint comes from gun.
b. Release the trigger and engage
the gun safety latch.
c. Turn Prime Valve OPEN to the
prime position ensuring the
pressure is released from the
system.
d. Turn Pressure Control Knob to
minimum pressure.
e. Install spray tip onto gun.
f. Close the prime valve to the
pressure position.
g. Turn the pressure control knob
to desired spray pressure.
h. Disengage the gun safety lock
and you are ready to start
spraying.
If you spray paint
into the paint
bucket, always use the lowest spray
pressure and maintain firm metal-tometal contact between gun and
container.
5. Adjust pressure.
a. Turn the Pressure Control Knob
clockwise to increase pressure and
counterclockwise to decrease
pressure.
b. Always use the lowest pressure
necessary to completely atomize
the material.
Operating the
sprayer at higher
pressure than needed wastes material,
causes early tip wear and reduces the
life of the spray equipment.
c. If more coverage is needed, use
a larger tip rather than increasing
the pressure.
d. Check the spray tip. The tip size
and angle determine the pattern
width and flow rate.
6. Reduce clutch wear.
a. The first 50 feet of airless spray
hose should be 3/8", the larger
diameter works as a pulsation
damper and saves unnecessary
cycling of the clutch. A minimum
of 100 feet of hose should be used.
b. Adjust the Engine Speed and
Pump Pressure. First set the
throttle lever to the maximum
RPM setting (fully left). Trigger the
gun onto a test paper to check the
spray pattern and atomization.
Adjust the Pressure Control Knob
until you get a good pattern.
Reduce RPM of engine to support
pressure without overworking
engines.
7. Clean tip if clogged. If tip is
becoming worn, replace it. Worn
tips waste paint, cause overspray,
make cutting-in difficult, and
decrease sprayer performance.
IMPORTANT: Always follow the
Pressure Relief Procedure on page 3
before servicing unit.
Never hold your
hand, body, fingers,
or hand in a rag in front of the spray
tip when cleaning or checking it for a
cleared tip. Always point the gun
toward the front or into a waste
container when checking to see if the
tip is cleared or when using a selfcleaning tip.
a. Follow the Pressure Relief
Procedure on page 3.
b. Clean the front of the tip
frequently (with toothbrush only)
during the day to keep material
from building up and clogging the
tip.
c. To clean and clear a tip if it clogs,
refer to the separate instruction
manual received with your gun and
nozzle.
NOTE: When pausing during a paint
job, keep tip clean by locking the gun
and submerging the tip in a small
bucket of paint thinner. This will help
reduce buildup and drying of paint in
tip, tip guard, and gun.
Clean a clogged
standard flat tip
only after it has been removed from
the gun. Follow the Pressure Relief
Procedure on page 3.
8. When shutting off the sprayer,
follow this procedure.
a. Whenever you stop spraying,
even for a short break, follow the
Pressure Relief Procedure on page 3.
b. Clean the tip and gun as
recommended by your separate
gun instruction manual.
c. Flush the sprayer at the end of
each work day if the material you
are spraying is water-based, or if it
could harden in the sprayer
overnight. See "Flushing" on page 4.
Use a compatible solvent to flush,
then fill the pump and hoses with an
oil based sovent such as mineral
spirits.
AL2810
!
WARNING
!
WARNING
NOTICE
!
WARNING
NOTICE
Page 8
8
Operating Instructions and Parts Manual
Airless Paint Systems
www.chpower.com
Operation (Cont.)
d. For long term shutdown or
storage, refer to page 4.
Be sure to relieve
pressure in the
pump after filling with mineral spirits.
SPRAY TECHNIQUE
Good Spray Gun Technique is at the
core of any spray paint operation.
Operator skill and efficiency is as
important as good equipment and
good paint. Good spray technique is a
skill that can be developed by
following these simple instructions.
If you are not familiar with spraying
techniques, study this section of your
manual and practice the proper
technique on pieces of cardboard or a
suitable surface.
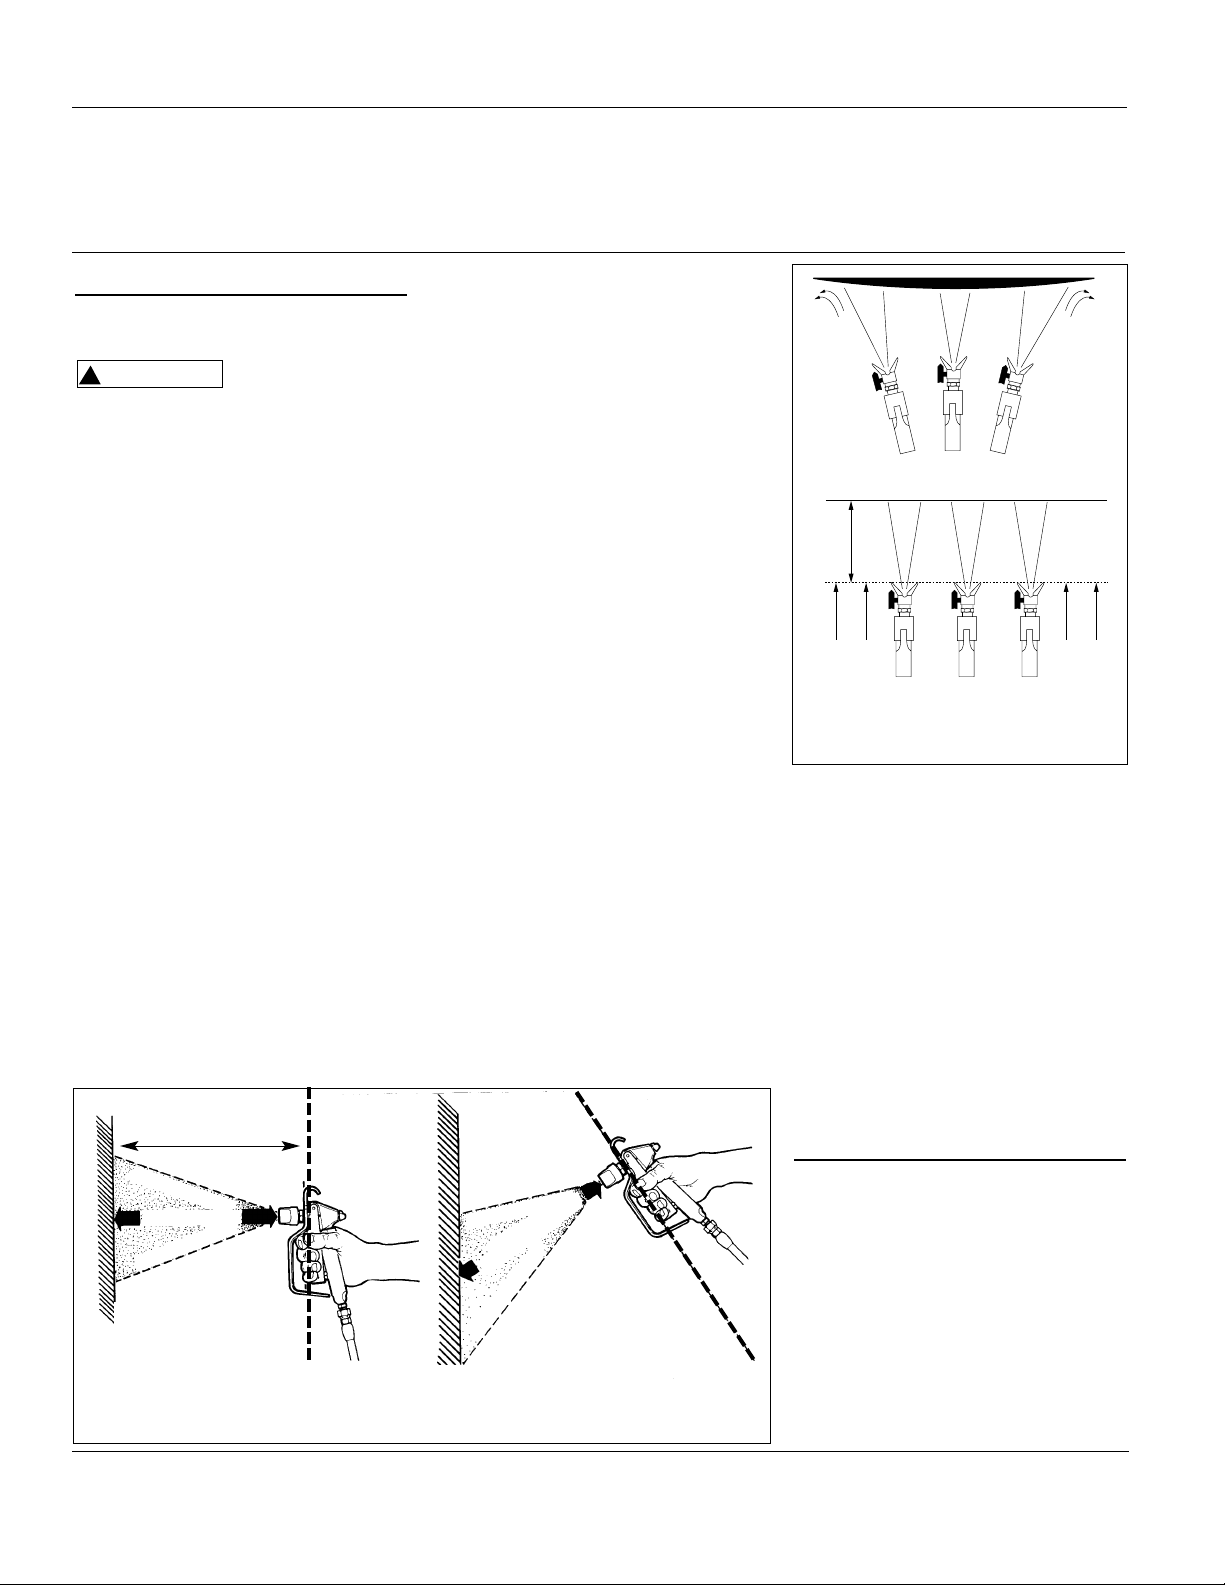
Hold the spray gun 12 - 15 inches away
from the work surface and keep it
perpendicular (straight) to the surface.
Move the spray gun parallel to the
work and at a right angle to the
surface. (See Figure 6).
Move the gun at a steady rate in order
to apply a good coverage. The wet
coat should be just under the thickness
at which a run or sag will occur. Slow
gun movement or gun held too close
will result in an overly wet or thick wet
or thick coat coverage that is likely to
run or sag.
Do not wave the spray gun. This
waving is called arching. Instead, hold
the spray gun at a 12 to 15 inch
distance perpendicular from the work.
(See Figure 7.)
The closer the spray gun is held to the
work, the thicker the paint is deposited
and the faster the gun must be moved
to prevent sags and runs. Holding the
gun too far from the work will cause
excessive fog, overspray, and a thin
and grainy coat.
It is important to "trigger" the gun
after gun movement (arm movement)
has started and release trigger (shut
gun off) before gun movement ends.
Gun movement is always longer than
actual paint (spray) stroke. In that
manner, even blending and uniform
paint coat thickness is achieved over
the entire surface. When the gun is in
motion as the trigger is pulled, it
deposits an even amount of paint.
Overlap the previous pass by half the
width of the spray pattern. Aim at the
bottom of the previous pass.
Adjust Pressure Control Knob so that
paint is completely atomized from the
spray gun. Insufficient pressure will
result in “tailing.” Too much pressure
will result in excess fog and overspray,
excessive tip wear, and increased
sprayer wear and tear.
Always use the lowest pressure possible
to obtain desirable results. Test the
spray pattern on a piece of cardboard
or other surface.
To cover “inside” and “outside”
corners (on walls or other objects), aim
the spray gun toward the center of the
corner. The spray pattern is divided in
half, and the edges of the spray
pattern on both walls are the same.
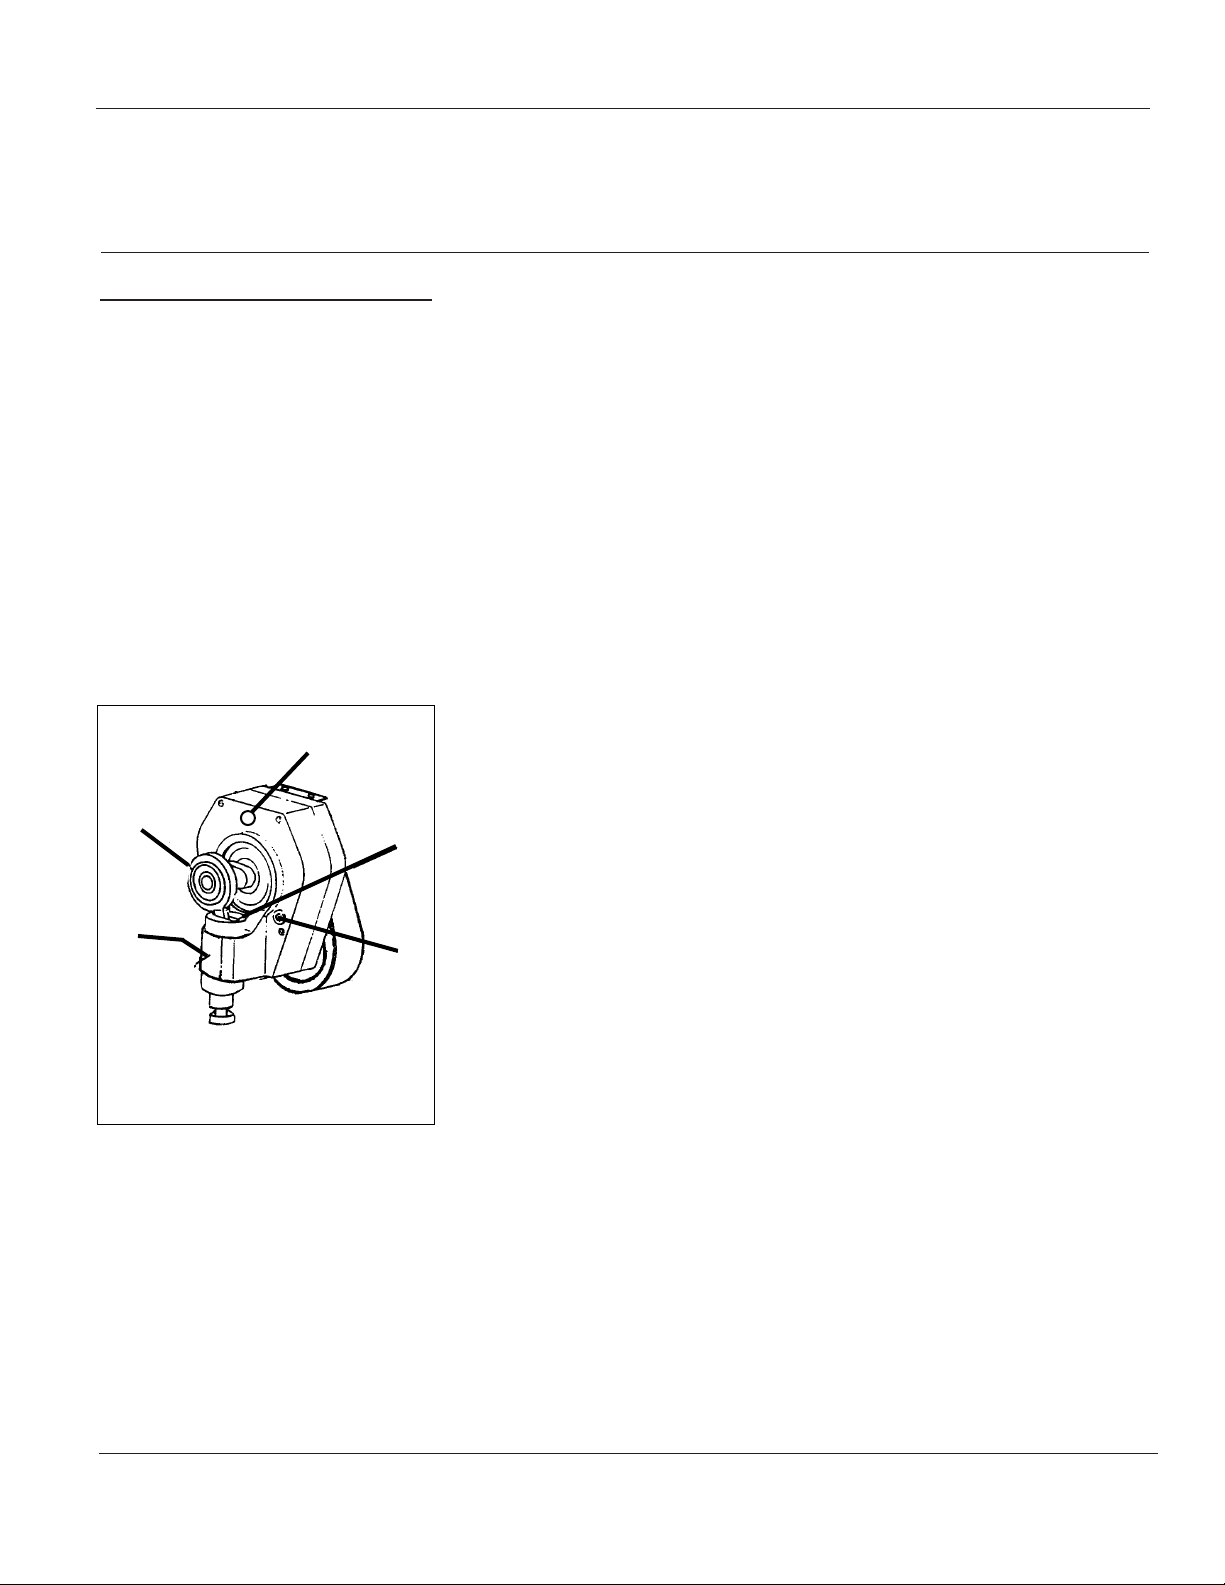
Electrical System
REPLACEMENT OF ELECTRICAL
CONTROL BOARD
1. Remove electrical cover.
2. Disconnect sensor lead from
electrical board.
3. Disconnect two clutch leads on
electrical board from leads on
clutch.
4. Using a 1/16” allen wrench, loosen
set screw in Pressure Control Knob
RIGHT
WRONG
Gun is held at an angle,
fluid disperses unevenly
Gun is held perpendicular
to work piece, fluid
disperses evenly
Figure 6 - How to hold spray gun when spraying
Figure 7 - Proper Spray Technique
INCORRECT
CORRECT
Start
Pull
Trigger
Release
Trigger
End
12-15”
AL2810
!
WARNING
Page 9

9
Airless Paint Systems
Operating Instructions and Parts Manual
www.chpower.com
Electrical System (Cont.)
and remove knob.
5. Using a 1/2” nut driver or 1/2” deep
socket, remove nut from pressure
control shaft. This will allow
removal of electrical control board
from frame.
6. Replace electrical board assembly in
reverse order. Adjust pressure
according to the procedure given in
Pressure Calibration on Electrical
Board section.
PRESSURE CALIBRATION ON
ELECTRICAL BOARD
1. Turn "Pressure Calibration" Trimpot
adjustment on electrical control
board in the counter clockwise
direction at least 15 revolutions.
2. Connect 5000 psi glycerine pressure
guage on output of pump between
fluid pump and airless hose to
monitor Fluid Pump Pressure.
3. Start engine and run at maximum
RPM. Turn Prime/Pressure Relief
Valve to the open (Prime) position.
Turn Pressure Control Knob to
maximum position (fully clockwise).
4. Using an insulated screwdriver,
adjust "Pressure Calibration"
Trimpot by turning clockwise until
the clutch engages. When the
clutch engages the pump will
commence Priming. When pump is
primed, turn the Prime/Pressure
Relief Valve to the Closed (Pressure)
position. The pump will begin to
pressurize and the clutch will
disengage at a low pressure.
Continue turning the Trimpot
clockwise to increase pressure to
3000 psi.
5. Trigger gun. The pressure should
drop approximately 350-400 psi
(when using a 3/8" hose), the clutch
will engage and build pressure to
3000 psi and disengage. Trigger
gun several times to ensure proper
pressure setting.
6. Turn Pressure Control Knob to
minimum position. The clutch
should disengage and pump stop
moving.
7. Secure leads with tie strap.
8. Replace cover on unit. Ensure the
leads are not pinched or damaged
in the process of replacing covers.
AL2810
Figure 8 - Electrical Board/Pressure Calibration
Page 10
10
Operating Instructions and Parts Manual
Airless Paint Systems
www.chpower.com
Service
FLUID PUMP
FLUID PUMP DISCONNECT
1. Flush out the material you are
spraying, if possible.
2. Follow the Pressure Relief
Procedure on page 3. Stop the
pump in the middle of down
stroke.
3. Remove the suction tube and fluid
hose (if so equipped) from the fluid
pump. Detach the hose from the
front of the fluid pump.
4. Remove 2 retaining rings and slip
the sleeve of the coupling down
and remove both coupling halves.
This will disconnect fluid pump
from the connecting rod.
5. Unscrew the two tie rod locknuts.
6. Pull the pump down off the tie
rods.
FLUID PUMP REINSTALL
1. Loosen packing nut and extend
piston rod so that it is in the “fully
up” position.
2. Make sure that spacer tubes (301-
048) are in place.
3. Connect connecting rod with fluid
pump by installing coupling halves.
Slide sleeve over coupling halves.
Secure with retaining rings.
4. Secure the fluid pump housing to
the tie rods and screw nuts with
lock washers on loosely.
5. Tighten the tie rod nuts evenly to
30 ft. lb.
6. Reconnect fluid hoses and suction
tube (if so equipped).
NOTE: After all the rod locknuts are
tight, the alignment of both rods
should allow easy assembly and
disassembly of the coupling. If there is
any binding, loosen and retighten all
the rod locknuts to improve the
alignment. Misalignment causes
premature wear of seal and packings.
7. Tighten the packing nut until there
is resistance, then tighten it 1 full
turn. Approximately 4 threads will
show when new packings are
installed. Fill the wet cup of the
packing nut 1/3 full with Throat
Seal Oil.
8. Start the pump and operate it
slowly (at low engine speed and
pressure setting ) to check the
piston rod for binding.
Adjust tie rod lock nuts if necessary
to eliminate binding.
9. Run at maximum pressure for
several minutes, relieve pressure
and repeat step 7.
AL2810
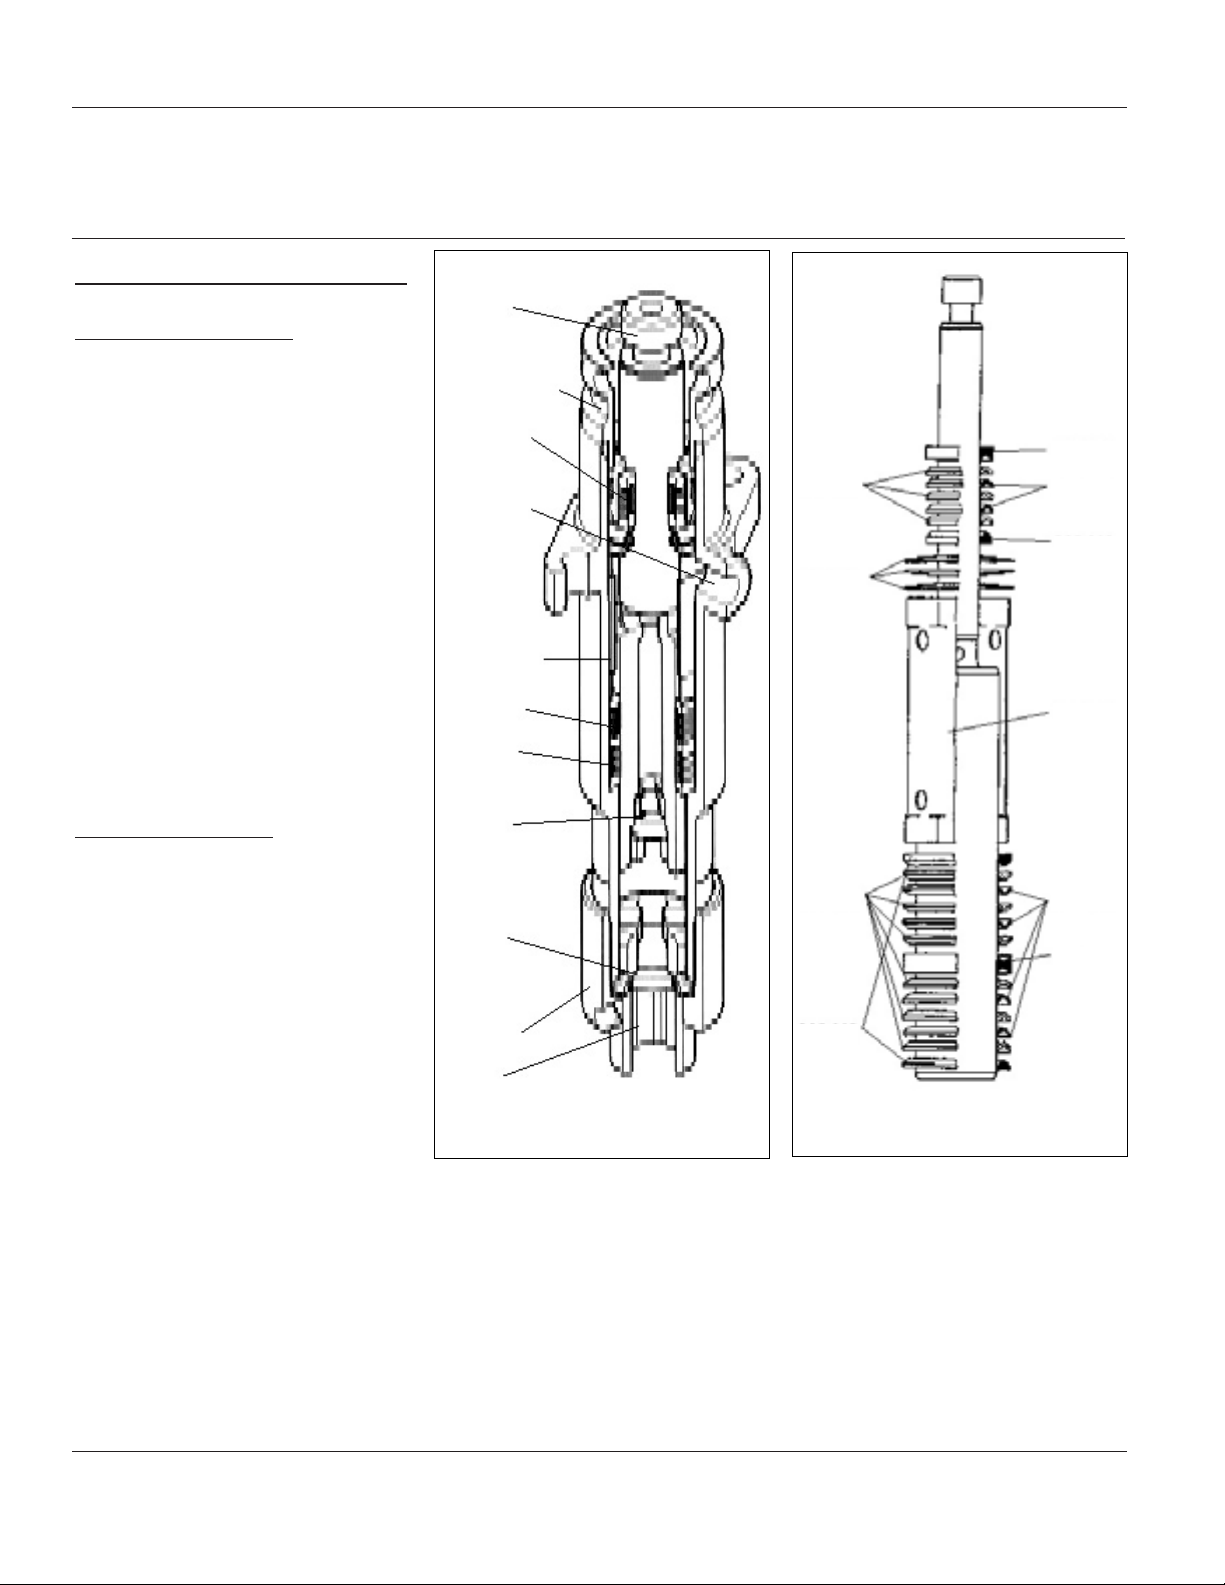
Figure 9 - Inlet Valve, Outlet Valve,
Piston Assembly
Piston
Packing nut/
wet cup
Upper
packing
Fluid
outlet
Distance
tube
Lower
packing
Wiper
packing
Outlet
valve
Inlet
valve
Suction
nut
Fluid
inlet
Figure 10 - Piston Assembly
187-030
187-031
187-029
187-037
187-026
187-060
187-025
187-315
187-059
187-058
Page 11
11
Airless Paint Systems
Operating Instructions and Parts Manual
www.chpower.com
halves and remove both coupling
halves. This will disconnect piston
rod from connecting rod and
gearbox assembly.
3. Screw the suction nut off the pump
and remove inlet valve assembly.
4. Using the rod collar tool, loosen
the packing nut (CCW) and push
the piston down and out of the
fluid body.
5. Place piston holder in a vise. Slide
the piston into the holder and lock
in place with a 1/4" pin.
6. Clean all parts and inspect them
carefully for wear or damage.
Inspect the outside of the piston
rod for scoring or wear. Replace
these parts if needed. A worn
piston rod will cause premature
wear of packings.
7. Using a 3/8" allen wrench to
unscrew the outlet seat support
from the piston.
8. Remove the outlet seat, O-ring,
outlet ball and ball cage.
9. Inspect the outlet ball and seat for
wear. Replace as required.
NOTE: Inlet seat is reversible.
10. Install parts back into piston rod as
shown in Figure 11.Place two drops
of loctite No. 242 (blue) on threads
of the outlet seat support before
assembling and torque to 20 ft-lbs.
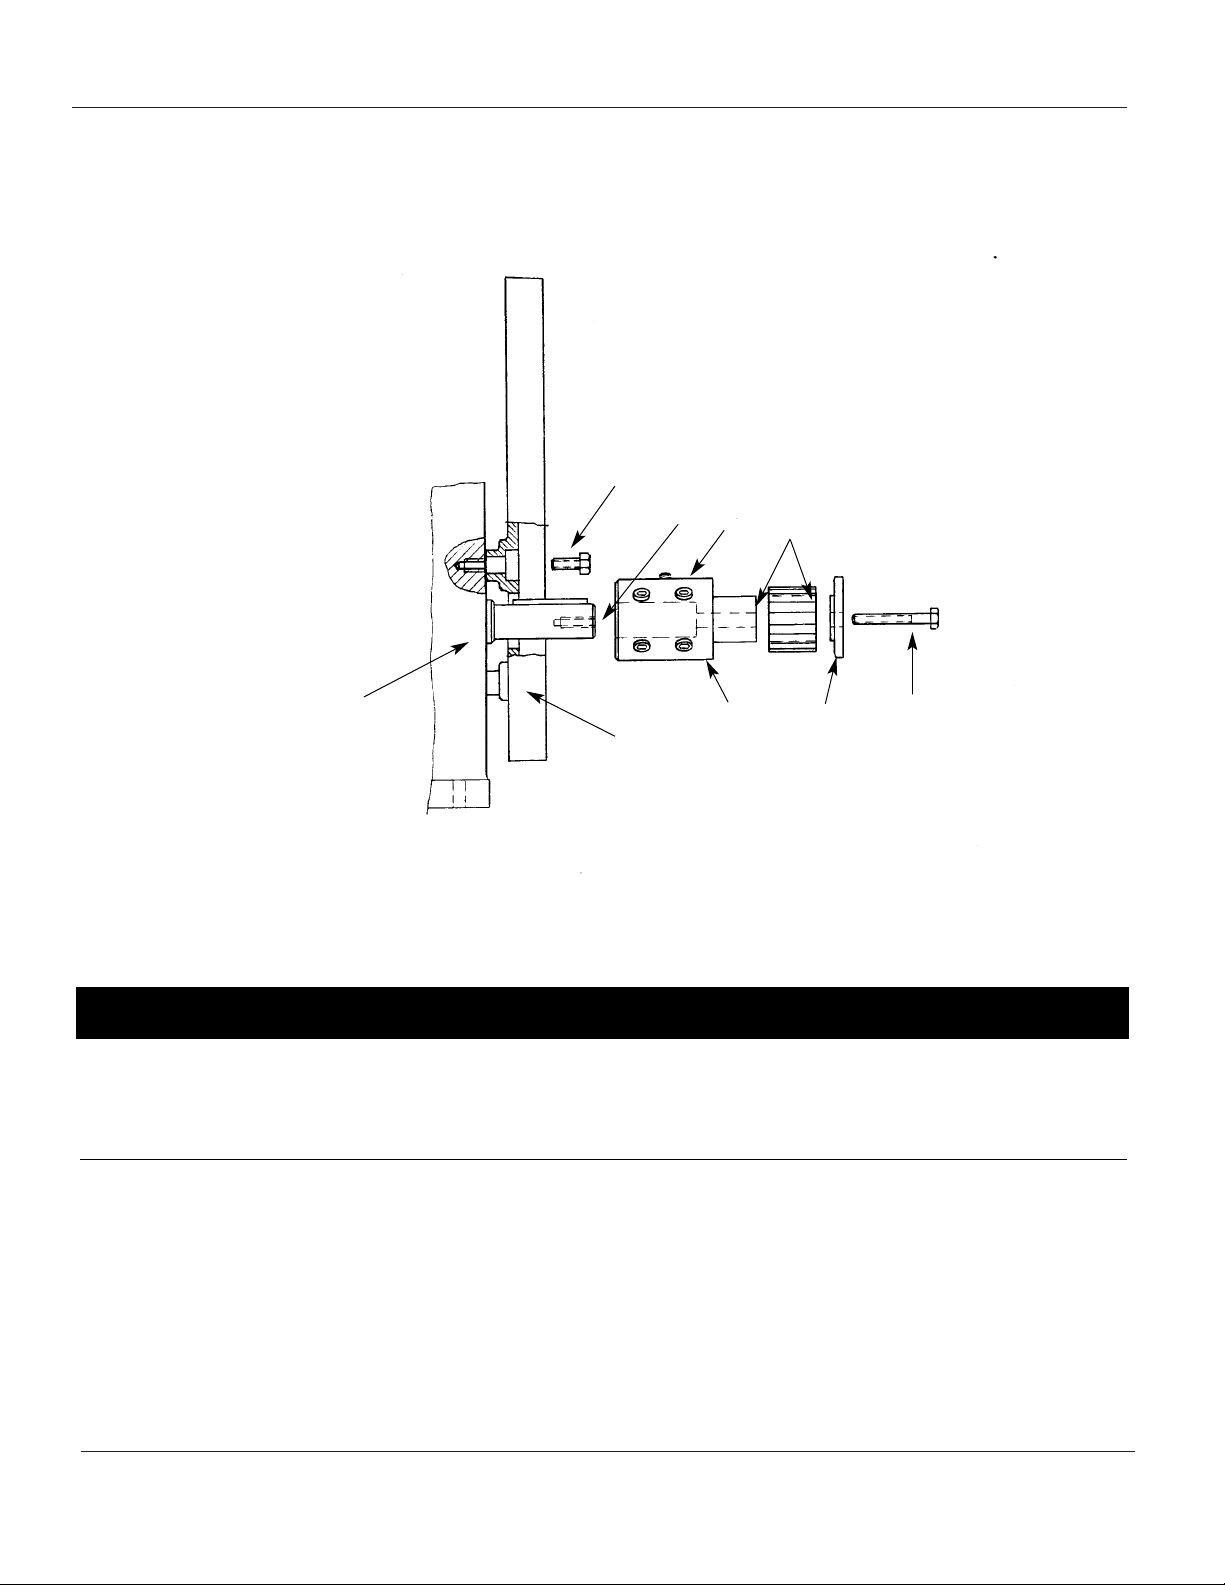
CLUTCH REPLACEMENT
NOTE: See clutch assembly parts list on
page 26.
Remove clutch as follows:
1. Remove upper and lower clutch
covers.
2. Remove splash cover from clutch
brackets and spacer tubes.
3. Disconnect two clutch leads from
electrical control board leads.
4. Remove gearbox cover with
manifold filter from gearbox.
AL2810
Service
(Cont.)
INLET VALVE
1. Using the rod collar tool, screw
suction nut off of fluid body.
(Suction nut contains intake seat
support.)
2. Remove inlet seat, O-ring, inlet ball
and ball cage with O-ring.
3. Clean all parts and inspect them for
wear or damage. Replace parts as
needed. Old O-rings should be
replaced with new ones.
NOTE: Inlet seat is reversible.
4. Clean inside of fluid body.
5. Reassemble the valve and screw it
onto the fluid body if no further
service is needed.
OUTLET VALVE
1. Stop piston rod in middle of its
stroke. Remove retaining rings.
2. Slip the sleeve off the coupling
Figure 11 - Piston Assembly
Page 12

12
Operating Instructions and Parts Manual
Airless Paint Systems
www.chpower.com
Service (Cont.)
Disconnect hose from fluid section.
5. Disconnect and remove fluid
section from gearbox, including
Connecting Rod Assy. (See"Fluid
Pump Disconnect, page 10)
6. Remove four nuts (page 20, Item
23) on the engine side of (Item 18)
from screws (Item 24) which pass
through spacer tubes (Item 15). This
will allow removal of Gearbox &
Clutch Assembly from "HolderManifold" (Item 18).
7. Pull the cog belt loose from the
engine shaft cog pulley and remove
the gearbox/clutch assembly from
the rest of the unit.
8. Place gearbox in vice by gripping
the flat part of the drive crank
allowing the clutch assembly to
face up. Use caution and not allow
gearbox to swing and damage
casting against vice.
9. Hold coupling screw, with 13/16"
wrench, then with 5/16" allen
wrench, screw differential screw
out of coupling screw and gearbox
shaft.
10.Screw large end of differential
screw into coupling nut assembly
and pull out of clutch assembly.
11.The clutch can now be removed
Spacers, removable spacer,
replacement clutch, bearings,
retaining rings should be inspected
and replaced if needed. (Items 3
through 8 on Parts List).
Install new clutch as follows:
1. With gearbox held as described in
Step 8 above, place first spacer and
bearing onto gearbox shaft.
2. Insert snap rings (2 into recesses of
cog pulley portion of clutch. Place
cog pulley portion of clutch with
cog belt attached onto shaft.
3. Place second spacer into cog pulley
portion of clutch. This spacer will
rest on the first bearing installed.
4. Insert second bearing on top of
upper snap ring.
5. Lay removable spacer on top of last
bearing. If the clutch air gap is
larger than .028", do not use
removable spacer. Put spacer over
removable spacer, if used, and top
bearing.
6. Place coil portion of clutch down
onto cog pulley portion of clutch
and center on gearbox shaft.
7. Screw differential screw into
coupling screw and nut until 1/16"
is showing.
8. Push coupling nut assembly into
clutch assembly until it comes to a
positive stop. (Differential screw
comes into contact with the
threaded gearbox shaft.)
9. With 13/16" wrench on coupling
screw and 5/16" allen wrench in
differential screw, simultaneously
with both wrenches screw coupling
nut assembly into gearbox shaft by
turning clockwise until a positive
stop is reached.
10. Hold coupling nut assembly and
tighten diffential screw to 30 ft.-lbs.
This will expand the coupling
assembly, thereby holding the
clutch assembly to gearbox shaft.
Turn clutch observing clutch gap.
The pulley should turn freely with
a gap of .012 to .024" between the
two clutch faces. If the gap is
greater than .028, remove the
spacer. Reassemble and check gap
for proper clearance.
11. Place cog belt over cog pulley
portion of clutch. Loosen set screws
until set screws are approximately
1/4" above block tensioner.
12. Reassemble the spacers onto
screws. Simultaneously lift gearbox
assembly with clutch into position
by placing cog belt over engine
shaft log pulley and inserting the
four screws into Holder-Manifold
and replacing nuts (4). Tighten nuts
to hold assembly in place.
13. Slightly loosen screws (4).
14. Evenly tighten Set Screws until
flush with tip of block tensioner..
Check tension on cog belt by
pressing hard with thumb. Proper
tensioning should allow for
approximately 1/8". If belt is too
loose, tighten set screws further.
15. Replace connecting rod and fluid
section. Preplace front cover on
gearbox. Connect hose to fluid
section.
16. Connect the clutch and board leads.
Connect spring to spacer tube.
17. Replace the splash shield.
18. Test the clutch for proper operation
19. Replace clutch covers.
Maintenance
REGULAR MAINTENANCE
1. Always stop the pump at the
bottom of its stroke when you take
a break or at the end of the day.
This helps keep material from
drying on the rod and damaging
the packings.
2. Keep the displacement pump
packing nut/wet cup1/3 full of TSO
(Throat Seal Oil) at all times. The
TSO helps protect the packings and
rod.
3. Inspect the packing nut daily.
Your pump has a patented "Triple
Life Packing System". Packing life
will be extended a minimum of
3 times if the following Packing
Tightening Procedure is
followed:
AL2810
Page 13
13
Airless Paint Systems
Operating Instructions and Parts Manual
www.chpower.com
Maintenance (Cont.)
Inspect the packing nut daily. If
seepage of paint into the packing
nut and/or movement of the piston
upward is found (while not
spraying), the packing nut should
be tightened enough to stop
leakage only, but not any tighter.
Overtightening will damage the
packings and reduce the packing
life.
4. Lubricate connecting rod pin every
3 months.
OIL AND LUBRICATION PROCEDURE
Figure 12 shows the necessary steps
involved in proper lubrication.
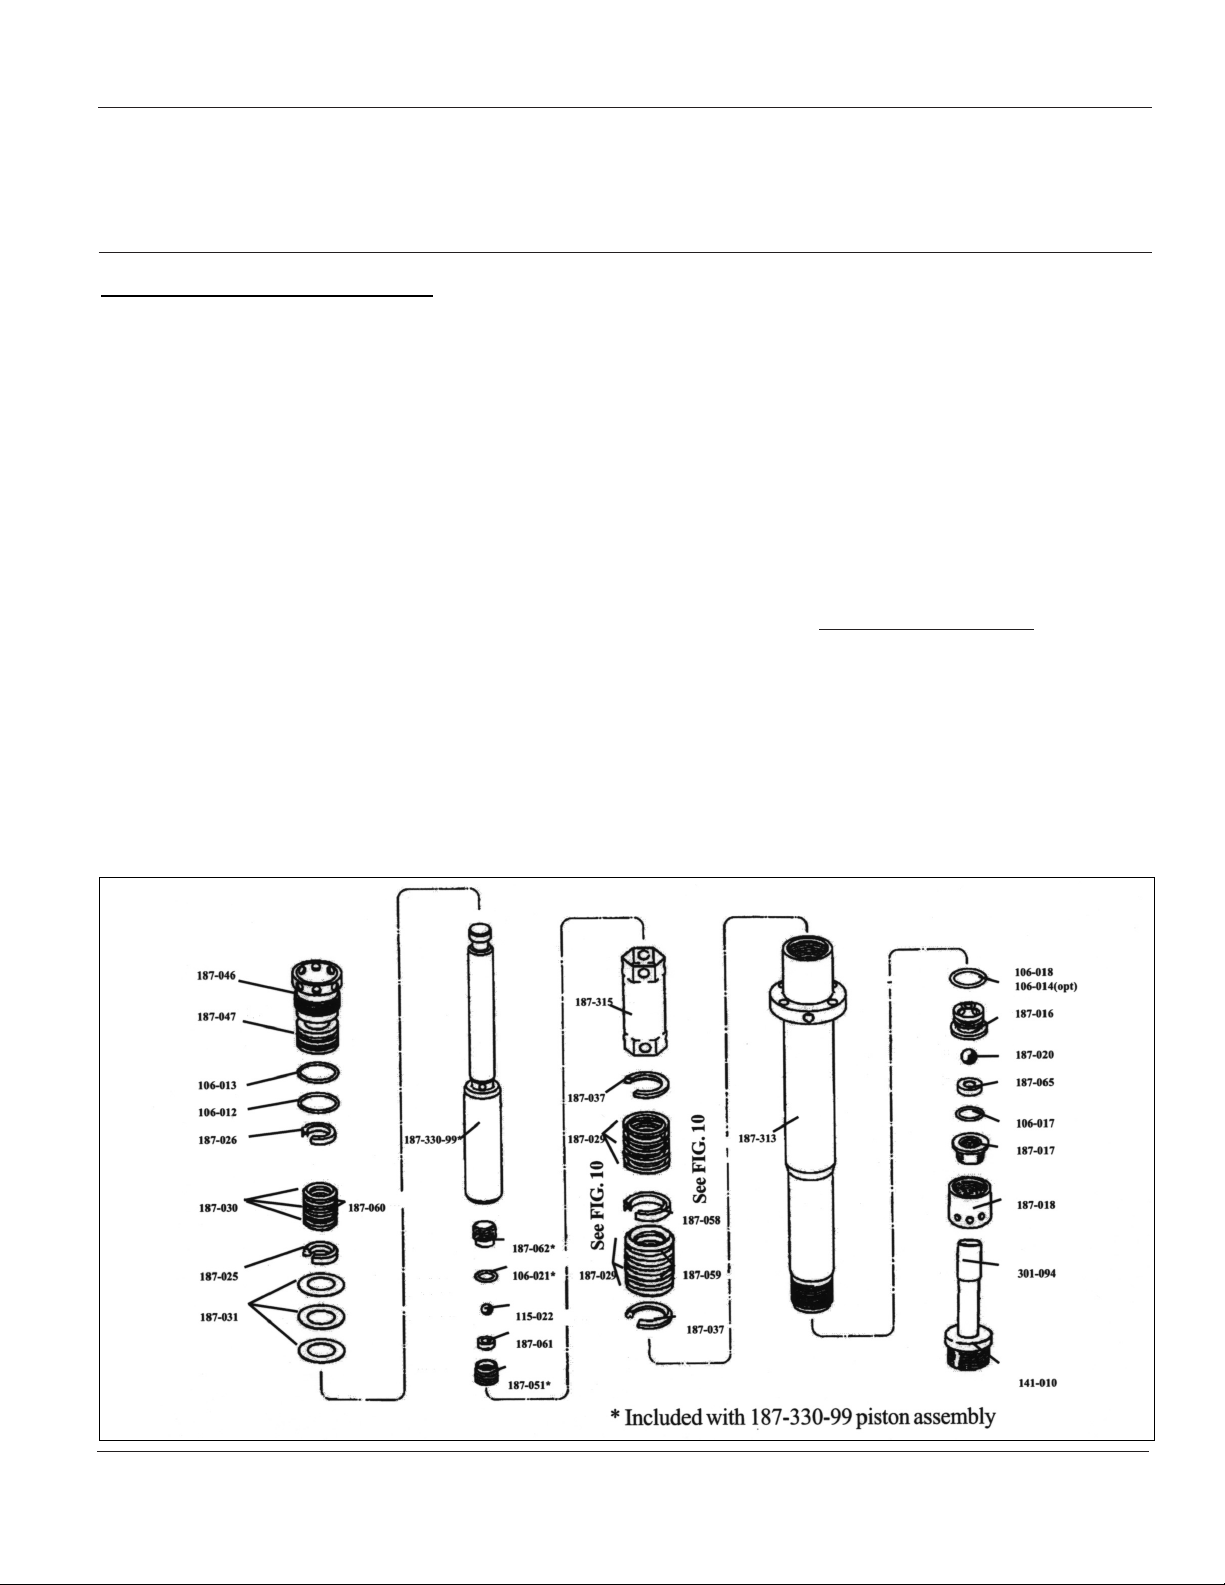
V-PACKING REPLACEMENT
Refer to Figure 9, 10 and 11 on pages
10 and 11 for corresponding part
illustrations.
V-Packing Replacement Kit Severe Duty
(PN 187-040) contains leather and
plastic packing, Teflon and Viton Orings, balls and plastic dual-sided
female adapter and larger male
glands. Gland Kit: PN 187-064.
1. Remove fluid pump as described in
“Fluid Pump Disconnect”
instructions on page 10.
2. Unscrew and remove the inlet valve
per instructions on page 11.
3. Unscrew and remove the packing
nut (187-046). Push the piston rod
down through the packings and
out of the pump. Utilizing packing
removal tool (187-249) the
complete packing set can be
removed quickly and easily.
Another method is to wrap some
masking tape around the bottom of
the piston. Now push the piston
back through the pump and
remove through the top. The
packings and glands will be
removed with the piston rod,
leaving the fluid body empty.
4. Disassemble and clean all parts for
reassembly. Discard old packings.
Save metal upper glands.
Replace metal lower glands
with new metal glands from
Packing Kit. If the old packing
had metal gland for 187-058
discard and replace with plastic
187-058.
5. Remove the outlet seat support,
outlet seat, outlet ball, O-ring and
ball cage as previously described on
page 11.
AL2810
Sealed
bearing
Bleed
(Weep hole)
1 oz. SAE
30W oil
every 3
months
Fill Plug.
NOTE:
Gearbox has
permanent gear grease
and does not require changing.
Oil
impregnated
sleeve. Dip
in hot 10W
oil when
removed.
Figure 12 - Oil and Lubrication
Procedure
Page 14

Operating Instructions and Parts Manual
Airless Paint Systems
14
www.chpower.com
Coarse spray
Excessive fogging
(overspray)
Pattern too wide
Pattern too narrow
Too much material
Too little material
Thin distrubtion in center
of pattern “horns”
Thick skin on work
Coating fails to close and
smooth over
Spray pattern irregular,
deflected
Craters or pock marks,
bubbles on work
Clogged screens
Low pressure
1. High pressure
2. Material too thin
Spray angle too large
Spray angle too small
1. Nozzle too small
2. Material too thin
3. Pressure too high
1. Nozzle too small
2. Material too thick
1. Worn tip
1. Wrong tip
1. Material too viscous
2. Application too heavy
Material too viscous
1. Orifice clogged.
2. Tip damaged.
Solvent balance
1. Extraneous material in paint.
2. Coarse pigments.
3. Poorly milled pigments (paint
pigments glocculate) cover
screen. Incompatible paint
mixture and thinners.
Symptom Possible Cause(s) Corrective Action
Troubleshooting Chart
Increase the pressure
1. Reduce pressure to satisfactory pattern distribution.
2. Use less thinner.
Use smaller spray angle tip.
Use larger spray angle tip (if coverage is OK, try tip in same
nozzle group).
1. Use next smaller nozzle.
2. Thicken spray material.
3. Reduce pressure.
1. Use next larger nozzle.
2. Thin spray material.
1. Change for new tip.
2. Use nozzle with narrow spray angle.
1. Thin cautiously.
2. Reduce pressure and/or use tip in next larger nozzle group.
Thin cautiously.
1. Clean carefully.
2. Replace with new tip.
Use 1 to 3% “short” solvents remainder “long” solvents.
(This is most likely to happen with material of low viscosity,
lacquers, etc.)
1. Clean screen
2. Use coarse screen if orifice size allows.
3. Use coarser screen, larger orifice tips. Obtain ball milled
paint. If thinner has been added, test to see if a drop
placed on top of paint mixes or flattens out on the surface.
If not, try different thinner in fresh batch of paint.
AL2810
Page 15

15
Airless Paint Systems
Operating Instructions and Parts Manual
www.chpower.com
AL2810
There is splitting from the
gun.
Paint leaks into the wet
cup.
Engine operates, but
paint pump does not
cycle
Engine and displacement
pump operate, but paint
pressure is too low or
none
Displacement pump
operates, but output is
too low on downstroke
on on both strokes
Clutch does not engage.
Clutch slips.
Engine stops.
1. Fluid supply low or empty
2. Air trapped in fluid pump or
hose
1. Packing nut/wet cup is loose
2. Upper packings worn or
damaged
3. Piston rod worn
1. Pressure setting is too low
2. Clutch not engaged
3. Displacement pump stopped
1. Pressure setting too low.
2. Tip or gun filter clogged.
3. Tip worn.
4. Fluid displacement pump
filter clogged.
5. Large pressure drop in fluid
hose.
1. Upper check valve ball not
seating properl.
2. Lower packings are worn or
damaged
Symptom Possible Cause(s) Corrective Action
Troubleshooting Chart Part II
1. Refill supply container.
2. Check for loose hose connections on the siphon
assembly. Tighten if needed. Reprime pump.
1. Tighten just enough to stop leakage.
2. Replace packings.
3. Replace piston rod.
1. Increase pressure.
2. See Troubleshooting Part III - Clutch Does Not Engage
3. Service pump.
1. Increase pressure.
2. Remove tip and/or filter. Clean if necessary.
3. Replace tip.
4. Clean filter.
5. Use a larger diameter hose.
1. Service upper check valve.
2. Replace packings.
See Troubleshooting Part III - Clutch Does Not Engage
Take unit to an authorized Campbell Hausfeld Service
Center.
Refer to engine manual.
Page 16

Operating Instructions and Parts Manual
16
www.chpower.com
AL2810
STEP 1: Ensure that the pressure control knob is in the maximum (fully clockwise) position.
STEP 2: Remove the upper and lower clutch and electrical covers.
STEP 3: Check all electrical connections between the engine magneto, sensor, control board and clutch for loose connections
or damaged leads. See Figure 8 on page 9.
STEP 4: Disconnect the two leads from the control board (blue) and the clutch assembly (black). Using a multimeter, with
the engine at maximum RPM, pressure control knob in the maximum position and the prime valve open (priming) position,
test the DC voltage across the boards leads (blue). This voltage must be 13-14 VDC. If the readings are correct, the board,
sensor and magneto are okay and the problem is the clutch assembly. If this is the case, proceed to Step 5. If the voltage is
outside this range go to Step 7.
STEP 5: Measure resistance between the clutch leads (black). This value must be 10-16 ohms. If this reading is out of
specifications the clutch is defective and must be replaced, otherwise continue troubleshooting.
STEP 6: If the clutch resistance readings of Step 5 are correct, check the spacing between the clutch field and plate. The gap
must be approximately .028". If this gap is too wide, remove the spacer from the clutch assembly. Should the clutch still not
engage, replace the clutch assembly. See page 11.
STEP 7: When the DC voltage from the board is not 13-14 VDC, disconnect the control board lead (black) from the engine
magneto lead (pink), located on the side of the engine. With the engine at maximum RPM, pressure control knob in
maximum (fully clockwise) position and prime valve open (priming), read the AC voltage from the magneto lead to the
sprayer frame. This reading should be 11-30 VAC. If outside this range, contact your local Honda repair facility for magneto
replacement. If the magneto is producing the proper AC voltage, continue to Step 8.
STEP 8: Test the sensor by reading the resistance between the red and black wires. The resistance runs between 1.8-3.5
kohms. A defective sensor usually shows no resistance (open). If the reading is outside standards, replace the sensor. An
alternative method to test the sensor, is to plug a new sensor into the board and see if the clutch will engage. Caution!
When using this method, ensure prime/pressure valve is in the prime position. This is important because the sensor plugged
into the board is not measuring pressure in the fluid section.
STEP 9: When Steps 7 and 8 have been completed and the magneto and sensor check good, the electrical control board is
the only item left, replace the board. See page 8.
Steps to Follow if Clutch Does Not Engage
Troubleshooting Chart Part III - Clutch Does Not Engage
Page 17

Operating Instructions and Parts Manual
17
www.chpower.com
AL2810
Notes
Page 18

18
For Replacement Parts, Call 1-800-626-4401
See Figures 10 & 11 on pages 10 & 11 for more Part Numbers in Diagrams
Please provide following information:
-Model number
-Serial number (if any)
-Part descriptions and number as shown in parts list
Address parts correspondence to:
Campbell Hausfeld
100 Production Drive
Harrison, OH 45030 U.S.A.
Paint System Assembly
Operating Instructions and Parts Manual
www.chpower.com
AL2810
Page 19

19
Operating Instructions and Parts Manual
www.chpower.com
AL2810
Ref. No. Description Part Number Qty.
1 007 Gun with swivel (Optional) 120-201XL 1
2 50’ x 1/4” Hose (Optional) 100-011 1
3 50’ x 3/8” Hose (Optional) 100-023 1
4 3/8” M x 3/8” M Nipple 169-010 1
5 Manifold filter assembly 111-200-99 1
6 3/8” plug 100-129 1
7 3/8” cap with ring 100-161 1
8 1/4” x 1/4” nipple 100-070 1
9 Ball valve 100-119 1
10 1/4” M x 1/4” F x 4’ Swivel hose 100-012 1
11 1/4” M x 1/4” f Elbow 100-004 1
12 1/4” Return tube 188-177 1
13 3/8” M x 3/8” F Elbow 169-013 2
14 3/8” F x 3/8” M x 21” Hose 100-123 2
15 1/4” M x 3/8” M Elbow 100-141 1
16 Manifold 301-253 1
17 1/4” Plug 100-028 2
18 1/4” Nut 100-317 2
19 1/4” Bolt 100-345 2
20 3/8 M x 1/4 M NPS Nipple 100-109 1
21 SL Fluid Pump 187-410 1
22 3/8 M x 3/8 M Elbow 167-016 1
Parts List for Paint System Assembly
Page 20

20
Operating Instructions and Parts Manual
www.chpower.com
AL2810
Power Unit Assembly
Part No. 301-530
Page 21

21
Operating Instructions and Parts Manual
www.chpower.com
AL2810
301-530
Ref. No. Description Part Number Qty.
1 Sleeve bearing 301-047 1
2 Shield front 301-189 1
3 Coupling set assembly 189-046A 1
4 Shield-rear 301-092 1
5 Spacer-tube 301-048 2
6 Washer, lock 140-035 2
7 Nut 140-051 2
8 Stud 100-328 1
9 Holder 305-013 1
10 Cog Belt 301-231 1
11 Cover-bottom 305-067 1
12 Adapter 305-012 1
13 Screw 100-339 4
14 5.5 HP Engine Assembly 301-524 1
15 Spacer tube 305-046 4
16 Clutch assembly 301-264 1
17 Cover 301-529 1
18 Holder-manifold 305-064 1
19 Plate-Gearbox mount 305-045 1
20 Sensor assembly 331-294-99 1
21 Pressure control board 301-282-99 1
22 Knob assembly 301-523A 1
23 Nut 140-044 8
24 Screw 305-047 4
25 Gearbox 301-208 1
26 Connecting rod assembly 301-333 1
27 Cover top 301-531 1
28 Grommet 301-135 6
29 Screw 100-312 4
30 Cover-Gearbox 301-320 1
31 Screw 301-337 2
32 Bolt 301-547 2
33 Lock nut 100-317 2
34 Washer 140-029 4
35 Washer 100-344 4
36 Shock mount 301-536 4
Ground assembly 188-160 1
Parts List for Power Unit Assembly
Page 22

22
Operating Instructions and Parts Manual
www.chpower.com
AL2810
Frame Assembly
Part No. 301-515
13
11
1
12
2
3
4
10
9
8
7
6
5
Page 23

23
Operating Instructions and Parts Manual
www.chpower.com
AL2810
301-515
Ref. No. Description Part Number Qty.
1 Frame weldment 301-510 1
2 Axle 5/8 x 21.81 188-367 1
3 Spacer 5/8 ID 113-031 2
4 Wheel 13 x 500-6T 301-165 2
5 Set collar 5/8 ID 143-029 2
6 Centerlock nut 5/16-18 100-317 2
7 Rubber foot 163-008A 2
8 Spacer .25 x .08 188-185 2
9 Washer 1.25 x .31 163-011A 2
10 Screw 5/16-18 169-050 2
11 Cup 100-170 1
12 Screw 10-24 301-546 2
13 Nut 10-24 120-021 2
Parts List for Frame Assembly
Page 24
24
Operating Instructions and Parts Manual
www.chpower.com
AL2810
7
8
9
Engine Assembly
Part No. 301-524
2
3
4
5
6
1
301-524
Ref. No. Description Part Number Qty.
1 Honda 5.5 HP Engine 301-160 1
2 Adapter 305-012 1
3 Screw 136-091 4
4 Key 112-029 1
5 Screw 100-357 1
6 Screw 100-383 4
7 Sheave 301-222A 1
8 Thrust Plate 301-229 1
9 Screw 301-230 1
Parts List for Engine Assembly
Page 25

25
Operating Instructions and Parts Manual
www.chpower.com
AL2810
Clutch Replacement Parts
Ref. No. Description Part Number Qty.
1 Cog belt 301-231 1
2 Clutch 301-264 1
3 Screw 305-088 1
4 Shoulder screw 100-175 1
5 Screw flanged 100-173 4
6 Set screw 100-174 2
7 Block tensioner 301-534 1
8 New gearbox 301-208 1
9 Plate 305-045 1
10 Spacer tube 305-046 4
Parts List for Clutch Replacement
Page 26

26
Operating Instructions and Parts Manual
www.chpower.com
AL2810
Clutch Assembly
Ref. No. Description Part Number Qty.
1 Screw-Differential 112-041 1
2 Coupling nut assembly 112-054 1
3 Spacer 301-412 1
4 Spacer-Removable 301-413 1
5 Clutch-Replacement 301-264 1
6 Bearing 301-037 2
7 Retaining ring 100-333 2
8 Spacer 301-274 2
9 Spring 136-068 1
10 Rubber edge 301-316 1
Parts List for Clutch Assembly
Page 27

27
Operating Instructions and Parts Manual
www.chpower.com
AL2810
Ball Valve
Part No. 100-119
100-119
Ref. No. Description Part Number Qty.
1 Handle 100-162 1
2 Screw 100-163 1
3 Ball 100-164 1
* Repair Kit KIT-119 1
Parts List for Ball Valve
1
2
*
3
*
*
*
*
Page 28

28
Operating Instructions and Parts Manual
www.chpower.com
AL2810
Manifold Filter
Part No. 111-200-99
111-200-99
Ref. No. Description Part Number Qty.
1 Base* 111-202 1
2 Spring* 301-356 1
3 O-ring* 106-007 1
4 Filter 111-204 1
5 Support* 111-203 1
6 Base* 111-201 1
7 3/8” M x 3/8” M Elbow 169-013 1
8 3/8” NPT (M) x 3/8” NPS (M) Hose connector 100-034 1
9 Plug 3/8” 100-129 1
10 3/8” NPT (M) x 3/8” NPS (M) Elbow 169-013 1
11 3/8” Cap with Ring 100-161 1
* Filter assembly 111-200 1
Parts List for Manifold Filter
Page 29

29
Operating Instructions and Parts Manual
www.chpower.com
AL2810
Suction Assembly - 5 Gallon
Part No. 301-090-99
Suction Assembly - 55 Gallon
Part No. 301-543-99
Ref. No. Description Part Number Qty.
- Suction Hose Assembly (Includes Items 1-5) for 5 Gallon 301-517 1
1 Inlet strainer 141-008 1
2 Suction tube for 5 Gallon 301-514 1
Suction tube for 55 Gallon 301-545 1
3 Hose clamps 301-516 2
4 Hose for 5 Gallon 301-513A 1
Hose for 55 Gallon 301-544 1
5 Elbow 100-165 1
6 Return pipe 188-377 1
7 Elbow 100-128 1
8 Whip 100-012 1
9 Elbow* 100-126 1
10 Reducer* 100-385 1
11 Fitting 187-017 1
12 Suction nut 187-018 1
* Used on units equipped with either the 100-180 or 331-050 prime valves. The 301-090 suction assembly also includes the
100-081A Elbow for units with the 138-001 marathon prime valve.
Parts List for Suction Assembly (5 Gallon and 55 Gallon)
10
9 8
7
6
5
3
3
1
2
4
12
11
FLUID PUMP
Page 30

30
Operating Instructions and Parts Manual
www.chpower.com
AL2810
Notes
Page 31

31
Operating Instructions and Parts Manual
www.chpower.com
AL2810
Notes
Page 32

32
Operating Instructions and Parts Manual
www.chpower.com
AL2810
Limited Warranty
1. DURATION: From the date of purchase by the original purchaser as follows: Standard Duty Paint Application Systems and
all Paint Application Accessories - 1 year, Serious Duty Paint Application Systems - 3 years, Extreme Duty Paint Application
Systems - 5 years.
2. WHO GIVES THIS WARRANTY (WARRANTOR): Campbell Hausfeld/A Scott Fetzer Company, 100 Production Drive, Harrison,
Ohio, 45030, Telephone: 1-800-626-4401.
3. WHO RECEIVES THIS WARRANTY (PURCHASER): The original purchaser (other than for purposes of resale or rental) of the
Campbell Hausfeld Product.
4. WHAT PRODUCTS ARE COVERED BY THIS WARRANTY: All non-compressor driven paint application systems, HVLP spraying
systems, and paint application accessories supplied or manufactured by the Warrantor.
5. WHAT IS COVERED UNDER THIS WARRANTY: Defects in material and workmanship which occur within the duration of the
warranty period. Warrantor will also cover normal wear items for a period of thirty days from the date of original purchase
against defects in material and workmanship. These wear items are: HVLP-filters, motor brushes, gun packing, gun
canister seal, gun check valve and gun air flow ring; Airless-inlet valve, outlet valve, gun valve, filters, tips, all seals and orings.
6. WHAT IS NOT COVERED UNDER THIS WARRANTY:
A. Implied warranties, including those of merchantability and FITNESS FOR A PARTICULAR PURPOSE ARE LIMITED FROM
THE DATE OF ORIGINAL PURCHASE AS STATED IN THE DURATION. If product is used for rental purposes, the warranty
will apply for ninety (90) days from the date of original purchase. Some states do not allow limitation on how long an
implied warranty lasts, so the above limitations may not apply to you.
B. ANY INCIDENTAL, INDIRECT, OR CONSEQUENTIAL LOSS, DAMAGE , OR EXPENSE THAT MAY RESULT FROM ANY
DEFECT, FAILURE, OR MALFUNCTION OF THE CAMPBELL HAUSFELD PRODUCT. Some states do not allow the exclusion
or limitation of incidental or consequential damages, so the above limitation or exclusion may not apply to you.
C. Any failure that results from an accident, purchaser’s abuse, neglect or failure to operate products in accordance with
instructions provided in the owner’s manual(s) supplied with product. Accident, purchaser’s abuse, neglect or failure to
operate products in accordance with instructions shall also include the removal or alteration of any safety devices. If
such safety devices are removed or altered, this warranty is void.
D. Normal adjustments which are explained in the owner’s manual(s) provided with the product.
E. Items or services that are normally required to maintain the product: HVLP-filters, motor brushes, gun packing, gun
canister seal, gun check valve and gun air flow ring; Airless-inlet valve, outlet valve, gun valve, filters, tips, all seals and
o-rings., or any other expendable part not specifically listed, will only be covered for thirty days from date of original
purchase.
7. RESPONSIBILITIES OF WARRANTOR UNDER THIS WARRANTY: Repair or replace, at Warrantor’s option, products or
components which are defective, have malfunctioned and/or failed to conform within duration of the warranty period.
8. RESPONSIBILITIES OF PURCHASER UNDER THIS WARRANTY:
A. Provide dated proof of purchase and maintenance records.
B. Deliver or ship the Campbell Hausfeld product or component to the nearest Campbell Hausfeld Authorized Service
Center. Freight costs, if any, must be borne by the purchaser.
C. Use reasonable care in the operation and maintenance of the products as described in the owner’s manual(s).
9. WHEN WARRANTOR WILL PERFORM REPAIR OR REPLACEMENT UNDER THIS WARRANTY: Repair or replacement will be
scheduled and serviced according to the normal work flow at the servicing location, and depending on the availability of
replacement parts.
This Limited Warranty applies in the U.S., Canada and Mexico only and gives you specific legal rights. You may also have
other rights which vary from state to state, or country to country.
 Loading...