

Page 1
Wifi touch-screen speaker video-intercom
XTS 7 WH WIFI
XTS 7 BK WIFI
XTS 7 WH WFBF
USER MANUAL
EN
English
FB00982-EN
Page 2

4
2
1
3
p. 2 - Manual FB0 0982-EN v. 1- 03/2018 - © CAME S.p.A. - The contents of this manual may be changed, at any time, and without notice.
1 Signaling LED
2 Loudspeaker
3 Touch screen display
4 Microphone.
DESCRIPTION
Full-touch speaker video intercom for the X1 system.
Description of parts
GENERAL PRECAUTIONS
• Carefully read the instructions before using the device.
• The installation, programming, commissioning and maintenance of the product must only be carried out by
qualified technicians, properly trained in compliance with the regulations in force, including health and safety
measures and the disposal of packaging.
• The equipment must be destined solely for the use for which it was expressly designed.
• The manufacturer declines all liability for any damage as a result of improper, incorrect or unreasonable use.
Maintenance and precautions when using the device
• Do not expose the LCD screen to direct sunlight.
• To clean, only use soft, dry, or slightly-moistened cloth rags. Do not use any chemicals.
• Do not block the air vents.
Page 3
O
B C GF H I
E
D
A
N
M
J
KL
p. 3 - Manual FB0 0982-EN v. 1- 03/2018 - © CAME S.p.A. - The contents of this manual may be changed, at any time, and without notice.
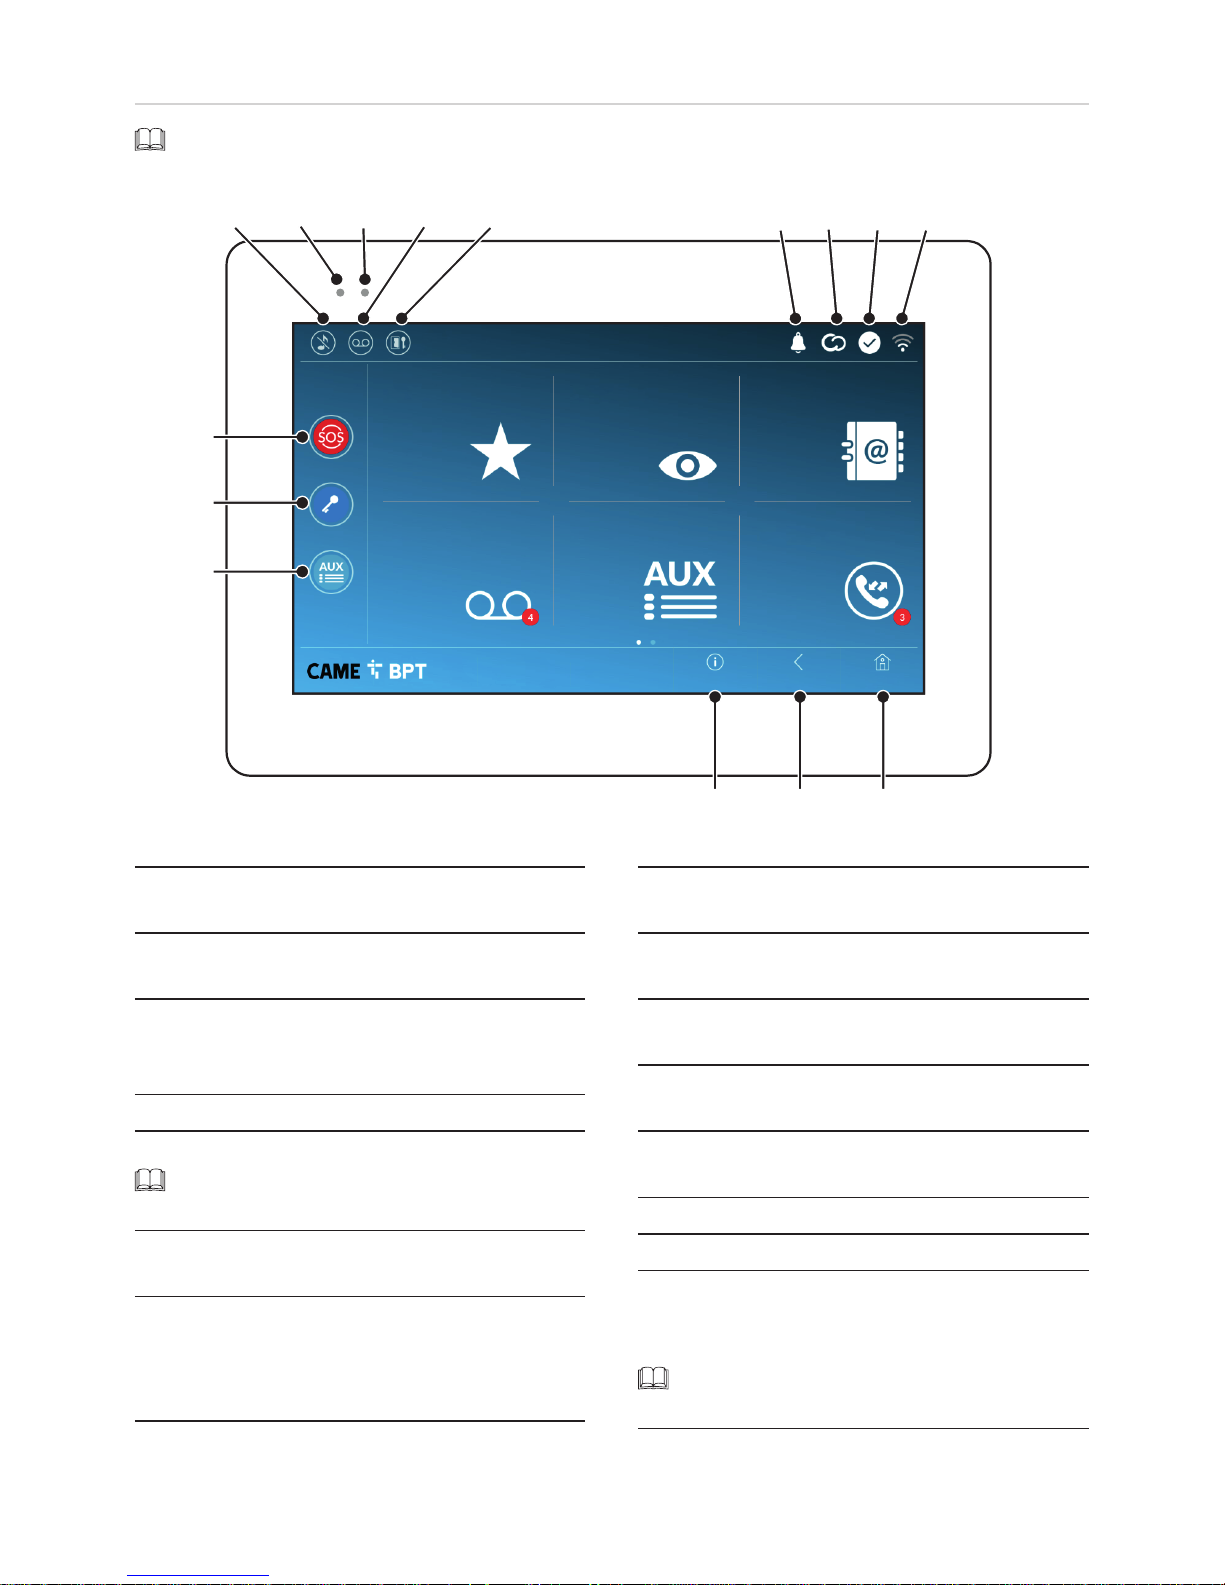
HomeBackInfo
Call register
Contacts
Aux List
Entry panels
Video Recording
Favourites
A Command to exclude call ringer; when the com-
mand is active, the red LED is lit.
B The red LED means that the device's ringer is
turned off
C The blinking blue LED, when the screen is stan-
ding by, means that there are unseen messages
or missed calls
D Turns the answering service off or on
E Turn the automatic door opener on or off
This icon appears only if the automatic door
opener function is properly set up.
F The blinking icon means there are unseen mes-
sages or missed calls
G The grey icon means that the device is enabled
for connecting to CAMEConnect; the white icon
means that the device is connected to CAMEConnect.
H The white icon means that the device is working
properly and is ready to take any calls
I The icon means that the Wifi connection is active
and strong
J This button appears on all screens and is for re-
turning to the homepage
K This button appears on all screens and is for re-
turning to the previous page
L This button appears on all screens and is for ac-
cessing the information pages
M This activates the preset auxiliary command
N Preset door opener command
O HELP button; It sends a "panic alarm" notification
to the assigned concierge,and shows the extension number
This button is featured in systems that require
a concierge service.
Commands and notifications found on the home page
The appearance of the homepage may vary according to the system configuration or the user interface.
19:02
Thursday
01 Feb 2018
Page 4
p. 4 - Manual FB0 0982-EN v. 1- 03/2018 - © CAME S.p.A. - The contents of this manual may be changed, at any time, and without notice.
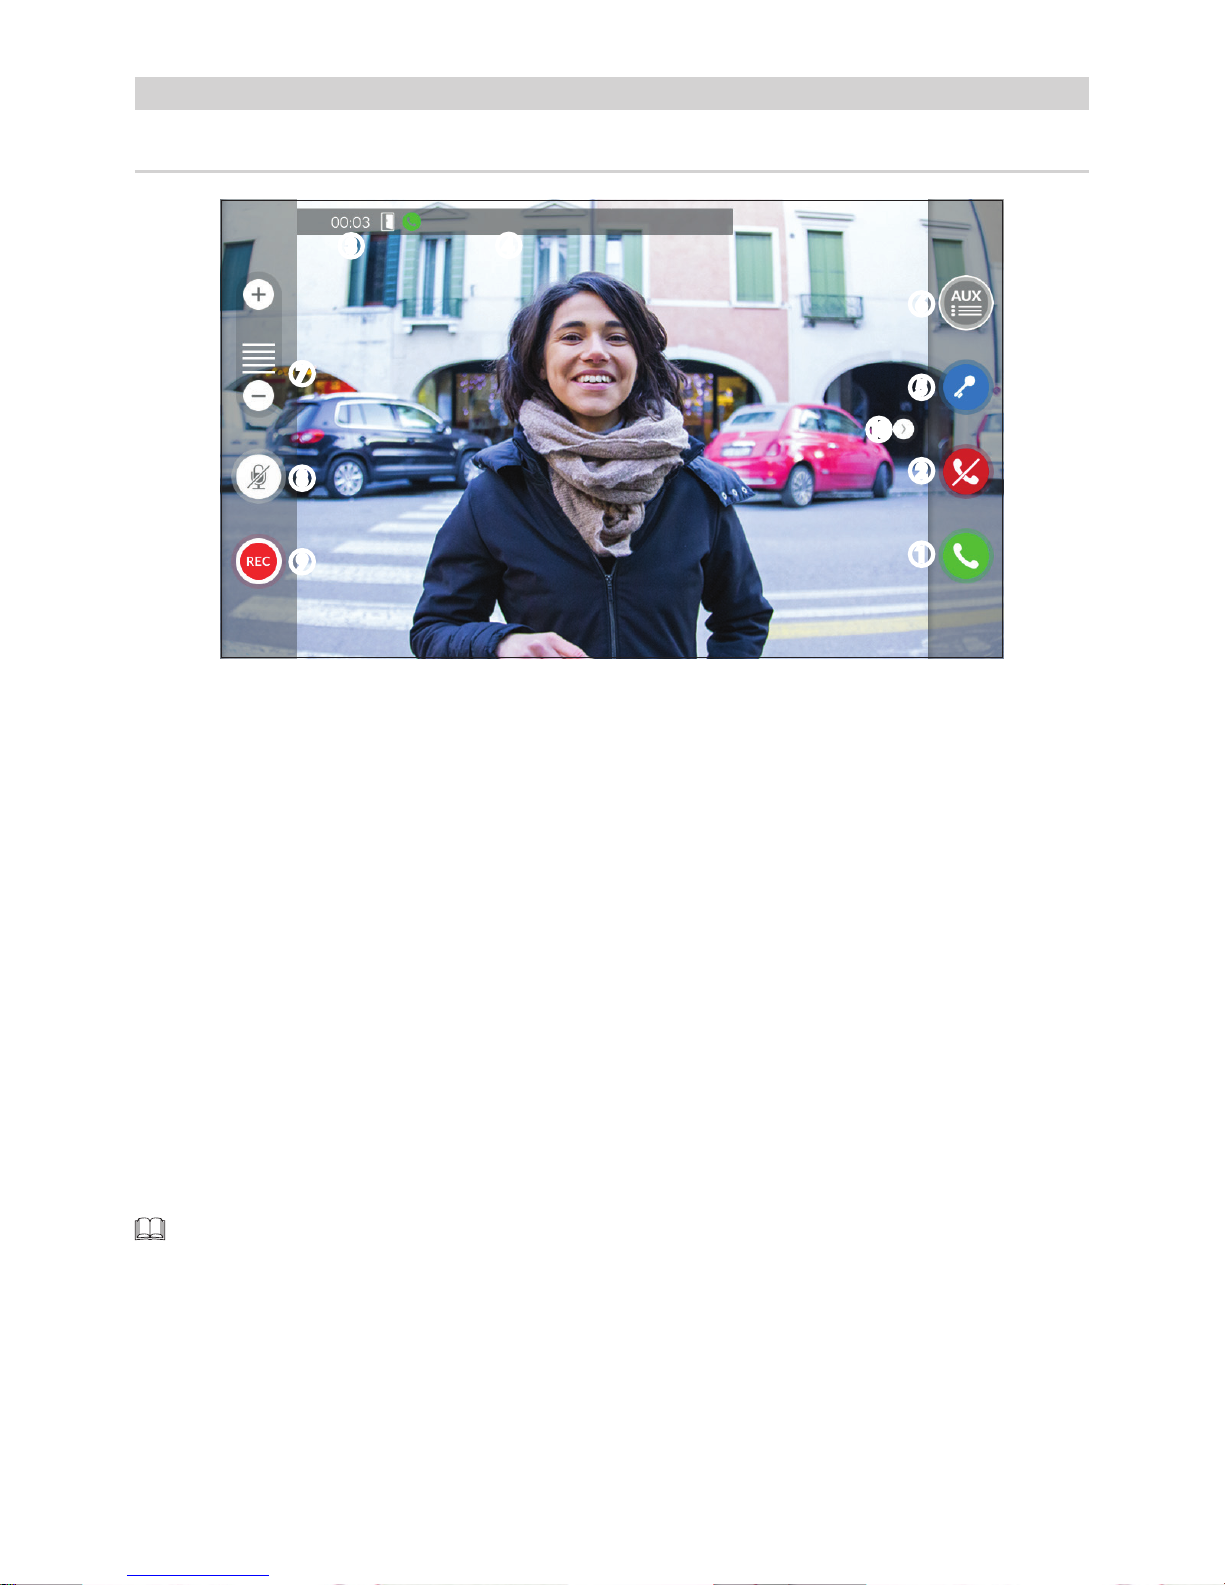
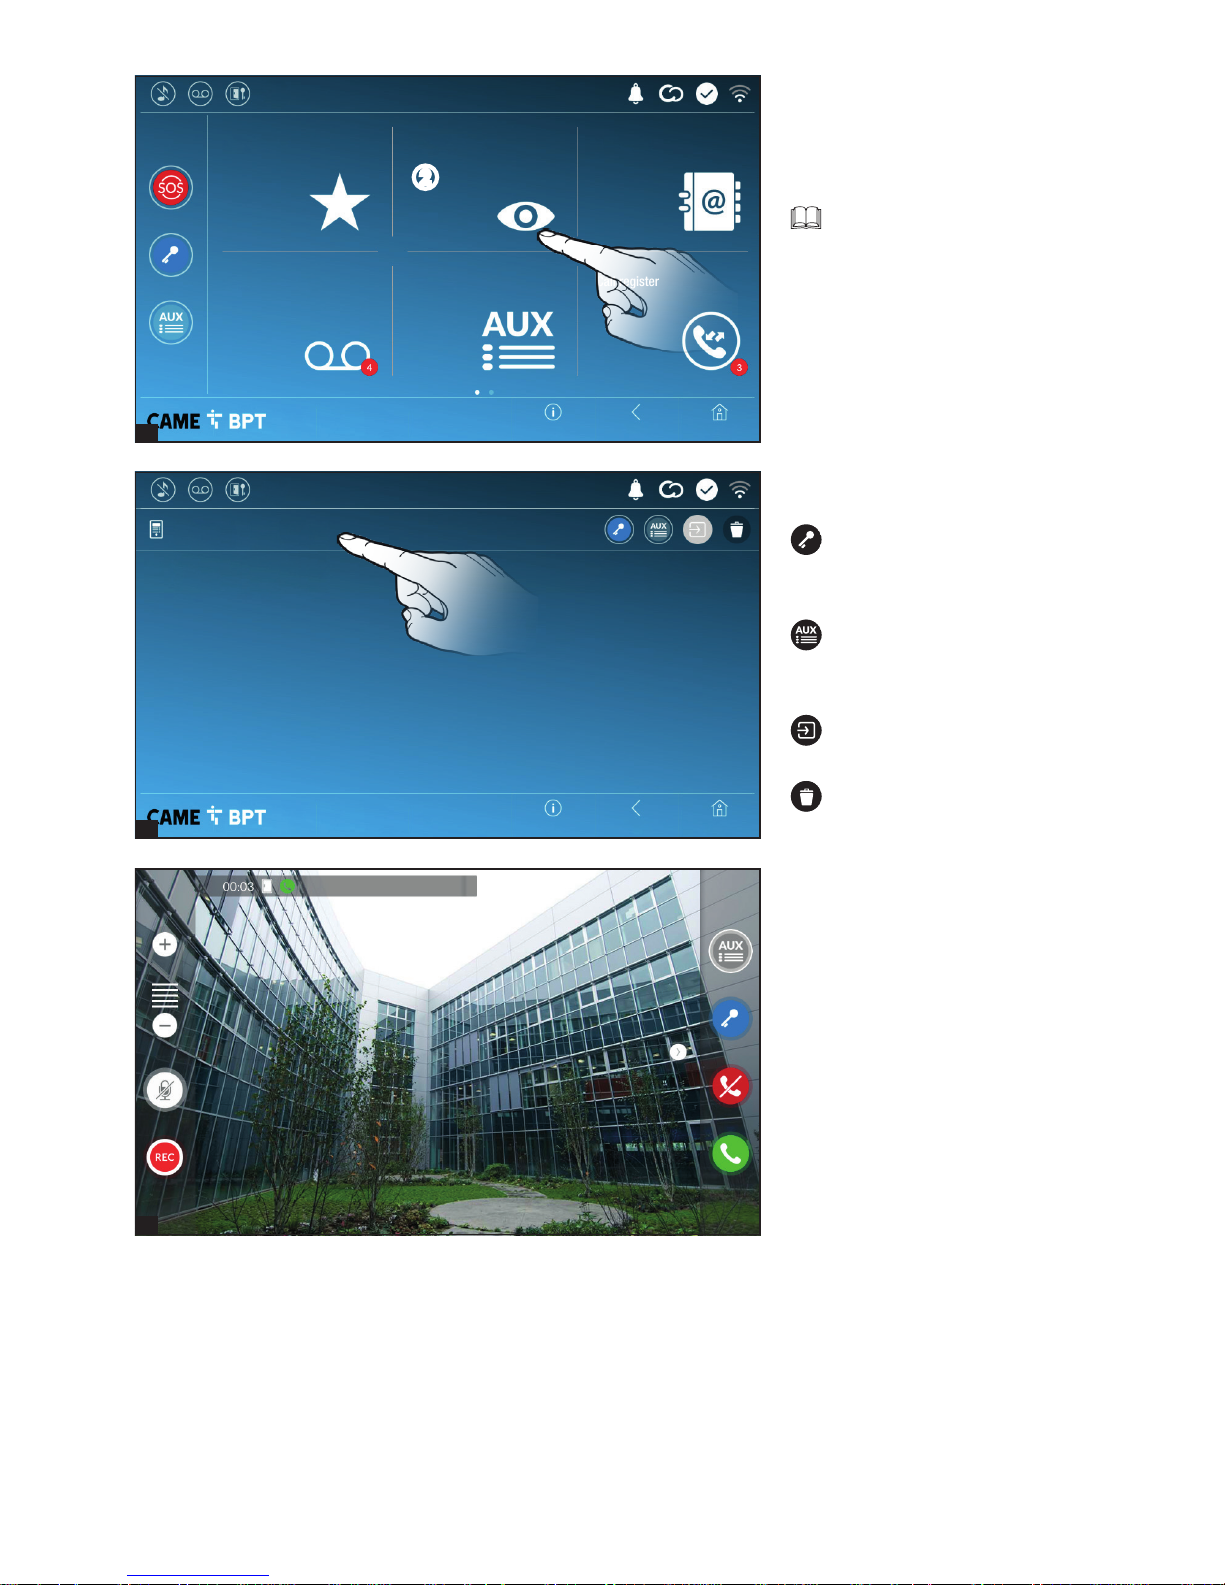
Call from Entry Panel
An image of the caller appears on the screen. The audio from and towards the caller is turned o.
A Touch the button to answer the call and to turn on the audio communication.
B Touch the button to refute the call and to return to the homepage.
Options appearing on the screen during a conversation
C Call duration.
D Caller's ID.
Commands that are active during a conversation
E It turns on the electric lock of the shown entry panel.
FThis opens the list of auxiliary commands configured for the shown entry panel; touch the name of the com-
mand that you want to send.
G Touch the + and - buttons to adjust the audio.
H Turn o the microphone (mute function).
I Touch the button the start audio/video recording the current conversation.
A red light signal blinks next to the caller's ID during the recording.
The recording is automatically ended after 10 seconds.
J Touch and drag the image on the screen (or press the > arrow) to view the listed entry panel or analog video
camera (if one is installed); the current audio/video call is ended.
HOW TO USE THE DEVICE
Answering a call
B
E
C
F
D
G
H
I
J
A
Page 5
1
2
3
p. 5 - Manual FB0 0982-EN v. 1- 03/2018 - © CAME S.p.A. - The contents of this manual may be changed, at any time, and without notice.
__CONCIERGE__
Main Call
Intercom 2 Not home
Main Call
Intercom 1 Not home
App 01 Call Mario's phone
App 02 Lucia's home
phone number
App 01 Mario's home
phone number
Home
Home
Back
Back
Info
Info
Call register
Contacts
Aux List
Entry panels
Video Recording
Favourites
19:02
Thursday
01 Feb 2018
19:02
Thursday
01 Feb 2018
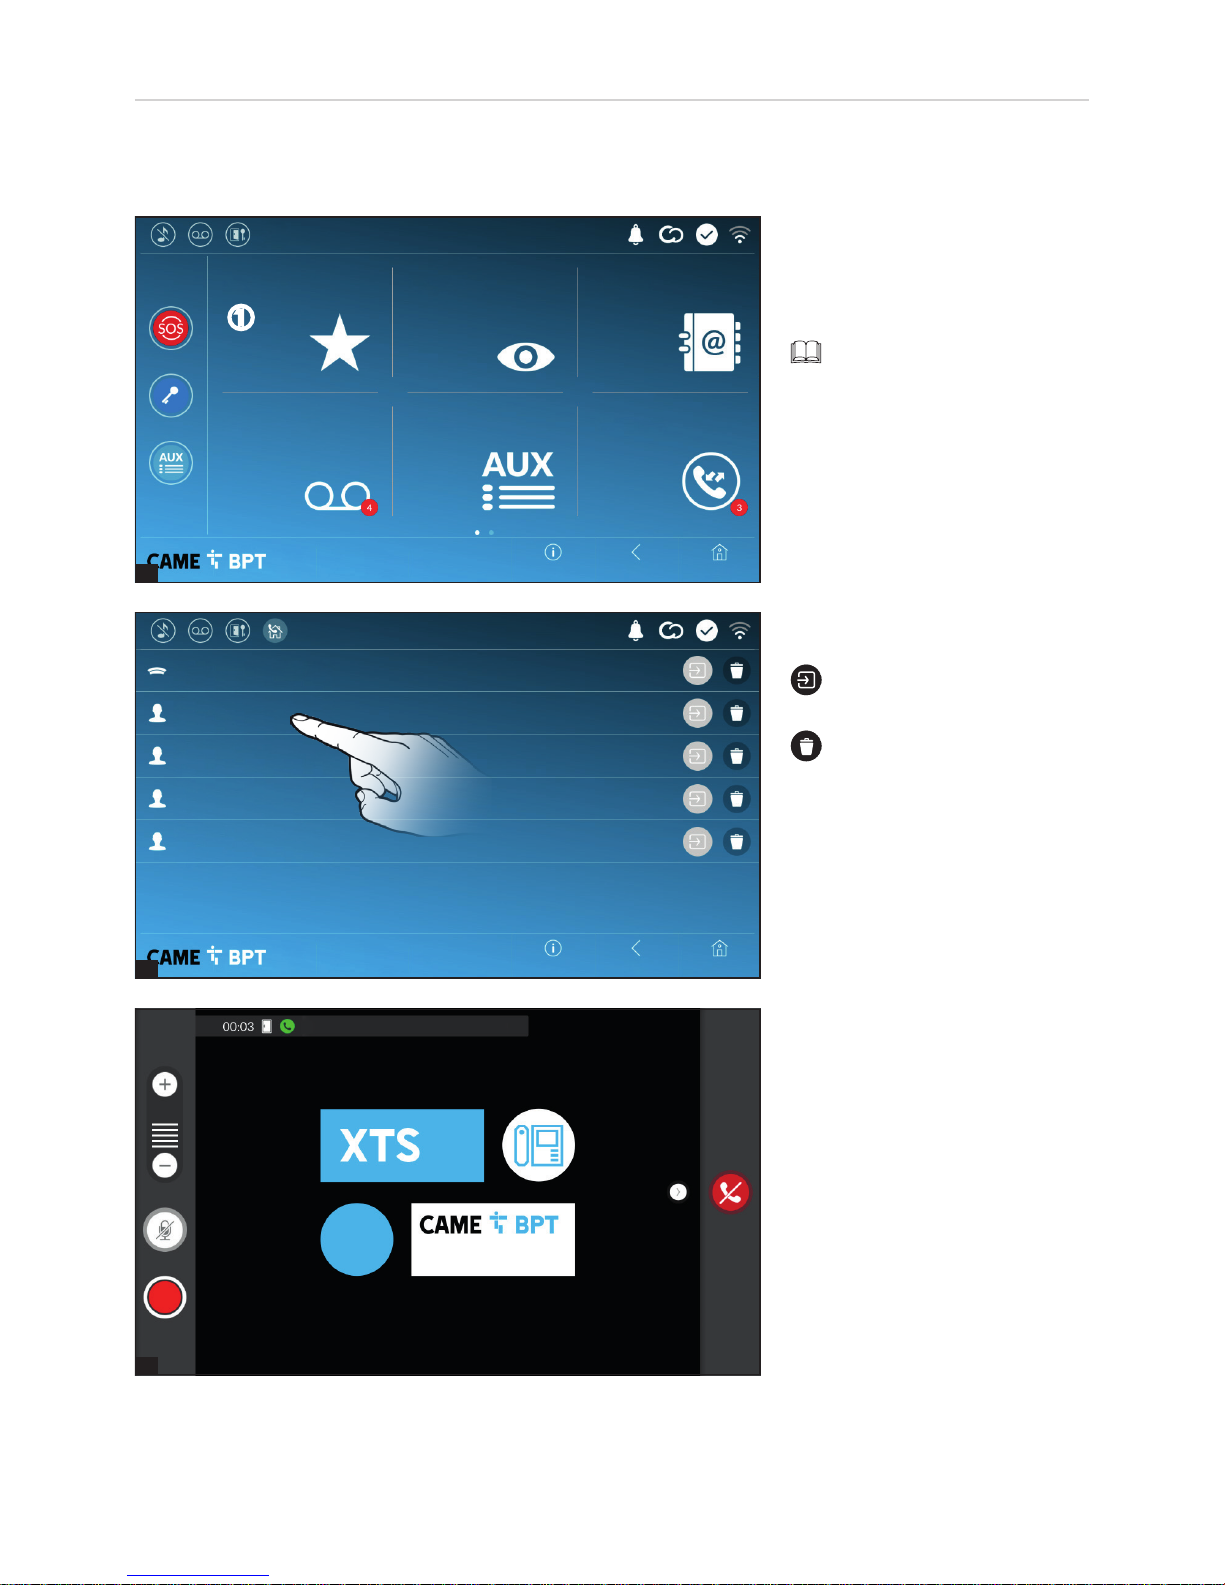
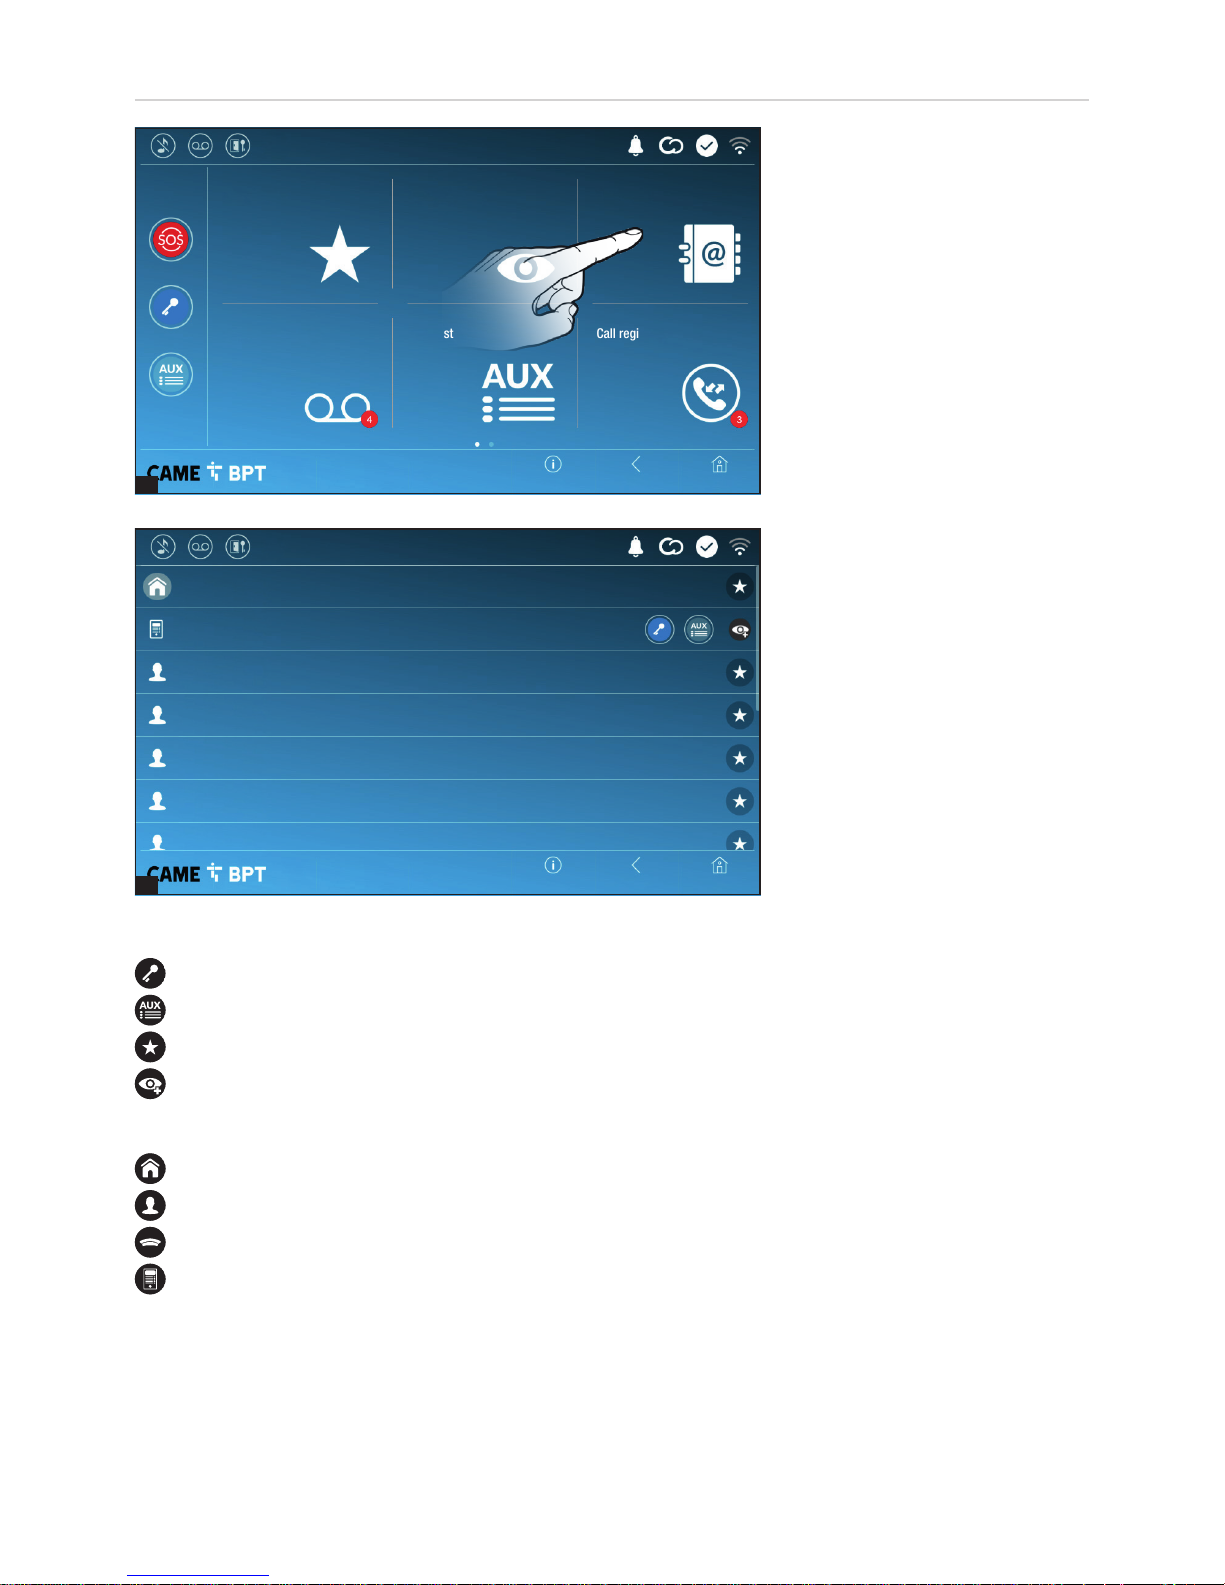
When communication is underway,
certain commands and information
appear on the screen, as mentioned before in the "Answering a
call" chapter on page 4.
Select one of the listed contacts to
initiate a call.
Touch the icon to view con-
tact's details.
Touch the icon to remove the
contact form the list of favorites.
Calling a contact on the
favorites list
A Touch the icon to access the list
of favorite contacts.
To fill the list of favorite contacts, see the chapter called
"Contacts" on page 7.
Making a call
This device lets you call other indoor receivers (intercommunication), any devices connected over the Wifi network
or, any entry panels.
A
Page 6
1
2
3
p. 6 - Manual FB0 0982-EN v. 1- 03/2018 - © CAME S.p.A. - The contents of this manual may be changed, at any time, and without notice.
Secondary entry panel
Main entry panel
Home
Home
Back
Back
Info
Info
Call register
Contacts
Aux List
Entry panels
Video Recording
Favourites
19:02
Thursday
01 Feb 2018
19:02
Thursday
01 Feb 2018
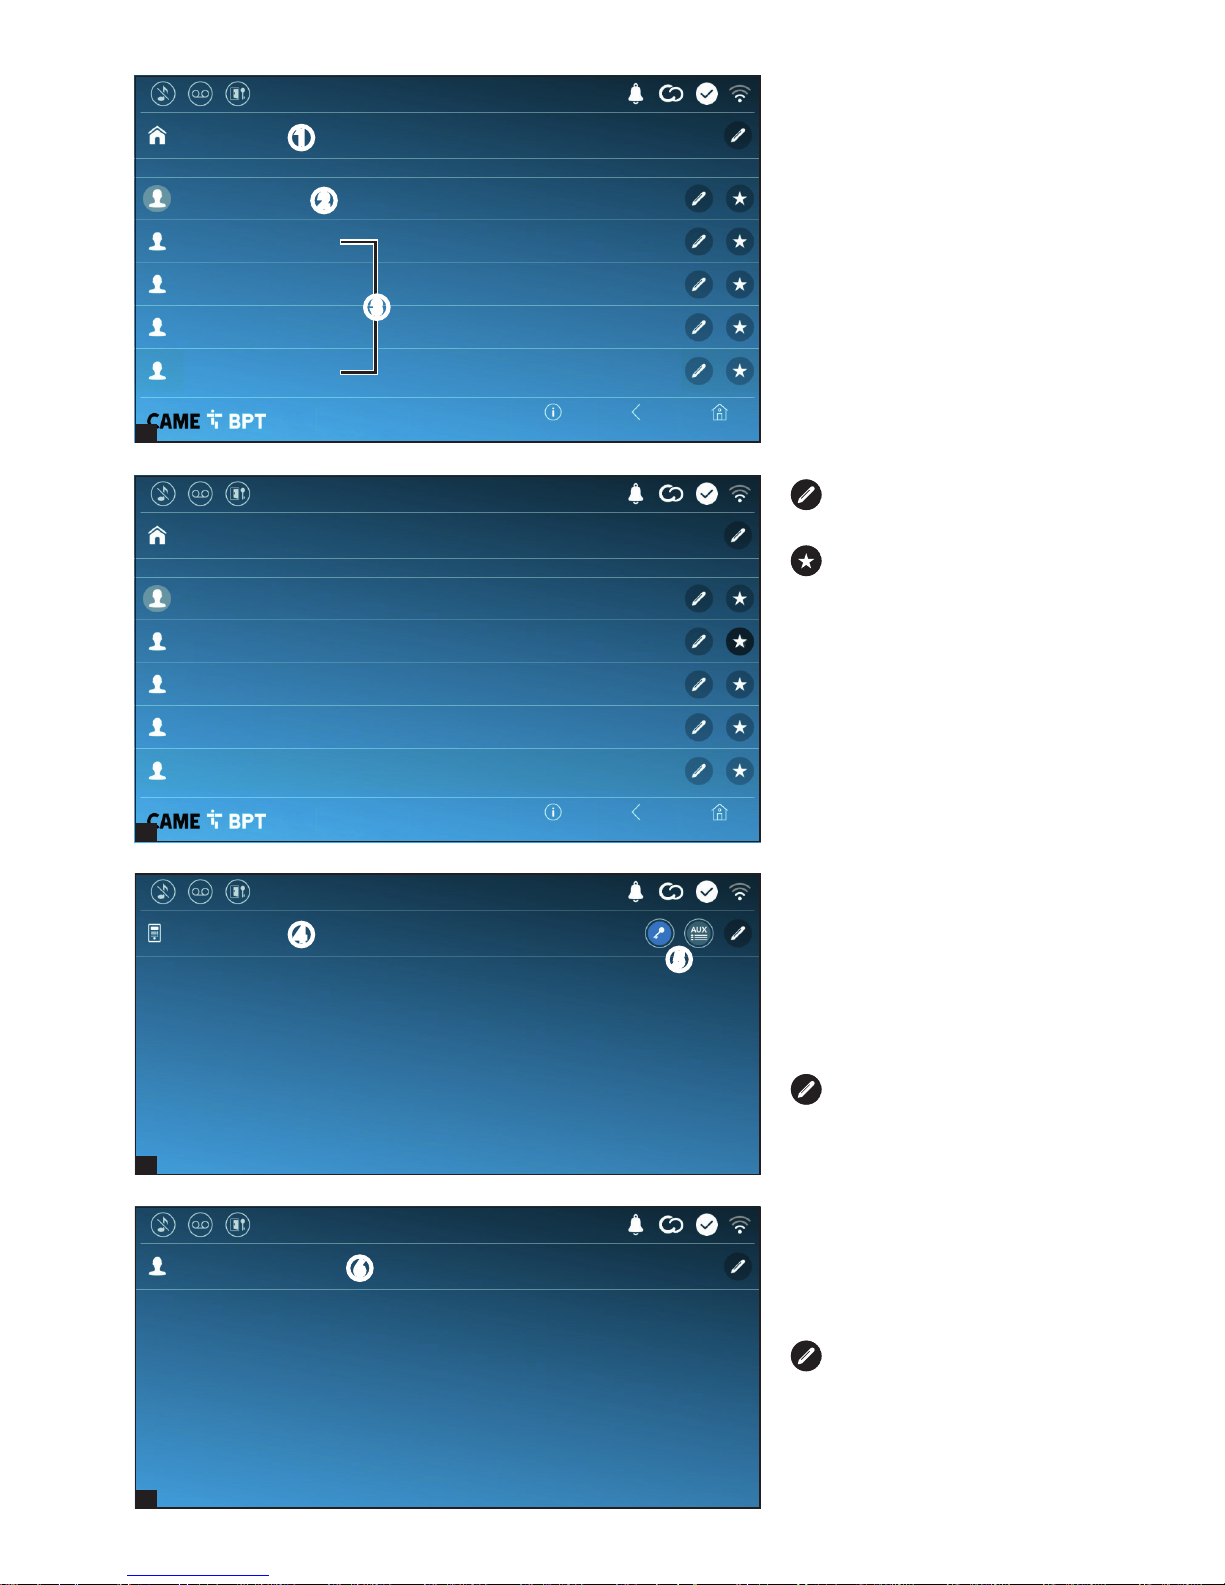
When communication is underway,
certain commands and information
appear on the screen, as mentioned before in the "Answering a
call" chapter on page 4.
Select the entry panel to initiate a
call.
This opens the door associated
to the entry panel without initiating
a call.
Opens a pop-up containing a
list of auxiliary commands associated to the entry panel.
Touch the icon to view contact's details.
Touch the icon to remove the
contact form the list of favorites.
Turn on communication to
entry panel
B Touch the icon to access the list
of entry panels.
to fill the list of entry panels,
see the "Contacts" chapter on
page 7.
B
Page 7
1
2
p. 7 - Manual FB0 0982-EN v. 1- 03/2018 - © CAME S.p.A. - The contents of this manual may be changed, at any time, and without notice.
Intercom 5
Intercom 4
Intercom 3
Intercom 2
Intercom 1
Entry panel
Unit
Home
Home
Back
Back
Info
Info
Call register
Contacts
Aux List
Entry panels
Video Recording
Favourites
19:02
Thursday
01 Feb 2018
19:02
Thursday
01 Feb 2018
Commands associated with contacts
Opens the door associated to the entry panel.
Opens a pop-up containing a list of auxiliary commands associated to the entry panel.
Adds/removes the selected to and from the favorites list.
Adds/removes the selected to and from the entry panels list.
Types of contact
Household
Single User
Concierge
Entry panel or analog video camera
Touch one of the listed items to access the window for viewing details on the selected contact and to customize
his or her name.
The list contains all the devices that
can be contacted.
Touch the icon to access the contacts list.
Contacts
Page 8
3
4
5
6
p. 8 - Manual FB0 0982-EN v. 1- 03/2018 - © CAME S.p.A. - The contents of this manual may be changed, at any time, and without notice.
Home
Home
Back
Back
Info
Info
App 04
App 03
Mobile App 4
Mobile App 3
App 02
Mobile App 2
App 01
Mobile App 1
EXTENSIONS
EXTENSIONS
XTS receiver
XTS receiver
Unit
Intercom 1
Entry panel
Unit
19:02
Thursday
01 Feb 2018
19:02
Thursday
01 Feb 2018
Touch the icon to edit the contact's name.
Touch the icon to add the contact to the list of favorites.
Touch the Back button to return to
the previous screen.
Unit
A Household (includes the indoor
receiver and any associated apps).
B the indoor receiver.
C Possible users connected to the
system via app, either locally or
from a remote location.
Touch one of the contacts to initiate
a call.
Intercom.
F Intercom contact.
Touch the contact to initiate the
call.
Touch the icon to edit the contact's name.
Entry panel
D Entry panel.
E Commands associated to an
entry panel.
Touch the contact to initiate the
call.
Touch the icon to edit the
contact's name.
B
D
F
E
A
C
Page 9

7
1
2
p. 9 - Manual FB0 0982-EN v. 1- 03/2018 - © CAME S.p.A. - The contents of this manual may be changed, at any time, and without notice.
Delete all
Entry panel
Entry panel
01 gen 2018 23:55
10s
03 gen 2018 17:33
10s
04 gen 2018 21:03
10s
Entry panel
Home
Home
Back
Back
Info
Info
Call register
Contacts
Aux List
Entry panels
Video Recording
Favourites
19:02
Thursday
01 Feb 2018
19:02
Thursday
01 Feb 2018
A Touch the icon the turn the answering service on or o.
To properly set up the answering service, see the "Video
answering service" chapter on
page 15.
B The number with the red background is the number of unseen
video messages.
When the screen standing-by, any
unseen video messages, are flagged by the blinking, blue LED fitted
on the frame.
Any unseen messages are highlighted.
Touch the wanted message to start
its playback.
Touch the icon to remove the
message from the list.
Touch the Back button to return to
the previous screen.
Video Recording
Concierge
G Concierge panel, if the system
features this.
Touch the contact to initiate the
call.
Touch the icon to edit the contact's name.
G
A
B
Page 10

1
2
1
p. 10 - Manual FB00 982-EN v. 1- 03/2018 - © CAME S.p.A. - The contents of this manual may be changed, at any time, and without notice.
Light
Entry panel
Gate
Entry panel
HomeBackInfo
Call register
Contacts
Aux List
Entry panels
Video Recording
Favourites
Home
Home
Back
Back
Info
Info
Call register
Contacts
Aux List
Entry panels
Video Recording
Favourites
19:02
Thursday
01 Feb 2018
19:02
Thursday
01 Feb 2018
19:02
Thursday
01 Feb 2018
Touch the name of the wanted
command to activate its corresponding contact.
Touch the icon to edit the
command name.
Touch the Back button to return.
A Touch the icon to access the call
history.
B The number with the red background is the number of missed
calls.
When the screen standing-by, any
missed calls are flagged by the
blinking, blue LED fitted on the
frame.
Call register
A Touch the icon to access the list
of auxiliary contacts.
The auxiliary commands (AUX) let
you activate suitably programmed
contacts to carry out additional
commands to the classic opening
of the entry door.
to fill the list of auxiliary contacts, see the chapter called "Aux
settings (auxiliary commands)"
on page 13.
Aux List
A
A
B
Page 11

2
1
2
p. 11 - Manual FB009 82-EN v. 1- 03/2018 - © CAME S.p.A. - The contents of this manual may be changed, at any time, and without notice.
Delete all
30 Jan 2017 15:45
0s
03 Jan 2018 16:31
0s
05 Jan 2018 14:21
0s
07 Jan 2018 21:03
0s
28 Jan 2018 11:23
0s
29 Jan 2018 19:55
0s
Concierge
Intercom 1
Entry panel
Entry panel
Entry panel
Entry panel
Home
Home
Home
Back
Back
Back
Info
Info
Info
Settings
IP 04 Video cameraIP 03 Video camera
IP 02 Video cameraIP 01 Video camera
CCTV
19:02
Thursday
01 Feb 2018
19:02
Thursday
01 Feb 2018
19:02
Thursday
01 Feb 2018
Select the IP video camera that you
want to view.
A Touch the icon to access the list
of available video cameras.
Types of calls
Incoming call.
Outgoing call.
Missed call.
Any missed calls are highlighted .
Touch the line you want to call your
contact.
Touch the icon to remove the
message from the list.
Touch the Back button to return to
the previous screen.
CCTV
Page 12

p. 12 - Manual FB00982-EN v. 1- 03/2018 - © CAME S.p.A. - The contents of this manual may be changed, at any time, and without notice.
HomeBack
Save
Info
EnglishLanguage
19:02
Thursday
01 Feb 2018
SettingsCCTV
Home
Home
Back
Back
Info
Info
IP video cameras
Auxiliary setting
Video Recording
Quick commands
Date/time
Language
System information
19:02
Thursday
01 Feb 2018
19:02
Thursday
01 Feb 2018
Choose the device interface language from the drop-down menu.
Save the setting by touching the
Save button.
Language
This window gives technical information that is useful for identifying
the device's characteristics and the
hardware and software versions.
System information
Touch the icon to return to the list
of settings.
GENERAL SETTINGS
Page 13

1
p. 13 - Manual FB0098 2- EN v. 1- 03/2018 - © CAME S.p.A. - The contents of this manual may be changed, at any time, and without notice.
The list is empty
New Aux
HomeBackInfo
19:02
Thursday
01 Feb 2018
State/City
Continent
01 Feb 2018 19:02
Date/time
NTP server
Mode
HomeBack
AutoManual
Save
Info
19:02
Thursday
01 Feb 2018
A touch the button to add a new
auxiliary command.
Aux settings (auxiliary commands)
This window is for setting the date
and time on the indoor receiver.
A The date and time are manually
set by the user.
B The date and time are automatically synchronized by a corresponding internet service; the
WiFi network to which the device is
connected must be able to access
the internet.
Selecting mode B activates the
section for NTP server settings.
C In this space provide the NTP server address through which the device will synchronize the date and time.
D When the A manual codeis activated, the pop-up window lets you manually set the current date and time.
E Select from the following lists the continent - state/city where the system is installed.
Save the setting by touching the Save button.
Touch the Back button to return to the list of settable parameters.
Date/time
C
D
E
A B
A
Page 14

2
3
p. 14 - Manual FB00982-EN v. 1- 03/2018 - © CAME S.p.A. - The contents of this manual may be changed, at any time, and without notice.
Preset Aux command
HomeBackInfo
19:02
Thursday
01 Feb 2018
Entry panelDestination
Aux 3Command
Gate opener
Garden lights
Entry panel
Gate opener
Entry panel
Description
Clean up
New Aux
Home
Home
Back
Back
Save
Info
Info
19:02
Thursday
01 Feb 2018
19:02
Thursday
01 Feb 2018
This window is for establishing
which of the previously configured
commands needs to be executed
by pressing the Aux button on the
homepage.
A From the list select the wanted
auxiliary command.
Touch the Back button to return to
the list of settable parameters.
Quick commands
The auxiliary commands will fill the
list.
For editing the selected element.
For eliminating the selected
element.
Touch the Back button to return to
the list of settable parameters.
B Touch the area to assign a name
to the AUX command that you are
going to add.
C Choose the command to associate the AUX to, from the list.
D Choose the destination of the
AUX command from the list.
Save the setting by touching the
Save button.
B
C
D
A
Page 15

1
p. 15 - Manual FB00 982- EN v. 1- 03/2018 - © CAME S.p.A. - The contents of this manual may be changed, at any time, and without notice.
The list is empty
New IP video camera
HomeBackInfo
19:02
Thursday
01 Feb 2018
Save
5Answer delay
Courtesy message
O
Play message
Record message
On
HomeBackInfo
19:02
Thursday
01 Feb 2018
A From the drop down menu, select the ring time - expressed in seconds - after which the automatic
recording is activated.
B Enable the courtesy message to
be played back.
C Button for recording and playing
back the courtesy message.
Save the setting by touching the
Save button.
Touch the Back button to return to
the list of settable parameters.
Video Recording
If the system has a video intercom entry panel installed, if the called user is not in, the device lets the caller record
a video message.
The caller may be notified of this by a courtesy message, for example, "The user is not available at the moment,
please leave a message after the beep".
The video message, labelled with the time and date of the call, are stored. You can view it later by consulting video
voicemail.
A Touch the button to add a new
IP video camera.
IP video cameras
B
A
C
A
Page 16

2
3
p. 16 - Manual FB00 982-EN v. 1- 03/2018 - © CAME S.p.A. - The contents of this manual may be changed, at any time, and without notice.
Background
HomeBackInfo
19:02
Thursday
01 Feb 2018
Clean up
New IP video camera
URI connection for the fixed image
Real-time URI connection
IP 04 Video camera
IP 03 Video camera
IP 02 Video camera
IP 01 Video camera
Description
Home
Home
Back
Back
Save
Info
Info
19:02
Thursday
01 Feb 2018
19:02
Thursday
01 Feb 2018
Select your preferred backdrop; the
new setting appears immediately.
Touch the Back button to return to
the list of settable parameters.
Backdrops
B Touch the area to assign a name
to the IP video camera that you are
going to add.
C Touch the area and type the
URI string for connecting the video
camera.
D Touch the area and type the URI
string for acquiring the static image
from the video camera, needed for
the preview.
Save the setting by touching the
Save button.
The added IP video cameras fill the
list.
For editing the selected element.
For eliminating the selected
element.
Touch the Back button to return to
the list of settable parameters.
B
C
D
Page 17

p. 17 - Manual FB0 0982-EN v. 1- 03/2018 - © CAME S.p.A. - The contents of this manual may be changed, at any time, and without notice.
Brightness in stand-by
Touch sound
Local doorbell tone
Ringing tone
Volume
Brightness
Clean screen
Home
Home
Back
Back
Info
Info
19:02
Thursday
01 Feb 2018
19:02
Thursday
01 Feb 2018
D With this function enabled, each touch on the screen is accompanied by a sound.
Touch the Back button to return to the list of settable parameters.
A Adjusts the brightness of the
screen during use.
B Adjusts the brightness of the
screen in standby.
C This makes the screen insensitive to the touch for 20 seconds, to
enable cleaning over it.
Touch the Back button to return to
the list of settable parameters.
A It adjusts the general volume of
the ringers for the video intercom
calls.
B Choose the tone to associate to
incoming calls from the drop-down
menu.
C From the drop down menu select the tone to associate to the call
from the landing.
Tones
Display
A
B
C
A
B
C
D
Page 18

2
1
p. 18 - Manual FB00 982- EN v. 1- 03/2018 - © CAME S.p.A. - The contents of this manual may be changed, at any time, and without notice.
Manual programming
Send SN
Multimedia
Backdrops
Configuration X2
Courtesy message
CAME Connect
IP video cameras
Network
Auxiliary setting
Configuring the user interface
Advanced settings
Automatic door opener
Tones
Credentials
Display
Home
Home
Home
Back
Back
Back
Info
Info
Info
19:02
Thursday
01 Feb 2018
19:02
Thursday
01 Feb 2018
19:02
Thursday
01 Feb 2018
This section requires specific know-how in operating the
video-intercom system. Wrong
settings may cause partial or
even total malfunctions; that is
why the editing of some parameters is allowed only after entering
the installer password; the default
password is 112233).
Advanced settings
Accessing the list of advanced settings.
Select the first item on the list.
A This button is for sending the
SN (serial number) to the Pcs/Xip
software during the programming
steps.
B This button takes you to manual
programming of the device.
The complete manual programming procedure for the call
is printed in the literature that is
issued with the indoor receivers.
Configuration X2
A
B
Page 19

1
2
p. 19 - Manual FB00 982- EN v. 1- 03/2018 - © CAME S.p.A. - The contents of this manual may be changed, at any time, and without notice.
DHCP
DHCP
YES
YES
Configure WiFi
Configure WiFi
Save
Save
Static
NO
NO
Address MAC
DNS
Gateway
Netmask
Netmask
IP address
IP address
Mode
Mode
Enabled
Enabled
WiFi
WiFi
Type of connection
Type of connection
Home
Home
Back
Back
Info
Info
19:02
Thursday
01 Feb 2018
19:02
Thursday
01 Feb 2018
C This button is for enabling WiFi
communication.
This
icon shows that the WiFi
connection is active, enabling the
network-settings sections below.
I Once you have chosen the
connection mode, the button is
for selecting and setting up a Wifi
network.
Every 30 seconds the device scans
for available networks.
D Lets you choose the type of address from:
DHCP
The device's IP address is assigned by the DHCP server; if there are no special needs, this mode lets you
continue with the settings without adding any additional data.
Static
The device's IP address is manually assigned.
E IF you have chosen a static IP address, enter the device's IP, which must belong to the same subnet as that of
the router and of the other connected devices.
F If the netmask is dierent from the default one, provide the proper netmask.
G Provide the default gateway for your network.
H Enter a valid DNS address to have the CAMEConnect connection (for example, 8.8.8.8.).
Network
C
D
E
F
G
H
I
Page 20

4
3
p. 20 - Manual FB00982-EN v. 1- 03/2018 - © CAME S.p.A. - The contents of this manual may be changed, at any time, and without notice.
Public WiFi
Protected
Smith home WiFi
Unprotected
Save
YES NO
None
Connect
State
Password
Internet service provider
Encryption
Enable connection
Security
Hidden network
Keycode
SSID
Save setting
Scan
Add WiFi network
Home
Home
Home
Back
Back
Back
Info
Info
Info
19:02
Thursday
01 Feb 2018
19:02
Thursday
01 Feb 2018
19:02
Thursday
01 Feb 2018
3 The page shows any detected
networks; to manually scan for
networks, touch this button J.
Select a network to connect to.
If the network is unprotected the
connection will be immediate.
If the network is protected, enter
the password for the WiFi network
to get access.
To save the configuration touch this
button L.
To connect to a WiFi network with a
hidden SSID, touch this button K.
On the page provided yo can enter
an SSID, that is, network name,
type of security, encryption and
password; when required.
To connect, touch this button M.
To save the configuration touch this
button L.
C URL of the service for remote calls (the default one is xip01.cameconnect.net)
D It shows the state of the connection.
A Device's univocal code.
B For enabling or disabling the
VoIP remote control of the video-intercom call.
The factory settings require that the
connection to CAME Connect be
enabled.
The CAME Connect connection must be active to receive
calls over the App.
CAME Connect
A
B
C
D
M
J
K
L
Page 21

1
p. 21 - Manual FB00 982- EN v. 1- 03/2018 - © CAME S.p.A. - The contents of this manual may be changed, at any time, and without notice.
The list is empty
New time-slot
HomeBackInfo
19:02
Thursday
01 Feb 2018
Unit - Mobile App 4
00700100003
Unit - Mobile App 3
00700100002
Unit - Mobile App 2
00700100001
Unit - Mobile App 1
00700100000
Save
Video App Bitrate (Kbps)
Video codec
Audio codec
Home
Home
Back
Back
Info
Info
19:02
Thursday
01 Feb 2018
19:02
Thursday
01 Feb 2018
A Touch the button to add a new
time slot.
The window lets you view the credentials of the four users enabled
to connect to the device via mobile
devices.
Touch the user you want to access
the screen that lets you assign or
edit an access password.
This window lets you configure the
maximum BITRATE that the device
can handle, while choosing among
the available values.
The greater the BITRATE values, the better the video quality,
but also the greater the data bandwidth occupied in UPLINK.
If the video on the App is not fluid
or deteriorated, set the lower BITRATE values.
Multimedia
Automatic door opener
This function, which is especially useful for businesses, lets you automatically open the entrance once the call-button is pressed on the entry panel. The activation of this function can be programmed to schedule time slots and
days of the week.
Credentials
A
Page 22

4
2
3
p. 22 - Manual FB009 82-EN v. 1- 03/2018 - © CAME S.p.A. - The contents of this manual may be changed, at any time, and without notice.
Clean up
New time-slot
Save
Save
Sun
Sun
Sat
Sat
Fri
Fri
Thu
Thu
Wed
Wed
Tue
Tue
Mon
Mon
Days of the week
Days of the week
Start time
Start time
13:30 - 18:30
Mon Tue Wed Thu Fri
Mon Tue Wed Thu Fri
08:30 - 12:30
13:30
08:30Start time
Start time
Home
Home
Home
Back
Back
Back
Info
Info
Info
19:02
Thursday
01 Feb 2018
19:02
Thursday
01 Feb 2018
19:02
Thursday
01 Feb 2018
For editing the selected element.
For eliminating the selected
element.
Touch the Back button to return to
the list of settable parameters.
D Touch the days of the week during which the time-slot needs to
be active.
E Touch this button to save the
time-slot you have just created.
Create other new time-slots and
touch the Save button to add them
to the list.
Touch the Back button to view the
list of time-slots that you have created.
C Touch the empty sections and
in the pop-up window set the start
and finish time of the time-slot for
activating the function.
C
E
D
Page 23

3
2
1
p. 23 - Manual FB009 82-EN v. 1- 03/2018 - © CAME S.p.A. - The contents of this manual may be changed, at any time, and without notice.
Customize Homepage functions
Preset Customized
Homepage active
HomeBackInfo
19:02
Thursday
01 Feb 2018
Save
Save
Empty Settings
EmptyEmpty
Number of frames:
Number of frames:
Home
Home
Back
Back
Info
Info
19:02
Thursday
01 Feb 2018
19:02
Thursday
01 Feb 2018
This section is for customizing the
appearance of the homepage.
A Select the type of homepage
that you wish to see.
B Touch the button to create a customized homepage.
Configuring the user interface
C From the drop down menu select the total number of sections
that will make up the main page.
Each page may contain up
to six sections; the last one is
always the configuration section.
Touch each of the empty sections
and use the drop-down menu to
select the content that you want to
assign to the section.
Save the setting by touching the
Save button.
C
A
B
Page 24

CAME S.p.A.
Via Martiri Della Libertà, 15
31030 Dosson di Casier - Treviso - Italy
tel. (+39) 0422 4940 - fax. (+39) 0422 4941
Manual FB00982-EN v. 1- 03/2018 - © CAME S.p.A. - The contents of this manual may be changed, at any time, and without notice.
Restore preset settings
Set slave mode
Restart application
Reboot device
HomeBackInfo
19:02
Thursday
01 Feb 2018
The factory settings require that the indoor receiver operate in "master" mode. If the system features several indoor receivers, that answer the same call within a home, only one of these must operate in "master" mode.
The others must operate in "slave" mode.
C Touch the button to set the indoor receiver to "slave" mode.
D Touch the button to return all the local settings to the default factory settings.
(administrator password required; the
default password is 112233).
A Touch the button to reboot the indoor receiver.
B Touch the button to reboot only
the application that runs the indoor
receiver.
Maintenance
Pertinent Regulations. This product complies with the law.
Decommissioning and disposal. Dispose of the packaging and the device at the end of its life cycle responsibly,
in compliance with the laws in force in the country where the product is used. The recyclable components are
marked with a symbol and the material's ID marker.
THE DATA PRESENTED IN THIS MANUAL MAY BE CHANGED, AT ANY TIME, AND WITHOUT NOTICE. MEASUREMENTS, UNLESS OTHERWISE STATED, ARE IN MILLIMETERS.
A
B
C
D
 Loading...